Embed Size (px)
Citation preview
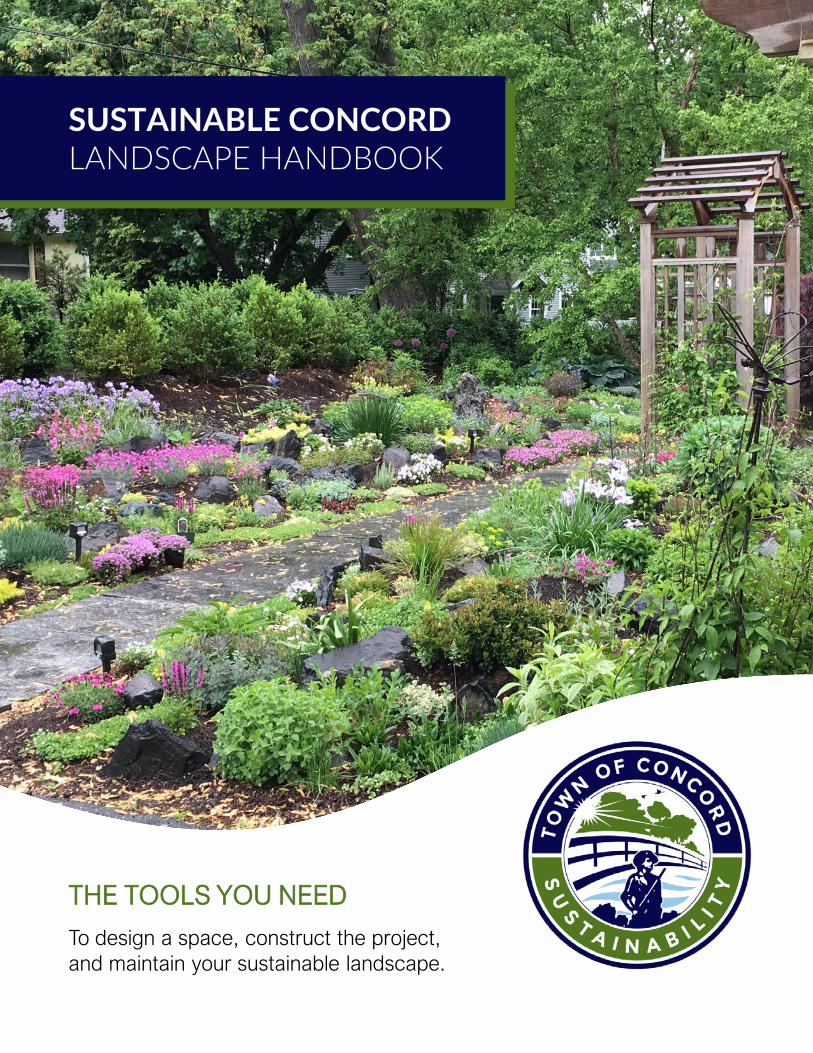
SUSTAINABLE CONCORDLANDSCAPE HANDBOOK
To design a space, construct the project, and maintain your sustainable landscape.
1
THE TOOLS YOU NEED

The history of Concord is deeply rooted in conservation and preservation. Today that means mitigating our contribution to climate change and being resilient to the impacts of climate change including drought, flooding, winter storms, and extreme heat.
The way in which we manage our landscapes impact our water supply, water quality, biodiversity, energy consumption, and soil health.
Sustainable landscaping is a win-win solution for our community and our natural resources because it:
- Increases biodiversity- Reduces demand on our limited water supply- Improves water quality - Mitigates of flash flooding- Increases resiliency to drought- Reduces energy consumption and maintenance needs- Increases potential for carbon sequestration- Enhances ground water recharge and reduced runoff during storms
This handbook is designed to help you create, install, and care for your landscape in a way that conserves water, takes the changing climate into account, and promotes the health of native species.
We hope you find this handbook useful in inspiring and creating your own sustainable landscape. We thank you for doing your part to create a sustainable Concord.
This handbook was created in partnership with Kim Lundgren Associates, Inc. and Bohler Engineering as part of a sustainable landscaping project that included a speaker series and three demonstration gardens of sustainable lawn alternatives planted throughout Concord. The sustainable landscaping project was made possible thanks to a grant provided by the Metropolitan Area Planning Council (MAPC) and the Barr Foundation. Special thanks to Concord Public Works, Concord Free Public Library, West Concord Green Thumbs, Concord-Carlisle High School administration and environmental science program, and Delia Kaye for their support of this project.
Yours in sustainability,Kate Hanley, Director of SustainabilityMelissa Simoncini, Senior Environmental and Regulatory Coordinator
concordma.gov/greenscapes
2

PHASE 1: PLANNING AND DESIGN
Getting Started: Who Will Do the Work?
Draw a Scaled Map of Your Property
Analyze Your Property: Observe and Interact
Assess Your Needs and Set Goals
Determine Space Layout
Create Your Design
Get to Know Your Style
PHASE 2: CONSTRUCTION AND INSTALLATION
Metrics of Success
Understand Local Bylaws and Regulations
Deal with Invasive Species
Limit Erosion
Mitigate Existing Drainage Issues
Choose Plants That Fit Site Conditions
Create a Planting Layout
Install Your Plants
Establish Your Landscape
PHASE 3: MAINTENANCE
Consider Community
Consider the Changing Climate
Water Regime
Certified Landscapes
Lawn Care
Controlling Invasive Species
Other Maintenance Methods
Planting For the Future
Additional Resources
1
2
3
Table of Contents
----------
4
6
7
10
11
12
14
----------
15
16
18
19
20
21
22
23
27
----------
30
31
32
40
41
42
48
49
51
3
PHASE 1: Planning and Design
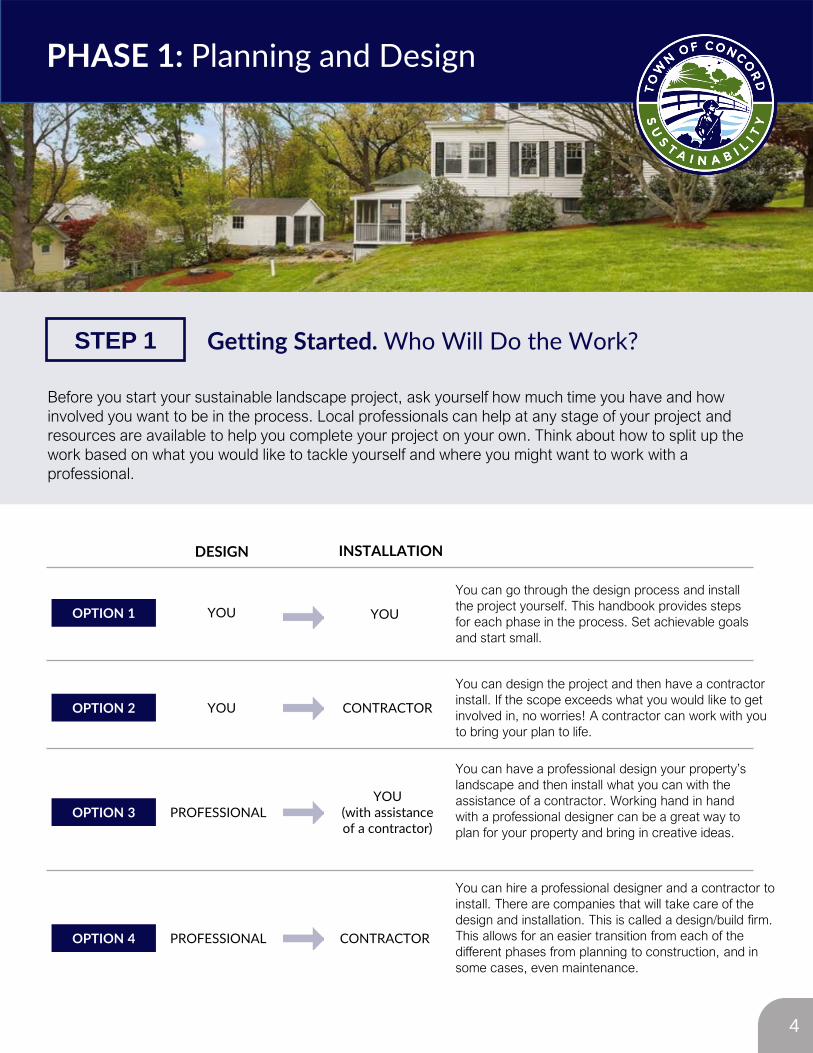
Before you start your sustainable landscape project, ask yourself how much time you have and how involved you want to be in the process. Local professionals can help at any stage of your project and resources are available to help you complete your project on your own. Think about how to split up the work based on what you would like to tackle yourself and where you might want to work with a professional.
STEP 1 Getting Started. Who Will Do the Work?
You can go through the design process and install the project yourself. This handbook provides steps for each phase in the process. Set achievable goals and start small.
You can design the project and then have a contractor install. If the scope exceeds what you would like to get involved in, no worries! A contractor can work with you to bring your plan to life.
You can hire a professional designer and a contractor to install. There are companies that will take care of the design and installation. This is called a design/build firm. This allows for an easier transition from each of the different phases from planning to construction, and in some cases, even maintenance.
You can have a professional design your property’s landscape and then install what you can with the assistance of a contractor. Working hand in hand with a professional designer can be a great way to plan for your property and bring in creative ideas.
YOU YOU
YOU CONTRACTOR
PROFESSIONALYOU
(with assistance of a contractor)
PROFESSIONAL CONTRACTOR
DESIGN INSTALLATION
OPTION 1
OPTION 2
OPTION 3
OPTION 4
4
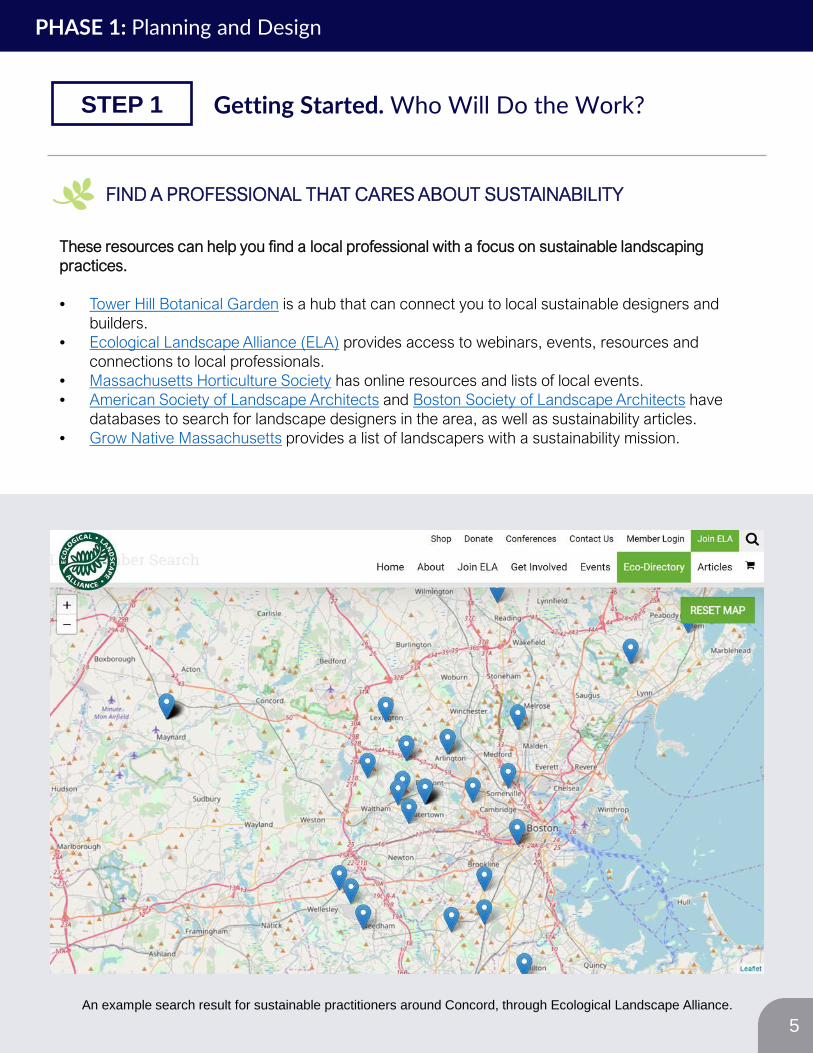
These resources can help you find a local professional with a focus on sustainable landscaping practices.
• Tower Hill Botanical Garden is a hub that can connect you to local sustainable designers and builders.
• Ecological Landscape Alliance (ELA) provides access to webinars, events, resources and connections to local professionals.
• Massachusetts Horticulture Society has online resources and lists of local events. • American Society of Landscape Architects and Boston Society of Landscape Architects have
databases to search for landscape designers in the area, as well as sustainability articles.• Grow Native Massachusetts provides a list of landscapers with a sustainability mission.
An example search result for sustainable practitioners around Concord, through Ecological Landscape Alliance.
FIND A PROFESSIONAL THAT CARES ABOUT SUSTAINABILITY
PHASE 1: Planning and Design
STEP 1 Getting Started. Who Will Do the Work?
5
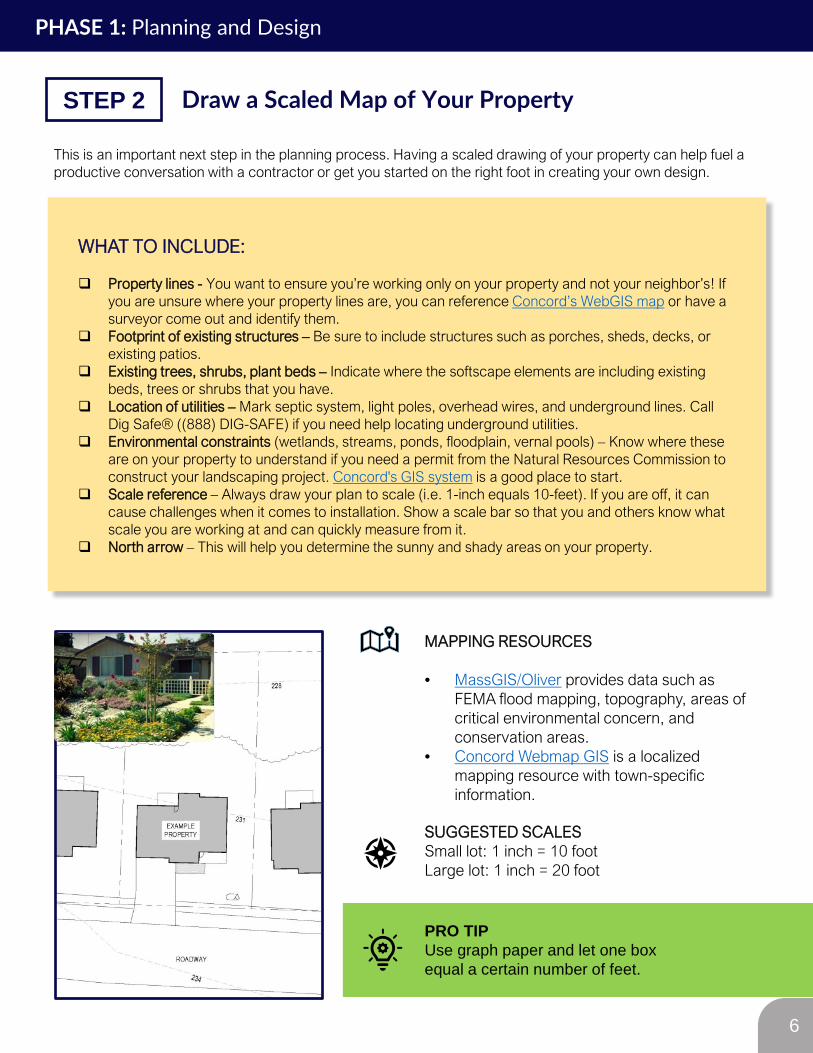
MAPPING RESOURCES
• MassGIS/Oliver provides data such as FEMA flood mapping, topography, areas of critical environmental concern, and conservation areas.
• Concord Webmap GIS is a localized mapping resource with town-specific information.
SUGGESTED SCALESSmall lot: 1 inch = 10 footLarge lot: 1 inch = 20 foot
PRO TIPUse graph paper and let one box equal a certain number of feet.
This is an important next step in the planning process. Having a scaled drawing of your property can help fuel a productive conversation with a contractor or get you started on the right foot in creating your own design.
Draw a Scaled Map of Your Property
WHAT TO INCLUDE:
Property lines - You want to ensure you’re working only on your property and not your neighbor’s! If you are unsure where your property lines are, you can reference Concord’s WebGIS map or have a surveyor come out and identify them.
Footprint of existing structures – Be sure to include structures such as porches, sheds, decks, or existing patios.
Existing trees, shrubs, plant beds – Indicate where the softscape elements are including existing beds, trees or shrubs that you have.
Location of utilities – Mark septic system, light poles, overhead wires, and underground lines. Call Dig Safe® ((888) DIG-SAFE) if you need help locating underground utilities.
Environmental constraints (wetlands, streams, ponds, floodplain, vernal pools) – Know where these are on your property to understand if you need a permit from the Natural Resources Commission to construct your landscaping project. Concord's GIS system is a good place to start.
Scale reference – Always draw your plan to scale (i.e. 1-inch equals 10-feet). If you are off, it can cause challenges when it comes to installation. Show a scale bar so that you and others know what scale you are working at and can quickly measure from it.
North arrow – This will help you determine the sunny and shady areas on your property.
PHASE 1: Planning and Design
STEP 2
6
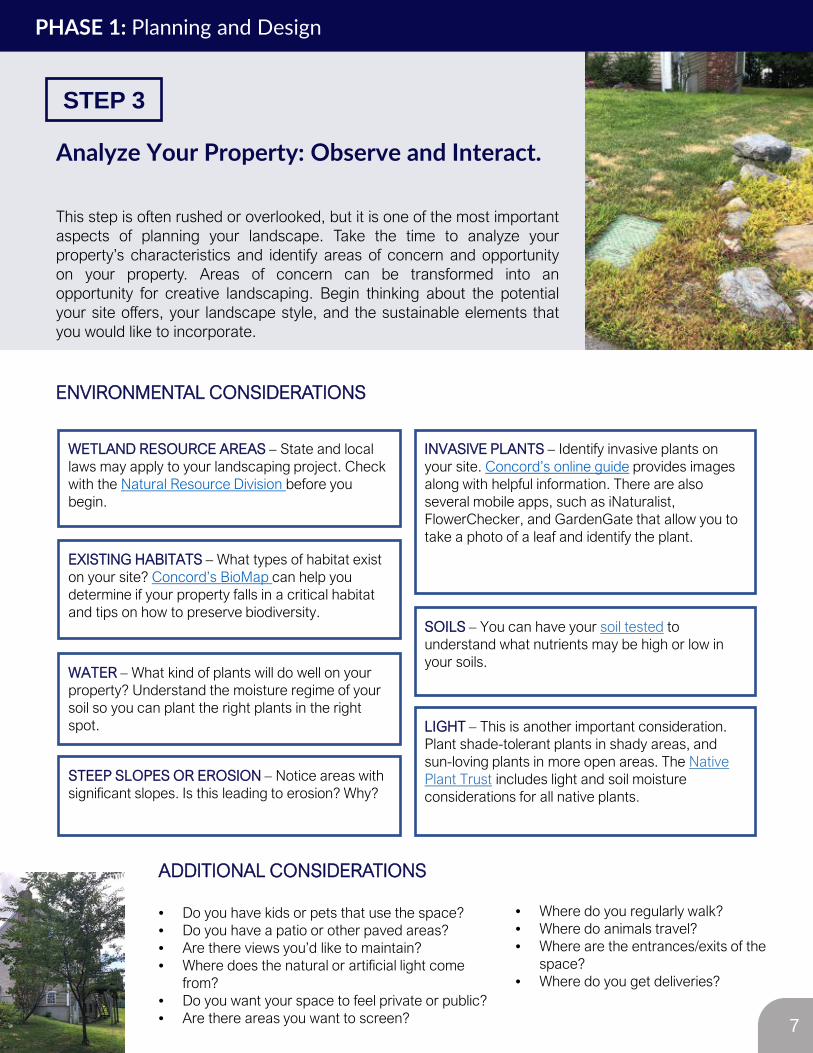
WETLAND RESOURCE AREAS – State and local laws may apply to your landscaping project. Check with the Natural Resource Division before you begin.
INVASIVE PLANTS – Identify invasive plants on your site. Concord’s online guide provides images along with helpful information. There are also several mobile apps, such as iNaturalist, FlowerChecker, and GardenGate that allow you to take a photo of a leaf and identify the plant.
EXISTING HABITATS – What types of habitat exist on your site? Concord’s BioMap can help you determine if your property falls in a critical habitat and tips on how to preserve biodiversity.
SOILS – You can have your soil tested to understand what nutrients may be high or low in your soils.
WATER – What kind of plants will do well on your property? Understand the moisture regime of your soil so you can plant the right plants in the right spot. LIGHT – This is another important consideration.
Plant shade-tolerant plants in shady areas, and sun-loving plants in more open areas. The Native Plant Trust includes light and soil moisture considerations for all native plants.
STEEP SLOPES OR EROSION – Notice areas with significant slopes. Is this leading to erosion? Why?
This step is often rushed or overlooked, but it is one of the most importantaspects of planning your landscape. Take the time to analyze yourproperty’s characteristics and identify areas of concern and opportunityon your property. Areas of concern can be transformed into anopportunity for creative landscaping. Begin thinking about the potentialyour site offers, your landscape style, and the sustainable elements thatyou would like to incorporate.
ADDITIONAL CONSIDERATIONS
• Do you have kids or pets that use the space? • Do you have a patio or other paved areas?• Are there views you’d like to maintain?• Where does the natural or artificial light come
from?• Do you want your space to feel private or public?• Are there areas you want to screen?
STEP 3
Analyze Your Property: Observe and Interact.
PHASE 1: Planning and Design
• Where do you regularly walk?• Where do animals travel?• Where are the entrances/exits of the
space?• Where do you get deliveries?
ENVIRONMENTAL CONSIDERATIONS
7

Underground Utilities and Utility boxesOpportunity: Shallow plantings to screen
Steep Slopes and ShadeOpportunity: Beautiful shade planting spot.
Let the slope plantings go wild with only native plants. Remove any invasive plants.
Roof Gutters DownspoutOpportunity: Collect rainwater in a rain
barrel or redirect into a rain garden
Consider the following features when walking your property, examining existing constraints andopportunities. Look for space that is underutilized and brainstorm alternative uses. Observing yourneighbors’ landscaping can be a great place for inspiration. Don’t be afraid to think outside the box.
Full Sun and Slope Towards HouseOpportunity: Collect water from slope.
Sunny perennial pollinator plants
Analyze Your Property. Observe and Interact.
PHASE 1: Planning and Design
STEP 3
8
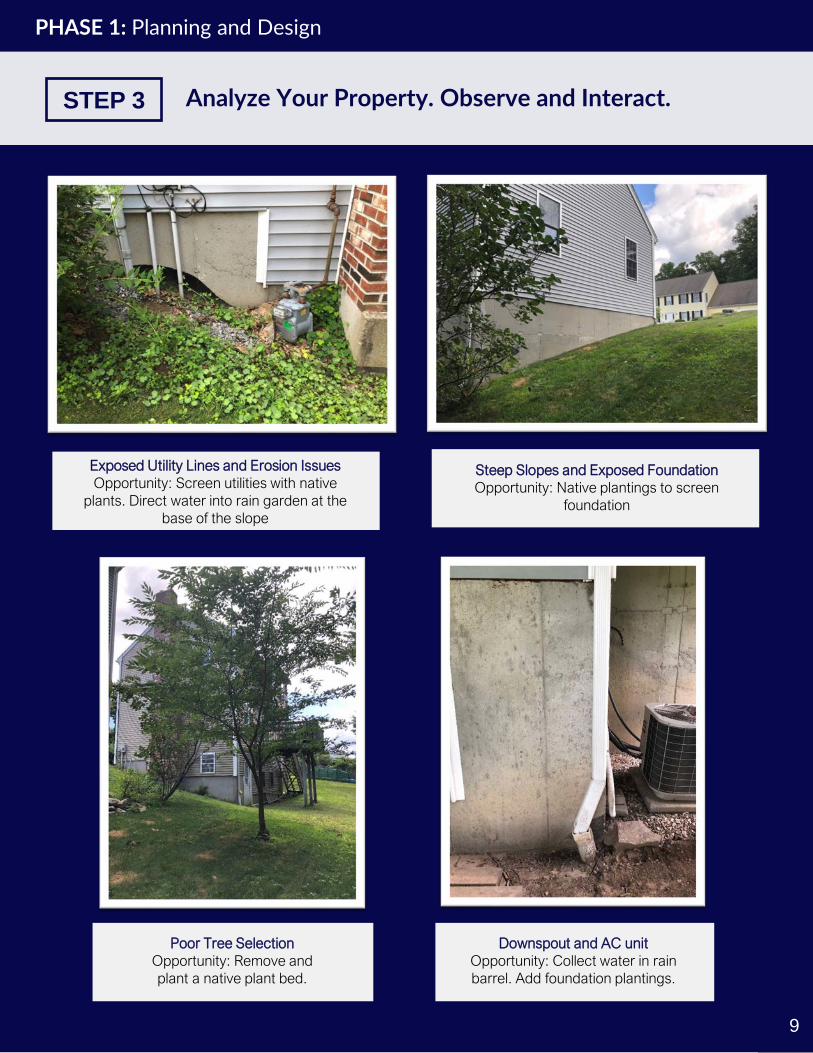
Exposed Utility Lines and Erosion IssuesOpportunity: Screen utilities with native
plants. Direct water into rain garden at the base of the slope
Steep Slopes and Exposed FoundationOpportunity: Native plantings to screen
foundation
Poor Tree SelectionOpportunity: Remove and plant a native plant bed.
Downspout and AC unitOpportunity: Collect water in rain barrel. Add foundation plantings.
PHASE 1: Planning and Design
Analyze Your Property. Observe and Interact.STEP 3
9
REDUCE WATER USE – Is there a way to capture rainwater on your site and use it for your benefit? Think about converting lawn areas to planting beds that would require little to no water once the plants are established. If you have lawn areas, consider amending the soil with organics. You will be surprised how little water a lawn needs if the soil is healthy. See Phase 3 on maintenance for more information on how to reduce your water use.
CAPTURE RAINWATER – Think beyond the rain barrel. There are rain devices, like tanks, that fit between your deck joists, or bags that can hide in crawl spaces. Small pumps allow you to water your garden with this type of rain storage.
IMPROVE SOIL WITH ORGANIC MATERIAL – Consider mulching your leaves or adding compost. This is free food for your plants as the leaves begin to decompose. This is a great fall project.
REDUCE OR REMOVE IMPERVIOUS SURFACES – Concord is facing new and costly federal requirements to reduce the amount of polluted stormwater runoff it discharges to waterways. Facing similar challenges, a growing number of communities have established a stormwater utility to help them mitigate the financial burden associates with managing runoff that originates of private property. Reducing the amount of impervious cover—asphalt, concrete, etc.—on your property today could minimize the impact of any such fee, should a stormwater utility be adopted in Concord.
INCREASE POLLINATOR PLANTS - It’s a fact that bee populations are declining. Why not help them out in your own backyard? You will begin to notice that native pollinator plants not only help the bees but a wide range of animals!
Assess Your Needs and Set Goals
PHASE 1: Planning and Design
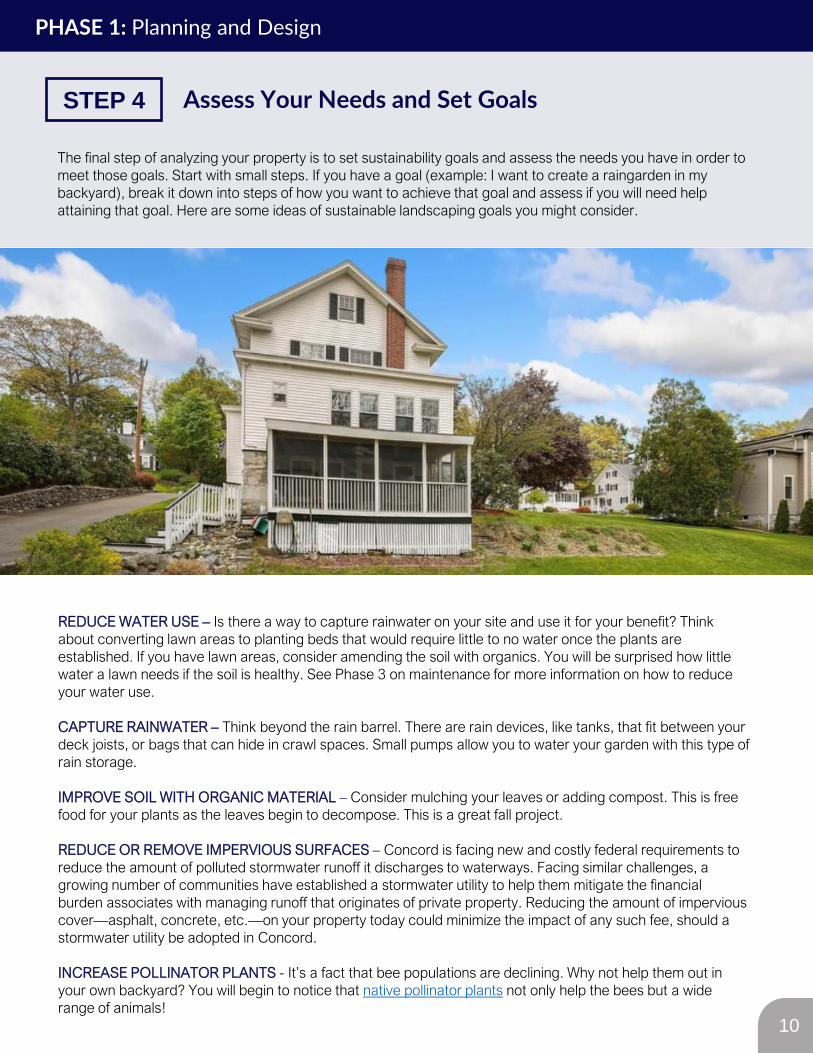
The final step of analyzing your property is to set sustainability goals and assess the needs you have in order to meet those goals. Start with small steps. If you have a goal (example: I want to create a raingarden in my backyard), break it down into steps of how you want to achieve that goal and assess if you will need help attaining that goal. Here are some ideas of sustainable landscaping goals you might consider.
STEP 4
10
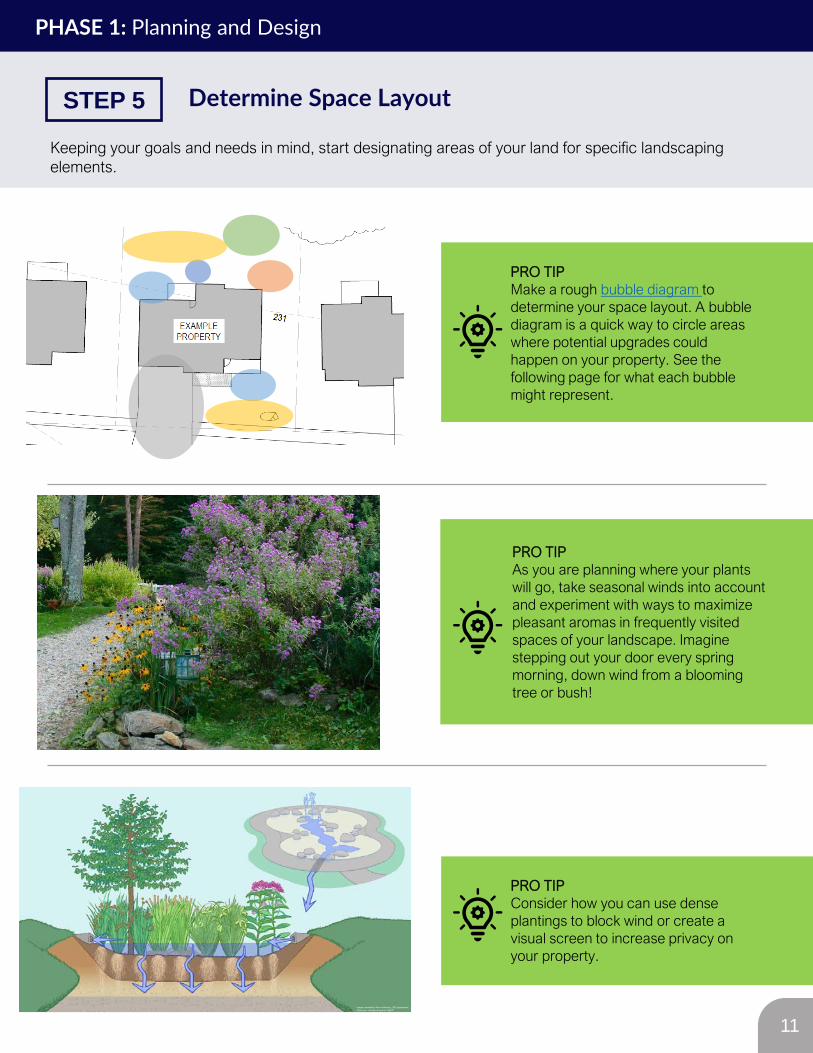
Keeping your goals and needs in mind, start designating areas of your land for specific landscaping elements.
Determine Space Layout
PHASE 1: Planning and Design
PRO TIPMake a rough bubble diagram to determine your space layout. A bubble diagram is a quick way to circle areas where potential upgrades could happen on your property. See the following page for what each bubble might represent.
PRO TIPAs you are planning where your plants will go, take seasonal winds into account and experiment with ways to maximize pleasant aromas in frequently visited spaces of your landscape. Imagine stepping out your door every spring morning, down wind from a blooming tree or bush!
PRO TIPConsider how you can use dense plantings to block wind or create a visual screen to increase privacy on your property.
STEP 5
11
1
1
23
4
56
Option 1
1
1
12
3
4
5
6
6
Option 2
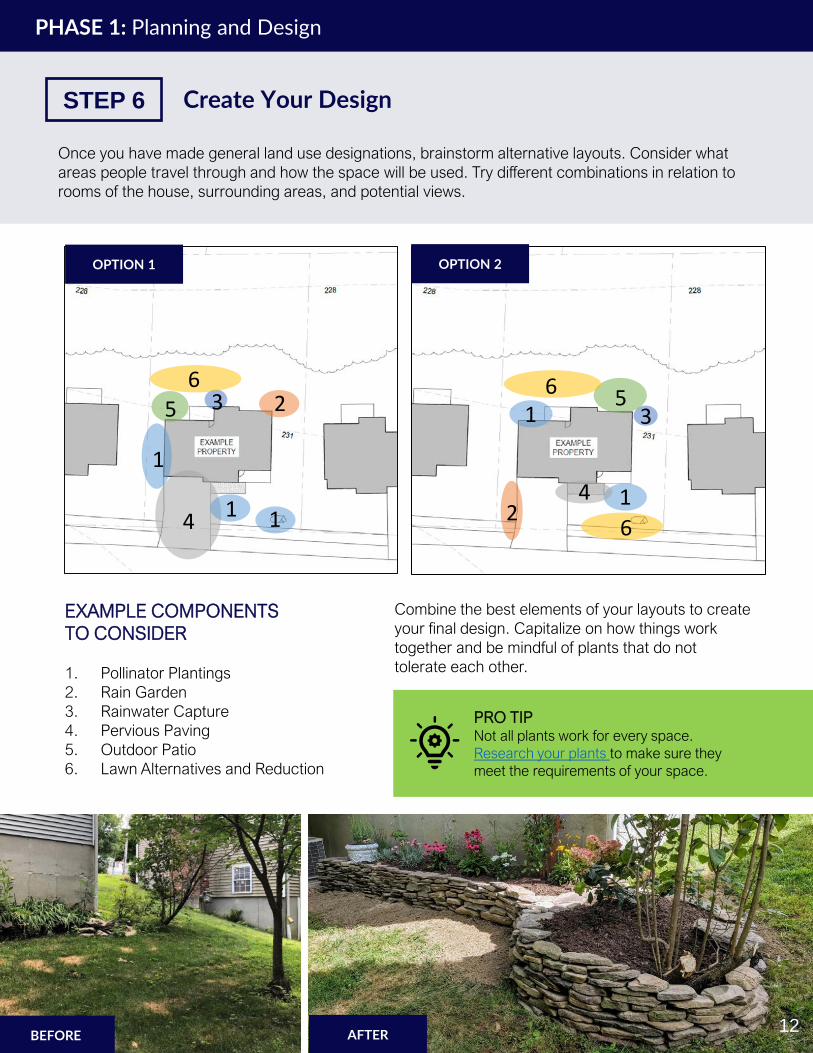
Once you have made general land use designations, brainstorm alternative layouts. Consider what areas people travel through and how the space will be used. Try different combinations in relation to rooms of the house, surrounding areas, and potential views.
Combine the best elements of your layouts to create your final design. Capitalize on how things work together and be mindful of plants that do not tolerate each other.
EXAMPLE COMPONENTS TO CONSIDER
1. Pollinator Plantings2. Rain Garden3. Rainwater Capture4. Pervious Paving5. Outdoor Patio6. Lawn Alternatives and Reduction
PRO TIPNot all plants work for every space. Research your plants to make sure they meet the requirements of your space.
Create Your Design
PHASE 1: Planning and Design
STEP 6
OPTION 1 OPTION 2
12BEFORE AFTER
PROPORTION IN LANDSCAPE DESIGN.
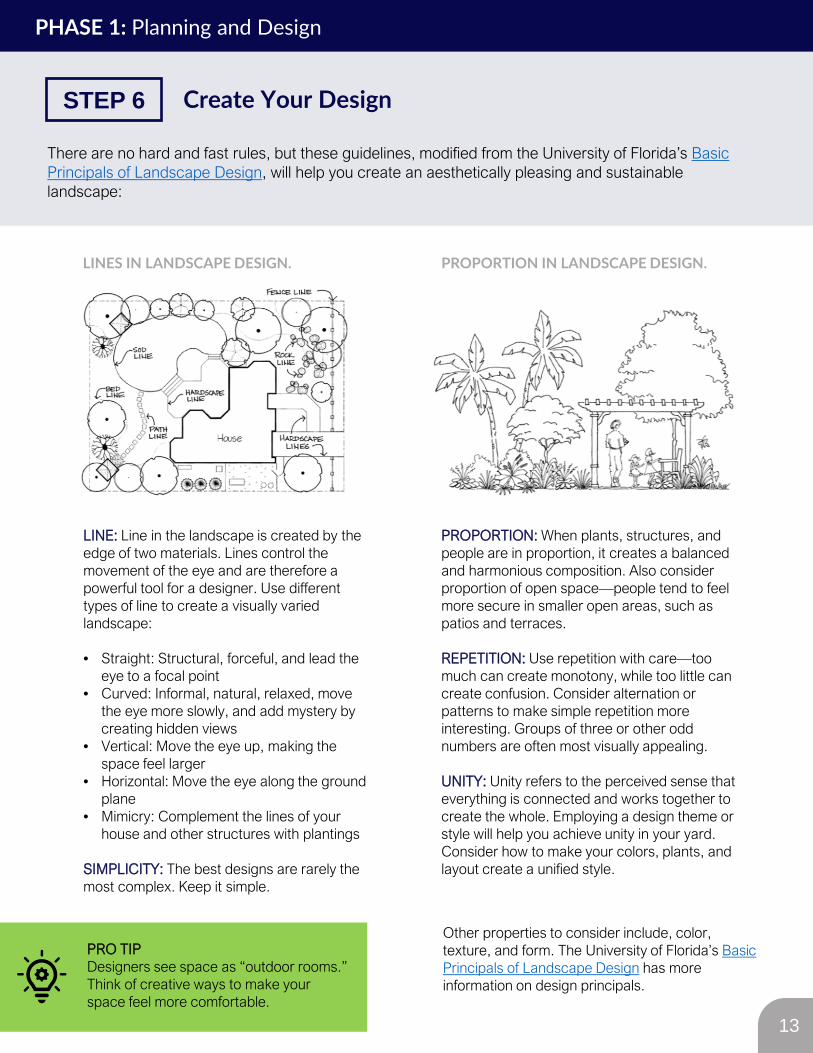
There are no hard and fast rules, but these guidelines, modified from the University of Florida’s Basic Principals of Landscape Design, will help you create an aesthetically pleasing and sustainable landscape:
PROPORTION: When plants, structures, and people are in proportion, it creates a balanced and harmonious composition. Also consider proportion of open space—people tend to feel more secure in smaller open areas, such as patios and terraces.
REPETITION: Use repetition with care—too much can create monotony, while too little can create confusion. Consider alternation or patterns to make simple repetition more interesting. Groups of three or other odd numbers are often most visually appealing.
UNITY: Unity refers to the perceived sense that everything is connected and works together to create the whole. Employing a design theme or style will help you achieve unity in your yard. Consider how to make your colors, plants, and layout create a unified style.
LINES IN LANDSCAPE DESIGN.
Create Your Design
PHASE 1: Planning and Design
PRO TIPDesigners see space as “outdoor rooms.” Think of creative ways to make your space feel more comfortable.
Other properties to consider include, color, texture, and form. The University of Florida’s Basic Principals of Landscape Design has more information on design principals.
LINE: Line in the landscape is created by the edge of two materials. Lines control the movement of the eye and are therefore a powerful tool for a designer. Use different types of line to create a visually varied landscape:
• Straight: Structural, forceful, and lead the eye to a focal point
• Curved: Informal, natural, relaxed, move the eye more slowly, and add mystery by creating hidden views
• Vertical: Move the eye up, making the space feel larger
• Horizontal: Move the eye along the ground plane
• Mimicry: Complement the lines of your house and other structures with plantings
SIMPLICITY: The best designs are rarely the most complex. Keep it simple.
STEP 6
13
THIS IS THE FUN PART!
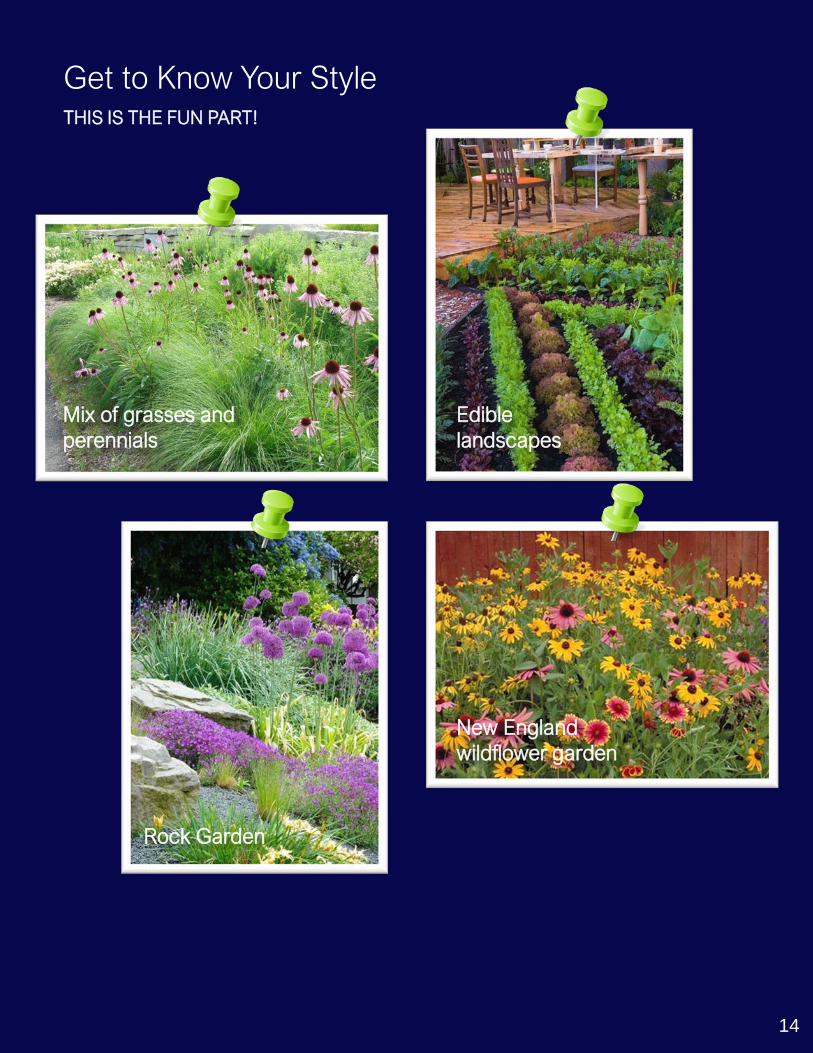
Get to Know Your Style
Mix of grasses and perennials
New England wildflower garden
Rock Garden
Edible landscapes
14
Sustainable Landscape Constructionby Kim Sorvig and J. William Thompson
This book provides a thorough reference on how to build landscapes that work with—rather than against—nature. The book highlights 10 core principals:
1. Keep healthy sites healthy2. Heal injured sites3. Favor living, flexible materials4. Respect the waters of life5. Pave less6. Consider origin and fate of materials7. Know the costs of energy over time8. Celebrate light; respect darkness9. Quietly defend silence10.Maintain to sustain
PHASE 2: Construction and Installation
Provides a focal point or view Includes low maintenance
materials Includes lawns and plants that do
not require irrigation Creates “outdoor rooms” for
larger yards (see page 13) Provides space that feels like an
extension of the house Offers smooth transitions from
one space to the next Provides year-round interest Maximizes native plantings Provides wildlife habitat Incorporates on-site stormwater
management Mitigates erosion
Metrics of Success
15
FIND OUT WHERE UNDERGROUNDUTILITIES ARE LOCATEDCall DIGSAFE (811) before you dig. It’s the law!
ARE YOU IN A WETLAND AREA?If your project falls within 100 feet of wetland resource areas, including Certified Vernal Pools, or 200 feet of perennial streams, review from the Natural Resources Commission may be required. Please contact the Natural Resources Division before you begin!
It's crucial for the Town and the State to protect the natural environment. Each community has their own restrictions, buffer zones, and protected habitats. For more information about local environmental bylaws and sustainable landscaping, visit the Garden Continuum.
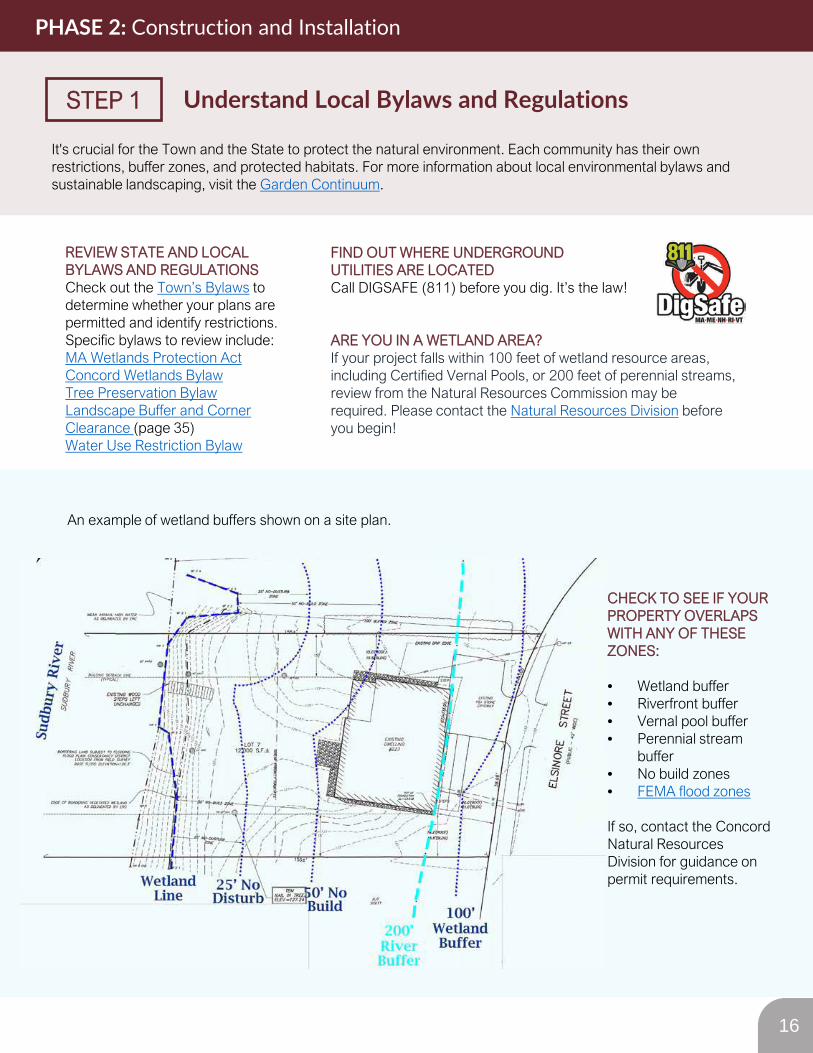
An example of wetland buffers shown on a site plan.
CHECK TO SEE IF YOUR PROPERTY OVERLAPS WITH ANY OF THESE ZONES:
• Wetland buffer• Riverfront buffer• Vernal pool buffer• Perennial stream
buffer• No build zones• FEMA flood zones
If so, contact the Concord Natural Resources Division for guidance on permit requirements.
STEP 1 Understand Local Bylaws and Regulations
PHASE 2: Construction and Installation
REVIEW STATE AND LOCAL BYLAWS AND REGULATIONSCheck out the Town’s Bylaws to determine whether your plans are permitted and identify restrictions. Specific bylaws to review include:MA Wetlands Protection ActConcord Wetlands BylawTree Preservation BylawLandscape Buffer and Corner Clearance (page 35)Water Use Restriction Bylaw
16
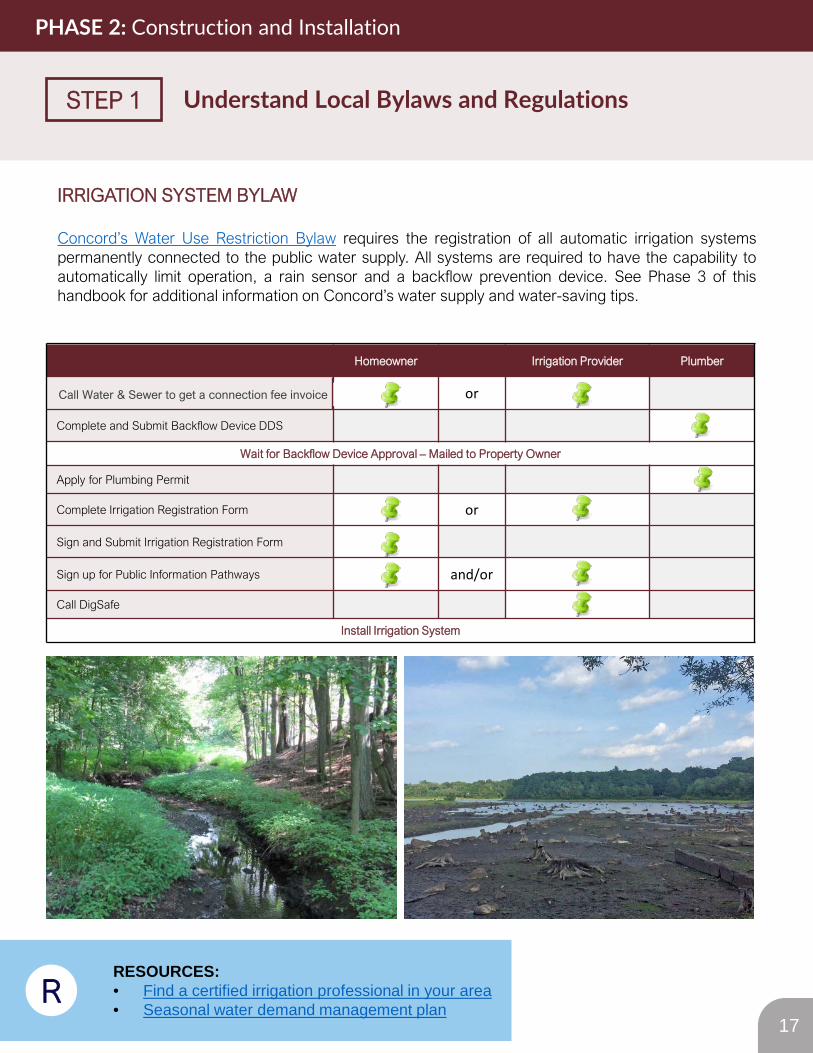
IRRIGATION SYSTEM BYLAW
Concord’s Water Use Restriction Bylaw requires the registration of all automatic irrigation systemspermanently connected to the public water supply. All systems are required to have the capability toautomatically limit operation, a rain sensor and a backflow prevention device. See Phase 3 of thishandbook for additional information on Concord’s water supply and water-saving tips.
STEP 1 Understand Local Bylaws and Regulations
PHASE 2: Construction and Installation
RESOURCES:• Find a certified irrigation professional in your area• Seasonal water demand management plan
17R
Homeowner Irrigation Provider Plumber
Call W/S to get connection fee invoice or
Complete and Submit Backflow Device DDS
Wait for Backflow Device Approval – Mailed to Property Owner
Apply for Plumbing Permit
Complete Irrigation Registration Form or
Sign and Submit Irrigation Registration Form
Sign up for Public Information Pathways and/or
Call DigSafe
Install Irrigation System
Call Water & Sewer to get a connection fee invoice
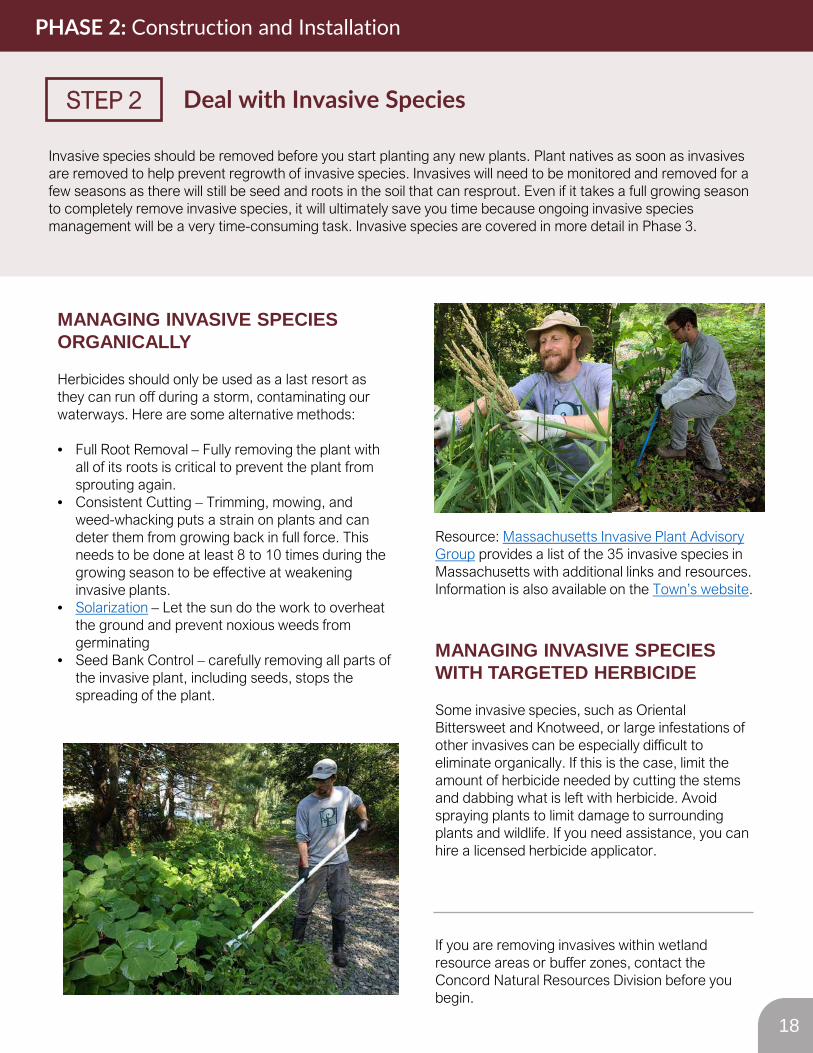
MANAGING INVASIVE SPECIES ORGANICALLY
Herbicides should only be used as a last resort as they can run off during a storm, contaminating our waterways. Here are some alternative methods:
• Full Root Removal – Fully removing the plant with all of its roots is critical to prevent the plant from sprouting again.
• Consistent Cutting – Trimming, mowing, and weed-whacking puts a strain on plants and can deter them from growing back in full force. This needs to be done at least 8 to 10 times during the growing season to be effective at weakening invasive plants.
• Solarization – Let the sun do the work to overheat the ground and prevent noxious weeds from germinating
• Seed Bank Control – carefully removing all parts of the invasive plant, including seeds, stops the spreading of the plant.
MANAGING INVASIVE SPECIES WITH TARGETED HERBICIDE
Some invasive species, such as Oriental Bittersweet and Knotweed, or large infestations of other invasives can be especially difficult to eliminate organically. If this is the case, limit the amount of herbicide needed by cutting the stems and dabbing what is left with herbicide. Avoid spraying plants to limit damage to surrounding plants and wildlife. If you need assistance, you can hire a licensed herbicide applicator.
Invasive species should be removed before you start planting any new plants. Plant natives as soon as invasives are removed to help prevent regrowth of invasive species. Invasives will need to be monitored and removed for a few seasons as there will still be seed and roots in the soil that can resprout. Even if it takes a full growing season to completely remove invasive species, it will ultimately save you time because ongoing invasive species management will be a very time-consuming task. Invasive species are covered in more detail in Phase 3.
Resource: Massachusetts Invasive Plant Advisory Group provides a list of the 35 invasive species in Massachusetts with additional links and resources. Information is also available on the Town’s website.
If you are removing invasives within wetland resource areas or buffer zones, contact the Concord Natural Resources Division before you begin.
STEP 2 Deal with Invasive Species
PHASE 2: Construction and Installation
18
BEFORE YOU START PLANTING
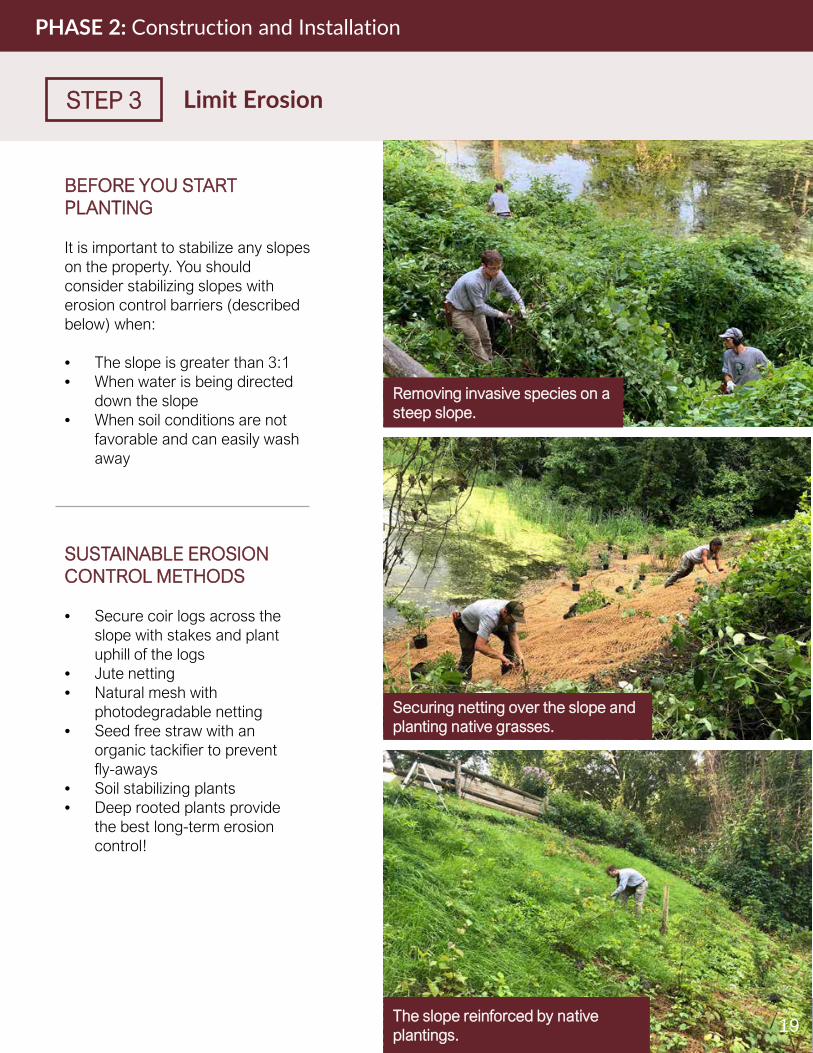
It is important to stabilize any slopes on the property. You should consider stabilizing slopes with erosion control barriers (described below) when:
• The slope is greater than 3:1• When water is being directed
down the slope• When soil conditions are not
favorable and can easily wash away
SUSTAINABLE EROSION CONTROL METHODS
• Secure coir logs across the slope with stakes and plant uphill of the logs
• Jute netting• Natural mesh with
photodegradable netting• Seed free straw with an
organic tackifier to prevent fly-aways
• Soil stabilizing plants• Deep rooted plants provide
the best long-term erosion control!
STEP 3 Limit Erosion
PHASE 2: Construction and Installation
Removing invasive species on a steep slope.
Securing netting over the slope and planting native grasses.
The slope reinforced by native plantings. 19
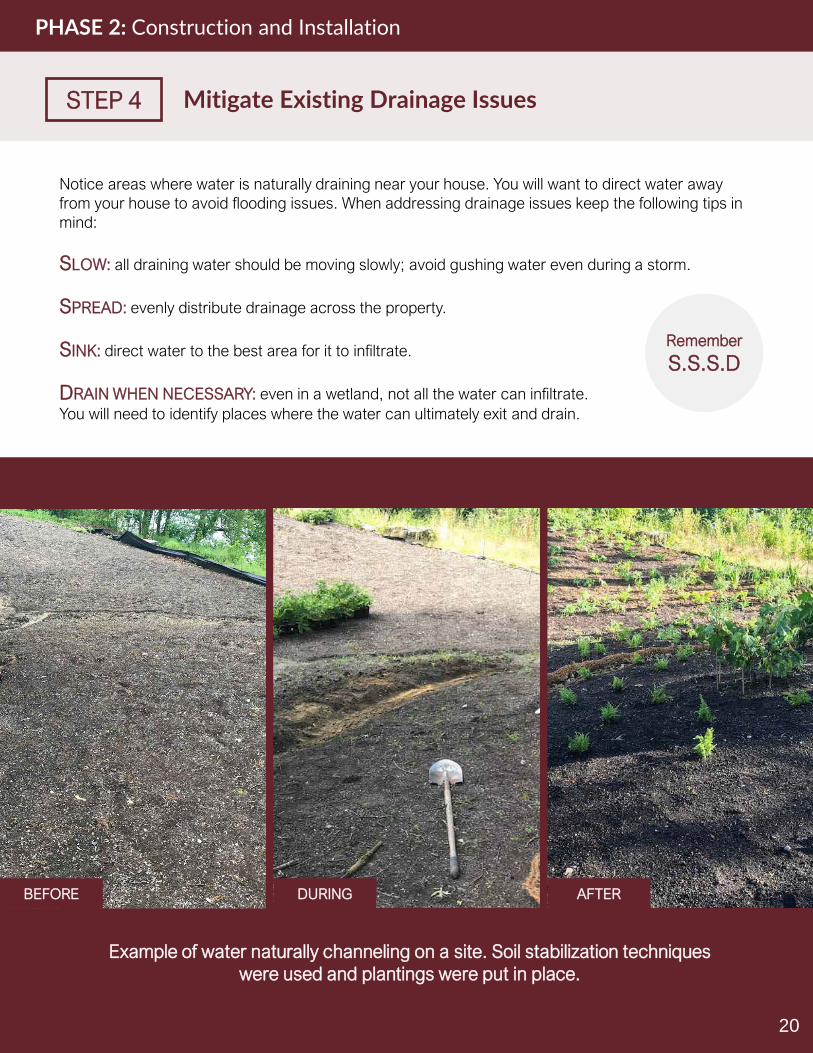
Notice areas where water is naturally draining near your house. You will want to direct water away from your house to avoid flooding issues. When addressing drainage issues keep the following tips in mind:
SLOW: all draining water should be moving slowly; avoid gushing water even during a storm.
SPREAD: evenly distribute drainage across the property.
SINK: direct water to the best area for it to infiltrate.
DRAIN WHEN NECESSARY: even in a wetland, not all the water can infiltrate. You will need to identify places where the water can ultimately exit and drain.
Example of water naturally channeling on a site. Soil stabilization techniques were used and plantings were put in place.
STEP 4 Mitigate Existing Drainage Issues
PHASE 2: Construction and Installation
BEFORE DURING AFTER
Remember
S.S.S.D
20
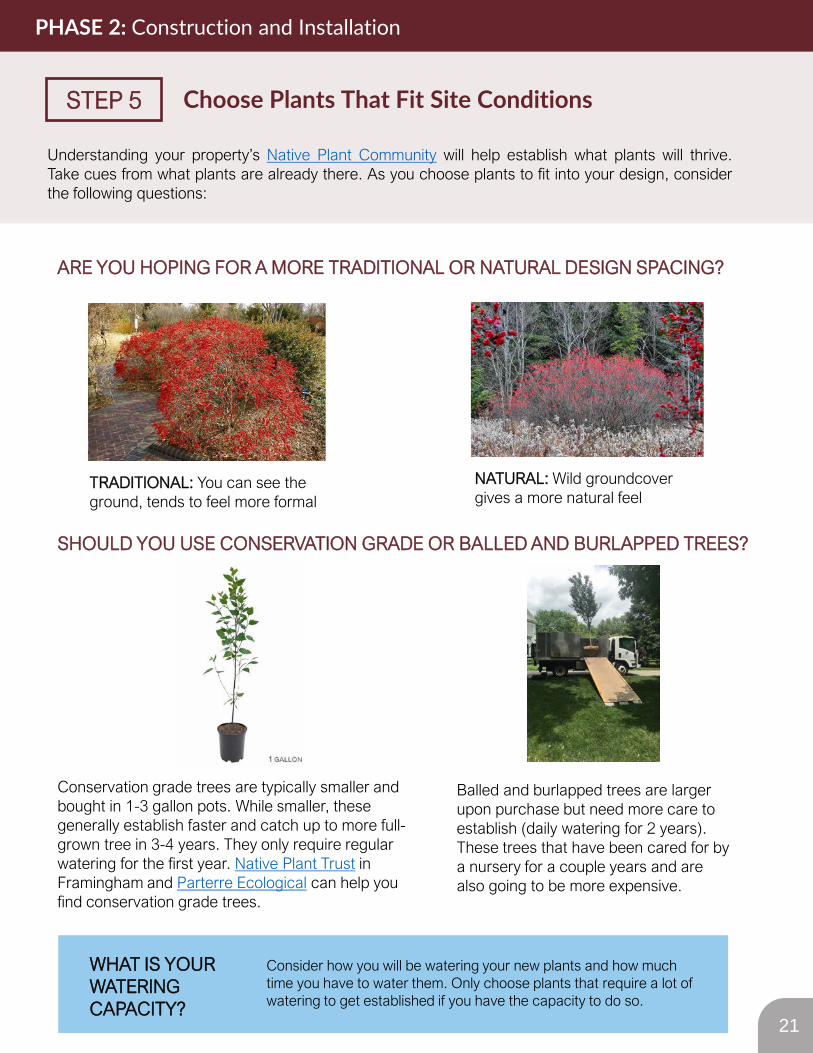
Understanding your property’s Native Plant Community will help establish what plants will thrive.Take cues from what plants are already there. As you choose plants to fit into your design, considerthe following questions:
ARE YOU HOPING FOR A MORE TRADITIONAL OR NATURAL DESIGN SPACING?
SHOULD YOU USE CONSERVATION GRADE OR BALLED AND BURLAPPED TREES?
Conservation grade trees are typically smaller and bought in 1-3 gallon pots. While smaller, these generally establish faster and catch up to more full-grown tree in 3-4 years. They only require regular watering for the first year. Native Plant Trust in Framingham and Parterre Ecological can help you find conservation grade trees.
Balled and burlapped trees are larger upon purchase but need more care to establish (daily watering for 2 years). These trees that have been cared for by a nursery for a couple years and are also going to be more expensive.
WHAT IS YOUR WATERING CAPACITY?
Consider how you will be watering your new plants and how much time you have to water them. Only choose plants that require a lot of watering to get established if you have the capacity to do so.
STEP 5 Choose Plants That Fit Site Conditions
PHASE 2: Construction and Installation
21
TRADITIONAL: You can see the ground, tends to feel more formal
NATURAL: Wild groundcover gives a more natural feel
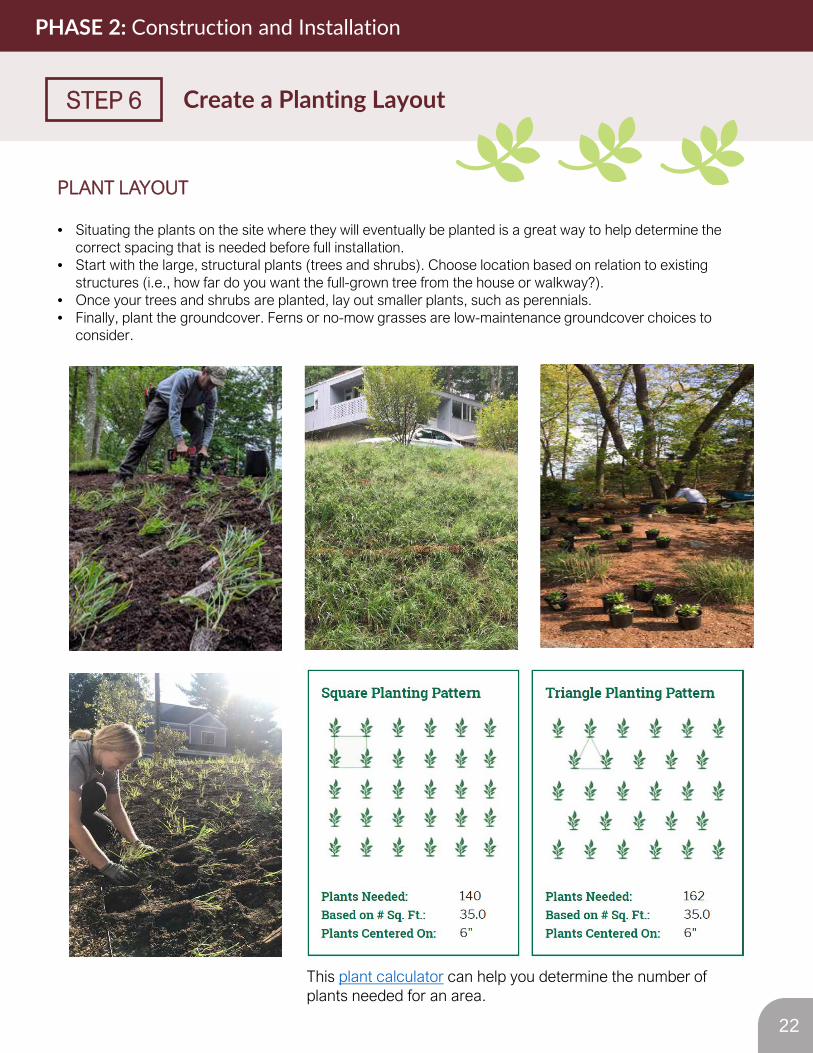
PLANT LAYOUT
• Situating the plants on the site where they will eventually be planted is a great way to help determine the correct spacing that is needed before full installation.
• Start with the large, structural plants (trees and shrubs). Choose location based on relation to existing structures (i.e., how far do you want the full-grown tree from the house or walkway?).
• Once your trees and shrubs are planted, lay out smaller plants, such as perennials.• Finally, plant the groundcover. Ferns or no-mow grasses are low-maintenance groundcover choices to
consider.
This plant calculator can help you determine the number of plants needed for an area.
STEP 6 Create a Planting Layout
PHASE 2: Construction and Installation
22
PRO TIPAfter digging the hole, sprinkle in organic root starter to help promote healthy, strong roots
PRO TIPWater all newly established plantings in the first year in order to help them establish new roots
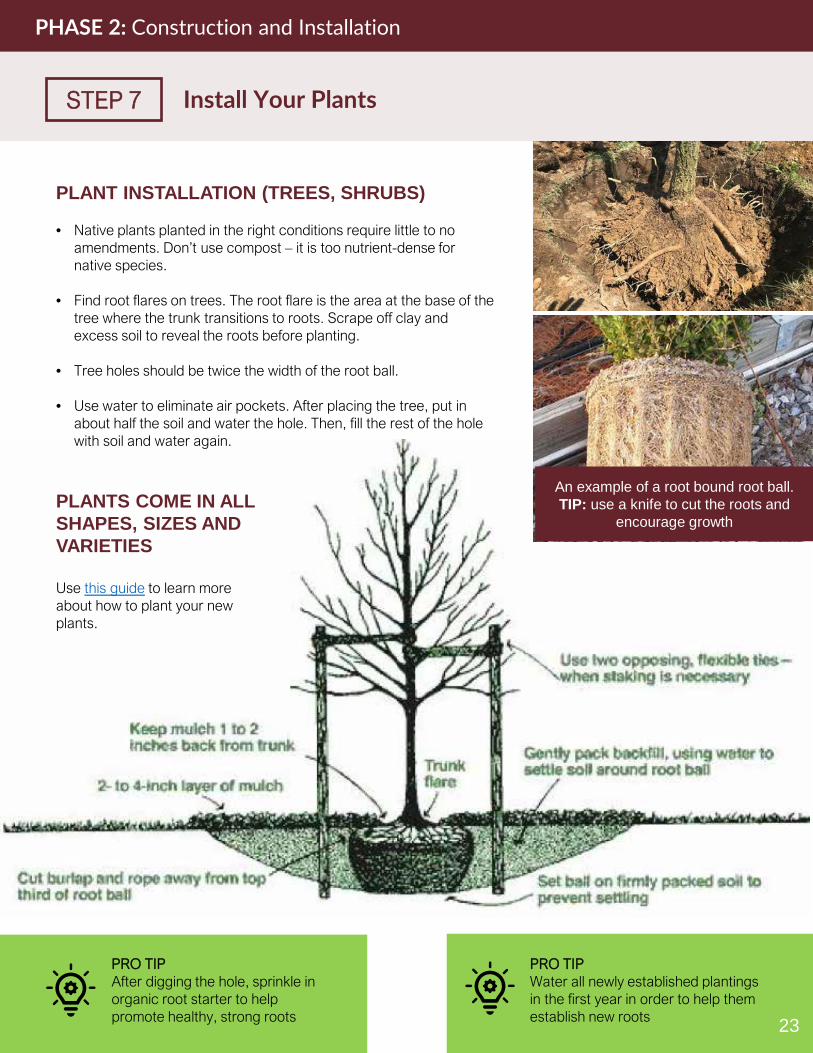
PLANTS COME IN ALL SHAPES, SIZES AND VARIETIES
Use this guide to learn more about how to plant your new plants.
STEP 7 Install Your Plants
PHASE 2: Construction and Installation
An example of a root bound root ball. TIP: use a knife to cut the roots and
encourage growth
23
PLANT INSTALLATION (TREES, SHRUBS)
• Native plants planted in the right conditions require little to no amendments. Don’t use compost – it is too nutrient-dense for native species.
• Find root flares on trees. The root flare is the area at the base of the tree where the trunk transitions to roots. Scrape off clay and excess soil to reveal the roots before planting.
• Tree holes should be twice the width of the root ball.
• Use water to eliminate air pockets. After placing the tree, put in about half the soil and water the hole. Then, fill the rest of the hole with soil and water again.
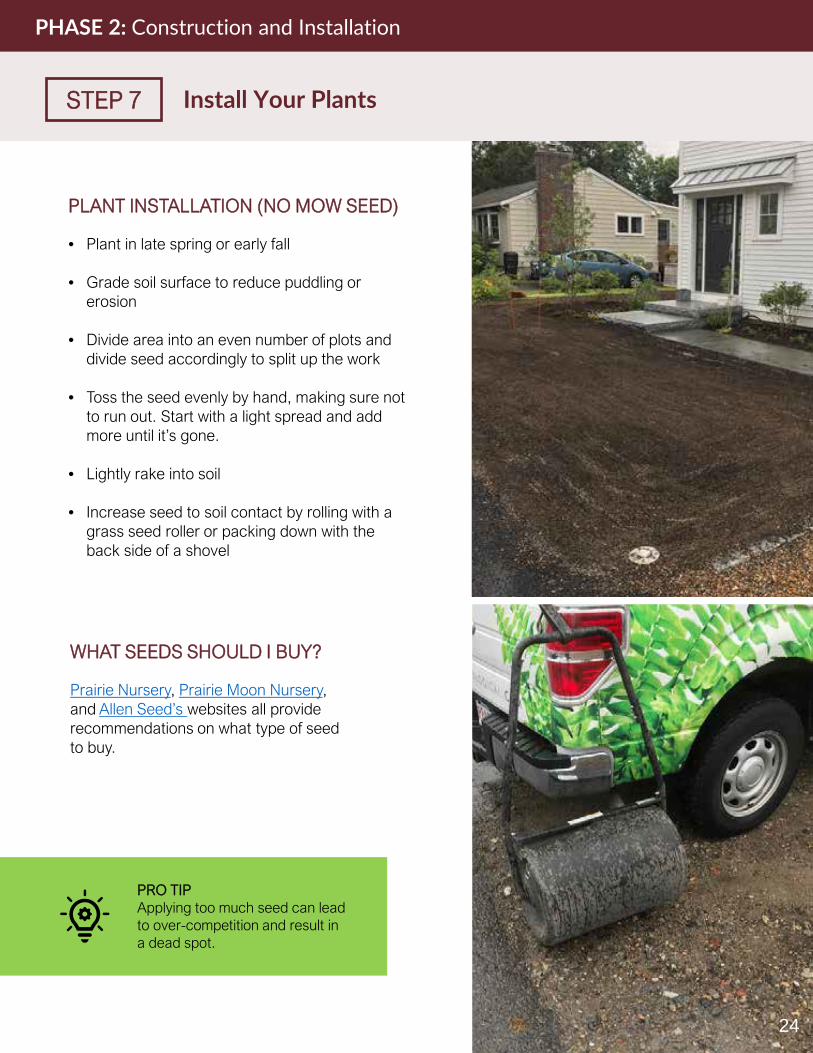
PLANT INSTALLATION (NO MOW SEED)
• Plant in late spring or early fall
• Grade soil surface to reduce puddling or erosion
• Divide area into an even number of plots and divide seed accordingly to split up the work
• Toss the seed evenly by hand, making sure not to run out. Start with a light spread and add more until it’s gone.
• Lightly rake into soil
• Increase seed to soil contact by rolling with a grass seed roller or packing down with the back side of a shovel
WHAT SEEDS SHOULD I BUY?
Prairie Nursery, Prairie Moon Nursery, and Allen Seed’s websites all provide recommendations on what type of seed to buy.
STEP 7 Install Your Plants
PHASE 2: Construction and Installation
PRO TIPApplying too much seed can lead to over-competition and result in a dead spot.
24
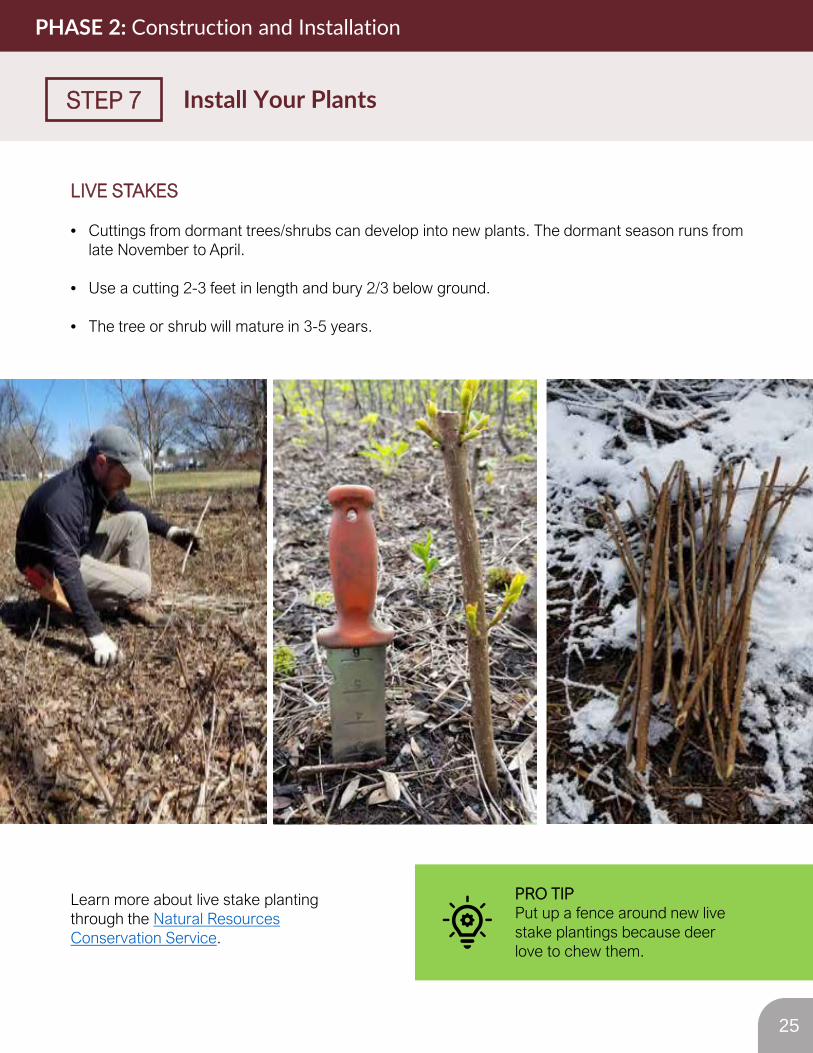
LIVE STAKES
• Cuttings from dormant trees/shrubs can develop into new plants. The dormant season runs from late November to April.
• Use a cutting 2-3 feet in length and bury 2/3 below ground.
• The tree or shrub will mature in 3-5 years.
Learn more about live stake planting through the Natural Resources Conservation Service.
STEP 7 Install Your Plants
PHASE 2: Construction and Installation
PRO TIPPut up a fence around new live stake plantings because deer love to chew them.
25
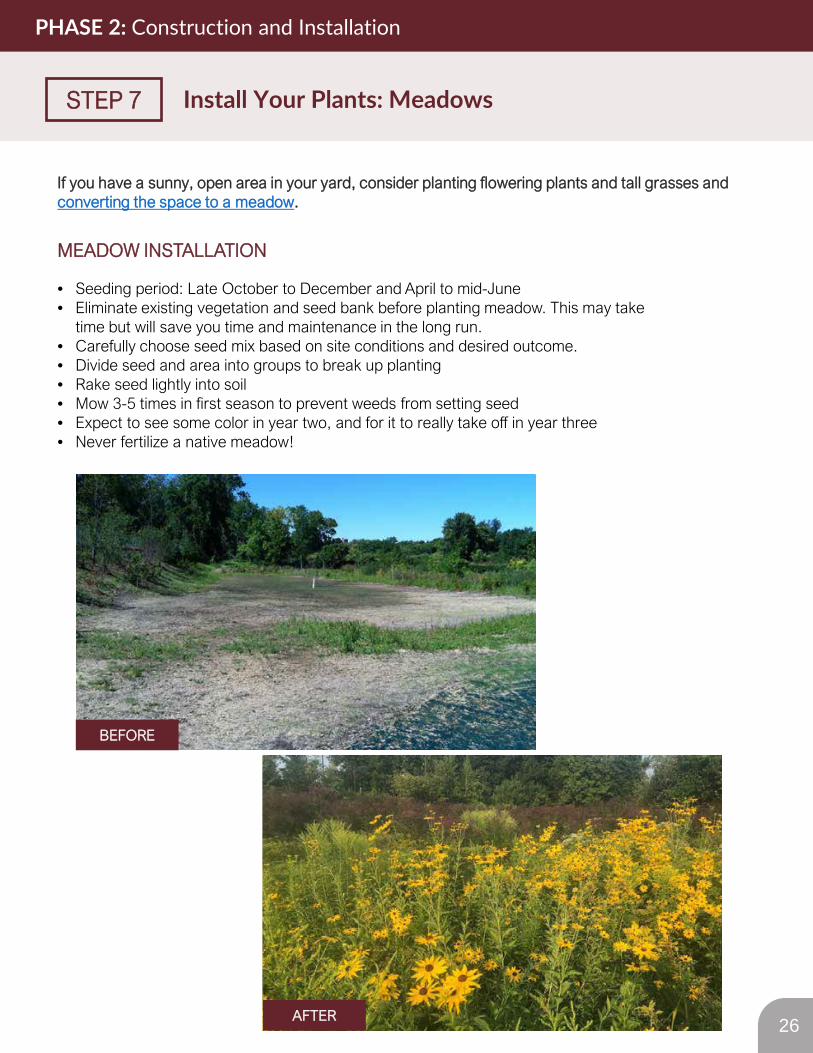
MEADOW INSTALLATION
• Seeding period: Late October to December and April to mid-June• Eliminate existing vegetation and seed bank before planting meadow. This may take
time but will save you time and maintenance in the long run. • Carefully choose seed mix based on site conditions and desired outcome. • Divide seed and area into groups to break up planting• Rake seed lightly into soil• Mow 3-5 times in first season to prevent weeds from setting seed• Expect to see some color in year two, and for it to really take off in year three• Never fertilize a native meadow!
If you have a sunny, open area in your yard, consider planting flowering plants and tall grasses and converting the space to a meadow.
STEP 7 Install Your Plants: Meadows
PHASE 2: Construction and Installation
BEFORE
AFTER 26
ESTABLISHMENT
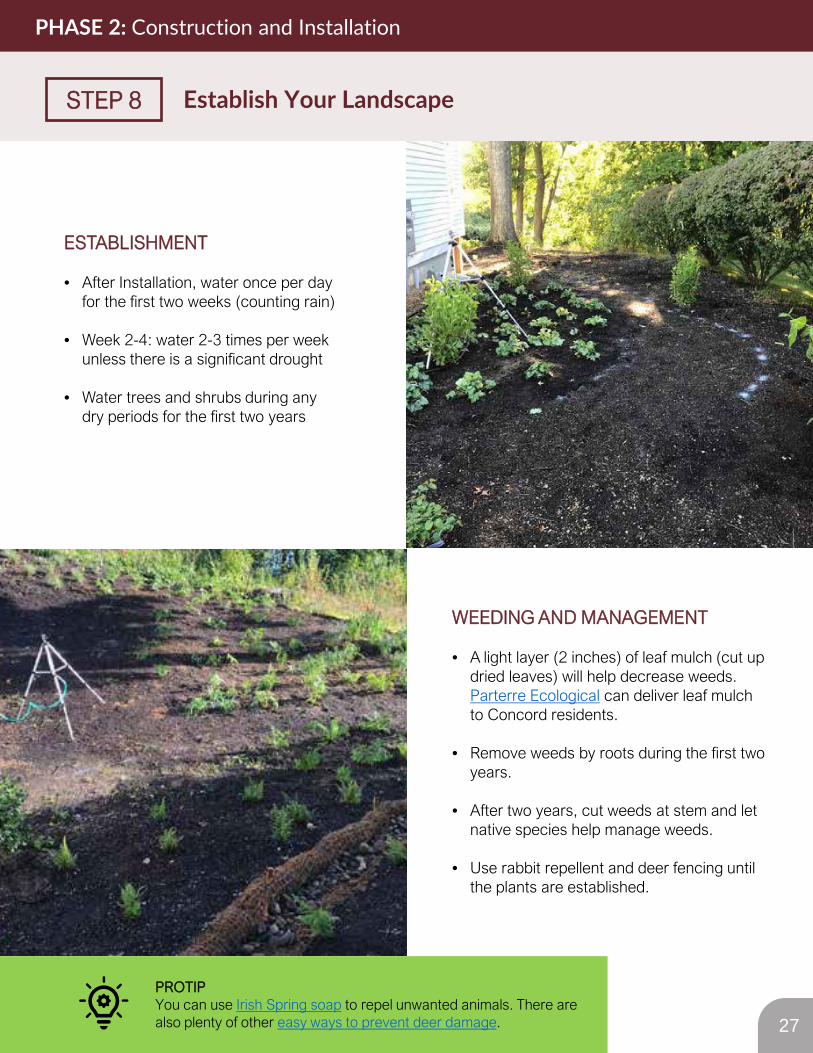
• After Installation, water once per day for the first two weeks (counting rain)
• Week 2-4: water 2-3 times per week unless there is a significant drought
• Water trees and shrubs during any dry periods for the first two years
PROTIPYou can use Irish Spring soap to repel unwanted animals. There are also plenty of other easy ways to prevent deer damage.
STEP 8 Establish Your Landscape
PHASE 2: Construction and Installation
WEEDING AND MANAGEMENT
• A light layer (2 inches) of leaf mulch (cut up dried leaves) will help decrease weeds. Parterre Ecological can deliver leaf mulch to Concord residents.
• Remove weeds by roots during the first two years.
• After two years, cut weeds at stem and let native species help manage weeds.
• Use rabbit repellent and deer fencing until the plants are established.
27

…REALITY DURING FIRST YEAR OF GROWTH
EXPECTATIONS FOR FIRST YEAR OF PLANTING…
28
PATIENCE
Key to Success…
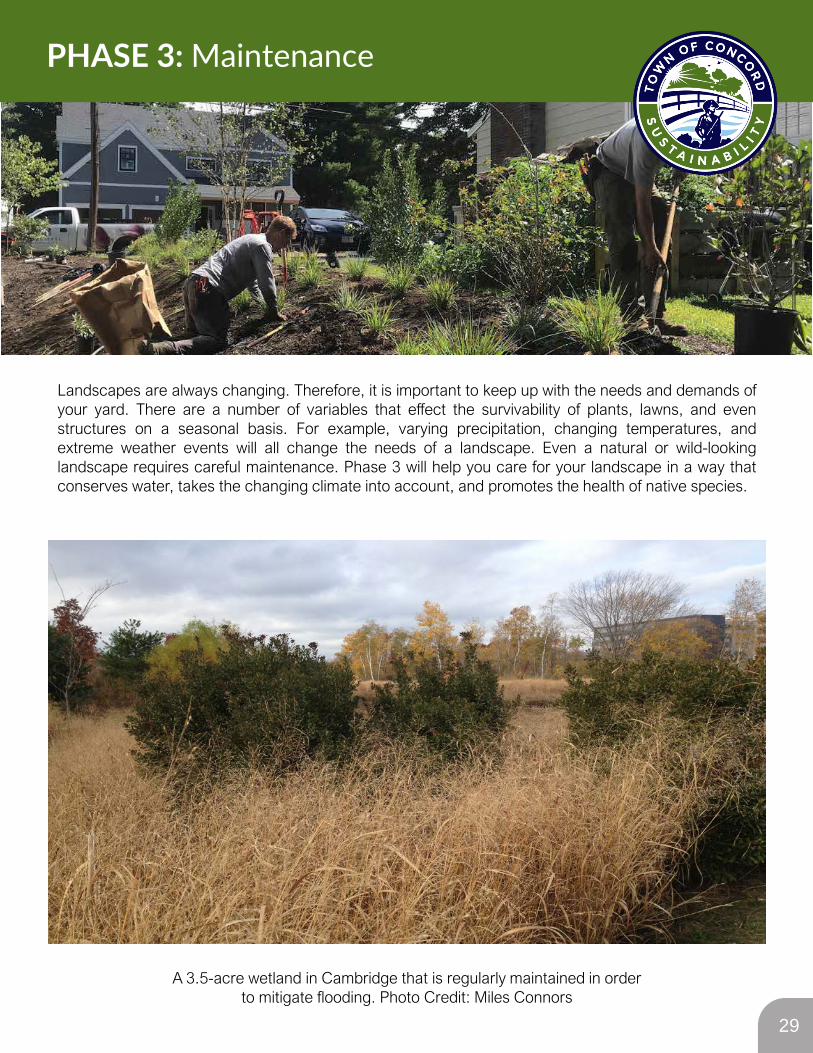
Landscapes are always changing. Therefore, it is important to keep up with the needs and demands ofyour yard. There are a number of variables that effect the survivability of plants, lawns, and evenstructures on a seasonal basis. For example, varying precipitation, changing temperatures, andextreme weather events will all change the needs of a landscape. Even a natural or wild-lookinglandscape requires careful maintenance. Phase 3 will help you care for your landscape in a way thatconserves water, takes the changing climate into account, and promotes the health of native species.
A 3.5-acre wetland in Cambridge that is regularly maintained in order to mitigate flooding. Photo Credit: Miles Connors
PHASE 3: Maintenance
29
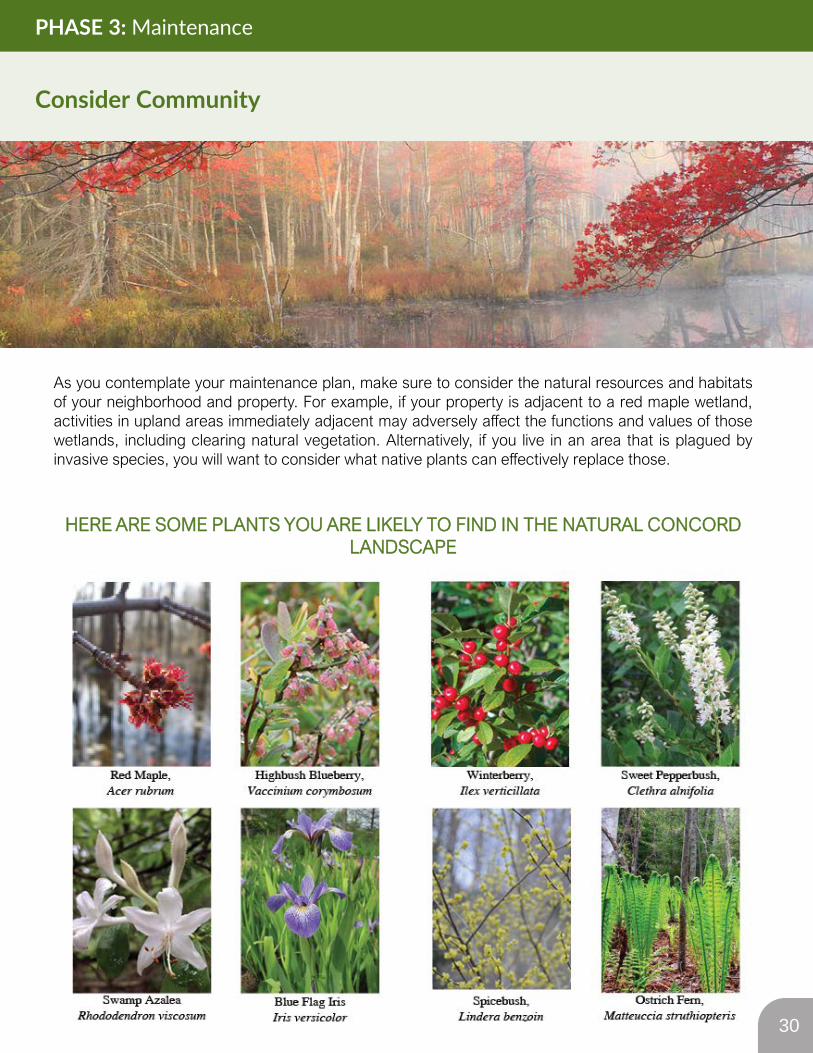
As you contemplate your maintenance plan, make sure to consider the natural resources and habitatsof your neighborhood and property. For example, if your property is adjacent to a red maple wetland,activities in upland areas immediately adjacent may adversely affect the functions and values of thosewetlands, including clearing natural vegetation. Alternatively, if you live in an area that is plagued byinvasive species, you will want to consider what native plants can effectively replace those.
Consider Community
PHASE 3: Maintenance
HERE ARE SOME PLANTS YOU ARE LIKELY TO FIND IN THE NATURAL CONCORD LANDSCAPE
30
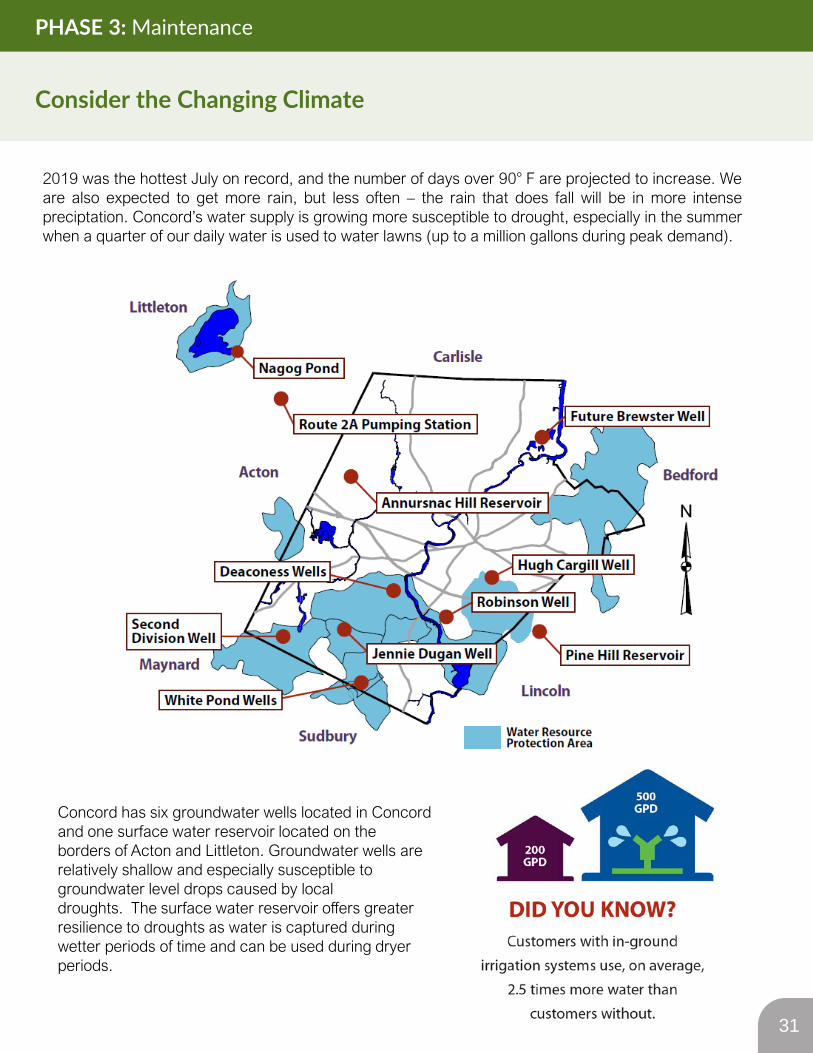
2019 was the hottest July on record, and the number of days over 90° F are projected to increase. Weare also expected to get more rain, but less often – the rain that does fall will be in more intensepreciptation. Concord’s water supply is growing more susceptible to drought, especially in the summerwhen a quarter of our daily water is used to water lawns (up to a million gallons during peak demand).
Concord has six groundwater wells located in Concord and one surface water reservoir located on the borders of Acton and Littleton. Groundwater wells are relatively shallow and especially susceptible to groundwater level drops caused by local droughts. The surface water reservoir offers greater resilience to droughts as water is captured during wetter periods of time and can be used during dryer periods.
Consider the Changing Climate
PHASE 3: Maintenance
31
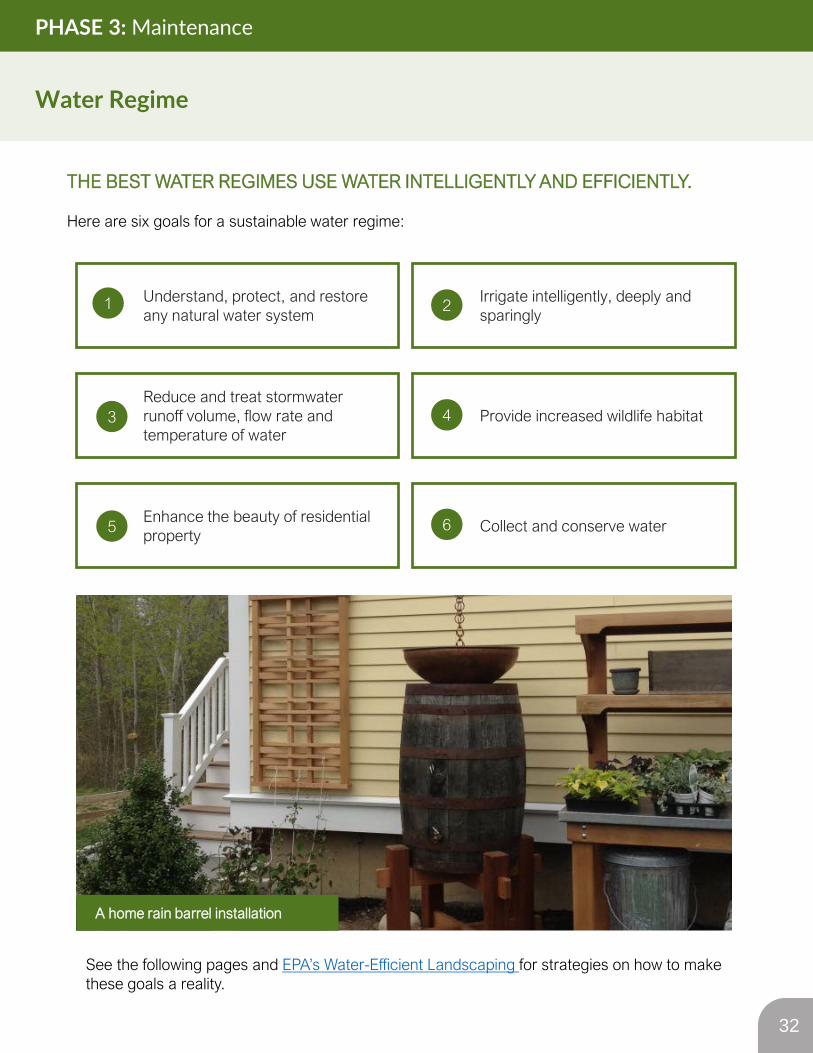
THE BEST WATER REGIMES USE WATER INTELLIGENTLY AND EFFICIENTLY.
Here are six goals for a sustainable water regime:
See the following pages and EPA’s Water-Efficient Landscaping for strategies on how to make these goals a reality.
Water Regime
PHASE 3: Maintenance
32
A home rain barrel installation
Understand, protect, and restore any natural water system
Irrigate intelligently, deeply and sparingly
Reduce and treat stormwater runoff volume, flow rate and temperature of water
Provide increased wildlife habitat
Enhance the beauty of residential property
Collect and conserve water
1 2
5 6
43
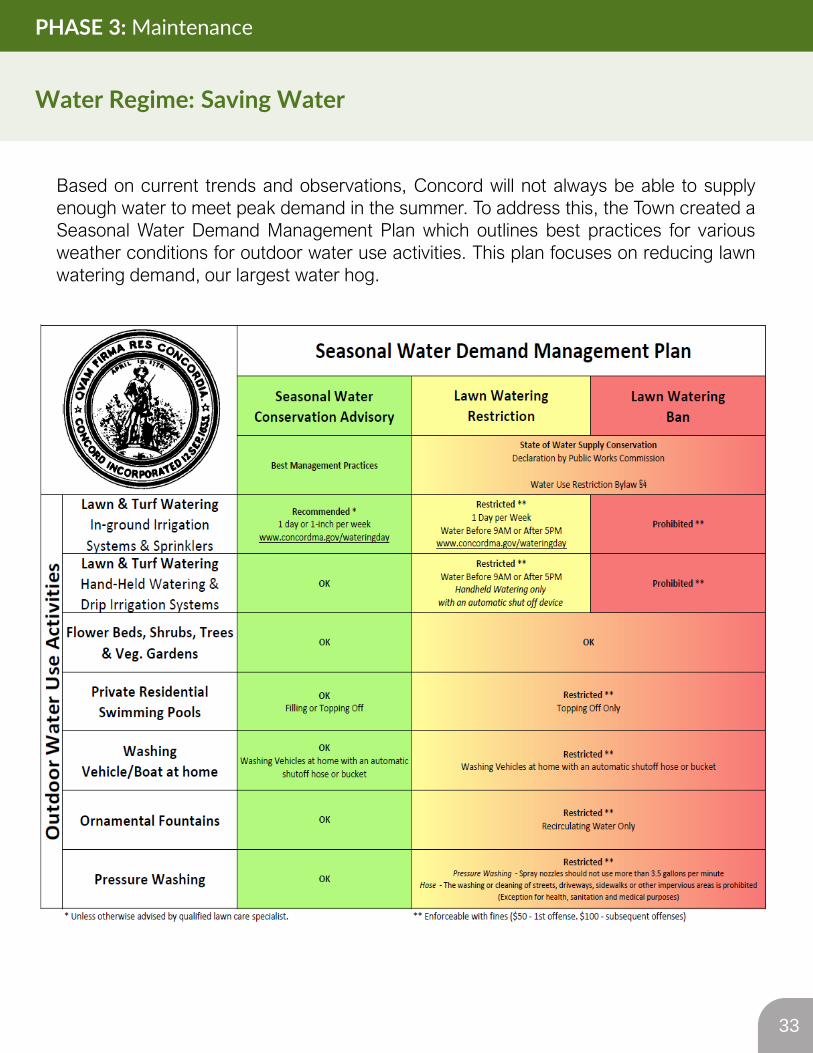
Based on current trends and observations, Concord will not always be able to supplyenough water to meet peak demand in the summer. To address this, the Town created aSeasonal Water Demand Management Plan which outlines best practices for variousweather conditions for outdoor water use activities. This plan focuses on reducing lawnwatering demand, our largest water hog.
Water Regime: Saving Water
PHASE 3: Maintenance
33
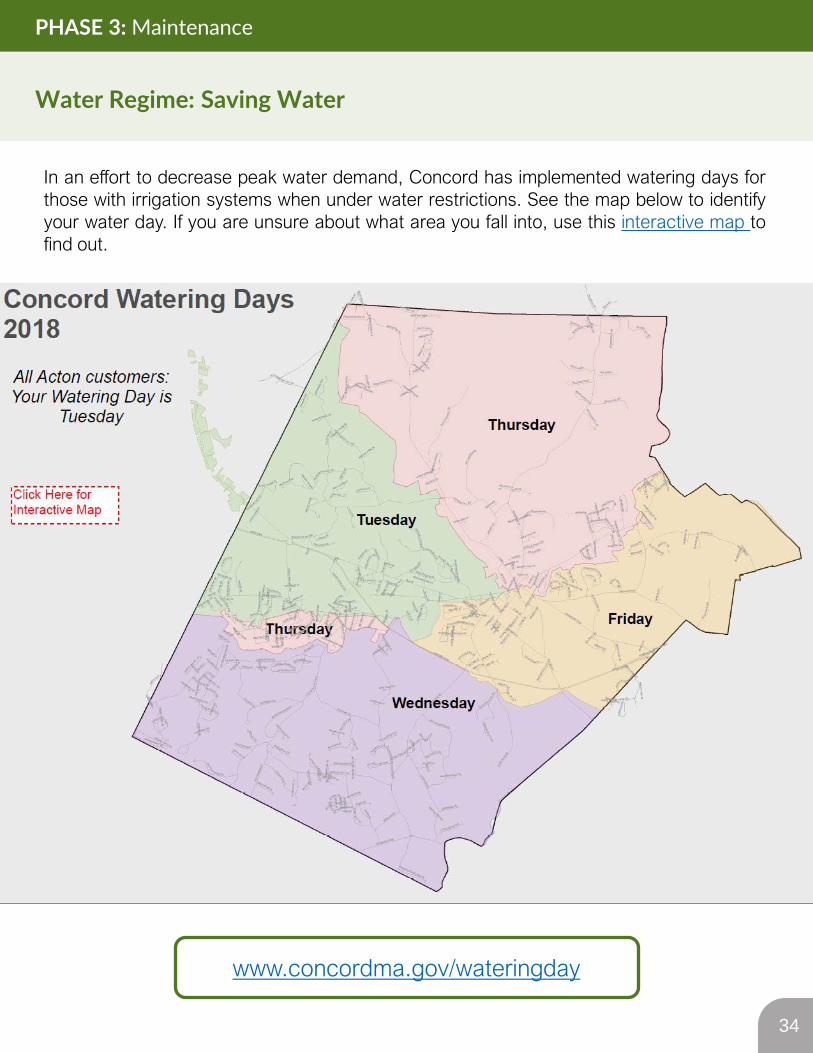
In an effort to decrease peak water demand, Concord has implemented watering days forthose with irrigation systems when under water restrictions. See the map below to identifyyour water day. If you are unsure about what area you fall into, use this interactive map tofind out.
Water Regime: Saving Water
PHASE 3: Maintenance
34
www.concordma.gov/wateringday
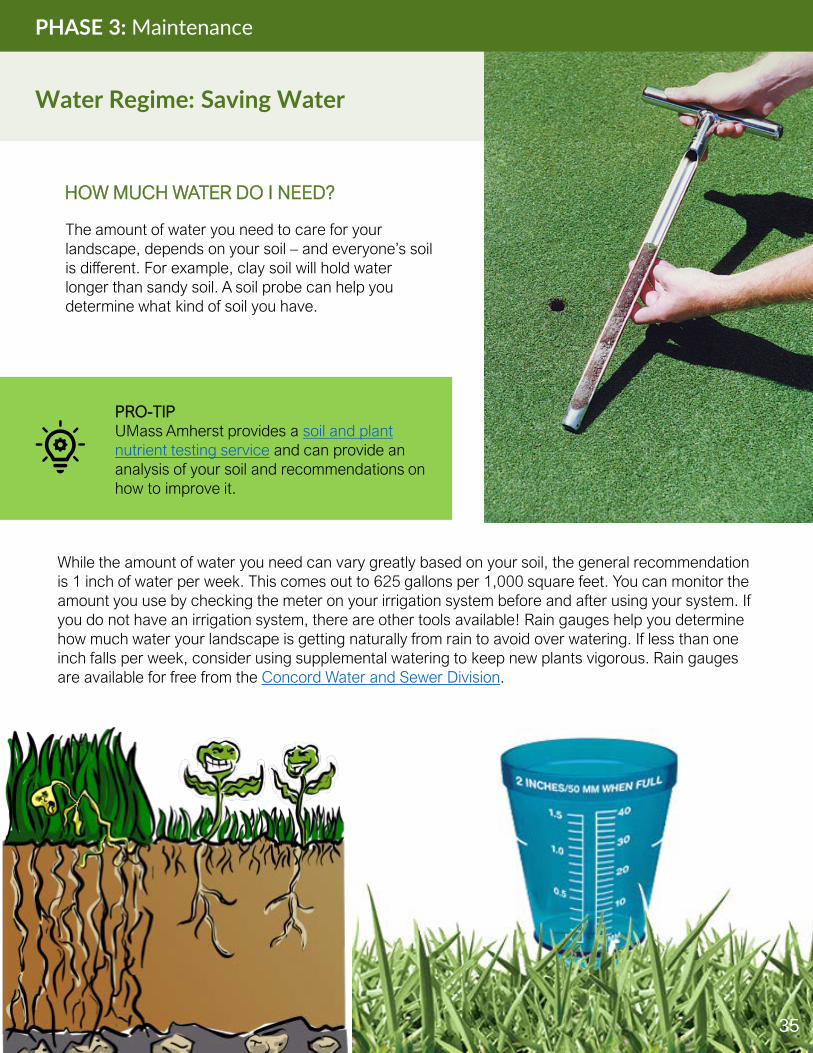
HOW MUCH WATER DO I NEED?
The amount of water you need to care for your landscape, depends on your soil – and everyone’s soil is different. For example, clay soil will hold water longer than sandy soil. A soil probe can help you determine what kind of soil you have.
Water Regime: Saving Water
PHASE 3: Maintenance
PRO-TIPUMass Amherst provides a soil and plant nutrient testing service and can provide an analysis of your soil and recommendations on how to improve it.
While the amount of water you need can vary greatly based on your soil, the general recommendation is 1 inch of water per week. This comes out to 625 gallons per 1,000 square feet. You can monitor the amount you use by checking the meter on your irrigation system before and after using your system. If you do not have an irrigation system, there are other tools available! Rain gauges help you determine how much water your landscape is getting naturally from rain to avoid over watering. If less than one inch falls per week, consider using supplemental watering to keep new plants vigorous. Rain gauges are available for free from the Concord Water and Sewer Division.
35

When installed correctly, drip irrigation is one of the most efficient ways to distribute water across your landscape. Interested in how drip irrigation works? Dig into the engineering behind it!
PRO-TIPWi-Fi irrigation systems can be a great way to monitor and control the amount of water you use. They automatically adjust based on the weather!
Water Regime: Irrigation Systems
PHASE 3: Maintenance
36
When watering water beds, micro-drip irrigation can be highly effective. These systems allow you to install mini emitters with various drip speeds, aimed directly at plant roots.
*App available with LNK WiFi Module, sold separately.
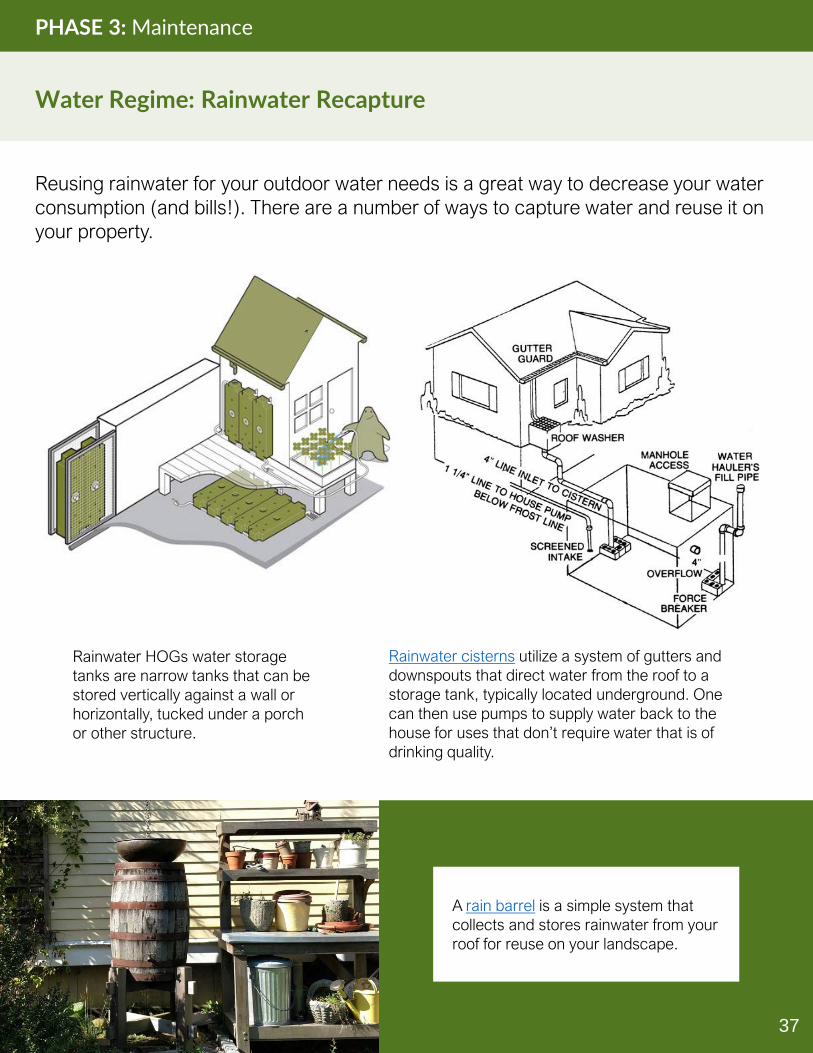
Reusing rainwater for your outdoor water needs is a great way to decrease your water consumption (and bills!). There are a number of ways to capture water and reuse it on your property.
Rainwater HOGs water storage tanks are narrow tanks that can be stored vertically against a wall or horizontally, tucked under a porch or other structure.
Rainwater cisterns utilize a system of gutters and downspouts that direct water from the roof to a storage tank, typically located underground. One can then use pumps to supply water back to the house for uses that don’t require water that is of drinking quality.
Water Regime: Rainwater Recapture
PHASE 3: Maintenance
37
A rain barrel is a simple system that collects and stores rainwater from your roof for reuse on your landscape.
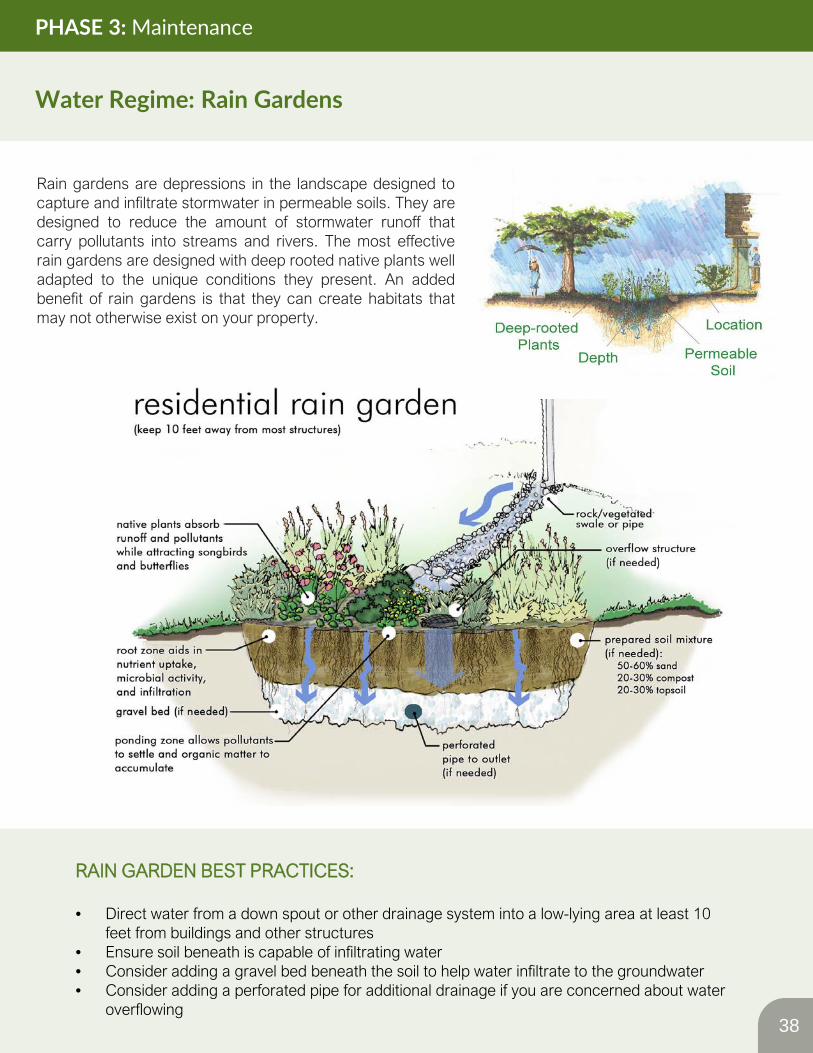
Rain gardens are depressions in the landscape designed tocapture and infiltrate stormwater in permeable soils. They aredesigned to reduce the amount of stormwater runoff thatcarry pollutants into streams and rivers. The most effectiverain gardens are designed with deep rooted native plants welladapted to the unique conditions they present. An addedbenefit of rain gardens is that they can create habitats thatmay not otherwise exist on your property.
RAIN GARDEN BEST PRACTICES:
• Direct water from a down spout or other drainage system into a low-lying area at least 10 feet from buildings and other structures
• Ensure soil beneath is capable of infiltrating water• Consider adding a gravel bed beneath the soil to help water infiltrate to the groundwater• Consider adding a perforated pipe for additional drainage if you are concerned about water
overflowing
Water Regime: Rain Gardens
PHASE 3: Maintenance
38
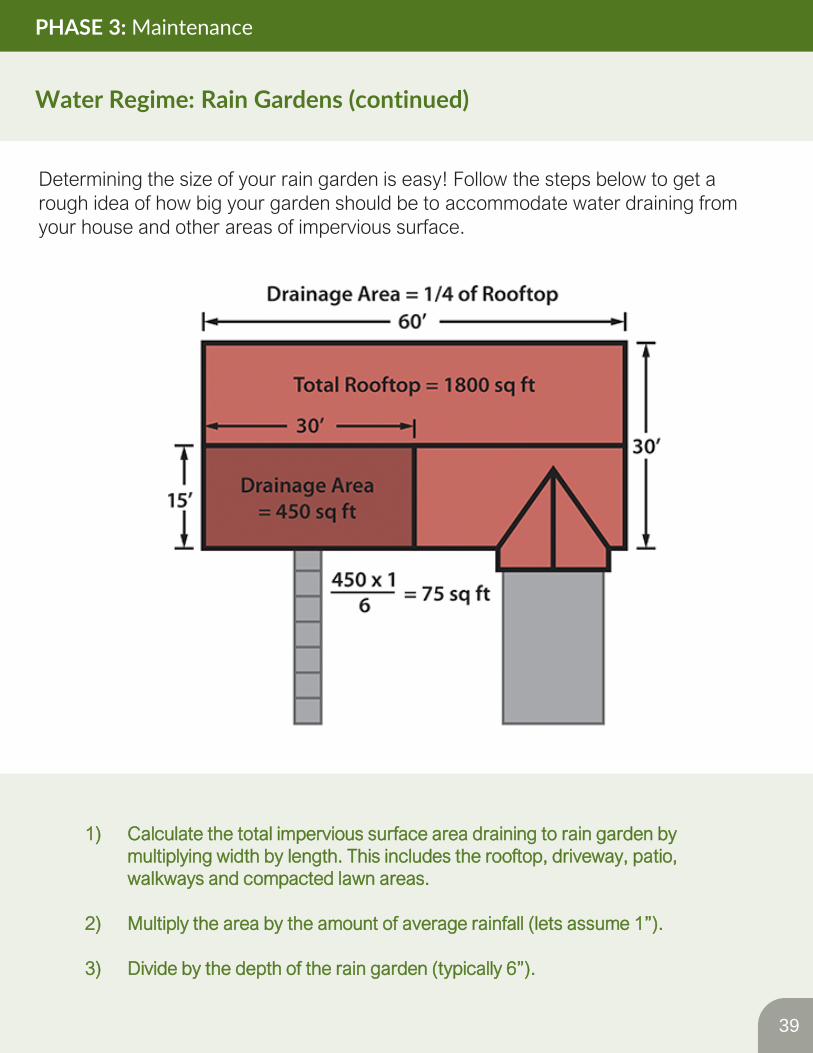
1) Calculate the total impervious surface area draining to rain garden by multiplying width by length. This includes the rooftop, driveway, patio, walkways and compacted lawn areas.
2) Multiply the area by the amount of average rainfall (lets assume 1”).
3) Divide by the depth of the rain garden (typically 6”).
Determining the size of your rain garden is easy! Follow the steps below to get a rough idea of how big your garden should be to accommodate water draining from your house and other areas of impervious surface.
Water Regime: Rain Gardens (continued)
PHASE 3: Maintenance
39
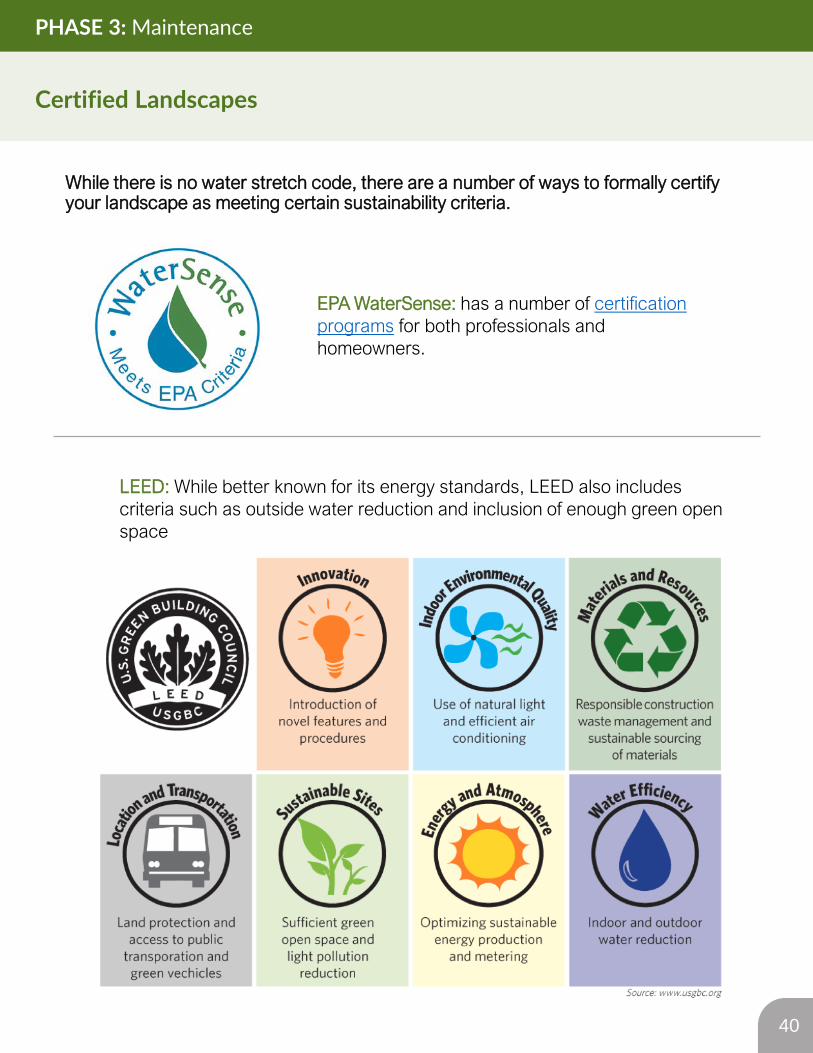
While there is no water stretch code, there are a number of ways to formally certify your landscape as meeting certain sustainability criteria.
Certified Landscapes
PHASE 3: Maintenance
40
EPA WaterSense: has a number of certification programs for both professionals and homeowners.
LEED: While better known for its energy standards, LEED also includes criteria such as outside water reduction and inclusion of enough green open space
Open space for kids and pets to play is great, but over time lawns can become an issue if fertilizers and herbicidesare used. Chemicals used on lawns turns into harmful runoff that pollutes our water bodies. Lawns are alsocontributing to decreasing biodiversity. Alternative lawn care can reduce the negative environmental impacts oflawns.
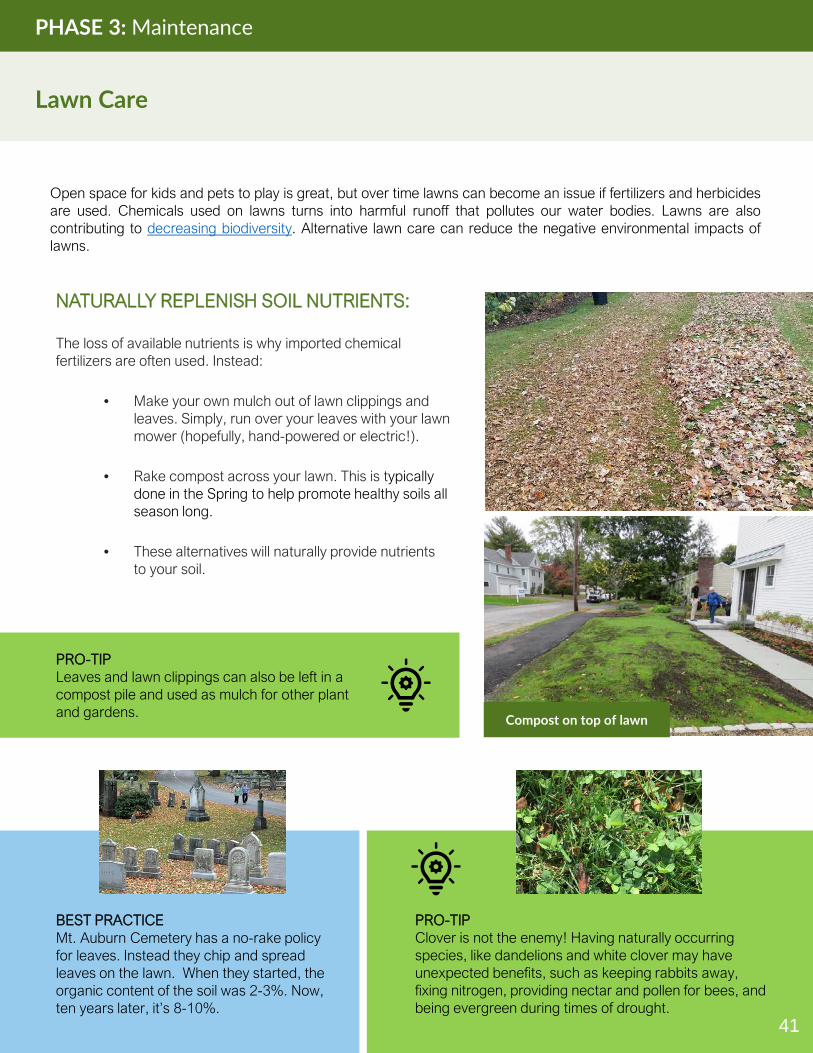
Mt. Auburn Cemetery has a no-rake policy for leaves. Instead they chip and spread leaves on the lawn. When they started, the organic content of the soil was 2-3%. Now, ten years later, it’s 8-10%.
NATURALLY REPLENISH SOIL NUTRIENTS:
The loss of available nutrients is why imported chemical fertilizers are often used. Instead:
• Make your own mulch out of lawn clippings and leaves. Simply, run over your leaves with your lawn mower (hopefully, hand-powered or electric!).
• Rake compost across your lawn. This is typically done in the Spring to help promote healthy soils all season long.
• These alternatives will naturally provide nutrients to your soil.
PRO-TIPLeaves and lawn clippings can also be left in a compost pile and used as mulch for other plant and gardens.
PRO-TIPClover is not the enemy! Having naturally occurring species, like dandelions and white clover may have unexpected benefits, such as keeping rabbits away, fixing nitrogen, providing nectar and pollen for bees, and being evergreen during times of drought.
Compost on top of lawn
Lawn Care
PHASE 3: Maintenance
BEST PRACTICE
41
DID YOU KNOW?According to the National Wildlife Federation, 42% of native plants and animals are at risk because of invasive species.
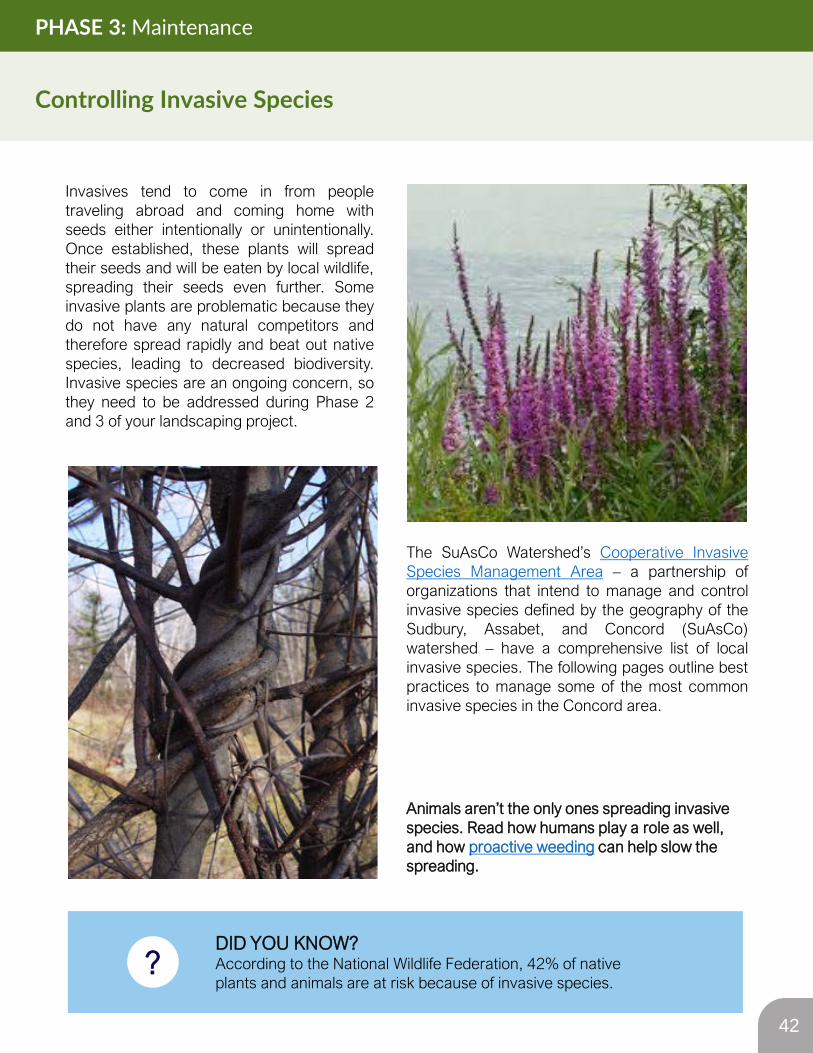
Invasives tend to come in from peopletraveling abroad and coming home withseeds either intentionally or unintentionally.Once established, these plants will spreadtheir seeds and will be eaten by local wildlife,spreading their seeds even further. Someinvasive plants are problematic because theydo not have any natural competitors andtherefore spread rapidly and beat out nativespecies, leading to decreased biodiversity.Invasive species are an ongoing concern, sothey need to be addressed during Phase 2and 3 of your landscaping project.
The SuAsCo Watershed’s Cooperative InvasiveSpecies Management Area – a partnership oforganizations that intend to manage and controlinvasive species defined by the geography of theSudbury, Assabet, and Concord (SuAsCo)watershed – have a comprehensive list of localinvasive species. The following pages outline bestpractices to manage some of the most commoninvasive species in the Concord area.
Animals aren’t the only ones spreading invasive species. Read how humans play a role as well, and how proactive weeding can help slow the spreading.
Controlling Invasive Species
PHASE 3: Maintenance
42
?
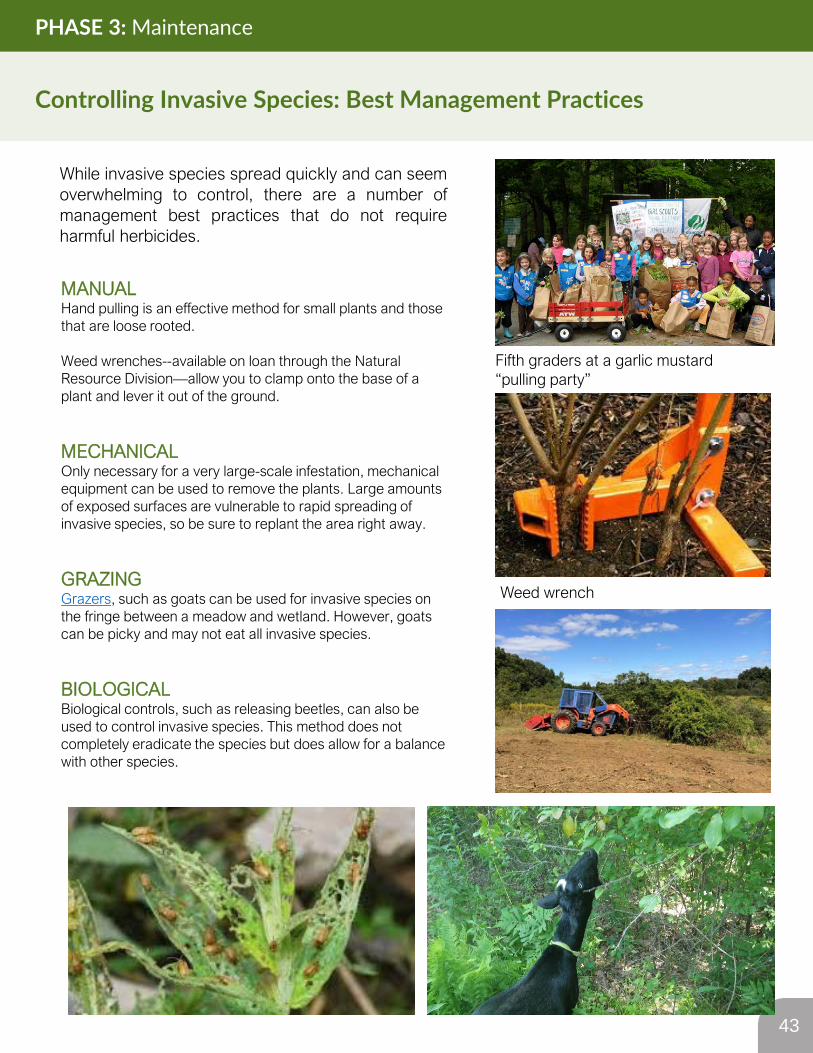
MANUALHand pulling is an effective method for small plants and those that are loose rooted.
Weed wrenches--available on loan through the Natural Resource Division—allow you to clamp onto the base of a plant and lever it out of the ground.
MECHANICALOnly necessary for a very large-scale infestation, mechanical equipment can be used to remove the plants. Large amounts of exposed surfaces are vulnerable to rapid spreading of invasive species, so be sure to replant the area right away.
GRAZINGGrazers, such as goats can be used for invasive species on the fringe between a meadow and wetland. However, goats can be picky and may not eat all invasive species.
BIOLOGICALBiological controls, such as releasing beetles, can also be used to control invasive species. This method does not completely eradicate the species but does allow for a balance with other species.
While invasive species spread quickly and can seemoverwhelming to control, there are a number ofmanagement best practices that do not requireharmful herbicides.
Controlling Invasive Species: Best Management Practices
PHASE 3: Maintenance
Fifth graders at a garlic mustard “pulling party”
Weed wrench
43
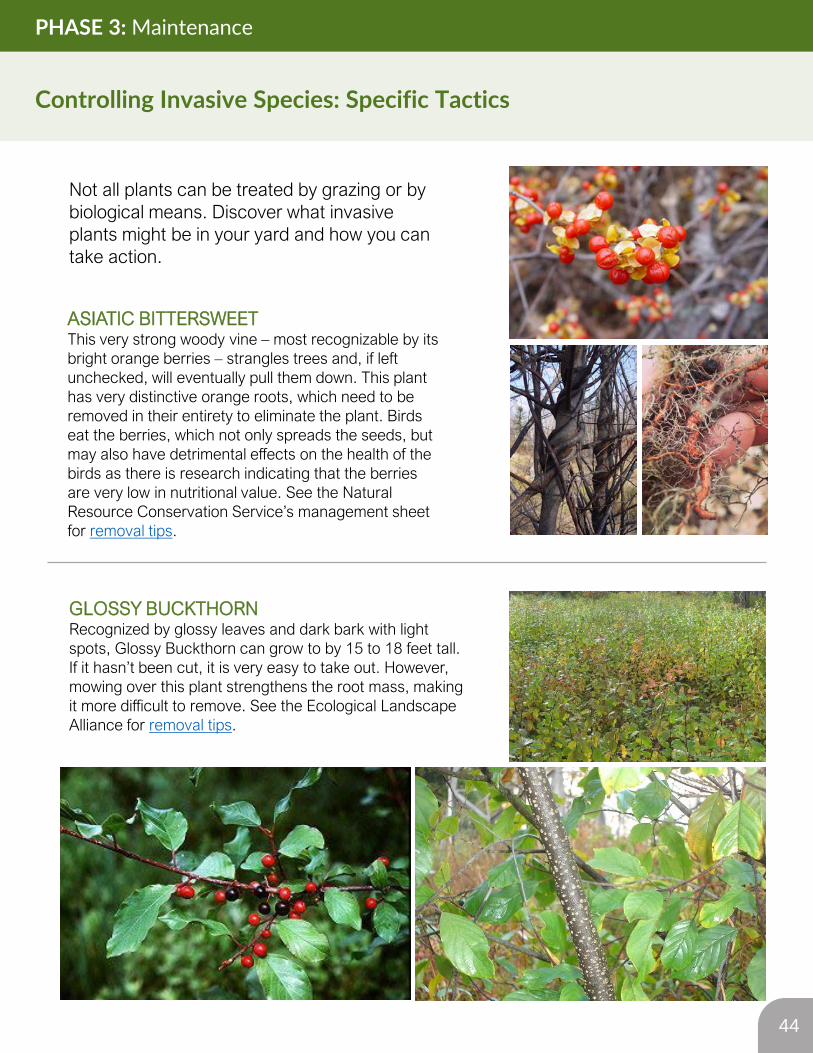
ASIATIC BITTERSWEETThis very strong woody vine – most recognizable by its bright orange berries – strangles trees and, if left unchecked, will eventually pull them down. This plant has very distinctive orange roots, which need to be removed in their entirety to eliminate the plant. Birds eat the berries, which not only spreads the seeds, but may also have detrimental effects on the health of the birds as there is research indicating that the berries are very low in nutritional value. See the Natural Resource Conservation Service’s management sheet for removal tips.
GLOSSY BUCKTHORNRecognized by glossy leaves and dark bark with light spots, Glossy Buckthorn can grow to by 15 to 18 feet tall. If it hasn’t been cut, it is very easy to take out. However, mowing over this plant strengthens the root mass, making it more difficult to remove. See the Ecological Landscape Alliance for removal tips.
Not all plants can be treated by grazing or by biological means. Discover what invasive plants might be in your yard and how you can take action.
Controlling Invasive Species: Specific Tactics
PHASE 3: Maintenance
44
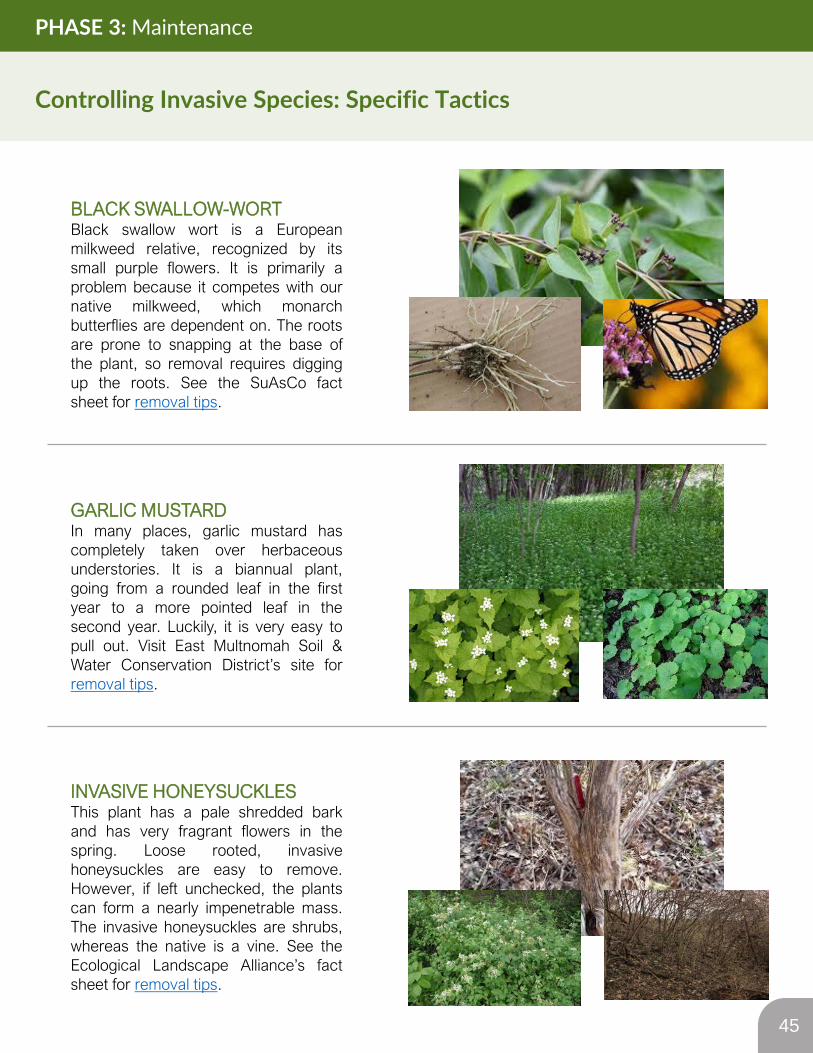
BLACK SWALLOW-WORTBlack swallow wort is a Europeanmilkweed relative, recognized by itssmall purple flowers. It is primarily aproblem because it competes with ournative milkweed, which monarchbutterflies are dependent on. The rootsare prone to snapping at the base ofthe plant, so removal requires diggingup the roots. See the SuAsCo factsheet for removal tips.
GARLIC MUSTARDIn many places, garlic mustard hascompletely taken over herbaceousunderstories. It is a biannual plant,going from a rounded leaf in the firstyear to a more pointed leaf in thesecond year. Luckily, it is very easy topull out. Visit East Multnomah Soil &Water Conservation District’s site forremoval tips.
INVASIVE HONEYSUCKLESThis plant has a pale shredded barkand has very fragrant flowers in thespring. Loose rooted, invasivehoneysuckles are easy to remove.However, if left unchecked, the plantscan form a nearly impenetrable mass.The invasive honeysuckles are shrubs,whereas the native is a vine. See theEcological Landscape Alliance’s factsheet for removal tips.
Controlling Invasive Species: Specific Tactics
PHASE 3: Maintenance
45
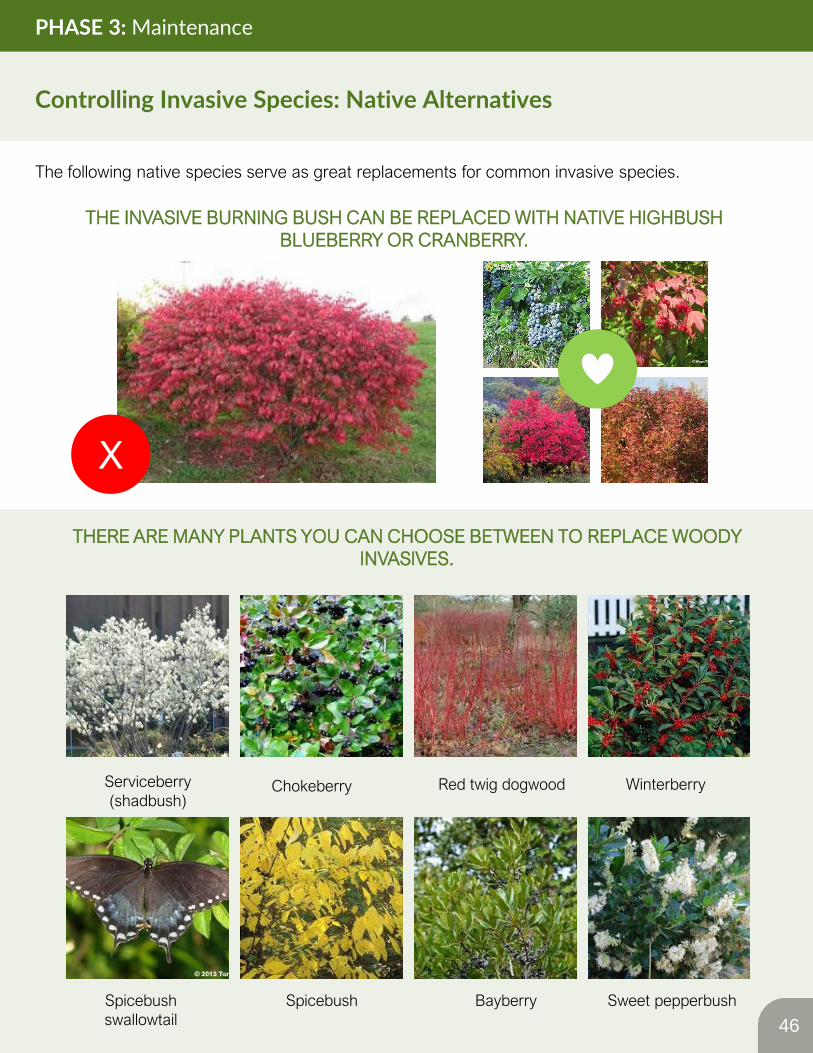
THE INVASIVE BURNING BUSH CAN BE REPLACED WITH NATIVE HIGHBUSH BLUEBERRY OR CRANBERRY.
THERE ARE MANY PLANTS YOU CAN CHOOSE BETWEEN TO REPLACE WOODY INVASIVES.
Serviceberry (shadbush)
SpicebushSpicebush swallowtail
Chokeberry
Bayberry
Red twig dogwood
Sweet pepperbush
Winterberry
Controlling Invasive Species: Native Alternatives
PHASE 3: Maintenance
The following native species serve as great replacements for common invasive species.
X
46
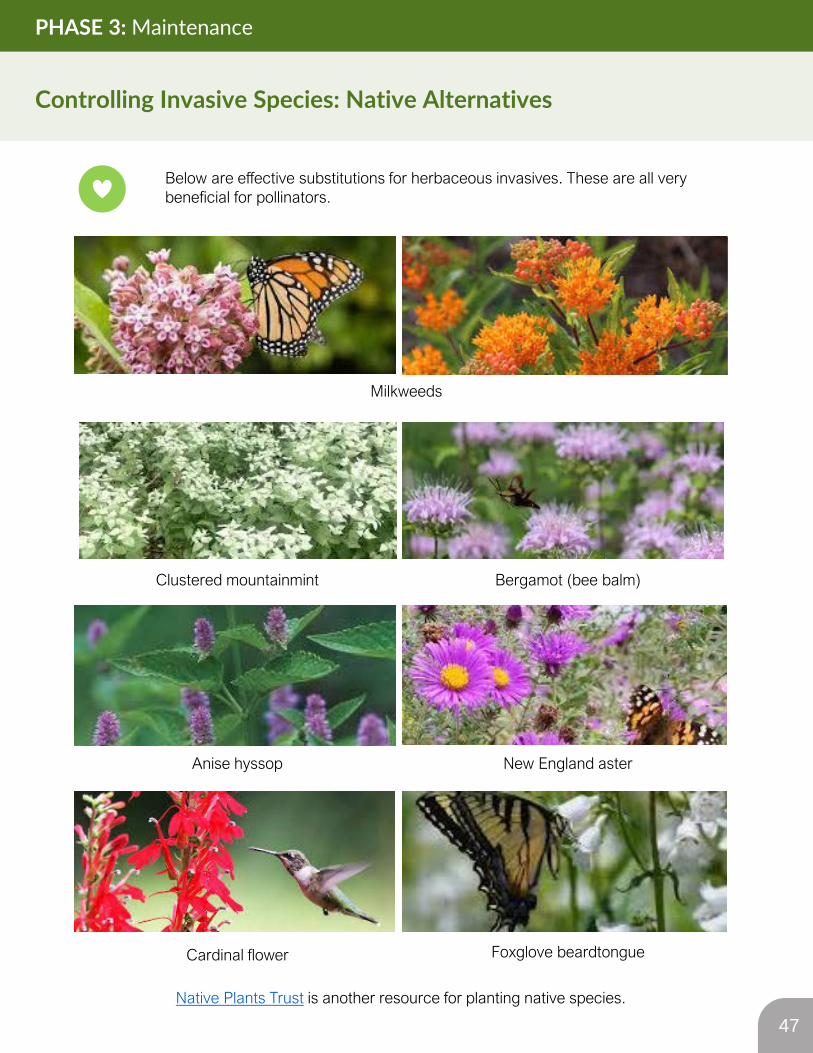
Milkweeds
Anise hyssop New England aster
Bergamot (bee balm)Clustered mountainmint
Cardinal flower Foxglove beardtongue
Below are effective substitutions for herbaceous invasives. These are all very beneficial for pollinators.
Native Plants Trust is another resource for planting native species.
Controlling Invasive Species: Native Alternatives
PHASE 3: Maintenance
47

• Leave native wildflower seed heads to expand the amount of wildflowers next season
• Collect native seeds for future use. Other seed resources:
• New England Wetland Plants
• Ernst
• Seed Library at the Fowler Library
• Divide and transplant plants to spread across your property to create larger plant beds for next season
• Prune overgrown plants
• Sheet mulch to reduce weeds
• Plant additional native trees, shrubs and perennials (conservation grade is recommended)
Fall is a great time to work on your landscape as that is when seeds naturally fall and there is little weed competition.
Other Maintenance Methods
PHASE 3: Maintenance
HERE ARE SOME IDEAS FOR SUSTAINABLY IMPROVING YOUR LANDSCAPE IN THE FALL:
48
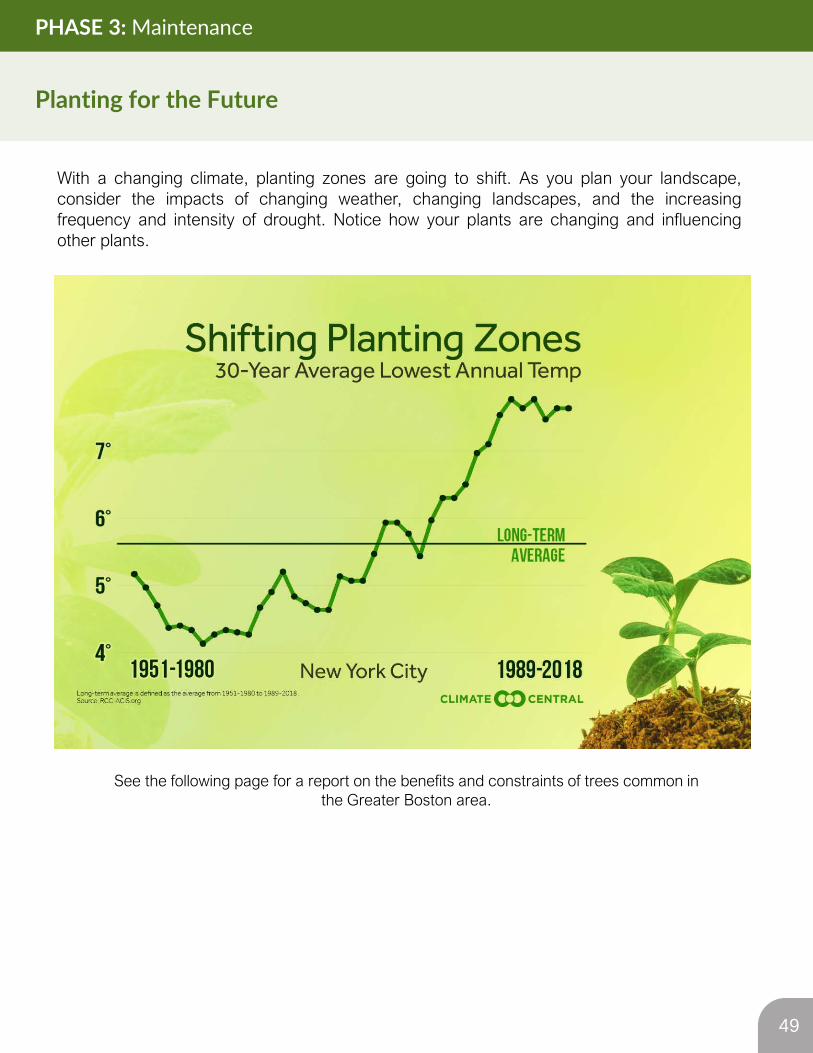
With a changing climate, planting zones are going to shift. As you plan your landscape,consider the impacts of changing weather, changing landscapes, and the increasingfrequency and intensity of drought. Notice how your plants are changing and influencingother plants.
See the following page for a report on the benefits and constraints of trees common in the Greater Boston area.
Planting for the Future
PHASE 3: Maintenance
49
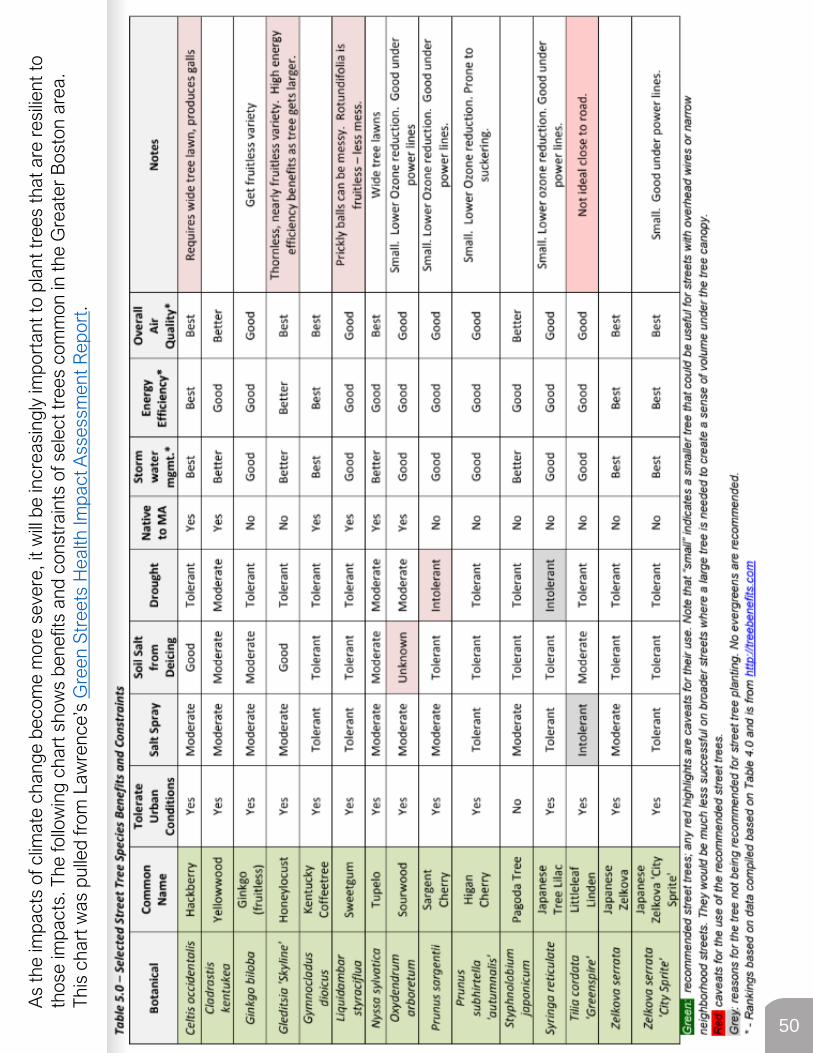
As
the
impa
cts
of c
limat
e ch
ange
bec
ome
mor
e se
vere
, it w
ill b
e in
crea
sing
ly im
port
ant t
o pl
ant t
rees
that
are
res
ilien
t to
thos
e im
pact
s. T
he fo
llow
ing
char
t sho
ws
bene
fits
and
cons
trai
nts
of s
elec
t tre
es c
omm
on in
the
Gre
ater
Bos
ton
area
. Th
is c
hart
was
pul
led
from
Law
renc
e’s
Gre
en S
tree
ts H
ealth
Impa
ct A
sses
smen
t Rep
ort.
50
Native Plant Resources:
• Grownativemass.org• Audubon Native Plants
Database• Bigelow Nursery • New England Wetland Plants• PlantNative.org
Pollinator Resources:
• MA Master Gardener Association• Massaudubon.org• Natural Resource Conservation
Service Pollinator-Friendly Plants• NortheastPollinator.com• Xerces Society: Pollinator
Conservation Resources
Sustainable Landscape Books:
• “Design with Nature” Ian L.McHarg
• “Planting: A New Perspective” Noel Kingsbury & Piet Oudolf
• “The American Meadow Garden: Creating a Natural Alternative to the Traditional Lawn” John Greenlee & Saxon Holt
• “Designing the Sustainable Site: Integrated Design Strategies for Small Scale Sites and Residential Landscapes” Heather L Venhaus & Herbert Dreiseitl
• Basic Principals of Landscape Design Gail Hanson
• Grow Native Massachusetts’ list of best books
Maintenance Resources:
• Massachusetts Healthy Soil Action Plan• Native Plant Trust• Native Plant Trust: Go Botany• Town of Concord Sustainability page• Town of Concord: Water Conservation• Town of Concord: Sustainable Landscaping • Town of Concord: Invasive Species• Natural Resources Division
Additional Resources
51