Embed Size (px)
Citation preview
Powerful and Frictionless Storage Administration
SoftNAS™ Cloud Installation & User Guide©2012-2017 SoftNAS, Inc.
Installation and User Guide
Copyright ©2017 SoftNAS, Inc.
Table of ContentsGetting Started ...........................................................................................................................................5
Legal ....................................................................................................................................................7Release Notes .....................................................................................................................................9SoftNAS Cloud® Features and Benefits ...........................................................................................32Support ...............................................................................................................................................34Deployment Checklist ........................................................................................................................36
SoftNAS Cloud Performance Best Practices ..........................................................................................37Performance Considerations .............................................................................................................38RAID Considerations .........................................................................................................................42
Software RAID Considerations ....................................................................................................43Hardware RAID Considerations ..................................................................................................45Amazon EBS RAID Considerations ............................................................................................46
Common Performance Use Cases ...................................................................................................47S3 Cloud Disk Best Practices ...........................................................................................................48Networking .........................................................................................................................................51Security ..............................................................................................................................................53
Launching SoftNAS Cloud® Platforms ....................................................................................................56Amazon Web Services (AWS) ..........................................................................................................57
Amazon EC2 Cloud Disk Overview ............................................................................................60AWS EC2 System Requirements ..........................................................................................61
Configuring AWS Identity and Access Management: Role and User ..............................63Creating the IAM Role for SoftNAS Cloud® .............................................................64Specifying the IAM User for SoftNAS Cloud® ..........................................................69
Regions and Availability Zones for Amazon Machine Images ........................................73Elastic and Virtual IP Addresses .....................................................................................75
Allocating New Elastic IP Addresses ........................................................................77Associating and Disassociating an Address .............................................................79
Amazon EC2 Setup and Performance Considerations .........................................................81Create and Configure an Instance in AWS ...........................................................................82
AWS Instances ................................................................................................................91Accessing SoftNAS Cloud® for EC2 ...............................................................................94Adding Amazon EBS Disks .............................................................................................95Managing EC2 instances in AWS ...................................................................................99Creating an EC2 Volume ...............................................................................................101Managing Volumes ........................................................................................................104
EBS Volumes and Device Mapping ........................................................................106Status Checks & Alarms .........................................................................................109Connecting to an Instance via SSH from the EC2 Console ....................................112
SoftNAS Cloud® Configuration .............................................................................................................115Accessing SoftNAS StorageCenter .................................................................................................116Getting Started Checklist .................................................................................................................118
Changing Default Passwords ....................................................................................................120Updating to the Latest Version ..................................................................................................122Activating SoftNAS Cloud® License .........................................................................................124
SoftNAS Cloud® S3 Disk Overview ................................................................................................127Adding Cloud Disk Extenders ...................................................................................................129Importing S3 Disks ....................................................................................................................138
Storage Pools Overview ..................................................................................................................140Partitioning Disks .......................................................................................................................142Create a Storage Pool ...............................................................................................................143

Installation and User Guide
Copyright ©2017 SoftNAS, Inc.
Sharing Volumes over a Network ....................................................................................................146Create & Configure Volumes .....................................................................................................147Creating a CIFS Share ..............................................................................................................150Creating NFS Share ..................................................................................................................161Creating an AFP (Apple Filing Protocol) Share ........................................................................169iSCSI LUNs and Targets ...........................................................................................................176
iSCSI CHAP Authentication .................................................................................................185Snapshots in StorageCenter .....................................................................................................187
Advanced/Performance Configuration .............................................................................................191MTU 9000 ..................................................................................................................................192Active Directory Configuration ...................................................................................................196
Adding Domain Controllers as DNS Server for SoftNAS ....................................................202Configuring Kerberos to Connect to Active Directory .........................................................206
Configuring Read Cache and Write Log ...................................................................................209How to Migrate Data Disks to a New SoftNAS VM ..................................................................212
Setting Up SnapReplicate and SNAP HA™ ...................................................................................214SnapReplicate ............................................................................................................................216SNAP HA™ ...............................................................................................................................223
Registering SoftNAS Cloud® .........................................................................................................226Microsoft Azure ......................................................................................................................................228
Microsoft Azure System Requirements ...........................................................................................230Create & Configure a Virtual Machine in Azure ..............................................................................232
Adding Administrative Accounts ................................................................................................239Generating SSH Keys ...............................................................................................................246Managing Network Settings .......................................................................................................250Adding Storage in Microsoft Azure ...........................................................................................253
Creating Storage Accounts .................................................................................................254Hot and Cool Storage ....................................................................................................257
Adding Disks via the Microsoft Azure Portal .......................................................................260Adding Block Storage via the SoftNAS UI ..........................................................................264Adding Object Storage via the SoftNAS UI ........................................................................267
High Availability in Azure SoftNAS ..................................................................................................270Azure Availability Sets ...............................................................................................................271SnapReplicate™ on Azure ........................................................................................................278SNAP HA on Azure ..................................................................................................................282
Connecting to the SoftNAS StorageCenter .....................................................................................284CenturyLink ............................................................................................................................................287
Setting up SoftNAS on Century Link ..............................................................................................290VMware vSphere ...................................................................................................................................300
Preparing a VMWare Hardware Environment .................................................................................302VMware vSphere Networking Considerations ...........................................................................304VMware vSphere Disk Device Considerations ..........................................................................305VMware vSphere Guidance for Storage Enclosures ...............................................................308
VMware vSphere System Requirements ........................................................................................309Update VMware Tools ...............................................................................................................312
Deploying your SoftNAS Instance in VMware vSphere ..................................................................313Configuring the Network Using SoftNAS Console ..........................................................................318
Customizing the System ............................................................................................................322Configuring VM Settings ..................................................................................................................334Logging on to VM ............................................................................................................................335Performance Tuning for VMware vSphere ......................................................................................338
Installation and User Guide
Copyright ©2017 SoftNAS, Inc.
Allocating Disk Storage Devices ...............................................................................................341Add RAW Device Mapping in VMware .....................................................................................343
VMWare HA Considerations ............................................................................................................348Advanced Configuration Notes for SoftNAS Cloud® ............................................................................349
SnapReplicate iSCSI Volume Sync .................................................................................................350Changing Monitoring Notification Frequency ..................................................................................351Networking Tips ...............................................................................................................................353Applying CHAP Authentication to iSCSI ACLs ...............................................................................354
Installation and User Guide
Copyright ©2017 SoftNAS, Inc.
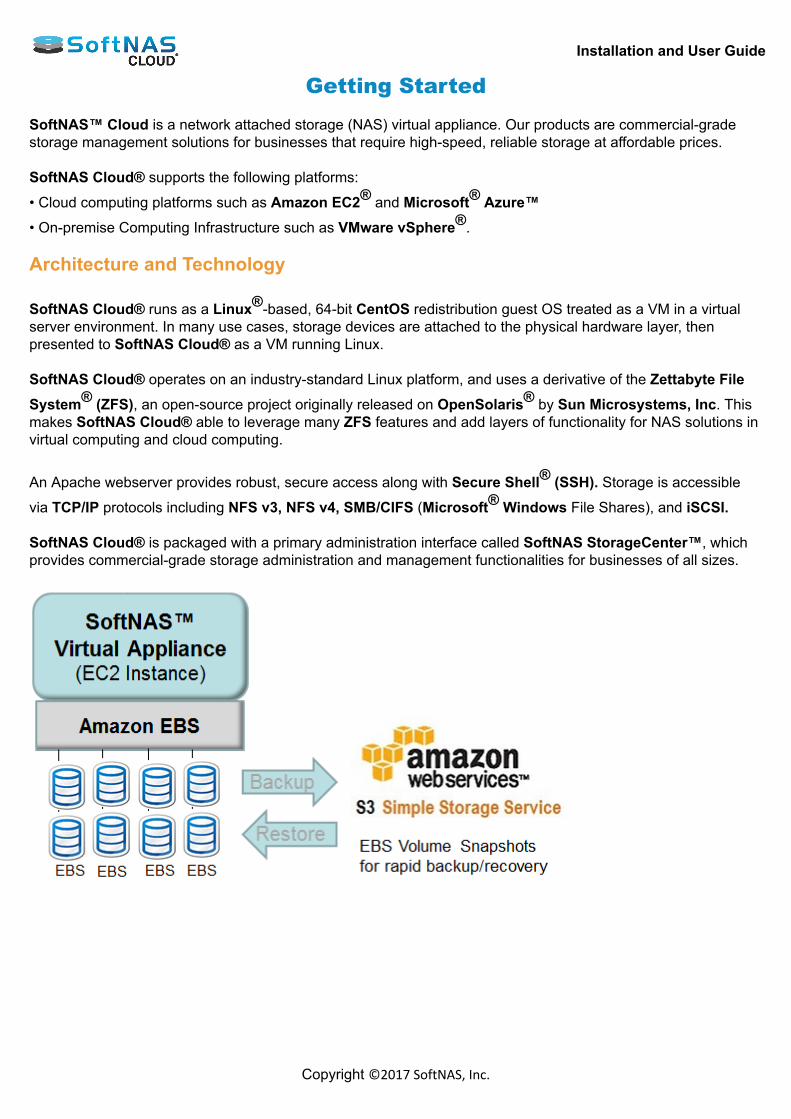
Getting Started SoftNAS™ Cloud is a network attached storage (NAS) virtual appliance. Our products are commercial-gradestorage management solutions for businesses that require high-speed, reliable storage at affordable prices. SoftNAS Cloud® supports the following platforms:
• Cloud computing platforms such as Amazon EC2® and Microsoft® Azure™• On-premise Computing Infrastructure such as VMware vSphere®. Architecture and Technology
SoftNAS Cloud® runs as a Linux®-based, 64-bit CentOS redistribution guest OS treated as a VM in a virtualserver environment. In many use cases, storage devices are attached to the physical hardware layer, thenpresented to SoftNAS Cloud® as a VM running Linux. SoftNAS Cloud® operates on an industry-standard Linux platform, and uses a derivative of the Zettabyte FileSystem® (ZFS), an open-source project originally released on OpenSolaris® by Sun Microsystems, Inc. Thismakes SoftNAS Cloud® able to leverage many ZFS features and add layers of functionality for NAS solutions invirtual computing and cloud computing.
An Apache webserver provides robust, secure access along with Secure Shell® (SSH). Storage is accessible
via TCP/IP protocols including NFS v3, NFS v4, SMB/CIFS (Microsoft® Windows File Shares), and iSCSI. SoftNAS Cloud® is packaged with a primary administration interface called SoftNAS StorageCenter™, whichprovides commercial-grade storage administration and management functionalities for businesses of all sizes.

Installation and User Guide
Copyright ©2017 SoftNAS, Inc.
Cloud Computing:SoftNAS Cloud® provides the highly-available network storage backbone needed for business-critical cloudapplications in the following environments: Amazon EC2 Microsoft Azure Premise-Based Computing: SoftNAS Cloud® installs from a download to act as a virtual server appliance. Run as many instances ofSoftNAS Cloud® VM as are needed in any of the following environments:
VMware vSphere SoftNAS Cloud®™, SoftNAS StorageCenter™, SnapReplicate™, and SNAP HA™ are trademarks ofSoftNAS Inc. All other trademarks referred to in this guide are owned by their respective companies.
Installation and User Guide
Copyright ©2017 SoftNAS, Inc.
LegalNo DownTime GuaranteeThe SoftNAS SNAP HA™ No Storage Downtime Guarantee Program guarantees 99.999% uptime for SoftNASCloud software and storage services, when operated with production workloads under SoftNAS best practices,or we will credit one-calendar month of SoftNAS service fees. By implementing SoftNAS SNAP HA™ in a high-availability configuration, you will realize 99.999% uptime of your storage infrastructure. Who Qualifies?New or existing SoftNAS customers running production applications or workloads on SoftNAS supported thirdparty platforms who have also registered the product. How do you qualify?Deploy SoftNAS Cloud and successfully run SNAP HA™ high-availability storage following guidelines in theSoftNAS High-Availability Guide and the Technical Requirements described below. Then, register the productfrom the product registration form, accessible from StorageCenter™. What is guaranteed?NFS, CIFS/SMB or iSCSI storage connectivity will be available and operational 99.999% in any given one-calendar month period. This guarantee applies if:storage connectivity outage is due to a simultaneous SoftNAS software failure of both SoftNAS Cloud controllers;or storage connectivity outage is due to a SoftNAS software failure of SoftNAS SNAP HA™ to maintaincontinuous NFS, CIFS/SMB and/or iSCSI access from at least one controller.How do you file a claim?Open a support ticket by going to https://www.softnas.com/helpdesk/index.php?/Tickets/Submit, completethe required outage information, and provide remote access into both controllers of the failed system. Thesupport ticket must be submitted within 10 days after the end of the month in which the claimed outage or failureoccurred. SoftNAS personnel must be provided with all requested log files and reasonable access to inspect thefailed SoftNAS SNAP HA™ instances before a claim will be processed. Approval of the credit is at the discretionof SoftNAS, dependent upon the results of the check and inspection performed by SoftNAS. third-party reports,data or log files may not be used for determination. Upon SoftNAS’ verification of the outage due solely toSoftNAS Cloud or SoftNAS SNAP HA™ operational failure and such outage is beyond the SoftNAS SNAP HA™No Storage Downtime Guarantee Program, SoftNAS will issue a credit within 30 days of such determination. How much is the credit and how is it applied?The credit is equal to the monthly payment for the month in which the failure or outage occurred. If quarterly,semi-annual or annual payments are made, then such payment will be prorated on a monthly basis to determinethe credit amount. Credits are applied towards future payments owed to SoftNAS only and are not issued asrefunds. SoftNAS Patents The following SoftNAS products are covered by patents and pending patent applications in the United States.Additionally, there are one or more pending international applications. The below notification serves to providevirtual patent marking under 35 U.S.C. § 287(a).
SoftNASProduct
Patent Number (or Patent Pending)
SoftNAS Cloud U.S. Pat. Nos. 9,378,262; 9,584,363.
SNAP HA™ SnapReplicate™
DeltaSync™ FlexFiles™
Installation and User Guide
Copyright ©2017 SoftNAS, Inc.
Ultrafast™ Disclaimers

Installation and User Guide
Copyright ©2017 SoftNAS, Inc.
Release NotesPresented below for your convenience and information are the release notes of the latest releases. WARNING: If updating from an older version, such as 3.4.9.4, your update can take up to 2 hours for the updateto complete. Do NOT terminate the update while in progress else errors may occur. If you feel that your updateis taking longer than 2 hours, please contact SoftNAS support for assistance and do not reboot your instance. Note: SoftNAS will not prompt for a reboot post-update. Reboot will occur automatically. Schedule update tocoincide with maintenance downtime. Note: As of version 3.4.8 SoftNAS does not support launching SoftNAS Cloud VMs on the Azure Classic Portal.The Azure Resource Manager (ARM) is the only supported platform on Azure. Note: As of version 3.4.9.7, the technical requirements for our No Downtime Guarantee have changed. Inparticular, the following minimum requirements must be met:• Software version must be 3.4.9.7 or above.• Software updates must be applied within 30 days of availability.For more details on our No Downtime Guarantee, click here. Note: We have also updated our sizing guidance for SofTNAS instances on both Azure and AWS platforms. General Purpose: For General Purpose workloads, the below sizes are a good starting point with regards tomemory and CPU resources. The recommended instances are suited to handle processing and caching forworkloads with minimal requirements for network bandwidth: • AWS: M4.2Xlarge• Azure: DS4_v2 High Performance: Workloads that are read intensive will benefit from larger memory-based read cache. Theadditional CPU resources will also provide better performance when deduplication, encryption, compression and/or RAID are enabled: • AWS: M4.4Xlarge• Azure: DS5_v2 Extreme Performance: The below options are ideal for heavier workloads that require a very high speednetwork connection due to the amount of data transferred over a network. In addition to the very high speednetwork, this level of VM gives you additional storage, CPU and memory: • AWS: M4.10Xlarge• Azure: DS15_v2SoftNAS Cloud 3.4.9.7 Release - March 27, 2017 OverviewSoftNAS Cloud® 3.4.9.7 is a maintenance release containing fixes, and improvements. Version 3.4.9.7 iscompatible with all editions of SoftNAS Cloud®. Upgrading Upgrading from 3.4.0 through 3.4.9.5Reboot Required for AWS and VMware instances if updating from 3.4.9.5 or earlier. No reboot required forupgrades from 3.4.9.6 Upgrading from 3.3.3 or 3.3.4
Installation and User Guide
Copyright ©2017 SoftNAS, Inc.
Reboot Required for AWS and VMware instances if updating from 3.4.9.5 or earlier. No reboot required forupgrades from 3.4.9.6.Follow instructions to upgrade a highly available SNAP HA™ pair. Upgrading from versions prior to 3.3.31-click upgrades are not supported from versions older than 3.3.3. Follow instructions to migrate, or ContactSoftNAS Support to schedule an upgrade session. New in SoftNAS Cloud® 3.4.9.7Instance support update - New instance sizes supported in the AWS Marketplace. Fixed in SoftNAS Cloud® 3.4.9.7 Improved Disk Status Reporting for HA failover - Failover is now triggered if an individual pool becomesunavailable, rather than only during a node failure. Update Warning - Language added to beginning of update process logs reminding customers that an updatecan take up to two hours, and not to reboot system.SoftNAS Cloud 3.4.9.6 Release - March 03, 2017 OverviewSoftNAS Cloud® 3.4.9.6 is a maintenance release containing fixes, and improvements. Version 3.4.9.6 iscompatible with all editions of SoftNAS Cloud®. Upgrading Upgrading from 3.4.0 through 3.4.9.5Reboot required for AWS and VMware instances. Upgrading from 3.3.3 or 3.3.4Reboot Required for AWS and VMware instances.Follow instructions to upgrade a highly available SNAP HA™ pair. Upgrading from versions prior to 3.3.31-click upgrades are not supported from versions older than 3.3.3. Follow instructions to migrate, or ContactSoftNAS Support to schedule an upgrade session. Fixed in SoftNAS Cloud® 3.4.9.6High Availability IP re-assignment issue - Fixed an issue in which the virtual IP address would not reassignitself to the primary node after a hard failover (ie, shut-down of primary node) and node recovery. This resulted inbeing unable to connect to CIFS and NFS shares post failover. SoftNAS Cloud 3.4.9.5 Release - Feb 21, 2017 OverviewSoftNAS Cloud® 3.4.9.5 is a maintenance release containing fixes, and improvements. Version 3.4.9.5 iscompatible with all editions of SoftNAS Cloud®. Upgrading Upgrading from 3.4.0 through 3.4.9.4Reboot required for AWS and VMware instances.
Installation and User Guide
Copyright ©2017 SoftNAS, Inc.
WARNING: Due to the size of the 3.4.9.5 update, it can take up to 2 hours for the update to complete. Do NOTterminate the update while in progress else errors may occur. If you feel that your update is taking longer than 2hours, please contact SoftNAS support for assistance and do not reboot your instance. Upgrading from 3.3.3 or 3.3.4Reboot Required for AWS and VMware instances.Follow instructions to upgrade a highly available SNAP HA™ pair. WARNING: Due to the size of the 3.4.9.5 update, it can take up to 2 hours for the update to complete. Do NOTterminate the update while in progress else errors may occur. If you feel that your update is taking longer than 2hours, please contact SoftNAS support for assistance and do not reboot your instance. Upgrading from versions prior to 3.3.31-click upgrades are not supported from versions older than 3.3.3. Follow instructions to migrate, or ContactSoftNAS Support to schedule an upgrade session. New in SoftNAS Cloud® 3.4.9.5Improved Disk Status Reporting for HA failover - Failover is now triggered if an individual pool becomesunavailable, rather than only during a node failure. Sipcalc included in installation package - This allows SoftNAS HA to operate in isolated environments (withoutaccess to the internet) without needing to connect externally for sipcalc download. SnapReplicate Throttling Improvements - Throttling now operates on all streams, rather than a per streambasis, ensuring that total outbound replication is throttled, rather than per individual volumes.Throttling levelsupdate according to available bandwidth based on iptables. Throttling can be enabled and disabled throughsettings. Improved logging/support reports - Additional log files files added to default list of log files submitted when asupport report if generated and sent to SoftNAS support, to make troubleshooting easier. Fixed in SoftNAS Cloud® 3.4.9.5NFS Bind Issue causing Client Mount hang fixed - An issue that caused client mounts to hang, and resulted in"stale file handle" errors. This has now been resolved. Deletion of Disks in Active Pool Prevented - A "loophole" in which it was possible to accidentally delete a diskin an active pool has now been prevented. Kerberos DNS issue fixed - Fixed an issue hard-coding Kerberos to a single KDC/Admin Server, rather thanusing DNS lookup to find a KDC/Admin server. This eliminates KDC/Admin Server as a single point of failure. Hosts File Issue corrected - Fixed a bug in which the etc/hosts file would not return with correct values after areboot in some cases. Volume Naming Issue corrected - Users can now create volumes of the same name on different pools. Snapclone Volume Mount issue fixed - A bug in which volumes created from Snapclones within the UI (but notif mounted from command line) would appear but without data has been resolved. Consumption-based licensing persistent billing error message resolved - An issue in which the “Can notconnect to AWS Billing” error would persist even after connectivity issues were fixed has now been eliminated. Replication Hang Issue Resolved - Fixed an issue where replication could hang for lengthy periods without anerror or notification.
Installation and User Guide
Copyright ©2017 SoftNAS, Inc.
Samba/NFS Failover issue - After a failover, Delta-Sync by design temporarily shuts down Samba and NFS toprevent data loss during a transfer. The ability to restart the service immediately has been introduced. Premium Disk Raid 0 Pool Creation Error fixed - An erroneous error when creating a RAID 0 pool from P20512GB Azure disks has been resolved. Delta-Sync File-mapping issue fixed - An issue in which failures could occur due to Delta-Sync failing to mapfiles correctly to .CSV has been resolved. VIP mapping failure upon reboot fixed - An issue was occurring when a reboot was performed when HA wasdeactivated resulting in loss of the VIP(becomes unassigned). This has now been resolved. Ensured that a reboot prompt is provided after each update. Log verbiage fix - Improved instructions matching the user interface have been introduced in log messages toresolve SnapReplicate failures. S3 bucket name fix - Numerical values can now be applied to bucket names. Errata for SoftNAS Cloud® 3.4.9.5If updating a SnapReplicate™ pairing to 3.4.9.5 according to the instructions found here, you may run acrossan error in which SoftNAS Cloud falsely reports SnapReplicate™ as still active, but with the deactivate button tocontinue the process grayed out.Recommended Action: If the above occurs, switch to the SnapReplicate/Snap HA tab, and activate anddeactivate replication, then return to the update process. SoftNAS Cloud 3.4.9.4 Release - Dec 21, 2016 OverviewSoftNAS Cloud® 3.4.9.4 is a maintenance release containing fixes, and improvements. Version 3.4.9.4 iscompatible with all editions of SoftNAS Cloud®. Upgrading Upgrading from 3.4.0 through 3.4.9.2A reboot is required for any users leveraging cloud disks. Upgrading from 3.3.3 or 3.3.4A reboot is required for any users leveraging cloud disks.Follow instructions to upgrade a highly available SNAP HA™ pair. Upgrading from versions prior to 3.3.31-click upgrades are not supported from versions older than 3.3.3. Follow instructions to migrate, or ContactSoftNAS Support to schedule an upgrade session. Fixed in SoftNAS Cloud® 3.4.9.4Auto Failover Issue – Fixed an issue where in some cases auto-failover did not assign the VIP address to theproper interface. SoftNAS Cloud 3.4.9.3 Release - Nov 21, 2016
Installation and User Guide
Copyright ©2017 SoftNAS, Inc.
OverviewSoftNAS Cloud® 3.4.9.3 is a maintenance release containing fixes, and improvements. Version 3.4.9.3 iscompatible with all editions of SoftNAS Cloud®. Upgrading Upgrading from 3.4.0 through 3.4.9.2A reboot is required for any users leveraging cloud disks. Upgrading from 3.3.3 or 3.3.4A reboot is required for any users leveraging cloud disks.Follow instructions to upgrade a highly available SNAP HA™ pair. Upgrading from versions prior to 3.3.31-click upgrades are not supported from versions older than 3.3.3. Follow instructions to migrate, or ContactSoftNAS Support to schedule an upgrade session. Fixed in SoftNAS Cloud® 3.4.9.2License Validation bug fix - Fixed an issue in which large storage volumes misrepresented terabytes asgigabytes, resulting in an error mistakenly stating the customer had exceeded his license limit. SoftNAS Cloud 3.4.9.2 Release - Nov 15, 2016 OverviewSoftNAS Cloud® 3.4.9.2 is a maintenance release containing fixes, and improvements. Version 3.4.9.2 iscompatible with all editions of SoftNAS Cloud®. Upgrading Upgrading from 3.4.0 through 3.4.9.1A reboot is required for any users leveraging cloud disks. Upgrading from 3.3.3 or 3.3.4A reboot is required for any users leveraging cloud disks.Follow instructions to upgrade a highly available SNAP HA™ pair. Upgrading from versions prior to 3.3.31-click upgrades are not supported from versions older than 3.3.3. Follow instructions to migrate, or ContactSoftNAS Support to schedule an upgrade session. New in SoftNAS Cloud® 3.4.9.2Getting Started Checklist Change - To more accurately reflect the requirement of an email address fornotifications and alerts, guidance is changed to create a 'notification email', rather than 'admin email'. Fixed in SoftNAS Cloud® 3.4.9.2AWS Directory Service Integration Fix - Fixed bug resulting in Ajax communication error as well as errors inauthenticating group permissions. Errata for SoftNAS Cloud® 3.4.9.2Error Creating HA Controller - Fixed an issue where the longer instance ID lengths were preventing creation ofthe HA controller.
Installation and User Guide
Copyright ©2017 SoftNAS, Inc.
SoftNAS Cloud 3.4.9.1 Release - Oct 25, 2016 OverviewSoftNAS Cloud® 3.4.9.1 is a maintenance release containing fixes, and improvements. Version 3.4.9.1 iscompatible with all editions of SoftNAS Cloud®. UpgradingUpgrading from 3.4.0 through 3.4.9A reboot is required for any users leveraging cloud disks. Upgrading from 3.3.3 or 3.3.4A reboot is required for any users leveraging cloud disks.Follow instructions to upgrade a highly available SNAP HA™ pair. Upgrading from versions prior to 3.3.31-click upgrades are not supported from versions older than 3.3.3. Follow instructions to migrate, or ContactSoftNAS Support to schedule an upgrade session. New in SoftNAS Cloud® 3.4.9.1Ephemeral Disks as Cache for Azure - SoftNAS Cloud can now leverage ephemeral disks as read cache toimprove performance on Azure instances. Case Sensitivity Option/Volume Creation - A checkbox has been provided to allow users to determine whetherto apply case sensitivity to a pool. Selectable Software Updates - Software Updates now shows up to 3 of the latest release versions available forupgrade (if the user has not updated for more than 3 releases), and allows the user to select from between them,based on linked release notes. Self-Configured Disk Authentication Version Option - In the Add Cloud Disk Extender wizard for Self-Configured Disks, users can now specify the authentication version (v2 or v4) used for the object storage inquestion. AWS Billing Gateway Failure to Connect Alert added - FCP customers will now be alerted if the connection tothe AWS Billing Gateway fails, and provided a timer in order to know when services will be disconnected. Support for AWS US East Ohio Region - The AWS/Ohio region is now accessible from within StorageCenter’sAdd Devices wizard, allowing users to create S3 disks from this region. HA Validation Pre-Checks - Validations have been added to ensure key HA requirements are all configuredprior to SNAP HA setup. These include:• Access to S3• Access to a NTP server• Two ENIs (one for replication traffic, one for heartbeat)• Checking that each ENI is set to a different subnet• IAM permissions• Admin email is validated Fixed in SoftNAS Cloud® 3.4.9.1Email Notifications Fix - SoftNAS Cloud no longer attempts to send email notifications to the default emailexample address of [email protected].

Installation and User Guide
Copyright ©2017 SoftNAS, Inc.
Etc./Hosts File Fix - Duplicate 127.0.0.1 entries no longer appear in the hosts file after a reboot. Importing S3 Disk Fix - If importing an S3 volume and the user specified an incorrect volume size (ie; a smallersize than it was created as), StorageCenter did not alert the user of the issue. This has been corrected. Email Notification Fix - An unnecessary alert email generated when checking for updates, regardless ofwhether updates are available, has been downgraded to info status, and will be logged rather than generating analert email. Errata for SoftNAS Cloud® 3.4.9.1On a SnapReplicate pairing of proxy SoftNAS instances, exclusions for the source and target now populateautomatically. However, upon deletion of Replication, the source entry should be removed from target exclusionlist. This does not occur.Recommended Action: If deleting replication on a proxied SoftNAS instance, remove source entry exclusionfrom target manually. Due to persistent display issues with header elements in Microsoft Edge, we no longer support the browser.Recommended Action: Open the instance in a supported browser, such as Internet Explorer or Chrome. In the Available Devices panel of Disk Devices, the Make and Model column presents SoftNAS created Azuredisks as "Msft Virtual Disks" rather than "SoftNAS, Azure Virtual Disk". This will be corrected in a later release.Recommended Action: None During software update, the Progress Bar may go to 102% for a few seconds prior to completion.Recommended Action: None. SoftNAS Cloud 3.4.9 Release - Sept 15, 2016OverviewVersion 3.4.9 is a maintenance release containing critical fixes and improvements. Version 3.4.9 is compatiblewith all editions of SoftNAS Cloud. UpgradingUpgrading from 3.4.0 through 3.4.9No reboot is required. Upgrading from 3.3.3 or 3.3.4No reboot is required.Follow instructions to upgrade a highly available SNAP HA™ pair. Upgrading from versions prior to 3.3.31-click upgrades are not supported from versions older than 3.3.3. Follow instructions to migrate, or ContactSoftNAS Support to schedule an upgrade session. Fixed in SoftNAS Cloud® 3.4.9Fixed NFSv4 bind issue - NFS was not mounting correctly after HA failover events leading to stale file handleerrors This issue has been fixed. SoftNAS Cloud 3.4.8 Release - Sept 1, 2016OverviewSoftNAS Cloud® 3.4.8 is a maintenance release containing feature additions, fixes, and improvements. Version3.4.8 is compatible with all editions of SoftNAS Cloud.
Installation and User Guide
Copyright ©2017 SoftNAS, Inc.
UpgradingUpgrading from 3.4.0 through 3.4.8A reboot is required for any users leveraging cloud disks. Upgrading from 3.3.3 or 3.3.4A reboot is required for any users leveraging cloud disks.Follow instructions to upgrade a highly available SNAP HA™ pair. Upgrading from versions prior to 3.3.31-click upgrades are not supported from versions older than 3.3.3. Follow instructions to migrate, or ContactSoftNAS Support to schedule an upgrade session. New in SoftNAS Cloud® 3.4.8AzureAzure Blob Object Storage Support – SoftNAS Cloud® frontends the object based scalable storage providedby Azure Blob Storage to present NFS, CIFS/SMB, iSCSI or AFP file sharing protocols for enterprise workloads.SoftNAS Cloud allows easy workload migrations to the Azure cloud without changing existing application datastructures or workflows. Scale NAS deployments to Azure Blob Storage from gigabytes to petabytes. Azure storage backends for SoftNAS Cloud:• Azure Premium Storage – SSD based block storage for high-performance, I/O intensive workloads.• Azure General Purpose Storage – HDD based block storage for general purpose workloads.• Azure Hot Blob Storage - Object storage optimized for frequent I/O data.• Azure Cool Blob Storage - Object storage optimized for low I/O and low cost (safe-keeping of less frequentlyaccessed file data). SNAP HA™ – now on Azure – SoftNAS’ patent-pending SNAP HA™ allows easy high-availability (HA) andcluster configuration for robust non-stop application operation with automatic failover and seamless transferacross controllers. SNAP HA, combined with Azure availability sets, makes the unique SoftNAS No StorageDowntime Guarantee available for customers using SoftNAS Cloud for Microsoft Azure. Role-based Access Control (RBAC) – Ensure greater security and control for organizations with multiple usersor systems on Microsoft Azure. RBAC allows management of users, roles and permissions to provide definedparameters for delegated administration. Support Change: As of 3.4.8 softnas does not support launching vms on the Classic Portal. The AzureResource Manager (ARM) is the only supported platform. Prominent SoftNAS features (notably high availability)will not function on VMs using Classic Portal. All Platforms DeltaSync™ – Reduces the Recovery Time Objective (RTO) from days to hours for cluster recovery from a high-availability (HA) failover event. Fixed in SoftNAS Cloud® 3.4.8Fixed SnapClone/HA issue - Replicating SnapClones no longer results in an HA degraded state. False error message removed - The false error message when restoring a pool with LUKS encryption enabledis eliminated. Fix to SNAP HA wizard on proxy instances - EIP option no longer displays if creating a SNAP HA pairing on aproxy enabled SoftNAS instance.
Installation and User Guide
Copyright ©2017 SoftNAS, Inc.
Error Message fixed - If entering a non-existent pool name into the Create Volume wizard, an error messagereading "Creating volume: No such pool: r0_dfaf" will be generated. S3 Import failure display issue fixed - A disk with 0 bytes no longer displays upon a failed S3 import. ‘Total Space Used’ stat fixed - Space calculations for block based volumes now display correctly. Self-Configured Disk bucket error fixed - A bucket error occurring when rebooting a proxy instance using self-configured disks has been eliminated. Fixed Proxy exclusion list- source and target exclusions for replication now auto-populate correctly before andafter replication is disabled/re-enabled. Fixed Display Issues in Microsoft Edge - Scroll bars within UI elements now display and function properly. Fixed UI Issue - Text overlapping radial button in LDAP server settings workspace is now correctly placed. Errata for SoftNAS Cloud® 3.4.8Errors may occur importing S3 disks that are members of a Storage Pool composed of multiple S3 disks.Recommended Action: Contact SoftNAS Support to assist if it is necessary to import Storage Pools that spanmultiple S3 disks. 1 click upgrade feature for versions below 3.3.3 is not functioning in Internet Explorer.Recommended Action: Perform the operation in Mozilla or Firefox. (3174) On a SnapReplicate pairing of proxy SoftNAS instances, exclusions for the source and target now populateautomatically. However, upon deletion of Replication, the source entry should be removed from target exclusionlist. This does not occur.Recommended Action: If deleting replication on a proxied SoftNAS instance, remove source entry exclusionfrom target manually. Due to SSL certificate renewal process, after software update, a failed request error may appear due to browsercalling up cached content. Alternatively, the software update complete message may appear twice, followed by awhite web page.Recommended Action: For either issue, refresh the browser (Ctrl +f5) to return to login. Azure AD password expiry can cause HA and Add Disk failures.Recommended Action: To disable password expiry, see Azure Documentation. When importing a deleted pool, the import pool dialog box may not disappear, though the pool importssuccessfully.Recommended Action: Verify pool import, and close the dialog box. Table headers for Disk Devices, Volumes and LUNS, Storage Pool panels may shift out of position/out of sight ifyou navigate to another area while a task (create/delete) is in process.Recommended Action: Refresh browser, or log out/log in if this occurs. SoftNAS login screen can intermittently appear in SoftNAS UI panel rather than in browser if session expires.Recommended Action: Refresh your browser, login as usual. Deleting an Azure Blob Disk from an instance via the Azure Portal can cause your SoftNAS instance to becomeunstable/unresponsive.Recommended Action: Delete Azure Blob disks from within the SoftNAS UI.

Installation and User Guide
Copyright ©2017 SoftNAS, Inc.
Currently, displayed pool or volume graphs are proportional, which can result in small pools being nearly invisibleif presented along with large pools or volumes (for example a 10 GB volume next to a 100 terabyte volume). SoftNAS Cloud 3.4.7.4 Release - Aug 19, 2016OverviewVersion 3.4.7.4 is a maintenance release containing critical fixes and improvements. Version 3.4.7.4 iscompatible with all editions of SoftNAS Cloud. Upgrading to this release is highly recommended for anyoneleveraging Cloud Disks. Upgrading Upgrading from 3.4.0 through 3.4.7A reboot is required for any users leveraging cloud disks. Upgrading from 3.3.3 or 3.3.4A reboot is required for any users leveraging cloud disks.Follow instructions to upgrade a highly available SNAP HA™ pair. Upgrading from versions prior to 3.3.31-click upgrades are not supported from versions older than 3.3.3. Follow instructions to migrate, or ContactSoftNAS Support to schedule an upgrade session. Fixed in SoftNAS Cloud® 3.4.7.4S3 Cloud Disk Fix - A modification to S3 Cloud disks allows for proper response when the underlying objectstorage returns a 500 or 503 error. SoftNAS Cloud 3.4.7.3 Release - Aug 2, 2016OverviewVersion 3.4.7.3 is a maintenance release containing critical fixes and improvements. Version 3.4.7.3 iscompatible with all editions of SoftNAS Cloud. Upgrading Upgrading from 3.4.0 through 3.4.7No reboot is required. Upgrading from 3.3.3 or 3.3.4No reboot is required.Follow instructions to upgrade a highly available SNAP HA™ pair. Upgrading from versions prior to 3.3.31-click upgrades are not supported from versions older than 3.3.3. Follow instructions to migrate, or ContactSoftNAS Support to schedule an upgrade session. Fixed in SoftNAS Cloud® 3.4.7.3 Fix to default settings - Disabled Linux Memory Overcommit. SoftNAS Cloud 3.4.7.2 Release - June 13, 2016Overview
Installation and User Guide
Copyright ©2017 SoftNAS, Inc.
Version 3.4.7.2 is a maintenance release containing critical fixes and improvements. Version 3.4.7.2 iscompatible with all editions of SoftNAS Cloud. UpgradingUpgrading from 3.4.0 through 3.4.7No reboot is required. Upgrading from 3.3.3 or 3.3.4No reboot is required.Follow instructions to upgrade a highly available SNAP HA™ pair. Upgrading from versions prior to 3.3.31-click upgrades are not supported from versions older than 3.3.3. Follow instructions to migrate, or ContactSoftNAS Support to schedule an upgrade session. Fixed in SoftNAS Cloud® 3.4.7.2Fix to Ajax errors - resolved an issue specific to 3.4.7 in which Ajax errors would result when rejoining a domain. Fix to NFS Exports Functionality - When creating NFS exports, the option to make the export available toeveryone was not functioning correctly. This has been resolved. Fix to NFS Exports bind entries - An issue with NFSv4 bind entries overwriting required entries for NFSv3compatibility has been fixed. Fix to AWS VIP routing table - When failing over in an HA setting, an error would occur upon required update ofthe AWS VIP routing table. This has been resolved. Fix to SNAP HA deletion error - An error that would occur when attempting to delete a SNAP HA pairing hasbeen resolved. Fix to Century Link Regional S3 Bucket location error - S3 Buckets placed in US East region would bemisplaced to another region. This has been resolved. SoftNAS Cloud 3.4.7.1 Release - May 23, 2016 OverviewVersion 3.4.7.1 is a maintenance release containing critical fixes and improvements. Version 3.4.7.1 iscompatible with all editions of SoftNAS Cloud. UpgradingUpgrading from 3.4.0 through 3.4.7No reboot is required. Upgrading from 3.3.3 or 3.3.4No reboot is required.Follow instructions to upgrade a highly available SNAP HA™ pair. Upgrading from versions prior to 3.3.31-click upgrades are not supported from versions older than 3.3.3. Follow instructions to migrate, or ContactSoftNAS Support to schedule an upgrade session. Fixed in SoftNAS Cloud® 3.4.7.1
Installation and User Guide
Copyright ©2017 SoftNAS, Inc.
VMware S3 Disk Device Errors - Fixed an issue in which S3 disks introduced to VMware instances upgradedto 3.4.7 would result in errors, or would hang. Pre-existing S3 disks (from prior to upgrade) sometimes did notdisplay in the Volumes Table. These issues have been resolved. SoftNAS Cloud 3.4.7 Release - May 16, 2016OverviewVersion 3.4.7 is a maintenance release containing critical fixes and improvements. Version 3.4.7 is compatiblewith all editions of SoftNAS Cloud® NAS. UpgradingUpgrading from 3.4.0 through 3.4.7A reboot is required in order to see the benefits of the fixes added in this release. Existing functionality will not beaffected pending reboot. SoftNAS recommends upgrading during a maintenance window. Upgrading from 3.3.3 or 3.3.4A reboot is required in order to see the benefits of the fixes added in this release. Existing functionality will not beaffected pending reboot. SoftNAS recommends upgrading during a maintenance window.
Follow instructions to upgrade a highly available SNAP HATM pair. Upgrading from versions prior to 3.3.31-click upgrades are not supported from versions older than 3.3.3. Follow instructions to migrate, or ContactSoftNAS Support to schedule an upgrade session. HA Patch in SoftNAS Cloud® 3.4.7HA Hotfix Release to Prevent Spontaneous Failovers and Improve Logging3.4.7 includes new logic and logging to address an issue seen in previous releases where brief losses ofcommunication between AWS and SoftNAS instances have resulted in unnecessary failovers. These measureswill both prevent the unnecessary failovers, and aid SoftNAS in determining root cause. Fixed in SoftNAS Cloud® 3.4.7 LUN Target Deletion Issue Fixed - Fixed an issue where a deleted target would result in the LUN detachingfrom other targets. CIFS Samba Configuration issue fixed - Fixed an issue with user level authentication for CIFS and ActiveDirectory integration. AWS key error on Proxy instances - Fixed an issue in which EBS and S3 disks added to a SoftNAS instancethat was protected by a proxy server would result in an AWS error message. Bucket errors on S3 whenconnected to a proxy were also resolved. Software Update via Proxy - Fixed an issue where software updates could not be installed when connected viaa proxy. License Authentication/Proxy issue - Fixed an issue with activating licenses of SoftNAS instances that areinstalled behind a proxy. Updates Functionality in Webmin Panel - Users can now perform OS Yum updates from within the WebminPanel. Log Message Classification Change - Fixed an HA failure message in SoftNAS logs which was misclassifiedas a "Warning" rather than an "Error". The message has been changed to:
Installation and User Guide
Copyright ©2017 SoftNAS, Inc.
"Error ---> HA controller is not configured! Using SnapReplicate role instead of HAController as authoritative." Fix to CLI Created Disks - Fixed an issue where disks created in CLI would default to a setting ofsync=disabled. NFS Server Default Thread Count Value- Default thread count logic is improved, and is now based on theamount of available RAM, rather than a set default. Improved NFS Export Functionality - Users can now add multiple hosts via our Webmin Panel with commaseparated values. Exports and Shares Displaying after Pool Deletion - Fixed an issue in which NFS Exports and AFP VolumeShares would continue to display after a pool was deleted. Importing S3 disks from Frankfurt Region Resolved - Errata issue identified in 3.4.6 is now resolved. Userscan now import S3 disks from Frankfurt without issue. SMTP Server Authentication - Fixed an issue with SMTP Authentication where windows domain and usernamewere not recognized as valid credentials (ie: domain/username). Errata for SoftNAS Cloud® 3.4.7Elastic IP addresses will not work when using a proxy. This option will be removed from the HA configurationwizard in a later release, if a proxy setup is detected.Recommended Action: If planning to establish high availability and use a proxy server, plan your configurationto make use of Virtual IP addresses in your configuration. As we are doing a yum update as part of the 3.4.7 update, it could take time to complete. The time variesdepending on Instance or VM resources.Recommended Action: Plan the update for a maintenance window. A misleading error message is generated if the wrong name is typed into the storage pool field when creating avolume - the error message reads ‘Creating Volume: Not enough space at pool test.’ It will be changed in anupcoming release to state that the pool specified does not exist. S3 volumes created and attached as iSCSI LUNs are not displaying the disk use percentage in the Volumestable.Recommended action: Monitor iSCSI Volumes in the Overview section to avoid running out of disk space. After upgrading your instance, your instance will refresh. A prompt should appear telling you to reboot yourinstance. It currently does not.Recommended Action: Reboot your instance after upgrade. If running your SoftNAS instance behind a proxy, you may run into issues with running a Yum update on yourSoftNAS instance. Certain mirror lists may return a 404 error (not found).Recommended Action: In the command shell, run the ‘yum clean all’ command, and then ‘yum update’ in orderto resolve the issue. If running a SnapReplicate SoftNAS pairing, for replication to occur, the IPs of both paired instances must beadded to the proxy's exclusion list manually. SoftNAS Cloud 3.4.6.2 Release - March 30, 2016Overview
Installation and User Guide
Copyright ©2017 SoftNAS, Inc.
Version 3.4.6.2 is a maintenance release containing critical fixes and improvements. Version 3.4.6.2 iscompatible with all editions of SoftNAS Cloud. UpgradingUpgrading from 3.4.0 through 3.4.6No reboot is required. Upgrading from 3.3.3 or 3.3.4No reboot is required.
Follow instructions to upgrade a highly available SNAP HATM pair. Upgrading from versions prior to 3.3.31-click upgrades are not supported from versions older than 3.3.3. Follow instructions to migrate, or ContactSoftNAS Support to schedule an upgrade session. Fixed in SoftNAS Cloud® 3.4.6.2AWS JAVA SDK update- Added support for a new reporting API resulting in a minor change to a usage reportingstructure.Version Numbering enhancement - Added support for four-digit version numbers within SoftNAS. SoftNAS Cloud 3.4.6.1 Release - March 21, 2016OverviewVersion 3.4.6.1 is an optional maintenance release containing upgrades that allow use of AWS' new FlexibleConsumption Pricing model. If not switching to the Flexible Consumption Pricing model, this upgrade can beskipped. Version 3.4.6.1 is compatible with all editions of SoftNAS Cloud® NAS. UpgradingUpgrading from 3.4.0 through 3.4.6No reboot is required. Upgrading from 3.3.3 or 3.3.4No reboot is required.
Follow instructions to upgrade a highly available SNAP HATM pair. Upgrading from versions prior to 3.3.31-click upgrades are not supported from versions older than 3.3.3. Follow instructions to migrate, or ContactSoftNAS Support to schedule an upgrade session. Fixed in SoftNAS Cloud® 3.4.6.1Flexible Consumption Pricing Added- SoftNAS is one of four vendors chosen to be part of the AWS flexibleconsumption pricing (FCP) launch. This new pricing model, only available via the AWS Marketplace, allowsyou to scale your software usage up or down without modifying your SoftNAS EC2-based instance and still paythrough your AWS Marketplace bill. When your usage changes, your hourly charge changes to match. Thismeans you only pay for the amount of software you need to operate your workloads. SoftNAS Cloud 3.4.6 Release - March 08, 2016OverviewVersion 3.4.6 is a maintenance release containing critical fixes and improvements. Version 3.4.6 is compatiblewith all editions of SoftNAS Cloud® NAS. UpgradingUpgrading from 3.4.0 through 3.4.6
Installation and User Guide
Copyright ©2017 SoftNAS, Inc.
A number of S3 improvements are included as part of the upgrade. To take full advantage of the S3improvements, a reboot is required. S3 Cloud Disks will continue to function without a reboot, but at the pre-upgrade level of functionality. Upgrading from 3.3.3 or 3.3.4A number of S3 improvements are included as part of the upgrade. To take full advantage of the S3improvements, a reboot is required. S3 Cloud Disks will continue to function without a reboot, but at the pre-upgrade level of functionality.
Follow instructions to upgrade a highly available SNAP HATM pair. Upgrading from versions prior to 3.3.31-click upgrades are not supported from versions older than 3.3.3. Follow instructions to migrate, or ContactSoftNAS Support to schedule an upgrade session. Security Patch in SoftNAS Cloud® 3.4.6Hotfix Release to Resolve Linux Glibc Library VulnerabilityOn February 16th, a serious defect was found in the getaddrinfo() library call in glibc. This issue, labelledCVE-2015-7547, allows an attacker to cause buffer overflow to occur, creating the possibility of remote codeexecution in some circumstances. In order to ensure that SoftNAS instances are not vulnerable to this potentiallyserious security issue, a hotfix has been created in order to eliminate this risk. If this hotfix has not already beenapplied, we recommend applying it immediately after your update to 3.4.6, as both the hotfix and update willrequire a reboot. Performing a single reboot for both patch and update will save significant time. See [SoftNASKB]: Installing Hotfix for CVE-2015-7547 for update instructions. Fixed in SoftNAS Cloud® 3.4.6Improvements to the implementation of S3 Cloud Disk Extender: A new High-Performance S3 Block Cachehas been implemented that improves performance drastically by caching changes in RAM, then synchronouslyflushing to S3 media in concert with ZFS filesystem to ensure data integrity. The High-Performance S3 BlockCache replaces the earlier “Block Cache File”, which is deprecated and no longer used or required.After upgrading to 3.4.6 (or later) and rebooting, it is recommended to delete any unused "s3cachepool" poolsthat were previously assigned for the block cache file storage, as they are no longer used. The block devicesused for these pools can be reassigned as read cache, write log, or decommissioned.Additionally, after upgrading to 3.4.6, it is necessary to reboot the instance in order for all of the improvements tobe installed. S3 Cloud Disks will continue to function, but until the system is rebooted not all of the improvementswill have been applied. Reboot is expected to take some time as the software updates are applied, particularly forS3 customers. The time required for the reboot to complete is dependent on the amount of data in the cache, andthe speed of your network connection. See Errata for more details. Frankfurt Region HA issue: Fixed an authentication issue preventing HA setup from functioning in the Frankfurtregion. Erroneous Dialog Windows: Fixed an issue in which HA installation would display several unnecessary dialogwindows. AD Domain Field Character Limit: Increased the previously restrictive character limit to 255 characters. Editing Volumes: Fixed an issue in which if a user attempted to edit a volume, modifying the volume would notcomplete. Errata for SoftNAS Cloud® 3.4.6As stated above, a reboot is required to obtain the improvements to S3 performance. Under certain conditions,this reboot can take a great deal of time. The reboot process performs three basic steps - applying the update,
Installation and User Guide
Copyright ©2017 SoftNAS, Inc.
flushing the cache, then the reboot itself. If using S3 over a slow network connection, flushing the cache can takea long time. It is important NOT to interrupt this process (ie. by a hard boot) or you may lose valuable data.Recommended Action: To avoid a lengthy reboot process, stop i/o, and wait for the cache to flush prior toperforming your reboot. You can determine the amount of data in your cache by opening SoftNAS' dashboard,and viewing Cache Memory under the Performance tab. Alternatively, monitor the network writes traffic in the I/O Throughput panel. When this activity subsides, your reboot should take far less time. When running a software update on platforms other than AWS an error may be shown in the log: "curl: (7)couldn't connect to host".Recommended Action: It is safe to ignore this error, and the update will complete successfully. An issue may occur when deleting SoftNAS Cloud Extender disks where the disk continues to appear in the diskdevices panel and the Storage Center user interface is unable to be displayed.Recommended Action: The issue will resolve itself and Storage Center will provide full functionality when thedelete operation completes. The SoftNAS Dashboard> Performance Panel does not include all types of filesystem activity in the throughputgraph. Errors may occur importing S3 disks that are members of a Storage Pool composed of multiple S3 disks.SoftNAS Support can assist if it is necessary to import Storage Pools that span multiple S3 disks.
If configured in a SNAP HATM/SnapReplicate configuration, volumes deleted from the primary node are notdeleted from the secondary. A takeover initiated from the target node will replicate the volume again.Recommended Action: If you need to remove the volume and its data permanently, delete the volume from bothnodes. iSCSI targets reconnect after a reboot, but disk devices may not show as available, due to a delay to the start ofZFS services.Recommended Action: Refresh after a minute or two, and the disks will reappear. If restoring a pool with LUKS encryption enabled, a false error message may be generated in the logs. Therestoration process will successfully restore the selected pool and data.Recommended Action: No action required, disregard error message. S3 Imports to the Frankfurt AWS region fail when initiated from the UI.Recommended Action: If you have the need to import an S3 Bucket in Frankfurt please contact SoftNASSupport. SoftNAS Cloud 3.4.5 Release - January 13, 2016OverviewVersion 3.4.5 is a maintenance release containing critical fixes and improvements. Version 3.4.5 is compatiblewith all editions of SoftNAS Cloud® NAS. UpgradingUpgrading from 3.4.0 through 3.4.5No reboot is required. Upgrading from 3.3.3 or 3.3.4No reboot is required.
Follow instructions to upgrade a highly available SNAP HATM pair. Upgrading from versions prior to 3.3.31-click upgrades are not supported from versions older than 3.3.3. Follow instructions to migrate, or ContactSoftNAS Support to schedule an upgrade session.
Installation and User Guide
Copyright ©2017 SoftNAS, Inc.
Fixed in SoftNAS Cloud® 3.4.5Nuisance alerts and log messages fixed - A minor issue with SNAP HATM resulted in unnecessary logmessages and nuisance email alerts from the target node has been resolved. NFS Bind on reboot fixed - A critical issue with remounting NFS bind mounts on reboot has been resolved.Errata for SoftNAS Cloud® 3.4.5If updating an instance that has as yet never been updated, there is a known issue where updating from 3.4.4 orearlier to 3.4.5 will hang at 82%, and will seemingly not update.Recommended Action: The update completes just fine, however you will need to reboot the system, oralternatively, go to Webmin, run the command "service httpd restart", then refresh the browser to see thechanges. Note: Instances newer than 3.4.6 will not see this issue. This issue will also not be seen if the update processhas previously been run, for example, if you previously updated from 3.4.3 to 3.4.4. The above issue has alsobeen seen in VMware instances. SoftNAS Cloud 3.4.4 Release - December 22, 2015OverviewVersion 3.4.4 is a maintenance release containing critical fixes and improvements. Version 3.4.4 is compatiblewith all editions of SoftNAS® Cloud NAS. UpgradingUpgrading from 3.4.0 through 3.4.4No reboot is required. Upgrading from 3.3.3 or 3.3.4No reboot is required.
Follow instructions to upgrade a highly available SNAP HATM pair. Upgrading from versions prior to 3.3.31-click upgrades are not supported from versions older than 3.3.3. Follow instructions to migrate, or ContactSoftNAS Support to schedule an upgrade session. Fixed in SoftNAS Cloud® 3.4.4S3 Cloud Disk data integrity fixes - Issues addressed that may result in a degradation of data integrity forS3 Cloud Disks through reboots, upgrades, and power-loss scenarios. All customers using S3 Cloud Disks arestrongly encouraged to apply the following steps. Steps 1-3 are required for data integrity. #4 is a performanceimprovement.
1. Upgrade to 3.4.4.2. Configure all S3 Cloud Disks to utilize 1 GB block cache file. For new configuration follow directions inAdd Cloud Disk Extenders in the Install Guide. For existing configurations Contact SoftNAS Support.3. Install the S3 Hotfix to ensure optimal performance and data integrity.4. Follow S3 Cloud Disk Best Practices by using VPC Endpoints on AWS.
Resync of data after a high availability failover - A SNAP HATM pair that had been failed, and repaired didnot reliably replicate data to the new target node. New in SoftNAS Cloud® 3.4.4New - SoftNAS Cloud AMI is now available in the Korea region, without local Korea S3 bucket support (all otherregions supported). Local Korea S3 bucket support coming in a future software update. Errata for SoftNAS Cloud® 3.4.4
Installation and User Guide
Copyright ©2017 SoftNAS, Inc.
In a high availability configuration, with the Primary instance in a Degraded state, SNAP HATM may not be ableto be deleted through the Delete HA operation on first attempt.Recommended Action: Log out of the StorageCenter UI. Log back in, and press Delete HA again. SuccessiveDelete HA operations will succeed. SoftNAS Cloud 3.4.3 Release - December 4, 2015OverviewVersion 3.4.3 fixes a licensing issue in 3.4.0-3.4.2 for SoftNAS Cloud Standard on AWS Marketplace. Version3.4.3 is compatible with all editions of SoftNAS Cloud® NAS. UpgradingUpgrading from 3.4.0 through 3.4.2No reboot is required. Upgrading from 3.3.3 or 3.3.4No reboot is required.
Follow instructions to upgrade a highly available SNAP HATM pair. Upgrading from versions prior to 3.3.31-click upgrades are not supported from versions older than 3.3.3. Follow instructions to migrate, or ContactSoftNAS Support to schedule an upgrade session. SoftNAS Cloud 3.4.2 Release - November 21, 2015OverviewVersions 3.4.2 provides additional security to major release version 3.4.0. Version 3.4.2 for all editions ofSoftNAS Cloud® NAS is available. Upgrading to version 3.4.2 is highly recommended to address critical featureand security enhancements. UpgradingUpgrading from 3.4.0 or 3.4.1No reboot is required. Upgrading from 3.3.3 or 3.3.4No reboot is required.
Follow instructions to upgrade a highly available SNAP HATM pair. Upgrading from versions prior to 3.3.31-click upgrades are not supported from versions older than 3.3.3. Follow instructions to migrate, or ContactSoftNAS Support to schedule an upgrade session. Security Update in SoftNAS Cloud® 3.4.2Security Update to Resolve Severe SoftNAS StorageCenter Security Vulnerability on Open NetworksThis security update resolves a potentially severe security vulnerability in the SoftNAS StorageCenter Aapacheweb server that could allow remote code execution when combined with other attacks over an unprotectednetwork such as the Internet. An attacker who successfully exploited the vulnerability could run arbitrarycommands on the storage appliance. Customers who have properly restricted Internet-based access toStorageCenter using the recommend best practices that limit StorageCenter access to a limited number ofapproved IP addresses or that isolate StorageCenter access to private networks, are less likely to be impactedthan those who provide open Internet-based StorageCenter access (which is never recommended).This security update addresses the vulnerability by closing exploits in Apache web server.New in SoftNAS Cloud® 3.4.0
Installation and User Guide
Copyright ©2017 SoftNAS, Inc.
360-degree Encryption™ – Data encryption all the time–at rest and in flight. Data-at-rest is encrypted throughopen source Linux Unified Key Setup (LUKs). LUKs is accepted as the standard for encryption of stored data. Data-in-flight is encrypted for CIFS and NFS file protocols. Apple File Protocol Support – Apple File Protocol (AFP) offers file services for Mac OS X. Now Mac userscan consolidate time machine backups and search for files with Spotlight when using SoftNAS with AFP forcentralized storage. Dual Factor Authentication – Prevent unauthorized access to SoftNAS management console with two-stepauthentication for SoftNAS StorageCenter™ through Google Authenticator. Login Protection from Bots – Human verification through Google reCAPTCHA prevents bots fromprogrammatically gaining access to the SoftNAS management console. Red Hat AMI on AWS – SoftNAS Cloud for Red Hat Enterprise Linux (RHEL) is now available as a separateRHEL 7 AMI on AWS Marketplace. Hitachi Data Systems S3 Support – Easily add Hitachi Content Platform (HCP) within StorageCenter to providefile services for Hitachi object storage. Active Directory Integration Improvements – Trusted Active Directory Domains, user searches and domainswith up to 1.35 million objects now supported. Fixed in SoftNAS Cloud® 3.4.0Key fixes to improve the SoftNAS experience include:• Alert system improved to decrease the number of generated emails• Software upgrade fixed to work with HA• 1-click software upgrade is restricted to version 3.3.0 and newer• GUID Partition Tables (GPT) on S3 devices could have been corrupted when upgrading from versions olderthan 3.3.0. • Adding 16TB EBS Volumes is now supported from StorageCenter• IAM improved to be more restrictive• Samba configuration file preserved across software updates• Product Registration prompts 7 days after product launchNTP configurable for HA• File permissions synchronize across CIFS shares and NFS exports• StorageCenter no longer randomly logs out user sessions• EULA “agree” button fixed to be accessible in FireFox 39.03 Errata for SoftNAS Cloud 3.4.0 - 3.4.2Due to a number of factors, SoftNAS instances may increase resource consumption when moving from POCto Production. Planning for production instances should reflect this by planning for these higher resourcerequirements. Examples where higher resources are needed include: increased IO load, replacing local storagesuch as EBS with S3, enabling SnapReplication, scheduling backups. Recommended Action: Plan scale-out to production by anticipating the need to use larger instances and moreresources for the SoftNAS VM. S3 based Storage Pools continue to grow over time, which can affect S3 bucket usage.Recommended Action: Contact Support for the patch for Trim/Discard. SnapReplicate does not replicate SnapClones. The Event Log reports not transferring SnapClones as an error. Recommended Action: Be aware that SnapClone data is not protected with SnapReplication and HA. Log files sent by Support Report can fail when too large. Failure is indicated by a pop-up status “Failure: Ajaxcommunication failed”.Recommended Action: Contact Support to transfer log files through FTP.
Installation and User Guide
Copyright ©2017 SoftNAS, Inc.
Users are allowed through StorageCenter UI to remove disk devices from newly created storage pools, evenwhen files are stored in a pool.Recommended Action: After creating a storage pool, close and reopen the Disk Devices tab before taking anyaction on devices in the tab. EBS Volumes may be incorrectly shown as Internal Devices in the Disk Devices tab if created added from theAWS console while other devices are added from StorageCenter.Recommended Action: Do not add disk devices from StorageCenter and AWS console at the same time. Errant error message is shown for loading AFP in SnapReplicate event log. The errrant message can be viewedin the Events section of Replication Control Panel, “ERROR: AFP Netatalk service failed to reload in remotenode…”.Recommended Action: The message is invalid. Ignore. Refreshing the SnapReplicate tab when connected through RDP will cause the UI frames to scroll to right.Recommended Action: The issue is cosmetic only. Avoid continual refreshes of the SnapReplicate tab whenconnected to the UI through RDP. UI has compatibility issues with FireFox version 41.0.1. A specific example is that the “Next” button onSnapReplicate wizard does not get enabled.Recommended Action: Use earlier version of FireFox such as 40.0.3 or another browser such as InternetExplorer, Chrome, Safari. In General System Settings, the webmin screen lists NFS Exports twice under Networking. NFS v4 and v3 aresupported, and are shown here as separate selections. Recommended Action: Select each NFS Exports option to find the version interested in. In the CIFS Shares Tab, Security and Access a user can be selected multiple times. Recommended Action: Avoid selecting a user more than once. On the Microsoft Azure platform, a disk device that has been assigned to a storage pool may be listed as Readyto Assign in Disk Devices.Recommended Action: Take care with SoftNAS on Azure, to assign a disk device to a storage pool only once. Storage Pools with a mix of encrypted and unencrypted S3 buckets are not recommended. Issues are noted when deleting mixed encryption S3 pools.Recommended Action: Do not mix Storage Pools with encrypted and unencrypted S3 buckets. If such poolsare deleted, reboot to access StorageCenter UI. The Disk Devices tab in StorageCenter does not update status for S3 devices when the S3 devices are deletedfrom the AWS console.Recommended Action: Don’t delete devices from the AWS Console that are in use. Delete S3 devices fromStorageCenter Disk Devices before deleting from AWS Console. In a storage pool with S3 devices, when a hot spare condition occurs from a spare S3 device, StorageCenter UImay be unresponsive. Recommended Action: Due to the highly durable nature of object storage, using hot spares in an S3-basedstorage pool is not recommended. Reboot instance if the UI is found unresponsive when using S3 hot spares. Deleting a target for an iSCSI share with multiple targets may cause all targets to become disconnected from thatiSCSI share. Recommended Action: Reconnect any targets from the iSCSI LUN Targets tab.

Installation and User Guide
Copyright ©2017 SoftNAS, Inc.
Connecting to an iSCSI LUN may cause an errant device to appear in the Disk Devices tab. Device shows up as0 bytes and needing to be un-mounted.Recommended Action: Avoid cleaning up or using 0 byte disk devices in the Disk Devices tab. Storage Pools protected with RAID 6 report Usable Capacity incorrectly by using the raw capacity value. Licensing is impacted.Recommended Action: RAID 6 usable capacity is determined by subtracting 2 disks’ capacity from a StoragePool’s raw capacity. Contact Support to obtain a larger license key. SoftNAS Cloud® 3.4.0 Release - November 10, 2015OverviewSoftNAS Cloud® 3.4.0 is a maintenance release containing feature additions, fixes, and improvements. UpgradingUpgrading from 3.3.3 or 3.3.4:No reboot is required. Upgrading from versions prior to 3.3.31-click upgrades are not supported from versions older than 3.3.3. Follow instructions to migrate. New in SoftNAS Cloud® 3.4.0360-degree Encryption™ – Data encryption all the time–at rest and in flight. Data-at-rest is encrypted throughopen source Linux Unified Key Setup (LUKs). LUKs is accepted as the standard for encryption of stored data.Data-in-flight is encrypted for CIFS and NFS file protocols.Apple File Protocol Support – Apple File Protocol (AFP) offers file services for Mac OS X. Now Mac users can consolidate time machine backups and search for files with Spotlight when using SoftNAS with AFP forcentralized storage.Dual Factor Authentication – Prevent unauthorized access to SoftNAS management console with two-stepauthentication for SoftNAS StorageCenter™ through Google Authenticator.Login Protection from Bots – Human verification through Google reCAPTCHA prevents bots fromprogrammatically gaining access to the SoftNAS management console.Red Hat AMI on AWS – SoftNAS Cloud for Red Hat Enterprise Linux (RHEL) is now available as a separateRHEL 7 AMI on AWS Marketplace.Hitachi Data Systems S3 Support – Easily add Hitachi Content Platform (HCP) within StorageCenter to providefile services for Hitachi object storage.Active Directory Integration Improvements– Trusted Active Directory Domains, user searches and domainswith up to 1.35 million objects now supported. Fixed in SoftNAS Cloud® 3.4.0Key fixes include:• Alert system improved to decrease the number of generated emails• Software upgrade fixed to work with HA• 1-click software upgrade is restricted to version 3.3.0 and newer• GUID Partition Tables (GPT) on S3 devices could have been corrupted when upgrading from versions olderthan 3.3.0.• Adding 16TB EBS Volumes is now supported from StorageCenter• IAM improved to be more restrictive• Samba configuration file preserved across software updates• Product Registration prompts 7 days after product launch• NTP configurable for HA• File permissions synchronize across CIFS shares and NFS exports• StorageCenter no longer randomly logs out user sessions• EULA “agree” button fixed to be accessible in FireFox 39.03 Errata for SoftNAS Cloud® 3.4.0
Installation and User Guide
Copyright ©2017 SoftNAS, Inc.
Due to a number of factors, SoftNAS instances may increase resource consumption when moving from POCto Production. Planning for production instances should reflect this by planning for these higher resourcerequirements. Examples where higher resources are needed include: increased IO load, replacing local storagesuch as EBS with S3, enabling SnapReplication, scheduling backups.Recommended Action: Plan scale-out to production by anticipating the need to use larger instances and moreresources for the SoftNAS VM. S3 based Storage Pools continue to grow over time, which can affect S3 bucket usage.Recommended Action: Contact Support for the patch for Trim/Discard. SnapReplicate does not replicate SnapClones. The Event Log reports not transferring SnapClones as an error.Recommended Action: Be aware that SnapClone data is not protected with SnapReplication and HA. Log files sent by Support Report can fail when too large. Failure is indicated by a pop-up status “Failure: Ajaxcommunication failed”.Recommended Action: Contact Support to transfer log files through FTP. Users are allowed through StorageCenter UI to remove disk devices from newly created storage pools, evenwhen files are stored in a pool.Recommended Action: After creating a storage pool, close and reopen the Disk Devices tab before taking anyaction on devices in the tab. EBS Volumes may be incorrectly shown as Internal Devices in the Disk Devices tab if created added from theAWS console while other devices are added from StorageCenter.Recommended Action: Do not add disk devices from StorageCenter and AWS console at the same time. Errant error message is shown for loading AFP in SnapReplicate event log. The errrant message can be viewedin the Events section of Replication Control Panel, “ERROR: AFP Netatalk service failed to reload in remotenode…”.Recommended Action: The message is invalid. Ignore. Refreshing the SnapReplicate tab when connected through RDP will cause the UI frames to scroll to right.Recommended Action: The issue is cosmetic only. Avoid continual refreshes of the SnapReplicate tab whenconnected to the UI through RDP. UI has compatibility issues with FireFox version 41.0.1. A specific example is that the “Next” button onSnapReplicate wizard does not get enabled. Recommended Action: Use earlier version of FireFox such as40.0.3 or another browser such as Internet Explorer, Chrome, Safari. In General System Settings, the webmin screen lists NFS Exports twice under Networking. NFS v4 and v3 aresupported, and are shown here as separate selections.Recommended Action: Select each NFS Exports option to find the version interested in. In the CIFS Shares Tab, Security and Access a user can be selected multiple times.Recommended Action: Avoid selecting a user more than once. On the Microsoft Azure platform, a disk device that has been assigned to a storage pool may be listed as Readyto Assign in Disk Devices.Recommended Action: Take care with SoftNAS on Azure, to assign a disk device to a storage pool only once. Storage Pools with a mix of encrypted and unencrypted S3 buckets are not recommended. Issues are noted when deleting mixed encryption S3 pools.Recommended Action: Do not mix Storage Pools with encrypted and unencrypted S3 buckets. If such pools aredeleted, reboot to access StorageCenter UI.
Installation and User Guide
Copyright ©2017 SoftNAS, Inc.
The Disk Devices tab in StorageCenter does not update status for S3 devices when the S3 devices are deletedfrom the AWS console.Recommended Action: Do not delete devices from the AWS Console that are in use. Delete S3 devices fromStorageCenter Disk Devices before deleting from AWS Console. In a storage pool with S3 devices, when a hot spare condition occurs from a spare S3 device, StorageCenter UImay be unresponsive.Recommended Action: Due to the highly durable nature of object storage, using hot spares in an S3- basedstorage pool is not recommended. Reboot instance if the UI is found unresponsive when using S3 hot spares. Configuring Storage Pools with encrypted S3 devices protected with RAID 5 may require a reboot to accessStorageCenter.Recommended Action: Due the highly durable nature of object storage, using RAID with S3-based storage poolis not recommended. Reboot instance if the UI is found unresponsive when using encrypted S3 with RAID 5. Deleting a target for an iSCSI share with multiple targets may cause all targets to become disconnected from thatiSCSI share.Recommended Action: Reconnect any targets from the iSCSI LUN Targets tab. Connecting to an iSCSI LUN may cause an errant device to appear in the Disk Devices tab. Device shows up as0 bytes and needing to be un-mounted.Recommended Action: Avoid cleaning up or using 0 byte disk devices in the Disk Devices tab. An iSCSI LUN exported by SoftNAS to VMware ESXi will not automatically reconnect after the SoftNAS VM isrebooted.Recommended Action: In StorageCenter, navigate to the tab iSCSI LUN Targets. Select the target and clickAdd a new iSCSI. Storage Pools protected with RAID 6 report Usable Capacity incorrectly by using the raw capacity value.Licensing is impacted.Recommended Action: RAID 6 usable capacity is determined by subtracting 2 disks’ capacity from a StoragePool’s raw capacity. Contact Support to obtain a larger license key.
Installation and User Guide
Copyright ©2017 SoftNAS, Inc.
SoftNAS Cloud® Features and BenefitsSoftNAS Cloud® is available in the cloud for Amazon Web Services, Century Link, and Azure platforms, andas an on-premise solution for VMware. Each platform offers the following features and benefits: • Deduplication & Compression• Industry-standard file-sharing protocols including iSCSI, NFS and CIFS• High-performance, multi-tier caching (RAM and SSD)• Scheduled snapshots via copy-on-write filesystem (ZFS)• Thin provisioning• Block replication through patent-pending SnapReplicate technology• Data integrity through built-in error detection and correction• Software and hardware RAID support ReliableSoftNAS Cloud® is built on proven, industry-standard platforms like VMware, Linux and ZFS for a solid andreliable foundation.
• Rapid Recovery• Data Integrity & Data Protection• Error Detection & Correction• Data is always safe, protected, and available
Robust FeaturesThe commercial-grade feature set previously found only on cumbersome, expensive NAS appliances is nowavailable as a robust software solution regardless of company size and budget. Private HA with 100% Uptime SLA - highly available virtual IP addressing across AWS availability zonesenabling failover of NAS services across zones within a VPC and delivering the only No Downtime GuaranteeSLA for AWS shared file storage. Azure HA provides the same No Downtime Guarantee SLA, provided yourtwo nodes are within an Azure availability set. Bumpless HA Failovers - NAS services fail over seamlessly across zones, providing uninterrupted CIFS andNFS client access to shared storage Multi-tenant HA Reliability - detection, filtering and prevention of sporadic HA failovers due to noisy neighbors,zone stresses and sporadic network anomalies occurring infrequently within heavily loaded multi-tenant AWSzones or Azure availability sets. Secure VPC Networking - secure NAS storage access routing within VPCs with complex routing tables andsubnets High-performance, highly-durable S3 Cloud Disks - RAM write-cache with transactional integrity providing upto hundreds of MB/second throughput with high durability, even in the face of disruptions and instance failures. High-performance, highly durable Cloud Disks leveraging Azure Blob Storage - On Azure SoftNASinstances, the same RAM write-cache and transactional integrity is provided as for S3 and other Cloud Diskproviders. With Azure Blob support, storage is no longer tied to the size of the Azure VM size selected. SoftNAScan leverage up to 16 Petabytes of Azure Blob Storage through multiple blob storage accounts (500 terabytesper storage account). Hot and Cool Azure Blob Storage Support - Azure blob storage accounts are set as either hot or cool storageupon creation. Storage added via these storage accounts is either hot or cool based on the account used.SoftNAS fully supports and provisions each type, ensuring you get the type of storage you need.

Installation and User Guide
Copyright ©2017 SoftNAS, Inc.
• Azure Cool Storage - Object storage that allows economical safe-keeping of less frequently accessedfile data.• Azure Hot Storage - Object storage that optimizes frequently accessed stored data to enablecontinuous IO.
IAM Role-based Security - Use of IAM roles provide least privilege access control and management, withoutuse of access keys for HA setup and S3 cloud disks Azure RBAC support - Azure Role-Based Access Control (RBAC) enables fine-grained access management forAzure. Using RBAC, you can grant only the amount of access that users need to perform their jobs. 360-degree encryption - supports encryption in flight and at rest to meet security and regulatory requirements DeltaSync™ – Reduces the Recovery Time Objective (RTO) from days to hours for cluster recovery from a high-availability (HA) failover event. Lowest CostSoftNAS Cloud® is the lowest-cost, most flexible NAS software solution, affordable enough for any small- tomedium-sized business, and still powerful enough to scale to enterprise level. No Training NeededSoftNAS makes it easy to get started without time-consuming, expensive training courses. Knowledge base andhelpdesk resources are available from the day of download. High PerformanceImproving any organization’s productivity and streamlining business-critical requirements with:
• Up to 10,000 IOPS on Amazon EC2• 10,000's IOPS on VMware with SSD caching• Multiple layers of read and write caching• High-performance capabilities make applications run at top speeds
Easy to ImplementZero to NAS in record time.
• Operate with existing and off-the-shelf server hardware with affordable, commodity disk drives• Re-use existing server hardware• Quickly download and install SoftNAS Cloud® to rapidly create a full-featured NAS.• Use existing equipment or run a NAS through the cloud with:
• Amazon EC2• Microsoft Azure• VMware vSphere
Installation and User Guide
Copyright ©2017 SoftNAS, Inc.
Support Online Help and Documentation SoftNAS offers indepth documentation on their website. Simply go to softnas.com, select Support, and clickDocumentation. You can also access Online Help from softnas.com/helpdesk. From the helpdesk, you cannot only create support tickets, but also search an ever growing list of knowledge base articles.Help us help you! Request new features from the SoftNAS team.
• This option can also be accessed at any time in the top right of the StorageCenter UI. Register for Premium SupportSoftNAS Cloud® subscribers who register the product will receive access to premium support levels, evenduring trial periods.
• Registering SoftNAS Cloud® SoftNAS Cloud® subscribers have the following support options:
• Regular Phone Support: Contact the helpdesk by phone 24/7 or during regular business hours 9 a.m.to 5 p.m. CST, Monday through Friday.• Helpdesk Tickets: Open a help desk ticket for issue tracking and faster support.• Email Support: Email our support team (they will open a help desk ticket).
Support for Free Trial SoftNAS Cloud® SubscribersFree Trial subscribers have the following support options:
• SoftNAS Cloud® Knowledge Base• Call our Support Line• Visit our HelpDesk or Email Us
Pre-Sales Support ForumsStill researching and deciding? Visit our pre-sales support forums.
• Pre-Sales Support Forums
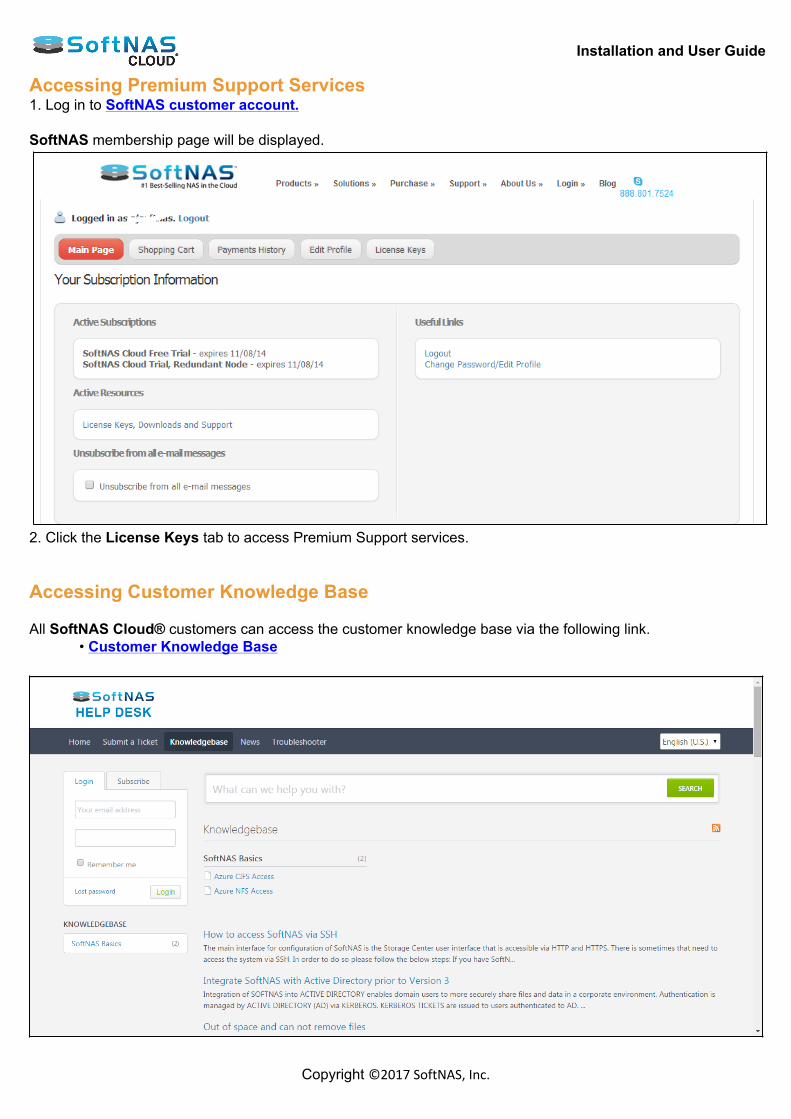
Installation and User Guide
Copyright ©2017 SoftNAS, Inc.
Accessing Premium Support Services1. Log in to SoftNAS customer account. SoftNAS membership page will be displayed.
2. Click the License Keys tab to access Premium Support services. Accessing Customer Knowledge Base All SoftNAS Cloud® customers can access the customer knowledge base via the following link.
• Customer Knowledge Base
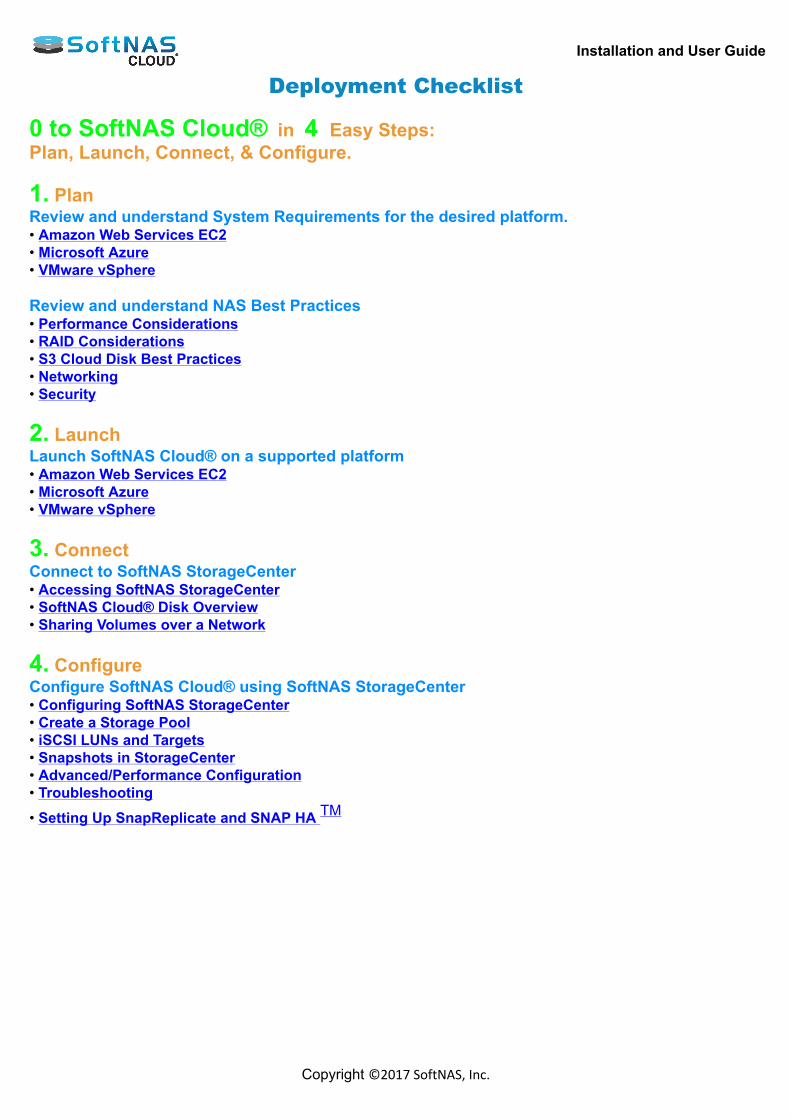
Installation and User Guide
Copyright ©2017 SoftNAS, Inc.
Deployment Checklist 0 to SoftNAS Cloud® in 4 Easy Steps:Plan, Launch, Connect, & Configure. 1. PlanReview and understand System Requirements for the desired platform.• Amazon Web Services EC2• Microsoft Azure• VMware vSphere Review and understand NAS Best Practices• Performance Considerations• RAID Considerations• S3 Cloud Disk Best Practices• Networking• Security 2. LaunchLaunch SoftNAS Cloud® on a supported platform• Amazon Web Services EC2• Microsoft Azure• VMware vSphere 3. ConnectConnect to SoftNAS StorageCenter• Accessing SoftNAS StorageCenter• SoftNAS Cloud® Disk Overview• Sharing Volumes over a Network 4. ConfigureConfigure SoftNAS Cloud® using SoftNAS StorageCenter• Configuring SoftNAS StorageCenter• Create a Storage Pool• iSCSI LUNs and Targets• Snapshots in StorageCenter• Advanced/Performance Configuration• Troubleshooting• Setting Up SnapReplicate and SNAP HA TM
Installation and User Guide
Copyright ©2017 SoftNAS, Inc.
SoftNAS Cloud Performance Best Practices The following sections provide a high-level overview of the concepts to understand before getting started with anySoftNAS Cloud® installation and configuration. Performance Best PracticesThe tradeoffs between cost and performance can be significant, so understanding actual, initial performanceneeds, plus contingency plans to address growth in those needs over time, is important when designing aSoftNAS Cloud® solution. Performance ConsiderationsRAID Considerations Common Performance Use Cases S3 Cloud Disk Best Practices Disk Management & Network Best PracticesSoftNAS Cloud® supports a broad range of data disk formats based on supported platform vendor. For on-premise installations, the following data disk formats are supported:
• Virtual hard disks (VMDK), as well as all VMware-supported datastores including local disks, fiber-channel SAN, iSCSI SAN, and dual path disks. • SSD, SATA/SAS, HDD disk devices, including Hybrid Storage Pools
For cloud-based offerings, SoftNAS Cloud® supports the following disk formats:
• EBS disks from Amazon EC2 • Amazon S3 Disks from Amazon EC2
Networking Best Practices Security Best Practices
Installation and User Guide
Copyright ©2017 SoftNAS, Inc.
Performance Considerations To get the best performance out of SoftNAS Cloud®, in either on-premise or cloud-based solutions, consult andremember these best practices. Best PracticesAs with any storage system, NAS performance is a function of a number of many different combined factors:
• Cache memory (first level read cache or ARC)• 2nd level cache (e.g., L2ARC) speed• Disk drive speed and the chosen RAID configuration• Disk controller and protocol
Cache Memory (first level)Solid state disk (SSD) and PCIe flash cache cards offer high-speed read caching and transaction logging forsynchronous writes. However, not all SSDs are created equal and some are better for these tasks than others. Inparticular, pay close attention to the specifications regarding 4K IOPS. For read caching (L2ARC), both read and write IOPS matter, as do the sequential throughput specifications of thedevice. For running a database, VMware VMDK, or other workloads that produce large amounts of random, small(e.g., 4KB) reads and writes, then ensure the SSD and flash cache devices provide high IOPS for 4K reads/writes. For the write log (ZIL), extremely fast write IOPS is most important (the ZIL is only read after a power failure orother outage event to replay synchronous write transactions that may not have been posted prior to the outage,so write IOPS is most critical for use as a ZIL). ZFS always uses a ZIL (unless the variable set "sync=disabled").By default, the ZIL uses the devices which comprise the storage pool. An "SLOG" device (called a "Write Log"in SoftNAS Cloud®) offloads the ZIL from the main pool to a separate log device, which improves performancewhen the right log device is chosen and configured properly.2nd Level Read CacheTo further improve read and query performance, configure a Read Cache device for use with SoftNAS Cloud®.SoftNAS Cloud® leverages the ZFS "L2ARC" as its second level cache. Cloud-based Read CacheFor cloud-based deployments, choose an instance type which includes local solid state disk (SSD) disks. Thestorage server will make use of as much read cache as it has been provided. Read cache devices can be addedand removed at any time with no risk of data loss to an existing storage pool. For many cloud vendors, there are two choices for SSD read cache: 1) Local SSD - this is the fastest read cache available, as the local SSDs are directly attached to each instanceand typically provide up to 120,000 IOPS2) Block storage Provisioned IOPS - these volumes can be assigned to SSD, providing a specified level ofguaranteed IOPS

Installation and User Guide
Copyright ©2017 SoftNAS, Inc.
On-Premise Read CacheFor on-premise deployments, add one or more SSD devices to the local storage server. Use of a properly-designed read cache is essential to get the IOPS and throughput for database, VDI, vMotion and other workloadscomprised primarily of small I/O operations (e.g., lots of small files, VMDKs, database transactions, etc.) Write LogThe "write log" on SoftNAS Cloud® leverages the ZFS Intent Log (ZIL). The ZIL is a "transaction log" used torecord synchronous writes (not asynchronous writes). When SoftNAS Cloud® receives synchronous writerequests, before returning to the caller, ZFS first records the write in memory and then completes the write to theZIL. By default, the ZIL is located on the same persistent storage associated with the storage pool (e.g., spinningdisk media). Once the write is recorded in the ZIL, the synchronous write is completed and the NFS, CIFS oriSCSI request returns to the caller. To increase performance of synchronous writes, add a separate write log (sometimes referred to as a "SLOG")device, as discussed in the Read Cache section above. A separate write log device enables ZFS to quickly storesynchronous write data and return to the caller. Note: This write log is only actually referenced in the event of a power failure or VM / instance crash, to replaythe transactions that were not committed prior to the outage event. Writes remain in RAM cache, to satisfysubsequent read requests and to write to stage to permanent storage during normal transaction processing(every 5 seconds by default). Cloud-based DeploymentsNote: Do not use local SSD or ephemeral disks attached directly to an instance for the write log, as theseinstance local devices are not guaranteed to be available again after reboot. Instead, use volumes withProvisioned IOPS for the Write Log (it's okay to use local SSD devices for Read Cache). Disk Controller ConsiderationsThere are several ways to get the most performance from these cache devices by following a few disk controllerbest practices: Pass-through ControllerIn this configuration, the disk controller is passed through to the SoftNAS Cloud® VM. This enables theSoftNAS Cloud® OS to directly interact with the disk controller. This provides the best possible performance, butrequires CPUs and motherboards which support Intel VT-d and disk controllers supported by CentOS operatingsystem. Note: For servers with the disk controller built into the motherboard, it is now common to install a virtual platformand then boot from USB, freeing up the disk controller for pass-through use.
Installation and User Guide
Copyright ©2017 SoftNAS, Inc.
PCIe Flash Cache CardsThere are flash memory plug-in cards with extremely fast NAND memory available in PCIe form. These makeextremely fast memory available at high speeds through the PCIe bus. Be sure to choose a PCIe flash memorycard that is supported by the hardware's virtualization vendor. Raw Device MappingSome SSD devices can be mapped directly to the SoftNAS Cloud® VM using Raw Device Mapping (RDM).Raw device access allows SCSI commands to flow directly between the SoftNAS CentOS operating system andthe SSD device for peak cache performance and IOPS, and to reduce context-switching between the SoftNASCloud® VM running CentOS and the virtualization host. Disk controller pass-through is preferred to RDM on systems with processors and configurations that support it. Disk Speed and RAIDVirtual Devices and IOPSAs SoftNAS Cloud® is built atop of ZFS, IOPS (I/O per second) are mostly a factor of the number of virtualdevices (vdevs) in a zpool. They are not a factor of the raw number of disks in the zpool. This is probably thesingle most important thing to realize and understand, and is commonly not. A vdev is a “virtual device”. A VirtualDevice is a single device/partition that act as a source for storage on which a pool can be created. For example,in VMware, each vdev can be a VMDK or raw disk device assigned to the SoftNAS Cloud® VM. A multi-device or multi-partition vdev can be in one of the following shapes: Stripe (technically, each chunk of a stripe is its own vdev)
- Mirror- RaidZ- A dynamic stripe of multiple mirror and/or RaidZ child vdevs
ZFS stripes writes across vdevs (not individual disks). A vdev is typically IOPS bound to the speed of the slowestdisk within it. So if with one vdev of 100 disks, a zpool's raw IOPS potential is effectively only a single disk, not100. If the environment utilizes a hardware RAID which presents a unified datastore to VMware then the actual stripingof writes occurs in the RAID controller card. Just be aware of where striping occurs and the implications onperformance (especially for write throughput). For information about RAID, see section RAID Considerations. DeduplicationA common misunderstanding is that ZFS deduplication is free, which can enable space savings on a ZFSfilesystems/zvols/zpools. In actuality, ZFS deduplication is performance on-the-fly as data is read and written.This can lead to a significant and sometimes unexpectedly high RAM requirement. Every block of data in a deduplicated filesystem can end up having an entry in a database known as the DDT(DeDupe Table). DDT entries need RAM. It is not uncommon for DDTs to grow to sizes larger than availableRAM on zpools that aren't even that large (couple of TBs). If the hits against the DDT aren't being servicedprimarily from RAM (or fast SSD configured as L2ARC), performance quickly drops to abysmal levels. Becauseenabling/disabling deduplication within ZFS doesn't actually do anything to the data already committed on disk,it recommended to not enable deduplication without a full understanding of its RAM and caching requirements.It may be difficult to get rid of later, after many terabytes of deduplicated data are already written to disk andsuddenly the network needs more RAM and/or cache. Plan cache and RAM needs around how much totaldeduplicated data is expected.

Installation and User Guide
Copyright ©2017 SoftNAS, Inc.
Note: A general rule of thumb is to provide at least 2 GB of DDT per TB of deduplicated data (actual results willvary based on how much duplication of data is required). Please note that the DDT tables require RAM beyond whatever is needed for caching of data, so be sure to takethis into account (RAM is very affordable these days, so get more than may be needed to be on the safe side). Extremely Large Destroy Operations - When destroying large filesystems, snapshots and cloned filesystems(e.g., in excess of a terabyte), the data is not immediately deleted - it is scheduled for background deletionprocessing. The deletion process touches many metadata blocks, and in a heavily deduplicated pool, must alsolook up and update the DDT to ensure the block reference counts are properly maintained. This results in asignificant amount of additional I/O, which can impact the total IOPS available for production workloads. For best results, schedule large destroy operations for after business hours or on weekends so that deletionprocessing IOPS will not impact the IOPS available for normal business day operations.
Installation and User Guide
Copyright ©2017 SoftNAS, Inc.
RAID Considerations SoftNAS Cloud® supports many options for both software and hardware RAID. When planning your deploymentit is important to consider the use cases for which you are setting up SoftNAS cloud, best practices for highavailability (if applicable) as well as the differences between hardware and software RAID. In the followingsections, we will cover these topics, and arm you with the knowledge needed to make the required decisions foryour circumstances. Software RAID Considerations Hardware RAID Considerations Amazon EBS RAID Considerations
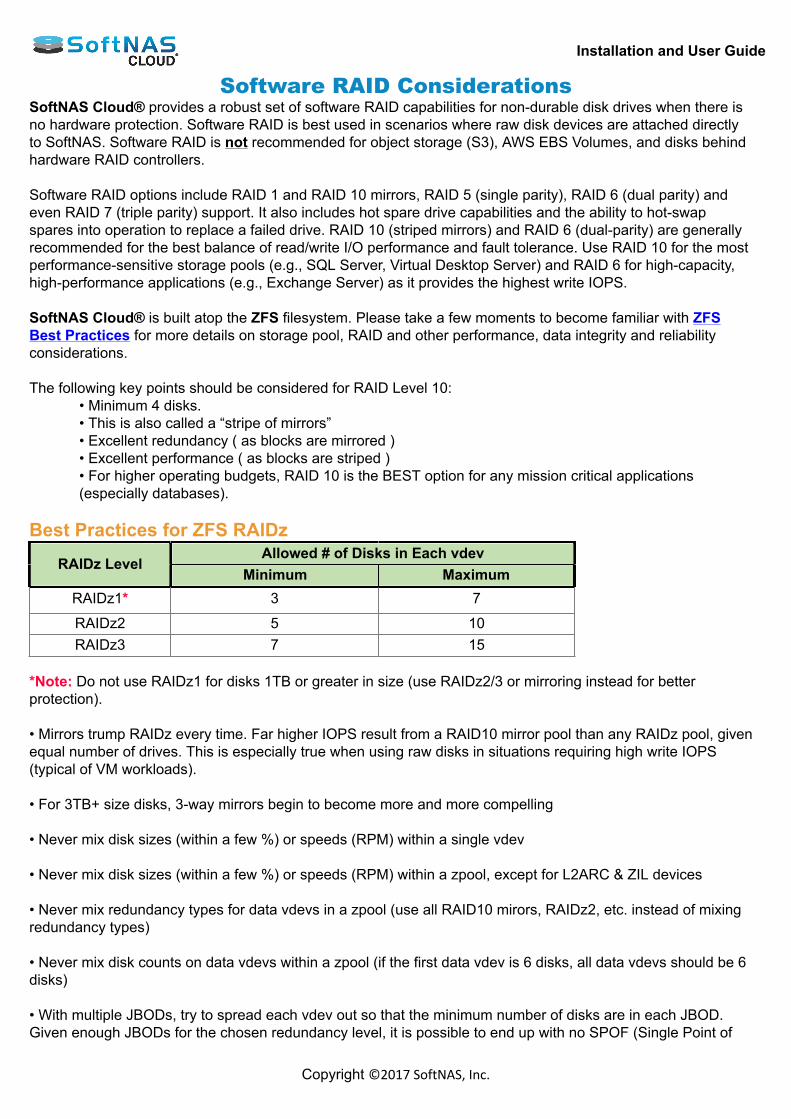
Installation and User Guide
Copyright ©2017 SoftNAS, Inc.
Software RAID ConsiderationsSoftNAS Cloud® provides a robust set of software RAID capabilities for non-durable disk drives when there isno hardware protection. Software RAID is best used in scenarios where raw disk devices are attached directlyto SoftNAS. Software RAID is not recommended for object storage (S3), AWS EBS Volumes, and disks behindhardware RAID controllers. Software RAID options include RAID 1 and RAID 10 mirrors, RAID 5 (single parity), RAID 6 (dual parity) andeven RAID 7 (triple parity) support. It also includes hot spare drive capabilities and the ability to hot-swapspares into operation to replace a failed drive. RAID 10 (striped mirrors) and RAID 6 (dual-parity) are generallyrecommended for the best balance of read/write I/O performance and fault tolerance. Use RAID 10 for the mostperformance-sensitive storage pools (e.g., SQL Server, Virtual Desktop Server) and RAID 6 for high-capacity,high-performance applications (e.g., Exchange Server) as it provides the highest write IOPS. SoftNAS Cloud® is built atop the ZFS filesystem. Please take a few moments to become familiar with ZFSBest Practices for more details on storage pool, RAID and other performance, data integrity and reliabilityconsiderations. The following key points should be considered for RAID Level 10:
• Minimum 4 disks.• This is also called a “stripe of mirrors”• Excellent redundancy ( as blocks are mirrored )• Excellent performance ( as blocks are striped )• For higher operating budgets, RAID 10 is the BEST option for any mission critical applications(especially databases).
Best Practices for ZFS RAIDz
Allowed # of Disks in Each vdevRAIDz Level
Minimum MaximumRAIDz1* 3 7
RAIDz2 5 10RAIDz3 7 15
*Note: Do not use RAIDz1 for disks 1TB or greater in size (use RAIDz2/3 or mirroring instead for betterprotection). • Mirrors trump RAIDz every time. Far higher IOPS result from a RAID10 mirror pool than any RAIDz pool, givenequal number of drives. This is especially true when using raw disks in situations requiring high write IOPS(typical of VM workloads). • For 3TB+ size disks, 3-way mirrors begin to become more and more compelling • Never mix disk sizes (within a few %) or speeds (RPM) within a single vdev • Never mix disk sizes (within a few %) or speeds (RPM) within a zpool, except for L2ARC & ZIL devices • Never mix redundancy types for data vdevs in a zpool (use all RAID10 mirors, RAIDz2, etc. instead of mixingredundancy types) • Never mix disk counts on data vdevs within a zpool (if the first data vdev is 6 disks, all data vdevs should be 6disks) • With multiple JBODs, try to spread each vdev out so that the minimum number of disks are in each JBOD.Given enough JBODs for the chosen redundancy level, it is possible to end up with no SPOF (Single Point of
Installation and User Guide
Copyright ©2017 SoftNAS, Inc.
Failure) in the form of JBOD, and if the JBODs themselves are spread out amongst sufficient HBAs, it becomespossible to even remove HBAs as a SPOF. • Use RAIDz2/3 over RAIDz1 plus a hot spare, because increased redundancy provides better data protection(and RAIDz3 is like having online hot spares, since it can sustain 2 drive failures).
Installation and User Guide
Copyright ©2017 SoftNAS, Inc.
Hardware RAID ConsiderationsSoftNAS Cloud® can leverage hardware RAID arrays, where the disk RAID process is managed by theunderlying disk controller. Hardware RAID may be available at the disk controller level, which can provide higherperforming RAID 5 and RAID 6 configurations, as the better controllers are able to coalesce multiple writes andoptimize disk arm write motion. When hardware RAID is used with SoftNAS Cloud®, RAID administration takesplace outside of SoftNAS Cloud®. When choosing to use hardware RAID, also use software RAID to increase redundancy, performance andrecoverability. To store long-term data for more than a few years, it is highly recommended to use the ZFSsoftware RAID functionality (even with hardware RAID) for VMDKs. This is because ZFS will detect and correct"bit rot" and other errors that creep into storage media over time; otherwise, errors creep in, causing corruptedfiles over the long haul; e.g., after 4 to 5 years, fewer if using inexpensive disks that are more prone to developinglong-term storage accuracy errors. When choosing a disk controller, if it includes write caching, be sure it also includes a built-in battery backupthat will hold onto any cached writes in the event of a power failure. This will increase the system's resiliency tofailure. Storage Configuration ScenarioFor the purpose of example, consider a storage solution using twenty 600 GB SAS drives. One possible configuration is as follows: • Create two hardware RAID 6 arrays, plus two spares. Each array consists of 8 drives - 6 data + 2 parity.• Each hardware RAID array becomes a VMware datastore with approximately 3.3 TB of usable storage (two 3.3TB datastores) Space Allocation:For maximum storage capacity and resiliency, create six 1.1 TB VMDKs from the two datastores and attach themto the SoftNAS Cloud® VM. This results in six virtual disks of 1.1 TB each becoming available within SoftNASCloud®. Inside SoftNAS Cloud®, add all six virtual disks to a single, large storage pool using RAID 5 (single parity). Theadvantage of using both hardware RAID 6 is the arrays can tolerate up to two concurrent drive failures on eacharray. The software RAID 5 then provides an added layer of parity and recoverability. Effectively disable software RAID within SoftNAS Cloud® by specifying RAID 0 (no redundancy, with striping)and assign all six 1.1 TB virtual disks to a storage pool. Please note that if hardware RAID is used, combinedwith RAID 0 in SoftNAS Cloud®, the built-in ZFS filesystem will be unable to recover data, as it will have noparity information to work with. As a result, as with any hardware RAID system, data integrity is reliant upon thehardware level RAID array and its integrity alone. Alternatively, place the hardware controller into "JBOD mode" and just pass each disk through to SoftNASCloud® directly as raw storage (no hardware RAID), and use the software RAID within SoftNAS Cloud® tohandle RAID. It is important to give careful consideration to which type of RAID configuration will be used to provide the rightbalance of performance and resilience for applications.
Installation and User Guide
Copyright ©2017 SoftNAS, Inc.
Amazon EBS RAID Considerations Configure EBS as RAID 0Each EBS volume attached to an instance is constituted on independent storage hardware within the AWSinfrastructure. SoftNAS Cloud® storage pools should therefore be configured as RAID 0 to stripe across multipleEBS volumes to gain the highest possible bandwidth and performance. Using any RAID level beyond RAID 0(RAID levels 1, 10, 5, 6, and 7) merely increases storage costs with little to no benefit to reducing failure rate orimproving performance. EBS SSD and Magnetic Disk LimitationsEBS General Purpose SSD are limited to 10,000 IOPs per volume. EBS Provisioned IOPs are limited to 20,000IOPs per volume. EBS Magnetic are more severely limited to 40-200 IOPs, which represents the maximumcapabilities of today’s spinning media. In testing we have seen the EBS SSDs provide more IOPs in shorterdurations, but sustained IOPS usage shows these to be bursts that are forced into alignment with disk limitations.By striping across multiple EBS Volumes, of any type, the IOPs can be higher than a single EBS Volume canprovide. AWS EBS Annual Failure Rate(AFR) and Storage PoolsAWS EBS annual failure rate (AFR) is published to be between 0.1% and 0.2%. Aggregating multiple EBSvolumes within a SoftNAS Cloud® storage pool will magnify the AFR. The AFR is roughly the number of EBSvolumes multiplied by AFR rate. Our recommendation is to understand the risk and size of (number of volumeswithin) storage pools appropriately. Using five EBS volumes within a storage pool (totaling up to 80 TB ofcapacity) will be an acceptable AFR for most use cases, and many use cases can tolerate an even higher AFR.For high capacity deployments, use multiple SoftNAS storage pools. By setting EBS volumes into separatestorage pools, you can achieve high performance and capacity, without adversely affecting AFR.
Installation and User Guide
Copyright ©2017 SoftNAS, Inc.
Common Performance Use Cases Common Scenarios and Best PracticesFor any high-performance on-premise use case, be sure to deploy an adequate amount (e.g., 64 GB or more) ofwrite log (ZFS "ZiL") and RAM (plus read cache (ZFS "L2ARC") to absorb the high level of 4K block I/O for bestresults). For workloads with predominately small (less than 128K) reads and writes, making use of RAM, write log andread cache is critical to achieving maximum throughput, as ZFS block I/O occurs in 128K block I/O chunks.Windows also defaults to 4K blocks. Windows WorkloadsOne approach that works well for a broad range of applications is to use a combination of SAS and SATA drives- using SSD for read cache/write log (always configure write logs as mirrored pairs in case a drive fails). SATAdrives provide very high densities in a relatively small footprint, which is perfect for user mass storage, Windowsprofiles, Office files, MS Exchange, etc. SQL Server typically demands SAS and/or SSD for best results, dueto the high transaction rates involved. Exchange can be relatively heavy on I/O when it's starting up, but sinceit reads most everything into memory, high-speed caching does little to help run-time performance after initialstartup. Virtual DesktopsVirtual desktops benefit greatly from all the cache memory, level 2 caching and high-speed storage available,because many performance lags quickly become visible as user launch applications, open and save files, etc.Caching also helps alleviate "login storms" and "boot storms" that occur when a large number of simultaneoususers attempt to log in first thing in the morning. For these situations, a combination of local caching (on each VDIserver), combined with appropriate caching for user profiles and applications can yield excellent results.
Installation and User Guide
Copyright ©2017 SoftNAS, Inc.
S3 Cloud Disk Best Practices Without proper configuration, a SoftNAS instance leveraging S3-compatible cloud disk extenders can performpoorly. To get the best performance possible for a SoftNAS deployment with S3-compatible cloud disks, keep inmind the following: SizingSizing a solution involving use of Cloud Disk Extenders is very much the same as for a solution making use ofa block-based implementation (VMDK or EBS). There is no change to storage space requirements. However,additional system resources may be required in order to handle the virtualization of the S3 storage requiredin order to present the S3 Cloud Disk as block storage. Stated another way, the number of buckets that areconfigured via cloud disk extender influences the amount of additional resources that are required to access thesame overall capacity of storage. CPUIf using cloud disk extenders in your instance/s, it is important to configure your instance with additionalprocessing power (CPU), above and beyond what is required for traditional block-based storage access.Presenting S3 storage as block-based storage requires a number of additional functions to be executed,including, for example, SSL/TLS key exchange and encryption, MD5 block computations, network stackprocessing, as well as optional encryption options. To avoid performance issues: • Do not use cloud disk extender on single vCPU instances.• 2 vCPU instances may be suitable for test scenarios. Two vCPU instances may still prove insufficient if your S3-compatible test/POC environment requires decent performance metrics.• For a production environment, a minimum of 4 vCPU instances is highly recommended. Many workloads willperform better with additional vCPU.• For each 75 MB/s of throughput required to perform the same task with block-based storage, an additional twovCPU is highly recommended.• CPU utilization should be monitored during proof-of-concept and initial production stages to verify that sufficientCPU has been provisioned for the provided workload.• Monit email alerts should be monitored and indications of high CPU utilization should be reviewed with respectto the Cloud Disk Extender configuration.• If operating in a trusted environment, and available as an option for the S3-compatible object storage beingused, CPU usage can be reduced by using http rather than https.• CPU usage can be further reduced by disabling optional encryption options. Example:A customer wants to use S3 object storage to save money over EBS. The current workload operates between100-150MB/s of throughput and is running on an m4.xlarge instance. Evaluating the current workload, weknow that it averages a healthy 50% CPU usage. To provide the same 150MB/s of S3 throughput, the generalguideline requests 4 additional vCPU over and above the current instance's existing 4 vCPU base. As a result,the CPU recommendation points to an m4.2xlarge instance, in order to provide four additional vCPU. RAMAs mentioned previously in this document, each instance of the cloud disk extender represents a process that isrunning inside of the SoftNAS instance for virtualizing the object storage as block storage. • Cloud Disk Extender should not be used in production on systems with less than 8GB of RAM.• Memory footprints less than 8GB of RAM may be suitable for test or PoC environments only.• A general guideline of 512MB of RAM should be provisioned above the normal required memory for a givenworkload.• Remember that half of the RAM is utilized for file-system caching. Additional resources are needed for thenetwork file services and the base operating environment (~2GB of RAM). Network
Installation and User Guide
Copyright ©2017 SoftNAS, Inc.
Cloud Disk Extender utilizes the network interface of an instance in order to access the object storage. Sufficientnetwork bandwidth must be provisioned in order to reach maximum performance profiles using Cloud DiskExtender. When considering the desired available throughput to the object store also consider the amount of
network throughput for network file services (NFS, CIFS, iSCSI, AFP) and SnapReplicate/SNAP HATM which, inmost configurations and platforms, all come from the same pool of available network bandwidth. • A somewhat safe calculation can be to determine the available network throughput being used for the instance,and to divide it divided by 3, in order tocalculate 1/3 for file services, 1/3 for replication, and 1/3 for object storageI/O.• When calculating, consider that SnapReplicate only replicates the write bandwidth, not the read bandwidth.• Be sure to convert properly between bits and bytes when comparing network throughput (usually expressed inbits) to disk throughput (usually expressed in bytes)• There is inherent overhead in the protocols used on the network (request/response, headers, checksums,control data, etc) such that full network saturation does not yield the full bandwidth as useful throughput.Consider only anticipating 90% of the link-speed as usable throughput.• Most clouds (and most data centers) do not provide full link-speed bandwidth on a sustained basis as systemsare utilizing shared resources. Systems designed to run at full provisioned capacity (of any metric) should beassigned to dedicated hosts rather than shared tenancy. Example:A customer uses NFS, SnapReplicate and SNAP HATM, and would like to use object storage. Expectedthroughput is about 40MB/s with 90% reads. According to calculation, the network throughput for the source nodereads as follows: • 4MB/s writes to NFS (incoming)• 36MB/s reads to NFS (outgoing)• 4MB/s writes to SnapReplicate (outgoing)• 4MB/s writes to Object Storage (outgoing)• 36MB/s reads to Object Storage (incoming) Total: 40MB/s incoming 44MB/s outgoing Calculating the total throughput in bytes, this is 320mbps incoming and 352mbps outgoing. According to calculation, the network throughput for the target node reads as follows: • 4MB/s writes from SnapReplicate (incoming)• 4MB/s writes to Object Storage (outgoing) Total: 4MB/S incoming and 4MB/S outgoing In bytes, this works out to 32mbps incoming 32mbps outgoing. A 100 mbps network connection is certainly not sufficient for this configuration, however, a 1gbps connectionshould be enough, even considering protocol overhead and avoiding 100% saturation of the network. Amazon AWS S3 Recommendation: VPC Endpoints Customers on AWS within a VPC should be using VPC Endpoints for accessing S3 object stores. By using aVPC endpoint, a higher quality service level is provided to S3 object stores within a region, thereby improvingthe overall reliability and performance when accessing S3 object storage. Additionally, a VPC Endpoint can beused in order to to communicate with resources in other services via private IPs, without exposing instances tothe internet. For guidance on setting up VPC Endpoints via the Amazon AWS console, see Amazon's help on the topic.

Installation and User Guide
Copyright ©2017 SoftNAS, Inc.
Installation and User Guide
Copyright ©2017 SoftNAS, Inc.
Networking For optimal SoftNAS Cloud® performance, adhere to the following Networking considerations and BestPractices: As with any storage system, NAS performance is a function of a number of many different combined factors:
• Network bandwidth available; e.g., 1 GbE vs. 10 GbE vs. Infiniband• Network QoS (whether the network is dedicated, shared, local vs. remote, EC2 provisioned IOPS, etc.)• Network latency (between workload VMs and SoftNAS Cloud® VM)• MTU settings in VM host software and switches• Network access protocol (NFS, CIFS/SMB, iSCSI, Direct-attached fiber-channel)• Use of VLANs to separate storage traffic from other network traffic.
Networking RequirementsA minimum of 1 gigabit networking is required and will provide throughput up to 120 MB/sec (line speed of 1GbE). 10 GbE offers 750+ MB/sec throughput. To reduce the overhead for intensive storage I/O workloads, it ishighly recommended to configure the VMware hosts running SoftNAS Cloud® and the heavy I/O workloads with"jumbo frames", MTU 9000. It's usually best to allocate a separate vSwitch for storage with dual physical NICswith their VMkernels configured for MTU 9000 (be sure to configure the physical switch ports for MTU 9000, aswell). If possible, isolating storage onto its own VLAN is also a best practice. When using dual switches for redundancy (usually a good idea and best practice for HA configurations), be sureto configure the VMware host vSwitch for Active-Active operation and test switch port failover prior to placingSoftNAS Cloud® into production (as with any other production VMware host). Choose static IPv4 addresses for SoftNAS Cloud®. If the plan is to assign storage to a separate VLAN (usuallya good idea), ensure the vSwitch and physical switches are properly configured and available for use. ForVMware-based storage systems, SoftNAS Cloud® is typically deployed on an internal, private network. Accessto the Internet from SoftNAS Cloud® is required for certain features to work; e.g., Software Updates (whichdownload updates from softnas.com site), NTP time synchronization (which can be used to keep the systemclock accurate), etc. From an administration perspective, allow browser-based access from the internal network only. Optionally,use SSH for remote shell access (optional). To completely isolate access to SoftNAS from both internal andexternal users, then access will be restricted to the VMware console only (launch a local web browser on thegraphical console's desktop). Add as many network interfaces to the SoftNAS Cloud® VM as are permitted bythe VMware environment. Prior to installation, allocate a static IP address for SoftNAS Cloud® and be prepared to enter the usual networkmask, default gateway and DNS details during network configuration. By default, SoftNAS Cloud® is configuredto initially boot in DHCP mode (but it is recommended to use a fixed, static IP address for production use). At a minimum, SoftNAS Cloud® must have at least one NIC assigned for management and storage. Provideseparate NICs for management/administration, storage I/O and replication I/O. Networking ConsiderationsA fast NAS response to requests isn't the only governing factor to how well workloads perform. Network design,available bandwidth and latency are also important factors. For example, for high-performance NAS applications,where possible, use of a dedicated VLAN for storage is a must. Configuring all components in the storage path touse MTU 9000 will greatly increase throughput by reducing the effects of round-trip network latency and reducingthe interrupt load on the NAS server itself. Interrupts are often overlooked as a source of overhead, becausethey aren't readily measured, but their effects can be significant, both on the NAS server and workload servers.Configure any NAS requiring the highest level of performance for MTU 9000 along with the switching ports usedbetween the NAS host and workload servers.
Installation and User Guide
Copyright ©2017 SoftNAS, Inc.
A single 1 GbE network segment will, at most, produce up to 120 MB/sec throughput under the most idealconditions possible. 10 GbE has been observed to deliver up to 1,000 MB/sec of throughput. The next consideration is protocol - Use NFS, CIFS or iSCSI? The iSCSI protocol often provides the bestthroughput, and increased resiliency through multi-pathing. Just be aware of the added complexities associatedwith iSCSI. For VM-based workloads - it's hard to go wrong with NFS or iSCSI. For user data (e.g.,file shares), CIFS ismore common because of the need to integrate natively with Windows, domain controllers and Active Directorywhen using a NAS as a file server. Thick-provisioning VMware datastores provides increased write performance, and should be preferred over thin-provsioning of VMDKs when optimal performance is required. Regardless of design, verify each implementation by running performance benchmarks to validate the throughputexpected before going into production.
Installation and User Guide
Copyright ©2017 SoftNAS, Inc.
Security IMPORTANT - Note the following to bolster the security of SoftNAS Cloud® storage solution. This list is notexhaustive, so apply the most appropriate set of best practices for deploying Linux-based systems locally or onthe Internet. Change Default PasswordsConsider changing the default password that is set for the user softnas and for root account. Apply the Latest Software UpdatesWe identify threats and provide fixes on a regular basis, so be sure to keep up with the latest software updatesand maintenance. Restrict Firewall source IPRestrict the allowed IP addresses which are allowed access to each port on SoftNAS Cloud® - especiallyHTTPS (port 443). Only allow approved administrators to access the SSH, HTTPS ports by restricting who (whichTCP/IP addresses) can access those ports. Restrict NAS ports (e.g.,CIFS, NFS, iSCSI, etc.) to only allow EC2workload instances; e.g.,x.x.x.x/24 or a specific range of workload instances. When publishing storage via NFS, CIFS, iSCSI, or other protocols from SoftNAS Cloud® via the Internet, it isalso critical to configure encrypted, authenticated access and limit the source ports accordingly. Also, be sure torestrict the range of allowed source IP addresses. If storage services are published only on an internal LAN orWAN, then apply appropriate security measures as for any storage server in this network environment. NFS and BIND Services:
TCP Port (Service) Source Service
111 x.x.x.x/24 portmapper2010 x.x.x.x/24 rquotad2011 x.x.x.x/24 nlockmgr2013 x.x.x.x/24 mountd2014 x.x.x.x/24 status2049 x.x.x.x/24 nfs
UDP Port (Service) Source Service111 x.x.x.x/24 portmapper2010 x.x.x.x/24 rquotad2011 x.x.x.x/24 nlockmgr2013 x.x.x.x/24 mountd2014 x.x.x.x/24 status2049 x.x.x.x/24 nfs CIFS/SMB via Samba:For ease of use, here are the ports to open for two-way CIFS communication with Windows and Linux desktopsystems.
Variable TCP Port # Servicenetbios-ns 137 NETBIOS Name Servicenetbios-dgm 138 NETBIOS Datagram
Service
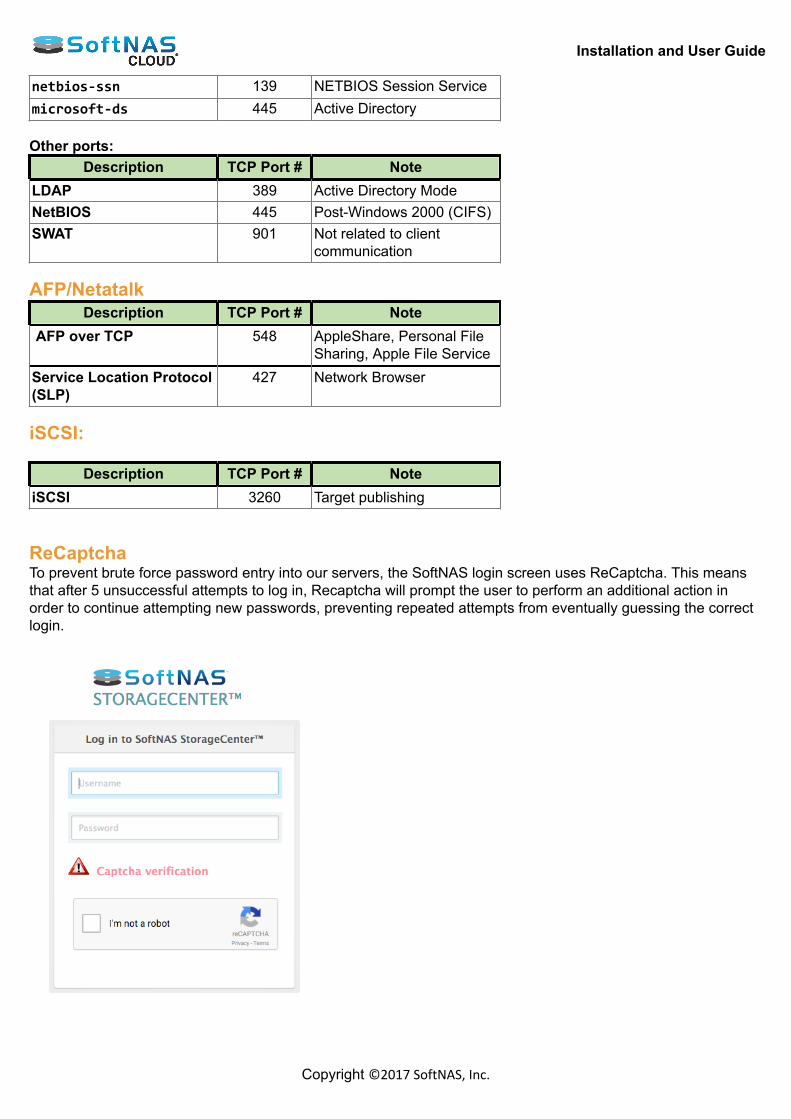
Installation and User Guide
Copyright ©2017 SoftNAS, Inc.
netbios-ssn 139 NETBIOS Session Servicemicrosoft-ds 445 Active Directory Other ports:
Description TCP Port # NoteLDAP 389 Active Directory ModeNetBIOS 445 Post-Windows 2000 (CIFS)SWAT 901 Not related to client
communication AFP/Netatalk
Description TCP Port # Note AFP over TCP 548 AppleShare, Personal File
Sharing, Apple File ServiceService Location Protocol(SLP)
427 Network Browser
iSCSI:
Description TCP Port # NoteiSCSI 3260 Target publishing ReCaptchaTo prevent brute force password entry into our servers, the SoftNAS login screen uses ReCaptcha. This meansthat after 5 unsuccessful attempts to log in, Recaptcha will prompt the user to perform an additional action inorder to continue attempting new passwords, preventing repeated attempts from eventually guessing the correctlogin.
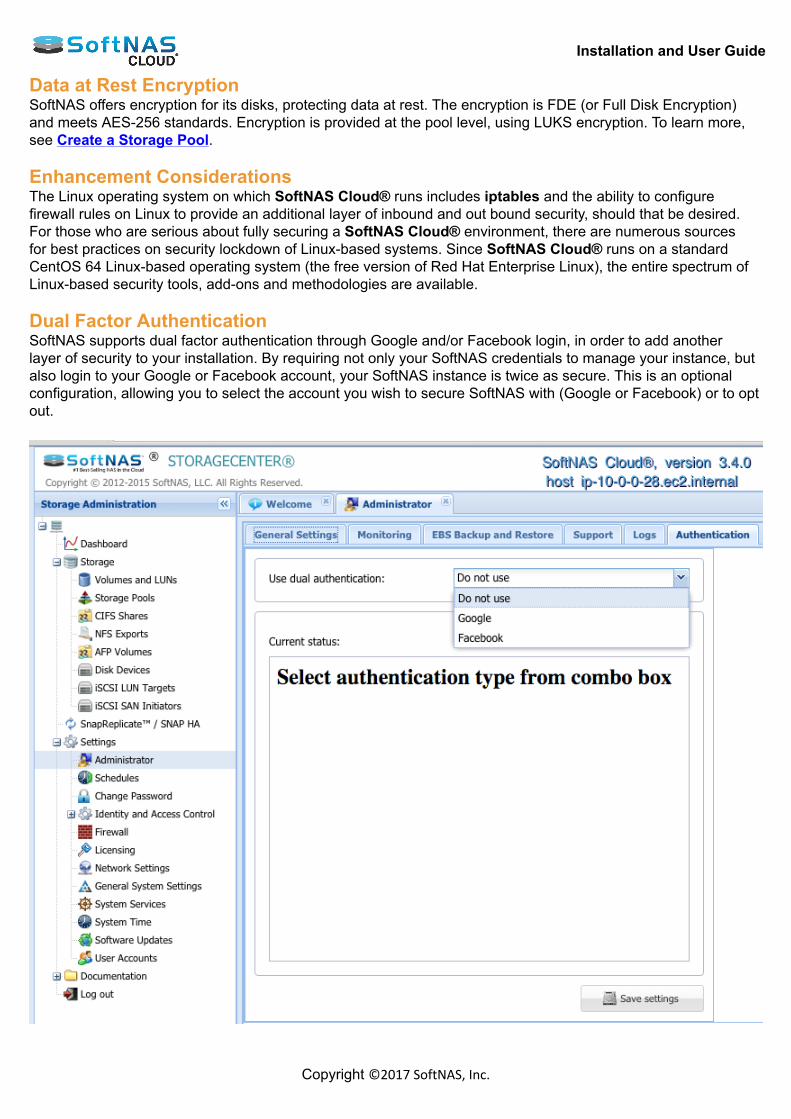
Installation and User Guide
Copyright ©2017 SoftNAS, Inc.
Data at Rest EncryptionSoftNAS offers encryption for its disks, protecting data at rest. The encryption is FDE (or Full Disk Encryption)and meets AES-256 standards. Encryption is provided at the pool level, using LUKS encryption. To learn more,see Create a Storage Pool. Enhancement ConsiderationsThe Linux operating system on which SoftNAS Cloud® runs includes iptables and the ability to configurefirewall rules on Linux to provide an additional layer of inbound and out bound security, should that be desired.For those who are serious about fully securing a SoftNAS Cloud® environment, there are numerous sourcesfor best practices on security lockdown of Linux-based systems. Since SoftNAS Cloud® runs on a standardCentOS 64 Linux-based operating system (the free version of Red Hat Enterprise Linux), the entire spectrum ofLinux-based security tools, add-ons and methodologies are available. Dual Factor AuthenticationSoftNAS supports dual factor authentication through Google and/or Facebook login, in order to add anotherlayer of security to your installation. By requiring not only your SoftNAS credentials to manage your instance, butalso login to your Google or Facebook account, your SoftNAS instance is twice as secure. This is an optionalconfiguration, allowing you to select the account you wish to secure SoftNAS with (Google or Facebook) or to optout.
Installation and User Guide
Copyright ©2017 SoftNAS, Inc.
Launching SoftNAS Cloud® Platforms SoftNAS Cloud® is available for various industry platforms, with a focus on local storage management interfacesand requirements. Platform-specific configuration will be explained in dedicated sub-sections of this guide, butmost SoftNAS Cloud® installations begin the same way. Note: Regardless of underlying platform, SoftNAS Cloud® will require the ability to access the Internet forsoftware updates, activation, etc. For this case, enabling only outbound TCP traffic to the softnas.com domain isrequired. Setting Up SoftNAS Cloud®1. Open a web browser and enter the SoftNAS website link https://www.softnas.com/ in the Address bar. The SoftNAS home page will be displayed. 2. For a free trial period, click the Try Now option at the bottom of the main SoftNAS.com screen. 3. Click through for the desired product registration and download if applicable. Follow the wizards and promptsto register and configure a local SoftNAS platform and GUI. Depending on platform chosen, the next steps maydiffer slightly; however, the steps are designed to be intuitive with industry best practices. SoftNAS Cloud®, SoftNAS StorageCenter™, SnapReplicate™, and SNAP HA™ are trademarks of SoftNASInc.. All other trademarks referred to in this guide are owned by their respective companies.
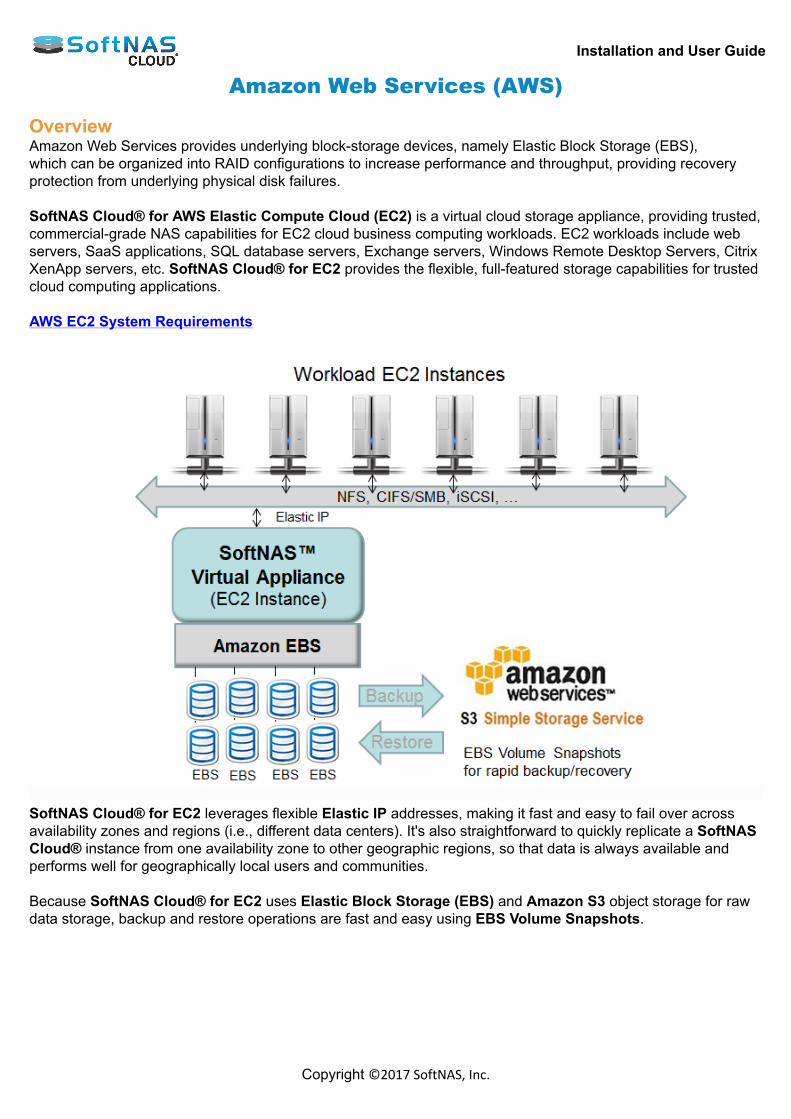
Installation and User Guide
Copyright ©2017 SoftNAS, Inc.
Amazon Web Services (AWS) OverviewAmazon Web Services provides underlying block-storage devices, namely Elastic Block Storage (EBS),which can be organized into RAID configurations to increase performance and throughput, providing recoveryprotection from underlying physical disk failures. SoftNAS Cloud® for AWS Elastic Compute Cloud (EC2) is a virtual cloud storage appliance, providing trusted,commercial-grade NAS capabilities for EC2 cloud business computing workloads. EC2 workloads include webservers, SaaS applications, SQL database servers, Exchange servers, Windows Remote Desktop Servers, CitrixXenApp servers, etc. SoftNAS Cloud® for EC2 provides the flexible, full-featured storage capabilities for trustedcloud computing applications. AWS EC2 System Requirements
SoftNAS Cloud® for EC2 leverages flexible Elastic IP addresses, making it fast and easy to fail over acrossavailability zones and regions (i.e., different data centers). It's also straightforward to quickly replicate a SoftNASCloud® instance from one availability zone to other geographic regions, so that data is always available andperforms well for geographically local users and communities. Because SoftNAS Cloud® for EC2 uses Elastic Block Storage (EBS) and Amazon S3 object storage for rawdata storage, backup and restore operations are fast and easy using EBS Volume Snapshots.

Installation and User Guide
Copyright ©2017 SoftNAS, Inc.
The Amazon EC2 cloud computing environment, which will be referred to simply as EC2 in this guide, is arobust, powerful virtualization and computing system with many options and capabilities. For our purposeshere, we will focus on installing SoftNAS Cloud® and configuring it for basic use. Additional options exist forincreasing performance and throughput, for database and other, more demanding applications, which will becovered briefly. In an Amazon EC2 or other cloud computing environment, SoftNAS Cloud® provides the network storagebackbone needed for business critical cloud applications. SoftNAS Cloud® for EC2 leverages EBS (Elastic Block Storage) as its underlying block storage devices.Multiple EBS devices are then organized into RAID configurations, increasing performance and throughput, andproviding the ability to recover from underlying physical disk failures that can occur with EBS. SoftNAS Cloud®provides the most durable, highest performance NAS solution available for Amazon EC2.
Installation and User Guide
Copyright ©2017 SoftNAS, Inc.
Product and Installation OptionsSoftNAS Cloud® provides the following applicable products:
• SoftNAS Cloud® Express (1TB of storage)• SoftNAS Cloud® Standard (20TB of storage)• SoftNAS Cloud® Enterprise (up to 16 PB of storage)• SoftNAS Cloud® BYOL (Bring Your Own License)
Product Storage Purchase License
SoftNAS Cloud®Express
1 TB Subscribevia AWSMarketplace.
Embedded in platformsubscription or BYOLavailable from SoftNAS.
SoftNAS Cloud®Standard
20 TB Subscribevia AWSMarketplace.
Embedded in platformsubscription or BYOLavailable from SoftNAS.
SoftNAS Cloud®Enterprise
16 PB Subscribevia AWSMarketplace.
Embedded in platformsubscription or BYOLavailable from SoftNAS.
• SoftNAS SNAP HATM included with each product.
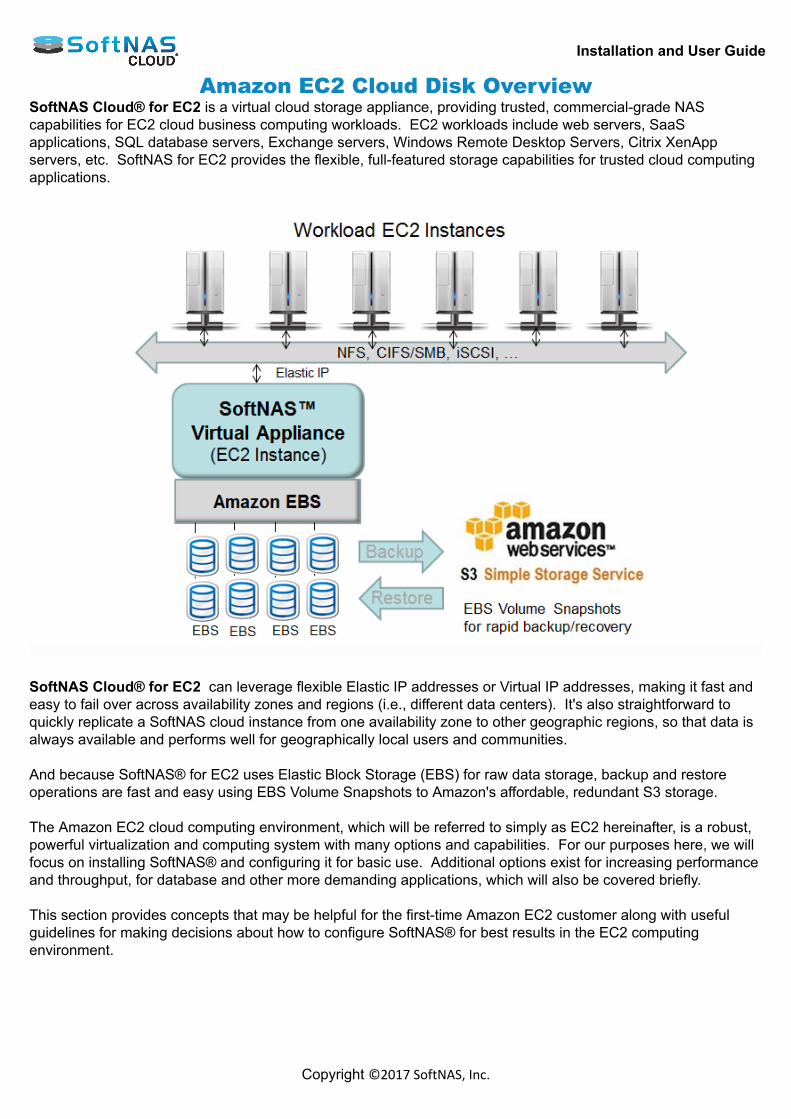
Installation and User Guide
Copyright ©2017 SoftNAS, Inc.
Amazon EC2 Cloud Disk OverviewSoftNAS Cloud® for EC2 is a virtual cloud storage appliance, providing trusted, commercial-grade NAScapabilities for EC2 cloud business computing workloads. EC2 workloads include web servers, SaaSapplications, SQL database servers, Exchange servers, Windows Remote Desktop Servers, Citrix XenAppservers, etc. SoftNAS for EC2 provides the flexible, full-featured storage capabilities for trusted cloud computingapplications.
SoftNAS Cloud® for EC2 can leverage flexible Elastic IP addresses or Virtual IP addresses, making it fast andeasy to fail over across availability zones and regions (i.e., different data centers). It's also straightforward toquickly replicate a SoftNAS cloud instance from one availability zone to other geographic regions, so that data isalways available and performs well for geographically local users and communities. And because SoftNAS® for EC2 uses Elastic Block Storage (EBS) for raw data storage, backup and restoreoperations are fast and easy using EBS Volume Snapshots to Amazon's affordable, redundant S3 storage. The Amazon EC2 cloud computing environment, which will be referred to simply as EC2 hereinafter, is a robust,powerful virtualization and computing system with many options and capabilities. For our purposes here, we willfocus on installing SoftNAS® and configuring it for basic use. Additional options exist for increasing performanceand throughput, for database and other more demanding applications, which will also be covered briefly. This section provides concepts that may be helpful for the first-time Amazon EC2 customer along with usefulguidelines for making decisions about how to configure SoftNAS® for best results in the EC2 computingenvironment.
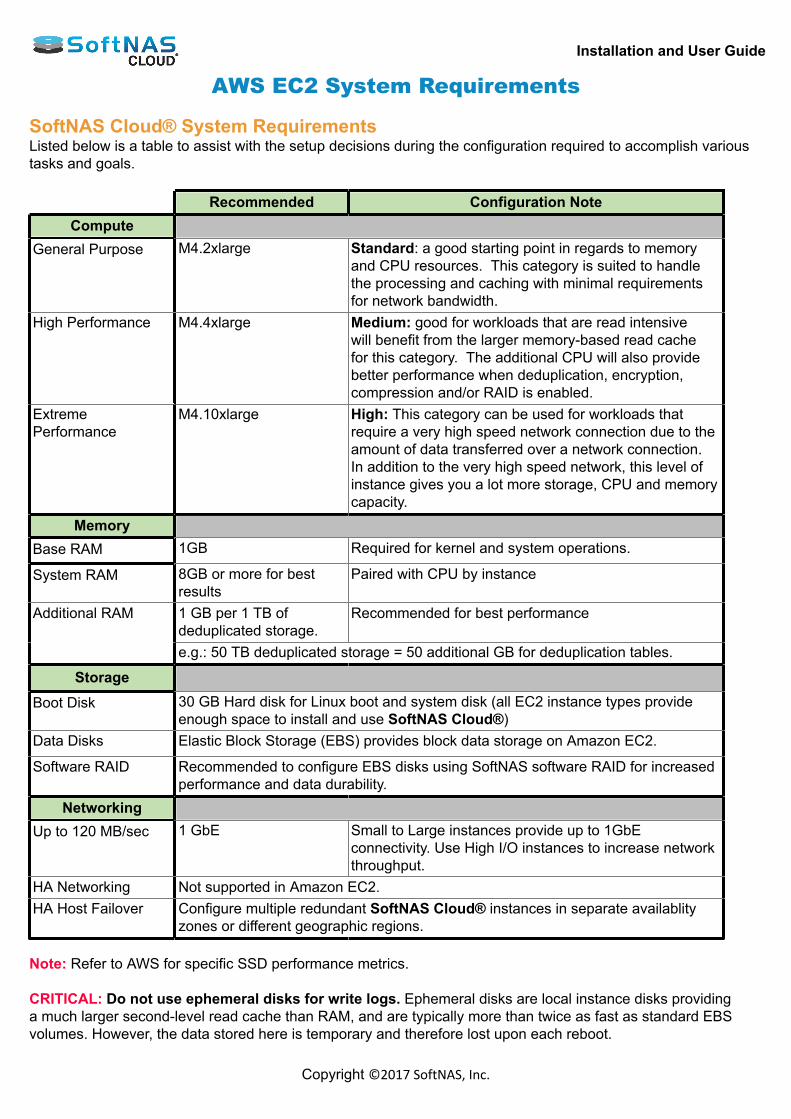
Installation and User Guide
Copyright ©2017 SoftNAS, Inc.
AWS EC2 System Requirements SoftNAS Cloud® System RequirementsListed below is a table to assist with the setup decisions during the configuration required to accomplish varioustasks and goals. Recommended Configuration Note
Compute General Purpose M4.2xlarge
Standard: a good starting point in regards to memoryand CPU resources. This category is suited to handlethe processing and caching with minimal requirementsfor network bandwidth.
High Performance M4.4xlarge Medium: good for workloads that are read intensivewill benefit from the larger memory-based read cachefor this category. The additional CPU will also providebetter performance when deduplication, encryption,compression and/or RAID is enabled.
ExtremePerformance
M4.10xlarge High: This category can be used for workloads thatrequire a very high speed network connection due to theamount of data transferred over a network connection. In addition to the very high speed network, this level ofinstance gives you a lot more storage, CPU and memorycapacity.
MemoryBase RAM 1GB Required for kernel and system operations.
System RAM 8GB or more for bestresults
Paired with CPU by instance
1 GB per 1 TB ofdeduplicated storage.
Recommended for best performanceAdditional RAM
e.g.: 50 TB deduplicated storage = 50 additional GB for deduplication tables.
Storage
Boot Disk 30 GB Hard disk for Linux boot and system disk (all EC2 instance types provideenough space to install and use SoftNAS Cloud®)
Data Disks Elastic Block Storage (EBS) provides block data storage on Amazon EC2.
Software RAID Recommended to configure EBS disks using SoftNAS software RAID for increasedperformance and data durability.
Networking Up to 120 MB/sec 1 GbE Small to Large instances provide up to 1GbE
connectivity. Use High I/O instances to increase networkthroughput.
HA Networking Not supported in Amazon EC2.HA Host Failover Configure multiple redundant SoftNAS Cloud® instances in separate availablity
zones or different geographic regions. Note: Refer to AWS for specific SSD performance metrics. CRITICAL: Do not use ephemeral disks for write logs. Ephemeral disks are local instance disks providinga much larger second-level read cache than RAM, and are typically more than twice as fast as standard EBSvolumes. However, the data stored here is temporary and therefore lost upon each reboot.

Installation and User Guide
Copyright ©2017 SoftNAS, Inc.
SoftNAS Cloud® System CapacitiesListed below is a table representing the capabilities of the SoftNAS Cloud® for Amazon Web Services. SoftNAS Cloud®
CapacityConfiguration Note
Editions SoftNAS Cloud®Express
1 TB
SoftNAS Cloud®Standard
20 TB
SoftNAS Cloud®Enterprise
16 PB
Memory RAM Cache 1 GB to 100 GB Defaults to 50% total RAM for read cacheSSD Cache low-speed level 2 cache OptionalEphemeral Cache low-speed level 2 cache Optional for read cache
Storage
Maximum Storage 16 PB Maximum usable storage capacity with SoftNASCloud®, contingent on license.
# of Storage Pools Unlimited # of Volumes Unlimited # of Snapshots Unlimited # of SnapshotClones
Unlimited
SnapReplicate Unlimited Pools& Volumes
SnapReplicateThrottle
56Kb/sec toUnlimited bandwidth
Active Directory Kerberos Integration Files and Directories Unlimited
Network Schedules Unlimited
NFS Exports: Linux Default iSCSI Targets Linux Default CIFS Shares Linux Default Firewall Ports: 22 (ssh), 443 (https) Plus NFS, iSCSI, and CIFS as required by networkIP Tables Firewall Off by default May be configured, but is not required. Use an
alternative method to set Security Groups unless addedfirewall protection on a SoftNAS Cloud® instance isrequired.
Installation and User Guide
Copyright ©2017 SoftNAS, Inc.
Configuring AWS Identity andAccess Management: Role and User
About IAMAmazon Web Services (AWS) Identity and Access Management (IAM) is a web service that enables AWScustomers to manage users and user permissions in AWS. The service is targeted at organizations with multipleusers or systems that use AWS products such as Amazon EC2, Amazon RDS, and the AWS ManagementConsole. With IAM, centrally manage users, security credentials such as access keys, and permissions thatcontrol which AWS resources users can access. Without IAM, organizations with multiple users and systems must either create multiple AWS accounts, eachwith its own billing and subscriptions to AWS products, or employees must all share the security credentials of asingle AWS account. Also, without IAM, there is no control over the tasks a particular user or system can do andwhat AWS resources they might use. IAM addresses this issue by enabling organizations to create multiple users (each user is a person, system, orapplication) who can use AWS products, each with individual security credentials, all controlled by and billed to asingle AWS account. With IAM, each user is allowed to do only what they need to do as part of the user's job. There are two methods by which one can set up Identity and Access Management for your SoftNAS Cloud®instance: • Creating the IAM Role for SoftNAS Cloud®• Specifying the IAM User for SoftNAS Cloud® We strongly recommend creating the IAM Role prior to setting up your instance, as it is the more secure method.Specifying an IAM User for your SoftNAS Cloud® instance is used when adding IAM functionality to existinginstances. Note: There is no need to create both the IAM Role and an IAM user. It is one or the other.
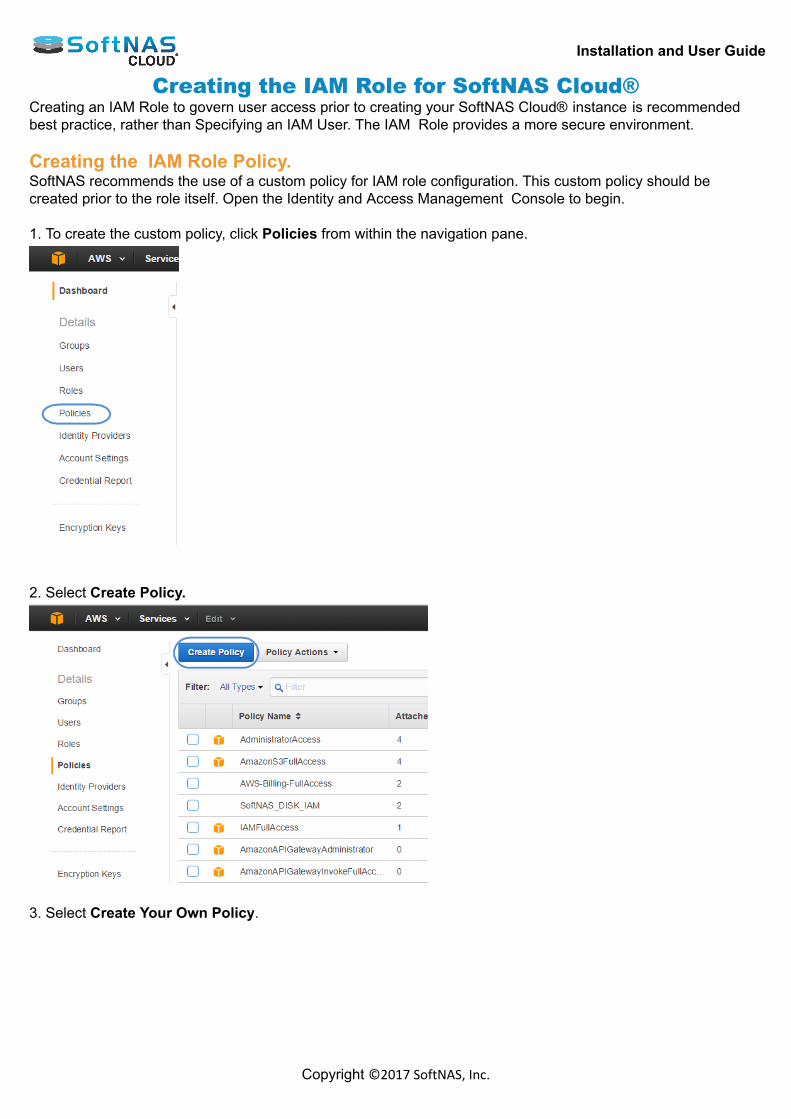
Installation and User Guide
Copyright ©2017 SoftNAS, Inc.
Creating the IAM Role for SoftNAS Cloud®Creating an IAM Role to govern user access prior to creating your SoftNAS Cloud® instance is recommendedbest practice, rather than Specifying an IAM User. The IAM Role provides a more secure environment. Creating the IAM Role Policy.SoftNAS recommends the use of a custom policy for IAM role configuration. This custom policy should becreated prior to the role itself. Open the Identity and Access Management Console to begin. 1. To create the custom policy, click Policies from within the navigation pane.
2. Select Create Policy.
3. Select Create Your Own Policy.
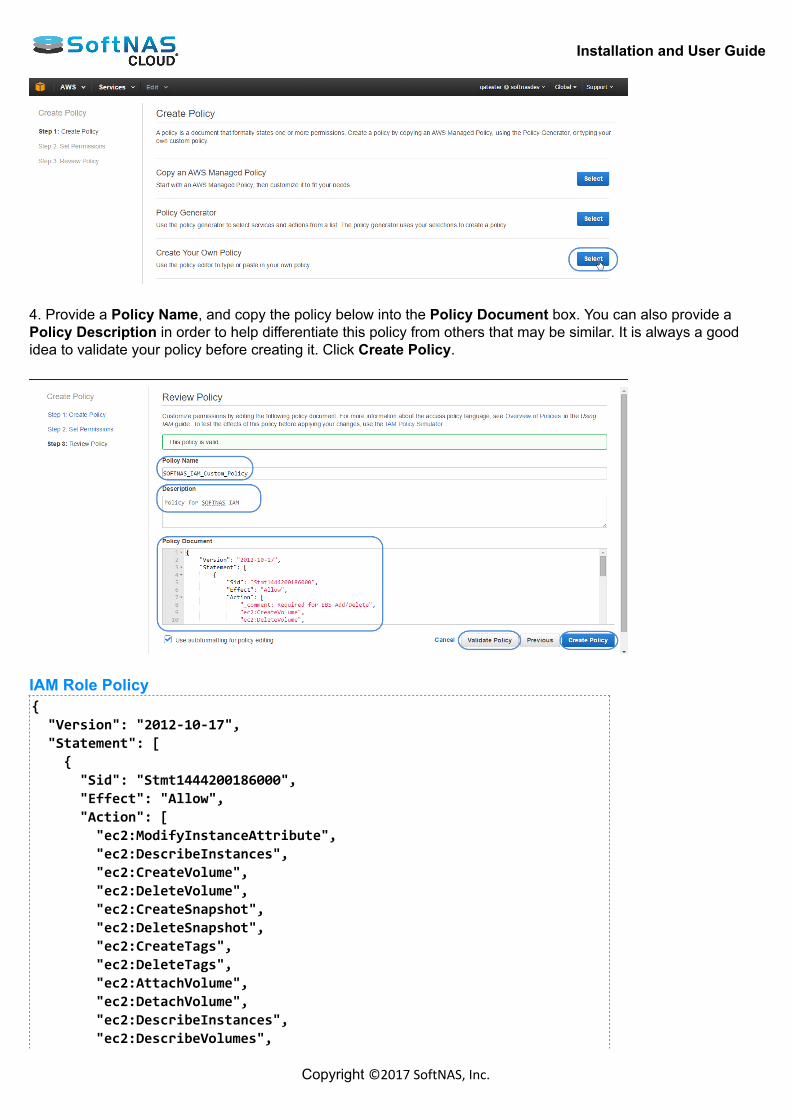
Installation and User Guide
Copyright ©2017 SoftNAS, Inc.
4. Provide a Policy Name, and copy the policy below into the Policy Document box. You can also provide aPolicy Description in order to help differentiate this policy from others that may be similar. It is always a goodidea to validate your policy before creating it. Click Create Policy.
IAM Role Policy{ "Version": "2012-10-17", "Statement": [ { "Sid": "Stmt1444200186000", "Effect": "Allow", "Action": [ "ec2:ModifyInstanceAttribute", "ec2:DescribeInstances", "ec2:CreateVolume", "ec2:DeleteVolume", "ec2:CreateSnapshot", "ec2:DeleteSnapshot", "ec2:CreateTags", "ec2:DeleteTags", "ec2:AttachVolume", "ec2:DetachVolume", "ec2:DescribeInstances", "ec2:DescribeVolumes",
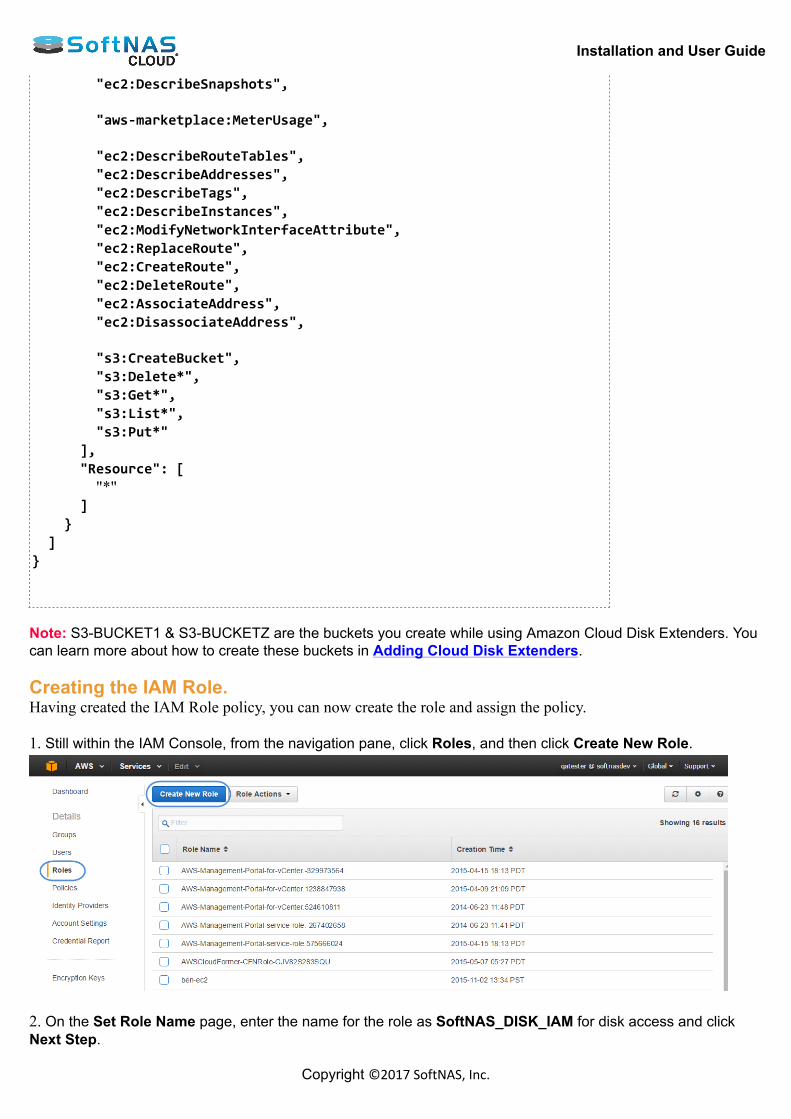
Installation and User Guide
Copyright ©2017 SoftNAS, Inc.
"ec2:DescribeSnapshots", "aws-marketplace:MeterUsage", "ec2:DescribeRouteTables", "ec2:DescribeAddresses", "ec2:DescribeTags", "ec2:DescribeInstances", "ec2:ModifyNetworkInterfaceAttribute", "ec2:ReplaceRoute", "ec2:CreateRoute", "ec2:DeleteRoute", "ec2:AssociateAddress", "ec2:DisassociateAddress", "s3:CreateBucket", "s3:Delete*", "s3:Get*", "s3:List*", "s3:Put*" ], "Resource": [ "*" ] } ]} Note: S3-BUCKET1 & S3-BUCKETZ are the buckets you create while using Amazon Cloud Disk Extenders. Youcan learn more about how to create these buckets in Adding Cloud Disk Extenders. Creating the IAM Role.Having created the IAM Role policy, you can now create the role and assign the policy. 1. Still within the IAM Console, from the navigation pane, click Roles, and then click Create New Role.
2. On the Set Role Name page, enter the name for the role as SoftNAS_DISK_IAM for disk access and clickNext Step.

Installation and User Guide
Copyright ©2017 SoftNAS, Inc.
Critical: Use only this role name, and remember that this string is case sensitive. 4. On the Select Role Type page, click Select next to Amazon EC2.
5. On the Attach Policy page, select the SoftNAS IAM Policy created earlier and click Next Step. (If you cannotfind the policy in question, change policy type to Customer Managed Policy)
Installation and User Guide
Copyright ©2017 SoftNAS, Inc.
6. Review the policy settings and click Create Role.

Installation and User Guide
Copyright ©2017 SoftNAS, Inc.
Specifying the IAM User for SoftNAS Cloud® Create the SoftNAS Cloud® AWS IAM User from the Amazon Web Services Dashboard. Specify the thepermissions for the resources that are required by SoftNAS Cloud® instances to operate safely and securely inthe AWS environment. The permissions are specified by applying a user policy to the SoftNAS Cloud® User. Creating the Policy To create the policy, follow the steps listed for Creating the IAM Role Policy, listed in short form for yourconvenience below:1. Click Policies from within the navigation pane.2. Select Create Policy.3. Select Create Your Own Policy.4. Provide a Policy Name, and copy the policy below into the Policy Document box. You can also provide aPolicy Description in order to help differentiate this policy from others that may be similar. It is always a goodidea to validate your policy before creating it. Click Create Policy. IAM User Policy{ "Version": "2012-10-17", "Statement": [ { "Sid": "Stmt1444200186000", "Effect": "Allow", "Action": [ "ec2:ModifyInstanceAttribute", "ec2:DescribeInstances", "ec2:CreateVolume", "ec2:DeleteVolume", "ec2:CreateSnapshot", "ec2:DeleteSnapshot", "ec2:CreateTags", "ec2:DeleteTags", "ec2:AttachVolume", "ec2:DetachVolume", "ec2:DescribeInstances", "ec2:DescribeVolumes", "ec2:DescribeSnapshots", "aws-marketplace:MeterUsage", "ec2:DescribeRouteTables", "ec2:DescribeAddresses", "ec2:DescribeTags", "ec2:DescribeInstances", "ec2:ModifyNetworkInterfaceAttribute", "ec2:ReplaceRoute", "ec2:CreateRoute", "ec2:DeleteRoute", "ec2:AssociateAddress", "ec2:DisassociateAddress", "s3:CreateBucket",

Installation and User Guide
Copyright ©2017 SoftNAS, Inc.
"s3:Delete*", "s3:Get*", "s3:List*", "s3:Put*" ], "Resource": [ "*" ] } ]} Note: S3-BUCKET1 & S3-BUCKETZ are the buckets you create while using Amazon Cloud Disk Extenders. Youcan learn more about how to create these buckets in Adding Cloud Disk Extenders. Linking the Policy To link the policy with the SoftNAS Cloud® User: 1. Login to the Amazon Web Services Dashboard.2. Click on Identity & Access Management (IAM).
This will bring up the IAM Secure AWS Access Control Dashboard. 3. From the Dashboard, click on Users.
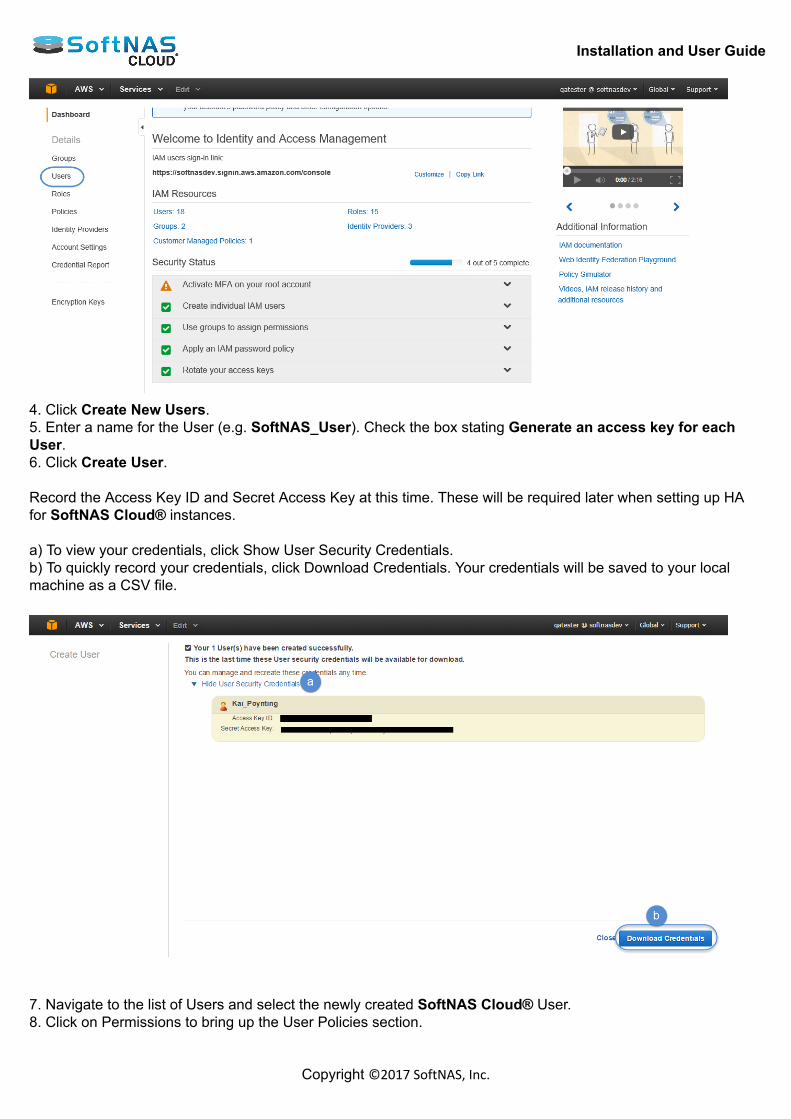
Installation and User Guide
Copyright ©2017 SoftNAS, Inc.
4. Click Create New Users.5. Enter a name for the User (e.g. SoftNAS_User). Check the box stating Generate an access key for eachUser.6. Click Create User. Record the Access Key ID and Secret Access Key at this time. These will be required later when setting up HAfor SoftNAS Cloud® instances. a) To view your credentials, click Show User Security Credentials.b) To quickly record your credentials, click Download Credentials. Your credentials will be saved to your localmachine as a CSV file.
7. Navigate to the list of Users and select the newly created SoftNAS Cloud® User.8. Click on Permissions to bring up the User Policies section.
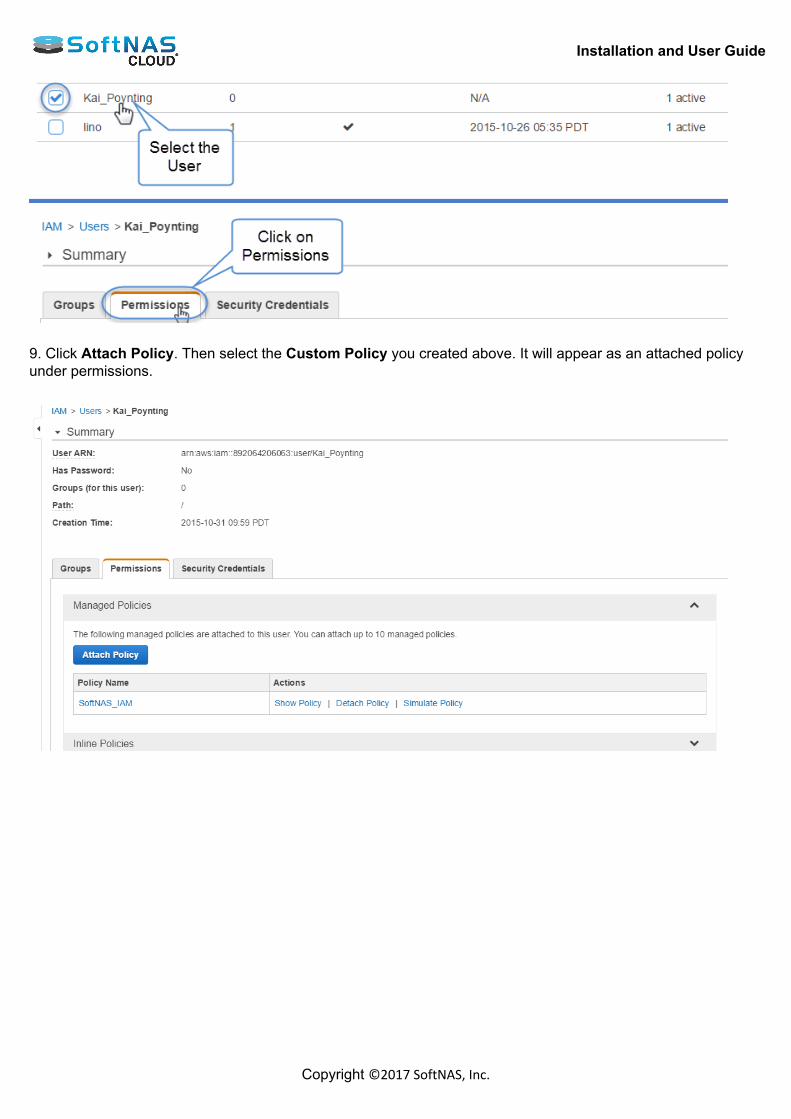
Installation and User Guide
Copyright ©2017 SoftNAS, Inc.
9. Click Attach Policy. Then select the Custom Policy you created above. It will appear as an attached policyunder permissions.
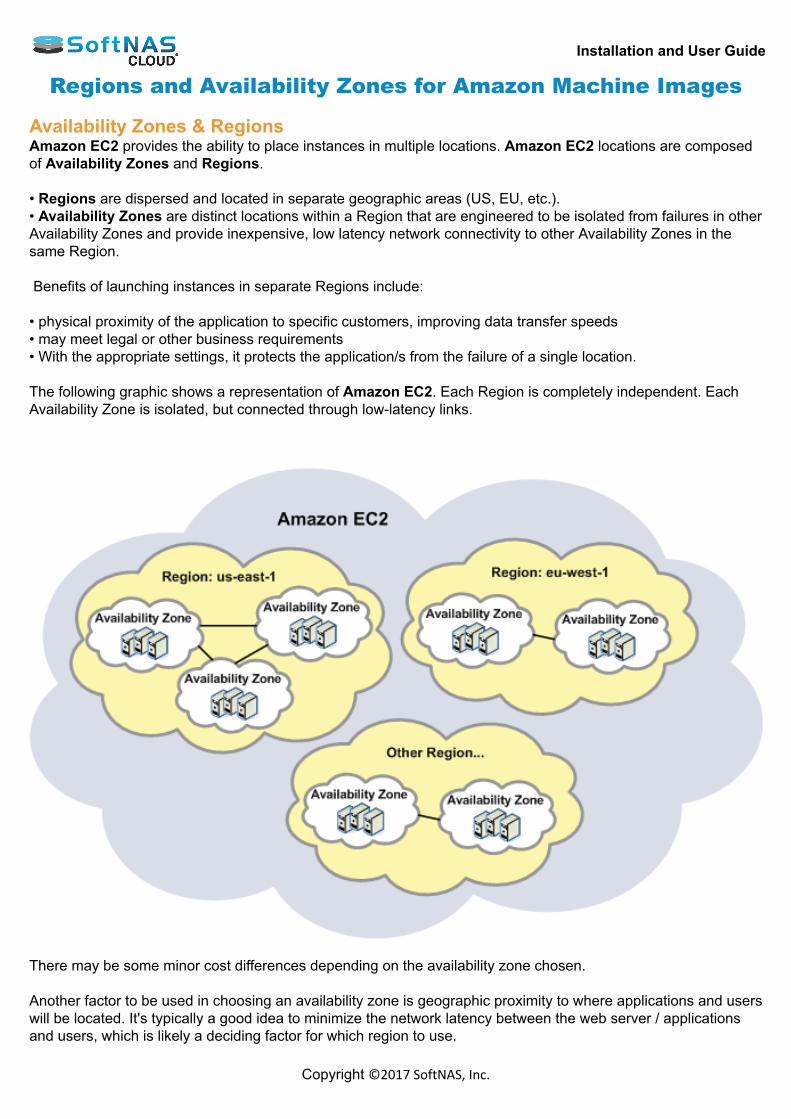
Installation and User Guide
Copyright ©2017 SoftNAS, Inc.
Regions and Availability Zones for Amazon Machine Images Availability Zones & RegionsAmazon EC2 provides the ability to place instances in multiple locations. Amazon EC2 locations are composedof Availability Zones and Regions. • Regions are dispersed and located in separate geographic areas (US, EU, etc.).• Availability Zones are distinct locations within a Region that are engineered to be isolated from failures in otherAvailability Zones and provide inexpensive, low latency network connectivity to other Availability Zones in thesame Region. Benefits of launching instances in separate Regions include: • physical proximity of the application to specific customers, improving data transfer speeds• may meet legal or other business requirements• With the appropriate settings, it protects the application/s from the failure of a single location. The following graphic shows a representation of Amazon EC2. Each Region is completely independent. EachAvailability Zone is isolated, but connected through low-latency links.
There may be some minor cost differences depending on the availability zone chosen. Another factor to be used in choosing an availability zone is geographic proximity to where applications and userswill be located. It's typically a good idea to minimize the network latency between the web server / applicationsand users, which is likely a deciding factor for which region to use.

Installation and User Guide
Copyright ©2017 SoftNAS, Inc.
Before beginning the configuration of SoftNAS on Amazon EC2, select the nearest location/region for AmazonMachine Image of SoftNAS on theSoftNAS site. Note : SoftNAS Cloud® is already installed as Amazon Machine Image (AMI), which means there's nothing todownload. Simply choose an AMI and and subsequent AWS region.
Take note of the region chosen. All AMIs created with this account will be launched in that region.
Installation and User Guide
Copyright ©2017 SoftNAS, Inc.
Elastic and Virtual IP AddressesWhen planning your AWS instance, it is important to keep high availability in mind prior to creating your instance.The decision to create a highly available storage solution using SoftNAS must be made early in order to allowyou to prepare your build accordingly. One decision that needs to be made early is whether to use Instance,Elastic or Virtual IPs. Beyond choosing the type of IP address you wish, there are many configuration stepsrequired to prepare for a high availability configuration. For complete coverage of high availability throughSoftNAS, go to our SoftNAS High-Availability Guide. Amazon EC2 provides three types of IP addresses: 1) Instance IP address: each instance is assigned a dynamic IP address, assigned by DHCP. These are on theinternal, private network, assigned by DHCP. They will be different each time a SoftNAS instance is booted. 2) Elastic IP address: these are static IP addresses, and is recommended for use with SoftNAS, if not usingVirtual IPs. These IP addresses are public-facing, static IP addresses which are "associated" with a particularinstance. While associated with an instance, these IP addresses are always the same, so there is a predictableway to address each SoftNAS instance in the environment. Elastic IP addresses are termed "elastic" as they canbe dynamically reassigned (moved) from once instance to another. 3)Virtual IP addresses: SoftNAS now supports the set up of highly available VPCs with private subnets usingvirtual IPs. Elastic IP setup is still supported for legacy purposes. However, Virtual IP setup, more securebecause it does not require a public facing IP, is our recommended best practice. If setting up SoftNAS SNAP
HATM with virtual IPs, there is no need to create Elastic IPs at all. The IPs assigned statically or via DHCP atinstance creation time can be retained. Virtual IPs and High AvailabilitySetup and maintenance of Virtual IP addresses are covered in the SoftNAS High-Availability Guide. Virtual IPaddresses are relatively simple to set up, requiring only that each VPC instance must have an IP in the sameCIDR block. A third IP outside this CIDR block will be selected during the HA wizard setup. This will be the IPaddress you will use to access the highly available share, whichever instance is currently the primary. There are multiple ways to configure secure administrative access to the SoftNAS SNAP HA™ storagecontrollers: 1) VPN - this is the most secure stand-alone solution, and a recommended minimum best practice for limitingaccess to the private IPs of each SoftNAS Cloud® controller. In this case, use DNS to assign a common nameto each controller (e.g., "nas01.localdomain.com", "nas02.localdomain.com"), making routing to each SoftNASCloud® controller convenient for administrators. 2) Admin Desktop - an even more secure approach is to combine VPN access with an Administrator's desktop,(sometimes referred to as a jumpbox) typically running Windows and accessed via RDP. This secure admindesktop adds another layer of authentication, namely Active Directory (or local account) authentication. Elastic IPs, HA and Dynamic DNSElastic IPs were long the go-to method, providing the flexibility to create a high-availability (HA) configuration.With the ability to configure Virtual IPs, more secure because it offers no public IP access point, Elastic IPs areno longer the recommended configuration, but are supported for legacy purposes as they are still widely used.
For more information on the SoftNAS High Availability technology via SNAP HATM or SnapReplicate, consult theSoftNAS High-Availability Guide.
Installation and User Guide
Copyright ©2017 SoftNAS, Inc.
As a quick example, consider two SoftNAS instances with replication between them configured as an Active-Passive HA pair in different availability zones in the same region (or across regions, as applicable to local needs).Let's call these SoftNAS instances "A" and "B", where "A" is currently the active, primary NAS. Assign three elastic IP addresses - one for A, one for B, and one "floating" elastic IP used for failover.Applications and DNS for SoftNAS Cloud® would reference the third elastic IP, as shown below.
Elastic IP Assigned ToIP 1 SoftNAS Instance AIP 2 SoftNAS Instance BIP 3 DNS - points to instance A initially
In this configuration, IP 1 and IP 2 are used to administer and perform replication between SoftNAS instances.DNS points to "A", which is the active SoftNAS instance. In this configuration, replication is configured to flowfrom "A" to "B", so that "B" is effectively a mirror of "A", always ready for a failover. In the event of a zone failure, physical disk failure or scheduled downtime / maintenance, IP 3 can be reassignedto "B", which becomes the active instance. When "A" is restored, replication can be reconfigured to flow from "B"to "A". Note: It can take up to 30 seconds to complete an elastic IP reassignment to a different instance. Alternatively, use IP 1 and IP 2 (without IP 3) and use dynamic DNS with a short TTL (time to live) and performfailover by simply reassigning the IP 1 or IP 2 via dynamic DNS. There are many different ways to configure HA and IP addresses - the above represents just a few ways,provided to illustrate the flexibility provided by elastic IP addressing and/or dynamic DNS. For more information:
• Allocating New Elastic IP Address • Associating and Disassociating an Address
Releasing the Address It is best practice to release the addresses that are no longer being used. To do so: 1. On the Elastic IP addresses page, select the address to be released. Note: Release the Elastic IP address that is not associated with an instance. 2. Click Release Address. The Release Address message box asking to confirm the releasing of the address will be displayed. The selected IP address will be released.
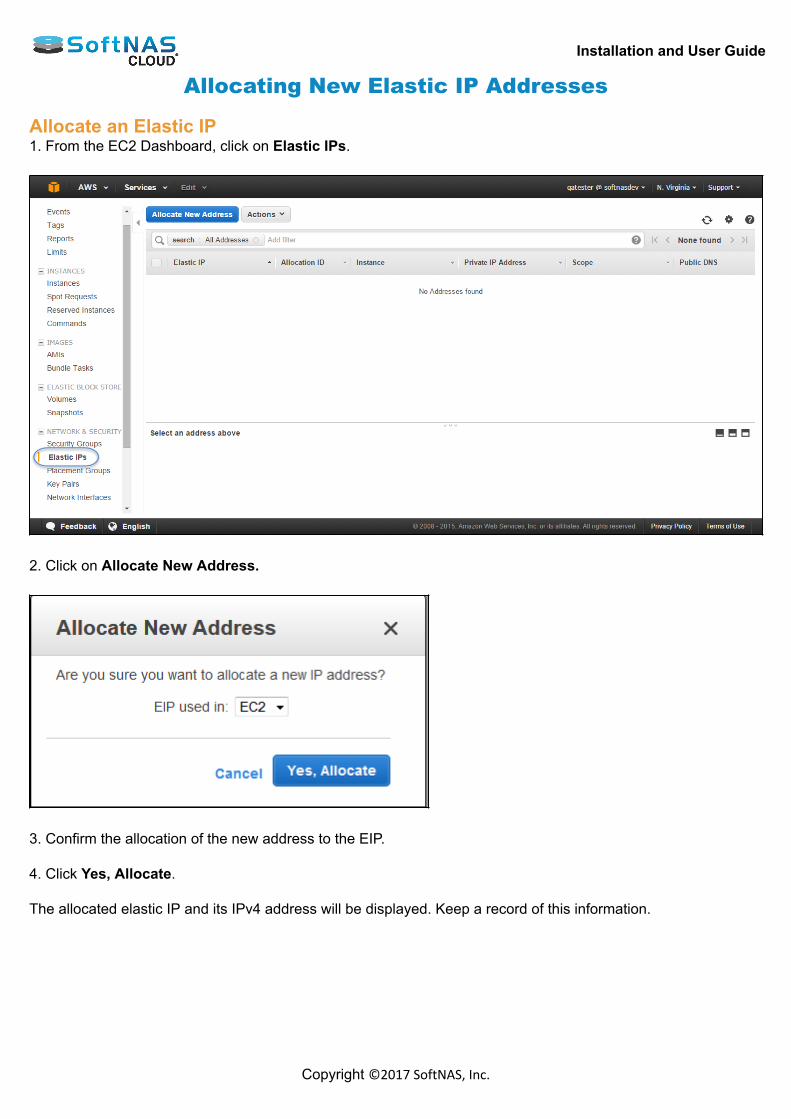
Installation and User Guide
Copyright ©2017 SoftNAS, Inc.
Allocating New Elastic IP Addresses Allocate an Elastic IP1. From the EC2 Dashboard, click on Elastic IPs.
2. Click on Allocate New Address.
3. Confirm the allocation of the new address to the EIP. 4. Click Yes, Allocate. The allocated elastic IP and its IPv4 address will be displayed. Keep a record of this information.
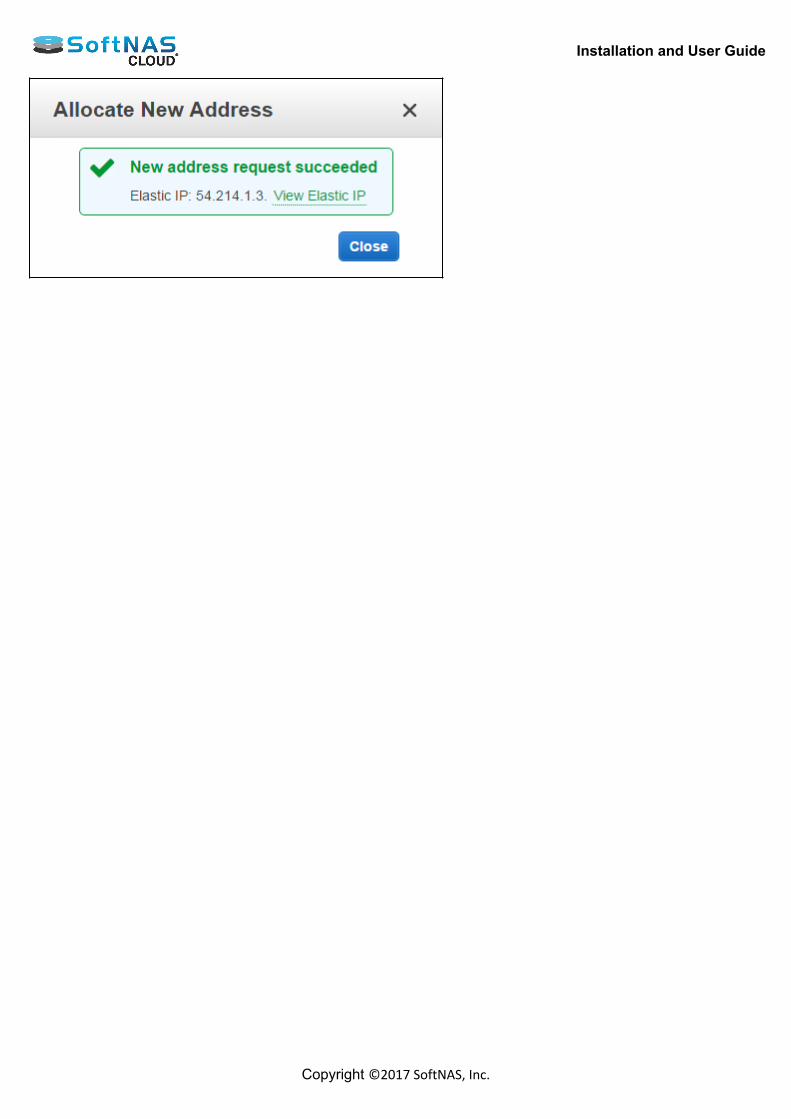
Installation and User Guide
Copyright ©2017 SoftNAS, Inc.

Installation and User Guide
Copyright ©2017 SoftNAS, Inc.
Associating and Disassociating an Address Associate or dissociate an elastic IP address with an instance. Associating an Address1. On the Elastic IP addresses page, select the address to be associated with an instance.
2. Under Actions, click Associate Address.
The Associate Address dialog will be displayed.
3. Select the instance to be associated from the Instance drop down list. 4. Click Associate. The elastic IP address is now associated with SoftNAS Cloud®.

Installation and User Guide
Copyright ©2017 SoftNAS, Inc.
Disassociate AddressSimilarly, it is possible to dissociate an address from the associated instance. 1. Select the elastic IP address to be dissociated from the instance. 2. Click Dissociate Address. The Dissociate Address message box asking for confirmation of the dissociation of address with the specificinstance will be displayed. 3. Click Yes, Disassociate. The selected address will be dissociated from the instance.
Installation and User Guide
Copyright ©2017 SoftNAS, Inc.
Amazon EC2 Setup and Performance Considerations Network Planning ConsiderationsTake into account best practices for AWS EC2 combined with SoftNAS Cloud® optimization configurationsbefore getting started with SoftNAS Cloud® for Amazon EC2. Note: For extremely heavy workloads, increase cache memory with High Memory Instances and / or EBS-Optimized and Bursting IOPS to provide better control over available IOPS. Consult the AWS Instancessection for more detailed recommendations and explanations on this topic. 2nd Level Read CacheTo further improve read and query performance, configure a Read Cache device for use with SoftNAS Cloud®.SoftNAS Cloud® leverages the ZFS L2ARC as its second-level cache. AWS EC2 Read CacheDuring instance creation, choose an instance type that includes local solid state disk (SSD) disks. The storageserver will make use of as much read cache as is provided to it. Read cache devices can be added and removedat any time with no risk of data loss to an existing storage pool. There are two choices for SSD read cache onEC2: 1. Local SSD - the fastest read cache available, as the local SSDs are directly attached to each EC2 instanceand provide up to 120,000 IOPS.2. EBS Provisioned IOPS - these EBS volumes can be assigned to SSD, providing a specified level ofguaranteed IOPS.
Installation and User Guide
Copyright ©2017 SoftNAS, Inc.
Create and Configure an Instance in AWS Amazon Web Services provides virtual cloud platform and computing resources for developers and ITprofessionals. SoftNAS Cloud® provides a powerful shared-storage interface into this robust resource throughunified connections of CIFS, NFS, iSCSI, giving the virtually unlimited capacity, remote replication, and highavailability needed for the expected workload. 1. Complete the Launching SoftNAS Cloud® Platforms initial registration procedure, beginning fromwww.softnas.com and choose SoftNAS Cloud® for AWS. 2. Continue through the registration wizard. 3. A SoftNAS Cloud® for Amazon Marketplace pricing page will ultimately appear. Choose to Launch with 1-Click or change preferred settings in the Manual Launch page and Launch from EC2 Console. Note: Review all pricing structure and usage fees in each section before confirming or launching an instance.Some settings will impact usage and subscription fees, even during a trial period.Amazon defines instance as "a copy of an Amazon Machine Image running as a virtual server in the AWScloud." This guide will use the AWS terminology in this section for UI consistency. Manual Launch ProcedureTo maximize customization, Manual Launch is the recommended choice for initial setup. Below are the basicsteps to follow. 1. Launch Instance• Once an AWS account has been created, log on to Amazon EC2 and navigate to EC2 Dashboard.• Create Instance from the Launch Instance item that appears on the Dashboard as well as the Instances page.
Note: The active region is visible in the Amazon Header menu next to the access email address. This can bechanged to create servers in different regions, but keep in mind budgeted subscription costs and data usagefees. Also consider permissions for different user levels at this stage. 2. Choose a SoftNAS Cloud® Amazon Machine Image (AMI)From the menu on the left, click AWS Marketplace and search for SoftNAS. Note: SoftNAS Cloud® supports two different virtualization types, either paravirtual (PV) or hardware virtualmachine (HVM, required for Enhanced Network Support, recommended) on General Use or Enterprise Level.Choose the instance type that supports predicted network requirements.
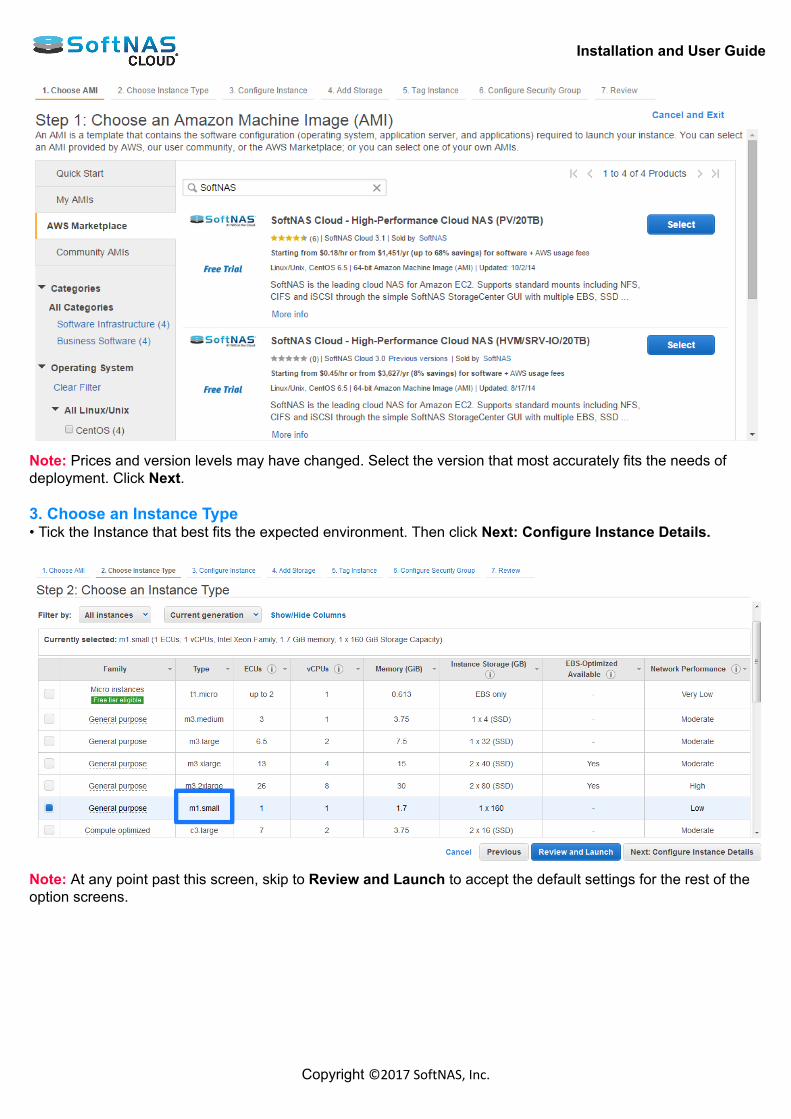
Installation and User Guide
Copyright ©2017 SoftNAS, Inc.
Note: Prices and version levels may have changed. Select the version that most accurately fits the needs ofdeployment. Click Next. 3. Choose an Instance Type• Tick the Instance that best fits the expected environment. Then click Next: Configure Instance Details.
Note: At any point past this screen, skip to Review and Launch to accept the default settings for the rest of theoption screens.

Installation and User Guide
Copyright ©2017 SoftNAS, Inc.
General Instance Types and Setup RecommendationsConsider the recommendations in section AWS Instances for a clearer network design. Note: Micro instances may be adequate for some development and QA testing purposes, but consider thelimitations on memory, CPU and network that are imposed on micro instances. These limitations have asignificant impact on SoftNAS Cloud®'s performance and throughput. View Instance DetailsView the complete details of an instance that is successfully launched. 1. Click Instances in the left panel. All the instances in the region will be displayed. 2. Select the instance for whose details are to be viewed. The details of that instance will be displayed at the bottom of the screen in different tabs.
3. The Description tab shows all the basic and general information of the instance. 4. The Status Checks tab displays the information on system status checks and instance status checks. StatusCheck Alarms are created from here. Status Checks & Alarms
5. The Monitoring tab displays all the CloudWatch alarm and metrics in graph format. 6. The Tags tab will show all the tags that are associated with the instance. Add, edit or remove tags in this area.
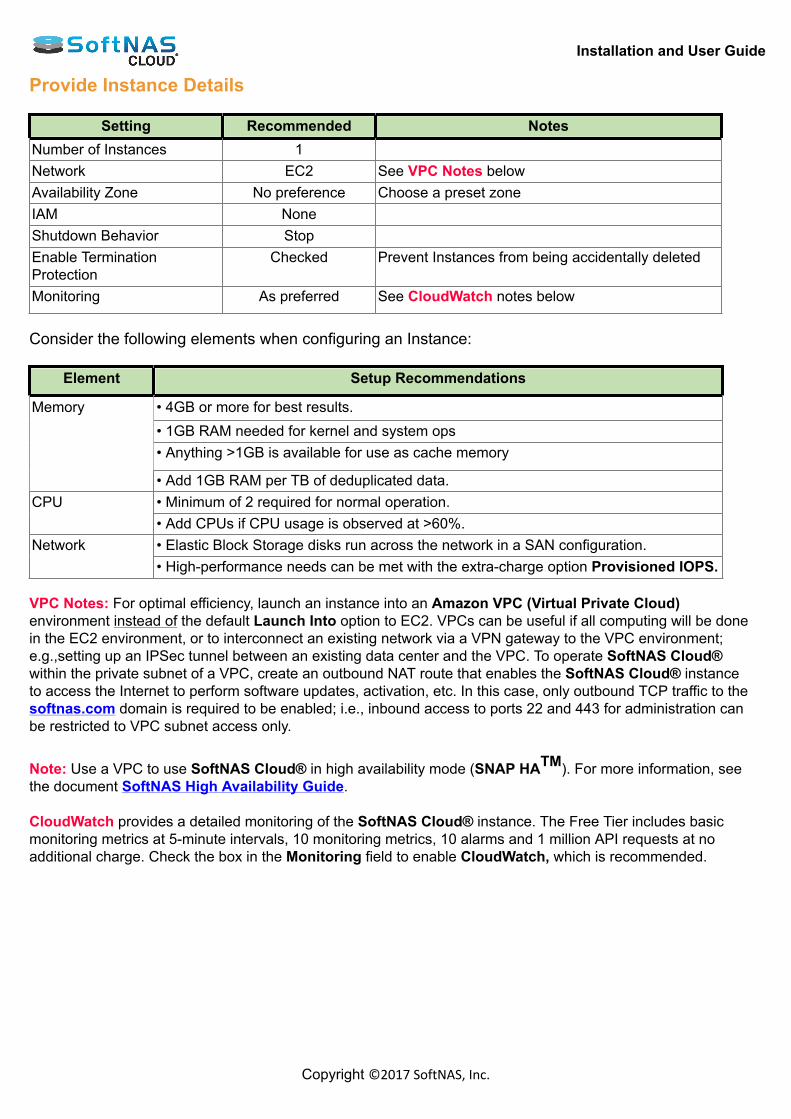
Installation and User Guide
Copyright ©2017 SoftNAS, Inc.
Provide Instance Details
Setting Recommended NotesNumber of Instances 1 Network EC2 See VPC Notes belowAvailability Zone No preference Choose a preset zoneIAM None Shutdown Behavior Stop Enable TerminationProtection
Checked Prevent Instances from being accidentally deleted
Monitoring As preferred See CloudWatch notes below Consider the following elements when configuring an Instance:
Element Setup Recommendations
• 4GB or more for best results.• 1GB RAM needed for kernel and system ops• Anything >1GB is available for use as cache memory
Memory
• Add 1GB RAM per TB of deduplicated data.• Minimum of 2 required for normal operation.CPU• Add CPUs if CPU usage is observed at >60%.• Elastic Block Storage disks run across the network in a SAN configuration.Network• High-performance needs can be met with the extra-charge option Provisioned IOPS.
VPC Notes: For optimal efficiency, launch an instance into an Amazon VPC (Virtual Private Cloud)environment instead of the default Launch Into option to EC2. VPCs can be useful if all computing will be donein the EC2 environment, or to interconnect an existing network via a VPN gateway to the VPC environment;e.g.,setting up an IPSec tunnel between an existing data center and the VPC. To operate SoftNAS Cloud®within the private subnet of a VPC, create an outbound NAT route that enables the SoftNAS Cloud® instanceto access the Internet to perform software updates, activation, etc. In this case, only outbound TCP traffic to thesoftnas.com domain is required to be enabled; i.e., inbound access to ports 22 and 443 for administration canbe restricted to VPC subnet access only.
Note: Use a VPC to use SoftNAS Cloud® in high availability mode (SNAP HATM). For more information, seethe document SoftNAS High Availability Guide. CloudWatch provides a detailed monitoring of the SoftNAS Cloud® instance. The Free Tier includes basicmonitoring metrics at 5-minute intervals, 10 monitoring metrics, 10 alarms and 1 million API requests at noadditional charge. Check the box in the Monitoring field to enable CloudWatch, which is recommended.
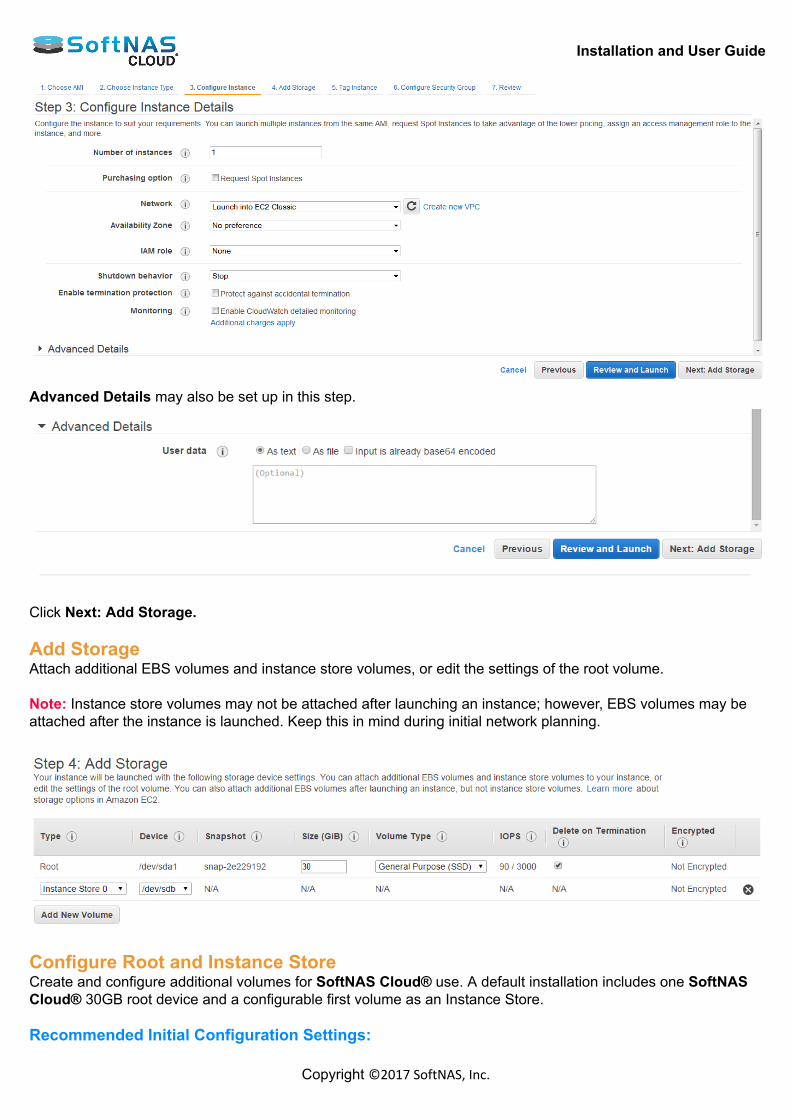
Installation and User Guide
Copyright ©2017 SoftNAS, Inc.
Advanced Details may also be set up in this step.
Click Next: Add Storage. Add StorageAttach additional EBS volumes and instance store volumes, or edit the settings of the root volume. Note: Instance store volumes may not be attached after launching an instance; however, EBS volumes may beattached after the instance is launched. Keep this in mind during initial network planning.
Configure Root and Instance StoreCreate and configure additional volumes for SoftNAS Cloud® use. A default installation includes one SoftNASCloud® 30GB root device and a configurable first volume as an Instance Store. Recommended Initial Configuration Settings:
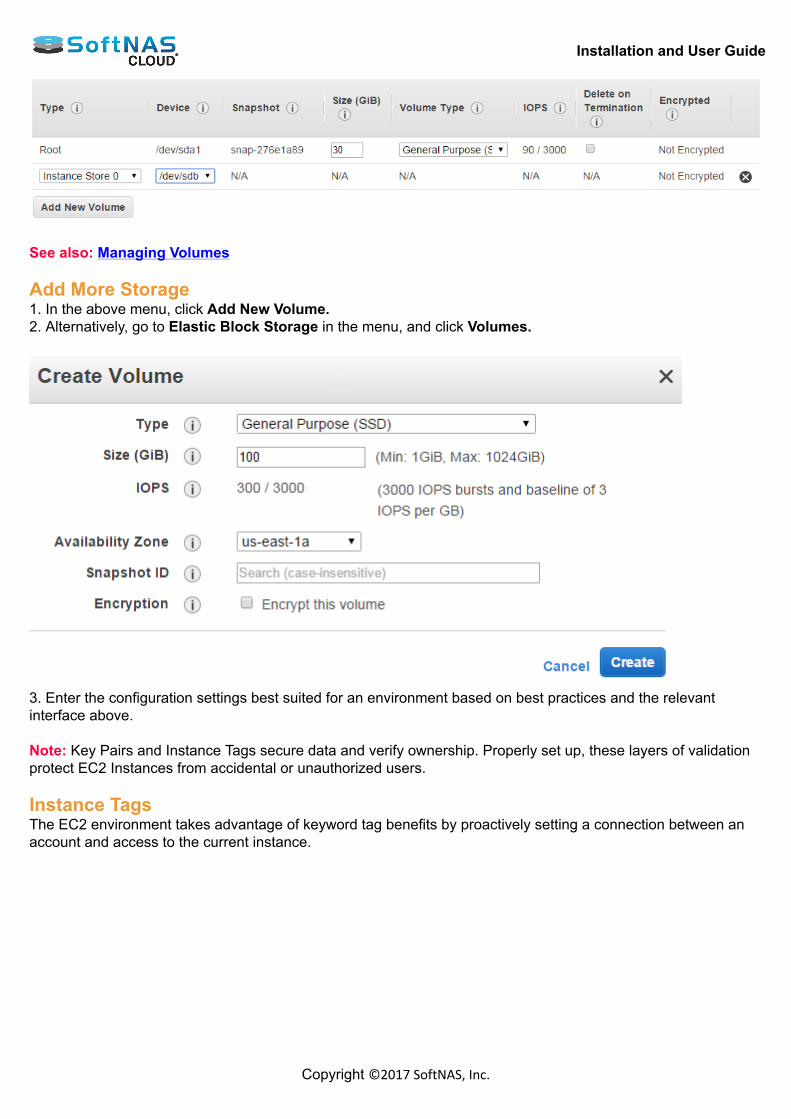
Installation and User Guide
Copyright ©2017 SoftNAS, Inc.
See also: Managing Volumes Add More Storage1. In the above menu, click Add New Volume.2. Alternatively, go to Elastic Block Storage in the menu, and click Volumes.
3. Enter the configuration settings best suited for an environment based on best practices and the relevantinterface above. Note: Key Pairs and Instance Tags secure data and verify ownership. Properly set up, these layers of validationprotect EC2 Instances from accidental or unauthorized users. Instance TagsThe EC2 environment takes advantage of keyword tag benefits by proactively setting a connection between anaccount and access to the current instance.

Installation and User Guide
Copyright ©2017 SoftNAS, Inc.
Note the following basic tag restrictions:• The aws: prefix is reserved for AWS use, and tags with this prefix do not count against tags per resource limit.• Maximum Tags: 10 tags per resource• Maximum Key String: 127 Unicode characters (case-sensitive)• Maximum Value String: 255 Unicode characters (case-sensitive) Creating or Selecting a Security GroupNext, network settings and services can be determined in advance by setting up a Security Group.
1. If creating a new security group for your instance, select the Create a new security group radio button.2. To create a custom configuration, simply click Add Rule, and select the desired protocol, the desired port, andfor improved security, place a limit on the accepted source IP.3. To select an existing security group configuration, click the Select an existing security group radio button,and select the desired option from the dropdown that appears. Creating a Key PairA Key Pair is a pair of security credentials associated with this Instance; the Public Key and the Private Key.TheCreate Key Pair section of the wizard will be displayed. In this step, create a public/private key pair used withSSH to access and administer the SoftNAS Cloud® instance in the cloud.
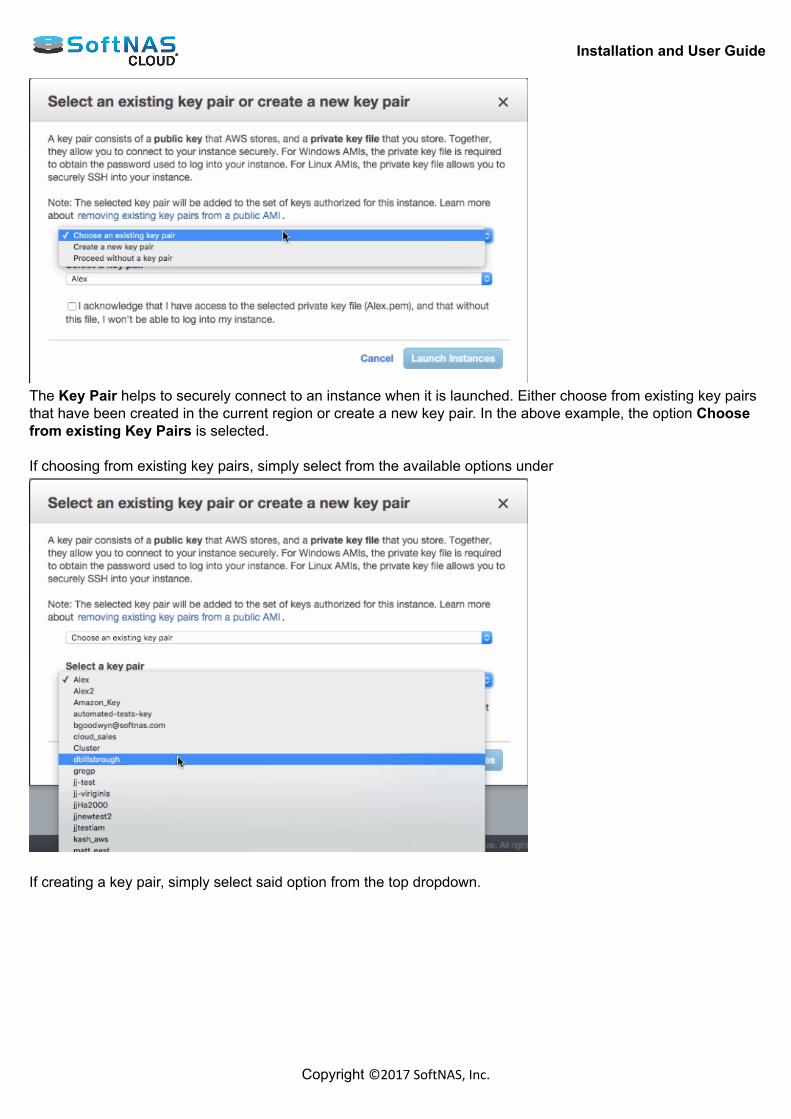
Installation and User Guide
Copyright ©2017 SoftNAS, Inc.
The Key Pair helps to securely connect to an instance when it is launched. Either choose from existing key pairsthat have been created in the current region or create a new key pair. In the above example, the option Choosefrom existing Key Pairs is selected. If choosing from existing key pairs, simply select from the available options under
If creating a key pair, simply select said option from the top dropdown.

Installation and User Guide
Copyright ©2017 SoftNAS, Inc.
Upon clicking Create a new key pair, the following dialog appears:
Name this key pair something that will help identify it later. Download the .pem file created, in order to gainaccess to your VM. As the warning below states, this will be the only opportunity to do so.
Note: Do not select the Proceed without a Key Pair option. If an instance is launched without a key pair, it willbe inaccessible. This option is used only when creating an AMI, and/or when connecting to the instance is notcritical. Click on Launch Instances. Add Disks Adding Amazon S3 Cloud Disks Adding Amazon EBS Disks
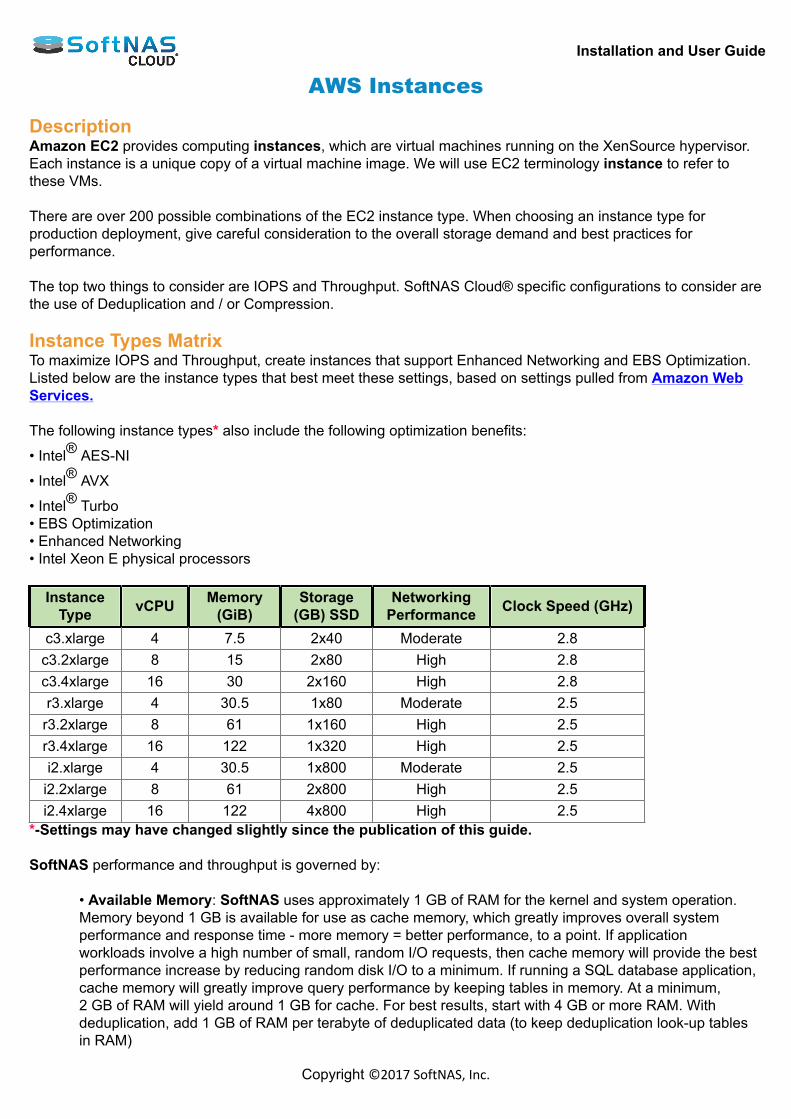
Installation and User Guide
Copyright ©2017 SoftNAS, Inc.
AWS Instances DescriptionAmazon EC2 provides computing instances, which are virtual machines running on the XenSource hypervisor.Each instance is a unique copy of a virtual machine image. We will use EC2 terminology instance to refer tothese VMs. There are over 200 possible combinations of the EC2 instance type. When choosing an instance type forproduction deployment, give careful consideration to the overall storage demand and best practices forperformance. The top two things to consider are IOPS and Throughput. SoftNAS Cloud® specific configurations to consider arethe use of Deduplication and / or Compression. Instance Types MatrixTo maximize IOPS and Throughput, create instances that support Enhanced Networking and EBS Optimization.Listed below are the instance types that best meet these settings, based on settings pulled from Amazon WebServices. The following instance types* also include the following optimization benefits:
• Intel® AES-NI
• Intel® AVX
• Intel® Turbo• EBS Optimization• Enhanced Networking• Intel Xeon E physical processors
InstanceType vCPU Memory
(GiB)Storage
(GB) SSDNetworking
Performance Clock Speed (GHz)
c3.xlarge 4 7.5 2x40 Moderate 2.8c3.2xlarge 8 15 2x80 High 2.8c3.4xlarge 16 30 2x160 High 2.8r3.xlarge 4 30.5 1x80 Moderate 2.5
r3.2xlarge 8 61 1x160 High 2.5r3.4xlarge 16 122 1x320 High 2.5i2.xlarge 4 30.5 1x800 Moderate 2.5
i2.2xlarge 8 61 2x800 High 2.5i2.4xlarge 16 122 4x800 High 2.5
*-Settings may have changed slightly since the publication of this guide. SoftNAS performance and throughput is governed by:
• Available Memory: SoftNAS uses approximately 1 GB of RAM for the kernel and system operation.Memory beyond 1 GB is available for use as cache memory, which greatly improves overall systemperformance and response time - more memory = better performance, to a point. If applicationworkloads involve a high number of small, random I/O requests, then cache memory will provide the bestperformance increase by reducing random disk I/O to a minimum. If running a SQL database application,cache memory will greatly improve query performance by keeping tables in memory. At a minimum,2 GB of RAM will yield around 1 GB for cache. For best results, start with 4 GB or more RAM. Withdeduplication, add 1 GB of RAM per terabyte of deduplicated data (to keep deduplication look-up tablesin RAM)

Installation and User Guide
Copyright ©2017 SoftNAS, Inc.
• CPU: SoftNAS needs a minimum of 2 CPUs for normal operation. To maintain peak performance whenusing the Compression feature, add CPUs (e.g.,4 CPU) if CPU usage is observed at 60% or greater onaverage.
• Network - In EC2, SoftNAS uses Elastic Block Storage (EBS), which are disks running across thenetwork in a SAN (storage area network) configuration. This means all disk I/O travels across a sharednetwork connecting the EC2 computing instance with the SAN. This makes network I/O an importantfactor in SoftNAS Cloud® environment performance.
• Multiple Performance & Scale Options: EC2 offers Fixed Performance Instances (e.g. m3, c3, andr3) as well as Burstable Performance Instances (e.g. t2) for occasional heavy use over baseline. EC2also offers many instance sizes and configurations. Consider all potential networking requirements whenchoosing instance type. Purchasing models include On-Demand, Reserved, and Spot Instances.
AWS EC2 Best PracticesTo get the best performance out of SoftNAS Cloud® in an AWS environment, consult the following bestpractices: Regions for Amazon Machine Images AWS Instances Elastic IPs
Installation and User Guide
Copyright ©2017 SoftNAS, Inc.
General Instance Type RecommendationsHere are some general recommendations for getting started with EC2 and SoftNAS.
• Standard: A good starting point in regards to memory and CPU resources. This category is suited tohandle the processing and caching with minimal requirements for network bandwidth. • Medium: Good for workloads that are read intensive, and will benefit from the larger memory-based read cache for this category. The additional CPU will also provide better performance whendeduplication, encryption, compression and/or RAID is enabled.
• High: This category can be used for workloads that require a very high speed network connection dueto the amount of data transferred over a network connection. In addition to the very high speed network,this level of instance gives you a lot more storage, CPU and memory capacity.
For extremely heavy workloads, increase cache memory with "High-Memory Instances" and/or use EBS-Optimized and Provisioned IOPS to provide better control over available IOPS. Note: Micro instances may be adequate for some development and QA testing purposes, and to keep costs low;however, be aware of the significant memory, CPU and network limits imposed on micro instances, which willcertainly limit performance and throughput of SoftNAS.
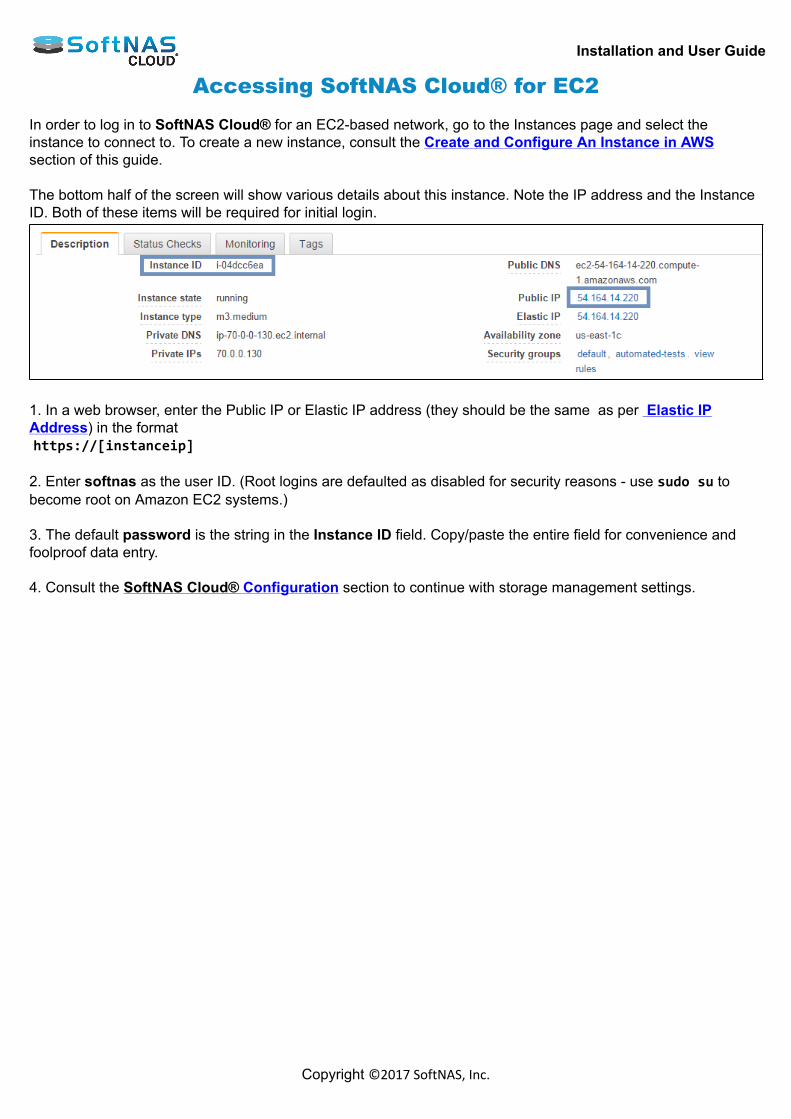
Installation and User Guide
Copyright ©2017 SoftNAS, Inc.
Accessing SoftNAS Cloud® for EC2 In order to log in to SoftNAS Cloud® for an EC2-based network, go to the Instances page and select theinstance to connect to. To create a new instance, consult the Create and Configure An Instance in AWSsection of this guide. The bottom half of the screen will show various details about this instance. Note the IP address and the InstanceID. Both of these items will be required for initial login.
1. In a web browser, enter the Public IP or Elastic IP address (they should be the same as per Elastic IPAddress) in the format https://[instanceip] 2. Enter softnas as the user ID. (Root logins are defaulted as disabled for security reasons - use sudo su tobecome root on Amazon EC2 systems.) 3. The default password is the string in the Instance ID field. Copy/paste the entire field for convenience andfoolproof data entry. 4. Consult the SoftNAS Cloud® Configuration section to continue with storage management settings.
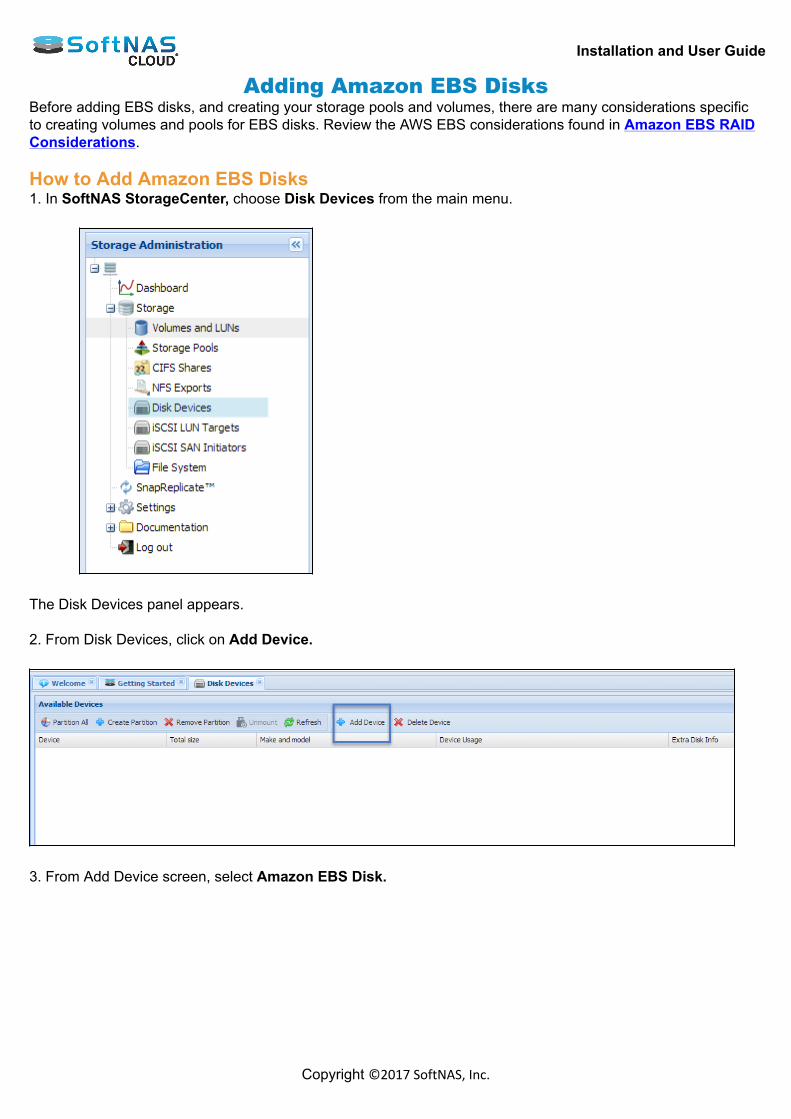
Installation and User Guide
Copyright ©2017 SoftNAS, Inc.
Adding Amazon EBS DisksBefore adding EBS disks, and creating your storage pools and volumes, there are many considerations specificto creating volumes and pools for EBS disks. Review the AWS EBS considerations found in Amazon EBS RAIDConsiderations. How to Add Amazon EBS Disks1. In SoftNAS StorageCenter, choose Disk Devices from the main menu.
The Disk Devices panel appears. 2. From Disk Devices, click on Add Device.
3. From Add Device screen, select Amazon EBS Disk.
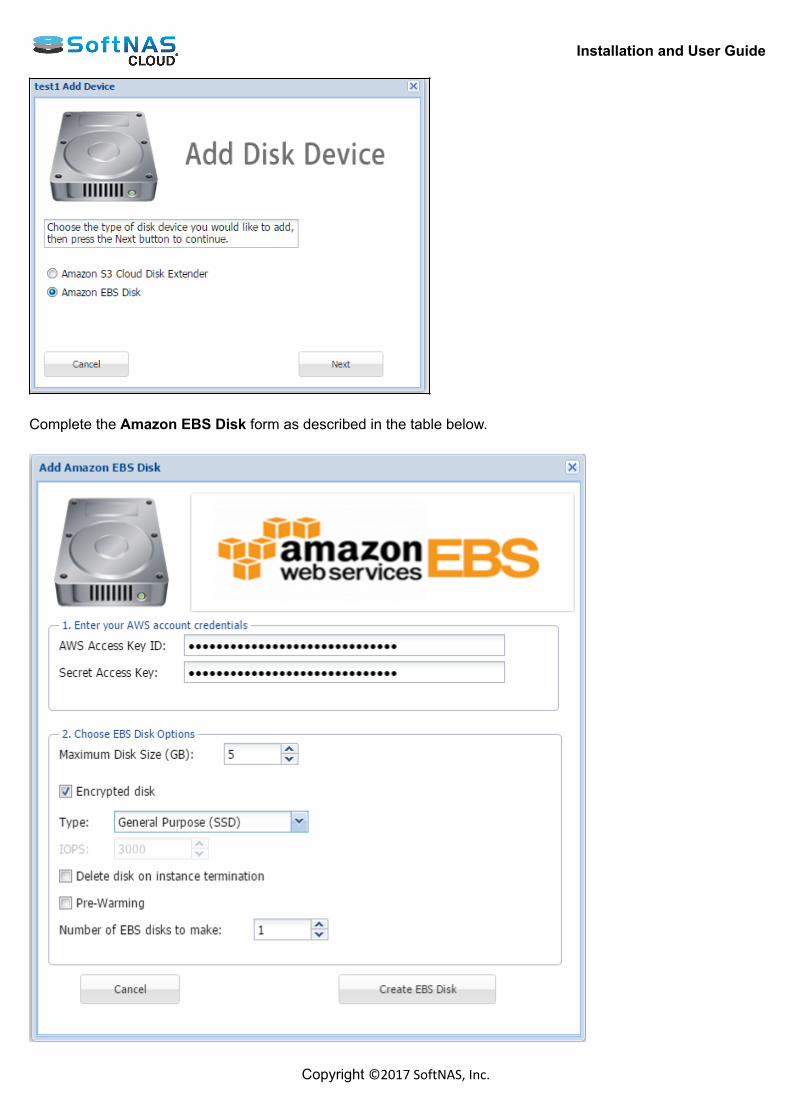
Installation and User Guide
Copyright ©2017 SoftNAS, Inc.
Complete the Amazon EBS Disk form as described in the table below.

Installation and User Guide
Copyright ©2017 SoftNAS, Inc.
Add Amazon Disk Reference TableParameter Description
AWS accountcredentials
Enter the AWS account credentials used to access Amazon Web Services. Note: If AWS account credentials are unavailable (grayed out), an Amazon IAM Rolewas specified at SoftNAS Cloud® instance creation. Creating a SoftNAS Cloud®IAM user from the Amazon Web Services Dashboard is the recommended approachfor a more secure connection to AWS. Creating the SoftNAS Cloud® S3/EBS IAM Role for AWS
EBS Disk Options Maximum Disk Size:Must be between 1-1024 GB. Encrypted Disk:Check this option and provide a Disk Password to encrypt the contents of the EBSdisk to ensure its contents cannot be accessed, except via this EBS Disk. Type:General Purpose SSD: General Purpose (SSD) volumes offer cost-effectivestorage that is ideal for a broad range of workloads. These volumes deliversingle-digit millisecond latencies, the ability to burst to 3,000 IOPS for extendedperiods of time, and a base performance of 3 IOPS/GiB. General Purpose (SSD)volumes can range in size from 1 GiB to 1 TiB. Provisioned IOPS (SSD): Provisioned IOPS (SSD) volumes are designed to meetthe needs of I/O-intensive workloads, particularly database workloads, thatare sensitive to storage performance and consistency in random access I/Othroughput. Specify an IOPS rate (using the dropdown provided when the option isselected) when the volume is created, and Amazon EBS delivers within 10 percent ofthe provisioned IOPS performance 99.9 percent of the time over a given year. Standard: Magnetic volumes provide the lowest cost per gigabyte of allAmazon EBS volume types. Magnetic volumes are backed by magnetic drivesand are ideal for workloads performing sequential reads, workloads where data isaccessed infrequently, and scenarios where the lowest storage cost is important.These volumes deliver approximately 100 IOPS on average, with burst capability ofup to hundreds of IOPS, and they can range in size from 1 GiB to 1 TiB. Magneticvolumes can be striped together in a RAID configuration for larger size and greaterperformance.
5. Click on Create SSD Disk. The EBS Disk is created and automatically partitioned and ready for use.
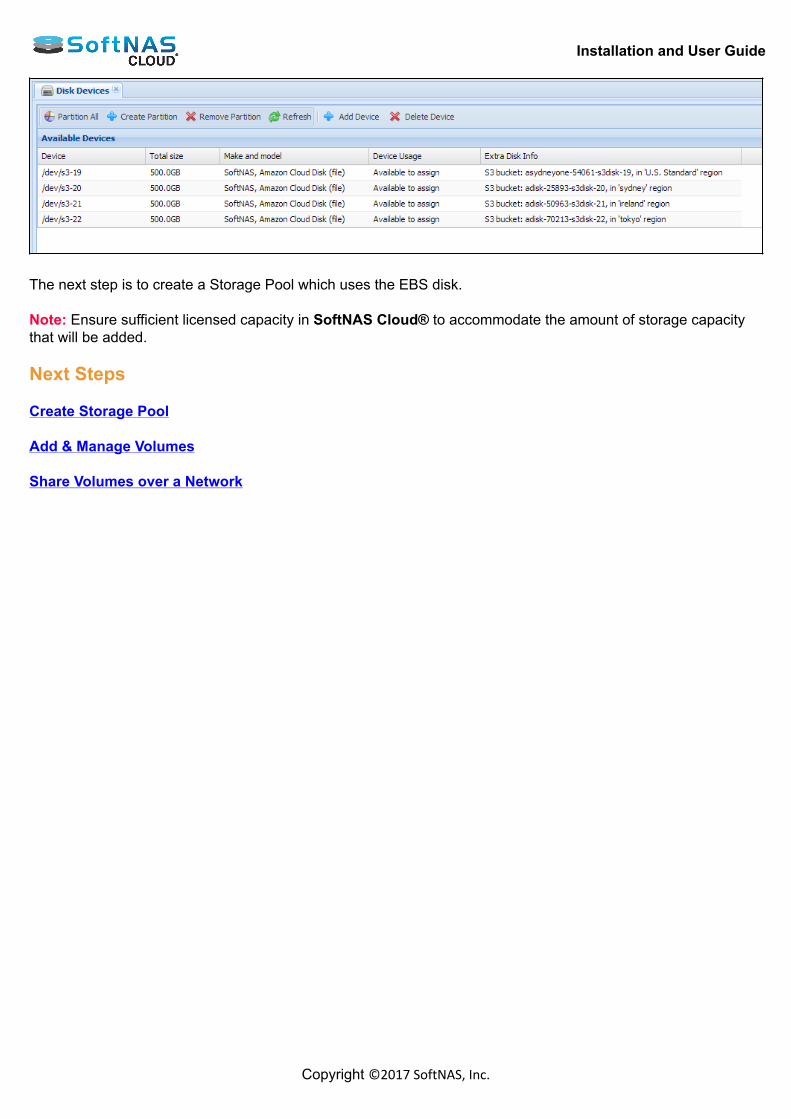
Installation and User Guide
Copyright ©2017 SoftNAS, Inc.
The next step is to create a Storage Pool which uses the EBS disk. Note: Ensure sufficient licensed capacity in SoftNAS Cloud® to accommodate the amount of storage capacitythat will be added. Next Steps Create Storage Pool Add & Manage Volumes Share Volumes over a Network
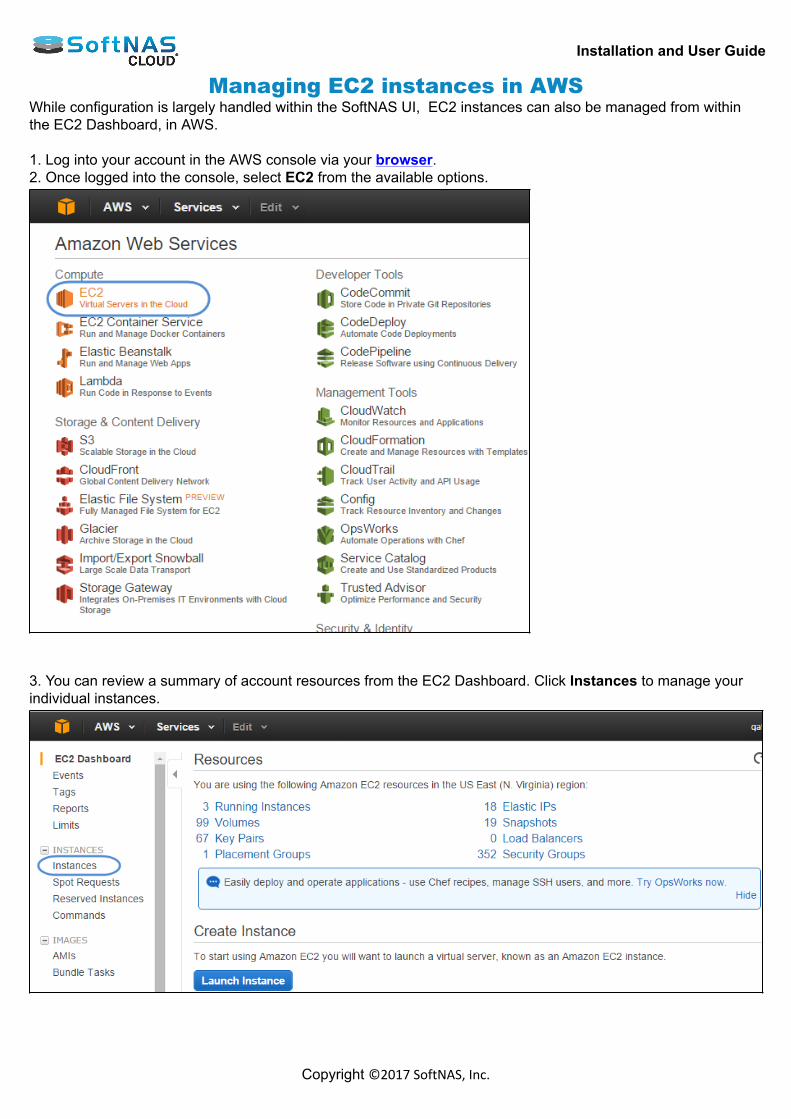
Installation and User Guide
Copyright ©2017 SoftNAS, Inc.
Managing EC2 instances in AWSWhile configuration is largely handled within the SoftNAS UI, EC2 instances can also be managed from withinthe EC2 Dashboard, in AWS. 1. Log into your account in the AWS console via your browser.2. Once logged into the console, select EC2 from the available options.
3. You can review a summary of account resources from the EC2 Dashboard. Click Instances to manage yourindividual instances.
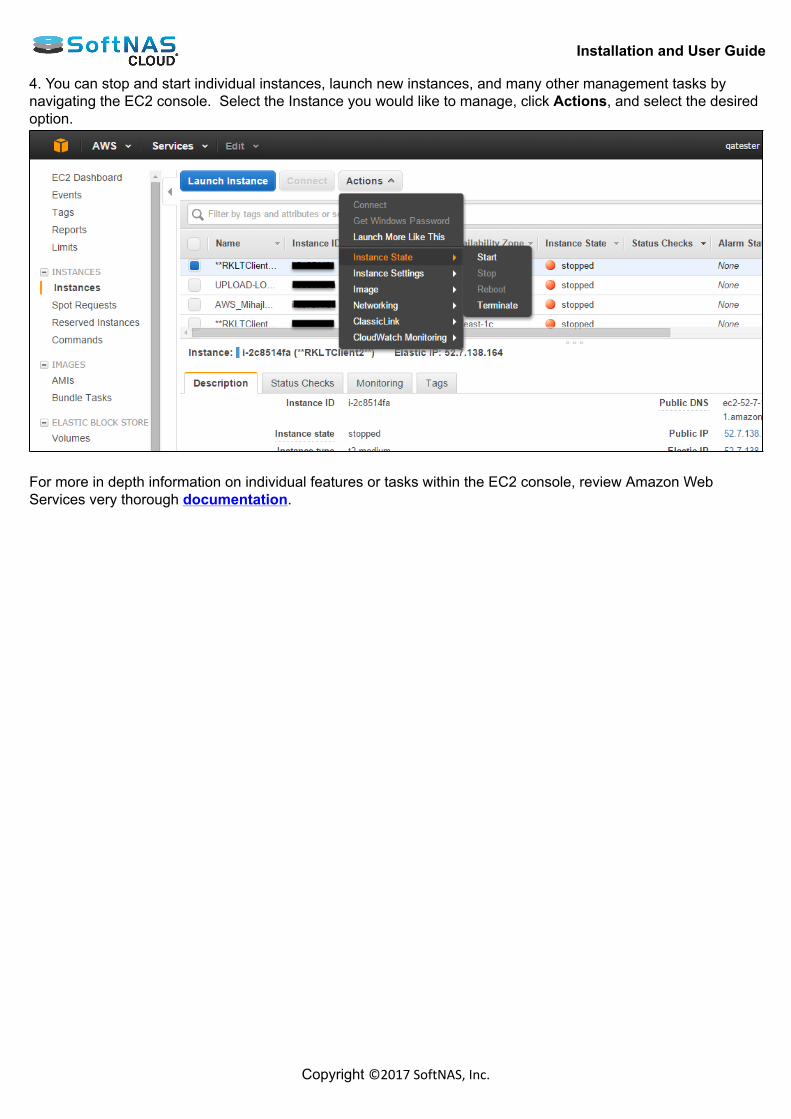
Installation and User Guide
Copyright ©2017 SoftNAS, Inc.
4. You can stop and start individual instances, launch new instances, and many other management tasks bynavigating the EC2 console. Select the Instance you would like to manage, click Actions, and select the desiredoption.
For more in depth information on individual features or tasks within the EC2 console, review Amazon WebServices very thorough documentation.
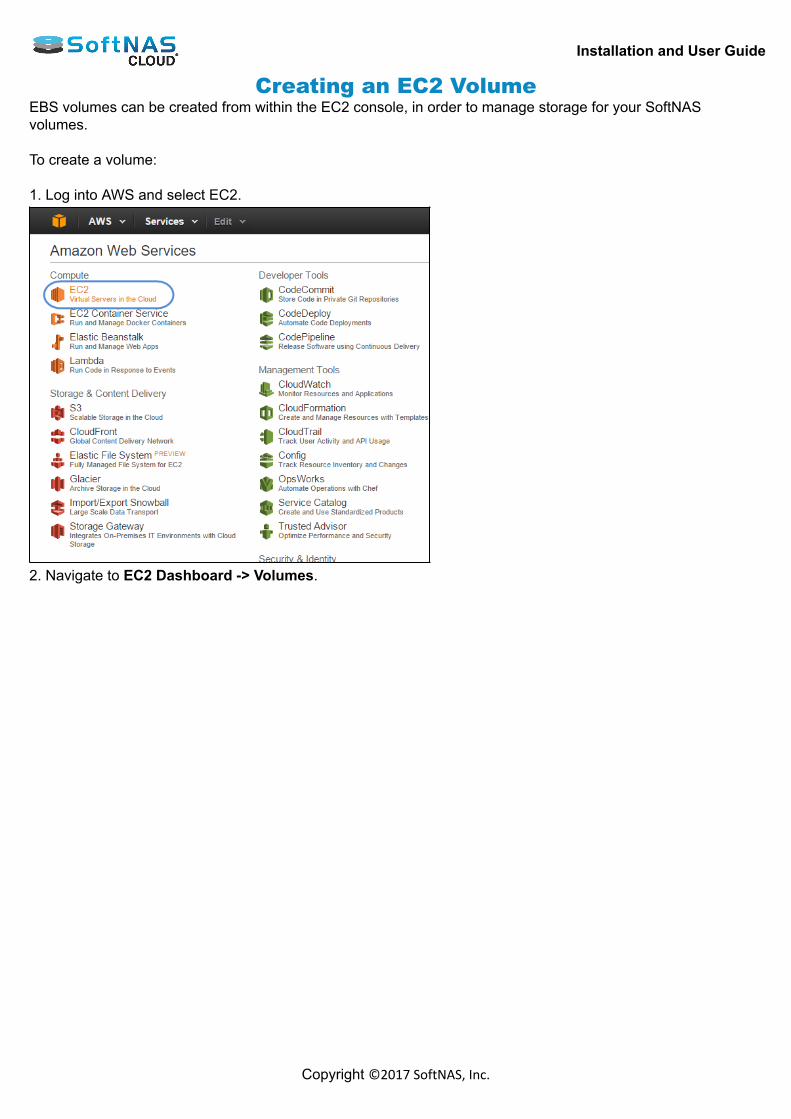
Installation and User Guide
Copyright ©2017 SoftNAS, Inc.
Creating an EC2 VolumeEBS volumes can be created from within the EC2 console, in order to manage storage for your SoftNASvolumes. To create a volume: 1. Log into AWS and select EC2.
2. Navigate to EC2 Dashboard -> Volumes.
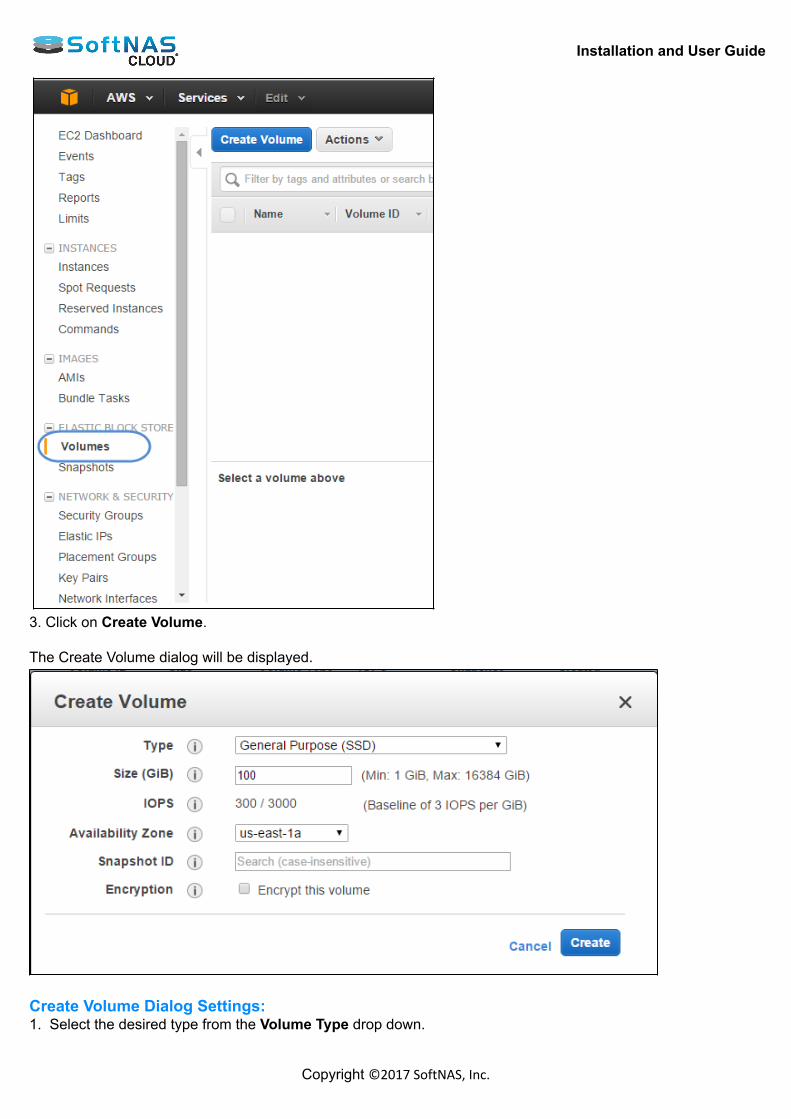
Installation and User Guide
Copyright ©2017 SoftNAS, Inc.
3. Click on Create Volume. The Create Volume dialog will be displayed.
Create Volume Dialog Settings:1. Select the desired type from the Volume Type drop down.
Installation and User Guide
Copyright ©2017 SoftNAS, Inc.
• General Purpose (SSD): Default IOPS (no guaranteed IOPS level in shared environment - less predictable,less consistent performance)• Provisioned IOPS: assign a specific level of IOPS by entering the number of I/O per second you want assuredfor the EBS data volumes (see Choosing an Instance Type)• Magnetic: IOPS limited to constraints of magnetic disks. 2. Enter the size of the volume in the Size text entry box. 3. View the IOPS based on the Volume Type selected under IOPS. If Provisioned IOPS is selected, this valuecan be manually set. 4. Select the desired zone from the Availability Zone drop-down. This helps you to attach the volume to yourinstance. 5. If creating the volume from a Snapshot, select the required snapshot from the Snapshot drop down list. 6. If the volume is to be encrypted, check the "Encrypt this volume" box. 7. Click the Create button. The new standard volume is created.
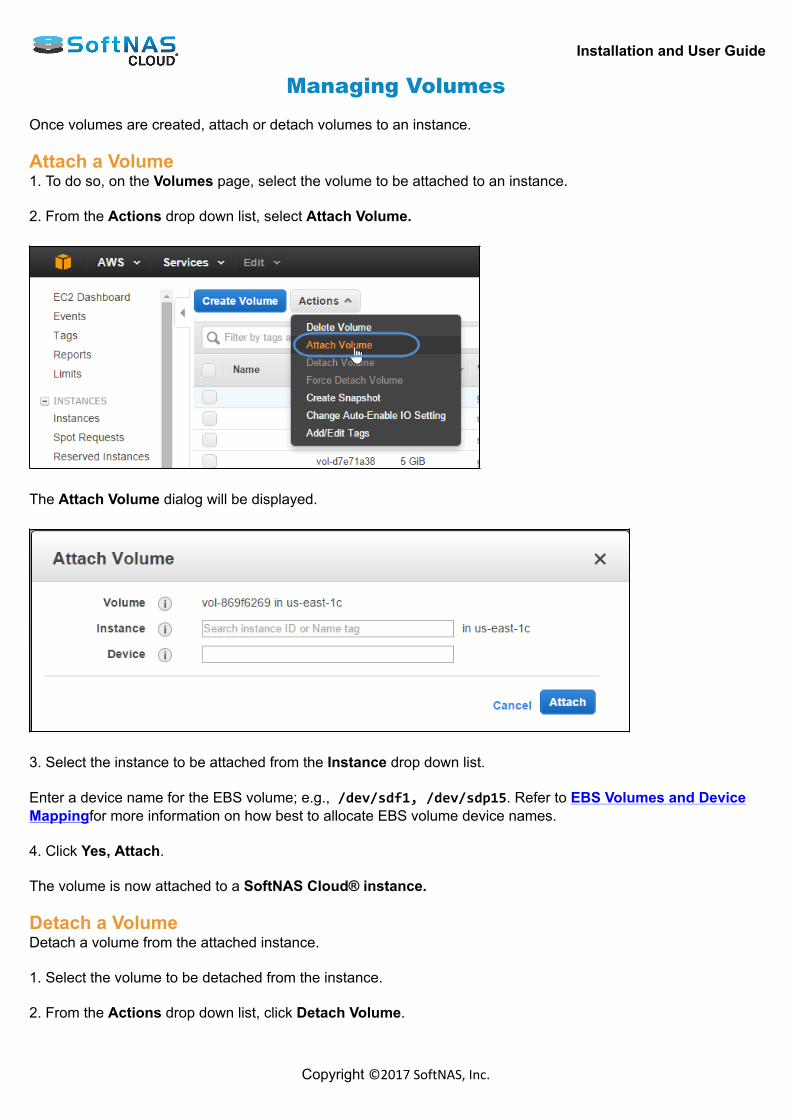
Installation and User Guide
Copyright ©2017 SoftNAS, Inc.
Managing Volumes Once volumes are created, attach or detach volumes to an instance. Attach a Volume1. To do so, on the Volumes page, select the volume to be attached to an instance. 2. From the Actions drop down list, select Attach Volume.
The Attach Volume dialog will be displayed.
3. Select the instance to be attached from the Instance drop down list. Enter a device name for the EBS volume; e.g., /dev/sdf1, /dev/sdp15. Refer to EBS Volumes and DeviceMappingfor more information on how best to allocate EBS volume device names. 4. Click Yes, Attach. The volume is now attached to a SoftNAS Cloud® instance. Detach a VolumeDetach a volume from the attached instance. 1. Select the volume to be detached from the instance. 2. From the Actions drop down list, click Detach Volume.
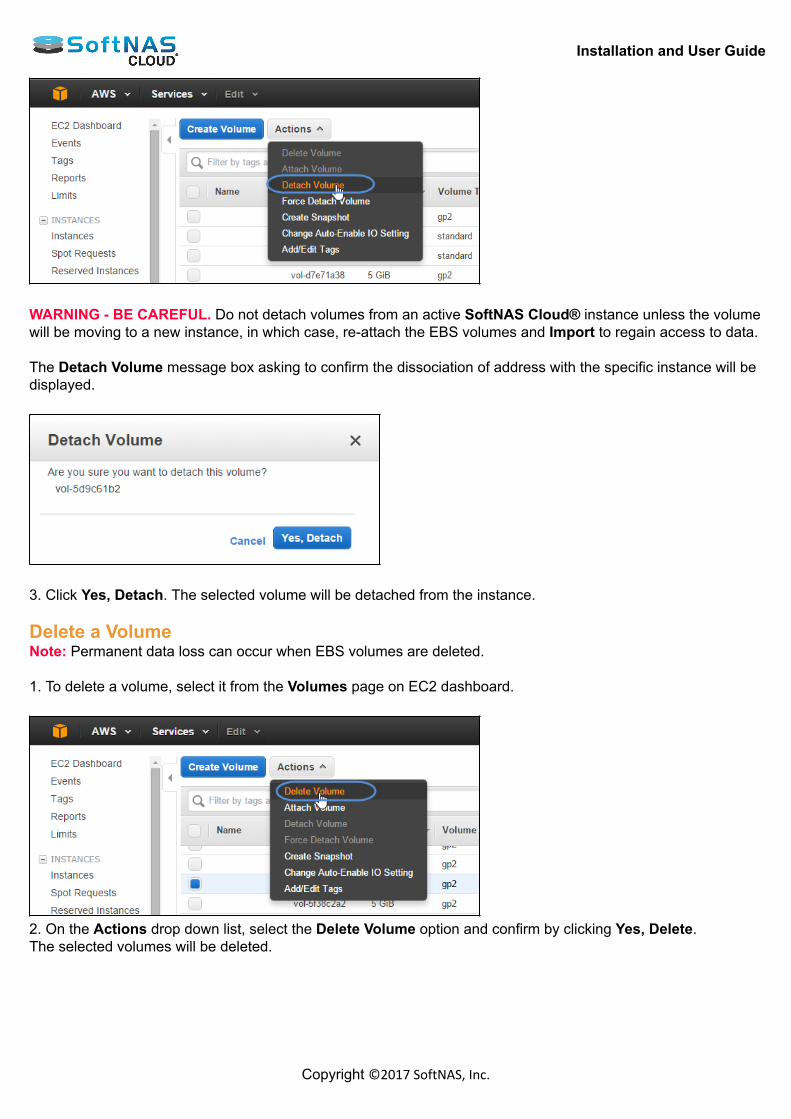
Installation and User Guide
Copyright ©2017 SoftNAS, Inc.
WARNING - BE CAREFUL. Do not detach volumes from an active SoftNAS Cloud® instance unless the volumewill be moving to a new instance, in which case, re-attach the EBS volumes and Import to regain access to data. The Detach Volume message box asking to confirm the dissociation of address with the specific instance will bedisplayed.
3. Click Yes, Detach. The selected volume will be detached from the instance. Delete a VolumeNote: Permanent data loss can occur when EBS volumes are deleted. 1. To delete a volume, select it from the Volumes page on EC2 dashboard.
2. On the Actions drop down list, select the Delete Volume option and confirm by clicking Yes, Delete.The selected volumes will be deleted.

Installation and User Guide
Copyright ©2017 SoftNAS, Inc.
EBS Volumes and Device Mapping EBS volumes are used to provide raw storage disk devices to SoftNAS Cloud® by attaching to the SoftNASCloud® instance using the AWS console. The recommended naming convention depends on the virtualizationtype of device. See the table below for the AWS-recommended device mapping method. EBS to Linux Device Mapping Table
Type ofVirtualization Available String Blocks Reserved
for RootInstance Store
VolumesRecommended
for EBS Volumes
Paravirtual
/dev/sd[a-z]/dev/sd[a-z][1-15]
/dev/hd[a-z]/dev/hd[a-z][1-15]
/dev/sda1 /dev/sd[b-e]/dev/sd[f-p]
/dev/sd[f-p][1-6]
HVM/dev/sd[a-z]
/dev/xvd[b-c][a-z]
Differs by AMI
/dev/sda1 or/dev/xvda
/dev/sd[b-e]
/dev/sd[b-y](hs1.8xlarge)
/dev/sd[f-p]
Note: Approval by AWS Support may be required to go beyond the initial 20 TB limit account default. About EBS Volume NamingEBS volumes are used to provide raw storage disk devices to SoftNAS. EBS volumes are attached to theSoftNAS instance using the AWS console. The number of disks that can be attached is based on the type ofvirtualization used - HVM or PV. HVMThe key restriction of using HVM virtualization is the limit of 11 attachable EBS volumes to your SoftNASinstance. This limit is based on the volume naming convention used by HVM instances. For HVM, AWSsupports EBS volume naming of /dev/sd[f-p]. This means that as each EBS volume is attached, it is assign adevice name of “/dev/sdf”, then “/dev/sdg”, and so on. Once the recommended name range of “f” through “p” areused, no additional EBS volumes should be attached. /dev/sd[f-p][1-15] Even though a-z may appear to work, use of those device names is not supported, and AWS might be using a-gand q-z range at some stage for something else, so for now, it's a good idea to stick with the device names from[f-p] when attaching EBS volumes via AWS console to an HVM instance. PVThe primary benefit to using PV AMIs to deploy SoftNAS is the ability to attach a much higher count of EBSvolumes. This is based on the volume naming convention used by PV virtualization. While HVM only supportslimited alpha characters for volume naming, PV supports the ability to add numeric values at the end of thevolume name. For PV, AWS supports EBS volume naming of /dev/sd[f-p][1-6]. This means that up to 66 EBSvolumes can be attached to a PV instance with a total raw EBS capacity of over 1 petabyte (11*6*16TB =1.056PB). For example: USE: /dev/sdf1, /dev/sdf2, /dev/sdf3 ... /dev/sdp5, /dev/sdp6 Note: While it is possible to add 66 EBS volumes as stated above, AWS guidance states that support forconfigurations above 40 EBS volumes is on a best effort basis.
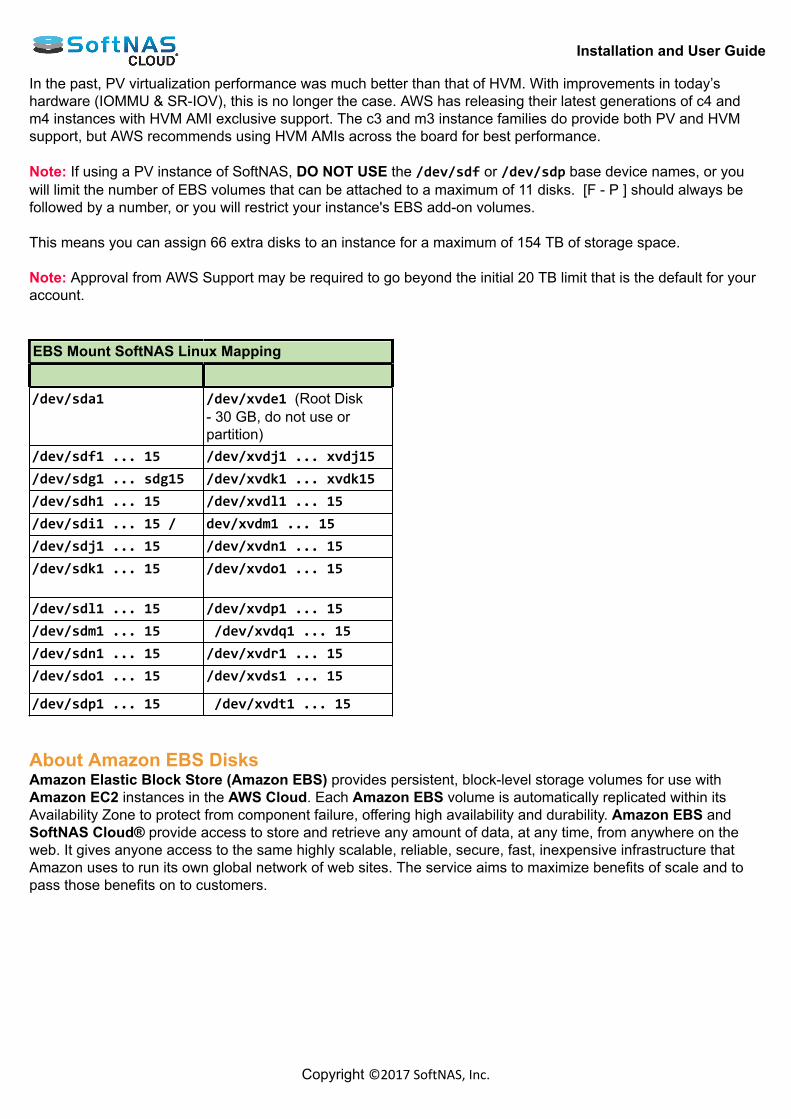
Installation and User Guide
Copyright ©2017 SoftNAS, Inc.
In the past, PV virtualization performance was much better than that of HVM. With improvements in today’shardware (IOMMU & SR-IOV), this is no longer the case. AWS has releasing their latest generations of c4 andm4 instances with HVM AMI exclusive support. The c3 and m3 instance families do provide both PV and HVMsupport, but AWS recommends using HVM AMIs across the board for best performance. Note: If using a PV instance of SoftNAS, DO NOT USE the /dev/sdf or /dev/sdp base device names, or youwill limit the number of EBS volumes that can be attached to a maximum of 11 disks. [F - P ] should always befollowed by a number, or you will restrict your instance's EBS add-on volumes. This means you can assign 66 extra disks to an instance for a maximum of 154 TB of storage space. Note: Approval from AWS Support may be required to go beyond the initial 20 TB limit that is the default for youraccount. EBS Mount SoftNAS Linux Mapping
/dev/sda1 /dev/xvde1 (Root Disk
- 30 GB, do not use orpartition)
/dev/sdf1 ... 15 /dev/xvdj1 ... xvdj15/dev/sdg1 ... sdg15 /dev/xvdk1 ... xvdk15/dev/sdh1 ... 15 /dev/xvdl1 ... 15/dev/sdi1 ... 15 / dev/xvdm1 ... 15/dev/sdj1 ... 15 /dev/xvdn1 ... 15/dev/sdk1 ... 15
/dev/xvdo1 ... 15
/dev/sdl1 ... 15 /dev/xvdp1 ... 15/dev/sdm1 ... 15 /dev/xvdq1 ... 15/dev/sdn1 ... 15 /dev/xvdr1 ... 15/dev/sdo1 ... 15 /dev/xvds1 ... 15
/dev/sdp1 ... 15 /dev/xvdt1 ... 15 About Amazon EBS DisksAmazon Elastic Block Store (Amazon EBS) provides persistent, block-level storage volumes for use withAmazon EC2 instances in the AWS Cloud. Each Amazon EBS volume is automatically replicated within itsAvailability Zone to protect from component failure, offering high availability and durability. Amazon EBS andSoftNAS Cloud® provide access to store and retrieve any amount of data, at any time, from anywhere on theweb. It gives anyone access to the same highly scalable, reliable, secure, fast, inexpensive infrastructure thatAmazon uses to run its own global network of web sites. The service aims to maximize benefits of scale and topass those benefits on to customers.
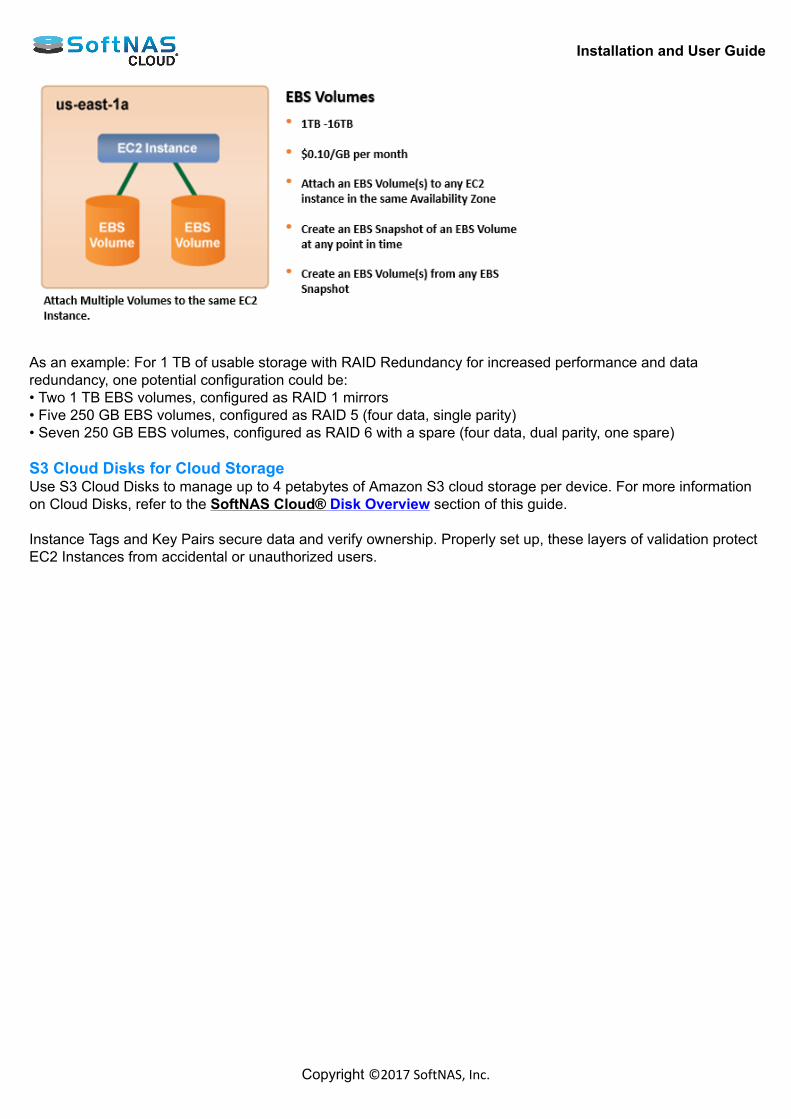
Installation and User Guide
Copyright ©2017 SoftNAS, Inc.
As an example: For 1 TB of usable storage with RAID Redundancy for increased performance and dataredundancy, one potential configuration could be:• Two 1 TB EBS volumes, configured as RAID 1 mirrors• Five 250 GB EBS volumes, configured as RAID 5 (four data, single parity)• Seven 250 GB EBS volumes, configured as RAID 6 with a spare (four data, dual parity, one spare) S3 Cloud Disks for Cloud StorageUse S3 Cloud Disks to manage up to 4 petabytes of Amazon S3 cloud storage per device. For more informationon Cloud Disks, refer to the SoftNAS Cloud® Disk Overview section of this guide. Instance Tags and Key Pairs secure data and verify ownership. Properly set up, these layers of validation protectEC2 Instances from accidental or unauthorized users.

Installation and User Guide
Copyright ©2017 SoftNAS, Inc.
Status Checks & Alarms Status CheckingIn order to know that instance is successfully launched, check its status. 1. Click Instances in the left panel. All the instances related to the specific region will be displayed. 2. When SoftNAS Cloud® is fully booted and is ready for initial configuration and use, the Status Checkscolumn will show a green checkmark with the message that 2/2 checks passed:
At this point, SoftNAS Cloud® instance is operational. Status Check MonitoringSet CloudWatch alarms in order to be notified automatically whenever the metric data reaches a pre-definedlevel. Create a status check alarm1. On the EC2 Dashboard, click the Instances option in the left panel. 2. Select the instance to which to add CloudWatch alarm. 3. Navigate to the Status Checks tab.
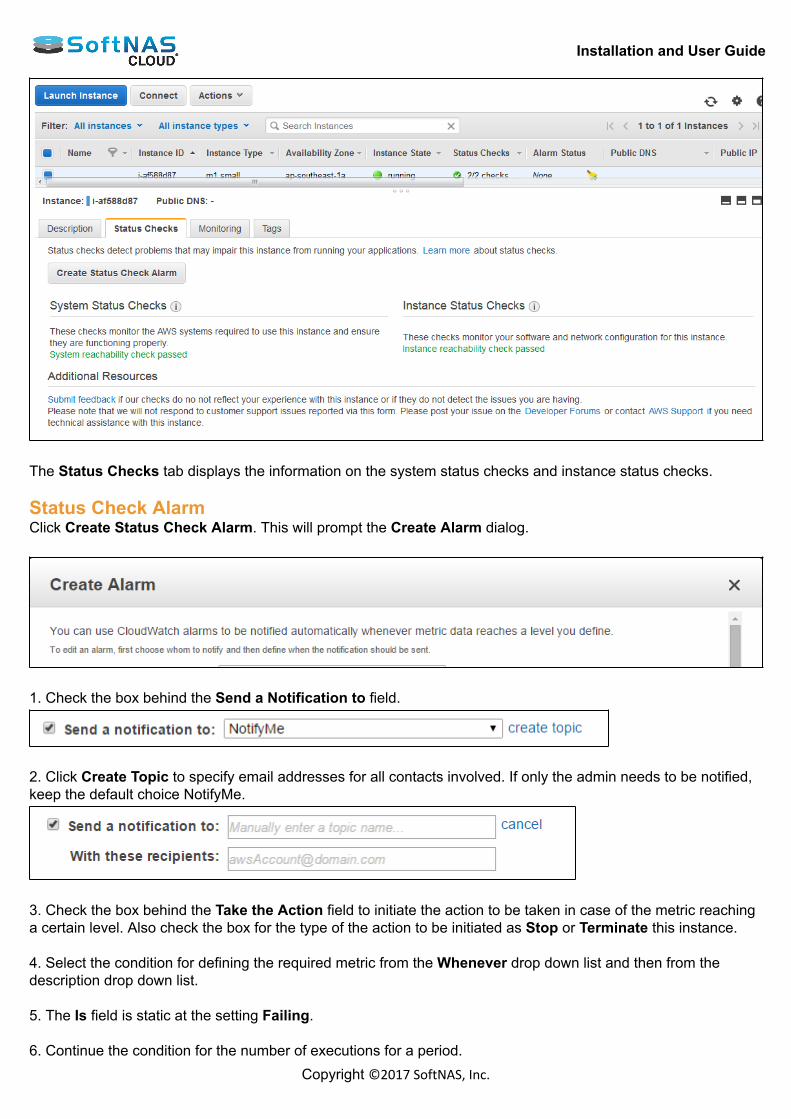
Installation and User Guide
Copyright ©2017 SoftNAS, Inc.
The Status Checks tab displays the information on the system status checks and instance status checks. Status Check AlarmClick Create Status Check Alarm. This will prompt the Create Alarm dialog.
1. Check the box behind the Send a Notification to field.
2. Click Create Topic to specify email addresses for all contacts involved. If only the admin needs to be notified,keep the default choice NotifyMe.
3. Check the box behind the Take the Action field to initiate the action to be taken in case of the metric reachinga certain level. Also check the box for the type of the action to be initiated as Stop or Terminate this instance. 4. Select the condition for defining the required metric from the Whenever drop down list and then from thedescription drop down list. 5. The Is field is static at the setting Failing. 6. Continue the condition for the number of executions for a period.
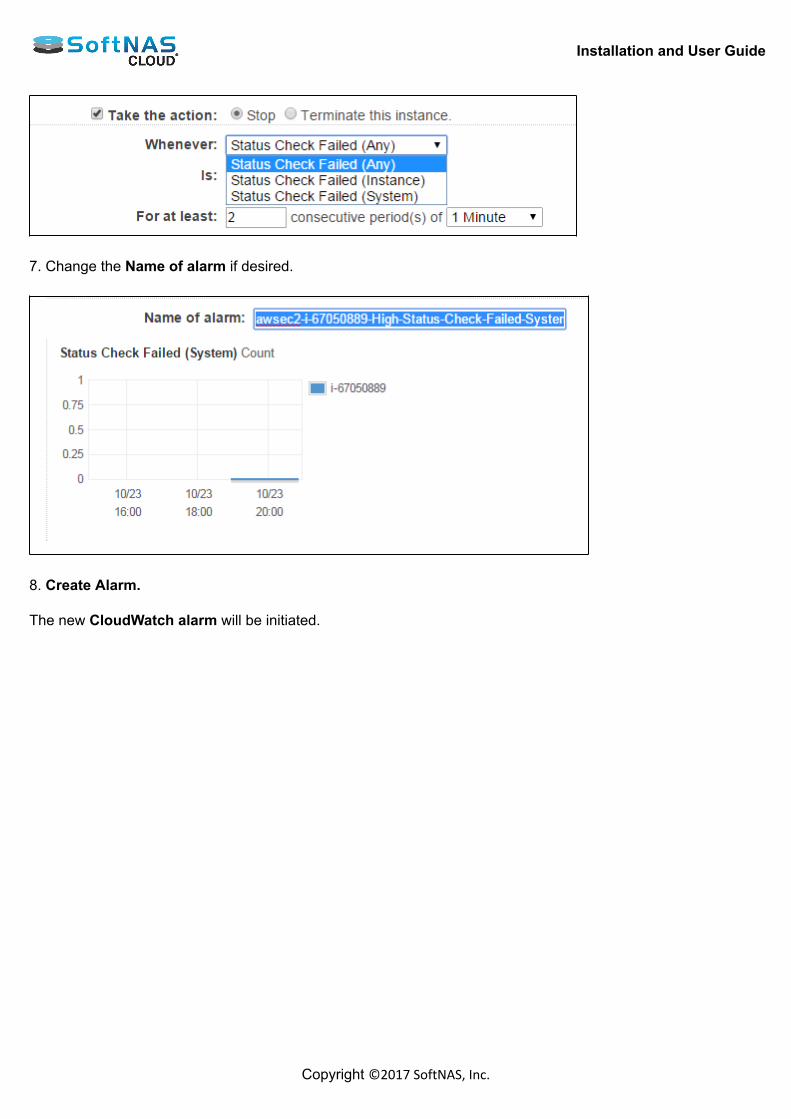
Installation and User Guide
Copyright ©2017 SoftNAS, Inc.
7. Change the Name of alarm if desired.
8. Create Alarm. The new CloudWatch alarm will be initiated.

Installation and User Guide
Copyright ©2017 SoftNAS, Inc.
Connecting to an Instance via SSH from the EC2 ConsoleConnecting to an EC2 instance directly via SSH is rarely necessary, however, the instructions below provide therequired information should the need arise. 1. Log on to Amazon, and select the EC2 Dashboard.
2. Navigate to EC2 Dashboard -> Instances.
3. Select the instance that you wish to connect. Click Connect.

Installation and User Guide
Copyright ©2017 SoftNAS, Inc.
The Connect to an Instance dialog will be displayed.
Note: You can connect from your web browser using either the Java SSH Client or as the standalone SSHclient. Choose an SSH client and use the following login credentials and your private key (created earlier in theinstallation process and saved in your secret location). For Browser based Java SSH Client Connection 1. Select the connection type as A Java SSH Client running directly from my browser(Java Required). 2. Enter the user name in the User Name text entry box. 3. Enter the private key path in the Private Key Path text entry box. 4. To store the key location, check the box in the Save Key Location field.
Installation and User Guide
Copyright ©2017 SoftNAS, Inc.
9. Click the Launch button. Note: You can use a user name of "ec2-user". The password-only logins via SSH are disabled for added securityin the cloud. You will only need the ec2-user name and password should it be required for any reason whileworking at the command line in Linux. Be sure to change the default "root" login ID to "ec2-user" when logginginto the SoftNAS on EC2 instance. For Standalone SSH Client Connection Note: To use a standalone SSH client, first download and install the SSH client. Then click on A standaloneSSH client in the above dialog for more detailed instructions. Some of the Windows SSH clients are given below and for more information on installing them, click the belowlinks. Bitvise Tunnelier: This is a powerful SSH client with integrated SSH and SFTP for file transfers and otherfeatures. This is recommended for power SSH users. Putty: The ubiquitous Putty client is always a good choice for SSH users.
Installation and User Guide
Copyright ©2017 SoftNAS, Inc.
SoftNAS Cloud® Configuration Regardless of platform, the SoftNAS StorageCenter UI remains visually consistent throughout the SoftNASCloud® experience. Some of the more common tasks can be done through the SoftNAS StorageCenter UI. This section can be accessed once any preferred platform mentioned in this guide has been configured up to thispoint. Refer to the appropriate section of this guide to ensure all steps have been followed.
Application Type PlatformCloud-based Amazon Web ServicesCloud-based Microsoft Azure On-Premise VMware vSphere SoftNAS Cloud®™, SoftNAS StorageCenter™, SnapReplicate™, and SNAP HA™ are trademarks ofSoftNAS Inc.. All other trademarks referred to in this guide are owned by their respective companies.

Installation and User Guide
Copyright ©2017 SoftNAS, Inc.
Accessing SoftNAS StorageCenter Navigating to StorageCenterFollow the instructions to set up and configure SoftNAS StorageCenter for the chosen environment. Eachconfiguration will supply an IP address that is used to access the StorageCenter UI. • For Amazon Web Services EC2, see Accessing SoftNAS Cloud® for EC2.• For VMware vSphere, use the IP address configured as per the instructions in Configuring the Network UsingSoftNAS Console.• For Azure, you will use an IP address assigned during instance creation, or modified in Network Interfaces. Toview or manage the IP address used to connect to your SoftNAS Cloud on Azure instance, see Microsoft Azure:Managing Network Settings.Generally, a privacy error warning due to a self-signed SSH certificate will pop up. Bypass this for now, andupdate this certificate at the earliest convenience. Logging InUpon the first access of StorageCenter administration interface, a prompt will require login with administratorcredentials, as shown below. The default username is softnas, and the default passwords for each platform arelisted below. Changing Default Passwords
SoftNAS Cloud®Platform
Default Password
Amazon Web ServicesEC2
[Instance Name]
Microsoft Azure [Set via SSH]
VMware vSphere* Pass4W0rd* Note the zero in Pass4W0rd. To prevent brute force entry, after 5 unsuccessful attempts to log in, Recaptcha will prompt the user to perform anadditional action in order to continue attempting new passwords.
Logging Out
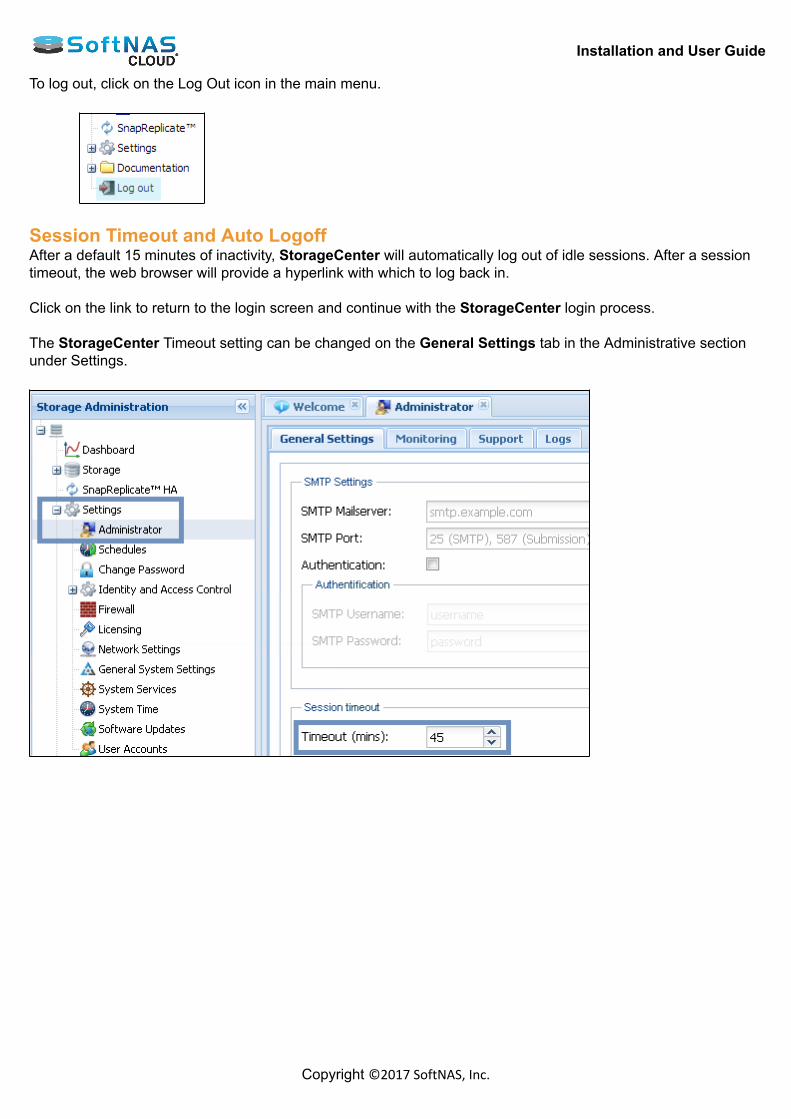
Installation and User Guide
Copyright ©2017 SoftNAS, Inc.
To log out, click on the Log Out icon in the main menu.
Session Timeout and Auto LogoffAfter a default 15 minutes of inactivity, StorageCenter will automatically log out of idle sessions. After a sessiontimeout, the web browser will provide a hyperlink with which to log back in. Click on the link to return to the login screen and continue with the StorageCenter login process. The StorageCenter Timeout setting can be changed on the General Settings tab in the Administrative sectionunder Settings.
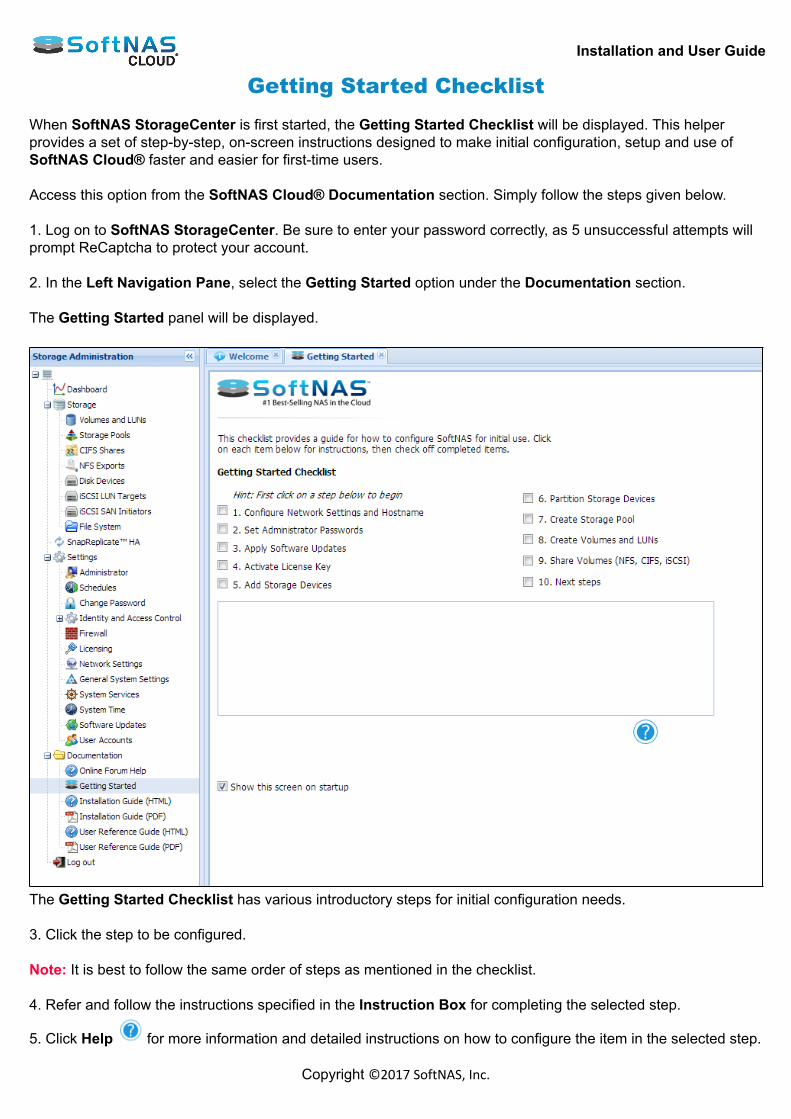
Installation and User Guide
Copyright ©2017 SoftNAS, Inc.
Getting Started Checklist When SoftNAS StorageCenter is first started, the Getting Started Checklist will be displayed. This helperprovides a set of step-by-step, on-screen instructions designed to make initial configuration, setup and use ofSoftNAS Cloud® faster and easier for first-time users. Access this option from the SoftNAS Cloud® Documentation section. Simply follow the steps given below. 1. Log on to SoftNAS StorageCenter. Be sure to enter your password correctly, as 5 unsuccessful attempts willprompt ReCaptcha to protect your account. 2. In the Left Navigation Pane, select the Getting Started option under the Documentation section. The Getting Started panel will be displayed.
The Getting Started Checklist has various introductory steps for initial configuration needs. 3. Click the step to be configured. Note: It is best to follow the same order of steps as mentioned in the checklist. 4. Refer and follow the instructions specified in the Instruction Box for completing the selected step.
5. Click Help for more information and detailed instructions on how to configure the item in the selected step.
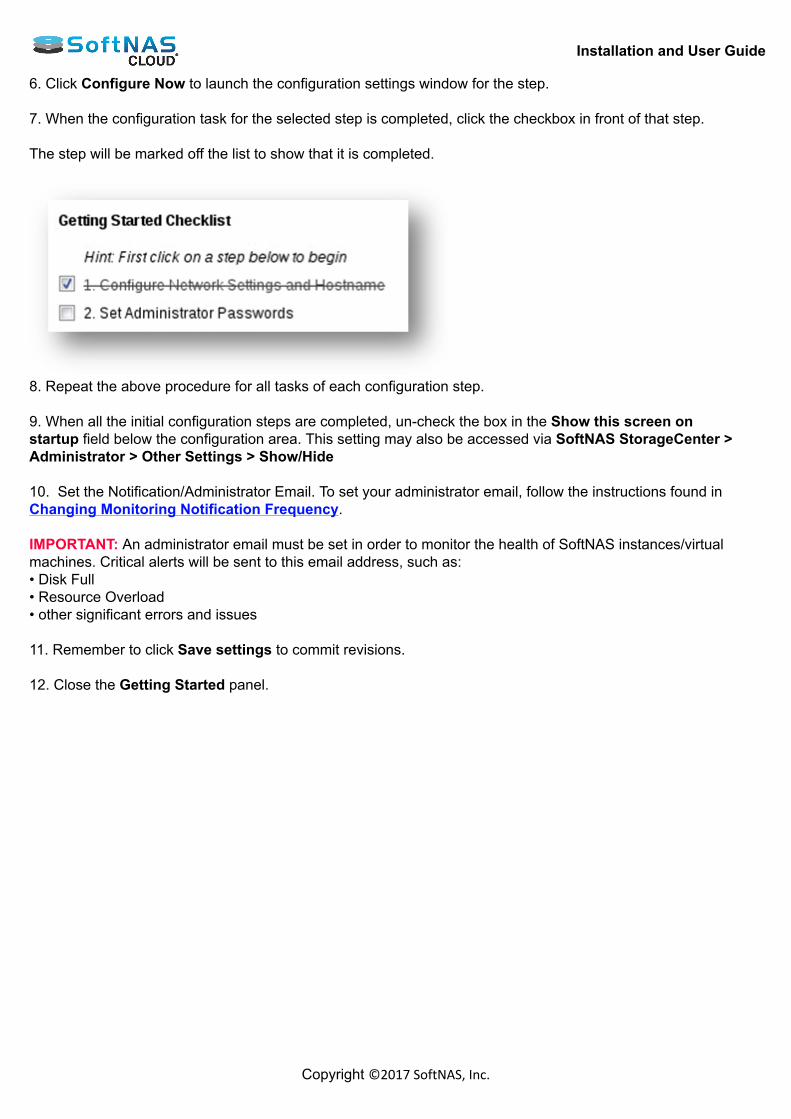
Installation and User Guide
Copyright ©2017 SoftNAS, Inc.
6. Click Configure Now to launch the configuration settings window for the step. 7. When the configuration task for the selected step is completed, click the checkbox in front of that step. The step will be marked off the list to show that it is completed.
8. Repeat the above procedure for all tasks of each configuration step. 9. When all the initial configuration steps are completed, un-check the box in the Show this screen onstartup field below the configuration area. This setting may also be accessed via SoftNAS StorageCenter >Administrator > Other Settings > Show/Hide 10. Set the Notification/Administrator Email. To set your administrator email, follow the instructions found inChanging Monitoring Notification Frequency. IMPORTANT: An administrator email must be set in order to monitor the health of SoftNAS instances/virtualmachines. Critical alerts will be sent to this email address, such as:• Disk Full• Resource Overload• other significant errors and issues 11. Remember to click Save settings to commit revisions. 12. Close the Getting Started panel.
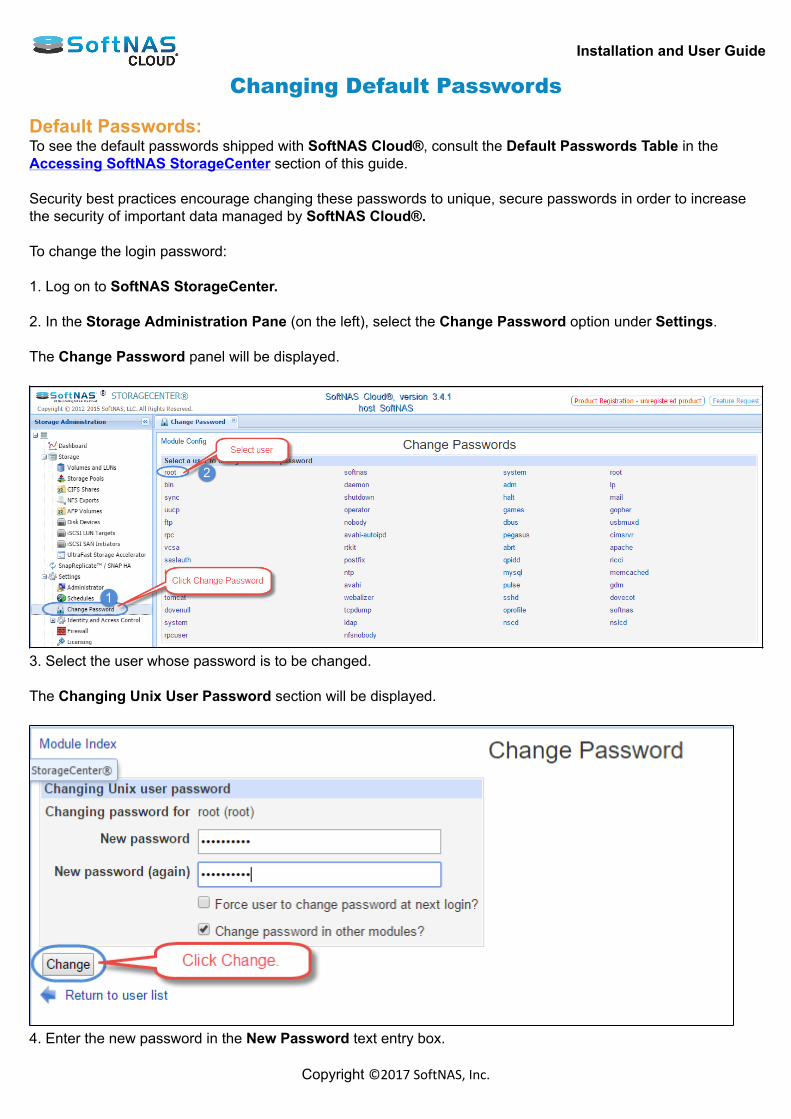
Installation and User Guide
Copyright ©2017 SoftNAS, Inc.
Changing Default Passwords Default Passwords:To see the default passwords shipped with SoftNAS Cloud®, consult the Default Passwords Table in theAccessing SoftNAS StorageCenter section of this guide. Security best practices encourage changing these passwords to unique, secure passwords in order to increasethe security of important data managed by SoftNAS Cloud®. To change the login password: 1. Log on to SoftNAS StorageCenter. 2. In the Storage Administration Pane (on the left), select the Change Password option under Settings. The Change Password panel will be displayed.
3. Select the user whose password is to be changed. The Changing Unix User Password section will be displayed.
4. Enter the new password in the New Password text entry box.
Installation and User Guide
Copyright ©2017 SoftNAS, Inc.
5. Confirm the password by re-entering it in the New Password (Again) text entry box. 6. Check "Force User to change password at next login?" to force the user to change the password when helogs on to the system next time. This allows an admin to provide a user a temporary password if he/she has loginissues. 7. Check "Change password in other modules?" to enforce the change of password in other modules also. 8. Click Change. The password of the selected user will now be changed and he/she can now log on to the system with the newpassword.

Installation and User Guide
Copyright ©2017 SoftNAS, Inc.
Updating to the Latest Version After installing SoftNAS Cloud®, it is recommended to perform a software update to ensure the latest version. 1. Log on to SoftNAS StorageCenter. 2. Click the Software Updates option under the Settings section in the Left Navigation Pane. The Software Updates panel will be displayed.
3. If the existing version is not the latest version, click Apply Update Now. The Confirm message box recommends backing up and creating a VM Snapshot of the current SoftNASCloud® installation image.
4. Confirm that all prerequisite steps have been satisfied. Click Yes. The Update Underway message box describing the progress of the update process will be displayed.
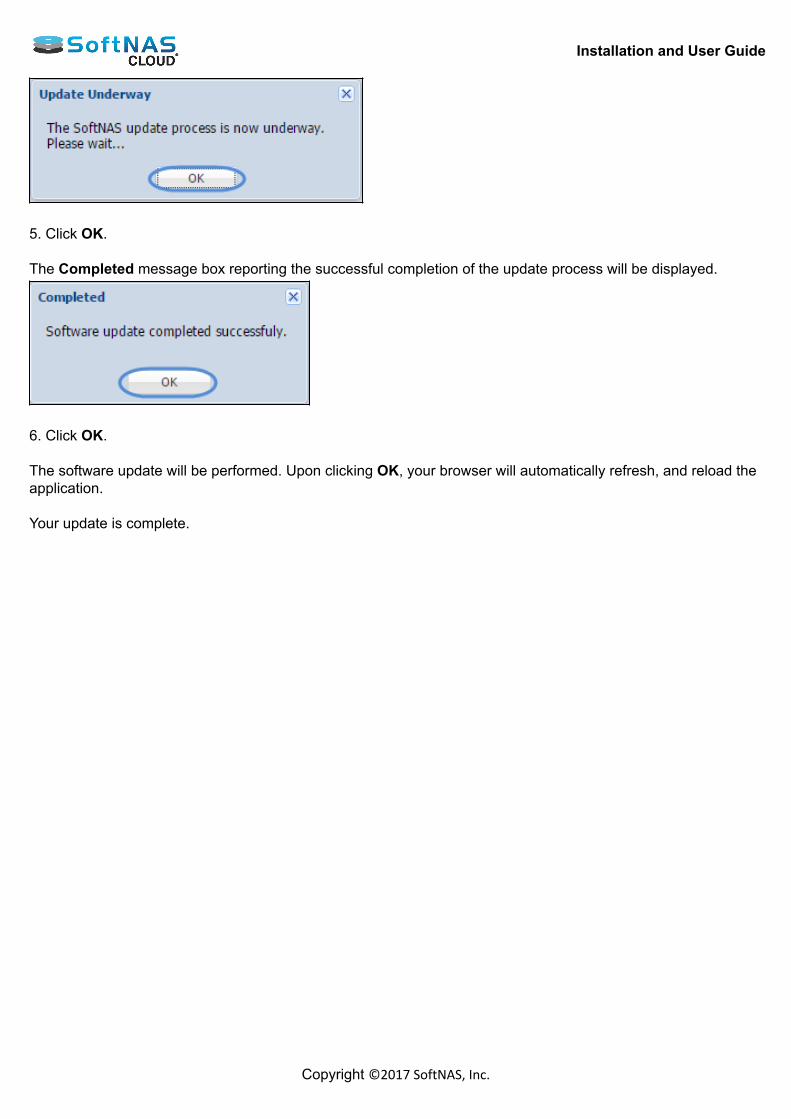
Installation and User Guide
Copyright ©2017 SoftNAS, Inc.
5. Click OK. The Completed message box reporting the successful completion of the update process will be displayed.
6. Click OK. The software update will be performed. Upon clicking OK, your browser will automatically refresh, and reload theapplication. Your update is complete.
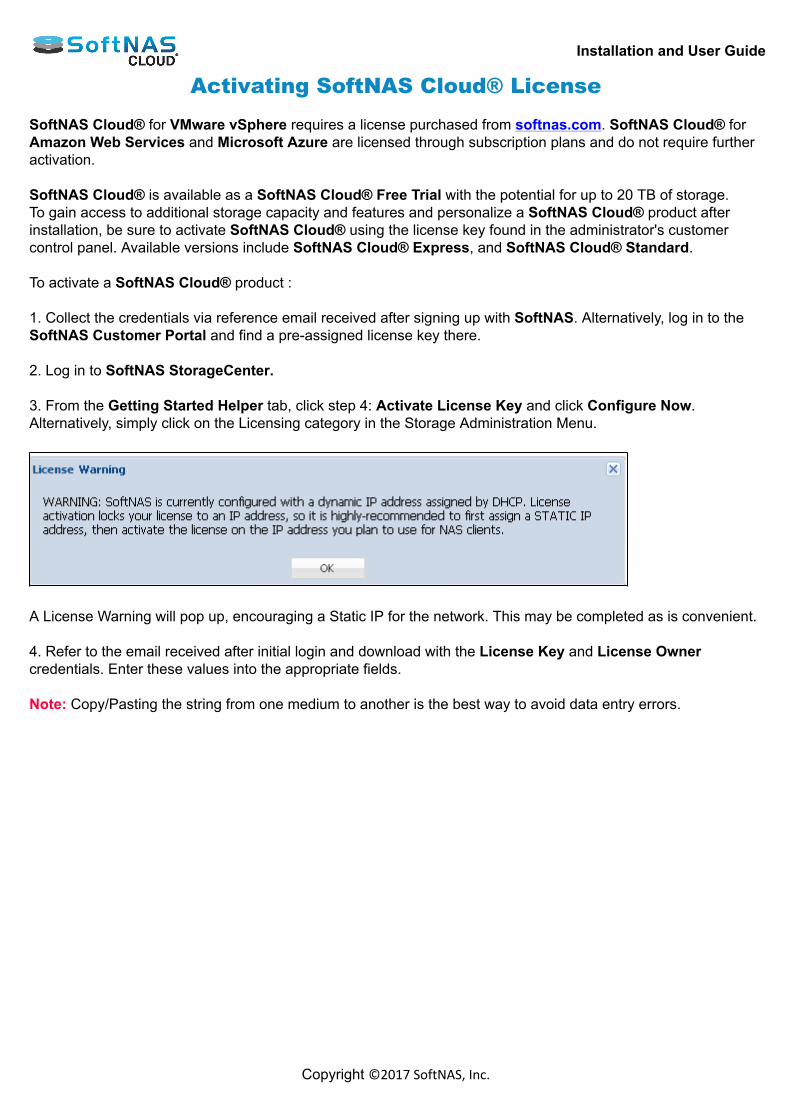
Installation and User Guide
Copyright ©2017 SoftNAS, Inc.
Activating SoftNAS Cloud® License SoftNAS Cloud® for VMware vSphere requires a license purchased from softnas.com. SoftNAS Cloud® forAmazon Web Services and Microsoft Azure are licensed through subscription plans and do not require furtheractivation. SoftNAS Cloud® is available as a SoftNAS Cloud® Free Trial with the potential for up to 20 TB of storage.To gain access to additional storage capacity and features and personalize a SoftNAS Cloud® product afterinstallation, be sure to activate SoftNAS Cloud® using the license key found in the administrator's customercontrol panel. Available versions include SoftNAS Cloud® Express, and SoftNAS Cloud® Standard. To activate a SoftNAS Cloud® product : 1. Collect the credentials via reference email received after signing up with SoftNAS. Alternatively, log in to theSoftNAS Customer Portal and find a pre-assigned license key there. 2. Log in to SoftNAS StorageCenter. 3. From the Getting Started Helper tab, click step 4: Activate License Key and click Configure Now.Alternatively, simply click on the Licensing category in the Storage Administration Menu.
A License Warning will pop up, encouraging a Static IP for the network. This may be completed as is convenient. 4. Refer to the email received after initial login and download with the License Key and License Ownercredentials. Enter these values into the appropriate fields. Note: Copy/Pasting the string from one medium to another is the best way to avoid data entry errors.
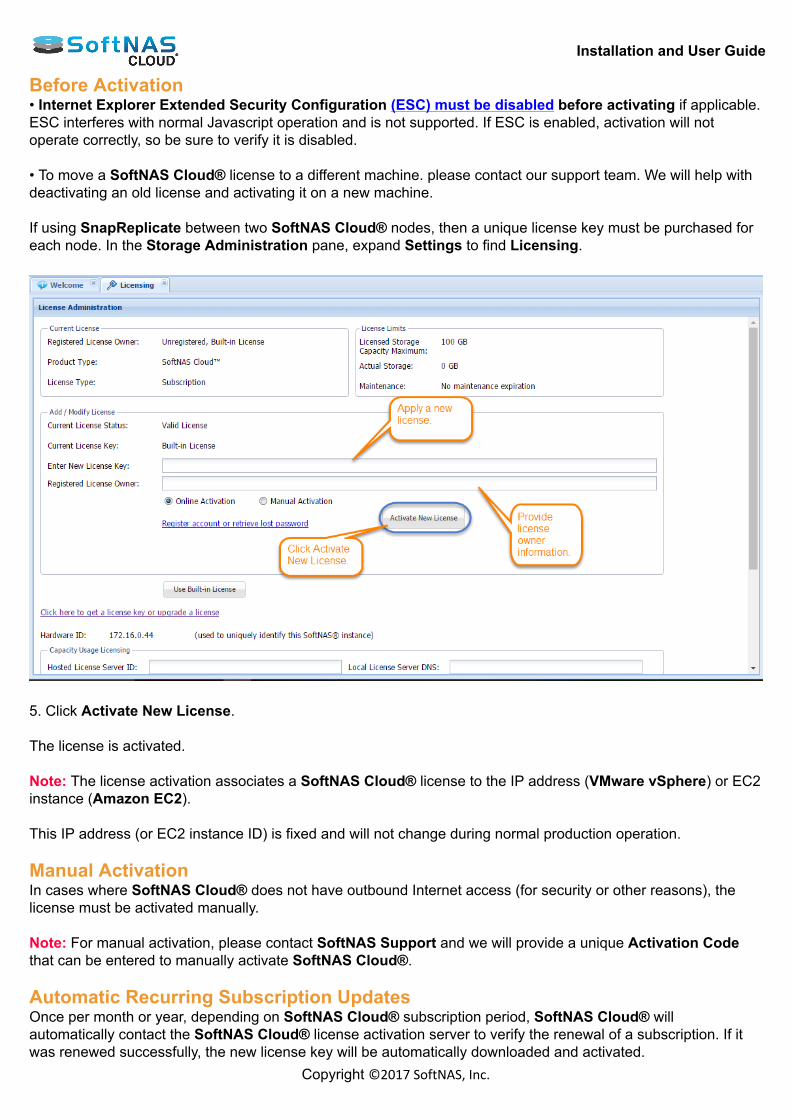
Installation and User Guide
Copyright ©2017 SoftNAS, Inc.
Before Activation• Internet Explorer Extended Security Configuration (ESC) must be disabled before activating if applicable.ESC interferes with normal Javascript operation and is not supported. If ESC is enabled, activation will notoperate correctly, so be sure to verify it is disabled. • To move a SoftNAS Cloud® license to a different machine. please contact our support team. We will help withdeactivating an old license and activating it on a new machine. If using SnapReplicate between two SoftNAS Cloud® nodes, then a unique license key must be purchased foreach node. In the Storage Administration pane, expand Settings to find Licensing.
5. Click Activate New License. The license is activated. Note: The license activation associates a SoftNAS Cloud® license to the IP address (VMware vSphere) or EC2instance (Amazon EC2). This IP address (or EC2 instance ID) is fixed and will not change during normal production operation. Manual ActivationIn cases where SoftNAS Cloud® does not have outbound Internet access (for security or other reasons), thelicense must be activated manually. Note: For manual activation, please contact SoftNAS Support and we will provide a unique Activation Codethat can be entered to manually activate SoftNAS Cloud®. Automatic Recurring Subscription UpdatesOnce per month or year, depending on SoftNAS Cloud® subscription period, SoftNAS Cloud® willautomatically contact the SoftNAS Cloud® license activation server to verify the renewal of a subscription. If itwas renewed successfully, the new license key will be automatically downloaded and activated.

Installation and User Guide
Copyright ©2017 SoftNAS, Inc.
Note: Please ensure that SoftNAS Cloud® has outbound Internet access for auto renewal to take place. License Grace PeriodIn the event SoftNAS Cloud® is running In a production environment and its license expires, it will enterthe grace period. During this grace period, all functions continue to be available, and each login to accessthe StorageCenter UI will prompt a license expiration warning notice reminder (e.g., SoftNAS Cloud® notconnected to Internet, credit card on file failed or expired, etc.). An email notification will have already been sentto the administrator about renewal at this point. Note: The grace period defaults to one week (7 days) for all monthly and annual licenses for SoftNAS Cloud®,providing ample time to resolve any license renewal issues. If there is a billing error, once that is corrected, thesystem will automatically download and install the renewed license key. In environments operating SoftNASCloud® without an Internet connection, it is recommended to use the annual subscription method, so it is onlynecessary to enter a license key once a year (or license SoftNAS Cloud® for multiple years if preferred).
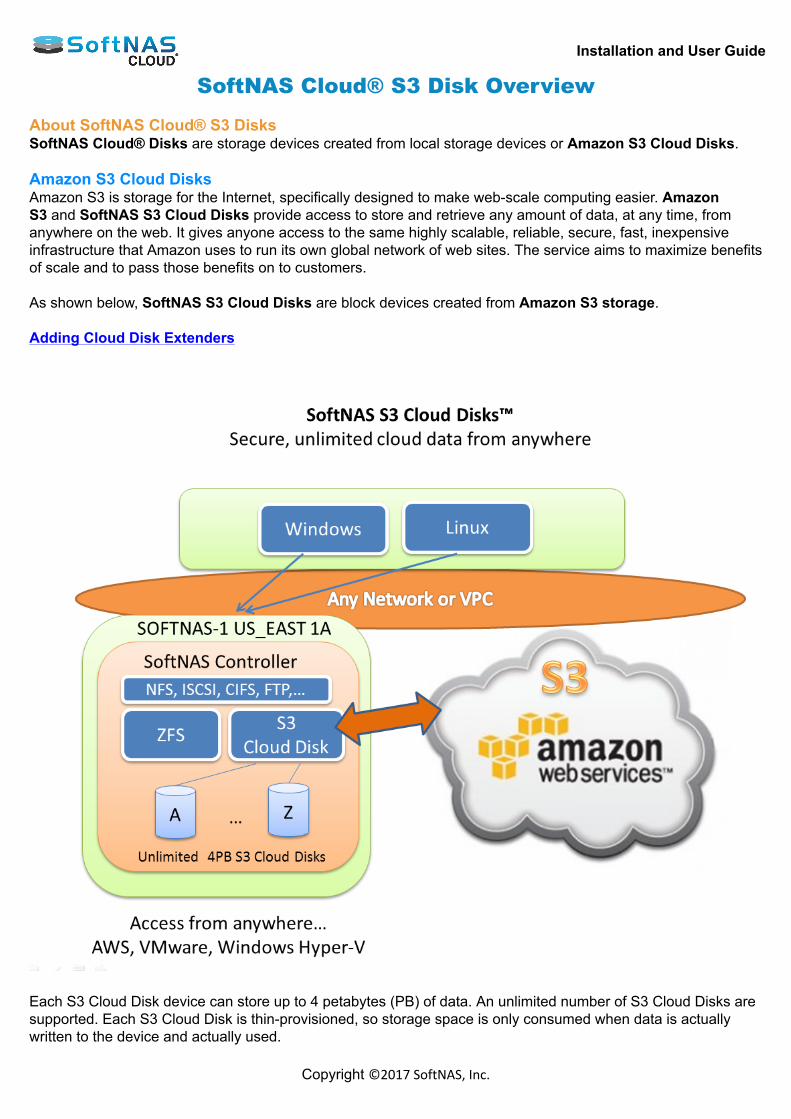
Installation and User Guide
Copyright ©2017 SoftNAS, Inc.
SoftNAS Cloud® S3 Disk Overview About SoftNAS Cloud® S3 DisksSoftNAS Cloud® Disks are storage devices created from local storage devices or Amazon S3 Cloud Disks. Amazon S3 Cloud DisksAmazon S3 is storage for the Internet, specifically designed to make web-scale computing easier. AmazonS3 and SoftNAS S3 Cloud Disks provide access to store and retrieve any amount of data, at any time, fromanywhere on the web. It gives anyone access to the same highly scalable, reliable, secure, fast, inexpensiveinfrastructure that Amazon uses to run its own global network of web sites. The service aims to maximize benefitsof scale and to pass those benefits on to customers. As shown below, SoftNAS S3 Cloud Disks are block devices created from Amazon S3 storage. Adding Cloud Disk Extenders
Each S3 Cloud Disk device can store up to 4 petabytes (PB) of data. An unlimited number of S3 Cloud Disks aresupported. Each S3 Cloud Disk is thin-provisioned, so storage space is only consumed when data is actuallywritten to the device and actually used.
Installation and User Guide
Copyright ©2017 SoftNAS, Inc.
S3 Cloud Disks are attached to SoftNAS Cloud® Storage Pools and provide unlimited cloud storage. Each clouddisk is encrypted and authenticated to provide added security. S3 Cloud Disks can be created and accessed on-premise from VMware ESXi systems, as well as within theAmazon EC2 cloud environment. Cloud disks benefit from SoftNAS Cloud® features, including RAM caching, SSD caching, compression,deduplication, scheduled snapshots and read/write clones. This means the best balance of performance andNAS features combined with the off-site data storage redundancy of S3. Amazon S3 storage subscription costs are industry-competitive, and the EC2 offerings integrate smoothly withSoftNAS Cloud® solutions. Consult Amazon S3 product information for latest details and pricing. S3 Cloud Disks can also be copied for long-term archive storage into AWS Glacier (functionality that is built intothe AWS console). It is strongly recommended that users review S3 Cloud Disk Best Practices prior to creating their instances. Next Steps Creating Storage Pools Configuring Volumes Sharing Volumes over a Network
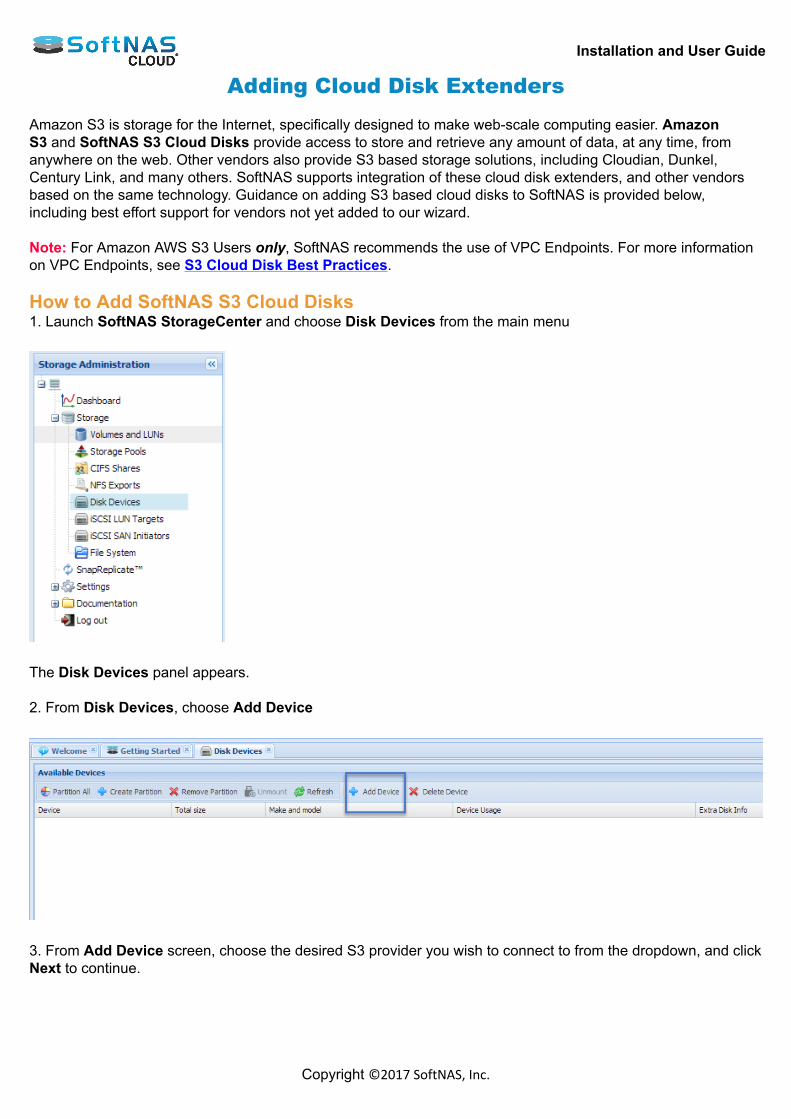
Installation and User Guide
Copyright ©2017 SoftNAS, Inc.
Adding Cloud Disk Extenders Amazon S3 is storage for the Internet, specifically designed to make web-scale computing easier. AmazonS3 and SoftNAS S3 Cloud Disks provide access to store and retrieve any amount of data, at any time, fromanywhere on the web. Other vendors also provide S3 based storage solutions, including Cloudian, Dunkel,Century Link, and many others. SoftNAS supports integration of these cloud disk extenders, and other vendorsbased on the same technology. Guidance on adding S3 based cloud disks to SoftNAS is provided below,including best effort support for vendors not yet added to our wizard. Note: For Amazon AWS S3 Users only, SoftNAS recommends the use of VPC Endpoints. For more informationon VPC Endpoints, see S3 Cloud Disk Best Practices. How to Add SoftNAS S3 Cloud Disks1. Launch SoftNAS StorageCenter and choose Disk Devices from the main menu
The Disk Devices panel appears. 2. From Disk Devices, choose Add Device
3. From Add Device screen, choose the desired S3 provider you wish to connect to from the dropdown, and clickNext to continue.
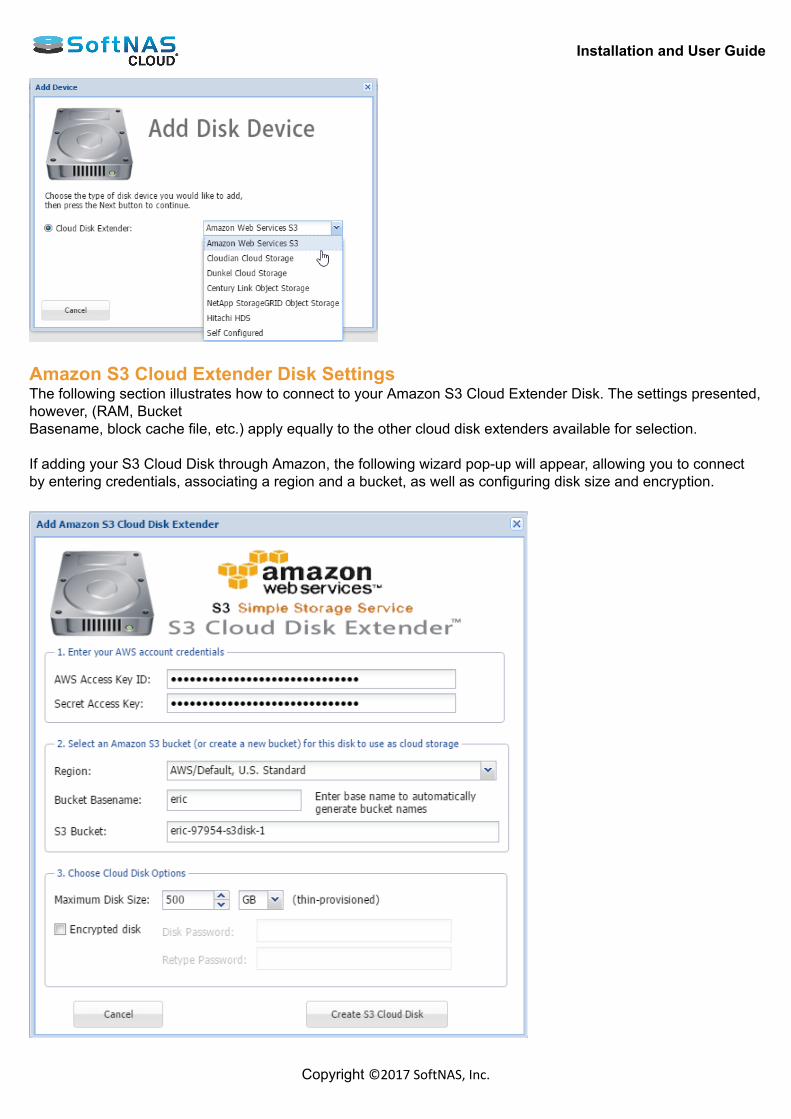
Installation and User Guide
Copyright ©2017 SoftNAS, Inc.
Amazon S3 Cloud Extender Disk SettingsThe following section illustrates how to connect to your Amazon S3 Cloud Extender Disk. The settings presented,however, (RAM, BucketBasename, block cache file, etc.) apply equally to the other cloud disk extenders available for selection. If adding your S3 Cloud Disk through Amazon, the following wizard pop-up will appear, allowing you to connectby entering credentials, associating a region and a bucket, as well as configuring disk size and encryption.
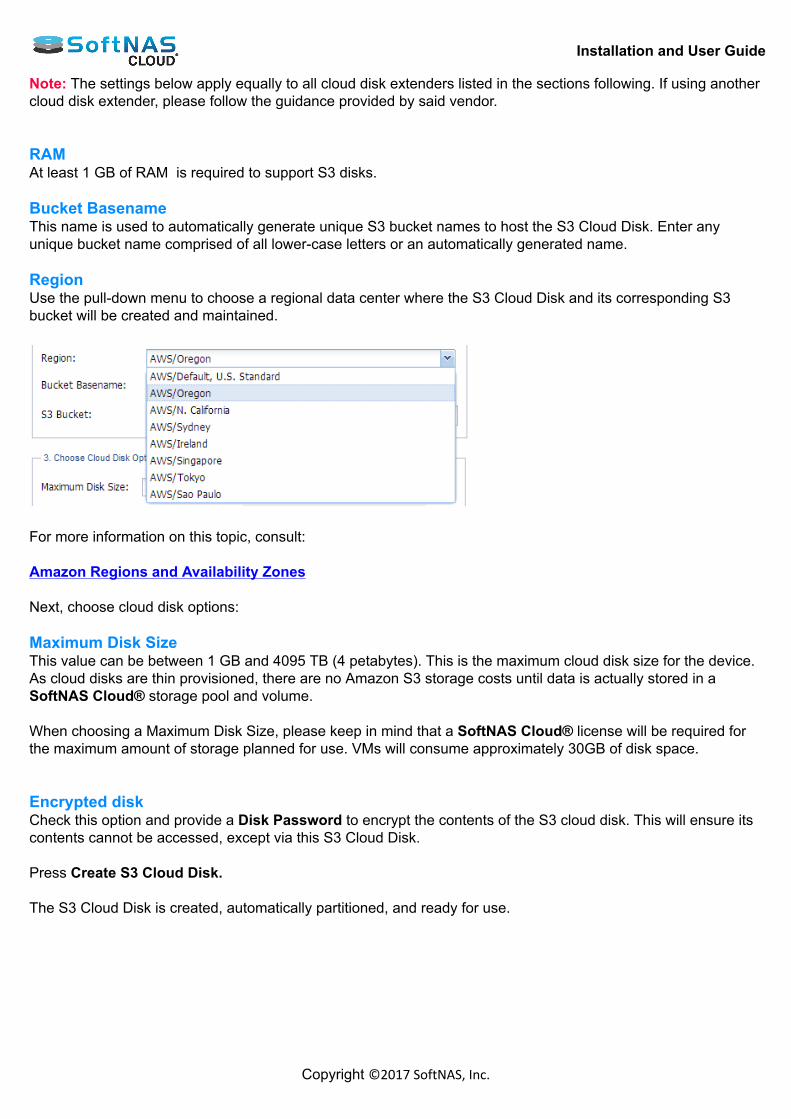
Installation and User Guide
Copyright ©2017 SoftNAS, Inc.
Note: The settings below apply equally to all cloud disk extenders listed in the sections following. If using anothercloud disk extender, please follow the guidance provided by said vendor. RAMAt least 1 GB of RAM is required to support S3 disks. Bucket BasenameThis name is used to automatically generate unique S3 bucket names to host the S3 Cloud Disk. Enter anyunique bucket name comprised of all lower-case letters or an automatically generated name. RegionUse the pull-down menu to choose a regional data center where the S3 Cloud Disk and its corresponding S3bucket will be created and maintained.
For more information on this topic, consult: Amazon Regions and Availability Zones Next, choose cloud disk options: Maximum Disk SizeThis value can be between 1 GB and 4095 TB (4 petabytes). This is the maximum cloud disk size for the device.As cloud disks are thin provisioned, there are no Amazon S3 storage costs until data is actually stored in aSoftNAS Cloud® storage pool and volume. When choosing a Maximum Disk Size, please keep in mind that a SoftNAS Cloud® license will be required forthe maximum amount of storage planned for use. VMs will consume approximately 30GB of disk space. Encrypted diskCheck this option and provide a Disk Password to encrypt the contents of the S3 cloud disk. This will ensure itscontents cannot be accessed, except via this S3 Cloud Disk. Press Create S3 Cloud Disk. The S3 Cloud Disk is created, automatically partitioned, and ready for use.
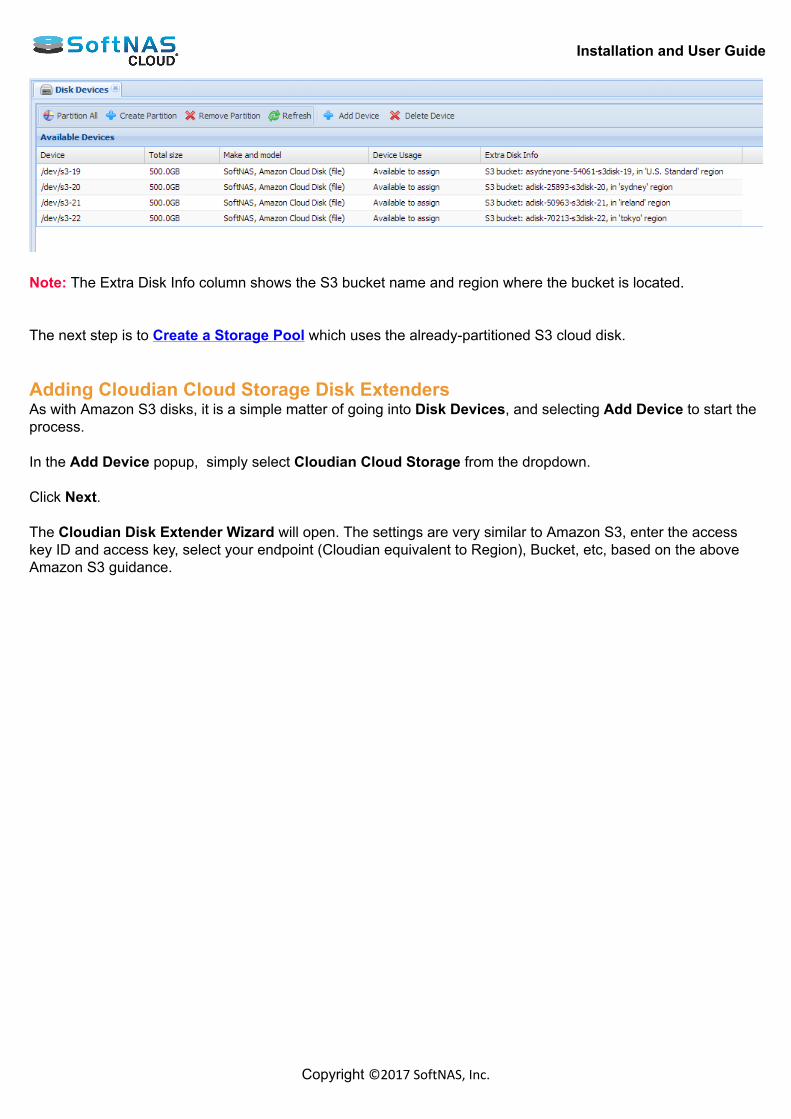
Installation and User Guide
Copyright ©2017 SoftNAS, Inc.
Note: The Extra Disk Info column shows the S3 bucket name and region where the bucket is located. The next step is to Create a Storage Pool which uses the already-partitioned S3 cloud disk. Adding Cloudian Cloud Storage Disk ExtendersAs with Amazon S3 disks, it is a simple matter of going into Disk Devices, and selecting Add Device to start theprocess. In the Add Device popup, simply select Cloudian Cloud Storage from the dropdown. Click Next. The Cloudian Disk Extender Wizard will open. The settings are very similar to Amazon S3, enter the accesskey ID and access key, select your endpoint (Cloudian equivalent to Region), Bucket, etc, based on the aboveAmazon S3 guidance.
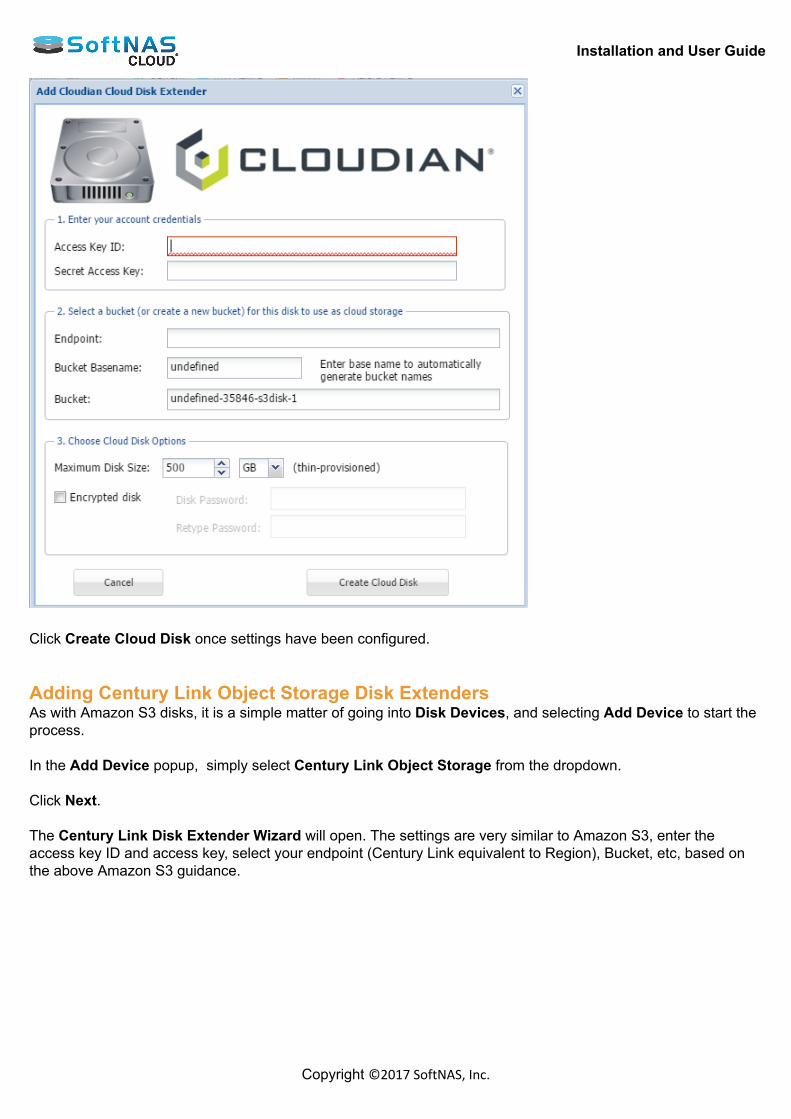
Installation and User Guide
Copyright ©2017 SoftNAS, Inc.
Click Create Cloud Disk once settings have been configured. Adding Century Link Object Storage Disk ExtendersAs with Amazon S3 disks, it is a simple matter of going into Disk Devices, and selecting Add Device to start theprocess. In the Add Device popup, simply select Century Link Object Storage from the dropdown. Click Next. The Century Link Disk Extender Wizard will open. The settings are very similar to Amazon S3, enter theaccess key ID and access key, select your endpoint (Century Link equivalent to Region), Bucket, etc, based onthe above Amazon S3 guidance.
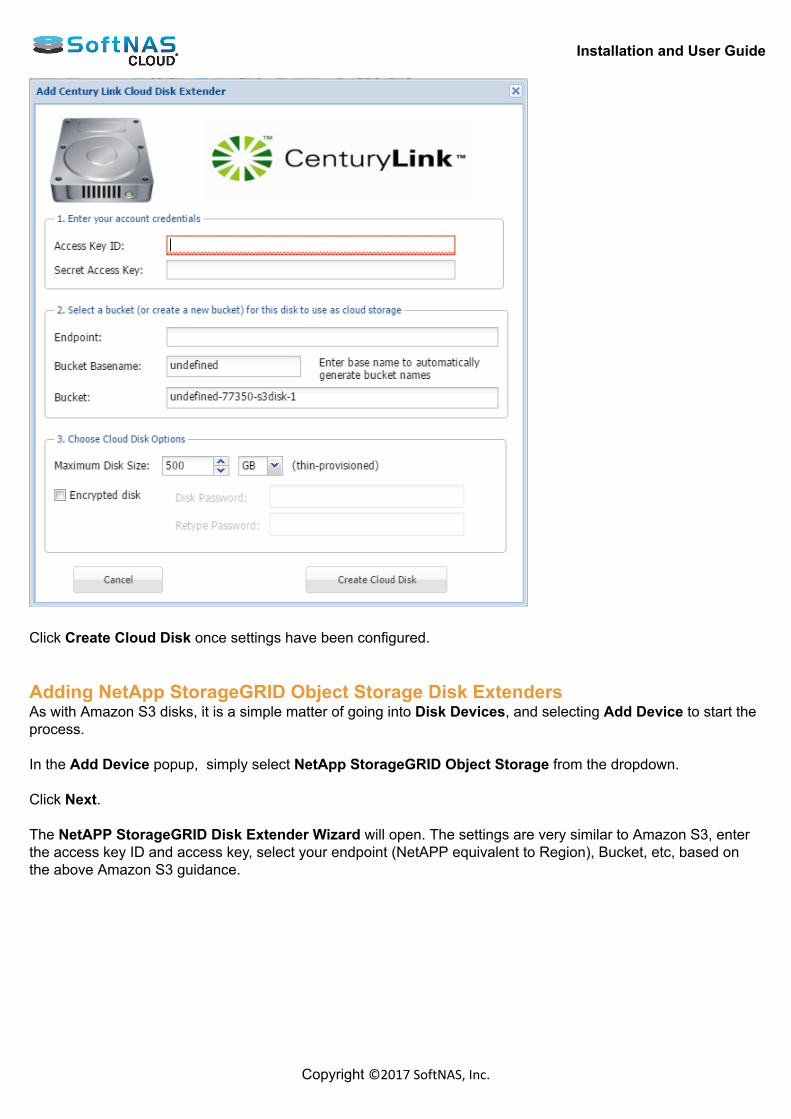
Installation and User Guide
Copyright ©2017 SoftNAS, Inc.
Click Create Cloud Disk once settings have been configured. Adding NetApp StorageGRID Object Storage Disk ExtendersAs with Amazon S3 disks, it is a simple matter of going into Disk Devices, and selecting Add Device to start theprocess. In the Add Device popup, simply select NetApp StorageGRID Object Storage from the dropdown. Click Next. The NetAPP StorageGRID Disk Extender Wizard will open. The settings are very similar to Amazon S3, enterthe access key ID and access key, select your endpoint (NetAPP equivalent to Region), Bucket, etc, based onthe above Amazon S3 guidance.
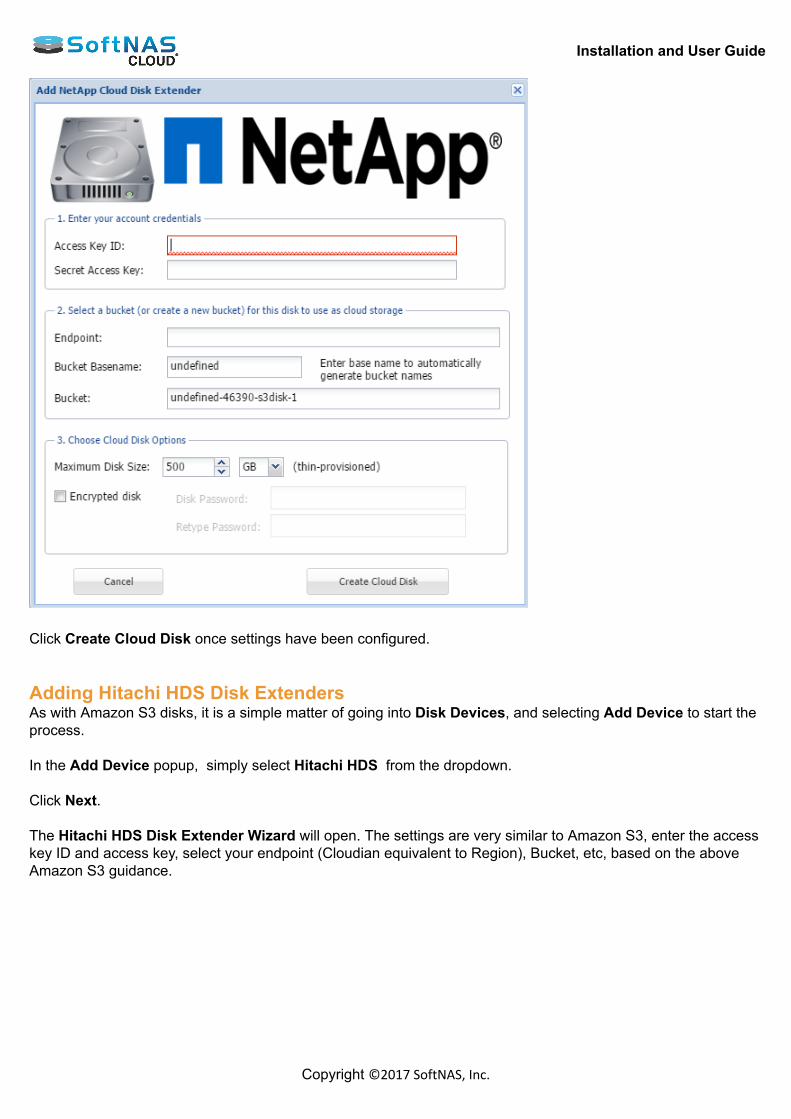
Installation and User Guide
Copyright ©2017 SoftNAS, Inc.
Click Create Cloud Disk once settings have been configured. Adding Hitachi HDS Disk ExtendersAs with Amazon S3 disks, it is a simple matter of going into Disk Devices, and selecting Add Device to start theprocess. In the Add Device popup, simply select Hitachi HDS from the dropdown. Click Next. The Hitachi HDS Disk Extender Wizard will open. The settings are very similar to Amazon S3, enter the accesskey ID and access key, select your endpoint (Cloudian equivalent to Region), Bucket, etc, based on the aboveAmazon S3 guidance.

Installation and User Guide
Copyright ©2017 SoftNAS, Inc.
Click Create Cloud Disk once settings have been configured. Adding Self-Configured Disk ExtendersThere are numerous S3 compatible cloud storage vendors, each with similar functionality. To allow adding ofdisks from any vendors we have not yet added to our wizard, you can use the self-configured disk extender toconnect to their storage. As with the other options, simply select Self Configured. Click Next. The Self-Configured Cloud Disk Extender Wizard will open. This wizard should work for any vendor withS3 compatible storage. As with Amazon S3, you need to add the Access Key ID and Access Key. Selectthe Endpoint according to the guidance found on the vendor site. The same with the remaining settings. S3compatible storage typically use a fairly standard list of settings.
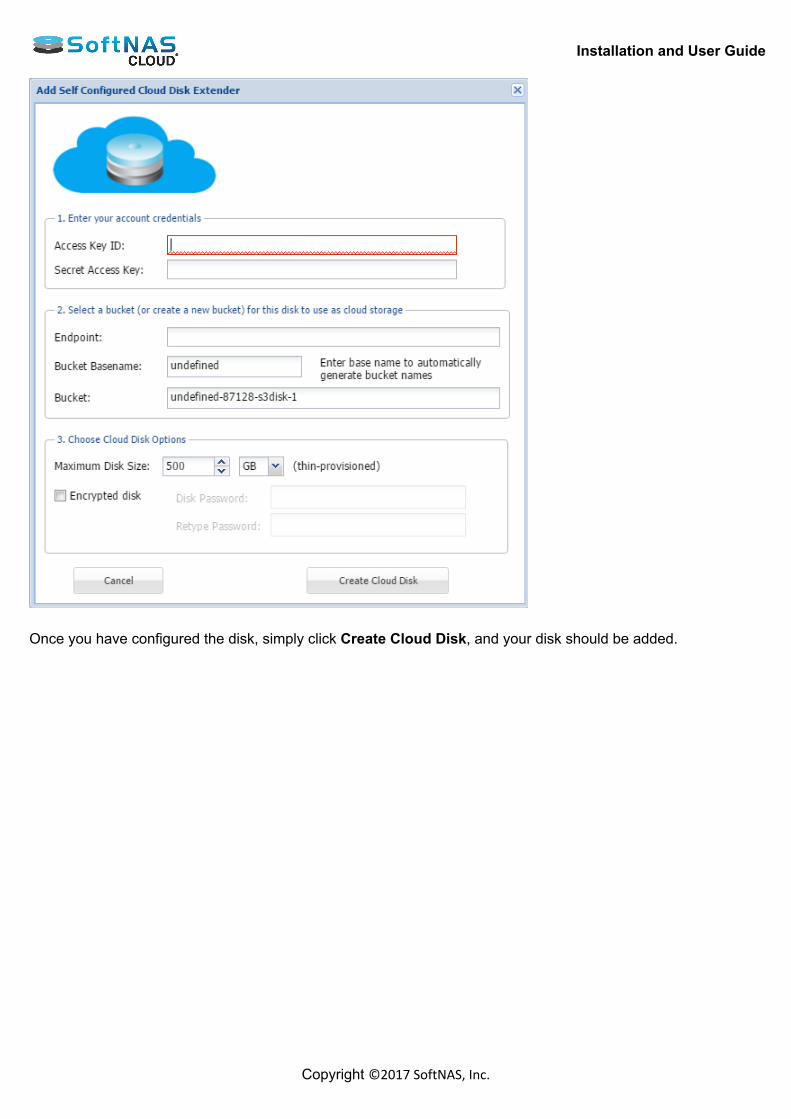
Installation and User Guide
Copyright ©2017 SoftNAS, Inc.
Once you have configured the disk, simply click Create Cloud Disk, and your disk should be added.
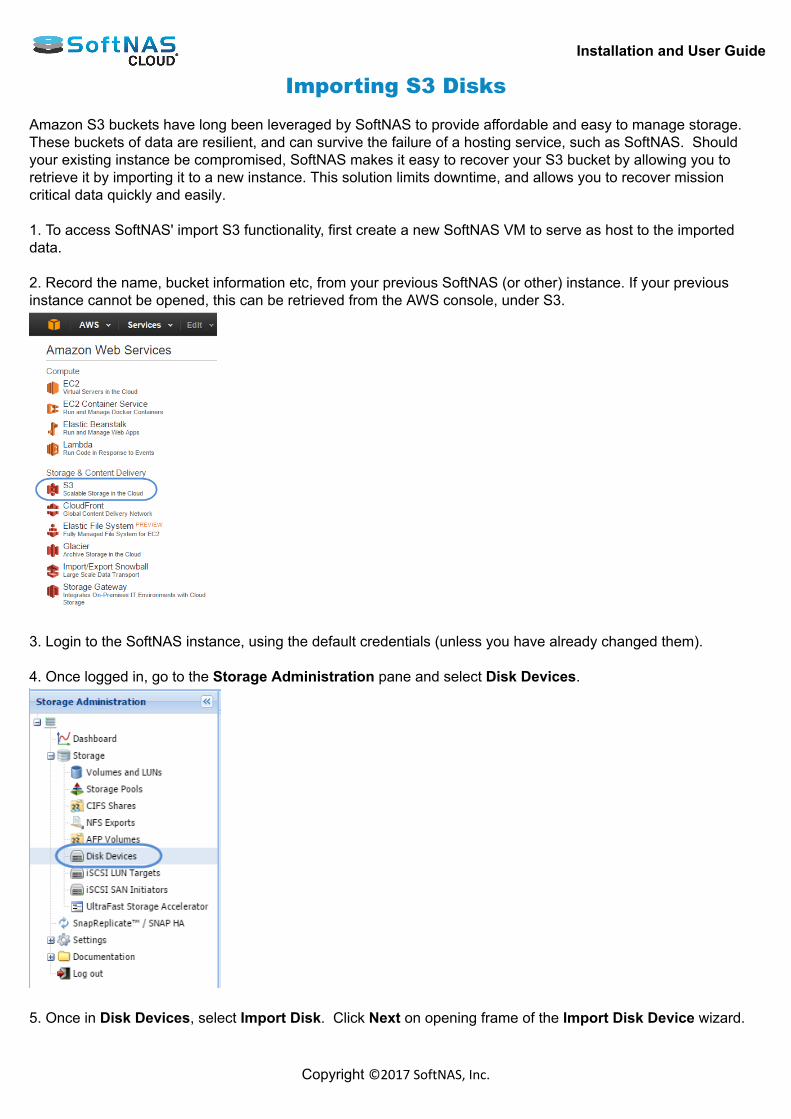
Installation and User Guide
Copyright ©2017 SoftNAS, Inc.
Importing S3 Disks
Amazon S3 buckets have long been leveraged by SoftNAS to provide affordable and easy to manage storage.These buckets of data are resilient, and can survive the failure of a hosting service, such as SoftNAS. Shouldyour existing instance be compromised, SoftNAS makes it easy to recover your S3 bucket by allowing you toretrieve it by importing it to a new instance. This solution limits downtime, and allows you to recover missioncritical data quickly and easily. 1. To access SoftNAS' import S3 functionality, first create a new SoftNAS VM to serve as host to the importeddata. 2. Record the name, bucket information etc, from your previous SoftNAS (or other) instance. If your previousinstance cannot be opened, this can be retrieved from the AWS console, under S3.
3. Login to the SoftNAS instance, using the default credentials (unless you have already changed them). 4. Once logged in, go to the Storage Administration pane and select Disk Devices.
5. Once in Disk Devices, select Import Disk. Click Next on opening frame of the Import Disk Device wizard.
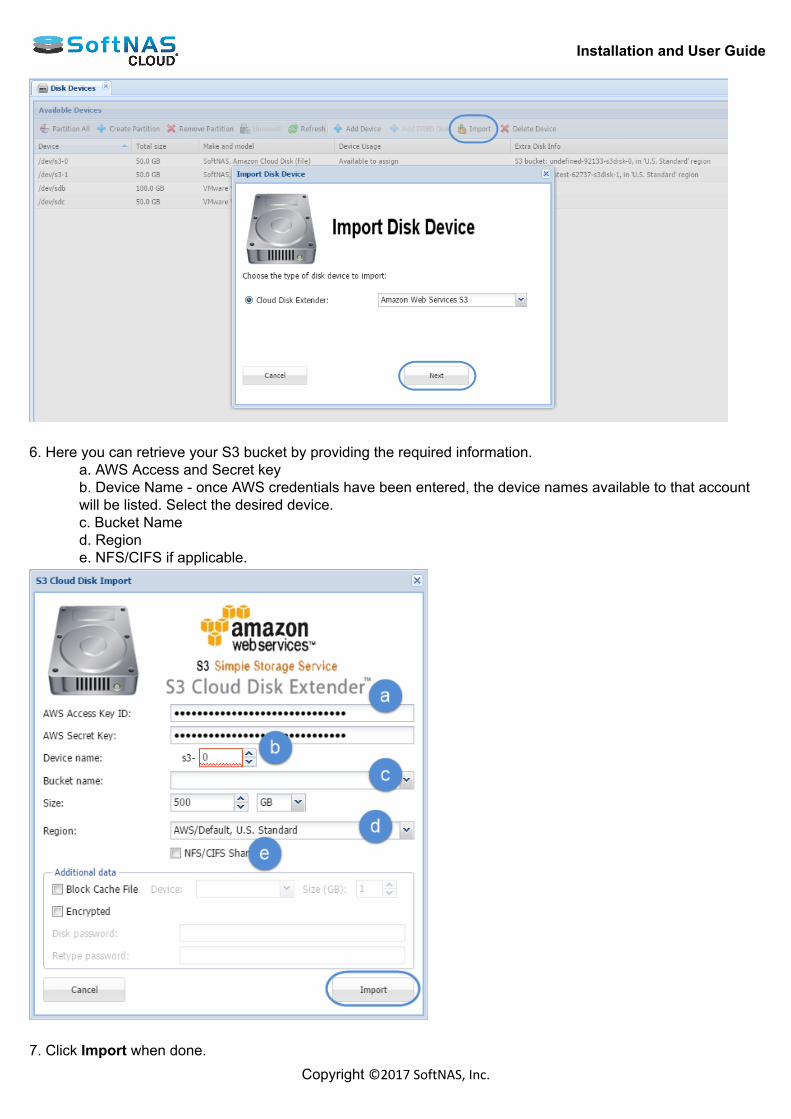
Installation and User Guide
Copyright ©2017 SoftNAS, Inc.
6. Here you can retrieve your S3 bucket by providing the required information.
a. AWS Access and Secret keyb. Device Name - once AWS credentials have been entered, the device names available to that accountwill be listed. Select the desired device.c. Bucket Named. Regione. NFS/CIFS if applicable.
7. Click Import when done.
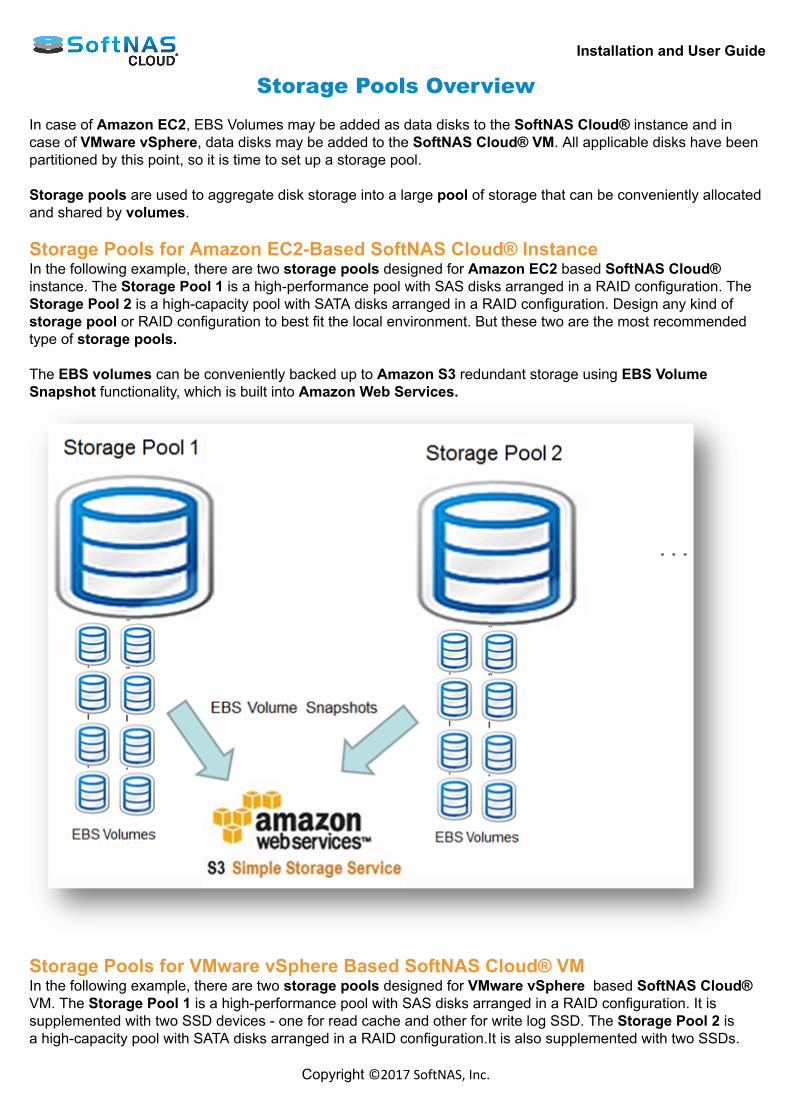
Installation and User Guide
Copyright ©2017 SoftNAS, Inc.
Storage Pools Overview In case of Amazon EC2, EBS Volumes may be added as data disks to the SoftNAS Cloud® instance and incase of VMware vSphere, data disks may be added to the SoftNAS Cloud® VM. All applicable disks have beenpartitioned by this point, so it is time to set up a storage pool. Storage pools are used to aggregate disk storage into a large pool of storage that can be conveniently allocatedand shared by volumes. Storage Pools for Amazon EC2-Based SoftNAS Cloud® InstanceIn the following example, there are two storage pools designed for Amazon EC2 based SoftNAS Cloud®instance. The Storage Pool 1 is a high-performance pool with SAS disks arranged in a RAID configuration. TheStorage Pool 2 is a high-capacity pool with SATA disks arranged in a RAID configuration. Design any kind ofstorage pool or RAID configuration to best fit the local environment. But these two are the most recommendedtype of storage pools. The EBS volumes can be conveniently backed up to Amazon S3 redundant storage using EBS VolumeSnapshot functionality, which is built into Amazon Web Services.
Storage Pools for VMware vSphere Based SoftNAS Cloud® VMIn the following example, there are two storage pools designed for VMware vSphere based SoftNAS Cloud®VM. The Storage Pool 1 is a high-performance pool with SAS disks arranged in a RAID configuration. It issupplemented with two SSD devices - one for read cache and other for write log SSD. The Storage Pool 2 isa high-capacity pool with SATA disks arranged in a RAID configuration.It is also supplemented with two SSDs.
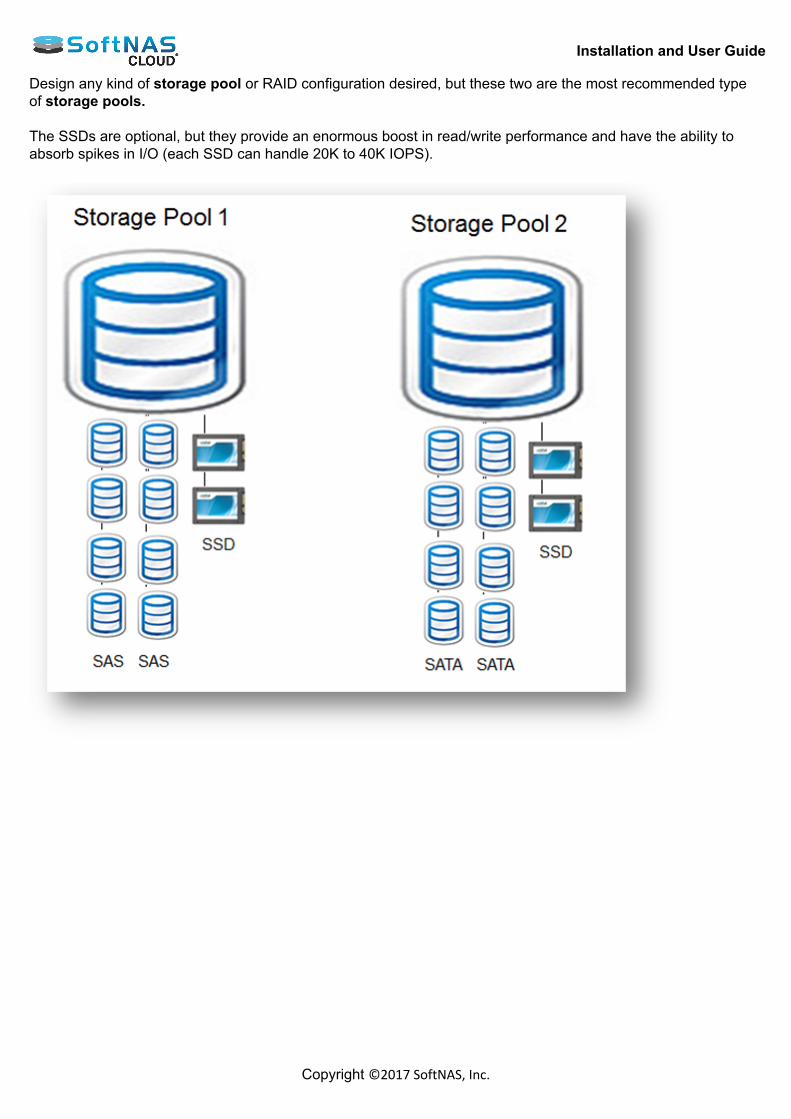
Installation and User Guide
Copyright ©2017 SoftNAS, Inc.
Design any kind of storage pool or RAID configuration desired, but these two are the most recommended typeof storage pools. The SSDs are optional, but they provide an enormous boost in read/write performance and have the ability toabsorb spikes in I/O (each SSD can handle 20K to 40K IOPS).

Installation and User Guide
Copyright ©2017 SoftNAS, Inc.
Partitioning Disks 1. Log on to SoftNAS StorageCenter. 2. In the Left Navigation Pane, select the Disk Devices option under the Storage section. The Disk Devices panel will be displayed.
Disk devices must be partitioned prior to use. The available devices are listed in the Available Devices grid,as shown above. Device Usage - indicates the current status of the device, which can be:
• Device needs partition - the initial state for a new device that has no partition• Available to assign - the device is partitioned and ready for use in a storage pool• Used in pool <poolname> - the device is in use by the indicated storage pool name
Use the buttons on the toolbar to partition the devices for initial use. Use Partition All to partition all disk devices.
Select each disk device, then use Create Partition to partition a device individually. Remove Partition can be used to remove an existing partition that is no longer needed.
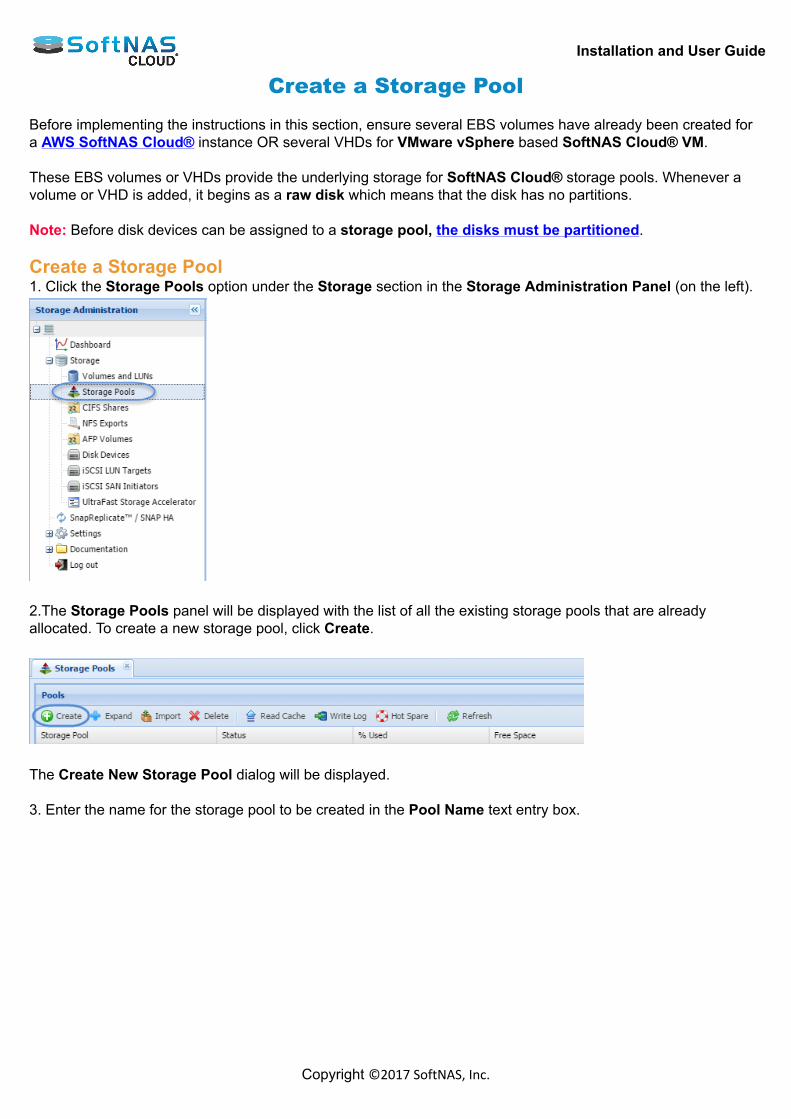
Installation and User Guide
Copyright ©2017 SoftNAS, Inc.
Create a Storage Pool Before implementing the instructions in this section, ensure several EBS volumes have already been created fora AWS SoftNAS Cloud® instance OR several VHDs for VMware vSphere based SoftNAS Cloud® VM. These EBS volumes or VHDs provide the underlying storage for SoftNAS Cloud® storage pools. Whenever avolume or VHD is added, it begins as a raw disk which means that the disk has no partitions. Note: Before disk devices can be assigned to a storage pool, the disks must be partitioned. Create a Storage Pool1. Click the Storage Pools option under the Storage section in the Storage Administration Panel (on the left).
2.The Storage Pools panel will be displayed with the list of all the existing storage pools that are alreadyallocated. To create a new storage pool, click Create.
The Create New Storage Pool dialog will be displayed. 3. Enter the name for the storage pool to be created in the Pool Name text entry box.

Installation and User Guide
Copyright ©2017 SoftNAS, Inc.
Some example storage pool naming schemes might include:
• Generic naming: naspool1, naspool2, ...• Disk-type naming: SAS1, SAS2, SATA1, SATA2• Use-case naming: OS1, OS2, Exchange1, SQLData1, UserData1, Geology, Accounting, IT, R&D, QA,Corp01, etc.
3. Select the redundancy level from the RAID Level drop down list. Note: If using hardware RAID at the disk controller level and have a single data disk presented to SoftNASCloud® for a storage pool, then software RAID may not be required; in such case, select No RAID/JBOD, as theRAID is implemented at a lower level and have no need for software RAID. 4. Select the disks to be allocated to this storage pool. Note: Each of the devices show the Disk Availability status as Available for Use. This implies that these disksare already partitioned. New disk devices must be partitioned before use. 5. In the Choose Pool Options step, check the box in the Forced Creation field to overwrite any older pools onthe disks selected. Note: If any of the disk devices chosen have been used as a part of another storage pool in the past (e.g., onethat was deleted), use the Forced Creation option to overwrite the previous data in order to use the disk in adifferent pool (a precaution to prevent accidental data loss). 6. Decide whether you wish to add LUKS Encryption (optional). Adding LUKS EncryptionLUKS (Linux Unified Key Setup) encryption is an encryption platform created by Clemens Fruhwirth in 2004 anddeveloped for Linux, but which offers a platform-independent standard on-disk format for use in various tools.

Installation and User Guide
Copyright ©2017 SoftNAS, Inc.
This ensures interoperability and compatibility between different programs, and ensures password managementbetween these programs in a secure and documented manner. LUKS encryption allows you to add a layer of security to your SoftNAS volumes and pools, and if implementedalong with Data-In-Flight encryption via SMB3 for CIFS, or by tunneling through SSH for NFS, can protect yourdata both at rest and in-flight.
a. To add LUKS encryption check the box.b. In the Type dropdown, select Password.c. Provide a password and confirm.
7. Choose the required Sync Mode:• standard:This is the default option. Synchronous file system transactions (fsync, O_DSYNC, O_SYNC, etc) arewritten out (to the intent log) and then secondly all devices written are flushed to ensure the data is stable(not cached by device controllers).• always:For the ultra-cautious, every file system transaction is written and flushed to stable storage by a systemcall return. This obviously has a big performance penalty.• disabled:Synchronous requests are disabled. File system transactions only commit to stable storage on the nextDMU transaction group commit which can be many seconds. This option gives the highest performance.However, it is very dangerous as ZFS is ignoring the synchronous transaction demands of applicationssuch as databases or NFS. Setting sync=disabled on the currently active root or /var file system mayresult in out-of-spec behavior, application data loss and increased vulnerability to replay attacks. Thisoption does *NOT* affect ZFS on-disk consistency. Administrators should only use this when these risksare understood.
8. If the pool is to be shared (accessed by more than one person at a time), check the box for Shared. 9. Click Create at the end. The new storage pool is created and is ready for use.
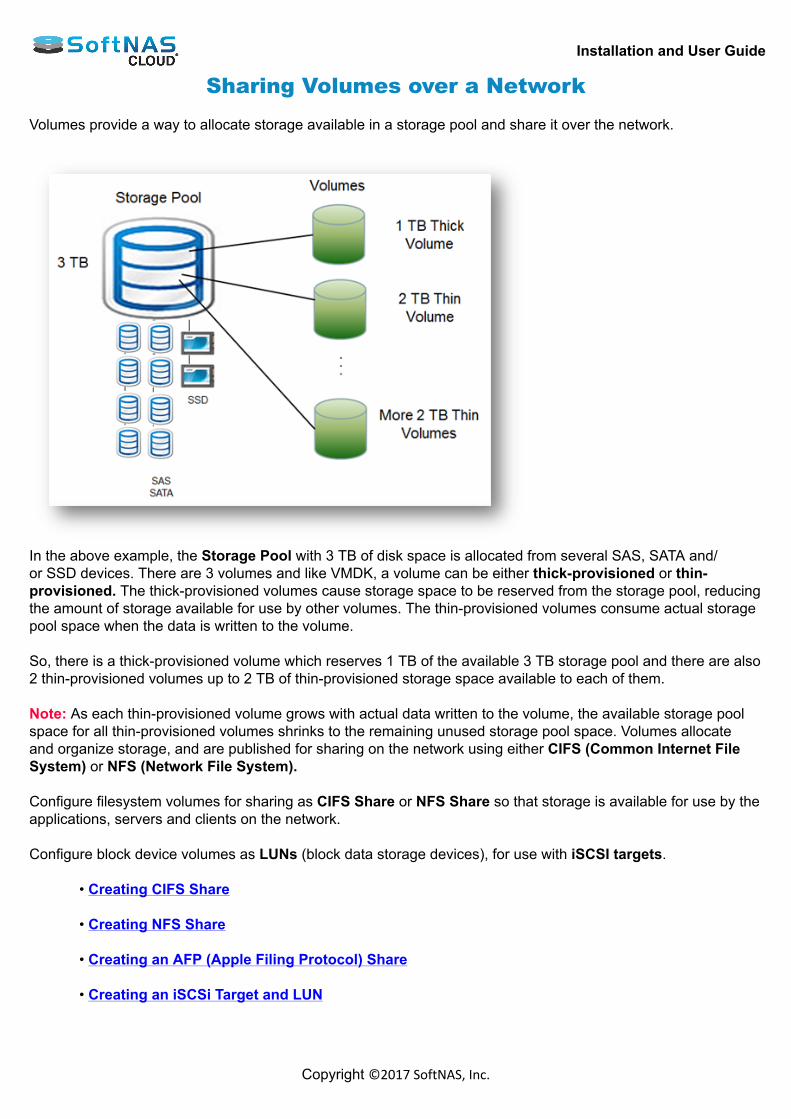
Installation and User Guide
Copyright ©2017 SoftNAS, Inc.
Sharing Volumes over a Network Volumes provide a way to allocate storage available in a storage pool and share it over the network.
In the above example, the Storage Pool with 3 TB of disk space is allocated from several SAS, SATA and/or SSD devices. There are 3 volumes and like VMDK, a volume can be either thick-provisioned or thin-provisioned. The thick-provisioned volumes cause storage space to be reserved from the storage pool, reducingthe amount of storage available for use by other volumes. The thin-provisioned volumes consume actual storagepool space when the data is written to the volume. So, there is a thick-provisioned volume which reserves 1 TB of the available 3 TB storage pool and there are also2 thin-provisioned volumes up to 2 TB of thin-provisioned storage space available to each of them. Note: As each thin-provisioned volume grows with actual data written to the volume, the available storage poolspace for all thin-provisioned volumes shrinks to the remaining unused storage pool space. Volumes allocateand organize storage, and are published for sharing on the network using either CIFS (Common Internet FileSystem) or NFS (Network File System). Configure filesystem volumes for sharing as CIFS Share or NFS Share so that storage is available for use by theapplications, servers and clients on the network. Configure block device volumes as LUNs (block data storage devices), for use with iSCSI targets.
• Creating CIFS Share • Creating NFS Share • Creating an AFP (Apple Filing Protocol) Share • Creating an iSCSi Target and LUN

Installation and User Guide
Copyright ©2017 SoftNAS, Inc.
Create & Configure Volumes Create the Volume1. Click Create in the toolbar.
The Create Volume dialog will be displayed.
Note: Take a moment to learn more about the SoftNAS advantage with our leading-edge Creating CIFS and Creating NFS Share solution sections. AFP file sharing is also possible, and is covered in Creating an AFPShare.
2. Enter the name of the volume in the Volume Name text entry box. 3. To select the storage pool where the storage space for the volume has to be reserved, click Storage Pool. The Choose a Storage Pool dialog will be displayed.
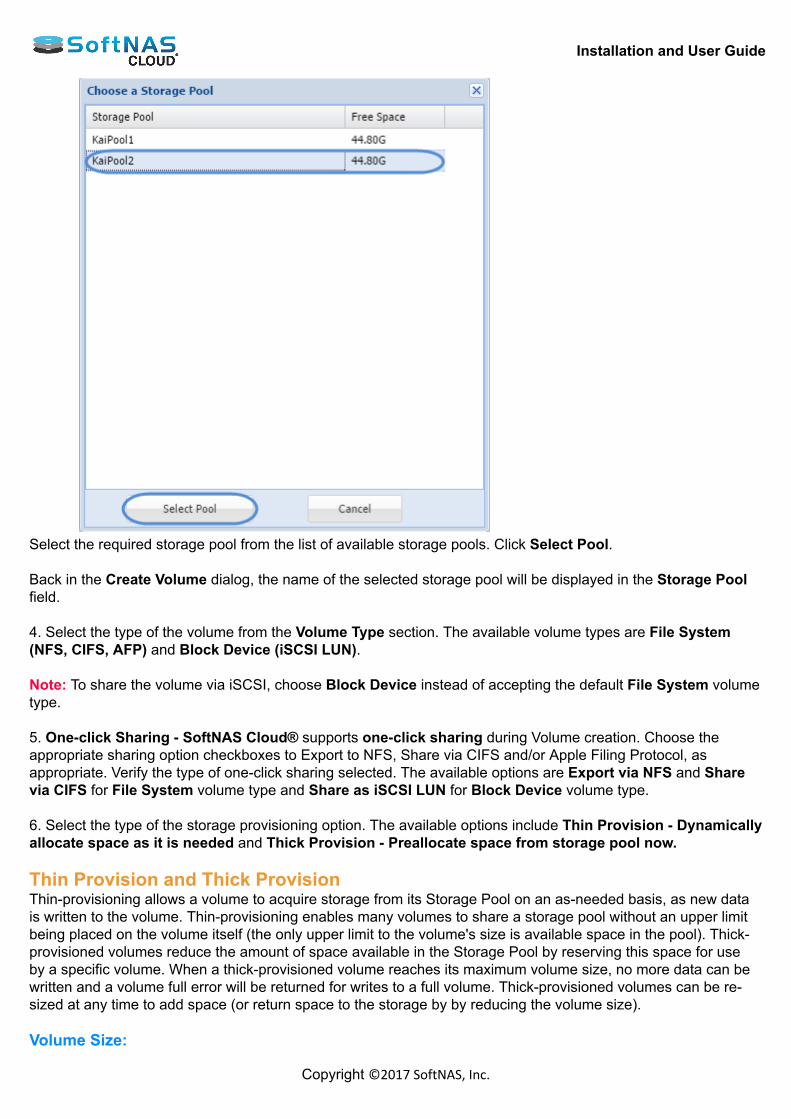
Installation and User Guide
Copyright ©2017 SoftNAS, Inc.
Select the required storage pool from the list of available storage pools. Click Select Pool.
Back in the Create Volume dialog, the name of the selected storage pool will be displayed in the Storage Poolfield. 4. Select the type of the volume from the Volume Type section. The available volume types are File System(NFS, CIFS, AFP) and Block Device (iSCSI LUN). Note: To share the volume via iSCSI, choose Block Device instead of accepting the default File System volumetype. 5. One-click Sharing - SoftNAS Cloud® supports one-click sharing during Volume creation. Choose theappropriate sharing option checkboxes to Export to NFS, Share via CIFS and/or Apple Filing Protocol, asappropriate. Verify the type of one-click sharing selected. The available options are Export via NFS and Sharevia CIFS for File System volume type and Share as iSCSI LUN for Block Device volume type. 6. Select the type of the storage provisioning option. The available options include Thin Provision - Dynamicallyallocate space as it is needed and Thick Provision - Preallocate space from storage pool now.
Thin Provision and Thick ProvisionThin-provisioning allows a volume to acquire storage from its Storage Pool on an as-needed basis, as new datais written to the volume. Thin-provisioning enables many volumes to share a storage pool without an upper limitbeing placed on the volume itself (the only upper limit to the volume's size is available space in the pool). Thick-provisioned volumes reduce the amount of space available in the Storage Pool by reserving this space for useby a specific volume. When a thick-provisioned volume reaches its maximum volume size, no more data can bewritten and a volume full error will be returned for writes to a full volume. Thick-provisioned volumes can be re-sized at any time to add space (or return space to the storage by by reducing the volume size).
Volume Size:

Installation and User Guide
Copyright ©2017 SoftNAS, Inc.
1. Select the type of the storage provisioning option as Thick Provision in the previous step, then specify thesize of the volume in the Volume Size field and select the size unit.
Once a Storage Pool has been selected for a thick-provisioned volume, the amount of available space to allocateis displayed below the Volume Size field, as shown in the example below.
The Volume Size value can be any valid numeric value; e.g., 10, 12.5, 100.0, 1.25
2. The Size Units selector is used to choose the units for the Volume Size. Select the required size unit from thedrop down list. The available units include MB – Megabytes, GB - Gigabytes (default) and TB – Terabytes.
Storage Optimization1. Select the required option for storage optimization in the Storage Optimization Options section. Theavailable options are Compression and Deduplication. The Compression type saves disk space, but requiresmore of CPU space. The Deduplication type eliminates duplicates, but consumes more memory space.
The Compression type saves disk space, at the expense of additional CPU overheads for each read and writerequest (to decode and encode the data). Depending on how compressible the data is, it is common to see datacompression rates up to 50% or more.
Note: When compressing a significant amount of data, be sure to observe the amount of actual CPU consumedduring a typical day, and if necessary, add more CPU capacity to the SoftNAS Cloud® VM as required to ensurecompression is fast and efficient. If data is not highly compressible, then disabling compression provides a betterperformance tradeoff.
• The Deduplication type eliminates duplicates, but consumes more memory space. For certain types of data(e.g., Windows virtual machine images, which are highly redundant in virtual desktop applications), deduplicationcan save up to 80% on storage requirements by eliminating duplicate data. Each time a duplicate data block isto be written, a pointer to the existing duplicate block is created instead, along with increasing the duplicate blockreference count. To make these operations as fast as possible, a table of deduplicated blocks is maintained. Ahash table of deduplicated blocks is kept in memory to make lookups very fast. When a duplicate block is read, itis usually in cache memory and is simply returned with no disk I/O required.
Note: It is recommended to avoid using deduplication unless the data is highly-duplicative, because of thememory impact of deduplication. It is estimated that for every terabyte of deduplicated data managed, onegigabyte of memory is required for the deduplication lookup tables. These tables compete with cache memory,which can reduce the overall performance of SoftNAS Cloud®. Snapshots Snapshots in StorageCenter iSCSI LUNs iSCSI LUNS and targets
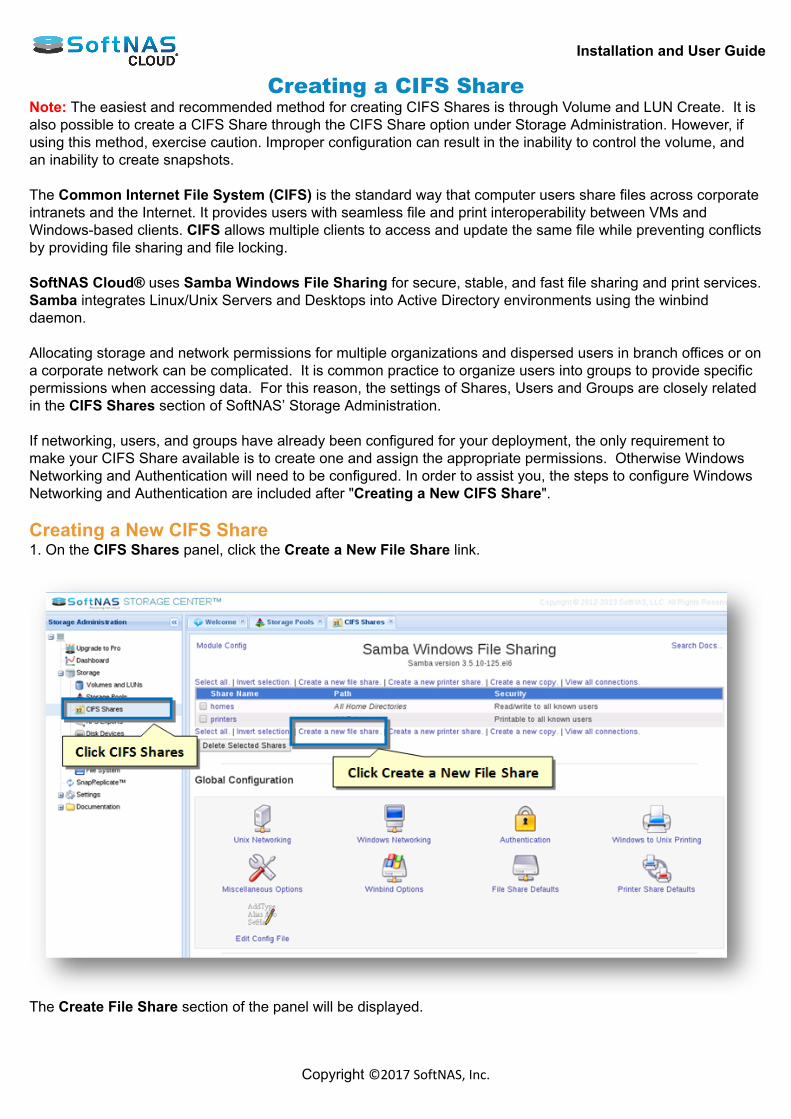
Installation and User Guide
Copyright ©2017 SoftNAS, Inc.
Creating a CIFS ShareNote: The easiest and recommended method for creating CIFS Shares is through Volume and LUN Create. It isalso possible to create a CIFS Share through the CIFS Share option under Storage Administration. However, ifusing this method, exercise caution. Improper configuration can result in the inability to control the volume, andan inability to create snapshots. The Common Internet File System (CIFS) is the standard way that computer users share files across corporateintranets and the Internet. It provides users with seamless file and print interoperability between VMs andWindows-based clients. CIFS allows multiple clients to access and update the same file while preventing conflictsby providing file sharing and file locking. SoftNAS Cloud® uses Samba Windows File Sharing for secure, stable, and fast file sharing and print services.Samba integrates Linux/Unix Servers and Desktops into Active Directory environments using the winbinddaemon. Allocating storage and network permissions for multiple organizations and dispersed users in branch offices or ona corporate network can be complicated. It is common practice to organize users into groups to provide specificpermissions when accessing data. For this reason, the settings of Shares, Users and Groups are closely relatedin the CIFS Shares section of SoftNAS’ Storage Administration. If networking, users, and groups have already been configured for your deployment, the only requirement tomake your CIFS Share available is to create one and assign the appropriate permissions. Otherwise WindowsNetworking and Authentication will need to be configured. In order to assist you, the steps to configure WindowsNetworking and Authentication are included after "Creating a New CIFS Share". Creating a New CIFS Share1. On the CIFS Shares panel, click the Create a New File Share link.
The Create File Share section of the panel will be displayed.
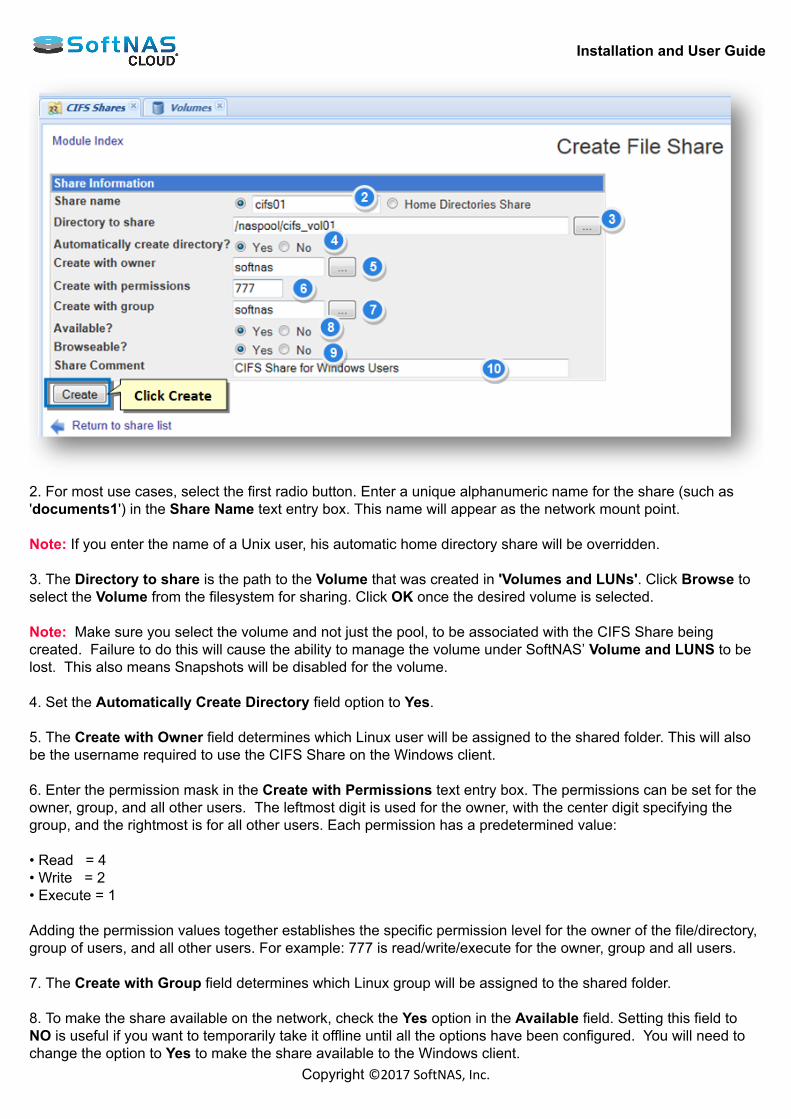
Installation and User Guide
Copyright ©2017 SoftNAS, Inc.
2. For most use cases, select the first radio button. Enter a unique alphanumeric name for the share (such as'documents1') in the Share Name text entry box. This name will appear as the network mount point. Note: If you enter the name of a Unix user, his automatic home directory share will be overridden. 3. The Directory to share is the path to the Volume that was created in 'Volumes and LUNs'. Click Browse toselect the Volume from the filesystem for sharing. Click OK once the desired volume is selected. Note: Make sure you select the volume and not just the pool, to be associated with the CIFS Share beingcreated. Failure to do this will cause the ability to manage the volume under SoftNAS’ Volume and LUNS to belost. This also means Snapshots will be disabled for the volume. 4. Set the Automatically Create Directory field option to Yes. 5. The Create with Owner field determines which Linux user will be assigned to the shared folder. This will alsobe the username required to use the CIFS Share on the Windows client. 6. Enter the permission mask in the Create with Permissions text entry box. The permissions can be set for theowner, group, and all other users. The leftmost digit is used for the owner, with the center digit specifying thegroup, and the rightmost is for all other users. Each permission has a predetermined value: • Read = 4• Write = 2• Execute = 1 Adding the permission values together establishes the specific permission level for the owner of the file/directory,group of users, and all other users. For example: 777 is read/write/execute for the owner, group and all users. 7. The Create with Group field determines which Linux group will be assigned to the shared folder. 8. To make the share available on the network, check the Yes option in the Available field. Setting this field toNO is useful if you want to temporarily take it offline until all the options have been configured. You will need tochange the option to Yes to make the share available to the Windows client.
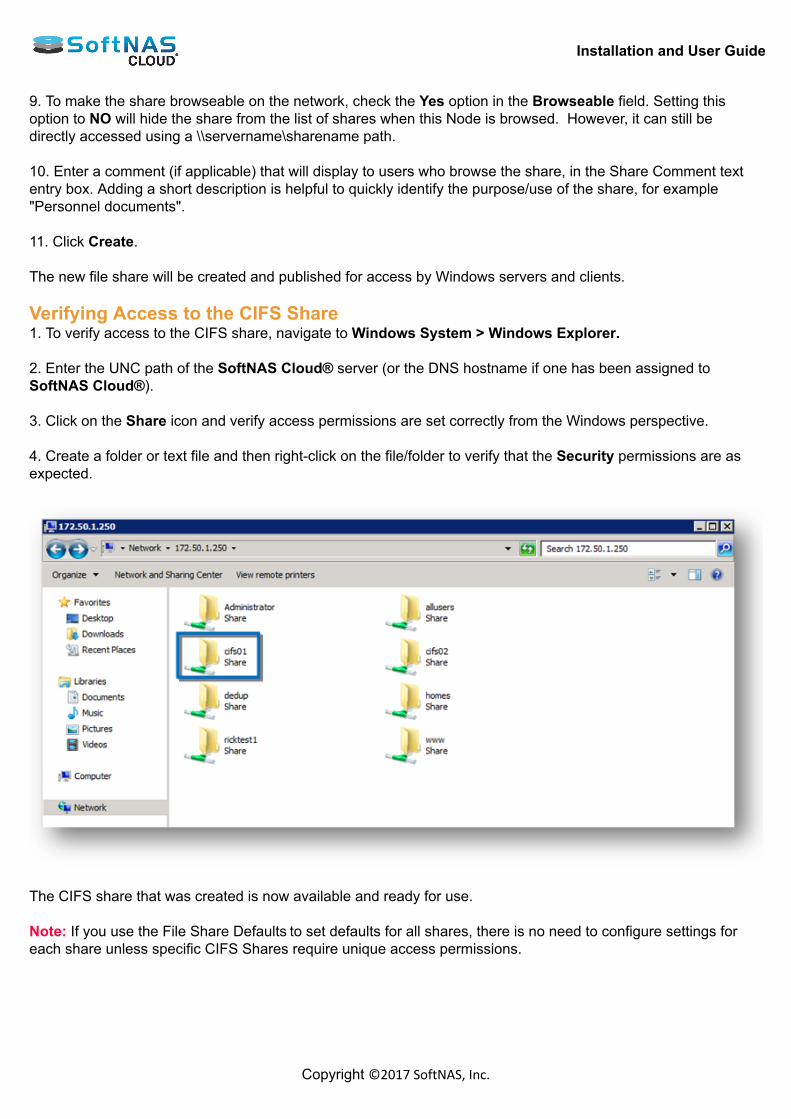
Installation and User Guide
Copyright ©2017 SoftNAS, Inc.
9. To make the share browseable on the network, check the Yes option in the Browseable field. Setting thisoption to NO will hide the share from the list of shares when this Node is browsed. However, it can still bedirectly accessed using a \\servername\sharename path. 10. Enter a comment (if applicable) that will display to users who browse the share, in the Share Comment textentry box. Adding a short description is helpful to quickly identify the purpose/use of the share, for example"Personnel documents". 11. Click Create. The new file share will be created and published for access by Windows servers and clients. Verifying Access to the CIFS Share1. To verify access to the CIFS share, navigate to Windows System > Windows Explorer. 2. Enter the UNC path of the SoftNAS Cloud® server (or the DNS hostname if one has been assigned toSoftNAS Cloud®). 3. Click on the Share icon and verify access permissions are set correctly from the Windows perspective. 4. Create a folder or text file and then right-click on the file/folder to verify that the Security permissions are asexpected.
The CIFS share that was created is now available and ready for use. Note: If you use the File Share Defaults to set defaults for all shares, there is no need to configure settings foreach share unless specific CIFS Shares require unique access permissions.
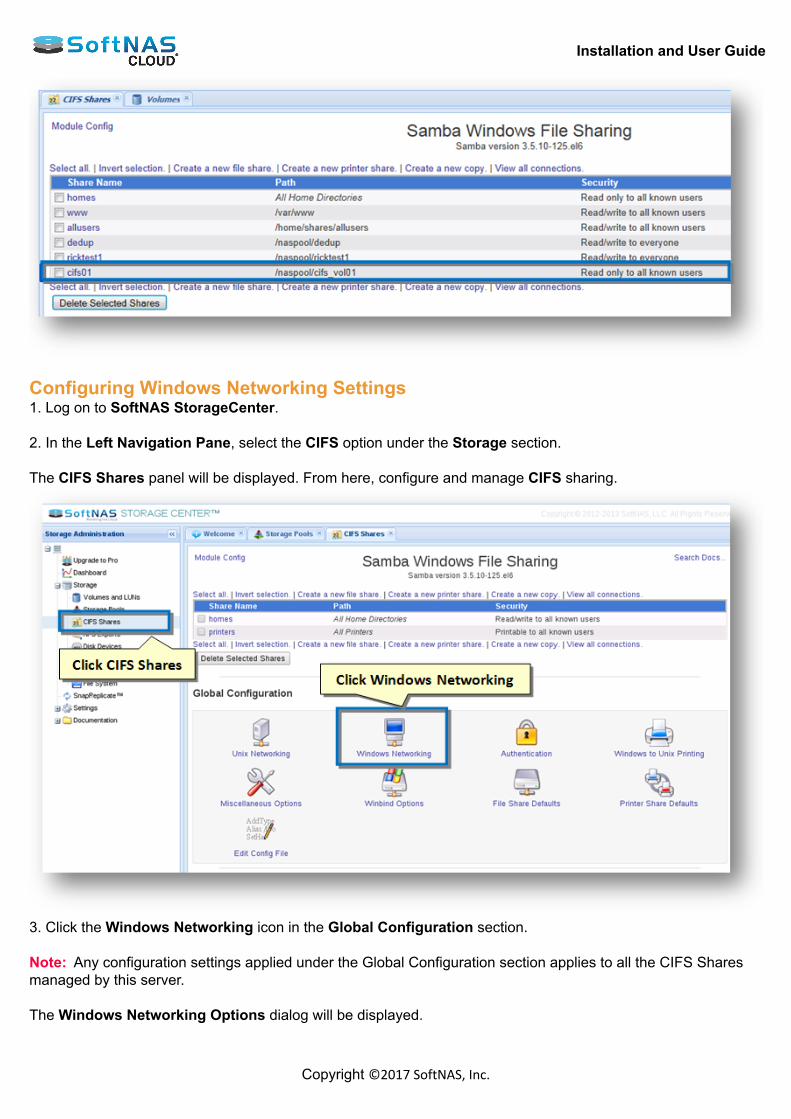
Installation and User Guide
Copyright ©2017 SoftNAS, Inc.
Configuring Windows Networking Settings1. Log on to SoftNAS StorageCenter. 2. In the Left Navigation Pane, select the CIFS option under the Storage section. The CIFS Shares panel will be displayed. From here, configure and manage CIFS sharing.
3. Click the Windows Networking icon in the Global Configuration section. Note: Any configuration settings applied under the Global Configuration section applies to all the CIFS Sharesmanaged by this server. The Windows Networking Options dialog will be displayed.
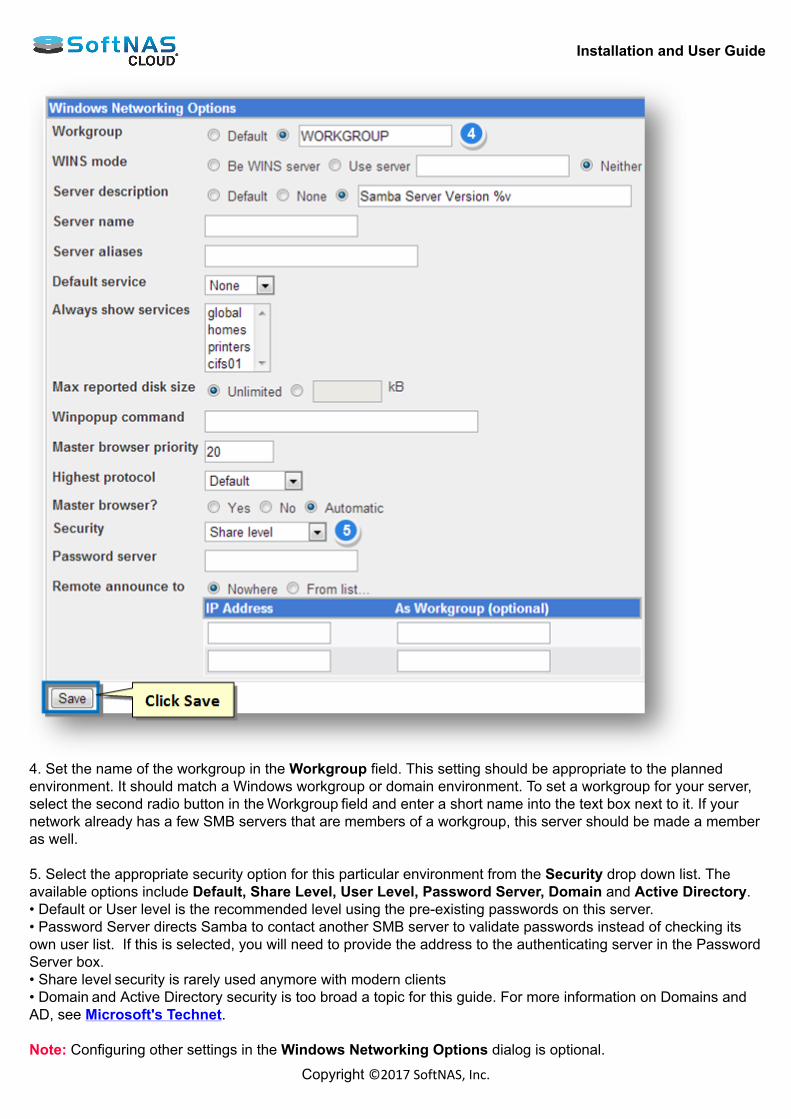
Installation and User Guide
Copyright ©2017 SoftNAS, Inc.
4. Set the name of the workgroup in the Workgroup field. This setting should be appropriate to the plannedenvironment. It should match a Windows workgroup or domain environment. To set a workgroup for your server,select the second radio button in the Workgroup field and enter a short name into the text box next to it. If yournetwork already has a few SMB servers that are members of a workgroup, this server should be made a memberas well. 5. Select the appropriate security option for this particular environment from the Security drop down list. Theavailable options include Default, Share Level, User Level, Password Server, Domain and Active Directory.• Default or User level is the recommended level using the pre-existing passwords on this server.• Password Server directs Samba to contact another SMB server to validate passwords instead of checking itsown user list. If this is selected, you will need to provide the address to the authenticating server in the PasswordServer box.• Share level security is rarely used anymore with modern clients• Domain and Active Directory security is too broad a topic for this guide. For more information on Domains andAD, see Microsoft's Technet. Note: Configuring other settings in the Windows Networking Options dialog is optional.
Installation and User Guide
Copyright ©2017 SoftNAS, Inc.
6. Click Save.Other options on this form: • If your network already has a WINS protocol server, select Use server in the WINS mode field and enter itsIP address. If not, you should choose Be WINS server so that Windows clients can use your system to lookupIP addresses for SMB server names. More recent versions of Windows (and Linux clients) do not need to useWINS, as they can look up server names in the DNS - assuming your network has a DNS server that has entriesfor all your hosts. • To set a description for your system, fill in the Server description field with something like Corporate file server. • Normally, Samba will use the first part of your system's DNS name as the SMB server name. To change this,enter something else in the Server name field. Clients will be able to refer to this server by whatever name youspecify. • To define alternate names that clients can use to refer to your server, fill in the Server aliases field with a space-separate list of names. • If you want your system to be the master browser for a network (the server that maintains lists of other SMBservers and clients on the network, as seen in Window's network neighborhood), change the Master browser?field to Yes. If you are running multiple Samba servers on the same subnet, this option should be set for onlyone. If there are other Windows or Samba servers on the network that want to be master browsers, the one withthe highest operating system level will win the 'election' that decides who gets the job. You can increase yoursystem's change of winning by increasing the Master browser priority field - the default of 20 will win againstWindows 95 systems, but you would need to enter 65 to beat Windows NT servers. • Normally, an SMB server broadcasts information about itself to other servers on the network so that it can beincluded in browse lists. However, if your network spans multiple subnets then broadcasts from one systemmay not reach others. To get around this problem, the Remote announce to table can be used to specify theaddresses of browser master servers to which this server's IP address and workgroup should be sent. Toconfigure remote announcements on this page, first select the From list option above the table. Then in the IPaddress field of each row enter the hostname or IP address of a server to announce to, and in the As workgroupfield the name of the workgroup that your server should appear under. If the second field is left empty, the serversreal workgroup (set in step 2) will be used. To enter more than two remote servers you will need to save and re-open this page so that more empty rows appear in the table. Now this environment is ready for CIFS sharing. Managing Security and Access Control in CIFS ShareOnce a CIFS Share has been created, you can edit various security-related options that control who has accessto it and which hosts they can connect from. This can be useful if some shares contain files that only certainpeople should have access to, or if your Samba server is for use by clients only on your internal network. Normally this is applied “Globally” to address of the CIFS Shares managed by this server but can be set forindividual CIFS Shares. To manage individual CIFS Shares, “click” on the appropriate Share Name. 1. On the CIFS Shares panel, click the name of the CIFS share link.
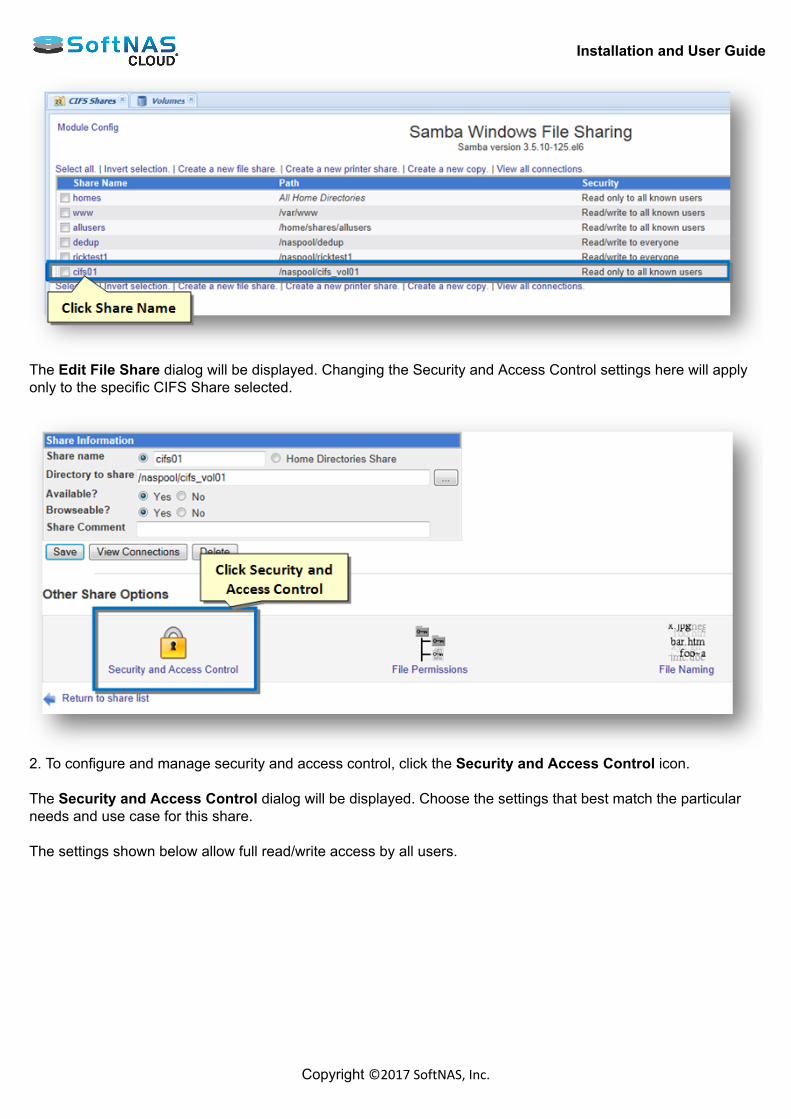
Installation and User Guide
Copyright ©2017 SoftNAS, Inc.
The Edit File Share dialog will be displayed. Changing the Security and Access Control settings here will applyonly to the specific CIFS Share selected.
2. To configure and manage security and access control, click the Security and Access Control icon. The Security and Access Control dialog will be displayed. Choose the settings that best match the particularneeds and use case for this share. The settings shown below allow full read/write access by all users.
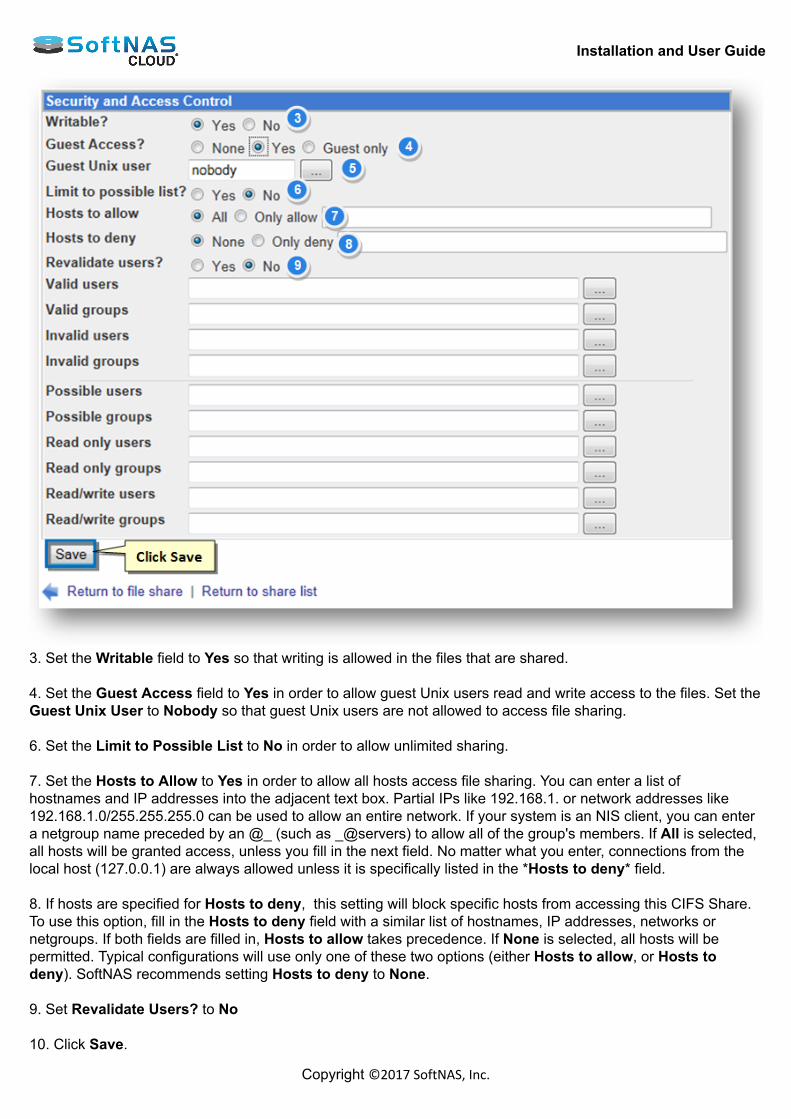
Installation and User Guide
Copyright ©2017 SoftNAS, Inc.
3. Set the Writable field to Yes so that writing is allowed in the files that are shared. 4. Set the Guest Access field to Yes in order to allow guest Unix users read and write access to the files. Set theGuest Unix User to Nobody so that guest Unix users are not allowed to access file sharing. 6. Set the Limit to Possible List to No in order to allow unlimited sharing. 7. Set the Hosts to Allow to Yes in order to allow all hosts access file sharing. You can enter a list ofhostnames and IP addresses into the adjacent text box. Partial IPs like 192.168.1. or network addresses like192.168.1.0/255.255.255.0 can be used to allow an entire network. If your system is an NIS client, you can entera netgroup name preceded by an @_ (such as _@servers) to allow all of the group's members. If All is selected,all hosts will be granted access, unless you fill in the next field. No matter what you enter, connections from thelocal host (127.0.0.1) are always allowed unless it is specifically listed in the *Hosts to deny* field. 8. If hosts are specified for Hosts to deny, this setting will block specific hosts from accessing this CIFS Share.To use this option, fill in the Hosts to deny field with a similar list of hostnames, IP addresses, networks ornetgroups. If both fields are filled in, Hosts to allow takes precedence. If None is selected, all hosts will bepermitted. Typical configurations will use only one of these two options (either Hosts to allow, or Hosts todeny). SoftNAS recommends setting Hosts to deny to None. 9. Set Revalidate Users? to No 10. Click Save.
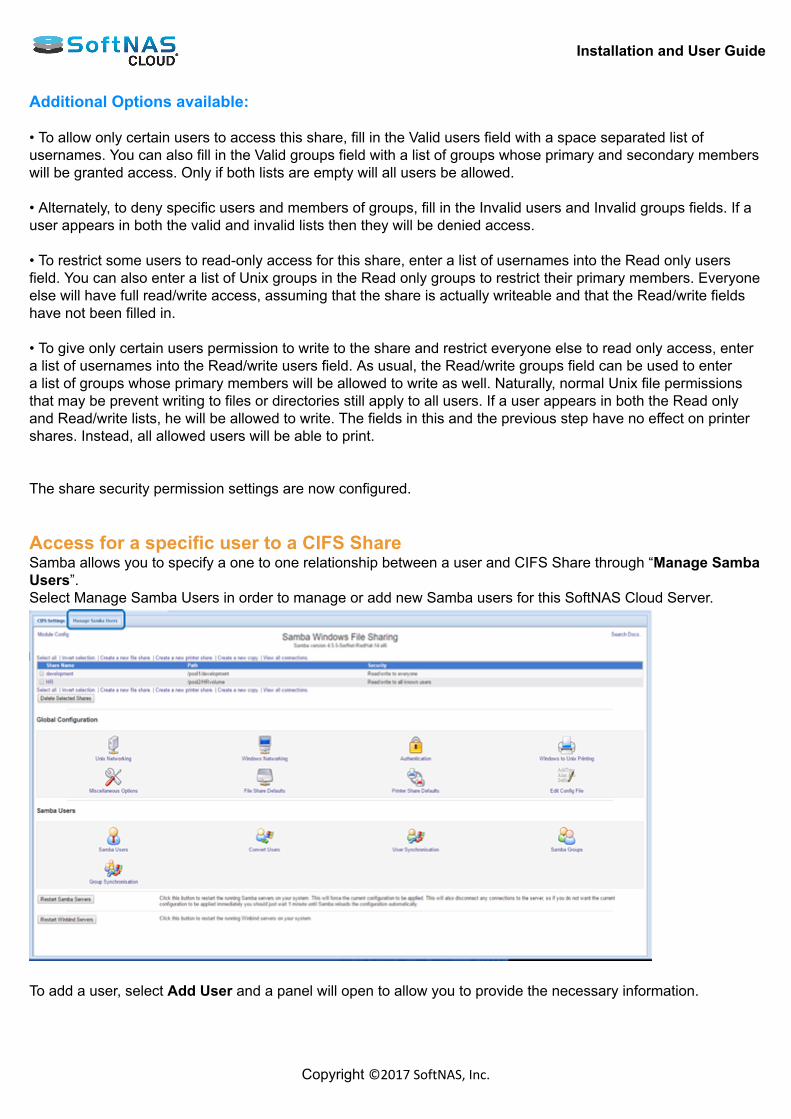
Installation and User Guide
Copyright ©2017 SoftNAS, Inc.
Additional Options available: • To allow only certain users to access this share, fill in the Valid users field with a space separated list ofusernames. You can also fill in the Valid groups field with a list of groups whose primary and secondary memberswill be granted access. Only if both lists are empty will all users be allowed. • Alternately, to deny specific users and members of groups, fill in the Invalid users and Invalid groups fields. If auser appears in both the valid and invalid lists then they will be denied access. • To restrict some users to read-only access for this share, enter a list of usernames into the Read only usersfield. You can also enter a list of Unix groups in the Read only groups to restrict their primary members. Everyoneelse will have full read/write access, assuming that the share is actually writeable and that the Read/write fieldshave not been filled in. • To give only certain users permission to write to the share and restrict everyone else to read only access, entera list of usernames into the Read/write users field. As usual, the Read/write groups field can be used to entera list of groups whose primary members will be allowed to write as well. Naturally, normal Unix file permissionsthat may be prevent writing to files or directories still apply to all users. If a user appears in both the Read onlyand Read/write lists, he will be allowed to write. The fields in this and the previous step have no effect on printershares. Instead, all allowed users will be able to print. The share security permission settings are now configured. Access for a specific user to a CIFS ShareSamba allows you to specify a one to one relationship between a user and CIFS Share through “Manage SambaUsers”.Select Manage Samba Users in order to manage or add new Samba users for this SoftNAS Cloud Server.
To add a user, select Add User and a panel will open to allow you to provide the necessary information.
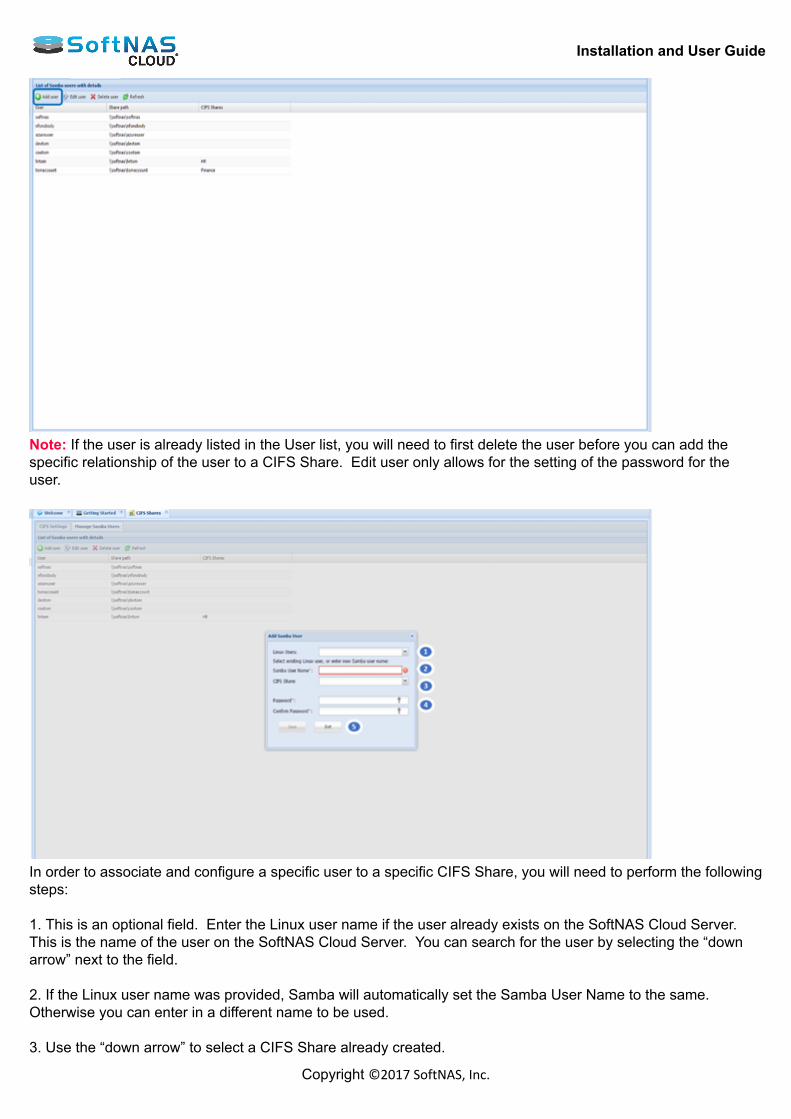
Installation and User Guide
Copyright ©2017 SoftNAS, Inc.
Note: If the user is already listed in the User list, you will need to first delete the user before you can add thespecific relationship of the user to a CIFS Share. Edit user only allows for the setting of the password for theuser.
In order to associate and configure a specific user to a specific CIFS Share, you will need to perform the followingsteps: 1. This is an optional field. Enter the Linux user name if the user already exists on the SoftNAS Cloud Server. This is the name of the user on the SoftNAS Cloud Server. You can search for the user by selecting the “downarrow” next to the field. 2. If the Linux user name was provided, Samba will automatically set the Samba User Name to the same.Otherwise you can enter in a different name to be used. 3. Use the “down arrow” to select a CIFS Share already created.
Installation and User Guide
Copyright ©2017 SoftNAS, Inc.
4. Set up the Samba User’s password and confirm it. 5. Select Save to apply the information to the newly added user.
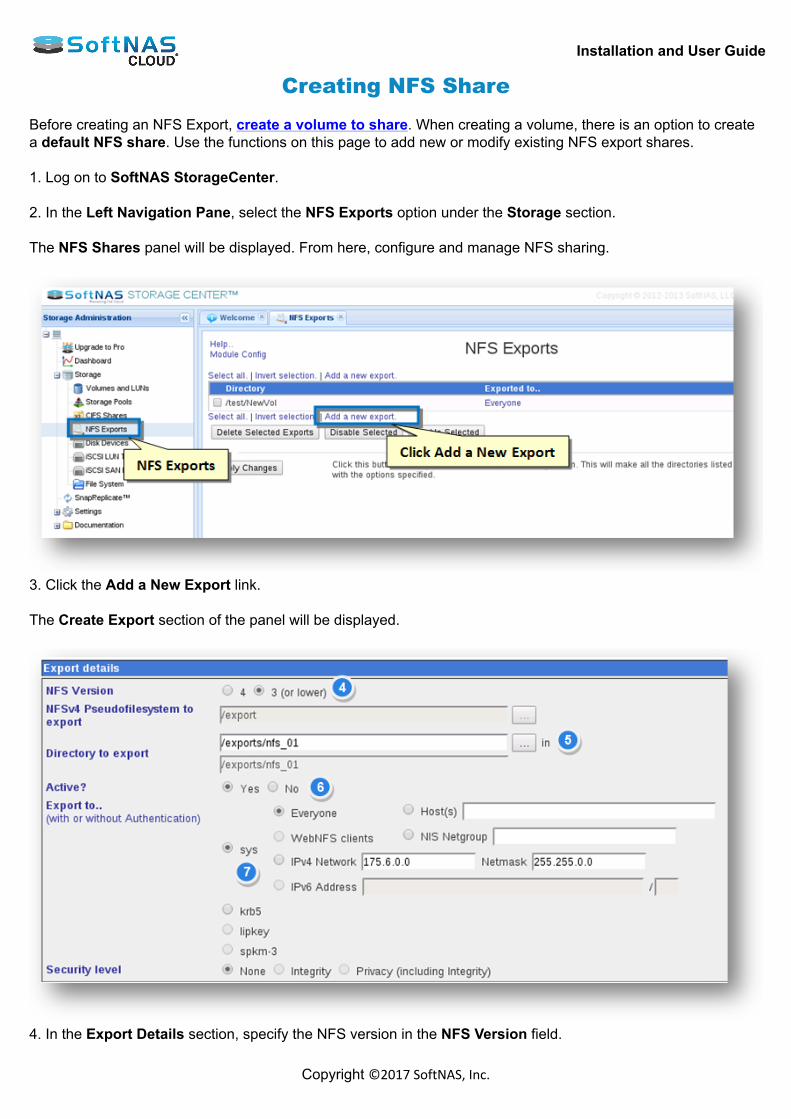
Installation and User Guide
Copyright ©2017 SoftNAS, Inc.
Creating NFS Share Before creating an NFS Export, create a volume to share. When creating a volume, there is an option to createa default NFS share. Use the functions on this page to add new or modify existing NFS export shares. 1. Log on to SoftNAS StorageCenter. 2. In the Left Navigation Pane, select the NFS Exports option under the Storage section. The NFS Shares panel will be displayed. From here, configure and manage NFS sharing.
3. Click the Add a New Export link. The Create Export section of the panel will be displayed.
4. In the Export Details section, specify the NFS version in the NFS Version field.
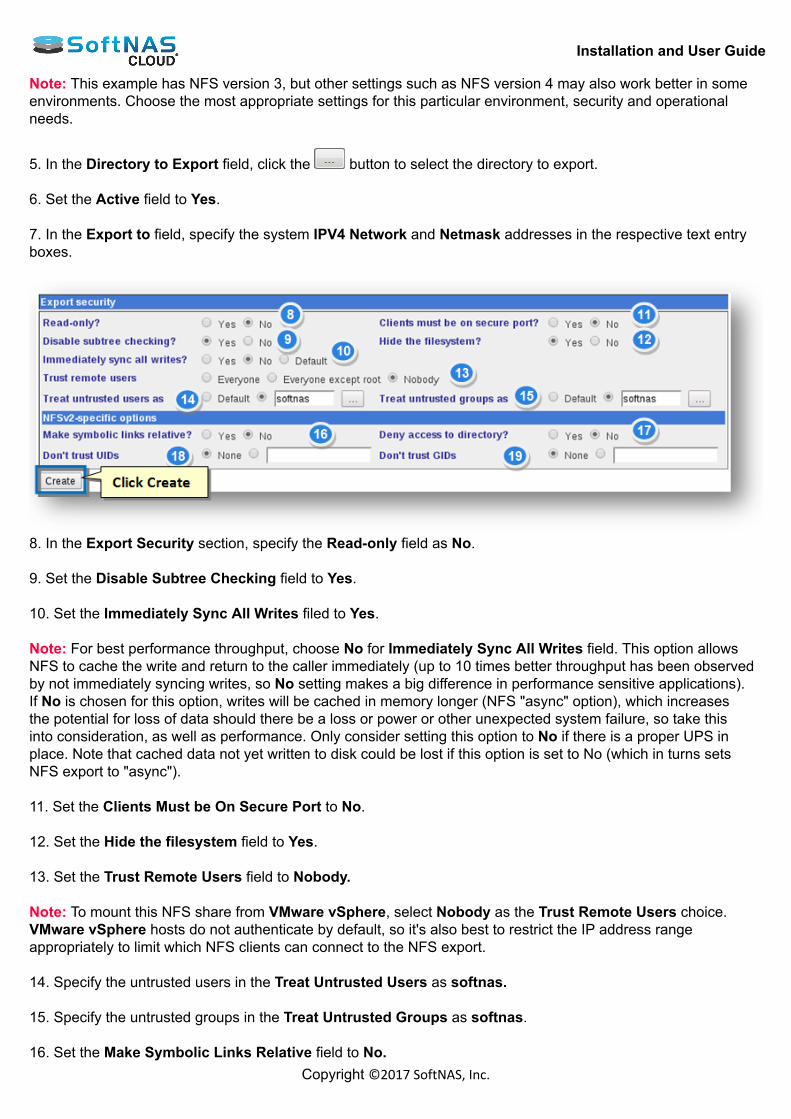
Installation and User Guide
Copyright ©2017 SoftNAS, Inc.
Note: This example has NFS version 3, but other settings such as NFS version 4 may also work better in someenvironments. Choose the most appropriate settings for this particular environment, security and operationalneeds.
5. In the Directory to Export field, click the button to select the directory to export. 6. Set the Active field to Yes. 7. In the Export to field, specify the system IPV4 Network and Netmask addresses in the respective text entryboxes.
8. In the Export Security section, specify the Read-only field as No. 9. Set the Disable Subtree Checking field to Yes. 10. Set the Immediately Sync All Writes filed to Yes. Note: For best performance throughput, choose No for Immediately Sync All Writes field. This option allowsNFS to cache the write and return to the caller immediately (up to 10 times better throughput has been observedby not immediately syncing writes, so No setting makes a big difference in performance sensitive applications).If No is chosen for this option, writes will be cached in memory longer (NFS "async" option), which increasesthe potential for loss of data should there be a loss or power or other unexpected system failure, so take thisinto consideration, as well as performance. Only consider setting this option to No if there is a proper UPS inplace. Note that cached data not yet written to disk could be lost if this option is set to No (which in turns setsNFS export to "async"). 11. Set the Clients Must be On Secure Port to No. 12. Set the Hide the filesystem field to Yes. 13. Set the Trust Remote Users field to Nobody. Note: To mount this NFS share from VMware vSphere, select Nobody as the Trust Remote Users choice.VMware vSphere hosts do not authenticate by default, so it's also best to restrict the IP address rangeappropriately to limit which NFS clients can connect to the NFS export. 14. Specify the untrusted users in the Treat Untrusted Users as softnas. 15. Specify the untrusted groups in the Treat Untrusted Groups as softnas. 16. Set the Make Symbolic Links Relative field to No.
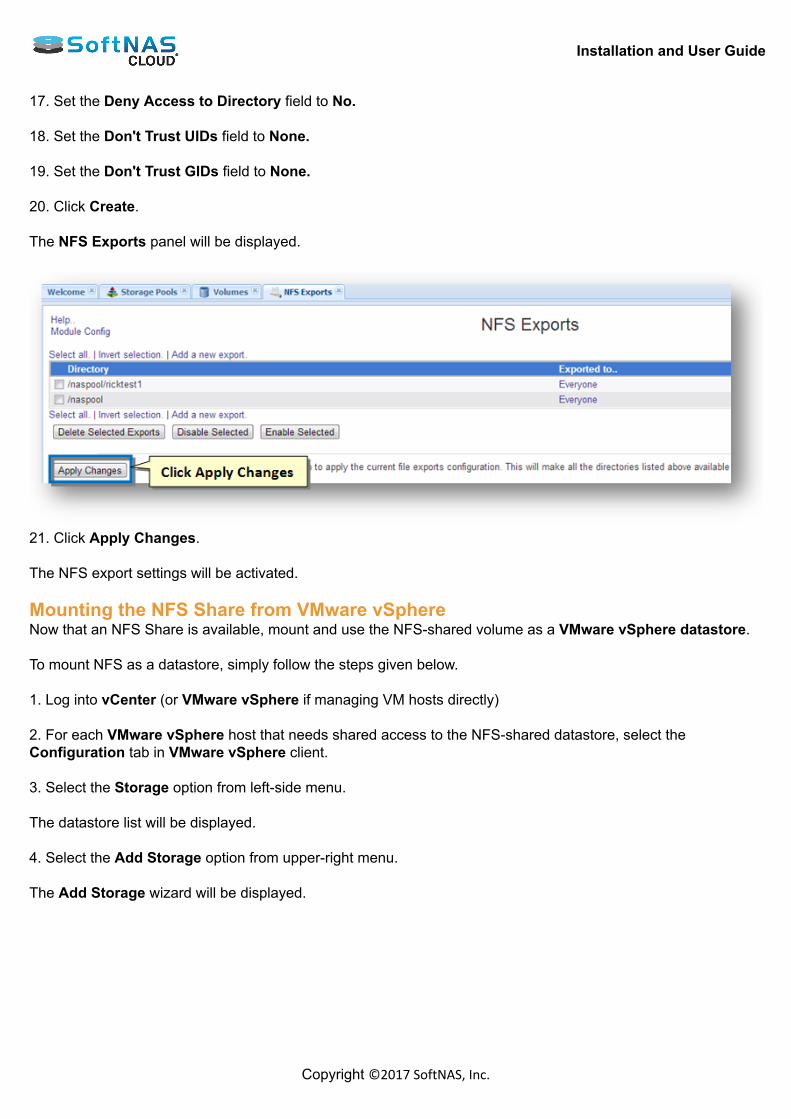
Installation and User Guide
Copyright ©2017 SoftNAS, Inc.
17. Set the Deny Access to Directory field to No. 18. Set the Don't Trust UIDs field to None. 19. Set the Don't Trust GIDs field to None. 20. Click Create. The NFS Exports panel will be displayed.
21. Click Apply Changes. The NFS export settings will be activated. Mounting the NFS Share from VMware vSphereNow that an NFS Share is available, mount and use the NFS-shared volume as a VMware vSphere datastore. To mount NFS as a datastore, simply follow the steps given below. 1. Log into vCenter (or VMware vSphere if managing VM hosts directly) 2. For each VMware vSphere host that needs shared access to the NFS-shared datastore, select theConfiguration tab in VMware vSphere client. 3. Select the Storage option from left-side menu. The datastore list will be displayed. 4. Select the Add Storage option from upper-right menu. The Add Storage wizard will be displayed.
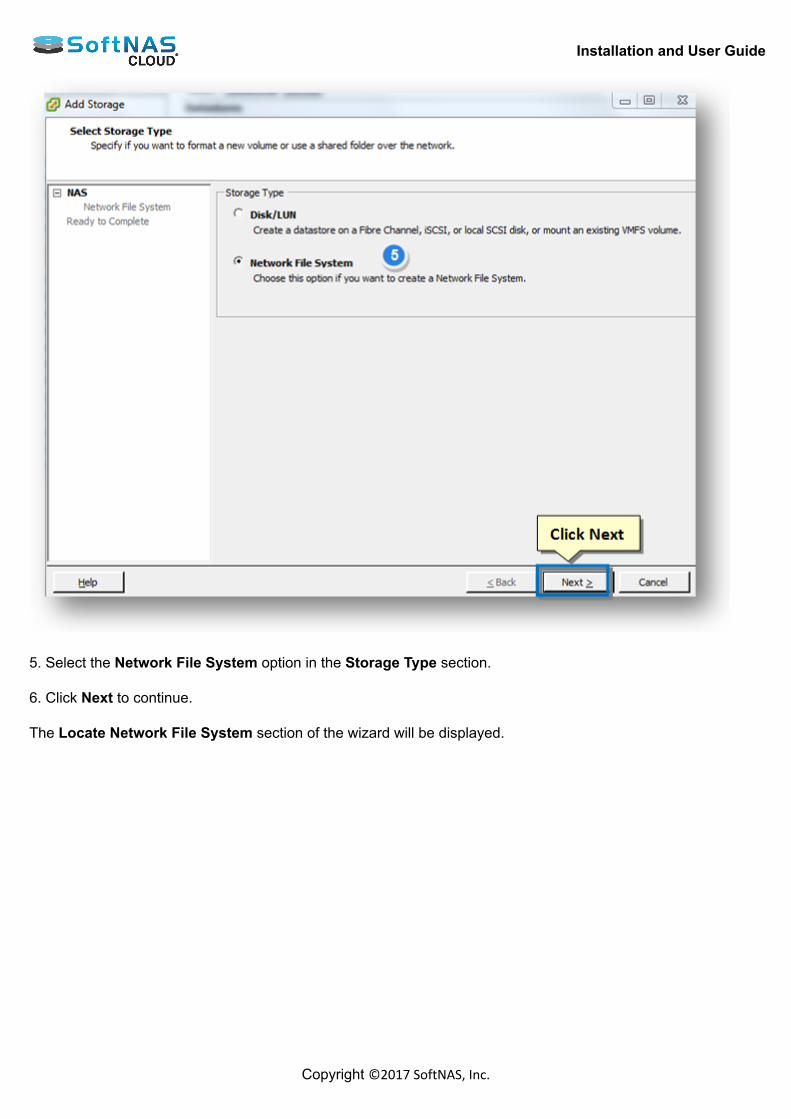
Installation and User Guide
Copyright ©2017 SoftNAS, Inc.
5. Select the Network File System option in the Storage Type section. 6. Click Next to continue. The Locate Network File System section of the wizard will be displayed.
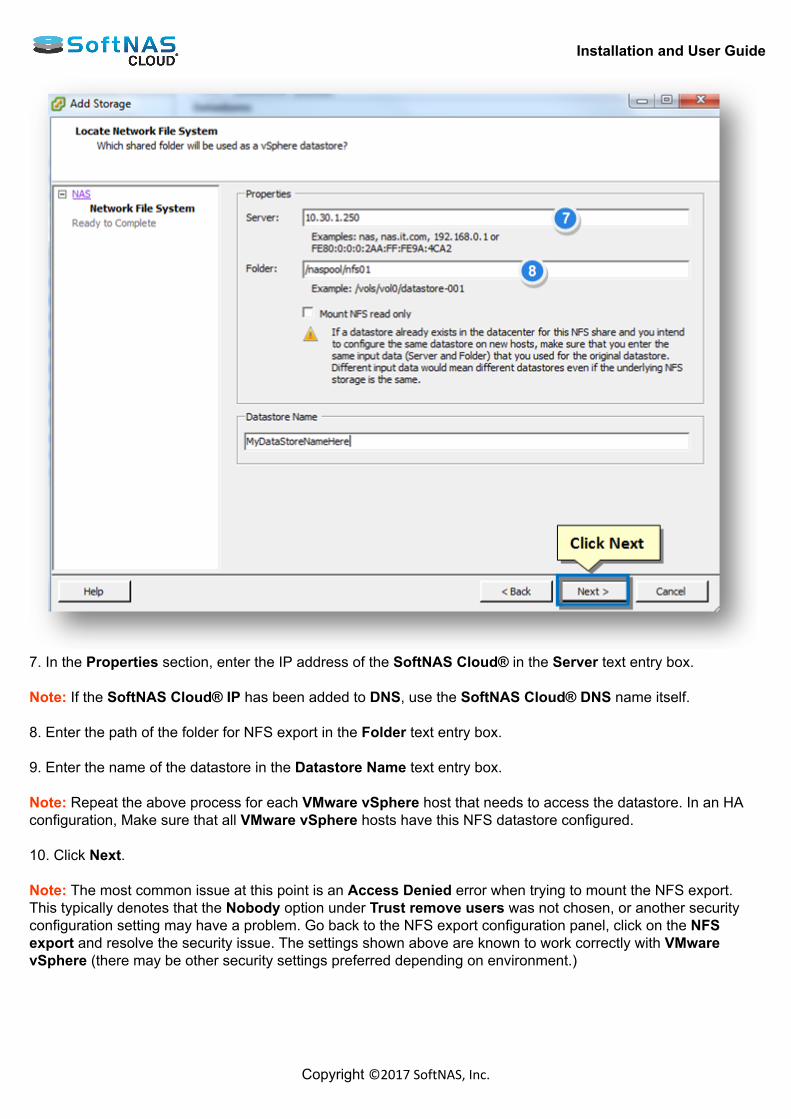
Installation and User Guide
Copyright ©2017 SoftNAS, Inc.
7. In the Properties section, enter the IP address of the SoftNAS Cloud® in the Server text entry box. Note: If the SoftNAS Cloud® IP has been added to DNS, use the SoftNAS Cloud® DNS name itself. 8. Enter the path of the folder for NFS export in the Folder text entry box. 9. Enter the name of the datastore in the Datastore Name text entry box. Note: Repeat the above process for each VMware vSphere host that needs to access the datastore. In an HAconfiguration, Make sure that all VMware vSphere hosts have this NFS datastore configured. 10. Click Next. Note: The most common issue at this point is an Access Denied error when trying to mount the NFS export.This typically denotes that the Nobody option under Trust remove users was not chosen, or another securityconfiguration setting may have a problem. Go back to the NFS export configuration panel, click on the NFSexport and resolve the security issue. The settings shown above are known to work correctly with VMwarevSphere (there may be other security settings preferred depending on environment.)
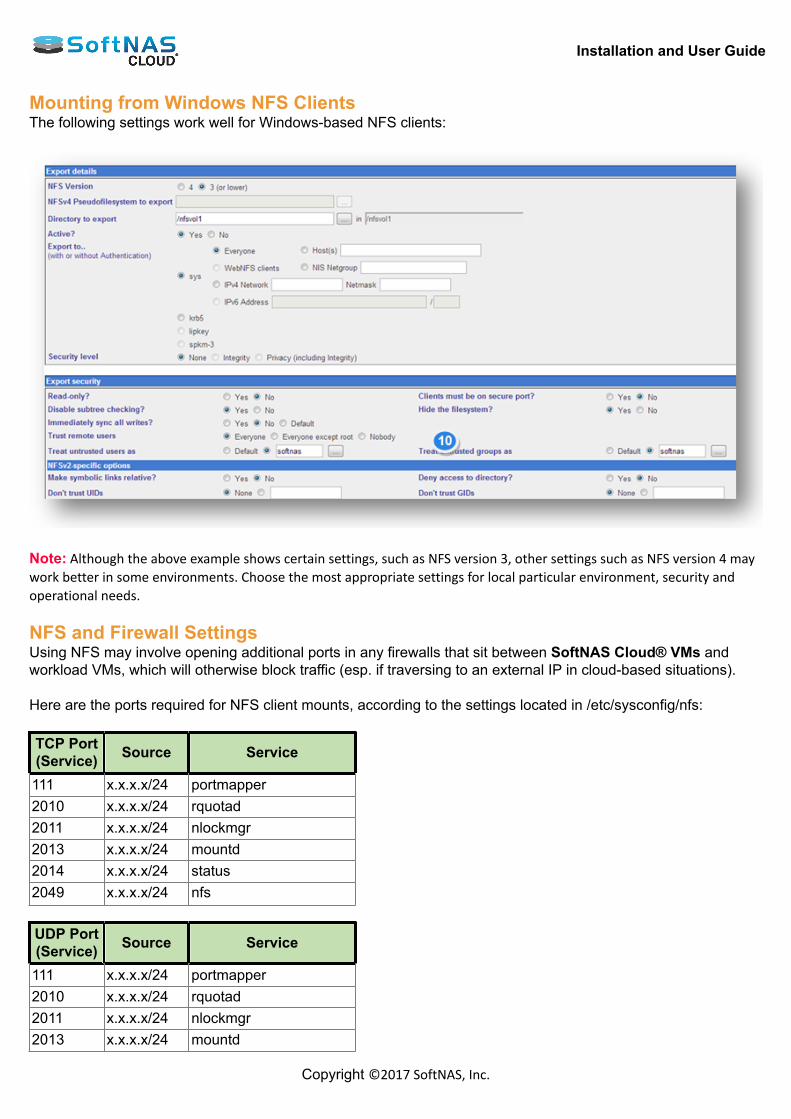
Installation and User Guide
Copyright ©2017 SoftNAS, Inc.
Mounting from Windows NFS ClientsThe following settings work well for Windows-based NFS clients:
Note: Although the above example shows certain settings, such as NFS version 3, other settings such as NFS version 4 maywork better in some environments. Choose the most appropriate settings for local particular environment, security andoperational needs. NFS and Firewall SettingsUsing NFS may involve opening additional ports in any firewalls that sit between SoftNAS Cloud® VMs andworkload VMs, which will otherwise block traffic (esp. if traversing to an external IP in cloud-based situations). Here are the ports required for NFS client mounts, according to the settings located in /etc/sysconfig/nfs: TCP Port(Service) Source Service
111 x.x.x.x/24 portmapper2010 x.x.x.x/24 rquotad2011 x.x.x.x/24 nlockmgr2013 x.x.x.x/24 mountd2014 x.x.x.x/24 status2049 x.x.x.x/24 nfs UDP Port(Service) Source Service
111 x.x.x.x/24 portmapper2010 x.x.x.x/24 rquotad2011 x.x.x.x/24 nlockmgr2013 x.x.x.x/24 mountd
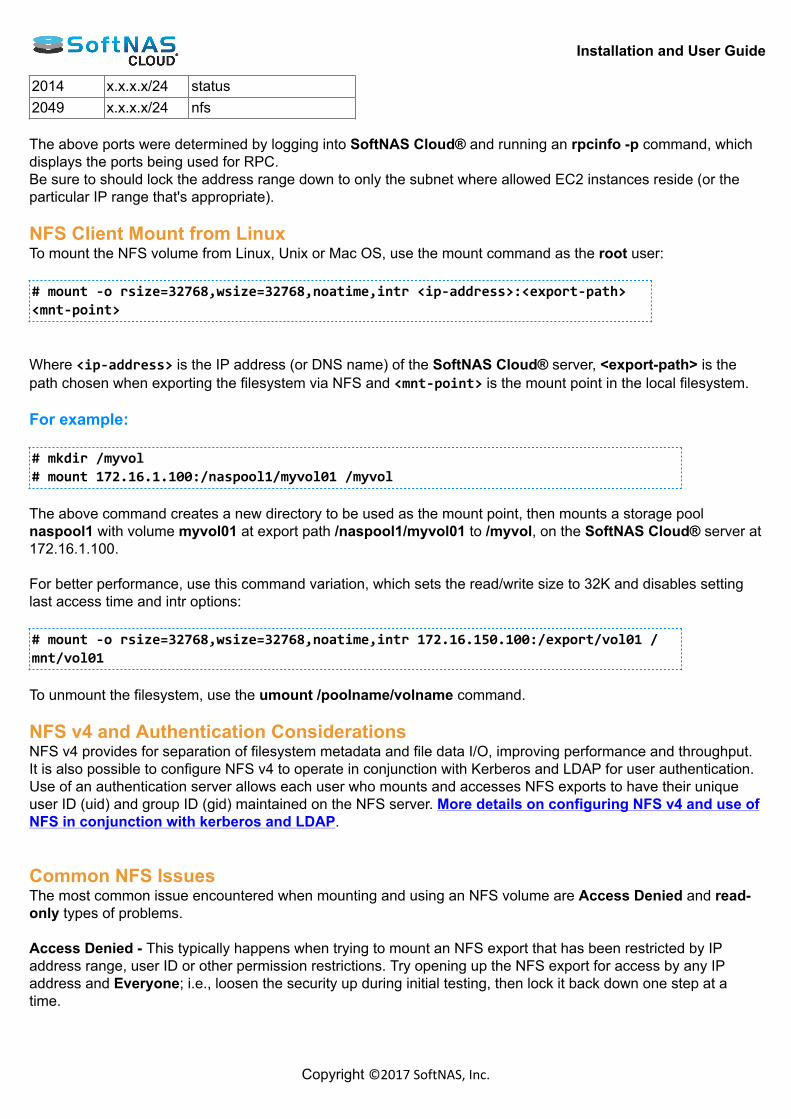
Installation and User Guide
Copyright ©2017 SoftNAS, Inc.
2014 x.x.x.x/24 status2049 x.x.x.x/24 nfs The above ports were determined by logging into SoftNAS Cloud® and running an rpcinfo -p command, whichdisplays the ports being used for RPC.Be sure to should lock the address range down to only the subnet where allowed EC2 instances reside (or theparticular IP range that's appropriate). NFS Client Mount from LinuxTo mount the NFS volume from Linux, Unix or Mac OS, use the mount command as the root user: # mount -o rsize=32768,wsize=32768,noatime,intr <ip-address>:<export-path><mnt-point> Where <ip-address> is the IP address (or DNS name) of the SoftNAS Cloud® server, <export-path> is thepath chosen when exporting the filesystem via NFS and <mnt-point> is the mount point in the local filesystem. For example: # mkdir /myvol# mount 172.16.1.100:/naspool1/myvol01 /myvol The above command creates a new directory to be used as the mount point, then mounts a storage poolnaspool1 with volume myvol01 at export path /naspool1/myvol01 to /myvol, on the SoftNAS Cloud® server at172.16.1.100. For better performance, use this command variation, which sets the read/write size to 32K and disables settinglast access time and intr options: # mount -o rsize=32768,wsize=32768,noatime,intr 172.16.150.100:/export/vol01 /mnt/vol01 To unmount the filesystem, use the umount /poolname/volname command. NFS v4 and Authentication ConsiderationsNFS v4 provides for separation of filesystem metadata and file data I/O, improving performance and throughput.It is also possible to configure NFS v4 to operate in conjunction with Kerberos and LDAP for user authentication.Use of an authentication server allows each user who mounts and accesses NFS exports to have their uniqueuser ID (uid) and group ID (gid) maintained on the NFS server. More details on configuring NFS v4 and use ofNFS in conjunction with kerberos and LDAP. Common NFS IssuesThe most common issue encountered when mounting and using an NFS volume are Access Denied and read-only types of problems. Access Denied - This typically happens when trying to mount an NFS export that has been restricted by IPaddress range, user ID or other permission restrictions. Try opening up the NFS export for access by any IPaddress and Everyone; i.e., loosen the security up during initial testing, then lock it back down one step at atime.
Installation and User Guide
Copyright ©2017 SoftNAS, Inc.
Read-Only Access - When this happens, it is possible to mount the filesystem, but not possible to write to themounted filesystem. This is a security permissions issue. Try opening up the permissions on the NFS export toEveryone as a starting point, then with a working NFS mount, choose to lock the security down incrementally.
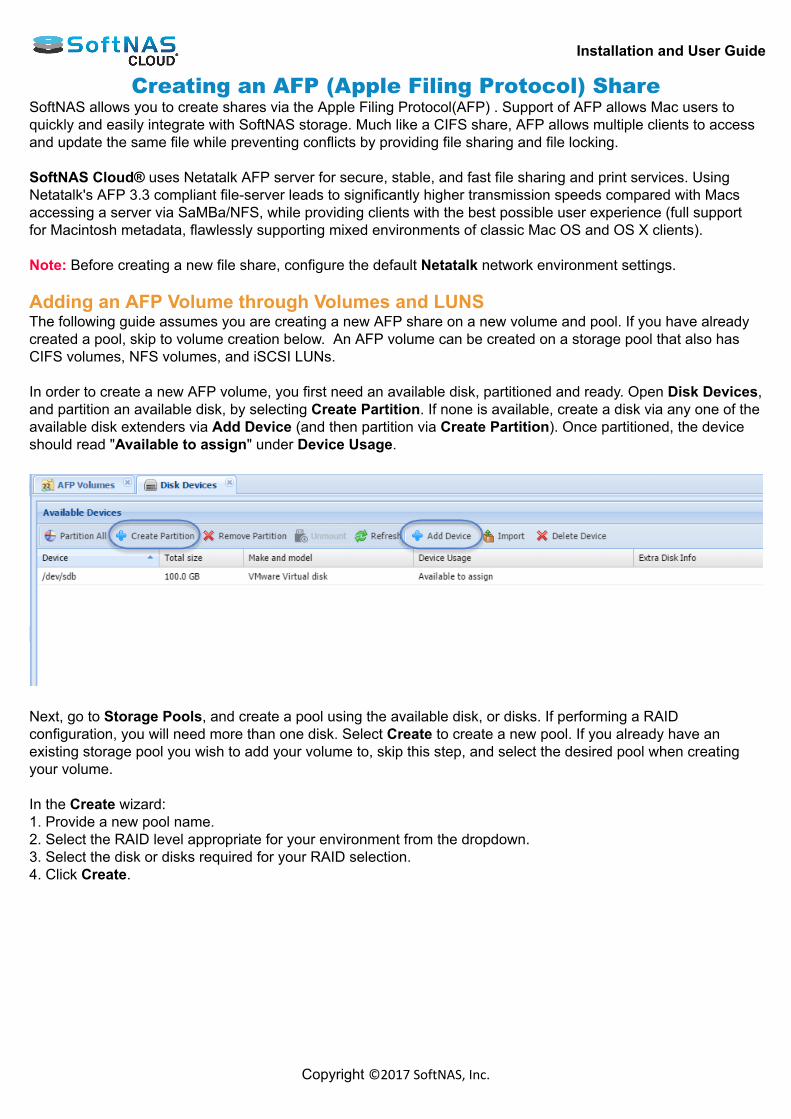
Installation and User Guide
Copyright ©2017 SoftNAS, Inc.
Creating an AFP (Apple Filing Protocol) ShareSoftNAS allows you to create shares via the Apple Filing Protocol(AFP) . Support of AFP allows Mac users toquickly and easily integrate with SoftNAS storage. Much like a CIFS share, AFP allows multiple clients to accessand update the same file while preventing conflicts by providing file sharing and file locking. SoftNAS Cloud® uses Netatalk AFP server for secure, stable, and fast file sharing and print services. UsingNetatalk's AFP 3.3 compliant file-server leads to significantly higher transmission speeds compared with Macsaccessing a server via SaMBa/NFS, while providing clients with the best possible user experience (full supportfor Macintosh metadata, flawlessly supporting mixed environments of classic Mac OS and OS X clients). Note: Before creating a new file share, configure the default Netatalk network environment settings. Adding an AFP Volume through Volumes and LUNSThe following guide assumes you are creating a new AFP share on a new volume and pool. If you have alreadycreated a pool, skip to volume creation below. An AFP volume can be created on a storage pool that also hasCIFS volumes, NFS volumes, and iSCSI LUNs. In order to create a new AFP volume, you first need an available disk, partitioned and ready. Open Disk Devices,and partition an available disk, by selecting Create Partition. If none is available, create a disk via any one of theavailable disk extenders via Add Device (and then partition via Create Partition). Once partitioned, the deviceshould read "Available to assign" under Device Usage.
Next, go to Storage Pools, and create a pool using the available disk, or disks. If performing a RAIDconfiguration, you will need more than one disk. Select Create to create a new pool. If you already have anexisting storage pool you wish to add your volume to, skip this step, and select the desired pool when creatingyour volume. In the Create wizard:1. Provide a new pool name.2. Select the RAID level appropriate for your environment from the dropdown.3. Select the disk or disks required for your RAID selection.4. Click Create.
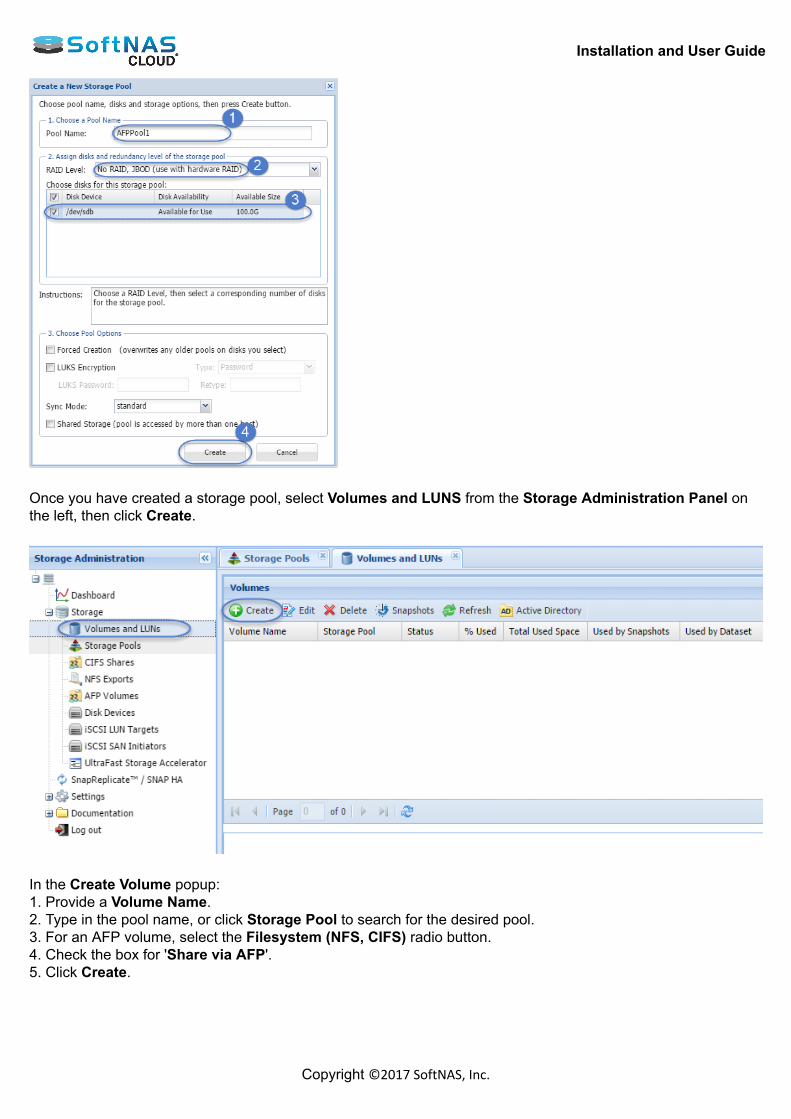
Installation and User Guide
Copyright ©2017 SoftNAS, Inc.
Once you have created a storage pool, select Volumes and LUNS from the Storage Administration Panel onthe left, then click Create.
In the Create Volume popup:1. Provide a Volume Name.2. Type in the pool name, or click Storage Pool to search for the desired pool.3. For an AFP volume, select the Filesystem (NFS, CIFS) radio button.4. Check the box for 'Share via AFP'.5. Click Create.

Installation and User Guide
Copyright ©2017 SoftNAS, Inc.
Note: It is possible to have a filesystem configured with any combination of NFS, CIFS, or AFP enabled. However, in this case we are selecting only AFP. By default, Export via NFS will be checked. Uncheck it, unlessyou intend to use both protocols. Your AFP volume is created. Go to AFP Volumes to finish configuring. Configuring Apple File Network Sharing 1. In the Left Navigation Pane, select the AFP Volumes option under the Storage section. The Netatalk AFP Server panel will be displayed. AFP Volumes created following the steps above will appearhere. From here, configure and manage AFP sharing.
2. If you have a volume created, check the box to select it, then scroll down. Click Server Options to edit yoursettings.
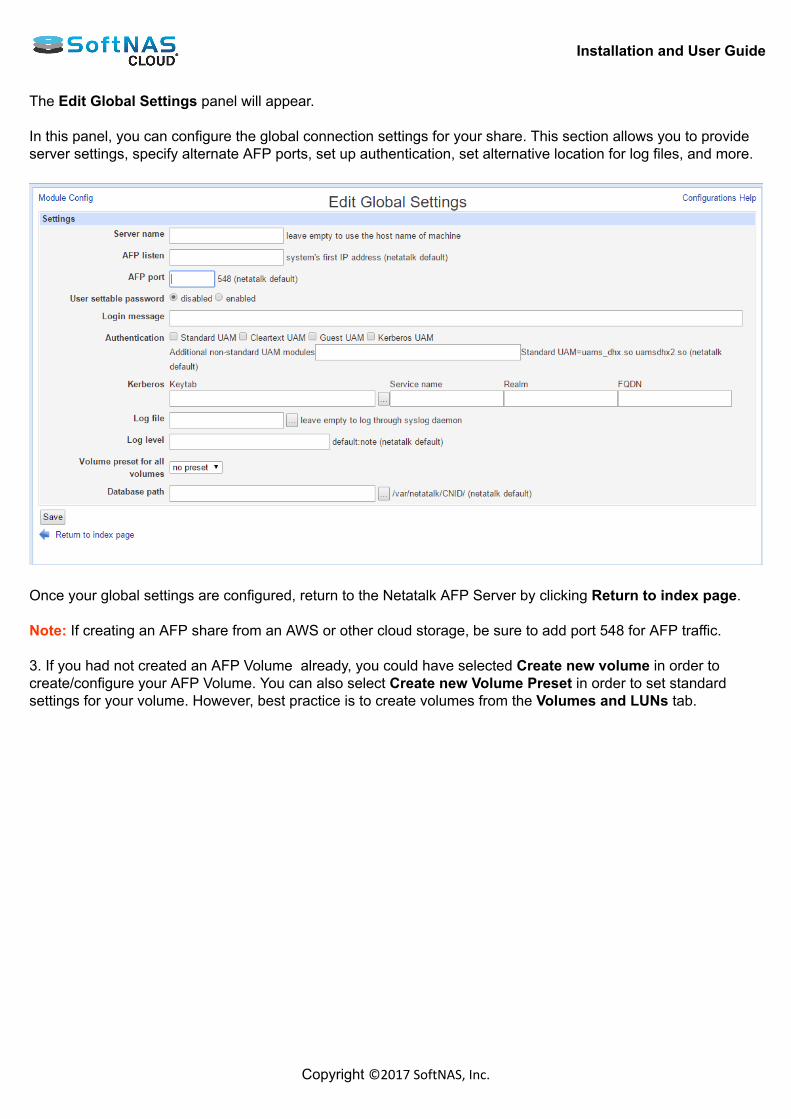
Installation and User Guide
Copyright ©2017 SoftNAS, Inc.
The Edit Global Settings panel will appear. In this panel, you can configure the global connection settings for your share. This section allows you to provideserver settings, specify alternate AFP ports, set up authentication, set alternative location for log files, and more.
Once your global settings are configured, return to the Netatalk AFP Server by clicking Return to index page. Note: If creating an AFP share from an AWS or other cloud storage, be sure to add port 548 for AFP traffic. 3. If you had not created an AFP Volume already, you could have selected Create new volume in order tocreate/configure your AFP Volume. You can also select Create new Volume Preset in order to set standardsettings for your volume. However, best practice is to create volumes from the Volumes and LUNs tab.
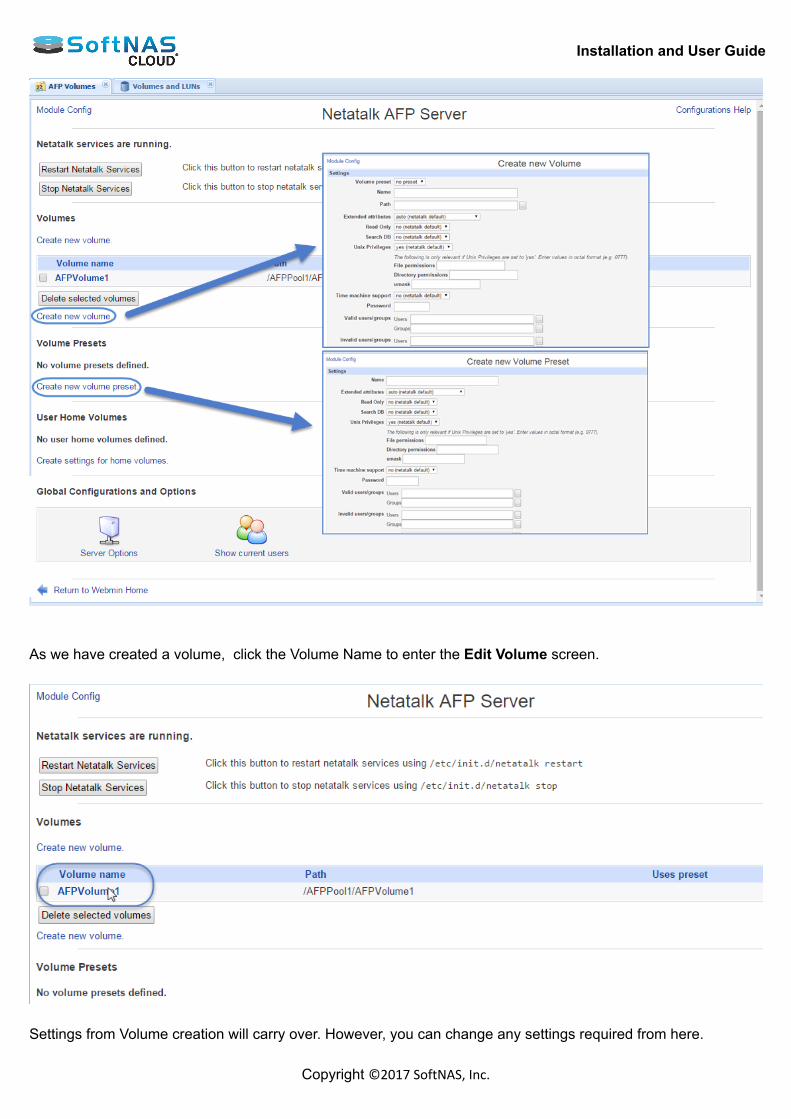
Installation and User Guide
Copyright ©2017 SoftNAS, Inc.
As we have created a volume, click the Volume Name to enter the Edit Volume screen.
Settings from Volume creation will carry over. However, you can change any settings required from here.
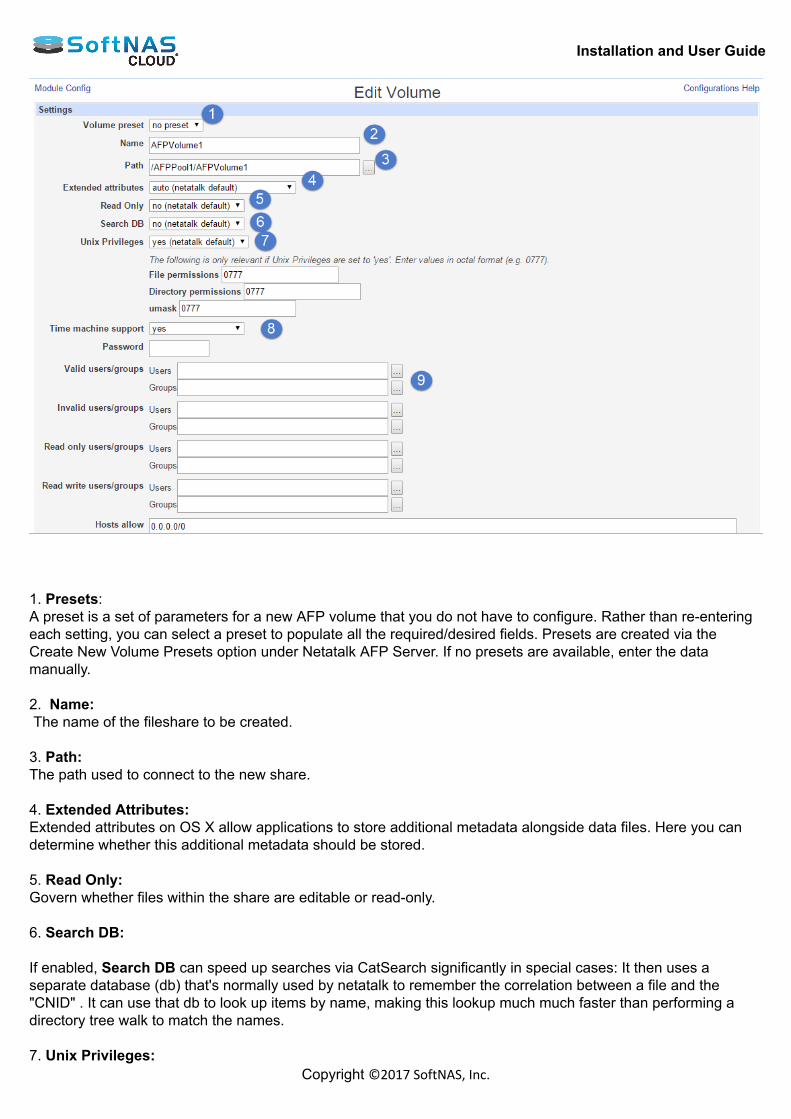
Installation and User Guide
Copyright ©2017 SoftNAS, Inc.
1. Presets:A preset is a set of parameters for a new AFP volume that you do not have to configure. Rather than re-enteringeach setting, you can select a preset to populate all the required/desired fields. Presets are created via theCreate New Volume Presets option under Netatalk AFP Server. If no presets are available, enter the datamanually. 2. Name: The name of the fileshare to be created. 3. Path:The path used to connect to the new share. 4. Extended Attributes:Extended attributes on OS X allow applications to store additional metadata alongside data files. Here you candetermine whether this additional metadata should be stored. 5. Read Only:Govern whether files within the share are editable or read-only. 6. Search DB: If enabled, Search DB can speed up searches via CatSearch significantly in special cases: It then uses aseparate database (db) that's normally used by netatalk to remember the correlation between a file and the"CNID" . It can use that db to look up items by name, making this lookup much much faster than performing adirectory tree walk to match the names. 7. Unix Privileges:
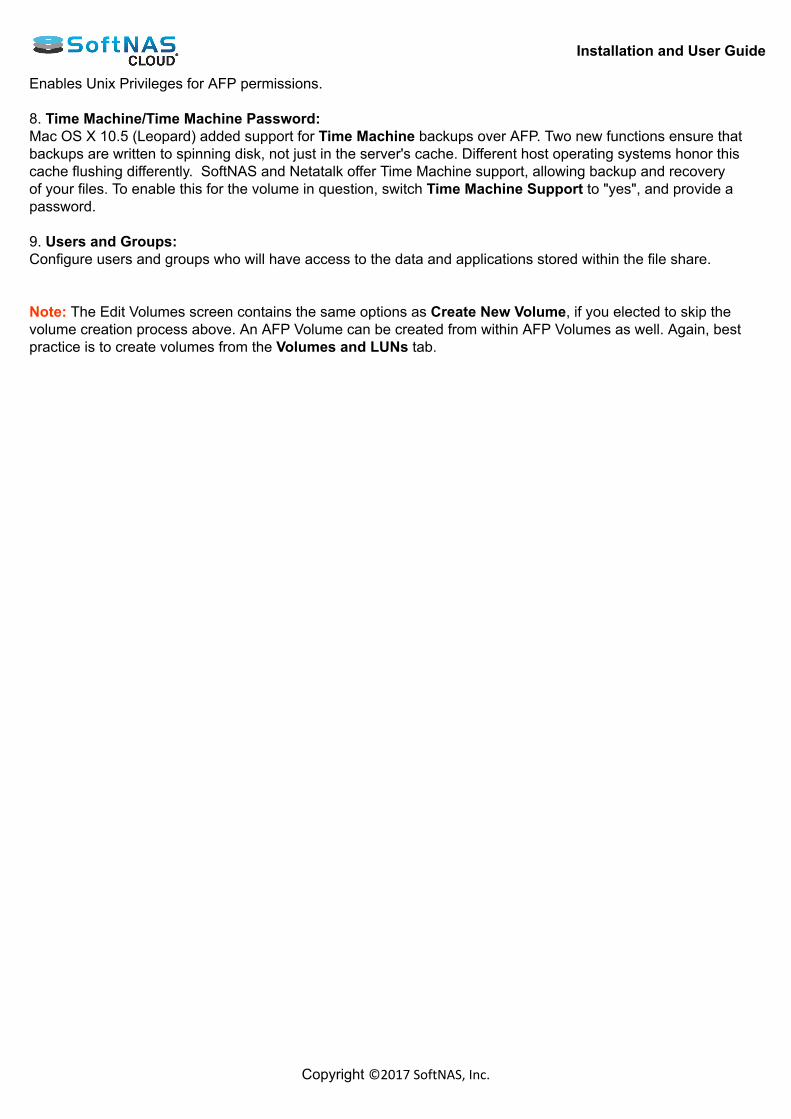
Installation and User Guide
Copyright ©2017 SoftNAS, Inc.
Enables Unix Privileges for AFP permissions. 8. Time Machine/Time Machine Password:Mac OS X 10.5 (Leopard) added support for Time Machine backups over AFP. Two new functions ensure thatbackups are written to spinning disk, not just in the server's cache. Different host operating systems honor thiscache flushing differently. SoftNAS and Netatalk offer Time Machine support, allowing backup and recoveryof your files. To enable this for the volume in question, switch Time Machine Support to "yes", and provide apassword. 9. Users and Groups:Configure users and groups who will have access to the data and applications stored within the file share. Note: The Edit Volumes screen contains the same options as Create New Volume, if you elected to skip thevolume creation process above. An AFP Volume can be created from within AFP Volumes as well. Again, bestpractice is to create volumes from the Volumes and LUNs tab.
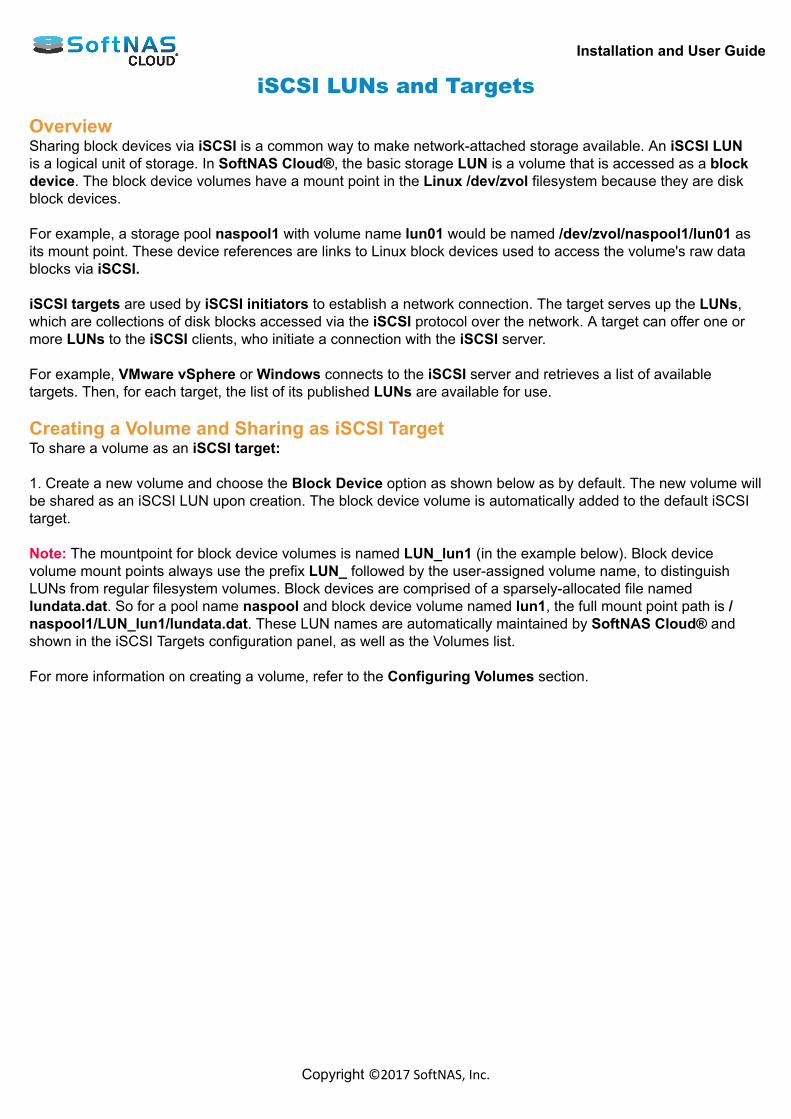
Installation and User Guide
Copyright ©2017 SoftNAS, Inc.
iSCSI LUNs and Targets OverviewSharing block devices via iSCSI is a common way to make network-attached storage available. An iSCSI LUNis a logical unit of storage. In SoftNAS Cloud®, the basic storage LUN is a volume that is accessed as a blockdevice. The block device volumes have a mount point in the Linux /dev/zvol filesystem because they are diskblock devices. For example, a storage pool naspool1 with volume name lun01 would be named /dev/zvol/naspool1/lun01 asits mount point. These device references are links to Linux block devices used to access the volume's raw datablocks via iSCSI. iSCSI targets are used by iSCSI initiators to establish a network connection. The target serves up the LUNs,which are collections of disk blocks accessed via the iSCSI protocol over the network. A target can offer one ormore LUNs to the iSCSI clients, who initiate a connection with the iSCSI server. For example, VMware vSphere or Windows connects to the iSCSI server and retrieves a list of availabletargets. Then, for each target, the list of its published LUNs are available for use. Creating a Volume and Sharing as iSCSI TargetTo share a volume as an iSCSI target: 1. Create a new volume and choose the Block Device option as shown below as by default. The new volume willbe shared as an iSCSI LUN upon creation. The block device volume is automatically added to the default iSCSItarget. Note: The mountpoint for block device volumes is named LUN_lun1 (in the example below). Block devicevolume mount points always use the prefix LUN_ followed by the user-assigned volume name, to distinguishLUNs from regular filesystem volumes. Block devices are comprised of a sparsely-allocated file namedlundata.dat. So for a pool name naspool and block device volume named lun1, the full mount point path is /naspool1/LUN_lun1/lundata.dat. These LUN names are automatically maintained by SoftNAS Cloud® andshown in the iSCSI Targets configuration panel, as well as the Volumes list. For more information on creating a volume, refer to the Configuring Volumes section.
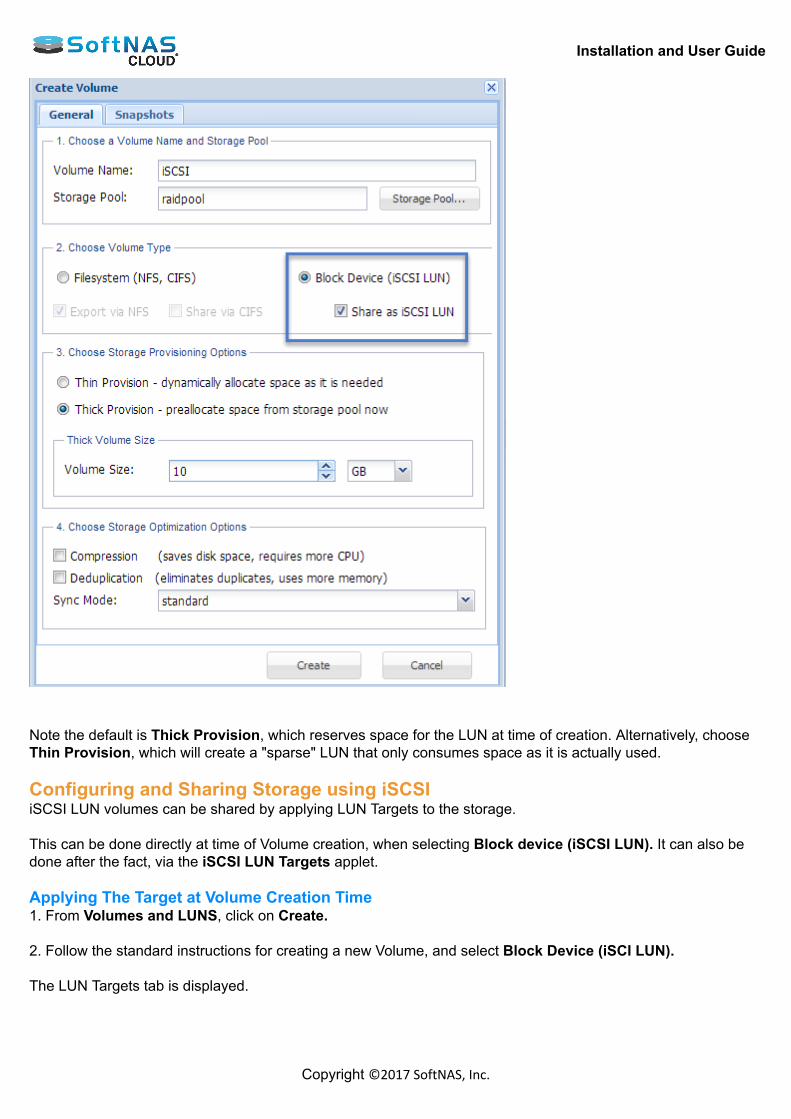
Installation and User Guide
Copyright ©2017 SoftNAS, Inc.
Note the default is Thick Provision, which reserves space for the LUN at time of creation. Alternatively, chooseThin Provision, which will create a "sparse" LUN that only consumes space as it is actually used. Configuring and Sharing Storage using iSCSIiSCSI LUN volumes can be shared by applying LUN Targets to the storage. This can be done directly at time of Volume creation, when selecting Block device (iSCSI LUN). It can also bedone after the fact, via the iSCSI LUN Targets applet. Applying The Target at Volume Creation Time1. From Volumes and LUNS, click on Create. 2. Follow the standard instructions for creating a new Volume, and select Block Device (iSCI LUN). The LUN Targets tab is displayed.

Installation and User Guide
Copyright ©2017 SoftNAS, Inc.
3. Select the appropriate LUN Target from the dropdown.
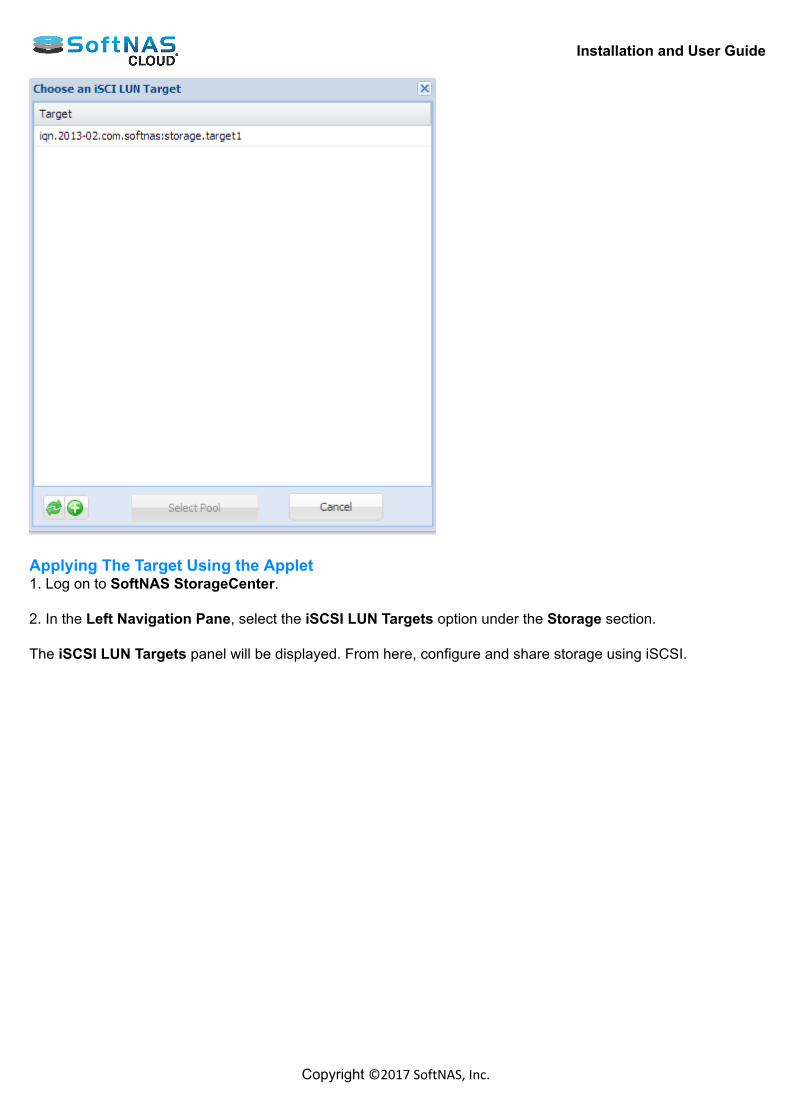
Installation and User Guide
Copyright ©2017 SoftNAS, Inc.
Applying The Target Using the Applet1. Log on to SoftNAS StorageCenter. 2. In the Left Navigation Pane, select the iSCSI LUN Targets option under the Storage section. The iSCSI LUN Targets panel will be displayed. From here, configure and share storage using iSCSI.

Installation and User Guide
Copyright ©2017 SoftNAS, Inc.
3. By default, an empty iSCSI target will be presented for you. However, if you need more than one, click CreateTarget. Once the target is created, either double-click the empty target, or click Add LUN.
The iSCSI Add A LUN dialog box will be displayed. 4. Either select the volume's block device from the dropdown (which will show available volumes)...

Installation and User Guide
Copyright ©2017 SoftNAS, Inc.
...or check the box for Create a New Device, and enter the path, and the desired size to associate with the LUN.
5. Click Add LUN to link the block device to the iSCSI Target as a LUN. The LUN is created and added to the target. You may have to refresh the screen for the targets to present themselves.
Note: Publish any number of block device volumes via a single iSCSI target. However, you can use the CreateTarget button to add new targets as needed.

Installation and User Guide
Copyright ©2017 SoftNAS, Inc.
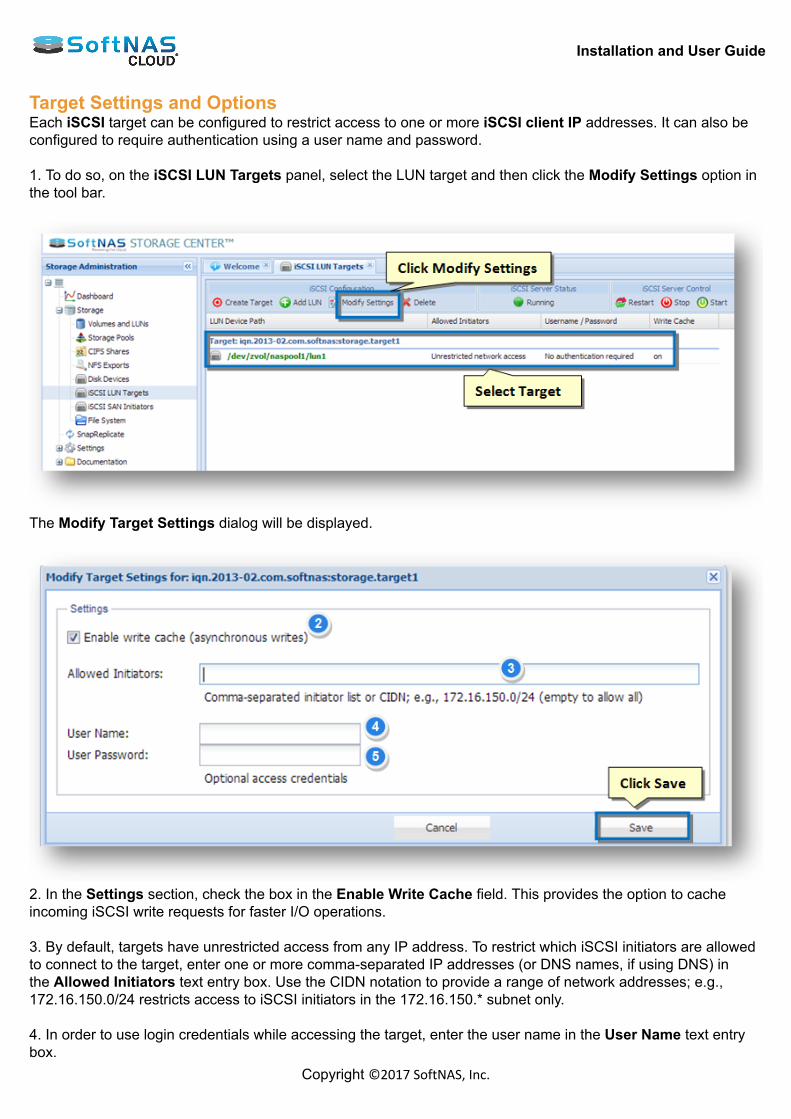
Installation and User Guide
Copyright ©2017 SoftNAS, Inc.
Target Settings and OptionsEach iSCSI target can be configured to restrict access to one or more iSCSI client IP addresses. It can also beconfigured to require authentication using a user name and password. 1. To do so, on the iSCSI LUN Targets panel, select the LUN target and then click the Modify Settings option inthe tool bar.
The Modify Target Settings dialog will be displayed.
2. In the Settings section, check the box in the Enable Write Cache field. This provides the option to cacheincoming iSCSI write requests for faster I/O operations. 3. By default, targets have unrestricted access from any IP address. To restrict which iSCSI initiators are allowedto connect to the target, enter one or more comma-separated IP addresses (or DNS names, if using DNS) inthe Allowed Initiators text entry box. Use the CIDN notation to provide a range of network addresses; e.g.,172.16.150.0/24 restricts access to iSCSI initiators in the 172.16.150.* subnet only. 4. In order to use login credentials while accessing the target, enter the user name in the User Name text entrybox.
Installation and User Guide
Copyright ©2017 SoftNAS, Inc.
5. Enter the password in the User Password text entry box. 6. Click Save. Note: To skip login credentials to the access target, then simply leave the User Name and User Password fieldsblank. 7. Once the required changes are made, click Save. 8. To enforce the changes, click Restart on the iSCSI LUN Targets panel. Accessing the Target and LUNTo access the iSCSI target and its LUNs, make use of an SCSI initiator from another system on the network. For more information, refer to the SoftNAS Reference Guide or the operating system reference guideassociated with an iSCSI initiator.
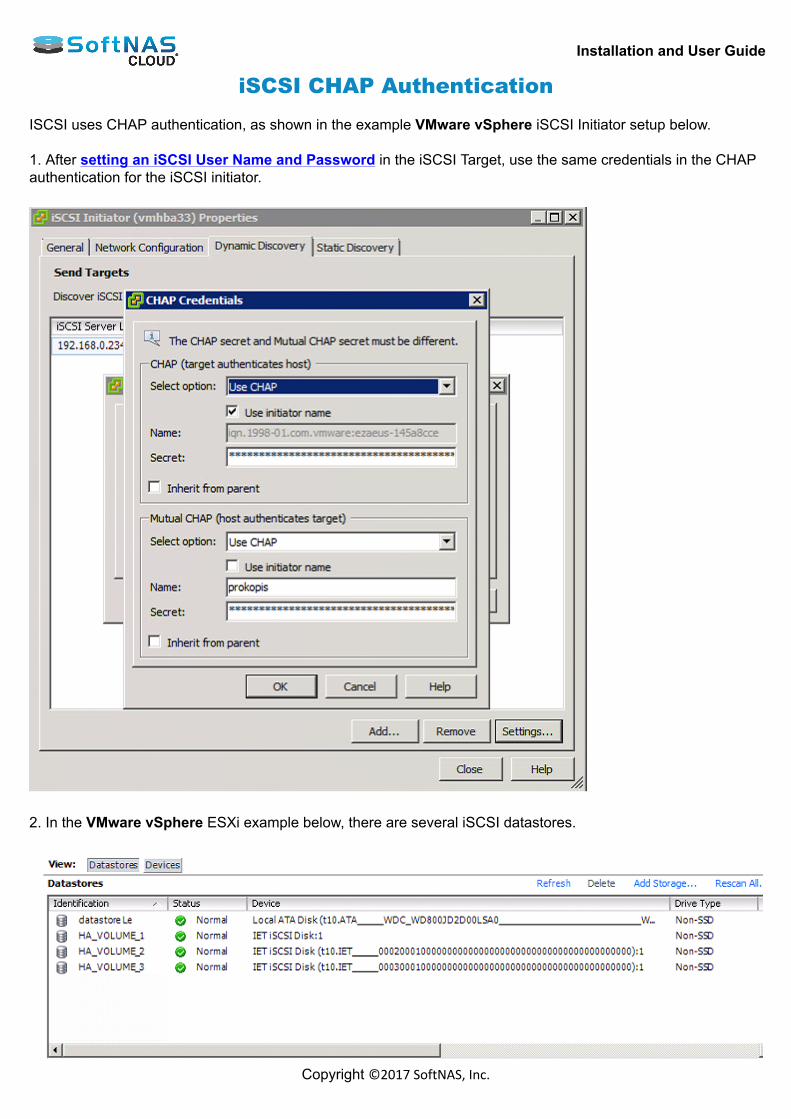
Installation and User Guide
Copyright ©2017 SoftNAS, Inc.
iSCSI CHAP Authentication ISCSI uses CHAP authentication, as shown in the example VMware vSphere iSCSI Initiator setup below. 1. After setting an iSCSI User Name and Password in the iSCSI Target, use the same credentials in the CHAPauthentication for the iSCSI initiator.
2. In the VMware vSphere ESXi example below, there are several iSCSI datastores.
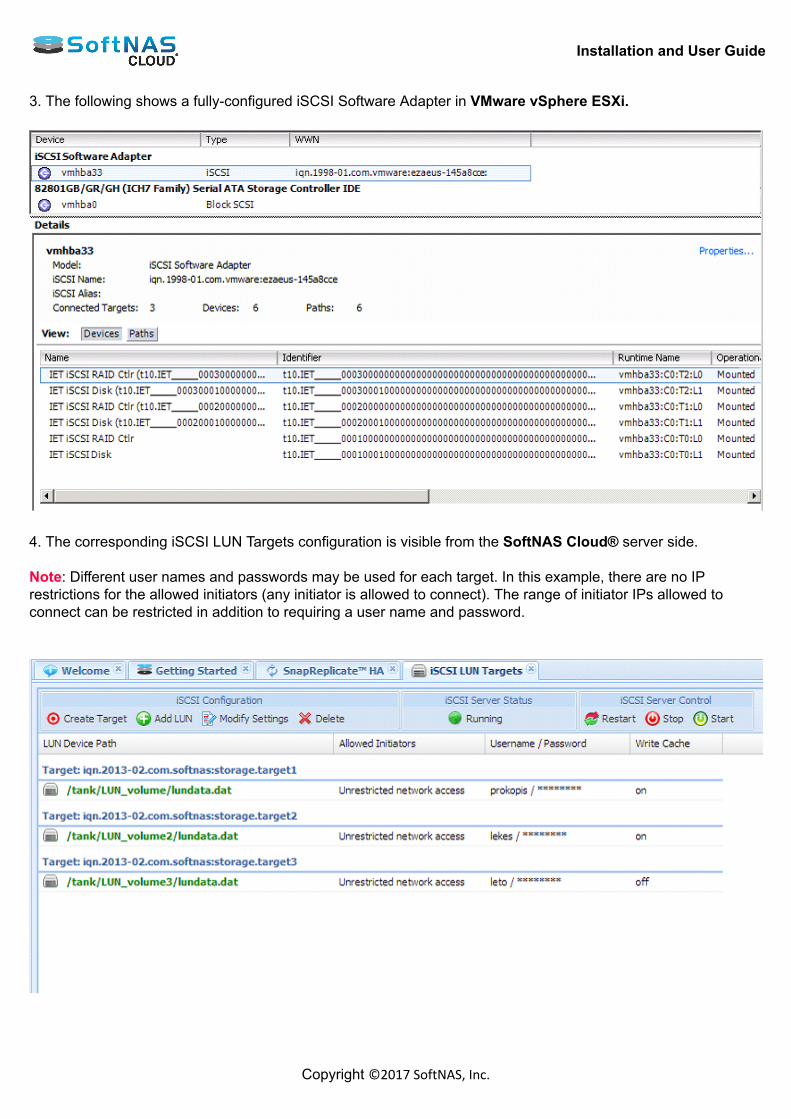
Installation and User Guide
Copyright ©2017 SoftNAS, Inc.
3. The following shows a fully-configured iSCSI Software Adapter in VMware vSphere ESXi.
4. The corresponding iSCSI LUN Targets configuration is visible from the SoftNAS Cloud® server side. Note: Different user names and passwords may be used for each target. In this example, there are no IPrestrictions for the allowed initiators (any initiator is allowed to connect). The range of initiator IPs allowed toconnect can be restricted in addition to requiring a user name and password.
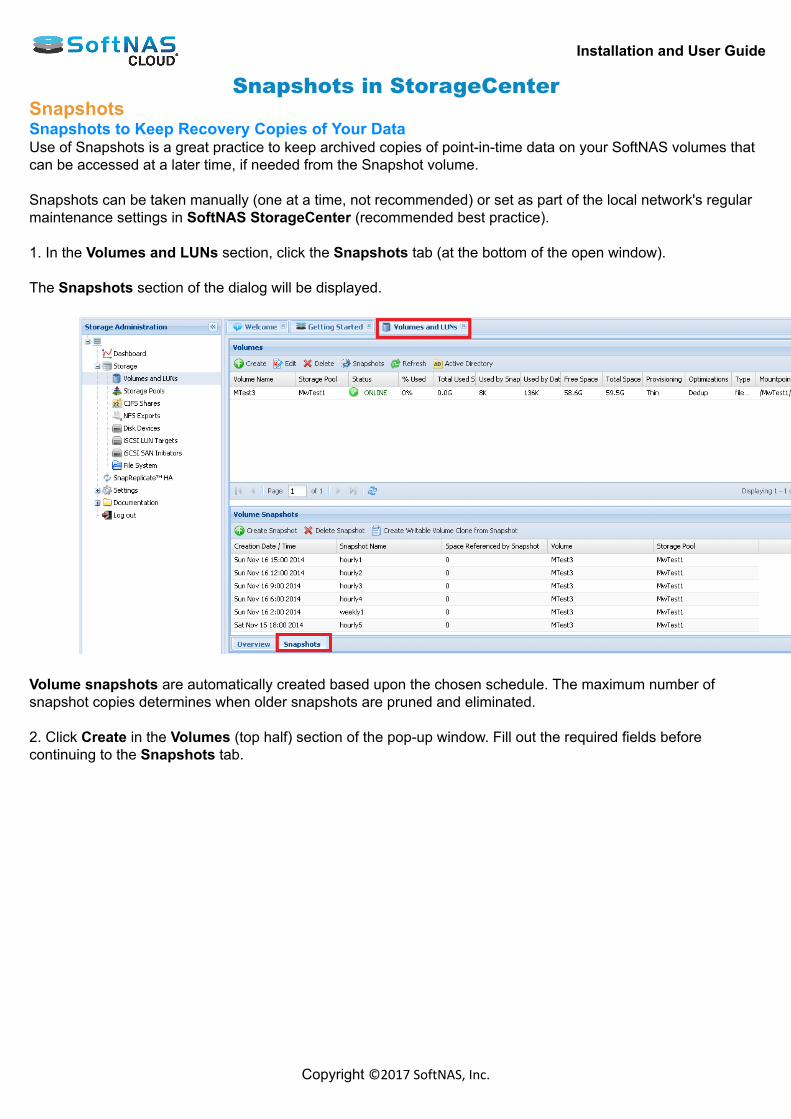
Installation and User Guide
Copyright ©2017 SoftNAS, Inc.
Snapshots in StorageCenterSnapshotsSnapshots to Keep Recovery Copies of Your DataUse of Snapshots is a great practice to keep archived copies of point-in-time data on your SoftNAS volumes thatcan be accessed at a later time, if needed from the Snapshot volume. Snapshots can be taken manually (one at a time, not recommended) or set as part of the local network's regularmaintenance settings in SoftNAS StorageCenter (recommended best practice). 1. In the Volumes and LUNs section, click the Snapshots tab (at the bottom of the open window).
The Snapshots section of the dialog will be displayed.
Volume snapshots are automatically created based upon the chosen schedule. The maximum number ofsnapshot copies determines when older snapshots are pruned and eliminated. 2. Click Create in the Volumes (top half) section of the pop-up window. Fill out the required fields beforecontinuing to the Snapshots tab.

Installation and User Guide
Copyright ©2017 SoftNAS, Inc.
3. Switch to the Snapshots tab at the top. 4. In the Volume Snapshot Configuration section, check the box in order to enable the scheduling of volumesnapshots.
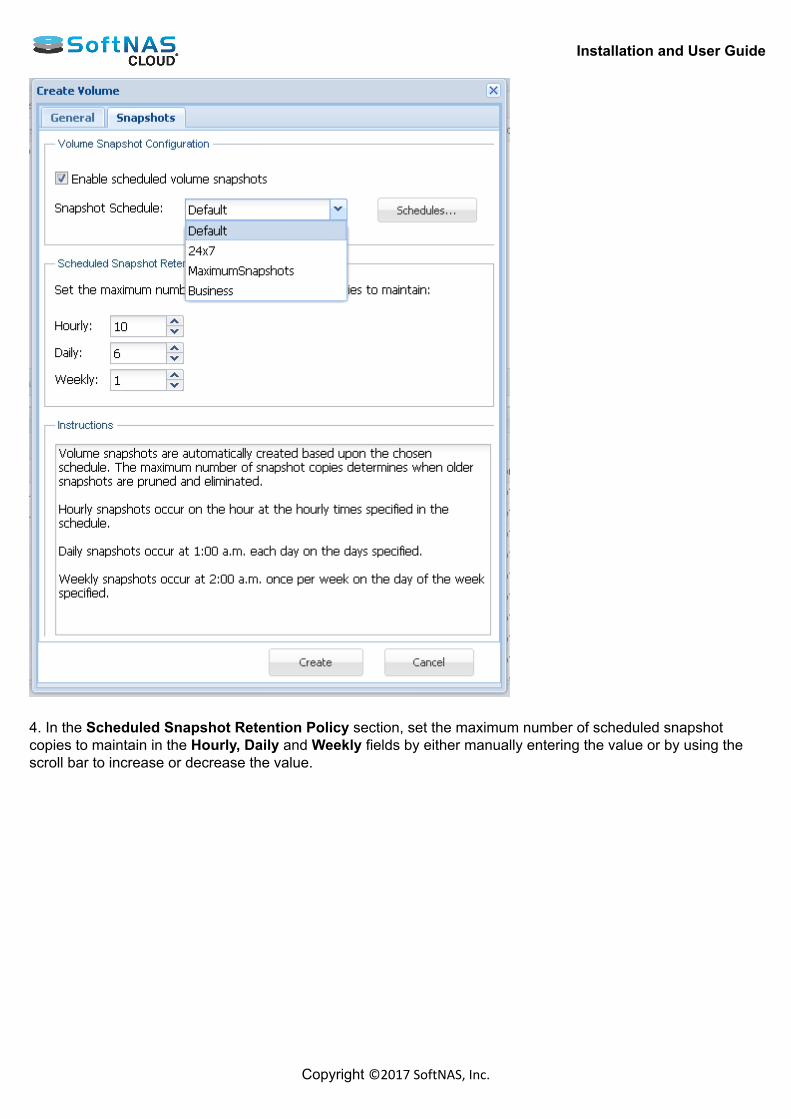
Installation and User Guide
Copyright ©2017 SoftNAS, Inc.
4. In the Scheduled Snapshot Retention Policy section, set the maximum number of scheduled snapshotcopies to maintain in the Hourly, Daily and Weekly fields by either manually entering the value or by using thescroll bar to increase or decrease the value.
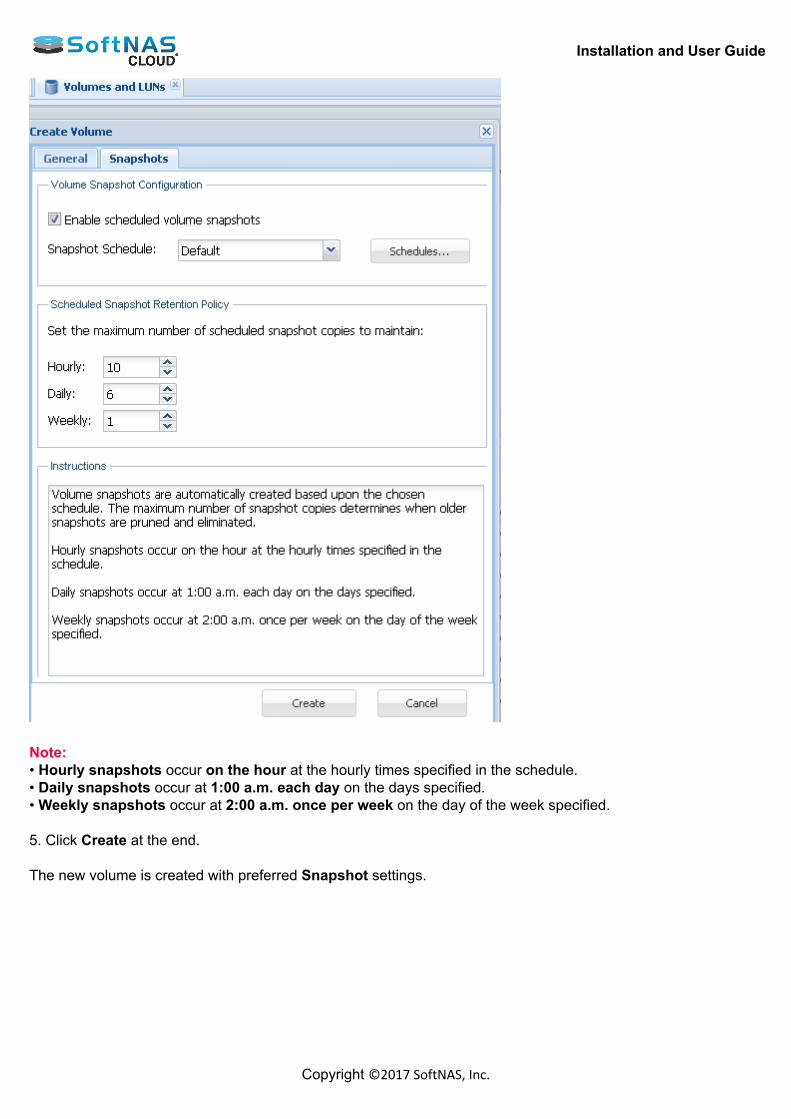
Installation and User Guide
Copyright ©2017 SoftNAS, Inc.
Note:• Hourly snapshots occur on the hour at the hourly times specified in the schedule.• Daily snapshots occur at 1:00 a.m. each day on the days specified.• Weekly snapshots occur at 2:00 a.m. once per week on the day of the week specified. 5. Click Create at the end. The new volume is created with preferred Snapshot settings.

Installation and User Guide
Copyright ©2017 SoftNAS, Inc.
Advanced/Performance Configuration Regardless of platform, occasionally higher-quality management tools can only be accessed through AdvancedConfigurations for Performance considerations. This guide provides instructions and recommendations for value-added support with the SoftNAS Cloud® package. MTU 9000 Active Directory Configuration Configuring Read Cache and Write Log
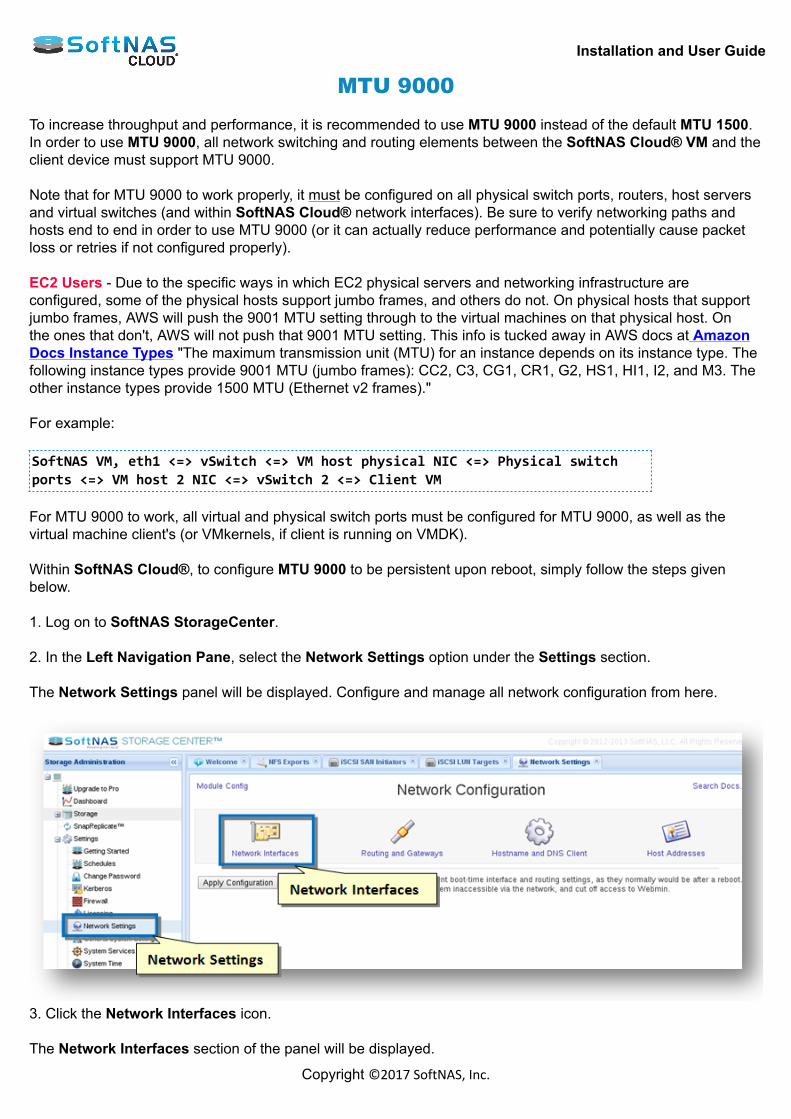
Installation and User Guide
Copyright ©2017 SoftNAS, Inc.
MTU 9000 To increase throughput and performance, it is recommended to use MTU 9000 instead of the default MTU 1500.In order to use MTU 9000, all network switching and routing elements between the SoftNAS Cloud® VM and theclient device must support MTU 9000. Note that for MTU 9000 to work properly, it must be configured on all physical switch ports, routers, host serversand virtual switches (and within SoftNAS Cloud® network interfaces). Be sure to verify networking paths andhosts end to end in order to use MTU 9000 (or it can actually reduce performance and potentially cause packetloss or retries if not configured properly). EC2 Users - Due to the specific ways in which EC2 physical servers and networking infrastructure areconfigured, some of the physical hosts support jumbo frames, and others do not. On physical hosts that supportjumbo frames, AWS will push the 9001 MTU setting through to the virtual machines on that physical host. Onthe ones that don't, AWS will not push that 9001 MTU setting. This info is tucked away in AWS docs at AmazonDocs Instance Types "The maximum transmission unit (MTU) for an instance depends on its instance type. Thefollowing instance types provide 9001 MTU (jumbo frames): CC2, C3, CG1, CR1, G2, HS1, HI1, I2, and M3. Theother instance types provide 1500 MTU (Ethernet v2 frames)." For example: SoftNAS VM, eth1 <=> vSwitch <=> VM host physical NIC <=> Physical switchports <=> VM host 2 NIC <=> vSwitch 2 <=> Client VM For MTU 9000 to work, all virtual and physical switch ports must be configured for MTU 9000, as well as thevirtual machine client's (or VMkernels, if client is running on VMDK). Within SoftNAS Cloud®, to configure MTU 9000 to be persistent upon reboot, simply follow the steps givenbelow. 1. Log on to SoftNAS StorageCenter. 2. In the Left Navigation Pane, select the Network Settings option under the Settings section. The Network Settings panel will be displayed. Configure and manage all network configuration from here.
3. Click the Network Interfaces icon. The Network Interfaces section of the panel will be displayed.
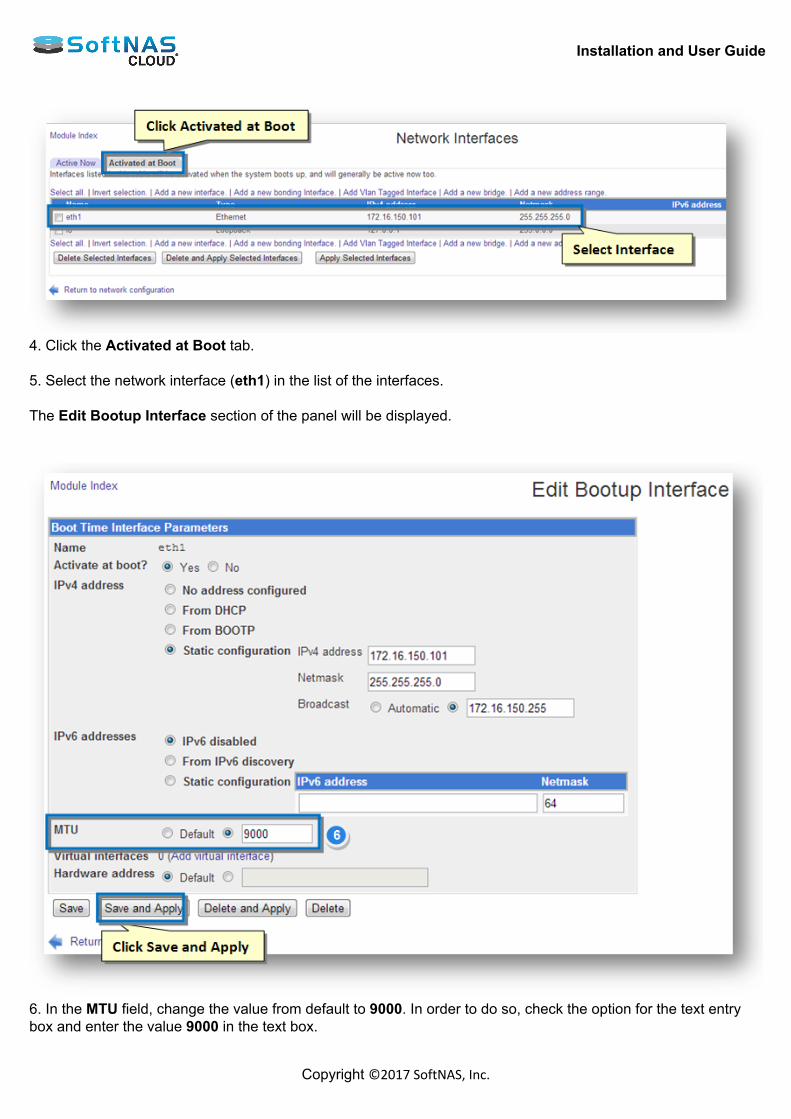
Installation and User Guide
Copyright ©2017 SoftNAS, Inc.
4. Click the Activated at Boot tab. 5. Select the network interface (eth1) in the list of the interfaces. The Edit Bootup Interface section of the panel will be displayed.
6. In the MTU field, change the value from default to 9000. In order to do so, check the option for the text entrybox and enter the value 9000 in the text box.
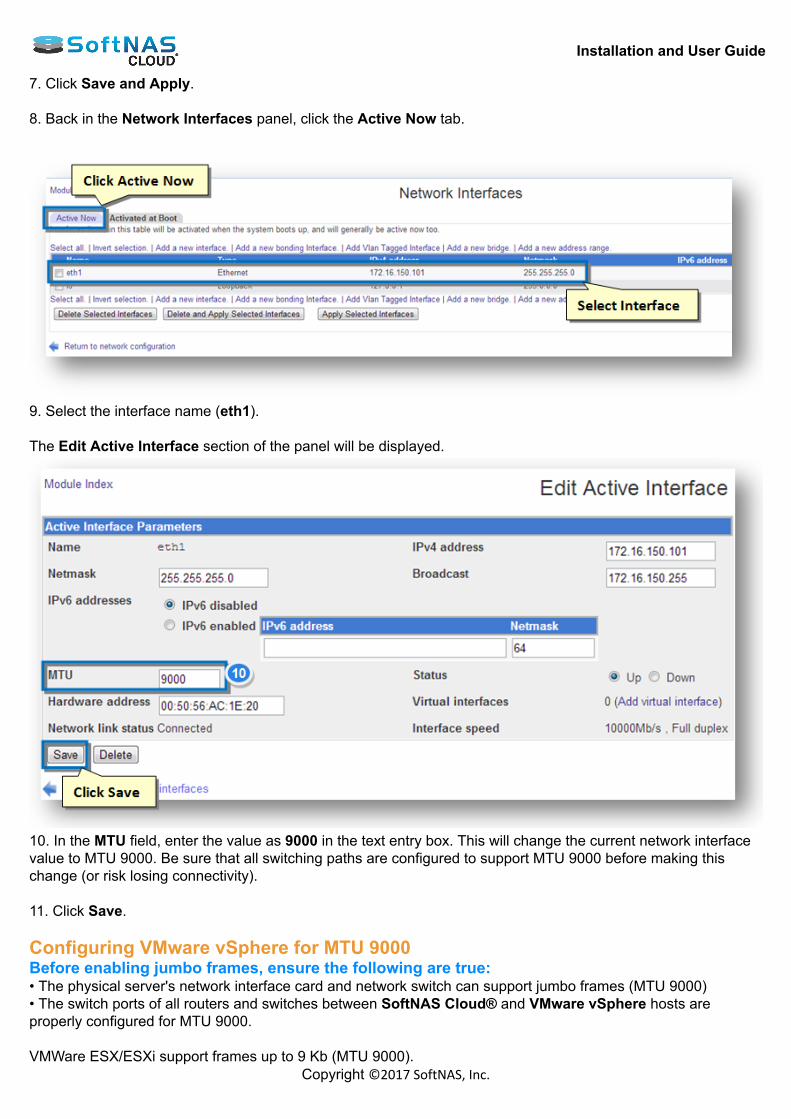
Installation and User Guide
Copyright ©2017 SoftNAS, Inc.
7. Click Save and Apply. 8. Back in the Network Interfaces panel, click the Active Now tab.
9. Select the interface name (eth1). The Edit Active Interface section of the panel will be displayed.
10. In the MTU field, enter the value as 9000 in the text entry box. This will change the current network interfacevalue to MTU 9000. Be sure that all switching paths are configured to support MTU 9000 before making thischange (or risk losing connectivity). 11. Click Save. Configuring VMware vSphere for MTU 9000Before enabling jumbo frames, ensure the following are true:• The physical server's network interface card and network switch can support jumbo frames (MTU 9000)• The switch ports of all routers and switches between SoftNAS Cloud® and VMware vSphere hosts areproperly configured for MTU 9000. VMWare ESX/ESXi support frames up to 9 Kb (MTU 9000).
Installation and User Guide
Copyright ©2017 SoftNAS, Inc.
In order to use jumbo frames support configuration is required end to end. These commands are good for ESX/ESXi 5.0 and later: 1. Log into host with the VMware vSphere client. 2. Select the physical host to make changes to and click on the host IP. 3. Choose the Configuration tab. 4. Select the Networking option under Hardware. 5. Select properties on the vSwitch to be configured. 6. When the vSwitch is selected, the MTU set will become visible under Advanced. 7. Set Properties. The default is 1500. 8. Click Edit on the bottom while the vSwitch is selected. 9. On the General tab there is a box labeled Advanced Properties 10. Change the MTU here from 1500 to 9000 and click OK. Also change the MTU for the VMK (VM kernel). In the same vSwitch Properties box select the first VMK listed. 11. The MAC address and MTU are listed under NIC Settings. 12. Click Edit for the first VMK 13. On the properties dialogue box that pops up set the MTU in the NIC settings box on the General tab to 9000and click OK 14. Repeat this for all VMKs under the virtual switch 15. Close the vSwitch properties dialogue and repeat for any remaining vSwitches Be sure to set the SoftNAS Cloud® network interface to accept Jumbo Frames / MTU 9000, as describedabove.
Installation and User Guide
Copyright ©2017 SoftNAS, Inc.
Active Directory Configuration OverviewIntegration of SoftNAS Cloud® into Active Directory enables domain users to more securely share files anddata in a corporate environment. Authentication is managed by Active Directory (AD) via Kerberos. Kerberostickets are issued to users authenticated to AD. When a user accesses a CIFS share managed by SoftNASCloud®, the ticket is then verified with AD to ensure it is authentic and valid before allowing access to the shares.Windows user IDs and groups (e.g.,Domain Users) are transparently and dynamically mapped from AD intoSoftNAS Cloud® and Linux, making access seamless for Windows users. When integrated into a domain environment, SoftNAS Cloud® becomes another member server of the domain -like any other Windows server joined to the domain. Authorization and granular access controls are available to manage the level of access available to various usersand user groups. The following sections detail how to configure SoftNAS Cloud® for integration with AD and how to troubleshootand resolve common issues that can arise during AD integration. On Linux, Samba is used to provide access to CIFS for access from Windows-based systems. Samba uses aprogram called winbind, which binds Windows authentication and identities (e.g., AD users and groups) withLinux, and automatically maps Windows users and groups to Linux users and groups. Please use the following process to integrate AD with SoftNAS Cloud® and Linux with Samba. Active Directory WizardConfigure AD using the Active Directory Wizard. This enables integration automation with AD. After entering some basic networking details to enable SoftNAS Cloud® to communicate within the ADenvironment, SoftNAS Cloud® will automatically set up the integration with AD, and will even run a finalverification stage to ensure that everything is working smoothly. 1. From Volumes and LUNS, click on Active Directory. The AD Wizard instructions are displayed.

Installation and User Guide
Copyright ©2017 SoftNAS, Inc.
2. Click on Next. 3. Provide the domain name of the active directory domain controller, and then click on Next.
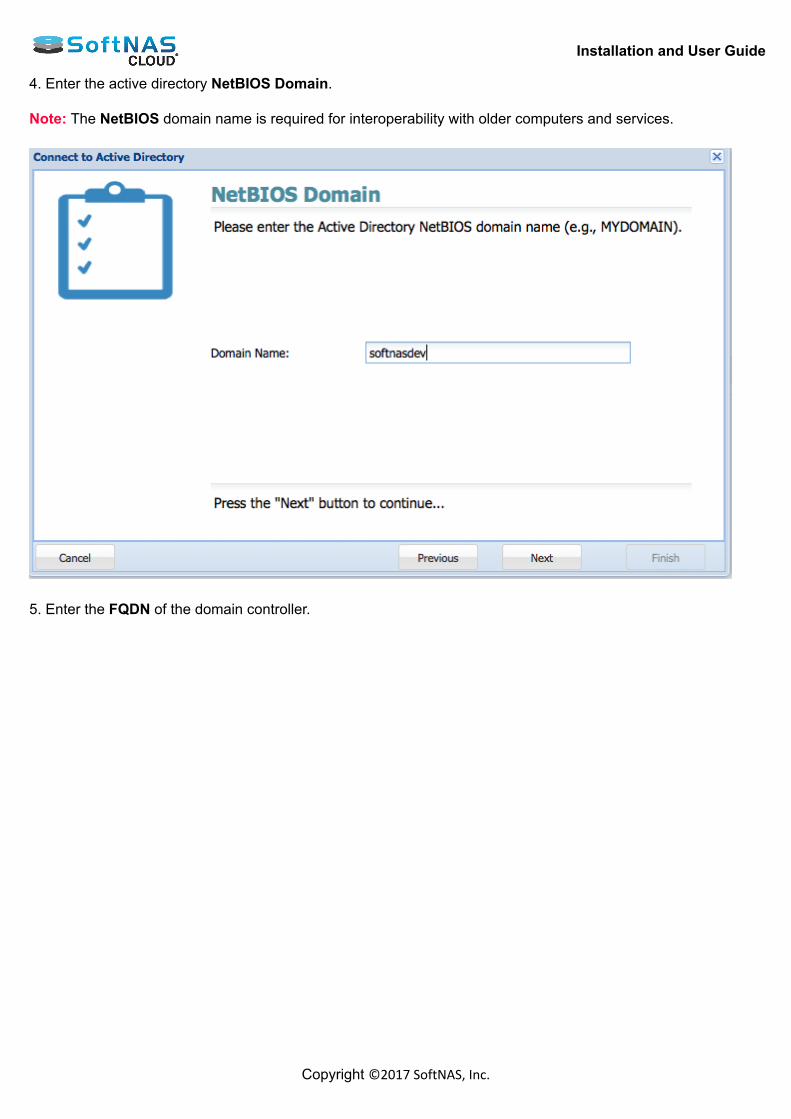
Installation and User Guide
Copyright ©2017 SoftNAS, Inc.
4. Enter the active directory NetBIOS Domain. Note: The NetBIOS domain name is required for interoperability with older computers and services.
5. Enter the FQDN of the domain controller.
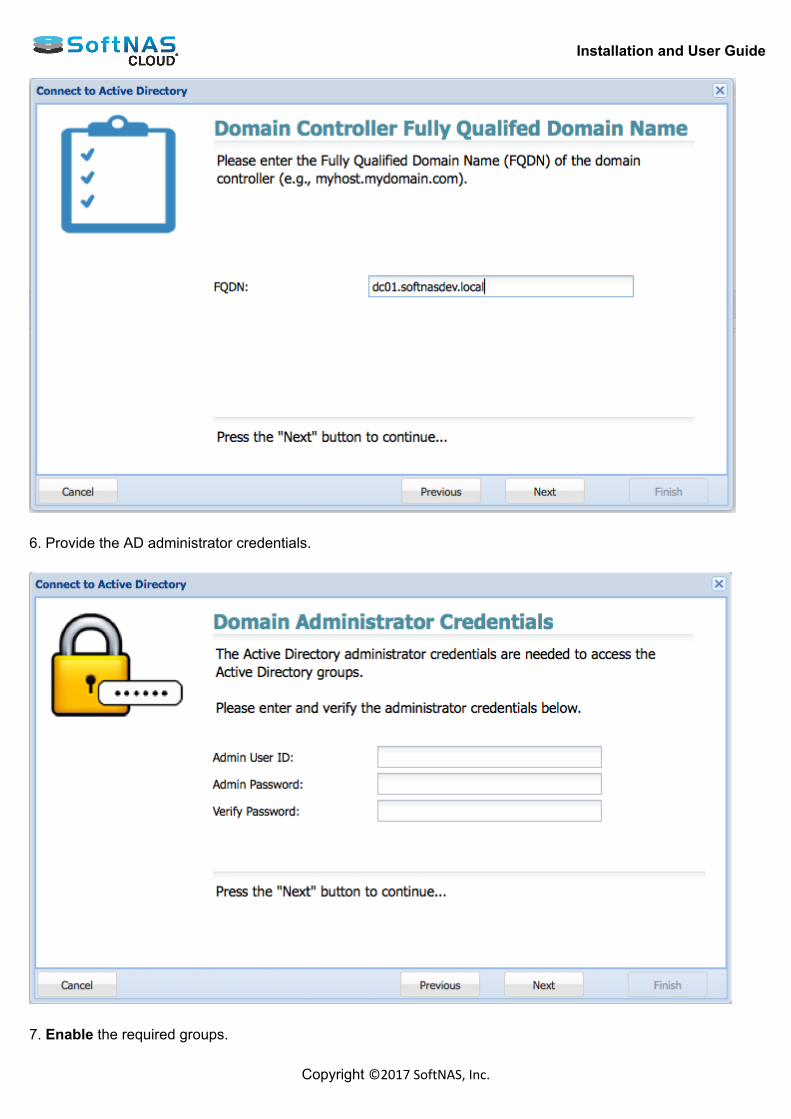
Installation and User Guide
Copyright ©2017 SoftNAS, Inc.
6. Provide the AD administrator credentials.
7. Enable the required groups.
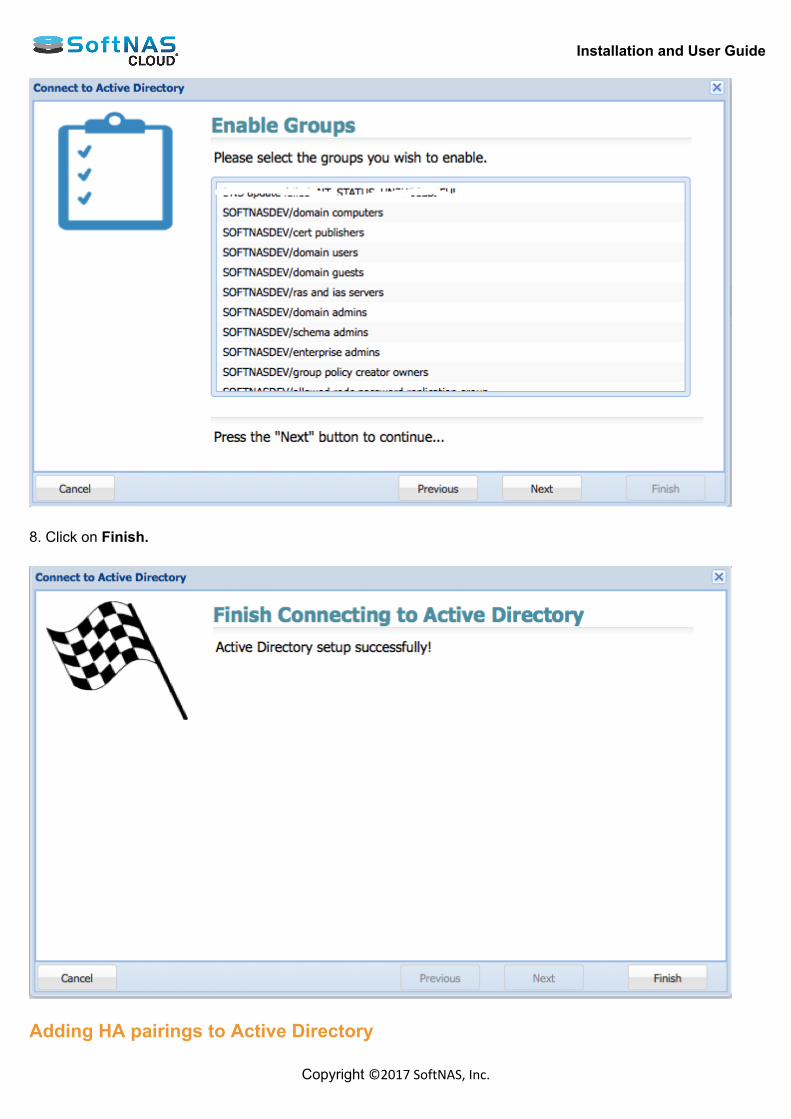
Installation and User Guide
Copyright ©2017 SoftNAS, Inc.
8. Click on Finish.
Adding HA pairings to Active Directory
Installation and User Guide
Copyright ©2017 SoftNAS, Inc.
If connecting SoftNAS instances in a High Availability pairing to Active Directory, you must perform theprocess above twice, once on each node. Active Directory configurations do not carry over to the second nodeautomatically because the target node's NAS services (amongst others) are not running while the node isdormant. Settings cannot be automatically triggered upon takeover. In order for the second instance to remain inActive Directory after a failover the second node must be added as well.
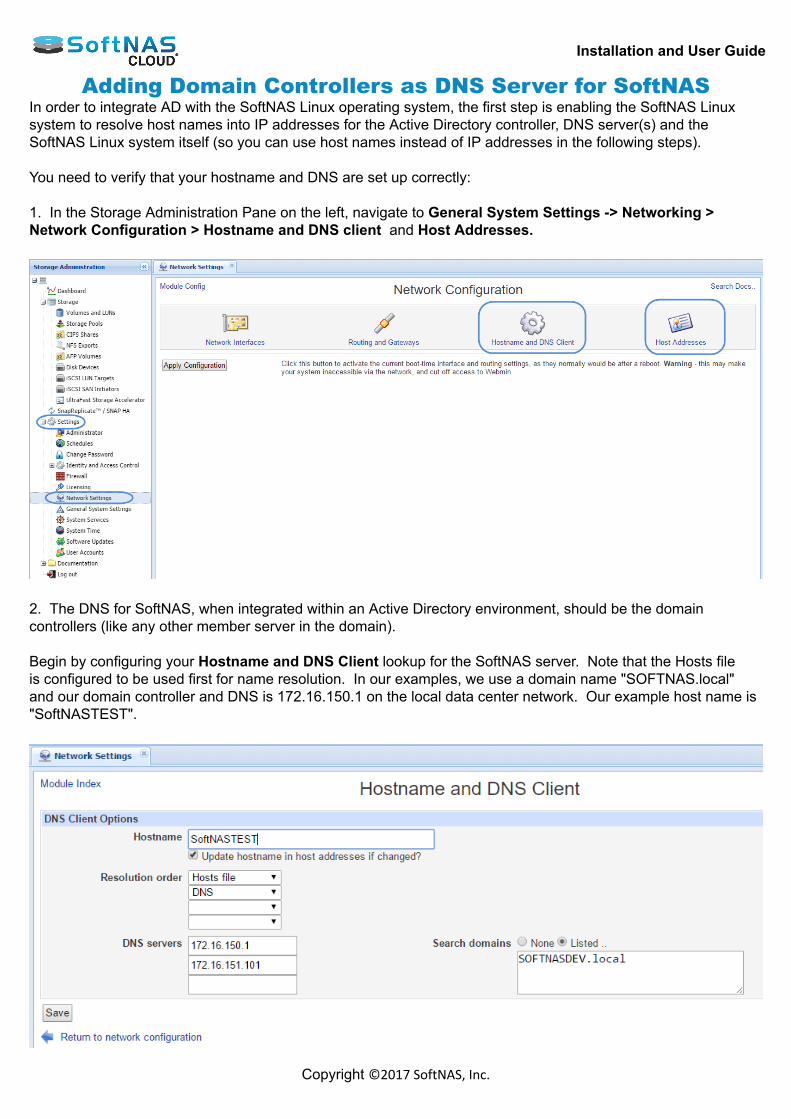
Installation and User Guide
Copyright ©2017 SoftNAS, Inc.
Adding Domain Controllers as DNS Server for SoftNASIn order to integrate AD with the SoftNAS Linux operating system, the first step is enabling the SoftNAS Linuxsystem to resolve host names into IP addresses for the Active Directory controller, DNS server(s) and theSoftNAS Linux system itself (so you can use host names instead of IP addresses in the following steps). You need to verify that your hostname and DNS are set up correctly: 1. In the Storage Administration Pane on the left, navigate to General System Settings -> Networking >Network Configuration > Hostname and DNS client and Host Addresses.
2. The DNS for SoftNAS, when integrated within an Active Directory environment, should be the domaincontrollers (like any other member server in the domain). Begin by configuring your Hostname and DNS Client lookup for the SoftNAS server. Note that the Hosts fileis configured to be used first for name resolution. In our examples, we use a domain name "SOFTNAS.local"and our domain controller and DNS is 172.16.150.1 on the local data center network. Our example host name is"SoftNASTEST".

Installation and User Guide
Copyright ©2017 SoftNAS, Inc.
3. Upon clicking Save to set the selected configuration, you will be returned to Network Configuration. Click HostAddresses.
4. To create each host table entry, click on the Add a new host address link.
5. Fill in the form that appears, then press
Create. 6. Repeat for both the Active Directory and SoftNAS host entries so your final host table looks similar to this:

Installation and User Guide
Copyright ©2017 SoftNAS, Inc.
In the above example, the IP address of the Active Directory controller is 172.16.150.1, so its FQDN is entered(WIN-00B96QSOC44).SOFTNAS.local, along with the "realm" name "SOFTNAS.LOCAL" in lower-case, upper-case and just the domain name "SOFTNAS". The next entry maps the IP address of the SoftNAS Linux host's IPaddress 172.16.150.50 to FQDN "softnastest.softnasdev.local", "softnastest" and "SOFTNASTEST". 7. Restart the network system to ensure the new DNS resolution rules are in effect. Note: Anytime you change the DNS or network settings, be sure to either issue a service network restartcommand as the root user or reboot SoftNAS with a sync; sync; reboot sequence to restart the networksubsystem so the new settings will take effect. 8. Verify the host mappings work correctly from a command line (on the SoftNAS host via SSH or a console). You may also want to verify that your host entries are correct by pinging them with "ping" commands that confirmeach mapping is correct. If these host name lookups are incorrect, other steps which follow will fail. Take amoment to verify the host mappings are working as expected for best results. If you prefer to do this verification via the StorageCenter UI, you can use the following screen to do so. To reachthe Command Shell screen, choose Settings > General System Settings, which will open a new window withaccess to the full Webmin console, then choose Others > Command Shell. Be sure to specify the "count" of pings using the "-c 4" switch (or the command will run indefinitely and notreturn).
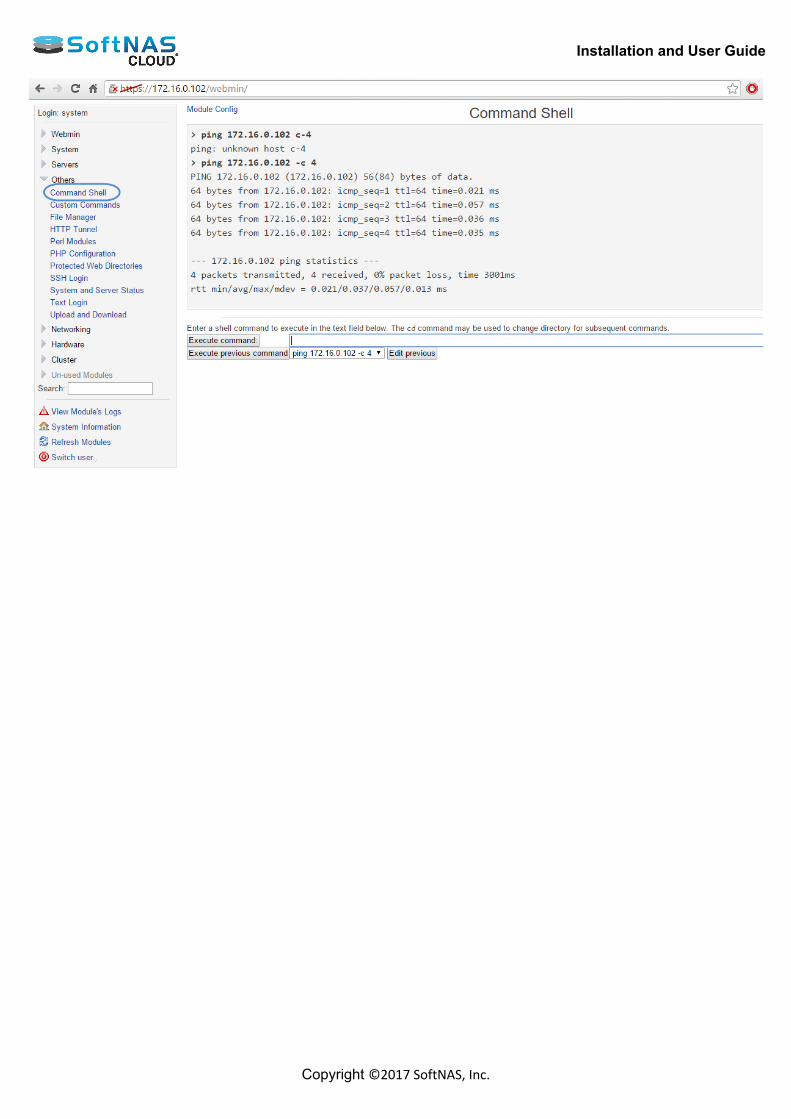
Installation and User Guide
Copyright ©2017 SoftNAS, Inc.
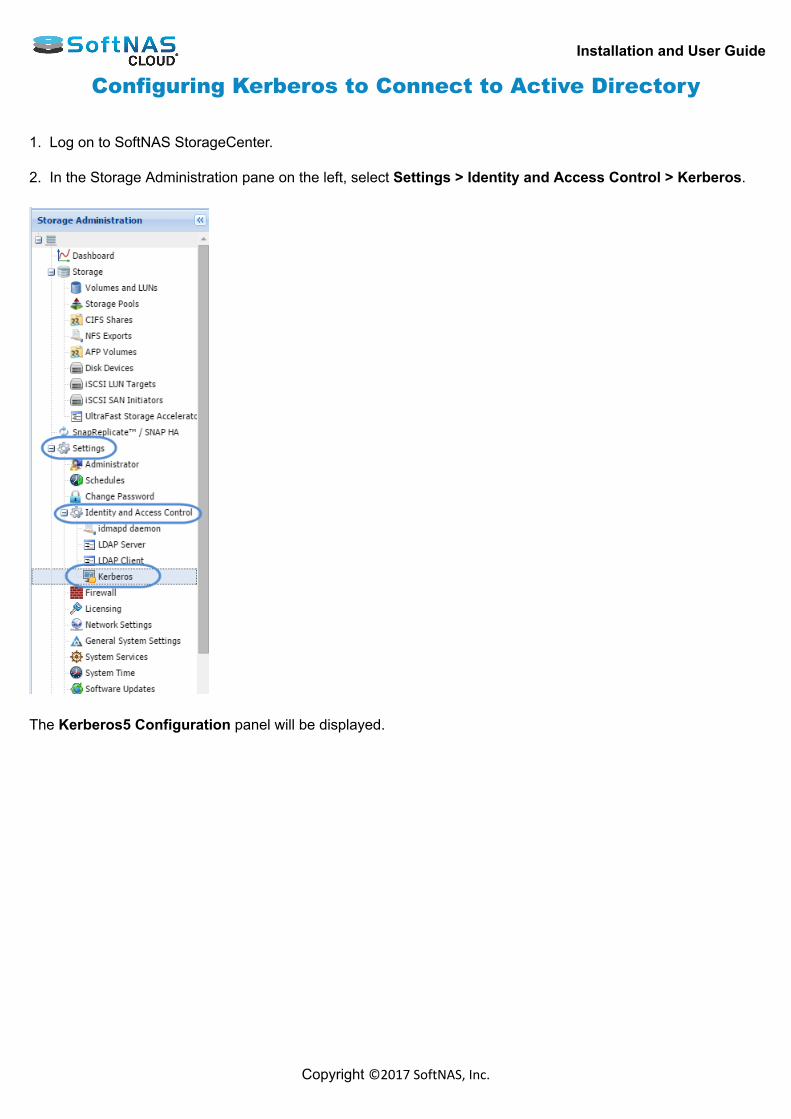
Installation and User Guide
Copyright ©2017 SoftNAS, Inc.
Configuring Kerberos to Connect to Active Directory 1. Log on to SoftNAS StorageCenter. 2. In the Storage Administration pane on the left, select Settings > Identity and Access Control > Kerberos.
The Kerberos5 Configuration panel will be displayed.

Installation and User Guide
Copyright ©2017 SoftNAS, Inc.
3. Enter the the full Active Directory server name in upper case in the Realm text entry box; e.g.,YOURDOMAIN.COM, MYDOMAIN.LOCAL. 4. Click the Update Configuration button. Verifying Kerberos is Functional In the above example, SOFTNAS.LOCAL is the full domain name. Log in to a command shell using SSH,SoftNAS Console (VMware) or use the Command Shell. To access the command shell from within the SoftNASUI, go to Settings > General System Settings, which will open a new window with access to the full Webminconsole, then choose Others > Command Shell.
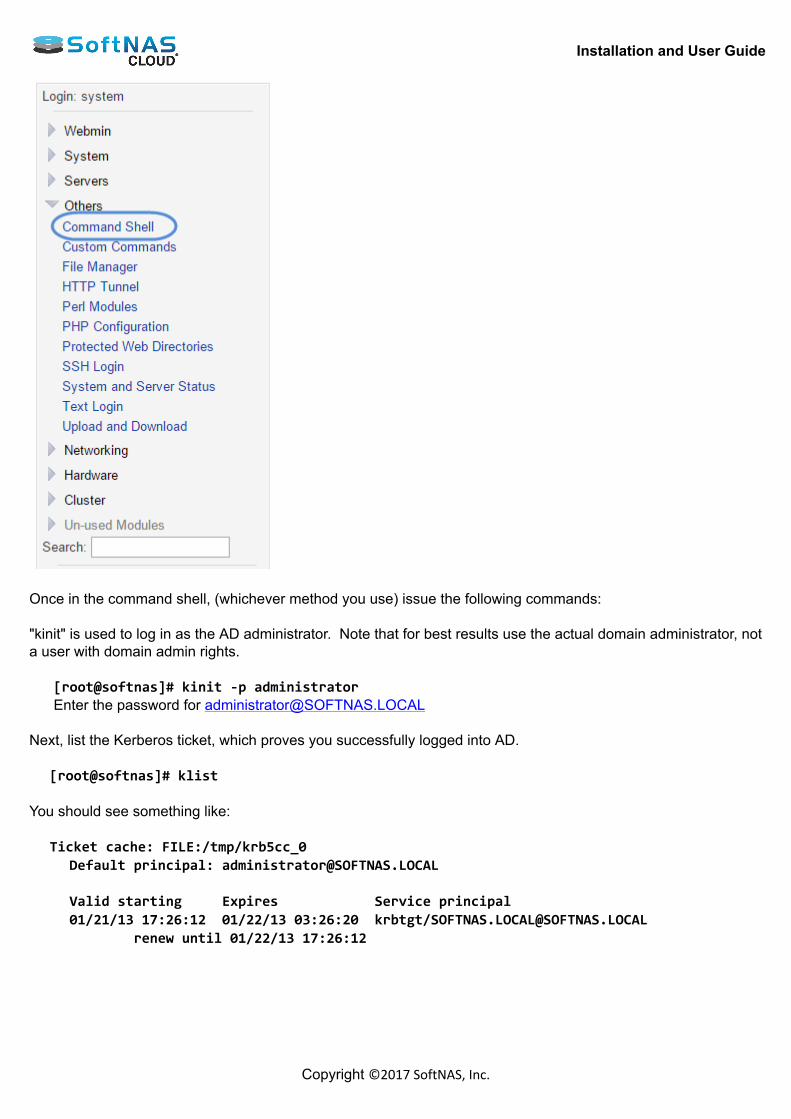
Installation and User Guide
Copyright ©2017 SoftNAS, Inc.
Once in the command shell, (whichever method you use) issue the following commands: "kinit" is used to log in as the AD administrator. Note that for best results use the actual domain administrator, nota user with domain admin rights. [root@softnas]# kinit -p administrator Enter the password for [email protected] Next, list the Kerberos ticket, which proves you successfully logged into AD. [root@softnas]# klist You should see something like: Ticket cache: FILE:/tmp/krb5cc_0 Default principal: [email protected] Valid starting Expires Service principal 01/21/13 17:26:12 01/22/13 03:26:20 krbtgt/[email protected] renew until 01/22/13 17:26:12

Installation and User Guide
Copyright ©2017 SoftNAS, Inc.
Configuring Read Cache and Write Log SoftNAS Cloud® provides the ability to add Read Cache and Write Log devices to a storage pool. Read Cacheprovides an additional layer of cache, in addition to RAM memory cache. The Write Log provides a cache forincoming writes to be written temporarily to high-speed storage, then later staged to lower-speed spindle-basedstorage. SSD is recommended for both Read Cache and Write Log. Important: The Write Log becomes a critical element of the storage pool, so it is highly recommended toalways use a RAID 1 mirror for Write Log (that way, if a write log device fails, the storage pool won't be at risk ofinvalidation because the write log is now an integral part of the pool). Configure Read Cache and Write Log.1. Click the Storage Pools option under the Storage section in the Left Navigation Pane. The Storage Pools panel will be displayed with the list of all the existing storage pools that are already allocated. 2. Create required storage pools as previously defined. Creating Storage Pools 3. Verify that disk drives are available that have not been assigned to other storage pools. Note: These should be high speed drives: SAS or SSD.
4. On the Storage Pools panel, click the Details tab in the lower panel. 5. Verify that no log or cache listed under Pool Devices. 6. Select the Storage Pool to which to add Read Cache / Write Log. 7. Click the Read Cache option in the toolbar.

Installation and User Guide
Copyright ©2017 SoftNAS, Inc.
The Add Read Cache to Storage Pool dialog will be displayed.
8. Select the disk to use for Read Cache. 9. Click the Add Cache button. 10. For the Write Log, select the storage pool and click the Write Log option in the toolbar. Note: Repeat the steps for Write Log just like the steps in the Read Cache.
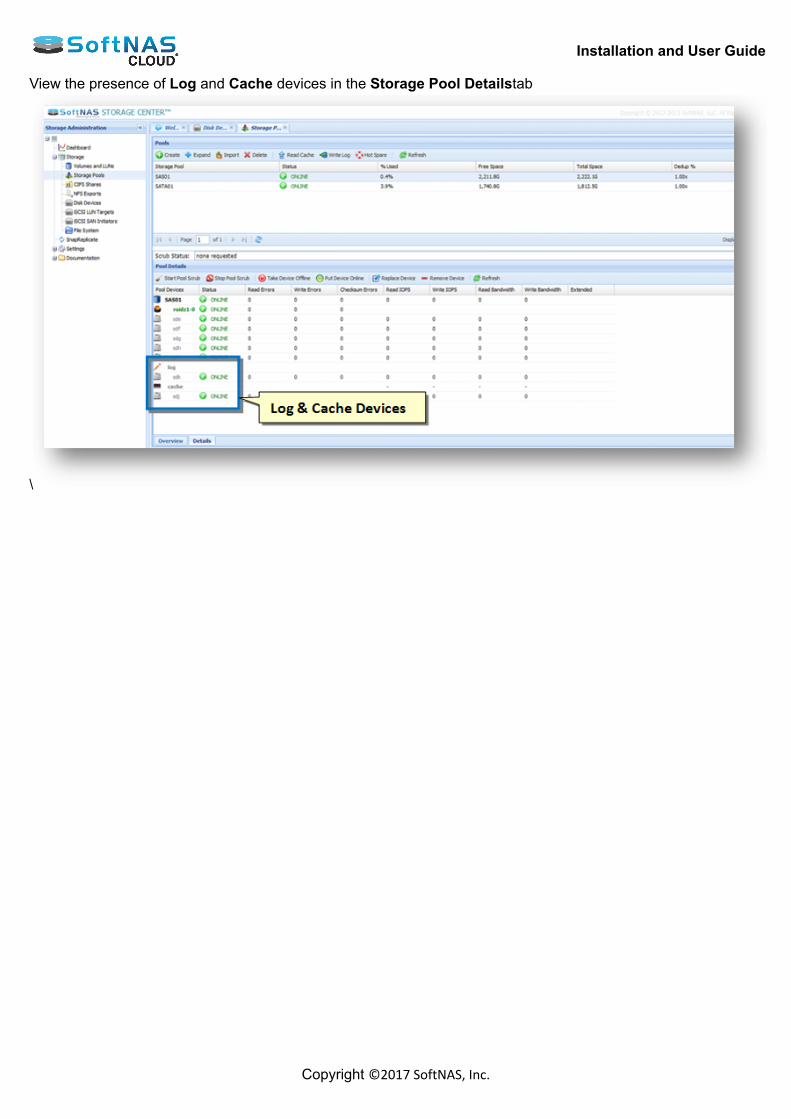
Installation and User Guide
Copyright ©2017 SoftNAS, Inc.
View the presence of Log and Cache devices in the Storage Pool Detailstab
\

Installation and User Guide
Copyright ©2017 SoftNAS, Inc.
How to Migrate Data Disks to a New SoftNAS VMYou may need to migrate data disks, along with their associated storage pools and volumes, from one SoftNASinstance to another. Examples of such cases may be: • Copy or move data from one SoftNAS VM to a different site or location.• Copy or move data from one SoftNAS instance on Amazon EC2 to a different region (different data center).• Restore a data image from backup (not common, but one of the valid use cases one should always be preparedto handle). For example, you may have EBS volume images snapshots saved on Amazon EC2, and want tomigrate a backup copy into a new SoftNAS instance. SoftNAS contains a feature known as Storage Pool Import. The Import feature scans the attached data disks toidentify any pools that are currently offline that are eligible to be imported and made active again. This feature isalso handy should you ever accidentally delete a pool.To move one or more storage pools (with its associated volumes) from one SoftNAS instance to another, followthe steps given below. 1. Make sure that there are no active workloads on NFS shares, CIFS shares or iSCSI targets making use of thestorage pool and volumes. Note: Do not attempt to move a volume that's active or data loss could occur. 2. Detach the inactive disk devices from the SoftNAS VM or EC2 instance.
• On Amazon EC2, use the Detach option for each EBS volume that you want to move. Refer to theAttaching and Detaching Volumes section for more information.• On VMware, remove each virtual hard disk from the VM using the Settings dialog.
3. Copy or move the disks (as appropriate) to the destination (if required). 4. Attach the disk devices to the new SoftNAS VM or EC2 instance.
• On Amazon EC2, use the Attach option for each EBS volume.Refer to the Attaching and DetachingVolumes section for more information.• On VMware, add each virtual hard disk to the VM using the Settings dialog
5. Log into the destination SoftNAS StorageCenter user-interface. 6. In the Left Navigation Pane, select the Storage Pools option under the Storage section. 7. Click the Import option in the toolbar. The Import Pools dialog will be displayed. It has two sections labeled Deleted Pools Available for Import and Foreign Pools Available for Import. The Foreign Pools listed (if any are present)are storage pools created on a different SoftNAS system. 8. If the pools are ready to import, there will be a button labeled Import <poolname>, where poolname will bethe pool that's available to import. Click that button. 9. You will need to select the Force Import checkbox, to force the system to import foreign pools from anothersystem. 10. For each volume, configure the volume's Snapshots to use the desired schedule. Note: They are not imported automatically, but can be manually copied from the old system by copying thesnapshots.ini and schedules.ini files in the /var/www/softnas/snserver folder.
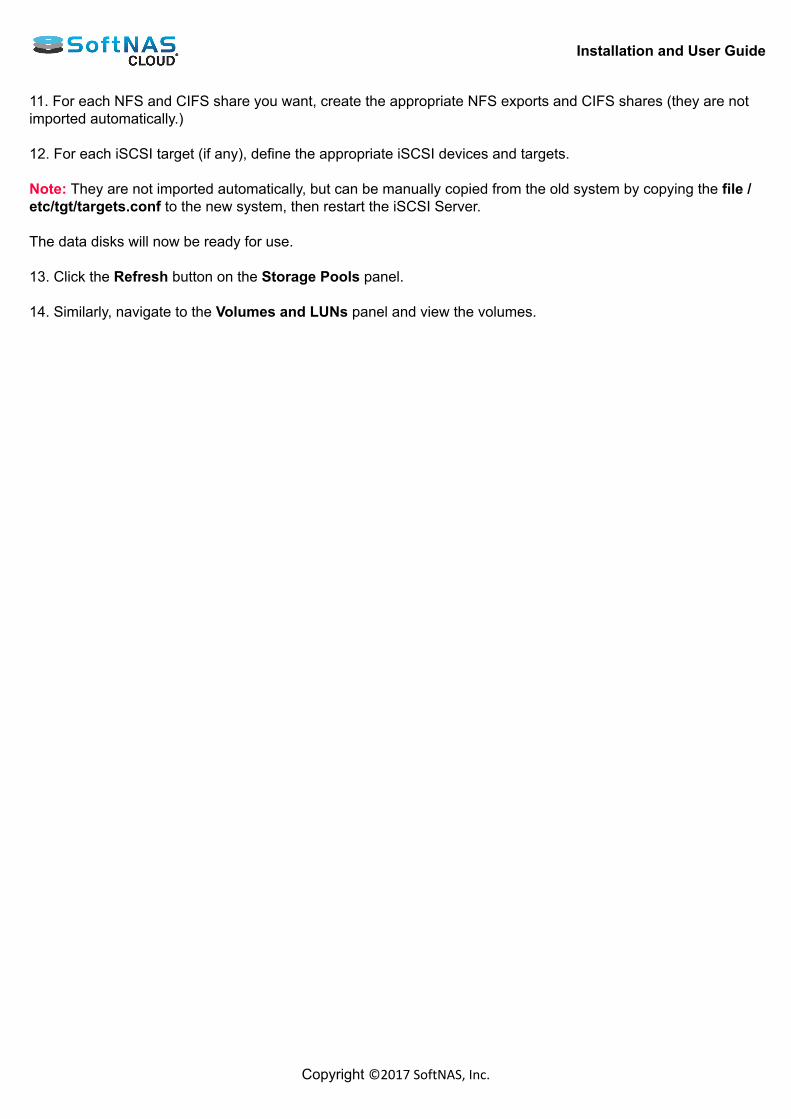
Installation and User Guide
Copyright ©2017 SoftNAS, Inc.
11. For each NFS and CIFS share you want, create the appropriate NFS exports and CIFS shares (they are notimported automatically.) 12. For each iSCSI target (if any), define the appropriate iSCSI devices and targets. Note: They are not imported automatically, but can be manually copied from the old system by copying the file /etc/tgt/targets.conf to the new system, then restart the iSCSI Server. The data disks will now be ready for use. 13. Click the Refresh button on the Storage Pools panel. 14. Similarly, navigate to the Volumes and LUNs panel and view the volumes.
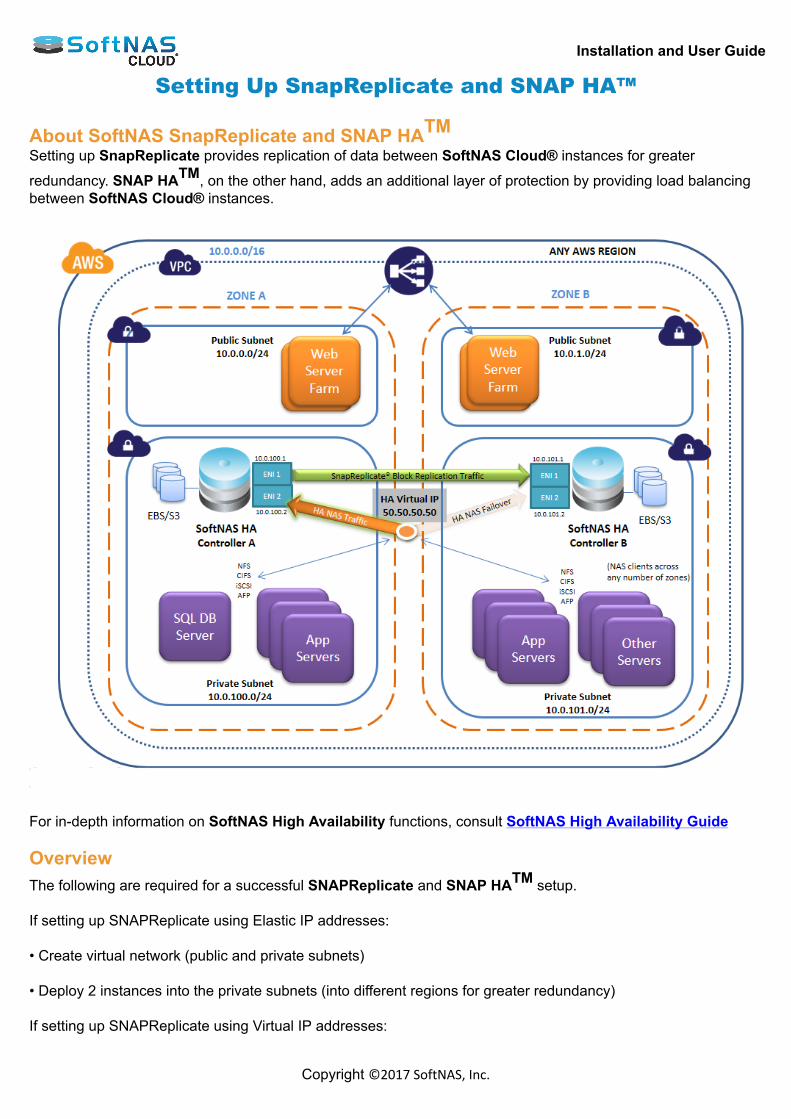
Installation and User Guide
Copyright ©2017 SoftNAS, Inc.
Setting Up SnapReplicate and SNAP HA™
About SoftNAS SnapReplicate and SNAP HATMSetting up SnapReplicate provides replication of data between SoftNAS Cloud® instances for greater
redundancy. SNAP HATM, on the other hand, adds an additional layer of protection by providing load balancingbetween SoftNAS Cloud® instances.
For in-depth information on SoftNAS High Availability functions, consult SoftNAS High Availability Guide OverviewThe following are required for a successful SNAPReplicate and SNAP HATM setup. If setting up SNAPReplicate using Elastic IP addresses: • Create virtual network (public and private subnets) • Deploy 2 instances into the private subnets (into different regions for greater redundancy) If setting up SNAPReplicate using Virtual IP addresses:

Installation and User Guide
Copyright ©2017 SoftNAS, Inc.
• Create virtual network (create separate private subnets.) • Deploy 2 instances into the private subnets (into different regions for greater redundancy) Launching SoftNAS Cloud® Platforms • Configure SoftNAS SnapReplicate. Setting Up For SnapReplicateThe following is required for a standard SoftNAS SnapReplicate and SNAP HATM implementation: If setting up SNAPReplicate using Elastic IP addresses: • Create virtual network (public and private subnets) • Deploy 2 instances into the private subnets (into different regions for greater redundancy) If setting up SNAPReplicate using Virtual IP addresses: • Create virtual network (create separate private subnets.) • Deploy 2 instances into the private subnets (into different regions for greater redundancy). Launching SoftNAS Cloud® Platforms
• Configure SnapReplicate and SNAP HATM using SoftNAS StorageCenter. Configuring StorageCenterOnce the StorageCenter interface has been accessed, set up the Disk Devices, Storage Pools, and Volumesthat will be required for HA. SoftNAS Cloud® Configuration Note: When setting up storage pools for replication, they have to have the same name. Otherwise, replication willnot work properly. Also, create a volume on the source-side node. For more in depth setup information on setting up SnapReplicate, see SnapReplicate.To review how to set up SNAP HATM, see SNAP HATM.
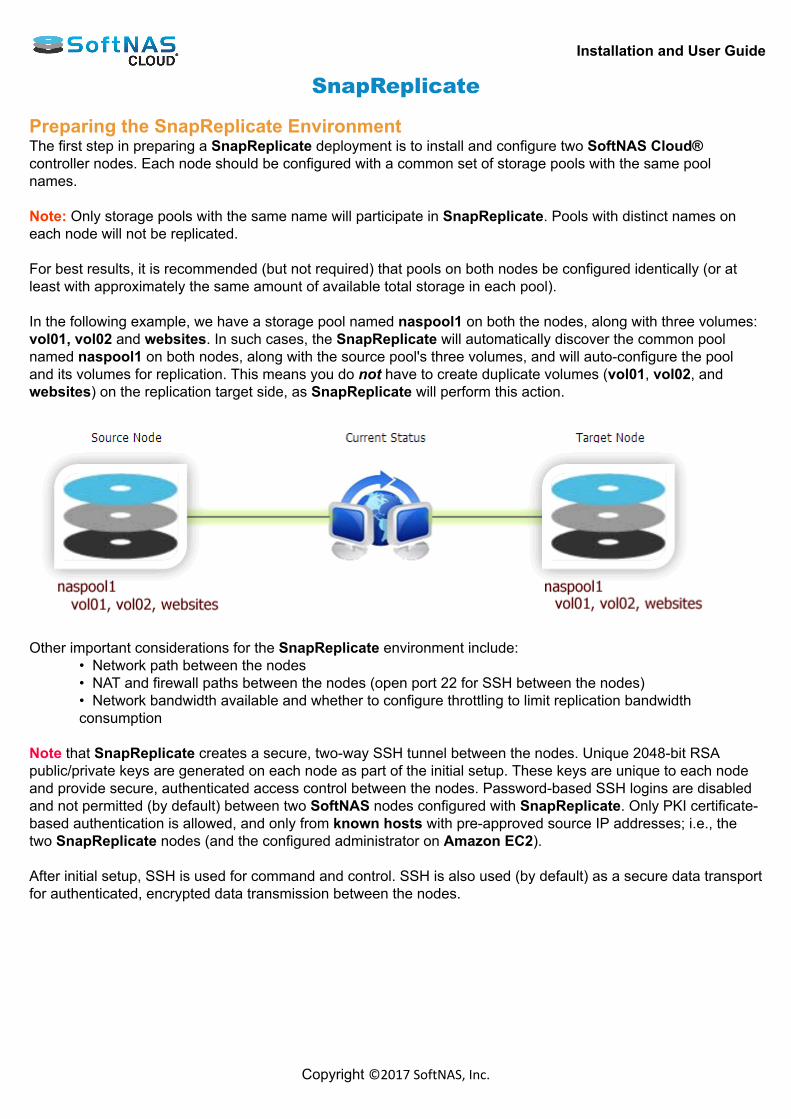
Installation and User Guide
Copyright ©2017 SoftNAS, Inc.
SnapReplicate Preparing the SnapReplicate EnvironmentThe first step in preparing a SnapReplicate deployment is to install and configure two SoftNAS Cloud®controller nodes. Each node should be configured with a common set of storage pools with the same poolnames. Note: Only storage pools with the same name will participate in SnapReplicate. Pools with distinct names oneach node will not be replicated. For best results, it is recommended (but not required) that pools on both nodes be configured identically (or atleast with approximately the same amount of available total storage in each pool). In the following example, we have a storage pool named naspool1 on both the nodes, along with three volumes:vol01, vol02 and websites. In such cases, the SnapReplicate will automatically discover the common poolnamed naspool1 on both nodes, along with the source pool's three volumes, and will auto-configure the pooland its volumes for replication. This means you do not have to create duplicate volumes (vol01, vol02, andwebsites) on the replication target side, as SnapReplicate will perform this action.
Other important considerations for the SnapReplicate environment include:
• Network path between the nodes• NAT and firewall paths between the nodes (open port 22 for SSH between the nodes)• Network bandwidth available and whether to configure throttling to limit replication bandwidthconsumption
Note that SnapReplicate creates a secure, two-way SSH tunnel between the nodes. Unique 2048-bit RSApublic/private keys are generated on each node as part of the initial setup. These keys are unique to each nodeand provide secure, authenticated access control between the nodes. Password-based SSH logins are disabledand not permitted (by default) between two SoftNAS nodes configured with SnapReplicate. Only PKI certificate-based authentication is allowed, and only from known hosts with pre-approved source IP addresses; i.e., thetwo SnapReplicate nodes (and the configured administrator on Amazon EC2). After initial setup, SSH is used for command and control. SSH is also used (by default) as a secure data transportfor authenticated, encrypted data transmission between the nodes.

Installation and User Guide
Copyright ©2017 SoftNAS, Inc.
Establishing a SnapReplicate RelationshipBe prepared with the IP address (or DNS name) of the target controller node, along with the SoftNASStorageCenter login credentials for that node. To establish the secure SnapReplicate relationship between two SoftNAS Cloud® nodes, simply follow thesteps given below. 1. Log into the source controller's SoftNAS StorageCenter administrator interface using a web browser. 2. In the Left Navigation Pane, select the SnapReplicate option. The SnapReplicate page will be displayed.
3. Click the Add Replication button in the Replication Control Panel. The Add Replication wizard will be displayed.

Installation and User Guide
Copyright ©2017 SoftNAS, Inc.
4. Read the instructions on the screen and then click the Next button.
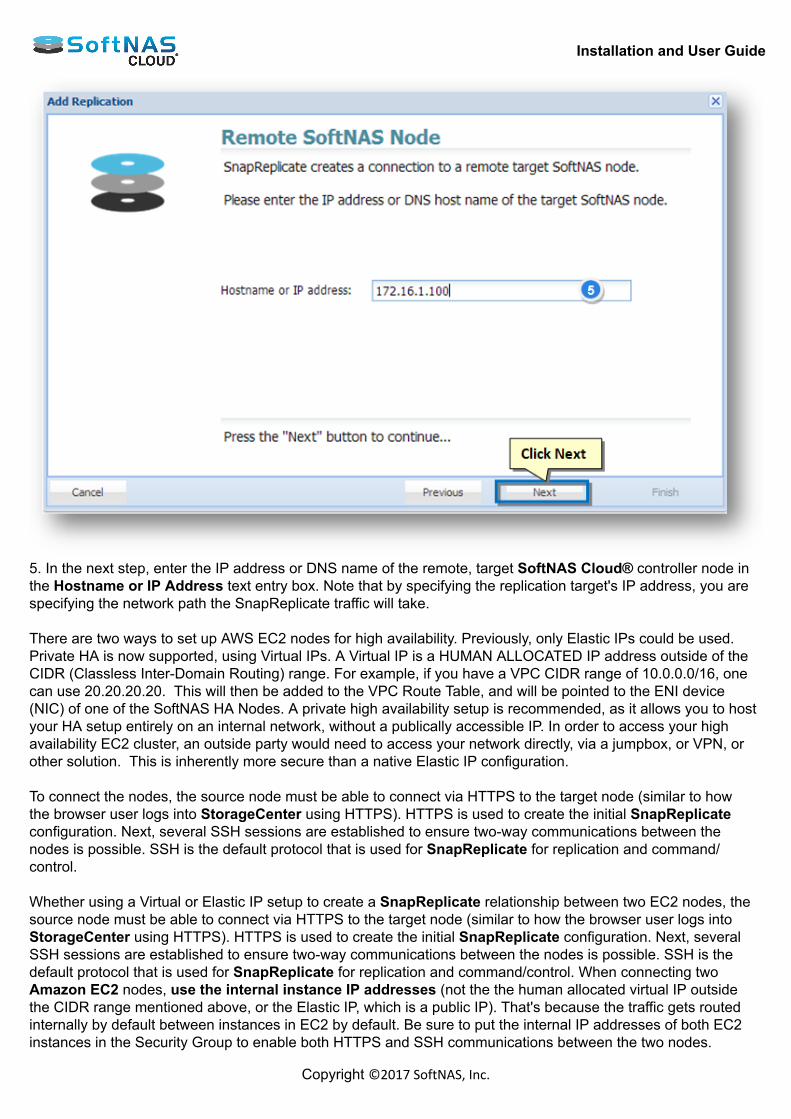
Installation and User Guide
Copyright ©2017 SoftNAS, Inc.
5. In the next step, enter the IP address or DNS name of the remote, target SoftNAS Cloud® controller node inthe Hostname or IP Address text entry box. Note that by specifying the replication target's IP address, you arespecifying the network path the SnapReplicate traffic will take. There are two ways to set up AWS EC2 nodes for high availability. Previously, only Elastic IPs could be used.Private HA is now supported, using Virtual IPs. A Virtual IP is a HUMAN ALLOCATED IP address outside of theCIDR (Classless Inter-Domain Routing) range. For example, if you have a VPC CIDR range of 10.0.0.0/16, onecan use 20.20.20.20. This will then be added to the VPC Route Table, and will be pointed to the ENI device(NIC) of one of the SoftNAS HA Nodes. A private high availability setup is recommended, as it allows you to hostyour HA setup entirely on an internal network, without a publically accessible IP. In order to access your highavailability EC2 cluster, an outside party would need to access your network directly, via a jumpbox, or VPN, orother solution. This is inherently more secure than a native Elastic IP configuration. To connect the nodes, the source node must be able to connect via HTTPS to the target node (similar to howthe browser user logs into StorageCenter using HTTPS). HTTPS is used to create the initial SnapReplicateconfiguration. Next, several SSH sessions are established to ensure two-way communications between thenodes is possible. SSH is the default protocol that is used for SnapReplicate for replication and command/control. Whether using a Virtual or Elastic IP setup to create a SnapReplicate relationship between two EC2 nodes, thesource node must be able to connect via HTTPS to the target node (similar to how the browser user logs intoStorageCenter using HTTPS). HTTPS is used to create the initial SnapReplicate configuration. Next, severalSSH sessions are established to ensure two-way communications between the nodes is possible. SSH is thedefault protocol that is used for SnapReplicate for replication and command/control. When connecting twoAmazon EC2 nodes, use the internal instance IP addresses (not the the human allocated virtual IP outsidethe CIDR range mentioned above, or the Elastic IP, which is a public IP). That's because the traffic gets routedinternally by default between instances in EC2 by default. Be sure to put the internal IP addresses of both EC2instances in the Security Group to enable both HTTPS and SSH communications between the two nodes.
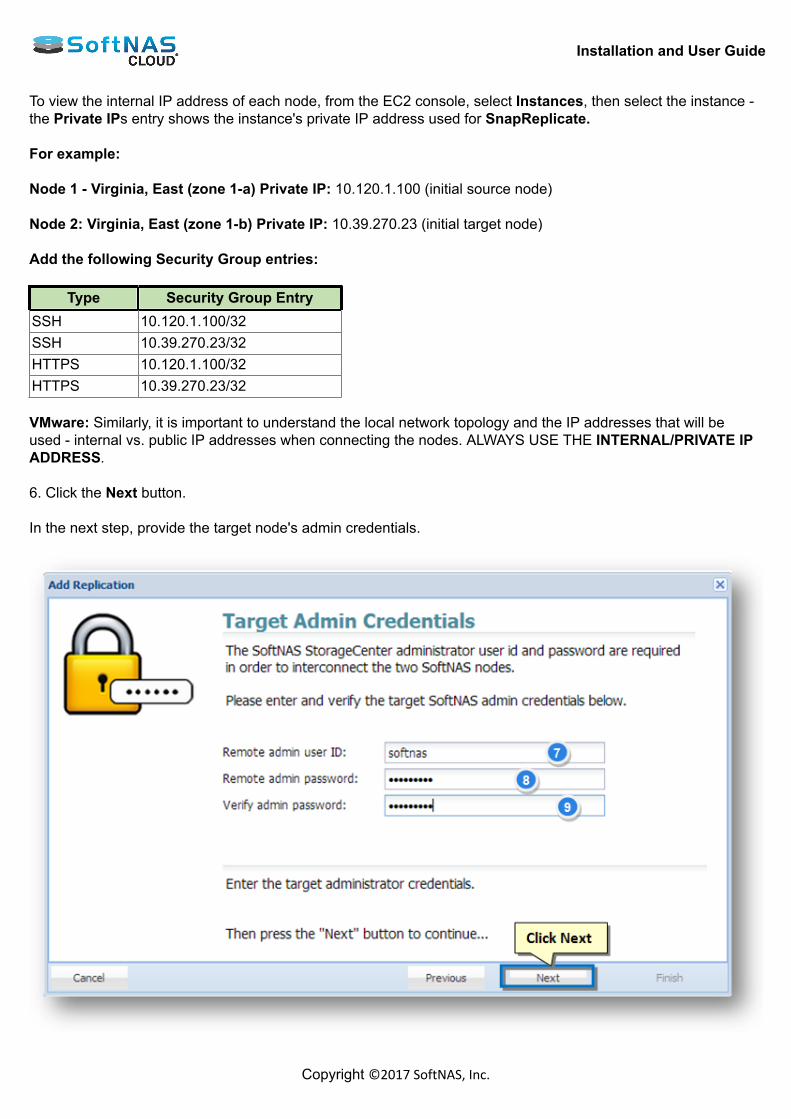
Installation and User Guide
Copyright ©2017 SoftNAS, Inc.
To view the internal IP address of each node, from the EC2 console, select Instances, then select the instance -the Private IPs entry shows the instance's private IP address used for SnapReplicate. For example: Node 1 - Virginia, East (zone 1-a) Private IP: 10.120.1.100 (initial source node) Node 2: Virginia, East (zone 1-b) Private IP: 10.39.270.23 (initial target node) Add the following Security Group entries:
Type Security Group EntrySSH 10.120.1.100/32SSH 10.39.270.23/32HTTPS 10.120.1.100/32HTTPS 10.39.270.23/32 VMware: Similarly, it is important to understand the local network topology and the IP addresses that will beused - internal vs. public IP addresses when connecting the nodes. ALWAYS USE THE INTERNAL/PRIVATE IPADDRESS. 6. Click the Next button. In the next step, provide the target node's admin credentials.
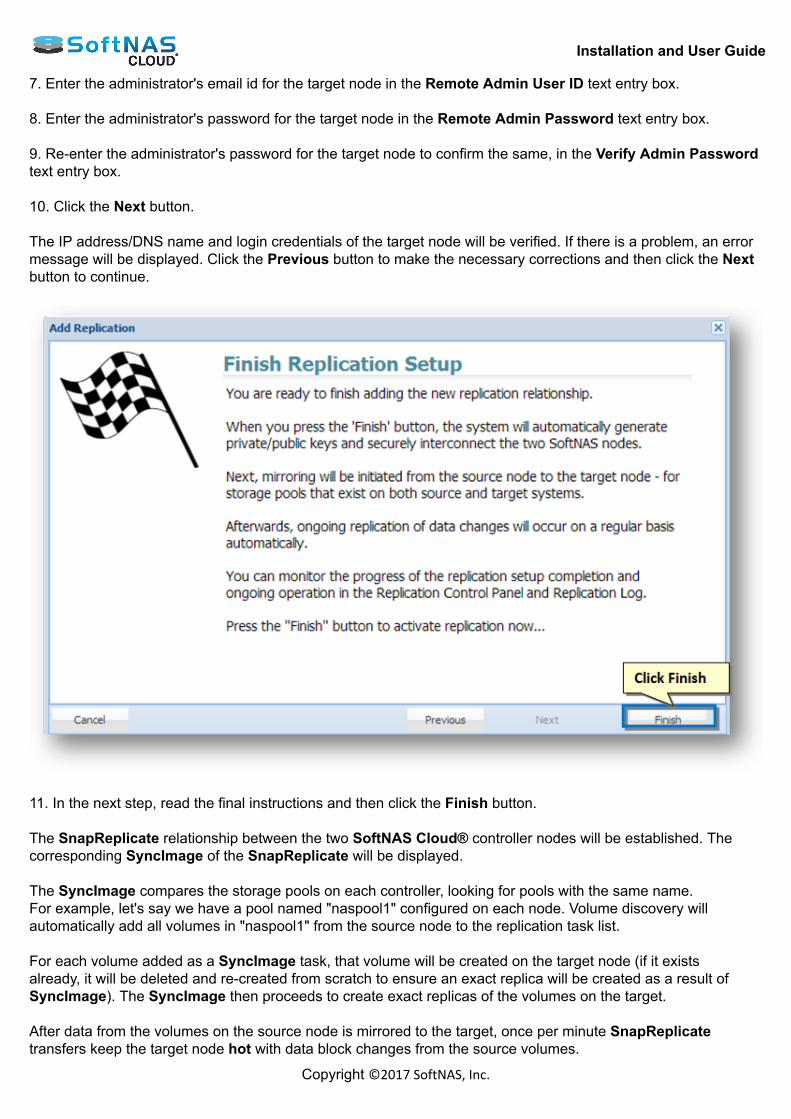
Installation and User Guide
Copyright ©2017 SoftNAS, Inc.
7. Enter the administrator's email id for the target node in the Remote Admin User ID text entry box. 8. Enter the administrator's password for the target node in the Remote Admin Password text entry box. 9. Re-enter the administrator's password for the target node to confirm the same, in the Verify Admin Passwordtext entry box. 10. Click the Next button. The IP address/DNS name and login credentials of the target node will be verified. If there is a problem, an errormessage will be displayed. Click the Previous button to make the necessary corrections and then click the Nextbutton to continue.
11. In the next step, read the final instructions and then click the Finish button. The SnapReplicate relationship between the two SoftNAS Cloud® controller nodes will be established. Thecorresponding SyncImage of the SnapReplicate will be displayed. The SyncImage compares the storage pools on each controller, looking for pools with the same name.For example, let's say we have a pool named "naspool1" configured on each node. Volume discovery willautomatically add all volumes in "naspool1" from the source node to the replication task list. For each volume added as a SyncImage task, that volume will be created on the target node (if it existsalready, it will be deleted and re-created from scratch to ensure an exact replica will be created as a result ofSyncImage). The SyncImage then proceeds to create exact replicas of the volumes on the target. After data from the volumes on the source node is mirrored to the target, once per minute SnapReplicatetransfers keep the target node hot with data block changes from the source volumes.
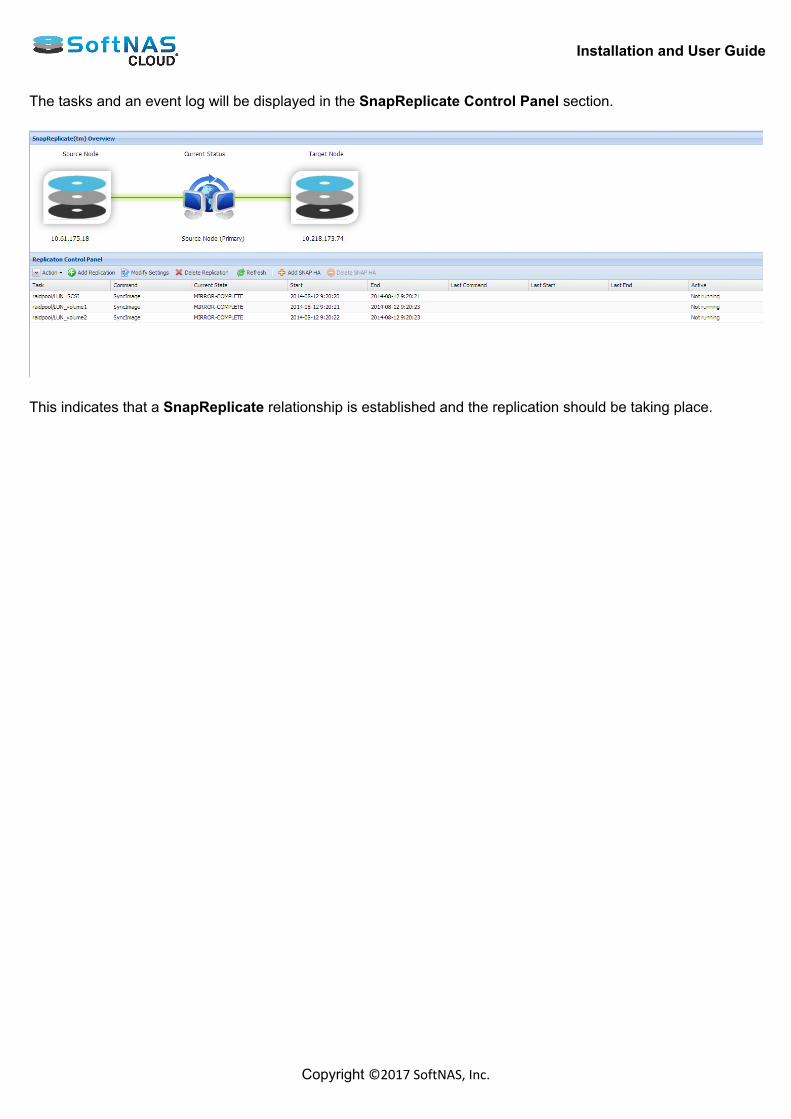
Installation and User Guide
Copyright ©2017 SoftNAS, Inc.
The tasks and an event log will be displayed in the SnapReplicate Control Panel section.
This indicates that a SnapReplicate relationship is established and the replication should be taking place.
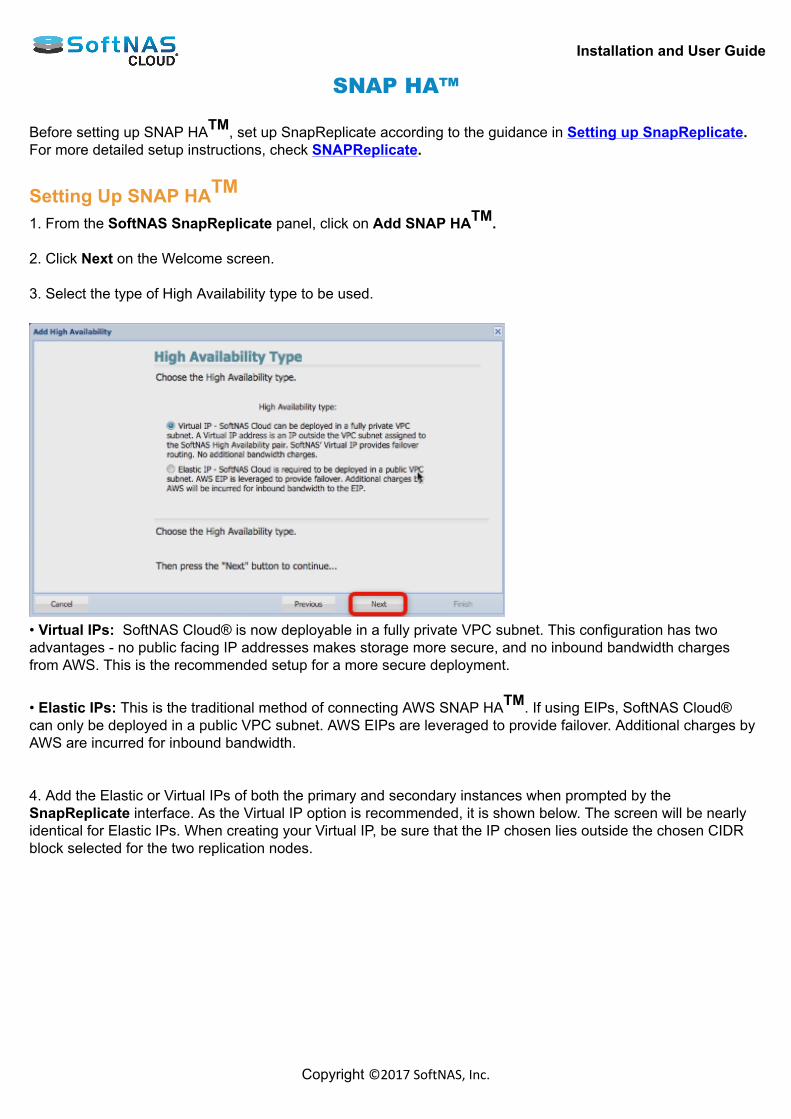
Installation and User Guide
Copyright ©2017 SoftNAS, Inc.
SNAP HA™
Before setting up SNAP HATM, set up SnapReplicate according to the guidance in Setting up SnapReplicate.For more detailed setup instructions, check SNAPReplicate.
Setting Up SNAP HATM
1. From the SoftNAS SnapReplicate panel, click on Add SNAP HATM. 2. Click Next on the Welcome screen. 3. Select the type of High Availability type to be used.
• Virtual IPs: SoftNAS Cloud® is now deployable in a fully private VPC subnet. This configuration has twoadvantages - no public facing IP addresses makes storage more secure, and no inbound bandwidth chargesfrom AWS. This is the recommended setup for a more secure deployment.
• Elastic IPs: This is the traditional method of connecting AWS SNAP HATM. If using EIPs, SoftNAS Cloud®can only be deployed in a public VPC subnet. AWS EIPs are leveraged to provide failover. Additional charges byAWS are incurred for inbound bandwidth. 4. Add the Elastic or Virtual IPs of both the primary and secondary instances when prompted by theSnapReplicate interface. As the Virtual IP option is recommended, it is shown below. The screen will be nearlyidentical for Elastic IPs. When creating your Virtual IP, be sure that the IP chosen lies outside the chosen CIDRblock selected for the two replication nodes.
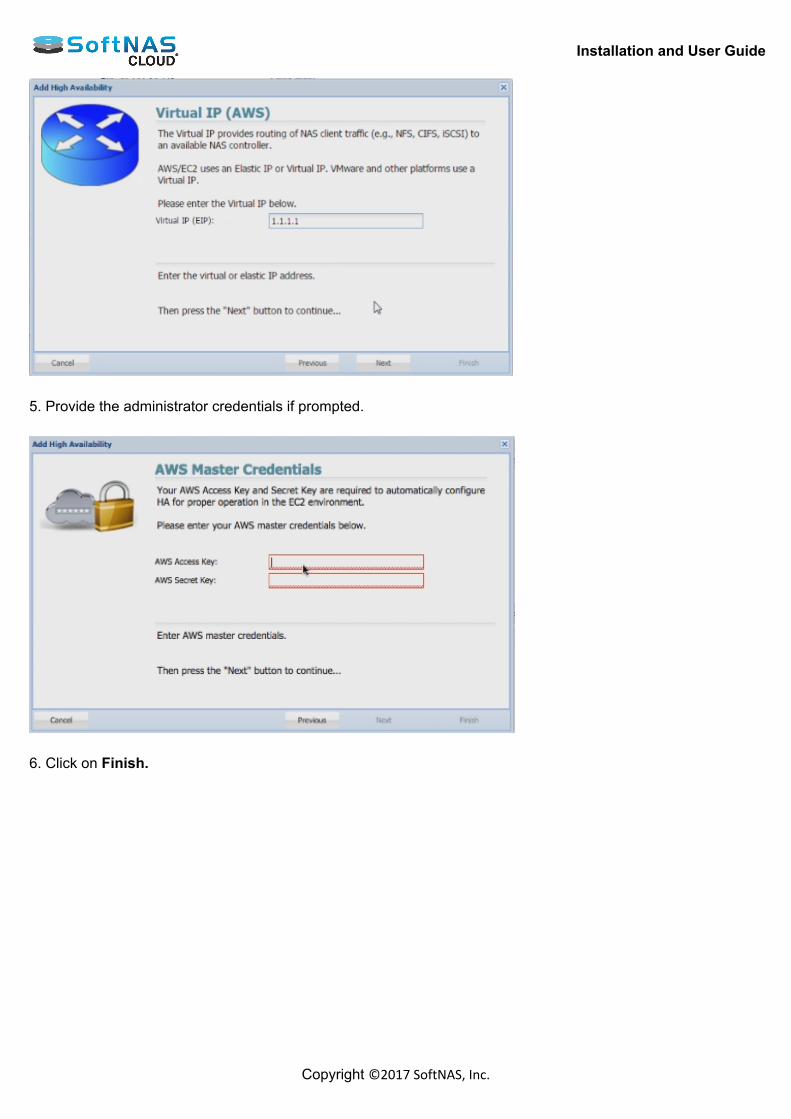
Installation and User Guide
Copyright ©2017 SoftNAS, Inc.
5. Provide the administrator credentials if prompted.
6. Click on Finish.
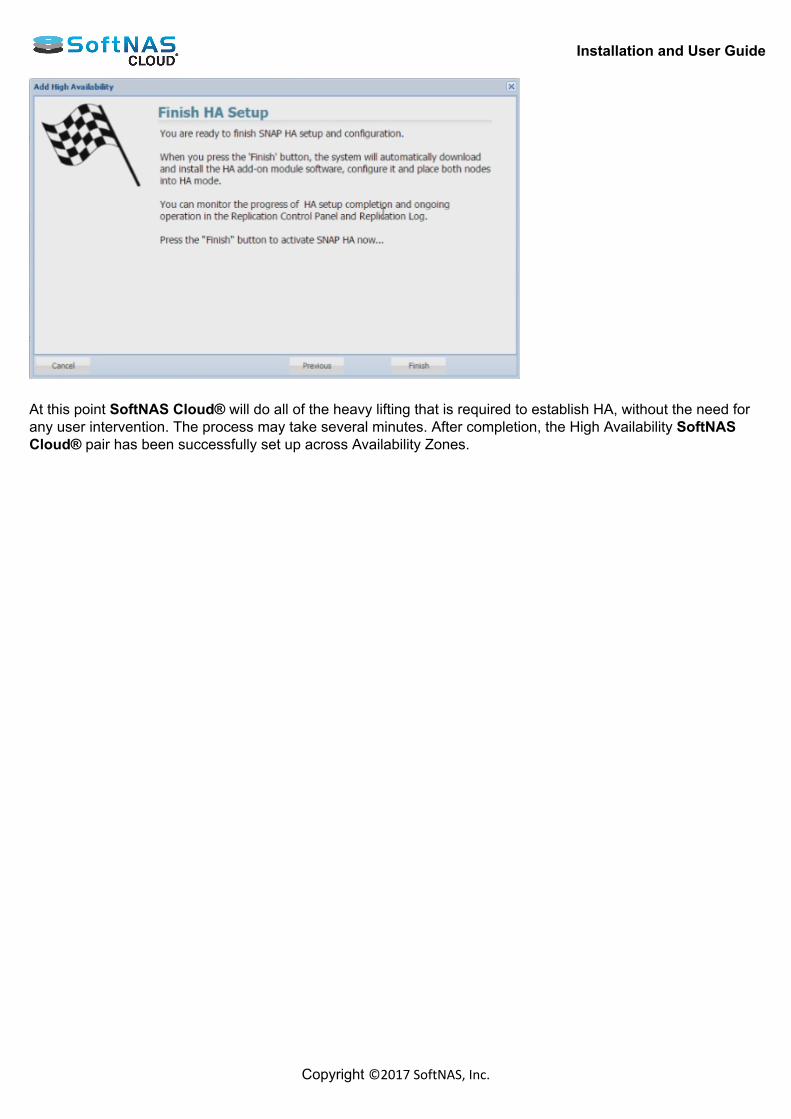
Installation and User Guide
Copyright ©2017 SoftNAS, Inc.
At this point SoftNAS Cloud® will do all of the heavy lifting that is required to establish HA, without the need forany user intervention. The process may take several minutes. After completion, the High Availability SoftNASCloud® pair has been successfully set up across Availability Zones.

Installation and User Guide
Copyright ©2017 SoftNAS, Inc.
Registering SoftNAS Cloud®Optimized SupportRegistering the SoftNAS Cloud® product provides access to free, unlimited support during business hours. multiple levels of support services to meet all levels of storage management needs. Upon initial sign-in, a pop-upwill prompt the user for account information required for support levels. Consult SoftNAS Support Page for themost up-to-date information on support levels. Registration DetailsOn the seventh day after deployment, the customer will be prompted to register their SoftNAS instance. Theprompt will appear as shown below. While he or she is not prompted after deployment, the user can registerat any time by clicking the red link in the upper right corner. If you do not register after seven days, the promptto register will begin to appear upon each login. However, you can select the "Do not show me this again"option to prevent future registration prompts. Remember though, that foregoing registration means you will notreceive our free, unlimited business hours support. The red asterisks (*) denote fields required for a successfulregistration; this menu may be returned to later. The business email address entered here will be the contactinformation used for SoftNAS Cloud® monitoring reports.
Manual Registration RequestTo return to the registration window after bypassing it at login, or to register immediately (prior to the promptsprovided on the seventh day and thereafter), click the hyperlink at the top right of the StorageCenter UI forProduct Registration. Note: Once the product has been successfully registered, this button will be disabled. Make use of the FeatureRequest hyperlink for product suggestions.
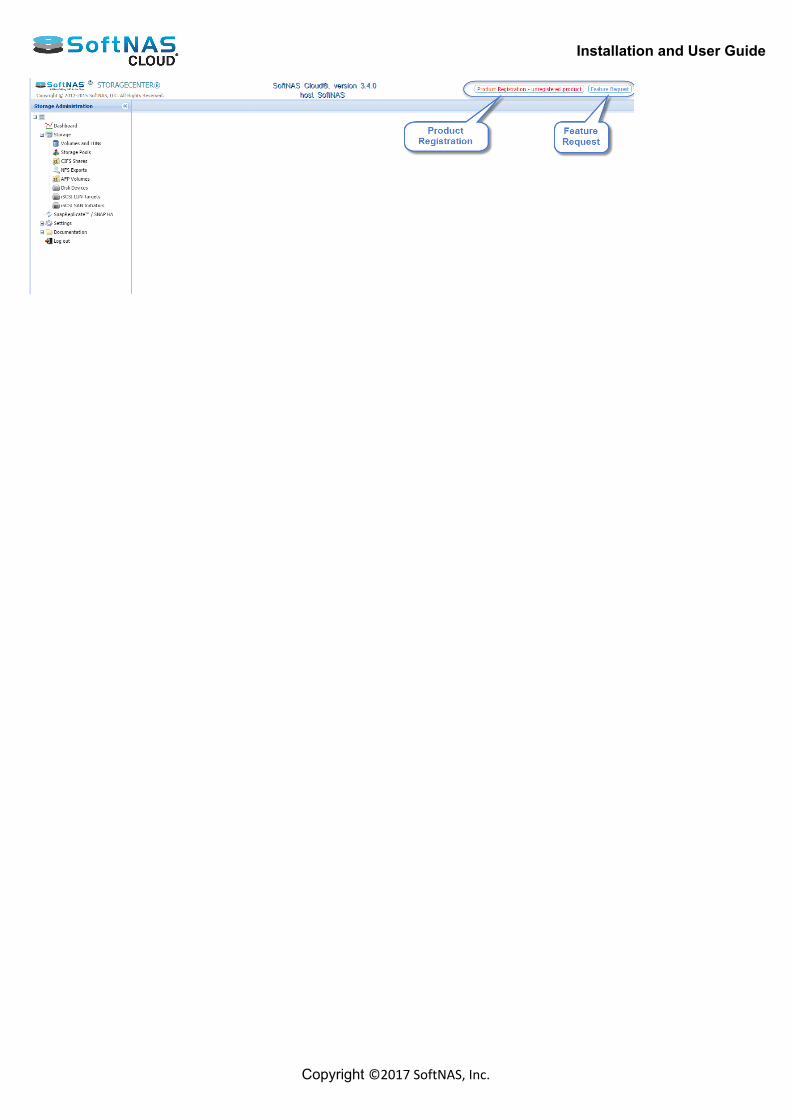
Installation and User Guide
Copyright ©2017 SoftNAS, Inc.
Installation and User Guide
Copyright ©2017 SoftNAS, Inc.
Microsoft Azure OverviewMicrosoft Azure is an Internet-scale computing and services platform hosted in data centers managed orsupported by Microsoft. It includes many separate features with corresponding developer services which can beused individually or collaboratively. SoftNAS Cloud® provides the network storage backbone needed for business critical cloud applications. SoftNAS Cloud® for Microsoft Azure leverages the underlying storage devices of Azure. Multiple devices arethen organized into RAID configurations, increasing performance and throughput, and providing the ability torecover from underlying physical disk failures. SoftNAS Cloud® provides the most durable, highest performanceNAS solution available for Microsoft Azure, and is the only Azure storage product that supports up to 16 PB ofBlob storage and high availability with a No Downtime Guarantee SLA.
Installation and User Guide
Copyright ©2017 SoftNAS, Inc.
Product and Installation OptionsSoftNAS Cloud® provides the following applicable products:
• SoftNAS Cloud® Express (1TB of storage)• SoftNAS Cloud® Standard (16 PB of storage)*• SoftNAS Cloud® BYOL (Bring Your Own License)
Product Storage Purchase License
SoftNAS Cloud®Express
1 TB Subscribevia AzureMarketplace.
Embedded in platformsubscription or BYOLavailable from SoftNAS.
SoftNAS Cloud®Standard
16 PB Subscribevia AzureMarketplace.
Embedded in platformsubscription or BYOLavailable from SoftNAS.
• SoftNAS SNAP HATM included with each product. *When leveraging Azure Blob storage and multiple blob storage accounts.

Installation and User Guide
Copyright ©2017 SoftNAS, Inc.
Recommended Configuration Note
Compute
General Purpose DS4v2 Standard / 8 cores Standard: A good starting point in regards tomemory and CPU resources. This category issuited to handle the processing and caching withminimal requirements for network bandwidth.
High DS5v2 Standard / 16 cores Medium: Good for workloads that are readintensive and will benefit from the larger memory-based read cache for this category. The additionalCPU will also provide better performance whendeduplication, encryption, compression and/orRAID is enabled.
Extreme DS15v2 / 20 cores High: This category can be used for workloads thatrequire a very high speed network connection dueto the amount of data transferred over a networkconnection. In addition to the very high speednetwork, this level of instance gives you a lot morestorage, CPU and memory capacity.
MemoryBase RAM - GeneralPurpose
28 GB /DS4v2 Standard/Premium
Premium or Standard storage
Base RAM - High 56 GB /DS5v2 Standard/Premium
Premium or Standard storage
Base RAM - Extreme 140GB / DS15v2 Standard/Premium
Local SSD, large-scale use with increased RAMcaching, premium or standard storage
1 GB per 1 TB ofdeduplicated storage.
Recommended for best performanceAdditional RAM
e.g.: 50 TB deduplicated storage = 50 *additional* GB for deduplication tablesfor best performance.
Storage
Boot Disk 30 GB Hard disk for Linux boot and system disk (included)Data Disk - General Standard Azure Data Disks (DS Standard Series)
High IOPS Azure Premium Storage (DSv2 Standard Series)
RAID 10 Recommended for I/O-intensive applications and databasesRAID 5/6 Recommended for best space utilization (tradeoff: slower write performance)
Network
Up to 120 MB/sec -1GbE
Less overhead cost
500+ MB/sec - 10 GbE Better performance(requires more resources)
Consider MTU 4000 configuration for optimalperformance
Note: As of version 3.4.8 SoftNAS does not support launching SoftNAS Cloud VMs on the classic portal. TheAzure Resource Manager (ARM) is the only supported platform.

Installation and User Guide
Copyright ©2017 SoftNAS, Inc.
SoftNAS Cloud® System CapacitiesListed below is a table representing the capabilities of the SoftNAS Cloud® for Microsoft Azure. SoftNAS Cloud® Capacity Configuration Note
Editions SoftNAS Cloud®Express
1TB Available as Azure subscription and BYOL fromSoftNAS.
SoftNAS Cloud®Standard
16 PB Available as Azure subscription and BYOL fromSoftNAS.
Free Tier DS3 Standard (100GB) Limited performance and functions. Advancedcapabilities such as SnapReplicate and SNAPHATM are not available.
Memory RAM Cache 1 GB to 100 GB Defaults to 50% total RAM for read cacheSSD Cache low-speed level 2 cache OptionalEphemeral Cache low-speed level 2 cache Optional for read cache
Storage
Maximum Storage 16 TB/16PB 16 TB - Maximum usable block storage capacity onAzure Marketplace, contingent on instance type.16PB - Can be extended up to 16 petabytes byleveraging multiple Azure Blob storage accounts.
# of Storage Pools Unlimited # of Volumes Unlimited
# of Snapshots Unlimited
# of Snapshot Clones Unlimited SnapReplicate Unlimited Pools & Volumes SnapReplicate Throttle 56Kb/sec to
Unlimited bandwidth
Active Directory Kerberos Integration Files and Directories Unlimited
Network Schedules Unlimited
NFS Exports: Linux Default
iSCSI Targets Linux Default CIFS Shares Linux Default Firewall Ports: 22 (ssh), 443 (https) Plus NFS, iSCSI, and CIFS, and AFP as requiredIP Tables Firewall Off by default May be configured, but is not required. Use an
alternative method to set Security Groups unlessadded firewall protection on SoftNAS Cloud®instance is required.
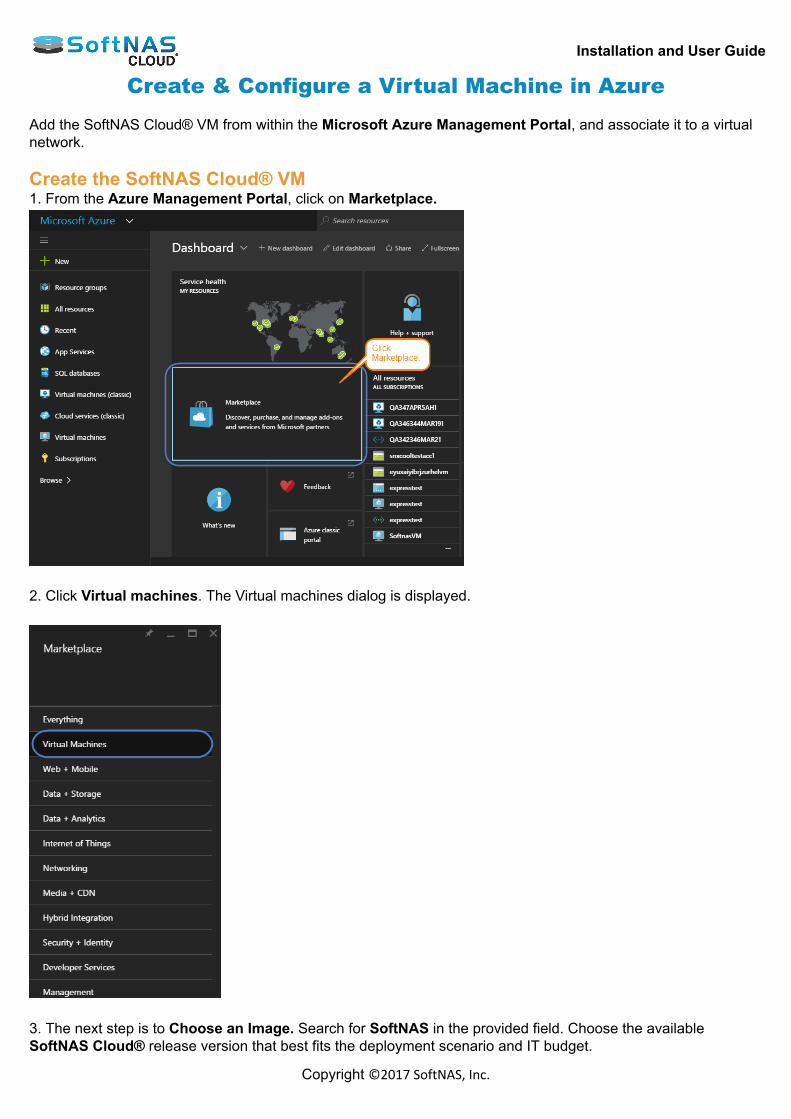
Installation and User Guide
Copyright ©2017 SoftNAS, Inc.
Create & Configure a Virtual Machine in Azure Add the SoftNAS Cloud® VM from within the Microsoft Azure Management Portal, and associate it to a virtualnetwork. Create the SoftNAS Cloud® VM1. From the Azure Management Portal, click on Marketplace.
2. Click Virtual machines. The Virtual machines dialog is displayed.
3. The next step is to Choose an Image. Search for SoftNAS in the provided field. Choose the availableSoftNAS Cloud® release version that best fits the deployment scenario and IT budget.
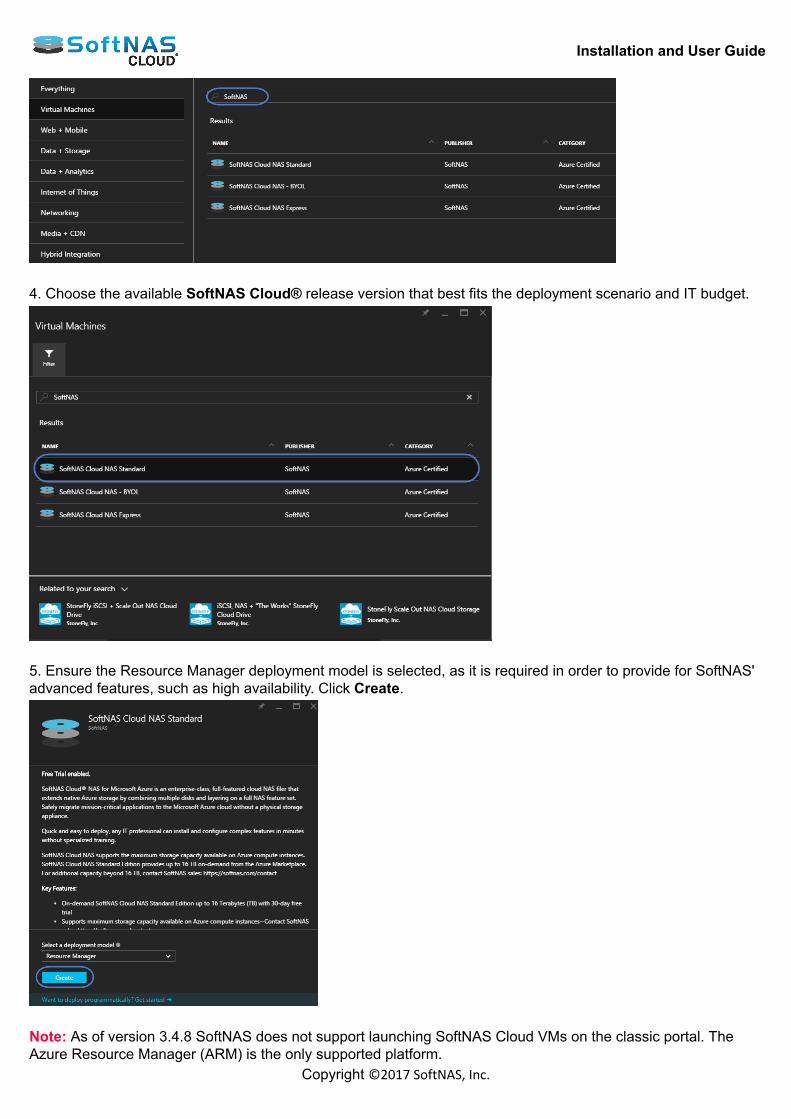
Installation and User Guide
Copyright ©2017 SoftNAS, Inc.
4. Choose the available SoftNAS Cloud® release version that best fits the deployment scenario and IT budget.
5. Ensure the Resource Manager deployment model is selected, as it is required in order to provide for SoftNAS'advanced features, such as high availability. Click Create.
Note: As of version 3.4.8 SoftNAS does not support launching SoftNAS Cloud VMs on the classic portal. TheAzure Resource Manager (ARM) is the only supported platform.

Installation and User Guide
Copyright ©2017 SoftNAS, Inc.
Configuring VM Name/User Name and AuthenticationHere the appropriate VM Name, user name, password, or public SSH key will be set. The user name must beset as 'softnas' or you will be unable to log into your instance. Other users can be created after initial login. Ifsecurity is a top concern, SSH should be used later to access the SoftNAS Cloud® instance with a Linux loginto set the password for User Name softnas. Additional users can be created within the SoftNAS UI after initialconfiguration. To make the required settings, configure the network settings as described in the table below.
Parameter Description
Host Name Provide a unique name for the Host.
User Name Set to softnas. The User Name of softnas is required to login to the virtualmachine. Note: As best practice for security, the password for the softnas accountshould not be set through the Azure interface. SSH will be used to access theSoftNAS Cloud® VM as a Linux login. The password will be created then.
Password You can set the Authentication type to Password, and provide a simplerpassword for your initial SoftNAS login, but this is not as secure a method.
SSH Paste in the public key for an SHH key pair. For example, use ssh-keygenon Linux or OS X, or Putty on Windows. For more information, see sectionGenerating SSH Keys.
Setting Size
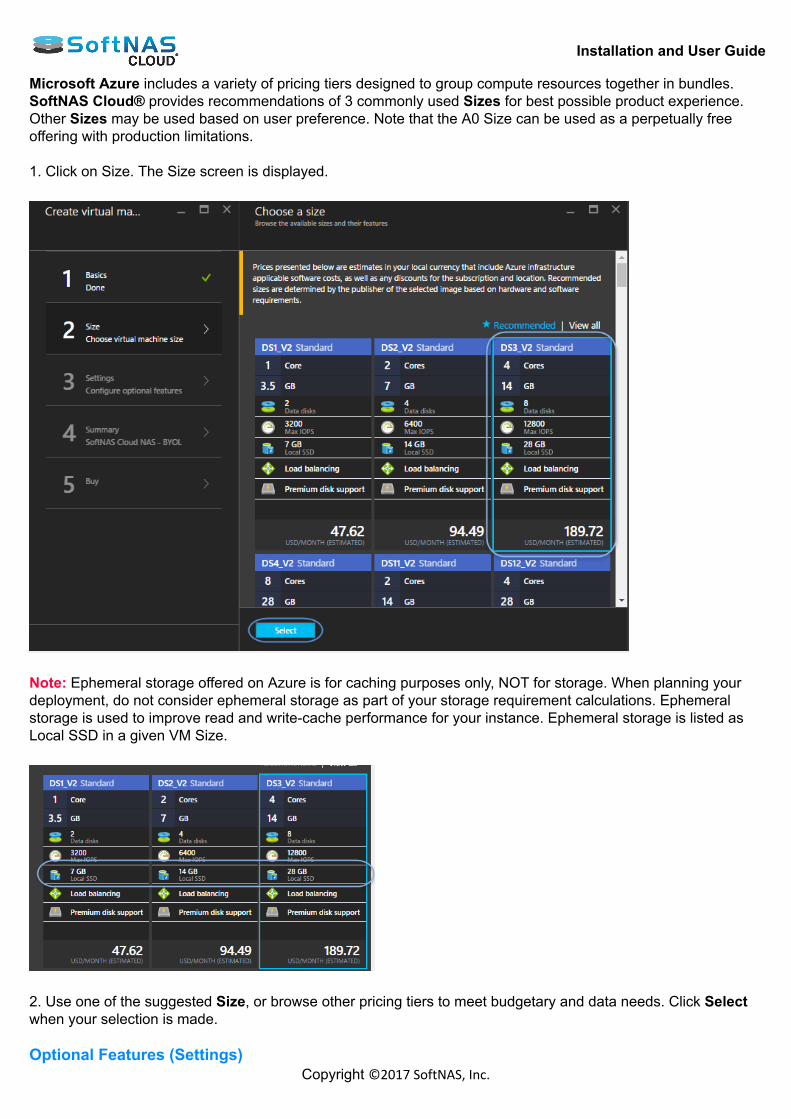
Installation and User Guide
Copyright ©2017 SoftNAS, Inc.
Microsoft Azure includes a variety of pricing tiers designed to group compute resources together in bundles.SoftNAS Cloud® provides recommendations of 3 commonly used Sizes for best possible product experience.Other Sizes may be used based on user preference. Note that the A0 Size can be used as a perpetually freeoffering with production limitations. 1. Click on Size. The Size screen is displayed.
Note: Ephemeral storage offered on Azure is for caching purposes only, NOT for storage. When planning yourdeployment, do not consider ephemeral storage as part of your storage requirement calculations. Ephemeralstorage is used to improve read and write-cache performance for your instance. Ephemeral storage is listed asLocal SSD in a given VM Size.
2. Use one of the suggested Size, or browse other pricing tiers to meet budgetary and data needs. Click Selectwhen your selection is made. Optional Features (Settings)
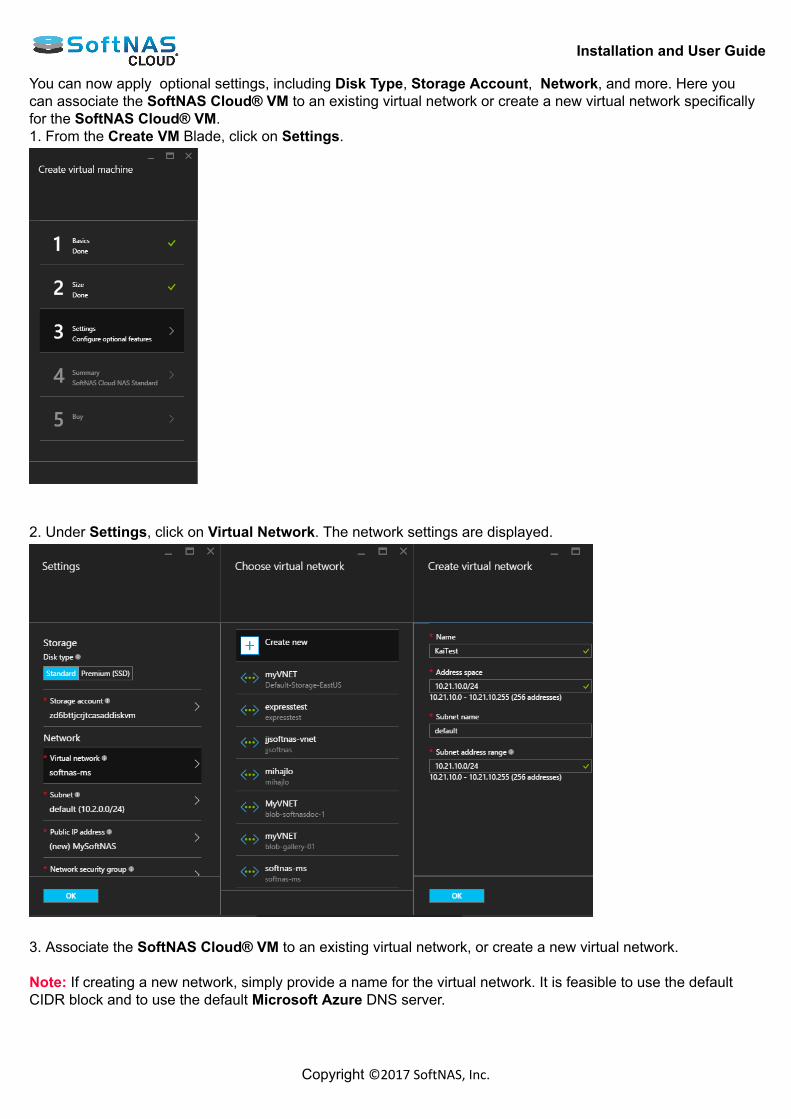
Installation and User Guide
Copyright ©2017 SoftNAS, Inc.
You can now apply optional settings, including Disk Type, Storage Account, Network, and more. Here youcan associate the SoftNAS Cloud® VM to an existing virtual network or create a new virtual network specificallyfor the SoftNAS Cloud® VM.1. From the Create VM Blade, click on Settings.
2. Under Settings, click on Virtual Network. The network settings are displayed.
3. Associate the SoftNAS Cloud® VM to an existing virtual network, or create a new virtual network. Note: If creating a new network, simply provide a name for the virtual network. It is feasible to use the defaultCIDR block and to use the default Microsoft Azure DNS server.
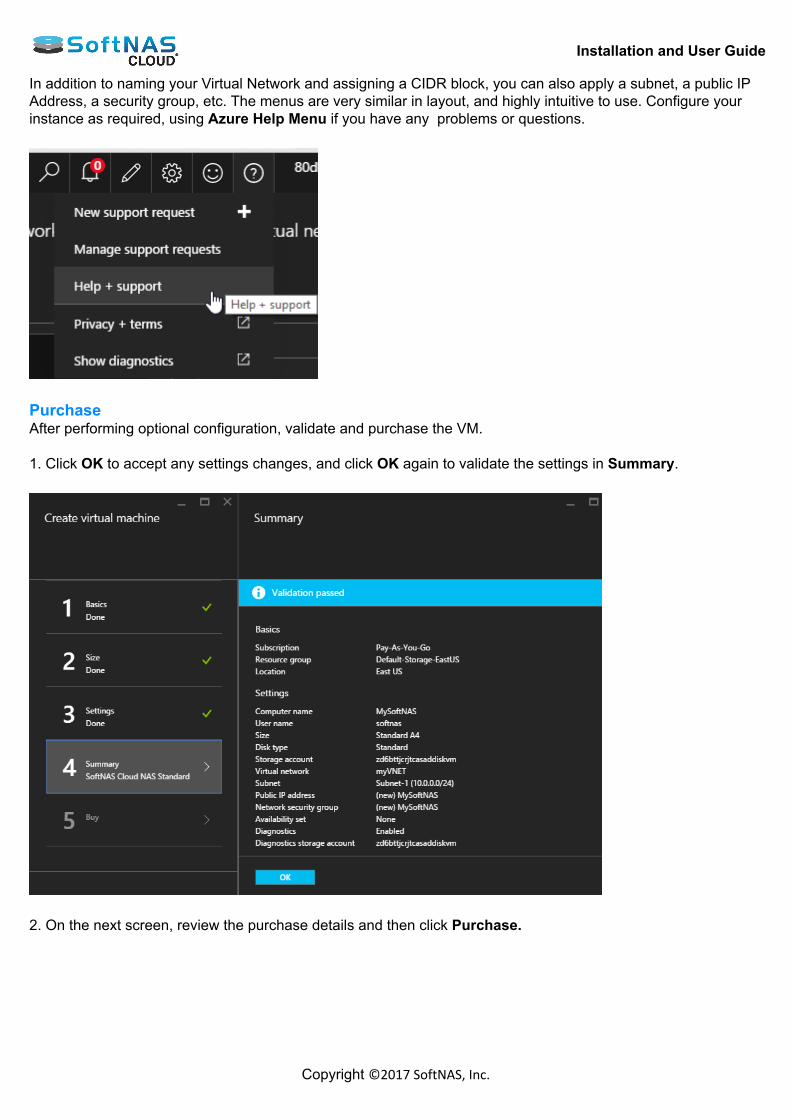
Installation and User Guide
Copyright ©2017 SoftNAS, Inc.
In addition to naming your Virtual Network and assigning a CIDR block, you can also apply a subnet, a public IPAddress, a security group, etc. The menus are very similar in layout, and highly intuitive to use. Configure yourinstance as required, using Azure Help Menu if you have any problems or questions.
PurchaseAfter performing optional configuration, validate and purchase the VM. 1. Click OK to accept any settings changes, and click OK again to validate the settings in Summary.
2. On the next screen, review the purchase details and then click Purchase.
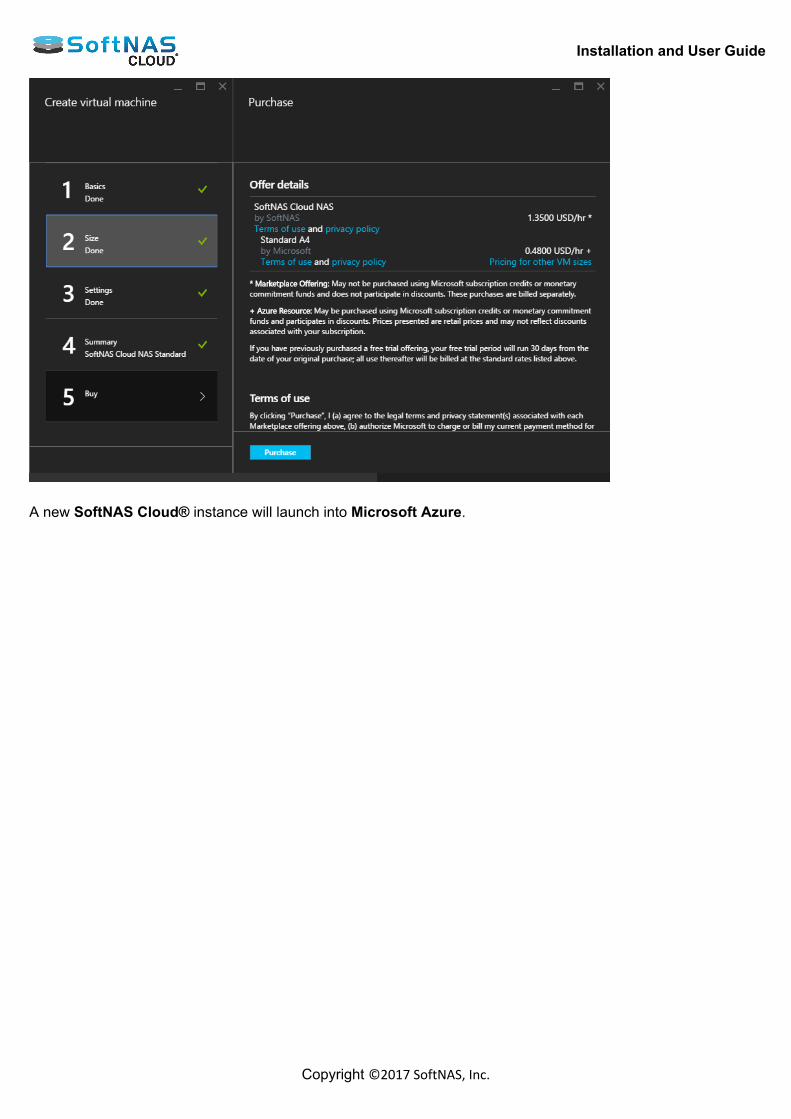
Installation and User Guide
Copyright ©2017 SoftNAS, Inc.
A new SoftNAS Cloud® instance will launch into Microsoft Azure.
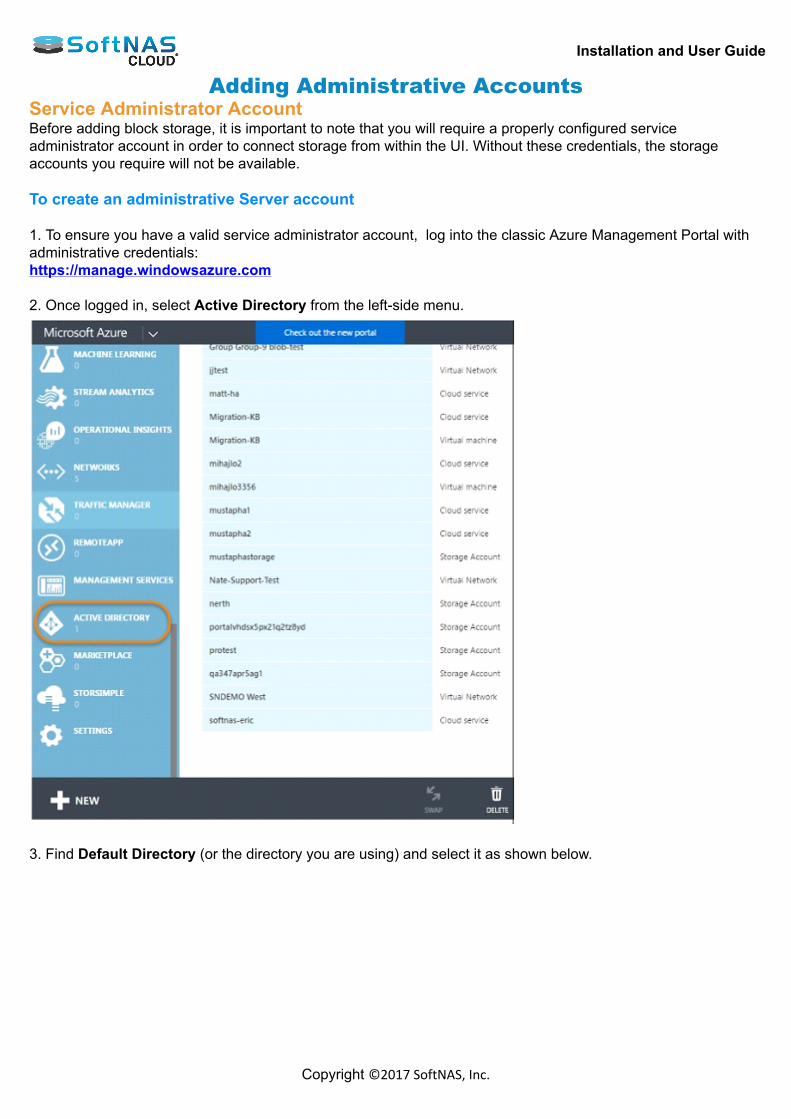
Installation and User Guide
Copyright ©2017 SoftNAS, Inc.
Adding Administrative AccountsService Administrator AccountBefore adding block storage, it is important to note that you will require a properly configured serviceadministrator account in order to connect storage from within the UI. Without these credentials, the storageaccounts you require will not be available. To create an administrative Server account 1. To ensure you have a valid service administrator account, log into the classic Azure Management Portal withadministrative credentials:https://manage.windowsazure.com 2. Once logged in, select Active Directory from the left-side menu.
3. Find Default Directory (or the directory you are using) and select it as shown below.

Installation and User Guide
Copyright ©2017 SoftNAS, Inc.
4. From Default Directory, select Users.
5. Find Add User at the bottom of the screen. Select it.
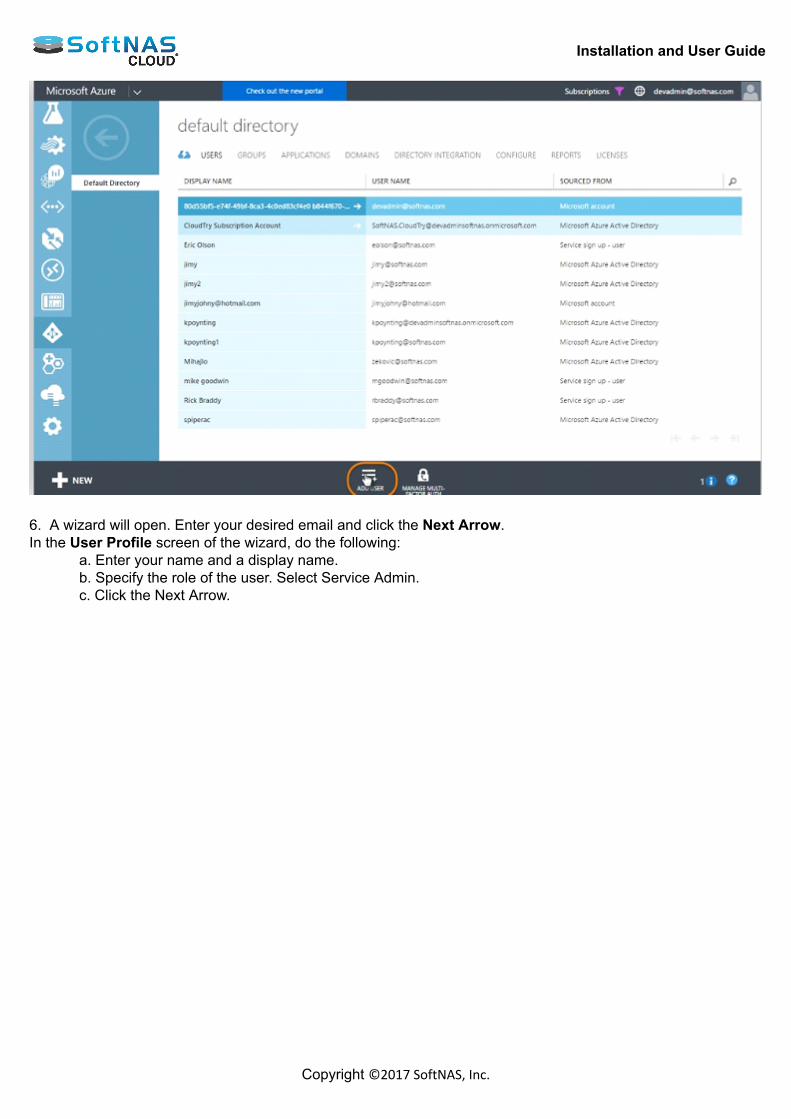
Installation and User Guide
Copyright ©2017 SoftNAS, Inc.
6. A wizard will open. Enter your desired email and click the Next Arrow.In the User Profile screen of the wizard, do the following:
a. Enter your name and a display name.b. Specify the role of the user. Select Service Admin.c. Click the Next Arrow.
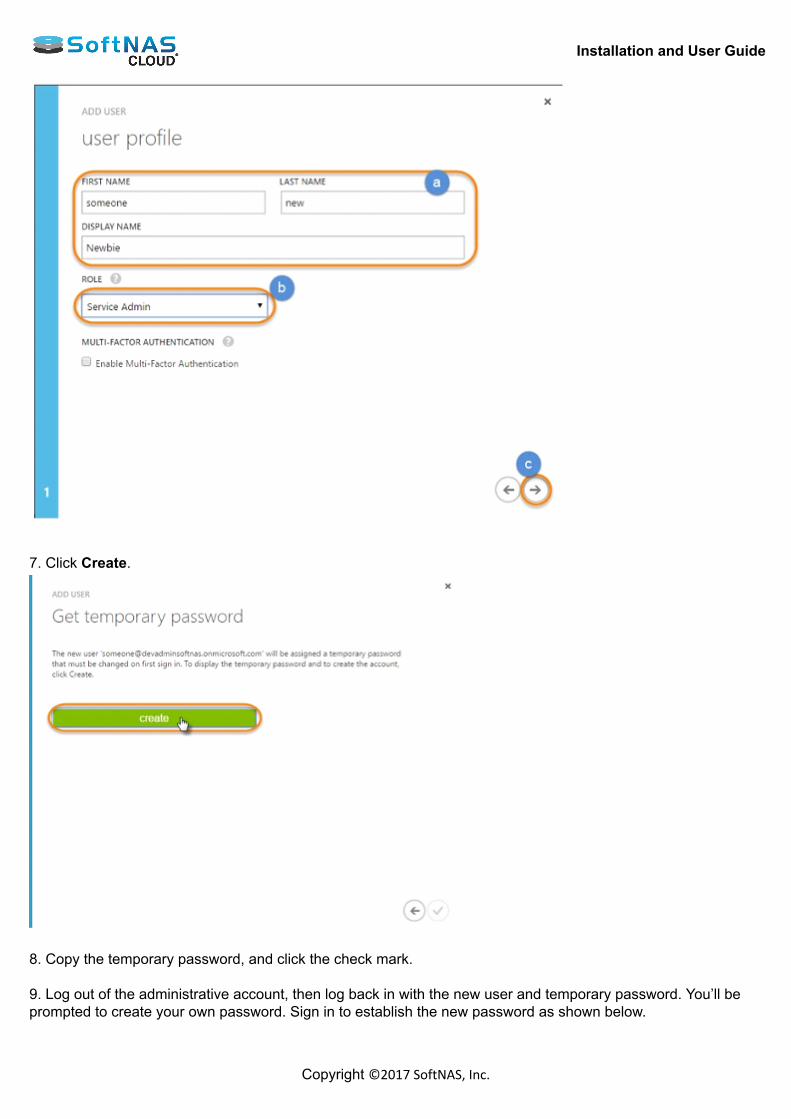
Installation and User Guide
Copyright ©2017 SoftNAS, Inc.
7. Click Create.
8. Copy the temporary password, and click the check mark. 9. Log out of the administrative account, then log back in with the new user and temporary password. You’ll beprompted to create your own password. Sign in to establish the new password as shown below.
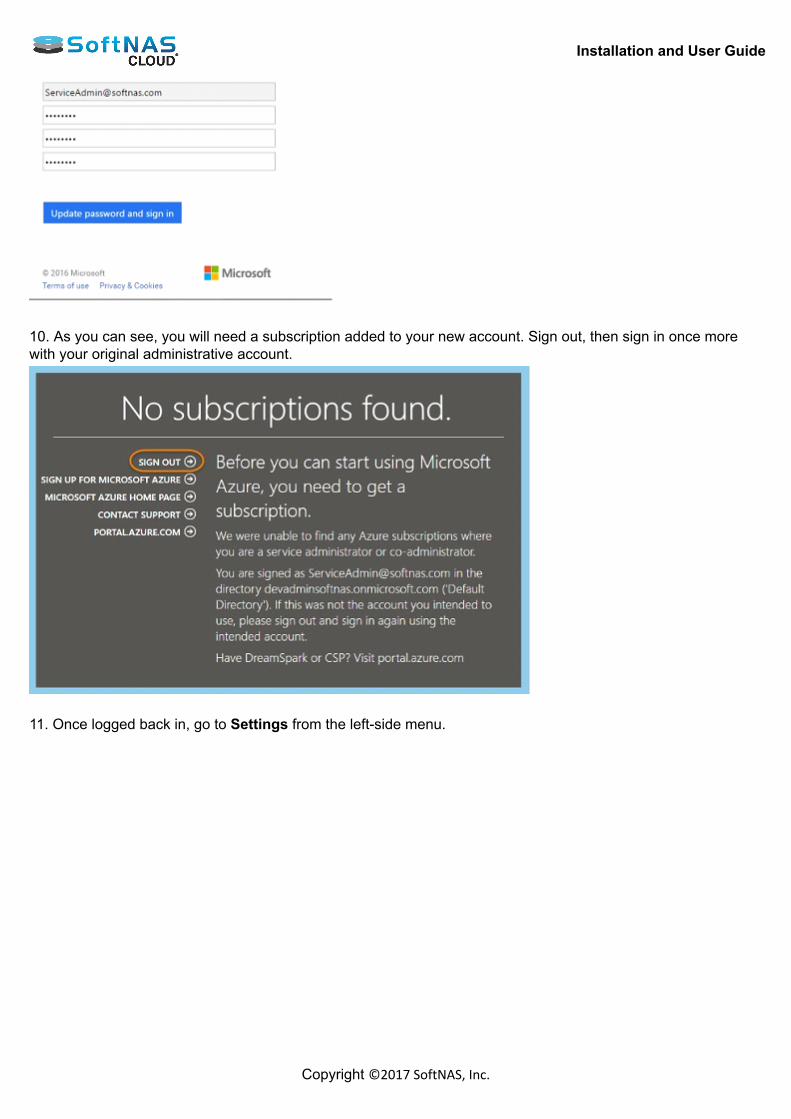
Installation and User Guide
Copyright ©2017 SoftNAS, Inc.
10. As you can see, you will need a subscription added to your new account. Sign out, then sign in once morewith your original administrative account.
11. Once logged back in, go to Settings from the left-side menu.
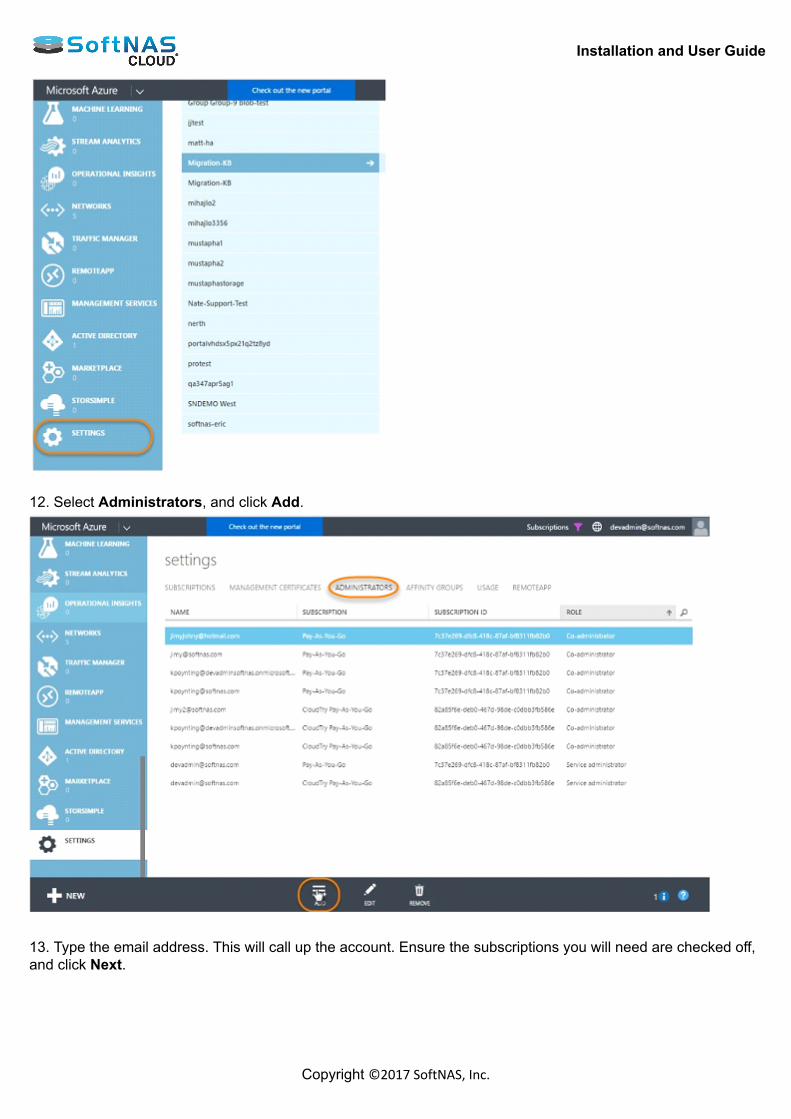
Installation and User Guide
Copyright ©2017 SoftNAS, Inc.
12. Select Administrators, and click Add.
13. Type the email address. This will call up the account. Ensure the subscriptions you will need are checked off,and click Next.
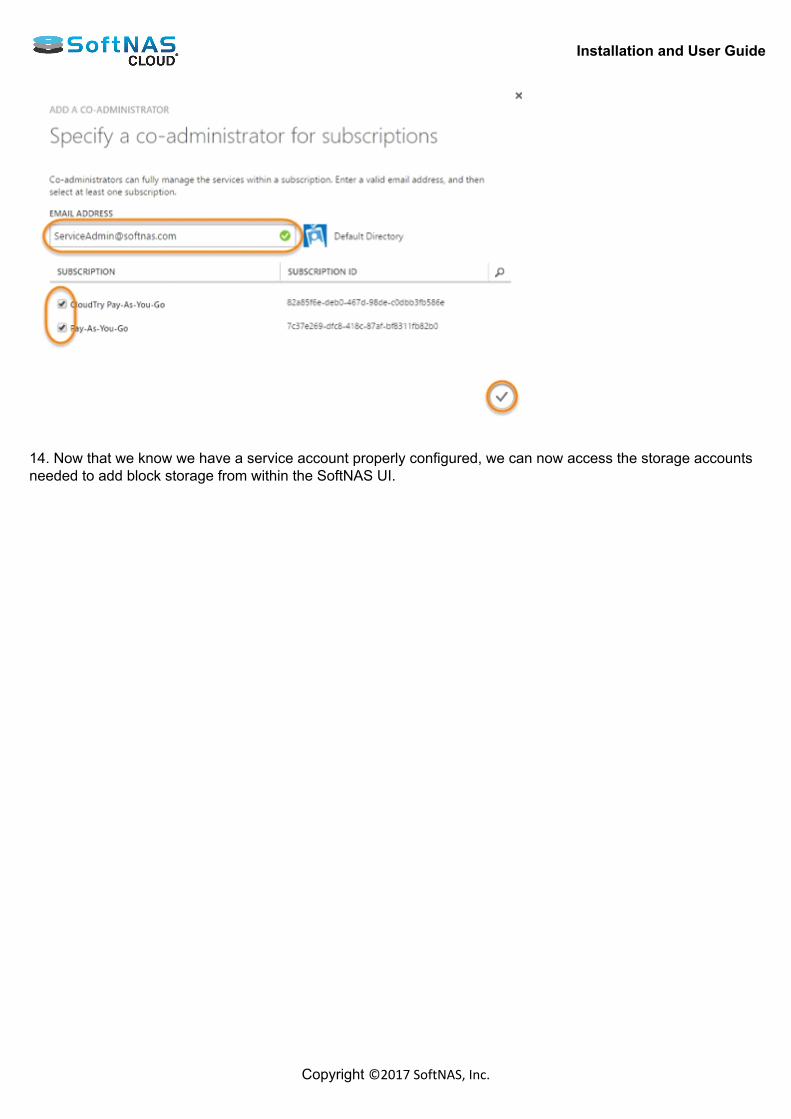
Installation and User Guide
Copyright ©2017 SoftNAS, Inc.
14. Now that we know we have a service account properly configured, we can now access the storage accountsneeded to add block storage from within the SoftNAS UI.
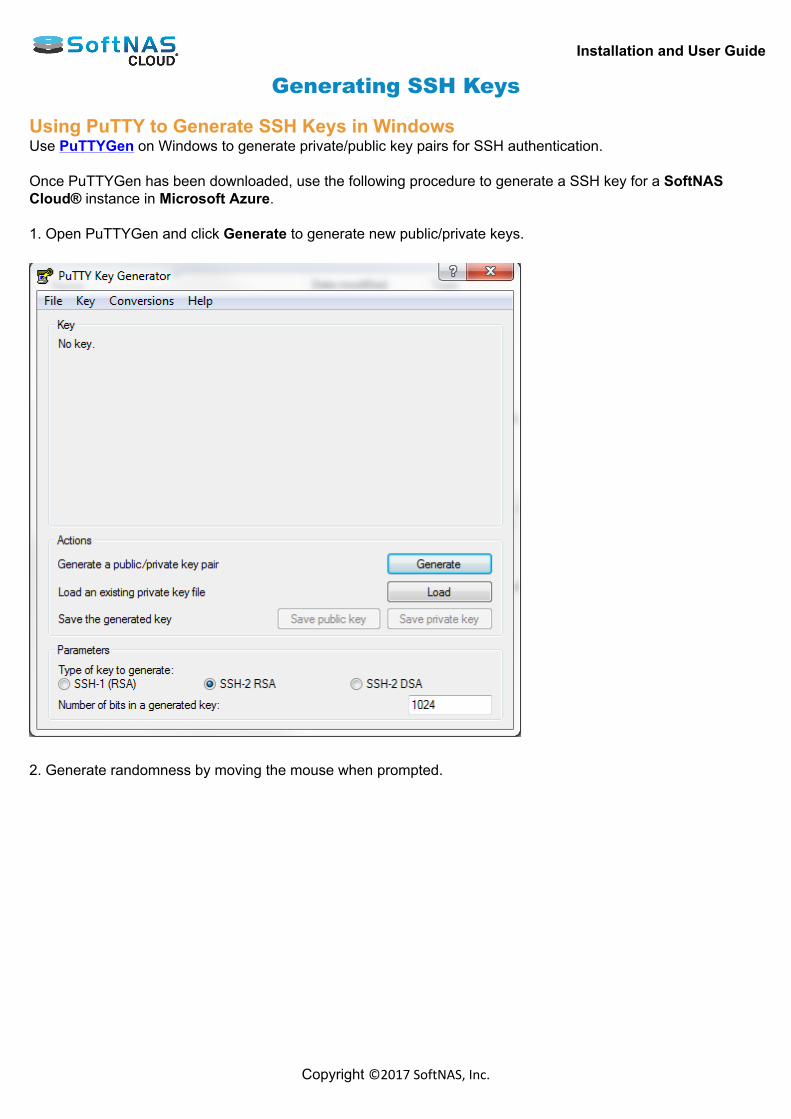
Installation and User Guide
Copyright ©2017 SoftNAS, Inc.
Generating SSH Keys Using PuTTY to Generate SSH Keys in WindowsUse PuTTYGen on Windows to generate private/public key pairs for SSH authentication. Once PuTTYGen has been downloaded, use the following procedure to generate a SSH key for a SoftNASCloud® instance in Microsoft Azure. 1. Open PuTTYGen and click Generate to generate new public/private keys.
2. Generate randomness by moving the mouse when prompted.
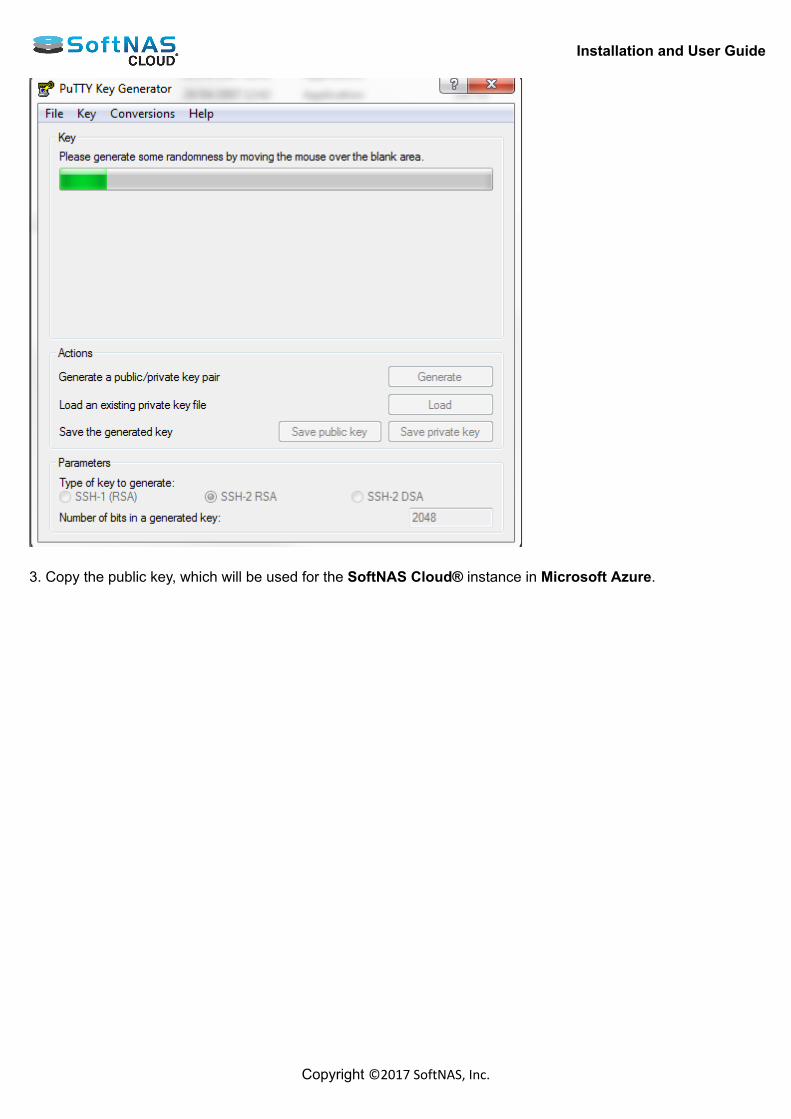
Installation and User Guide
Copyright ©2017 SoftNAS, Inc.
3. Copy the public key, which will be used for the SoftNAS Cloud® instance in Microsoft Azure.
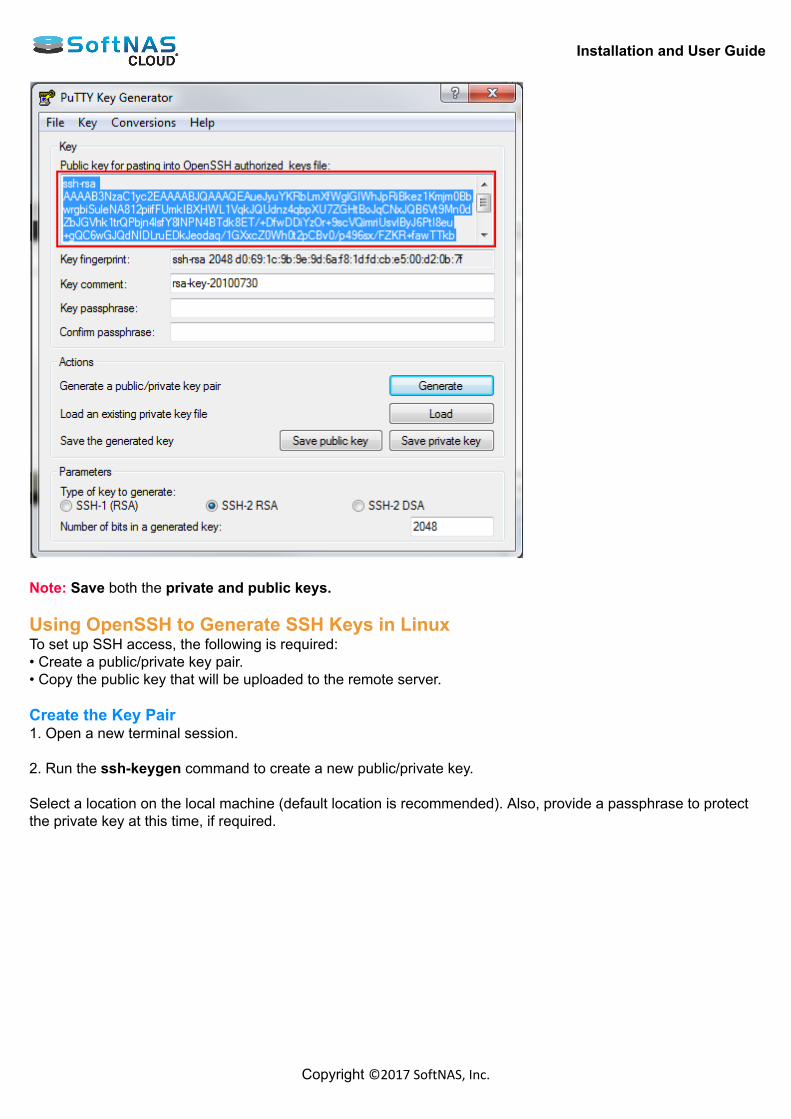
Installation and User Guide
Copyright ©2017 SoftNAS, Inc.
Note: Save both the private and public keys. Using OpenSSH to Generate SSH Keys in LinuxTo set up SSH access, the following is required:• Create a public/private key pair.• Copy the public key that will be uploaded to the remote server. Create the Key Pair1. Open a new terminal session. 2. Run the ssh-keygen command to create a new public/private key. Select a location on the local machine (default location is recommended). Also, provide a passphrase to protectthe private key at this time, if required.
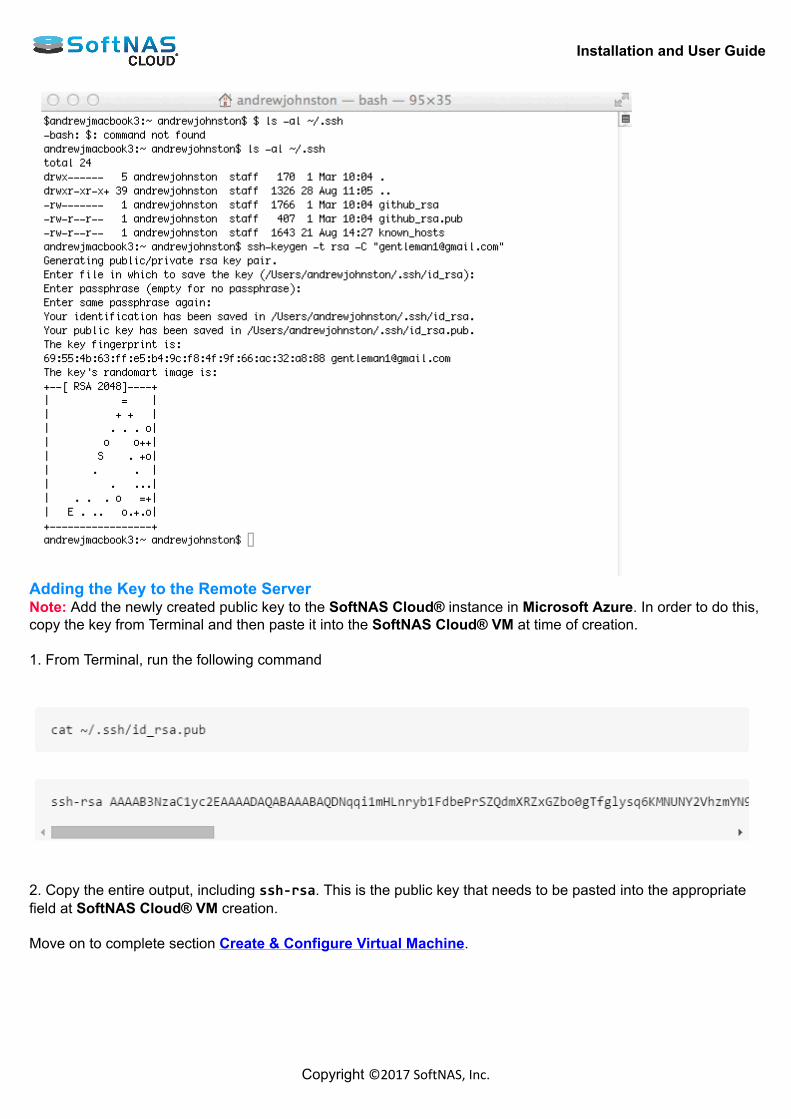
Installation and User Guide
Copyright ©2017 SoftNAS, Inc.
Adding the Key to the Remote ServerNote: Add the newly created public key to the SoftNAS Cloud® instance in Microsoft Azure. In order to do this,copy the key from Terminal and then paste it into the SoftNAS Cloud® VM at time of creation. 1. From Terminal, run the following command
2. Copy the entire output, including ssh-rsa. This is the public key that needs to be pasted into the appropriatefield at SoftNAS Cloud® VM creation. Move on to complete section Create & Configure Virtual Machine.
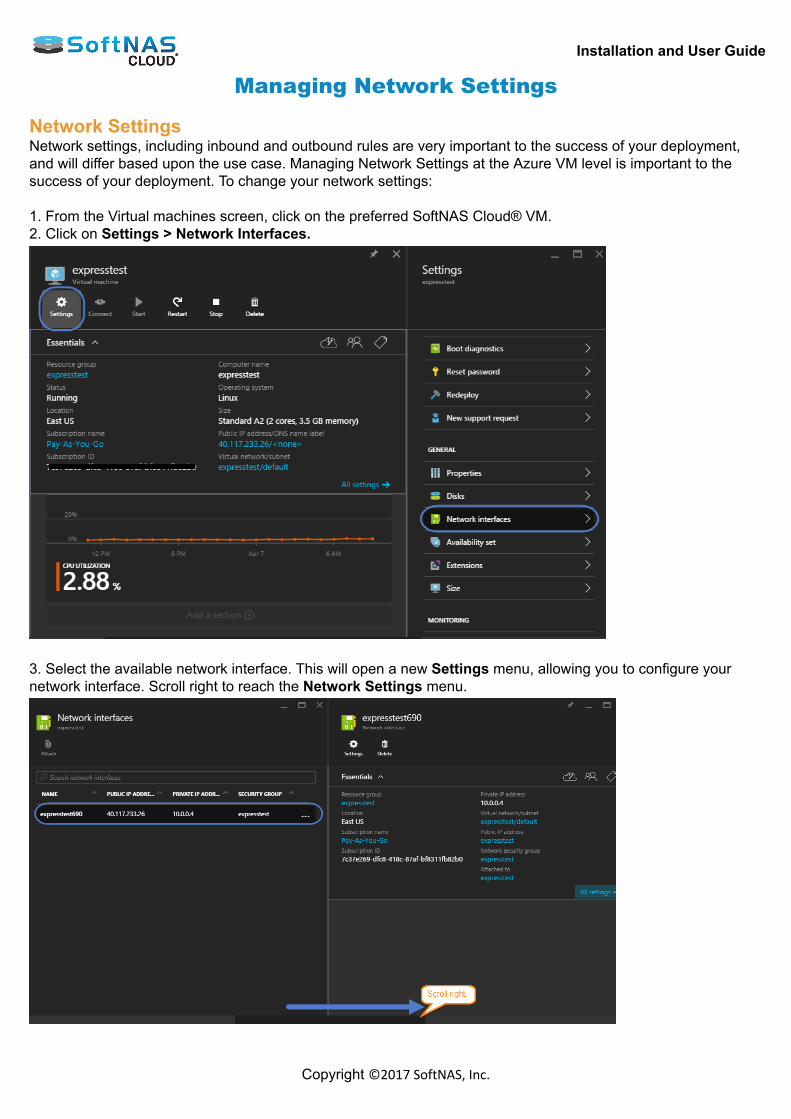
Installation and User Guide
Copyright ©2017 SoftNAS, Inc.
Managing Network Settings Network SettingsNetwork settings, including inbound and outbound rules are very important to the success of your deployment,and will differ based upon the use case. Managing Network Settings at the Azure VM level is important to thesuccess of your deployment. To change your network settings: 1. From the Virtual machines screen, click on the preferred SoftNAS Cloud® VM.2. Click on Settings > Network Interfaces.
3. Select the available network interface. This will open a new Settings menu, allowing you to configure yournetwork interface. Scroll right to reach the Network Settings menu.
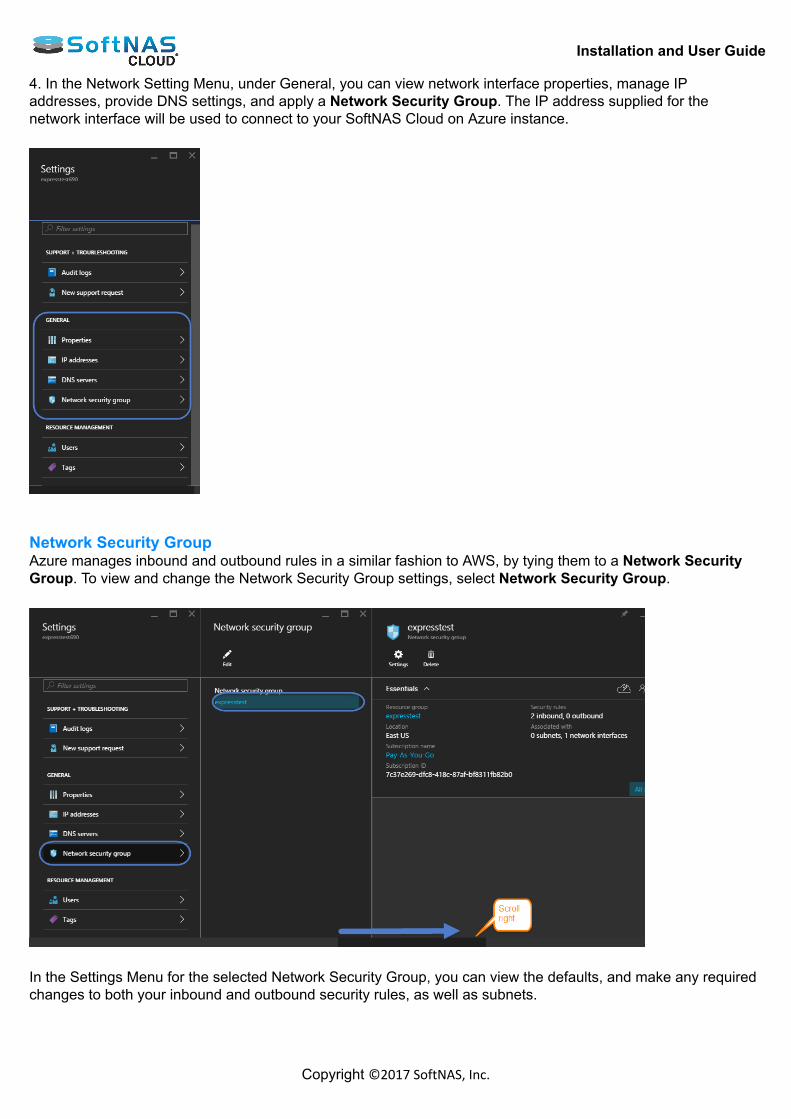
Installation and User Guide
Copyright ©2017 SoftNAS, Inc.
4. In the Network Setting Menu, under General, you can view network interface properties, manage IPaddresses, provide DNS settings, and apply a Network Security Group. The IP address supplied for thenetwork interface will be used to connect to your SoftNAS Cloud on Azure instance.
Network Security GroupAzure manages inbound and outbound rules in a similar fashion to AWS, by tying them to a Network SecurityGroup. To view and change the Network Security Group settings, select Network Security Group.
In the Settings Menu for the selected Network Security Group, you can view the defaults, and make any requiredchanges to both your inbound and outbound security rules, as well as subnets.
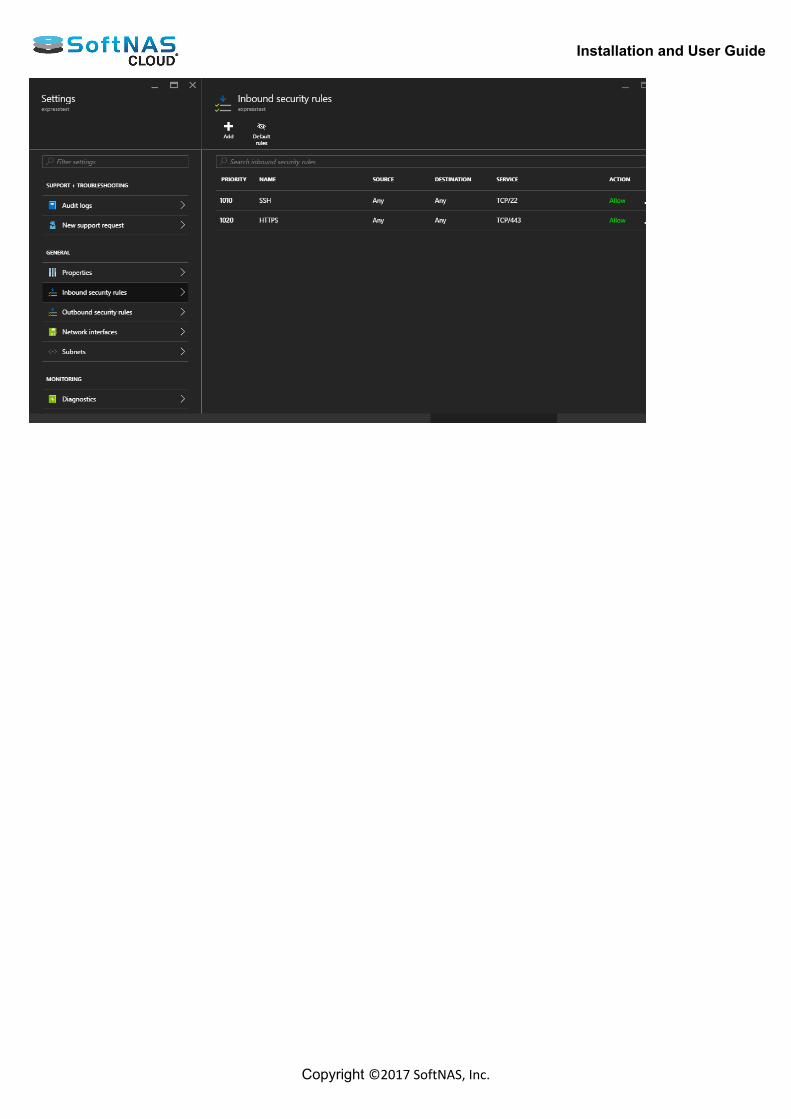
Installation and User Guide
Copyright ©2017 SoftNAS, Inc.

Installation and User Guide
Copyright ©2017 SoftNAS, Inc.
Adding Storage in Microsoft AzureThere are three basic methods of adding disks (storage) to your SoftNAS instance on Azure. Each method is afairly simple task, but there are some considerations before adding your storage, or even selecting your method.One of the key decisions you will need to make is whether to deploy and use block or object storage. Note: Whichever type of storage you choose, it will require set up of storage accounts. • Creating Storage Accounts Block StorageBlock storage provides fixed size raw storage capacity within your VM. In Azure, these are referred to as virtualhard disks. Within the SoftNAS UI, these are referred to as Microsoft (MSFT) Disks. Each volume added istreated as an independent disk drive. Block storage disks are only accessible when attached to an OS, such asthe linux-based SoftNAS framework we offer. They are typically formatted with a file system, such as FAT32,NTFS, EXT3, or EXT4. They are also easily configured into software RAID configurations. Note: In SoftNAS, object storage can also be leveraged into RAID configurations. Block storage is typically used for applications, particularly databases and mission critical apps, such as SQL,Exchange, or Sharepoint, etc...anything that requires high performance benchmarks and low latency. There are two methods to add block storage for SoftNAS on Azure: • Adding Disks Via the Microsoft Azure Portal• Adding Block Storage via the SoftNAS UI Object (Blob) StorageObject storage (called Blob storage in Azure), is directly accessible through an API or HTTP/HTTPS and canstore any type of data. The data is guaranteed not to be lost and can be replicated across data centers. It offersweb service interfaces for easy access. Typical uses for Object (Blob) storage includes unstructured data such as repositories of music, image, andvideo files. It is also used for log files, backup files, and data dumps. Blob storage provides large capacity forlarge data sets and archive files. It can be used to replace local tape drives. While these are typical use cases,SoftNAS offers the ability to treat object storage as independent disks, much like block storage, allowing it to beconfigured into RAID configured volumes. To add object storage to your SoftNAS instance: • Adding Object Storage via the SoftNAS UI
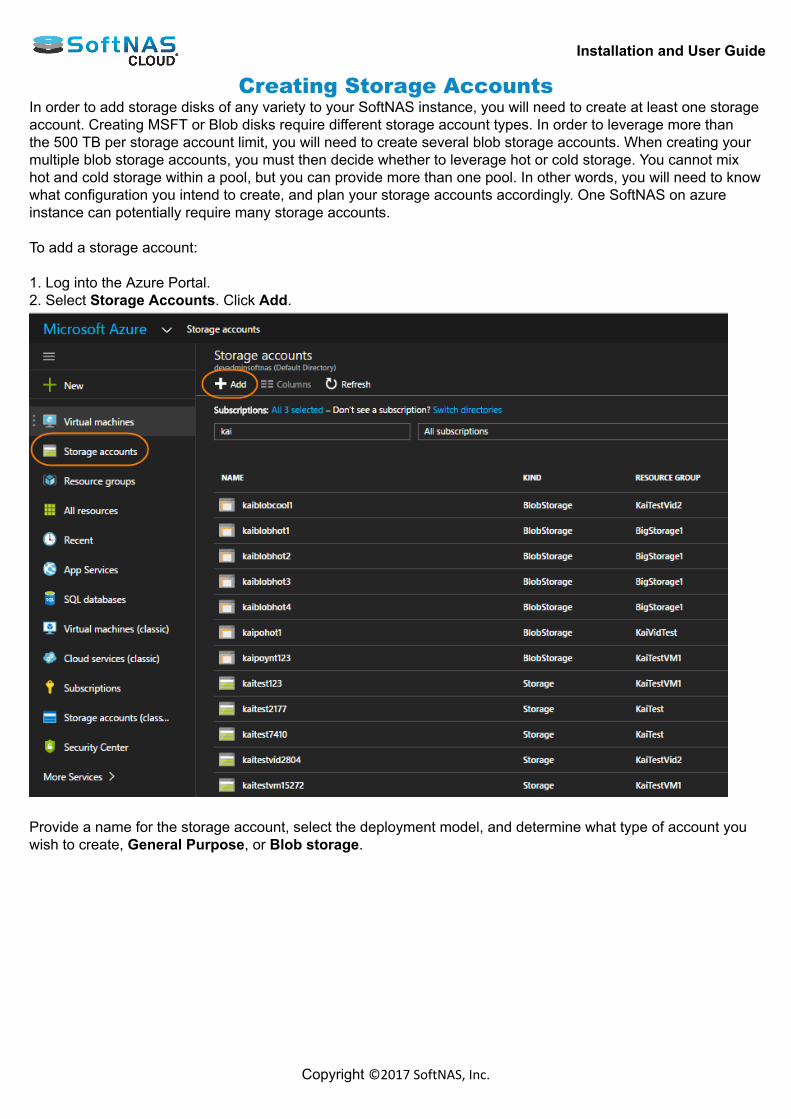
Installation and User Guide
Copyright ©2017 SoftNAS, Inc.
Creating Storage AccountsIn order to add storage disks of any variety to your SoftNAS instance, you will need to create at least one storageaccount. Creating MSFT or Blob disks require different storage account types. In order to leverage more thanthe 500 TB per storage account limit, you will need to create several blob storage accounts. When creating yourmultiple blob storage accounts, you must then decide whether to leverage hot or cold storage. You cannot mixhot and cold storage within a pool, but you can provide more than one pool. In other words, you will need to knowwhat configuration you intend to create, and plan your storage accounts accordingly. One SoftNAS on azureinstance can potentially require many storage accounts. To add a storage account: 1. Log into the Azure Portal.2. Select Storage Accounts. Click Add.
Provide a name for the storage account, select the deployment model, and determine what type of account youwish to create, General Purpose, or Blob storage.
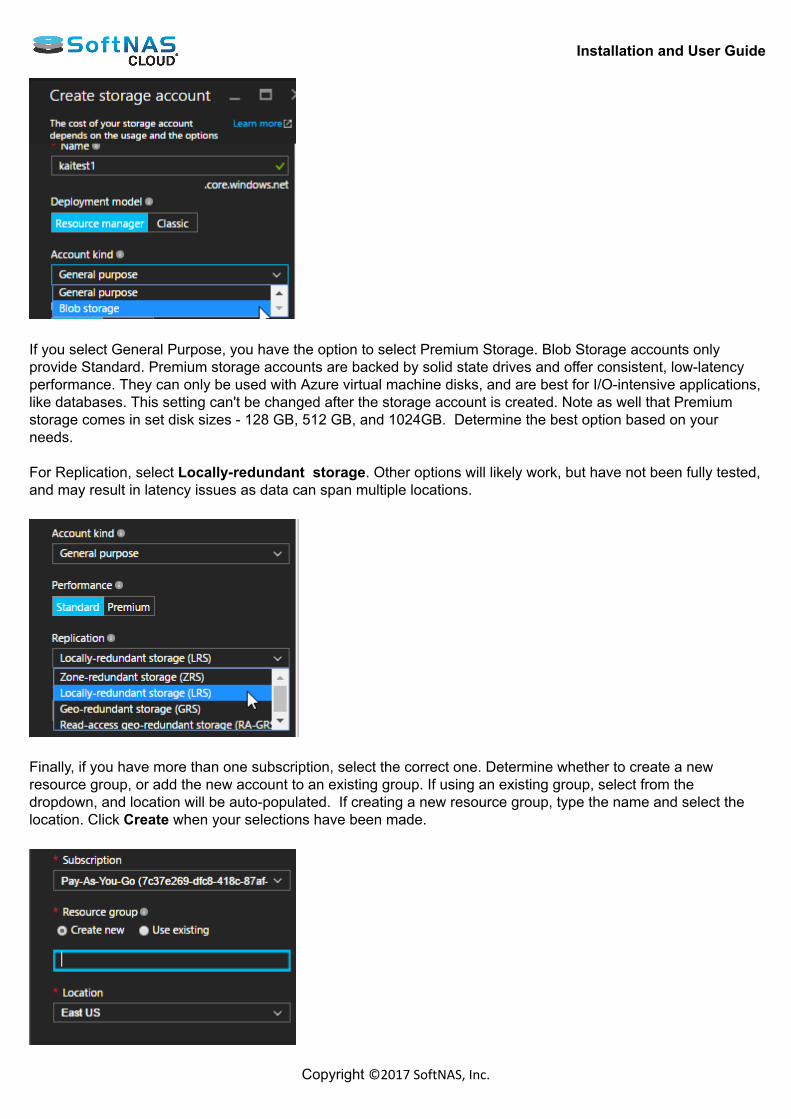
Installation and User Guide
Copyright ©2017 SoftNAS, Inc.
If you select General Purpose, you have the option to select Premium Storage. Blob Storage accounts onlyprovide Standard. Premium storage accounts are backed by solid state drives and offer consistent, low-latencyperformance. They can only be used with Azure virtual machine disks, and are best for I/O-intensive applications,like databases. This setting can't be changed after the storage account is created. Note as well that Premiumstorage comes in set disk sizes - 128 GB, 512 GB, and 1024GB. Determine the best option based on yourneeds. For Replication, select Locally-redundant storage. Other options will likely work, but have not been fully tested,and may result in latency issues as data can span multiple locations.
Finally, if you have more than one subscription, select the correct one. Determine whether to create a newresource group, or add the new account to an existing group. If using an existing group, select from thedropdown, and location will be auto-populated. If creating a new resource group, type the name and select thelocation. Click Create when your selections have been made.
Installation and User Guide
Copyright ©2017 SoftNAS, Inc.
You now have a new storage account, whether Blob storage or General Purpose. • Hot and Cool Storage • Adding Disks via the Microsoft Azure Portal • Adding Block Storage via the SoftNAS UI • Adding Object Storage via the SoftNAS UI
Installation and User Guide
Copyright ©2017 SoftNAS, Inc.
Hot and Cool StorageThere are two general types of storage accounts for Azure: • General Purpose• Blob Storage Accounts General purpose accounts are used for block storage, or Azure Virtual Machine Disks. If deciding to add Azure object storage (otherwise known as Blob storage), you will need to have a Blob storageaccount set up, or you will not be able to call upon the storage within the SoftNAS UI. When creating your BlobStorage account, you will also have another decision to make - whether you will leverage hot or cool storage forAzure. SoftNAS offers full support for both options: • Azure Cool Storage - Object storage that allows economical safe-keeping of less frequently accessed file data. • Azure Hot Storage - Object storage that optimizes frequently accessed stored data to enable continuous IO. Note: You cannot mix hot and cool storage disks in a RAID configured pool. A decision must be made on storagetype for each pool. As storage type is determined at the blob storage account level, you must be aware of thetype of account created. SoftNAS recommends labelling them with Hot or Cool in the names to avoid confusion. When creating your Azure blob account, you will see an option to determine the 'Access tier' with two availableoptions, Hot and Cool. This setting determines what type of blob storage the account in question will provide. IfHot, this storage account will only provide Hot storage to your instance. If creating a separate pool of Cool disks,another blob storage account will need to be provided.
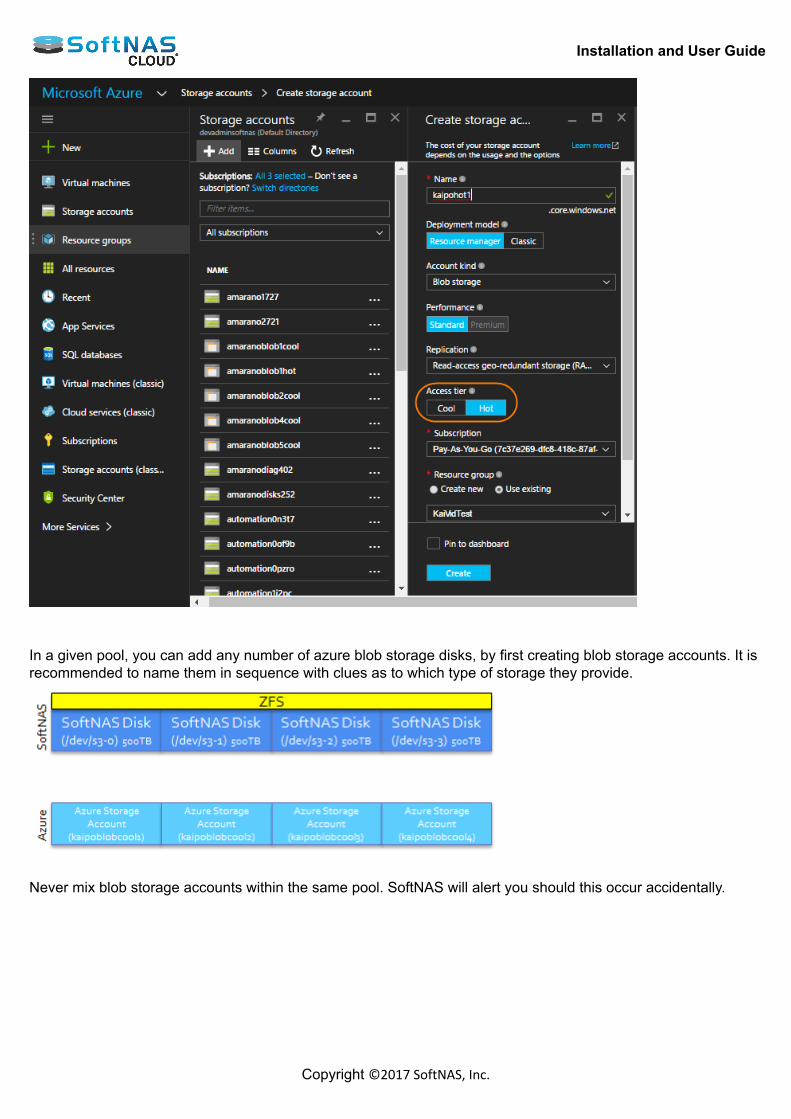
Installation and User Guide
Copyright ©2017 SoftNAS, Inc.
In a given pool, you can add any number of azure blob storage disks, by first creating blob storage accounts. It isrecommended to name them in sequence with clues as to which type of storage they provide.
Never mix blob storage accounts within the same pool. SoftNAS will alert you should this occur accidentally.
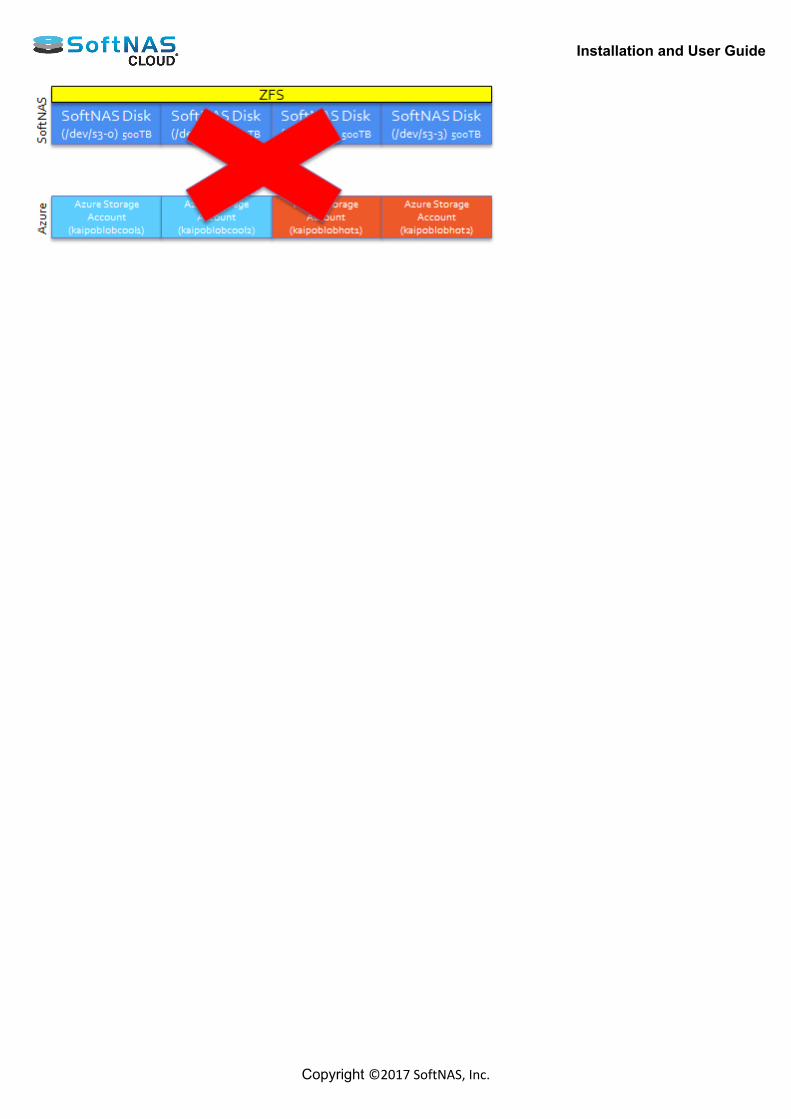
Installation and User Guide
Copyright ©2017 SoftNAS, Inc.
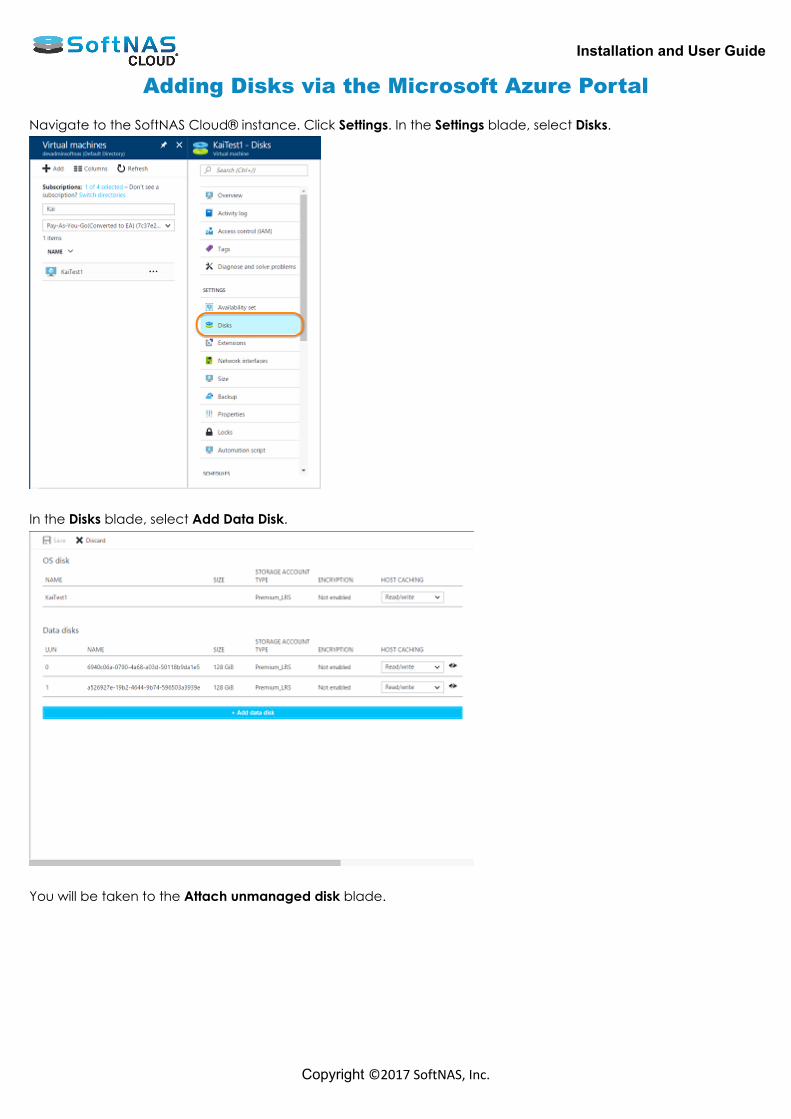
Installation and User Guide
Copyright ©2017 SoftNAS, Inc.
Adding Disks via the Microsoft Azure Portal Navigate to the SoftNAS Cloud® instance. Click Settings. In the Settings blade, select Disks.
In the Disks blade, select Add Data Disk.
You will be taken to the Attach unmanaged disk blade.
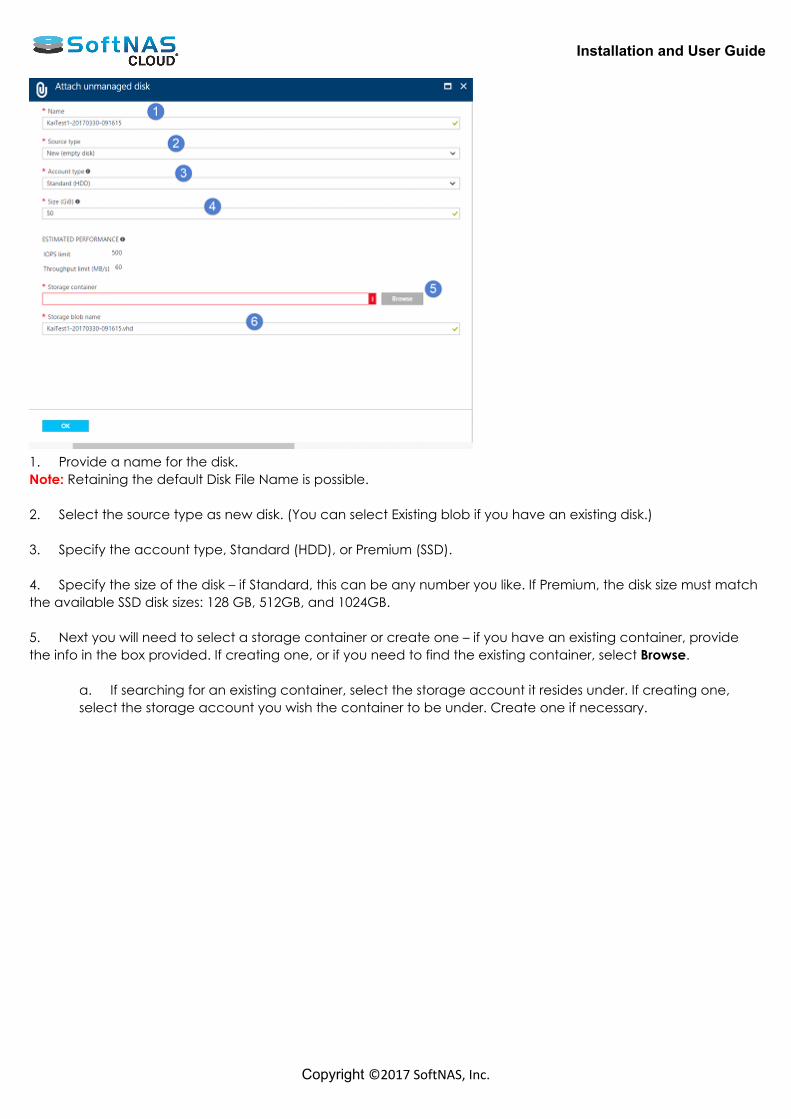
Installation and User Guide
Copyright ©2017 SoftNAS, Inc.
1. Provide a name for the disk.Note: Retaining the default Disk File Name is possible. 2. Select the source type as new disk. (You can select Existing blob if you have an existing disk.) 3. Specify the account type, Standard (HDD), or Premium (SSD). 4. Specify the size of the disk – if Standard, this can be any number you like. If Premium, the disk size must matchthe available SSD disk sizes: 128 GB, 512GB, and 1024GB. 5. Next you will need to select a storage container or create one – if you have an existing container, providethe info in the box provided. If creating one, or if you need to find the existing container, select Browse.
a. If searching for an existing container, select the storage account it resides under. If creating one,select the storage account you wish the container to be under. Create one if necessary.
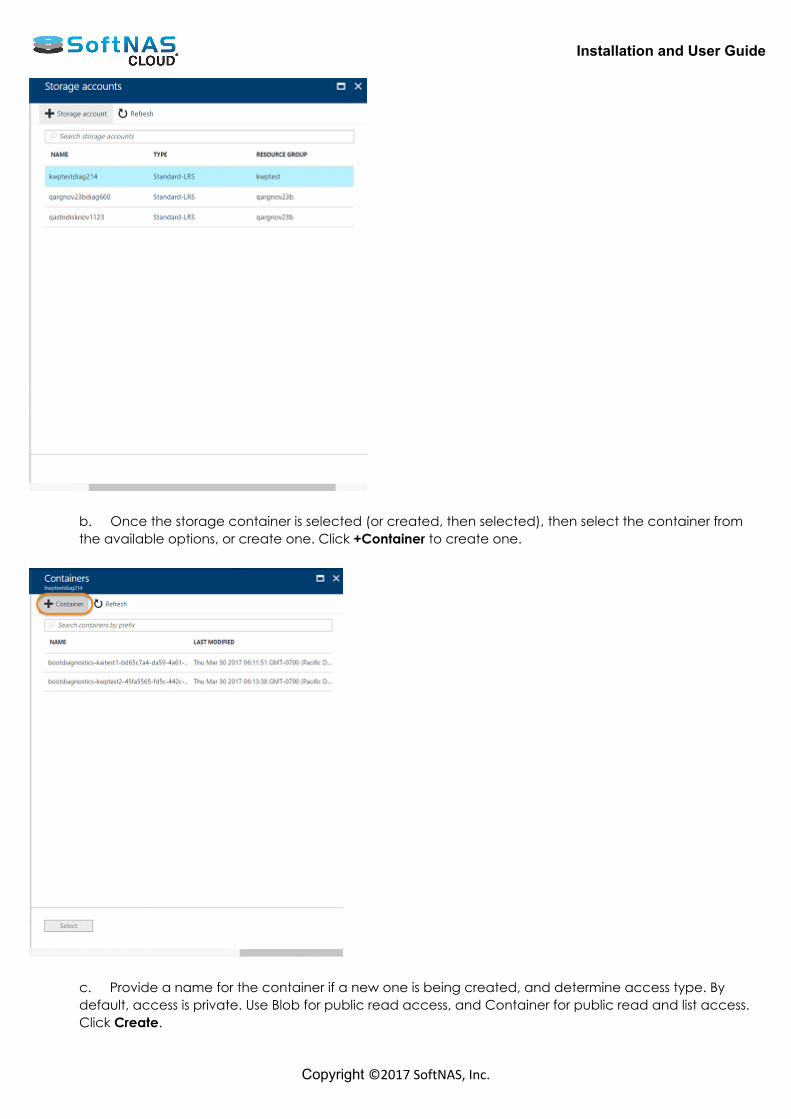
Installation and User Guide
Copyright ©2017 SoftNAS, Inc.
b. Once the storage container is selected (or created, then selected), then select the container fromthe available options, or create one. Click +Container to create one.
c. Provide a name for the container if a new one is being created, and determine access type. Bydefault, access is private. Use Blob for public read access, and Container for public read and list access. Click Create.
Installation and User Guide
Copyright ©2017 SoftNAS, Inc.
d. Select the container, created or existing. 6. Provide an alternate name for the vhd, if you so choose. Again, the default is acceptable. 7. Click OK, and the disk will be added.Now you can create pools and volumes. This process is identical across Cloud platforms. Creating Storage Pools Configuring Volumes
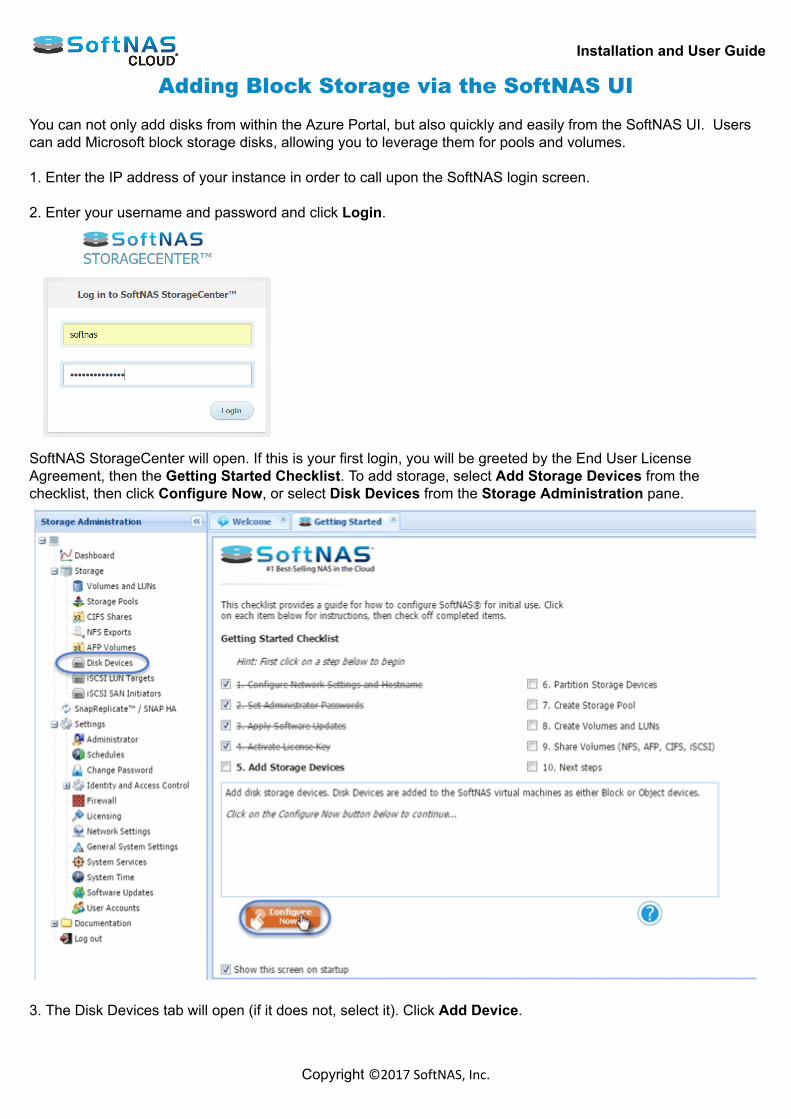
Installation and User Guide
Copyright ©2017 SoftNAS, Inc.
Adding Block Storage via the SoftNAS UI You can not only add disks from within the Azure Portal, but also quickly and easily from the SoftNAS UI. Userscan add Microsoft block storage disks, allowing you to leverage them for pools and volumes. 1. Enter the IP address of your instance in order to call upon the SoftNAS login screen. 2. Enter your username and password and click Login.
SoftNAS StorageCenter will open. If this is your first login, you will be greeted by the End User LicenseAgreement, then the Getting Started Checklist. To add storage, select Add Storage Devices from thechecklist, then click Configure Now, or select Disk Devices from the Storage Administration pane.
3. The Disk Devices tab will open (if it does not, select it). Click Add Device.

Installation and User Guide
Copyright ©2017 SoftNAS, Inc.
From the Add Disk Device wizard, select the second option, Microsoft Cloud Disk Extender. Click Next.
4. Provide the service administration account with access to the appropriate subscriptions.
5. Select the appropriate storage account, then set the disk size, and the number of disks you wish to create.
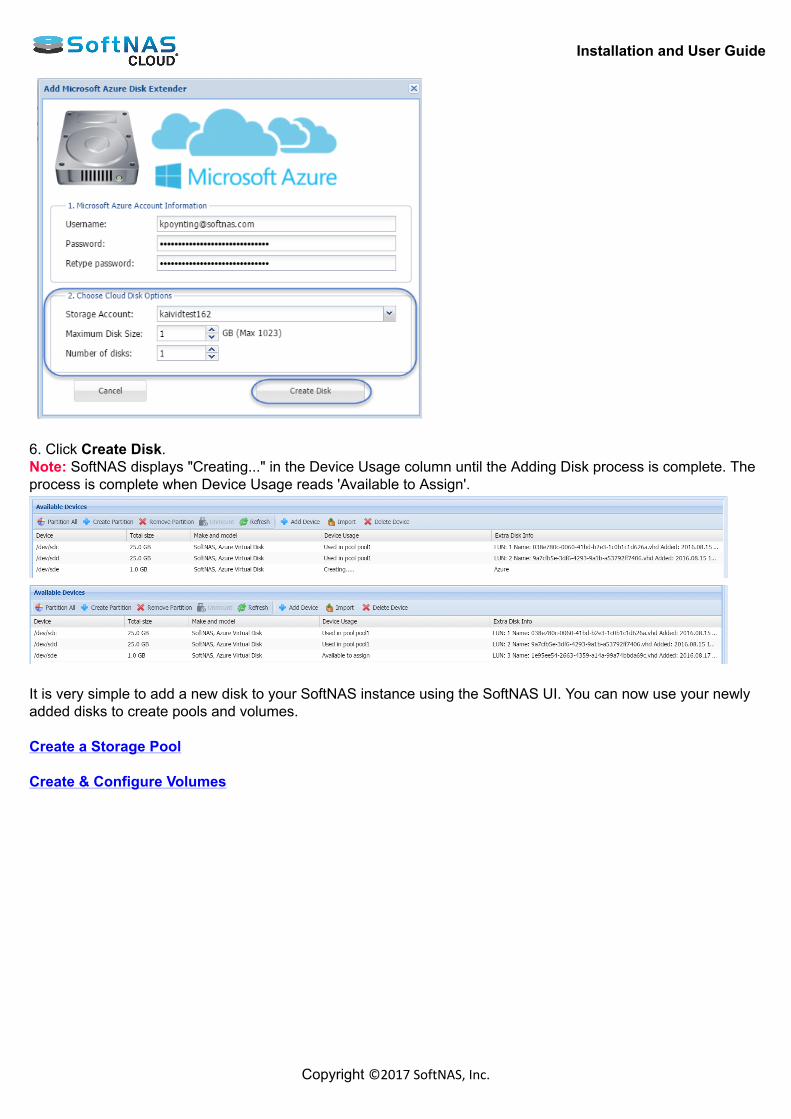
Installation and User Guide
Copyright ©2017 SoftNAS, Inc.
6. Click Create Disk.Note: SoftNAS displays "Creating..." in the Device Usage column until the Adding Disk process is complete. Theprocess is complete when Device Usage reads 'Available to Assign'.
It is very simple to add a new disk to your SoftNAS instance using the SoftNAS UI. You can now use your newlyadded disks to create pools and volumes. Create a Storage Pool Create & Configure Volumes
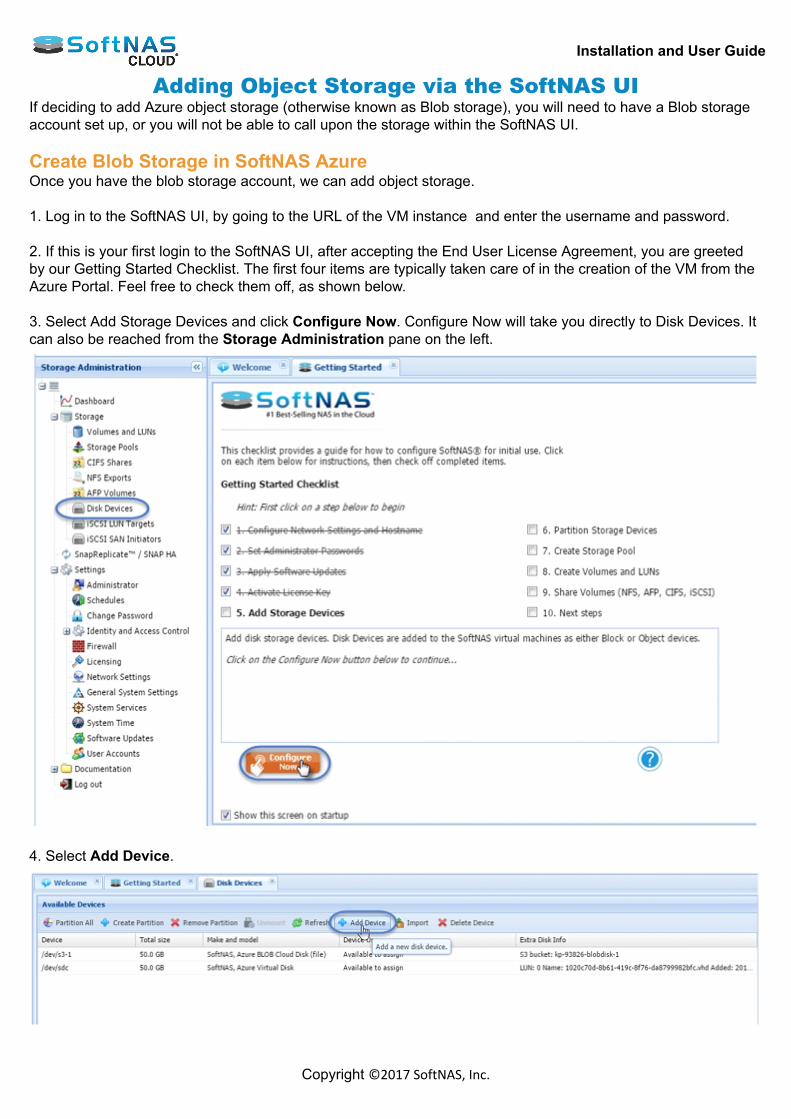
Installation and User Guide
Copyright ©2017 SoftNAS, Inc.
Adding Object Storage via the SoftNAS UIIf deciding to add Azure object storage (otherwise known as Blob storage), you will need to have a Blob storageaccount set up, or you will not be able to call upon the storage within the SoftNAS UI. Create Blob Storage in SoftNAS AzureOnce you have the blob storage account, we can add object storage. 1. Log in to the SoftNAS UI, by going to the URL of the VM instance and enter the username and password. 2. If this is your first login to the SoftNAS UI, after accepting the End User License Agreement, you are greetedby our Getting Started Checklist. The first four items are typically taken care of in the creation of the VM from theAzure Portal. Feel free to check them off, as shown below. 3. Select Add Storage Devices and click Configure Now. Configure Now will take you directly to Disk Devices. Itcan also be reached from the Storage Administration pane on the left.
4. Select Add Device.
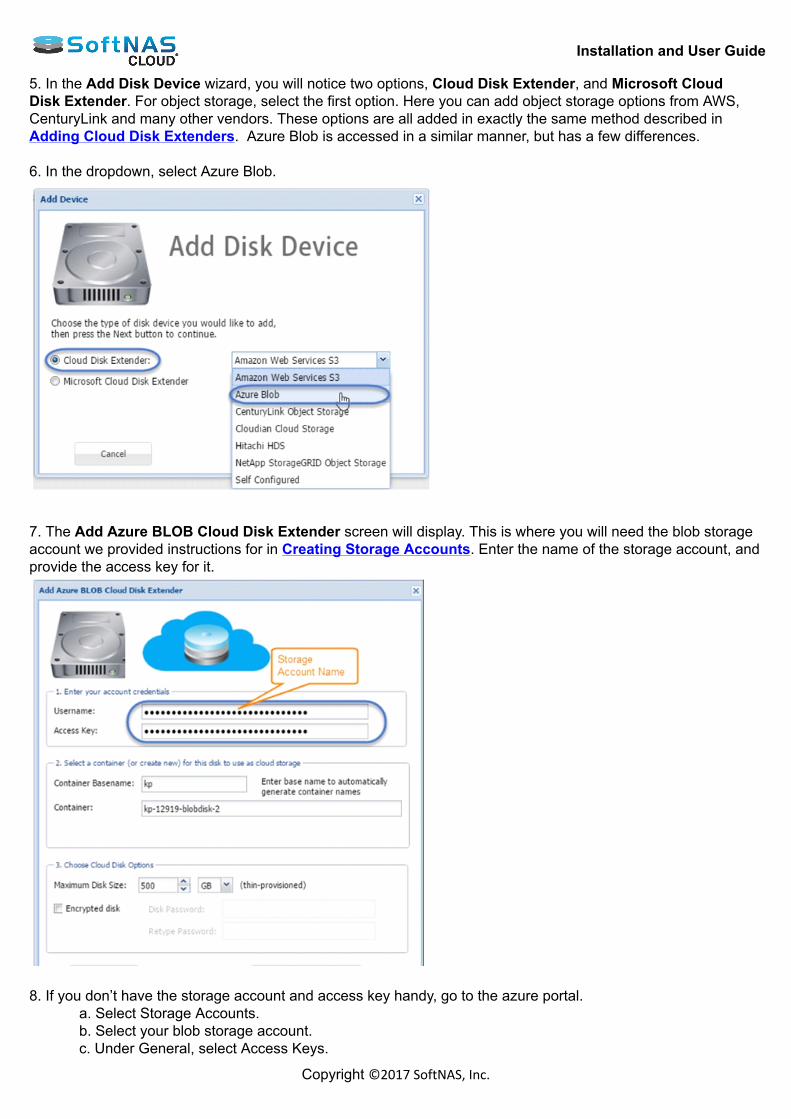
Installation and User Guide
Copyright ©2017 SoftNAS, Inc.
5. In the Add Disk Device wizard, you will notice two options, Cloud Disk Extender, and Microsoft CloudDisk Extender. For object storage, select the first option. Here you can add object storage options from AWS,CenturyLink and many other vendors. These options are all added in exactly the same method described inAdding Cloud Disk Extenders. Azure Blob is accessed in a similar manner, but has a few differences. 6. In the dropdown, select Azure Blob.
7. The Add Azure BLOB Cloud Disk Extender screen will display. This is where you will need the blob storageaccount we provided instructions for in Creating Storage Accounts. Enter the name of the storage account, andprovide the access key for it.
8. If you don’t have the storage account and access key handy, go to the azure portal.
a. Select Storage Accounts.b. Select your blob storage account.c. Under General, select Access Keys.
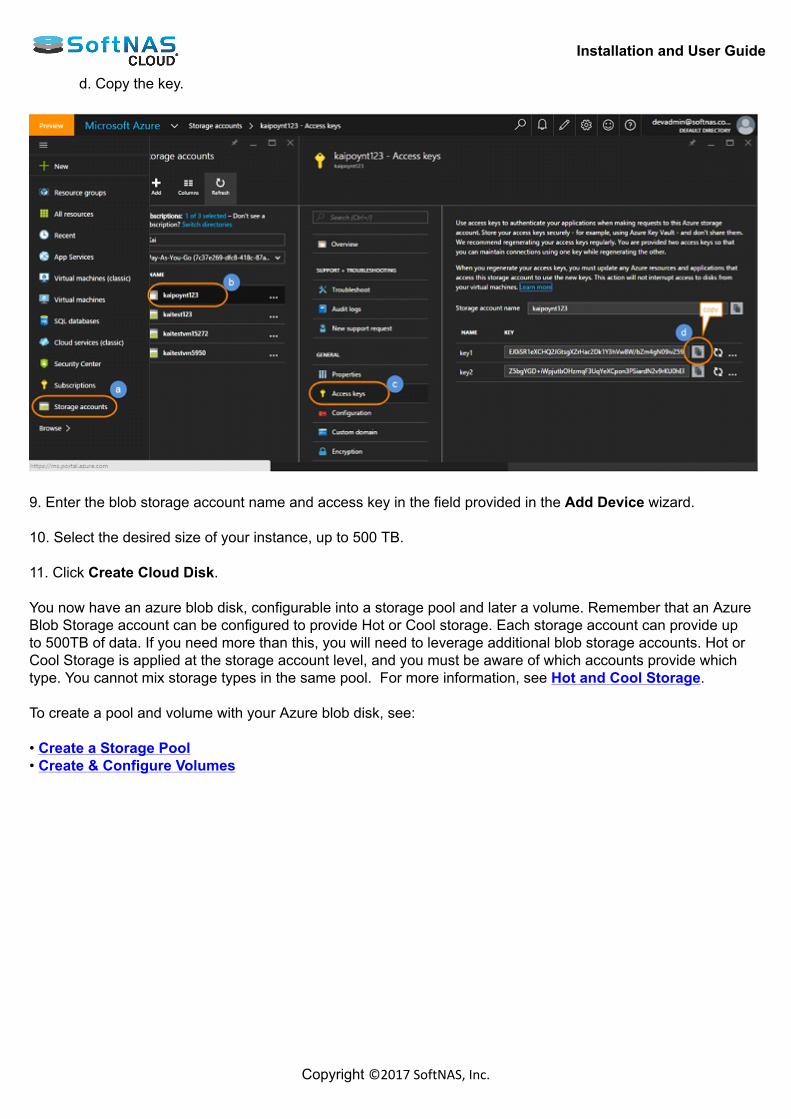
Installation and User Guide
Copyright ©2017 SoftNAS, Inc.
d. Copy the key.
9. Enter the blob storage account name and access key in the field provided in the Add Device wizard. 10. Select the desired size of your instance, up to 500 TB. 11. Click Create Cloud Disk. You now have an azure blob disk, configurable into a storage pool and later a volume. Remember that an AzureBlob Storage account can be configured to provide Hot or Cool storage. Each storage account can provide upto 500TB of data. If you need more than this, you will need to leverage additional blob storage accounts. Hot orCool Storage is applied at the storage account level, and you must be aware of which accounts provide whichtype. You cannot mix storage types in the same pool. For more information, see Hot and Cool Storage. To create a pool and volume with your Azure blob disk, see: • Create a Storage Pool• Create & Configure Volumes
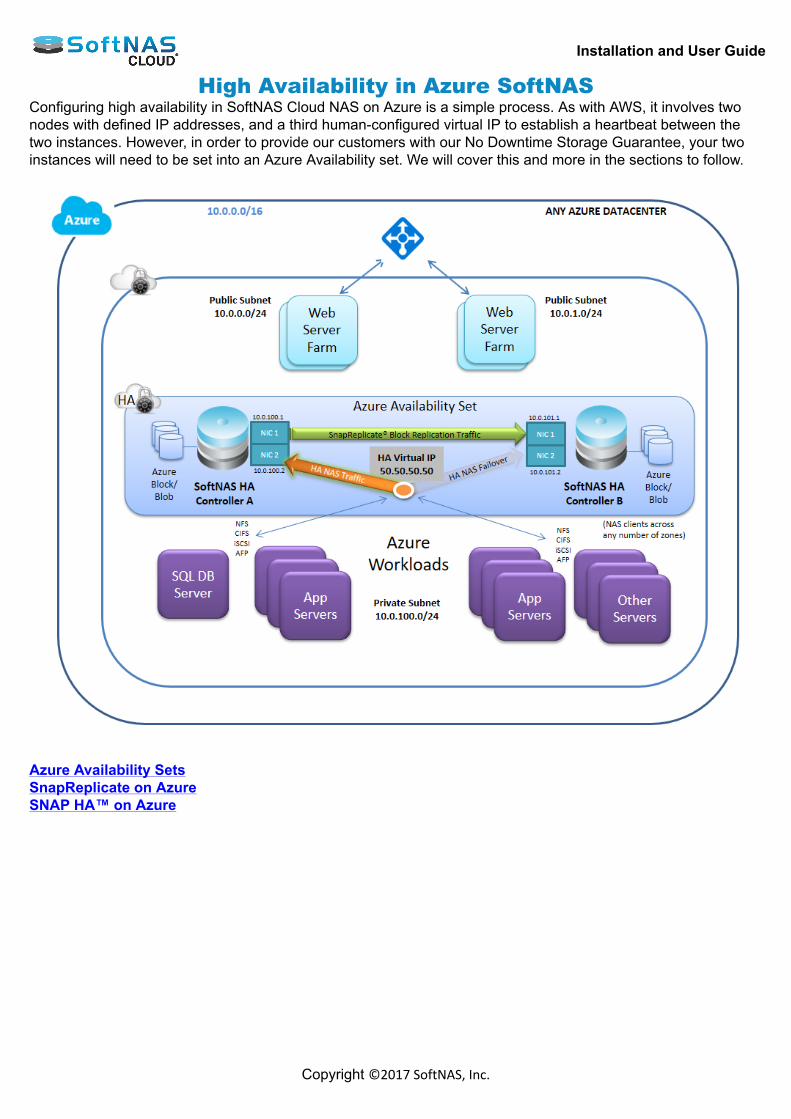
Installation and User Guide
Copyright ©2017 SoftNAS, Inc.
High Availability in Azure SoftNASConfiguring high availability in SoftNAS Cloud NAS on Azure is a simple process. As with AWS, it involves twonodes with defined IP addresses, and a third human-configured virtual IP to establish a heartbeat between thetwo instances. However, in order to provide our customers with our No Downtime Storage Guarantee, your twoinstances will need to be set into an Azure Availability set. We will cover this and more in the sections to follow.
Azure Availability SetsSnapReplicate on AzureSNAP HA™ on Azure
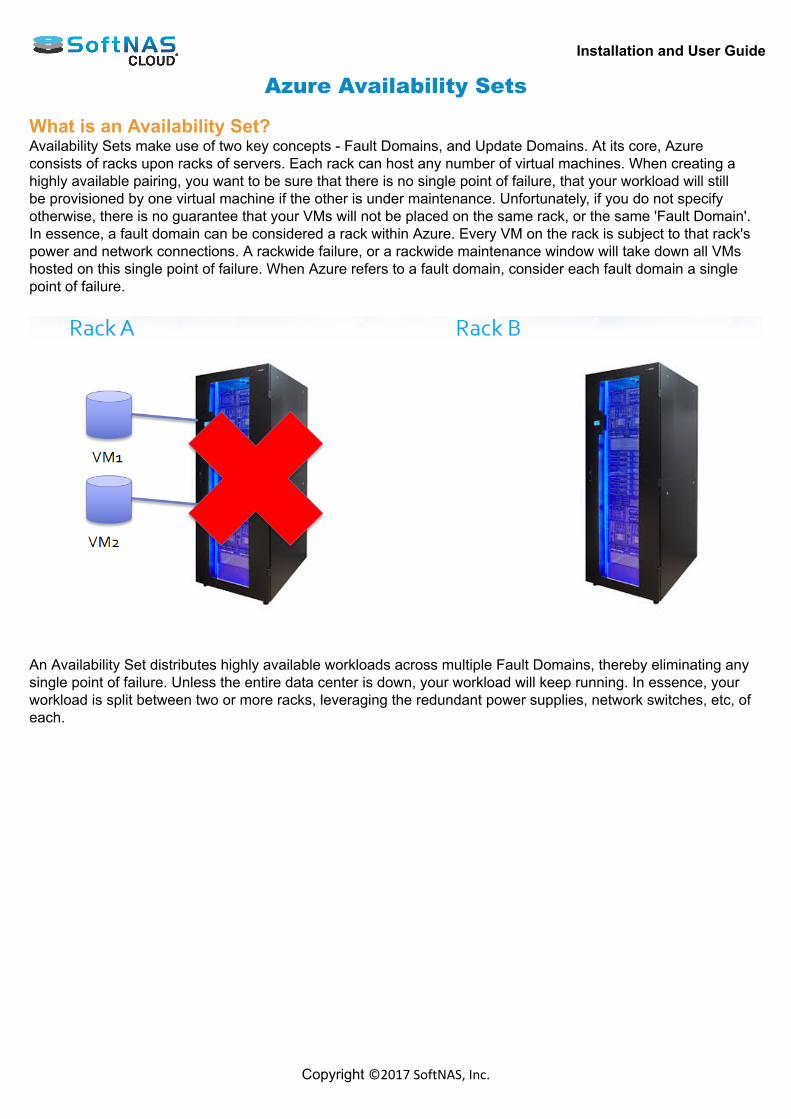
Installation and User Guide
Copyright ©2017 SoftNAS, Inc.
Azure Availability Sets What is an Availability Set?Availability Sets make use of two key concepts - Fault Domains, and Update Domains. At its core, Azureconsists of racks upon racks of servers. Each rack can host any number of virtual machines. When creating ahighly available pairing, you want to be sure that there is no single point of failure, that your workload will stillbe provisioned by one virtual machine if the other is under maintenance. Unfortunately, if you do not specifyotherwise, there is no guarantee that your VMs will not be placed on the same rack, or the same 'Fault Domain'.In essence, a fault domain can be considered a rack within Azure. Every VM on the rack is subject to that rack'spower and network connections. A rackwide failure, or a rackwide maintenance window will take down all VMshosted on this single point of failure. When Azure refers to a fault domain, consider each fault domain a singlepoint of failure.
An Availability Set distributes highly available workloads across multiple Fault Domains, thereby eliminating anysingle point of failure. Unless the entire data center is down, your workload will keep running. In essence, yourworkload is split between two or more racks, leveraging the redundant power supplies, network switches, etc, ofeach.
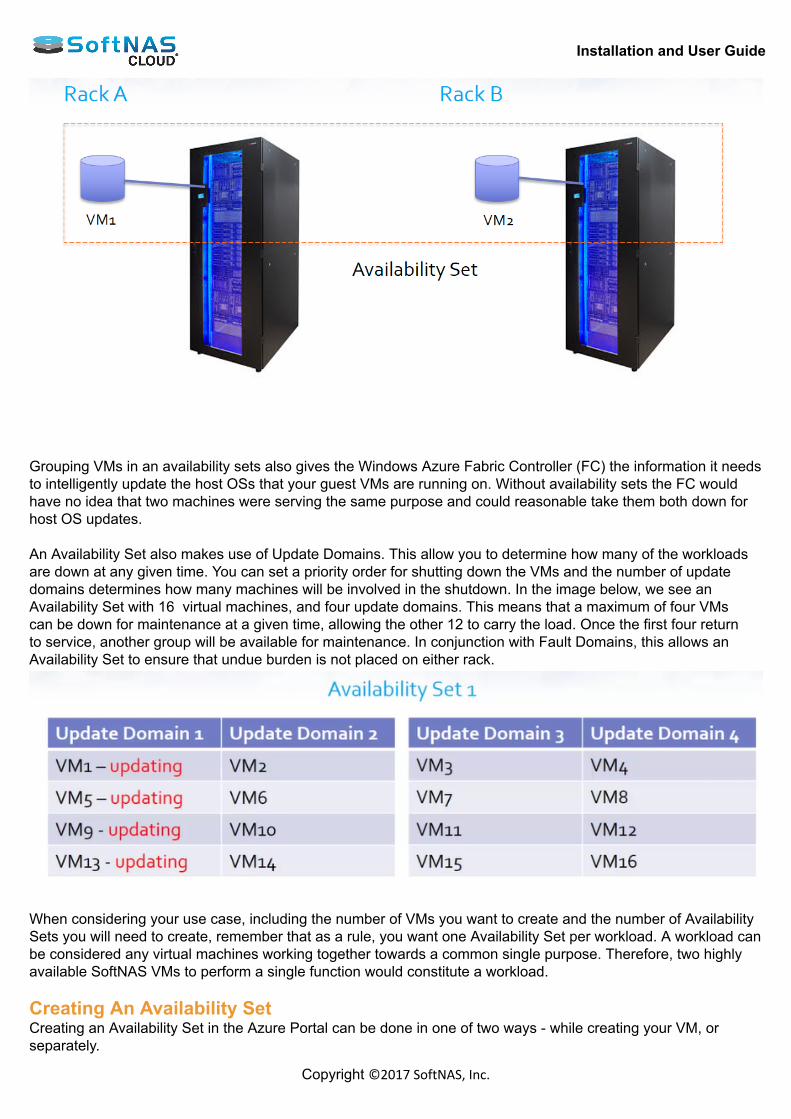
Installation and User Guide
Copyright ©2017 SoftNAS, Inc.
Grouping VMs in an availability sets also gives the Windows Azure Fabric Controller (FC) the information it needsto intelligently update the host OSs that your guest VMs are running on. Without availability sets the FC wouldhave no idea that two machines were serving the same purpose and could reasonable take them both down forhost OS updates. An Availability Set also makes use of Update Domains. This allow you to determine how many of the workloadsare down at any given time. You can set a priority order for shutting down the VMs and the number of updatedomains determines how many machines will be involved in the shutdown. In the image below, we see anAvailability Set with 16 virtual machines, and four update domains. This means that a maximum of four VMs can be down for maintenance at a given time, allowing the other 12 to carry the load. Once the first four returnto service, another group will be available for maintenance. In conjunction with Fault Domains, this allows anAvailability Set to ensure that undue burden is not placed on either rack.
When considering your use case, including the number of VMs you want to create and the number of AvailabilitySets you will need to create, remember that as a rule, you want one Availability Set per workload. A workload canbe considered any virtual machines working together towards a common single purpose. Therefore, two highlyavailable SoftNAS VMs to perform a single function would constitute a workload. Creating An Availability SetCreating an Availability Set in the Azure Portal can be done in one of two ways - while creating your VM, orseparately.
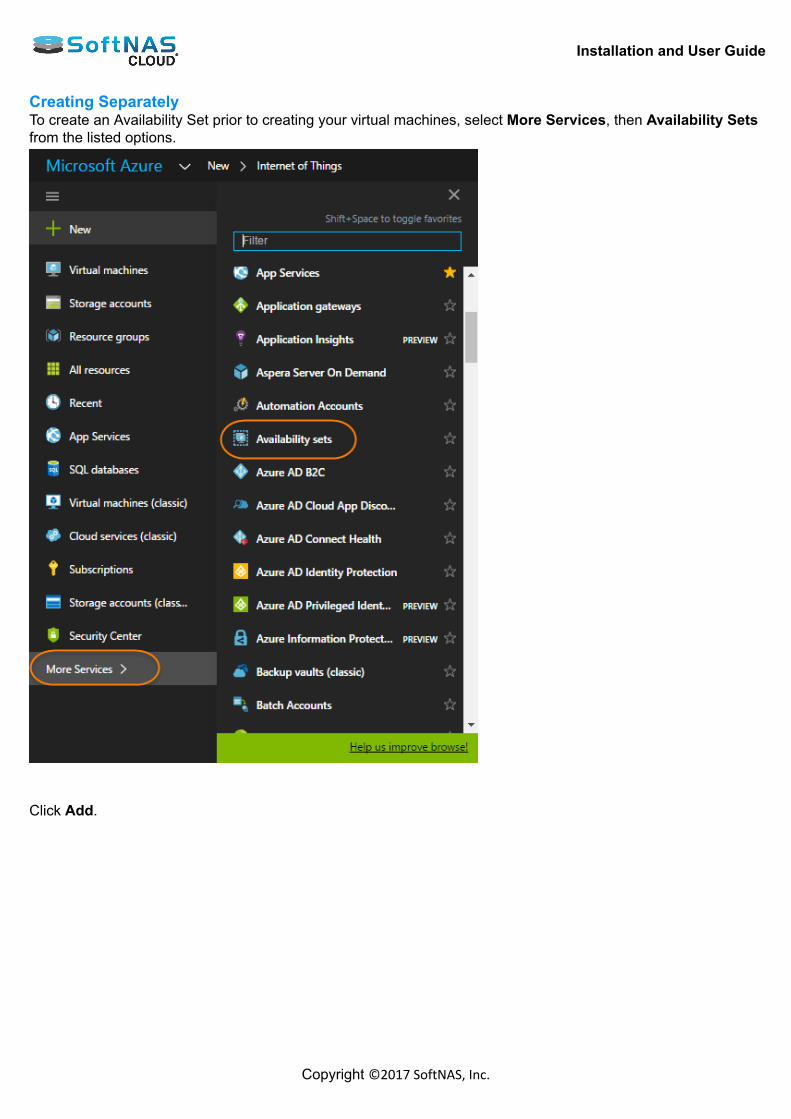
Installation and User Guide
Copyright ©2017 SoftNAS, Inc.
Creating SeparatelyTo create an Availability Set prior to creating your virtual machines, select More Services, then Availability Setsfrom the listed options.
Click Add.
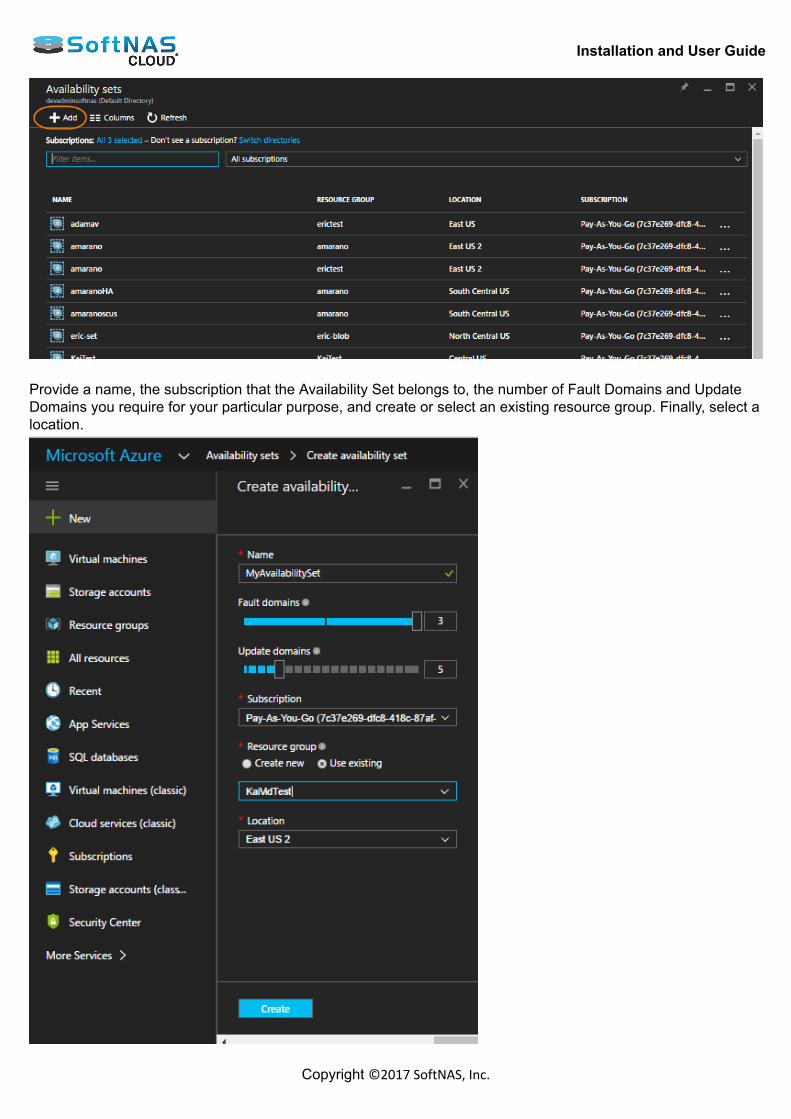
Installation and User Guide
Copyright ©2017 SoftNAS, Inc.
Provide a name, the subscription that the Availability Set belongs to, the number of Fault Domains and UpdateDomains you require for your particular purpose, and create or select an existing resource group. Finally, select alocation.
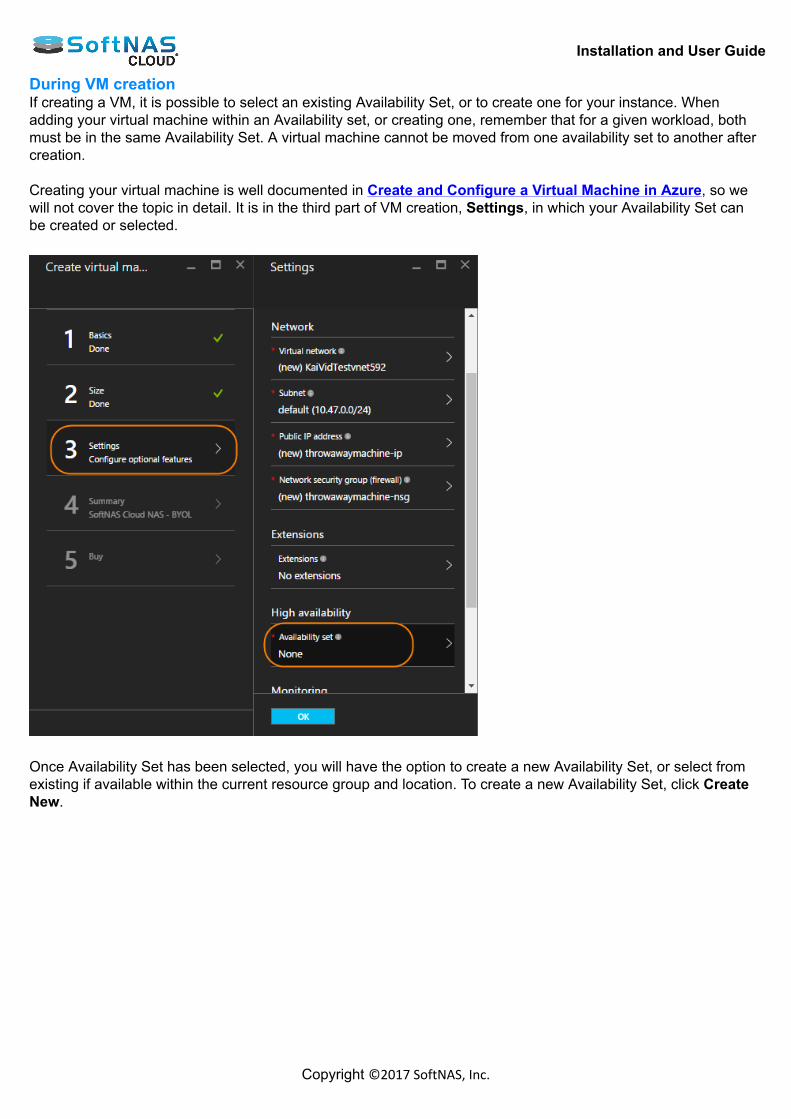
Installation and User Guide
Copyright ©2017 SoftNAS, Inc.
During VM creationIf creating a VM, it is possible to select an existing Availability Set, or to create one for your instance. Whenadding your virtual machine within an Availability set, or creating one, remember that for a given workload, bothmust be in the same Availability Set. A virtual machine cannot be moved from one availability set to another aftercreation. Creating your virtual machine is well documented in Create and Configure a Virtual Machine in Azure, so wewill not cover the topic in detail. It is in the third part of VM creation, Settings, in which your Availability Set canbe created or selected.
Once Availability Set has been selected, you will have the option to create a new Availability Set, or select fromexisting if available within the current resource group and location. To create a new Availability Set, click CreateNew.
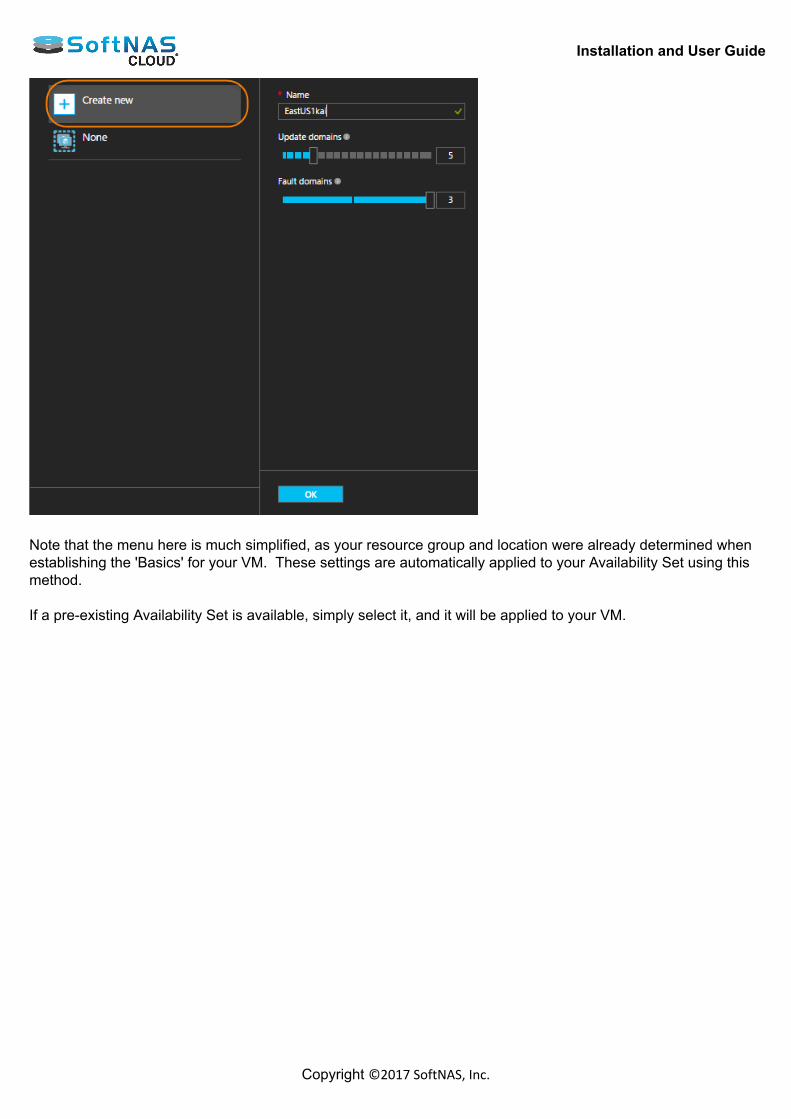
Installation and User Guide
Copyright ©2017 SoftNAS, Inc.
Note that the menu here is much simplified, as your resource group and location were already determined whenestablishing the 'Basics' for your VM. These settings are automatically applied to your Availability Set using thismethod. If a pre-existing Availability Set is available, simply select it, and it will be applied to your VM.
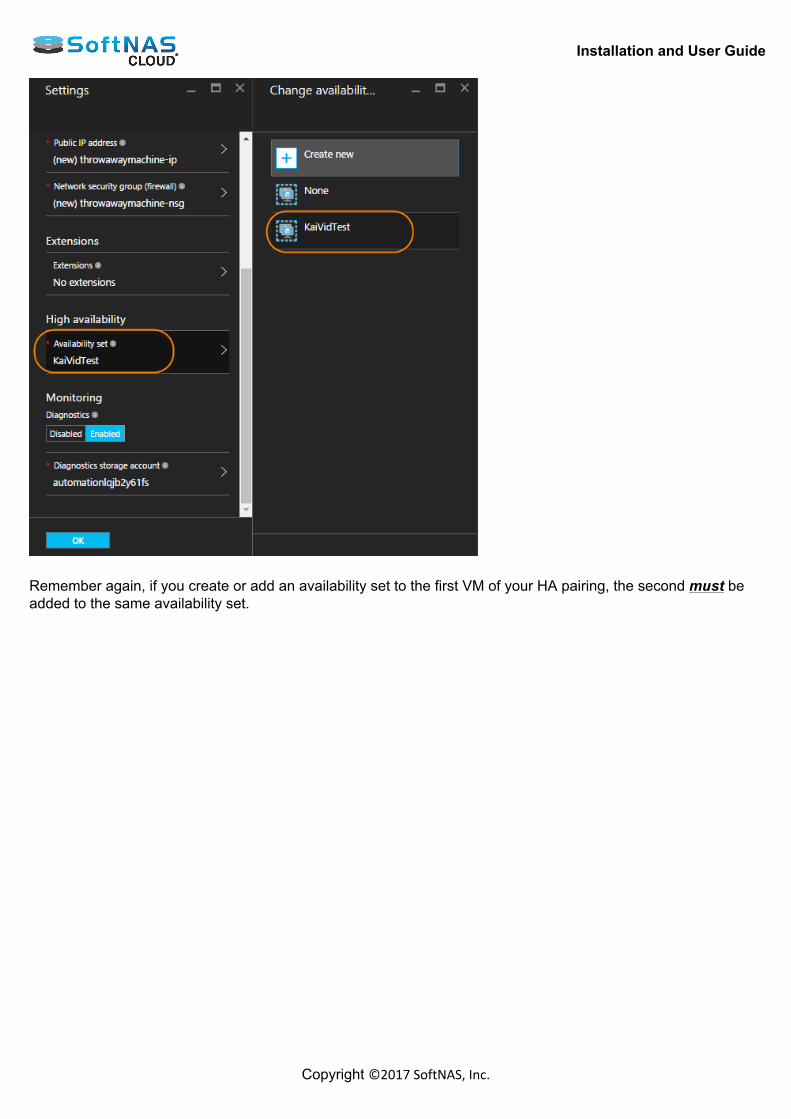
Installation and User Guide
Copyright ©2017 SoftNAS, Inc.
Remember again, if you create or add an availability set to the first VM of your HA pairing, the second must beadded to the same availability set.
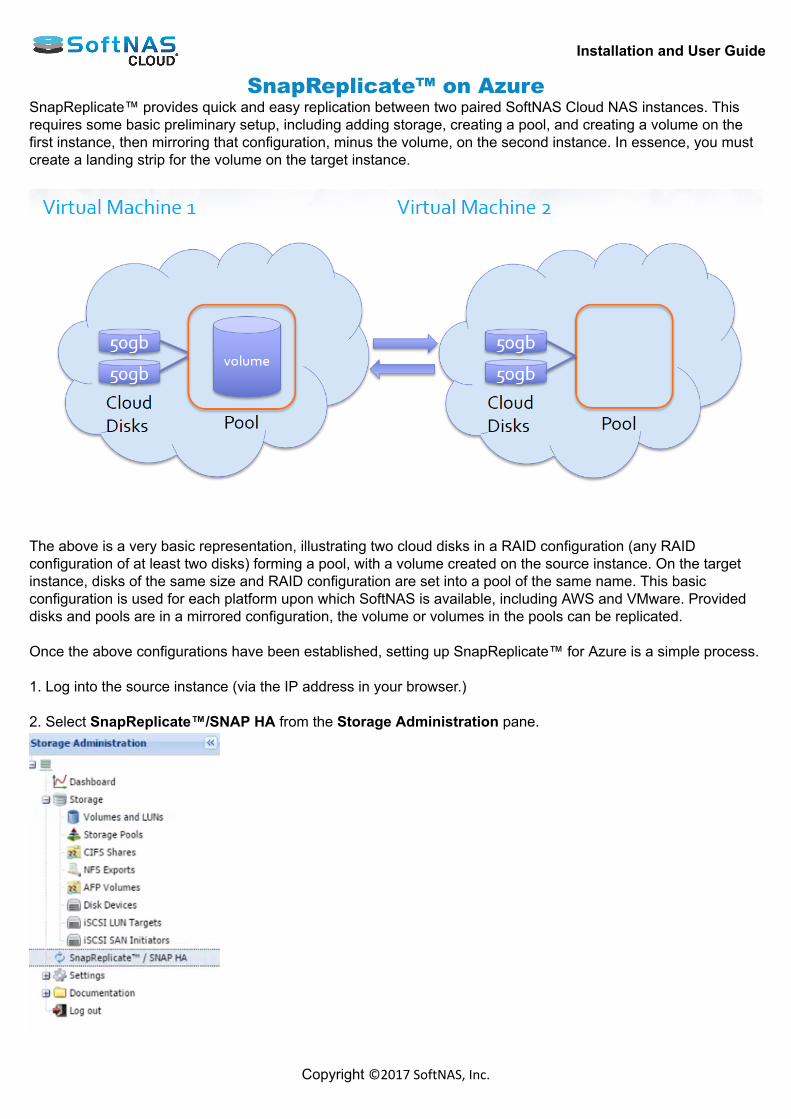
Installation and User Guide
Copyright ©2017 SoftNAS, Inc.
SnapReplicate™ on AzureSnapReplicate™ provides quick and easy replication between two paired SoftNAS Cloud NAS instances. Thisrequires some basic preliminary setup, including adding storage, creating a pool, and creating a volume on thefirst instance, then mirroring that configuration, minus the volume, on the second instance. In essence, you mustcreate a landing strip for the volume on the target instance.
The above is a very basic representation, illustrating two cloud disks in a RAID configuration (any RAIDconfiguration of at least two disks) forming a pool, with a volume created on the source instance. On the targetinstance, disks of the same size and RAID configuration are set into a pool of the same name. This basicconfiguration is used for each platform upon which SoftNAS is available, including AWS and VMware. Provideddisks and pools are in a mirrored configuration, the volume or volumes in the pools can be replicated. Once the above configurations have been established, setting up SnapReplicate™ for Azure is a simple process. 1. Log into the source instance (via the IP address in your browser.) 2. Select SnapReplicate™/SNAP HA from the Storage Administration pane.

Installation and User Guide
Copyright ©2017 SoftNAS, Inc.
3. The SnapReplicate/SnapHA window opens. Click Add Replication.
4. The Add Replication wizard will open. Click Next.
5. In the Remote SoftNAS Node window, enter the IP Address of theTarget Node. Click Next.
6. Enter the credentials for the target softNAS node (by default this will be a username of softnas, and thepassword established in setup, unless alternate credentials were created). Click Next.
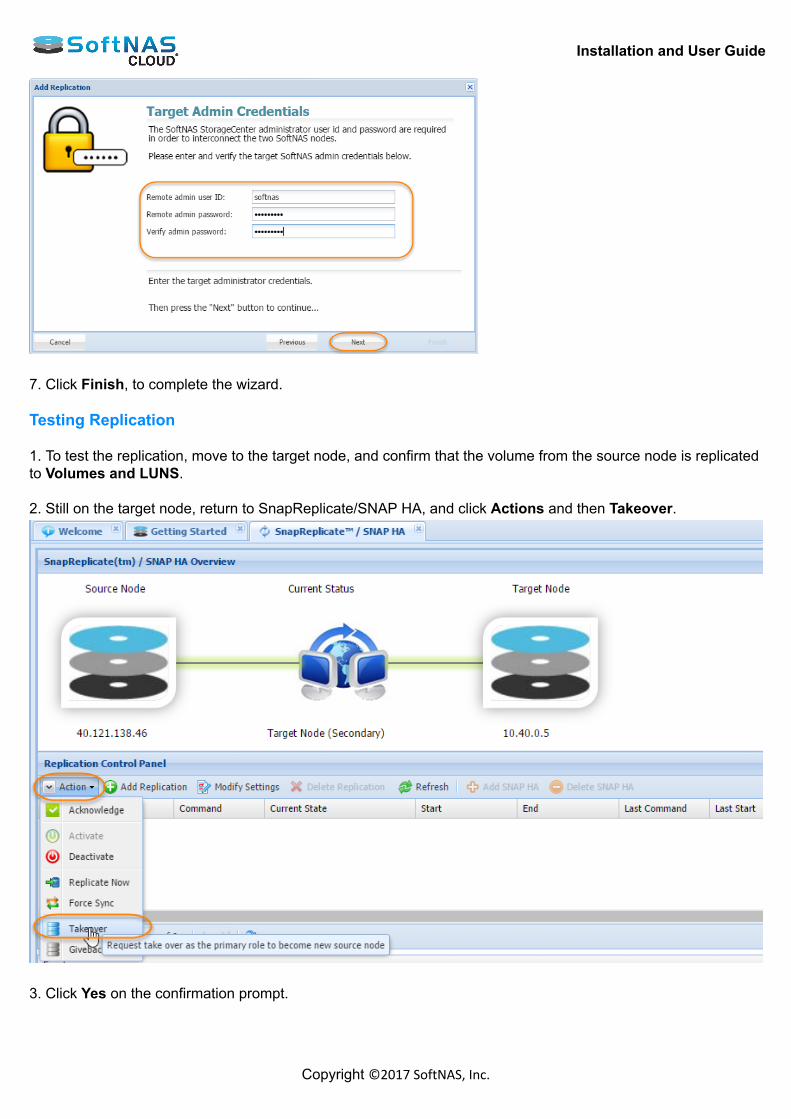
Installation and User Guide
Copyright ©2017 SoftNAS, Inc.
7. Click Finish, to complete the wizard. Testing Replication 1. To test the replication, move to the target node, and confirm that the volume from the source node is replicatedto Volumes and LUNS. 2. Still on the target node, return to SnapReplicate/SNAP HA, and click Actions and then Takeover.
3. Click Yes on the confirmation prompt.

Installation and User Guide
Copyright ©2017 SoftNAS, Inc.
4. The target node will become the primary.
5. Return to the former source node. Click Actions and Takeover to restore the source node as Primary.

Installation and User Guide
Copyright ©2017 SoftNAS, Inc.
SNAP HA on AzureSnapReplicate™ allows for manual replication of volumes to another node in the event of a problem or aplanned maintenance. SNAP HA allows replication to be triggered automatically in such a case, by establishinga heartbeat between linked instances. If the heartbeat fails to register for more than a few moments, the otherinstance takes over, ensuring seamless access to the provisioned data. 1. To set up SNAP HA, start the process by clicking Add SNAP HA.
2. The Add High Availability wizard opens, providing an Instruction window. Click Next.
3. The next screen depends upon whether your storage pool has made use of MSFT disks added from within theSoftNAS UI (as explained in Adding Block Storage via the SoftNAS UI), or if you added Azure Blob Storagedisks, or added your block storage disks through the Azure Portal.If you added Azure Blob Storage or used the Azure Portal to add your disks, then you would first have to provideAzure account credentials before being prompted to enter your Virtual IP Address.

Installation and User Guide
Copyright ©2017 SoftNAS, Inc.
4. If you added Microsoft disks using the SoftNAS UI, you will have supplied Azure credentials already. In thiscase, the wizard will skip ahead to the Virtual IP screen. This is because your credentials would be cached inorder to speed up the process.Here you will create and add an IP Address that is not in the same CIDR block as the instances. (In simplestterms, ensure that the IP address does not start with the same numbers as the two instances.) Click Next.
5. Click Finish on the Finish HA Setup screen.
6. Your SNAP HA pairing is created.
To test, shut down one of the instances. The other will become primary after a few moments. Alternatively, selectActions, and Takeover to simulate a failover.
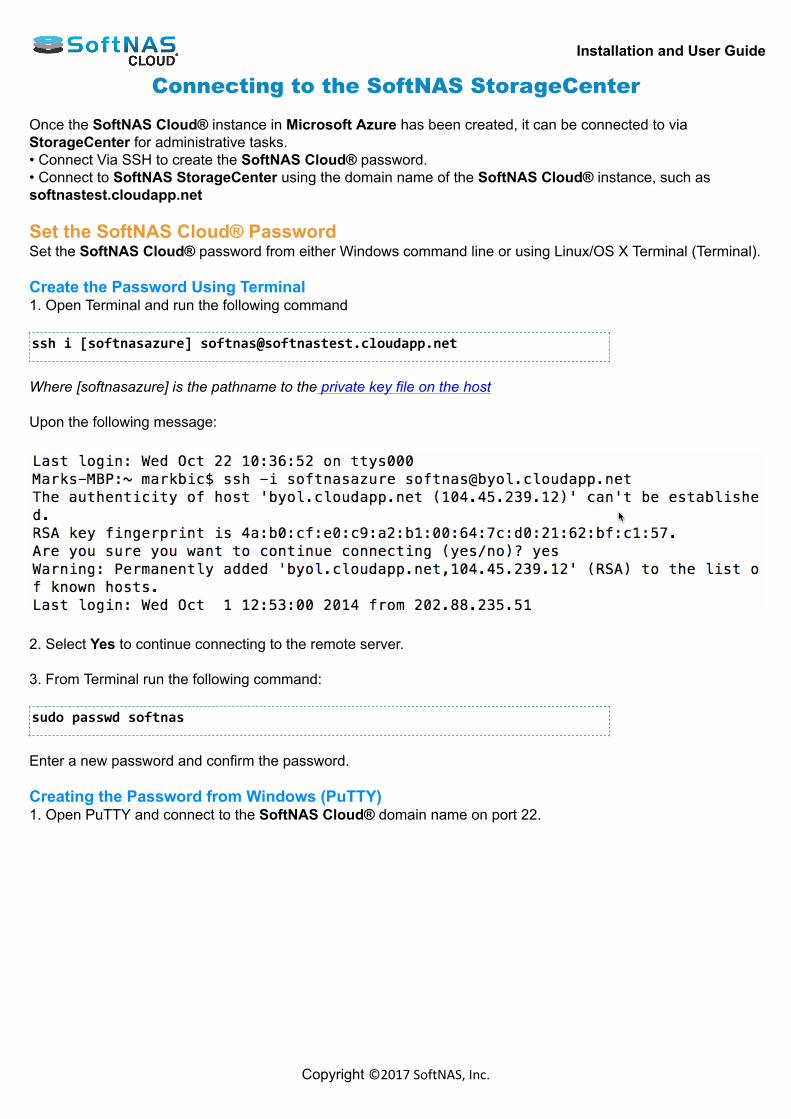
Installation and User Guide
Copyright ©2017 SoftNAS, Inc.
Connecting to the SoftNAS StorageCenter Once the SoftNAS Cloud® instance in Microsoft Azure has been created, it can be connected to viaStorageCenter for administrative tasks.• Connect Via SSH to create the SoftNAS Cloud® password.• Connect to SoftNAS StorageCenter using the domain name of the SoftNAS Cloud® instance, such assoftnastest.cloudapp.net Set the SoftNAS Cloud® PasswordSet the SoftNAS Cloud® password from either Windows command line or using Linux/OS X Terminal (Terminal). Create the Password Using Terminal1. Open Terminal and run the following command ssh i [softnasazure] [email protected]
Where [softnasazure] is the pathname to the private key file on the host Upon the following message:
2. Select Yes to continue connecting to the remote server. 3. From Terminal run the following command: sudo passwd softnas
Enter a new password and confirm the password. Creating the Password from Windows (PuTTY)1. Open PuTTY and connect to the SoftNAS Cloud® domain name on port 22.
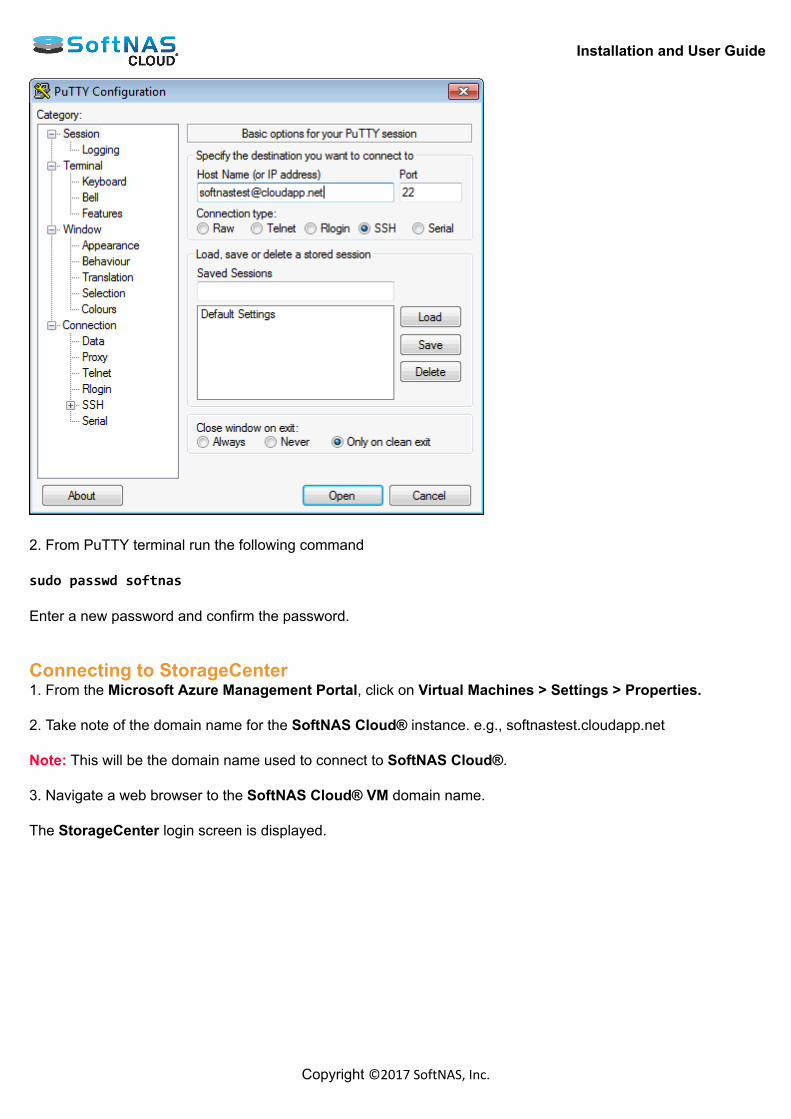
Installation and User Guide
Copyright ©2017 SoftNAS, Inc.
2. From PuTTY terminal run the following command sudo passwd softnas Enter a new password and confirm the password. Connecting to StorageCenter1. From the Microsoft Azure Management Portal, click on Virtual Machines > Settings > Properties. 2. Take note of the domain name for the SoftNAS Cloud® instance. e.g., softnastest.cloudapp.net Note: This will be the domain name used to connect to SoftNAS Cloud®. 3. Navigate a web browser to the SoftNAS Cloud® VM domain name. The StorageCenter login screen is displayed.
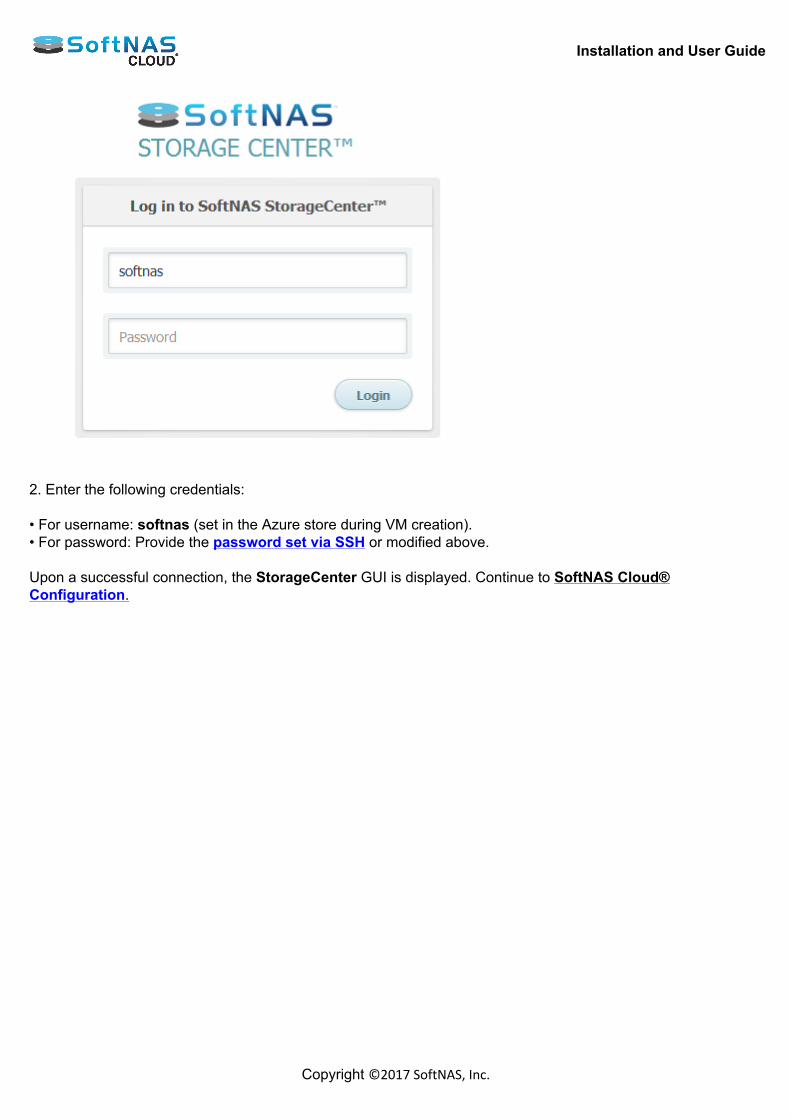
Installation and User Guide
Copyright ©2017 SoftNAS, Inc.
2. Enter the following credentials: • For username: softnas (set in the Azure store during VM creation).• For password: Provide the password set via SSH or modified above. Upon a successful connection, the StorageCenter GUI is displayed. Continue to SoftNAS Cloud®Configuration.
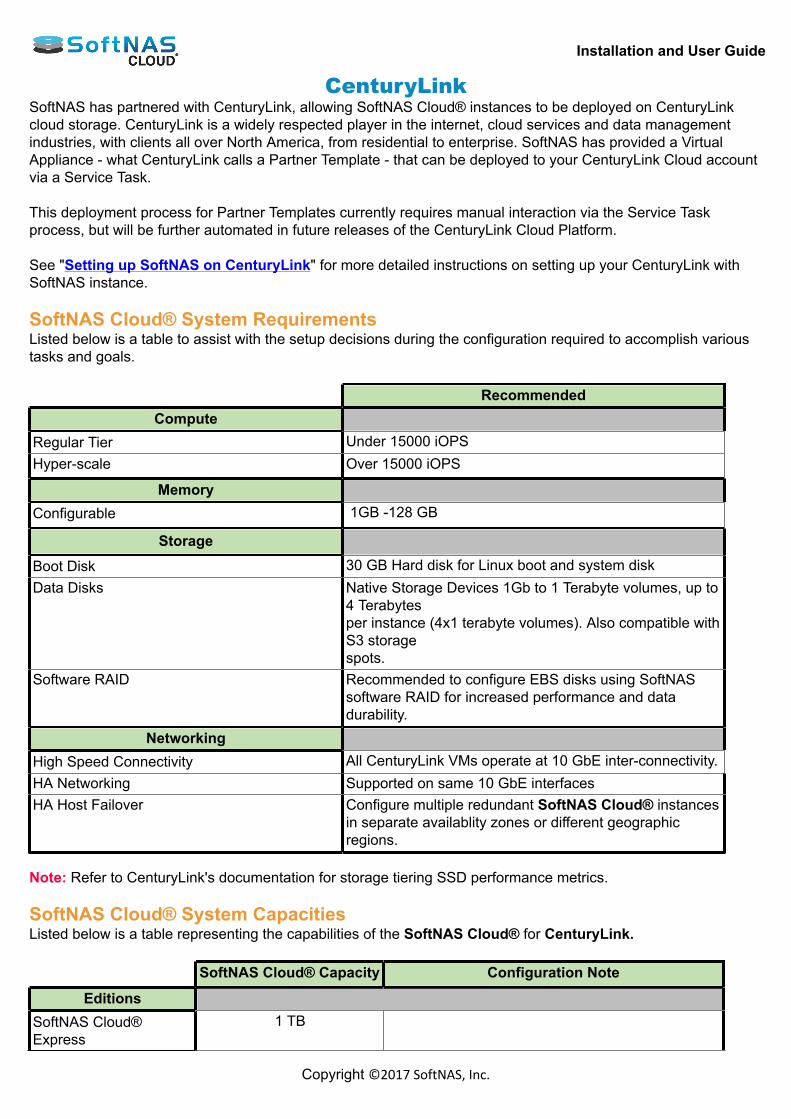
Installation and User Guide
Copyright ©2017 SoftNAS, Inc.
CenturyLinkSoftNAS has partnered with CenturyLink, allowing SoftNAS Cloud® instances to be deployed on CenturyLinkcloud storage. CenturyLink is a widely respected player in the internet, cloud services and data managementindustries, with clients all over North America, from residential to enterprise. SoftNAS has provided a VirtualAppliance - what CenturyLink calls a Partner Template - that can be deployed to your CenturyLink Cloud accountvia a Service Task. This deployment process for Partner Templates currently requires manual interaction via the Service Taskprocess, but will be further automated in future releases of the CenturyLink Cloud Platform. See "Setting up SoftNAS on CenturyLink" for more detailed instructions on setting up your CenturyLink withSoftNAS instance. SoftNAS Cloud® System RequirementsListed below is a table to assist with the setup decisions during the configuration required to accomplish varioustasks and goals. Recommended
Compute Regular Tier Under 15000 iOPSHyper-scale Over 15000 iOPS
MemoryConfigurable 1GB -128 GB
Storage
Boot Disk 30 GB Hard disk for Linux boot and system diskData Disks Native Storage Devices 1Gb to 1 Terabyte volumes, up to
4 Terabytesper instance (4x1 terabyte volumes). Also compatible withS3 storagespots.
Software RAID Recommended to configure EBS disks using SoftNASsoftware RAID for increased performance and datadurability.
Networking High Speed Connectivity All CenturyLink VMs operate at 10 GbE inter-connectivity.HA Networking Supported on same 10 GbE interfacesHA Host Failover Configure multiple redundant SoftNAS Cloud® instances
in separate availablity zones or different geographicregions.
Note: Refer to CenturyLink's documentation for storage tiering SSD performance metrics. SoftNAS Cloud® System CapacitiesListed below is a table representing the capabilities of the SoftNAS Cloud® for CenturyLink. SoftNAS Cloud® Capacity Configuration Note
Editions SoftNAS Cloud®Express
1 TB
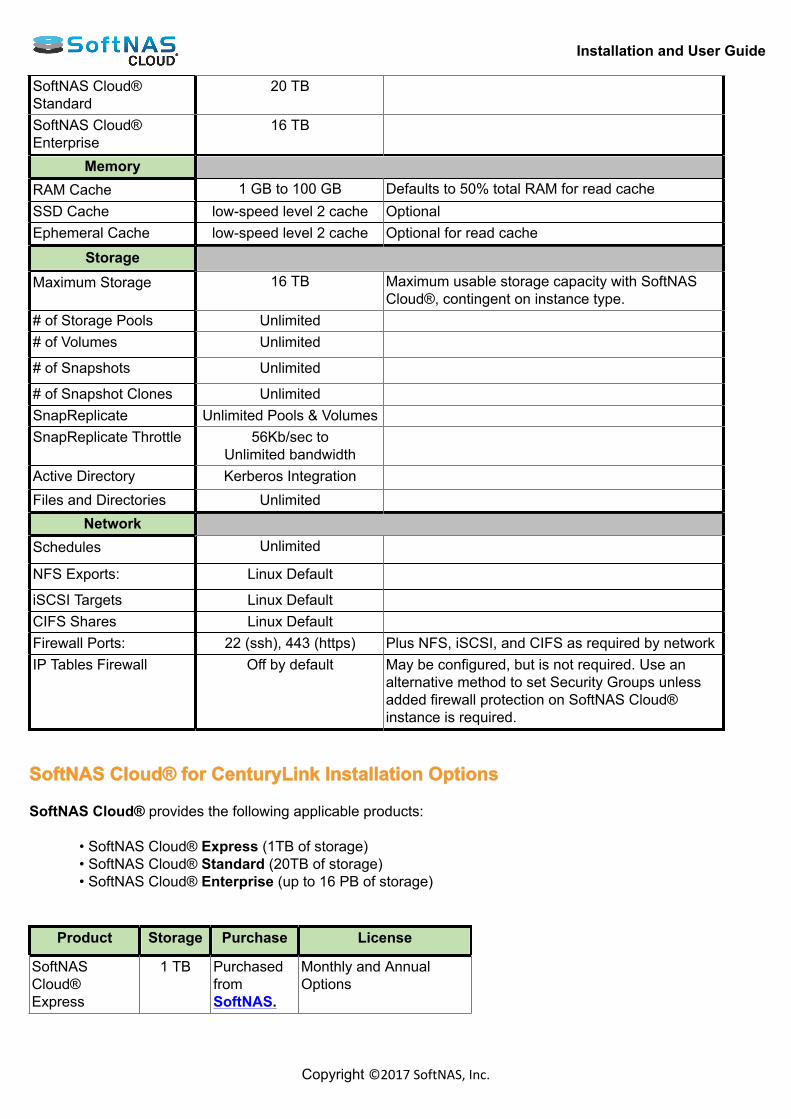
Installation and User Guide
Copyright ©2017 SoftNAS, Inc.
SoftNAS Cloud®Standard
20 TB
SoftNAS Cloud®Enterprise
16 TB
Memory RAM Cache 1 GB to 100 GB Defaults to 50% total RAM for read cacheSSD Cache low-speed level 2 cache OptionalEphemeral Cache low-speed level 2 cache Optional for read cache
Storage
Maximum Storage 16 TB Maximum usable storage capacity with SoftNASCloud®, contingent on instance type.
# of Storage Pools Unlimited # of Volumes Unlimited
# of Snapshots Unlimited
# of Snapshot Clones Unlimited SnapReplicate Unlimited Pools & Volumes SnapReplicate Throttle 56Kb/sec to
Unlimited bandwidth
Active Directory Kerberos Integration Files and Directories Unlimited
Network Schedules Unlimited
NFS Exports: Linux Default
iSCSI Targets Linux Default CIFS Shares Linux Default Firewall Ports: 22 (ssh), 443 (https) Plus NFS, iSCSI, and CIFS as required by networkIP Tables Firewall Off by default May be configured, but is not required. Use an
alternative method to set Security Groups unlessadded firewall protection on SoftNAS Cloud®instance is required.
SoftNAS Cloud® for CenturyLink Installation Options SoftNAS Cloud® provides the following applicable products:
• SoftNAS Cloud® Express (1TB of storage)• SoftNAS Cloud® Standard (20TB of storage)• SoftNAS Cloud® Enterprise (up to 16 PB of storage)
Product Storage Purchase License
SoftNASCloud®Express
1 TB Purchasedfrom SoftNAS.
Monthly and AnnualOptions

Installation and User Guide
Copyright ©2017 SoftNAS, Inc.
SoftNASCloud®Standard
20 TB Purchasedfrom SoftNAS.
Monthly and AnnualOptions
SoftNASCloud®Enterprise
16 PB Purchasedfrom SoftNAS.
Monthly and AnnualOptions
• SoftNAS SNAP HATM included with each product.
Installation and User Guide
Copyright ©2017 SoftNAS, Inc.
Setting up SoftNAS on Century LinkSetting up SoftNAS on CenturyLinkSoftNAS deploys in a virtual appliance model, as a CenturyLink Cloud "Partner Template". Follow these step bystep instructions to deploy a SoftNAS solution in to your CenturyLink Cloud account: PrerequisiteIn order to set up a SoftNAS instance using CenturyLink Cloud, you will need: • access to the CenturyLink Cloud platform as an authorized user.• to identify a Network VLAN you want the SoftNAS instance to reside on. The Support EmailIn order to integrate SoftNAS with Century Link, it all starts with an email. CenturyLink support needs to knowwhat sort of instance you wish to setup. The email should be formatted roughly as seen below, with informationmatching your organizational requirements. Open a service task request ticket via email to [email protected] the following details: Note: You will need to edit some of the information below. TO: [email protected] EMAIL SUBJECT: Ecosystem Partner Template Import Request CLC Support Team, please create a ticket to import the Ecosystem Partner Template image referenced below tomy CenturyLink Cloud Account: - Import CenturyLink Ecosystem Partner Source Image: SoftNAS OVA- My CenturyLink Cloud Account Alias: ####- Data Center to import image to: ###- Server Name to import image as: ##########- VLAN in the account to add the Server to: ########- Additional Notes or work to be done: IMPORTANT: Please make sure that the IP shows up in Control so that theuser canadd a Public IP through Portal if desired. Please let me know if you have any questions or issues. Kindly send me a reply once the work has beencompleted and let us know the IP address of the server where this technology has been deployed. Thank you very much,Your_Name_and_Contact_ Info_Here In the template above, the key information required is as seen below: • Import CenturyLink Ecosystem Partner Source Image: SoftNAS OVA• A Century Cloud Account Alias: Your Alias• Data center to import an image to: - type or copy and paste the name of the desired Data Center. In theexample below, this is UC1 - US West (Santa Clara)
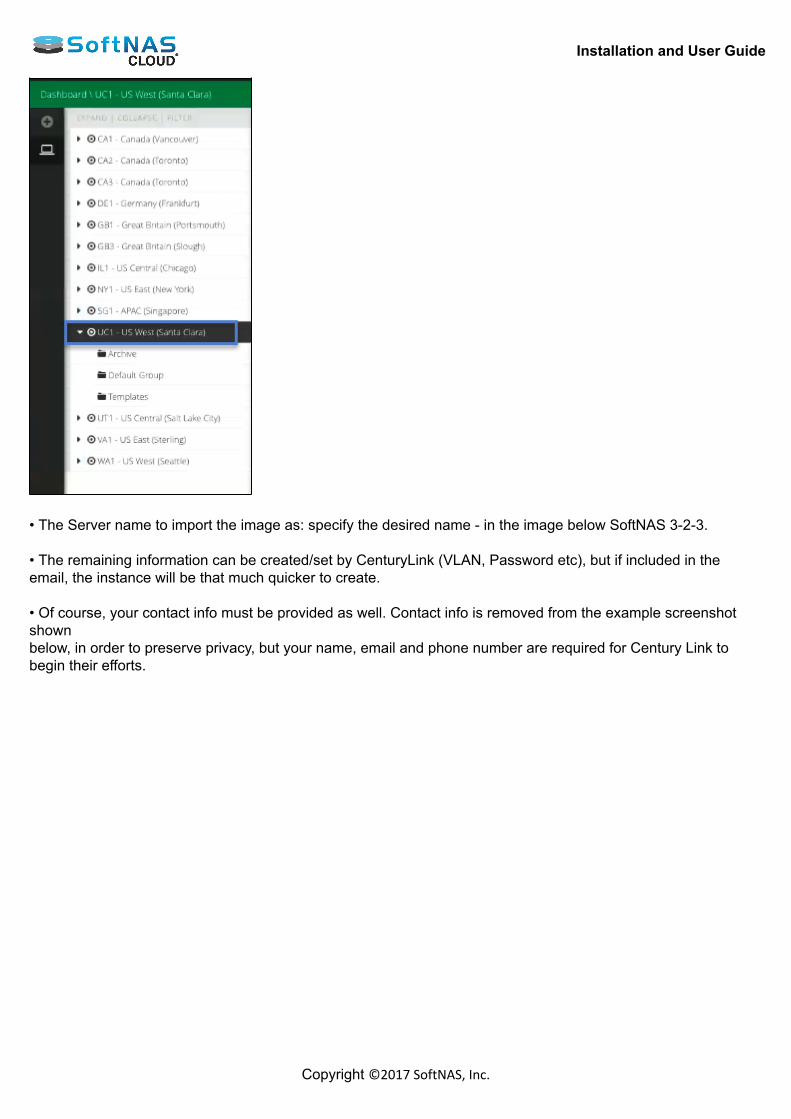
Installation and User Guide
Copyright ©2017 SoftNAS, Inc.
• The Server name to import the image as: specify the desired name - in the image below SoftNAS 3-2-3. • The remaining information can be created/set by CenturyLink (VLAN, Password etc), but if included in theemail, the instance will be that much quicker to create. • Of course, your contact info must be provided as well. Contact info is removed from the example screenshotshownbelow, in order to preserve privacy, but your name, email and phone number are required for Century Link tobegin their efforts.
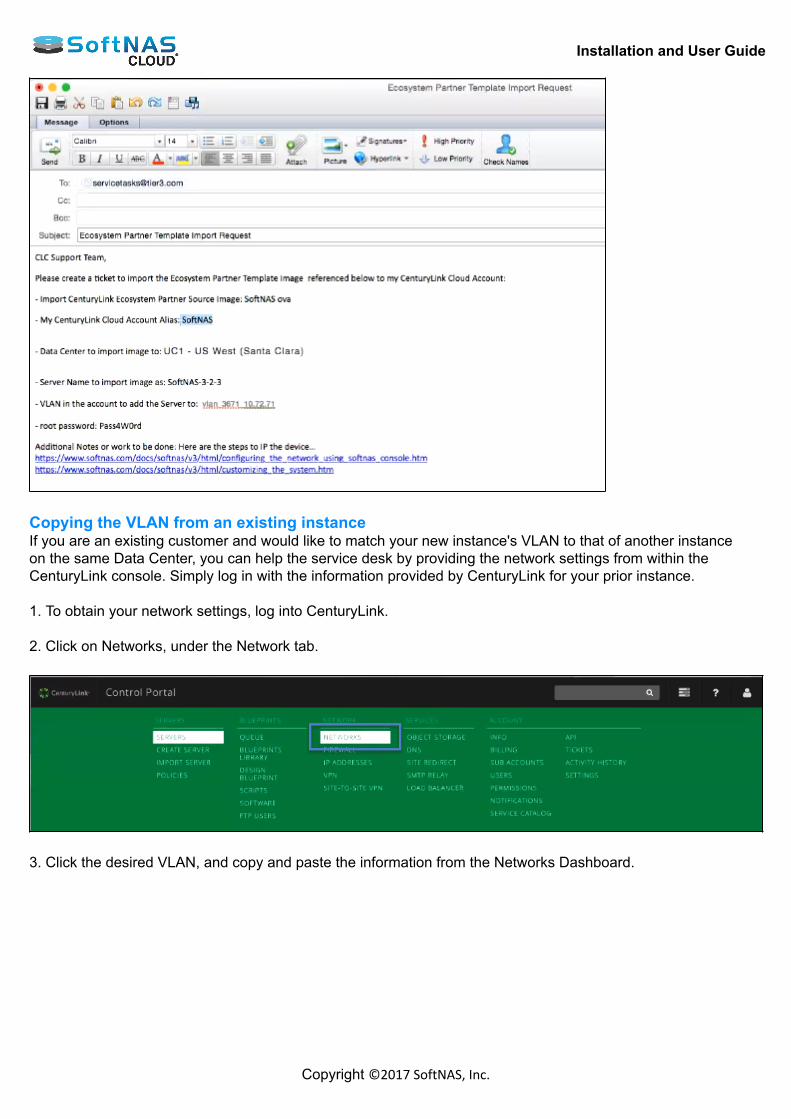
Installation and User Guide
Copyright ©2017 SoftNAS, Inc.
Copying the VLAN from an existing instanceIf you are an existing customer and would like to match your new instance's VLAN to that of another instanceon the same Data Center, you can help the service desk by providing the network settings from within theCenturyLink console. Simply log in with the information provided by CenturyLink for your prior instance. 1. To obtain your network settings, log into CenturyLink. 2. Click on Networks, under the Network tab.
3. Click the desired VLAN, and copy and paste the information from the Networks Dashboard.
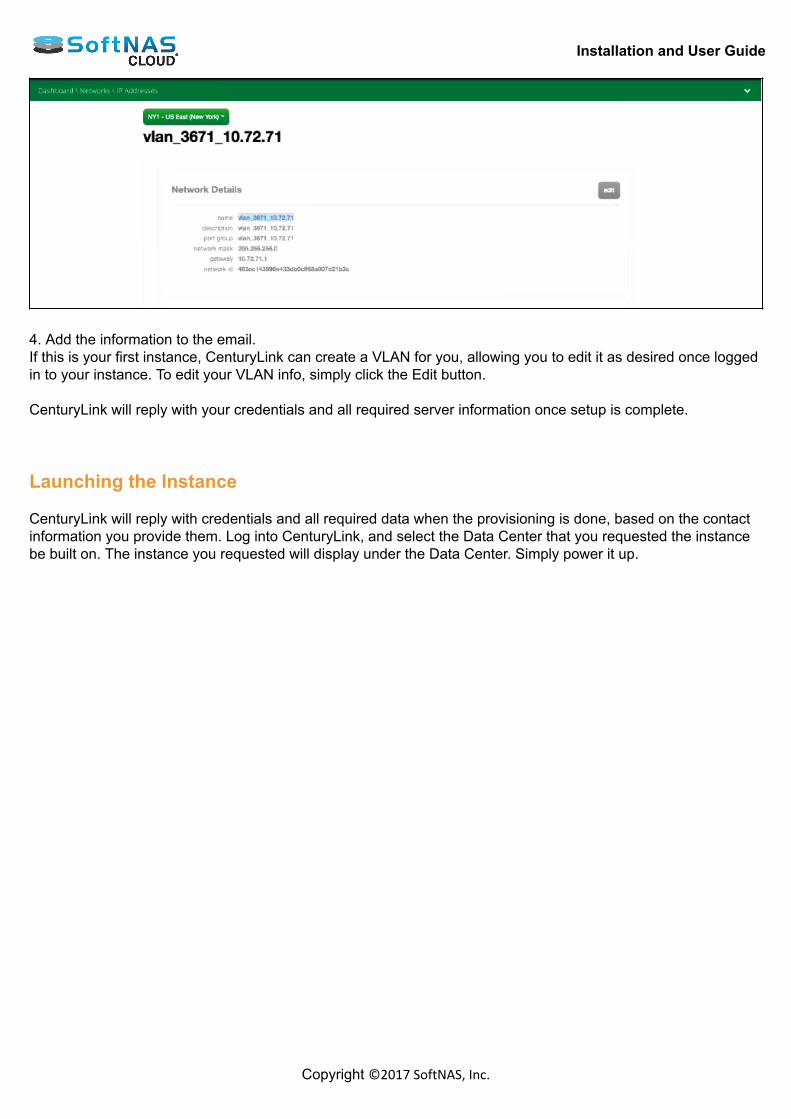
Installation and User Guide
Copyright ©2017 SoftNAS, Inc.
4. Add the information to the email.If this is your first instance, CenturyLink can create a VLAN for you, allowing you to edit it as desired once loggedin to your instance. To edit your VLAN info, simply click the Edit button. CenturyLink will reply with your credentials and all required server information once setup is complete. Launching the Instance CenturyLink will reply with credentials and all required data when the provisioning is done, based on the contactinformation you provide them. Log into CenturyLink, and select the Data Center that you requested the instancebe built on. The instance you requested will display under the Data Center. Simply power it up.
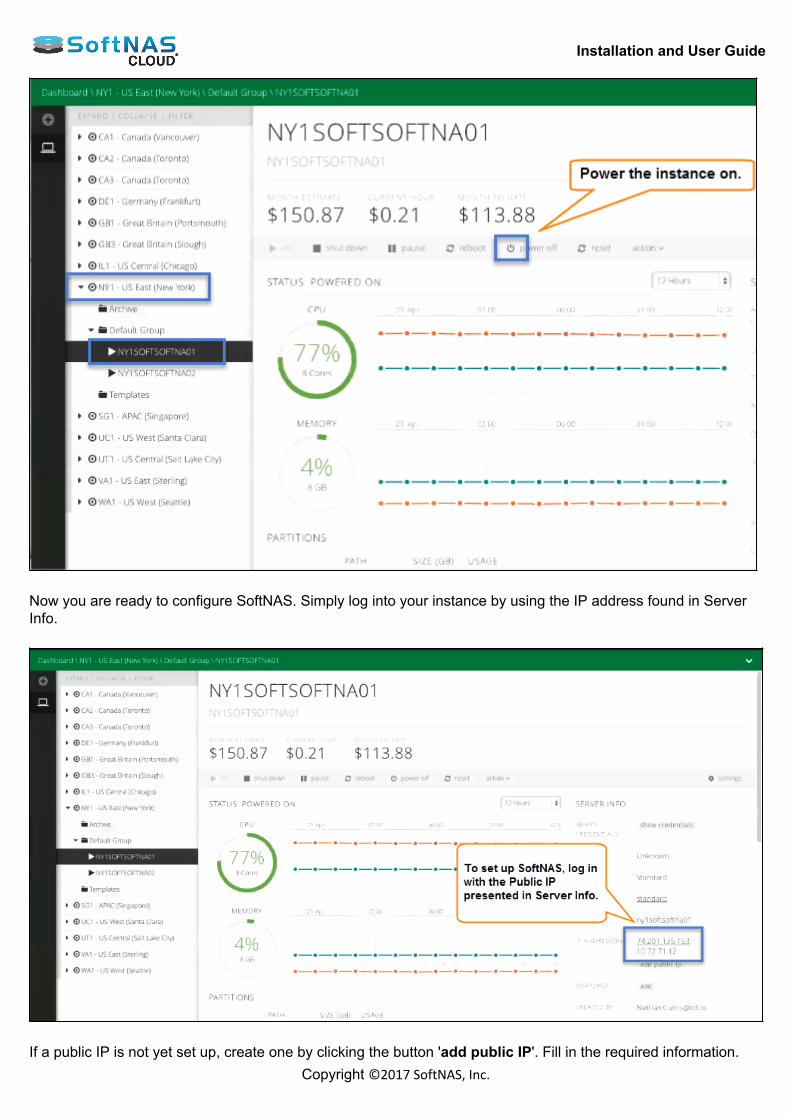
Installation and User Guide
Copyright ©2017 SoftNAS, Inc.
Now you are ready to configure SoftNAS. Simply log into your instance by using the IP address found in ServerInfo.
If a public IP is not yet set up, create one by clicking the button 'add public IP'. Fill in the required information.
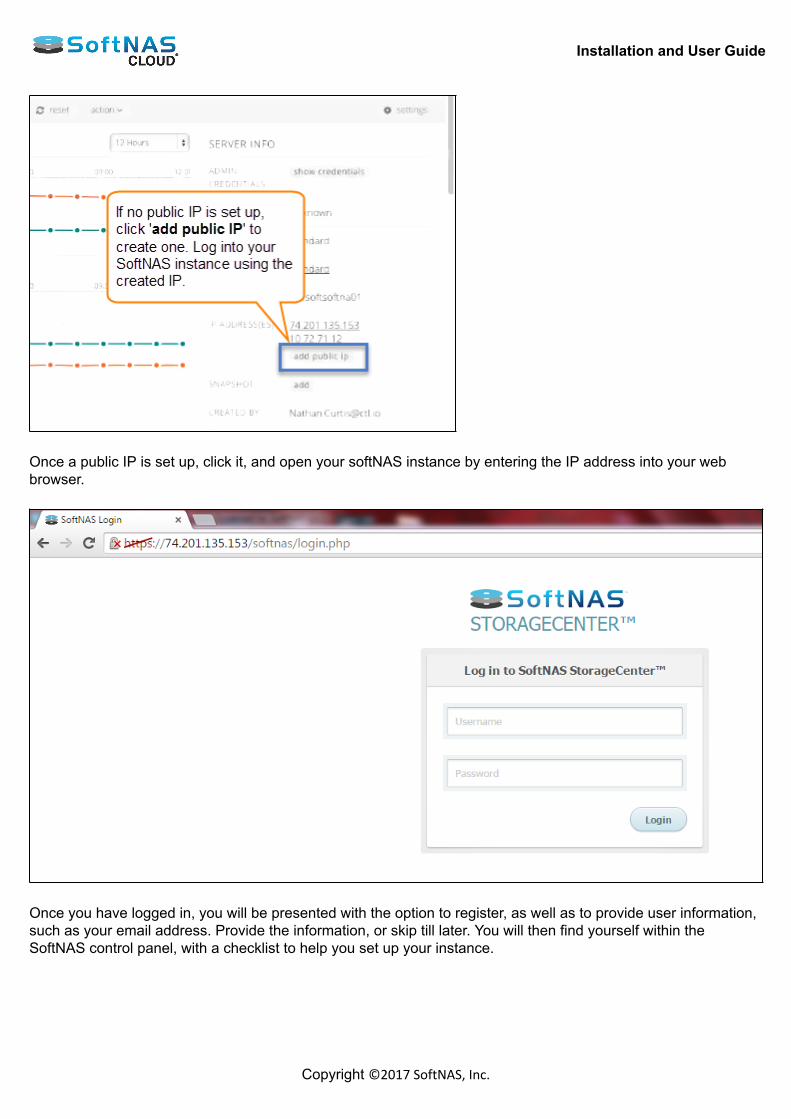
Installation and User Guide
Copyright ©2017 SoftNAS, Inc.
Once a public IP is set up, click it, and open your softNAS instance by entering the IP address into your webbrowser.
Once you have logged in, you will be presented with the option to register, as well as to provide user information,such as your email address. Provide the information, or skip till later. You will then find yourself within theSoftNAS control panel, with a checklist to help you set up your instance.
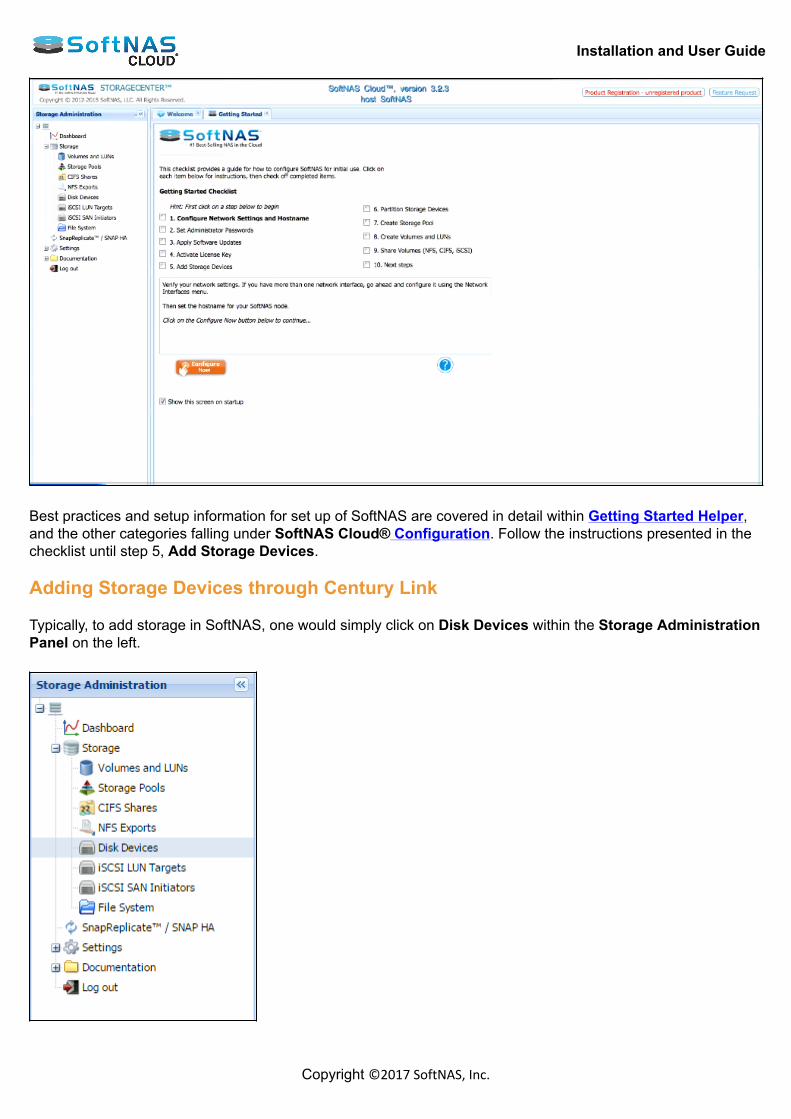
Installation and User Guide
Copyright ©2017 SoftNAS, Inc.
Best practices and setup information for set up of SoftNAS are covered in detail within Getting Started Helper,and the other categories falling under SoftNAS Cloud® Configuration. Follow the instructions presented in thechecklist until step 5, Add Storage Devices. Adding Storage Devices through Century Link Typically, to add storage in SoftNAS, one would simply click on Disk Devices within the Storage AdministrationPanel on the left.
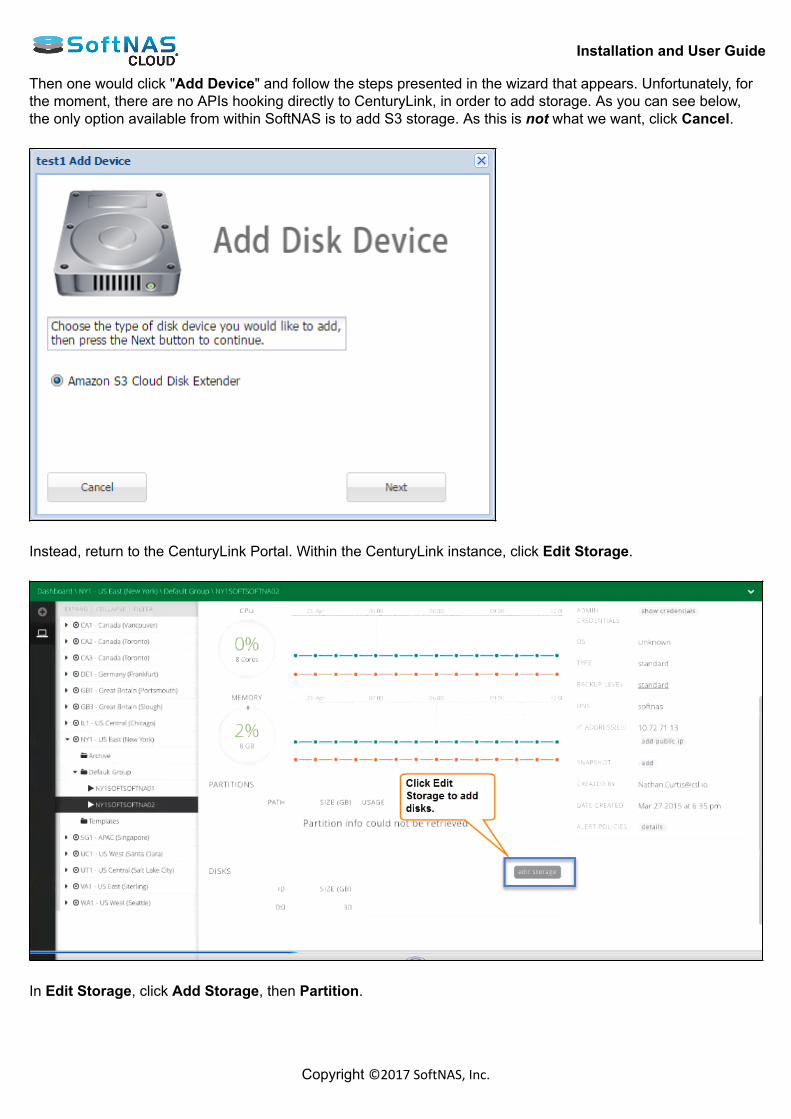
Installation and User Guide
Copyright ©2017 SoftNAS, Inc.
Then one would click "Add Device" and follow the steps presented in the wizard that appears. Unfortunately, forthe moment, there are no APIs hooking directly to CenturyLink, in order to add storage. As you can see below,the only option available from within SoftNAS is to add S3 storage. As this is not what we want, click Cancel.
Instead, return to the CenturyLink Portal. Within the CenturyLink instance, click Edit Storage.
In Edit Storage, click Add Storage, then Partition.
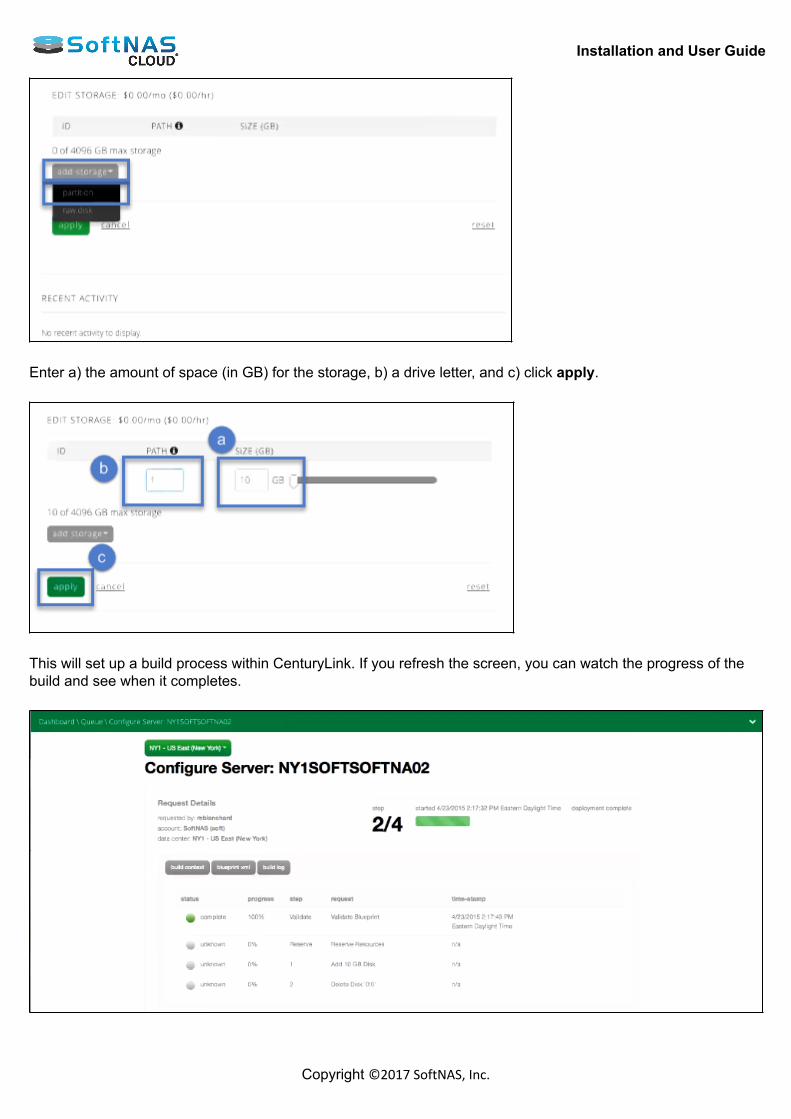
Installation and User Guide
Copyright ©2017 SoftNAS, Inc.
Enter a) the amount of space (in GB) for the storage, b) a drive letter, and c) click apply.
This will set up a build process within CenturyLink. If you refresh the screen, you can watch the progress of thebuild and see when it completes.

Installation and User Guide
Copyright ©2017 SoftNAS, Inc.
Once complete, return to SoftNAS via the public IP set up earlier. Click Disk Devices once more, and the newdevices will be presented, and available to assign into pools.
Set up of pools, volumes, high availability and more are covered in the SoftNAS Cloud® Configuration sectionof this Installation Guide. High Availability configurations are covered in more detail within our High AvailabilityGuide.

Installation and User Guide
Copyright ©2017 SoftNAS, Inc.
VMware vSphere OverviewAs shown below, SoftNAS Cloud® operates within the VMware virtualization environment, typically on aVMware host that is dedicated as a NAS storage server. VMware virtualization provides the broadest rangeof device and resources, resulting in superior management and administration. And because SoftNAS runswithin VMware, it inherits all the features and support that comes from VMware, including vCenter and otheradministration tools.
VMware vSphere client is a familiar entity in on-premise storage environments. It is considered the principaladministrative interface for vCenter Server and ESXi environments. After downloading and installing VMware vSphere, ensure that the most recent version of this client has beeninstalled. Please review the VMware vSphere System Requirements for more details on recommended settings for theSoftNAS Cloud® VM.
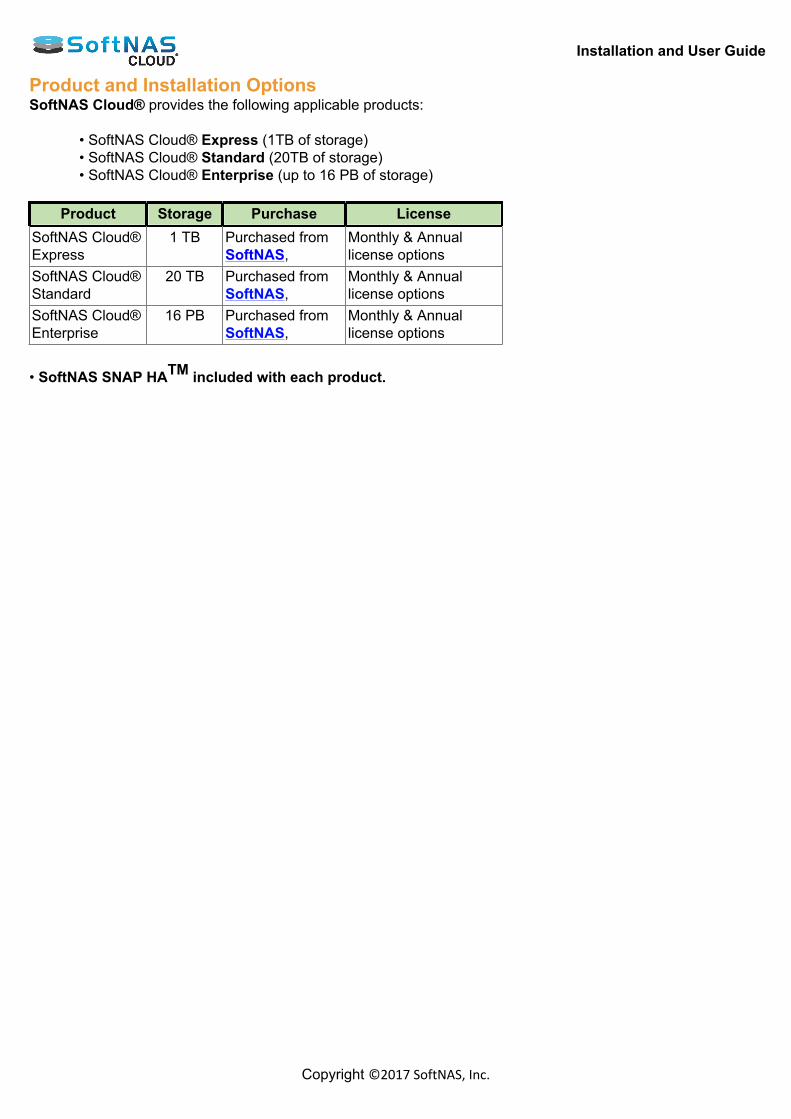
Installation and User Guide
Copyright ©2017 SoftNAS, Inc.
Product and Installation OptionsSoftNAS Cloud® provides the following applicable products:
• SoftNAS Cloud® Express (1TB of storage)• SoftNAS Cloud® Standard (20TB of storage)• SoftNAS Cloud® Enterprise (up to 16 PB of storage)
Product Storage Purchase LicenseSoftNAS Cloud®Express
1 TB Purchased fromSoftNAS,
Monthly & Annuallicense options
SoftNAS Cloud®Standard
20 TB Purchased fromSoftNAS,
Monthly & Annuallicense options
SoftNAS Cloud®Enterprise
16 PB Purchased fromSoftNAS,
Monthly & Annuallicense options
• SoftNAS SNAP HATM included with each product.
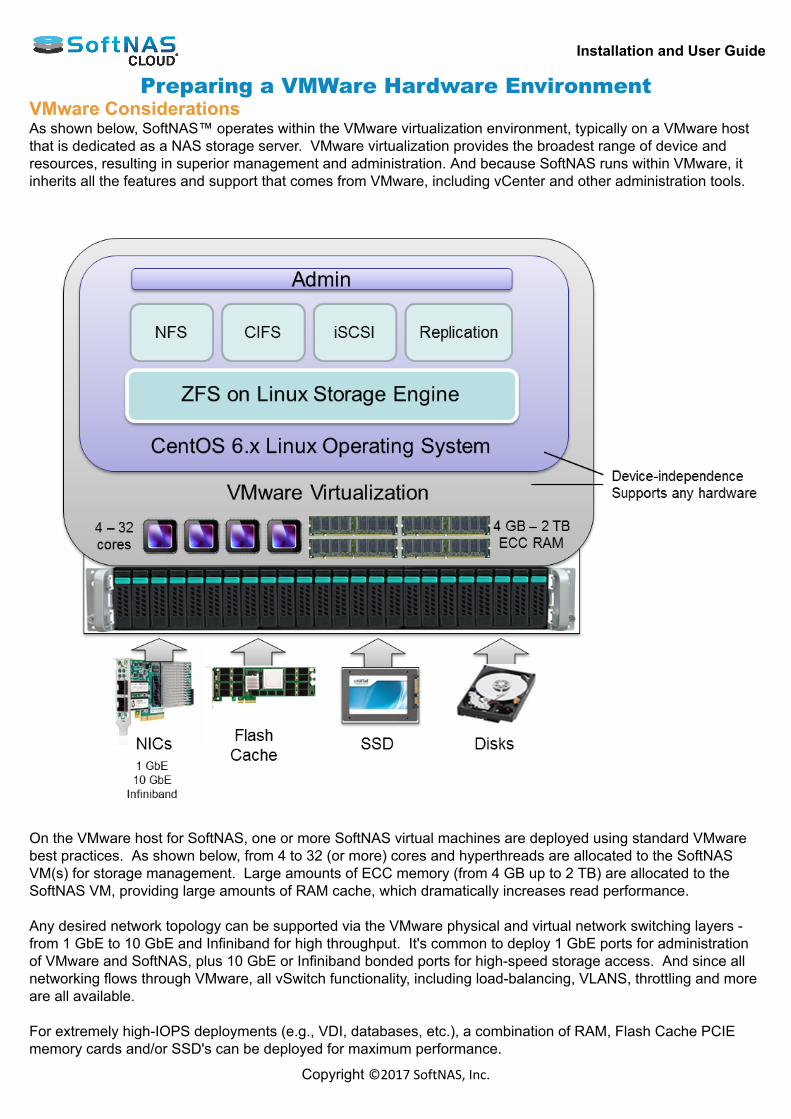
Installation and User Guide
Copyright ©2017 SoftNAS, Inc.
Preparing a VMWare Hardware EnvironmentVMware ConsiderationsAs shown below, SoftNAS™ operates within the VMware virtualization environment, typically on a VMware hostthat is dedicated as a NAS storage server. VMware virtualization provides the broadest range of device andresources, resulting in superior management and administration. And because SoftNAS runs within VMware, itinherits all the features and support that comes from VMware, including vCenter and other administration tools.
On the VMware host for SoftNAS, one or more SoftNAS virtual machines are deployed using standard VMwarebest practices. As shown below, from 4 to 32 (or more) cores and hyperthreads are allocated to the SoftNASVM(s) for storage management. Large amounts of ECC memory (from 4 GB up to 2 TB) are allocated to theSoftNAS VM, providing large amounts of RAM cache, which dramatically increases read performance. Any desired network topology can be supported via the VMware physical and virtual network switching layers -from 1 GbE to 10 GbE and Infiniband for high throughput. It's common to deploy 1 GbE ports for administrationof VMware and SoftNAS, plus 10 GbE or Infiniband bonded ports for high-speed storage access. And since allnetworking flows through VMware, all vSwitch functionality, including load-balancing, VLANS, throttling and moreare all available. For extremely high-IOPS deployments (e.g., VDI, databases, etc.), a combination of RAM, Flash Cache PCIEmemory cards and/or SSD's can be deployed for maximum performance.

Installation and User Guide
Copyright ©2017 SoftNAS, Inc.
The SoftNAS VM runs as an x64 version of the robust, secure and stable CentOS 6.x Linux operating system. Linux provides a broad range of standard services, including NFS, CIFS (Samba) and iSCSI for NAS clientconnectivity. Virtualization adds a minor amount of overhead (less than 5%) versus bare metal operation. The additional CPUand memory available more than compensates for this nominal virtualization overhead. Of course, virtualizationprovides SoftNAS storage many of the same benefits that workload VM's enjoy by being virtualized (e.g., ease ofadministration and management, and unparalleled flexibility and device compatibility). Note: A minimum of 4 vCPUs is required for proper operation. ZFS includes 256-bit block checksums, whichconsume some CPU. If you choose to use data compression and/or deduplication, additional CPU power maybe required. The ZFS storage engine makes very effective use of RAM for caching. As RAM is relatively inexpensive,it is recommended to provide the SoftNAS VM with as much RAM as you can make available for optimalperformance. Always use ECC RAM with SoftNAS, as you want to ensure there are no errors accidentallyintroduced into your data by memory read/write cycles (and ECC will detect and correct any such errorsimmediately). Please review the VMware vSphere System Requirements for more details on recommended settings for theSoftNAS VM.
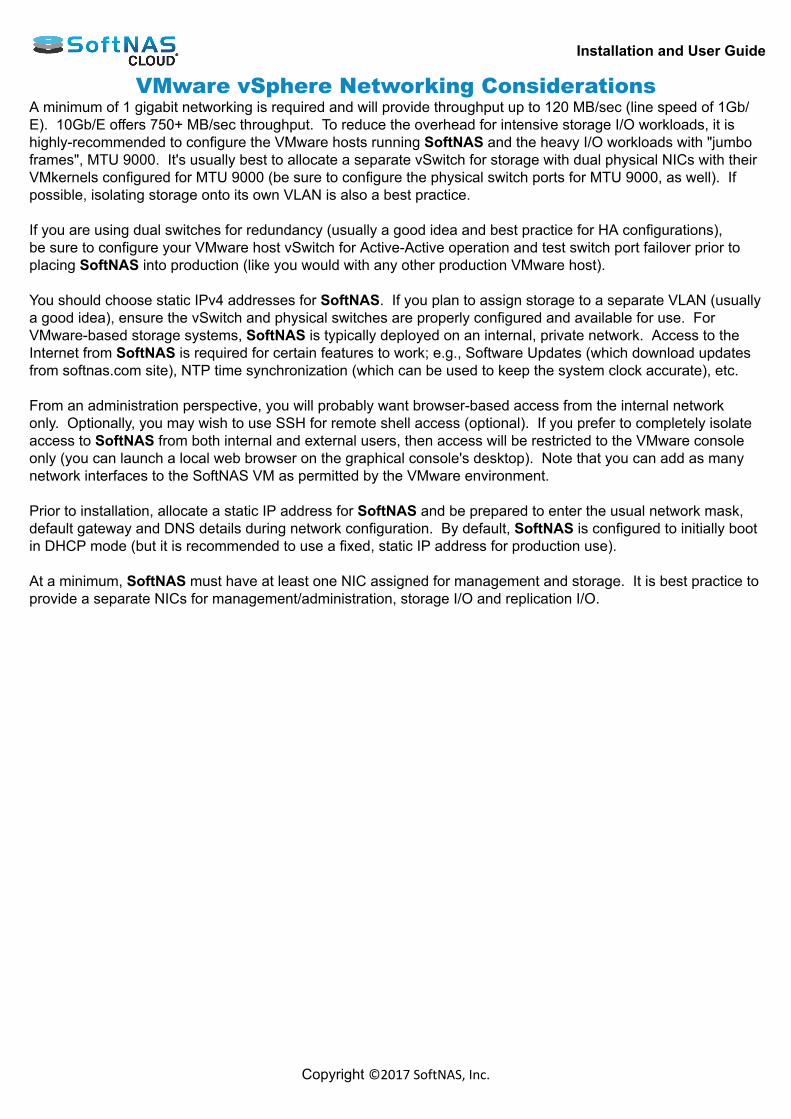
Installation and User Guide
Copyright ©2017 SoftNAS, Inc.
VMware vSphere Networking ConsiderationsA minimum of 1 gigabit networking is required and will provide throughput up to 120 MB/sec (line speed of 1Gb/E). 10Gb/E offers 750+ MB/sec throughput. To reduce the overhead for intensive storage I/O workloads, it ishighly-recommended to configure the VMware hosts running SoftNAS and the heavy I/O workloads with "jumboframes", MTU 9000. It's usually best to allocate a separate vSwitch for storage with dual physical NICs with theirVMkernels configured for MTU 9000 (be sure to configure the physical switch ports for MTU 9000, as well). Ifpossible, isolating storage onto its own VLAN is also a best practice. If you are using dual switches for redundancy (usually a good idea and best practice for HA configurations),be sure to configure your VMware host vSwitch for Active-Active operation and test switch port failover prior toplacing SoftNAS into production (like you would with any other production VMware host). You should choose static IPv4 addresses for SoftNAS. If you plan to assign storage to a separate VLAN (usuallya good idea), ensure the vSwitch and physical switches are properly configured and available for use. ForVMware-based storage systems, SoftNAS is typically deployed on an internal, private network. Access to theInternet from SoftNAS is required for certain features to work; e.g., Software Updates (which download updatesfrom softnas.com site), NTP time synchronization (which can be used to keep the system clock accurate), etc. From an administration perspective, you will probably want browser-based access from the internal networkonly. Optionally, you may wish to use SSH for remote shell access (optional). If you prefer to completely isolateaccess to SoftNAS from both internal and external users, then access will be restricted to the VMware consoleonly (you can launch a local web browser on the graphical console's desktop). Note that you can add as manynetwork interfaces to the SoftNAS VM as permitted by the VMware environment. Prior to installation, allocate a static IP address for SoftNAS and be prepared to enter the usual network mask,default gateway and DNS details during network configuration. By default, SoftNAS is configured to initially bootin DHCP mode (but it is recommended to use a fixed, static IP address for production use). At a minimum, SoftNAS must have at least one NIC assigned for management and storage. It is best practice toprovide a separate NICs for management/administration, storage I/O and replication I/O.

Installation and User Guide
Copyright ©2017 SoftNAS, Inc.
VMware vSphere Disk Device ConsiderationsThe SoftNAS VM runs the Linux operating system, which boots from its own virtual hard disk (VMDK) on the localdisk drive (host datastore). SoftNAS manages a collection of locally-attached storage devices, as shown below. Physical storage devicesare typically managed by VMware and presented as VMware datastore (it is also possible to pass disk controllerthrough VMware directly to Linux for direct-attached raw disks, although that configuration is more complex andless common). VMDKs are used to attach disk storage to the SoftNAS Linux VM. SSD read and write cache devices areattached in a similar way. Note that a single SoftNAS VM can be deployed for dedicated applications or multipleSoftNAS VM's can be deployed for service provider configurations, where different customers receive their ownseparate SoftNAS virtual storage server.
VMDK's can be arranged into raid configurations within SoftNAS to form RAID-1/10 mirrors or RAIDZ-1 toRAIDZ-3 configurations, which provide additional data protection features.
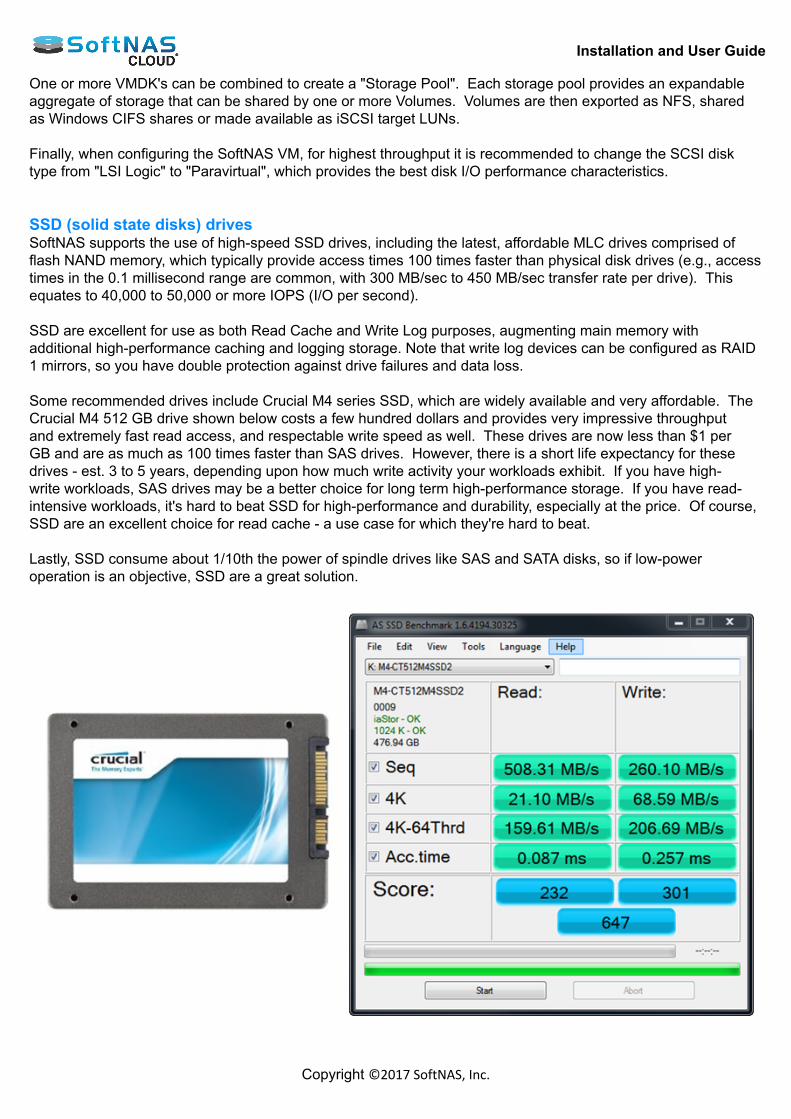
Installation and User Guide
Copyright ©2017 SoftNAS, Inc.
One or more VMDK's can be combined to create a "Storage Pool". Each storage pool provides an expandableaggregate of storage that can be shared by one or more Volumes. Volumes are then exported as NFS, sharedas Windows CIFS shares or made available as iSCSI target LUNs. Finally, when configuring the SoftNAS VM, for highest throughput it is recommended to change the SCSI disktype from "LSI Logic" to "Paravirtual", which provides the best disk I/O performance characteristics. SSD (solid state disks) drivesSoftNAS supports the use of high-speed SSD drives, including the latest, affordable MLC drives comprised offlash NAND memory, which typically provide access times 100 times faster than physical disk drives (e.g., accesstimes in the 0.1 millisecond range are common, with 300 MB/sec to 450 MB/sec transfer rate per drive). Thisequates to 40,000 to 50,000 or more IOPS (I/O per second). SSD are excellent for use as both Read Cache and Write Log purposes, augmenting main memory withadditional high-performance caching and logging storage. Note that write log devices can be configured as RAID1 mirrors, so you have double protection against drive failures and data loss. Some recommended drives include Crucial M4 series SSD, which are widely available and very affordable. TheCrucial M4 512 GB drive shown below costs a few hundred dollars and provides very impressive throughputand extremely fast read access, and respectable write speed as well. These drives are now less than $1 perGB and are as much as 100 times faster than SAS drives. However, there is a short life expectancy for thesedrives - est. 3 to 5 years, depending upon how much write activity your workloads exhibit. If you have high-write workloads, SAS drives may be a better choice for long term high-performance storage. If you have read-intensive workloads, it's hard to beat SSD for high-performance and durability, especially at the price. Of course,SSD are an excellent choice for read cache - a use case for which they're hard to beat. Lastly, SSD consume about 1/10th the power of spindle drives like SAS and SATA disks, so if low-poweroperation is an objective, SSD are a great solution.
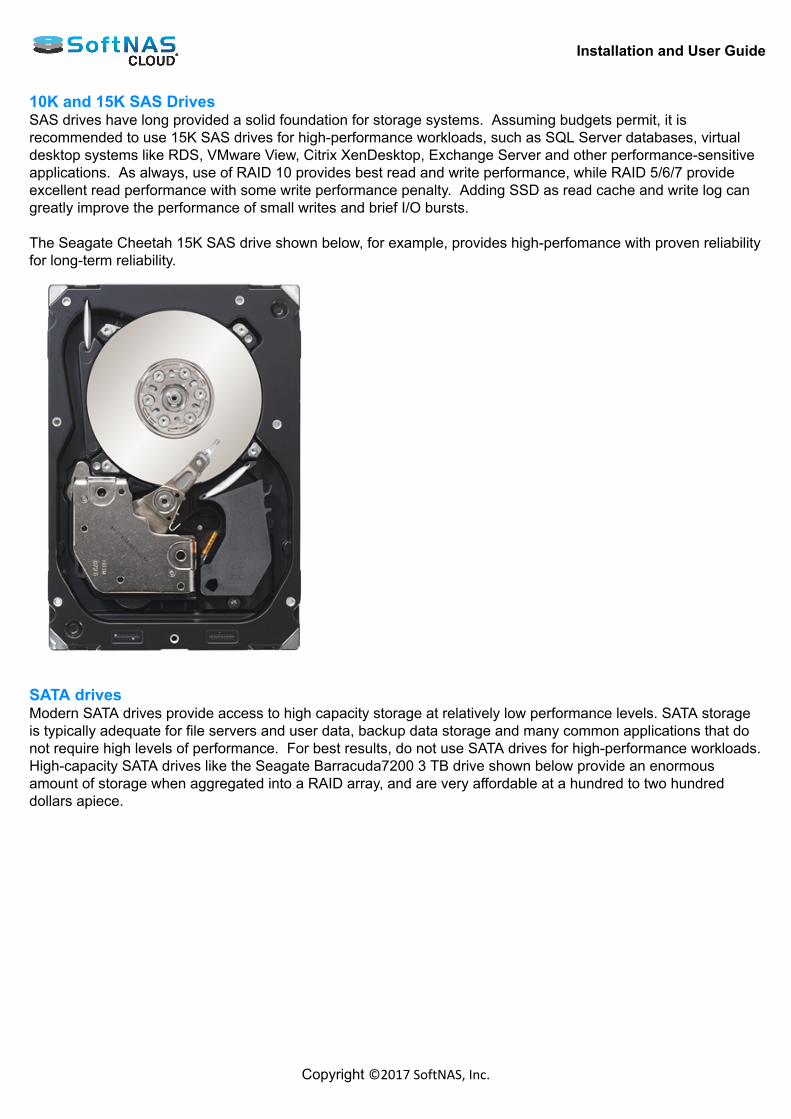
Installation and User Guide
Copyright ©2017 SoftNAS, Inc.
10K and 15K SAS DrivesSAS drives have long provided a solid foundation for storage systems. Assuming budgets permit, it isrecommended to use 15K SAS drives for high-performance workloads, such as SQL Server databases, virtualdesktop systems like RDS, VMware View, Citrix XenDesktop, Exchange Server and other performance-sensitiveapplications. As always, use of RAID 10 provides best read and write performance, while RAID 5/6/7 provideexcellent read performance with some write performance penalty. Adding SSD as read cache and write log cangreatly improve the performance of small writes and brief I/O bursts. The Seagate Cheetah 15K SAS drive shown below, for example, provides high-perfomance with proven reliabilityfor long-term reliability.
SATA drivesModern SATA drives provide access to high capacity storage at relatively low performance levels. SATA storageis typically adequate for file servers and user data, backup data storage and many common applications that donot require high levels of performance. For best results, do not use SATA drives for high-performance workloads.High-capacity SATA drives like the Seagate Barracuda7200 3 TB drive shown below provide an enormousamount of storage when aggregated into a RAID array, and are very affordable at a hundred to two hundreddollars apiece.
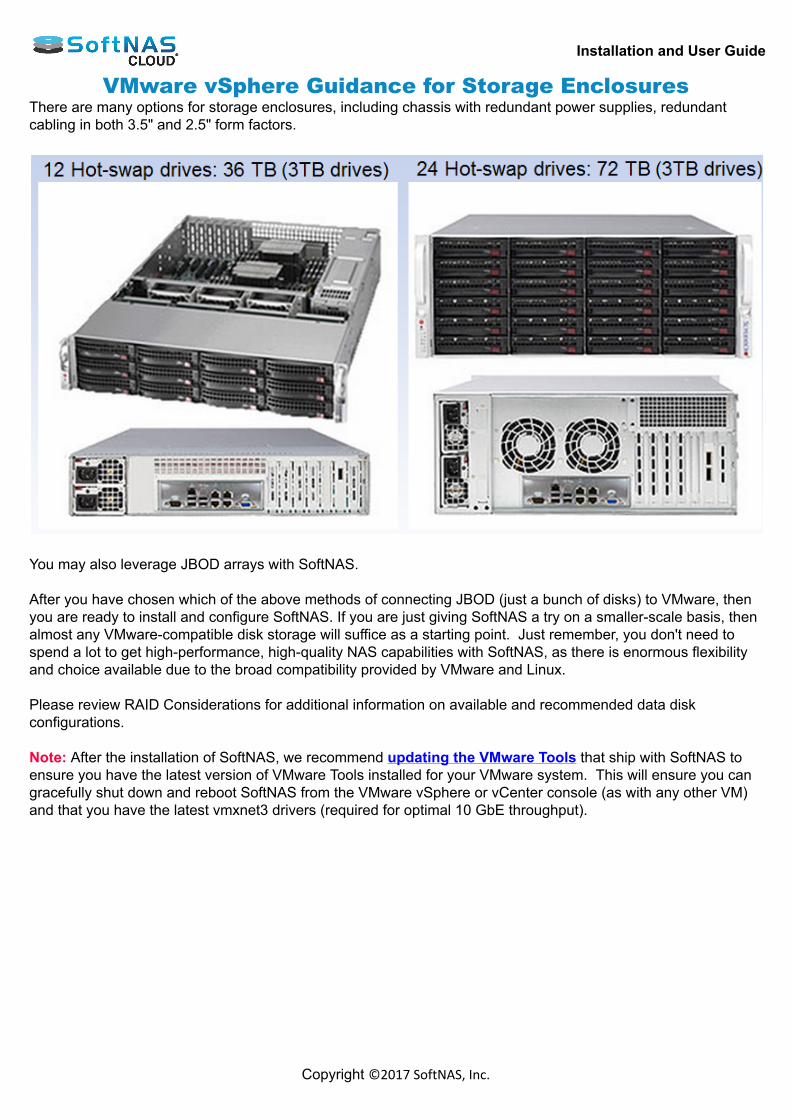
Installation and User Guide
Copyright ©2017 SoftNAS, Inc.
VMware vSphere Guidance for Storage EnclosuresThere are many options for storage enclosures, including chassis with redundant power supplies, redundantcabling in both 3.5" and 2.5" form factors.
You may also leverage JBOD arrays with SoftNAS. After you have chosen which of the above methods of connecting JBOD (just a bunch of disks) to VMware, thenyou are ready to install and configure SoftNAS. If you are just giving SoftNAS a try on a smaller-scale basis, thenalmost any VMware-compatible disk storage will suffice as a starting point. Just remember, you don't need tospend a lot to get high-performance, high-quality NAS capabilities with SoftNAS, as there is enormous flexibilityand choice available due to the broad compatibility provided by VMware and Linux. Please review RAID Considerations for additional information on available and recommended data diskconfigurations. Note: After the installation of SoftNAS, we recommend updating the VMware Tools that ship with SoftNAS toensure you have the latest version of VMware Tools installed for your VMware system. This will ensure you cangracefully shut down and reboot SoftNAS from the VMware vSphere or vCenter console (as with any other VM)and that you have the latest vmxnet3 drivers (required for optimal 10 GbE throughput).
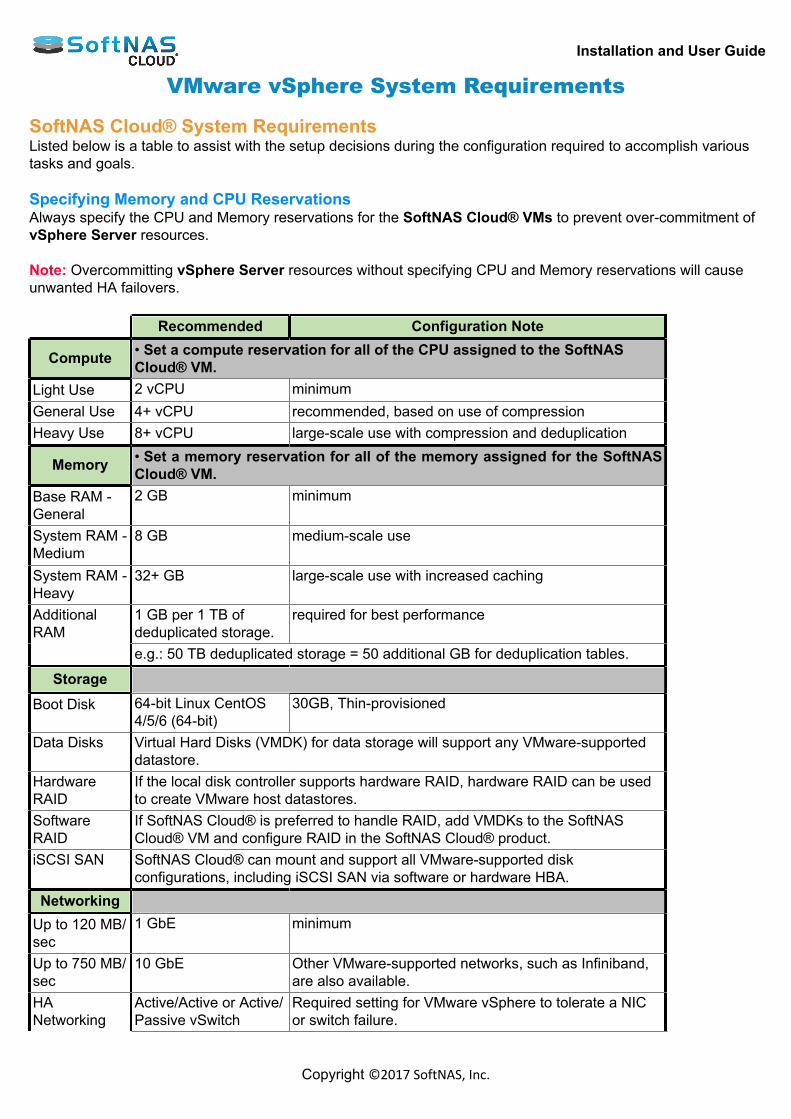
Installation and User Guide
Copyright ©2017 SoftNAS, Inc.
VMware vSphere System Requirements SoftNAS Cloud® System RequirementsListed below is a table to assist with the setup decisions during the configuration required to accomplish varioustasks and goals. Specifying Memory and CPU ReservationsAlways specify the CPU and Memory reservations for the SoftNAS Cloud® VMs to prevent over-commitment ofvSphere Server resources. Note: Overcommitting vSphere Server resources without specifying CPU and Memory reservations will causeunwanted HA failovers. Recommended Configuration Note
Compute • Set a compute reservation for all of the CPU assigned to the SoftNASCloud® VM.
Light Use 2 vCPU minimumGeneral Use 4+ vCPU recommended, based on use of compressionHeavy Use 8+ vCPU large-scale use with compression and deduplication
Memory • Set a memory reservation for all of the memory assigned for the SoftNASCloud® VM.
Base RAM -General
2 GB minimum
System RAM -Medium
8 GB medium-scale use
System RAM -Heavy
32+ GB large-scale use with increased caching
1 GB per 1 TB ofdeduplicated storage.
required for best performanceAdditionalRAM
e.g.: 50 TB deduplicated storage = 50 additional GB for deduplication tables.
Storage
Boot Disk 64-bit Linux CentOS4/5/6 (64-bit)
30GB, Thin-provisioned
Data Disks Virtual Hard Disks (VMDK) for data storage will support any VMware-supporteddatastore.
HardwareRAID
If the local disk controller supports hardware RAID, hardware RAID can be usedto create VMware host datastores.
SoftwareRAID
If SoftNAS Cloud® is preferred to handle RAID, add VMDKs to the SoftNASCloud® VM and configure RAID in the SoftNAS Cloud® product.
iSCSI SAN SoftNAS Cloud® can mount and support all VMware-supported diskconfigurations, including iSCSI SAN via software or hardware HBA.
Networking Up to 120 MB/sec
1 GbE minimum
Up to 750 MB/sec
10 GbE Other VMware-supported networks, such as Infiniband,are also available.
HANetworking
Active/Active or Active/Passive vSwitch
Required setting for VMware vSphere to tolerate a NICor switch failure.
Installation and User Guide
Copyright ©2017 SoftNAS, Inc.
Use of "full mesh" HA switch configurations are also recommended to preventswitch failures from interrupting storage access.
HA HostFailover
Ensure that, for each host operating with SoftNAS Cloud®, the Data Disks areaccessible. Preferred method: dual-path disks or iSCSI or fiber-attached diskswith VMware drivers.
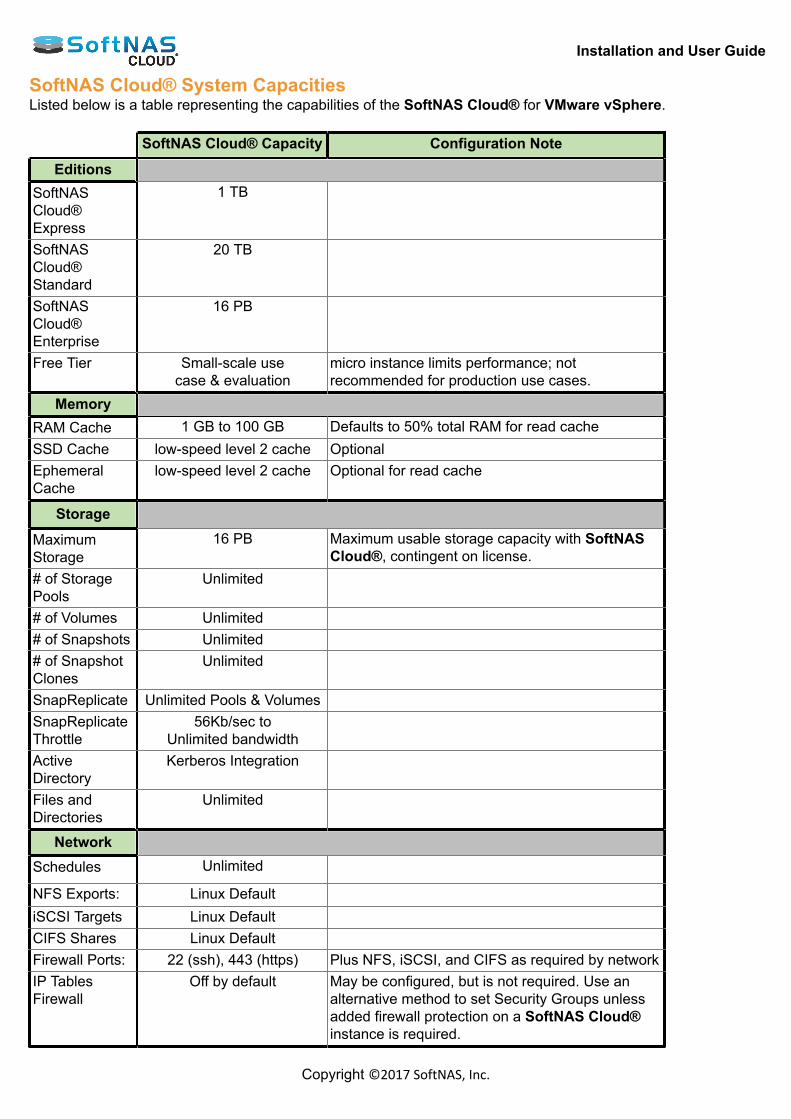
Installation and User Guide
Copyright ©2017 SoftNAS, Inc.
SoftNAS Cloud® System CapacitiesListed below is a table representing the capabilities of the SoftNAS Cloud® for VMware vSphere. SoftNAS Cloud® Capacity Configuration Note
Editions SoftNASCloud®Express
1 TB
SoftNASCloud®Standard
20 TB
SoftNASCloud®Enterprise
16 PB
Free Tier Small-scale usecase & evaluation
micro instance limits performance; notrecommended for production use cases.
Memory RAM Cache 1 GB to 100 GB Defaults to 50% total RAM for read cacheSSD Cache low-speed level 2 cache OptionalEphemeralCache
low-speed level 2 cache Optional for read cache
Storage
MaximumStorage
16 PB Maximum usable storage capacity with SoftNASCloud®, contingent on license.
# of StoragePools
Unlimited
# of Volumes Unlimited # of Snapshots Unlimited # of SnapshotClones
Unlimited
SnapReplicate Unlimited Pools & Volumes SnapReplicateThrottle
56Kb/sec toUnlimited bandwidth
ActiveDirectory
Kerberos Integration
Files andDirectories
Unlimited
Network
Schedules Unlimited
NFS Exports: Linux Default iSCSI Targets Linux Default CIFS Shares Linux Default Firewall Ports: 22 (ssh), 443 (https) Plus NFS, iSCSI, and CIFS as required by networkIP TablesFirewall
Off by default May be configured, but is not required. Use analternative method to set Security Groups unlessadded firewall protection on a SoftNAS Cloud®instance is required.

Installation and User Guide
Copyright ©2017 SoftNAS, Inc.
Update VMware Tools As with any VM, it is important to ensure VMware Tools are current and operating correctly. SoftNAS ships withthe latest version of VMware Tools already installed, but it is a recommended best practice to ensure the VMwareTools are installed and compatible. SoftNAS makes use of the vmxnet 3 network driver to support 10 GbE virtual NICs, support which is provided bydrivers that come with VMware Tools. These drivers are compatible across all ESXI 5.x versions. To update VMware Tools on Linux, follow VMware's instructions here. Log in as root (use the default password"Pass4W0rd" if the administrator has not yet changed the root password). To log in, open up a console windowon VMware and press F8 in the SoftNAS Console, log in with the root password, then log into the SoftNASDesktop and launch a command shell, then follow the VMware Tools installation and update instructions. As shown below, after pressing F8, enter the root password.
We recommend automatic kernel rebuilds (the last question during VMware Tools installs), so that VMwareTools remains compatible with future kernel updates.
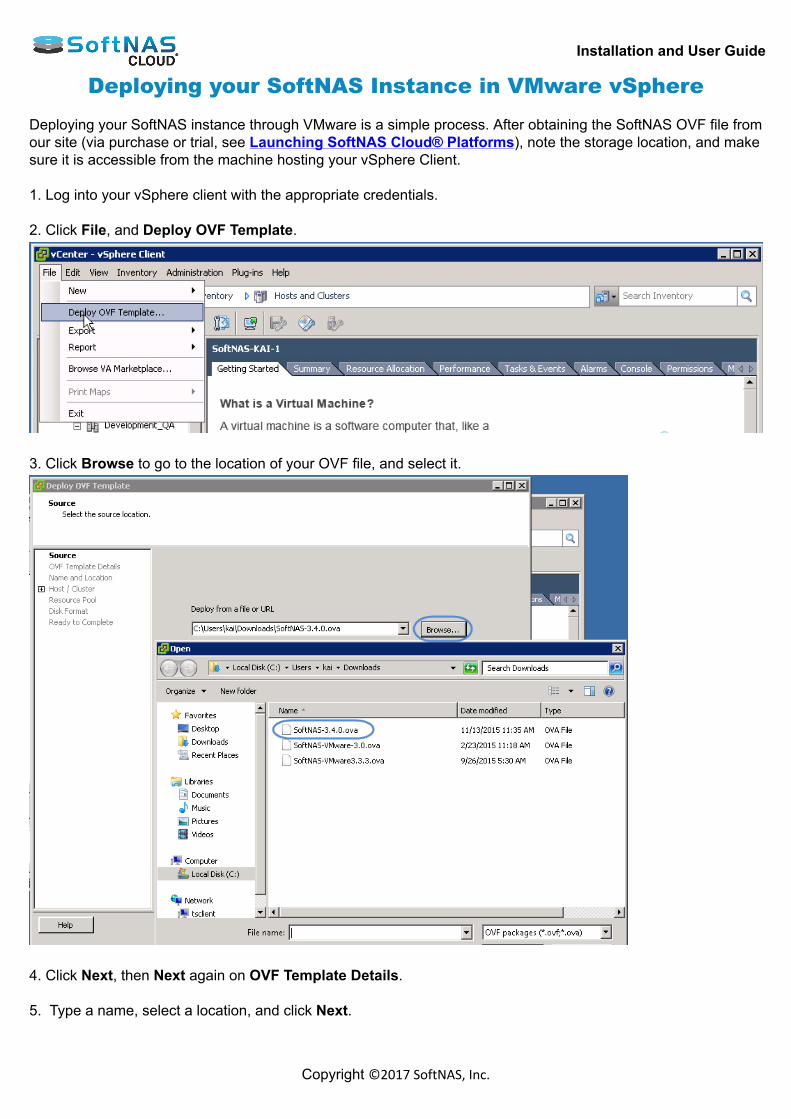
Installation and User Guide
Copyright ©2017 SoftNAS, Inc.
Deploying your SoftNAS Instance in VMware vSphere
Deploying your SoftNAS instance through VMware is a simple process. After obtaining the SoftNAS OVF file fromour site (via purchase or trial, see Launching SoftNAS Cloud® Platforms), note the storage location, and makesure it is accessible from the machine hosting your vSphere Client. 1. Log into your vSphere client with the appropriate credentials. 2. Click File, and Deploy OVF Template.
3. Click Browse to go to the location of your OVF file, and select it.
4. Click Next, then Next again on OVF Template Details. 5. Type a name, select a location, and click Next.

Installation and User Guide
Copyright ©2017 SoftNAS, Inc.
6. Select the Host or Cluster you wish to deploy on, and click Next.
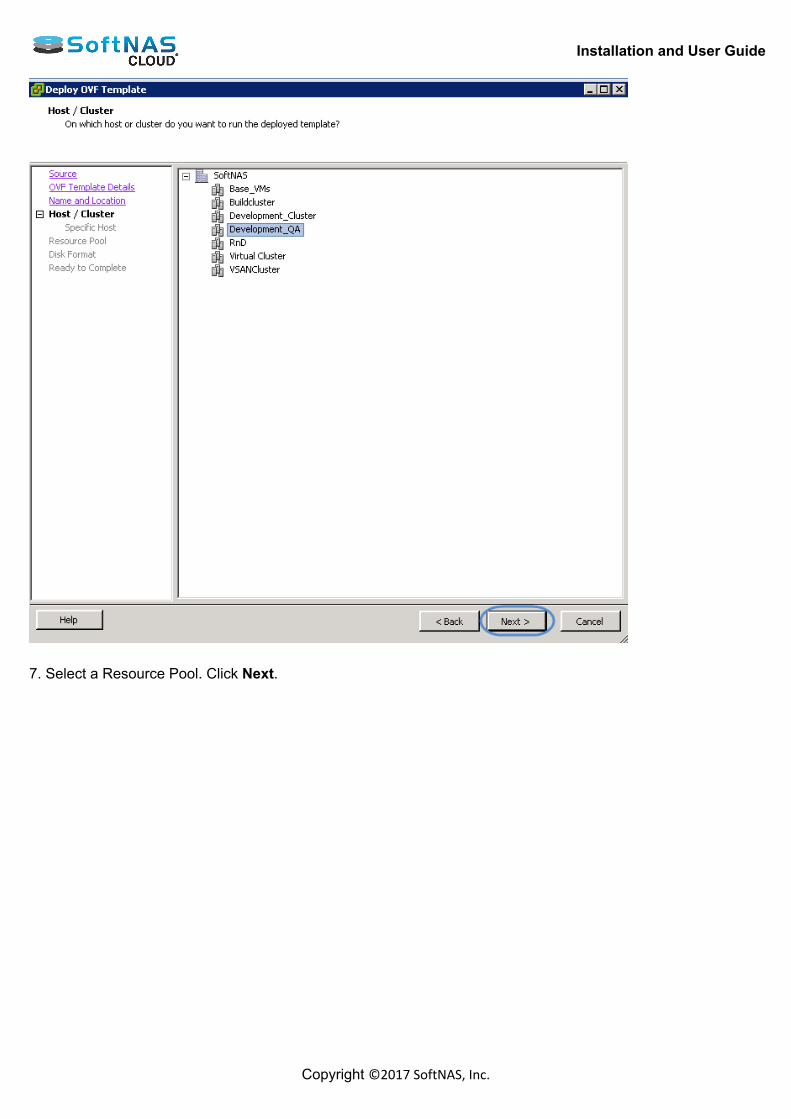
Installation and User Guide
Copyright ©2017 SoftNAS, Inc.
7. Select a Resource Pool. Click Next.

Installation and User Guide
Copyright ©2017 SoftNAS, Inc.
8. Select your destination storage. Click Next.

Installation and User Guide
Copyright ©2017 SoftNAS, Inc.
9. Select a Disk Format, depending on your requirements. For example if running your VM in an environment withspace constraints, select thin provisioning. Look to VMware help for more information. Click Next. 10. Select a network for your VM. If creating an HA environment, be sure to select the same network as otherinstances. Note: If creating an HA environment, you will require at least three VMs, two to act as paired nodes, and one toact as HA Controller. Plan accordingly. 11. Click Finish. Your SoftNAS instance will deploy after a short interval.
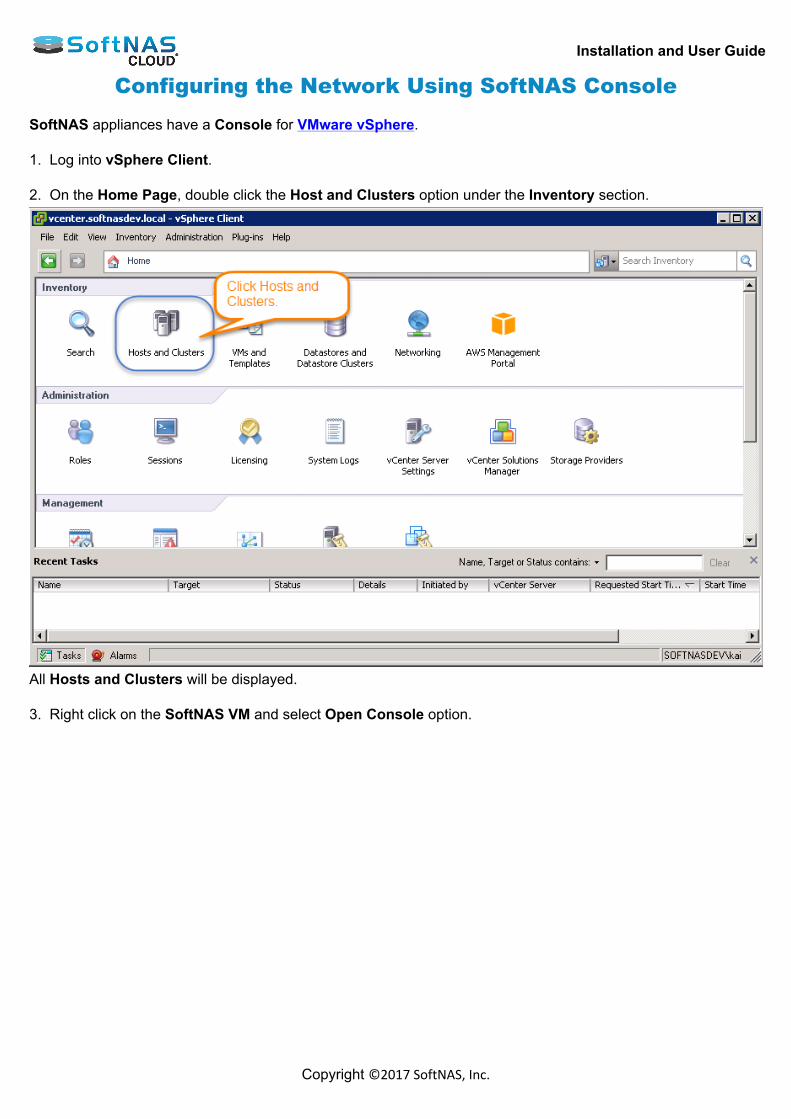
Installation and User Guide
Copyright ©2017 SoftNAS, Inc.
Configuring the Network Using SoftNAS Console SoftNAS appliances have a Console for VMware vSphere. 1. Log into vSphere Client. 2. On the Home Page, double click the Host and Clusters option under the Inventory section.
All Hosts and Clusters will be displayed. 3. Right click on the SoftNAS VM and select Open Console option.
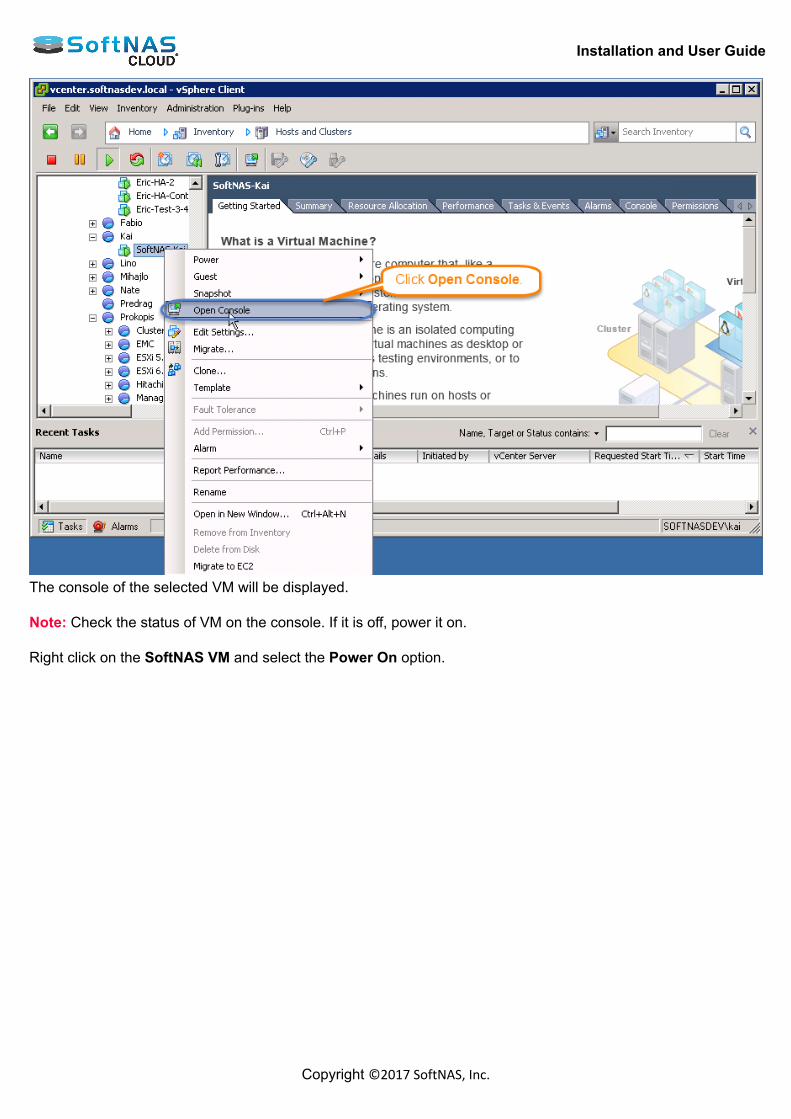
Installation and User Guide
Copyright ©2017 SoftNAS, Inc.
The console of the selected VM will be displayed. Note: Check the status of VM on the console. If it is off, power it on. Right click on the SoftNAS VM and select the Power On option.

Installation and User Guide
Copyright ©2017 SoftNAS, Inc.
The Console with the new configuration screen will be displayed.
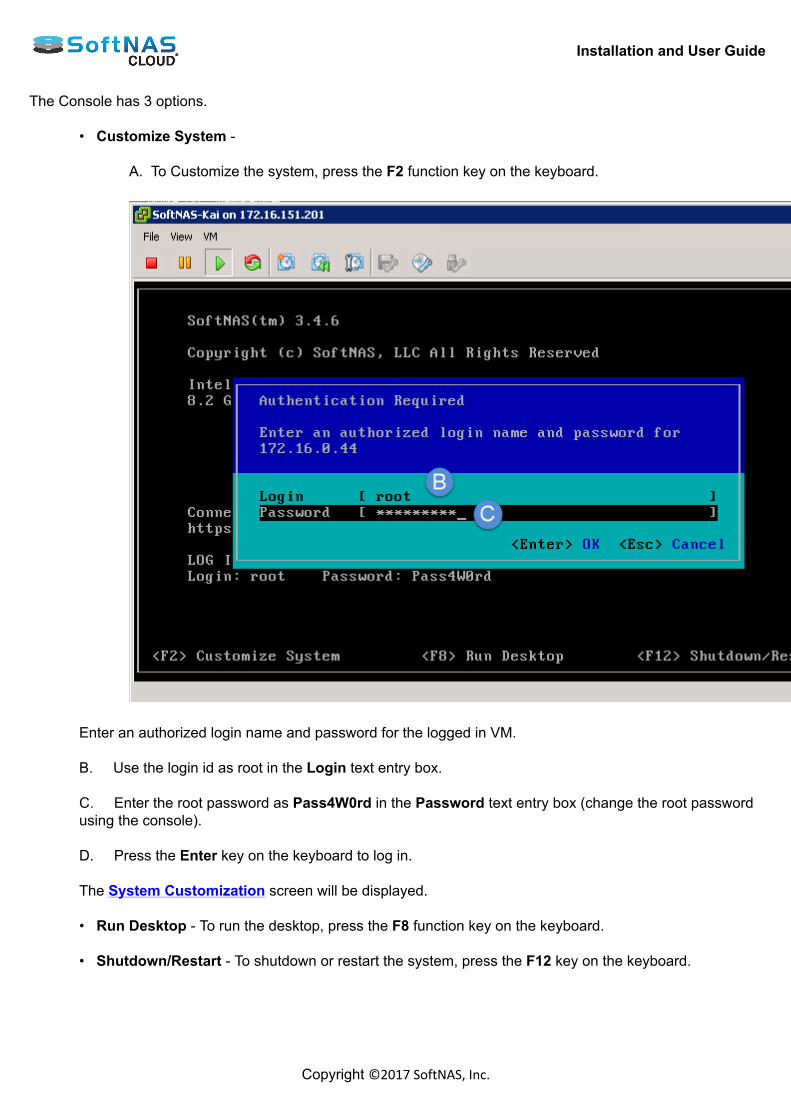
Installation and User Guide
Copyright ©2017 SoftNAS, Inc.
The Console has 3 options.
• Customize System -
A. To Customize the system, press the F2 function key on the keyboard.
Enter an authorized login name and password for the logged in VM. B. Use the login id as root in the Login text entry box. C. Enter the root password as Pass4W0rd in the Password text entry box (change the root passwordusing the console). D. Press the Enter key on the keyboard to log in. The System Customization screen will be displayed.
• Run Desktop - To run the desktop, press the F8 function key on the keyboard. • Shutdown/Restart - To shutdown or restart the system, press the F12 key on the keyboard.
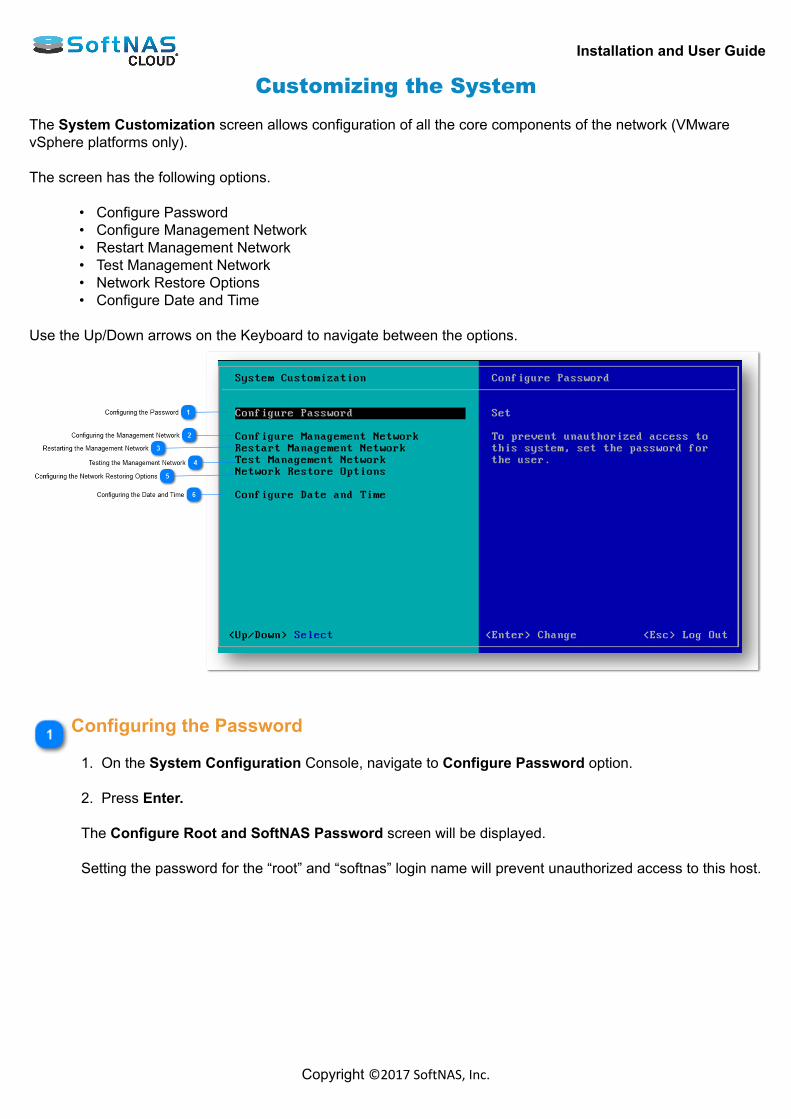
Installation and User Guide
Copyright ©2017 SoftNAS, Inc.
Customizing the System The System Customization screen allows configuration of all the core components of the network (VMwarevSphere platforms only). The screen has the following options.
• Configure Password• Configure Management Network• Restart Management Network• Test Management Network• Network Restore Options• Configure Date and Time
Use the Up/Down arrows on the Keyboard to navigate between the options.
Configuring the Password 1. On the System Configuration Console, navigate to Configure Password option. 2. Press Enter. The Configure Root and SoftNAS Password screen will be displayed. Setting the password for the “root” and “softnas” login name will prevent unauthorized access to this host.
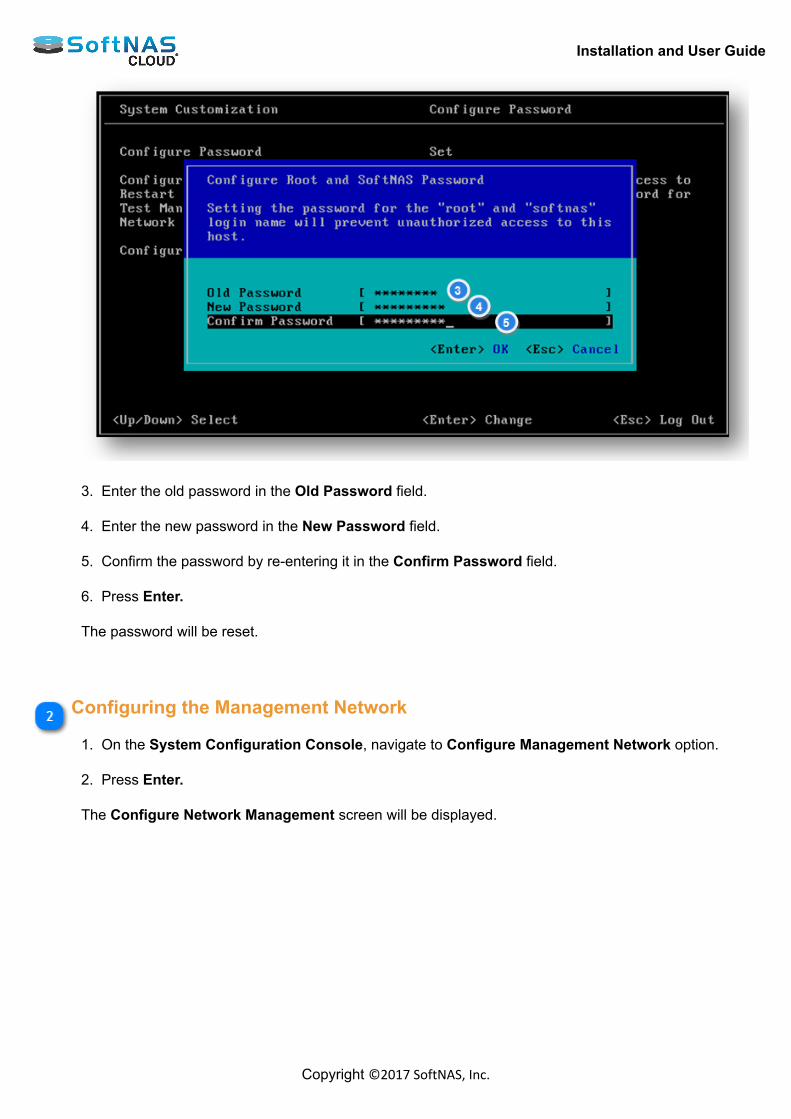
Installation and User Guide
Copyright ©2017 SoftNAS, Inc.
3. Enter the old password in the Old Password field. 4. Enter the new password in the New Password field. 5. Confirm the password by re-entering it in the Confirm Password field. 6. Press Enter. The password will be reset.
Configuring the Management Network 1. On the System Configuration Console, navigate to Configure Management Network option. 2. Press Enter. The Configure Network Management screen will be displayed.
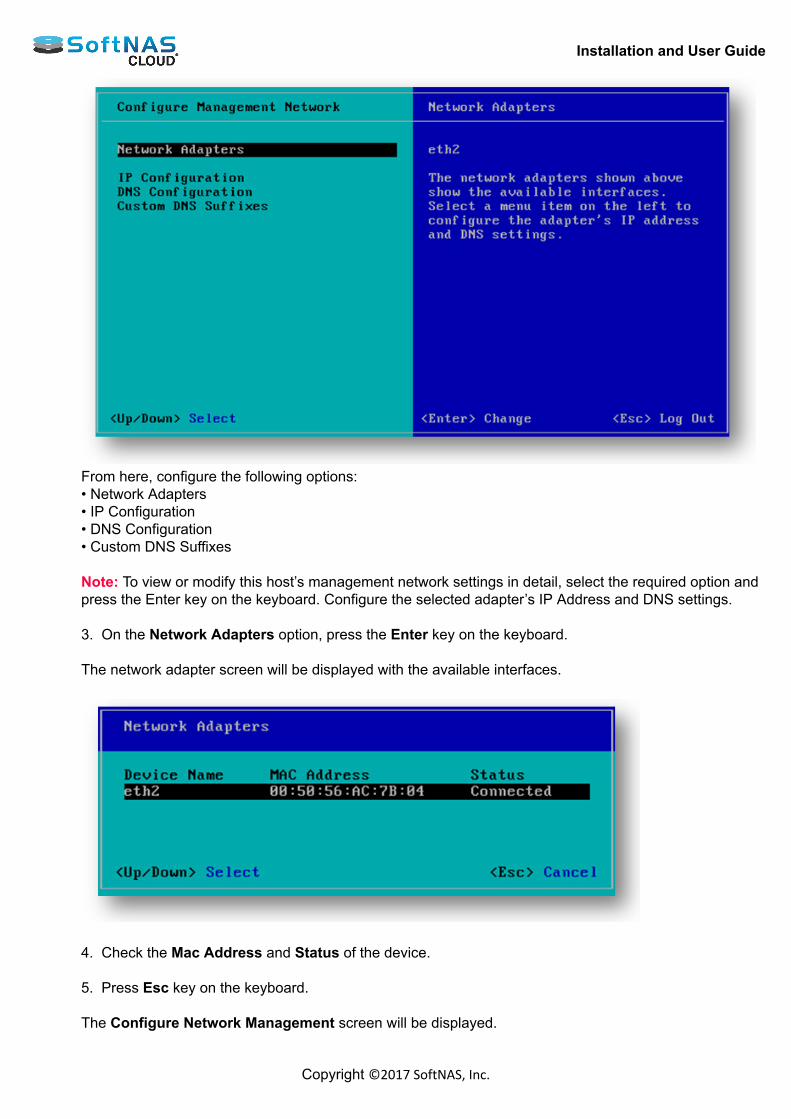
Installation and User Guide
Copyright ©2017 SoftNAS, Inc.
From here, configure the following options:• Network Adapters• IP Configuration• DNS Configuration• Custom DNS Suffixes Note: To view or modify this host’s management network settings in detail, select the required option andpress the Enter key on the keyboard. Configure the selected adapter’s IP Address and DNS settings. 3. On the Network Adapters option, press the Enter key on the keyboard. The network adapter screen will be displayed with the available interfaces.
4. Check the Mac Address and Status of the device. 5. Press Esc key on the keyboard. The Configure Network Management screen will be displayed.
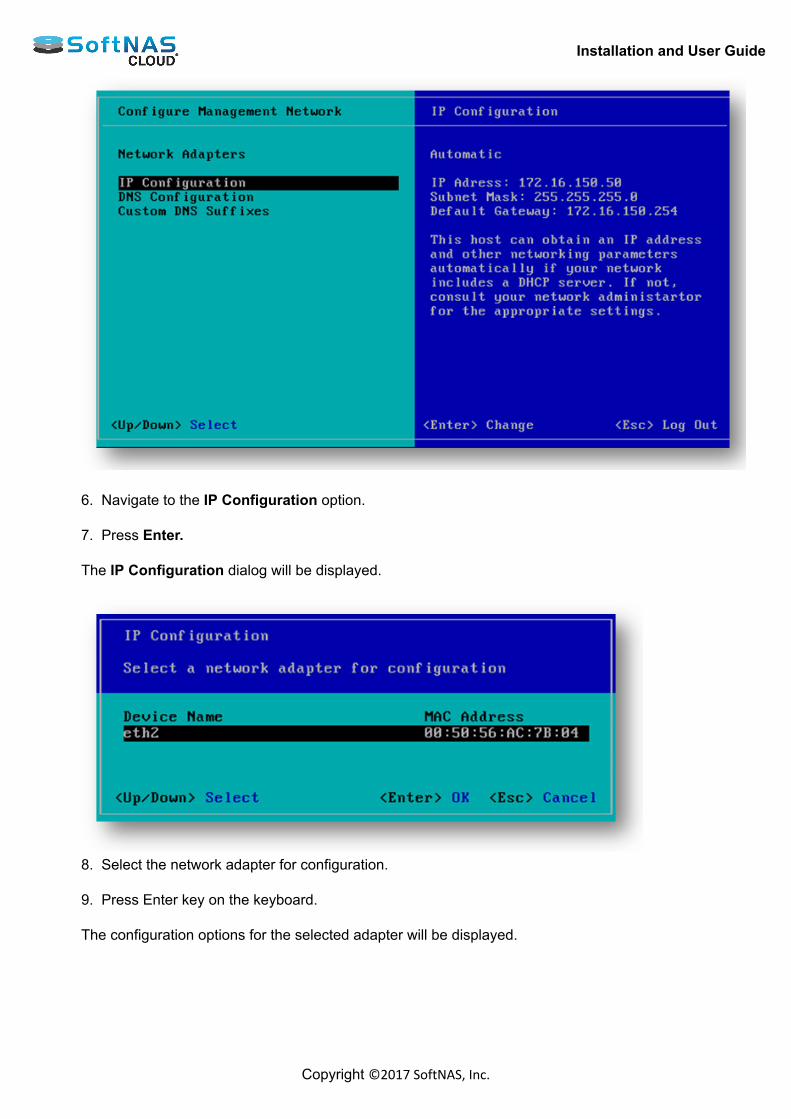
Installation and User Guide
Copyright ©2017 SoftNAS, Inc.
6. Navigate to the IP Configuration option. 7. Press Enter. The IP Configuration dialog will be displayed.
8. Select the network adapter for configuration. 9. Press Enter key on the keyboard. The configuration options for the selected adapter will be displayed.
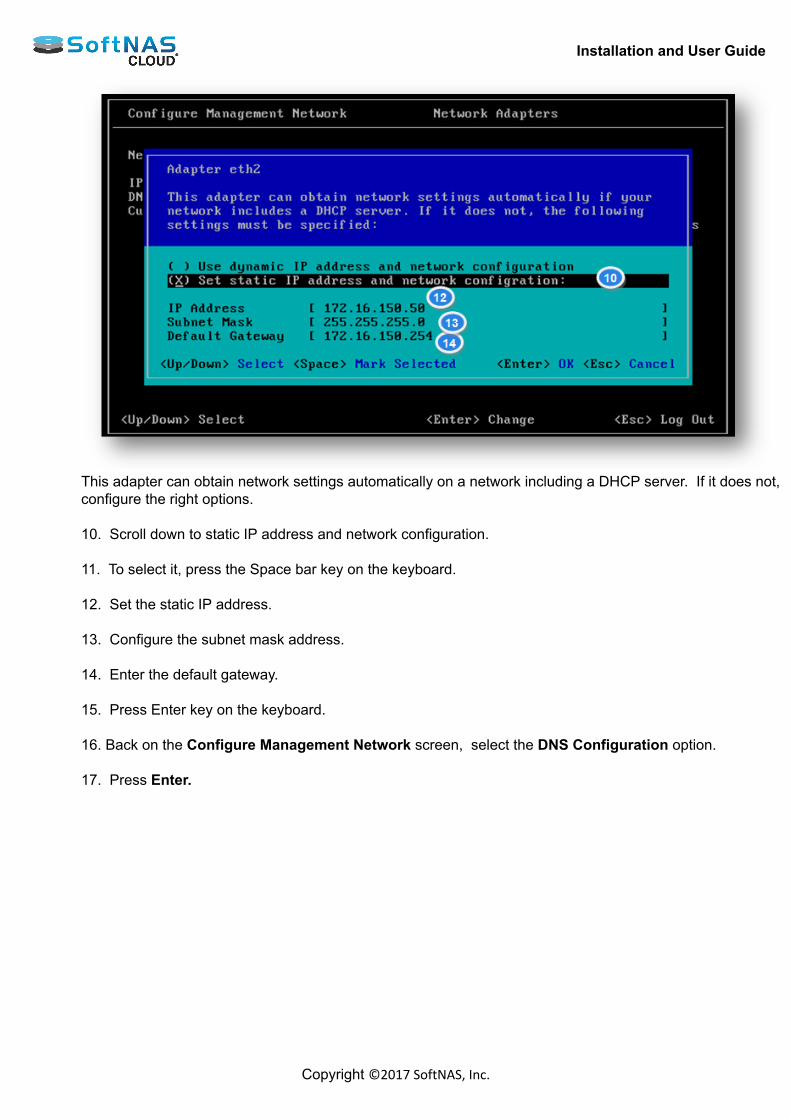
Installation and User Guide
Copyright ©2017 SoftNAS, Inc.
This adapter can obtain network settings automatically on a network including a DHCP server. If it does not,configure the right options. 10. Scroll down to static IP address and network configuration. 11. To select it, press the Space bar key on the keyboard. 12. Set the static IP address. 13. Configure the subnet mask address. 14. Enter the default gateway. 15. Press Enter key on the keyboard. 16. Back on the Configure Management Network screen, select the DNS Configuration option. 17. Press Enter.
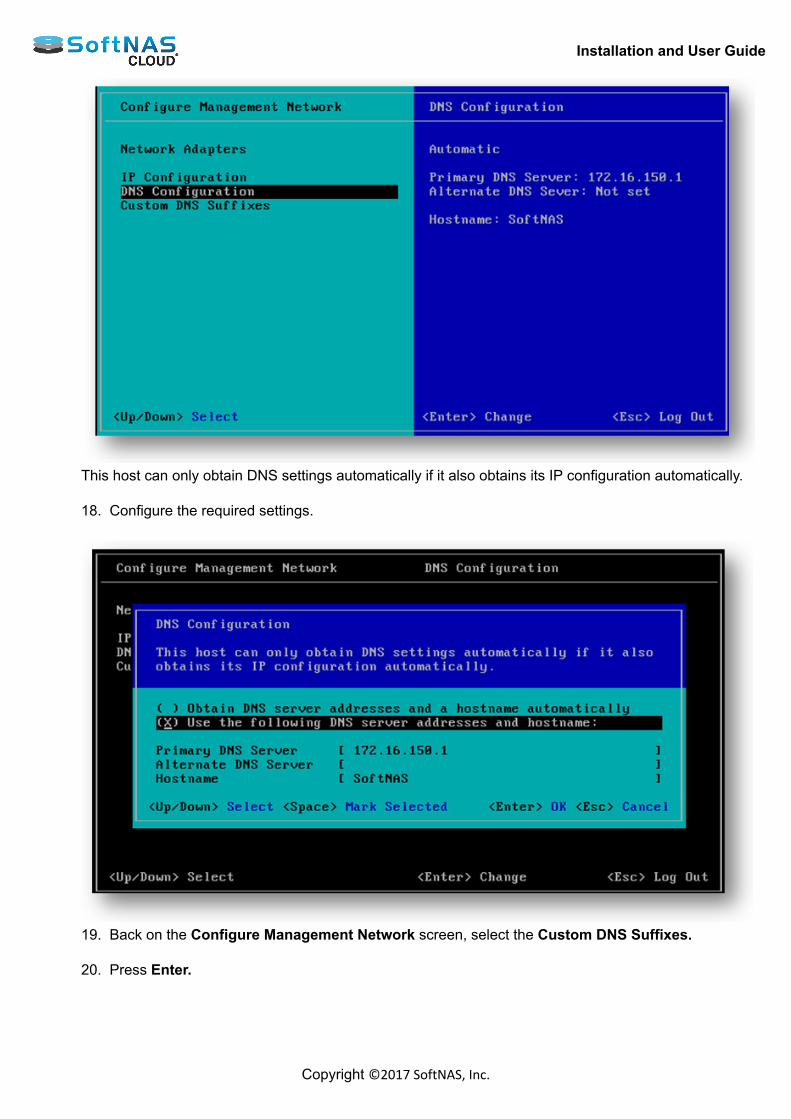
Installation and User Guide
Copyright ©2017 SoftNAS, Inc.
This host can only obtain DNS settings automatically if it also obtains its IP configuration automatically. 18. Configure the required settings.
19. Back on the Configure Management Network screen, select the Custom DNS Suffixes. 20. Press Enter.
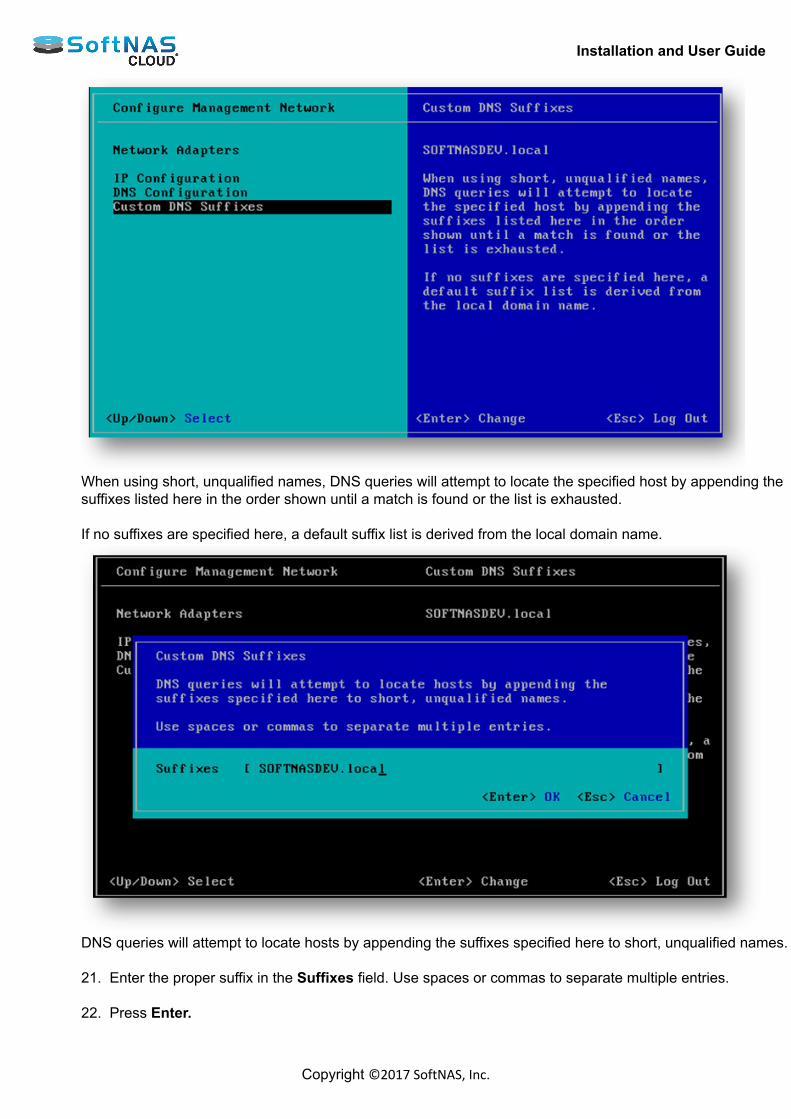
Installation and User Guide
Copyright ©2017 SoftNAS, Inc.
When using short, unqualified names, DNS queries will attempt to locate the specified host by appending thesuffixes listed here in the order shown until a match is found or the list is exhausted. If no suffixes are specified here, a default suffix list is derived from the local domain name.
DNS queries will attempt to locate hosts by appending the suffixes specified here to short, unqualified names. 21. Enter the proper suffix in the Suffixes field. Use spaces or commas to separate multiple entries. 22. Press Enter.
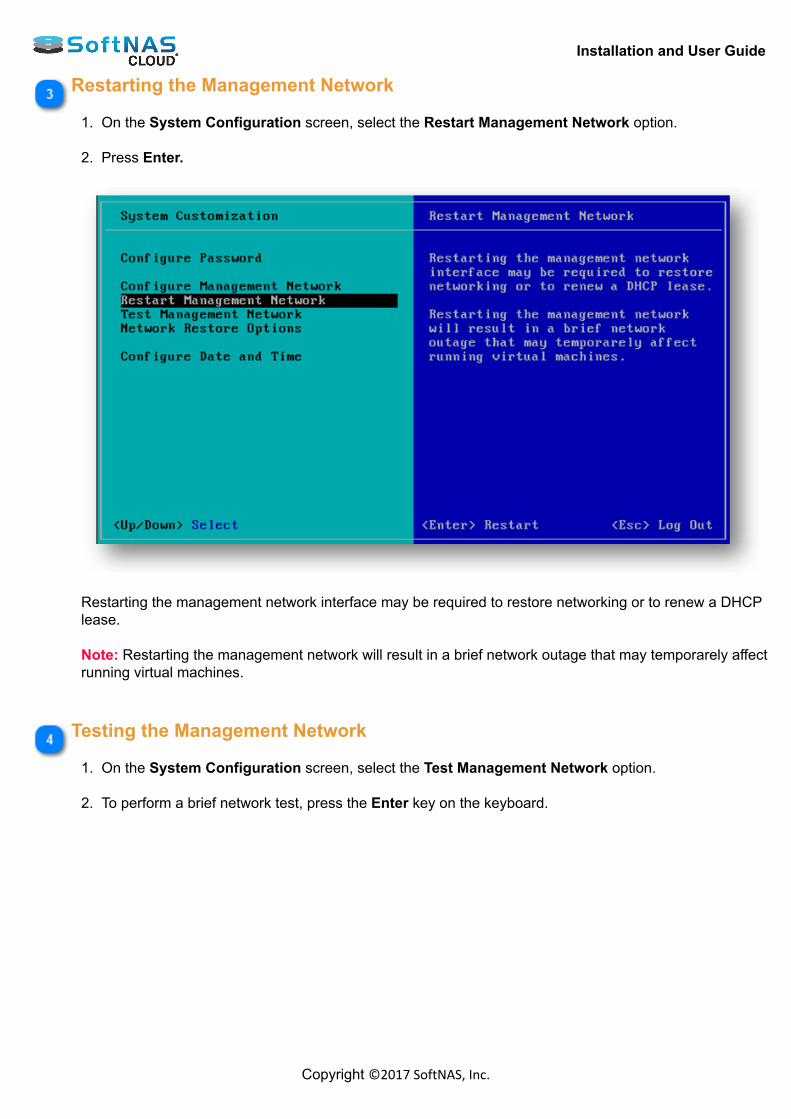
Installation and User Guide
Copyright ©2017 SoftNAS, Inc.
Restarting the Management Network 1. On the System Configuration screen, select the Restart Management Network option. 2. Press Enter.
Restarting the management network interface may be required to restore networking or to renew a DHCPlease. Note: Restarting the management network will result in a brief network outage that may temporarely affectrunning virtual machines.
Testing the Management Network 1. On the System Configuration screen, select the Test Management Network option. 2. To perform a brief network test, press the Enter key on the keyboard.
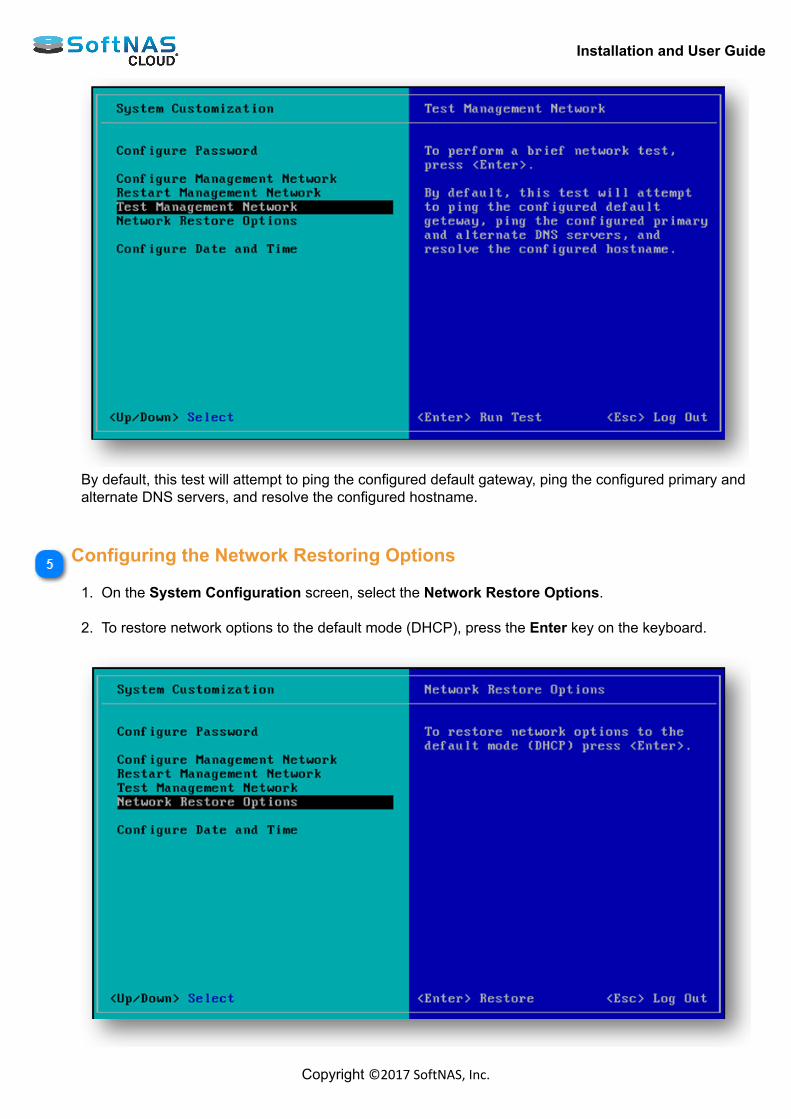
Installation and User Guide
Copyright ©2017 SoftNAS, Inc.
By default, this test will attempt to ping the configured default gateway, ping the configured primary andalternate DNS servers, and resolve the configured hostname.
Configuring the Network Restoring Options 1. On the System Configuration screen, select the Network Restore Options. 2. To restore network options to the default mode (DHCP), press the Enter key on the keyboard.
Installation and User Guide
Copyright ©2017 SoftNAS, Inc.
The default network options will be restored.
Configuring the Date and Time
1. On the System Configuration screen, select the Configure Date and Time option. 2. To restore network options to the default mode (DHCP), press the Enter key on the keyboard. The Configure Date and Time screen will be displayed.
3. To set date and time, select the Date and Time option. 4. Press Enter. The Change Date and Time dialog will be displayed.
5. Enter the correct date in the Date field. 6. Enter the time in hours, minutes and seconds in the field.
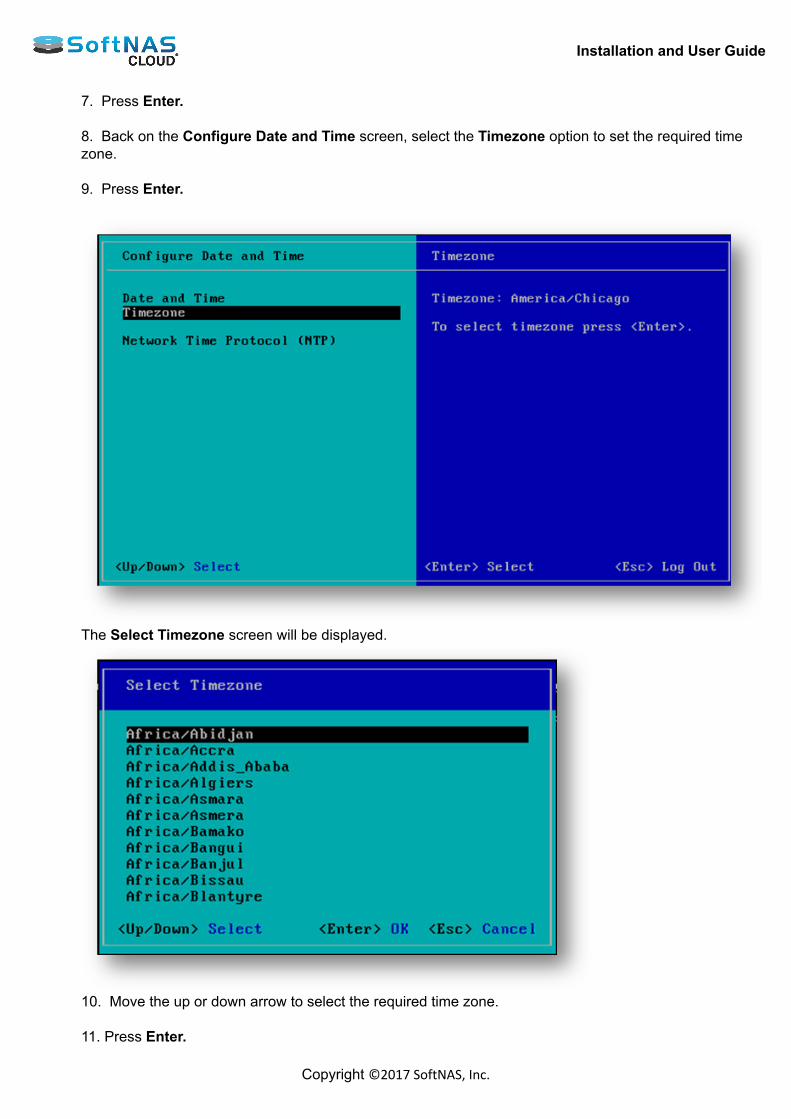
Installation and User Guide
Copyright ©2017 SoftNAS, Inc.
7. Press Enter. 8. Back on the Configure Date and Time screen, select the Timezone option to set the required timezone. 9. Press Enter.
The Select Timezone screen will be displayed.
10. Move the up or down arrow to select the required time zone. 11. Press Enter.

Installation and User Guide
Copyright ©2017 SoftNAS, Inc.
The selected time zone will be set. 12. Back on the Configure Date and Time screen, select the Network Time Protocol option. 13. Press Enter.
The Set Network Time Protocol (NTP) Server screen will be displayed.
14. Enter the NTP server address in the Server Address field. 15. Press Enter. The NTP server time will be synchronized.

Installation and User Guide
Copyright ©2017 SoftNAS, Inc.
Configuring VM SettingsRequired SettingsAfter installing the OVF to create the SoftNAS Virtual Storage Appliance VM, configure the VM settings inaccordance with best practices and network needs. The boot disk (Hard Disk 1) should be set to 30 GB, thin-provisioned. For a quick benchmarking resource configuration, use 4 vCPUs and 4 to 8 GB of RAM. Configure storage andrun benchmarking tools to observe resource utilization in the SoftNAS StorageCenter Dashboard charts andvSphere performance charts. RAM Note: The operating system and SoftNAS consume up to 1 GB of RAM, using most of the remainingRAM for cache memory and metadata. The more RAM assigned to the VM, the better read cache performancewill be, as SoftNAS will keep as much data in RAM cache as possible. Consider this resource allocation fordeduplication: at least 1 GB of RAM per terabyte of deduplicated storage, to keep the deduplication tables inmemory (or supplement the RAM cache with a read cache device). Optional SettingsParavirtual SCSI Disk Controller SupportFor maximum throughput and IOPS on VMware, choose the Paravirtual SCSI Controller for the SoftNAS VM(instead of using the default LSI Logic Parallel SCSI controller). VM Snapshot ModeBefore applying software updates to SoftNAS after it is in production, and to support online backups in popularbackup programs, VM snapshots are useful as part of the backup and recovery process. Depending on the planto manage backups of VM data, choose which mode snapshots will operate in.
• Independent Mode - to enable smaller VM snapshots, configure the boot disk, Hard Disk 1, in the"Independent" mode. This causes VM snapshots to apply only to this first hard disk by default (and notinclude all added data disks, which could be prohibitively large). The advantage of using Independentmode is VM snapshots will be faster and smaller.• Dependent Mode - by default, VM snapshots include all hard disks attached to the VM. When usedwith SoftNAS and a VM backup process, this setting causes all SoftNAS VM disks to be backed uptogether as a set. This results in much larger backup sets, but may be preferable as a means of achievingadditional protection and recoverability in the event of a disaster or need to restore the entire storagesystem to a different computer or location. If there are only a few terabytes to back up, this may be theprudent choice.
Network AdapterOn a typical 1 gigabit network, the default E1000 network adapter is sufficient; however, for a 10 gigabit orhigher-performance network card, the VMXNET 3 network adapter should be used for best results and higherthroughput. Note that installation of the VMXNET 3 requires installation of the proper VMware Tools in the guestoperating system (in this case, CentOS 64-bit Linux). Memory / CPU Hot PlugIt is recommended to allow CPU Hot Plug and disable Memory Hot Add, which will make it more convenient toadd CPU later to use a lot of data compression or other features that consume additional CPU. Linux seems todo fine when additional CPU are added at run-time. Note: Add memory with the system powered down and disable hot add of memory at run time.

Installation and User Guide
Copyright ©2017 SoftNAS, Inc.
Logging on to VM Save the SoftNAS Cloud® for VMware vSphere OVA file to a computer from the email received after productregistration. This version of SoftNAS Cloud® is delivered as an OVA virtual machine appliance file for VMwarevSphere related virtual machine environments. This OVA has been tested and certified for use with VMwarevSphere. Connect to ESXi host via VMware vSphere Client, either directly to the host or using vCenter, as appropriate. From vSphere ClientFor virtual machine environment such as VMware ESXI, deploy the SoftNAS™ Virtual Storage Appliance onhosts that are running ESXi version 4.x or later. Then access the OVF files from vSphere Client. 1. Start vSphere Client installed on a computer within the virtual network.
2. Provide the host IP login credentials to access SoftNAS Virtual Storage Appliance installed on the local hostserver. Select the SoftNAS VM. 3. Install the OVA software appliance using VMware vSphere Client and follow the on-screen instructions.
• In the VMware vSphere Client, select File > Deploy OVF Template and enter the path or navigate tothe OVA file on the local system.• Follow the prompts in the Deploy OVF Template wizard to create the SoftNAS Cloud® VirtualStorage Appliance as a VM on the local host.• If prompted to choose the operating system, select 64-bit Linux CentOS 4/5/6 (64-bit) and ThinProvisioned. The VM will consume approximately 30GB of disk space.
4. Power On the VM and Open Console. 5. Click the SoftNAS Admin option to begin the login process. The SoftNAS Cloud® Login screen will be displayed,.

Installation and User Guide
Copyright ©2017 SoftNAS, Inc.
5. If the administrator password has not been changed yet, enter the default password Pass4W0rd (with a zero),in the Password text entry box. 6. Click Log In. The SoftNAS Cloud® VM's desktop will be displayed.
Installation and User Guide
Copyright ©2017 SoftNAS, Inc.
Open Terminal from the SoftNAS Cloud® VM desktop to find or verify the IP address required for access toSoftNAS StorageCenter. From the SoftNAS Cloud® VM desktop, either access the SoftNAS Storage Administration or Terminal toconfigure network settings. Now that the VM has been verified, open SoftNAS StorageCenter.
Installation and User Guide
Copyright ©2017 SoftNAS, Inc.
Performance Tuning for VMware vSphere Achieving peak storage performance in the VMware environment involves tuning the VMware configurationbeyond default values. The following are recommended best practices for tuning VMware for use with SoftNAS. VMDirectPathVMDirectPath provides a means of passing a disk controller device directly through to the guest operatingsystem (i.e., CentOS Linux). To enable VMDirectPath Configuration page in the vSphere Client
1) Select the ESX host from Inventory.2) Select the Configuration tab.3) Select Advanced Settings under Hardware.4) Edit and select device(storage controller,physical nic)
Note that Intel VT-d (or equivalent) processor feature is required for support of VMDirectPath. VM SCSI Controller - Set to ParavirtualIn VMware, change the SCSI controller type to "Paravirtual", which provides more efficient access to storage. Physical NIC SettingsA host physical NIC can have settings, which can provide better utilization and performance improvement: Most 1GbE or 10GbE NICs (Network Interface Cards) support a feature called interrupt moderation or interruptthrottling, which coalesces interrupts from the NIC to the host so that the host does not get overwhelmed andspend too many CPU cycles processing interrupts. To disable physical NIC interrupt moderation on the ESXi host execute the following from ESXi SSH session. Find the appropriate module parameter for the NIC by first finding the driver using the ESXi command: # esxcli network nic list Then find the list of module parameters for the driver used: # esxcli system module parameters list -m <driver> This example applies to the Intel 10GbE driver called ixgbe. # esxcli system module parameters set -m ixgbe -p "InterruptThrottleRate=0" Also, check the host for SR-IOV support, which provides additional performance and throughput in virtualizedsystems like VMware. Adjust Network Heap Size for high network trafficBy default ESX server network stack allocates 64MB of buffers to handle network data. Increase buffer allocation from 64MB to 128MB memory to handle more network data To change Heap Size ESX Host:Configuration tab for the ESX Server host- Advanced Settings-VMkernel - Boot-VMkernel.Boot.netPktHeapMaxSize
Installation and User Guide
Copyright ©2017 SoftNAS, Inc.
Virtual NIC SettingsVM’s virtual adapter has many tuning options, which can also provide much better throughput: Configure jumbo frames (MTU 9000) in vSwitch and virtual network adapter (be sure physical switch supportsMTU 9000) We recommend VMXNET 3 virtual NICs Disable virtual interrupt coalescing for VMXNET 3 virtual NICs as follows: Go to vSphere Client, go to VM Settings - Options tab - Advanced General - Configuration Parameters and addan entry for ethernetX.coalescingScheme with the value of disabled.An alternative way to disable virtual interrupt coalescing for all virtual NICs on the host which affects all VMs,not just the latency-sensitive ones, is by setting the advanced networking performance option (Configuration -Advanced Settings - Net) CoalesceDefaultOn to 0 (disabled). Disable LROReload the vmxnet3 driver in the SoftNAS CentOS guest operating system. Log into the SoftNAS Cloud® VMusing SSH (or the Desktop Console) and su root: # modprobe -r vmxnet3 Add the following line in /etc/modprobe.conf:(options vmxnet3 disable_lro=1) Then reload the driver using: # modprobe vmxnet3
Physical Host BIOS SettingsOn most servers, these BIOS Settings can improve the overall performance of the host: • Turn on Hyper-threading in BIOS• Confirm that the BIOS is set to enable all populated sockets for all cores• Enable “Turbo Mode” for processors that support it• Confirm that hardware-assisted virtualization features are enabled in the BIOS• Disable any other power-saving mode in the BIOS• Disable any unneeded devices from the BIOS, such as serial and USB ports• In order to allow ESXi to control CPU power-saving features, set power management in the BIOS to “OSControlled Mode” or equivalent. Even without planning to use these power-saving features, ESXi provides aconvenient way to manage them.• C-states deeper than C1/C1E (i.e., C3, C6) allow further power savings, though with an increased chanceof performance impacts. We recommend, however, enabling all C-states in BIOS, then use ESXi host powermanagement to control their use. NUMA SettingsNUMA systems are advanced server platforms with more than one system bus. They can harness large numbersof processors in a single system image with superior price to performance ratios. The high latency of accessingremote memory in NUMA (Non-Uniform Memory Access) architecture servers can add a non-trivial amount oflatency to application performance.
Installation and User Guide
Copyright ©2017 SoftNAS, Inc.
For best performance of latency-sensitive applications in guest OSes, all vCPUs should be scheduled on thesame NUMA node and all VM memory should fit and be allocated out of the local physical memory attached tothat NUMA node. Processor affinity for vCPUs to be scheduled on specific NUMA nodes, as well as memory affinity for all VMmemory to be allocated from those NUMA nodes, can be set using the vSphere Client under VM Settings –Options tab – Advanced General – Configuration Parameters and adding entries for “numa.nodeAffinity=0, 1, …,”where 0, 1, etc. are the processor socket numbers.

Installation and User Guide
Copyright ©2017 SoftNAS, Inc.
Allocating Disk Storage Devices Add Data Disks to SoftNAS Cloud® VMAdding storage to SoftNAS Cloud® involves adding virtual hard disks (VMDKs on VMware) to the SoftNASCloud® VM. The first step is to decide how to connect the drives, then associate the disks' storage with theSoftNAS Cloud® VM as virtual disks. For example, consider a network of ten 300 GB 15K SAS drives attached to a VMware vSphere host. There areseveral ways to incorporate these drives into the SoftNAS Cloud®. Option 1 - Add Hardware RAID Datastore and Virtual DisksIn this case, treat the 15K SAS drives just like any other RAID array created for a VMware vSphere host: Configure and establish a RAID array.• Use the vendor-supplied software that came with the disk controller For example, a configuration of ten disks as RAID 6 (dual parity), plus one hot spare. This leaves seven datadrives in the array. In VMware vSphere, the disk array will appear as a single datastore to VMware. Add this storage in the usualway, using Add Storage menu in vCenter / vSphere client to create a datastore from the array. Call thisdatastore hwraid1.
7 data disks2 parity disks
hwraid1 array
1 spare diskdatastore 1 hwraid1 array Then, in VM Settings for SoftNAS Cloud®, allocate one or more VMDKs to the SoftNAS Cloud® VM in this newdatastore hwraid1. In environments with ESXi 5.x or later, allocate one large VMDK so the entire datastore isallocated to SoftNAS as a single virtual disk. In environments using ESXI 4.x, the datastores are limited to 2 TBmaximum, so allocate as many virtual disks as needed to add this storage to the SoftNAS Cloud® VM. Thin-provisioned VMDKs are faster to back up later (using a VMware vSphere backup tool), since the only thingbeing backed up is the storage that's actually used. Thick-provisioned VMDKs are slightly faster and may bepreferred for higher-performance applications. Hardware RAID generally provides the highest performance:• The disk controller is optimized for managing the RAID operations• And all RAID overhead is handled in hardware• LED indicators and other hot-swap functionality is handled by the vendor sofware (including failure notificationand remediation).• When a disk fails, the hardware is optimized for rebuilding the array with the replaced disk (whether hot-swapped or manually swapped). With a large number of disks (e.g., 48 or more), using hardware RAID with an optimal number of physical drivesper RAID array provides significant performance advantages vs. very large single arrays (and hardware RAIDrebuilds will be much faster this way). After creating the RAID array, follow the usual steps in VMware vSphere / vCenter to add the array as a storagedevice and create a datastore. This datastore will then be used to create one or more VMDKs to be used asSoftNAS Cloud® data disks.
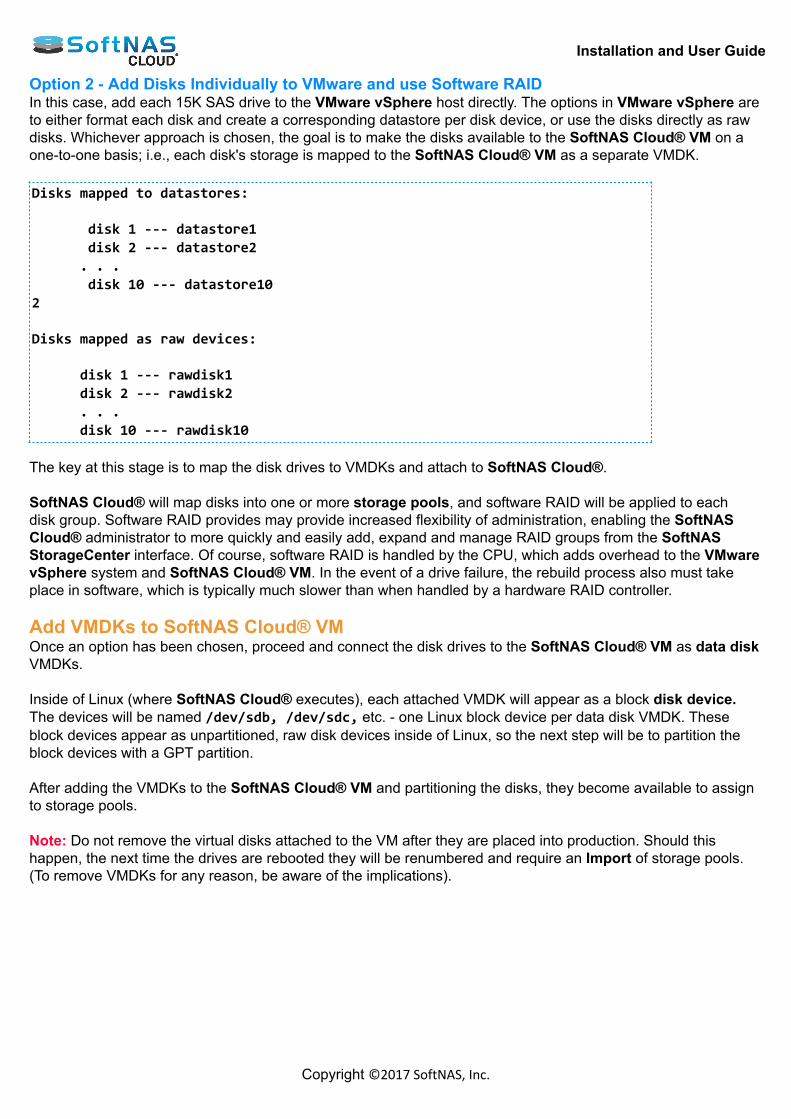
Installation and User Guide
Copyright ©2017 SoftNAS, Inc.
Option 2 - Add Disks Individually to VMware and use Software RAIDIn this case, add each 15K SAS drive to the VMware vSphere host directly. The options in VMware vSphere areto either format each disk and create a corresponding datastore per disk device, or use the disks directly as rawdisks. Whichever approach is chosen, the goal is to make the disks available to the SoftNAS Cloud® VM on aone-to-one basis; i.e., each disk's storage is mapped to the SoftNAS Cloud® VM as a separate VMDK. Disks mapped to datastores: disk 1 --- datastore1 disk 2 --- datastore2 . . . disk 10 --- datastore102 Disks mapped as raw devices: disk 1 --- rawdisk1 disk 2 --- rawdisk2 . . . disk 10 --- rawdisk10 The key at this stage is to map the disk drives to VMDKs and attach to SoftNAS Cloud®. SoftNAS Cloud® will map disks into one or more storage pools, and software RAID will be applied to eachdisk group. Software RAID provides may provide increased flexibility of administration, enabling the SoftNASCloud® administrator to more quickly and easily add, expand and manage RAID groups from the SoftNASStorageCenter interface. Of course, software RAID is handled by the CPU, which adds overhead to the VMwarevSphere system and SoftNAS Cloud® VM. In the event of a drive failure, the rebuild process also must takeplace in software, which is typically much slower than when handled by a hardware RAID controller. Add VMDKs to SoftNAS Cloud® VMOnce an option has been chosen, proceed and connect the disk drives to the SoftNAS Cloud® VM as data diskVMDKs. Inside of Linux (where SoftNAS Cloud® executes), each attached VMDK will appear as a block disk device.The devices will be named /dev/sdb, /dev/sdc, etc. - one Linux block device per data disk VMDK. Theseblock devices appear as unpartitioned, raw disk devices inside of Linux, so the next step will be to partition theblock devices with a GPT partition. After adding the VMDKs to the SoftNAS Cloud® VM and partitioning the disks, they become available to assignto storage pools. Note: Do not remove the virtual disks attached to the VM after they are placed into production. Should thishappen, the next time the drives are rebooted they will be renumbered and require an Import of storage pools.(To remove VMDKs for any reason, be aware of the implications).
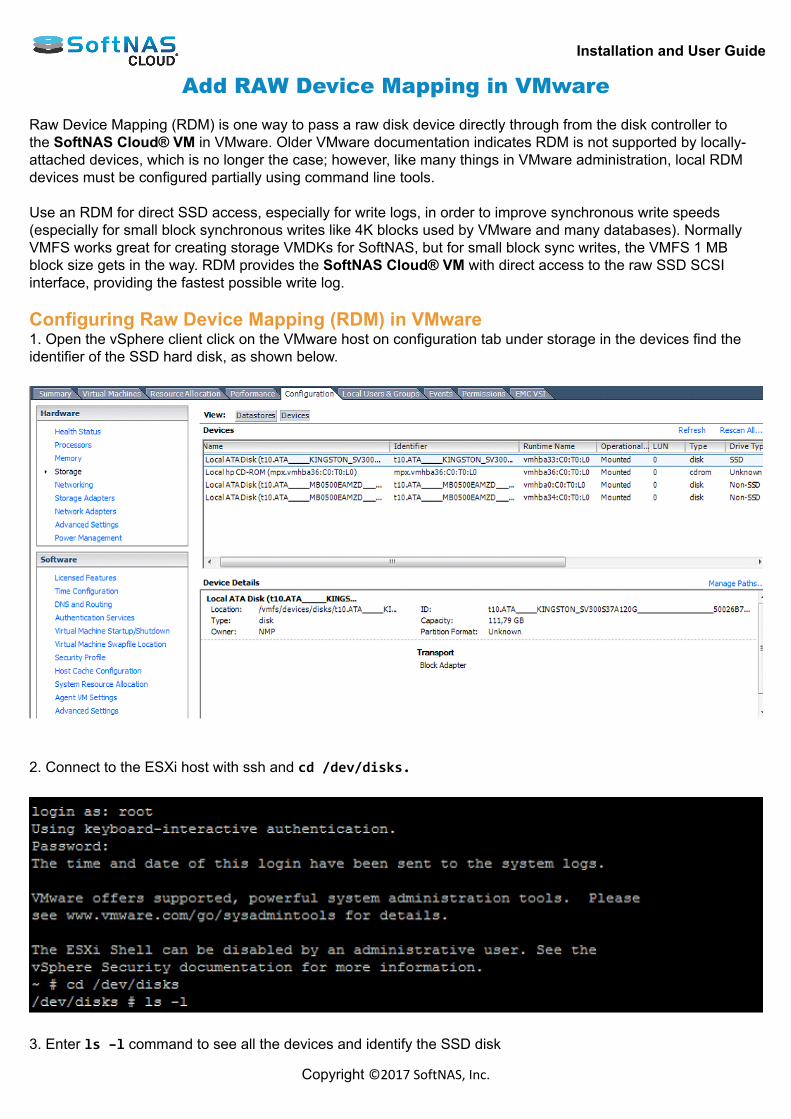
Installation and User Guide
Copyright ©2017 SoftNAS, Inc.
Add RAW Device Mapping in VMware Raw Device Mapping (RDM) is one way to pass a raw disk device directly through from the disk controller tothe SoftNAS Cloud® VM in VMware. Older VMware documentation indicates RDM is not supported by locally-attached devices, which is no longer the case; however, like many things in VMware administration, local RDMdevices must be configured partially using command line tools. Use an RDM for direct SSD access, especially for write logs, in order to improve synchronous write speeds(especially for small block synchronous writes like 4K blocks used by VMware and many databases). NormallyVMFS works great for creating storage VMDKs for SoftNAS, but for small block sync writes, the VMFS 1 MBblock size gets in the way. RDM provides the SoftNAS Cloud® VM with direct access to the raw SSD SCSIinterface, providing the fastest possible write log. Configuring Raw Device Mapping (RDM) in VMware1. Open the vSphere client click on the VMware host on configuration tab under storage in the devices find theidentifier of the SSD hard disk, as shown below.
2. Connect to the ESXi host with ssh and cd /dev/disks.
3. Enter ls –l command to see all the devices and identify the SSD disk
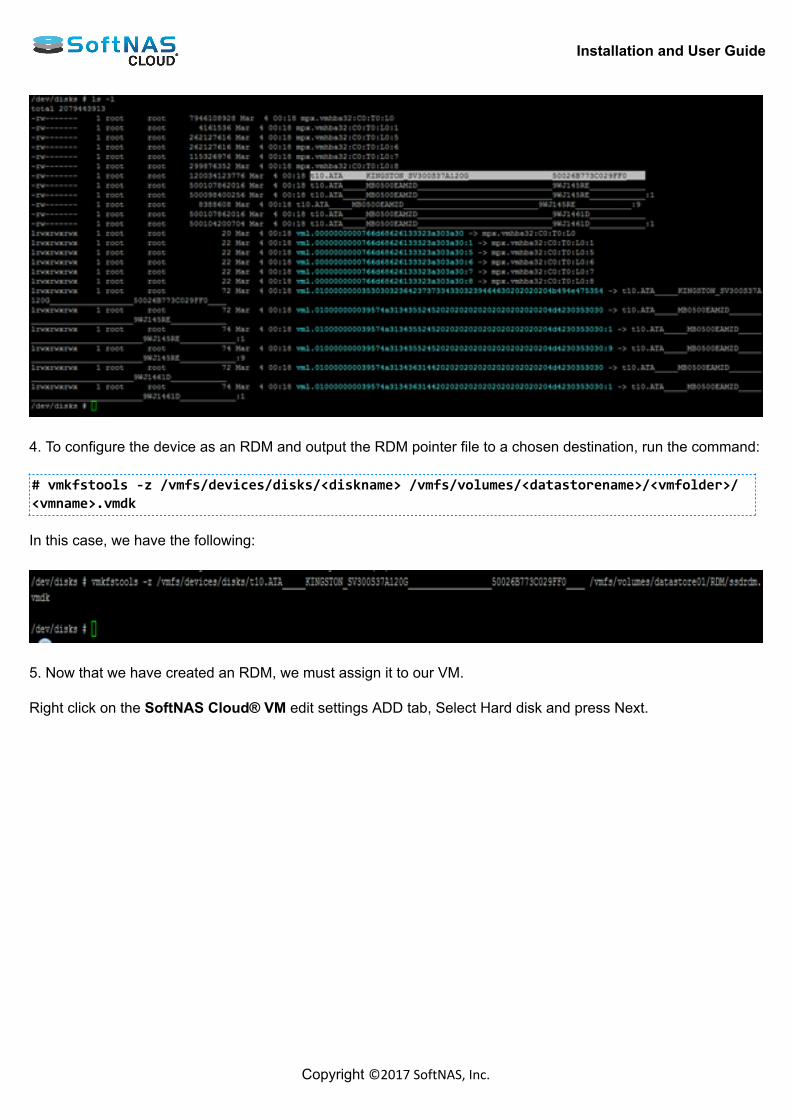
Installation and User Guide
Copyright ©2017 SoftNAS, Inc.
4. To configure the device as an RDM and output the RDM pointer file to a chosen destination, run the command: # vmkfstools -z /vmfs/devices/disks/<diskname> /vmfs/volumes/<datastorename>/<vmfolder>/<vmname>.vmdk In this case, we have the following:
5. Now that we have created an RDM, we must assign it to our VM. Right click on the SoftNAS Cloud® VM edit settings ADD tab, Select Hard disk and press Next.

Installation and User Guide
Copyright ©2017 SoftNAS, Inc.
6. Next, choose the existing virtual disk option and press Next.

Installation and User Guide
Copyright ©2017 SoftNAS, Inc.
7. Browse to the location where the RDM pointer is stored. Choose the pointer, then press OK.
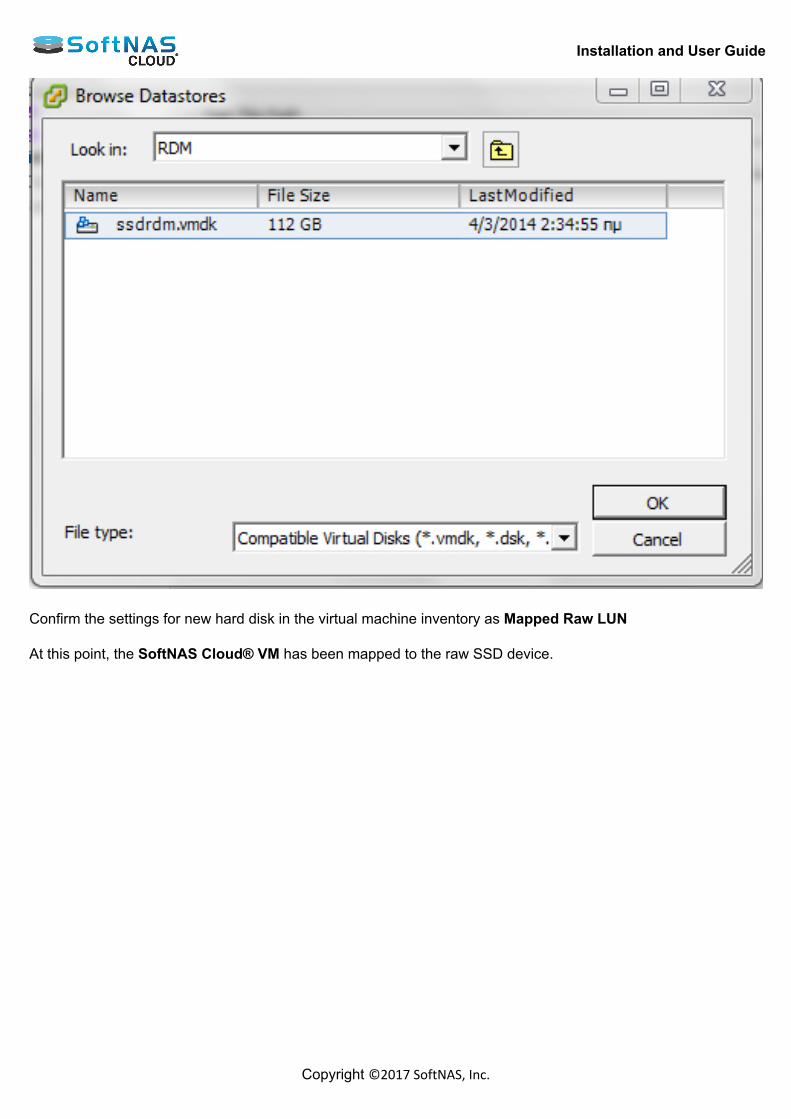
Installation and User Guide
Copyright ©2017 SoftNAS, Inc.
Confirm the settings for new hard disk in the virtual machine inventory as Mapped Raw LUN
At this point, the SoftNAS Cloud® VM has been mapped to the raw SSD device.
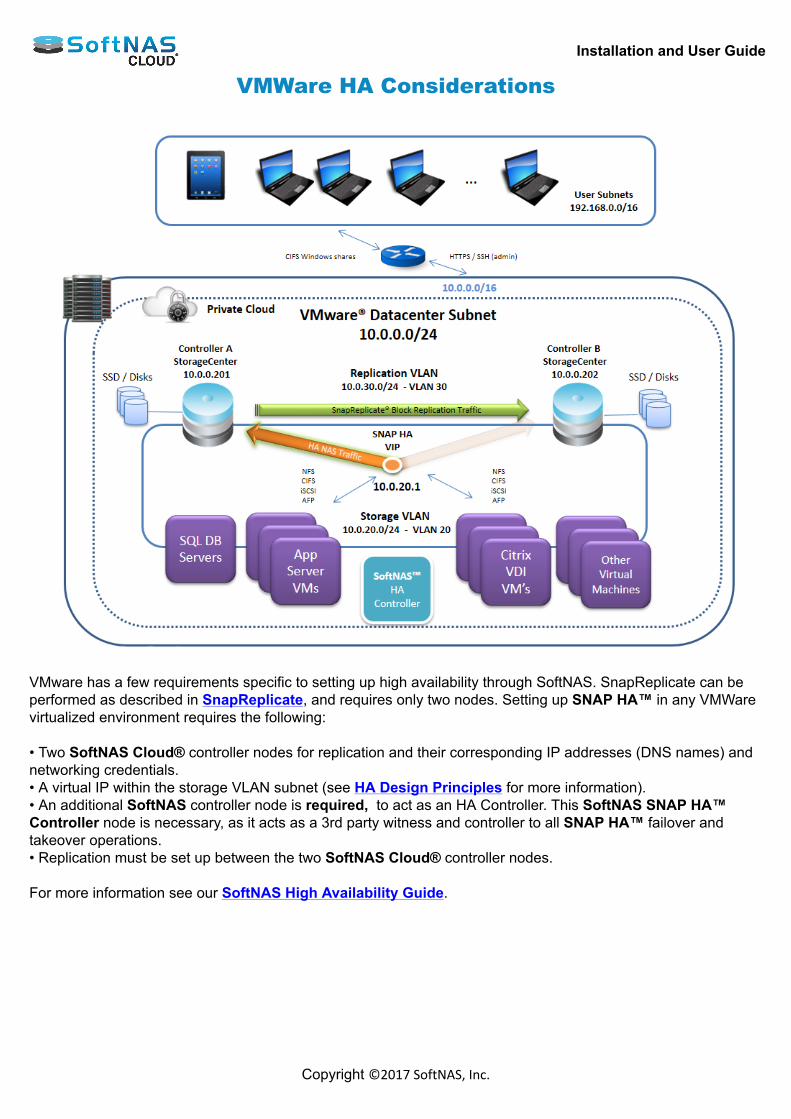
Installation and User Guide
Copyright ©2017 SoftNAS, Inc.
VMWare HA Considerations
VMware has a few requirements specific to setting up high availability through SoftNAS. SnapReplicate can beperformed as described in SnapReplicate, and requires only two nodes. Setting up SNAP HA™ in any VMWarevirtualized environment requires the following: • Two SoftNAS Cloud® controller nodes for replication and their corresponding IP addresses (DNS names) andnetworking credentials.• A virtual IP within the storage VLAN subnet (see HA Design Principles for more information).• An additional SoftNAS controller node is required, to act as an HA Controller. This SoftNAS SNAP HA™Controller node is necessary, as it acts as a 3rd party witness and controller to all SNAP HA™ failover andtakeover operations.• Replication must be set up between the two SoftNAS Cloud® controller nodes. For more information see our SoftNAS High Availability Guide.
Installation and User Guide
Copyright ©2017 SoftNAS, Inc.
Advanced Configuration Notes for SoftNAS Cloud® Occasionally, administrators will need to configure at a deeper level of the storage network. Here are somecommon notes. If the information here is not sufficient, we encourage contacting our Support Team. SnapReplicate iSCSI Volume Sync Changing Email Report Frequency Networking Tips Applying CHAP Authentication to iSCSI ACLs
Installation and User Guide
Copyright ©2017 SoftNAS, Inc.
SnapReplicate iSCSI Volume Sync Topic:When using an HA cluster with iSCSI Targets, SnapReplicate can fail due to an issue with file locking on theiSCSI Volumes. This issue only occurs when re-adding replication to an existing target node. Procedure:Delete the target node's iSCSI LUN, then re-add replication.
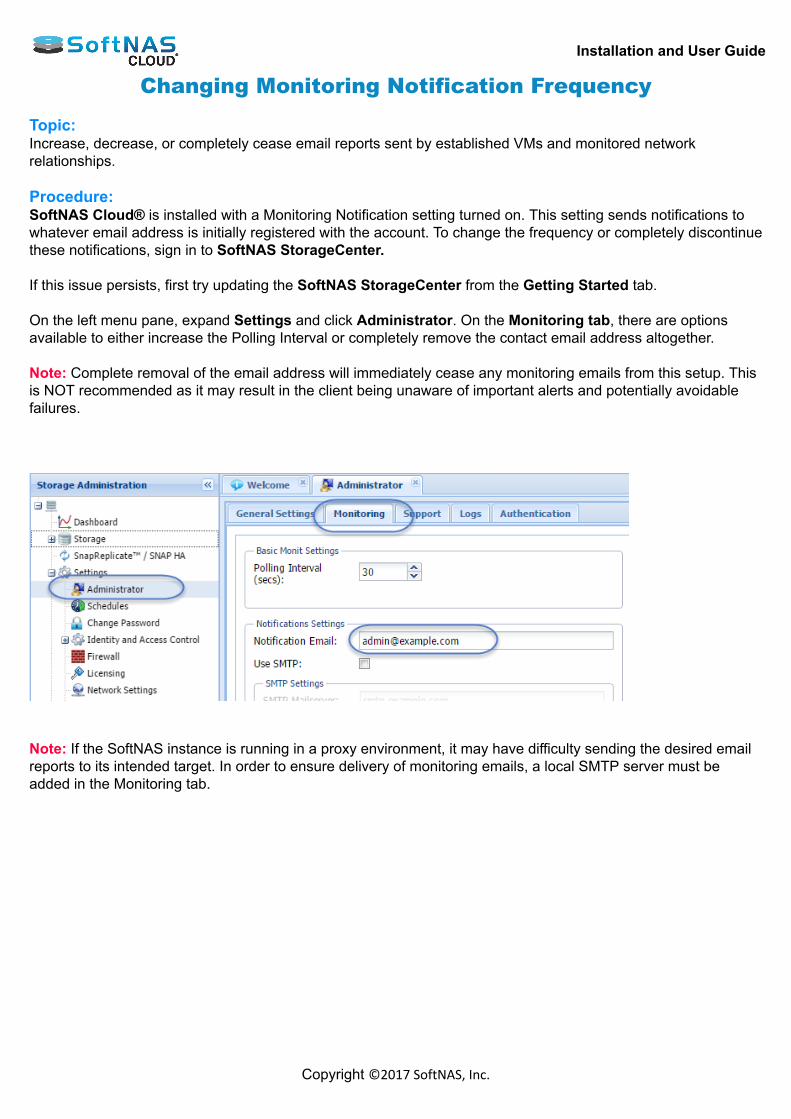
Installation and User Guide
Copyright ©2017 SoftNAS, Inc.
Changing Monitoring Notification Frequency Topic:Increase, decrease, or completely cease email reports sent by established VMs and monitored networkrelationships. Procedure:SoftNAS Cloud® is installed with a Monitoring Notification setting turned on. This setting sends notifications towhatever email address is initially registered with the account. To change the frequency or completely discontinuethese notifications, sign in to SoftNAS StorageCenter. If this issue persists, first try updating the SoftNAS StorageCenter from the Getting Started tab. On the left menu pane, expand Settings and click Administrator. On the Monitoring tab, there are optionsavailable to either increase the Polling Interval or completely remove the contact email address altogether. Note: Complete removal of the email address will immediately cease any monitoring emails from this setup. Thisis NOT recommended as it may result in the client being unaware of important alerts and potentially avoidablefailures.
Note: If the SoftNAS instance is running in a proxy environment, it may have difficulty sending the desired emailreports to its intended target. In order to ensure delivery of monitoring emails, a local SMTP server must beadded in the Monitoring tab.
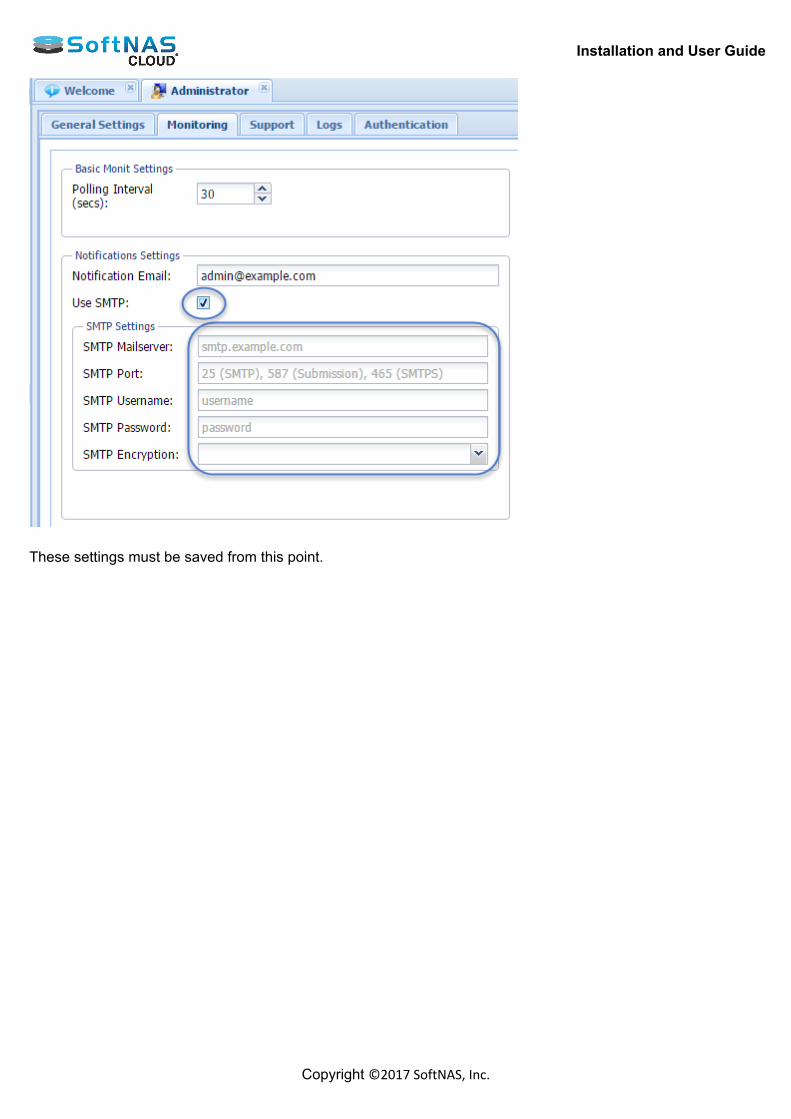
Installation and User Guide
Copyright ©2017 SoftNAS, Inc.
These settings must be saved from this point.
Installation and User Guide
Copyright ©2017 SoftNAS, Inc.
Networking Tips 10 Gigabit Network Configurations on VMware vSphereBy default, the SoftNAS Cloud® VM (on VMware vSphere) ships with the default E1000 virtual NIC adapter andVMware defaults to MTU 1500. For best performance results above 1 gigabit, follow the steps outlined below. 1. Replace the E1000 virtual NIC adapter with a vmxnet3 on the SoftNAS Cloud® VM.2. Use MTU 9000 instead of MTU 1500 for vSwitch, vmKernel and physical switch configurations. Be sure toconfigure the network interface in SoftNAS for MTU 9000 also. Refer to the MTU 9000 section for more information. A dedicated VLAN for storage traffic is recommended. For VMware, refer to the Performance Tuning forVMware vSphere section for details. iSCSI Multi-pathingTo increase performance throughput and resiliency, use of iSCSI multipathing is recommended by VMware andother vendors. Since SoftNAS operates in a hypervisor environment, it is possible to configure multi-path operation as follows: 1. On the VMware host where the SoftNAS Cloud® VM runs, install and use multiple physical NIC adapters2. Assign a dedicated vSwitch for each incoming iSCSI target path (one per physical NIC)3. Assign the SoftNAS Cloud® VM a dedicated virtual NIC adapter for each incoming iSCSI target path (pervSwitch/physical NIC)4. Assign a unique IP address to each corresponding Linux network interface (for each virtual NIC attached tothe SoftNAS Cloud® VM)5. Restart the SoftNAS iSCSI service and verify connectivity from the iSCSI initiator client(s) to each iSCSItarget path. A dedicated VLAN for storage traffic is recommended.
Installation and User Guide
Copyright ©2017 SoftNAS, Inc.
Applying CHAP Authentication to iSCSI ACLs About CHAP AuthenticationIn computing, the Challenge-Handshake Authentication Protocol (CHAP) authenticates a user or network host toan authenticating entity. CHAP provides protection against replay attacks by the peer through the use of an incrementally changingidentifier and of a variable challenge-value. CHAP requires that both the client and server know the plaintextof the secret, although it is never sent over the network. Thus, CHAP provides better security as compared toPassword Authentication Protocol (PAP) which is vulnerable for both these reasons. The below steps allow you to apply CHAP Authentication to iSCSI ACLs, improving the security of your SoftNASvolumes. Setting up ACLs 1. Set up iSCSI as per the documentation for SoftNAS v3.2.3 and higher.2. Use SSH to access the system, login as root. Perform the following commands:
a. targetclib. cd /c. cd iscsid. cd <iQN for iSCSI needing ACL's>e. lsf. cd tpg1/aclsg. create <iQN for iSCSI Initiator, windows iSCSI Initiator Configure Tab>h. cd ../../i. lsj. cd /k. saveconfigl. exit
3. You should now be able to see the ACL listed for iQN.4. Repeat the process as required for any other iQN's. Note: Determine whether the portal needs to be reconfigured prior to moving beyond the above steps. CHAP Authentication Setup 1. Set up iSCSI as described in the documentation for SoftNAS v3.2.3 and higher.2. Use SSH to access the system, logging in as root.Perform the following commands:
a. targetclib. cd /c. cd iscsid. cd <iQN for iSCSI Target>e. lsf. cd tpg1g. get attribute authentication
3. At this point, authentication should be 0(zero) by default.
a. set attribute authentication=1b. get attribute authentication
Installation and User Guide
Copyright ©2017 SoftNAS, Inc.
4. Confirm CHAP Authentication via the following commands.
a. cd aclsb. lsc. cd <ACL created earlier(iQN)>d. set userid=<for windows use iQN of initiator>e. set password=<Secret Target Password>f. set mutual_userid=<for Mutual CHAP, trget iQN>g. set mutual_password=<Secret CHAP Password>h. cd /i. saveconfigj. exitk. service fcoe-target restart


