Embed Size (px)
Citation preview

Micro Focus SecurityArcSight Micro Focus SecurityArcSight ConnectorsSoftware Version: 8.3.0
SmartConnector for Cisco IronPort WebSecurity Appliance File
Document Release Date: February 2022Software Release Date: February 2022

Legal NoticesMicro FocusThe Lawn22-30 Old Bath RoadNewbury, Berkshire RG14 1QNUK
https://www.microfocus.com
Copyright Notice© Copyright 2007 – 2022 Micro Focus or one of its affiliates
Confidential computer software. Valid license from Micro Focus required for possession, use or copying. Theinformation contained herein is subject to change without notice.
The only warranties for Micro Focus products and services are set forth in the express warranty statementsaccompanying such products and services. Nothing herein should be construed as constituting an additional warranty.Micro Focus shall not be liable for technical or editorial errors or omissions contained herein.
No portion of this product's documentation may be reproduced or transmitted in any form or by any means, electronicor mechanical, including photocopying, recording, or information storage and retrieval systems, for any purpose otherthan the purchaser's internal use, without the express written permission of Micro Focus.
Notwithstanding anything to the contrary in your license agreement for Micro Focus ArcSight software, you mayreverse engineer and modify certain open source components of the software in accordance with the license terms forthose particular components. See below for the applicable terms.
U.S. Governmental Rights. For purposes of your license to Micro Focus ArcSight software, “commercial computersoftware” is defined at FAR 2.101. If acquired by or on behalf of a civilian agency, the U.S. Government acquires thiscommercial computer software and/or commercial computer software documentation and other technical data subjectto the terms of the Agreement as specified in 48 C.F.R. 12.212 (Computer Software) and 12.211 (Technical Data) of theFederal Acquisition Regulation (“FAR”) and its successors. If acquired by or on behalf of any agency within theDepartment of Defense (“DOD”), the U.S. Government acquires this commercial computer software and/or commercialcomputer software documentation subject to the terms of the Agreement as specified in 48 C.F.R. 227.7202-3 of theDOD FAR Supplement (“DFARS”) and its successors. This U.S. Government Rights Section 18.11 is in lieu of, andsupersedes, any other FAR, DFARS, or other clause or provision that addresses government rights in computer softwareor technical data.
Trademark NoticesAdobe™ is a trademark of Adobe Systems Incorporated.
Microsoft® and Windows® are U.S. registered trademarks of Microsoft Corporation.
UNIX® is a registered trademark of The Open Group.
Documentation UpdatesThe title page of this document contains the following identifying information:
l Software Version number
l Document Release Date, which changes each time the document is updated
l Software Release Date, which indicates the release date of this version of the software
To check for recent updates or to verify that you are using the most recent edition of a document, go to:
https://www.microfocus.com/support-and-services/documentation
SmartConnector for Cisco IronPort Web Security Appliance File
Micro Focus Micro Focus Security ArcSight Connectors (8.3.0) Page 2 of 20

Support
Phone A list of phone numbers is available on the Technical SupportPage: https://softwaresupport.softwaregrp.com/support-contact-information
Support Web Site https://softwaresupport.softwaregrp.com/
ArcSight Product Documentation https://community.softwaregrp.com/t5/ArcSight-Product-Documentation/ct-p/productdocs
Contact Information
About this PDF Version of Online HelpThis document is a PDF version of the online help. This PDF file is provided so you can easily print multiple topics fromthe help information or read the online help in PDF format. Because this content was originally created to be viewed asonline help in a web browser, some topics may not be formatted properly. Some interactive topics may not be presentin this PDF version. Those topics can be successfully printed from within the online help.
SmartConnector for Cisco IronPort Web Security Appliance File
Micro Focus Micro Focus Security ArcSight Connectors (8.3.0) Page 3 of 20

Document Revision HistoryThe title page of this document contains the following identifying information:l Software Version number, which indicates the software version.
l Document Release Date, which changes each time the document is updated.
To check for recent updates or to verify that you are using the most recent edition of a document, go to ArcSight ProductDocumentation Community on the Micro Focus Security Community.
Date Product Version Description
MM/DD/YYYY X.X.X.X Description of change
Document Changes
Page 4 of 20

Contents
SmartConnector for Cisco IronPort Web Security Appliance File 6
Product Overview 7
IronPort Web Security Logging 8
Log Types Supported 8
Log Subscriptions 8
Selecting the Log Format (Style) 9
Transaction Result Codes 10
Install the SmartConnector 11
Prepare to Install Connector 11
Install Core Software 11
Set Global Parameters (optional) 12
Select Connector and Add Parameter Information 13
Select a Destination 15
Complete Installation and Configuration 15
Run the SmartConnector 16
Device Event Mapping to ArcSight Fields 17IronPort Web Security Mappings to ArcSight ESM Fields 17IronPort W3C Extended Log Format Mappings 18
Send Documentation Feedback 20
SmartConnector for Cisco IronPort Web Security Appliance File
Page 5 of 20

SmartConnector for Cisco IronPort WebSecurity Appliance FileThis guide provides information for installing the SmartConnector for Cisco IronPort WebSecurity Appliance File and configuring the device for event collection. Support for IronPortAsyncOS 8.0, 8.5, and 10 for Cisco Web Security Appliance is provided.
Intended Audience
This guide provides information for IT administrators who are responsible for managing theArcSight SmartConnectors.
Additional Documentation
The ArcSight SmartConnectors documentation library includes the following resources:
l Installation Guide for ArcSight SmartConnectors, which provides detailed information aboutinstalling SmartConnectors.
l Configuration Guides for ArcSight SmartConnectors, which provide information aboutconfiguring SmartConnectorss to collect events from different sources.
l Release Notes for ArcSight SmartConnectors, which provides information about the latestrelease
For the most recent version of this guide and other ArcSight SmartConnector documentationresources, visit the documentation site for ArcSight SmartConnectors.
Contact Information
We want to hear your comments and suggestions about this book and the otherdocumentation included with this product. You can use the comment on this topic link at thebottom of each page of the online documentation, or send an email to [email protected].
For specific product issues, contact Micro Focus Customer Care.
SmartConnector for Cisco IronPort Web Security Appliance FileSmartConnector for Cisco IronPort Web Security Appliance File
SmartConnector for Cisco IronPort Web Security Appliance File Page 6 of 20

Product OverviewThe Cisco IronPort Web Security appliances combine a high-performance security platformwith a new scanning technology that enables signature-based spyware filtering. Robustmanagement and reporting tools deliver ease of administration and complete visibility intothreat-related activity.
The Cisco IronPort Web Security appliances let you create custom reports, configure customlog files, and view interactive data that you can use to monitor system activity and manageruntime events. The appliance also supports an alert engine framework that generatesmessages describing error conditions and the severity of each event.
SmartConnector for Cisco IronPort Web Security Appliance FileProduct Overview
Product Overview Page 7 of 20

IronPort Web Security LoggingFor complete information about IronPort Web Security appliance logging, see theWeb SecurityAppliance User Guide.
Log Types SupportedThe S-series appliance provides several options for creating custom log files and configuring logfile retrieval; this SmartConnector supports using SCP and FTP. Logging includes options forstandard log types such as Apache, Squid, and Squid Detailed.
The ArcSight SmartConnector for Cisco IronPort Web Security Syslog supports Apache and Squidlog formats for Access Log events. Squid Detailed format is not currently supported.
Log SubscriptionsYou can subscribe to a variety of log files and customize the type of information that isrecorded in each log. Use System Administration -> Log Subscriptions to configure theaccess log subscriptions and customize its log file settings.
Note the location of the access log; this value will be needed during SmartConnectorinstallation.
The S-series appliance can be configured to log various levels of system information. Optionsfor logging include:
Level Description
Critical Logs error messages.
Warning Logs system errors and system warnings.
Information Provides a detailed record of system operations. This options is the default system settingfor each log file.
Debug Logs data that is useful for debugging system problems.
Trace Provides a complete record of system operations and activity. This option is recommend fordevelopers only.
Use the System Administration -> Log Subscriptions -> New Log Subscriptions pageto customize the level of information recorded in each log file.
SmartConnector for Cisco IronPort Web Security Appliance FileIronPort Web Security Logging
IronPort Web Security Logging Page 8 of 20

Selecting the Log Format (Style)Use the System Administration -> Log Subscriptions -> Edit Log Subscription pageto configure custom formatting for access log file entries.
SmartConnector for Cisco IronPort Web Security Appliance FileIronPort Web Security Logging
Selecting the Log Format (Style) Page 9 of 20

Click the log file name (accesslogs ) on the Log Subscriptions page to access the Edit LogSubscription page.
Transaction Result CodesThe access log file provides a descriptive record of all Web Proxy filtering and scanning activity.Access log file entries display a record of how the appliance handled each transaction.
Transaction result codes in the access log file describe how the appliance resolves clientrequests. For example, if a request for an object can be resolved from the cache, the resultcode is TCP-HIT. However, if the object is not in the cache and the appliance pulls the objectfrom an origin server, the result code is TCP_MISS. The following table describes transactionresult codes. These codes are mapped to the ArcSight ESM Device Action field for each event.
Result Code Description
TCP_HIT The object requested was cached in memory.
TCP_IMS_HIT The client sent an IMS (If-Modified-Since) request for an object and the object was found inthe cache. The proxy responds with a 304 response.
TCP_MEM_HIT The object was not found in the cache, so it was fetched from the origin server.
TCP_MISS The object was not found in the cache and was fetched from an origin server.
TCP_REFRESH_HIT The object was in the cache, but was stale. The proxy sent an IMS (If-Modified-Since)request to the origin server, the server confirmed that the object was not modified, and thestale object was served.
TCP_REFRESH_MISS The object was in the cache, but was stale. The proxy sent an IMS request to the originserver and pulled a fresh copy of the object.
TCP_CLIENT_REFRESH
The client issued a Pragma: No-cache header and the object was pulled from the originserver.
TCP_DENIED The client request was denied.
UDP_MISS The object was fetched from the origin server.
NONE There was an error in the transaction; for example, a DNS failure or a gateway timeout.
SmartConnector for Cisco IronPort Web Security Appliance FileIronPort Web Security Logging
Transaction Result Codes Page 10 of 20

Install the SmartConnectorThe following sections provide instructions for installing and configuring your selectedSmartConnector.
Prepare to Install ConnectorBefore you install any SmartConnectors, make sure that the ArcSight products with which theconnectors will communicate have already been installed correctly (such as ArcSight ESM orArcSight Logger).
For complete product information, read the Administrator's Guide as well as the Installationand Configuration guide for your ArcSight product before installing a new SmartConnector. Ifyou are adding a connector to the ArcSight Management Center, see the ArcSightManagement Center Administrator's Guide for instructions, and start the installation procedureat "Set Global Parameters (optional)" or "Select Connector and Add Parameter Information."
Before installing the SmartConnector, be sure the following are available:
l Local access to the machine where the SmartConnector is to be installedl Administrator passwords
Install Core SoftwareUnless specified otherwise at the beginning of this guide, this SmartConnector can be installedon all ArcSight supported platforms; for the complete list, see the SmartConnector Product andPlatform Support document, available from the Micro Focus SSO and Protect 724 sites.
1 Download the SmartConnector executable for your operating system from the Micro FocusSSO site.
2 Start the SmartConnector installation and configuration wizard by running the executable.
Follow the wizard through the following folder selection tasks and installation of the coreconnector software:
Introduction Choose Install Folder Choose Shortcut Folder Pre-Installation Summary Installing...
SmartConnector for Cisco IronPort Web Security Appliance FileInstall the SmartConnector
Install the SmartConnector Page 11 of 20

3 When the installation of SmartConnector core component software is finished, the followingwindow is displayed:
Set Global Parameters (optional)If you choose to perform any of the operations shown in the following table, do so beforeadding your connector. You can set the following parameters:
Parameter Setting
FIPS mode Select 'Enabled' to enable FIPS compliant mode. To enable FIPS Suite B Mode, see theSmartConnector User Guide under "Modifying Connector Parameters" for instructions.Initially, this value is set to 'Disabled'.
RemoteManagement
Select 'Enabled' to enable remote management from ArcSight Management Center. Whenqueried by the remote management device, the values you specify here for enablingremote management and the port number will be used. Initially, this value is set to'Disabled'.
SmartConnector for Cisco IronPort Web Security Appliance FileInstall the SmartConnector
Set Global Parameters (optional) Page 12 of 20

Parameter Setting
RemoteManagementListener Port
The remote management device will listen to the port specified in this field. The defaultport number is 9001.
Preferred IP Version When both IPv4 and IPv6 IP addresses are available for the local host (the machine onwhich the connector is installed), you can choose which version is preferred. Otherwise, youwill see only one selection. The initial setting is IPv4.
The following parameters should be configured only if you are using Micro Focus SecureDatasolutions to provide encryption. See theMicro Focus SecureData Architecture Guide for moreinformation.
Parameter Setting
Format PreservingEncryption
Data leaving the connector machine to a specified destination can be encrypted byselecting ‘Enabled’ to encrypt the fields identified in ‘Event Fields to Encrypt' beforeforwarding events. If encryption is enabled, it cannot be disabled. Changing any of theencryption parameters again will require a fresh installation of the connector.
Format PreservingPolicy URL
Enter the URL where the Micro Focus SecureData Server is installed.
Proxy Server (https) Enter the proxy host for https connection if any proxy is enabled for this machine.
Proxy Port Enter the proxy port for https connection if any proxy is enabled for this machine.
Format PreservingIdentity
The Micro Focus SecureData client software allows client applications to protect and accessdata based on key names. This key name is referred to as the identity. Enter the useridentity configured for Micro Focus SecureData.
Format PreservingSecret
Enter the secret configured for Micro Focus SecureData to use for encryption.
Event Fields toEncrypt
Recommended fields for encryption are listed; delete any fields you do not want encryptedand add any string or numeric fields you want encrypted. Encrypting more fields can affectperformance, with 20 fields being the maximum recommended. Also, because encryptionchanges the value, rules or categorization could also be affected. Once encryption isenabled, the list of event fields cannot be edited.
After making your selections, click Next. A summary screen is displayed. Review the summaryof your selections and click Next. Click Continue to return to proceed with "Add a Connector"window. Continue the installation procedure with "Select Connector and Add ParameterInformation."
Select Connector and Add Parameter Information1 Select Add a Connector and click Next. If applicable, you can enable FIPS mode and enableremote management later in the wizard after SmartConnector configuration.
SmartConnector for Cisco IronPort Web Security Appliance FileInstall the SmartConnector
Select Connector and Add Parameter Information Page 13 of 20

2 Select Cisco IronPort Web Security Appliance File and click Next.
3 Enter the required SmartConnector parameters to configure the SmartConnector, then clickNext.
Parameter Description
Folder Enter the path to and name of the access log file folder.
Log Type This SmartConnector currently supports 'webaccess' logs.
Log File Format Enter the name of the log file format: squid.format, apache.format, or w3c_elf.format (W3CExtended Log Format). The default value is squid.format. (Version 8.5 and 10 supportApache and Squid formats only.)
You can click the 'Export' button to export the host name data you have entered into theable into a CSV file; you can click the 'Import' button to select a CSV file to import into the tablerather than add the data manually. See the "SmartConnector User's Guide" for moreinformation.
SmartConnector for Cisco IronPort Web Security Appliance FileInstall the SmartConnector
Select Connector and Add Parameter Information Page 14 of 20

Select a Destination1 The next window asks for the destination type; select a destination and click Next. Forinformation about the destinations listed, see the ArcSight SmartConnector User Guide.
2 Enter values for the destination. For the ArcSight Manager destination, the values you enterfor User and Password should be the same ArcSight user name and password you createdduring the ArcSight Manager installation. Click Next.
3 Enter a name for the SmartConnector and provide other information identifying theconnector's use in your environment. Click Next. The connector starts the registration process.
4 If you have selected ArcSight Manager as the destination, the certificate import window forthe ArcSight Manager is displayed. Select Import the certificate to the connector fromdestination and click Next. (If you select Do not import the certificate to connector fromdestination, the connector installation will end.) The certificate is imported and the Addconnector Summary window is displayed.
Complete Installation and Configuration1 Review the Add Connector Summary and click Next. If the summary is incorrect, clickPrevious to make changes.
2 The wizard now prompts you to choose whether you want to run the SmartConnector as astand-alone process or as a service. If you choose to run the connector as a stand-aloneprocess, select Leave as a standalone application, click Next, and continue with step 5.
3 If you chose to run the connector as a service, with Install as a service selected, click Next.The wizard prompts you to define service parameters. Enter values for Service Internal Nameand Service Display Name and select Yes or No for Start the service automatically. The InstallService Summary window is displayed when you click Next.
4 Click Next on the summary window.
5 To complete the installation, choose Exit and Click Next.
For instructions about upgrading the connector or modifying parameters, see theSmartConnector User Guide.
SmartConnector for Cisco IronPort Web Security Appliance FileInstall the SmartConnector
Select a Destination Page 15 of 20

Run the SmartConnectorSmartConnectors can be installed and run in stand-alone mode, on Windows platforms as aWindows service, or on UNIX platforms as a UNIX daemon, depending upon the platformsupported. On Windows platforms, SmartConnectors also can be run using shortcuts andoptional Start menu entries.
If the connector is installed in stand-alone mode, it must be started manually and is notautomatically active when a host is restarted. If installed as a service or daemon, the connectorruns automatically when the host is restarted. For information about connectors running asservices or daemons, see the ArcSight SmartConnector User Guide.
To run all SmartConnectors installed in stand-alone mode on a particular host, open acommand window, go to $ARCSIGHT_HOME\current\bin and run: arcsight connectors
To view the SmartConnector log, read the file $ARCSIGHT_HOME\current\logs\agent.log; tostop all SmartConnectors, enter Ctrl+C in the command window.
SmartConnector for Cisco IronPort Web Security Appliance FileRun the SmartConnector
Run the SmartConnector Page 16 of 20

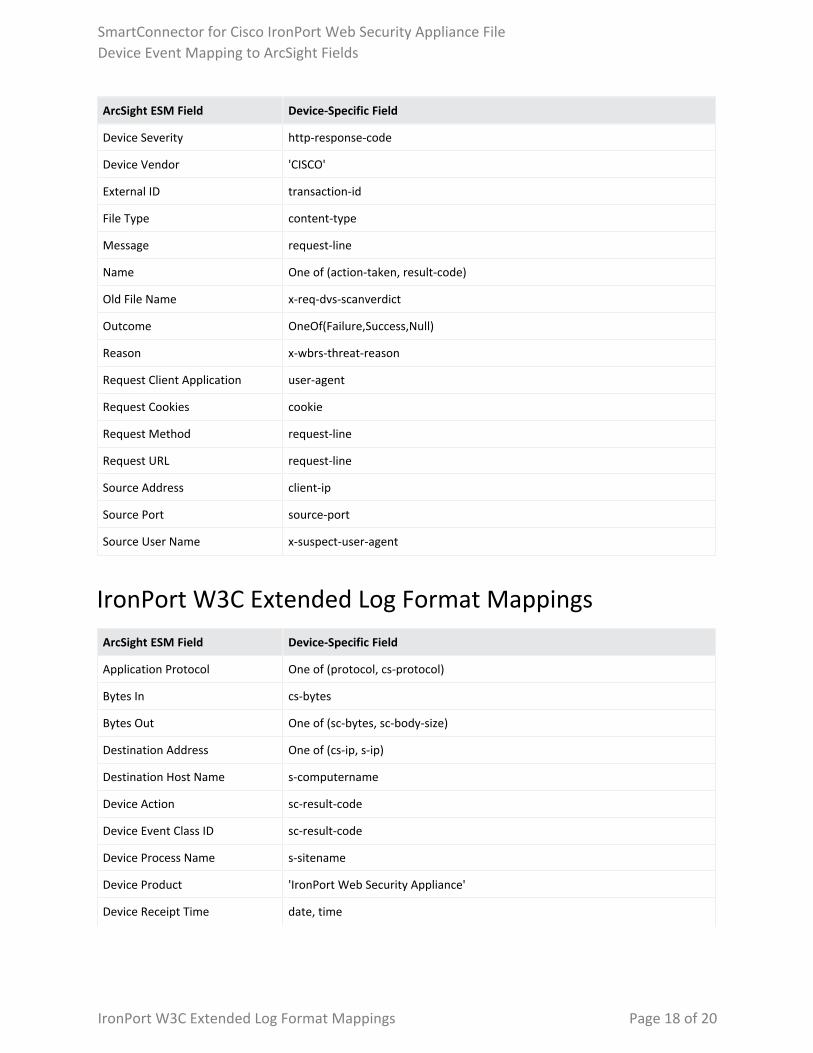
Device Event Mapping to ArcSight FieldsThe following section lists the mappings of ArcSight data fields to the device's specific eventdefinitions. See the ArcSight Console User's Guide for more information about the ArcSightdata fields.
IronPort Web Security Mappings to ArcSight ESM FieldsArcSight ESM Field Device-Specific Field
Additional data threat-name
Additional data threat-risk-ratio
Application Protocol One of(protocol, request-line)
ArcSight (Connector) Severity High = 400..603; Medium = 300..399; Low = 100..299,000,-50
Bytes In total-bytes
Destination Host Name One of (destination-hostname, data-source)
Destination Port destination-port
Destination User Name authenticated-user
Device Action One of (action-taken, result-code)
Device Address hostName
Device Custom Number2 total-bytes-used
Device Custom Number2 Label Total Bytes Used
Device Custom String 1 referrer
Device Custom String 2 One of(thread-result-code,x-webcat-code-full,x-webcat-req-code-full)
Device Custom String 3 decoded-wbrs-score
Device Custom String 4 All of (thread-result-code, decoded-wbrs-score, verdict, threat-hname, threat-risk-ratio, spyid, trace-id)
Device Custom String 5 hierarchy-retrieval
Device Custom String 6 error-type
Device Event Class ID http-response-code
Device Host Name hostName
Device Product 'IronPort Web Security Appliance'
Device Receipt Time OneOfDateTime(timestamp,apache-timestamp)
SmartConnector for Cisco IronPort Web Security Appliance FileDevice Event Mapping to ArcSight Fields
Device Event Mapping to ArcSight Fields Page 17 of 20
ArcSight ESM Field Device-Specific Field
Device Severity http-response-code
Device Vendor 'CISCO'
External ID transaction-id
File Type content-type
Message request-line
Name One of (action-taken, result-code)
Old File Name x-req-dvs-scanverdict
Outcome OneOf(Failure,Success,Null)
Reason x-wbrs-threat-reason
Request Client Application user-agent
Request Cookies cookie
Request Method request-line
Request URL request-line
Source Address client-ip
Source Port source-port
Source User Name x-suspect-user-agent
IronPort W3C Extended Log Format MappingsArcSight ESM Field Device-Specific Field
Application Protocol One of (protocol, cs-protocol)
Bytes In cs-bytes
Bytes Out One of (sc-bytes, sc-body-size)
Destination Address One of (cs-ip, s-ip)
Destination Host Name s-computername
Device Action sc-result-code
Device Event Class ID sc-result-code
Device Process Name s-sitename
Device Product 'IronPort Web Security Appliance'
Device Receipt Time date, time
SmartConnector for Cisco IronPort Web Security Appliance FileDevice Event Mapping to ArcSight Fields
IronPort W3C Extended Log Format Mappings Page 18 of 20

ArcSight ESM Field Device-Specific Field
Device Vendor 'CISCO'
File Path cs-uri-stem
Name sc-result-code
Request Client Application cs(User-Agent)
Request Method cs-method
Request URL cs-url
Source Address c-ip
Source User Name One of (cs-username, x-cache-user)
please confirm that when customer used MySQL JDBC driver 5.1.38, they had issue to receiveeevents. And the workaround is to apply older driver 5.0.8, after that connector is able toreceived events.
SmartConnector for Cisco IronPort Web Security Appliance FileDevice Event Mapping to ArcSight Fields
IronPort W3C Extended Log Format Mappings Page 19 of 20

Send Documentation FeedbackIf you have comments about this document, you can contact the documentation team byemail. If an email client is configured on this computer, click the link above and an emailwindow opens with the following information in the subject line:
Feedback on SmartConnector for Cisco IronPort Web Security Appliance File (Micro FocusSecurity ArcSight Connectors 8.3.0)
Just add your feedback to the email and click send.
If no email client is available, copy the information above to a new message in a web mailclient, and send your feedback to [email protected].
We appreciate your feedback!
Send Documentation Feedback Page 20 of 20