Embed Size (px)
Citation preview

Sentinel SuperPro 6.5Developer’s Guide
Copyright © 2007, SafeNet, Inc. All rights reserved.
All attempts have been made to make the information in this document complete and accurate. SafeNet, Inc. isnot responsible for any direct or indirect damages or loss of business resulting from inaccuracies or omissions.The specifications contained in this document are subject to change without notice.
SafeNet, Sentinel, and Sentinel SuperPro are either trademarks or registered trademarks of Safenet, Inc.Microsoft Windows, Windows 98, Windows ME, Windows 2000, Windows 2003, Windows XP, and Windows Vistaare either trademarks or registered trademarks of Microsoft Corporation in the United States and othercountries. Linux is a trademark of Linus Torvalds, in the United States and other countries. All other productnames referenced herein are trademarks or registered trademarks of their respective manufacturers.
CONFIDENTIAL INFORMATION
Sentinel SuperPro protection system is designed to protect your applications from unauthorized use. The lessinformation that unauthorized people have regarding your security system, the greater your protection. It is inyour best interest to protect the information herein from access by unauthorized individuals.
Part Number 007632-001, Revision A
Software versions 6.5 and later
SafeNet Sales Offices
Revision Action/Change Date
A Initial Release July 2005
B Updated for the 6.5 Release July 2007
Australia +61 3 9882 8322
Brazil +55 11 6121 6455
China +86 10 88519191
Finland +358 20 500 7800
France +33 1 47 55 74 70
Germany +49 1803 7246269
Hong Kong +852 3157 7111
India +91-11-32980377 / 30980641
Japan (Tokyo) + 81 45 6405733
Korea +82 31 705 8212
Mexico +52 55 5575 1441
Netherlands +31 73 658 1900
Singapore +65 6297 6196
Taiwan 886-2-27353736
UK (Camberley) +44 0 1276 608000
U.S. (Massachusetts) +1 978.539.4800
U.S. (New Jersey) +1 201.333.3400
U.S. (Virginia) +1 703.279.4500
U.S. (Irvine, California) +1 949.450.7300
U.S. (San Jose, California) + (408) 452 7651
U.S. (Torrance, California) +1 310.533.8100
ii Sentinel SuperPro 6.5 Developer’s Guide
International Quality Standard Certification
European Community Directive Conformance Statement
FCC Notice to Users
Sentinel SuperPro has passed the FCC Self-authorization process of Computers and Computer Peripherals. FCC Part 15 Class B Specifications.
This equipment has been tested and found to comply with the limits for a class B digital device, pursuant to part 15 of the FCC Rules. These limits are designed to provide reasonable protection against harmful interference in a residential installation. This equipment generates, uses and can radiate radio frequency energy and if not installed and used in accordance with the instructions, may cause harmful interference to radio communica-tions. However, there is no guarantee that interference will not occur in a particular installation. If this equip-ment does cause harmful interference to radio or television reception, which can be determined by turning the equipment off and on, the user is encouraged to try to correct the interference by one or more of the following measures:
■ Reorient or relocate the receiving antenna.
■ Increase the separation between the equipment and receiver.
■ Connect the equipment into an outlet on a circuit different from that to which the receiver is connected.
■ Consult the dealer or an experienced radio/TV technician for help.
In order to maintain compliance with FCC regulations, shielded cables must be used with this equipment. Opera-
tion with non-approved equipment or unshielded cables is likely to result in interference to radio and TV
reception. The user is cautioned that changes and modifications made to the equipment without the approval of
manufacturer could void the user's authority to operate this equipment.
The Beijing, China; Irvine, California, U.S.A; and Rotterdam, The Netherlands facilities are certified to the latest, globally-recognized ISO 9001:2000 standard. The certificate number is: CERT-02982-2003-AQ-HOU-RAB Rev 3.
This product is in conformity with the protection requirements of EC Council Directive 89/336/EEC. Conformity is declared to the following applicable stan-dards for electro-magnetic compatibility immunity and susceptibility; CISPR22 and IEC801. This product satisfies the CLASS B limits of EN 55022.
FCC
Sentinel SuperPro 6.5 Developer’s Guide iii

iv Sentinel SuperPro 6.5 Developer’s Guide

Contents
Preface ........................................................................................... xvii
Terms and Coventions Used in This Guide ................................................................. xviiAbout This Guide....................................................................................................... xviiiMore Documentation Resources ................................................................................. xxiContacting Technical Support..................................................................................... xxiExport Considerations ................................................................................................ xxiiWe Welcome Your Comments .................................................................................. xxiii
Chapter 1: What Is Sentinel SuperPro? ........................................... 1
Software Piracy Affects Your Business...........................................................................1Sentinel SuperPro For Marketing Success......................................................................2How Sentinel SuperPro Protects Your Software ............................................................3
Protection Types ..........................................................................................................5Sentinel SuperPro Features and Benefits......................................................................10Sentinel SuperPro Components....................................................................................14
The Hardware Key .....................................................................................................14The Sentinel SuperPro API .........................................................................................16The Sentinel SuperPro Developer’s Toolkit ...................................................................16The Sentinel System Driver.........................................................................................16The Sentinel Protection Server ....................................................................................17
Sentinel SuperPro 6.5 Developer's Guide v
Contents
Chapter 2: Using the Hardware Key .............................................. 19
Getting to Know the Key ............................................................................................. 20SuperPro XM - Maximizes Application Security ......................................................... 22Restricted Cells ......................................................................................................... 24Programmable Cells .................................................................................................. 24
Programming the Key ................................................................................................. 25Access Codes ............................................................................................................. 25Cell Types ................................................................................................................. 26Cell Values................................................................................................................ 35Valid Algorithm Addresses......................................................................................... 37Algorithm with Password and Counter....................................................................... 47
Diagram showing cell structure of a SuperPro XM key............................................... 51Attaching the Sentinel SuperPro Hardware Key ........................................................ 52
Installing the Parallel Port Hardware Key .................................................................. 52Installing the USB Hardware Key .............................................................................. 55
Ordering and Returning Keys ..................................................................................... 56Ordering Additional Keys........................................................................................... 56Returning Keys ......................................................................................................... 57
Chapter 3: Designing Your Protection Strategy........................... 59
Introduction to Software Security Concepts................................................................ 61Protection Types ....................................................................................................... 61Active v. Inactive Applications.................................................................................... 63Activation Types ....................................................................................................... 63Network Licenses ...................................................................................................... 72
Getting Started ............................................................................................................ 73Quick and Easy Protection ......................................................................................... 73Customized Protection............................................................................................... 73Basic Protection Guidelines........................................................................................ 74
Commonly Used Protection Techniques ..................................................................... 76Reading Stored Data ..................................................................................... 76Using Algorithms to Encrypt Data ............................................................................. 77Using Activation Passwords ...................................................................................... 79Dealing With Missing Hardware Keys ....................................................................... 82
vi Sentinel SuperPro 6.5 Developer's Guide
Contents
Dealing With Newly Connected Hardware Keys ..........................................................84Advanced Protection Techniques ................................................................................85
Using Returned Values as Variables ............................................................................85Implementing Encryption Techniques..........................................................................85Querying Activation Passwords ..................................................................................91Using Data Words......................................................................................................91Assembly Language Techniques ..................................................................................92Using Stepped Access..................................................................................................93Obstructing Debuggers ...............................................................................................94
Controlling Demo Applications ....................................................................................94Using Counters ..........................................................................................................95Querying Counters .....................................................................................................99
Programming the Hardware Key .................................................................................99Using One Key for Multiple Applications .................................................................. 100
Moving On................................................................................................................. 100
Chapter 4: Implementing Licensing............................................. 101
License Sharing ....................................................................................................... 101Setting the Access Mode ............................................................................................ 103
Setting Stand-alone or Network Mode ...................................................................... 103Setting RNBO_SPN_ALL_MODES ......................................................................... 104About the NSP_HOST Variable................................................................................ 105
Finding a Key............................................................................................................. 106Finding a Key in Stand-alone Mode .......................................................................... 106Finding a Key in Network Mode............................................................................... 106Finding a Key in Dual Mode..................................................................................... 107
Getting a License ....................................................................................................... 108The License ID......................................................................................................... 109Maintaining the License........................................................................................... 109A Note About Licenses ............................................................................................. 109
Releasing a License.................................................................................................... 110Using Sublicenses ...................................................................................................... 110
Sublicense Usage Example ....................................................................................... 110Getting a Sublicense ................................................................................................ 111Adding Sublicenses to Your Protection Strategy........................................................ 111
Sentinel SuperPro 6.5 Developer's Guide vii
Contents
Chapter 5: Starting the Sentinel SuperPro Toolkit........................................................... 113
Opening the Sentinel SuperPro Toolkit ..................................................................... 114Entering Your Passwords ........................................................................................ 114Include Overwrite Passwords in DSAFE.DLL and USAFE.DLL ................................. 118Enabling the One-Time Update Option for License Codes............................................ 119
Navigating in the Sentinel SuperPro Toolkit............................................................. 121Stages and Sections.................................................................................................. 122Menu Bar ............................................................................................................... 126Getting Help............................................................................................................ 126Using Online Help ................................................................................................... 127
Completing the Overview Stage ................................................................................ 127Learning About Sentinel SuperPro Concepts ............................................................. 127Using the API Explorer ........................................................................................... 127Querying Algorithms............................................................................................... 134
Creating a Project ...................................................................................................... 136What Is a Project?................................................................................................... 136Creating a New Project ............................................................................................ 137Importing a .DAT File.............................................................................................. 137Changing Your Developer ID or Passwords ............................................................... 138
Opening an Existing Project ...................................................................................... 139Saving Your Project .................................................................................................. 140Adding Password Protection to Your Project............................................................ 140
Locking a Project ..................................................................................................... 141Changing the Password for a Locked Project ............................................................. 142Unlocking a Project ................................................................................................. 142
Creating a Project File for Distributors ...................................................................... 143Closing the Sentinel SuperPro Toolkit....................................................................... 144
Chapter 6: Protecting Your Application...................................... 145
What Is Application Protection? ............................................................................... 146Demo Applications .................................................................................................. 146
Selecting a Protection Type ....................................................................................... 149Using Integrated Protection ...................................................................................... 151
viii Sentinel SuperPro 6.5 Developer's Guide
Contents
Selecting the Cell Address ........................................................................................ 151Overriding the Default Algorithm Values.................................................................. 152Adding a Demo Counter ........................................................................................... 154Selecting the Activation Type ................................................................................... 155
Using Automatic Protection...................................................................................... 157Entering a Name for the Protection Element ............................................................. 157Selecting the Cell Address ........................................................................................ 158Selecting the Input and Output Files ......................................................................... 160Selecting Automatic Protection Execution Options.................................................... 163Providing Advanced Security Settings ...................................................................... 167Selecting Additional Files for Encryption .................................................................. 170Selecting the Activation Type ................................................................................... 174Customizing Error Messages ................................................................................... 176
Protecting Multiple Applications............................................................................... 177Editing an Application Protection Element ............................................................... 177
Deleting an Application Protection Element .............................................................. 178Where to Go from Here.............................................................................................. 178Frequently Asked Questions...................................................................................... 180
Chapter 7: Working With Design Elements................................. 185
Custom Element Types .............................................................................................. 186Adding Algorithms.................................................................................................... 188
Entering Counter Values.......................................................................................... 191Entering Password Values ....................................................................................... 192
Adding Counters ....................................................................................................... 193Adding User Data ...................................................................................................... 195Adding Sublicense Limits .......................................................................................... 198Editing Existing Elements .......................................................................................... 200
Deleting an Element ................................................................................................ 201Rearranging Elements on the Key............................................................................. 201
Chapter 8: Implementing Your Strategy..................................... 205
Creating the Prototype .............................................................................................. 207
Sentinel SuperPro 6.5 Developer's Guide ix
Contents
Starting the Prototype Process................................................................................. 208Verifying the Key Using MemView............................................................................ 209Adding API Functions to Your Source Code ............................................................. 211
Viewing the Pseudocode........................................................................................... 211Adding Code to Your Application.............................................................................. 213Using the API Explorer to Evaluate the API Functions.............................................. 213
Shelling an Application ............................................................................................. 215Testing Your Application Protection......................................................................... 219
Chapter 9: Defining Field Activation Actions ............................. 221
Working with Actions ............................................................................................... 222Adding an Action..................................................................................................... 223Removing an Action ................................................................................................ 224
Working with Commands ......................................................................................... 225Adding a Command ................................................................................................. 225Removing a Command............................................................................................. 228Available Commands ............................................................................................... 229
Testing Your Strategy ............................................................................................... 230Final Steps ................................................................................................................. 231Configuring the SafeCfg Utility for Linux .................................................................. 232
Chapter 10: Programming Keys ................................................... 233
Setting Up to Program Product Keys......................................................................... 235Selecting the Appropriate Keys................................................................................. 235Connecting the Keys ................................................................................................ 235
Programming a Product Key..................................................................................... 237Viewing Programming Statistics.............................................................................. 240Verifying the Key Was Programmed Correctly ......................................................... 241
Setting Up to Program Distributor Keys .................................................................... 242Selecting the Appropriate Keys................................................................................. 242Connecting the Keys ................................................................................................ 242
Programming a Distributor Key................................................................................ 244
x Sentinel SuperPro 6.5 Developer's Guide
Contents
Chapter 11: Shipping Your Application ...................................... 247
What to Send to Your Customers.............................................................................. 248Installing the Sentinel System Driver ....................................................................... 249Installing the Sentinel Protection Server ................................................................... 250Installing the Sentinel Data Protection Driver........................................................... 258
What to Send to Your Distributors ............................................................................ 260Customer Items....................................................................................................... 260Distributor-Only Items............................................................................................ 261
Packaging and Handling Guidelines for Keys ........................................................... 263
Chapter 12: Activating and Updating Keys................................. 265
How Product Keys are Activated or Updated ............................................................ 266What Is a Locking Code?.......................................................................................... 267What Is a License Code?........................................................................................... 268
How Distributors Activate an Application ................................................................ 269Using the Client Activator ......................................................................................... 271
Client Activator Customer Requirements.................................................................. 272Steps for Deploying the Client Activator.................................................................... 272If You Don’t Use the Client Activator ....................................................................... 273
Updating Product Keys in the Field ........................................................................... 274Receiving the Locking Code from Your Customer ...................................................... 274Generating a License Code ...................................................................................... 274Sending the License Code to Your Customer.............................................................. 277
Updating Distributor Keys in the Field ...................................................................... 279
Chapter 13: Using the Stand-alone Utilities................................ 281
Using the Make Keys Utility....................................................................................... 282Installing the Make Keys Utility .............................................................................. 282Opening the Make Keys Utility ................................................................................ 283Programming Product Keys..................................................................................... 284Programming Distributor Keys................................................................................ 286Viewing Programming Statistics.............................................................................. 289
Using the License Generator Utility ........................................................................... 290
Sentinel SuperPro 6.5 Developer's Guide xi
Contents
Installing the License Generator Utility .................................................................... 290Opening the License Generator Utility ...................................................................... 291Generating a License Code........................................................................................ 292
Using the Field Exchange Utility................................................................................ 295Installing the Field Exchange Utility – Developers .................................................... 295Installing the Field Exchange Utility – Customers .................................................... 295Opening the Field Exchange Utility .......................................................................... 297Generating a Locking Code ....................................................................................... 298Entering a License Code ........................................................................................... 299
Chapter 14: API Function Reference ............................................ 301
Using the Sentinel SuperPro API............................................................................... 301API Functions Summary........................................................................................... 303The RB_SPRO_APIPACKET Structure...................................................................... 305RNBOsproActivate .................................................................................................... 305RNBOsproCleanUp .................................................................................................... 307RNBOsproDecrement ................................................................................................ 307RNBOsproEnumServer ........................................................................................... 310RNBOsproExtendedRead .......................................................................................... 313RNBOsproFindFirstUnit............................................................................................. 315RNBOsproFindNextUnit ............................................................................................ 316RNBOsproFormatPacket ........................................................................................... 317RNBOsproGetContactServer ..................................................................................... 318RNBOsproGetFullStatus ............................................................................................ 319RNBOsproGetHardLimit............................................................................................ 320RNBOsproGetKeyInfo................................................................................................ 321RNBOsproGetKeyType .............................................................................................. 321RNBOsproGetSubLicense .......................................................................................... 325RNBOsproGetVersion ................................................................................................ 326RNBOsproInitialize .................................................................................................... 329RNBOsproOverwrite.................................................................................................. 330RNBOsproQuery ........................................................................................................ 332RNBOsproRead.......................................................................................................... 335RNBOsproReleaseLicense.......................................................................................... 337RNBOsproSetContactServer ...................................................................................... 339
xii Sentinel SuperPro 6.5 Developer's Guide
Contents
RNBOsproSetHeartBeat............................................................................................. 341RNBOsproSetProtocol ............................................................................................... 344RNBOsproCheckTerminalService ............................................................................. 346RNBOsproSetSharedLicense...................................................................................... 348RNBOsproWrite......................................................................................................... 350API Status Codes ....................................................................................................... 352
Chapter 15: Migrating from Older Versions of Sentinel Keys... 357
Chapter 16: Features for Linux Distribution............................... 359
Support for SuperPro XM and Parallel Port Keys...................................................... 360Sharing support in the Dual Client Library ............................................................... 360Sublicensing............................................................................................................ 361Cancelling a License................................................................................................. 361
Sentinel Protection Installer for Linux Redistributables ........................................... 362What to Send to Your Customers and Distributors ................................................... 363Getting Started .......................................................................................................... 365
Part I – Using the Windows Toolkit ......................................................................... 365Part II – Working in Your Application Source Code................................................... 368Part III – Configuring SafeCfg .................................................................................. 368Part IV – The Final Steps......................................................................................... 368
Frequently Asked Questions...................................................................................... 368
Appendix A: Troubleshooting...................................................... 373
Uninstalling the Sentinel SuperPro Toolkit............................................................... 374Repairing a Sentinel SuperPro Installation............................................................... 376Modifying/Repairing Sentinel SuperPro Installer on Vista ....................................... 377Strategy Design Issues ............................................................................................... 378Application Protection Issues.................................................................................... 379
Protecting Multi-File Applications ........................................................................... 380Protecting Interpreted-language Applications............................................................ 381
Sentinel SuperPro 6.5 Developer's Guide xiii
Contents
Input File Attributes................................................................................................ 381Thread Local Storage ............................................................................................... 382Lahey F90 Fortran 2.0........................................................................................... 382Protecting FoxPro 3.0 and 5.0 Applications............................................................. 382Protecting Microsoft J++ 1.1 Java Applets ............................................................... 382Note for SmartHeap Users ....................................................................................... 382Protecting Applications That Use “Starter” Programs............................................... 383
Key Programming Issues........................................................................................... 384Application Activation Issues.................................................................................... 386Sentinel SuperPro Compatibility ............................................................................... 388Sentinel SuperPro Key Compatibility Issues.............................................................. 390
About the USB Hardware Interface .......................................................................... 391
Appendix B: Compatible Compilers and Applications............... 393
Appendix C: Using the Command Line Shell Utility................... 397
Command Line Syntax .............................................................................................. 398Using the Shell Utility ................................................................................................ 399
Example ................................................................................................................. 400
Index .............................................................................................. 403
Appendix D: Glossary ................................................................... 419
A ................................................................................................................................ 419C ................................................................................................................................ 422D ................................................................................................................................ 423E................................................................................................................................. 425F................................................................................................................................. 425H ................................................................................................................................ 426I ................................................................................................................................. 426L................................................................................................................................. 427
xiv Sentinel SuperPro 6.5 Developer's Guide
Contents
M ............................................................................................................................... 428N ................................................................................................................................ 428O ................................................................................................................................ 429P ................................................................................................................................ 429Q ................................................................................................................................ 430R ................................................................................................................................ 430S................................................................................................................................. 430T ................................................................................................................................ 432U ................................................................................................................................ 432W ............................................................................................................................... 432
Sentinel SuperPro 6.5 Developer's Guide xv
Contents
xvi Sentinel SuperPro 6.5 Developer's Guide
Preface
Thank you for selecting Sentinel SuperPro to protect your applications from unauthorized use. The Sentinel SuperPro software protection system com-bines a programmable hardware key with the ability to encrypt data, giving you a wide range of methods for securing multiple applications from illegal distribution and use.
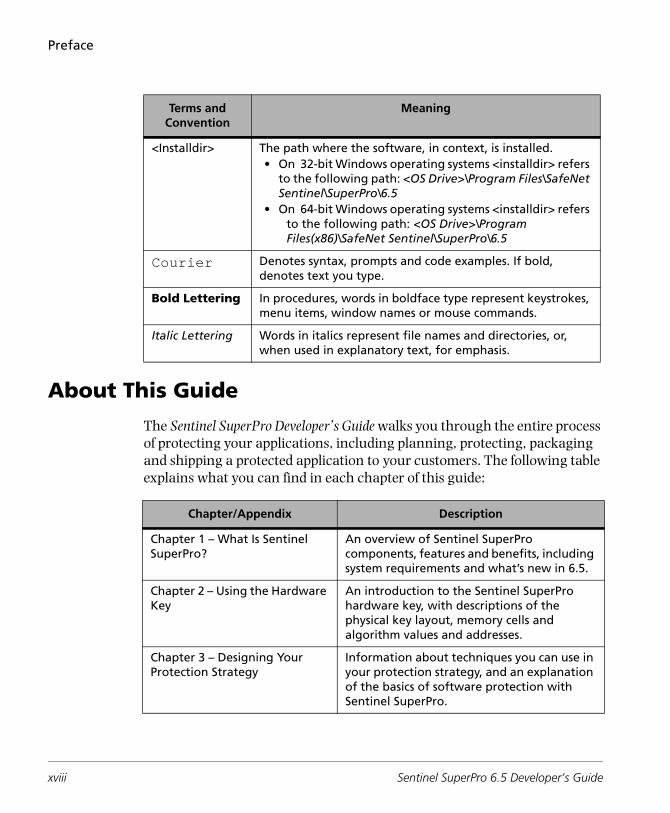
Terms and Coventions Used in This Guide
Please note the following conventions used in this guide:
Terms and Convention
Meaning
<OS Drive> The root drive on your system where your operating system is installed.
Sentinel SuperPro 6.5 Developer’s Guide xvii
Preface
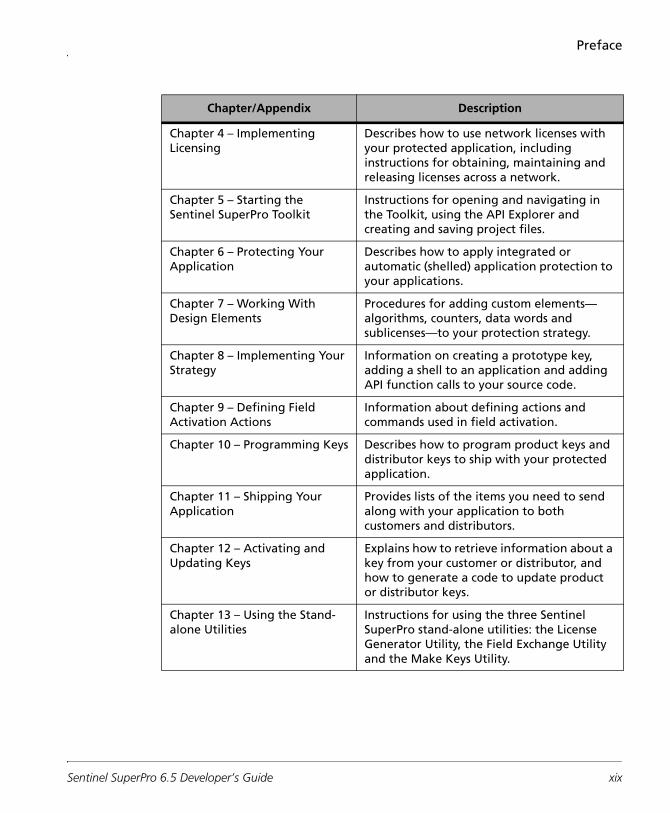
About This Guide
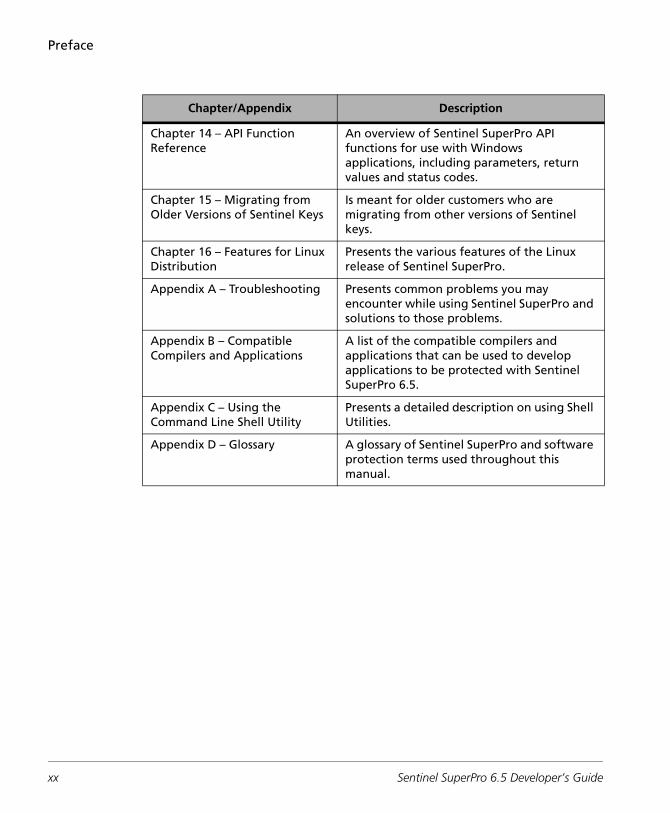
The Sentinel SuperPro Developer’s Guide walks you through the entire process of protecting your applications, including planning, protecting, packaging and shipping a protected application to your customers. The following table explains what you can find in each chapter of this guide:
<Installdir> The path where the software, in context, is installed.• On 32-bit Windows operating systems <installdir> refers
to the following path: <OS Drive>\Program Files\SafeNet Sentinel\SuperPro\6.5
• On 64-bit Windows operating systems <installdir> refers to the following path: <OS Drive>\Program Files(x86)\SafeNet Sentinel\SuperPro\6.5
Courier Denotes syntax, prompts and code examples. If bold, denotes text you type.
Bold Lettering In procedures, words in boldface type represent keystrokes, menu items, window names or mouse commands.
Italic Lettering Words in italics represent file names and directories, or, when used in explanatory text, for emphasis.
Terms and Convention
Meaning
Chapter/Appendix Description
Chapter 1 – What Is Sentinel SuperPro?
An overview of Sentinel SuperPro components, features and benefits, including system requirements and what’s new in 6.5.
Chapter 2 – Using the Hardware Key
An introduction to the Sentinel SuperPro hardware key, with descriptions of the physical key layout, memory cells and algorithm values and addresses.
Chapter 3 – Designing Your Protection Strategy
Information about techniques you can use in your protection strategy, and an explanation of the basics of software protection with Sentinel SuperPro.
xviii Sentinel SuperPro 6.5 Developer’s Guide
Preface
Chapter 4 – Implementing Licensing
Describes how to use network licenses with your protected application, including instructions for obtaining, maintaining and releasing licenses across a network.
Chapter 5 – Starting the Sentinel SuperPro Toolkit
Instructions for opening and navigating in the Toolkit, using the API Explorer and creating and saving project files.
Chapter 6 – Protecting Your Application
Describes how to apply integrated or automatic (shelled) application protection to your applications.
Chapter 7 – Working With Design Elements
Procedures for adding custom elements—algorithms, counters, data words and sublicenses—to your protection strategy.
Chapter 8 – Implementing Your Strategy
Information on creating a prototype key, adding a shell to an application and adding API function calls to your source code.
Chapter 9 – Defining Field Activation Actions
Information about defining actions and commands used in field activation.
Chapter 10 – Programming Keys Describes how to program product keys and distributor keys to ship with your protected application.
Chapter 11 – Shipping Your Application
Provides lists of the items you need to send along with your application to both customers and distributors.
Chapter 12 – Activating and Updating Keys
Explains how to retrieve information about a key from your customer or distributor, and how to generate a code to update product or distributor keys.
Chapter 13 – Using the Stand-alone Utilities
Instructions for using the three Sentinel SuperPro stand-alone utilities: the License Generator Utility, the Field Exchange Utility and the Make Keys Utility.
Chapter/Appendix Description
Sentinel SuperPro 6.5 Developer’s Guide xix
Preface
Chapter 14 – API Function Reference
An overview of Sentinel SuperPro API functions for use with Windows applications, including parameters, return values and status codes.
Chapter 15 – Migrating from Older Versions of Sentinel Keys
Is meant for older customers who are migrating from other versions of Sentinel keys.
Chapter 16 – Features for Linux Distribution
Presents the various features of the Linux release of Sentinel SuperPro.
Appendix A – Troubleshooting Presents common problems you may encounter while using Sentinel SuperPro and solutions to those problems.
Appendix B – Compatible Compilers and Applications
A list of the compatible compilers and applications that can be used to develop applications to be protected with Sentinel SuperPro 6.5.
Appendix C – Using the Command Line Shell Utility
Presents a detailed description on using Shell Utilities.
Appendix D – Glossary A glossary of Sentinel SuperPro and software protection terms used throughout this manual.
Chapter/Appendix Description
xx Sentinel SuperPro 6.5 Developer’s Guide
Preface
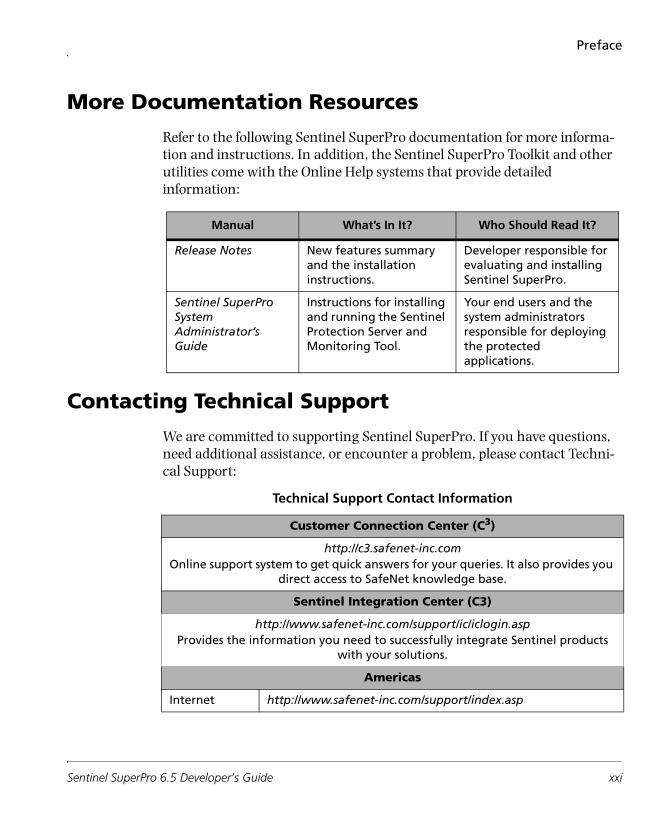
More Documentation Resources
Refer to the following Sentinel SuperPro documentation for more informa-tion and instructions. In addition, the Sentinel SuperPro Toolkit and other utilities come with the Online Help systems that provide detailed information:
Contacting Technical Support
We are committed to supporting Sentinel SuperPro. If you have questions, need additional assistance, or encounter a problem, please contact Techni-cal Support:
Manual What’s In It? Who Should Read It?
Release Notes New features summary and the installation instructions.
Developer responsible for evaluating and installing Sentinel SuperPro.
Sentinel SuperPro System Administrator’s Guide
Instructions for installing and running the Sentinel Protection Server and Monitoring Tool.
Your end users and the system administrators responsible for deploying the protected applications.
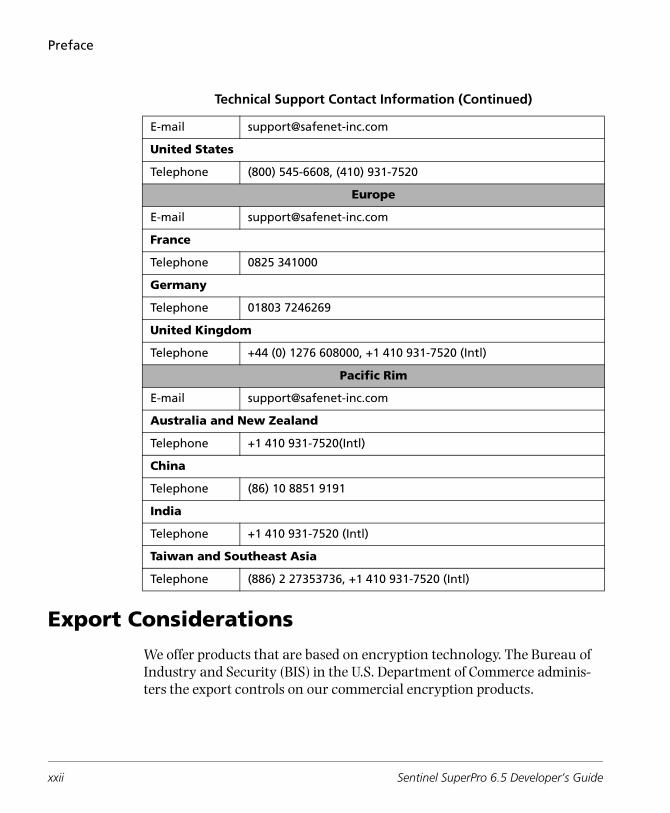
Technical Support Contact Information
Customer Connection Center (C3)
http://c3.safenet-inc.comOnline support system to get quick answers for your queries. It also provides you
direct access to SafeNet knowledge base.
Sentinel Integration Center (C3)
http://www.safenet-inc.com/support/ic/iclogin.aspProvides the information you need to successfully integrate Sentinel products
with your solutions.
Americas
Internet http://www.safenet-inc.com/support/index.asp
Sentinel SuperPro 6.5 Developer’s Guide xxi
Preface
Export Considerations
We offer products that are based on encryption technology. The Bureau of Industry and Security (BIS) in the U.S. Department of Commerce adminis-ters the export controls on our commercial encryption products.
E-mail [email protected]
United States
Telephone (800) 545-6608, (410) 931-7520
Europe
E-mail [email protected]
France
Telephone 0825 341000
Germany
Telephone 01803 7246269
United Kingdom
Telephone +44 (0) 1276 608000, +1 410 931-7520 (Intl)
Pacific Rim
E-mail [email protected]
Australia and New Zealand
Telephone +1 410 931-7520(Intl)
China
Telephone (86) 10 8851 9191
India
Telephone +1 410 931-7520 (Intl)
Taiwan and Southeast Asia
Telephone (886) 2 27353736, +1 410 931-7520 (Intl)
Technical Support Contact Information (Continued)
xxii Sentinel SuperPro 6.5 Developer’s Guide
Preface
Rules governing exports of encryption can be found in the Export Adminis-tration Regulations (EAR), 15 CFR Parts 730-774, which implements the Export Administration Act (“EAA” 50 U.S.C. App. 2401 et seq.).
Important Note: BIS requires that each entity exporting products be famil-iar with and comply with their obligations described in the Export Administration Regulations. Please note that the regulations are subject to change. We recommend that you obtain your own legal advice when attempting to export any product that uses encryption. In addition, some countries may restrict certain levels of encryption imported into their coun-try. We recommend consulting legal counsel in the appropriate country or the applicable governmental agencies in the particular country.
We Welcome Your Comments
To help us improve future versions of <product name> documentation, we want to know about any corrections, clarifications or further information you would find useful. When you contact us, please include the following information:
■ The title and version of the guide you are referring to
■ The version of the <product name> software you are using
■ Your name, company name, job title, phone number and e-mail address
Send us e-mail at:
Thank you for your feedback. Keep in mind that these e-mails are only for documentation feedback. If you have a technical question, please contact Technical Support (see “Contacting Technical Support” on page xxi).
Sentinel SuperPro 6.5 Developer’s Guide xxiii

Preface
xxiv Sentinel SuperPro 6.5 Developer’s Guide
Chapter 1What Is Sentinel SuperPro?
In this chapter we will assess how software piracy threatens your profits and understand how Sentinel SuperPro can curb widespread piracy and add value to your software distribution.
Software Piracy Affects Your Business
Software piracy hurts the bottom-line of your business. Every year a huge share of revenue is lost due to piracy—affecting your profits and research and development prospects.
Software piracy can occur in many forms, varying from malicious counter-feiting to violation of the license agreement by users who may be unaware they are doing so (for example, too many clients using the application at one time, unreported installations and exchange of software disks among peers).
Software protection not only effectively secures against piracy but can also enhance product versatility with flexible licensing models. You can use new avenues for distributing your applications and ultimately improve return-on- investment. Moreover, software protection must be simple to implement so your schedules are not burdened with lengthy training and programming time. Read on to learn how Sentinel SuperPro can do all this and much more!
Sentinel SuperPro 6.5 Developer’s Guide 1
Chapter 1 - What Is Sentinel SuperPro?
Sentinel SuperPro For Marketing Success
Sentinel SuperPro is the most popular hardware key from the family of Sen-tinel keys that protect your applications from unauthorized use.
You can use Sentinel SuperPro for preventing software piracy and boosting revenue by increasing the availability of your software to new marketing segments—that might be interested in buying selective/full features of your software at attractive prices. Using Sentinel SuperPro, you can:
■ Distribute your application without being concerned about the licensing violations, such as the number of users exceeding the number of licenses bought, unauthorized installations, and so on.
■ Sell date-limited and feature-limited software for increasing the product usage/trial rate among the potential customers.
■ Protect multiple applications and modules with a single key.
■ Provide stand-alone and network licensing to customers with small setups or large enterprises.
■ Activate and renew applications/features, increase demo limits, and convert demos to full versions remotely.
Note: What is a license?A license authorizes a user to access your application using the key. It rep-resents the license agreement between you and your customer. Sentinel SuperPro ensures that the terms and conditions agreed upon by both the parties (whether the application will stop running after a specific number of days, it can only run on a specific computer, and so on) are met.
2 Sentinel SuperPro 6.5 Developer’s Guide
Chapter 1 - What Is Sentinel SuperPro?
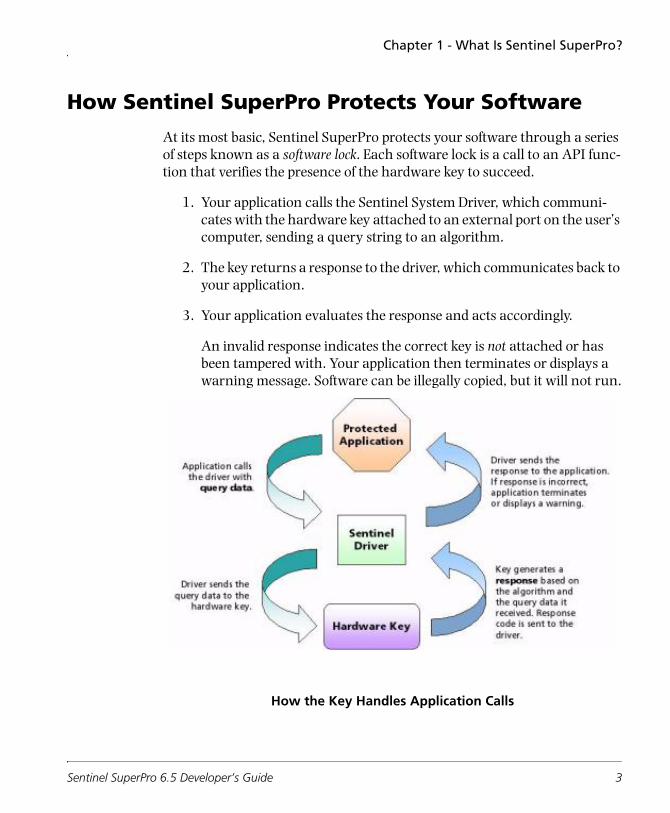
How Sentinel SuperPro Protects Your Software
At its most basic, Sentinel SuperPro protects your software through a series of steps known as a software lock. Each software lock is a call to an API func-tion that verifies the presence of the hardware key to succeed.
1. Your application calls the Sentinel System Driver, which communi-cates with the hardware key attached to an external port on the user’s computer, sending a query string to an algorithm.
2. The key returns a response to the driver, which communicates back to your application.
3. Your application evaluates the response and acts accordingly.
An invalid response indicates the correct key is not attached or has been tampered with. Your application then terminates or displays a warning message. Software can be illegally copied, but it will not run.
How the Key Handles Application Calls
Sentinel SuperPro 6.5 Developer’s Guide 3
Chapter 1 - What Is Sentinel SuperPro?
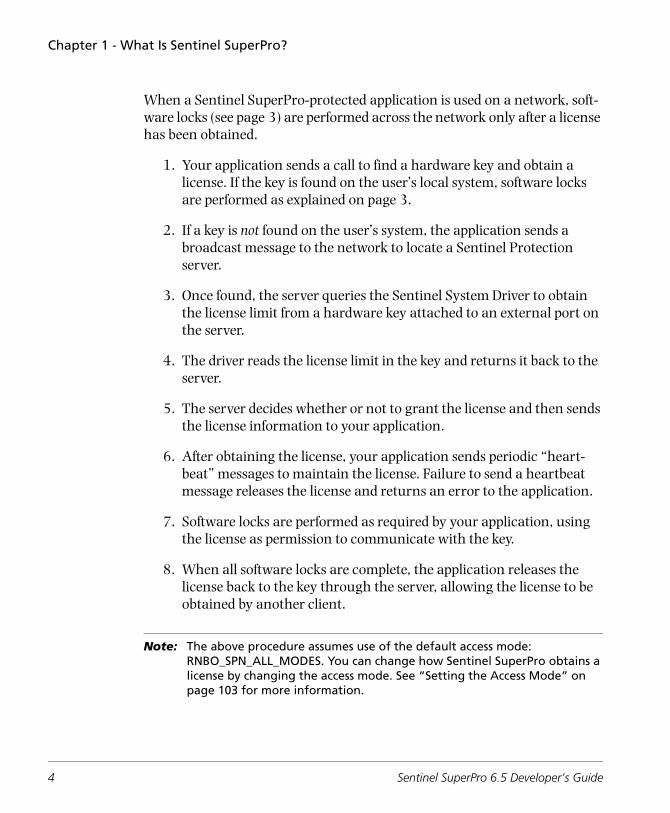
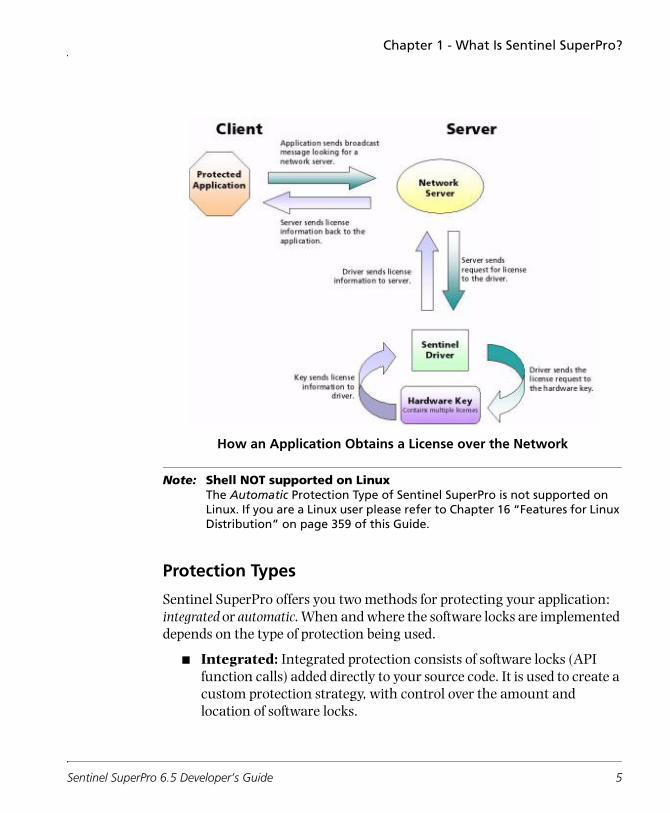
When a Sentinel SuperPro-protected application is used on a network, soft-ware locks (see page 3) are performed across the network only after a license has been obtained.
1. Your application sends a call to find a hardware key and obtain a license. If the key is found on the user’s local system, software locks are performed as explained on page 3.
2. If a key is not found on the user’s system, the application sends a broadcast message to the network to locate a Sentinel Protection server.
3. Once found, the server queries the Sentinel System Driver to obtain the license limit from a hardware key attached to an external port on the server.
4. The driver reads the license limit in the key and returns it back to the server.
5. The server decides whether or not to grant the license and then sends the license information to your application.
6. After obtaining the license, your application sends periodic “heart-beat” messages to maintain the license. Failure to send a heartbeat message releases the license and returns an error to the application.
7. Software locks are performed as required by your application, using the license as permission to communicate with the key.
8. When all software locks are complete, the application releases the license back to the key through the server, allowing the license to be obtained by another client.
Note: The above procedure assumes use of the default access mode: RNBO_SPN_ALL_MODES. You can change how Sentinel SuperPro obtains a license by changing the access mode. See “Setting the Access Mode” on page 103 for more information.
4 Sentinel SuperPro 6.5 Developer’s Guide
Chapter 1 - What Is Sentinel SuperPro?
How an Application Obtains a License over the Network
Note: Shell NOT supported on LinuxThe Automatic Protection Type of Sentinel SuperPro is not supported on Linux. If you are a Linux user please refer to Chapter 16 “Features for Linux Distribution” on page 359 of this Guide.
Protection Types
Sentinel SuperPro offers you two methods for protecting your application: integrated or automatic. When and where the software locks are implemented depends on the type of protection being used.
■ Integrated: Integrated protection consists of software locks (API function calls) added directly to your source code. It is used to create a custom protection strategy, with control over the amount and location of software locks.
Sentinel SuperPro 6.5 Developer’s Guide 5
Chapter 1 - What Is Sentinel SuperPro?
The frequency of software locks within your application, and the action taken if no key is found, is left up to you. The more locks you add to your application, the more difficult it will be for potential hack-ers to break your application’s protection.
Because you must understand the API function calls used to support the protection strategy you have designed, and manually add them to your code, using integrated protection may take longer.
■ Automatic: Automatic (shelled) protection is the fastest and easiest method of protecting your applications with Sentinel SuperPro.
Instead of adding software locks to your source code, a protective “shell1” is automatically added to your application’s executable file, so that the software lock is called before the application starts—if the hardware key is not present, the user sees an error message and the application does not run.The Shell provides automatic and faster protection. It is capable for protecting against debugging, disassembling, reverse-engineering, and memory dumping attacks.Also, while the application is running, the shell periodically checks to verify the hardware key is still attached—if at any time the key is miss-ing the application throws an error.
Automatic protection also gives you more control over demo options such as expiration dates, counters and time/date limits.
For more details, see “About Shell Protection” on page 7 and “Provid-ing Advanced Security Settings” on page 167.
Note: The automatic protection option, is not supported on Linux.
1.The method in which protective wrappers are put around the application quickly and eas-ily.
6 Sentinel SuperPro 6.5 Developer’s Guide

Chapter 1 - What Is Sentinel SuperPro?
About Shell Protection
In Shell, protective wrappers are put around your application that guard it from unauthorized access. Shell encrypts your original application and will deny access unless the correct Sentinel Key is always present and all the licensing conditions are met.
The Shell has multi-layer architecture. The previous layer, if executed suc-cessfully, only will decrypt the successive layer. Multiple layers provide extra protection to your application—similar to what multiple locks provide to your door. Breaking them require additional resources, time, and skill that could potentially deter hacking attacks. Further, due to the random pattern of the layers, no two Shell implementations are same.
Shell Protection in Action
Sentinel SuperPro 6.5 Developer’s Guide 7
Chapter 1 - What Is Sentinel SuperPro?
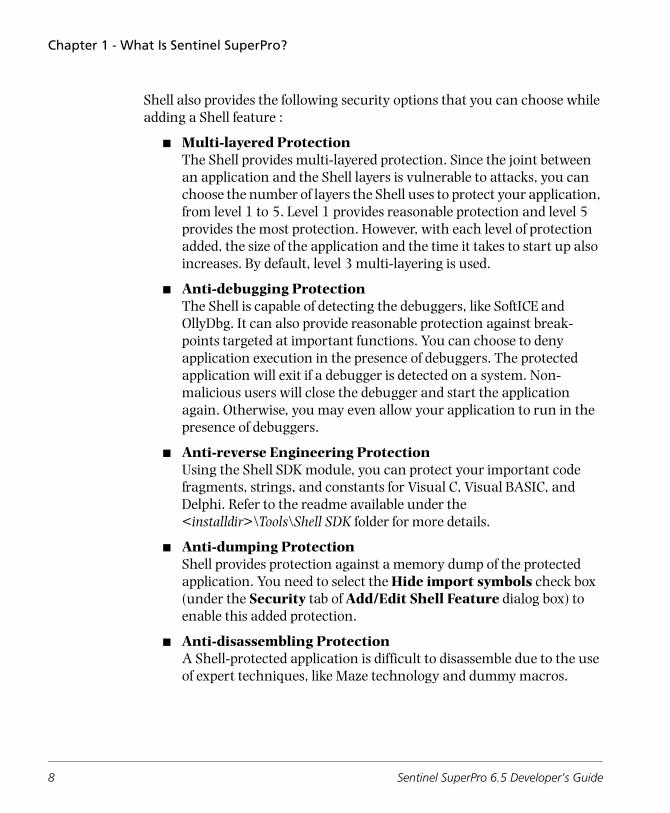
Shell also provides the following security options that you can choose while adding a Shell feature :
■ Multi-layered ProtectionThe Shell provides multi-layered protection. Since the joint between an application and the Shell layers is vulnerable to attacks, you can choose the number of layers the Shell uses to protect your application, from level 1 to 5. Level 1 provides reasonable protection and level 5 provides the most protection. However, with each level of protection added, the size of the application and the time it takes to start up also increases. By default, level 3 multi-layering is used.
■ Anti-debugging ProtectionThe Shell is capable of detecting the debuggers, like SoftICE and OllyDbg. It can also provide reasonable protection against break-points targeted at important functions. You can choose to deny application execution in the presence of debuggers. The protected application will exit if a debugger is detected on a system. Non-malicious users will close the debugger and start the application again. Otherwise, you may even allow your application to run in the presence of debuggers.
■ Anti-reverse Engineering Protection Using the Shell SDK module, you can protect your important code fragments, strings, and constants for Visual C, Visual BASIC, and Delphi. Refer to the readme available under the <installdir>\Tools\Shell SDK folder for more details.
■ Anti-dumping ProtectionShell provides protection against a memory dump of the protected application. You need to select the Hide import symbols check box (under the Security tab of Add/Edit Shell Feature dialog box) to enable this added protection.
■ Anti-disassembling ProtectionA Shell-protected application is difficult to disassemble due to the use of expert techniques, like Maze technology and dummy macros.
8 Sentinel SuperPro 6.5 Developer’s Guide
Chapter 1 - What Is Sentinel SuperPro?
■ Enhanced security for .NET applicationsThe new multi-layer shell protects its own code against disassembling and debugging. Shell also supports .NET DLL.
■ Support for Terminal ClientThe Shell provides support for Terminal Client using the RNBOsproCheckTerminalService API. The function allows you to enable/disable application execution on terminal clients while RNBOsproFindFirstUnit, or RNBOsproFindNextUnit API is executed.An option to allow terminal service is provided on the Toolkit and this selected option is considered during runtime.
Note: To support shelling on Terminal client, RNBOsproCheckTerminalService API will always be called with an OFF flag during shelling, and will not be dependent on the option selection on Toolkit.
When to Use Shell?
The Shell is a popular method of protecting 32-bit Windows executables and DLLs because:
■ It is extremely easy to implement. People with no-programming experience can use it without any hassles.
■ It does not require source code of your application.
It allows implementing the most-popular licensing models in just a few clicks. For more information, refer to “Providing Advanced Security Set-tings” on page 167.
Sentinel SuperPro 6.5 Developer’s Guide 9
Chapter 1 - What Is Sentinel SuperPro?
Sentinel SuperPro Features and Benefits
■ Supported Key Type
The Sentinel SuperPro 6.5 Toolkit provides the facility to design and program the SuperPro and SuperPro XM keys. It enables the devel-oper to design a strategy of up to the maximum key size (256) that is supported by the Toolkit (available only in case of SuperPro XM keys).
■ Customizable Protection
One key can be programmed to provide several different types of both fixed and variable responses, giving you many variations in the types of software locks you can create.
For example, cells can be used to store fixed user data, such as serial numbers, user names or codes controlling feature access. Such data can be read by your application to verify the key is still attached or to perform some other function. You can also use stored data to control program flow or application functions.
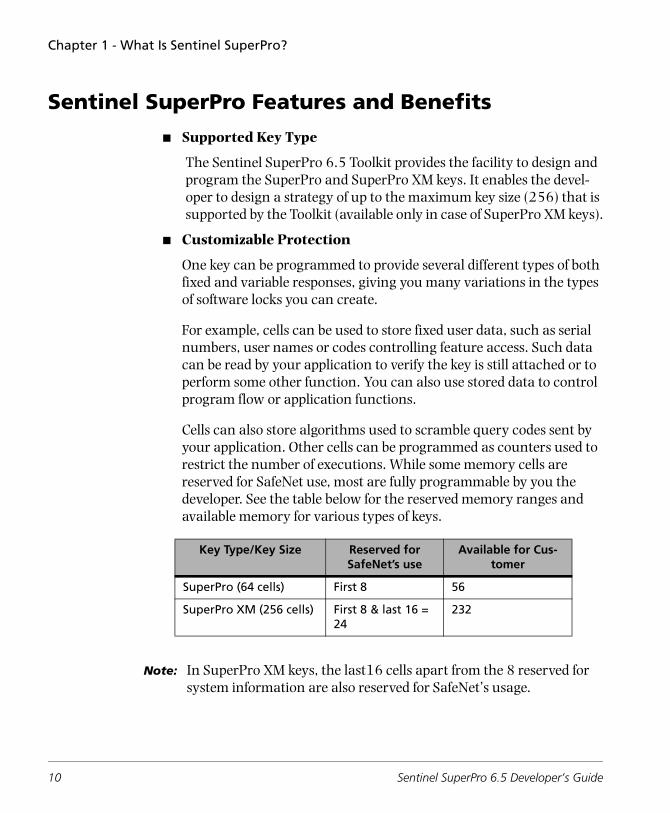
Cells can also store algorithms used to scramble query codes sent by your application. Other cells can be programmed as counters used to restrict the number of executions. While some memory cells are reserved for SafeNet use, most are fully programmable by you the developer. See the table below for the reserved memory ranges and available memory for various types of keys.
Note: In SuperPro XM keys, the last16 cells apart from the 8 reserved for system information are also reserved for SafeNet’s usage.
Key Type/Key Size Reserved for SafeNet’s use
Available for Cus-tomer
SuperPro (64 cells) First 8 56
SuperPro XM (256 cells) First 8 & last 16 = 24
232
10 Sentinel SuperPro 6.5 Developer’s Guide
Chapter 1 - What Is Sentinel SuperPro?
■ Password Protection
The ability to program Sentinel SuperPro hardware keys is protected by three passwords: the Write Password and two Overwrite Passwords. The Write Password allows you to write to undefined cells and read/write data words. The two Overwrite Passwords allow you to write to all other non-restricted cells: read-only data words, counters and algorithm words.
You must have your passwords to program keys through the SSP Toolkit or the Make Keys Utility. You must also include the passwords in your protected application to reprogram cells in the field or use some API function calls. Passwords ensure only authorized users can change your protection strategy or program keys.
■ Field Exchange Capability
Shipping your protected application and its corresponding key(s) to customers in the field doesn’t end your control over the key and your software. With Sentinel SuperPro, you can perform a number of func-tions on keys already in the field, including activating and updating product, setting or clearing bits, and incrementing or decrementing counters.
Field exchange enables you to ship your application in an unusable state, and provide a means for legitimate users to activate it. The acti-vation process is protected by encryption algorithms and passwords pre-programmed into the key. This same process also allows you to support field upgrades and control feature access.
■ Demo Application Control
If you provide demo or trial versions of your applications to your cus-tomers, you may want those applications to run only a set number of times, or you may want to define an expiration date. Sentinel Super-Pro gives you demo application control through the use of counters, time limits and expiration dates.
Sentinel SuperPro 6.5 Developer’s Guide 11
Chapter 1 - What Is Sentinel SuperPro?
■ Multiple Applications Per Key
With Sentinel SuperPro, you can protect many applications on a sin-gle hardware key (limited only by the number of empty memory cells available). In each protection strategy, certain cells in the key are assigned to each application. Each application can then query the key using algorithms. Thus, your users can run several protected applica-tions with a single hardware key attached.
The number of applications you can assign to a single key is depen-dent on how complex your protection strategy is. More complicated strategies require more memory cells, resulting in fewer cells available for other protected applications.
■ Enforce License Sharing
A significant addition to Sentinel SuperPro 6.5 is its ability to enforce concurrent licensing sharing. It allows a user running multiple instances of a protected application on a single computer to consume a single license.
The number of available licenses is determined by the hard limit pro-grammed into the key, or through the use of sublicensing per application.
■ Sublicensing
Sublicensing is useful when you want to apply a license limit to a spe-cific feature of the protected application. If you have specified a user limit in your protection strategy, you can allow sharing the sub-licenses issued on the basis of a combination of User Name and MAC Address(i.e. a seat), so that if a request for accessing that feature of the protected application comes more than once from the same seat, then no extra license is consumed.
You can program up to 232 separate sublicense license limits in each key—each sublicense is a custom element occupying a single cell on the hardware key. The total number of sublicense limits you can pro-gram is dependent on the number of cells being used by other ele-ments of your strategy.
12 Sentinel SuperPro 6.5 Developer’s Guide
Chapter 1 - What Is Sentinel SuperPro?
■ Local or Network Access
Using the Sentinel SuperPro API, you can configure your application to run on a non-networked (stand-alone) system with a key directly attached, on a network using a license obtained from a key attached to a server, or on either a stand-alone system or a network, depending on how the application is being used.
■ Multiple Key and Server Support
Up to 10 keys can be connected to USB or parallel ports on the same server; up to five parallel port keys can be attached to the same paral-lel port. There is no limit to the maximum number of servers you can have on the network.
Thus, the network’s total concurrent license limit is the sum of all the limits in all keys attached to all servers. If a user attempts to access a protected application (assuming the application is running in the default RNBO_SPN_ALL_MODES—see page 104), and the first server has reached its license limit, Sentinel SuperPro automatically checks the first key on another server for an available license. Use of multiple servers helps avoid a single point of failure.
■ Application Time-Out
The server can disconnect a user, and release the license for use by other users, after a pre-determined amount of time has elapsed with-out a Sentinel SuperPro query or heartbeat message. This helps pre-vent idle users from tying up licenses, and permits recovery of licenses used by aborted programs or workstations that are unexpectedly dis-connected from the network.
Sentinel SuperPro 6.5 Developer’s Guide 13
Chapter 1 - What Is Sentinel SuperPro?
Warning! Your developer ID and passwords control access to your hardware key—do not lose them. If you do, you will need to return the key to SafeNet Inc. for a replacement. Also, to prevent unauthorized use of the key, be sure to keep the password document secure!
Sentinel SuperPro Components
The Sentinel SuperPro system is made up of five components:
■ The hardware key
■ The Sentinel SuperPro Developer’s Toolkit
■ The Sentinel SuperPro API
■ The Sentinel System Driver
■ The Sentinel Protection Server
Each of these components is explained in the following sections.
The Hardware Key
The Sentinel SuperPro hardware key is a programmable, read/write mem-ory device that provides the responses necessary to unlock your application. The hardware key is the heart of your application protection strategy.
To implement a protection scheme, you program your application to send calls to the hardware key to verify its presence. If the correct hardware key is attached to the user’s system or available on the network, it responds to your application’s calls with the appropriate responses, allowing the user access to your application.
The developer configurable memory cells can be programmed with algo-rithms, data values to provide fixed responses, or to serve as counters. Each key also contains internal logic that transforms data based on encryption strings you define.
14 Sentinel SuperPro 6.5 Developer’s Guide
Chapter 1 - What Is Sentinel SuperPro?
Network Keys v. Stand-alone Keys
There are two types of Sentinel SuperPro hardware keys: network and stand-alone:
■ The network key allows multiple network clients to access a protected application using a single hardware key. Network keys, which are typically connected to servers on the network (see page 17), are programmed at the factory with a hard limit.
The hard limit defines the maximum number of licenses that can be obtained from the key, and thus the maximum number of users (both local and across the network) that can access the protected application. Keys are available with the following pre-programmed hard limits: 1, 2, 3, 5, 10, 25, 50 or unlimited.
■ A stand-alone key is typically connected directly to a user’s local workstation, providing access to the protected application only on a single system. All standalone clients consume one license.
Product Keys v. Distributor Keys
Prior to shipping your application to your customers, you must program your hardware keys with your protection strategy. A hardware key can be programmed as either a product key or a distributor key.
■ Product keys are shipped to your end users with your protected application, providing access to the application. Product keys may be either stand-alone or network keys, depending on how your application will be used (by single clients or across the network).
■ Distributor keys are given to your sales distributors, allowing them to perform activation and update functions on product keys provided to end users when they sell your protected application. Distributor keys can be either stand-alone or network keys; they must be connected to the distributor’s local machine.
SafeNet customizes Sentinel SuperPro hardware keys for each developer, which means another developer cannot reprogram your keys.
Sentinel SuperPro 6.5 Developer’s Guide 15
Chapter 1 - What Is Sentinel SuperPro?
Tip: Refer to Chapter 10, “Programming Keys,” on page 233 for more informa-tion about programming product and distributor keys. For more information about how keys are activated and updated, refer to Chapter 12, “Activating and Updating Keys,” on page 265.
The Sentinel SuperPro API
The Sentinel SuperPro API is a set of functions used to communicate between your application, the Sentinel system driver, the server and the hardware key. If you choose to use the integrated protection option (see page 5), you embed API function calls to communicate with the hardware key directly in your application’s source code.
The Sentinel SuperPro Developer’s Toolkit
The Sentinel SuperPro Developer’s Toolkit (SSP Toolkit) is a Windows appli-cation that combines the functions necessary to develop your protection strategy, program the hardware keys, and ship a protected application into one, easy-to-use package.
Once you have developed and prototyped your protection strategy using the SSP Toolkit, a protection plan with pseudocode is generated for you to use as a guide for adding the appropriate API function calls to your source code.
After you have modified your source code, or shelled your application (see page 7), you are ready to use the SSP Toolkit to program your hardware keys with the values your application will use to determine whether or not the key is attached to the user’s system or the server.
The Sentinel System Driver
Sentinel system driver is the device driver for using the hardware keys. It must be redistributed with any SuperPro protected application, regardless of the strategy chosen. In addition, the Sentinel driver must be installed on the system where the hardware key is attached.
■ For standalone applications, the driver must be installed on the same system as the protected application.
16 Sentinel SuperPro 6.5 Developer’s Guide
Chapter 1 - What Is Sentinel SuperPro?
■ For networked applications, the Sentinel driver must be installed on the system in the network where the hardware key is attached.
The Sentinel Protection Server
If you design your protected application to be run on a network using con-current licensing, your customer must install the Sentinel Protection Server on the same machine where the hardware key is located. This server man-ages licensing and security for the protected application. The server is the link between the client running your application and the hardware key that responds to the API functions used in your protection strategy.
Sentinel SuperPro 6.5 Developer’s Guide 17
Chapter 1 - What Is Sentinel SuperPro?
18 Sentinel SuperPro 6.5 Developer’s Guide
Chapter 2Using the Hardware Key
The hardware key is the heart of Sentinel SuperPro protection. The key con-trols and verifies access to your protected applications, assuring that only authorized users can run them. Before you begin designing your protection strategy, however, you should understand how the key works, and how it can be used.
This chapter covers the following topics:
■ Physical key layout
■ Possible uses for the key
■ Reserved cells
■ Access codes
■ Cell values
■ Cell types
■ Algorithm values and addresses
■ Ordering and returning keys
Sentinel SuperPro 6.5 Developer’s Guide 19
Chapter 2 - Using the Hardware Key
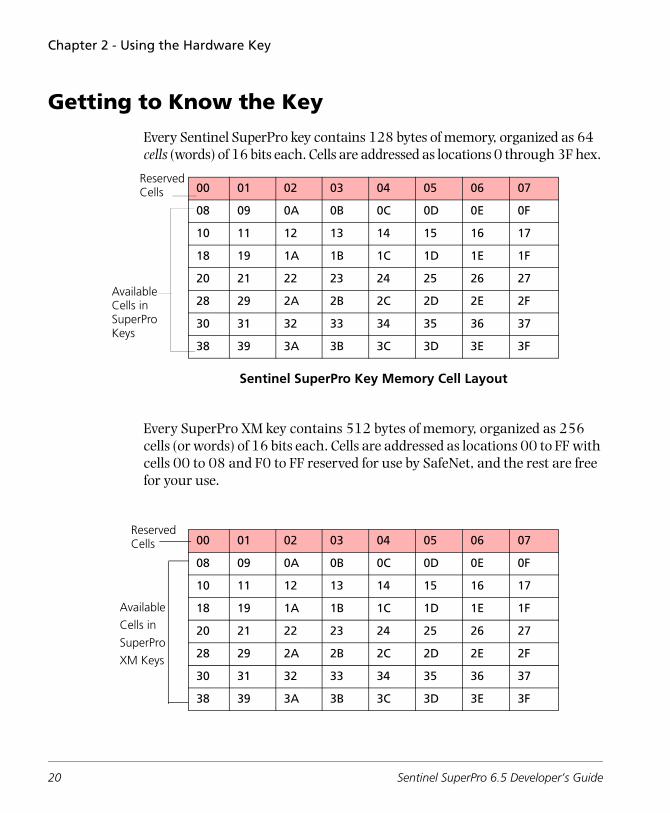
Getting to Know the Key
Every Sentinel SuperPro key contains 128 bytes of memory, organized as 64 cells (words) of 16 bits each. Cells are addressed as locations 0 through 3F hex.
Sentinel SuperPro Key Memory Cell Layout
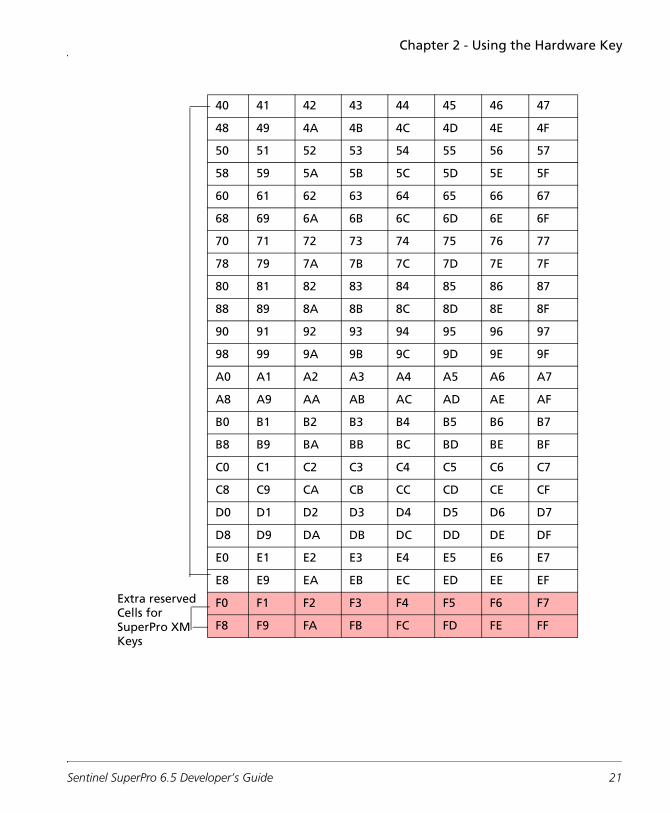
Every SuperPro XM key contains 512 bytes of memory, organized as 256 cells (or words) of 16 bits each. Cells are addressed as locations 00 to FF with cells 00 to 08 and F0 to FF reserved for use by SafeNet, and the rest are free for your use.
00 01 02 03 04 05 06 07
08 09 0A 0B 0C 0D 0E 0F
10 11 12 13 14 15 16 17
18 19 1A 1B 1C 1D 1E 1F
20 21 22 23 24 25 26 27
28 29 2A 2B 2C 2D 2E 2F
30 31 32 33 34 35 36 37
38 39 3A 3B 3C 3D 3E 3F
00 01 02 03 04 05 06 07
08 09 0A 0B 0C 0D 0E 0F
10 11 12 13 14 15 16 17
18 19 1A 1B 1C 1D 1E 1F
20 21 22 23 24 25 26 27
28 29 2A 2B 2C 2D 2E 2F
30 31 32 33 34 35 36 37
38 39 3A 3B 3C 3D 3E 3F
AvailableCells in SuperPro Keys
ReservedCells
ReservedCells
Available
Cells in SuperPro
XM Keys
20 Sentinel SuperPro 6.5 Developer’s Guide
Chapter 2 - Using the Hardware Key
40 41 42 43 44 45 46 47
48 49 4A 4B 4C 4D 4E 4F
50 51 52 53 54 55 56 57
58 59 5A 5B 5C 5D 5E 5F
60 61 62 63 64 65 66 67
68 69 6A 6B 6C 6D 6E 6F
70 71 72 73 74 75 76 77
78 79 7A 7B 7C 7D 7E 7F
80 81 82 83 84 85 86 87
88 89 8A 8B 8C 8D 8E 8F
90 91 92 93 94 95 96 97
98 99 9A 9B 9C 9D 9E 9F
A0 A1 A2 A3 A4 A5 A6 A7
A8 A9 AA AB AC AD AE AF
B0 B1 B2 B3 B4 B5 B6 B7
B8 B9 BA BB BC BD BE BF
C0 C1 C2 C3 C4 C5 C6 C7
C8 C9 CA CB CC CD CE CF
D0 D1 D2 D3 D4 D5 D6 D7
D8 D9 DA DB DC DD DE DF
E0 E1 E2 E3 E4 E5 E6 E7
E8 E9 EA EB EC ED EE EF
F0 F1 F2 F3 F4 F5 F6 F7
F8 F9 FA FB FC FD FE FF
Extra reservedCells for SuperPro XMKeys
Sentinel SuperPro 6.5 Developer’s Guide 21
Chapter 2 - Using the Hardware Key
Tip: Think of a cell as being a holding container (memory location) for the words that make up your algorithms, counters and other elements. Cells have addresses that represent their location on the key, much like street addresses represent the location of houses in a neighborhood.
SuperPro XM - Maximizes Application Security
SuperPro XM keys provide an additional algorithm engine that uses indus-try standard AES (Advanced Encryption Standard) encryption to generate unique query responses. A proprietary algorithm is used to generate a 128-bit AES key that is derived from the algorithm descriptor and other developer specific information within the key. This results in an extremely secure query/response mechanism.
In addition to the AES based algorithm engine, SuperPro XM keys provide the following:
■ 256 memory cells which give you the room to protect more applications
■ Protection against brute force attacks of the Write and Overwrite Passwords
Note: In SSP XM key, the password counter is enabled. If someone uses wrong password while writing to a cell for more than 15 times, the key gets locked. The key must be returned to SafeNet for unlocking.
22 Sentinel SuperPro 6.5 Developer’s Guide
Chapter 2 - Using the Hardware Key
When you program a cell, you assign it various attributes. These attributes determine how the cell (and the word it contains) is used by your applica-tion. Cell attributes include the cell type, the access code and the cell value.
Each of these attributes are explained later in this chapter. Generally, each cell contains one of the following types of words:
■ Data Words: A data word can store data such as sublicenses, customer information, serial numbers, passwords, and check digits. You code your application to read the word and then evaluate and act upon the stored value. A data word cell may be programmed as read-only or read/write.
■ Counter Words: A counter word contains an initial value you set that is then decremented by your application. A typical use of a counter word is to limit the number of times a demo application can be executed.
■ Algorithms: An algorithm contains a bit pattern that defines how the hardware key should encrypt query data sent by your application. The key uses the algorithm cell value—plus an internally stored proprietary algorithm—to transform the query data and then return a value to your application. You design your application to send queries to the key and then evaluate and act upon the responses.
Algorithms are active or inactive. Only active algorithms can return a valid response to a query. The active/inactive bit in the cell value con-trols whether or not the algorithm is active. “Algorithm Values” on page 35
Additionally, all algorithms are two words (and thus, two cells) long, and may have activation passwords and counters associated with them (see “Valid Algorithm Addresses” on page 37).
Sentinel SuperPro 6.5 Developer’s Guide 23

Chapter 2 - Using the Hardware Key
Restricted Cells
Cells 00 through 07 in SuperPro key are restricted cells that contain fixed, preprogrammed system information:
Cells 00 through 07 in SuperPro XM key are restricted cells that contain fixed, preprogrammed system information and cells F0 through FF are also reserved for use by SafeNet:
Programmable Cells
Cells 08 through 3F are available for you to program in SuperPro Key, while the SuperPro XM key provides you with a vast cell range to program i.e.
Cell Contents Readable?
00 Key serial number; sequentially assigned per key.a
a. Maximum 16-bit value (0 – 65535). Serial numbers are not guaran-teed to be unique. If you require unique serial numbers, please con-tact your SafeNet sales representative, as SafeNet must program the keys.
Yes
01 Developer ID; unique to your company/product. Yes
02 – 07 Reserved for use by SafeNet Inc. No
F0 - FF Reserved for use by SafeNet Inc. No
24 Sentinel SuperPro 6.5 Developer’s Guide
Chapter 2 - Using the Hardware Key
from 08 through EF. The next section explains in detail how to program these cells in the key.
Programming the Key
When you program the key, you are actually assigning attributes to the cells. These attributes describe how the words contained in the cells are used to pro-tect your application. There are three cell attributes: cell type, access code and cell value. Each of these attributes are explained in the following sections.
Access Codes
Every cell has an access code associated with it that controls how the cell can be used by your application—it defines the cell’s cell type attribute. For example, some cell types have an access code that permits cell values to be both read and overwritten, while others are read-only, or not writable at all. Access codes are numbers whose value can be 0 - 3 or 7. Both SuperPro and SuperPro XM supports access codes in the 0 - 3 range. However, access code 7 is only valid on SuperPro XM keys.
When you define an element using the SSP Toolkit’s Element Definition Wiz-ard, you do not assign the cell access codes. The access codes are determined by the wizard, based on the protection feature you are implementing. If your application programs or reprograms cells in the field, it must specify the new access code.
Sentinel SuperPro 6.5 Developer’s Guide 25
Chapter 2 - Using the Hardware Key
The following table describes the five available access codes:
Cell Types
Each cell is assigned a code that defines how you want to use the selected cell. This code is called a cell type. The cell type classifies the type of data stored in the cell, which in turn affects how the cell can be used.
Each cell type is identified by a two-letter abbreviation; for example, CW identifies a counter word.
Some cell types are designed to be used in groups. For example, algorithms can have counters and passwords associated with them. Other cell types have address restrictions, meaning they can be assigned only to specific cells on the key.
Code Description
0 Read/write data wordYour application can read the word in the cell and, if the Write Password is supplied, modify its contents.
1 Read-only (locked) data wordYour application can read the word in the cell, but cannot change it without the Overwrite Passwords.
2 Counter wordThe cell contains a word (value) that your application can decrement using the Write Password. The cell’s value cannot be changed (other than by decrementing it) without the Overwrite Passwords.
3 Locked and hidden/algorithm wordYour application cannot read the cell’s value. Modification requires the Overwrite Passwords. The cell value (contents) is hidden (unreadable).
7 AES Algorithm EngineAccess code 7 is used for AES algorithm words and is exclusive to the SuperPro XM key. Similar to access code 3, your application cannot read the cell's value. Modification requires the Overwrite Passwords, even if the cell is unlocked (access code 0).
26 Sentinel SuperPro 6.5 Developer’s Guide

Chapter 2 - Using the Hardware Key
The following table describes the available cell types, with the following sec-tions explaining each cell type in greater detail.
Undefined (**)
The Undefined cell type is used to identify a cell that has not yet been pro-grammed or is not used in your protection strategy. This cell type is identified by two asterisks (**).
Cells you don’t need for your protection strategy can be left undefined. How-ever, you may want to program unused cells as read-only data words or algorithm/hidden words. It prevents them from being written to without both the write and overwrite passwords. Hackers can use an unlocked data word to try to figure out the write password. Making unused cells read-only or algorithm/hidden words helps to prevent these type of brute force attacks on the write password.
Tip: Undefined cells can also be programmed with random values to make your strategy more confusing for hackers. See “Programming a Product Key” on
Cell Type Access Code Name
** 0 Undefined
AA 3/7 Active Algorithm
AH 3/7 Algorithm Half
AP 3/7 Activation Password
CA 2 Algorithm Counter Word
CW 2 Counter Word
DI 1 Developer ID
DL 1 Locked Data Word
DW 0 Data Word
IA 3/7 Inactive Algorithm
RW 3/7 Reserved Word
SN 1 Serial Number
Sentinel SuperPro 6.5 Developer’s Guide 27
Chapter 2 - Using the Hardware Key
page 237 for more information.
Access Code
An Undefined cell has an access code of 0 – read/write data.
Valid Addresses
For the SuperPro key, any unrestricted cell in the range 08 - 3F can be classi-fied as undefined. In the case of SuperPro XM key, the rule is the same except the range is 08 - EF
Active Algorithm (AA)
The Active Algorithm (AA) cell type defines an active (enabled) algorithm. An algorithm consists of two adjacent AA cells (words) with access codes of 3 or 7. The values in these cells affect the way query data is encrypted via the RNBOsproQuery() API function. An algorithm must be active for it to return a valid response to a query.
The value in the second AA cell must be between 8000 and FFFF. See “Algo-rithm Values” on page 35 for more information.
AA cells can have a password and counter(s) associated with them.
Access Code
An AA cell has an access code of 3 or 7 – algorithm/hidden.
Valid Addresses
The first AA word must be in a cell located at an unrestricted, even address. Additional restrictions apply if a counter and/or password is associated with the algorithm. See “Valid Algorithm Addresses” on page 37 for more information.
Algorithm Half (AH)
The Algorithm Half (AH) cell type can be used for each of the two cells required for an algorithm. The algorithm created by two AH cells is basically
28 Sentinel SuperPro 6.5 Developer’s Guide
Chapter 2 - Using the Hardware Key
the same as that created by two AA or IA cells; the difference is that you can program the descriptor in two steps, which may be useful in some protection schemes.
The value in the second AH cell must be between:
■ 0000 to 7FFF for a disabled algorithm
■ 8000 to BFFF for an enabled simple algorithm
■ C000 to FFFF for an enabled enhanced algorithm
■ 8000 to FFFF for an enabled AES algorithm (access code must be 7)
See “Algorithm Values” on page 35 for more information.
AH cells can have a password and counter(s) associated with them.
Note: Use of the AH cell type requires a thorough understanding of algorithms. Consider using the AA and IA cell types instead.
Access Code
An AH cell has an access code of 3 or 7 (SuperPro XM only) – algorithm/hidden.
Valid Addresses
An AH word can be located in any unrestricted cell 08 – 3F for Super Pro keys and 08-EF for SuperPro XM Keys. You must leave an adjacent cell vacant for the other half of the algorithm. Also, the first AH word of the pair must be located in an even-numbered cell.
Additional restrictions apply if a counter and/or password is associated with the algorithm. See “Valid Algorithm Addresses” on page 37 for more information.
Activation Password (AP)
The Activation Password (AP) cell type is used to activate an inactive algo-rithm so it can be used for queries. This allows activation, via a password, of
Sentinel SuperPro 6.5 Developer’s Guide 29
Chapter 2 - Using the Hardware Key
an algorithm at a customer’s site. For detailed instructions on using activa-tion passwords, see “Using Activation Passwords” on page 79.
The AP cell type must be two cells long and must immediately follow the algorithm it activates.
Access Code
An AP cell has an access code of 3 – algorithm/hidden. It cannot be directly read or written to; its value is used only to verify a user-supplied password during execution of the RNBOsproActiveAlgorithm() API function.
Because an AP cell has an access code of 3, it can also be used as an algo-rithm. See “Querying Activation Passwords” on page 91 for more information.
Valid Addresses
An AP cell must be located immediately after a two-word algorithm (cell type AA, AH or IA).
Additional restrictions apply if a counter is also associated with the algo-rithm. See “Valid Algorithm Addresses” on page 37 for more information.
Algorithm Counter Word (CA)
The Algorithm Counter Word (CA) cell type defines a counter that deacti-vates an associated algorithm when the counter reaches zero. You program an initial value into the counter, then decrement it using the RNBOsproDec-rement() API function. The CA cell must immediately precede the algorithm it deactivates.
Thus, this cell type can be used to control the number of times an applica-tion can be executed. See “Controlling Demo Applications” on page 94 for more information.
Optionally, you can associate two counters (two CA cells) with one algo-rithm. In this case, the first counter to reach zero deactivates the algorithm. If desired, you could use the second counter after the algorithm is re-acti-vated with a password.
30 Sentinel SuperPro 6.5 Developer’s Guide
Chapter 2 - Using the Hardware Key
Access Code
A CA cell has an access code of 2 – counter. It can be read, but cannot be written to except by the RNBOsproDecrement() or RNBOsproOverwrite() API functions.
Valid Addresses
A CA cell is always located immediately before a two-word algorithm (cell type AA, AH or IA). See “Valid Algorithm Addresses” on page 37 for more information.
Counter Word (CW)
The Counter Word (CW) cell type is used for a counter that is not used to deactivate an algorithm. You program an initial value into the counter word, then decrement it using the RNBOsproDecrement() API function. You code your application to check the value in the counter and proceed accord-ingly if the value reaches zero.
A CW cell is similar to a data word—it is used for storing data or keeping track of something such as a number of uses. It is more restricted than a data word, however, because you cannot overwrite it without the Overwrite Passwords. You can decrement it with only the Write Password.
One use of this cell type is to control specific functions within your applica-tion. For example, if you associate a counter with the Save button control, you can code the application so that when the counter reaches zero, the Save button will no longer be available, preventing the user from saving their work and making the application unusable in a practical sense.
Access Code
A CW cell has an access code of 2 – counter. It can be read, but cannot be written to except by the RNBOsproDecrement() or RNBOsproOverwrite() API functions.
Sentinel SuperPro 6.5 Developer’s Guide 31
Chapter 2 - Using the Hardware Key
Valid Addresses
Any unrestricted cell 08 – 3F for Super Pro keys and 08-EF for SuperPro XM Keys can be classified as a CW cell type.
Warning! If you program a counter cell, and you use the next two cells for an algorithm, the counter will function as an algorithm counter. When the counter reaches zero, the algorithm will be deactivated, even if you did not intend for that to happen.
Developer ID (DI)
The Developer ID (DI) cell type is used for cell 01 only. This cell holds a read-only data word that contains the unique developer ID assigned to you by SafeNet Inc. You cannot assign cell type DI to any other cell.
Access Code
A DI cell has an access code of 1 – locked. You can read the developer ID, but cannot change it.
Valid Addresses
The only cell that can be defined as cell type DI is cell 01.
Locked Data Word (DL)
The Locked Data Word (DL) cell type is used for data words you want your application to read, but not write to, such as sublicense cells.
Access Code
A DL cell has an access code of 1 – locked. After you program the cell, your application can read it, but cannot change it without the Overwrite Passwords.
32 Sentinel SuperPro 6.5 Developer’s Guide
Chapter 2 - Using the Hardware Key
Valid Addresses
Any unrestricted cell 08 – 3F for Super Pro keys and 08-EF for SuperPro XM Keys can be classified as a DL cell type.
Data Word (DW)
The Data Word (DW) cell type can store any value (data word) you want to use in your protection strategy. This value can be read and/or changed by your application. It can also be decremented.
Access Code
A DW cell has an access code of 0 – read/write. It can be reprogrammed using the Write Password.
Valid Addresses
Any unrestricted cell 08 – 3F for Super Pro keys and 08-EF for SuperPro XM Keys can be classified as a DW cell type.
Inactive Algorithm (IA)
The Inactive Algorithm (IA) cell type defines an inactive (disabled) algorithm.
An algorithm consists of two adjacent cells with access codes of 3 or 7 for SuperPro XM keys. The values in these cells affect the way an input string is encrypted via the RNBOsproQuery() API function. An inactive algorithm cannot be used for a query until it is activated by the RNBOsproActivate() API function.
The value in the second IA cell must be between 0000 and 7FFF. See “Algo-rithm Values” on page 35 for more information.
IA cells should always have a password associated with them so the algo-rithm can be activated. They can also have one or two counters.
Sentinel SuperPro 6.5 Developer’s Guide 33
Chapter 2 - Using the Hardware Key
Access Code
An IA cell has an access code of 3 or 7 for SuperPro XM keys – algorithm/hidden.
Valid Addresses
The first IA cell must be at an unrestricted, even address. Additional restric-tions apply if a counter and/or password is associated with the algorithm. See “Valid Algorithm Addresses” on page 37 for more information.
Reserved Word (RW)
The Reserved Word (RW) cell type is used for cells 05 through 07 only. These cells hold hidden words that are reserved for use by SafeNet Inc. You cannot assign cell type RW to any other cell.
Access Code
An RW cell has an access code of 3 – algorithm/hidden. You cannot read or write to these cells.
Valid Addresses
The only cells defined as type RW are cells 05, 06 and 07 in case of SuperPro Keys. However the SuperPro XM keys define 16 more cells from F0 to FF as reserved cells apart from the cells 05, 06 and 07.
Serial Number (SN)
The Serial Number (SN) cell type is used for cell 00 only. This cell holds a read-only data word that contains the hardware key’s serial number. The value in this cell is preprogrammed and cannot be modified. You cannot assign cell type SN to any other cell, or overwrite the SN cell.
Note: Serial numbers ranging from 0–65535 are assigned sequentially and are not guaranteed to be unique. If you require unique serial numbers, please contact your SafeNet Inc. sales representative, as SafeNet must program the keys.
34 Sentinel SuperPro 6.5 Developer’s Guide

Chapter 2 - Using the Hardware Key
Access Code
An SN cell has an access code of 1 – locked. You can read the serial number but cannot modify the value in this cell.
Valid Addresses
The only cell defined as type SN is cell 00 in both Super Pro and SuperPro XM keys.
Cell Values
Each cell also has a cell value containing a 16-bit value. The cell value is also known as a word. The value in the second cell of an algorithm controls whether or not the algorithm is active, and whether the enhanced algorithm engine is enabled for the algorithm. See the next section for more information.
Algorithm Values
There are special rules applied to the second cell of an algorithm. The word (value) in the second cell controls:
■ Whether the algorithm is active or inactive. Only active algorithms can be used for queries.
■ Whether the enhanced algorithm engine is enabled or disabled. The enhanced algorithm engine provides a more secure algorithm.
The active/inactive state of an algorithm is controlled by bit 15 of the second word of the algorithm:
■ If this bit is 1, the algorithm is active.
■ If this bit is 0, the algorithm is inactive
The state of the enhanced algorithm engine is controlled by bit 14 of the sec-ond word of the algorithm:
■ If this bit is 1, the enhanced engine is enabled.
■ If this bit is 0, the enhanced engine is disabled.
Sentinel SuperPro 6.5 Developer’s Guide 35
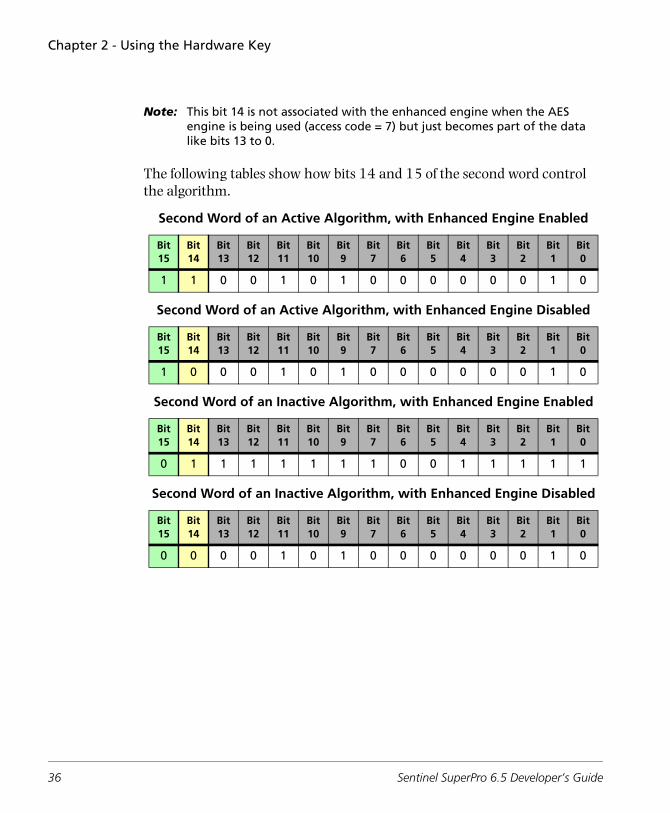
Chapter 2 - Using the Hardware Key
Note: This bit 14 is not associated with the enhanced engine when the AES engine is being used (access code = 7) but just becomes part of the data like bits 13 to 0.
The following tables show how bits 14 and 15 of the second word control the algorithm.
Second Word of an Active Algorithm, with Enhanced Engine Enabled
Bit15
Bit 14
Bit 13
Bit 12
Bit 11
Bit 10
Bit 9
Bit 7
Bit 6
Bit 5
Bit 4
Bit 3
Bit 2
Bit 1
Bit 0
1 1 0 0 1 0 1 0 0 0 0 0 0 1 0
Second Word of an Active Algorithm, with Enhanced Engine Disabled
Bit15
Bit 14
Bit 13
Bit 12
Bit 11
Bit 10
Bit 9
Bit 7
Bit 6
Bit 5
Bit 4
Bit 3
Bit 2
Bit 1
Bit 0
1 0 0 0 1 0 1 0 0 0 0 0 0 1 0
Second Word of an Inactive Algorithm, with Enhanced Engine Enabled
Bit15
Bit 14
Bit 13
Bit 12
Bit 11
Bit 10
Bit 9
Bit 7
Bit 6
Bit 5
Bit 4
Bit 3
Bit 2
Bit 1
Bit 0
0 1 1 1 1 1 1 1 0 0 1 1 1 1 1
Second Word of an Inactive Algorithm, with Enhanced Engine Disabled
Bit15
Bit 14
Bit 13
Bit 12
Bit 11
Bit 10
Bit 9
Bit 7
Bit 6
Bit 5
Bit 4
Bit 3
Bit 2
Bit 1
Bit 0
0 0 0 0 1 0 1 0 0 0 0 0 0 1 0
36 Sentinel SuperPro 6.5 Developer’s Guide
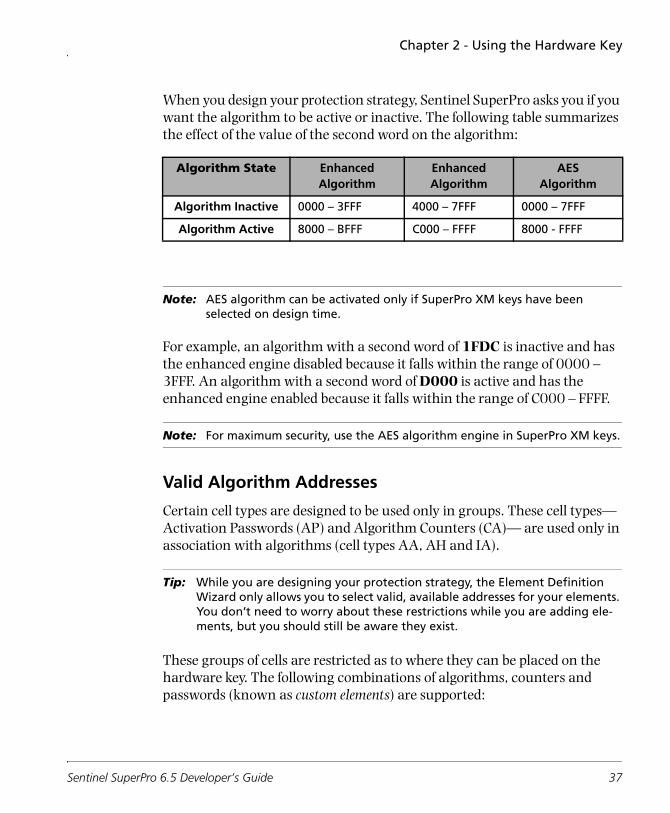
Chapter 2 - Using the Hardware Key
When you design your protection strategy, Sentinel SuperPro asks you if you want the algorithm to be active or inactive. The following table summarizes the effect of the value of the second word on the algorithm:
Note: AES algorithm can be activated only if SuperPro XM keys have been selected on design time.
For example, an algorithm with a second word of 1FDC is inactive and has the enhanced engine disabled because it falls within the range of 0000 – 3FFF. An algorithm with a second word of D000 is active and has the enhanced engine enabled because it falls within the range of C000 – FFFF.
Note: For maximum security, use the AES algorithm engine in SuperPro XM keys.
Valid Algorithm Addresses
Certain cell types are designed to be used only in groups. These cell types—Activation Passwords (AP) and Algorithm Counters (CA)— are used only in association with algorithms (cell types AA, AH and IA).
Tip: While you are designing your protection strategy, the Element Definition Wizard only allows you to select valid, available addresses for your elements. You don’t need to worry about these restrictions while you are adding ele-ments, but you should still be aware they exist.
These groups of cells are restricted as to where they can be placed on the hardware key. The following combinations of algorithms, counters and passwords (known as custom elements) are supported:
Algorithm State Enhanced Algorithm
EnhancedAlgorithm
AESAlgorithm
Algorithm Inactive 0000 – 3FFF 4000 – 7FFF 0000 – 7FFF
Algorithm Active 8000 – BFFF C000 – FFFF 8000 - FFFF
Sentinel SuperPro 6.5 Developer’s Guide 37
Chapter 2 - Using the Hardware Key
■ Algorithm (2 cells)
■ Algorithm with password (4 cells)
■ Algorithm with counter (3 cells)
■ Algorithm with two counters (4 cells)
■ Algorithm with password and counter (5 cells)
■ Algorithm with password and two counters (6 cells)
Tip: Remember, each word takes up one cell. So an algorithm with two counters uses four cells, because it has four words: two counters, plus the algorithm’s two words.
Sentinel SuperPro automatically selects appropriate locations for your algo-rithms when you add a custom element in the Design stage. You also have the option to select the locations yourself in Element Layout View, but you are not allowed to place the algorithm in an invalid position. See Chapter 7, “Working With Design Elements,” on page 185 for more information about adding custom elements to your protection strategy.
The address restrictions for these cell groups are summarized in the follow-ing sections. In this discussion, an algorithm (identified by ALGO in the following tables) can be defined using AA, IA or AH cells.
Note: MOD is used in the formula used to compute valid cell addresses. MOD is a modulus arithmetic operator used to divide two numbers, resulting in the remainder of the division. For example, 8 MOD 3 equals 2 because 8 / 3 equals 2, with a remainder of 2. The remainder is the result of the MOD notation.
38 Sentinel SuperPro 6.5 Developer’s Guide
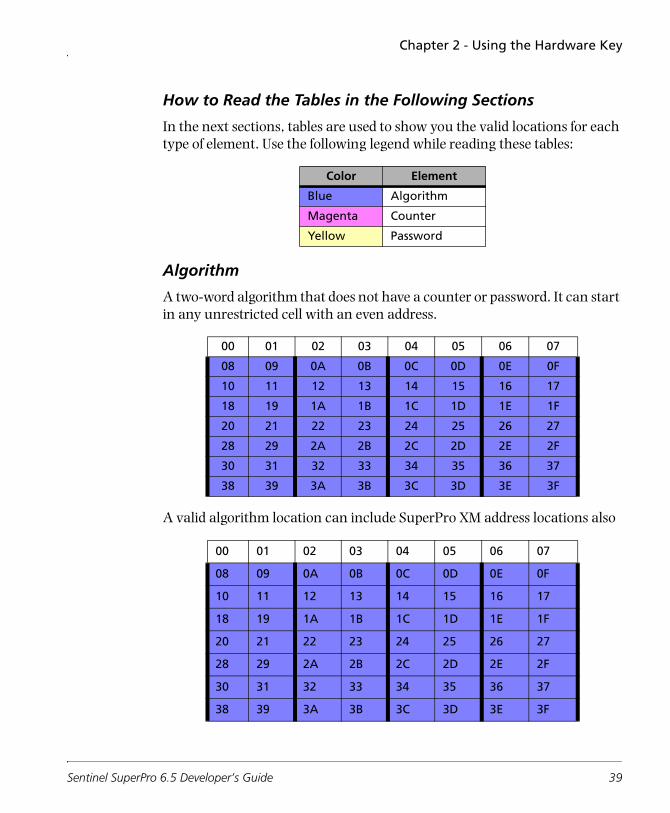
Chapter 2 - Using the Hardware Key
How to Read the Tables in the Following Sections
In the next sections, tables are used to show you the valid locations for each type of element. Use the following legend while reading these tables:
Algorithm
A two-word algorithm that does not have a counter or password. It can start in any unrestricted cell with an even address.
A valid algorithm location can include SuperPro XM address locations also
Color Element
Blue Algorithm
Magenta Counter
Yellow Password
00 01 02 03 04 05 06 07
08 09 0A 0B 0C 0D 0E 0F
10 11 12 13 14 15 16 17
18 19 1A 1B 1C 1D 1E 1F
20 21 22 23 24 25 26 27
28 29 2A 2B 2C 2D 2E 2F
30 31 32 33 34 35 36 37
38 39 3A 3B 3C 3D 3E 3F
00 01 02 03 04 05 06 07
08 09 0A 0B 0C 0D 0E 0F
10 11 12 13 14 15 16 17
18 19 1A 1B 1C 1D 1E 1F
20 21 22 23 24 25 26 27
28 29 2A 2B 2C 2D 2E 2F
30 31 32 33 34 35 36 37
38 39 3A 3B 3C 3D 3E 3F
Sentinel SuperPro 6.5 Developer’s Guide 39
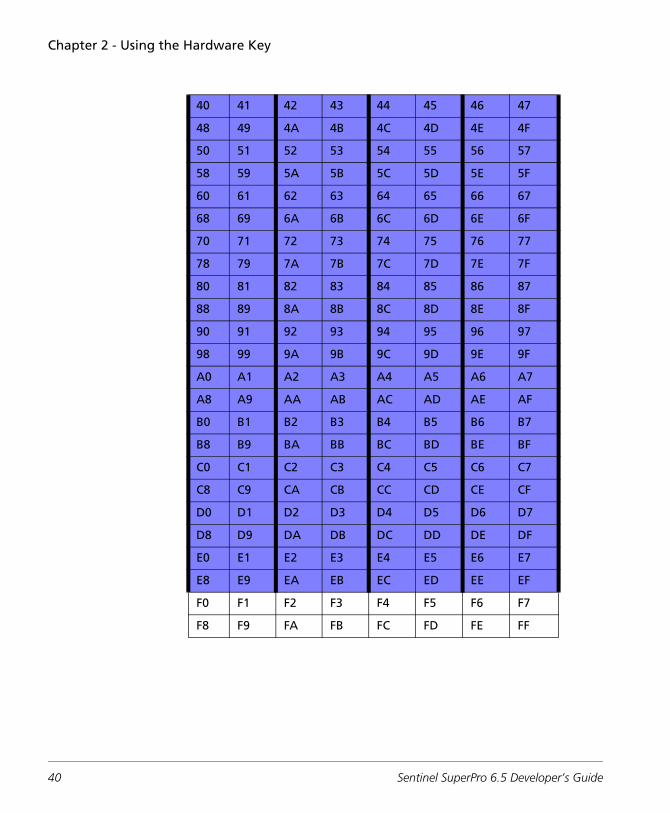
Chapter 2 - Using the Hardware Key
40 41 42 43 44 45 46 47
48 49 4A 4B 4C 4D 4E 4F
50 51 52 53 54 55 56 57
58 59 5A 5B 5C 5D 5E 5F
60 61 62 63 64 65 66 67
68 69 6A 6B 6C 6D 6E 6F
70 71 72 73 74 75 76 77
78 79 7A 7B 7C 7D 7E 7F
80 81 82 83 84 85 86 87
88 89 8A 8B 8C 8D 8E 8F
90 91 92 93 94 95 96 97
98 99 9A 9B 9C 9D 9E 9F
A0 A1 A2 A3 A4 A5 A6 A7
A8 A9 AA AB AC AD AE AF
B0 B1 B2 B3 B4 B5 B6 B7
B8 B9 BA BB BC BD BE BF
C0 C1 C2 C3 C4 C5 C6 C7
C8 C9 CA CB CC CD CE CF
D0 D1 D2 D3 D4 D5 D6 D7
D8 D9 DA DB DC DD DE DF
E0 E1 E2 E3 E4 E5 E6 E7
E8 E9 EA EB EC ED EE EF
F0 F1 F2 F3 F4 F5 F6 F7
F8 F9 FA FB FC FD FE FF
40 Sentinel SuperPro 6.5 Developer’s Guide

Chapter 2 - Using the Hardware Key
Algorithm with Password
A two-word algorithm that has an activation password (AP). It must start in a cell with an address equal to 0 MOD 4. The two-word password must immediately follow.
Diagram showing cell structure of a SuperPro key
00 01 02 03 04 05 06 07
08 09 0A 0B 0C 0D 0E 0F
10 11 12 13 14 15 16 17
18 19 1A 1B 1C 1D 1E 1F
20 21 22 23 24 25 26 27
28 29 2A 2B 2C 2D 2E 2F
30 31 32 33 34 35 36 37
38 39 3A 3B 3C 3D 3E 3F
00 01 02 03 04 05 06 07
08 09 0A 0B 0C 0D 0E 0F
10 11 12 13 14 15 16 17
18 19 1A 1B 1C 1D 1E 1F
20 21 22 23 24 25 26 27
28 29 2A 2B 2C 2D 2E 2F
30 31 32 33 34 35 36 37
38 39 3A 3B 3C 3D 3E 3F
40 41 42 43 44 45 46 47
48 49 4A 4B 4C 4D 4E 4F
50 51 52 53 54 55 56 57
58 59 5A 5B 5C 5D 5E 5F
60 61 62 63 64 65 66 67
68 69 6A 6B 6C 6D 6E 6F
70 71 72 73 74 75 76 77
78 79 7A 7B 7C 7D 7E 7F
Sentinel SuperPro 6.5 Developer’s Guide 41
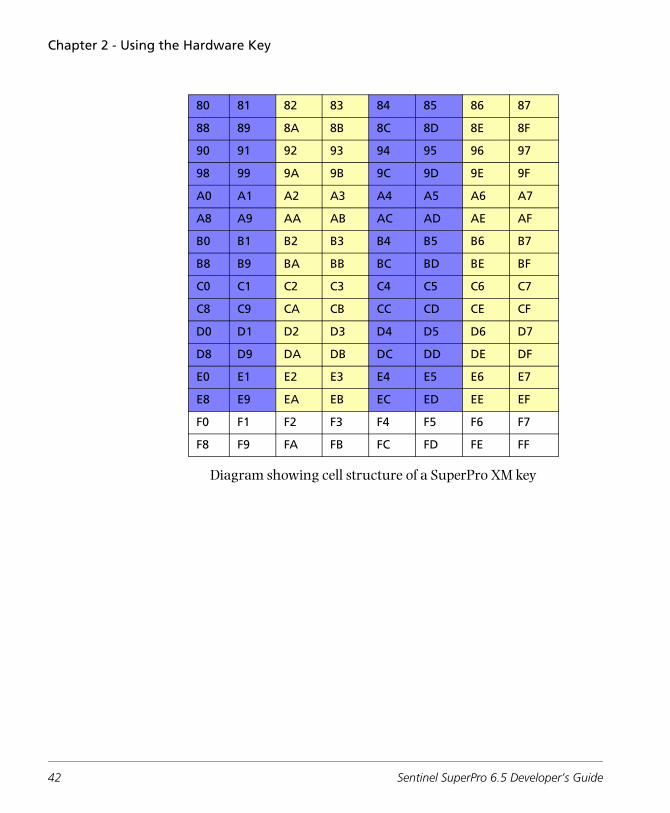
Chapter 2 - Using the Hardware Key
Diagram showing cell structure of a SuperPro XM key
80 81 82 83 84 85 86 87
88 89 8A 8B 8C 8D 8E 8F
90 91 92 93 94 95 96 97
98 99 9A 9B 9C 9D 9E 9F
A0 A1 A2 A3 A4 A5 A6 A7
A8 A9 AA AB AC AD AE AF
B0 B1 B2 B3 B4 B5 B6 B7
B8 B9 BA BB BC BD BE BF
C0 C1 C2 C3 C4 C5 C6 C7
C8 C9 CA CB CC CD CE CF
D0 D1 D2 D3 D4 D5 D6 D7
D8 D9 DA DB DC DD DE DF
E0 E1 E2 E3 E4 E5 E6 E7
E8 E9 EA EB EC ED EE EF
F0 F1 F2 F3 F4 F5 F6 F7
F8 F9 FA FB FC FD FE FF
42 Sentinel SuperPro 6.5 Developer’s Guide
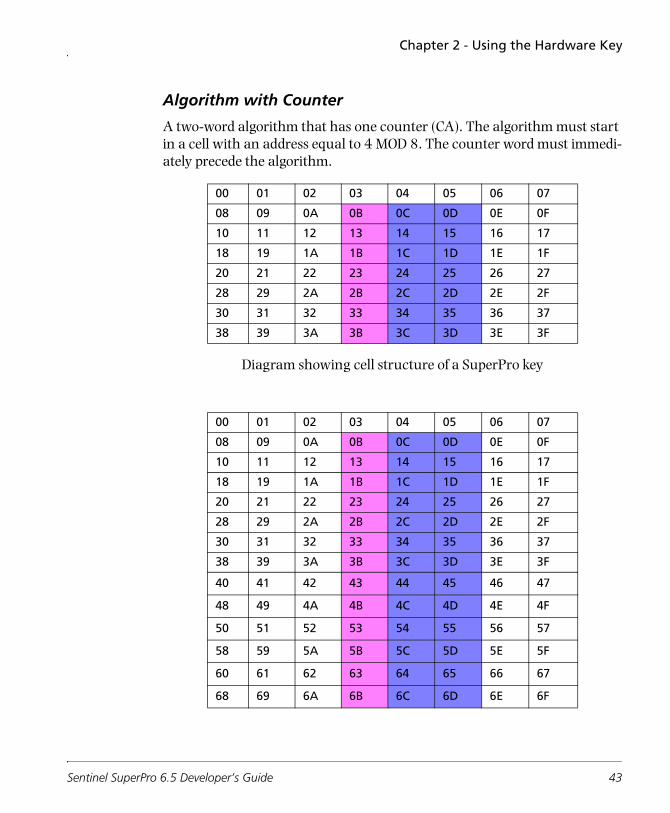
Chapter 2 - Using the Hardware Key
Algorithm with Counter
A two-word algorithm that has one counter (CA). The algorithm must start in a cell with an address equal to 4 MOD 8. The counter word must immedi-ately precede the algorithm.
Diagram showing cell structure of a SuperPro key
00 01 02 03 04 05 06 07
08 09 0A 0B 0C 0D 0E 0F
10 11 12 13 14 15 16 17
18 19 1A 1B 1C 1D 1E 1F
20 21 22 23 24 25 26 27
28 29 2A 2B 2C 2D 2E 2F
30 31 32 33 34 35 36 37
38 39 3A 3B 3C 3D 3E 3F
00 01 02 03 04 05 06 07
08 09 0A 0B 0C 0D 0E 0F
10 11 12 13 14 15 16 17
18 19 1A 1B 1C 1D 1E 1F
20 21 22 23 24 25 26 27
28 29 2A 2B 2C 2D 2E 2F
30 31 32 33 34 35 36 37
38 39 3A 3B 3C 3D 3E 3F
40 41 42 43 44 45 46 47
48 49 4A 4B 4C 4D 4E 4F
50 51 52 53 54 55 56 57
58 59 5A 5B 5C 5D 5E 5F
60 61 62 63 64 65 66 67
68 69 6A 6B 6C 6D 6E 6F
Sentinel SuperPro 6.5 Developer’s Guide 43
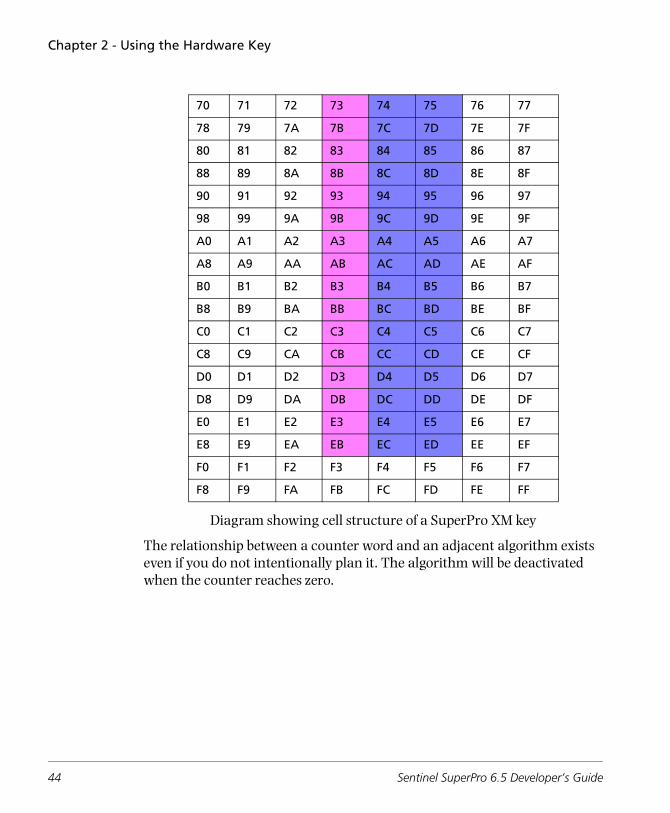
Chapter 2 - Using the Hardware Key
Diagram showing cell structure of a SuperPro XM key
The relationship between a counter word and an adjacent algorithm exists even if you do not intentionally plan it. The algorithm will be deactivated when the counter reaches zero.
70 71 72 73 74 75 76 77
78 79 7A 7B 7C 7D 7E 7F
80 81 82 83 84 85 86 87
88 89 8A 8B 8C 8D 8E 8F
90 91 92 93 94 95 96 97
98 99 9A 9B 9C 9D 9E 9F
A0 A1 A2 A3 A4 A5 A6 A7
A8 A9 AA AB AC AD AE AF
B0 B1 B2 B3 B4 B5 B6 B7
B8 B9 BA BB BC BD BE BF
C0 C1 C2 C3 C4 C5 C6 C7
C8 C9 CA CB CC CD CE CF
D0 D1 D2 D3 D4 D5 D6 D7
D8 D9 DA DB DC DD DE DF
E0 E1 E2 E3 E4 E5 E6 E7
E8 E9 EA EB EC ED EE EF
F0 F1 F2 F3 F4 F5 F6 F7
F8 F9 FA FB FC FD FE FF
44 Sentinel SuperPro 6.5 Developer’s Guide

Chapter 2 - Using the Hardware Key
Algorithm with Two Counters
A two-word algorithm that has two counters (CA). The algorithm must start in a cell with an address equal to 4 MOD 8. The counter words must imme-diately precede the algorithm.
Diagram showing cell structure of a SuperPro key
00 01 02 03 04 05 06 07
08 09 0A 0B 0C 0D 0E 0F
10 11 12 13 14 15 16 17
18 19 1A 1B 1C 1D 1E 1F
20 21 22 23 24 25 26 27
28 29 2A 2B 2C 2D 2E 2F
30 31 32 33 34 35 36 37
38 39 3A 3B 3C 3D 3E 3F
Sentinel SuperPro 6.5 Developer’s Guide 45

Chapter 2 - Using the Hardware Key
00 01 02 03 04 05 06 07
08 09 0A 0B 0C 0D 0E 0F
10 11 12 13 14 15 16 17
18 19 1A 1B 1C 1D 1E 1F
20 21 22 23 24 25 26 27
28 29 2A 2B 2C 2D 2E 2F
30 31 32 33 34 35 36 37
38 39 3A 3B 3C 3D 3E 3F
40 41 42 43 44 45 46 47
48 49 4A 4B 4C 4D 4E 4F
50 51 52 53 54 55 56 57
58 59 5A 5B 5C 5D 5E 5F
60 61 62 63 64 65 66 67
68 69 6A 6B 6C 6D 6E 6F
70 71 72 73 74 75 76 77
78 79 7A 7B 7C 7D 7E 7F
80 81 82 83 84 85 86 87
88 89 8A 8B 8C 8D 8E 8F
90 91 92 93 94 95 96 97
98 99 9A 9B 9C 9D 9E 9F
A0 A1 A2 A3 A4 A5 A6 A7
A8 A9 AA AB AC AD AE AF
B0 B1 B2 B3 B4 B5 B6 B7
B8 B9 BA BB BC BD BE BF
C0 C1 C2 C3 C4 C5 C6 C7
C8 C9 CA CB CC CD CE CF
D0 D1 D2 D3 D4 D5 D6 D7
46 Sentinel SuperPro 6.5 Developer’s Guide
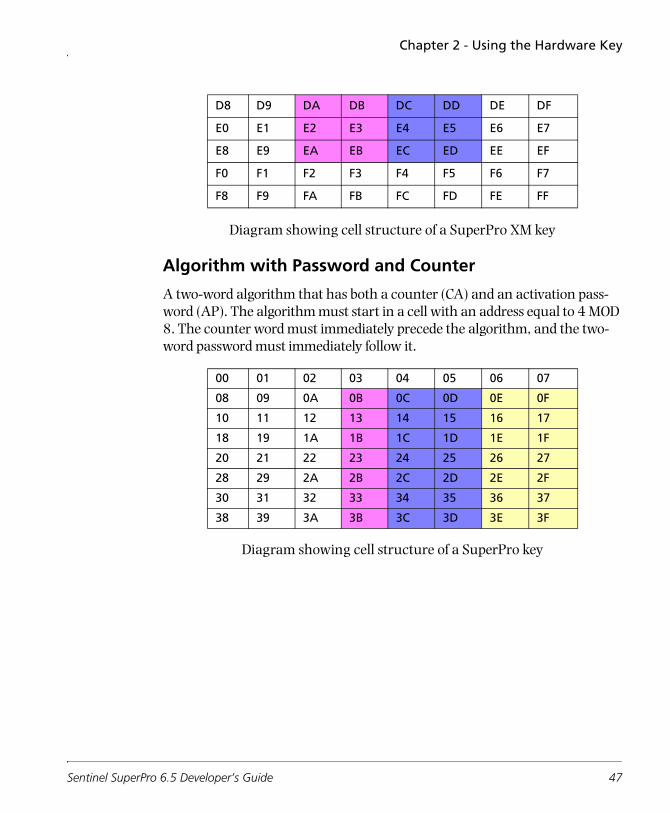
Chapter 2 - Using the Hardware Key
Diagram showing cell structure of a SuperPro XM key
Algorithm with Password and Counter
A two-word algorithm that has both a counter (CA) and an activation pass-word (AP). The algorithm must start in a cell with an address equal to 4 MOD 8. The counter word must immediately precede the algorithm, and the two-word password must immediately follow it.
Diagram showing cell structure of a SuperPro key
D8 D9 DA DB DC DD DE DF
E0 E1 E2 E3 E4 E5 E6 E7
E8 E9 EA EB EC ED EE EF
F0 F1 F2 F3 F4 F5 F6 F7
F8 F9 FA FB FC FD FE FF
00 01 02 03 04 05 06 07
08 09 0A 0B 0C 0D 0E 0F
10 11 12 13 14 15 16 17
18 19 1A 1B 1C 1D 1E 1F
20 21 22 23 24 25 26 27
28 29 2A 2B 2C 2D 2E 2F
30 31 32 33 34 35 36 37
38 39 3A 3B 3C 3D 3E 3F
Sentinel SuperPro 6.5 Developer’s Guide 47
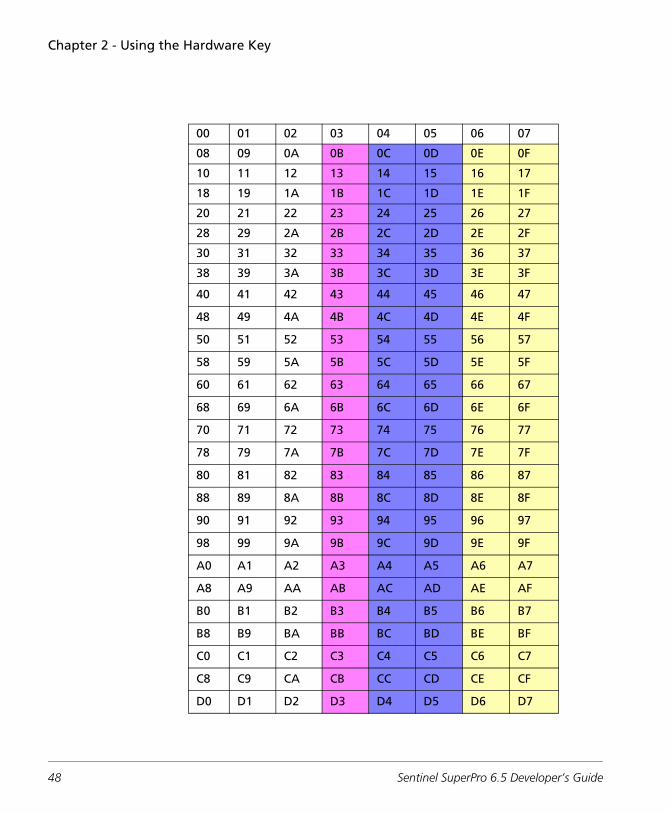
Chapter 2 - Using the Hardware Key
00 01 02 03 04 05 06 07
08 09 0A 0B 0C 0D 0E 0F
10 11 12 13 14 15 16 17
18 19 1A 1B 1C 1D 1E 1F
20 21 22 23 24 25 26 27
28 29 2A 2B 2C 2D 2E 2F
30 31 32 33 34 35 36 37
38 39 3A 3B 3C 3D 3E 3F
40 41 42 43 44 45 46 47
48 49 4A 4B 4C 4D 4E 4F
50 51 52 53 54 55 56 57
58 59 5A 5B 5C 5D 5E 5F
60 61 62 63 64 65 66 67
68 69 6A 6B 6C 6D 6E 6F
70 71 72 73 74 75 76 77
78 79 7A 7B 7C 7D 7E 7F
80 81 82 83 84 85 86 87
88 89 8A 8B 8C 8D 8E 8F
90 91 92 93 94 95 96 97
98 99 9A 9B 9C 9D 9E 9F
A0 A1 A2 A3 A4 A5 A6 A7
A8 A9 AA AB AC AD AE AF
B0 B1 B2 B3 B4 B5 B6 B7
B8 B9 BA BB BC BD BE BF
C0 C1 C2 C3 C4 C5 C6 C7
C8 C9 CA CB CC CD CE CF
D0 D1 D2 D3 D4 D5 D6 D7
48 Sentinel SuperPro 6.5 Developer’s Guide
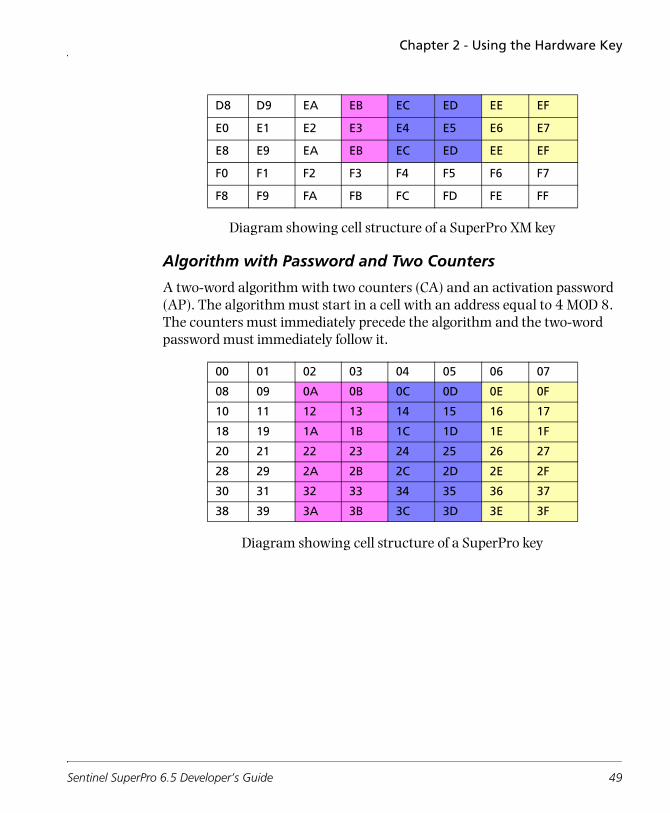
Chapter 2 - Using the Hardware Key
Diagram showing cell structure of a SuperPro XM key
Algorithm with Password and Two Counters
A two-word algorithm with two counters (CA) and an activation password (AP). The algorithm must start in a cell with an address equal to 4 MOD 8. The counters must immediately precede the algorithm and the two-word password must immediately follow it.
Diagram showing cell structure of a SuperPro key
D8 D9 EA EB EC ED EE EF
E0 E1 E2 E3 E4 E5 E6 E7
E8 E9 EA EB EC ED EE EF
F0 F1 F2 F3 F4 F5 F6 F7
F8 F9 FA FB FC FD FE FF
00 01 02 03 04 05 06 07
08 09 0A 0B 0C 0D 0E 0F
10 11 12 13 14 15 16 17
18 19 1A 1B 1C 1D 1E 1F
20 21 22 23 24 25 26 27
28 29 2A 2B 2C 2D 2E 2F
30 31 32 33 34 35 36 37
38 39 3A 3B 3C 3D 3E 3F
Sentinel SuperPro 6.5 Developer’s Guide 49

Chapter 2 - Using the Hardware Key
00 01 02 03 04 05 06 07
08 09 0A 0B 0C 0D 0E 0F
10 11 12 13 14 15 16 17
18 19 1A 1B 1C 1D 1E 1F
20 21 22 23 24 25 26 27
28 29 2A 2B 2C 2D 2E 2F
30 31 32 33 34 35 36 37
38 39 3A 3B 3C 3D 3E 3F
40 41 42 43 44 45 46 47
48 49 4A 4B 4C 4D 4E 4F
50 51 52 53 54 55 56 57
58 59 5A 5B 5C 5D 5E 5F
60 61 62 63 64 65 66 67
68 69 6A 6B 6C 6D 6E 6F
70 71 72 73 74 75 76 77
78 79 7A 7B 7C 7D 7E 7F
80 81 82 83 84 85 86 87
88 89 8A 8B 8C 8D 8E 8F
90 91 92 93 94 95 96 97
98 99 9A 9B 9C 9D 9E 9F
A0 A1 A2 A3 A4 A5 A6 A7
A8 A9 AA AB AC AD AE AF
B0 B1 B2 B3 B4 B5 B6 B7
B8 B9 BA BB BC BD BE BF
C0 C1 C2 C3 C4 C5 C6 C7
C8 C9 CA CB CC CD CE CF
D0 D1 D2 D3 D4 D5 D6 D7
50 Sentinel SuperPro 6.5 Developer’s Guide
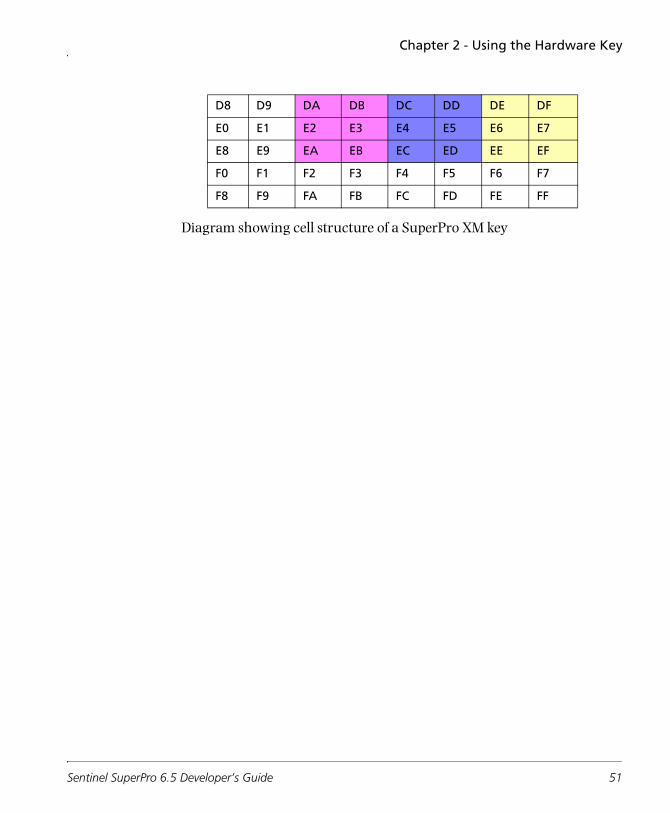
Chapter 2 - Using the Hardware Key
Diagram showing cell structure of a SuperPro XM key
D8 D9 DA DB DC DD DE DF
E0 E1 E2 E3 E4 E5 E6 E7
E8 E9 EA EB EC ED EE EF
F0 F1 F2 F3 F4 F5 F6 F7
F8 F9 FA FB FC FD FE FF
Sentinel SuperPro 6.5 Developer’s Guide 51
Chapter 2 - Using the Hardware Key
Attaching the Sentinel SuperPro Hardware Key
Sentinel SuperPro comes with one hardware key for you to use while you are designing and implementing your application protection strategies. The key must be connected to your workstation while you run Sentinel SuperPro software.
When you placed your order for Sentinel SuperPro, you should have speci-fied whether you wanted a network version, or a non-network version. The type of key you receive—network or stand-alone—depends on the version of Sentinel SuperPro you ordered. Network keys can be identified by the phrase “SuperProNet” stamped into the plastic on one side of the key.
Sentinel SuperPro hardware keys come in two form-factors: parallel port or USB. Again, the type you received in your package depends on what you specified when you placed your order.
Parallel port keys (25-pin or 36-pin) connect to a parallel port located on the back of your computer. USB keys connect to a USB port located on the back or front of your computer or on a USB hub. Use the instructions in the appropriate following section to install your hardware key.
Installing the Parallel Port Hardware Key
The Sentinel SuperPro key can be attached to any parallel port on your com-puter, as the Sentinel system driver automatically polls each port to locate the key.
1. Locate an available parallel port on your computer.
If your computer has only one parallel port, you may need to tempo-rarily remove any existing parallel port devices (such as a Zip drive or printer) in order to connect the key. These devices may be recon-nected to the key’s outside connector after you have installed the key.
2. Attach the key to the parallel port connector.
❑ If you are using a 25-pin key, we recommend you attach the key directly to the parallel port without using an extension cable
52 Sentinel SuperPro 6.5 Developer’s Guide
Chapter 2 - Using the Hardware Key
between the computer and the key. However, you may use a cable to connect a printer or other parallel device to the key; see below for more information on using cables with the Sentinel SuperPro key.
❑ If you are using a 36-pin key, you may use a cable to connect the key to the computer, but do not use an extension cable to connect a printer or other parallel device to the key.
3. Tighten the screws to connect the key securely to the port.
4. If necessary, reconnect any other parallel port devices to the outside connector on the key. We recommend using a shielded printer cable if you are connecting a printer to your computer through the Sentinel SuperPro key.
Using Cables with the Sentinel SuperPro Hardware Key
Due to the large variety of cables currently on the market, SafeNet Inc. does not recommend a specific brand or type of cable for use with the Sentinel SuperPro key, nor do we guarantee that all cables will be compatible with the key.
However, we do recommend the following:
■ Cables should not be longer than 6 feet in length.
■ Cables should be shielded.
■ Do not use ribbon cables.
■ Cables must be straight-through; that is, they must have all pin signals wired through to the connectors on either end of the cable.
Please be aware that not all combinations of cables and printers are compat-ible with the Sentinel SuperPro key—contact SafeNet Inc. Support if you encounter a compatibility problem.
Sentinel SuperPro 6.5 Developer’s Guide 53
Chapter 2 - Using the Hardware Key
Connecting Multiple Parallel Port Keys
Multiple Sentinel SuperPro keys can be attached to the same parallel port; this is called cascading. Cascaded keys do not all need to have the same devel-oper ID, and network keys can be cascaded with stand-alone keys.
The number of keys that can be cascaded is dependent on the system they are attached to. Typically, up to five keys can be connected to the same port. Refer to your system’s documentation for more information about attaching devices to your parallel port.
Sentinel SuperPro keys can also be cascaded with other SafeNet Inc. keys that support cascading. Make sure the Sentinel SuperPro keys are the last keys in the chain (farthest from the computer).
Warning! There is one exception to this rule. If you are cascading Sentinel SuperPro keys with SafeNet Inc.’s NetSentinel keys, the Sentinel SuperPro keys must be located before any NetSentinel keys in the chain. NetSentinel keys should be the last keys in the chain. If Sen-tinel SuperPro keys are located behind NetSentinel keys, they will not be recognized by the Sentinel system driver, and thus the protected application will not run.
While Sentinel SuperPro keys can be cascaded with keys from other compa-nies, this may cause compatibility issues and is not recommended.
When your application attempts to establish communication with a key, it must specify the developer ID. The driver then locates the first key with this developer ID. The application can also ask for another key with the same developer ID if the first key is not desired for some reason.
Keys can also be connected to up to three parallel ports on the same com-puter. For example, if you have three parallel ports on your computer, you could attach a separate key to each port simultaneously. The Sentinel sys-tem driver automatically polls all parallel (and USB) ports when looking for a key.
54 Sentinel SuperPro 6.5 Developer’s Guide
Chapter 2 - Using the Hardware Key
Note: You cannot cascade keys with the same developer ID while you are pro-gramming keys. Every key must be programmed individually.
Installing the USB Hardware Key
If you have multiple USB ports (if, for example, you are using a USB hub), you can connect up to 10 USB hardware keys on a single computer. Cascad-ing—connecting multiple keys to the same port—is not supported for Sentinel SuperPro USB hardware keys.
We recommend installing the Sentinel system driver prior to connecting any USB keys to your system.
1. Locate an available USB port on your computer.
2. Attach the key to the USB port. Make sure it is securely and tightly connected.
Note: USB hardware keys can be used with Windows 98/ME/XP/2003/Vista or Windows 2000 workstations only.
Sentinel SuperPro 6.5 Developer’s Guide 55

Chapter 2 - Using the Hardware Key
Ordering and Returning Keys
The SSP Toolkit comes with one Sentinel SuperPro hardware key (see page 52). You need to order additional keys that you will program and then ship with your protected applications.
Ordering Additional Keys
Contact your SafeNet Inc. representative to order additional Sentinel Super-Pro hardware keys. When you place your order, be sure to have your developer product identifier available. This code can be found on the hard-ware key itself. Each key’s label shows:
■ A model number: This code is assigned to all keys you use to protect a specific product. The model number starts with an "S" for SuperPro keys or an "SX" for SuperPro XM keys. The next two characters identify the distributor and the last five characters are the sequence numbers.
Note: The model number is NOT the same as the developer ID programmed into the key. The product identifier is used for ordering purposes only.
■ A manufacturing code: This code identifies the key’s manufacturing lot. It is helpful to SafeNet Inc. if a key is returned for any reason.
Sample Sentinel SuperPro Key Label
SRB006439938L24319
ModelNumber
ManufacturingCode
56 Sentinel SuperPro 6.5 Developer’s Guide
Chapter 2 - Using the Hardware Key
Note: The model number and the manufacturing code are in the same format on both network and stand-alone keys.
When you place your order, you should also have the following information on hand:
■ What type of keys you want: network or stand-alone
■ What form-factor you want your keys to be in: parallel or USB
■ If you are using network keys, what you want for the hard limit (see page 15) that will be pre-programmed into the key
For more information about hardware key versions, see “Network Keys v. Stand-alone Keys” on page 15. For more information about key form-fac-tors, refer to “Attaching the Sentinel SuperPro Hardware Key” on page 52.
Returning Keys
Occasionally, you may find that you need to return a SafeNet product for exchange or repair. To ensure proper handling is acknowledged for the returned keys, you must obtain a Return Material Authorization (RMA) num-ber prior to shipping the products to SafeNet. To obtain an RMA number:
■ If you suspect a technical problem, call SafeNet’s Technical Support. The support representative will work with you to rule out resolvable software and/or configuration problems. If the problem cannot be resolved, the RMA department will assign you an RMA number over the phone.
■ If you have keys to be returned for other than a specific technical situation, call SafeNet’s RMA department for an RMA number.
Sentinel SuperPro 6.5 Developer’s Guide 57
Chapter 2 - Using the Hardware Key
Packaging the Keys for a Return
After you have obtained an RMA number and are ready to package the keys for shipping, please read and follow these packaging guidelines:
■ Install an electrostatic-dissipating mat as a work surface, and make sure the mat is properly grounded.
■ Wear grounding wrist or ankle straps while handling the keys.
■ Use packaging materials designed to avoid electrostatic charge during shipment. Plastic that does not generate static (“cold plastic”) is typically pink in color. You may also use “conductive plastic”, which is designed to drain off static.
Warning! Electrostatic charges can damage the Sentinel SuperPro keys. We strongly recommend following these guidelines at all times to pre-vent damage to your keys.
Be sure to write your RMA number on the shipping label to ensure prompt and correct handlings.
58 Sentinel SuperPro 6.5 Developer’s Guide
Chapter 3Designing Your Protection Strategy
The goal of any software protection strategy developed using Sentinel Super-Pro is to significantly reduce the chance that someone can defeat the protection and use your application without the hardware key. In general, the time and expense required for a skilled hacker to break your scheme is directly related to the number and complexity of the locks you place in your application. Protection can be as simple or as complex as you wish.
Before you actually start adding protection to your source code, however, you should design your protection strategy, deciding what type(s) of protec-tion you’ll use, which activation types you need, and more.
This chapter introduces you to the types of protection you can use with Sen-tinel SuperPro, gives some guidelines for using various protection types, and describes advanced protection techniques you can use for even greater secu-rity. Once you have read through this chapter, you will be ready to start the SSP Toolkit and begin adding protection to your application.
This chapter covers the following topics:
■ Introduction to software security
■ Protection types
■ Activation types
Sentinel SuperPro 6.5 Developer’s Guide 59
Chapter 3 - Designing Your Protection Strategy
■ Using network licensing
■ Guidelines for using various protection and activation types
■ Controlling demo applications
■ Reading stored data
■ Using algorithms for encryption
■ Advanced protection techniques
■ Programming the key
Note: All values and cell addresses used in this chapter’s examples are in hexadec-imal format. Also, for simplicity, standard error-checking steps are omitted from the examples. If you receive an invalid response to a query or another function, we recommend retrying the operation before taking action.
60 Sentinel SuperPro 6.5 Developer’s Guide
Chapter 3 - Designing Your Protection Strategy
Introduction to Software Security Concepts
Before you start making decisions about the strategy you’re going to use to protect your applications, it’s important that you understand the concepts behind software security.
Protection Types
Sentinel SuperPro provides two general types of protection: integrated and automatic. The protection type determines when and where software locks are implemented.
Integrated
When you choose integrated protection, you add software locks—API func-tions to verify the presence of the key—directly into your application’s source code. You control the amount and location of the locks.
The frequency of software locks within your application, and the action taken if no key is found, is left up to you. The more locks you add to your application, the more difficult it will be for potential hackers to break your application’s protection.
Because you must understand the API calls used to support the protection strategy you have designed, and manually add them to your code, using integrated protection may take longer.
Integrated protection is most commonly used when:
■ You want to have control over the protection techniques used to secure your application.
■ You have access to the source code and understand the API functions (for more information about the Sentinel SuperPro API go to “Using the Sentinel SuperPro API” on page 301).
Automatic (Shelled)
Automatic protection is a simplified, fast, and easy way to protect your application against unauthorized access.
Sentinel SuperPro 6.5 Developer’s Guide 61
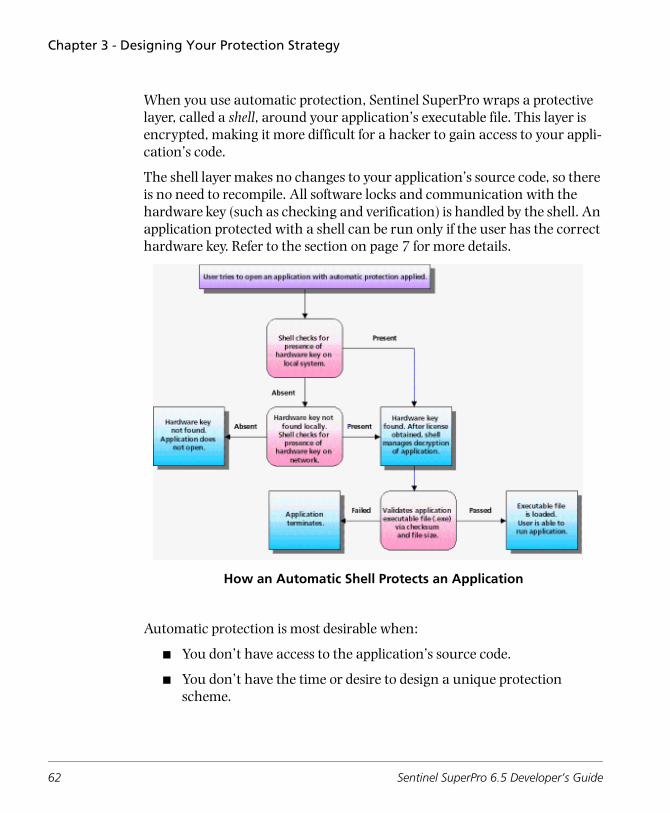
Chapter 3 - Designing Your Protection Strategy
When you use automatic protection, Sentinel SuperPro wraps a protective layer, called a shell, around your application’s executable file. This layer is encrypted, making it more difficult for a hacker to gain access to your appli-cation’s code.
The shell layer makes no changes to your application’s source code, so there is no need to recompile. All software locks and communication with the hardware key (such as checking and verification) is handled by the shell. An application protected with a shell can be run only if the user has the correct hardware key. Refer to the section on page 7 for more details.
How an Automatic Shell Protects an Application
Automatic protection is most desirable when:
■ You don’t have access to the application’s source code.
■ You don’t have the time or desire to design a unique protection scheme.
62 Sentinel SuperPro 6.5 Developer’s Guide
Chapter 3 - Designing Your Protection Strategy
■ You want additional security by implementing a shell in conjunction with API functions incorporated in your code.
■ You want to effortlessly include time/date/execution controls for a demo application, without having to manually add the elements and API functions in code.
Note: Some applications or .DLLs (such as those using threaded local storage) may not work correctly with automatic protection applied. In this case, use integrated protection instead.
Active v. Inactive Applications
As part of your protection strategy, you choose to make your application either active or inactive.
An active application is one that is ready to run when shipped to your cus-tomer. It will always remain active, as long as the hardware key is attached.
An inactive application will not run until it is activated.
For example, you can make your main application active, but make addi-tional features inactive. This allows your customer to easily purchase and immediately activate upgrades in the field, because you can provide the acti-vation password for the additional features without shipping additional software or visiting the customer’s site.
Demo or metered applications are a special case, in that they are shipped as active, but usually become inactive after a specific number of executions. See “Controlling Demo Applications” on page 94 for more information.
Activation Types
When you protect your applications with Sentinel SuperPro, you also choose how you want your customer to activate future applications, or addi-tional features, after installation.
The methods defining how customers activate your application are called activation types. There are four activation types in Sentinel SuperPro: active, static, trusted and distributed.
Sentinel SuperPro 6.5 Developer’s Guide 63

Chapter 3 - Designing Your Protection Strategy
The following table describes each of the available activation types, what you must do to use each type, and suggestions for how you can use each type. Typically, the activation type you use is based on whether you want your application to be active or inactive.
Activation Type
Description When to Use
Active • Your application is always active when the hardware key is attached. It needs no activation password.
• You want your main prod-uct to be always active so your customer can always run it.
• You might ship add-on features (that you intend to charge separately for) as inactive products, to be activated at a later time when your customer pur-chases them.
Static • The application is inactive until activated with an activa-tion password, unless it is a demo or metered application.
• The activation password is the same for every hardware key used to protect the appli-cation. This means one pass-word works for multiple keys.
• This type is easier to deploy, because the pass-word is always the same, making it easier to update several keys on different computers.
• If you are writing a sepa-rate activation password utility, you must use this type because you know what the password will be.
64 Sentinel SuperPro 6.5 Developer’s Guide
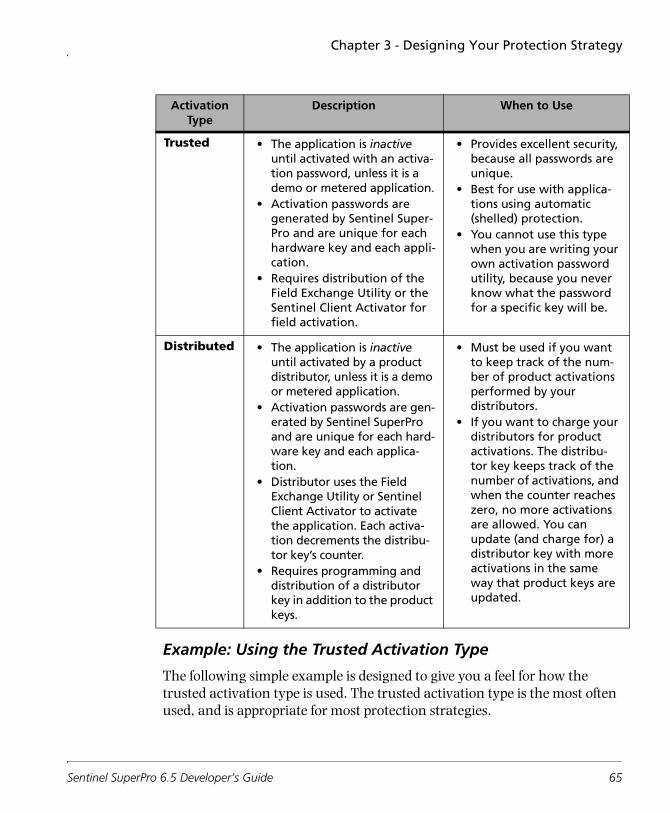
Chapter 3 - Designing Your Protection Strategy
Example: Using the Trusted Activation Type
The following simple example is designed to give you a feel for how the trusted activation type is used. The trusted activation type is the most often used, and is appropriate for most protection strategies.
Trusted • The application is inactive until activated with an activa-tion password, unless it is a demo or metered application.
• Activation passwords are generated by Sentinel Super-Pro and are unique for each hardware key and each appli-cation.
• Requires distribution of the Field Exchange Utility or the Sentinel Client Activator for field activation.
• Provides excellent security, because all passwords are unique.
• Best for use with applica-tions using automatic (shelled) protection.
• You cannot use this type when you are writing your own activation password utility, because you never know what the password for a specific key will be.
Distributed • The application is inactive until activated by a product distributor, unless it is a demo or metered application.
• Activation passwords are gen-erated by Sentinel SuperPro and are unique for each hard-ware key and each applica-tion.
• Distributor uses the Field Exchange Utility or Sentinel Client Activator to activate the application. Each activa-tion decrements the distribu-tor key’s counter.
• Requires programming and distribution of a distributor key in addition to the product keys.
• Must be used if you want to keep track of the num-ber of product activations performed by your distributors.
• If you want to charge your distributors for product activations. The distribu-tor key keeps track of the number of activations, and when the counter reaches zero, no more activations are allowed. You can update (and charge for) a distributor key with more activations in the same way that product keys are updated.
Activation Type
Description When to Use
Sentinel SuperPro 6.5 Developer’s Guide 65
Chapter 3 - Designing Your Protection Strategy
Assume you want to create 100 copies of your application to ship to your customers. Your product line is defined as follows:
■ You have a main application—named SceneryEditor— that you want to run immediately at the customer’s site.
■ You have a demo of SceneryEditor that you want to run immediately at the customer site, but it will expire at some point.
■ You have ten other add-on features for SceneryEditor that your customer may purchase in the future as upgrades.
In general, the following procedure describes how you would use Sentinel SuperPro to protect and distribute SceneryEditor and its add-on features:
1. Use the SSP Toolkit to define the following:
❑ Assign SceneryEditor an active activation type, by applying either integrated or automatic application protection.
❑ Assign the demo version a trusted activation type.
❑ Assign each of the add-on features (separately) a trusted activation type. Each add-on feature is treated as a separate application by Sentinel SuperPro.
2. Add the protection to your applications by using the pseudocode pro-tection plan generated during the Implementation stage to add the appropriate calls to your source code, or add the shell(s) to the appro-priate executable files.
3. Produce 100 copies of SceneryEditor and its user documentation.
4. Program 100 Sentinel SuperPro hardware keys with the protection strategy you defined in step 1, using the Make Keys stage.
5. Ship SceneryEditor, along with one product key and the Sentinel Cli-ent Activator or Field Exchange Utility.
If your customer decides to upgrade from the demo version, or decides to purchase additional features for SceneryEditor, the Client Activator or Field
66 Sentinel SuperPro 6.5 Developer’s Guide
Chapter 3 - Designing Your Protection Strategy
Exchange Utility may be used in order to obtain a locking code. Your cus-tomer sends you the locking code, and you do the following:
1. Start the SSP Toolkit and navigate to the Implementation stage.
2. Click the Field Activation tab, and then click License Generator.
Note: You can also use the License Generator Utility to generate a license code.
3. Enter the locking code provided by your user, and select the actions you want to perform on the key in the field.
The actions you select determine which features the user will have access to. Sentinel SuperPro generates a license code that will apply the selected actions to the user’s key.
4. Send the license code to your user, who then enters the code in the Cli-ent Activator or Field Exchange Utility, automatically activating the appropriate product or upgrade.
Sentinel SuperPro 6.5 Developer’s Guide 67
Chapter 3 - Designing Your Protection Strategy
Example: Using the Distributed Activation Type
The next example is designed to give you a feel for how the distributed acti-vation type is used. The distributed activation type is used when you want to give your sales distributors the ability to activate or update your application.
Assume you want to create 50 copies of your application to ship to custom-ers, but these copies will be shipped to your distributors to sell. So that you can keep track of how many products your distributors sell, you decide to use the distributed activation type. Your product line is defined as follows:
■ You have a main application—named SceneryEditor—that the distributor must activate in the product key before shipping it to the customer.
■ You have three other add-on features for SceneryEditor that customers may purchase in the future as upgrades.
■ You have five distributors, and you want each distributor to sell a maximum of 10 copies of SceneryEditor.
In general, the following procedure describes how you would use Sentinel SuperPro to protect and distribute SceneryEditor through your distributors.
1. Use the SSP Toolkit to define the following:
❑ Assign SceneryEditor a distributed activation type, by applying either integrated or automatic application protection.
❑ Assign each of the add-on features (separately) a distributed activation type. Each add-on feature is treated as a separate application by Sentinel SuperPro.
2. Add the protection to your applications by using the pseudocode pro-tection plan generated during the Implementation stage to add the appropriate calls to your source code, or add the shell(s) to the appro-priate executable files.
3. Produce 50 copies of SceneryEditor and its user documentation.
68 Sentinel SuperPro 6.5 Developer’s Guide
Chapter 3 - Designing Your Protection Strategy
4. Program 50 Sentinel SuperPro hardware keys with the protection strategy you defined in step 1, using the Make Keys stage.
5. Program a distributor key (with the protection strategy you defined in step 1) for each of your distributors who will be selling SceneryEditor, using the Make Keys stage.
The activation counter for each key should be set to 40—10 licenses to activate SceneryEditor, and 10 licenses each to activate each of the add-on features.
6. From the Project stage, export the protection strategy you defined in step 1 to a .DST file.
7. Ship the following items to each distributor:
❑ Ten copies of SceneryEditor
❑ Ten programmed product keys that have not yet been activated
❑ Ten copies of the Sentinel Client Activator or Field Exchange Utility for distribution to customers with SceneryEditor
❑ One of the distributor keys you programmed in step 5
❑ The .DST file you created in step 6
❑ The License Generator Utility
As soon as the application from has been received by the customer through distributor, if the decision of purchasing additional features for SceneryEdi-tor has been made, the customer must activate the application or features before using them. To do so, the Client Activator or Field Exchange Utility may be used in order to obtain a locking code. The customer sends the distrib-utor the locking code, and the distributor then does the following:
1. Connects the distributor key to the workstation.
2. Verifies that the Sentinel Protection server is installed and running on the workstation.
Sentinel SuperPro 6.5 Developer’s Guide 69
Chapter 3 - Designing Your Protection Strategy
3. Starts the License Generator Utility and opens the .DST file you provided with the protected application.
4. Enters the locking code provided by the customer, and selects the actions to perform on the key in the field.
The actions the distributor selects determine which features the cus-tomer will have access to.
5. Generates a license code that will apply the selected actions to the cus-tomer’s key.
Each time a license code is generated, the activation counter in the distributor’s key is decremented by one. Once the counter reaches zero, the distributor can no longer activate or update SceneryEditor.
Note: The activation counter is decremented only when a distributor generates a license code to activate or update a distributed application. Distributors can activate or update an unlimited number of static or trusted applica-tions; the activation counter is not decremented by these types of applica-tions. In fact, distributor keys do not need to be connected at all in order to generate license codes for static or trusted applications.
6. Sends the license code to the customer, who then enters the code in the Client Activator or Field Exchange Utility, automatically activat-ing the appropriate product or upgrade.
When the license limit counter on a distributor’s key reaches zero, you can increment the limit counter through field activation, much in the same way that a customer’s product key is updated by the distributor. You may want to charge for incrementing the distributor’s key. To increment the license limit counter in a distributor’s key:
1. Start the SSP Toolkit and navigate to the Implementation stage.
2. Click the Field Activation tab, and then click License Generator.
70 Sentinel SuperPro 6.5 Developer’s Guide
Chapter 3 - Designing Your Protection Strategy
3. Ask the distributor to generate a locking code for his distributor key using the Field Exchange Utility. The distributor key, not a product key, must be connected the distributor’s system to generate the appro-priate locking code.
4. Enter the locking code provided by the distributor, and select the Increment Distributor Counter action. You should have already programmed this action, and the increment value, when you initially created your protection strategy.
5. Generate a license code.
6. Send the license code to your distributor, who then enters the code in the Field Exchange Utility, automatically incrementing the license limit for his distributor key.
The distributor can now continue to activate and upgrade product keys for SceneryEditor, as described above.
Choosing an Activation Type for Demo Applications
When you want to provide your application as a demo, you must use an acti-vation type other than active. This is because, by definition, a demo must expire (become inactive) after it is run a specific number of times. You will want to activate the demo when you ship it to your customers, so that it will run.
Therefore, you should use the static or trusted activation type. The demo is then active until it expires. If you want your distributor to activate the demo, you should use the distributed activation type.
Note: The distributed activation type is similar to the trusted activation type; the only difference is that activations of distributed applications are metered.
For more information on protecting demo applications, see “Controlling Demo Applications” on page 94.
Sentinel SuperPro 6.5 Developer’s Guide 71
Chapter 3 - Designing Your Protection Strategy
Network Licenses
Another decision you need to make while protecting your application is how you want to use licenses with your application. With Sentinel SuperPro 6.5, every user of your application needs to obtain a license before running the application. The license allows the user to start the application and access the hardware key.
The license limit indicates the maximum number of concurrent users of the application. Each instance of an application uses a license when it is started.
Licenses can be used in two ways—with a stand-alone application or with a network application. If the application is stand-alone, each user needs his own hardware key, as only one license can be obtained from each key. If the application is a network application, only one key—located on the net-work—is required, but the single key can issue multiple licenses, allowing for simultaneous use of your application by several clients.
The type of licensing model to use is up to you. It depends on how you will be selling your application, and how you expect your users to deploy it within their organization.
Sublicensing
Sublicensing is useful when you want to apply a license limit to a specific feature of the protected application. If you have specified a user limit in your protection strategy, you can allow sharing the sub-licenses issued on the basis of a combination of User Name and MAC Address (i.e. a seat), so that if a request for accessing that feature of the protected application comes more than once from the same seat, then no extra license is consumed.
You can program up to 232 separate sublicense license limits in each key—each sublicense is a custom element occupying a single cell on the hardware key. The total number of sublicense limits you can program is dependent on the number of cells being used by other elements of your strategy
72 Sentinel SuperPro 6.5 Developer’s Guide
Chapter 3 - Designing Your Protection Strategy
Getting Started
Now that you understand the concepts behind software security, you are ready to get started with designing your own protection strategy. The first decision you need to make is whether you want to use quick and easy pro-tection, or if you want to take more time and create your own custom protection strategy.
Quick and Easy Protection
If you don’t have a lot of time and you need to quickly protect your software before shipping it to your customers, you may want to consider using auto-matic protection.
With Sentinel SuperPro, implementing automatic protection for your appli-cation can take 30 minutes or less, while still giving you options for activation types, time and date controls and algorithm values. When you choose automatic protection, the SSP Toolkit does most of the work for you, with no need to modify your source code.
If you want to start protecting your applications right away, skip to page 99 to read important information about programming the hardware key, then go immediately to Chapter 5, “Starting the Sentinel SuperPro Toolkit,” on page 113 to get started.
Customized Protection
If you have more time to work on your protection strategy, a custom strategy may be the answer for you. Customizing your strategy allows you to take advantage of a number of protection techniques, both basic and advanced, using those that work best for your application.
Customized protection allows you to:
■ Choose how to use each memory cell in the key.
■ Select the algorithms used in your protection strategy.
■ Add data words or counters where appropriate.
Sentinel SuperPro 6.5 Developer’s Guide 73
Chapter 3 - Designing Your Protection Strategy
■ Add API function calls to your source code to support your protection strategy.
■ Create a very secure level of protection for your application.
Note: Creating your own customized protection scheme requires you to under-stand the API functions and all rules governing how cells can be pro-grammed. Be sure you have thoroughly reviewed the information in this chapter, as well as Chapters 3 and 14, before you begin programming the key and writing code.
If you decide you want to create your own unique protection strategy, con-tinue with the next sections in this chapter, which provide information on the various techniques you can use to protect your application. Once you’ve completed this chapter, go to Chapter 5, “Starting the Sentinel SuperPro Toolkit,” on page 113 to get started with implementing your strategy.
Basic Protection Guidelines
If you decide to create your own customized protection strategy, keep in mind the following guidelines to ensure your strategy is effective.
Send Frequent Queries
One of the most basic and effective techniques you can use to confuse hack-ers is to call the hardware key frequently. If you rely on a single call at the beginning of your code, it is relatively easy for a skilled hacker to isolate the call and defeat your protection.
Another potential problem with querying only once is that a user could remove the key after starting the application. The key could then be used to run another copy of the application. The first copy would continue to run, because no queries are being performed to check for the key’s continued presence. This process of removing a key after starting an application and then using the same key to start the application on other computers is known as “lamplighting.”
If you decide to implement network licensing as part of your protection strategy, you must send a message to the key every 90 seconds in order to
74 Sentinel SuperPro 6.5 Developer’s Guide
Chapter 3 - Designing Your Protection Strategy
maintain the license. Failure to send this “heartbeat” message to the server (and thus the hardware key) will result in loss of the license and an error being sent to the application. Heartbeat messages let the server and key know that the license is still in use by the client running the application. For more information about heartbeat messages, see page 109.
Scatter Lock Code
Software locks consist of multiple steps: calling the key, evaluating the returned value, and acting on the evaluation results. For added protection, separate these lock components in your code. A software lock is harder to break if its code components are physically separated into different sections of the application instead of being located together.
Manipulate Returned Data
Use the data returned from the hardware key in various ways. For example, leave the result in a variable, then check it later.
Sentinel SuperPro 6.5 Developer’s Guide 75
Chapter 3 - Designing Your Protection Strategy
Commonly Used Protection Techniques
This section describes several common techniques you can use, individually or together, to protect your application. Many of these schemes are based on one or more of the following general methods:
■ Overloading potential hackers with data by calling the hardware key many times throughout your code.
■ Decentralizing your locks throughout the code, rather than restricting them to a few places that can be easily detected and eliminated.
■ Distracting potential hackers with locks that make your application perform long series of meaningless operations. These calls mislead hackers and make your valid locks harder to isolate.
Some techniques can be used with returned values sent from any of the three type of words (data, counter and algorithms). Other techniques can be used with only one type of word.
Note: A returned value is the value received from any type of cell in response to a query or read sent from your application.
When evaluating a returned value, always compare the response to the expected value. Do not rely on receiving a specific invalid response.
Reading Stored Data
For a simple protection scheme, program a single cell with a value. Then, have your application read that cell and verify it contains the correct data. If it does, continue execution. If the correct data is not found, assume the key is not attached or has been tampered with and proceed accordingly.
Example
In this example, we programmed one cell in the key with a two-byte value. We then had our application read that cell during execution, taking appro-priate action after the read.
76 Sentinel SuperPro 6.5 Developer’s Guide
Chapter 3 - Designing Your Protection Strategy
1. Select a two-byte value. We used 1234.
2. Select a cell to program this value into. We used cell 20.
3. Use the SSP Toolkit to program the selected cell with the value. In this example, we programmed the value 1234 into cell 20.
Note: To add a data word cell to your key, you need to create a custom element. See Chapter 7, “Working With Design Elements,” on page 185 for detailed instructions.
Use the Data Word cell type if you want the application to be able to modify the cell later. Use the Locked Data Word cell type if you want the cell to be read-only.
4. Add the required API functions in your application code:
❑ RNBOsproFormatPacket() – Initializes the packet.
❑ RNBOsproInitialize() – Performs required initialization.
❑ RNBOsproFindFirstUnit() – Establishes communication with the key and gets a license.
❑ RNBOsproRead() – Reads the cell and returns the value in it.
5. Code your application to evaluate the response to the read.
6. Code your application to display an error or abort if the read operation does not return the value you programmed. We recommend retrying the operation at least once before taking a negative action.
Note: For more information about the API functions used in this example, see Chapter 14, “API Function Reference,” on page 301.
Using Algorithms to Encrypt Data
A more complex form of protection is using algorithms to encrypt data you send to the key.
Sentinel SuperPro 6.5 Developer’s Guide 77

Chapter 3 - Designing Your Protection Strategy
In this case, you send a data string to the key that is encrypted by the key using a preprogrammed algorithm. Your application then examines the returned value, verifying that the correct encrypted string was returned, or using the value to control your application’s execution in some way.
Tip: Longer query strings generally offer greater protection. We recommend your query strings be at least 32 bits (8 hex characters) long.
Example
This example describes how to set up your application to require a correctly encrypted response from the key.
1. Select two 16-bit hex values to use for the algorithm. We used 1234 and C000 to create an active algorithm using the enhanced algo-rithm engine.
Remember, the second word must be between 8000 and FFFF to make the algorithm active.
2. Select two cells to program these values in. We used cells 0A and 0B.
Note: Throughout the SSP Toolkit, only valid and available cell addresses are pro-vided in Address drop-down lists, preventing you from selecting an inap-propriate address. For more information about algorithm address restrictions, see “Valid Algorithm Addresses” on page 37.
Sentinel SuperPro will select an address for you if you select Auto instead of a cell; see page 189 for more information.
3. Select a query string to send to the key to be encrypted. We used 8FA31B4B.
4. In the SSP Toolkit, open the Design stage.
5. Add an Algorithm as a custom element. Enter the values you selected in step 1 as the first and second words of the algorithm.
78 Sentinel SuperPro 6.5 Developer’s Guide
Chapter 3 - Designing Your Protection Strategy
See Chapter 7, “Working With Design Elements,” on page 185 for detailed instructions on adding algorithms to your protection strat-egy.
6. Move to the Prototype stage, and click Go to program a test key with your specifications.
7. Move to the Implementation stage, and click the API Explorer tab.
8. Click Query Response Generator.
9. On the Query Response Generator screen, determine the encrypted value your key will return for the query value you selected in step 3.
See “Querying Algorithms” on page 134 for more information on using the query response generator.
Using our examples from above, the query string 8FA31B4B returns a value of 3C5E4AD1.
1. Add the appropriate API functions in your application to make the query. The following functions are required:
❑ RNBOsproFormatPacket() – Initializes the packet.
❑ RNBOsproInitialize() – Performs required initialization.
❑ RNBOsproFindFirstUnit() – Establishes communication with the key and gets a license.
❑ RNBOsproQuery() – Sends the query string and points to a location for the response value.
2. Code your application to display a message and exit if the query does not return the appropriate response (determined in step 9).
Using Activation Passwords
You can program the hardware key so an algorithm is associated with an activation password. The algorithm and the password are each two words
Sentinel SuperPro 6.5 Developer’s Guide 79
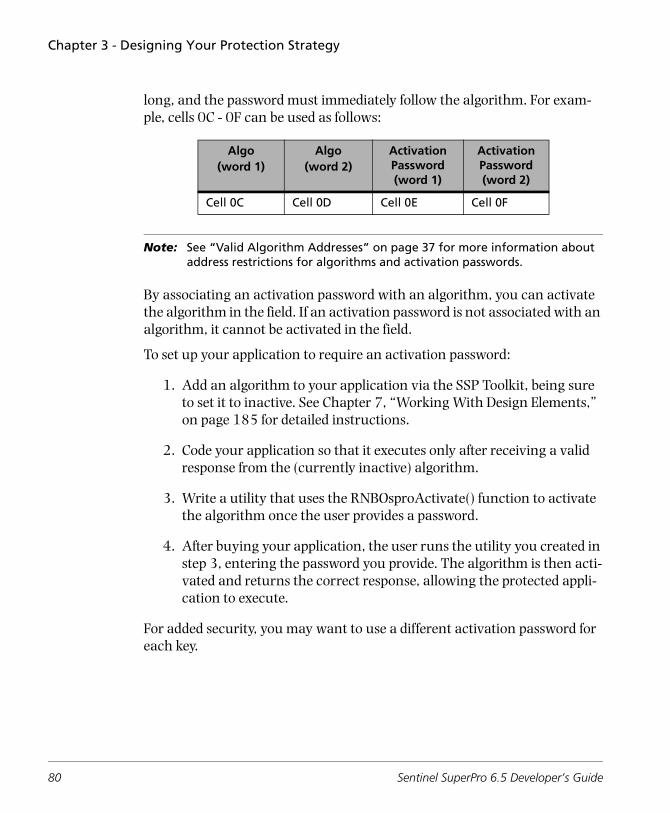
Chapter 3 - Designing Your Protection Strategy
long, and the password must immediately follow the algorithm. For exam-ple, cells 0C - 0F can be used as follows:
Note: See “Valid Algorithm Addresses” on page 37 for more information about address restrictions for algorithms and activation passwords.
By associating an activation password with an algorithm, you can activate the algorithm in the field. If an activation password is not associated with an algorithm, it cannot be activated in the field.
To set up your application to require an activation password:
1. Add an algorithm to your application via the SSP Toolkit, being sure to set it to inactive. See Chapter 7, “Working With Design Elements,” on page 185 for detailed instructions.
2. Code your application so that it executes only after receiving a valid response from the (currently inactive) algorithm.
3. Write a utility that uses the RNBOsproActivate() function to activate the algorithm once the user provides a password.
4. After buying your application, the user runs the utility you created in step 3, entering the password you provide. The algorithm is then acti-vated and returns the correct response, allowing the protected appli-cation to execute.
For added security, you may want to use a different activation password for each key.
Algo(word 1)
Algo(word 2)
Activation Password (word 1)
Activation Password (word 2)
Cell 0C Cell 0D Cell 0E Cell 0F
80 Sentinel SuperPro 6.5 Developer’s Guide
Chapter 3 - Designing Your Protection Strategy
Example
This example demonstrates how to activate an inactive application in the field. Usually, an application is deactivated because it is a demo that has been “turned off ” after the specified number of executions. Alternatively, you may have set up your application so the user must enter an activation password before the application will run.
You temporarily “turn off ” an application by including an RNBOspro-Query() function call that requires the hardware key to return a correctly encrypted value. Then you make it impossible for the hardware key to return the value because its algorithm has been set to inactive.
By definition, an algorithm is inactive if the high-order bit of its second word is 0. This is done as follows:
■ If a counter is used, when it reaches zero, the RNBOsproDecrement() function sets the bit to 0.
■ In your factory, the SSP Toolkit is used to set the algorithm as inactive.
You must write a utility, or add a feature or function to your applica-tion, to activate the algorithm once the user supplies the correct password. The query performed by the protected application then returns the correct response, and the application runs successfully.
Note: The utility used to enter activation passwords is not included with, nor can it be created with, the SSP Toolkit. You must design and code this utility for use with your application yourself.
The following example assumes you release your application in a deacti-vated state, and provide a password and utility to activate it.
1. Use the SSP Toolkit to program an algorithm with password as a cus-tom element at address 0C, as follows:
❑ Algorithm: 0123 3456
❑ Password: AB16 09C5
Sentinel SuperPro 6.5 Developer’s Guide 81

Chapter 3 - Designing Your Protection Strategy
Remember, the value in the second word of the algorithm must be between 0000 and 7FFF to make the algorithm inactive. See “Algo-rithm Values” on page 35 for detailed instructions.
2. Add API functions in your application to query the hardware key using the activated algorithm. The following functions are required:
❑ RNBOsproFormatPacket() – Initializes the packet.
❑ RNBOsproInitialize() – Performs required initialization.
❑ RNBOsproFindFirstUnit() – Establishes communication with the key and gets a license.
❑ RNBOsproActivate() – Passes the password input by the user, your write password, and the address of the algorithm’s first word.
If the password is correct, RNBOsproActivate() changes the algo-rithm’s active/inactive bit to active, making it available for queries.
Note: You may want to send a query using the algorithm before calling RNBOsproActivate(). If the query returns the correct response, the algo-rithm is already activated.
3. Write a utility the user can use to enter the password you provide. This utility should also use the API calls listed above.
Dealing With Missing Hardware Keys
If no hardware key is attached to the computer or network server when a protected application is run, an error is returned by the RNBOsproFind-FirstUnit() API function. If a connection is established, but the key is later removed, subsequent API functions will return errors. See “API Status Codes” on page 352 for more information about these errors.
If your application detects that the Sentinel SuperPro key is not present, it is up to you to decide what action you want to take. Typically, you should not shut down your application because of a single unexpected response.
82 Sentinel SuperPro 6.5 Developer’s Guide
Chapter 3 - Designing Your Protection Strategy
Instead, repeat your query; if the response is still wrong, then you can take action. Possible actions include:
■ Display a message and wait for the user to respond. This method does not prevent users from running the application, but it makes doing so extremely annoying, especially if the application queries the hardware key frequently.
■ Shut down the application after a predetermined number of failed queries. (However, only under the most extraordinary circumstances should you terminate your application without allowing the user to first save his work.)
■ Allow the application to appear as if it is functioning properly, while in fact it is not. (Be very careful if you use this method; less drastic actions should be considered first.)
■ Display a critical error message and tell the user to contact your technical support department.
These are just some suggested actions; you can implement any combination of them to suit your needs.
Remember, other events, such as network transmission errors or parallel port contention problems, can also cause your application to detect a hard-ware key problem. Since these are almost always innocent events, you should design your strategy to be as forgiving of them as possible, while still maintaining protection integrity.
Note: All attempts have been made to guarantee error-free transmissions to and from the key. However, a small possibility exists that an invalid response may be received even if the key is attached. As a result, we recommend always retrying the query one or more times if you receive an invalid response. If the response is consistently invalid, then take the action you deem appropriate.
Sentinel SuperPro 6.5 Developer’s Guide 83
Chapter 3 - Designing Your Protection Strategy
Dealing With Newly Connected Hardware Keys
Once a Sentinel Protection server is running on your user’s network, addi-tional keys can be installed at any time without having to reboot the server—this is called hotplugging.
The Sentinel Protection server will automatically detect any new keys that have been attached since the last time the server was started. This allows the user to connect a new key to the server without shutting down the server and terminating those clients currently accessing the key and running the protected application.
84 Sentinel SuperPro 6.5 Developer’s Guide
Chapter 3 - Designing Your Protection Strategy
Advanced Protection Techniques
Once you understand how to use the basic tenets of software protection, you may want to further protect your application through the use of advanced techniques.
Using Returned Values as Variables
Because software is generally easier to break than hardware, most hackers will try to break your application by attacking the software. Therefore, any tricks or traps you can implement in your code by incorporating a response from the hardware key will add even more protection.
One effective technique is to hide software locks in a high-level language by using returned values to control application flow. With this method, a value returned by the key becomes a logical pointer or selection key to the next exe-cution step or subroutine. This makes analysis of your code more difficult.
Another way to use a returned value is to add it to the value of a variable so the sum is the desired value of the variable. If the variable is used in other parts of the code, then that code is dependent on the call to the hardware key.
For example, suppose that at some point in your application you want a variable to contain the value 13. Assume that one of the query strings you send to the key returns the decimal number 12,345.
■ Set the variable to -12,332.
■ Send the query.
■ Add the response to the variable.
If the correct key is attached, the variable will contain the proper value.
Implementing Encryption Techniques
Another effective method for protecting your application is to use reversible encryption techniques to encrypt and decrypt data.
To do this, use the RNBOsproQuery() function to scramble a data string, and then use the scrambled response to encrypt your application code. You then
Sentinel SuperPro 6.5 Developer’s Guide 85
Chapter 3 - Designing Your Protection Strategy
ship your application to the field with encrypted code, which is decrypted only if the hardware key is attached.
Most encryption algorithms depend on a key value—sometimes called a password or seed—to transform the data.
Using a different seed produces different encrypted results, but reproduces the original data if that seed is also used for decryption.
Note: Use of this technique requires advanced knowledge of encryption methods and their use in application code. Some of these techniques may be diffi-cult or impossible to implement in some languages.
Using Returned Values as Encryption Seeds
You can use the key’s returned values to disguise critical portions of data or code as random data until decrypted for use. If the encryption seed is derived from values produced by Sentinel SuperPro, the correct key must be present before the code can be decrypted and executed.
Tip: When decrypted data is “in the clear,” use some other form of protection to block interrupts used by debuggers to gain control.
The most common reversible algorithms use the Boolean operator EXCLU-SIVE OR (XOR). XOR works as follows:
■ If a seed bit has a value of 1, XOR reverses the state of the corresponding bit in the original string and copies it to the result.
■ If a seed bit has a value of 0, XOR copies the corresponding bit in the original string to the result.
Applying the same algorithm to the result reverses the encryption and restores the data to its original state.
86 Sentinel SuperPro 6.5 Developer’s Guide
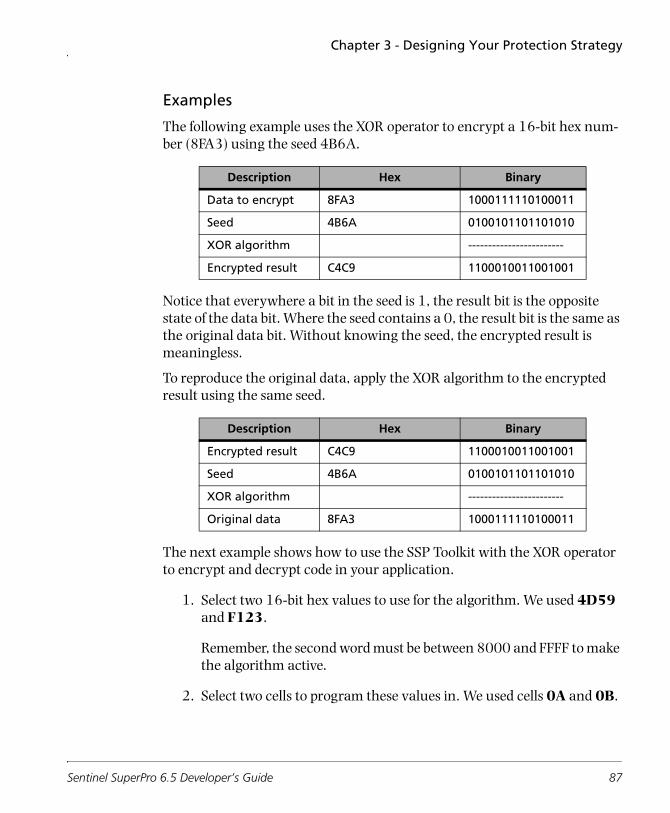
Chapter 3 - Designing Your Protection Strategy
Examples
The following example uses the XOR operator to encrypt a 16-bit hex num-ber (8FA3) using the seed 4B6A.
Notice that everywhere a bit in the seed is 1, the result bit is the opposite state of the data bit. Where the seed contains a 0, the result bit is the same as the original data bit. Without knowing the seed, the encrypted result is meaningless.
To reproduce the original data, apply the XOR algorithm to the encrypted result using the same seed.
The next example shows how to use the SSP Toolkit with the XOR operator to encrypt and decrypt code in your application.
1. Select two 16-bit hex values to use for the algorithm. We used 4D59 and F123.
Remember, the second word must be between 8000 and FFFF to make the algorithm active.
2. Select two cells to program these values in. We used cells 0A and 0B.
Description Hex Binary
Data to encrypt 8FA3 1000111110100011
Seed 4B6A 0100101101101010
XOR algorithm ------------------------
Encrypted result C4C9 1100010011001001
Description Hex Binary
Encrypted result C4C9 1100010011001001
Seed 4B6A 0100101101101010
XOR algorithm ------------------------
Original data 8FA3 1000111110100011
Sentinel SuperPro 6.5 Developer’s Guide 87
Chapter 3 - Designing Your Protection Strategy
Sentinel SuperPro will select an address for you if you select Auto instead of a cell; see page 189 for more information.
Note: For more information about algorithm address restrictions, see “Valid Algorithm Addresses” on page 37.
3. Select query data to send to the key to be encrypted. We used 7009AB12.
4. In the SSP Toolkit, open the Design stage.
5. Add an Algorithm as a custom element. Enter the values you selected in step 1 as the first and second words of the algorithm.
See Chapter 7, “Working With Design Elements,” on page 185 for detailed instructions on adding algorithms to your protection strat-egy.
6. Move to the Prototype stage, and click Go to program a test key with your specifications.
7. Move to the Implementation stage, and click the API Explorer tab.
8. Click Query Response Generator.
9. On the Query Response Generator screen, determine the encrypted value your key will return for the query data you selected in step 3.
See “Querying Algorithms” on page 134 for more information on using the query response generator.
The encrypted return value is the encryption seed you will use to encrypt part of your code. Using our examples from above, the query string 7009AB12 returns a value of 60D6867D.
10. Select an encryption method. We used the Boolean operator XOR.
11. Select the data in your code you want to encrypt. We used the hex value 8FA31B4B.
88 Sentinel SuperPro 6.5 Developer’s Guide
Chapter 3 - Designing Your Protection Strategy
12. Apply the operator you selected in step 10 to the data, using the encryption seed. If you ship your application with the encrypted code, it will not execute correctly until the code is decrypted by a correct response.
In our example, the result is A73FBA5B.
13. Code your application so it decrypts the encrypted code if the hard-ware key is present. To do this, query the key. If it is present, the RNBOsproQuery() function returns the response string you used as the encryption seed.
Because XOR is a reversible operation, applying the same encryption seed to the encrypted data returns the data to its original state and your application should continue to execute properly.
14. Add the following required API functions in your application to make the query:
❑ RNBOsproFormatPacket() – Initializes the packet.
❑ RNBOsproInitialize() – Performs required initialization.
❑ RNBOsproFindFirstUnit() – Establishes communication with the key and gets a license.
❑ RNBOsproQuery() – Sends the query string and points to a location for the response value.
Code your application to display a message and exit if the query does not return the appropriate value and the code cannot be decrypted.
Using Longer Encryption Seeds
If the data to encrypt is longer, a longer seed can be constructed. The scheme for forming such a seed may be as complicated as you wish.
For example, the number 4B6A can be expanded to a 32-byte string by “rotating” it left 15 times and stringing the results of each rotation together. This yields the following hex string:
Sentinel SuperPro 6.5 Developer’s Guide 89
Chapter 3 - Designing Your Protection Strategy
4B6A 96D4 2DA9 5B52 B6A4 6D49 DA92 B525 6A4B D496 A92D 525B A4B6 496D 92DA 25B5
You can use this string as a seed with the XOR algorithm to encrypt a 32-byte string. For example, the ASCII string “This is the secret of my pro-gram” can be represented as the following hex string:
5468 6973 2069 7320 7468 6520 7365 63726574 206F 6620 4D59 2070 726F 6772 616D
Using the 32-byte seed with the XOR algorithm produces the following encrypted result:
1F02 FFA7 0DC0 2872 C2CC 0869 A9F7 D6570F3F F4F9 CD0D 1F02 84C6 3B04 F5A8 44D8
The result looks nothing like the original character string, yet the original data can be easily recovered using the same algorithm seed that changed it.
You can use this method with entire sections of code within your applica-tion, expanding the seed as needed.
Using Advanced Encryption Techniques
You can make encryption even more complex, depending on how sophisti-cated you want to make your application. For example:
■ Use values returned by the key as seeds for a pseudo-random number generator that generates seed encryption patterns.
■ Use returned values to decrypt subroutines that then decrypt code using an entirely different encryption method and seed.
■ Instead of using the XOR operator, multiply each byte by a seed to encrypt it. Divide by the same seed to decrypt the data.
Multiplying an 8-bit value can yield a 16-bit result. The result is dou-ble the size of a data string produced with the XOR operator, but is also harder to crack. If you use this technique, make sure your multi-plier/divisor seed does not equal 0.
90 Sentinel SuperPro 6.5 Developer’s Guide
Chapter 3 - Designing Your Protection Strategy
Your local technical library should have several reference materials on encryption that can help you implement these techniques in your protec-tion strategy. Other topics you may wish to research include codes, cryptology and the National Security Agency (NSA).
Querying Activation Passwords
Normally, an activation password is used to activate an inactive algorithm, as described in “Using Activation Passwords” on page 79. However, because an algorithm password has an access code of 3 (meaning it is also an algo-rithm word), you can also use the password itself as an algorithm.
To make a password an active algorithm, you must set bit 7 of its second word to 1 (set the value in the second word to a number between 8000 and FFFF). Then use the RNBOsproQuery() function to send an input string to the key, specifying the starting address of the password. The key encrypts the string according to the bit pattern of the algorithm password, and then returns the encrypted value to your application.
This technique provides an alternate method of querying the key. For exam-ple, you may want to query the algorithm password before invoking the RNBOsproActivate() function, to verify that the password appears to be correct.
Note: You cannot use this method if you use the trusted activation type, which creates a different activation password for each customer.
Using Data Words
In addition to reading the value in a single data word cell (see page 76), there are a number of other ways you can use cells programmed with read/write data words (access code 0) or read-only data words (access code 1) as part of your protection strategy.
■ Store machine code in data words. This code can be read, checksummed and executed in a way that is verified by a different part of the application.
Sentinel SuperPro 6.5 Developer’s Guide 91
Chapter 3 - Designing Your Protection Strategy
■ Program the application’s serial number in a data word cell. Read the cell and compare the value to the correct serial number.
If you have multiple application packages, store the serial number for each in separate data word cells.
■ Store the user’s name in data words as ASCII bytes, then compare or display it.
■ Use the 56 programmable cells as one large, 896-bit bitmap. Various combinations of bits can determine features or other responses, depending on your application.
Assembly Language Techniques
Implementing Sentinel SuperPro protection in assembly language offers more flexibility than other languages. However, you can use only one Senti-nel SuperPro subroutine to make hardware key queries. If you try to link two different interface subroutines with your application, you may get dou-bly defined symbols.
Hiding Calls
A hacker may analyze your object code and examine addresses referenced by CALL instructions to find the calls to the Sentinel SuperPro interface rou-tines. The hacker could then analyze the code of the interface routine and the code following each call in order to defeat the lock.
One method to avoid detection of your queries is to call the key without using the assembly language CALL instruction. Instead, push the return address onto the stack followed by the procedure address, and then execute a RET (return) instruction.
Inserting Extra Data
Analysis of your code can also be made more difficult by inserting frequent “garbage” data bytes. This process is effective at throwing static disassem-blers out of sync.
92 Sentinel SuperPro 6.5 Developer’s Guide
Chapter 3 - Designing Your Protection Strategy
For example, after each unconditional jump and return, insert a garbage data byte or two whose value is equal to the first byte of a very long assembly language instruction.
This same technique can be used following conditional branches, as long as the preceding code always guarantees the branch is invoked. Such a jump or branch may also be used immediately prior to the call, with an intervening data byte.
Using Stepped Access
If you market multiple versions of your application, you can use Sentinel SuperPro to control access to features within the application, based on crite-ria you specify. This is called stepped access.
For example, you may offer a basic package, an expanded package with some additional features, and a deluxe package with all features. Using stepped access, the application contains an array of conditions instructing the system to activate different features based on the value returned by the hardware key. You control the features implemented by the application by using a different algorithm for each package.
Three algorithms produce three different values for the same string. For the string ABCD, for example, three algorithms might produce the values 2610, 1830 and 6287.
Your application should contain statements that produce different responses based on the returned value, as illustrated by the following pseudocode:
If <result> EQUALS2610 THEN <enable basic features>1830 THEN <enable basic + expanded features>6287 THEN <enable all features>
If you have many steps, or conditions, they can be stored in an array. The application checks the array for a match with the string and returns the number of the element matched. This number then determines the features activated or the action taken by the application.
Sentinel SuperPro 6.5 Developer’s Guide 93
Chapter 3 - Designing Your Protection Strategy
Obstructing Debuggers
Many potential hackers use debuggers to break large, complex software packages with high licensing fees. You may want to incorporate safeguards aimed directly at preventing the use of debuggers to circumvent the software locks in your protection strategy.
For example, you might lock out the keyboard during hardware key queries, or destroy the contents of interrupt vectors 1 and 3 (the trace and break-point interrupts).
While no technique can deter every hacker, the more safeguards you imple-ment, and the greater the variety you use, the more difficult the hacker’s task. Eventually, it makes more sense for potential hackers to either purchase your application, or attempt to break a different, less secure application.
Controlling Demo Applications
If you are shipping a demo version of your application, you may want to control the number of times the application is executed, and then prevent its use after a predetermined number of executions. You can use Sentinel SuperPro to count the number of times the application is executed.
To count executions, you program a cell as a counter, and set its initial value. Each time the application is executed, the counter is decremented by one (the decrement is performed by the RNBOsproDecrement() function). You code your application to not run again once the counter reaches zero.
If you use the shelled protection type, you can also limit demo applications by time and number of days. For example, your application may be enabled for only 30 days after the initial execution. For more detailed information on using time and date controls see page 163.
The counter/algorithm combination may also be associated with a pass-word. If the user purchases an extension of the software, you provide them with the activation password that gives them full, unlimited access to your software. See page 79 for more information about providing users with acti-vation passwords in the field.
94 Sentinel SuperPro 6.5 Developer’s Guide
Chapter 3 - Designing Your Protection Strategy
Like the full version of an application, demos also require a license to access the hardware key. You may want to consider whether you want your demo applications to act as stand-alone applications or as network applications. Both demo applications and the full version can be run on the network at the same time, as long as enough licenses are available. For more informa-tion about using licensing, see “Network Licenses” on page 72.
Using Counters
There are multiple ways of using counters to control access to your demo applications. One way is to check the counter to see if it has reached zero, then proceed accordingly.
Another, more secure, method is to associate the counter with an algorithm the application requires for queries. When the counter reaches zero, the associated algorithm is automatically deactivated. (RNBOsproDecrement() changes the high-order bit of the algorithm’s second word.) Future queries using this algorithm return incorrect values.
To limit application executions using an algorithm/counter, you must pro-gram the key to meet the following specifications:
■ The word you decrement must be a counter word.
■ The counter must be located in a cell with an address equal to 3 MOD 8.
■ The two words immediately following the counter (at addresses equal to 4 MOD 8 and 5 MOD 8) must contain an active algorithm.
Note: The relationship between a counter word and an adjacent algorithm exists even if you do not intentionally plan it. The algorithm will be deactivated when the counter reaches zero. See “Valid Algorithm Addresses” on page 37 for more information about where counters can be placed.
You can also use two counters: the algorithm is deactivated when either counter reaches 0. The second counter must be located at an address equal to 2 MOD 8. If desired, you could use the second counter after the algorithm is re-activated with a password.
Sentinel SuperPro 6.5 Developer’s Guide 95
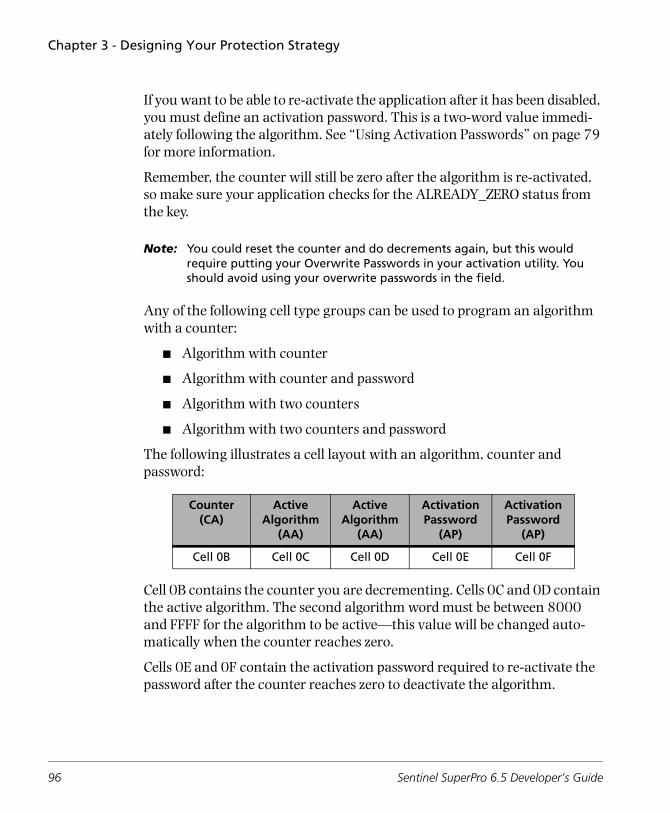
Chapter 3 - Designing Your Protection Strategy
If you want to be able to re-activate the application after it has been disabled, you must define an activation password. This is a two-word value immedi-ately following the algorithm. See “Using Activation Passwords” on page 79 for more information.
Remember, the counter will still be zero after the algorithm is re-activated, so make sure your application checks for the ALREADY_ZERO status from the key.
Note: You could reset the counter and do decrements again, but this would require putting your Overwrite Passwords in your activation utility. You should avoid using your overwrite passwords in the field.
Any of the following cell type groups can be used to program an algorithm with a counter:
■ Algorithm with counter
■ Algorithm with counter and password
■ Algorithm with two counters
■ Algorithm with two counters and password
The following illustrates a cell layout with an algorithm, counter and password:
Cell 0B contains the counter you are decrementing. Cells 0C and 0D contain the active algorithm. The second algorithm word must be between 8000 and FFFF for the algorithm to be active—this value will be changed auto-matically when the counter reaches zero.
Cells 0E and 0F contain the activation password required to re-activate the password after the counter reaches zero to deactivate the algorithm.
Counter (CA)
Active Algorithm
(AA)
Active Algorithm
(AA)
Activation Password
(AP)
Activation Password
(AP)
Cell 0B Cell 0C Cell 0D Cell 0E Cell 0F
96 Sentinel SuperPro 6.5 Developer’s Guide
Chapter 3 - Designing Your Protection Strategy
Example
This example demonstrates how to limit the number of times a demo appli-cation can execute. This is done by requiring the application to query an algorithm that becomes unusable (deactivated) after a specified number of executions. The algorithm is associated with a counter that is initialized to the number of times the application can run.
Remember, if you want to allow the user to re-activate the applica-tion after the counter has reached zero, you must also program an activation password.
Note: This example assumes you will be controlling the number of times your demo can execute by adding a custom element. You also have control over demo executions when you use integrated or automatic application pro-tection. See Chapter 6, “Protecting Your Application,” on page 145 for more information.
1. Select the cells you want to use for the algorithm and counter. Review the address restrictions on page 37.
We used cells at the following addresses:
❑ Counter: 0B
❑ Algorithm Word 1: 0C
❑ Algorithm Word 2: 0D
2. Decide how many times you want the demo to run. We chose 5.
3. Select two 16-bit hex values to use for the algorithm. Remember, the second word must be between 8000 and FFFF to make the algorithm active.
We used 1234 and C000.
4. Select an input string (preferably at least 32 bits long) to send to the key. We used ABCDDCBA.
Sentinel SuperPro 6.5 Developer’s Guide 97
Chapter 3 - Designing Your Protection Strategy
5. Use the SSP Toolkit to program an algorithm with counter as a cus-tom element at the address you selected for the counter cell. See Chap-ter 7, “Working With Design Elements,” on page 185 for instructions.
We programmed it at address 0B, as follows:
❑ Algorithm: 0123 COOO
❑ Counter: 5
Note: If you want to provide the ability to re-activate the application in the field, you must add an algorithm with counter and password instead. This allows you to program an activation password into the two cells following the algorithm.
3. Add the following required API functions in your application:
❑ RNBOsproFormatPacket() – Initializes the packet.
❑ RNBOsproInitialize() – Performs required initialization.
❑ RNBOsproFindFirstUnit() – Establishes communication with the key and gets a license.
❑ RNBOsproDecrement() – Decrements the counter by one. Call this function every time your application executes.
In our example, on the fifth execution, the counter in cell 0B reaches zero. At this point, RNBOsproDecrement() deactivates the algorithm used by the RNBOsproQuery() function (see below). On the sixth execution, therefore, the query does not return the expected value. Usually, you would code the application to display a message and then terminate.
❑ RNBOsproQuery() – Sends the query string and points to a location for the response value.
Tip: To make a potential hacker’s task more difficult, separate the RNBOspro-Query() and RNBOsproDecrement() function calls in your code. This helps obscure the connection between them.
98 Sentinel SuperPro 6.5 Developer’s Guide
Chapter 3 - Designing Your Protection Strategy
Querying Counters
If you are using a counter with your demo application, you can use the RNBOsproQuery() function to query the counter word, verifying it has been counted down. This technique is useful because it allows you to see if a hacker is trying to sidestep your counter in an attempt to continue the demo condition indefinitely.
Counters used in this way must be two words long:
■ The first word has an access code of 2 (counter). This word must be located in an even-numbered cell.
■ The second word has an access code of 3 (algorithm/hidden). This word must be located in an odd-numbered cell. The value of this word must be in the range for active algorithms.
Code your application to send a query to the counter/algorithm before per-forming each decrement. A given query string should return a different response value after each decrement, because the value in the first word (the counter) will have changed.
If the query returns the same value, either the algorithm is not active, or the counter was not decremented, which may mean a hacker is attempting to circumvent your protection strategy.
Programming the Hardware Key
Once you have an idea of the types of protection you want to use, you must consider how you want to program the available 232 cells on the SuperPro XM key or the available 56 cells on the SuperPro key to implement your strategy.
A primary consideration is the number of applications that will share the hardware key. Any of your applications can use any available cell, but you must make sure to allow enough cells for the type of protection you want for each application.
Sentinel SuperPro 6.5 Developer’s Guide 99
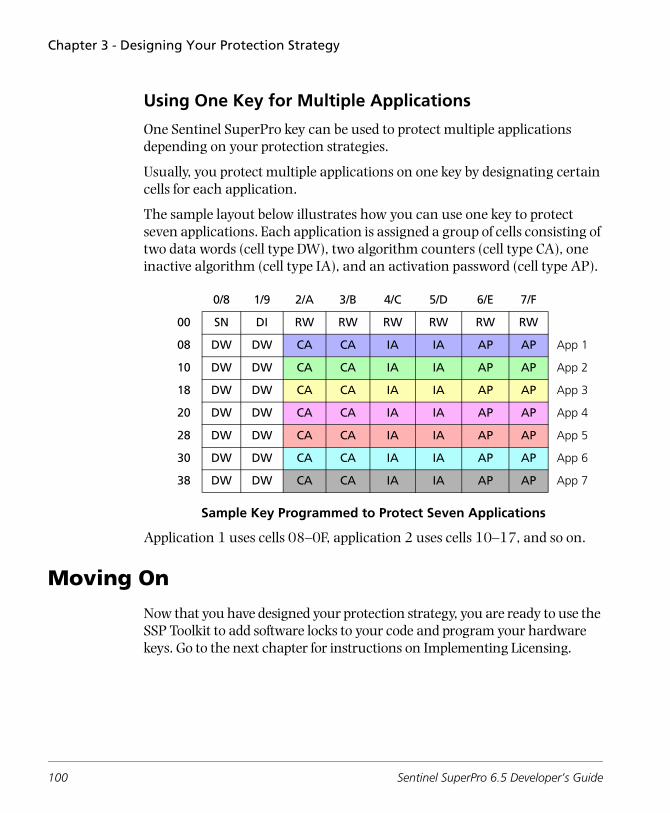
Chapter 3 - Designing Your Protection Strategy
Using One Key for Multiple Applications
One Sentinel SuperPro key can be used to protect multiple applications depending on your protection strategies.
Usually, you protect multiple applications on one key by designating certain cells for each application.
The sample layout below illustrates how you can use one key to protect seven applications. Each application is assigned a group of cells consisting of two data words (cell type DW), two algorithm counters (cell type CA), one inactive algorithm (cell type IA), and an activation password (cell type AP).
Sample Key Programmed to Protect Seven Applications
Application 1 uses cells 08–0F, application 2 uses cells 10–17, and so on.
Moving On
Now that you have designed your protection strategy, you are ready to use the SSP Toolkit to add software locks to your code and program your hardware keys. Go to the next chapter for instructions on Implementing Licensing.
0/8 1/9 2/A 3/B 4/C 5/D 6/E 7/F
00 SN DI RW RW RW RW RW RW
08 DW DW CA CA IA IA AP AP App 1
10 DW DW CA CA IA IA AP AP App 2
18 DW DW CA CA IA IA AP AP App 3
20 DW DW CA CA IA IA AP AP App 4
28 DW DW CA CA IA IA AP AP App 5
30 DW DW CA CA IA IA AP AP App 6
38 DW DW CA CA IA IA AP AP App 7
100 Sentinel SuperPro 6.5 Developer’s Guide
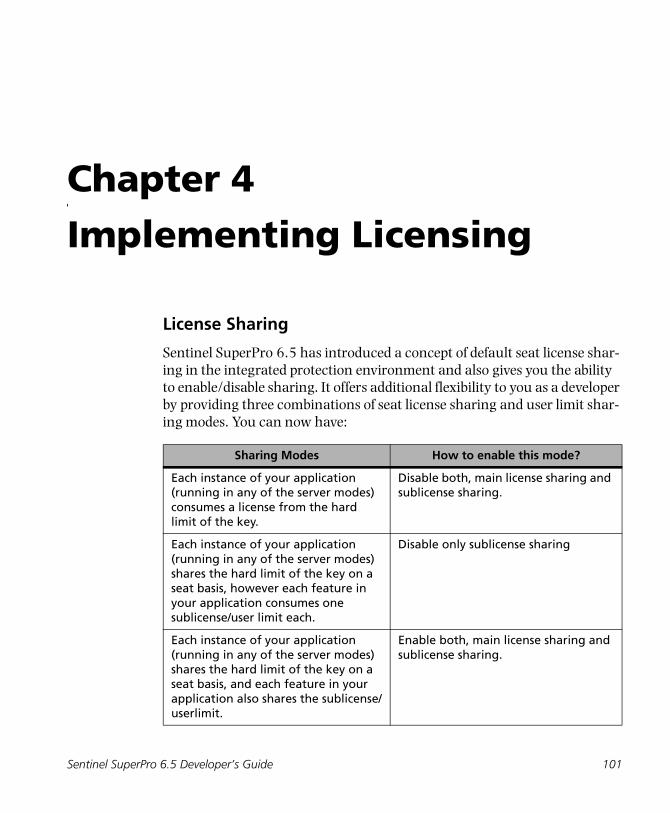
Chapter 4Implementing Licensing
License Sharing
Sentinel SuperPro 6.5 has introduced a concept of default seat license shar-ing in the integrated protection environment and also gives you the ability to enable/disable sharing. It offers additional flexibility to you as a developer by providing three combinations of seat license sharing and user limit shar-ing modes. You can now have:
Sharing Modes How to enable this mode?
Each instance of your application (running in any of the server modes) consumes a license from the hard limit of the key.
Disable both, main license sharing and sublicense sharing.
Each instance of your application (running in any of the server modes) shares the hard limit of the key on a seat basis, however each feature in your application consumes one sublicense/user limit each.
Disable only sublicense sharing
Each instance of your application (running in any of the server modes) shares the hard limit of the key on a seat basis, and each feature in your application also shares the sublicense/userlimit.
Enable both, main license sharing and sublicense sharing.
Sentinel SuperPro 6.5 Developer’s Guide 101

Chapter 4 – Implementing Licensing
* Server modes are RNBO_SPN_LOCAL, RNBO_SPN_BROADCAST, RNBO_SPN_ALL_MODES, RNBO_SPN_SERVER_MODES, and Servername/IP Address/IPX Address only.
Note: If you are running the shell protection strategy, you won’t be able to access the features of seat license sharing mechanism. You can choose an option in which both main license shar-ing and sublicense sharing is enabled or an option in which both main license sharing shar-ing and sublicense sharing is disabled.
All protected applications must obtain a license before they can be run. Licenses determine both who can use the application, and where the appli-cation can be used. Each instance of an application uses a license when it is started. As a developer, you have control over where your application will look for a key and obtain a license.
The SuperPro functions that you would add to your application’s source code would locate a key, obtain a license, maintain the license by sending messages back to the server, and then release the license when it is no longer needed.
This chapter explains how licensing is implemented in your protected appli-cations. Detailed instructions for adding the appropriate code can be found in “Adding API Functions to Your Source Code” on page 211.
This chapter covers the following topics:
• Setting the access mode
• Finding a key
• Getting a license
• Maintaining a license
• Releasing a license
• Using sublicenses
102 Sentinel SuperPro 6.5 Developer’s Guide
Chapter 4 – Implementing Licensing
Setting the Access Mode
Access modes determine where your application will look for the appropri-ate hardware key. There are three access modes that can be used by your protected application: stand-alone, network and dual.
• Stand-alone mode is used for applications where you want only a local key to be used.
• Network mode is used for applications where you want only a network key to be used.
• Dual mode is used when you want your application to use either a local key or a network key. This is the default mode for all Sentinel SuperPro-protected applications.
Depending on how you want your protected application to be used, you can allow your users to set the access mode through Configuration file. Environ-ment, or you can set the access mode through code. An access mode set through code will always override an access mode set through an environ-ment variable.
Note: If you don’t specify an access mode, your protected applications will use dual mode as the default.
Setting Stand-alone or Network Mode
Stand-alone or network mode is set through the RNBOsproSetContact-Server API function. This function tells the application whether or not to look on the network for a server and key. If the function is set to "no-net", RNBO_STANDALONE or RNBO_SPN_DRIVER, the application will look only on the local system for a key. If the function is set to a specific server name, the application will look only to that server for a key.
Putting your application in network mode by setting the contact server pre-vents the application from sending a broadcast message to the entire network.
Sentinel SuperPro 6.5 Developer’s Guide 103
Chapter 4 – Implementing Licensing
Sending broadcast messages not only requires use of network resources, it also takes longer, meaning the application will take longer to load and be ready for use. Setting your application to network mode will save both time and network resources, because the application will contact only the server you have defined in the RNBOsproSetContactServer API function or the Configuration file or NSP_HOST variable.
Note: If you set your application to network mode in code, your user must name his Sentinel Pro-tection server the same as the server name you set. If it does not happen so, your application will not be able to locate the server and key, and will not run. For this reason, if you want your application to run in network mode, you may find it easier to use dual mode in code, and then instruct your users to set the server name through the NSP_HOST variable. You could also use a configuration file to set the variable. See page 105 for more information about this variable.
To set stand-alone mode:
• RNBOsproSetContactServer(apiPacket, “no-net”);
To set network mode:
• RNBOsproSetContactServer(apiPacket, “*host name/IPaddress/IPXaddress of serverhost*”);
For specific details about using this function, refer to Chapter 14, “API Func-tion Reference,” on page 301.
Setting RNBO_SPN_ALL_MODES
Because RNBO_SPN_ALL_MODES is the default access mode, you do not need to add any special API functions to your source code. The standard pseudocode (see “Adding API Functions to Your Source Code” on page 211) assumes your application will be used in RNBO_SPN_ALL_MODES mode.
When in RNBO_SPN_ALL_MODES, an application will send broadcast mes-sages to the network to locate an appropriate server if no key is found on local server. Keep in mind, broadcast messages require additional network resources and result in a longer total time from application start-up to key
104 Sentinel SuperPro 6.5 Developer’s Guide
Chapter 4 – Implementing Licensing
acquisition. If network resources and timing is an issue for you, you may want to consider using network mode.
About the NSP_HOST Variable
Another means of setting the application’s access mode is through the NSP_HOST environment variable. NSP_HOST tells the protected applica-tion which server to look for when it needs to access a Sentinel SuperPro key.
This variable is typically set by your end-user on the server or client systems your application will be run on. However, in all cases, an access mode set through code will override an access mode set via the environment variable or through the configuration file. The sntlconfig.xml configuration file has also been included that can be shipped to your customers to set an access mode, heartbeat and protocol on each client system to guide the protected applica-tion. We recommend setting the access mode through code whenever possible.
The possible values for this variable are as follows:
• no-net: Tells the application to act as a stand-alone application. The application will look for a key only on the client machine.
If the key is not found, the application will not send a broadcast mes-sage to the network looking for a server and key.
• server host name, IP address or IPX address: Tells the application to act as a network application. The application will look for a key only on the selected server.
If the selected server is not found, or a key is not found on the selected server, the application will not send a broadcast message to the net-work looking for another server and key.
For the API Elements Protected Applications
Setting this variable is optional, and, if you have set the access mode through code, unnecessary. However, for maximum performance, we rec-ommend to system administrators that this variable be set on each client
Sentinel SuperPro 6.5 Developer’s Guide 105
Chapter 4 – Implementing Licensing
workstation. If the end-user does not set this variable, and you have not set the access mode through code, the application will be in dual mode.
Detailed instructions for setting this variable can be found in the Sentinel SuperPro System Administrator’s Guide.
Finding a Key
Before your application can obtain a license, it must first locate a Sentinel SuperPro hardware key either on the local machine or somewhere on the network. Where and how your application locates a key is dependent on what access mode your application is using.
The following API function calls are used to locate a key:
• RNBOsproFormatPacket
• RNBOsproInitialize
• RNBOsproGetContactServer (optional)
• RNBOsproFindFirstUnit
Finding a Key in Stand-alone Mode
When your application is in stand-alone mode, it looks for a key on the local machine. If a key is not present locally, the application will not go to the net-work to find a key. It will simply return an error message that a key cannot be found.
If the key is found, the application starts normally and communicates with the key through the server (which must also be installed on the same work-station) to obtain a license.
Finding a Key in Network Mode
When your application is in network mode, it will go immediately to the net-work to locate a key, ignoring the local USB and parallel ports completely.
If a contact server was set in code using the RNBOsproGetContactServer function, or through the Configuration File/NSP_HOST variable, the appli-
106 Sentinel SuperPro 6.5 Developer’s Guide
Chapter 4 – Implementing Licensing
cation will look only for the specified server. If the server cannot be located, an error message appears and the application shuts down.
The application does not look for a key locally when it is in network mode.
Finding a Key in Dual Mode
While in dual mode, the application will always check for the presence of a key on the local machine before it goes out to the network. If a local key is found, the key is used as if in stand-alone mode.
If the application cannot find a local key, it sends a broadcast message to the network to find out which servers are available. It then communicates with one of those servers to obtain a license from the key. If a network key is found, the key is used as if in network mode.
Finding the First Server by Sending a Broadcast Message to the Network
An application running in dual mode will send a broadcast message to the network to locate a server and key only when a local key cannot be found. The broadcast message is sent to the subnet the application is running on. Once the first server responds, the application attempts to obtain a license from that server.
If the contacted server does not have any licenses available, no further broadcast messages will be sent, and the application will return an error.
Finding Additional Servers
To allow your application to obtain a list of all servers available on the net-work, use the RNBOsproEnumServer API function.
This function allows you to obtain the server list, and then contact each server on the list until a license is obtained. The following functions must be called prior to contacting each server: RNBOsproSetContactServer and RNBOsproFindFirstUnit. See page 310 for more information about the RNBOsproEnumServer function.
Sentinel SuperPro 6.5 Developer’s Guide 107
Chapter 4 – Implementing Licensing
Getting a License
All license information is maintained by Sentinel Protection server installed on the client machines or the servers on the network.
Before an application can be started, it must first obtain a license from the Sentinel Protection server. The server issues a license only if the license limit in the key has not yet been exceeded. The license limit indicates the maximum number of concurrent users of the application. Once a key is located, the way in which a license is obtained is the same for applications running all modes.
Note: Remember, whether the application is stand-alone or network, it always uses the Sentinel System Driver as the means of communicating with the key. That is why the Sentinel Protec-tion Server must be installed on the same system as the Sentinel System Driver.
The process for obtaining a license is as follows:
1. Once a hardware key is found, the application requests a license.
2. The Sentinel Protection server queries the Sentinel system driver to obtain the license limit from the hardware key.
3. The driver returns the license limit to the Sentinel Protection server.
4. If a license is available, the Sentinel Protection server grants the license. If all licenses are in use, the server denies the license request.
5. The Sentinel Protection server communicates the license status—granted or denied—to the client.
6. One of the following occurs:
• If the license was granted, the application continues to run.
• If the license was denied, the user is notified that no licenses are available. You can choose to then display an error or shut down the application.
108 Sentinel SuperPro 6.5 Developer’s Guide
Chapter 4 – Implementing Licensing
Note: All communication between the client and the server is encrypted for greater security.
The License ID
Once a license is obtained, a license ID that uniquely identifies the client and the license is issued. The license ID number must be used in all subsequent calls to the key from the client.
Maintaining the License
Once a license has been obtained, the application must maintain the license by sending “heartbeat” messages to the server, confirming the client is still using the license. To send a heartbeat message, call any API function that accesses the key, such as a read or write function. When these functions access the key, they confirm to the server that the key (and license) is still in use.
These periodic messages should be sent every 90 seconds. If the server does not receive a heartbeat message from the client, it will release the license and send an error to the application. An error is also returned if the applica-tion sends a heartbeat message after the license has already been released. How to handle these errors in your application is left up to your discretion.
A Note About Licenses
Throughout this manual, we refer to obtaining and releasing licenses. Although it is convenient to describe license management in this way, in actuality, licenses are never physically moved between the server/key and the client workstation. Instead, the Sentinel Protection server simply keeps track of how many users can run the application and decrements and incre-ments the license count as authorized users are granted permission to run the application and as they exit the application.
Note: The Sentinel Protection server maintains a log of all transactions that take place during a particular session, allowing you to view when a license is issued and who it was issued to. See the Sentinel SuperPro System Administrator’s Guide for more information about the server log file.
Sentinel SuperPro 6.5 Developer’s Guide 109
Chapter 4 – Implementing Licensing
Releasing a License
There are three situations in which a license should be released:
• The client has shut down the protected application
• The client fails to send a heartbeat message to the server
• Your application has completed all key operations
Use the RNBOsproReleaseLicense API function to release a license and make it available for use by other clients. For more information about using this function, see page 337.
Using Sublicenses
A sublicense is a license limit you define that is less than or equal to the hard limit programmed into the key. Sublicenses allow you to:
• Implement fewer licenses for an application than the hard limit programmed on the key
• Protect several applications using the same key, and define separate license limits for each
• Control concurrent access to specific features or modules within your protected application(s)
Sublicenses must be a constant number. But, there must be a hard license available before a sublicense can be obtained, no matter how many subli-censes are left.
Sublicense Usage Example
For example, assume the hard limit on your network keys is 20 licenses. If you are protecting three applications (SceneryEditor, ShapeEditor and Tex-tEditor) with a single key, you could use sublicenses to define the following:
• Set the license limit for SceneryEditor to 10
110 Sentinel SuperPro 6.5 Developer’s Guide
Chapter 4 – Implementing Licensing
• Set the license limit for ShapeEditor to 7
• Set the license limit for TextEditor to 10
Notice that the total number of sublicenses is greater than the hard limit. This means that if all the sublicenses for SceneryEditor are being used, there are only 10 hard licenses left.
If all seven licenses are being used for ShapeEditor, only three hard licenses are left for TextEditor. Thus, even though TextEditor has 10 sublicenses available, only three clients can use it. This is because the hard license is obtained first, then the sublicense.
Getting a Sublicense
To obtain a sublicense for a client, first use the RNBOsproFindFirstUnit func-tion to obtain a license from the key, then use the RNBOsproGetSubLicense API function to obtain the sublicense.
The key’s hard limit is decremented first, then the sublicense limit is decre-mented for the requested application. It is up to you as to how you want to handle a client request when a sublicense is unavailable.
We recommend that if the sublicenses for a particular application are all being used, no additional clients should be allowed to obtain a license for that application, even if there are still licenses available under the hard limit.
Once the sublicense has been obtained, it works in the same way as other licenses—you can read or write to cells on the key, activate algorithms and more. You also need to send heartbeat messages to maintain the sublicense in the same way that you would to maintain a normal license.
Adding Sublicenses to Your Protection Strategy
Sublicenses are added to your protection strategy in the same way that counters and data words are added—as a custom element. For more infor-mation about adding sublicenses, see “Adding Sublicense Limits” on page 198.
Because sublicenses are stored in locked data word cells, you can have as many sublicenses as you have available cells. This gives you flexibility in
Sentinel SuperPro 6.5 Developer’s Guide 111
Chapter 4 – Implementing Licensing
implementing sublicenses in your protection strategy. For example, you could use a sublicense for accessing a particular algorithm—the algorithm could only be accessed if the sublicense limit has not been exceeded.
Or, you could use a single sublicense to limit usage of two separate algo-rithms by programming your application—using the RNBOsproGetSublicense API function— to get the sublicense limit (located in a single cell) prior to querying either algorithm. If the sublicense limit has been exceeded, either algorithm cannot be successfully queried.
Note: Cell availability depends on the number and type of elements being used in your protection strategy, as well as the number of applications being protected.
112 Sentinel SuperPro 6.5 Developer’s Guide
Chapter 5Starting the Sentinel SuperPro Toolkit
The Sentinel SuperPro Developer’s Toolkit features an intuitive interface which allows you to start protecting your applications immediately. This chapter provides a guided tour of the SSP Toolkit, introducing ways to maneuver smoothly from stage to stage, as well as instructions for viewing, entering and modifying information. We suggest reading this chapter to get a feel for how the SSP Toolkit works before performing any protection tasks.
This chapter covers the following topics:
• Opening and navigating in the SSP Toolkit
• Learning about Sentinel SuperPro functionality
• Using the API Explorer
• Creating a new project or opening an existing project
• Creating a project file for distributors
• Saving and locking your project
Note: The procedures in this chapter assume you have already installed the SSP Toolkit and the Sentinel Protection server.
Sentinel SuperPro 6.5 Developer’s Guide 113
Chapter 5 – Starting the Sentinel SuperPro Toolkit
Opening the Sentinel SuperPro Toolkit
The Sentinel Protection server must be running in order for the Toolkit to be able to access the hardware key while you create your protection strategy. Therefore, before starting the Toolkit, verify you have the server running on your system. See the Sentinel SuperPro System Administrator’s Guide for more information about using the server.
To open the SSP Toolkit:
1. From the Start menu, point to Programs > SafeNet Senti-nel>SuperPro>6.5.
2. Select SuperPro Toolkit. The Sentinel SuperPro Developer Toolkit appears.
Entering Your Passwords
Before you can use Sentinel SuperPro, you must provide your Developer ID, Overwrite Password1,Overwrite Password2, and Write Pass-word.
Tip: You only need to enter these the first time you open Sentinel SuperPro Toolkit, as your passwords are remembered for subsequent sessions. Even if you don’t enter them, the toolkit still allows you to continue, up through the Prototyping stage after which entering the Developer ID, Write Pass-word, and Overwrite Passwords 1 and 2 is required to proceed further.
Your developer ID is a unique identification code. You must use your devel-oper ID to program or establish a connection to your keys. All the keys used by your organization have the same developer ID.
The Overwrite Passwords allow you to set or change the value or access code of any cell other than a restricted cell. Keep these passwords secure, as they have the power to reprogram all other cells in your key!
The Write Password allows you to change or set the value or access code of a data word or undefined cell. This password also allows you to decrement counter words.
114 Sentinel SuperPro 6.5 Developer’s Guide
Chapter 5 – Starting the Sentinel SuperPro Toolkit
The Secret Code
The secret code is used to create matched dsafe/usafe pairs.The same secret code across various platforms ensures that compatible dsafe/usafe pairs are created. Hence, any usafe will give a locking code that can be used by dsafe on Windows to generate the same license string.
For example, a Linux-based user can easily accept licenses from a Windows-based developer/distributor. A secret code string must be 9 to 16 characters long—consisting of at least one numeric character. For Windows, you need to submit it when you configure your Toolkit, while on Linux you use the same string to configure the SafeCfg.
These passwords, and your developer ID, are provided by SafeNet Inc., and can be found on the password sheet included in your Sentinel SuperPro package.
Once you enter the developer ID and passwords, the field exchange DLLs are created. These DLLs use the developer ID and passwords for the attached key. These DLLs are used to activate or update keys in the field.
If you enter an incorrect developer ID or passwords, you will be unable to program keys in the Prototype stage, and thus will be unable to implement your protection strategy.
To enter your passwords:
Sentinel SuperPro 6.5 Developer’s Guide 115
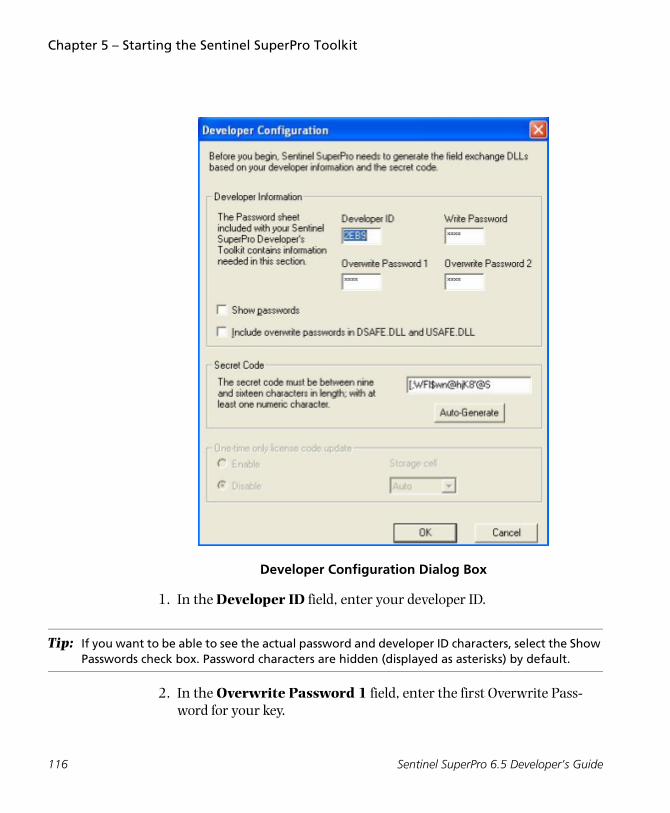
Chapter 5 – Starting the Sentinel SuperPro Toolkit
Developer Configuration Dialog Box
1. In the Developer ID field, enter your developer ID.
Tip: If you want to be able to see the actual password and developer ID characters, select the Show Passwords check box. Password characters are hidden (displayed as asterisks) by default.
2. In the Overwrite Password 1 field, enter the first Overwrite Pass-word for your key.
116 Sentinel SuperPro 6.5 Developer’s Guide
Chapter 5 – Starting the Sentinel SuperPro Toolkit
3. In the Overwrite Password 2 field, enter the second Overwrite Pass-word for your key.
4. In the Write field, enter the Write Password for your key.
Note: Cells 8 and 9 are used internally while configuring a key. If you are re-configuring an already programmed key, the information stored in cells 8 and 9 would be lost.
5. If you want to include the Overwrite Passwords in the field exchange DLLs, or use the one-time update feature, go to “Include Overwrite Passwords in DSAFE.DLL and USAFE.DLL” on page 118. Otherwise, go to the next step.
6. Enter a secret code in the space provided. You may however click on Auto Generate to get an auto generated code.
7. Click on ENABLE or DISABLE under One-time only license code update to allocate a single cell in the Sentinel SuperPro key for storage of the one-time update values. If you select on ENABLE, then you may also select a storage cell from the Storage cell drop down on its right, else go to next step.
8. Click OK.
If you have already created projects with the Toolkit, be sure to read the warning message that appears thoroughly and take the appropri-ate action.
The Toolkit window appears.
9. Go to “Navigating in the Sentinel SuperPro Toolkit” on page 121.
Note: The Toolkit prompts an error message if a proper key is not attached to your machine, when setting the developer configuration parameters,
Sentinel SuperPro 6.5 Developer’s Guide 117
Chapter 5 – Starting the Sentinel SuperPro Toolkit
About the Field Exchange DLLs
The field exchange DLLs—dsafe32.dll and usafe32.dll—are generated each time you enter or change the developer ID and/or passwords in the Devel-oper Configuration dialog box. If DLLs already exist on this workstation, they will be overwritten, as each time DLLs are generated they are different.
If new DLLs are generated, and you have already distributed the old DLLs with your protected software, you will be unable to reprogram keys using the old DLLs because your dsafe32.dll won’t match with the user’s usafe32.dll. In this case, be sure to create backups of your old DLLs so you can continue to reprogram existing keys in the field.
Include Overwrite Passwords in DSAFE.DLL and USAFE.DLL
The overwrite passwords are necessary whenever you want to change the value of a locked data word or read-only cell on the key. If you will be imple-menting the one-time update option for license codes (see below), you must include the overwrite passwords in your field exchange DLLs.
When included in the DLLs, the overwrite passwords are encrypted. How-ever, SafeNet Inc. strongly recommends against including these passwords in your field exchange DLLs, as they could pose a security risk to your application. A talented hacker could possibly decrypt these pass-words, and use them to gain unauthorized access to your application. Think carefully before you choose to include the overwrite passwords in the field exchange DLLs.
To include the overwrite passwords in the field exchange DLLs:
1. Select the Include overwrite passwords in DSAFE.DLL and USAFE.DLL check box. A warning message appears.
2. Read the warning message, then click OK.
3. Go to the next section.
118 Sentinel SuperPro 6.5 Developer’s Guide
Chapter 5 – Starting the Sentinel SuperPro Toolkit
Enabling the One-Time Update Option for License Codes
The one-time update option allows you to prevent license codes from being applied to a key more than once. The license code includes information about how a key should be updated, such as incrementing a license counter or activating an application. (For more information about license codes, see “What Is a License Code?” on page 268.)
For example, if a single license code that increments a counter is applied to a key multiple times, the counter will be incremented multiple times also. This means that if a license code that increments a counter by five is applied three times, the total incremented value will be 15–10 more than you intended.
To prevent users from applying a license code more than once, enable the one-time update feature. This feature uses a single cell to determine the validity of a license code. If the value in the cell is not what is expected by the license code, the license code cannot be applied, and the key will not be updated.
Note: The one-time update option is available for use with both product keys and distributor keys.
The one-time update feature requires the overwrite passwords to be included in your field exchange DLLs (see page 118). You may want to weigh the benefits of using the one-time update feature against the security risks inherent in including the overwrite passwords in the DLLs.
To enable the one-time update option:
1. Verify that the Include overwrite passwords in DSAFE.DLL and USAFE.DLL check box has been selected.
2. Under One-time only license code update, select Enable. A warn-ing message appears.
3. Read the warning message, then click OK.
4. In the Storage Cell field, select the cell you want the one-time update feature stored in. Select Auto to allow Sentinel SuperPro to select a cell for you. Once you select this cell, it cannot be moved or changed.
Sentinel SuperPro 6.5 Developer’s Guide 119
Chapter 5 – Starting the Sentinel SuperPro Toolkit
5. Click OK.
If you have already created projects with the Toolkit, be sure to read the warning message that appears thoroughly and take the appropri-ate action. See “The Toolkit prompts an error message if a proper key is not attached to your machine, when setting the developer configura-tion parameters,” on page 117 for more information.
The Toolkit window appears.
120 Sentinel SuperPro 6.5 Developer’s Guide
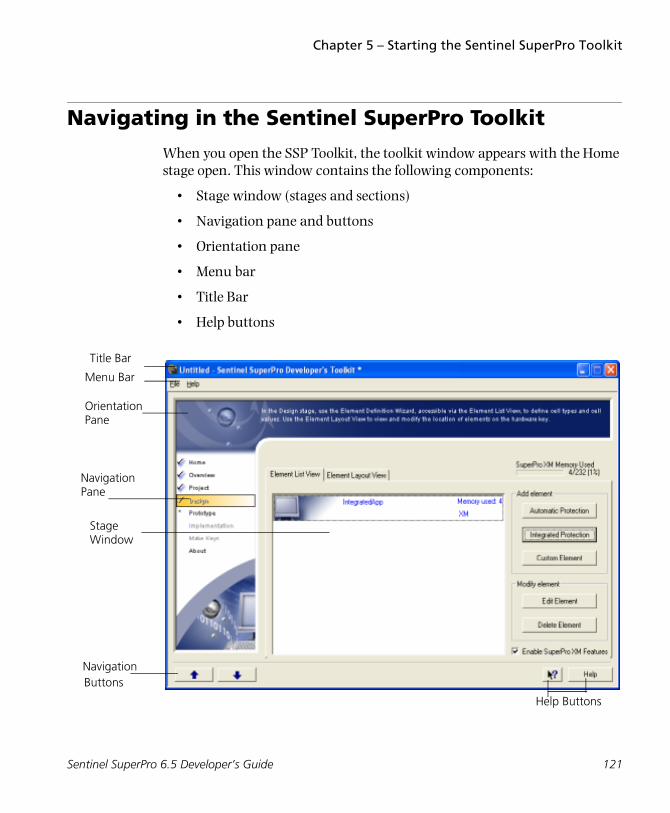
Chapter 5 – Starting the Sentinel SuperPro Toolkit
Navigating in the Sentinel SuperPro Toolkit
When you open the SSP Toolkit, the toolkit window appears with the Home stage open. This window contains the following components:
• Stage window (stages and sections)
• Navigation pane and buttons
• Orientation pane
• Menu bar
• Title Bar
• Help buttons
Menu Bar
Title Bar
Orientation Pane
NavigationPane
StageWindow
ButtonsNavigation
Help Buttons
Sentinel SuperPro 6.5 Developer’s Guide 121
Chapter 5 – Starting the Sentinel SuperPro Toolkit
Toolkit Window (with Design Stage Open)
Stages and Sections
The SSP Toolkit is made up of eight different stages. Stages appear in the stage window, where sections and sub-sections within the window help you navigate to the tasks necessary to implement your protection strategy. The stages are as follows:
• Home – The default stage that appears when the SSP Toolkit opens. No tasks are performed in this stage.
• Overview – Sections in this stage introduce you to Sentinel SuperPro concepts. This stage also features the API Explorer, where you can test API function calls, view the key’s cell layout, and send queries to the key to obtain return values.
• Project – This stage provides setup and configuration information. Create or open projects and enter your developer ID and passwords in this stage.
• Design – The Design stage has two sections: Element List View and Element Layout View. Use the Element Definition Wizard, accessible via Element List View, to define cell types and cell values. Element Layout View allows you to view and modify the location of algorithm, counter and data word cells on the hardware key.
• Prototype – In this stage, you program the cells in the hardware key with the values defined in the Design stage, generating pseudocode for use in adding API functions to your source code. This stage is a required stage.
• Implementation – When you implement your strategy, you add the appropriate protection to your application code, either by adding a shell to the application’s executable file, or adding API functions to the source code based on the pseudocode generated during prototyping,
This stage also allows you to define the actions that can be taken through field activation, and is used to create license codes for distri-bution to customers who have purchased upgrades in the field.
122 Sentinel SuperPro 6.5 Developer’s Guide

Chapter 5 – Starting the Sentinel SuperPro Toolkit
• Make Keys – Hardware keys programmed with your protection strategy, as defined in the Design stage, must be distributed with each copy of your software. The Make Keys stage allows you to program keys prior to distribution.
• About – For more information about the version of the SSP Toolkit you are using, or links to SafeNet Inc. information on the Web, go to this stage. No tasks are performed in this stage.
The following table defines the tasks required to implement your protection strategy and what stage they are located in:
Sentinel SuperPro Toolkit Tasks and Corresponding Stages
Stage Task
Home No tasks are performed in this stage.
Overview Tasks performed in this stage are for informational use only and are not required to implement a protection strategy.
Project Create a new project or open existing project.
Enter your developer ID and passwords.
Save an existing project.
Design Select integrated or automatic protection type.
Select an activation type.
Define time/date/execution controls (for demos only).
Add counters, passwords, sublicense limits and/or data words.
Prototype Program attached hardware key memory cells.
Generate pseudocode and field exchange data.
Sentinel SuperPro 6.5 Developer’s Guide 123
Chapter 5 – Starting the Sentinel SuperPro Toolkit
Moving From Stage to Stage
To move from stage to stage, click on the stage name in the navigation pane. Once you have visited a stage, a check mark appears to the left of the stage name. Your navigation history for the current project is saved in the project file.
You can also use the Back and Next navigation buttons, located beneath the navigation pane, to move sequentially through the stages.
Stages are arranged in the order you will typically use them; however, you do not need to visit the stages in this order, nor do you need to complete all the sections in each stage before moving to another stage. For example, you can go to the Project stage without first going to the Overview stage.
There is one exception to this rule. The Prototype stage is a required stage (identified by an asterisk [*] to the left of the stage name). You cannot go to the Implementation or Make Keys stages until you have completed the Prototype stage.
The following diagram shows how you can move from stage to stage and section to section within the SSP Toolkit:
Implementation Shell applications.
View pseudocode and add appropriate API functions to application source code.
Define field activation actions and commands.
Generate license codes based on locking codes received from customers in the field who have purchased upgrades.
Make Keys Program product keys for distribution to customers and distributor keys for use by distributors who will activate your application.
About No tasks are performed in this stage.
Sentinel SuperPro Toolkit Tasks and Corresponding Stages
Stage Task
124 Sentinel SuperPro 6.5 Developer’s Guide
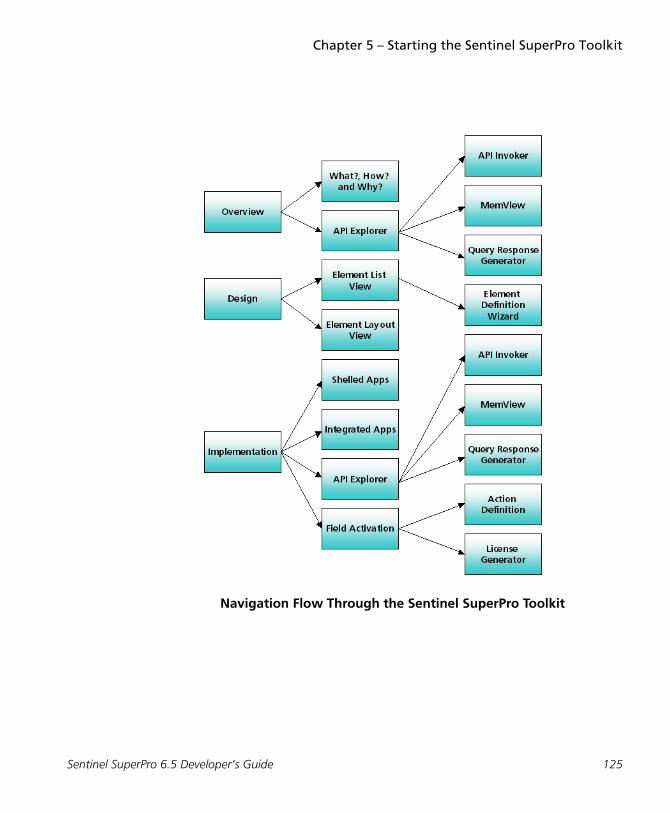
Chapter 5 – Starting the Sentinel SuperPro Toolkit
Navigation Flow Through the Sentinel SuperPro Toolkit
Sentinel SuperPro 6.5 Developer’s Guide 125
Chapter 5 – Starting the Sentinel SuperPro Toolkit
Menu Bar
SSP Toolkit commands are located in menus at the top of the toolkit window. When a command appears dimmed, it is unavailable for use with the selected stage or section. Menu options are described in the following table:
Getting Help
There are several ways to get help while using the SSP Toolkit. For general issues, look for answers in this guide and in the online Help system that is included with the SSP Toolkit.
You may also want to read through the text provided in the SSP Toolkit’s Overview stage. The introductory information included there can help you gain a basic understanding of Sentinel SuperPro concepts.
Additionally, as you move through the stages, pay attention to the text that appears in the orientation pane at the top of the SSP Toolkit window. This text provides a quick overview of the steps you’ll take in each stage and how they
Sentinel SuperPro Toolkit Menu Commands
Menu Command Description
File New Creates a new SuperPro project.
Open Opens an existing SuperPro project.
Save Saves the current project.
Save As Saves the current project under a new file name.
Export DST File Saves the current project as a .DST file. Provides limited project information to distributors.
Recently Opened projects
Displays a list of last four, recently open projects if any have been opened so far.
Exit Exits Sentinel SuperPro.
Help Help Topics Accesses the Sentinel SuperPro online Help.
Index Accesses the online Help index.
What’s This? Accesses context-sensitive help.
About Displays Sentinel SuperPro version and copyright information.
126 Sentinel SuperPro 6.5 Developer’s Guide
Chapter 5 – Starting the Sentinel SuperPro Toolkit
apply to protection strategies. If you find yourself unsure of what to do in a particular stage, read the orientation pane text for help.
Using Online Help
The SSP Toolkit ships with a complete online Help system. It includes a detailed table of contents and thorough index searching capabilities.
SSP Toolkit Help is very easy to use. The majority of the information found in this guide is also available through Help.
To access online Help, select Help Topics from the Help menu.
Most fields also have context-sensitive help, which is accessible by right-clicking on a field, check box or button to view Help information specific to that item.
Or, click the What’s This button at the bottom of the SSP Toolkit win-dow to access the Help pointer, then click on the item you need help for.
For more information, please review the Using Help topic in online Help.
Completing the Overview Stage
Learning About Sentinel SuperPro Concepts
The first three tabs in the Overview stage provide information about Senti-nel SuperPro concepts. The text in this section is designed primarily for those users who may not have access to the Sentinel SuperPro documenta-tion, yet need to get started protecting an application.
If you want a quick introduction to how Sentinel SuperPro works, you may want to review this information. However, if you have read Chapters 1– 4 in this manual, you can skip this information, as most of the concepts were explained in those chapters.
Using the API Explorer
The API Explorer allows you to experiment with API function calls on vari-ous cells in the key before you add them to your source code. It is also a good
Sentinel SuperPro 6.5 Developer’s Guide 127
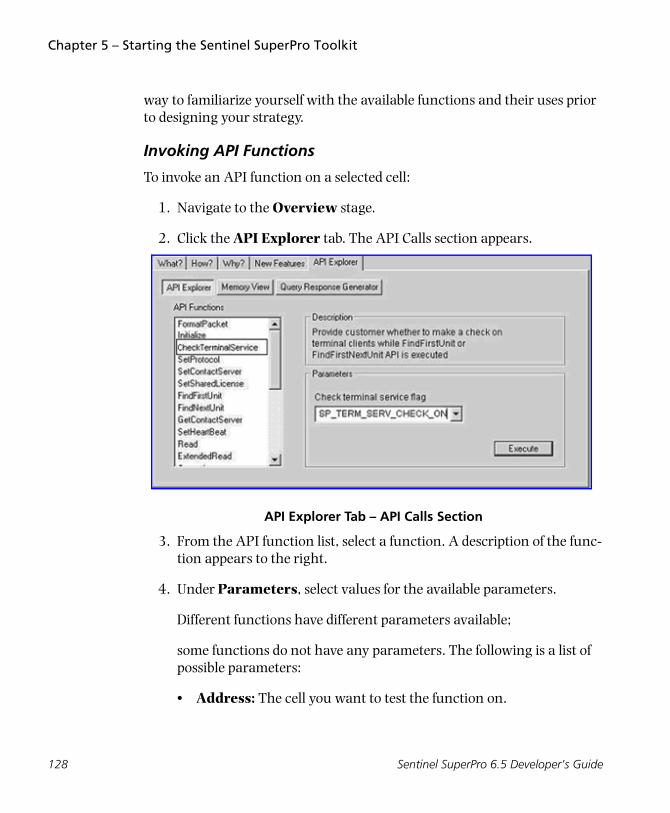
Chapter 5 – Starting the Sentinel SuperPro Toolkit
way to familiarize yourself with the available functions and their uses prior to designing your strategy.
Invoking API Functions
To invoke an API function on a selected cell:
1. Navigate to the Overview stage.
2. Click the API Explorer tab. The API Calls section appears.
API Explorer Tab – API Calls Section
3. From the API function list, select a function. A description of the func-tion appears to the right.
4. Under Parameters, select values for the available parameters.
Different functions have different parameters available;
some functions do not have any parameters. The following is a list of possible parameters:
• Address: The cell you want to test the function on.
128 Sentinel SuperPro 6.5 Developer’s Guide
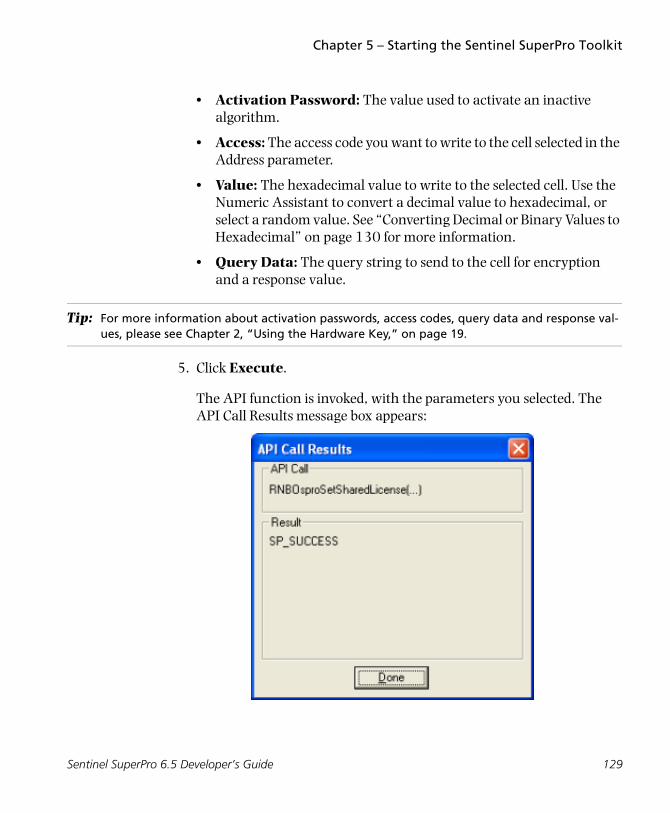
Chapter 5 – Starting the Sentinel SuperPro Toolkit
• Activation Password: The value used to activate an inactive algorithm.
• Access: The access code you want to write to the cell selected in the Address parameter.
• Value: The hexadecimal value to write to the selected cell. Use the Numeric Assistant to convert a decimal value to hexadecimal, or select a random value. See “Converting Decimal or Binary Values to Hexadecimal” on page 130 for more information.
• Query Data: The query string to send to the cell for encryption and a response value.
Tip: For more information about activation passwords, access codes, query data and response val-ues, please see Chapter 2, “Using the Hardware Key,” on page 19.
5. Click Execute.
The API function is invoked, with the parameters you selected. The API Call Results message box appears:
Sentinel SuperPro 6.5 Developer’s Guide 129
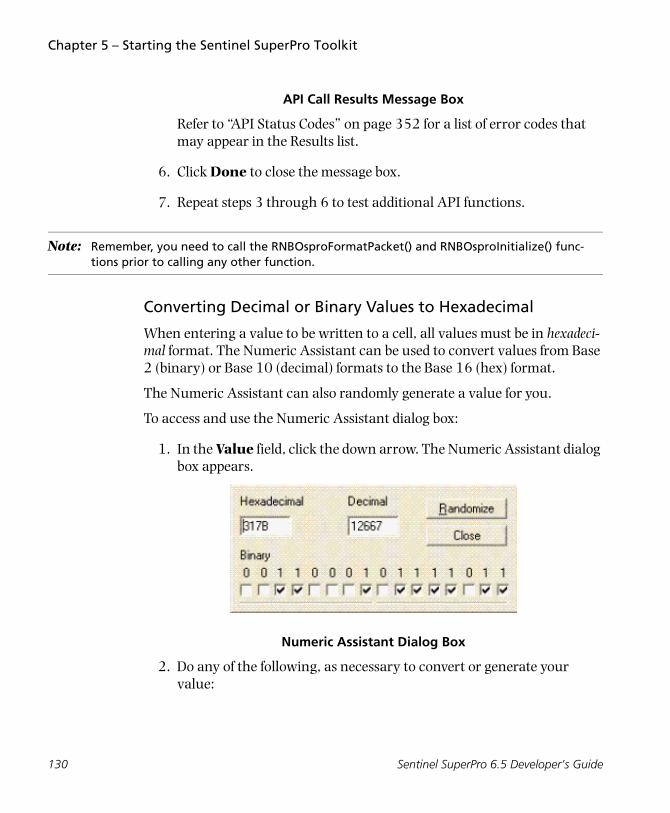
Chapter 5 – Starting the Sentinel SuperPro Toolkit
API Call Results Message Box
Refer to “API Status Codes” on page 352 for a list of error codes that may appear in the Results list.
6. Click Done to close the message box.
7. Repeat steps 3 through 6 to test additional API functions.
Note: Remember, you need to call the RNBOsproFormatPacket() and RNBOsproInitialize() func-tions prior to calling any other function.
Converting Decimal or Binary Values to Hexadecimal
When entering a value to be written to a cell, all values must be in hexadeci-mal format. The Numeric Assistant can be used to convert values from Base 2 (binary) or Base 10 (decimal) formats to the Base 16 (hex) format.
The Numeric Assistant can also randomly generate a value for you.
To access and use the Numeric Assistant dialog box:
1. In the Value field, click the down arrow. The Numeric Assistant dialog box appears.
Numeric Assistant Dialog Box
2. Do any of the following, as necessary to convert or generate your value:
130 Sentinel SuperPro 6.5 Developer’s Guide
Chapter 5 – Starting the Sentinel SuperPro Toolkit
• To convert a decimal value to a hexadecimal value, enter the value in the Decimal field.
The Numeric Assistant automatically calculates the corresponding hexadecimal and binary values.
• To convert a binary value to a hexadecimal value, clear or select the check boxes located along the bottom of the dialog box. Each check box represents a binary digit—select a check box for the value 1, clear a check box for the value 0.
The Numeric Assistant automatically calculates the corresponding hexadecimal and decimal values.
• To generate a random value, click Randomize.
The Numeric Assistant generates a random value, and provides you with the hexadecimal, decimal and binary equivalents of that value. You can click Randomize as many times as you like.
3. Click Close.
The value from the Hexadecimal field is transferred to the Value field.
Sentinel SuperPro 6.5 Developer’s Guide 131
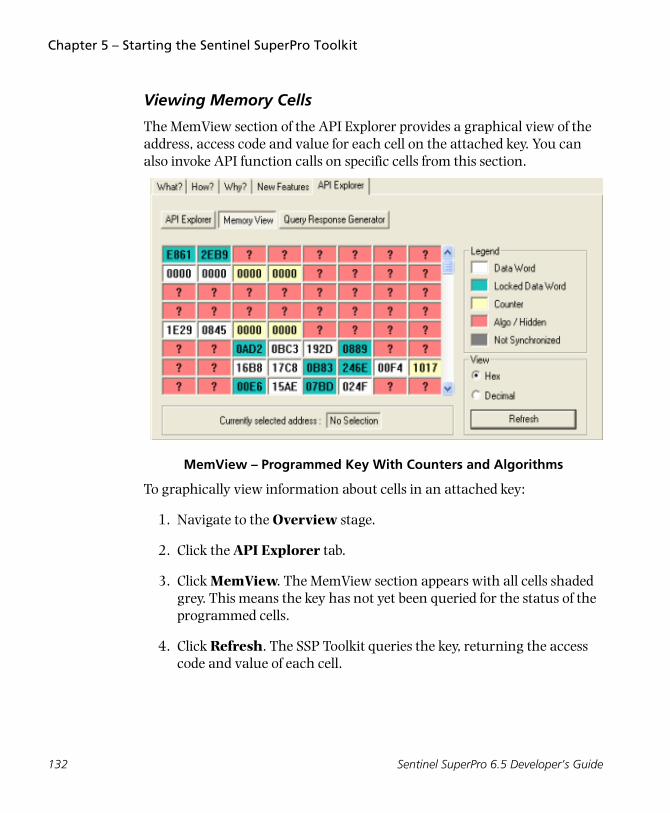
Chapter 5 – Starting the Sentinel SuperPro Toolkit
Viewing Memory Cells
The MemView section of the API Explorer provides a graphical view of the address, access code and value for each cell on the attached key. You can also invoke API function calls on specific cells from this section.
MemView – Programmed Key With Counters and Algorithms
To graphically view information about cells in an attached key:
1. Navigate to the Overview stage.
2. Click the API Explorer tab.
3. Click MemView. The MemView section appears with all cells shaded grey. This means the key has not yet been queried for the status of the programmed cells.
4. Click Refresh. The SSP Toolkit queries the key, returning the access code and value of each cell.
132 Sentinel SuperPro 6.5 Developer’s Guide
Chapter 5 – Starting the Sentinel SuperPro Toolkit
Cell access codes are identified by different colors, as shown in the legend on the right. Cell values are provided in hexadecimal format within each indi-vidual cell.
A question mark (?) represents a restricted cell, or a cell programmed with an algorithm value.
To view a selected cell’s address, move the mouse pointer over that cell. The address appears in the Address field automatically.
Tip: To view cell values and addresses in decimal format, select Decimal in the lower right of the window.
To invoke an API function for a selected cell from the MemView section:
1. Right-click on the cell and select API and then the function from the shortcut menu that appears. The API Function dialog box appears.
2. Enter the appropriate parameters for the function. See page 128.
3. Click Execute.
The API function is invoked on the selected cell, and the return value appears in the API Call Results message box. See “Invoking API Func-tions” on page 128 for more information.
Sentinel SuperPro 6.5 Developer’s Guide 133
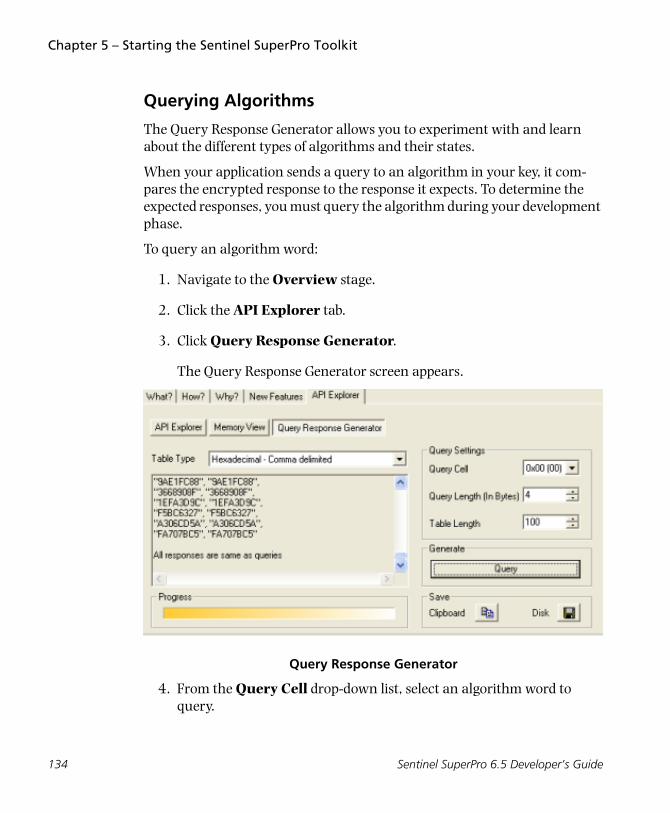
Chapter 5 – Starting the Sentinel SuperPro Toolkit
Querying Algorithms
The Query Response Generator allows you to experiment with and learn about the different types of algorithms and their states.
When your application sends a query to an algorithm in your key, it com-pares the encrypted response to the response it expects. To determine the expected responses, you must query the algorithm during your development phase.
To query an algorithm word:
1. Navigate to the Overview stage.
2. Click the API Explorer tab.
3. Click Query Response Generator.
The Query Response Generator screen appears.
Query Response Generator
4. From the Query Cell drop-down list, select an algorithm word to query.
134 Sentinel SuperPro 6.5 Developer’s Guide
Chapter 5 – Starting the Sentinel SuperPro Toolkit
Use the MemView section to determine which cells on your key are algorithm cells. See “Viewing Memory Cells” on page 132.
5. In the Query Length box, enter or select the number of queries you want to make.
6. In the Table Length box, enter or select the number of pairs you want for the Query Length defined in Step 5.
7. Click Query.
The SSP Toolkit queries the algorithm cell you selected in step 4 with the query string selected in step 6.
The result values appear—in hexadecimal format—in the query/response text box. Select an option from the drop-down list to view the return values in other formats. The value in the Response column is the encrypted string your application should expect to receive when it sends the same query.
A summary is included at the end of the list to help you determine if the algorithm is active or inactive. If the responses are the same as the queries, the algorithm is inactive. If the responses are different than the queries, the algorithm is active.
8. To query a new cell, repeat steps 4 through 7.
Sentinel SuperPro 6.5 Developer’s Guide 135
Chapter 5 – Starting the Sentinel SuperPro Toolkit
Creating a Project
What Is a Project?
A project is stored in a Sentinel SuperPro Toolkit file. The project contains all the data used to create your protection strategy—elements, passwords, your developer ID, algorithm values, counters, data words, field activation commands, etc.
Your project is the template that will be used to program the keys protecting your application.
Projects are protected with strong encryption, so your passwords and devel-oper ID cannot be obtained from a project without opening it in the SSP Toolkit.
Additionally, you can prevent unauthorized users from being able to open your projects (even if they have the SSP Toolkit) by locking them. See “Adding Password Protection to Your Project” on page 140 for more information.
Because your project contains sensitive information about your protection strategy, we recommend making it accessible to developers only—do not give your project file to manufacturing or distribution personnel who also have access to the SSP Toolkit.
Note: Manufacturing personnel do need the project file to use the Make Keys Utility, but they will not be able to make changes to your project with these utilities. Distributors should be given a .DST file for use with the License Generator Utility. See “Creating a Project File for Distributors” on page 143 for more information.
Projects can be saved and re-opened for editing as needed.
136 Sentinel SuperPro 6.5 Developer’s Guide
Chapter 5 – Starting the Sentinel SuperPro Toolkit
Creating a New Project
When you open the SSP Toolkit, a new project, untitled.spp, is created by default. We recommend saving this project with a more meaningful name before starting to design your protection strategy. See “Saving Your Project” on page 140 for instructions.
You may also want to create a new project after you have opened an existing project. To do so:
1. Navigate to the Project stage.
2. Click New.
3. If another project is open, and you haven’t saved it, you are asked if you want to save the current project. Click Yes to save your changes, or No to discard them.
A new untitled project opens.
Tip: In case you did not enter the Developer ID, Write Password and the Overwrite Passwords 1 and 2 in the developer configuration dialog box, at the time of saving your project you will get a message stating: “You must specify the secret code, the spp file can not be saved, first complete the developer configuration in the project stage“. Complete the developer configu-ration and then proceed further.
Importing a .DAT File
If you have used previous versions of Sentinel SuperPro, you may have already created protection strategies. You can edit existing strategies in the SuperPro Toolkit by importing the .DAT file created by previous versions.
The <profile_name>.DAT file contains the data used to program your keys, and was created using the SentinelWizard in previous versions of Sentinel SuperPro.
Sentinel SuperPro 6.5 Developer’s Guide 137
Chapter 5 – Starting the Sentinel SuperPro Toolkit
Note: .DAT files were created by Sentinel SuperPro versions 5.1 and earlier. Projects created using Sentinel SuperPro 6.0 were saved with a .SPP extension, and may be opened using the pro-cedure on page 139. Files saved in NetSentinel cannot be opened in Sentinel SuperPro 6.5.
To import a .DAT file:
1. Navigate to the Project stage in a new project.
2. Click Import DAT File. The Open dialog box appears.
3. Browse to locate the .DAT file you want to import, then click Open.
The .DAT file, with the elements you defined in the previous version, is imported into the current project. The elements are added to the cur-rent project. If there are cell conflicts during the import process, a warning message appears and the element that caused the conflict is not imported.
You can merge two .DAT files into one project file by importing both .DAT files into the same project file.
Changing Your Developer ID or Passwords
When creating a project, you may need to change the developer ID and/or passwords (for example, if you are using a different Sentinel SuperPro key).
See “Entering Your Passwords” on page 114 for more information about your Developer ID, the Overwrite Passwords and the Write Password.
To change your developer ID and/or passwords:
1. Navigate to the Project stage.
2. Click Configure. The Developer Configuration dialog box appears.
Note: Cells 8 and 9 are used internally while configuring a key. If you are re-configuring an already programmed key, the information stored in cells 8 and 9 would be lost.
138 Sentinel SuperPro 6.5 Developer’s Guide
Chapter 5 – Starting the Sentinel SuperPro Toolkit
3. In the Developer ID field, enter your developer ID.
Tip: If you want to be able to see the actual password and developer ID characters, select the Show Passwords check box. Password characters are hidden (displayed as asterisks) by default.
4. In the Overwrite Password 1 field, enter the first Overwrite Pass-word for your key.
5. In the Overwrite Password 2 field, enter the second Overwrite Pass-word for your key.
6. In the Write field, enter the Write Password for your key.
7. Click OK. A warning message appears.
8. Read the warning message thoroughly, and take the appropriate action. See “The Toolkit prompts an error message if a proper key is not attached to your machine, when setting the developer configura-tion parameters,” on page 117 for more information.
You are returned to the Project stage.
Opening an Existing Project
Once you have saved a project, you can re-open it later to edit it, program keys, or generate license codes for customer upgrades.
To open an existing project:
1. Navigate to the Project stage.
2. Click Open.
The Open dialog box appears.
3. Browse to locate the Sentinel SuperPro project you want to open, then click Open.
Sentinel SuperPro 6.5 Developer’s Guide 139
Chapter 5 – Starting the Sentinel SuperPro Toolkit
All Sentinel SuperPro projects have an extension of .SPP.
4. If you haven’t saved the currently open project, you are asked if you want to save the current project. Click Yes to save your changes, or No to discard them.
If the project was locked, the Password dialog box appears. Enter the unlock password. The project opens in the SSP Toolkit.
See “Adding Password Protection to Your Project” on page 140 for more information about locked projects.
Saving Your Project
We recommend saving your project often, particularly when you first open or before you close the SSP Toolkit.
• To save your project with the existing name, from the File menu, select Save.
Tip: You can verify the name of the project you are currently viewing by looking at the Sentinel SuperPro window title bar, where the name of the project is displayed.
• To save the project under another file name:
1. From the File menu, select Save As. The Save As dialog box appears.
2. Enter the new project name in the File Name field, then click Save. The project is saved under the new file name.
Adding Password Protection to Your Project
To protect against unauthorized access to your project, we recommend you lock your project. Locking adds password protection to your project, so that you must enter a password to open it in the SSP Toolkit.
140 Sentinel SuperPro 6.5 Developer’s Guide
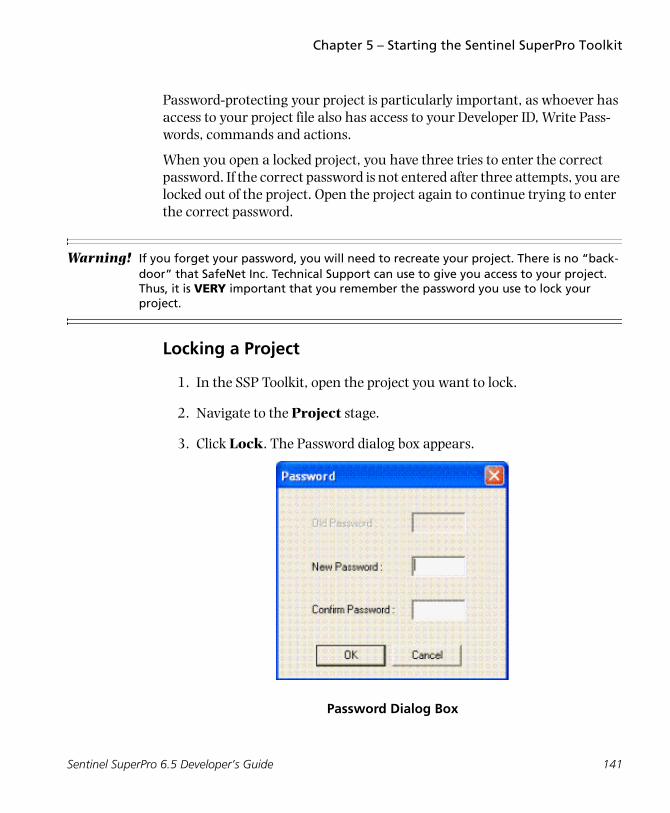
Chapter 5 – Starting the Sentinel SuperPro Toolkit
Password-protecting your project is particularly important, as whoever has access to your project file also has access to your Developer ID, Write Pass-words, commands and actions.
When you open a locked project, you have three tries to enter the correct password. If the correct password is not entered after three attempts, you are locked out of the project. Open the project again to continue trying to enter the correct password.
Warning! If you forget your password, you will need to recreate your project. There is no “back-door” that SafeNet Inc. Technical Support can use to give you access to your project. Thus, it is VERY important that you remember the password you use to lock your project.
Locking a Project
1. In the SSP Toolkit, open the project you want to lock.
2. Navigate to the Project stage.
3. Click Lock. The Password dialog box appears.
Password Dialog Box
Sentinel SuperPro 6.5 Developer’s Guide 141
Chapter 5 – Starting the Sentinel SuperPro Toolkit
4. In the New Password field, enter the password you want to use to lock the project. Passwords are case-sensitive and are limited to 12 characters.
5. In the Confirm Password field, enter the same password again for confirmation.
6. Click OK. The project is locked. The next time you open it, you will be required to enter the password you selected in step 4.
Changing the Password for a Locked Project
You can change the password for a locked project at any time, as long as you know the existing password. To change the password:
1. Open the project whose password you want to change.
2. Navigate to the Project stage.
3. Click Lock. The Password dialog box appears.
4. In the Old Password field, enter the existing password.
5. In the New Password field, enter the new password.
6. In the Confirm Password field, enter the new password again for confirmation.
7. Click OK. The password for the locked project is changed. The next time you open the project, you will need to enter the new password.
Unlocking a Project
To unlock a project and remove the password protection:
1. Open the project you want to unlock.
2. Navigate to the Project stage.
3. Click Unlock. The Password dialog box appears.
142 Sentinel SuperPro 6.5 Developer’s Guide
Chapter 5 – Starting the Sentinel SuperPro Toolkit
4. Enter the password for the locked project, then click OK.
Password protection is removed from the project and the Unlock but-ton becomes unavailable, indicating the project is no longer locked.
Creating a Project File for Distributors
To avoid giving your distributors access to your passwords—which would also give them the ability to change field activation commands or other ele-ments in your protection strategy—we recommend creating a project file specifically for your distributors.
This special file, a .DST file, allows your distributors to activate and update product keys, but prevents them from making changes to your strategy. The .DST file also prevents distributors from increasing the number of licenses available on their distributor keys by incrementing the distributor counter.
Your distributor will need to open the .DST file in the License Generator Util-ity in order to generate license codes and activate or update product keys. For more information about how the distributor updates keys using this file, see “How Distributors Activate an Application” on page 269.
To create a .DST file:
1. In the SSP Toolkit, open the project you want to create a distributor’s file from.
2. While in any stage, from the File menu, select Export .DST File. The Save As dialog box appears.
3. Enter the distributor file name in the File Name field, then click Save.
The distributor file is saved under the file name you entered, with a .DST extension. It is now ready to be sent to your distributors.
Sentinel SuperPro 6.5 Developer’s Guide 143
Chapter 5 – Starting the Sentinel SuperPro Toolkit
Closing the Sentinel SuperPro Toolkit
To close the SSP Toolkit:
1. From the File menu, select Exit.
2. If you have made changes to your project, but haven’t saved them, you are prompted to do so. Click Yes to save your changes or No to discard them.
144 Sentinel SuperPro 6.5 Developer’s Guide
Chapter 6Protecting Your Application
When you start designing your protection strategy, the first decision you need to make is whether you want to protect your application using one of the predefined protection types—integrated or automatic—or if you want to add your own custom elements.
Custom elements are individual algorithms, counters, sublicense limits or data words. You define not only the values for these elements, but also their location on the key. For more information about using custom elements, see Chapter 7, “Working With Design Elements,” on page 185.
This chapter explains how to protect your application using one of the pre-defined application protection types. We recommend selecting and imple-menting one of these types for every application you are protecting. If you want to also use custom elements, you can do so in addition to the standard application protection.
This chapter covers the following topics:
■ What is application protection?
■ Selecting a protection type
■ Using integrated protection
■ Using automatic protection
Sentinel SuperPro 6.5 Developer’s Guide 145
Chapter 6 - Protecting Your Application
What Is Application Protection?
Application protection is an algorithm with an associated activation type as determined by the options you choose to include in your strategy. Applica-tion protection can be either integrated or automatic. The protection type determines when and where software locks are implemented.
When you choose integrated protection, you add software locks—API func-tions—directly into your application’s source code. You control the amount and location of the locks.
When you use automatic protection, Sentinel SuperPro wraps a protective layer, called a shell, around your application’s executable file. This layer is encrypted, making it more difficult for a hacker to gain access to your appli-cation’s code.
Whatever level of protection you decide to implement, the overall goal is to have your application periodically check that the key is present. As long as your application takes appropriate measures if the key is not attached, only legitimate purchasers will be able to use your application.Both stand-alone and network applications can use either protection type.
Note: If you apply both automatic and integrated protection to your application, when the automatic portion of the application executes it will run in the mode set during protection (i.e. either Standalone, Network, or dual). When the integrated portion of the application executes, it will run in the access mode you set in code, or dual mode if no access mode was specified. See “Setting the Access Mode” on page 103 for more information.
For more information about application protection types, and examples of when you should choose one over the other, please see “Protection Types” on page 61.
Demo Applications
With both types of application protection, you can designate your applica-tion as being a demonstration (demo) or trial version through the use of a counter that controls the number of times the application can run before it expires.
146 Sentinel SuperPro 6.5 Developer’s Guide
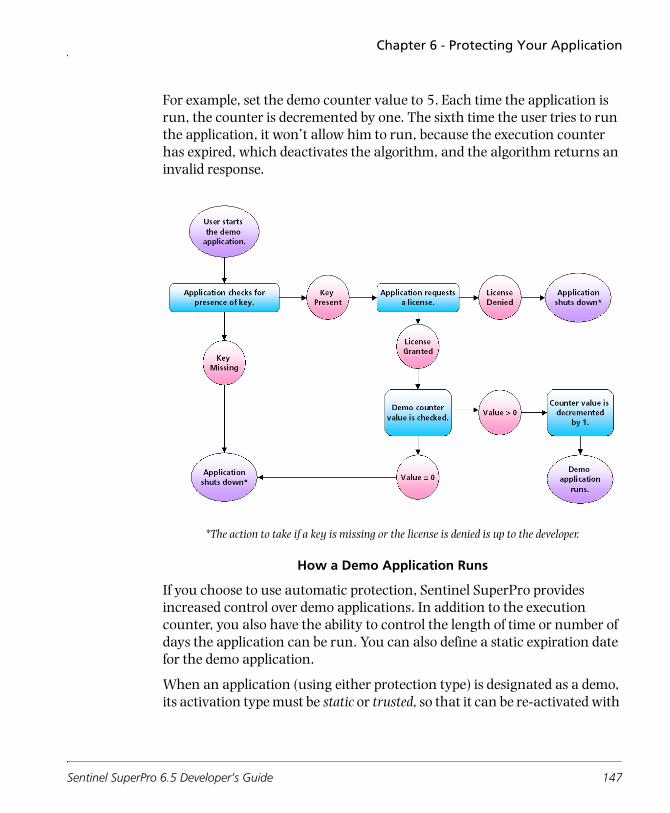
Chapter 6 - Protecting Your Application
For example, set the demo counter value to 5. Each time the application is run, the counter is decremented by one. The sixth time the user tries to run the application, it won’t allow him to run, because the execution counter has expired, which deactivates the algorithm, and the algorithm returns an invalid response.
How a Demo Application Runs
If you choose to use automatic protection, Sentinel SuperPro provides increased control over demo applications. In addition to the execution counter, you also have the ability to control the length of time or number of days the application can be run. You can also define a static expiration date for the demo application.
When an application (using either protection type) is designated as a demo, its activation type must be static or trusted, so that it can be re-activated with
*The action to take if a key is missing or the license is denied is up to the developer.
Sentinel SuperPro 6.5 Developer’s Guide 147
Chapter 6 - Protecting Your Application
a password when it expires and you have verified purchase of the full version of the application.
For more information about designating demo applications, see “Control-ling Demo Applications” on page 94.
148 Sentinel SuperPro 6.5 Developer’s Guide
Chapter 6 - Protecting Your Application
Selecting a Protection Type
The first step in applying application protection is to select whether you want to use automatic or integrated protection. The Element Definition Wiz-ard, accessible via the Element List View tab, will walk you though the process of adding protection to your application.
To add protection to your application:
1. Navigate to the Design stage.
2. Verify you are on the Element List View tab.
3. Select Automatic Protection or Integrated Protection, then click Next.
Note: Before you create the first element in your protection strategy, you need to decide whether you will be using SuperPro XM or SuperPro keys for your design. When you click on one of the buttons in the “Add element” group, you will be asked to specify whether the design will be used with SuperPro XM or SuperPro keys. Alternatively, you can specify SuperPro XM keys by clicking on the “Enable SuperPro XM Features” check box in the lower right-hand corner before creating the first element.
4. In the Name field, enter a name for this element.
We recommend using the name of the application you are protecting. There is a 16-character limit for element names.
For example, if you are using automatic protection to protect the SceneryEditor application, you might name the element Scenery (Auto).
This way, when viewing the element list, you’ll quickly be able to rec-ognize what applications you have protected. The icons in the ele-ment list show you what kind of application protection is used for each application.
Sentinel SuperPro 6.5 Developer’s Guide 149
Chapter 6 - Protecting Your Application
Tip: This name will be used throughout the SSP Toolkit to identify this element, so be sure it adequately describes the element.
5. In the Comments field, enter any additional information about the element you want to save. This field is optional.
6. Click Next.
7. Do one of the following:
❑ If you selected Integrated Protection, go to the next section to continue.
❑ If you selected Automatic Protection, select show advanced options check box to view the advanced options. Go to “Using Automatic Protection” on page 157 to continue.
150 Sentinel SuperPro 6.5 Developer’s Guide
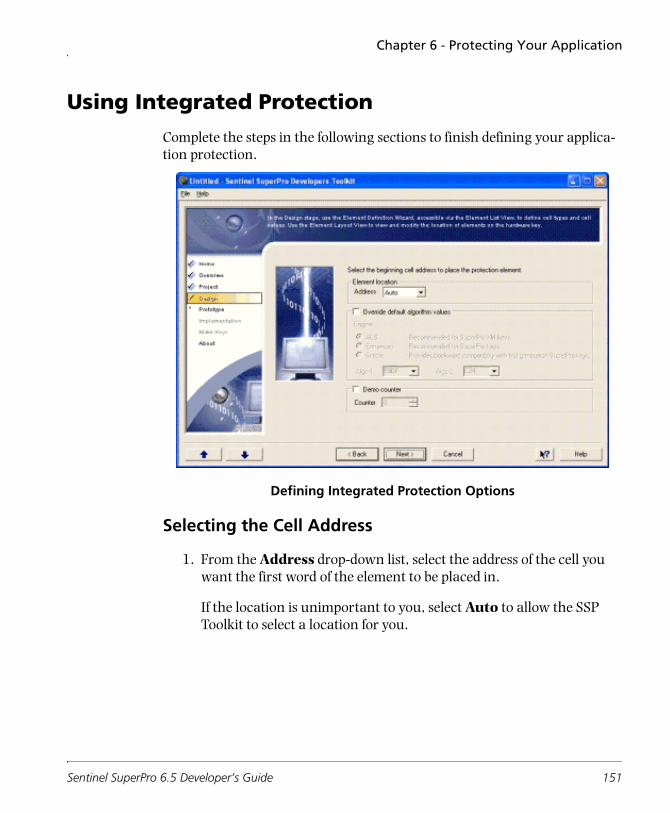
Chapter 6 - Protecting Your Application
Using Integrated Protection
Complete the steps in the following sections to finish defining your applica-tion protection.
Defining Integrated Protection Options
Selecting the Cell Address
1. From the Address drop-down list, select the address of the cell you want the first word of the element to be placed in.
If the location is unimportant to you, select Auto to allow the SSP Toolkit to select a location for you.
Sentinel SuperPro 6.5 Developer’s Guide 151
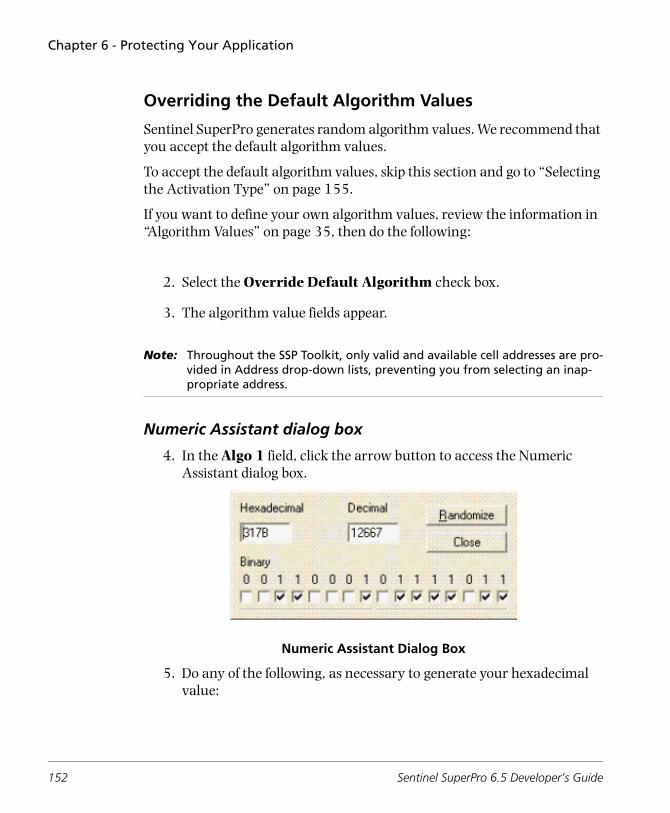
Chapter 6 - Protecting Your Application
Overriding the Default Algorithm Values
Sentinel SuperPro generates random algorithm values. We recommend that you accept the default algorithm values.
To accept the default algorithm values, skip this section and go to “Selecting the Activation Type” on page 155.
If you want to define your own algorithm values, review the information in “Algorithm Values” on page 35, then do the following:
2. Select the Override Default Algorithm check box.
3. The algorithm value fields appear.
Note: Throughout the SSP Toolkit, only valid and available cell addresses are pro-vided in Address drop-down lists, preventing you from selecting an inap-propriate address.
Numeric Assistant dialog box
4. In the Algo 1 field, click the arrow button to access the Numeric Assistant dialog box.
Numeric Assistant Dialog Box
5. Do any of the following, as necessary to generate your hexadecimal value:
152 Sentinel SuperPro 6.5 Developer’s Guide
Chapter 6 - Protecting Your Application
❑ To generate a random value, click Randomize.
The Numeric Assistant generates a random value, and provides you with the hexadecimal, decimal and binary equivalents of that value. You can click Randomize as many times as you like.
❑ To convert a decimal value to a hexadecimal value, enter the value in the Decimal field.
The Numeric Assistant automatically calculates the corresponding hexadecimal and binary values.
6. Click Close.
The value from the Hexadecimal field is transferred to the Algo 1 field.
7. Repeat steps 3 – 4 for the Algo 2 field.
Note: If you already know the value you want to use for the algorithm words, you can enter it directly in the Algo 1 and Algo 2 fields. Algo 1 is the first algorithm word and Algo 2 is the second algorithm word. When you select an activation type, the Algo 2 value will be automatically changed, as nec-essary, to make the algorithm active or inactive.
8. The AES algorithm engine is selected by default for protection strate-gies using the SuperPro XM key. This is the most secure algorithm engine. However, you can select one of the other two algorithm engines (Enhanced and Simple) if desired for backward compatibility with previous protection strategies.
The Enhanced algorithm engine is selected by default for protection strategies using the SuperPro key. This is the most secure algorithm engine for that key type. The AES algorithm engine is unavailable in SuperPro keys, however, you may select the Simple algorithm engine if desired for backward compatibility reasons.
Sentinel SuperPro 6.5 Developer’s Guide 153
Chapter 6 - Protecting Your Application
Adding a Demo Counter
This is an optional setting. If you don’t want to make this application a demo application, skip this section and go to “Selecting the Activation Type” on page 155.
If you want to make this application a demo application that can be used for a limited number of times, as explained in “Demo Applications” on page 146, do the following:
9. Select the Demo Counter check box.
10. In the counter value box, enter a number representing the number of times you want to allow the demo application to be executed.
For example, if you enter 5, the application can be run five times. The sixth time the user tries to run the application, they will be unable to.
11. Click Next.
12. Go to the next section.
154 Sentinel SuperPro 6.5 Developer’s Guide
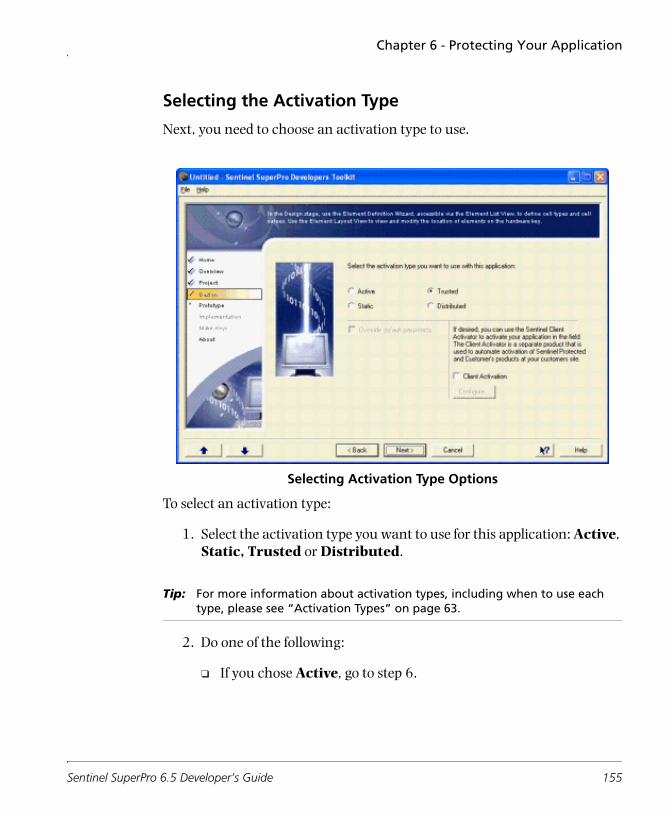
Chapter 6 - Protecting Your Application
Selecting the Activation Type
Next, you need to choose an activation type to use.
Selecting Activation Type Options
To select an activation type:
1. Select the activation type you want to use for this application: Active, Static, Trusted or Distributed.
Tip: For more information about activation types, including when to use each type, please see “Activation Types” on page 63.
2. Do one of the following:
❑ If you chose Active, go to step 6.
Sentinel SuperPro 6.5 Developer’s Guide 155
Chapter 6 - Protecting Your Application
❑ If you chose Static and want to override the default activation passwords, select the Override default passwords check box. The activation password fields appear. Go to step 3.
❑ If you chose Trusted or Distributed, or you chose Static but don’t want to override the default activation passwords, go to step 5.
Note: If you selected Trusted or Distributed, you cannot override the default acti-vation passwords. Unique activation passwords are generated based on the developer ID, serial number and product information. See the table “Activation Types” on page 63 for more information about the Trusted and Distributed activation types.
3. In the Password 1 field, click the arrow button to access the Numeric Assistant dialog box, and enter an activation password for the first word of the algorithm.
See page 152 for instructions on using the Numeric Assistant dialog box.
4. Repeat step 3 for the Password 2 field to enter a password for the sec-ond word of the algorithm.
5. Do one of the following:
❑ If you want to use the Client Activator to develop product-specific activation information for the application, select the Use Client Activator check box, then click Configure to launch the Activation Wizard.
When you have completed defining your application’s activation information, save your project and close the Activation Wizard to return to the SSP Toolkit.
❑ If you don’t want to use the Client Activator, go to the next step.
Tip: For more information about the Client Activator, see “Using the Client Acti-vator” on page 271. You may also want to refer to the Client Activator docu-mentation, included in the Client Activator package.
156 Sentinel SuperPro 6.5 Developer’s Guide
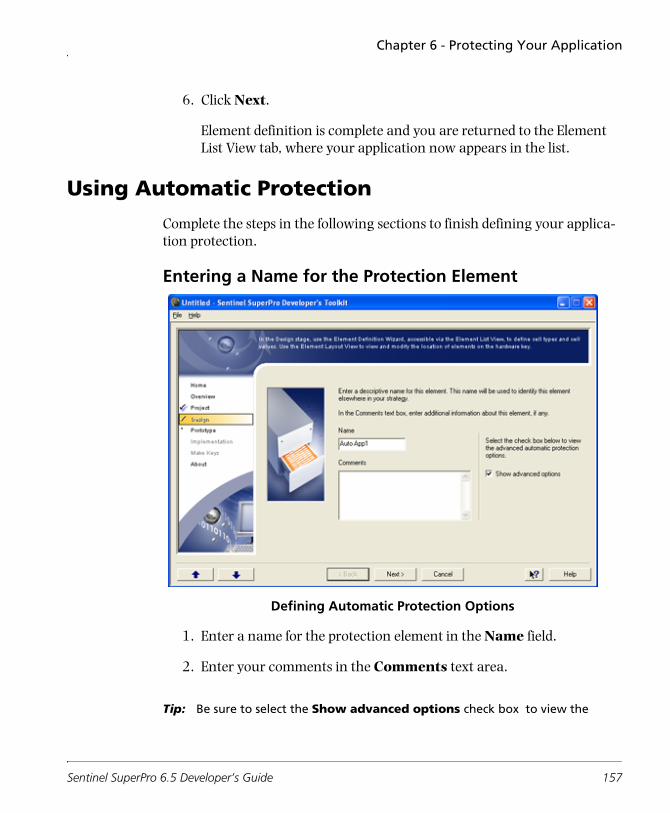
Chapter 6 - Protecting Your Application
6. Click Next.
Element definition is complete and you are returned to the Element List View tab, where your application now appears in the list.
Using Automatic Protection
Complete the steps in the following sections to finish defining your applica-tion protection.
Entering a Name for the Protection Element
Defining Automatic Protection Options
1. Enter a name for the protection element in the Name field.
2. Enter your comments in the Comments text area.
Tip: Be sure to select the Show advanced options check box to view the
Sentinel SuperPro 6.5 Developer’s Guide 157
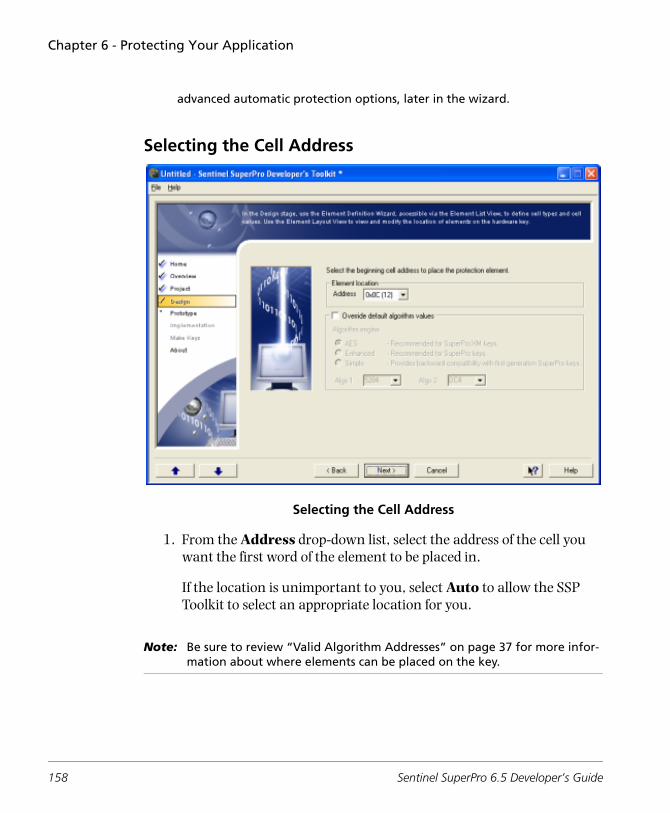
Chapter 6 - Protecting Your Application
advanced automatic protection options, later in the wizard.
Selecting the Cell Address
Selecting the Cell Address
1. From the Address drop-down list, select the address of the cell you want the first word of the element to be placed in.
If the location is unimportant to you, select Auto to allow the SSP Toolkit to select an appropriate location for you.
Note: Be sure to review “Valid Algorithm Addresses” on page 37 for more infor-mation about where elements can be placed on the key.
158 Sentinel SuperPro 6.5 Developer’s Guide
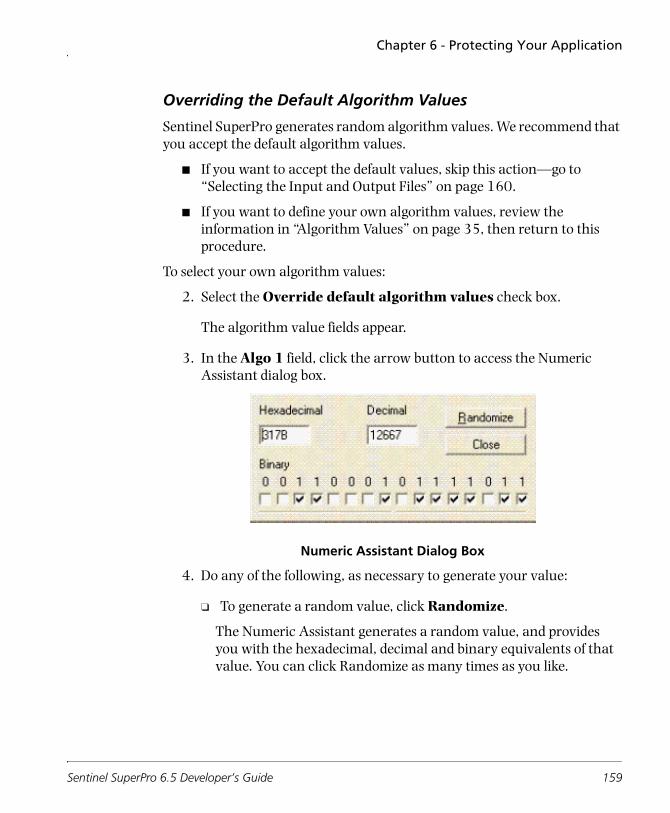
Chapter 6 - Protecting Your Application
Overriding the Default Algorithm Values
Sentinel SuperPro generates random algorithm values. We recommend that you accept the default algorithm values.
■ If you want to accept the default values, skip this action—go to “Selecting the Input and Output Files” on page 160.
■ If you want to define your own algorithm values, review the information in “Algorithm Values” on page 35, then return to this procedure.
To select your own algorithm values:
2. Select the Override default algorithm values check box.
The algorithm value fields appear.
3. In the Algo 1 field, click the arrow button to access the Numeric Assistant dialog box.
Numeric Assistant Dialog Box
4. Do any of the following, as necessary to generate your value:
❑ To generate a random value, click Randomize.
The Numeric Assistant generates a random value, and provides you with the hexadecimal, decimal and binary equivalents of that value. You can click Randomize as many times as you like.
Sentinel SuperPro 6.5 Developer’s Guide 159
Chapter 6 - Protecting Your Application
❑ To convert a decimal value to a hexadecimal value, enter the value in the Decimal field.
The Numeric Assistant automatically calculates the corresponding hexadecimal and binary values.
5. Click Close.
The value from the Hexadecimal field is transferred to the Algo 1 field.
6. Repeat steps 3 – 4 for the Algo 2 field.
Note: If you already know the value you want to use for the algorithm words, you can enter it directly in the Algo 1 and Algo 2 fields. Algo 1 is the first algorithm word and Algo 2 is the second algorithm word. When you select an activation type, the Algo 2 value will be automatically changed, as nec-essary, to make the algorithm active or inactive.
7. The AES algorithm engine is selected by default for protection strate-gies using the SuperPro XM key. This is the most secure algorithm engine. However, you can select one of the other two algorithm engines (Enhanced and Simple) if desired for backward compatibility with previous protection strategies.
The Enhanced algorithm engine is selected by default for protection strategies using the SuperPro key. This is the most secure algorithm engine for that key type. The AES algorithm engine is unavailable in SuperPro keys, however, you may select the Simple algorithm engine if desired for backward compatibility reasons.
8. Go to the next section.
Selecting the Input and Output Files
Next, you need to select the executable file (.EXE or .DLL) you want to apply the shell to. This file is the input file. You also need to select the path and file name you want the protected application’s executable file written to. This is
160 Sentinel SuperPro 6.5 Developer’s Guide
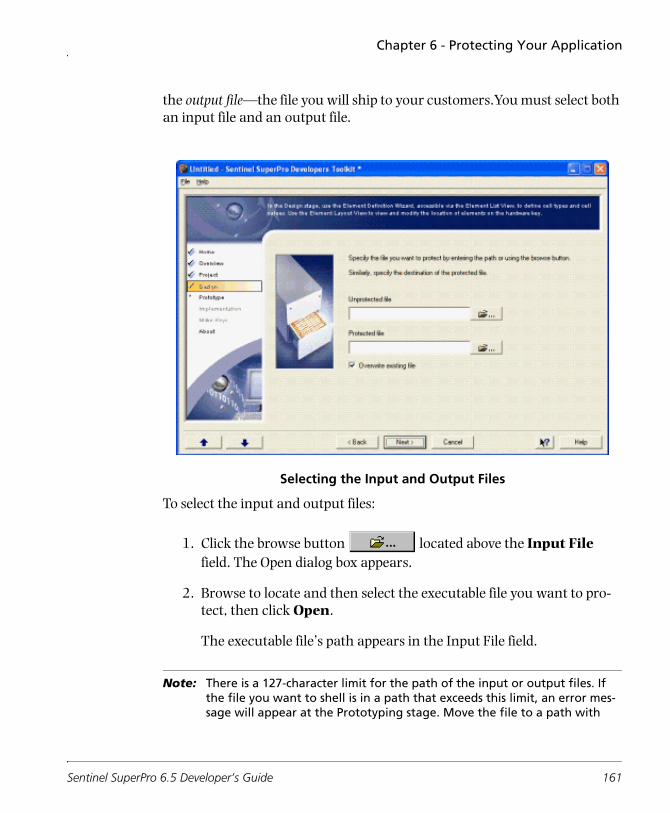
Chapter 6 - Protecting Your Application
the output file—the file you will ship to your customers.You must select both an input file and an output file.
Selecting the Input and Output Files
To select the input and output files:
1. Click the browse button located above the Input File field. The Open dialog box appears.
2. Browse to locate and then select the executable file you want to pro-tect, then click Open.
The executable file’s path appears in the Input File field.
Note: There is a 127-character limit for the path of the input or output files. If the file you want to shell is in a path that exceeds this limit, an error mes-sage will appear at the Prototyping stage. Move the file to a path with
Sentinel SuperPro 6.5 Developer’s Guide 161
Chapter 6 - Protecting Your Application
shorter directory names, then update the location and click Next again to continue.
3. Click the browse button located above the Output File field. The Open dialog box appears.
4. Browse to locate the directory path you want the protected executable file placed in after the shell is added. Be sure to enter a file name for the shelled executable file at the end of the path.
5. If you want the shelled file to overwrite an existing file with the same name, select the Overwrite existing output file check box.
Warning! If you specify the shelled application’s executable file to have the same name as the non-shelled file, and you select the overwrite option, the non-shelled file will be overwritten with the shelled file.
We recommend changing the name of the output file to something different than the original file to preserve an original, unshelled copy of your application’s executable file. You may also want to make a backup copy of your unshelled executable file.
6. You must also decide how and where you want your protected appli-cation to access the key. Choose any of the options given below before clicking Next:
■ Stand-Alone: The RNBO_STANDALONE access mode is followed.
■ Network: This option requires the SuperPro server. The RNBO_SPN_SERVER_MODES access mode is followed, unless a specific server is set through the configuration file sntlconfig.xml. This is also the default mode.
The sntlconfig.xml is preferred over NSP_HOST environment variable over the settings done using the automatic protection wizard in Toolkit is available only with the Network option.
162 Sentinel SuperPro 6.5 Developer’s Guide
Chapter 6 - Protecting Your Application
■ All Modes: The RNBO_SPN_ALL_MODES access mode is followed.
7. You can also enable license sharing by selecting Enable license sharing check box. Selecting the Use Sublicensing check box will enable your application to acquire a single license if more than one requests for opening the protected application originates from the same seat (i.e. a combination of User Name and MAC Address).
8. You can optionally choose a cell address from the Address drop down or simply select Auto to let the Toolkit assign a cell automatically. You may also add a counter value for the Value field. It allows to restrict the number of sublicense issued to a protected application.
9. Go to the next section.
Selecting Automatic Protection Execution Options
Using automatic protection gives you more control over demo applications than integrated protection. You have three options for limiting the execu-tion of an application:
■ You can specify the last date the application can be run.
■ You can limit the number of executions allowed.
■ You can limit the time allowed to use the demo application.
If you select two or three limits, the application will expire as soon as any limit is reached.
You must also select a cell in which to store the desired limit—Sentinel SuperPro programs the limits you set into the cells you select. For execution and time control, these cells are programmed as counters. For date control, the cell is programmed as a locked data word.
If your application uses execution or time control, it reads the value of the selected counter when it is run. Depending on the value, one of the follow-ing occurs:
Sentinel SuperPro 6.5 Developer’s Guide 163
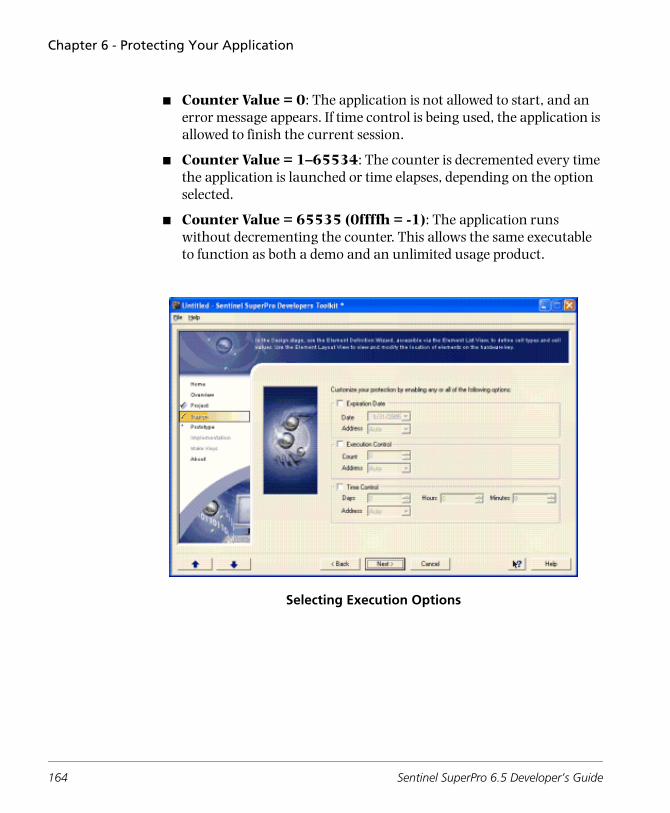
Chapter 6 - Protecting Your Application
■ Counter Value = 0: The application is not allowed to start, and an error message appears. If time control is being used, the application is allowed to finish the current session.
■ Counter Value = 1–65534: The counter is decremented every time the application is launched or time elapses, depending on the option selected.
■ Counter Value = 65535 (0ffffh = -1): The application runs without decrementing the counter. This allows the same executable to function as both a demo and an unlimited usage product.
Selecting Execution Options
164 Sentinel SuperPro 6.5 Developer’s Guide
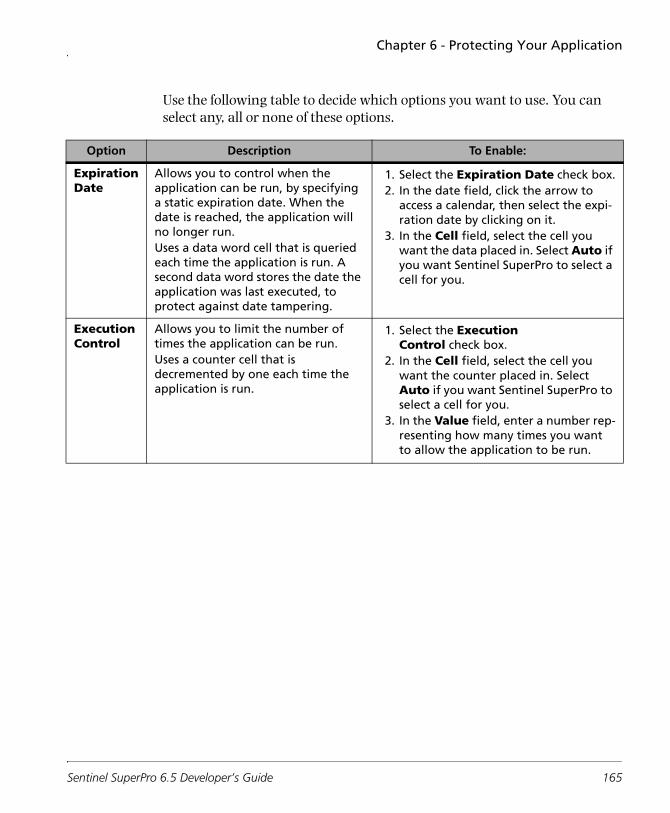
Chapter 6 - Protecting Your Application
Use the following table to decide which options you want to use. You can select any, all or none of these options.
Option Description To Enable:
Expiration Date
Allows you to control when the application can be run, by specifying a static expiration date. When the date is reached, the application will no longer run. Uses a data word cell that is queried each time the application is run. A second data word stores the date the application was last executed, to protect against date tampering.
1. Select the Expiration Date check box.2. In the date field, click the arrow to
access a calendar, then select the expi-ration date by clicking on it.
3. In the Cell field, select the cell you want the data placed in. Select Auto if you want Sentinel SuperPro to select a cell for you.
Execution Control
Allows you to limit the number of times the application can be run. Uses a counter cell that is decremented by one each time the application is run.
1. Select the Execution Control check box.
2. In the Cell field, select the cell you want the counter placed in. Select Auto if you want Sentinel SuperPro to select a cell for you.
3. In the Value field, enter a number rep-resenting how many times you want to allow the application to be run.
Sentinel SuperPro 6.5 Developer’s Guide 165
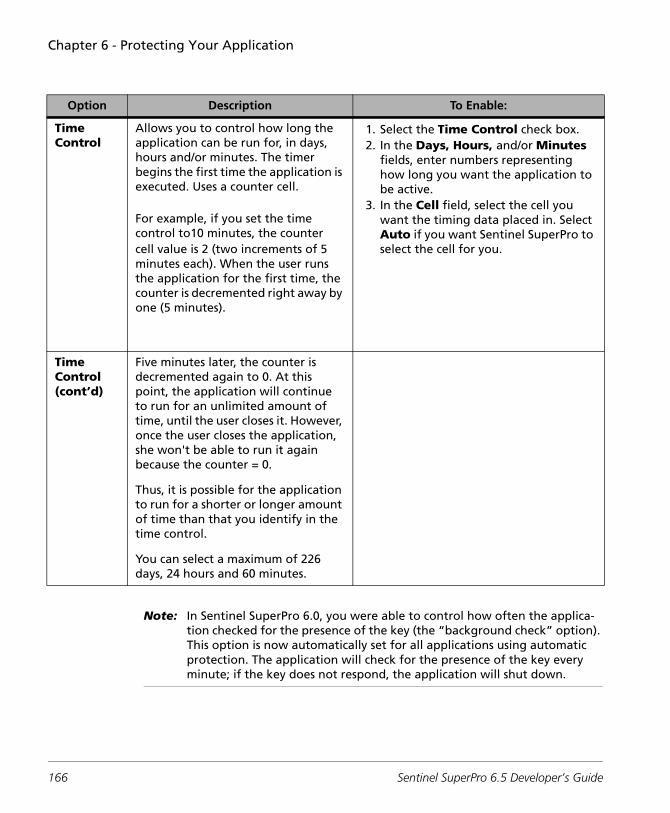
Chapter 6 - Protecting Your Application
Note: In Sentinel SuperPro 6.0, you were able to control how often the applica-tion checked for the presence of the key (the “background check” option). This option is now automatically set for all applications using automatic protection. The application will check for the presence of the key every minute; if the key does not respond, the application will shut down.
Time Control
Allows you to control how long the application can be run for, in days, hours and/or minutes. The timer begins the first time the application is executed. Uses a counter cell.
For example, if you set the time control to10 minutes, the counter cell value is 2 (two increments of 5 minutes each). When the user runs the application for the first time, the counter is decremented right away by one (5 minutes).
1. Select the Time Control check box.2. In the Days, Hours, and/or Minutes
fields, enter numbers representing how long you want the application to be active.
3. In the Cell field, select the cell you want the timing data placed in. Select Auto if you want Sentinel SuperPro to select the cell for you.
Time Control (cont’d)
Five minutes later, the counter is decremented again to 0. At this point, the application will continue to run for an unlimited amount of time, until the user closes it. However, once the user closes the application, she won't be able to run it again because the counter = 0.
Thus, it is possible for the application to run for a shorter or longer amount of time than that you identify in the time control.
You can select a maximum of 226 days, 24 hours and 60 minutes.
Option Description To Enable:
166 Sentinel SuperPro 6.5 Developer’s Guide

Chapter 6 - Protecting Your Application
After you have finished selecting the options you want to use, click Next to continue.
Providing Advanced Security Settings
This screen allows you to select the shell security options for the protected application.
Advanced Security settings
Sentinel SuperPro 6.5 Developer’s Guide 167
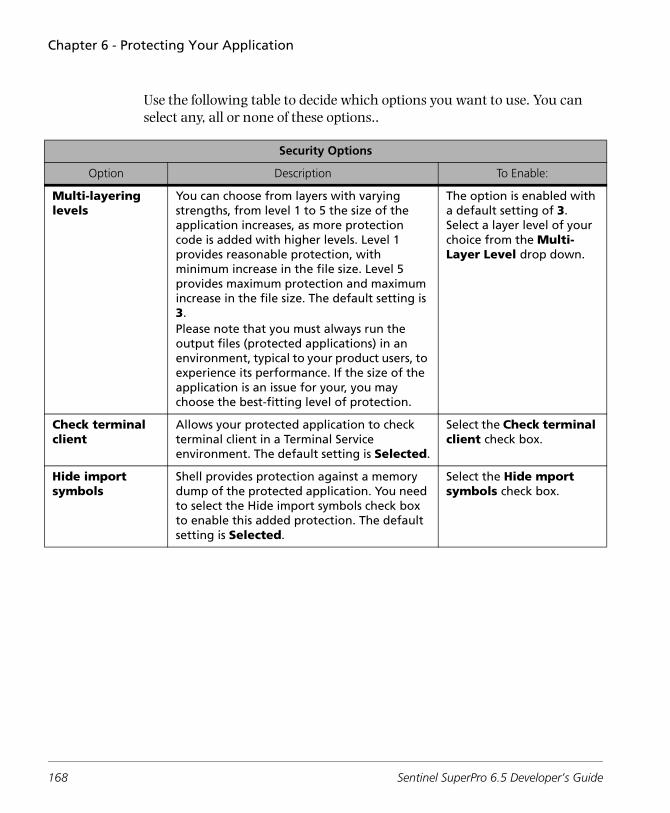
Chapter 6 - Protecting Your Application
Use the following table to decide which options you want to use. You can select any, all or none of these options..
Security Options
Option Description To Enable:
Multi-layering levels
You can choose from layers with varying strengths, from level 1 to 5 the size of the application increases, as more protection code is added with higher levels. Level 1 provides reasonable protection, with minimum increase in the file size. Level 5 provides maximum protection and maximum increase in the file size. The default setting is 3.Please note that you must always run the output files (protected applications) in an environment, typical to your product users, to experience its performance. If the size of the application is an issue for your, you may choose the best-fitting level of protection.
The option is enabled with a default setting of 3. Select a layer level of your choice from the Multi-Layer Level drop down.
Check terminal client
Allows your protected application to check terminal client in a Terminal Service environment. The default setting is Selected.
Select the Check terminal client check box.
Hide import symbols
Shell provides protection against a memory dump of the protected application. You need to select the Hide import symbols check box to enable this added protection. The default setting is Selected.
Select the Hide mport symbols check box.
168 Sentinel SuperPro 6.5 Developer’s Guide

Chapter 6 - Protecting Your Application
Advanced Options
Option Description To Enable:
.NET Enhancement
.NET Enhancements feature provides enhanced security to pure .NET applications (Exes and Dlls):• Hides original entry point method (only
.NET executable)• Encrypts string of original application• Encrypts constant of original application
When this feature is selected then the SDNPro.dll needs to be provided to the end-user along with the protected application. The default setting is Not Selected.Note: The prerequisite to use .NET enhancement feature (to shell .NET application using .NET Enhancements) is that the machine should have the same version of .NET Framework and .NET SDK installed.The mixed code applications are not supported with the .NET Enhancement option.
Select the .NET Enhancement check box.
Allow my application to run when a debugger is present
You can keep the check box cleared to deny application execution in the presence of debuggers. The protected application will not run if it executed from a debugger. Non-malicious users will close the debugger and start the application again. However, if for some reason you want to allow your application to run in the presenceof debuggers, select this check box. The default setting is Not Selected.
Select the Allow my application to run when a debugger is present check box.
I have used Shell SDK
Select this check box if you used the Shell SDK (available under the \Tools directory) for protecting your important code fragments, constants, and string data. Refer to the readme file available in the folder for details. The default setting is Not Selected.
Select the I have used Shell SDK check box.
Sentinel SuperPro 6.5 Developer’s Guide 169
Chapter 6 - Protecting Your Application
Note: The Advanced Options of Shell Security settings are not displayed if you have not checked the Show advanced options check box, while entering a Protection Element Name in the first dialog of Shell Wizard.
1. After you have finished selecting the options you want to use, click Next to continue.
2. Do one of the following:
❑ If you chose to encrypt additional files at shell time, go to the next section.
❑ If you chose not to encrypt additional files, go to “Selecting the Activation Type” on page 174.
Selecting Additional Files for Encryption
The SSP Toolkit can also encrypt external files—such as overlays, data files, or other file types—other than the application executable at shell time.
Your protected application will automatically and transparently decrypt at run time, as needed, the files you specified for encryption. When not in use, these files are re-encrypted. If your application creates one of these files, it will be encrypted.
Note: If you select files to be encrypted at shell time, and your application will be run on Windows 98, you must install the Sentinel data protection driver on your user’s system. See “Installing the Sentinel Data Protection Driver” on page 258 for more information.If you are shelling an application and you try to encrypt a .DLL which is a dependency of the application you are shelling, the .DLL will not be decrypted at runtime because the operating system tries to load the .DLL before the shell has a chance to decrypt it.
The actual file encryption takes place when you add the shell to the applica-tion in the Prototyping stage.
You can encrypt a maximum of 50 files at a time. To encrypt more than 50 files, add a second automatic protection element. In the second element, be
170 Sentinel SuperPro 6.5 Developer’s Guide
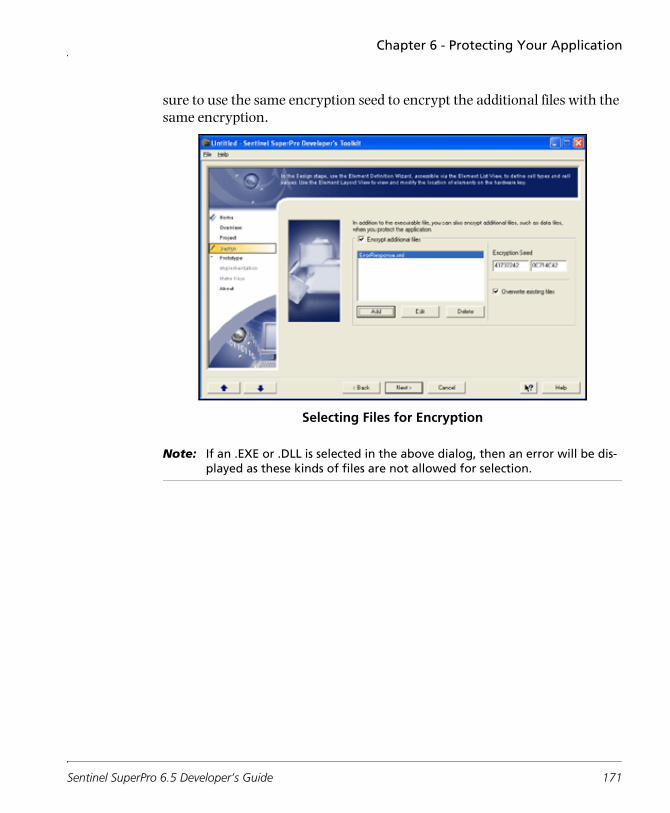
Chapter 6 - Protecting Your Application
sure to use the same encryption seed to encrypt the additional files with the same encryption.
Selecting Files for Encryption
Note: If an .EXE or .DLL is selected in the above dialog, then an error will be dis-played as these kinds of files are not allowed for selection.
Sentinel SuperPro 6.5 Developer’s Guide 171
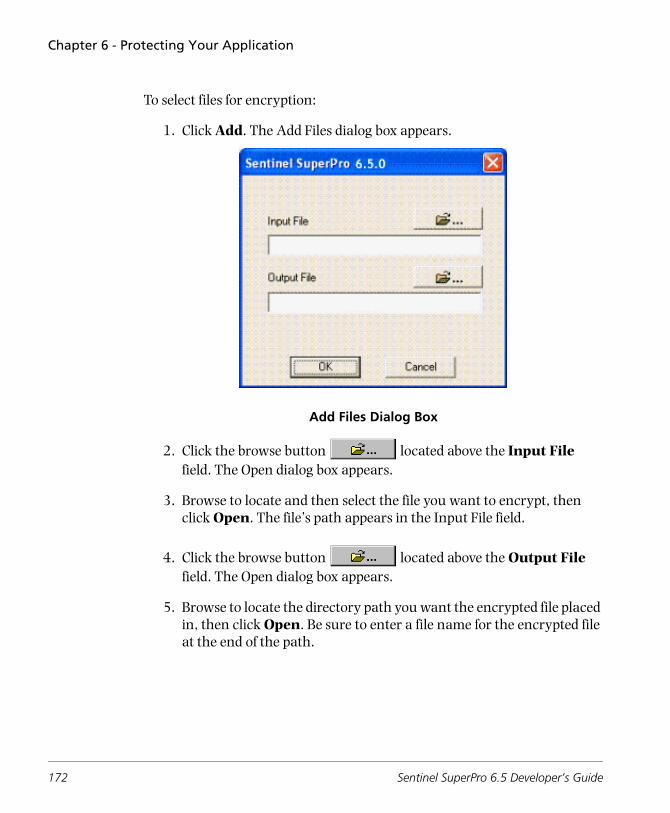
Chapter 6 - Protecting Your Application
To select files for encryption:
1. Click Add. The Add Files dialog box appears.
Add Files Dialog Box
2. Click the browse button located above the Input File field. The Open dialog box appears.
3. Browse to locate and then select the file you want to encrypt, then click Open. The file’s path appears in the Input File field.
4. Click the browse button located above the Output File field. The Open dialog box appears.
5. Browse to locate the directory path you want the encrypted file placed in, then click Open. Be sure to enter a file name for the encrypted file at the end of the path.
172 Sentinel SuperPro 6.5 Developer’s Guide
Chapter 6 - Protecting Your Application
Warning! We recommend changing the name of the output file to something different than the original file to preserve an original, unencrypted copy of the file. You may also want to create backup copies of the original files.
6. Click OK.
7. Repeat steps 1 – 6 to select additional files for encryption.
Note: If you add a file and then decide you don’t want to encrypt that file, select the file and then click Delete. You can also change the location path for an input and/or output file by selecting the file and then clicking Edit.
8. In the Encryption Seed fields, enter the seed (password) to be used for encryption. The seed is any two strings of eight hex characters (forming a 64-bit seed).
A random encryption seed is provided; you can choose to use this seed if you like. If encrypted data files are shared by multiple applications, all the applications must use the same encryption seed. See page 86 for more information about encryption seeds.
9. If you want encrypted files to overwrite existing files with the same name, select the Overwrite existing files check box.
10. Click Next, then go to the next section to continue.
Sentinel SuperPro 6.5 Developer’s Guide 173
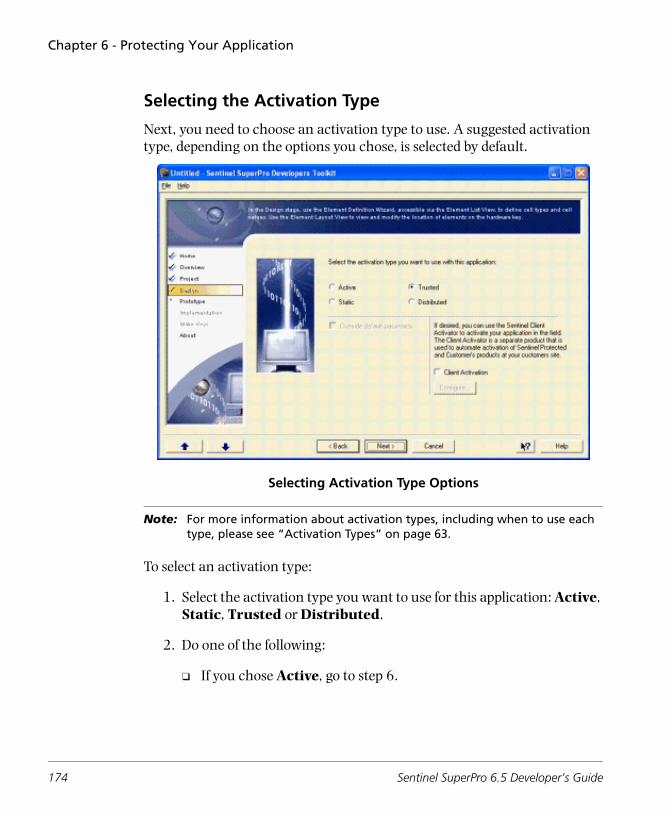
Chapter 6 - Protecting Your Application
Selecting the Activation Type
Next, you need to choose an activation type to use. A suggested activation type, depending on the options you chose, is selected by default.
Selecting Activation Type Options
Note: For more information about activation types, including when to use each type, please see “Activation Types” on page 63.
To select an activation type:
1. Select the activation type you want to use for this application: Active, Static, Trusted or Distributed.
2. Do one of the following:
❑ If you chose Active, go to step 6.
174 Sentinel SuperPro 6.5 Developer’s Guide

Chapter 6 - Protecting Your Application
❑ If you chose Static and want to override the default (random) activation passwords, select the Override default passwords check box. The activation password fields appear. Go to step 3.
❑ If you chose Trusted or Distributed, or you chose Static but don’t want to override the default activation passwords, go to step 5.
Note: If you selected Trusted or Distributed, you cannot override the default acti-vation passwords. Unique activation passwords are generated based on the developer ID, serial number and product ID. See the table “Activation Types” on page 63 for more information about the Trusted and Distributed activation types.
3. In the Password 1 field, click the arrow button to access the Numeric Assistant dialog box, and enter an activation password for the first word of the algorithm.
See page 152 for instructions on using the Numeric Assistant dialog box.
4. Repeat step 3 for the Password 2 field to enter a password for the sec-ond word of the algorithm.
5. Do one of the following:
❑ If you want to use the Client Activator to customize product-specific activation information for the application, select the Use Client Activator check box, then click Configure to launch the Activation Wizard.
When you have completed defining your application’s activation information, save your project and close the Activation Wizard to return to the SSP Toolkit.
❑ If you don’t want to use the Client Activator, go to the next step.
Tip: For more information about the Client Activator, see “How Distributors Acti-vate an Application” on page 269. You may also want to refer to the Client Activator documentation, included in the Client Activator package.
Sentinel SuperPro 6.5 Developer’s Guide 175
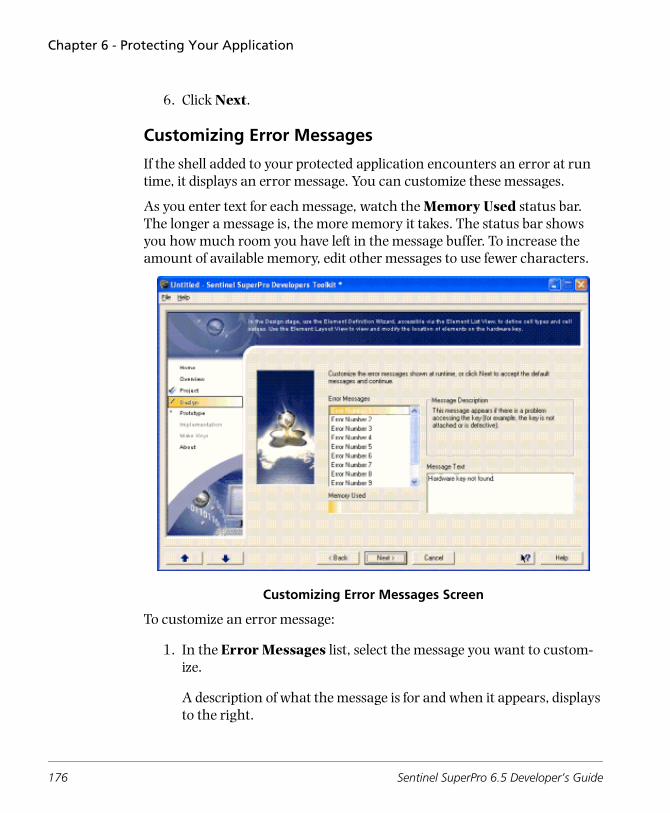
Chapter 6 - Protecting Your Application
6. Click Next.
Customizing Error Messages
If the shell added to your protected application encounters an error at run time, it displays an error message. You can customize these messages.
As you enter text for each message, watch the Memory Used status bar. The longer a message is, the more memory it takes. The status bar shows you how much room you have left in the message buffer. To increase the amount of available memory, edit other messages to use fewer characters.
Customizing Error Messages Screen
To customize an error message:
1. In the Error Messages list, select the message you want to custom-ize.
A description of what the message is for and when it appears, displays to the right.
176 Sentinel SuperPro 6.5 Developer’s Guide
Chapter 6 - Protecting Your Application
2. In the Message Text field, modify the default message text as needed.
The message text is saved automatically.
3. Repeat steps 1 – 2 to edit additional messages.
4. When you have finished customizing your error messages, click Next to continue. This will take you to the page which summarizes your protection strategy. Click on Finish. Element definition is complete and you are returned to the Element List View, where your application now appears in the list.
Protecting Multiple Applications
Sentinel SuperPro allows you to protect multiple applications on the same key. However, the number of applications is dependent on the number of ele-ments you have programmed on the key. The more elements you have, the more cells that are used, and thus the fewer applications you can protect.
If you want to protect multiple applications on a single key, be sure to also take into consideration how many custom elements you will add. Check the Element Layout View tab to see how many cells you have left on the key for this strategy.
If you want to add more applications to your protection strategy, go back to “Selecting a Protection Type” on page 149.
Editing an Application Protection Element
If you need to make changes to an application protection element, you can edit it at any time. To edit an application protection element:
1. Navigate to the Design stage.
2. Verify you are on the Element List View tab.
3. Click on the application you want to edit.
Sentinel SuperPro 6.5 Developer’s Guide 177
Chapter 6 - Protecting Your Application
4. Click Edit. Each step of the Element Definition Wizard appears as it did when you first created the protected application.
5. Make your changes as necessary, clicking Next to move through each step of the wizard.
Deleting an Application Protection Element
In addition to editing an application element, you can also remove the appli-cation from your protection strategy. Be sure you want to remove the application from your protection strategy before you complete the following procedure, as you cannot recover an application once it has been deleted—you would need to add the application again as if it was new.
To delete a protected application:
1. Navigate to the Design stage.
2. Verify you are on the Element List View tab.
3. Click on the application you want to delete.
4. Click Delete.
5. You are asked if you want to confirm the deletion. Click Yes.
The application is deleted from your protection strategy.
Note: If you have edited or deleted a protected application after you have com-pleted the Prototype stage, you must complete the Prototype stage again before you can continue to the Implementation or Make Keys stages.
Where to Go from Here
When you have finished adding all the applications you want to protect as part of this strategy, you are ready to continue to the next step.
178 Sentinel SuperPro 6.5 Developer’s Guide
Chapter 6 - Protecting Your Application
To add custom elements, such as algorithms, counters and data words, to your protection strategy, go to Chapter 7, “Working With Design Elements,” on page 185.
Otherwise, go to Chapter 8, “Implementing Your Strategy,” on page 205 to continue.
Sentinel SuperPro 6.5 Developer’s Guide 179
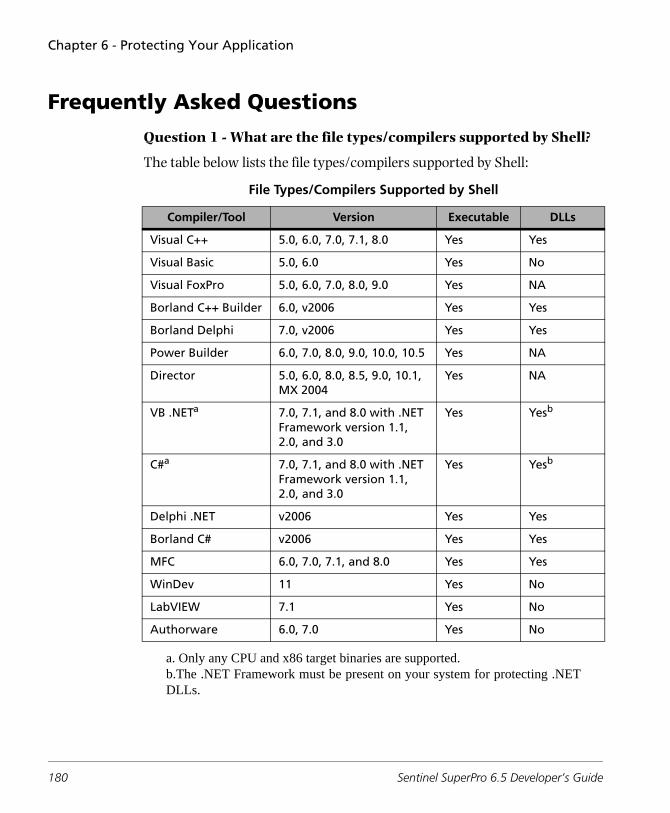
Chapter 6 - Protecting Your Application
Frequently Asked Questions
Question 1 - What are the file types/compilers supported by Shell?
The table below lists the file types/compilers supported by Shell:
File Types/Compilers Supported by Shell
Compiler/Tool Version Executable DLLs
Visual C++ 5.0, 6.0, 7.0, 7.1, 8.0 Yes Yes
Visual Basic 5.0, 6.0 Yes No
Visual FoxPro 5.0, 6.0, 7.0, 8.0, 9.0 Yes NA
Borland C++ Builder 6.0, v2006 Yes Yes
Borland Delphi 7.0, v2006 Yes Yes
Power Builder 6.0, 7.0, 8.0, 9.0, 10.0, 10.5 Yes NA
Director 5.0, 6.0, 8.0, 8.5, 9.0, 10.1, MX 2004
Yes NA
VB .NETa
a. Only any CPU and x86 target binaries are supported.
7.0, 7.1, and 8.0 with .NET Framework version 1.1, 2.0, and 3.0
Yes Yesb
b.The .NET Framework must be present on your system for protecting .NETDLLs.
C#a 7.0, 7.1, and 8.0 with .NET Framework version 1.1, 2.0, and 3.0
Yes Yesb
Delphi .NET v2006 Yes Yes
Borland C# v2006 Yes Yes
MFC 6.0, 7.0, 7.1, and 8.0 Yes Yes
WinDev 11 Yes No
LabVIEW 7.1 Yes No
Authorware 6.0, 7.0 Yes No
180 Sentinel SuperPro 6.5 Developer’s Guide
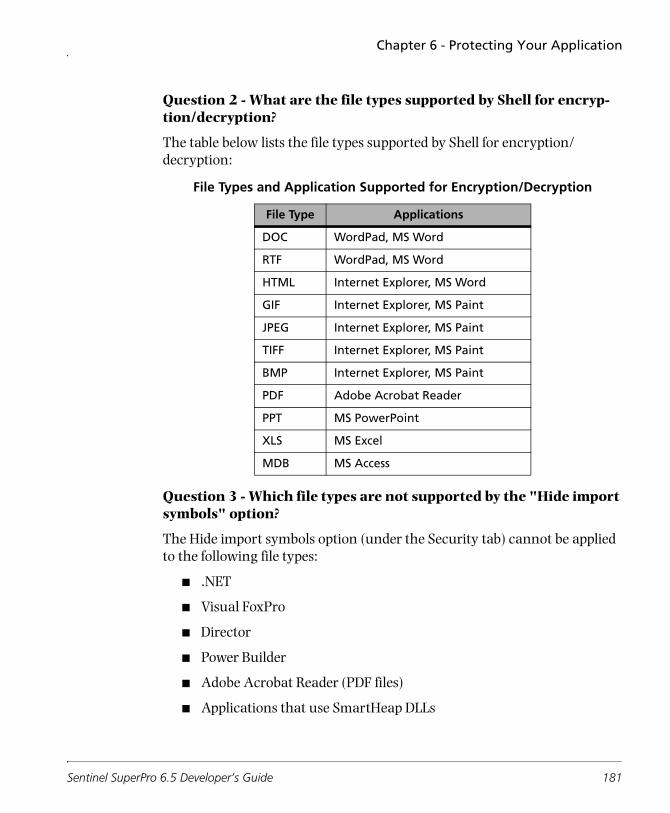
Chapter 6 - Protecting Your Application
Question 2 - What are the file types supported by Shell for encryp-tion/decryption?
The table below lists the file types supported by Shell for encryption/decryption:
Question 3 - Which file types are not supported by the "Hide import symbols" option?
The Hide import symbols option (under the Security tab) cannot be applied to the following file types:
■ .NET
■ Visual FoxPro
■ Director
■ Power Builder
■ Adobe Acrobat Reader (PDF files)
■ Applications that use SmartHeap DLLs
File Types and Application Supported for Encryption/Decryption
File Type Applications
DOC WordPad, MS Word
RTF WordPad, MS Word
HTML Internet Explorer, MS Word
GIF Internet Explorer, MS Paint
JPEG Internet Explorer, MS Paint
TIFF Internet Explorer, MS Paint
BMP Internet Explorer, MS Paint
PDF Adobe Acrobat Reader
PPT MS PowerPoint
XLS MS Excel
MDB MS Access
Sentinel SuperPro 6.5 Developer’s Guide 181

Chapter 6 - Protecting Your Application
■ When you are also using data file encryption option
Question 4 - Can I protect .NET DLLs using Shell? Are there any pre-requisites for protecting .NET DLLs?
Yes. You can protect both .NET executables and DLLs using Shell. However, .NET Framework 1.1 or later needs to be installed to protect .NET Frame-work 1.0 or 1.1 based-DLLs and .NET Framework 2.0 or later needs to be installed to protect .NET Framework 2.0 or 3.0 based-DLLs.
Please note that an exception may occur while executing a (32-bit) .NET Framework 2.0 or 3.0 DLL, protected using Shell. To avoid this, please use any of the following methods with the executable calling this DLL:
■ Select x86 configuration at the build time.
■ Use the CorFlags Conversion tool to modify the binary (Type CorFlags theApp.exe /32bit+ in the command prompt and press Enter).
The prerequisite to use .NET enhancement feature (to shell .NET applica-tion using .NET Enhancements) is that the machine should have the same version of .NET Framework and .NET SDK installed.The mixed code applications are not supported with the .NET Enhancement option.
Question 5 - Why do .NET applications protected using Shell meth-ods fail to run if it is signed with strong names?
Shelling .NET applications, signed with strong names, is not supported.
Question 6 - Why do .NET applications protected using Shell meth-ods fail to run if it uses XML serialization? The problem exists in .NET EXEs only.
If .NET EXEs is targeting .NET 2.0, the problem can be resolved if before shelling the .NET exe, developers can use XML Serializer Generator Tool (Sgen.exe1) to create an XML serialization assembly for types in the .NET exe.
1.The sgen.exe utility can be found in "Program Files\Microsoft Visual Studio 8\SDK\v2.0\Bin" folder of Visual Studio Installation.
182 Sentinel SuperPro 6.5 Developer’s Guide
Chapter 6 - Protecting Your Application
Follow the following series of steps:
1. Assuming that the unshelled exe is TestKey.exe, run sgen TestKey.exe in command prompt.This creates TestKey.XmlSerializers.dll in the same folder.
2. Now Shell the exe and copy paste the .XMLSerializers.dll generated in step 1 to the same folder where the shelled exe is located.
3. Running the Shelled exe now should execute it fine.
Question 7 - Why do Vista applications that require .mui files fail to run when protected using Shell methods?
These protected files on Vista need .mui2 files to execute. These .mui files are stored inside the default language folder (for example, en-US for an English version) that must be placed at a location where the protected executable resides. For example, for an English version of vista, if the protected Notepad.exe resides in C:\ protected then the .mui files must reside at the same location inside the en-US folder. Please check for the .mui files, located at the location as advised in the example.
Question 8 - Are there any special files to be distributed to the end user for applications protected using the .NET enhancement feature.
■ The following dlls should be distributed to end users:
❑ RelLic.dll (when executables are protected): Rellic.dll is required for releasing license for executable. When Rellic.dll is not present with the protected application then license will not be released.
❑ SDNPro.dll (when .NET enhancement option is selected during protection): If SDNPro.dll is not present with the application protected (using .NET enhancement option) then protected application will not execute and an error will be displayed that SDNPro.dll is missing.
2.Files required for language and region settings.
Sentinel SuperPro 6.5 Developer’s Guide 183

Chapter 6 - Protecting Your Application
Question 9 - How can I rebuild the original C++ builder DLL if the shelled C++ builder DLL crashes during unload?
You can rebuild the original DLL and also prevent the crash to occur again by following the steps mentioned below:
1. Press the Release button on the Compiler tab.
2. On the Linker tab, the following options need to be unchecked:
❑ Create debug information
❑ Use dynamic RTL
❑ Use debug libraries
You may protect the rebuilt DLL again.
184 Sentinel SuperPro 6.5 Developer’s Guide
Chapter 7Working With Design Elements
In addition to adding application protection to your protection strategy, you can also add individual design elements, such as algorithms with counters and passwords, individual counters, sublicense limits, and data words that contain data you want to store on the key, such as serial numbers or user data.
These custom elements are added to your strategy through the Element Def-inition Wizard, similar to how you added application protection to your strategy, making it easy to customize your protection strategy.
Note: If you add custom elements, the SSP Toolkit cannot generate the API pseudocode for you. You must write the API calls required to use the values programmed into your keys yourself.
This chapter covers the following topics:
■ Types of elements you can add
■ Adding algorithms, counters, sublicense limits or data words
■ Editing an existing element
■ Deleting an element
Sentinel SuperPro 6.5 Developer’s Guide 185
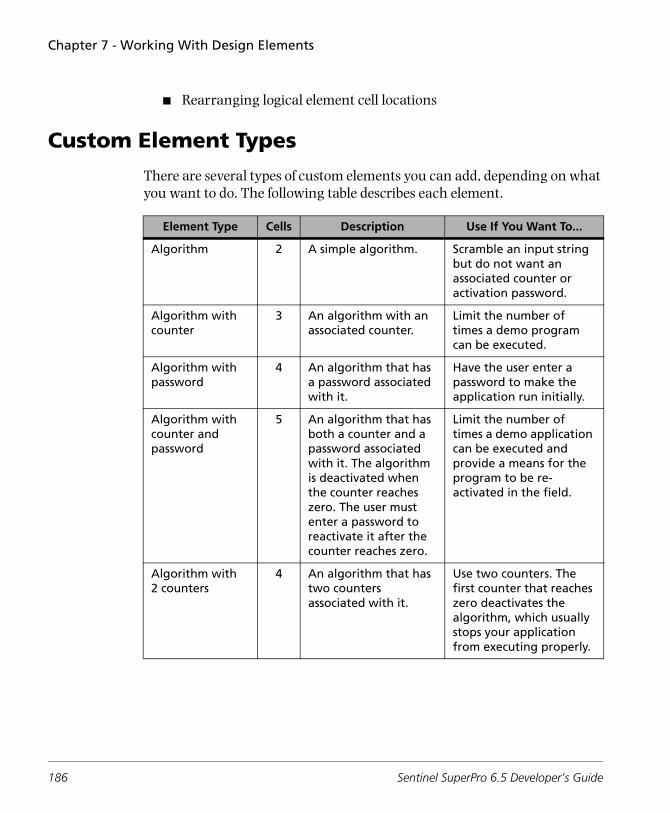
Chapter 7 - Working With Design Elements
■ Rearranging logical element cell locations
Custom Element Types
There are several types of custom elements you can add, depending on what you want to do. The following table describes each element.
Element Type Cells Description Use If You Want To...
Algorithm 2 A simple algorithm. Scramble an input string but do not want an associated counter or activation password.
Algorithm with counter
3 An algorithm with an associated counter.
Limit the number of times a demo program can be executed.
Algorithm with password
4 An algorithm that has a password associated with it.
Have the user enter a password to make the application run initially.
Algorithm with counter and password
5 An algorithm that has both a counter and a password associated with it. The algorithm is deactivated when the counter reaches zero. The user must enter a password to reactivate it after the counter reaches zero.
Limit the number of times a demo application can be executed and provide a means for the program to be re-activated in the field.
Algorithm with 2 counters
4 An algorithm that has two counters associated with it.
Use two counters. The first counter that reaches zero deactivates the algorithm, which usually stops your application from executing properly.
186 Sentinel SuperPro 6.5 Developer’s Guide

Chapter 7 - Working With Design Elements
For more information on when to use custom elements, refer to Chapter 3, “Designing Your Protection Strategy,” on page 59.
Algorithm with 2 counters and password
6 An algorithm that has two counters and a password.
Implement an algorithm that is to be deactivated when either counter reaches zero. The user must enter a password to activate or reactivate the application.
Counter 1 A cell that contains a value you can decrement.
Limit the number of times a demo program can be run, or count the number of times any particular operation is performed.
User data 1 A cell that contains a value your application can test (and change) during execution.If the cell is locked, the value is read-only; your application can read the stored data but cannot change it without the overwrite passwords.
Store a serial number, feature control code or other data you define.
Sublicense 1 A cell that contains a value you select as a sublicense limit.
Restrict the license limit for this application to something less than the hard limit already programmed into the key.
Element Type Cells Description Use If You Want To...
Sentinel SuperPro 6.5 Developer’s Guide 187
Chapter 7 - Working With Design Elements
Adding Algorithms
To add a custom algorithm to your protection strategy:
1. Navigate to the Design stage.
2. Verify you are on the Element List View tab.
3. Select Custom Element, then click Next.
4. Select the type of algorithm you want to add, then click Next.
5. In the Name field, enter a name for this algorithm. There is a 16-character limit for element names.
Tip: This name will be used throughout the SSP Toolkit to identify this algorithm, so be sure it adequately describes it.
6. In the Comments field, enter any additional information about the algorithm you want to save. This field is optional.
7. Click Next.
The following screen appears (the number of counters and passwords depends on the type of algorithm you selected in step 5):
188 Sentinel SuperPro 6.5 Developer’s Guide
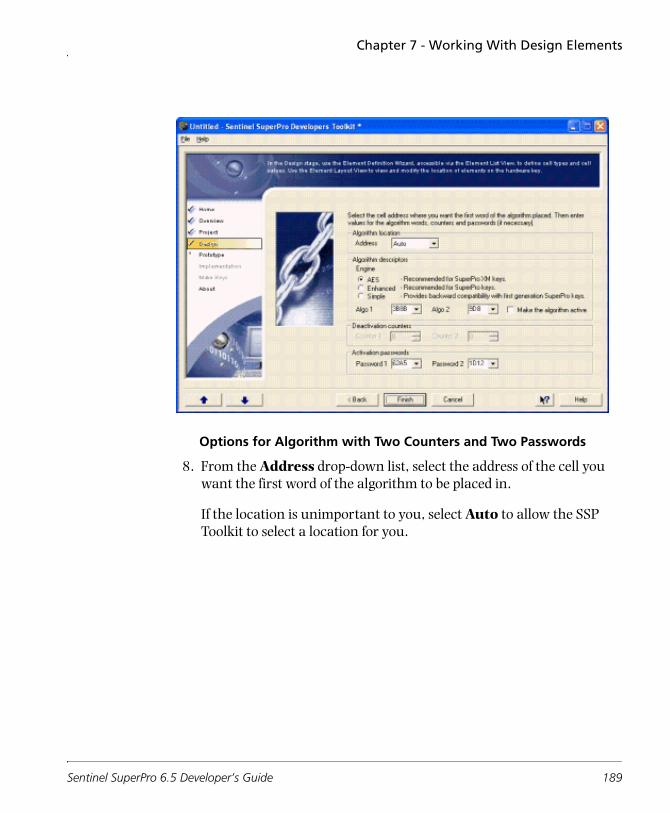
Chapter 7 - Working With Design Elements
Options for Algorithm with Two Counters and Two Passwords
8. From the Address drop-down list, select the address of the cell you want the first word of the algorithm to be placed in.
If the location is unimportant to you, select Auto to allow the SSP Toolkit to select a location for you.
Sentinel SuperPro 6.5 Developer’s Guide 189
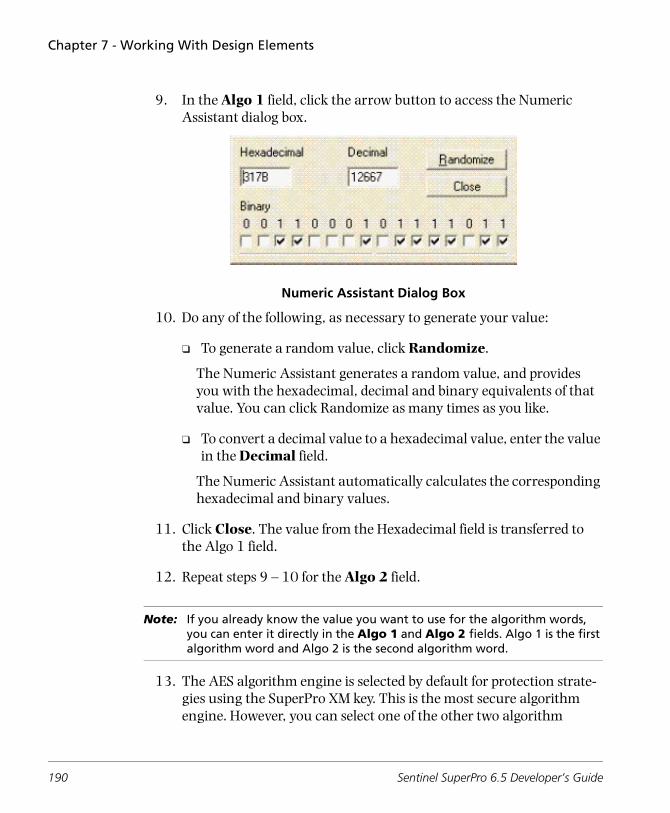
Chapter 7 - Working With Design Elements
9. In the Algo 1 field, click the arrow button to access the Numeric Assistant dialog box.
Numeric Assistant Dialog Box
10. Do any of the following, as necessary to generate your value:
❑ To generate a random value, click Randomize.
The Numeric Assistant generates a random value, and provides you with the hexadecimal, decimal and binary equivalents of that value. You can click Randomize as many times as you like.
❑ To convert a decimal value to a hexadecimal value, enter the value in the Decimal field.
The Numeric Assistant automatically calculates the corresponding hexadecimal and binary values.
11. Click Close. The value from the Hexadecimal field is transferred to the Algo 1 field.
12. Repeat steps 9 – 10 for the Algo 2 field.
Note: If you already know the value you want to use for the algorithm words, you can enter it directly in the Algo 1 and Algo 2 fields. Algo 1 is the first algorithm word and Algo 2 is the second algorithm word.
13. The AES algorithm engine is selected by default for protection strate-gies using the SuperPro XM key. This is the most secure algorithm engine. However, you can select one of the other two algorithm
190 Sentinel SuperPro 6.5 Developer’s Guide
Chapter 7 - Working With Design Elements
engines (Enhanced and Simple) if desired for backward compatibility with previous protection strategies.
The Enhanced algorithm engine is selected by default for protection strategies using the SuperPro key. This is the most secure algorithm engine for that key type. The AES algorithm engine is unavailable in SuperPro keys, however, you may select the Simple algorithm engine if desired for backward compatibility reasons.
14. If you want to make this algorithm active, select the Make the algo-rithm active check box. Clear the check box to make the algorithm inactive.
If the algorithm is active, the application will be ready to run when shipped to your customer. If the algorithm is inactive, the application will not run until it is activated in the field, by the user entering the appropriate activation passwords.
15. Do one of the following:
❑ If the algorithm you selected has one or more counters associated with it, go to the next section.
❑ If the algorithm you selected has a password, but no counters, go to “Entering Password Values” on page 192.
❑ If the algorithm you selected has neither a password, nor a counter associated with it, click Finish.
Algorithm definition is complete, and you are returned to the Ele-ment List View tab, where the algorithm appears in the list.
Entering Counter Values
If the algorithm you selected has one or more counters associated with it, you need to define the starting values for each counter.
1. In the Counter field, enter a number representing the starting value of the counter.
Sentinel SuperPro 6.5 Developer’s Guide 191
Chapter 7 - Working With Design Elements
For example, if you want to use the counter to control a demo applica-tion’s executions, and you enter 5, the application can be run five times. The sixth time the user tries to run the application, she will be unable to.
2. Repeat step 1 for the second counter, if applicable.
3. Do one of the following:
❑ If the algorithm you selected also has a password, go to Entering Password Values below.
❑ If the algorithm you selected does not have a password associated with it, click Finish.
Algorithm definition is complete, and you are returned to the Ele-ment List View tab, where the algorithm appears in the list.
Entering Password Values
If the algorithm you selected has a password associated with it, you need to define the password values for each word of the algorithm.
1. In the Password 1 field, click the arrow button to access the Numeric Assistant dialog box, and enter an activation password for the first word of the algorithm.
See page 190 for instructions on using the Numeric Assistant dialog box.
2. Repeat step 1 for the Password 2 field to enter a password for the sec-ond word of the algorithm.
3. Click Finish.
Algorithm definition is complete, and you are returned to the Element List View tab, where the algorithm appears in the list.
192 Sentinel SuperPro 6.5 Developer’s Guide
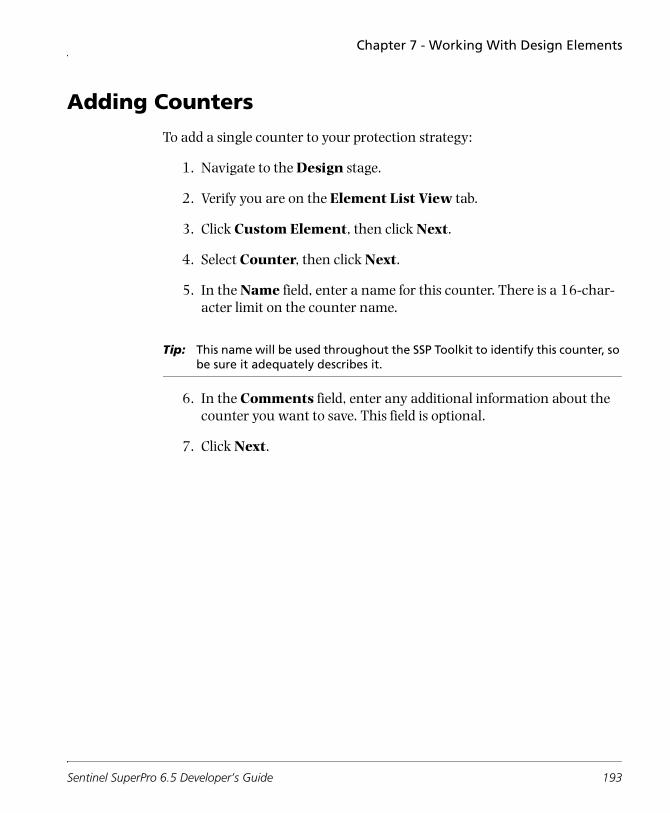
Chapter 7 - Working With Design Elements
Adding Counters
To add a single counter to your protection strategy:
1. Navigate to the Design stage.
2. Verify you are on the Element List View tab.
3. Click Custom Element, then click Next.
4. Select Counter, then click Next.
5. In the Name field, enter a name for this counter. There is a 16-char-acter limit on the counter name.
Tip: This name will be used throughout the SSP Toolkit to identify this counter, so be sure it adequately describes it.
6. In the Comments field, enter any additional information about the counter you want to save. This field is optional.
7. Click Next.
Sentinel SuperPro 6.5 Developer’s Guide 193
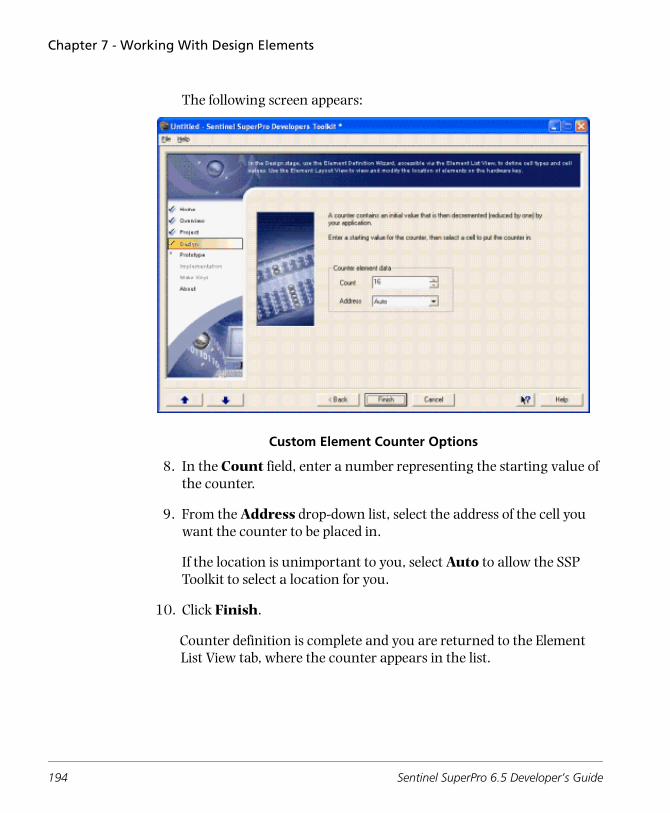
Chapter 7 - Working With Design Elements
The following screen appears:
Custom Element Counter Options
8. In the Count field, enter a number representing the starting value of the counter.
9. From the Address drop-down list, select the address of the cell you want the counter to be placed in.
If the location is unimportant to you, select Auto to allow the SSP Toolkit to select a location for you.
10. Click Finish.
Counter definition is complete and you are returned to the Element List View tab, where the counter appears in the list.
194 Sentinel SuperPro 6.5 Developer’s Guide
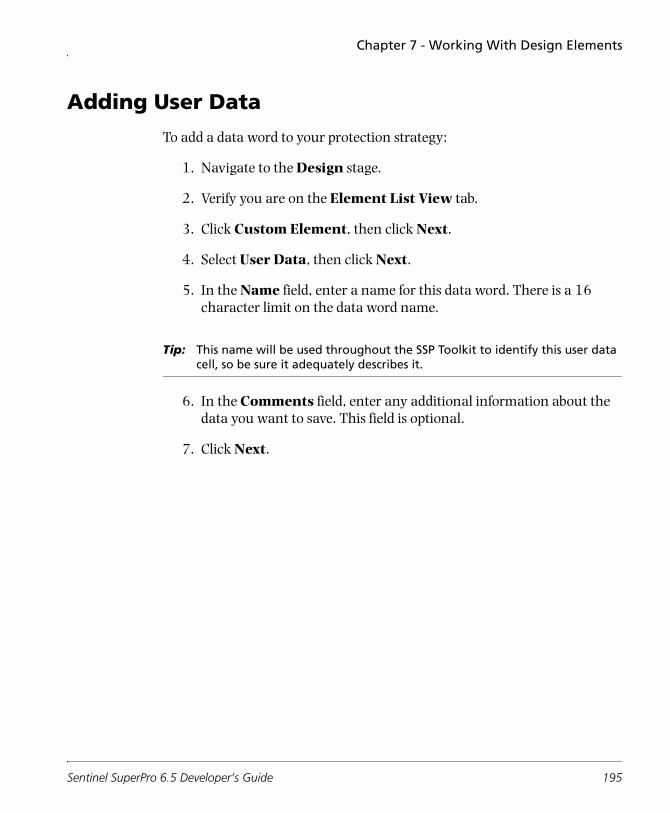
Chapter 7 - Working With Design Elements
Adding User Data
To add a data word to your protection strategy:
1. Navigate to the Design stage.
2. Verify you are on the Element List View tab.
3. Click Custom Element, then click Next.
4. Select User Data, then click Next.
5. In the Name field, enter a name for this data word. There is a 16 character limit on the data word name.
Tip: This name will be used throughout the SSP Toolkit to identify this user data cell, so be sure it adequately describes it.
6. In the Comments field, enter any additional information about the data you want to save. This field is optional.
7. Click Next.
Sentinel SuperPro 6.5 Developer’s Guide 195
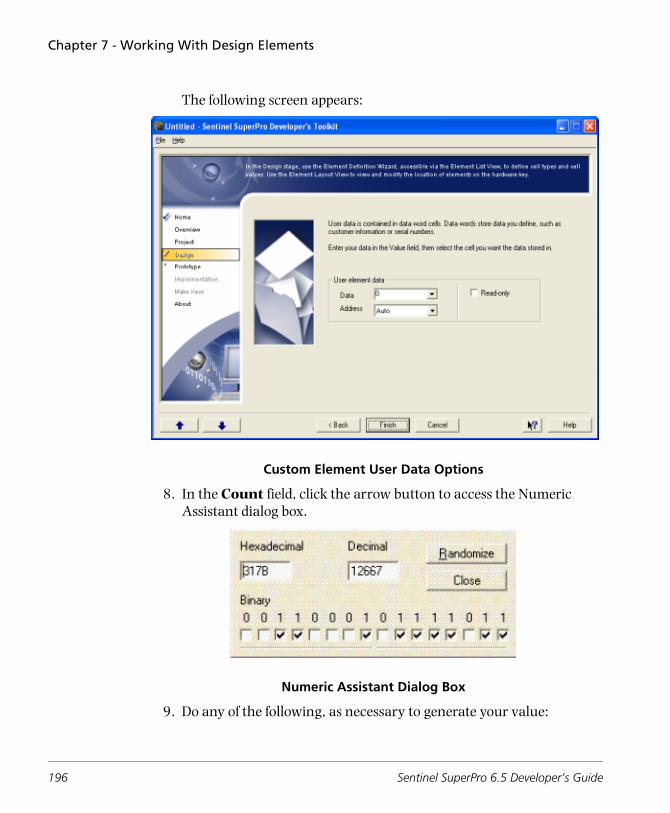
Chapter 7 - Working With Design Elements
The following screen appears:
Custom Element User Data Options
8. In the Count field, click the arrow button to access the Numeric Assistant dialog box.
Numeric Assistant Dialog Box
9. Do any of the following, as necessary to generate your value:
196 Sentinel SuperPro 6.5 Developer’s Guide
Chapter 7 - Working With Design Elements
❑ To generate a random value, click Randomize.
The Numeric Assistant generates a random value, and provides you with the hexadecimal, decimal and binary equivalents of that value. You can click Randomize as many times as you like.
❑ To convert a decimal value to a hexadecimal value, enter the value in the Decimal field.
The Numeric Assistant automatically calculates the correspond-ing hexadecimal and binary values.
Click Close. The value from the Hexadecimal field is transferred to the Count field.
10. From the Address drop-down list, select the address of the cell you want the data to be placed in.
If the location is unimportant to you, select Auto to allow the SSP Toolkit to select a location for you.
11. If you want your application to be able to read this data, but not make changes to it, select the Read-Only check box.
If you leave this check box blank, your application will be able to change the data located in this cell.
12. Click Finish.
Data word definition is complete and you are returned to the Element List View tab, where the data word element appears in the list.
Sentinel SuperPro 6.5 Developer’s Guide 197
Chapter 7 - Working With Design Elements
Adding Sublicense Limits
To add a sublicense limit to your protection strategy:
1. Navigate to the Design stage.
2. Verify you are on the Element List View tab.
3. Click Custom Element, then click Next.
4. Select Sublicense, then click Next.
5. In the Name field, enter a name for this sublicense. There is a 16 character limit on the sublicense name.
Tip: This name will be used throughout the SSP Toolkit to identify this sublicense, so be sure it adequately describes it.
6. In the Comments field, enter any additional information about the sublicense you want to save. This field is optional.
7. Click Next.
198 Sentinel SuperPro 6.5 Developer’s Guide
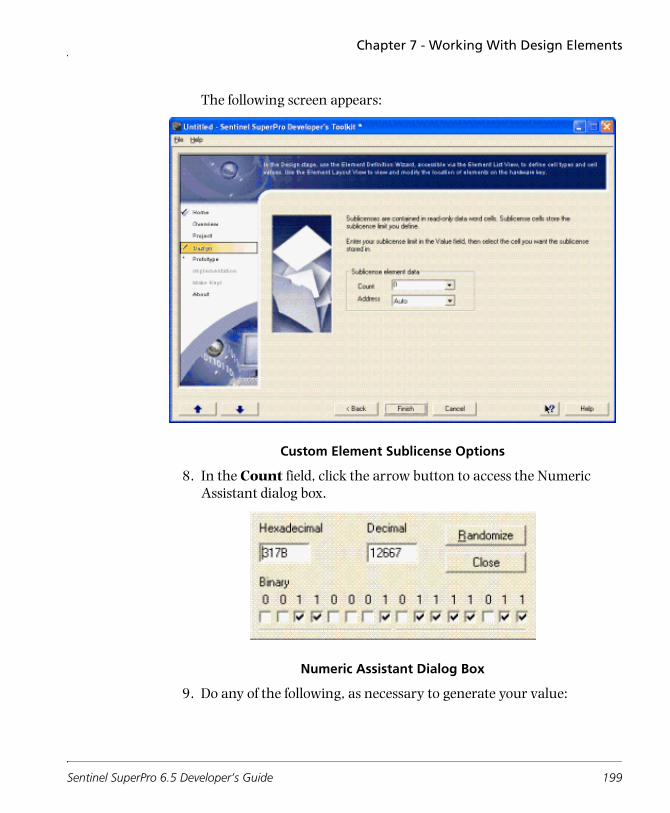
Chapter 7 - Working With Design Elements
The following screen appears:
Custom Element Sublicense Options
8. In the Count field, click the arrow button to access the Numeric Assistant dialog box.
Numeric Assistant Dialog Box
9. Do any of the following, as necessary to generate your value:
Sentinel SuperPro 6.5 Developer’s Guide 199
Chapter 7 - Working With Design Elements
❑ To generate a random value, click Randomize.
The Numeric Assistant generates a random value, and provides you with the hexadecimal, decimal and binary equivalents of that value. You can click Randomize as many times as you like.
❑ To convert a decimal value to a hexadecimal value, enter the value in the Decimal field.
The Numeric Assistant automatically calculates the correspond-ing hexadecimal and binary values.
Click Close. The value from the Hexadecimal field is transferred to the Count field.
10. From the Address drop-down list, select the address of the cell you want the sublicense to be placed in.
If the location is unimportant to you, select Auto to allow the SSP Toolkit to select a location for you.
Note: Sublicense cells are read-only by default.
11. Click Finish.
Sublicense definition is complete and you are returned to the Element List View tab, where the sublicense element appears in the list.
Editing Existing Elements
If you need to make changes to your custom elements, you can edit them at any time. To edit a custom element:
1. Navigate to the Design stage.
2. Verify you are on the Element List View tab.
3. Click on the element you want to edit.
200 Sentinel SuperPro 6.5 Developer’s Guide
Chapter 7 - Working With Design Elements
4. Click Edit. Each step of the Element Definition Wizard appears as it did when you first created the element.
5. Make your changes as necessary, clicking Next to move through each step of the wizard.
Deleting an Element
In addition to editing an element, you can also remove the element from your protection strategy. Be sure you want to remove the element from your protection strategy before you complete the following procedure, as you cannot recover an element once it has been deleted—you would need to add the element again as if it was new.
To delete an element:
1. Navigate to the Design stage.
2. Verify you are on the Element List View tab.
3. Click on the element you want to delete.
4. Click Delete Element.
5. You are asked if you want to confirm the deletion. Click Yes.
The element is deleted from your protection strategy.
Note: If you have edited or deleted an element after you have completed the Prototype stage, you must complete the Prototype stage again before you can continue to the Implementation or Make Keys stages.
Rearranging Elements on the Key
Once you have defined all the elements in your protection strategy, includ-ing application protection elements, you can view where the element cells are located on the key. You can also rearrange the elements in your strategy using the drag-and-drop method.
Sentinel SuperPro 6.5 Developer’s Guide 201
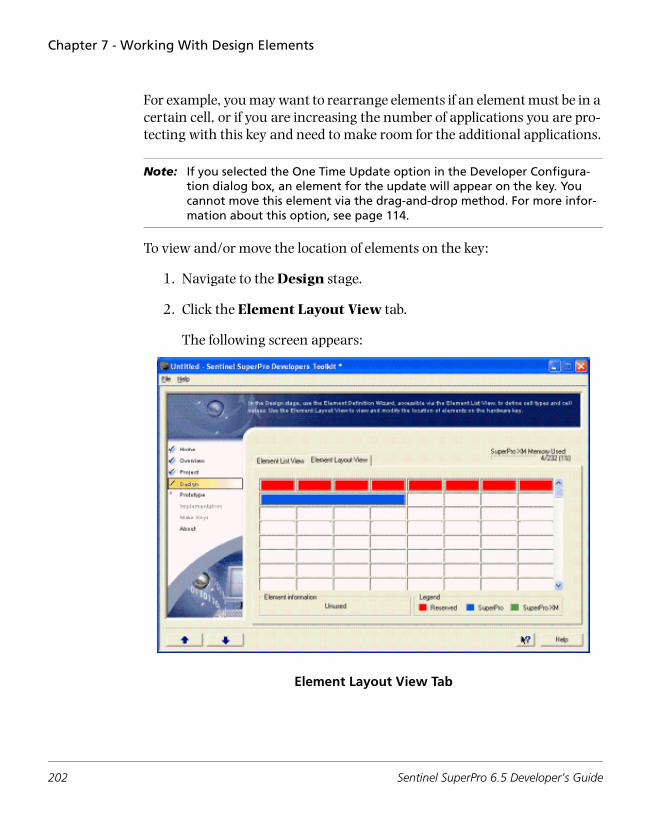
Chapter 7 - Working With Design Elements
For example, you may want to rearrange elements if an element must be in a certain cell, or if you are increasing the number of applications you are pro-tecting with this key and need to make room for the additional applications.
Note: If you selected the One Time Update option in the Developer Configura-tion dialog box, an element for the update will appear on the key. You cannot move this element via the drag-and-drop method. For more infor-mation about this option, see page 114.
To view and/or move the location of elements on the key:
1. Navigate to the Design stage.
2. Click the Element Layout View tab.
The following screen appears:
Element Layout View Tab
202 Sentinel SuperPro 6.5 Developer’s Guide
Chapter 7 - Working With Design Elements
3. Move your cursor over the cells to view the name of the element located in the cell.
4. Click and drag an element to move it to a new location on the key.
You cannot move an element to an illegal location on the key. Review “Valid Algorithm Addresses” on page 37 for more information on valid addresses for algorithms and counters.
Warning! If you move a counter to the immediate left of an algorithm, the counter will function as an algorithm counter. When the counter reaches zero, the algorithm will be deactivated, even if you did not intend for that to happen.
Sentinel SuperPro 6.5 Developer’s Guide 203
Chapter 7 - Working With Design Elements
204 Sentinel SuperPro 6.5 Developer’s Guide
Chapter 8Implementing Your Strategy
The Sentinel SuperPro 6.5 Toolkit provides the facility to design and program the SuperPro and SuperPro XM keys. It enables the devel-oper to design a strategy of upto the maximum key size (232) that is supported by the Toolkit (available only in case of SuperPro XM keys).
One key can be programmed to provide several different types of both fixed and variable responses, giving you many variations in the types of software locks you can create.
For example, cells can be used to store fixed user data, such as serial numbers, user names or codes controlling feature access. Such data can be read by your application to verify the key is still attached or to perform some other function. You can also use stored data to control program flow or application functions.
Cells can also store algorithms used to scramble query codes sent by your application. Other cells can be programmed as counters used to restrict the number of executions. While the first 8 cells are reserved for system information, in both SuperPro and SuperPro XM keys, the
Sentinel SuperPro 6.5 Developer’s Guide 205

Chapter 8 - Implementing Your Strategy
rest can be used in any desired way (see table below).
When you have finished designing your protection strategy—all your design elements are in place and you have defined what type of application protection to use—you are ready to implement your strategy.
The first step in implementing your strategy is to create a prototype hard-ware key. During the prototyping, the SSP Toolkit writes your protection strategy elements to the key, generates query/response pairs, adds default field activation actions, and generates pseudocode.
The second (optional) step is to verify the key was programmed correctly by viewing the cell values in MemView.
The last step in implementing your strategy is to add the appropriate API function calls to your source code, either manually if you are using inte-grated protection, or by “shelling” your application if you selected automatic protection.
This chapter covers the following topics:
• Creating the prototype
• Verifying the key using MemView
• Shelling an application
• Adding API functions to your source code
Key Type/Key Size Reserved for SafeNet’s use
Available for Cus-tomer
SuperPro (64 cells) First 8 56
SuperPro XM (256 cells) First 8 & last 16 = 24
232
206 Sentinel SuperPro 6.5 Developer’s Guide

Chapter 8 - Implementing Your Strategy
Creating the Prototype
When you create a prototype of your protection strategy, you are actually programming a master key with all of the elements you previously defined as part of your protection strategy.
Only those cells containing an element are overwritten; the more elements you have in your strategy, the longer the prototype process takes. Any cells that are not used in your strategy, but were previously programmed are left alone.
Note: If you delete an element from your strategy, and then repeat the prototype process, when you view the key using MemView, it may look like the element is still there. This is because when you prototype a key, it skips any unassigned cells. Since the cells from the element you deleted are now unassigned, they weren’t overwritten, and thus still contain the values from the previous prototype. Despite this, the element has been deleted and is not pro-grammed into the key.
During prototyping, after the key is programmed, Sentinel SuperPro also performs the following functions:
• Generates query/response pairs for each application included in your strategy. Queries are used to verify the presence of the key while your application is running. Random query values—and lots of them—in your code makes your application more secure. You can view the query/response pairs in the pseudocode; see “Viewing the Pseudocode” on page 211.
• Defines default field activation actions and commands. If any of the applications or custom element algorithms in your strategy use the activation type Static, Trusted or Distributed, Sentinel SuperPro creates a default action and command for activating the application in the field. See “Working with Actions” on page 222 for more information.
• Generates a pseudocode protection plan. The pseudocode protection plan outlines the API functions you need to add to your application (if you are using integrated protection), as well as
Sentinel SuperPro 6.5 Developer’s Guide 207
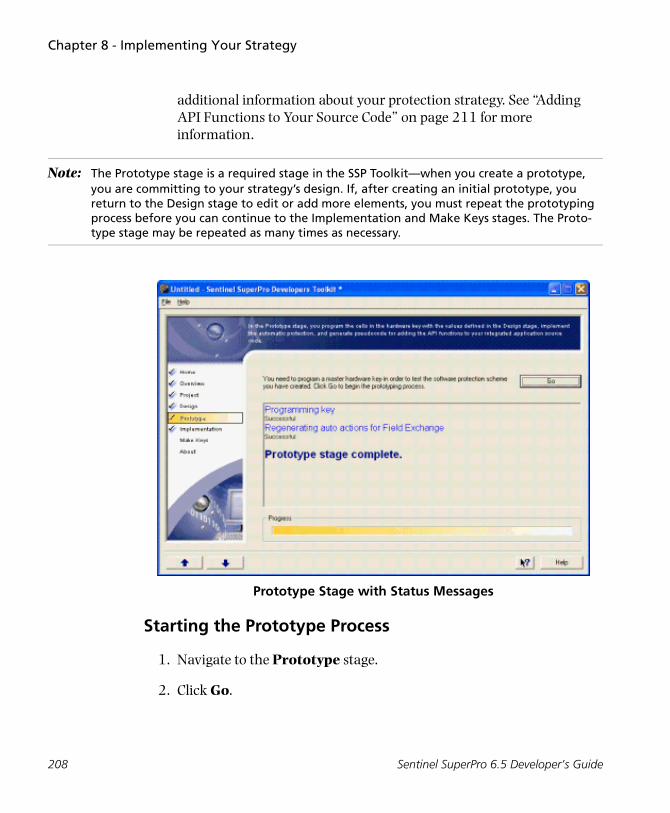
Chapter 8 - Implementing Your Strategy
additional information about your protection strategy. See “Adding API Functions to Your Source Code” on page 211 for more information.
Note: The Prototype stage is a required stage in the SSP Toolkit—when you create a prototype, you are committing to your strategy’s design. If, after creating an initial prototype, you return to the Design stage to edit or add more elements, you must repeat the prototyping process before you can continue to the Implementation and Make Keys stages. The Proto-type stage may be repeated as many times as necessary.
Prototype Stage with Status Messages
Starting the Prototype Process
1. Navigate to the Prototype stage.
2. Click Go.
208 Sentinel SuperPro 6.5 Developer’s Guide
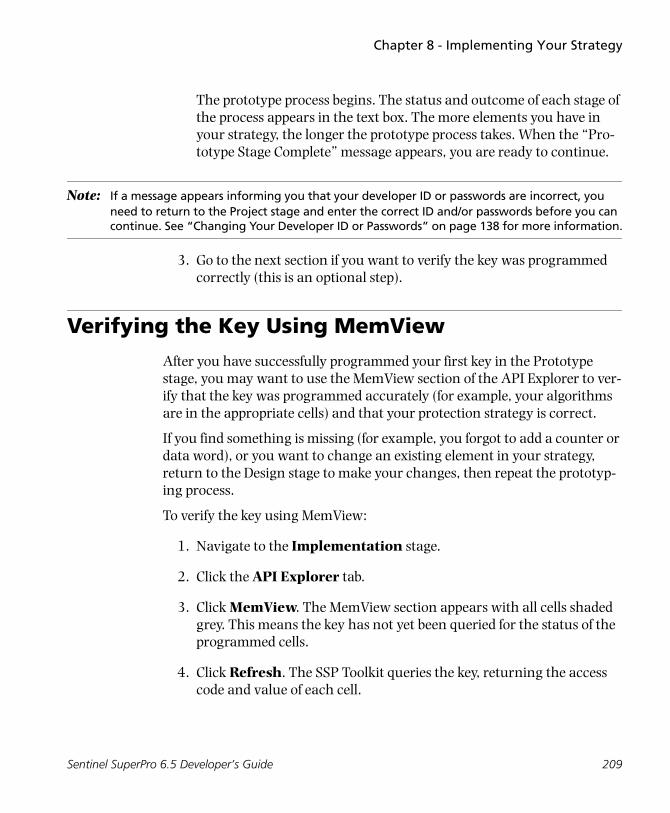
Chapter 8 - Implementing Your Strategy
The prototype process begins. The status and outcome of each stage of the process appears in the text box. The more elements you have in your strategy, the longer the prototype process takes. When the “Pro-totype Stage Complete” message appears, you are ready to continue.
Note: If a message appears informing you that your developer ID or passwords are incorrect, you need to return to the Project stage and enter the correct ID and/or passwords before you can continue. See “Changing Your Developer ID or Passwords” on page 138 for more information.
3. Go to the next section if you want to verify the key was programmed correctly (this is an optional step).
Verifying the Key Using MemView
After you have successfully programmed your first key in the Prototype stage, you may want to use the MemView section of the API Explorer to ver-ify that the key was programmed accurately (for example, your algorithms are in the appropriate cells) and that your protection strategy is correct.
If you find something is missing (for example, you forgot to add a counter or data word), or you want to change an existing element in your strategy, return to the Design stage to make your changes, then repeat the prototyp-ing process.
To verify the key using MemView:
1. Navigate to the Implementation stage.
2. Click the API Explorer tab.
3. Click MemView. The MemView section appears with all cells shaded grey. This means the key has not yet been queried for the status of the programmed cells.
4. Click Refresh. The SSP Toolkit queries the key, returning the access code and value of each cell.
Sentinel SuperPro 6.5 Developer’s Guide 209
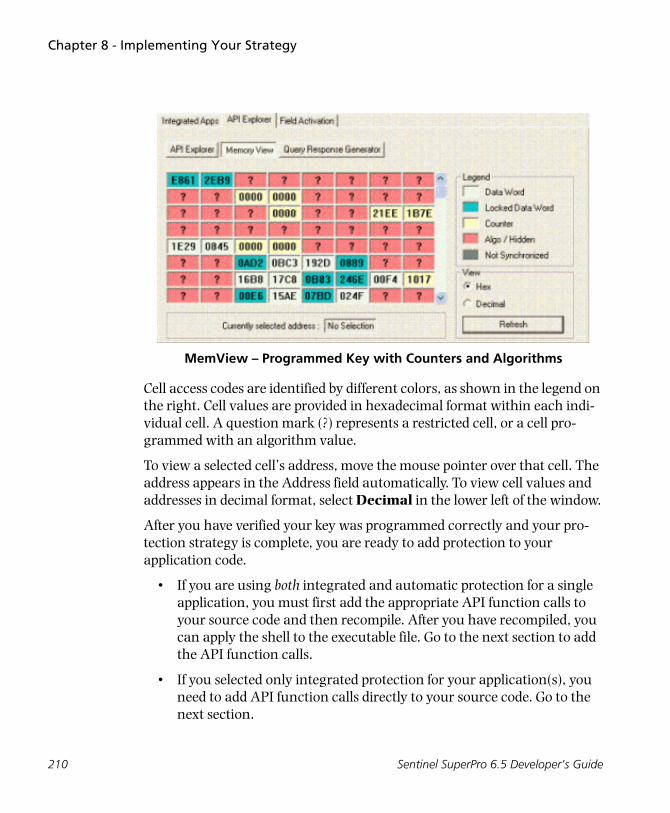
Chapter 8 - Implementing Your Strategy
MemView – Programmed Key with Counters and Algorithms
Cell access codes are identified by different colors, as shown in the legend on the right. Cell values are provided in hexadecimal format within each indi-vidual cell. A question mark (?) represents a restricted cell, or a cell pro-grammed with an algorithm value.
To view a selected cell’s address, move the mouse pointer over that cell. The address appears in the Address field automatically. To view cell values and addresses in decimal format, select Decimal in the lower left of the window.
After you have verified your key was programmed correctly and your pro-tection strategy is complete, you are ready to add protection to your application code.
• If you are using both integrated and automatic protection for a single application, you must first add the appropriate API function calls to your source code and then recompile. After you have recompiled, you can apply the shell to the executable file. Go to the next section to add the API function calls.
• If you selected only integrated protection for your application(s), you need to add API function calls directly to your source code. Go to the next section.
210 Sentinel SuperPro 6.5 Developer’s Guide
Chapter 8 - Implementing Your Strategy
• If you selected only automatic protection for your application(s), go to “Shelling an Application” on page 215.
Adding API Functions to Your Source Code
If you are using integrated protection for your application, you must manu-ally add the appropriate API function calls to your application’s source code in order to implement your protection strategy. The SSP Toolkit provides you with pseudocode that tells you what functions you need to add to your code.
Note: If you are using only automatic (“shelled”) protection for your application, the appropriate API functions are added during the shell process. You do not need to manually add API func-tion calls to your application source code. Go to “Shelling an Application” on page 215.
Viewing the Pseudocode
The pseudocode protection plan generated by the SSP Toolkit outlines your protection strategy. You can display this information within the Implemen-tation stage, or you can save it as a file to your hard drive, where you can then open it in any text editor to view, edit or print out. Pseudocode is pro-vided for the most frequently used development languages: ANSI C, Visual Basic and Pascal.
Warning! The pseudocode protection plan contains your developer ID and passwords—make sure you keep it secure!
To view the pseudocode for your development language:
1. Navigate to the Implementation stage.
2. Click the Integrated Apps tab.
3. From the drop-down list, select the application you want to view the pseudocode protection plan for.
Sentinel SuperPro 6.5 Developer’s Guide 211
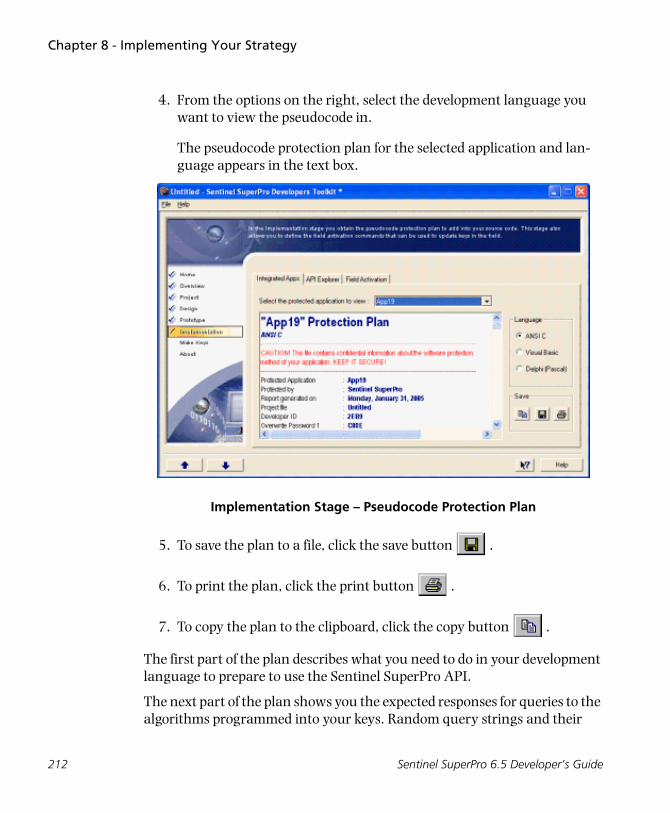
Chapter 8 - Implementing Your Strategy
4. From the options on the right, select the development language you want to view the pseudocode in.
The pseudocode protection plan for the selected application and lan-guage appears in the text box.
Implementation Stage – Pseudocode Protection Plan
5. To save the plan to a file, click the save button .
6. To print the plan, click the print button .
7. To copy the plan to the clipboard, click the copy button .
The first part of the plan describes what you need to do in your development language to prepare to use the Sentinel SuperPro API.
The next part of the plan shows you the expected responses for queries to the algorithms programmed into your keys. Random query strings and their
212 Sentinel SuperPro 6.5 Developer’s Guide

Chapter 8 - Implementing Your Strategy
corresponding response strings (generated during the Prototype stage) are included, even for applications that are designated as inactive. You may wish to copy this section from the plan and paste it into your source code.
The query section is followed by pseudocode for the API function calls required to implement your protection strategy.
Adding Code to Your Application
To add API function calls to your application code, look at the example code provided for your development language. This code is available from the Sentinel SuperPro installation Web site.
The example file shows the exact syntax for each Sentinel SuperPro API function. Referring to the example, add the function calls specified in the pseudocode file to your application’s source code.
Tip: For more information about Sentinel SuperPro API functions, please refer to Chapter 14, “API Function Reference,” on page 301.
Using the API Explorer to Evaluate the API Functions
If you want to see expected responses, or evaluate the behavior of the API functions with your programmed key prior to putting them in your source code, use the API Explorer.
To test an API function on a selected cell:
1. Navigate to the Implementation stage.
2. Click the API Explorer tab.
3. To evaluate the API function, click API Explorer to access the API Explorer section.
4. From the API function list, select a function. A description of the func-tion appears to the right.
5. Under Parameters, select values for the available parameters.
Sentinel SuperPro 6.5 Developer’s Guide 213
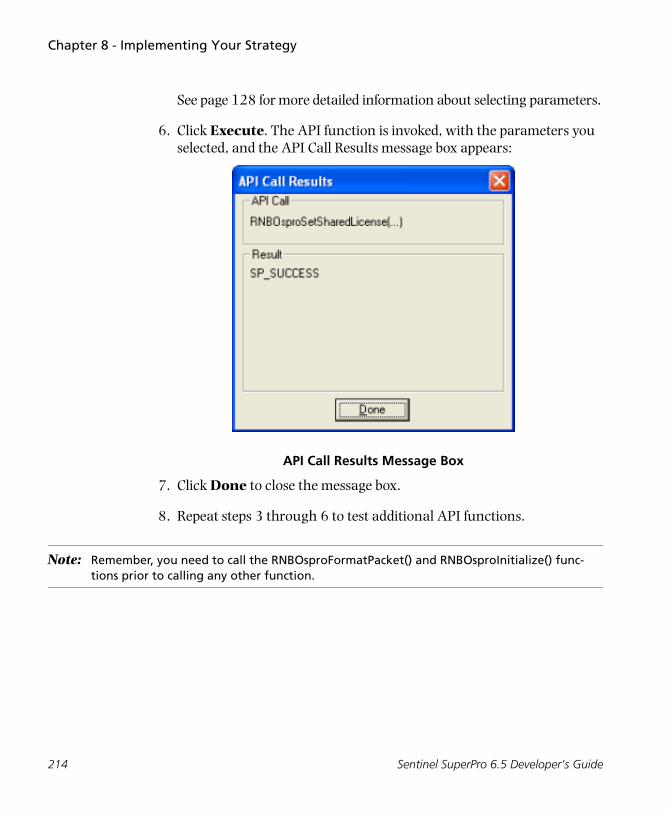
Chapter 8 - Implementing Your Strategy
See page 128 for more detailed information about selecting parameters.
6. Click Execute. The API function is invoked, with the parameters you selected, and the API Call Results message box appears:
API Call Results Message Box
7. Click Done to close the message box.
8. Repeat steps 3 through 6 to test additional API functions.
Note: Remember, you need to call the RNBOsproFormatPacket() and RNBOsproInitialize() func-tions prior to calling any other function.
214 Sentinel SuperPro 6.5 Developer’s Guide
Chapter 8 - Implementing Your Strategy
Shelling an Application
Applications you have defined as using automatic (“shelled”) protection are easy to implement, as all you need to do is click a button to add the protec-tive shell layer to your executable file. Once the shell has been added, all the protection options you defined for the application are in place.
To add the shell to an application:
1. Navigate to the Design stage.
2. In the Element List View tab click on automatic protection and select the type of key whether it is SuperPro or SuperPro XM
Note: You’ll be prompted to select the key type only if you are using the Toolkit for the first time during this session or if you have not already specified the Key type from the check box at the bottom of the screen
3. Enter a name for the element.
4. Select the Show advanced options check box if you want to view advanced options like element location or advanced security settings. Click Next.
5. Enter an Element location in the Address dropdown or click on Auto to allow the Toolkit to select a value automatically.
6. Click on Override Default Algorithm check box. For SuperPro XM strategy by default the AES algorithm option is selected, however, you can choose any of the other two options available (Enhanced and Sim-ple).Whereas for SuperPro strategy by default the Enhanced option is selected, however, you may select simple one also (AES option is dis-abled in this case).
7. Enter values for the Algo 1 field or click the drop down and select Randomize to generate a random value.
Sentinel SuperPro 6.5 Developer’s Guide 215
Chapter 8 - Implementing Your Strategy
8. Repeat Step 5 for Algo 2 field also. Click Next.
9. Select a path for Protected and Unprotected File(s).
10. Select Override Existing file check box and click Next.
11. You must also decide how and where you want your protected applica-tion to access the key. Choose any of the options given below:
• Stand-Alone: The RNBO_STANDALONE access mode is followed.
• Network: This option requires the SuperPro server. The RNBO_SPN_SERVER_MODES access mode is followed, unless a specific server is set in the NSP_HOST environment variable. This is also the default mode.
The priority of the NSP_HOST environment variable over the settings done using the automatic protection wizard in Toolkit is available only with the Network option.
• All Modes: The RNBO_SPN_ALL_MODES access mode is followed.
12. You can also enable license sharing by selecting Enable license shar-ing check box. Selecting the Use Sublicensing check box will enable your application to acquire a single license if more than one requests for opening the protected application originates from the same seat (i.e. a combination of User Name and MAC Address).
13. Customize your protection by enabling any or all of the following:
• Expiration Date
• Execution Control
• Time Control
14. Select Shell Security options for the protected application. Customize your protection by enabling any or all of the following:
• Security Options
• Multi-Layer Level
216 Sentinel SuperPro 6.5 Developer’s Guide
Chapter 8 - Implementing Your Strategy
• Check terminal client
• Hide importsymbols
• Advanced Options
• .NET Enhancement
• Allow my application to run when a debugger is present
• I have used Shell SDK
Note: The Advanced Options are available only if you have selected the Show advanced options check box. Refer to Step 4 on page 215.
15. Select the Encrypt additional files check box. Add some additional files by clicking on Add and browsing the file(s) location.
Note: You may also add or edit the existing files in the list.
16. Enter a value for the Encryption Seed. Select the Overwrite Exist-ing files check box and click Next.
17. Select the activation type you want to use for this application: Active, Static, Trusted or Distributed. Do one of the following:
• If you chose Active, go to step 6.
• If you chose Static and want to override the default activation passwords, select the Override default passwords check box. The activation password fields appear. Go to step 3.
• If you chose Trusted or Distributed, or you chose Static but don’t want to override the default activation passwords, go to step 5.
Note: If you selected Trusted or Distributed, you cannot override the default activation passwords. Unique activation passwords are generated based on the developer ID, serial number and product information. See the table “Sentinel SuperPro Activation Types” on page 60 for more information about the Trusted and Distributed activation types.
Sentinel SuperPro 6.5 Developer’s Guide 217
Chapter 8 - Implementing Your Strategy
18. In the Password 1 field, click the arrow button to access the Numeric Assistant dialog box, and enter an activation password for the first word of the algorithm.
19. Repeat step 3 for the Password 2 field to enter a password for the sec-ond word of the algorithm.
20. Do one of the following:
• If you want to use the Client Activator to develop product-specific activation information for the application, select the Use Client Activator check box, then click Configure to launch the Activation Wizard.
• When you have completed defining your application’s activation information, save your project and close the Activation Wizard to return to the SSP Toolkit.
21. If you don’t want to use the Client Activator, go to the next step.You’ll be able to see a list of Error Messages, clicking on which would display the custom message text. You may change the Custom Mes-sage Text by entering any text.
22. Click on Next, a list displaying your selected strategy will appear, Click on Prototype Now button and your application will be Shelled.
218 Sentinel SuperPro 6.5 Developer’s Guide
Chapter 8 - Implementing Your Strategy
Testing Your Application Protection
At this point, you have defined your protection strategy, programmed a pro-totype hardware key, and added the appropriate code—either manually or via a shell—to protect your application.
Before you continue, we recommend testing your application to verify that it executes correctly with the appropriate hardware key both attached and missing. To do so:
1. Make sure the Sentinel SuperPro hardware key is attached to your computer.
2. Verify the Sentinel Protection server is running on your system.
3. Execute your protected application.
With the key attached, the application should run normally.
4. Exit the application.
5. Remove the Sentinel SuperPro key from your computer.
6. Execute your protected application.
With the key missing, you should be unable to run your application and an error message should appear.
If you have designed your application to be a network application, you may also want to test that your application can find a key located on another computer on the network. To do so:
1. Connect the Sentinel SuperPro hardware key to another computer on the same network as your computer.
2. Start the Sentinel Protection server on the system you connected the key to.
Sentinel SuperPro 6.5 Developer’s Guide 219
Chapter 8 - Implementing Your Strategy
3. On your computer, execute your protected application.
With the key attached to the server, the application should be able to obtain a license and run normally.
4. Use the application for several minutes, to verify that heartbeat mes-sages are being sent appropriately and that you do not receive any time-out errors from the server.
5. With the application still running, go to the server computer and open the Sentinel License Monitor to verify that the key is showing a single license in use.
6. Exit the application.
7. Remove the Sentinel SuperPro key from the server.
8. On your computer, execute your protected application again.
With the key missing from the server, you should be unable to obtain a license and an error message should appear.
If your protected application does not respond as expected in either the stan-dalone or the network scenarios, review your protection strategy for missing elements or errors by rereading Chapters 7 and 8 in this guide. If, after reviewing your strategy, you still need assistance, please contact SafeNet Technical Support. See “Contacting Technical Support” on page xxi for Technical Support contact information.
220 Sentinel SuperPro 6.5 Developer’s Guide
Chapter 9Defining Field Activation Actions
Note: If you are a Linux user, refer to the last section of this chapter “Configuring the SafeCfg Utility for Linux” on page 232 for allowing field activation by configuring the SafeCfg.
To be able to update keys in the field, you need to define the field activation actions and commands that can be performed on those keys within your protection strategy.
Commands are API function calls that describe what will be done to the key in the field. For example, the Decrement Counter command locates the counter cell on the key and decrements it by the value you specify. Actions are groups of one or more commands.
When you generate a license code, the actions and commands you select are encrypted into the license code specific to the selected key. When the license code is entered in the Client Activator or Field Exchange Utility, the actions and commands are applied to the key.
This chapter includes the following topics:
■ Adding actions
■ Adding commands
Sentinel SuperPro 6.5 Developer’s Guide 221
Chapter 9 - Defining Field Activation Actions
■ Available commands
■ Testing your strategy
Working with Actions
Actions are groups of commands. This allows you to group a set of com-mands together so you—or your distributors—don’t have to select the commands individually when generating license codes for field updates. This is especially helpful for those people who will be generating license codes, but don’t need to be exposed to the complexities of the commands being used.
Actions and commands for activating an inactive application (activation type of Static, Trusted or Distributed) are added automatically during the Prototype stage. These actions and commands cannot be changed or deleted, as they are the default means of activating your application.
Automatically added actions and commands can be identified with red asterisks (*) on their icons.
Note: If you selected the Distributed activation type, be sure to add an action and command for incrementing the counter on the distributor key. This will allow you to add more licenses to your distributor’s key in the field.
When you create a .DST file for your distributor, the command for incre-menting the distributor key counter is NOT included. This prevents your distributor from giving himself more update licenses without your approval.
If you change your strategy by returning to the Design stage, these actions and commands are appropriately updated or removed automatically during the Prototype stage.
You must define actions before you can add commands to your protection strategy.
222 Sentinel SuperPro 6.5 Developer’s Guide
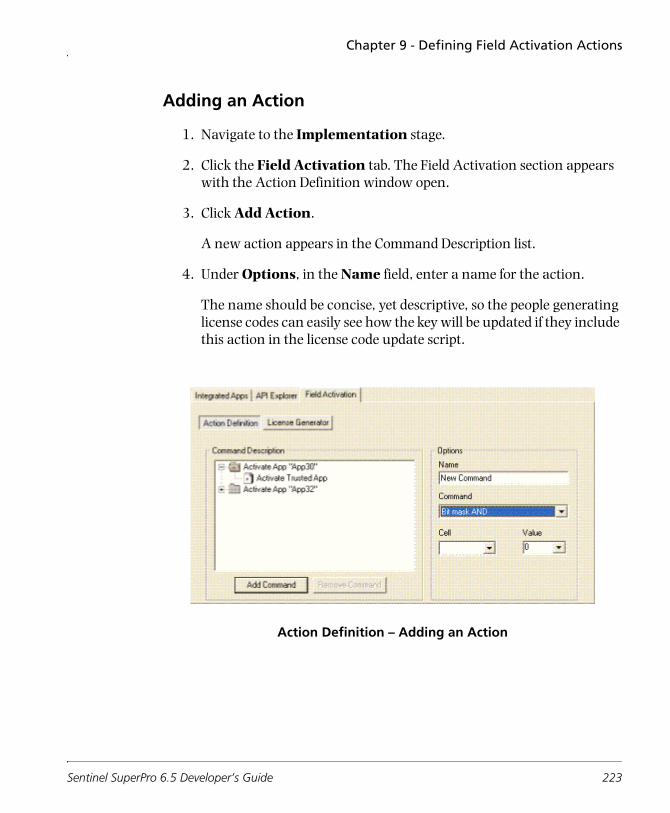
Chapter 9 - Defining Field Activation Actions
Adding an Action
1. Navigate to the Implementation stage.
2. Click the Field Activation tab. The Field Activation section appears with the Action Definition window open.
3. Click Add Action.
A new action appears in the Command Description list.
4. Under Options, in the Name field, enter a name for the action.
The name should be concise, yet descriptive, so the people generating license codes can easily see how the key will be updated if they include this action in the license code update script.
Action Definition – Adding an Action
Sentinel SuperPro 6.5 Developer’s Guide 223
Chapter 9 - Defining Field Activation Actions
Removing an Action
If you no longer want an action in your protection strategy, or you have made a mistake, you can delete actions. To do so:
■ Select the action you want to delete, then click Remove Action.
The action—and all its corresponding commands—is removed from the Command Description list.
Note: You are not asked to confirm the action deletion. Be sure you have selected the right action, and that you want to delete this action perma-nently, before you click Remove Action.
If you have provided your Sentinel SuperPro project file to users who are generating license codes, you need to send a new file to those users after you have removed an action. This prevents them from selecting the action you just removed to update a key in the field.
224 Sentinel SuperPro 6.5 Developer’s Guide
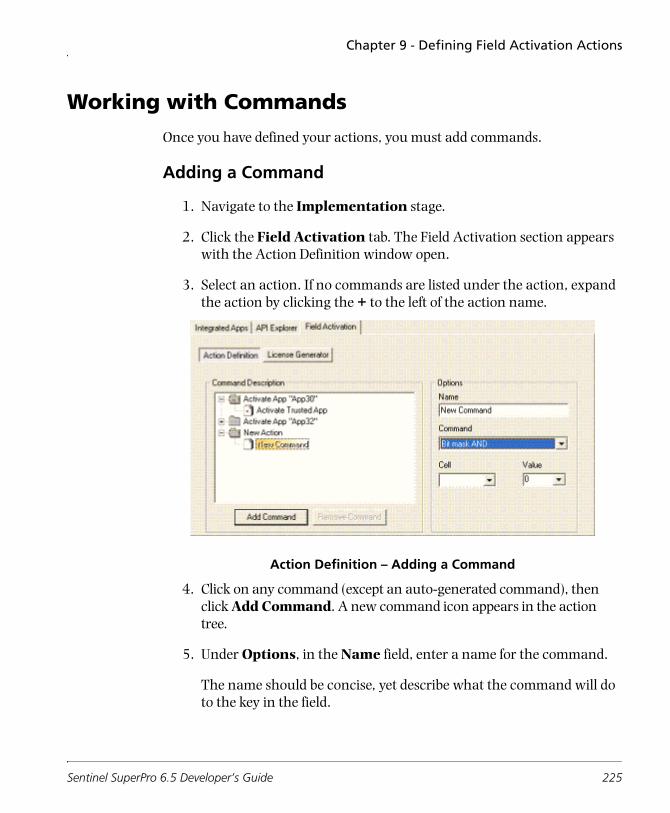
Chapter 9 - Defining Field Activation Actions
Working with Commands
Once you have defined your actions, you must add commands.
Adding a Command
1. Navigate to the Implementation stage.
2. Click the Field Activation tab. The Field Activation section appears with the Action Definition window open.
3. Select an action. If no commands are listed under the action, expand the action by clicking the + to the left of the action name.
Action Definition – Adding a Command
4. Click on any command (except an auto-generated command), then click Add Command. A new command icon appears in the action tree.
5. Under Options, in the Name field, enter a name for the command.
The name should be concise, yet describe what the command will do to the key in the field.
Sentinel SuperPro 6.5 Developer’s Guide 225
Chapter 9 - Defining Field Activation Actions
6. From the Command drop-down list, select the command you want to perform on the key.
See “Available Commands” on page 229 for a list of available com-mands and descriptions of each.
7. From the Cell drop-down list, select the address of the cell you want the command performed on.
Note: To view the cells being used in your protection strategy (and the elements occupying them), open the Design stage, then click the Element Layout View tab. See “Rearranging Elements on the Key” on page 201 for more information. To view the addresses of these cells, open the Implementa-tion stage, click the API Explorer tab, then click MemView. See “Viewing Memory Cells” on page 132 for more information.
8. In the Value field, enter the value you want written to the selected cell.
Click the arrow to access the Numeric Assistant dialog box. See page 190 for instructions on using the Numeric Assistant.
Use the table on the next page as a guide for what values to enter, based on the command you have selected.
Tip: The Overwrite Passwords are necessary whenever you want to change the value of a locked data word or read-only cell on the key. If you will be imple-menting the one-time update option for license codes (see below), you must include the Overwrite Passwords in your field exchange DLLs.
226 Sentinel SuperPro 6.5 Developer’s Guide
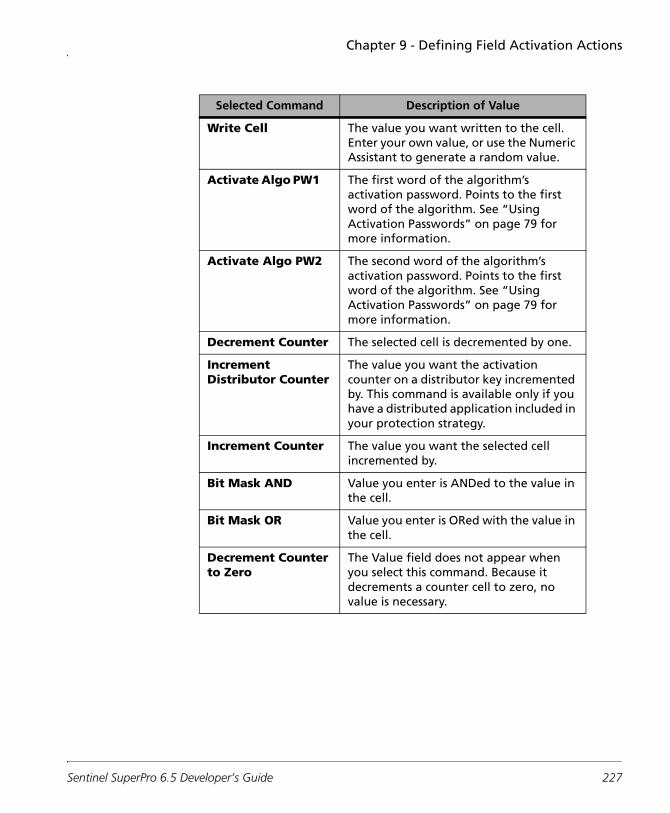
Chapter 9 - Defining Field Activation Actions
Selected Command Description of Value
Write Cell The value you want written to the cell. Enter your own value, or use the Numeric Assistant to generate a random value.
Activate Algo PW1 The first word of the algorithm’s activation password. Points to the first word of the algorithm. See “Using Activation Passwords” on page 79 for more information.
Activate Algo PW2 The second word of the algorithm’s activation password. Points to the first word of the algorithm. See “Using Activation Passwords” on page 79 for more information.
Decrement Counter The selected cell is decremented by one.
Increment Distributor Counter
The value you want the activation counter on a distributor key incremented by. This command is available only if you have a distributed application included in your protection strategy.
Increment Counter The value you want the selected cell incremented by.
Bit Mask AND Value you enter is ANDed to the value in the cell.
Bit Mask OR Value you enter is ORed with the value in the cell.
Decrement Counter to Zero
The Value field does not appear when you select this command. Because it decrements a counter cell to zero, no value is necessary.
Sentinel SuperPro 6.5 Developer’s Guide 227
Chapter 9 - Defining Field Activation Actions
9. If it is displayed, from the Access Code drop-down list, select the access code you want assigned to the selected cell.
The access code determines how you want to use the selected cell. For example, to make the cell an algorithm cell, select access code 3; to make the cell a counter, select access code 2. See “Cell Types” on page 26 for more information.
Removing a Command
If you no longer want a command in your protection strategy, or you have made a mistake, you can delete commands, just as you can actions.
Tip: To delete all commands in an action, it may be easier to delete the action itself—see “Removing an Action” on page 224 for more information.
To remove a command:
■ Select the command you want to delete, then click Remove Command.
The command is removed from the Command Description list.
Note: You are not asked to confirm the command deletion. Be sure you have selected the right command, and that you want to delete this command permanently, before you click Remove Command.
Because each action must have at least one command, you cannot delete a command if it is the only command listed under the selected action. If you need to delete such a command, click Add Command first to add a new, undefined command, then remove the first command as described above.
If you have provided your Sentinel SuperPro project file to users who are generating license codes, you need to send a new file to those users after you have removed a command. This prevents them from selecting the command you just removed to update a key in the field.
228 Sentinel SuperPro 6.5 Developer’s Guide
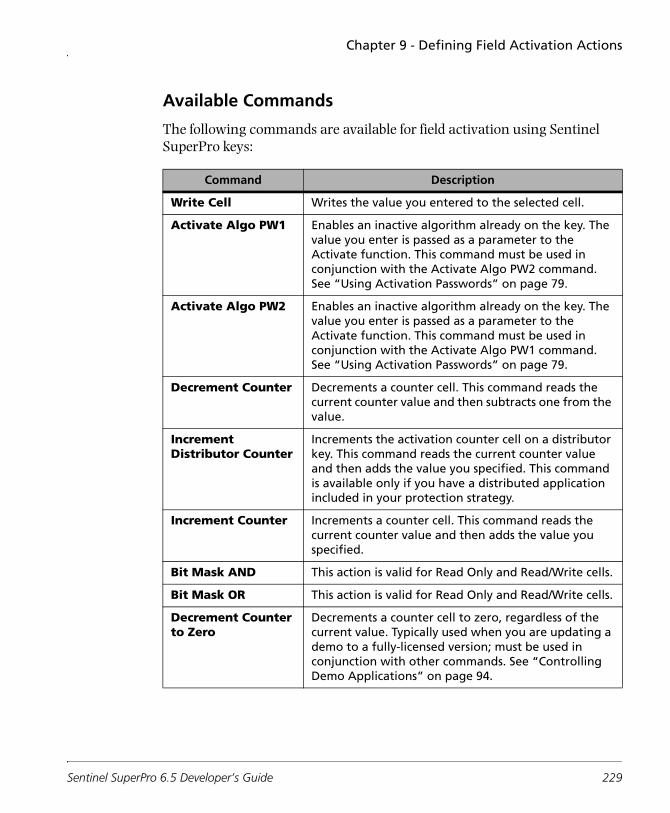
Chapter 9 - Defining Field Activation Actions
Available Commands
The following commands are available for field activation using Sentinel SuperPro keys:
Command Description
Write Cell Writes the value you entered to the selected cell.
Activate Algo PW1 Enables an inactive algorithm already on the key. The value you enter is passed as a parameter to the Activate function. This command must be used in conjunction with the Activate Algo PW2 command. See “Using Activation Passwords” on page 79.
Activate Algo PW2 Enables an inactive algorithm already on the key. The value you enter is passed as a parameter to the Activate function. This command must be used in conjunction with the Activate Algo PW1 command. See “Using Activation Passwords” on page 79.
Decrement Counter Decrements a counter cell. This command reads the current counter value and then subtracts one from the value.
Increment Distributor Counter
Increments the activation counter cell on a distributor key. This command reads the current counter value and then adds the value you specified. This command is available only if you have a distributed application included in your protection strategy.
Increment Counter Increments a counter cell. This command reads the current counter value and then adds the value you specified.
Bit Mask AND This action is valid for Read Only and Read/Write cells.
Bit Mask OR This action is valid for Read Only and Read/Write cells.
Decrement Counter to Zero
Decrements a counter cell to zero, regardless of the current value. Typically used when you are updating a demo to a fully-licensed version; must be used in conjunction with other commands. See “Controlling Demo Applications” on page 94.
Sentinel SuperPro 6.5 Developer’s Guide 229
Chapter 9 - Defining Field Activation Actions
Testing Your Strategy
After you have defined all your actions and commands for field activation, you may want to test your strategy before you start manufacturing keys and shipping your application to verify that the commands are applied appropri-ately and the key is correctly updated.
To test your protection strategy’s field activation commands:
1. Program a key using your protection strategy. See Chapter 10, “Pro-gramming Keys,” on page 233 for instructions.
2. Connect the key to any workstation and use it to run your applica-tion.
3. Open the Client Activator or the Field Exchange Utility on the work-station you ran your application on, and generate a locking code.
4. On a different workstation, start the SSP Toolkit, open the Imple-mentation stage, and then click on License Generator.
You can also use the License Generator Utility, if desired.
5. Enter the locking code and generate a license code, selecting the actions you want to test. See Chapter 12, “Activating and Updating Keys,” on page 265 for instructions.
6. On the workstation running your application, enter the license code you generated in step 5 in the Client Activator or the Field Exchange Utility.
7. After the license code updates the key, check to see if you have access to the expected areas of your application, based on the action(s) you selected in step 5.
8. Remove the key you updated from the workstation.
230 Sentinel SuperPro 6.5 Developer’s Guide
Chapter 9 - Defining Field Activation Actions
9. Connect the key to the workstation you are running Sentinel Super-Pro on to view the cells and their values using MemView in the API Explorer section of the Implementation stage.
The values should match those you entered when you were defining the commands. See “Viewing Memory Cells” on page 132 for more information about using MemView.
Final Steps
Now that your strategy is complete, the final step in preparing the applica-tion for shipping is to compile it.
Compile the application and link it with the appropriate interface modules and the Sentinel system driver. Use the readme file for your development language to determine what file(s) you need.
Once linked, the interface module and Sentinel system driver handle all communication between your application and the key.
Note: The above steps are for applications using integrated protection only. If you are using automatic (shelled) protection, you do not need to compile or link your application. A shelled application is ready to ship as soon as you have applied the shell.
Sentinel SuperPro 6.5 Developer’s Guide 231
Chapter 9 - Defining Field Activation Actions
Configuring the SafeCfg Utility for Linux
SafeCfg is a command-line utility that is configured with developer-specific information and a secret code to generate a matching pair of DSAFE and USAFE objects. The USAFE object (libusafe.so) will be shipped along with your protected application.
Follow the steps given below to configure the SafeCfg utility:
1. SafeCfg is located in the /opt/Sentinel/SuperPro/6.4/Tools path. Execute the SafeCfg utility by typing SafeCfg at the Shell command prompt.
2. Now, you need to fill in your developer ID and passwords in the order of appearance. Read the instructions in the section“Developer Configura-tion Dialog Box” on page 116 for more information. Ensure that you choose the same settings to configure the SAFE objects.
3. You will be now asked to either auto generate the secret code or type on your own. The secret code is a parameter that enables field updates across multiple platforms. To use the auto generated string, type y, or type n and specify a secret. A secret string must be 9 to 16 characters long, consisting of at least one numeric character.
4. You will be asked to include the overwrite passwords or not. Decide and act appropriately.
5. You may be asked to specify a one time update cell, only if you have included your overwrite passwords in step 4 earlier. Type a cell address in hexadecimal.
Tip: You could use the Memory View option in Toolkit window to decide which cell to select.
6. The libusafe.so and libdsafe.so are created in your current directory.
232 Sentinel SuperPro 6.5 Developer’s Guide
Chapter 10Programming Keys
Once you have completed your protection strategy, including prototyping a master key, you are ready to start programming product keys to include in the final package with your protected application.
Typically, as a developer, you will not be responsible for programming the keys that will be shipped to your customers. This task is usually handled by your company’s manufacturing department as part of the assembly-line process for creating your product.
To avoid giving your manufacturing department access to your pass-words—which would also give them the ability to change field activation commands or other elements in your protection strategy—we recommend providing them with the Make Keys Utility included with Sentinel SuperPro. For more information about this utility, please refer to Chapter 13, “Using the Stand-alone Utilities,” on page 281.
You may also decide to allow your distributors to program product keys. In this case, you will need to provide those distributors with a pre-programmed distributor key to meter the number of keys they activate and/or update. You may be responsible for programming distributor keys, or this task may also be handled by your company’s manufacturing department.
Sentinel SuperPro 6.5 Developer’s Guide 233
Chapter 10 - Programming Keys
The instructions in this chapter are provided so you can familiarize yourself with the key programming procedures used by your manufacturing depart-ment, or so you can program product or distributor keys yourself if necessary.
This chapter covers the following topics:
■ Setting up to program product keys
■ Programming a product key
■ Programming a distributor key
234 Sentinel SuperPro 6.5 Developer’s Guide
Chapter 10 - Programming Keys
Setting Up to Program Product Keys
Before you begin programming product keys, make sure you have an ade-quate stock of keys with your assigned developer ID. The keys you will be programming as product keys must have the same developer ID as the key used while you designed your protection strategy.
If you need additional keys, please contact your SafeNet Inc. sales represen-tative or distributor.
Selecting the Appropriate Keys
Depending on what you have implemented in your protection strategy, you will be programming either stand-alone keys or network keys.
Network keys, which are pre-programmed by SafeNet with the hard limit you specified when you placed your order, can be identified by the words “SuperPro Net” pressed into the plastic on the key.
It is important that you select the appropriate key for programming. Stand-alone keys allow only one user per key, even when used in a network envi-ronment. Programming stand-alone keys when you should be using network keys will decrease the number of licenses available to your customers.
Connecting the Keys
You can program one or more keys attached to your system, with a single strategy you define. As a result, you will want to protect connectors from being damaged, while at the same time making it convenient to connect and disconnect keys.
Note: You can cascade keys while they are being programmed.
To solve the issue, we recommend attaching a shielded cable with appropriate connectors for the key(s) you are programming that reaches from the port to a work surface, preventing you from having to reach or bend over to connect or disconnect keys.
Sentinel SuperPro 6.5 Developer’s Guide 235
Chapter 10 - Programming Keys
Do not remove a key while it is being programmed, as a write failure will occur. A key removed during programming can be reprogrammed. However, you may stop the key programming operation in between by click-ing the Abort button that appears at the time of key programming.
Note: If you remove a key (which was inserted first in the series), while programming multiple keys then, the keys that come next in the series will not be programmed. You'll need to start the activity again.
Using Cables with the Sentinel SuperPro Hardware Key
Due to the large variety of cables currently on the market, SafeNet Inc. does not recommend a specific brand or type of cable for use with the Sentinel SuperPro key, nor do we guarantee that all cables will be compatible with the key.
However, we do recommend the following:
■ Cables should not be longer than 6 feet in length.
■ Cables should be shielded.
■ Do not use ribbon cables.
■ Cables must be straight-through; that is, they must have all pin signals wired through to the connectors on either end of the cable.
Please be aware that cable connectors may only be used for a specific num-ber of times, perhaps for as few as 100 connections. Contact the manufacturer of your cable/connector for specific information on how many insertions the cable/connector is rated for. Based on that specification, change the cable/connector on a regular basis, as needed.
Additionally, since the insertion life of the connector on the computer you are using for programming is also limited, you may want to consider using SafeNet Inc.’ key programming services as a solution for reliable, high-vol-ume key programming.
236 Sentinel SuperPro 6.5 Developer’s Guide
Chapter 10 - Programming Keys
Programming a Product Key
To program a product key:
1. In the SSP Toolkit, open the Sentinel SuperPro project containing the protection strategy for the application you are programming the key(s) for.
2. Navigate to the Make Keys stage, and verify you are on the Product Keys tab.
Note: If you did not complete the Prototype stage, the Make Keys stage is unavailable and you are not ready to program product keys. Refer to Chap-ter 8, “Implementing Your Strategy,” on page 205 for more information on completing the Prototype stage.
A list of the applications you applied integrated or automatic protection to appears. The values under Metered indicates whether or not the application has a demo counter or metering options associated with it.
Sentinel SuperPro 6.5 Developer’s Guide 237
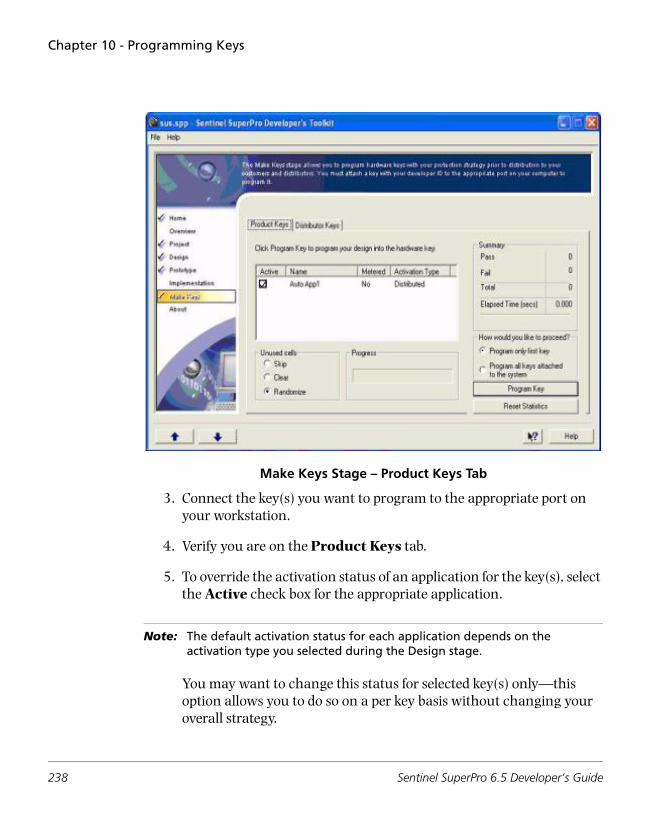
Chapter 10 - Programming Keys
Make Keys Stage – Product Keys Tab
3. Connect the key(s) you want to program to the appropriate port on your workstation.
4. Verify you are on the Product Keys tab.
5. To override the activation status of an application for the key(s), select the Active check box for the appropriate application.
Note: The default activation status for each application depends on the activation type you selected during the Design stage.
You may want to change this status for selected key(s) only—this option allows you to do so on a per key basis without changing your overall strategy.
238 Sentinel SuperPro 6.5 Developer’s Guide
Chapter 10 - Programming Keys
For example, you can make a demo application inactive so that it must be activated in the field.
If the Active check box is selected, the application will be shipped as active for this key only. If the check box is cleared, the application will be inactive upon shipment, requiring the user to enter an activation password to run the application.
Note: Because the override is on a per key basis, if you make a change to the activation status, it will affect ALL keys programmed in the batch.
6. Under Unused Cells (i.e. cells that appear as “unassigned” in Mem-View.), select one of the following:
❑ Skip: Overwrites any cells used in your protection strategy, but leaves any cells that are unallocated or not assigned value in your protection strategy. This is the default option.
❑ Clear: Removes values and access codes/cell types from all cells not used in your protection strategy, including any previously programmed cells. Both the cell value and access code is set to 0.
❑ Randomize: Randomly assigns values and access codes to cells not used in your protection strategy. This is the most secure option; it makes your protection strategy more difficult for hackers to crack.
7. You can program one or more keys by choosing an appropriate option under How would you like to proceed?.
Note: If you are programming multiple keys, the activation type remains same for all of them.
Sentinel SuperPro 6.5 Developer’s Guide 239
Chapter 10 - Programming Keys
8. Click Program Key.
The key is programmed with the protection strategy you defined.
9. On successful programming, disconnect the key(s) from the port. If the key fails the programming process, refer to Appendix A, “Trou-bleshooting,” on page 373 for assistance.
Note: To determine if a programming failure is due to a software error or a hard-ware error, try programming another key with the same strategy. If the programming is successful, the previous error was hardware-related. If you try programming many keys, and all of them fail programming, the error is software-related. Refer to Appendix A, “Troubleshooting,” on page 373 for help, or contact SafeNet Inc. Technical Support for additional assis-tance.
Viewing Programming Statistics
After each key is programmed, the Summary section is updated accordingly:
■ Pass: The number of keys that have been successfully programmed.
■ Fail: The number of keys that have not been successfully programmed.
■ Total: The total number of keys you have programmed during this session, whether they passed or failed.
■ Elapsed Time: The amount of time it took to program the last key.
These statistics are not project-specific—even if you program multiple keys with multiple projects (protection strategies), the statistics do not reset until you exit the SSP Toolkit and start it again with a new session.
To reset the statistics without closing and restarting the SSP Toolkit, click Reset Statistics.
240 Sentinel SuperPro 6.5 Developer’s Guide
Chapter 10 - Programming Keys
Verifying the Key Was Programmed Correctly
We recommend periodically checking your product keys to be sure they are being programmed correctly.
To do so, attach a randomly selected key to a workstation running the SSP Toolkit, then open the MemView section of the API Explorer (in the Over-view or Implementation stage) to graphically view each cell’s access code and value. See “Viewing Memory Cells” on page 132 for more information about using MemView.
Sentinel SuperPro 6.5 Developer’s Guide 241
Chapter 10 - Programming Keys
Setting Up to Program Distributor Keys
Distributor keys are used to meter the activation or update of your applica-tion(s) by your distributors. You need to program one distributor key per distributor, per product line. When you program the key, you assign the ini-tial activation counter value (the number of activations or updates the distributor has paid for) for each application being sold by your distributor.
Note: You can program ONLY one Distributor key at a time. For more information about using the Distributed activation type, see page 68.
Before you begin programming distributor keys, make sure you have an ade-quate stock of keys with your assigned developer ID. The keys you will be programming as distributor keys must have the same developer ID as the key used while you designed your protection strategy.
If you need additional keys, please contact your SafeNet Inc. sales represen-tative or distributor.
Selecting the Appropriate Keys
Distributor keys can be stand-alone or network keys; the type of key used to create a distributor key is unimportant, as long as the developer ID is the same as the key used to create your protection strategy.
Connecting the Keys
As you program multiple keys, you will be taking Sentinel SuperPro keys on and off your workstation frequently. As a result, you will want to protect connectors from being damaged, while at the same time making it conve-nient to connect and disconnect keys.
Note: You cannot cascade keys while they are being programed. Only one key can be attached at a time during programming.
242 Sentinel SuperPro 6.5 Developer’s Guide
Chapter 10 - Programming Keys
To solve both issues, we recommend attaching a shielded cable with appro-priate connectors for the key you are programming that reaches from the port to a work surface, preventing you from having to reach or bend over to connect or disconnect keys.
Do not remove a key while it is being programmed, as a write failure will occur. A key removed during programming can be reprogrammed.
Using Cables with the Sentinel SuperPro Hardware Key
Due to the large variety of cables currently on the market, SafeNet Inc. does not recommend a specific brand or type of cable for use with the Sentinel SuperPro key, nor do we guarantee that all cables will be compatible with the key.
However, we do recommend the following:
■ Cables should not be longer than 6 feet in length.
■ Cables should be shielded.
■ Do not use ribbon cables.
■ Cables must be straight-through; that is, they must have all pin signals wired through to the connectors on either end of the cable.
Please be aware that cable connectors may only be used for a specific num-ber of times, perhaps for as few as 100 connections. Contact the manufacturer of your cable/connector for specific information on how many insertions the cable/connector is rated for. Based on that specification, change the cable/connector on a regular basis, as needed.
Additionally, since the insertion life of the connector on the computer you are using for programming is also limited, you may want to consider using SafeNet Inc.’ key programming services as a solution for reliable, high-vol-ume key programming.
Sentinel SuperPro 6.5 Developer’s Guide 243

Chapter 10 - Programming Keys
Programming a Distributor Key
To program a distributor key:
1. In the SSP Toolkit, open the Sentinel SuperPro project containing the protection strategy for the application you are programming a key for.
2. Navigate to the Make Keys stage.
Note: If you did not complete the Prototype stage, the Make Keys stage is unavailable and you are not ready to program product keys. Refer to Chap-ter 8, “Implementing Your Strategy,” on page 205 for more information on completing the Prototype stage.
3. Click the Distributor Keys tab.
A list of the applications you applied integrated or automatic protection to, and assigned the Distributed activation type to, appears. You can program distributor keys only for those applications using the Distrib-uted activation type.
244 Sentinel SuperPro 6.5 Developer’s Guide
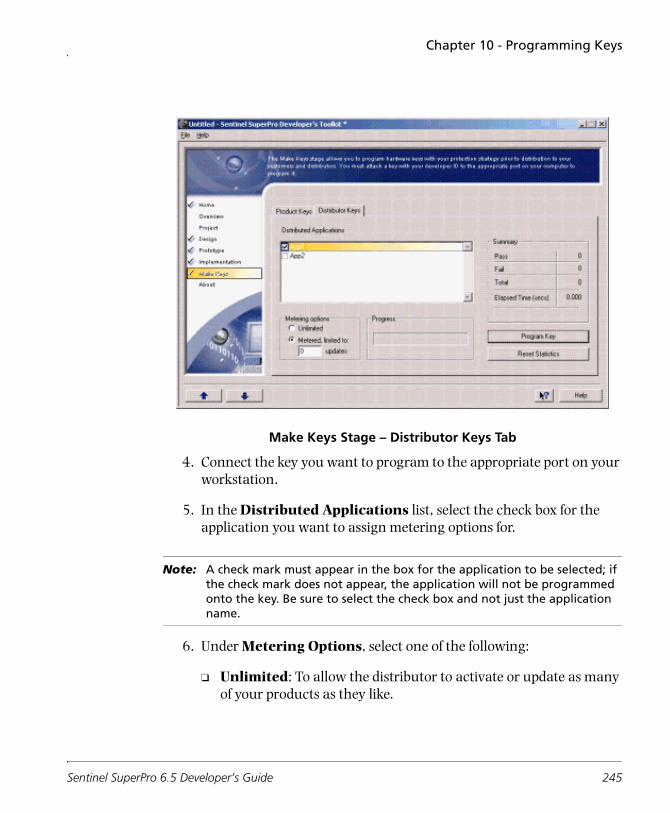
Chapter 10 - Programming Keys
Make Keys Stage – Distributor Keys Tab
4. Connect the key you want to program to the appropriate port on your workstation.
5. In the Distributed Applications list, select the check box for the application you want to assign metering options for.
Note: A check mark must appear in the box for the application to be selected; if the check mark does not appear, the application will not be programmed onto the key. Be sure to select the check box and not just the application name.
6. Under Metering Options, select one of the following:
❑ Unlimited: To allow the distributor to activate or update as many of your products as they like.
Sentinel SuperPro 6.5 Developer’s Guide 245
Chapter 10 - Programming Keys
❑ Limited: To pre-define the number of applications the distributor can activate or update. Enter a number between 0 -65535 in the corresponding field.
7. Repeat steps 5 and 6 for each application you want the distributor to be able to activate and update.
You can program a distributor key to activate or update multiple applications. When you select the check box for the next application, the metering option changes to the default value of zero, or to the value you previously selected for the application.
8. Click Program Key.
The key is programmed with the protection strategy you defined.
9. On successful programming, disconnect the key from the port.
Note: To determine if a programming failure is due to a software error or a hardware error, try programming another key with the same strategy. If the programming is successful, the previous error was hardware-related. If you try programming many keys, and all of them fail programming, the error is software-related. Refer to Appendix A, “Troubleshooting,” on page 373 for help, or contact SafeNet Inc. Technical Support for additional assistance.
246 Sentinel SuperPro 6.5 Developer’s Guide
Chapter 11Shipping Your Application
When your application is complete, and your product keys are programmed, you are ready to ship your protected application to your distributors and/or customers.
What you ship depends on who you are sending the application to. Custom-ers usually only need the application, the key and the Sentinel system driver.
However, when you ship your application to distributors, there are additional items you must ship along with your application and the product key, such as the stand-alone utilities used for field activation or key programming, and a distributor key for activating distributed applications.
This chapter provides lists of recommended items to send to distributors and customers; you can modify these lists as appropriate for use with your application.
To protect your product keys against damage during shipping, this chapter also provides guidelines for handling and packaging your keys.
This chapter covers the following topics:
■ What to send to your customers
■ What to send to your distributors
■ Packaging and handling guidelines for product keys
Sentinel SuperPro 6.5 Developer’s Guide 247

Chapter 11 - Shipping Your Application
What to Send to Your Customers
When you ship your protected application to your customers, you must pro-vide the following:
■ The application executable and associated data files.
■ The Sentinel Protection Server (required for network applications). See “Installing the Sentinel Protection Server” on page 250.
■ The Sentinel SuperPro System Administrator’s Guide Help in HTML format (SentinelSP6.5 Sys Admin Help).
■ The Sentinel Client Activator (recommended) or Field Exchange Utility (fieldexutil.exe) if your application is a demo or is programmed to allow field activation.
Note: If you choose to use the Sentinel Client Activator, you also need to ship your customers the Client Activator configuration file (activator.rac) and installation tool (ainst.exe). See the Client Activator documentation for more information.
■ The following file: USafe32.dll.
■ The following dlls should be distributed to end users:
❑ RelLic.dll (when executables are protected): Rellic.dll is required for releasing license for executable. When Rellic.dll is not present with the protected application then license will not be released.
❑ SDNPro.dll (when .NET enhancement option is selected during protection): If SDNPro.dll is not present with the application protected (using .NET enhancement option) then protected application will not execute and an error will be displayed that SDNPro.dll is missing.
■ The Field Exchange Utility Help file—Fieldexchutil.chm (only if you are shipping the Field Exchange Utility, fieldexutil.exe).
Note: If the license code is generated by Sentinel Super Pro 6.5.0 Toolkit, you must send the Sentinel Super Pro 6.5.0 Field Exchange Utility and USafe32.dll to the end user.
248 Sentinel SuperPro 6.5 Developer’s Guide
Chapter 11 - Shipping Your Application
■ If you are shipping the Field Exchange Utility, the following files to provide support for HTML Help: hhupd.exe and hhactivex.dll (see page 253 for more information).
■ Instructions for using the Client Activator or Field Exchange Utility (fieldexutil.exe) for field upgrades.
■ One or more Sentinel SuperPro keys programmed with the license limits and values expected by your application.
■ Instructions for attaching the key to the computer or network server.
■ The Sentinel system driver—sentinel.sys for Windows 2000/XP/2003/Vista or sentinel.vxd for Windows 98/ME - version SSD7.4.0 or later.The Sentinel system driver—sntnlusb.sys for Windows 98/ME/2000/XP/2003/Vista - version SSD7.4.0 or later in case you are using USB keys.
■ If you are protecting data files for a Windows 98/ME application, you also need to ship the Sentinel data protection driver. See “Installing the Sentinel Data Protection Driver” on page 258.
■ If you wrote a separate utility for entering activation passwords, you also need to ship that utility and its associated files.
Installing the Sentinel System Driver
The Sentinel system driver is a required component for all users of your pro-tected application, the Sentinel Protection server and any Sentinel utilities, such as the Field Exchange Utility or the Make Keys Utility. To simplify the driver installation process for your customers and distributors, you may choose to incorporate the driver installation in your application’s installa-tion routines.
When to Deploy?
Sentinel driver is the device driver for using the hardware keys. It must be redistributed with all kinds of SuperPro protected applications, regardless of the strategy chosen.
Sentinel SuperPro 6.5 Developer’s Guide 249
Chapter 11 - Shipping Your Application
Where to Deploy?
The Sentinel driver must be deployed on the system where the hardware key is attached. If the application is a stand-alone application, install the Senti-nel driver on the system where the application is installed. If the application is a network application, install the Sentinel driver on the system in the net-work where the hardware key is attached.
How to Deploy?
You can use the Sentinel Protection Installer to deploy Sentinel driver and/or Sentinel Protection Server. For Windows The <installdir>\Sentinel Protec-tion Installer path contains the relevant files, including the merge modules and an MSI that you can use in your Windows Installer-based package. It also contains a Help file that guides you about the various methods to deploy Sentinel System Driver.
Tip: Download latest releasesKeep watching http://www.safenet-inc.com/support/index.asp for the latest releases of Sentinel Protection Installer. You can provide the same Web address to your customers/distributors for downloading directly.
Installing the Sentinel Protection Server
When to Deploy?
It is the license manager for your protected applications. As a rule of thumb, it is necessary for using network applications—when clients concurrently access the hardware key(s) attached to a networked system.
The access mode you have chosen for your protected application can also help you in deciding whether you need to ship the protection server or not.
Where to Deploy?
The Sentinel Protection Server must be installed on the system where the hardware key is attached.
250 Sentinel SuperPro 6.5 Developer’s Guide
Chapter 11 - Shipping Your Application
■ If the application is a stand-alone application, the Sentinel driver and key must also exist on the same system.
■ If the application is a network application, install the Sentinel Protection Server on a system in the network where the hardware key is attached. The Sentinel driver must also exist on the same system. If necessary, multiple Sentinel Protection Servers can be installed in a network, as long a hardware key is there for each system.
Note: If you use RNBO_STANDALONE then you don't need the Sentinel Protec-tion Server at all.
How to Deploy?
You can use the Sentinel Protection Installer to deploy Sentinel driver and/or Sentinel Protection Server.
For Windows
The <installdir>\Sentinel Protection Installer path contains the relevant files, including the merge modules and an MSI that you can use in your Windows Installer-based package. It also contains a Help file that guides you about the various methods to deploy Sentinel Pro-tection Server.
On Windows 2000/XP/2003/Vista, the Sentinel Protection Server is installed as a system service that will start automatically whenever you boot up.
Note: Deploying Sentinel License MonitorNo additional steps are needed to deploy Sentinel License Monitor, unless you are customizing the Sentinel License Monitor .class files.
Including the Server in Your Own Installation Program
To simplify the server installation process for your customers, you may choose to include the server installation as a part of your application’s setup routines, so that the server is installed automatically.
Sentinel SuperPro 6.5 Developer’s Guide 251
Chapter 11 - Shipping Your Application
Note: You can also create your own installer program that includes just the Senti-nel Protection Server and the Sentinel system driver, and have your users run it separately from your application installer. How you install the server and driver is up to you, as long as they do get installed.
For your convenience, merge modules for use with the Windows Installer have been provided on the Sentinel SuperPro Installation CD. These mod-ules can be found at: E:\Sentinel Protection Installer\Merge Modules where E: is the CD drive. The following procedure provides instructions for using the merge modules in your own installer.
If you choose to not use Windows Installer, another alternative is to add the files manually to your own installer and then use the loadserv.exe utility to add the Windows NT service, and manually add shortcuts for the Windows 9x (98/ME) server. Use the information on page 254 to help you manually add the executable files into your installation program.
Using Merge Modules with Windows Installer 2.0 or Later
Three merge modules are provided to allow you to control what gets installed on the user’s system. The three files are:
■ SentinelProtectionServer.msm: This module contains the actual server programs for Windows 9x. It determines which server to install depending on the operating system it is being installed on.
On Windows 9x, it adds a shortcut in the startup group so that it starts automatically on the next boot.
The server component requires the Sentinel system driver v.7.4.0 or higher to already be installed on the user’s system. Merge modules for the driver are also provided—these can be placed into your installa-tion package so that both the server and driver are installed at the same time. Refer to the Sentinel System Driver Installation Developer's Guide, an online HTML document included on the Sentinel SuperPro Installation CD, for more information.
252 Sentinel SuperPro 6.5 Developer’s Guide
Chapter 11 - Shipping Your Application
■ Driver Merge modules: Another category of Merge Modules also exists. It contains three types of Merge Modules viz. SSDConfigFiles.msm, SSDParallel.msm and SSDUSB.msm.
Note: To view HTML Help, users also must have Microsoft Internet Explorer 4.0 or later installed on their systems. Internet Explorer is NOT part of this merge module, and may need to be installed separately. Refer to www.microsoft.com for more information.
The merge modules can be added to any Microsoft Windows Installer pack-age. There are many third-party applications that can be used to design a Windows Installer package. An example would be InstallShield® for Win-dows Installer. As with other applications, it assists you in building the actual installation media and simplifies configuration. For more informa-tion about using and developing a Windows Installer package, visit Microsoft’s MSDN Web site at http://www.microsoft.com.
Once you add the merge module to your installation package, you can asso-ciate it with a particular installation feature. This allows the user to have some control over whether this feature should be installed. Alternatively, you can make it a required item so that the user must install it with your application.
The merge module itself contains the necessary files, registry entries and shortcuts to install the server. It will determine what needs to be installed based on the operating system it is being installed on. This frees you from having to understand exactly how to install the server, yet you can install the server from your own installer, giving you full control of the installation.
There are no special custom actions or properties that have to be used with these merge modules. The only supported properties are the standard prop-erties that are used by any Windows Installer package. Please refer to the Microsoft Windows Installer documentation for more information.
Sentinel SuperPro 6.5 Developer’s Guide 253
Chapter 11 - Shipping Your Application
Requiring a Reboot During Server Installation
No attempt is made to start the Windows 9x server as part of the installa-tion. If your installer determines that a reboot is not required for the Sentinel System Driver, it is safe to run the Windows 9x server executable at the end of the installation.
Note: Windows 9x requires a reboot to start the Sentinel Protection Server.
Installing the Server with the Executable Files
For your distributors and manufacturing employees, you can simply provide the server executable file and ask them to run the file on their workstation to install the server. The executable files can be found on the Sentinel SuperPro Installation CD at: <CD Drive>\SentinelSuperPro6.5.0.exe. where <CDDrive> is the drive letter of your CD Rom drive.
Windows 98, ME users should use the spnsrv9x.exe and loadserv.exe files. Windows 2000, XP, 2003 or Vista users should use the spnsrvnt.exe and loadserv.exe files. Instructions for installing both server types are provided below.
To install the Windows 9x server:
1. Verify that the Sentinel system driver has already been installed on your system.
2. Copy the spnsrv9x.exe and loadserv.exe files to any location on your local hard drive.
254 Sentinel SuperPro 6.5 Developer’s Guide
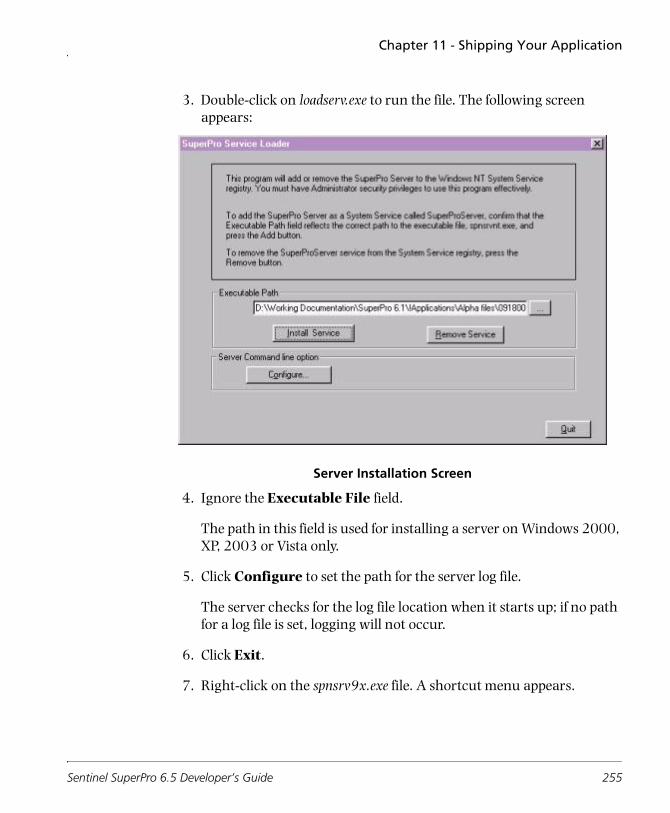
Chapter 11 - Shipping Your Application
3. Double-click on loadserv.exe to run the file. The following screen appears:
Server Installation Screen
4. Ignore the Executable File field.
The path in this field is used for installing a server on Windows 2000, XP, 2003 or Vista only.
5. Click Configure to set the path for the server log file.
The server checks for the log file location when it starts up; if no path for a log file is set, logging will not occur.
6. Click Exit.
7. Right-click on the spnsrv9x.exe file. A shortcut menu appears.
Sentinel SuperPro 6.5 Developer’s Guide 255
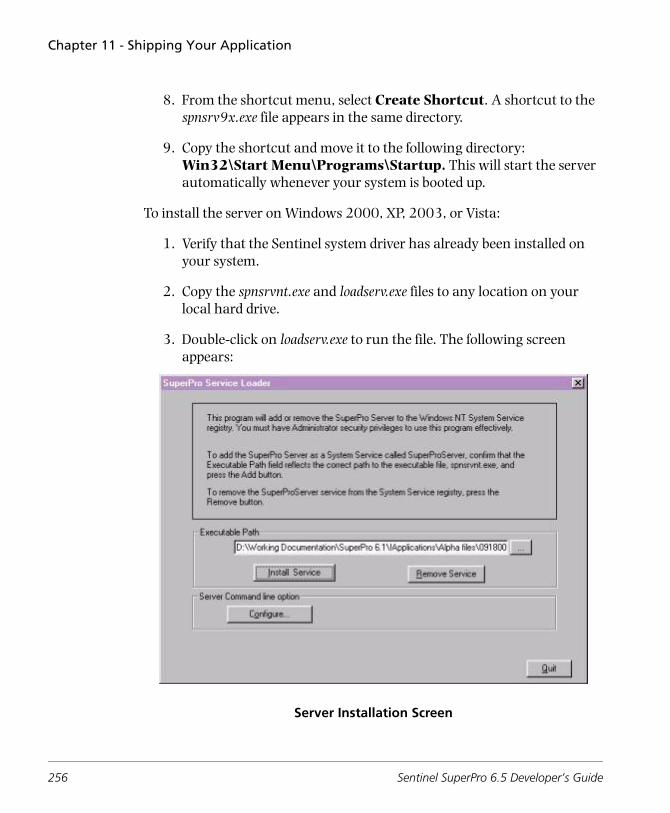
Chapter 11 - Shipping Your Application
8. From the shortcut menu, select Create Shortcut. A shortcut to the spnsrv9x.exe file appears in the same directory.
9. Copy the shortcut and move it to the following directory: Win32\Start Menu\Programs\Startup. This will start the server automatically whenever your system is booted up.
To install the server on Windows 2000, XP, 2003, or Vista:
1. Verify that the Sentinel system driver has already been installed on your system.
2. Copy the spnsrvnt.exe and loadserv.exe files to any location on your local hard drive.
3. Double-click on loadserv.exe to run the file. The following screen appears:
Server Installation Screen
256 Sentinel SuperPro 6.5 Developer’s Guide
Chapter 11 - Shipping Your Application
4. Confirm that the path in the Executable File field is the correct path for the location of the spnsrvnt.exe file.
5. Click Configure to set the path for the server log file.
6. Click Install Service to install the server. The server is an NT service that will start automatically whenever your system is booted up.
Sentinel SuperPro 6.5 Developer’s Guide 257

Chapter 11 - Shipping Your Application
Installing the Sentinel Data Protection Driver
The Sentinel data protection driver implements a file system which inter-cepts all file I/O at the operating system level. Without this driver loaded at the end user’s Windows 98/ME workstation, the protected application will not be able to encrypt/decrypt files. It is also required for successful execu-tion of Shell protected .NET applications on Win 98/Me.
If you protect data files for Windows 98/ME applications, your customers need to receive and install the data protection driver, as well as your applica-tion and data files.
For your convenience, SafeNet Inc. has included an installation program for the Sentinel data protection driver on the Sentinel SuperPro installation CD, located at (assuming E: is the drive letter of your CD-ROM drive): E:\Data Protection Driver.
Also, so you can modify this installation program for your own installation needs, we have provided the C source code that installs this program. Please refer to the source code file for information on modifying it.
Note: The data protection driver must only be run on Windows 98/ME; it is the responsibility of the calling program to check for the type of operating sys-tem being used. Remind customers that their computer must be rebooted after installing the data protection driver in order to load the driver.
The following files comprise the Sentinel data protection driver:
■ instdrvr.exe: An installation program that installs the Sentinel system driver in the correct location on your customer’s workstation.
■ instdrvr.c: The C source code file that installs the program and creates the registry keys. It may be modified to suit your needs.
■ sentdata.vxd: The Sentinel data protection driver is needed to perform transparent data file encryption/decryption in 32-bit applications running in Windows 98/ME. It is also required for successful execution of Shell protected .NET applications on Win 98/Me.
258 Sentinel SuperPro 6.5 Developer’s Guide
Chapter 11 - Shipping Your Application
Calling the Installation Program
Your installation program may call the data protection driver with the fol-lowing command line options:
■ /P Specifies the source path for sentdata.vxd. If not included, the installer looks for the .VXD file in the directory where the driver installer resides.
■ /U Uninstalls the driver.
The installation program returns a zero if it was successful; otherwise, it returns the error code of the last Win32 API call that had an error (if appli-cable). If the unsuccessful API call does not return an error, the installer returns a -1.
Sentinel SuperPro 6.5 Developer’s Guide 259
Chapter 11 - Shipping Your Application
What to Send to Your Distributors
If your company uses distributors to sell your products, you need to decide:
■ If distributors can provide license codes for field activation.
■ If distributors will be activating or updating your application using a distributor key, and if so, how many activations you will limit them to.
Your decisions about these items will determine what you ship to your distributors.
Customer Items
These are those items you need to ship to your distributor so they can send them to customers who purchase your protected application.
■ The application executable and associated data files.
■ The Sentinel Protection Server (required for both stand-alone and network applications). See “Installing the Sentinel Protection Server” on page 250.
■ The Sentinel SuperPro System Administrator’s Help in HTML format (SentinelSP6.5 Sys Admin Help).
■ The Sentinel Client Activator (recommended) or Field Exchange Utility if your application is a demo or is programmed to allow field activation.
Note: If you choose to use the Sentinel Client Activator, you also need to ship your customers the Client Activator configuration file (activator.rac) and installation tool (ainst.exe). See the Client Activator documentation for more information.
■ The following file: usafe32.dll.
■ The Field Exchange Utility Help file—Fieldexchutil.chm (only if you are shipping the Field Exchange Utility, fieldexutil.exe).
260 Sentinel SuperPro 6.5 Developer’s Guide
Chapter 11 - Shipping Your Application
■ If you are shipping the Monitoring Tool or the Field Exchange Utility, the following files to provide support for HTML Help: hhupd.exe and hhactivex.dll (see page 253 for more information).
■ Instructions for using the Client Activator or Field Exchange Utility for field upgrades.
■ One or more Sentinel SuperPro keys programmed with the license limits and values expected by your application.
■ Instructions for attaching the key to the computer or network server.
■ The Sentinel system driver—sentinel.sys for Win 2000/2003 or sentinel.vxd for Win 98/ME/XP—version PD-7.4.0 or later.The Sentinel system driver—sntlUSB.sys for Windows 2000/2003/Vista or sentinel.vxd for Windows 98/ME/XP—version PD -7.4.0 or later in case you are using USB keys.
■ If you are protecting data files for a Windows 98/ME/XP application, you also need to ship the Sentinel data protection driver. See “Installing the Sentinel Data Protection Driver” on page 258.
Distributor-Only Items
The items in this section are shipped to distributors for their use only, if you have decided to allow them to activate applications or generate license codes for field upgrades.
■ A distributor key, if you want to manage the number of activations or updates your distributor can perform.
■ The License Generator Utility (LicenseGenUtil.exe) and instructions for using it.
■ The following files: lang_enu.dll, sp_gXX.dll1, spcommon.dll, dsafedll.dll and dsafe32.dll.
1.The sp_gXX.dll file can be any of the following, depending on the color depth the display driver is configured to: sp_g24.dll, sp_g08.dll or sp_g04.dll.
Sentinel SuperPro 6.5 Developer’s Guide 261

Chapter 11 - Shipping Your Application
■ The Sentinel SuperPro distributor’s project file (.DST) with the protection strategy for the application you are shipping.
Documentation
You can copy the appropriate sections from Chapter 13, “Using the Stand-alone Utilities,” on page 281 to send to distributors using the License Gener-ator Utility, or to customers using the Field Exchange Utility. You can also use the information in Chapter 14 to create your own documentation for these utilities.
262 Sentinel SuperPro 6.5 Developer’s Guide
Chapter 11 - Shipping Your Application
Packaging and Handling Guidelines for Keys
The following information includes guidelines for shipping Sentinel Super-Pro keys with your protected application. Following these guidelines should help ensure that the keys you ship reach your customers safely.
In general, the shipping and handling procedures suggested for the Sentinel SuperPro keys conform to the industry standards for handling electronic printed circuit boards. Your company may already have appropriate work surfaces and procedures in place.
Use the following steps to prepare the work areas used to receive, inspect, stock, program and package Sentinel SuperPro keys:
■ Install a electrostatic-dissipating mat for a work surface. Make sure the mat is properly grounded.
■ Ensure all operators wear grounding wrist or ankle straps.
■ When storing Sentinel SuperPro keys for inventory, use plastic tubs designed to dissipate electrostatic charges.
■ Use packaging materials designed to avoid electrostatic charge during shipment. Plastic that does not generate static (called cold plastic) is typically pink in color. You may also choose to use conductive plastic, which is designed to drain off static.
Warning! Electrostatic charges may damage the Sentinel SuperPro keys. Work surface mats and wrist straps are strongly recommended.
Sentinel SuperPro 6.5 Developer’s Guide 263
Chapter 11 - Shipping Your Application
264 Sentinel SuperPro 6.5 Developer’s Guide
Chapter 12Activating and Updating Keys
Sentinel SuperPro’s Secure, Authenticated Field Exchange (SAFE, also known as field activation) protection system provides you with a secure method of remotely updating a Sentinel SuperPro hardware key’s memory after the key is sent to your user or distributor.
Field activation allows you to increase demo limits, upgrade demo applica-tions to fully licensed versions, and provide access to additional modules or features, without having to ship a new key to the customer or visit the cus-tomer’s site. It also allows you to update distributor keys to add activations in the field.
In the field, your customers generate a locking code that they send to you (or your distributor). You then input the locking code in the Field Activation section of the Implementation stage (or the License Generator Utility) to generate a license code that you return to the customer. The license code updates the key and activates the customer’s application appropriately.
This chapter covers the following topics:
■ How keys are activated or updated
■ Using the Sentinel Client Activator
■ Receiving customer locking codes
■ Generating license codes
■ Updating distributor keys
Sentinel SuperPro 6.5 Developer’s Guide 265
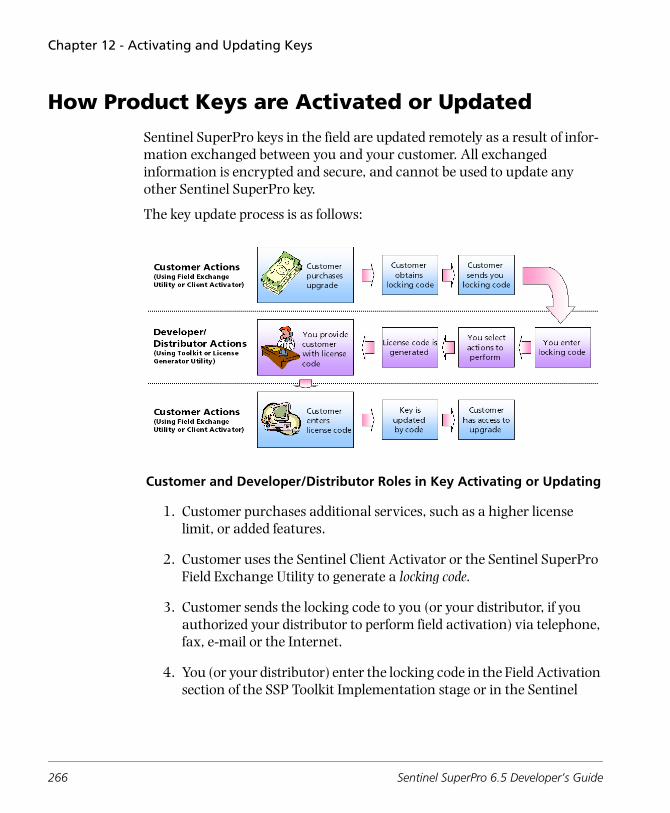
Chapter 12 - Activating and Updating Keys
How Product Keys are Activated or Updated
Sentinel SuperPro keys in the field are updated remotely as a result of infor-mation exchanged between you and your customer. All exchanged information is encrypted and secure, and cannot be used to update any other Sentinel SuperPro key.
The key update process is as follows:
Customer and Developer/Distributor Roles in Key Activating or Updating
1. Customer purchases additional services, such as a higher license limit, or added features.
2. Customer uses the Sentinel Client Activator or the Sentinel SuperPro Field Exchange Utility to generate a locking code.
3. Customer sends the locking code to you (or your distributor, if you authorized your distributor to perform field activation) via telephone, fax, e-mail or the Internet.
4. You (or your distributor) enter the locking code in the Field Activation section of the SSP Toolkit Implementation stage or in the Sentinel
266 Sentinel SuperPro 6.5 Developer’s Guide

Chapter 12 - Activating and Updating Keys
SuperPro License Generator Utility. The key information is extracted from the locking code.
5. You select the actions you want to perform on the key in the field.
Note: Available activation and update actions, and their corresponding com-mands, were defined when the protection strategy for the application was being designed. See Chapter 9, “Defining Field Activation Actions,” on page 221 for more information.
6. Sentinel SuperPro generates a license code—specific to the customer’s key—based on the locking code you entered and the actions you selected.
7. You send the license code back to your customer.
8. Customer enters the license code in the Client Activator or Field Exchange Utility.
The license code tells the Field Exchange Utility or Client Activator how to reprogram the key, including how to activate the application.
9. The key is updated and the customer has access to the services he pur-chased.
What Is a Locking Code?
The locking code for a key includes information about how the key is cur-rently programmed, including the key’s serial number and developer ID. You must have a customer-generated locking code to create a license code.
Locking codes are unique for each key.
Note: In previous versions of Sentinel SuperPro, the locking code was known as the Key ID string.
Sentinel SuperPro 6.5 Developer’s Guide 267
Chapter 12 - Activating and Updating Keys
What Is a License Code?
The license code for a key describes the actions to be performed on a key in the field. It determines how the application will be activated or updated; for example, what new features the customer will have access to, or the number of additional licenses that will be added.
The license code is generated by Sentinel SuperPro based on the locking code provided by the customer and the actions you select. When the cus-tomer enters the license code in the Client Activator or Field Exchange Utility, a script is automatically run that performs the selected actions on the key.
License codes are unique to the key the locking code was generated from.
Note: In previous versions of Sentinel SuperPro, the license code was known as the Update Key string.
268 Sentinel SuperPro 6.5 Developer’s Guide
Chapter 12 - Activating and Updating Keys
How Distributors Activate an Application
Distributors activate an application in much the same way that you would update a key in the field. They use the License Generator Utility, together with the .DST file you provide them, to create license codes that activate or update your protected application. Distributors must have the distributor key connected to their system while using the License Generator Utility to generate license codes.
Distributor responsibilities are dependent on how much work you want to off load to your distributors. Sentinel SuperPro allows for many distribution models to be used; any of the following models could be implemented:
■ The distributor activates product keys prior to sending them to your customers.
■ The distributor sends non-activated product keys to your customers, and activates the key through field activation after the customer receives it.
■ The distributor is responsible only for providing application updates through the field activation process.
Distributors activate product keys through the following process:
1. Customer uses the Sentinel Client Activator or the Sentinel SuperPro Field Exchange Utility to generate a locking code.
2. Customer sends the locking code to the distributor via telephone, fax, e-mail or the Internet.
3. With his distributor key connected, the distributor opens the .DST file you provided in the Sentinel SuperPro License Generator Utility.
4. The distributor enters the locking code in the License Generator Util-ity. The key information is extracted from the locking code.
5. The distributor selects the actions to perform on the key in the field.
Sentinel SuperPro 6.5 Developer’s Guide 269
Chapter 12 - Activating and Updating Keys
6. Sentinel SuperPro generates a license code—specific to the customer’s key—based on the locking code entered and the actions selected.
7. The activation counter on the distributor’s key is decremented by one after the license code is generated.
8. The distributor sends the license code back to your customer.
9. Customer enters the license code in the Client Activator or Field Exchange Utility.
10. The key is updated and the customer has access to the application.
270 Sentinel SuperPro 6.5 Developer’s Guide
Chapter 12 - Activating and Updating Keys
Using the Client Activator
The Sentinel Client Activator is an automated license installation utility that is used to create a product-specific activation script for your protected application.
The Client Activator is SafeNet Inc.’ recommended means of field activation for Sentinel SuperPro protected applications, due to its user-friendly inter-face. The Client Activator also allows your customers to easily and quickly activate your product via a Web site, if you desire. Additionally, if you are going to use SentinelExpress with your Sentinel SuperPro-protected applica-tion for field activation, you must use the Client Activator.
Included in the Client Activator is an Auto Activation Wizard that builds and configures a Client Activator for a specific protected application. The Wizard collects product and publisher information that is used by the Client Activator to process a license activation request.
The Wizard allows you to choose how the product activation will be pre-sented to your customer, and defines the methods your customer can use to activate the product (keyboard/file, telephone, fax/mail, Internet and drop-in hardware).
To build your product-specific Client Activator, you simply define your prod-uct and activation method(s). The Wizard builds the Client Activator, which you ship with your protected application. When your customer installs the application, he or she has the option of clicking the Try or Buy button.
The Try button allows your customer to use the product for a specified time limit or pre-determined number of executions. The Buy button prompts your customer for the necessary information and completes the activation.
Sentinel SuperPro 6.5 Developer’s Guide 271
Chapter 12 - Activating and Updating Keys
Client Activator Customer Requirements
Your customers must be running one of the following operating systems in order to use the Client Activator:
■ Windows 98/ME
■ Windows XP
■ Windows 2000
■ Windows 2003 Server
■ Windows Vista
Additionally, if you are going to allow product activations and upgrades over the Internet, your customers must use one of the following Internet browsers:
■ Internet Explorer 4.01 or higher
■ Netscape Navigator 4.6 or higher
Steps for Deploying the Client Activator
If you decide to use the Client Activator to activate your application in the field, you need to complete the following steps:
■ Protect your application with the SSP Toolkit.
■ Use the Activation Wizard to tell the Client Activator how to activate your application. You’ll need to provide the Client Activator with the usafe32.dll that was created during the Prototype stage (see Chapter 8, “Implementing Your Strategy,” on page 205 for more information on the Prototype stage).
■ Include the .rac and ainst.exe files in the application’s install program.
■ Modify the install program to run ainst.exe during installation.
■ Package and ship the protected application as described in Chapter 11, “Shipping Your Application,” on page 247 of this guide.
272 Sentinel SuperPro 6.5 Developer’s Guide
Chapter 12 - Activating and Updating Keys
For more information about using the Client Activator, including the com-plete list of files you need to ship to your customer, please refer to the Client Activator documentation.
Where to Install Client Activator
In order to update keys, the Client Activator must be installed on the same system where the Sentinel SuperPro key has been connected.
■ If your application is a stand-alone application, the Client Activator should be installed on each client system.
■ If your application is a network application, the Client Activator should be installed only on the server where the Sentinel SuperPro key is located; it does not need to be installed on the client systems.
Be sure to modify your install program appropriately.
If You Don’t Use the Client Activator
If you decide to not use the Client Activator for field activation and upgrades, your customers will need to use the Sentinel SuperPro Field Exchange Utility to obtain locking codes. This utility is also included on your Sentinel SuperPro installation CD. See Chapter 13, “Using the Stand-alone Utilities,” on page 281 for more information.
Sentinel SuperPro 6.5 Developer’s Guide 273
Chapter 12 - Activating and Updating Keys
Updating Product Keys in the Field
Field activation requires both you and your customer to exchange informa-tion about the key. Your customer is responsible for generating and sending the locking code to you. You are responsible for generating and sending the license code to the customer.
This section provides instructions for the developer’s or distributor’s role in field activation. For more information and detailed instructions on the cus-tomer’s role, please refer to Chapter 13, “Using the Stand-alone Utilities,” on page 281.
Receiving the Locking Code from Your Customer
Before you can generate a license code, you must receive a locking code from your customer for the key protecting the application they want to update. If the customer has multiple copies of your application, each of which use a different key, your customer must send you a unique locking code for each key.
There are several ways that a customer can provide you with the locking code; use the method that works best for both you and your customer:
Also, your customer can save the code to a file. This file has an default name of LockingCode.loc, and can be loaded directly into the License Code Generator.
Generating a License Code
Once you have received the customer’s locking code, you are ready to gener-ate a corresponding license code.
Note: The instructions in this section assume you are using the Field Activation sec-tion of the Implementation stage to generate the locking code. If you are using the License Generator Utility, refer to Chapter 13, “Using the Stand-alone Utilities,” on page 281 for more information.
■ Telephone ■ E-mail
■ Fax ■ Internet
274 Sentinel SuperPro 6.5 Developer’s Guide
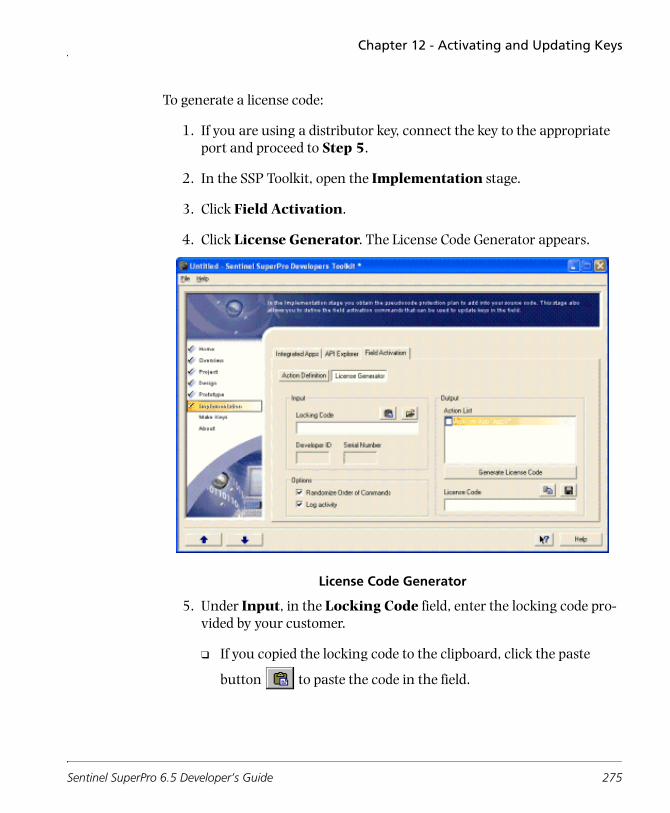
Chapter 12 - Activating and Updating Keys
To generate a license code:
1. If you are using a distributor key, connect the key to the appropriate port and proceed to Step 5.
2. In the SSP Toolkit, open the Implementation stage.
3. Click Field Activation.
4. Click License Generator. The License Code Generator appears.
License Code Generator
5. Under Input, in the Locking Code field, enter the locking code pro-vided by your customer.
❑ If you copied the locking code to the clipboard, click the paste
button to paste the code in the field.
Sentinel SuperPro 6.5 Developer’s Guide 275

Chapter 12 - Activating and Updating Keys
❑ If the locking code was saved to a file (.LOC), click the open button
to locate and open the file. The code is entered in the field automatically.
The developer ID and serial number of the key the code was generated from appears in the corresponding fields.
6. Under Output, in the Action list, select the action(s) you want to perform on the customer’s key.
You can select as many actions as necessary. To remove an action, clear the corresponding check box.
Note: Only selected actions (identified with a check mark) are added to the license code’s script. Remember, actions determine which application features will be activated or upgraded. For more information about actions, see Chapter 9, “Defining Field Activation Actions,” on page 221.
7. If you don’t want to randomize the order in which commands are applied to the key in the field, clear the Randomize Order of Com-mands check box.
While randomizing the order commands are applied in can make it harder for hackers to trace what you are doing in code, there are cer-tain situations in which you should not randomize commands.
Assume you have two commands that operate on the same cell. One command must be executed before the other because the second com-mand expects the cell to be in a state set by the first command. In this case, you should not randomize commands.
Randomizing commands can produce a different license code for a given action set, even if the locking code is the same. Non-randomized commands produce the same license code every time for any given locking code and action set.
8. Select the Log Activity check box to create a log file (LicenseGen.log) containing all the license codes you generate.
276 Sentinel SuperPro 6.5 Developer’s Guide
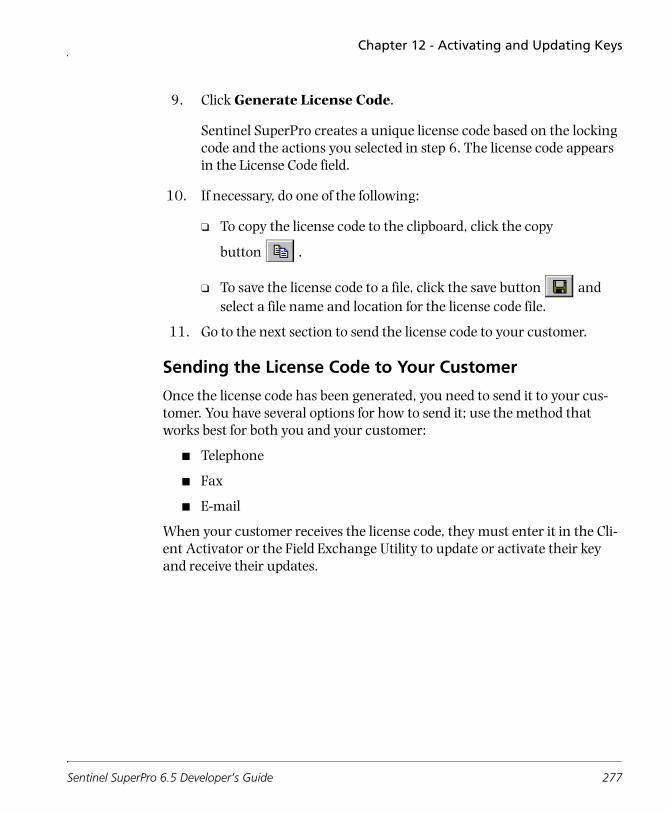
Chapter 12 - Activating and Updating Keys
9. Click Generate License Code.
Sentinel SuperPro creates a unique license code based on the locking code and the actions you selected in step 6. The license code appears in the License Code field.
10. If necessary, do one of the following:
❑ To copy the license code to the clipboard, click the copy
button .
❑ To save the license code to a file, click the save button and select a file name and location for the license code file.
11. Go to the next section to send the license code to your customer.
Sending the License Code to Your Customer
Once the license code has been generated, you need to send it to your cus-tomer. You have several options for how to send it; use the method that works best for both you and your customer:
■ Telephone
■ Fax
When your customer receives the license code, they must enter it in the Cli-ent Activator or the Field Exchange Utility to update or activate their key and receive their updates.
Sentinel SuperPro 6.5 Developer’s Guide 277
Chapter 12 - Activating and Updating Keys
Note: If you selected the one-time update option, your customer will only be able to apply the license code one time. If they attempt to apply the license code more than once, no additional updates or counter increments will occur.
However, if you did not select the one-time update option, your customer can apply the license code as many times as they like, possibly increment-ing counters more than you intended. For more information about using the one-time update option, see “Enabling the One-Time Update Option for License Codes” on page 119.
For information on how your customer enters the license code using the Field Exchange Utility, refer to Chapter 13, “Using the Stand-alone Utilities,” on page 281.
For information about using the Client Activator to enter the license code, please refer to the Client Activator documentation.
Tip: Remember, you should provide your customers with instructions for generat-ing the locking code and entering the license code. See “What to Send to Your Customers” on page 248 for more information.
278 Sentinel SuperPro 6.5 Developer’s Guide
Chapter 12 - Activating and Updating Keys
Updating Distributor Keys in the Field
When the activation counter on a distributor key reaches zero, the distribu-tor will no longer be able to activate your application, or perform updates to keys in the field. You can increment the activation counter on a distributor key (and charge for doing so) in the same way that you update product keys in the field.
To update a distributor key in the field:
1. Ask your distributor to run the Field Exchange Utility, while his dis-tributor key is connected to his system, to generate a locking code.
2. Tell your distributor to send the locking code to you via telephone, fax, e-mail or the Internet.
3. Enter the locking code in the Field Activation section of the SSP Tool-kit Implementation stage. The key information is extracted from the locking code.
4. Select the Increment Distributor Counter action.
5. Click Generate License Code. Sentinel SuperPro generates a license code—specific to the distributor’s key—based on the locking code you entered and the action you selected.
6. Send the license code back to the distributor.
7. Distributor enters the license code in the Field Exchange Utility.
8. The key is updated and the distributor has access to additional activa-tion or update licenses.
Sentinel SuperPro 6.5 Developer’s Guide 279

Chapter 12 - Activating and Updating Keys
280 Sentinel SuperPro 6.5 Developer’s Guide
Chapter 13Using the Stand-alone Utilities
Sentinel SuperPro comes with a set of three stand-alone utilities that allow you to give other people—such as manufacturing department employees or distributors—the ability to perform selected Sentinel SuperPro functions without also having access to your passwords and protection strategy infor-mation. The three utilities are as follows:
• The Make Keys Utility allows you to program keys for your protected application.
• The License Generator Utility allows you or your distributors to activate and update product keys in the field through creation of a license code.
• The Field Exchange Utility is used by your customers to generate locking codes and enter license codes. This utility is necessary only if you are using field activation for your application, but are not shipping the Client Activator.
Tip: For information about the stand-alone Sentinel License Monitor, please refer to the Sentinel SuperPro System Administrator’s Guide, included in your package.
Sentinel SuperPro 6.5 Developer’s Guide 281
Chapter 13 - Using the Stand-alone Utilities
This chapter covers the following topics:
• Using the Make Keys Utility
• Using the License Generator Utility
• Using the Field Exchange Utility
Using the Make Keys Utility
To avoid giving your manufacturing department access to your pass-words—which would also give them the ability to change field activation commands or other elements in your protection strategy—we recommend providing them with the Make Keys Utility.
This utility has the exact same functionality as that found in the Make Keys stage in Sentinel SuperPro. See Chapter 10, “Programming Keys,” on page 233 for more information about the Make Keys stage.
Installing the Make Keys Utility
The Make Keys Utility is installed automatically during Sentinel SuperPro setup, in the same folder where you installed the SSP Toolkit. To use the Make Keys Utility, the Sentinel Protection Server must also be installed and running on the same workstation. To distribute this utility and the server to your manufacturing department, do one of the following:
• Use the Sentinel SuperPro setup program to install only the Make Keys Utility and the Sentinel Protection Server on the appropriate computers. The setup program is accessible from the Sentinel SuperPro installation CD.
• Provide them with a copy of the Make Keys Utility executable file (MakeKeysUtil.exe), and the following files: spcommon.dll, lang_enu.dll, sp_gXX.dll, makedll.dll and makekeysutil.chm. All files should be placed in a single directory.
Also, provide them with a copy of the appropriate server executable file and ask them to run the file on their workstation to install the server. Windows 98 or ME users should use the spnsrv9x.exe file. Windows
282 Sentinel SuperPro 6.5 Developer’s Guide
Chapter 13 - Using the Stand-alone Utilities
2000 users should use the spnsrvnt.exe and loadserv.exe files. Instruc-tions for installing both server types are provided in “Installing the Server with the Executable Files” on page 254.
You also need to provide these users with the Sentinel SuperPro project (.SPP) containing the protection strategy for the application they will be cre-ating keys for.
You’ll want to install the Make Keys Utility on computers that reside on your manufacturing floor. You are free to install a copy of this utility and the server on multiple computers within your manufacturing area, so that keys can be programmed on multiple computers at the same time.
Opening the Make Keys Utility
To open the Make Keys Utility:
1. Verify the Sentinel Protection Server is installed and running. See “Using the Field Exchange Utility” on page 282 for instructions.
2. Do one of the following:
• From the Start menu, point to Programs > SafeNet Sentinel > SuperPro > 6.5> Tools, then select Make Keys Utility.
• Double-click the MakeKeysUtil.exe file icon.
Note: If you did not use the Sentinel SuperPro setup program to install the Make Keys Utility, it will not be accessible from the Start > Programs menu.
A list of the applications protected in the project appears. The values under Metered indicates whether or not the application has a demo counter or metered options associated with it.
Sentinel SuperPro 6.5 Developer’s Guide 283
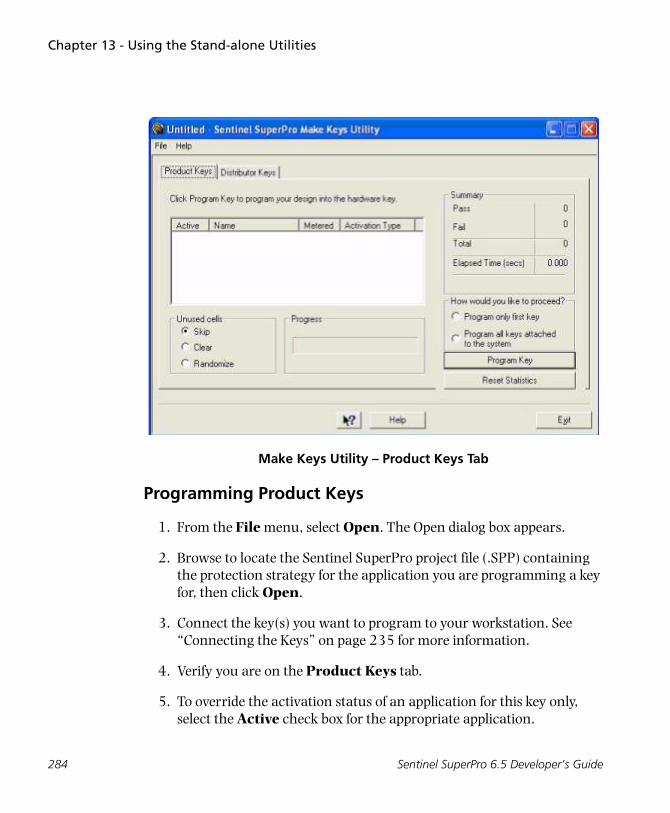
Chapter 13 - Using the Stand-alone Utilities
Make Keys Utility – Product Keys Tab
Programming Product Keys
1. From the File menu, select Open. The Open dialog box appears.
2. Browse to locate the Sentinel SuperPro project file (.SPP) containing the protection strategy for the application you are programming a key for, then click Open.
3. Connect the key(s) you want to program to your workstation. See “Connecting the Keys” on page 235 for more information.
4. Verify you are on the Product Keys tab.
5. To override the activation status of an application for this key only, select the Active check box for the appropriate application.
284 Sentinel SuperPro 6.5 Developer’s Guide
Chapter 13 - Using the Stand-alone Utilities
For example, you can make a demo application inactive so that it must be activated in the field.
If the Active check box is selected, the application will be shipped as active for the key(s). If the check box is cleared, the application will be inactive upon shipment, requiring the user to enter an activation pass-word to run the application.
Note: Because the override is on a per key basis, if you make a change to the activation status, it will affect ALL keys programmed in the batch. Make key utility only reads the design and does not allow you to modify it.
6. Under Unused Cells, select one of the following:
• Skip: Overwrites any cells used in the protection strategy, but leaves any cells that are unallocated or not assigned values in your protection strategy. This is the default option.
• Clear: Removes values and access codes/cell types from all cells not used in the protection strategy, including any previously programmed cells.
• Randomize: Randomly assigns values and access codes to cells not used in the protection strategy. This is the most secure option; it makes the protection more difficult for hackers to crack.
7. You can program one or more keys by choosing an appropriate option under How would you like to proceed?.
8. Click Program Key. The Make Keys Utility programs the key(s) with the protection strategy you defined.
Sentinel SuperPro 6.5 Developer’s Guide 285
Chapter 13 - Using the Stand-alone Utilities
9. On successful programming, disconnect the key(s) from the port. If the key fails the programming process, refer to Appendix A, “Trou-bleshooting,” on page 373 for assistance.
Programming Distributor Keys
1. From the File menu, select Open. The Open dialog box appears.
2. Browse to locate the Sentinel SuperPro project file (.SPP) containing the protection strategy for the application you are programming a dis-tributor key for, then click Open.
3. Connect the key you want to program to the appropriate port on your workstation. See “Connecting the Keys” on page 235 for more infor-mation.
4. Click the Distributor Keys tab.
A list of the applications assigned the Distributed activation type appears. You can program distributor keys only for those applications using the Distributed activation type.
286 Sentinel SuperPro 6.5 Developer’s Guide
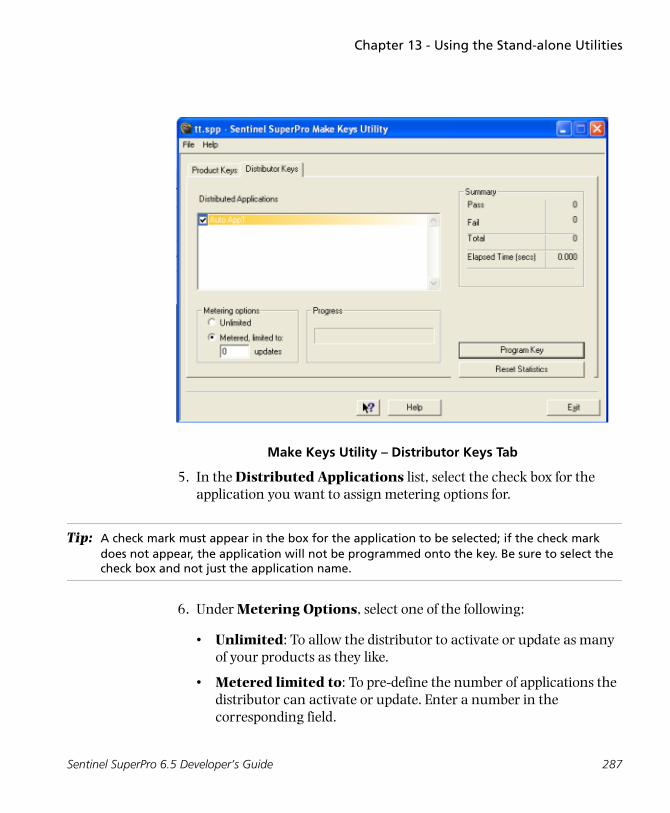
Chapter 13 - Using the Stand-alone Utilities
Make Keys Utility – Distributor Keys Tab
5. In the Distributed Applications list, select the check box for the application you want to assign metering options for.
Tip: A check mark must appear in the box for the application to be selected; if the check mark does not appear, the application will not be programmed onto the key. Be sure to select the check box and not just the application name.
6. Under Metering Options, select one of the following:
• Unlimited: To allow the distributor to activate or update as many of your products as they like.
• Metered limited to: To pre-define the number of applications the distributor can activate or update. Enter a number in the corresponding field.
Sentinel SuperPro 6.5 Developer’s Guide 287
Chapter 13 - Using the Stand-alone Utilities
7. Repeat steps 5 and 6 for each application you want the distributor to be able to activate and update.
You can program a distributor key to activate or update multiple appli-cations. When you select the check box for the next application, the metering option changes to the default value of zero, or to the value you previously selected for the application.
8. Click Program Key. The Make Keys Utility programs the key with the protection strategy you defined.
Note: You can program ONLY one Distributor key at a time.
9. On successful programming, disconnect the key from the port. If the key fails the programming process, refer to Appendix A, “Trou-bleshooting,” on page 373 for assistance.
10. Repeat steps 3 through 9 until all distributor keys have been pro-grammed.
288 Sentinel SuperPro 6.5 Developer’s Guide
Chapter 13 - Using the Stand-alone Utilities
Viewing Programming Statistics
After each key is programmed, the Summary section is updated accordingly:
• Pass: The number of keys that have been successfully programmed.
• Fail: The number of keys that have not been successfully programmed.
Note: To determine if a programming failure is due to a software error or a hardware error, try programming another key with the same strategy. If the programming is successful, the pre-vious error was hardware-related. If you try programming many keys, and all of them fail programming, the error is software-related. Refer to Appendix A, “Troubleshooting,” on page 373 for help, or contact SafeNet Inc. Technical Support for additional assistance.
• Total: The total number of keys you have programmed during this session, whether they passed or failed.
• Elapsed Time: The amount of time it took to program the last key.
These statistics are not project-specific—even if you program multiple keys with multiple project files (protection strategies), the statistics do not reset until you exit the Make Keys Utility and start it again with a new session.
To reset the statistics without closing and restarting the Make Keys Utility, click Reset Statistics.
Sentinel SuperPro 6.5 Developer’s Guide 289
Chapter 13 - Using the Stand-alone Utilities
Using the License Generator Utility
If you are giving your distributors—or anyone in your organization—the ability to provide field activation and updates for your customers, we recom-mend giving them the License Generator Utility to do so.
This prevents those users from changing field action or command defini-tions, or other elements in your protection strategy, and also does not give them access to your passwords.
This utility has the exact same functionality as that found in the Field Acti-vation > License Generator section of the Implementation stage in the SSP Toolkit. See Chapter 12, “Activating and Updating Keys,” on page 265 for more information about field activation.
Installing the License Generator Utility
The License Generator Utility is installed automatically during Sentinel SuperPro setup, in the same folder where you installed the SSP Toolkit. To use the License Generator Utility, the Sentinel Protection Server must also be installed and running on the same workstation. To distribute this utility and the server to your distributors or other users, do one of the following:
• Use the Sentinel SuperPro setup program to install only the License Generator Utility and the Sentinel Protection Server on the appropriate computers. The setup program is accessible from the Sentinel SuperPro installation CD.
• Provide them with a copy of the License Generator Utility executable file (LicenseGenUtil.exe), and the following files: spcommon.dll, lang_enu.dll, sp_gXX.dll, dsafedll.dll, dsafe32.dll, and licensegenutil.chm. All files should be placed in a single directory.
Also, provide them with a copy of the appropriate server executable file and ask them to run the file on their workstation to install the server. Windows 98 or ME users should use the spnsrv9x.exe file. Windows 2000 users should use the spnsrvnt.exe and loadserv.exe files. Instruc-tions for installing both server types are provided in “Installing the
290 Sentinel SuperPro 6.5 Developer’s Guide
Chapter 13 - Using the Stand-alone Utilities
Server with the Executable Files” on page 254.
You also need to provide these users with the Sentinel SuperPro distributor project file (.DST) containing the protection strategy for the application they will be providing field activation for.
Opening the License Generator Utility
To open the License Generator utility:
1. Verify the Sentinel Protection Server is installed and running. See “Using the Field Exchange Utility” on page 282 for instructions.
2. Do one of the following:
• From the Start menu, point to Programs > SafeNet Sentinel > SuperPro > 6.5> Tools, then select License Generator Utility.
• Double-click the LicenseGenUtil.exe file icon.
Note: If you did not use the Sentinel SuperPro setup program to install the License Generator Util-ity, it will not be accessible from the Start > Programs menu.
Sentinel SuperPro 6.5 Developer’s Guide 291
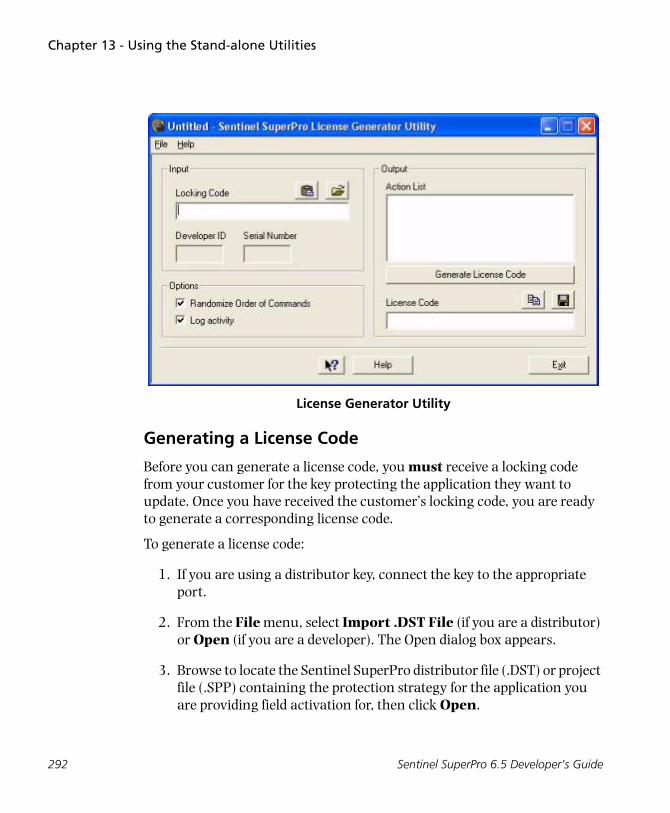
Chapter 13 - Using the Stand-alone Utilities
License Generator Utility
Generating a License Code
Before you can generate a license code, you must receive a locking code from your customer for the key protecting the application they want to update. Once you have received the customer’s locking code, you are ready to generate a corresponding license code.
To generate a license code:
1. If you are using a distributor key, connect the key to the appropriate port.
2. From the File menu, select Import .DST File (if you are a distributor) or Open (if you are a developer). The Open dialog box appears.
3. Browse to locate the Sentinel SuperPro distributor file (.DST) or project file (.SPP) containing the protection strategy for the application you are providing field activation for, then click Open.
292 Sentinel SuperPro 6.5 Developer’s Guide

Chapter 13 - Using the Stand-alone Utilities
4. Under Input, in the Locking Code field, enter the locking code pro-vided by your customer.
• If you copied the locking code to the clipboard, click the paste
button to paste the code in the field.
• If the locking code was saved to a file (.LOC), click the open button
to locate and open the file. The code is entered in the field automatically.
The developer ID and serial number of the key the code was generated from appears in the corresponding fields.
5. Under Output, in the Action list, select the action(s) you want to per-form on the customer’s key.
You can select as many actions as necessary. To remove an action, clear the corresponding check box.
Note: Only selected actions (identified with a check mark) are added to the license code’s script. Remember, actions determine what elements of the application will be activated or upgraded. For more information about actions, see Chapter 9, “Defining Field Activation Actions,” on page 221.
6. If you don’t want to randomize the order in which commands are applied to the key in the field, clear the Randomize Order of Com-mands check box.
While randomizing the order commands are applied in can make it harder for hackers to trace what you are doing in code, there are cer-tain situations in which you should not randomize commands.
Assume you have two commands that operate on the same cell. One command must be executed before the other because the second com-mand expects the cell to be in a state set by the first command. In this case, you should not randomize commands.
Randomizing commands can produce a different license code for a
Sentinel SuperPro 6.5 Developer’s Guide 293
Chapter 13 - Using the Stand-alone Utilities
given action set, even if the locking code is the same. Non-randomized commands produce the same license code every time for any given locking code and action set.
7. Select the Log Activity check box to create a log file (LicenseGen.log) containing all the license codes you generate.
8. Click Generate License Code.
The License Generator Utility creates a unique license code based on the locking code and the actions you selected in step 5. The license code appears in the License Code field.
9. If necessary, do one of the following:
• To copy the license code to the clipboard, click the copy
button .
• To save the license code to a file, click the save button and select a file name and location for the license code file.
10. Refer to “Sending the License Code to Your Customer” on page 277 for instructions on sending the license code to your customer.
294 Sentinel SuperPro 6.5 Developer’s Guide

Chapter 13 - Using the Stand-alone Utilities
Using the Field Exchange Utility
The Field Exchange Utility is the only stand-alone utility you will send to your customers. An alternative to the Client Activator, it is used to first gen-erate the locking code needed to create a license code, and then enter the license code that performs the field activation commands.
This utility needs to be sent to your customers along with your protected application only if you will be using field activation and you are not using the Client Activator. To use the Field Exchange Utility, the Sentinel Protec-tion Server must also be installed and running on the same workstation.
As a developer, you may want to use this utility as a quick means of testing your keys and the field activation process. After you have completed your protection strategy and programmed some keys, experiment with different field activation commands to make sure the license code applies those com-mands correctly.
Installing the Field Exchange Utility – Developers
The Field Exchange utility (FieldExUtil.exe) is installed automatically during SenintelSuperPro setup, in the same folder where you installed the SSP Tool-kit. No further installation is necessary.
Installing the Field Exchange Utility – Customers
If you are shipping the Field Exchange utility to your customers for field acti-vation instead of the Client Activator, you should install the Field Exchange executable file (FieldExUtil.exe), field exchange .DLL (usafe32.dll) and Help file (fieldexutil.chm) as part of your application’s setup routine.
In order to update keys, the Field Exchange Utility must be installed on the same system where the Sentinel SuperPro key has been connected.
• If your application is a stand-alone application, the Field Exchange Utility should be installed on each client system.
Sentinel SuperPro 6.5 Developer’s Guide 295
Chapter 13 - Using the Stand-alone Utilities
• If your application is a network application, the Field Exchange Utility should be installed only on the server where the Sentinel SuperPro key is located; it does not need to be installed on the client systems.
Be sure to modify your installation programs appropriately.
Warning! DO NOT send your customers the Sentinel SuperPro project (.SPP) containing the pro-tection strategy for the application they purchased.
296 Sentinel SuperPro 6.5 Developer’s Guide
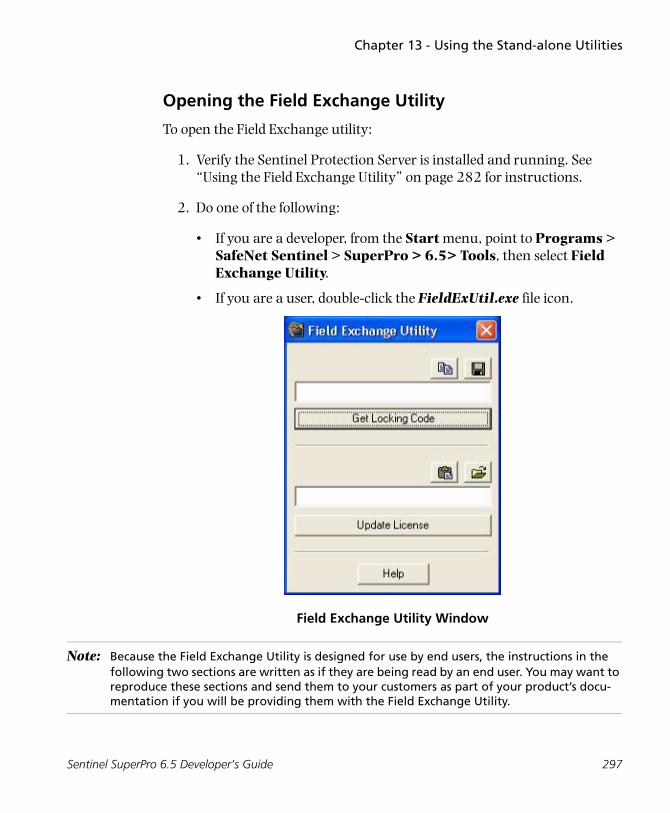
Chapter 13 - Using the Stand-alone Utilities
Opening the Field Exchange Utility
To open the Field Exchange utility:
1. Verify the Sentinel Protection Server is installed and running. See “Using the Field Exchange Utility” on page 282 for instructions.
2. Do one of the following:
• If you are a developer, from the Start menu, point to Programs > SafeNet Sentinel > SuperPro > 6.5> Tools, then select Field Exchange Utility.
• If you are a user, double-click the FieldExUtil.exe file icon.
Field Exchange Utility Window
Note: Because the Field Exchange Utility is designed for use by end users, the instructions in the following two sections are written as if they are being read by an end user. You may want to reproduce these sections and send them to your customers as part of your product’s docu-mentation if you will be providing them with the Field Exchange Utility.
Sentinel SuperPro 6.5 Developer’s Guide 297
Chapter 13 - Using the Stand-alone Utilities
Generating a Locking Code
To update the hardware key used to run your application, you must provide information about the key to your software provider. The Field Exchange Utility displays this information in the form of a locking code, similar to the following:
EHBFGYARDIJABRFLEBDH
You must communicate the locking code to the software provider as they have instructed (for example, via fax or e-mail). The provider will then give you a corresponding license code to enter into the Field Exchange Utility.
To generate a locking code for a key:
1. Verify the correct hardware key is attached to the appropriate port on your computer or server.
2. Click Get Locking Code. The locking code appears in the top field.
If the message “Error” appears in the top field, make sure the key is firmly attached to the port and try again.
3. Do one of the following:
• Click the copy button to place the locking code on the clipboard.
• Click the save button to save the locking code to a file. Define a location and file name for the file, then click Save.
• Write down the code exactly as it appears in the field.
4. Send the locking code to the software provider as directed.
5. Wait to continue the update process until you have received the license code from your software provider.
You can leave the Field Exchange Utility open, or you may close it. Either way, the license code you receive will update your key correctly.
298 Sentinel SuperPro 6.5 Developer’s Guide
Chapter 13 - Using the Stand-alone Utilities
Entering a License Code
The license code provided to you by the software provider will reprogram the hardware key used to run the application, giving you access to the addi-tional services or features you have purchased. License codes look the same as locking codes.
License codes are unique to the key they were generated for. License codes used with one key cannot be used to activate upgrades for another key, even if the application the key is used with is the same.
To enter a license code:
1. If necessary, open the Field Exchange Utility.
2. Verify the correct key is attached to your computer or server. Only one hardware key should be attached to your computer during the update process.
Note: If you are updating a key on a server, you must remove all other keys, leaving only the one you are updating. Only one key should be attached to the server during the update process. Because removing keys may terminate the application on some client systems, you may want to perform key updates only during non-peak hours.
3. In the field above the Update License button, enter the license code given to you by your software provider. Do one of the following:
• Click the paste button to paste the code from the clipboard, if it was placed there.
• Click the open button to load the code from a file. Browse to locate the file (.LIC), then click Open.
• Type the code in the field. Be sure to enter it exactly as it was provided.
4. Click Update License. The key update process begins; it may take up to two or three minutes to complete the process.
Sentinel SuperPro 6.5 Developer’s Guide 299
Chapter 13 - Using the Stand-alone Utilities
5. When “Update Successful” appears, close the Field Exchange Utility.
The application is now ready to use, and you should have access to the additional licenses or new features you purchased.
Note: If the update process is not successful, verify the key is securely attached to your computer and try again. If the process is still unsuccessful, or you do not have access to the upgrades you purchased when the process is complete, contact your software provider for assistance.
300 Sentinel SuperPro 6.5 Developer’s Guide
Chapter 14API Function Reference
The Sentinel SuperPro API is a set of functions (calls) used to communicate between your application, the network server (when necessary), the Senti-nel system driver and the hardware key. When you use integrated protection, API functions embedded in your source code call the hardware key to verify its presence, obtain a license and/or perform some other pre-defined action.
This chapter provides an overview of the Sentinel SuperPro API functions, including a list of API status codes. The functions in this chapter are based on the C programming language, and can be used for both stand-alone and network applications.
Using the Sentinel SuperPro API
All functions require a pointer to a packet record (RB_SPRO_APIPACKET) as a parameter. The Sentinel system driver uses the data in the packet record to communicate with the hardware key. The packet record is initialized by the RNBOsproFormatPacket function, and must reside on a DWORD bound-ary. You must allocate memory for the record and pass an RB_SPRO_APIPACKET pointer to all API functions. An application should never modify the data in the packet.
Sentinel SuperPro 6.5 Developer’s Guide 301
Chapter 14 - API Function Reference
Note: Each APIPACKET record is a license request, so there should be a separate APIPACKET record created for each RNBOsproFindFirstUnit call.
The following is an example of a typical API calling sequence:
1. Include the appropriate SuperPro API definition file in your source code.
2. Link your application with the appropriate SuperPro library file.
3. Declare a variable of type RB_SPRO_APIPACKET.
4. Format the API packet that you previously declared using the RNBOsproFormatPacket function call.
5. Initialize the packet you declared using the RNBOsproInitialize function call.
6. Add code to set the contact server using the RNBOsproSetContactServer function call.
7. Add code to check for the presence of the key using the RNBOsproFindFirstUnit function call.
8. If you are using sublicensing, make a call to obtain the sublicense using the RNBOsproGetSubLicense function call.
9. Now you can use other SuperPro API functions, such as RNBOspro-Query, RNBOsproRead, etc. as appropriate for the protection scheme you have designed.
10. Before your application terminates, call the RNBOsproReleaseLicense function to release all licenses and sublicenses held by your applica-tion.
Note: The exact name of the API functions may be different that those listed above, depending on the interface you are using.
302 Sentinel SuperPro 6.5 Developer’s Guide

Chapter 14 - API Function Reference
Also, make sure you call a SuperPro API function, such as RNBOsproQuery or RNBOsproRead, at least once every 90 seconds after obtaining a license. This will provide the application heartbeat so that the server keeps the license allocated to the application. See “Maintaining the License” on page 109 for more information.
For additional information about using API functions in your protection strategy, refer to Chapter 3, “Designing Your Protection Strategy,” on page 59. Also, for information about setting the application’s access mode through code, see “Setting the Access Mode” on page 103.
Tip: Sample code can be found in the pseudocode generated during the Proto-type stage. See “Viewing the Pseudocode” on page 211 for more informa-tion.
API Functions Summary
The following table summarizes the Sentinel SuperPro API functions. Each function is explained in further detail later in this chapter.
Function See... Description
RNBOsproActivate page 305 Activates an inactive algorithm so it can be used by the RNBOsproQuery() function.
RNBOsproCheckTerminalService
page 346 Allows enabling/disabling the checking on terminal clients while RNBOsproFindFirstUnit, or RNBOsproFindNextUnit API is executed.
RNBOsproCleanUp page 307 Releases the memory resources acquired by the SuperPro client library.
RNBOsproDecrement page 307 Decrements a counter word or read/write data word by one. If the counter is associated with an active algorithm, decrementing to zero deactivates the algorithm.
RNBOsproEnumServer page 310 Enumerates the number of servers running on the network, according to the specified developer ID.
Sentinel SuperPro 6.5 Developer’s Guide 303
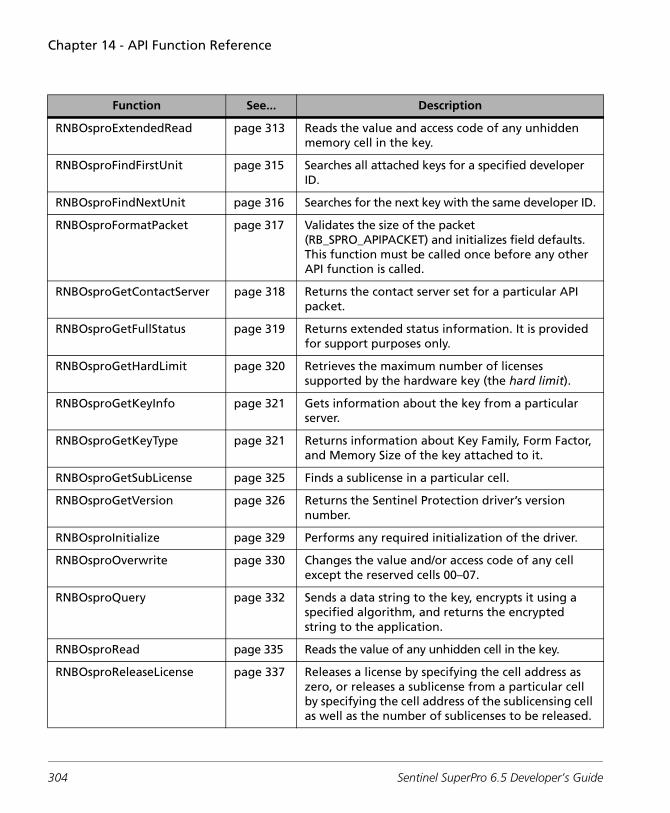
Chapter 14 - API Function Reference
RNBOsproExtendedRead page 313 Reads the value and access code of any unhidden memory cell in the key.
RNBOsproFindFirstUnit page 315 Searches all attached keys for a specified developer ID.
RNBOsproFindNextUnit page 316 Searches for the next key with the same developer ID.
RNBOsproFormatPacket page 317 Validates the size of the packet (RB_SPRO_APIPACKET) and initializes field defaults. This function must be called once before any other API function is called.
RNBOsproGetContactServer page 318 Returns the contact server set for a particular API packet.
RNBOsproGetFullStatus page 319 Returns extended status information. It is provided for support purposes only.
RNBOsproGetHardLimit page 320 Retrieves the maximum number of licenses supported by the hardware key (the hard limit).
RNBOsproGetKeyInfo page 321 Gets information about the key from a particular server.
RNBOsproGetKeyType page 321 Returns information about Key Family, Form Factor, and Memory Size of the key attached to it.
RNBOsproGetSubLicense page 325 Finds a sublicense in a particular cell.
RNBOsproGetVersion page 326 Returns the Sentinel Protection driver’s version number.
RNBOsproInitialize page 329 Performs any required initialization of the driver.
RNBOsproOverwrite page 330 Changes the value and/or access code of any cell except the reserved cells 00–07.
RNBOsproQuery page 332 Sends a data string to the key, encrypts it using a specified algorithm, and returns the encrypted string to the application.
RNBOsproRead page 335 Reads the value of any unhidden cell in the key.
RNBOsproReleaseLicense page 337 Releases a license by specifying the cell address as zero, or releases a sublicense from a particular cell by specifying the cell address of the sublicensing cell as well as the number of sublicenses to be released.
Function See... Description
304 Sentinel SuperPro 6.5 Developer’s Guide
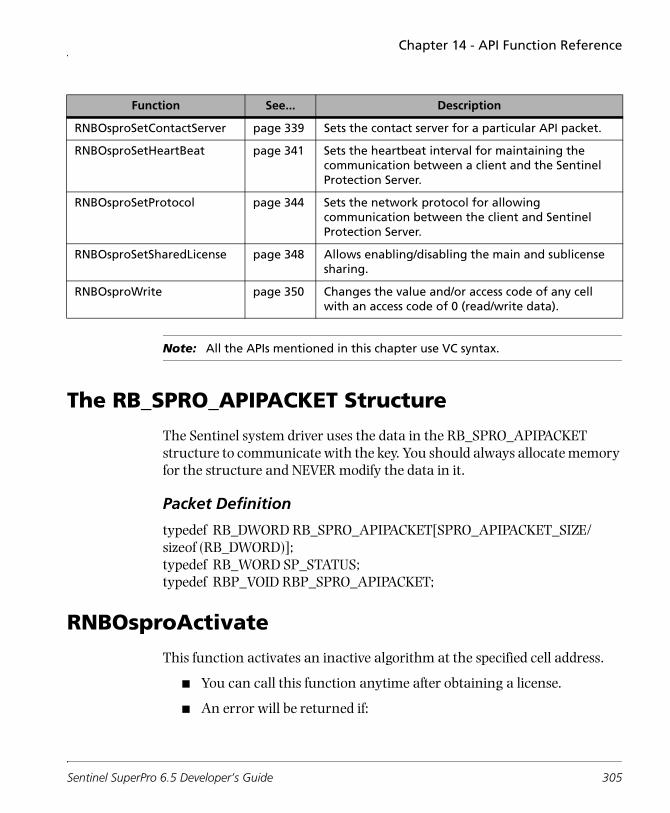
Chapter 14 - API Function Reference
Note: All the APIs mentioned in this chapter use VC syntax.
The RB_SPRO_APIPACKET Structure
The Sentinel system driver uses the data in the RB_SPRO_APIPACKET structure to communicate with the key. You should always allocate memory for the structure and NEVER modify the data in it.
Packet Definition
typedef RB_DWORD RB_SPRO_APIPACKET[SPRO_APIPACKET_SIZE/sizeof (RB_DWORD)];typedef RB_WORD SP_STATUS;typedef RBP_VOID RBP_SPRO_APIPACKET;
RNBOsproActivate
This function activates an inactive algorithm at the specified cell address.
■ You can call this function anytime after obtaining a license.
■ An error will be returned if:
RNBOsproSetContactServer page 339 Sets the contact server for a particular API packet.
RNBOsproSetHeartBeat page 341 Sets the heartbeat interval for maintaining the communication between a client and the Sentinel Protection Server.
RNBOsproSetProtocol page 344 Sets the network protocol for allowing communication between the client and Sentinel Protection Server.
RNBOsproSetSharedLicense page 348 Allows enabling/disabling the main and sublicense sharing.
RNBOsproWrite page 350 Changes the value and/or access code of any cell with an access code of 0 (read/write data).
Function See... Description
Sentinel SuperPro 6.5 Developer’s Guide 305
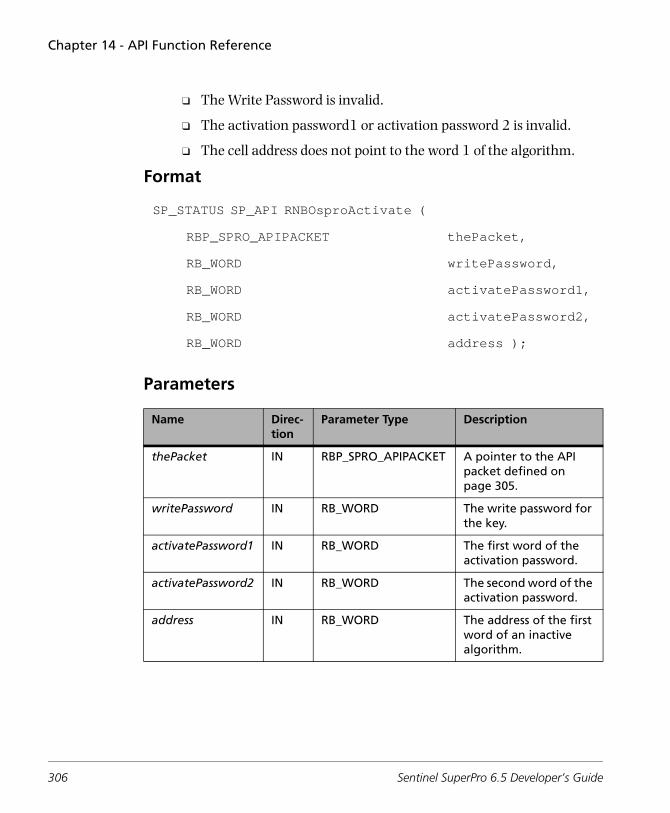
Chapter 14 - API Function Reference
❑ The Write Password is invalid.
❑ The activation password1 or activation password 2 is invalid.
❑ The cell address does not point to the word 1 of the algorithm.
Format
Parameters
SP_STATUS SP_API RNBOsproActivate (
RBP_SPRO_APIPACKET thePacket,
RB_WORD writePassword,
RB_WORD activatePassword1,
RB_WORD activatePassword2,
RB_WORD address );
Name Direc-tion
Parameter Type Description
thePacket IN RBP_SPRO_APIPACKET A pointer to the API packet defined on page 305.
writePassword IN RB_WORD The write password for the key.
activatePassword1 IN RB_WORD The first word of the activation password.
activatePassword2 IN RB_WORD The second word of the activation password.
address IN RB_WORD The address of the first word of an inactive algorithm.
306 Sentinel SuperPro 6.5 Developer’s Guide
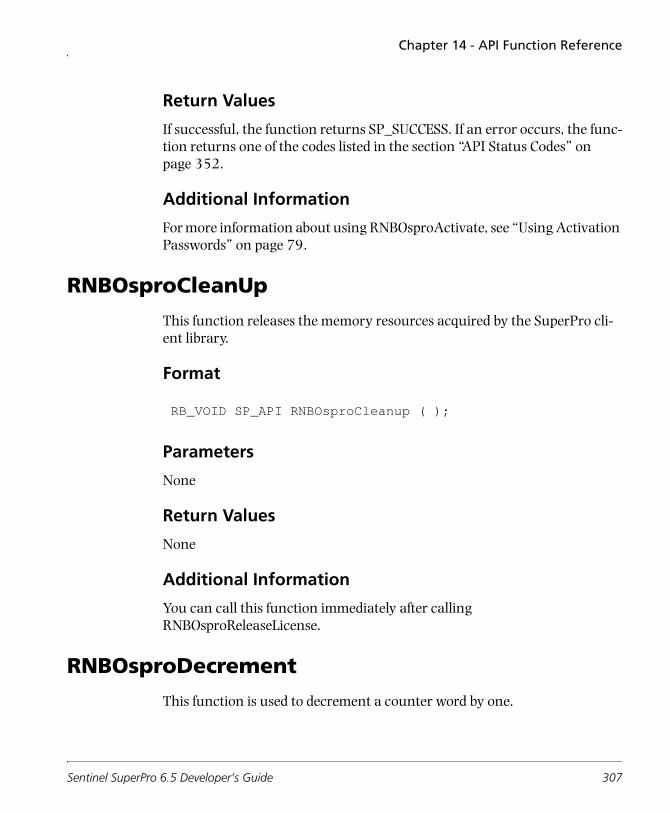
Chapter 14 - API Function Reference
Return Values
If successful, the function returns SP_SUCCESS. If an error occurs, the func-tion returns one of the codes listed in the section “API Status Codes” on page 352.
Additional Information
For more information about using RNBOsproActivate, see “Using Activation Passwords” on page 79.
RNBOsproCleanUp
This function releases the memory resources acquired by the SuperPro cli-ent library.
Format
Parameters
None
Return Values
None
Additional Information
You can call this function immediately after calling RNBOsproReleaseLicense.
RNBOsproDecrement
This function is used to decrement a counter word by one.
RB_VOID SP_API RNBOsproCleanup ( );
Sentinel SuperPro 6.5 Developer’s Guide 307
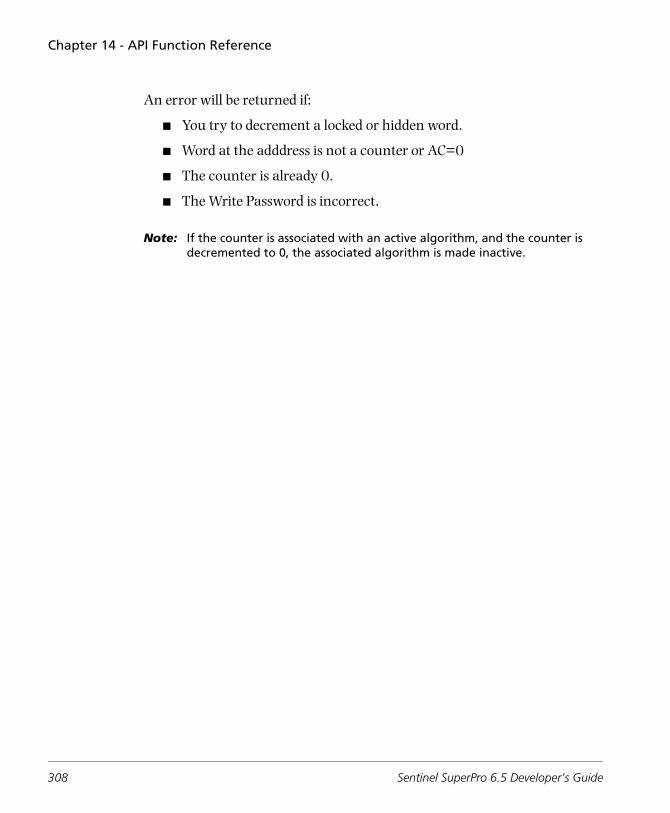
Chapter 14 - API Function Reference
An error will be returned if:
■ You try to decrement a locked or hidden word.
■ Word at the adddress is not a counter or AC=0
■ The counter is already 0.
■ The Write Password is incorrect.
Note: If the counter is associated with an active algorithm, and the counter is decremented to 0, the associated algorithm is made inactive.
308 Sentinel SuperPro 6.5 Developer’s Guide
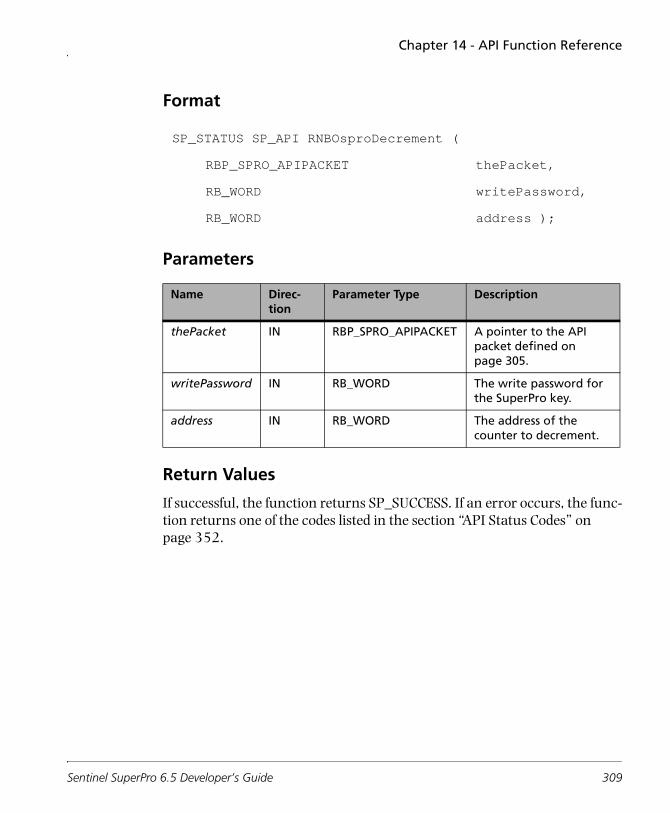
Chapter 14 - API Function Reference
Format
Parameters
Return Values
If successful, the function returns SP_SUCCESS. If an error occurs, the func-tion returns one of the codes listed in the section “API Status Codes” on page 352.
SP_STATUS SP_API RNBOsproDecrement (
RBP_SPRO_APIPACKET thePacket,
RB_WORD writePassword,
RB_WORD address );
Name Direc-tion
Parameter Type Description
thePacket IN RBP_SPRO_APIPACKET A pointer to the API packet defined on page 305.
writePassword IN RB_WORD The write password for the SuperPro key.
address IN RB_WORD The address of the counter to decrement.
Sentinel SuperPro 6.5 Developer’s Guide 309
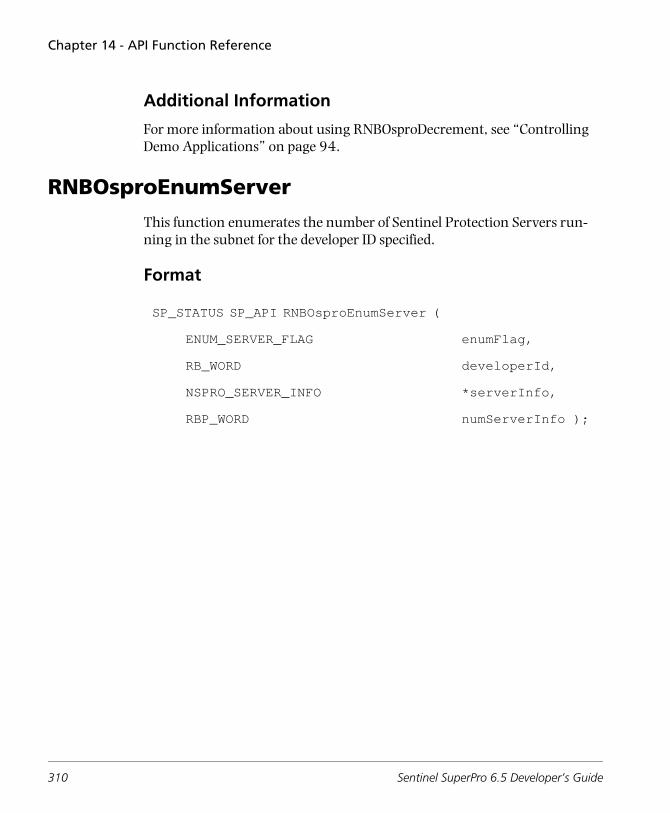
Chapter 14 - API Function Reference
Additional Information
For more information about using RNBOsproDecrement, see “Controlling Demo Applications” on page 94.
RNBOsproEnumServer
This function enumerates the number of Sentinel Protection Servers run-ning in the subnet for the developer ID specified.
Format
SP_STATUS SP_API RNBOsproEnumServer (
ENUM_SERVER_FLAG enumFlag,
RB_WORD developerId,
NSPRO_SERVER_INFO *serverInfo,
RBP_WORD numServerInfo );
310 Sentinel SuperPro 6.5 Developer’s Guide
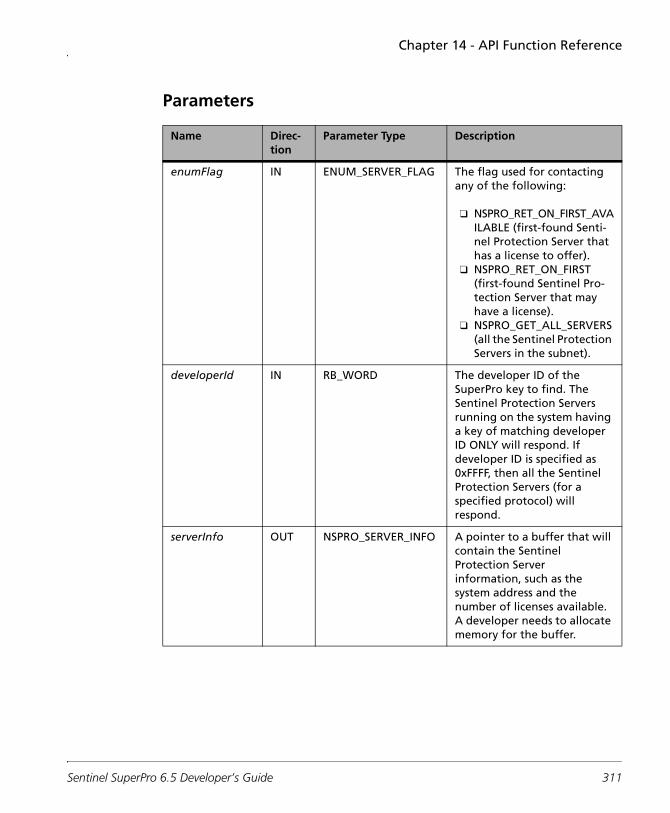
Chapter 14 - API Function Reference
Parameters
Name Direc-tion
Parameter Type Description
enumFlag IN ENUM_SERVER_FLAG The flag used for contacting any of the following:
❑ NSPRO_RET_ON_FIRST_AVAILABLE (first-found Senti-nel Protection Server that has a license to offer).
❑ NSPRO_RET_ON_FIRST (first-found Sentinel Pro-tection Server that may have a license).
❑ NSPRO_GET_ALL_SERVERS (all the Sentinel Protection Servers in the subnet).
developerId IN RB_WORD The developer ID of the SuperPro key to find. The Sentinel Protection Servers running on the system having a key of matching developer ID ONLY will respond. If developer ID is specified as 0xFFFF, then all the Sentinel Protection Servers (for a specified protocol) will respond.
serverInfo OUT NSPRO_SERVER_INFO A pointer to a buffer that will contain the Sentinel Protection Server information, such as the system address and the number of licenses available. A developer needs to allocate memory for the buffer.
Sentinel SuperPro 6.5 Developer’s Guide 311
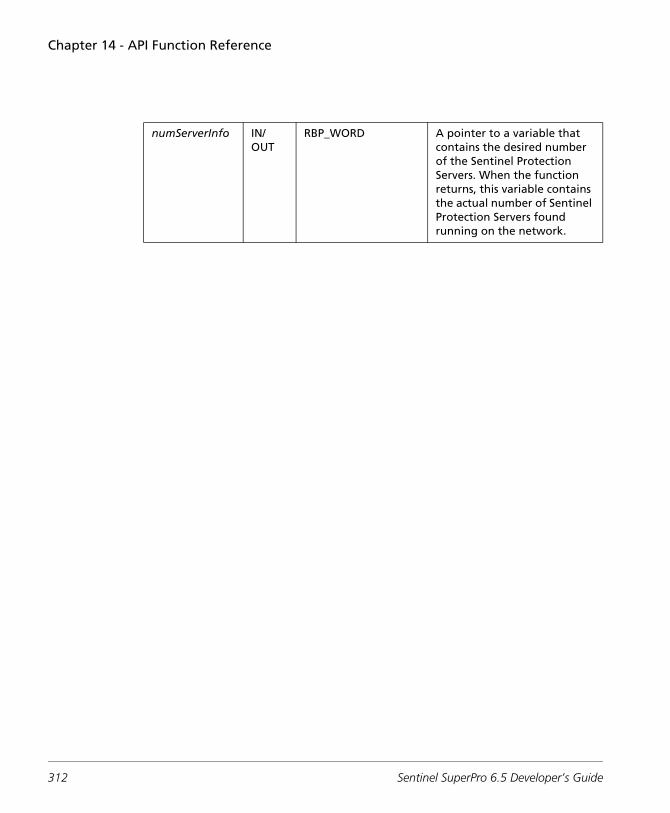
Chapter 14 - API Function Reference
numServerInfo IN/OUT
RBP_WORD A pointer to a variable that contains the desired number of the Sentinel Protection Servers. When the function returns, this variable contains the actual number of Sentinel Protection Servers found running on the network.
312 Sentinel SuperPro 6.5 Developer’s Guide
Chapter 14 - API Function Reference
Return Values
If an error occurs, the function returns one of the error codes listed in the section “API Status Codes” on page 352.
Additional Information
For more information about using RNBOsproEnumServer, see “Finding Additional Servers” on page 107.
RNBOsproExtendedRead
This function reads the word and access code at the specified address. On success, the data variable contains the information from the SuperPro key and the access code variable contains the access code.
Sentinel SuperPro 6.5 Developer’s Guide 313
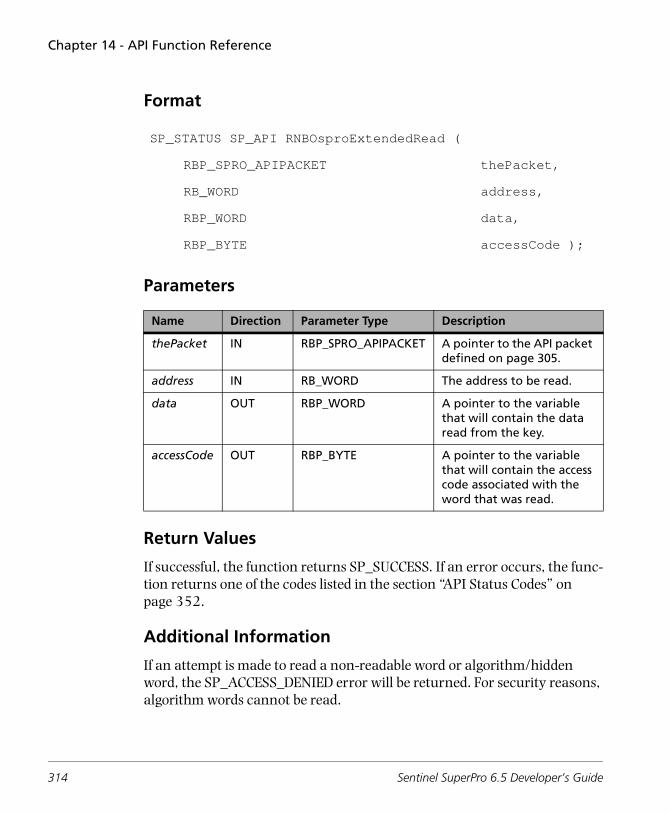
Chapter 14 - API Function Reference
Format
Parameters
Return Values
If successful, the function returns SP_SUCCESS. If an error occurs, the func-tion returns one of the codes listed in the section “API Status Codes” on page 352.
Additional Information
If an attempt is made to read a non-readable word or algorithm/hidden word, the SP_ACCESS_DENIED error will be returned. For security reasons, algorithm words cannot be read.
SP_STATUS SP_API RNBOsproExtendedRead (
RBP_SPRO_APIPACKET thePacket,
RB_WORD address,
RBP_WORD data,
RBP_BYTE accessCode );
Name Direction Parameter Type Description
thePacket IN RBP_SPRO_APIPACKET A pointer to the API packet defined on page 305.
address IN RB_WORD The address to be read.
data OUT RBP_WORD A pointer to the variable that will contain the data read from the key.
accessCode OUT RBP_BYTE A pointer to the variable that will contain the access code associated with the word that was read.
314 Sentinel SuperPro 6.5 Developer’s Guide
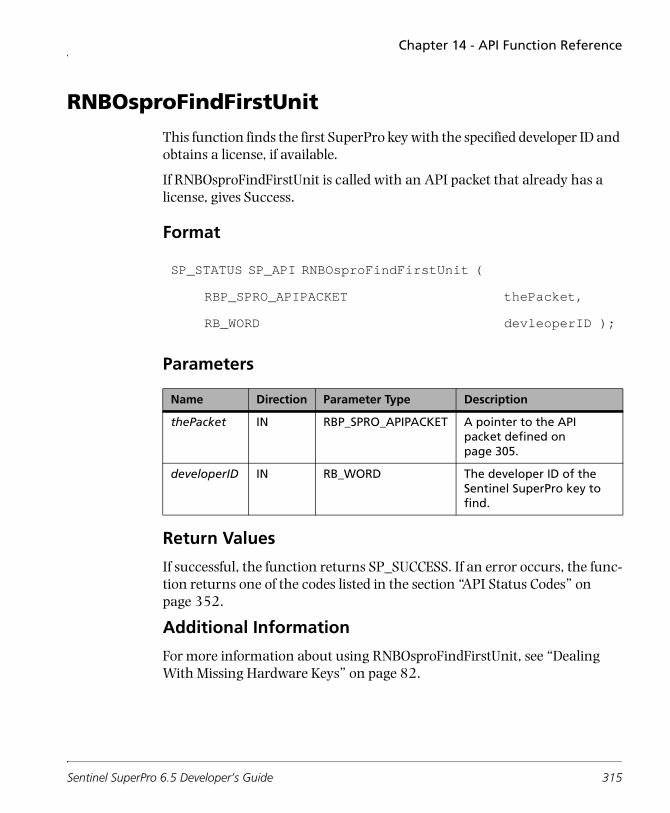
Chapter 14 - API Function Reference
RNBOsproFindFirstUnit
This function finds the first SuperPro key with the specified developer ID and obtains a license, if available.
If RNBOsproFindFirstUnit is called with an API packet that already has a license, gives Success.
Format
Parameters
Return Values
If successful, the function returns SP_SUCCESS. If an error occurs, the func-tion returns one of the codes listed in the section “API Status Codes” on page 352.
Additional Information
For more information about using RNBOsproFindFirstUnit, see “Dealing With Missing Hardware Keys” on page 82.
SP_STATUS SP_API RNBOsproFindFirstUnit (
RBP_SPRO_APIPACKET thePacket,
RB_WORD devleoperID );
Name Direction Parameter Type Description
thePacket IN RBP_SPRO_APIPACKET A pointer to the API packet defined on page 305.
developerID IN RB_WORD The developer ID of the Sentinel SuperPro key to find.
Sentinel SuperPro 6.5 Developer’s Guide 315
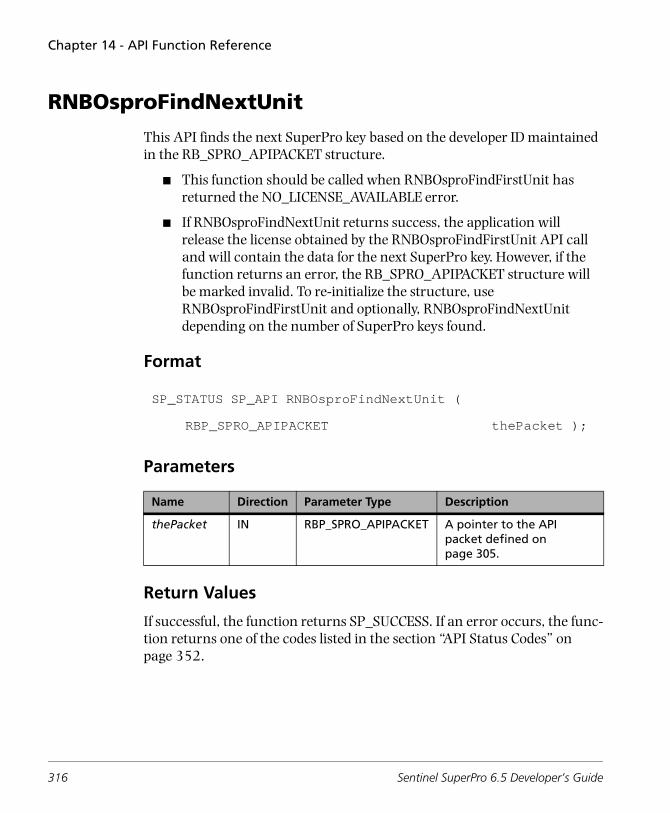
Chapter 14 - API Function Reference
RNBOsproFindNextUnit
This API finds the next SuperPro key based on the developer ID maintained in the RB_SPRO_APIPACKET structure.
■ This function should be called when RNBOsproFindFirstUnit has returned the NO_LICENSE_AVAILABLE error.
■ If RNBOsproFindNextUnit returns success, the application will release the license obtained by the RNBOsproFindFirstUnit API call and will contain the data for the next SuperPro key. However, if the function returns an error, the RB_SPRO_APIPACKET structure will be marked invalid. To re-initialize the structure, use RNBOsproFindFirstUnit and optionally, RNBOsproFindNextUnit depending on the number of SuperPro keys found.
Format
Parameters
Return Values
If successful, the function returns SP_SUCCESS. If an error occurs, the func-tion returns one of the codes listed in the section “API Status Codes” on page 352.
SP_STATUS SP_API RNBOsproFindNextUnit (
RBP_SPRO_APIPACKET thePacket );
Name Direction Parameter Type Description
thePacket IN RBP_SPRO_APIPACKET A pointer to the API packet defined on page 305.
316 Sentinel SuperPro 6.5 Developer’s Guide
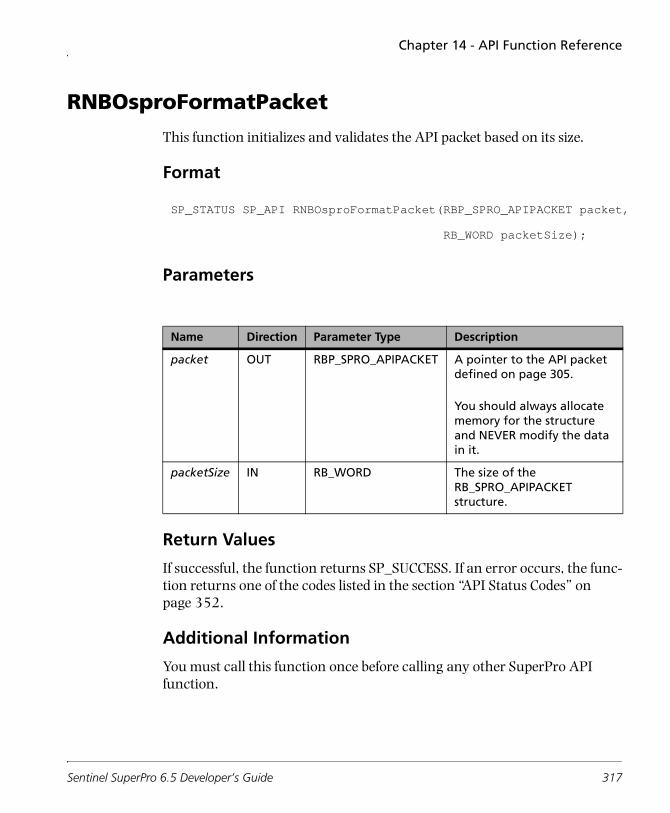
Chapter 14 - API Function Reference
RNBOsproFormatPacket
This function initializes and validates the API packet based on its size.
Format
Parameters
Return Values
If successful, the function returns SP_SUCCESS. If an error occurs, the func-tion returns one of the codes listed in the section “API Status Codes” on page 352.
Additional Information
You must call this function once before calling any other SuperPro API function.
SP_STATUS SP_API RNBOsproFormatPacket(RBP_SPRO_APIPACKET packet,
RB_WORD packetSize);
Name Direction Parameter Type Description
packet OUT RBP_SPRO_APIPACKET A pointer to the API packet defined on page 305.
You should always allocate memory for the structure and NEVER modify the data in it.
packetSize IN RB_WORD The size of the RB_SPRO_APIPACKET structure.
Sentinel SuperPro 6.5 Developer’s Guide 317
Chapter 14 - API Function Reference
RNBOsproGetContactServer
This function returns the access mode set to obtain a license.
Format
Parameters
Return Values
If successful, the function returns SP_SUCCESS. If an error occurs, the func-tion returns one of the codes listed in the section “API Status Codes” on page 352.
SP_STATUS SP_API RNBOsproGetContactServer (
RBP_SPRO_APIPACKET thePacket,
RBP_CHAR serverNameBuf,
RB_WORD serverNameBufSz );
Name Direc-tion
Parameter Type Description
thePacket IN SPP_SPRO_APIPACKET A pointer to the API packet defined on page 305.
serverNameBuf OUT RBP_CHAR A pointer to the buffer in which the Sentinel Protection Server name is copied. Memory needs to be allocated for the buffer.
serverNameBufSz IN RB_WORD The length of the buffer. The maximum length recommended is 64 bytes.
318 Sentinel SuperPro 6.5 Developer’s Guide
Chapter 14 - API Function Reference
Additional Information
■ You can call this function anytime after successfully calling RNBOsproFindFirstUnit.
■ You could call this function in order to know from where the license was issued to your application. For example, you can display the Sentinel Protection Server name via some command in your user interface so that the user is aware of which system was contacted to obtain a license.
RNBOsproGetFullStatus
This function obtains the return code of the last-called API function.
Format
Parameters
Return Values
If successful, the function returns the status of the last-called API function. If an error occurs, the function returns one of the error codes listed in the section “API Status Codes” on page 352.
SP_STATUS SP_API RNBOsproGetFullStatus (
RBP_SPRO_APIPACKET thePacket );
Name Direction Parameter Type Description
thePacket IN RBP_SPRO_APIPACKET A pointer to the API packet defined on page 305.
Sentinel SuperPro 6.5 Developer’s Guide 319
Chapter 14 - API Function Reference
Additional Information
■ This function is provided for support purposes only. It returns an RB_WORD value that can be interpreted by the Technical Support.
■ You can call this function anytime after obtaining a license.
RNBOsproGetHardLimit
This function retrieves the hard limit of the key from which the license was obtained.
Format
Parameters
Return Values
If successful, the function returns SP_SUCCESS. If an error occurs, the func-tion returns one of the codes listed in the section “API Status Codes” on page 352.
SP_STATUS SP_API RNBOsproGetHardLimit (
RBP_SPRO_APIPACKET thePacket,
RBP_WORD hardLimit );
Name Direction Parameter Type Description
thePacket IN RBP_SPRO_APIPACKET A pointer to the API packet defined on page 305.
hardLimit OUT RBP_WORD A pointer to the location that holds the hard limit of the key. It defines the maximum number of licenses that can be issued by this key.
320 Sentinel SuperPro 6.5 Developer’s Guide
Chapter 14 - API Function Reference
Additional Information
You can call this function anytime after obtaining a license.
RNBOsproGetKeyInfo
This function retrieves the following information about the key attached on a stand-alone system or a network computer (where the Sentinel Protection Server is running):
■ Developer ID
■ Hard limit
■ Licenses in-use
■ Licenses timed-out
■ Highest number of licenses used
RNBOsproGetKeyType
This function returns the following information about the key attached to a system:
■ Key FamilyThe key family parameter will return 0 or 1, where 0 denotes the SuperPro keys (the SSP keys) and 1 denotes the UltraPro keys (the SUP keys).
■ Form FactorThe form factor parameter will return 0 or 1, where 0 denotes the parallel keys and 1 denotes the USB keys.
■ Memory SizeThe number of cells (inclusive of the reserved cells).
Sentinel SuperPro 6.5 Developer’s Guide 321
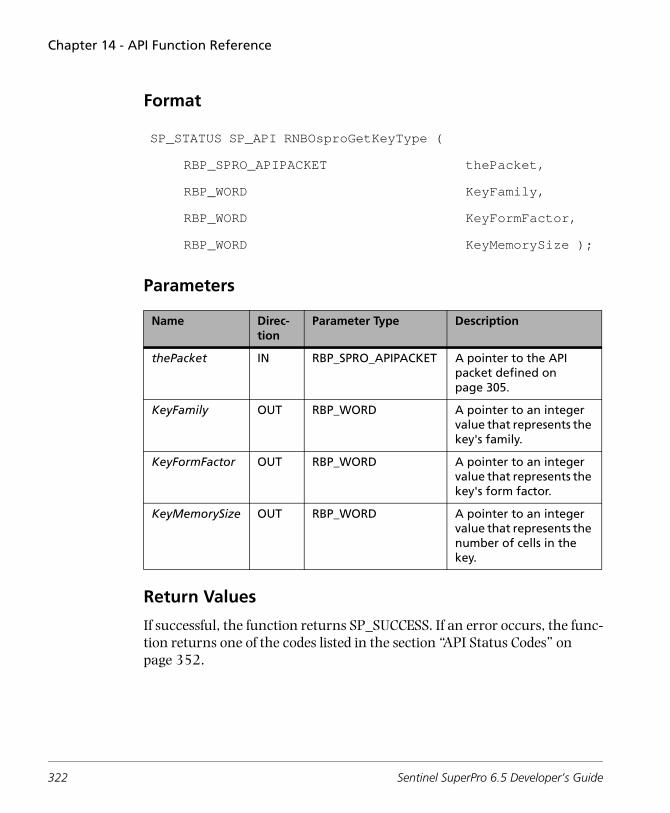
Chapter 14 - API Function Reference
Format
Parameters
Return Values
If successful, the function returns SP_SUCCESS. If an error occurs, the func-tion returns one of the codes listed in the section “API Status Codes” on page 352.
SP_STATUS SP_API RNBOsproGetKeyType (
RBP_SPRO_APIPACKET thePacket,
RBP_WORD KeyFamily,
RBP_WORD KeyFormFactor,
RBP_WORD KeyMemorySize );
Name Direc-tion
Parameter Type Description
thePacket IN RBP_SPRO_APIPACKET A pointer to the API packet defined on page 305.
KeyFamily OUT RBP_WORD A pointer to an integer value that represents the key's family.
KeyFormFactor OUT RBP_WORD A pointer to an integer value that represents the key's form factor.
KeyMemorySize OUT RBP_WORD A pointer to an integer value that represents the number of cells in the key.
322 Sentinel SuperPro 6.5 Developer’s Guide
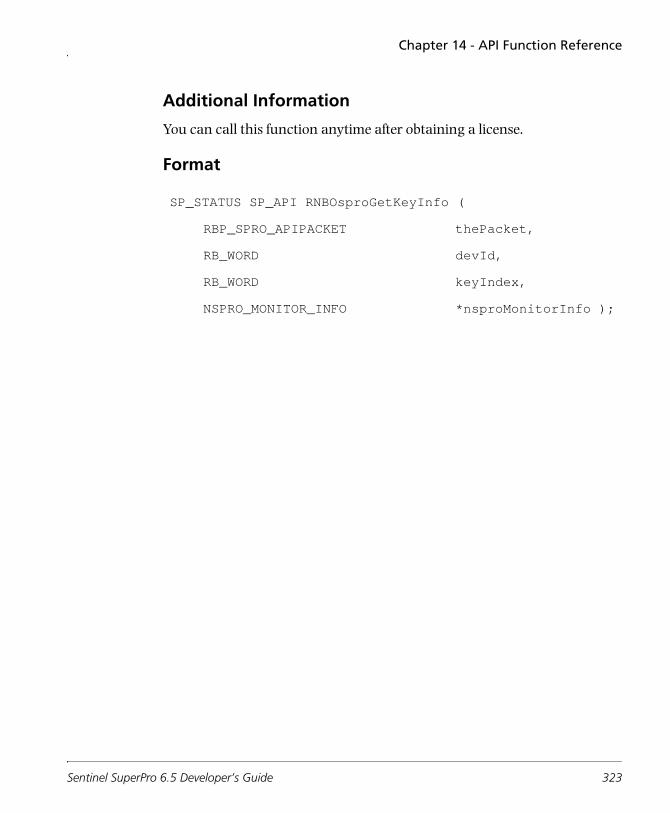
Chapter 14 - API Function Reference
Additional Information
You can call this function anytime after obtaining a license.
Format
SP_STATUS SP_API RNBOsproGetKeyInfo (
RBP_SPRO_APIPACKET thePacket,
RB_WORD devId,
RB_WORD keyIndex,
NSPRO_MONITOR_INFO *nsproMonitorInfo );
Sentinel SuperPro 6.5 Developer’s Guide 323
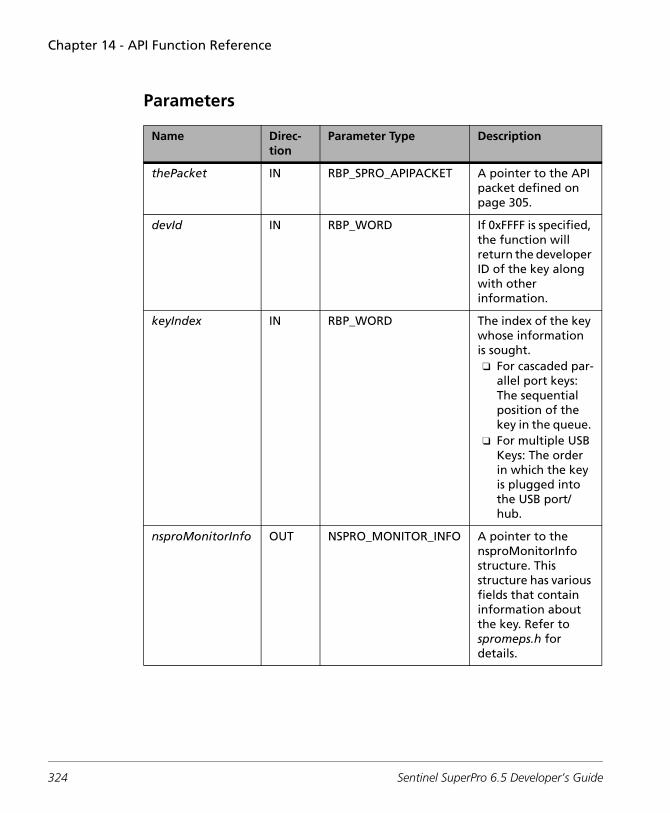
Chapter 14 - API Function Reference
Parameters
Name Direc-tion
Parameter Type Description
thePacket IN RBP_SPRO_APIPACKET A pointer to the API packet defined on page 305.
devId IN RBP_WORD If 0xFFFF is specified, the function will return the developer ID of the key along with other information.
keyIndex IN RBP_WORD The index of the key whose information is sought.❑ For cascaded par-
allel port keys: The sequential position of the key in the queue.
❑ For multiple USB Keys: The order in which the key is plugged into the USB port/hub.
nsproMonitorInfo OUT NSPRO_MONITOR_INFO A pointer to the nsproMonitorInfo structure. This structure has various fields that contain information about the key. Refer to spromeps.h for details.
324 Sentinel SuperPro 6.5 Developer’s Guide
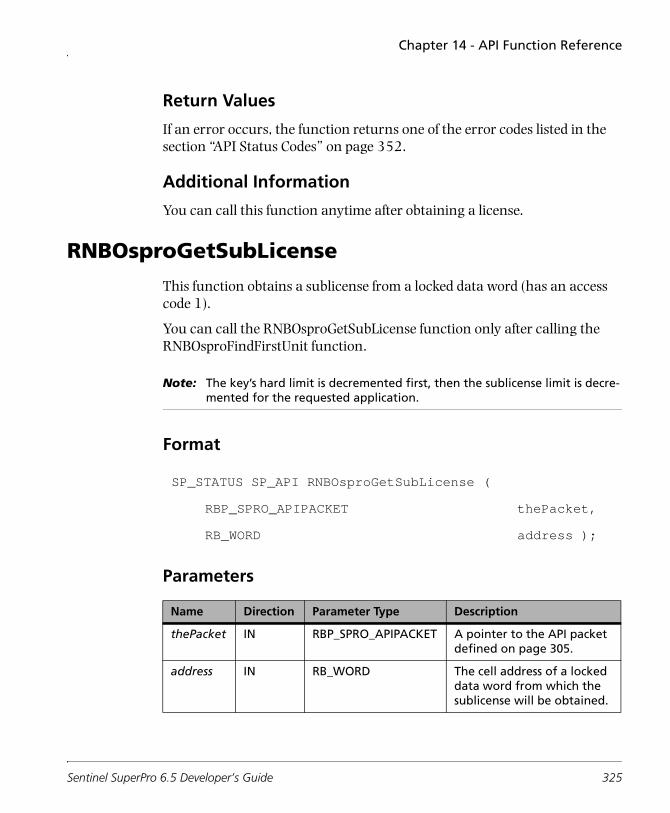
Chapter 14 - API Function Reference
Return Values
If an error occurs, the function returns one of the error codes listed in the section “API Status Codes” on page 352.
Additional Information
You can call this function anytime after obtaining a license.
RNBOsproGetSubLicense
This function obtains a sublicense from a locked data word (has an access code 1).
You can call the RNBOsproGetSubLicense function only after calling the RNBOsproFindFirstUnit function.
Note: The key’s hard limit is decremented first, then the sublicense limit is decre-mented for the requested application.
Format
Parameters
SP_STATUS SP_API RNBOsproGetSubLicense (
RBP_SPRO_APIPACKET thePacket,
RB_WORD address );
Name Direction Parameter Type Description
thePacket IN RBP_SPRO_APIPACKET A pointer to the API packet defined on page 305.
address IN RB_WORD The cell address of a locked data word from which the sublicense will be obtained.
Sentinel SuperPro 6.5 Developer’s Guide 325
Chapter 14 - API Function Reference
Return Values
If successful, the function returns SP_SUCCESS. If an error occurs, the func-tion returns one of the codes listed in the section “API Status Codes” on page 352.
Additional Information
For more information about using RNBOsproGetSubLicense, see “Getting a Sublicense” on page 111.
RNBOsproGetVersion
This function returns the Sentinel system driver's version and type.
326 Sentinel SuperPro 6.5 Developer’s Guide
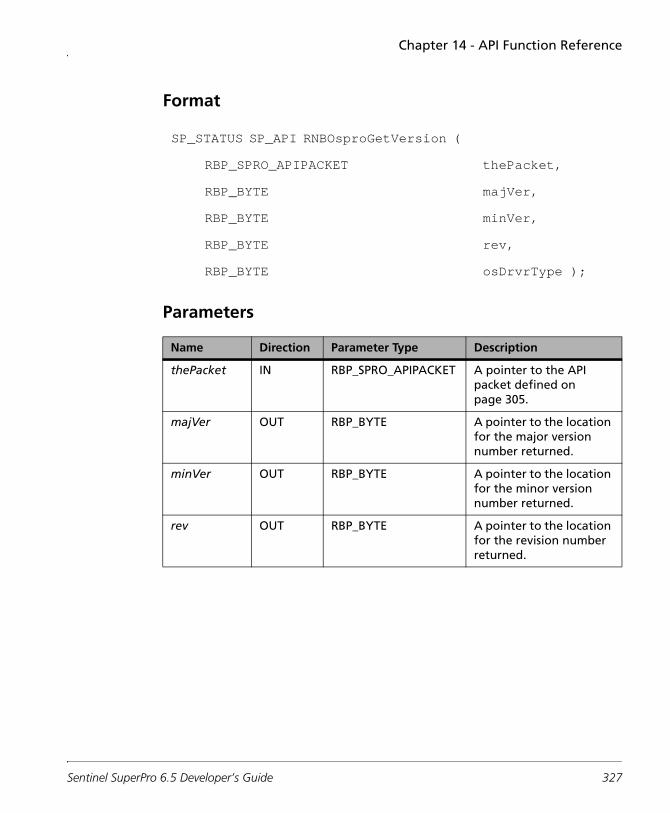
Chapter 14 - API Function Reference
Format
Parameters
SP_STATUS SP_API RNBOsproGetVersion (
RBP_SPRO_APIPACKET thePacket,
RBP_BYTE majVer,
RBP_BYTE minVer,
RBP_BYTE rev,
RBP_BYTE osDrvrType );
Name Direction Parameter Type Description
thePacket IN RBP_SPRO_APIPACKET A pointer to the API packet defined on page 305.
majVer OUT RBP_BYTE A pointer to the location for the major version number returned.
minVer OUT RBP_BYTE A pointer to the location for the minor version number returned.
rev OUT RBP_BYTE A pointer to the location for the revision number returned.
Sentinel SuperPro 6.5 Developer’s Guide 327
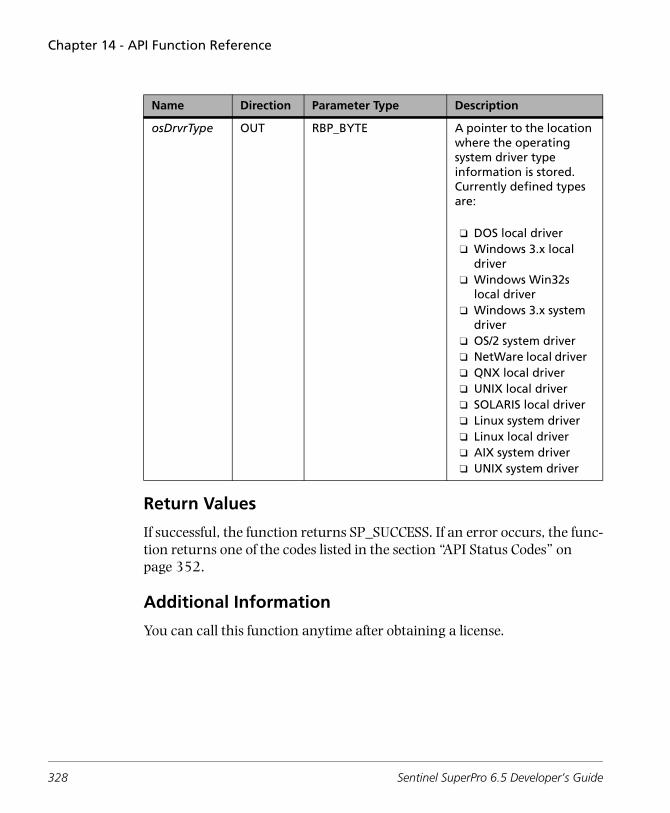
Chapter 14 - API Function Reference
Return Values
If successful, the function returns SP_SUCCESS. If an error occurs, the func-tion returns one of the codes listed in the section “API Status Codes” on page 352.
Additional Information
You can call this function anytime after obtaining a license.
osDrvrType OUT RBP_BYTE A pointer to the location where the operating system driver type information is stored. Currently defined types are:
❑ DOS local driver ❑ Windows 3.x local
driver ❑ Windows Win32s
local driver ❑ Windows 3.x system
driver ❑ OS/2 system driver ❑ NetWare local driver ❑ QNX local driver❑ UNIX local driver ❑ SOLARIS local driver❑ Linux system driver ❑ Linux local driver ❑ AIX system driver ❑ UNIX system driver
Name Direction Parameter Type Description
328 Sentinel SuperPro 6.5 Developer’s Guide

Chapter 14 - API Function Reference
RNBOsproInitialize
This function initializes the API packet and sets the values specified (if any) in the configuration file or the NSP_HOST environment variable.
Format
Parameters
Return Values
If successful, the function returns SP_SUCCESS. If an error occurs, the func-tion returns one of the codes listed in the section “API Status Codes” on page 352.
Additional Information
You must call this function immediately after RNBOsproFormatPacket.
SP_STATUS SP_API RNBOsproInitialize (
RBP_SPRO_APIPACKET thePacket );
Name Direction Parameter Type Description
thePacket OUT RBP_SPRO_APIPACKET A pointer to the API packet defined on page 305.
You should always allocate memory for the structure and NEVER modify the data in it.
Sentinel SuperPro 6.5 Developer’s Guide 329
Chapter 14 - API Function Reference
RNBOsproOverwrite
This function is used to change the value and access code of a word at the specified address. The word data is placed in the data variable and its associ-ated access code in the access code variable.
Format
SP_STATUS SP_API RNBOsproOverwrite (
RBP_SPRO_APIPACKET thePacket,
RB_WORD writePassword,
RB_WORD overwritePassword1,
RB_WORD overwritePassword2,
RB_WORD address,
RB_WORD data,
RB_BYTE accessCode );
330 Sentinel SuperPro 6.5 Developer’s Guide
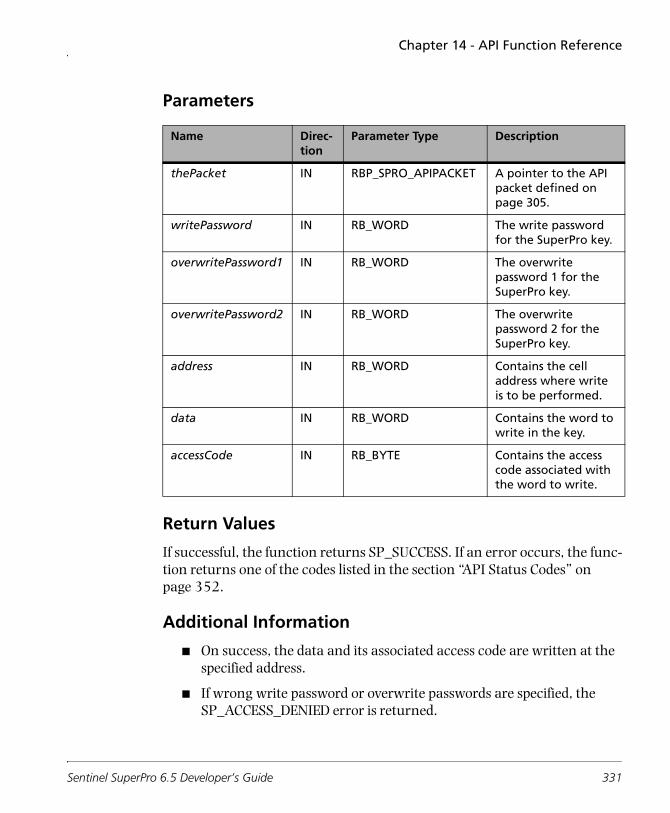
Chapter 14 - API Function Reference
Parameters
Return Values
If successful, the function returns SP_SUCCESS. If an error occurs, the func-tion returns one of the codes listed in the section “API Status Codes” on page 352.
Additional Information
■ On success, the data and its associated access code are written at the specified address.
■ If wrong write password or overwrite passwords are specified, the SP_ACCESS_DENIED error is returned.
Name Direc-tion
Parameter Type Description
thePacket IN RBP_SPRO_APIPACKET A pointer to the API packet defined on page 305.
writePassword IN RB_WORD The write password for the SuperPro key.
overwritePassword1 IN RB_WORD The overwrite password 1 for the SuperPro key.
overwritePassword2 IN RB_WORD The overwrite password 2 for the SuperPro key.
address IN RB_WORD Contains the cell address where write is to be performed.
data IN RB_WORD Contains the word to write in the key.
accessCode IN RB_BYTE Contains the access code associated with the word to write.
Sentinel SuperPro 6.5 Developer’s Guide 331
Chapter 14 - API Function Reference
■ This function can be used to overwrite any word on the SuperPro key (with the exception of the reserved words).
RNBOsproQuery
This function is used to query an algorithm at the specified address.
The query data pointer will point to the first byte of the data to be passed to the algorithm. The length of the query data (in bytes) is specified in the length variable. The minimum length is 4 bytes and the maximum length is 56 bytes.
On success, the query response will be placed in the buffer pointed to by the response pointer. It will have the same length as the query data. The last four bytes of the query response will also be placed in the Response32 variable.
Note: It is the programmer’s responsibility to allocate the memory for the buff-ers.
332 Sentinel SuperPro 6.5 Developer’s Guide
Chapter 14 - API Function Reference
Format
Parameters
SP_STATUS SP_API RNBOsproQuery (
RBP_SPRO_APIPACKET thePacket,
RB_WORD address,
RBP_VOID queryData,
RBP_VOID response,
RBP_DWORD response32,
RB_WORD length );
Name Direction Parameter Type Description
thePacket IN RBP_SPRO_APIPACKET A pointer to the API packet defined on page 305.
address IN RB_WORD The address of the word to query. It must point to the first word of an active algorithm.
Sentinel SuperPro 6.5 Developer’s Guide 333

Chapter 14 - API Function Reference
Return Values
If successful, the function returns SP_SUCCESS. If an error occurs, the func-tion returns one of the codes listed in the section“API Status Codes” on page 352.
Additional Information
If the address is not the first word of an active algorithm, the return status will be successful and the response buffer data will be the same as the query buffer data.
For more information about using RNBOsproQuery, see the following:
■ “Using Activation Passwords” on page 79
■ “Advanced Protection Techniques” on page 85
■ “Querying Counters” on page 99
queryData IN RBP_VOID The pointer to the first byte of the query bytes.
response OUT RBP_VOID The pointer to the first byte of the response bytes.
response32 OUT RBP_DWORD The pointer to the location that will contain a copy of the last four bytes of the query response.
length IN RB_WORD This is the number of query bytes to send to the active algorithm and also the length of the response buffer.
Name Direction Parameter Type Description
334 Sentinel SuperPro 6.5 Developer’s Guide
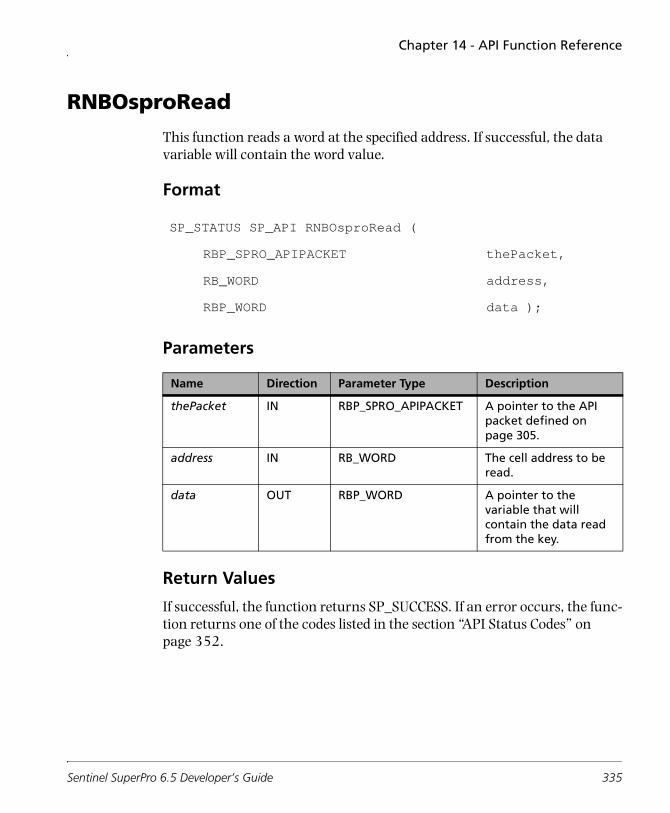
Chapter 14 - API Function Reference
RNBOsproRead
This function reads a word at the specified address. If successful, the data variable will contain the word value.
Format
Parameters
Return Values
If successful, the function returns SP_SUCCESS. If an error occurs, the func-tion returns one of the codes listed in the section “API Status Codes” on page 352.
SP_STATUS SP_API RNBOsproRead (
RBP_SPRO_APIPACKET thePacket,
RB_WORD address,
RBP_WORD data );
Name Direction Parameter Type Description
thePacket IN RBP_SPRO_APIPACKET A pointer to the API packet defined on page 305.
address IN RB_WORD The cell address to be read.
data OUT RBP_WORD A pointer to the variable that will contain the data read from the key.
Sentinel SuperPro 6.5 Developer’s Guide 335
Chapter 14 - API Function Reference
Additional Information
If an attempt is made to read a non-readable word or algorithm/hidden word, the SP_ACCESS_DENIED error will be returned. For security reasons, algorithm words cannot be read.
336 Sentinel SuperPro 6.5 Developer’s Guide
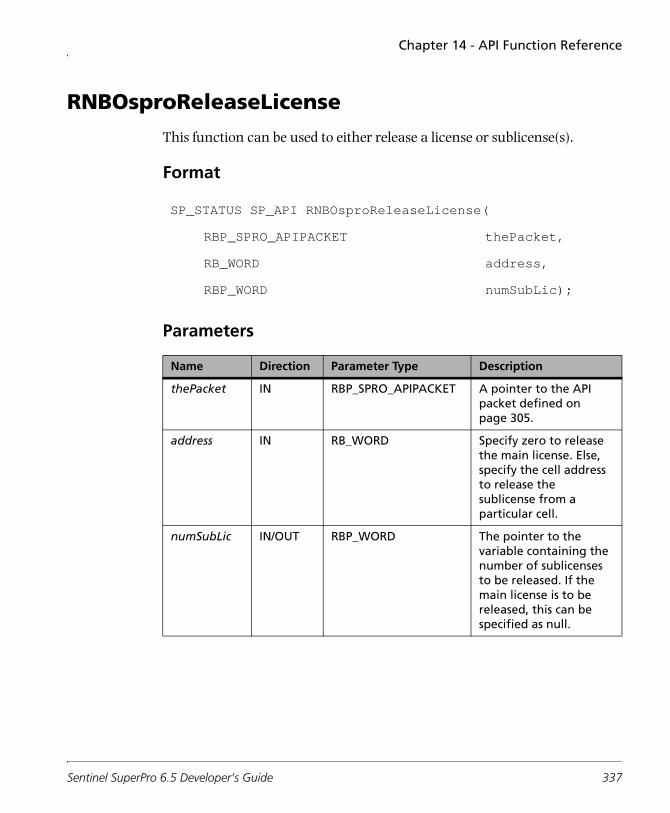
Chapter 14 - API Function Reference
RNBOsproReleaseLicense
This function can be used to either release a license or sublicense(s).
Format
Parameters
SP_STATUS SP_API RNBOsproReleaseLicense(
RBP_SPRO_APIPACKET thePacket,
RB_WORD address,
RBP_WORD numSubLic);
Name Direction Parameter Type Description
thePacket IN RBP_SPRO_APIPACKET A pointer to the API packet defined on page 305.
address IN RB_WORD Specify zero to release the main license. Else, specify the cell address to release the sublicense from a particular cell.
numSubLic IN/OUT RBP_WORD The pointer to the variable containing the number of sublicenses to be released. If the main license is to be released, this can be specified as null.
Sentinel SuperPro 6.5 Developer’s Guide 337

Chapter 14 - API Function Reference
Return Values
If successful, the function returns SP_SUCCESS. If an error occurs, the func-tion returns one of the codes listed in the section “API Status Codes” on page 352.
Additional Information
■ You can call this function anytime after obtaining a license; followed by RNBOsproCleanUp.
■ You can call this function before your application terminates. For example, the handler of the exit command button in your user interface can make use of this function.
■ We recommend you to use this function in order to release the idle licenses for other clients in queue. This function is especially useful in cases where you have set the heartbeat interval as infinite. The Sentinel Protection Server will not release the license unless you call this function.
338 Sentinel SuperPro 6.5 Developer’s Guide
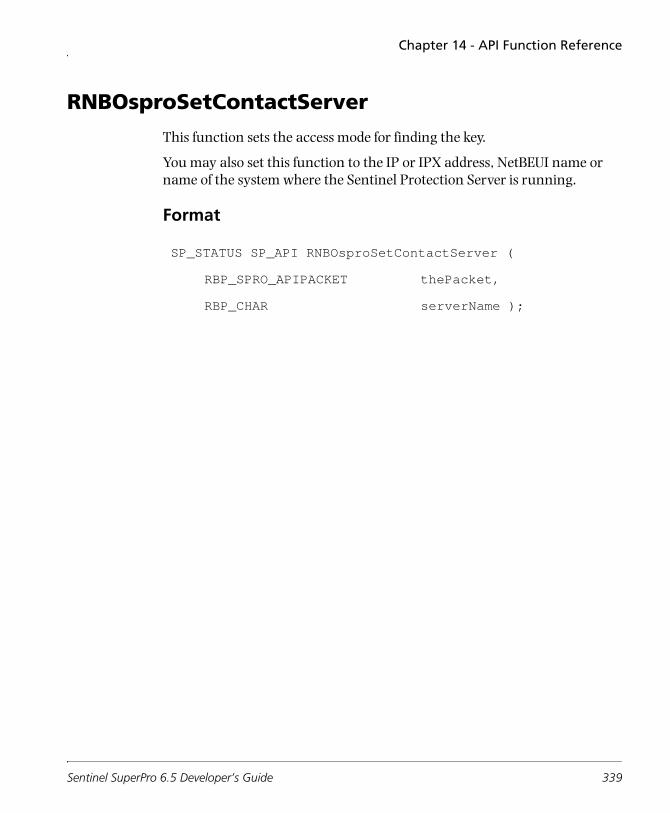
Chapter 14 - API Function Reference
RNBOsproSetContactServer
This function sets the access mode for finding the key.
You may also set this function to the IP or IPX address, NetBEUI name or name of the system where the Sentinel Protection Server is running.
Format
SP_STATUS SP_API RNBOsproSetContactServer (
RBP_SPRO_APIPACKET thePacket,
RBP_CHAR serverName );
Sentinel SuperPro 6.5 Developer’s Guide 339
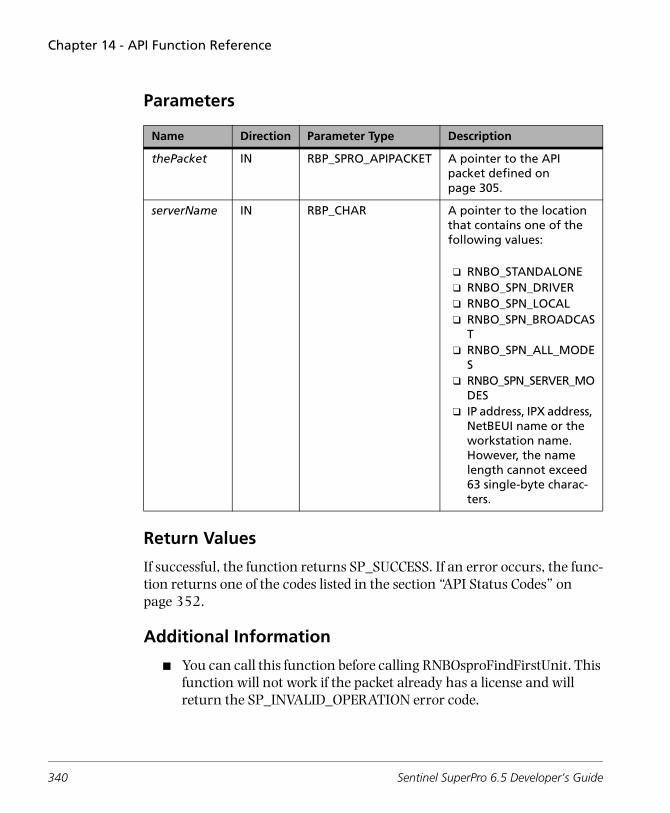
Chapter 14 - API Function Reference
Parameters
Return Values
If successful, the function returns SP_SUCCESS. If an error occurs, the func-tion returns one of the codes listed in the section “API Status Codes” on page 352.
Additional Information
■ You can call this function before calling RNBOsproFindFirstUnit. This function will not work if the packet already has a license and will return the SP_INVALID_OPERATION error code.
Name Direction Parameter Type Description
thePacket IN RBP_SPRO_APIPACKET A pointer to the API packet defined on page 305.
serverName IN RBP_CHAR A pointer to the location that contains one of the following values:
❑ RNBO_STANDALONE ❑ RNBO_SPN_DRIVER❑ RNBO_SPN_LOCAL❑ RNBO_SPN_BROADCAS
T❑ RNBO_SPN_ALL_MODE
S❑ RNBO_SPN_SERVER_MO
DES❑ IP address, IPX address,
NetBEUI name or the workstation name. However, the name length cannot exceed 63 single-byte charac-ters.
340 Sentinel SuperPro 6.5 Developer’s Guide
Chapter 14 - API Function Reference
■ An access mode can be set using three alternate methods: by calling the RNBOsproSetContactServer function, or by setting a tag in the configuration file, or by setting the NSP_HOST environment variable. RNBO_SPN_ALL_MODES will be used if none of the three methods is used.
An access mode set using RNBOsproSetContactServer has priority over the value set via the other two methods.
For more information about using RNBOsproSetContactServer, see “Setting Stand-alone or Network Mode” on page 103.
RNBOsproSetHeartBeat
This function sets the heartbeat interval for maintaining the communica-tion between a client and the Sentinel Protection Server. The heartbeat time can be set to INFINITE_HEARTBEAT or from 1 minute to 30 days, in multi-ples of 1 second.
The heartbeat represents the interval within which your application notifies the Sentinel Protection Server that it is still running. If this function is not called, the protection server assumes the default value as two minutes (120 seconds). As a result, if no call is made to the key at least every two minutes, the license will be released and the SP_INVALID_LICENSE error will be returned if any call is made using the same packet.
Sentinel SuperPro 6.5 Developer’s Guide 341
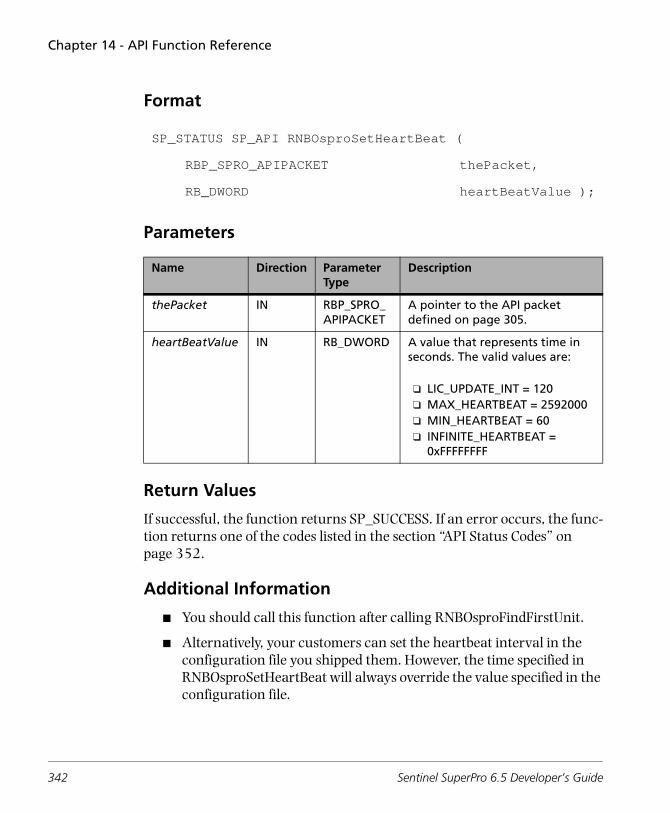
Chapter 14 - API Function Reference
Format
Parameters
Return Values
If successful, the function returns SP_SUCCESS. If an error occurs, the func-tion returns one of the codes listed in the section “API Status Codes” on page 352.
Additional Information
■ You should call this function after calling RNBOsproFindFirstUnit.
■ Alternatively, your customers can set the heartbeat interval in the configuration file you shipped them. However, the time specified in RNBOsproSetHeartBeat will always override the value specified in the configuration file.
SP_STATUS SP_API RNBOsproSetHeartBeat (
RBP_SPRO_APIPACKET thePacket,
RB_DWORD heartBeatValue );
Name Direction Parameter Type
Description
thePacket IN RBP_SPRO_APIPACKET
A pointer to the API packet defined on page 305.
heartBeatValue IN RB_DWORD A value that represents time in seconds. The valid values are:
❑ LIC_UPDATE_INT = 120❑ MAX_HEARTBEAT = 2592000❑ MIN_HEARTBEAT = 60❑ INFINITE_HEARTBEAT =
0xFFFFFFFF
342 Sentinel SuperPro 6.5 Developer’s Guide
Chapter 14 - API Function Reference
When the heartbeat time interval set is too low and there is congestion on the network, then the application can terminate even before contacting the protection server. To avoid such a situation, you may want to specify a longer heartbeat interval. However, if infinite heartbeat set, then the protec-tion server will never release the license unless RNBOsproReleaseLicense is called.
Sentinel SuperPro 6.5 Developer’s Guide 343
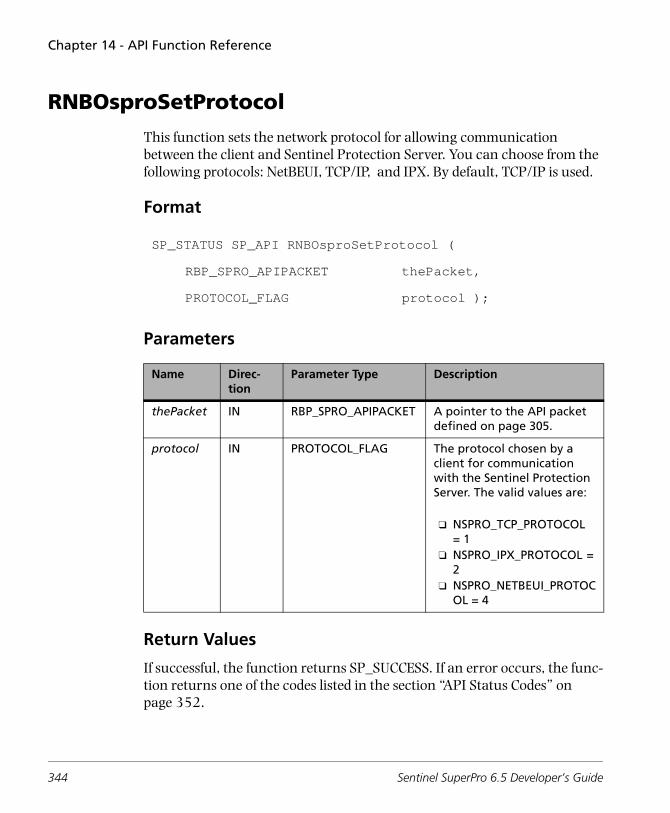
Chapter 14 - API Function Reference
RNBOsproSetProtocol
This function sets the network protocol for allowing communication between the client and Sentinel Protection Server. You can choose from the following protocols: NetBEUI, TCP/IP, and IPX. By default, TCP/IP is used.
Format
Parameters
Return Values
If successful, the function returns SP_SUCCESS. If an error occurs, the func-tion returns one of the codes listed in the section “API Status Codes” on page 352.
SP_STATUS SP_API RNBOsproSetProtocol (
RBP_SPRO_APIPACKET thePacket,
PROTOCOL_FLAG protocol );
Name Direc-tion
Parameter Type Description
thePacket IN RBP_SPRO_APIPACKET A pointer to the API packet defined on page 305.
protocol IN PROTOCOL_FLAG The protocol chosen by a client for communication with the Sentinel Protection Server. The valid values are:
❑ NSPRO_TCP_PROTOCOL = 1
❑ NSPRO_IPX_PROTOCOL = 2
❑ NSPRO_NETBEUI_PROTOCOL = 4
344 Sentinel SuperPro 6.5 Developer’s Guide
Chapter 14 - API Function Reference
Additional Information
■ This function can be called after successfully calling RNBOsproInitialize and before calling RNBOsproFindFirstUnit.
■ This function will not work if the packet already has a license and will return the SP_INVALID_OPERATION error code.
■ Alternatively, your customers can set the network protocol in the configuration file you ship to them. However, a protocol set using the RNBOsproSetProtocol function will always override the value specified in the configuration file.
Sentinel SuperPro 6.5 Developer’s Guide 345
Chapter 14 - API Function Reference
RNBOsproCheckTerminalService
This function allows you to enable/disable the application execution on ter-minal clients while RNBOsproFindFirstUnit, or RNBOsproFindNextUnit API is executed. This function shall be called before RNBOsproFindFirstUnit if the user wants to enable the support for Terminal Client.
Format
Parameters
Return Code
If successful, the function returns SP_SUCCESS. If an error occurs, the func-tion returns one of the codes listed in the section “API Status Codes” on page 352.
SP_STATUS SP_API
RNBOsproCheckTerminalService (
SP_OUT thePacket,
RB_WORD termserv);
Name Direction Parameter Type Description
thePacket
IN RBP_SPRO_APIPACKET A pointer to the API packet.
termserv IN RB_DWORD The valid values are:❑ SP_TERM_SERV_CHECK_ON = 1
(enable checking on terminal clients)
❑ SP_TERM_SERV_CHECK_OFF = 0 (disable checking on terminal clients)
346 Sentinel SuperPro 6.5 Developer’s Guide
Chapter 14 - API Function Reference
Additional Information
■ This API function should be called after calling the RNBOsproFormatPacket and RNBOsproInitialize API functions and before calling the RNBOsproFindFirstUnit API function.
■ When calling RNBOsproFindFirstUnit or RNBOsproFindNextUnit API, it will act according to the following rules:
❑ If RNBOsproCheckTerminalService is not called:
❑ If RNBOsproCheckTerminalService is called:
Parameter Value Access Mode Application Instances
SP_TERM_SERV_CHECK_ON(1) Standalone No License
Server Mode Hard Limit Consume
Parameter Value Access Mode Application Instances
SP_TERM_SERV_CHECK_ON(1) Standalone No License
Server Mode Hard Limit Consume
SP_TERM_SERV_CHECK_OFF(0) Standalone Infinite
Server Mode Infinite (Share on)
Consume Hard Limit (Share off)
Sentinel SuperPro 6.5 Developer’s Guide 347
Chapter 14 - API Function Reference
RNBOsproSetSharedLicense
This function allows you to enable/disable the main and sublicense sharing. The licenses issued to users from the same seat (a user name and MAC address combination) are shared.
Format
SP_EXPORT SP_STATUS SP_API RNBOsproSetSharedLicense(
SP_IN RBP_SPRO_APIPACKET thePacket,
SP_IN RB_WORD shareMainLic,
SP_IN RB_WORD shareSubLic);
348 Sentinel SuperPro 6.5 Developer’s Guide
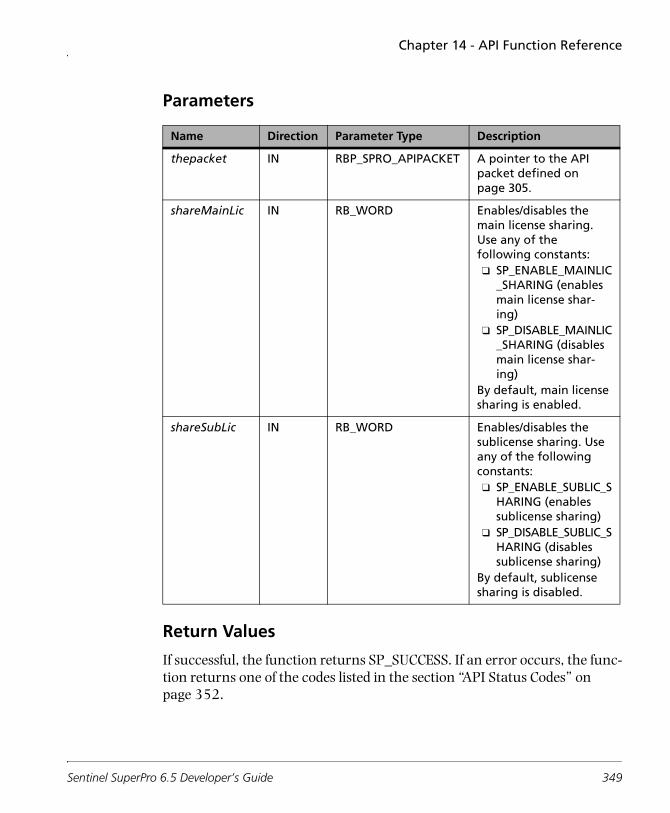
Chapter 14 - API Function Reference
Parameters
Return Values
If successful, the function returns SP_SUCCESS. If an error occurs, the func-tion returns one of the codes listed in the section “API Status Codes” on page 352.
Name Direction Parameter Type Description
thepacket IN RBP_SPRO_APIPACKET A pointer to the API packet defined on page 305.
shareMainLic IN RB_WORD Enables/disables the main license sharing. Use any of the following constants:❑ SP_ENABLE_MAINLIC
_SHARING (enables main license shar-ing)
❑ SP_DISABLE_MAINLIC_SHARING (disables main license shar-ing)
By default, main license sharing is enabled.
shareSubLic IN RB_WORD Enables/disables the sublicense sharing. Use any of the following constants:❑ SP_ENABLE_SUBLIC_S
HARING (enables sublicense sharing)
❑ SP_DISABLE_SUBLIC_SHARING (disables sublicense sharing)
By default, sublicense sharing is disabled.
Sentinel SuperPro 6.5 Developer’s Guide 349
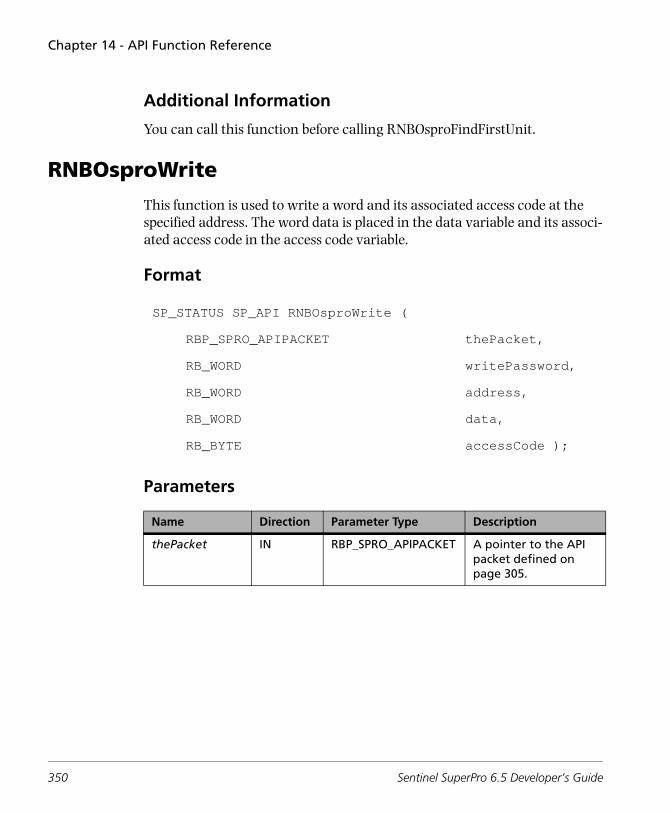
Chapter 14 - API Function Reference
Additional Information
You can call this function before calling RNBOsproFindFirstUnit.
RNBOsproWrite
This function is used to write a word and its associated access code at the specified address. The word data is placed in the data variable and its associ-ated access code in the access code variable.
Format
Parameters
SP_STATUS SP_API RNBOsproWrite (
RBP_SPRO_APIPACKET thePacket,
RB_WORD writePassword,
RB_WORD address,
RB_WORD data,
RB_BYTE accessCode );
Name Direction Parameter Type Description
thePacket IN RBP_SPRO_APIPACKET A pointer to the API packet defined on page 305.
350 Sentinel SuperPro 6.5 Developer’s Guide
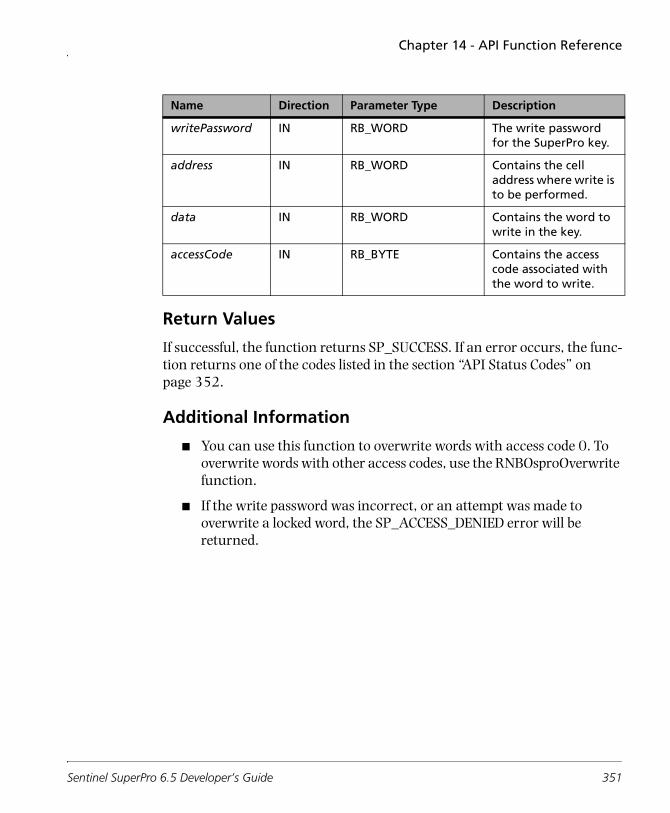
Chapter 14 - API Function Reference
Return Values
If successful, the function returns SP_SUCCESS. If an error occurs, the func-tion returns one of the codes listed in the section “API Status Codes” on page 352.
Additional Information
■ You can use this function to overwrite words with access code 0. To overwrite words with other access codes, use the RNBOsproOverwrite function.
■ If the write password was incorrect, or an attempt was made to overwrite a locked word, the SP_ACCESS_DENIED error will be returned.
writePassword IN RB_WORD The write password for the SuperPro key.
address IN RB_WORD Contains the cell address where write is to be performed.
data IN RB_WORD Contains the word to write in the key.
accessCode IN RB_BYTE Contains the access code associated with the word to write.
Name Direction Parameter Type Description
Sentinel SuperPro 6.5 Developer’s Guide 351
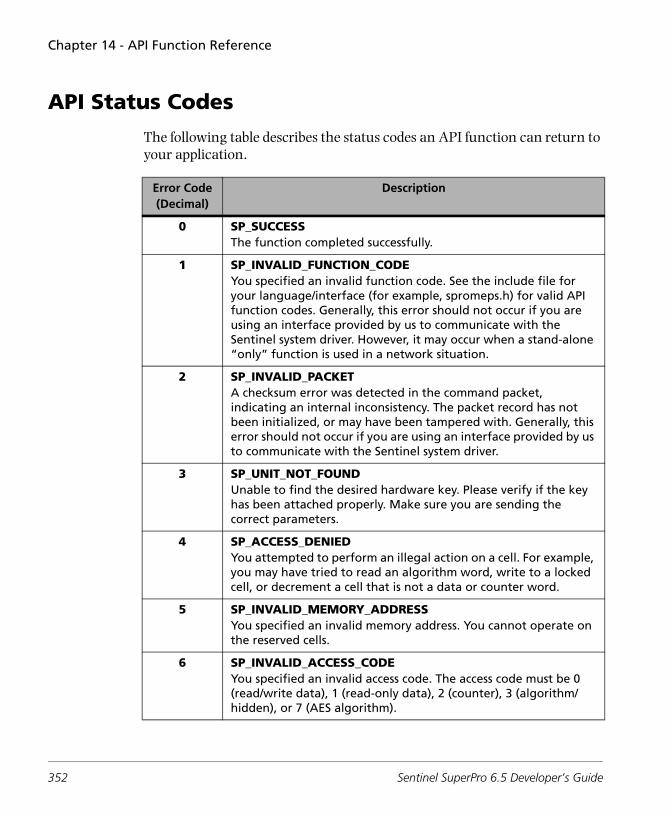
Chapter 14 - API Function Reference
API Status Codes
The following table describes the status codes an API function can return to your application.
Error Code(Decimal)
Description
0 SP_SUCCESSThe function completed successfully.
1 SP_INVALID_FUNCTION_CODEYou specified an invalid function code. See the include file for your language/interface (for example, spromeps.h) for valid API function codes. Generally, this error should not occur if you are using an interface provided by us to communicate with the Sentinel system driver. However, it may occur when a stand-alone “only” function is used in a network situation.
2 SP_INVALID_PACKETA checksum error was detected in the command packet, indicating an internal inconsistency. The packet record has not been initialized, or may have been tampered with. Generally, this error should not occur if you are using an interface provided by us to communicate with the Sentinel system driver.
3 SP_UNIT_NOT_FOUNDUnable to find the desired hardware key. Please verify if the key has been attached properly. Make sure you are sending the correct parameters.
4 SP_ACCESS_DENIEDYou attempted to perform an illegal action on a cell. For example, you may have tried to read an algorithm word, write to a locked cell, or decrement a cell that is not a data or counter word.
5 SP_INVALID_MEMORY_ADDRESSYou specified an invalid memory address. You cannot operate on the reserved cells.
6 SP_INVALID_ACCESS_CODEYou specified an invalid access code. The access code must be 0 (read/write data), 1 (read-only data), 2 (counter), 3 (algorithm/hidden), or 7 (AES algorithm).
352 Sentinel SuperPro 6.5 Developer’s Guide

Chapter 14 - API Function Reference
7 SP_PORT_IS_BUSYThe requested operation could not be completed because the port is busy. This can occur if there is considerable printer activity, or if a unit on the port is performing a write operation and is blocking the port. Try the function again.
8 SP_WRITE_NOT_READYThe write or decrement operation could not be performed due to lack of sufficient power. Try the function again.
9 SP_NO_PORT_FOUNDNo parallel ports could be found, or there was a problem with the protocol being used on the network.
10 SP_ALREADY_ZEROYou tried to decrement a counter that contains the value zero.
12 SP_ERR_DRIVER_NOT_INSTALLEDThe Sentinel system driver was not installed or detected. Communication to the hardware key was not possible. Verify the device driver is correctly installed.
13 SP_IO_COMMUNICATIONS_ERRORThe system device driver is having problems communicating. Verify the device driver is correctly installed.
15 SP_PACKET_TOO_SMALLThe memory allocated for the API packet is less than the required size.
16 SP_INVALID_PARAMETER Arguments and values passed to the API function are invalid.
18 SP_VERSION_NOT_SUPPORTEDThe current system device driver is outdated. Update the driver.
19 SP_OS_NOT_SUPPORTEDThe operating system or environment is not supported by the client library. Contact Technical Support for assistance.
20 SP_QUERY_TOO_LONGYou sent a query string longer than 56 characters. Send a shorter string.
Error Code(Decimal)
Description
Sentinel SuperPro 6.5 Developer’s Guide 353
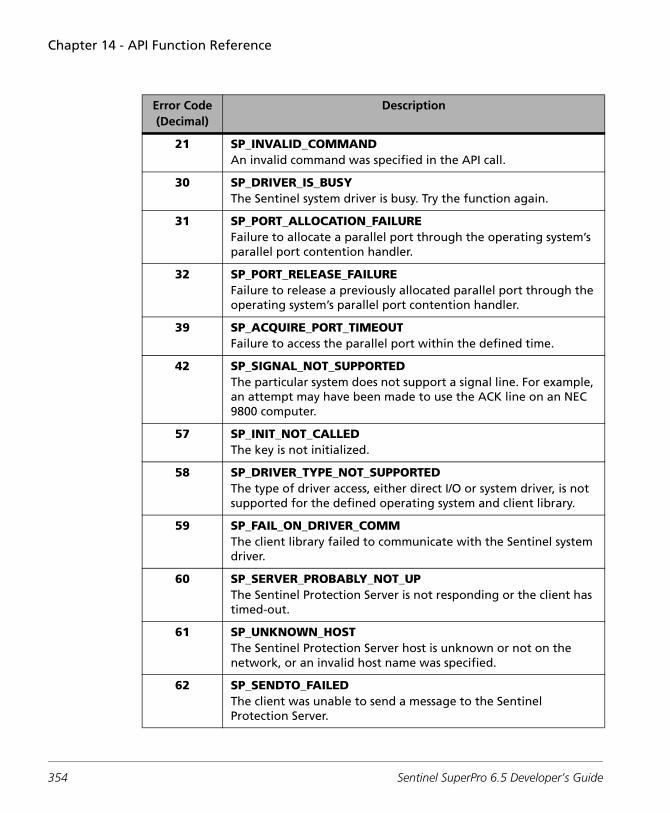
Chapter 14 - API Function Reference
21 SP_INVALID_COMMANDAn invalid command was specified in the API call.
30 SP_DRIVER_IS_BUSYThe Sentinel system driver is busy. Try the function again.
31 SP_PORT_ALLOCATION_FAILUREFailure to allocate a parallel port through the operating system’s parallel port contention handler.
32 SP_PORT_RELEASE_FAILUREFailure to release a previously allocated parallel port through the operating system’s parallel port contention handler.
39 SP_ACQUIRE_PORT_TIMEOUTFailure to access the parallel port within the defined time.
42 SP_SIGNAL_NOT_SUPPORTEDThe particular system does not support a signal line. For example, an attempt may have been made to use the ACK line on an NEC 9800 computer.
57 SP_INIT_NOT_CALLEDThe key is not initialized.
58 SP_DRIVER_TYPE_NOT_SUPPORTEDThe type of driver access, either direct I/O or system driver, is not supported for the defined operating system and client library.
59 SP_FAIL_ON_DRIVER_COMMThe client library failed to communicate with the Sentinel system driver.
60 SP_SERVER_PROBABLY_NOT_UPThe Sentinel Protection Server is not responding or the client has timed-out.
61 SP_UNKNOWN_HOSTThe Sentinel Protection Server host is unknown or not on the network, or an invalid host name was specified.
62 SP_SENDTO_FAILEDThe client was unable to send a message to the Sentinel Protection Server.
Error Code(Decimal)
Description
354 Sentinel SuperPro 6.5 Developer’s Guide
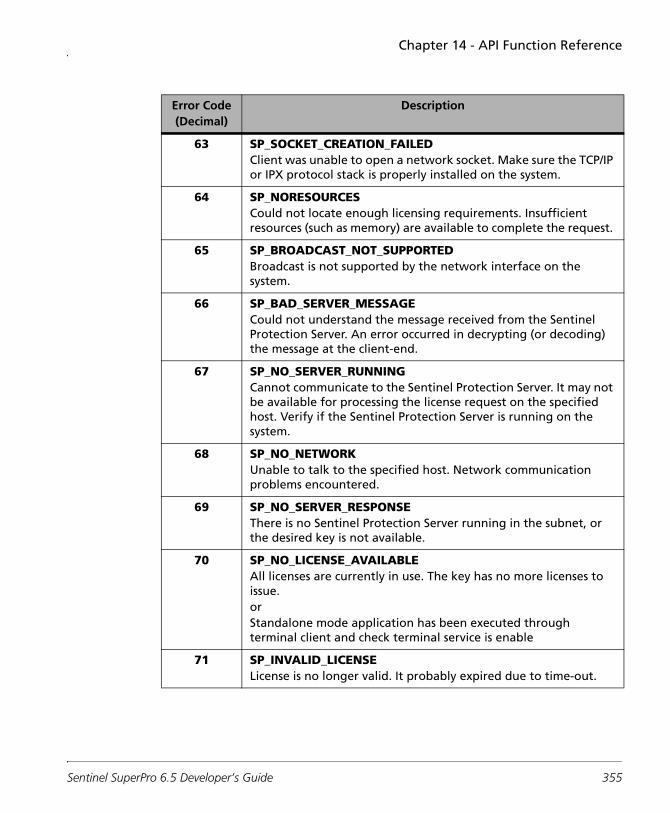
Chapter 14 - API Function Reference
63 SP_SOCKET_CREATION_FAILEDClient was unable to open a network socket. Make sure the TCP/IP or IPX protocol stack is properly installed on the system.
64 SP_NORESOURCESCould not locate enough licensing requirements. Insufficient resources (such as memory) are available to complete the request.
65 SP_BROADCAST_NOT_SUPPORTEDBroadcast is not supported by the network interface on the system.
66 SP_BAD_SERVER_MESSAGECould not understand the message received from the Sentinel Protection Server. An error occurred in decrypting (or decoding) the message at the client-end.
67 SP_NO_SERVER_RUNNINGCannot communicate to the Sentinel Protection Server. It may not be available for processing the license request on the specified host. Verify if the Sentinel Protection Server is running on the system.
68 SP_NO_NETWORKUnable to talk to the specified host. Network communication problems encountered.
69 SP_NO_SERVER_RESPONSEThere is no Sentinel Protection Server running in the subnet, or the desired key is not available.
70 SP_NO_LICENSE_AVAILABLEAll licenses are currently in use. The key has no more licenses to issue. orStandalone mode application has been executed through terminal client and check terminal service is enable
71 SP_INVALID_LICENSELicense is no longer valid. It probably expired due to time-out.
Error Code(Decimal)
Description
Sentinel SuperPro 6.5 Developer’s Guide 355
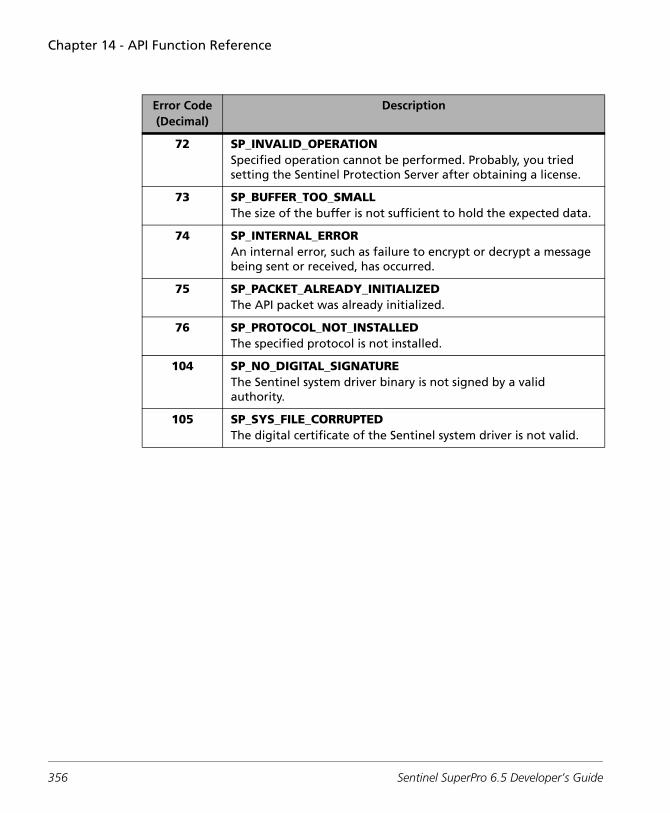
Chapter 14 - API Function Reference
72 SP_INVALID_OPERATIONSpecified operation cannot be performed. Probably, you tried setting the Sentinel Protection Server after obtaining a license.
73 SP_BUFFER_TOO_SMALLThe size of the buffer is not sufficient to hold the expected data.
74 SP_INTERNAL_ERRORAn internal error, such as failure to encrypt or decrypt a message being sent or received, has occurred.
75 SP_PACKET_ALREADY_INITIALIZEDThe API packet was already initialized.
76 SP_PROTOCOL_NOT_INSTALLEDThe specified protocol is not installed.
104 SP_NO_DIGITAL_SIGNATUREThe Sentinel system driver binary is not signed by a valid authority.
105 SP_SYS_FILE_CORRUPTEDThe digital certificate of the Sentinel system driver is not valid.
Error Code(Decimal)
Description
356 Sentinel SuperPro 6.5 Developer’s Guide
Chapter 15Migrating from Older Versions of Sentinel Keys
If you have used a previous version of Sentinel SuperPro—such as Sentinel SuperPro 5.1 or Sentinel SuperPro Advantage—or NetSentinel, then you must contact SafeNet Technical support for any queries in using SuperPro 6.5 with your existing Sentinel family product.
Applications you protected using Sentinel SuperPro 5.1 or earlier will con-tinue to run without problems. We are committed to supporting Sentinel SuperPro. If you have questions, need additional assistance, or encounter a problem, go to “Contacting Technical Support” on page xxi.
Sentinel SuperPro 6.5 Developer’s Guide 357
Chapter 15 - Migrating from Older Versions of Sentinel Keys
358 Sentinel SuperPro 6.5 Developer’s Guide
Chapter 16Features for Linux Distribution
Note: This chapter is meant for Linux users ONLY. If you are a Windows user, refer to other chapters of the Developer’s Guide.
The Linux Platform of Sentinel SuperPro brings the popular Sentinel key based-protection to a wide community of Linux developers—allowing them to safeguard and control the use of their applications.
The network support that was added in the last release allowed multiple cli-ents across the network to access a SuperPro key concurrently with the Sentinel Protection server. You can even remotely activate inactive applica-tions or enable selective features using the Field Exchange utility. This release introduces the following:
■ The Sentinel UNIX Driver for parallel port supports communication with the parallel form factor of the SuperPro key.
■ USB daemon supports communication with the USB form factor of the SuperPro and SuperPro XM keys. Refer to Chapter -2 “Using the Hardware Key” on page 19 for more information on SuperPro XM Key.
Apart from discussing these features, the following topics are also covered:
Sentinel SuperPro 6.5 Developer’s Guide 359
Chapter 16 - Features for Linux Distribution
■ “Sentinel Protection Installer for Linux Redistributables” on page 362. This topic will explain you the step-by-step process of protecting an application.
■ “What to Send to Your Customers and Distributors” on page 363.
■ “Frequently Asked Questions” on page 368.
Tip: The APIs and various programs/utilities referred within this chapter, such as the Sentinel Pro-tection server, Field Exchange, Sentinel License Monitor, are functionally similar to the Win-dows components, unless stated otherwise. Therefore, developers who are already familiar with the Windows version of the software will find it quick and easy to learn about the Linux version of Sentinel SuperPro. First-time developers are recommended to begin with the Senti-nel SuperPro Developer’s Guide for Windows.
The major highlights of the SuperPro Linux package are as follows:
Support for SuperPro XM and Parallel Port Keys
This Sentinel Unix Driver for parallel port supports communication with parallel form of the SuperPro key. Refer to section “Installing the Parallel Port Hardware Key” on page 52 for details.
A daemon has been provided to allow accessing the USB keys i.e. SuperPro and SuperPro XM attached to the USB port. Refer to section “Installing the USB Hardware Key” on page 55 for details.
Sharing support in the Dual Client Library
The Dual Client Library that is provided directly communicates with the driver in order to access the SuperPro, SuperPro XM (both parallel and USB) keys connected locally. However, it provides the twin functionality for both network and stand alone communication. For more details on the sharing features added in this release, refer to the section on “License Sharing” on page 101.
360 Sentinel SuperPro 6.5 Developer’s Guide
Chapter 16 - Features for Linux Distribution
Sublicensing
The Sentinel Protection Server now provides sharing of seat license requested from the same user or machine. Refer to the section on “Subli-censing” on page 12 for details.
Cancelling a License
If desired, the user can cancel the licenses issued to the clients from a key. This need might arise in situations when some other privileged client needs a license or an application terminates without releasing the license acquired. The Sentinel License Monitor does not prompt users for any errors encountered while canceling a license. However, a license will not be can-celed if there is excessive traffic in the network or a wrong password is specified. For more information on cancelling a license, refer to the Sentinel SuperPro System Administrator’s Help.
Sentinel SuperPro 6.5 Developer’s Guide 361

Chapter 16 - Features for Linux Distribution
Sentinel Protection Installer for Linux Redistributables
To ease the installation of the SuperPro redistributables—the parallel port driver, USB daemon, Sentinel Protection server, and Sentinel License Moni-tor—on your customer’s computer, the Sentinel Protection Installer has been provided.
The /sentinel_protection_installer folder in the Sentinel SuperPro CD con-tains the following items:
Note: The Sentinel Protection server for Linux only supports the TCP/IP protocol.
File Description
/protection_install.sh Script to install the Sentinel Protection Installer’s all four components.
/protection_uninstall.sh Script to uninstall the Sentinel Protection Installer’s all four components.
/driver/drvr_install.sh Script to install the Sentinel UNIX Driver components.
/driver/drvr_uninstall.sh Script to uninstall the Sentinel UNIX Driver components.
/driver/sntl-sud-7.1.0-0.i386.rpm Script to install the parallel and/or USB port driver components.
/server/sntl-server-7.1.0-0.i386.rpm Script to install the Sentinel Protection Server.
/licenseagreement.txt Stores legal agreement between the software seller and the buyer.
/ReadMe.pdf Provides an overview of the Sentinel Protection Installer, its installation and a few tips on using the related components.
362 Sentinel SuperPro 6.5 Developer’s Guide
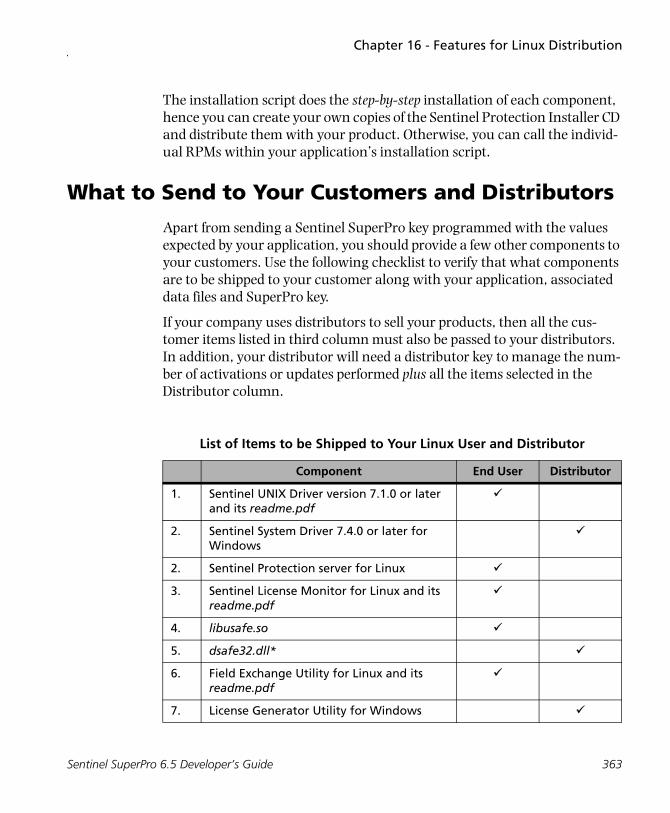
Chapter 16 - Features for Linux Distribution
The installation script does the step-by-step installation of each component, hence you can create your own copies of the Sentinel Protection Installer CD and distribute them with your product. Otherwise, you can call the individ-ual RPMs within your application’s installation script.
What to Send to Your Customers and Distributors
Apart from sending a Sentinel SuperPro key programmed with the values expected by your application, you should provide a few other components to your customers. Use the following checklist to verify that what components are to be shipped to your customer along with your application, associated data files and SuperPro key.
If your company uses distributors to sell your products, then all the cus-tomer items listed in third column must also be passed to your distributors. In addition, your distributor will need a distributor key to manage the num-ber of activations or updates performed plus all the items selected in the Distributor column.
List of Items to be Shipped to Your Linux User and Distributor
Component End User Distributor
1. Sentinel UNIX Driver version 7.1.0 or later and its readme.pdf
2. Sentinel System Driver 7.4.0 or later for Windows
2. Sentinel Protection server for Linux
3. Sentinel License Monitor for Linux and its readme.pdf
4. libusafe.so
5. dsafe32.dll*
6. Field Exchange Utility for Linux and its readme.pdf
7. License Generator Utility for Windows
Sentinel SuperPro 6.5 Developer’s Guide 363

Chapter 16 - Features for Linux Distribution
*For platform-independent field activation, ensure that you follow the same configu-ration settings—and not only the same secret code—on Windows and Linux to have identical SAFE objects.
8. Sentinel Client Activator Not Available on Linux.
9. DocumentationYou should provide sufficient information to your customers on setting the NSP_HOST variable depending on the access mode you set. Relevant information about the Sentinel Protection server, Sentinel UNIX driver and other redistributables may aid their operation. Please refer to the readme.pdf included for each component.
Distributors can be provided with documentation on topics such as, how to generate licenses using the License Generator, and so on.
10. The Windows License Generator Utility and the following files: lang_enu.dll, sp_gXX.dll, makedll.dll and spcommon.dll.
11. The Sentinel SuperPro distributor’s project file (.DST) with the protection strategy for the application you are shipping.
List of Items to be Shipped to Your Linux User and Distributor (Continued)
Component End User Distributor
364 Sentinel SuperPro 6.5 Developer’s Guide
Chapter 16 - Features for Linux Distribution
Getting Started
Sentinel SuperPro on Linux does not provide you with a Toolkit as in the Windows version. However, the Windows Toolkit itself can be used to per-form similar actions on the SuperPro key. Your actions to protect an application can be divided into four parts as described below:
Note: For detail on the procedures and concepts for using the Toolkit, refer to Chapter 5‚ ”Starting the Sentinel SuperPro Toolkit”.
Part I – Using the Windows Toolkit
Use the Windows Toolkit to design your protection strategy and program the hardware keys. You also define the field activation commands here, if you wish to allow field activation. The Toolkit also allows you to evaluate the behavior of the API functions with your programmed key prior to put-ting them in your source code, using the API Explorer.
Note that the automatic protection option, in which a protective layer is added around your executable, is not supported on Linux. You can instead customize a unique protection plan using integrated application protection. With this, you can take advantage of a number of protection techniques, both basic and advanced, using those that work best for your application. You can also add individual design elements to your protection strategy, known as custom elements.
The exact steps followed to protect an application are presented below:
1. On a computer where the SuperPro software for Windows is installed, point to Programs > SafeNet Sentinel> SuperPro > 6.5 from the Start menu. Now, click SuperPro Toolkit to open the Toolkit.
2. If starting the Toolkit for the first-time, you need to enter the devel-oper-specific details, as your passwords are remembered for subse-quent sessions. Even if you don’t enter them, the toolkit still allows you to continue, up through the Prototyping stage after which entering the Developer ID, Write Password, and Overwrite Passwords 1 and 2 is
Sentinel SuperPro 6.5 Developer’s Guide 365
Chapter 16 - Features for Linux Distribution
required to proceed further. Refer to the section on “Developer Config-uration Dialog Box” on page 116 for details.
Note: In case you did not enter the Developer ID, Write Password and the Overwrite Passwords 1 and 2 in the developer configuration dialog box, at the time of saving your project you will get a message stating: “You must specify the secret code, the spp file can not be saved, first complete the developer configuration in the project stage“. Complete the developer configuration and then proceed further.
3. Navigate to the Design stage and click Integrated Protection under Element List View.
Note: Before you create the first element in your protection strategy, you need to decide whether you will be using SuperPro XM or SuperPro keys for your design. When you click on one of the buttons in the “Add element” group, you will be asked to specify whether the design will be used with SuperPro XM or SuperPro keys. Alternatively, you can specify SuperPro XM keys by clicking on the “Enable SuperPro XM Features” check box in the lower right-hand corner before creating the first element.
4. Assign a name and comment for your application. This name will be shown in the Element List View. Click Next.
5. From the Address drop-down list, select the address of the cell you want the first word of the element to be placed in. If the location is unimportant to you, select Auto to allow the Toolkit to select a loca-tion for you.
6. Select the Override Default Algorithm check box to specify your own algorithm values, although, we recommend that you use the default ones. See the instructions on “Overriding the Default Algo-rithm Values” on page 152 for detailed instructions.
7. Now, if you want the application to be a demo application, select the Demo counter check box and specify an integer value between 0 and 65535.
366 Sentinel SuperPro 6.5 Developer’s Guide
Chapter 16 - Features for Linux Distribution
8. In the next screen, you are required to specify an activation type for your application. You can choose any of the following activation types: active, static, trusted or distributed. Refer to the section “Activation Types” on page 63 to learn more about each activation type. Note that a Linux application in the field can only be activated using the Field Exchange utility. Support for the Sentinel Client Activator is not pro-vided for the SuperPro Linux release. Clicking Next will bring you back to the Element List View, where you find your element added in the list.
9. Now, navigate to the Prototype stage. Click Go. This will: program a master key, generate query/response pairs, define default actions for remote activation. More commands for field activation can be added in the Implementation stage.
10. You are automatically brought to the Implementation stage, where a pseudocode protection plan is generated. Although, it cannot be used directly in your source code, it gives an idea about the sequence of the various APIs to be called. It also shows you the expected responses for queries to the algorithms programmed into your keys. You may wish to copy this section from the plan for reference. Use any of the Save options to save the pseudocode for reference.
11. If you wish to allow remote activation for your application in the field, you must define the field activation commands. Click the Field Acti-vation tab. Refer to Chapter 9, “Defining Field Activation Actions” on page 221 for exact procedure.
12. Once you are finished with the Implementation stage, you can pro-ceed to make your product and distributor keys in the Make Keys stage. Refer to Chapter 10,“Programming Keys” on page 233 for detailed information.
13. Save your project (.spp) in the Project stage.
Sentinel SuperPro 6.5 Developer’s Guide 367
Chapter 16 - Features for Linux Distribution
Part II – Working in Your Application Source Code
Afterward, you can add the SuperPro API functions to your source code. You can refer to the pseudocode obtained from the Toolkit. Interfaces are provided for GCC, Java, and Kylix to assist you in adding the APIs to code. Each interface directory consists of a document in PDF format that shows the exact syntax for each of these languages, and explains how to build the example program given.
Note: Ensure that you also link your application with the pthread system library along with the SuperPro client library.
Part III – Configuring SafeCfg
If you are allowing field activation, configure the SafeCfg. The libusafe.so will be shipped along with your protected application. Refer to “Configuring the SafeCfg Utility for Linux” on page 232 for details.
Warning! Each time you modify your configuration settings, a new pair of USAFE and DSAFE objects is reproduced. However, to serve your applications already in the field, you must make a backup of objects corresponding to the existing settings.
Part IV – The Final Steps
Finally, you should prepare an installer for your protected application. Consider using Sentinel Protection Installer for installing the end user components as explained below. The section “What to Send to Your Cus-tomers and Distributors” on page 363 provides a helpful list.
Frequently Asked Questions
This section consists of a few commonly asked questions that can occur to you or your customer. If you are facing any other problem in using Sentinel
368 Sentinel SuperPro 6.5 Developer’s Guide
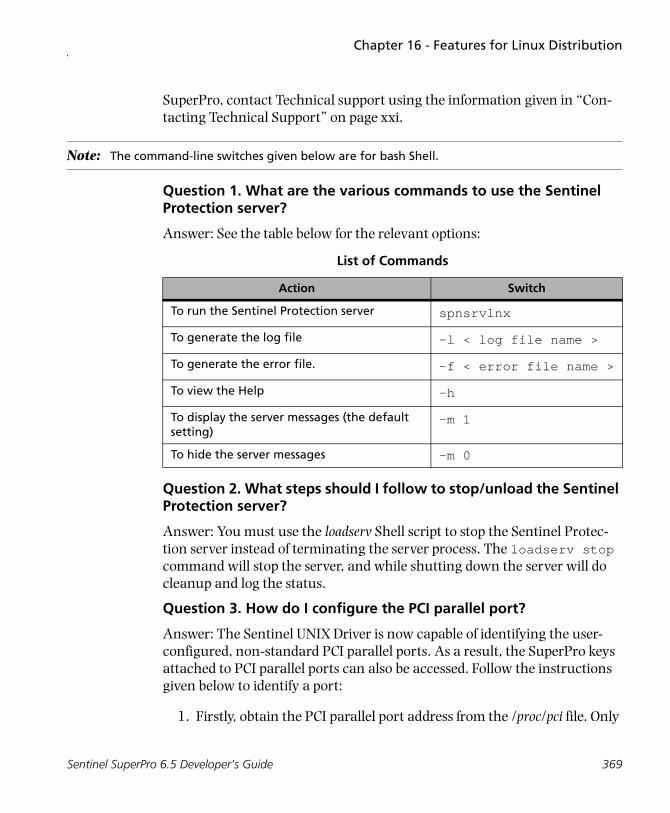
Chapter 16 - Features for Linux Distribution
SuperPro, contact Technical support using the information given in “Con-tacting Technical Support” on page xxi.
Note: The command-line switches given below are for bash Shell.
Question 1. What are the various commands to use the Sentinel Protection server?
Answer: See the table below for the relevant options:
Question 2. What steps should I follow to stop/unload the Sentinel Protection server?
Answer: You must use the loadserv Shell script to stop the Sentinel Protec-tion server instead of terminating the server process. The loadserv stop command will stop the server, and while shutting down the server will do cleanup and log the status.
Question 3. How do I configure the PCI parallel port?
Answer: The Sentinel UNIX Driver is now capable of identifying the user-configured, non-standard PCI parallel ports. As a result, the SuperPro keys attached to PCI parallel ports can also be accessed. Follow the instructions given below to identify a port:
1. Firstly, obtain the PCI parallel port address from the /proc/pci file. Only
List of Commands
Action Switch
To run the Sentinel Protection server spnsrvlnx
To generate the log file -l < log file name >
To generate the error file. -f < error file name >
To view the Help -h
To display the server messages (the default setting)
-m 1
To hide the server messages -m 0
Sentinel SuperPro 6.5 Developer’s Guide 369
Chapter 16 - Features for Linux Distribution
one address can be specified at a time.
2. Now, edit the rc.local file available at the /etc/rc.d/rc.local path. The entry: insmod –f /opt/sentinel/sud/parallal/mdrbdr.o should be modified to: insmod –f /opt/sentinel/sud/paral-lal/mdrbdr.o address=<address>.
The address of the I/O port was obtained in step 1. For example, ins-mod –f /opt/sentinel/sud/parallal/mdrbdr.o address=0xdcf8 will check the 0xdcf8 port.
3. Now, reboot the computer to apply the settings. Or, to access the key right away, unload the driver using the rmmod mdrbdr command—followed by reloading it using the following command: insmod –f //opt/sentinel/sud/parallal/mdrbdr.o address=<address>. Now, you are ready to access the key.
Question 4. How do I set the NSP_HOST variable on Linux?
Answer: You can use the export NSP_HOST=<Value> command in the bash Shell to set NSP_HOST. Or, you can also make an entry in the .bash_profile file. For other types of Shell, you should refer to the respective man pages.
The possible values are: RNBO_SPN_DRIVER, RNBO_SPN_LOCAL, RNBO_SPN_BROADCAST, RNBO_SPN_ALL_MODES, RNBO_SPN_SERVER_MODES, NO-NET and server host name or IP address. These strings are case-sensitive.
Question 5. How do I detect if the Sentinel UNIX Driver and Senti-nel Protection server are running on a system?
Answer: The following commands are helpful:
■ The lsmod command will show you if the modules required by Sentinel UNIX Driver are loaded.
• The mdrbdr.o is the Sentinel parallel driver module.
• The usbcore and usb-uhci/usb-ohci (depending on the hardware specifications) modules are needed by the USB daemon.
370 Sentinel SuperPro 6.5 Developer’s Guide
Chapter 16 - Features for Linux Distribution
■ The load_daemon.sh status command will show the USB daemon status—whether running or stopped.
■ The loadserv status command will show the status of the Sentinel Protection server.
• spnsrvlnx (pid nnnn nnnn nnnn nnnn) is running output indicates that the Sentinel Protection server is running.
• spnsrvlnx is stopped output indicates that the Sentinel Protection server is not running.
By default the Sentinel Protection server messages are displayed. To hide them, start the Sentinel Protection server with the -m 0 switch,
Sentinel SuperPro 6.5 Developer’s Guide 371
Chapter 16 - Features for Linux Distribution
372 Sentinel SuperPro 6.5 Developer’s Guide
Appendix ATroubleshooting
SafeNet Inc. is committed to providing easy-to-use products that increase productivity and offer top-quality performance. However, if you do experi-ence a problem, you may save yourself time by first looking over the information and recommendations in this troubleshooting appendix.
This appendix presents common Sentinel SuperPro problems and solutions. If you cannot quickly solve your problem using the information in this appendix, please contact SafeNet Inc. Technical Support for further assis-tance. Contact information can be found on page xxi.
This appendix covers the following topics:
■ Uninstalling the Sentinel SuperPro Toolkit
■ Repairing a Sentinel SuperPro Installation
■ Strategy design issues
■ Application protection issues
■ Sentinel SuperPro key compatibility issues
■ Key programming issues
Sentinel SuperPro 6.5 Developer’s Guide 373
Appendix A - Troubleshooting
Uninstalling the Sentinel SuperPro Toolkit
This section explains how to uninstall the Sentinel SuperPro Developer’s Toolkit and related Sentinel SuperPro components from your system.
1. From the Start menu, select Settings > Control Panel. The Control Panel window appears.
2. Double-click Add/Remove Programs. The Add/Remove Programs Properties dialog box appears.
3. From the list of installed applications, select Sentinel SuperPro 6.5.0.
4. Click Add/Remove. The Sentinel SuperPro Installation Wizard Wel-come screen appears.
5. Click Next. The Modify, Repair or Remove screen appears.
6. Select Remove, then click Next.
7. You are asked to confirm the removal of Sentinel SuperPro 6.5.0. Click Remove. Sentinel SuperPro Toolkit uninstallation begins.
8. If any Sentinel SuperPro files are in use, the Files in Use screen appears. Close any listed files, then click Retry.
9. When uninstallation is complete, the Finished screen appears. Click Finish. You are returned to the Add/Remove Programs Properties dialog box.
Note: Depending on your operating system, you may need to reboot your system at this point. You will be prompted if a reboot is required; if a message appears, follow the on-screen instructions.
To completely remove Sentinel SuperPro files from your system, you should also uninstall the following components:
■ Client Activator Wizard
374 Sentinel SuperPro 6.5 Developer’s Guide

Appendix A - Troubleshooting
■ Sentinel System Driver
Repeat steps 3 – 9 above for each of these components, if necessary. When you have finished uninstalling Sentinel SuperPro components, click OK to close the Add/Remove Programs Properties dialog box.
Note: If you have more than one application that uses the Sentinel system driver installed on your system, the Sentinel SuperPro uninstall process will not uninstall the driver. The driver will be uninstalled only when the last appli-cation using the driver is uninstalled. This holds true for the Sentinel Pro-tection server also.
Also, the following files do not get automatically removed when you unin-stall Sentinel SuperPro. You should delete these files manually to complete the uninstallation process.
■ Log files generated by the Sentinel Protection server
■ Log files generated during key programming or license code generation
■ Intermediate files created by compiling interfaces
■ Any Sentinel SuperPro project files (.SPP or .DST)
■ usafe32.dll and dsafe32.dll
Sentinel SuperPro 6.5 Developer’s Guide 375
Appendix A - Troubleshooting
Repairing a Sentinel SuperPro Installation
The Sentinel SuperPro Installation Wizard features a repair function, allow-ing you to fix any errors that may have occurred during installation, or reinstall any critical files you may have accidentally deleted or that have become corrupt.
You may need to use the repair function if any of the following occurs:
■ Your Sentinel SuperPro shortcuts (on the desktop or in the Start menu) stop working
■ When you start the SSP Toolkit, a message appears saying you are missing .DLL files
■ The Sentinel Protection server won’t start
■ The Sentinel system driver appears to be missing
When you run a repair operation, the Installation Wizard locates all the files installed with Sentinel SuperPro, and then updates or replaces them as nec-essary. It also restores any registry entries and shortcuts that were created during the initial installation process.
While the repair function can be a quick and easy way to fix minor prob-lems, it may not always solve all problems. If, after running the repair function, you are still having problems, you should first remove, and then reinstall Sentinel SuperPro.
To run a repair operation:
1. From the Start menu, select Settings > Control Panel. The Control Panel window appears.
2. Double-click Add/Remove Programs. The Add/Remove Programs Properties dialog box appears.
3. From the list of installed applications, select Sentinel SuperPro 6.5.0.
376 Sentinel SuperPro 6.5 Developer’s Guide
Appendix A - Troubleshooting
4. Click Add/Remove. The Sentinel SuperPro Installation Wizard Wel-come screen appears.
5. Click Next. The Modify, Repair or Remove screen appears.
6. Select Repair, then click Next.
The Ready to Repair screen appears.
7. Click Install to start the repair process.
8. When the repair process is complete, the Install Complete screen appears. Click Finish.
Note: Depending on your operating system, you may need to reboot your system at this point. You will be prompted if a reboot is required; if a message appears, follow the on-screen instructions.
Modifying/Repairing Sentinel SuperPro Installer on Vista
If you are a restricted user on Vista you may get problems when you perform modify/repair in Software Explorer. Some custom actions in Sentinel SuperPro Installer need administrator privileges, such as firewall configuration, service stop/restart, driver instal-lation or repair, and so on. When modifying or repairing from Software Explorer, you must enter the correct administrator password in all UAC dia-logs and consent all these dialogs to ensure successful modification, otherwise it may get problems.
An administrator on Vista is not asked to enter password, but he should con-sent all UAC dialogs to ensure success for the entire modification/repair process.
Sentinel SuperPro 6.5 Developer’s Guide 377
Appendix A - Troubleshooting
Strategy Design Issues
The following are common issues related to designing your protection strat-egy. For more information about designing your strategy, see Chapter 3, “Designing Your Protection Strategy,” on page 59.
Question:
Is there a limit on the number of writes I can make to a cell?
Answer:
Making frequent writes to a cell can lead to premature key failure. For this reason, SafeNet Inc. recommends limiting writes to a key to a reasonable amount. For example, writing to any cell on a single key once every 10 sec-onds, 8 hours a day leads to more than 2 million writes a year, which is too many. Write to the key only when necessary; use other means—such as querying or reading a cell—to verify the key is still attached and has not been tampered with.
378 Sentinel SuperPro 6.5 Developer’s Guide

Appendix A - Troubleshooting
Application Protection Issues
The following are common issues related to implementing and using appli-cation protection as a part of your protection strategy. For a complete description of how to use application protection, see Chapter 6, “Protecting Your Application,” on page 145.
Question:
I receive an error if I attempt to encrypt more than 50 files when I apply a shell to my application. How can I encrypt more than 50 files?
Answer:
When applying a shell, you can encrypt a maximum of 50 files at time. To encrypt more than 50 files with an application using automatic (shelled) protection, you need to create multiple application protection elements, all of which use the same encryption seed. For example, if you need to encrypt 125 files, you will need to create three application protection elements using automatic protection (50 + 50 + 25).
1. Create an application protection element, and select automatic pro-tection. See “Using Automatic Protection” on page 157.
2. Specify the first 50 files you want to be encrypted at shell time. See “Selecting Additional Files for Encryption” on page 170.
3. Write down the encryption seed you used for the first 50 files.
4. Continue through the Element Definition Wizard to complete the application protection element.
5. Repeat step 1 to add another application protection element.
6. Specify the next 50 files you want to be encrypted at shell time.
Sentinel SuperPro 6.5 Developer’s Guide 379
Appendix A - Troubleshooting
7. Enter the encryption seed you wrote down in step 3. You must use the same encryption seed that you used for the first 50 files, if you want the files to use the same encryption.
8. Repeat step 4.
9. Repeat steps 5 – 7 until you have specified all the files you want to encrypt.
Note: While reading the following sections, keep in mind that even if an applica-tion cannot be protected using automatic protection, it can always be pro-tected using integrated protection instead.
Protecting Multi-File Applications
Using automatic (shelled) protection allows you to protect multiple execut-able files. However, there are several things you must keep in mind when protecting an application made up of multiple executable (.EXE or .DLL) files:
■ You can protect a single DLL that will be used by multiple unprotected .EXE files without any special precautions. However, if you want to protect a single DLL that will be used by multiple protected .EXE files, you must make sure the .EXE files and the .DLL file share compatible protection settings. This means they must use the same encryption seed, algorithm data, and data file encryption settings.
■ Multiple .EXE files in a single application must have the same encryption seed if they share data files and the same algorithm data (or at least, non-conflicting use of cells).
■ If your application uses multiple DLLs, we do not recommend protecting the DLLs, because the last DLL loaded overrides settings for previously loaded ones.
However, if you must protect the DLLs, be very careful to make sure they share exactly the same protection options. The DLLs must also use the same encryption seed and algorithm data as the protected
380 Sentinel SuperPro 6.5 Developer’s Guide
Appendix A - Troubleshooting
.EXE files in the application.
Protecting Interpreted-language Applications
A special case of protecting multi-file applications is protecting an inter-preted program that uses a separate interpreter program at runtime to execute the application. In this case, you need to protect the interpreter pro-gram, as well as your program, since one calls the other.
How you protect the two executable programs depends on the programming system you are using.
In most cases, you will protect the interpreter program and your program as two separate executable files, using the same protection settings: encryption seed and algorithm data.
For instance, to protect a FoxPro 3.0 application, you need to protect the runtime file vfp300.esl, as well as your .EXE file.
If your application is an interpreted program that does not require a sepa-rate runtime program (such as certain Macromedia applications that append the interpreter to your program in a single executable file), you can protect the single executable file in the usual way.
In some cases, the interpreter program must be protected as the main exe-cutable program, and your application must be protected as a data file used by the interpreter.
You may have to experiment to see what works for you. If you need assis-tance, contact SafeNet Inc. Technical Support.
Note: For a list of the compatible compilers and applications supported by Senti-nel SuperPro, please see “Appendix B, “Compatible Compilers and Applica-tions,” on page 393.
Input File Attributes
If your input file has the read-only attribute set, Sentinel SuperPro may not be able to protect the file. In order for Sentinel SuperPro to read the file, you
Sentinel SuperPro 6.5 Developer’s Guide 381
Appendix A - Troubleshooting
must clear the read-only attributes on the file properties sheet and run the protection application again.
Thread Local Storage
Sentinel SuperPro cannot protect multi-threaded Win32 applications with DLLs that use Thread Local Storage (TLS). Compilers such as Microsoft Visual C++ version 4.2 and higher support TLS.
Lahey F90 Fortran 2.0
Sentinel SuperPro cannot protect a Win32 application that has been com-piled with Lahey F90 Fortran 2.0.
Protecting FoxPro 3.0 and 5.0 Applications
For FoxPro 3.0, both the program (.EXE) and the runtime (vfp300.esl) must be protected using the same encryption seed. At least one encrypted data file must be specified; if no real data encryption is needed, specify a dummy file-name (for example, zzz.zzz). For FoxPro 5.0, only the program (.EXE) and any data files must be protected.
Protecting Microsoft J++ 1.1 Java Applets
Because Microsoft J++ 1.1 Java uses a separate interpreter program, you must protect both java.exe and your applet file as separate executables using the same protection settings.
Note for SmartHeap Users
If you are using MicroQuill’s SmartHeap memory management software and protecting your application as data encryption enabled, you may have difficulty with the encrypted data files under Windows NT. If this is the case, first try to disable the SmartHeap DLL automatic patching activity con-trolled by Registry values. Please refer to your SmartHeap documentation for more information.
382 Sentinel SuperPro 6.5 Developer’s Guide
Appendix A - Troubleshooting
Protecting Applications That Use “Starter” Programs
Some applications use a “starter program,” which in turn calls the main executable application. One application using a starter program is Corel WordPerfect. This application calls various DLLs that call the main Word-Perfect application, which in turn may open a document file. In this case, you must protect the main executable file rather than the starter program, and protect the document files as data files used by the main executable application.
Sentinel SuperPro 6.5 Developer’s Guide 383
Appendix A - Troubleshooting
Key Programming Issues
The following are common issues related to programming keys using the SSP Toolkit or the Make Keys Utility. For a complete description of how to program keys, see Chapter 10, “Programming Keys,” on page 233.
Question:
During key programming, I received a write failure message asking me to enter my developer ID and passwords again. What happened?
Answer:
If you remove the key while it is being programmed, this message appears.
Verify the key is firmly connected to the appropriate port on the computer, and that it is fully-seated in the port. An inadequate connection can cause these types of errors.
Question:
A key failed the programming process. How can I tell if the error is software or hardware related?
Answer:
To determine if a programming failure is due to a software error or a hard-ware error, try programming another key with the same strategy.
If the programming is successful, the previous error was hardware-related.
If you try programming many keys, and all of them fail programming, the error is software-related.
384 Sentinel SuperPro 6.5 Developer’s Guide
Appendix A - Troubleshooting
Question:
When I try to create a key prototype in the Prototype stage, or program a key in the Make Keys stage, I get a message saying the server isn’t running. What does this mean?
Answer:
The Sentinel Protection Server must be running to access the hardware key. This includes any kind of key access operation, including creating a proto-type or programming keys.
For server installation instructions, see “Installing the Sentinel Protection Server” on page 250. For information about how to verify the server is run-ning, see “Using the Field Exchange Utility” on page 282.
Sentinel SuperPro 6.5 Developer’s Guide 385
Appendix A - Troubleshooting
Application Activation Issues
The following are common issues related to activating applications or per-forming field upgrades using the SSP Toolkit or the License Generator Utility. For a complete description of how to activate or update applications, see Chapter 12, “Activating and Updating Keys,” on page 265.
Question:
Why can’t my distributor activate applications or update keys using the License Generator Utility?
Answer:
There are several possible reasons why a distributor could be having prob-lems activating or updating applications.
■ His distributor key is not connected. The distributor must have his distributor key connected in order to generate license codes for applications using the distributed activation type. Verify that your distributor has his distributor key appropriately and firmly connected.
■ The activation counter on his distributor key has reached zero. If there are no more licenses to activate or update applications left on the distributor key, your distributor will not be able to generate license codes. You need to increment the activation counter on the distributor’s key through field activation. See “Updating Distributor Keys in the Field” on page 279 for instructions.
■ He is using an incorrect distributor key. The distributor key connected to the workstation must be programmed with the Sentinel SuperPro project the application was protected with. If your distributors are responsible for activating multiple applications with multiple keys, it is important that the correct key be connected when attempting to generate license codes.
■ The wrong .DST file is being used. The .DST file opened in the License Generator Utility must be the file that was created from the same project you programmed the distributor key with, and protected
386 Sentinel SuperPro 6.5 Developer’s Guide
Appendix A - Troubleshooting
the application with. If the wrong .DST file is being used, license codes cannot be generated.
■ The Sentinel Protection Server is not running. To use the License Generator Utility, the Sentinel Protection Server must be installed and running on the same workstation the distributor key is connected to and the utility is being run on. Ask your distributor to verify that the server is running, using the instructions found in “Using the Field Exchange Utility” on page 282.
Sentinel SuperPro 6.5 Developer’s Guide 387
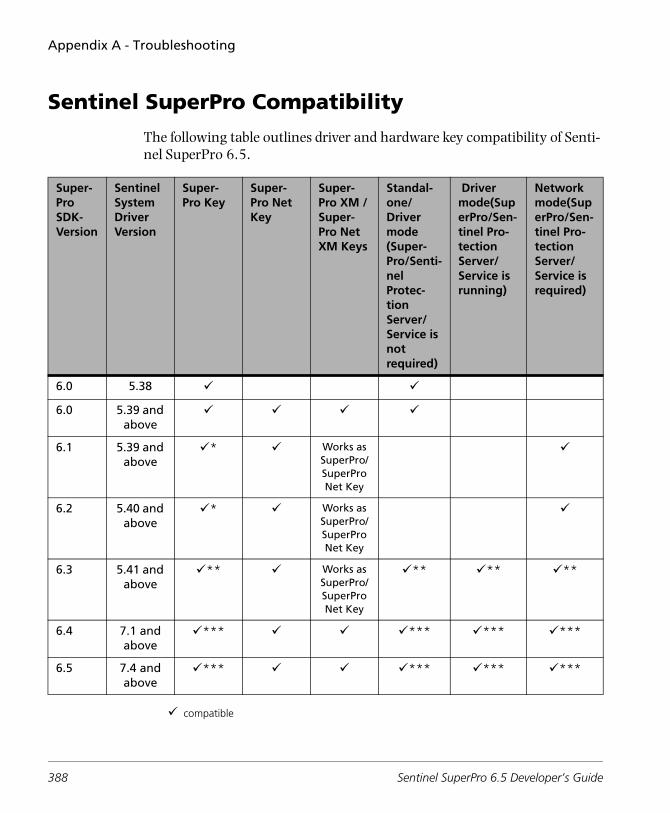
Appendix A - Troubleshooting
Sentinel SuperPro Compatibility
The following table outlines driver and hardware key compatibility of Senti-nel SuperPro 6.5.
compatible
Super-Pro SDK-Version
Sentinel System Driver Version
Super-Pro Key
Super-Pro Net Key
Super-Pro XM /Super-Pro Net XM Keys
Standal-one/Driver mode (Super-Pro/Senti-nel Protec-tion Server/Service is not required)
Driver mode(SuperPro/Sen-tinel Pro-tection Server/Service is running)
Network mode(SuperPro/Sen-tinel Pro-tection Server/Service is required)
6.0 5.38
6.0 5.39 and above
6.1 5.39 and above
* Works as SuperPro/SuperPro Net Key
6.2 5.40 and above
* Works as SuperPro/SuperPro Net Key
6.3 5.41 and above
** Works as SuperPro/SuperPro Net Key
** ** **
6.4 7.1 and above
*** *** *** ***
6.5 7.4 and above
*** *** *** ***
388 Sentinel SuperPro 6.5 Developer’s Guide
Appendix A - Troubleshooting
* On local using 'NO-NET' mode on local machine user can take unlimited licenses with-out sublicensing From a remote sub-net machine only one network license available with no sublicenses
**The zero hard-limit keys are treated as one hard-limit key. In standalone mode user can run infinite number instances on his local machine.In network mode the license(s) limit is defined by the hard-limit of the key.In driver mode if the SuperPro/Sentinel Protection server/service is running on local machine then number of license(s) available in driver mode is defined by hard-limit of the key else it works similar to standalone mode. Also a single license is shared by n applications running in driver mode if server is running.
***The zero hard-limit keys are treated as one hard-limit key. In standalone mode user can run infinite number instances on his local machine.In network mode the license(s) limit is defined by the hard-limit of the key.In driver mode if the SuperPro/Sentinel Protection server/service is running on local machine then number of license(s) available in driver mode is defined by hard-limit of the key else it works similar to standalone mode. Also a single license is shared by n applications running in driver mode if server is running.The concept of license or sublicensing sharing affects the consumption of hard limit in driver and network mode.
Note: Applications that were protected using Sentinel SuperPro 6.0 can use 6.1 hardware keys only if version 5.39 of the Sentinel system driver is being used. In this case, 6.1 hardware keys are viewed by the protected applica-tion as stand-alone keys with a license limit of one.
Sentinel SuperPro 6.5 Developer’s Guide 389
Appendix A - Troubleshooting
Sentinel SuperPro Key Compatibility Issues
The information in this section will help you isolate and avoid compatibility problems that may occur with the Sentinel SuperPro key. This section does not attempt to address compatibility issues with specific models of comput-ers, printer, or other parallel or USB devices.
SafeNet Inc. expends great effort to ensure our products are compatible and transparent to printer operations. Parallel port devices should retain com-patibility with SafeNet Inc. products.
For the latest information about compatibility issues with specific devices, please contact SafeNet Inc. Technical Support.
Compatibility Requirements
The Sentinel SuperPro key operates on an IBM-compatible parallel port built to Centronics standards. The key is completely transparent, allowing nor-mal computer-printer communication.
The Sentinel SuperPro key’s circuitry inhibits the printer response on the BUSY line from returning to the computer while the key is responding to a command on the corresponding line. This prevents collisions on the response line caused by simultaneous use by the printer and the key. Once the key finishes processing the command, the printer’s response is unblocked and allowed to pass through to the computer.
The Sentinel SuperPro key meets the electrical parameters for the logic cir-cuits used in the IBM printer adapter card. If you encounter problems using the key with other equipment, compatibility problems may be the cause.
Incompatible Connectors
Some computers otherwise compatible with the IBM specification include a 36-pin Centronics-type connector on the motherboard, rather than the IBM-style DB-25 connector used with the Sentinel SuperPro key.
In this case, you need special printer cables to adapt the Sentinel SuperPro key to the computer or the printer.
390 Sentinel SuperPro 6.5 Developer’s Guide
Appendix A - Troubleshooting
Using Other Hardware Keys
If the Sentinel SuperPro key is installed on a port with other hardware keys, place the Sentinel SuperPro key at the end of the chain (closest to the printer).
Specific Hardware Problems
Because the Sentinel SuperPro key uses the IBM printer adapter as the design model for its hardware interface, it is compatible with the wide range of hardware adhering to the IBM standard for parallel interfaces. However, not all computers properly implement this standard.
For example, some computer parallel ports do not provide pull-up resistors to power the Sentinel SuperPro key. This is especially true with some laptop computers. Generally, if a printer is plugged in and powered on, it will pro-vide power.
Because the problems experienced with these systems are caused by use of a non-standard IBM parallel port, they can usually be corrected by replacing the parallel port with a truly IBM-compatible parallel port, or by adding a second, IBM-compatible printer adapter card.
About the USB Hardware Interface
SafeNet Inc. USB Sentinel SuperPro key conforms with the following specifications:
■ Microsoft plug-n-play
■ Universal Serial Bus
The Sentinel SuperPro USB key can be attached to any USB port and has been tested with hub ports, motherboard ports, and some plug-in USB ports.
Sentinel SuperPro 6.5 Developer’s Guide 391
Appendix A - Troubleshooting
392 Sentinel SuperPro 6.5 Developer’s Guide

Appendix BCompatible Compilers and Applications
This appendix provides a list of the compatible compilers and applications that can be used to develop applications to be protected with Sentinel Super-Pro 6.5.
This list applies only to applications being protected with the automatic (shelled) protection option.
Applications developed with these and many other languages can always be protected using integrated protection.:
File Types/Compilers Supported by Shell
Compiler/Tool Version Executable DLLs
Visual C++ 5.0, 6.0, 7.0, 7.1, 8.0 Yes Yes
Visual Basic 5.0, 6.0 Yes No
Visual FoxPro 5.0, 6.0, 7.0, 8.0, 9.0 Yes NA
Borland C++ Builder 6.0, v2006 Yes Yes
Borland Delphi 7.0, v2006 Yes Yes
Power Builder 6.0, 7.0, 8.0, 9.0, 10.0, 10.5 Yes NA
Director 5.0, 6.0, 8.0, 8.5, 9.0, 10.1, MX 2004
Yes NA
“Sentinel SuperPro 6.5 Developer’s Guide” 393
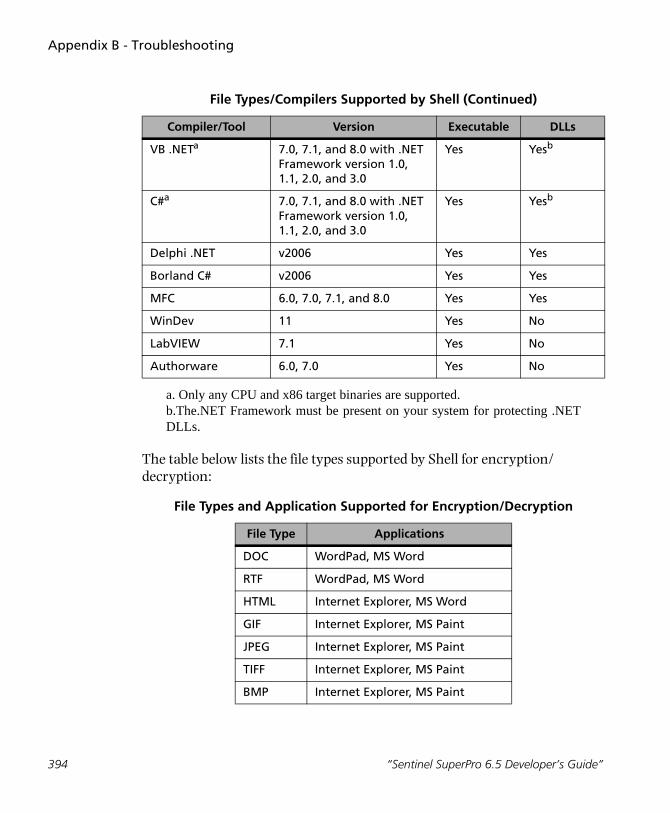
Appendix B - Troubleshooting
VB .NETa 7.0, 7.1, and 8.0 with .NET Framework version 1.0, 1.1, 2.0, and 3.0
Yes Yesb
C#a 7.0, 7.1, and 8.0 with .NET Framework version 1.0, 1.1, 2.0, and 3.0
Yes Yesb
Delphi .NET v2006 Yes Yes
Borland C# v2006 Yes Yes
MFC 6.0, 7.0, 7.1, and 8.0 Yes Yes
WinDev 11 Yes No
LabVIEW 7.1 Yes No
Authorware 6.0, 7.0 Yes No
a. Only any CPU and x86 target binaries are supported.b.The.NET Framework must be present on your system for protecting .NETDLLs.
The table below lists the file types supported by Shell for encryption/decryption:
File Types and Application Supported for Encryption/Decryption
File Type Applications
DOC WordPad, MS Word
RTF WordPad, MS Word
HTML Internet Explorer, MS Word
GIF Internet Explorer, MS Paint
JPEG Internet Explorer, MS Paint
TIFF Internet Explorer, MS Paint
BMP Internet Explorer, MS Paint
File Types/Compilers Supported by Shell (Continued)
Compiler/Tool Version Executable DLLs
394 “Sentinel SuperPro 6.5 Developer’s Guide”
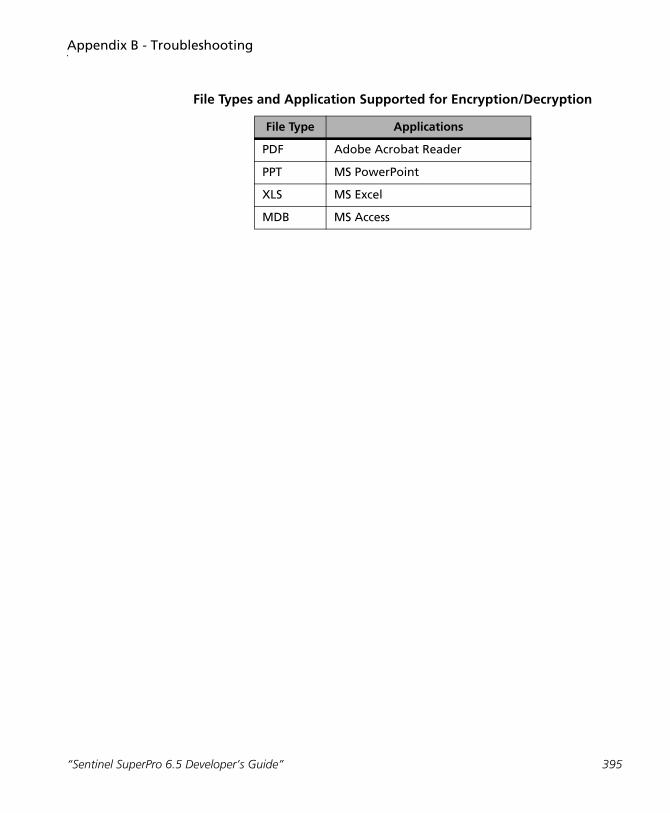
Appendix B - Troubleshooting
PDF Adobe Acrobat Reader
PPT MS PowerPoint
XLS MS Excel
MDB MS Access
File Types and Application Supported for Encryption/Decryption
File Type Applications
“Sentinel SuperPro 6.5 Developer’s Guide” 395
Appendix B - Troubleshooting
396 “Sentinel SuperPro 6.5 Developer’s Guide”
Appendix CUsing the Command Line Shell Utility
Note: This appendix is meant for Windows users ONLY. If you are a Windows user, refer to other appendices of the Developer’s Guide.
If you want to protect your application while you are still developing it, you can use the Shell utility to easily “shell” your application after each build. This utility is command line-based.
To use the Shell utility to add automatic (“shelled”) protection to your appli-cation during the build process, add a batch file that calls an existing Sentinel SuperPro project. The automatic protection options you set up and saved in the SSP Toolkit are then used to shell your application during the build process.
Note: A Sentinel SuperPro project file (*.spp) that defines the automatic (“shelled”) protection options for the application(s) you want to shell must exist before you can use the Shell util-ity. For more information about setting up automatic protection, see Chapter 6, “Protecting Your Application,” on page 145.
Sentinel SuperPro 6.5 Developer’s Guide 397

Appendix C - Using the Command Line Shell Utility
In previous versions of the SentinelShell command line, you could specify shell protection options, such as adding execution control or identifying files for encryption. In this version, there are no design-related command line options; all design options must be set up in the SSP Toolkit and saved to a project file. See “Using Automatic Protection” on page 157 for instructions.
Command Line Syntax
The syntax for shelling an application from the command line is:
ShellUtil ProjectFile [App 1] [App 2]...[App N]
where:
• ShellUtil is the name of the command line shell utility
• Project File is the name of the Sentinel SuperPro project file (*.spp) you designed the application’s protection strategy in.
• [App 1] is the name of the application you want to shell, as it was specified in the Sentinel SuperPro project.
More than one application may be shelled with the same command See “Using the Shell Utility” on page 387 for more information.
398 Sentinel SuperPro 6.5 Developer’s Guide
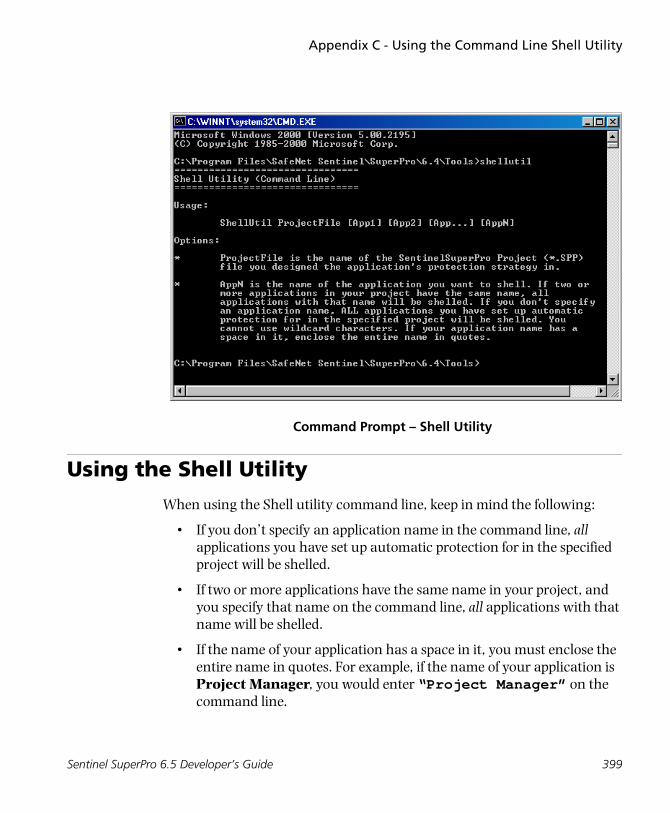
Appendix C - Using the Command Line Shell Utility
Command Prompt – Shell Utility
Using the Shell Utility
When using the Shell utility command line, keep in mind the following:
• If you don’t specify an application name in the command line, all applications you have set up automatic protection for in the specified project will be shelled.
• If two or more applications have the same name in your project, and you specify that name on the command line, all applications with that name will be shelled.
• If the name of your application has a space in it, you must enclose the entire name in quotes. For example, if the name of your application is Project Manager, you would enter “Project Manager” on the command line.
Sentinel SuperPro 6.5 Developer’s Guide 399
Appendix C - Using the Command Line Shell Utility
• You cannot use wildcard characters.
• If using the command line in a build process, shelling an application is a post-build step that should occur after the link stage.
Note: To use the Shell Utility, you need to program an active shell algorithm(s) based key using the Toolkit.
Example
The following example shows how to use the Shell utility to apply automatic protection to one or more applications.
Assume you have a Sentinel SuperPro project file named MyApps.spp. In this project, you added three applications—ShapeEditor, SceneryEditor and TextEditor.
You designed your protection strategy to use integrated protection for Shap-eEditor, and automatic protection for SceneryEditor and TextEditor.
To shell SceneryEditor and/or TextEditor using the command line:
1. Open a command prompt and navigate to the directory where the ShellUtil.exe is located.
In our example, we navigated to:
C:\SentinelSuperPro6\
2. Enter the shell command, specifying the Sentinel SuperPro project name (including the file extension) and the name of the application(s) you want to shell.
In our example, we wanted to shell only the SceneryEditor application, so we entered:
ShellUtil MyApps.spp SceneryEditor
If we had entered:
400 Sentinel SuperPro 6.5 Developer’s Guide

Appendix C - Using the Command Line Shell Utility
ShellUtil MyApps.spp
both SceneryEditor and TextEditor would have been shelled. This is because we did not specify an application name, so all applications in the project defined as having automatic protection would have been shelled.
In both cases, ShapeEditor would not be shelled because it was defined as having integrated protection and is thus ignored by the Shell utility.
3. Press Enter. The applications are shelled via the command line.
Sentinel SuperPro 6.5 Developer’s Guide 401
Appendix C - Using the Command Line Shell Utility
402 Sentinel SuperPro 6.5 Developer’s Guide
Index
Symbols
.NET Enhancement 9, 169
.spp) 367
A
About command 126About Shell Protection 7About stage 123access codes
cells, viewing 132description 25, 26, 419in field activation com-
mands 228Access function parameter
128access modes
default 103, 146definition 419description 103dual mode 103, 107network mode 103, 106setting 103, 105stand-alone mode 103, 106
access, stepped 93accessing
projects 136
actions, field activationadding 223default 207description 221–222, 419removing 224selecting 276testing 230
Activate Algo PW command 227, 229
activatingapplications 69, 81, 269keys 266See also field activation
activation counteradding update command
222description 65, 70, 229updating 70, 279
Activation Password (AP) 29Activation Password function
parameter 128activation passwords
algorithms 79, 91description 29, 64–65, 420querying 91trusted activation type 156using 79, 94
utility for 81, 249with demo applications 96
activation status 238activation types
active 63, 420changing algorithm values
153default activation actions
207demo applications 147description 63, 420distributed 65, 68selecting 155, 174static 63, 431trusted 65, 68, 156, 432
Activation Wizard 156, 271, 272
activeactivation type 420algorithms 23, 28, 35, 191applications 63, 420
Active Algorithm (AA) 28active/inactive bit 23, 35, 82,
420adding
actions 223algorithms 188–192
Sentinel SuperPro 6.5 Developer’s Guide 403
Index
API functions to source code 211–214
commands 225counters 193–194custom elements 188–200data words 195–197demo counter 154field activation
actions 223commands 225
protection to applications 211
sublicenses 198Address function parameter
128addresses
algorithms 37–47cell 20cell types
Activation Password (AP) 30
Active Algorithm (AA) 28
Algorithm Counter Word (CA) 31
Algorithm Half (AH) 29Counter Word (CW) 32Data Word (DW) 33Developer ID (DI) 32Inactive Algorithm (IA)
34Locked Data Word (DL)
33Serial Number (SN) 35Undefined (**) 28
description 420selecting 37, 151
advancedencryption techniques 90
protection techniques 85–94
security settings 167ainst.exe 272Algorithm Counter Word
(CW) 30Algorithm Half (AH) 28algorithms
activation passwords 80, 91
active 23, 35, 191adding 188addresses, valid 37–47custom elements 186–192default values 152, 159description 23, 420enhanced engine 35, 37,
191inactive 35–37, 191overriding values 152, 159querying 134using to encrypt data 77–
79values 35, 155with counters 43–47, 96with password 39, 47
anti-debugging protection 8, 169
anti-disassembling protection 8, 169
anti-dumping 8anti-reverse engineering 8API Explorer
description 122, 127, 421evaluating functions 213–
214invoking functions 128
API function calls 5API functions
adding to source code 211–214
evaluating 213–214in integrated protection 61invoking 128, 133parameters 128pseudocode 207status codes 352–356
API, SuperPro 16, 301–351, 421
APIPACKET 301application protection
deleting 178description 146editing 177See also automatic protec-
tionSee also integrated protec-
tiontesting 219testing on network 219
applicationsactivating 69, 81, 269activation status 238active 63, 64, 420adding protection to 210applying shell to 215calls to key 3compatible with automatic
protection 393compiling 231demo
activation types 71, 148controlling 30, 94–98description 11, 63protecting 146–148upgrading from 66, 68
FoxPro, protecting 382in command-line shell utili-
404 Sentinel SuperPro 6.5 Developer’s Guide
Index
ty 399inactive 63–71, 81interpreted-language 381linking 231metered 237, 244, 286multi-file, protecting 380number per key 12, 99–100protecting multiple 177protection methods for 5,
76, 147–148serial numbers, storing 92shipping
to customers 248to distributors 260
with starter programs 383arrays, condition 93assembly language techniques
92attributes
cells 22–26input file 381
automatic protectionaccess mode, default 146activation type 65adding shell to executable
215command-line version
397–401compatible compilers 393customizing error messages
176description 6, 61, 146, 422overriding default algo-
rithm values 159selecting
cell address 158demo options 163–166executable file 160–163execution control 165
expiration date 165files for encryption 170–
173input/output files 160–
163time control 166
using 157–178when to use 62, 73
B
Back button 124background checking 166bases, converting between
130–131benefits 10binary values, converting
130–131Bit Mask AND command 227,
229Bit Mask OR command 227,
229Boolean operators 86broadcast messages 104, 107buttons, navigation 124
C
cables, using with keys 53, 236, 243
calls, hiding 92Cancelling a License 361cascading keys 54, 242cell types
Activation Password (AP) 37
Active Algorithm (AA) 28address restrictions 26–27,
34–37Algorithm Counter Word
(CA) 30
Algorithm Half (AH) 28Counter Word (CW) 31Data Word (DW) 33description 25, 26–27, 422Developer ID (DI) 32groups of 38–49Inactive Algorithm (IA) 33Locked Data Word (DL) 32Serial Number (SN) 34Undefined (**) 27
cell values 35, 132, 422cells
access codes 25, 132addresses 20cell types 26–27description 20, 422locations, selecting 151,
157programmable 20, 24, 205prototyping 207reserved 20–24, 205undefined 27unused 239, 246, 288values 35, 132, 422viewing 132write limit 378
changingapplication protection 177,
208custom elements 200, 208developer ID 138passwords 138, 142
Check terminal client 9, 168clearing unused cells 239,
246, 288Client Activator
customer use of 266, 269, 279
deploying 272
Sentinel SuperPro 6.5 Developer’s Guide 405
Index
description 221, 271, 423requirements 272shipping
to customers 248to distributors 260
using 156, 271–273closing the Toolkit 144code
adding API functions to 211–215
Combo Installer for Linux 362command-line shell utility
description 397syntax 398using 399–401
commandsdescription 229field activation
adding 225default 207description 221, 423randomizing order of 276removing 228testing 230
menu 126compatibility
key 390SentinelSuperPro 388
compilers, compatible 393compiling applications 231components, SentinelSuper-
Pro 13, 14concurrent access 110conditional access 93connecting keys
for distributor program-ming 242
for product key program-ming 235
contact server 103, 107context-sensitive help 127controlling demos 94converting values between
bases 130–131Counter Word (CW) 31counters
activation 65, 70, 229adding 193custom elements 187decrementing 95description 23, 423moving 203querying 99time or execution control
163using 30–31, 94–99, 147–
148values, entering 191with algorithms 45–47, 96
counting executions 94creating projects 136custom elements
addingalgorithms 188–192counters 193–194data words 198–200
algorithmsadding 188–192description 186valid locations 39with counter 43with password 41with password and
counter 47with password and two
counters 49with two counters 45
counters
adding 193–194description 187
data wordsdescription 187
deleting 200description 37, 145, 185editing 200, 208rearranging on key 201–
203sublicenses
adding 111, 198description 187
types 186when to use 186–187
customersreceiving locking code from
274role in field activation 274sending license code to 277shipping applications to
248using Client Activator 266
customizederror messages 176protection 73
D
DAT filesimporting 137
dataencrypting with algorithms
77–79garbage 93inserting extra 92stored, reading 76
Data Protection driverfiles 258installing 258–259shipping
406 Sentinel SuperPro 6.5 Developer’s Guide
Index
to customers 249to distributors 261
Data Word (DW) 33data words
adding 198–200description 23, 423expiration date 165using 91
data, returned 75dates, expiration 165debuggers, obstructing 94decentralizing locks 76decimal, converting values
130–131Decrement Counter command
227, 229Decrement Counter to Zero
command 227, 229decrementing counters 95decrypting files 170, 258decryption 423default
access mode 103, 146actions/commands 207algorithm values 152, 159password values 156
deletingactions 224application protection ele-
ments 178, 207, 208custom elements 200, 208field activation
actions 224commands 228
project passwords 143demo applications
activation types 68, 147controlling 30, 94–98description 11, 63, 423
licenses for 95limiting executions 97protecting 146–147upgrading from 66, 69
demo counter, adding 154demo options
automatic protection 163–166
execution control 165expiration date 165time control 166
deploying Client Activator 272
Design stage 122, 123, 424developer ID 232
cell type 32changing 138description 114, 424entering 114–115incorrect 115keys 24, 54
developer product identifier 56Developer’s Toolkit
See SentinelSuperPro Tool-kit
development languages, com-patible 393
distributed activation typeadding update command for
222demo applications 71description 65example 68selecting 155, 174
distributor keysactivation counter 65, 70description 15, 65, 261metering options 245programming 242–246,
286updating 70, 279
distributorsactivating applications 69,
269command for updating key
222creating project files for 143responsibilities 269shipping to 260–262
DLLsencrypting at shell time 170field exchange 115, 118protecting 380
documentationshipping 262
driversData Protection 258–259definition 424installing 249, 258–259packet record 301shipping 249, 261system 3, 249, 258uninstalling 375
dsafe32.dll 118, 261dsafedll.dll 261DST files 143, 222dual mode
definition 424description 103finding key in 107
E
editingapplication protection ele-
ments 177, 208custom elements 200, 208
Element Definition Wizard 122, 149
Sentinel SuperPro 6.5 Developer’s Guide 407
Index
Element Layout View 38, 122, 202
Element List View 122elements
application protection 177custom 186–203description 37, 425editing 200naming 149rearranging on key 201selecting addresses for 37,
151encrypting
data 77–78encryption
definition 425seeds
entering 173returned values as 86using 89–90
selecting files for 170–173techniques 85–90
encryption seeddefinition 425
encryption seedsentering 173multiplying by 90using 86, 89–90
encryption techniques 90enhanced algorithm engine
35entering
activation passwords, utili-ty for 81
counter values 191developer ID 115–119, 139licence code 299locking code 275passwords
key 114project 140values 192
environment variable 105error messages 176error-checking 60errors
licensing 109programming 240, 246
evaluatingAPI functions 213–214responses 76
EXCLUSIVE OR operator 86EXE files
protecting multiple 380See also Automatic Protec-
tionexecutable file, selecting 160–
163execution control 163–165executions
counting 94limiting 97
Exit command 126exiting the Toolkit 144expiration date 165exporting to .DST file 143
F
featurescontrolling access to 93SentinelSuperPro 10
field activationactions
adding 223default 207, 223description 221, 223removing 224selecting 276
commandsaccess codes in 227Activate Algo PW 227Bit Mask AND 227Bit Mask OR 227Decrement Counter to
Zero 227default 207, 223description 221Increment Cell 227removing 228Write Cell 227
customer actions 266customer role in 274default actions/commands
207, 222description 11, 265, 266,
425developer actions 266testing 230testing actions/commands
230use of passwords 11
field exchangedescription 11, 425See also field activation
field exchange DLLs 115, 118Field Exchange Utility
customer use of 266, 269, 279
description 65, 221, 281, 295
entering license code 299generating locking code
298installing 295opening 297required files 295shipping 248, 260
408 Sentinel SuperPro 6.5 Developer’s Guide
Index
updating key 299when to use 295
File menu 126files
DAT 137Data Protection driver 259decrypting 170, 258dsafe32.dll 118, 261dsafedll.dll 261DST 143, 222encrypting at shell time
removing 173selecting 170–173
executable, selecting 160fieldexchutil.chm 248hhactivex.dll 249hhupd.exe 249HTML Help support 249input/output 160–162instdrvr.c 259instdrvr.exe 259lang_enu.dll 283licensegen.log 276lockingcode.loc 274log 276makedll.dll 283NetSentinel 138required
for Field Exchange Utility 296
for License Generator Utility 290
for Make Keys Utility 283saving license code to 277sentdata.vxd 259sp_gXX.dll 283spcommon.dll 283usafe32.dll 118, 248, 260,
283
forgotten passwords 141form-factors, keys 52FoxPro 382functions, API
See API Functions
G
garbage data, using 93generating
license code 274, 292locking code 298pseudocode protection plan
207query/response pairs 207random values 130, 131
Getting Started 362groups, cell types 38–49guidelines
for protection 74shipping keys 263
H
handling keys 57, 263hard limit 15, 426hardware interfaces
USB 391hardware keys
activating 266cables 53cables for 236, 243cascading 54, 242cell layout 20communicating with 54communication 3, 83compatibility issues 390connecting 52–54, 235,
242creating prototype 207description 14, 19, 426
developer ID 24, 54distributor 15, 65, 70, 242–
246, 261, 279finding 106form-factors 52handling 58, 263hard limit 15installing 52, 84installing on server 84invalid responses 60, 83license code 268locating 106locking codes 267master 207memory 16, 20, 23missing 82–83multiple 13multiple applications on 12,
99, 100NetSentinel 54network 15, 52, 235ordering 56packaging 58, 263parallel port 52–54passwords 11, 114, 138preventing access to 14product 15programming 25, 99, 233–
241, 242–246querying frequently 74rearranging elements on
201response generation 3returning 57serial number 24, 34shipping
guidelines 263to customers 249, 261to distributors 260
Sentinel SuperPro 6.5 Developer’s Guide 409
Index
stand-alone 15, 52, 57, 235testing 241troubleshooting 391updated by distributors 269updating 11, 266, 279, 300USB 52, 55viewing cells on 132
heartbeat messagesdescription 74sending 109
Help menu 126help, context-sensitive 127hexadecimal 130–131hhactivex.dll 249hhupd.exe 249hidden word 426Hide import symbols 8, 168hiding calls 92hiding software locks 85Home stage 122hotplugging 84How? tab 127HTML Help
support files 249
I
identifying network keys 52Implementation Stage 426Implementation stage 122,
124implementing strategy 206importing DAT files 137inactive
algorithms 35–37, 191application
activation example 81description 427
applicationsdefault actions/com-
mands 222description 63–65
Inactive Algorithm (IA) 33incorrect passwords 115Increment Counter command
227, 229Increment Distributor Counter
command 227, 229incrementing activation
counter 222, 279Index command 126input files
attributes 381selecting 160–163
inserting extra data 92installation
Data Protection driver 259repairing 376
installingData Protection driver 258–
259Field Exchange Utility 295–
296hardware key 52keys on server 84License Generator Utility
290Make Keys Utility 282SentinelSuperPro Server
250on Windows 2000 256on Windows NT 256Windows 9x 254
system driver 249system drivers 249
instdrvr.c 258instdrvr.exe 258integrated protection
activation types 63
API functions 61demo counter 154description 5, 61, 146, 427overriding default algo-
rithm values 152selecting 155selecting cell location 151using 151–156when used 61
interfacesUSB 391
interpreted-language applica-tions 381
invalid responses 60, 83invoking API functions 128,
133
J
J++ 382Java applets 382
K
Key ID string 267keys
See Hardware Keyskeys on server 52
L
Lahey F90 Fortran 382lang_enu.dll 282languages, compatible 393license code
copying 277definition 427description 268entering 299generated by distributors
269generating 274, 292
410 Sentinel SuperPro 6.5 Developer’s Guide
Index
one-time update option 119preventing multiple use of
119saving to file 277sending to customers 277
License Generator Utilitydescription 67, 281, 290generating license code
with 292installing 290opening 291required files 290shipping 261
license ID 109license limit 4, 12, 72, 108licensegen.log 276licenses
adding to distributor key 222
definition 427description 72enforcement 12errors 109for demos 95hard limit 15, 426heartbeat messages 74, 109maintaining 109obtaining 4, 108releasing 110
limited metering option 245limits, cell write 378linking applications 231loading license code 276loadserv.exe 254locating keys 106Locked Data Word (DL) 32locked projects
changing passwords 142opening 140
locked word 427locking a project 140–141locking code
copying 298description 267, 427entering 275generating 298loading from file 275pasting 275receiving 274saving to file 298
lockingcode.loc 274locks
See software lockslog file
license codes 276server 109
M
machine code 91maintaining licenses 109Make Keys stage 123, 124,
237, 244, 428Make Keys Utility
description 233, 281installing 282opening 282programming distributor
keys 286–289programming product keys
284–285required files 283viewing statistics in 289
makedll.dll 282manipulating returned data
75manufacturing code 56master key 207meaningless locks 76
memory used 176Memory View 232memory, key 20MemView
description 132invoking API functions 133using 132–133verifying prototype with
209menu commands 126merge modules
description 249server installation 252using 252
merging DAT files 138messages
broadcast 104, 107error 176heartbeat
description 74sending 109
metered applications 237, 244, 286
metering options, distributor key 245
methods, protection 76, 146–148
Migrating from Older Versions of Sentinel Keys 357
missing hardware keys 82–83MOD 38modes, access
See access modesMonitoring Tool
description 428moving
counters 203from stage to stage 124
multi-file applications 380
Sentinel SuperPro 6.5 Developer’s Guide 411
Index
multi-layering 8, 168multiple
applicationson one key 100protecting 12, 177
DLLs, protecting 380EXE files, protecting 380hardware keys, connecting
54
N
namesapplications 399element 149project, viewing 140
navigation 121–127navigation buttons 124navigation pane 124NetSentinel
keys 54opening files from 138
networkaccess 13applications
demos 95licenses 72protection types 146
keysdefinition 428description 15, 57identifying 52selecting for program-
ming 235licensing 72obtaining license on 4software locks on 4testing protection on 219
network modeadvantages of 104
definition 428description 103finding key in 106setting 103
newproject 136
New command 126Next button 124no-net 103NSP_HOST - Linux 370NSP_HOST variable
description 105using 104
Numeric Assistant 130–131
O
obstructing debuggers 94obtaining
licenses 4, 108list of servers 107sublicenses 111
one-time update optiondescription 119moving element 202results of 278
online help 127Open command 126opening
Field Exchange Utility 297License Generator Utility
291locked projects 140Make Keys Utility 282NetSentinel files 138project 139SentinelSuperPro Toolkit
114ordering keys 56orientation pane 126
output filesoverwriting existing 162selecting 160–162
overloading 76overriding
default algorithm values 152
default password values 156
Overview stage 122, 123, 127, 429
overwrite passwordsdescription 11, 114, 429entering 116in field exchange DLLs 118,
226overwriting
cells on prototype key 207existing encrypted files at
shell time 173existing output files 162
P
packaging keys 58, 263packet record 301parallel port
devices 53hardware keys 52–54
parameters, API function 128passwords 232
activationalgorithms, used as 91querying 91trusted activation type
156using 79, 94utility for 81, 249with demo applications
95
412 Sentinel SuperPro 6.5 Developer’s Guide
Index
changingkey 138project 142
description 11entering 140
key 114project 140values for 192
incorrect 116key
changing 138entering 114
overwrite 11, 114–116, 429
projectforgotten 141removing 142
values 192viewing characters 116with algorithms 41, 47write 11, 114, 432
pasting locking code 275PCI parallel port- Configuring
(Linux) 369percentages, sublicensing 110product keys 15programmable cells 20, 24,
205programming keys
cascading 55, 235, 242connecting keys for 235,
242description 25distributor 242, 244, 286errors 240, 246hardware keys 99, 234–
246manufacturing department
role 282
overriding activation status 238
product 235–241removing key during 235,
242starting 237, 244statistics 240testing 241troubleshooting 384unused cells 239, 246, 288using Make Keys Utility
284–289Project stage 122, 123, 429projects
adding passwords to 140creating new 136description 136, 429for distributors 143importing DAT file 137locking 140–142name 140new 136opening existing 139passwords, forgotten 141providing access to 136saving 140unlocking 142
protected application 248protection
adding to application 210application 6, 146–148,
220automatic 6, 7, 157–177customized 73guidelines for 74integrated 5, 146–148,
151–156of multiple applications 12password, for project 140
quick 73techniques
advanced 85assembly language 92commonly used 76encrypting data 77encryption 85–94hiding calls 92obstructing debuggers
94querying activation pass-
words 91reading stored data 76returned values as vari-
ables 85using activation pass-
words 79, 94using data words 91using stepped access 93
protection plan, pseudocodedescription 211–212generating 207
protection strategy 59, 73protection types
automaticdescription 5, 61using 157–163when to use 73
description 5, 61integrated
description 5, 61using 151–156when to use 61
selecting 149shelled 61
prototypecreating 208description 207
Prototype stage 122, 123,
Sentinel SuperPro 6.5 Developer’s Guide 413
Index
208, 429prototyping
functions 207starting 208verifying programming 209
pseudocodedescription 430generating 207viewing 211with custom elements 185
pseudo-random numbers 90pthread system library 368
Q
queryAPI function 332data 3, 430description 430responses to 76sending 74string length 78
Query Data function parame-ter 129
Query Response Generator 134–135
query/response pairsgenerating 207in pseudocode 212
queryingactivation passwords 91algorithms 134counters 99hardware keys 75
quitting the Toolkit 144
R
randomvalues, generating 130,
131
randomizingfield activation commands
276unused cells 239, 246, 288
RB_SPRO_APIPACKET 301reading stored data 76rearranging elements on key
201receiving locking code 274regulations, export xxiiireleasing licenses 13, 110removing
actions 224application protection ele-
ments 177, 207, 208commands 228custom elements 200, 207,
208files to be encrypted at shell
time 173project passwords 142
repairing the install 376required files
Field Exchange Utility 296License Generator Utility
290Make Keys Utility 283
required stages 124requirements
Client Activator 272key compatibility 388, 390
reserved cells 20–24, 205resetting statistics 240response string 430response values
description 76, 99, 135invalid 60, 83
restricted cells 11, 20–24returned data, manipulating
75returned values
as encryption seeds 86description 76evaluating 76See also response valuesusing as variables 85
returning keys 57RMA, obtaining 57RNBOsproActivate 80, 82,
305RNBOsproCheckTerminalSer-
vice 346RNBOsproDecrement 30, 31,
81, 98, 307RNBOsproEnumServer 107,
310RNBOsproExtendedRead 313RNBOsproFindFirstUnit 82,
315RNBOsproFindNextUnit 316RNBOsproFormatPacket 130,
317RNBOsproGetContactServer
313, 319, 321, 325RNBOsproGetFullStatus 319RNBOsproGetHardLimit 320RNBOsproGetKeyInfo 321RNBOsproGetSubLicense 111,
325RNBOsproGetVersion 326RNBOsproInitialize 130, 329RNBOsproOverWrite 330RNBOsproQuery 28, 33, 81,
85, 91, 98, 99, 332RNBOsproRead 335RNBOsproReleaseLicense
110, 337RNBOsproSetContactServer
414 Sentinel SuperPro 6.5 Developer’s Guide
Index
103, 339RNBOsproWrite 350
S
SAFE 265Save As command 126Save command 126saving
license code to file 277, 298project 140
scattering code 75seeds, encryption 86, 89, 173selecting
activation type 155, 174demo options 163field activation actions 276files for encryption 170–
173input/output files 160protection type 149
sendinglicense code to customer
277queries 74
sentdata.vxd 258Sentinel driver
See system driverSentinel Query Response Gen-
erator 134–135Sentinel system driver
See system driverSentinelSuperPro
API 16, 421benefits 10compatibility 388components 13, 14features 10–13package contents 13software protection 3
SentinelSuperPro APIdescription 301invoking functions 128,
133status codes 352–356Win-32 301–351
SentinelSuperPro ToolkitSee Toolkit
SentinelWizard 137Serial Number (SN) 34serial numbers
application, storing 92for keys 24range of 24, 34
server, SentinelSuperProcontact 103, 106contacting 107definition 430description 17executable files 254installing 250licenses on 108log file 109maintaining license count
109obtaining list of 107responding to broadcast
107updating keys on 299
setting access modes 103–106shell
applying to application 215description 6, 62, 146, 430error messages 176
Shell SDK module 8shell utility, command-line
397–401Shell, feature
files supported 180
shelling applicationsSee Automatic Protection
shippingapplications
to customers 248to distributors 260–262
Client Activator 248, 260documentation 261drivers 261Field Exchange Utility 248hardware keys 261, 263keys 58, 248License Generator Utility
261Make Keys Utility 261
Show Passwords check box 116
skipping unused cells 239, 246, 288
SmartHeap 382software locks
decentralizing 76description 3, 5, 431hiding 85in automatic protection 62in integrated protection 61,
146meaningless 76on network 4placement in code 75steps 75variations 10, 205
software protection 3software version, viewing 126source code
adding API functions to 214
examples 211sp_gXX.dll 282
Sentinel SuperPro 6.5 Developer’s Guide 415
Index
spcommon.dll 282spnsrv9x.exe 254spnsrvnt.exe 254stage window 122stages
About 123description 122Design 122Home 122Implementation 122Make Keys 123moving from 124Overview 122Project 122Prototype 122required 124
stand-aloneaccess 13applications
demos 95licenses 72protection types 146
keys 57definition 431description 15selecting for program-
ming 235stand-alone mode
definition 431description 103finding key in 106setting 103
stand-alone utilitiesSee utilities
starter programs 383static activation type 63, 71,
431statistics
programming 240, 289
status codes, API 352–356stepped access 93stored data, reading 76storing serial numbers 92strategy
creating prototype for 207implementing 206
sublicense limits 111sublicenses
adding 111, 198cell type used for 32custom element type 187definition 431obtaining 111
sublicensingdescription 12, 72heartbeat messages 111percentages 110usage example 110uses for 110
subroutines, assembly lan-guage 92
SuperPro API 16, 301–351SuperPro server - Unload 369SuperProNetServers.msm 252syntax, command-line shell
utility 398system driver
installing 249shipping 249, 261uninstalling 375
T
techniques, protection 76–94testing
application protection 219field activation actions/
commands 230programmed keys 241
threaded local storage 63, 382time control
counter values 163description 166
time-out 13Toolkit
closing 144navigating in 121opening 114uninstalling 374
trial versionsSee demo applications
troubleshootingapplication activation 386cannot update keys in field
118deleted element still visible
in MemView 207distributor can’t generate li-
cense codes 386encrypting more than 50
files at shell time 379hardware problems 391key programming 384repairing installation 376server not running message
385update process unsuccessful
299trusted activation type
description 65, 71, 432example 65overriding default password
values 156querying activation pass-
words 91
U
unauthorized access 14
416 Sentinel SuperPro 6.5 Developer’s Guide
Index
Undefined (**) 27uninstalling
SentinelSuperPro 374system driver 375
unlimited metering option 245
unlocking project 142untitled.spp 137unused cells 239, 246, 288Update Key string 268update, one-time 119, 202,
278updating
activation counters 279distributor keys 70, 279keys
description 11, 266on server 299randomizing commands
276selecting actions for 276using Field Exchange
Utility 299Usafe32.dll 363usafe32.dll 118, 248, 260,
295USB 391, 432USB hardware key 52, 55USB ports 55user data
custom elements 187description 10, 205
utilitiesactivation password 80, 81,
249command-line shell 397–
401Field Exchange 295–300License Generator 290–294
Make Keys 282–289stand-alone 281–300
V
valid addresses 49Value function parameter 129values
algorithm 35, 153algorithm, default 152, 159cells 35, 132, 422converting between bases
130–131counter
entering 191for time controls 163
NSP_HOST variable 105passwords 192query 135random 130–131responses 76, 99, 135returned
as encryption seeds 86as variables 85
variable, NSP_HOST 104, 105variables, returned values as
85verifying
prototype 209viewing
cells on key 132password characters 116programming statistics
240, 289project name 140pseudocode 211software version 126
W
Web site, Technical Support
xxiWhat to Send to Customer -
Linux 363What? tab 127What’s This? help 127Why? tab 127Win-32 API functions 351Windows 2000
installing server on 256Windows 9x
installing server on 254Windows Installer
description 249using merge modules 252
Windows NTinstalling
server on 256Windows Vista 249words
algorithms 23counter 23data 23, 91description 20, 35, 432types 23
Write Cell command 227, 229write password
description 11, 114, 432entering 116
writing to cells, limitations 378
X
XOR operator 86, 89, 90
Sentinel SuperPro 6.5 Developer’s Guide 417

Index
418 Sentinel SuperPro 6.5 Developer’s Guide
Appendix DGlossary
A
access code
An attribute that identifies the accessibility and functionality of a cell. Possi-ble values are:
0 read/write data word
1 read-only (locked) data word
2 counter
3 algorithm/hidden
7 algorithm/hidden/AES
See also locked word, hidden word, data word, counter, algorithm.
access mode
Access modes determine where your application will look for the appropri-ate hardware key. There are three access modes that can be used by your protected application: stand-alone, network and dual. See also network mode, dual mode, stand-alone mode.
action A group of one or more field activation commands. See also field activa-tion, command.
Sentinel SuperPro 6.5 Developer’s Guide 419
Appendix D - Glossary
activation password
A two-word value that can be used to activate an inactive algorithm. The password is programmed into the two cells immediately following the algo-rithm. You give your users the password and a utility with which to enter it.
Activation passwords use access code 3. They are called hidden words because their values cannot be read by your application. See also access code, algorithm, hidden word.
activation type
Protection provided by Sentinel SuperPro that allows for various methods of customer activation of program modules. Possible activation types are active, static and trusted. See also active activation type, static activation type, trusted activation type.
active/inactive bit
A bit in an algorithm’s second word that controls whether or not the algo-rithm will respond correctly to a query. An algorithm must be active to respond to a query. See also algorithm, query.
active activation type
Method of activation provided by Sentinel SuperPro where the application is always active. It does not need an activation password (no activation is necessary).
See also activation type, activation password.
active An application that is ready to run when shipped to your customer. It will always remain active, as long as the hardware key is attached.SuperPro XM keys provide an additional algorithm engine that uses indus-try standard AES (Advanced Encryption Standard) encryption to generate unique query responses.
address The memory used to identify a specific cell. See also cell.
algorithm An element containing a bit pattern that defines how the hardware key should encrypt query data sent by your application. The key uses an algo-rithm to encrypt the query data and then return a value to your application. You design your application to send queries to the key and then evaluate and act upon the responses.
application
420 Sentinel SuperPro 6.5 Developer’s Guide
Appendix D - Glossary
Algorithms can be active or inactive. Only active algorithms can return a valid response to a query. The active/inactive bit in the cell value controls whether or not the algorithm is active.
All algorithms are two words (and thus, two cells) long, and may have acti-vation passwords and counters associated with them.
See also query data, active/inactive bit, query, response value.
anti-debugging protection
The Shell is capable of detecting the debuggers, like SoftICE and OllyDbg. It can also provide reasonable protection against break-points targeted at important functions. You can choose to deny application execution in the presence of debuggers. The protected application will exit if a debugger is detected on a system. Non-malicious users will close the debugger and start the application again. Otherwise, you may even allow your application to run in the presence of debuggers.
anti-disassembling protection
A Shell-protected application is difficult to disassemble due to the use of expert techniques, like Maze technology and dummy macros.
anti-dumping protection
Shell provides protection against a memory dump of the protected applica-tion. You need to select the Hide import symbols check box to enable this added protection.
API Application Program Interface. The set of client interface routines your application uses to communicate with the Sentinel system driver, which in turn communicates with the hardware key. See also driver.
API Explorer
Allows you to experiment with API function calls on various cells in the key before you add them to your source code. It is also a good way to familiarize yourself with the available functions and their uses prior to designing your strategy.
Sentinel SuperPro 6.5 Developer’s Guide 421
Appendix D - Glossary
anti-reverse engineering protection
Using the Shell SDK module, you can protect your important code frag-ments, strings, and constants for Visual C, Visual BASIC, and Delphi.
protection An algorithm with an associated activation type as determined by the options you choose to include in your strategy. Application protection can be either integrated or automatic. The protection type determines when and where software locks are implemented. See also automatic protection, integrated protection, software lock, activation type, anti-debug-ging protection, multi-layered protection, etc.
automatic protection
Also known as shelled protection. The fastest and easiest method of protect-ing your applications with Sentinel SuperPro.
Instead of adding software locks to your source code, a protective “shell” is automatically added to your application’s executable file, so that the soft-ware lock is called before the application starts—if the hardware key is not present, the user sees an error message and the application does not run. Automatic protection also gives you more control over demo options such as expiration dates, counters and time/date limits. See also application pro-tection, shell, software lock.
C
cell A memory location on the hardware key that holds 16-bit values. Elements occupy one or more cells on the key.
cell type A code assigned to each cell that defines (logically) how you want to use the cell. The cell type classifies the type of data stored in the cell, which in turn affects how the cell can be used.
Each cell type is identified by a two-letter abbreviation; for example, CW identifies a counter word.
cell value The 16-bit value contained in each cell. The cell value is also known as a word.
422 Sentinel SuperPro 6.5 Developer’s Guide
Appendix D - Glossary
Client Activator
An automated license installation utility that is used to create a product-specific activation script for your protected application.
The Client Activator is SafeNet Inc.’ recommended means of field activation for Sentinel SuperPro protected applications, due to its user-friendly inter-face. The Client Activator also allows your customers to easily and quickly activate your product via a Web site, if you desire.
command Function calls that describe what will be done to a key in the field. For exam-ple, the Decrement Counter command locates the counter cell on the key and decrements it by the value you specify. See also API.
counter A cell used to count down from a pre-programmed value. The value in a counter is decremented each time your application sends the RNBOsproDec-rement() API function. A counter has an access code of 2. Usually, counters are used to control the number of times a demo application is executed. If desired, a counter can be associated with an algorithm; when the counter reaches zero, the algorithm is deactivated automatically. See also access code, demo, algorithm.
D
data word A cell in a Sentinel SuperPro key that is used to store information. A data word can store data such as customer information, serial numbers, pass-words, and check digits. You code your application to read the word and then evaluate and act upon the stored value.
Your application can use the stored value to verify the key is still attached, or to control program flow or operation. A data word has an access code of 0 (read/write) or 1 (locked/read-only). See also access code, locked word.
decryption
The process of deciphering data that was previously encrypted. Decryption requires a secret key or password. See also encryption.
demo A demonstration or trial version of an application that uses a counter to control the number of times the application can run before it expires. See also counter.
Sentinel SuperPro 6.5 Developer’s Guide 423

Appendix D - Glossary
Design Stage
The Design stage has two sections: Element List View and Element Layout View. Use the Element Definition Wizard, accessible via Element List View, to define cell types and cell values. Element Layout View allows you to view and modify the location of algorithm, counter and data word cells on the hardware key.
developer ID
A unique identification code assigned to you by SafeNet Inc. You must use your developer ID to program your keys. You must also use it in your pro-tected application to establish a connection with a key.
distributor Someone outside of your organization who will be responsible for selling and activating your application. For example, distributors could be resellers or fulfillment centers. Distributors must receive a distributor key in order to activate an application using the distributed activation type. See also, dis-tributor key, distributed activation type.
distributor key
A key given to your sales distributors, allowing them to perform activation and update functions on product keys provided to end-users when they sell your protected application. A counter decrements each time the distributor activates or updates an application. This allows you to keep track of applica-tions activated by your distributor. See also, counter, distributed activation type.
distributed activation type
Method of product activation provided by Sentinel SuperPro where the application is inactive until activated by an activation password. The activa-tion password is different for every key; it is derived from the key’s serial number, product information, an encryption engine, and an algorithm located on a distributor key. An application using the distributed activation type will be activated by your distributors using a distributor key. See also, activation password, distributor key, activation type.
driver A piece of software that enables the computer to communicate with a peripheral device (the Sentinel SuperPro hardware key).
dual mode
An access mode used when you want your application to use either a local key or a network key. This is the default mode for all Sentinel SuperPro-pro-tected applications. When in dual mode, an application will send broadcast
424 Sentinel SuperPro 6.5 Developer’s Guide
Appendix D - Glossary
messages to the network to locate an appropriate server. See also network mode, access modes, stand-alone mode.
E
element An item in your protection strategy such as an algorithm, counter, data word or application protection.
encryption
The scrambling of data to prevent unauthorized access. Encryption is the most effective way to achieve data security. To read an encrypted file, you must have access to a secret key or password that enables you to decrypt it. See also decryption.
encryption seed
A string of bits used to as an input to an encryption function or algorithm. The larger the seed (the more bits in the seed), the greater the number of potential patterns that can be created, thus making it harder to break the code and decrypt the contents.
F
field activation
A secure method of remotely updating a Sentinel SuperPro hardware key’s memory after the key is sent to your user.
Field activation allows you to increase demo limits, upgrade demo applica-tions to fully licensed versions, and provide access to additional modules or features, without having to ship a new key to the customer or visit the cus-tomer’s site.
field exchange
Enables you to ship your application in an unusable state, and provide a means for legitimate users to activate it. The activation process is protected by encryption algorithms and passwords pre-programmed into the key. This same process also allows you to support field upgrades and control feature access. See also algorithm, field activation, activation password, active/inactive bit.
Sentinel SuperPro 6.5 Developer’s Guide 425
Appendix D - Glossary
H
hard limit Defines the maximum number of licenses that can be obtained from a key, and thus the maximum number of users (both local and across the network) that can access the protected application. The hard limit is programmed into each key at the factory and cannot be changed. See also hardware key, license, sublicense.
hardware key
The heart of Sentinel SuperPro protection. The key controls and verifies access to your protected applications, assuring that only authorized users can run them
hexadecimal
A base-16 number system. That is, a numbering system containing 16 sequential numbers as base units (including 0) before adding a new position for the next number. The hexadecimal numbers are 0-9 and then the letters A-F.
When showing the contents of computer storage, one hexadecimal digit can represent the arrangement of four binary digits. Two hexadecimal digits can represent eight binary digits, or a byte.
hidden word
A cell that cannot be read by your application. Most hidden words are algo-rithms and activation passwords. Your Write Password and Overwrite Passwords are also hidden words. A hidden word has an access code of 3. See also access code, algorithm, activation password, Write Password, Overwrite Password.
I
Implementation Stage
This stage allows you to add a shell to an application’s executable file, or view the pseudocode protection plan generated during prototyping,
This stage also allows you to define the actions that can be taken through field activation, and is used to create license codes for distribution to cus-tomers who have purchased upgrades in the field.
426 Sentinel SuperPro 6.5 Developer’s Guide
Appendix D - Glossary
inactive application
An application that will not run until it is activated.
integrated protection
A form of application protection where software locks (API function calls) are added directly to your source code. It is used to create a custom protec-tion strategy, with control over the amount and location of software locks. See also software lock, API, application protection.
L
license A license allows the user to start the protected application and access the hardware key. Licenses are never physically moved between the server/key and the client workstation. Instead, the Sentinel Protection server simply keeps track of how many users can run the application and decrements and increments the license count as authorized users are granted permission to run the application and as they exit the application. See also hard limit, sublicense.
license code
A code that describes the actions to be performed on a key in the field. It determines how the application will be activated or updated.
The license code is generated by Sentinel SuperPro based on the locking code provided by the customer and the actions you select. When the cus-tomer enters the license code in the Client Activator or Field Exchange Utility, a script is automatically run that performs the selected actions on the key.
License codes are unique to the key the locking code was generated from. See also action, command, field exchange, locking code.
locked word
A data word that contains a value that can be read but not changed by your application unless the Overwrite Passwords are used. A locked data word has an access code of 1. See also data word, access code, overwrite Passwords.
locking code
A code that includes information about how a key is currently programmed, including the key’s serial number and developer ID. You must have a cus-
Sentinel SuperPro 6.5 Developer’s Guide 427
Appendix D - Glossary
tomer-generated locking code to create a license code. Locking codes are unique for each key. See also action, command, field exchange, license code.
M
Make Keys Stage
The Make Keys stage allows you to program keys prior to distribution. Hard-ware keys programmed with your protection strategy, as defined in the Design stage, must be distributed with each copy of your software.
Monitoring Tool
A Windows application designed for use with protected applications intended to be run on a network. The Monitoring Tool displays information about all Sentinel Protection servers, keys and user licenses in the field. The tool reports statistics, such as the number of licenses currently in use and the license limit for each key.
multi-layered protection
The Shell provides multi-layered protection. Since the joint between an application and the Shell layers is vulnerable to attacks, you can choose the number of layers the Shell uses to protect your application, from level 1 to 5. Level 1 provides reasonable protection and level 5 provides the most protec-tion. However, with each level of protection added, the size of the application and the time it takes to start up also increases. By default, level 3 multi-lay-ering is used.
N
network key
Allows multiple network clients to access a protected application using a single hardware key. Network keys, which are typically connected to servers on the network, are programmed at the factory with a hard limit. See also hard limit, hardware key, license.
network mode
An access mode used for applications where you want only a network key to be used. The application will look for a key only on the selected server. If the selected server is not found, or a key is not found on the selected server, the application will not send a broadcast message to the network looking for
428 Sentinel SuperPro 6.5 Developer’s Guide
Appendix D - Glossary
another server and key. See also access modes, dual mode, stand-alone mode.
O
Overview Stage
Sections in this stage introduce you to Sentinel SuperPro concepts. This stage also features the API Explorer, where you can test API function calls, view the key’s cell layout, and send queries to the key to obtain return values.
overwrite passwords
A set of passwords you must have in order to set or change the value or access code of any cell other than a data word or a cell that is undefined.
Your overwrite passwords are provided to you by SafeNet Inc. Keep them secure; they have the power to reprogram all unrestricted cells in your key. See also Write Password.
P
product key
See hardware key.
project A project is stored in a Sentinel SuperPro file. The project contains all the data used to create your protection strategy—elements, passwords, your developer ID, algorithm values, counters, data words, field activation com-mands, etc.
Your project is the template that will be used to program the keys protecting your application.
Project Stage
This stage provides setup and configuration information. Create or open projects and enter your developer ID and passwords in this stage.
Prototype Stage
In this stage, you program the cells in the hardware key with the values defined in the Design stage, generating pseudocode for use in adding API functions to your source code. This stage is a required stage.
Sentinel SuperPro 6.5 Developer’s Guide 429
Appendix D - Glossary
pseudocode
Outlines the API functions you need to add to your application (if you are using integrated protection), as well as additional information about your protection strategy.
Q
query The process by which an application verifies that the hardware key is still attached or has not been tampered with. This is done by sending query data to be scrambled using a specific algorithm stored in the key. See also algo-rithm, query data.
query data
The value an application sends in a query to the hardware key. The key scrambles the string according to its internal logic and the bit pattern defined in a specified algorithm. It then returns a response to the applica-tion. See also response string, algorithm, query.
R
response string
The scrambled result derived when the hardware key processes query data according to the bit pattern contained in an algorithm. The hardware key returns the response string to the application. The application then uses the response to determine whether the user is authorized to run the application. See also query data, algorithm.
S
server The Sentinel Protection server manages licensing and security for the pro-tected application. The server is the link between the client running your application and the hardware key, located on the network, that responds to the API functions used in your protection strategy.
shell A protective layer wrapped around your application’s executable file when you use automatic protection. This layer is encrypted, making it more diffi-cult for a hacker to gain access to your application’s code.
430 Sentinel SuperPro 6.5 Developer’s Guide
Appendix D - Glossary
All software locks and communication with the hardware key (such as checking and verification) are handled by the shell. An application pro-tected with a shell can be run only if the user has the correct hardware key. See also automatic protection, software lock.
software lock
A decision point in an application. The purpose of a software lock is to verify the presence of the correct hardware key.
For example, an application might send query data to the hardware key, and require a specific response in order to continue execution. Other software locks may simply read the value in a cell and compare it to the value known to be programmed in that cell. See also query data.
stand-alone mode
An access mode used for applications where you want only a local key to be used. The application will look for a key only on the client machine. If the key is not found, the application will not send a broadcast message to the network looking for a server and key. See also network mode, dual mode, access modes.
stand - alone key
A key typically connected directly to a user’s local workstation, providing access to the protected application only on a single system. Stand-alone keys have a hard limit of 0, meaning the key can be used only by one user at a time. These keys can also be connected to servers, but provide only a single license at any one time. See also network key, hard limit, license.
sublicense A sublicense is a license limit you define that is less than or equal to the hard limit programmed into the key. Sublicenses allow you to implement fewer licenses for an application than the hard limit programmed on the key, pro-tect several applications using the same key by defining separate license limits for each, and control concurrent access to specific features or modules within your protected application(s). See also hard limit, license.
static activation type
Method of product activation provided by Sentinel SuperPro where the application is inactive until activated with an activation password, unless it is a demo or metered application. The password is the same for every key used with the protected application. See also activation password, demo.
Sentinel SuperPro 6.5 Developer’s Guide 431
Appendix D - Glossary
T
trusted activation type
Method of product activation provided by Sentinel SuperPro where the application is inactive until activated by an activation password, unless it is a demo or metered application. The activation password is different for every key; it is derived from the key’s serial number, product information and an encryption engine. See also activation password, demo, activation type.
U
USB Universal Serial Bus. A technology that features one “universal” plug type for all USB peripheral-to-PC connections. USB replaces all the different kinds of serial and parallel port connectors with one standardized plug and port.
USB simplifies the connection of peripherals to computers by providing an instant, no-hassle way to connect USB peripherals. With USB-equipped PCs and peripherals are automatically configured and ready for use.
W
word See cell.
Write Password
A password you must have in order to set or change the value or access code of a data word or a cell that is not yet defined. This password also allows you to decrement counters. Your Write Password is provided by SafeNet Inc. See also access code, data word, counter.
432 Sentinel SuperPro 6.5 Developer’s Guide


