Embed Size (px)
Citation preview
GN163130ZGB-GN163140ZGBN
EN/ID 57 7742 0000/BF- EN-ID
RefrigeratorUser Manual
Kulkas/Lemari EsPanduan Pengguna

Please read this manual before using the product!Dear Customer,We'd like you to make the best use of our product, which has been manufactured in modern facilities with care and meticulous quality controls.Thus, we advice you to read the entire user manual before you use the product. In case the product changes hands, do not forget to hand the guide to its new owner along with the product.
This guide will help you use the product quickly and safely.t� Please read the user guide carefully before installing and operating the product.t� Always observe the applicable safety instructions.t� Keep the user guide within easy reach for future use.t� Please read any other documents provided with the product.Keep in mind that this user guide may apply to several product models. The guide clearly indicates any variations of different models.
C Important information and useful tips.
A Risk of life and property.
B Risk of electric shock.
The product’s packaging is made of recyclable materials, in accordance with the National Environment Legislation.
A
AAC
SUPPLIER’S NAME MODEL IDENTIFIER (*)
INFORMATIONC.The model information as stored in the product data base can be reached by entering following website and searching for your model identifier (*) found on energy label.
https://eprel.ec.europa.eu/
2 / 41 EN Refrigerator / User Guide
1. Safety and environment instructions 31.1. General safety. . . . . . . . . . . . . . . . . . . . . . . 31.1.1 HC warning . . . . . . . . . . . . . . . . . . . . . . . . 41.1.2 For models with water dispenser . . . . . . . . 41.2. Intended use. . . . . . . . . . . . . . . . . . . . . . . . 51.3. Child safety. . . . . . . . . . . . . . . . . . . . . . . . . 51.4. Compliance with the WEEE Directive and
Disposing of the Waste Product: . . . . . . . . 51.5. Compliance with RoHS Directive . . . . . . . . . 51.6. Package information . . . . . . . . . . . . . . . . . . 5
2 Refrigerator 6
2 Refrigerator 7
3 Installation 83.1. Right place for installation . . . . . . . . . . . . . . 83.2. Attaching the plastic wedges . . . . . . . . . . . . 83.3. Adjusting the stands . . . . . . . . . . . . . . . . . . 93.4. Power connection . . . . . . . . . . . . . . . . . . . . 93.5. Water connection . . . . . . . . . . . . . . . . . . . 103.6. Connecting water hose to the product . . . . 113.7. Connecting to water mains . . . . . . . . . . . . 113.8. For products using water carboy . . . . . . . . 123.9 Water filter . . . . . . . . . . . . . . . . . . . . . . . . . 123.9.1.Fixing external filter on the wall (Optional) 133.9.2.Internal filter . . . . . . . . . . . . . . . . . . . . . . 14
4 Preparation 164.1. What to do for energy saving . . . . . . . . . . . 164.2. First Use . . . . . . . . . . . . . . . . . . . . . . . . . . 16
5 Using the product 175.1. Indicator panel . . . . . . . . . . . . . . . . . . . . . 175.2. Humidity controlled crisper . . . . . . . . . . . . 275.3. Activating water filter change warning . . . . 285.4. Using the water fountain . . . . . . . . . . . . . . 305.5. Filling the fountain water tank . . . . . . . . . . 305.6. Cleaning the water tank. . . . . . . . . . . . . . . 315.7. Taking ice / water . . . . . . . . . . . . . . . . . . . 325.8. Drip tray . . . . . . . . . . . . . . . . . . . . . . . . . 325.9. Zero degree compartment . . . . . . . . . . . . . 335.10. Vegetable bin . . . . . . . . . . . . . . . . . . . . . 335.11. Blue light/HarvestFresh . . . . . . . . . . . . . . 335.12. Ionizer . . . . . . . . . . . . . . . . . . . . . . . . . . . 335.13. Minibar . . . . . . . . . . . . . . . . . . . . . . . . . . 335.14. Odour filter . . . . . . . . . . . . . . . . . . . . . . . 335.15. Icematic and ice storage box . . . . . . . . . . 345.16. Ice-maker . . . . . . . . . . . . . . . . . . . . . . . . 345.17. Freezing fresh food . . . . . . . . . . . . . . . . . 365.18. Recommendations for storing frozen foods 365.19. Deep freezer details . . . . . . . . . . . . . . . . . 365.20. Placing the food. . . . . . . . . . . . . . . . . . . . 375.21. Door open alert . . . . . . . . . . . . . . . . . . . . 375.22. Interior light . . . . . . . . . . . . . . . . . . . . . . . 37
6 Maintenance and Cleaning 386.1. Preventing Bad Odour . . . . . . . . . . . . . . . . 386.2. Protecting Plastic Surfaces . . . . . . . . . . . . 38
7. Troubleshooting 39
Table of Contents
3 / 41 ENRefrigerator / User Guide
1. Safety and environment instructionsThis section provides the safety instructions necessary to prevent the risk of injury and material damage. Failure to observe these instructions will invalidate all types of product warranty.
Intended use
AWARNING: Keep ventilation openings, in the appliance enclosure or in the built-instructure, clear of obstruction.
AWARNING:Do not use mechanical devices or other means to accelerate the defrosting process, other than those recommended by the manufacturer.
AWARNING: Do not damage the refrigerant circuit.
AWARNING: Do not use electrical appliances inside the food storage compartments of the appliance, unless they are of the type recommended by the manufacturer.
This appliance is intended to be used in household and similar applications such as– staff kitchen areas in shops, offices and other working environments;– farm houses and by clients in hotels, motels and other residential type environments;– bed and breakfast type environments;– catering and similar non-retail applications.
1.1. General safetyt� This product should not be used by
persons with physical, sensory and mental disabilities, without sufficient knowledge and experience or by children. The device can only be used by such persons under supervision and instruction of a person responsible
for their safety. Children should not be allowed to play with this device.
t� In case of malfunction, unplug the device.
t� After unplugging, wait at least 5 minutes before plugging in again.
t� Unplug the product when not in use.t� Do not touch the plug with wet hands!
Do not pull the cable to plug off, always hold the plug.
t� Do not plug in the refrigerator if the socket is loose.
t� Unplug the product during installation, maintenance, cleaning and repair.
t� If the product will not be used for a while, unplug the product and remove any food inside.
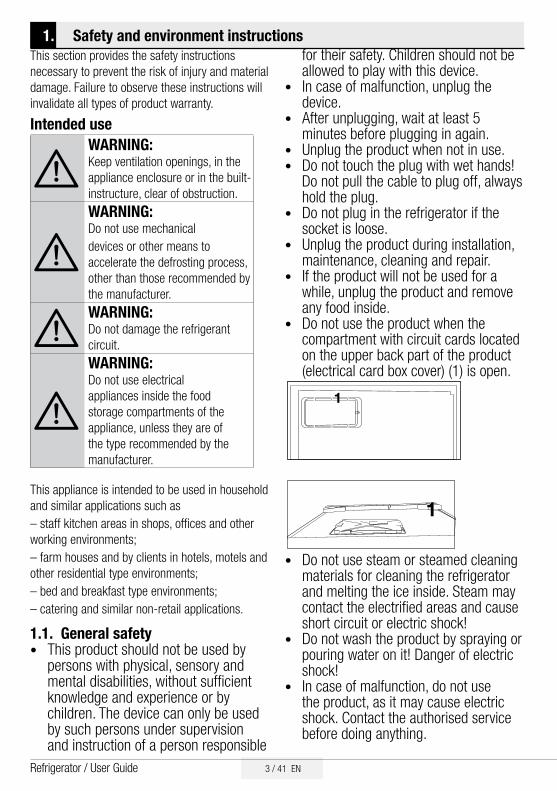
t� Do not use the product when the compartment with circuit cards located on the upper back part of the product (electrical card box cover) (1) is open.
1
1
t� Do not use steam or steamed cleaning materials for cleaning the refrigerator and melting the ice inside. Steam may contact the electrified areas and cause short circuit or electric shock!
t� Do not wash the product by spraying or pouring water on it! Danger of electric shock!
t� In case of malfunction, do not use the product, as it may cause electric shock. Contact the authorised service before doing anything.

4 / 41 EN Refrigerator / User Guide
Safety and environment instructionst� Plug the product into an earthed
socket. Earthing must be done by a qualified electrician.
t� If the product has LED type lighting, contact the authorised service for replacing or in case of any problem.
t� Do not touch frozen food with wet hands! It may adhere to your hands!
t� Do not place liquids in bottles and cans into the freezer compartment. They may explode.
t� Place liquids in upright position after tightly closing the lid.
t� Do not spray flammable substances near the product, as it may burn or explode.
t� Do not keep flammable materials and products with flammable gas (sprays, etc.) in the refrigerator.
t� Do not place containers holding liquids on top of the product. Splashing water on an electrified part may cause electric shock and risk of fire.
t� Exposing the product to rain, snow, sunlight and wind will cause electrical danger. When relocating the product, do not pull by holding the door handle. The handle may come off.
t� Take care to avoid trapping any part of your hands or body in any of the moving parts inside the product.
t� Do not step or lean on the door, drawers and similar parts of the refrigerator. This will cause the product to fall down and cause damage to the parts.
t� Take care not to trap the power cable.
t� When positioning the appliance, ensure the supply cord is not trapped or damaged.
t� Do not locate multiple portable socket-outlets or portable power supplies at the rear of the appliance.
t� Your Side by Side refrigerator needs a water connection. If no water tap is available yet and you have to call for an plumber please note: In case your house is provided with an underfloor heating system please consider, drilling holes into the concrete ceiling could damage this heating system.
1.1.1 HC warningIf the product comprises a cooling system using R600a gas, take care to avoid damaging the cooling system and its pipe while using and moving the product. This gas is flammable. If the cooling system is damaged, keep the product away from sources of fire and ventilate the room immediately.
CThe label on the inner left side indicates the type of gas used in the product.
1.1.2 For models with water dispensert� Pressure for cold water inlet shall be
maximum 90 psi (620 kPa). If your water pressure exceeds 80 psi (550 kPa), use a pressure limiting valve in your mains system. If you do not know how to check your water pressure, ask for the help of a professional plumber.
5 / 41 ENRefrigerator / User Guide
Safety and environment instructionst� If there is risk of water hammer effect
in your installation, always use a water hammer prevention equipment in your installation. Consult Professional plumbers if you are not sure that there is no water hammer effect in your installation.
t� Do not install on the hot water inlet. Take precautions against of the risk of freezing of the hoses. Water temperature operating interval shall be 33°F (0.6°C) minimum and 100°F (38°C) maximum.
t� Use drinking water only.1.2. Intended uset� This product is designed for home use.
It is not intended for commercial use. t� The product should be used to store
food and beverages only.t� Do not keep sensitive products
requiring controlled temperatures (vaccines, heat sensitive medication, medical supplies, etc.) in the refrigerator.
t� The manufacturer assumes no responsibility for any damage due to misuse or mishandling.
t� Original spare parts will be provided for 10 years, following the product purchasing date.
1.3. Child safetyt� Keep packaging materials out of
children’s reach.t� Do not allow the children to play with
the product.t� If the product’s door comprises a lock,
keep the key out of children’s reach.
1.4. Compliance with the WEEE Directive and Disposing of the Waste Product: This product complies with EU WEEE Directive (2012/19/EU). This product bears a classification symbol for waste electrical and electronic equip-ment (WEEE).
This symbol indicates that this product shall not be disposed with other house-hold wastes at the end of its service life. Used device must be returned to offical collection point for recycling of electrical
and electronic devices. To find these collection sys-tems please contact to your local authorities or re-tailer where the product was puchased. Each household performs important role in recovering and recycling of old appliance. Appropriate disposal of used appliance helps prevent potential negative consequences for the environment and human health.
1.5. Compliance with RoHS DirectiveThe product you have purchased complies with EU RoHS Directive (2011/65/EU). It does not contain harmful and prohibited materials specified in the Directive.
1.6. Package informationPackaging materials of the product are manufactured from recyclable materials in accordance with our National Environment Regulations. Do not dis-
pose of the packaging materials together with the domestic or other wastes. Take them to the pack-aging material collection points designated by the local authorities.
6 / 41 EN Refrigerator / User Guide
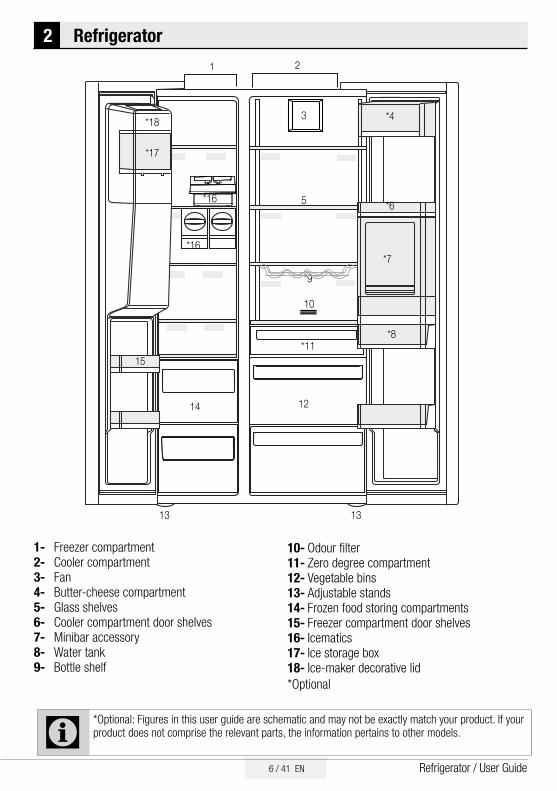
2 Refrigerator
C*Optional: Figures in this user guide are schematic and may not be exactly match your product. If your product does not comprise the relevant parts, the information pertains to other models.
1- Freezer compartment2- Cooler compartment3- Fan4- Butter-cheese compartment5- Glass shelves6- Cooler compartment door shelves7- Minibar accessory8- Water tank9- Bottle shelf
10- Odour filter11- Zero degree compartment12- Vegetable bins13- Adjustable stands14- Frozen food storing compartments15- Freezer compartment door shelves16- Icematics17- Ice storage box18- Ice-maker decorative lid*Optional
2
3 *4
5 *6
1
*7
*11
*16
*16
*17
*18
12
13
14
15
13
*8
10
*9

7 / 41 ENRefrigerator / User Guide
21
3 *4
5
*6
*7
1111
10
13
9
8
*14
12
*14
2 Refrigerator
C*Optional: Figures in this user guide are schematic and may not be exactly match your product. If your product does not comprise the relevant parts, the information pertains to other models.

8 / 41 EN Refrigerator / User Guide
3 Installation3.1. Right place for installationContact the Authorized Service for the product's installation. To ready the product for installation, see the information in the user guide and make sure the electric and water utilities are as required. If not, call an electrician and plumber to arrange the utilities as necessary.
BWARNING: The manufacturer assumes no responsibility for any damage caused by the work carried out by unauthorized persons.
BWARNING: The product’s power cable must be unplugged during installation. Failure to do so may result in death or serious injuries!
AWARNING: : If the door span is too narrow for the product to pass, remove the door and turn the product sideways; if this does not work, contact the authorized service.
t�1MBDF�UIF�QSPEVDU�PO�B�GMBU�TVSGBDF�UP�BWPJE�vibration.
t�1MBDF�UIF�QSPEVDU�BU�MFBTU����DN�BXBZ�GSPN�UIF�heater, stove and similar sources of heat and at least 5 cm away from electric ovens.
t�%P�OPU�FYQPTF�UIF�QSPEVDU�UP�EJSFDU�TVOMJHIU�PS�keep in damp environments.
t�5IF�QSPEVDU�SFRVJSFT�BEFRVBUF�BJS�DJSDVMBUJPO�UP�function efficiently. If the product will be placed in an alcove, remember to leave at least 5 cm distance between the product and the ceiling and the walls.
t�%P�OPU�JOTUBMM�UIF�QSPEVDU�JO�FOWJSPONFOUT�XJUI�temperatures below -5°C.
3.2. Attaching the plastic wedgesUse the plastic wedges in the provided with the product to provide sufficient space for air circulation between the product and the wall. 1. To attach the wedges, remove the screws on the product and use the screws provided with the wedges.
2. Attach 2 plastic wedges on the ventilation cover shown as j in the figure.
9 / 41 ENRefrigerator / User Guide
Installation
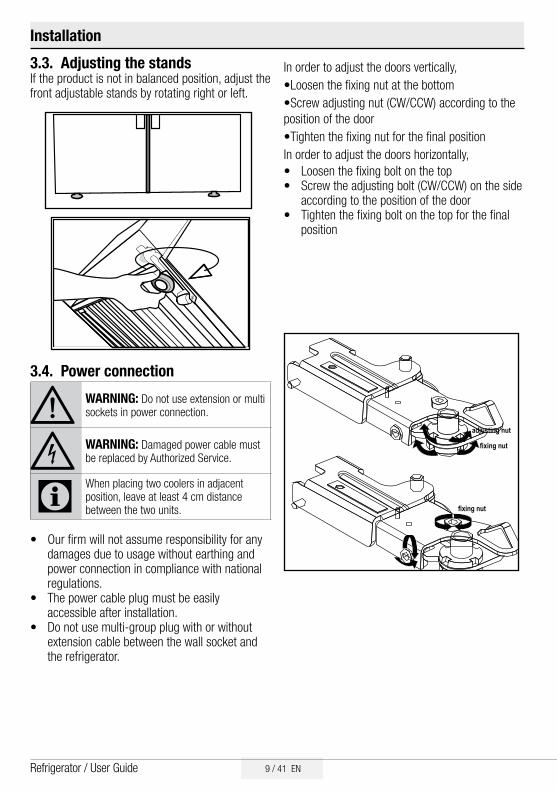
3.3. Adjusting the standsIf the product is not in balanced position, adjust the front adjustable stands by rotating right or left.
3.4. Power connection
A WARNING: Do not use extension or multi sockets in power connection.
B WARNING: Damaged power cable must be replaced by Authorized Service.
CWhen placing two coolers in adjacent position, leave at least 4 cm distance between the two units.
t� Our firm will not assume responsibility for any damages due to usage without earthing and power connection in compliance with national regulations.
t� The power cable plug must be easily accessible after installation.
t� Do not use multi-group plug with or without extension cable between the wall socket and the refrigerator.
In order to adjust the doors vertically,t-PPTFO�UIF�GJYJOH�OVU�BU�UIF�CPUUPNt4DSFX�BEKVTUJOH�OVU�$8�$$8�BDDPSEJOH�UP�UIF�position of the doort5JHIUFO�UIF�GJYJOH�OVU�GPS�UIF�GJOBM�QPTJUJPOIn order to adjust the doors horizontally, t� Loosen the fixing bolt on the topt� Screw the adjusting bolt (CW/CCW) on the side
according to the position of the doort� Tighten the fixing bolt on the top for the final
position
adjusting nut
fixing nut
fixing nut
adjusting nut
10 / 41 EN Refrigerator / User Guide
Installation3.5. Water connection (Optional)
AWARNING: Unplug the product and the water pump (if available) during connection.
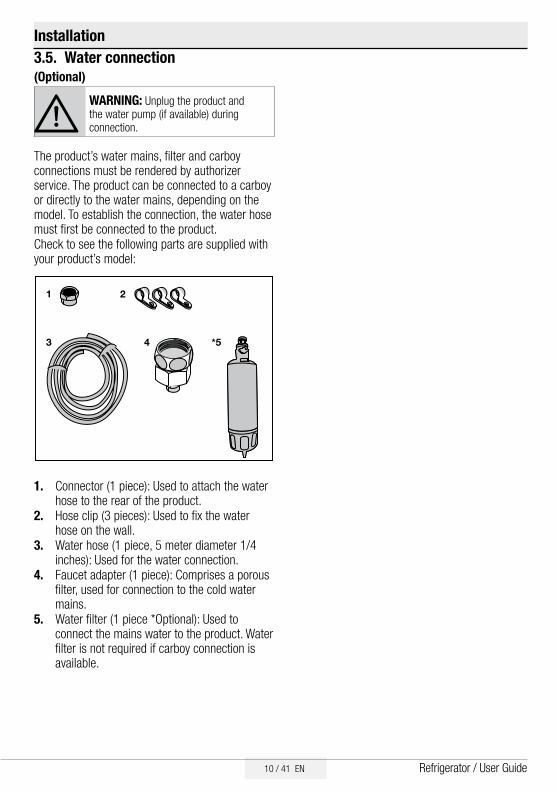
The product’s water mains, filter and carboy connections must be rendered by authorizer service. The product can be connected to a carboy or directly to the water mains, depending on the model. To establish the connection, the water hose must first be connected to the product.Check to see the following parts are supplied with your product’s model:
3
1
4
2
*5
1. Connector (1 piece): Used to attach the water hose to the rear of the product.
2. Hose clip (3 pieces): Used to fix the water hose on the wall.
3. Water hose (1 piece, 5 meter diameter 1/4 inches): Used for the water connection.
4. Faucet adapter (1 piece): Comprises a porous filter, used for connection to the cold water mains.
5. Water filter (1 piece *Optional): Used to connect the mains water to the product. Water filter is not required if carboy connection is available.

11 / 41 ENRefrigerator / User Guide
Installation
123
3.6. Connecting water hose to the productTo connect the water hose to the product, follow the instructions below.1. Remove the connector on the hose nozzle
adaptor in the back of the product and run the hose through the connector.
2. Push the water hose down tightly and connect to the hose nozzle adaptor.
3. Tighten the connector manually to fix on the hose nozzle adaptor. You may also tighten the connector using a pipe wrench or pliers.
3.7. Connecting to water mains(Optional)To use the product by connecting to the cold water mains, a standard 1/2” valve connector must be installed to the cold water mains in your home. If the connector is not available or if you are unsure, consult a qualified plumber. 1. Detach the connector (1) from the faucet
adaptor (2).
123
2. Connect the faucet adaptor to the water mains valve.
3. Attach the connector around the water hose.
4. Connect the other end of the hose to the water mains (See Section 3.7) or, to use carboy, to the water pump (See Section 3.8).
12 / 41 EN Refrigerator / User Guide
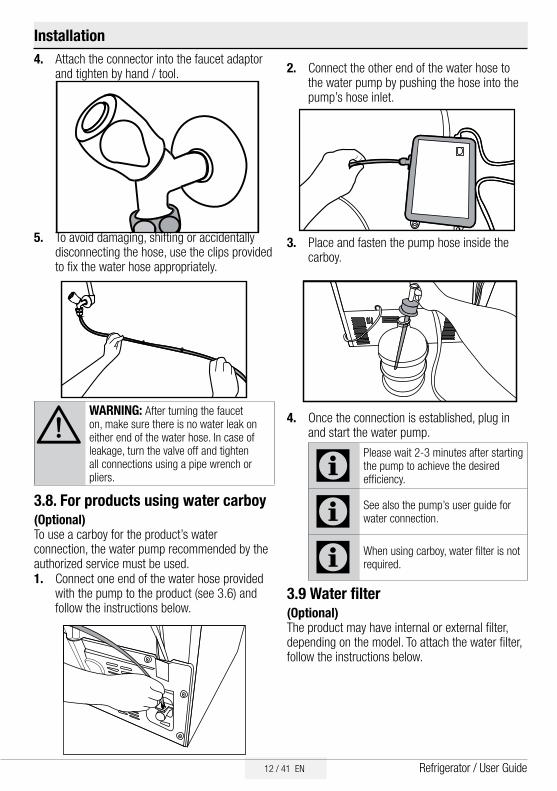
Installation4. Attach the connector into the faucet adaptor
and tighten by hand / tool.
2. Connect the other end of the water hose to
the water pump by pushing the hose into the pump’s hose inlet.
5. To avoid damaging, shifting or accidentally disconnecting the hose, use the clips provided to fix the water hose appropriately.
AWARNING: After turning the faucet on, make sure there is no water leak on either end of the water hose. In case of leakage, turn the valve off and tighten all connections using a pipe wrench or pliers.
3.8. For products using water carboy(Optional)To use a carboy for the product’s water connection, the water pump recommended by the authorized service must be used. 1. Connect one end of the water hose provided
with the pump to the product (see 3.6) and follow the instructions below.
3. Place and fasten the pump hose inside the
carboy.
4. Once the connection is established, plug in and start the water pump.
CPlease wait 2-3 minutes after starting the pump to achieve the desired efficiency.
C See also the pump’s user guide for water connection.
C When using carboy, water filter is not required.
3.9 Water filter(Optional)The product may have internal or external filter, depending on the model. To attach the water filter, follow the instructions below.
13 / 41 ENRefrigerator / User Guide
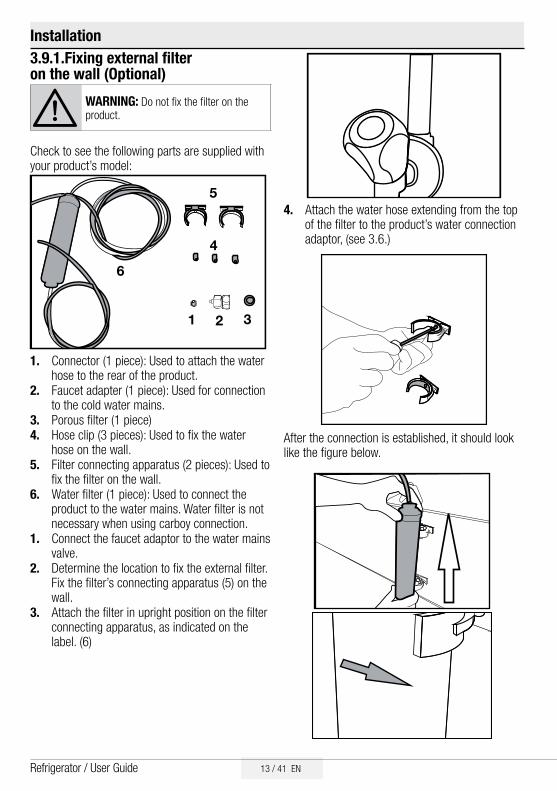
Installation3.9.1.Fixing external filter on the wall (Optional)
A WARNING: Do not fix the filter on the product.
Check to see the following parts are supplied with your product’s model:
1. Connector (1 piece): Used to attach the water hose to the rear of the product.
2. Faucet adapter (1 piece): Used for connection to the cold water mains.
3. Porous filter (1 piece)4. Hose clip (3 pieces): Used to fix the water
hose on the wall.5. Filter connecting apparatus (2 pieces): Used to
fix the filter on the wall.6. Water filter (1 piece): Used to connect the
product to the water mains. Water filter is not necessary when using carboy connection.
1. Connect the faucet adaptor to the water mains valve.
2. Determine the location to fix the external filter. Fix the filter’s connecting apparatus (5) on the wall.
3. Attach the filter in upright position on the filter connecting apparatus, as indicated on the label. (6)
4. Attach the water hose extending from the top of the filter to the product’s water connection adaptor, (see 3.6.)
After the connection is established, it should look like the figure below.
1 2 3
4
5
6
14 / 41 EN Refrigerator / User Guide
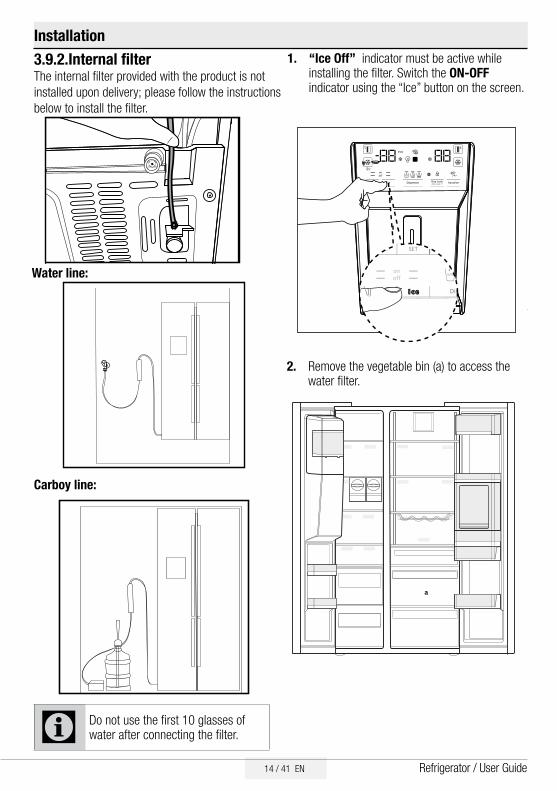
Installation3.9.2.Internal filterThe internal filter provided with the product is not installed upon delivery; please follow the instructions below to install the filter.
1. “Ice Off” indicator must be active while installing the filter. Switch the ON-OFF indicator using the “Ice” button on the screen.
Water line:
Carboy line:
2. Remove the vegetable bin (a) to access the water filter.
a
C Do not use the first 10 glasses of water after connecting the filter.
15 / 41 ENRefrigerator / User Guide
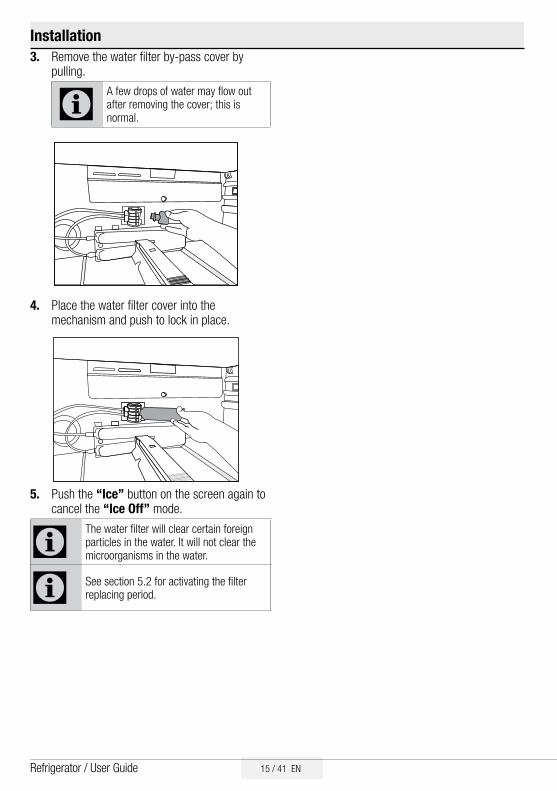
Installation3. Remove the water filter by-pass cover by
pulling.
CA few drops of water may flow out after removing the cover; this is normal.
4. Place the water filter cover into the mechanism and push to lock in place.
5. Push the “Ice” button on the screen again to cancel the “Ice Off” mode.
CThe water filter will clear certain foreign particles in the water. It will not clear the microorganisms in the water.
C See section 5.2 for activating the filter replacing period.
16 / 41 EN Refrigerator / User Guide
4 Preparation4.1. What to do for energy savingmehmet
AConnecting the product to electronic energy-saving systems is harmful, as it may damage the product.
t� For a freestanding appliance; ‘this refrigerating appliance is not intended to be used as a built-in appliance.
t� Do not keep the refrigerator doors open for long periods.
t� Do not place hot food or beverages into the refrigerator.
t� Do not overfill the refrigerator; blocking the internal air flow will reduce cooling capacity.
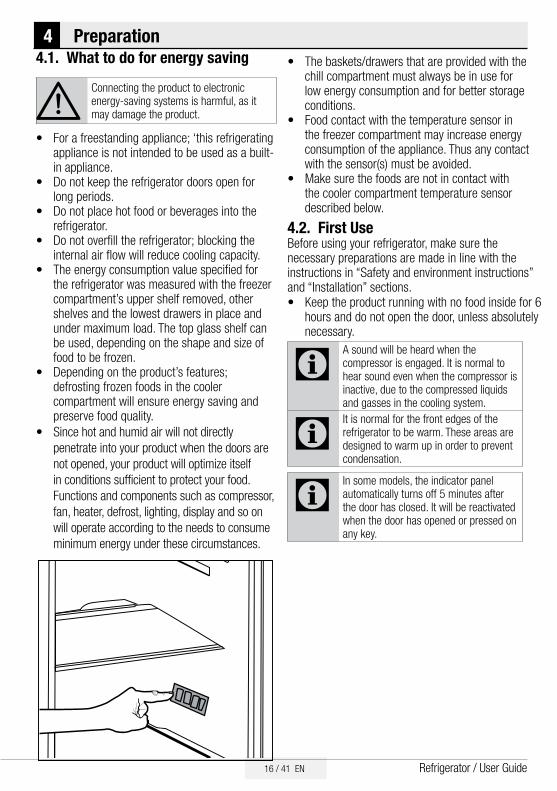
t� The energy consumption value specified for the refrigerator was measured with the freezer compartment’s upper shelf removed, other shelves and the lowest drawers in place and under maximum load. The top glass shelf can be used, depending on the shape and size of food to be frozen.
t� Depending on the product’s features; defrosting frozen foods in the cooler compartment will ensure energy saving and preserve food quality.
t� Since hot and humid air will not directly penetrate into your product when the doors are not opened, your product will optimize itself in conditions sufficient to protect your food. Functions and components such as compressor, fan, heater, defrost, lighting, display and so on will operate according to the needs to consume minimum energy under these circumstances.
t� The baskets/drawers that are provided with the chill compartment must always be in use for low energy consumption and for better storage conditions.
t� Food contact with the temperature sensor in the freezer compartment may increase energy consumption of the appliance. Thus any contact with the sensor(s) must be avoided.
t� Make sure the foods are not in contact with the cooler compartment temperature sensor described below.
4.2. First UseBefore using your refrigerator, make sure the necessary preparations are made in line with the instructions in “Safety and environment instructions” and “Installation” sections. t� Keep the product running with no food inside for 6
hours and do not open the door, unless absolutely necessary.
CA sound will be heard when the compressor is engaged. It is normal to hear sound even when the compressor is inactive, due to the compressed liquids and gasses in the cooling system.
CIt is normal for the front edges of the refrigerator to be warm. These areas are designed to warm up in order to prevent condensation.
CIn some models, the indicator panel automatically turns off 5 minutes after the door has closed. It will be reactivated when the door has opened or pressed on any key.

17 / 41 ENRefrigerator / User Guide
5 Using the product
5.1. Indicator panelIndicator panels may vary depending on the model of your product.Audial and visual functions of the indicator panel will assist in using the refrigerator.
8 1 2 3
457 6
9
1. Cooler compartment indicator2. Error status indicator3. Temperature indicator4. Vacation function button5. Temperature adjustment button6. Compartment selection button7. Freezer Compartment indicator8. Economy mode indicator9. Vacation function indicator *optional
C*Optional: The figures in this user guide are intended as drafts and may not perfectly match your product. If your product does not comprise the relevant parts, the information pertains to other models.

18 / 41 EN Refrigerator / User Guide
Using the product
1. Cooler compartment indicatorThe cooler compartment light will turn on when adjusting the cooler compartment temperature.
2. Error status indicatorThis sensor will activate if the refrigerator is not cooling adequately or in case of sensor fault. When this indicator is active, the freezer compartment temperature indicator will display "E" and the cooler compartment temperature indicator will display "1, 2, 3..." etc. numbers. The numbers on the indicator serve to inform the service personnel about the fault.
3. Temperature indicatorIndicates the temperature of the freezer and cooler compartments.
4.Vacation function buttonTo activate this function, press and hold the Vacation button for 3 seconds. When the Vacation function is active, the cooler compartment temperature indicator displays the inscription "- -" and no cooling process will be active in the cooling compartment. This function is not suitable to keep food in the cooler compartment. Other compartments will remain cooled with the respective temperature set for each compartment.
Push the Vacation button ( ) again to cancel this function.
5. Temperature adjustment buttonRespective compartment's temperature varies in -24°C..... -18°C and 8°C...1°C ranges.
6. Compartment selection buttonUse the refrigerator compartment selection button to toggle between the cooler and freezer compartments.
7. Freezer Compartment indicatorThe freezer compartment light will turn on when adjusting the cooler compartment temperature.
8. Economy mode indicatorIndicates the refrigerator is running on energy-saving mode. This indicator will be active when the temperature in the freezer compartment is set to -18°C.
9.Vacation function indicatorIndicates the vacation function is active.
1
2
3
4
5
6
7
8
9
Eco Mode
Yellow: Vacation
Display On after any interaction with buttonsinteraction with product/

19 / 41 ENRefrigerator / User Guide
Using the product
1
2
3
4
5
6
7
8
9
Eco Mode
Yellow: Vacation
Display On after any interaction with buttonsinteraction with product/
C*Optional: The figures in this user guide are intended as drafts and may not perfectly match your product. If your product does not comprise the relevant parts, the information pertains to other models.
20 / 41 EN Refrigerator / User Guide
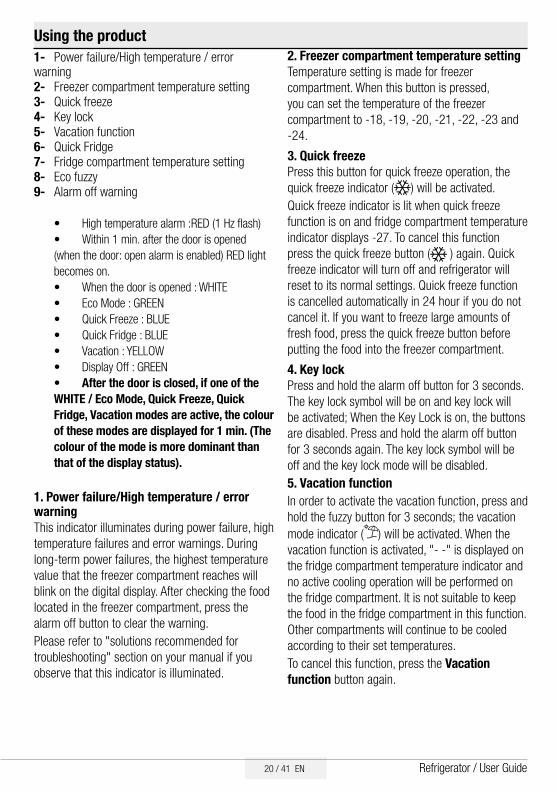
Using the product1- Power failure/High temperature / error warning2- Freezer compartment temperature setting3- Quick freeze4- Key lock5- Vacation function6- Quick Fridge7- Fridge compartment temperature setting8- Eco fuzzy9- Alarm off warning
t� High temperature alarm :RED (1 Hz flash) t� Within 1 min. after the door is opened (when the door: open alarm is enabled) RED light becomes on.t� When the door is opened : WHITEt� Eco Mode : GREENt� Quick Freeze : BLUEt� Quick Fridge : BLUEt� Vacation : YELLOWt� Display Off : GREENt� After the door is closed, if one of the WHITE / Eco Mode, Quick Freeze, Quick Fridge, Vacation modes are active, the colour of these modes are displayed for 1 min. (The colour of the mode is more dominant than that of the display status).
1. Power failure/High temperature / error warning This indicator illuminates during power failure, high temperature failures and error warnings. During long-term power failures, the highest temperature value that the freezer compartment reaches will blink on the digital display. After checking the food located in the freezer compartment, press the alarm off button to clear the warning. Please refer to "solutions recommended for troubleshooting" section on your manual if you observe that this indicator is illuminated.
2. Freezer compartment temperature setting Temperature setting is made for freezer compartment. When this button is pressed, you can set the temperature of the freezer compartment to -18, -19, -20, -21, -22, -23 and -24.
3. Quick freeze Press this button for quick freeze operation, the quick freeze indicator ( ) will be activated.Quick freeze indicator is lit when quick freeze function is on and fridge compartment temperature indicator displays -27. To cancel this function press the quick freeze button ( ) again. Quick freeze indicator will turn off and refrigerator will reset to its normal settings. Quick freeze function is cancelled automatically in 24 hour if you do not cancel it. If you want to freeze large amounts of fresh food, press the quick freeze button before putting the food into the freezer compartment.
4. Key lockPress and hold the alarm off button for 3 seconds. The key lock symbol will be on and key lock will be activated; When the Key Lock is on, the buttons are disabled. Press and hold the alarm off button for 3 seconds again. The key lock symbol will be off and the key lock mode will be disabled. 5. Vacation functionIn order to activate the vacation function, press and hold the fuzzy button for 3 seconds; the vacation mode indicator ( ) will be activated. When the vacation function is activated, "- -" is displayed on the fridge compartment temperature indicator and no active cooling operation will be performed on the fridge compartment. It is not suitable to keep the food in the fridge compartment in this function. Other compartments will continue to be cooled according to their set temperatures.To cancel this function, press the Vacation function button again.

21 / 41 ENRefrigerator / User Guide
Using the product6.Quick fridgeQuick fridge indicator is lit ( ) and the fridge compartment temperature indicator value is displayed as 1 when the quick fridge function is activated. To cancel this function, press the Quick fridge button again. Quick fridge indicator will be off and the refrigerator will be reset to its normal settings. Quick fridge function is cancelled automatically in 1 hour if you do not cancel it. If you want to cool large amounts of fresh food, press the Quick fridge button before putting the food into the fridge compartment.7. Fridge compartment temperature settingWhen this button is pressed the fridge compartment temperature can be set to 8,7,6,5,4,3,2 and 1 values.
8. Eco fuzzy Press and hold the eco fuzzy button for 1 seconds to activate the eco fuzzy function. Refrigerator will start operating in the most economic mode at least 6 hours later and the economic usage indicator will be on ( ). Press and hold the eco fuzzy function button for 3 seconds to disable the eco fuzzy function.This indicator will be on after 6 hours when eco fuzzy is activated.
9. Alarm off warningIn case of power failure/high temperature alarm, after checking the foods in the freezer compartment, press the alarm off button to clear the warning.

22 / 41 EN Refrigerator / User Guide
Using the product
C*Optional: The figures in this user guide are intended as drafts and may not perfectly match your product. If your product does not comprise the relevant parts, the information pertains to other models.
*1
1 *2
2 3
4
56*7.1 *7.28910
11
*34(*)
1312
5
6
7891011.1
11.2
1. Economic use2- High temperature / fault alert3. Energy saving function (display off)4- Rapid cooling5- Vacation function6- Cooler compartment temperature setting7. Energy saving (display off) /Alarm off8- Keypad lock9- Eco-fuzzy10- Freezer compartment temperature setting 11- Rapid freezing
23 / 41 ENRefrigerator / User Guide
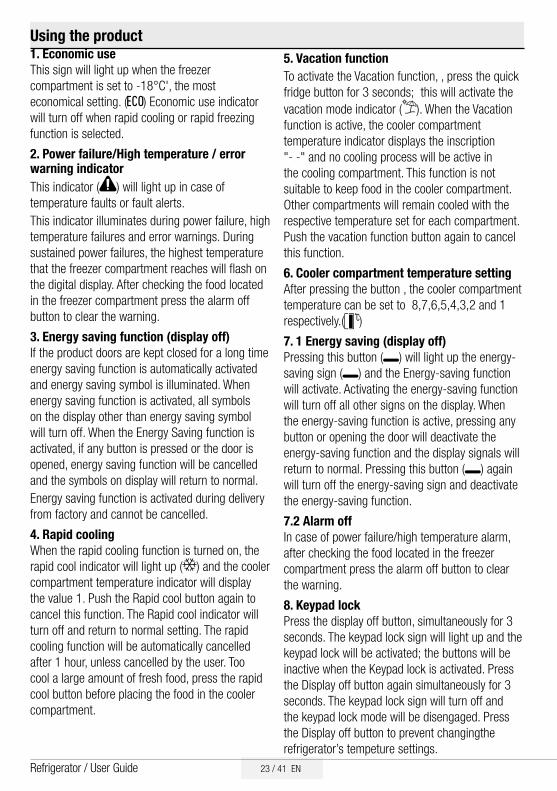
Using the product1. Economic useThis sign will light up when the freezer compartment is set to -18°C', the most economical setting. ( ) Economic use indicator will turn off when rapid cooling or rapid freezing function is selected.
2. Power failure/High temperature / error warning indicator This indicator ( ) will light up in case of temperature faults or fault alerts. This indicator illuminates during power failure, high temperature failures and error warnings. During sustained power failures, the highest temperature that the freezer compartment reaches will flash on the digital display. After checking the food located in the freezer compartment press the alarm off button to clear the warning.
3. Energy saving function (display off)If the product doors are kept closed for a long time energy saving function is automatically activated and energy saving symbol is illuminated. When energy saving function is activated, all symbols on the display other than energy saving symbol will turn off. When the Energy Saving function is activated, if any button is pressed or the door is opened, energy saving function will be cancelled and the symbols on display will return to normal.Energy saving function is activated during delivery from factory and cannot be cancelled.
4. Rapid coolingWhen the rapid cooling function is turned on, the rapid cool indicator will light up ( ) and the cooler compartment temperature indicator will display the value 1. Push the Rapid cool button again to cancel this function. The Rapid cool indicator will turn off and return to normal setting. The rapid cooling function will be automatically cancelled after 1 hour, unless cancelled by the user. Too cool a large amount of fresh food, press the rapid cool button before placing the food in the cooler compartment.
5. Vacation functionTo activate the Vacation function, , press the quick fridge button for 3 seconds; this will activate the vacation mode indicator ( ). When the Vacation function is active, the cooler compartment temperature indicator displays the inscription "- -" and no cooling process will be active in the cooling compartment. This function is not suitable to keep food in the cooler compartment. Other compartments will remain cooled with the respective temperature set for each compartment. Push the vacation function button again to cancel this function.
6. Cooler compartment temperature settingAfter pressing the button , the cooler compartment temperature can be set to 8,7,6,5,4,3,2 and 1 respectively.( )
7. 1 Energy saving (display off)Pressing this button ( ) will light up the energy-saving sign ( ) and the Energy-saving function will activate. Activating the energy-saving function will turn off all other signs on the display. When the energy-saving function is active, pressing any button or opening the door will deactivate the energy-saving function and the display signals will return to normal. Pressing this button ( ) again will turn off the energy-saving sign and deactivate the energy-saving function.
7.2 Alarm offIn case of power failure/high temperature alarm, after checking the food located in the freezer compartment press the alarm off button to clear the warning.
8. Keypad lockPress the display off button, simultaneously for 3 seconds. The keypad lock sign will light up and the keypad lock will be activated; the buttons will be inactive when the Keypad lock is activated. Press the Display off button again simultaneously for 3 seconds. The keypad lock sign will turn off and the keypad lock mode will be disengaged. Press the Display off button to prevent changingthe refrigerator’s tempeture settings.
24 / 41 EN Refrigerator / User Guide
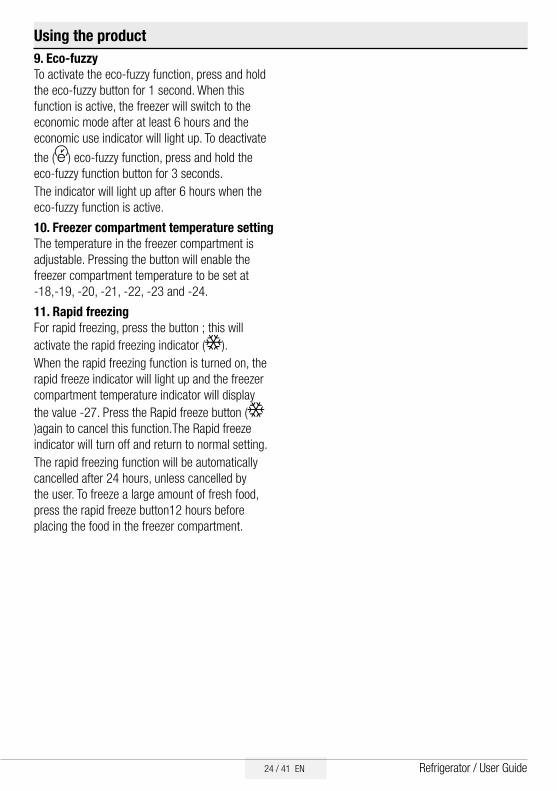
Using the product9. Eco-fuzzyTo activate the eco-fuzzy function, press and hold the eco-fuzzy button for 1 second. When this function is active, the freezer will switch to the economic mode after at least 6 hours and the economic use indicator will light up. To deactivate the ( ) eco-fuzzy function, press and hold the eco-fuzzy function button for 3 seconds.The indicator will light up after 6 hours when the eco-fuzzy function is active.
10. Freezer compartment temperature settingThe temperature in the freezer compartment is adjustable. Pressing the button will enable the freezer compartment temperature to be set at -18,-19, -20, -21, -22, -23 and -24.
11. Rapid freezingFor rapid freezing, press the button ; this will activate the rapid freezing indicator ( ).When the rapid freezing function is turned on, the rapid freeze indicator will light up and the freezer compartment temperature indicator will display the value -27. Press the Rapid freeze button ()again to cancel this function.The Rapid freeze indicator will turn off and return to normal setting.The rapid freezing function will be automatically cancelled after 24 hours, unless cancelled by the user. To freeze a large amount of fresh food, press the rapid freeze button12 hours before placing the food in the freezer compartment.
25 / 41 ENRefrigerator / User Guide
Using the product
C*Optional: The figures in this user guide are intended as drafts and may not perfectly match your product. If your product does not comprise the relevant parts, the information pertains to other models.
*1
1 *2
2 3
4
56*7.1 *7.28910
11
*34(*)
1312
5
6
7891011.1
11.2
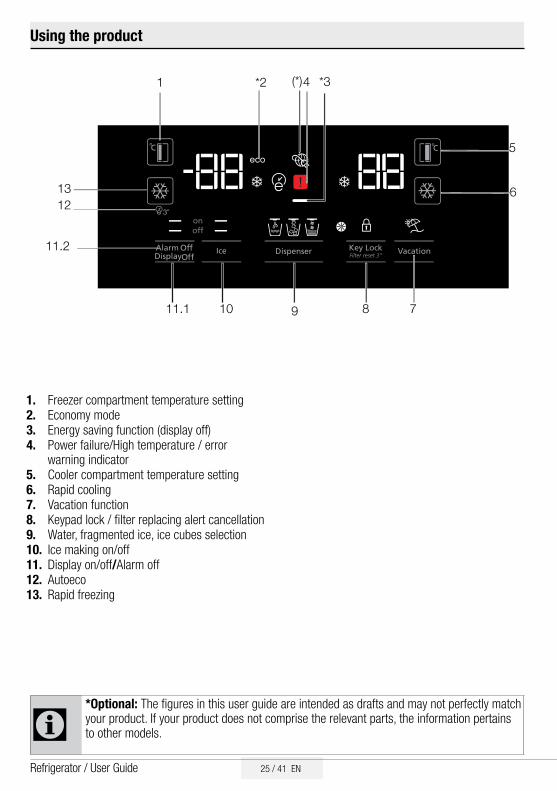
1. Freezer compartment temperature setting2. Economy mode3. Energy saving function (display off)4. Power failure/High temperature / error
warning indicator5. Cooler compartment temperature setting6. Rapid cooling7. Vacation function8. Keypad lock / filter replacing alert cancellation9. Water, fragmented ice, ice cubes selection10. Ice making on/off11. Display on/off/Alarm off12. Autoeco13. Rapid freezing
26 / 41 EN Refrigerator / User Guide
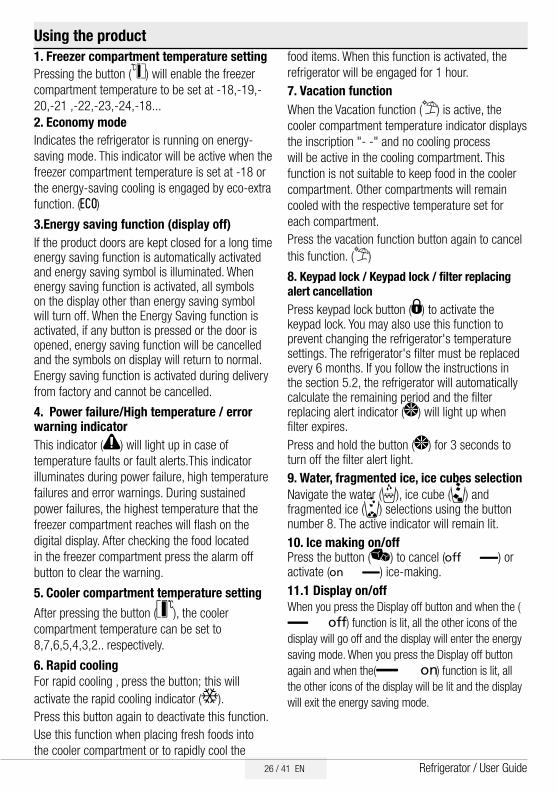
Using the product1. Freezer compartment temperature settingPressing the button ( ) will enable the freezer compartment temperature to be set at -18,-19,-20,-21 ,-22,-23,-24,-18...2. Economy mode Indicates the refrigerator is running on energy-saving mode. This indicator will be active when the freezer compartment temperature is set at -18 or the energy-saving cooling is engaged by eco-extra function. ( )
3.Energy saving function (display off)If the product doors are kept closed for a long time energy saving function is automatically activated and energy saving symbol is illuminated. When energy saving function is activated, all symbols on the display other than energy saving symbol will turn off. When the Energy Saving function is activated, if any button is pressed or the door is opened, energy saving function will be cancelled and the symbols on display will return to normal.Energy saving function is activated during delivery from factory and cannot be cancelled.
4. Power failure/High temperature / error warning indicator This indicator ( ) will light up in case of temperature faults or fault alerts.This indicator illuminates during power failure, high temperature failures and error warnings. During sustained power failures, the highest temperature that the freezer compartment reaches will flash on the digital display. After checking the food located in the freezer compartment press the alarm off button to clear the warning.
5. Cooler compartment temperature settingAfter pressing the button ( ), the cooler compartment temperature can be set to 8,7,6,5,4,3,2.. respectively.
6. Rapid coolingFor rapid cooling , press the button; this will activate the rapid cooling indicator ( ).Press this button again to deactivate this function.Use this function when placing fresh foods into the cooler compartment or to rapidly cool the
food items. When this function is activated, the refrigerator will be engaged for 1 hour.7. Vacation functionWhen the Vacation function ( ) is active, the cooler compartment temperature indicator displays the inscription "- -" and no cooling process will be active in the cooling compartment. This function is not suitable to keep food in the cooler compartment. Other compartments will remain cooled with the respective temperature set for each compartment.Press the vacation function button again to cancel this function. ( )
8. Keypad lock / Keypad lock / filter replacing alert cancellationPress keypad lock button ( ) to activate the keypad lock. You may also use this function to prevent changing the refrigerator's temperature settings. The refrigerator's filter must be replaced every 6 months. If you follow the instructions in the section 5.2, the refrigerator will automatically calculate the remaining period and the filter replacing alert indicator ( ) will light up when filter expires.Press and hold the button ( ) for 3 seconds to turn off the filter alert light.9. Water, fragmented ice, ice cubes selectionNavigate the water ( ), ice cube ( ) and fragmented ice ( ) selections using the button number 8. The active indicator will remain lit. 10. Ice making on/offPress the button ( ) to cancel ( ) or activate ( ) ice-making.11.1 Display on/offWhen you press the Display off button and when the (
) function is lit, all the other icons of the display will go off and the display will enter the energy saving mode. When you press the Display off button again and when the( ) function is lit, all the other icons of the display will be lit and the display will exit the energy saving mode.
27 / 41 ENRefrigerator / User Guide
Using the product
5.2. Humidity controlled crisper(FreSHelf)(This feature is optional)Humidity rates of the vegetables and fruit are kept under control with the feature of humidity-controlled crisper and the food is ensured to stay fresh for longer.We recommend you to place the leafy vegetables such as lettuce, spinach and the vegetables which are sensitive to humidity loss, in a horizontal manner as much as possible inside the crisper, not on their roots in a vertical position.While the vegetables are being placed, specific gravity of the vegetables should be taken into consideration. Heavy and hard vegetables should be put at the bottom of the crisper and the lightweight and soft vegetables should be placed over.Never leave the vegetables inside the crisper in their bags. If the vegetables are left inside their bags, this will cause them to decompose in a short period of time. In case contacting with other vegetables is not preferred for hygiene concerns, use a perforated paper and other similar packaging materials instead of a bag.Do not place together the pear, apricot, peach, etc. and apple in particular which have a high level of generation of ethylene gas in the same crisper with the other vegetables and fruit. The ethylene gas which is emitted by these fruit may cause the other fruit to ripen faster and decompose in a shorter time.
11.2 Alarm off warningIn case of power failure/high temperature alarm, after checking the food located in the freezer compartment press the alarm off button to clear the warning.12. AutoecoPress the auto eco button ( ), for 3 seconds to activate this function. If the door remains closed for a long time when this function is activated, the cooler section will switch to economic mode. Press the button again to deactivate this function.The indicator will light up after 6 hours when the auto eco function is active. ( )
13. Rapid freezingFor rapid freezing, press the button ; this will activate the rapid freezing indicator ( ).When the rapid freezing function is turned on, the rapid freeze indicator will light up and the freezer compartment temperature indicator will display the value -27. Press the Rapid freeze button ()again to cancel this function.The Rapid freeze indicator will turn off and return to normal setting.The rapid freezing function will be automatically cancelled after 24 hours, unless cancelled by the user. To freeze a large amount of fresh food, press the rapid freeze button 12 hours before placing the food in the freezer compartment.
28 / 41 EN Refrigerator / User Guide
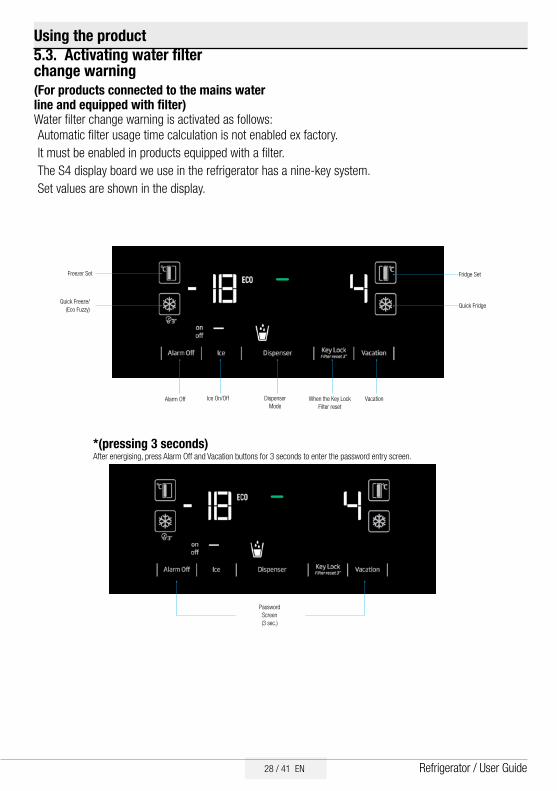
Using the product5.3. Activating water filter change warning(For products connected to the mains water line and equipped with filter)Water filter change warning is activated as follows:
Freezer Set Fridge Set
Quick Fridge
Alarm Off Ice On/Off Dispenser Mode
When the Key Lock Filter reset
Vacation
Quick Freeze/(Eco Fuzzy)
*(pressing 3 seconds)After energising, press Alarm Off and Vacation buttons for 3 seconds to enter the password entry screen.
Password Screen(3 sec.)
Automatic filter usage time calculation is not enabled ex factory.It must be enabled in products equipped with a filter.The S4 display board we use in the refrigerator has a nine-key system.Set values are shown in the display.
29 / 41 ENRefrigerator / User Guide
Using the product
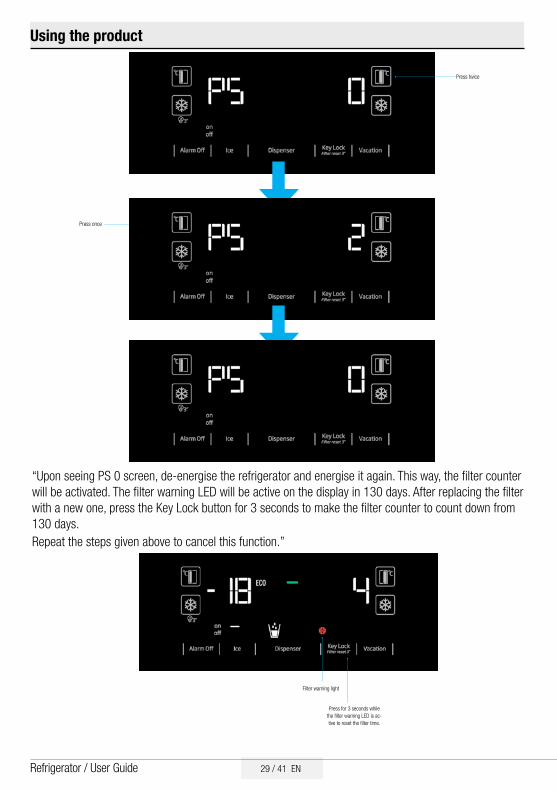
Press twice
Press once
“Upon seeing PS 0 screen, de-energise the refrigerator and energise it again. This way, the filter counter will be activated. The filter warning LED will be active on the display in 130 days. After replacing the filter with a new one, press the Key Lock button for 3 seconds to make the filter counter to count down from 130 days.Repeat the steps given above to cancel this function.”
Filter warning light
Press for 3 seconds while the filter warning LED is ac-tive to reset the filter time.
30 / 41 EN Refrigerator / User Guide
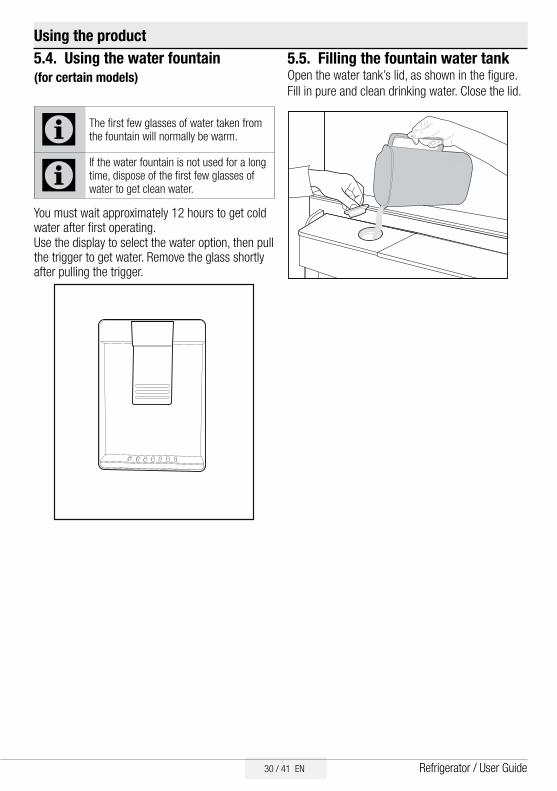
Using the product5.4. Using the water fountain (for certain models)
C The first few glasses of water taken from the fountain will normally be warm.
CIf the water fountain is not used for a long time, dispose of the first few glasses of water to get clean water.
You must wait approximately 12 hours to get cold water after first operating. Use the display to select the water option, then pull the trigger to get water. Remove the glass shortly after pulling the trigger.
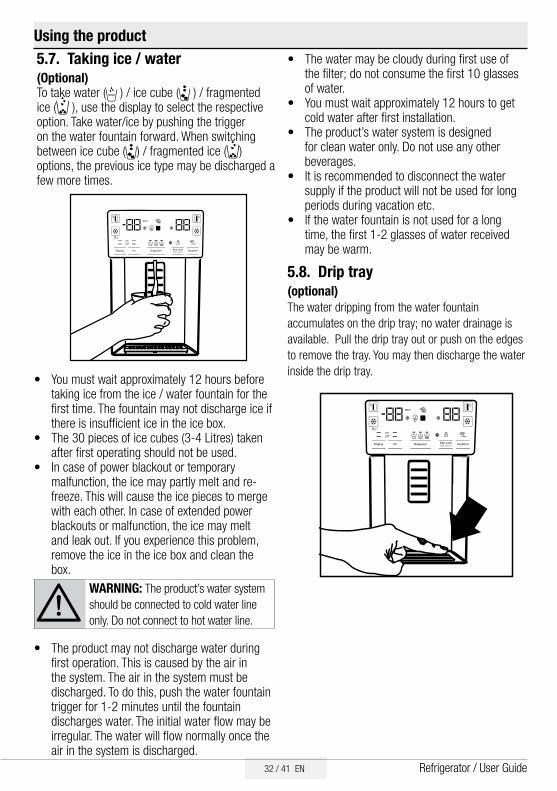
5.5. Filling the fountain water tankOpen the water tank’s lid, as shown in the figure. Fill in pure and clean drinking water. Close the lid.

31 / 41 ENRefrigerator / User Guide
Using the product5.6. Cleaning the water tankRemove the water filling reservoir inside the door shelf. Detach by holding both sides of the doorshelf.Hold both sides of the water tank and remove at 45° angle.Remove and clean the water tank lid.
A
Do not fill the water tank with fruit juice, fizzy beverages, alcoholic beverages or any other liquids incompatible for use in the water fountain. Using such liquids will cause malfunction and irreparable damage in the water fountain. Using the fountain in this way is not within the scope of warranty. Such certain chemicals and additives in the beverages / liquids may cause material damage to the water tank.
AThe water tank and water fountain components cannot be washed with dishwashers.
32 / 41 EN Refrigerator / User Guide
Using the product5.7. Taking ice / water (Optional)To take water ( ) / ice cube ( ) / fragmented ice ( ), use the display to select the respective option. Take water/ice by pushing the trigger on the water fountain forward. When switching between ice cube ( ) / fragmented ice ( ) options, the previous ice type may be discharged a few more times.
t� You must wait approximately 12 hours before taking ice from the ice / water fountain for the first time. The fountain may not discharge ice if there is insufficient ice in the ice box.
t� The 30 pieces of ice cubes (3-4 Litres) taken after first operating should not be used.
t� In case of power blackout or temporary malfunction, the ice may partly melt and re-freeze. This will cause the ice pieces to merge with each other. In case of extended power blackouts or malfunction, the ice may melt and leak out. If you experience this problem, remove the ice in the ice box and clean the box.
AWARNING: The product’s water system should be connected to cold water line only. Do not connect to hot water line.
t� The product may not discharge water during first operation. This is caused by the air in the system. The air in the system must be discharged. To do this, push the water fountain trigger for 1-2 minutes until the fountain discharges water. The initial water flow may be irregular. The water will flow normally once the air in the system is discharged.
t� The water may be cloudy during first use of the filter; do not consume the first 10 glasses of water.
t� You must wait approximately 12 hours to get cold water after first installation.
t� The product’s water system is designed for clean water only. Do not use any other beverages.
t� It is recommended to disconnect the water supply if the product will not be used for long periods during vacation etc.
t� If the water fountain is not used for a long time, the first 1-2 glasses of water received may be warm.
5.8. Drip tray (optional)The water dripping from the water fountain accumulates on the drip tray; no water drainage is available. Pull the drip tray out or push on the edges to remove the tray. You may then discharge the water inside the drip tray.

33 / 41 ENRefrigerator / User Guide
Using the product5.9. Zero degree compartment(Optional)Use this compartment to keep delicatessen at lower temperatures or meat products for immediate consumption. Do not place fruits and vegetables in this compartment. You can expand the product's internal volume by removing any of the zero degree compartments. To remove the compartment, simply pull forth, lift up and pull out.
5.10. Vegetable bin The refrigerator's vegetable bin is designed to keep vegetables fresh by preserving humidity. For this purpose, the overall cold air circulation is intensified in the vegetable bin. Keep fruits and vegetables in this compartment. Keep the green-leaved vegetables and fruits separately to prolong their life.
5.11. Blue light/HarvestFresh*May not be available in all models
For the blue light,Fruits and vegetables stored in the crispers that are illuminated with a blue light continue their photosynthesis by means of the wavelength effect of blue light and thus preserve their vitamin content.
ForHarvestFresh,Fruits and vegetables stored in crispers illuminated with the HarvestFresh technology preserve their vitamins for a longer time thanks to the blue, green, red lights and dark cycles, which simulate a day cycle.If you open the door of the refrigerator during the dark period of the HarvestFresh technology, the refrigerator will automatically detect this and enable the blue-green or red light to illuminate the crisper for your convenience. After you have closed the door of the refrigerator, the dark period will continue, representing the night time in a day cycle.
5.12. Ionizer(Optional)The ionizer system in the cooler compartment's air duct serves to ionize the air. The negative ion emissions will eliminate bacteria and other molecules causing odour in the air.
5.13. Minibar(Optional)The refrigerator's minibar door shelf can be accessed without opening the door. This will allow you to easily take frequently consumed food and beverages from the refrigerator. To open the minibar cover, push with your hand and pull towards yourself.
AWARNING: Do not sit, hang or place heavy objects on the minibar cover. This may damage the product or cause you to be injured.
To close this compartment, simply push forward from the upper section of the cover.
5.14. Odour filter (optional)The odour filter in the cooler compartment's air duct will prevent undesirable odour formation.
34 / 41 EN Refrigerator / User Guide
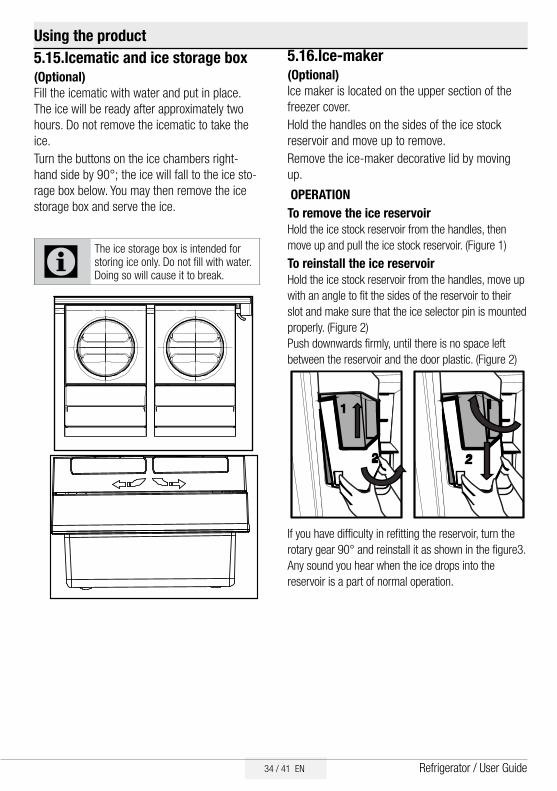
Using the product5.15. Icematic and ice storage box(Optional)Fill the icematic with water and put in place. The ice will be ready after approximately two hours. Do not remove the icematic to take the ice.Turn the buttons on the ice chambers right-hand side by 90°; the ice will fall to the ice sto-rage box below. You may then remove the ice storage box and serve the ice.
CThe ice storage box is intended for storing ice only. Do not fill with water. Doing so will cause it to break.
5.16. Ice-maker (Optional)Ice maker is located on the upper section of the freezer cover.Hold the handles on the sides of the ice stock reservoir and move up to remove. Remove the ice-maker decorative lid by moving up.
OPERATIONTo remove the ice reservoirHold the ice stock reservoir from the handles, then move up and pull the ice stock reservoir. (Figure 1)To reinstall the ice reservoirHold the ice stock reservoir from the handles, move up with an angle to fit the sides of the reservoir to their slot and make sure that the ice selector pin is mounted properly. (Figure 2)Push downwards firmly, until there is no space left between the reservoir and the door plastic. (Figure 2)
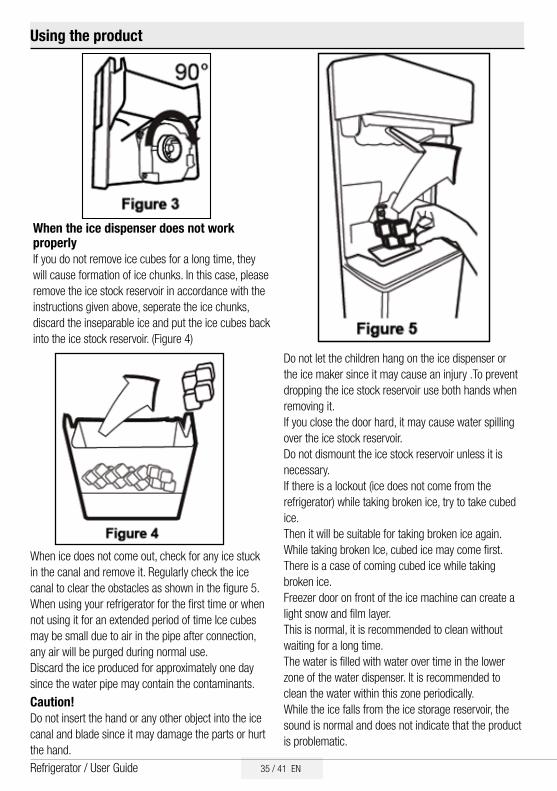
If you have difficulty in refitting the reservoir, turn the rotary gear 90° and reinstall it as shown in the figure3.Any sound you hear when the ice drops into the reservoir is a part of normal operation.
35 / 41 ENRefrigerator / User Guide
Using the product
When the ice dispenser does not work properlyIf you do not remove ice cubes for a long time, they will cause formation of ice chunks. In this case, please remove the ice stock reservoir in accordance with the instructions given above, seperate the ice chunks, discard the inseparable ice and put the ice cubes back into the ice stock reservoir. (Figure 4)
When ice does not come out, check for any ice stuck in the canal and remove it. Regularly check the icecanal to clear the obstacles as shown in the figure 5.When using your refrigerator for the first time or when not using it for an extended period of time Ice cubes may be small due to air in the pipe after connection, any air will be purged during normal use.Discard the ice produced for approximately one day since the water pipe may contain the contaminants.Caution!Do not insert the hand or any other object into the ice canal and blade since it may damage the parts or hurt the hand.
Do not let the children hang on the ice dispenser or the ice maker since it may cause an injury .To prevent dropping the ice stock reservoir use both hands when removing it.If you close the door hard, it may cause water spilling over the ice stock reservoir.Do not dismount the ice stock reservoir unless it is necessary.If there is a lockout (ice does not come from the refrigerator) while taking broken ice, try to take cubed ice.Then it will be suitable for taking broken ice again.While taking broken Ice, cubed ice may come first. There is a case of coming cubed ice while taking broken ice.Freezer door on front of the ice machine can create a light snow and film layer.This is normal, it is recommended to clean without waiting for a long time.The water is filled with water over time in the lower zone of the water dispenser. It is recommended to clean the water within this zone periodically.While the ice falls from the ice storage reservoir, the sound is normal and does not indicate that the product is problematic.

36 / 41 EN Refrigerator / User Guide
Using the product
5.17. Freezing fresh foodt� To preserve food quality, the food items placed
in the freezer compartment must be frozen as quickly as possible, use the rapid freezing for this.
t� To freeze a large amount of fresh food, press the rapid freeze button 12 hours before placing the food in the freezer compartment.
t� Freezing the food items when fresh will extend the storage time in the freezer compartment.
t� Pack the food items in air-tight packs and seal tightly.
t� Make sure the food items are packed before putting in the freezer. Use freezer holders, tinfoil and damp-proof paper, plastic bag or similar packaging materials instead of traditional packaging paper.
t� Mark each food pack by writing the date on the package before freezing.This will allow you to determine the freshness of each pack every time the freezer is opened. Keep the earlier food items in the front to ensure they are used first.
t� Frozen food items must be used immediately after defrosting and should not be frozen again.
t� Do not free large quantities of food at once.
Freezer Compartment
Setting
Cooler Compartment
SettingDescriptions
-18°C 4°C This is the default, recommended setting.-20,-22 or -24°C 4°C These settings are recommended for ambient temperatures
exceeding 30°C.
Rapid Freeze 4°CPress Rapid Freeze function 12 hours before placing the food, the product will reset to previous settings when the process is completed.
-18°C or colder 2°C Use these settings if you believe the cooler compartment is not cold enough due to ambient temperature or frequently opening the door.
5.18. Recommendations for storing frozen foodsThe compartment must be set to at least -18°C.1. Place the food items in the freezer as quickly
as possible to avoid defrosting.2. Before freezing, check the “Expiry Date” on
the package to make sure it is not expired.3. Make sure the food’s packaging is not
damaged.
5.19. Deep freezer detailsAs per the IEC 62552 standards, the freezer must have the capacity to freeze 4,5 kg of food items at -18°C or lower temperatures in 24 hours for each 100 litres of freezer compartment volume. Food items can only be preserved for extended periods at or below temperature of -18°C . You can keep the foods fresh for months (in deep freezer at or below temperatures of 18°C ).The food items to be frozen must not contact the already-frozen food inside to avoid partial defrosting.Boil the vegetables and filter the water to extend the frozen storage time. Place the food in air-tight packages after filtering and place in the freezer. Bananas, tomatoes, lettuce, celery, boiled eggs, potatoes and similar food items should not be frozen. Freezing these food items will simply reduce the nutritional value and food quality, as well as possible spoiling which is harmful to health.
The blade mechanism inside the ice bank is sharp and can cut your hand.If the ice dispenser does not provide ice, the ice may be stuck together, remove the tank and clean it again.Ice type cannot be changed on the display when the ice trigger is pressed to obtain ice. Release the trigger, change the ice type on the display and obtain ice again.
37 / 41 ENRefrigerator / User Guide
Using the product
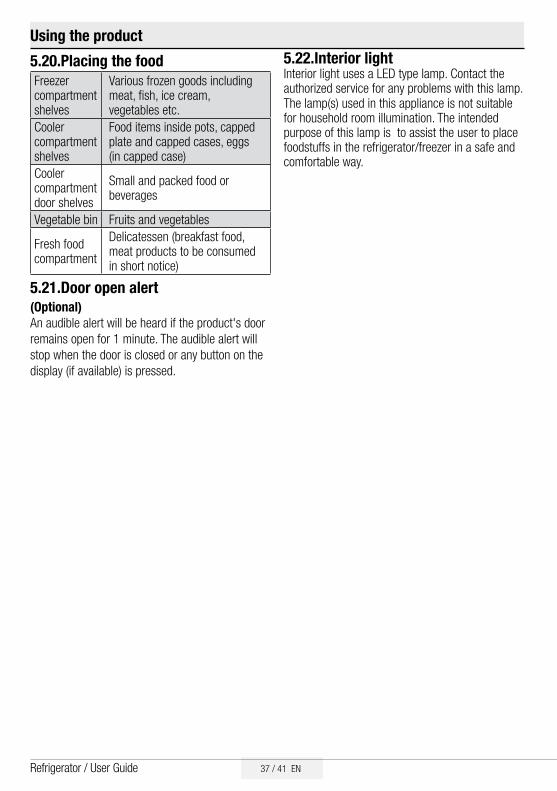
5.20. Placing the foodFreezer compartment shelves
Various frozen goods including meat, fish, ice cream, vegetables etc.
Cooler compartment shelves
Food items inside pots, capped plate and capped cases, eggs (in capped case)
Cooler compartment door shelves
Small and packed food or beverages
Vegetable bin Fruits and vegetables
Fresh food compartment
Delicatessen (breakfast food, meat products to be consumed in short notice)
5.21. Door open alert (Optional)An audible alert will be heard if the product's door remains open for 1 minute. The audible alert will stop when the door is closed or any button on the display (if available) is pressed.
5.22. Interior lightInterior light uses a LED type lamp. Contact the authorized service for any problems with this lamp.The lamp(s) used in this appliance is not suitable for household room illumination. The intended purpose of this lamp is to assist the user to place foodstuffs in the refrigerator/freezer in a safe and comfortable way.
38 / 41 EN Refrigerator / User Guide
6 Maintenance and CleaningCleaning the product regularly will prolong its service life.
B WARNING: Disconnect the power before cleaning the refrigerator.
t� Do not use sharp and abrasive tools, soap, house cleaning materials, detergents, gas, gasoline, varnish and similar substances for cleaning.
t� Melt a teaspoonful of carbonate in the water. Moisten a piece of cloth in the water and wring out. Wipe the device with this cloth and dry off thoroughly.
t� Take care to keep water away from the lamp’s cover and other electrical parts.
t� Clean the door using a wet cloth. Remove all items inside to detach the door and chassis shelves. Lift the door shelves up to detach. Clean and dry the shelves, then attach back in place by sliding from above.
t� Do not use chloric water or cleaning products on the exterior surface and chrome-coated parts of the product. Chlorine will cause rust on such metallic surfaces.
t� Do not use sharp, abrasive tools, soap, household cleaning agents, detergents, kerosene, fuel oil, varnish etc. to prevent removal and deformation of the prints on the plastic part. Use lukewarm water and a soft cloth for cleaning and then wipe it dry.
6.1. Preventing Bad OdourThe product is manufactured free of any odorous materials. However, keeping the food in inappropriate sections and improper cleaning of internal surfaces may lead to malodour.To avoid this, clean the inside with carbonated water every 15 days.t� Keep the foods in sealed holders.
Microorganisms may spread out of unsealed food items and cause malodour.
t� Do not keep expired and spoilt foods in the refrigerator.
6.2. Protecting Plastic Surfaces Oil spilled on plastic surfaces may damage the surface and must be cleaned immediately with warm water.
39 / 41 ENRefrigerator / User Guide
7. TroubleshootingCheck this list before contacting the service. Doing so will save you time and money. This list includes frequent complaints that are not related to faulty workmanship or materials. Certain features mentioned herein may not apply to your product.
The refrigerator is not working. t� The power plug is not fully settled. >>>
Plug it in to settle completely into the socket.
t� The fuse connected to the socket powering the product or the main fuse is blown. >>> Check the fuses.
Condensation on the side wall of the cooler compartment (MULTI ZONE, COOL, CONTROL and FLEXI ZONE).t� The door is opened too frequently >>>
Take care not to open the product’s door too frequently.
t� The environment is too humid. >>> Do not install the product in humid environments.
t� Foods containing liquids are kept in unsealed holders. >>> Keep the foods containing liquids in sealed holders.
t� The product’s door is left open. >>> Do not keep the product’s door open for long periods.
t� The thermostat is set to too low temperature. >>> Set the thermostat to appropriate temperature.
Compressor is not working.t� In case of sudden power failure or pulling
the power plug off and putting back on, the gas pressure in the product’s cooling system is not balanced, which triggers the compressor thermic safeguard. The product will restart after approximately 6 minutes. If the product does not restart after this period, contact the service.
t� Defrosting is active. >>> This is normal for a fully-automatic defrosting product. The defrosting is carried out periodically.
t� The product is not plugged in. >>> Make sure the power cord is plugged in.
t� The temperature setting is incorrect. >>> Select the appropriate temperature setting.
t� The power is out. >>> The product will continue to operate normally once the power is restored.
The refrigerator’s operating noise is increasing while in use.t� The product’s operating performance may
vary depending on the ambient temperature variations. This is normal and not a malfunction.
The refrigerator runs too often or for too long.t� The new product may be larger than the
previous one. Larger products will run for longer periods.
t� The room temperature may be high. >>> The product will normally run for long periods in higher room temperature.
t� The product may have been recently plugged in or a new food item is placed inside. >>> The product will take longer to reach the set temperature when recently plugged in or a new food item is placed inside. This is normal.
t� Large quantities of hot food may have been recently placed into the product. >>> Do not place hot food into the product.
t� The doors were opened frequently or kept open for long periods. >>> The warm air moving inside will cause the product to run longer. Do not open the doors too frequently.
t� The freezer or cooler door may be ajar. >>> Check that the doors are fully closed.
t� The product may be set to temperature too low. >>> Set the temperature to a higher degree and wait for the product to reach the adjusted temperature.
t� The cooler or freezer door washer may be dirty, worn out, broken or not properly settled. >>> Clean or replace the washer. Damaged / torn door washer will cause the product to run for longer periods to preserve the current temperature.

40 / 41 EN Refrigerator / User Guide
TroubleshootingThe freezer temperature is very low, but the cooler temperature is adequate.t� The freezer compartment temperature is set
to a very low degree. >>> Set the freezer compartment temperature to a higher degree and check again.
The cooler temperature is very low, but the freezer temperature is adequate.t� The cooler compartment temperature is set
to a very low degree. >>> Set the freezer compartment temperature to a higher degree and check again.
The food items kept in cooler compartment drawers are frozen.t� The cooler compartment temperature is set
to a very low degree. >>> Set the freezer compartment temperature to a higher degree and check again.
The temperature in the cooler or the freezer is too high.t� The cooler compartment temperature is set
to a very high degree. >>> Temperature setting of the cooler compartment has an effect on the temperature in the freezer compartment. Wait until the temperature of relevant parts reach the sufficient level by changing the temperature of cooler or freezer compartments.
t� The doors were opened frequently or kept open for long periods. >>> Do not open the doors too frequently.
t� The door may be ajar. >>> Fully close the door.
t� The product may have been recently plugged in or a new food item is placed inside. >>> This is normal. The product will take longer to reach the set temperature when recently plugged in or a new food item is placed inside.
t� Large quantities of hot food may have been recently placed into the product. >>> Do not place hot food into the product.
Shaking or noise.t� The ground is not level or durable. >>> If
the product is shaking when moved slowly, adjust the stands to balance the product. Also make sure the ground is sufficiently durable to bear the product.
t� Any items placed on the product may cause noise. >>> Remove any items placed on the product.
The product is making noise of liquid flowing, spraying etc.t� The product’s operating principles involve
liquid and gas flows. >>> This is normal and not a malfunction.
There is sound of wind blowing coming from the product.t� The product uses a fan for the cooling
process. This is normal and not a malfunction.
There is condensation on the product’s internal walls.t� Hot or humid weather will increase icing
and condensation. This is normal and not a malfunction.
t� The doors were opened frequently or kept open for long periods. >>> Do not open the doors too frequently; if open, close the door.
t� The door may be ajar. >>> Fully close the door.
There is condensation on the product’s exterior or between the doors.t� The ambient weather may be humid, this
is quite normal in humid weather. >>> The condensation will dissipate when the humidity is reduced.
The interior smells bad.t� The product is not cleaned regularly. >>>
Clean the interior regularly using sponge, warm water and carbonated water.
t� Certain holders and packaging materials may cause odour. >>> Use holders and packaging materials without free of odour.
t� The foods were placed in unsealed holders. >>> Keep the foods in sealed holders.
41 / 41 ENRefrigerator / User Guide
TroubleshootingMicro-organisms may spread out of unsealed food items and cause malodour. Remove any expired or spoilt foods from the product.
The door is not closing.t� Food packages may be blocking the door.
>>> Relocate any items blocking the doors.t� The product is not standing in full upright
position on the ground. >>> Adjust the stands to balance the product.
t� The ground is not level or durable. >>> Make sure the ground is level and sufficiently durable to bear the product.
The vegetable bin is jammed.t� The food items may be in contact with
the upper section of the drawer. >>> Reorganize the food items in the drawer.
If The Surface Of The Product Is Hot.t� High temperatures may be observed
between the two doors, on the side panels and at the rear grill while the product is operating. This is normal and does not require service maintenance!Be careful when touching these areas.
A WARNING:If the problem persists after following the instructions in this section, contact your vendor or an Authorised Service. Do not try to repair the product.
Mohon baca pedoman ini sebelum menggunakan produk! Pelanggan yang terhormat,
Kami ingin Anda mendapatkan manfaat terbaik dari produk kami, yang telah
diproduksi di fasilitas modern dengan kendali mutu yang cermat dan teliti.
Jadi, kami sarankan Anda membaca seluruh pedoman pengguna sebelum Anda
menggunakan produk ini. Jika produk berpindah tangan, jangan lupa untuk
menyerahkan pedoman kepada pemilik baru beserta produknya.
Pedoman ini akan membantu Anda menggunakan produk secara cepat dan aman.
• Baca pedoman pengguna dengan teliti sebelum memasang dan
mengoperasikan produk.
• Selalu patuhi instruksi keselamatan yang berlaku.
• Simpan pedoman pengguna di tempat yang mudah dijangkau untuk digunakan
nantinya.
• Mohon baca dokumen lain yang disediakan beserta produk.
Mohon diingat bahwa pedoma pengguna ini mungkin berlaku pada beberapa model
produk. Pedoman ini dengan jelas menunjukkan variasi model yang berbeda.
Informasi penting dan tips yang berguna.
Risiko pada jiwa dan harta
Risiko sengatan listrik
Kemasan produk terbuat dari
bahan yang dapat didaur ulang,
sesuai dengan Undang-
Undang Lingkungan Nasional.
Daftar isi
1 Instruksi keselamatan dan instruksi terkait
lingkungan 3 4 Persiapan 16
1.1. Keselamatan umum ........................... 3
1.1.1 Peringatan HC .................................. 4
1.1.2 Untuk model dengan dispenser air .. 4
1.2. Penggunaan yang dimaksudkan ......... 5
1.3. Keselamatan anak-anak...................... 5
1.4. Kesesuaian dengan Arahan WEEE
dan Pembuangan Limbah Produk ....... 5
1.5. Kepatuhan pada Peraturan RoHS ....... 5
1.6. Informasi paket .................................... 5
4.1. Apa yang harus dilakukan untuk
menghemat energi ................................ 16
4.2. Penggunaan Pertama ........................... 16
5 Menggunakan produk 17
5.1. Panel indikator ...................................... 17
5.2. Ruang buah dan sayur dengan
pengontrol kelembapan ........................ 27
5.3. Mengaktifkan peringatan perubahan
filter air .................................................. 28
5.4. Menggunakan pancuran air .................. 30
5.5. Mengisi tangki pancuran air .................. 30
5.6. Membersihkan tangki air ....................... 31
5.7. Mengambil es / air ................................. 32
5.8. Baki penampung tetesan ..................... 32
5.9. Kompartemen nol derajat ...................... 33
5.10. Penyimpan sayuran .......................... 33
5.11. Cahaya biru ...................................... 33
5.12. Ionizer .............................................. 33
5.13. Minibar .............................................. 33
5.14. Filter bau ........................................... 33
5.15. Kotak penyimpanan esmatik dan es 34
5.16. Pembuat es ...................................... 34
5.17. Membekukan Makanan segar .......... 36
5.18. Rekomendasi untuk
penyimpanan makanan beku ............ 36
5.19. Rincian freezer lebih dalam ............. 36
5.20. Menempatkan makanan ................... 37
5.21. Peringatan pintu terbuka ................... 37
5.22. Lampu interior ................................... 37
2 Lemari es 6
2 Lemari es 7
3 Instalasi 8
3.1. Tempat tepat untuk instalasi ............. 8
3.2. Memasang plastik penutup .............. 8
3.3. Mengatur dudukan ............................ 9
3.4. Sambungan daya .............................. 9
3.5. Saluran air ......................................... 10
3.6. Menyambungkan selang air pada
produk .............................................. 11
3.7. Menyambungkan sumber air ............. 11
3.8. Untuk produk yang menggunakan
galon air (carboy) .............................. 12
3.9. Filter air ............................................ 12
3.9.1. Memasang filter eksternal pada
dinding (Opsional) .......................... 13
3.9.2. Filter internal 14
6 Perawatan dan Pembersihan 38
6.1. Mencegah Bau Tidak Enak ................ 38
6.2. Melindungi Permukaan Plastik ............ 38
7 Pemecahan masalah 39
1. Instruksi keselamatan dan instruksi terkait lingkungan Bagian ini memberikan instruksi keselamatan yang
diperlukan untuk mencegah risiko cedera dan
kerusakan material. Kegagalan dalam mematuhi
instruksi ini akan menyebabkan semua jenis garansi
produk tidak berlaku.
tersebut di bawah pengawasan dan instruksi dari
orang yang bertanggung jawab atas keselamatan
mereka. Anak-anak jangan diperkenankan bermain
dengan perangkat ini.
• Dalam hal terjadi kegagalan, cabut steker
perangkat ini.
• Setelah dicabut, tunggu minimal 5 menit
sebelum menyambungkan ke listrik lagi.
• Cabut steker saat produk tidak digunakan.
• Jangan memegang steker ketika tangan basah!
Jangan menarik kabel untuk melepas steker,
selalu pegang konektornya.
• Jangan mencolokkan steker lemari es jika soket
longgar.
• Cabut steker saat melakukan instalasi,
pemeliharaan, pembersihan, dan perbaikan.
• Jika produk tidak akan digunakan untuk
sementara waktu, cabut steker produk dan
keluarkan semua makanan di dalamnya.
• Jangan menggunakan produk ini saat
kompartemen dengan card rangkaian berada di
bagian belakang atas produk (tutup boks card
listrik) (1) terbuka.
• Jangan menggunakan uap atau bahan
pembersih beruap untuk membersihkan lemari
es dan melelehkan es di dalamnya. Uap dapat
mengenai daerah beraliran listrik dan
menyebabkan hubungan singkat atau sengatan
listrik!
Penggunaan yang dimaksudkan
Perangkat ini ditujukan untuk digunakan dalam
rumah tangga dan terapan serupa seperti
- area dapur karyawan di bengkel, kantor, dan
lingkungan kerja lain;
- peternakan dan klien di hotel, motel, atau
lingkungan jenis tempat tinggal lain;
- lingkungan jenis penginapan (break and
breakfast);
- terapan katering and non-retail sejenis.
1.1. Keselamatan umum
• Produk ini sebaiknya tidak digunakan oleh orang
pengidap cacat fisik, indra, mental yang tidak
memiliki pengetahuan dan Pengalaman yang
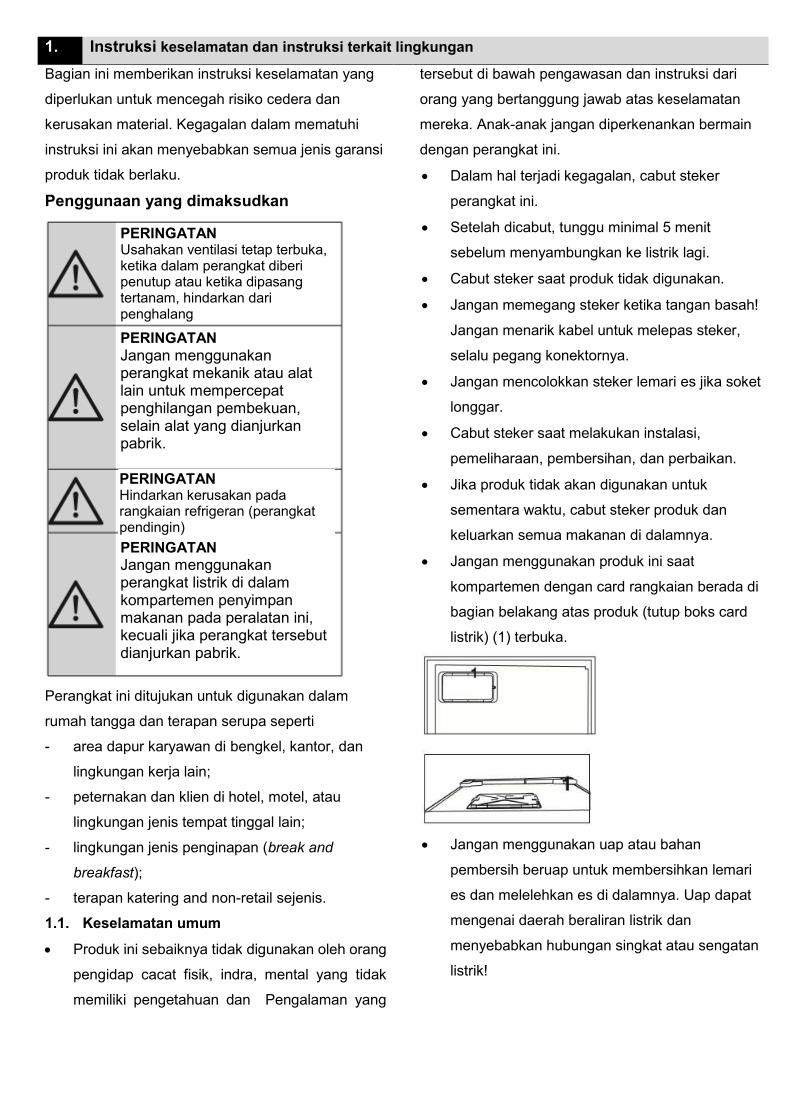
PERINGATAN Usahakan ventilasi tetap terbuka, ketika dalam perangkat diberi penutup atau ketika dipasang tertanam, hindarkan dari penghalang
PERINGATAN Jangan menggunakan perangkat mekanik atau alat lain untuk mempercepat penghilangan pembekuan, selain alat yang dianjurkan pabrik.
PERINGATAN Hindarkan kerusakan pada rangkaian refrigeran (perangkat pendingin) PERINGATAN Jangan menggunakan perangkat listrik di dalam kompartemen penyimpan makanan pada peralatan ini, kecuali jika perangkat tersebut dianjurkan pabrik.

memadai atau oleh anak-anak. Perangkat ini
hanya dapat digunakan oleh orang-orang • Jangan mencuci produk dengan menyemprot
atau mengguyurkan air! Bahaya sengatan
listrik!
Instruksi keselamatan dan instruksi terkait lingkungan • Jika terjadi kegagalan fungsi, jangan gunakan
produk, karena dapat menyebabkan sengatan
listrik. Hubungi servis resmi sebelum melakukan
apa pun.
• Sambungkan produk ke soket pembumian.
Pembumian harus dilakukan oleh ahli listrik
yang memiliki kualifikasi.
• Jika produk memiliki lampu jenis LED, hubungi
servis resmi untuk mengganti lampu tersebut
atau jika ada masalah.
• Jangan menyentuh makanan beku dengan
tangan basah! Makanan mungkin akan
menempel di tangan Anda!
• Jangan memasukkan cairan di botol dan kaleng
ke dalam kompartemen freezer. Botol atau
kaleng itu bisa meledak.
• Tempatkan cairan secara tegak lurus setelah
menutupnya dengan rapat.
• Jangan menyemprotkan bahan yang mudah
terbakar di dekat produk, karena dapat terbakar
atau meledak.
• Jangan menyimpan bahan mudah terbakar dan
produk mengandung gas mudah terbakar
(semprotan, dll.) di dalam lemari es.
• Jangan menempatkan wadah penampung
cairan di atas produk. Percikan air ke bagian
yang beraliran listrik dapat menyebabkan
sengatan listrik dan risiko kebakaran.
• Memaparkan produk pada hujan, salju, sinar
matahari, dan angin akan menyebabkan bahaya
pada kelistrikan. Saat memindahkan produk,
jangan menarik dengan memegang gagang
pintu. Gagang pintu itu mungkin terlepas.
menyebabkan produk jatuh dan menyebabkan
kerusakan pada bagian-bagiannya.
• Berhati-hatilah agar tidak tersandung kabel
daya.
1.1.1 Peringatan HC Jika produk terdiri atas sistem pendingin
menggunakan gas R600a, berhati-hatilah agar tidak
merusak sistem pendingin dan pipa saat
menggunakan dan memindahkan produk. Gas ini
mudah terbakar. Jika sistem pendingin rusak,
jauhkan produk dari sumber api dan segera
sediakan ruang untuk pergantian segera.
1.1.2 Untuk model dengan dispenser air
• Tekanan untuk saluran masuk air dingin
maksimal harus 90 psi (6.2 bar). Jika tekanan
air Anda lebih dari 80 psi (5,5 bar), gunakan
katup pembatas tekanan di sistem utama Anda.
Jika Anda tidak tahu cara memeriksa tekanan
air Anda, mintalah bantuan ahli pipa
profesional.
• Jika ada risiko efek pukulan air (water hammer
effect) pada instalasi Anda, selalu gunakan
peralatan pencegahan pukulan air pada
instalasi Anda. Hubungi ahli pipa profesional
jika Anda tidak yakin tidak terdapat efek
pukulan air di instalasi Anda.
• Jangan pasang di saluran masuk air panas.
Lakukan tindakan pencegahan terhadap risiko
Label di sisi atas dalam menunjukkan jenis gas yang digunakan pada produk ini
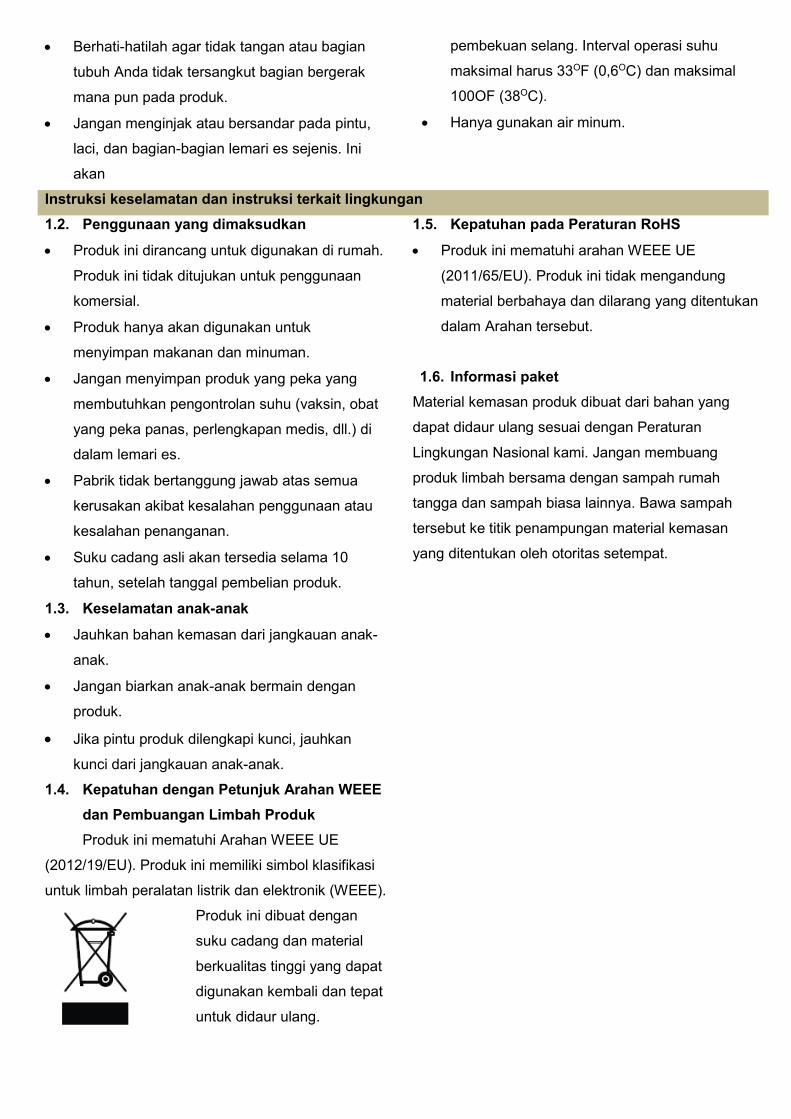
• Berhati-hatilah agar tidak tangan atau bagian
tubuh Anda tidak tersangkut bagian bergerak
mana pun pada produk.
• Jangan menginjak atau bersandar pada pintu,
laci, dan bagian-bagian lemari es sejenis. Ini
akan
pembekuan selang. Interval operasi suhu
maksimal harus 33OF (0,6OC) dan maksimal
100OF (38OC).
• Hanya gunakan air minum.
Instruksi keselamatan dan instruksi terkait lingkungan 1.2. Penggunaan yang dimaksudkan
• Produk ini dirancang untuk digunakan di rumah.
Produk ini tidak ditujukan untuk penggunaan
komersial.
• Produk hanya akan digunakan untuk
menyimpan makanan dan minuman.
• Jangan menyimpan produk yang peka yang
membutuhkan pengontrolan suhu (vaksin, obat
yang peka panas, perlengkapan medis, dll.) di
dalam lemari es.
• Pabrik tidak bertanggung jawab atas semua
kerusakan akibat kesalahan penggunaan atau
kesalahan penanganan.
• Suku cadang asli akan tersedia selama 10
tahun, setelah tanggal pembelian produk.
1.5. Kepatuhan pada Peraturan RoHS
• Produk ini mematuhi arahan WEEE UE
(2011/65/EU). Produk ini tidak mengandung
material berbahaya dan dilarang yang ditentukan
dalam Arahan tersebut.
1.6. Informasi paket Material kemasan produk dibuat dari bahan yang
dapat didaur ulang sesuai dengan Peraturan
Lingkungan Nasional kami. Jangan membuang
produk limbah bersama dengan sampah rumah
tangga dan sampah biasa lainnya. Bawa sampah
tersebut ke titik penampungan material kemasan
yang ditentukan oleh otoritas setempat.
1.3. Keselamatan anak-anak
• Jauhkan bahan kemasan dari jangkauan anak-
anak.
• Jangan biarkan anak-anak bermain dengan
produk.
• Jika pintu produk dilengkapi kunci, jauhkan
kunci dari jangkauan anak-anak.
1.4. Kepatuhan dengan Petunjuk Arahan WEEE dan Pembuangan Limbah Produk Produk ini mematuhi Arahan WEEE UE
(2012/19/EU). Produk ini memiliki simbol klasifikasi
untuk limbah peralatan listrik dan elektronik (WEEE).
Produk ini dibuat dengan
suku cadang dan material
berkualitas tinggi yang dapat
digunakan kembali dan tepat
untuk didaur ulang.
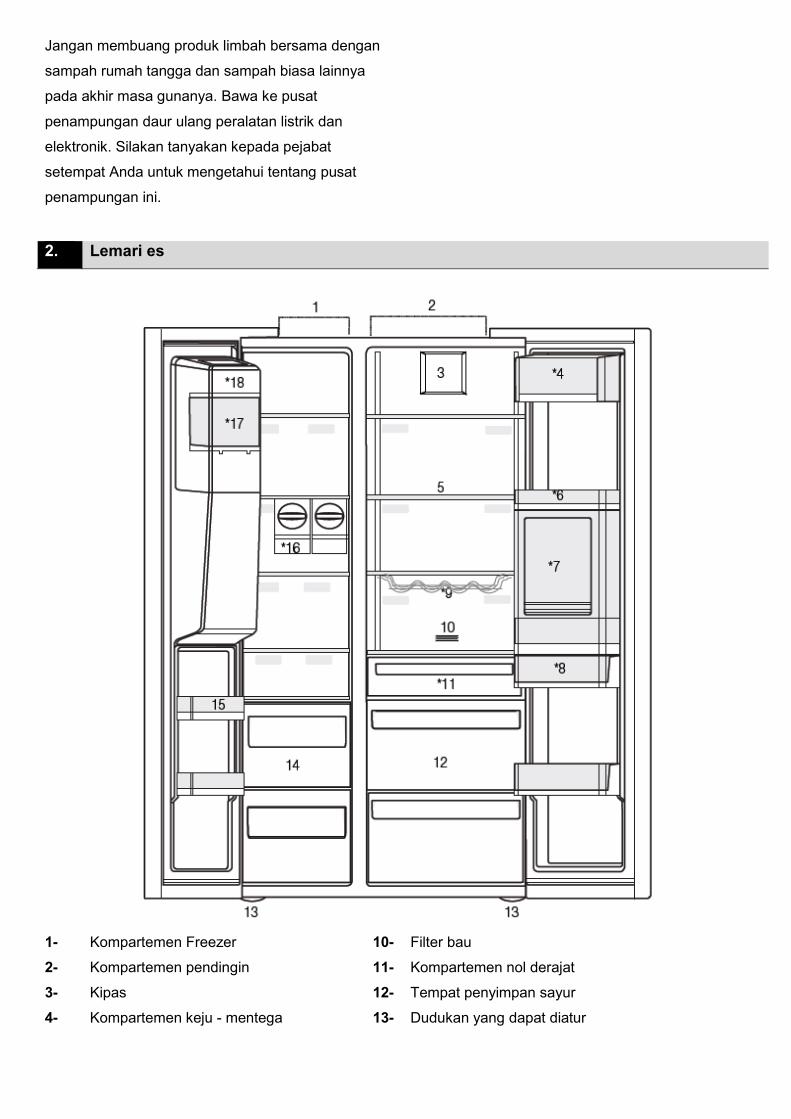
Jangan membuang produk limbah bersama dengan
sampah rumah tangga dan sampah biasa lainnya
pada akhir masa gunanya. Bawa ke pusat
penampungan daur ulang peralatan listrik dan
elektronik. Silakan tanyakan kepada pejabat
setempat Anda untuk mengetahui tentang pusat
penampungan ini.
2. Lemari es
1- Kompartemen Freezer 10- Filter bau
2- Kompartemen pendingin 11- Kompartemen nol derajat
3- Kipas 12- Tempat penyimpan sayur
4- Kompartemen keju - mentega 13- Dudukan yang dapat diatur
5- Rak kaca 14- Kompartemen penyimpanan makanan beku
6- Rak pintu kompartemen pendingin 15- Rak pintu kompartemen Freezer
7- Aksesori Minibar 16- Icematics
8- Tangki air 17- Kotak penyimpanan es
9- Rak botol 18- Penutup dekoratif pembuat es
* Opsional
2. Lemari es
* Opsional: Gambar-gambar dalam pedoman pengguna ini bersifat skematik dan mungkin tidak sama persis dengan produk Anda. Jika produk Anda tidak memiliki bagian-bagian yang relevan, informasi tersebut merupakan informasi untuk model lain.


3 Instalasi 3.1. Tempat yang tepat untuk instalasi Hubungi Servis Resmi untuk melakukan instalasi
produk. Untuk menyiapkan instalasi produk, lihat
informasi pada pedoman pengguna dan pastikan
keperluan listrik dan air sesuai kebutuhan. Jika
tidak, hubungi tukang listrik dan ahli pipa untuk
mengatur keperluan seperlunya.
• Letakkan produk di permukaan rata untuk
menghindari getaran.
• Letakkan produk setidaknya 30 cm dari
pemanas, kompor, dan sumber panas serupa
dan minimal 5 cm dari oven listrik.
• Jangan memaparkan produk pada sinar
matahari langsung atau terus berada di
lingkungan yang lembap.
• Produk memerlukan sirkulasi udara yang
memadai agar berfungsi secara efisien. Jika
produk akan ditempatkan di ceruk dinding, ingat
untuk menyisakan jarak setidaknya 5 cm antara
produk dan langit-langit serta dinding.
• Jangan memasang produk di lingkungan
dengan suhu di bawah -5OC.
3.2. Memasang plastik penutup Gunakan penutup plastik yang disediakan beserta
produk untuk menyediakan ruang yang memadai
untuk sirkulasi udara di antara produk dan dinding.
1. Untuk memasang penutup tersebut, lepaskan
sekrup pada produk dan gunakan sekrup yang
disediakan pada penutup.
2. Pasang 2 penutupo plastik pada penutup
ventilasi seperti yang ditunjukkan pada huruf J pada
gambar.
PERINGATAN: Pabrik tidak bertanggung jawab atas semua kerusakan akibat pekerjaan yang dilakukan orang yang tidak berwenang.
PERINGATAN: Kabel daya produk harus dicabut saat instalasi. Kelalaian melakukan ini dapat mengakibatkan kematian atau cedera serius! PERINGATAN:Jika bentang pintu terlalu sempit untuk dilewati produk, lepas pintu tersebut dan masukkan produk menyamping; jika ini tidak berhasil, hubungi servis resmi.

Instalasi
3.3. Mengatur dudukan Jika produk tidak dalam posisi seimbang, atur
dudukan depan dengan memutar ke kanan atau ke
kiri.
3.4. Sambungan daya
• Perusahaan kami tidak akan bertanggung jawab
atas semua kerusakan akibat penggunaan
tanpa pembumian dan koneksi listrik tidak
sesuai dengan peraturan nasional.
• Steker kabel daya harus mudah diakses setelah
dipasang.
• Sambungkan lemari es ke soket pembumian
dengan tegangan 220-240V/50 Hz. Steker
harus memiliki sekering 10-16A.
• Jangan gunakan colokan multi-grup dengan
atau tanpa kabel pemanjangan di antara soket
dinding dan lemari es.
Untuk dapat mengatur pintu secara vertikal,
• Kendurkan mur pengencang di bagian bawah
• Sekrupkan mur pengatur (CW / CCW) sesuai
dengan posisi pintu
• Kencangkan mur pengencang pada posisi
terakhir
Untuk dapat menyesuaikan pintu secara horizontal,
• Kendurkan mur pengencang di bagian atas
• Sekrupkan mur pengatur (CW / CCW) di
samping sesuai dengan posisi pintu
• Kencangkan baut pengencang di bagian atas
pada posisi terakhir
PERINGATAN: Jangan menggunakan soket pemanjangan atau multi soket pada sambungan daya.
PERINGATAN: Kabel daya yang rusak harus diganti oleh Servis Resmi.
Saat menempatkan dua pendingin di posisi yang berdampingan, sisakan jarak setidaknya 4 cm di antara dua unit itu.
Mur pengencang
Mur pengencang
Mur Pengatur
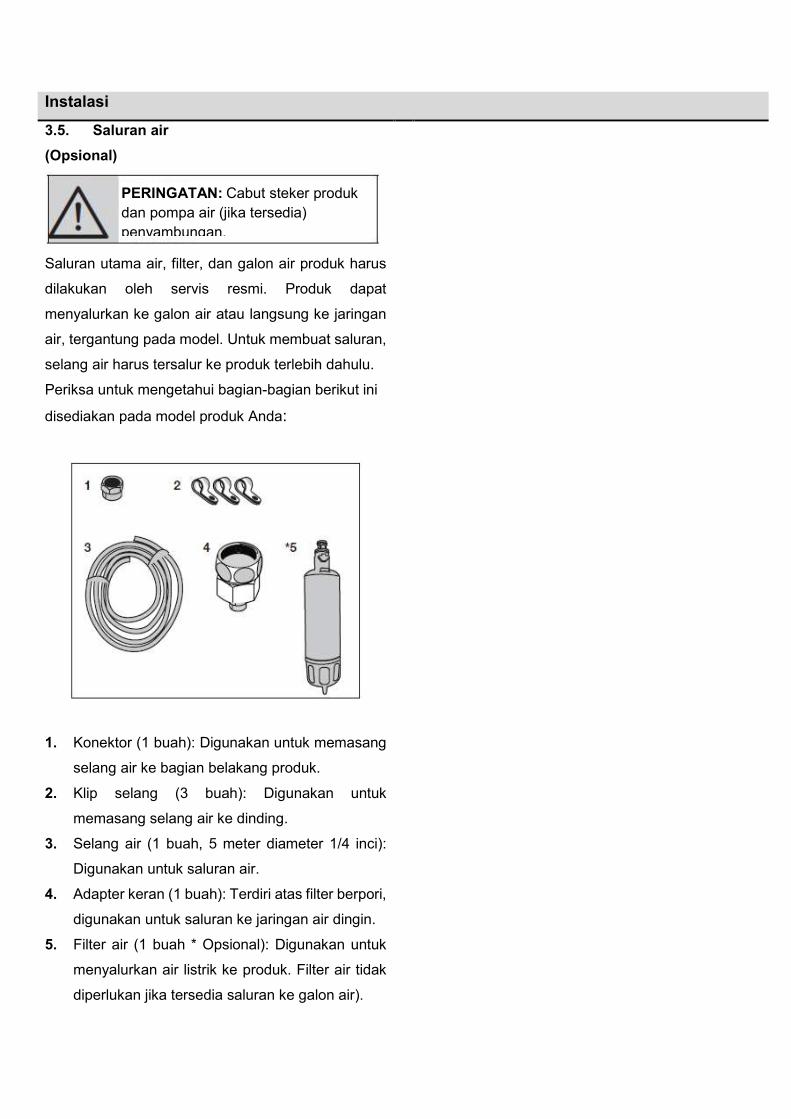
Instalasi
3.5. Saluran air (Opsional)
Saluran utama air, filter, dan galon air produk harus
dilakukan oleh servis resmi. Produk dapat
menyalurkan ke galon air atau langsung ke jaringan
air, tergantung pada model. Untuk membuat saluran,
selang air harus tersalur ke produk terlebih dahulu.
Periksa untuk mengetahui bagian-bagian berikut ini
disediakan pada model produk Anda:
1. Konektor (1 buah): Digunakan untuk memasang
selang air ke bagian belakang produk.
2. Klip selang (3 buah): Digunakan untuk
memasang selang air ke dinding.
3. Selang air (1 buah, 5 meter diameter 1/4 inci):
Digunakan untuk saluran air.
4. Adapter keran (1 buah): Terdiri atas filter berpori,
digunakan untuk saluran ke jaringan air dingin.
5. Filter air (1 buah * Opsional): Digunakan untuk
menyalurkan air listrik ke produk. Filter air tidak
diperlukan jika tersedia saluran ke galon air).
PERINGATAN: Cabut steker produk dan pompa air (jika tersedia) penyambungan.
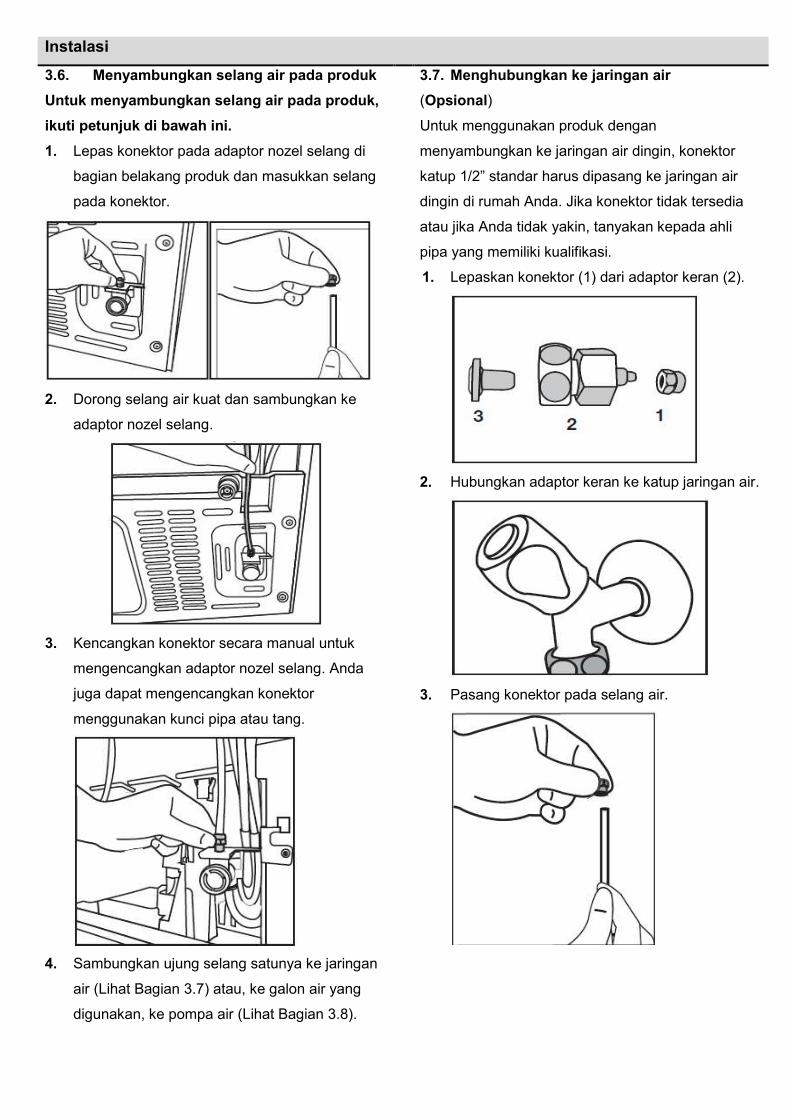
Instalasi
3.6. Menyambungkan selang air pada produk Untuk menyambungkan selang air pada produk, ikuti petunjuk di bawah ini. 1. Lepas konektor pada adaptor nozel selang di
bagian belakang produk dan masukkan selang
pada konektor.
2. Dorong selang air kuat dan sambungkan ke
adaptor nozel selang.
3. Kencangkan konektor secara manual untuk
mengencangkan adaptor nozel selang. Anda
juga dapat mengencangkan konektor
menggunakan kunci pipa atau tang.
4. Sambungkan ujung selang satunya ke jaringan
air (Lihat Bagian 3.7) atau, ke galon air yang
digunakan, ke pompa air (Lihat Bagian 3.8).
3.7. Menghubungkan ke jaringan air (Opsional) Untuk menggunakan produk dengan
menyambungkan ke jaringan air dingin, konektor
katup 1/2” standar harus dipasang ke jaringan air
dingin di rumah Anda. Jika konektor tidak tersedia
atau jika Anda tidak yakin, tanyakan kepada ahli
pipa yang memiliki kualifikasi.
1. Lepaskan konektor (1) dari adaptor keran (2).
2. Hubungkan adaptor keran ke katup jaringan air.
3. Pasang konektor pada selang air.
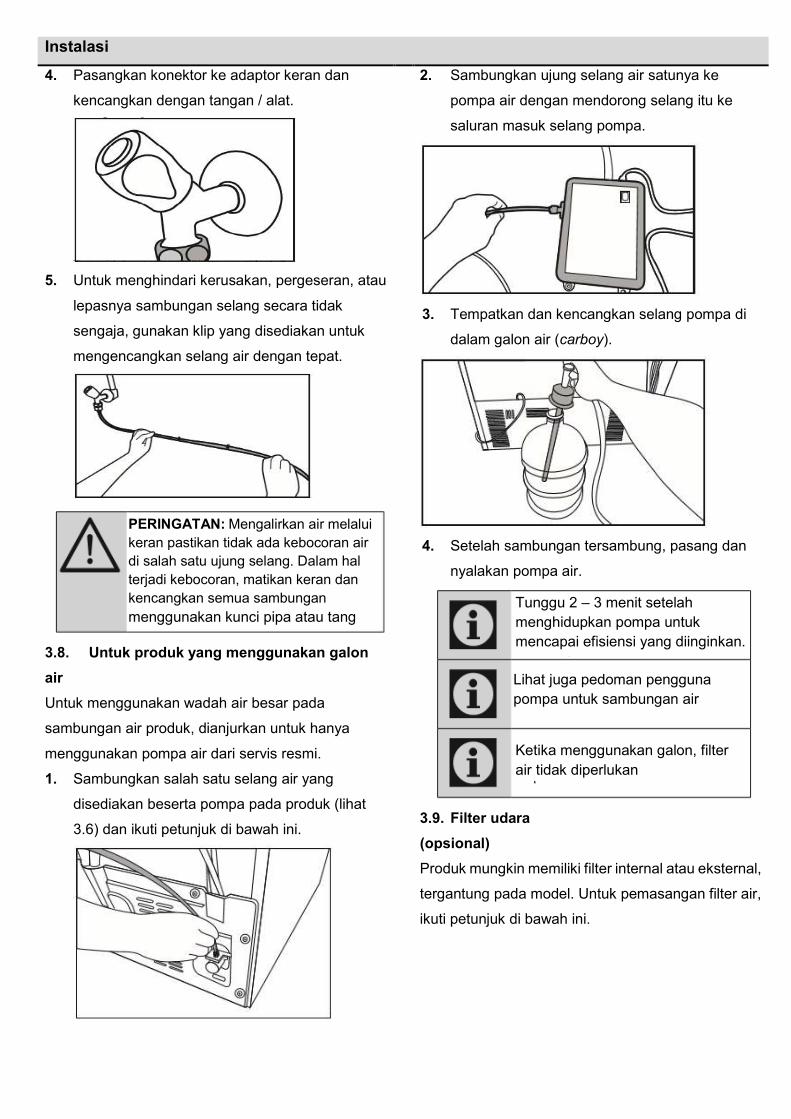
Instalasi
4. Pasangkan konektor ke adaptor keran dan
kencangkan dengan tangan / alat.
5. Untuk menghindari kerusakan, pergeseran, atau
lepasnya sambungan selang secara tidak
sengaja, gunakan klip yang disediakan untuk
mengencangkan selang air dengan tepat.
3.8. Untuk produk yang menggunakan galon air Untuk menggunakan wadah air besar pada
sambungan air produk, dianjurkan untuk hanya
menggunakan pompa air dari servis resmi.
1. Sambungkan salah satu selang air yang
disediakan beserta pompa pada produk (lihat
3.6) dan ikuti petunjuk di bawah ini.
2. Sambungkan ujung selang air satunya ke
pompa air dengan mendorong selang itu ke
saluran masuk selang pompa.
3. Tempatkan dan kencangkan selang pompa di
dalam galon air (carboy).
4. Setelah sambungan tersambung, pasang dan
nyalakan pompa air.
3.9. Filter udara (opsional) Produk mungkin memiliki filter internal atau eksternal,
tergantung pada model. Untuk pemasangan filter air,
ikuti petunjuk di bawah ini.
PERINGATAN: Mengalirkan air melalui keran pastikan tidak ada kebocoran air di salah satu ujung selang. Dalam hal terjadi kebocoran, matikan keran dan kencangkan semua sambungan menggunakan kunci pipa atau tang
Tunggu 2 – 3 menit setelah menghidupkan pompa untuk mencapai efisiensi yang diinginkan.
Lihat juga pedoman pengguna pompa untuk sambungan air
Ketika menggunakan galon, filter air tidak diperlukan
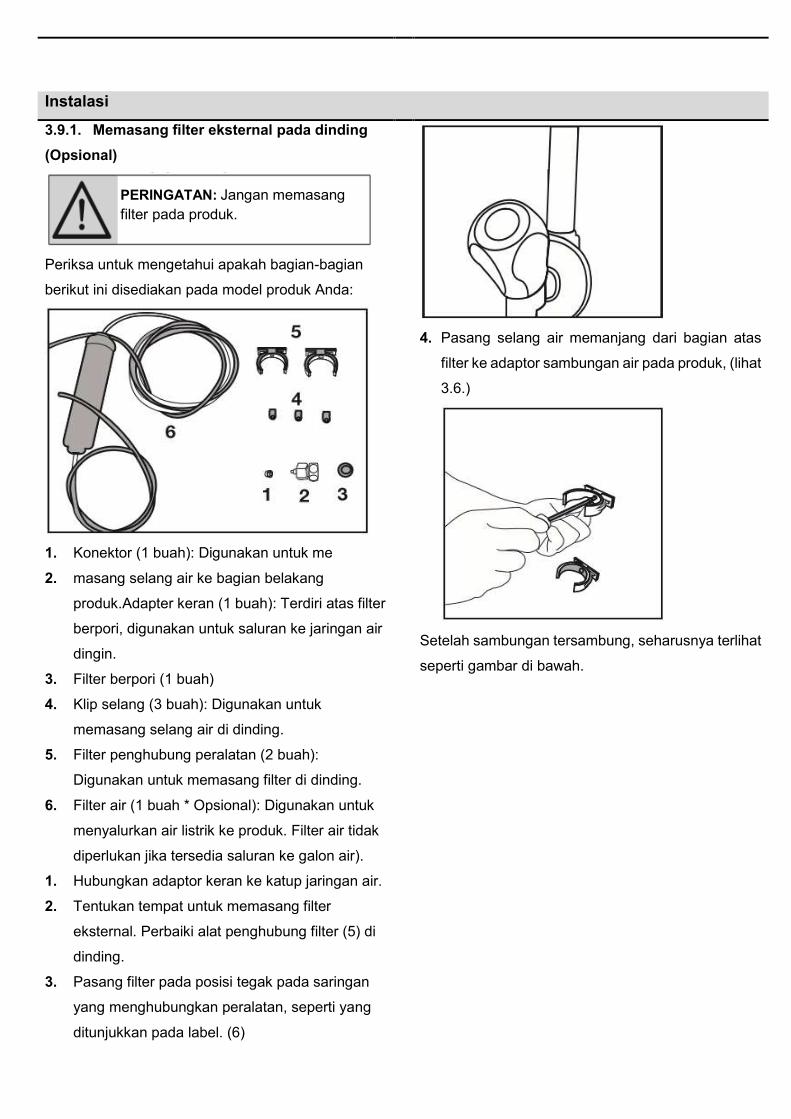
Instalasi
3.9.1. Memasang filter eksternal pada dinding (Opsional)
Periksa untuk mengetahui apakah bagian-bagian
berikut ini disediakan pada model produk Anda:
1. Konektor (1 buah): Digunakan untuk me
2. masang selang air ke bagian belakang
produk.Adapter keran (1 buah): Terdiri atas filter
berpori, digunakan untuk saluran ke jaringan air
dingin.
3. Filter berpori (1 buah)
4. Klip selang (3 buah): Digunakan untuk
memasang selang air di dinding.
5. Filter penghubung peralatan (2 buah):
Digunakan untuk memasang filter di dinding.
6. Filter air (1 buah * Opsional): Digunakan untuk
menyalurkan air listrik ke produk. Filter air tidak
diperlukan jika tersedia saluran ke galon air).
1. Hubungkan adaptor keran ke katup jaringan air.
2. Tentukan tempat untuk memasang filter
eksternal. Perbaiki alat penghubung filter (5) di
dinding.
3. Pasang filter pada posisi tegak pada saringan
yang menghubungkan peralatan, seperti yang
ditunjukkan pada label. (6)
4. Pasang selang air memanjang dari bagian atas
filter ke adaptor sambungan air pada produk, (lihat
3.6.)
Setelah sambungan tersambung, seharusnya terlihat
seperti gambar di bawah.
PERINGATAN: Jangan memasang filter pada produk.
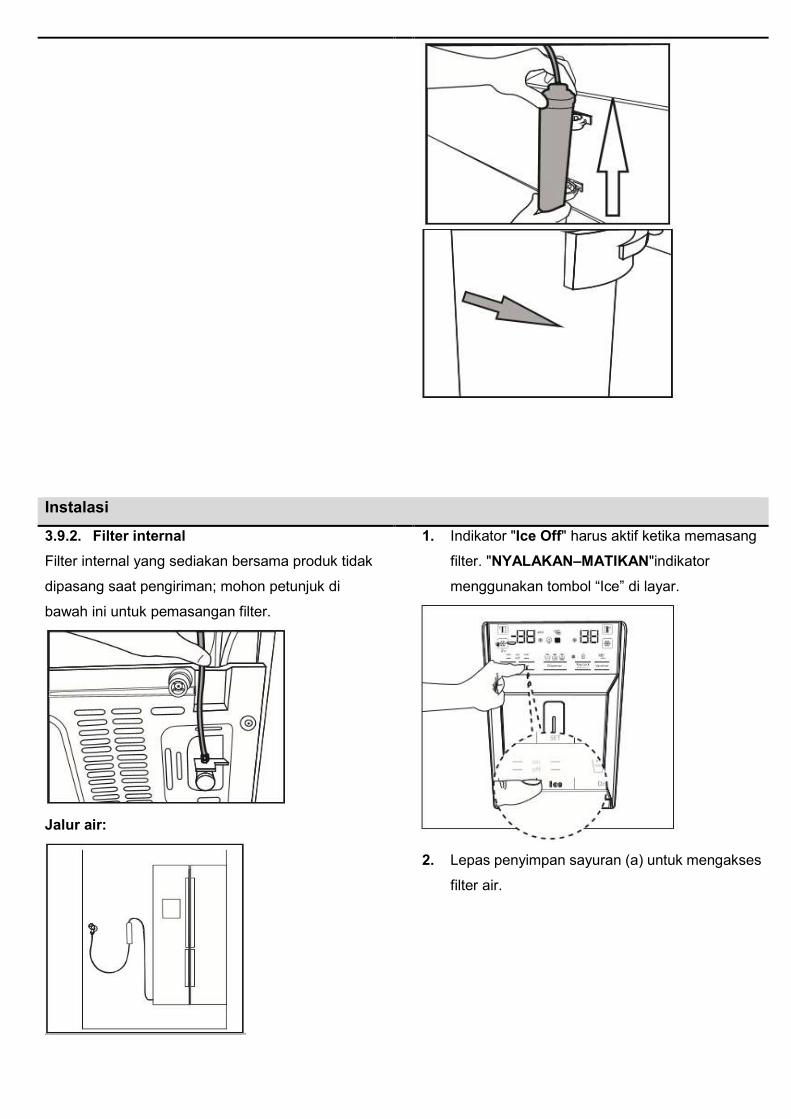
Instalasi
3.9.2. Filter internal Filter internal yang sediakan bersama produk tidak
dipasang saat pengiriman; mohon petunjuk di
bawah ini untuk pemasangan filter.
Jalur air:
1. Indikator "Ice Off" harus aktif ketika memasang
filter. "NYALAKAN–MATIKAN"indikator
menggunakan tombol “Ice” di layar.
2. Lepas penyimpan sayuran (a) untuk mengakses
filter air.
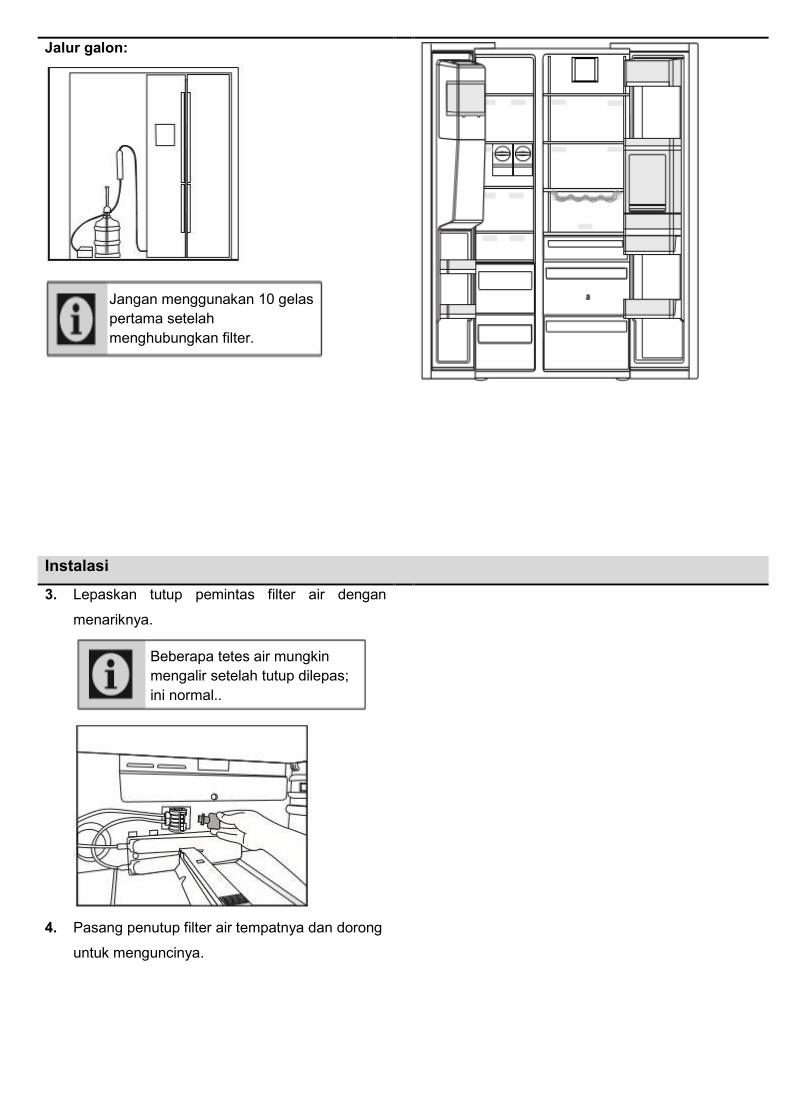
Jalur galon:
Instalasi
3. Lepaskan tutup pemintas filter air dengan
menariknya.
4. Pasang penutup filter air tempatnya dan dorong
untuk menguncinya.
Jangan menggunakan 10 gelas pertama setelah menghubungkan filter.
Beberapa tetes air mungkin mengalir setelah tutup dilepas; ini normal..
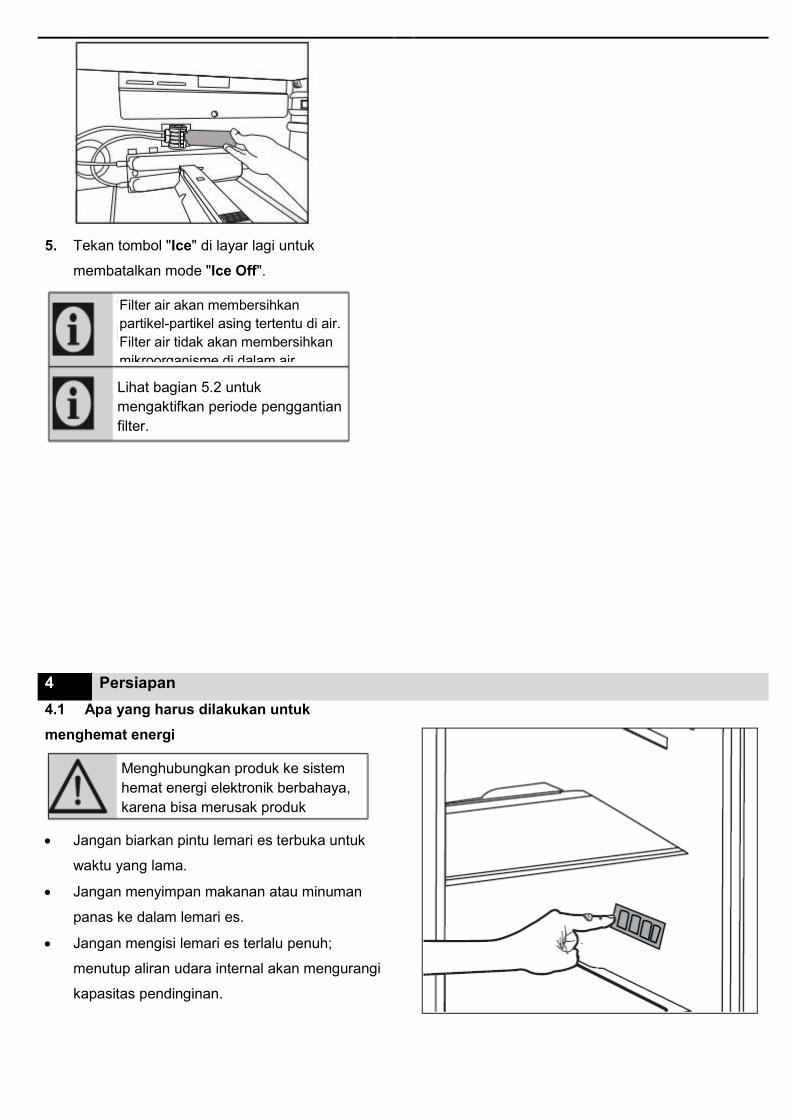
5. Tekan tombol "Ice" di layar lagi untuk
membatalkan mode "Ice Off".
4 Persiapan 4.1 Apa yang harus dilakukan untuk menghemat energi
• Jangan biarkan pintu lemari es terbuka untuk
waktu yang lama.
• Jangan menyimpan makanan atau minuman
panas ke dalam lemari es.
• Jangan mengisi lemari es terlalu penuh;
menutup aliran udara internal akan mengurangi
kapasitas pendinginan.
Filter air akan membersihkan partikel-partikel asing tertentu di air. Filter air tidak akan membersihkan mikroorganisme di dalam air.
Lihat bagian 5.2 untuk mengaktifkan periode penggantian filter.
Menghubungkan produk ke sistem hemat energi elektronik berbahaya, karena bisa merusak produk
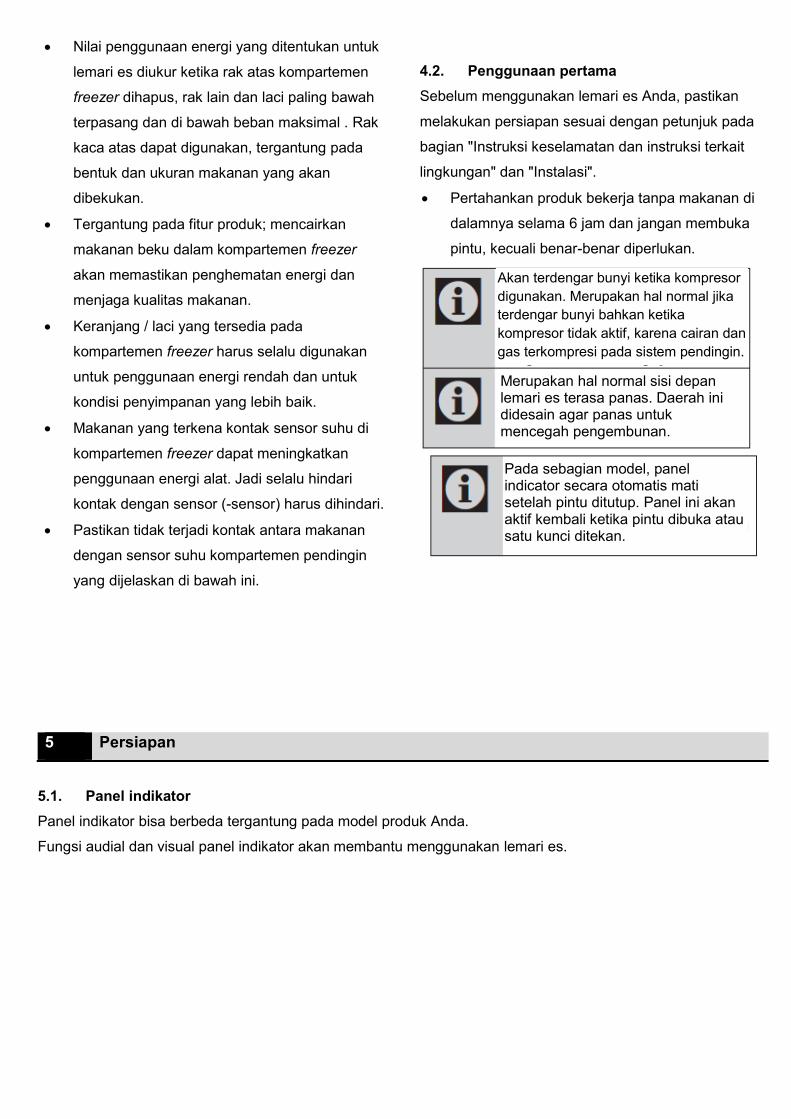
• Nilai penggunaan energi yang ditentukan untuk
lemari es diukur ketika rak atas kompartemen
freezer dihapus, rak lain dan laci paling bawah
terpasang dan di bawah beban maksimal . Rak
kaca atas dapat digunakan, tergantung pada
bentuk dan ukuran makanan yang akan
dibekukan.
• Tergantung pada fitur produk; mencairkan
makanan beku dalam kompartemen freezer
akan memastikan penghematan energi dan
menjaga kualitas makanan.
• Keranjang / laci yang tersedia pada
kompartemen freezer harus selalu digunakan
untuk penggunaan energi rendah dan untuk
kondisi penyimpanan yang lebih baik.
• Makanan yang terkena kontak sensor suhu di
kompartemen freezer dapat meningkatkan
penggunaan energi alat. Jadi selalu hindari
kontak dengan sensor (-sensor) harus dihindari.
• Pastikan tidak terjadi kontak antara makanan
dengan sensor suhu kompartemen pendingin
yang dijelaskan di bawah ini.
4.2. Penggunaan pertama Sebelum menggunakan lemari es Anda, pastikan
melakukan persiapan sesuai dengan petunjuk pada
bagian "Instruksi keselamatan dan instruksi terkait
lingkungan" dan "Instalasi".
• Pertahankan produk bekerja tanpa makanan di
dalamnya selama 6 jam dan jangan membuka
pintu, kecuali benar-benar diperlukan.
5 Persiapan
5.1. Panel indikator Panel indikator bisa berbeda tergantung pada model produk Anda.
Fungsi audial dan visual panel indikator akan membantu menggunakan lemari es.
Akan terdengar bunyi ketika kompresor digunakan. Merupakan hal normal jika terdengar bunyi bahkan ketika kompresor tidak aktif, karena cairan dan gas terkompresi pada sistem pendingin.
Merupakan hal normal sisi depan lemari es terasa panas. Daerah ini didesain agar panas untuk mencegah pengembunan.
Pada sebagian model, panel indicator secara otomatis mati setelah pintu ditutup. Panel ini akan aktif kembali ketika pintu dibuka atau satu kunci ditekan.

1. Indikator kompartemen pendingin
2. Indikator status eror
3. Indikator suhu
4. Tombol fungsi liburan (vacation)
5. Tombol pengaturan suhu
6. Tombol pemilihan kompartemen
7. Indikator Kompresor Freezer
8. Indikator mode ekonomi
9. Indikator fungsi liburan
*pilihan
* Opsional: Gambar-gambar dalam pedoman pengguna ini bertujuan sebagai draf dan mungkin tidak sama persis dengan produk Anda. Jika produk Anda tidak memiliki bagian-bagian yang relevan, informasi tersebut merupakan informasi untuk model lain.
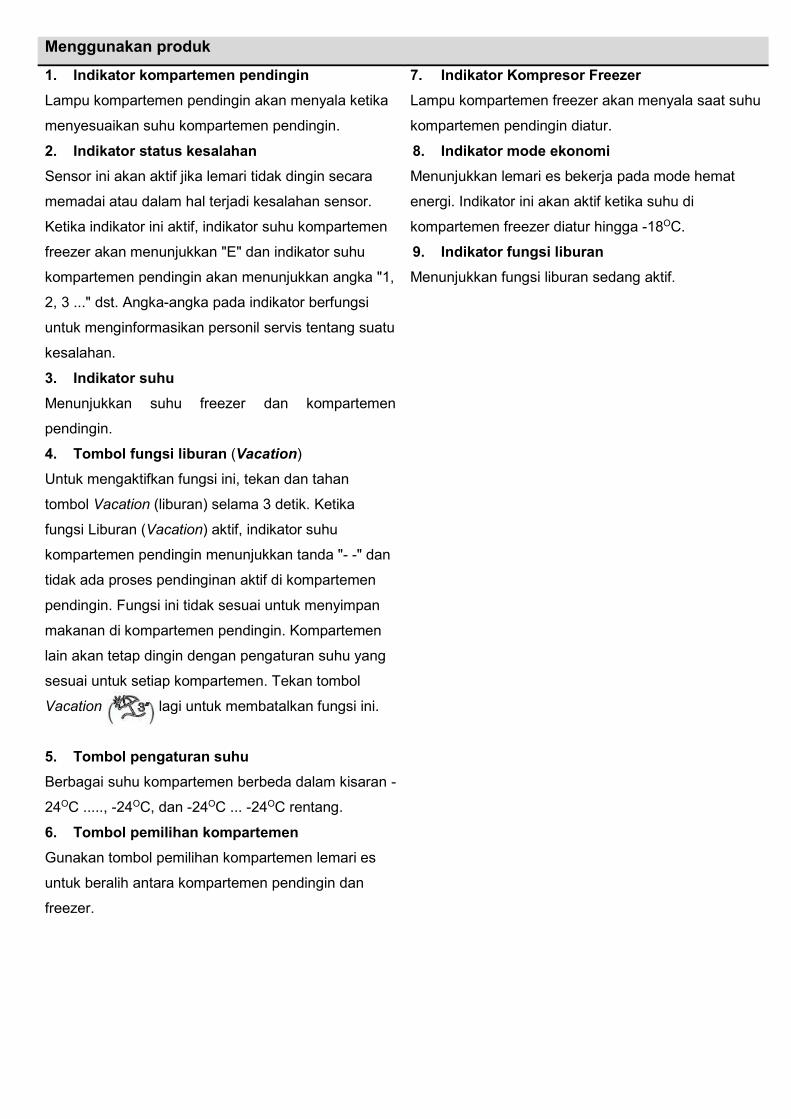
Menggunakan produk
1. Indikator kompartemen pendingin Lampu kompartemen pendingin akan menyala ketika
menyesuaikan suhu kompartemen pendingin.
2. Indikator status kesalahan Sensor ini akan aktif jika lemari tidak dingin secara
memadai atau dalam hal terjadi kesalahan sensor.
Ketika indikator ini aktif, indikator suhu kompartemen
freezer akan menunjukkan "E" dan indikator suhu
kompartemen pendingin akan menunjukkan angka "1,
2, 3 ..." dst. Angka-angka pada indikator berfungsi
untuk menginformasikan personil servis tentang suatu
kesalahan.
3. Indikator suhu Menunjukkan suhu freezer dan kompartemen
pendingin.
4. Tombol fungsi liburan (Vacation) Untuk mengaktifkan fungsi ini, tekan dan tahan
tombol Vacation (liburan) selama 3 detik. Ketika
fungsi Liburan (Vacation) aktif, indikator suhu
kompartemen pendingin menunjukkan tanda "- -" dan
tidak ada proses pendinginan aktif di kompartemen
pendingin. Fungsi ini tidak sesuai untuk menyimpan
makanan di kompartemen pendingin. Kompartemen
lain akan tetap dingin dengan pengaturan suhu yang
sesuai untuk setiap kompartemen. Tekan tombol
Vacation lagi untuk membatalkan fungsi ini.
5. Tombol pengaturan suhu Berbagai suhu kompartemen berbeda dalam kisaran -
24OC ....., -24OC, dan -24OC ... -24OC rentang.
6. Tombol pemilihan kompartemen Gunakan tombol pemilihan kompartemen lemari es
untuk beralih antara kompartemen pendingin dan
freezer.
7. Indikator Kompresor Freezer Lampu kompartemen freezer akan menyala saat suhu
kompartemen pendingin diatur.
8. Indikator mode ekonomi Menunjukkan lemari es bekerja pada mode hemat
energi. Indikator ini akan aktif ketika suhu di
kompartemen freezer diatur hingga -18OC.
9. Indikator fungsi liburan Menunjukkan fungsi liburan sedang aktif.

Menggunakan produk
Hijau: Layar mati / mode eco
Merah: Suhu Tinggi / Pintu Terbuka
Biru : Pembekuan Cepat / Pendinginan Cepat Putih: interaksi dengan produk / Layar menyala setelah semua interaksi dengan tombol Kuning: Liburan
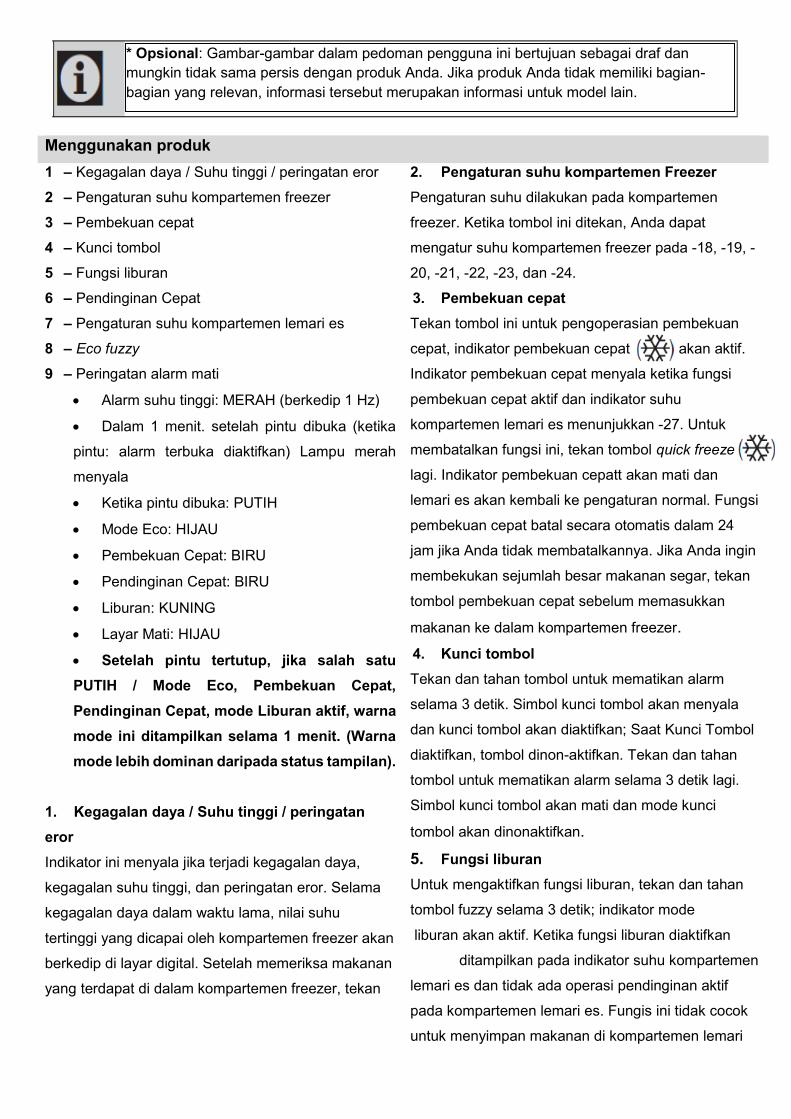
Menggunakan produk 1 – Kegagalan daya / Suhu tinggi / peringatan eror
2 – Pengaturan suhu kompartemen freezer
3 – Pembekuan cepat
4 – Kunci tombol
5 – Fungsi liburan
6 – Pendinginan Cepat
7 – Pengaturan suhu kompartemen lemari es
8 – Eco fuzzy
9 – Peringatan alarm mati
• Alarm suhu tinggi: MERAH (berkedip 1 Hz)
• Dalam 1 menit. setelah pintu dibuka (ketika
pintu: alarm terbuka diaktifkan) Lampu merah
menyala
• Ketika pintu dibuka: PUTIH
• Mode Eco: HIJAU
• Pembekuan Cepat: BIRU
• Pendinginan Cepat: BIRU
• Liburan: KUNING
• Layar Mati: HIJAU
• Setelah pintu tertutup, jika salah satu PUTIH / Mode Eco, Pembekuan Cepat, Pendinginan Cepat, mode Liburan aktif, warna mode ini ditampilkan selama 1 menit. (Warna mode lebih dominan daripada status tampilan).
1. Kegagalan daya / Suhu tinggi / peringatan eror Indikator ini menyala jika terjadi kegagalan daya,
kegagalan suhu tinggi, dan peringatan eror. Selama
kegagalan daya dalam waktu lama, nilai suhu
tertinggi yang dicapai oleh kompartemen freezer akan
berkedip di layar digital. Setelah memeriksa makanan
yang terdapat di dalam kompartemen freezer, tekan
2. Pengaturan suhu kompartemen Freezer Pengaturan suhu dilakukan pada kompartemen
freezer. Ketika tombol ini ditekan, Anda dapat
mengatur suhu kompartemen freezer pada -18, -19, -
20, -21, -22, -23, dan -24.
3. Pembekuan cepat Tekan tombol ini untuk pengoperasian pembekuan
cepat, indikator pembekuan cepat akan aktif.
Indikator pembekuan cepat menyala ketika fungsi
pembekuan cepat aktif dan indikator suhu
kompartemen lemari es menunjukkan -27. Untuk
membatalkan fungsi ini, tekan tombol quick freeze
lagi. Indikator pembekuan cepatt akan mati dan
lemari es akan kembali ke pengaturan normal. Fungsi
pembekuan cepat batal secara otomatis dalam 24
jam jika Anda tidak membatalkannya. Jika Anda ingin
membekukan sejumlah besar makanan segar, tekan
tombol pembekuan cepat sebelum memasukkan
makanan ke dalam kompartemen freezer. 4. Kunci tombol Tekan dan tahan tombol untuk mematikan alarm
selama 3 detik. Simbol kunci tombol akan menyala
dan kunci tombol akan diaktifkan; Saat Kunci Tombol
diaktifkan, tombol dinon-aktifkan. Tekan dan tahan
tombol untuk mematikan alarm selama 3 detik lagi.
Simbol kunci tombol akan mati dan mode kunci
tombol akan dinonaktifkan.
5. Fungsi liburan Untuk mengaktifkan fungsi liburan, tekan dan tahan
tombol fuzzy selama 3 detik; indikator mode
liburan akan aktif. Ketika fungsi liburan diaktifkan
ditampilkan pada indikator suhu kompartemen
lemari es dan tidak ada operasi pendinginan aktif
pada kompartemen lemari es. Fungis ini tidak cocok
untuk menyimpan makanan di kompartemen lemari
* Opsional: Gambar-gambar dalam pedoman pengguna ini bertujuan sebagai draf dan mungkin tidak sama persis dengan produk Anda. Jika produk Anda tidak memiliki bagian-bagian yang relevan, informasi tersebut merupakan informasi untuk model lain.

tombol untuk mematikan alarm menghentikan
peringatan.
Silakan lihat pada bagian "solusi yang dianjurkan
untuk pemecahan masalah" pada pedoman Anda jika
Anda melihat indikator ini menyala
es. Kompartemen lain akan terus dingin sesuai
dengan suhu yang telah diatur.
Untuk membatalkan fungsi ini, tekan tombol fungsi Liburan (Vacation) lagi.
Menggunakan produk 6. Pendinginan cepat Indikator pendingin cepat menyala dan nilai
indikator suhu kompartemen lemari es ditampilkan
sebagai 1 ketika fungsi pendinginan cepat diaktifkan.
Untuk membatalkan fungsi ini, tekan tombol
pendinginan Cepat (Quick fridge) lagi. Indikator
Pendinginan cepat akan mati dan lemari es akan
diatur ulang pada pengaturan normal. Fungsi
Pendinginan cepat dibatalkan secara otomatis dalam
1 jam jika Anda tidak membatalkannya. Jika Anda
ingin mendinginkan makanan segar dalam jumlah
besar, tekan tombol Pendingnan Cepat sebelum
memasukkan makanan ke dalam kompartemen
lemari es.
7. Pengaturan suhhu kompartemen lemari es Ketika tombol ini ditekan suhu kompartemen
lemari dapat diatur pada nilai 8,7,6,5,4,3,2, dan
1. 8. Eco fuzzy Tekan dan tahan tombol eco-fuzzy selama 1 detik
untuk mengaktifkan fungsi eco-fuzzy. Lemari es akan
mulai beroperasi dalam mode paling ekonomis
setidaknya 6 jam kemudian dan indikator penggunaan
ekonomi akan menyala . Tekan dan tahan
tombol fungsi eco-fuzzy selama 3 detik untuk
menonaktifkan fungsi eco-fuzzy.
Indikator ini akan menyala setelah 6 jam ketika eco-
fuzzy diaktifkan.
9. Peringatan alarm mati (off) Dalam hal terjadi kegagalan daya / alarm suhu tinggi,
setelah memeriksa makanan di dalam kompartemen

freezer, tekan tombol untuk mematikan alarm untuk
menghentikan peringatan.
Menggunakan produk
1. – Penggunaan ekonomi
2. – Suhu tinggi / peringatan kesalahan
3. – Fungsi hemat energi (layar mati)
4. – Pendinginan cepat
5. – Fungsi liburan (Vacation)
6. – pengaturan suhu kompartemen pendingin
7. – Hemat energi (layar mati) / Alarm mati
8. – Kunci papan tombol
9. – Eco-fuzzy
10. – Pengaturan suhu kompartemen Freezer
1 2 3
11. – Pembekuan cepat
* Opsional: Gambar-gambar dalam pedoman pengguna ini bertujuan sebagai draf dan mungkin tidak sama persis dengan produk Anda. Jika produk Anda tidak memiliki bagian-bagian yang relevan, informasi tersebut merupakan informasi untuk model lain.

Menggunakan produk 1. Penggunaan ekonomi Tanda ini akan menyala ketika kompartemen freezer
diatur pada -18OC', pengaturan paling ekonomis.
(ECO) Indikator penggunaan ekonomi akan mati
ketika pendinginan cepat atau fungsi pembekuan
cepat dipilih.
2. Kegagalan daya / suhu tinggi / Indikator peringatan suhu Indikator ini akan menyala dalam hal terjadi
kesalahan suhu atau peringatan kesalahan. Jika
Anda melihat indikator ini menyala, silakan lihat
bagian "solusi yang dianjurkan untuk pemecahan
masalah" pada pedoman.
Indikator ini menyala jika terjadi kegagalan daya,
kegagalan suhu tinggi, dan peringatan kesalahan.
Selama terjadi kegagalan daya yang berkelanjutan,
suhu tertinggi yang dicapai oleh kompartemen freezer
akan berkedip pada layar digital. Setelah memeriksa
makanan yang berada di kompartemen freezer, tekan
tombol untuk mematikan alarm untuk menghentikan
peringatan.
3. Fungsi hemat energi (layar mati) Jika pintu produk disimpan tetap tertutup untuk jangka
waktu yang lama, fungsi hemat energi secara
otomatis aktif dan simbol hemat energi menyala.
Ketika fungsi hemat energi aktif, semua simbol di
layar selain simbol hemat energi akan mati. Ketika
fungsi Hemat Energi diaktifkan, jika tombol apa pun
ditekan atau pintu dibuka, fungsi hemat energi akan
dibatalkan dan simbol di layar akan kembali normal.
Fungsi hemat energi aktif saat dikirim dari pabrik dan
tidak dapat dibatalkan.
4. Pendinginan cepat Ketika fungsi pendinginan cepat dinyalakan, indikator
dingin cepat akan menyala dan indikator suhu
kompartemen pendingin menampilkan ditampilkan
nilai 1. Tekan tombol Rapid Cool lagi untuk
membatalkan fungsi ini. Indikator pendingin cepat
akan mati dan kembali ke pengaturan normal.
Fungsi pendinginan cepat akan secara otomatis
dibatalkan setelah 1 jam, kecuali dibatalkan oleh
pengguna. Untuk mendinginkan sejumlah besar
makanan segar, tekan tombol dingin cepat sebelum
meletakkan makanan di dalam kompartemen
pendingin.
5. Fungsi liburan Untuk mengaktifkan fungsi Liburan, tekan tombol
pendinginan cepat selama 3 detik; ini akan
mengaktifkan indikator mode liburan . Ketika
fungsi Liburan aktif, indikator suhu kompartemen
pendingin menampilkan tanda dan tidak ada
proses pendinginan di dalam kompartemen
pendingin. Fungsi ini tidak cocok untuk menyimpan
makanan di dalam kompartemen pendingin.
Kompartemen-kompartemen lain akan tetap
didinginkan pada pengaturan suhu masing-masing
pada setiap kompartemen. Tekan tombol fungsi
liburan lagi untuk membatalkan fungsi ini.
6. Pengaturan suhu kompartemen pendingin Setelah menekan tombol, suhu kompartemen
pendingin dapat diatur pada 8,7,6,5,4,3,2 dan 1
masing-masing.
7.1 Hemat energi (layar mati) Menekan tombol ini akan menyalakan tanda
hemat energi dan fungsi hemat Energi akan
aktif. Mengaktifkan fungsi hemat energi akan
mematikan semua tanda lain di layar. Ketika fungsi
hemat energi aktif, menekan suatu tombol atau
membuka pintu akan menonaktifkan fungsi hemat
energi dan sinyal layar akan kembali normal.
Menekan tombol ini lagi akan mematikan tanda
hemat energi dan menonaktifkan fungsi hemat energi.
7.2 Alarm mati Dalam hal terjadi kegagalan daya / alarm suhu tinggi,
setelah memeriksa makanan yang berada di dalam
kompartemen freezer tekan tombol untuk mematikan
alarm untuk menghentikan peringatan.
Menggunakan produk 8. Kunci papan tombol Tekan tombol display off, secara terus-menerus
selama 3 detik. Tanda kunci papan tombol akan
menyala dan kunci papan tombol akan aktif; tombol
akan tidak aktif ketika kunci papan tombol diaktifkan.
Tekan kembali tombol Display off secara terus-
menerus selama 3 detik. Tanda kunci papan tombol
akan mati dan
mode kunci papan tombol akan tidak aktif. Tekan
tombol Display off untuk mencegah perubahan
pengaturan suhu lemari es.
9. Eco-fuzzy Untuk mengaktifkan fungsi eco-fuzzy, tekan dan
tahan tombol eco-fuzzy selama 1 detik. Ketika fungsi
ini aktif, freezer akan beralih menjadi mode ekonomis
setidaknya 6 jam kemudian dan indikator penggunaan
ekonomi akan menyala . Untuk menonaktifkan fungsi
eco-fuzzy , tekan dan tahan tombol fungsi eco-
fuzzy selama 3 detik. Indikator ini akan menyala
setelah 6 jam ketika eco-fuzzy aktif.
10. Pengaturan suhu kompartemen freezer Suhu di dalam kompartemen freezer dapat diatur.
Menekan tombol akan membuat suhu kompartemen
freezer dapat diatur pada -18, -19, -20, -21, -22, -23,
dan -24.
11. Pembekuan cepat Untuk melakukan pembekuan cepat, tekan tombol; ini
akan mengaktifkan indikator pembekuan cepat
Ketika fungsi pembekuan cepat dinyalakan, indikator
pembekuan cepat akan menyala dan indikator suhu
kompartemen freezer akan menampilkan nilai -27.
Tekan tombol Rapid freeze lagi untuk
membatalkan fungsi ini. Indikator pembekuan cepat
akan mati dan kembali ke pengaturan normal. Fungsi
pembekuan cepat akan secara otomatis batal setelah
24 jam, kecuali jika dibatalkan oleh pengguna. Untuk
membekukan sejumlah besar makanan segar, tekan
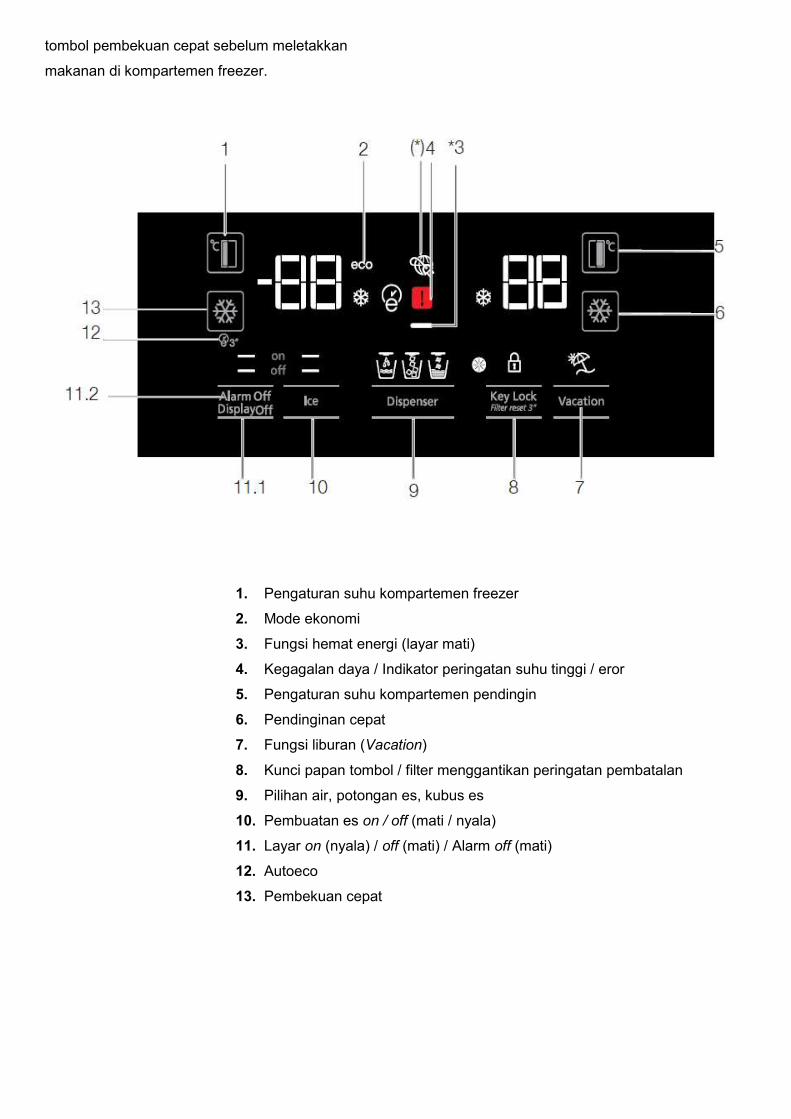
tombol pembekuan cepat sebelum meletakkan
makanan di kompartemen freezer.
1. Pengaturan suhu kompartemen freezer
2. Mode ekonomi
3. Fungsi hemat energi (layar mati)
4. Kegagalan daya / Indikator peringatan suhu tinggi / eror
5. Pengaturan suhu kompartemen pendingin
6. Pendinginan cepat
7. Fungsi liburan (Vacation)
8. Kunci papan tombol / filter menggantikan peringatan pembatalan
9. Pilihan air, potongan es, kubus es
10. Pembuatan es on / off (mati / nyala)
11. Layar on (nyala) / off (mati) / Alarm off (mati)
12. Autoeco
13. Pembekuan cepat

* Opsional: Gambar-gambar dalam pedoman pengguna ini bertujuan sebagai draf dan mungkin tidak sama persis dengan produk Anda. Jika produk Anda tidak memiliki bagian-bagian yang relevan, informasi tersebut merupakan informasi untuk model lain.
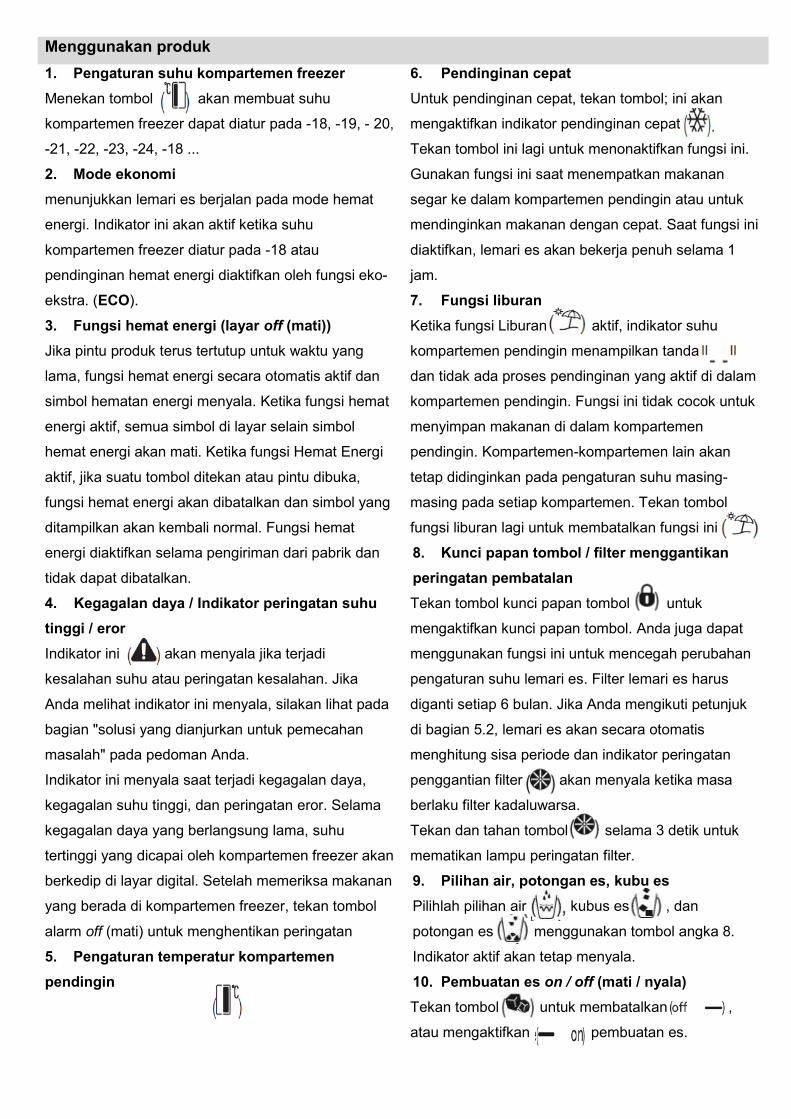
Menggunakan produk 1. Pengaturan suhu kompartemen freezer Menekan tombol akan membuat suhu
kompartemen freezer dapat diatur pada -18, -19, - 20,
-21, -22, -23, -24, -18 ...
2. Mode ekonomi menunjukkan lemari es berjalan pada mode hemat
energi. Indikator ini akan aktif ketika suhu
kompartemen freezer diatur pada -18 atau
pendinginan hemat energi diaktifkan oleh fungsi eko-
ekstra. (ECO).
3. Fungsi hemat energi (layar off (mati)) Jika pintu produk terus tertutup untuk waktu yang
lama, fungsi hemat energi secara otomatis aktif dan
simbol hematan energi menyala. Ketika fungsi hemat
energi aktif, semua simbol di layar selain simbol
hemat energi akan mati. Ketika fungsi Hemat Energi
aktif, jika suatu tombol ditekan atau pintu dibuka,
fungsi hemat energi akan dibatalkan dan simbol yang
ditampilkan akan kembali normal. Fungsi hemat
energi diaktifkan selama pengiriman dari pabrik dan
tidak dapat dibatalkan.
4. Kegagalan daya / Indikator peringatan suhu tinggi / eror Indikator ini akan menyala jika terjadi
kesalahan suhu atau peringatan kesalahan. Jika
Anda melihat indikator ini menyala, silakan lihat pada
bagian "solusi yang dianjurkan untuk pemecahan
masalah" pada pedoman Anda.
Indikator ini menyala saat terjadi kegagalan daya,
kegagalan suhu tinggi, dan peringatan eror. Selama
kegagalan daya yang berlangsung lama, suhu
tertinggi yang dicapai oleh kompartemen freezer akan
berkedip di layar digital. Setelah memeriksa makanan
yang berada di kompartemen freezer, tekan tombol
alarm off (mati) untuk menghentikan peringatan
5. Pengaturan temperatur kompartemen pendingin
6. Pendinginan cepat Untuk pendinginan cepat, tekan tombol; ini akan
mengaktifkan indikator pendinginan cepat
Tekan tombol ini lagi untuk menonaktifkan fungsi ini.
Gunakan fungsi ini saat menempatkan makanan
segar ke dalam kompartemen pendingin atau untuk
mendinginkan makanan dengan cepat. Saat fungsi ini
diaktifkan, lemari es akan bekerja penuh selama 1
jam.
7. Fungsi liburan Ketika fungsi Liburan aktif, indikator suhu
kompartemen pendingin menampilkan tanda
dan tidak ada proses pendinginan yang aktif di dalam
kompartemen pendingin. Fungsi ini tidak cocok untuk
menyimpan makanan di dalam kompartemen
pendingin. Kompartemen-kompartemen lain akan
tetap didinginkan pada pengaturan suhu masing-
masing pada setiap kompartemen. Tekan tombol
fungsi liburan lagi untuk membatalkan fungsi ini.
8. Kunci papan tombol / filter menggantikan peringatan pembatalan Tekan tombol kunci papan tombol untuk
mengaktifkan kunci papan tombol. Anda juga dapat
menggunakan fungsi ini untuk mencegah perubahan
pengaturan suhu lemari es. Filter lemari es harus
diganti setiap 6 bulan. Jika Anda mengikuti petunjuk
di bagian 5.2, lemari es akan secara otomatis
menghitung sisa periode dan indikator peringatan
penggantian filter akan menyala ketika masa
berlaku filter kadaluwarsa.
Tekan dan tahan tombol selama 3 detik untuk
mematikan lampu peringatan filter.
9. Pilihan air, potongan es, kubu es Pilihlah pilihan air kubus es , dan
potongan es menggunakan tombol angka 8.
Indikator aktif akan tetap menyala.
10. Pembuatan es on / off (mati / nyala) Tekan tombol untuk membatalkan ,
atau mengaktifkan pembuatan es.
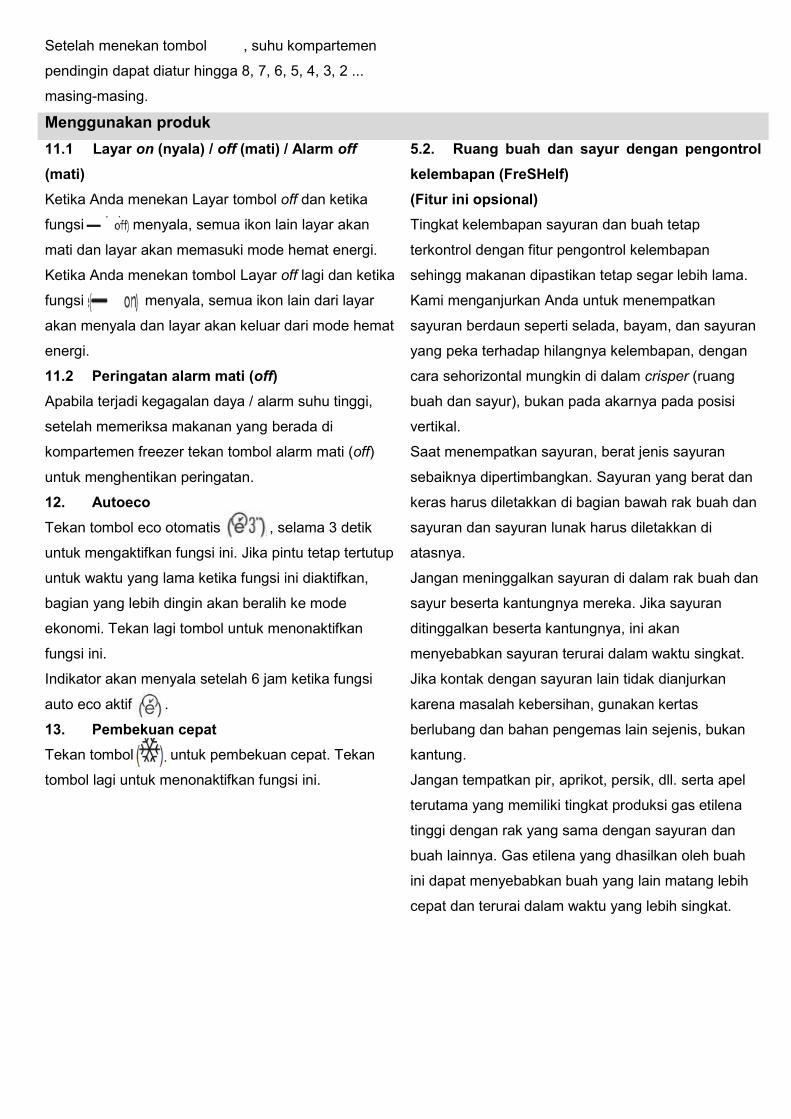
Setelah menekan tombol , suhu kompartemen
pendingin dapat diatur hingga 8, 7, 6, 5, 4, 3, 2 ...
masing-masing.
Menggunakan produk 11.1 Layar on (nyala) / off (mati) / Alarm off (mati) Ketika Anda menekan Layar tombol off dan ketika
fungsi menyala, semua ikon lain layar akan
mati dan layar akan memasuki mode hemat energi.
Ketika Anda menekan tombol Layar off lagi dan ketika
fungsi menyala, semua ikon lain dari layar
akan menyala dan layar akan keluar dari mode hemat
energi.
11.2 Peringatan alarm mati (off) Apabila terjadi kegagalan daya / alarm suhu tinggi,
setelah memeriksa makanan yang berada di
kompartemen freezer tekan tombol alarm mati (off)
untuk menghentikan peringatan.
12. Autoeco Tekan tombol eco otomatis , selama 3 detik
untuk mengaktifkan fungsi ini. Jika pintu tetap tertutup
untuk waktu yang lama ketika fungsi ini diaktifkan,
bagian yang lebih dingin akan beralih ke mode
ekonomi. Tekan lagi tombol untuk menonaktifkan
fungsi ini.
Indikator akan menyala setelah 6 jam ketika fungsi
auto eco aktif .
13. Pembekuan cepat Tekan tombol untuk pembekuan cepat. Tekan
tombol lagi untuk menonaktifkan fungsi ini.
5.2. Ruang buah dan sayur dengan pengontrol kelembapan (FreSHelf) (Fitur ini opsional) Tingkat kelembapan sayuran dan buah tetap
terkontrol dengan fitur pengontrol kelembapan
sehingg makanan dipastikan tetap segar lebih lama.
Kami menganjurkan Anda untuk menempatkan
sayuran berdaun seperti selada, bayam, dan sayuran
yang peka terhadap hilangnya kelembapan, dengan
cara sehorizontal mungkin di dalam crisper (ruang
buah dan sayur), bukan pada akarnya pada posisi
vertikal.
Saat menempatkan sayuran, berat jenis sayuran
sebaiknya dipertimbangkan. Sayuran yang berat dan
keras harus diletakkan di bagian bawah rak buah dan
sayuran dan sayuran lunak harus diletakkan di
atasnya.
Jangan meninggalkan sayuran di dalam rak buah dan
sayur beserta kantungnya mereka. Jika sayuran
ditinggalkan beserta kantungnya, ini akan
menyebabkan sayuran terurai dalam waktu singkat.
Jika kontak dengan sayuran lain tidak dianjurkan
karena masalah kebersihan, gunakan kertas
berlubang dan bahan pengemas lain sejenis, bukan
kantung.
Jangan tempatkan pir, aprikot, persik, dll. serta apel
terutama yang memiliki tingkat produksi gas etilena
tinggi dengan rak yang sama dengan sayuran dan
buah lainnya. Gas etilena yang dhasilkan oleh buah
ini dapat menyebabkan buah yang lain matang lebih
cepat dan terurai dalam waktu yang lebih singkat.

Menggunakan produk 5.3. Mengaktifkan peringatan perubahan filter air (Untuk produk yang terhubung ke saluran air utama dan dilengkapi filter) Peringatan penggantian filter air diaktifkan sebagai
berikut:
Penghitungan waktu penggunaan filter otomatis tidak
diaktifkan di pabrik. Penghitungan tersebut harus
diaktifkan dalam produk yang dilengkapi dengan filter.
Papan layar S4 yang kami gunakan di lemari es
memiliki sistem sembilan tombol. Atur nilai yang
ditunjukkan pada layar.
* (menekan 3 detik) Setelah tersambung daya, tekan tombol Alarm Off dan Vacation selama 3 detik untuk masuk ke layar
memasukkan kata sandi (password).
Pengaturan freezer
Pembekuan cepat
Alarm Off Alarm On/Off Mode Dispenser Ketika Filter Kunci Tombol di-reset
Liburan / vacation
Pengaturan Pendinginan
Pendinginan Cepat

Menggunakan produk
Layar Kata Sandi (Password)
3 det
Tekan Mode
Tekan sekali
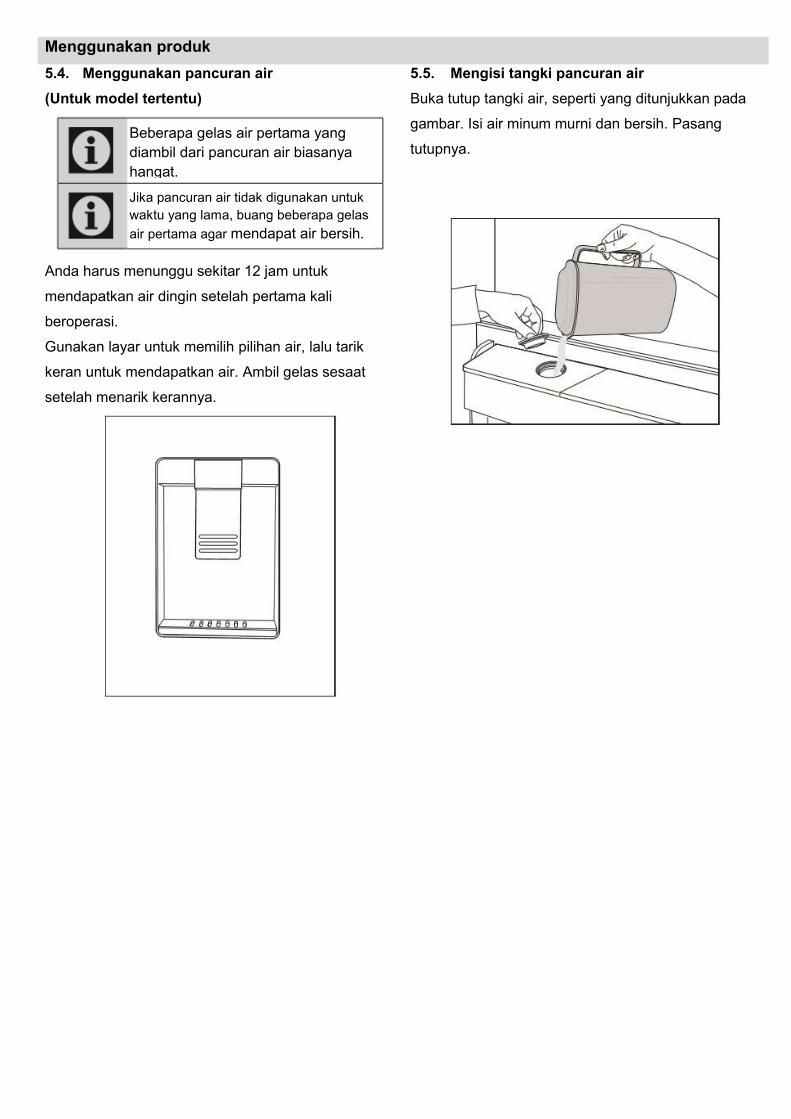
Menggunakan produk 5.4. Menggunakan pancuran air (Untuk model tertentu)
Anda harus menunggu sekitar 12 jam untuk
mendapatkan air dingin setelah pertama kali
beroperasi.
Gunakan layar untuk memilih pilihan air, lalu tarik
keran untuk mendapatkan air. Ambil gelas sesaat
setelah menarik kerannya.
5.5. Mengisi tangki pancuran air Buka tutup tangki air, seperti yang ditunjukkan pada
gambar. Isi air minum murni dan bersih. Pasang
tutupnya.
Beberapa gelas air pertama yang diambil dari pancuran air biasanya hangat.
Jika pancuran air tidak digunakan untuk waktu yang lama, buang beberapa gelas air pertama agar mendapat air bersih.
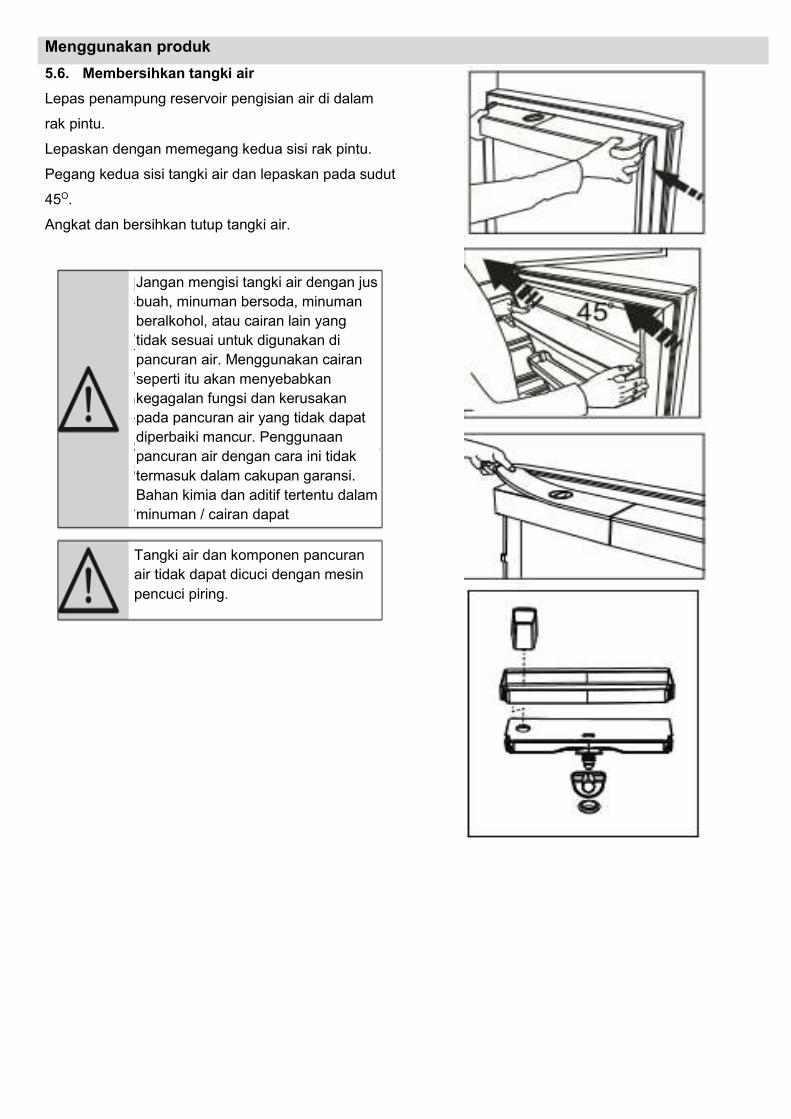
Menggunakan produk 5.6. Membersihkan tangki air Lepas penampung reservoir pengisian air di dalam
rak pintu.
Lepaskan dengan memegang kedua sisi rak pintu.
Pegang kedua sisi tangki air dan lepaskan pada sudut
45O.
Angkat dan bersihkan tutup tangki air.
Jangan mengisi tangki air dengan jus buah, minuman bersoda, minuman beralkohol, atau cairan lain yang tidak sesuai untuk digunakan di pancuran air. Menggunakan cairan seperti itu akan menyebabkan kegagalan fungsi dan kerusakan pada pancuran air yang tidak dapat diperbaiki mancur. Penggunaan pancuran air dengan cara ini tidak termasuk dalam cakupan garansi. Bahan kimia dan aditif tertentu dalam minuman / cairan dapat menyebabkan kerusakan material tangki air.
Tangki air dan komponen pancuran air tidak dapat dicuci dengan mesin pencuci piring.
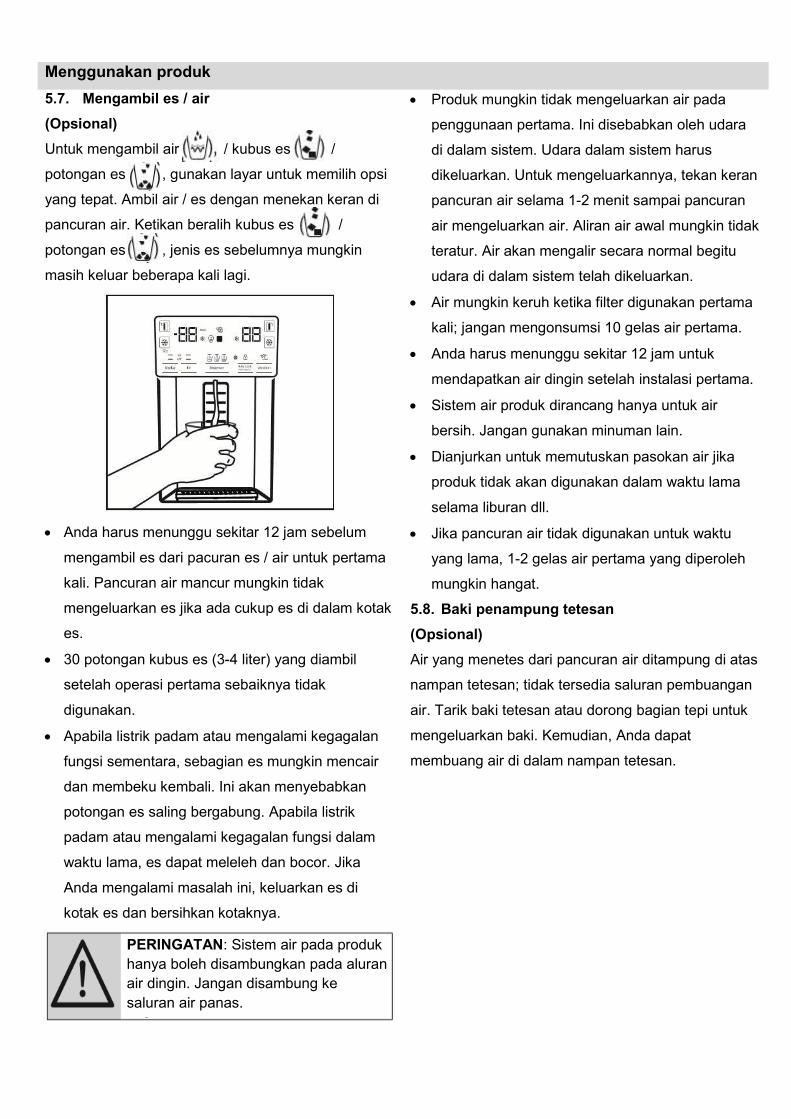
Menggunakan produk 5.7. Mengambil es / air (Opsional) Untuk mengambil air / kubus es /
potongan es , gunakan layar untuk memilih opsi
yang tepat. Ambil air / es dengan menekan keran di
pancuran air. Ketikan beralih kubus es /
potongan es , jenis es sebelumnya mungkin
masih keluar beberapa kali lagi.
• Anda harus menunggu sekitar 12 jam sebelum
mengambil es dari pacuran es / air untuk pertama
kali. Pancuran air mancur mungkin tidak
mengeluarkan es jika ada cukup es di dalam kotak
es.
• 30 potongan kubus es (3-4 liter) yang diambil
setelah operasi pertama sebaiknya tidak
digunakan.
• Apabila listrik padam atau mengalami kegagalan
fungsi sementara, sebagian es mungkin mencair
dan membeku kembali. Ini akan menyebabkan
potongan es saling bergabung. Apabila listrik
padam atau mengalami kegagalan fungsi dalam
waktu lama, es dapat meleleh dan bocor. Jika
Anda mengalami masalah ini, keluarkan es di
kotak es dan bersihkan kotaknya.
• Produk mungkin tidak mengeluarkan air pada
penggunaan pertama. Ini disebabkan oleh udara
di dalam sistem. Udara dalam sistem harus
dikeluarkan. Untuk mengeluarkannya, tekan keran
pancuran air selama 1-2 menit sampai pancuran
air mengeluarkan air. Aliran air awal mungkin tidak
teratur. Air akan mengalir secara normal begitu
udara di dalam sistem telah dikeluarkan.
• Air mungkin keruh ketika filter digunakan pertama
kali; jangan mengonsumsi 10 gelas air pertama.
• Anda harus menunggu sekitar 12 jam untuk
mendapatkan air dingin setelah instalasi pertama.
• Sistem air produk dirancang hanya untuk air
bersih. Jangan gunakan minuman lain.
• Dianjurkan untuk memutuskan pasokan air jika
produk tidak akan digunakan dalam waktu lama
selama liburan dll.
• Jika pancuran air tidak digunakan untuk waktu
yang lama, 1-2 gelas air pertama yang diperoleh
mungkin hangat.
5.8. Baki penampung tetesan (Opsional) Air yang menetes dari pancuran air ditampung di atas
nampan tetesan; tidak tersedia saluran pembuangan
air. Tarik baki tetesan atau dorong bagian tepi untuk
mengeluarkan baki. Kemudian, Anda dapat
membuang air di dalam nampan tetesan.
PERINGATAN: Sistem air pada produk hanya boleh disambungkan pada aluran air dingin. Jangan disambung ke saluran air panas.
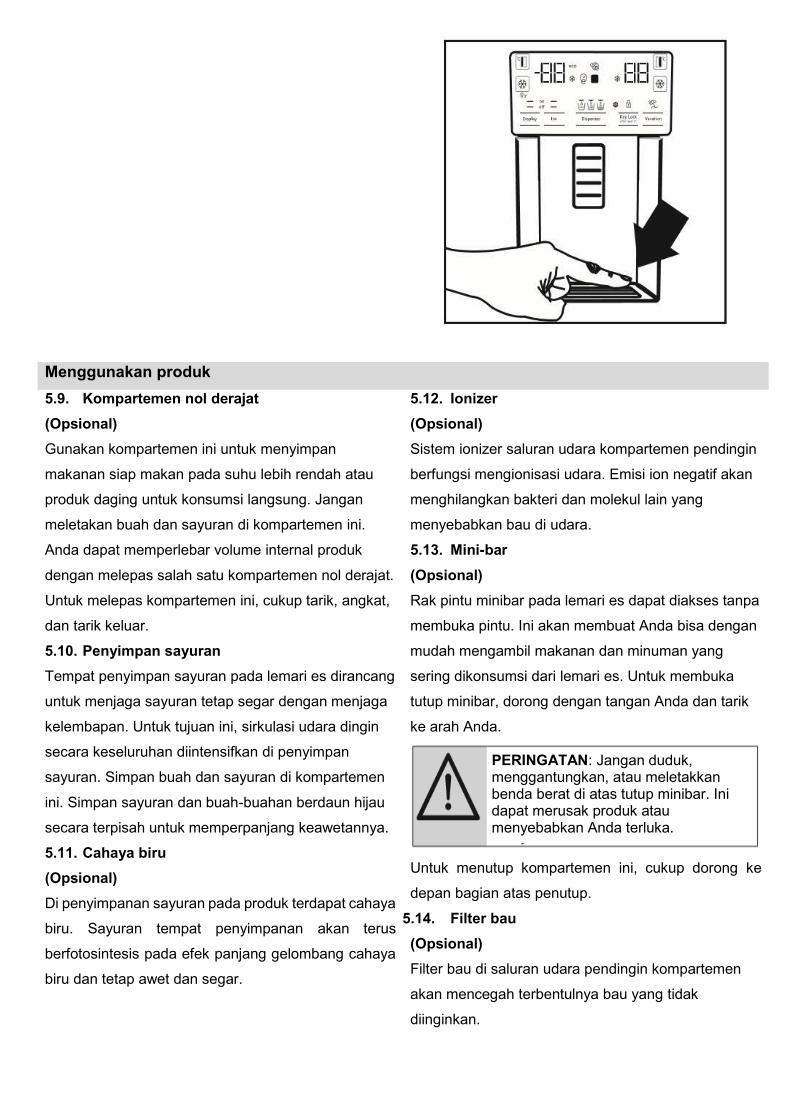
Menggunakan produk 5.9. Kompartemen nol derajat (Opsional) Gunakan kompartemen ini untuk menyimpan
makanan siap makan pada suhu lebih rendah atau
produk daging untuk konsumsi langsung. Jangan
meletakan buah dan sayuran di kompartemen ini.
Anda dapat memperlebar volume internal produk
dengan melepas salah satu kompartemen nol derajat.
Untuk melepas kompartemen ini, cukup tarik, angkat,
dan tarik keluar.
5.10. Penyimpan sayuran Tempat penyimpan sayuran pada lemari es dirancang
untuk menjaga sayuran tetap segar dengan menjaga
kelembapan. Untuk tujuan ini, sirkulasi udara dingin
secara keseluruhan diintensifkan di penyimpan
sayuran. Simpan buah dan sayuran di kompartemen
ini. Simpan sayuran dan buah-buahan berdaun hijau
secara terpisah untuk memperpanjang keawetannya.
5.11. Cahaya biru (Opsional) Di penyimpanan sayuran pada produk terdapat cahaya
biru. Sayuran tempat penyimpanan akan terus
berfotosintesis pada efek panjang gelombang cahaya
biru dan tetap awet dan segar.
5.12. Ionizer (Opsional) Sistem ionizer saluran udara kompartemen pendingin
berfungsi mengionisasi udara. Emisi ion negatif akan
menghilangkan bakteri dan molekul lain yang
menyebabkan bau di udara.
5.13. Mini-bar (Opsional) Rak pintu minibar pada lemari es dapat diakses tanpa
membuka pintu. Ini akan membuat Anda bisa dengan
mudah mengambil makanan dan minuman yang
sering dikonsumsi dari lemari es. Untuk membuka
tutup minibar, dorong dengan tangan Anda dan tarik
ke arah Anda.
Untuk menutup kompartemen ini, cukup dorong ke
depan bagian atas penutup.
5.14. Filter bau (Opsional) Filter bau di saluran udara pendingin kompartemen
akan mencegah terbentulnya bau yang tidak
diinginkan.
PERINGATAN: Jangan duduk, menggantungkan, atau meletakkan benda berat di atas tutup minibar. Ini dapat merusak produk atau menyebabkan Anda terluka.
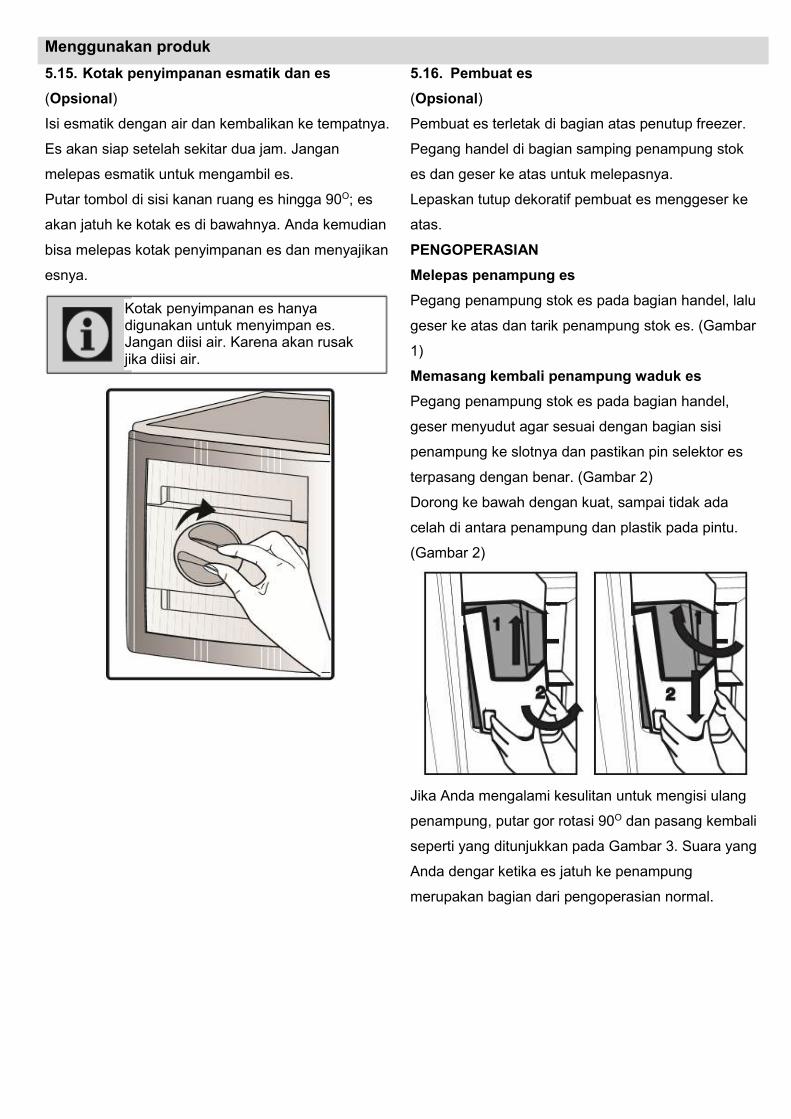
Menggunakan produk 5.15. Kotak penyimpanan esmatik dan es (Opsional) Isi esmatik dengan air dan kembalikan ke tempatnya.
Es akan siap setelah sekitar dua jam. Jangan
melepas esmatik untuk mengambil es.
Putar tombol di sisi kanan ruang es hingga 90O; es
akan jatuh ke kotak es di bawahnya. Anda kemudian
bisa melepas kotak penyimpanan es dan menyajikan
esnya.
5.16. Pembuat es (Opsional) Pembuat es terletak di bagian atas penutup freezer.
Pegang handel di bagian samping penampung stok
es dan geser ke atas untuk melepasnya.
Lepaskan tutup dekoratif pembuat es menggeser ke
atas.
PENGOPERASIAN Melepas penampung es Pegang penampung stok es pada bagian handel, lalu
geser ke atas dan tarik penampung stok es. (Gambar
1)
Memasang kembali penampung waduk es Pegang penampung stok es pada bagian handel,
geser menyudut agar sesuai dengan bagian sisi
penampung ke slotnya dan pastikan pin selektor es
terpasang dengan benar. (Gambar 2)
Dorong ke bawah dengan kuat, sampai tidak ada
celah di antara penampung dan plastik pada pintu.
(Gambar 2)
Jika Anda mengalami kesulitan untuk mengisi ulang
penampung, putar gor rotasi 90O dan pasang kembali
seperti yang ditunjukkan pada Gambar 3. Suara yang
Anda dengar ketika es jatuh ke penampung
merupakan bagian dari pengoperasian normal.
Kotak penyimpanan es hanya digunakan untuk menyimpan es. Jangan diisi air. Karena akan rusak jika diisi air.

Menggunakan produk
Ketika dispenser es tidak bekerja semestinya Jika Anda tidak mengambil kubus es untuk waktu
yang lama, es tersebut akan menyebabkan
terbentuknya bongkahan es. Dalam kasus ini,
lepaskan penampung stok es sesuai dengan
pentunjuk yang diberikan di atas, pisahkan
bongkahan es, buang es yang menempel dan
kembalikan kubus es ke penampung stok es.
(Gambar 4)
Ketika es tidak keluar, periksa es yang menempel di
saluran dan bersihkan. Secara teratur periksa saluran
es untuk membersihkan penyumbat seperti yang
ditunjukkan pada gambar 5. Ketika menggunakan
lemari es untuk pertama kalinya atau ketika tidak
menggunakannya untuk waktu yang lama Kubus Es
mungkin berukuran kecil karena udara di dalam pipa
setelah penyambungan, udara akan dimurnikan
selama penggunaan normal.
Buang es yang dihasilkan selama kurang lebih satu
hari karena pipa air mungkin mengandung
kontaminan.
Awas! Jangan masukkan tangan atau benda lain ke saluran
es dan bilah karena dapat merusak bagian-bagian
atau melukai tangan.
Jangan biarkan anak-anak bergantung pada
dispenser es atau pembuat es karena dapat
menyebabkan cedera
Untuk mencegah agar penampung es tidak jatuh,
gunakan kedua tangan saat melepasnya.
Jika Anda menutup pintu dengan keras, ini bisa
mengakibatkan air tumpah di atas penampung stok
es.
Jangan menurunkan penampung stok es kecuali jika
perlu.
Gambar 3
Gambar 4
Gambar 5
Menggunakan produk 5.17. Membekukan makanan segar
• Untuk menjaga kualitas makanan, makanan yang
ditempatkan di kompartemen freezer harus
dibekukan sesegear mungkin, gunakan
pembekuan cepat untuk melakukan ini.
• Membekukan makanan saat masih segar akan
memperpanjang waktu penyimpanan di
kompartemen freezer.
• Masukkan makanan di dalam kemasan kedap
udara dan tutup rapat.
• Pastikan makanan sudah berada dalam kemasan
sebelum dimasukkan ke dalam freezer. Gunakan
wadah freezer, kertas timah, dan kertas tahan
lembap, kantong plastik atau bahan pengemas
sejenis, bukan kertas kemasan tradisional.
• Tandai semua kemasan makanan dengan
menuliskan tanggal pada paket sebelum
membekukannya. Ini akan memungkinkan Anda
menentukan kesegaran setiap bungkus setiap kali
freezer dibuka. Simpan makanan paling lama di
bagian depan untuk memastikan makanan
tersebut digunakan terlebih dahulu.
• Makanan beku harus digunakan segera setelah
tidak lagi beku dan tidak boleh dibekukan lagi.
• Jangan mengambil makanan dalam jumlah besar
sekaligus.
5.18. Rekomendasi untuk menyimpan makanan beku Kompartemen harus diatur setidaknya pada suhu -18 OC. 1. Masukkan makanan di dalam freezer sesegera
mungkin untuk menghidari pembekuan mencair.
2. Sebelum membekukan, periksa "Tanggal
Kadaluwarsa" pada paket untuk memastikan
makanan tidak kadaluwarsa.
3. Pastikan kemasan makanan tidak rusak.
5.19. Detail deep freezer Sesuai dengan standar IEC 62552, freezer harus
memiliki kapasitas untuk membekukan 4,5 kg bahan
makanan pada suhu -18OC atau suhu yang lebih
rendah dalam waktu 24 jam untuk setiap 100 liter
volume kompartemen freezer. Makanan hanya dapat
diawetkan untuk waktu yang lama pada atau pada
suhu di bawah -18OC. Anda dapat menyimpan
makanan segar selama berbulan-bulan (pada freezer
dingin atau di bawah suhu 18OC).
Makanan yang akan dibekukan tidak boleh mengenai
makanan yang sudah dibekukan di dalam untuk
menghindari pencairan sebagian.
Rebus sayuran dan saring air untuk memperpanjang
waktu penyimpanan pembekuan. Tempatkan
makanan dalam kemasan kedap udara setelah
penyaringan dan masukkan di dalam freezer. Pisang,
tomat, selada, seledri, telur rebus, kentang, dan
makanan sejenis tidak boleh dibekukan.
Membekukan makanan ini akan mengurangi nilai gizi
dan kualitas makanan, serta mungkin menyebabkan
kerusakan yang membahayakan kesehatan.

Menggunakan produk
Pengaturan Kompartemen
Freezer
Pengaturan Kompartemen
Pendingin
Keterangan
-18OC 4OC Ini pengaturan default, yang dianjurkan.
-20OC, -22OC,
atau -24OC
4OC Pengaturan ini dianjurkan untuk lingkungan yang melebihi 30OC.
Pembekuan
Cepat
4OC Gunakan suhu ini untuk membekukan bahan makanan dalam waktu
singkat, produk akan kembali ke pengaturan sebelumnya ketika proses
selesai.
-18OC atau
lebih dingin
2OC Gunakan pengaturan ini jika Anda yakin kompartemen pendingin tidak
cukup dingin karena suhu kamar atau sering membuka pintu
5.20. Menempatkan makanan
Rak
kompartemen
freezer
Berbagai bahan beku termasuk
daging, ikan, es krim, sayuran,
dll.
Rak
kompartemen
pendingin
Makanan di dalam kemasan,
piring bertutup, dan wadah
bertutup, telur (dalam wadah
bertutup)
Rak pintu
kompartemen
pendingin
Kemasan makanan dan
minuman kecil
Tempat
penyimpan
sayuran
Buah dan sayuran
Kompartemen
makanan segar Makanan jadi (makanan
sarapan, produk daging untuk
dikonsumsi dalam waktu
singkat)
5.21. Pintu waspada terbuka (Opsional) Suara peringatan akan terdengar jika pintu produk
tetap terbuka selama 1 menit. Tanda yang terdengar
5.22. Lampu interior Lampu interior menggunakan lampu jenis LED.
Hubungi servis resmi jika mengalami suatu masalah
pada lampu.
Lampu yang digunakan dalam alat ini tidak cocok
untuk penerangan ruangan rumah tangga. Tujuan
penggunaan lampu ini yaitu untuk membantu
pengguna menempatkan bahan makanan ke dalam
lemari es / freezer secara aman dan nyaman.

akan berhenti ketika pintu tertutup atau suatu tombol
di layar (jika tersedia) ditekan.
6 Perawatan dan Pembersihan Membersihkan produk secara teratur akan
memperpanjang umur pakainya.
• Jangan menggunakan alat yang tajam
dan abrasif, sabun, bahan pembersih
rumah, detergen, gas, bensin, pernis,
dan bahan sejenis untuk membersihkan.
• Cairkan satu sendok teh karbonat di
dalam air. Basahi sepotong kain
dengan air dan peras. Bersihkan
perangkat dengan kain ini dan
keringkan secara menyeluruh.
• Berhati-hatilah agar air tidak
mengenai penutup lampu dan komponen
listrik lain.
• Bersihkan pintu menggunakan kain
basah. Ambil semua barang di dalam
untuk melepaskan pintu dan rak sasis.
Angkat pintu rak untuk melepasnya.
Bersihkan dan keringkan rak, lalu
pasang kembali dengan menyelipkan
dari dari atas.
• Jangan menggunakan air klorin atau
produk pembersih pada permukaan luar
dan bagian-bagian produk yang
berlapis krom. Klorin akan
menyebabkan karat pada permukaan
logam tersebut.
• Jangan gunakan alat tajam, abrasif,
sabun, alat pembersih rumah tangga,
detergen, minyak tanah, bahan bakar
minyak, pernis dll. untuk mencegah
terhapusnya dan perubahan bentuk
6.1. Mencegah Bau Tidak Enak Produk ini dibuat bebas dari material bebas bau.
Akan tetapi, menyimpan makanan di bagian yang
tidak sesuai dan pembersihan permukaan bagian
dalam yang tidak tepat dapat menyebabkan bau tidak
enak.
Untuk menghindari ini, bersihkan bagian dalam
dengan air berkarbonasi setiap 15 hari.
• Simpan makanan dalam wadah tertutup.
Mikroorganisme bisa menyebar dari makanan
yang tidak tertutup rapat dan menyebabkan bau
tidak enak.
• Jangan menyimpan makanan yang sudah
kadaluarsa dan basi di dalam lemari es.
6.2. Melindungi Permukaan Plastik Minyak yang tumpah di permukaan plastik bisa
merusak permukaan dan harus segera dibersihkan
dengan air hangat.
PERINGATAN: Lepas sambungan daya sebelum membersihkan lemari es.
cetakan di bagian plastik. Gunakan
air hangat dan kain lembut untuk
membersihkan dan kemudian lap sampai
kering.
7. Pemecahan masalah Periksa daftar ini sebelum menghubungi servis.
Dengan melakukan ini akan menghemat waktu dan
uang Anda. Daftar ini mencakup keluhan yang sering
disampaikan yang tidak terkait dengan kesalahan
pengerjaan atau material. Fitur-fitur tertentu yang
disebutkan di sini mungkin tidak berlaku untuk produk
Anda.
Lemari es tidak berfungsi.
• Steker listrik tidak terpasang sepenuhnya. >>>
Masukkan agar benar-benar masuk ke dalam
soket.
• Sekering yang terhubung ke soket yang memberi
daya produk atau sekring utama putus. >>>
Periksa sekeringnya.
Pengembunan pada dinding samping kompartemen pendingin (MULTI ZONE, COOL, CONTROL dan FLEXI ZONE).
• Pintu terlalu sering dibuka >>> Berhati-hatilah
untuk tidak terlalu sering membuka pintu produk.
• Lingkungan terlalu lembap. >>> Jangan
memasang produk di lingkungan yang lembab.
• Makanan yang mengandung cairan disimpan
dalam wadah tidak ditutup. >>> Simpan makanan
yang mengandung cairan dalam wadah tertutup.
• Pintu produk dibiarkan terbuka. >>> Jangan
biarkan pintu produk tetap terbuka untuk waktu
yang lama.
• Termostat diatur pada suhu terlalu rendah. >>>
Atur thermostat ke suhu yang sesuai.
Kompresor tidak berfungsi.
• Jika terjadi kegagalan daya tiba-tiba atau steker
listrik tertarik lepas dan dicolokkan kembali,
tekanan gas dalam sistem pendingin produk tidak
seimbang, sehingga memicu pengaman thermal
• Defrosting aktif. >>> Ini normal pada produk
Defrosting es otomatis penuh. Pencairan bunga es
dilakukan secara berkala.
• Produk tidak dicolokkan. >>> Pastikan kabel listrik
sudah terpasang.
• Pengaturan suhu tidak sesuai. >>> Pilih
pengaturan suhu yang sesuai.
• Daya mati. >>> Produk akan terus beroperasi
secara normal setelah daya pulih.
Lemari es beroperasi semakin berisik saat digunakan.
• Kinerja pengoperasian produk dapat berbeda
tergantung pada variasi suhu lingkungan. Ini
normal dan bukan merupakan kerusakan.
Lemari es terlalu sering atau terlalu lama bekerja.
• Produk baru mungkin lebih besar daripada produk
sebelumnya. Produk yang lebih besar akan
bekerja lebih lama.
• Suhu ruangan mungkin tinggi. >>> Produk
biasanya akan bekerja dalam waktu lama pada
suhu ruang lebih tinggi.
• Produk mungkin baru saja dicolokkan atau bahan
makanan baru saja dimasukkan di dalamnya. >>>
Produk akan membutuhkan waktu lebih lama
untuk mencapai suhu pengaturan ketika baru saja
dicolokkan atau bahan makanan baru saja
ditempatkan di dalamnya. Ini normal.
• Sejumlah besar makanan panas mungkin baru-
saja dimasukkan ke dalam produk. >>> Jangan
memasukkan makanan panas ke dalam produk.
• Pintu sering dibuka atau tetap terbuka dalam
waktu lama. >>> Udara hangat yang bergerak di
dalam akan menyebabkan produk bekerja lebih
lama. Jangan terlalu sering membuka pintu.
kompresor. Produk akan restart setelah kira-kira 6
menit. Jika produk tidak melakukan restart periode
ini, hubungi servis.
Pemecahan masalah
• Pintu freezer atau pendingin mungkin sedikit
terbuka >>> Periksa apakah pintu sudah tertutup
rapat.
• Produk mungkin diatur pada suhu terlalu rendah.
>>> Atur suhu pada tingkat lebih tinggi dan
tunggu produk mencapai suhu peyesuaian.
• Ring pintu pendingin atau freezer mungkin kotor,
usang, rusak, atau tidak terpasang dengan tepat.
>>> Bersihkan atau ganti ring pintu. Ring pintu
yang rusak / aus akan menyebabkan produk
bekerja lebih lama untuk mempertahankan suhu
saat ini.
Suhu freezer sangat rendah, tetapi suhu pendingin sedang.
• Suhu kompartemen freezer diatur ke tingkat yang
sangat rendah. >>> Atur suhu kompartemen
freezer ke tingkat yang lebih tinggi dan periksa
lagi.
Suhu pendingin sangat rendah, tetapi suhu freezer sedang.
• Suhu kompartemen pendingin diatur pada tingkat
sangat rendah. >>> Atur suhu kompartemen
freezer ke tingkat yang lebih tinggi dan periksa
lagi.
Bahan makanan yang disimpan di laci kompartemen pendingin beku.
• Suhu kompartemen pendingin diatur pada tingkat
sangat rendah. >>> Atur suhu kompartemen
freezer pada tingkat lebih tinggi dan periksa lagi.
Suhu di pendingin atau freezer terlalu tinggi.
• Suhu kompartemen pendingin diatur pada tingkat
sangat tinggi. >>> Pengaturan suhu
• Pintu sering dibuka atau tetap terbuka dalam
waktu lama. >>> Jangan terlalu sering membuka
pintu.
• Pintu mungkin terbuka sedikit. >>> Tutup pintu
dengan rapat.
• Produk mungkin baru saja dicolokkan atau bahan
makanan baru saja dimasukkan di dalamnya.
>>> Produk akan membutuhkan waktu lebih
lama untuk mencapai suhu pengaturan ketika
baru saja dicolokkan atau bahan makanan baru
saja ditempatkan di dalamnya.
• Sejumlah besar makanan panas mungkin baru-
saja dimasukkan ke dalam produk. >>> Jangan
memasukkan makanan panas ke dalam produk.
Bergetar atau berisik.
• Lantai tidak rata atau kokoh. >>> Jika produk
bergetar saat bergeser perlahan, atur dudukan
untuk menyeimbangkan produk. Juga pastikan
lantai cukup kokoh untuk menopang produk.
• Barang apa pun yang diletakkan di atas produk
dapat menyebabkan kebisingan. >>> Singkirkan
semua barang yang ditempatkan di atas produk.
Produk ini menghasilkan suara aliran, semprotan cairan dll.
• Prinsip operasi produk melibatkan aliran cairan
dan gas. >>> Ini normal dan bukan kegagalan
fungsi.
Ada suara hembusan angin yang berasal dari produk.
• Produk menggunakan kipas untuk proses
pendinginan. >>> Ini normal dan bukan
kegagalan fungsi.
kompartemen pendingin memiliki efek pada suhu
di kompartemen freezer. Tunggu sampai suhu di
bagian yang sesuai mencapai tingkat yang cukup
dengan mengubah suhu kompartemen pendingin
atau freezer.
Terjadi pengembunan pada dinding dalam produk.
• Cuaca panas atau lembap akan meningkatkan
lapisan es dan pengembunan. Ini normal dan
bukan kegagalan fungsi.
Pemecahan masalah
• Pintu sering dibuka sering atau tetap terbuka
dalam waktu lama. >>> Jangan terlalu sering
membuka pintu; jika terbuka, tutup pintunya.
• Pintu mungkin sedikit terbuka. >>> Tutup pintu
dengan rapat.
Terjadi pengembunan pada bagian produk atau di antara pintu.
• Cuaca sekitar mungkin lembap, ini cukup normal
pada cuaca lembap. >>> embun akan hilang
ketika kelembapan berkurang. Interior bau tidak enak.
• Produk tidak dibersihkan secara teratur. >>>
Bersihkan interior secara teratur menggunakan
spons, air hangat, dan air berkarbonasi.
• Bahan wadah dan pengemas tertentu dapat
menyebabkan bau. >>> Gunakan bahan wadah
dan bahan pengemas tanpa bebas bau.
• Makanan ditempatkan pada wadah yang tidak
tidak berpenutup. >>> Simpan makanan dalam
wadah tertutup. Mikroorganisme dapat
menyebar dari makanan yang tidak tertutup dan
menyebabkan bau tak sedap. Keluarkan
makanan yang sudah kadaluarsa atau basi dari
produk.
Pintunya tidak tertutup.
• Kemasan makanan mungkin menahan pintu.
>>> Pindahkan semua barang yang menghalangi
pintu.
• Produk tidak berdiri tegak lurus di lantai. >>> Atur
dudukan untuk menyeimbangkan produk.
• Lantai tidak rata atau kokoh. >>> Pastikan lantai
cukup kokoh untuk menopang produk..
Penyimpanan sayuran macet.
• Bahan makanan mungkin mengenai bagian atas
penyimpanan. >>> Tata ulang bahan makanan di
dalam penyimpanan.
Jika Permukaan Produk Ini Panas.
• Suhu tinggi dapat diamati fi antara dua pintu, pada
panel samping dan di grill belakang saat produk
beroperasi. Ini normal dan tidak memerlukan
pemeliharaan servis! Berhati-hatilah saat
menyentuh area ini.
.
.
PERINGATAN: Jika masalah berlanjut setelah mengikuti petunjuk
di bagian ini, hubungi vendor Anda atau Servis
Resmi. Jangan mencoba memperbaiki sendiri
produk
0
Produk ini diimport oleh: PT. BEKO APPLIANCES INDONESIA, The Plaza Office Tower Lt. 22 Unit F2-F3 Jl. MH. Thamrin Kav 28-30 Jakarta, Indonesia 10350 Telp : 021-2918-9229 Fax. : 021-2918-9228 Produk ini dibuat oleh: Arcelik A.S., Refrigerator Plant Organize Sanayi Bölgesi, 26110 Odunpazarı/Eskişehir MADE in Turkey
www.beko.com