Embed Size (px)
Citation preview
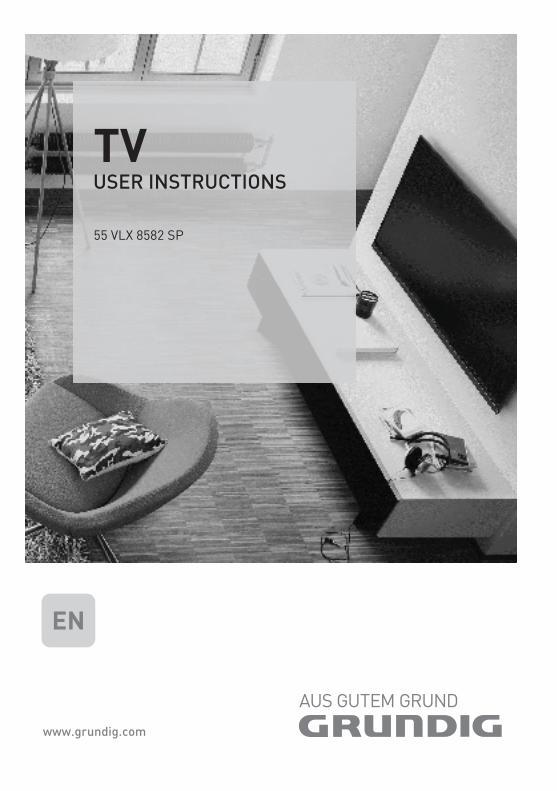
EN
55 VLX 8582 SP
ENGLISH2
TABLEOFCONTENTS---------------------------------------------------------------------------------
5 SET-UPANDSAFETY
7 GENERALINFORMATION7 Specialfeaturesofyourtelevisionset8 Receivingdigitalstations8 GRUNDIGSCRSystem8 Importantnotesonenvironmentalprotection8 Notesonstillimages
9 PACKINGCONTENTS9 Standartaccessory9 Optionalaccessory
10 CONNECTION/PREPARATION10 Connectingtheantennaandpowercorda11 Settinguporhanging12 Insertingbatteriesintheremotecontrol
13 OVERVIEW13 Connectionsonthetelevisionset15 ControlbuttonsontheTV15 Multi-functionswitch16 Remotecontrol-mainfunctions17 Remotecontrol-allfunctions
18 INITIALSET-UP18 Settingsforconnectingtothehomenetwork18 Tuningchannels19 Initialset-up–overview20 ArrangeInitialset-up24 ChangingtheChannelEditorforthe
digitalchannels
28 PICTURE/SOUNDSETTINGS28 Picturesettings29 Restoredefaultsettings29 Concludingthesettings30 Soundsettings31 Restoredefaultsettings31 Concludingthesettings
32 TVOPERATION–BASICFUNCTIONS32 Switchingonandoff32 Selectingchannels32 Selectingstationsfromlists32 SelectingAVchannels32 Adjustingthevolume32 Muting32 Displayinginformation33 Audiolanguage33 Subtitles33 Zapfunction33 PIPmode
34 TVOPERATION–ADDITIONAL FUNCTIONS34 Sleeptimer34 Zoomfunction34 Changingthepictureformat35 Audiosettings35 Picturesettings
36 ELECTRONICTVGUIDE36 Logontothe“RoviGuide™“36 TheElectronicTVguideinOfflinemode37 TheElectronicTVguideinOnlinemode
38 3DFUNCTION38 Importantinformationabout3DFunction38 Prepare3DFunction38 Watching3Dcontent39 3DSettings
41 HBBTVMODE41 WhatisHbbTV?42 UsingHbbTV42 Additionalfunctionsforvideoindexes42 DeactivateandactivateHbbTV42 Deactivateandactivatedigitalteletext
43 TELETEXTMODE43 TOPtextorFLOFtextmode43 Normaltextmode43 Additionalfunctions
3ENGLISH
TABLEOFCONTENTS---------------------------------------------------------------------------------
44 USBRECORDING44 Informationonrecordingandplaying
televisionprogrammes44 Possiblelimitationswhenusinganexter-
naldatamedium45 Connectingexternaldatamedia46 USBrecordingsettings47 Timeshift–″Pausing”programmes48 RecordingTVprogrammes48 One-touchprogrammerecording48 Recordingaprogrammefromthechannellist49 Programmesettingforrecording50 Editingthetimer50 Deletingatimer51 Playback51 Deletingprogrammesfromtherecorded
filesmenu
52 USBOPERATION52 FileformatsforUSBoperating53 Connectingexternaldatamedia53 Removingtheexternaldatamedia54 Thefilebrowser54 SettingsintheUSBsetupmenu56 Playbackbasicfunctions57 Additionalplaybackfunctions58 Playingthevideo,musicandimagefiles
withhomenetworkconnection58 Selectingthedigitalmediaserver59 Playback59 Otherplaybackoptions
60 SMARTINTER@CTIVETV4.0FEATURE60 [email protected]
plications60 USBkeyboardandmouse60 StartingSmartInter@ctiveTV61 Navigationandeneteringtextduring
registration61 CreatingaGrundigApplicationStoreaccount62 LogginginwithGrundigApplication
Storeaccount63 GrundigApplicationStore65 Navigationinthemainmenu65 Playbackandotheroptionsintheap-
plications66 Webbrowsermenu66 Webbrowserapplications
67 LANGUAGESETTINGS67 Changingthemenulanguage67 Changingtheaudiolanguage67 Changingthesubtitlelanguage67 Changingthekeyboard
language
68 ACCESSIBLEFUNCTIONS68 SubtitleMode68 Audiodescription(audiosubtitles)
69 ADVANCEDSETTINGS69 Autosleep69 Storelogoview69 PowerLEDbrightness70 Powersavemode70 Switchingon/offweatherinformation
71 TIMERFUNCTIONS71 Sleeptimer71 Ontimer(AutoOn)72 Offtimer(AutoOff)
73 PARENTALSETTINGS73 ParentalGuidance73 Lockingthemenus74 Blockingthemultifunctionswitch74 ChangingthePINcode74 Blockingatelevisionchannel75 Watchingablockedtelevisionchannel75 ResettingPINcode
76 DATEANDTIMESETTINGS76 Autotuning76 Manualtuning
77 SOFTWAREOFTHEDEVICE77 Productinformation77 Softwareupdate(OAD)77 Softwareupdate(Internet)77 Softwareupdate(USB)
78 ACCESSORIES

ENGLISH4
TABLEOFCONTENTS---------------------------------------------------------------------------------
79 RESETFUNCTIONS79 Resettingthetelevisiontoitsoriginalstate79 Deletingchannelhistory
80 USINGEXTERNALDEVICES80 DIGILINK80 TheDigiLinkfunctionsofthetelevision81 DeviceControl82 Highdefinition–HDready82 Connectionoptions83 Connectinganexternaldevice84 UsingaDVDrecorder,DVDplayer,video
recorderorset-topbox84 Headphones85 Hi-fisystem86 PlayingtheaudiosignalviatheHiFi
system87 Cablescreenshare(MHL)88 Wirelessscreenshare(Liveshare)
89 OPERATIONWITHCOMMON INTERFACE89 Whatiscommoninterface?89 InsertingtheCAmodule89 AccesscontrolforCAmoduleandsmart
cards
90 NETWORKSETUP90 Networkconnection90 Wirednetwork91 Wirednetworksettings93 Wirelessnetwork93 Wirelessnetworksettings97 ChangeTVName98 ConnectingtheTVtoa“hidden”network
99 SETTINGFURTHERCHANNELS99 Searchingforalldigitalchannelsfroma
satelliteautomatically100 Searchingfordigitalchannelsfroma
satellitemanuallyonatransponder101 Antennasettingsandsearchingfordigital
channelsfromasatelliteautomatically102 Antennasettings,SCRsystemandsearch-
ingfordigitalchannelsfromasatelliteautomatically
103 AntennasettingsforDiSEqC1.0/1.1andsearchingdigitalchannelsfromasatelliteautomatically
105 Motorantennasetup(DiSEqC1.2)106 Searchingfordigitalchannelsfromthe
cableproviderautomatically107 Searchingfordigitalchannelsfromthe
cableprovidermanually107 SearchingfordigitalterrestrialTVchan-
nelsautomatically108 SearchingfordigitalterrestrialTVchan-
nelsmanually109 Automaticserviceupdate109 Tuninganaloguetelevisionchannels111 Changingstoredanaloguechannels112 Displayingsignalinformation
113 INFORMATION113 Additionalinformation114 Serviceinformationfordealers114 NotesforWLANreception115 Networkinterfaces115 Disposingofthepackaging115 Environmentalnote115 Explanationofthesymbolswhichmaybe
presentonbacksideofthetelevisionset116 Troubleshooting
118 GLOSSARY
123 INDEX
5ENGLISH
SET-UPANDSAFETY-----------------------------------------------------------------------------------
AboutyourTVset7WithyourTVset,youcanreceiveandwatch
digitalTVprogrammesoverDVB-S,DVB-TandDVB-C,alongwithanalogueTV.
7ManyfeaturesoftheTVsetrequireanInter-netconnection.TheTVsetisequippedwithWLANandaLANport.
7 TheTVsetcanrecordprogrammes.ForthisfeatureyouneedaUSBstoragedevice,suchasanexternalharddrive(notincluded).Re-cordedprogrammescanonlybeplayedonthesameTVset.AftertheTVstisrepaired,itispossiblethatrecordedprogrammesmaynolongerbeabletobeplayedback.
Intendeduse7TheTVsetisdesignedforuseindryrooms.7UsetheTVsetwiththesuppliedstandor
asuitableVESAbracket.7TheTVsetisprimarilyintendedfortheplay-
backofTVprogrammes,streamingcontentandaudio/videomaterialfromexternalde-vices.Anyotheruseisstrictlyprohibited.
Itisnotintendedasaninformationdisplayorforpredominantuseasacomputermonitor.Ifastillimageoranon-full-formatimageisdis-playedforanextendedperiod,visibletracesmayremainonthescreenforsometime.
Thisisnotadefectthatcanbeusedasthebasisforawarrantyclaim.
SafetyWARNING
Riskofelectricalaccident7DonotopentheTVset.Safetyriskmayarise
andalsotheguaranteeoftheproductcanbevoidifthetelevisionsetisopened.
7TheTVsetcanonlybeoperatedwiththepowercableortheAC/DCadaptersuppliedwiththeproduct.
7DonotoperatetheTVsetwithadamagedpowercord/AC/DCadaptor(ifsupplied).
7IftheplugontheTVsethasanearthingcon-tact,onlyinserttheplugintoasocketwithanearthingcontact.
7PlugtheTVsetintothemainssocketonlyafteryouhaveconnectedtheexternaldevicesandtheantenna.
7ProtecttheTVsetfrommoisture.Donotplaceanyvesselsfilledwithwater(suchasvases)ontheTV.
Firehazard7 Topreventthespreadoffire,
keepcandlesorotheropenflamesawayfromthisproductatalltimes.
7DonotcovertheventilationslotsontheTVset.
7Alwaysunplugthepowerplugandantennaplugduringathunderstorm.
7KeepcandlesorotheropenflamesawayfromtheTVset.
7Donotexposethebatteriestoextremeheatsuchassunshine,fireorthelike.
7Onlyusebatteriesofthesametype(brand,size,properties).Donotuseusedandnewbatteriestogether.
ENGLISH6
SET-UPANDSAFETY-----------------------------------------------------------------------------------
WARNINGInjuriescausedbyfallingTVsetNeverplacetheTVsetonanunstablesurface.TheTVsetmayfall,causingseriousinjury,pos-siblyleadingtodeathinisolatedcases.Observethefollowingprecautions:7Onlyusethemanufacturer’srecommended
cabinetsorstands.7Onlyusefurniturethatcansafelysupportthe
TVset.7MakesurethattheTVsetdoesnotprotrude
beyondthedimensionsofthefurnitureonwhichitisresting.
7DonotplacetheTVsetontallfurniture(suchaskitchencabinets,bookshelves)withoutsecurelyanchoringthefurnitureandTVset.
7DonotplacetheTVsetonfabricorothermaterialslocatedbetweentheTVsetandfurniture.
7Instructchildrenthatthereisdangerassoci-atedwithclimbingonfurniturewhentheTVsetistobereached.
NOTICEShortenedservicelifeduetohighoperatingtemperature7DonotplacetheTVsetnexttoheatingunits
orindirectsunlight.7Toensureadequateventilation,maintain
clearanceofatleast10cmaroundtheTVset.
Discolourationoffurnitureduetorubberfeet7Somefurnituresurfacesmaydiscolourwhen
theycomeincontactwithrubber.Toprotectfurniture,youcanplaceasheetmadeofglassorplasticunderthestand.Donotusetextileunderlaysormatssuchasdoilies.
Environmentalinformation7 Donotdisposeofbatteriesin
thehouseholdwaste.Usedbat-teriesmustbereturnedtoretail
storesorpubliccollectionpoints.Youhelptoprotecttheenvironmentinthisway.
7Besuretodisposeofpackagingmaterialsforyourproductseparatelyaccordingtotheguidelinesoflocalauthoritiessothattheycanberecycledinanenvironmentallysafemanner.
7 IfyouarenotusingyourTVsetforawhile,turnittostandbymode.Instandbymode,theTVsetusesverylittleenergy(≤0.5W).IfyoudonotusetheTVsetforanextendedperiod,turnitoffwiththepowerswitchorunplugthepowercordfromthesocket.Ifyouturnoffthedeviceordisconnectitfromthepowersupply,theswitch-ontimerandpro-grammedrecordingswillnotwork.
7SelectalocationfortheTVsetsothatnodirectsunlightfallsonthescreen.Thisallowsalowerbacklighttobeselected,whichsavesenergy.
7 Donotdisposeoftheproductalongwithnormalhouseholdwasteattheendofitsservicelife.Takeittoarecyclingcentre
forelectricalandelectronicequipment.

7ENGLISH
Specialfeaturesofyourtelevisionset7 Yourtelevisionsetenablesyoutoreceiveand
watchdigitalstations(viaDVB-S,DVB-TandDVB-C),includingtheHighDefinition(HD)ones.Atpresent,receptionforthesedigitaltelevisionstationsinHighDefinitionisonlypossibleinsomecountriesinEurope.
7 AlthoughthistelevisionmeetsthecurrentDVB-S,DVB-TandDVB-CstandardsasofAugust2012,itscompatibilitywithfutureDVB-Sdigitalsatellitebroadcasts,DVB-Tdigitalter-restrialbroadcastsandDVB-Cdigitalcablebroadcastsisnotguaranteed.
7 Thistelevisioncanreceiveandprocessallanalogueandallunencrypteddigitalstations.Thistelevisionsethasanintegrateddigitalandanaloguereceiver.Thedigitalreceiverunitconvertsthesignalsfromdigitalstationstoprovideoutstandingaudioandpicturequality.
7 Thetwin-tripletunerenablesPIPfunctionsoyoucanviewoneTVprogrammeinthemainpictureandanotherinaninsetpicture.
YoucannowalsoviewoneTVprogrammewhilerecordinganotherprogramme.
7 TheTVguide(onlyfordigitalstations)tellsyouofanyschedulechangesatshortnotice,andprovidesanoverviewofallthestations’schedulesforthenextfewdays.Quitealotofcontentsuchasprogrammedata,channellogos,players,images,frag-ments,etc.canbereachedviatheinternetthroughinternetconnectionthankstotheon-linefeatureoftheTVguide.Detailedinformationforeachchannel-ifprovidedbythebroadcastingchannel-isincludedintheelectronicprogrammeguide.
7 Youcanconnectvariousdatamedia,forexample,anexternalharddrive,aUSBmemorystickoradigitalcameratotheUSBsockets.Usingthefilebrowser,youcanthenselectandplaythefileformatsyouwant(forexample,MP4,MP3orJPEGdata).
7 WiththeTimeShiftfunction,youcaneas-ilystopandresumeaprogrammewiththeremotecontrolinafastandsimpleway.Programmeisrecordedtotheexternaldatamedium.
GENERALINFORMATION-------------------------------------------------------------------
7 YoucanrecordanydigitalTVchannelyouhavechosen,ifnolimitationhasbeenim-posedbythebroadcaster.
TVchannelistransformedbyyourtelevisionandsavedtoaUSBexternaldatamedium.
Youcanrecallandplaysavedprogramsfromthearchive.
Whilearecordingisinprogress,youcanselectandwatchanotherrecordingfromthearchive.
FordetailedinformationaboutsavingandplayingTVprograms,pleaseseepage44.
7 Withthe3Dfunctionand3DglassesofyourTV,youcanwatch3Dmoviesinthecomfortofyourhomewiththerealityofatheater.LEDtechnologyhasbeenusedinthistelevi-siontoprovideyouwiththebestexperiencein3Dfeature.Tojointhe3Dworld,justputontheGrundig3Dglasses.
7 SMARTinter@ctiveTV4.0featureprovidesyourTVwithInternetapplicationswhenyourTVisconnectedtoInternet.Youcansurfthroughthewebpages,visitpopularvideoandphotosharingsitesaswellassocialnet-workswiththeseapplications.
7 WirelessUSBkeyboardandmousesupportintheWebbrowsingofyourtelevisionfacilitatessurfingthroughtheinternetpagesfortheuser.
7 DLNAfeatureallowsyoutouseawiredorwireless(withwirelessUSNnetworkdevice)localnetworktoaccessyourcontentthatwererecordedwithDLNAcompatibledevicesweuseatourdailylivessuchasaPC,mobilephoneorNAS(NetworkAttachedStorage)whichareoperatedasDMS(DigitalMedialServer).WhilewatchingTV,youcanplayanycontentyoulikeatanytimebyusingDMCapplicationsonyourmobiledeviceorPCwithoutstartingDLNAapplication.
7 ADLNAcompatibledevicesuchasaPC,mobilephone,NASoraNAS-like(Networkattachedstorage)devicewhichoperatesasaDMS(DigitalMediaServer)isrequiredinordertousehomenetwork.
ENGLISH8
GENERALINFORMATION-------------------------------------------------------------------
Importantnotesonenvironmen-talprotectionThoseitemsmentionedbelowwillhelpyoureducetheconsumptionofnaturalresourcesaswellassaveyourmoneybyreducingelectricitybills.7 IfyouwillnotbeusingtheTVsetforseveral
days,itshouldbedisconnectedfromthemainsforenvironmentalandsafetyreasons.TVwillnotconsumeenergyinthiscondition.
7 IftheTVsethasmainswitch,itwillbeenoughtoturntheTVoffviamainswitch.TVwillreduceenergyconsumptionalmosttoZeroWatt.
7 TVconsumeslessenergyonstandbymode.However,someTVsetsmayhavefeaturessuchasontimer,thatrequiretheTVsettobeleftinstandbytoworkcorrectly.
7 TVconsumeslessenergywhenbrightnessisreduced.
NotesonstillimagesWatchingthesameimageforalongtimeonthescreenmaycauseastillimageremainfeeblyonthebackground.Feebleimage(s)ontheback-groundisoriginatedfromLCD/LEDtechnologyanddoesnotrequireanyactionunderguaran-tee.Toavoidsuchcasesand/orminimizetheimpact,youmayobservethetipsbelow.7 DonotallowthesameTVchanneltostayon
thescreenforaverylongtime.Channellogosmaycausethissituation.
7 Donotallowtheimages,whicharenotfullscreen,toconstantlystayonthescreen;ifnotstreamedinfullscreenformatbythebroad-caster,youcanconverttheimagestofullscreenbychangingpictureformats.
7 Higherbrightnessand/orcontrastvalueswillleadthisimpacttoappearfaster;therefore,youarerecommendedtowatchyourTVinthelowestbrightnessandcontrastlevels.
Receivingdigitalstations7 Toreceivedigitalsatellitestations(DVB-S)you
needasatelliteantenna.7 Toreceivedigitalstations(DVB-T)youneed
adigitalrooftoporindoorantenna(passiveoractiveindoorantennawithitsownpowersupply).
7 TheantennacableofthecableTVnetworkthatbroadcastinDVB-CmustbepluggedintoTVinordertoreceivetheDVB-Cbroadcasts.
7 Unlikeanaloguebroadcasting,noteverystationhasitsowntransmissionfrequency.Instead,severalstationsaregroupedintowhatareknownasbouquetsonaregionalornationallevel.
7 Youcanfindthecurrenttransmissioninforma-tiononteletextfromvariousbroadcasters,orlookinaTVguideorontheInternet.
7 Variousdigitaltelevisionstationsfromprivatebroadcastersareencrypted(DVB-S,DVB-TandDVB-C).WatchingthesestationsandtherecordingandplaybackfunctionsareonlypossiblewiththeappropriateCImoduleandaSmartCard.Askyourspecialistdealer.
GRUNDIGSCRSystemYourTVsupportsSCRsystem(SingleChannelRouter).WithSCRsatellitesystem,severalus-erscanindividuallyreceiveallsignalsfromthesatellitesimultaneously.
9ENGLISH
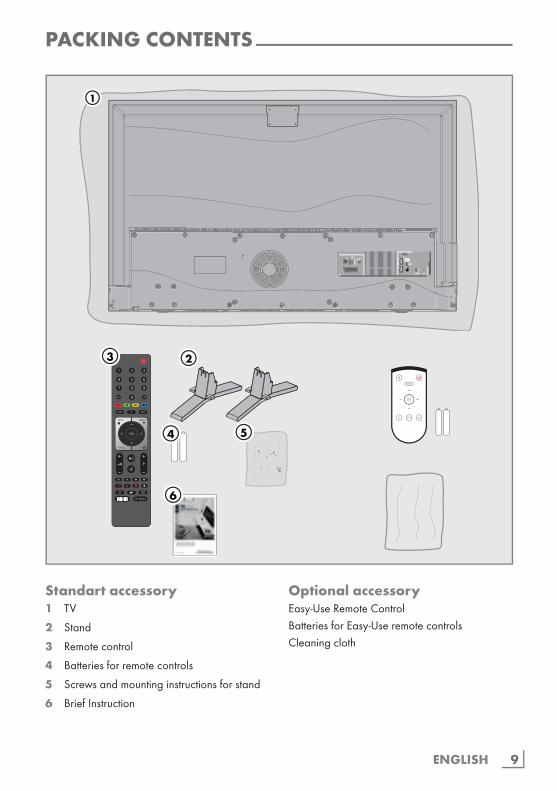
PACKINGCONTENTS-------------------------------------------------------------------------------
Standartaccessory1 TV
2 Stand
3 Remotecontrol
4 Batteriesforremotecontrols
5 Screwsandmountinginstructionsforstand
6 BriefInstruction
OptionalaccessoryEasy-UseRemoteControlBatteriesforEasy-UseremotecontrolsCleaningcloth
4
2
1
5
3
MAIN
SUB
6
ENGLISH10
CONNECTION/PREPARATION-----------------------------------------------------
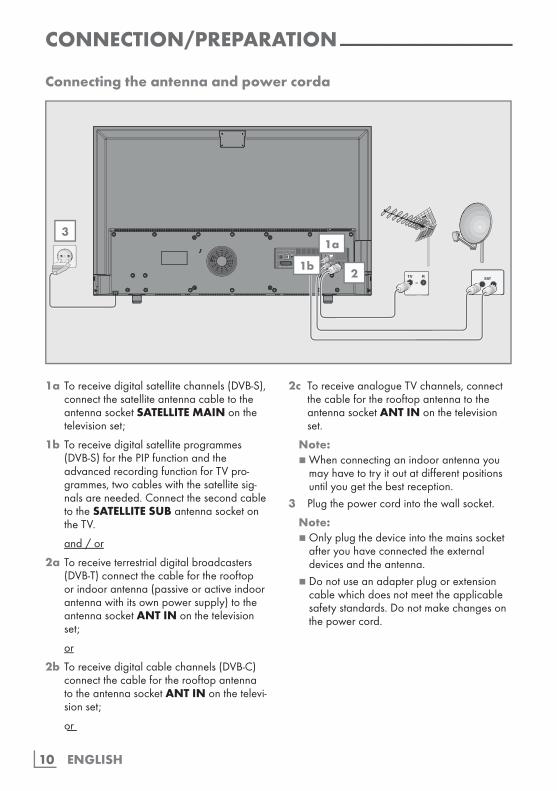
Connectingtheantennaandpowercorda
1a Toreceivedigitalsatellitechannels(DVB-S),connectthesatelliteantennacabletotheantennasocketSATELLITEMAINonthetelevisionset;
1b Toreceivedigitalsatelliteprogrammes(DVB-S)forthePIPfunctionandtheadvancedrecordingfunctionforTVpro-grammes,twocableswiththesatellitesig-nalsareneeded.ConnectthesecondcabletotheSATELLITESUBantennasocketontheTV.
and/or
2a Toreceiveterrestrialdigitalbroadcasters(DVB-T)connectthecablefortherooftoporindoorantenna(passiveoractiveindoorantennawithitsownpowersupply)totheantennasocketANTINonthetelevisionset;
or
2b Toreceivedigitalcablechannels(DVB-C)connectthecablefortherooftopantennatotheantennasocketANTINonthetelevi-sionset;
or
2c ToreceiveanalogueTVchannels,connectthecablefortherooftopantennatotheantennasocketANTINonthetelevisionset.
Note:7 Whenconnectinganindoorantennayou
mayhavetotryitoutatdifferentpositionsuntilyougetthebestreception.
3 Plugthepowercordintothewallsocket.
Note:7 Onlyplugthedeviceintothemainssocket
afteryouhaveconnectedtheexternaldevicesandtheantenna.
7 Donotuseanadapterplugorextensioncablewhichdoesnotmeettheapplicablesafetystandards.Donotmakechangesonthepowercord.
SCART / S-VHS / COMPONENT
Optic Out SERVICEONLY
LANSATELLITE
ANT IN
HD
MI4
(AR
C)
HD
MI3
USB 3
MAIN
SUB
1a
1b2
3
11ENGLISH
CONNECTION/PREPARATION-----------------------------------------------------
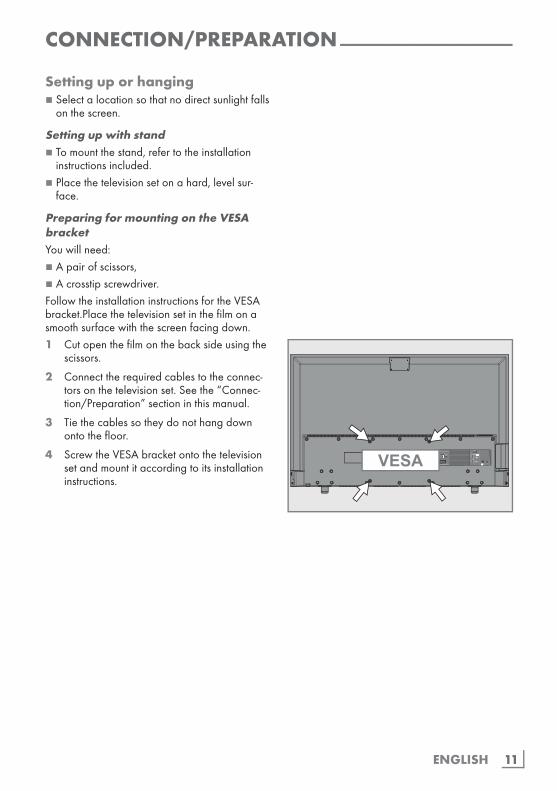
Settinguporhanging7 Selectalocationsothatnodirectsunlightfalls
onthescreen.
Settingupwithstand7 Tomountthestand,refertotheinstallation
instructionsincluded.7 Placethetelevisionsetonahard,levelsur-
face.
PreparingformountingontheVESAbracketYouwillneed:7 Apairofscissors,7 Acrosstipscrewdriver.FollowtheinstallationinstructionsfortheVESAbracket.Placethetelevisionsetinthefilmonasmoothsurfacewiththescreenfacingdown.1 Cutopenthefilmonthebacksideusingthe
scissors.
2 Connecttherequiredcablestotheconnec-torsonthetelevisionset.Seethe“Connec-tion/Preparation”sectioninthismanual.
3 Tiethecablessotheydonothangdownontothefloor.
4 ScrewtheVESAbracketontothetelevisionsetandmountitaccordingtoitsinstallationinstructions.
SCART / S-VHS / COMPONENT
Optic Out SERVICEONLY
LANSATELLITE
ANT IN
HD
MI4
(AR
C)
HD
MI3
USB 3
MAIN
SUBVESA
ENGLISH12
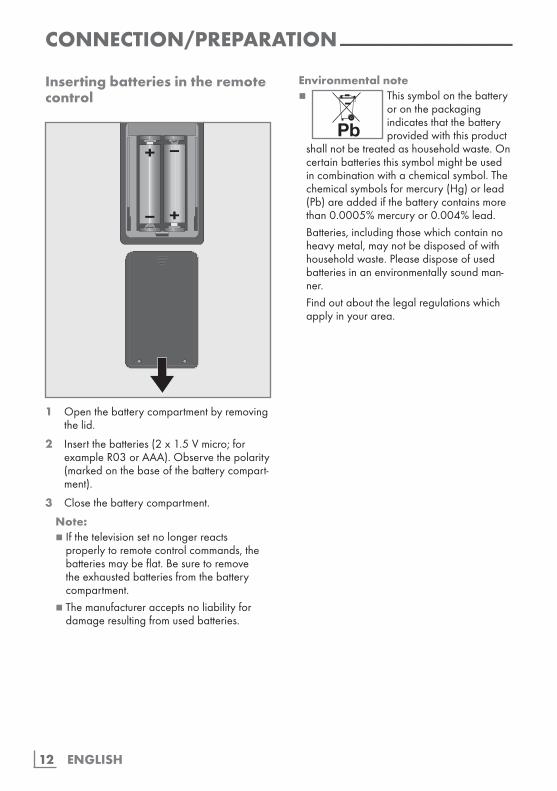
Insertingbatteriesintheremotecontrol
CONNECTION/PREPARATION-----------------------------------------------------
1 Openthebatterycompartmentbyremovingthelid.
2 Insertthebatteries(2x1.5Vmicro;forexampleR03orAAA).Observethepolarity(markedonthebaseofthebatterycompart-ment).
3 Closethebatterycompartment.
Note:7 Ifthetelevisionsetnolongerreacts
properlytoremotecontrolcommands,thebatteriesmaybeflat.Besuretoremovetheexhaustedbatteriesfromthebatterycompartment.
7 Themanufactureracceptsnoliabilityfordamageresultingfromusedbatteries.
Environmentalnote7 Thissymbolonthebattery
oronthepackagingindicatesthatthebatteryprovidedwiththisproduct
shallnotbetreatedashouseholdwaste.Oncertainbatteriesthissymbolmightbeusedincombinationwithachemicalsymbol.Thechemicalsymbolsformercury(Hg)orlead(Pb)areaddedifthebatterycontainsmorethan0.0005%mercuryor0.004%lead.
Batteries,includingthosewhichcontainnoheavymetal,maynotbedisposedofwithhouseholdwaste.Pleasedisposeofusedbatteriesinanenvironmentallysoundman-ner.
Findoutaboutthelegalregulationswhichapplyinyourarea.
13ENGLISH
OVERVIEW--------------------------------------------------------------------------------------------------------------
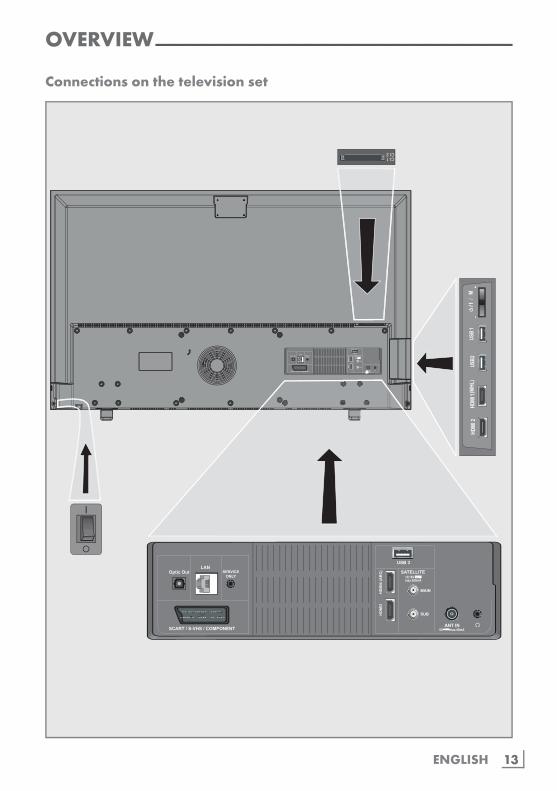
Connectionsonthetelevisionset
SCART / S-VHS / COMPONENT
Optic Out SERVICEONLY
LANSATELLITE
ANT IN
HD
MI4
(AR
C)
HD
MI3
USB 3
SCART / S-VHS / COMPONENT
Optic Out SERVICEONLY
LANSATELLITE
ANT IN
HD
MI4
(AR
C)
HD
MI3
USB 3
MAIN
SUB
MAIN
SUB
ENGLISH14
OVERVIEW--------------------------------------------------------------------------------------------------------------
OpticOut Audiooutputsockets(opti-cal)forPCM/DolbyDigitalsignals.
Itisfordigitalmultichannelaudio/videoamplifierorAVreceiverconnections.
LAN Networkcableconnectionsocket.
ServiceOnly Serviceonly.
SCART/S-VHS/COMPONENT
Euro/AVsocket(CVBSsignal,RGBsignal);
videosignalinputforS-Videocamera(withScart-S-VHSconverter).
Videosignalinput(YUVsignalwithScart-YUVconverter).
USB3 USBHarddisksocketforexternaldatamediumandPVRfunction;connectionforwirelesskeyboard,mouse.
HDMI4(ARC) HDMIsocket,audio/videosignalinput(HDMI).
HDMI3 HDMIsocket,audio/videosignalinput(HDMI).
SATELLITEMAIN Satelliteantennasocket.
SATELLITESUB Antennasocketforthesec-ondsatellitesignal(DVB-S).
ANTIN Antennasocket.
U Headphoneconnection(3.5mmjack);externalaudiooutput(withheadphone-RCAcon-verter).
CI1 Commoninterfaceslot.
CI2 Commoninterfaceslot.
USB1 USBHarddisksocketforexternaldatamediumandPVRfunction;connectionforwirelesskeyboard,mouse.
USB2 USBsocketforexternaldatamediumandPVRfunc-tion;connectionforwirelesskeyboard,mouse.
HDMI1(MHL) HDMIsocket,audio/videosignalinput(HDMI).
HDMI2 HDMIsocket,audio/videosignalinput(HDMI).
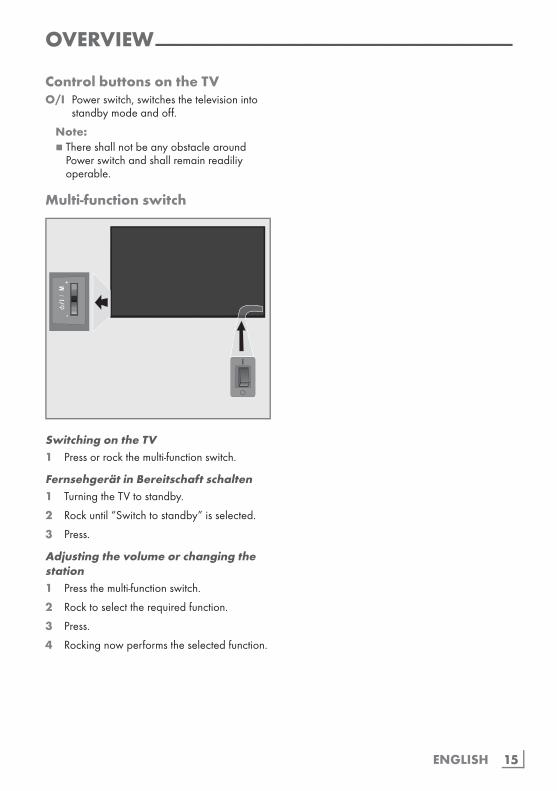
15ENGLISH
ControlbuttonsontheTVO/I Powerswitch,switchesthetelevisioninto
standbymodeandoff.
Note:7 Thereshallnotbeanyobstaclearound
Powerswitchandshallremainreadiliyoperable.
Multi-functionswitch
SwitchingontheTV1 Pressorrockthemulti-functionswitch.
FernsehgerätinBereitschaftschalten1 TurningtheTVtostandby.
2 Rockuntil“Switchtostandby”isselected.
3 Press.
Adjustingthevolumeorchangingthestation1 Pressthemulti-functionswitch.
2 Rocktoselecttherequiredfunction.
3 Press.
4 Rockingnowperformstheselectedfunction.
OVERVIEW--------------------------------------------------------------------------------------------------------------
ENGLISH16
OVERVIEW--------------------------------------------------------------------------------------------------------------
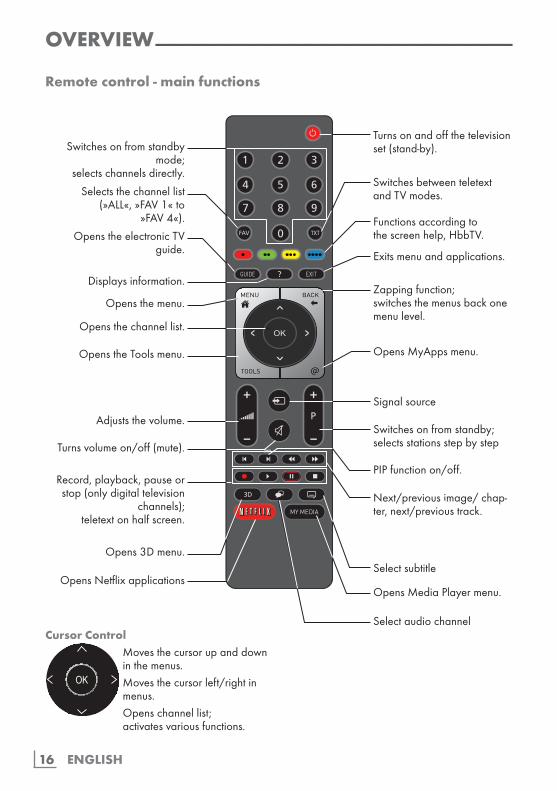
CursorControlMovesthecursorupanddowninthemenus.Movesthecursorleft/rightinmenus.Openschannellist;activatesvariousfunctions.
Turnsonandoffthetelevisionset(stand-by).
Signalsource
Turnsvolumeon/off(mute).
Opens3Dmenu.
Zappingfunction;switchesthemenusbackonemenulevel.
Opensthemenu.
OpenstheToolsmenu.
SwitchesbetweenteletextandTVmodes.
OpensMyAppsmenu.
Switchesonfromstandby;selectsstationsstepbystep
Adjuststhevolume.
Displaysinformation.
Exitsmenuandapplications.
Opensthechannellist.
OpenstheelectronicTVguide.
Switchesonfromstandbymode;
selectschannelsdirectly.
Selectsthechannellist(»ALL«,»FAV1«to
»FAV4«).
Record,playback,pauseorstop(onlydigitaltelevision
channels);teletextonhalfscreen.
OpensNetflixapplicationsOpensMediaPlayermenu.
Functionsaccordingtothescreenhelp,HbbTV.
Next/previousimage/chap-ter,next/previoustrack.
Selectsubtitle
Selectaudiochannel
Remotecontrol-mainfunctions
PIPfunctionon/off.
17ENGLISH
OVERVIEW--------------------------------------------------------------------------------------------------------------
Remotecontrol-allfunctions(red) Selectsapageinteletextmode;(green) selects/activatesvariousfunctions(yellow)inmenus.(blue)5 Switchestodoublecharactersize
inteletextmode;selectstheprevioustrack/previouspictureintheMediaPlayer.
6 Updatesapageinteletextmode;selectsthenexttrack/nextpictureintheMediaPlayer.
3 Pageholdinteletextmode;startsthereversepicturesearchintheMediaPlayer.
4 Showanswersinteletextmode;startstheforwardpicturesearchintheMediaPlayer.
Startsrecording(indigitalTVop-eration,recordingonlyviaexternaldatamedia).
8 Startsplaybackintheexternaldatamedia;StartsplaybackintheDLNAmenu.
! Timeshiftduringlivesignal(indigi-talTVoperation,onlyviaexternaldatamedia);pausesthefileexecutedontheexternaldatamedia;pausesthefileexecutedontheDLNAmenu.
7 Selectsthesplitscreenfunctioninteletextmode;endsplaybackinthefilebrowser;endsrecordingorplaybackinthePVRmode;stopsthefileexecutedontheDLNAmenu.
Selectsdifferentaudiolanguage(indigitalTVoperation).
Selectsdifferentsubtitles(indigitalTVoperation).
Note:7YourTVsupportsremotecontrolfeaturefor
AppleiPhones,WindowsmobilephonesandAndroidphones.
DependingonthefeaturesofyourTV,youmaycontrolyourTVbyyourphoneafterdownloadingthefree»GRUNDIGTVRemote«applicationfromAppleApp.StoreorGooglePlay(AndroidMarket).
ENGLISH18
INITIALSET-UP---------------------------------------------------------------------------------------------------
Thetelevisionsetisfittedwithan“installationas-sistant”,whichguidesyoustepbystepthroughthebasicsettings.Usingthescreendialogue,theuserguideenablessupposedlycomplexsettingsanddataentriestobepresentedsimplyandclearlyforeverybody.Pagesanddialogueitemsappearonthescreen,whichidentifythesubsequentandlikelyoperat-ingsteps.Tosupportthis,youwillalsoseetherequiredbuttonsymbolsoftheremotecontrol.Thebasicsettingsindetail:–languageselection–countryselection;–choiceofusermode;–locationselection;–accessoriesselection;–networksettings(ifdesired);–Stationsettings(DVB-S,DVB-T,DVB-Cand
analoguechannels).Thedetailedsettingscanbefoundonpages20and23.
SettingsforconnectingtothehomenetworkDependingontheconnectiontothehomenet-work,youconnectyourtelevisiontothehomenetwork:–viaaLANconnectionor–withoutcableviaWLANTherearetwooptionswiththeLAN-connection:
Automaticconnection alldataregardingconnectionsettings(»IPAd-
dress«,»Netmask«,»Gateway«and»DNS«)areobtainedfrommodemautomatically.
Manualconnection alldataregardingconnectionsettings(»IPAd-
dress«,»Netmask«,»Gateway«and»DNS«)mustbeconfiguredmanually.
TherearevariousoptionswhenusingWLAN:
Automaticconnection alldataregardingconnectionsettings(»IPAd-
dress«,»Netmask«,»Gateway«and»DNS«)areobtainedfrommodemautomatically.
Dependingontherouter,youcanusethefol-lowingoptions:
–Option“WPS-PBC”(PushButtonConfigura-tion);
–ConnectingwithaWPSPIN; –Connectingbyenteringthenetworkpass-
word.
Manualconnection alldataregardingconnectionsettings(»IPAd-
dress«,»Netmask«,»Gateway«and»DNS«)mustbeconfiguredmanually.
TuningchannelsDependingonthetypeofantennaconnected,youcandecidewhichchannelsyouwouldlikethetelevisiontosearchfor.DVB-S–Tunesdigitalchannelsfromthe satellite,frompage22. Youhavetwooptionsforthissearch: – thebasicinstallationwhichpresetsastan-
dardselection,e.g.thesatelliteAstra19.2°East;youneedonlystartthesearch;
– theprofessionalinstallation,whichallowsyoutomakeallrequiredsettingsandsetparametersforyourreceiversystem.
DVB-C–Forsettingupdigitalcablechannels seepage22.DVB-T–Forsettingupdigitalterrestrial channelsseepage23.SearchingforAnalogtelevisionchannels, see"Settingfurtherchannels"sectiononpage
109.Note:7 See“Settingfurtherchannels”"sectionstart-
ingfrompage99formoreinformationondigitaltelevisionchannelsettings.
19ENGLISH
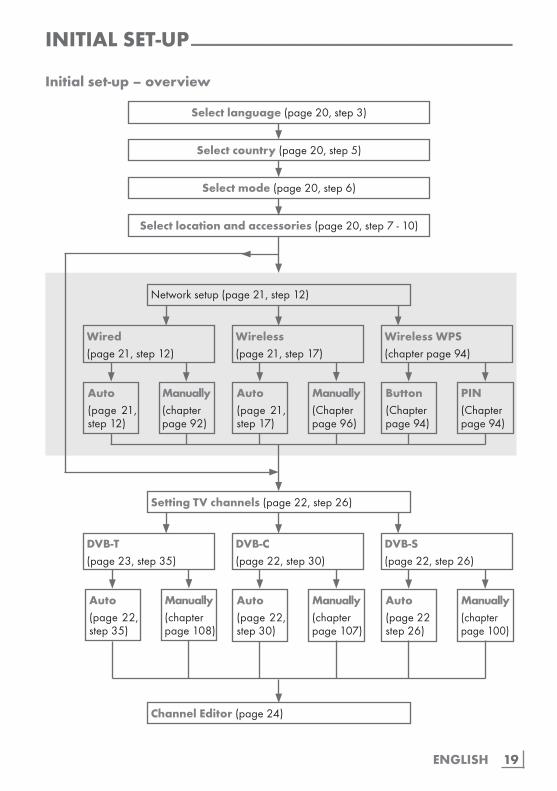
Selectlanguage(page20,step3)
INITIALSET-UP---------------------------------------------------------------------------------------------------
Initialset-up–overview
Networksetup(page21,step12)
Wired(page21,step12)
Wireless(page21,step17)
WirelessWPS(chapterpage94)
Auto(page21,step12)
Manually(chapterpage92)
Auto(page21,step17)
Manually(Chapterpage96)
Button(Chapterpage94)
PIN(Chapterpage94)
ChannelEditor(page24)
SettingTVchannels(page22,step26)
DVB-T(page23,step35)
DVB-C(page22,step30)
DVB-S(page22,step26)
Auto(page22,step30)
Manually(chapterpage107)
Auto(page22step26)
Manually(chapterpage100)
Auto(page22,step35)
Manually(chapterpage108)
Selectcountry(page20,step5)
Selectmode(page20,step6)
Selectlocationandaccessories(page20,step7-10)
ENGLISH20
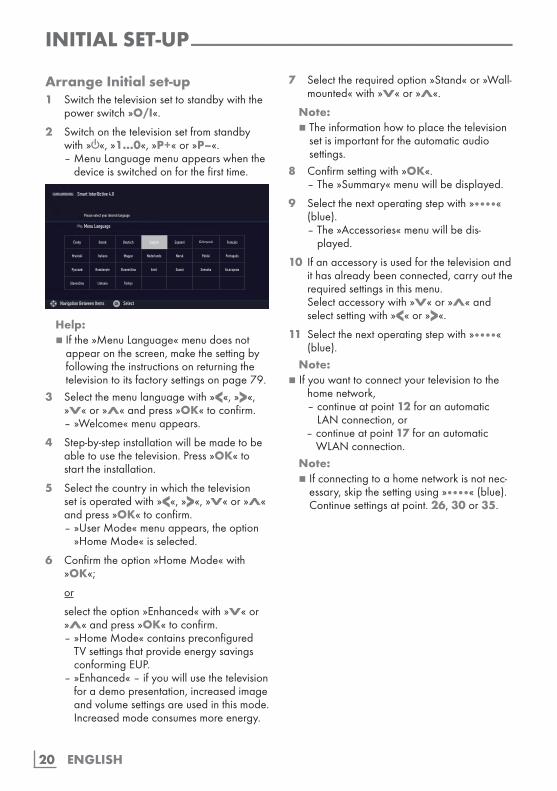
ArrangeInitialset-up1 Switchthetelevisionsettostandbywiththe
powerswitch»O/I«.
2 Switchonthetelevisionsetfromstandbywith»8«,»1…0«,»P+«or»P–«.
–MenuLanguagemenuappearswhenthedeviceisswitchedonforthefirsttime.
Smart Inter@ctive 4.0
Select
Menu Language
Please select your desired language
Česky Dansk Deutsch English Espanol Eλληvıκά Français
Hrvatski Italiano Magyar Nederlands Norsk Polski Português
Pyccкий Româneşte Slovenščina Eesti Suomi Svenska Бългaрски
Slovenčina Lietuviu Türkçe
Navigation Between Items
English
Help:7 Ifthe»MenuLanguage«menudoesnot
appearonthescreen,makethesettingbyfollowingtheinstructionsonreturningthetelevisiontoitsfactorysettingsonpage79.
3 Selectthemenulanguagewith»<«,»>«,»V«or»Λ«andpress»OK«toconfirm.
–»Welcome«menuappears.
4 Step-by-stepinstallationwillbemadetobeabletousethetelevision.Press»OK«tostarttheinstallation.
5 Selectthecountryinwhichthetelevisionsetisoperatedwith»<«,»>«,»V«or»Λ«andpress»OK«toconfirm.
–»UserMode«menuappears,theoption»HomeMode«isselected.
6 Confirmtheoption»HomeMode«with»OK«;
or
selecttheoption»Enhanced«with»V«or»Λ«andpress»OK«toconfirm.
–»HomeMode«containspreconfiguredTVsettingsthatprovideenergysavingsconformingEUP.
–»Enhanced«–ifyouwillusethetelevisionforademopresentation,increasedimageandvolumesettingsareusedinthismode.Increasedmodeconsumesmoreenergy.
INITIALSET-UP---------------------------------------------------------------------------------------------------
7 Selecttherequiredoption»Stand«or»Wall-mounted«with»V«or»Λ«.
Note:7Theinformationhowtoplacethetelevision
setisimportantfortheautomaticaudiosettings.
8 Confirmsettingwith»OK«. –The»Summary«menuwillbedisplayed.
9 Selectthenextoperatingstepwith»«(blue).
–The»Accessories«menuwillbedis-played.
10 Ifanaccessoryisusedforthetelevisionandithasalreadybeenconnected,carryouttherequiredsettingsinthismenu.
Selectaccessorywith»V«or»Λ«andselectsettingwith»<«or»>«.
11 Selectthenextoperatingstepwith»«(blue).
Note:7Ifyouwanttoconnectyourtelevisiontothe
homenetwork, –continueatpoint12foranautomatic
LANconnection,or –continueatpoint17foranautomatic
WLANconnection.Note:7Ifconnectingtoahomenetworkisnotnec-
essary,skipthesettingusing»«(blue).Continuesettingsatpoint.26,30or35.
21ENGLISH
ConnectingtoahomenetworkwithaLANcable12 Confirm»ChangeConnectionType«with
»OK«.
13 Selecttheoption»Wired«with»V«or»Λ«andpress»OK«toconfirm.
Note:7ThesettingsforamanualLANconnection
areonpage92.14 Press»«(red)toselect»Connect«optionto
establishmodemconnection. –»Connecting...Pleasewait«message
willbedisplayed,andiftheconnectionisestablished»ConnectionToGateway:Success«messageswillbedisplayed.
15 Press»«(green)tochecktheperformedsettingsandalsoifthelocalnetworkandinternetconnectionhasbeenestablished.
–»Testing...Pleasewait«messagewillbedisplayed,andiftheconnectionisestablished»ConnectionToGateway:Success«,»InternetConnection:Success«messageswillbedisplayed.
16 Toswitchto»Source«menupress»«(blue).
Note:7ContinuesearchingforTVchannelswith: –point26forDVB-Sreception; –point30forDVB-Creception; –point35forDVB-Treception.
Connectingautomaticallybyenteringthenetworkpassword17 Confirm»ChangeConnectionType«with
»OK«.
18 Selecttheoption»Wireless«with»V«or»Λ«andpress»OK«toconfirm.
19 Confirmthemessage»DoyouwanttoturnonWi-Fi?«select»Yes«with»<«or»>«andpress»OK«toconfirm.
20 Selecttheline»SelectAccessPoint«with»V«or»Λ«andpress»OK«toconfirm.
–»SelectAccessPoint«menuappearsandavailablewirelessnetworksarescannedanddisplayedinthemenu.
21 Selectthenetworkthatyouwanttocon-nectwith»V«or»Λ«andpress»OK«toconfirm.
–Wirelessconnectionpasswordscreenisdisplayed.
22 Selecttherequiredcharacterwith»V«,»Λ«,»<«or»>«andmovetothenextcharacterwith»OK«.
–Using»Shift«➡»OK«,youcanswitchbetweenuppercaseletters/numbersandlowercaseletters/specialcharacters.
–Select»Del«todeletethecharacterenteredandpress»OK«toconfirm.
23 Confirmthepasswordwith»«(green). –»Connecting...Pleasewait«message
willbedisplayed,andiftheconnectionisestablished»ConnectionToGateway:Success«messageswillbedisplayed.
24Press»«(green)tochecktheperformedsettingsandalsoifthelocalnetworkandinternetconnectionhasbeenestablished.
–»Testing...Pleasewait«messagewillbedisplayed,andiftheconnectionisestablished»ConnectionToGateway:Success«,»InternetConnection:Success«messageswillbedisplayed.
25 Toswitchto»SourceSetup«menupress»«(blue).
Note:7ContinuesearchingforTVchannelswith: –point26forDVB-Sreception; –point30forDVB-Creception; –point35forDVB-Treception.
INITIALSET-UP---------------------------------------------------------------------------------------------------
ENGLISH22
INITIALSET-UP---------------------------------------------------------------------------------------------------
Searchingtelevisionchannelswithsat-ellitesignal(DVB-S)26Selecttheoption»Satellite(DVB-S/S2)«
with»V«or»Λ«andpress»OK«toconfirm.
–ThesatelliteAstra19.2°Eastispreset.
27 Confirmthepushbutton»Continue«with»«(blue).
Notes:7Ifaseconddigitalsatellitesignaliscon-
nectedtoSATELLITESUBinputthen»SatelliteInput«optionshouldbeselectedas»Dual«.
7SelecttheChannelType. Press»V«or»Λ«toselectwhetheryou
wanttosearchforonlydigitalchannels(Digital)oronlyradiochannels(Radio)orboth(Digital+Radio)andpress»OK«toselectandmarkorunmarkthe»Digital«and/or»Radio«items.
7SelectScanMode. Toselectwhetheryouwanttosearchfor
onlyfreedigitaltelevisionchannels(Free),onlyscrambleddigitaltelevisionchannels(Scrambled)orboth(Free+Scrambled),press»V«or»Λ«andpress»OK«toselectandmarkorunmarkthe»Free«and/or»Scrambled«items.
28Press»«(red)tostartsearching. –»DigitalSearching«menuappearsand
thescanforTVchannelsbegins. –Thescaniscompleteassoonasthemes-
sage»Searchiscompleted!«appears.
29Selectthe»ChannelEditor«with»OK«.
Tuningcabledigitaltelevisionchannels(DVB-C)
Note:7Noadditionalsettingisnecessaryforthe
“secondtuner”.30 Selecttheoption»Cable(DVB-C)«with
»V«or»Λ«andpress»OK«toconfirm.
31 Selecttheline»ScanType«with»V«or»Λ«.
Selecttheoption»Quick«or»Full«with»<«or»>«.
–»Quick«scanningfunctionsetsthechan-nelsaccordingtothecableoperatorinformationinthebroadcastingsignal.
–»Full«scanfunctionscanstheentirefre-quencyrangeselected.Withthissearchoption,searchcantakealongtime.Thissearchtypeisrecommended.Somecableprovidersdonotsupport»Quick«scan.
Note:7 Youcanspeedupthesearch.Todothis,
frequencyandnetworkIDinformationarerequired.YoumaygetthisdatafromyourcableoperatororfinditintheInternetforums.
32 Confirmthepushbutton»Continue«with»«(blue).
Note:7PerformChannelTypeselection.Press
»V«or»Λ«toselectwhetheryouwanttosearchforonlydigitalchannels(Digital),onlyAnalogchannels(Analog)orboth(Digital+Analog)andpress»OK«tose-lectandmarkorunmarkthe»Digital«and»Analog«items.
33 Press»«(red)tostartsearching. –The»DigitalorAnalogSearching«menu
appears,andthesearchforTVchannelsbegins.
–Thescaniscompleteassoonasthe»Searchiscompleted!«appears.
34Selectthe»ChannelEditor«with»OK«.
23ENGLISH
INITIALSET-UP---------------------------------------------------------------------------------------------------
Tuningterrestrialdigitaltelevisionchannels(DVB-T)
Note:7Noadditionalsettingisnecessaryforthe
“secondtuner”.35Selecttheoption»Air(DVB-T/T2)«with
»V«or»Λ«andpress»OK«toconfirm.
Important:7 Theantennapowersupply(5V )may
onlybeswitchedoniftheantennaisanactiveindoorantennawithasignalamplifieranditisnotalreadysuppliedwithavoltageviaamainsplug(orsimilarsupply).Otherwiseyoumaycauseashortcircuitandirreparablydamageyourantenna.
36Selecttheline»ActiveAntennaPower«with»V«or»Λ«.
Switchontheantennapowersupplyfortheantennawith»<«or»>«(»On«).
37 Selecttheline»NextPage«with»V«or»Λ«andpress»OK«toconfirm.
Note:7PerformChannelTypeselection.Press
»V«or»Λ«toselectwhetheryouwanttosearchforonlydigitalchannels(Digital),onlyAnalogchannels(Analog)orboth(Digital+Analog)andpress»OK«tose-lectandmarkorunmarkthe»Digital«and»Analog«items.
38Press»«(red)tostartsearching. –The»DigitalorAnalogSearching«menu
appears,andthesearchforTVchannelsbegins.
–Thescaniscompleteassoonasthe»Searchiscompleted!«appears.
39Selectthe»ChannelEditor«with»OK«.
ENGLISH24
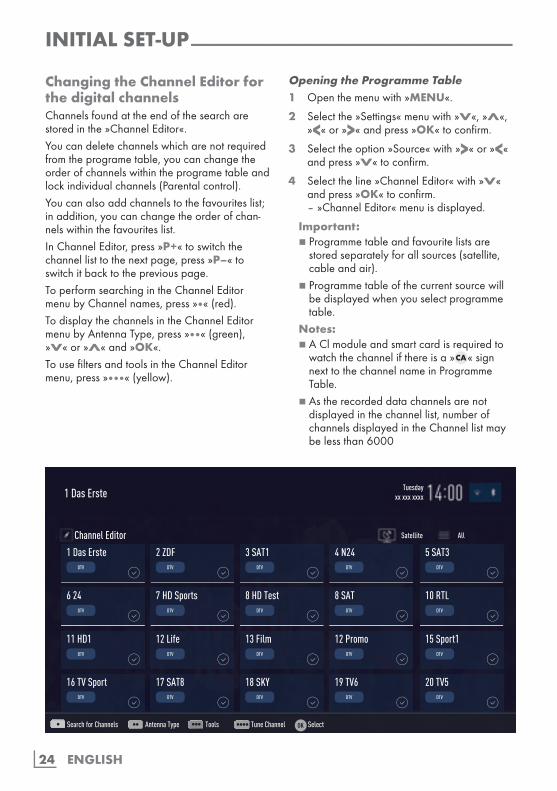
ChangingtheChannelEditorforthedigitalchannelsChannelsfoundattheendofthesearcharestoredinthe»ChannelEditor«.Youcandeletechannelswhicharenotrequiredfromtheprogrametable,youcanchangetheorderofchannelswithintheprogrametableandlockindividualchannels(Parentalcontrol).Youcanalsoaddchannelstothefavouriteslist;inaddition,youcanchangetheorderofchan-nelswithinthefavouriteslist.InChannelEditor,press»P+«toswitchthechannellisttothenextpage,press»P–«toswitchitbacktothepreviouspage.ToperformsearchingintheChannelEditormenubyChannelnames,press»«(red).TodisplaythechannelsintheChannelEditormenubyAntennaType,press»«(green),»V«or»Λ«and»OK«.TousefiltersandtoolsintheChannelEditormenu,press»«(yellow).
INITIALSET-UP---------------------------------------------------------------------------------------------------
OpeningtheProgrammeTable1 Openthemenuwith»MENU«.
2 Selectthe»Settings«menuwith»V«,»Λ«,»<«or»>«andpress»OK«toconfirm.
3 Selecttheoption»Source«with»>«or»<«andpress»V«toconfirm.
4 Selecttheline»ChannelEditor«with»V«andpress»OK«toconfirm.
–»ChannelEditor«menuisdisplayed.
Important:7 Programmetableandfavouritelistsare
storedseparatelyforallsources(satellite,cableandair).
7 Programmetableofthecurrentsourcewillbedisplayedwhenyouselectprogrammetable.
Notes:7 AClmoduleandsmartcardisrequiredto
watchthechannelifthereisa» «signnexttothechannelnameinProgrammeTable.
7 Astherecordeddatachannelsarenotdisplayedinthechannellist,numberofchannelsdisplayedintheChannellistmaybelessthan6000
Tuesdayxx xxx xxxx1 Das Erste
Search for Channels Antenna Type Tools Tune Channel Select
Satellite AllChannel Editor1 Das Erste
DTV
11 HD1DTV
6 24DTV
16 TV SportDTV
3 SAT1DTV
13 FilmDTV
8 HD TestDTV
18 SKYDTV
2 ZDFDTV
12 LifeDTV
7 HD SportsDTV
17 SAT8DTV
4 N24DTV
12 PromoDTV
8 SATDTV
19 TV6DTV
5 SAT3DTV
15 Sport1DTV
10 RTLDTV
20 TV5DTV
25ENGLISH
INITIALSET-UP---------------------------------------------------------------------------------------------------
SearchingchannelsbynameintheChannelEditorWhilearrangingthechannelsintheChannelEditor,youcansearchandselectthechannelnamebythefirstthreecharacters.1 Inthe»ChannelEditor«menu,selectthe
searchmodebypressing»«(red).
2 Selectthefirstcharacterofthechannelnameyouwanttosearchwith»V«,»Λ«,»<«or»>«andpress»OK«toconfirm.
Repeattheentryforthenextcharacters. –Channelsfoundwillbelistedontheright
sideofthescreen.
3 With»>«switchtoresultsection,selectthechannelyouaresearchingwith»V«or»Λ«,andhighlightthiswith»OK«.
Note:7 Tochangetheplaceof,deleteoraddthe
channelstofavoriteslists,continuereadingtherelevantsection.
4 Toreturntothepreviousmenu,press»BACK<«.
5 Toexitthe»ChannelEditor«menu,press»EXIT«.
DeletingchannelsintheChannelEditor1 Inthe»ChannelEditor«menu,selectthe
channel(s)youwanttodeletewith»V«,»Λ«,»<«or»>«,andhighlightthechannelbypressing»OK«.
–Channelismarkedwith»✔«.
2 Press»«(yellow). –»Tools«menuisdisplayed.
3 Selecttheline»Delete«with»V«or»Λ«andpress»OK«toconfirm.
4 Toconfirmdeletionprocess,selecttheop-tion»OK«with»<«or»>«;
or
tocanceldeletionprocess,selecttheoption»No«with»<«or»>«andpress»OK«toconfirm.
5 Toexitthe»ChannelEditor«menu,press»EXIT«.
Movingthechannelsinthechannelor-ganizertodifferentchannelpositions1 Inthe»ChannelEditor«menu,selectthe
channel(s)youwanttomovewith»V«,»Λ«,»<«or»>«,andhighlightthetelevi-sionchannelbypressing»OK«.
–Channelismarkedwith»✔«.
2 Press»«(yellow). –»Tools«menuisdisplayed.
3 Selecttheline»Move«with»V«or»Λ«andpress»OK«toconfirm.
Notes:7 Incaseofchangingtheorderofthechan-
nels,channelnumberssentbythebroad-casterwillbechanged.
7 Ifmorethanonechannelisselectedformoving,channelswillbemovedoneaftertheotheraccordingtotheselectionorderofchannels.
4 Selectthenewplaceofthechannelwith»V«,»Λ«,»<«or»>«andpress»OK«toconfirm.
5 Toexitthe»ChannelEditor«menu,press»EXIT«.
DisplayingchannelsintheChannelEditorbyantennatypeIfyouhavemorethanoneantennatype,youcandisplaychannelsintheChannelEditorbyantennatype.1 Todisplaythechannelsinthe»Channel
Editor«menubyantennatype,press»«(green).
2 Select»Air«,»Cable«or»Satellite«with»V«or»Λ«andpress»OK«.
–Televisionwillswitchtotheantennasys-temyouhaveselectedandchannelswillbedisplayed.
3 Toexitthe»ChannelEditor«menu,press»EXIT«.
ENGLISH26
SequencingchannelsintheChannelEditorYoucansequencethechannelsintheChannelEditoraccordingtodifferentcriteriasuchasTV,radioorscrambled/unscrambled.1 Tosequencethechannelsaccordingtodif-
ferentcriteriainthe»ChannelEditor«menu,press»«(yellow).
2 Selectthesequencingcriteriayouwantwith»V«or»Λ«andpress»OK«toconfirm.
–Channelswillbedisplayedinthe»Chan-nelEditor«menubythecriteriayouhaveselected.
3 Toexitthe»ChannelEditor«menu,press»EXIT«.
CreatingalistoffavouritesYoucanselectyourfavouritechannelsandsavetheminuptofourlists(FAV1toFAV4).
Note:7 Favouritelistsmustbecreatedseparately
forallsources(satellite,cableandair).7 Aftercreatedthefavouritelist,press»FAV«
toselectthefavoritelist.1 Inthe»ChannelEditor«menu,selectthe
channel(s)youwanttoaddinthefavor-iteslistwith»V«,»Λ«,»<«or»>«,andhighlightthetelevisionchannelbypressing»OK«.
–Channelismarkedwith»✔«.
2 Press»«(yellow). –»Tools«menuisdisplayed.
3 Selecttheline»AddtoFav.«with»V«or»Λ«andpress»OK«toconfirm.
–»AddtoFav.«menuisdisplayed.
4 Selectthefavoritelistyouwanttoaddtheselectedchannelswith»V«or»Λ«andstorewith»OK«.
–ThechannelsaremarkedintheChannelEditorwith»❶«,»❷«,»❸«or»❹«.
–Youcanaddthesamechannelinmorethanonefavouriteslist.
–Eachfavouritelistcancontainmaximum255channels.
INITIALSET-UP---------------------------------------------------------------------------------------------------
Notes:7 Youcandeletechannelsfromthefavourites
list.Press»«(yellow),selectthefavoriteslistthechannelisinwith»V«or»Λ«andpress»OK«toconfirm.Selectthechannel(s)youwanttodeletewith»V«,»Λ«,»<«or»>«,andhighlightthechannelbypressing»OK«.Press»«(yellow)andselecttheline»RemovefromFav.«with»V«,»Λ«andconfirmwith»OK«.
7 Whenachannelstoredinthefavouritechannellistisdeletedchannelorderinthefavouritelistisupdated.
5 Toexitthe»ChannelEditor«menu,press»EXIT«.
SortingchannelsinthefavoriteslistYoucanchangethechannelsortinginthefavoriteslist.1 Toselectfavoriteslistinthe»ChannelEdi-
tor«press»«(yellow).
2 Selectthefavoriteslistyouwanttosortwith»V«or»Λ«andpress»OK«toconfirm.
3 Selectthechannel(s)youwanttomovewith»V«,»Λ«,»<«or»>«,andhighlightthetelevisionchannelbypressing»OK«.
–Channelismarkedwith»✔«.
4 Press»«(yellow). –»Tools«menuisdisplayed.
5 Selecttheline»Move«with»V«or»Λ«andpress»OK«toconfirm.
Note:7 Ifmorethanonechannelisselectedfor
moving,channelswillbemovedoneaftertheotheraccordingtotheselectionorderofchannels.
6 Selectthenewplaceofthechannelwith»V«,»Λ«,»<«or»>«andpress»OK«toconfirm.
7 Toexitthe»ChannelEditor«menu,press»EXIT«.
27ENGLISH
INITIALSET-UP---------------------------------------------------------------------------------------------------
Enterownnamesforthefavouriteslists(max.6characters)Youcanrenameallfavoriteslists.
1 Torecallfavoriteslistmenuwhennomenuisopenedonthescreen,press»FAV«.
2 Selectthefavoriteslistyouwanttorenamewith»V«or»Λ«andpress»«(blue)button.
–Virtualkeyboardwillbedisplayed.
3 Todeletethecurrentnamestepbystep,press»«(red).
4 Selecttherequiredcharacter/numberwith»V«,»Λ«,»<«or»>«andmovetothenextcharacterwith»OK«.
Repeatthesameprocessforallcharacters/numbers.
Note:7 Using»Shift«➡»OK«,youcanswitch
betweenuppercaseletters/numbersandlowercaseletters/specialcharacters.
5 Tosavethenewnamewith»«(green).
6 Press»EXIT«toendthesetting.
RenamingAVchannelsYoucanrenameAVchannelsaccordingtothedeviceyouhaveconnected.Forexample,foraPCwhichyouhaveconnectedtoHDMI1sourceofTVwithHDMIcable,youcannamethesourceasPC.
1 Open»InputSource«menuwith» «.
2 SelecttheAVsourceyouwillrenamewith»<«or»>«andpress»«(blue).
–Renamemenuisdisplayed.
3 Press»OK«anddeletethe“old”namestepbystepwith»«(red).
4 Selecttherequiredcharacter/numberwith»V«,»Λ«,»<«or»>«andmovetothenextcharacterwith»OK«.
Repeatthesameprocessforallcharacters/numbers.
Note:7 Using»Shift«➡»OK«,youcanswitch
betweenuppercaseletters/numbersandlowercaseletters/specialcharacters.
5 Tosavethenewnamewith»«(green).
6 Selecttheiconappropriateforthedevicetypewith»<«or»>«andpress»OK«toconfirm
7 Tosavethesetting,press»«(blue). –Sourcenameandiconwillchange.
8 Press»EXIT«toendthesetting.

ENGLISH28
PICTURE/SOUNDSETTINGS-----------------------------------------------------------
Picturesettings1 Openthemenuwith»MENU«.
2 Selectmenuitem»Settings«with»V«,»Λ«,»<«or»>«andpress»OK«toconfirm.
3 Selectmenuitem»Picture«with»<«or»>«andpress»V«toconfirm.
–»PictureSettings«menuisactive.
3D Settings >
Picture Format 16:9
Picture Mode Natural
Backlight Ec0
Advanced
Restore default display settings
Picture
Tuesdayxx xxx xxxx
Source TimerSound NetworkTV Parental
Settings > Picture
Change Area Select ExitBackBACK EXIT
4 Selecttherequiredline»PictureFormat«,»PictureMode«or»Backlight«with»V«or»Λ«andpress»OK«toconfirm.
Selecttheoptionwith»<«or»>«. Press»BACK<«toreturnto»Picture«
menu.
Note:7 Othersettingsareavailableunder»Ad-
vanced«.5 Selecttheline»Advanced«with»V«or
»Λ«andpress»OK«toconfirm.
6 Selecttherequiredline/functionwith»V«or»Λ«andpress»OK«toconfirm.
Selectthevalue/optionwith»<«or»>«andpress»OK«toconfirm.
Press»BACK<«toreturnto»Picture«menu.
7 Press»EXIT«toendthesetting.
AdvancedpicturesettingsThe“advancedpicturesettings”areinprincipaldigitalimageimprovementswhich,however,shouldbeonlyusedwhennecessarywhenpic-turequalityandtransmissionisexcellent.Theymaywellimprovethedisplaywithpoormate-rial,butmayadverselyaffectthedisplaywheretransmissionandpicturequalityareexcellent.
7 »Backlight«–Manualsettingforbacklight-ing(onlyactiveifdynamicbacklightingisswitchedto“OFF”).Thissettingalsodirectlyimpactspowerconsumption.
»DynamicBacklight«–Herethedeviceoptimallyadjuststhebacklightingforthepicturecontentbyregulatingthebacklightingdependingontheaveragepicturebrightness.Ifapicturehaspredominatelydarkareas,thentheblackleveldisplayedisimprovedbydownwardadjustmentofthebacklighting(inthiscasethedisplayofthedarkareasisimproved),andwithpredomi-nantlybrightpicturematerialthebacklight-ingismaximisedinordertodisplaytheseareasmorebrightly.
7 »VibrantColour«–Increasesthecolourcontrastandthecontrastadjustment.Thissettingismostlytoostrongforusewithnor-malpicturesandshouldonlybeusedwherenecessary(loworoff)otherwisenuancesintheimagecanbesuppressed.
7 »Gamma«–Thissettingestablisheswhichbrightnessvalueshouldbedisplayedforwhichdigitaltransmissionvalue.Mostrecordingsaretransmittedwithagammavalueof2.2(allWindowsPCsandnewerPCswithaMACoperatingsystemworkwiththis,olderMACsystemsandtransmis-sionswithoutcolourprofilemostlyoperatewithagammavalueof1.8).
7 »DynamicContrast«–Thefunctiondynami-callyandoptimallyadjuststhecontrastfortherespectivepicturecontentbyanalysingimagesandthenalteringthisdependinginachangeincontrast.Thisincreasethecon-tract,howevermayalsoreducethevisiblebrightnesslevelsinthepicture.
29ENGLISH
PICTURE/SOUNDSETTINGS-----------------------------------------------------------
7 »PerfectClear«–Improvesthegeneralim-agebymeansofagentlebluehue(givingtheappearanceofgreatersharpness)andimprovestheblacklevelbysettingthisen-tirelytoblackfromspecificshadeofback.Thisreducesthevisiblegreyvaluesinthedarkareasofthepicture.
7 »Filmmode«detectsandprocessesfeaturefilmsautomaticallyforallchannelsources.Thismeansyouwillalwaysreceiveanoptimalpicture.
Thisfunctionsinthemodi480i,576iand1080iinTVplaybackandforotherchan-nelsources.
Ifthe»Filmmode«isswitchedonforprogrammeswithoutafeaturefilmsignal,minorproblemssuchaspicturefreeze,defectivesubtitlesorfinelinesinthepicturecouldoccur.
7 »MEMC«–Improvesthedisplayofmovingimagesthroughtheadditionalcomputationofintermediatepicturesandisonlyavail-ablefordevicesfrom32”.ItisdisplayedwithaPPRof400(PicturePerfectionRate).Iftheadjustmentvalueistoohigh,thismayresultinghostingwithpoortransmissionduetotheincorrectcomputationoftheinterme-diatepictures.
7 »NoisReduction«–Reducesthevisiblesnowbydisplayingthepicturealittlelesssharplyandcreatingaslightblurring.Shouldthereforebeusedminimallywithgoodpicturematerial.
7 »BlockNoiseReduction«–ThisfunctioncanonlybeselectedwithdigitalreceptionsourcesandAVpresets.Itreducesanyin-terferencefromartefacts(pixelblocks)fromdigitalprogrammesduetoMPEGcompres-sion(suchasfromDVB-TreceiversandlowertransmissionratesorDVDplayers).
Restoredefaultsettings1 Inthemenu»Picture«selecttheline»Restore
defaultdisplaysettings«with»V«or»Λ«andpress»OK«toconfirm.
2 Selectpushbutton»Yes«with»<«or»>«toconfirmthesecurityquery;
or
selectpushbutton»No«with»<«or»>«totocancelthefunction.
3 Press»EXIT«toendthesetting.
Concludingthesettings1 Press»EXIT«toendthesetting.
ENGLISH30
PICTURE/SOUNDSETTINGS-----------------------------------------------------------
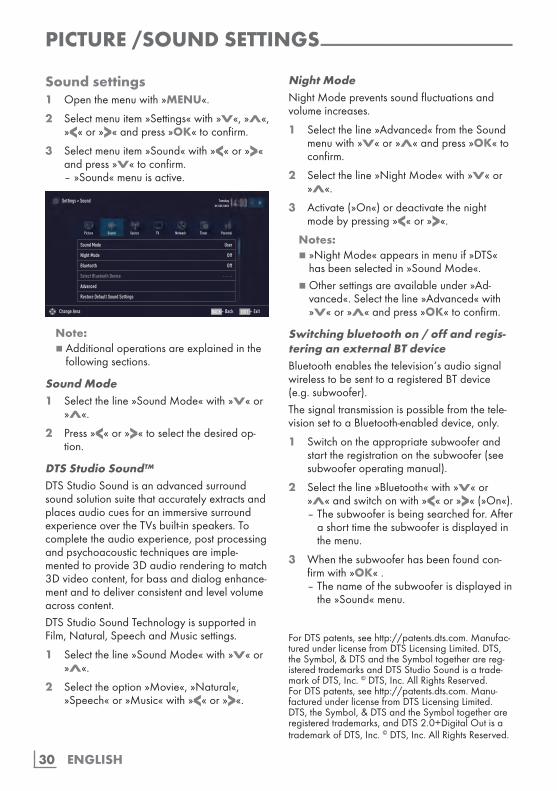
Soundsettings1 Openthemenuwith»MENU«.
2 Selectmenuitem»Settings«with»V«,»Λ«,»<«or»>«andpress»OK«toconfirm.
3 Selectmenuitem»Sound«with»<«or»>«andpress»V«toconfirm.
–»Sound«menuisactive.
Sound Mode User
Night Mode Off
Bluetooth Off
Select Bluetooth Device - - - -
Advanced
Restore Default Sound Settings
Picture
Tuesdayxx xxx xxxx
Source TimerSound NetworkTV Parental
Settings > Sound
Change Area ExitBackBACK EXIT
Note:7 Additionaloperationsareexplainedinthe
followingsections.
SoundMode1 Selecttheline»SoundMode«with»V«or
»Λ«.
2 Press»<«or»>«toselectthedesiredop-tion.
DTSStudioSound™DTSStudioSoundisanadvancedsurroundsoundsolutionsuitethataccuratelyextractsandplacesaudiocuesforanimmersivesurroundexperienceovertheTVsbuilt-inspeakers.Tocompletetheaudioexperience,postprocessingandpsychoacoustictechniquesareimple-mentedtoprovide3Daudiorenderingtomatch3Dvideocontent,forbassanddialogenhance-mentandtodeliverconsistentandlevelvolumeacrosscontent.DTSStudioSoundTechnologyissupportedinFilm,Natural,SpeechandMusicsettings.
1 Selecttheline»SoundMode«with»V«or»Λ«.
2 Selecttheoption»Movie«,»Natural«,»Speech«or»Music«with»<«or»>«.
NightModeNightModepreventssoundfluctuationsandvolumeincreases.
1 Selecttheline»Advanced«fromtheSoundmenuwith»V«or»Λ«andpress»OK«toconfirm.
2 Selecttheline»NightMode«with»V«or»Λ«.
3 Activate(»On«)ordeactivatethenightmodebypressing»<«or»>«.
Notes:7 »NightMode«appearsinmenuif»DTS«
hasbeenselectedin»SoundMode«.7 Othersettingsareavailableunder»Ad-
vanced«.Selecttheline»Advanced«with»V«or»Λ«andpress»OK«toconfirm.
Switchingbluetoothon/offandregis-teringanexternalBTdeviceBluetoothenablesthetelevision‘saudiosignalwirelesstobesenttoaregisteredBTdevice(e.g.subwoofer).Thesignaltransmissionispossiblefromthetele-visionsettoaBluetooth-enableddevice,only.
1 Switchontheappropriatesubwooferandstarttheregistrationonthesubwoofer(seesubwooferoperatingmanual).
2 Selecttheline»Bluetooth«with»V«or»Λ«andswitchonwith»<«or»>«(»On«).
–Thesubwooferisbeingsearchedfor.Afterashorttimethesubwooferisdisplayedinthemenu.
3 Whenthesubwooferhasbeenfoundcon-firmwith»OK«.
–Thenameofthesubwooferisdisplayedinthe»Sound«menu.
ForDTSpatents,seehttp://patents.dts.com.Manufac-turedunderlicensefromDTSLicensingLimited.DTS,theSymbol,&DTSandtheSymboltogetherarereg-isteredtrademarksandDTSStudioSoundisatrade-markofDTS,Inc.©DTS,Inc.AllRightsReserved.ForDTSpatents,seehttp://patents.dts.com.Manu-facturedunderlicensefromDTSLicensingLimited.DTS,theSymbol,&DTSandtheSymboltogetherareregisteredtrademarks,andDTS2.0+DigitalOutisatrademarkofDTS,Inc.©DTS,Inc.AllRightsReserved.

31ENGLISH
PICTURE/SOUNDSETTINGS-----------------------------------------------------------
Note:7 Tologoutthesubwoofer,selectthe
»Bluetoothdevice«itemwith»V«or»Λ«andpress»OK«toconfirm.Logoutthesubwooferwith»«(red).
4 Endsettingswith»EXIT«.
LocationselectionThefunctionhowtoplacethetelevisionsetisimportantfortheautomaticaudiosettings.
1 Selecttheline»Advanced«fromtheSoundmenuwith»V«or»Λ«andpress»OK«toconfirm.
2 Selecttheline»TVLocation«with»V«or»Λ«.
3 Selecttherequiredoption»Stand«or»Wall-mounted«with»<«or»>«.
Stereo/dualchannelIfthedevicereceivestwochannelprogrammes,e.g.afilmwiththeoriginalsoundonsoundchannelB(display:»DualII«)andthedubbedversiononsoundchannelA(display:»DualI«),youcanselectthedesiredsoundchannel.1 Selecttheline»Advanced«fromtheSound
menuwith»V«or»Λ«andpress»OK«toconfirm.
2 Selecttheline»SoundType«with»V«or»Λ«andadjustthesettingwith»<«or»>«.
EqualizerEqualizeroffersasoundsettingthatyoucancreate.Equaliserisactiveinthemenuwhen»SoundMode«isselectedas»User«.
1 Selecttheline»Advanced«fromtheSoundmenuwith»V«or»Λ«andpress»OK«toconfirm.
2 Selecttheline»Equalizer«with»V«or»Λ«andpress»OK«toconfirm.
–»Equalizer«menuopens.
3 Itisactivein»120Hz«frequencyband. Adjustthepreferredvaluebyusing»<«or
»>«.
4 Selectthenextfrequencybandwith»V«or»Λ«torepeattheadjustmentprocedure.
5 Tosaveadjustment,press»BACK<«.
AutomaticvolumeThetelevisionchannelsbroadcastatdifferentvolumes.Theautomaticvolumelimiting(AVL)functionmeansthevolumeiskeptthesamewhenyouswitchbetweenchannels.1 Selecttheline»Advanced«fromtheSound
menuwith»V«or»Λ«andpress»OK«toconfirm.
2 Selecttheline»AVL«with»V«or»Λ«andthenselect»On«with»<«or»>«.
Note:7 AVLitemisactiveinthemenuwhen»Sound
Mode«isselectedas»User«or»StandardMode«.
Restoredefaultsettings1 Inthemenu»Sound«selecttheline»Restore
DefaultSoundSettings«with»V«or»Λ«andpress»OK«toconfirm.
2 Selectpushbutton»Yes«with»<«or»>«toconfirmthesecurityquery;
or
selectpushbutton»No«with»<«or»>«totocancelthefunction.
3 Press»EXIT«toendthesetting.
Concludingthesettings1 Press»EXIT«toendthesetting.
ENGLISH32
TVOPERATION–BASICFUNCTIONS---------------------------------
Switchingonandoff1 Switchthetelevisiontostandbywiththe
powerswitch»ON•OFF«.
2 Press»8«,»1…0«or»P+«or»P-«toswitchonthetelevisionfromstandbymode.
3 Press»8«toswitchthetelevisiontostandby.
4 Switchthetelevisiontostandbywiththepowerswitch»ON•OFF«.
Selectingchannels1 Use»1…0«toselectchannelsdirectly.
2 Selectchannelsstepbystepwith»P+«or»P-«.
3 Openthechannellistbypressing»OK«,selectthechannellistbypressing»<«or»>«andconfirmwith»OK«,thenclosethechannellistwith»EXIT«.
Notes:7 Programmeinformationforthefollowing
daysanbecalledupwith»Λ«.7 Switchtoradiochannelsbycallingup
thechannellistwith»OK«,press»«(blue),use»V«or»Λ«toselecttheoption»Radio«.Selectradiochannelswith»<«or»>«andconfirmwith»OK«.
7SwitchbacktoTVchannellistsbycallingupthechannellistsagainwith»OK«,press»«(blue),using»V«or»Λ«toselecttheoption»Digital«andconfirmwith»OK«.
7 Tosaveenergy,youcanturnoffthescreenin“Radiomode”(see“ADVANCEDSET-TINGS”onpage70).
SelectingstationsfromlistsYoucanselectstationsfromvariouslists,(e.g.ALL,FAV1-FAV4).1 Press»FAV«torecallthefavoritelistmenu. –»Favorite«menuisdisplayed.
2 Selectthefavoritelistwith»V«or»Λ«andopenitwith»OK«
3 Selectthechannelwith»<«or»>«andpress»OK«toconfirm.
4 Press»EXIT«toexitthechannellist.
SelectingAVchannels1 Open»InputSource«menuwith» «.
2 SelectthedesiredAVchannelpositionwith»<«or»>«andconfirmwith»OK«.
3 Use»1…0«toswitchbacktothetelevisionchannel.
Note:7 TheAVpresetdescriptionscanbechanged.
See“Settings”sectiononpage27.
Adjustingthevolume1 Adjustthevolumewith»–o+«.
Muting1 Use»p«toswitchthesoundoff(mute)and
toswitchitonagain.
DisplayinginformationInformationabouteachtelevisionprogramisshownautomaticallyateverychangeofchan-nel.1 Displayinformation,press»?«repeatedly. –Thedisplaydisappearsautomatically
afterashortwhile.
33ENGLISH
AudiolanguageYoucanselectvariouslanguageswhenwatch-ingdigitalchannels.Thisdependsonthepro-grammebeingbroadcast.1 Press» «toopentheselectionmenu.
2 Selectthelanguagewith»V«or»Λ«andpress»OK«toconfirm.
3 Press»EXIT«toendthesettings.
SubtitlesYoucanselectvarioussubtitleswhenwatch-ingdigitalchannels.Thisdependsonthepro-grammebeingbroadcast.1 Press» «toopentheselectionmenu.
2 Selectthelanguagewith»V«or»Λ«andpress»OK«toconfirm.
Note:7 SubtitlesinTerrestrialDigitalbroadcastsare
notsupportedin3Dmode.3 Press»EXIT«toendthesettings.
ZapfunctionThisfunctionallowsyoutosavethetelevisionchannelwhichyouarecurrentlywatchingandswitchtootherchannels(zapping).1 Selectthechannelyouwanttosaveinthe
zapmemorywith»1…0«or»P+«,»P-«(forexample,channel1,BBC1)andsavewith»BACK<«.
2 Changechannelswith»1…0«or»Λ«»V«.
3 Youcannowuse»BACK<«toswitchbetweenthesavedchannel(intheexample,BBC1)andthechannelyouwerewatchingbefore.
4 Press»EXIT«toquitthezapfunction.
TVOPERATION–BASICFUNCTIONS---------------------------------
PIPmodePIP(pictureinapicture)allowsyoutowatchaninsetpicturefromasecondpicturesourceinadditiontothecurrentstation.IfyouwanttousethePIPfunctionwithdigitalsatelliteprogrammes(DVB-S),youneedtocon-nectasecondsatellitecabletotheSATELLITESUBsocket.TheTVstationcanonlybechangedinthemainpicture.
Displayingtheinsetpicture1 Press»6 PIP«todisplaytheinsetpicture.
Swappingthemainandinsetpictures1 Press»BACK<«toswapthemainand
insetpictures.
SelectingtheTVprogramme1 Press»P+«or»P-«tochangetheTVpro-
grammeincrementally.
Selectingthepositionoftheinsetpicture1 Press»>«or»<«tochangethepositionof
theinsetpicture.
Changingthesizeoftheinsetpicture1 Press»V«or»Λ«tochangethesizeofthe
insetpicture.
ExitingPIPmode1 Press»EXIT«tohidetheinsetpicture.
ENGLISH34
TVOPERATION–ADDITIONALFUNCTIONS------------
Youcanfindthefollowingsettingsinthe»Tools«menu.
SleeptimerInthe»SleepTimer«menuyoucanenteratimeforthetelevisiontoswitchoff.Afterthistimehaselapsed,thetelevisionswitchestostandbymode.1 OpentheToolsmenuwith»TOOLS«.
2 Selecttheline»SleepTimer«with»V«or»Λ«.
3 Selecttheswitch-offtimewith»<«or»>«.
Note:7 Setthefunctionto»Off«with»<«or»>«to
switchitoff.4 Press»EXIT«toendthesettings.
ZoomfunctionWiththisfunction,youcanenlargethepictureonthetelevision.1 OpentheToolsmenuwith»TOOLS«.
2 Selecttheline»Zoom«with»V«or»Λ«.
3 Selectzoomsettingwith»<«or»>«andpress»OK«toconfirm.
–Imageisenlargedascenter-focused.
4 Tonavigateintheenlargedpicture,press»«(red)andmovethescreenwith»<«,»>«,»V«or»Λ«.
5 Toreturntothezoommenu,press»BACK<«.
Note:7 Zoomfeatureisnotsupportedin3Dmode.
6 Press»EXIT«toendthesettings.
ChangingthepictureformatThetelevisionautomaticallyswitchestothe16:9formatifthisformatisdetectedviatheEuro-AVsocket.1 OpentheToolsmenuwith»TOOLS«.
2 Selecttheline»PictureFormat«with»V«or»Λ«.
3 Selectthepictureformatwith»<«or»>«andpress»OK«toconfirm.
4 Press»EXIT«toendthesettings.
Notes:7 Pictureformatselectionisnotsupportedin
3Dmode.7Youcanchoosebetweenthefollowing
pictureformats.
»Auto«formatThepictureformatisautomaticallyswitchedto»16:9«for16:9programmes.Thepictureformatisautomaticallyswitchedto»4:3«for4:3programmes.
»16:9«and»14:9«formatsDuringprogrammesin4:3format,thepictureisstretchedhorizontallyif»16:9«or»14:9«isselected.Thepicturegeometryisstretchedhorizontally.Withactual16:9signalsources(fromaset-topboxontheEuro-AVsocket)thepicturefillsthescreencompletelyandwiththecorrectgeometry.
»4:3«formatThepictureisshownin4:3format.
»LetterBox«formatTheletterboxsettingisespeciallysuitableforprogrammesin16:9.Theblackborderswhichareusuallyatthetopandbottomofthescreenareeliminated,4:3picturesfillthescreen.Thetransmittedpicturesareenlarged,butareslightlycroppedatthetopandbottom.Thepicturegeometryremainsunchanged.
35ENGLISH
TVOPERATION–ADDITIONALFUNCTIONS------------
»Subtitle«formatIfyoucannotreadthesubtitleswhichappearonthebottomofthescreen,thenselect»Subtitle«.
»Panorama«formatThissettingissuitedtofilmswithalargewidth/heightratio.Duringprogrammesin4:3formatthepictureisstretchedhorizontallyifthe»Panorama«functionisselected.Thepicturegeometryisstretchedhorizontally.
»Overscan«formatWhenthismodeisselected,highdefinedpicturefromHDMIandComponentinputsisnotcroppedanditisdisplayedinitsoriginalsize.ThisisonlyactiveinHDMImodeandforresolu-tionsatorabove720p.
Audiosettings1 OpentheToolsmenuwith»TOOLS«.
2 Selecttheline»SoundPreset«with»V«or»Λ«.
3 Selecttheaudiosettingbypressing»<«or»>«.
–Youcanchangethe»User«audiosetting;see“Equalizer”onpage31.
4 Press»EXIT«toendthesettings.
Picturesettings1 OpentheToolsmenuwith»TOOLS«.
2 Selecttheline»PictureMode«with»V«or»Λ«.
3 Selectthepicturesettingbypressing»<«or»>«.
4 Press»EXIT«toendthesettings.

ENGLISH36
ELECTRONICTVGUIDE---------------------------------------------------------------------------
TheElectronicTVguide(RoviGuide™)hastwooperationmodes:onlineandoffline.Intheofflinemode,onlythebroadcastinforma-tionisreceivedviabroadcast.AlotofcontentcanbereceivedviatheInternetconnectionintheonlinemodesuchas,pro-grammeinformation,channellogos,informationaboutplayers,pictures,fragments,etc.
Logontothe“RoviGuide™“IfyouusetheElectronicTVguideforthefirsttime,youmustlogon.1 Press»GUIDE«tostartElectronicTVguide. –»TermsandConditions«isdisplayed.
2 With»V«displayTermsandConditions,selectthepushbutton»IAgree«andpress»OK«toconfirm.
TheElectronicTVguideinOfflinemodeIntheofflinemode,theelectronicprogrammeguideoffersanoverviewofallprogrammesthatwillbebroadcastinthenextweek(fordigitalstationsonly).1 Press»GUIDE«tostartElectronicTVguide. –Amessageisdisplayed.
Notes:7 NotallchannelsprovideadetailedTV
guide.7 Manybroadcasterssupplythedailypro-
grammebutnodetaileddescriptions.7 Therearebroadcasterswhichdonotpro-
videanyinformationatall.2 Selectthepushbutton»Continue«with»V«
andpress»OK«toconfirm.
3 Selectthechannelwith»V«or»Λ«. –Informationabouttheactuelprogrammeis
displayedintheselectedtelevisionchan-nel.
4 Switchtotheinformationaboutthecurrentprogrammeusing»OK«.
Notes:7Todisplayasmallimageoftheprogramme
selectthe»Watch«buttonwith»>«andconfirmwith»OK«.
7Theprogrammeselectedcanberecorded(ifanexternaldatamediumisconnected).Todothisselectthe»Record«buttonwith»>«andconfirmwith»OK«.Confirmthedisplaywith»OK«.
7Toaddtheprogrammeselectedtotheremindertimerselectthe»SetReminder«buttonwith»>«andconfirmwith»OK«.Confirmthedisplaywith»OK«.
5 Returntotheprogrammeoverviewwith»BACK<«.
6 Press»>«toselectinformationonthenextprogrammeand»<«toreturntotheinfor-mationforthecurrentprogramme.
Note:7 Youcanfiltercertaintypesofprogrammes.
Todothispress»<«toselecttheoption»All«andpress»V«or»Λ«toselectthedesiredprogrammetypeandconfirmwith»OK«.
7 Press»EXIT«toclosethechannelguide.
37ENGLISH
ELECTRONICTVGUIDE---------------------------------------------------------------------------
TheElectronicTVguideinOnlinemode»Search«and»Suggestions«optionscomesintheelectronicprogrammeguideintheonlinemodeasdifferentfromtheofflinemode.AlotofcontentcanbereceivedviatheInternetwiththeseoptionssuchas,programmeinformation,channellogos,informationaboutactors,pic-tures,fragments,etc.(onlyfordigitalchannels).
Note:7Thebasicfunctionsarethesameasinthe
“Offlinemode”.1 Press»GUIDE«tostartElectronicTVguide. –»ElectronicTVguide«isdisplayed.
2 Press»<«oncetodisplaythetopmenu. –»TVListing«optionismarked.
“Browse”searchparameter1 Select»Browse«with»V«or»Λ«and
press»OK«toconfirm. –Aselectionofprogrammesappears.
2 Press»<«andselectsearchparameterwith»V«or»Λ«andpress»OK«toconfirm.
–Thesearchresultsaredisplayedonthescreen.
3 Selecttherequiredprogrammewith»V«,»Λ«,»<«or»>«andpress»OK«toviewinformation.
4 Switchoffthechannelguidewith»EXIT«.
“Search”searchparameter1 Selectthe»Search«itemwith»V«or»Λ«
andpress»OK«toconfirm. –Anentryfieldappears.
2 Selectthefirstcharacter/digitoftherequiredsearchitemwith»V«or»Λ«andpress»OK«tomovetothenextposition.
–Thesearchresultsaredisplayedonthescreen.
Note:7Thelastcharacter/digitcanbedeletedwith
»BACK <«.3 Use»>«toswitchtothechanneland»>«to
switchtotheprogramme.
4 Selecttherequiredchannelwith»V«or»Λ«andpress»OK«toviewtheinforma-tion.
Note:7Youcanalsosearchforspecificpro-
grammesbypressing»«(green)andmakeaselection.
5 Switchoffthechannelguidewith»EXIT«.
ENGLISH38
3DFUNCTION----------------------------------------------------------------------------------------------------
Importantinformationabout3DFunction
7WatchingTVfromaclosedistanceforalongtimeimpairsthesenseofsight.
7Avoidwatching3Dimagesforlongdura-tions.
7WatchingTVwithactive3Dglassesforlongdurationsmaycauseheadacheandfatigue.StopwatchingTVifyoufeeldizzi-ness,headacheorfatigue.
7Donotwatch3Dimagesifyouareanxious,sleepyortired.
7Somepeoplemayexperienceepilepticparalysisorstrokewhentheyaresubjectedtotheflashingimagesorlightincertaintelevisionimagesorvideogames.Personswithahistoryofepilepsyorparalysisshouldconsultaphysicianbeforeusing3Dfunction.
7Ifyouexperienceanyofthefollowingsituations,stopwatching3Dimagesandconsultamedicalexpert.Changeinsight,dizziness,instability,twitchineyesormuscles,nausea,confusion,contractionorcramp,difficultyinconcentration.Childrenmustbeaskedwhethertheyareexperienc-inganyoftheaboveconditionssincetheyaremorevulnerabletosuchconditionsthentheadults.
73Dimagescanstunaudience.Itissuggest-edforelders,pregnantwomen,epilepsypatientsandpersonswithseriousphysicaldisorderstoavoidwatching3Dimages.
7Donotuse3DActiveglassesforpurposesotherthantheirintendeduse.Wearing3Dactiveglassesforanypurpose(suchassunglasses,protectiveglasses)maycausephysicaldamageorimpairthesightofseeing.
7Optimumdistanceofwatchingshouldbethreeormoretimestheheightofthescreen.
Prepare3DFunctionGRUNDIGAS-3DGglassesprovidetherealityoftheaterswhenyouwatch3Dmoviesatyourhome.ThisTVisequippedwithLEDtechnologytoprovideyouthebestpossible3Dimages.Tojointhehighdefinition3Dworld,youjustneedtoputonGRUNDIGAS-3DGglassesdesignedspecifically.
Notes:7 ThisproductiscompatiblewithGRUNDIG
AS-3DGglassesandmaynotsupportac-tiveglassesofdifferentbrandsormodels.
7 GRUNDIGAS-3DGglassesarealsosoldseparately.PleasecontactyourdealerfromwhereyouhavepurchasedyourTVinordertoobtainmoreinformationforbuyingglasses.
7 Infraredtransmitterislocatedatthelowerleftcornerofthedisplayandemitsthesignalsat90degreesinhorizontaldirectionand40degreesinverticaldirection.
7 Itmaynotbepossibletoobtain3Deffectswhenthereisanobstaclebetweenthe3Dtransmitterandtheglasses.
Watching3DcontentNotes:7 The3Dfunctionissupportedbythe»Air«,
»Cable«and»Satellite«inputsourcesorbyexternaldeviceswhichareconnectedtotheHDMI,COMPONENTorUSBsockets.
7 Attheprogramsources»Air«,»Cable«,»Satellite«and»COMPONENT«thefunc-tions»SidebySide«and»TopBottom«areonlysupportedatresolutionsof»1280x720p50/60Hz«,»1920x1080i50/60Hz«and»1920x1080p24/30,50/60Hz«.
7 3Dexperiencemaychangedependingontheformatandfeaturesofthepicture(reso-lution,sharpnessandetc)suppliedfromtheexternalinput.
39ENGLISH
3DFUNCTION----------------------------------------------------------------------------------------------------
7 3Deffectmaydegradeifyouwatch3Dim-agesunderfluorescentlight.Insuchcases,eitherreducethelightorturnoffthelamp.
7 While3Dmodeisactive,ifProgramtable,channelorsourceischanged,MyAppsorGrundigApplicationStorearelaunched,fileplaybackendsornextfileisselectedinUSBandPVRmodeyourtelevisionwillswitchto2Dmode.
1 Open»SelectSource«menuwith» «.
2 Selectthe3DplaybackAVsourcewith»<«or»>«andpress»OK«toconfirm.
3 Open3Dmenuwith»3D«,use»<«or»>«toselect»SidebySide«,»TopBottom«or»2D→3D«optionaccordingtothecontenttobeplayedandpress»OK«toconfirm.
–»2D→3D«:Changes2Dpictureto3D. –»SidebySide«:Displaysapicturenextto
theotherone. –»TopBottom«:Displaysapicturebelow
theotherone. –»FramePacking«:Rightandleftimagesof
theTVaredisplayedalternately.Note:7 FramePackingoptioncanbedisplayedon
3DmenuonlyifanHDMI1.4supportedvideosignalissentfromanexternaldevice.SidebySideandTopBottomoptionsarenotdisplayed.
4 Turnofthefunction,open3Dmenuwith»3D«,use»<«or»>«toselect»Off«andpress»OK«toconfirm.
Note:7 Refertotheusermanualof3DGrundig
AS-3DGglassesfordetailedinformationaboutusage,cleaningandcareoftheglasses.
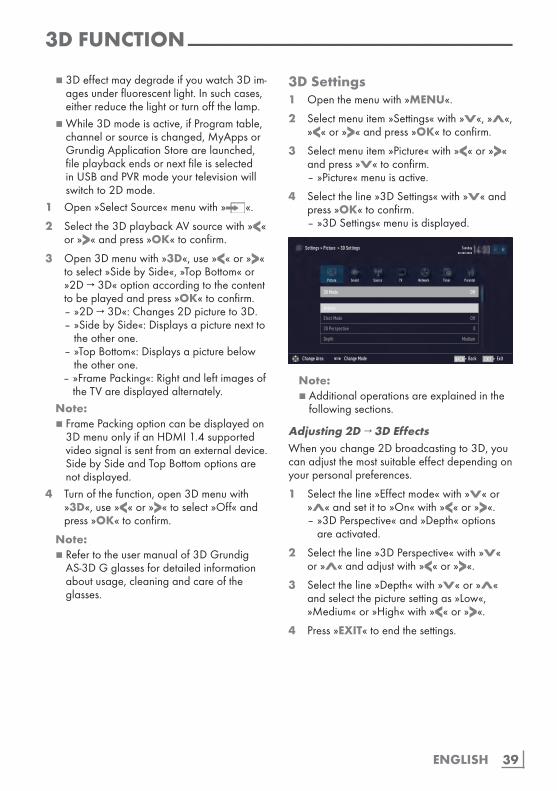
3DSettings1 Openthemenuwith»MENU«.
2 Selectmenuitem»Settings«with»V«,»Λ«,»<«or»>«andpress»OK«toconfirm.
3 Selectmenuitem»Picture«with»<«or»>«andpress»V«toconfirm.
–»Picture«menuisactive.
4 Selecttheline»3DSettings«with»V«andpress»OK«toconfirm.
–»3DSettings«menuisdisplayed.
3D Mode Off
3D Efects
Efect Mode Off
3D Perspective 0
Depth Medium
Picture
Tuesdayxx xxx xxxx
Source TimerSound NetworkTV Parental
Settings > Picture > 3D Settings
Change Area Change Mode ExitBackBACK EXIT
Note:7 Additionaloperationsareexplainedinthe
followingsections.
Adjusting2D→3DEffectsWhenyouchange2Dbroadcastingto3D,youcanadjustthemostsuitableeffectdependingonyourpersonalpreferences.
1 Selecttheline»Effectmode«with»V«or»Λ«andsetitto»On«with»<«or»>«.
–»3DPerspective«and»Depth«optionsareactivated.
2 Selecttheline»3DPerspective«with»V«or»Λ«andadjustwith»<«or»>«.
3 Selecttheline»Depth«with»V«or»Λ«andselectthepicturesettingas»Low«,»Medium«or»High«with»<«or»>«.
4 Press»EXIT«toendthesettings.
ENGLISH40
3DFUNCTION----------------------------------------------------------------------------------------------------
LRCorrectionWhenFramePackingmodeisenabledinHDMIsource,3Dperceptionmaydisappearin3Dfilmsor3DgamesduetoasynchronizationshiftarisingfromHDMIsignal.Youmaycorrect3Dperceptionwiththisfeature.
1 Selecttheline»LRCorrection«with»V«or»Λ«.
2 Press»<«or»>«toswitchthefunction»On«.
Note:7 Setthefunctionto»Off«with»<«or»>«.
3 Press»EXIT«toendthesettings.
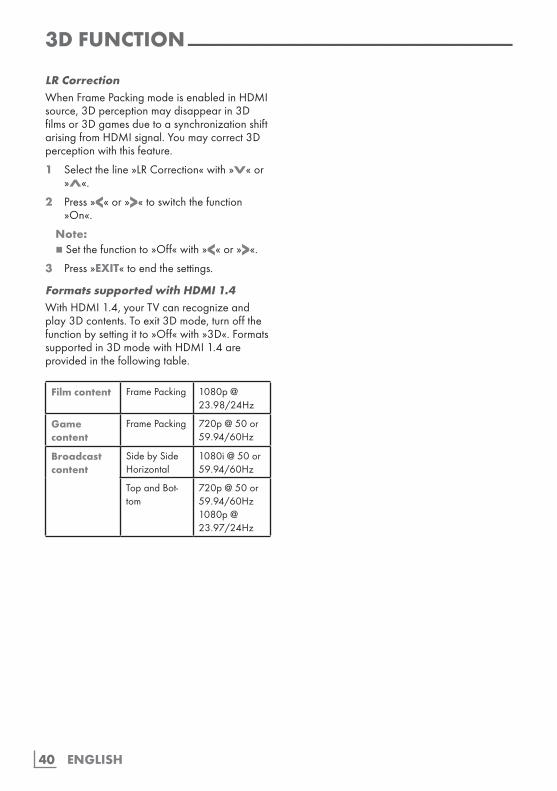
FormatssupportedwithHDMI1.4WithHDMI1.4,yourTVcanrecognizeandplay3Dcontents.Toexit3Dmode,turnoffthefunctionbysettingitto»Off«with»3D«.Formatssupportedin3DmodewithHDMI1.4areprovidedinthefollowingtable.
Filmcontent FramePacking [email protected]/24Hz
Gamecontent
FramePacking [email protected]/60Hz
Broadcastcontent
SidebySideHorizontal
[email protected]/60Hz
TopandBot-tom
41ENGLISH
HBBTVMODE------------------------------------------------------------------------------------------------------
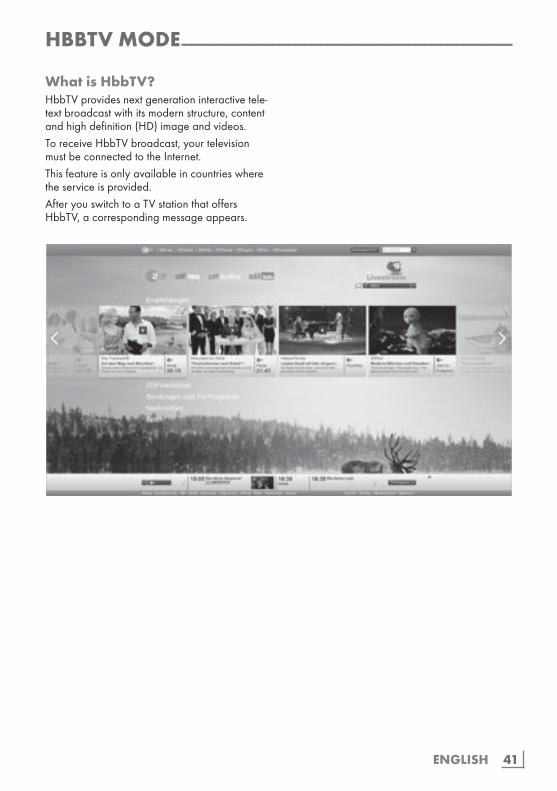
WhatisHbbTV?HbbTVprovidesnextgenerationinteractivetele-textbroadcastwithitsmodernstructure,contentandhighdefinition(HD)imageandvideos.ToreceiveHbbTVbroadcast,yourtelevisionmustbeconnectedtotheInternet.Thisfeatureisonlyavailableincountrieswheretheserviceisprovided.AfteryouswitchtoaTVstationthatoffersHbbTV,acorrespondingmessageappears.
ENGLISH42
UsingHbbTVWhenyouswitchtoaTVprogramthatsupportsHbbTV,aninfomessagewillappearstatingthatHbbTVbroadcastisavailable.1 Press»«(red)toopenHbbTV. –Informationregardingtheserviceswillap-
pearonthescreen.Additionally,coloredbuttonsnecessaryforbrowsingthemenuswillalsoappear.
Notes:7 Therangeofsubjectsandselectionofindi-
vidualsubjectsdependontheprogrammeprovider.
7 Numericbuttons»1«through»0«areusedforadditionalfunctions.
2 Press»«(green),»«(yellow)or»«(blue)or»V«,»Λ«,»<«or»>«andconfirmwith»OK«toselectthedesiredtopicfield.
3 Selecttheoptionyouwantwith»V«,»Λ«,»<«or»>«intheselectedtopicfieldandconfirmwith»OK«.
4 Press»«(red)tocloseHbbTV.
Note:7IfthenavigationinHbbTVmodedoesnot
work,youcanexitthefunctionbypressing»EXIT«.
Additionalfunctionsforvideoindexes1 Startplaybackwith»8«.
2 Pauseplaybackwith»!«.
3 Resumeplaybackwith»8«.
4 Rewindby»3«forwardby»4«.
5 Stopplaybackwith»7«.
HBBTVMODE------------------------------------------------------------------------------------------------------
DeactivateandactivateHbbTVThisoptionallowsturningoffHbbTVfeature,thuswarningsshallnotbedisplayedonchan-nelswithHbbTVfeature.1 Openthemenuwith»MENU«.
2 Selectmenuitem»Settings«with»V«,»Λ«,»<«or»>«andpress»OK«toconfirm.
3 Selectthemenuitem»Source«with»>«or»<«andpress»V«toconfirm.
–»Source«menuisactive.
4 Selecttheline»Advanced«with»V«or»Λ«andpress»OK«toconfirm.
5 Selecttheline»HbbTV«with»V«or»Λ«.
6 Selecttheoption»Off«with»<«or»>«.
Note:7 ToactivateHbbTVagain,selectinstep.6
theoption»On«.7 Press»EXIT«toendthesetting.
DeactivateandactivatedigitalteletextIfyoudeactivatedigitalvideotext,onlynormalvideotextcanbeselected,howevertheotherfunctionsoftheinteractiveserviceHbbTVarestillavailable.1 Openthemenuwith»MENU«.
2 Selectmenuitem»Settings«with»V«,»Λ«,»<«or»>«andpress»OK«toconfirm.
3 Selectthemenuitem»Source«with»>«or»<«andpress»V«toconfirm.
–»Source«menuisactive.
4 Selecttheline»Advanced«with»V«or»Λ«andpress»OK«toconfirm.
5 Selecttheline»DigitalTeletext«with»V«or»Λ«.
6 Selecttheoption»Off«with»<«or»>«.
Note:7 Toreactivatedigitalteletext,select»On«in
step6.7 Press»EXIT«toendthesetting.
43ENGLISH
TOPtextorFLOFtextmodeNote:7Ifyouonlywanttousethis“normal”video
text,disablethedigitalvideotext,seepage42.
1 Press»TXT«toswitchtotheTeletextmode.
2 Youcanselectteletextpagesdirectlywith»1...0«orstepbystepwith»V«or»Λ«.
Toreturntopage100,press»?«.
Note:7 Atthebottomofthescreen,youwillseean
informationlineconsistingofared,greenand,dependingonthechannel,yellowandbluetextfield.Yourremotecontrolhasbut-tonswiththecorrespondingcolours.
3 Press»«(red)toscrollonepageback.
4 Press»«(green)toscrollonepageforward.
5 Press»«(yellow)toselectsection.
6 Press»«(blue)toselecttopic.
7 Press»TXT«toexittheTeletextmode.
Normaltextmode1 Press»TXT«toswitchtotheTeletextmode.
2 Youcanselectteletextpagesdirectlywith»1...0«.
Toreturntopage100,press»?«.
3 Press»P-«toscrollonepageback.
4 Press»P+«toscrollonepageforward.
5 Press»TXT«toexittheTeletextmode.
Note:7 Teletextfeatureisnotsupportedin3D
mode.
AdditionalfunctionsSkippingthewaitingtimeWhileapageisbeingsearchedfor,youcanswitchtothetelevisionchannel.
1 Entertheteletextpagenumberwith»1…0«andthenpress»6«.
–Assoonasthepageisfound,thepagenumberisdisplayed.
2 Press»6«toswitchtotheteletextpage.
Increasingcharactersize1 Toenlargethecharactersizeofateletext
page,press»5«repeatedly.
PagestopAmultiplepagemaycontainseveralsub-pages,whichareautomaticallyscrolledbythetransmit-tingstation.
1 Stopthesub-pageswith»3«.
2 Press»3«toquitthefunction.
Callingupasub-pagedirectlyIftheselectedteletextpagecontainsfurtherpages,thenumberofthecurrentsub-pageaswellasthetotalnumberofpagesisdisplayed.
1 Callupthesub-pagewith» «.
2 Press»«(red)or»«(green)toselectasub-page.
3 Press» «toquitthefunction.
RevealanswerCertainteletextpagescontain”hiddenanswers”orinformationwhichcanbecalledup.1 Displayinformationwith»4«.
2 Concealtheinformationwith»4«.
Splittingthescreen(SplitScreen)Withthisfunctionyoucanseethetelevisionchannelontheleftandtheteletextpageontheright.
1 Toactivatethesplitscreenfunction,press»7«.
–Televisionchannelandteletextpageap-pearsidebysideonthescreen.
2 Todeactivatethefunction,press»7«.
TELETEXTMODE------------------------------------------------------------------------------------------------
ENGLISH44
USBRECORDING-------------------------------------------------------------------------------------------
Informationonrecordingandplayingtelevisionprogrammes
7Recordingandreproducingprogrammes,thiscanonlybedonewithdigitaltelevisionstations(DVB-S,DVB-TandDVB-C).
7Thedigitaltelevisionstations(DVB-S,DVB-TandDVB-C)youareabletorecordandplaybackalsodependonthebroadcastingstation.
7Recordingandreproducingprogrammes,aswellastheTimeShiftfunctioncanonlybecarriedoutusinganexternaldatamedium(harddriveorUSBstick).
7Recordingscanbemadewithmostdatamediumsonthemarket.However,wecan-notguaranteeoperationforalldatamedia.
7Ifyourecordaprogrammeonanexternaldatamedium,youcanonlywatchitonyourtelevision.
Youcannotwatchthisprogrammeonanyotherdevice.
7Ifyousendyourtelevisiontoberepairedandhardwarecomponentsneedtobereplaced,youmightnotbeabletoplaytherecordingsagainontherepairedtelevision.
7Grundigisn'tresponsibleforanylossofdatastoredonanyexternalstoragedevice.
7ItisrecommendedtoplaythefilessavedonDTVbyPVRplayer.SomerecordedfilesmaynotplaycorrectlyonUSBMediaPlayer.
PossiblelimitationswhenusinganexternaldatamediumDependingonthebroadcastingstation,youmayexperiencevariousrestrictionsonsomefunctionsfromsometelevisionstations.GRUNDIGhasnoinfluenceontheserestrictions.
7Recordingaprogrammeontheexternaldatamediumcanbedisabledbythebroadcaster.
If»URI*protected!PVRfunctionblocked«isdisplayed,thenrecordingortimeshiftisrestricted(onerecordingpossible)ordisabled(recordingnotpossible)bythebroadcaster.
*URI=userrightsinformation.7Ifyourecordandsaveaprogrammeon
thearchiveofanexternaldatamedium,playbackcanberestricted.
Thebroadcastercanallowyoutoseethisprogrammeoneormoretimesbutcouldalsojustmakeitavailableforacertainperiodoftime.
7Stationsfromwhichchildrenareprotected,immediatelyrequireaPINnumberbeforerecordingstarts.Ifthisauthorisationisnotgiven,therecordingmaynotstart.
7Copyingaprogrammefromadigitaltelevi-sionstationontoavideoorDVDrecorderusingtheSCART/S-VHS/COMPONENTsocket(analogaudio/videosignal)canalsoberestrictedbythebroadcaster.Inordertodothis,yourdevicemustsupportthecopyingfunction.
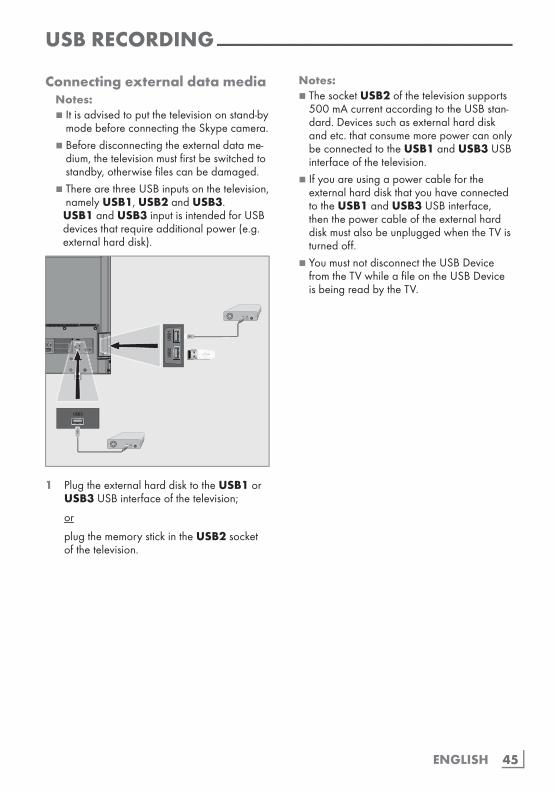
45ENGLISH
USBRECORDING-------------------------------------------------------------------------------------------
ConnectingexternaldatamediaNotes:7 Itisadvisedtoputthetelevisiononstand-by
modebeforeconnectingtheSkypecamera.7 Beforedisconnectingtheexternaldatame-
dium,thetelevisionmustfirstbeswitchedtostandby,otherwisefilescanbedamaged.
7 TherearethreeUSBinputsonthetelevision,namelyUSB1,USB2andUSB3.
USB1andUSB3inputisintendedforUSBdevicesthatrequireadditionalpower(e.g.externalharddisk).
1 PlugtheexternalharddisktotheUSB1orUSB3USBinterfaceofthetelevision;
or
plugthememorystickintheUSB2socketofthetelevision.
Notes:7 ThesocketUSB2ofthetelevisionsupports
500mAcurrentaccordingtotheUSBstan-dard.Devicessuchasexternalharddiskandetc.thatconsumemorepowercanonlybeconnectedtotheUSB1andUSB3USBinterfaceofthetelevision.
7 IfyouareusingapowercablefortheexternalharddiskthatyouhaveconnectedtotheUSB1andUSB3USBinterface,thenthepowercableoftheexternalharddiskmustalsobeunpluggedwhentheTVisturnedoff.
7 YoumustnotdisconnecttheUSBDevicefromtheTVwhileafileontheUSBDeviceisbeingreadbytheTV.
SCART / S-VHS / COMPONENT
Optic Out SERVICEONLY
LAN
ANT INANT INANT IN
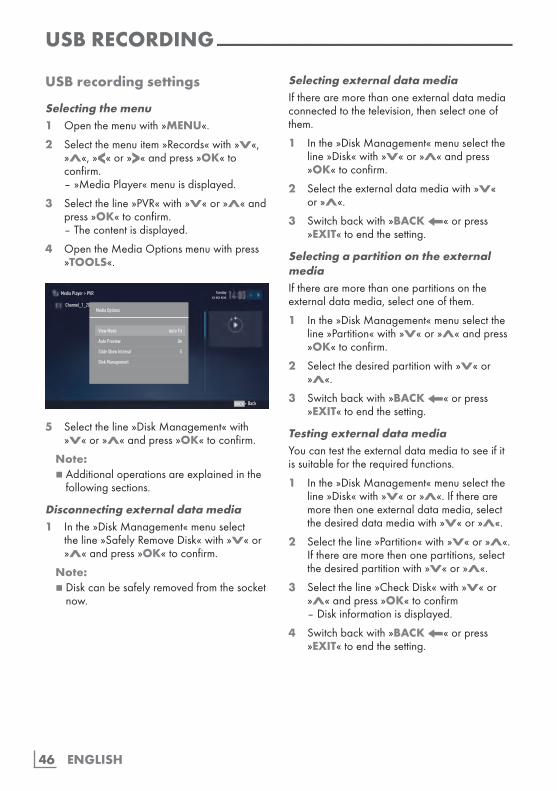
ENGLISH46
USBrecordingsettings
Selectingthemenu1 Openthemenuwith»MENU«.
2 Selectthemenuitem»Records«with»V«,»Λ«,»<«or»>«andpress»OK«toconfirm.
–»MediaPlayer«menuisdisplayed.
3 Selecttheline»PVR«with»V«or»Λ«andpress»OK«toconfirm.
–Thecontentisdisplayed.
4 OpentheMediaOptionsmenuwithpress»TOOLS«.
Media Player > PVR
Channel_1_201548_154649.ts
Tuesdayxx xxx xxxx
BackBACK
View Mode Auto Fit
Auto Preview On
Slide Show Interval 5
Disk Management
Media Options
5 Selecttheline»DiskManagement«with»V«or»Λ«andpress»OK«toconfirm.
Note:7 Additionaloperationsareexplainedinthe
followingsections.
Disconnectingexternaldatamedia1 Inthe»DiskManagement«menuselect
theline»SafelyRemoveDisk«with»V«or»Λ«andpress»OK«toconfirm.
Note:7 Diskcanbesafelyremovedfromthesocket
now.
USBRECORDING-------------------------------------------------------------------------------------------
SelectingexternaldatamediaIftherearemorethanoneexternaldatamediaconnectedtothetelevision,thenselectoneofthem.
1 Inthe»DiskManagement«menuselecttheline»Disk«with»V«or»Λ«andpress»OK«toconfirm.
2 Selecttheexternaldatamediawith»V«or»Λ«.
3 Switchbackwith»BACK<«orpress»EXIT«toendthesetting.
SelectingapartitionontheexternalmediaIftherearemorethanonepartitionsontheexternaldatamedia,selectoneofthem.
1 Inthe»DiskManagement«menuselecttheline»Partition«with»V«or»Λ«andpress»OK«toconfirm.
2 Selectthedesiredpartitionwith»V«or»Λ«.
3 Switchbackwith»BACK<«orpress»EXIT«toendthesetting.
TestingexternaldatamediaYoucantesttheexternaldatamediatoseeifitissuitablefortherequiredfunctions.
1 Inthe»DiskManagement«menuselecttheline»Disk«with»V«or»Λ«.Iftherearemorethenoneexternaldatamedia,selectthedesireddatamediawith»V«or»Λ«.
2 Selecttheline»Partition«with»V«or»Λ«.Iftherearemorethenonepartitions,selectthedesiredpartitionwith»V«or»Λ«.
3 Selecttheline»CheckDisk«with»V«or»Λ«andpress»OK«toconfirm
–Diskinformationisdisplayed.
4 Switchbackwith»BACK<«orpress»EXIT«toendthesetting.
47ENGLISH
USBRECORDING-------------------------------------------------------------------------------------------
Formattingthepartition1 Inthe»DiskManagement«menuselectthe
line»FormatPartition«with»V«or»Λ«andpress»OK«toconfirm.
2 Selectpushbutton»Yes«with»<«or»>«toconfirmthesecurityquery;
or
selectpushbutton»No«with»<«or»>«totocancelthefunction.
3 Switchbackwith»BACK<«press»EXIT«toendthesetting.
SwitchingtocontinuousrecordingWhenthecontinuousrecordingoptionissettoon,TVstartsrecordingthecurrentprogrammetotimeshiftingmemory.Averagerecordingtimeforthismemoryis60minutes.1 Openthemenuwith»MENU«.
2 Selectthemenuitem»Settings«with»V«,»Λ«,»<«or»>«andpress»OK«toconfirm.
3 Selectthemenuitem»TV«with»>«or»<«andpress»V«toconfirm.
4 Selecttheline»Advanced«»V«or»Λ«andpress»OK«toconfirm.
5 Selecttheline»PermanentTimeshift«with»V«or»Λ«.
6 Press»<«or»>«toturnto»On«position.
7 Press»EXIT«toendthesetting.
Timeshift–″Pausing”programmesYoucanpauseanyprogramyouarewatch-ing.Thisisausefulfunction.Forinstance,ifthephoneringswhenyouarewatchingamovie,youcanpausethemovieandresumeitafterthecallwithoutmissingnothing.Thelastscenethatwasfrozenisdisplayedandtimeshiftisrecordedintotheexternaldatamedia.InTimeShiftmode,youcanonlyrecordasmuchasthefreememoryspaceontheexternaldatamedia.Youcanrecordcurrentbroadcastforapproxi-mately60minutes.
Note:7 Forundisturbed“PermanentTimeshift”use
anexternalUSBharddisk.1 Press»!«duringthebroadcast. –Televisionpictureispausedanddelay
timeisdisplayed.
2 Toresumethebroadcast,press»8«. –Thesystemcontinuesrecordingthebroad-
castwhileyouarewatchingit.
Note:7 Followingfunctionscanbeusedintimeshift
mode. – Fastrewind,press»3«severaltimesfor
thedesiredspeed; – Fastforward,press»4«severaltimesfor
thedesiredspeed; – Topausepress»!«.
3 Press»7«toexittheTimeShiftfunction. –Themessage»LiveBroadcast«appears. –Thescenesinthe“timeshiftmemory”are
deleted.
ENGLISH48
RecordingTVprogrammesYoucanrecordTVprogrammeswhilesimultane-ouslywatchingadifferentTVprogramme.Thedatafortheseprogrammesisrecordedonanexternaldatamediumandthisarchiveisadmin-isteredviathetelevision.
Notes:7 Ifyouwanttousetherecordfunctionwith
digitalsatelliteprogrammes(DVB-S)andwatchadifferentTVprogrammeatthesametime,youneedtoconnectasecondsatellitecabletotheSATELLITESUBsocket.
Amemoryof44MBupto110MBisrequiredfora1minuterecord.Otherrecordingsinthearchivecanbewatchedwhileaprogrammeisbeingrecorded.ItisnotpossibletoshiftTVprogrammebetweenDVB-TandDVB-C.
One-touchprogrammerecord-ing1 Selectthechannelwith»1…0«or»P+«,
»P–«andpress» «tostarttherecord-ing.
–Recordinginformationisdisplayed:Recordingsymbol,channelname,pro-grammetimeandrecordingtime.
–Thisinformationwilldisappearshortly.
2 Toendtherecording,press»7«.
3 Selectpushbutton»Yes«with»<«or»>«toconfirmthesecurityquery;
or
selectpushbutton»No«with»<«or»>«totocontinuetherecording.
Notes:7 Whenrecordingiscomplete,itwillauto-
maticallybestoredontheexternaldatamedia.
7 Ifyouremovetheexternaldatamediaduringrecording,thentherecordingiscancelledautomaticallyandnodataisrecordedontotheexternaldatamedia.
Recordingaprogrammefromthechannellist1 Press»OK«toopenthechannellist.
2 Selectachannelwith»<«or»>«andpress»OK«toconfirm.
3 Press»EXIT«toexitfromthechannellist.
4 Press» «tostartrecording. –Recordinginformationisdisplayed:
Recordingsymbol,channelname,pro-grammetimeandrecordingtime.
–Theseinformationwilldisappearafterashortwhile.Recordingsymbolandrecord-ingtimewillappearonthelowerrightcornerofthescreen.
5 Toendtherecording,press»7«.
6 Selectpushbutton»Yes«with»<«or»>«toconfirmthesecurityquery;
or
selectpushbutton»No«with»<«or»>«tocontinuetherecording.
USBRECORDING-------------------------------------------------------------------------------------------
49ENGLISH
USBRECORDING-------------------------------------------------------------------------------------------
Programmesettingforrecord-ing...withelectronicprogrammeguideElectronicprogrammeguidedatacanbeusedforrecording.25EPGreminderand/orrecordercanbesetintotal.
1 Press»GUIDE«toopentheelectronicprogrammeguide.
2 SelectthepreferredTVprogramwith»V«or»Λ«.
–InformationabouttheactualTVprogramisdisplayed.
3 Press»<«or»>«toselecttheTVprogramyouwanttorecord.
4 Toaddbroadcaststothetimerpress»OK«. –InformationfortheTVprogramtobe
recordedwillbedisplayed.
5 Selecttheline»Record«with»>«andpress»OK«toconfirm.
–Recordingdatarangeappears.
6 Press»OK«toconfirm.
7 Press»EXIT«toendthemenu.
Note:7 Ifthedatafortherecordingistobe
changed,openmenuwith»MENU«.Selectthemenuitem»ScheduleList«with»V«,»Λ«,»<«or»>«andconfirmwith»OK«.Press»«(green),changethedataandandsaveitwith»«(blue).
Notes:7 Awarningisdisplayedbeforethetimer
recordingstartsandcountsdownfor10sec-ondstoallowyoutoswitchtothechannel.Attheendof10seconds,thechanneltoberecordedappearsautomatically.
7 Ifthetimerrecordingstartsduringplay-back,playbackstops.Ifyoudonotselect»Yes«inthewarningprompt,recordingwillstartautomaticallyattheendofthecountdown.
7 OnlyforUPCcustomersNote:PartsofpreviousornextfilescanbeincludedintotherecordwhiletheprogrammeisbeingrecordedresultingfrompossibleProgrammeGuideerrors.Insuchcases,keepinmindthatthehighestfamilyprotectionlevelwillapplyforthewholerecordingifoneormoreofthoseprogrammeshaveanyleveloffam-ilyprotection.
Setthelead/follow-uptimeWiththisfunctionyoucanchangetherecordingtimesetbytheelectronicTVguide.Ifyouthinkthataprogramwillstartafewmin-utesearlierorwillendseveralminuteslater,youcan„add“upto60minutestothistime1 Openthemenuwith»MENU«.
2 Selectthemenuitem»ScheduleList«with»V«,»Λ«,»<«or»>«andpress»OK«toconfirm.
3 Activadethe»PaddingTime«menuwith»«(blue).
4 Changethestarttimewith»<«or»>«.
5 Use»V«toswitchtotheline»End«andchangetheendtimewith»<«or»>«.
6 Selectpushbutton»Save«with»V«andpress»OK«toconfirm.
7 Press»EXIT«toendthemenu.
ENGLISH50
...byenteringtheinformationmanu-ally25TVprogrammescanbepresetforthetimerrecordingorasareminder.1 Press»GUIDE«toopentheelectronic
programmeguide.
2 Press»<«todisplaythetopmenu. –»TVListing«optionismarked.
3 Selecttheline»SetRecording«with»V«or»Λ«andpress»OK«toconfirm.
–»SetRecording«menuisdisplayed,»Channel«ismarked.
Note:7 Ifyouwanttousethereminderfunction,
selecttheline»SetReminder«.4 Press»OK«,selectthechannelyouwantto
recordwith»V«or»Λ«andpress»OK«toconfirm.Topasstothenextitempress»V«.
5 Press»OK«,selectthedateyouwanttorecordwith»V«or»Λ«andpress»OK«toconfirm.Topasstothenextitempress»V«.
6 Press»OK«,enterstartingtimewith»V«or»Λ«andpress»OK«toconfirm.Topasstothenextitempress»>«.
7 Press»OK«,enterstartingtimewith»V«or»Λ«andpress»OK«toconfirm.Topasstothenextitempress»V«.
8 Press»OK«,select»Mode«(»Once«,»Ev-eryDay«or»Weekly«)with»V«or»Λ«andpress»OK«toconfirm.
9 Select»SaveRecording«with»V«andconfirmwith»OK«.
–Recordingtimerangeappears.
10 Press»OK«toconfirm. –Recordingtimerisprogrammed.
11 Press»EXIT«toendthemenu.
USBRECORDING-------------------------------------------------------------------------------------------
Notes:7 Awarningisdisplayedbeforethetimer
recordingstartsandcountsdownfor10sec-ondstoallowyoutoswitchtothechannel.Attheendof10seconds,thechanneltoberecordedappearsautomatically.
7 Ifthetimerrecordingstartsduringplay-back,playbackstops.Ifyoudonotselect»Yes«inthewarningprompt,recordingwillstartautomaticallyattheendofthecountdown.
Editingthetimer1 Openthemenuwith»MENU«.
2 Selectthemenuitem»ScheduleList«with»V«,»Λ«,»<«or»>«andpress»OK«toconfirm.
3 Selectthetitleoftheprogrammetobechangedwith»V«or»Λ«andpress»«(green)toeditthetitle.
4 With»V«or»Λ«selecttheitemsyouwanttoeditandmodifythemwith»1…0«and»<«or»>«.
5 Tosavethemodification,press»«(blue).
–Timerischanged.
6 Press»EXIT«toendthesetting.
Deletingatimer1 Openthemenuwith»MENU«.
2 Selectthemenuitem»ScheduleList«with»V«,»Λ«,»<«or»>«andpress»OK«toconfirm.
3 Selectthetitleoftheprogrammetobedeletedwith»V«or»Λ«andanddeletethetimerwith»«(yellow).
4 Selectpushbutton»Yes«with»<«or»>«toconfirmthesecurityquery;
or
selectpushbutton»Cancel«with»<«or»>«tocanceldeletionprocess.
5 Press»EXIT«toendthesetting.
51ENGLISH
USBRECORDING-------------------------------------------------------------------------------------------
PlaybackEitherstartedmanuallyorwiththetimerfunc-tion,therecordedprogrammesareallstoredintheexternaldatamedia.Youcandisplayanar-chiveonanexternaldatamediafrom»Records«–»MediaPlayer«menu.
Selectingabroadcastfromtherecordedfileslist1 Openthemenuwith»MENU«.
2 Selectthemenuitem»Records«with»V«,»Λ«,»<«or»>«andpress»OK«toconfirm.
–»MediaPlayer«menuisdisplayed.
3 Selecttheoption»PVR«with»V«or»Λ«andpress»OK«toconfirm.
–Recordedfilesaredisplayed.
4 Selectthebroadcastyouwanttoplaywith»V«or»Λ«andstartplaybackwith»8«.
5 Press»7«toendplayback. –TVreturnstomediaplayermenu.
Forward/reversepicturesearch1 Press»4«repeatedlytoselecttheplayback
speed(2x,4x,8x,16xor32x);
or
press»3«repeatedlytoselecttheplay-backspeed(2x,4x,8x,16xor32x).
PlaybackduringarecordingYoucaneitherwatchthecurrentprogrammethatisbeingrecordedorapreviouslyrecordedprogrammewhilerecordingtakesplace.1 Selectthechannelwith»1…0«or»P+«,
»P–«andpress» «tostarttherecord-ing.
2 TodisplayPVRcontentpress»«(red)button.
3 Selecttheprogrammeyouwanttowatchwith»V«or»Λ«andstartplaybackwith»8«.
4 Press»7«tostopplayback.
5 Press»7«tostoprecording.
6 Selectpushbutton»OK«with»<«or»>«toconfirmthesecurityquery;
or
selectpushbutton»Cancel«with»<«or»>«tocanceldeletionprocess.
DeletingprogrammesfromtherecordedfilesmenuYoucandeleterecordedprogrammesfromtheRecordedFileslist.1 Openthemenuwith»MENU«.
2 Selectthemenuitem»Records«with»V«,»Λ«,»<«or»>«andpress»OK«toconfirm.
–»MediaPlayer«menuisdisplayed.
3 Selecttheoption»PVR«with»V«or»Λ«andpress»OK«toconfirm.
–Recordedfilesaredisplayed.
4 Selectthebroadcaststobedeletedwith»<«or»>«.
5 »Todeletethebroadcast,press»«(red).
6 Selectpushbutton»OK«with»<«or»>«toconfirmthesecurityquery;
or
selectpushbutton»Cancel«with»<«or»>«tocanceldeletionprocess.
Note:7 Filesthatarebeingrecordedorplayed
backcannotbedeletedfromthe»Record-edFiles«menu.
7 Press»EXIT«toendthemenu.
ENGLISH52
USBOPERATION--------------------------------------------------------------------------------------------
FileformatsforUSBoperatingYourtelevisioncanbeoperatedviatheUSBinputwiththefollowingfileformats:
VideodataSpecialcodecsforvideocompressionanddecompressionprovidemorememoryspacewithoutcompromisingthepicturequalityexces-sively.YourtelevisionplaysvideofilesintheformatsXVID,H.264/MPEG-4AVC(L4.1,4referencepictures),MPEG-4,MPEG-2,MPEG-1,MJPEGandMOV.Thefollowingfilenameextensionsarealsosupported:“.avi”,“mkv”,“.mp4”,“.ts”,“.mov”,“.mpg”,“.dat”,“.vob”,”.divx”.Inadditiontovideodata,thesefilesalsocontainaudiodatacompressedand"packaged"byusingMP3,AAC,DTS2.0orDolbyDigital.DTS2.0+DigitalOutdenotesthedualabilitytopasstheDTSencodeddigitalbistreamtoanexternalDTSdecoderforplaybackaswellasfolddownthedigitalsurroundsoundtrackforplaybackina2-channelenvironmentthroughanalogoutputs.Format(codec)informationisembeddedwithinthefilecontentandmaydifferdependingonthefileextension.“.avi”,“.mkv”or“.divx”filescon-tainingdivxcodecwithinarenotplaybacked.
ImagedataYourtelevisioncandisplaypicturedatainJPEG,PNGandBMPformats.JPEGstandsforJointPictureExpertsGroup.Thisprocessisintendedtocompresspicturefiles.PNGandBMPstandardsareintendedtocom-presspicturedatawithoutloss.Picturefilescanbesavedinadatastoragemediumtogetherwithotherfiletypes.Suchfilescanbeorganizedasfoldersandsubfolders.
AudiodataYourtelevisioncanplayaudiodatacodedwithMP3,AACstandards.MP3standsforMPEG-1VolumeLevel3andisbasedontheMPEG-1standarddevelopedbyMPEG(MotionPictureExpertGroup).AACindicatestheAdvancedAudioCodingandisdevelopedbyMPEG.AACprovideshigheraudioqualitywiththesamedatarate(bitrate).WMA(WindowsMediaAudio)isacompres-sionstandarddevelopedbyMicrosoftforaudiodata.TheseformatsenableaudiofilestobesavedonstoragedeviceswithasoundqualitysimilartothatofaCD.Fileextensionssupportedbyyourdevice:“.mp3”,“.mp2”,“.wma”,“.m4a”,“.aac”,".wav"MP3filescanbeorganisedintofoldersandsubfolderssimilartothefilesonacomputer.
ForDTSpatents,seehttp://patents.dts.com.Manufac-turedunderlicensefromDTSLicensingLimited.DTS,theSymbol,&DTSandtheSymboltogetherarereg-isteredtrademarksandDTSStudioSoundisatrade-markofDTS,Inc.©DTS,Inc.AllRightsReserved.ForDTSpatents,seehttp://patents.dts.com.Manu-facturedunderlicensefromDTSLicensingLimited.DTS,theSymbol,&DTSandtheSymboltogetherareregisteredtrademarks,andDTS2.0+DigitalOutisatrademarkofDTS,Inc.©DTS,Inc.AllRightsReserved.
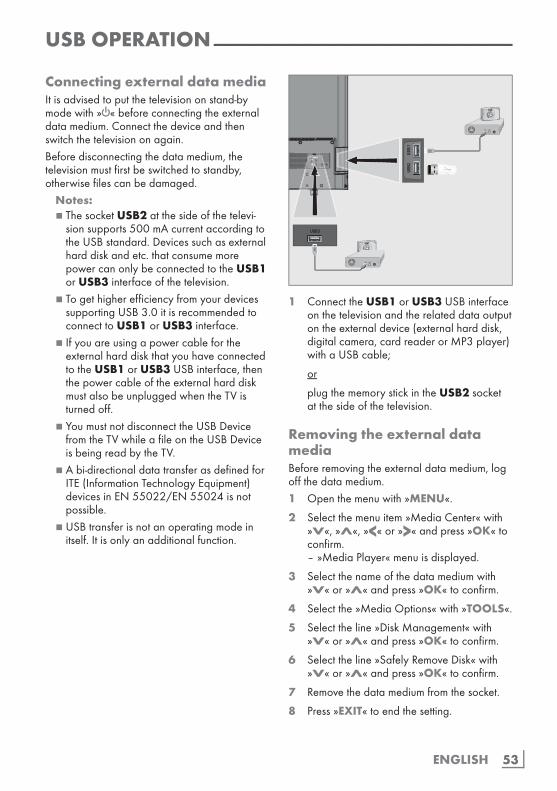
53ENGLISH
USBOPERATION--------------------------------------------------------------------------------------------
ConnectingexternaldatamediaItisadvisedtoputthetelevisiononstand-bymodewith»8«beforeconnectingtheexternaldatamedium.Connectthedeviceandthenswitchthetelevisiononagain.Beforedisconnectingthedatamedium,thetelevisionmustfirstbeswitchedtostandby,otherwisefilescanbedamaged.
Notes:7 ThesocketUSB2atthesideofthetelevi-
sionsupports500mAcurrentaccordingtotheUSBstandard.Devicessuchasexternalharddiskandetc.thatconsumemorepowercanonlybeconnectedtotheUSB1orUSB3interfaceofthetelevision.
7 TogethigherefficiencyfromyourdevicessupportingUSB3.0itisrecommendedtoconnecttoUSB1orUSB3interface.
7 IfyouareusingapowercablefortheexternalharddiskthatyouhaveconnectedtotheUSB1orUSB3USBinterface,thenthepowercableoftheexternalharddiskmustalsobeunpluggedwhentheTVisturnedoff.
7 YoumustnotdisconnecttheUSBDevicefromtheTVwhileafileontheUSBDeviceisbeingreadbytheTV.
7 Abi-directionaldatatransferasdefinedforITE(InformationTechnologyEquipment)devicesinEN55022/EN55024isnotpossible.
7 USBtransferisnotanoperatingmodeinitself.Itisonlyanadditionalfunction.
1 ConnecttheUSB1orUSB3USBinterfaceonthetelevisionandtherelateddataoutputontheexternaldevice(externalharddisk,digitalcamera,cardreaderorMP3player)withaUSBcable;
or
plugthememorystickintheUSB2socketatthesideofthetelevision.
RemovingtheexternaldatamediaBeforeremovingtheexternaldatamedium,logoffthedatamedium.1 Openthemenuwith»MENU«.
2 Selectthemenuitem»MediaCenter«with»V«,»Λ«,»<«or»>«andpress»OK«toconfirm.
–»MediaPlayer«menuisdisplayed.
3 Selectthenameofthedatamediumwith»V«or»Λ«andpress»OK«toconfirm.
4 Selectthe»MediaOptions«with»TOOLS«.
5 Selecttheline»DiskManagement«with»V«or»Λ«andpress»OK«toconfirm.
6 Selecttheline»SafelyRemoveDisk«with»V«or»Λ«andpress»OK«toconfirm.
7 Removethedatamediumfromthesocket.
8 Press»EXIT«toendthesetting.
SCART / S-VHS / COMPONENT
Optic Out SERVICEONLY
LAN
ANT INANT IN
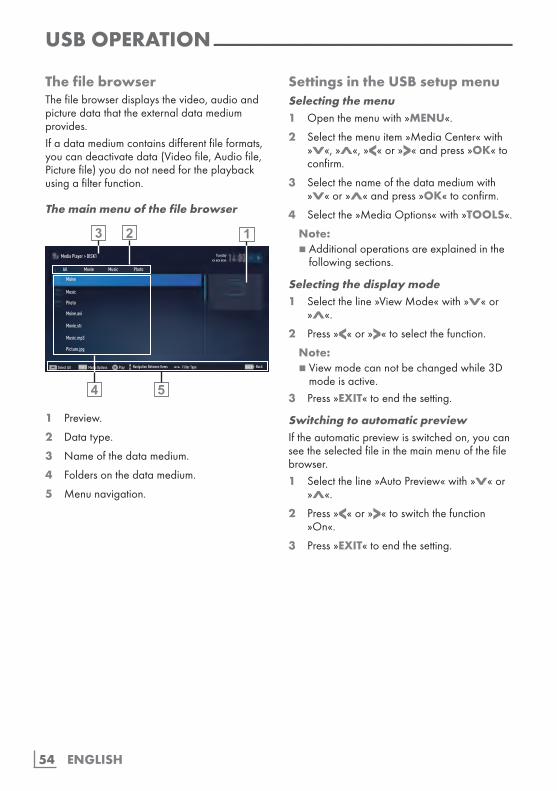
ENGLISH54
ThefilebrowserThefilebrowserdisplaysthevideo,audioandpicturedatathattheexternaldatamediumprovides.Ifadatamediumcontainsdifferentfileformats,youcandeactivatedata(Videofile,Audiofile,Picturefile)youdonotneedfortheplaybackusingafilterfunction.
Themainmenuofthefilebrowser
Media Player > DISK1
Moive
Music
Photo
Moive.avi
Movie.str
Music.mp3
Picture.jpg
Tuesdayxx xxx xxxx
BackBACKTOOLS
All Movie Music Photo
Select All Media Options Filter TypeNavigation Between ItemsPlay
4 5
123
1 Preview.
2 Datatype.
3 Nameofthedatamedium.
4 Foldersonthedatamedium.
5 Menunavigation.
USBOPERATION--------------------------------------------------------------------------------------------
SettingsintheUSBsetupmenuSelectingthemenu1 Openthemenuwith»MENU«.
2 Selectthemenuitem»MediaCenter«with»V«,»Λ«,»<«or»>«andpress»OK«toconfirm.
3 Selectthenameofthedatamediumwith»V«or»Λ«andpress»OK«toconfirm.
4 Selectthe»MediaOptions«with»TOOLS«.
Note:7 Additionaloperationsareexplainedinthe
followingsections.
Selectingthedisplaymode1 Selecttheline»ViewMode«with»V«or
»Λ«.
2 Press»<«or»>«toselectthefunction.
Note:7 Viewmodecannotbechangedwhile3D
modeisactive.3 Press»EXIT«toendthesetting.
SwitchingtoautomaticpreviewIftheautomaticpreviewisswitchedon,youcanseetheselectedfileinthemainmenuofthefilebrowser.1 Selecttheline»AutoPreview«with»V«or
»Λ«.
2 Press»<«or»>«toswitchthefunction»On«.
3 Press»EXIT«toendthesetting.
55ENGLISH
USBOPERATION--------------------------------------------------------------------------------------------
Selectingthedisplaydurationoftheslideshow1 Selecttheline»SlideShowInterval«with
»V«or»Λ«.
2 Selectthetime(3,5,10seconds)with»<«or»>«.
3 Press»EXIT«toendthesetting.
SubtitlesettingsIfthefilmhassubtitles,youcanturnonandoffthissubtitle,changeitssizeorcolour.1 Use»V«or»Λ«toselect»SubtitleAutoSe-
lection«,»SubtitleSize«or»SubtitleColor«.
2 Adjustwith»<«or»>«.
3 Press»EXIT«toendthesetting.
Note:7 Theseadjustmentscanonlybemadefor
externalsubtitlefiles.Theseadjustmentscannotbemadeinsubtitlescombinedwiththemovie.
ENGLISH56
Playbackbasicfunctions1 Openthemenuwith»MENU«.
2 Selectthemenuitem»MediaCenter«with»V«,»Λ«,»<«or»>«andpress»OK«toconfirm.
–»MediaPlayer«menuisdisplayed.
Note:7Ifthecontentoftheexternaldatamedium
isnotdisplayed,press»«(yellow)torefresh.
3 Selectthenameofthedatamedium»V«or»Λ«andpress»OK«toconfirm.
–MediaPlayermenuoftheselectedexter-naldatamediumisdisplayed.
4 Selectthedesiredtype(All,Movie,MusicorPhoto)with»<«or»>«andpress»OK«toconfirm.
5 Selectthefolderwith»V«or»Λ«andpress»OK«toopenit.
–Alistofsub-directoriesappears.
Note:7 Gobacktothepreviousfolderwith
»BACK<«.6 Selectthetrackorpicturewith»V«or»Λ«,
andpress»8«tostartplaying.
Notes:7 Whenplayingpicturedata,press»?«to
viewinformationabouttheresolutionandthesize.
7 ForplayingMP3orWMAdata,informa-tiononthealbum,trackandsingerisdisplayedattheleftofthemenu.
7 Whenplayingpicturedata,press»?«toswitchonacontrolpanel.
7 Press»!«topauseplayback.
8 Toresumeplaybackpress»8«.
9 Press»7«toendplayback. –Thefilebrowserappears.
USBOPERATION--------------------------------------------------------------------------------------------
Notes:7Use»BACK<«whenyouwouldliketo
returntothelastfolder.7 Itispossiblethatsomefilesthataresup-
portedinUSBmodedonotoperateduetosomeproblemsthatmayarisedependingonhowsuchfilesarecreated(compression)althoughtheycontainthesupportedfileextension.
7 Iftherearemorethenoneaudiosources(audiostream)inthevideofilesthatarebeingplayed,thenyoucanswitchbetweentheaudiosourceswiththe» «whilethefileisplayedinfullscreenmode.
7 Moviesyouwillbewatchingfromthemoviefileonlysupportssubtitleswith.srt,.sub,.ass,.ssa,.smiformat.Namesofthesubtitleandmoviefilesmustbethesame.Other-wise,subtitlecannotbedisplayed.
Infilmswhichyouwillwatchin3Dmodeonlyexternalsubtitleissupported.Internalsubtitlesinsomemoviesappearcorrectiftheyarecompatiblewith3Dformat.Iftheyarenotcompatible,ablurryimagewillap-pearonscreen.
57ENGLISH
AdditionalplaybackfunctionsDependingonthefileformatsused,thefollow-ingadditionalfunctionsarepossible.
SelectingpartitiononHDfiles(onlysupportedvideofiles)1 Duringplayback,selectthenextchapter
with»>«.
2 Duringplayback,selectthepreviouschap-terwith»<«.
SelectingtitlesonHDfiles(onlysupportedvideofiles)1 Duringplayback,selectthenexttitlewith
»Λ«.
2 Duringplayback,selecttheprevioustitlewith»V«.
PlayingselectedtracksOnlyplaythemarkedtracks.1 Selectthetrackyouwantwith»V«or»Λ«
andhighlightwith»«(yellow).
2 Selectthetrackyouwantwith»V«or»Λ«andhighlightwith»«(yellow).
3 Startplaybackwith»8«.
4 Press»7«toendplayback.
Note:7 Toremovethehighlighting,selectthetrack
with»V«or»Λ«andremovethemarkingwith»«(yellow).
Selectingatrackorpictureinsteps(SKIP)1 Duringplayback,selectthenexttrack/pic-
tureyouwantwith»6«.
2 Selecttheprevioustrack/picturewith»5«. –Playbackbeginswiththetrackorpicture
youselected.
USBOPERATION--------------------------------------------------------------------------------------------
Movetodesiredtime(onlyvideofiles)1 Press»OK«duringplayback.
2 Enterthetimethatyouwanttomovetowith»1...0«andconfirmwith»OK«.
Searchingforward(onlyvideoandaudiofiles)Youcanselectdifferentspeeds(2-fold,4-fold,8-fold,16-foldand32-foldforwardsandback-wards).1 Duringplaybackyoucanselectplayback
speedbypressing»3«or»4«.
2 Toresumeplaybackpress»8«.
Turnthepicturedisplay(onlypicturefiles)Thepicturescanberotatedby90°.1 Duringplayback,switchonthecontrol
panelwith»OK«.
2 Use»<«or»>«toselect» «andpress»OK«.
–Thepicturerotates90°clockwise.
Repeatfunctions Options: –»One«,theselectedtrackisrepeated
once; –»Sequence«,selectedtracksarerepeated
consecutively; –»Random«,selectedtracksarerepeated
inamixedorder; –»None«,repetitionoff.
1 Press»8«tostartplayback.
2 Duringplayback,switchonthecontrolpanelwith»OK«.
3 Select» «with»<«or»>«andpress»OK«repeatedly.
–Therepeatfunctionwillchange.
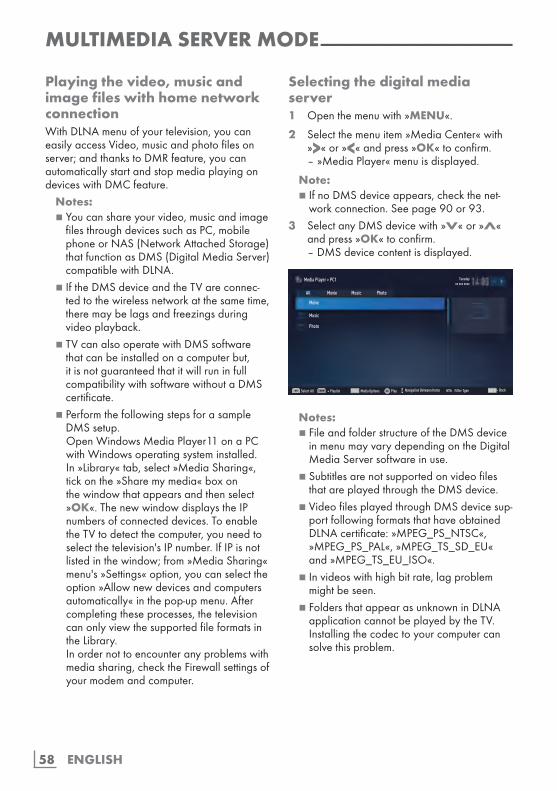
ENGLISH58
MULTIMEDIASERVERMODE-----------------------------------------------------------
Playingthevideo,musicandimagefileswithhomenetworkconnectionWithDLNAmenuofyourtelevision,youcaneasilyaccessVideo,musicandphotofilesonserver;andthankstoDMRfeature,youcanautomaticallystartandstopmediaplayingondeviceswithDMCfeature.
Notes:7 Youcanshareyourvideo,musicandimage
filesthroughdevicessuchasPC,mobilephoneorNAS(NetworkAttachedStorage)thatfunctionasDMS(DigitalMediaServer)compatiblewithDLNA.
7 IftheDMSdeviceandtheTVareconnec-tedtothewirelessnetworkatthesametime,theremaybelagsandfreezingsduringvideoplayback.
7 TVcanalsooperatewithDMSsoftwarethatcanbeinstalledonacomputerbut,itisnotguaranteedthatitwillruninfullcompatibilitywithsoftwarewithoutaDMScertificate.
7 PerformthefollowingstepsforasampleDMSsetup.
OpenWindowsMediaPlayer11onaPCwithWindowsoperatingsysteminstalled.In»Library«tab,select»MediaSharing«,tickonthe»Sharemymedia«boxonthewindowthatappearsandthenselect»OK«.ThenewwindowdisplaystheIPnumbersofconnecteddevices.ToenabletheTVtodetectthecomputer,youneedtoselectthetelevision'sIPnumber.IfIPisnotlistedinthewindow;from»MediaSharing«menu's»Settings«option,youcanselecttheoption»Allownewdevicesandcomputersautomatically«inthepop-upmenu.Aftercompletingtheseprocesses,thetelevisioncanonlyviewthesupportedfileformatsintheLibrary.
Inordernottoencounteranyproblemswithmediasharing,checktheFirewallsettingsofyourmodemandcomputer.
Selectingthedigitalmediaserver1 Openthemenuwith»MENU«.
2 Selectthemenuitem»MediaCenter«with»>«or»<«andpress»OK«toconfirm.
–»MediaPlayer«menuisdisplayed.
Note:7 IfnoDMSdeviceappears,checkthenet-
workconnection.Seepage90or93.3 SelectanyDMSdevicewith»V«or»Λ«
andpress»OK«toconfirm. –DMSdevicecontentisdisplayed.
Media Player > PC1
Moive
Music
Photo
Tuesdayxx xxx xxxx
BackBACKTOOLS
All Movie Music Photo
Select All + Playlist Media Options Filter TypeNavigation Between ItemsPlay
Notes:7 FileandfolderstructureoftheDMSdevice
inmenumayvarydependingontheDigitalMediaServersoftwareinuse.
7 SubtitlesarenotsupportedonvideofilesthatareplayedthroughtheDMSdevice.
7 VideofilesplayedthroughDMSdevicesup-portfollowingformatsthathaveobtainedDLNAcertificate:»MPEG_PS_NTSC«,»MPEG_PS_PAL«,»MPEG_TS_SD_EU«and»MPEG_TS_EU_ISO«.
7 Invideoswithhighbitrate,lagproblemmightbeseen.
7 FoldersthatappearasunknowninDLNAapplicationcannotbeplayedbytheTV.Installingthecodectoyourcomputercansolvethisproblem.
59ENGLISH
7 AudiofilesplayedthroughDMSdevicesup-portfollowingformatsthathaveobtainedDLNAcertificate:»AAC_ADTS_320«,»LPCM«,»MP3«,»WMABASE«and»WMAFULL«.
7 ImagefilesplayedthroughDMSdevicesupportfollowingformatsthathaveobtainedDLNAcertificate:»JPEG_LRG«,»JPEG_MED«and»JPEG_SM«.
MULTIMEDIASERVERMODE-----------------------------------------------------------
Playback1 SelectthecontentfolderonDMSdevice
with»V«or»Λ«andpress»OK«. –Alltitlesaredisplayed.toconfirm.
2 Selectthedesiredtitlewith»V«or»Λ«.
3 Press»8«tostartplayback.
Otherplaybackoptions1 Press»!«topauseplayback.
2 Toresumeplaybackpress»8«.
3 Press»5«or»6«untilyoureachthedesiredfile.
4 Press»7«tostopplayback.
5 Switchbacktothecontentwith»BACK<«.
6 ToexitDLNAfeaturepress»EXIT«.
7 Selectpushbutton»Yes«with»<«or»>«toconfirmthesecurityquery;
or
selectpushbutton»No«with»<«or»>«tocanceldeletionprocess.
Note:7 Also,youcanselectfollowingplayingfunc-
tionsfromthemenu: –» «selectrepeatfunctions; –»5«selectprevioustitle; –»3«picturesearcheprevious; –»8«startsplaying; –»!«pausesplaying; –»7«stopsplaying; –»4«picturesearchenext; –»6«selectnexttitle.
ENGLISH60
SMARTINTER@CTIVETV4.0FEATURE--------------------------------
SMARTInter@ctiveTV4.0inter-netapplicationsSmartInter@ctiveTV4.0interactiveapplicationsprovideyourtelevisionwithInternetservicesandpages.Theseapplicationsaredesignedaccordingtoyourtelevision.WithSMARTInter@ctiveTV4.0featureyoucanrunmanylocalandglobalinternetapplica-tions.ThankstoGrundigApplicationStore,youcanfindmanyapplicationsthatyoumayuseonyourGrundigTV.YoucandownloadmanyapplicationsfromGrundigApplicationStore.Theseapplicationsincludevideo,picture,music,socialnetworkingapplications,newsandsportsapplications,weatherforecastapplicationsandsomespecificapplications.
Notes:7 [email protected],
inter@ctiveapplicationsmayvaryfromonecountrytotheother.
7 [email protected],cannotuploadfilestoawebsiteandcannotinstalladd-insexceptLoginpagesofsomeapplicationsforapplicationsotherthantheonesinGrundigSmartApps.
7 Grundigisnotresponsibleforthecontentandthequalityofcontentofferedbythecontentproviders.
7 LocalandglobalinternetapplicationsprovidedthroughyourSmartInter@ctiveTV4.0comeswithyourTVwithintheframe-workofspeciallimiteddurationagreementsenteredintowiththeapplicationowners.Applicationownersmayupdate,modify,restrictorentirelyremovethoseapplicationswiththeirowndecision.Grundigcannotbeheldresponsibleforsuchchanges.
7 Grundigreservestherighttomakeallchangessuchasmodifications,restric-tions,extensions,transfersandremovalsoninternetapplicationsprovidedthroughyourSMARTInter@ctiveTV4.0.
7 InLoginprocessofsomeapplications,itmayberequiredtoconnecttothewebpageoftherelatedapplication.SubjectwebpagesmaycontainlinksnotrelatedtoLoginprocess.Whenconnectingthoselinks,TVmayaccessopenwebandviewcontentsthatarenotsupportedbyyourTV.Asyouareonopenweb,yourTVcannotcontrolthoseunsupportedcontentsorcan-notbeheldresponsibleforthem.
USBkeyboardandmouseYoumayconnectakeyboardormousetobothsocketsUSB1,USB2orsocketUSB3touseintheWebbrowser.Keyboardsandmicerequir-ingspecialdrivearenotsupported.
StartingSmartInter@ctiveTV1 Openthemenuwith»MENU«.
2 Selectthemenuitem»ApplicationsStore«with»<«or»>«andpress»OK«toconfirmoropenthemenu»ApplicationsStore«with»@«.
–»Inter@ctiveApplications«menuwillbedisplayed.Duringinitiallogin,registrationscreenforGRUNDIGApplicationStorewillbedisplayed.
Notes:7Ifyoupress»@«whennomenuisopen,
youcanaccess»MyApps«menu.7IfyouattempttostartInter@ctiveapplica-
tionswithoutacableorwirelessadapterconnected,therelatedwarningisdisplayedonthescreen.IfyourwiredorwirelessadapterisconnectedbutyoucannotreceiveIPorinternetisnotconnected,[email protected],checkNetworkconnectionset-tings.see.page90or93.
7 Youcanfindoutaboutnavigatinginthemenusandhowtosetupaccesstotheap-plicationsinthefollowingchapter.
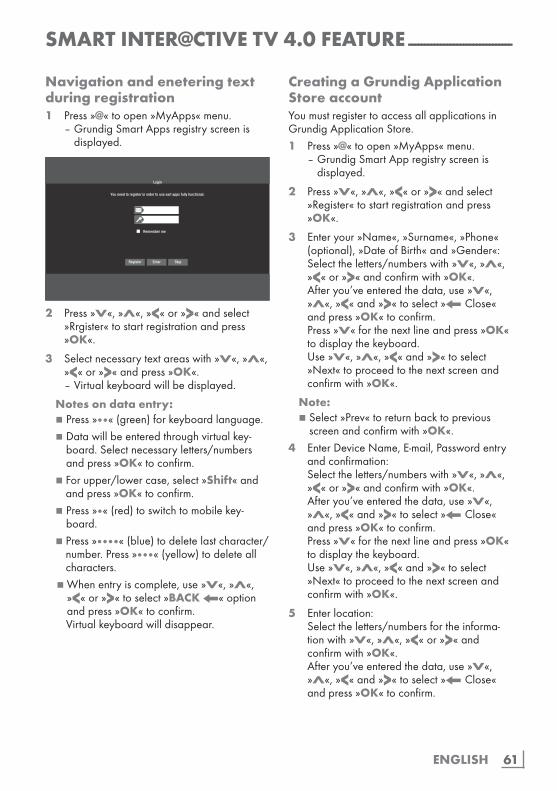
61ENGLISH
SMARTINTER@CTIVETV4.0FEATURE--------------------------------
Navigationandeneteringtextduringregistration1 Press»@«toopen»MyApps«menu. –GrundigSmartAppsregistryscreenis
displayed.
Login
You need to register in order to use sart apps fully functional.
Remember me
Register Enter Skip
2 Press»V«,»Λ«,»<«or»>«andselect»Rrgister«tostartregistrationandpress»OK«.
3 Selectnecessarytextareaswith»V«,»Λ«,»<«or»>«andpress»OK«.
–Virtualkeyboardwillbedisplayed.
Notesondataentry:7Press»«(green)forkeyboardlanguage.7Datawillbeenteredthroughvirtualkey-
board.Selectnecessaryletters/numbersandpress»OK«toconfirm.
7 Forupper/lowercase,select»Shift«andandpress»OK«toconfirm.
7Press»«(red)toswitchtomobilekey-board.
7 Press»«(blue)todeletelastcharacter/number.Press»«(yellow)todeleteallcharacters.
7 Whenentryiscomplete,use»V«,»Λ«,»<«or»>«toselect»BACK<«optionandpress»OK«toconfirm.
Virtualkeyboardwilldisappear.
CreatingaGrundigApplicationStoreaccountYoumustregistertoaccessallapplicationsinGrundigApplicationStore.1 Press»@«toopen»MyApps«menu. –GrundigSmartAppregistryscreenis
displayed.
2 Press»V«,»Λ«,»<«or»>«andselect»Register«tostartregistrationandpress»OK«.
3 Enteryour»Name«,»Surname«,»Phone«(optional),»DateofBirth«and»Gender«:
Selecttheletters/numberswith»V«,»Λ«,»<«or»>«andconfirmwith»OK«.
Afteryou’veenteredthedata,use»V«,»Λ«,»<«and»>«toselect»< Close«andpress»OK«toconfirm.
Press»V«forthenextlineandpress»OK«todisplaythekeyboard.
Use»V«,»Λ«,»<«and»>«toselect»Next«toproceedtothenextscreenandconfirmwith»OK«.
Note:7Select»Prev«toreturnbacktoprevious
screenandconfirmwith»OK«.4 EnterDeviceName,E-mail,Passwordentry
andconfirmation: Selecttheletters/numberswith»V«,»Λ«,
»<«or»>«andconfirmwith»OK«. Afteryou’veenteredthedata,use»V«,
»Λ«,»<«and»>«toselect»< Close«andpress»OK«toconfirm.
Press»V«forthenextlineandpress»OK«todisplaythekeyboard.
Use»V«,»Λ«,»<«and»>«toselect»Next«toproceedtothenextscreenandconfirmwith»OK«.
5 Enterlocation: Selecttheletters/numbersfortheinforma-
tionwith»V«,»Λ«,»<«or»>«andconfirmwith»OK«.
Afteryou’veenteredthedata,use»V«,»Λ«,»<«and»>«toselect»< Close«andpress»OK«toconfirm.
ENGLISH62
SMARTINTER@CTIVETV4.0FEATURE--------------------------------
6 Tocompletetheregistrationuse»V«,»Λ«,»<«or»>«toselect»Save«andconfirmwith»OK«.
–RegistrationiscompletedandEntryscreenwillbedisplayed.
LogginginwithGrundigAppli-cationStoreaccountIfyouresetyourtelevisiontofactorysettingsforanyreasonwith»Saveinstalledapplications«unselected,allapplicationsyouhavedown-loadedwillbedeleted,andwhenyouaccess»Inter@ctiveApplications«menu,theregistrationscreenwillbedisplayedagain.Youcanlog-inagainwiththee-mailandpass-wordyouhaveprovidedduringGrundigAp-plicationStoreregistrationwithouttheneedforre-registration.
1 Press»@«toopen»MyApps«menu. –GrundigSmartAppentryscreenisdis-
played.
2 Enteryoure-mailaddress: Press»OK«andselecttheletters/numbers
with»V«,»Λ«,»<«or»>«andconfirmwith»OK«.
Thenuse»V«,»Λ«,»<«and»>«toselect»< Close«andconfirmwith»OK«.
3 Enteryourpassword: Press»V«and»OK«.Enterdatawith»V«,
»Λ«,»<«or»>«andconfirmwith»OK«. Thenuse»V«,»Λ«,»<«and»>«toselect
»< Close«andconfirmwith»OK«.
4 Use»V«toselect»Login«andpress»OK«.
5 Use»V«,»Λ«,»<«and»>«toselecttheapplicationsthatyouwanttosynchronizeandconfirmwith»OK«.
Use»V«,»Λ«,»<«and»>«toselect»Synchronize«andconfirmwith»OK«.
6 Afterthedownloadingiscompletedpress»OK«.
–»GrundigMyApps«menuwillbedis-played.
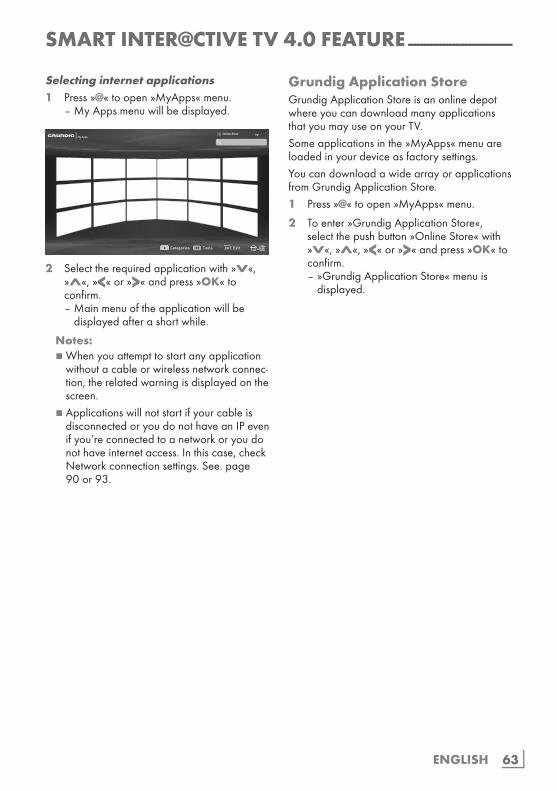
63ENGLISH
SMARTINTER@CTIVETV4.0FEATURE--------------------------------
Selectinginternetapplications1 Press»@«toopen»MyApps«menu. –MyAppsmenuwillbedisplayed.
Catagories Tools Exit
Online Store ...TV
My Apps
2 Selecttherequiredapplicationwith»V«,»Λ«,»<«or»>«andpress»OK«toconfirm.
–Mainmenuoftheapplicationwillbedisplayedafterashortwhile.
Notes:7 Whenyouattempttostartanyapplication
withoutacableorwirelessnetworkconnec-tion,therelatedwarningisdisplayedonthescreen.
7 ApplicationswillnotstartifyourcableisdisconnectedoryoudonothaveanIPevenifyou’reconnectedtoanetworkoryoudonothaveinternetaccess.Inthiscase,checkNetworkconnectionsettings.See.page90or93.
GrundigApplicationStoreGrundigApplicationStoreisanonlinedepotwhereyoucandownloadmanyapplicationsthatyoumayuseonyourTV.Someapplicationsinthe»MyApps«menuareloadedinyourdeviceasfactorysettings.YoucandownloadawidearrayorapplicationsfromGrundigApplicationStore.1 Press»@«toopen»MyApps«menu.
2 Toenter»GrundigApplicationStore«,selectthepushbutton»OnlineStore«with»V«,»Λ«,»<«or»>«andpress»OK«toconfirm.
–»GrundigApplicationStore«menuisdisplayed.
ENGLISH64
SMARTINTER@CTIVETV4.0FEATURE--------------------------------
Downloadingandinstallinginternetapplications1 SelectthedesiredcategoryinGrundig
OnlineApplicationswith»V«or»Λ«andpress»>«topasstoapplicationfield;
or
selecttheapplicationyouwantwithcriterion:
»MostPopular«, »HighestRated«, »ReleaseDate«;
or
ifyouwanttoselecttheapplicationbysearchingdirected,selectthepushbutton“Search”with»V«,»Λ«,»<«and»>«,confirmwith»OK«andselectthesearchcriterionwiththeVirtualkeyboard.
2 Selecttheapplicationyouwanttodown-loadwith»V«,»Λ«,»<«or»>«andpress»OK«toconfirm
–Informationontheapplicationwillbedisplayed.
3 Startdownloadbyconfirmingthepushbutton»Install«with»OK«,thenconfirmthepushbutton»Run«with»OK«.
–Applicationwillbedownloadedandinstalled.
4 Tostartapplicationpress»OK«;
or
tocontinueinstallingapplicationpress»@«.
Uninstallinginternetapplications1 Use»V«,»Λ«,»<«or»>«toselectthe
applicationthatyouwanttouninstall.
2 Press»«(green)toactivatethetoolsmenu,use»<«or»>«toselect»Uninstall«optionandconfirmwith»OK«.
–Awarningmessageisdisplayed.
3 Confirm»Uninstall»with»OK«.
or
tocanceltheuninstallationprocessselect»Cancel«with»<«or»>«andpress»OK«.
4 Press»OK«tofinishtheprocess.
RatinginternetapplicationsYoucanrateapplicationsinstalledonyourTVindividually.1 Press»«(red)buttonin»Myapps«menu
andselectcategorieswith»<«or»>«.
2 Selecttheapplicationyouwanttoratein»Myapps«menuwith»V«,»Λ«,»<«or»>«.
3 Actiadethetoolsmenubypressing»«(green),selecttheoption»Rate«with»<«or»>«andpress»OK«toconfirm.
4 Press»Λ«onceandselecttheratingwith»<«or»>«.
Tosaveapplicationratingselect»Rate«with»V«andpress»OK«toconfirm.;
5 Press»OK«tofinishtheprocess.
AddingInternetapplicationstofavoritesYoucanaddfrequentlyusedInternetapplica-tionstofavoritesandcollecttheseunder»Favor-ites«headingundercategories.1 Press»«(red)buttonin»Myapps«menu
andselectcategorieswith»<«or»>«.
2 Selecttheapplicationyouwanttoaddtofavoritesin»MyApps«menuwith»V«,»Λ«,»<«or»>«.
3 Actiadethetoolsmenubypressing»«(green),selecttheoption»AddToFav.«with»<«or»>«andpress»OK«toconfirm.
–»★«ismarkedandapplicationisaddedtofavorites.

65ENGLISH
SMARTINTER@CTIVETV4.0FEATURE--------------------------------
SmartInter@ctiveTV4.0browsermainmenu1 Applications.
2 PushbuttontotheApplicationstore.
3 Searchbar.
4 Categoriesmenu.
5 Toolsmenu.
6 Exit.
Navigationinthemainmenu1 Press»«(red)buttonin»Myapps«menu
andselectcategorieswith»<«or»>«.
2 Selecttherequiredapplicationwith»V«,»Λ«,»<«or»>«andpress»OK«toconfirm.
–Mainmenuoftheapplicationwillbedisplayedafterashortwhile.
3 Usageofapplicationmostlydependsonapplication’sownstructure.Followthenotesonthescreen.
Playbackandotheroptionsintheapplications
Note:7 Someapplicationsdonotsupportallplay-
ingoptions,andplayingoptionsmayvaryamongdifferentapplications.
1 »8«startsplayingintheapplications;
2 »!«pausesplayingintheapplications;
3 »7«stopsplayingintheapplications;
4 Intheapplications,press»3«or»4«tostartpicturesearch.
5 Intheapplications,press»5«or»6«toskipforward/backward.
6 »V«,»Λ«,»<«,»>«allowsslidingofthenavigationkeysintheapplicationsandvirtualkeyboard.
7 Press»OK«toconfirmtheselectionsinvirtualkeyboardandapplications.
8 »1…0«»«(red),»«(green),»«(yellow),»«(blue)selects/activatesvariousfunctionsinapplications.
9 »@«switchesofftheapplicationandgoesbackto»Myapps«menu.
10 »EXIT«switchesofftheapplicationandgoesbacktothelastbroadcastsourceyouwerein.
Catagories Tools Exit
Online StoreMy Apps
1
23
4 5 6
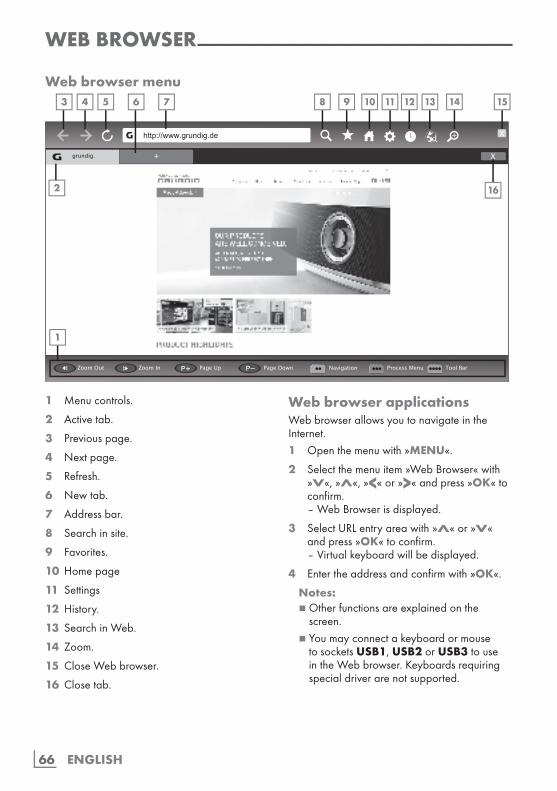
ENGLISH66
WEBBROWSER-------------------------------------------------------------------------------------------------
Webbrowsermenu
1 Menucontrols.
2 Activetab.
3 Previouspage.
4 Nextpage.
5 Refresh.
6 Newtab.
7 Addressbar.
8 Searchinsite.
9 Favorites.
10 Homepage
11 Settings
12 History.
13 SearchinWeb.
14 Zoom.
15 CloseWebbrowser.
16 Closetab.
Zoom Out Zoom In Page Up Page Down Navigation Process Menu Tool Bar
grundig.
http://www.grundig.de
2
1
3 4 5 7 8 9 10 11 12 13 14 156
16
WebbrowserapplicationsWebbrowserallowsyoutonavigateintheInternet.1 Openthemenuwith»MENU«.
2 Selectthemenuitem»WebBrowser«with»V«,»Λ«,»<«or»>«andpress»OK«toconfirm.
–WebBrowserisdisplayed.
3 SelectURLentryareawith»Λ«or»V«andpress»OK«toconfirm.
–Virtualkeyboardwillbedisplayed.
4 Entertheaddressandconfirmwith»OK«.
Notes:7 Otherfunctionsareexplainedonthe
screen.7 Youmayconnectakeyboardormouse
to socketsUSB1,USB2orUSB3touseintheWebbrowser.Keyboardsrequiringspecialdriverarenotsupported.
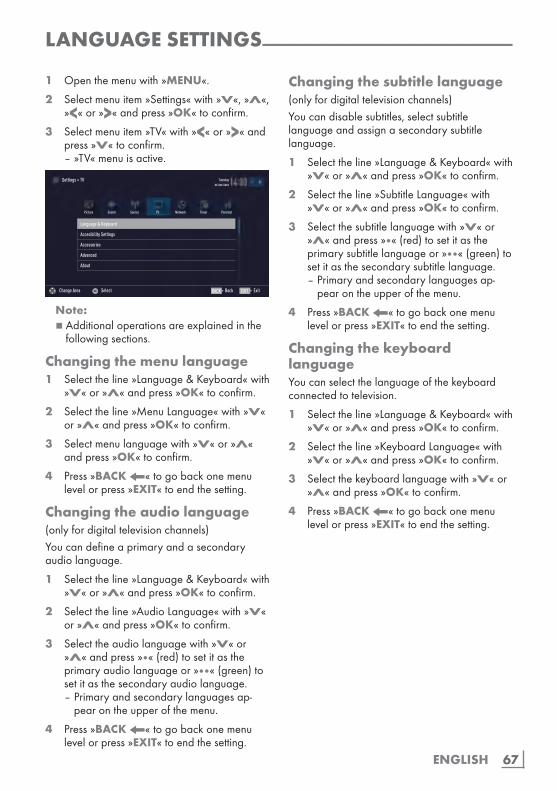
67ENGLISH
LANGUAGESETTINGS-----------------------------------------------------------------------------
1 Openthemenuwith»MENU«.
2 Selectmenuitem»Settings«with»V«,»Λ«,»<«or»>«andpress»OK«toconfirm.
3 Selectmenuitem»TV«with»<«or»>«andpress»V«toconfirm.
–»TV«menuisactive.
Language & Keyboard
Accesibility Settings
Accessories
Advanced
About
Picture
Tuesdayxx xxx xxxx
Source TimerSound NetworkTV Parental
Settings > TV
Change Area Select ExitBackBACK EXIT
Note:7 Additionaloperationsareexplainedinthe
followingsections.
Changingthemenulanguage1 Selecttheline»Language&Keyboard«with
»V«or»Λ«andpress»OK«toconfirm.
2 Selecttheline»MenuLanguage«with»V«or»Λ«andpress»OK«toconfirm.
3 Selectmenulanguagewith»V«or»Λ«andpress»OK«toconfirm.
4 Press»BACK<«togobackonemenulevelorpress»EXIT«toendthesetting.
Changingtheaudiolanguage(onlyfordigitaltelevisionchannels)Youcandefineaprimaryandasecondaryaudiolanguage.
1 Selecttheline»Language&Keyboard«with»V«or»Λ«andpress»OK«toconfirm.
2 Selecttheline»AudioLanguage«with»V«or»Λ«andpress»OK«toconfirm.
3 Selecttheaudiolanguagewith»V«or»Λ«andpress»«(red)tosetitastheprimaryaudiolanguageor»«(green)tosetitasthesecondaryaudiolanguage.
–Primaryandsecondarylanguagesap-pearontheupperofthemenu.
4 Press»BACK<«togobackonemenulevelorpress»EXIT«toendthesetting.
Changingthesubtitlelanguage(onlyfordigitaltelevisionchannels)Youcandisablesubtitles,selectsubtitlelanguageandassignasecondarysubtitlelanguage.
1 Selecttheline»Language&Keyboard«with»V«or»Λ«andpress»OK«toconfirm.
2 Selecttheline»SubtitleLanguage«with»V«or»Λ«andpress»OK«toconfirm.
3 Selectthesubtitlelanguagewith»V«or»Λ«andpress»«(red)tosetitastheprimarysubtitlelanguageor»«(green)tosetitasthesecondarysubtitlelanguage.
–Primaryandsecondarylanguagesap-pearontheupperofthemenu.
4 Press»BACK<«togobackonemenulevelorpress»EXIT«toendthesetting.
ChangingthekeyboardlanguageYoucanselectthelanguageofthekeyboardconnectedtotelevision.
1 Selecttheline»Language&Keyboard«with»V«or»Λ«andpress»OK«toconfirm.
2 Selecttheline»KeyboardLanguage«with»V«or»Λ«andpress»OK«toconfirm.
3 Selectthekeyboardlanguagewith»V«or»Λ«andpress»OK«toconfirm.
4 Press»BACK<«togobackonemenulevelorpress»EXIT«toendthesetting.
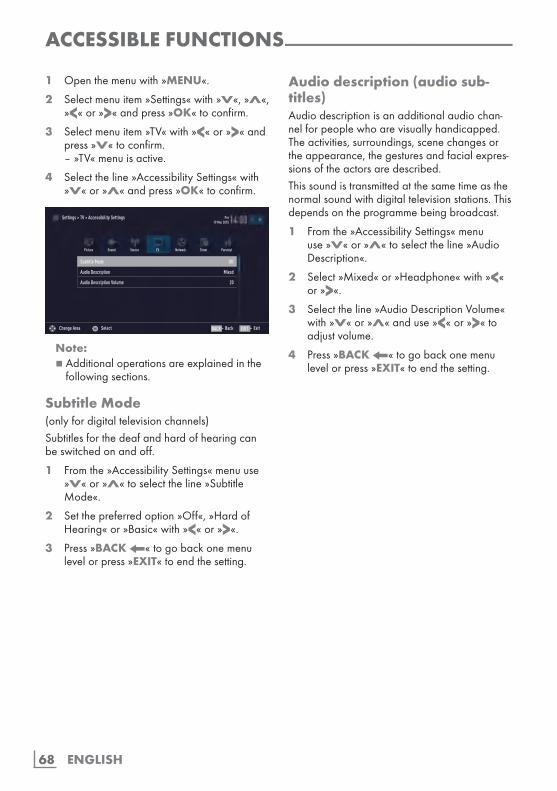
ENGLISH68
ACCESSIBLEFUNCTIONS----------------------------------------------------------------------
1 Openthemenuwith»MENU«.
2 Selectmenuitem»Settings«with»V«,»Λ«,»<«or»>«andpress»OK«toconfirm.
3 Selectmenuitem»TV«with»<«or»>«andpress»V«toconfirm.
–»TV«menuisactive.
4 Selecttheline»AccessibilitySettings«with»V«or»Λ«andpress»OK«toconfirm.
Subtitle Mode Off
Audio Description Mixed
Audio Description Volume 20
Picture
Per19 Mar 2015
Source TimerSound NetworkTV Parental
Settings > TV > Accessibility Settings
Change Area Select ExitBackBACK EXIT
Note:7 Additionaloperationsareexplainedinthe
followingsections.
SubtitleMode(onlyfordigitaltelevisionchannels)Subtitlesforthedeafandhardofhearingcanbeswitchedonandoff.
1 Fromthe»AccessibilitySettings«menuuse»V«or»Λ«toselecttheline»SubtitleMode«.
2 Setthepreferredoption»Off«,»HardofHearing«or»Basic«with»<«or»>«.
3 Press»BACK<«togobackonemenulevelorpress»EXIT«toendthesetting.
Audiodescription(audiosub-titles)Audiodescriptionisanadditionalaudiochan-nelforpeoplewhoarevisuallyhandicapped.Theactivities,surroundings,scenechangesortheappearance,thegesturesandfacialexpres-sionsoftheactorsaredescribed.Thissoundistransmittedatthesametimeasthenormalsoundwithdigitaltelevisionstations.Thisdependsontheprogrammebeingbroadcast.
1 Fromthe»AccessibilitySettings«menuuse»V«or»Λ«toselecttheline»AudioDescription«.
2 Select»Mixed«or»Headphone«with»<«or»>«.
3 Selecttheline»AudioDescriptionVolume«with»V«or»Λ«anduse»<«or»>«toadjustvolume.
4 Press»BACK<«togobackonemenulevelorpress»EXIT«toendthesetting.
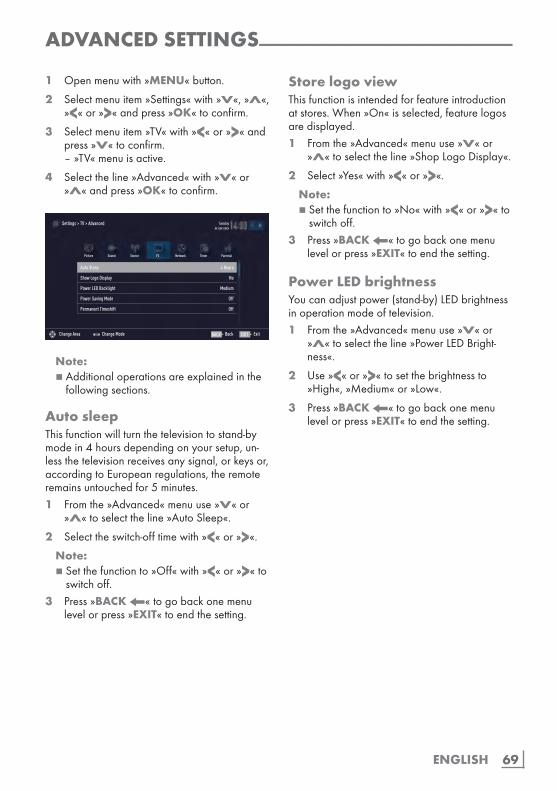
69ENGLISH
ADVANCEDSETTINGS------------------------------------------------------------------------------
1 Openmenuwith»MENU«button.
2 Selectmenuitem»Settings«with»V«,»Λ«,»<«or»>«andpress»OK«toconfirm.
3 Selectmenuitem»TV«with»<«or»>«andpress»V«toconfirm.
–»TV«menuisactive.
4 Selecttheline»Advanced«with»V«or»Λ«andpress»OK«toconfirm.
Auto Sleep 4 Hours
Show Logo Display No
Power LED Backlight Medium
Power Saving Mode Off
Permanent Timeshift Off
Picture
Tuesdayxx xxx xxxx
Source TimerSound NetworkTV Parental
Settings > TV > Advanced
Change Area ExitBackBACK EXITChange Mode
Note:7 Additionaloperationsareexplainedinthe
followingsections.
AutosleepThisfunctionwillturnthetelevisiontostand-bymodein4hoursdependingonyoursetup,un-lessthetelevisionreceivesanysignal,orkeysor,accordingtoEuropeanregulations,theremoteremainsuntouchedfor5minutes.1 Fromthe»Advanced«menuuse»V«or
»Λ«toselecttheline»AutoSleep«.
2 Selecttheswitch-offtimewith»<«or»>«.
Note:7 Setthefunctionto»Off«with»<«or»>«to
switchoff.3 Press»BACK<«togobackonemenu
levelorpress»EXIT«toendthesetting.
StorelogoviewThisfunctionisintendedforfeatureintroductionatstores.When»On«isselected,featurelogosaredisplayed.1 Fromthe»Advanced«menuuse»V«or
»Λ«toselecttheline»ShopLogoDisplay«.
2 Select»Yes«with»<«or»>«.
Note:7 Setthefunctionto»No«with»<«or»>«to
switchoff.3 Press»BACK<«togobackonemenu
levelorpress»EXIT«toendthesetting.
PowerLEDbrightnessYoucanadjustpower(stand-by)LEDbrightnessinoperationmodeoftelevision.1 Fromthe»Advanced«menuuse»V«or
»Λ«toselecttheline»PowerLEDBright-ness«.
2 Use»<«or»>«tosetthebrightnessto»High«,»Medium«or»Low«.
3 Press»BACK<«togobackonemenulevelorpress»EXIT«toendthesetting.
ENGLISH70
ADVANCEDSETTINGS------------------------------------------------------------------------------
PowersavemodeItensuresautomaticshutoffofscreeninAn-tenna,Cable,SatelliteandradiochannelsandUSBmodewhenplayingaudiofiles.1 Fromthe»Advanced«menuuse»V«
or»Λ«toselecttheline»PowerSavingMode«.
2 Press»<«or»>«tosetshutofftimeofdisplayas»10Seconds«,»30Seconds«,»60Seconds«.
3 Press»BACK<«togobackonemenulevelorpress»EXIT«toendthesetting.
Note:7 Ifthescreencloseswhilelisteningtomusic
inUSBmode,press»MENU«andselect»Off«with»<«or»>«toclosethefeature.
Switchingon/offweatherinfor-mationIfthisfunctionisactivated,aweatherlogoandthelocaltemperatureisdisplayed.
1 Fromthe»Advanced«menuuse»V«or»Λ«toselecttheline»WeatherWidget«.
2 Press»<«or»>«toturnto»On«position.
3 Press»EXIT«toendthesetting.
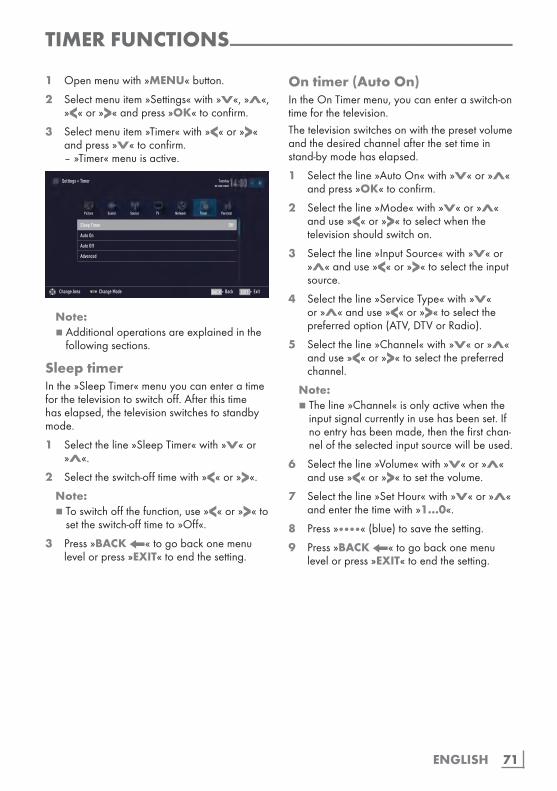
71ENGLISH
TIMERFUNCTIONS---------------------------------------------------------------------------------------
1 Openmenuwith»MENU«button.
2 Selectmenuitem»Settings«with»V«,»Λ«,»<«or»>«andpress»OK«toconfirm.
3 Selectmenuitem»Timer«with»<«or»>«andpress»V«toconfirm.
–»Timer«menuisactive.
Sleep Timer Off
Auto On
Auto Off
Advenced
Picture
Tuesdayxx xxx xxxx
Source TimerSound NetworkTV Parental
Settings > Timer
Change Area ExitBackBACK EXITChange Mode
Note:7 Additionaloperationsareexplainedinthe
followingsections.
SleeptimerInthe»SleepTimer«menuyoucanenteratimeforthetelevisiontoswitchoff.Afterthistimehaselapsed,thetelevisionswitchestostandbymode.
1 Selecttheline»SleepTimer«with»V«or»Λ«.
2 Selecttheswitch-offtimewith»<«or»>«.
Note:7 Toswitchoffthefunction,use»<«or»>«to
settheswitch-offtimeto»Off«.
3 Press»BACK<«togobackonemenulevelorpress»EXIT«toendthesetting.
Ontimer(AutoOn)IntheOnTimermenu,youcanenteraswitch-ontimeforthetelevision.Thetelevisionswitchesonwiththepresetvolumeandthedesiredchannelafterthesettimeinstand-bymodehaselapsed.
1 Selecttheline»AutoOn«with»V«or»Λ«andpress»OK«toconfirm.
2 Selecttheline»Mode«with»V«or»Λ«anduse»<«or»>«toselectwhenthetelevisionshouldswitchon.
3 Selecttheline»InputSource«with»V«or»Λ«anduse»<«or»>«toselecttheinputsource.
4 Selecttheline»ServiceType«with»V«or»Λ«anduse»<«or»>«toselectthepreferredoption(ATV,DTVorRadio).
5 Selecttheline»Channel«with»V«or»Λ«anduse»<«or»>«toselectthepreferredchannel.
Note:7 Theline»Channel«isonlyactivewhenthe
inputsignalcurrentlyinusehasbeenset.Ifnoentryhasbeenmade,thenthefirstchan-neloftheselectedinputsourcewillbeused.
6 Selecttheline»Volume«with»V«or»Λ«anduse»<«or»>«tosetthevolume.
7 Selecttheline»SetHour«with»V«or»Λ«andenterthetimewith»1…0«.
8 Press»«(blue)tosavethesetting.
9 Press»BACK<«togobackonemenulevelorpress»EXIT«toendthesetting.
ENGLISH72
Offtimer(AutoOff)Inthe»AutoOff«menu,youcanenteraswitch-offtimeforthetelevision.Thetelevisionswitchestostand-byaftertheenteredtimehaselapsed.
1 Selecttheline»AutoOff«with»V«or»Λ«andpress»OK«toconfirm.
2 Selecttheline»Mode«with»V«or»Λ«anduse»<«or»>«toselectwhenthetelevisionshouldswitchoff.
3 Selecttheline»SetHour«with»V«or»Λ«andenterthetimewith»1…0«.
4 Press»«(blue)tosavethesetting.
5 Press»BACK<«togobackonemenulevelorpress»EXIT«toendthesetting.
TIMERFUNCTIONS---------------------------------------------------------------------------------------
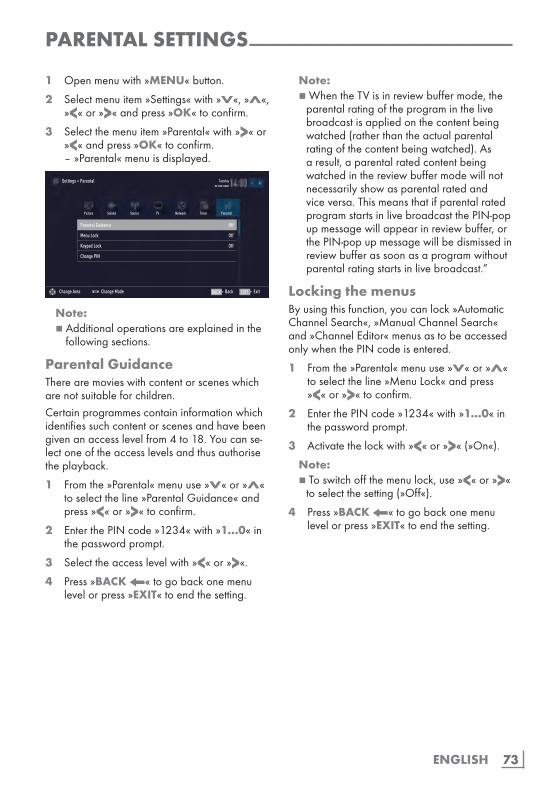
73ENGLISH
PARENTALSETTINGS---------------------------------------------------------------------------------
1 Openmenuwith»MENU«button.
2 Selectmenuitem»Settings«with»V«,»Λ«,»<«or»>«andpress»OK«toconfirm.
3 Selectthemenuitem»Parental«with»>«or»<«andpress»OK«toconfirm.
–»Parental«menuisdisplayed.
Parental Guidance Off
Menu Lock Off
Keypad Lock Off
Change PIN
Picture
Tuesdayxx xxx xxxx
Source TimerSoiund NetworkTV Parental
Settings > Parental
Change Area Change Mode ExitBackBACK EXIT
Note:7 Additionaloperationsareexplainedinthe
followingsections.
ParentalGuidanceTherearemovieswithcontentorsceneswhicharenotsuitableforchildren.Certainprogrammescontaininformationwhichidentifiessuchcontentorscenesandhavebeengivenanaccesslevelfrom4to18.Youcanse-lectoneoftheaccesslevelsandthusauthorisetheplayback.
1 Fromthe»Parental«menuuse»V«or»Λ«toselecttheline»ParentalGuidance«andpress»<«or»>«toconfirm.
2 EnterthePINcode»1234«with»1...0«inthepasswordprompt.
3 Selecttheaccesslevelwith»<«or»>«.
4 Press»BACK<«togobackonemenulevelorpress»EXIT«toendthesetting.
Note:7 WhentheTVisinreviewbuffermode,the
parentalratingoftheprograminthelivebroadcastisappliedonthecontentbeingwatched(ratherthantheactualparentalratingofthecontentbeingwatched).Asaresult,aparentalratedcontentbeingwatchedinthereviewbuffermodewillnotnecessarilyshowasparentalratedandviceversa.ThismeansthatifparentalratedprogramstartsinlivebroadcastthePIN-popupmessagewillappearinreviewbuffer,orthePIN-popupmessagewillbedismissedinreviewbufferassoonasaprogramwithoutparentalratingstartsinlivebroadcast.”
LockingthemenusByusingthisfunction,youcanlock»AutomaticChannelSearch«,»ManualChannelSearch«and»ChannelEditor«menusastobeaccessedonlywhenthePINcodeisentered.
1 Fromthe»Parental«menuuse»V«or»Λ«toselecttheline»MenuLock«andpress»<«or»>«toconfirm.
2 EnterthePINcode»1234«with»1...0«inthepasswordprompt.
3 Activatethelockwith»<«or»>«(»On«).
Note:7 Toswitchoffthemenulock,use»<«or»>«
toselectthesetting(»Off«).
4 Press»BACK<«togobackonemenulevelorpress»EXIT«toendthesetting.
ENGLISH74
PARENTALSETTINGS---------------------------------------------------------------------------------
BlockingthemultifunctionswitchWhenthekeylockisactivated,themultifunctionswitchonthetelevisiondoesnotfunction.
1 Fromthe»Parental«menuuse»V«or»Λ«toselecttheline»KeypadLock«andpress»<«or»>«toconfirm.
2 EnterthePINcode»1234«with»1...0«inthepasswordprompt.
3 Activate(On)ordeactivate(Off)thepanellockwith»<«or»>«.
4 Press»BACK<«togobackonemenulevelorpress»EXIT«toendthesetting.
ChangingthePINcodeInsteadofthedefaultcode»1234«,youcanenterapersonalcode.Pleasetakenoteofyourpersonalcode.1 Fromthe»Parental«menuuse»V«or»Λ«
toselecttheline»ChangePIN«andpress»OK«toconfirm.
2 EnterthecurrentPINcode»1234«with»1...0«.
3 Enteryournewfour-digitpersonalPINcodewith»1...0«.
4 ReenteryourpersonalPINcodewith»1...0«.
5 Press»BACK<«togobackonemenulevelorpress»EXIT«toendthesetting.
BlockingatelevisionchannelYoucanblockindividualtelevisionchannelswhicharenotsuitableforchildrenusingapersonalPINcode.
1 Openmenuwith»MENU«button.
2 Selectmenuitem»Settings«with»V«,»Λ«,»<«or»>«andpress»OK«toconfirm.
3 Selectthemenuitem»Source«with»>«or»<«andpress»OK«toconfirm.
4 Selecttheline»ChannelEditor«with»V«or»Λ«andpress»OK«toconfirm.
5 Selectthechanneltobeblockedwith»V«,»Λ«,»<«or»>«andhighlightwith»OK«.
–Channelismarkedwith»✔«.
6 Activadethe»Tools«menuwith»«(yel-low).
7 Selecttheline»ChannelLock«with»V«or»Λ«andpress»OK«toconfirm.
8 EnterthePINcode»1234«with»1...0«inthepasswordprompt.
9 Confirmtheentrywith»OK«. –Channelismarkedwith» «.
Note:7 Toremovethelock,selectthechannel
againwith»V«,»Λ«,»<«or»>«,acti-vadethe»Tools«menuwith»«(yellow),selecttheline»UnlockChannel«with»V«or»Λ«andpress»OK«toconfirm
10 Press»EXIT«toendthesetting.
75ENGLISH
PARENTALSETTINGS---------------------------------------------------------------------------------
WatchingablockedtelevisionchannelYoucanwatchaTVchannelblockedwithPINcodebyselectingtheTVchannelandenteringthePINcode.
1 Selecttheblockedchannelwith»1…0«or»P+«,»P–«.
2 EnterthePINcode»1234«with»1...0«inthepasswordprompt.
–Blockedchannelcanbeviewed.
Note:7 Channelwillbeblockedagainwhenyou
changethechannel.
ResettingPINcodeUsethisfunctionifyouforgetthePINcode.
1 Fromthe»Parental«menuuse»V«or»Λ«toselecttheline»ChangePIN«andpress»OK«toconfirm.
2 EnterthePINcode»2356«with»1...0«.
3 Enteryournewfour-digitpersonalPINcodewith»1...0«.
4 ReenteryourpersonalPINcodewith»1...0«.
5 Press»BACK<«togobackonemenulevelorpress»EXIT«toendthesetting.

ENGLISH76
DATEANDTIMESETTINGS-----------------------------------------------------------------
1 Openmenuwith»MENU«button.
2 Selectmenuitem»Settings«with»V«,»Λ«,»<«or»>«andpress»OK«toconfirm.
3 Selectthemenuitem»Timer«with»>«or»<«andpress»OK«toconfirm.
–»Timer«menuisdisplayed.
4 Selecttheline»Advanced«with»V«or»Λ«andpress»OK«toconfirm.
Sleep Timer Off
Auto On
Auto Off
Date & Time
Date & Time Set.
Time Adjustment AUTO
Picture
Tuesdayxx xxx xxxx
Source TimerSound NetworkTV Parental
Settings > Timer
Change Area Select ExitBackBACK EXIT
Note:7 Additionaloperationsareexplainedinthe
followingsections.
AutotuningThetelevisionautomaticallydetectsthelocaldif-ferencetoGreenwichMeanTime(theselectedchannelprovidesatimesignal).
1 Fromthe»Advanced«menuuse»V«or»Λ«toselecttheline»Date&TimeSet.«andpress»OK«toconfirm.
2 Selecttheline»Mode«with»V«andthenselecttheoption»AUTO«with»<«or»>«.
–Dateandtimeareautomaticallyupdated;
3 Press»BACK<«togobackonemenulevelorpress»EXIT«toendthesetting.
ManualtuningYoucansetthelocaltimedifferenceyourselfifthetimeisnotdetectedorisnotthesameasyourlocaltime.
1 Fromthe»Advanced«menuuse»V«or»Λ«toselecttheline»TimeAdjustment«.
2 Selecttheoption»Manual«with»<«or»>«.
–»TimeZone«and»DaylightSaving«areactive.
3 Selecttheline»TimeZone«with»V«or»Λ«andpress»OK«toconfirm.
–TheTimezoneselectionmenuisdis-played.
4 Adjustthetimezonewith»V«or»Λ«andpress»OK«toconfirm.
5 Selecttheline»DaylightSaving«with»V«or»Λ«andthenselecttheoption»AUTO«,»Off«or»On«with»<«or»>«.
6 Press»BACK<«togobackonemenulevelorpress»EXIT«toendthesetting.
Note:7 Iftheoption»AUTO«isselectedintheline
»TimeAdjustment«,thetelevisionsetauto-maticallyadaptsthetimetothetimesignalfromtherespectivebroadcaster.However,differentchannelsmayalsousetimebaseswhicharedifferenttothoseofyourcountrye.g.foreignbroadcasters.Inthesecases,remindersandplannedrecordingsmaybeannulledduetothetimedifference.
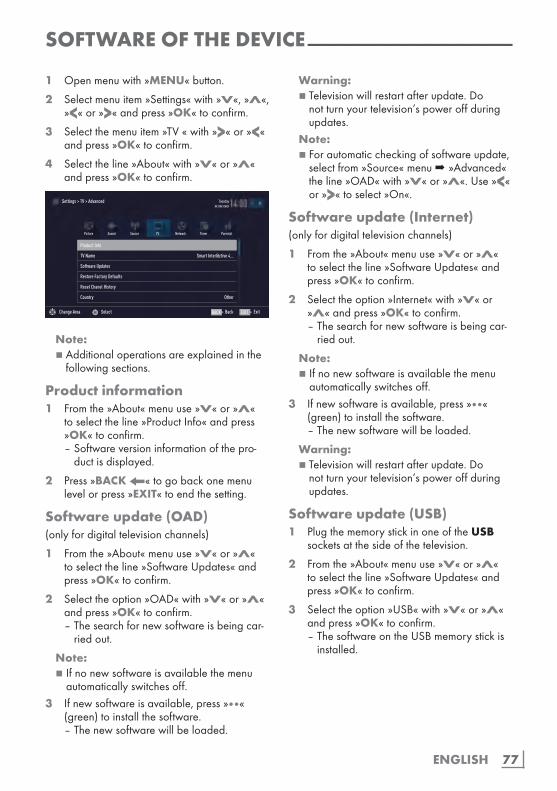
77ENGLISH
SOFTWAREOFTHEDEVICE---------------------------------------------------------------
1 Openmenuwith»MENU«button.
2 Selectmenuitem»Settings«with»V«,»Λ«,»<«or»>«andpress»OK«toconfirm.
3 Selectthemenuitem»TV«with»>«or»<«andpress»OK«toconfirm.
4 Selecttheline»About«with»V«or»Λ«andpress»OK«toconfirm.
Product Info
TV Name Smart Inter@ctive 4...
Software Updates
Restore Factory Defaults
Reset Chanel History
Country Other
Picture
Tuesdayxx xxx xxxx
Source TimerSound NetworkTV Parental
Settings > TV > Advanced
Change Area Select ExitBackBACK EXIT
Note:7 Additionaloperationsareexplainedinthe
followingsections.
Productinformation1 Fromthe»About«menuuse»V«or»Λ«
toselecttheline»ProductInfo«andpress»OK«toconfirm.
–Softwareversioninformationofthepro-ductisdisplayed.
2 Press»BACK<«togobackonemenulevelorpress»EXIT«toendthesetting.
Softwareupdate(OAD)(onlyfordigitaltelevisionchannels)
1 Fromthe»About«menuuse»V«or»Λ«toselecttheline»SoftwareUpdates«andpress»OK«toconfirm.
2 Selecttheoption»OAD«with»V«or»Λ«andpress»OK«toconfirm.
–Thesearchfornewsoftwareisbeingcar-riedout.
Note:7Ifnonewsoftwareisavailablethemenu
automaticallyswitchesoff.3 Ifnewsoftwareisavailable,press»«
(green)toinstallthesoftware. –Thenewsoftwarewillbeloaded.
Warning:7 Televisionwillrestartafterupdate.Do
notturnyourtelevision’spoweroffduringupdates.
Note:7 Forautomaticcheckingofsoftwareupdate,
selectfrom»Source«menu➡ »Advanced«theline»OAD«with»V«or»Λ«.Use»<«or»>«toselect»On«.
Softwareupdate(Internet)(onlyfordigitaltelevisionchannels)
1 Fromthe»About«menuuse»V«or»Λ«toselecttheline»SoftwareUpdates«andpress»OK«toconfirm.
2 Selecttheoption»Internet«with»V«or»Λ«andpress»OK«toconfirm.
–Thesearchfornewsoftwareisbeingcar-riedout.
Note:7Ifnonewsoftwareisavailablethemenu
automaticallyswitchesoff.3 Ifnewsoftwareisavailable,press»«
(green)toinstallthesoftware. –Thenewsoftwarewillbeloaded.
Warning:7 Televisionwillrestartafterupdate.Do
notturnyourtelevision’spoweroffduringupdates.
Softwareupdate(USB)1 PlugthememorystickinoneoftheUSB
socketsatthesideofthetelevision.
2 Fromthe»About«menuuse»V«or»Λ«toselecttheline»SoftwareUpdates«andpress»OK«toconfirm.
3 Selecttheoption»USB«with»V«or»Λ«andpress»OK«toconfirm.
–ThesoftwareontheUSBmemorystickisinstalled.
ENGLISH78
ACCESSORIES------------------------------------------------------------------------------------------------------
Youcanconnectvariousaccessoriestoyourtelevisiontousewithvideotalk,volumecontrol,motioncontrolorakeyboardandmousetouseinyourwebbrowser.Displaythestatusoftheconnectedaccessoryfromthismenutoperformvariousadjustments.
1 Openmenuwith»MENU«button.
2 Selectmenuitem»Settings«with»V«,»Λ«,»<«or»>«andpress»OK«toconfirm.
3 Selectthemenuitem»TV«with»>«or»<«andpress»V«toconfirm.
4 Selecttheline»Accessories«with»V«or»Λ«andpress»OK«toconfirm.
5 Selecttheneedfullinewith»V«or»Λ«andpress»OK«toconfirm.
Selecttheneedfulfunctionwith»<«or»>«.
6 Press»BACK<«togobackonemenulevelorpress»EXIT«toendthesetting.
Notes:7 Accessoriesaresoldindividually.They
arenotprovidedwithyourTV.PleasecontactyourdealerfromwhereyouhavepurchasedyourTVinordertoobtainmoreinformationaboutpurchasing.
7Thedisplaysforthestatusandthesettingsdependontheaccessoriesused.
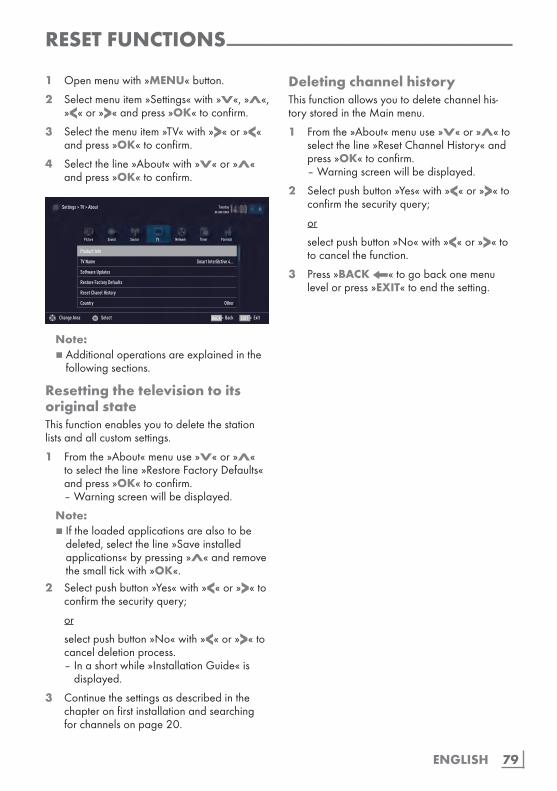
79ENGLISH
RESETFUNCTIONS----------------------------------------------------------------------------------------
1 Openmenuwith»MENU«button.
2 Selectmenuitem»Settings«with»V«,»Λ«,»<«or»>«andpress»OK«toconfirm.
3 Selectthemenuitem»TV«with»>«or»<«andpress»OK«toconfirm.
4 Selecttheline»About«with»V«or»Λ«andpress»OK«toconfirm.
Product Info
TV Name Smart Inter@ctive 4...
Software Updates
Restore Factory Defaults
Reset Chanel History
Country Other
Picture
Tuesdayxx xxx xxxx
Source TimerSound NetworkTV Parental
Settings > TV > About
Change Area Select ExitBackBACK EXIT
Note:7 Additionaloperationsareexplainedinthe
followingsections.
ResettingthetelevisiontoitsoriginalstateThisfunctionenablesyoutodeletethestationlistsandallcustomsettings.
1 Fromthe»About«menuuse»V«or»Λ«toselecttheline»RestoreFactoryDefaults«andpress»OK«toconfirm.
–Warningscreenwillbedisplayed.
Note:7 Iftheloadedapplicationsarealsotobe
deleted,selecttheline»Saveinstalledapplications«bypressing»Λ«andremovethesmalltickwith»OK«.
2 Selectpushbutton»Yes«with»<«or»>«toconfirmthesecurityquery;
or
selectpushbutton»No«with»<«or»>«tocanceldeletionprocess.
–Inashortwhile»InstallationGuide«isdisplayed.
3 Continuethesettingsasdescribedinthechapteronfirstinstallationandsearchingforchannelsonpage20.
DeletingchannelhistoryThisfunctionallowsyoutodeletechannelhis-torystoredintheMainmenu.
1 Fromthe»About«menuuse»V«or»Λ«toselecttheline»ResetChannelHistory«andpress»OK«toconfirm.
–Warningscreenwillbedisplayed.
2 Selectpushbutton»Yes«with»<«or»>«toconfirmthesecurityquery;
or
selectpushbutton»No«with»<«or»>«totocancelthefunction.
3 Press»BACK<«togobackonemenulevelorpress»EXIT«toendthesetting.
ENGLISH80
DIGILINKYourtelevisionisequippedwithDIGILINKfeature.ThisfeatureutilizesCEC(ConsumerElec-tronicsControl)protocol.CECallowsyoutomakeanHDMI
connectiononsocketsHDMIbetweenyourTVandDVDplayer,STBorvideorecorderandcontrolsuchequipmentswiththeremotecontrolofthetelevision.Thisfeaturemustalsobesupportedbythedeviceyouwillconnect.Youtelevisionsupportsthefollowingfunctions.Fordetailedinformationaboutthisfunction,readusermanualoftheexternaldevice.
TheDigiLinkfunctionsofthetelevisionTurningonexternaldevicefromstandbymodeWhenyouswitchonyourexternaldevice(e.g.DVDplayer)fromstandbymode,yourtelevisionwillbeturnedonfromstandbymodeaswellanditwillswitchtotheHDMIsourcethattheexternaldeviceisconnectedto.Dependingonthefeaturesoftheexternaldevice(e.g.AVreceiver)canstartandyourtelevisioncanstayonstand-bymode.
SelectingtheHDMIsourcefromthetelevisionWhenyouswitchonyourexternaldevice(e.g.DVDplayer),yourtelevisionwillswitchtotheHDMIsourcethattheexternaldeviceiscon-nectedtoyourTVshouldbeopen.
SelectingthemenulanguageWhenyouselectmenulanguageonyourTV,menulanguageoftheexternaldevicewillchangeaswell(ifyourDVDplayersupports).
USINGEXTERNALDEVICES---------------------------------------------------------------
SwitchingofftheexternaldevicefromstandbymodeAfterswitchingyourtelevisiontostandby,yourexternaldevice(e.g.DVDplayer)willalsoswitchtostandbyifitisswitchedon.DIGILINKisalwaysactiveonyourtelevision.Refertotheusermanualofyourexternaldevicetolearnhowtoactivatethisfeatureonit.
Searchingandselectingtheactiveex-ternaldeviceYoucanconnectupto11devicesthatsupportDIGILINKtothistelevision.1 OpentheToolsmenuwith»TOOLS«.
2 Selecttheline»Digilink«with»V«or»Λ«andpress»OK«toconfirm.
–Connecteddevicesaresearchedandtheonesthatarefoundaredisplayedonthe»DeviceList«menu.
3 Startdevicesearchwith»«(blue). –Thedevicesfoundareshowninthemenu.
4 Selectthedevicethatyouwanttocontrolwith»V«or»Λ«andmarkitwith»OK«.
–Iftheselecteddeviceisconnectedtoadifferentsourcethanthecurrentone,youwillautomaticallyswitchtothesourcetowhichthedeviceisconnected.
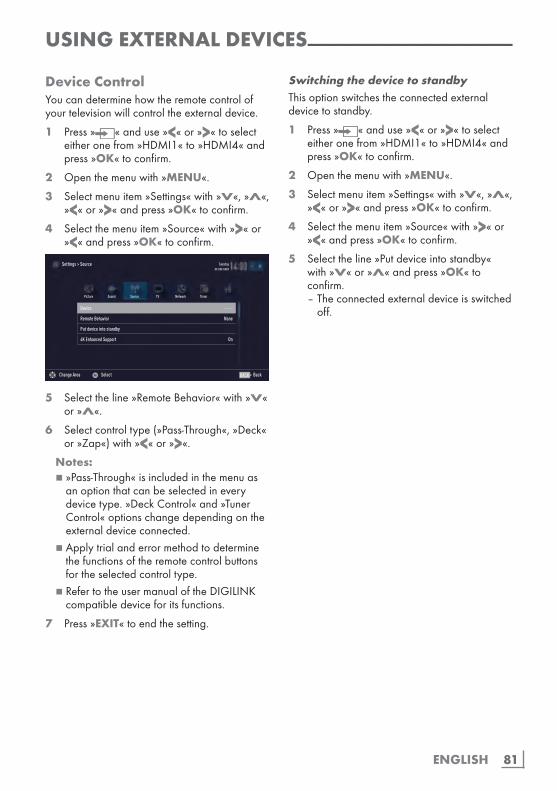
81ENGLISH
USINGEXTERNALDEVICES---------------------------------------------------------------
DeviceControlYoucandeterminehowtheremotecontrolofyourtelevisionwillcontroltheexternaldevice.
1 Press» «anduse»<«or»>«toselecteitheronefrom»HDMI1«to»HDMI4«andpress»OK«toconfirm.
2 Openthemenuwith»MENU«.
3 Selectmenuitem»Settings«with»V«,»Λ«,»<«or»>«andpress»OK«toconfirm.
4 Selectthemenuitem»Source«with»>«or»<«andpress»OK«toconfirm.
Device - - - -
Remote Behavior None
Put device into standby
4K Enhanced Support On
Picture
Tuesdayxx xxx xxxx
Source TimerSound NetworkTV
Settings > Source
Change Area Select BackBACK
5 Selecttheline»RemoteBehavior«with»V«or»Λ«.
6 Selectcontroltype(»Pass-Through«,»Deck«or»Zap«)with»<«or»>«.
Notes:7 »Pass-Through«isincludedinthemenuas
anoptionthatcanbeselectedineverydevicetype.»DeckControl«and»TunerControl«optionschangedependingontheexternaldeviceconnected.
7 Applytrialanderrormethodtodeterminethefunctionsoftheremotecontrolbuttonsfortheselectedcontroltype.
7 RefertotheusermanualoftheDIGILINKcompatibledeviceforitsfunctions.
7 Press»EXIT«toendthesetting.
SwitchingthedevicetostandbyThisoptionswitchestheconnectedexternaldevicetostandby.
1 Press» «anduse»<«or»>«toselecteitheronefrom»HDMI1«to»HDMI4«andpress»OK«toconfirm.
2 Openthemenuwith»MENU«.
3 Selectmenuitem»Settings«with»V«,»Λ«,»<«or»>«andpress»OK«toconfirm.
4 Selectthemenuitem»Source«with»>«or»<«andpress»OK«toconfirm.
5 Selecttheline»Putdeviceintostandby«with»V«or»Λ«andpress»OK«toconfirm.
–Theconnectedexternaldeviceisswitchedoff.
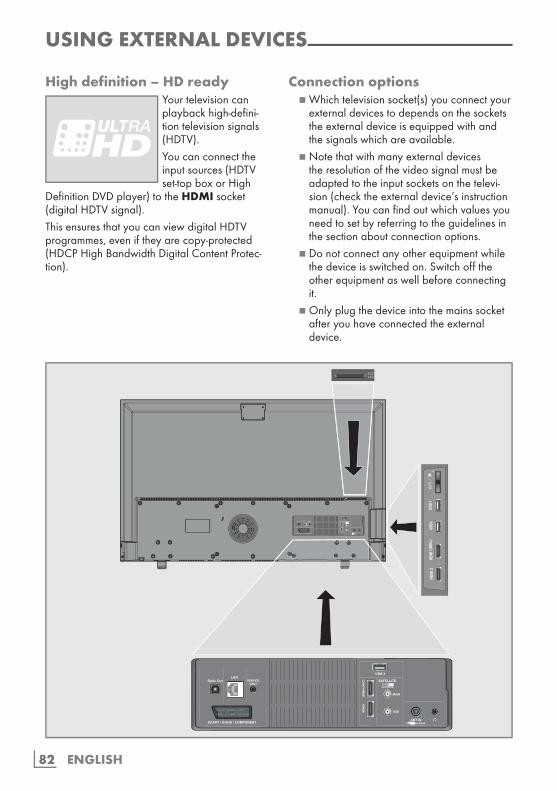
ENGLISH82
USINGEXTERNALDEVICES---------------------------------------------------------------
Highdefinition–HDreadyYourtelevisioncanplaybackhigh-defini-tiontelevisionsignals(HDTV).Youcanconnecttheinputsources(HDTVset-topboxorHigh
DefinitionDVDplayer)totheHDMIsocket(digitalHDTVsignal).ThisensuresthatyoucanviewdigitalHDTVprogrammes,eveniftheyarecopy-protected(HDCPHighBandwidthDigitalContentProtec-tion).
Connectionoptions7 Whichtelevisionsocket(s)youconnectyour
externaldevicestodependsonthesocketstheexternaldeviceisequippedwithandthesignalswhichareavailable.
7 Notethatwithmanyexternaldevicestheresolutionofthevideosignalmustbeadaptedtotheinputsocketsonthetelevi-sion(checktheexternaldevice’sinstructionmanual).Youcanfindoutwhichvaluesyouneedtosetbyreferringtotheguidelinesinthesectionaboutconnectionoptions.
7 Donotconnectanyotherequipmentwhilethedeviceisswitchedon.Switchofftheotherequipmentaswellbeforeconnectingit.
7 Onlyplugthedeviceintothemainssocketafteryouhaveconnectedtheexternaldevice.
SCART / S-VHS / COMPONENT
Optic Out SERVICEONLY
LANSATELLITE
ANT IN
HD
MI4
(AR
C)
HD
MI3
USB 3
SCART / S-VHS / COMPONENT
Optic Out SERVICEONLY
LANSATELLITE
ANT IN
HD
MI4
(AR
C)
HD
MI3
USB 3
MAIN
SUB
MAIN
SUB

83ENGLISH
ConnectinganexternaldeviceWithadigitalaudio/videosignal7 Suitabledevices:Digitalsatellitereceiver,
gameconsole,BluRayplayer,DVDplayer/recorder,set-topbox,notebook,PC.
7 Videosignal:digitalimage;definition:stan-dard576p;HDTV720p,1080i,1080p.
7 Audiosignal:digitalsound(stereo,multichan-nelcompression,uncompressed).
7 Channelposition»HDMI1«,»HDMI2«,»HDMI3«or»HDMI4«.
1 ConnecttheHDMI1(MHL),HDMI2,HDMI3orHDMI4(ARC)socketonthetelevisionandthecorrespondingHDMIsocketontheexternaldeviceusingastan-dardHDMIcable(digitalvideoandaudiosignal).
EliminatingcompatibilityproblemforUltraHD(4K)WhenconnectinganolderHDMIplayer(likeaBlu-rayplayer,forexample)toyourTV,thesoundmaynotbeavailable.ThisiscausedtoacompatibilityissuebetweentheHDMIplayerandtheTVduetodifferentHDMIstandards.1 Press»MENU«toopenthemenu.
2 Select»Settings«using»V«,»Λ«,»<«or»>«andconfirmwith»OK«.
3 Select»Source«with»>«or»<«andcon-firmwith»V«.
–The»Source«menuisactive.
4 Selecttheline»Advanced4Ksupport«us-ing»V«or»Λ«.
5 Switchoffthe»Advanced4Ksupport«func-tionusing»<«or»>«(»Off«).
USINGEXTERNALDEVICES---------------------------------------------------------------
Withananaloguevideosignal(pro-gressive)7 Suitabledevices:DVDplayer/recorder,game
console.7 Videosignal:YUV;definition:standard576p;
HDTV720p,1080i,1080p.7 Audiosignal:stereo,analog.7 Channelposition»Component«.
1 ConnecttheSCART/S-VHS/COMPO-NENTsocketsonthetelevisionandthecor-respondingsocketsontheexternaldeviceusingScart-YUVconverter(videoandaudiosignal).
UsingtheEuro/AVsocket7 Suitabledevices:Digitalsatellitereceiver,
DVDplayer/recorder,set-topbox,gameconsole,videorecorder,decoder.
7 Videosignal:CVBS/RGB.7 Audiosignal:stereo,analog.7 Channelposition »SCART«.
1 ConnecttheSCART/S-VHS/COM-PONENTinputonthetelevisiontothecorrespondingsocketontheexternaldeviceusingEURO/AVcable(videoandaudiosignal).
ENGLISH84
USINGEXTERNALDEVICES---------------------------------------------------------------
SelectingScartvolumeadjustment1 Openthemenuwith»MENU«.
2 Selectmenuitem»Settings«with»V«,»Λ«,»<«or»>«andpress»OK«toconfirm.
3 Selectthemenuitem»Sound«with»>«or»<«andpress»V«toconfirm.
4 Selecttheline»Advanced«with»V«or»Λ«andpress»OK«toconfirm.
5 Selecttheline»ScartOutput«with»V«or»Λ«.
6 Selecttheoption»Fixed«or»Adjustable«with»<«or»>«.
Note:7 »ScartVolume«becomesactivewhen»Ad-
justable«isselectedinthemenu.7 Selecttheline»ScartVolume«with»V«or
»Λ«andadjustthevolumebyusing»<«or»>«.
8 Press»EXIT«toendthesetting.
WithS-Videosignal7 Suitabledevices:DVDplayer/recorder,video
recorder,camerarecorder,notebook,PCs.7 Videosignal:Y/C.7 Audiosignal:stereo,analog.7 Channelposition»S-VIDEO«.
1 ConnecttheSCART/S-VHS/COM-PONENTsocketonthetelevisiontothecorrespondingsocketontheexternaldeviceusingEURO/AVcable(videoandaudiosignal).
UsingaDVDrecorder,DVDplayer,videorecorderorset-topbox1 Switchonthevideorecorder,DVDplayer
orset-topboxandselectthefunctionyouwishtouse.
2 Press» «anduse»<«or»>«toselectinputsignal(»SCART«,»S-VHS«,»HDMI1(MHL)«,»HDMI2«,»HDMI3«,»HDMI4(ARC)«or»COMPONENT«)andpress»OK«toconfirm.
HeadphonesConnectingheadphones1 Plugtheheadphonejack(3.5mmøjack
plug)intotheheadphonesocketofthetelevision.
Selectingthevolumeforthehead-phones1 Openthemenuwith»MENU«.
2 Selectmenuitem»Settings«with»V«,»Λ«,»<«or»>«andpress»OK«toconfirm.
3 Selectthemenuitem»Sound«with»>«or»<«andpress»V«toconfirm.
4 Selecttheline»Advanced«with»V«or»Λ«andpress»OK«toconfirm.
5 Selecttheline»HeadphoneVolume«with»V«or»Λ«.
6 Adjustthevolumewith»<«or»>«.
7 Press»EXIT«toendthesetting.
Note:7 Prolongedlisteningatloudvolumeswiththe
earphonescandamageyourhearing.
85ENGLISH
Hi-fisystemConnectingdigitalmulti-channelampli-fier/AVreceiver1 ConnecttheHDMI4(ARC)(HDMI1.4
AudioReturnChannel)sockettotherelevantsocketontheHDMIARCcompliantDigitalmultichannelamplifier/AVreceiverwithastandardHDMIcable(digitalaudiosignal);
or
2 ConnecttheOpticOutsocketonthetelevi-siontothecorrespondingsocketontheAVreceiverusingastandardopticdigitalcable(digitalaudiosignal).
Important:7 DonotuseaHDMIcablelongerthan5m
forHDMIARCconnection.
ApplythedevicewithHDMIARCfunc-tionandactivateHDMIARC1 Switchonthethemulti-channelamplifieror
theAVreceiver.IfaBlu-rayPlayeriscon-nectedontheAVreceiver,theplayermustbeswitchedon,too.
2 Openthetoolsmenuwith»TOOLS«.
3 Selecttheline»Digilink«with»V«or»Λ«andpress»OK«toconfirm.
–AudiodeviceconnectedtotheHDMI4(ARC)sourceinthe»DeviceList«menushallbedisplayedinthelist.
4 Startdevicesearchwith»«(blue). –AudiodeviceconnectedtotheHDMI4
(ARC)sourceshallbedisplayedinthelist.
5 Selectthedevicewith»V«or»Λ«andpress»OK«toconfirm.
USINGEXTERNALDEVICES---------------------------------------------------------------
Notes:7 Iftheaudiosystemalsohasaplayingfunc-
tion(e.g.HometheatersystemincludingDVDplayerfunction),twodeviceswillbelistedontheHDMICEClist.Thefirstoneistheplayer,andthesecondoneistheaudioplayback.
7 IfaBlu-rayPlayerisconnectedtotheAVreceiver,pleaseremovetheDiscfromthePlayerduringtheregistration.
6 Openthemenuwith»MENU«.
7 Selectmenuitem»Settings«with»V«,»Λ«,»<«or»>«andpress»OK«toconfirm.
8 Selectthemenuitem»Sound«with»>«or»<«andpress»V«toconfirm.
9 Selecttheline»Advanced«with»V«or»Λ«andpress»OK«toconfirm.
10 Selecttheline»ARC«with»V«or»Λ«.
11 Press»<«or»>«toselect»On«.
Notes:7 Theinternalspeakersofthetelevisionare
switchingoffautomaticaly.7 ThevolumeoftheAVreceiveryoucanad-
justwiththeremotecontrolofthetelevision.7 ForswitchingofftheHDMIARCfunction
select»Off«with»<«or»>«.7 TheARCfunctionwillbedeactivatedwhile
switchingoffthetelevisionandtheinternalspeakersareactiveagain.
12 Press»EXIT«toendthesetting.
ManufacturedunderlicensefromDolbyLaboratories.DolbyanddoubleDsymbolsaretrademarksofDolbyLaboratories.
ENGLISH86
USINGEXTERNALDEVICES---------------------------------------------------------------
PlayingtheaudiosignalviatheHiFisystem1 ConnectthesocketUonthetelevisionand
thecorrespondingsocketonthehi-fisystem/AVreceiverusingaadaptercable.
Note:7 Whenthisfunctionisactivated,thehi-fi
system/AVreceiver(connectedtosocketU)transmitstheaudiosignal.
2 Openthemenuwith»MENU«.
3 Selectmenuitem»Settings«with»V«,»Λ«,»<«or»>«andpress»OK«toconfirm.
4 Selectthemenuitem»Sound«with»>«or»<«andpress»OK«toconfirm.
–»Sound«menuisdisplayed.
5 Selecttheline»Advanced«with»V«or»Λ«andpress»OK«toconfirm.
6 Selecttheline»AudioOut«with»V«or»Λ«.
7 Selecttheoption»Fixed«or»Adjustable«with»<«or»>«.
Notes:7 Ifyouselect»Adjustable«,thevolumecan
bechangedinthemenuoption»AudioOutVolume«.
7 Ifyouwanttoobtaintheaudiooutputonlyfromhi-fisystem/AVreceiver,selecttheoption»Off«intheline»TVSpeakerwith»<«or»>«.
8 Press»EXIT«toendthesetting.
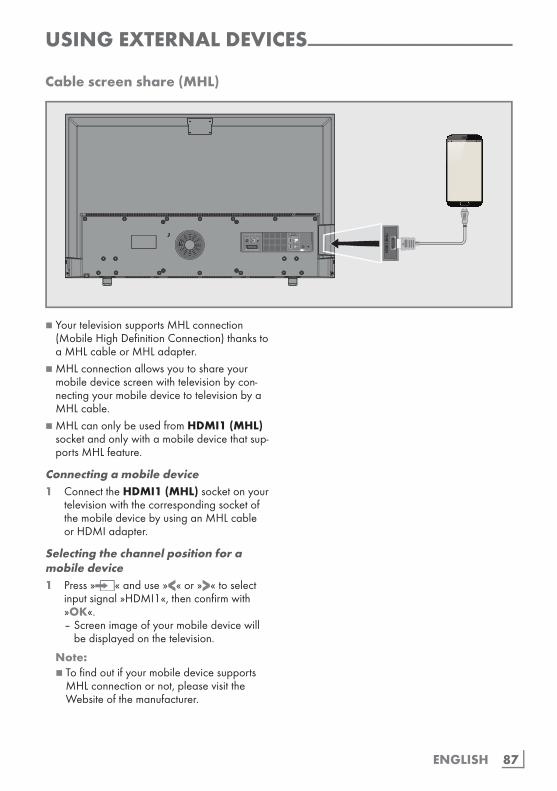
87ENGLISH
USINGEXTERNALDEVICES---------------------------------------------------------------
7 YourtelevisionsupportsMHLconnection(MobileHighDefinitionConnection)thankstoaMHLcableorMHLadapter.
7 MHLconnectionallowsyoutoshareyourmobiledevicescreenwithtelevisionbycon-nectingyourmobiledevicetotelevisionbyaMHLcable.
7 MHLcanonlybeusedfromHDMI1(MHL)socketandonlywithamobiledevicethatsup-portsMHLfeature.
Connectingamobiledevice1 ConnecttheHDMI1(MHL)socketonyour
televisionwiththecorrespondingsocketofthemobiledevicebyusinganMHLcableorHDMIadapter.
Selectingthechannelpositionforamobiledevice1 Press» «anduse»<«or»>«toselect
inputsignal»HDMI1«,thenconfirmwith»OK«.
–Screenimageofyourmobiledevicewillbedisplayedonthetelevision.
Note:7 Tofindoutifyourmobiledevicesupports
MHLconnectionornot,pleasevisittheWebsiteofthemanufacturer.
Cablescreenshare(MHL)
SCART / S-VHS / COMPONENT
Optic Out SERVICEONLY
LANSATELLITE
ANT IN
HD
MI4
(AR
C)
HD
MI3
USB 3
MAIN
SUB
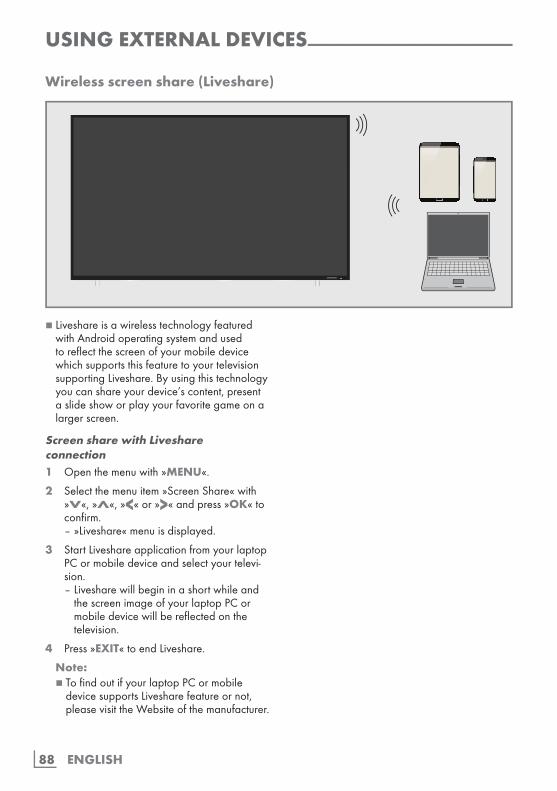
ENGLISH88
USINGEXTERNALDEVICES---------------------------------------------------------------
7 LiveshareisawirelesstechnologyfeaturedwithAndroidoperatingsystemandusedtoreflectthescreenofyourmobiledevicewhichsupportsthisfeaturetoyourtelevisionsupportingLiveshare.Byusingthistechnologyyoucanshareyourdevice’scontent,presentaslideshoworplayyourfavoritegameonalargerscreen.
ScreensharewithLiveshareconnection1 Openthemenuwith»MENU«.
2 Selectthemenuitem»ScreenShare«with»V«,»Λ«,»<«or»>«andpress»OK«toconfirm.
–»Liveshare«menuisdisplayed.
3 StartLiveshareapplicationfromyourlaptopPCormobiledeviceandselectyourtelevi-sion.
–LivesharewillbegininashortwhileandthescreenimageofyourlaptopPCormobiledevicewillbereflectedonthetelevision.
4 Press»EXIT«toendLiveshare.
Note:7 TofindoutifyourlaptopPCormobile
devicesupportsLivesharefeatureornot,pleasevisittheWebsiteofthemanufacturer.
Wirelessscreenshare(Liveshare)
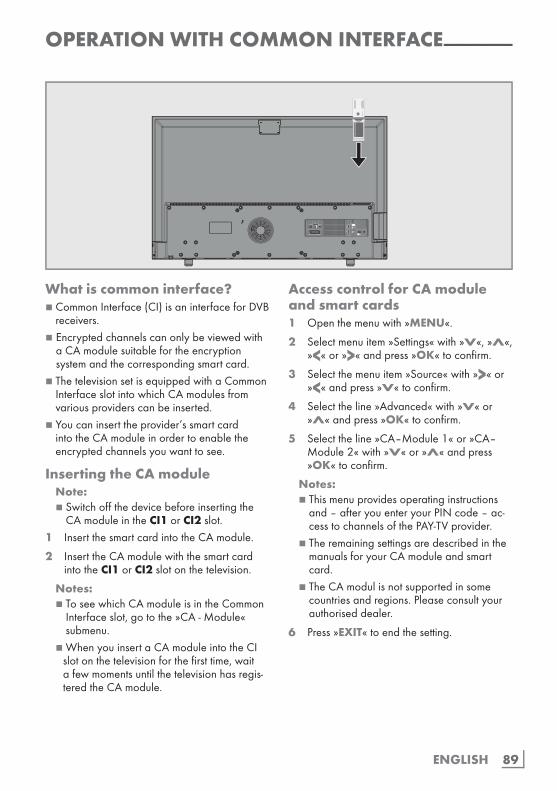
89ENGLISH
OPERATIONWITHCOMMONINTERFACE---------------------
Whatiscommoninterface?7 CommonInterface(CI)isaninterfaceforDVB
receivers.7Encryptedchannelscanonlybeviewedwith
aCAmodulesuitablefortheencryptionsystemandthecorrespondingsmartcard.
7 ThetelevisionsetisequippedwithaCommonInterfaceslotintowhichCAmodulesfromvariousproviderscanbeinserted.
7 Youcaninserttheprovider’ssmartcardintotheCAmoduleinordertoenabletheencryptedchannelsyouwanttosee.
InsertingtheCAmoduleNote:7 Switchoffthedevicebeforeinsertingthe
CAmoduleintheCI1orCI2slot.1 InsertthesmartcardintotheCAmodule.
2 InserttheCAmodulewiththesmartcardintotheCI1orCI2slotonthetelevision.
Notes:7 ToseewhichCAmoduleisintheCommon
Interfaceslot,gotothe»CA-Module«submenu.
7 WhenyouinsertaCAmoduleintotheCIslotonthetelevisionforthefirsttime,waitafewmomentsuntilthetelevisionhasregis-teredtheCAmodule.
AccesscontrolforCAmoduleandsmartcards1 Openthemenuwith»MENU«.
2 Selectmenuitem»Settings«with»V«,»Λ«,»<«or»>«andpress»OK«toconfirm.
3 Selectthemenuitem»Source«with»>«or»<«andpress»V«toconfirm.
4 Selecttheline»Advanced«with»V«or»Λ«andpress»OK«toconfirm.
5 Selecttheline»CA–Module1«or»CA–Module2«with»V«or»Λ«andpress»OK«toconfirm.
Notes:7 Thismenuprovidesoperatinginstructions
and–afteryouenteryourPINcode–ac-cesstochannelsofthePAY-TVprovider.
7 TheremainingsettingsaredescribedinthemanualsforyourCAmoduleandsmartcard.
7 TheCAmodulisnotsupportedinsomecountriesandregions.Pleaseconsultyourauthoriseddealer.
6 Press»EXIT«toendthesetting.
SCART / S-VHS / COMPONENT
Optic Out SERVICEONLY
LANSATELLITE
ANT IN
HD
MI4
(AR
C)
HD
MI3
USB 3
MAIN
SUB
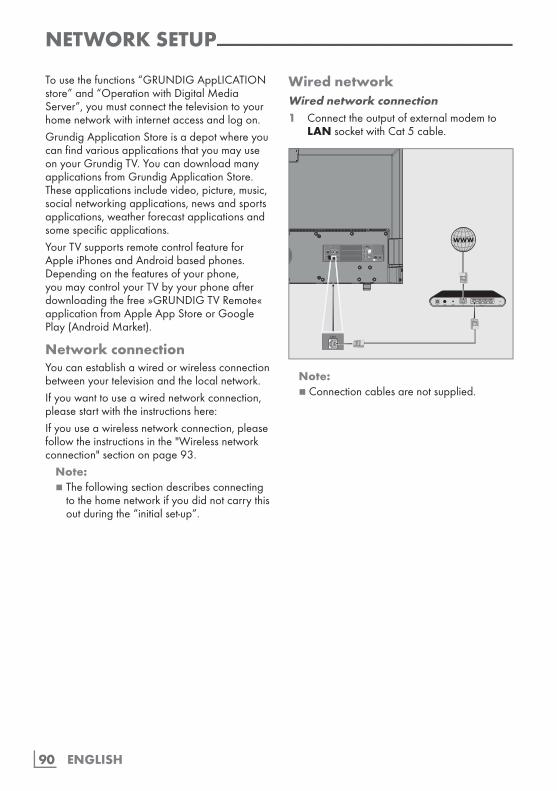
ENGLISH90
NETWORKSETUP-------------------------------------------------------------------------------------------
Tousethefunctions“GRUNDIGAppLICATIONstore”and“OperationwithDigitalMediaServer”,youmustconnectthetelevisiontoyourhomenetworkwithinternetaccessandlogon.GrundigApplicationStoreisadepotwhereyoucanfindvariousapplicationsthatyoumayuseonyourGrundigTV.YoucandownloadmanyapplicationsfromGrundigApplicationStore.Theseapplicationsincludevideo,picture,music,socialnetworkingapplications,newsandsportsapplications,weatherforecastapplicationsandsomespecificapplications.YourTVsupportsremotecontrolfeatureforAppleiPhonesandAndroidbasedphones.Dependingonthefeaturesofyourphone,youmaycontrolyourTVbyyourphoneafterdownloadingthefree»GRUNDIGTVRemote«applicationfromAppleAppStoreorGooglePlay(AndroidMarket).
NetworkconnectionYoucanestablishawiredorwirelessconnectionbetweenyourtelevisionandthelocalnetwork.Ifyouwanttouseawirednetworkconnection,pleasestartwiththeinstructionshere:Ifyouuseawirelessnetworkconnection,pleasefollowtheinstructionsinthe"Wirelessnetworkconnection"sectiononpage93.
Note:7Thefollowingsectiondescribesconnecting
tothehomenetworkifyoudidnotcarrythisoutduringthe“initialset-up”.
WirednetworkWirednetworkconnection1 Connecttheoutputofexternalmodemto
LANsocketwithCat5cable.
Note:7 Connectioncablesarenotsupplied.
Optic Out SERVICEONLY
LANSATELLITE
ANT IN
HD
MI4
(AR
C)
HD
MI3
USB 3
MAIN
SUB
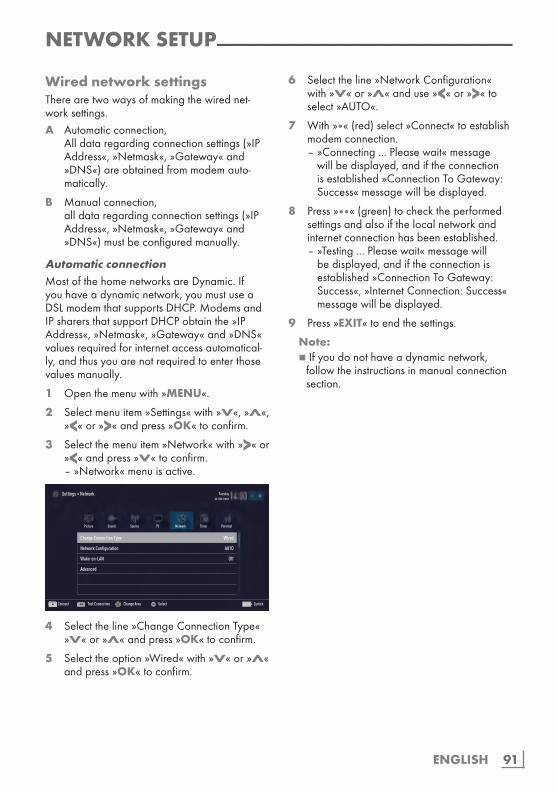
91ENGLISH
WirednetworksettingsTherearetwowaysofmakingthewirednet-worksettings.A Automaticconnection, Alldataregardingconnectionsettings(»IP
Address«,»Netmask«,»Gateway«and»DNS«)areobtainedfrommodemauto-matically.
B Manualconnection, alldataregardingconnectionsettings(»IP
Address«,»Netmask«,»Gateway«and»DNS«)mustbeconfiguredmanually.
AutomaticconnectionMostofthehomenetworksareDynamic.Ifyouhaveadynamicnetwork,youmustuseaDSLmodemthatsupportsDHCP.ModemsandIPsharersthatsupportDHCPobtainthe»IPAddress«,»Netmask«,»Gateway«and»DNS«valuesrequiredforinternetaccessautomatical-ly,andthusyouarenotrequiredtoenterthosevaluesmanually.
1 Openthemenuwith»MENU«.
2 Selectmenuitem»Settings«with»V«,»Λ«,»<«or»>«andpress»OK«toconfirm.
3 Selectthemenuitem»Network«with»>«or»<«andpress»V«toconfirm.
–»Network«menuisactive.
Picture
Tuesdayxx xxx xxxx
Source TimerSound NetworkTV Parental
Settings > Network
Change AreaConnect Test Connection Select ZurückBACK
Change Connection Type Wired
Network Configuration AUTO
Wake-on-LAN Off
Advanced
4 Selecttheline»ChangeConnectionType«»V«or»Λ«andpress»OK«toconfirm.
5 Selecttheoption»Wired«with»V«or»Λ«andpress»OK«toconfirm.
NETWORKSETUP-------------------------------------------------------------------------------------------
6 Selecttheline»NetworkConfiguration«with»V«or»Λ«anduse»<«or»>«toselect»AUTO«.
7 With»«(red)select»Connect«toestablishmodemconnection.
–»Connecting...Pleasewait«messagewillbedisplayed,andiftheconnectionisestablished»ConnectionToGateway:Success«messagewillbedisplayed.
8 Press»«(green)tochecktheperformedsettingsandalsoifthelocalnetworkandinternetconnectionhasbeenestablished.
–»Testing...Pleasewait«messagewillbedisplayed,andiftheconnectionisestablished»ConnectionToGateway:Success«,»InternetConnection:Success«messagewillbedisplayed.
9 Press»EXIT«toendthesettings.
Note:7 Ifyoudonothaveadynamicnetwork,
followtheinstructionsinmanualconnectionsection.
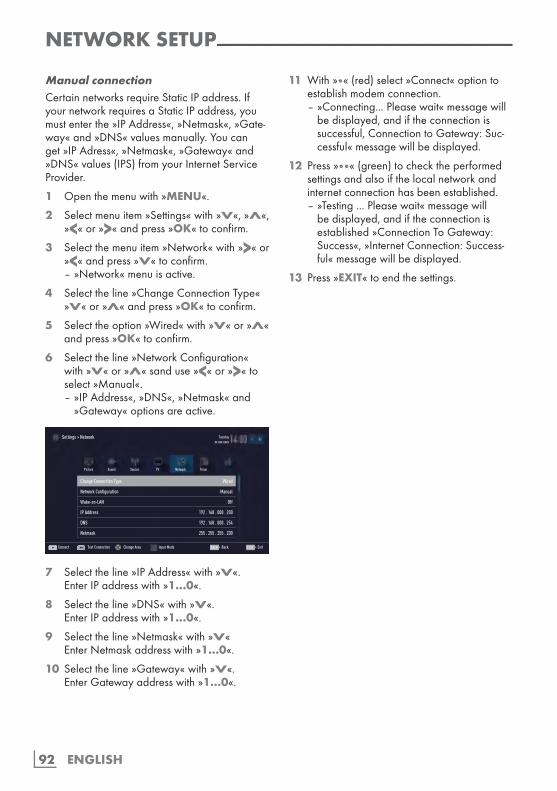
ENGLISH92
NETWORKSETUP-------------------------------------------------------------------------------------------
ManualconnectionCertainnetworksrequireStaticIPaddress.IfyournetworkrequiresaStaticIPaddress,youmustenterthe»IPAddress«,»Netmask«,»Gate-way«and»DNS«valuesmanually.Youcanget»IPAdress«,»Netmask«,»Gateway«and»DNS«values(IPS)fromyourInternetServiceProvider.
1 Openthemenuwith»MENU«.
2 Selectmenuitem»Settings«with»V«,»Λ«,»<«or»>«andpress»OK«toconfirm.
3 Selectthemenuitem»Network«with»>«or»<«andpress»V«toconfirm.
–»Network«menuisactive.
4 Selecttheline»ChangeConnectionType«»V«or»Λ«andpress»OK«toconfirm.
5 Selecttheoption»Wired«with»V«or»Λ«andpress»OK«toconfirm.
6 Selecttheline»NetworkConfiguration«with»V«or»Λ«sanduse»<«or»>«toselect»Manual«.
–»IPAddress«,»DNS«,»Netmask«and»Gateway«optionsareactive.
Change Connection Type Wired
Network Configuration Manual
Wake-on-LAN Off
IP Address 192 . 168 . 000 . 200
DNS 192 . 168 . 000 . 254
Netmask 255 . 255 . 255 . 200
Picture
Tuesdayxx xxx xxxx
Source TimerSound NetworkTV
Settings > Network
Change AreaConnect Test Connection Input Mode ExitBack EXITBACK
7 Selecttheline»IPAddress«with»V«. EnterIPaddresswith»1…0«.
8 Selecttheline»DNS«with»V«. EnterIPaddresswith»1…0«.
9 Selecttheline»Netmask«with»V« EnterNetmaskaddresswith»1…0«.
10 Selecttheline»Gateway«with»V«. EnterGatewayaddresswith»1…0«.
11 With»«(red)select»Connect«optiontoestablishmodemconnection.
–»Connecting...Pleasewait«messagewillbedisplayed,andiftheconnectionissuccessful,ConnectiontoGateway:Suc-cessful«messagewillbedisplayed.
12 Press»«(green)tochecktheperformedsettingsandalsoifthelocalnetworkandinternetconnectionhasbeenestablished.
–»Testing...Pleasewait«messagewillbedisplayed,andiftheconnectionisestablished»ConnectionToGateway:Success«,»InternetConnection:Success-ful«messagewillbedisplayed.
13 Press»EXIT«toendthesettings.

93ENGLISH
WirelessnetworkWirelessnetworkconnection
1 Televisionincludesabuilt-inWirelessWiFiAdaptertoconnectittowirelessnetwork.
Notes:7 WirelessLANadaptersupportsIEEE
802.11B/GandNcommunicationprotocols.WerecommendyoutouseIEEE802.11Nprotocoltoobtainthebestperfor-manceinwirelessHDvideoplayback.
7 IfyouuseamodemthatsupportsIEEE802.11B/G,videoplaybackperformancemaybepoorwhencomparedtoamodemthatsup-portsIEEE802.11NsincethedatatransferrateofIEEE802.11B/Gprotocolislower.
7 Pleasenotethatvideoplaybackperfor-manceinaDLNAapplicationonawirelesslocalnetworkandinaSMARTinter@ctiveTV4.0applicationonanetworkwithinternetconnectiondependsonthenumberofusersonthenetworkasitisthecaseineverywirelessnetwork.
7 Itisrecommendedtoswitchofftheequip-mentthatarenotinuseinhomenetworkinordertoavoidunnecessarynetworktraffic.
7 Placingthemodemorwirelessnetworkshareronanelevatedlocationwillincreasethewirelessconnectionreceptionstrength.
7 Wirelessconnectionreceptionstrengthmayvarydependingonthetypeofthemodemandthedistancebetweenthemodemandtelevision.
NETWORKSETUP-------------------------------------------------------------------------------------------
WirelessnetworksettingsYouhaveseveralwaystoconnectyourTVtoyourhomenetwork.A Automaticconnection, alldataregardingconnectionsettings(»IP
Address«,»Netmask«,»Gateway«and»DNS«)areobtainedfrommodemauto-matically.
Dependingontherouter,youcanusethefollowingoptions:
–Option“WPS-PBC”(PushButtonConfigu-ration);
–ConnectingwithaWPSPIN; –Connectingbyenteringthenetworkpass-
word.
B Manualconnection, alldataregardingconnectionsettings(»IP
Address«,»Netmask«,»Gateway«and»DNS«)mustbeconfiguredmanually.
SCART / S-VHS / COMPONENT
Optic Out SERVICEONLY
LANSATELLITE
ANT IN
HD
MI4
(AR
C)
HD
MI3
USB 3
MAIN
SUB
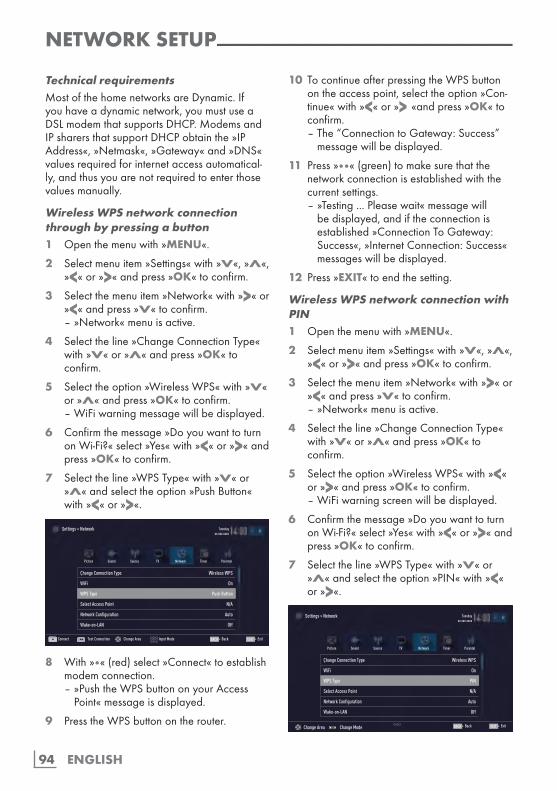
ENGLISH94
NETWORKSETUP-------------------------------------------------------------------------------------------
TechnicalrequirementsMostofthehomenetworksareDynamic.Ifyouhaveadynamicnetwork,youmustuseaDSLmodemthatsupportsDHCP.ModemsandIPsharersthatsupportDHCPobtainthe»IPAddress«,»Netmask«,»Gateway«and»DNS«valuesrequiredforinternetaccessautomatical-ly,andthusyouarenotrequiredtoenterthosevaluesmanually.
WirelessWPSnetworkconnectionthroughbypressingabutton1 Openthemenuwith»MENU«.
2 Selectmenuitem»Settings«with»V«,»Λ«,»<«or»>«andpress»OK«toconfirm.
3 Selectthemenuitem»Network«with»>«or»<«andpress»V«toconfirm.
–»Network«menuisactive.
4 Selecttheline»ChangeConnectionType«with»V«or»Λ«andpress»OK«toconfirm.
5 Selecttheoption»WirelessWPS«with»V«or»Λ«andpress»OK«toconfirm.
–WiFiwarningmessagewillbedisplayed.
6 Confirmthemessage»DoyouwanttoturnonWi-Fi?«select»Yes«with»<«or»>«andpress»OK«toconfirm.
7 Selecttheline»WPSType«with»V«or»Λ«andselecttheoption»PushButton«with»<«or»>«.
Çhange Connection Type Wireless WPS
WiFi On
WPS Type Push Button
Select Access Point N/A
Network Configuration Auto
Wake-on-LAN Off
Picture
Tuesdayxx xxx xxxx
Source TimerSound NetworkTV Parental
Settings > Network
Change AreaConnect Test Connection Input Mode ExitBack EXITBACK
8 With»«(red)select»Connect«toestablishmodemconnection.
–»PushtheWPSbuttononyourAccessPoint«messageisdisplayed.
9 PresstheWPSbuttonontherouter.
10 TocontinueafterpressingtheWPSbuttonontheaccesspoint,selecttheoption»Con-tinue«with»<«or»>«andpress»OK«toconfirm.
–The“ConnectiontoGateway:Success”messagewillbedisplayed.
11 Press»«(green)tomakesurethatthenetworkconnectionisestablishedwiththecurrentsettings.
–»Testing...Pleasewait«messagewillbedisplayed,andiftheconnectionisestablished»ConnectionToGateway:Success«,»InternetConnection:Success«messageswillbedisplayed.
12 Press»EXIT«toendthesetting.
WirelessWPSnetworkconnectionwithPIN1 Openthemenuwith»MENU«.
2 Selectmenuitem»Settings«with»V«,»Λ«,»<«or»>«andpress»OK«toconfirm.
3 Selectthemenuitem»Network«with»>«or»<«andpress»V«toconfirm.
–»Network«menuisactive.
4 Selecttheline»ChangeConnectionType«with»V«or»Λ«andpress»OK«toconfirm.
5 Selecttheoption»WirelessWPS«with»<«or»>«andpress»OK«toconfirm.
–WiFiwarningscreenwillbedisplayed.
6 Confirmthemessage»DoyouwanttoturnonWi-Fi?«select»Yes«with»<«or»>«andpress»OK«toconfirm.
7 Selecttheline»WPSType«with»V«or»Λ«andselecttheoption»PIN«with»<«or»>«.
Çhange Connection Type Wireless WPS
WiFi On
WPS Type PIN
Select Access Point N/A
Network Configuration Auto
Wake-on-LAN Off
Picture
Tuesdayxx xxx xxxx
Source TimerSound NetworkTV Parental
Settings > Network
ExitBack EXITBACKChange Area Change Mode
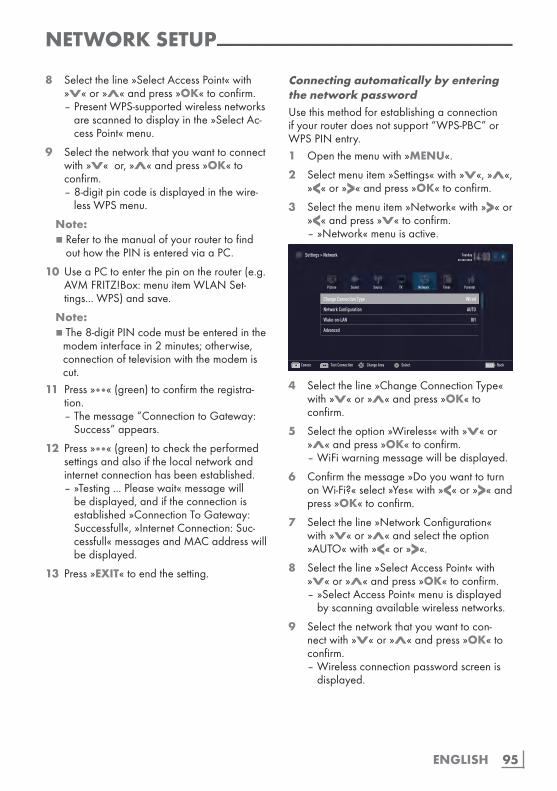
95ENGLISH
8 Selecttheline»SelectAccessPoint«with»V«or»Λ«andpress»OK«toconfirm.
–PresentWPS-supportedwirelessnetworksarescannedtodisplayinthe»SelectAc-cessPoint«menu.
9 Selectthenetworkthatyouwanttoconnectwith»V«or,»Λ«andpress»OK«toconfirm.
–8-digitpincodeisdisplayedinthewire-lessWPSmenu.
Note:7 Refertothemanualofyourroutertofind
outhowthePINisenteredviaaPC.
10 UseaPCtoenterthepinontherouter(e.g.AVMFRITZ!Box:menuitemWLANSet-tings...WPS)andsave.
Note:7 The8-digitPINcodemustbeenteredinthe
modeminterfacein2minutes;otherwise,connectionoftelevisionwiththemodemiscut.
11 Press»«(green)toconfirmtheregistra-tion.
–Themessage“ConnectiontoGateway:Success”appears.
12 Press»«(green)tochecktheperformedsettingsandalsoifthelocalnetworkandinternetconnectionhasbeenestablished.
–»Testing...Pleasewait«messagewillbedisplayed,andiftheconnectionisestablished»ConnectionToGateway:Successfull«,»InternetConnection:Suc-cessfull«messagesandMACaddresswillbedisplayed.
13 Press»EXIT«toendthesetting.
ConnectingautomaticallybyenteringthenetworkpasswordUsethismethodforestablishingaconnectionifyourrouterdoesnotsupport“WPS-PBC”orWPSPINentry.1 Openthemenuwith»MENU«.
2 Selectmenuitem»Settings«with»V«,»Λ«,»<«or»>«andpress»OK«toconfirm.
3 Selectthemenuitem»Network«with»>«or»<«andpress»V«toconfirm.
–»Network«menuisactive.
Change Connection Type Wired
Network Configuration AUTO
Wake-on-LAN Off
Advanced
Picture
Tuesdayxx xxx xxxx
Source TimerSound NetworkTV Parental
Settings > Network
Change AreaConnec Test Connection Select BackBACK
4 Selecttheline»ChangeConnectionType«with»V«or»Λ«andpress»OK«toconfirm.
5 Selecttheoption»Wireless«with»V«or»Λ«andpress»OK«toconfirm.
–WiFiwarningmessagewillbedisplayed.
6 Confirmthemessage»DoyouwanttoturnonWi-Fi?«select»Yes«with»<«or»>«andpress»OK«toconfirm.
7 Selecttheline»NetworkConfiguration«with»V«or»Λ«andselecttheoption»AUTO«with»<«or»>«.
8 Selecttheline»SelectAccessPoint«with»V«or»Λ«andpress»OK«toconfirm.
–»SelectAccessPoint«menuisdisplayedbyscanningavailablewirelessnetworks.
9 Selectthenetworkthatyouwanttocon-nectwith»V«or»Λ«andpress»OK«toconfirm.
–Wirelessconnectionpasswordscreenisdisplayed.
NETWORKSETUP-------------------------------------------------------------------------------------------
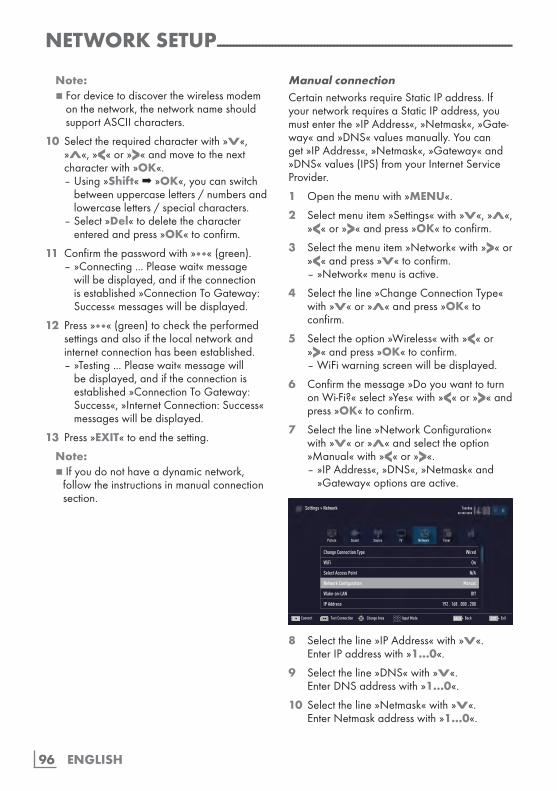
ENGLISH96
NETWORKSETUP-------------------------------------------------------------------------------------------
Note:7 Fordevicetodiscoverthewirelessmodem
onthenetwork,thenetworknameshouldsupportASCIIcharacters.
10 Selecttherequiredcharacterwith»V«,»Λ«,»<«or»>«andmovetothenextcharacterwith»OK«.
–Using»Shift«➡»OK«,youcanswitchbetweenuppercaseletters/numbersandlowercaseletters/specialcharacters.
–Select»Del«todeletethecharacterenteredandpress»OK«toconfirm.
11 Confirmthepasswordwith»«(green). –»Connecting...Pleasewait«message
willbedisplayed,andiftheconnectionisestablished»ConnectionToGateway:Success«messageswillbedisplayed.
12 Press»«(green)tochecktheperformedsettingsandalsoifthelocalnetworkandinternetconnectionhasbeenestablished.
–»Testing...Pleasewait«messagewillbedisplayed,andiftheconnectionisestablished»ConnectionToGateway:Success«,»InternetConnection:Success«messageswillbedisplayed.
13 Press»EXIT«toendthesetting.
Note:7 Ifyoudonothaveadynamicnetwork,
followtheinstructionsinmanualconnectionsection.
ManualconnectionCertainnetworksrequireStaticIPaddress.IfyournetworkrequiresaStaticIPaddress,youmustenterthe»IPAddress«,»Netmask«,»Gate-way«and»DNS«valuesmanually.Youcanget»IPAddress«,»Netmask«,»Gateway«and»DNS«values(IPS)fromyourInternetServiceProvider.
1 Openthemenuwith»MENU«.
2 Selectmenuitem»Settings«with»V«,»Λ«,»<«or»>«andpress»OK«toconfirm.
3 Selectthemenuitem»Network«with»>«or»<«andpress»V«toconfirm.
–»Network«menuisactive.
4 Selecttheline»ChangeConnectionType«with»V«or»Λ«andpress»OK«toconfirm.
5 Selecttheoption»Wireless«with»<«or»>«andpress»OK«toconfirm.
–WiFiwarningscreenwillbedisplayed.
6 Confirmthemessage»DoyouwanttoturnonWi-Fi?«select»Yes«with»<«or»>«andpress»OK«toconfirm.
7 Selecttheline»NetworkConfiguration«with»V«or»Λ«andselecttheoption»Manual«with»<«or»>«.
–»IPAddress«,»DNS«,»Netmask«and»Gateway«optionsareactive.
Change Connection Type Wired
WiFi On
Select Access Point N/A
Network Configuration Manual
Wake-on-LAN Off
IP Address 192 . 168 . 000 . 200
Picture
Tuesdayxx xxx xxxx
Source TimerSound NetworkTV
Settings > Network
Change AreaConnect Test Connection Input Mode ExitBack EXITBACK
8 Selecttheline»IPAddress«with»V«. EnterIPaddresswith»1…0«.
9 Selecttheline»DNS«with»V«. EnterDNSaddresswith»1…0«.
10 Selecttheline»Netmask«with»V«. EnterNetmaskaddresswith»1…0«.
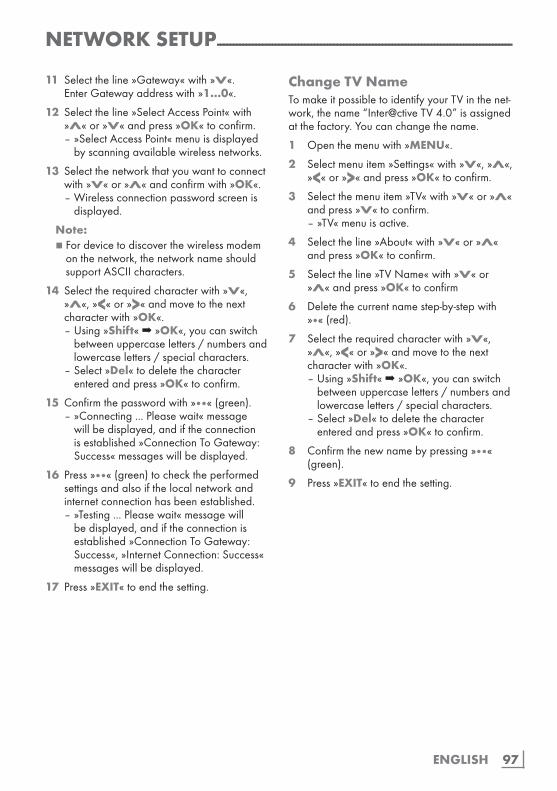
97ENGLISH
ChangeTVNameTomakeitpossibletoidentifyyourTVinthenet-work,thename“[email protected]”isassignedatthefactory.Youcanchangethename.
1 Openthemenuwith»MENU«.
2 Selectmenuitem»Settings«with»V«,»Λ«,»<«or»>«andpress»OK«toconfirm.
3 Selectthemenuitem»TV«with»V«or»Λ«andpress»V«toconfirm.
–»TV«menuisactive.
4 Selecttheline»About«with»V«or»Λ«andpress»OK«toconfirm.
5 Selecttheline»TVName«with»V«or»Λ«andpress»OK«toconfirm
6 Deletethecurrentnamestep-by-stepwith»«(red).
7 Selecttherequiredcharacterwith»V«,»Λ«,»<«or»>«andmovetothenextcharacterwith»OK«.
–Using»Shift«➡»OK«,youcanswitchbetweenuppercaseletters/numbersandlowercaseletters/specialcharacters.
–Select»Del«todeletethecharacterenteredandpress»OK«toconfirm.
8 Confirmthenewnamebypressing»«(green).
9 Press»EXIT«toendthesetting.
NETWORKSETUP-------------------------------------------------------------------------------------------
11 Selecttheline»Gateway«with»V«. EnterGatewayaddresswith»1…0«.
12 Selecttheline»SelectAccessPoint«with»Λ«or»V«andpress»OK«toconfirm.
–»SelectAccessPoint«menuisdisplayedbyscanningavailablewirelessnetworks.
13 Selectthenetworkthatyouwanttoconnectwith»V«or»Λ«andconfirmwith»OK«.
–Wirelessconnectionpasswordscreenisdisplayed.
Note:7 Fordevicetodiscoverthewirelessmodem
onthenetwork,thenetworknameshouldsupportASCIIcharacters.
14 Selecttherequiredcharacterwith»V«,»Λ«,»<«or»>«andmovetothenextcharacterwith»OK«.
–Using»Shift«➡»OK«,youcanswitchbetweenuppercaseletters/numbersandlowercaseletters/specialcharacters.
–Select»Del«todeletethecharacterenteredandpress»OK«toconfirm.
15 Confirmthepasswordwith»«(green). –»Connecting...Pleasewait«message
willbedisplayed,andiftheconnectionisestablished»ConnectionToGateway:Success«messageswillbedisplayed.
16 Press»«(green)tochecktheperformedsettingsandalsoifthelocalnetworkandinternetconnectionhasbeenestablished.
–»Testing...Pleasewait«messagewillbedisplayed,andiftheconnectionisestablished»ConnectionToGateway:Success«,»InternetConnection:Success«messageswillbedisplayed.
17 Press»EXIT«toendthesetting.
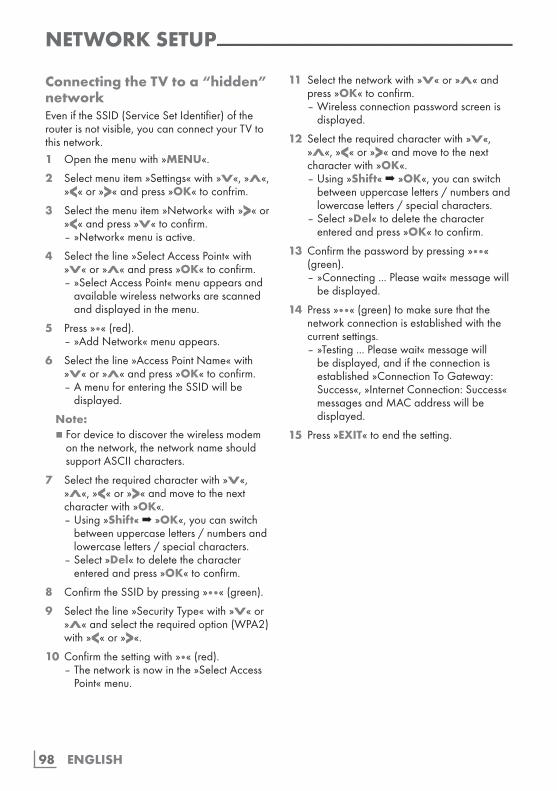
ENGLISH98
NETWORKSETUP-------------------------------------------------------------------------------------------
ConnectingtheTVtoa“hidden”networkEveniftheSSID(ServiceSetIdentifier)oftherouterisnotvisible,youcanconnectyourTVtothisnetwork.1 Openthemenuwith»MENU«.
2 Selectmenuitem»Settings«with»V«,»Λ«,»<«or»>«andpress»OK«toconfrim.
3 Selectthemenuitem»Network«with»>«or»<«andpress»V«toconfirm.
–»Network«menuisactive.
4 Selecttheline»SelectAccessPoint«with»V«or»Λ«andpress»OK«toconfirm.
–»SelectAccessPoint«menuappearsandavailablewirelessnetworksarescannedanddisplayedinthemenu.
5 Press»«(red). –»AddNetwork«menuappears.
6 Selecttheline»AccessPointName«with»V«or»Λ«andpress»OK«toconfirm.
–AmenuforenteringtheSSIDwillbedisplayed.
Note:7 Fordevicetodiscoverthewirelessmodem
onthenetwork,thenetworknameshouldsupportASCIIcharacters.
7 Selecttherequiredcharacterwith»V«,»Λ«,»<«or»>«andmovetothenextcharacterwith»OK«.
–Using»Shift«➡»OK«,youcanswitchbetweenuppercaseletters/numbersandlowercaseletters/specialcharacters.
–Select»Del«todeletethecharacterenteredandpress»OK«toconfirm.
8 ConfirmtheSSIDbypressing»«(green).
9 Selecttheline»SecurityType«with»V«or»Λ«andselecttherequiredoption(WPA2)with»<«or»>«.
10 Confirmthesettingwith»«(red). –Thenetworkisnowinthe»SelectAccess
Point«menu.
11 Selectthenetworkwith»V«or»Λ«andpress»OK«toconfirm.
–Wirelessconnectionpasswordscreenisdisplayed.
12 Selecttherequiredcharacterwith»V«,»Λ«,»<«or»>«andmovetothenextcharacterwith»OK«.
–Using»Shift«➡»OK«,youcanswitchbetweenuppercaseletters/numbersandlowercaseletters/specialcharacters.
–Select»Del«todeletethecharacterenteredandpress»OK«toconfirm.
13 Confirmthepasswordbypressing»«(green).
–»Connecting...Pleasewait«messagewillbedisplayed.
14 Press»«(green)tomakesurethatthenetworkconnectionisestablishedwiththecurrentsettings.
–»Testing...Pleasewait«messagewillbedisplayed,andiftheconnectionisestablished»ConnectionToGateway:Success«,»InternetConnection:Success«messagesandMACaddresswillbedisplayed.
15 Press»EXIT«toendthesetting.
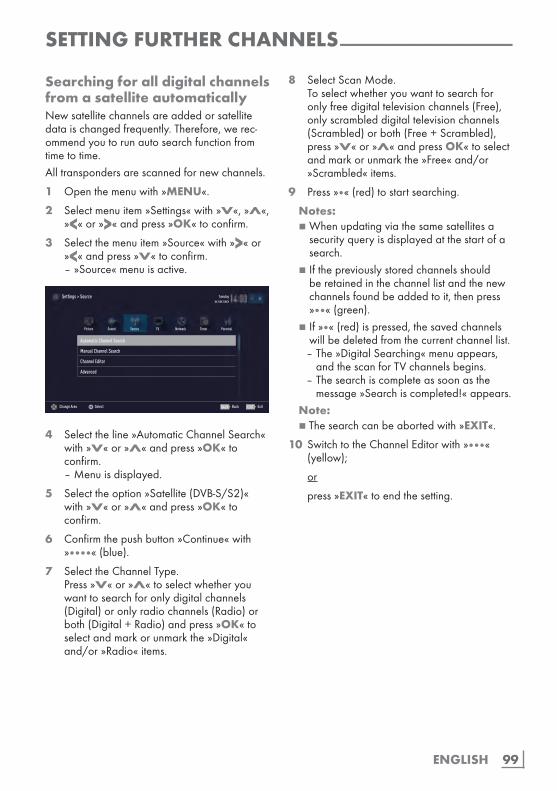
99ENGLISH
SETTINGFURTHERCHANNELS-----------------------------------------------------
SearchingforalldigitalchannelsfromasatelliteautomaticallyNewsatellitechannelsareaddedorsatellitedataischangedfrequently.Therefore,werec-ommendyoutorunautosearchfunctionfromtimetotime.Alltranspondersarescannedfornewchannels.
1 Openthemenuwith»MENU«.
2 Selectmenuitem»Settings«with»V«,»Λ«,»<«or»>«andpress»OK«toconfirm.
3 Selectthemenuitem»Source«with»>«or»<«andpress»V«toconfirm.
–»Source«menuisactive.
Automatic Channel Search
Manual Channel Search
Channel Editor
Advanced
Picture
Tuesdayxx xxx xxxx
Source TimerSound NetworkTV Parental
Settings > Source
Change Area Select ExitBack EXITBACK
4 Selecttheline»AutomaticChannelSearch«with»V«or»Λ«andpress»OK«toconfirm.
–Menuisdisplayed.
5 Selecttheoption»Satellite(DVB-S/S2)«with»V«or»Λ«andpress»OK«toconfirm.
6 Confirmthepushbutton»Continue«with»«(blue).
7 SelecttheChannelType. Press»V«or»Λ«toselectwhetheryou
wanttosearchforonlydigitalchannels(Digital)oronlyradiochannels(Radio)orboth(Digital+Radio)andpress»OK«toselectandmarkorunmarkthe»Digital«and/or»Radio«items.
8 SelectScanMode. Toselectwhetheryouwanttosearchfor
onlyfreedigitaltelevisionchannels(Free),onlyscrambleddigitaltelevisionchannels(Scrambled)orboth(Free+Scrambled),press»V«or»Λ«andpressOK«toselectandmarkorunmarkthe»Free«and/or»Scrambled«items.
9 Press»«(red)tostartsearching.
Notes:7Whenupdatingviathesamesatellitesa
securityqueryisdisplayedatthestartofasearch.
7Ifthepreviouslystoredchannelsshouldberetainedinthechannellistandthenewchannelsfoundbeaddedtoit,thenpress»«(green).
7If»«(red)ispressed,thesavedchannelswillbedeletedfromthecurrentchannellist.
–The»DigitalSearching«menuappears,andthescanforTVchannelsbegins.
–Thesearchiscompleteassoonasthemessage»Searchiscompleted!«appears.
Note:7 Thesearchcanbeabortedwith»EXIT«.
10 SwitchtotheChannelEditorwith»«(yellow);
or
press»EXIT«toendthesetting.

ENGLISH100
SETTINGFURTHERCHANNELS-----------------------------------------------------
Searchingfordigitalchan-nelsfromasatellitemanuallyonatransponderIfacertainchannelcannotbefoundwithautomaticsearch,youcansearchitmanuallybymanualsearchfunction.Youmustenterallparametersofthechannelcorrectly.Youcanobtainthecurrenttransponderinformationfromteletextpage,satelliteTVmagazinesorinternet.
1 Openthemenuwith»MENU«.
2 Selectmenuitem»Settings«with»V«,»Λ«,»<«or»>«andpress»OK«toconfirm.
3 Selectthemenuitem»Source«with»>«or»<«andpress»V«toconfirm.
–»Source«menuisactive.
4 Selecttheline»ManualChannelSearch«with»V«or»Λ«andpress»OK«toconfirm.
5 Selecttheoption»Satellite(DVB-S/S2)«with»V«or»Λ«andpress»OK«toconfirm.
6 Selecttherequiredoptionformanuallyadjustingwith»V«or»Λ«:
ServiceTypePress»<«or»>«toselectwhetheryouwanttosearchforonlytelevisionchannels(DTV),onlyradiochannels(Radio)orboth(Radio+TV).
ScanTypePress»<«or»>«toselectwhetheryouwanttosearchforonlyfreedigitaltelevisionchannels(Free),onlyscrambleddigitaltelevisionchannels(Scrambled)orboth(Free+Scrambled).
TransponderEnterthetransponderfrequencywith»1...0«infivedigits.
SymbolRateEnterthetranspondersymbolratewith»1...0«infivedigits.
PolarizationSetthepolarisationforthetransponderto»Horizontal«or»Vertical«using»<«or»>«.
NetworkSearchSelectthenetworksearchwith»<«or»>«as»On«or»Off«.
7 Press»«(red)tostartsearching. –The»DigitalSearching«menuappears,
andthescanforTVchannelsbegins. –Allchannelsfoundonthetransponderare
shown.Thenewchannelswillbeaddedtothebottomofthechanneltable.
Note:7 Thesearchcanbeabortedwith»EXIT«.
8 Press»EXIT«toendthesetting.
101ENGLISH
Antennasettingsandsearchingfordigitalchannelsfromasatel-liteautomatically
Note:7 ThefollowingdescriptionabouttheLNBset-
tingspremiseasubstantialexpertiseaboutthesatellitesystems.Askyourspecialistdealer.
1 Openthemenuwith»MENU«.
2 Selectmenuitem»Settings«with»V«,»Λ«,»<«or»>«andpress»OK«toconfirm.
3 Selectthemenuitem»Source«with»>«or»<«andpress»V«toconfirm.
–»Source«menuisactive.
4 Selecttheline»AutomaticChannelSearch«with»V«or»Λ«andpress»OK«toconfirm.
5 Selecttheoption»Satellite(DVB-S/S2)«with»V«or»Λ«andpress»OK«toconfirm.
6 Selecttheline»AntennaSettings«with»V«or»Λ«andpress»OK«toconfirm.
–The»AntennaSettings«menuisdis-played.
7 Selectandsettherequiredoptionfortheantennasettingswith»V«or»Λ«:
SatellitePress»OK«thenselecttherequiredsatel-litewith»V«or»Λ«andpress»OK«toconfirm.
LNBTypePress»OK«thenselecttherequiredLNBTypewith»<«or»>«,entertherequireddataandconfirmwith»«(green).
LNBPowerSettheLNBpowerto»Off«,»13/18V«or»14/19V«dependingontheLNBtypebyusing»<«or»>«.
LNBselectionOnlynecessaryfor»DiSEqC1.0«or»DiSEqC1.1«,seechapter“SearchingforantennasettingsforDiSEqC1.0/1.1anddigitalchannelsfromasatelliteautomati-cally”.
SETTINGFURTHERCHANNELS-----------------------------------------------------
8 Exittheantennasettingswith»«(blue).
9 SelecttheChannelType. Press»V«or»Λ«toselectwhetheryou
wanttosearchforonlydigitalchannels(Digital)oronlyradiochannels(Radio)orboth(Digital+Radio)andpress»OK«toselectandmarkorunmarkthe»Digital«and/or»Radio«items.
10 SelectScanMode. Toselectwhetheryouwanttosearchfor
onlyfreedigitaltelevisionchannels(Free),onlyscrambleddigitaltelevisionchannels(Scrambled)orboth(Free+Scrambled),press»V«or»Λ«andpressOK«toselectandmarkorunmarkthe»Free«and/or»Scrambled«items.
11 Press»«(red)tostartsearching.
Notes:7Whenupdatingviathesamesatellitesa
securityqueryisdisplayedatthestartofasearch.
7Ifthepreviouslystoredchannelsshouldberetainedinthechannellistandthenewchannelsfoundbeaddedtoit,thenpress»«(green).
7If»«(red)ispressed,thesavedchannelswillbedeletedfromthecurrentchannellist.
–The»DigitalSearching«menuappears,andthescanforTVchannelsbegins.
–Thesearchiscompleteassoonasthemessage»Searchiscompleted!«appears.
Note:7 Thesearchcanbeabortedwith»EXIT«.
12 SwitchtotheChannelEditorwith»«(yellow);
or
press»EXIT«toendthesetting.
ENGLISH102
SETTINGFURTHERCHANNELS-----------------------------------------------------
Antennasettings,SCRsystemandsearchingfordigitalchan-nelsfromasatelliteautomati-cally
Notes:7 YourTVsupportsSCRsystem(SingleChan-
nelRouter–EN50494).7 ThefollowingdescriptionabouttheLNBset-
tingspremiseasubstantialexpertiseaboutthesatellitesystems.Askyourspecialistdealer.
1 Openthemenuwith»MENU«.
2 Selectmenuitem»Settings«with»V«,»Λ«,»<«or»>«andpress»OK«toconfirm.
3 Selectthemenuitem»Source«with»>«or»<«andpress»V«toconfirm.
–»Source«menuisactive.
4 Selecttheline»AutomaticChannelSearch«with»V«or»Λ«andpress»OK«toconfirm.
5 Selecttheoption»Satellite(DVB-S/S2)«with»V«or»Λ«andpress»OK«toconfirm.
6 Selecttheline»AntennaSettings«with»V«or»Λ«andpress»OK«toconfirm.
–The»AntennaSettings«menuisdis-played.
7 Selectandsettherequiredoptionfortheantennasettingswith»V«or»Λ«:
SatellitePress»OK«thenselecttherequiredsatel-litewith»V«or»Λ«andpress»OK«toconfirm.
LNBtypeIfyourantennasystemisequippedwithasingle-cablesystemmultiswitch,usetheop-tion»GrundigSCR«.Press»OK«andselectthe»GrundigSCR«optionwith»<«or»>«.Selectthe»LNB-FrequencyHigh«linewith»V«andenterthefrequencywith»1...0«infivedigits.
Selectthe»LNB-FrequencyLow«linewith»V«andenterthefrequencywith»1...0«infivedigits.Confirmthesettingswith»«(green).
LNBSelectionDependingonthenumberofLNBs,selecttheoptionwith»<«or»>«.»1/2«ifonly1LNBisused;iftwoLNBsareused,selecttherequiredLNB(»1/2«or»2/2«).
UserBandSelectthenumberoftheantennasocketusedwith»<«or»>«.
UBFrequency(MHz)Entertherequiredfrequencyfortheselectedantennasocketwith»1...0«.
UserBand(Sub)Selectthenumberofthesecondselectedantennasocketusedwith»<«or»>«.
UBFrequency(MHz)(Sub)Entertherequiredfrequencyforthesecondselectedantennasocketwith»1...0«.
Notes:7 Useinstallationequipmentsupported/sug-
gestedbyyourSCRSwitch.7 Otherusers/receiversconnectedtothe
systemmaybeaffectedifthespecifieduserbandnumberandfrequencyischangedduringinstallation.
7 UserbandanduserbandfrequencyisspecifiedontheSCRswitchused;andeachuser/receivermustselectaspecifieduserbandanduserbandfrequency.
7 WithSCRsatellitesystem,autosearchbyseveralusers/receiversatthesametimemaycauseproblems.
8 Exittheantennasettingswith»«(blue).
9 SelecttheChannelType. Press»V«or»Λ«toselectwhetheryou
wanttosearchforonlydigitalchannels(Digital)oronlyradiochannels(Radio)orboth(Digital+Radio)andpress»OK«toselectandmarkorunmarkthe»Digital«and/or»Radio«items.
103ENGLISH
10 SelectScanMode. Toselectwhetheryouwanttosearchfor
onlyfreedigitaltelevisionchannels(Free),onlyscrambleddigitaltelevisionchannels(Scrambled)orboth(Free+Scrambled),press»V«or»Λ«andpressOK«toselectandmarkorunmarkthe»Free«and/or»Scrambled«items.
11 Press»«(red)tostartsearching.
Notes:7Whenupdatingviathesamesatellitesa
securityqueryisdisplayedatthestartofasearch.
7Ifthepreviouslystoredchannelsshouldberetainedinthechannellistandthenewchannelsfoundbeaddedtoit,thenpress»«(green).
7If»«(red)ispressed,thesavedchannelswillbedeletedfromthecurrentchannellist.
–The»DigitalSearching«menuappears,andthescanforTVchannelsbegins.
–Thesearchiscompleteassoonasthemessage»Searchiscompleted!«appears.
Note:7 Thesearchcanbeabortedwith»EXIT«.
12 SwitchtotheChannelEditorwith»«(yellow);
or
press»EXIT«toendthesetting.
AntennasettingsforDiSEqC1.0/1.1andsearchingdigitalchannelsfromasatelliteauto-matically
Note:7 ThefollowingdescriptionabouttheLNBset-
tingspremiseasubstantialexpertiseaboutthesatellitesystems.Askyourspecialistdealer.
1 Openthemenuwith»MENU«.
2 Selectmenuitem»Settings«with»V«,»Λ«,»<«or»>«andpress»OK«toconfirm.
3 Selectthemenuitem»Source«with»>«or»<«andpress»V«toconfirm.
–»Source«menuisactive.
4 Selecttheline»AutomaticChannelSearch«with»V«or»Λ«andpress»OK«toconfirm.
5 Selecttheoption»Satellite(DVB-S/S2)«with»V«or»Λ«andpress»OK«toconfirm.
6 Selecttheline»AntennaSettings«with»V«or»Λ«andpress»OK«toconfirm.
–The»AntennaSettings«menuisdis-played.
7 Selectandsettherequiredoptionfortheantennasettingswith»V«or»Λ«:
SatellitePress»OK«thenselecttherequiredsatel-litewith»V«or»Λ«andpress»OK«toconfirm.
LNBTypePress»OK«thenselecttherequiredLNBTypewith»<«or»>«,entertherequireddataandconfirmwith»«(green).
LNBPowerSettheLNBpowerto»Off«,»13/18V«or»14/19V«dependingontheLNBtypebyusing»<«or»>«.
LNBselectionSeeDISEqCmode.
SETTINGFURTHERCHANNELS-----------------------------------------------------
ENGLISH104
DISEqCModeBasedonthenumberofcurrentsatellitesys-tem,selecttheoption»Off«»DiSEqC1.0«or»DiSEqC1.1«with»<«or»>«.
–»Off«:Forsatellitesystemswithsingleantenna.
–»DiSEqC1.0«switchallowsforreceivingfrommaximumfoursatellitesatthesametime.
From»LNBSelection«use»<«or»>tomakethe»1/4«,»2/4«,»3/4«or»4/4«selectionforthesatellitethatcorrespondstorelevantDiSEqCposi-tions.
–»DiSEqC1.1«switchallowsforreceivingfrommaximumsixteensatellitesatthesametime.
From»LNBselection«use»<«or»>«tomaketheselectionsbetween»1/16«and»16/16«forthesatellitethatcorrespondstorelevantDiSEqCpositions.
8 Exittheantennasettingswith»«(blue).
9 SelecttheChannelType. Press»V«or»Λ«toselectwhetheryou
wanttosearchforonlydigitalchannels(Digital)oronlyradiochannels(Radio)orboth(Digital+Radio)andpress»OK«toselectandmarkorunmarkthe»Digital«and/or»Radio«items.
10 SelectScanMode. Toselectwhetheryouwanttosearchfor
onlyfreedigitaltelevisionchannels(Free),onlyscrambleddigitaltelevisionchannels(Scrambled)orboth(Free+Scrambled),press»V«or»Λ«andpressOK«toselectandmarkorunmarkthe»Free«and/or»Scrambled«items.
11 Press»«(red)tostartsearching.
Notes:7Whenupdatingviathesamesatellitesa
securityqueryisdisplayedatthestartofasearch.
7Ifthepreviouslystoredchannelsshouldberetainedinthechannellistandthenewchannelsfoundbeaddedtoit,thenpress»«(green).
SETTINGFURTHERCHANNELS-----------------------------------------------------
7If»«(red)ispressed,thesavedchannelswillbedeletedfromthecurrentchannellist.
–The»DigitalSearching«menuappears,andthescanforTVchannelsbegins.
–Thesearchiscompleteassoonasthemessage»Searchiscompleted!«appears.
Note:7 Thesearchcanbeabortedwith»EXIT«.
12 SwitchtotheChannelEditorwith»«(yellow);
or
press»EXIT«toendthesetting.
Note:7Repeattheprocedurefrompoint1forthe
settingsofthesecondsatelliteoranyothers.Thesechannelswillbeaddedtothebottomofthechanneltable.
105ENGLISH
SETTINGFURTHERCHANNELS-----------------------------------------------------
Motorantennasetup(DiSEqC1.2)Note:7 ThefollowingdescriptionabouttheLNBset-
tingspremiseasubstantialexpertiseaboutthesatellitesystems.Askyourspecialistdealer.
YourtelevisionsupportsDiSEqC1.2motorizedsatellitesystems.Thisfeatureallowstocontrolthesatellitethroughyourtelevision.Adjustthesatelliteantennapositionaccordingtoeachsatellite.Thesesettingscanbestoredandtheantennacanbemovedtoapresetposition.
1 Openthemenuwith»MENU«.
2 Selectmenuitem»Settings«with»V«,»Λ«,»<«or»>«andpress»OK«toconfirm.
3 Selectthemenuitem»Source«with»>«or»<«andpress»V«toconfirm.
–»Source«menuisactive.
4 Selecttheline»ManualChannelSearch«with»V«or»Λ«andpress»OK«toconfirm.
5 Selecttheoption»Satellite(DVB-S/S2)«with»V«or»Λ«andpress»OK«toconfirm.
6 Activatetheoption»AntennaSettings«with»«(blue).
–The»AntennaSettings«menuisdis-played.
7 Selecttheline»DiSEqCMode«with»V«or»Λ«andselect»DiSEqC1.2«with»<«or»>«.
–Theline»DiSEqC1.2SETTINGS«isac-tive.
8 Selecttheline»DiSEqC1.2SETTINGS«with»V«or»Λ«andpress»OK«toconfirm.
–»DiSEqC1.2SETTINGS«menuisdis-played.
9 Use»V«or»Λ«toselectnecessaryitems.
MovingMode SettheMovingModewith»<«or»>«to
»Discrete«or»Continuous«. –»Discrete«:Movestheantennatowestor
eastforthedeterminedstepsize. –»Continuous«:Movestheantennatowest
oreastcontinuously.
StepSize With»<«or»>«selectthenumberofsteps
theantennahastorotate.»StepSize«isactivewhen»MovingMode«isselectedas»Discrete«.
MoveMotor Adjuststheantennafortheselectedsatellite.
Settheantennato»West«with»<«andto»East«with»>«.
–»GoToStoredPosition«:Movestheantennatothepresetsatelliteposition.Maximum50positionscanbesaved.Selectthesettingwith»«(green)button,selectpredefinedpositionwith»<«or»>«andconfirmwith»«(green)button.Antennawillmodetosavedposition.
–»StorePosition«:Storesantenna'scurrentposition.Selectsettingwith»«(red)but-ton,selectrecordingpositionwith»<«or»>«andconfirmwith»«(green)button.
LimitPosition –Setsthelimitpositionwhichtheantenna
willbeabletomoveandallowstheantennatomovewithinthedeterminedlimits.With»<«specifyalimitpositionin»West«directionandwith»>«specifyalimitpositionin»East«direction.
ResetDiSEqC1.2Limit –Resetsthelimitpositionssetforthean-
tenna.
10 Press»EXIT«toendthesetting.
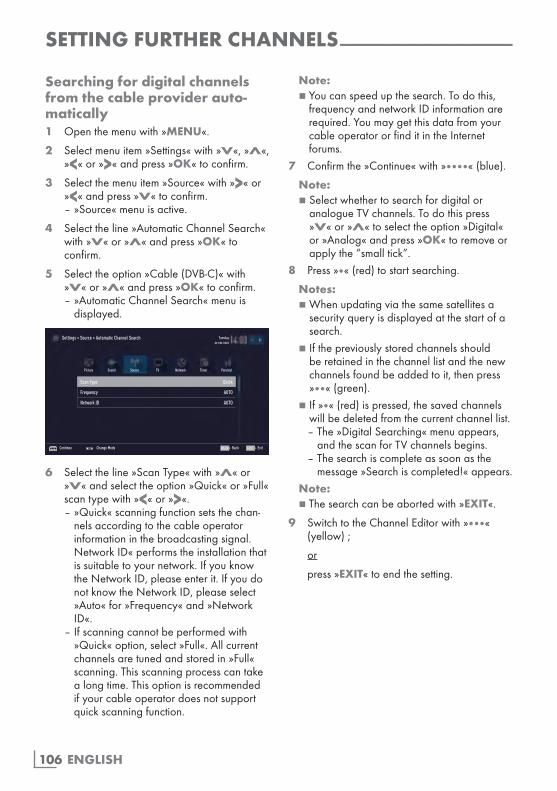
ENGLISH106
SETTINGFURTHERCHANNELS-----------------------------------------------------
Searchingfordigitalchannelsfromthecableproviderauto-matically1 Openthemenuwith»MENU«.
2 Selectmenuitem»Settings«with»V«,»Λ«,»<«or»>«andpress»OK«toconfirm.
3 Selectthemenuitem»Source«with»>«or»<«andpress»V«toconfirm.
–»Source«menuisactive.
4 Selecttheline»AutomaticChannelSearch«with»V«or»Λ«andpress»OK«toconfirm.
5 Selecttheoption»Cable(DVB-C)«with»V«or»Λ«andpress»OK«toconfirm.
–»AutomaticChannelSearch«menuisdisplayed.
Scan Type Quick
Frequency AUTO
Network ID AUTO
Picture
Tuesdayxx xxx xxxx
Source TimerSound NetworkTV Parental
Settings > Source > Automatic Channel Search
Continue ExitBack EXITBACKChange Mode
6 Selecttheline»ScanType«with»Λ«or»V«andselecttheoption»Quick«or»Full«scantypewith»<«or»>«.
–»Quick«scanningfunctionsetsthechan-nelsaccordingtothecableoperatorinformationinthebroadcastingsignal.NetworkID«performstheinstallationthatissuitabletoyournetwork.IfyouknowtheNetworkID,pleaseenterit.IfyoudonotknowtheNetworkID,pleaseselect»Auto«for»Frequency«and»NetworkID«.
–Ifscanningcannotbeperformedwith»Quick«option,select»Full«.Allcurrentchannelsaretunedandstoredin»Full«scanning.Thisscanningprocesscantakealongtime.Thisoptionisrecommendedifyourcableoperatordoesnotsupportquickscanningfunction.
Note:7 Youcanspeedupthesearch.Todothis,
frequencyandnetworkIDinformationarerequired.YoumaygetthisdatafromyourcableoperatororfinditintheInternetforums.
7 Confirmthe»Continue«with»«(blue).
Note:7Selectwhethertosearchfordigitalor
analogueTVchannels.Todothispress»V«or»Λ«toselecttheoption»Digital«or»Analog«andpress»OK«toremoveorapplythe“smalltick”.
8 Press»«(red)tostartsearching.
Notes:7Whenupdatingviathesamesatellitesa
securityqueryisdisplayedatthestartofasearch.
7Ifthepreviouslystoredchannelsshouldberetainedinthechannellistandthenewchannelsfoundbeaddedtoit,thenpress»«(green).
7If»«(red)ispressed,thesavedchannelswillbedeletedfromthecurrentchannellist.
–The»DigitalSearching«menuappears,andthescanforTVchannelsbegins.
–Thesearchiscompleteassoonasthemessage»Searchiscompleted!«appears.
Note:7 Thesearchcanbeabortedwith»EXIT«.
9 SwitchtotheChannelEditorwith»«(yellow);
or
press»EXIT«toendthesetting.
107ENGLISH
SETTINGFURTHERCHANNELS-----------------------------------------------------
Searchingfordigitalchannelsfromthecableprovidermanu-ally1 Openthemenuwith»MENU«.
2 Selectmenuitem»Settings«with»V«,»Λ«,»<«or»>«andpress»OK«toconfirm.
3 Selectthemenuitem»Source«with»>«or»<«andpress»V«toconfirm.
–»Source«menuisactive.
4 Selecttheline»ManualChannelSearch«with»V«or»Λ«andpress»OK«toconfirm.
5 Selecttheoption»Cable(DVB-C)«with»V«or»Λ«andpress»OK«toconfirm.
6 Selectwhethertosearchfordigitalorana-logueTVchannels.
Totothispress»V«or»Λ«toselecttheoption»Digital«or»Analogue«andconfirmwith»OK«.
7 With»V«select»Frequency(MHz)«andenterfrequency(4-digit)directlywith»1...0«;searchwillstart.
–Thesearchisfinishedwhenthechannelsfoundappearinthelist.
8 Press»EXIT«toendthesetting.
SearchingfordigitalterrestrialTVchannelsautomatically1 Openthemenuwith»MENU«.
2 Selectmenuitem»Settings«with»V«,»Λ«,»<«or»>«andpress»OK«toconfirm.
3 Selectthemenuitem»Source«with»>«or»<«andpress»V«toconfirm.
–»Source«menuisactive.
4 Selecttheline»Advanced«with»V«or»Λ«andpress»OK«toconfirm.
5 Selecttheline»ActiveAntennaPower«with»V«or»Λ«.
Switchontheantennapowersupplyfortheantennawith»<«or»>«(»On«).
Important:7 Theantennapowersupply(5V)mayonly
beswitchedoniftheantennaisanactiveindoorantennawithasignalamplifieranditisnotalreadysuppliedwithavoltageviaamainsplug(orsimilarsupply).Otherwiseyoumaycauseashortcircuitandirrepara-blydamageyourantenna.
6 Press»BACK<«togobackonemenulevel.
7 Selecttheline»AutomaticChannelSearch«with»Λ«or»V«andpress»OK«toconfirm.
8 Selecttheoption»Air(DVB-T/T2)«with»Λ«or»V«andpress»OK«toconfirm.
9 Selectwhethertosearchfordigitalorana-logueTVchannels.
Totothispress»Λ«oder»V«toselecttheoption»Digital«or»Analogue«andconfirmwith»OK«.
10 Press»«(red)tostartsearching.
Notes:7Whenupdatingviathesamesatellitesa
securityqueryisdisplayedatthestartofasearch.
7Ifthepreviouslystoredchannelsshouldberetainedinthechannellistandthenewchannelsfoundbeaddedtoit,thenpress»«(green).
ENGLISH108
7If»«(red)ispressed,thesavedchannelswillbedeletedfromthecurrentchannellist.
–The»DigitalSearching«menuappears,andthescanforTVchannelsbegins.
–Thesearchiscompleteassoonasthemessage»Searchiscompleted!«appears.
Note:7 Thesearchcanbeabortedwith»EXIT«.
11 SwitchtotheChannelEditorwith»«(yellow);
or
press»EXIT«toendthesetting.
SETTINGFURTHERCHANNELS-----------------------------------------------------
SearchingfordigitalterrestrialTVchannelsmanually1 Openthemenuwith»MENU«.
2 Selectmenuitem»Settings«with»V«,»Λ«,»<«or»>«andpress»OK«toconfirm.
3 Selectthemenuitem»Source«with»>«or»<«andpress»V«toconfirm.
–»Source«menuisactive.
4 Selecttheline»Advanced«with»V«or»Λ«andpress»OK«toconfirm.
5 Selecttheline»ActiveAntennaPower«with»V«or»Λ«.
Switchontheantennapowersupplyfortheantennawith»<«or»>«(»On«)
Important:7 Theantennapowersupply(5V)mayonly
beswitchedoniftheantennaisanactiveindoorantennawithasignalamplifieranditisnotalreadysuppliedwithavoltageviaamainsplug(orsimilarsupply).Otherwiseyoumaycauseashortcircuitandirrepara-blydamageyourantenna.
6 Press»BACK<«togobackonemenulevel.
7 Selecttheline»ManualChannelSearch«with»Λ«or»V«andpress»OK«toconfirm.
8 Selecttheoption»Air«with»Λ«or»V«andpress»OK«toconfirm
–»ManualChannelSearch«menuisdis-played.
9 Selectwhethertosearchfordigitalorana-logueTVchannels.
Totothispress»Λ«or»V«toselecttheoption»Digital«or»Analogue«andconfirmwith»OK«.
10 Enterfrequency(3-digit)directlywith»1...0«.
–Searchwillstart. –Thesearchisfinishedwhenthechannels
foundappearinthelist.
11 Press»EXIT«toendthesetting.
109ENGLISH
SETTINGFURTHERCHANNELS-----------------------------------------------------
AutomaticserviceupdateIfthisfunctionisactivated,possiblechangesofnetworkoperatorsareupdatedautomatically.Theunitmustbelocatedinstand-bymode.Thisupdatingaffectsalltypesofreception-ter-restrial,cableandsatellite.1 Openthemenuwith»MENU«.
2 Selectmenuitem»Settings«with»V«,»Λ«,»<«or»>«andpress»OK«toconfirm.
3 Selectthemenuitem»Source«with»>«or»<«andpress»V«toconfirm.
–»Source«menuisactive.
4 Selecttheline»Advanced«with»V«or»Λ«andpress»OK«toconfirm.
5 Selecttheline»AutomaticServiceUpdate«with»V«or»Λ«andselecttheautomaticupdatewith»<«or»>«(»On«).
6 Press»EXIT«toendthesetting.
TuninganaloguetelevisionchannelsThissettingisonlynecessaryifyoucannotreceiveanydigitalchannelsandyouhavenotcarriedoutananaloguesearchduringinitialsetup.Thetelevisionchannelcanbesetdirectlyorusingthesearch.
SettingallanaloguetelevisionchannelsTheanaloguetelevisionstationsarelistedinthechannellistafterthedigitaltelevisionstations.
Note:7 Plugtherooftopantennacable(forana-
loguetelevisionstations)intotheANTINsocketonthetelevision.
1 Openthemenuwith»MENU«.
2 Selectmenuitem»Settings«with»V«,»Λ«,»<«or»>«andpress»OK«toconfirm.
3 Selectthemenuitem»Source«with»>«or»<«andpress»V«toconfirm.
–»Source«menuisactive.
4 Selecttheline»AutomaticChannelSearch«with»V«or»Λ«andpress»OK«toconfirm.
5 Selecttheoption»Air(DVB-T/T2)«or»Cable(DVB-C)«with»V«or»Λ«andconfirmthesourceyouarereceivinganalogbroadcastfrombypressing»OK«.
6 Selecttheoption»Digital«with»V«or»Λ«andpress»OK«toremovethesmalltick.
7 Press»«(red)tostartsearching.
ENGLISH110
SETTINGFURTHERCHANNELS-----------------------------------------------------
Notes:7 Afterstartingthescan,asecurityquerywill
appear.Press»«(green)toconfirmtheoption»Yes«.
–Allchannelandfavouriteslistsfortheanaloguechannelswillbedeletedandcompilednew.
–The»AnalogSearching«menuappears,andthescanforTVchannelsbegins.Dependingonthenumberoftelevisionchannelsreceived,thiscaneasilytakeafewminutes.
–Thesearchiscompleteassoonasthe»Searchiscompleted!«appears.
Note:7 Thesearchcanbeendedprematurelywith
»EXIT«.8 Press»«(yellow)toswitchtotheChan-
nelEditor;
or
press»EXIT«toendthesetting.
Tuningtheanaloguetelevisionchannelsbyenteringthechannelnumbers1 Openthemenuwith»MENU«.
2 Selectmenuitem»Settings«with»V«,»Λ«,»<«or»>«andpress»OK«toconfirm.
3 Selectthemenuitem»Source«with»>«or»<«andpress»V«toconfirm.
–»Source«menuisactive.
4 Selecttheline»ManualChannelSearch«with»V«or»Λ«andpress»OK«toconfirm.
5 Selecttheoption»Air(DVB-T/T2)«or»Cable(DVB-C)«with»V«or»Λ«andconfirmthesourceyouarereceivinganalogbroadcastfrombypressing»OK«.
6 Selecttheoption»Analog«with»V«or»Λ«andpress»OK«toconfirm.
–Menuisdisplayed.
7 Selecttheline»ProgramNo«with»V«or»Λ«andpress»<«,»>«or»1…0«toselectthepreset.
8 Selecttheline»Band«with»V«or»Λ«.Toselect»S«(specialchannel)or»C«(chan-nel)optionspress»<«or»>«.
9 Selecttheline»Channel«with»V«or»Λ«.Toenterthechannelnumberstepbystep,press»<«or»>«orenteritdirectlywith»1…0«or
startaautomaticscanwith»«(green)or»«(yellow).
Note:7 »Thecurrentsystemisdisplayedinthe
»System«.Ifthecolourand/orsoundisnotfunctioningcorrectly,select»System«with»V«or»Λ.Selecttherequiredsettingwith»<«or»>«.
7 Whenfinetuningisrequired,select»FineTuning«with»V«or»Λ«andtunewith»<«or»>«.
10 Tosavethesettingpress»«(blue).
Note:7 Tosetothertelevisionchannels,repeat
stepsfrom7to10.
11 Press»EXIT«toendthesetting.
111ENGLISH
SETTINGFURTHERCHANNELS-----------------------------------------------------
ChangingstoredanaloguechannelsIfchannelswerestoredwiththeautomaticchan-nelsearchduringthetuningofthetelevisionchannels,youcandeletethem.Youcanalsochangeorenterthenameofachannelandskipachannel.
Selectingchannellists1 Openthemenuwith»MENU«.
2 Selectmenuitem»Settings«with»V«,»Λ«,»<«or»>«andpress»OK«toconfirm.
3 Selectthemenuitem»Source«with»>«or»<«andpress»V«toconfirm.
–»Source«menuisactive.
4 Selecttheline»ChannelEditor«with»V«or»Λ«andpress»OK«toconfirm.
–»ChannelEditor«menuisdisplayed.
Note:7 Additionaloperationsareexplainedinthe
followingsections.
Deletingchannels1 Inthe»ChannelEditor«menu,selectthe
channel(s)youwanttodeletewith»V«,»Λ«,»<«or»>«,andhighlightthetelevi-sionchannelbypressing»OK«.
–Channelismarkedwith»✔«.
Note:7IfseveralTVchannelsaretobedeleted,
press»V«,»Λ«,»<«or»>«toselecttheseandmarkeachonewith»OK«.
2 Activadethe»Tools«menuwith»«(yel-low).
3 Selecttheline»Delete«with»V«or»Λ«andpress»OK«toconfirm.
4 Toconfirmdeletionprocess,selecttheop-tion»OK«with»<«or»>«andpress»OK«toconfirm;
or
tocanceldeletionprocess,selecttheoption»No«with»<«or»>«andpress»OK«toconfirm.
5 Press»EXIT«toclosethemenu.
Enteringtheanalogchannelnames(maximum8characters)1 Inthe»ChannelEditor«menu,selectthe
channelyouwanttorenamewith»V«,»Λ«,»<«or»>«,andhighlightitbypress-ing»OK«.
–Channelismarkedwith»✔«.
2 Activadethe»Tools«menuwith»«(yel-low).
3 Selecttheline»Rename«with»V«or»Λ«andpress»OK«toconfirm.
4 Deletethecurrentchannelnamestep-by-stepwith»«(red).
5 Selecttherequiredcharacterwith»V«,»Λ«,»<«or»>«andmovetothenextcharacterwith»OK«.
–Using»Shift«➡»OK«,youcanswitchbetweenuppercaseletters/numbersandlowercaseletters/specialcharacters.
–Select»Del«todeletethecharacterenteredandpress»OK«toconfirm.
6 Confirmthechannelnamewith»«(green).
Note:7 Toenterotherchannelnames,repeatsteps
1to6.

ENGLISH112
SETTINGFURTHERCHANNELS-----------------------------------------------------
Creatingalistoffavourites-analogchannelsYoucanselectyourfavouritechannelsandsavetheminuptofourlists(FAV1toFAV4).
1 Inthe»ChannelEditor«menu,selectthechannel(s)youwanttoaddinthefavor-iteslistwith»V«,»Λ«,»<«or»>«,andhighlightthetelevisionchannelbypressing»OK«.
–Channelismarkedwith»✔«.
2 Activadethe»Tools«menuwith»«(yel-low).
3 Selecttheline»AddToFav.«with»V«or»Λ«andpress»OK«toconfirm.
–»AddtoFav.«menuisdisplayed.
4 Selectthefavoritelistyouwanttoaddtheselectedchannelswith»V«or»Λ«andstorewith»OK«.
–ThechannelsaremarkedintheChannelEditorwith»❶«,»❷«,»❸«or»❹«.
–Youcanaddthesamechannelinmorethanonefavouriteslist.
–Eachfavouritelistcancontainmaximum255channels.
Notes:7 Youcandeletechannelsfromthefavou-
riteslist.Press»«(yellow),selectthefavoriteslistthechannelisinwith»V«or»Λ«andpress»OK«toconfirm.Selectthechannel(s)youwanttodeletewith»V«,»Λ«,»<«or»>«,andhighlightthechannelbypressing»OK«.
Press»«(yellow)andselecttheline»RemovefromFav.«with»V«or»Λ«andconfirmwith»OK«.Thechannelyouhaveselectedisnowdeletedfromthefavoriteslist.
7 Whenachannelstoredinthefavouritechannellistisdeletedchannelorderinthefavouritelistisupdated.
5 Press»EXIT«toclosethemenu.
Displayingsignalinformation(onlyfordigitaltelevisionchannels)1 Openthemenuwith»MENU«.
2 Selectmenuitem»Settings«with»V«,»Λ«,»<«or»>«andpress»OK«toconfirm.
3 Selectthemenuitem»Source«with»>«or»<«andpress»V«toconfirm.
–»Source«menuisactive.
4 Selecttheline»Advanced«with»V«or»Λ«andpress»OK«toconfirm.
5 Selecttheline»SignalInformation«with»V«or»Λ«andpress»OK«toconfirm.
–»SignalInformation«menuisdisplayed.
Notes:7 Signalinformationchangesdependingon
thecurrentsource.7 Signalinformationisshownatthetopofthe
menu.Themore»Frequency«and»SignalStrength«barstretchestotheright,themoresignalyouhave.
7 Thesignallevelnotonlydependsonyourreceiversystem,butalsoonthechannelwhichiscurrentlyactive.Rememberthiswhenaligningyourantennausingthesignalleveldisplay.
6 Press»EXIT«toclosethemenu.
113ENGLISH
INFORMATION-------------------------------------------------------------------------------------------------
GRUNDIG55VLX8582SP
ProductdatasheetEnergyefficiencyclass AScreendiagonal 139cm/55inchPowerconsumption Operation110W/180Wmax. Standby<0.50W Networkedstandby<3W Switchedoff0WAnnualpowerconsumption 161kWhMaximumresolution 3840×2160
AdditionalinformationOperatingvoltage: 220…240V~,50…60HzScreen(dm²) 82dm²RoHSlimits Pb(lead)/Hg(mercury) PbconcentrationcomplieswithRoHSlimits/
0mgPeakluminanceratio 65%Audiooutput 2×30Wmusicpower 2×15Wsinepower+10Wsinepowerof
thesubwoofer Thesubwooferisoptionalandthereforenot
availableonallproducts.Defaultsatellites 20LNBpowersupply 13/18V,14/19Voptional,maximum
500mALNBswitchingsignal 0/22kHz650mV+/-250mVppDiSEqC 1.0-operation,1.1-operation,1.2-operation
Digitalreceptionranges2xSatellite Kuband: 10,700MHz…12,750MHz Modulation: DVBSQPSK,DVBS2QPSK,
8PSK IFband: 950MHz…2150MHz Signallevel: –25dBm…–65dBm2xCable Overallband: 110MHz…862MHz Modulation: 16QAM,32QAM,64QAM,
128QAMand256QAM Symbolrate: 4.0Msym/s…7.2Msym/s2xTerrestrial(DVB-T) VHF/UHF-Band,bandwidth7MHzand
8MHz FFTsize: 2k,8k Modulation: 16QAM,64QAM,QPSK Guardinterval: 1/4,1/8,1/16,1/322xTerrestrial(DVB-T2)* VHF/UHF-Band,bandwidth7MHzand
8MHz FFTsize: 1k,2k,4k,8k,16k,32k Modulation: 16QAM,64QAM,
256QAM,QPSK Guardinterval: 1/4,19/256,1/8,19/128,
1/16,1/32,1/128 *DVB-T2isoptionalandthereforenotavail-
ableonallproducts.Analoguereceptionranges C02…C80,specialchannelsS01…S41Presetchannels TV/Radio 6000(satellite–DVB-S), 1000(cable–DVB-C)
or99(analogue) 1000(terrestrial–DVB-T)or
99(analogue) 7AV,3USBSupportedmediafiles Imagefiles: jpg/jpe,bmp,png Musicfiles: m4a,wma,aac Videofiles: mov,xvid,mpg,mpe,vob,
dat,trp,ts,avi,mp4,mkvWeight approx.14,4kgDimensions W×H×D124,2cm×75cm×6,2cm
-Righttomaketechnicalchangesanderrorsreserved.
ENGLISH114
INFORMATION-------------------------------------------------------------------------------------------------
ServiceinformationfordealersThisproductcomplieswithEuropeanUniondirectivesandregula-tionsbelow:2006/95/EC:Elec-
tricalequipmentdirectiveforusewithincertainvoltagelimits.2004/108/EC:Directiverelevantforelectro-magneticsuitability.2009/125/EC:Directiveandrelevantforeco-designforproductsusingenergyaswellasitsfollowingsub-directives.278/2009:Regulationregardingecofriendlydesignrequirementsregardingenergyconsump-tionofunchargedexternalpowersourcesandaverageactiveefficiency(formodelswithAC/DCadapters).642/2009:Regulationregardingecofriendlydesignrequirementsfortelevisions.801/2013onChangesAboutEnvironment-FriendlyDesignRequirementsforTelevisions.2010/30/EU:DirectiveregardingEnergyLabel-lingofEnergy-Relatedproductsaswellasitsfollowingsub-directives;1062/2010:Regulationregardingenergylabellingoftelevisions.2011/65/EU:Directiveonlimitationsonuseofcertainhazardousmaterialsonelectric,elec-tronicdomesticandofficeequipment.1999/5/EC:RegulationsonRadioandTele-communicationsTerminalEquipment.Toreceiveacopyofdeclarationofcompliance(DoC)visit:http://www.grundig.com/download/doc.Youcanaccessthedeclarationofcompliancebyrunningyourtelevisionmodelontheproductmodelsearchsectionbyenteringthemodelnumberonthecoveroftheuser'smanual.
NotesforWLANreceptionThefollowinginformationisonlyapplicablefordevicesthataresoldinthecountriesenforcingEUregulations.TV’swirelesssystemcanonlybeusedinthecountriesgiveninthetablebelow.
AT BE BG CH CY CZ DE DKEE ES FI FR GB GR HU IEIS IT LI LT LU LV MT NL
NO PL PT RO SE SI SK TR
Thisdevicecanalsobeoperatedinthecoun-triesoutsideEurope.
ForthecustomersinItalyPublicuseissubjecttoserviceprovider'spermis-sion.ForthecustomersinNorway;Radioequipmentuseisnotallowedinagraphi-calareawithin20kmdiameterofNy-Alesund,Svalbord.
ForthecustomersinTurkeyThisdevice'sWLAN(Wifi)featureisonlyusedindoors.InTurkey,outdooruseisnotallowed.MakesureWLAN(Wifi)featureisclosedwhenusingoutdoors.
ForthecustomersinNorwayThissub-sectiondoesnotapplytothegeograph-icalregionwithinaradiusof20kmfromthecentreofNyÅlesund.
115ENGLISH
INFORMATION-------------------------------------------------------------------------------------------------
NetworkinterfacesThisproductisintendedforconnectiontotheADSLnetwork.
DisposingofthepackagingThepackingmaterialsaredangerousforchil-dren.Keepthepackingmaterialsoutofthereachofchildren.Thepackingofyourproductismanufacturedfromrecyclablematerials.Disposebyclassifyinginaccordancewithwasteinstructions.Donotdisposealongwithnormalhouseholdwaste.
EnvironmentalnoteThisproducthasbeenmadefromhigh-qualitypartsandmaterialswhichcanbere-usedandrecycled.
Therefore,donotdisposeoftheproductwithnormalhouseholdwasteattheendofitslife.Takeittoacollectionpointforrecyclingelectri-calandelectronicdevices.Thisisindicatedbythissymbolontheproduct,intheoperatingmanualandonthepackaging.Pleasefindoutaboutcollectionpointsoperatedbyyourlocalauthorities.Helpprotecttheenvironmentbyrecyclingusedproducts.
Explanationofthesymbolswhichmaybepresentonbacksideofthetelevisionset
ClassIIorDoubleinsulation.Televisionsetdoesn’trequireconnectiontoelectricalearth(ground).
Alternatingcurrent.ThesetworksonlywithAClinevolt-ageinyourhouseholdelectric-ity.
Directcurrent.ThesetworksonlywithAC/DCadapter.
ForthecustomersinRussiaShortRangeDevicewithFHSSModulationApplications.Maximum2.5mWe.i.r.p.forcollectingtelemetryinformationforauto-matictrackingandsourcecalculationsystems,100mWe.i.r.pisthemaximumallowedshortrangedevicedensityvaluepermittedforuseonoutdoorapplicationswithoutanylimitationoninstallationheight.Foruseswithotherpurposes,thisappliestooutdoorapplicationinwhichthisvaluedoesnotexceed10mabovetheground.Shortrangedevicedensityforindoorapplica-tionsis100mWe.i.r.pmaximum.Shortrangedeviceapplicationswithbroad-bandmodulationwithDSSSandotherthanFHSS.ThemaximumaveragedensityvalueforshortrangedeviceapplicationswithbroadbandmodulationwithDSSSandotherthanFHSSis100mWe.i.r.p.Foronlythepurposeofcompilingtelemetrydataforautomaticmonitoringandsourceestimationsystems,maximumshortrangedeviceallowedtobeusedinoutdoorapplicationsis20mW/MHzor100mWe.i.r.p.Maximumdensityvalueforindooruseofshortrangedevicesis10mW/MHzor100mWe.i.r.p.
ForthecustomersinUkraineMaximumshortrangedevicedensityvalueforindooruses,alongwithinternalantennawith6dBiamplificationfactor,is100mWe.i.r.p.
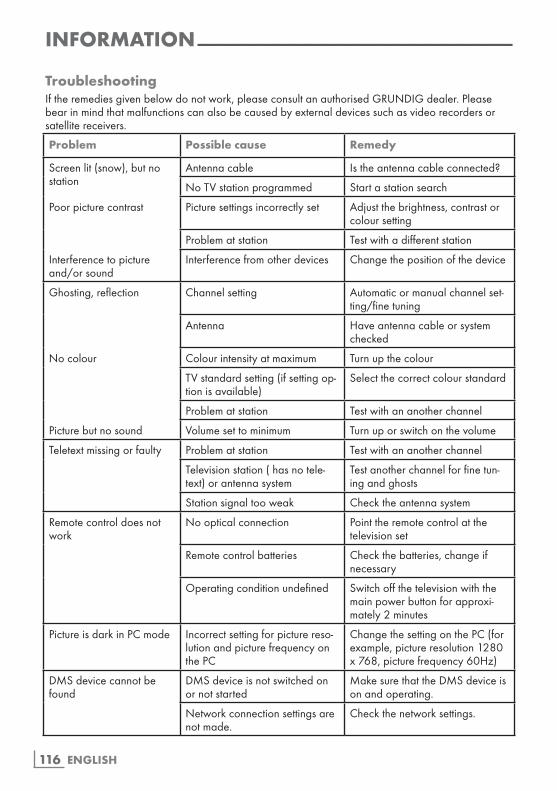
ENGLISH116
INFORMATION-------------------------------------------------------------------------------------------------
TroubleshootingIftheremediesgivenbelowdonotwork,pleaseconsultanauthorisedGRUNDIGdealer.Pleasebearinmindthatmalfunctionscanalsobecausedbyexternaldevicessuchasvideorecordersorsatellitereceivers.
Problem Possiblecause Remedy
Screenlit(snow),butnostation
Antennacable Istheantennacableconnected?
NoTVstationprogrammed Startastationsearch
Poorpicturecontrast Picturesettingsincorrectlyset Adjustthebrightness,contrastorcoloursetting
Problematstation Testwithadifferentstation
Interferencetopictureand/orsound
Interferencefromotherdevices Changethepositionofthedevice
Ghosting,reflection Channelsetting Automaticormanualchannelset-ting/finetuning
Antenna Haveantennacableorsystemchecked
Nocolour Colourintensityatmaximum Turnupthecolour
TVstandardsetting(ifsettingop-tionisavailable)
Selectthecorrectcolourstandard
Problematstation Testwithananotherchannel
Picturebutnosound Volumesettominimum Turnuporswitchonthevolume
Teletextmissingorfaulty Problematstation Testwithananotherchannel
Televisionstation(hasnotele-text)orantennasystem
Testanotherchannelforfinetun-ingandghosts
Stationsignaltooweak Checktheantennasystem
Remotecontroldoesnotwork
Noopticalconnection Pointtheremotecontrolatthetelevisionset
Remotecontrolbatteries Checkthebatteries,changeifnecessary
Operatingconditionundefined Switchoffthetelevisionwiththemainpowerbuttonforapproxi-mately2minutes
PictureisdarkinPCmode Incorrectsettingforpicturereso-lutionandpicturefrequencyonthePC
ChangethesettingonthePC(forexample,pictureresolution1280x768,picturefrequency60Hz)
DMSdevicecannotbefound
DMSdeviceisnotswitchedonornotstarted
MakesurethattheDMSdeviceisonandoperating.
Networkconnectionsettingsarenotmade.
Checkthenetworksettings.
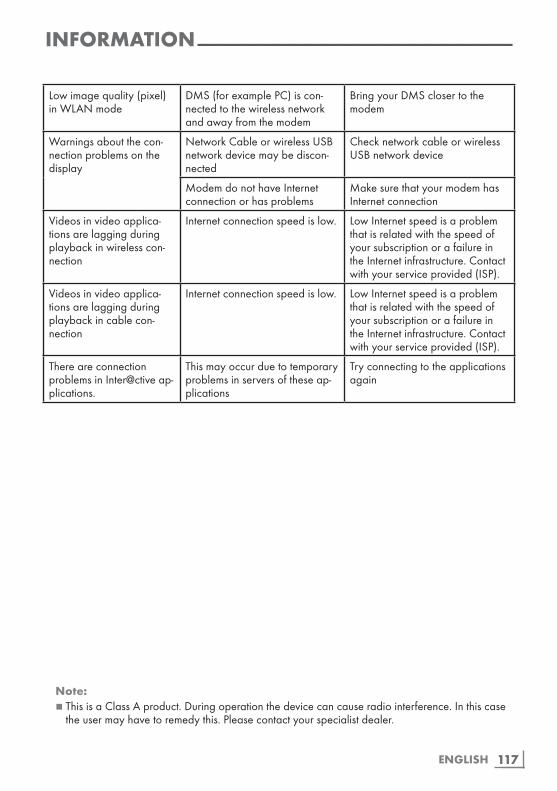
117ENGLISH
Note:7 ThisisaClassAproduct.Duringoperationthedevicecancauseradiointerference.Inthiscase
theusermayhavetoremedythis.Pleasecontactyourspecialistdealer.
Lowimagequality(pixel)inWLANmode
DMS(forexamplePC)iscon-nectedtothewirelessnetworkandawayfromthemodem
BringyourDMSclosertothemodem
Warningsaboutthecon-nectionproblemsonthedisplay
NetworkCableorwirelessUSBnetworkdevicemaybediscon-nected
ChecknetworkcableorwirelessUSBnetworkdevice
ModemdonothaveInternetconnectionorhasproblems
MakesurethatyourmodemhasInternetconnection
Videosinvideoapplica-tionsarelaggingduringplaybackinwirelesscon-nection
Internetconnectionspeedislow. LowInternetspeedisaproblemthatisrelatedwiththespeedofyoursubscriptionorafailureintheInternetinfrastructure.Contactwithyourserviceprovided(ISP).
Videosinvideoapplica-tionsarelaggingduringplaybackincablecon-nection
Internetconnectionspeedislow. LowInternetspeedisaproblemthatisrelatedwiththespeedofyoursubscriptionorafailureintheInternetinfrastructure.Contactwithyourserviceprovided(ISP).
ThereareconnectionproblemsinInter@ctiveap-plications.
Thismayoccurduetotemporaryproblemsinserversoftheseap-plications
Tryconnectingtotheapplicationsagain
INFORMATION-------------------------------------------------------------------------------------------------
ENGLISH118
GLOSSARY--------------------------------------------------------------------------------------------------------------
Dependingonthetelevisionmodel.
ARCTheARC(AudioReturnChannel)canbeusedtoplaybacktheaudiosignalfromthetelevisionchannelusinganHDMIcableoranopticalcablewithamulti-channelamplifier.
BacklighManualsettingforbacklighting(onlyactiveifdynamicbacklightingisswitchedto“OFF”).Thissettingalsodirectlyimpactspowercon-sumption.
BlockNoiseReductionThisfunctioncanonlybeselectedwithdigitalreceptionsourcesandAVpresets.Itreducesanyinterferencefromartefacts(pixelblocks)fromdigitalprogrammesduetoMPEGcompression(suchasfromDVB-Treceiversandlowertrans-missionratesorDVDplayers).
BootloaderversionBootloaderisasoftwareapplicationthatisloadedbythedevicefirmwarefromabootca-pablemediumandthenexecuted.Thebootloaderthenloadsfurtherpartsoftheoperatingsystem.
CommonInterfaceInterfaceforaDVBreceiver.Encryptedchan-nelscanonlybeviewedwithaCAmodulesuitablefortheencryptionsystemandincon-junctionwiththecorrespondingsmartcard.
DigilinkThisfunctionusestheCEC(ConsumerElectron-icsControl)protocol.CECallowsexternaldevicesconnectedtotheHDMIsocketswithanHDMIcable(e.g.DVDplayer)tobeoperatedwitharemotecontrol.
DiSEqCDiSEqC(DigitalSatelliteEquipmentControl)isadigitalsystemforcontrollingcomplexsatellitesystemswithamotororseveralLNBs.DiSEqCisnecessaryiftwoormoresatelliteposi-tionsneedtobecontrolled.
DynamicBacklightHerethedeviceoptimallyadjuststhebacklightingforthepicturecontentbyregulatingthebacklightingdependingontheaveragepic-turebrightness.Ifapicturehaspredominatelydarkareas,thentheblackleveldisplayedisimprovedbydownwardadjustmentofthebacklighting(inthiscasethedisplayofthedarkar-easisimproved),andwithpredominantlybrightpicturematerialthebacklightingismaximisedinordertodisplaytheseareasmorebrightly.
DLNADigitalLivingNetworkAlliance(DLNA)isaninternationalassociationofentertainmentelectronics,IThardwareandmobiletelephonemanufacturersthataimstoensureperfectcom-municationbetweenITdevicesinthehomeandpersonalusesector.ThesystemletsyouloadandplayanyaccessiblefilesonthenetworkonyourGrundigLEDTVsimplybyusingtheremotecontrol–withouttheinconvenienceofconnect-ingaUSBharddiskorburningDVDs.
DomainnamesystemThedomainnamesystem(DNS)isoneofthemostimportantservicesontheInternet.ItsmainfunctionistoconvertanInternetaddressintothecorrespondingIPaddress.
DTSStudioSound™DTSStudioSoundisanadvancedsurroundsoundsolutionpackagethatextractsandposi-tionstheexactaudiosignalsforanatmosphericsurroundsoundexperienceusingthebuilt-inTVspeakers.Tocompletetheaudioexperience,post-processingandpsychoacousticmethodsareusedwhichprovide3Daudioplaybackinaccordancewiththe3Dvideocontent-foropti-misingbassanddialogueanddeliveringunifiedandbalancedvolumefortheentirecontent.
DVB-CDVB-C(DigitalVideoBroadcasting–Cable)andthesuccessorDVB-C2standardarevaria-tionsofDVBwhichisusedfortransmittingdigitalradioandtelevisionsignalsviaacableconnec-tion.
119ENGLISH
DVB-SDVB-S(DigitalVideoBroadcasting–Satellite)isthenamegiventobroadcastingDVBsignalsviasatellite.
DVB-TDVB-T(DigitalVideoBroadcasting–Terrestrial)isavariationofDVBwhichisusedfortransmit-tingdigitalradioandtelevisionsignalsviaacableconnection.
DynamicContrastThefunctiondynamicallyandoptimallyadjuststhecontrastfortherespectivepicturecontentbyanalysingimagesandthenalteringthisdepend-inginachangeincontrast.Thisincreasethecontract,howevermayalsoreducethevisiblebrightnesslevelsinthepicture.
FilmmodeDetectsandprocessesfeaturefilmsautomati-callyforallchannelsources.Thismeansyouwillalwaysreceiveanoptimalpicture.Thisfunctionsinthemodi480i,576iand1080iinTVplaybackandforotherchannelsources.Ifthe»Filmmode«isswitchedonforpro-grammeswithoutafeaturefilmsignal,minorproblemssuchaspicturefreeze,defectivesub-titlesorfinelinesinthepicturecouldoccur.
FirmwareversionFirmwareisthetermusedforsoftwarethatisem-beddedinaprogrammedchip(microcontroller).Itismostlystoredinaflashmemory,anEPROMoranEEPROM.Thefirmwarecontainsfunctionsforcontrollingthedevice.
GammaThissettingestablisheswhichbrightnessvalueshouldbedisplayedforwhichdigitaltransmis-sionvalue.Mostrecordingsaretransmittedwithagammavalueof2.2(allWindowsPCsandnewerPCswithaMACoperatingsystemworkwiththis,olderMACsystemsandtransmissionswithoutcolourprofilemostlyoperatewithagammavalueof1.8).
GLOSSARY--------------------------------------------------------------------------------------------------------------
GatewayIPAgatewayallowsnetworks,whichmaybebasedoncompletelydifferentprotocols,tocommunicatewitheachother.Inthehomearea,acombinationoftherouterandtheDSLmodemareusedasanInternetgateway.
HardwareversionHardwareinthiscontextmeansthedevice.Thisincludesallcomponentssuchasprocessor,display,etc.
HbbTVHbbTVistheinteractivesuccessorofvideotext,whichhascontentwithamoderndesign,highresolutionimagesandvideo¬sequences.ForfullfunctionalityofHbbTV,theTVmustbeconnectedtotheinternet.
HDHighDefinitionTelevisionisageneraltermforarangeoftelevisionstandardswhichfeatureincreasedvertical,horizontalortemporalresolu-tion.FullHDisafeatureofanHDTVcapabledevicewhichisabletooutputorrecordanHDresolu-tionof1920x1080pixels.
IPaddressAnIPaddress(Internetprotocoladdress)isusedtouniquelyidentifytheaddressofcomputersandotherdevicesinanIPnetwork.Themostwell-knownnetworkinwhichIPaddressesareusedistheInternet.Here,forexample,webserversareaddressedusingtheIPaddress.TheIPaddresscanbeprovidedautomaticallybytherouter(automaticaddress)orcanbeenteredmanuallyintherouter(staticaddress).Ifitisenteredmanually,thisaddressmustalsobeenteredinthehi-fisystem.
JPEGJPEGstandsforJointPictureExpertsGroup.Itdenotesaprocessforcompressingpicturefiles.
ENGLISH120
GLOSSARY--------------------------------------------------------------------------------------------------------------
LIVESHAREWithLiveShare,youcanstreamallthecontentbetweenWiDi™/Miracast™certifiedmobiledevices(smartphoneortablet)andthetelevisionviawi-fi.YoucanalsoeasilystreamHDcontentontothetelevision,andofcoursevice-versabytransmittingTVcontenttomobiledevices.
LNBLowNoiseBlockislocatedinthecentreofaparabolicantenna.Itconvertsthesatellitefrequencyfrom,forex-ample,10.7to11.75or11.8to12.75GHztothe950-2150MHzrange,therebyenablingthecabletransmissionusingacoaxialcableandmorerecentlyalsowithopticalfibreandrecep-tionwithasatellitereceiver.
MEMCImprovesthedisplayofmovingimagesthroughtheadditionalcomputationofintermediatepic-turesandisonlyavailablefordevicesfrom32”.ItisdisplayedwithaPPRof400(PicturePerfec-tionRate).Iftheadjustmentvalueistoohigh,thismayresultinghostingwithpoortransmissionduetotheincorrectcomputationoftheinterme-diatepictures.
MHL2.0TheMobileHighDefinitionLink2.0transmitsevenhighresolutioncontentfromanyMHL-com-patiblemobiledevicetothetelevisionwithoutdelay.YoucanconnectthemicroUSBconnec-tionofthemobiledevicetotheMHL-compatibleportonthetelevisionusinganMHL-supportingHDMIcable.
MP3MP3istheabbreviationforMPEG-1Level3andisbasedontheMPEG-1standard,whichwasdevelopedbytheMPEG(MotionPictureExpertGroup).
NAS(networkaccessstorage)TheabbreviationNASisusedfordevicesthatprovidedatafromaharddrivetoanetwork.Networkname(SSID)Thenetworkname(SSID–servicesetidentifier)isthetermusedfortheidentificationofawirelessnetworkthatisbasedonIEEE802.11.EverywirelessLANhasaconfigurableSSID,whichuniquelyidentifiesthewirelessnetwork.Thecharactersequenceofthenetworknamecanbeupto32charactersinlength.Itisconfiguredinthebasestation(accesspoint)ofawirelessLANandsetonallclientswhichaccessit.
NetworkmaskThenetworkmaskornetmask,sometimesalsoreferredtoasasubnetmask,isabitmaskthatseparatesanIPaddressintoanetworkpartandadevice/hostpart.ItisusedinIPnetworkstomakeroutingdecisions.
NoisReductionReducesthevisiblesnowbydisplayingthepicturealittlelesssharplyandcreatingaslightblurring.Shouldthereforebeusedminimallywithgoodpicturematerial.
PerfectClearImprovesthegeneralimagebymeansofagentlebluehue(givingtheappearanceofgreatersharpness)andimprovestheblacklevelbysettingthisentirelytoblackfromspecificshadeofback.Thisreducesthevisiblegreyvaluesinthedarkareasofthepicture.
PrivateIPaddressPrivateIPaddressesbelongtoparticularIPad-dressrangesthatarenotroutedintheInternet.TheycanbeusedbyanybodyforprivateNet-works,suchasLANs.ManycomputernetworksrequirecompleteconnectivityatIPlevel,butonlylimitedaccesstotheInternet.Ifsuchacom-puternetworkhasaprivateIPaddressrange,itformsanintranetwhichcannotbeaccessedfromtheInternetastheInternetroutersignoreprivateaddressranges.AgatewayorrouterthatisplacedinthisprivatenetworkandwhichhasapublicaddressintheInternetaswellasaprivateIPaddressmakestheconnectiontotheInternet.Thiscanbeperformedbyaproxyor
121ENGLISH
usingNAT/PAT/Masquerading.Astheaddressrangeusedcanonlybeviewedwithinthepri-vatenetwork,thesamerangecanalsobeusedinotherprivatenetworks.TheuniquenatureofanIPaddressrequiredbytheInternetprotocolisensuredbythisrestrictedvisibility.
ProxyserverAproxyorproxyserverisaserviceprogramforcomputernetworksthatadministersdatatrans-fer.Itmakesdatatransferfaster,andcanalsoincreasesecuritybyimplementingaccesscontrolmechanisms.Thetransferisconductedbetweencomputersorprogramsincomputernetworks.Ontheserverside,theproxyactsasaclient;ontheclientside,itactsasaserver.
RouterArouterisanetworkcomponentthatlinkssev-eralcomputernetworks.Therouteranalyses(onthebasisoflayer3information)thenetworkpackagesofaprotocolitreceivesandforwardsittotheintendeddestinationnetwork.Conven-tionalroutersworkonlayer3oftheapplicationlayer.Arouterhasaninterfaceforeverynet-workconnectedtoit.Whendataisreceived,therouterdeterminesthecorrectpathtothedestina-tionandtherebythesuitableinterfaceviawhichthedatacanbetransferred.Forthisitusesalocallyavailableroutingtablethatspecifiesviawhichrouterconnectionaparticularnetworkcanbereached.
RoviGuide™Electronicchannelguidewithvariousinforma-tiononthetelevisionprogrammes.
SCR(SingleChannelRouter)Unrestrictedsinglecablesystem.Ifyourantennasystemisequippedwithasinglecablemulti-switch,thetelevisionswhicharecon-nectedtothisantennasystemcanreceivetelevi-sionchannelsindependentlyfromoneanother.
Security(WEP/WPA)WEP(wiredequivalentprivacy)isthestandardencryptionalgorithmforWLAN.Itcontrolsbothaccesstothenetworkaswellasensuringtheconfidentialityandintegrityofdata.Thisproce-dureisconsideredinsecurenowadays.Forthisreason,morerecentWLANinstallationsshouldusethemoresecureWPAencryption.
SymbolrateThisisthenumberoftransmittedsymbolsinthedigitaltransmissiontechnologypertimeunit
TimeshiftYoucanpausetheprogrammeyouarewatch-ing.Thisisausefulfunction,forexampleifthetelephoneringswhileyouarewatchingafilmandyoudonotwanttomissanything.Theprogrammeissavedinthetime¬shiftmemo-ryoftheexternaldatamedium.Amaximumof60minutesofthecurrentprogrammecanberecordedinthetimeshiftmemory.
TransponderAtransponderreceivesdataonasatelliteandthentransmitsitagain.Forexample,anearthstationcantransmitdatasignalsfortelevisionchannelstoageostationarysatellite,whichsendsthisbacktoearth.Anysuitablesatelliteantennawithvisualcontacttothesatellitecanreceivethesignal.
UHDTVUltraHighDefinitionTelevision(UHDTVorUltraHDTV)andUltraHighDefinitionVideo(UHDV)areadigitalvideoformatwhichincludestwopictureresolutions(4Kand8K).Resolution:3840×2160(UHD-1)or7680×4320pixels(UHD-2).
GLOSSARY--------------------------------------------------------------------------------------------------------------
ENGLISH122
USB-RecordingEnablesrecordingandplaybackoftelevisionprogrammeswithdigitaltelevisionchannels(DVB-S,DVB-TandDVB-C).Thisdependsonthebroadcaster.Recordingandplaybackofprogrammescanonlybecarriedoutusinganexternaldatame-dium(harddriveorUSBstick).
VibrantColourIncreasesthecolourcontrastandthecontrastadjustment.Thissettingismostlytoostrongforusewithnormalpicturesandshouldonlybeusedwherenecessary(loworoff)otherwisenuancesintheimagecanbesuppressed.
Wi-FiTheWi-FiAllianceisanorganisationthathastakenonthetaskofcertifyingproductsfromdifferentmanufacturersonthebasisoftheIEEE-802.11standard,therebyensuringthatdifferentwirelessdevicescanoperateinparallel.On31October2002,theconsortiuman-nouncedanewencryptiontechnology–Wi-FiProtectedAccess(WPA)–apartofthe(then)forthcomingIEEEstandard802.11iwhichwouldreplacetheWEPencryptionprocedure,whichwasalreadyregardedasinsecurebeforethenewstandardcameintoforce.After802.11icameintoforce,theWi-FigroupcoinedthetermWPA2.IEEE802.11eisanindustrialstandardissuedbytheInstituteofElectricalandElectronicsEn-gineers(IEEE)andasupplementtothewirelessLANstandardIEEE802.11forsupportingthequalityofservice.802.11eworksaccordingtoasimilarprincipleastheQoSprocedureDiffServ.DatapackagesintheWLANaremarkedbythesenderandtheaccesspointisstoppedinordertohandlepack-ageswithhigherpriority.Withtheaidof802.11e,real-timeapplicationsuchasVoiceoverIParebettersupportedastheyrequireacertainbandwidthinthenetworktoensuretheconnectionisnotinterruptedifothernetworktrafficcreatestoogreataburdenontheavailabledatatransferrate.
GLOSSARY--------------------------------------------------------------------------------------------------------------
123ENGLISH
INDEX----------------------------------------------------------------------------------------------------------------------------
Numbers
3DFunction.....383DSettings.....39
A
AccesscontrolforCAmoduleandsmartcards.....89AccessibleFunctions.....68Accessories.....78Adjusting2D→3DEffects.....39Adjustingthevolume.....32Advancedpicturesettings.....28AdvancedSettings.....69ApplythedevicewithHDMIARCfunctionandactivateHDMIARC.....85ArrangeInitialset-up.....20Audiodata.....52Audiodescription(audiosubtitles).....68Audiolanguage.....33Audiosettings.....35Automaticconnection.....91Automaticserviceupdate.....109Automaticvolume.....31Autosleep.....69Autotuning.....76
B
Blockingatelevisionchannel.....74Blockingthemultifunctionswitch.....74
C
Cablescreenshare(MHL).....87Callingupasub-pagedirectly.....43ChangeTVName.....97Changingstoredanaloguechannels.....111Changingtheaudiolanguage.....67ChangingtheChannelEditorforthedigitalchannels.....24Changingthekeyboardlanguage.....67Changingthemenulanguage.....67Changingthepictureformat.....34ChangingthePINcode.....74Changingthesubtitlelanguage.....67Concludingthesettings.....29,31Connectingamobiledevice.....87Connectinganexternaldevice.....83
Connectingautomaticallybyenteringthenetworkpassword.....21,95Connectingdigitalmulti-channelamplifier/AVreceiver.....85Connectingexternaldatamedia.....45,53Connectingheadphones.....84Connectingtheantennaandpowercord.....10ConnectingtheTVtoa“hidden”network.....98ConnectingtoahomenetworkwithaLANcable.....21Connectionoptions.....82Connectionsonthetelevisionset.....13ControlbuttonsontheTV.....15Creatingalistoffavourites.....26Creatingalistoffavourites-analogchannels.....112
D
DateandTimeSettings.....76Deactivateandactivatedigitalteletext.....42DeactivateandactivateHbbTV.....42Deletingatimer.....50Deletingchannelhistory.....79Deletingchannels.....111DeletingchannelsintheChannelEditor.....25Deletingprogrammesfromtherecordedfilesmenu.....51DeviceControl.....81DisplayingchannelsintheChannelEditorbyantennatype.....25Displayinginformation.....32Displayingsignalinformation.....112Disposingofthepackaging.....115DTSStudioSound™.....30
E
Editingthetimer.....50ElectronicTVGuide.....36Enteringtheanalogchannelnames(maximum8characters).....111Enterownnamesforthefavouriteslists(max.7characters).....27Environmentalnote.....115Equalizer.....31
ENGLISH124
INDEX----------------------------------------------------------------------------------------------------------------------------
F
FormatssupportedwithHDMI1.4.....40Formattingthepartition.....47Forward/reversepicturesearch.....51
G
Generalinformation.....7GRUNDIGSCRSystem.....8
H
HbbTVMode.....41Headphones.....84Highdefinition–HDready.....82
I
Imagedata.....52Importantinformationabout3DFunction.....38Importantnotesonenvironmentalprotection.....8Increasingcharactersize.....43Information.....113Informationonrecordingandplayingtelevisionprogrammes.....44Initialset-up.....18Insertingbatteriesintheremotecontrol.....12InsertingtheCAmodule.....89
L
Languagesettings.....67LNBSettings.....101Lockingthemenus.....73Logontothe„RoviGuide™“.....36LRCorrection.....40
M
Manualconnection.....92,96Manualtuning.....76Motorantennasetup(DiSEqC1.2).....105Movetodesiredtime.....57Movingthechannelsinthechannelorganizertodifferentchannelpositions.....25MultimediaServerMode.....58Muting.....32
N
Navigationinthemainmenu.....65Networkconnection.....90Networkinterfaces.....115NetworkSetup.....90NightMode.....31Normaltextmode.....43NotesforWLANreception.....114Notesonstillimages.....8
O
Offtimer(AutoOff).....72One-touchprogrammerecording.....48Ontimer(AutoOn).....71OpeningtheProgrammeTable.....24Operationwithcommoninterface.....89Overview.....13
P
Packingcontents.....9Pagestop.....43ParentalGuidance.....73ParentalSettings.....73PIPmode.....33Picturesettings.....28,35Playback.....51Playbackandotheroptionsintheapplications.....65Playbackbasicfunctions.....56Playbackduringarecording.....51Playingselectedtracks.....57PlayingtheaudiosignalviatheHiFisystem.....86Playingthevideo,musicandimagefileswithhomenetworkconnection.....58Possiblelimitationswhenusinganexternaldatamedium.....44PowerLEDbrightness.....69Powersavemode.....69,70Prepare3DFunction.....38PreparingformountingontheVESAbracket.....11Productinformation.....77Programmesettingforrecording.....49
125ENGLISH
R
Receivingdigitalstations.....8Recordingaprogrammefromthechannellist.....48Recordingprogrammes.....48Remotecontrol-allfunctions.....16,17Removingtheexternaldatamedia.....53RenamingAVchannels.....27Repeatfunctions.....57ResetFunctions.....79ResettingPINcode.....75Resettingthetelevisiontoitsoriginalstate.....79Restoredefaultsettings.....29,31Revealanswer.....43
S
ScreensharewithLiveshareconnection.....88Searchingandselectingtheactiveexternaldevice.....80SearchingchannelsbynameintheChannelEditor.....25Searchingforalldigitalchannelsfromasatelliteautomatically.....99Searchingforchannelsfromthecableproviderautomatically.....106Searchingforchannelsfromthecableprovidermanually.....107Searchingfordigitaltelevisionchannelsfromasatellitemanually.....100,102,103SearchingfordigitalterrestrialTVchannelsautomatically.....107SearchingfordigitalterrestrialTVchannelsmanually.....108Searchingforward.....57Searchingtelevisionchannelswithsatellitesignal(DVB-S).....22Selectingabroadcastfromtherecordedfileslist.....51Selectingapartitionontheexternalmedia.....46Selectingatrackorpictureinsteps(SKIP).....57SelectingAVchannels.....32Selectingchannellists.....111Selectingchannels.....32Selectingexternaldatamedia.....46SelectingpartitiononHDfiles.....57Selectingstationsfromlists.....32
INDEX----------------------------------------------------------------------------------------------------------------------------
Selectingthechannelpositionforamobiledevice.....87Selectingthedigitalmediaserver.....58Selectingthedisplaydurationoftheslideshow.....55Selectingthedisplaymode.....54SelectingtheHDMIsourcefromthetelevision.....80Selectingthemenu.....46,54Selectingthemenulanguage.....80Selectingthevolumefortheheadphones.....84SelectingtitlesonHDfiles.....57SequencingchannelsintheChannelEditor.....26Serviceinformationfordealers.....114Setthelead/follow-uptime.....49Settingallanaloguetelevisionchannels.....109Settingfurtherchannels.....99Settingsforconnectingtothehomenetwork.....18SettingsintheUSBsetupmenu.....54Settinguporhanging.....11Settingupwithstand.....11Set-upandsafety.....5Skippingthewaitingtime.....43Sleeptimer.....34,71SMARTInter@ctiveTV3.0Feature.....60Softwareofthedevice.....77Softwareupdate(Internet).....77Softwareupdate(OAD).....77Softwareupdate(USB).....77Sortingchannelsinthefavoriteslist.....26SoundMode.....30Soundsettings.....30Specialfeaturesofyourtelevisionset.....7Splittingthescreen(SplitScreen).....43Stereo/dualchannel.....31Storelogoview.....69SubtitleMode.....68Subtitles.....33Subtitlesettings.....55Switchingbluetoothon/offandregisteringanexternalsubwoofer.....30Switchingofftheexternaldevicefromstandbymode.....80Switchingonandoff.....32
ENGLISH126
INDEX----------------------------------------------------------------------------------------------------------------------------
Switchingthedevicetostandby.....81Switchingtoautomaticpreview.....54Switchingtocontinuousrecording.....47
T
TeletextMode.....43Testingexternaldatamedia.....46TheDigiLinkfunctionsofthetelevision.....80TheElectronicTVguideinOfflinemode.....36TheElectronicTVguideinOnlinemode.....37Thefilebrowser.....54Themainmenuofthefilebrowser.....54TimerFunctions.....71Timeshift–″Pausing”programmes.....47TOPtextorFLOFtextmode.....43Troubleshooting.....116Tuninganaloguetelevisionchannels.....109Tuningcabledigitaltelevisionchannels(DVB-C).....22Tuningchannels.....18Tuningterrestrialdigitaltelevisionchannels(DVB-T).....23Tuningtheanaloguetelevisionchannelsbyenteringthechannelnumbers.....110Turningonexternaldevicefromstandbymode.....80Turnthepicturedisplay.....57TVoperation–additionalfunctions.....34TVoperation–Basicfunctions.....32
U
USBOpertion.....52USBRecording.....44USBrecordingsettings.....46UsingaDVDrecorder,DVDplayer,videorecorderorset-topbox.....84Usingexternaldevices.....80UsingHbbTV.....42
V
Videodata.....52
W
Watching3Dcontent.....38Watchingablockedtelevisionchannel.....75WEBBrowser.....66Webbrowserapplications.....66Webbrowsermenu.....66Whatiscommoninterface?.....89WhatisHbbTV?.....41Wirednetwork.....90Wirednetworkconnection.....90Wirednetworksettings.....91Wirelessnetwork.....93Wirelessnetworkconnection.....93Wirelessnetworksettings.....93Wirelessscreenshare(Liveshare).....88WirelessWPSnetworkconnectionthroughbypressingabutton.....94WirelessWPSnetworkconnectionwithPIN.....94
Z
Zapfunction.....33Zoomfunction.....34

Grundig Intermedia GmbH • Beuthener Strasse 41 • D–90471 Nürnberg
v


![[2022] SGHC 55 - GROUNDS OF DECISION](https://img.dokumen.tips/doc/110x75/6327a8f9e491bcb36c0b6428/2022-sghc-55-grounds-of-decision.jpg)

