Embed Size (px)
Citation preview

DIGITAL CAMERA
Reference Manual
En
• Read this manual thoroughly before using the camera.• To ensure proper use of the camera, be sure to read
“For Your Safety” (page xvi).• After reading this manual, keep it in a readily accessible
place for future reference.

Choose from 3 different manuals.
The Reference Manual (this manual)In addition to the material covered in the User’s Manual supplied with the camera, the Reference Manual details the options available in the camera menus and covers such topics as connecting the camera to other devices (for information on wireless networks, see the Network Guide).
Among the topics covered in the Reference Manual are:• Basic shooting and playback
operations• Advanced shooting options• The camera menus• Connecting to computers, printers,
and HDMI devices• Flash photography using optional
flash units
The Reference Manual can also be viewed online in html format.
https://onlinemanual.nikonimglib.com/z7_z6/en/
For a guide to all aspects of camera operation, read:
Z 6nikon online manual Z 7

i
The User’s Manual (included)Master basic camera operations as well as features specific to this camera.
• Table of Contents• Getting to Know the Camera• First Steps• Basic Photography and Playback• Basic Settings• Shooting Controls• The i Button• Troubleshooting
The Network Guide (pdf)Learn how to use Wi-Fi or Bluetooth to connect the camera to a computer or a smart device such as smartphone or tablet.
Also included is information on such topics as the tasks that can be accomplished using a WT-7 wireless transmitter.
The Network Guide is available from the Nikon Download Center.
Z 7: https://downloadcenter.nikonimglib.com/en/products/492/Z_7.htmlZ 6: https://downloadcenter.nikonimglib.com/en/products/493/Z_6.html
Z 7 Model Name: N1710Z 6 Model Name: N1711
For a guide to basic shooting and playback, read:
For information on wireless connections, read:
•
•
Z 6nikon download center Z 7
ii
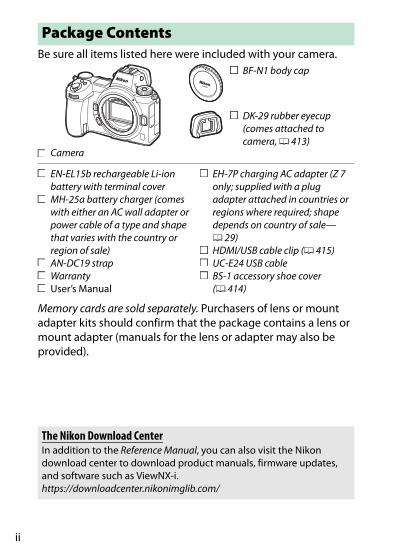
Be sure all items listed here were included with your camera.
Memory cards are sold separately. Purchasers of lens or mount adapter kits should confirm that the package contains a lens or mount adapter (manuals for the lens or adapter may also be provided).
Package Contents
BF-N1 body cap
DK-29 rubber eyecup (comes attached to camera, 0 413)
Camera
EN-EL15b rechargeable Li-ion battery with terminal coverMH-25a battery charger (comes with either an AC wall adapter or power cable of a type and shape that varies with the country or region of sale)AN-DC19 strapWarrantyUser’s Manual
EH-7P charging AC adapter (Z 7 only; supplied with a plug adapter attached in countries or regions where required; shape depends on country of sale—0 29)HDMI/USB cable clip (0 415)UC-E24 USB cableBS-1 accessory shoe cover (0 414)
The Nikon Download CenterIn addition to the Reference Manual, you can also visit the Nikon download center to download product manuals, firmware updates, and software such as ViewNX-i.https://downloadcenter.nikonimglib.com/
iii
This manual is for use with both the Z 7 and Z 6. The illustrations show the Z 7.
Symbols and ConventionsTo make it easier to find the information you need, the following symbols and conventions are used:
Menu items, options, and messages that appear in the camera displays are shown in bold. Throughout this manual, the display in camera monitor and viewfinder during shooting is referred to as the “shooting display”; in most cases, the illustrations show the monitor.
Throughout this manual, smartphones and tablets are referred to as “smart devices”.
Camera SettingsThe explanations in this manual assume that default settings are used.
About This Manual
DThis icon marks notes, information that should be read before using this product.
AThis icon marks tips, additional information you may find helpful when using this product.
0 This icon marks references to other sections in this manual.
A For Your SafetyBefore using the camera for the first time, read the safety instructions in “For Your Safety” (0 xvi).
iv
Package Contents ......................................................................... iiFor Your Safety ........................................................................... xviNotices........................................................................................... xx
Getting to Know the Camera 1
Parts of the Camera ...................................................................... 1Camera Body ............................................................................................1The Control Panel ...................................................................................5The Monitor and Viewfinder...............................................................6
Camera Controls............................................................................ 8The Viewfinder.........................................................................................8The Monitor Mode Button...................................................................8Touch Controls ..................................................................................... 10The DISP Button..................................................................................... 15The Sub-Selector.................................................................................. 17The AF-ON Button .................................................................................. 17The Command Dials ........................................................................... 17The G Button.................................................................................... 18The i Button (i Icon)........................................................................ 21The Function Buttons (Fn1 and Fn2) ............................................... 24
First Steps 27
Attach the Camera Strap ........................................................... 27Charge the Battery...................................................................... 28
The Battery Charger............................................................................ 28Charging AC Adapters ....................................................................... 29
Insert the Battery and a Memory Card.................................... 32Attach a Lens................................................................................ 36Choose a Language and Set the Clock.................................... 38
Table of Contents
v
Basic Photography and Playback 41
Taking Photographs (b Mode) ................................................ 41Shooting Movies (b Mode).......................................................45Basic Playback..............................................................................49
Viewing Movies .................................................................................... 49Deleting Unwanted Pictures ........................................................... 51
Basic Settings 52
Focus.............................................................................................. 52Choosing a Focus Mode.................................................................... 52AF-Area Mode ....................................................................................... 54The Touch Shutter............................................................................... 57Manual Focus ........................................................................................ 59
White Balance ..............................................................................61Silent Photography.....................................................................65Rating Pictures............................................................................. 66Protecting Pictures from Deletion ........................................... 67
Shooting Controls 68
The Mode Dial ..............................................................................68P: Programmed Auto .......................................................................... 69S: Shutter-Priority Auto ...................................................................... 69A: Aperture-Priority Auto................................................................... 70M: Manual................................................................................................ 70User Settings: U1, U2, and U3 Modes............................................... 72Long Time-Exposures (Mode M) ..................................................... 75
The S (ISO Sensitivity) Button .............................................. 77Auto ISO Sensitivity Control ............................................................ 78
The E (Exposure Compensation) Button ............................... 79The c/E (Release Mode/Self-Timer) Button......................... 81
The Self-Timer ....................................................................................... 84

vi
The Sub-Selector..........................................................................86Focus-Point Selection.........................................................................86Autoexposure (AE) Lock ....................................................................86Focus Lock ..............................................................................................86
The i Button 89
Using the i Menu ........................................................................89The Photo-Mode i Menu ...........................................................90
Set Picture Control...............................................................................91White Balance........................................................................................96Image Quality ..................................................................................... 102Image Size............................................................................................ 104Flash Mode .......................................................................................... 105Metering............................................................................................... 106Wi-Fi Connection............................................................................... 107Active D-Lighting .............................................................................. 108Release Mode...................................................................................... 109Vibration Reduction ......................................................................... 110AF-Area Mode..................................................................................... 111Focus Mode......................................................................................... 111
The Movie-Mode i Menu........................................................ 112Set Picture Control............................................................................ 113White Balance..................................................................................... 113Frame Size, Frame Rate, and Movie Quality ............................ 114Microphone Sensitivity ................................................................... 116Choose Image Area .......................................................................... 117Metering............................................................................................... 118Wi-Fi Connection............................................................................... 118Active D-Lighting .............................................................................. 118Electronic VR ....................................................................................... 118Vibration Reduction ......................................................................... 119AF-Area Mode..................................................................................... 119Focus Mode......................................................................................... 119

vii
More About Playback 120
Viewing Pictures........................................................................120Full-Frame Playback..........................................................................120Thumbnail Playback .........................................................................121
Photo Information ....................................................................122The i Button: Playback ............................................................130
Select to Send/Deselect ..................................................................132Choose Start/End Point ...................................................................133Save Current Frame ..........................................................................136
Taking a Closer Look: Playback Zoom...................................137Deleting Pictures.......................................................................138
During Playback .................................................................................138The Playback Menu...........................................................................139
Menu Guide 141
Defaults .......................................................................................141D The Playback Menu: Managing Images...........................152
Delete............................................................................................153Playback Folder .........................................................................153Playback Display Options ......................................................153Image Review.............................................................................154After Delete.................................................................................154After Burst, Show ......................................................................155Rotate Tall....................................................................................155Slide Show...................................................................................156Rating............................................................................................157
viii
C The Photo Shooting Menu: Shooting Options .............. 158Reset Photo Shooting Menu ................................................ 159Storage Folder........................................................................... 159File Naming ................................................................................ 163Choose Image Area ................................................................. 163Image Quality ............................................................................ 164Image Size................................................................................... 164NEF (RAW) Recording ............................................................. 166ISO Sensitivity Settings .......................................................... 167White Balance............................................................................ 168Set Picture Control................................................................... 175Manage Picture Control......................................................... 177Color Space ................................................................................ 180Active D-Lighting ..................................................................... 180Long Exposure NR.................................................................... 181High ISO NR................................................................................ 181Vignette Control ....................................................................... 182Diffraction Compensation .................................................... 182Auto Distortion Control ......................................................... 182Flicker Reduction Shooting .................................................. 183Metering...................................................................................... 183Flash Control.............................................................................. 184Flash Mode ................................................................................. 186Flash Compensation ............................................................... 187Focus Mode................................................................................ 187AF-Area Mode............................................................................ 187Vibration Reduction ................................................................ 187Auto Bracketing........................................................................ 188Multiple Exposure .................................................................... 198HDR (High Dynamic Range) ................................................. 205Interval Timer Shooting ......................................................... 210Time-Lapse Movie.................................................................... 221Focus Shift Shooting............................................................... 229Silent Photography ................................................................. 235
ix
1 The Movie Shooting Menu: Movie Shooting Options ...236Reset Movie Shooting Menu ................................................237File Naming.................................................................................237Choose Image Area..................................................................237Frame Size/Frame Rate...........................................................237Movie Quality.............................................................................237Movie File Type .........................................................................237ISO Sensitivity Settings...........................................................238White Balance ............................................................................238Set Picture Control ...................................................................239Manage Picture Control .........................................................239Active D-Lighting......................................................................239High ISO NR ................................................................................239Vignette Control .......................................................................240Diffraction Compensation.....................................................240Auto Distortion Control..........................................................240Flicker Reduction ......................................................................240Metering ......................................................................................241Focus Mode ................................................................................241AF-Area Mode ............................................................................241Vibration Reduction.................................................................241Electronic VR...............................................................................241Microphone Sensitivity...........................................................242Attenuator...................................................................................242Frequency Response ...............................................................243Wind Noise Reduction ............................................................243Headphone Volume ................................................................243Timecode.....................................................................................244

x
A Custom Settings: Fine-Tuning Camera Settings............ 245Reset Custom Settings ........................................................... 248
a: Autofocus.................................................................................... 249a1: AF-C Priority Selection..................................................... 249a2: AF-S Priority Selection ..................................................... 249a3: Focus Tracking with Lock-On........................................ 250a4: Auto-Area AF Face Detection ....................................... 250a5: Focus Points Used............................................................. 250a6: Store Points by Orientation ........................................... 251a7: AF Activation....................................................................... 252a8: Limit AF-Area Mode Selection...................................... 252a9: Focus Point Wrap-Around.............................................. 253a10: Focus Point Options....................................................... 253a11: Low-Light AF .................................................................... 253a12: Built-in AF-Assist Illuminator ...................................... 254a13: Manual Focus Ring in AF Mode ................................. 254
b: Metering/Exposure ................................................................. 255b1: EV Steps for Exposure Cntrl........................................... 255b2: Easy Exposure Compensation...................................... 255b3: Center-Weighted Area .................................................... 256b4: Fine-Tune Optimal Exposure........................................ 256
c: Timers/AE Lock.......................................................................... 257c1: Shutter-Release Button AE-L ......................................... 257c2: Self-Timer ............................................................................. 257c3: Power Off Delay ................................................................. 258
d: Shooting/Display ..................................................................... 259d1: CL Mode Shooting Speed .............................................. 259d2: Max. Continuous Release............................................... 259d3: Sync. Release Mode Options......................................... 259d4: Exposure Delay Mode ..................................................... 260d5: Electronic Front-Curtain Shutter ................................. 260d6: Limit Selectable Image Area ......................................... 260d7: File Number Sequence.................................................... 261d8: Apply Settings to Live View .......................................... 262

xi
d9: Framing Grid Display .......................................................262d10: Peaking Highlights .........................................................262d11: View All in Continuous Mode .....................................262
e: Bracketing/Flash .......................................................................263e1: Flash Sync Speed ...............................................................263e2: Flash Shutter Speed..........................................................264e3: Exposure Comp. for Flash...............................................264e4: Auto c ISO Sensitivity Control ......................................264e5: Modeling Flash ...................................................................265e6: Auto Bracketing (Mode M) .............................................265e7: Bracketing Order................................................................266
f: Controls.........................................................................................267f1: Customize i Menu ...........................................................267f2: Custom Control Assignment ..........................................269f3: OK Button ..............................................................................277f4: Shutter Spd & Aperture Lock..........................................279f5: Customize Command Dials.............................................279f6: Release Button to Use Dial ..............................................281f7: Reverse Indicators ..............................................................281
g: Movie ............................................................................................282g1: Customize i Menu..........................................................282g2: Custom Control Assignment.........................................283g3: OK Button.............................................................................288g4: AF Speed...............................................................................288g5: AF Tracking Sensitivity ....................................................289g6: Highlight Display...............................................................290
B The Setup Menu: Camera Setup..........................................291Format Memory Card..............................................................292Save User Settings....................................................................292Reset User Settings ..................................................................292Language.....................................................................................292Time Zone and Date ................................................................293Monitor Brightness ..................................................................293Monitor Color Balance ............................................................294
xii
Viewfinder Brightness ............................................................ 295Viewfinder Color Balance ...................................................... 295Control Panel Brightness....................................................... 295Limit Monitor Mode Selection............................................. 296Information Display................................................................. 296AF Fine-Tune.............................................................................. 297Non-CPU Lens Data ................................................................. 298Clean Image Sensor................................................................. 298Image Dust Off Ref Photo ..................................................... 299Image Comment ...................................................................... 301Copyright Information ........................................................... 302Beep Options ............................................................................. 303Touch Controls.......................................................................... 303HDMI............................................................................................. 304Location Data ............................................................................ 304Wireless Remote (WR) Options ........................................... 305Assign Remote (WR) Fn Button........................................... 306Airplane Mode........................................................................... 306Connect to Smart Device ...................................................... 306Connect to PC............................................................................ 307Wireless Transmitter (WT-7) ................................................. 307Conformity Marking................................................................ 307Battery Info ................................................................................. 308Slot Empty Release Lock........................................................ 308Save/Load Settings.................................................................. 309Reset All Settings...................................................................... 311Firmware Version ..................................................................... 311
N The Retouch Menu: Creating Retouched Copies .......... 312NEF (RAW) Processing ............................................................ 315Trim ............................................................................................... 318Resize............................................................................................ 319D-Lighting................................................................................... 321Red-Eye Correction.................................................................. 321Straighten ................................................................................... 322
xiii
Distortion Control.....................................................................322Perspective Control .................................................................323Image Overlay............................................................................324Trim Movie ..................................................................................327Side-by-Side Comparison......................................................327
O My Menu/m Recent Settings..............................................329
Connections 334
Connecting to Smart Devices .................................................334Connecting to Computers .......................................................335
Connecting via USB ..........................................................................335Wireless Networks (Wi-Fi) ...............................................................339
Connecting to Printers .............................................................340Printing Pictures One at a Time....................................................341Printing Multiple Pictures ...............................................................342
Connecting to HDMI Devices ..................................................343HDMI Recorders .................................................................................344
On-Camera Flash Photography 347
“On-Camera” Versus “Remote” ..............................................347Camera-Mounted Flash Units .......................................................347Remote Flash Photography ...........................................................347
Using an On-Camera Flash ......................................................348Flash Control Mode...................................................................350Flash Modes ...............................................................................352Flash Compensation.................................................................354FV Lock ........................................................................................355Flash Info for On-Camera Units ..............................................357

xiv
Remote Flash Photography 360
Using Remote Flash Units ....................................................... 360Radio AWL.................................................................................. 362
Establishing a Wireless Connection............................................ 362Adjusting Flash Settings ................................................................. 366Adding a Shoe-Mounted Flash Unit........................................... 372
Optical AWL ............................................................................... 373Using Optical AWL with the SB-5000 or SB-500..................... 373
Optical/Radio AWL ................................................................... 381Viewing Flash Info .................................................................... 382
Troubleshooting 385
Problems and Solutions .......................................................... 386Battery/Display................................................................................... 386Shooting............................................................................................... 387Playback................................................................................................ 389Bluetooth and Wi-Fi (Wireless Networks)................................. 391Miscellaneous..................................................................................... 391
Indicators and Error Messages............................................... 392Indicators.............................................................................................. 392Error Messages ................................................................................... 394

xv
Technical Notes 396
The Camera Display and Control Panel ................................396The Monitor: Photo Mode ..............................................................396The Monitor: Movie Mode ..............................................................401The Viewfinder: Photo Mode.........................................................402The Viewfinder: Movie Mode.........................................................404The Control Panel ..............................................................................405
The Nikon Creative Lighting System.....................................406Other Accessories......................................................................411
Attaching a Power Connector and AC Adapter......................416Caring for the Camera ..............................................................418
Storage ..................................................................................................418Cleaning ................................................................................................418Image Sensor Cleaning....................................................................419Manual Cleaning................................................................................422
Caring for the Camera and Battery: Cautions......................424Specifications.............................................................................429NIKKOR Z 24–70mm f/4 S Lens User’s Manual.....................444FTZ Mount Adapter User’s Manual ........................................453Approved Memory Cards ........................................................460Memory Card Capacity.............................................................461Battery Endurance ....................................................................463Index ............................................................................................464
xvi
To prevent damage to property or injury to yourself or to others, read “For Your Safety” in its entirety before using this product.
Keep these safety instructions where all those who use this product will read them.
For Your Safety
DANGER: Failure to observe the precautions marked with this icon carries a high risk of death or severe injury.
WARNING: Failure to observe the precautions marked with this icon could result in death or severe injury.
CAUTION: Failure to observe the precautions marked with this icon could result in injury or property damage.
WARNING• Do not use while walking or operating a vehicle.
Failure to observe this precaution could result in accidents or other injury.
• Do not disassemble or modify this product. Do not touch internal parts that become exposed as the result of a fall or other accident.Failure to observe these precautions could result in electric shock or other injury.
• Should you notice any abnormalities such as the product producing smoke, heat, or unusual odors, immediately disconnect the battery or power source.Continued operation could result in fire, burns or other injury.
• Keep dry. Do not handle with wet hands. Do not handle the plug with wet hands.Failure to observe these precautions could result in fire or electric shock.
• Do not let your skin remain in prolonged contact with this product while it is on or plugged in.Failure to observe this precaution could result in low-temperature burns.
• Do not use this product in the presence of flammable dust or gas such as propane, gasoline or aerosols.Failure to observe this precaution could result in explosion or fire.
xvii
• Do not directly view the sun or other bright light source through the lens.Failure to observe this precaution could result in visual impairment.
• Do not aim the flash or AF-assist illuminator at the operator of a motor vehicle.Failure to observe this precaution could result in accidents.
• Keep this product out of reach of children.Failure to observe this precaution could result in injury or product malfunction. In addition, note that small parts constitute a choking hazard. Should a child swallow any part of this product, seek immediate medical attention.
• Do not entangle, wrap or twist the straps around your neck.Failure to observe this precaution could result in accidents.
• Do not use batteries, chargers, or AC adapters not specifically designated for use with this product. When using batteries, chargers, and AC adapters designated for use with this product, do not:- Damage, modify, forcibly tug or bend the cords or cables, place them
under heavy objects, or expose them to heat or flame.- Use travel converters or adapters designed to convert from one
voltage to another or with DC-to-AC inverters.Failure to observe these precautions could result in fire or electric shock.
• Do not handle the plug when charging the product or using the AC adapter during thunderstorms.Failure to observe this precaution could result in electric shock.
• Do not handle with bare hands in locations exposed to extremely high or low temperatures.Failure to observe this precaution could result in burns, or frostbite.
CAUTION• Do not leave the lens pointed at the sun or other strong light sources.
Light focused by the lens could cause fire or damage to product’s internal parts. When shooting backlit subjects, keep the sun well out of the frame. Sunlight focused into the camera when the sun is close to the frame could cause fire.

xviii
• Turn this product off when its use is prohibited. Disable wireless features when the use of wireless equipment is prohibited.The radio-frequency emissions produced by this product could interfere with equipment onboard aircraft or in hospitals or other medical facilities.
• Remove the battery and disconnect the AC adapter if this product will not be used for an extended period.Failure to observe this precaution could result in fire or product malfunction.
• Do not fire the flash in contact with or in close proximity to the skin or objects.Failure to observe this precaution could result in burns or fire.
• Do not leave the product where it will be exposed to extremely high temperatures, for an extended period such as in an enclosed automobile or in direct sunlight.Failure to observe this precaution could result in fire or product malfunction.
• Do not look directly at the AF-assist illuminator.Failure to observe this precaution could have adverse effects on vision.
• Do not transport cameras or lenses with tripods or similar accessories attached.Failure to observe this precaution could result in injury or product malfunction.
DANGER (Batteries)• Do not mishandle batteries.
Failure to observe the following precautions could result in the batteries leaking, overheating, rupturing, or catching fire:- Use only rechargeable batteries approved for use in this product.- Do not expose batteries to flame or excessive heat.- Do not disassemble.- Do not short-circuit the terminals by touching them to necklaces,
hairpins, or other metal objects.- Do not expose batteries or the products in which they are inserted to
powerful physical shocks.
xix
• Charge only as indicated.Failure to observe this precaution could result in the batteries leaking, overheating, rupturing, or catching fire.
• If battery liquid comes into contact with the eyes, rinse with plenty of clean water and seek immediate medical attention.Delaying action could result in eye injuries.
WARNING (Batteries)• Keep batteries out of reach of children.
Should a child swallow a battery, seek immediate medical attention.
• Do not immerse batteries in water or expose to rain.Failure to observe this precaution could result in fire or product malfunction. Immediately dry the product with a towel or similar object should it become wet.
• Discontinue use immediately should you notice any changes in the batteries, such as discoloration or deformation. Cease charging EN-EL15b rechargeable batteries if they do not charge in the specified period of time.Failure to observe these precautions could result in the batteries leaking, overheating, rupturing, or catching fire.
• When batteries are no longer needed, insulate the terminals with tape.Overheating, rupture, or fire may result should metal objects come into contact with the terminals.
• If battery liquid comes into contact with a person's skin or clothing, immediately rinse the affected area with plenty of clean water.Failure to observe this precaution could result in skin irritation.
xx
• No part of the manuals included with this product may be reproduced, transmitted, transcribed, stored in a retrieval system, or translated into any language in any form, by any means, without Nikon’s prior written permission.
• Nikon reserves the right to change the appearance and specifications of the hardware and software described in these manuals at any time and without prior notice.
• Nikon will not be held liable for any damages resulting from the use of this product.
• While every effort has been made to ensure that the information in these manuals is accurate and complete, we would appreciate it were you to bring any errors or omissions to the attention of the Nikon representative in your area (address provided separately).
Notices

xxi
Notice Concerning Prohibition of Copying or ReproductionNote that simply being in possession of material that has been digitally copied or reproduced by means of a scanner, digital camera, or other device may be punishable by law.
• Items prohibited by law from being copied or reproducedDo not copy or reproduce paper money, coins, securities, government bonds, or local government bonds, even if such copies or reproductions are stamped “Sample.”
The copying or reproduction of paper money, coins, or securities which are circulated in a foreign country is prohibited.
Unless the prior permission of the government has been obtained, the copying or reproduction of unused postage stamps or post cards issued by the government is prohibited.
The copying or reproduction of stamps issued by the government and of certified documents stipulated by law is prohibited.
• Cautions on certain copies and reproductionsThe government has issued cautions on copies or reproductions of securities issued by private companies (shares, bills, checks, gift certificates, etc.), commuter passes, or coupon tickets, except when a minimum of necessary copies are to be provided for business use by a company. Also, do not copy or reproduce passports issued by the government, licenses issued by public agencies and private groups, ID cards, and tickets, such as passes and meal coupons.
• Comply with copyright noticesUnder copyright law, photographs or recordings of copyrighted works made with the camera cannot be used without the permission of the copyright holder. Exceptions apply to personal use, but note that even personal use may be restricted in the case of photographs or recordings of exhibits or live performances.

xxii
Use Only Nikon Brand Electronic AccessoriesNikon cameras are designed to the highest standards and include complex electronic circuitry. Only Nikon brand electronic accessories (including chargers, batteries, AC adapters, and flash accessories) certified by Nikon specifically for use with this Nikon digital camera are engineered and proven to operate within the operational and safety requirements of this electronic circuitry.
The use of non-Nikon electronic accessories could damage the camera and may void your Nikon warranty. The use of third-party rechargeable Li-ion batteries not bearing the Nikon holographic seal shown at right could interfere with normal operation of the camera or result in the batteries overheating, igniting, rupturing, or leaking.
For more information about Nikon brand accessories, contact a local authorized Nikon dealer.
D Before Taking Important PicturesBefore taking pictures on important occasions (such as at weddings or before taking the camera on a trip), take a test shot to ensure that the camera is functioning normally. Nikon will not be held liable for damages or lost profits that may result from product malfunction.
D Life-Long LearningAs part of Nikon’s “Life-Long Learning” commitment to ongoing product support and education, continually-updated information is available on-line at the following sites:• For users in the U.S.A.: https://www.nikonusa.com/• For users in Europe and Africa: https://www.europe-nikon.com/support/• For users in Asia, Oceania, and the Middle East: https://www.nikon-asia.com/Visit these sites to keep up-to-date with the latest product information, tips, answers to frequently-asked questions (FAQs), and general advice on digital imaging and photography. Additional information may be available from the Nikon representative in your area. See the following URL for contact information: https://imaging.nikon.com/
1Getting to Know the Camera
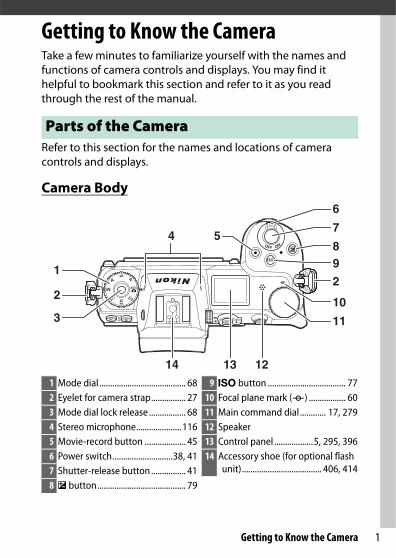
Getting to Know the CameraTake a few minutes to familiarize yourself with the names and functions of camera controls and displays. You may find it helpful to bookmark this section and refer to it as you read through the rest of the manual.
Refer to this section for the names and locations of camera controls and displays.
Camera Body
Parts of the Camera
2
1
5
310
8
7
6
11
2
9
14 13 12
4
1 Mode dial ........................................ 682 Eyelet for camera strap................ 273 Mode dial lock release ................. 684 Stereo microphone.....................1165 Movie-record button ................... 456 Power switch............................38, 417 Shutter-release button ................ 418 E button......................................... 79
9 S button .................................... 7710 Focal plane mark (E) ................. 6011 Main command dial ............ 17, 27912 Speaker13 Control panel ..................5, 295, 39614 Accessory shoe (for optional flash
unit)..................................... 406, 414

2 Getting to Know the Camera
The Camera Body (Continued)
1 2 3
13
6
4
5
9
8
10
11
7
12
1 Image sensor ............................... 4192 Monitor mode button ...........8, 2963 AF-assist illuminator ............43, 254
Red-eye reduction lamp... 105, 352Self-timer lamp ..............................84
4 Cover for accessory terminal and USB and HDMI connectors
5 Cover for headphone and microphone connectors
6 Lens mounting mark ....................367 Headphone connector.............. 2438 CHARGE lamp.................................299 USB connector .......... 335, 411, 415
10 HDMI connector ....... 343, 411, 41511 Accessory terminal..................... 41112 Connector for external
microphone ............................... 41113 Body cap.................................36, 411
D Do Not Touch the Image SensorUnder no circumstances should you exert pressure on the image sensor, poke it with cleaning tools, or subject it to powerful air currents from a blower. These actions could scratch or otherwise damage the sensor. For information on cleaning the image sensor, see “Image Sensor Cleaning” (0 419). Image sensor

3Getting to Know the Camera
20 19 1718
131211
141516
1
6
2
4
3
5
87 9 10
1 Eye sensor ..........................................82 Viewfinder ........................... 6, 8, 4023 Viewfinder eyepiece...................4134 K button........................................ 495 O button ......................................... 516 Monitor............... 6, 10, 57, 293, 3967 Diopter adjustment control ..........88 DISP button............................ 15, 1229 Photo/movie selector ............41, 45
10 AF-ON button .................................. 17
11 Sub-selector.............................17, 8612 i button.........21, 89, 130, 267, 28213 Memory card slot cover .............. 3214 Memory card access lamp....33, 8315 J button .......................18, 277, 28816 Multi selector................................. 1817 G button........................... 18, 14118 c (E) button................................ 8119 W (Q) button ..............20, 120, 12120 X button ........................59, 120, 137
D The MonitorThe angle of the monitor can be adjusted as shown.
4 Getting to Know the Camera
The Camera Body (Continued)
5
4
2
3
8
10
9
1
6
7
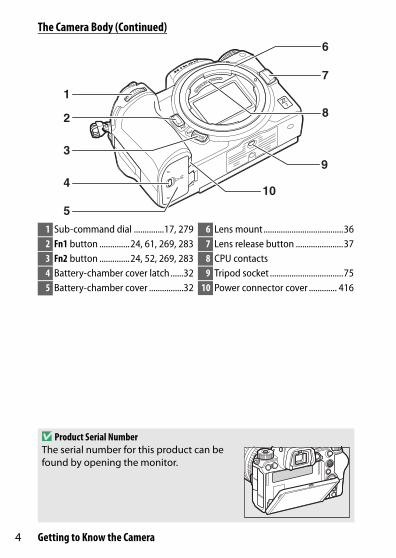
1 Sub-command dial ..............17, 2792 Fn1 button ..............24, 61, 269, 2833 Fn2 button ..............24, 52, 269, 2834 Battery-chamber cover latch ......325 Battery-chamber cover ................32
6 Lens mount.....................................367 Lens release button ......................378 CPU contacts9 Tripod socket ..................................75
10 Power connector cover ............. 416
D Product Serial NumberThe serial number for this product can be found by opening the monitor.

5Getting to Know the Camera
The Control PanelThe control panel lights when the camera is on. At default settings, the following indicators are displayed; for a full list of the indicators that appear in the control panel, see “The Control Panel” (0 405).
1 2
7
6 5
3
4
1 Shutter speed ..........................69, 702 Aperture.......................................... 703 Battery indicator ........................... 344 “k” (appears when memory
remains for over 1000 exposures) .................................... 34
5 Number of exposures remaining ............................ 34, 461
6 Release mode ................................ 817 ISO sensitivity ................................ 77

6 Getting to Know the Camera
The Monitor and ViewfinderAt default settings, the following indicators appear in the monitor and viewfinder in photo mode; for a full list of indicators, see “The Camera Display and Control Panel” (0 396).
Monitor Viewfinder
1
11
32 4 5 6 7 8
15
9
12
14
13
10
2322
21
1618 171920
24
24 3 45 6
16
7 811 921 22 10
151318 1720 141 19
2
1 Shooting mode ..............................682 Focus point...............................42, 543 Release mode ........................81, 1094 Focus mode...................52, 187, 2415 AF-area mode...............54, 187, 2416 Active D-Lighting ..... 108, 180, 2397 Picture Control .............91, 175, 2398 White balance .......61, 96, 168, 2389 Image area ................. 117, 163, 237
10 Image size............................ 104, 16411 Image quality ..................... 102, 16412 i icon.......................................13, 21
13 Exposure indicator ........................71Exposure compensation display ............................................79
14 “k” (appears when memory remains for over 1000 exposures) .....................................34
15 Number of exposures remaining .............................34, 461
16 ISO sensitivity.................................7717 ISO sensitivity indicator ...............77
Auto ISO sensitivity indicator .....78

7Getting to Know the Camera
The following items appear in movie mode.
18 Aperture.......................................... 7019 Shutter speed ..........................69, 7020 Metering .....................106, 183, 24121 Battery indicator ........................... 34
22 Vibration reduction indicator............................. 110, 187
23 Touch shooting .......................10, 5724 “Clock not set” indicator ............. 40
Monitor Viewfinder
3
1
5
4
2
87
9
6
10
1 43
597 28
10
6
1 Recording indicator...................... 45Recording disabled ...................... 46
2 Time remaining ............................. 453 Frame size and rate/
image quality ....................114, 2374 File name ......................................237
5 Release mode (still photography)...................... 81
6 Subject tracking............................ 567 Sound level .................................. 1168 Microphone sensitivity..... 116, 2429 Frequency response................... 243
10 AF-area brackets ........................... 54

8 Getting to Know the Camera
This section outlines how to use various camera controls and displays.
The ViewfinderPlacing your eye to the viewfinder activates the eye sensor, switching the display from the monitor to the viewfinder (note that the eye sensor will also respond to other objects, such as your fingers). The viewfinder can be used for menus and playback if desired.
The Monitor Mode ButtonPress the monitor mode button to cycle between viewfinder and monitor displays.
Camera Controls
D The Diopter Adjustment ControlTo focus the viewfinder, lift and rotate the diopter adjustment control, being careful not to put your fingers or fingernails in your eye. Push the control back in once focus is adjusted to your satisfaction.
A Extended UseWhen using the viewfinder for extended periods, you can adjust viewfinder brightness and hue for ease of viewing by selecting Off for Custom Setting d8 (Apply settings to live view).
A Monitor ModeYou can limit the choice of monitor modes available using the Limit monitor mode selection option in the setup menu.
Eye sensor
9Getting to Know the Camera
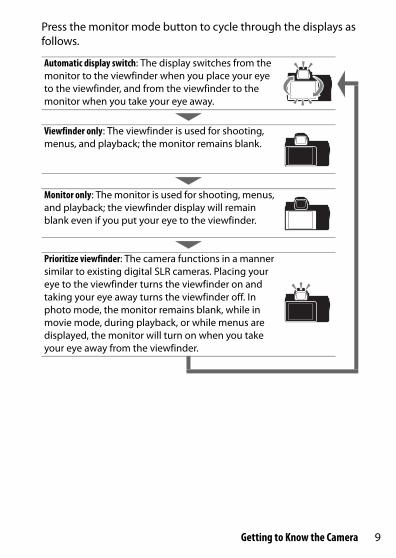
Press the monitor mode button to cycle through the displays as follows.
Automatic display switch: The display switches from the monitor to the viewfinder when you place your eye to the viewfinder, and from the viewfinder to the monitor when you take your eye away.
Viewfinder only: The viewfinder is used for shooting, menus, and playback; the monitor remains blank.
Monitor only: The monitor is used for shooting, menus, and playback; the viewfinder display will remain blank even if you put your eye to the viewfinder.
Prioritize viewfinder: The camera functions in a manner similar to existing digital SLR cameras. Placing your eye to the viewfinder turns the viewfinder on and taking your eye away turns the viewfinder off. In photo mode, the monitor remains blank, while in movie mode, during playback, or while menus are displayed, the monitor will turn on when you take your eye away from the viewfinder.

10 Getting to Know the Camera
Touch ControlsThe touch-sensitive monitor can be used to adjust camera settings, focus and release the shutter, view photos and movies, enter text, and navigate the menus. Touch controls are not available while the viewfinder is in use.
❚❚ Focusing and Releasing the ShutterTouch the monitor to focus on the selected point (touch AF). In photo mode, the shutter will be released when you lift your finger from the display (touch shutter).
Touch AF settings can be adjusted by tapping the W icon (0 57).

11Getting to Know the Camera
❚❚ Adjusting SettingsTap highlighted settings in the display and choose the desired option by tapping icons or sliders. Press J to select the chosen option and return to the shooting display or tap Z to exit without changing settings.
❚❚ PlaybackFlick left or right to view other pictures during full-frame playback.
In full-frame view, touching the bottom of the display brings up a frame-advance bar. Slide your finger left or right over the bar to scroll rapidly to other pictures.
Frame advance bar

12 Getting to Know the Camera
Use stretch and pinch gestures to zoom in and out and slide to scroll. You can also give the display two quick taps to zoom in from full-frame playback or cancel zoom.
To “zoom out” to a thumbnail view, use a pinch gesture in full-frame playback. Use pinch and stretch to choose the number of images displayed from 4, 9, and 72 frames.
❚❚ Movie PlaybackTap the on-screen guide to start movie playback (movies are indicated by a 1 icon). Tap the display to pause or resume, or tap Z to exit to full-frame playback.
Guide
13Getting to Know the Camera
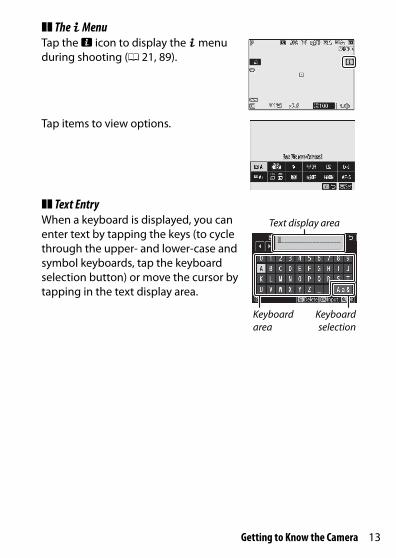
❚❚ The i MenuTap the i icon to display the i menu during shooting (0 21, 89).
Tap items to view options.
❚❚ Text EntryWhen a keyboard is displayed, you can enter text by tapping the keys (to cycle through the upper- and lower-case and symbol keyboards, tap the keyboard selection button) or move the cursor by tapping in the text display area.
Text display area
Keyboard area
Keyboardselection
14 Getting to Know the Camera
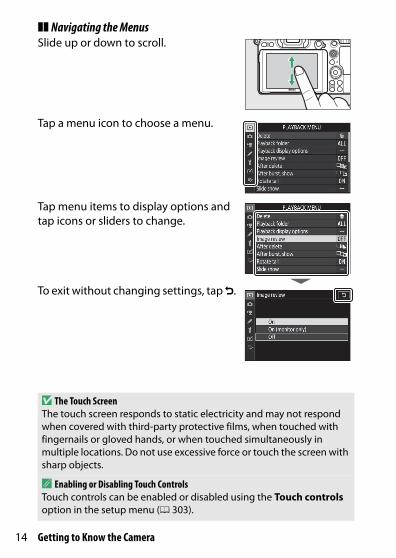
❚❚ Navigating the MenusSlide up or down to scroll.
Tap a menu icon to choose a menu.
Tap menu items to display options and tap icons or sliders to change.
To exit without changing settings, tap Z.
D The Touch ScreenThe touch screen responds to static electricity and may not respond when covered with third-party protective films, when touched with fingernails or gloved hands, or when touched simultaneously in multiple locations. Do not use excessive force or touch the screen with sharp objects.
A Enabling or Disabling Touch ControlsTouch controls can be enabled or disabled using the Touch controls option in the setup menu (0 303).
15Getting to Know the Camera
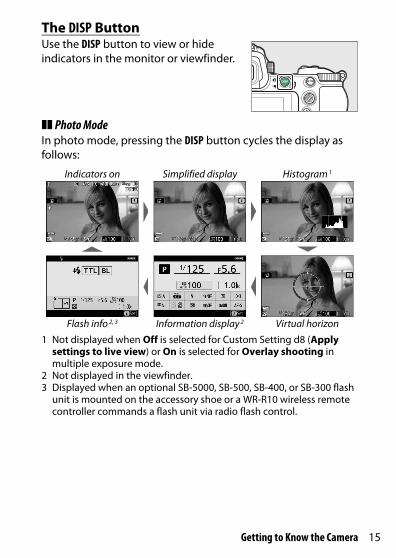
The DISP ButtonUse the DISP button to view or hide indicators in the monitor or viewfinder.
❚❚ Photo ModeIn photo mode, pressing the DISP button cycles the display as follows:
1 Not displayed when Off is selected for Custom Setting d8 (Apply settings to live view) or On is selected for Overlay shooting in multiple exposure mode.
2 Not displayed in the viewfinder.3 Displayed when an optional SB-5000, SB-500, SB-400, or SB-300 flash
unit is mounted on the accessory shoe or a WR-R10 wireless remote controller commands a flash unit via radio flash control.
Indicators on Simplified display Histogram 1
Flash info 2, 3 Information display 2 Virtual horizon
16 Getting to Know the Camera
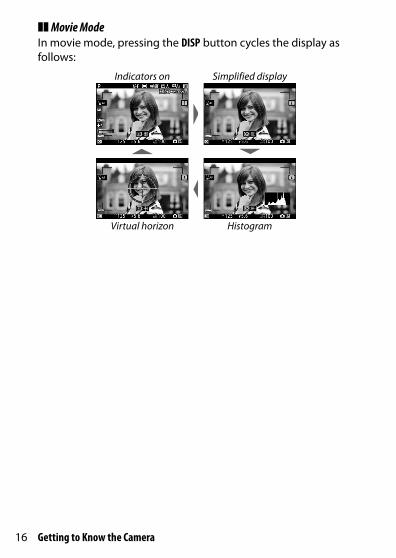
❚❚ Movie ModeIn movie mode, pressing the DISP button cycles the display as follows:
Indicators on Simplified display
Virtual horizon Histogram
17Getting to Know the Camera
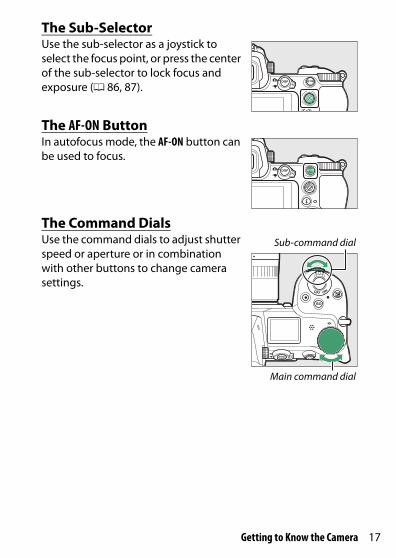
The Sub-SelectorUse the sub-selector as a joystick to select the focus point, or press the center of the sub-selector to lock focus and exposure (0 86, 87).
The AF-ON ButtonIn autofocus mode, the AF-ON button can be used to focus.
The Command DialsUse the command dials to adjust shutter speed or aperture or in combination with other buttons to change camera settings.
Sub-command dial
Main command dial
18 Getting to Know the Camera
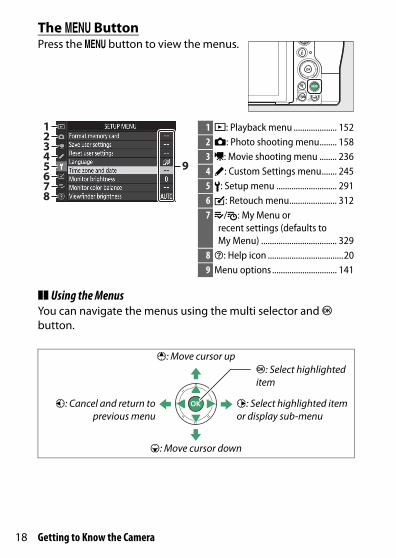
The G ButtonPress the G button to view the menus.
❚❚ Using the MenusYou can navigate the menus using the multi selector and J button.
9
12345678
1 D: Playback menu .................... 1522 C: Photo shooting menu........ 1583 1: Movie shooting menu ........ 2364 A: Custom Settings menu....... 2455 B: Setup menu ............................ 2916 N: Retouch menu...................... 3127 O/m: My Menu or
recent settings (defaults to My Menu) ................................... 329
8 d: Help icon ...................................209 Menu options .............................. 141
1: Move cursor up
3: Move cursor down
2: Select highlighted item or display sub-menu
4: Cancel and return toprevious menu
J: Select highlighted item

19Getting to Know the Camera
1 Highlight the icon for the current menu.Press 4 to highlight the icon for the current menu.
2 Select a menu.Press 1 or 3 to select the desired menu.
3 Position the cursor in the selected menu.Press 2 to position the cursor in the selected menu.
4 Highlight a menu item.Press 1 or 3 to highlight a menu item (items that are displayed in gray are not currently available and cannot be selected).

20 Getting to Know the Camera
5 Display options.Press 2 to display options for the selected menu item.
6 Highlight an option.Press 1 or 3 to highlight an option (options that are displayed in gray are not currently available and cannot be selected).
7 Select the highlighted item.Press J to select the highlighted item. To exit without making a selection, press the G button. To exit the menus and return to shooting mode, press the shutter-release button halfway.
You can also navigate the menus using touch controls (0 14).
A The d (Help) IconIf a d icon appears at the bottom left corner of the display, you can view a description of the currently selected option or menu by pressing the W (Q) button. Press 1 or 3 to scroll the text, or press W (Q) again to return to the menus.

21Getting to Know the Camera
The i Button (i Icon)For quick access to frequently-used settings, press the i button or tap the i icon in the display.
Tap the desired item or highlight items and press J to view options. You can also adjust settings by highlighting items and rotating the command dials. The items displayed in photo mode (0 90) differ from those displayed in movie mode (0 112).
or
A The Playback i MenuPressing the i button during playback displays a context-sensitive menu of frequently-used playback options.

22 Getting to Know the Camera
❚❚ Customizing the i MenuThe items displayed in the photo-mode i menu can be chosen using Custom Setting f1 (Customize i menu).
1 Select Custom Setting f1.In the Custom Settings menu, highlight Custom Setting f1 (Customize i menu) and press J (for information on using the menus, see “The G Button”, 0 18).
2 Choose a position.Highlight a position in the menu you want to edit and press J.
3 Choose an option.Highlight an option and press J to assign it to the selected position and return to the menu displayed in Step 2. Repeat Steps 2 and 3 as desired.
4 Exit.Press the G button to save changes and exit.
23Getting to Know the Camera
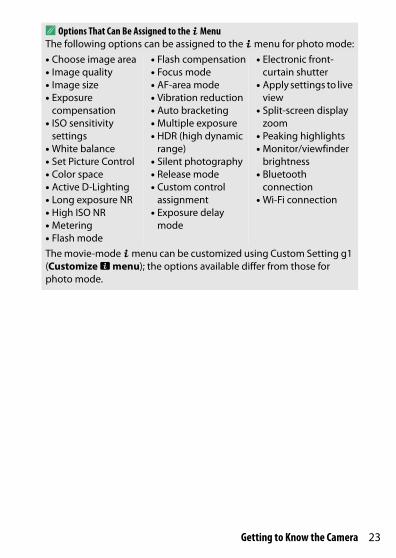
A Options That Can Be Assigned to the i MenuThe following options can be assigned to the i menu for photo mode:• Choose image area• Image quality• Image size• Exposure
compensation• ISO sensitivity
settings• White balance• Set Picture Control• Color space• Active D-Lighting• Long exposure NR• High ISO NR• Metering• Flash mode
• Flash compensation• Focus mode• AF-area mode• Vibration reduction• Auto bracketing• Multiple exposure• HDR (high dynamic
range)• Silent photography• Release mode• Custom control
assignment• Exposure delay
mode
• Electronic front-curtain shutter
• Apply settings to live view
• Split-screen display zoom
• Peaking highlights• Monitor/viewfinder
brightness• Bluetooth
connection• Wi-Fi connection
The movie-mode i menu can be customized using Custom Setting g1 (Customize i menu); the options available differ from those for photo mode.
24 Getting to Know the Camera
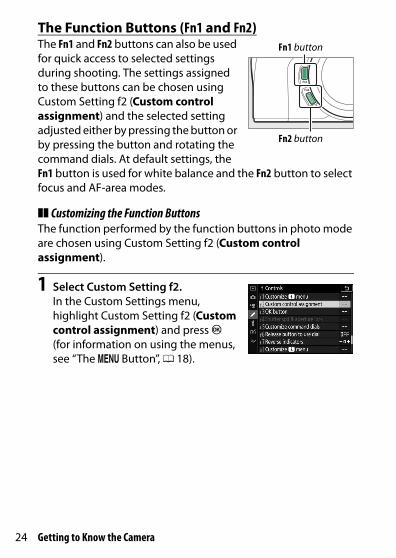
The Function Buttons (Fn1 and Fn2)The Fn1 and Fn2 buttons can also be used for quick access to selected settings during shooting. The settings assigned to these buttons can be chosen using Custom Setting f2 (Custom control assignment) and the selected setting adjusted either by pressing the button or by pressing the button and rotating the command dials. At default settings, the Fn1 button is used for white balance and the Fn2 button to select focus and AF-area modes.
❚❚ Customizing the Function ButtonsThe function performed by the function buttons in photo mode are chosen using Custom Setting f2 (Custom control assignment).
1 Select Custom Setting f2.In the Custom Settings menu, highlight Custom Setting f2 (Custom control assignment) and press J (for information on using the menus, see “The G Button”, 0 18).
Fn1 button
Fn2 button
25Getting to Know the Camera
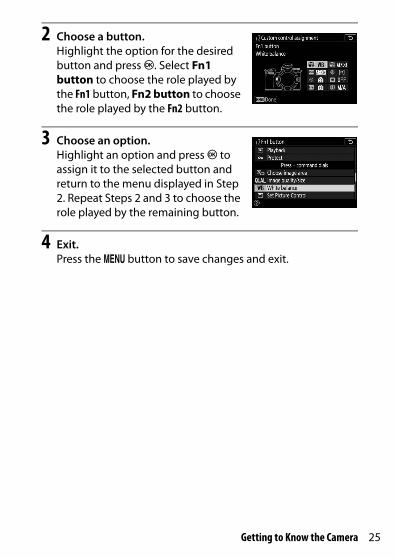
2 Choose a button.Highlight the option for the desired button and press J. Select Fn1 button to choose the role played by the Fn1 button, Fn2 button to choose the role played by the Fn2 button.
3 Choose an option.Highlight an option and press J to assign it to the selected button and return to the menu displayed in Step 2. Repeat Steps 2 and 3 to choose the role played by the remaining button.
4 Exit.Press the G button to save changes and exit.

26 Getting to Know the Camera
A Roles That Can Be Assigned to the Function ButtonsThe following roles can be assigned to the function buttons in photo mode:• AF-ON• AF lock only• AE lock (hold)• AE lock (reset on
release)• AE lock only• AE/AF lock• FV lock• c disable/enable• Preview• Matrix metering• Center-weighted
metering• Spot metering• Highlight-weighted
metering• Bracketing burst
• Sync. release selection
• + NEF (RAW)• Framing grid display• Zoom on/off• MY MENU• Access top item in
MY MENU• Playback• Protect• Choose image area• Image quality/size• White balance• Set Picture Control• Active D-Lighting• Metering
• Flash mode/compensation
• Focus mode/AF-area mode
• Auto bracketing• Multiple exposure• HDR (high dynamic
range)• Exposure delay
mode• Shutter spd &
aperture lock• Peaking highlights• Rating• Choose non-CPU
lens number• None
The roles played by the function buttons in movie mode can be chosen using Custom Setting g2 (Custom control assignment); the options available differ from those for photo mode.

27First Steps
First StepsComplete the steps in this chapter before taking pictures for the first time.
A strap is supplied with the camera; additional straps are available separately. Attach the strap securely to the camera eyelets.
Attach the Camera Strap

28 First Steps
The battery can be charged using the supplied battery charger or a charging AC adapter (a charging AC adapter is supplied with the Z 7, and can be purchased separately for the Z 6).
The Battery ChargerInsert the supplied EN-EL15b battery and plug the charger in. Depending on the country or region, the charger comes with either an AC wall adapter or a power cable.• AC wall adapter: Insert the AC wall adapter into the charger AC
inlet (q). Slide the AC wall adapter latch as shown (w) and rotate the adapter 90 ° to fix it in place (e). Insert the battery and plug the charger in.
• Power cable: After connecting the power cable with the plug in the orientation shown, insert the battery and plug the cable in.
Charge the Battery
D The Battery and ChargerRead and follow the warnings and cautions in “For Your Safety” (0 xvi) and “Caring for the Camera and Battery: Cautions” (0 424).
AC wall adapter latch
29First Steps
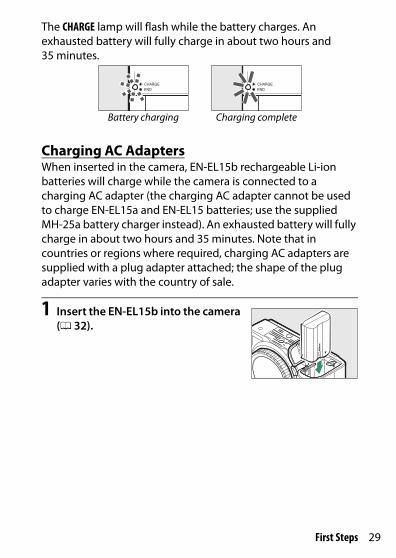
The CHARGE lamp will flash while the battery charges. An exhausted battery will fully charge in about two hours and 35 minutes.
Charging AC AdaptersWhen inserted in the camera, EN-EL15b rechargeable Li-ion batteries will charge while the camera is connected to a charging AC adapter (the charging AC adapter cannot be used to charge EN-EL15a and EN-EL15 batteries; use the supplied MH-25a battery charger instead). An exhausted battery will fully charge in about two hours and 35 minutes. Note that in countries or regions where required, charging AC adapters are supplied with a plug adapter attached; the shape of the plug adapter varies with the country of sale.
1 Insert the EN-EL15b into the camera (0 32).
Battery charging Charging complete

30 First Steps
2 After confirming that the camera is off, connect the charging AC adapter and plug the adapter in. Insert the plug or plug adapter straight into the socket rather than at an angle, and observe the same precaution when unplugging the charging AC adapter.
The camera CHARGE lamp lights amber while charging is in progress and turns off when charging is complete. Note that although the camera can be used while connected, the battery will not charge and the camera will not draw power from the charging AC adapter while the camera is on.
3 Unplug and disconnect the charging AC adapter when charging is complete.
CHARGE lamp
Outlet
Charging AC adapter

31First Steps
D The CHARGE LampIf the battery cannot be charged using the charging AC adapter, for example because the battery is not compatible or the temperature of the camera is elevated, the CHARGE lamp will flash rapidly for about 30 seconds and then turn off. If the CHARGE lamp is off and you did not observe the battery charging, turn the camera on and check the battery level.

32 First Steps
Before inserting or removing the battery or memory cards, confirm that the camera power switch is in the OFF position. Insert the battery in the orientation shown, using the battery to keep the orange battery latch pressed to one side. The latch locks the battery in place when the battery is fully inserted.
Holding the memory card in the orientation shown, slide it straight into the slot until it clicks into place.
Insert the Battery and a Memory Card
Battery latch
33First Steps
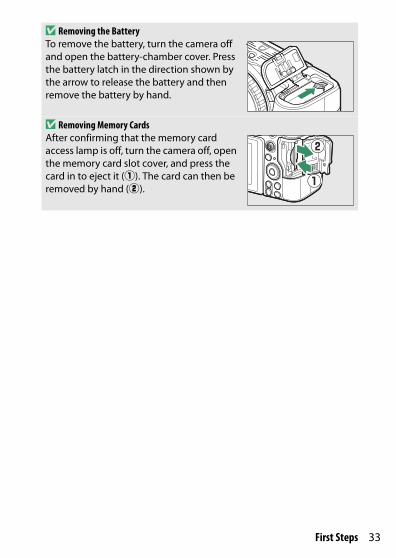
D Removing the BatteryTo remove the battery, turn the camera off and open the battery-chamber cover. Press the battery latch in the direction shown by the arrow to release the battery and then remove the battery by hand.
D Removing Memory CardsAfter confirming that the memory card access lamp is off, turn the camera off, open the memory card slot cover, and press the card in to eject it (q). The card can then be removed by hand (w).

34 First Steps
Battery LevelThe battery level is shown in the shooting display and control panel while the camera is on.
The battery level display changes as the battery level diminishes, from L through K, J, I, and finally, H. When the battery level falls to H, suspend shooting and charge the battery or ready a spare battery. When the battery is exhausted, the H icon will flash; charge the battery or insert a fully-charged spare battery.
Number of Exposures RemainingWhen the camera is on, the shooting display and control panel show the number of photographs that can be taken at current settings (values over 1000 are rounded down to the nearest hundred; e.g., values between 1400 and 1499 are shown as 1.4 k).
Monitor Viewfinder Control panel
Monitor Viewfinder Control panel
35First Steps
D Memory Cards• Memory cards may be hot after use. Observe due caution when
removing memory cards from the camera.• Turn the power off before inserting or removing memory cards. Do
not remove memory cards from the camera, turn the camera off, or remove or disconnect the power source during formatting or while data are being recorded, deleted, or copied to a computer or other device. Failure to observe these precautions could result in loss of data or in damage to the camera or card.
• Do not touch the card terminals with your fingers or metal objects.• Do not bend, drop, or subject to strong physical shocks.• Do not apply force to the card casing. Failure to observe this
precaution could damage the card.• Do not expose to water, heat, high levels of humidity, or direct
sunlight.• Do not format memory cards in a computer.
D No Memory CardIf no memory card is inserted, a “no memory card” indicator will appear in the shooting display and [–E–] will appear in both the control panel and the shooting display.
36 First Steps
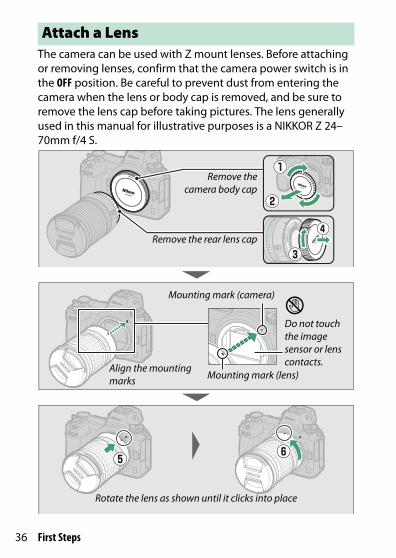
The camera can be used with Z mount lenses. Before attaching or removing lenses, confirm that the camera power switch is in the OFF position. Be careful to prevent dust from entering the camera when the lens or body cap is removed, and be sure to remove the lens cap before taking pictures. The lens generally used in this manual for illustrative purposes is a NIKKOR Z 24–70mm f/4 S.
Attach a Lens
Remove thecamera body cap
Remove the rear lens cap
Mounting mark (camera)
Mounting mark (lens)Align the mounting marks
GDo not touch the image sensor or lens contacts.
Rotate the lens as shown until it clicks into place

37First Steps
D F Mount LensesBe sure to attach the FTZ mount adapter (supplied or available separately, 0 453) before using F mount lenses. Attempting to attach F mount lenses directly to the camera could damage the lens or image sensor.
D Lenses with Retractable BarrelsLenses with retractable barrels must be extended before use. Rotate the lens zoom ring as shown until the lens clicks into the extended position.
D Detaching LensesBe sure the camera is off when removing or exchanging lenses. To remove the lens, press and hold the lens release button (q) while turning the lens clockwise (w). After removing the lens, replace the lens caps and camera body cap.
38 First Steps
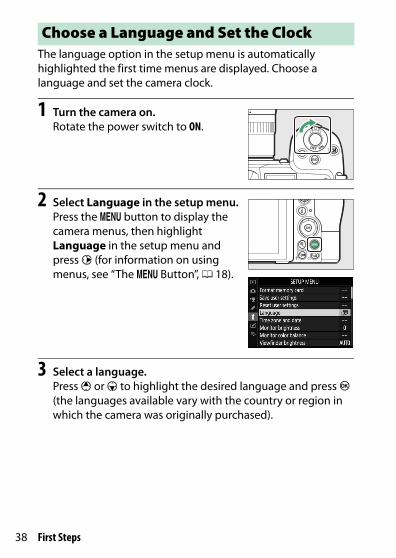
The language option in the setup menu is automatically highlighted the first time menus are displayed. Choose a language and set the camera clock.
1 Turn the camera on.Rotate the power switch to ON.
2 Select Language in the setup menu.Press the G button to display the camera menus, then highlight Language in the setup menu and press 2 (for information on using menus, see “The G Button”, 0 18).
3 Select a language.Press 1 or 3 to highlight the desired language and press J (the languages available vary with the country or region in which the camera was originally purchased).
Choose a Language and Set the Clock
39First Steps
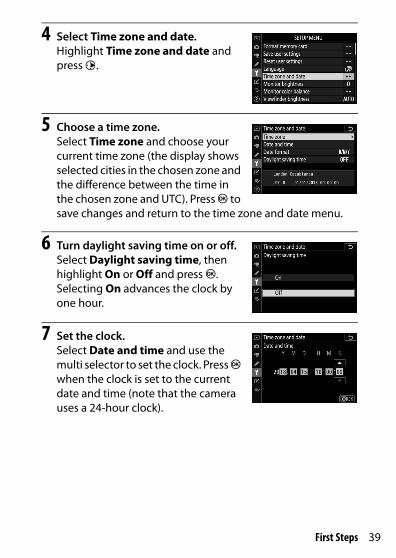
4 Select Time zone and date.Highlight Time zone and date and press 2.
5 Choose a time zone.Select Time zone and choose your current time zone (the display shows selected cities in the chosen zone and the difference between the time in the chosen zone and UTC). Press J to save changes and return to the time zone and date menu.
6 Turn daylight saving time on or off.Select Daylight saving time, then highlight On or Off and press J. Selecting On advances the clock by one hour.
7 Set the clock.Select Date and time and use the multi selector to set the clock. Press J when the clock is set to the current date and time (note that the camera uses a 24-hour clock).
40 First Steps
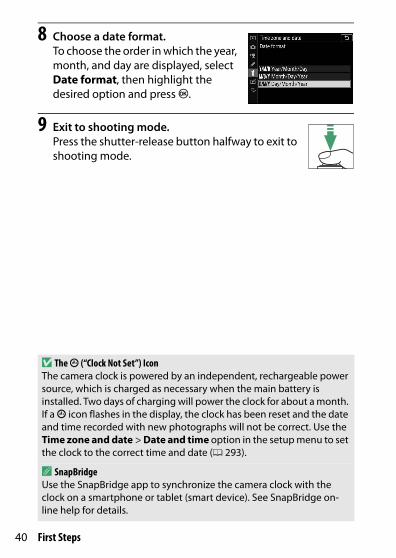
8 Choose a date format.To choose the order in which the year, month, and day are displayed, select Date format, then highlight the desired option and press J.
9 Exit to shooting mode.Press the shutter-release button halfway to exit to shooting mode.
D The t (“Clock Not Set”) IconThe camera clock is powered by an independent, rechargeable power source, which is charged as necessary when the main battery is installed. Two days of charging will power the clock for about a month. If a t icon flashes in the display, the clock has been reset and the date and time recorded with new photographs will not be correct. Use the Time zone and date > Date and time option in the setup menu to set the clock to the correct time and date (0 293).
A SnapBridgeUse the SnapBridge app to synchronize the camera clock with the clock on a smartphone or tablet (smart device). See SnapBridge on-line help for details.
41Basic Photography and Playback
Basic Photography and PlaybackThis chapter explains the basics of taking and viewing photos.
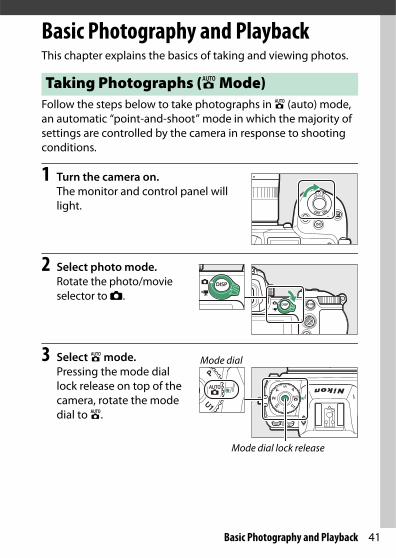
Follow the steps below to take photographs in b (auto) mode, an automatic “point-and-shoot” mode in which the majority of settings are controlled by the camera in response to shooting conditions.
1 Turn the camera on.The monitor and control panel will light.
2 Select photo mode.Rotate the photo/movie selector to C.
3 Select b mode.Pressing the mode dial lock release on top of the camera, rotate the mode dial to b.
Taking Photographs (b Mode)
Mode dial
Mode dial lock release
42 Basic Photography and Playback
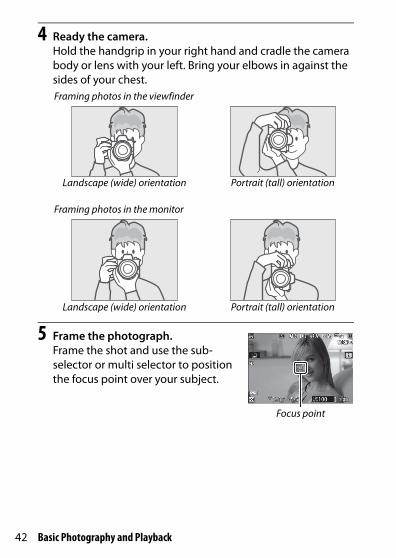
4 Ready the camera.Hold the handgrip in your right hand and cradle the camera body or lens with your left. Bring your elbows in against the sides of your chest.
5 Frame the photograph.Frame the shot and use the sub-selector or multi selector to position the focus point over your subject.
Framing photos in the viewfinder
Landscape (wide) orientation Portrait (tall) orientation
Framing photos in the monitor
Landscape (wide) orientation Portrait (tall) orientation
Focus point

43Basic Photography and Playback
6 Focus.To focus, press the shutter-release button halfway or press the AF-ON button (the AF-assist illuminator may light if the subject is poorly lit). If the camera is able to focus, the focus point will be displayed in green; otherwise, the focus point will flash red.
D The AF-Assist IlluminatorDo not obstruct the AF-assist illuminator while it is lit.

44 Basic Photography and Playback
7 Shoot.Smoothly press the shutter-release button the rest of the way down to take the photograph (you can also take a photograph by touching the monitor: touch your subject to focus and lift your finger to release the shutter). The memory card access lamp will light while the photo is recorded to the memory card. Do not eject the memory card or remove or disconnect the power source until the lamp has gone out and recording is complete.
D The Standby TimerIf no operations are performed for about 30 seconds, the display will dim for a few seconds before the monitor, viewfinder, and control panel turn off to reduce the drain on the battery. Press the shutter-release button halfway to reactivate the display. The length of time before the standby timer expires automatically can be selected using Custom Setting c3 (Power off delay) > Standby timer.
Memory cardaccess lamp
45Basic Photography and Playback
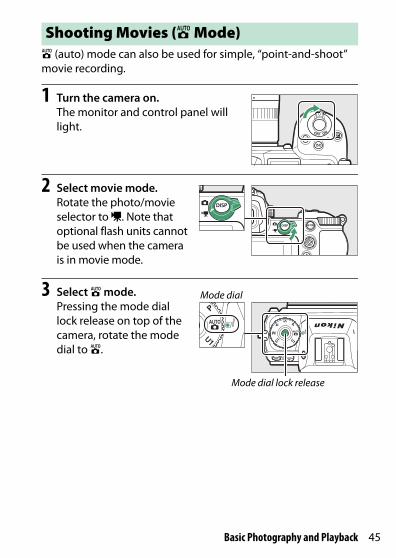
b (auto) mode can also be used for simple, “point-and-shoot” movie recording.
1 Turn the camera on.The monitor and control panel will light.
2 Select movie mode.Rotate the photo/movie selector to 1. Note that optional flash units cannot be used when the camera is in movie mode.
3 Select b mode.Pressing the mode dial lock release on top of the camera, rotate the mode dial to b.
Shooting Movies (b Mode)
Mode dial
Mode dial lock release
46 Basic Photography and Playback
4 Start recording.Press the movie-record button to start recording. While recording is in progress, the camera will display a recording indicator and the time remaining. The camera can be refocused at any time during recording by pressing the AF-ON button or tapping your subject in the display. Sound is recorded via the built-in microphone; do not cover the microphone during recording.
5 End recording.Press the movie-record button again to end recording. The memory card access lamp will light while the camera finishes saving the movie to the memory card. Do not eject the memory card or remove or disconnect the power source until the lamp has gone out and recording is complete.
D The 0 IconA 0 icon indicates that movies cannot be recorded.
Movie-record button
Recording indicator
Time remaining
Memory cardaccess lamp
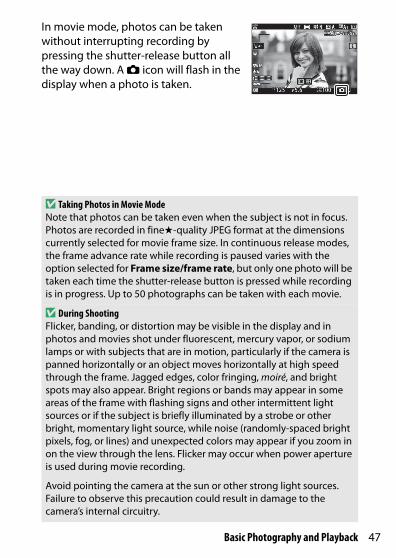
47Basic Photography and Playback
In movie mode, photos can be taken without interrupting recording by pressing the shutter-release button all the way down. A C icon will flash in the display when a photo is taken.
D Taking Photos in Movie ModeNote that photos can be taken even when the subject is not in focus. Photos are recorded in finem-quality JPEG format at the dimensions currently selected for movie frame size. In continuous release modes, the frame advance rate while recording is paused varies with the option selected for Frame size/frame rate, but only one photo will be taken each time the shutter-release button is pressed while recording is in progress. Up to 50 photographs can be taken with each movie.
D During ShootingFlicker, banding, or distortion may be visible in the display and in photos and movies shot under fluorescent, mercury vapor, or sodium lamps or with subjects that are in motion, particularly if the camera is panned horizontally or an object moves horizontally at high speed through the frame. Jagged edges, color fringing, moiré, and bright spots may also appear. Bright regions or bands may appear in some areas of the frame with flashing signs and other intermittent light sources or if the subject is briefly illuminated by a strobe or other bright, momentary light source, while noise (randomly-spaced bright pixels, fog, or lines) and unexpected colors may appear if you zoom in on the view through the lens. Flicker may occur when power aperture is used during movie recording.
Avoid pointing the camera at the sun or other strong light sources. Failure to observe this precaution could result in damage to the camera’s internal circuitry.

48 Basic Photography and Playback
D Recording MoviesRecording ends automatically when the maximum length is reached or the memory card fills or if the lens is removed, another mode is selected, or the photo/movie selector is rotated to C. Note that the built-in microphone may record sounds made by the camera or lens during vibration reduction, autofocus, or changes to aperture.
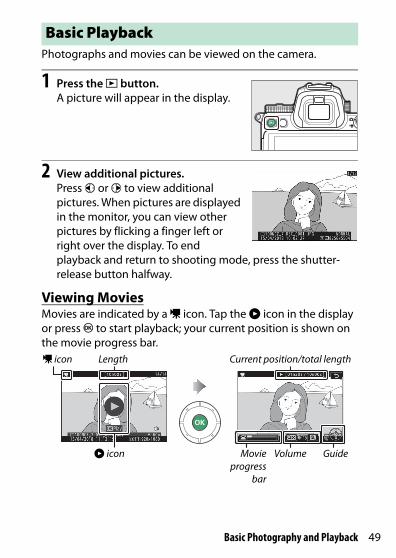
49Basic Photography and Playback
Photographs and movies can be viewed on the camera.
1 Press the K button.A picture will appear in the display.
2 View additional pictures.Press 4 or 2 to view additional pictures. When pictures are displayed in the monitor, you can view other pictures by flicking a finger left or right over the display. To end playback and return to shooting mode, press the shutter-release button halfway.
Viewing MoviesMovies are indicated by a 1 icon. Tap the a icon in the display or press J to start playback; your current position is shown on the movie progress bar.
Basic Playback
1 icon Length Current position/total length
a icon Movieprogress
bar
Volume Guide

50 Basic Photography and Playback
The following operations can be performed:
Operation DescriptionPause Press 3 to pause playback.
Play Press J to resume playback when playback is paused or during rewind/advance.
Rewind/advance
Press 4 to rewind, 2 to advance. Speed increases with each press, from 2× to 4× to 8× to 16×; keep the control pressed to skip to the beginning or end of the movie (the first frame is indicated by a h in the top right corner of the display, the last frame by a i). If playback is paused, the movie rewinds or advances one frame at a time; keep the control pressed for continuous rewind or advance.
Start slow-motion playback
Press 3 while the movie is paused to start slow-motion playback.
Skip 10 s Rotate the main command dial one stop to skip ahead or back 10 s.
Skip to last or first frame
Rotate the sub-command dial to skip to the last or first frame.
Adjust volume Press X to increase volume, W (Q) to decrease.
Trim movie To view movie editing options, pause playback and press the i button.
Exit Press 1 or K to exit to full-frame playback.Return to shooting
modePress the shutter-release button halfway to exit to shooting mode.

51Basic Photography and Playback
Deleting Unwanted PicturesPress the O button to delete the current picture. Note that pictures cannot be recovered once deleted.
1 Display a picture you wish to delete.Display a photo or movie you wish to delete as described in “Basic Playback” (0 49).
2 Delete the picture.Press the O button. A confirmation dialog will be displayed; press the O button again to delete the picture and return to playback. To exit without deleting the picture, press K.
A DeleteTo delete selected pictures, all pictures taken on selected dates, or all pictures in a chosen location on the memory card, use the Delete option in the playback menu.
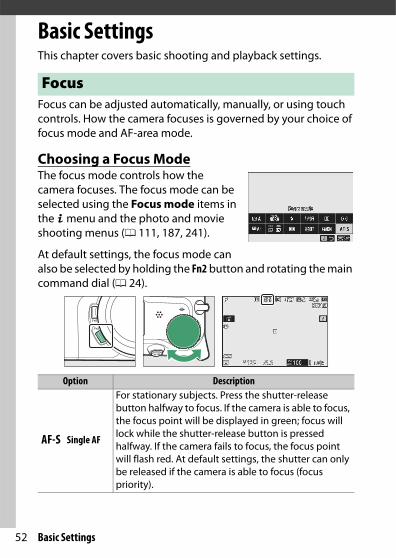
52 Basic Settings
Basic SettingsThis chapter covers basic shooting and playback settings.
Focus can be adjusted automatically, manually, or using touch controls. How the camera focuses is governed by your choice of focus mode and AF-area mode.
Choosing a Focus ModeThe focus mode controls how the camera focuses. The focus mode can be selected using the Focus mode items in the i menu and the photo and movie shooting menus (0 111, 187, 241).
At default settings, the focus mode can also be selected by holding the Fn2 button and rotating the main command dial (0 24).
Focus
Option Description
AF-S Single AF
For stationary subjects. Press the shutter-release button halfway to focus. If the camera is able to focus, the focus point will be displayed in green; focus will lock while the shutter-release button is pressed halfway. If the camera fails to focus, the focus point will flash red. At default settings, the shutter can only be released if the camera is able to focus (focus priority).

53Basic Settings
AF-C Continuous AF
For moving subjects. The camera focuses continuously while the shutter-release button is pressed halfway; if the subject moves, the camera will predict the final distance to the subject and adjust focus as necessary. At default settings, the shutter can be released whether or not the subject is in focus (release priority).
AF-F Full-time AF
The camera adjusts focus continuously in response to subject movement or changes in composition. Focus locks when the shutter-release button is pressed halfway. This option is only available in movie mode.
MF Manual focus
Focus manually (0 59). The shutter can be released whether or not the subject is in focus.
D AutofocusThe display may brighten or darken while the camera focuses and the focus point may sometimes be displayed in green when the camera is unable to focus. The camera may be unable to focus in the following situations:• The subject contains lines parallel to the long edge of the frame• The subject lacks contrast• The subject in the focus point contains areas of sharply contrasting
brightness, or includes spot lighting or a neon sign or other light source that changes in brightness
• Flicker or banding appears under fluorescent, mercury-vapor, sodium-vapor, or similar lighting
• A cross (star) filter or other special filter is used• The subject appears smaller than the focus point• The subject is dominated by regular geometric patterns (e.g., blinds
or a row of windows in a skyscraper)
D Turning the Camera OffThe focus position may change if you turn the camera off and then on again after focusing.
A Low-Light AFFor improved focus when lighting is poor, select AF-S and choose On for Custom Setting a11 (Low-light AF).
Option Description
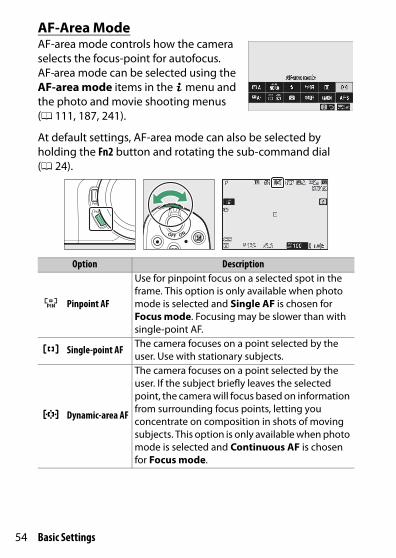
54 Basic Settings
AF-Area ModeAF-area mode controls how the camera selects the focus-point for autofocus. AF-area mode can be selected using the AF-area mode items in the i menu and the photo and movie shooting menus (0 111, 187, 241).
At default settings, AF-area mode can also be selected by holding the Fn2 button and rotating the sub-command dial (0 24).
Option Description
3 Pinpoint AF
Use for pinpoint focus on a selected spot in the frame. This option is only available when photo mode is selected and Single AF is chosen for Focus mode. Focusing may be slower than with single-point AF.
d Single-point AF The camera focuses on a point selected by the user. Use with stationary subjects.
e Dynamic-area AF
The camera focuses on a point selected by the user. If the subject briefly leaves the selected point, the camera will focus based on information from surrounding focus points, letting you concentrate on composition in shots of moving subjects. This option is only available when photo mode is selected and Continuous AF is chosen for Focus mode.

55Basic Settings
f Wide-area AF (S) The camera focuses on a point selected by the user. Use with stationary subjects. The focus points for Wide-area AF (S) are wider than those for Single-point AF, while the focus points for Wide-area AF (L) are wider than those for Wide-area AF (S).
g Wide-area AF (L)
h Auto-area AF
The camera automatically detects the subject and selects the focus area. At default settings, the camera gives priority to portrait subjects; if a portrait subject is detected, the selected subject will be indicated by a yellow border (if multiple faces are detected, you can choose your subject using the multi selector). Subject tracking (0 56) can be activated by pressing the J button.
A Quick Focus-Point SelectionFor quicker focus-point selection, choose Every other point for Custom Setting a5 (Focus points used) to use only a quarter of the available focus points (the number of points available for Wide-area AF (L) does not change). If you prefer to use the sub-selector for focus-point selection, you can choose Select center focus point for Custom Setting f2 (Custom control assignment) > Sub-selector center to allow the center of the sub-selector to be used to quickly select the center focus point.
Option Description

56 Basic Settings
❚❚ Subject TrackingWhen Auto-area AF is selected for AF-area mode, pressing J enables focus tracking. The focus point will change to a targeting reticule; position the reticule over the target and either press J again or press the AF-ON button to start tracking. The focus point will track the selected subject as it moves through the frame (in the case of portrait subjects, focus will track the subject’s face). To end tracking, press J a third time. To exit subject-tracking mode, press the W (Q) button.
D Subject TrackingThe camera may be unable to track subjects if they move quickly, leave the frame or are obscured by other objects, change visibly in size, color, or brightness, or are too small, too large, too bright, too dark, or similar in color or brightness to the background.

57Basic Settings
The Touch ShutterTouch controls can be used to focus and release the shutter. Touch the display to focus and lift your finger to release the shutter.
Tap the icon shown in the illustration to choose the operation performed by tapping the display in shooting mode. Choose from the following options:• W: Touch the display to position the
focus point and focus (autofocus only; the touch shutter cannot be used to focus in manual focus mode). Focus locks while your finger remains on the display; lift your finger to release the shutter. Available only in photo mode.
• V: As above, except that lifting your finger from the display does not release the shutter. If auto-area AF is selected for AF-area mode, the camera will track the selected subject as it moves through the frame; to switch to a different subject, tap it in the display.
• X: Touch shutter disabled.

58 Basic Settings
D Taking Pictures Using Touch Shooting OptionsThe shutter-release button can be used to focus and take pictures even when the W icon is displayed to show that touch shooting options are active. Use the shutter-release button to take photographs in continuous shooting mode and during movie recording (touch shooting options can be used only to take pictures one at a time in continuous shooting mode and cannot be used to take photographs during movie recording).
In self-timer mode, focus locks on the selected subject when you touch the monitor and the number of shots currently selected in self-timer mode will be taken starting about 10 seconds after you lift your finger from the display.
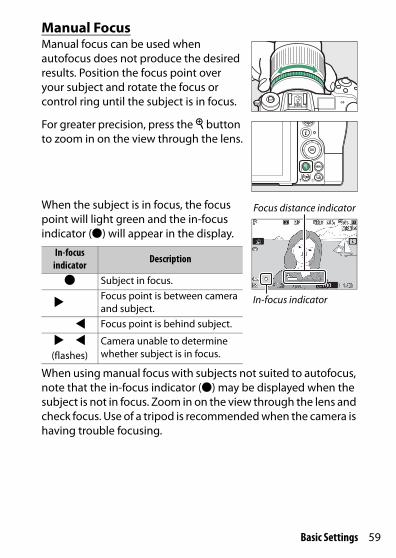
59Basic Settings
Manual FocusManual focus can be used when autofocus does not produce the desired results. Position the focus point over your subject and rotate the focus or control ring until the subject is in focus.
For greater precision, press the X button to zoom in on the view through the lens.
When the subject is in focus, the focus point will light green and the in-focus indicator (I) will appear in the display.
When using manual focus with subjects not suited to autofocus, note that the in-focus indicator (I) may be displayed when the subject is not in focus. Zoom in on the view through the lens and check focus. Use of a tripod is recommended when the camera is having trouble focusing.
In-focus indicator Description
I Subject in focus.
FFocus point is between camera and subject.
H Focus point is behind subject.
F H Camera unable to determine whether subject is in focus.(flashes)
Focus distance indicator
In-focus indicator
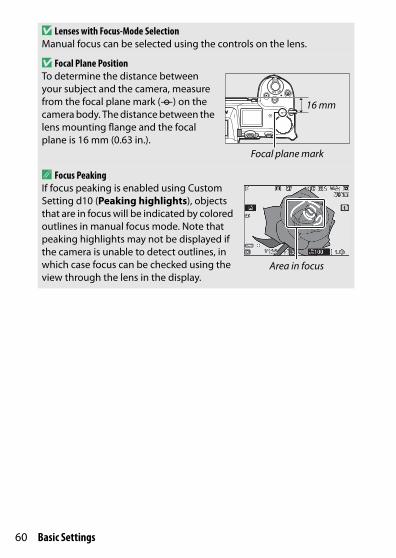
60 Basic Settings
D Lenses with Focus-Mode SelectionManual focus can be selected using the controls on the lens.
D Focal Plane PositionTo determine the distance between your subject and the camera, measure from the focal plane mark (E) on the camera body. The distance between the lens mounting flange and the focal plane is 16 mm (0.63 in.).
A Focus PeakingIf focus peaking is enabled using Custom Setting d10 (Peaking highlights), objects that are in focus will be indicated by colored outlines in manual focus mode. Note that peaking highlights may not be displayed if the camera is unable to detect outlines, in which case focus can be checked using the view through the lens in the display.
Focal plane mark
16 mm
Area in focus
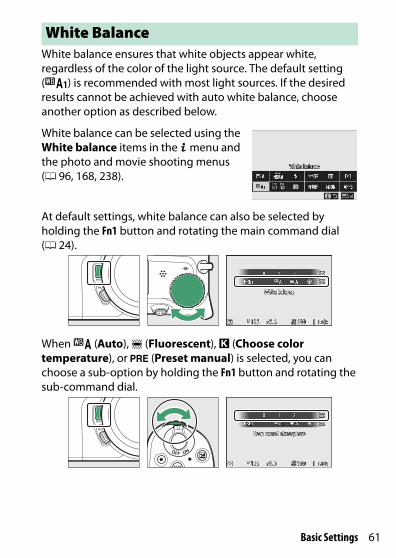
61Basic Settings
White balance ensures that white objects appear white, regardless of the color of the light source. The default setting (j) is recommended with most light sources. If the desired results cannot be achieved with auto white balance, choose another option as described below.
White balance can be selected using the White balance items in the i menu and the photo and movie shooting menus (0 96, 168, 238).
At default settings, white balance can also be selected by holding the Fn1 button and rotating the main command dial (0 24).
When 4 (Auto), I (Fluorescent), K (Choose color temperature), or L (Preset manual) is selected, you can choose a sub-option by holding the Fn1 button and rotating the sub-command dial.
White Balance
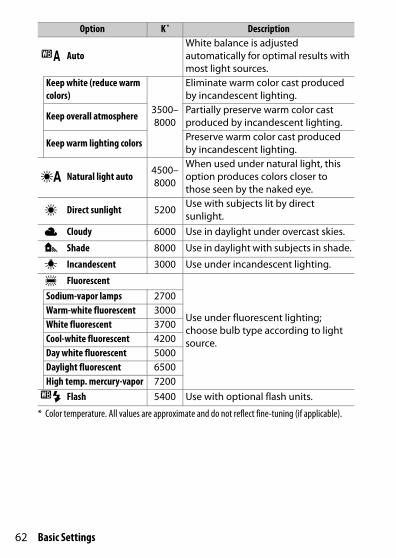
62 Basic Settings
* Color temperature. All values are approximate and do not reflect fine-tuning (if applicable).
Option K * Description
4 AutoWhite balance is adjusted automatically for optimal results with most light sources.
Keep white (reduce warm colors)
3500–8000
Eliminate warm color cast produced by incandescent lighting.
Keep overall atmosphere Partially preserve warm color cast produced by incandescent lighting.
Keep warm lighting colors Preserve warm color cast produced by incandescent lighting.
D Natural light auto 4500–8000
When used under natural light, this option produces colors closer to those seen by the naked eye.
H Direct sunlight 5200Use with subjects lit by direct sunlight.
G Cloudy 6000 Use in daylight under overcast skies.
M Shade 8000 Use in daylight with subjects in shade.
J Incandescent 3000 Use under incandescent lighting.
I Fluorescent
Use under fluorescent lighting; choose bulb type according to light source.
Sodium-vapor lamps 2700Warm-white fluorescent 3000White fluorescent 3700Cool-white fluorescent 4200Day white fluorescent 5000Daylight fluorescent 6500High temp. mercury-vapor 72005 Flash 5400 Use with optional flash units.
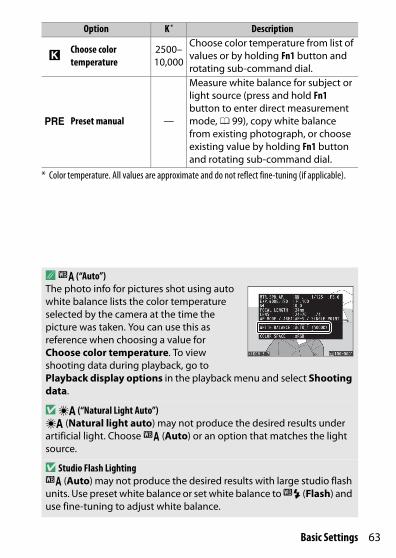
63Basic Settings
* Color temperature. All values are approximate and do not reflect fine-tuning (if applicable).
Option K * Description
KChoose color temperature
2500–10,000
Choose color temperature from list of values or by holding Fn1 button and rotating sub-command dial.
L Preset manual —
Measure white balance for subject or light source (press and hold Fn1 button to enter direct measurement mode, 0 99), copy white balance from existing photograph, or choose existing value by holding Fn1 button and rotating sub-command dial.
A4 (“Auto”)The photo info for pictures shot using auto white balance lists the color temperature selected by the camera at the time the picture was taken. You can use this as reference when choosing a value for Choose color temperature. To view shooting data during playback, go to Playback display options in the playback menu and select Shooting data.
DD (“Natural Light Auto”)D (Natural light auto) may not produce the desired results under artificial light. Choose 4 (Auto) or an option that matches the light source.
D Studio Flash Lighting4 (Auto) may not produce the desired results with large studio flash units. Use preset white balance or set white balance to 5 (Flash) and use fine-tuning to adjust white balance.
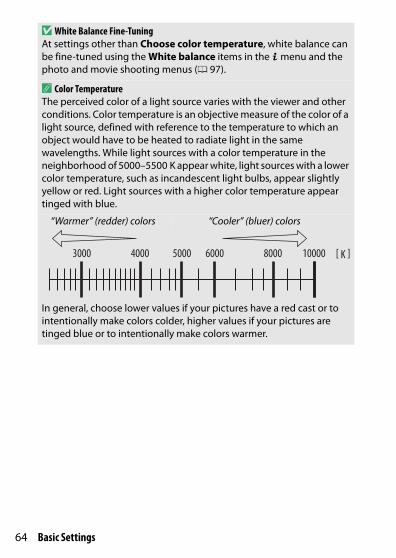
64 Basic Settings
D White Balance Fine-TuningAt settings other than Choose color temperature, white balance can be fine-tuned using the White balance items in the i menu and the photo and movie shooting menus (0 97).
A Color TemperatureThe perceived color of a light source varies with the viewer and other conditions. Color temperature is an objective measure of the color of a light source, defined with reference to the temperature to which an object would have to be heated to radiate light in the same wavelengths. While light sources with a color temperature in the neighborhood of 5000–5500 K appear white, light sources with a lower color temperature, such as incandescent light bulbs, appear slightly yellow or red. Light sources with a higher color temperature appear tinged with blue.
“Warmer” (redder) colors “Cooler” (bluer) colors
In general, choose lower values if your pictures have a red cast or to intentionally make colors colder, higher values if your pictures are tinged blue or to intentionally make colors warmer.
3000 4000 5000 6000 8000 10000 [ K ]
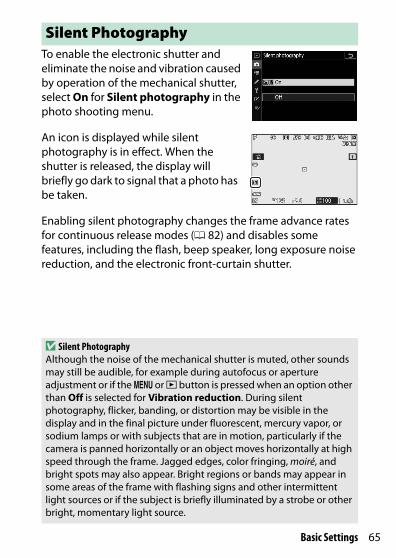
65Basic Settings
To enable the electronic shutter and eliminate the noise and vibration caused by operation of the mechanical shutter, select On for Silent photography in the photo shooting menu.
An icon is displayed while silent photography is in effect. When the shutter is released, the display will briefly go dark to signal that a photo has be taken.
Enabling silent photography changes the frame advance rates for continuous release modes (0 82) and disables some features, including the flash, beep speaker, long exposure noise reduction, and the electronic front-curtain shutter.
Silent Photography
D Silent PhotographyAlthough the noise of the mechanical shutter is muted, other sounds may still be audible, for example during autofocus or aperture adjustment or if the G or K button is pressed when an option other than Off is selected for Vibration reduction. During silent photography, flicker, banding, or distortion may be visible in the display and in the final picture under fluorescent, mercury vapor, or sodium lamps or with subjects that are in motion, particularly if the camera is panned horizontally or an object moves horizontally at high speed through the frame. Jagged edges, color fringing, moiré, and bright spots may also appear. Bright regions or bands may appear in some areas of the frame with flashing signs and other intermittent light sources or if the subject is briefly illuminated by a strobe or other bright, momentary light source.

66 Basic Settings
Selected pictures can be rated or marked as candidates for later deletion. Ratings can also be viewed in Capture NX-D and ViewNX-i. Protected pictures cannot be rated.
1 Select an image.Press the K button to start playback and display a picture you want to rate.
2 Display the i menu.Press the i button to view the i menu.
3 Select Rating.Highlight Rating and press J.
4 Choose a rating.Rotate the main command dial to choose a rating of from zero to five stars, or select d to mark the picture as a candidate for later deletion. Press J to complete the operation.
Rating Pictures

67Basic Settings
Use the Protect option in the i menu to protect pictures from accidental deletion. Note that this does NOT prevent pictures being deleted when the memory card is formatted.
1 Select an image.Press the K button to start playback and display a picture you want to protect.
2 Display the i menu.Press the i button to view the i menu.
3 Select Protect.Highlight Protect and press J. Protected pictures are indicated by a P icon; to remove protection, display the picture and repeat Steps 2–3.
Protecting Pictures from Deletion
A Removing Protection from All PicturesTo remove protection from all pictures in the folder or folders currently selected for Playback folder in the playback menu, select Unprotect all in the i menu.
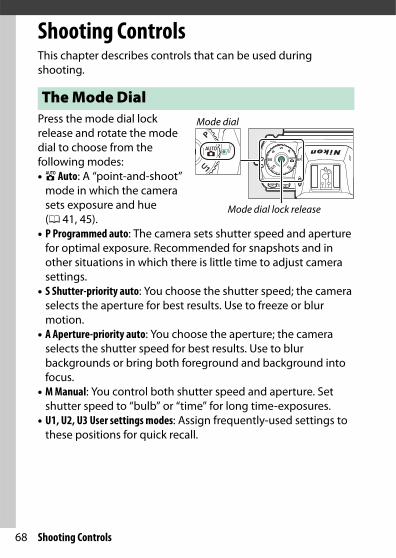
68 Shooting Controls
Shooting ControlsThis chapter describes controls that can be used during shooting.
Press the mode dial lock release and rotate the mode dial to choose from the following modes:• b Auto: A “point-and-shoot”
mode in which the camera sets exposure and hue (0 41, 45).
• P Programmed auto: The camera sets shutter speed and aperture for optimal exposure. Recommended for snapshots and in other situations in which there is little time to adjust camera settings.
• S Shutter-priority auto: You choose the shutter speed; the camera selects the aperture for best results. Use to freeze or blur motion.
• A Aperture-priority auto: You choose the aperture; the camera selects the shutter speed for best results. Use to blur backgrounds or bring both foreground and background into focus.
• M Manual: You control both shutter speed and aperture. Set shutter speed to “bulb” or “time” for long time-exposures.
• U1, U2, U3 User settings modes: Assign frequently-used settings to these positions for quick recall.
The Mode DialMode dial
Mode dial lock release

69Shooting Controls
P: Programmed AutoIn this mode, the camera automatically adjusts shutter speed and aperture according to a built-in program to ensure optimal exposure in most situations. Different combinations of shutter speed and aperture that produce the same exposure can be selected by rotating the main command dial (“flexible program”). While flexible program is in effect, a flexible program indicator (U) is displayed. To restore default shutter speed and aperture settings, rotate the main command dial until the indicator is no longer displayed, choose another mode, or turn the camera off.
S: Shutter-Priority AutoIn shutter-priority auto, you choose the shutter speed while the camera automatically selects the aperture that will produce the optimal exposure. To choose a shutter speed, rotate the main command dial. Shutter speed can be set to “×200” or to values between 30 s and 1/8000 s and can be locked at the selected setting (0 279).
Monitor
Control panel

70 Shooting Controls
A: Aperture-Priority AutoIn aperture-priority auto, you choose the aperture while the camera automatically selects the shutter speed that will produce the optimal exposure. To choose an aperture between the minimum and maximum values for the lens, rotate the sub-command dial. Aperture can be locked at the selected setting (0 279).
M: ManualIn manual exposure mode, you control both shutter speed and aperture. Rotate the main command dial to choose a shutter speed, and the sub-command dial to set aperture. Shutter speed can be set to “×200” or to values between 30 s and 1/8000 s, or the shutter can be held open indefinitely for a long time-exposure (0 75). Aperture can be set to values between the minimum and maximum values for the lens. Use the exposure indicators to check exposure.
Shutter speed and aperture can be locked at the selected settings.
Monitor Control panel
Shutter speed ApertureShutter speed Aperture
Monitor
Control panel
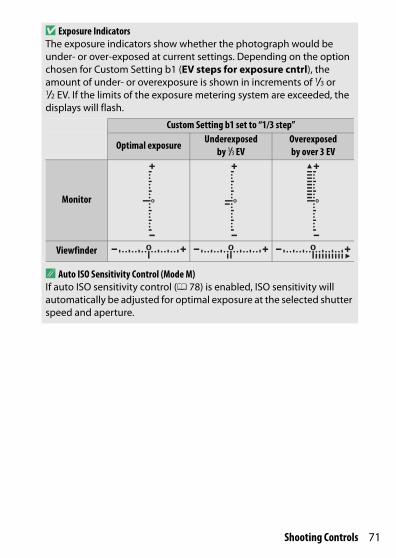
71Shooting Controls
D Exposure IndicatorsThe exposure indicators show whether the photograph would be under- or over-exposed at current settings. Depending on the option chosen for Custom Setting b1 (EV steps for exposure cntrl), the amount of under- or overexposure is shown in increments of 1/3 or 1/2 EV. If the limits of the exposure metering system are exceeded, the displays will flash.
Custom Setting b1 set to “1/3 step”
Optimal exposure Underexposed by 1/3 EV
Overexposed by over 3 EV
Monitor
Viewfinder
A Auto ISO Sensitivity Control (Mode M)If auto ISO sensitivity control (0 78) is enabled, ISO sensitivity will automatically be adjusted for optimal exposure at the selected shutter speed and aperture.
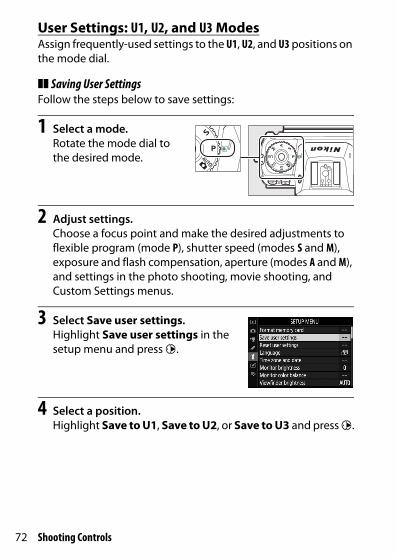
72 Shooting Controls
User Settings: U1, U2, and U3 ModesAssign frequently-used settings to the U1, U2, and U3 positions on the mode dial.
❚❚ Saving User SettingsFollow the steps below to save settings:
1 Select a mode.Rotate the mode dial to the desired mode.
2 Adjust settings.Choose a focus point and make the desired adjustments to flexible program (mode P), shutter speed (modes S and M), exposure and flash compensation, aperture (modes A and M), and settings in the photo shooting, movie shooting, and Custom Settings menus.
3 Select Save user settings.Highlight Save user settings in the setup menu and press 2.
4 Select a position.Highlight Save to U1, Save to U2, or Save to U3 and press 2.
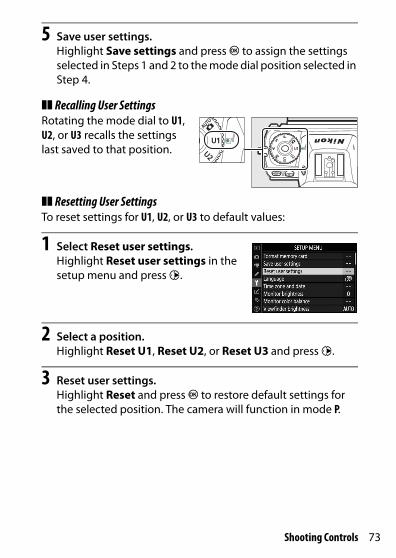
73Shooting Controls
5 Save user settings.Highlight Save settings and press J to assign the settings selected in Steps 1 and 2 to the mode dial position selected in Step 4.
❚❚ Recalling User SettingsRotating the mode dial to U1, U2, or U3 recalls the settings last saved to that position.
❚❚ Resetting User SettingsTo reset settings for U1, U2, or U3 to default values:
1 Select Reset user settings.Highlight Reset user settings in the setup menu and press 2.
2 Select a position.Highlight Reset U1, Reset U2, or Reset U3 and press 2.
3 Reset user settings.Highlight Reset and press J to restore default settings for the selected position. The camera will function in mode P.

74 Shooting Controls
D User SettingsThe following cannot be saved to U1, U2, or U3.Photo shooting menu:• Storage folder• Choose image area• Manage Picture Control• Multiple exposure• Interval timer shooting• Time-lapse movie• Focus shift shooting
Movie shooting menu:• Choose image area• Manage Picture Control
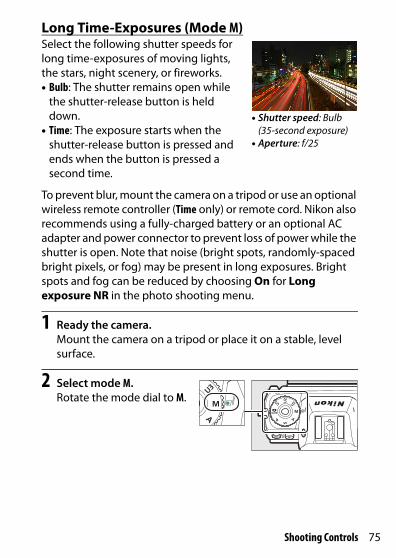
75Shooting Controls
Long Time-Exposures (Mode M)Select the following shutter speeds for long time-exposures of moving lights, the stars, night scenery, or fireworks.• Bulb: The shutter remains open while
the shutter-release button is held down.
• Time: The exposure starts when the shutter-release button is pressed and ends when the button is pressed a second time.
To prevent blur, mount the camera on a tripod or use an optional wireless remote controller (Time only) or remote cord. Nikon also recommends using a fully-charged battery or an optional AC adapter and power connector to prevent loss of power while the shutter is open. Note that noise (bright spots, randomly-spaced bright pixels, or fog) may be present in long exposures. Bright spots and fog can be reduced by choosing On for Long exposure NR in the photo shooting menu.
1 Ready the camera.Mount the camera on a tripod or place it on a stable, level surface.
2 Select mode M.Rotate the mode dial to M.
• Shutter speed: Bulb (35-second exposure)
• Aperture: f/25

76 Shooting Controls
3 Choose a shutter speed.Rotate the main command dial to choose a shutter speed of Bulb or Time.
4 Open the shutter.Bulb: After focusing, press the shutter-release button all the way down. Keep the shutter-release button pressed until the exposure is complete.
Time: Press the shutter-release button all the way down.
5 Close the shutter.Bulb: Take your finger off the shutter-release button.
Time: Press the shutter-release button all the way down.
Bulb Time
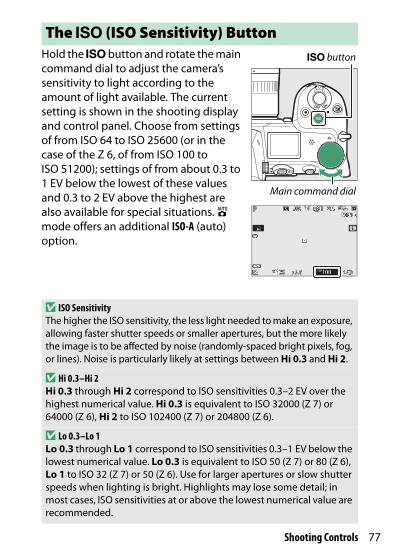
77Shooting Controls
Hold the S button and rotate the main command dial to adjust the camera’s sensitivity to light according to the amount of light available. The current setting is shown in the shooting display and control panel. Choose from settings of from ISO 64 to ISO 25600 (or in the case of the Z 6, of from ISO 100 to ISO 51200); settings of from about 0.3 to 1 EV below the lowest of these values and 0.3 to 2 EV above the highest are also available for special situations. b mode offers an additional ISO-A (auto) option.
The S (ISO Sensitivity) Button
D ISO SensitivityThe higher the ISO sensitivity, the less light needed to make an exposure, allowing faster shutter speeds or smaller apertures, but the more likely the image is to be affected by noise (randomly-spaced bright pixels, fog, or lines). Noise is particularly likely at settings between Hi 0.3 and Hi 2.
D Hi 0.3–Hi 2Hi 0.3 through Hi 2 correspond to ISO sensitivities 0.3–2 EV over the highest numerical value. Hi 0.3 is equivalent to ISO 32000 (Z 7) or 64000 (Z 6), Hi 2 to ISO 102400 (Z 7) or 204800 (Z 6).
D Lo 0.3–Lo 1Lo 0.3 through Lo 1 correspond to ISO sensitivities 0.3–1 EV below the lowest numerical value. Lo 0.3 is equivalent to ISO 50 (Z 7) or 80 (Z 6), Lo 1 to ISO 32 (Z 7) or 50 (Z 6). Use for larger apertures or slow shutter speeds when lighting is bright. Highlights may lose some detail; in most cases, ISO sensitivities at or above the lowest numerical value are recommended.
S button
Main command dial

78 Shooting Controls
Auto ISO Sensitivity ControlIn modes P, S, A, and M, auto ISO sensitivity control can be enabled or disabled by holding the S button and rotating the sub-command dial. When auto ISO sensitivity control is enabled, ISO sensitivity will automatically be adjusted if optimal exposure cannot be achieved at the value selected with the S button and main command dial. To prevent ISO sensitivity going too high, you can choose an upper limit of from ISO 100 (Z 7) or 200 (Z 6) to Hi 2 using the ISO sensitivity settings > Maximum sensitivity item in the photo shooting menu.
When auto ISO sensitivity control is enabled, the shooting display will show ISO AUTO and control panel ISO-A. When sensitivity is altered from the value selected by the user, the altered value is shown in the display.
Monitor Control panel
D Auto ISO Sensitivity ControlIf the ISO sensitivity selected by the user is higher than that chosen for Maximum sensitivity when auto ISO sensitivity control is enabled, the value selected by the user will be used instead. When a flash is used, shutter speed will be restricted to values between the speed selected for Custom Setting e1 (Flash sync speed) and the speed selected for Custom Setting e2 (Flash shutter speed).
Sub-command dial
S button
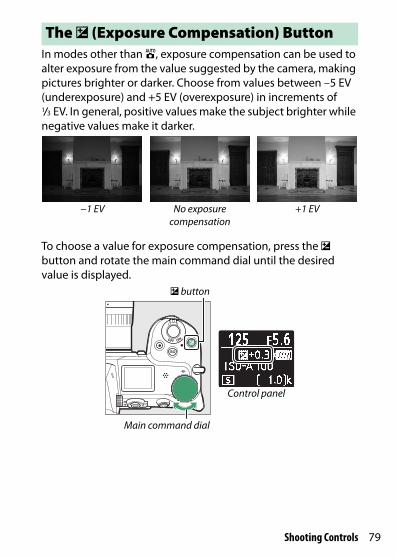
79Shooting Controls
In modes other than b, exposure compensation can be used to alter exposure from the value suggested by the camera, making pictures brighter or darker. Choose from values between –5 EV (underexposure) and +5 EV (overexposure) in increments of 1/3 EV. In general, positive values make the subject brighter while negative values make it darker.
To choose a value for exposure compensation, press the E button and rotate the main command dial until the desired value is displayed.
The E (Exposure Compensation) Button
−1 EV No exposure compensation
+1 EV
E button
Control panel
Main command dial
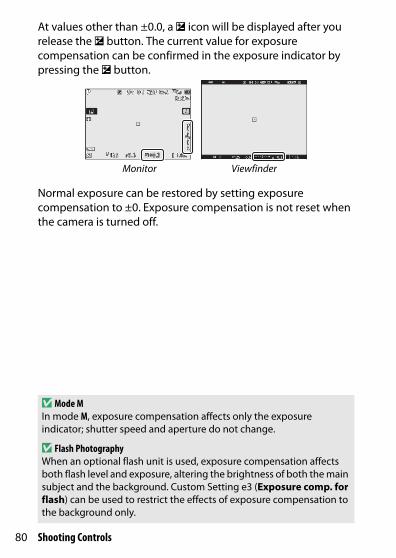
80 Shooting Controls
At values other than ±0.0, a E icon will be displayed after you release the E button. The current value for exposure compensation can be confirmed in the exposure indicator by pressing the E button.
Normal exposure can be restored by setting exposure compensation to ±0. Exposure compensation is not reset when the camera is turned off.
Monitor Viewfinder
D Mode MIn mode M, exposure compensation affects only the exposure indicator; shutter speed and aperture do not change.
D Flash PhotographyWhen an optional flash unit is used, exposure compensation affects both flash level and exposure, altering the brightness of both the main subject and the background. Custom Setting e3 (Exposure comp. for flash) can be used to restrict the effects of exposure compensation to the background only.

81Shooting Controls
The “release mode” determines what happens when the shutter-release button is pressed. To choose a release mode, hold the c (E) button and rotate the main command dial. Press J when the desired option is highlighted; the selected option is indicated by icons in the shooting display and control panel.
The following options are available in photo mode.
The c/E (Release Mode/Self-Timer) Button
Monitor
Control panel
Option Description
U Single frame The camera takes one photograph each time the shutter-release button is pressed.
V Continuous L
While the shutter-release button is held down, the camera records 1–5 frames per second. The frame rate can be chosen by rotating the sub-command dial when Continuous L is highlighted in the release-mode menu.
W Continuous H While the shutter-release button is held down, the camera records up to about 5.5 frames per second.
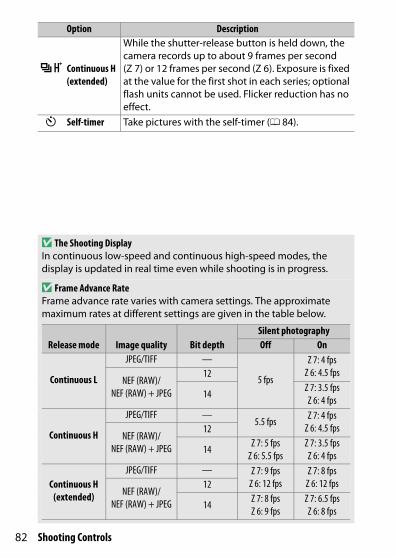
82 Shooting Controls
X Continuous H (extended)
While the shutter-release button is held down, the camera records up to about 9 frames per second (Z 7) or 12 frames per second (Z 6). Exposure is fixed at the value for the first shot in each series; optional flash units cannot be used. Flicker reduction has no effect.
E Self-timer Take pictures with the self-timer (0 84).
D The Shooting DisplayIn continuous low-speed and continuous high-speed modes, the display is updated in real time even while shooting is in progress.
D Frame Advance RateFrame advance rate varies with camera settings. The approximate maximum rates at different settings are given in the table below.
Release mode Image quality Bit depthSilent photographyOff On
Continuous L
JPEG/TIFF —
5 fps
Z 7: 4 fpsZ 6: 4.5 fps
NEF (RAW)/NEF (RAW) + JPEG
12
14Z 7: 3.5 fpsZ 6: 4 fps
Continuous H
JPEG/TIFF —5.5 fps
Z 7: 4 fpsZ 6: 4.5 fps
NEF (RAW)/NEF (RAW) + JPEG
12
14Z 7: 5 fps
Z 6: 5.5 fpsZ 7: 3.5 fpsZ 6: 4 fps
Continuous H (extended)
JPEG/TIFF — Z 7: 9 fpsZ 6: 12 fps
Z 7: 8 fpsZ 6: 12 fps
NEF (RAW)/NEF (RAW) + JPEG
12
14Z 7: 8 fpsZ 6: 9 fps
Z 7: 6.5 fpsZ 6: 8 fps
Option Description
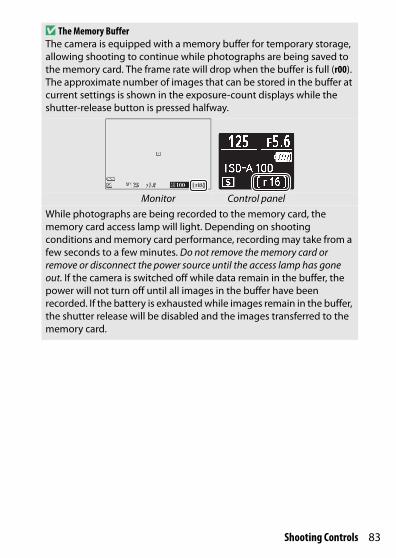
83Shooting Controls
D The Memory BufferThe camera is equipped with a memory buffer for temporary storage, allowing shooting to continue while photographs are being saved to the memory card. The frame rate will drop when the buffer is full (r00). The approximate number of images that can be stored in the buffer at current settings is shown in the exposure-count displays while the shutter-release button is pressed halfway.
Monitor Control panelWhile photographs are being recorded to the memory card, the memory card access lamp will light. Depending on shooting conditions and memory card performance, recording may take from a few seconds to a few minutes. Do not remove the memory card or remove or disconnect the power source until the access lamp has gone out. If the camera is switched off while data remain in the buffer, the power will not turn off until all images in the buffer have been recorded. If the battery is exhausted while images remain in the buffer, the shutter release will be disabled and the images transferred to the memory card.
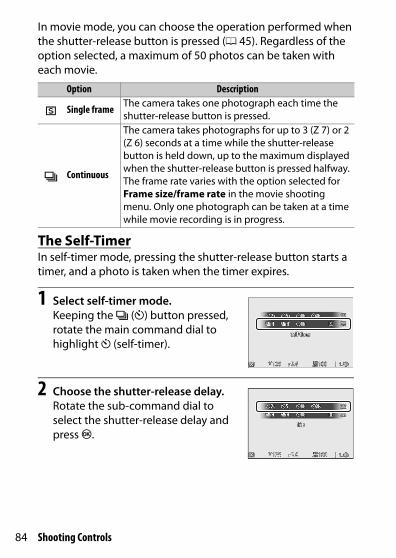
84 Shooting Controls
In movie mode, you can choose the operation performed when the shutter-release button is pressed (0 45). Regardless of the option selected, a maximum of 50 photos can be taken with each movie.
The Self-TimerIn self-timer mode, pressing the shutter-release button starts a timer, and a photo is taken when the timer expires.
1 Select self-timer mode.Keeping the c (E) button pressed, rotate the main command dial to highlight E (self-timer).
2 Choose the shutter-release delay.Rotate the sub-command dial to select the shutter-release delay and press J.
Option Description
U Single frame The camera takes one photograph each time the shutter-release button is pressed.
c Continuous
The camera takes photographs for up to 3 (Z 7) or 2 (Z 6) seconds at a time while the shutter-release button is held down, up to the maximum displayed when the shutter-release button is pressed halfway. The frame rate varies with the option selected for Frame size/frame rate in the movie shooting menu. Only one photograph can be taken at a time while movie recording is in progress.

85Shooting Controls
3 Frame the photograph and focus.If AF-S is selected for focus mode, the timer will not start unless the camera is able to focus.
4 Start the timer.Press the shutter-release button all the way down to start the timer. A E icon will appear in the display and the self-timer lamp will start to flash, stopping two seconds before the photograph is taken.
D Taking Multiple ShotsUse Custom Setting c2 (Self-timer) to choose the number of shots taken, and the interval between the shots taken, when the self-timer finishes counting down.
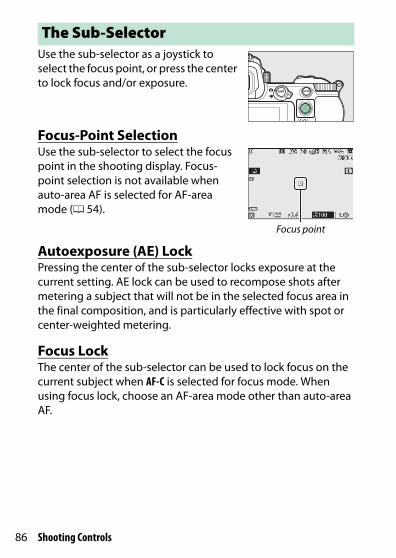
86 Shooting Controls
Use the sub-selector as a joystick to select the focus point, or press the center to lock focus and/or exposure.
Focus-Point SelectionUse the sub-selector to select the focus point in the shooting display. Focus-point selection is not available when auto-area AF is selected for AF-area mode (0 54).
Autoexposure (AE) LockPressing the center of the sub-selector locks exposure at the current setting. AE lock can be used to recompose shots after metering a subject that will not be in the selected focus area in the final composition, and is particularly effective with spot or center-weighted metering.
Focus LockThe center of the sub-selector can be used to lock focus on the current subject when AF-C is selected for focus mode. When using focus lock, choose an AF-area mode other than auto-area AF.
The Sub-Selector
Focus point

87Shooting Controls
❚❚ Locking Focus and ExposureFollow the steps below to use focus and exposure lock.
1 Set focus and exposure.Position the subject in the selected focus point and press the shutter-release button halfway to set focus and exposure. Check that the focus point is displayed in green.
2 Lock focus and exposure.With the shutter-release button pressed halfway, press the center of the sub-selector to lock both focus and exposure (an AE-L icon will be displayed).
Shutter-release button
Sub-selector

88 Shooting Controls
3 Recompose the photograph and shoot.Focus will remain locked between shots if you keep the shutter-release button pressed halfway (AF-S) or keep the center of the sub-selector pressed, allowing several photographs in succession to be taken at the same focus setting.
Do not change the distance between the camera and the subject while focus lock is in effect. If the subject moves, focus again at the new distance.
D AF-SWhen AF-S is selected for focus mode, focus will lock while the shutter-release button is pressed halfway (focus will also lock while the center of the sub-selector is pressed).
D Using the Shutter-Release Button for Exposure LockIf On (half press) is selected for Custom Setting c1 (Shutter-release button AE-L), exposure will lock while the shutter-release button is pressed halfway.
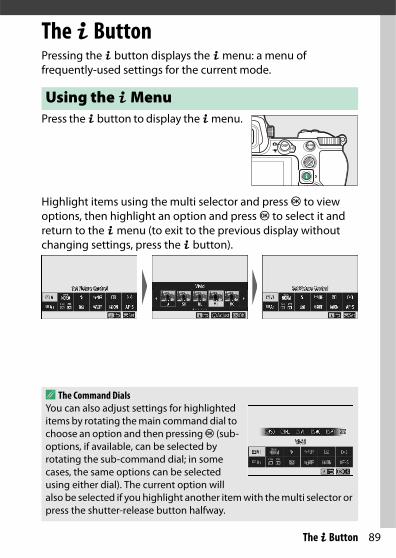
89The i Button
The i ButtonPressing the i button displays the i menu: a menu of frequently-used settings for the current mode.
Press the i button to display the i menu.
Highlight items using the multi selector and press J to view options, then highlight an option and press J to select it and return to the i menu (to exit to the previous display without changing settings, press the i button).
Using the i Menu
A The Command DialsYou can also adjust settings for highlighted items by rotating the main command dial to choose an option and then pressing J (sub-options, if available, can be selected by rotating the sub-command dial; in some cases, the same options can be selected using either dial). The current option will also be selected if you highlight another item with the multi selector or press the shutter-release button halfway.
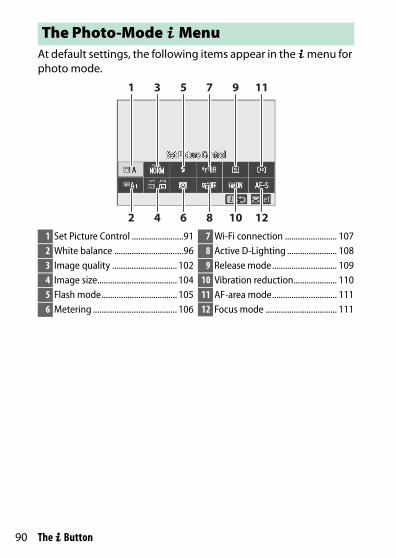
90 The i Button
At default settings, the following items appear in the i menu for photo mode.
The Photo-Mode i Menu
1 3 5 7 9 11
42 6 8 10 121 Set Picture Control ........................912 White balance ................................963 Image quality .............................. 1024 Image size..................................... 1045 Flash mode................................... 1056 Metering ....................................... 106
7 Wi-Fi connection ........................ 1078 Active D-Lighting ....................... 1089 Release mode.............................. 109
10 Vibration reduction.................... 11011 AF-area mode.............................. 11112 Focus mode ................................. 111

91The i Button
Set Picture ControlChoose a Picture Control according to the subject or type of scene.
Option Description
n Auto
The camera automatically adjusts hues and tones based on the Standard Picture Control. The complexions of portrait subjects will appear softer, and such elements as the foliage and sky in outdoor shots more vivid, than in pictures taken with the Standard Picture Control.
Q Standard Standard processing for balanced results. Recommended for most situations.
R NeutralMinimal processing for natural results. Choose for photographs that will later be processed or retouched.
S VividPictures are enhanced for a vivid, photoprint effect. Choose for photographs that emphasize primary colors.
T Monochrome Take monochrome photographs.
o Portrait Process portraits for skin with natural texture and a rounded feel.
p Landscape Produces vibrant landscapes and cityscapes.
q Flat
Details are preserved over a wide tone range, from highlights to shadows. Choose for photographs that will later be extensively processed or retouched.
k01–k20
Creative Picture Control
Choose from the following Picture Controls, each a unique combination of hue, tone, saturation, and other settings tuned for a particular effect: Dream, Morning, Pop, Sunday, Somber, Dramatic, Silence, Bleached, Melancholic, Pure, Denim, Toy, Sepia, Blue, Red, Pink, Charcoal, Graphite, Binary, and Carbon.
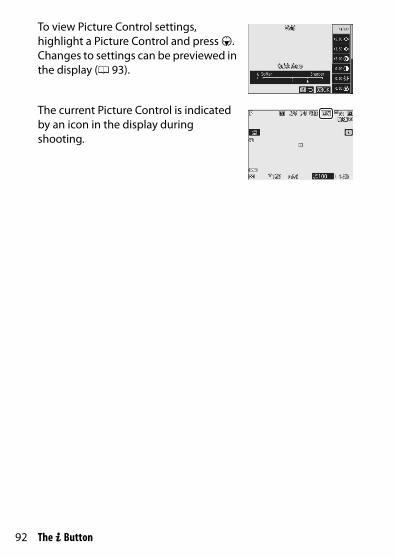
92 The i Button
To view Picture Control settings, highlight a Picture Control and press 3. Changes to settings can be previewed in the display (0 93).
The current Picture Control is indicated by an icon in the display during shooting.
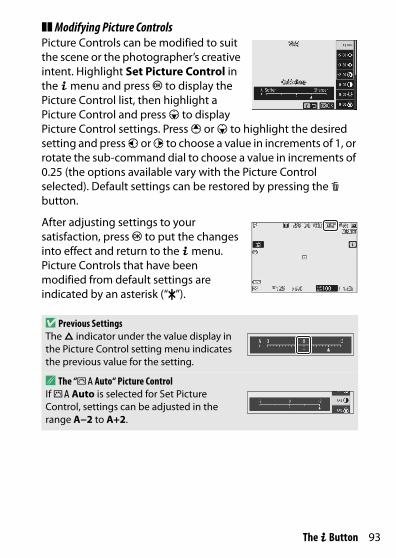
93The i Button
❚❚ Modifying Picture ControlsPicture Controls can be modified to suit the scene or the photographer’s creative intent. Highlight Set Picture Control in the i menu and press J to display the Picture Control list, then highlight a Picture Control and press 3 to display Picture Control settings. Press 1 or 3 to highlight the desired setting and press 4 or 2 to choose a value in increments of 1, or rotate the sub-command dial to choose a value in increments of 0.25 (the options available vary with the Picture Control selected). Default settings can be restored by pressing the O button.
After adjusting settings to your satisfaction, press J to put the changes into effect and return to the i menu. Picture Controls that have been modified from default settings are indicated by an asterisk (“U”).
D Previous SettingsThe j indicator under the value display in the Picture Control setting menu indicates the previous value for the setting.
A The “n Auto“ Picture ControlIf n Auto is selected for Set Picture Control, settings can be adjusted in the range A−2 to A+2.
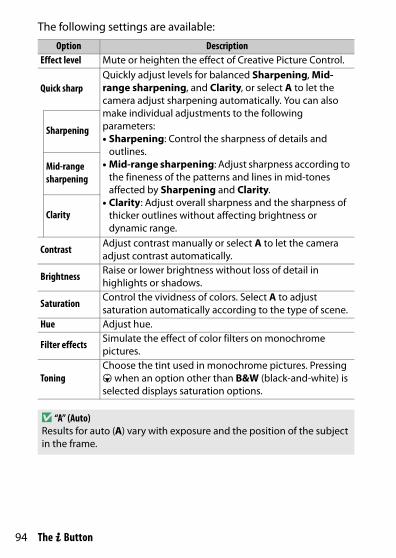
94 The i Button
The following settings are available:
Option DescriptionEffect level Mute or heighten the effect of Creative Picture Control.
Quick sharpQuickly adjust levels for balanced Sharpening, Mid-range sharpening, and Clarity, or select A to let the camera adjust sharpening automatically. You can also make individual adjustments to the following parameters:• Sharpening: Control the sharpness of details and
outlines.• Mid-range sharpening: Adjust sharpness according to
the fineness of the patterns and lines in mid-tones affected by Sharpening and Clarity.
• Clarity: Adjust overall sharpness and the sharpness of thicker outlines without affecting brightness or dynamic range.
Sharpening
Mid-range sharpening
Clarity
Contrast Adjust contrast manually or select A to let the camera adjust contrast automatically.
Brightness Raise or lower brightness without loss of detail in highlights or shadows.
SaturationControl the vividness of colors. Select A to adjust saturation automatically according to the type of scene.
Hue Adjust hue.
Filter effects Simulate the effect of color filters on monochrome pictures.
ToningChoose the tint used in monochrome pictures. Pressing 3 when an option other than B&W (black-and-white) is selected displays saturation options.
D “A” (Auto)Results for auto (A) vary with exposure and the position of the subject in the frame.

95The i Button
D Filter EffectsChoose from the following:
Mode SettingY (yellow) These options enhance contrast and can be used to tone down the brightness
of the sky in landscape photographs. Orange produces more contrast than yellow, red more contrast than orange.
O (orange)R (red)
G (green) Green softens skin tones and can be used for portraits.
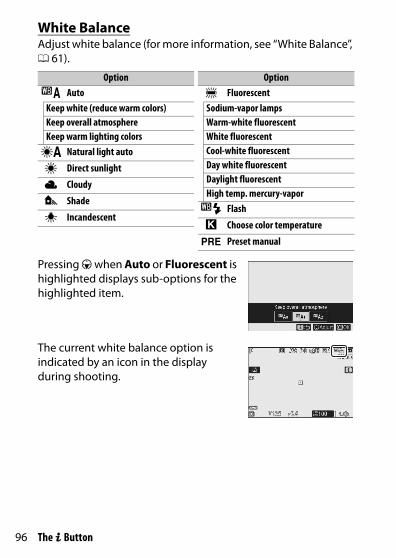
96 The i Button
White BalanceAdjust white balance (for more information, see “White Balance”, 0 61).
Pressing 3 when Auto or Fluorescent is highlighted displays sub-options for the highlighted item.
The current white balance option is indicated by an icon in the display during shooting.
Option4 Auto
Keep white (reduce warm colors)Keep overall atmosphereKeep warm lighting colorsD Natural light auto
H Direct sunlight
G Cloudy
M Shade
J Incandescent
I FluorescentSodium-vapor lampsWarm-white fluorescentWhite fluorescentCool-white fluorescentDay white fluorescentDaylight fluorescentHigh temp. mercury-vapor5 Flash
K Choose color temperature
L Preset manual
Option
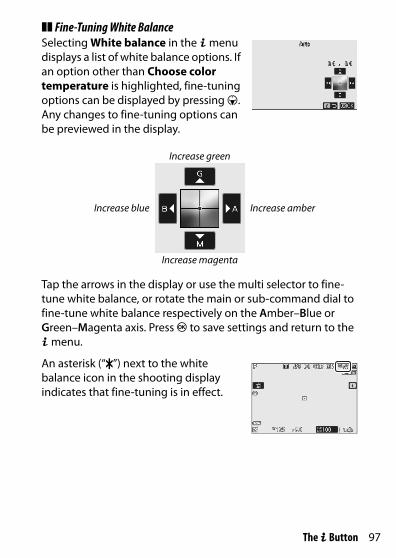
97The i Button
❚❚ Fine-Tuning White BalanceSelecting White balance in the i menu displays a list of white balance options. If an option other than Choose color temperature is highlighted, fine-tuning options can be displayed by pressing 3. Any changes to fine-tuning options can be previewed in the display.
Tap the arrows in the display or use the multi selector to fine-tune white balance, or rotate the main or sub-command dial to fine-tune white balance respectively on the Amber–Blue or Green–Magenta axis. Press J to save settings and return to the i menu.
An asterisk (“U”) next to the white balance icon in the shooting display indicates that fine-tuning is in effect.
Increase green
Increase blue Increase amber
Increase magenta

98 The i Button
❚❚ Choosing a Color TemperatureSelecting White balance in the i menu displays a list of white balance options. When Choose color temperature is highlighted, color temperature options can be viewed by pressing 3.
Press 4 or 2 to highlight digits on the Amber–Blue or Green–Magenta axis and press 1 or 3 to change. Press J to save settings and return to the i menu. If a value other than zero is selected for the Green–Magenta axis, an asterisk (“U“) will be displayed next to the white balance icon.
Value for Amber–Blue axis
Value forGreen–Magenta axis
D Choose Color TemperatureNote that the desired results will not be obtained with flash or fluorescent lighting. Choose 5 (Flash) or I (Fluorescent) for these sources. With other light sources, take a test shot to determine if the selected value is appropriate.
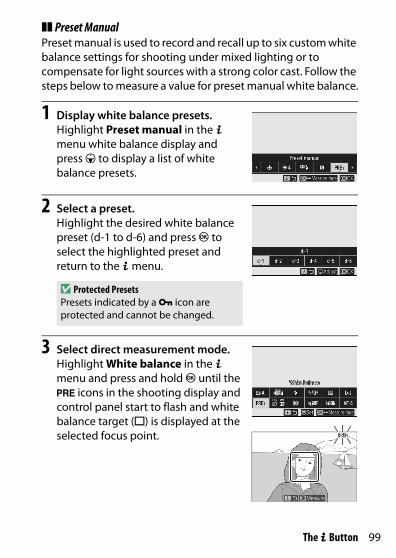
99The i Button
❚❚ Preset ManualPreset manual is used to record and recall up to six custom white balance settings for shooting under mixed lighting or to compensate for light sources with a strong color cast. Follow the steps below to measure a value for preset manual white balance.
1 Display white balance presets.Highlight Preset manual in the i menu white balance display and press 3 to display a list of white balance presets.
2 Select a preset.Highlight the desired white balance preset (d-1 to d-6) and press J to select the highlighted preset and return to the i menu.
3 Select direct measurement mode.Highlight White balance in the i menu and press and hold J until the L icons in the shooting display and control panel start to flash and white balance target (r) is displayed at the selected focus point.
D Protected PresetsPresets indicated by a g icon are protected and cannot be changed.

100 The i Button
4 Measure white balance.To measure white balance, tap a white or gray object, or use the multi selector to position the r over a white or gray area of the display and either press J or press the shutter-release button all the way down (note that the r cannot be repositioned when an optional flash unit is attached, in which case you will need to measure white balance with a white or gray object positioned in the center of the frame).
If the camera is unable to measure white balance, a message will be displayed. Try measuring white balance again with a different target.
5 Exit direct measurement mode.Press the i button to exit direct measurement mode.
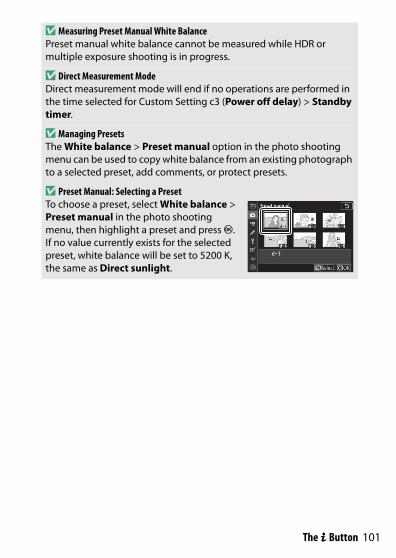
101The i Button
D Measuring Preset Manual White BalancePreset manual white balance cannot be measured while HDR or multiple exposure shooting is in progress.
D Direct Measurement ModeDirect measurement mode will end if no operations are performed in the time selected for Custom Setting c3 (Power off delay) > Standby timer.
D Managing PresetsThe White balance > Preset manual option in the photo shooting menu can be used to copy white balance from an existing photograph to a selected preset, add comments, or protect presets.
D Preset Manual: Selecting a PresetTo choose a preset, select White balance > Preset manual in the photo shooting menu, then highlight a preset and press J. If no value currently exists for the selected preset, white balance will be set to 5200 K, the same as Direct sunlight.
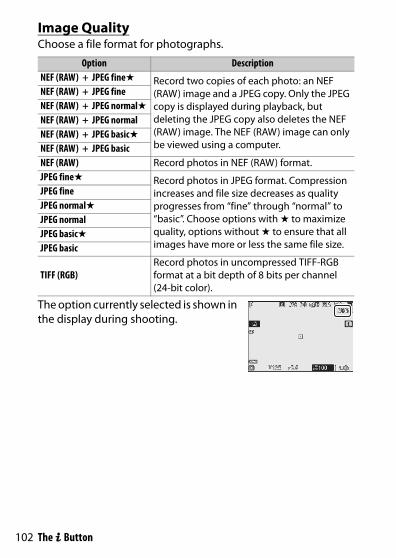
102 The i Button
Image QualityChoose a file format for photographs.
The option currently selected is shown in the display during shooting.
Option DescriptionNEF (RAW) + JPEG finem Record two copies of each photo: an NEF
(RAW) image and a JPEG copy. Only the JPEG copy is displayed during playback, but deleting the JPEG copy also deletes the NEF (RAW) image. The NEF (RAW) image can only be viewed using a computer.
NEF (RAW) + JPEG fineNEF (RAW) + JPEG normalmNEF (RAW) + JPEG normalNEF (RAW) + JPEG basicmNEF (RAW) + JPEG basicNEF (RAW) Record photos in NEF (RAW) format.JPEG finem Record photos in JPEG format. Compression
increases and file size decreases as quality progresses from “fine” through “normal” to “basic”. Choose options with m to maximize quality, options without m to ensure that all images have more or less the same file size.
JPEG fineJPEG normalmJPEG normalJPEG basicmJPEG basic
TIFF (RGB)Record photos in uncompressed TIFF-RGB format at a bit depth of 8 bits per channel (24-bit color).
103The i Button
A NEF (RAW)NEF (RAW) image files (extension “*.nef”) contain the raw data output from the image sensor. Using Nikon’s ViewNX-i or Capture NX-D software, you can adjust and re-adjust settings such as exposure compensation and white balance as often as you please without degrading image quality, making this format ideal for photos that will be processed in multiple different ways. ViewNX-i and Capture NX-D are available free-of-charge from the Nikon Download Center.
The process of converting NEF (RAW) images to other formats is referred to as “NEF (RAW) processing”. You can save NEF (RAW) images in other formats using the ViewNX-i and Capture NX-D computer applications or the NEF (RAW) processing option in the camera retouch menu.

104 The i Button
Image SizeChoose the size at which photographs are recorded.
The option currently selected is shown in the display during shooting.
The physical dimensions of the photos in pixels varies with the option selected for Choose image area.
Option Description
NEF (RAW)Large Choose the size for photos recorded in NEF (RAW)
format. NEF (RAW) is available only when an NEF (RAW) option is selected for image quality.
MediumSmall
JPEG/TIFFLarge
Choose the size for photos recorded in JPEG or TIFF format.
MediumSmall
Z 7: Image sizeLarge Medium Small
Image area
FX (36 × 24) 8256 × 5504 6192 × 4128 4128 × 2752DX (24 × 16) 5408 × 3600 4048 × 2696 2704 × 18005 : 4 (30 × 24) 6880 × 5504 5152 × 4120 3440 × 27521 : 1 (24 × 24) 5504 × 5504 4128 × 4128 2752 × 275216 : 9 (36 × 20) 8256 × 4640 6192 × 3480 4128 × 2320
Z 6: Image sizeLarge Medium Small
Image area
FX (36 × 24) 6048 × 4024 4528 × 3016 3024 × 2016DX (24 × 16) 3936 × 2624 2944 × 1968 1968 × 13121 : 1 (24 × 24) 4016 × 4016 3008 × 3008 2000 × 200016 : 9 (36 × 20) 6048 × 3400 4528 × 2544 3024 × 1696

105The i Button
Flash ModeChoose a flash mode for optional flash units (0 352). The options available depend on the mode selected with the mode dial.
The option currently selected is indicated by an icon in the display during shooting.
Option Available in
I Fill flashb, P, S, A, MJ Red-eye
reduction
K Slow sync + red-eye P, A
L Slow sync
M Rear-curtain sync P, S, A, M
s Flash off b, P, S, A, M
Option Available in

106 The i Button
MeteringMetering determines how the camera sets exposure. The following options are available:
The option currently selected is indicated by an icon in the display during shooting.
Option Description
L Matrix metering
The camera meters a wide area of the frame and sets exposure according to tone distribution, color, composition, and distance for results close to those seen by the naked eye.
M Center-weighted metering
The camera meters the entire frame but assigns the greatest weight to an area in the center of the frame, the size of which can be chosen using Custom Setting b3 (Center-weighted area). This is the classic meter for portraits and is also recommended when using filters with an exposure factor (filter factor) over 1×.
N Spot metering
The camera meters a 4 mm circle (equivalent to approximately 1.5% of the frame) centered on the current focus point, making it possible to meter off-center subjects (if auto-area AF is in effect, the camera will instead meter the center focus point). Spot metering ensures that the subject will be correctly exposed, even when the background is much brighter or darker.
t Highlight-weighted metering
The camera assigns the greatest weight to highlights. Use this option to reduce loss of detail in highlights, for example when photographing spotlit performers on-stage.

107The i Button
Wi-Fi ConnectionEnable or disable Wi-Fi. Enable Wi-Fi to establish wireless connections to computers or between the camera and smartphones or tablets (smart devices) running the SnapBridge app.
The camera displays a Wi-Fi icon when Wi-Fi is enabled.
To turn Wi-Fi off, highlight Wi-Fi connection in the i menu and press J. If Wi-Fi is currently enabled, a Close Wi-Fi connection prompt will be displayed; press J to end the connection.
A Wireless ConnectionsFor information on establishing wireless connections to computers or smart devices, see the Network Guide, available from the Nikon Download Center:Z 7: https://downloadcenter.nikonimglib.com/en/products/492/Z_7.htmlZ 6: https://downloadcenter.nikonimglib.com/en/products/493/Z_6.html
More information on using SnapBridge is available via the app’s online help.

108 The i Button
Active D-LightingActive D-Lighting preserves details in highlights and shadows, creating photographs with natural contrast. Use for high-contrast scenes, for example when photographing brightly lit outdoor scenery through a door or window or taking pictures of shaded subjects on a sunny day. It is most effective when used with matrix metering.
The option currently selected is indicated by an icon in the display during shooting.
Off Y Auto
Option Description
Y AutoThe camera automatically adjusts Active D-Lighting in response to shooting conditions (in mode M, however, YAuto is equivalent to Q Normal).
Z Extra highChoose the amount of Active D-Lighting performed from Z Extra high, P High, Q Normal, and R Low.
P High
Q Normal
R Low
c Off Active D-Lighting off.
D Active D-LightingNoise (randomly-spaced bright pixels, fog, or lines) may appear in photos taken with Active D-Lighting. Uneven shading may be visible with some subjects. Active D-Lighting does not apply at high ISO sensitivities (Hi 0.3–Hi 2).

109The i Button
Release ModeChoose the operation performed when the shutter-release button is pressed all the way down. For more information, see “The c/E (Release Mode/Self-Timer) Button” (0 81).
When Continuous L or Self-timer is highlighted, additional options can be displayed by pressing 3.
Pressing 3 when Continuous L is highlighted displays frame advance rate options.
Pressing 3 when Self-timer is highlighted displays options for the shutter-release delay and the number of shots taken when the timer expires.
The current release mode is shown by icons in the shooting display and control panel.
OptionU Single frame
V Continuous L
W Continuous H
X Continuous H (extended)
E Self-timer
Option

110 The i Button
Vibration ReductionChoose whether to enable vibration reduction. The options available vary with the lens.
Options other than Off are shown by an icon in the display during shooting.
Option Description
COn Choose for enhanced vibration reduction when
photographing static subjects.Normal
D Sport Choose when photographing athletes and other subjects that are moving rapidly and unpredictably.
E Off Vibration reduction off.
D Vibration ReductionVibration reduction may be unavailable with some lenses. When using vibration reduction, wait for the image in the display to stabilize before shooting. With some lenses, the image in the display may also jiggle after the shutter is released; this is normal and does not indicate a malfunction.
Sport or On is recommended for panning shots. In Sport, Normal, and On modes, vibration reduction applies only to motion that is not part of the pan (if the camera is panned horizontally, for example, vibration reduction will be applied only to vertical shake).
To prevent unintended results, select Off when the camera is mounted on a tripod unless the tripod head is unsecured or the camera is mounted on a monopod, in which case Normal, Sport, or On is recommended.
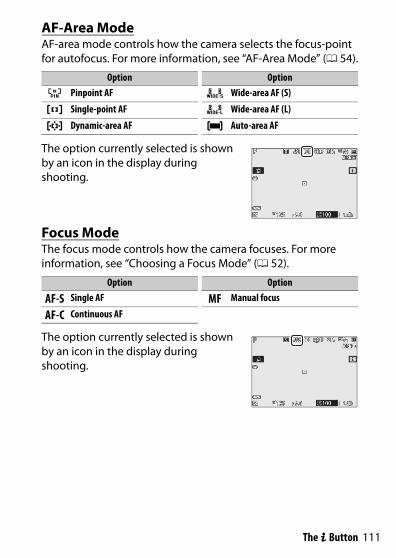
111The i Button
AF-Area ModeAF-area mode controls how the camera selects the focus-point for autofocus. For more information, see “AF-Area Mode” (0 54).
The option currently selected is shown by an icon in the display during shooting.
Focus ModeThe focus mode controls how the camera focuses. For more information, see “Choosing a Focus Mode” (0 52).
The option currently selected is shown by an icon in the display during shooting.
Option
3 Pinpoint AF
d Single-point AF
e Dynamic-area AF
f Wide-area AF (S)
g Wide-area AF (L)
h Auto-area AF
Option
Option
AF-S Single AF
AF-C Continuous AFMF Manual focus
Option

112 The i Button
At default settings, the following items appear in the i menu for movie mode.
The Movie-Mode i Menu
1 3 5 7 9 11
42 6 8 10 121 Set Picture Control ..................... 1132 White balance ............................. 1133 Frame size and rate/
image quality............................. 1144 Microphone sensitivity.............. 1165 Choose image area .................... 1176 Metering ....................................... 118
7 Wi-Fi connection ........................ 1188 Active D-Lighting ....................... 1189 Electronic VR................................ 118
10 Vibration reduction.................... 11911 AF-area mode.............................. 11912 Focus mode ................................. 119
A “Same as Photo Settings”If Same as photo settings is selected for Set Picture Control, White balance, Active D-Lighting, or Vibration reduction in the movie shooting menu, a h icon will appear at the top left corner of the i menu, indicating that the options selected for these settings in photo mode also apply in movie mode and vice versa.

113The i Button
Set Picture ControlChoose a Picture Control for movie recording. For more information, see “Set Picture Control” (0 91).
White BalanceAdjust white balance for movie recording. For more information, see “White Balance” (0 61, 96).

114 The i Button
Frame Size, Frame Rate, and Movie QualitySelect the movie frame size (in pixels) and frame rate. You can also choose from two Movie quality options: High quality (indicated by frame size/rate icons with “m”) and Normal. Together, these options determine the maximum bit rate, as shown in the following table.
1 Actual frame rates for values listed as 120p, 60p, 30p, and 24p are respectively 119.88 fps, 59.94 fps, 29.97 fps, and 23.976 fps.
2 Movie quality fixed at High quality.3 Image area fixed at DX (Z 7) or FX (Z 6); face detection not enabled in auto-area AF AF-area
mode.4 Each movie may be recorded across up to 8 files of up to 4 GB each. The number of files and the
length of each file vary with the options selected for Frame size/frame rate and Movie quality.
Frame size/frame rate 1
Max. bit rate (Mbps) Max. recording
timeHigh
quality Normal
r 3840 × 2160 (4K UHD); 30p
144 — 2
29 min. 59 s 4
s 3840 × 2160 (4K UHD); 25p
t 3840 × 2160 (4K UHD); 24p
w 1920 × 1080; 120p 3
x 1920 × 1080; 100p 3
y/y 1920 × 1080; 60p56 28
z/z 1920 × 1080; 50p
1/1 1920 × 1080; 30p
28 142/2 1920 × 1080; 25p
3/3 1920 × 1080; 24p
A 1920 × 1080; 30p ×4 (slow-mo) 3
36— 2 3 min.B 1920 × 1080; 25p ×4 (slow-mo) 3
C 1920 × 1080; 24p ×5 (slow-mo) 3 29
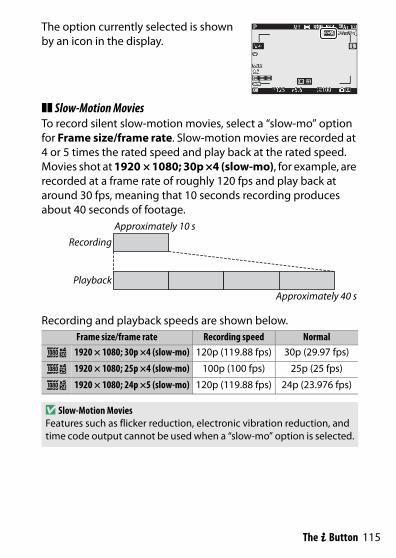
115The i Button
The option currently selected is shown by an icon in the display.
❚❚ Slow-Motion MoviesTo record silent slow-motion movies, select a “slow-mo” option for Frame size/frame rate. Slow-motion movies are recorded at 4 or 5 times the rated speed and play back at the rated speed. Movies shot at 1920 × 1080; 30p ×4 (slow-mo), for example, are recorded at a frame rate of roughly 120 fps and play back at around 30 fps, meaning that 10 seconds recording produces about 40 seconds of footage.
Recording and playback speeds are shown below.
Approximately 10 s
Recording
Playback
Approximately 40 s
Frame size/frame rate Recording speed Normal
A 1920 × 1080; 30p ×4 (slow-mo) 120p (119.88 fps) 30p (29.97 fps)
B 1920 × 1080; 25p ×4 (slow-mo) 100p (100 fps) 25p (25 fps)
C 1920 × 1080; 24p ×5 (slow-mo) 120p (119.88 fps) 24p (23.976 fps)
D Slow-Motion MoviesFeatures such as flicker reduction, electronic vibration reduction, and time code output cannot be used when a “slow-mo” option is selected.

116 The i Button
Microphone SensitivityTurn the built-in or external microphones on or off or adjust microphone sensitivity. Choose bA to adjust sensitivity automatically or Microphone off to turn sound recording off or adjust microphone sensitivity manually by choosing a value between b1 and b20 (the higher the value, the higher the sensitivity).
At settings other than bA, the option currently selected is shown by an icon in the display.
If the sound level is displayed in red, the volume is too high. Reduce microphone sensitivity.
D The 2 IconMovies recorded with the microphone off are indicated by a 2 icon in full-frame and movie playback.
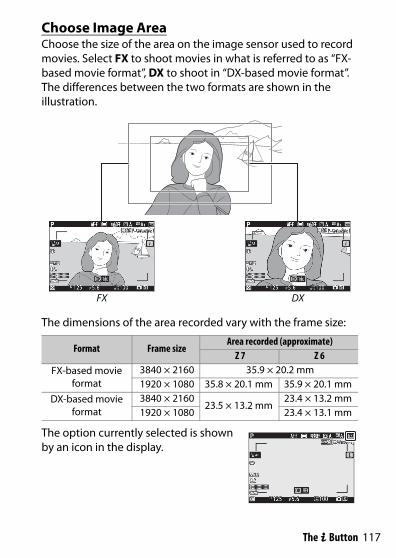
117The i Button
Choose Image AreaChoose the size of the area on the image sensor used to record movies. Select FX to shoot movies in what is referred to as “FX-based movie format”, DX to shoot in “DX-based movie format”. The differences between the two formats are shown in the illustration.
The dimensions of the area recorded vary with the frame size:
The option currently selected is shown by an icon in the display.
FX DX
Format Frame size Area recorded (approximate)
Z 7 Z 6FX-based movie
format 3840 × 2160 35.9 × 20.2 mm 1920 × 1080 35.8 × 20.1 mm 35.9 × 20.1 mm
DX-based movie format
3840 × 2160 23.5 × 13.2 mm
23.4 × 13.2 mm 1920 × 1080 23.4 × 13.1 mm

118 The i Button
MeteringChoose how the camera sets exposure in movie mode. For more information, see “Metering” (0 106), but note that spot metering is not available.
Wi-Fi ConnectionEnable or disable Wi-Fi. For more information, see “Wi-Fi Connection” (0 107).
Active D-LightingChoose an Active D-Lighting option for movie mode. For more information, see “Active D-Lighting” (0 108). Note that if Same as photo settings is selected for Active D-Lighting in the movie shooting menu and Auto is selected in the photo shooting menu, movies will be shot at a setting equivalent to Normal.
Electronic VRSelect On to enable electronic vibration reduction in movie mode. Electronic vibration reduction is not available at frame sizes of 1920 × 1080; 120p, 1920 × 1080; 100p, or 1920 × 1080 (slow-mo). Note that when electronic vibration reduction is on, the angle of view will be reduced, slightly increasing the apparent focal length, and the maximum sensitivity for movie recording is fixed at ISO 25600 (Z 7) or 51200 (Z 6).
An icon appears in the display while On is selected.
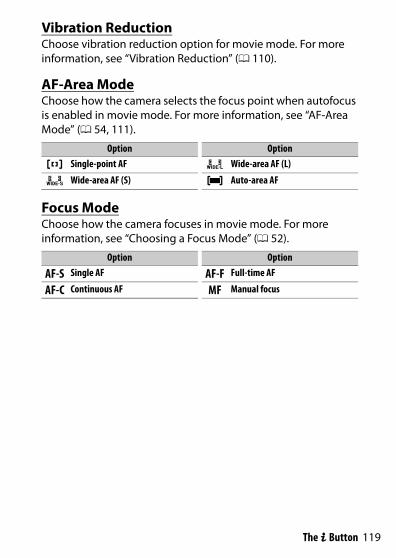
119The i Button
Vibration ReductionChoose vibration reduction option for movie mode. For more information, see “Vibration Reduction” (0 110).
AF-Area ModeChoose how the camera selects the focus point when autofocus is enabled in movie mode. For more information, see “AF-Area Mode” (0 54, 111).
Focus ModeChoose how the camera focuses in movie mode. For more information, see “Choosing a Focus Mode” (0 52).
Option
d Single-point AF
f Wide-area AF (S)g Wide-area AF (L)
h Auto-area AF
Option
Option
AF-S Single AF
AF-C Continuous AFAF-F Full-time AF
MF Manual focus
Option
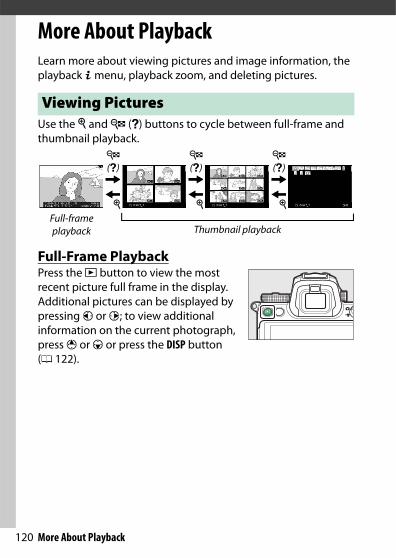
120 More About Playback
More About PlaybackLearn more about viewing pictures and image information, the playback i menu, playback zoom, and deleting pictures.
Use the X and W (Q) buttons to cycle between full-frame and thumbnail playback.
Full-Frame PlaybackPress the K button to view the most recent picture full frame in the display. Additional pictures can be displayed by pressing 4 or 2; to view additional information on the current photograph, press 1 or 3 or press the DISP button (0 122).
Viewing Pictures
W (Q)
X
W (Q)
X
W (Q)
X
Full-frame playback Thumbnail playback
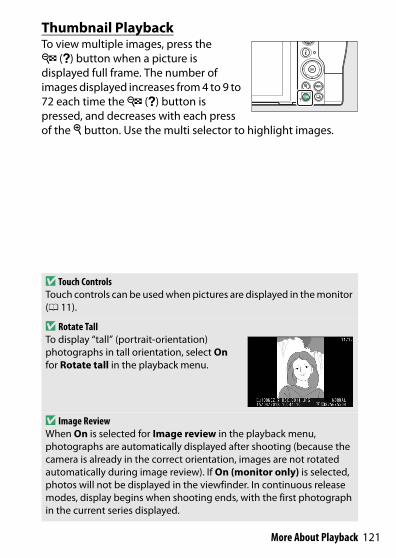
121More About Playback
Thumbnail PlaybackTo view multiple images, press the W (Q) button when a picture is displayed full frame. The number of images displayed increases from 4 to 9 to 72 each time the W (Q) button is pressed, and decreases with each press of the X button. Use the multi selector to highlight images.
D Touch ControlsTouch controls can be used when pictures are displayed in the monitor (0 11).
D Rotate TallTo display “tall” (portrait-orientation) photographs in tall orientation, select On for Rotate tall in the playback menu.
D Image ReviewWhen On is selected for Image review in the playback menu, photographs are automatically displayed after shooting (because the camera is already in the correct orientation, images are not rotated automatically during image review). If On (monitor only) is selected, photos will not be displayed in the viewfinder. In continuous release modes, display begins when shooting ends, with the first photograph in the current series displayed.
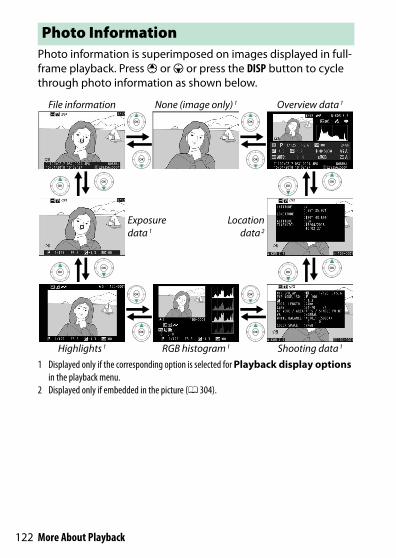
122 More About Playback
Photo information is superimposed on images displayed in full-frame playback. Press 1 or 3 or press the DISP button to cycle through photo information as shown below.
1 Displayed only if the corresponding option is selected for Playback display options in the playback menu.
2 Displayed only if embedded in the picture (0 304).
Photo Information
File information None (image only) 1 Overview data 1
Exposure data 1
Locationdata 2
Highlights 1 RGB histogram 1 Shooting data 1

123More About Playback
File Information
* Displayed only if Focus point is selected for Playback display options.
Exposure Data
* Displayed in red if photo was taken with auto ISO sensitivity control on.
1 3 4 5
6
910
11
8 7
2
1213
1 Protect status................................. 672 Retouch indicator ....................... 3123 Upload marking .......................... 1324 Focus point *................................... 545 Frame number/
total number of frames6 Image quality .............................. 1027 Image size..................................... 1048 Image area .......................... 117, 1639 Time of recording ................ 38, 293
10 Date of recording................. 38, 29311 Rating .............................................. 6612 Folder name................................. 15313 File name ............................. 163, 237
321 4 5
1 Shooting mode ............................. 682 Shutter speed ..........................69, 703 Aperture.......................................... 704 Exposure compensation ............. 795 ISO sensitivity * .............................. 77

124 More About Playback
Highlights
RGB Histogram
1 2 1 Highlights (areas that may be overexposed)
2 Folder number-frame number........................................ 159
34562
1
1 Folder number-frame number........................................ 159
2 White balance ......................... 61, 96Color temperature ..................98White balance fine-tuning
..................................................97Preset manual ..........................99
3 Histogram (RGB channel) ......... 1254 Histogram (red channel)........... 1255 Histogram (green channel)...... 1256 Histogram (blue channel) ........ 125
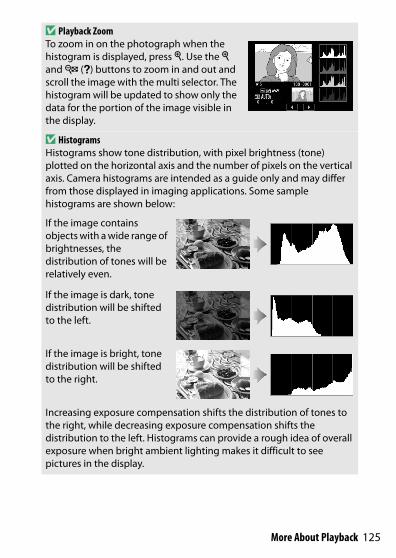
125More About Playback
D Playback ZoomTo zoom in on the photograph when the histogram is displayed, press X. Use the X and W (Q) buttons to zoom in and out and scroll the image with the multi selector. The histogram will be updated to show only the data for the portion of the image visible in the display.
D HistogramsHistograms show tone distribution, with pixel brightness (tone) plotted on the horizontal axis and the number of pixels on the vertical axis. Camera histograms are intended as a guide only and may differ from those displayed in imaging applications. Some sample histograms are shown below:
If the image contains objects with a wide range of brightnesses, the distribution of tones will be relatively even.
If the image is dark, tone distribution will be shifted to the left.
If the image is bright, tone distribution will be shifted to the right.
Increasing exposure compensation shifts the distribution of tones to the right, while decreasing exposure compensation shifts the distribution to the left. Histograms can provide a rough idea of overall exposure when bright ambient lighting makes it difficult to see pictures in the display.
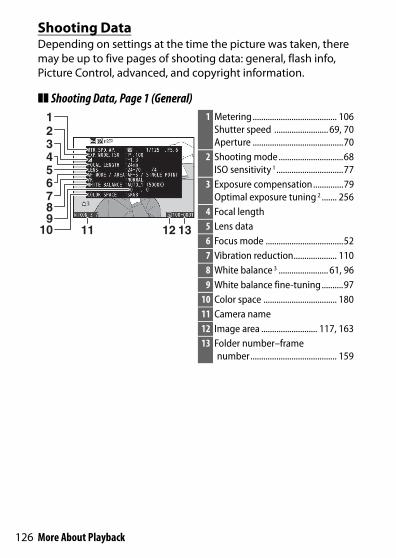
126 More About Playback
Shooting DataDepending on settings at the time the picture was taken, there may be up to five pages of shooting data: general, flash info, Picture Control, advanced, and copyright information.
❚❚ Shooting Data, Page 1 (General)
1312
654321
789
10 11
1 Metering....................................... 106Shutter speed ......................... 69, 70Aperture ..........................................70
2 Shooting mode..............................68ISO sensitivity 1 ...............................77
3 Exposure compensation..............79Optimal exposure tuning 2 ....... 256
4 Focal length5 Lens data6 Focus mode ....................................527 Vibration reduction.................... 1108 White balance 3 ....................... 61, 969 White balance fine-tuning..........97
10 Color space .................................. 18011 Camera name12 Image area .......................... 117, 16313 Folder number–frame
number........................................ 159

127More About Playback
❚❚ Shooting Data, Page 2 (Flash Info) 4
❚❚ Shooting Data, Page 3 (Picture Control)
❚❚ Shooting Data, Page 4 (Advanced)
161514
17
14 Flash type15 Remote flash control ................. 36016 Flash mode.......................... 105, 35217 Flash control mode .................... 184
Flash compensation................... 187
18
18 Picture Control 5 ................... 91, 175
22212019
23
24
19 High ISO noise reduction.......... 181Long exposure noise reduction..................................... 181
20 Active D-Lighting ....................... 10821 HDR exposure differential ........ 205
HDR smoothing........................... 20522 Vignette control .......................... 18223 Retouch history........................... 31224 Image comment ......................... 301

128 More About Playback
❚❚ Shooting Data, Page 5 (Copyright Information) 6
1 Displayed in red if photo was taken with auto ISO sensitivity control on.2 Displayed if Custom Setting b4 (Fine-tune optimal exposure) has been set to a
value other than zero for any metering method.3 Also includes color temperature of photos taken using auto white balance.4 Displayed only if photo was taken with optional flash unit (0 406).5 The items displayed vary with the Picture Control selected when the picture was taken.6 Copyright information is only displayed if recorded with the photograph using the
Copyright information option in the setup menu.
Location DataThe latitude, longitude, and other location data are supplied by and vary with the GPS or smart device (0 304). In the case of movies, the data give the location at the start of recording.
25
26
25 Name of photographer............. 30226 Copyright holder ........................ 302
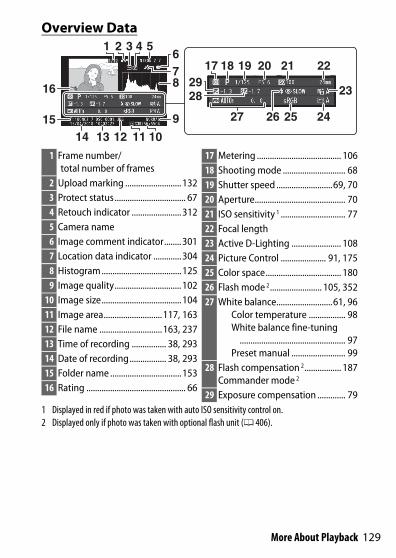
129More About Playback
Overview Data
1 Displayed in red if photo was taken with auto ISO sensitivity control on.2 Displayed only if photo was taken with optional flash unit (0 406).
1 5
8
9
14 13 12 11
16 232829
17 18 19 20 21 22
26 25 24
7
32 46
10
2715
1 Frame number/total number of frames
2 Upload marking ..........................1323 Protect status................................. 674 Retouch indicator .......................3125 Camera name6 Image comment indicator........3017 Location data indicator .............3048 Histogram .....................................1259 Image quality...............................102
10 Image size.....................................10411 Image area...........................117, 16312 File name .............................163, 23713 Time of recording ................ 38, 29314 Date of recording................. 38, 29315 Folder name .................................15316 Rating .............................................. 66
17 Metering ....................................... 10618 Shooting mode ............................. 6819 Shutter speed ..........................69, 7020 Aperture.......................................... 7021 ISO sensitivity 1 .............................. 7722 Focal length23 Active D-Lighting ....................... 10824 Picture Control ..................... 91, 17525 Color space................................... 18026 Flash mode 2........................ 105, 35227 White balance..........................61, 96
Color temperature ................. 98White balance fine-tuning
................................................. 97Preset manual ......................... 99
28 Flash compensation 2................. 187Commander mode 2
29 Exposure compensation ............. 79

130 More About Playback
Pressing the i button during playback zoom or full-frame or thumbnail playback displays the i menu for playback mode. Select options using the multi selector and J button and press the i button to exit the menu and return to playback.
The options available in the playback i menu vary with the type of picture.
Photos: Pressing the i button when a photo is selected displays the options listed below.• Quick crop (displayed only during playback zoom): Save a copy of the
current image cropped to the area visible in the display. This option is not available when histograms are displayed.
• Rating: Rate the current picture (0 66).• Select to send/deselect (smart device/PC/WT): Select the current
picture for upload. The option displayed varies with the type of device connected (0 132).
• Retouch: Use the options in the retouch menu (0 312) to create a retouched copy of the current photograph.
• Choose folder: Choose a folder for playback. Highlight a folder and press J to view the pictures in the highlighted folder.
• Protect: Add protection to or remove protection from the current picture (0 67).
• Unprotect all (not available during playback zoom): Remove protection from all pictures in the folder currently selected for Playback folder in the playback menu.
The i Button: Playback

131More About Playback
Movies: The options below are available when a movie is selected.• Rating: Rate the current picture (0 66).• Select to send/deselect (PC/WT): Select the current picture for
upload. The option displayed varies with the type of device connected (0 132).
• Volume control: Adjust playback volume.• Trim movie: Trim footage from the current movie and save the
edited copy in a new file (0 133).• Choose folder: Choose a folder for playback. Highlight a folder
and press J to view the pictures in the highlighted folder.• Protect: Add protection to or remove protection from the
current picture (0 67).• Unprotect all: Remove protection from all pictures in the folder
currently selected for Playback folder in the playback menu.
Movies (playback paused): The options below are available when movie playback is paused.• Choose start/end point: Trim footage from the current movie and
save the edited copy in a new file (0 133).• Save current frame: Save a selected frame as a JPEG still (0 136).

132 More About Playback
Select to Send/DeselectFollow the steps below to select the current picture for upload to a smart device, computer, or ftp server. The i menu options used to select pictures for upload vary with the type of device connected:• Select to send/deselect (smart device): Displayed when the camera is
connected to a smart device via built-in Bluetooth or Wi-Fi using the Connect to smart device item in the setup menu (0 306).
• Select to send/deselect (PC): Displayed when the camera is connected to a computer via built-in Wi-Fi using the Connect to PC item in the setup menu (0 307).
• Select to send/deselect (WT): Displayed when the camera is connected to a computer or ftp server via an WT-7 wireless transmitter (available separately) using the Wireless transmitter (WT-7) item in the setup menu (0 307).
1 Select a picture.Display a picture in full-frame playback or playback zoom or select it in the thumbnail list.
2 Choose Select to send/deselect.Press the i button to display the i menu, then highlight Select to send/deselect and press J. Pictures selected for upload are indicated by a W icon; to deselect, repeat Steps 1 and 2.
D MoviesMovies cannot be uploaded via Bluetooth. The maximum file size for movies uploaded by other means is 4 GB.
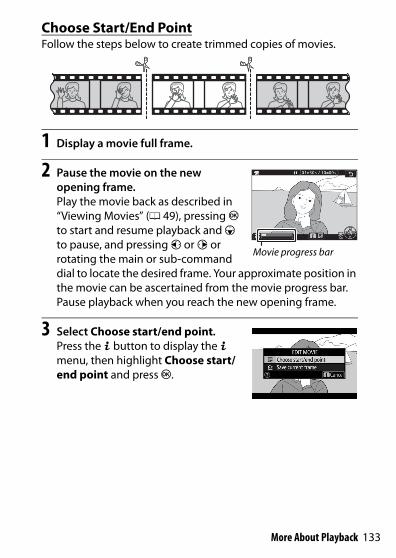
133More About Playback
Choose Start/End PointFollow the steps below to create trimmed copies of movies.
1 Display a movie full frame.
2 Pause the movie on the new opening frame.Play the movie back as described in “Viewing Movies” (0 49), pressing J to start and resume playback and 3 to pause, and pressing 4 or 2 or rotating the main or sub-command dial to locate the desired frame. Your approximate position in the movie can be ascertained from the movie progress bar. Pause playback when you reach the new opening frame.
3 Select Choose start/end point.Press the i button to display the i menu, then highlight Choose start/end point and press J.
Movie progress bar
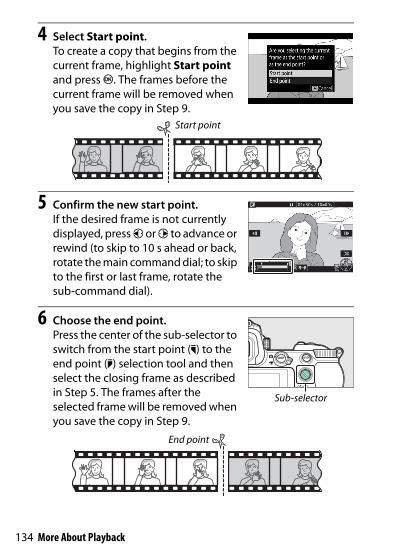
134 More About Playback
4 Select Start point.To create a copy that begins from the current frame, highlight Start point and press J. The frames before the current frame will be removed when you save the copy in Step 9.
5 Confirm the new start point.If the desired frame is not currently displayed, press 4 or 2 to advance or rewind (to skip to 10 s ahead or back, rotate the main command dial; to skip to the first or last frame, rotate the sub-command dial).
6 Choose the end point.Press the center of the sub-selector to switch from the start point (w) to the end point (x) selection tool and then select the closing frame as described in Step 5. The frames after the selected frame will be removed when you save the copy in Step 9.
Start point
Sub-selector
End point
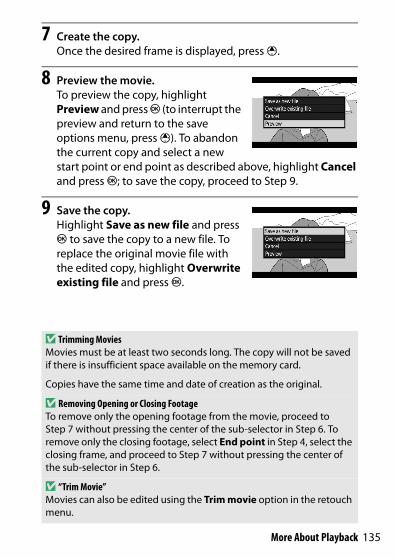
135More About Playback
7 Create the copy.Once the desired frame is displayed, press 1.
8 Preview the movie.To preview the copy, highlight Preview and press J (to interrupt the preview and return to the save options menu, press 1). To abandon the current copy and select a new start point or end point as described above, highlight Cancel and press J; to save the copy, proceed to Step 9.
9 Save the copy.Highlight Save as new file and press J to save the copy to a new file. To replace the original movie file with the edited copy, highlight Overwrite existing file and press J.
D Trimming MoviesMovies must be at least two seconds long. The copy will not be saved if there is insufficient space available on the memory card.
Copies have the same time and date of creation as the original.
D Removing Opening or Closing FootageTo remove only the opening footage from the movie, proceed to Step 7 without pressing the center of the sub-selector in Step 6. To remove only the closing footage, select End point in Step 4, select the closing frame, and proceed to Step 7 without pressing the center of the sub-selector in Step 6.
D “Trim Movie”Movies can also be edited using the Trim movie option in the retouch menu.

136 More About Playback
Save Current FrameTo save a copy of a selected frame as a JPEG still:
1 Pause the movie on the desired frame.Play the movie back as described in “Viewing Movies” (0 49), pressing J to start and resume playback and 3 to pause. Pause the movie at the frame you intend to copy.
2 Choose Save current frame.Press the i button to display the i menu, then highlight Save current frame and press J to create a JPEG copy of the current frame. The image will be recorded at the dimensions selected for Frame size/frame rate in the movie shooting menu.
D Save Current FrameJPEG movie stills created with the Save current frame option cannot be retouched. JPEG movie stills lack some categories of photo information.

137More About Playback
To zoom in during full-frame playback, press X or J.
While zoom is in effect, you can:• Zoom in or out/view other areas of the image: Press X or use stretch
gestures to zoom in to a maximum of approximately 32×, 24×, or 16× for large, medium, or small images respectively (Z 7, or in the case of the Z 6, to a maximum of approximately 24×, 18×, or 12×; all figures are for FX format). Press W (Q) or use pinch gestures to zoom out. While the photo is zoomed in, use the multi selector or slide a finger over the screen to view areas not currently visible in the display. Keep the multi selector pressed to scroll rapidly to other areas of the frame. A navigation window is displayed for a few seconds after the zoom ratio is altered; the area currently visible in the display is indicated by a yellow border. The bar under the navigation window shows the zoom ratio, turning green at 1 : 1.
• Select faces: Faces detected during zoom are indicated by white borders in the navigation window. Rotate the sub-command dial or tap the on-screen guide to view other faces.
• View other images: Rotate the main command dial or tap the e or f icons at the bottom of the display to view the same location in other photos at the current zoom ratio. Playback zoom is cancelled when a movie is displayed.
• Return to shooting mode: Press the shutter-release button halfway or press the K button to exit to shooting mode.
• Display the menus: Press G to view the menus.
Taking a Closer Look: Playback Zoom
Navigation window
On-screen guide

138 More About Playback
Press the O button to delete the current picture or use the Delete option in the playback menu to delete multiple selected pictures, all pictures taken on a selected date, or all pictures in the current playback folder (protected pictures cannot be deleted). Exercise caution when deleting pictures, as pictures cannot be recovered once deleted.
During PlaybackPress the O button to delete the current photograph.
1 Press the O button.A confirmation dialog will be displayed.
2 Press the O button again.To delete the picture, press the O button again. To exit without deleting the picture, press K.
Deleting Pictures
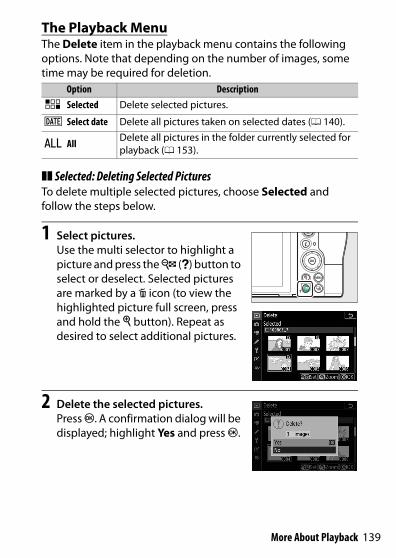
139More About Playback
The Playback MenuThe Delete item in the playback menu contains the following options. Note that depending on the number of images, some time may be required for deletion.
❚❚ Selected: Deleting Selected PicturesTo delete multiple selected pictures, choose Selected and follow the steps below.
1 Select pictures.Use the multi selector to highlight a picture and press the W (Q) button to select or deselect. Selected pictures are marked by a O icon (to view the highlighted picture full screen, press and hold the X button). Repeat as desired to select additional pictures.
2 Delete the selected pictures.Press J. A confirmation dialog will be displayed; highlight Yes and press J.
Option Description
Q Selected Delete selected pictures.
i Select date Delete all pictures taken on selected dates (0 140).
R All Delete all pictures in the folder currently selected for playback (0 153).

140 More About Playback
❚❚ Select Date: Deleting Pictures Taken on Selected DatesTo delete all unprotected pictures taken on selected dates, choose Delete > Select date in the playback menu and follow the steps below.
1 Select dates.Highlight a date and press 2 to select all pictures taken on the highlighted date. Selected dates are marked with a M icon. Repeat as desired to select additional dates; to deselect a date, highlight it and press 2.
2 Delete the pictures taken on the selected dates.Press J. A confirmation dialog will be displayed; highlight Yes and press J.

141Menu Guide > Defaults
Menu GuideLearn more about camera menus.
The default settings for the options in the camera menus are listed below.
Playback Menu Defaults
Photo Shooting Menu Defaults
Defaults
Option DefaultPlayback folder AllImage review OffAfter delete Show nextAfter burst, show Last image in burstRotate tall OnSlide show
Image type Still images and moviesFrame interval 2 s
Option DefaultStorage folder
Rename Z 7: NCZ_7Z 6: NCZ_6
Select folder by number 100File naming DSCChoose image area FX (36×24)Image quality JPEG normalImage size
JPEG/TIFFLarge
NEF (RAW)
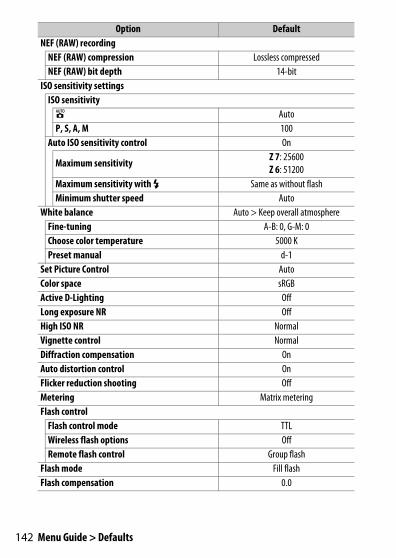
142 Menu Guide > Defaults
NEF (RAW) recordingNEF (RAW) compression Lossless compressedNEF (RAW) bit depth 14-bit
ISO sensitivity settingsISO sensitivityb AutoP, S, A, M 100
Auto ISO sensitivity control On
Maximum sensitivity Z 7: 25600Z 6: 51200
Maximum sensitivity with c Same as without flashMinimum shutter speed Auto
White balance Auto > Keep overall atmosphereFine-tuning A-B: 0, G-M: 0Choose color temperature 5000 KPreset manual d-1
Set Picture Control AutoColor space sRGBActive D-Lighting OffLong exposure NR OffHigh ISO NR NormalVignette control NormalDiffraction compensation OnAuto distortion control OnFlicker reduction shooting OffMetering Matrix meteringFlash control
Flash control mode TTLWireless flash options OffRemote flash control Group flash
Flash mode Fill flashFlash compensation 0.0
Option Default
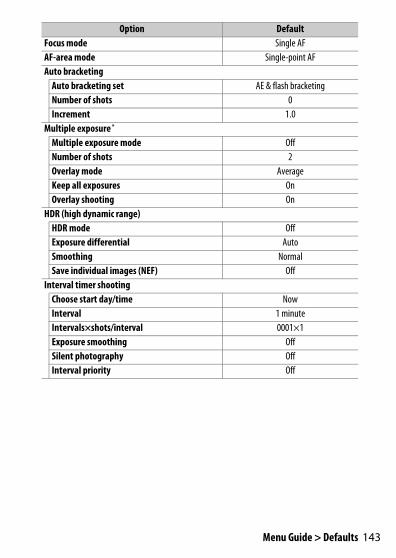
143Menu Guide > Defaults
Focus mode Single AFAF-area mode Single-point AFAuto bracketing
Auto bracketing set AE & flash bracketingNumber of shots 0Increment 1.0
Multiple exposure *
Multiple exposure mode OffNumber of shots 2Overlay mode AverageKeep all exposures OnOverlay shooting On
HDR (high dynamic range)HDR mode OffExposure differential AutoSmoothing NormalSave individual images (NEF) Off
Interval timer shootingChoose start day/time NowInterval 1 minuteIntervals×shots/interval 0001×1Exposure smoothing OffSilent photography OffInterval priority Off
Option Default

144 Menu Guide > Defaults
Movie Shooting Menu Defaults
Time-lapse movieInterval 5 sShooting time 25 minutesExposure smoothing OnSilent photography OffChoose image area FXFrame size/frame rate 1920×1080; 60pInterval priority Off
Focus shift shootingNo. of shots 100Focus step width 5Interval until next shot 0First-frame exposure lock OnPeaking stack image Don’t createSilent photography Off
Silent photography Off* Photo shooting menu reset is not available while shooting is in progress.
Option DefaultFile naming DSCChoose image area FXFrame size/frame rate 1920×1080; 60pMovie quality High qualityMovie file type MOVISO sensitivity settings
Maximum sensitivity Z 7: 25600Z 6: 51200
Auto ISO control (mode M) OnISO sensitivity (mode M) 100
Option Default
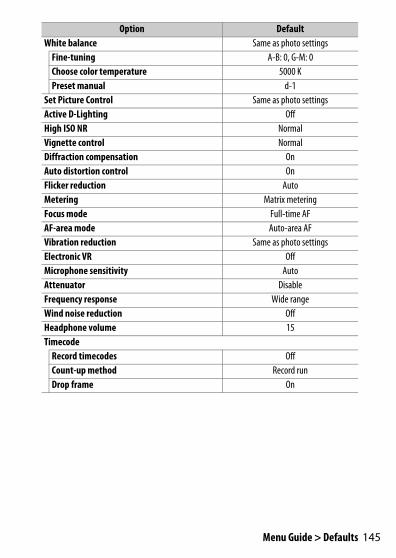
145Menu Guide > Defaults
White balance Same as photo settingsFine-tuning A-B: 0, G-M: 0Choose color temperature 5000 KPreset manual d-1
Set Picture Control Same as photo settingsActive D-Lighting OffHigh ISO NR NormalVignette control NormalDiffraction compensation OnAuto distortion control OnFlicker reduction AutoMetering Matrix meteringFocus mode Full-time AFAF-area mode Auto-area AFVibration reduction Same as photo settingsElectronic VR OffMicrophone sensitivity AutoAttenuator DisableFrequency response Wide rangeWind noise reduction OffHeadphone volume 15Timecode
Record timecodes OffCount-up method Record runDrop frame On
Option Default
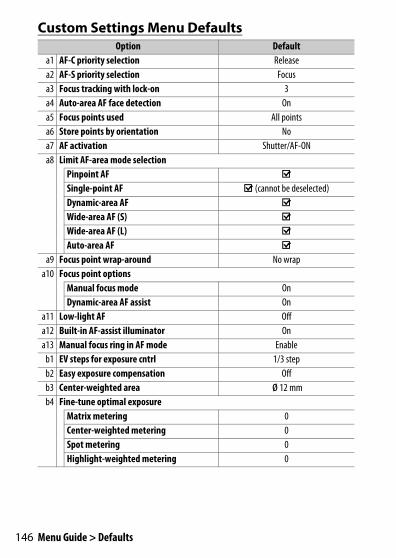
146 Menu Guide > Defaults
Custom Settings Menu DefaultsOption Default
a1 AF-C priority selection Releasea2 AF-S priority selection Focusa3 Focus tracking with lock-on 3a4 Auto-area AF face detection Ona5 Focus points used All pointsa6 Store points by orientation Noa7 AF activation Shutter/AF-ONa8 Limit AF-area mode selection
Pinpoint AF M
Single-point AF M (cannot be deselected)Dynamic-area AF M
Wide-area AF (S) M
Wide-area AF (L) M
Auto-area AF M
a9 Focus point wrap-around No wrapa10 Focus point options
Manual focus mode OnDynamic-area AF assist On
a11 Low-light AF Offa12 Built-in AF-assist illuminator Ona13 Manual focus ring in AF mode Enable
b1 EV steps for exposure cntrl 1/3 stepb2 Easy exposure compensation Offb3 Center-weighted area ø 12 mmb4 Fine-tune optimal exposure
Matrix metering 0Center-weighted metering 0Spot metering 0Highlight-weighted metering 0

147Menu Guide > Defaults
c1 Shutter-release button AE-L Offc2 Self-timer
Self-timer delay 10 sNumber of shots 1Interval between shots 0.5 s
c3 Power off delayPlayback 10 sMenus 1 minImage review 4 sStandby timer 30 s
d1 CL mode shooting speed 3 fpsd2 Max. continuous release 200d3 Sync. release mode options Syncd4 Exposure delay mode Offd5 Electronic front-curtain shutter Disabled6 Limit selectable image area
FX (36×24) M (cannot be deselected)DX (24×16) M
5:4 (30×24) (Z 7 only) M
1:1 (24×24) M
16:9 (36×20) M
d7 File number sequence Ond8 Apply settings to live view Ond9 Framing grid display Off
d10 Peaking highlightsPeaking level OffPeaking highlight color Red
d11 View all in continuous mode On
Option Default

148 Menu Guide > Defaults
e1 Flash sync speed 1/200 se2 Flash shutter speed 1/60 se3 Exposure comp. for flash Entire framee4 Auto c ISO sensitivity control Subject and backgrounde5 Modeling flash One6 Auto bracketing (mode M) Flash/speede7 Bracketing order MTR > under > overf1 Customize i menu Set Picture Control; White balance;
Image quality; Image size; Flash mode; Metering; Wi-Fi connection;
Active D-Lighting; Release mode; Vibration reduction; AF-area mode;
Focus modef2 Custom control assignment
Fn1 button White balanceFn2 button Focus mode/AF-area modeAF-ON button AF-ONSub-selector Focus point selectionSub-selector center AE/AF lockMovie record button NoneLens Fn button AE/AF lockLens control ring Focus (M/A)
f3 OK buttonShooting mode Select center focus pointPlayback mode Zoom on/off
Zoom on/off 1 : 1 (100%)f4 Shutter spd & aperture lock
Shutter speed lockOff
Aperture lock
Option Default
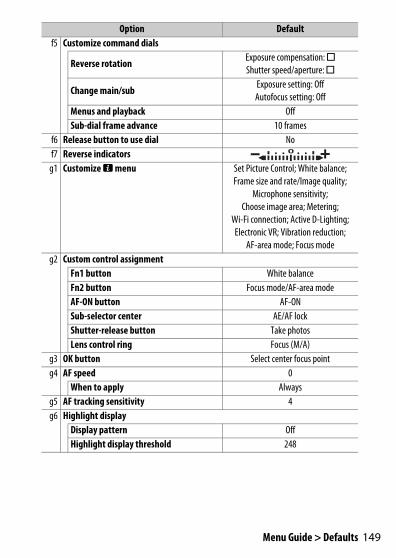
149Menu Guide > Defaults
f5 Customize command dials
Reverse rotation Exposure compensation: UShutter speed/aperture: U
Change main/sub Exposure setting: OffAutofocus setting: Off
Menus and playback OffSub-dial frame advance 10 frames
f6 Release button to use dial Nof7 Reverse indicators
g1 Customize i menu Set Picture Control; White balance; Frame size and rate/Image quality;
Microphone sensitivity; Choose image area; Metering;
Wi-Fi connection; Active D-Lighting; Electronic VR; Vibration reduction;
AF-area mode; Focus modeg2 Custom control assignment
Fn1 button White balanceFn2 button Focus mode/AF-area modeAF-ON button AF-ONSub-selector center AE/AF lockShutter-release button Take photosLens control ring Focus (M/A)
g3 OK button Select center focus pointg4 AF speed 0
When to apply Alwaysg5 AF tracking sensitivity 4g6 Highlight display
Display pattern OffHighlight display threshold 248
Option Default

150 Menu Guide > Defaults
Setup Menu DefaultsOption Default
Time zone and dateDaylight saving time Off
Monitor brightness 0Monitor color balance A-B: 0, G-M: 0Viewfinder brightness AutoViewfinder color balance A-B: 0, G-M: 0Control panel brightness AutoInformation display Dark on lightAF fine-tune
AF fine-tune (On/Off) OffClean image sensor
Automatic cleaning Clean at shutdownBeep options
Beep on/off OffVolume 2Pitch Low
Touch controlsEnable/disable touch controls EnableFull-frame playback flicks Left V Right
HDMIOutput resolution AutoAdvanced
Output range AutoExternal recording control OffOutput data depth 8 bitN-Log setting OffView assist Off

151Menu Guide > Defaults
Location dataStandby timer EnableSet clock from satellite Yes
Wireless remote (WR) optionsLED lamp OnLink mode Pairing
Assign remote (WR) Fn button NoneAirplane mode DisableSlot empty release lock Enable release
Option Default
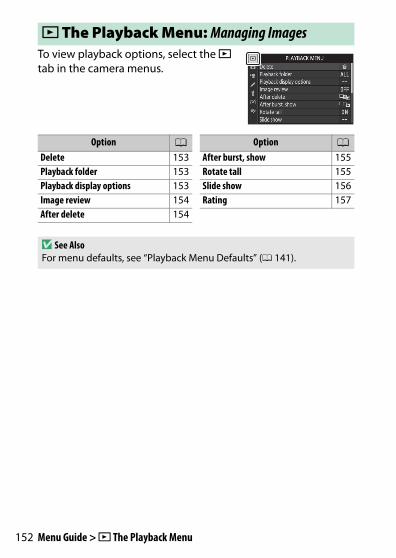
152 Menu Guide > D The Playback Menu
To view playback options, select the D tab in the camera menus.
DThe Playback Menu: Managing Images
Option 0Delete 153Playback folder 153Playback display options 153Image review 154After delete 154
After burst, show 155Rotate tall 155Slide show 156Rating 157
Option 0
D See AlsoFor menu defaults, see “Playback Menu Defaults” (0 141).

153Menu Guide > D The Playback Menu
Delete multiple images.
Choose a folder for playback.
Choose the information available in the playback photo information display. Highlight options and press 2 to select or deselect; items selected for display during full-frame playback are indicated by L icons. To return to the playback menu, press J.
DeleteG button ➜ D (playback menu)
Option DescriptionQ Selected Delete selected pictures.
i Select date Delete all pictures taken on selected dates.
R AllDelete all pictures in the folder currently selected for playback.
Playback FolderG button ➜ D (playback menu)
Option Description
(Folder name)
Pictures in all folders created with the camera will be visible during playback. Folders can be renamed using the Storage folder > Rename option in the photo shooting menu (0 159).
All Pictures in all folders will be visible during playback.
Current Only pictures in the current folder will be visible during playback.
Playback Display OptionsG button ➜ D (playback menu)
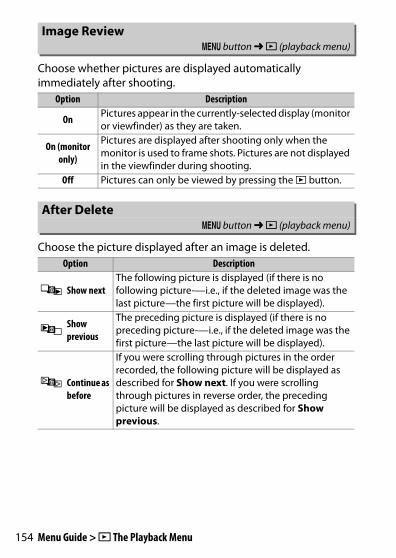
154 Menu Guide > D The Playback Menu
Choose whether pictures are displayed automatically immediately after shooting.
Choose the picture displayed after an image is deleted.
Image ReviewG button ➜ D (playback menu)
Option Description
On Pictures appear in the currently-selected display (monitor or viewfinder) as they are taken.
On (monitor only)
Pictures are displayed after shooting only when the monitor is used to frame shots. Pictures are not displayed in the viewfinder during shooting.
Off Pictures can only be viewed by pressing the K button.
After DeleteG button ➜ D (playback menu)
Option Description
S Show nextThe following picture is displayed (if there is no following picture—i.e., if the deleted image was the last picture—the first picture will be displayed).
TShow previous
The preceding picture is displayed (if there is no preceding picture—i.e., if the deleted image was the first picture—the last picture will be displayed).
U Continue as before
If you were scrolling through pictures in the order recorded, the following picture will be displayed as described for Show next. If you were scrolling through pictures in reverse order, the preceding picture will be displayed as described for Show previous.
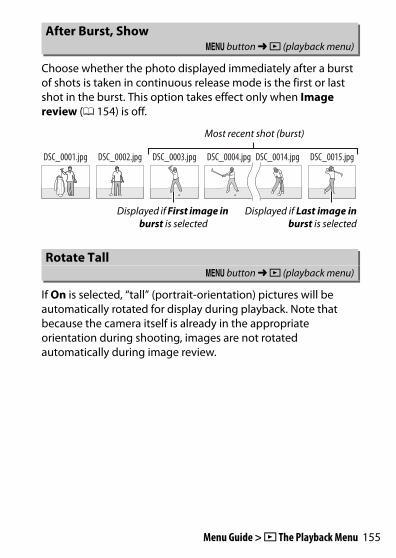
155Menu Guide > D The Playback Menu
Choose whether the photo displayed immediately after a burst of shots is taken in continuous release mode is the first or last shot in the burst. This option takes effect only when Image review (0 154) is off.
If On is selected, “tall” (portrait-orientation) pictures will be automatically rotated for display during playback. Note that because the camera itself is already in the appropriate orientation during shooting, images are not rotated automatically during image review.
After Burst, ShowG button ➜ D (playback menu)
Most recent shot (burst)
Displayed if First image in burst is selected
Displayed if Last image inburst is selected
Rotate TallG button ➜ D (playback menu)
DSC_0001.jpg DSC_0002.jpg DSC_0003.jpg DSC_0004.jpg DSC_0014.jpg DSC_0015.jpg
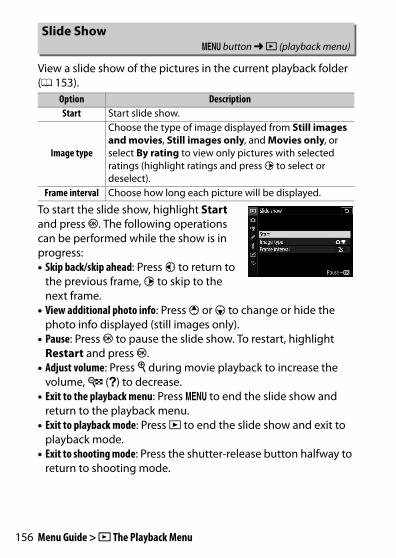
156 Menu Guide > D The Playback Menu
View a slide show of the pictures in the current playback folder (0 153).
To start the slide show, highlight Start and press J. The following operations can be performed while the show is in progress:• Skip back/skip ahead: Press 4 to return to
the previous frame, 2 to skip to the next frame.
• View additional photo info: Press 1 or 3 to change or hide the photo info displayed (still images only).
• Pause: Press J to pause the slide show. To restart, highlight Restart and press J.
• Adjust volume: Press X during movie playback to increase the volume, W (Q) to decrease.
• Exit to the playback menu: Press G to end the slide show and return to the playback menu.
• Exit to playback mode: Press K to end the slide show and exit to playback mode.
• Exit to shooting mode: Press the shutter-release button halfway to return to shooting mode.
Slide ShowG button ➜ D (playback menu)
Option DescriptionStart Start slide show.
Image type
Choose the type of image displayed from Still images and movies, Still images only, and Movies only, or select By rating to view only pictures with selected ratings (highlight ratings and press 2 to select or deselect).
Frame interval Choose how long each picture will be displayed.

157Menu Guide > D The Playback Menu
A dialog is displayed when the show ends. Select Restart to restart or Exit to return to the playback menu.
Rate pictures or mark them as candidates for later deletion. Press 4 or 2 to highlight pictures and press 1 or 3 to choose a rating of from zero to five stars, or select d to mark the picture as a candidate for later deletion (to view the highlighted picture full screen, press and hold the X button). Press J to exit when the operation is complete.
RatingG button ➜ D (playback menu)

158 Menu Guide > C The Photo Shooting Menu
To view the photo shooting menu, select the C tab in the camera menus.
C The Photo Shooting Menu: Shooting Options
Option 0Reset photo shooting menu 159Storage folder 159File naming 163Choose image area 163Image quality 164Image size 164NEF (RAW) recording 166ISO sensitivity settings 167White balance 168Set Picture Control 175Manage Picture Control 177Color space 180Active D-Lighting 180Long exposure NR 181High ISO NR 181Vignette control 182Diffraction compensation 182
Auto distortion control 182Flicker reduction shooting 183Metering 183Flash control 184Flash mode 186Flash compensation 187Focus mode 187AF-area mode 187Vibration reduction 187Auto bracketing 188Multiple exposure 198HDR (high dynamic range) 205Interval timer shooting 210Time-lapse movie 221Focus shift shooting 229Silent photography 235
Option 0
D See AlsoFor menu defaults, see “Photo Shooting Menu Defaults” (0 141).

159Menu Guide > C The Photo Shooting Menu
Select Yes to restore photo shooting menu options to their default values (0 141).
Rename folders and select the folder in which subsequent pictures will be stored.
RenameFolders are identified by a 5-character folder name preceded by a 3-digit folder number assigned automatically by the camera. The default folder name is “NCZ_7” (Z 7) or “NCZ_6” (Z 6); to change the name assigned to new folders, select Rename. If desired, the default name can be restored by pressing and holding the O button while the keyboard is displayed. Existing folders cannot be renamed.
Reset Photo Shooting MenuG button ➜ C (photo shooting menu)
Storage FolderG button ➜ C (photo shooting menu)
Folder
Folder number Folder name

160 Menu Guide > C The Photo Shooting Menu
D Text EntryA keyboard is displayed when text entry is required. Tap letters on the screen or use the multi selector to highlight characters and press J to insert them at the current cursor position (note that if a character is entered when the field is full, the last character in the field will be deleted). To delete the character under the cursor, press the O button. To move the cursor to a new position, tap the display or rotate the main command dial. To complete entry and return to the previous menu, press X. To exit without completing text entry, press G.
Text display area
Keyboard area
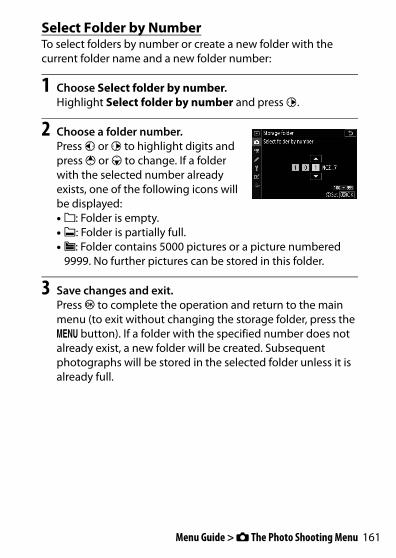
161Menu Guide > C The Photo Shooting Menu
Select Folder by NumberTo select folders by number or create a new folder with the current folder name and a new folder number:
1 Choose Select folder by number.Highlight Select folder by number and press 2.
2 Choose a folder number.Press 4 or 2 to highlight digits and press 1 or 3 to change. If a folder with the selected number already exists, one of the following icons will be displayed:• W: Folder is empty.• X: Folder is partially full.• Y: Folder contains 5000 pictures or a picture numbered
9999. No further pictures can be stored in this folder.
3 Save changes and exit.Press J to complete the operation and return to the main menu (to exit without changing the storage folder, press the G button). If a folder with the specified number does not already exist, a new folder will be created. Subsequent photographs will be stored in the selected folder unless it is already full.
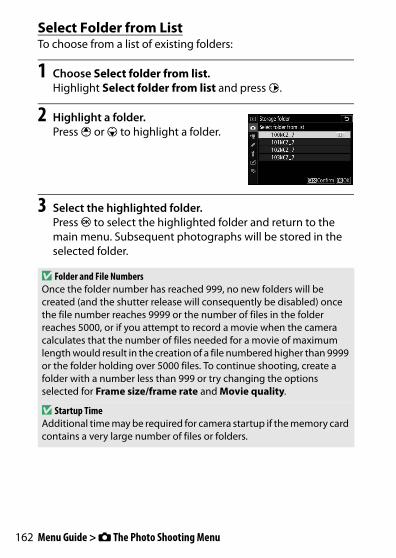
162 Menu Guide > C The Photo Shooting Menu
Select Folder from ListTo choose from a list of existing folders:
1 Choose Select folder from list.Highlight Select folder from list and press 2.
2 Highlight a folder.Press 1 or 3 to highlight a folder.
3 Select the highlighted folder.Press J to select the highlighted folder and return to the main menu. Subsequent photographs will be stored in the selected folder.
D Folder and File NumbersOnce the folder number has reached 999, no new folders will be created (and the shutter release will consequently be disabled) once the file number reaches 9999 or the number of files in the folder reaches 5000, or if you attempt to record a movie when the camera calculates that the number of files needed for a movie of maximum length would result in the creation of a file numbered higher than 9999 or the folder holding over 5000 files. To continue shooting, create a folder with a number less than 999 or try changing the options selected for Frame size/frame rate and Movie quality.
D Startup TimeAdditional time may be required for camera startup if the memory card contains a very large number of files or folders.

163Menu Guide > C The Photo Shooting Menu
Photographs are saved using file names consisting of “DSC_” or, in the case of images that use the Adobe RGB color space (0 180), “_DSC”, followed by a four-digit number and a three-letter extension (e.g., “DSC_0001.JPG” or “_DSC0002.JPG”). The File naming option is used to select three letters to replace the “DSC” portion of the file name as described in “Text Entry” (0 160).
The camera offers a choice of the following image areas:
File NamingG button ➜ C (photo shooting menu)
D ExtensionsThe following extensions are used: “.NEF” for NEF (RAW) images, “.TIF” for TIFF (RGB) images, “.JPG” for JPEG images, “.MOV” for MOV movies, “.MP4” for MP4 movies, and “.NDF” for dust off reference data. In each pair of photographs recorded at image-quality settings of NEF (RAW)+JPEG, the NEF and JPEG images have the same file names but different extensions.
Choose Image AreaG button ➜ C (photo shooting menu)
Option Description
c FX (36 × 24)Images are recorded in FX format with an angle of view equivalent to a NIKKOR lens on a 35 mm format camera.
a DX (24× 16)Images are recorded in DX format. To calculate the approximate focal length of the lens in 35 mm format, multiply by 1.5.
b 5 : 4 (30 × 24) Pictures are recorded with an aspect ratio of 5 : 4 (Z 7 only).
m 1 : 1 (24×24) Pictures are recorded with an aspect ratio of 1 : 1.
Z 16 : 9 (36×20) Pictures are recorded with an aspect ratio of 16 : 9.

164 Menu Guide > C The Photo Shooting Menu
Choose a file format for photographs. For more information, see “Image Quality” (0 102).
Choose the size, in pixels, of photographs recorded with the camera. Select JPEG/TIFF to choose the size of JPEG and TIFF images, NEF (RAW) to choose the size of NEF (RAW) images.
Z 7:
Image QualityG button ➜ C (photo shooting menu)
Image SizeG button ➜ C (photo shooting menu)
Image area Option Size (pixels) Print size (cm/in.) *
FX (36 × 24)FX format
Large 8256 × 5504 69.9 × 46.6/27.5 × 18.3Medium 6192 × 4128 52.4 × 35.0/20.6 × 13.8
Small 4128 × 2752 35.0 × 23.3/13.8 × 9.2
DX (24× 16)DX format
Large 5408 × 3600 45.8 × 30.5/18.0 × 12.0Medium 4048 × 2696 34.3 × 22.8/13.5 × 9.0
Small 2704 × 1800 22.9 × 15.2/9.0 × 6.0
5 : 4 (30 × 24)Large 6880 × 5504 58.3 × 46.6/22.9 × 18.3
Medium 5152 × 4120 43.6 × 34.9/17.2 × 13.7Small 3440 × 2752 29.1 × 23.3/11.5 × 9.2
1 : 1 (24×24)Large 5504 × 5504 46.6 × 46.6/18.3 × 18.3
Medium 4128 × 4128 35.0 × 35.0/13.8 × 13.8Small 2752 × 2752 23.3 × 23.3/9.2 × 9.2
16 : 9 (36×20)Large 8256 × 4640 69.9 × 39.3/27.5 × 15.5
Medium 6192 × 3480 52.4 × 29.5/20.6 × 11.6Small 4128 × 2320 35.0 × 19.6/13.8 × 7.7
* Approximate size when printed at 300 dpi. Print size in inches equals image size in pixels divided by printer resolution in dots per inch (dpi; 1 inch = approximately 2.54 cm).

165Menu Guide > C The Photo Shooting Menu
Z 6:
Image area Option Size (pixels) Print size (cm/in.) *
FX (36 × 24)FX format
Large 6048 × 4024 51.2 × 34.1/20.2 × 13.4Medium 4528 × 3016 38.3 × 25.5/15.1 × 10.1
Small 3024 × 2016 25.6 × 17.1/10.1 × 6.7
DX (24 × 16)DX format
Large 3936 × 2624 33.3 × 22.2/13.1 × 8.7Medium 2944 × 1968 24.9 × 16.7/9.8 × 6.6
Small 1968 × 1312 16.7 × 11.1/6.6 × 4.4
1 : 1 (24×24)Large 4016 × 4016 34.0 × 34.0/13.4 × 13.4
Medium 3008 × 3008 25.5 × 25.5/10.0 × 10.0 Small 2000 × 2000 16.9 × 16.9/6.7 × 6.7
16 : 9 (36×20)Large 6048 × 3400 51.2 × 28.8/20.2 × 11.3
Medium 4528 × 2544 38.3 × 21.5/15.1 × 8.5Small 3024 × 1696 25.6 × 14.4/10.1 × 5.7
* Approximate size when printed at 300 dpi. Print size in inches equals image size in pixels divided by printer resolution in dots per inch (dpi; 1 inch = approximately 2.54 cm).
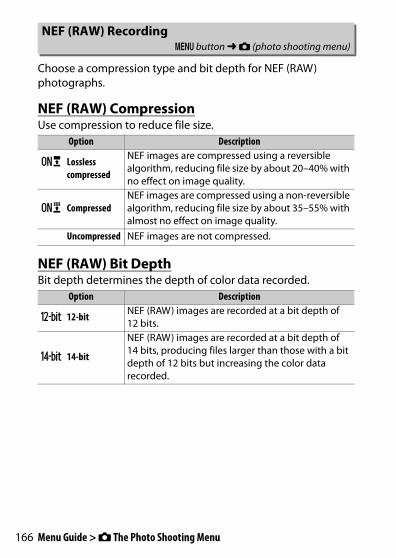
166 Menu Guide > C The Photo Shooting Menu
Choose a compression type and bit depth for NEF (RAW) photographs.
NEF (RAW) CompressionUse compression to reduce file size.
NEF (RAW) Bit DepthBit depth determines the depth of color data recorded.
NEF (RAW) RecordingG button ➜ C (photo shooting menu)
Option Description
N Lossless compressed
NEF images are compressed using a reversible algorithm, reducing file size by about 20–40% with no effect on image quality.
O CompressedNEF images are compressed using a non-reversible algorithm, reducing file size by about 35–55% with almost no effect on image quality.
Uncompressed NEF images are not compressed.
Option Description
q 12-bit NEF (RAW) images are recorded at a bit depth of 12 bits.
r 14-bit
NEF (RAW) images are recorded at a bit depth of 14 bits, producing files larger than those with a bit depth of 12 bits but increasing the color data recorded.

167Menu Guide > C The Photo Shooting Menu
Adjust ISO sensitivity settings for photographs.
ISO Sensitivity SettingsG button ➜ C (photo shooting menu)
Option Description
ISO sensitivity
Adjust ISO sensitivity. Select from values between ISO 64 and 25600 (or in the case of the Z 6, between ISO 100 and ISO 51200). Settings of from about 0.3 to 1 EV below the lowest of these values and 0.3 to 2 EV above the highest are also available for special situations. b mode offers an additional Auto option.
Auto ISO sensitivity
control
If On is selected, the camera will automatically adjust ISO sensitivity when optimal exposure cannot be achieved at the value selected for ISO sensitivity. The options listed below are available for fine-tuning auto ISO sensitivity control.• Maximum sensitivity: Choose an upper limit for ISO
sensitivity to prevent it being raised too high.• Maximum sensitivity with c: Choose the upper ISO
sensitivity limit for photos taken using an optional flash unit.
• Minimum shutter speed: Choose the shutter speed below which auto ISO sensitivity control will kick in to prevent underexposure in modes P and A. Options range from 1/4000 s to 30 s. An Auto option is also available (0 168).

168 Menu Guide > C The Photo Shooting Menu
Adjust white balance. For more information, see the “White Balance” sections in “Basic Settings” (0 61) and “The i Button” (0 96).
A “Minimum Shutter Speed” > “Auto”If Auto is selected for Auto ISO sensitivity control > Minimum shutter speed, the camera will choose the minimum shutter speed based on the focal length of the lens. For example, the camera will automatically select fast minimum shutter speeds to reduce the blur that commonly occurs with telephoto lenses.
Auto shutter-speed selection can be fine-tuned for faster or slower minimum values by highlighting Auto and pressing 2; choosing fast minimum shutter speeds when photographing fast-moving objects reduces blur.
Shutter speeds may drop below the selected minimum if optimum exposure cannot be achieved at the ISO sensitivity chosen for Maximum sensitivity.
White BalanceG button ➜ C (photo shooting menu)
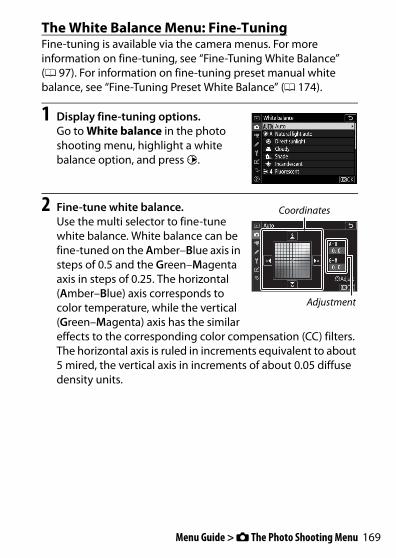
169Menu Guide > C The Photo Shooting Menu
The White Balance Menu: Fine-TuningFine-tuning is available via the camera menus. For more information on fine-tuning, see “Fine-Tuning White Balance” (0 97). For information on fine-tuning preset manual white balance, see “Fine-Tuning Preset White Balance” (0 174).
1 Display fine-tuning options.Go to White balance in the photo shooting menu, highlight a white balance option, and press 2.
2 Fine-tune white balance.Use the multi selector to fine-tune white balance. White balance can be fine-tuned on the Amber–Blue axis in steps of 0.5 and the Green–Magenta axis in steps of 0.25. The horizontal (Amber–Blue) axis corresponds to color temperature, while the vertical (Green–Magenta) axis has the similar effects to the corresponding color compensation (CC) filters. The horizontal axis is ruled in increments equivalent to about 5 mired, the vertical axis in increments of about 0.05 diffuse density units.
Coordinates
Adjustment
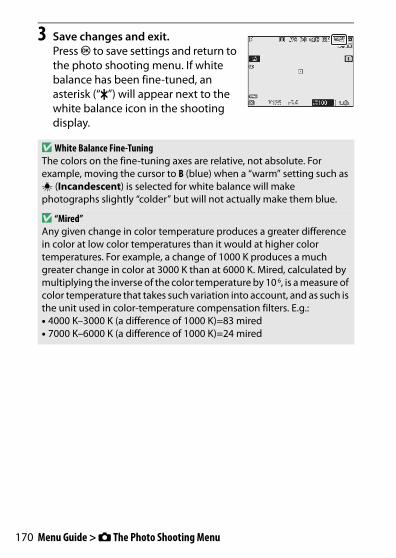
170 Menu Guide > C The Photo Shooting Menu
3 Save changes and exit.Press J to save settings and return to the photo shooting menu. If white balance has been fine-tuned, an asterisk (“U”) will appear next to the white balance icon in the shooting display.
D White Balance Fine-TuningThe colors on the fine-tuning axes are relative, not absolute. For example, moving the cursor to B (blue) when a “warm” setting such as J (Incandescent) is selected for white balance will make photographs slightly “colder” but will not actually make them blue.
D “Mired”Any given change in color temperature produces a greater difference in color at low color temperatures than it would at higher color temperatures. For example, a change of 1000 K produces a much greater change in color at 3000 K than at 6000 K. Mired, calculated by multiplying the inverse of the color temperature by 10 6, is a measure of color temperature that takes such variation into account, and as such is the unit used in color-temperature compensation filters. E.g.:• 4000 K–3000 K (a difference of 1000 K)=83 mired• 7000 K–6000 K (a difference of 1000 K)=24 mired
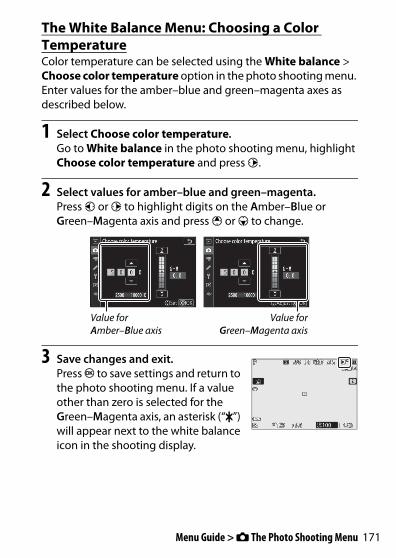
171Menu Guide > C The Photo Shooting Menu
The White Balance Menu: Choosing a Color TemperatureColor temperature can be selected using the White balance > Choose color temperature option in the photo shooting menu. Enter values for the amber–blue and green–magenta axes as described below.
1 Select Choose color temperature.Go to White balance in the photo shooting menu, highlight Choose color temperature and press 2.
2 Select values for amber–blue and green–magenta.Press 4 or 2 to highlight digits on the Amber–Blue or Green–Magenta axis and press 1 or 3 to change.
3 Save changes and exit.Press J to save settings and return to the photo shooting menu. If a value other than zero is selected for the Green–Magenta axis, an asterisk (“U”) will appear next to the white balance icon in the shooting display.
Value for Amber–Blue axis
Value forGreen–Magenta axis

172 Menu Guide > C The Photo Shooting Menu
D Choose Color TemperatureNote that the desired results will not be obtained with flash or fluorescent lighting. Choose 5 (Flash) or I (Fluorescent) for these sources. With other light sources, take a test shot to determine if the selected value is appropriate.

173Menu Guide > C The Photo Shooting Menu
Preset Manual: Copying White Balance from a PhotographThe Preset manual option in the white balance menu can be used to copy a white balance value from an existing photograph. For more information on preset manual white balance, see “Preset Manual” (0 99).
1 Select Preset manual.Go to White balance in the photo shooting menu, highlight Preset manual, and press 2.
2 Select a destination.Highlight the destination preset (d-1 to d-6) and press X.
3 Choose Select image.The preset manual white balance menu will be displayed; highlight Select image and press 2.
4 Highlight a source image.Highlight the source image. To view the highlighted image full frame, press and hold the X button.

174 Menu Guide > C The Photo Shooting Menu
5 Copy white balance.Press J to copy the white balance value from the highlighted photograph to the selected preset. If the highlighted photograph has a comment, the comment will be copied to the comment for the selected preset.
D Fine-Tuning Preset White BalanceThe current preset can be fine-tuned by selecting Fine-tune in the preset manual white balance menu and adjusting white balance as described in “The White Balance Menu: Fine-Tuning” (0 169).
D Edit CommentTo enter a descriptive comment of up to 36 characters for the current white-balance preset, select Edit comment in the preset manual white balance menu.
D ProtectTo protect the current white-balance preset, select Protect in the preset manual white balance menu, then highlight On and press J. Protected presets cannot be modified and the Fine-tune and Edit comment options cannot be used.
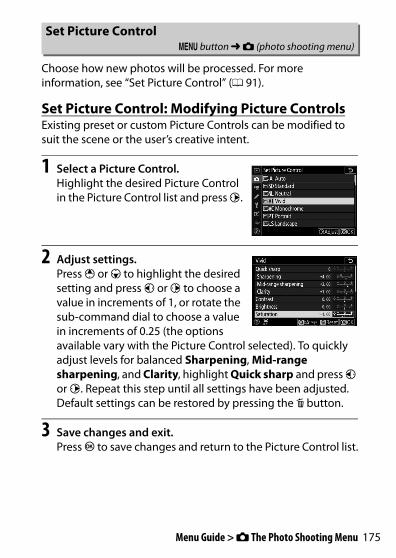
175Menu Guide > C The Photo Shooting Menu
Choose how new photos will be processed. For more information, see “Set Picture Control” (0 91).
Set Picture Control: Modifying Picture ControlsExisting preset or custom Picture Controls can be modified to suit the scene or the user’s creative intent.
1 Select a Picture Control.Highlight the desired Picture Control in the Picture Control list and press 2.
2 Adjust settings.Press 1 or 3 to highlight the desired setting and press 4 or 2 to choose a value in increments of 1, or rotate the sub-command dial to choose a value in increments of 0.25 (the options available vary with the Picture Control selected). To quickly adjust levels for balanced Sharpening, Mid-range sharpening, and Clarity, highlight Quick sharp and press 4 or 2. Repeat this step until all settings have been adjusted. Default settings can be restored by pressing the O button.
3 Save changes and exit.Press J to save changes and return to the Picture Control list.
Set Picture ControlG button ➜ C (photo shooting menu)

176 Menu Guide > C The Photo Shooting Menu
D Custom Picture ControlsModifications to existing Picture Controls can be saved as custom Picture Controls using the Manage Picture Control option in the photo or movie shooting menu. Custom Picture Controls can be copied to a memory card and used in compatible software or shared among cameras of the same model.
D The i MenuModifying Picture Controls from the i menu allows the effect to be previewed in the display. Highlight Set Picture Control in the i menu and press J, then press 4 and 2 to choose a Picture Control and press 3 to display Picture Control settings.
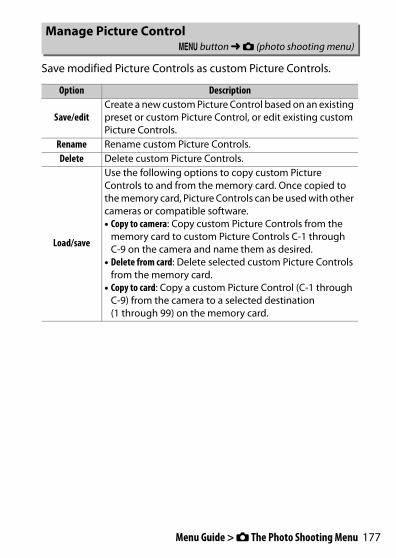
177Menu Guide > C The Photo Shooting Menu
Save modified Picture Controls as custom Picture Controls.
Manage Picture ControlG button ➜ C (photo shooting menu)
Option Description
Save/editCreate a new custom Picture Control based on an existing preset or custom Picture Control, or edit existing custom Picture Controls.
Rename Rename custom Picture Controls.Delete Delete custom Picture Controls.
Load/save
Use the following options to copy custom Picture Controls to and from the memory card. Once copied to the memory card, Picture Controls can be used with other cameras or compatible software.• Copy to camera: Copy custom Picture Controls from the
memory card to custom Picture Controls C-1 through C-9 on the camera and name them as desired.
• Delete from card: Delete selected custom Picture Controls from the memory card.
• Copy to card: Copy a custom Picture Control (C-1 through C-9) from the camera to a selected destination (1 through 99) on the memory card.

178 Menu Guide > C The Photo Shooting Menu
Creating Custom Picture ControlsThe Picture Controls supplied with the camera can be modified and saved as custom Picture Controls.
1 Select Save/edit.Highlight Save/edit and press2.
2 Select a Picture Control.Highlight an existing Picture Control and press 2, or press J to proceed to Step 4 to save a copy of the highlighted Picture Control without further modification.
3 Edit the selected Picture Control.To abandon any changes and start over from default settings, press the O button. Press J when settings are complete.
4 Select a destination.Choose a destination for the custom Picture Control (C-1 through C-9) and press 2.

179Menu Guide > C The Photo Shooting Menu
5 Name the Picture Control.A text-entry dialog will be displayed. By default, new Picture Controls are named by adding a two-digit number (assigned automatically) to the name of the existing Picture Control; to choose a different name, rename the Picture Control as described in “Text Entry” (0 160). Tap the keyboard selection button to cycle through the upper-case, lower-case, and symbol keyboards. Custom Picture Control names can be up to nineteen characters long. Any characters after the nineteenth will be deleted.
Name area
Keyboard area Keyboard selection
D Custom Picture Control OptionsThe options available with custom Picture Controls are the same as those on which the custom Picture Control was based.
D The Original Picture Control IconThe original preset Picture Control on which the custom Picture Control is based is indicated by an icon in the top right corner of the edit display.
OriginalPicture Control icon

180 Menu Guide > C The Photo Shooting Menu
The color space determines the gamut of colors available for color reproduction. sRGB is recommended for general-purpose printing and display, Adobe RGB, with its broader gamut of colors, for professional publication and commercial printing.
Preserve details in highlights and shadows, creating pictures with natural contrast. For more information, see “Active D-Lighting” (0 108).
Color SpaceG button ➜ C (photo shooting menu)
D Adobe RGBFor accurate color reproduction, Adobe RGB images require applications, displays, and printers that support color management.
D Color SpaceViewNX-i and Capture NX-D automatically select the correct color space when opening photographs created with this camera. Results cannot be guaranteed with third-party software.
Active D-LightingG button ➜ C (photo shooting menu)
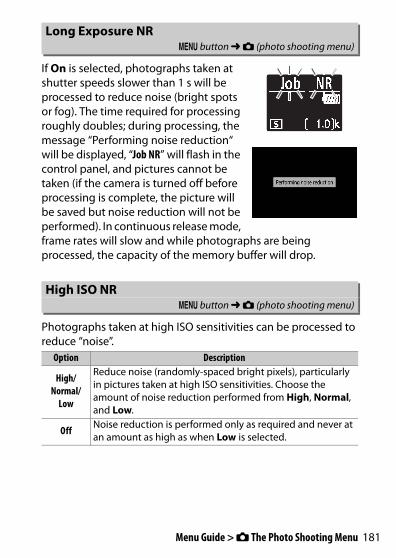
181Menu Guide > C The Photo Shooting Menu
If On is selected, photographs taken at shutter speeds slower than 1 s will be processed to reduce noise (bright spots or fog). The time required for processing roughly doubles; during processing, the message “Performing noise reduction“ will be displayed, “Job NR” will flash in the control panel, and pictures cannot be taken (if the camera is turned off before processing is complete, the picture will be saved but noise reduction will not be performed). In continuous release mode, frame rates will slow and while photographs are being processed, the capacity of the memory buffer will drop.
Photographs taken at high ISO sensitivities can be processed to reduce “noise”.
Long Exposure NRG button ➜ C (photo shooting menu)
High ISO NRG button ➜ C (photo shooting menu)
Option Description
High/Normal/
Low
Reduce noise (randomly-spaced bright pixels), particularly in pictures taken at high ISO sensitivities. Choose the amount of noise reduction performed from High, Normal, and Low.
Off Noise reduction is performed only as required and never at an amount as high as when Low is selected.

182 Menu Guide > C The Photo Shooting Menu
Vignette control reduces the drop in brightness that occurs at the edges the frame. Its effects vary from lens to lens and are most noticeable at maximum aperture. Choose from High, Normal, Low, and Off.
Select On to reduce diffraction at small apertures (high f/-numbers).
Select On as required to reduce barrel distortion when shooting with wide-angle lenses and to reduce pin-cushion distortion when shooting with long lenses (note that On may be selected automatically with some lenses, in which case the Auto distortion control option will be grayed out and unavailable).
Vignette ControlG button ➜ C (photo shooting menu)
D Vignette ControlDepending on the scene, shooting conditions, and type of lens, TIFF and JPEG images may exhibit noise (fog) or variations in peripheral brightness, while custom Picture Controls and preset Picture Controls that have been modified from default settings may not produce the desired effect. Take test shots and view the results in the display.
Diffraction CompensationG button ➜ C (photo shooting menu)
Auto Distortion ControlG button ➜ C (photo shooting menu)
183Menu Guide > C The Photo Shooting Menu
When On is selected, the camera will time photographs to reduce banding, areas of under- or over-exposure, or (in photographs taken in continuous release modes) uneven coloration caused by the flicker of such light sources as fluorescent or mercury-vapor lamps (note that the frame rate may drop while flicker reduction is in effect, and that the frame rate may slow or become erratic during burst shooting).
Metering determines how the camera sets exposure. For more information, see “Metering” (0 106).
Flicker Reduction ShootingG button ➜ C (photo shooting menu)
D “Flicker Reduction Shooting” in the Photo Shooting MenuFlicker reduction can detect flicker at 100 and 120 Hz (associated respectively with AC power supplies of 50 and 60 Hz). Flicker may not be detected or the desired results may not be achieved with dark backgrounds, bright light sources, or decorative lighting displays and other non-standard lighting. Depending on the light source, there may be a slight delay before the shutter is released. The desired results may not be achieved if the frequency of the power supply changes during shooting.
Flicker detection will not take effect at shutter speeds slower than 1/100 s (including Bulb and Time) or when Continuous H (extended) is selected for release mode or silent photography, HDR, or exposure delay mode is enabled.
MeteringG button ➜ C (photo shooting menu)
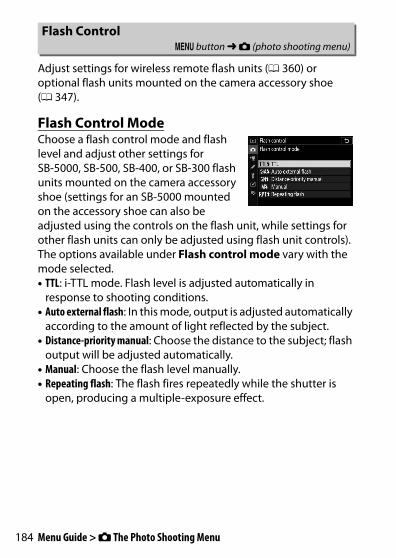
184 Menu Guide > C The Photo Shooting Menu
Adjust settings for wireless remote flash units (0 360) or optional flash units mounted on the camera accessory shoe (0 347).
Flash Control ModeChoose a flash control mode and flash level and adjust other settings for SB-5000, SB-500, SB-400, or SB-300 flash units mounted on the camera accessory shoe (settings for an SB-5000 mounted on the accessory shoe can also be adjusted using the controls on the flash unit, while settings for other flash units can only be adjusted using flash unit controls). The options available under Flash control mode vary with the mode selected.• TTL: i-TTL mode. Flash level is adjusted automatically in
response to shooting conditions.• Auto external flash: In this mode, output is adjusted automatically
according to the amount of light reflected by the subject.• Distance-priority manual: Choose the distance to the subject; flash
output will be adjusted automatically.• Manual: Choose the flash level manually.• Repeating flash: The flash fires repeatedly while the shutter is
open, producing a multiple-exposure effect.
Flash ControlG button ➜ C (photo shooting menu)

185Menu Guide > C The Photo Shooting Menu
Wireless Flash OptionsAdjust settings for simultaneous wireless control of multiple remote flash units. This option is available only when an SB-5000 or SB-500 flash unit or a WR-R10 wireless remote controller is mounted on the camera.
Option Description
Y Optical AWLThe remote flash units are controlled using low-intensity flashes emitted by the master flash (0 373).
Y/Z Optical/radio AWL
Choose this option when using both optically- and radio-controlled flash units (0 381).
Z Radio AWLThe remote flash units are controlled by radio signals from a WR-R10 attached to the camera (0 362).
Off Remote flash photography disabled.

186 Menu Guide > C The Photo Shooting Menu
Remote Flash ControlChoose from the remote flash photography options listed below (0 366, 373).
Radio Remote Flash InfoView the flash units currently controlled via radio AWL.
Choose the flash mode for wireless remote flash units or flash units mounted on the camera accessory shoe. For more information, see “Flash Mode” (0 105, 352).
Option Description
Group flash Choose a separate flash control mode for each group of remote flash units.
Quick wireless control
Choose the balance between groups A and B and set the output for group C manually.
Remote repeating
The flash units fire repeatedly while the shutter is open, producing a multiple-exposure effect.
Flash ModeG button ➜ C (photo shooting menu)
187Menu Guide > C The Photo Shooting Menu
Adjust flash output to control the brightness of the main subject relative to the background (0 354). Flash output can be increased to make the main subject appear brighter or reduced to prevent unwanted highlights or reflections.
The focus mode controls how the camera focuses. For more information, see “Choosing a Focus Mode” (0 52).
Choose how the camera selects the focus-point for autofocus. For more information, see “AF-Area Mode” (0 54).
Choose whether to enable vibration reduction. For more information, see “Vibration Reduction” (0 110).
Flash CompensationG button ➜ C (photo shooting menu)
Focus ModeG button ➜ C (photo shooting menu)
AF-Area ModeG button ➜ C (photo shooting menu)
Vibration ReductionG button ➜ C (photo shooting menu)

188 Menu Guide > C The Photo Shooting Menu
Vary exposure, flash level, Active D-Lighting (ADL), or white balance slightly with each shot, “bracketing” the current value. Bracketing can be used in situations in which getting the right settings is difficult and there is not time to check results and adjust settings with each shot, or to experiment with different settings for the same subject. The following options are available:• Auto bracketing set: Choose the setting or settings bracketed
when auto bracketing is in effect. Choose AE & flash bracketing to perform both exposure and flash-level bracketing, AE bracketing to bracket only exposure, Flash bracketing to perform only flash-level bracketing, WB bracketing to perform white-balance bracketing, or ADL bracketing to perform bracketing using Active D-Lighting.
• Number of shots: Choose the number of shots in the bracketing sequence.
• Increment: Choose the amount the selected settings vary with each shot (ADL bracketing excluded).
• Amount: Choose how Active D-Lighting varies with each shot (ADL bracketing only).
Auto BracketingG button ➜ C (photo shooting menu)
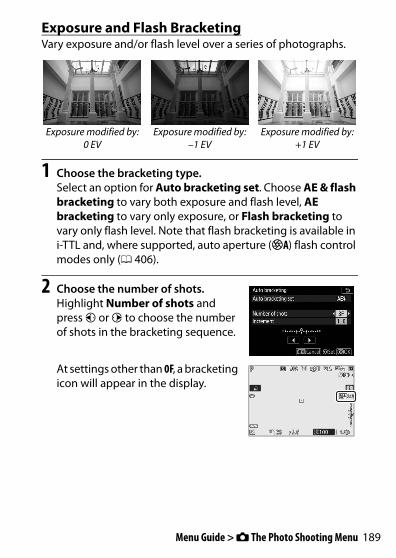
189Menu Guide > C The Photo Shooting Menu
Exposure and Flash BracketingVary exposure and/or flash level over a series of photographs.
1 Choose the bracketing type.Select an option for Auto bracketing set. Choose AE & flash bracketing to vary both exposure and flash level, AE bracketing to vary only exposure, or Flash bracketing to vary only flash level. Note that flash bracketing is available in i-TTL and, where supported, auto aperture (qA) flash control modes only (0 406).
2 Choose the number of shots.Highlight Number of shots and press 4 or 2 to choose the number of shots in the bracketing sequence.
At settings other than 0F, a bracketing icon will appear in the display.
Exposure modified by: 0 EV
Exposure modified by: –1 EV
Exposure modified by: +1 EV
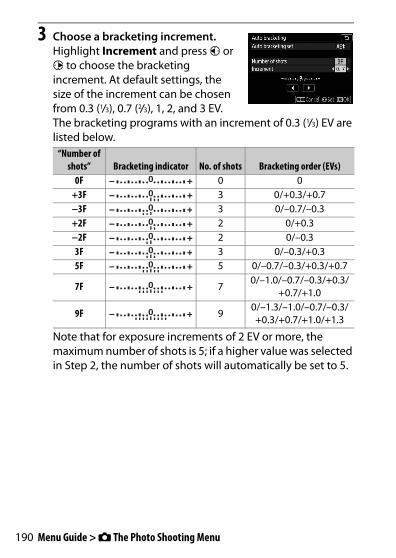
190 Menu Guide > C The Photo Shooting Menu
3 Choose a bracketing increment.Highlight Increment and press 4 or 2 to choose the bracketing increment. At default settings, the size of the increment can be chosen from 0.3 (1/3), 0.7 (2/3), 1, 2, and 3 EV. The bracketing programs with an increment of 0.3 (1/3) EV are listed below.
Note that for exposure increments of 2 EV or more, the maximum number of shots is 5; if a higher value was selected in Step 2, the number of shots will automatically be set to 5.
“Number of shots” Bracketing indicator No. of shots Bracketing order (EVs)
0F 0 0+3F 3 0/+0.3/+0.7−3F 3 0/–0.7/–0.3+2F 2 0/+0.3−2F 2 0/–0.33F 3 0/–0.3/+0.35F 5 0/–0.7/–0.3/+0.3/+0.7
7F 7 0/–1.0/–0.7/–0.3/+0.3/+0.7/+1.0
9F 9 0/–1.3/–1.0/–0.7/–0.3/+0.3/+0.7/+1.0/+1.3
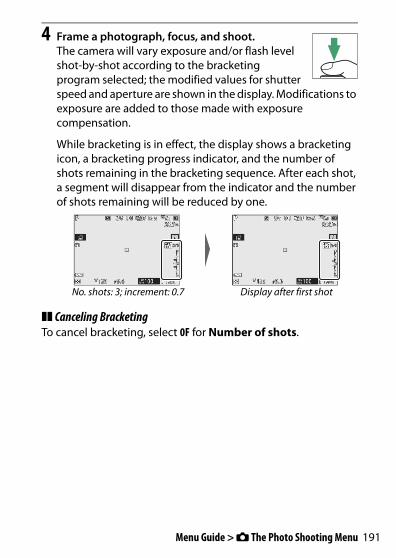
191Menu Guide > C The Photo Shooting Menu
4 Frame a photograph, focus, and shoot.The camera will vary exposure and/or flash level shot-by-shot according to the bracketing program selected; the modified values for shutter speed and aperture are shown in the display. Modifications to exposure are added to those made with exposure compensation.
While bracketing is in effect, the display shows a bracketing icon, a bracketing progress indicator, and the number of shots remaining in the bracketing sequence. After each shot, a segment will disappear from the indicator and the number of shots remaining will be reduced by one.
❚❚ Canceling BracketingTo cancel bracketing, select 0F for Number of shots.
No. shots: 3; increment: 0.7 Display after first shot
192 Menu Guide > C The Photo Shooting Menu
D Exposure and Flash BracketingIn continuous release modes, shooting will pause after the number of shots specified in the bracketing program have been taken. Shooting will resume the next time the shutter-release button is pressed. In self-timer mode, the camera will take one shot each time the shutter-release button is pressed, regardless of the option selected for Custom Setting c2 (Self-timer) > Number of shots; the interval between shots is however controlled by Custom Setting c2 (Self-timer) > Interval between shots. In other modes, one shot will be taken each time the shutter-release button is pressed.
If the memory card fills before all shots in the sequence have been taken, shooting can be resumed from the next shot in the sequence after the memory card has been replaced or shots have been deleted to make room on the memory card. If the camera is turned off before all shots in the sequence have been taken, bracketing will resume from the next shot in the sequence when the camera is turned on.
D Exposure BracketingThe camera modifies exposure by varying shutter speed and aperture (mode P), aperture (mode S), or shutter speed (modes A and M). If On is selected for ISO sensitivity settings > Auto ISO sensitivity control in modes P, S, and A, the camera will automatically vary ISO sensitivity for optimum exposure when the limits of the camera exposure system are exceeded; in mode M, the camera will first use auto ISO sensitivity control to bring exposure as close as possible to the optimum and then bracket this exposure by varying shutter speed. Custom Setting e6 (Auto bracketing (mode M)) can be used to change how the camera performs exposure and flash bracketing in mode M: by varying flash level together with shutter speed and/or aperture, or by varying flash level alone.
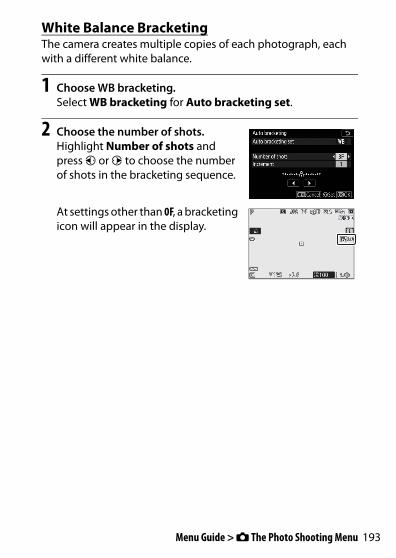
193Menu Guide > C The Photo Shooting Menu
White Balance BracketingThe camera creates multiple copies of each photograph, each with a different white balance.
1 Choose WB bracketing.Select WB bracketing for Auto bracketing set.
2 Choose the number of shots.Highlight Number of shots and press 4 or 2 to choose the number of shots in the bracketing sequence.
At settings other than 0F, a bracketing icon will appear in the display.

194 Menu Guide > C The Photo Shooting Menu
3 Choose a bracketing increment.Highlight Increment and press 4 or 2 to choose the bracketing increment. Each increment is roughly equivalent to 5 mired. Choose from increments of 1 (5 mired), 2 (10 mired), or 3 (15 mired). Higher B values correspond to increased amounts of blue, higher A values to increased amounts of amber. The bracketing programs with an increment of 1 are listed below.
“Number of shots” Bracketing indicator
No. of shots Increment Bracketing order
0F 0 1 0B3F 3 1B 0/B1/B2A3F 3 1A 0/A2/A1B2F 2 1B 0/B1A2F 2 1A 0/A13F 3
1A, 1B
0/A1/B15F 5 0/A2/A1/B1/B2
7F 7 0/A3/A2/A1/B1/B2/B3
9F 9 0/A4/A3/A2/A1/B1/B2/B3/B4
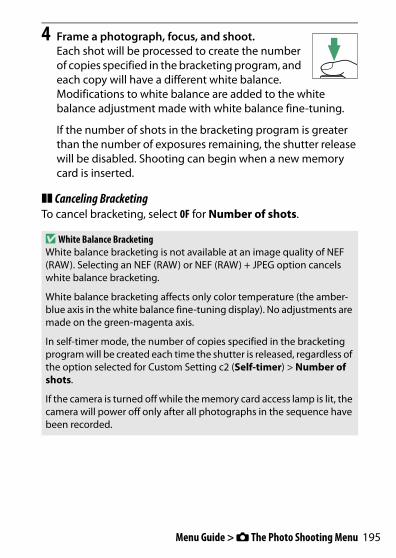
195Menu Guide > C The Photo Shooting Menu
4 Frame a photograph, focus, and shoot.Each shot will be processed to create the number of copies specified in the bracketing program, and each copy will have a different white balance. Modifications to white balance are added to the white balance adjustment made with white balance fine-tuning.
If the number of shots in the bracketing program is greater than the number of exposures remaining, the shutter release will be disabled. Shooting can begin when a new memory card is inserted.
❚❚ Canceling BracketingTo cancel bracketing, select 0F for Number of shots.
D White Balance BracketingWhite balance bracketing is not available at an image quality of NEF (RAW). Selecting an NEF (RAW) or NEF (RAW) + JPEG option cancels white balance bracketing.
White balance bracketing affects only color temperature (the amber-blue axis in the white balance fine-tuning display). No adjustments are made on the green-magenta axis.
In self-timer mode, the number of copies specified in the bracketing program will be created each time the shutter is released, regardless of the option selected for Custom Setting c2 (Self-timer) > Number of shots.
If the camera is turned off while the memory card access lamp is lit, the camera will power off only after all photographs in the sequence have been recorded.

196 Menu Guide > C The Photo Shooting Menu
ADL BracketingThe camera varies Active D-Lighting over a series of exposures.
1 Choose ADL bracketing.Select ADL bracketing for Auto bracketing set.
2 Choose the number of shots.Highlight Number of shots and press 4 or 2 to choose the number of shots in the bracketing sequence. Choose two shots to take one photograph with Active D-Lighting off and another at the value selected in Step 3. Choose three to five shots to take a series of photographs with Active D-Lighting set to Off, Low, and Normal (three shots), Off, Low, Normal, and High (four shots), or Off, Low, Normal, High, and Extra high (five shots). If you choose more than two shots, proceed to Step 4.
At settings other than 0F, a bracketing icon will appear in the display.
3 Choose a value for Active D-Lighting.Highlight Amount and press 4 or 2 to choose an option. The chosen setting applies when 2F is selected for Number of shots.
AmountBracketing
orderOFF L Off/LowOFF N Off/NormalOFF H Off/High
OFF H+ Off/Extra highOFF AUTO Off/Auto
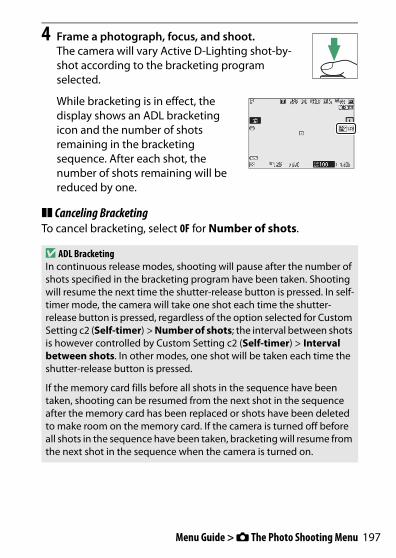
197Menu Guide > C The Photo Shooting Menu
4 Frame a photograph, focus, and shoot.The camera will vary Active D-Lighting shot-by-shot according to the bracketing program selected.
While bracketing is in effect, the display shows an ADL bracketing icon and the number of shots remaining in the bracketing sequence. After each shot, the number of shots remaining will be reduced by one.
❚❚ Canceling BracketingTo cancel bracketing, select 0F for Number of shots.
D ADL BracketingIn continuous release modes, shooting will pause after the number of shots specified in the bracketing program have been taken. Shooting will resume the next time the shutter-release button is pressed. In self-timer mode, the camera will take one shot each time the shutter-release button is pressed, regardless of the option selected for Custom Setting c2 (Self-timer) > Number of shots; the interval between shots is however controlled by Custom Setting c2 (Self-timer) > Interval between shots. In other modes, one shot will be taken each time the shutter-release button is pressed.
If the memory card fills before all shots in the sequence have been taken, shooting can be resumed from the next shot in the sequence after the memory card has been replaced or shots have been deleted to make room on the memory card. If the camera is turned off before all shots in the sequence have been taken, bracketing will resume from the next shot in the sequence when the camera is turned on.

198 Menu Guide > C The Photo Shooting Menu
Record two to ten NEF (RAW) exposures as a single photograph. The following options are available:• Multiple exposure mode: Choose from On (series) (take a series of
multiple exposures, ending when Off is selected), On (single photo) (take one multiple exposure), or Off (exit without creating additional multiple exposures).
• Number of shots: Choose the number of exposures that will be combined to form a single photograph.
• Overlay mode: Choose from the options below.- Add: The exposures are overlaid without modification; gain is
not adjusted.- Average: Before the exposures are overlaid, the gain for each is
divided by the total number of exposures (the gain for each exposure is set to 1/2 for 2 exposures, 1/3 for 3 exposures, etc).
- Lighten: The camera compares the pixels in each exposure and uses only the brightest.
- Darken: The camera compares the pixels in each exposure and uses only the darkest.
Multiple ExposureG button ➜ C (photo shooting menu)
+
+

199Menu Guide > C The Photo Shooting Menu
• Keep all exposures: Choose On to save the individual shots that make up each multiple exposure, Off to discard the individual shots and save only the multiple exposure.
• Overlay shooting: If On is selected, earlier exposures will be superimposed on the view through the lens during shooting.
• Select first exposure (NEF): Choose the first exposure from the NEF (RAW) images on the memory card.
Creating a Multiple ExposureFollow the steps below to shoot a multiple exposure.
1 Select Multiple exposure.Highlight Multiple exposure in the photo shooting menu and press 2.
2 Select a mode.Highlight Multiple exposure mode and press 2, then press 1 or 3 to choose the desired mode and press J to select.
If On (series) or On (single photo) is selected, an icon will appear in the display.
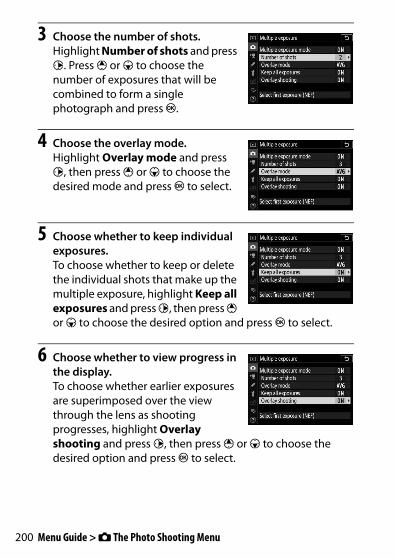
200 Menu Guide > C The Photo Shooting Menu
3 Choose the number of shots.Highlight Number of shots and press 2. Press 1 or 3 to choose the number of exposures that will be combined to form a single photograph and press J.
4 Choose the overlay mode.Highlight Overlay mode and press 2, then press 1 or 3 to choose the desired mode and press J to select.
5 Choose whether to keep individual exposures.To choose whether to keep or delete the individual shots that make up the multiple exposure, highlight Keep all exposures and press 2, then press 1 or 3 to choose the desired option and press J to select.
6 Choose whether to view progress in the display.To choose whether earlier exposures are superimposed over the view through the lens as shooting progresses, highlight Overlay shooting and press 2, then press 1 or 3 to choose the desired option and press J to select.

201Menu Guide > C The Photo Shooting Menu
7 Choose the first exposure.To choose the first exposure from existing photos taken with Large selected for Image size > NEF (RAW) in the photo shooting menu, highlight Select first exposure (NEF) and press 2. Use the multi selector to highlight the desired image and press J to select (to view the highlighted image full screen, press and hold the X button).
8 Frame a photograph, focus, and shoot.Continue shooting until all exposures have been taken and the final photograph has been recorded (if you selected an existing NEF (RAW) image as the first exposure in Step 7, shooting will start from the second exposure). If On (single photo) was selected in Step 2, multiple exposure shooting will end when the photo is recorded; otherwise, you can continue taking multiple exposures until multiple exposure shooting is turned off.
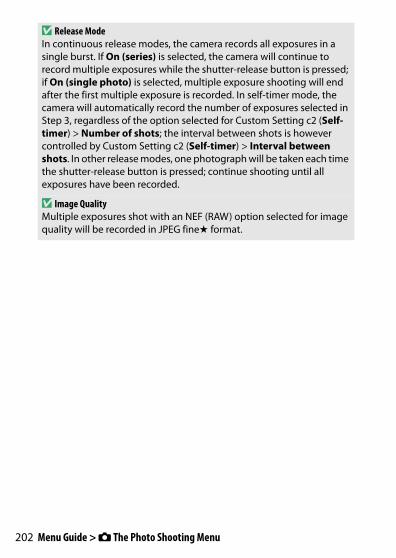
202 Menu Guide > C The Photo Shooting Menu
D Release ModeIn continuous release modes, the camera records all exposures in a single burst. If On (series) is selected, the camera will continue to record multiple exposures while the shutter-release button is pressed; if On (single photo) is selected, multiple exposure shooting will end after the first multiple exposure is recorded. In self-timer mode, the camera will automatically record the number of exposures selected in Step 3, regardless of the option selected for Custom Setting c2 (Self-timer) > Number of shots; the interval between shots is however controlled by Custom Setting c2 (Self-timer) > Interval between shots. In other release modes, one photograph will be taken each time the shutter-release button is pressed; continue shooting until all exposures have been recorded.
D Image QualityMultiple exposures shot with an NEF (RAW) option selected for image quality will be recorded in JPEG finem format.
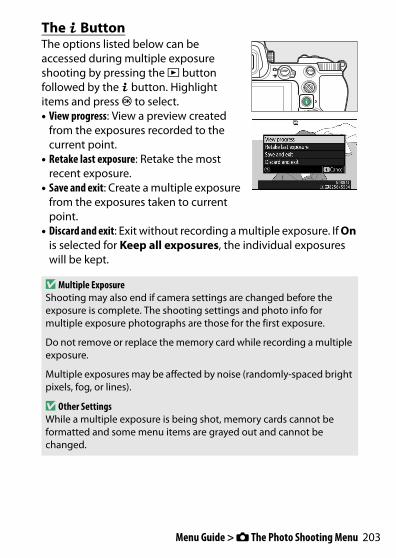
203Menu Guide > C The Photo Shooting Menu
The i ButtonThe options listed below can be accessed during multiple exposure shooting by pressing the K button followed by the i button. Highlight items and press J to select.• View progress: View a preview created
from the exposures recorded to the current point.
• Retake last exposure: Retake the most recent exposure.
• Save and exit: Create a multiple exposure from the exposures taken to current point.
• Discard and exit: Exit without recording a multiple exposure. If On is selected for Keep all exposures, the individual exposures will be kept.
D Multiple ExposureShooting may also end if camera settings are changed before the exposure is complete. The shooting settings and photo info for multiple exposure photographs are those for the first exposure.
Do not remove or replace the memory card while recording a multiple exposure.
Multiple exposures may be affected by noise (randomly-spaced bright pixels, fog, or lines).
D Other SettingsWhile a multiple exposure is being shot, memory cards cannot be formatted and some menu items are grayed out and cannot be changed.

204 Menu Guide > C The Photo Shooting Menu
Ending Multiple ExposuresTo end a multiple exposure before the specified number of exposures have been taken, select Off for Multiple exposure mode or press the K button followed by the i button and select either Save and exit or Discard and exit. If shooting ends or you select Save and exit before the specified number of exposures have been taken, a multiple exposure will be created from the exposures that have been recorded to that point. If Average is selected for Overlay mode, gain will be adjusted to reflect the number of exposures actually recorded. Note that shooting will end automatically if the standby timer expires.
D The Standby TimerMenus and playback can be used between exposures, but note that if no operations are performed for about 40 seconds during playback or 90 seconds while menus are displayed, shooting will end and a multiple exposure will be created from the exposures recorded to that point. The time available to record the next exposure can be extended by choosing longer times for Custom Setting c3 (Power off delay) > Playback and Menus.
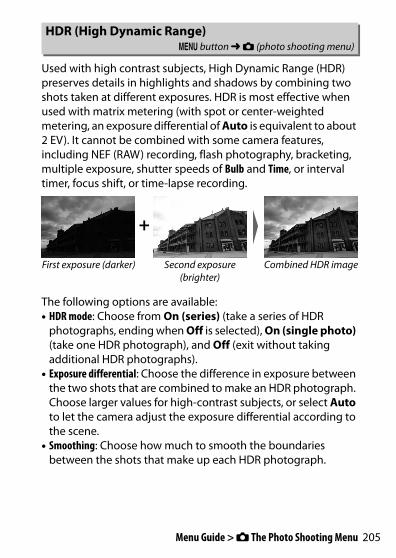
205Menu Guide > C The Photo Shooting Menu
Used with high contrast subjects, High Dynamic Range (HDR) preserves details in highlights and shadows by combining two shots taken at different exposures. HDR is most effective when used with matrix metering (with spot or center-weighted metering, an exposure differential of Auto is equivalent to about 2 EV). It cannot be combined with some camera features, including NEF (RAW) recording, flash photography, bracketing, multiple exposure, shutter speeds of Bulb and Time, or interval timer, focus shift, or time-lapse recording.
The following options are available:• HDR mode: Choose from On (series) (take a series of HDR
photographs, ending when Off is selected), On (single photo) (take one HDR photograph), and Off (exit without taking additional HDR photographs).
• Exposure differential: Choose the difference in exposure between the two shots that are combined to make an HDR photograph. Choose larger values for high-contrast subjects, or select Auto to let the camera adjust the exposure differential according to the scene.
• Smoothing: Choose how much to smooth the boundaries between the shots that make up each HDR photograph.
HDR (High Dynamic Range)G button ➜ C (photo shooting menu)
+
First exposure (darker) Second exposure (brighter)
Combined HDR image

206 Menu Guide > C The Photo Shooting Menu
• Save individual images (NEF): Choose On to save each of the individual shots used to create the HDR image. The photos are saved as large-size NEF (RAW) files regardless of the options selected for image quality and size in the photo shooting menu.
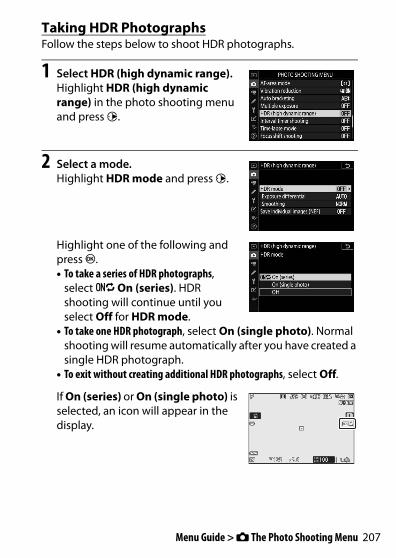
207Menu Guide > C The Photo Shooting Menu
Taking HDR PhotographsFollow the steps below to shoot HDR photographs.
1 Select HDR (high dynamic range).Highlight HDR (high dynamic range) in the photo shooting menu and press2.
2 Select a mode.Highlight HDR mode and press 2.
Highlight one of the following and press J.• To take a series of HDR photographs,
select 0 On (series). HDR shooting will continue until you select Off for HDR mode.
• To take one HDR photograph, select On (single photo). Normal shooting will resume automatically after you have created a single HDR photograph.
• To exit without creating additional HDR photographs, select Off.
If On (series) or On (single photo) is selected, an icon will appear in the display.

208 Menu Guide > C The Photo Shooting Menu
3 Choose the exposure differential.To choose the difference in exposure between the two shots, highlight Exposure differential and press 2.
Highlight an option and press J. Choose higher values for high-contrast subjects, but note that choosing a value higher than required may not produce the desired results; if Auto is selected, the camera will automatically adjust exposure to suit the scene.
4 Choose the amount of smoothing.To choose how much the boundaries between the two images are smoothed, highlight Smoothing and press2.
Highlight an option and press J. Higher values produce a smoother composite image. Uneven shading may be visible with some subjects.

209Menu Guide > C The Photo Shooting Menu
5 Choose whether to keep individual exposures.To choose whether to save the individual NEF (RAW) images that make up the HDR photograph, highlight Save individual images (NEF) and press 2, then press 1 or 3 to choose the desired option and press J to select.
6 Frame a photograph, focus, and shoot.The camera takes two exposures when the shutter-release button is pressed all the way down. “Job” and “HDR” will flash in the control panel while the images are combined; no photographs can be taken until recording is complete. Regardless of the option currently selected for release mode, only one photograph will be taken each time the shutter-release button is pressed.
If On (series) is selected, HDR will only turn off when Off is selected for HDR mode; if On (single photo) is selected, HDR turns off automatically after the photograph is taken.
D Framing HDR PhotographsThe edges of the image will be cropped out. The desired results may not be achieved if the camera or subject moves during shooting. Use of a tripod is recommended. Depending on the scene, shadows may appear around bright objects or halos may appear around dark objects; this effect can be reduced by adjusting the amount of smoothing.

210 Menu Guide > C The Photo Shooting Menu
Take photographs at the selected interval until the specified number of shots has been recorded. Select a release mode other than Self-timer (E) when using the interval timer.
Selecting Interval timer shooting displays the options below.• Start: Start interval timer shooting, either after 3 s (Now
selected for Choose start day/time) or at a selected date and time (Choose day/time). Shooting will continue at the selected interval until all shots have been taken.
• Choose start day/time: Choose a start option. To start shooting immediately, select Now. To start shooting at a chosen date and time, select Choose day/time.
• Interval: Choose the interval (hours, minutes, and seconds) between shots.
• Intervals×shots/interval: Choose the number of intervals and the number of shots per interval.
• Exposure smoothing: Selecting On allows the camera to adjust exposure to match previous shot in modes other than M (note that exposure smoothing only takes effect in mode M if auto ISO sensitivity control is on). Large changes in subject brightness during shooting may result in apparent variations in exposure, in which case it may be necessary to shorten the interval between shots.
• Silent photography: Select On to silence the shutter during shooting.
Interval Timer ShootingG button ➜ C (photo shooting menu)
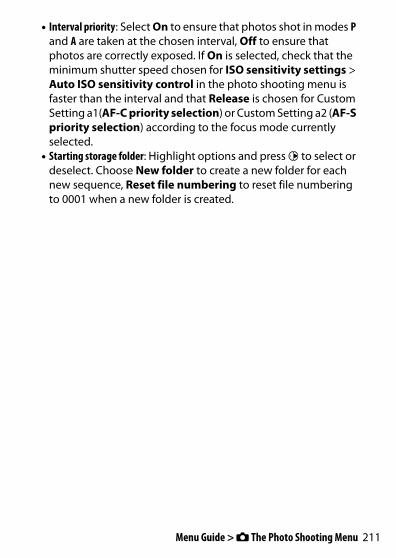
211Menu Guide > C The Photo Shooting Menu
• Interval priority: Select On to ensure that photos shot in modes P and A are taken at the chosen interval, Off to ensure that photos are correctly exposed. If On is selected, check that the minimum shutter speed chosen for ISO sensitivity settings > Auto ISO sensitivity control in the photo shooting menu is faster than the interval and that Release is chosen for Custom Setting a1(AF-C priority selection) or Custom Setting a2 (AF-S priority selection) according to the focus mode currently selected.
• Starting storage folder: Highlight options and press 2 to select or deselect. Choose New folder to create a new folder for each new sequence, Reset file numbering to reset file numbering to 0001 when a new folder is created.

212 Menu Guide > C The Photo Shooting Menu
Interval Timer Photography
1 Select Interval timer shooting.Highlight Interval timer shooting in the photo shooting menu and press 2.
Interval timer shooting options will be displayed.
D Before ShootingBefore beginning interval timer photography, take a test shot at current settings and view the results. We recommend using a tripod and selecting Off for Vibration reduction in the photo shooting menu. Before choosing a starting time, select Time zone and date in the setup menu and make sure that the camera clock is set to the correct time and date. To ensure that shooting is not interrupted, be sure the camera battery is fully charged. If in doubt, charge the battery before use or use an AC adapter and power connector (available separately).

213Menu Guide > C The Photo Shooting Menu
2 Adjust interval timer settings.Adjust the following settings:• Choose start day/time: Choose the starting date and time.
To start shooting immediately, select Now. To start shooting at a chosen date and time, select Choose day/time, then choose the date and time and press J.
• Interval: Choose the interval, in hours, minutes, and seconds.
Highlight Choose start day/time and press 2.
Highlight an option and press J.
Highlight Interval and press 2. Choose an interval and press J.

214 Menu Guide > C The Photo Shooting Menu
• Intervals×shots/interval: Choose the number of intervals and the number of shots per interval.
In single frame release mode, the photographs for each interval will be taken at the rate chosen for Custom Setting d1 (CL mode shooting speed). When silent photography is enabled, the number of shots per interval is fixed at one.
• Exposure smoothing: Enable or disable exposure smoothing.
• Silent photography: Enable or disable silent photography.
Highlight Intervals×shots/interval and press 2.
Choose the number of intervals and shots/interval and press J.
Highlight Exposure smoothing and press 2.
Highlight an option and press J.
Highlight Silent photography and press 2.
Highlight an option and press J.
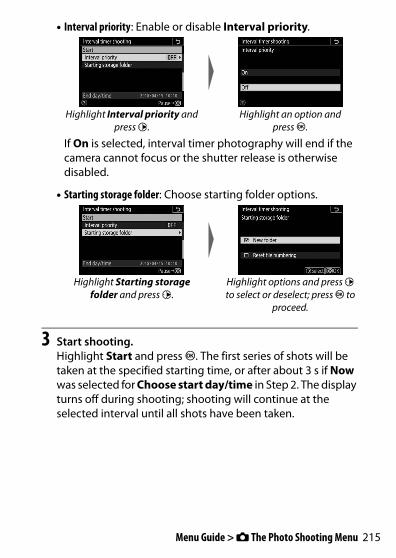
215Menu Guide > C The Photo Shooting Menu
• Interval priority: Enable or disable Interval priority.
If On is selected, interval timer photography will end if the camera cannot focus or the shutter release is otherwise disabled.
• Starting storage folder: Choose starting folder options.
3 Start shooting.Highlight Start and press J. The first series of shots will be taken at the specified starting time, or after about 3 s if Now was selected for Choose start day/time in Step 2. The display turns off during shooting; shooting will continue at the selected interval until all shots have been taken.
Highlight Interval priority and press 2.
Highlight an option and press J.
Highlight Starting storage folder and press 2.
Highlight options and press 2 to select or deselect; press J to
proceed.

216 Menu Guide > C The Photo Shooting Menu
D During ShootingDuring interval timer photography, the memory card access lamp will flash.
If the display is turned on by pressing the shutter-release button halfway, the message “Interval timer shooting“ will be displayed and the Q icon will flash. Settings can be adjusted, the menus used, and pictures played back while interval timer photography is in progress. The display will turn off automatically shortly before each interval. Note that changing camera settings while the interval timer is active may cause shooting to end.
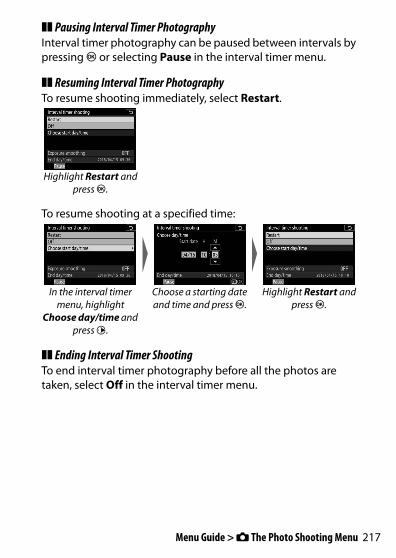
217Menu Guide > C The Photo Shooting Menu
❚❚ Pausing Interval Timer PhotographyInterval timer photography can be paused between intervals by pressing J or selecting Pause in the interval timer menu.
❚❚ Resuming Interval Timer PhotographyTo resume shooting immediately, select Restart.
To resume shooting at a specified time:
❚❚ Ending Interval Timer ShootingTo end interval timer photography before all the photos are taken, select Off in the interval timer menu.
Highlight Restart and press J.
In the interval timer menu, highlight
Choose day/time and press 2.
Choose a starting date and time and press J.
Highlight Restart and press J.
218 Menu Guide > C The Photo Shooting Menu
❚❚ No PhotographPhotographs will not be taken at the selected interval if the current interval ends before the photograph or photographs for the previous interval have been taken, the memory card is full, or AF-S is selected and the camera is unable to focus (note that the camera focuses before each shot). In autofocus mode, the camera will either end interval timer photography (On selected for Interval priority) or skip to the next interval (Off selected for Interval priority) if no photograph is taken after eight seconds.
219Menu Guide > C The Photo Shooting Menu
D Out of MemoryIf the memory card is full, the interval timer will remain active but no pictures will be taken. Resume shooting after deleting some pictures or turning the camera off and inserting another memory card.
D Interval Timer PhotographyChoose an interval longer than the time needed to take the selected number of shots and, if you are using a flash, the time needed for the flash to charge. If the interval is too short, the number of photos taken may be less than the total listed in Step 2 (the number of intervals multiplied by the number of shots per interval) or the flash may fire at less than the power needed for full exposure. Interval timer photography will not start if the interval is set to 00:00’0.5” and both Silent photography and Interval priority are enabled. Interval timer photography cannot be combined with some camera features, including movie recording, time-lapse movies, long time-exposures (bulb or time photography), and focus shift. Note that because the shutter speed, frame rate, and time needed to record images may vary from one interval to the next, the time between the end of one interval and the beginning of the next may vary. If shooting cannot proceed at current settings (for example, if a shutter speed of Bulb or Time is currently selected in mode M, the interval is zero, or the start time is in less than a minute), a warning will be displayed.
Interval timer shooting will pause when Self-timer (E) is selected for release mode or if the camera is turned off and then on again (when the camera is off, batteries and memory cards can be replaced without ending interval timer photography). Pausing shooting does not affect interval timer settings.
D Release ModeRegardless of the release mode selected, the camera will take the specified number of shots at each interval.
220 Menu Guide > C The Photo Shooting Menu
D BracketingAdjust bracketing settings before starting interval timer photography. If exposure, flash, or ADL bracketing is active while interval timer photography is in effect, the camera will take the number of shots in the bracketing program at each interval, regardless of the number of shots specified in the interval timer menu. If white balance bracketing is active while interval timer photography is in effect, the camera will take one shot at each interval and process it to create the number of copies specified in the bracketing program. Note that bracketing cannot be used during interval timer photography when On is selected for Interval priority.
D Silent PhotographySelecting On for Silent photography disables some camera features, including:• ISO sensitivities of Hi 0.3 through Hi 2• Flash photography• Exposure delay mode• Flicker reduction• Bracketing

221Menu Guide > C The Photo Shooting Menu
The camera automatically takes photos at selected intervals to create a silent time-lapse movie.
Selecting Time-lapse movie displays the options below.• Start: Start time-lapse recording. Shooting starts after about 3 s
and continues at the selected interval for the selected shooting time.
• Interval: Choose the interval between shots in minutes and seconds.
• Shooting time: Choose how long the camera will continue to take pictures (hours and minutes).
• Exposure smoothing: Selecting On smooths abrupt changes in exposure in modes other than M (note that exposure smoothing only takes effect in mode M if auto ISO sensitivity control is on). Large changes in subject brightness during shooting may result in apparent variations in exposure, in which case it may be necessary to shorten the interval between shots.
• Silent photography: Select On to silence the shutter during shooting.
• Choose image area: Choose an image area (FX or DX).• Frame size/frame rate: Choose the frame size and rate for the final
movie. The options are those for Frame size/frame rate in the movie shooting menu.
Time-Lapse MovieG button ➜ C (photo shooting menu)

222 Menu Guide > C The Photo Shooting Menu
• Interval priority: Select On to ensure that frames shot in modes P and A are taken at the chosen interval, Off to ensure that photos are correctly exposed. If On is selected, check that the minimum shutter speed chosen for ISO sensitivity settings > Auto ISO sensitivity control in the photo shooting menu is faster than the interval and that Release is chosen for Custom Setting a1(AF-C priority selection) or Custom Setting a2 (AF-S priority selection) according to the focus mode currently selected.
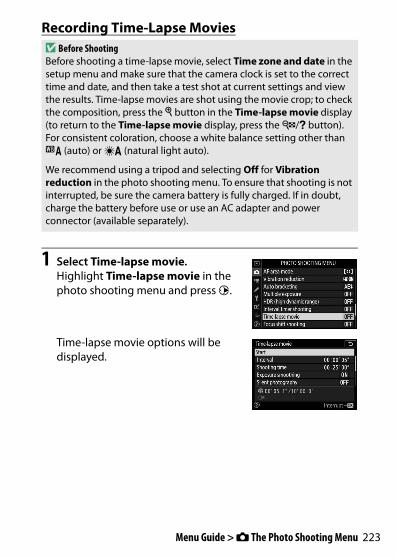
223Menu Guide > C The Photo Shooting Menu
Recording Time-Lapse Movies
1 Select Time-lapse movie.Highlight Time-lapse movie in the photo shooting menu and press 2.
Time-lapse movie options will be displayed.
D Before ShootingBefore shooting a time-lapse movie, select Time zone and date in the setup menu and make sure that the camera clock is set to the correct time and date, and then take a test shot at current settings and view the results. Time-lapse movies are shot using the movie crop; to check the composition, press the X button in the Time-lapse movie display (to return to the Time-lapse movie display, press the W/Q button). For consistent coloration, choose a white balance setting other than 4 (auto) or D (natural light auto).
We recommend using a tripod and selecting Off for Vibration reduction in the photo shooting menu. To ensure that shooting is not interrupted, be sure the camera battery is fully charged. If in doubt, charge the battery before use or use an AC adapter and power connector (available separately).
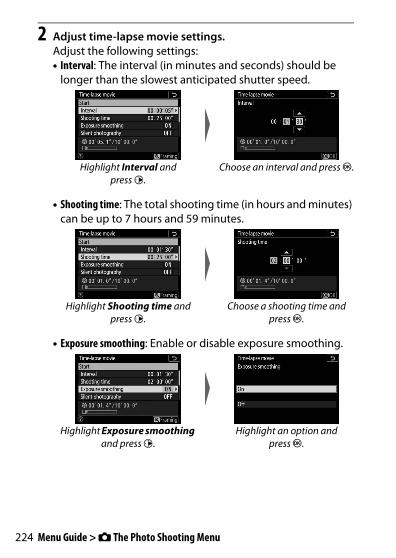
224 Menu Guide > C The Photo Shooting Menu
2 Adjust time-lapse movie settings.Adjust the following settings:• Interval: The interval (in minutes and seconds) should be
longer than the slowest anticipated shutter speed.
• Shooting time: The total shooting time (in hours and minutes) can be up to 7 hours and 59 minutes.
• Exposure smoothing: Enable or disable exposure smoothing.
Highlight Interval and press 2.
Choose an interval and press J.
Highlight Shooting time and press 2.
Choose a shooting time and press J.
Highlight Exposure smoothing and press 2.
Highlight an option and press J.
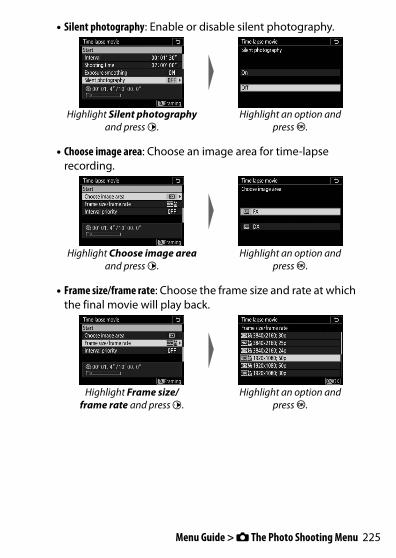
225Menu Guide > C The Photo Shooting Menu
• Silent photography: Enable or disable silent photography.
• Choose image area: Choose an image area for time-lapse recording.
• Frame size/frame rate: Choose the frame size and rate at which the final movie will play back.
Highlight Silent photography and press 2.
Highlight an option and press J.
Highlight Choose image area and press 2.
Highlight an option and press J.
Highlight Frame size/frame rate and press 2.
Highlight an option and press J.
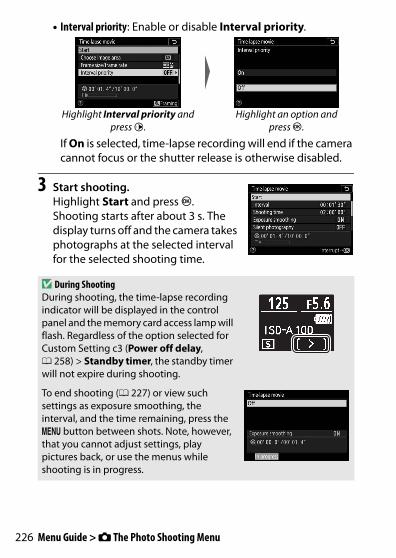
226 Menu Guide > C The Photo Shooting Menu
• Interval priority: Enable or disable Interval priority.
If On is selected, time-lapse recording will end if the camera cannot focus or the shutter release is otherwise disabled.
3 Start shooting.Highlight Start and press J. Shooting starts after about 3 s. The display turns off and the camera takes photographs at the selected interval for the selected shooting time.
Highlight Interval priority and press 2.
Highlight an option and press J.
D During ShootingDuring shooting, the time-lapse recording indicator will be displayed in the control panel and the memory card access lamp will flash. Regardless of the option selected for Custom Setting c3 (Power off delay, 0 258) > Standby timer, the standby timer will not expire during shooting.
To end shooting (0 227) or view such settings as exposure smoothing, the interval, and the time remaining, press the G button between shots. Note, however, that you cannot adjust settings, play pictures back, or use the menus while shooting is in progress.
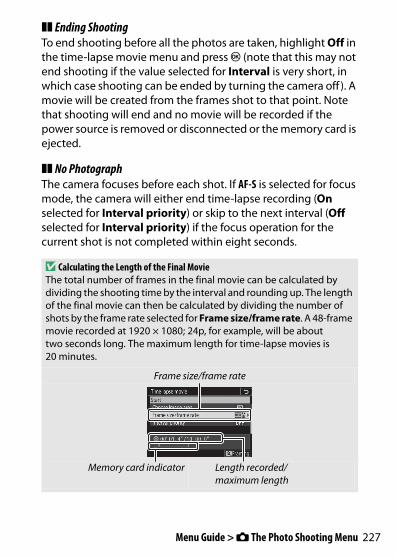
227Menu Guide > C The Photo Shooting Menu
❚❚ Ending ShootingTo end shooting before all the photos are taken, highlight Off in the time-lapse movie menu and press J (note that this may not end shooting if the value selected for Interval is very short, in which case shooting can be ended by turning the camera off ). A movie will be created from the frames shot to that point. Note that shooting will end and no movie will be recorded if the power source is removed or disconnected or the memory card is ejected.
❚❚ No PhotographThe camera focuses before each shot. If AF-S is selected for focus mode, the camera will either end time-lapse recording (On selected for Interval priority) or skip to the next interval (Off selected for Interval priority) if the focus operation for the current shot is not completed within eight seconds.
D Calculating the Length of the Final MovieThe total number of frames in the final movie can be calculated by dividing the shooting time by the interval and rounding up. The length of the final movie can then be calculated by dividing the number of shots by the frame rate selected for Frame size/frame rate. A 48-frame movie recorded at 1920 × 1080; 24p, for example, will be about two seconds long. The maximum length for time-lapse movies is 20 minutes.
Frame size/frame rate
Memory card indicator Length recorded/maximum length

228 Menu Guide > C The Photo Shooting Menu
D Time-Lapse MoviesTime-lapse cannot be combined with some camera features, including movie recording, long time-exposures (bulb or time photography), the self-timer, bracketing, HDR (high dynamic range), multiple exposure, interval timer photography, and focus shift. Active D-Lighting is disabled automatically. Note that because shutter speed and the time needed to record the image to the memory card may vary from shot to shot, the interval between a shot being recorded and the start of the next shot may vary. Shooting will not begin if a time-lapse movie cannot be recorded at current settings (for example, if the memory card is full, the interval or shooting time is zero, the interval is longer than the shooting time, or the interval is set to 00:00’0.5” and both Silent photography and Interval priority are enabled).
Shooting may end if camera controls are used or settings are changed or HDMI cable is connected. A movie will be created from the frames shot to the point where shooting ended.
D Image ReviewThe K button cannot be used to view pictures while shooting is in progress, but the current frame will be displayed for a few seconds after each shot if On or On (monitor only) is selected for Image review in the playback menu. Other playback operations cannot be performed while the frame is displayed.
D Silent PhotographySelecting On for Silent photography disables some camera features, including:• ISO sensitivities of Hi 0.3 through Hi 2• Flash photography• Exposure delay mode• Long exposure noise reduction• Flicker reduction
229Menu Guide > C The Photo Shooting Menu
Focus shift, which automatically varies focus over a series of shots, is used to take photos that will later be combined using focus stacking to create a single image with increased depth of field. Before using focus shift, choose a focus mode of AF-S or AF-C and a release mode other than Self-timer (E).
Selecting Focus shift shooting displays the options below.• Start: Start shooting. The camera will change the focus distance
by the selected amount with each shot.• No. of shots: Choose the number of shots (maximum 300).• Focus step width: Choose the amount the focus distance changes
with each shot.• Interval until next shot: The time between shots, in seconds. Select
00 to take photos at approximately 5.5 fps.• First-frame exposure lock: If On is selected, the camera will lock
exposure for all images at the setting for the first frame.• Peaking stack image: If Create is selected, the camera will employ
focus peaking to create a black-and-white preview stack that can be used to check focus after shooting.
• Silent photography: Select On to silence the shutter during shooting.
• Starting storage folder: Highlight options and press 2 to select or deselect. Choose New folder to create a new folder for each new sequence, Reset file numbering to reset file numbering to 0001 when a new folder is created.
Focus Shift ShootingG button ➜ C (photo shooting menu)
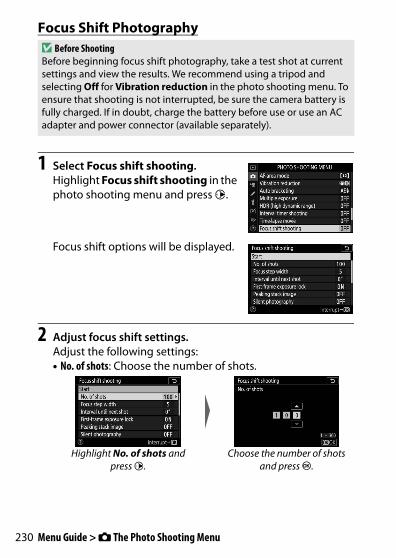
230 Menu Guide > C The Photo Shooting Menu
Focus Shift Photography
1 Select Focus shift shooting.Highlight Focus shift shooting in the photo shooting menu and press 2.
Focus shift options will be displayed.
2 Adjust focus shift settings.Adjust the following settings:• No. of shots: Choose the number of shots.
D Before ShootingBefore beginning focus shift photography, take a test shot at current settings and view the results. We recommend using a tripod and selecting Off for Vibration reduction in the photo shooting menu. To ensure that shooting is not interrupted, be sure the camera battery is fully charged. If in doubt, charge the battery before use or use an AC adapter and power connector (available separately).
Highlight No. of shots and press 2.
Choose the number of shots and press J.
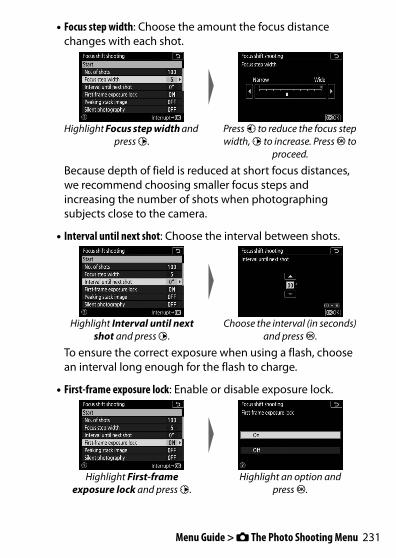
231Menu Guide > C The Photo Shooting Menu
• Focus step width: Choose the amount the focus distance changes with each shot.
Because depth of field is reduced at short focus distances, we recommend choosing smaller focus steps and increasing the number of shots when photographing subjects close to the camera.
• Interval until next shot: Choose the interval between shots.
To ensure the correct exposure when using a flash, choose an interval long enough for the flash to charge.
• First-frame exposure lock: Enable or disable exposure lock.
Highlight Focus step width and press 2.
Press 4 to reduce the focus step width, 2 to increase. Press J to
proceed.
Highlight Interval until next shot and press 2.
Choose the interval (in seconds) and press J.
Highlight First-frame exposure lock and press 2.
Highlight an option and press J.
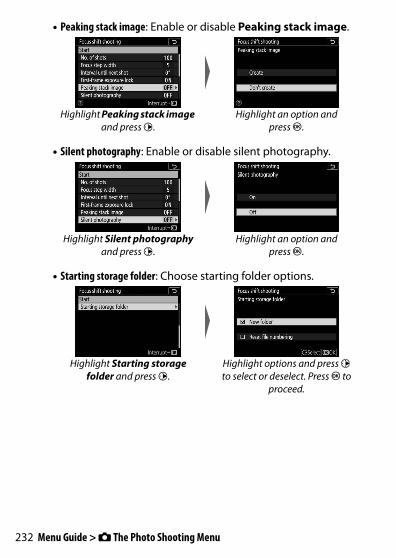
232 Menu Guide > C The Photo Shooting Menu
• Peaking stack image: Enable or disable Peaking stack image.
• Silent photography: Enable or disable silent photography.
• Starting storage folder: Choose starting folder options.
Highlight Peaking stack image and press 2.
Highlight an option and press J.
Highlight Silent photography and press 2.
Highlight an option and press J.
Highlight Starting storage folder and press 2.
Highlight options and press 2 to select or deselect. Press J to
proceed.

233Menu Guide > C The Photo Shooting Menu
3 Start shooting.Highlight Start and press J. Shooting starts after about 3 s. The display turns off and the camera takes photographs at the selected interval, starting at the focus distance selected at the start of shooting and progressing out toward infinity by the selected focus step distance with each shot. Shooting ends when the selected number of shots has been taken or focus reaches infinity. To end shooting before all shots have been taken, select Off for Focus shift shooting in the photo shooting menu or press the shutter-release button halfway or press the J button between shots.
D ApertureTo prevent the loss of definition that can occur at smaller apertures, choose an aperture with an f-number lower than f/11–f/8.
D During ShootingDuring focus shift photography, the release mode indicator in the control panel will turn off and the memory card access lamp will flash. Regardless of the option selected for Custom Setting c3 (Power off delay) > Standby timer, the standby timer will not expire during shooting. Note that changing camera settings while focus shift photography is in progress may cause shooting to end. Shooting will end if focus is adjusted during shooting.
D Peaking Stack ImageDuring playback, a p icon appears on photographs shot with Create selected for Peaking stack image, indicating that a focus stack preview can be displayed by pressing the i button and selecting Display peaking stack image. The areas displayed in white will be in focus when the pictures are stacked. Focus stack previews can only be viewed on the camera used to create them.
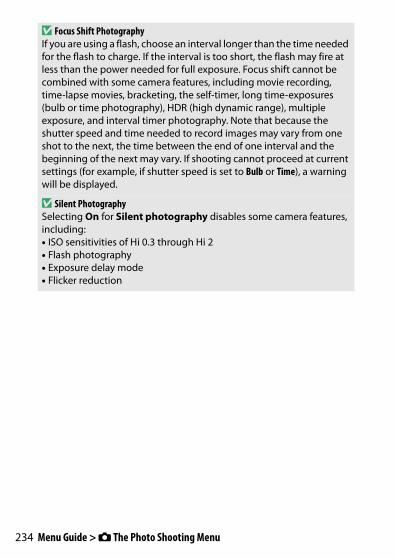
234 Menu Guide > C The Photo Shooting Menu
D Focus Shift PhotographyIf you are using a flash, choose an interval longer than the time needed for the flash to charge. If the interval is too short, the flash may fire at less than the power needed for full exposure. Focus shift cannot be combined with some camera features, including movie recording, time-lapse movies, bracketing, the self-timer, long time-exposures (bulb or time photography), HDR (high dynamic range), multiple exposure, and interval timer photography. Note that because the shutter speed and time needed to record images may vary from one shot to the next, the time between the end of one interval and the beginning of the next may vary. If shooting cannot proceed at current settings (for example, if shutter speed is set to Bulb or Time), a warning will be displayed.
D Silent PhotographySelecting On for Silent photography disables some camera features, including:• ISO sensitivities of Hi 0.3 through Hi 2• Flash photography• Exposure delay mode• Flicker reduction
235Menu Guide > C The Photo Shooting Menu
Select On to reduce vibrations caused by the shutter when shooting landscapes and other static subjects (0 65). Use of a tripod is recommended. The flash and long exposure noise reduction are disabled, as are the electronic front-curtain shutter and beep speaker, regardless of the options selected for Custom Setting d5 (Electronic front-curtain shutter) and for Beep options in the setup menu. In continuous release modes, the frame advance rate will change (0 82).
Silent PhotographyG button ➜ C (photo shooting menu)

236 Menu Guide > 1 The Movie Shooting Menu
To view the movie shooting menu, select the 1 tab in the camera menus.
1 The Movie Shooting Menu: Movie Shooting Options
Option 0Reset movie shooting menu 237File naming 237Choose image area 237Frame size/frame rate 237Movie quality 237Movie file type 237ISO sensitivity settings 238White balance 238Set Picture Control 239Manage Picture Control 239Active D-Lighting 239High ISO NR 239Vignette control 240Diffraction compensation 240
Auto distortion control 240Flicker reduction 240Metering 241Focus mode 241AF-area mode 241Vibration reduction 241Electronic VR 241Microphone sensitivity 242Attenuator 242Frequency response 243Wind noise reduction 243Headphone volume 243Timecode 244
Option 0
D See AlsoFor menu defaults, see “Movie Shooting Menu Defaults” (0 144).

237Menu Guide > 1 The Movie Shooting Menu
Select Yes to restore movie shooting menu options to their default values (0 144).
Choose the three-letter prefix used in naming the image files in which movies are stored. The default prefix is “DSC” (0 163).
Choose a movie crop (image area) from FX or DX.
Choose the movie frame size (in pixels) and frame rate. For more information, see “Frame Size, Frame Rate, and Movie Quality” (0 114).
Choose from High quality and Normal.
Record movies in MOV or MP4 format.
Reset Movie Shooting MenuG button ➜ 1 (movie shooting menu)
File NamingG button ➜ 1 (movie shooting menu)
Choose Image AreaG button ➜ 1 (movie shooting menu)
Frame Size/Frame RateG button ➜ 1 (movie shooting menu)
Movie QualityG button ➜ 1 (movie shooting menu)
Movie File TypeG button ➜ 1 (movie shooting menu)

238 Menu Guide > 1 The Movie Shooting Menu
Adjust the following ISO sensitivity settings.• Maximum sensitivity: Choose the upper
limit for auto ISO sensitivity control from values between ISO 200 and Hi 2. Auto ISO sensitivity control is used in modes P, S, and A and when On is selected for Auto ISO control (mode M) in mode M.
• Auto ISO control (mode M): Select On to enable auto ISO sensitivity control in mode M, Off to use the value selected for ISO sensitivity (mode M).
• ISO sensitivity (mode M): Choose the ISO sensitivity for mode M from values between ISO 64 (Z 7) or 100 (Z 6) and Hi 2. Auto ISO sensitivity control is used in other modes.
Choose the white balance for movies (0 61). Select Same as photo settings to use the option currently selected for photos.
ISO Sensitivity SettingsG button ➜ 1 (movie shooting menu)
D Auto ISO Sensitivity ControlAt high ISO sensitivities, the camera may have difficulty focusing and noise (randomly-spaced bright pixels, fog, or lines) may increase. This can be prevented by choosing a lower value for ISO sensitivity settings > Maximum sensitivity.
White BalanceG button ➜ 1 (movie shooting menu)
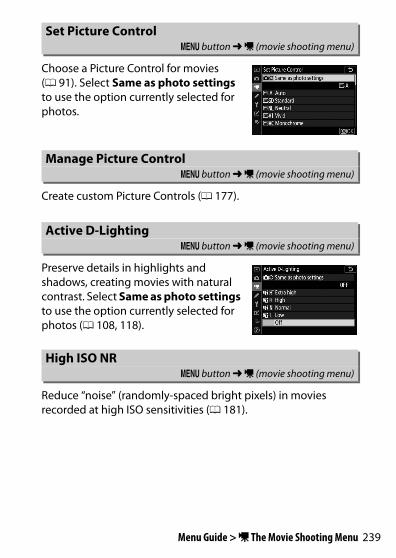
239Menu Guide > 1 The Movie Shooting Menu
Choose a Picture Control for movies (0 91). Select Same as photo settings to use the option currently selected for photos.
Create custom Picture Controls (0 177).
Preserve details in highlights and shadows, creating movies with natural contrast. Select Same as photo settings to use the option currently selected for photos (0 108, 118).
Reduce “noise” (randomly-spaced bright pixels) in movies recorded at high ISO sensitivities (0 181).
Set Picture ControlG button ➜ 1 (movie shooting menu)
Manage Picture ControlG button ➜ 1 (movie shooting menu)
Active D-LightingG button ➜ 1 (movie shooting menu)
High ISO NRG button ➜ 1 (movie shooting menu)

240 Menu Guide > 1 The Movie Shooting Menu
Reduce vignetting in movies (0 182). Select Same as photo settings to use the option currently selected for photos.
Reduce diffraction in movies (0 182).
Reduce barrel and pin-cushion distortion in movies (0 182).
Reduce flicker and banding when shooting movies under fluorescent or mercury-vapor lighting. Choose Auto to allow the camera to automatically choose the correct frequency, or manually match the frequency to that of the local AC power supply.
Vignette ControlG button ➜ 1 (movie shooting menu)
Diffraction CompensationG button ➜ 1 (movie shooting menu)
Auto Distortion ControlG button ➜ 1 (movie shooting menu)
Flicker ReductionG button ➜ 1 (movie shooting menu)
D “Flicker Reduction” in the Movie Shooting MenuIf Auto fails to produce the desired results and you are unsure as to the frequency of the local power supply, test both the 50 and 60 Hz options and choose the one that produces the best results. Flicker reduction may not produce the desired results if the subject is very bright, in which case you should try choosing a smaller aperture (higher f-number). To prevent flicker, select mode M and choose a shutter speed adapted to the frequency of the local power supply: 1/125 s, 1/60 s, or 1/30 s for 60 Hz; 1/100 s, 1/50 s, or 1/25 s for 50 Hz.
241Menu Guide > 1 The Movie Shooting Menu
Choose how the camera meters exposure in movie mode (0 106). Spot metering is not available.
Choose a focus mode for movie recording (0 52).
Choose how the camera focuses in movie mode (0 54).
Choose a vibration reduction option for movie recording (0 110). Select Same as photo settings to use the option currently selected for photos.
Choose whether to enable electronic vibration reduction in movie mode.
MeteringG button ➜ 1 (movie shooting menu)
Focus ModeG button ➜ 1 (movie shooting menu)
AF-Area ModeG button ➜ 1 (movie shooting menu)
Vibration ReductionG button ➜ 1 (movie shooting menu)
Electronic VRG button ➜ 1 (movie shooting menu)

242 Menu Guide > 1 The Movie Shooting Menu
Turn built-in or external microphones on or off or adjust microphone sensitivity. Choose Auto to adjust sensitivity automatically or Microphone off to turn sound recording off; to select microphone sensitivity manually, select Manual and choose a sensitivity.
Select Enable to reduce microphone gain and prevent audio distortion when recording movies in loud environments.
Microphone SensitivityG button ➜ 1 (movie shooting menu)
D The 2 IconMovies that were recorded without sound are indicated by a 2 icon in movie and full-frame playback.
AttenuatorG button ➜ 1 (movie shooting menu)
243Menu Guide > 1 The Movie Shooting Menu
If S Wide range is selected, built-in and external microphones will respond to a wide range of frequencies, from music to the bustling hum of a city street. Choose T Vocal range to bring out human voices.
Select On to enable the low-cut filter for the built-in microphone (optional stereo microphones are unaffected), reducing noise produced by wind blowing over the microphone (note that other sounds may also be affected). Wind-noise reduction for optional stereo microphones that support this feature can be enabled or disabled using microphone controls.
Press 1 or 3 to adjust headphone volume.
Frequency ResponseG button ➜ 1 (movie shooting menu)
Wind Noise ReductionG button ➜ 1 (movie shooting menu)
Headphone VolumeG button ➜ 1 (movie shooting menu)
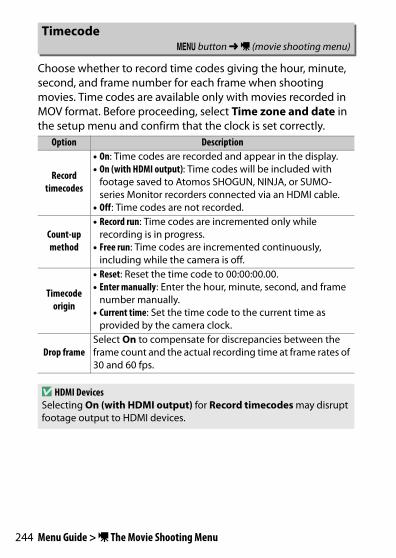
244 Menu Guide > 1 The Movie Shooting Menu
Choose whether to record time codes giving the hour, minute, second, and frame number for each frame when shooting movies. Time codes are available only with movies recorded in MOV format. Before proceeding, select Time zone and date in the setup menu and confirm that the clock is set correctly.
TimecodeG button ➜ 1 (movie shooting menu)
Option Description
Record timecodes
• On: Time codes are recorded and appear in the display.• On (with HDMI output): Time codes will be included with
footage saved to Atomos SHOGUN, NINJA, or SUMO-series Monitor recorders connected via an HDMI cable.
• Off: Time codes are not recorded.
Count-up method
• Record run: Time codes are incremented only while recording is in progress.
• Free run: Time codes are incremented continuously, including while the camera is off.
Timecode origin
• Reset: Reset the time code to 00:00:00.00.• Enter manually: Enter the hour, minute, second, and frame
number manually.• Current time: Set the time code to the current time as
provided by the camera clock.
Drop frameSelect On to compensate for discrepancies between the frame count and the actual recording time at frame rates of 30 and 60 fps.
D HDMI DevicesSelecting On (with HDMI output) for Record timecodes may disrupt footage output to HDMI devices.
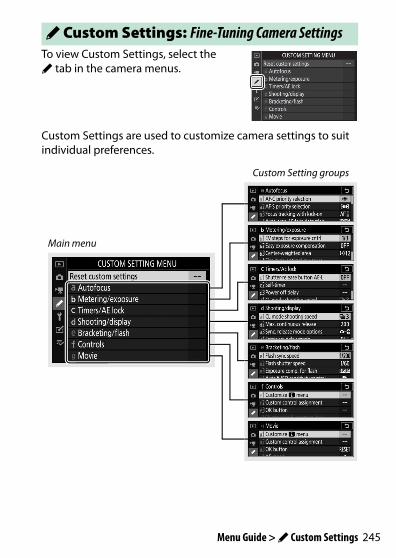
245Menu Guide > A Custom Settings
To view Custom Settings, select the A tab in the camera menus.
Custom Settings are used to customize camera settings to suit individual preferences.
ACustom Settings: Fine-Tuning Camera Settings
Custom Setting groups
Main menu
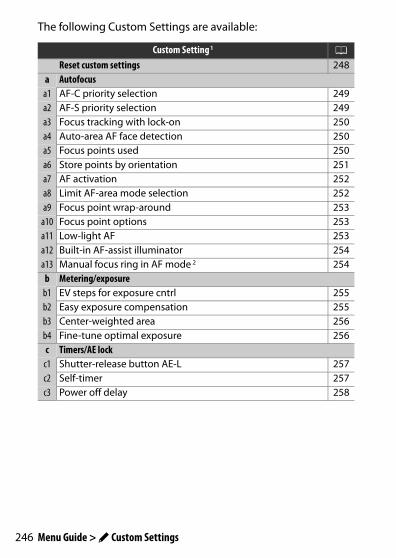
246 Menu Guide > A Custom Settings
The following Custom Settings are available:
Custom Setting 1 0Reset custom settings 248
a Autofocusa1 AF-C priority selection 249a2 AF-S priority selection 249a3 Focus tracking with lock-on 250a4 Auto-area AF face detection 250a5 Focus points used 250a6 Store points by orientation 251a7 AF activation 252a8 Limit AF-area mode selection 252a9 Focus point wrap-around 253
a10 Focus point options 253a11 Low-light AF 253a12 Built-in AF-assist illuminator 254a13 Manual focus ring in AF mode 2 254
b Metering/exposureb1 EV steps for exposure cntrl 255b2 Easy exposure compensation 255b3 Center-weighted area 256b4 Fine-tune optimal exposure 256c Timers/AE lock
c1 Shutter-release button AE-L 257c2 Self-timer 257c3 Power off delay 258

247Menu Guide > A Custom Settings
d Shooting/displayd1 CL mode shooting speed 259d2 Max. continuous release 259d3 Sync. release mode options 259d4 Exposure delay mode 260d5 Electronic front-curtain shutter 260d6 Limit selectable image area 260d7 File number sequence 261d8 Apply settings to live view 262d9 Framing grid display 262
d10 Peaking highlights 262d11 View all in continuous mode 262
e Bracketing/flashe1 Flash sync speed 263e2 Flash shutter speed 264e3 Exposure comp. for flash 264e4 Auto c ISO sensitivity control 264e5 Modeling flash 265e6 Auto bracketing (mode M) 265e7 Bracketing order 266f Controls
f1 Customize i menu 267f2 Custom control assignment 269f3 OK button 277f4 Shutter spd & aperture lock 279f5 Customize command dials 279f6 Release button to use dial 281f7 Reverse indicators 281
Custom Setting 1 0

248 Menu Guide > A Custom Settings
Select Yes to restore Custom Settings to their default values (0 146).
g Movieg1 Customize i menu 282g2 Custom control assignment 283g3 OK button 288g4 AF speed 288g5 AF tracking sensitivity 289g6 Highlight display 290
1 Items modified from default values are indicated by asterisks (“U“).2 Available with compatible lenses only.
D See AlsoFor menu defaults, see “Custom Settings Menu Defaults” (0 146).
Reset Custom SettingsG button ➜ A (Custom Settings menu)
Custom Setting 1 0
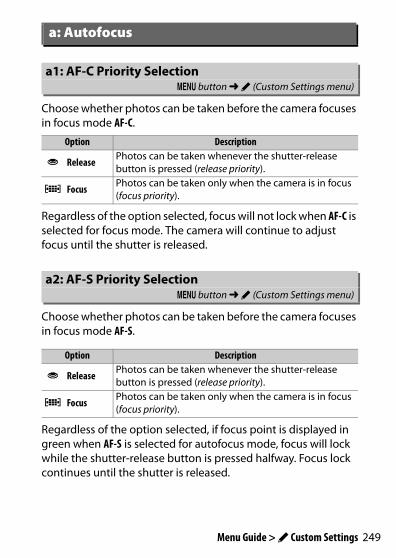
249Menu Guide > A Custom Settings
Choose whether photos can be taken before the camera focuses in focus mode AF-C.
Regardless of the option selected, focus will not lock when AF-C is selected for focus mode. The camera will continue to adjust focus until the shutter is released.
Choose whether photos can be taken before the camera focuses in focus mode AF-S.
Regardless of the option selected, if focus point is displayed in green when AF-S is selected for autofocus mode, focus will lock while the shutter-release button is pressed halfway. Focus lock continues until the shutter is released.
a: Autofocus
a1: AF-C Priority SelectionG button ➜ A (Custom Settings menu)
Option Description
G Release Photos can be taken whenever the shutter-release button is pressed (release priority).
F Focus Photos can be taken only when the camera is in focus (focus priority).
a2: AF-S Priority SelectionG button ➜ A (Custom Settings menu)
Option Description
G Release Photos can be taken whenever the shutter-release button is pressed (release priority).
F Focus Photos can be taken only when the camera is in focus (focus priority).
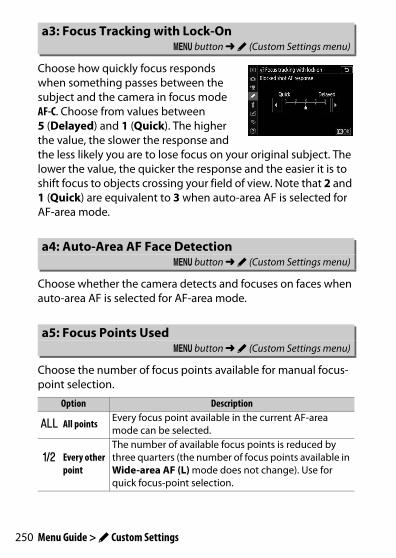
250 Menu Guide > A Custom Settings
Choose how quickly focus responds when something passes between the subject and the camera in focus mode AF-C. Choose from values between 5 (Delayed) and 1 (Quick). The higher the value, the slower the response and the less likely you are to lose focus on your original subject. The lower the value, the quicker the response and the easier it is to shift focus to objects crossing your field of view. Note that 2 and 1 (Quick) are equivalent to 3 when auto-area AF is selected for AF-area mode.
Choose whether the camera detects and focuses on faces when auto-area AF is selected for AF-area mode.
Choose the number of focus points available for manual focus-point selection.
a3: Focus Tracking with Lock-OnG button ➜ A (Custom Settings menu)
a4: Auto-Area AF Face DetectionG button ➜ A (Custom Settings menu)
a5: Focus Points UsedG button ➜ A (Custom Settings menu)
Option Description
R All points Every focus point available in the current AF-area mode can be selected.
I Every other point
The number of available focus points is reduced by three quarters (the number of focus points available in Wide-area AF (L) mode does not change). Use for quick focus-point selection.
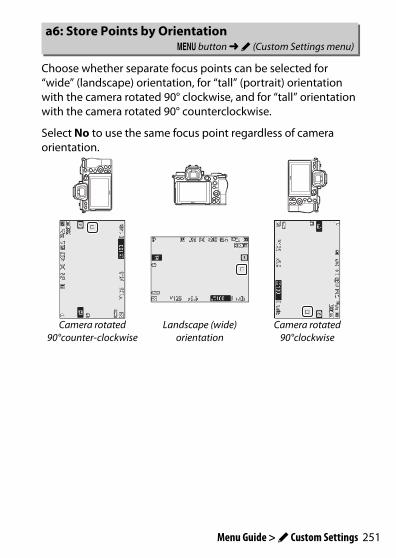
251Menu Guide > A Custom Settings
Choose whether separate focus points can be selected for “wide” (landscape) orientation, for “tall” (portrait) orientation with the camera rotated 90° clockwise, and for “tall” orientation with the camera rotated 90° counterclockwise.
Select No to use the same focus point regardless of camera orientation.
a6: Store Points by OrientationG button ➜ A (Custom Settings menu)
Camera rotated 90°counter-clockwise
Landscape (wide) orientation
Camera rotated 90°clockwise

252 Menu Guide > A Custom Settings
Select Yes to enable separate focus-point selection.
Choose whether the shutter-release button can be used to focus (Shutter/AF-ON) or if focus can only be adjusted using the AF-ON button or other controls to which AF-ON has been assigned (AF-ON only).
Choose the options that can be selected by rotating the sub-command dial when AF-area mode is assigned to the i menu or a camera control. Highlight the desired modes and press 2 to select or deselect. Press J to save changes when settings are complete.
Camera rotated 90°counter-clockwise
Landscape (wide) orientation
Camera rotated 90°clockwise
a7: AF ActivationG button ➜ A (Custom Settings menu)
a8: Limit AF-Area Mode SelectionG button ➜ A (Custom Settings menu)
253Menu Guide > A Custom Settings
Choose whether focus-point selection “wraps around” from one edge of the display to another. If Wrap is selected, focus-point selection will “wrap around” from top to bottom, bottom to top, right to left, and left to right, so that, for example, pressing the sub-selector right when a focus point at the right edge of the display is highlighted selects the corresponding focus point at the left edge of the display.
Choose from the following focus point display options:• Manual focus mode: Choose On to display the active focus point in
manual focus mode, Off to display the focus point only during focus point selection.
• Dynamic-area AF assist: If On is selected, both the selected focus point and the surrounding focus points will be displayed in dynamic-area AF mode. Choose Off to display only the selected focus point.
Choose On for more accurate focus under low-light conditions when AF-S is selected for focus mode, but note that camera may require more time to focus. This option takes effect only in photo mode when a setting other than b is chosen with the mode dial. While low-light AF is in effect, “Low-light” will appear in the display and the display refresh rate may drop.
a9: Focus Point Wrap-AroundG button ➜ A (Custom Settings menu)
a10: Focus Point OptionsG button ➜ A (Custom Settings menu)
a11: Low-Light AFG button ➜ A (Custom Settings menu)

254 Menu Guide > A Custom Settings
Choose whether the built-in AF-assist illuminator lights to assist the focus operation in photo mode when lighting is poor.
Choose whether the lens focus ring can be used for manual focus in autofocus mode. Choose from the options below.• Enable: Autofocus can be over-ridden by rotating the lens focus
ring while the shutter-release button is pressed halfway (autofocus with manual override). To refocus using autofocus, lift your finger from the shutter-release button and then press it halfway again.
• Disable: The lens focus ring cannot be used for manual focus while autofocus mode is selected.
a12: Built-in AF-Assist IlluminatorG button ➜ A (Custom Settings menu)
Option DescriptionOn The illuminator lights as required (AF-S focus mode only).
Off The illuminator does not light to assist the focus operation. The camera may not be able to focus when lighting is poor.
D The AF-Assist IlluminatorThe AF-assist illuminator has a range of about 1–3 m (3 ft 4 in.–9 ft 10 in.); when using the illuminator, remove the lens hood. Do not obstruct the AF-assist illuminator while it is lit.
a13: Manual Focus Ring in AF ModeG button ➜ A (Custom Settings menu)

255Menu Guide > A Custom Settings
Select the increments used for adjustments to shutter speed, aperture, ISO sensitivity, bracketing, and exposure and flash compensation.
Choose whether the E button is needed for exposure compensation.• On (auto reset): In modes P, S, and A, exposure compensation can
be set by rotating the command dial not currently used for shutter speed or aperture (easy exposure compensation is not available in mode M). The setting selected using the command dial is reset when the camera turns off or the standby timer expires (exposure compensation settings selected using the E button are not reset).
• On: As above, except that the exposure compensation value selected using the command dial is not reset when the camera turns off or the standby timer expires.
• Off: Exposure compensation is set by pressing the E button and rotating the main command dial.
The “0” at the center of the exposure display flashes while easy exposure compensation is enabled, even when exposure compensation is set to ±0.
b: Metering/Exposure
b1: EV Steps for Exposure CntrlG button ➜ A (Custom Settings menu)
b2: Easy Exposure CompensationG button ➜ A (Custom Settings menu)

256 Menu Guide > A Custom Settings
Choose the size of the area given the most weight in center-weighted metering.
Use this option to fine-tune the exposure value selected by the camera. Exposure can be fine-tuned separately for each metering method by from +1 to −1 EV in steps of 1/6 EV.
b3: Center-Weighted AreaG button ➜ A (Custom Settings menu)
b4: Fine-Tune Optimal ExposureG button ➜ A (Custom Settings menu)
D Fine-Tuning ExposureThe exposure compensation (E) icon is not displayed when exposure fine-tuning is in effect. The only way to determine how much exposure has been altered is to view the amount in the fine-tuning menu.
257Menu Guide > A Custom Settings
Choose whether exposure locks when the shutter-release button is pressed.
Choose the length of the shutter release delay, the number of shots taken, and the interval between shots in self-timer mode.• Self-timer delay: Choose the length of the shutter-release delay.• Number of shots: Press 1 and 3 to choose the number of shots
taken each time the shutter-release button is pressed.• Interval between shots: Choose the interval between shots when
Number of shots is more than 1.
c: Timers/AE Lock
c1: Shutter-Release Button AE-LG button ➜ A (Custom Settings menu)
Option Description
O On (half press) Pressing the shutter-release button halfway locks exposure.
P On (burst mode) Exposure only locks while the shutter-release button is pressed all the way down.
Off Pressing the shutter-release button does not lock exposure.
c2: Self-TimerG button ➜ A (Custom Settings menu)
258 Menu Guide > A Custom Settings
Choose how long the control panel and camera displays remain on when no operations are performed. Different settings can be chosen for Playback, Menus, Image review, and Standby timer, the last of which determines how long both the monitor or viewfinder display and the control panel remain on when no operations are performed during shooting (the monitor and viewfinder dim a few seconds before the standby timer expires). Choose shorter power-off delays for longer battery life.
c3: Power Off DelayG button ➜ A (Custom Settings menu)
259Menu Guide > A Custom Settings
Choose the frame advance rate for low-speed continuous release mode.
The maximum number of shots that can be taken in a single burst in continuous release modes can be set to any value between 1 and 200. Note that regardless of the option selected, there is no limit to the number of photos that can be taken in a single burst when a shutter speed of 4 s or slower is selected in mode S or M.
Choose whether the shutters on the remote cameras are synchronized with the shutter on the master camera when using an optional wireless remote controller.
d: Shooting/Display
d1: CL Mode Shooting SpeedG button ➜ A (Custom Settings menu)
d2: Max. Continuous ReleaseG button ➜ A (Custom Settings menu)
D The Memory BufferRegardless of the option selected for Custom Setting d2, shooting will slow when the memory buffer fills (r00).
d3: Sync. Release Mode OptionsG button ➜ A (Custom Settings menu)
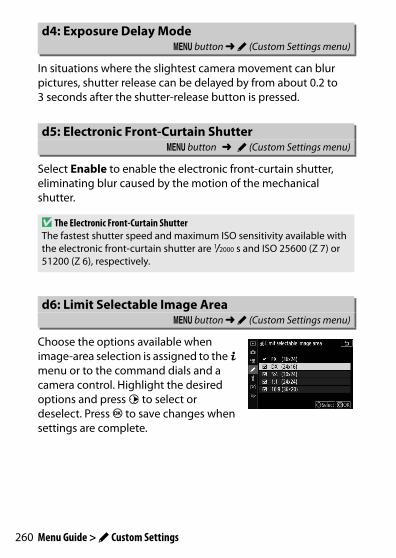
260 Menu Guide > A Custom Settings
In situations where the slightest camera movement can blur pictures, shutter release can be delayed by from about 0.2 to 3 seconds after the shutter-release button is pressed.
Select Enable to enable the electronic front-curtain shutter, eliminating blur caused by the motion of the mechanical shutter.
Choose the options available when image-area selection is assigned to the i menu or to the command dials and a camera control. Highlight the desired options and press 2 to select or deselect. Press J to save changes when settings are complete.
d4: Exposure Delay ModeG button ➜ A (Custom Settings menu)
d5: Electronic Front-Curtain ShutterG button ➜ A (Custom Settings menu)
D The Electronic Front-Curtain ShutterThe fastest shutter speed and maximum ISO sensitivity available with the electronic front-curtain shutter are 1/2000 s and ISO 25600 (Z 7) or 51200 (Z 6), respectively.
d6: Limit Selectable Image AreaG button ➜ A (Custom Settings menu)
261Menu Guide > A Custom Settings
When a picture is taken, the camera names the file by adding one to the last file number used. This option controls whether file numbering continues from the last number used when a new folder is created, the memory card is formatted, or a new memory card is inserted in the camera.
d7: File Number SequenceG button ➜ A (Custom Settings menu)
Option Description
On
File numbering continues from the last number used or from the largest file number in the current folder, whichever is higher. If a picture is taken when the current folder contains a picture numbered 9999, a new folder will be created automatically and file numbering will begin again from 0001.
Off
File numbering is reset to 0001 when a new folder is created, the memory card is formatted, or a new memory card is inserted in the camera. Note that a new folder is created automatically if a picture is taken when the current folder contains 5000 pictures.
Reset
As for On, except that the next picture taken after Reset is selected is assigned a file number by adding one to the largest file number in the current folder. If the folder is empty, file numbering is reset to 0001.
D File Number SequenceIf the current folder is numbered 999 and contains either 5000 pictures or a picture numbered 9999, the shutter-release button will be disabled and no further pictures can be taken (in addition, movie recording may be disabled if the camera calculates that the number of files needed to record a movie of the maximum length would result in the folder containing over 5000 files or a file with a number over 9999). Choose Reset for Custom Setting d7 (File number sequence) and then either format the current memory card or insert a new memory card.
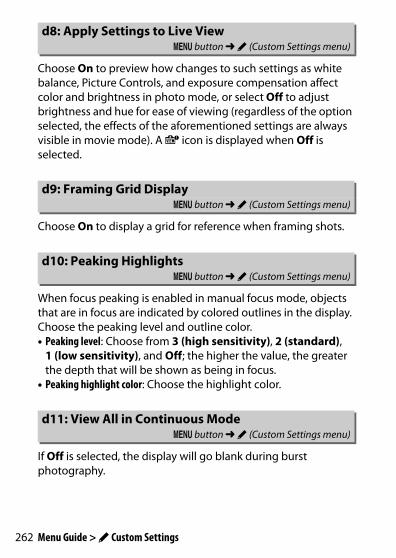
262 Menu Guide > A Custom Settings
Choose On to preview how changes to such settings as white balance, Picture Controls, and exposure compensation affect color and brightness in photo mode, or select Off to adjust brightness and hue for ease of viewing (regardless of the option selected, the effects of the aforementioned settings are always visible in movie mode). A g icon is displayed when Off is selected.
Choose On to display a grid for reference when framing shots.
When focus peaking is enabled in manual focus mode, objects that are in focus are indicated by colored outlines in the display. Choose the peaking level and outline color.• Peaking level: Choose from 3 (high sensitivity), 2 (standard),
1 (low sensitivity), and Off; the higher the value, the greater the depth that will be shown as being in focus.
• Peaking highlight color: Choose the highlight color.
If Off is selected, the display will go blank during burst photography.
d8: Apply Settings to Live ViewG button ➜ A (Custom Settings menu)
d9: Framing Grid DisplayG button ➜ A (Custom Settings menu)
d10: Peaking HighlightsG button ➜ A (Custom Settings menu)
d11: View All in Continuous ModeG button ➜ A (Custom Settings menu)
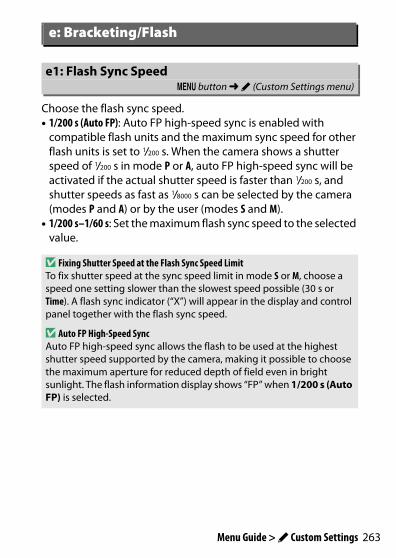
263Menu Guide > A Custom Settings
Choose the flash sync speed.• 1/200 s (Auto FP): Auto FP high-speed sync is enabled with
compatible flash units and the maximum sync speed for other flash units is set to 1/200 s. When the camera shows a shutter speed of 1/200 s in mode P or A, auto FP high-speed sync will be activated if the actual shutter speed is faster than 1/200 s, and shutter speeds as fast as 1/8000 s can be selected by the camera (modes P and A) or by the user (modes S and M).
• 1/200 s–1/60 s: Set the maximum flash sync speed to the selected value.
e: Bracketing/Flash
e1: Flash Sync SpeedG button ➜ A (Custom Settings menu)
D Fixing Shutter Speed at the Flash Sync Speed LimitTo fix shutter speed at the sync speed limit in mode S or M, choose a speed one setting slower than the slowest speed possible (30 s or Time). A flash sync indicator (“X”) will appear in the display and control panel together with the flash sync speed.
D Auto FP High-Speed SyncAuto FP high-speed sync allows the flash to be used at the highest shutter speed supported by the camera, making it possible to choose the maximum aperture for reduced depth of field even in bright sunlight. The flash information display shows “FP” when 1/200 s (Auto FP) is selected.
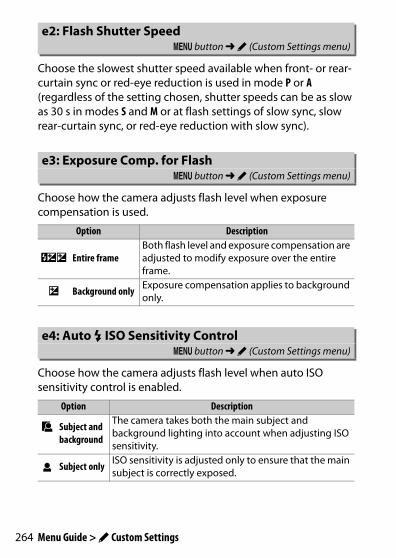
264 Menu Guide > A Custom Settings
Choose the slowest shutter speed available when front- or rear-curtain sync or red-eye reduction is used in mode P or A (regardless of the setting chosen, shutter speeds can be as slow as 30 s in modes S and M or at flash settings of slow sync, slow rear-curtain sync, or red-eye reduction with slow sync).
Choose how the camera adjusts flash level when exposure compensation is used.
Choose how the camera adjusts flash level when auto ISO sensitivity control is enabled.
e2: Flash Shutter SpeedG button ➜ A (Custom Settings menu)
e3: Exposure Comp. for FlashG button ➜ A (Custom Settings menu)
Option Description
YE Entire frameBoth flash level and exposure compensation are adjusted to modify exposure over the entire frame.
E Background only Exposure compensation applies to background only.
e4: Auto c ISO Sensitivity ControlG button ➜ A (Custom Settings menu)
Option Description
e Subject and background
The camera takes both the main subject and background lighting into account when adjusting ISO sensitivity.
f Subject only ISO sensitivity is adjusted only to ensure that the main subject is correctly exposed.
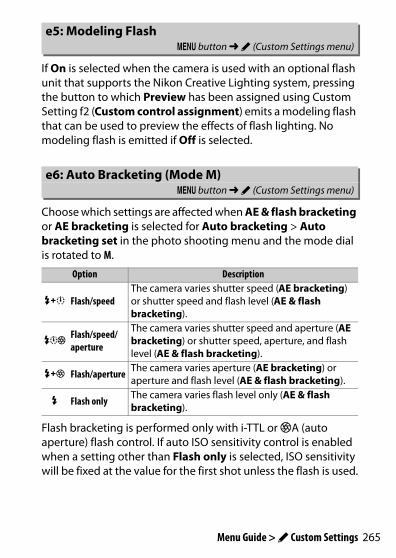
265Menu Guide > A Custom Settings
If On is selected when the camera is used with an optional flash unit that supports the Nikon Creative Lighting system, pressing the button to which Preview has been assigned using Custom Setting f2 (Custom control assignment) emits a modeling flash that can be used to preview the effects of flash lighting. No modeling flash is emitted if Off is selected.
Choose which settings are affected when AE & flash bracketing or AE bracketing is selected for Auto bracketing > Auto bracketing set in the photo shooting menu and the mode dial is rotated to M.
Flash bracketing is performed only with i-TTL or qA (auto aperture) flash control. If auto ISO sensitivity control is enabled when a setting other than Flash only is selected, ISO sensitivity will be fixed at the value for the first shot unless the flash is used.
e5: Modeling FlashG button ➜ A (Custom Settings menu)
e6: Auto Bracketing (Mode M)G button ➜ A (Custom Settings menu)
Option Description
F Flash/speedThe camera varies shutter speed (AE bracketing) or shutter speed and flash level (AE & flash bracketing).
GFlash/speed/aperture
The camera varies shutter speed and aperture (AE bracketing) or shutter speed, aperture, and flash level (AE & flash bracketing).
H Flash/aperture The camera varies aperture (AE bracketing) or aperture and flash level (AE & flash bracketing).
I Flash only The camera varies flash level only (AE & flash bracketing).
266 Menu Guide > A Custom Settings
At the default setting of MTR > under > over (H), exposure, flash, and white balance bracketing are performed in the following order: the unmodified shot is taken first, followed by the shot with the lowest value, followed by the shot with the highest value. If Under > MTR > over (I) is selected, shooting will proceed in order from the lowest to the highest value. This setting has no effect on ADL bracketing.
e7: Bracketing OrderG button ➜ A (Custom Settings menu)

267Menu Guide > A Custom Settings
Choose the options displayed in the i menu for photo mode. The following options can be assigned to any position in the menu by highlighting the desired position, pressing J, and choosing the desired option.
f: Controls
f1: Customize i MenuG button ➜ A (Custom Settings menu)
Option 0
J Choose image area 163
8 Image quality 102
o Image size 104
E Exposure compensation 79
9 ISO sensitivity settings 77, 167
m White balance 61, 96
h Set Picture Control 91
p Color space 180
y Active D-Lighting 108
q Long exposure NR 181
r High ISO NR 181
w Metering 106
c Flash mode 105, 352
Y Flash compensation 187
s Focus mode 52, 111
t AF-area mode 54, 111
u Vibration reduction 110
t Auto bracketing 188
$ Multiple exposure 198
2HDR (high dynamic range) 205
L Silent photography 65
v Release mode 81
w Custom control assignment 269
z Exposure delay mode 260
x Electronic front-curtain shutter 260
yApply settings to live view 262
z Split-screen display zoom 268
W Peaking highlights 262
3 Monitor/viewfinder brightness
293, 295
Z Bluetooth connection 306
U Wi-Fi connection 107
Option 0
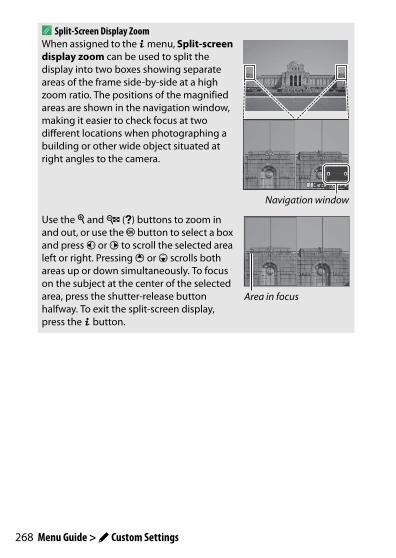
268 Menu Guide > A Custom Settings
A Split-Screen Display ZoomWhen assigned to the i menu, Split-screen display zoom can be used to split the display into two boxes showing separate areas of the frame side-by-side at a high zoom ratio. The positions of the magnified areas are shown in the navigation window, making it easier to check focus at two different locations when photographing a building or other wide object situated at right angles to the camera.
Use the X and W (Q) buttons to zoom in and out, or use the J button to select a box and press 4 or 2 to scroll the selected area left or right. Pressing 1 or 3 scrolls both areas up or down simultaneously. To focus on the subject at the center of the selected area, press the shutter-release button halfway. To exit the split-screen display, press the i button.
Navigation window
Area in focus
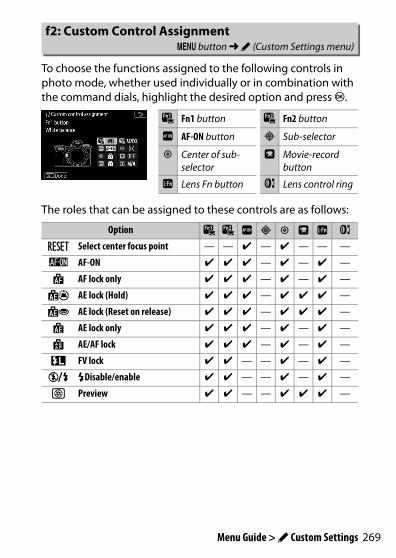
269Menu Guide > A Custom Settings
To choose the functions assigned to the following controls in photo mode, whether used individually or in combination with the command dials, highlight the desired option and press J.
The roles that can be assigned to these controls are as follows:
f2: Custom Control AssignmentG button ➜ A (Custom Settings menu)
w Fn1 button y Fn2 button
V AF-ON button 7 Sub-selector
8 Center of sub-selector
z Movie-record button
S Lens Fn button l Lens control ring
Option w y V 7 8 z S l
K Select center focus point — — ✔ — ✔ — — —
A AF-ON ✔ ✔ ✔ — ✔ — ✔ —
F AF lock only ✔ ✔ ✔ — ✔ — ✔ —
E AE lock (Hold) ✔ ✔ ✔ — ✔ ✔ ✔ —
D AE lock (Reset on release) ✔ ✔ ✔ — ✔ ✔ ✔ —
C AE lock only ✔ ✔ ✔ — ✔ — ✔ —
B AE/AF lock ✔ ✔ ✔ — ✔ — ✔ —
r FV lock ✔ ✔ — — ✔ — ✔ —
h cDisable/enable ✔ ✔ — — ✔ — ✔ —
q Preview ✔ ✔ — — ✔ ✔ ✔ —

270 Menu Guide > A Custom Settings
L Matrix metering ✔ ✔ — — ✔ — ✔ —
M Center-weighted metering ✔ ✔ — — ✔ — ✔ —
N Spot metering ✔ ✔ — — ✔ — ✔ —
t Highlight-weighted metering ✔ ✔ — — ✔ — ✔ —
1 Bracketing burst ✔ ✔ — — ✔ — ✔ —
c Sync. release selection ✔ ✔ — — ✔ — ✔ —
4 + NEF (RAW) ✔ ✔ — — ✔ ✔ ✔ —
b Framing grid display ✔ ✔ — — ✔ ✔ ✔ —
p Zoom on/off ✔ ✔ ✔ — — ✔ ✔ —
O MY MENU ✔ ✔ — — — ✔ ✔ —
3 Access top item in MY MENU ✔ ✔ — — — ✔ ✔ —
K Playback ✔ ✔ — — — — ✔ —
g Protect ✔ ✔ — — — — — —
J Choose image area ✔ ✔ — — ✔ ✔ — —
8 Image quality/size ✔ ✔ — — — ✔ — —
m White balance ✔ ✔ — — — ✔ — —
h Set Picture Control ✔ ✔ — — — ✔ — —
y Active D-Lighting ✔ ✔ — — — ✔ — —
w Metering ✔ ✔ — — — ✔ — —
I/Y Flash mode/compensation ✔ ✔ — — — ✔ — —
z Focus mode/AF-area mode ✔ ✔ — — — ✔ — —
Option w y V 7 8 z S l

271Menu Guide > A Custom Settings
1 Available only with compatible lenses.2 Regardless of the option selected, in manual focus mode the control ring can only be used to
adjust focus.
t Auto bracketing ✔ ✔ — — — ✔ — —
$ Multiple exposure ✔ ✔ — — — ✔ — —
2 HDR (high dynamic range) ✔ ✔ — — — ✔ — —
z Exposure delay mode ✔ ✔ — — — ✔ — —
$ Shutter spd & aperture lock ✔ ✔ — — — ✔ — —
W Peaking highlights ✔ ✔ — — — — — —
c Rating ✔ ✔ — — — — — —
w Choose non-CPU lens number ✔ ✔ — — ✔ ✔ — —
Y Same as multi selector — — — ✔ — — — —
x Focus point selection — — — ✔ — — — —
X Focus (M/A) — — — — — — — ✔ 1, 2
q Aperture — — — — — — — ✔ 2
E Exposure compensation — — — — — — — ✔ 2
None ✔ ✔ ✔ — ✔ ✔ ✔ ✔ 2
Option w y V 7 8 z S l
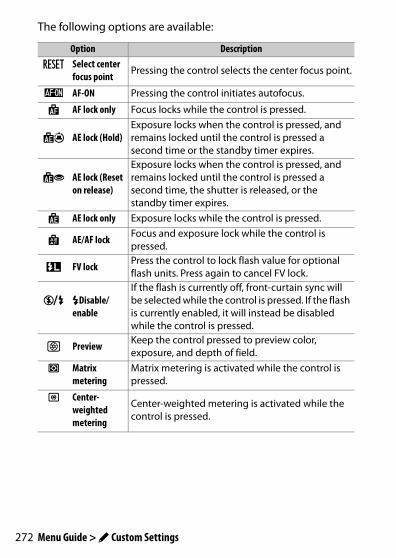
272 Menu Guide > A Custom Settings
The following options are available:
Option Description
K Select center focus point Pressing the control selects the center focus point.
A AF-ON Pressing the control initiates autofocus.
F AF lock only Focus locks while the control is pressed.
E AE lock (Hold)Exposure locks when the control is pressed, and remains locked until the control is pressed a second time or the standby timer expires.
D AE lock (Reset on release)
Exposure locks when the control is pressed, and remains locked until the control is pressed a second time, the shutter is released, or the standby timer expires.
C AE lock only Exposure locks while the control is pressed.
B AE/AF lock Focus and exposure lock while the control is pressed.
r FV lock Press the control to lock flash value for optional flash units. Press again to cancel FV lock.
h cDisable/enable
If the flash is currently off, front-curtain sync will be selected while the control is pressed. If the flash is currently enabled, it will instead be disabled while the control is pressed.
q Preview Keep the control pressed to preview color, exposure, and depth of field.
L Matrix metering
Matrix metering is activated while the control is pressed.
M Center-weighted metering
Center-weighted metering is activated while the control is pressed.
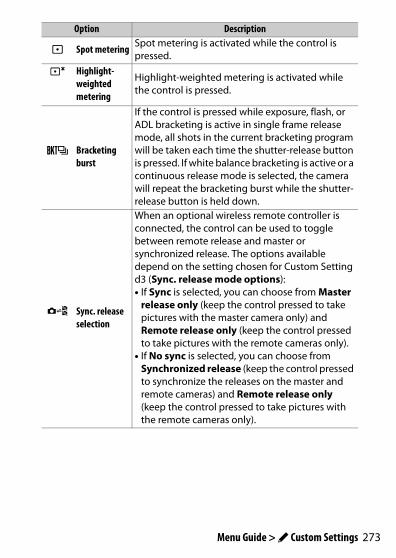
273Menu Guide > A Custom Settings
N Spot metering Spot metering is activated while the control is pressed.
t Highlight-weighted metering
Highlight-weighted metering is activated while the control is pressed.
1 Bracketing burst
If the control is pressed while exposure, flash, or ADL bracketing is active in single frame release mode, all shots in the current bracketing program will be taken each time the shutter-release button is pressed. If white balance bracketing is active or a continuous release mode is selected, the camera will repeat the bracketing burst while the shutter-release button is held down.
c Sync. release selection
When an optional wireless remote controller is connected, the control can be used to toggle between remote release and master or synchronized release. The options available depend on the setting chosen for Custom Setting d3 (Sync. release mode options):• If Sync is selected, you can choose from Master
release only (keep the control pressed to take pictures with the master camera only) and Remote release only (keep the control pressed to take pictures with the remote cameras only).
• If No sync is selected, you can choose from Synchronized release (keep the control pressed to synchronize the releases on the master and remote cameras) and Remote release only (keep the control pressed to take pictures with the remote cameras only).
Option Description
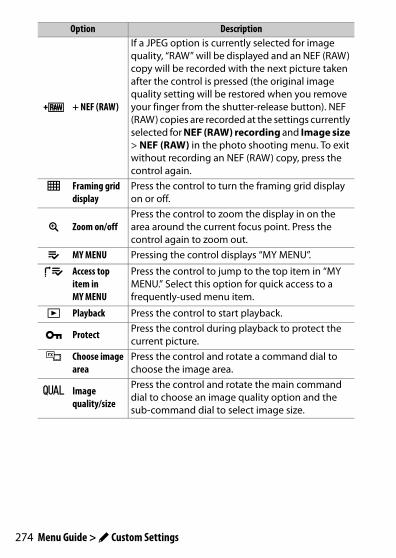
274 Menu Guide > A Custom Settings
4 + NEF (RAW)
If a JPEG option is currently selected for image quality, “RAW” will be displayed and an NEF (RAW) copy will be recorded with the next picture taken after the control is pressed (the original image quality setting will be restored when you remove your finger from the shutter-release button). NEF (RAW) copies are recorded at the settings currently selected for NEF (RAW) recording and Image size > NEF (RAW) in the photo shooting menu. To exit without recording an NEF (RAW) copy, press the control again.
b Framing grid display
Press the control to turn the framing grid display on or off.
p Zoom on/offPress the control to zoom the display in on the area around the current focus point. Press the control again to zoom out.
O MY MENU Pressing the control displays “MY MENU”.
3 Access top item in MY MENU
Press the control to jump to the top item in “MY MENU.” Select this option for quick access to a frequently-used menu item.
K Playback Press the control to start playback.
g Protect Press the control during playback to protect the current picture.
J Choose image area
Press the control and rotate a command dial to choose the image area.
8 Image quality/size
Press the control and rotate the main command dial to choose an image quality option and the sub-command dial to select image size.
Option Description

275Menu Guide > A Custom Settings
m White balance
Press the control and rotate the main command dial to choose a white balance option (in some cases, a sub-option can be selected using the sub-command dial).
h Set Picture Control
Press the control and rotate a command dial to choose a Picture Control.
y Active D-Lighting
Press the control and rotate a command dial to adjust Active D-Lighting.
w Metering Press the control and rotate a command dial to choose a metering option.
I/Y Flash mode/compensation
Press the control and rotate the main command dial to choose a flash mode and the sub-command dial to adjust flash output.
z Focus mode/AF-area mode
Press the control and rotate the main and sub-command dials to choose the focus and AF-area modes.
t Auto bracketing
Press the control and rotate the main command dial to choose the number of shots and the sub-command dial to select the bracketing increment or Active D-Lighting amount.
$ Multiple exposure
Press the control and rotate the main command dial to choose the mode and the sub-command dial to choose the number of shots.
2 HDR (high dynamic range)
Press the control and rotate the main command dial to choose the mode and the sub-command dial to choose the exposure differential.
z Exposure delay mode
Press the control and rotate a command dial to choose the shutter-release delay.
Option Description

276 Menu Guide > A Custom Settings
$ Shutter spd & aperture lock
Press the control and rotate the main command dial to lock shutter speed in modes S and M; press the control and rotate the sub-command dial to lock aperture in modes A and M.
W Peaking highlights
Press the control and rotate the main command dial to choose a peaking level and the sub-command dial to select the peaking color.
c Rating Press the control and rotate the main command dial to rate the current picture during playback.
w Choose non-CPU lens number
Press the control and rotate a command dial to choose a lens number saved using the Non-CPU lens data option in the setup menu.
Y Same as multi selector
Pressing the sub-selector up, down, left, and right during shooting or playback has the same effect as pressing 1, 3, 4, and 2 on the multi selector. To choose the role played by sub-selector during zoom, highlight Same as multi selector and press 2. Choose from Scroll (scroll the display) and Display next/previous frame (view other photos at the same zoom ratio).
x Focus point selection
Use the control to select the focus point. Using the control during playback ends playback and enables focus-point selection.
X Focus (M/A)
Use the control to focus manually, independent of the option selected for focus mode. Press the shutter-release button halfway or press the AF-ON button to refocus using autofocus.
q Aperture Use the control to adjust aperture.
E Exposure compensation Use the control to adjust exposure compensation.
None The control has no effect.
Option Description

277Menu Guide > A Custom Settings
Choose the role assigned to the J button in photo mode and during playback.
• Shooting mode: Choose from the options below. Regardless of the option selected, the J button can be used for focus tracking when auto-area AF is selected for AF-area mode.
f3: OK ButtonG button ➜ A (Custom Settings menu)
Option DescriptionK Select center
focus point Pressing J selects the center focus point.
p Zoom on/offPress J to zoom the display in on the area around the current focus point (to choose the zoom ratio, highlight Zoom on/off and press 2).
None Pressing J during shooting has no effect.

278 Menu Guide > A Custom Settings
• Playback mode: Choose from the options below. Regardless of the option selected, pressing J when a movie is displayed full frame starts movie playback.
Option Description
n Thumbnail on/off
Toggle between full-frame and thumbnail playback.
o View histograms
In both full-frame and thumbnail playback, a histogram is displayed while the J button is pressed.
p Zoom on/off
Toggle between full-frame or thumbnail playback and playback zoom (to choose the zoom ratio, highlight Zoom on/off and press 2). The zoom display is centered on the active focus point.
u Choose folderA folder-selection dialog will be displayed; highlight a folder and press J to view the pictures in the selected folder.
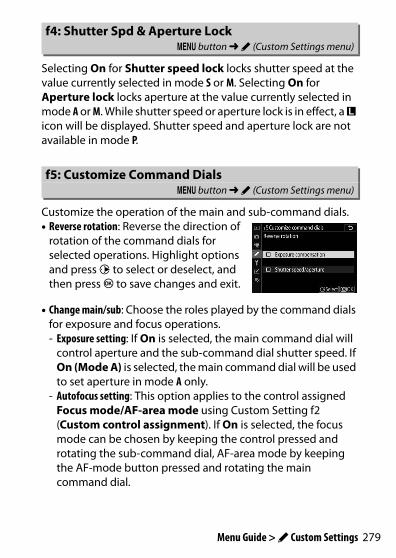
279Menu Guide > A Custom Settings
Selecting On for Shutter speed lock locks shutter speed at the value currently selected in mode S or M. Selecting On for Aperture lock locks aperture at the value currently selected in mode A or M. While shutter speed or aperture lock is in effect, a O icon will be displayed. Shutter speed and aperture lock are not available in mode P.
Customize the operation of the main and sub-command dials.• Reverse rotation: Reverse the direction of
rotation of the command dials for selected operations. Highlight options and press 2 to select or deselect, and then press J to save changes and exit.
• Change main/sub: Choose the roles played by the command dials for exposure and focus operations.- Exposure setting: If On is selected, the main command dial will
control aperture and the sub-command dial shutter speed. If On (Mode A) is selected, the main command dial will be used to set aperture in mode A only.
- Autofocus setting: This option applies to the control assigned Focus mode/AF-area mode using Custom Setting f2 (Custom control assignment). If On is selected, the focus mode can be chosen by keeping the control pressed and rotating the sub-command dial, AF-area mode by keeping the AF-mode button pressed and rotating the main command dial.
f4: Shutter Spd & Aperture LockG button ➜ A (Custom Settings menu)
f5: Customize Command DialsG button ➜ A (Custom Settings menu)
280 Menu Guide > A Custom Settings
• Menus and playback: Select Off to use the multi selector for menus and playback. If On or On (image review excluded) is selected, the main command dial can be used to choose the picture displayed during full-frame playback and to highlight thumbnails and menu items. The sub-command dial is used in full-frame playback to skip forward or back according to the option selected for Sub-dial frame advance and in thumbnail playback to page up or down. While menus are displayed, rotating the sub-command dial right displays the sub-menu for the highlighted option, while rotating it left displays the previous menu. To make a selection, press 2 or J. Select On (image review excluded) to prevent the command dials from being used for playback during image review.
• Sub-dial frame advance: When On or On (image review excluded) is selected for Menus and playback, the sub-command dial can be rotated during full-frame playback to select a folder, to skip forward or back 10 or 50 frames at a time, or to skip to the next or previous protected picture, the next or previous photo, the next or previous movie, or the next or previous picture with a selected rating (to choose the rating, highlight Rating and press 2).
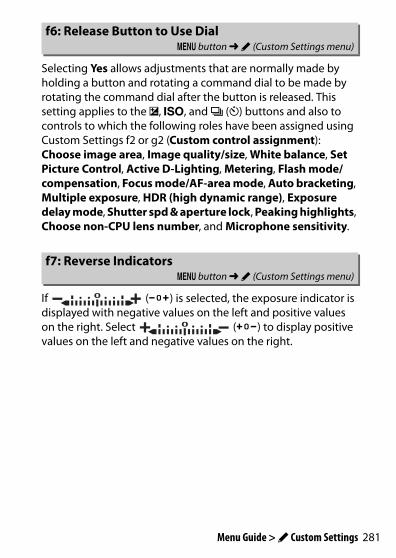
281Menu Guide > A Custom Settings
Selecting Yes allows adjustments that are normally made by holding a button and rotating a command dial to be made by rotating the command dial after the button is released. This setting applies to the E, S, and c (E) buttons and also to controls to which the following roles have been assigned using Custom Settings f2 or g2 (Custom control assignment): Choose image area, Image quality/size, White balance, Set Picture Control, Active D-Lighting, Metering, Flash mode/compensation, Focus mode/AF-area mode, Auto bracketing, Multiple exposure, HDR (high dynamic range), Exposure delay mode, Shutter spd & aperture lock, Peaking highlights, Choose non-CPU lens number, and Microphone sensitivity.
If (W) is selected, the exposure indicator is displayed with negative values on the left and positive values on the right. Select (V) to display positive values on the left and negative values on the right.
f6: Release Button to Use DialG button ➜ A (Custom Settings menu)
f7: Reverse IndicatorsG button ➜ A (Custom Settings menu)

282 Menu Guide > A Custom Settings
Choose the options displayed in the i menu for movie mode. The following options can be assigned to any position in the menu by highlighting the desired position, pressing J, and choosing the desired option.
g: Movie
g1: Customize i MenuG button ➜ A (Custom Settings menu)
Option 0
J Choose image area 117
G Frame size and rate/Image quality 114
E Exposure compensation 79
9 ISO sensitivity settings 238
m White balance 61, 96
h Set Picture Control 91
y Active D-Lighting 108, 118
w Metering 106, 118
s Focus mode 52, 119
t AF-area mode 54, 119
u Vibration reduction 110
4 Electronic VR 118
H Microphone sensitivity 116
5 Attenuator 242
6 Frequency response 243
7 Wind noise reduction 243
8 Headphone volume 243
W Peaking highlights 262
9 Highlight display 290
3 Monitor/viewfinder brightness
293, 295
Z Bluetooth connection 306
U Wi-Fi connection 107
Option 0

283Menu Guide > A Custom Settings
To choose the functions assigned to the following controls in movie mode, whether used individually or in combination with the command dials, highlight the desired option and press J.
The roles that can be assigned to these controls are as follows:
g2: Custom Control AssignmentG button ➜ A (Custom Settings menu)
w Fn1 button y Fn2 button
V AF-ON button 8 Center of sub-selectorG Shutter-release
button l Lens control ring
Option w y V 8 G l
t Power aperture (open) ✔ — — — — —
q Power aperture (close) — ✔ — — — —
i Exposure compensation + ✔ — — — — —
h Exposure compensation – — ✔ — — — —
b Framing grid display ✔ ✔ — ✔ — —
g Protect ✔ ✔ — — — —
K Select center focus point — — ✔ ✔ — —
A AF-ON — — ✔ — — —
F AF lock only — — ✔ ✔ — —
E AE lock (Hold) — — ✔ ✔ — —
C AE lock only — — ✔ ✔ — —
B AE/AF lock — — ✔ ✔ — —
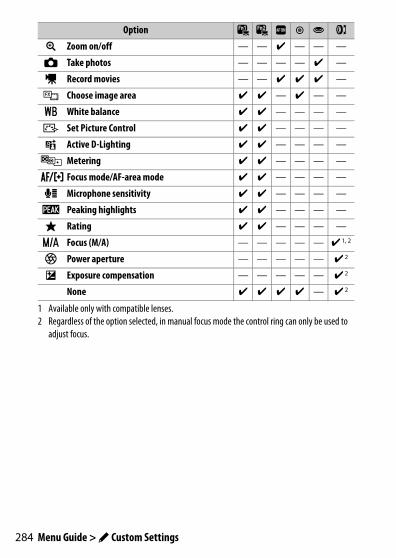
284 Menu Guide > A Custom Settings
1 Available only with compatible lenses.2 Regardless of the option selected, in manual focus mode the control ring can only be used to
adjust focus.
p Zoom on/off — — ✔ — — —
C Take photos — — — — ✔ —
1 Record movies — — ✔ ✔ ✔ —
J Choose image area ✔ ✔ — ✔ — —
m White balance ✔ ✔ — — — —
h Set Picture Control ✔ ✔ — — — —
y Active D-Lighting ✔ ✔ — — — —
w Metering ✔ ✔ — — — —
z Focus mode/AF-area mode ✔ ✔ — — — —
H Microphone sensitivity ✔ ✔ — — — —
W Peaking highlights ✔ ✔ — — — —
c Rating ✔ ✔ — — — —
X Focus (M/A) — — — — — ✔ 1, 2
q Power aperture — — — — — ✔ 2
E Exposure compensation — — — — — ✔ 2
None ✔ ✔ ✔ ✔ — ✔ 2
Option w y V 8 G l

285Menu Guide > A Custom Settings
The following options are available:
Option Description
t Power aperture (open)
Aperture widens while the control is pressed. Use in combination with Custom Setting g2 (Custom control assignment) > Fn2 button > Power aperture (close) for button-controlled aperture adjustment.
q Power aperture (close)
Aperture narrows while the control is pressed. Use in combination with Custom Setting g2 (Custom control assignment) > Fn1 button > Power aperture (open) for button-controlled aperture adjustment.
i Exposure compensation +
Exposure compensation increases while the control is pressed. Use in combination with Custom Setting g2 (Custom control assignment) > Fn2 button > Exposure compensation − for button-controlled exposure compensation.
h Exposure compensation –
Exposure compensation decreases while the control is pressed. Use in combination with Custom Setting g2 (Custom control assignment) > Fn1 button > Exposure compensation + for button-controlled exposure compensation.
b Framing grid display
Press the control to turn the framing grid display on or off.
g Protect Press the control during playback to protect the current picture.
K Select center focus point
Pressing the control selects the center focus point.
A AF-ON Pressing the control initiates autofocus.
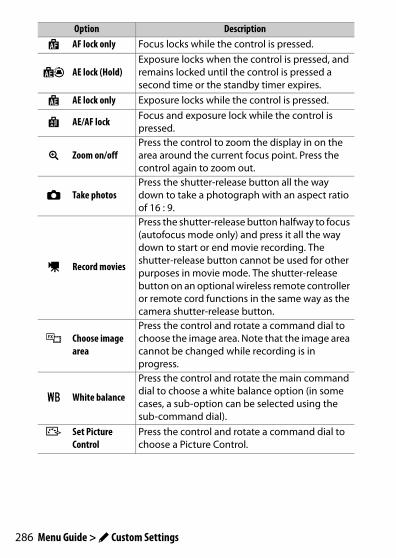
286 Menu Guide > A Custom Settings
F AF lock only Focus locks while the control is pressed.
E AE lock (Hold)Exposure locks when the control is pressed, and remains locked until the control is pressed a second time or the standby timer expires.
C AE lock only Exposure locks while the control is pressed.
B AE/AF lock Focus and exposure lock while the control is pressed.
p Zoom on/offPress the control to zoom the display in on the area around the current focus point. Press the control again to zoom out.
C Take photosPress the shutter-release button all the way down to take a photograph with an aspect ratio of 16 : 9.
1 Record movies
Press the shutter-release button halfway to focus (autofocus mode only) and press it all the way down to start or end movie recording. The shutter-release button cannot be used for other purposes in movie mode. The shutter-release button on an optional wireless remote controller or remote cord functions in the same way as the camera shutter-release button.
J Choose image area
Press the control and rotate a command dial to choose the image area. Note that the image area cannot be changed while recording is in progress.
m White balance
Press the control and rotate the main command dial to choose a white balance option (in some cases, a sub-option can be selected using the sub-command dial).
h Set Picture Control
Press the control and rotate a command dial to choose a Picture Control.
Option Description
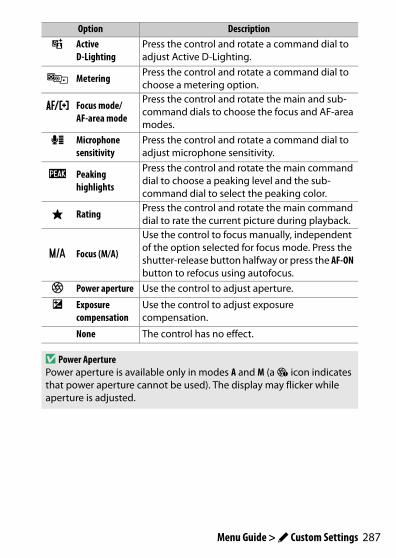
287Menu Guide > A Custom Settings
y Active D-Lighting
Press the control and rotate a command dial to adjust Active D-Lighting.
w Metering Press the control and rotate a command dial to choose a metering option.
z Focus mode/AF-area mode
Press the control and rotate the main and sub-command dials to choose the focus and AF-area modes.
H Microphone sensitivity
Press the control and rotate a command dial to adjust microphone sensitivity.
W Peaking highlights
Press the control and rotate the main command dial to choose a peaking level and the sub-command dial to select the peaking color.
c Rating Press the control and rotate the main command dial to rate the current picture during playback.
X Focus (M/A)
Use the control to focus manually, independent of the option selected for focus mode. Press the shutter-release button halfway or press the AF-ON button to refocus using autofocus.
q Power aperture Use the control to adjust aperture.
E Exposure compensation
Use the control to adjust exposure compensation.
None The control has no effect.
D Power AperturePower aperture is available only in modes A and M (a 6 icon indicates that power aperture cannot be used). The display may flicker while aperture is adjusted.
Option Description
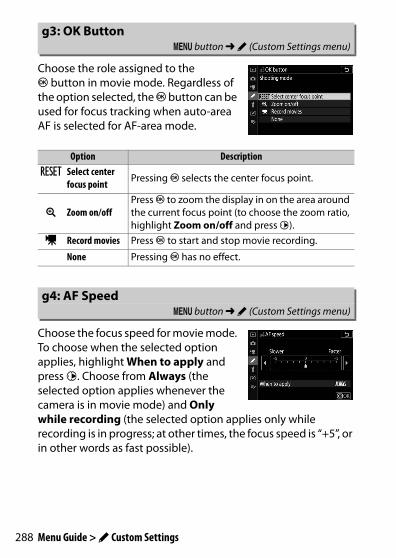
288 Menu Guide > A Custom Settings
Choose the role assigned to the J button in movie mode. Regardless of the option selected, the J button can be used for focus tracking when auto-area AF is selected for AF-area mode.
Choose the focus speed for movie mode. To choose when the selected option applies, highlight When to apply and press 2. Choose from Always (the selected option applies whenever the camera is in movie mode) and Only while recording (the selected option applies only while recording is in progress; at other times, the focus speed is “+5”, or in other words as fast possible).
g3: OK ButtonG button ➜ A (Custom Settings menu)
Option DescriptionK Select center
focus point Pressing J selects the center focus point.
p Zoom on/offPress J to zoom the display in on the area around the current focus point (to choose the zoom ratio, highlight Zoom on/off and press 2).
1 Record movies Press J to start and stop movie recording.
None Pressing J has no effect.
g4: AF SpeedG button ➜ A (Custom Settings menu)

289Menu Guide > A Custom Settings
Choose how quickly focus responds when your subject leaves the focus point or something passes between the subject and the camera in movie mode. Choose from values between 7 (Low) and 1 (High). The higher the value, the slower the response and the less likely you are to lose focus on your original subject when something passes between the subject and the camera. The lower the value, the quicker the camera is to respond to the subject leaving the focus area by shifting focus to a new subject in the same area.
g5: AF Tracking SensitivityG button ➜ A (Custom Settings menu)
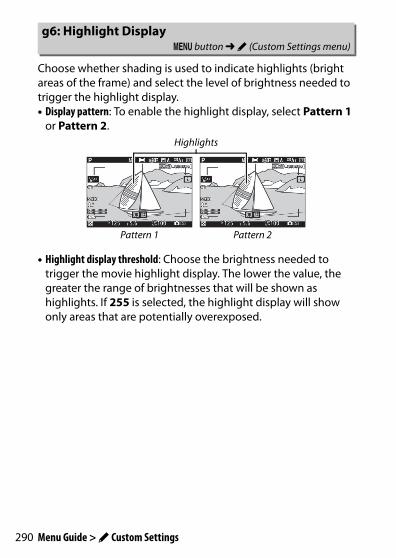
290 Menu Guide > A Custom Settings
Choose whether shading is used to indicate highlights (bright areas of the frame) and select the level of brightness needed to trigger the highlight display.• Display pattern: To enable the highlight display, select Pattern 1
or Pattern 2.
• Highlight display threshold: Choose the brightness needed to trigger the movie highlight display. The lower the value, the greater the range of brightnesses that will be shown as highlights. If 255 is selected, the highlight display will show only areas that are potentially overexposed.
g6: Highlight DisplayG button ➜ A (Custom Settings menu)
Highlights
Pattern 1 Pattern 2
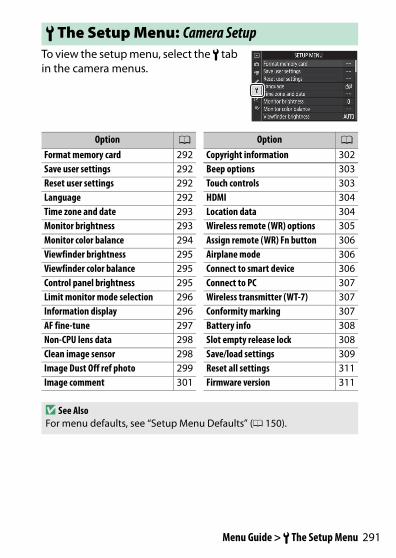
291Menu Guide > B The Setup Menu
To view the setup menu, select the B tab in the camera menus.
B The Setup Menu: Camera Setup
Option 0Format memory card 292Save user settings 292Reset user settings 292Language 292Time zone and date 293Monitor brightness 293Monitor color balance 294Viewfinder brightness 295Viewfinder color balance 295Control panel brightness 295Limit monitor mode selection 296Information display 296AF fine-tune 297Non-CPU lens data 298Clean image sensor 298Image Dust Off ref photo 299Image comment 301
Copyright information 302Beep options 303Touch controls 303HDMI 304Location data 304Wireless remote (WR) options 305Assign remote (WR) Fn button 306Airplane mode 306Connect to smart device 306Connect to PC 307Wireless transmitter (WT-7) 307Conformity marking 307Battery info 308Slot empty release lock 308Save/load settings 309Reset all settings 311Firmware version 311
Option 0
D See AlsoFor menu defaults, see “Setup Menu Defaults” (0 150).
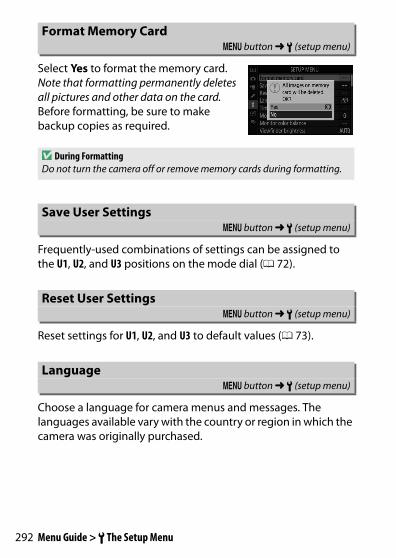
292 Menu Guide > B The Setup Menu
Select Yes to format the memory card. Note that formatting permanently deletes all pictures and other data on the card. Before formatting, be sure to make backup copies as required.
Frequently-used combinations of settings can be assigned to the U1, U2, and U3 positions on the mode dial (0 72).
Reset settings for U1, U2, and U3 to default values (0 73).
Choose a language for camera menus and messages. The languages available vary with the country or region in which the camera was originally purchased.
Format Memory CardG button ➜ B (setup menu)
D During FormattingDo not turn the camera off or remove memory cards during formatting.
Save User SettingsG button ➜ B (setup menu)
Reset User SettingsG button ➜ B (setup menu)
LanguageG button ➜ B (setup menu)

293Menu Guide > B The Setup Menu
Change time zones, set the camera clock, choose the date display order, and turn daylight saving time on or off.
If the clock is reset, a t indicator will be displayed.
Press 1 or 3 to adjust monitor brightness. Choose higher values for increased brightness, lower values for reduced brightness. Note that monitor brightness can only be adjusted when the monitor is the active display; it cannot be adjusted in the “viewfinder only” monitor mode or when your eye is to the viewfinder.
Time Zone and DateG button ➜ B (setup menu)
Option Description
Time zone Choose a time zone. The camera clock is automatically set to the time in the new time zone.
Date and time Set the camera clock.
Date format Choose the order in which the day, month, and year are displayed.
Daylight saving time
Turn daylight saving time on or off. The camera clock will automatically be advanced or set back one hour. The default setting is Off.
Monitor BrightnessG button ➜ B (setup menu)
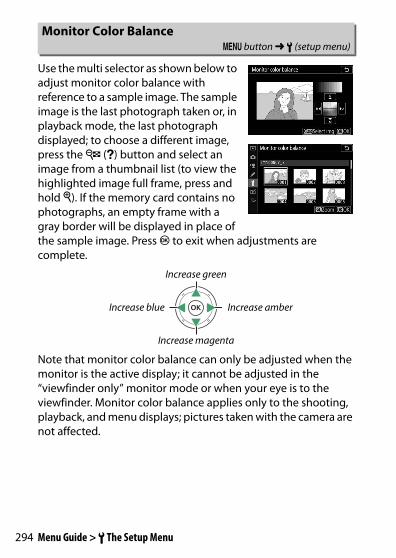
294 Menu Guide > B The Setup Menu
Use the multi selector as shown below to adjust monitor color balance with reference to a sample image. The sample image is the last photograph taken or, in playback mode, the last photograph displayed; to choose a different image, press the W (Q) button and select an image from a thumbnail list (to view the highlighted image full frame, press and hold X). If the memory card contains no photographs, an empty frame with a gray border will be displayed in place of the sample image. Press J to exit when adjustments are complete.
Note that monitor color balance can only be adjusted when the monitor is the active display; it cannot be adjusted in the “viewfinder only” monitor mode or when your eye is to the viewfinder. Monitor color balance applies only to the shooting, playback, and menu displays; pictures taken with the camera are not affected.
Monitor Color BalanceG button ➜ B (setup menu)
Increase green
Increase blue Increase amber
Increase magenta
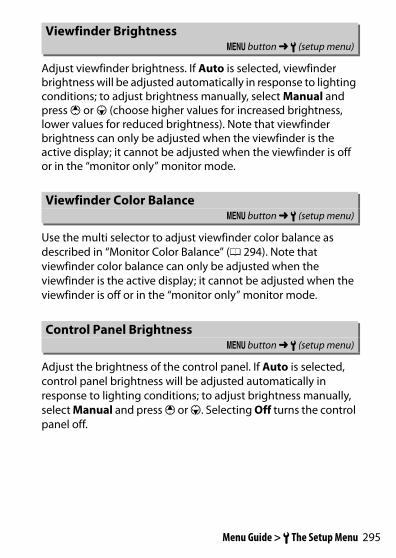
295Menu Guide > B The Setup Menu
Adjust viewfinder brightness. If Auto is selected, viewfinder brightness will be adjusted automatically in response to lighting conditions; to adjust brightness manually, select Manual and press 1 or 3 (choose higher values for increased brightness, lower values for reduced brightness). Note that viewfinder brightness can only be adjusted when the viewfinder is the active display; it cannot be adjusted when the viewfinder is off or in the “monitor only” monitor mode.
Use the multi selector to adjust viewfinder color balance as described in “Monitor Color Balance” (0 294). Note that viewfinder color balance can only be adjusted when the viewfinder is the active display; it cannot be adjusted when the viewfinder is off or in the “monitor only” monitor mode.
Adjust the brightness of the control panel. If Auto is selected, control panel brightness will be adjusted automatically in response to lighting conditions; to adjust brightness manually, select Manual and press 1 or 3. Selecting Off turns the control panel off.
Viewfinder BrightnessG button ➜ B (setup menu)
Viewfinder Color BalanceG button ➜ B (setup menu)
Control Panel BrightnessG button ➜ B (setup menu)

296 Menu Guide > B The Setup Menu
Choose the monitor modes that can be selected using the monitor mode button. Highlight the desired options and press 2 to select or deselect. Press J to save changes when settings are complete.
Adjust the color of the lettering in the information display for ease of viewing. Choose Dark on light (w) to display black letters on a white background or Light on dark (x) to display white letters on a dark background.
Limit Monitor Mode SelectionG button ➜ B (setup menu)
Information DisplayG button ➜ B (setup menu)
Dark on light Light on dark
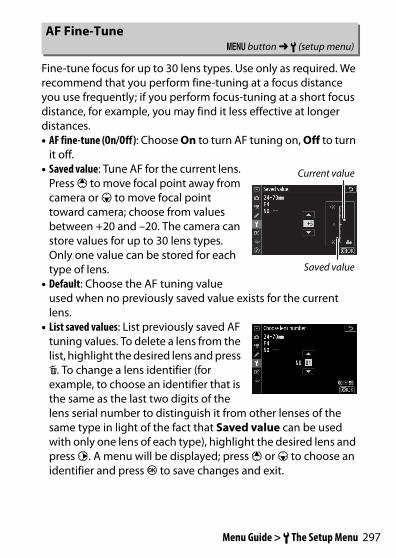
297Menu Guide > B The Setup Menu
Fine-tune focus for up to 30 lens types. Use only as required. We recommend that you perform fine-tuning at a focus distance you use frequently; if you perform focus-tuning at a short focus distance, for example, you may find it less effective at longer distances.• AF fine-tune (On/Off): Choose On to turn AF tuning on, Off to turn
it off.• Saved value: Tune AF for the current lens.
Press 1 to move focal point away from camera or 3 to move focal point toward camera; choose from values between +20 and –20. The camera can store values for up to 30 lens types. Only one value can be stored for each type of lens.
• Default: Choose the AF tuning value used when no previously saved value exists for the current lens.
• List saved values: List previously saved AF tuning values. To delete a lens from the list, highlight the desired lens and press O. To change a lens identifier (for example, to choose an identifier that is the same as the last two digits of the lens serial number to distinguish it from other lenses of the same type in light of the fact that Saved value can be used with only one lens of each type), highlight the desired lens and press 2. A menu will be displayed; press 1 or 3 to choose an identifier and press J to save changes and exit.
AF Fine-TuneG button ➜ B (setup menu)
Current value
Saved value
298 Menu Guide > B The Setup Menu
Non-CPU lenses can be attached via a mount adapter (available separately). Use Non-CPU lens data to record the focal length and maximum aperture of non-CPU lenses, allowing them to be used with on-camera vibration reduction and certain other camera features.• Lens number: Choose a number to identify the lens.• Focal length (mm): Enter the lens focal length.• Maximum aperture: Enter the maximum aperture.
Dirt or dust entering the camera when lenses are exchanged or the body cap is removed may adhere to the image sensor and affect your photographs. The Clean image sensor option vibrates the sensor to remove dust.
Non-CPU Lens DataG button ➜ B (setup menu)
Clean Image SensorG button ➜ B (setup menu)
Option DescriptionClean now Perform image sensor cleaning immediately.
Automatic cleaning
• Clean at shutdown: The image sensor is automatically cleaned during shutdown each time the camera is turned off.
• Cleaning off: Automatic image sensor cleaning off.
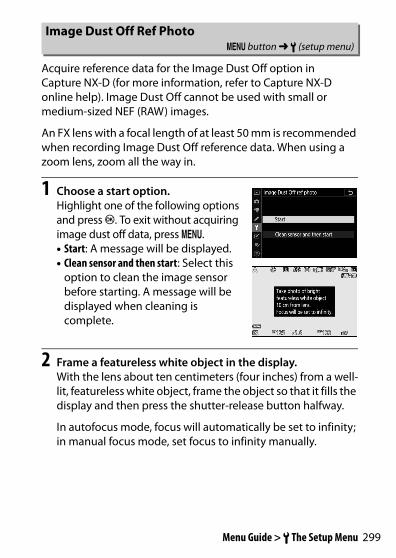
299Menu Guide > B The Setup Menu
Acquire reference data for the Image Dust Off option in Capture NX-D (for more information, refer to Capture NX-D online help). Image Dust Off cannot be used with small or medium-sized NEF (RAW) images.
An FX lens with a focal length of at least 50 mm is recommended when recording Image Dust Off reference data. When using a zoom lens, zoom all the way in.
1 Choose a start option.Highlight one of the following options and press J. To exit without acquiring image dust off data, press G.• Start: A message will be displayed.• Clean sensor and then start: Select this
option to clean the image sensor before starting. A message will be displayed when cleaning is complete.
2 Frame a featureless white object in the display.With the lens about ten centimeters (four inches) from a well-lit, featureless white object, frame the object so that it fills the display and then press the shutter-release button halfway.
In autofocus mode, focus will automatically be set to infinity; in manual focus mode, set focus to infinity manually.
Image Dust Off Ref PhotoG button ➜ B (setup menu)

300 Menu Guide > B The Setup Menu
3 Acquire dust off reference data.Press the shutter-release button the rest of the way down to acquire Image Dust Off reference data. The monitor turns off when the shutter-release button is pressed.
If the reference object is too bright or too dark, the camera may be unable to acquire Image Dust Off reference data and a message will be displayed. Choose another reference object and repeat the process from Step 1.
D Image Sensor CleaningDust off reference data recorded before image sensor cleaning is performed cannot be used with photographs taken after image sensor cleaning is performed. Select Clean sensor and then start only if the dust off reference data will not be used with existing photographs.
D Image Dust Off Reference DataThe same reference data can be used for photographs taken with different lenses or at different apertures. Reference images cannot be viewed using computer imaging software. A grid pattern is displayed when reference images are viewed on the camera.

301Menu Guide > B The Setup Menu
Add a comment to new photographs as they are taken. Comments can be viewed as metadata in ViewNX-i or Capture NX-D. The comment is also visible on the shooting data page in the photo information display. The following options are available:• Input comment: Input a comment as described in “Text Entry”
(0 160). Comments can be up to 36 characters long.• Attach comment: Select this option to
attach the comment to all subsequent photographs. Highlight Attach comment and press 2 to turn it on or off. After choosing the desired setting, press J to exit.
Image CommentG button ➜ B (setup menu)
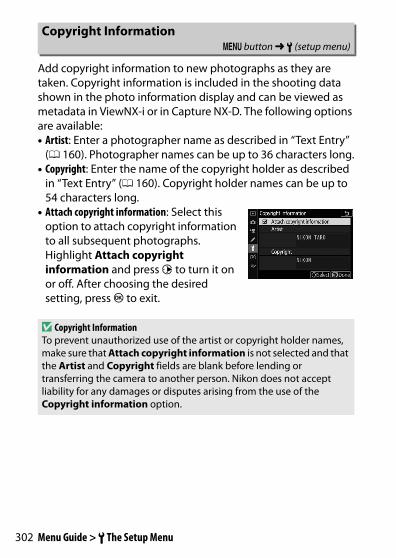
302 Menu Guide > B The Setup Menu
Add copyright information to new photographs as they are taken. Copyright information is included in the shooting data shown in the photo information display and can be viewed as metadata in ViewNX-i or in Capture NX-D. The following options are available:• Artist: Enter a photographer name as described in “Text Entry”
(0 160). Photographer names can be up to 36 characters long.• Copyright: Enter the name of the copyright holder as described
in “Text Entry” (0 160). Copyright holder names can be up to 54 characters long.
• Attach copyright information: Select this option to attach copyright information to all subsequent photographs. Highlight Attach copyright information and press 2 to turn it on or off. After choosing the desired setting, press J to exit.
Copyright InformationG button ➜ B (setup menu)
D Copyright InformationTo prevent unauthorized use of the artist or copyright holder names, make sure that Attach copyright information is not selected and that the Artist and Copyright fields are blank before lending or transferring the camera to another person. Nikon does not accept liability for any damages or disputes arising from the use of the Copyright information option.

303Menu Guide > B The Setup Menu
Choose the pitch and volume of the beep that sounds when:• The self-timer is in operation• Time-lapse recording ends• The camera focuses in photo mode (AF-S selected for focus
mode; Focus selected for Custom Setting a2, AF-S priority selection; and Off selected for Silent photography)
• The touch screen is used for keyboard entry
The Beep options menu contains the following items:• Beep on/off: Turn the beep speaker on or off, or select Off (touch
controls only) to disable the beep during keyboard entry while enabling it for other purposes.
• Volume: Adjust beep volume.• Pitch: Choose the pitch of the beep from High and Low.
Adjust settings for monitor touch controls.• Enable/disable touch controls: Select Disable to prevent accidental
use of touch-screen controls, or Playback only to enable touch-screen controls in playback mode only.
• Full-frame playback flicks: Choose whether the next image in full-frame playback is displayed by flicking left or by flicking right.
Beep OptionsG button ➜ B (setup menu)
Touch ControlsG button ➜ B (setup menu)
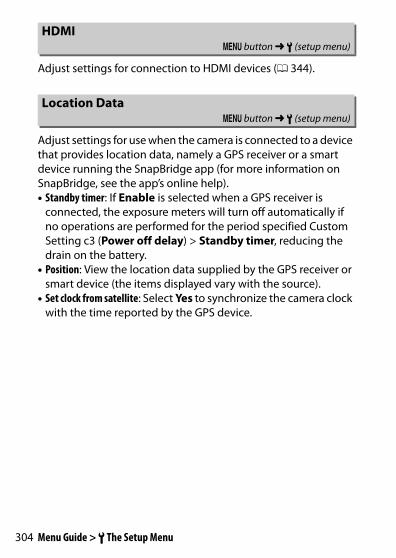
304 Menu Guide > B The Setup Menu
Adjust settings for connection to HDMI devices (0 344).
Adjust settings for use when the camera is connected to a device that provides location data, namely a GPS receiver or a smart device running the SnapBridge app (for more information on SnapBridge, see the app’s online help).• Standby timer: If Enable is selected when a GPS receiver is
connected, the exposure meters will turn off automatically if no operations are performed for the period specified Custom Setting c3 (Power off delay) > Standby timer, reducing the drain on the battery.
• Position: View the location data supplied by the GPS receiver or smart device (the items displayed vary with the source).
• Set clock from satellite: Select Yes to synchronize the camera clock with the time reported by the GPS device.
HDMIG button ➜ B (setup menu)
Location DataG button ➜ B (setup menu)
305Menu Guide > B The Setup Menu
Adjust settings for optional WR-R10 wireless remote controllers and for optional radio-controlled flash units that support Advanced Wireless Lighting.
LED LampEnable or disable the status LEDs on a WR-R10 wireless remote controller mounted on the camera. For more information, see the documentation supplied with the wireless remote controller.
Link ModeChoose a link mode for WR-R10 wireless remote controllers mounted on other cameras or radio-controlled flash units that support Advanced Wireless Lighting. Be sure that the same mode is selected for the other devices.• Pairing: To pair the camera with a WR-R10, mount the WR-R10
on the camera and press the pairing button.• PIN: Connect using a four-digit PIN
code. Press 4 or 2 to highlight digits and press 1 or 3 to change, then press J to enter and display the selected PIN.
Regardless of the option selected for Link mode, signals from paired wireless remote controllers will always be received by the WR-R10. Users of the WR-1 wireless remote controller will need to select pairing as the WR-1 link mode.
Wireless Remote (WR) OptionsG button ➜ B (setup menu)
D The WR-R10 Wireless Remote ControllerBe sure the firmware for the WR-R10 has been updated to the latest version (version 3.0 or later). For information on firmware updates, see the Nikon website for your area.

306 Menu Guide > B The Setup Menu
Choose the role played by the Fn button on optional wireless remote controllers equipped with an Fn button. See Custom Setting f2 (Custom control assignment) for more information.
Select Enable to disable the camera’s built-in Bluetooth and Wi-Fi functions. The Bluetooth and Wi-Fi functions of optional peripheral devices connected to the camera can only be disabled by disconnecting the devices.
Adjust settings for connection to a smart device. For information on connecting to smart devices, see SnapBridge online help or the Network Guide.
Assign Remote (WR) Fn ButtonG button ➜ B (setup menu)
Option
A AF-ON
F AF lock only
D AE lock (Reset on release)
C AE lock only
B AE/AF lock
r FV lock
h cDisable/enable
q Preview
4 + NEF (RAW)
None
Option
Airplane ModeG button ➜ B (setup menu)
Connect to Smart DeviceG button ➜ B (setup menu)
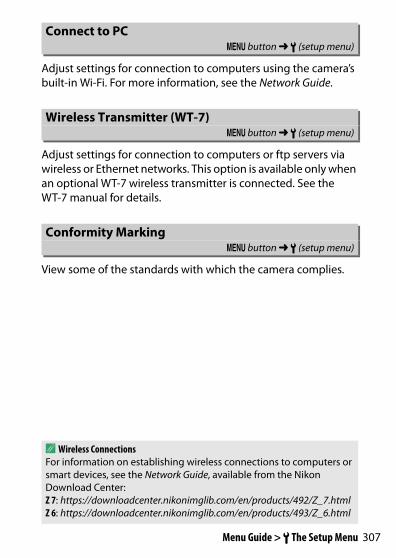
307Menu Guide > B The Setup Menu
Adjust settings for connection to computers using the camera’s built-in Wi-Fi. For more information, see the Network Guide.
Adjust settings for connection to computers or ftp servers via wireless or Ethernet networks. This option is available only when an optional WT-7 wireless transmitter is connected. See the WT-7 manual for details.
View some of the standards with which the camera complies.
Connect to PCG button ➜ B (setup menu)
Wireless Transmitter (WT-7)G button ➜ B (setup menu)
Conformity MarkingG button ➜ B (setup menu)
A Wireless ConnectionsFor information on establishing wireless connections to computers or smart devices, see the Network Guide, available from the Nikon Download Center:Z 7: https://downloadcenter.nikonimglib.com/en/products/492/Z_7.htmlZ 6: https://downloadcenter.nikonimglib.com/en/products/493/Z_6.html

308 Menu Guide > B The Setup Menu
View information on the battery currently inserted in the camera.• Charge: The current battery level
expressed as a percentage.• No. of shots: The number of times the
shutter has been released with the current battery since the battery was last charged. Note that the camera may sometimes release the shutter without recording a photograph, for example when measuring preset white balance.
• Battery age: A five-level display showing battery age. 0 (k) indicates that battery performance is unimpaired, 4 (l) that the battery has reached the end of its charging life and should be replaced. Note that fresh batteries charged at temperatures under about 5 °C (41 °F) may show a temporary drop in charging life; the battery age display will however return to normal once the battery has been recharged at a temperature of about 20 °C (68 °F) or higher.
Selecting Enable release allows the shutter to be released when no memory card is inserted, although no pictures will be recorded (they will however be displayed in demo mode). If Release locked is selected, the shutter-release button is only enabled when a memory card is inserted in the camera.
Battery InfoG button ➜ B (setup menu)
Slot Empty Release LockG button ➜ B (setup menu)

309Menu Guide > B The Setup Menu
Select Save settings to save the following settings to the memory card (if the card is full, an error will be displayed). Use this option to share settings among cameras of the same model.
Save/Load SettingsG button ➜ B (setup menu)
Playback menuPlayback display optionsImage reviewAfter deleteAfter burst, showRotate tall
Photo shooting menuFile namingChoose image areaImage qualityImage sizeNEF (RAW) recordingISO sensitivity settingsWhite balanceSet Picture Control (Custom Picture Controls are saved as Auto)Color spaceActive D-LightingLong exposure NRHigh ISO NRVignette controlDiffraction compensationAuto distortion control
Photo shooting menu (continued)Flicker reduction shootingMeteringFlash controlFlash modeFlash compensationFocus modeAF-area modeVibration reduction (settings vary with lens)Auto bracketingSilent photography
Movie shooting menuFile namingChoose image areaFrame size/frame rateMovie qualityMovie file typeISO sensitivity settingsWhite balanceSet Picture Control (Custom Picture Controls are saved as Auto)Active D-Lighting

310 Menu Guide > B The Setup Menu
Settings saved using the camera or other cameras of the same model can be restored by selecting Load settings. Note that Save/load settings is only available when a memory card is inserted in the camera, and that the Load settings option is only available if the card contains saved settings.
Movie shooting menu (continued)High ISO NRVignette controlDiffraction compensationAuto distortion controlFlicker reductionMeteringFocus modeAF-area modeVibration reduction (settings vary with lens)Electronic VRMicrophone sensitivityAttenuatorFrequency responseWind noise reductionHeadphone volumeTimecode (excepting Timecode origin)
Custom SettingsAll Custom Settings except d3 (Sync. release mode options)
Setup menuLanguageTime zone and date (excepting Date and time)Limit monitor mode selectionInformation displayNon-CPU lens dataClean image sensorImage commentCopyright informationBeep optionsTouch controlsHDMILocation data (excepting Position)Wireless remote (WR) optionsAssign remote (WR) Fn buttonSlot empty release lock
D Saved SettingsSettings are saved in a file with a name beginning with “NCSET” and ending with three characters that differ from camera to camera. The camera will not be able to load settings if the file name is changed.
311Menu Guide > B The Setup Menu
Reset all settings except Language and Time zone and date to their default values. Copyright information and other user-generated entries are also reset. We recommend that you save settings using the Save/load settings option in the setup menu before performing a reset.
View the current camera firmware version.
Reset All SettingsG button ➜ B (setup menu)
Firmware VersionG button ➜ B (setup menu)

312 Menu Guide > N The Retouch Menu
To view the retouch menu, select the N tab in the camera menus.
The options in the retouch menu are used to create trimmed or retouched copies of existing pictures. The retouch menu is only displayed when a memory card containing photographs is inserted in the camera.
1 Can only be selected by pressing G and selecting N tab.2 Can only be displayed by pressing i and selecting Retouch in full-frame playback when a
retouched image or original is displayed.
N The Retouch Menu: Creating Retouched Copies
Option 0
7 NEF (RAW) processing 315
k Trim 318
8 Resize 319
i D-Lighting 321
j Red-eye correction 321
Z Straighten 322
a Distortion control 322
e Perspective control 323
o Image overlay 1 324
9 Trim movie 327
p Side-by-side comparison 2 327
Option 0

313Menu Guide > N The Retouch Menu
Creating Retouched CopiesTo create a retouched copy:
1 Select an item in the retouch menu.Press 1 or 3 to highlight an item, 2 to select.
2 Select a picture.Highlight a picture and press J. To view the highlighted picture full screen, press and hold the X button.
3 Select retouch options.For more information, see the section for the selected item. To exit without creating a retouched copy, press G.
D RetouchIn the case of images recorded at image quality settings of NEF + JPEG, only the NEF (RAW) image will be retouched. The camera may not be able to display or retouch images created with other devices.
D Power off DelayThe display will turn off and the operation will be cancelled if no actions are performed for a brief period. Any unsaved changes will be lost. To increase the time the display remains on, choose a longer menu display time using Custom Setting c3 (Power off delay) > Menus.
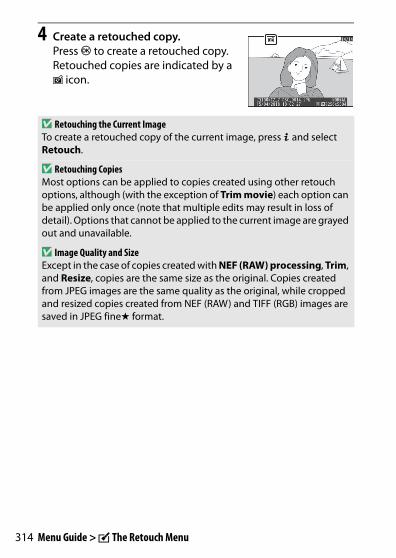
314 Menu Guide > N The Retouch Menu
4 Create a retouched copy.Press J to create a retouched copy. Retouched copies are indicated by a p icon.
D Retouching the Current ImageTo create a retouched copy of the current image, press i and select Retouch.
D Retouching CopiesMost options can be applied to copies created using other retouch options, although (with the exception of Trim movie) each option can be applied only once (note that multiple edits may result in loss of detail). Options that cannot be applied to the current image are grayed out and unavailable.
D Image Quality and SizeExcept in the case of copies created with NEF (RAW) processing, Trim, and Resize, copies are the same size as the original. Copies created from JPEG images are the same quality as the original, while cropped and resized copies created from NEF (RAW) and TIFF (RGB) images are saved in JPEG finem format.

315Menu Guide > N The Retouch Menu
Create JPEG copies of NEF (RAW) photographs. If you displayed the retouch menu by pressing the G button, you can use this option to copy multiple images.
1 Select NEF (RAW) processing.Highlight NEF (RAW) processing in the retouch menu and press 2.
2 Choose how images are selected.Choose from the following options:• Select image(s): Select one or more
images manually.• Select date: Create JPEG copies of all
the NEF (RAW) images taken on selected dates.
• Select all images: Create JPEG copies of all the NEF (RAW) images on the memory card (proceed to Step 4).
NEF (RAW) ProcessingG button ➜ N (retouch menu)
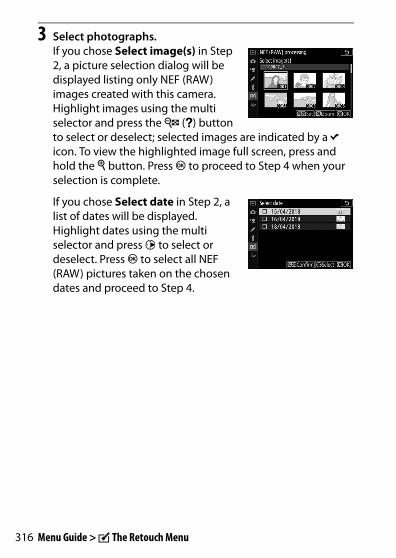
316 Menu Guide > N The Retouch Menu
3 Select photographs.If you chose Select image(s) in Step 2, a picture selection dialog will be displayed listing only NEF (RAW) images created with this camera. Highlight images using the multi selector and press the W (Q) button to select or deselect; selected images are indicated by a L icon. To view the highlighted image full screen, press and hold the X button. Press J to proceed to Step 4 when your selection is complete.
If you chose Select date in Step 2, a list of dates will be displayed. Highlight dates using the multi selector and press 2 to select or deselect. Press J to select all NEF (RAW) pictures taken on the chosen dates and proceed to Step 4.

317Menu Guide > N The Retouch Menu
4 Choose settings for the JPEG copies.Adjust the settings listed below, or select Original to use the setting in effect when the photograph was taken (the original settings are listed below the preview). Note that exposure compensation can only be set to values between −2 and +2 EV.
5 Copy the photographs.Highlight EXE and press J to create a JPEG copy of the selected photograph (if multiple photos are selected, a confirmation dialog will be displayed; highlight Yes and press J to create JPEG copies of the selected photos). To exit without copying the photographs, press the K button.
4321
5
9876
10
1 Image quality........................... 102
2 Image size ................................. 104
3 White balance......................61, 96
4 Exposure compensation...........79
5 Set Picture Control............91, 175
6 High ISO NR ..............................181
7 Color space ...............................180
8 Vignette control.......................182
9 Active D-Lighting ....................108
10 Diffraction compensation .....182
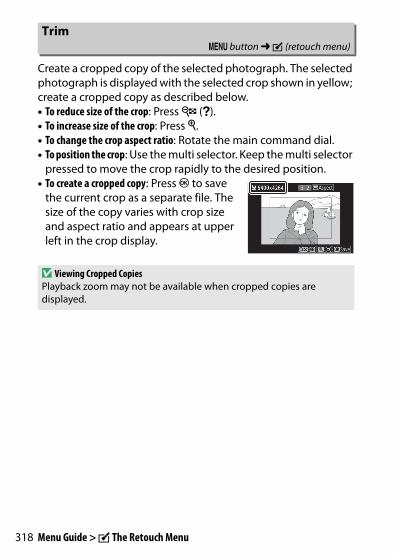
318 Menu Guide > N The Retouch Menu
Create a cropped copy of the selected photograph. The selected photograph is displayed with the selected crop shown in yellow; create a cropped copy as described below.• To reduce size of the crop: Press W (Q).• To increase size of the crop: Press X.• To change the crop aspect ratio: Rotate the main command dial.• To position the crop: Use the multi selector. Keep the multi selector
pressed to move the crop rapidly to the desired position.• To create a cropped copy: Press J to save
the current crop as a separate file. The size of the copy varies with crop size and aspect ratio and appears at upper left in the crop display.
TrimG button ➜ N (retouch menu)
D Viewing Cropped CopiesPlayback zoom may not be available when cropped copies are displayed.

319Menu Guide > N The Retouch Menu
Use the Resize option in the camera menu N tab to create small copies of selected photographs.
1 Select Resize.Highlight Resize in the N tab and press 2.
2 Choose a size.Highlight Choose size and press 2.
Highlight the desired size and press J.
ResizeG button ➜ N (retouch menu)
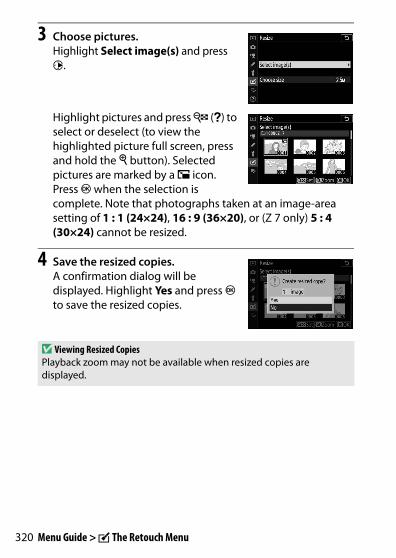
320 Menu Guide > N The Retouch Menu
3 Choose pictures.Highlight Select image(s) and press 2.
Highlight pictures and press W (Q) to select or deselect (to view the highlighted picture full screen, press and hold the X button). Selected pictures are marked by a 8 icon. Press J when the selection is complete. Note that photographs taken at an image-area setting of 1 : 1 (24×24), 16 : 9 (36×20), or (Z 7 only) 5 : 4 (30×24) cannot be resized.
4 Save the resized copies.A confirmation dialog will be displayed. Highlight Yes and press J to save the resized copies.
D Viewing Resized Copies Playback zoom may not be available when resized copies are displayed.
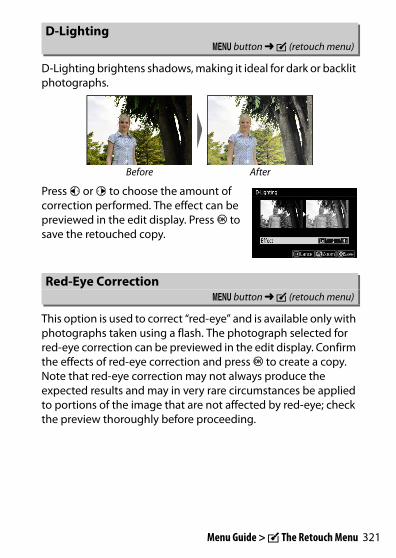
321Menu Guide > N The Retouch Menu
D-Lighting brightens shadows, making it ideal for dark or backlit photographs.
Press 4 or 2 to choose the amount of correction performed. The effect can be previewed in the edit display. Press J to save the retouched copy.
This option is used to correct “red-eye” and is available only with photographs taken using a flash. The photograph selected for red-eye correction can be previewed in the edit display. Confirm the effects of red-eye correction and press J to create a copy. Note that red-eye correction may not always produce the expected results and may in very rare circumstances be applied to portions of the image that are not affected by red-eye; check the preview thoroughly before proceeding.
D-LightingG button ➜ N (retouch menu)
Before After
Red-Eye CorrectionG button ➜ N (retouch menu)

322 Menu Guide > N The Retouch Menu
Create a straightened copy of the selected image. Press 2 to rotate the image clockwise by up to five degrees in increments of approximately 0.25 degrees, 4 to rotate it counter-clockwise (the effect can be previewed in the edit display; note that edges of the image will be trimmed to create a square copy). Press J to save the retouched copy.
Create copies with reduced peripheral distortion. Select Auto to let the camera correct distortion automatically and then make fine adjustments using the multi selector, or select Manual to reduce distortion manually. Note that Auto is not available with photos taken using auto distortion control. Press 2 to reduce barrel distortion, 4 to reduce pincushion distortion (the effect can be previewed in the edit display; note that greater amounts of distortion control result in more of the edges being cropped out). Press J to save the retouched copy.
StraightenG button ➜ N (retouch menu)
Distortion ControlG button ➜ N (retouch menu)

323Menu Guide > N The Retouch Menu
Create copies that reduce the effects of perspective in photos taken looking up from the base of a tall object. Use the multi selector to adjust perspective (note that greater amounts of perspective control result in more of the edges being cropped out). The results can be previewed in the edit display. Press J to save the retouched copy.
Perspective ControlG button ➜ N (retouch menu)
Before After
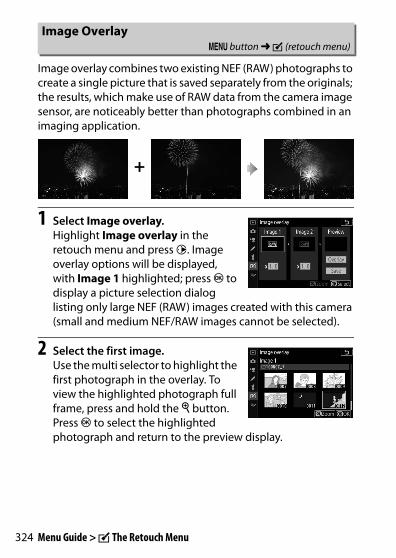
324 Menu Guide > N The Retouch Menu
Image overlay combines two existing NEF (RAW) photographs to create a single picture that is saved separately from the originals; the results, which make use of RAW data from the camera image sensor, are noticeably better than photographs combined in an imaging application.
1 Select Image overlay.Highlight Image overlay in the retouch menu and press 2. Image overlay options will be displayed, with Image 1 highlighted; press J to display a picture selection dialog listing only large NEF (RAW) images created with this camera (small and medium NEF/RAW images cannot be selected).
2 Select the first image.Use the multi selector to highlight the first photograph in the overlay. To view the highlighted photograph full frame, press and hold the X button. Press J to select the highlighted photograph and return to the preview display.
Image OverlayG button ➜ N (retouch menu)
+

325Menu Guide > N The Retouch Menu
3 Select the second image.The selected image will appear as Image 1. Highlight Image 2 and press J, then select the second photo as described in Step 2.
4 Adjust gain.Highlight Image 1 or Image 2 and optimize exposure for the overlay by pressing 1 or 3 to select the gain from values between 0.1 and 2.0. Repeat for the second image. The default value is 1.0; select 0.5 to halve gain or 2.0 to double it. The effects of gain are visible in the Preview column.
5 Preview the overlay.To preview the composition, press 4 or 2 to place the cursor in the Preview column, then press 1 or 3 to highlight Overlay and press J (note that colors and brightness in the preview may differ from the final image). To save the overlay without displaying a preview, select Save. To return to Step 4 and select new photos or adjust gain, press W (Q).
6 Save the overlay.Press J while the preview is displayed to save the overlay. After an overlay is created, the resulting image will be displayed full-frame.

326 Menu Guide > N The Retouch Menu
D Image OverlayOnly large NEF (RAW) photographs with the same image area and bit-depth can be combined. The overlay is saved in JPEG finem format and has the same photo info (including date of recording, metering, shutter speed, aperture, shooting mode, exposure compensation, focal length, and image orientation) and values for white balance and Picture Control as the photograph selected for Image 1. The current image comment is appended to the overlay when it is saved; copyright information, however, is not copied.
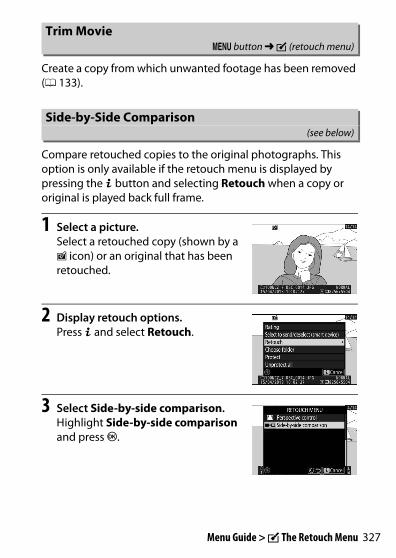
327Menu Guide > N The Retouch Menu
Create a copy from which unwanted footage has been removed (0 133).
Compare retouched copies to the original photographs. This option is only available if the retouch menu is displayed by pressing the i button and selecting Retouch when a copy or original is played back full frame.
1 Select a picture.Select a retouched copy (shown by a p icon) or an original that has been retouched.
2 Display retouch options.Press i and select Retouch.
3 Select Side-by-side comparison.Highlight Side-by-side comparison and press J.
Trim MovieG button ➜ N (retouch menu)
Side-by-Side Comparison(see below)
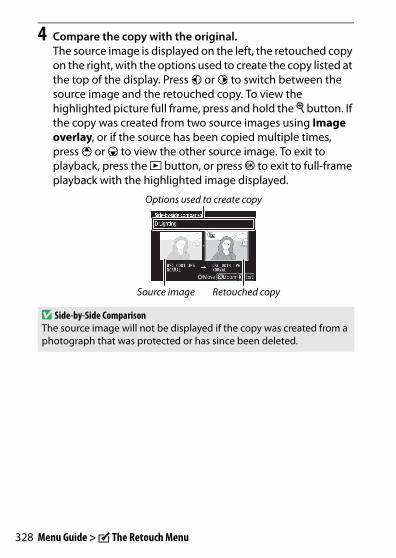
328 Menu Guide > N The Retouch Menu
4 Compare the copy with the original.The source image is displayed on the left, the retouched copy on the right, with the options used to create the copy listed at the top of the display. Press 4 or 2 to switch between the source image and the retouched copy. To view the highlighted picture full frame, press and hold the X button. If the copy was created from two source images using Image overlay, or if the source has been copied multiple times, press 1 or 3 to view the other source image. To exit to playback, press the K button, or press J to exit to full-frame playback with the highlighted image displayed.
Options used to create copy
Source image Retouched copy
D Side-by-Side ComparisonThe source image will not be displayed if the copy was created from a photograph that was protected or has since been deleted.

329Menu Guide > O My Menu/m Recent Settings
To view My Menu, select the O tab in the camera menus.
The MY MENU option can be used to create and edit a customized list of up to 20 items from the playback, photo shooting, movie shooting, Custom Settings, setup, and retouch menus. If desired, recent settings can be displayed in place of My Menu.
Options can be added, deleted, and reordered as described below.
Adding Options to My Menu
1 Select Add items.In My Menu (O), highlight Add items and press 2.
2 Select a menu.Highlight the name of the menu containing the option you wish to add and press 2.
O My Menu/m Recent Settings
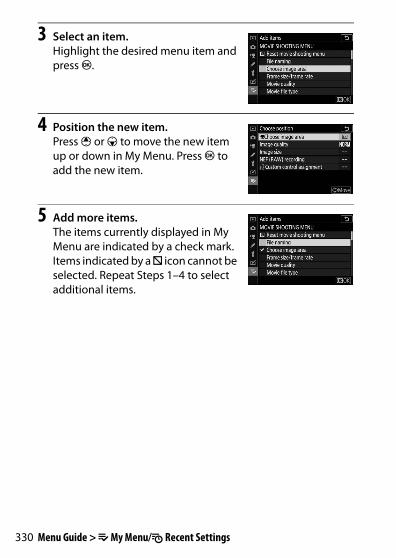
330 Menu Guide > O My Menu/m Recent Settings
3 Select an item.Highlight the desired menu item and press J.
4 Position the new item.Press 1 or 3 to move the new item up or down in My Menu. Press J to add the new item.
5 Add more items.The items currently displayed in My Menu are indicated by a check mark. Items indicated by a V icon cannot be selected. Repeat Steps 1–4 to select additional items.
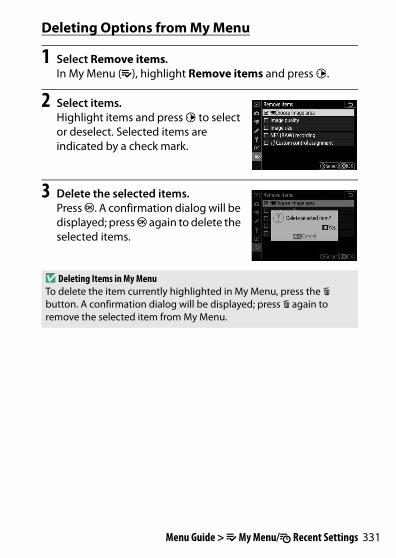
331Menu Guide > O My Menu/m Recent Settings
Deleting Options from My Menu
1 Select Remove items.In My Menu (O), highlight Remove items and press 2.
2 Select items.Highlight items and press 2 to select or deselect. Selected items are indicated by a check mark.
3 Delete the selected items.Press J. A confirmation dialog will be displayed; press J again to delete the selected items.
D Deleting Items in My MenuTo delete the item currently highlighted in My Menu, press the O button. A confirmation dialog will be displayed; press O again to remove the selected item from My Menu.
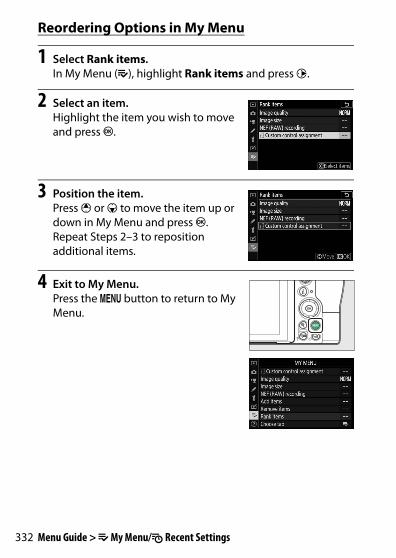
332 Menu Guide > O My Menu/m Recent Settings
Reordering Options in My Menu
1 Select Rank items.In My Menu (O), highlight Rank items and press 2.
2 Select an item.Highlight the item you wish to move and press J.
3 Position the item.Press 1 or 3 to move the item up or down in My Menu and press J. Repeat Steps 2–3 to reposition additional items.
4 Exit to My Menu.Press the G button to return to My Menu.
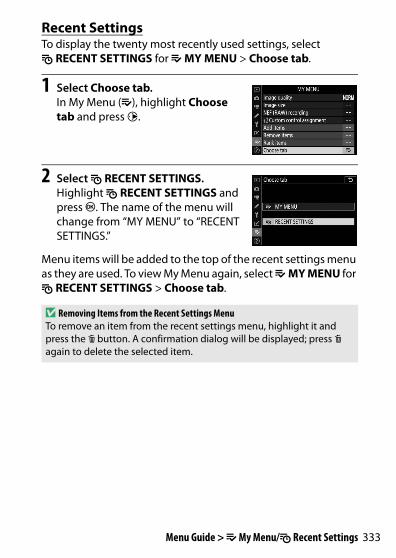
333Menu Guide > O My Menu/m Recent Settings
Recent SettingsTo display the twenty most recently used settings, select m RECENT SETTINGS for O MY MENU > Choose tab.
1 Select Choose tab.In My Menu (O), highlight Choose tab and press 2.
2 Select m RECENT SETTINGS.Highlight m RECENT SETTINGS and press J. The name of the menu will change from “MY MENU” to “RECENT SETTINGS.”
Menu items will be added to the top of the recent settings menu as they are used. To view My Menu again, select O MY MENU for m RECENT SETTINGS > Choose tab.
D Removing Items from the Recent Settings MenuTo remove an item from the recent settings menu, highlight it and press the O button. A confirmation dialog will be displayed; press O again to delete the selected item.
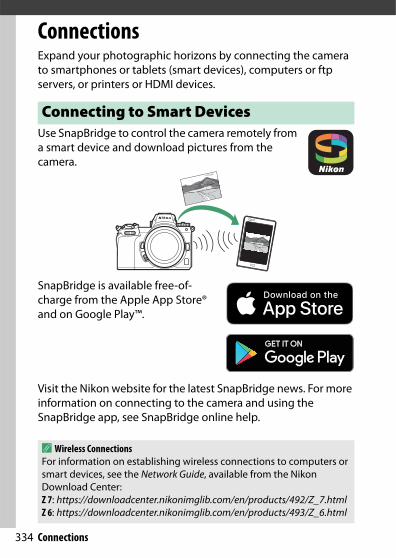
334 Connections
ConnectionsExpand your photographic horizons by connecting the camera to smartphones or tablets (smart devices), computers or ftp servers, or printers or HDMI devices.
Use SnapBridge to control the camera remotely from a smart device and download pictures from the camera.
SnapBridge is available free-of-charge from the Apple App Store® and on Google Play™.
Visit the Nikon website for the latest SnapBridge news. For more information on connecting to the camera and using the SnapBridge app, see SnapBridge online help.
Connecting to Smart Devices
A Wireless ConnectionsFor information on establishing wireless connections to computers or smart devices, see the Network Guide, available from the Nikon Download Center:Z 7: https://downloadcenter.nikonimglib.com/en/products/492/Z_7.htmlZ 6: https://downloadcenter.nikonimglib.com/en/products/493/Z_6.html

335Connections
To upload pictures to a computer, connect the camera via a wireless network or using the supplied USB cable.
Connecting via USBIf the supplied USB cable is used to connect the camera to a computer running ViewNX-i, you can copy pictures to the computer, where they can be viewed, edited, and organized.
❚❚ Installing ViewNX-iDownload the ViewNX-i installer from the following website and follow the on-screen instructions to complete installation (existing users should be sure to download the latest version, as earlier versions may not support the camera). An Internet connection is required. For system requirements and other information, see the Nikon website for your region.https://downloadcenter.nikonimglib.com/
Connecting to Computers
D Capture NX-DUse Nikon’s Capture NX-D software to fine-tune photos or to change settings for NEF (RAW) pictures and save them in other formats. Capture NX-D is available for download from:https://downloadcenter.nikonimglib.com/

336 Connections
❚❚ Copying Pictures to the ComputerFor detailed instructions, see the online help for ViewNX-i.
1 Connect the USB cable.After turning the camera off and ensuring that a memory card is inserted, connect the supplied USB cable as shown.
D USB HubsConnect the camera directly to the computer; do not connect the cable via a USB hub or keyboard.
D Use a Reliable Power SourceTo ensure that data transfer is not interrupted, be sure the camera battery is fully charged.
D Connecting CablesBe sure the camera is off when connecting or disconnecting interface cables. Do not use force or attempt to insert the connectors at an angle.
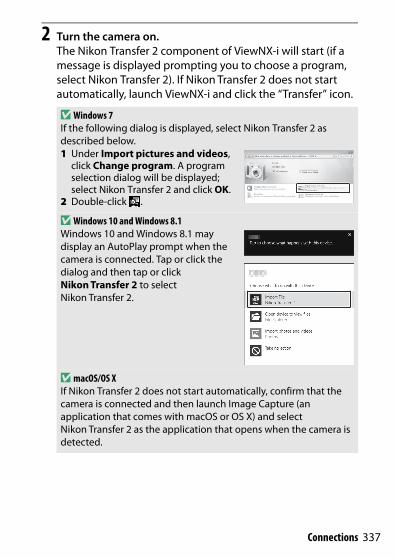
337Connections
2 Turn the camera on.The Nikon Transfer 2 component of ViewNX-i will start (if a message is displayed prompting you to choose a program, select Nikon Transfer 2). If Nikon Transfer 2 does not start automatically, launch ViewNX-i and click the “Transfer” icon.
D Windows 7If the following dialog is displayed, select Nikon Transfer 2 as described below.1 Under Import pictures and videos,
click Change program. A program selection dialog will be displayed; select Nikon Transfer 2 and click OK.
2 Double-click .
D Windows 10 and Windows 8.1Windows 10 and Windows 8.1 may display an AutoPlay prompt when the camera is connected. Tap or click the dialog and then tap or click Nikon Transfer 2 to select Nikon Transfer 2.
D macOS/OS XIf Nikon Transfer 2 does not start automatically, confirm that the camera is connected and then launch Image Capture (an application that comes with macOS or OS X) and select Nikon Transfer 2 as the application that opens when the camera is detected.

338 Connections
3 Click Start Transfer.Pictures on the memory card will be copied to the computer.
4 Turn the camera off.Turn the camera off and disconnect the USB cable when transfer is complete.
Click Start Transfer
D Transferring MoviesDo not attempt to transfer movies from the memory card while it is inserted in another camera. Doing so could result in the movies being deleted without being transferred.
D During TransferDo not turn the camera off or disconnect the USB cable while transfer is in progress.

339Connections
Wireless Networks (Wi-Fi)The following methods can be used to connect to a computer via Wi-Fi. For more information, see the Network Guide.
❚❚ Built-in Wi-FiUse the Connect to PC option in the camera setup menu to connect to computers either directly or via a wireless router.
❚❚ The WT-7 Wireless TransmitterWhen the camera is connected to an optional WT-7 wireless transmitter, the Wireless transmitter (WT-7) option in the setup menu can be used for connection to computers or ftp servers.
Use the WT-7 for connection to Ethernet networks and for more reliable connections to wireless networks. With Camera Control Pro 2 (available separately), the camera can be controlled remotely and pictures saved directly to the computer as they are taken.
Connection via a wireless router Direct wireless connection
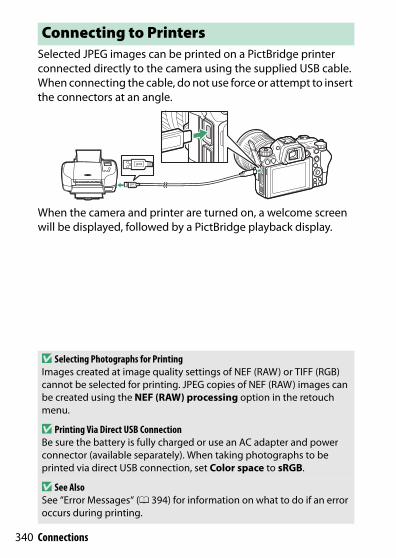
340 Connections
Selected JPEG images can be printed on a PictBridge printer connected directly to the camera using the supplied USB cable. When connecting the cable, do not use force or attempt to insert the connectors at an angle.
When the camera and printer are turned on, a welcome screen will be displayed, followed by a PictBridge playback display.
Connecting to Printers
D Selecting Photographs for PrintingImages created at image quality settings of NEF (RAW) or TIFF (RGB) cannot be selected for printing. JPEG copies of NEF (RAW) images can be created using the NEF (RAW) processing option in the retouch menu.
D Printing Via Direct USB ConnectionBe sure the battery is fully charged or use an AC adapter and power connector (available separately). When taking photographs to be printed via direct USB connection, set Color space to sRGB.
D See AlsoSee “Error Messages“ (0 394) for information on what to do if an error occurs during printing.
341Connections
Printing Pictures One at a Time
1 Display the desired picture.Press 4 or 2 to view additional pictures. Press the X button to zoom in on the current frame (press K to exit zoom). To view six pictures at a time, press the W (Q) button. Use the multi selector to highlight pictures, or press the X button to display the highlighted picture full frame.
2 Adjust printing options.Press J to display the following items, then press 1 or 3 to highlight an item and press 2 to view options (only options supported by the current printer are listed; to use the default option, select Printer default). After selecting an option, press J to return to the printer settings menu.• Page size: Choose a page size.• No. of copies: This option is listed only when pictures are
printed one at a time. Press 1 or 3 to choose number of copies (maximum 99).
• Border: Choose whether to frame photos in white borders.• Print date: Choose whether to print the times and dates of
recording on photos.• Cropping: This option is listed only when pictures are printed
one at a time. To exit without cropping, highlight No cropping and press J. To crop the current picture, highlight Crop and press 2. A crop selection dialog will be displayed; press X to increase the size of the crop, W (Q) to decrease, and use the multi selector to position the crop. Note that print quality may drop if small crops are printed at large sizes.

342 Connections
3 Start printing.Select Start printing and press J to start printing. To cancel printing before all copies have been printed, press J.
Printing Multiple Pictures
1 Display the PictBridge menu.Press the G button in the PictBridge playback display.
2 Choose an option.Highlight one of the following options and press 2.• Print select: Select pictures for printing. Press 4 or 2 to scroll
through pictures (to view the highlighted picture full screen, press and hold the X button) and press 1 or 3 to choose the number of prints. To deselect a picture, set the number of prints to zero.
• Index print: Create an index print of all JPEG pictures on the memory card. Note that if the memory card contains more than 256 pictures, only the first 256 images will be printed. A warning will be displayed if the page size selected in Step 3 is too small for an index print.
3 Adjust printing options.Adjust printer settings as described in Step 2 of “Printing Pictures One at a Time” (0 341).
4 Start printing.Select Start printing and press J to start printing. To cancel printing before all copies have been printed, press J.

343Connections
The optional High-Definition Multimedia Interface (HDMI) cable (0 411) or a type C HDMI cable (available separately from third-party suppliers) can be used to connect the camera to high-definition video devices. Always turn the camera off before connecting or disconnecting an HDMI cable.
❚❚ HDMI DisplaysAfter connecting the camera to an HDMI television or other display, tune the device to the HDMI channel, then turn the camera on and press the K button. During playback, images will be displayed on the television screen. Volume can be adjusted using television controls; the camera controls cannot be used.
Connecting to HDMI Devices
Connect to camera
Connect to high-definition device (choose cable with connector for HDMI device)

344 Connections
HDMI RecordersThe camera can record video directly to connected HDMI recorders. Some recorders will even start and stop recording in response to camera controls. Use the HDMI option in the setup menu to adjust settings for HDMI output.• Output Resolution: Choose the format for images output to the
HDMI device. If Auto is selected, the camera will automatically select the appropriate format.
• Advanced: Adjust the settings below.- Output range: Auto is recommended in most situations. If the
camera is unable to determine the correct RGB video signal output range for the HDMI device, you can choose Limited range for devices with an RGB video signal input range of 16 to 235 or Full range for devices with an RGB video signal input range of 0 to 255. Choose Limited range if you notice a loss of detail in shadows, Full range if shadows are “washed out” or too bright.

345Connections
- External recording control: Enabling external recording control allows camera controls to be used to start and stop recording when the camera is connected via HDMI to a third-party recorder that supports the Atomos Open Protocol (Atomos SHOGUN, NINJA, or SUMO-series Monitor recorders). An icon will be displayed in the camera monitor: A is displayed in movie live view, while B is displayed during movie recording. During recording, check the recorder and recorder display to ensure that footage is being saved to the device (note that the footage output to the device may be disrupted while external recording control is in effect). The camera display will turn off automatically when the standby timer expires, ending HDMI output; when recording movies to an external device, select Standby timer for Custom Setting c3 (Power off delay) and choose No limit or a time longer than the anticipated recording time. See the manual provided with the recorder for more information on device features and operation.
- Output data depth: Choose from 8 bit and 10 bit.
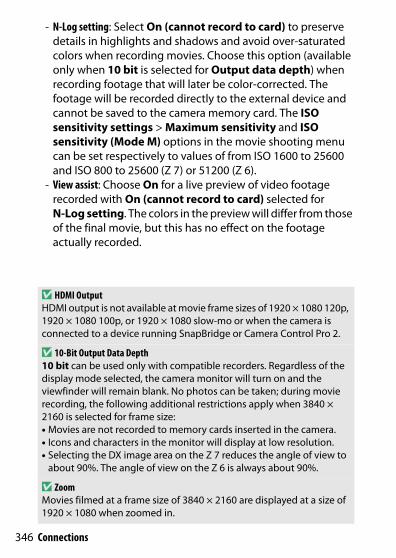
346 Connections
- N-Log setting: Select On (cannot record to card) to preserve details in highlights and shadows and avoid over-saturated colors when recording movies. Choose this option (available only when 10 bit is selected for Output data depth) when recording footage that will later be color-corrected. The footage will be recorded directly to the external device and cannot be saved to the camera memory card. The ISO sensitivity settings > Maximum sensitivity and ISO sensitivity (Mode M) options in the movie shooting menu can be set respectively to values of from ISO 1600 to 25600 and ISO 800 to 25600 (Z 7) or 51200 (Z 6).
- View assist: Choose On for a live preview of video footage recorded with On (cannot record to card) selected for N-Log setting. The colors in the preview will differ from those of the final movie, but this has no effect on the footage actually recorded.
D HDMI OutputHDMI output is not available at movie frame sizes of 1920 × 1080 120p, 1920 × 1080 100p, or 1920 × 1080 slow-mo or when the camera is connected to a device running SnapBridge or Camera Control Pro 2.
D 10-Bit Output Data Depth10 bit can be used only with compatible recorders. Regardless of the display mode selected, the camera monitor will turn on and the viewfinder will remain blank. No photos can be taken; during movie recording, the following additional restrictions apply when 3840 × 2160 is selected for frame size:• Movies are not recorded to memory cards inserted in the camera.• Icons and characters in the monitor will display at low resolution.• Selecting the DX image area on the Z 7 reduces the angle of view to
about 90%. The angle of view on the Z 6 is always about 90%.
D ZoomMovies filmed at a frame size of 3840 × 2160 are displayed at a size of 1920 × 1080 when zoomed in.
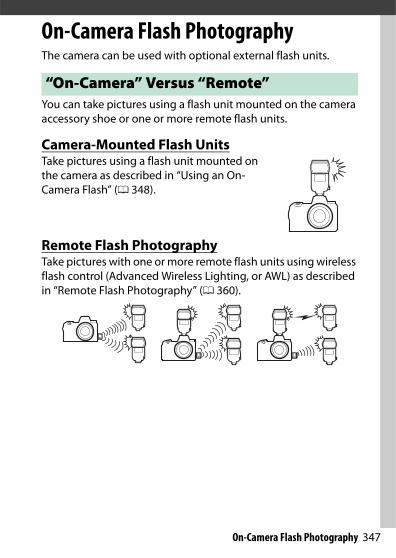
347On-Camera Flash Photography
On-Camera Flash PhotographyThe camera can be used with optional external flash units.
You can take pictures using a flash unit mounted on the camera accessory shoe or one or more remote flash units.
Camera-Mounted Flash UnitsTake pictures using a flash unit mounted on the camera as described in “Using an On-Camera Flash” (0 348).
Remote Flash PhotographyTake pictures with one or more remote flash units using wireless flash control (Advanced Wireless Lighting, or AWL) as described in “Remote Flash Photography” (0 360).
“On-Camera” Versus “Remote”
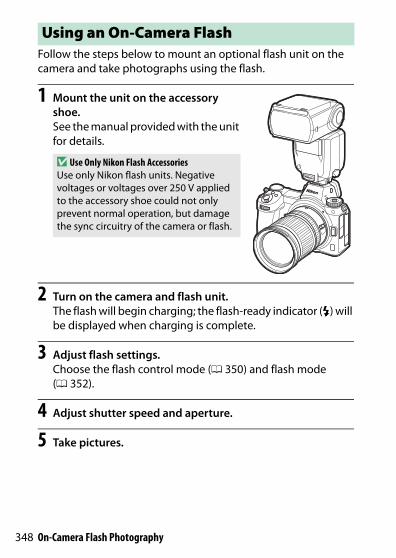
348 On-Camera Flash Photography
Follow the steps below to mount an optional flash unit on the camera and take photographs using the flash.
1 Mount the unit on the accessory shoe.See the manual provided with the unit for details.
2 Turn on the camera and flash unit.The flash will begin charging; the flash-ready indicator (c) will be displayed when charging is complete.
3 Adjust flash settings.Choose the flash control mode (0 350) and flash mode (0 352).
4 Adjust shutter speed and aperture.
5 Take pictures.
Using an On-Camera Flash
D Use Only Nikon Flash AccessoriesUse only Nikon flash units. Negative voltages or voltages over 250 V applied to the accessory shoe could not only prevent normal operation, but damage the sync circuitry of the camera or flash.
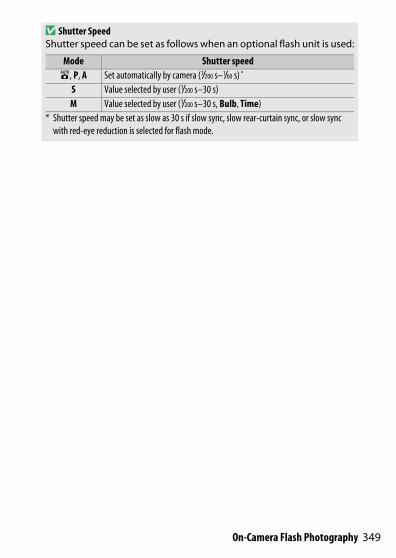
349On-Camera Flash Photography
D Shutter SpeedShutter speed can be set as follows when an optional flash unit is used:
Mode Shutter speedb, P, A Set automatically by camera (1/200 s–1/60 s) *
S Value selected by user (1/200 s–30 s)M Value selected by user (1/200 s–30 s, Bulb, Time)
* Shutter speed may be set as slow as 30 s if slow sync, slow rear-curtain sync, or slow sync with red-eye reduction is selected for flash mode.
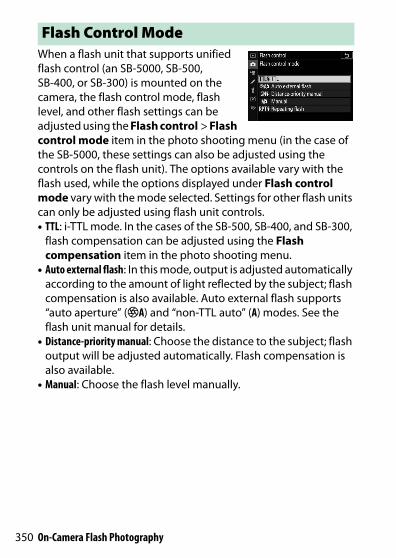
350 On-Camera Flash Photography
When a flash unit that supports unified flash control (an SB-5000, SB-500, SB-400, or SB-300) is mounted on the camera, the flash control mode, flash level, and other flash settings can be adjusted using the Flash control > Flash control mode item in the photo shooting menu (in the case of the SB-5000, these settings can also be adjusted using the controls on the flash unit). The options available vary with the flash used, while the options displayed under Flash control mode vary with the mode selected. Settings for other flash units can only be adjusted using flash unit controls.• TTL: i-TTL mode. In the cases of the SB-500, SB-400, and SB-300,
flash compensation can be adjusted using the Flash compensation item in the photo shooting menu.
• Auto external flash: In this mode, output is adjusted automatically according to the amount of light reflected by the subject; flash compensation is also available. Auto external flash supports “auto aperture” (qA) and “non-TTL auto” (A) modes. See the flash unit manual for details.
• Distance-priority manual: Choose the distance to the subject; flash output will be adjusted automatically. Flash compensation is also available.
• Manual: Choose the flash level manually.
Flash Control Mode

351On-Camera Flash Photography
• Repeating flash: The flash fires repeatedly while the shutter is open, producing a multiple-exposure effect. Choose the flash level (Output), the maximum number of times the unit fires (Times), and the number of times the flash fires per second (Frequency, measured in Hertz). The options available for Times vary depending on the options selected for Output and Frequency; see the documentation provided with the flash unit for details.
D Unified Flash ControlUnified flash control allows the camera and flash unit to share settings. If a flash unit that supports unified flash control is mounted on the camera, changes to flash settings made with either the camera or flash unit are reflected on both devices, as are changes made using optional Camera Control Pro 2 software.
D i-TTL Flash ControlWhen a CLS-compatible flash unit is set to TTL, the camera automatically selects one of the following types of flash control:• i-TTL balanced fill-flash: The flash unit emits a series of nearly invisible
preflashes (monitor preflashes) immediately before the main flash. The camera analyzes preflashes reflected from objects in all areas of the frame and adjusts flash output for a natural balance between the main subject and ambient background lighting.
• Standard i-TTL fill-flash: Flash output is adjusted to bring lighting in the frame to standard level; the brightness of the background is not taken into account. Recommended for shots in which the main subject is emphasized at the expense of background details, or when exposure compensation is used. Standard i-TTL fill-flash is activated automatically when spot metering is selected.

352 On-Camera Flash Photography
Use the Flash mode option in the photo shooting menu to choose the flash mode. The options available depend on the mode selected with the mode dial.
Flash Modes
Option DescriptionAvailable
in
I Fill flash
The flash fires with every shot. In modes P and A, shutter speed will automatically be set to values between 1/200 s (or 1/8000 s with Auto FP High-Speed Sync) and 1/60 s.
b, P, S, A, M
J Red-eye reduction
Use for portraits. The flash fires with every shot, but before it fires, the red-eye reduction lamp on the flash unit lights to reduce “red-eye” (a flash unit with red-eye reduction is required). Not recommended with moving subjects or in other situations in which quick shutter response is required. Do not move camera during shooting.
K Slow sync + red-eye
As for Red-eye reduction except that shutter speed slows automatically to capture background lighting at night or under low light. Use when you want to include background lighting in portraits. Use of a tripod is recommended to prevent blurring caused by camera shake.
P, A
L Slow sync
As for Fill flash except that shutter speed slows automatically to capture background lighting at night or under low light. Use when you want to capture both subject and background. Use of a tripod is recommended to prevent blurring caused by camera shake.
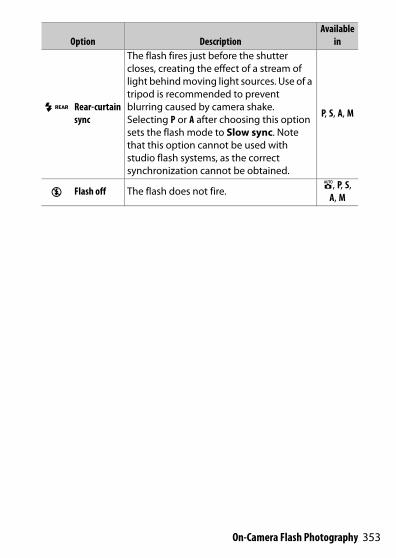
353On-Camera Flash Photography
M Rear-curtain sync
The flash fires just before the shutter closes, creating the effect of a stream of light behind moving light sources. Use of a tripod is recommended to prevent blurring caused by camera shake. Selecting P or A after choosing this option sets the flash mode to Slow sync. Note that this option cannot be used with studio flash systems, as the correct synchronization cannot be obtained.
P, S, A, M
s Flash off The flash does not fire.b, P, S,
A, M
Option DescriptionAvailable
in
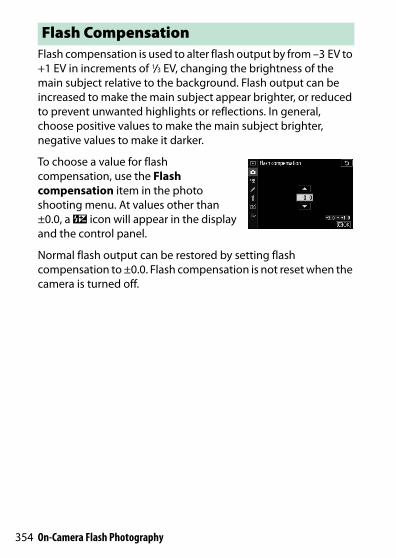
354 On-Camera Flash Photography
Flash compensation is used to alter flash output by from –3 EV to +1 EV in increments of 1/3 EV, changing the brightness of the main subject relative to the background. Flash output can be increased to make the main subject appear brighter, or reduced to prevent unwanted highlights or reflections. In general, choose positive values to make the main subject brighter, negative values to make it darker.
To choose a value for flash compensation, use the Flash compensation item in the photo shooting menu. At values other than ±0.0, a Y icon will appear in the display and the control panel.
Normal flash output can be restored by setting flash compensation to ±0.0. Flash compensation is not reset when the camera is turned off.
Flash Compensation

355On-Camera Flash Photography
This feature is used to lock flash output, allowing photographs to be recomposed without changing the flash level and ensuring that flash output is appropriate to the subject even when the subject is not positioned in the center of the frame. Flash output is adjusted automatically for any changes in ISO sensitivity and aperture. FV lock is not available in b mode.
To use FV lock:
1 Assign FV lock to a camera control.Assign FV lock to a control using Custom Setting f2 (Custom control assignment).
2 Attach a CLS-compatible flash unit.Mount a CLS-compatible flash unit on the camera accessory shoe.
3 Set the flash unit to the appropriate mode.Turn the flash unit on and select TTL or Auto external flash for Flash control > Flash control mode (SB-5000, SB-500, SB-400, or SB-300) or set the flash control mode to TTL, monitor pre-flash qA, or monitor pre-flash A (other flash units; see the documentation provided with the flash unit for details).
FV Lock
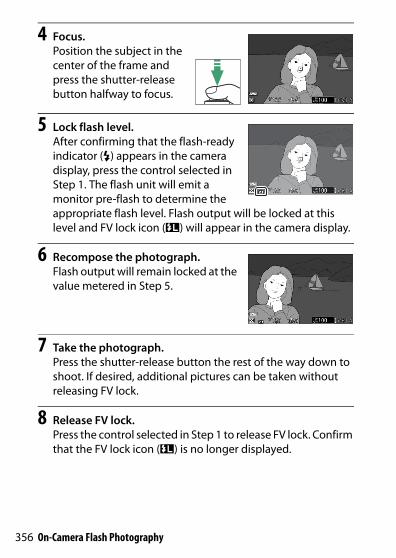
356 On-Camera Flash Photography
4 Focus.Position the subject in the center of the frame and press the shutter-release button halfway to focus.
5 Lock flash level.After confirming that the flash-ready indicator (c) appears in the camera display, press the control selected in Step 1. The flash unit will emit a monitor pre-flash to determine the appropriate flash level. Flash output will be locked at this level and FV lock icon (r) will appear in the camera display.
6 Recompose the photograph.Flash output will remain locked at the value metered in Step 5.
7 Take the photograph.Press the shutter-release button the rest of the way down to shoot. If desired, additional pictures can be taken without releasing FV lock.
8 Release FV lock.Press the control selected in Step 1 to release FV lock. Confirm that the FV lock icon (r) is no longer displayed.
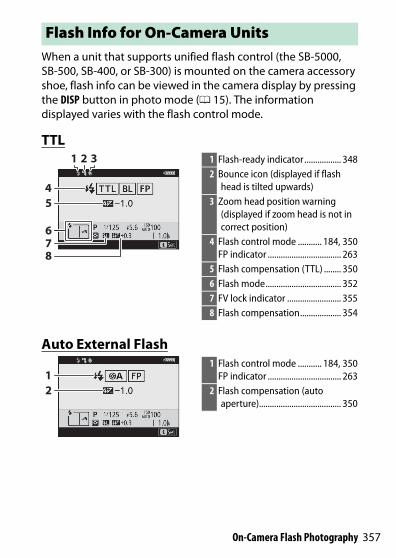
357On-Camera Flash Photography
When a unit that supports unified flash control (the SB-5000, SB-500, SB-400, or SB-300) is mounted on the camera accessory shoe, flash info can be viewed in the camera display by pressing the DISP button in photo mode (0 15). The information displayed varies with the flash control mode.
TTL
Auto External Flash
Flash Info for On-Camera Units
5
78
6
4
21 3 1 Flash-ready indicator ................. 3482 Bounce icon (displayed if flash
head is tilted upwards)3 Zoom head position warning
(displayed if zoom head is not in correct position)
4 Flash control mode ........... 184, 350FP indicator .................................. 263
5 Flash compensation (TTL) ........ 3506 Flash mode................................... 3527 FV lock indicator ......................... 3558 Flash compensation................... 354
21
1 Flash control mode ........... 184, 350FP indicator .................................. 263
2 Flash compensation (auto aperture)...................................... 350
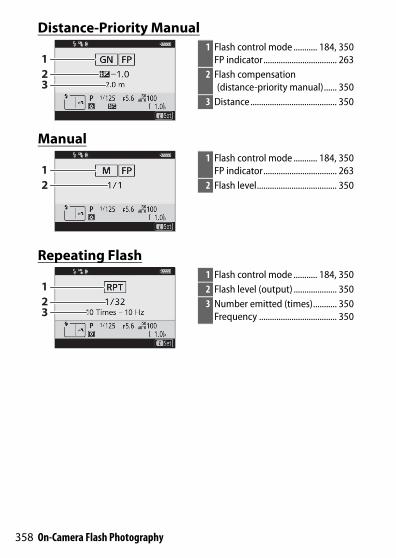
358 On-Camera Flash Photography
Distance-Priority Manual
Manual
Repeating Flash
23
11 Flash control mode ........... 184, 350
FP indicator.................................. 2632 Flash compensation
(distance-priority manual)...... 3503 Distance........................................ 350
21
1 Flash control mode ........... 184, 350FP indicator.................................. 263
2 Flash level..................................... 350
23
11 Flash control mode ........... 184, 3502 Flash level (output) .................... 3503 Number emitted (times)........... 350
Frequency .................................... 350

359On-Camera Flash Photography
D Flash Info and Camera SettingsThe flash information display shows selected camera settings, including shooting mode, shutter speed, aperture, and ISO sensitivity.
D Changing Flash SettingsFlash settings can be changed by pressing the i button in the flash info display. The options available vary with the flash unit and the settings selected. You can also test-fire the flash.
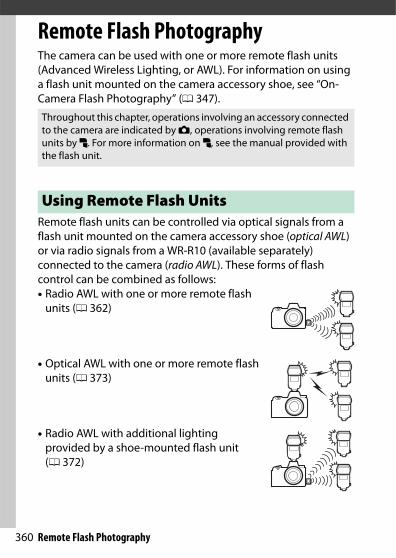
360 Remote Flash Photography
Remote Flash PhotographyThe camera can be used with one or more remote flash units (Advanced Wireless Lighting, or AWL). For information on using a flash unit mounted on the camera accessory shoe, see “On-Camera Flash Photography” (0 347).
Remote flash units can be controlled via optical signals from a flash unit mounted on the camera accessory shoe (optical AWL) or via radio signals from a WR-R10 (available separately) connected to the camera (radio AWL). These forms of flash control can be combined as follows:• Radio AWL with one or more remote flash
units (0 362)
• Optical AWL with one or more remote flash units (0 373)
• Radio AWL with additional lighting provided by a shoe-mounted flash unit (0 372)
Throughout this chapter, operations involving an accessory connected to the camera are indicated by C, operations involving remote flash units by f. For more information on f, see the manual provided with the flash unit.
Using Remote Flash Units

361Remote Flash Photography
• Radio AWL combined with optical AWL provided by a shoe-mounted flash unit (0 381)
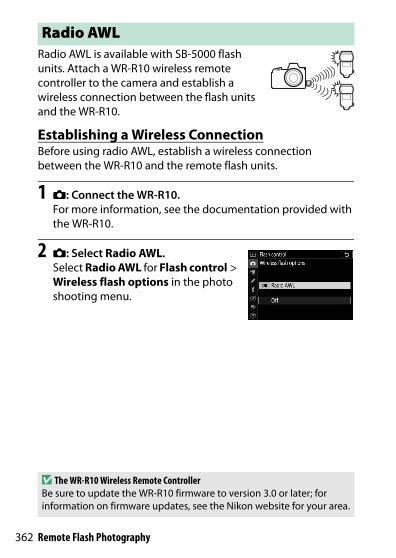
362 Remote Flash Photography
Radio AWL is available with SB-5000 flash units. Attach a WR-R10 wireless remote controller to the camera and establish a wireless connection between the flash units and the WR-R10.
Establishing a Wireless ConnectionBefore using radio AWL, establish a wireless connection between the WR-R10 and the remote flash units.
1 C: Connect the WR-R10.For more information, see the documentation provided with the WR-R10.
2 C: Select Radio AWL.Select Radio AWL for Flash control > Wireless flash options in the photo shooting menu.
Radio AWL
D The WR-R10 Wireless Remote ControllerBe sure to update the WR-R10 firmware to version 3.0 or later; for information on firmware updates, see the Nikon website for your area.

363Remote Flash Photography
3 C: Choose a channel.Set the WR-R10 channel selector to the desired channel.
4 C: Choose a link mode.Select Wireless remote (WR) options > Link mode in the setup menu and choose from the following options:• Pairing: The camera connects only to
devices with which it has previously been paired, preventing signal interference from other devices in the vicinity. Given that each device must be paired separately, PIN is recommended when connecting to a large number of devices.
• PIN: Communication is shared among all devices with the same four-digit PIN, making this a good choice for photography featuring a large number of remote devices. If there are multiple cameras present that share the same PIN, the flash units will be under the sole control of the camera that connects first, preventing all other cameras from connecting (the LEDs on the WR-R10 units connected to the affected cameras will blink).

364 Remote Flash Photography
5 f: Establish a wireless connection.Set the remote flash units to radio AWL remote mode and set the devices to the channel you selected in Step 3, then pair each of the remote units with the WR-R10 according to the option selected in Step 4:• Pairing: Initiate pairing on the remote unit and press the
WR-R10 pairing button. Pairing is complete when the LINK lamps on the WR-R10 and flash unit flash orange and green; once a connection is established, the LINK lamp on the remote flash unit will light green.
• PIN: Use the controls on the remote flash unit to enter the PIN you selected in Step 4. The LINK lamp on the remote unit will light green once a connection is established.
6 f: Confirm that the flash-ready lights for all flash units are lit.In radio AWL, the flash-ready indicator will light in the camera display when all flash units are ready.
D Listing Remote Flash UnitsTo view the flash units currently controlled using radio AWL, select Flash control > Radio remote flash info in the photo shooting menu. The identifier (“remote flash name”) for each unit can be changed using flash unit controls.
Connected flash unit
Group Flash-ready indicator

365Remote Flash Photography
D ReconnectingAs long as the channel, link mode, and other settings remain the same, the WR-R10 will automatically connect to previously paired flash units when you select remote mode and Steps 3–5 can be omitted. The flash unit LINK lamp lights green when a connection is established.
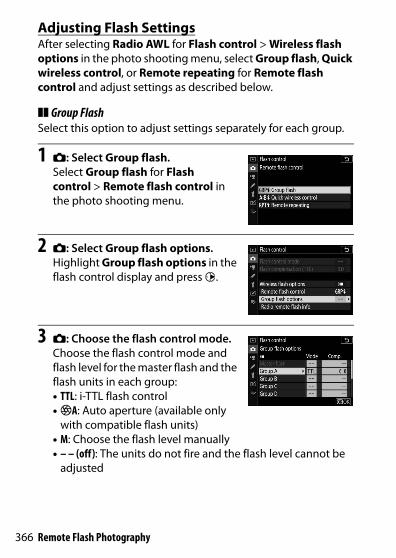
366 Remote Flash Photography
Adjusting Flash SettingsAfter selecting Radio AWL for Flash control > Wireless flash options in the photo shooting menu, select Group flash, Quick wireless control, or Remote repeating for Remote flash control and adjust settings as described below.
❚❚ Group FlashSelect this option to adjust settings separately for each group.
1 C: Select Group flash.Select Group flash for Flash control > Remote flash control in the photo shooting menu.
2 C: Select Group flash options.Highlight Group flash options in the flash control display and press 2.
3 C: Choose the flash control mode.Choose the flash control mode and flash level for the master flash and the flash units in each group:• TTL: i-TTL flash control• qA: Auto aperture (available only
with compatible flash units)• M: Choose the flash level manually• – – (off): The units do not fire and the flash level cannot be
adjusted

367Remote Flash Photography
4 f: Group the remote flash units.Choose a group (A–F) for each of the remote flash units. The master flash can control up to 18 flash units in any combination.
5 C/f: Compose the shot.Compose the shot and arrange the flash units. See the documentation provided with the flash units for more information. After arranging the units, press the i button in the flash info display (0 384) and select c Test flash to test-fire the units and confirm that they are functioning normally.
6 C: Take the photograph.
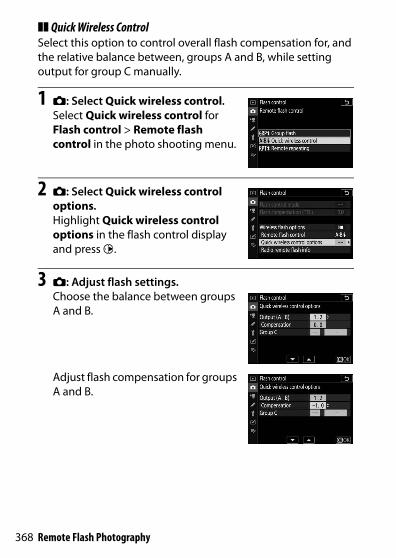
368 Remote Flash Photography
❚❚ Quick Wireless ControlSelect this option to control overall flash compensation for, and the relative balance between, groups A and B, while setting output for group C manually.
1 C: Select Quick wireless control.Select Quick wireless control for Flash control > Remote flash control in the photo shooting menu.
2 C: Select Quick wireless control options.Highlight Quick wireless control options in the flash control display and press 2.
3 C: Adjust flash settings.Choose the balance between groups A and B.
Adjust flash compensation for groups A and B.

369Remote Flash Photography
Choose a flash control mode and flash level for the units in group C:• M: Choose the flash level manually.• – –: The units in group C do not fire.
4 f: Group the remote flash units.Choose a group (A, B, or C). The master flash can control up to 18 flash units in any combination.
5 C/f: Compose the shot.Compose the shot and arrange the flash units. See the documentation provided with the flash units for more information. After arranging the units, press the i button in the flash info display (0 384) and select c Test flash to test fire the units and confirm that they are functioning normally.
6 C: Take the photograph.
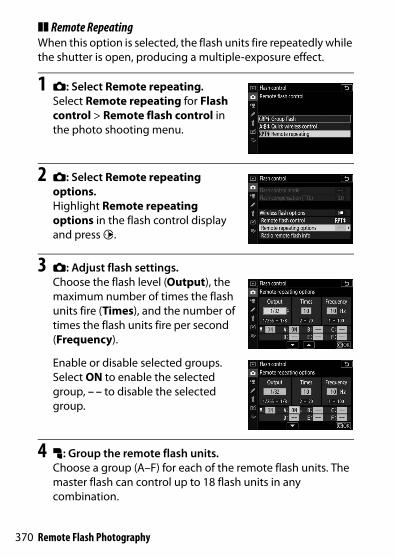
370 Remote Flash Photography
❚❚ Remote RepeatingWhen this option is selected, the flash units fire repeatedly while the shutter is open, producing a multiple-exposure effect.
1 C: Select Remote repeating.Select Remote repeating for Flash control > Remote flash control in the photo shooting menu.
2 C: Select Remote repeating options.Highlight Remote repeating options in the flash control display and press 2.
3 C: Adjust flash settings.Choose the flash level (Output), the maximum number of times the flash units fire (Times), and the number of times the flash units fire per second (Frequency).
Enable or disable selected groups. Select ON to enable the selected group, – – to disable the selected group.
4 f: Group the remote flash units.Choose a group (A–F) for each of the remote flash units. The master flash can control up to 18 flash units in any combination.
371Remote Flash Photography
5 C/f: Compose the shot.Compose the shot and arrange the flash units. See the documentation provided with the flash units for more information. After arranging the units, press the i button in the flash info display (0 384) and select c Test flash to test-fire the units and confirm that they are functioning normally.
6 C: Take the photograph.
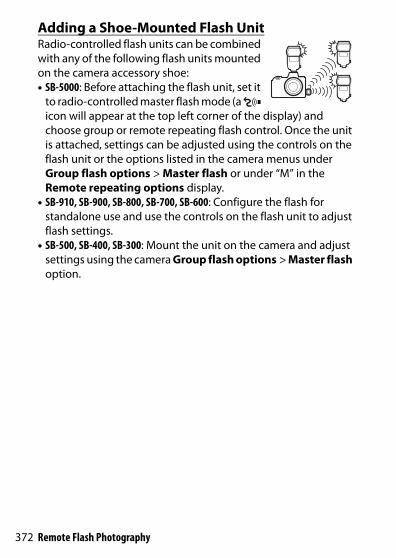
372 Remote Flash Photography
Adding a Shoe-Mounted Flash UnitRadio-controlled flash units can be combined with any of the following flash units mounted on the camera accessory shoe:• SB-5000: Before attaching the flash unit, set it
to radio-controlled master flash mode (a d icon will appear at the top left corner of the display) and choose group or remote repeating flash control. Once the unit is attached, settings can be adjusted using the controls on the flash unit or the options listed in the camera menus under Group flash options > Master flash or under “M” in the Remote repeating options display.
• SB-910, SB-900, SB-800, SB-700, SB-600: Configure the flash for standalone use and use the controls on the flash unit to adjust flash settings.
• SB-500, SB-400, SB-300: Mount the unit on the camera and adjust settings using the camera Group flash options > Master flash option.

373Remote Flash Photography
Remote flash units can be controlled via optical signals from an optional flash unit mounted on the camera accessory shoe and functioning as a master flash (optical AWL; for information on compatible flash units, see “The Nikon Creative Lighting System”, 0 406). If the flash unit in question is an SB-5000 or SB-500, settings can be adjusted from the camera (see below); otherwise settings must be adjusted using flash unit controls as described in the documentation provided with the unit. For information on flash placement and other topics, see the documentation provided with the flash units.
Using Optical AWL with the SB-5000 or SB-500Mount the flash unit on the camera accessory shoe and select Optical AWL for Flash control > Wireless flash options in the photo shooting menu. Group flash settings can be adjusted using Flash control > Remote flash control; the Remote flash control item for the SB-5000 also offers Quick wireless control and Remote repeating settings.
Optical AWL
D The SB-5000When an SB-5000 is mounted on the camera accessory shoe, Flash control settings can also be changed using the controls on the flash unit.
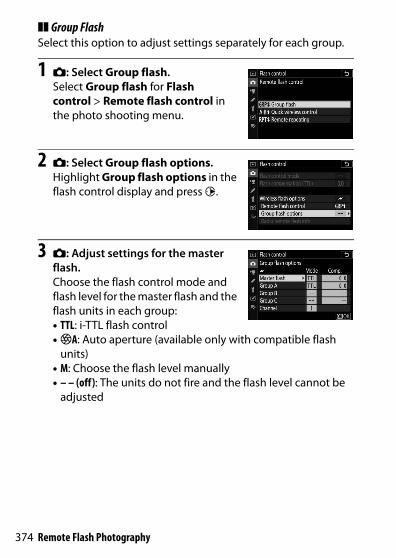
374 Remote Flash Photography
❚❚ Group FlashSelect this option to adjust settings separately for each group.
1 C: Select Group flash.Select Group flash for Flash control > Remote flash control in the photo shooting menu.
2 C: Select Group flash options.Highlight Group flash options in the flash control display and press 2.
3 C: Adjust settings for the master flash.Choose the flash control mode and flash level for the master flash and the flash units in each group:• TTL: i-TTL flash control• qA: Auto aperture (available only with compatible flash
units)• M: Choose the flash level manually• – – (off): The units do not fire and the flash level cannot be
adjusted

375Remote Flash Photography
Choose a channel for the master flash. If the remote flash units include an SB-500, you must choose channel 3, but otherwise you can choose any channel between 1 and 4.
4 f: Set the remote flash units to the same channel as the master flash.Set the remote flash units to the channel selected in Step 3.
5 f: Group the remote flash units.Choose a group (A, B, or C, or if you are using an SB-500 master flash, A or B) for each remote flash unit. Although there is no limit on the number of remote flash units that may be used, the practical maximum is three per group. With more than this number, the light emitted by the remote flash units will interfere with performance.
6 C/f: Compose the shot.Compose the shot and arrange the flash units. See the documentation provided with the flash units for more information. After arranging the units, press the test buttons on the flash units to test-fire the flash and confirm that the units are functioning normally. Flash units can also be test-fired by pressing the i button in the flash info display (0 384) and selecting c Test flash.
7 C/f: Take the photograph.Take the photograph after confirming that the flash-ready lights for all flash units are lit.
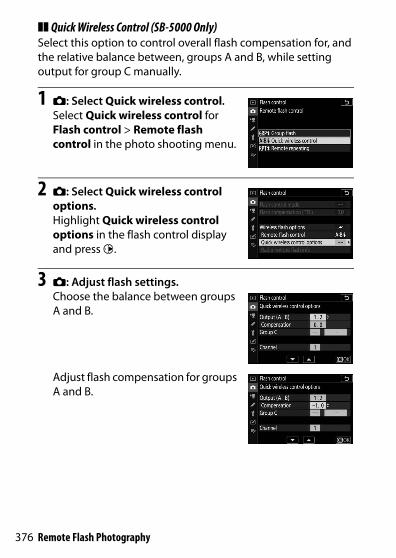
376 Remote Flash Photography
❚❚ Quick Wireless Control (SB-5000 Only)Select this option to control overall flash compensation for, and the relative balance between, groups A and B, while setting output for group C manually.
1 C: Select Quick wireless control.Select Quick wireless control for Flash control > Remote flash control in the photo shooting menu.
2 C: Select Quick wireless control options.Highlight Quick wireless control options in the flash control display and press 2.
3 C: Adjust flash settings.Choose the balance between groups A and B.
Adjust flash compensation for groups A and B.
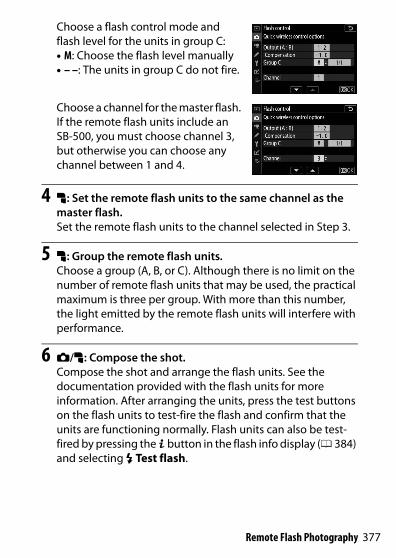
377Remote Flash Photography
Choose a flash control mode and flash level for the units in group C:• M: Choose the flash level manually• – –: The units in group C do not fire.
Choose a channel for the master flash. If the remote flash units include an SB-500, you must choose channel 3, but otherwise you can choose any channel between 1 and 4.
4 f: Set the remote flash units to the same channel as the master flash.Set the remote flash units to the channel selected in Step 3.
5 f: Group the remote flash units.Choose a group (A, B, or C). Although there is no limit on the number of remote flash units that may be used, the practical maximum is three per group. With more than this number, the light emitted by the remote flash units will interfere with performance.
6 C/f: Compose the shot.Compose the shot and arrange the flash units. See the documentation provided with the flash units for more information. After arranging the units, press the test buttons on the flash units to test-fire the flash and confirm that the units are functioning normally. Flash units can also be test-fired by pressing the i button in the flash info display (0 384) and selecting c Test flash.

378 Remote Flash Photography
7 C/f: Take the photograph.Take the photograph after confirming that the flash-ready lights for all flash units are lit.
❚❚ Remote Repeating (SB-5000 Only)When this option is selected, the flash units fire repeatedly while the shutter is open, producing a multiple-exposure effect.
1 C: Select Remote repeating.Select Remote repeating for Flash control > Remote flash control in the photo shooting menu.
2 C: Select Remote repeating options.Highlight Remote repeating options in the flash control display and press 2.

379Remote Flash Photography
3 C: Adjust flash settings.Choose the flash level (Output), the maximum number of times the flash units fire (Times), and the number of times the flash units fire per second (Frequency).
Enable or disable selected groups. Select ON to enable the selected group, – – to disable the selected group.
Choose a channel for the master flash. If the remote flash units include an SB-500, you must choose channel 3, but otherwise you can choose any channel between 1 and 4.
4 f: Set the remote flash units to the same channel as the master flash.Set the remote flash units to the channel selected in Step 3.

380 Remote Flash Photography
5 f: Group the remote flash units.Choose a group (A, B, or C) for each remote flash unit. Although there is no limit on the number of remote flash units that may be used, the practical maximum is three per group. With more than this number, the light emitted by the remote flash units will interfere with performance.
6 C/f: Compose the shot.Compose the shot and arrange the flash units. See the documentation provided with the flash units for more information. After arranging the units, press the test buttons on the flash units to test-fire the flash and confirm that the units are functioning normally. Flash units can also be test-fired by pressing the i button in the flash info display (0 384) and selecting c Test flash.
7 C/f: Take the photograph.Take the photograph after confirming that the flash-ready lights for all flash units are lit.
D Optical AWLPosition the sensor windows on the remote flash units to pick up the light from the master flash (particular care is required if the camera is not mounted on a tripod). Be sure that direct light or strong reflections from the remote flash units do not enter the camera lens (in TTL mode) or the photocells on the remote flash units (qA mode), as this may interfere with exposure. To prevent low-intensity timing flashes emitted by the master flash from appearing in photographs taken at short range, choose low ISO sensitivities or small apertures (high f-numbers). After positioning the remote flash units, take a test shot and view the results in the camera display.

381Remote Flash Photography
Optical and radio AWL can be used together. Radio flash control is provided by a WR-R10 connected to the camera, optical control by an SU-800 wireless Speedlight commander or an SB-910, SB-900, SB-800, SB-700, or SB-500 flash unit mounted on the camera accessory shoe. Before proceeding, establish a wireless connection between the radio-controlled flash units and the WR-R10. If an SB-500 is mounted on the camera accessory shoe, select Optical/radio AWL for Flash control > Wireless flash options in the photo shooting menu; with other flash units or the SU-800, this option is selected automatically.
The only option available for Remote flash control will be Group flash. Choose a group (A–F) for each of the remote flash units. Place optically-controlled flash units in groups A through C and radio-controlled units in groups D through F (to display options for groups D through F, press 1 or 3 in the group flash options display).
Optical/Radio AWL
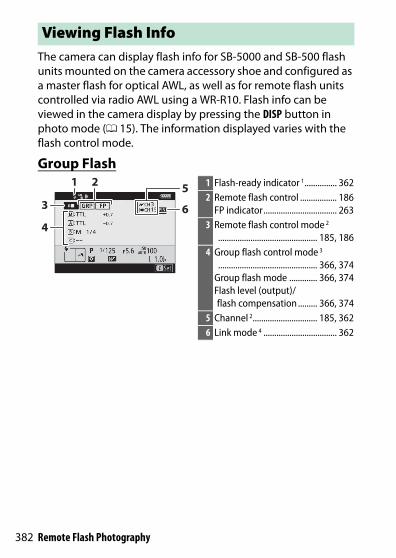
382 Remote Flash Photography
The camera can display flash info for SB-5000 and SB-500 flash units mounted on the camera accessory shoe and configured as a master flash for optical AWL, as well as for remote flash units controlled via radio AWL using a WR-R10. Flash info can be viewed in the camera display by pressing the DISP button in photo mode (0 15). The information displayed varies with the flash control mode.
Group Flash
Viewing Flash Info
53 64
21 1 Flash-ready indicator 1............... 3622 Remote flash control ................. 186
FP indicator.................................. 2633 Remote flash control mode 2
.............................................. 185, 1864 Group flash control mode 3
.............................................. 366, 374Group flash mode ............. 366, 374Flash level (output)/flash compensation ......... 366, 374
5 Channel 2.............................. 185, 3626 Link mode 4 .................................. 362

383Remote Flash Photography
Quick Wireless Control
Remote Repeating
1 Displayed in radio AWL when all flash units are ready.2 Optical AWL is indicated by Y, radio AWL by Z, joint optical and radio AWL by Y and Z.
Optical AWL channel for joint optical and radio AWL is displayed only when SB-500 is used as master flash.
3 Icons are displayed for each group when joint optical and radio AWL is used.4 Displayed only when radio AWL or join optical and radio AWL is used.
73 8
21
654
1 Flash-ready indicator 1 ............... 3622 Remote flash control ................. 186
FP indicator .................................. 2633 Remote flash control mode 2
.............................................. 185, 1864 A : B ratio.............................. 368, 3765 Flash compensation.......... 368, 3766 Group C flash control mode
and flash level (output) ... 368, 3767 Channel 2.............................. 185, 3628 Link mode 4................................... 362
74 8
6
2 31
5
1 Flash-ready indicator 1 ............... 3622 Remote flash control ................. 1863 Flash level (output) ........... 370, 3784 Remote flash control mode 2
.............................................. 185, 1865 Number emitted (times)... 370, 378
Frequency............................ 370, 3786 Group status
(enabled/disabled) .......... 370, 3787 Channel 2.............................. 185, 3628 Link mode 4................................... 362
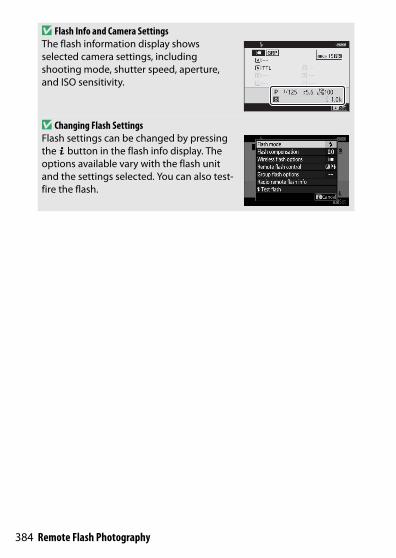
384 Remote Flash Photography
D Flash Info and Camera SettingsThe flash information display shows selected camera settings, including shooting mode, shutter speed, aperture, and ISO sensitivity.
D Changing Flash SettingsFlash settings can be changed by pressing the i button in the flash info display. The options available vary with the flash unit and the settings selected. You can also test-fire the flash.
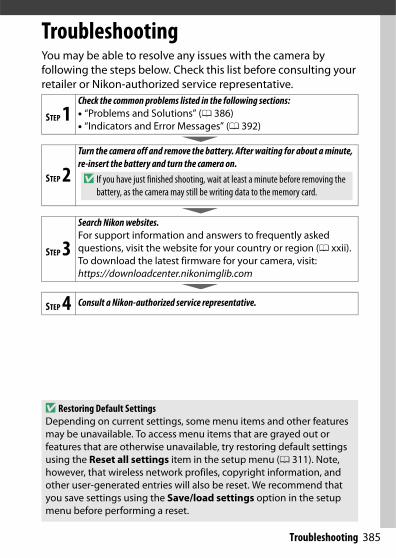
385Troubleshooting
TroubleshootingYou may be able to resolve any issues with the camera by following the steps below. Check this list before consulting your retailer or Nikon-authorized service representative.
STEP 1Check the common problems listed in the following sections:• “Problems and Solutions” (0 386)• “Indicators and Error Messages” (0 392)
STEP 2Turn the camera off and remove the battery. After waiting for about a minute, re-insert the battery and turn the camera on.D If you have just finished shooting, wait at least a minute before removing the
battery, as the camera may still be writing data to the memory card.
STEP 3Search Nikon websites.For support information and answers to frequently asked questions, visit the website for your country or region (0 xxii). To download the latest firmware for your camera, visit:https://downloadcenter.nikonimglib.com
STEP 4 Consult a Nikon-authorized service representative.
D Restoring Default SettingsDepending on current settings, some menu items and other features may be unavailable. To access menu items that are grayed out or features that are otherwise unavailable, try restoring default settings using the Reset all settings item in the setup menu (0 311). Note, however, that wireless network profiles, copyright information, and other user-generated entries will also be reset. We recommend that you save settings using the Save/load settings option in the setup menu before performing a reset.

386 Troubleshooting
Solutions to some common issues are listed below.
Battery/Display
Problems and Solutions
The camera is on but does not respond: Wait for recording to end. If the problem persists, turn the camera off. If the camera does not turn off, remove and reinsert the battery or, if you are using an AC adapter, disconnect and reconnect the AC adapter. Note that although any data currently being recorded will be lost, data that have already been recorded will not be affected by removing or disconnecting the power source.The viewfinder or monitor does not turn on: Choose a different monitor mode using the monitor mode button.The viewfinder is out of focus: Rotate the diopter adjustment control to focus the viewfinder. If this does not correct the problem, select AF-S, single-point AF, and the center focus point, and then frame a high-contrast subject in the center focus point and press the shutter-release button halfway to focus the camera. With the camera in focus, use the diopter adjustment control to bring the subject into clear focus in the viewfinder.The displays turn off without warning: Choose longer delays for Custom Setting c3 (Power off delay).The control panel is unresponsive and dim: Control panel response times and brightness vary with temperature.
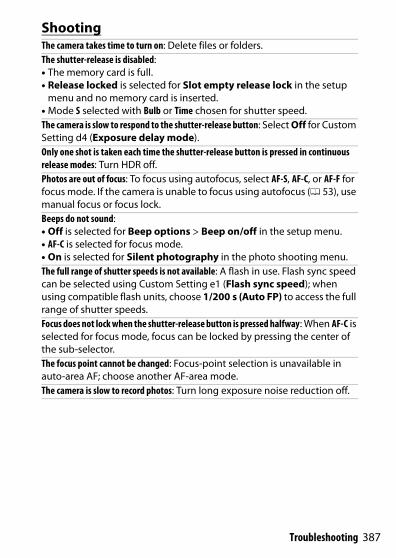
387Troubleshooting
ShootingThe camera takes time to turn on: Delete files or folders.The shutter-release is disabled:• The memory card is full.• Release locked is selected for Slot empty release lock in the setup
menu and no memory card is inserted.• Mode S selected with Bulb or Time chosen for shutter speed.The camera is slow to respond to the shutter-release button: Select Off for Custom Setting d4 (Exposure delay mode).Only one shot is taken each time the shutter-release button is pressed in continuous release modes: Turn HDR off.Photos are out of focus: To focus using autofocus, select AF-S, AF-C, or AF-F for focus mode. If the camera is unable to focus using autofocus (0 53), use manual focus or focus lock.Beeps do not sound:• Off is selected for Beep options > Beep on/off in the setup menu.• AF-C is selected for focus mode.• On is selected for Silent photography in the photo shooting menu.The full range of shutter speeds is not available: A flash in use. Flash sync speed can be selected using Custom Setting e1 (Flash sync speed); when using compatible flash units, choose 1/200 s (Auto FP) to access the full range of shutter speeds.Focus does not lock when the shutter-release button is pressed halfway: When AF-C is selected for focus mode, focus can be locked by pressing the center of the sub-selector.The focus point cannot be changed: Focus-point selection is unavailable in auto-area AF; choose another AF-area mode.The camera is slow to record photos: Turn long exposure noise reduction off.

388 Troubleshooting
Photographs and movies do not appear to have the same exposure as the preview shown in the display: To preview the effects of changes to settings that affect exposure and color, select On for Custom Setting d8 (Apply settings to live view). Note that changes to Monitor brightness and Viewfinder brightness have no effect on images recorded with the camera.Flicker or banding appears in movie mode: Select Flicker reduction in the movie shooting menu and choose an option that matches the frequency of the local AC power supply.Bright regions or bands appear in the view through the lens: The shot is being framed under flashing sign, flash, or other light source with brief duration.Smudges appear in photographs: Clean the front and rear lens elements. If the problem persists, perform image sensor cleaning.Shooting ends unexpectedly or does not start: Shooting may end automatically to prevent damage to the camera’s internal circuits if the ambient temperature is high or the camera has been used extensively for burst shooting, movie recording, or the like. If you are unable to shoot because the camera has overheated, wait for the internal circuits to cool and then try again. Note that the camera may feel warm to the touch, but this does not indicate a malfunction.Image artifacts appear in the display during shooting: “Noise” (randomly-spaced bright pixels, fog, or lines) and unexpected colors may appear if you zoom in on the view through the lens. Randomly-spaced bright pixels, fog, or bright spots may also arise as a result of increases in the temperature of the camera’s internal circuits during shooting; turn the camera off when it is not in use. At high ISO sensitivities, noise may become more noticeable in long exposures or in pictures recorded when the camera temperature is elevated. Note that the distribution of noise in the display may differ from that in the final picture. To reduce noise, adjust settings such as ISO sensitivity, shutter speed, or Active D-Lighting.

389Troubleshooting
Playback
The camera cannot measure white balance: The subject is too dark or too bright.Images cannot be selected as source for preset white balance: The images in question were created with a different model of camera.White balance bracketing is unavailable:• An NEF (RAW) or NEF+JPEG image quality option is selected for image
quality.• Multiple exposure shooting is on.The effects of Picture Controls differ from image to image: Auto is selected for Set Picture Control, a Picture Control based on Auto is selected, or A (auto) is selected for Quick sharp, contrast, or saturation. For consistent results over a series of photographs, choose another setting.Metering cannot be changed: Autoexposure lock is in effect.Exposure compensation cannot be used: Choose mode P, S, or A.Noise (colored splotches or other artifacts) appears in long time-exposures: Enable long exposure noise reduction.The AF-assist illuminator does not light:• Select On for Custom Setting a12 (Built-in AF-assist illuminator).• The illuminator does not light in movie mode or when AF-C or MF is
selected for focus mode.Sound is not recorded with movies: Microphone off is selected for Microphone sensitivity in the movie shooting menu.
NEF (RAW) images are not played back: The pictures were taken at image qualities of NEF + JPEG.The camera does not display pictures recorded with other cameras: Pictures recorded with other makes of camera may not be displayed correctly.Some photos are not displayed during playback: Select All for Playback folder.“Tall” (portrait) orientation photos are displayed in “wide” (landscape) orientation:• Select On for Rotate tall in the playback menu.• The photos are displayed in image review.• The camera was pointed up or down when photo was taken.

390 Troubleshooting
Pictures cannot be deleted: The pictures are protected. Remove protection.Pictures cannot be retouched: The picture cannot be edited with this camera.The camera displays a message stating that the folder contains no images: Select All for Playback folder.Pictures cannot be printed: NEF (RAW) and TIFF photos cannot be printed by direct USB connection. Transfer the photos to a computer and print them using Capture NX-D. NEF (RAW) photos can be saved in JPEG format using the NEF (RAW) processing option in the retouch menu.Pictures are not displayed on HDMI devices: Confirm that an HDMI cable (available separately) is connected.Output to HDMI devices does not function as expected:• Check that the HDMI cable is correctly connected.• Select Off for HDMI > Advanced > External recording control in the
setup menu.• Check again after selecting Reset all settings in the setup menu.The Image Dust Off option in Capture NX-D does not have desired effect: Image sensor cleaning changes the position of dust on the image sensor. Dust off reference data recorded before image sensor cleaning is performed cannot be used with photographs taken after image sensor cleaning is performed; similarly, dust off reference data recorded after image sensor cleaning is performed cannot be used with photographs taken before image sensor cleaning is performed.Computers do not display NEF (RAW) images the same way as the camera does: Third-party software does not display effects of Picture Controls, Active D-Lighting, vignette control, or the like. Use Capture NX-D or ViewNX-i.Pictures cannot be transferred to a computer: The computer operating system is not compatible with the camera or image transfer software. Use a card reader or card slot to copy the pictures to a computer.
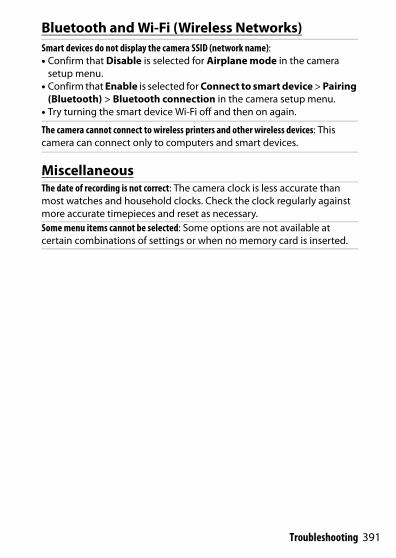
391Troubleshooting
Bluetooth and Wi-Fi (Wireless Networks)
Miscellaneous
Smart devices do not display the camera SSID (network name):• Confirm that Disable is selected for Airplane mode in the camera
setup menu.• Confirm that Enable is selected for Connect to smart device > Pairing
(Bluetooth) > Bluetooth connection in the camera setup menu.• Try turning the smart device Wi-Fi off and then on again.
The camera cannot connect to wireless printers and other wireless devices: This camera can connect only to computers and smart devices.
The date of recording is not correct: The camera clock is less accurate than most watches and household clocks. Check the clock regularly against more accurate timepieces and reset as necessary.Some menu items cannot be selected: Some options are not available at certain combinations of settings or when no memory card is inserted.

392 Troubleshooting
This section lists the indicators and error messages that appear in the control panel and camera display.
IndicatorsThe following indicators appear in the control panel and/or camera display:
Indicators and Error Messages
Indicator
Problem SolutionCamera display
Control panel
H Low battery.Ready a fully-charged spare battery.
H
(flashes)
Battery exhausted. Recharge or replace battery.
Battery info unavailable.
Battery cannot be used. Contact Nikon-authorized service representative.
Battery not supported. Replace with Nikon battery.Battery temperature high.
Remove battery and wait for it to cool.
F H(flashes)
— Camera unable to focus using autofocus.
Change composition or focus manually.
F–– Lens is not correctly attached.
Ensure that lens is correctly attached.
Bulb(flashes)
Bulb selected in mode S.Change shutter speed or select mode M.Time
(flashes)Time selected in mode S.
Busy(flashes)
Processing in progress. Wait until processing is complete.
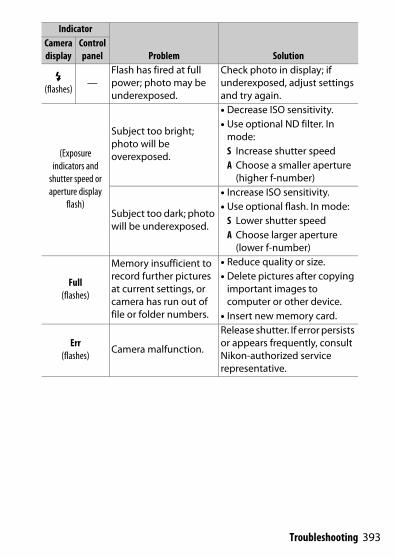
393Troubleshooting
c(flashes)
—Flash has fired at full power; photo may be underexposed.
Check photo in display; if underexposed, adjust settings and try again.
(Exposure indicators and
shutter speed or aperture display
flash)
Subject too bright; photo will be overexposed.
• Decrease ISO sensitivity.• Use optional ND filter. In
mode:S Increase shutter speedA Choose a smaller aperture
(higher f-number)
Subject too dark; photo will be underexposed.
• Increase ISO sensitivity.• Use optional flash. In mode:
S Lower shutter speedA Choose larger aperture
(lower f-number)
Full(flashes)
Memory insufficient to record further pictures at current settings, or camera has run out of file or folder numbers.
• Reduce quality or size.• Delete pictures after copying
important images to computer or other device.
• Insert new memory card.
Err(flashes)
Camera malfunction.
Release shutter. If error persists or appears frequently, consult Nikon-authorized service representative.
Indicator
Problem SolutionCamera display
Control panel
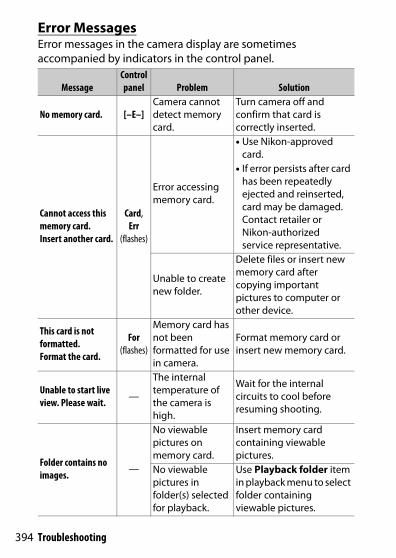
394 Troubleshooting
Error MessagesError messages in the camera display are sometimes accompanied by indicators in the control panel.
MessageControl panel Problem Solution
No memory card. [–E–]Camera cannot detect memory card.
Turn camera off and confirm that card is correctly inserted.
Cannot access this memory card. Insert another card.
Card, Err
(flashes)
Error accessing memory card.
• Use Nikon-approved card.
• If error persists after card has been repeatedly ejected and reinserted, card may be damaged. Contact retailer or Nikon-authorized service representative.
Unable to create new folder.
Delete files or insert new memory card after copying important pictures to computer or other device.
This card is not formatted. Format the card.
For(flashes)
Memory card has not been formatted for use in camera.
Format memory card or insert new memory card.
Unable to start live view. Please wait. —
The internal temperature of the camera is high.
Wait for the internal circuits to cool before resuming shooting.
Folder contains no images. —
No viewable pictures on memory card.
Insert memory card containing viewable pictures.
No viewable pictures in folder(s) selected for playback.
Use Playback folder item in playback menu to select folder containing viewable pictures.
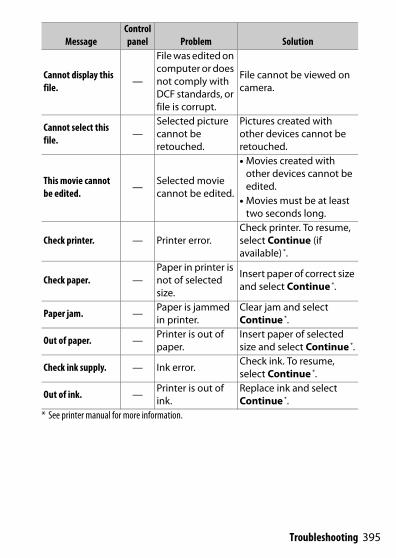
395Troubleshooting
Cannot display this file. —
File was edited on computer or does not comply with DCF standards, or file is corrupt.
File cannot be viewed on camera.
Cannot select this file. —
Selected picture cannot be retouched.
Pictures created with other devices cannot be retouched.
This movie cannot be edited. —
Selected movie cannot be edited.
• Movies created with other devices cannot be edited.
• Movies must be at least two seconds long.
Check printer. — Printer error.Check printer. To resume, select Continue (if available) *.
Check paper. —Paper in printer is not of selected size.
Insert paper of correct size and select Continue *.
Paper jam. — Paper is jammed in printer.
Clear jam and select Continue *.
Out of paper. —Printer is out of paper.
Insert paper of selected size and select Continue *.
Check ink supply. — Ink error. Check ink. To resume, select Continue *.
Out of ink. — Printer is out of ink.
Replace ink and select Continue *.
* See printer manual for more information.
MessageControl panel Problem Solution
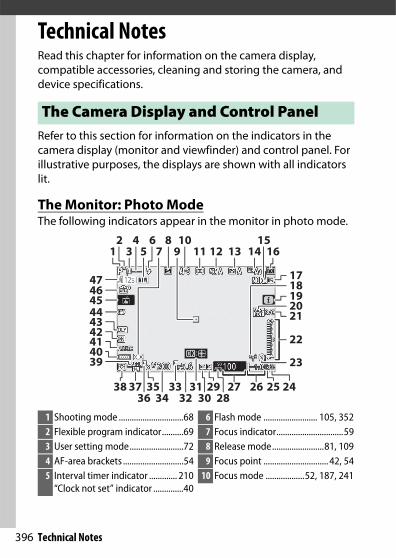
396 Technical Notes
Technical NotesRead this chapter for information on the camera display, compatible accessories, cleaning and storing the camera, and device specifications.
Refer to this section for information on the indicators in the camera display (monitor and viewfinder) and control panel. For illustrative purposes, the displays are shown with all indicators lit.
The Monitor: Photo ModeThe following indicators appear in the monitor in photo mode.
The Camera Display and Control Panel
394041424344454647
22
271
15616
89 1110
12 13 1454
3
17
19
21
18
20
23
25 242930 283436
313332
353738 2627
1 Shooting mode ..............................682 Flexible program indicator..........693 User setting mode.........................724 AF-area brackets ............................545 Interval timer indicator ............. 210
“Clock not set” indicator ..............40
6 Flash mode ......................... 105, 3527 Focus indicator...............................598 Release mode........................81, 1099 Focus point .............................. 42, 54
10 Focus mode ..................52, 187, 241
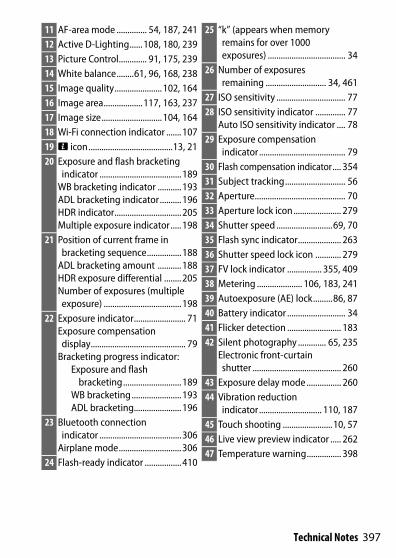
397Technical Notes
11 AF-area mode .............. 54, 187, 24112 Active D-Lighting......108, 180, 23913 Picture Control............. 91, 175, 23914 White balance........61, 96, 168, 23815 Image quality......................102, 16416 Image area..................117, 163, 23717 Image size............................104, 16418 Wi-Fi connection indicator .......10719 i icon.......................................13, 2120 Exposure and flash bracketing
indicator ......................................189WB bracketing indicator ...........193ADL bracketing indicator..........196HDR indicator...............................205Multiple exposure indicator.....198
21 Position of current frame in bracketing sequence................188
ADL bracketing amount ...........188HDR exposure differential ........205Number of exposures (multiple exposure) ....................................198
22 Exposure indicator........................ 71Exposure compensation display............................................ 79
Bracketing progress indicator:Exposure and flash
bracketing...........................189WB bracketing.......................193ADL bracketing......................196
23 Bluetooth connection indicator ......................................306
Airplane mode.............................30624 Flash-ready indicator .................410
25 “k” (appears when memory remains for over 1000 exposures) .................................... 34
26 Number of exposures remaining ............................ 34, 461
27 ISO sensitivity ................................ 7728 ISO sensitivity indicator .............. 77
Auto ISO sensitivity indicator .... 7829 Exposure compensation
indicator........................................ 7930 Flash compensation indicator.... 35431 Subject tracking............................ 5632 Aperture.......................................... 7033 Aperture lock icon...................... 27934 Shutter speed ..........................69, 7035 Flash sync indicator.................... 26336 Shutter speed lock icon ............ 27937 FV lock indicator ................ 355, 40938 Metering ..................... 106, 183, 24139 Autoexposure (AE) lock.........86, 8740 Battery indicator ........................... 3441 Flicker detection ......................... 18342 Silent photography ............. 65, 235
Electronic front-curtain shutter ......................................... 260
43 Exposure delay mode ................ 26044 Vibration reduction
indicator............................. 110, 18745 Touch shooting .......................10, 5746 Live view preview indicator ..... 26247 Temperature warning................ 398

398 Technical Notes
D Temperature WarningsIf the camera temperature becomes elevated, a temperature warning will be displayed together with a count-down timer (the timer turns red when the thirty second mark is reached). In some cases, the timer may be displayed immediately after the camera is turned on. When the timer reaches zero, the shooting display will turn off automatically to protect the camera’s internal circuits.

399Technical Notes
❚❚ The Information Display
1516
14
171819
9101112
6 8521 743
13
1 Shooting mode ............................. 682 Flexible program indicator ......... 693 User setting mode ........................ 724 Shutter speed lock icon.............2795 Flash sync indicator....................2636 Shutter speed ..........................69, 707 Aperture lock icon ......................2798 Aperture.......................................... 709 Exposure and flash bracketing
indicator ......................................189WB bracketing indicator ...........193ADL bracketing indicator..........196HDR indicator...............................205Multiple exposure indicator.....198
10 “k” (appears when memory remains for over 1000 exposures) .................................... 34
11 Number of exposures remaining............................. 34, 461
12 Exposure indicator ....................... 71Exposure compensation display ........................................... 79
Bracketing progress indicator:Exposure and flash
bracketing........................... 189WB bracketing....................... 193ADL bracketing ..................... 196
13 i icon.......................................13, 2114 ISO sensitivity ................................ 7715 ISO sensitivity indicator .............. 77
Auto ISO sensitivity indicator .... 7816 FV lock indicator ................ 355, 40917 Autoexposure (AE) lock.........86, 8718 Flash compensation indicator.... 35419 Exposure compensation
indicator........................................ 79Exposure compensation value............................................... 79
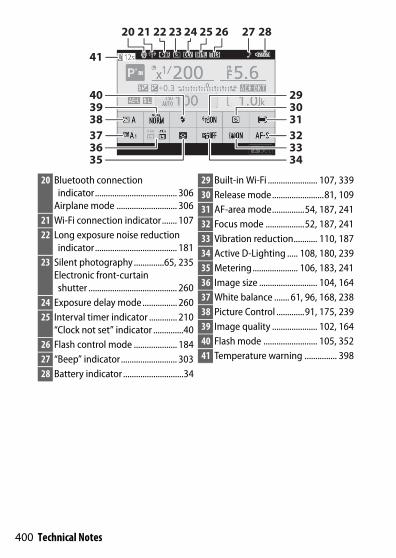
400 Technical Notes
20 21 22 24 25 2623 27 28
3536
34
40 29
33
39 30
37
41
3238 31
20 Bluetooth connection indicator...................................... 306
Airplane mode ............................ 30621 Wi-Fi connection indicator....... 10722 Long exposure noise reduction
indicator...................................... 18123 Silent photography ..............65, 235
Electronic front-curtain shutter ......................................... 260
24 Exposure delay mode................ 26025 Interval timer indicator ............. 210
“Clock not set” indicator ..............4026 Flash control mode .................... 18427 “Beep” indicator.......................... 30328 Battery indicator ............................34
29 Built-in Wi-Fi ....................... 107, 33930 Release mode........................81, 10931 AF-area mode...............54, 187, 24132 Focus mode ..................52, 187, 24133 Vibration reduction........... 110, 18734 Active D-Lighting ..... 108, 180, 23935 Metering..................... 106, 183, 24136 Image size ........................... 104, 16437 White balance ....... 61, 96, 168, 23838 Picture Control .............91, 175, 23939 Image quality ..................... 102, 16440 Flash mode ......................... 105, 35241 Temperature warning ............... 398
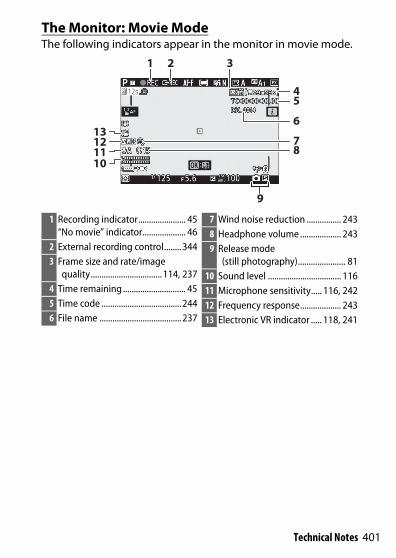
401Technical Notes
The Monitor: Movie ModeThe following indicators appear in the monitor in movie mode.
10111213
1 2 3
4
6
5
78
9
1 Recording indicator...................... 45“No movie” indicator.................... 46
2 External recording control........3443 Frame size and rate/image
quality.................................114, 2374 Time remaining ............................. 455 Time code .....................................2446 File name ......................................237
7 Wind noise reduction ................ 2438 Headphone volume ................... 2439 Release mode
(still photography)...................... 8110 Sound level .................................. 11611 Microphone sensitivity..... 116, 24212 Frequency response................... 24313 Electronic VR indicator ..... 118, 241
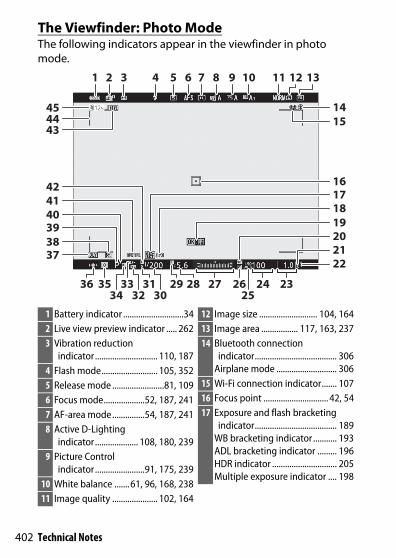
402 Technical Notes
The Viewfinder: Photo ModeThe following indicators appear in the viewfinder in photo mode.
38
43
39404142
19
37
4445
22
14
12 1321 3 4 5 6 7 8 9 10 11
15
2120
1716
18
2625
3134
33 2932
2830
3536 2327 24
1 Battery indicator ............................342 Live view preview indicator ..... 2623 Vibration reduction
indicator............................. 110, 1874 Flash mode.......................... 105, 3525 Release mode ........................81, 1096 Focus mode...................52, 187, 2417 AF-area mode...............54, 187, 2418 Active D-Lighting
indicator.................... 108, 180, 2399 Picture Control
indicator.......................91, 175, 23910 White balance .......61, 96, 168, 23811 Image quality ..................... 102, 164
12 Image size ........................... 104, 16413 Image area ................. 117, 163, 23714 Bluetooth connection
indicator...................................... 306Airplane mode ............................ 306
15 Wi-Fi connection indicator....... 10716 Focus point .............................. 42, 5417 Exposure and flash bracketing
indicator...................................... 189WB bracketing indicator ........... 193ADL bracketing indicator ......... 196HDR indicator .............................. 205Multiple exposure indicator .... 198
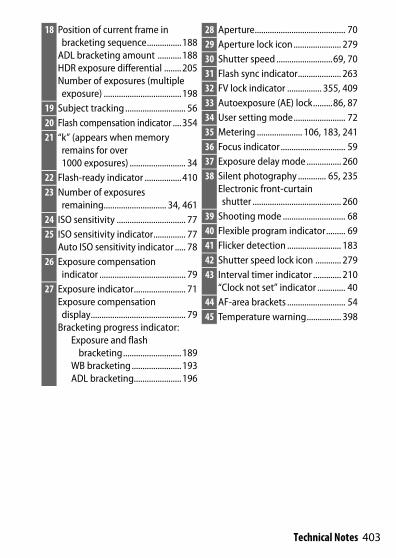
403Technical Notes
18 Position of current frame in bracketing sequence................188
ADL bracketing amount ...........188HDR exposure differential ........205Number of exposures (multiple exposure) ....................................198
19 Subject tracking ............................ 5620 Flash compensation indicator ....35421 “k” (appears when memory
remains for over 1000 exposures) .......................... 34
22 Flash-ready indicator .................41023 Number of exposures
remaining............................. 34, 46124 ISO sensitivity ................................ 7725 ISO sensitivity indicator............... 77
Auto ISO sensitivity indicator ..... 7826 Exposure compensation
indicator ........................................ 7927 Exposure indicator........................ 71
Exposure compensation display............................................ 79
Bracketing progress indicator:Exposure and flash
bracketing...........................189WB bracketing.......................193ADL bracketing......................196
28 Aperture.......................................... 7029 Aperture lock icon...................... 27930 Shutter speed ..........................69, 7031 Flash sync indicator.................... 26332 FV lock indicator ................ 355, 40933 Autoexposure (AE) lock.........86, 8734 User setting mode........................ 7235 Metering ..................... 106, 183, 24136 Focus indicator .............................. 5937 Exposure delay mode ................ 26038 Silent photography ............. 65, 235
Electronic front-curtain shutter ......................................... 260
39 Shooting mode ............................. 6840 Flexible program indicator......... 6941 Flicker detection ......................... 18342 Shutter speed lock icon ............ 27943 Interval timer indicator ............. 210
“Clock not set” indicator ............. 4044 AF-area brackets ........................... 5445 Temperature warning................ 398

404 Technical Notes
The Viewfinder: Movie ModeThe following indicators appear in the viewfinder in movie mode.
9101112
13
8 6
1
234
5
71 Frame size and rate/image
quality................................. 114, 2372 File name ...................................... 1633 External recording control ....... 3444 Recording indicator ......................45
“No movie” indicator ....................465 Time code..................................... 2446 Time remaining..............................45
7 Release mode (still photography) ......................81
8 Sound level .................................. 1169 Microphone sensitivity .... 116, 242
10 Frequency response .................. 24311 Wind noise reduction................ 24312 Headphone volume................... 24313 Electronic VR indicator..... 118, 241

405Technical Notes
The Control Panel2 31 4 5
1011
12
9 8
6
7
1 Shutter-speed lock icon ............2792 Shutter speed ..........................69, 703 Exposure compensation
indicator ........................................ 79Exposure compensation value ..... 79
4 Aperture lock icon ......................2795 Aperture.......................................... 706 Battery indicator ........................... 347 “k” (appears when memory
remains for over 1000 exposures) .................................... 34
8 Number of exposures remaining ............................ 34, 461
9 Release mode ................................ 8110 ISO sensitivity ................................ 7711 Flash compensation indicator.... 354
“Flash off” icon ............................ 10512 Flash sync indicator.................... 263

406 Technical Notes
Nikon’s advanced Creative Lighting System (CLS) offers improved communication between the camera and compatible flash units for improved flash photography.
CLS-Compatible Flash UnitsThe following features are available with CLS-compatible flash units:
The Nikon Creative Lighting System
SB-5000
SB-910SB-900SB-800
SB-700
SB-600
SB-500
SU-800
SB-R200
SB-400
SB-300
Single flash
i-TTL
i-TTL balanced fill flash 1 ✔ ✔ ✔ ✔ ✔ — — ✔ ✔
Standard i-TTL fill flash
✔ 2 ✔ 2 ✔ ✔ 2 ✔ — — ✔ ✔
qA Auto aperture ✔ ✔ 3 — — — — — — —A Non-TTL auto — ✔ 3 — — — — — — —
GN Distance-priority manual
✔ ✔ ✔ — — — — — —
M Manual ✔ ✔ ✔ ✔ ✔ 4 — — ✔ 4 ✔ 4
RPT Repeating flash ✔ ✔ — — — — — — —
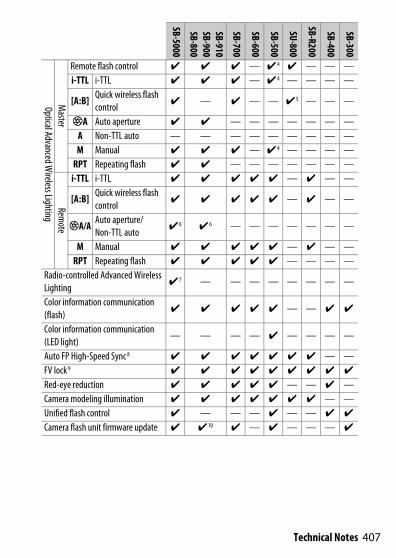
407Technical Notes
Optical Advanced Wireless Lighting
Master
Remote flash control ✔ ✔ ✔ — ✔ 4 ✔ — — —i-TTL i-TTL ✔ ✔ ✔ — ✔ 4 — — — —
[A:B] Quick wireless flash control
✔ — ✔ — — ✔ 5 — — —
qA Auto aperture ✔ ✔ — — — — — — —A Non-TTL auto — — — — — — — — —M Manual ✔ ✔ ✔ — ✔ 4 — — — —
RPT Repeating flash ✔ ✔ — — — — — — —
Remote
i-TTL i-TTL ✔ ✔ ✔ ✔ ✔ — ✔ — —
[A:B] Quick wireless flash control
✔ ✔ ✔ ✔ ✔ — ✔ — —
qA/A Auto aperture/Non-TTL auto
✔ 6 ✔ 6 — — — — — — —
M Manual ✔ ✔ ✔ ✔ ✔ — ✔ — —RPT Repeating flash ✔ ✔ ✔ ✔ ✔ — — — —
Radio-controlled Advanced Wireless Lighting
✔ 7 — — — — — — — —
Color information communication (flash)
✔ ✔ ✔ ✔ ✔ — — ✔ ✔
Color information communication (LED light)
— — — — ✔ — — — —
Auto FP High-Speed Sync 8 ✔ ✔ ✔ ✔ ✔ ✔ ✔ — —FV lock 9 ✔ ✔ ✔ ✔ ✔ ✔ ✔ ✔ ✔
Red-eye reduction ✔ ✔ ✔ ✔ ✔ — — ✔ —Camera modeling illumination ✔ ✔ ✔ ✔ ✔ ✔ ✔ — —Unified flash control ✔ — — — ✔ — — ✔ ✔
Camera flash unit firmware update ✔ ✔ 10 ✔ — ✔ — — — ✔
SB-5000
SB-910SB-900SB-800
SB-700
SB-600
SB-500
SU-800
SB-R200
SB-400
SB-300
408 Technical Notes
1 Not available with spot metering.2 Can also be selected with flash unit.3 qA/A mode selection performed on flash unit using custom settings.4 Can only be selected using the camera Flash control option.5 Available only during close-up photography.6 Choice of qA and A depends on the option selected with the master flash.7 Supports the same features as remote flash units with optical AWL.8 Available only in i-TTL, qA, A, GN, and M flash-control modes.9 Available only in i-TTL flash control mode or when the flash is set to emit monitor pre-flashes in qA or A flash control mode.
10 Firmware updates for the SB-910 and SB-900 can be performed from the camera.
The SU-800 Wireless Speedlight CommanderWhen mounted on a CLS-compatible camera, the SU-800 can be used as a commander for SB-5000, SB-910, SB-900, SB-800, SB-700, SB-600, SB-500, or SB-R200 flash units in up to three groups. The SU-800 itself is not equipped with a flash.
A Modeling IlluminationPressing the control to which Preview has been assigned using Custom Setting f2 (Custom control assignment) causes CLS-compatible flash units to emit a modeling flash. This feature can be used with Advanced Wireless Lighting to preview the total lighting effect achieved with multiple flash units; the effect is best viewed by looking directly at the subject rather than at the camera display. Modeling illumination can be turned off using Custom Setting e5 (Modeling flash).
D Flash CompensationIn i-TTL and auto aperture (qA) flash control modes, the flash compensation selected with the optional flash unit or the camera Flash control option is added to the flash compensation selected with the Flash compensation option in the photo shooting menu.

409Technical Notes
D Other Flash UnitsThe following flash units can be used in non-TTL auto and manual modes.
Flash unit SB-80DX, SB-28DX, SB-28,
SB-26, SB-25, SB-24
SB-50DX, SB-23, SB-29, SB-21B,
SB-29S
SB-30, SB-27 1, SB-22S, SB-22, SB-20, SB-16B,
SB-15Flash modeA Non-TTL auto ✔ — ✔
M Manual ✔ ✔ ✔
G Repeating flash ✔ — —REAR Rear-curtain sync 2 ✔ ✔ ✔
1 Flash mode is automatically set to TTL and shutter-release is disabled. Set flash unit to A (non-TTL auto flash).
2 Available when camera is used to select flash mode.
D Using FV Lock with Optional Flash UnitsFV lock is available with optional flash units in TTL and (where supported) monitor pre-flash qA and monitor pre-flash A flash control modes (see the manual provided with the flash unit for more information). Note that when Advanced Wireless Lighting is used to control remote flash units, you will need to set the flash control mode for the master or at least one remote group to TTL, qA, or A. The area metered for FV lock is as follows:
Flash unit Flash mode Metered area
Stand-alone flash uniti-TTL 6-mm circle in center of frameqA Area metered by flash exposure meter
Used with other flash units (Advanced Wireless Lighting)
i-TTL Entire frameqA
Area metered by flash exposure meterA
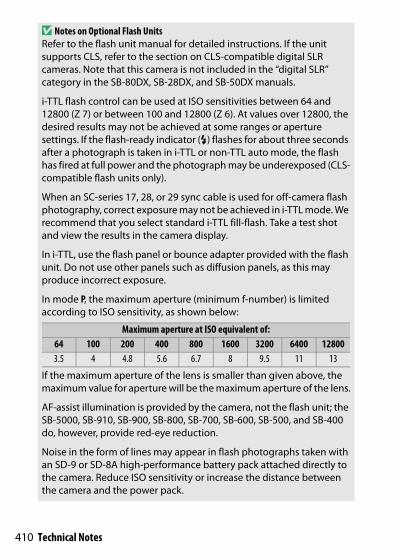
410 Technical Notes
D Notes on Optional Flash UnitsRefer to the flash unit manual for detailed instructions. If the unit supports CLS, refer to the section on CLS-compatible digital SLR cameras. Note that this camera is not included in the “digital SLR” category in the SB-80DX, SB-28DX, and SB-50DX manuals.
i-TTL flash control can be used at ISO sensitivities between 64 and 12800 (Z 7) or between 100 and 12800 (Z 6). At values over 12800, the desired results may not be achieved at some ranges or aperture settings. If the flash-ready indicator (c) flashes for about three seconds after a photograph is taken in i-TTL or non-TTL auto mode, the flash has fired at full power and the photograph may be underexposed (CLS-compatible flash units only).
When an SC-series 17, 28, or 29 sync cable is used for off-camera flash photography, correct exposure may not be achieved in i-TTL mode. We recommend that you select standard i-TTL fill-flash. Take a test shot and view the results in the camera display.
In i-TTL, use the flash panel or bounce adapter provided with the flash unit. Do not use other panels such as diffusion panels, as this may produce incorrect exposure.
In mode P, the maximum aperture (minimum f-number) is limited according to ISO sensitivity, as shown below:
Maximum aperture at ISO equivalent of:64 100 200 400 800 1600 3200 6400 128003.5 4 4.8 5.6 6.7 8 9.5 11 13
If the maximum aperture of the lens is smaller than given above, the maximum value for aperture will be the maximum aperture of the lens.
AF-assist illumination is provided by the camera, not the flash unit; the SB-5000, SB-910, SB-900, SB-800, SB-700, SB-600, SB-500, and SB-400 do, however, provide red-eye reduction.
Noise in the form of lines may appear in flash photographs taken with an SD-9 or SD-8A high-performance battery pack attached directly to the camera. Reduce ISO sensitivity or increase the distance between the camera and the power pack.

411Technical Notes
A variety of accessories are available for your Nikon camera.
Other Accessories
Power sources • EN-EL15b Rechargeable Li-ion Battery: Additional EN-EL15b batteries are available from local retailers and Nikon service representatives. EN-EL15a/EN-EL15 batteries can also be used, but note that you may not be able to take as many pictures on a single charge (0 463).
• MH-25a Battery Charger: The MH-25a can be used to recharge EN-EL15b batteries. MH-25 battery chargers can also be used.
• EH-7P Charging AC Adapter: The EH-7P can be used to charge EN-EL15b batteries inserted in the camera (the battery only charges when the camera is off ). It cannot be used to charge EN-EL15a/EN-EL15 batteries.
• EP-5B Power Connector, EH-5c and EH-5b AC Adapters: These accessories can be used to power the camera for extended periods. The EP-5B is required to connect the camera to the EH-5c/EH-5b; see “Attaching a Power Connector and AC Adapter” (0 416) for details.
Filters • Neutral Color (NC) filters can be used to protect the lens.• To prevent ghosting, avoid using filters when the
subject is framed against a bright light, or when a bright light source is in the frame.
• Center-weighted metering is recommended if matrix metering fails to produce the desired results for filters with exposure factors (filter factors) over 1× (Y44, Y48, Y52, O56, R60, X0, X1, C-PL, ND2S, ND4, ND4S, ND8, ND8S, ND400, A2, A12, B2, B8, B12). See the filter manual for details.
• Filters intended for special-effects photography may interfere with autofocus or the in-focus indicator (I).
Mount adapters FTZ Mount Adapter (0 453)
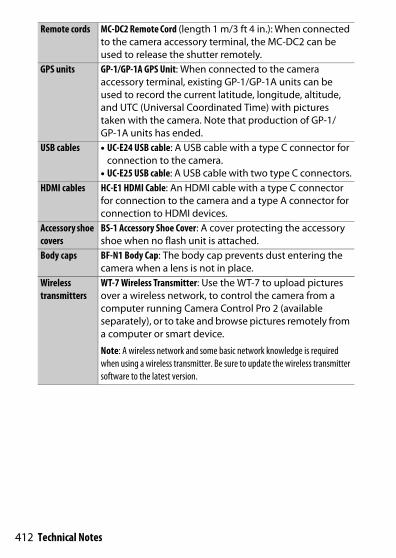
412 Technical Notes
Remote cords MC-DC2 Remote Cord (length 1 m/3 ft 4 in.): When connected to the camera accessory terminal, the MC-DC2 can be used to release the shutter remotely.
GPS units GP-1/GP-1A GPS Unit: When connected to the camera accessory terminal, existing GP-1/GP-1A units can be used to record the current latitude, longitude, altitude, and UTC (Universal Coordinated Time) with pictures taken with the camera. Note that production of GP-1/GP-1A units has ended.
USB cables • UC-E24 USB cable: A USB cable with a type C connector for connection to the camera.
• UC-E25 USB cable: A USB cable with two type C connectors.HDMI cables HC-E1 HDMI Cable: An HDMI cable with a type C connector
for connection to the camera and a type A connector for connection to HDMI devices.
Accessory shoe covers
BS-1 Accessory Shoe Cover: A cover protecting the accessory shoe when no flash unit is attached.
Body caps BF-N1 Body Cap: The body cap prevents dust entering the camera when a lens is not in place.
Wireless transmitters
WT-7 Wireless Transmitter: Use the WT-7 to upload pictures over a wireless network, to control the camera from a computer running Camera Control Pro 2 (available separately), or to take and browse pictures remotely from a computer or smart device.
Note: A wireless network and some basic network knowledge is required when using a wireless transmitter. Be sure to update the wireless transmitter software to the latest version.

413Technical Notes
Wireless remote controllers
• WR-R10 Wireless Remote Controller/WR-T10 Wireless Remote Controller: When a WR-R10 wireless remote controller is attached to the accessory terminal, the camera can be controlled wirelessly using a WR-T10 wireless remote controller (when connecting the WR-R10, be sure the cover for the accessory terminal and the USB and HDMI connectors is fully open). The WR-R10 can also be used to control radio-controlled flash units. For synchronized release involving more than one camera, ready multiple cameras with paired WR-R10 units attached.
• WR-1 Wireless Remote Controller: WR-1 units are used with WR-R10 or WR-T10 wireless remote controllers or with other WR-1 remote controllers, with the WR-1 units functioning as either transmitters or receivers. As a transmitter, the WR-1 can be used to control the camera and take pictures via signals transmitted to a receiver (a WR-R10 or a second WR-1) connected to the camera accessory terminal, while as a receiver it receives remote commands from a WR-T10 or a separate WR-1 transmitter.
Note: Be sure the firmware for the WR-R10 and WR-1 has been updated to the latest version (WR-R10 firmware version 3.0 or later and WR-1 firmware version 1.0.1 or later). For information on firmware updates, see the Nikon website for your area.
Viewfinder eyepiece accessories
DK-29 Rubber Eyecup: The DK-29 makes the image in the viewfinder easier to see, preventing eye fatigue.
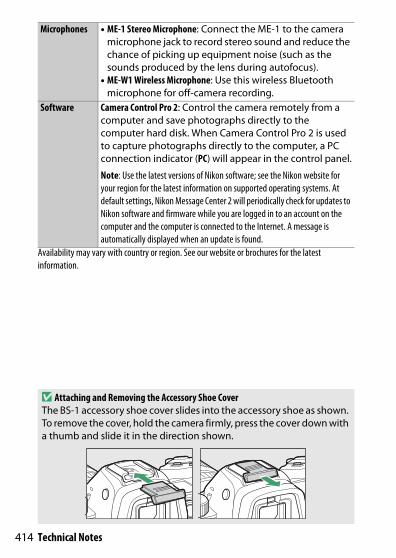
414 Technical Notes
Availability may vary with country or region. See our website or brochures for the latest information.
Microphones • ME-1 Stereo Microphone: Connect the ME-1 to the camera microphone jack to record stereo sound and reduce the chance of picking up equipment noise (such as the sounds produced by the lens during autofocus).
• ME-W1 Wireless Microphone: Use this wireless Bluetooth microphone for off-camera recording.
Software Camera Control Pro 2: Control the camera remotely from a computer and save photographs directly to the computer hard disk. When Camera Control Pro 2 is used to capture photographs directly to the computer, a PC connection indicator (PC) will appear in the control panel.
Note: Use the latest versions of Nikon software; see the Nikon website for your region for the latest information on supported operating systems. At default settings, Nikon Message Center 2 will periodically check for updates to Nikon software and firmware while you are logged in to an account on the computer and the computer is connected to the Internet. A message is automatically displayed when an update is found.
D Attaching and Removing the Accessory Shoe CoverThe BS-1 accessory shoe cover slides into the accessory shoe as shown. To remove the cover, hold the camera firmly, press the cover down with a thumb and slide it in the direction shown.
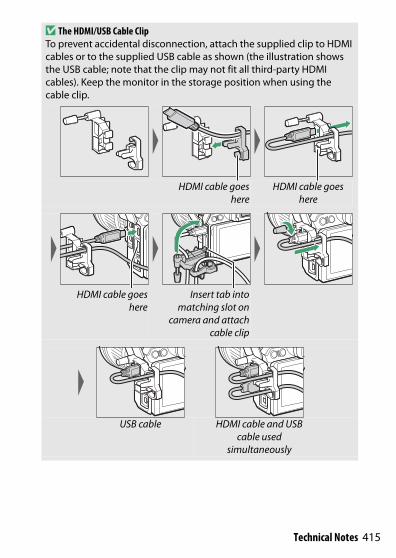
415Technical Notes
D The HDMI/USB Cable ClipTo prevent accidental disconnection, attach the supplied clip to HDMI cables or to the supplied USB cable as shown (the illustration shows the USB cable; note that the clip may not fit all third-party HDMI cables). Keep the monitor in the storage position when using the cable clip.
HDMI cable goeshere
HDMI cable goes here
HDMI cable goeshere
Insert tab intomatching slot on
camera and attachcable clip
USB cable HDMI cable and USB cable used
simultaneously
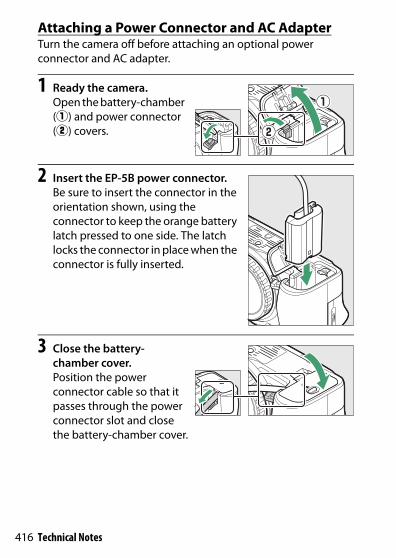
416 Technical Notes
Attaching a Power Connector and AC AdapterTurn the camera off before attaching an optional power connector and AC adapter.
1 Ready the camera.Open the battery-chamber (q) and power connector (w) covers.
2 Insert the EP-5B power connector.Be sure to insert the connector in the orientation shown, using the connector to keep the orange battery latch pressed to one side. The latch locks the connector in place when the connector is fully inserted.
3 Close the battery-chamber cover.Position the power connector cable so that it passes through the power connector slot and close the battery-chamber cover.
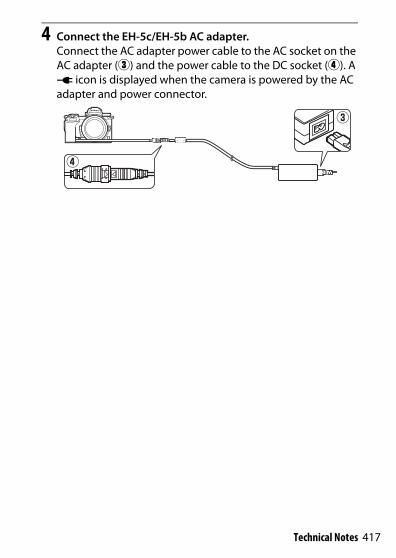
417Technical Notes
4 Connect the EH-5c/EH-5b AC adapter.Connect the AC adapter power cable to the AC socket on the AC adapter (e) and the power cable to the DC socket (r). A P icon is displayed when the camera is powered by the AC adapter and power connector.
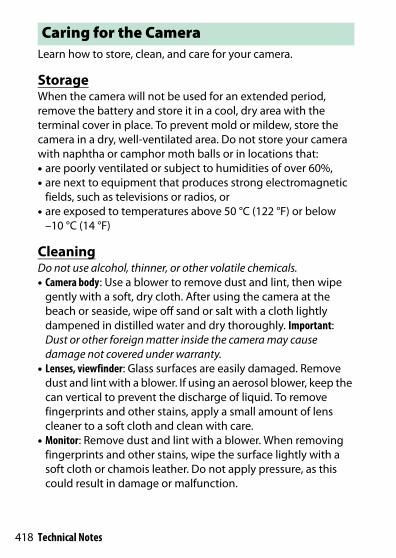
418 Technical Notes
Learn how to store, clean, and care for your camera.
StorageWhen the camera will not be used for an extended period, remove the battery and store it in a cool, dry area with the terminal cover in place. To prevent mold or mildew, store the camera in a dry, well-ventilated area. Do not store your camera with naphtha or camphor moth balls or in locations that:• are poorly ventilated or subject to humidities of over 60%,• are next to equipment that produces strong electromagnetic
fields, such as televisions or radios, or• are exposed to temperatures above 50 °C (122 °F) or below
–10 °C (14 °F)
CleaningDo not use alcohol, thinner, or other volatile chemicals.• Camera body: Use a blower to remove dust and lint, then wipe
gently with a soft, dry cloth. After using the camera at the beach or seaside, wipe off sand or salt with a cloth lightly dampened in distilled water and dry thoroughly. Important: Dust or other foreign matter inside the camera may cause damage not covered under warranty.
• Lenses, viewfinder: Glass surfaces are easily damaged. Remove dust and lint with a blower. If using an aerosol blower, keep the can vertical to prevent the discharge of liquid. To remove fingerprints and other stains, apply a small amount of lens cleaner to a soft cloth and clean with care.
• Monitor: Remove dust and lint with a blower. When removing fingerprints and other stains, wipe the surface lightly with a soft cloth or chamois leather. Do not apply pressure, as this could result in damage or malfunction.
Caring for the Camera

419Technical Notes
Image Sensor CleaningIf you suspect that dirt or dust on the image sensor is appearing in photographs, you can clean the sensor using the Clean image sensor option in the setup menu. The sensor can be cleaned at any time using the Clean now option, or cleaning can be performed automatically when the camera is turned off. If image sensor cleaning fails to resolve the problem, contact a Nikon-authorized service representative.
❚❚ “Clean Now”Holding the camera base down, select Clean image sensor in the setup menu, then highlight Clean now and press J. The camera will check and clean the image sensor. No other operations can be performed until cleaning is complete; do not remove or disconnect the power source until cleaning ends and the setup menu is displayed.
420 Technical Notes
D Image Sensor CleaningUsing camera controls during shutdown interrupts image sensor cleaning.
If image sensor cleaning is performed several times in succession, image sensor cleaning may be temporarily disabled to protect the camera’s internal circuitry. Cleaning can be performed again after a short wait.
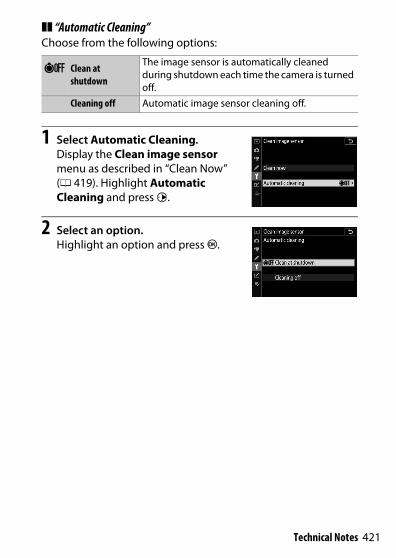
421Technical Notes
❚❚ “Automatic Cleaning”Choose from the following options:
1 Select Automatic Cleaning.Display the Clean image sensor menu as described in “Clean Now” (0 419). Highlight Automatic Cleaning and press 2.
2 Select an option.Highlight an option and press J.
6 Clean at shutdown
The image sensor is automatically cleaned during shutdown each time the camera is turned off.
Cleaning off Automatic image sensor cleaning off.

422 Technical Notes
Manual CleaningIf foreign matter cannot be removed from the image sensor using image sensor cleaning, the sensor can be cleaned manually as described below. Note, however, that the sensor is extremely delicate and easily damaged; we recommend that manual cleaning be performed only by a Nikon-authorized service representative.
1 Remove the lens.Turn the camera off and remove the lens or body cap.
2 Examine the image sensor.Holding the camera so that light falls on the image sensor, examine the sensor for dust or lint. If no foreign objects are present, proceed to Step 4.
3 Clean the sensor.Remove any dust and lint from the sensor with a blower. Do not use a blower-brush, as the bristles could damage the sensor. Dirt that cannot be removed with a blower can only be removed by Nikon-authorized service personnel. Under no circumstances should you touch or wipe the sensor.
4 Replace the lens or body cap.
423Technical Notes
D Foreign Matter on the Image SensorForeign matter entering the camera when lenses or body caps are removed or exchanged (or in rare circumstances lubricant or fine particles from the camera itself ) may adhere to the image sensor, where it may appear in photographs taken under certain conditions. To protect the camera when no lens is in place, be sure to replace the body cap provided with the camera, being careful to first remove all dust and other foreign matter that may be adhering to the camera mount, lens mount, and body cap. Avoid attaching the body cap or exchanging lenses in dusty environments.
Should foreign matter find its way onto the image sensor, use the image sensor cleaning option as described in “Image Sensor Cleaning”(0 419). If the problem persists, clean the sensor manually (0 422) or have the sensor cleaned by authorized Nikon service personnel. Photographs affected by the presence of foreign matter on the sensor can be retouched using the clean image options available in some imaging applications.
D Servicing the Camera and AccessoriesThe camera is a precision device and requires regular servicing. Nikon recommends that the camera be inspected by the original retailer or a Nikon-authorized service representative once every one to two years, and that it be serviced once every three to five years (note that fees apply to these services). Frequent inspection and servicing are particularly recommended if the camera is used professionally. Any accessories regularly used with the camera, such as lenses or optional flash units, should be included when the camera is inspected or serviced.

424 Technical Notes
Do not drop: The product may malfunction if subjected to strong shocks or vibration.
Keep dry: This product is not waterproof, and may malfunction if immersed in water or exposed to high levels of humidity. Rusting of the internal mechanism can cause irreparable damage.
Avoid sudden changes in temperature: Sudden changes in temperature, such as those that occur when entering or leaving a heated building on a cold day, can cause condensation inside the device. To prevent condensation, place the device in a carrying case or plastic bag before exposing it to sudden changes in temperature.
Keep away from strong magnetic fields: Do not use or store this device in the vicinity of equipment that generates strong electromagnetic radiation or magnetic fields. Static charges or the magnetic fields produced by equipment such as radio transmitters could interfere with the display, damage data stored on the memory card, or affect the product’s internal circuitry.
Do not leave the lens pointed at the sun: Do not leave the lens pointed at the sun or other strong light source for an extended period. Intense light may cause the image sensor to deteriorate or produce a white blur effect in photographs.
Turn the product off before removing or disconnecting the power source: Do not unplug the product or remove the battery while the product is on or while images are being recorded or deleted. Forcibly cutting power in these circumstances could result in loss of data or in damage to product memory or internal circuitry. To prevent an accidental interruption of power, avoid carrying the product from one location to another while an AC adapter is connected.
Caring for the Camera and Battery: Cautions

425Technical Notes
Cleaning: When cleaning the camera body, use a blower to gently remove dust and lint, then wipe gently with a soft, dry cloth. After using the camera at the beach or seaside, wipe off any sand or salt using a cloth lightly dampened in pure water and then dry the camera thoroughly. In rare instances, static electricity may cause the LCD displays to light up or go dark. This does not indicate a malfunction, and the display will soon return to normal.
Lenses, viewfinders, and other glass elements are easily damaged. Dust and lint should be gently removed with a blower. When using an aerosol blower, keep the can vertical to prevent discharge of liquid. To remove fingerprints and other stains from glass surfaces, apply a small amount of lens cleaner to a soft cloth and wipe the glass carefully.
Do not touch the image sensor: Under no circumstances should you exert pressure on the image sensor, poke it with cleaning tools, or subject it to powerful air currents from a blower. These actions could scratch or otherwise damage the sensor. For information on cleaning the image sensor, see “Image Sensor Cleaning” (0 419).
Lens contacts: Keep the lens contacts clean and be careful not to touch them with your fingers or with tools or other objects.
Storage: To prevent mold or mildew, store the camera in a dry, well-ventilated area. If you are using an AC adapter, unplug the adapter to prevent fire. If the product will not be used for an extended period, remove the battery to prevent leakage and store the camera in a plastic bag containing a desiccant. Do not, however, store the camera case in a plastic bag, as this may cause the material to deteriorate. Note that desiccant gradually loses its capacity to absorb moisture and should be replaced at regular intervals.
To prevent mold or mildew, take the camera out of storage at least once a month. Turn the camera on and release the shutter a few times before putting it away.
Store the battery in a cool, dry place. Replace the terminal cover before putting the battery away.
Image sensor
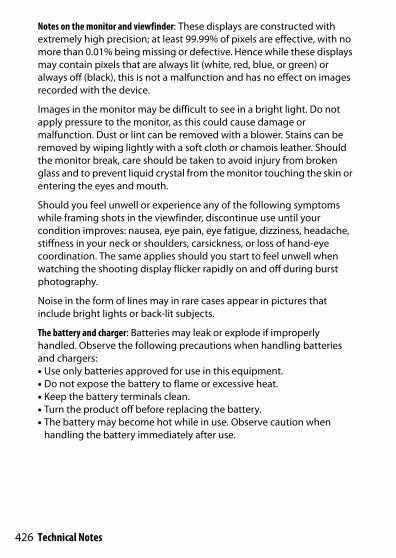
426 Technical Notes
Notes on the monitor and viewfinder: These displays are constructed with extremely high precision; at least 99.99% of pixels are effective, with no more than 0.01% being missing or defective. Hence while these displays may contain pixels that are always lit (white, red, blue, or green) or always off (black), this is not a malfunction and has no effect on images recorded with the device.
Images in the monitor may be difficult to see in a bright light. Do not apply pressure to the monitor, as this could cause damage or malfunction. Dust or lint can be removed with a blower. Stains can be removed by wiping lightly with a soft cloth or chamois leather. Should the monitor break, care should be taken to avoid injury from broken glass and to prevent liquid crystal from the monitor touching the skin or entering the eyes and mouth.
Should you feel unwell or experience any of the following symptoms while framing shots in the viewfinder, discontinue use until your condition improves: nausea, eye pain, eye fatigue, dizziness, headache, stiffness in your neck or shoulders, carsickness, or loss of hand-eye coordination. The same applies should you start to feel unwell when watching the shooting display flicker rapidly on and off during burst photography.
Noise in the form of lines may in rare cases appear in pictures that include bright lights or back-lit subjects.
The battery and charger: Batteries may leak or explode if improperly handled. Observe the following precautions when handling batteries and chargers:• Use only batteries approved for use in this equipment.• Do not expose the battery to flame or excessive heat.• Keep the battery terminals clean.• Turn the product off before replacing the battery.• The battery may become hot while in use. Observe caution when
handling the battery immediately after use.

427Technical Notes
• Remove the battery from the camera or charger when not in use and replace the terminal cover. These devices draw minute amounts of charge even when off and could draw the battery down to the point that it will no longer function. If the battery will not be used for some time, insert it in the camera and run it flat before removing it from the camera for storage. The battery should be stored in a cool location with an ambient temperature of 15 °C to 25 °C (59 °F to 77 °F; avoid hot or extremely cold locations). Repeat this process at least once every six months.
• Turning the camera on or off repeatedly when the battery is fully discharged will shorten battery life. Batteries that have been fully discharged must be charged before use.
• The internal temperature of the battery may rise while the battery is in use. Attempting to charge the battery while the internal temperature is elevated will impair battery performance, and the battery may not charge or charge only partially. Wait for the battery to cool before charging.
• Charge the battery indoors at ambient temperatures of 5 °C to 35 °C (41 °F to 95 °F). Do not use the battery at ambient temperatures below 0 °C (32 °F) or above 40 °C (104 °F); failure to observe this precaution could damage the battery or impair its performance. Capacity may be reduced and charging times increase at battery temperatures from 0 °C (32 °F) to 15 °C (59 °F) and from 45 °C (113 °F) to 60 °C (140 °F). The battery will not charge if its temperature is below 0 °C (32 °F) or above 60 °C (140 °F).
• If the CHARGE lamp flashes quickly (about eight times a second) during charging, confirm that the temperature is in the correct range and then unplug the charger and remove and reinsert the battery. If the problem persists, cease use immediately and take battery and charger to your retailer or a Nikon-authorized service representative.
• Do not move the charger or touch the battery during charging. Failure to observe this precaution could in very rare instances result in the charger showing that charging is complete when the battery is only partially charged. Remove and reinsert the battery to begin charging again.
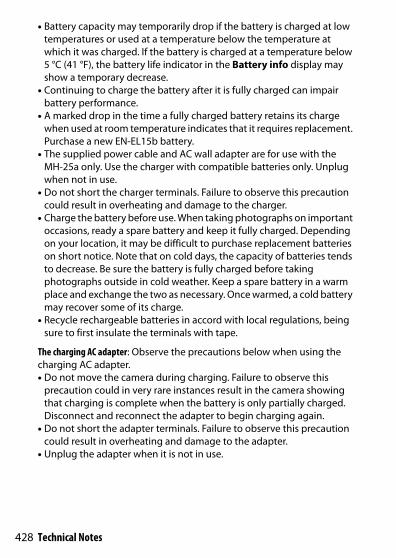
428 Technical Notes
• Battery capacity may temporarily drop if the battery is charged at low temperatures or used at a temperature below the temperature at which it was charged. If the battery is charged at a temperature below 5 °C (41 °F), the battery life indicator in the Battery info display may show a temporary decrease.
• Continuing to charge the battery after it is fully charged can impair battery performance.
• A marked drop in the time a fully charged battery retains its charge when used at room temperature indicates that it requires replacement. Purchase a new EN-EL15b battery.
• The supplied power cable and AC wall adapter are for use with the MH-25a only. Use the charger with compatible batteries only. Unplug when not in use.
• Do not short the charger terminals. Failure to observe this precaution could result in overheating and damage to the charger.
• Charge the battery before use. When taking photographs on important occasions, ready a spare battery and keep it fully charged. Depending on your location, it may be difficult to purchase replacement batteries on short notice. Note that on cold days, the capacity of batteries tends to decrease. Be sure the battery is fully charged before taking photographs outside in cold weather. Keep a spare battery in a warm place and exchange the two as necessary. Once warmed, a cold battery may recover some of its charge.
• Recycle rechargeable batteries in accord with local regulations, being sure to first insulate the terminals with tape.
The charging AC adapter: Observe the precautions below when using the charging AC adapter.• Do not move the camera during charging. Failure to observe this
precaution could in very rare instances result in the camera showing that charging is complete when the battery is only partially charged. Disconnect and reconnect the adapter to begin charging again.
• Do not short the adapter terminals. Failure to observe this precaution could result in overheating and damage to the adapter.
• Unplug the adapter when it is not in use.

429Technical Notes
Nikon Z 7/Z 6 Digital Camera
Specifications
TypeType Digital camera with support for
interchangeable lensesLens mount Nikon Z mount
LensCompatible lenses • Z mount NIKKOR lenses
• F mount NIKKOR lenses with mount adapter; restrictions may apply
Effective pixelsEffective pixels • Z 7: 45.7 million
• Z 6: 24.5 million
Image sensorImage sensor 35.9 × 23.9 mm CMOS sensor (Nikon FX format)Total pixels • Z 7: 46.89 million
• Z 6: 25.28 millionDust-Reduction System Image Dust Off reference data (requires
Capture NX-D); image sensor cleaning
StorageImage size (pixels) • Z 7:
- FX (36×24) image area8256 × 5504 (Large: 45.4 M)6192 × 4128 (Medium: 25.6 M)4128 × 2752 (Small: 11.4 M)
- DX (24×16) image area5408 × 3600 (Large: 19.5 M)4048 × 2696 (Medium: 10.9 M)2704 × 1800 (Small: 4.9 M)
- 5 : 4 (30×24) image area6880 × 5504 (Large: 37.9 M)5152 × 4120 (Medium: 21.2 M)3440 × 2752 (Small: 9.5 M)

430 Technical Notes
Image size (pixels) - 1 : 1 (24×24) image area5504 × 5504 (Large: 30.3 M)4128 × 4128 (Medium: 17.0 M)2752 × 2752 (Small: 7.6 M)
- 16 : 9 (36×20) image area8256 × 4640 (Large: 38.3 M)6192 × 3480 (Medium: 21.5 M)4128 × 2320 (Small: 9.6 M)
- Photographs taken during movie recording at a frame size of 3840 × 2160: 3840 × 2160
- Photographs taken during movie recording at other frame sizes: 1920 × 1080
• Z 6:- FX (36×24) image area
6048 × 4024 (Large: 24.3 M)4528 × 3016 (Medium: 13.7 M)3024 × 2016 (Small: 6.1 M)
- DX (24×16) image area3936 × 2624 (Large: 10.3 M)2944 × 1968 (Medium: 5.8 M)1968 × 1312 (Small: 2.6 M)
- 1 : 1 (24×24) image area4016 × 4016 (Large: 16.1 M)3008 × 3008 (Medium: 9.0 M)2000 × 2000 (Small: 4.0 M)
- 16 : 9 (36×20) image area6048 × 3400 (Large: 20.6 M)4528 × 2544 (Medium: 11.5 M)3024 × 1696 (Small: 5.1 M)
- Photographs taken during movie recording at a frame size of 3840 × 2160: 3840 × 2160
- Photographs taken during movie recording at other frame sizes: 1920 × 1080
Storage

431Technical Notes
File format • NEF (RAW): 12 or 14 bit (lossless compressed, compressed, or uncompressed); large, medium, and small available (medium and small images are recorded at a bit depth of 12 bits using lossless compression)
• TIFF (RGB)• JPEG: JPEG-Baseline compliant with fine
(approx. 1 : 4), normal (approx. 1 : 8), or basic (approx. 1 : 16) compression; optimal quality compression available
• NEF (RAW)+JPEG: Single photograph recorded in both NEF (RAW) and JPEG formats
Picture Control System Auto, Standard, Neutral, Vivid, Monochrome, Portrait, Landscape, Flat, Creative Picture Controls (Dream, Morning, Pop, Sunday, Somber, Dramatic, Silence, Bleached, Melancholic, Pure, Denim, Toy, Sepia, Blue, Red, Pink, Charcoal, Graphite, Binary, Carbon); selected Picture Control can be modified; storage for custom Picture Controls
Media XQD memory cardsFile system DCF 2.0, Exif 2.31, PictBridge
ViewfinderViewfinder 1.27-cm/0.5-in. approx. 3690k-dot (Quad VGA)
OLED with color balance and auto and 11-level manual brightness controls
Frame coverage Approx. 100% horizontal and 100% verticalMagnification Approx. 0.8× (50 mm lens at infinity, −1.0 m −1)Eyepoint 21 mm (−1.0 m −1; from center surface of
viewfinder eyepiece lens)Diopter adjustment −4 – +2 m −1
Eye sensor Automatically switches between monitor and viewfinder displays
Storage

432 Technical Notes
ShutterType Electronically-controlled vertical-travel focal-
plane mechanical shutter; electronic front-curtain shutter; electronic shutter
Speed 1/8000 – 30 s in steps of 1/3 or 1/2 EV, bulb, time, X200
Flash sync speed X=1/200 s; synchronizes with shutter at 1/200 s or slower; Auto FP High-Speed sync supported
ReleaseRelease mode Single frame, low-speed continuous, high-
speed continuous, high-speed continuous (extended), self-timer
Approximate maximum frame advance rate (measured under Nikon-specified test conditions)
• Z 7:- Low-speed continuous: 1–5 fps- High-speed continuous: 5.5 fps (14-bit NEF/RAW:
5 fps)- High-speed continuous (extended): 9 fps (14-bit
NEF/RAW: 8 fps)• Z 6:
- Low-speed continuous: 1–5 fps- High-speed continuous: 5.5 fps- High-speed continuous (extended): 12 fps (14-bit
NEF/RAW: 9 fps)Self-timer 2 s, 5 s, 10 s, 20 s; 1–9 exposures at intervals of
0.5, 1, 2, or 3 s
ExposureMetering system TTL metering using camera image sensorMetering mode • Matrix metering
• Center-weighted metering: Weight of 75% given to 12 mm circle in center of frame; weighting can instead be based on average of entire frame
• Spot metering: Meters 4 mm circle (about 1.5% of frame) centered on selected focus point
• Highlight-weighted meteringRange (ISO 100, f/2.0 lens, 20 °C/68 °F)
• Z 7: –3 – +17 EV• Z 6: –4 – +17 EV
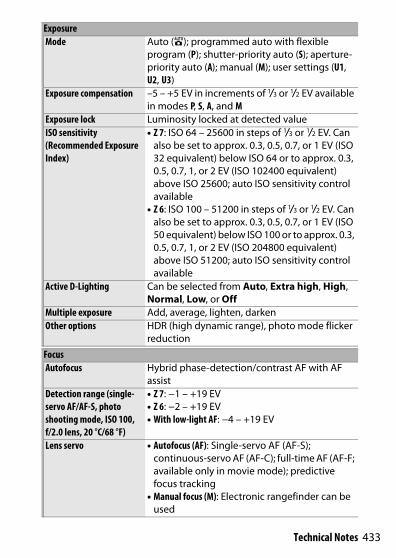
433Technical Notes
Mode Auto (b); programmed auto with flexible program (P); shutter-priority auto (S); aperture-priority auto (A); manual (M); user settings (U1, U2, U3)
Exposure compensation –5 – +5 EV in increments of 1/3 or 1/2 EV available in modes P, S, A, and M
Exposure lock Luminosity locked at detected valueISO sensitivity (Recommended Exposure Index)
• Z 7: ISO 64 – 25600 in steps of 1/3 or 1/2 EV. Can also be set to approx. 0.3, 0.5, 0.7, or 1 EV (ISO 32 equivalent) below ISO 64 or to approx. 0.3, 0.5, 0.7, 1, or 2 EV (ISO 102400 equivalent) above ISO 25600; auto ISO sensitivity control available
• Z 6: ISO 100 – 51200 in steps of 1/3 or 1/2 EV. Can also be set to approx. 0.3, 0.5, 0.7, or 1 EV (ISO 50 equivalent) below ISO 100 or to approx. 0.3, 0.5, 0.7, 1, or 2 EV (ISO 204800 equivalent) above ISO 51200; auto ISO sensitivity control available
Active D-Lighting Can be selected from Auto, Extra high, High, Normal, Low, or Off
Multiple exposure Add, average, lighten, darkenOther options HDR (high dynamic range), photo mode flicker
reduction
FocusAutofocus Hybrid phase-detection/contrast AF with AF
assistDetection range (single-servo AF/AF-S, photo shooting mode, ISO 100, f/2.0 lens, 20 °C/68 °F)
• Z 7: −1 – +19 EV• Z 6: −2 – +19 EV• With low-light AF: −4 – +19 EV
Lens servo • Autofocus (AF): Single-servo AF (AF-S); continuous-servo AF (AF-C); full-time AF (AF-F; available only in movie mode); predictive focus tracking
• Manual focus (M): Electronic rangefinder can be used
Exposure
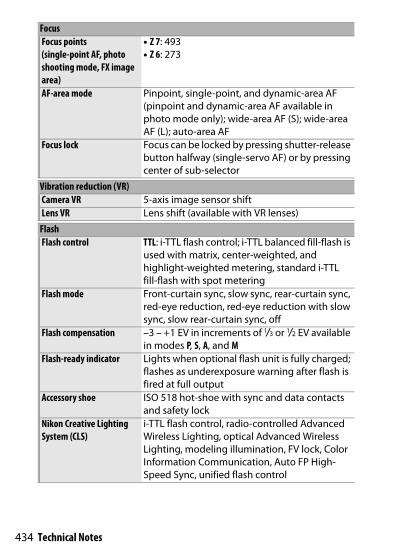
434 Technical Notes
Focus points (single-point AF, photo shooting mode, FX image area)
• Z 7: 493• Z 6: 273
AF-area mode Pinpoint, single-point, and dynamic-area AF (pinpoint and dynamic-area AF available in photo mode only); wide-area AF (S); wide-area AF (L); auto-area AF
Focus lock Focus can be locked by pressing shutter-release button halfway (single-servo AF) or by pressing center of sub-selector
Vibration reduction (VR)Camera VR 5-axis image sensor shiftLens VR Lens shift (available with VR lenses)
FlashFlash control TTL: i-TTL flash control; i-TTL balanced fill-flash is
used with matrix, center-weighted, and highlight-weighted metering, standard i-TTL fill-flash with spot metering
Flash mode Front-curtain sync, slow sync, rear-curtain sync, red-eye reduction, red-eye reduction with slow sync, slow rear-curtain sync, off
Flash compensation –3 – +1 EV in increments of 1/3 or 1/2 EV available in modes P, S, A, and M
Flash-ready indicator Lights when optional flash unit is fully charged; flashes as underexposure warning after flash is fired at full output
Accessory shoe ISO 518 hot-shoe with sync and data contacts and safety lock
Nikon Creative Lighting System (CLS)
i-TTL flash control, radio-controlled Advanced Wireless Lighting, optical Advanced Wireless Lighting, modeling illumination, FV lock, Color Information Communication, Auto FP High-Speed Sync, unified flash control
Focus

435Technical Notes
White balanceWhite balance Auto (3 types), natural light auto, direct
sunlight, cloudy, shade, incandescent, fluorescent (7 types), flash, choose color temperature (2500 K–10,000 K), preset manual (up to 6 values can be stored), all except choose color temperature with fine-tuning
BracketingBracketing types Exposure, flash, white balance, and ADL
MovieMetering system TTL exposure metering using main image
sensorMetering mode Matrix, center-weighted, or highlight-weightedFrame size (pixels) and frame rate
• 3840 × 2160 (4K UHD); 30p (progressive), 25p, 24p
• 1920 × 1080; 120p, 100p, 60p, 50p, 30p, 25p, 24p
• 1920×1080 (slow-mo); 30p ×4, 25p ×4, 24p ×5 Actual frame rates for 120p, 100p, 60p, 50p, 30p, 25p, and 24p are 119.88, 100, 59.94, 50, 29.97, 25, and 23.976 fps respectively; quality selection available at all sizes except 3840 × 2160, 1920 × 1080 120p/100p, and 1920 × 1080 slow-mo, when quality is fixed at m (high)
File format MOV, MP4Video compression H.264/MPEG-4 Advanced Video CodingAudio recording format Linear PCM, AACAudio recording device Built-in stereo or external microphone with
attenuator option; sensitivity adjustable

436 Technical Notes
ISO sensitivity (Recommended Exposure Index)
• Z 7:-b: Auto ISO sensitivity control (ISO 64 to
25600)- P, S, A: Auto ISO sensitivity control (ISO 64
to Hi 2) with selectable upper limit- M: Auto ISO sensitivity control (ISO 64 to Hi 2)
available with selectable upper limit; manual selection (ISO 64 to 25600 in steps of 1/3 or 1/2 EV) with additional options available equivalent to approximately 0.3, 0.5, 0.7, 1, or 2 EV (ISO 102400 equivalent) above ISO 25600
• Z 6:-b: Auto ISO sensitivity control (ISO 100 to
51200)- P, S, A: Auto ISO sensitivity control (ISO 100 to
Hi 2) with selectable upper limit- M: Auto ISO sensitivity control (ISO 100 to
Hi 2) available with selectable upper limit; manual selection (ISO 100 to 51200 in steps of 1/3 or 1/2 EV) with additional options available equivalent to approximately 0.3, 0.5, 0.7, 1, or 2 EV (ISO 204800 equivalent) above ISO 51200
Active D-Lighting Can be selected from Same as photo settings, Extra high, High, Normal, Low, or Off
Other options Time-lapse movies, electronic vibration reduction, time codes, movie log output (N-Log)
MonitorMonitor 8-cm/3.2-in., approx. 2100k-dot tilting TFT
touch-sensitive LCD with 170° viewing angle, approximately 100% frame coverage, and color balance and 11-level manual brightness controls
Movie
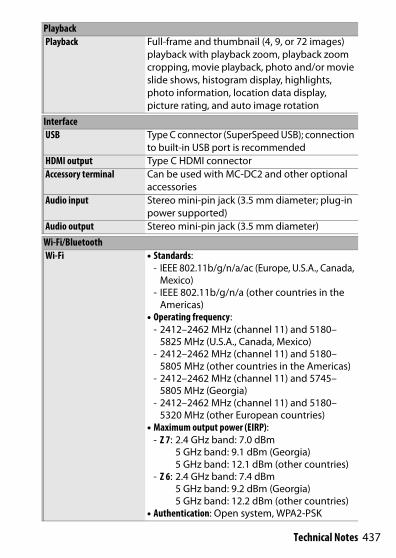
437Technical Notes
PlaybackPlayback Full-frame and thumbnail (4, 9, or 72 images)
playback with playback zoom, playback zoom cropping, movie playback, photo and/or movie slide shows, histogram display, highlights, photo information, location data display, picture rating, and auto image rotation
InterfaceUSB Type C connector (SuperSpeed USB); connection
to built-in USB port is recommendedHDMI output Type C HDMI connectorAccessory terminal Can be used with MC-DC2 and other optional
accessoriesAudio input Stereo mini-pin jack (3.5 mm diameter; plug-in
power supported)Audio output Stereo mini-pin jack (3.5 mm diameter)
Wi-Fi/BluetoothWi-Fi • Standards:
- IEEE 802.11b/g/n/a/ac (Europe, U.S.A., Canada, Mexico)
- IEEE 802.11b/g/n/a (other countries in the Americas)
• Operating frequency: - 2412–2462 MHz (channel 11) and 5180–
5825 MHz (U.S.A., Canada, Mexico)- 2412–2462 MHz (channel 11) and 5180–
5805 MHz (other countries in the Americas)- 2412–2462 MHz (channel 11) and 5745–
5805 MHz (Georgia)- 2412–2462 MHz (channel 11) and 5180–
5320 MHz (other European countries)• Maximum output power (EIRP):
- Z 7: 2.4 GHz band: 7.0 dBm5 GHz band: 9.1 dBm (Georgia)5 GHz band: 12.1 dBm (other countries)
- Z 6: 2.4 GHz band: 7.4 dBm5 GHz band: 9.2 dBm (Georgia)5 GHz band: 12.2 dBm (other countries)
• Authentication: Open system, WPA2-PSK

438 Technical Notes
Bluetooth • Communication protocols: Bluetooth Specification Version 4.2
• Operating frequency:Bluetooth: 2402–2480 MHzBluetooth Low Energy: 2402–2480 MHz
• Maximum output power (EIRP):- Z 7: Bluetooth: 1.5 dBm
Bluetooth Low Energy: 0 dBm- Z 6: Bluetooth: 1.9 dBm
Bluetooth Low Energy: 0.4 dBmRange (line of sight) Approximately 10 m (32 ft) without
interference; range may vary with signal strength and presence or absence of obstacles
Power sourceBattery One EN-EL15b rechargeable Li-ion battery
(0 463); EN-EL15a/EN-EL15 can also be used, but note that you may not be able to take as many pictures on a single charge and that charging AC adapter can be used to charge EN-EL15b batteries only
Charging AC adapter EH-7P charging AC adapter (supplied with the Z 7 only)
AC adapter EH-5c/EH-5b AC adapter (requires EP-5B power connector, which is available separately)
Tripod socketTripod socket 1/4 in. (ISO 1222)
Dimensions/weightDimensions (W × H × D) Approx. 134 × 100.5 × 67.5 mm (5.3 × 4 × 2.7 in.)Weight Approx. 675 g (1 lb. 7.9 oz.) with battery and
memory card but without body cap; approx. 585 g/1 lb. 4.7 oz. (camera body only)
Wi-Fi/Bluetooth

439Technical Notes
• Unless otherwise stated, all measurements are performed in conformity with Camera and Imaging Products Association (CIPA) standards or guidelines.
• All figures are for a camera with a fully-charged battery.• The sample images displayed on the camera and the images and illustrations in the manuals
are for expository purposes only.• Nikon reserves the right to change the appearance and specifications of the hardware and
software described in this manual at any time and without prior notice. Nikon will not be held liable for damages that may result from any mistakes that this manual may contain.
❚❚ MH-25a Battery Charger
The symbols on this product represent the following:m AC, p DC, q Class II equipment (The construction of the product is double-insulated.)
Operating environmentTemperature 0 °C–40 °C (+32 °F–104 °F)Humidity 85% or less (no condensation)
Rated input AC 100–240 V, 50/60 Hz, 0.23–0.12 ARated output DC 8.4 V/1.2 ASupported batteries Nikon EN-EL15b rechargeable Li-ion batteriesCharging time Approx. 2 hours and 35 minutes at an ambient
temperature of 25 °C (77 °F) when no charge remains
Operating temperature 0 °C–40 °C (+32 °F–104 °F)Dimensions (W × H × D) Approx. 95 × 33.5 × 71 mm (3.7 × 1.3 × 2.8 in.),
excluding projectionsLength of power cable Approx. 1.5 m (4.9 ft), if suppliedWeight Approx. 115 g (4.1 oz), excluding supplied
power connector (power cable or AC wall adapter)
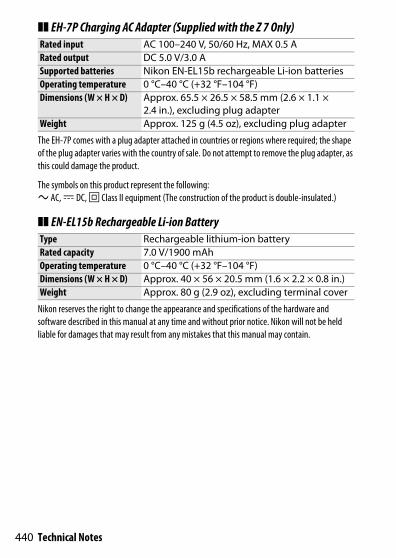
440 Technical Notes
❚❚ EH-7P Charging AC Adapter (Supplied with the Z 7 Only)
The EH-7P comes with a plug adapter attached in countries or regions where required; the shape of the plug adapter varies with the country of sale. Do not attempt to remove the plug adapter, as this could damage the product.
The symbols on this product represent the following:m AC, p DC, q Class II equipment (The construction of the product is double-insulated.)
❚❚ EN-EL15b Rechargeable Li-ion Battery
Nikon reserves the right to change the appearance and specifications of the hardware and software described in this manual at any time and without prior notice. Nikon will not be held liable for damages that may result from any mistakes that this manual may contain.
Rated input AC 100–240 V, 50/60 Hz, MAX 0.5 ARated output DC 5.0 V/3.0 ASupported batteries Nikon EN-EL15b rechargeable Li-ion batteriesOperating temperature 0 °C–40 °C (+32 °F–104 °F)Dimensions (W × H × D) Approx. 65.5 × 26.5 × 58.5 mm (2.6 × 1.1 ×
2.4 in.), excluding plug adapterWeight Approx. 125 g (4.5 oz), excluding plug adapter
Type Rechargeable lithium-ion batteryRated capacity 7.0 V/1900 mAhOperating temperature 0 °C–40 °C (+32 °F–104 °F)Dimensions (W × H × D) Approx. 40 × 56 × 20.5 mm (1.6 × 2.2 × 0.8 in.)Weight Approx. 80 g (2.9 oz), excluding terminal cover

441Technical Notes
A Trademark InformationIOS is a trademark or registered trademark of Cisco Systems, Inc., in the United States and/or other countries and is used under license. Windows is either a registered trademark or a trademark of Microsoft Corporation in the United States and/or other countries. Mac, macOS, OS X, Apple®, App Store®, the Apple logos, iPhone®, iPad®, and iPod touch® are trademarks of Apple Inc. registered in the U.S. and/or other countries. Android, Google Play and the Google Play logo are trademarks of Google LLC. The Android robot is reproduced or modified from work created and shared by Google and used according to terms described in the Creative Commons 3.0 Attribution License. The PictBridge logo is a trademark. XQD is a trademark of Sony Corporation. HDMI, the HDMI logo and High-Definition Multimedia Interface are trademarks or registered trademarks of HDMI Licensing, LLC.
Wi-Fi and the Wi-Fi logo are trademarks or registered trademarks of the Wi-Fi Alliance. The Bluetooth® word mark and logos are registered trademarks owned by Bluetooth SIG, Inc. and any use of such marks by Nikon Corporation is under license.
All other trade names mentioned in this manual or the other documentation provided with your Nikon product are trademarks or registered trademarks of their respective holders.
Use of the Made for Apple badge means that an accessory has been designed to connect specifically to the Apple products identified in the badge, and has been certified by the developer to meet Apple performance standards. Apple is not responsible for the operation of this device or its compliance with safety and regulatory standards. Please note that the use of this accessory with an Apple product may affect wireless performance.

442 Technical Notes
A FreeType License (FreeType2)Portions of this software are copyright © 2012 The FreeType Project (https://www.freetype.org). All rights reserved.
A MIT License (HarfBuzz)Portions of this software are copyright © 2018 The HarfBuzz Project (https://www.freedesktop.org/wiki/Software/HarfBuzz). All rights reserved.
A AVC Patent Portfolio LicenseTHIS PRODUCT IS LICENSED UNDER THE AVC PATENT PORTFOLIO LICENSE FOR THE PERSONAL AND NON-COMMERCIAL USE OF A CONSUMER TO (i) ENCODE VIDEO IN COMPLIANCE WITH THE AVC STANDARD (“AVC VIDEO”) AND/OR (ii) DECODE AVC VIDEO THAT WAS ENCODED BY A CONSUMER ENGAGED IN A PERSONAL AND NON-COMMERCIAL ACTIVITY AND/OR WAS OBTAINED FROM A VIDEO PROVIDER LICENSED TO PROVIDE AVC VIDEO. NO LICENSE IS GRANTED OR SHALL BE IMPLIED FOR ANY OTHER USE. ADDITIONAL INFORMATION MAY BE OBTAINED FROM MPEG LA, L.L.C. SEE http://www.mpegla.com
A Disposing of Data Storage DevicesPlease note that deleting images or formatting memory cards or other data storage devices does not completely erase the original image data. Deleted files can sometimes be recovered from discarded storage devices using commercially available software, potentially resulting in the malicious use of personal image data. Ensuring the privacy of such data is the user’s responsibility.
Before discarding a data storage device or transferring ownership to another person, erase all data using commercial deletion software, or format the device and then completely refill it with images containing no private information (for example, pictures of empty sky). Care should be taken to avoid injury when physically destroying data storage devices.
Before discarding the camera or transferring ownership to another person, you should also use the Reset all settings option in the camera setup menu to delete network settings and other personal information.

443Technical Notes
A Supported Standards• DCF Version 2.0: The Design Rule for Camera File System (DCF) is a
standard widely used in the digital camera industry to ensure compatibility among different makes of camera.
• Exif version 2.31: The camera supports Exif (Exchangeable Image File Format for Digital Still Cameras) version 2.31, a standard in which information stored with photographs is used for optimal color reproduction when the images are output on Exif-compliant printers.
• PictBridge: A standard developed through cooperation with the digital camera and printer industries, allowing photographs to be output directly to a printer without first transferring them to a computer.
• HDMI: High-Definition Multimedia Interface is a standard for multimedia interfaces used in consumer electronics and AV devices capable of transmitting audiovisual data and control signals to HDMI-compliant devices via a single cable connection.

444 Technical Notes ➜ NIKKOR Z 24–70mm f/4 S Lens User’s Manual
This section is included as a lens manual for purchasers of the NIKKOR Z 24–70mm f/4 S lens kit. Note that lens kits may not be available in some countries or regions.
Using the Lens❚❚ Parts of the Lens: Names and Functions
NIKKOR Z 24–70mm f/4 S Lens User’s Manual
4 5 6 7 8
12
9 10 111 2
313 14
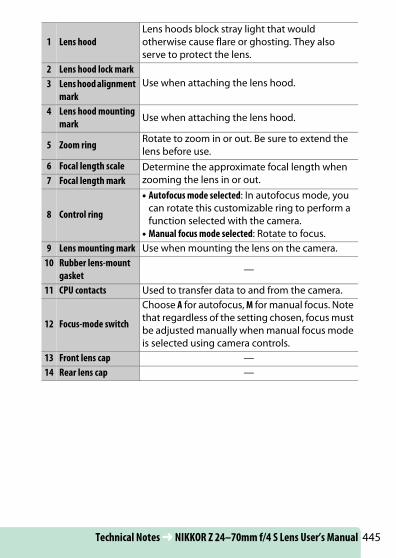
445Technical Notes ➜ NIKKOR Z 24–70mm f/4 S Lens User’s Manual
1 Lens hoodLens hoods block stray light that would otherwise cause flare or ghosting. They also serve to protect the lens.
2 Lens hood lock markUse when attaching the lens hood.3 Lens hood alignment
mark4 Lens hood mounting
mark Use when attaching the lens hood.
5 Zoom ring Rotate to zoom in or out. Be sure to extend the lens before use.
6 Focal length scale Determine the approximate focal length when zooming the lens in or out.7 Focal length mark
8 Control ring
• Autofocus mode selected: In autofocus mode, you can rotate this customizable ring to perform a function selected with the camera.
• Manual focus mode selected: Rotate to focus.9 Lens mounting mark Use when mounting the lens on the camera.
10 Rubber lens-mount gasket —
11 CPU contacts Used to transfer data to and from the camera.
12 Focus-mode switch
Choose A for autofocus, M for manual focus. Note that regardless of the setting chosen, focus must be adjusted manually when manual focus mode is selected using camera controls.
13 Front lens cap —14 Rear lens cap —

446 Technical Notes ➜ NIKKOR Z 24–70mm f/4 S Lens User’s Manual
❚❚ Attachment and RemovalAttaching the Lens
1 Turn the camera off, remove the body cap, and detach the rear lens cap.
2 Position the lens on the camera body, keeping the mounting mark on the lens aligned with the mounting mark on the camera body, and then rotate the lens counterclockwise until it clicks into place.
Removing the Lens
1 Turn the camera off.
2 Press and hold the lens release button while turning the lens clockwise.

447Technical Notes ➜ NIKKOR Z 24–70mm f/4 S Lens User’s Manual
❚❚ Before UseThe lens is retractable and must be extended before use. Rotate the zoom ring as shown until the lens clicks into the extended position. Pictures can only be taken when the focal length mark points to positions between 24 and 70 on the focal length scale.
To retract the lens, rotate the zoom ring in the opposite direction, stopping when you reach the (I) position on the focal length scale.
If the camera is turned on with the lens retracted, a warning will be displayed. Extend the lens before use.
Pictures can be taken at these focal lengths
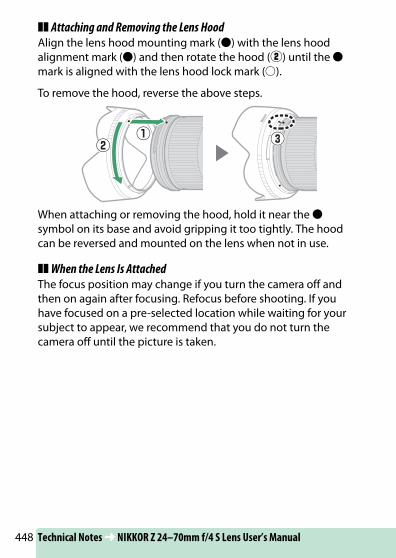
448 Technical Notes ➜ NIKKOR Z 24–70mm f/4 S Lens User’s Manual
❚❚ Attaching and Removing the Lens HoodAlign the lens hood mounting mark (I) with the lens hood alignment mark (I) and then rotate the hood (w) until the I mark is aligned with the lens hood lock mark (K).
To remove the hood, reverse the above steps.
When attaching or removing the hood, hold it near the I symbol on its base and avoid gripping it too tightly. The hood can be reversed and mounted on the lens when not in use.
❚❚ When the Lens Is AttachedThe focus position may change if you turn the camera off and then on again after focusing. Refocus before shooting. If you have focused on a pre-selected location while waiting for your subject to appear, we recommend that you do not turn the camera off until the picture is taken.
449Technical Notes ➜ NIKKOR Z 24–70mm f/4 S Lens User’s Manual
Precautions for Use• Do not pick up or hold the lens or camera using only the lens
hood.• Keep the CPU contacts clean.• Should the rubber lens-mount gasket be damaged, cease use
immediately and take the lens to a Nikon-authorized service center for repair.
• Replace the front and rear lens caps when the lens is not in use.• To protect the interior of the lens, store it out of direct sunlight.• Keep the lens dry. Rusting of the internal mechanism can cause
irreparable damage.• Leaving the lens in extremely hot locations could damage or
warp parts made from reinforced plastic.• Rapid changes in temperature may cause damaging
condensation inside and outside the lens. Before taking the lens from a warm to a cold environment or vice versa, place it in its case or a plastic bag to slow the change in temperature.
• We recommend that you place the lens in its case to protect it from scratches during transport.

450 Technical Notes ➜ NIKKOR Z 24–70mm f/4 S Lens User’s Manual
Lens Care• Removing dust is normally sufficient to clean the glass surfaces
of the lens.• Smudges and fingerprints can be removed from fluorine-
coated lens elements using a soft, clean cotton cloth or lens cleaning tissue; clean from the center outwards using a circular motion. To remove stubborn stains, wipe gently using a soft cloth lightly dampened with a small amount of distilled water, ethanol, or lens cleaner. Any drop-shaped marks left from this process on the water- and oil-repellent surface can subsequently be removed with a dry cloth.
• When cleaning lens elements that are not fluorine-coated, remove smudges and fingerprints using a soft, clean cotton cloth or lens cleaning tissue lightly dampened with a small amount of ethanol or lens cleaner. Wipe gently from the center outwards in a circular motion, taking care not to leave smears or touch the lens with your fingers.
• Never use organic solvents such as paint thinner or benzene to clean the lens.
• Neutral Color (NC) filters (available separately) and the like can be used to protect the front lens element.
• If the lens will not be used for an extended period, store it in a cool, dry location to prevent mold and rust. Do not store in direct sunlight or with naphtha or camphor moth balls.

451Technical Notes ➜ NIKKOR Z 24–70mm f/4 S Lens User’s Manual
Accessories❚❚ Supplied Accessories• LC-72B 72 mm snap-on Front Lens Cap• LF-N1 Rear Lens Cap• HB-85 Bayonet Hood• CL-C1 Lens Case
❚❚ Compatible Accessories72 mm screw-on filters
D Using the Lens Case• The case is intended to protect the lens from scratches, not from falls
or other physical shocks.• The case is not water resistant.• The material used in the case may fade, bleed, shrink, or change color
when rubbed or wet.• Remove dust with a soft brush.• Water and stains can be removed from the surface with a soft, dry
cloth. Do not use alcohol, benzene, thinner, or other volatile chemicals.
• Do not store in locations exposed to direct sunlight or high temperatures or humidity.
• Do not use the case to clean the monitor or lens elements.• Be careful that the lens does not fall from the case during transport.
Material: Polyester
D FiltersUse only one filter at a time. Remove the lens hood before attaching filters or rotating circular polarizing filters.
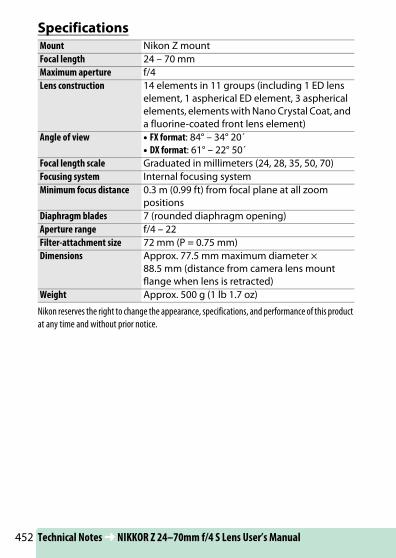
452 Technical Notes ➜ NIKKOR Z 24–70mm f/4 S Lens User’s Manual
Specifications
Nikon reserves the right to change the appearance, specifications, and performance of this product at any time and without prior notice.
Mount Nikon Z mountFocal length 24 – 70 mmMaximum aperture f/4Lens construction 14 elements in 11 groups (including 1 ED lens
element, 1 aspherical ED element, 3 aspherical elements, elements with Nano Crystal Coat, and a fluorine-coated front lens element)
Angle of view • FX format: 84° – 34° 20´• DX format: 61° – 22° 50´
Focal length scale Graduated in millimeters (24, 28, 35, 50, 70)Focusing system Internal focusing systemMinimum focus distance 0.3 m (0.99 ft) from focal plane at all zoom
positionsDiaphragm blades 7 (rounded diaphragm opening)Aperture range f/4 – 22Filter-attachment size 72 mm (P = 0.75 mm)Dimensions Approx. 77.5 mm maximum diameter ×
88.5 mm (distance from camera lens mount flange when lens is retracted)
Weight Approx. 500 g (1 lb 1.7 oz)

453Technical Notes ➜ FTZ Mount Adapter User’s Manual
This mount adapter allows Nikon F mount NIKKOR lenses to be mounted on Nikon Z mount mirrorless cameras. It cannot be mounted on F mount (Nikon digital SLR) or 1 mount cameras (Nikon 1 advanced cameras with interchangeable lenses) or used with 1 NIKKOR lenses. This section is included as a mount-adapter manual for purchasers of the mount-adapter kit. Note that mount-adapter kits may not be available in some countries or regions.
Note that depending on the lens, the adapter may limit autofocus or other camera features.
FTZ Mount Adapter User’s Manual
A Compatible F Mount LensesFor information on lenses that can be mounted on the FTZ mount adapter for use with Z mount cameras, see Compatible F Mount Lenses, available from the Nikon Download Center:https://downloadcenter.nikonimglib.com/en/products/491/FTZ.html

454 Technical Notes ➜ FTZ Mount Adapter User’s Manual
The Mount Adapter❚❚ Parts of the Adapter Lens mount Camera mount
1
2 3
4
5
67
8
1 Nikon F mount (attaches to lens)2 Lens signal contacts3 Lens mounting mark4 Lens release5 Tripod socket
6 Adapter mounting mark7 Nikon Z mount (attaches to
camera)8 CPU contacts
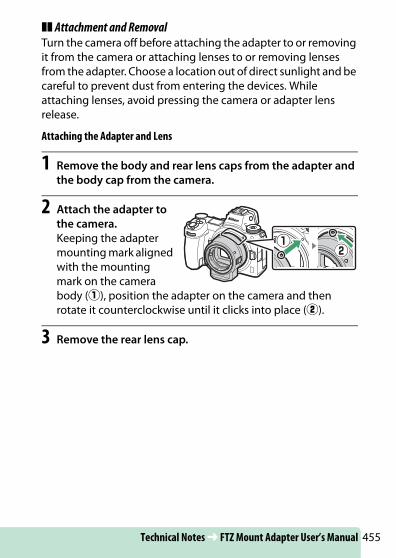
455Technical Notes ➜ FTZ Mount Adapter User’s Manual
❚❚ Attachment and Removal Turn the camera off before attaching the adapter to or removing it from the camera or attaching lenses to or removing lenses from the adapter. Choose a location out of direct sunlight and be careful to prevent dust from entering the devices. While attaching lenses, avoid pressing the camera or adapter lens release.
Attaching the Adapter and Lens
1 Remove the body and rear lens caps from the adapter and the body cap from the camera.
2 Attach the adapter to the camera.Keeping the adapter mounting mark aligned with the mounting mark on the camera body (q), position the adapter on the camera and then rotate it counterclockwise until it clicks into place (w).
3 Remove the rear lens cap.

456 Technical Notes ➜ FTZ Mount Adapter User’s Manual
4 Attach the lens to the adapter.Keeping the lens mounting mark aligned with the lens mounting mark on the adapter (e), position the lens on the adapter and then rotate it counterclockwise until it clicks into place (r).
Detaching the Lens and Adapter
1 Detach the lens.Press and hold the adapter lens release (q) while turning the lens clockwise (w). Attach the front and rear caps to the lens after removal.
2 Detach the adapter.Press and hold the camera lens release button (e) while turning the adapter clockwise (r). After removing the adapter, attach the body and rear caps to the adapter and the body cap to the camera.

457Technical Notes ➜ FTZ Mount Adapter User’s Manual
D CPU Lenses with Aperture RingsSelect minimum aperture (the highest f/-number) before attaching CPU lenses equipped with aperture rings.
D Incompatible Lenses and AccessoriesThe following lenses and accessories cannot be used. Attempting to forcibly attach any of this equipment could damage the adapter or the lens. Individual variation may render lenses other than those listed below incompatible; do not use force if you encounter resistance when attempting to attach a lens.• Non-AI lenses• IX-NIKKOR• TC-16A AF Teleconverter• Lenses that require the AU-1
focusing unit (400mm f/4.5, 600mm f/5.6, 800mm f/8, 1200mm f/11)
• Fisheye (6mm f/5.6, 7.5mm f/5.6, 8mm f/8, OP 10mm f/5.6)
• 2.1cm f/4• K2 Extension Ring• 180–600mm f/8 ED (serial
numbers 174041–174180)• 360–1200mm f/11 ED (serial
numbers 174031–174127)• 200–600mm f/9.5 (serial
numbers 280001–300490)• AF lenses for the F3AF (AF 80mm
f/2.8, AF 200mm f/3.5 ED, TC-16 AF Teleconverter)
• PC 28mm f/4 (serial number 180900 or earlier)
• PC 35mm f/2.8 (serial numbers 851001–906200)
• PC 35mm f/3.5 (old type)• Reflex 1000mm f/6.3 (old type)• NIKKOR-H Auto 2.8cm f/3.5
(28mm f/3.5) lenses with serial numbers below 362000
• NIKKOR-S Auto 3.5cm f/2.8 (35mm f/2.8) lenses with serial numbers below 928000
• NIKKOR-S Auto 5cm f/2 (50mm f/2)
• NIKKOR-Q Auto 13.5cm f/3.5 (135mm f/3.5) lenses with serial numbers below 753000
• Micro-NIKKOR 5.5cm f/3.5• Medical-NIKKOR Auto 200mm
f/5.6• Auto NIKKOR Telephoto-Zoom
85–250mm f/4–4.5• Auto NIKKOR Telephoto-Zoom
200–600mm f/9.5–10.5
458 Technical Notes ➜ FTZ Mount Adapter User’s Manual
Using the Mount Adapter• Autofocus may not function as expected when the adapter is
used with an F mount NIKKOR lens. If the camera has trouble focusing, set the AF-area mode to single point and select the center focus area, or focus manually.
• With some lenses, the camera vibration reduction feature may not function as expected or may cause vignetting or a drop in peripheral illumination.
Precautions for Use• When using the adapter with lenses weighing over 1300 g (2 lb
13.9 oz), support the lens when holding the camera and do not use the camera strap. Failure to observe these precautions could damage the camera lens mount.
• When using telephoto lenses equipped with a tripod collar, attach the tripod to the lens tripod collar rather than to the adapter tripod socket.
• Keep the CPU and lens signal contacts clean.• Keep the adapter dry. Rusting of the internal mechanism can
cause irreparable damage.• Leaving the adapter in extremely hot locations could damage
or warp parts made from reinforced plastic.
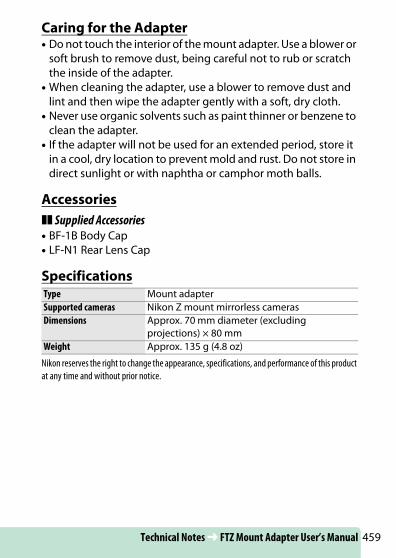
459Technical Notes ➜ FTZ Mount Adapter User’s Manual
Caring for the Adapter• Do not touch the interior of the mount adapter. Use a blower or
soft brush to remove dust, being careful not to rub or scratch the inside of the adapter.
• When cleaning the adapter, use a blower to remove dust and lint and then wipe the adapter gently with a soft, dry cloth.
• Never use organic solvents such as paint thinner or benzene to clean the adapter.
• If the adapter will not be used for an extended period, store it in a cool, dry location to prevent mold and rust. Do not store in direct sunlight or with naphtha or camphor moth balls.
Accessories❚❚ Supplied Accessories• BF-1B Body Cap• LF-N1 Rear Lens Cap
Specifications
Nikon reserves the right to change the appearance, specifications, and performance of this product at any time and without prior notice.
Type Mount adapterSupported cameras Nikon Z mount mirrorless camerasDimensions Approx. 70 mm diameter (excluding
projections) × 80 mmWeight Approx. 135 g (4.8 oz)

460 Technical Notes
The camera can be used with XQD memory cards. Cards with write speeds of 45 MB/s (300×) or better are recommended for movie recording; slower speeds may interrupt recording or cause jerky, uneven playback. For information on compatibility and operation, contact the manufacturer.
Approved Memory Cards

461Technical Notes
The following table shows the approximate number of pictures that can be stored on a 64 GB Sony G-series QD-G64E XQD card at different image quality and size settings when FX (36 × 24) is selected for Choose image area (as of July 2018).
Z 7:
Memory Card Capacity
Image quality Image size File size 1No. of
images 1Buffer
capacity 2
NEF (RAW)
Lossless compressed
12-bitLarge 44.7 MB 748 23
Medium 31.5 MB 1000 19Small 24.5 MB 1400 19
14-bit
Large
55.8 MB 654 19
Compressed12-bit 40.7 MB 1000 2314-bit 49.4 MB 845 19
Uncompressed12-bit 74.1 MB 748 2314-bit 85.1 MB 654 18
TIFF (RGB)Large 134.6 MB 412 21
Medium 76.5 MB 723 22Small 34.8 MB 1500 25
JPEG3
FineLarge 17.2 MB 1900 25
Medium 11.7 MB 3200 25Small 6.8 MB 6500 25
NormalLarge 11.8 MB 3700 25
Medium 7.0 MB 6400 25Small 3.5 MB 12,700 25
BasicLarge 3.8 MB 7500 25
Medium 2.6 MB 12,300 25Small 1.6 MB 24,100 25
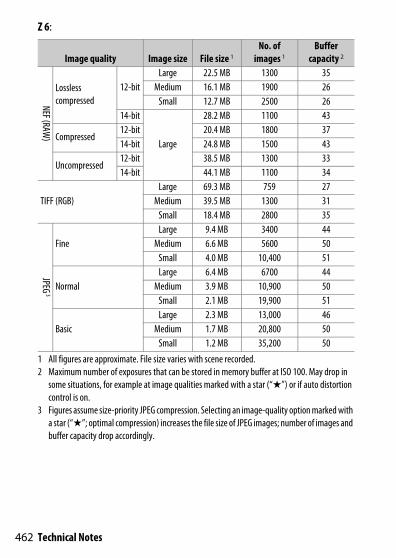
462 Technical Notes
Z 6:
1 All figures are approximate. File size varies with scene recorded.2 Maximum number of exposures that can be stored in memory buffer at ISO 100. May drop in
some situations, for example at image qualities marked with a star (“m”) or if auto distortion control is on.
3 Figures assume size-priority JPEG compression. Selecting an image-quality option marked with a star (“m”; optimal compression) increases the file size of JPEG images; number of images and buffer capacity drop accordingly.
Image quality Image size File size 1No. of
images 1Buffer
capacity 2
NEF (RAW)
Lossless compressed
12-bitLarge 22.5 MB 1300 35
Medium 16.1 MB 1900 26Small 12.7 MB 2500 26
14-bit
Large
28.2 MB 1100 43
Compressed12-bit 20.4 MB 1800 3714-bit 24.8 MB 1500 43
Uncompressed12-bit 38.5 MB 1300 3314-bit 44.1 MB 1100 34
TIFF (RGB)Large 69.3 MB 759 27
Medium 39.5 MB 1300 31Small 18.4 MB 2800 35
JPEG3
FineLarge 9.4 MB 3400 44
Medium 6.6 MB 5600 50Small 4.0 MB 10,400 51
NormalLarge 6.4 MB 6700 44
Medium 3.9 MB 10,900 50Small 2.1 MB 19,900 51
BasicLarge 2.3 MB 13,000 46
Medium 1.7 MB 20,800 50Small 1.2 MB 35,200 50
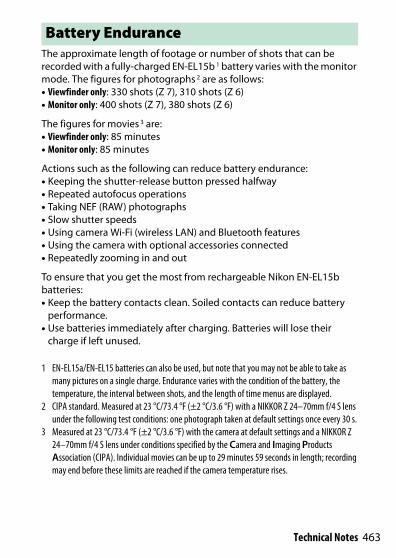
463Technical Notes
The approximate length of footage or number of shots that can be recorded with a fully-charged EN-EL15b 1 battery varies with the monitor mode. The figures for photographs 2 are as follows:• Viewfinder only: 330 shots (Z 7), 310 shots (Z 6)• Monitor only: 400 shots (Z 7), 380 shots (Z 6)
The figures for movies 3 are:• Viewfinder only: 85 minutes• Monitor only: 85 minutes
Actions such as the following can reduce battery endurance:• Keeping the shutter-release button pressed halfway• Repeated autofocus operations• Taking NEF (RAW) photographs• Slow shutter speeds• Using camera Wi-Fi (wireless LAN) and Bluetooth features• Using the camera with optional accessories connected• Repeatedly zooming in and out
To ensure that you get the most from rechargeable Nikon EN-EL15b batteries:• Keep the battery contacts clean. Soiled contacts can reduce battery
performance.• Use batteries immediately after charging. Batteries will lose their
charge if left unused.
1 EN-EL15a/EN-EL15 batteries can also be used, but note that you may not be able to take as many pictures on a single charge. Endurance varies with the condition of the battery, the temperature, the interval between shots, and the length of time menus are displayed.
2 CIPA standard. Measured at 23 °C/73.4 °F (±2 °C/3.6 °F) with a NIKKOR Z 24–70mm f/4 S lens under the following test conditions: one photograph taken at default settings once every 30 s.
3 Measured at 23 °C/73.4 °F (±2 °C/3.6 °F) with the camera at default settings and a NIKKOR Z 24–70mm f/4 S lens under conditions specified by the Camera and Imaging Products Association (CIPA). Individual movies can be up to 29 minutes 59 seconds in length; recording may end before these limits are reached if the camera temperature rises.
Battery Endurance

464 Technical Notes
Symbols
b (Auto mode) ......................41, 45, 68P (Programmed auto) .................68, 69S (Shutter-priority auto) .............68, 69A (Aperture-priority auto)..........68, 70M (Manual) ......................................68, 70U1/U2/U3 ...........................................68, 72U (Single frame) ................. 81, 84, 109V (Continuous L) ................... 81, 109W (Continuous H)................... 81, 109X (Continuous H (extended)) ...82, 109E (Self-timer)....................... 82, 84, 1093 (Pinpoint AF)......................... 54, 111d (Single-point AF) .......54, 111, 119e (Dynamic-area AF) ............. 54, 111f (Wide-area AF (S)).....55, 111, 119g (Wide-area AF (L)) .....55, 111, 119h (Auto-area AF) ............55, 111, 119L (Matrix) ........................................... 106M (Center-weighted) ...................... 106N (Spot)............................................... 106t (Highlight-weighted) ............... 106J (Red-eye reduction).......105, 352L (Slow sync) ......................105, 352M (Rear-curtain sync)........105, 353E (Exposure compensation) ...........79K button ..................................... 49, 120O button .................................................51G button............................................18c (E) button .......................................81S button .....................................77, 78W (Q) button ....................20, 120, 121X button.....................................120, 137i button ....................... 21, 89, 130, 203J button................................................18I (In-focus indicator) ........................59
c (Flash-ready indicator)................410t icon..................................................... 40
Numerics
1 : 1 (24 × 24) ......................................10416 : 9 (36 × 20)....................................1045 : 4 (30 × 24) ......................................104
A
AC adapter ................................ 411, 416Accessories..........................................411Accessory terminal...........................437Active D-Lighting..108, 118, 180, 239ADL bracketing..................................196AE & flash bracketing ......................189AE bracketing.....................................189AE lock ............................................. 86, 87AF ....................................................52, 249AF activation.......................................252AF fine-tune........................................297AF lock ............................................. 86, 87AF speed ..............................................288AF tracking sensitivity.....................289AF-area mode .54, 111, 119, 187, 241AF-assist ........................................43, 254AF-C......................................... 53, 111, 119AF-C priority selection ....................249AF-F...................................................53, 119AF-ON button.......................................... 17AF-S......................................... 52, 111, 119AF-S priority selection.....................249After burst, show ..............................155After delete .........................................154Airplane mode...................................306Aperture................................................. 70Aperture-priority auto ...................... 70Apply settings to live view ............262Assign remote (WR) Fn button ....306
Index

465Technical Notes
Attaching the lens...............................36Attenuator .......................................... 242Auto (Set Picture Control) ................91Auto (White balance) ..................62, 96Auto bracketing.......................188, 265Auto c ISO sensitivity control ...... 264Auto distortion control .........182, 240Auto external flash..................350, 357Auto FP high-speed sync............... 263Auto ISO sensitivity control ... 78, 167Auto-area AF ......................55, 111, 119Auto-area AF face detection ........ 250Autoexposure lock.......................86, 87Autofocus..................................... 52, 249Automatic display switch................... 9
B
Battery ...........................28, 32, 411, 440Battery charger .......................... 28, 439Battery endurance ........................... 463Battery info ......................................... 308Battery level...........................................34Beep options...................................... 303Body cap....................................... 36, 412Bracketing........................................... 265Bracketing order............................... 266Bulb ..........................................................75
C
Cable clip............................................. 415Camera Control Pro 2 ..................... 414Capture NX-D.............................. 66, 335Center-weighted .....................106, 256CHARGE lamp ....................................29, 30Charging AC adapter .....29, 411, 428, 440
Charging the battery .........................28Choose color temp. (White balance).63, 96, 98, 171
Choose image area...... 104, 117, 163, 237
Choose start/end point ..................133CL mode shooting speed...............259Clean image sensor................ 298, 419Clock................................................. 38, 40Clock battery ........................................ 40Cloudy (White balance) ............. 62, 96Color space..........................................180Color temperature..............63, 98, 171Command dial ............................17, 279Compatible lenses............................429Conformity marking ........................307Connect to PC .......................... 307, 335Connect to smart device ...... 306, 334Continuous............................81, 84, 109Continuous H ..............................81, 109Continuous H (extended) .......82, 109Continuous L ...............................81, 109Continuous release mode81, 84, 109Control panel................................. 5, 405Control panel brightness ...............295Control ring..................................59, 445Copyright.............................................302CPU contacts ......................................445Creative Lighting System (CLS)....406Creative Picture Control ................... 91Crop .......................................................130Custom control assignment .24, 269, 283
Custom Picture Control176, 177, 239Custom Settings...................... 146, 245Customize i menu ........ 22, 267, 282
D
Date and time .............................39, 293Date format..................................40, 293Daylight saving time.................39, 293DCF.........................................................443Default settings ....................... 141, 385Delete................................... 51, 138, 153Delete all images...............................139Delete current image ...............51, 138

466 Technical Notes
Delete selected images.................. 139Diffraction compensation....182, 240Diopter adjustment control .............. 8Direct sunlight (White balance) ....62, 96
DISP button.............................................15Distance-priority manual .....350, 358Distortion control............................. 322D-Lighting........................................... 321Download center ...................................iiDX .......................................................... 104DX format............................................ 117Dynamic-area AF....................... 54, 111
E
Edit movie...........................50, 133, 327Electronic front-curtain shutter .. 260Electronic VR.............................118, 241Error messages.........................392, 394EV steps for exposure cntrl ........... 255Exif ......................................................... 443Exposure................................ 71, 79, 255Exposure compensation 79, 255, 264Exposure data.................................... 123Exposure delay mode..................... 260Exposure indicator..............................71Exposure lock ................................86, 87Exposures remaining.........................34Extensions........................................... 163External microphone .............116, 414Eye sensor................................................ 8
F
File information ................................ 123File naming................................163, 237File number sequence.................... 261Filter effects...........................................95Fine-tune optimal exposure ........ 256Fine-tuning white balance .... 97, 169Firmware version.............................. 311Flash.......................... 105, 263, 347, 406
Flash (White balance)................. 62, 96Flash bracketing................................189Flash compensation .............. 187, 354Flash control ............................. 184, 350Flash info ................................... 357, 382Flash mode.......................105, 186, 352Flash ready indicator .......................410Flash shutter speed..........................264Flash sync speed ..................... 263, 349Flat (Set Picture Control) .................. 91Flexible program................................. 69Flick.......................................................... 11Flicker reduction ..................... 183, 240Fluorescent (White balance).... 62, 96Fn1 button.............................................. 24Fn2 button.............................................. 24Focal length........................................447Focal length scale.............................447Focal plane mark................................. 60Focus indicator .................................... 59Focus lock....................................... 86, 87Focus mode .....52, 111, 119, 187, 241Focus point ........................ 86, 250, 253Focus shift shooting ........................229Focus tracking with lock-on..........250Format memory card ......................292Frame rate ....................................82, 114Frame size/frame rate ........... 114, 237Framing grid display........................262Frequency response ........................243Full-frame playback ...........11, 49, 120Function buttons ................................ 24FV lock......................................... 355, 409FX.................................................. 104, 117
G
Group flash.......................366, 374, 382
H
HDMI ..................................304, 343, 443HDMI cable..........................................412
467Technical Notes
HDMI connector ............................... 343HDMI recorders................................. 344Headphone volume ........................ 243Headphones....................................... 243Help..........................................................20Hi ...............................................................77High Dynamic Range (HDR) ......... 205High ISO NR...............................181, 239Highlight display .............................. 290Highlights............................60, 106, 124Highlight-weighted......................... 106Histogram ....................15, 16, 124, 125
I
Image area .... 104, 117, 163, 164, 237Image comment ............................... 301Image Dust Off ref photo .............. 299Image overlay .................................... 324Image quality............................102, 164Image review ............................121, 154Image sensor........................ 2, 419, 425Image size ..................................104, 164Incandescent (White balance).62, 96In-focus indicator ................................59Information display .........15, 296, 399Interval timer shooting .................. 210ISO sensitivity ....................77, 167, 238i-TTL...........................350, 351, 357, 406
J
JPEG....................................................... 102
L
L (large)................................................. 104Landscape (Set Picture Control) ....91Language ..................................... 38, 292LED lamp ............................................. 305Lens ................................................ 36, 444Lens mount ...........................................36Lens mounting mark..........................36Limit AF-area mode selection...... 252
Limit monitor mode selection .....296Limit selectable image area ..........260LINK mode................................. 305, 363Lo .............................................................. 77Location data ........................... 128, 304Long exposure NR ............................181Low-light AF .......................................253
M
M (medium) .........................................104Main command dial ........................... 17Manage Picture Control ....... 177, 239Manual ................................. 70, 350, 358Manual focus .............. 53, 59, 111, 119Manual focus ring in AF mode.....254Matrix metering.................................106Max. continuous release ................259Maximum aperture ..........................410Maximum sensitivity.................78, 167Memory buffer..................................... 83Memory card ..................... 32, 460, 461Memory card capacity.....................461Menu guide.........................................141Metering............................106, 183, 241MF ........................................... 53, 111, 119Microphone .............................. 116, 414Microphone sensitivity ......... 116, 242Minimum aperture ...........................457Minimum shutter speed.................167Mired .....................................................170Mode dial ............................................... 68Mode dial lock release ...................... 68Modeling flash ...................................265Monitor..................................... 6, 10, 396Monitor brightness ..........................293Monitor color balance.....................294Monitor mode button..........................8Monitor pre-flash ..............................409Monochrome (Set Picture Control)...91
Mount adapter...................................453
468 Technical Notes
Movie file type................................... 237Movie quality............................114, 237Movie shooting menu...........144, 236Movie-record button .........................46Movies.................................... 45, 49, 112Multi selector........................................18Multiple exposure............................ 198My Menu ............................................. 329
N
Natural light auto (White balance) ....62, 96
NEF (RAW)..................................102, 166NEF (RAW) processing.................... 315NEF (RAW) recording ...................... 166Neutral (Set Picture Control)...........91N-Log setting..................................... 346Non-CPU lens..................................... 298Number of focus points................. 250Number of shots............................... 463
O
OK button ..................................277, 288Optical AWL ..............................373, 380Optical/radio AWL ........................... 381Overview data ................................... 129
P
Peaking highlights........................... 262Perspective control ......................... 323Photo information ........................... 122Photo shooting menu ...........141, 158Photo/movie selector.................41, 45PictBridge...................................340, 443Picture Controls ................91, 175, 239Pinpoint AF.................................. 54, 111Playback ................................ 11, 49, 120Playback display options............... 153Playback folder ................................. 153Playback menu.........................141, 152Playback zoom..................12, 125, 137
Portrait (Set Picture Control) .......... 91Power connector .................... 411, 416Power off delay..................................258Power switch........................................ 38Preset manual (White balance)..... 63, 96, 99, 173
Press the shutter-release button all the way down .................................... 44
Press the shutter-release button halfway ................................................. 43
Prioritize viewfinder..............................9Problems and solutions..................386Product serial number .........................4Programmed auto.............................. 69Protecting photographs .................. 67
Q
Quick crop ...........................................130Quick sharp........................................... 94Quick wireless control..368, 376, 383
R
Radio AWL ...........................................362Rating....................................................157Rear-curtain sync ..............................105Recent settings........................ 329, 333Rechargeable Li-ion battery .28, 411, 440
Red-eye correction...........................321Red-eye reduction............................105Release button to use dial .............281Release mode..............................81, 109Remote cord................................75, 412Remote flash photography. 347, 360Remote repeating .........370, 378, 383Removing the lens from the camera.37
Repeating flash........................ 351, 358Reset..........................159, 237, 248, 311Reset all settings ...............................311Reset custom settings.....................248
469Technical Notes
Reset movie shooting menu........ 237Reset photo shooting menu ........ 159Reset user settings.................... 73, 292Resize.................................................... 319Restoring default settings............. 385Retouch menu................................... 312Reverse indicators............................ 281RGB ............................102, 124, 163, 180Rotate tall ...................................121, 155
S
S (small) ................................................ 104Same as photo settings.................. 112Save current frame .......................... 136Save user settings ..................... 72, 292Save/load settings ........................... 309Select date .................................139, 140Select to send to smart device .... 132Select to send/deselect.................. 132Self-timer......................82, 84, 109, 257Sensitivity...............................................77Set Picture Control...........91, 175, 239Setup menu...............................150, 291Shade (White balance) ......................96Shooting data.................................... 126Shutter spd & aperture lock.......... 279Shutter speed ................................69, 70Shutter-priority auto ..........................69Shutter-release button...............43, 44Shutter-release button AE-L......... 257Side-by-side comparison............... 327Silent photography .................. 65, 235Single frame ......................... 81, 84, 109Single-point AF .................54, 111, 119Size ...............................................104, 164Slide show........................................... 156Slot empty release lock .................. 308Slow sync............................................. 105Slow-motion movies....................... 115Smart device ............ 40, 107, 306, 334SnapBridge .................................. 40, 334
Specifications .....................................429Splitscreen display zoom ...............268Spot........................................................106Standard (Set Picture Control) ....... 91Standard i-TTL fill-flash ...................406Standby timer ................... 44, 258, 304Storage folder ....................................159Store points by orientation ...........251Straighten............................................322Sub-command dial............................. 17Subject tracking .................................. 56Sub-selector................................... 17, 86Sync. release mode options..........259
T
Text entry......................................13, 160Thumbnail ............................................. 12TIFF (RGB).............................................102Tilting monitor........................................3Time......................................................... 75Time zone .....................................39, 293Time zone and date ..................39, 293Timecode .............................................244Time-lapse movie .............................221Touch controls .....................10, 57, 303Touch screen ................................. 10, 57Touch shutter ................................ 10, 57Trademark Information ..................441Trim........................................................318Trimming movies............. 50, 133, 327Tripod...................................................... 75Troubleshooting ...............................385
U
Unified flash control ........................351USB............................................... 335, 340User settings................................72, 292Using an on-camera flash ..............348
V
Vibration reduction.......110, 187, 241
470 Technical Notes
View all in continuous mode ....... 262Viewfinder ......................................8, 402Viewfinder brightness .................... 295Viewfinder color balance .............. 295Viewfinder eyepiece ...................8, 413Viewfinder eyepiece cap ............... 413Viewfinder focus.................................... 8ViewNX-i....................................... 66, 335Vignette control ......................182, 240Virtual horizon...............................15, 16Vivid (Set Picture Control)................91Volume.......................................... 50, 303
W
WB (White balance) .....................61, 96WB bracketing................................... 193White balance ............61, 96, 168, 238Wide-area AF .....................55, 111, 119Wi-Fi .............................................107, 339Wind noise reduction ..................... 243Wireless................................................ 339Wireless remote (WR) options ..... 305Wireless remote controller .305, 362, 413
Wireless transmitter (WT-7) 307, 339, 412
X
XQD memory card ........................... 460


No reproduction in any form of this manual, in whole or in part (except for brief quotation in critical articles or reviews), may be made without written authorization from NIKON CORPORATION.
SB8K02(11)6MOA1011-02


