Embed Size (px)
Citation preview
PROJECT: PiCTURETM
Project 1Computer Science 61BL, Summer 2009
Department of Electrical Engineering and Computer SciencesUniversity of California, Berkeley
COLLEEN LEWIS, JONATHAN KOTKER, KAUSHIK IYER, GEORGE WANG, DAVID ZENG
Contents
1 Deadlines 2
2 Overview 22.1 The Picture class . . . . . . . . . . . . . . . . . . . . . . . . . . . . . . . . . . . . . . . . . . . 22.2 The Pixel class and the Color class . . . . . . . . . . . . . . . . . . . . . . . . . . . . . . . . . 3
3 Downloading and Running the Framework Code 6
4 Description of Included Files 8
5 Tasks 105.1 Level 1 . . . . . . . . . . . . . . . . . . . . . . . . . . . . . . . . . . . . . . . . . . . . . . . . . . 10
5.1.1 Photonegative . . . . . . . . . . . . . . . . . . . . . . . . . . . . . . . . . . . . . . . . . . 105.1.2 Chroma Key . . . . . . . . . . . . . . . . . . . . . . . . . . . . . . . . . . . . . . . . . . . 10
5.2 Level 2 . . . . . . . . . . . . . . . . . . . . . . . . . . . . . . . . . . . . . . . . . . . . . . . . . . 115.2.1 Rotate . . . . . . . . . . . . . . . . . . . . . . . . . . . . . . . . . . . . . . . . . . . . . . 115.2.2 Flip . . . . . . . . . . . . . . . . . . . . . . . . . . . . . . . . . . . . . . . . . . . . . . . . 115.2.3 Edge Detection . . . . . . . . . . . . . . . . . . . . . . . . . . . . . . . . . . . . . . . . . 11
5.3 Level 3 . . . . . . . . . . . . . . . . . . . . . . . . . . . . . . . . . . . . . . . . . . . . . . . . . . 125.3.1 ASCII Art . . . . . . . . . . . . . . . . . . . . . . . . . . . . . . . . . . . . . . . . . . . . 125.3.2 Blur . . . . . . . . . . . . . . . . . . . . . . . . . . . . . . . . . . . . . . . . . . . . . . . . 135.3.3 Paint Bucket . . . . . . . . . . . . . . . . . . . . . . . . . . . . . . . . . . . . . . . . . . . 14
6 README and Documentation 15
7 Testing 16
8 Style Guide 16
9 Grading and Submission Details 17
10 Showing It Off 18
11 Frequently Asked Questions 18
12 Acknowledgments 22
1
1 Deadlines
This project is time-consuming; please start early. This project should also be done on your own. Your finalsolution to this project is due Monday, July 13 2009 at 10PM. We suggest that you finish the majority ofthe project before your first midterm on Tuesday, July 7 2009, in order to prevent a last-minute rush; also,project 2 will be released on Thursday, July 9 2009, before project 1 is due. To further ensure that you arealong the path to finishing your project on time, we will be instituting one checkpoint, due Thursday, July2 2009; the instructions for this checkpoint are given in the document appended to this specification.
2 Overview
We are just one week in, but we now have enough knowledge to complete our very own (albeit simpler)version of commercial picture manipulation software! We will call it PROJECT: PiCTURETM, an acronymfor Picture Construction and Transformation through the Utilization of Reliable Entities, and all of yourfirst project will be concerned with creating, debugging, and testing these ‘reliable entities’1. As a result ofthis project, we hope that you will feel considerably more comfortable with arrays, loops, invariants, andtesting, all while finishing something really cool that you can share!
As part of this project, we will be mainly dealing with three classes: The Picture class encapsulates infor-mation associated with a picture, the Pixel class encapsulates the information associated with each elementof that picture (also called a pixel), and the Color class, which, as the name implies, stores information re-garding a particular color. All of these classes overload the toString and equals methods.
2.1 The Picture class
Continuing with the object-oriented programming paradigm that this class is based on, we represent apicture with the Picture class2. The constructors available for the Picture class are:
1. Picture(): This no-argument constructor will create a default white picture of size 200 pixels by100 pixels.
2. Picture(String fileName): This constructor takes the file name of the picture to be opened, andcreates a corresponding new Picture object.
3. Picture(int width, int height): This constructor creates a new white picture with the widthand height specified.
4. Picture(Picture pictureToCopy): This constructor creates a new Picture object that is acopy of the Picture object provided.
We also provide methods that you will find useful for manipulating the picture associated with a Pictureobject:
1. int getWidth(): This method returns the width of the picture associated with the Picture object.
2. int getHeight(): This method returns the height of the picture associated with the Pictureobject.
3. Pixel getPixel(x, y): This method returns a Pixel object associated with the pixel located atposition (x, y) in the picture. More information about the Pixel class is presented in section 2.2.
1The ‘entities’ refer to the methods that you are going to code, and they are ‘reliable’ because you are going to test them thoroughly.2This class inherits most of its methods from the SimplePicture class, which also maintains methods and instance variables
associated with the picture. However, we will only concern ourselves with the methods in the Picture class.
2
We have also provided a static utility method to make loading an image from your project directory easier:
Picture loadPicture(String pictureName)
This static method can be used to create a Picture object from the file name of a file within your Eclipseproject. Although this method creates a Picture object, it is not a constructor. It calculates the path ofyour current directory and based upon that loads the appropriate file.
Alternatively, you could use the following static utility method on the FileChooser class:
String pickAFile()
This static method produces a graphical file chooser interface that allows you to select the picture file youwould like to load, and then returns a String containing the path of the picture file.Finally, we have provided two nonstatic utility methods that allow you to view the picture correspondingto a Picture object:
1. public void show(): This method allows you to view the picture in a simple frame without anyoptions. This can be useful for quickly displaying the Picture objects returned by the differentmethods you will be implementing.
2. public void explore(): This method allows you to view the picture in the regular PROJECT:PiCTURETM GUI. This can be useful if you would like to carefully examine the pixels in a picture, inorder to test the results of the different methods you will be implementing.
2.2 The Pixel class and the Color class
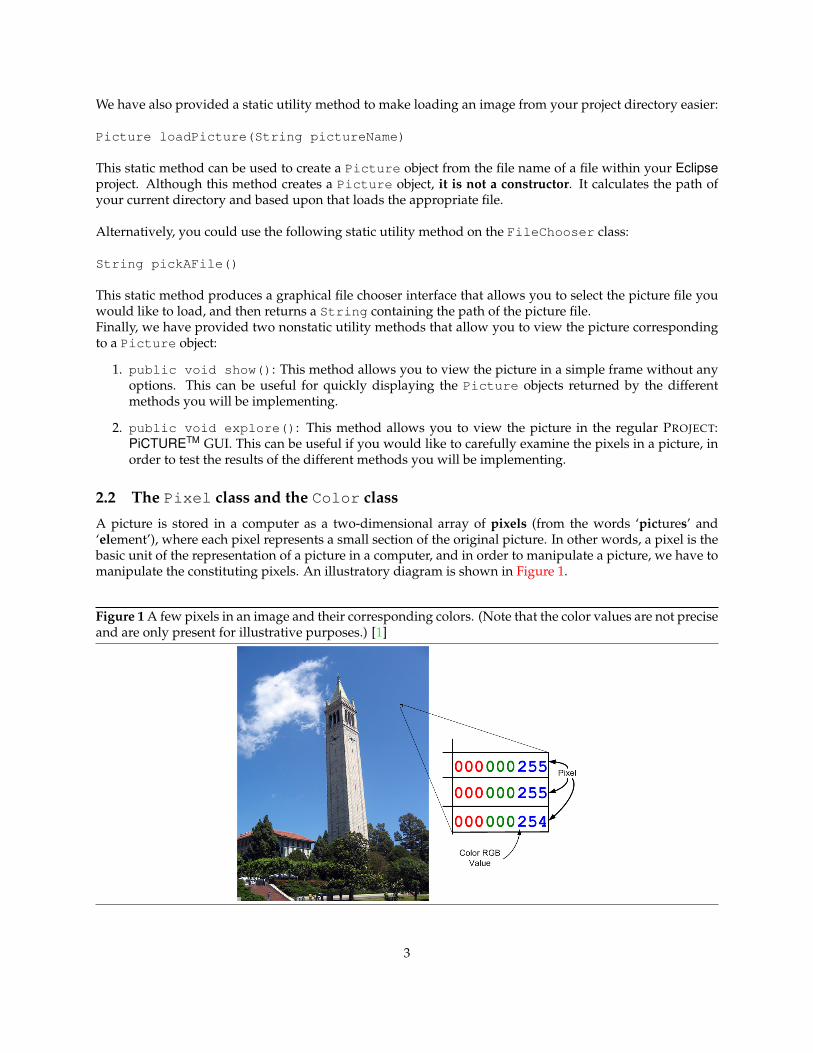
A picture is stored in a computer as a two-dimensional array of pixels (from the words ‘pictures’ and‘element’), where each pixel represents a small section of the original picture. In other words, a pixel is thebasic unit of the representation of a picture in a computer, and in order to manipulate a picture, we have tomanipulate the constituting pixels. An illustratory diagram is shown in Figure 1.
Figure 1 A few pixels in an image and their corresponding colors. (Note that the color values are not preciseand are only present for illustrative purposes.) [1]
3

The coordinate system that is conventionally used assigns the pixel at the top left of the image with the co-ordinates (0, 0), with the x-coordinate increasing rightwards, and the y-coordinate increasing downwards.For example, the coordinates of the pixels at the corners of an image of width w and height h are shown inFigure 2.
Figure 2 Coordinates of pixels at the corners of an image of width w and height h. [1]
Every pixel in a picture has a certain color, which is represented using RGB values. The idea is that everycolor can be specified by three components – red, green, and blue – where the values for each componentrange from 0 to 255; the higher the value, the more the contribution of that particular color. For example,the blue color has a blue component value of 255, but red and green component values of 0 each. Again,the orange color has a red component value of 255, but it also has a bit of green, and so it has a greencomponent value of 165, and a blue component value of 0. Black is the absence of color, and so all thecomponents have value 0; on the other side, white is the presence of all color, and so all the componentshave value 255. Examples of the RGB values for other colors are shown in Figure 3.
Figure 3 The RGB values of a few colors.
4
Every pixel also has an alpha value to represent its transparency: its value ranges from 0 to 255 as well,with 0 representing a pixel that is completely transparent, and 255 representing a pixel that is completelyopaque. Alpha values in between the two end values produce a translucent pixel.
An object of the Pixel class encapsulates these four pieces of information associated with every pixel, andconsequently has the following useful methods:
1. int getRed(): This method returns the value of the red component of this pixel, which ranges from0 to 255.
2. int getGreen(): This method returns the value of the green component of this pixel, which rangesfrom 0 to 255.
3. int getBlue(): This method returns the value of the blue component of this pixel, which rangesfrom 0 to 255.
4. int getAlpha(): This method returns the alpha value of this pixel, which ranges from 0 to 255.
5. int getAverage(): This method returns the average of the red, green, and blue values of this pixel,which ranges from 0 to 255.
6. void setRed(int value): This method sets the value of the red component of this pixel tovalue.
7. void setGreen(int value): This method sets the value of the green component of this pixel tovalue.
8. void setBlue(int value): This method sets the value of the blue component of this pixel tovalue.
9. void setAlpha(int value): This method sets the alpha value of this pixel to value.
The Color class provides an alternate encapsulation for the RGB color values associated with a pixel, andis located in the java.awt package. The class has many constructors, and the ones that will be most usefulto us are:
1. Color(int r, int g, int b): This constructor creates a Color object based on the RGB valuesprovided.
2. Color(int r, int g, int b, int a): This constructor creates a Color object based on theRGB and alpha values provided.
The Pixel class works in tandem with the Color class to provide the following methods:
1. Color getColor: This nonstatic method returns the Color object corresponding to the currentPixel. The Color object obtained will always have an alpha value of 255.
2. void setColor(Color newColor): This nonstatic method sets the red, blue, and green compo-nents of this pixel to those stored inside newColor.
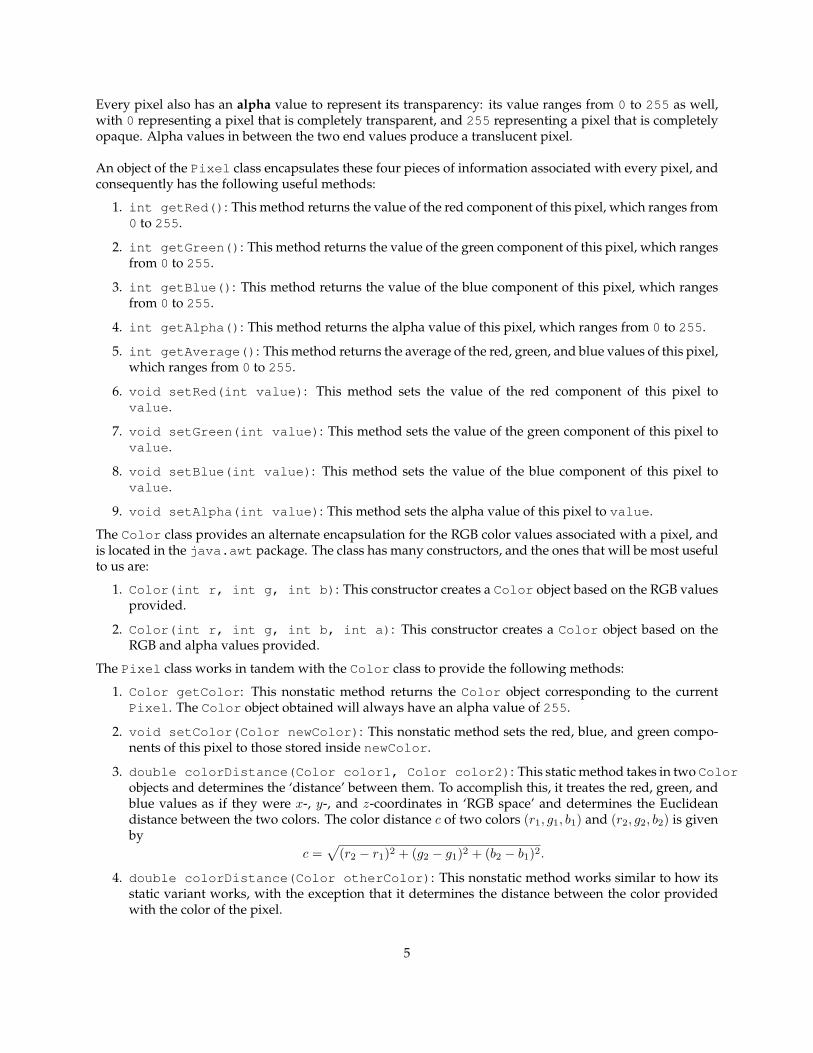
3. double colorDistance(Color color1, Color color2): This static method takes in two Colorobjects and determines the ‘distance’ between them. To accomplish this, it treates the red, green, andblue values as if they were x-, y-, and z-coordinates in ‘RGB space’ and determines the Euclideandistance between the two colors. The color distance c of two colors (r1, g1, b1) and (r2, g2, b2) is givenby
c =√
(r2 − r1)2 + (g2 − g1)2 + (b2 − b1)2.
4. double colorDistance(Color otherColor): This nonstatic method works similar to how itsstatic variant works, with the exception that it determines the distance between the color providedwith the color of the pixel.
5
3 Downloading and Running the Framework Code
All of the files that you will be working with are located in the directory ∼cs61b/labcode/proj1.
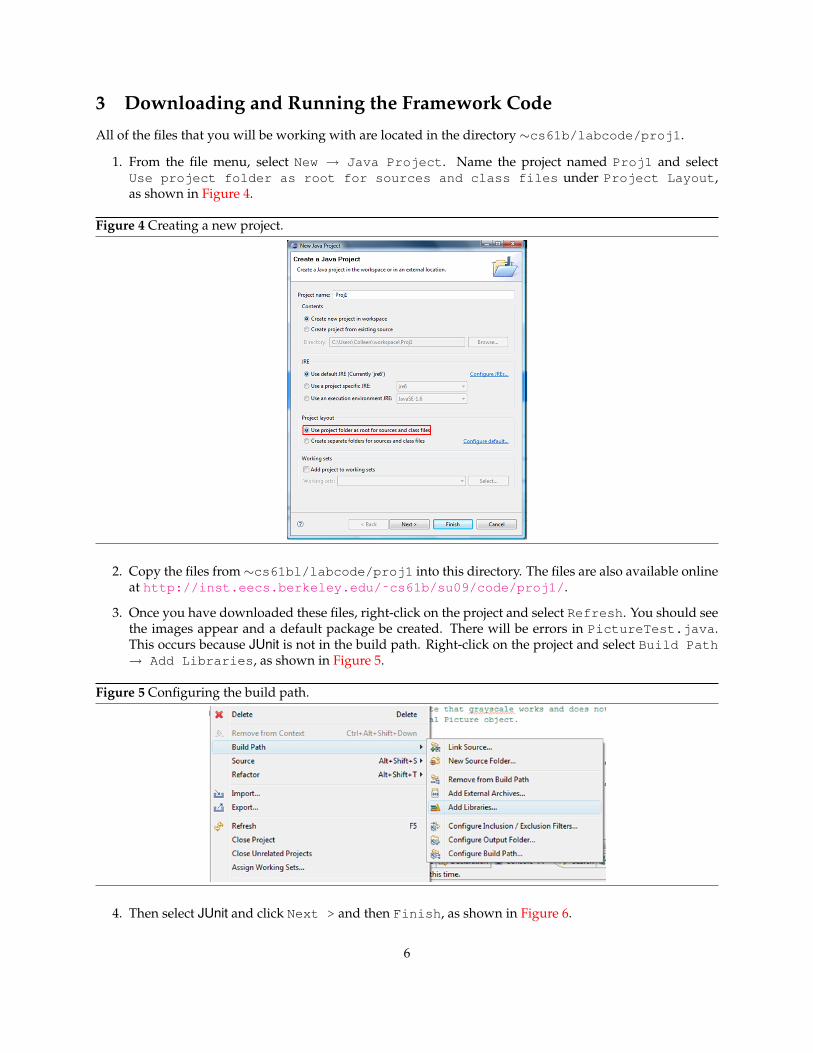
1. From the file menu, select New → Java Project. Name the project named Proj1 and selectUse project folder as root for sources and class files under Project Layout,as shown in Figure 4.
Figure 4 Creating a new project.
2. Copy the files from∼cs61bl/labcode/proj1 into this directory. The files are also available onlineat http://inst.eecs.berkeley.edu/˜cs61b/su09/code/proj1/.
3. Once you have downloaded these files, right-click on the project and select Refresh. You should seethe images appear and a default package be created. There will be errors in PictureTest.java.This occurs because JUnit is not in the build path. Right-click on the project and select Build Path→ Add Libraries, as shown in Figure 5.
Figure 5 Configuring the build path.
4. Then select JUnit and click Next > and then Finish, as shown in Figure 6.
6
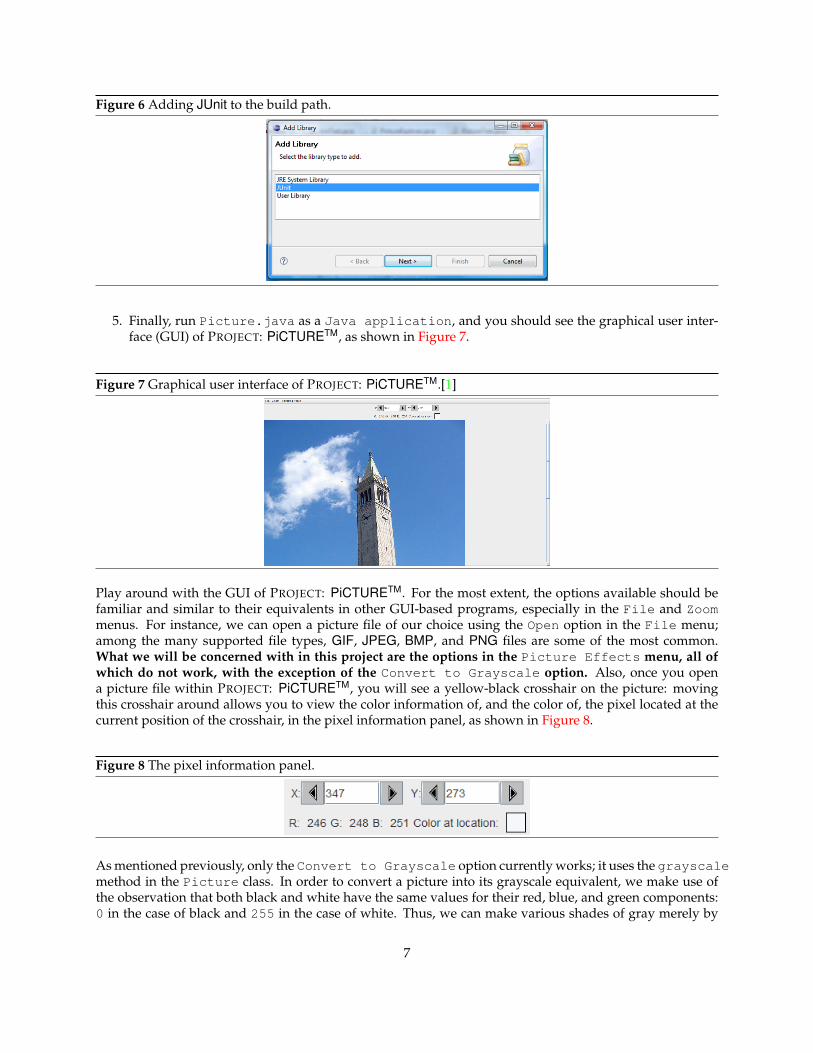
Figure 6 Adding JUnit to the build path.
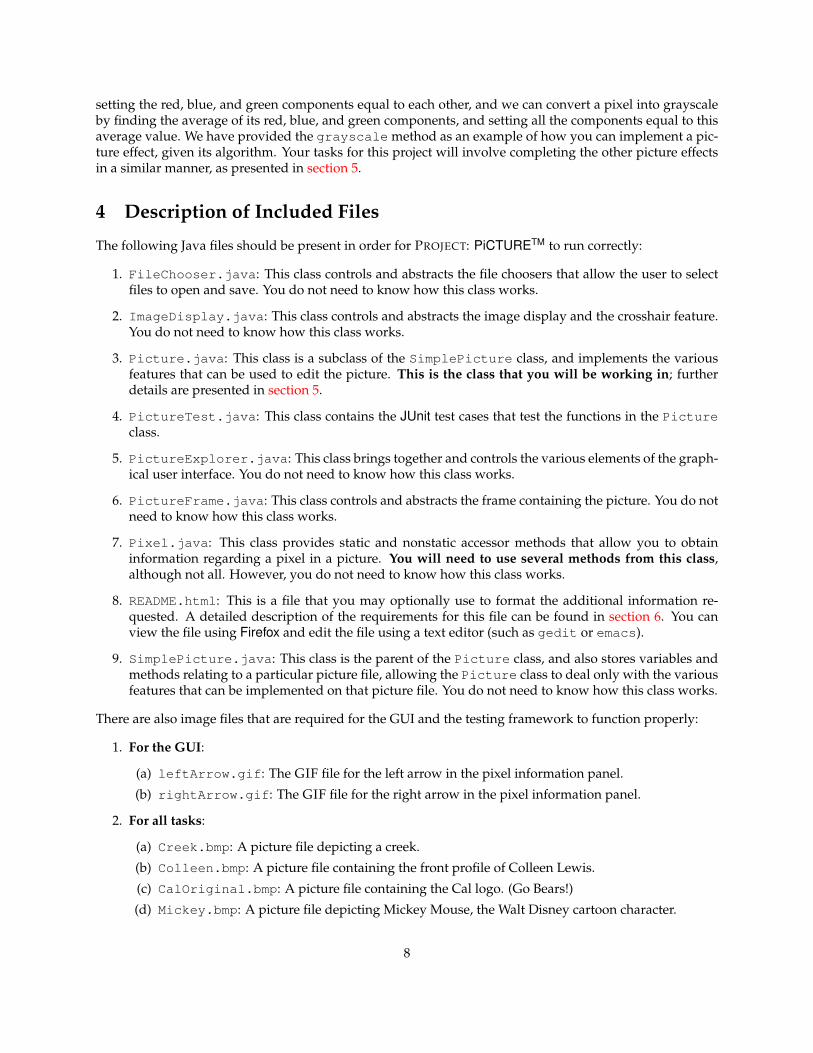
5. Finally, run Picture.java as a Java application, and you should see the graphical user inter-face (GUI) of PROJECT: PiCTURETM, as shown in Figure 7.
Figure 7 Graphical user interface of PROJECT: PiCTURETM.[1]
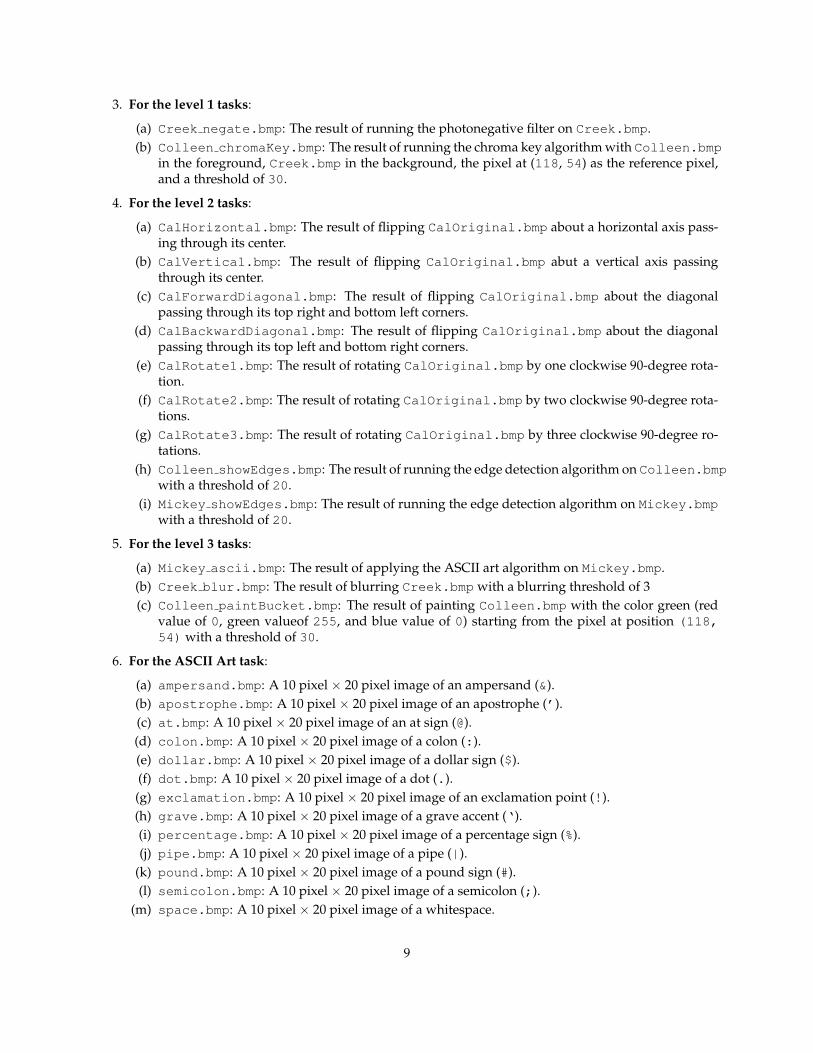
Play around with the GUI of PROJECT: PiCTURETM. For the most extent, the options available should befamiliar and similar to their equivalents in other GUI-based programs, especially in the File and Zoommenus. For instance, we can open a picture file of our choice using the Open option in the File menu;among the many supported file types, GIF, JPEG, BMP, and PNG files are some of the most common.What we will be concerned with in this project are the options in the Picture Effects menu, all ofwhich do not work, with the exception of the Convert to Grayscale option. Also, once you opena picture file within PROJECT: PiCTURETM, you will see a yellow-black crosshair on the picture: movingthis crosshair around allows you to view the color information of, and the color of, the pixel located at thecurrent position of the crosshair, in the pixel information panel, as shown in Figure 8.
Figure 8 The pixel information panel.
As mentioned previously, only the Convert to Grayscale option currently works; it uses the grayscalemethod in the Picture class. In order to convert a picture into its grayscale equivalent, we make use ofthe observation that both black and white have the same values for their red, blue, and green components:0 in the case of black and 255 in the case of white. Thus, we can make various shades of gray merely by
7
setting the red, blue, and green components equal to each other, and we can convert a pixel into grayscaleby finding the average of its red, blue, and green components, and setting all the components equal to thisaverage value. We have provided the grayscale method as an example of how you can implement a pic-ture effect, given its algorithm. Your tasks for this project will involve completing the other picture effectsin a similar manner, as presented in section 5.
4 Description of Included Files
The following Java files should be present in order for PROJECT: PiCTURETM to run correctly:
1. FileChooser.java: This class controls and abstracts the file choosers that allow the user to selectfiles to open and save. You do not need to know how this class works.
2. ImageDisplay.java: This class controls and abstracts the image display and the crosshair feature.You do not need to know how this class works.
3. Picture.java: This class is a subclass of the SimplePicture class, and implements the variousfeatures that can be used to edit the picture. This is the class that you will be working in; furtherdetails are presented in section 5.
4. PictureTest.java: This class contains the JUnit test cases that test the functions in the Pictureclass.
5. PictureExplorer.java: This class brings together and controls the various elements of the graph-ical user interface. You do not need to know how this class works.
6. PictureFrame.java: This class controls and abstracts the frame containing the picture. You do notneed to know how this class works.
7. Pixel.java: This class provides static and nonstatic accessor methods that allow you to obtaininformation regarding a pixel in a picture. You will need to use several methods from this class,although not all. However, you do not need to know how this class works.
8. README.html: This is a file that you may optionally use to format the additional information re-quested. A detailed description of the requirements for this file can be found in section 6. You canview the file using Firefox and edit the file using a text editor (such as gedit or emacs).
9. SimplePicture.java: This class is the parent of the Picture class, and also stores variables andmethods relating to a particular picture file, allowing the Picture class to deal only with the variousfeatures that can be implemented on that picture file. You do not need to know how this class works.
There are also image files that are required for the GUI and the testing framework to function properly:
1. For the GUI:
(a) leftArrow.gif: The GIF file for the left arrow in the pixel information panel.
(b) rightArrow.gif: The GIF file for the right arrow in the pixel information panel.
2. For all tasks:
(a) Creek.bmp: A picture file depicting a creek.
(b) Colleen.bmp: A picture file containing the front profile of Colleen Lewis.
(c) CalOriginal.bmp: A picture file containing the Cal logo. (Go Bears!)
(d) Mickey.bmp: A picture file depicting Mickey Mouse, the Walt Disney cartoon character.
8
3. For the level 1 tasks:
(a) Creek negate.bmp: The result of running the photonegative filter on Creek.bmp.(b) Colleen chromaKey.bmp: The result of running the chroma key algorithm with Colleen.bmp
in the foreground, Creek.bmp in the background, the pixel at (118, 54) as the reference pixel,and a threshold of 30.
4. For the level 2 tasks:
(a) CalHorizontal.bmp: The result of flipping CalOriginal.bmp about a horizontal axis pass-ing through its center.
(b) CalVertical.bmp: The result of flipping CalOriginal.bmp abut a vertical axis passingthrough its center.
(c) CalForwardDiagonal.bmp: The result of flipping CalOriginal.bmp about the diagonalpassing through its top right and bottom left corners.
(d) CalBackwardDiagonal.bmp: The result of flipping CalOriginal.bmp about the diagonalpassing through its top left and bottom right corners.
(e) CalRotate1.bmp: The result of rotating CalOriginal.bmp by one clockwise 90-degree rota-tion.
(f) CalRotate2.bmp: The result of rotating CalOriginal.bmp by two clockwise 90-degree rota-tions.
(g) CalRotate3.bmp: The result of rotating CalOriginal.bmp by three clockwise 90-degree ro-tations.
(h) Colleen showEdges.bmp: The result of running the edge detection algorithm on Colleen.bmpwith a threshold of 20.
(i) Mickey showEdges.bmp: The result of running the edge detection algorithm on Mickey.bmpwith a threshold of 20.
5. For the level 3 tasks:
(a) Mickey ascii.bmp: The result of applying the ASCII art algorithm on Mickey.bmp.(b) Creek blur.bmp: The result of blurring Creek.bmp with a blurring threshold of 3(c) Colleen paintBucket.bmp: The result of painting Colleen.bmp with the color green (red
value of 0, green valueof 255, and blue value of 0) starting from the pixel at position (118,54) with a threshold of 30.
6. For the ASCII Art task:
(a) ampersand.bmp: A 10 pixel × 20 pixel image of an ampersand (&).(b) apostrophe.bmp: A 10 pixel × 20 pixel image of an apostrophe (’).(c) at.bmp: A 10 pixel × 20 pixel image of an at sign (@).(d) colon.bmp: A 10 pixel × 20 pixel image of a colon (:).(e) dollar.bmp: A 10 pixel × 20 pixel image of a dollar sign ($).(f) dot.bmp: A 10 pixel × 20 pixel image of a dot (.).(g) exclamation.bmp: A 10 pixel × 20 pixel image of an exclamation point (!).(h) grave.bmp: A 10 pixel × 20 pixel image of a grave accent (‘).(i) percentage.bmp: A 10 pixel × 20 pixel image of a percentage sign (%).(j) pipe.bmp: A 10 pixel × 20 pixel image of a pipe (|).
(k) pound.bmp: A 10 pixel × 20 pixel image of a pound sign (#).(l) semicolon.bmp: A 10 pixel × 20 pixel image of a semicolon (;).
(m) space.bmp: A 10 pixel × 20 pixel image of a whitespace.
9
5 Tasks
To help you pace yourself and set a realistic timeline for the completion of this project, we have dividedthe picture effects that you are to implement into three levels: the higher the level, the more the complexity,and the more the code required to implement the corresponding functions.
In implementing the methods below, you are to assume that all the information you need is given either asarguments to the method, or can be obtained using the getter methods on the Picture and Pixel classes.You do not need to worry about how the information is provided to the method; the GUI automaticallytakes care of that. A corollary of this is that the method signatures should not be modified in any way, orelse the GUI will not work in tandem with your code.
Please note that, in your solution, none of the public methods that we have provided should be changedin terms of either name, return type, arguments or code.
5.1 Level 1
5.1.1 Photonegative
Inverting a picture is often useful, particularly if you are attempting to restore an old picture and only havethe negatives available. Taking the negative of a picture involves inverting its constituent colors.
Fill in the method
public Picture negate()
which will return a new Picture that is the current Picture inverted. We consider each pixel of thispicture, and subtract each of its color values from 255 and assign that value to the corresponding pixel inthe new picture. The alpha values are not changed.
5.1.2 Chroma Key
Reporters and actors often employ a ‘green screen’, a surface of constant color in front of which they ini-tially tape their scenes, the images and frames from which are later post-processed to add new backgroundscenery. This technique is called chroma key and we will emulate this in PROJECT: PiCTURETM.
In order to accomplish this, we first select a pixel, and choose a background image. We then proceed tosearch the picture for any pixels that are within a certain threshold of the selected pixel (in terms of colordistance) and then replace them with the corresponding pixels from the background picture provided.
Fill in the method
public Picture chromaKey(int xRef, int yRef, Picture background, int threshold)
which will return a new Picture that is the result of the chroma key technique applied on the currentPicture, with the x and y coordinates of the pixel selected (the ‘reference pixel’) on the current Picture,and a specified threshold.
If the pictures happen to be of different sizes, the Picture returned should have width that is the smallerof the widths of the two original pictures, and should have height that is the smaller of the heights of thetwo original pictures. The chroma key technique should then be performed as if the two pictures werealigned at the top left corner (0, 0).
10
5.2 Level 2
5.2.1 Rotate
Fill in the method
public Picture rotate(int rotations)
which will return a new Picture that is the current Picture rotated by an integer multiples (providedas an argument) of 90 degrees. If the number of rotations is positive, then the picture is rotated clockwise;if it is negative, then the picture is rotated counterclockwise. If the argument provided is a multiple of four(including zero), the image should not be rotated at all.
For example, if rotations is 1, then the picture should be rotated through 90 degrees clockwise; ifrotations is 3, then the picture should be rotated through 270 degrees clockwise. Again, if rotations is-1, then the picture should be rotated through 90 degrees counterclockwise; if rotations is -2, then thepicture should be rotated through 180 degrees clockwise. Finally, if rotations is 0, 4, or -4, for example,then the picture is not rotated at all.
5.2.2 Flip
Fill in the method
public Picture flip(int axis)
which will return a new Picture that is the current Picture flipped across the given axis.
The axis is indicated by a static, constant integer argument that can be one of the following:
1. Picture.HORIZONTAL: The image is flipped across an axis that passes horizontally through its cen-ter. The file CalHorizontal.bmp, for example, is the file CalOriginal.bmp flipped across a hori-zontal axis.
2. Picture.VERTICAL: The image is flipped across an axis that passes vertically through its center, asdemonstrated by CalVertical.bmp.
3. Picture.FORWARD DIAGONAL: The image is flipped across a diagonal that passes through the topright and the bottom left corners of the image, as demonstrated by CalForwardDiagonal.bmp.
4. Picture.BACKWARD DIAGONAL: The image is flipped across a diagonal that passes through the topleft and the bottom right corners of the image, as demonstrated by CalBackwardDiagonal.bmp.
5.2.3 Edge Detection
Fill in the method
public Picture showEdges(int threshold)
which will return a new Picture that contains only the edges of the current Picture. In order to achievethis, we look for areas in the Picture where the color changes beyond a specific threshold. For each pixel,we separately consider the color distance between that pixel and the one pixel to its left, and also the colordistance between that pixel and the one pixel to the north, where applicable. As an example, we wouldcompare the pixel at (3, 4) with the pixels at (3, 3) and the pixels at (2, 4). Also, since the pixel at (0, 4) only
11
has a pixel to its north, we would only compare it to that pixel.
If either of the color distances is larger than the provided color threshold, it is set to black (with an alphaof 255); otherwise, the pixel is set to white (with an alpha of 255). The pixel at (0, 0) will always be setto white. This algorithm works because regions of a picture that are not edges tend to have similar colors(such as the different parts of a face, or the sky), whereas regions of a picture that are across edges tend tohave drastically different colors.
5.3 Level 3
5.3.1 ASCII Art
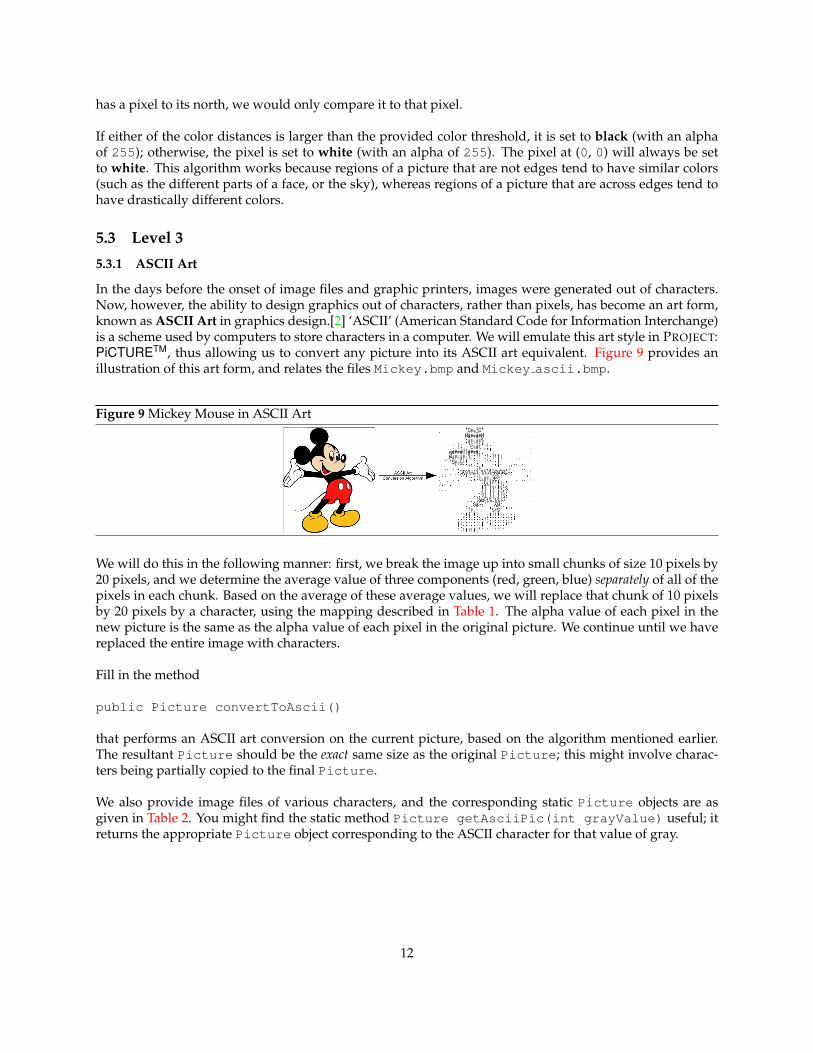
In the days before the onset of image files and graphic printers, images were generated out of characters.Now, however, the ability to design graphics out of characters, rather than pixels, has become an art form,known as ASCII Art in graphics design.[2] ‘ASCII’ (American Standard Code for Information Interchange)is a scheme used by computers to store characters in a computer. We will emulate this art style in PROJECT:PiCTURETM, thus allowing us to convert any picture into its ASCII art equivalent. Figure 9 provides anillustration of this art form, and relates the files Mickey.bmp and Mickey ascii.bmp.
Figure 9 Mickey Mouse in ASCII Art
We will do this in the following manner: first, we break the image up into small chunks of size 10 pixels by20 pixels, and we determine the average value of three components (red, green, blue) separately of all of thepixels in each chunk. Based on the average of these average values, we will replace that chunk of 10 pixelsby 20 pixels by a character, using the mapping described in Table 1. The alpha value of each pixel in thenew picture is the same as the alpha value of each pixel in the original picture. We continue until we havereplaced the entire image with characters.
Fill in the method
public Picture convertToAscii()
that performs an ASCII art conversion on the current picture, based on the algorithm mentioned earlier.The resultant Picture should be the exact same size as the original Picture; this might involve charac-ters being partially copied to the final Picture.
We also provide image files of various characters, and the corresponding static Picture objects are asgiven in Table 2. You might find the static method Picture getAsciiPic(int grayValue) useful; itreturns the appropriate Picture object corresponding to the ASCII character for that value of gray.
12
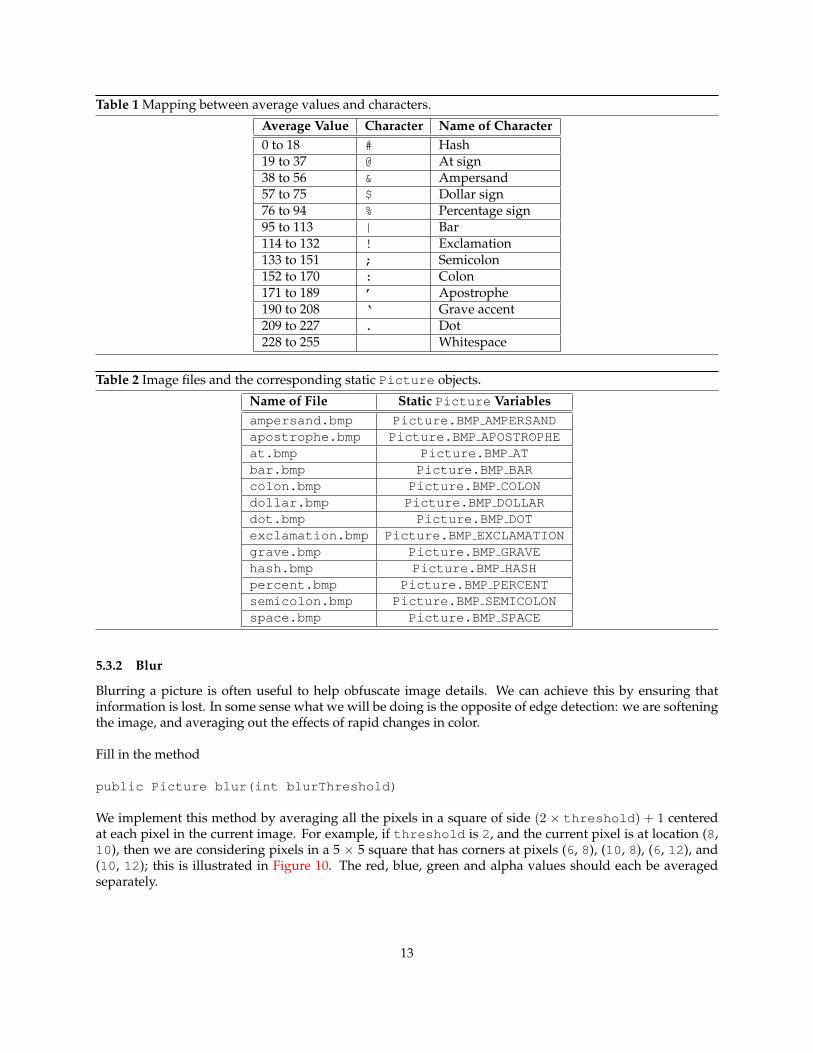
Table 1 Mapping between average values and characters.
Average Value Character Name of Character0 to 18 # Hash19 to 37 @ At sign38 to 56 & Ampersand57 to 75 $ Dollar sign76 to 94 % Percentage sign95 to 113 | Bar114 to 132 ! Exclamation133 to 151 ; Semicolon152 to 170 : Colon171 to 189 ’ Apostrophe190 to 208 ‘ Grave accent209 to 227 . Dot228 to 255 Whitespace
Table 2 Image files and the corresponding static Picture objects.
Name of File Static Picture Variablesampersand.bmp Picture.BMP AMPERSANDapostrophe.bmp Picture.BMP APOSTROPHEat.bmp Picture.BMP ATbar.bmp Picture.BMP BARcolon.bmp Picture.BMP COLONdollar.bmp Picture.BMP DOLLARdot.bmp Picture.BMP DOTexclamation.bmp Picture.BMP EXCLAMATIONgrave.bmp Picture.BMP GRAVEhash.bmp Picture.BMP HASHpercent.bmp Picture.BMP PERCENTsemicolon.bmp Picture.BMP SEMICOLONspace.bmp Picture.BMP SPACE
5.3.2 Blur
Blurring a picture is often useful to help obfuscate image details. We can achieve this by ensuring thatinformation is lost. In some sense what we will be doing is the opposite of edge detection: we are softeningthe image, and averaging out the effects of rapid changes in color.
Fill in the method
public Picture blur(int blurThreshold)
We implement this method by averaging all the pixels in a square of side (2 × threshold) + 1 centeredat each pixel in the current image. For example, if threshold is 2, and the current pixel is at location (8,10), then we are considering pixels in a 5 × 5 square that has corners at pixels (6, 8), (10, 8), (6, 12), and(10, 12); this is illustrated in Figure 10. The red, blue, green and alpha values should each be averagedseparately.
13
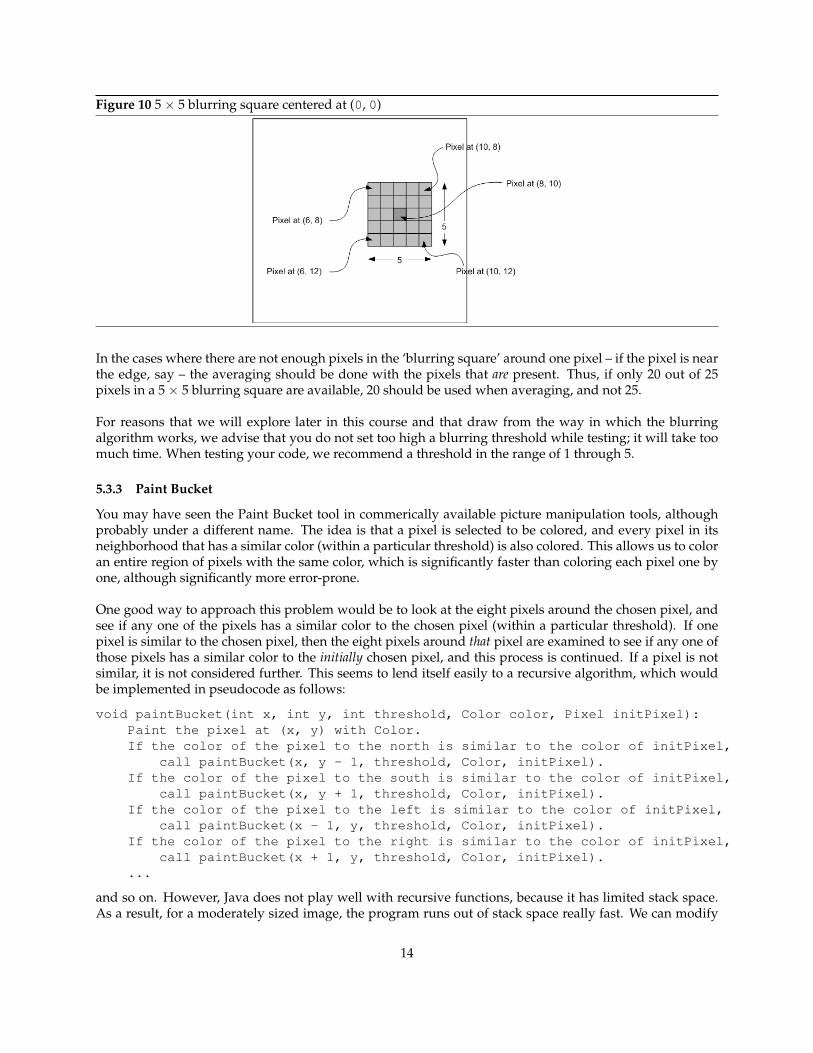
Figure 10 5 × 5 blurring square centered at (0, 0)
In the cases where there are not enough pixels in the ‘blurring square’ around one pixel – if the pixel is nearthe edge, say – the averaging should be done with the pixels that are present. Thus, if only 20 out of 25pixels in a 5 × 5 blurring square are available, 20 should be used when averaging, and not 25.
For reasons that we will explore later in this course and that draw from the way in which the blurringalgorithm works, we advise that you do not set too high a blurring threshold while testing; it will take toomuch time. When testing your code, we recommend a threshold in the range of 1 through 5.
5.3.3 Paint Bucket
You may have seen the Paint Bucket tool in commerically available picture manipulation tools, althoughprobably under a different name. The idea is that a pixel is selected to be colored, and every pixel in itsneighborhood that has a similar color (within a particular threshold) is also colored. This allows us to coloran entire region of pixels with the same color, which is significantly faster than coloring each pixel one byone, although significantly more error-prone.
One good way to approach this problem would be to look at the eight pixels around the chosen pixel, andsee if any one of the pixels has a similar color to the chosen pixel (within a particular threshold). If onepixel is similar to the chosen pixel, then the eight pixels around that pixel are examined to see if any one ofthose pixels has a similar color to the initially chosen pixel, and this process is continued. If a pixel is notsimilar, it is not considered further. This seems to lend itself easily to a recursive algorithm, which wouldbe implemented in pseudocode as follows:
void paintBucket(int x, int y, int threshold, Color color, Pixel initPixel):Paint the pixel at (x, y) with Color.If the color of the pixel to the north is similar to the color of initPixel,
call paintBucket(x, y - 1, threshold, Color, initPixel).If the color of the pixel to the south is similar to the color of initPixel,
call paintBucket(x, y + 1, threshold, Color, initPixel).If the color of the pixel to the left is similar to the color of initPixel,
call paintBucket(x - 1, y, threshold, Color, initPixel).If the color of the pixel to the right is similar to the color of initPixel,
call paintBucket(x + 1, y, threshold, Color, initPixel)....
and so on. However, Java does not play well with recursive functions, because it has limited stack space.As a result, for a moderately sized image, the program runs out of stack space really fast. We can modify
14
this algorithm by using a queue.
A queue is a data structure where new elements are added to the end, and old elements are removed fromthe front; in other words, removal can only happen from the front, while addition can only happen at theend. The LinkedList class, from the java.util package provides the best approximation to a queue inJava, or indeed, any class that employs the Queue interface from the java.util package.
The idea is that we use a queue to keep track of pixels that we want to examine, examine each pixel onthe queue one after the other, and stop painting once our queue is empty. Thus, we start by adding thechosen pixel to an empty queue; then, we select the first pixel in the queue (which is initially the chosenpixel) and examine the eight pixels around it. If any of those pixels are similar in color to the initial chosenpixel, we add it to the queue; otherwise, we ignore it. We repeat this process: we select the first pixel inthe queue and examine the eight pixels around it, and add those pixels to the queue that are similar in color.
This sounds like a great algorithm, because it does not require any recursive calls, and only requires loops.However, we run into the issue where we redundantly examine pixels that we have already seen. To over-come this, we keep another data structure (called a history) where we store the pixels that we have alreadyseen, whether we have colored them or not. Before we put a pixel on to the queue, we first check our historyto ensure that we have not already seen that pixel before. You will need to come up with a way to efficientlystore this history data structure.
Fill in the method
public Picture paintBucket(int x, int y, Color newColor, int threshold)
that performs the paint bucket algorithm described above.
6 README and Documentation
Computer programming at its heart is a design process. One aspect of this design process is designinghelper methods that make the problems you are solving easier. We want to know how you used helpermethods to make this project easier.
Along with this project you will be submitting a file called README.html; this file should contain theinformation described below.
1. Your name.
2. Your login.
3. Disclaimers: A list of any methods you were not able to finish completely.
4. Choose the four most important/interesting helper methods that you wrote for your project. For eachhelper method, please describe:
(a) The arguments of the method.
(b) What the method does.
(c) Why the method is helpful and what other methods use this helper method.
5. Your favorite part or aspect of this project. (not graded)
6. One thing we should change about the project in the future. (not graded)
15
We have provided a template that you might find useful, although you do not have to use it. Even if youdo not use our template, you must submit a file named README.html. This file does not need to containany HTML; however, it must contain all of the information described above.
7 Testing
We have provided you with 16 tests within PictureTest.java. Most of these tests compare solutionimages that we have provided in the project directory with the result of running your code that is in-tended to produce the same result. When you download the project, only the testGrayscale() andhelpersWork() test methods should pass.
To test your project, you should write additional test cases. This will involve testing your private methods,as well as expanding the test cases we have provided to test other possible cases. There is an example oftesting the private helper method used in the provided grayscale() code. You should write a test casethat tests all of your non-trivial methods. If you have any doubt about whether a helper method is trivial,please include test cases.
Although there is no way for us to enforce this, we encourage you on the project to use test-driven devel-opment. This means that before you fill out the body of a new method (public or private), you shouldwrite test cases that will validate that the method works (once it is written). This is a very helpful way tobrainstorm the behavior of the method. By writing the test code before writing the method, you are likelyto have better test coverage and because of the helpful process of specifying how it must behave, you arelikely to have better code!
8 Style Guide
10% of your grade for this project will be based on your coding style. We will deduct points for code thatdoes not match the following style, documentation and encapsulation guidelines. (This guide is based uponthe style guide written by Professor Jonathan Shewchuk’s and used in the spring 2009 version of CS61B.)
1. Each method must be preceded by a comment describing its behavior unambiguously. These com-ments must include descriptions of what each parameter is for, and what the method returns (if any-thing). They must also include a description of what the method does (though not necessarily how itdoes it) detailed enough that somebody else could implement a method that does the same thing fromscratch using only the provided documentation. See the comments in the framework code providedfor an example of what we mean.
2. All classes, fields, and methods must have the proper public/private/protected qualifier. Wewill deduct points if you make things public that could conceivably allow a user to corrupt the datastructure.
3. Classes that contain extraneous debugging code, print statements, or meaningless comments thatmake the code hard to read will be penalized.
4. Your file should be indented to clearly show the structure of nested statements like loops and if state-ments. Sloppy indentation will be penalized. Eclipse will automatically indent your code. Highlightyour code and press Ctrl+I or Ctrl+Shift+F.
5. All if, else, while, do, and for statements should use braces, even if they are not syntacticallyrequired.
16
6. All classes start with a capital letter, all methods and (non-final) data fields start with a lower caseletter, and in both cases, each new word within the name starts with a capital letter. Constants (finalfields) are all capital letters only.
7. Numerical constants with special meaning should always be represented by all-caps final staticconstants.
8. All class, method, field, and variable names should be meaningful to a human reader.
9. Methods should not exceed about 50 lines. Any method that long can probably be broken up intological pieces. The same is probably true for any method that needs more than 7 levels of indentation.
10. Avoid unnecessary duplicated code; if you use the same (or very similar) fifteen lines of code in twodifferent places, those lines should probably be a separate method call.
11. Programs should be easy to read.
12. Keep lines of reasonable length (say, 72 characters, with a maximum of 80 characters) for readability.
9 Grading and Submission Details
We will use the rubric presented in Table 3 when grading your submission.
Table 3 Grading rubric.
Level 1 Photonegative 3%Chroma Key 5%
Level 2Rotate 10%Flip 10%Edge Detection 5%
Level 3ASCII Art 10%Blur 10%Paint Bucket 15%
Additional Stuff
Documentation (README) 10%Testing 10%Style 10%Checkoff 2%
Please make sure that your solution runs on the lab machines as well before submitting; there have beenmultiple cases in the past where students have either forgotten to turn in a particular file, or have had thewrong version of a file, or have inadvertently added a typo before submission, resulting in a zero grade.Please double (or triple) check your files before submission.
Once you are satisfied with your solution, change your directory (cd) to where your project files are stored,and run the command submit proj1. You should only turn in Picture.java, PictureTest.javaand README.html. Please do not modify any other files; we will not look at any other files when gradingyour submission. You should double check that the three files work with the framework code provided, soas to ensure that you have not inadvertently modified any other file.
After submitting, if you realize that your solution is flawed, you may fix it and submit again. We will onlygrade your last submission; you may, however, inform the reader if you would like an earlier submission
17
graded.
Late Policy. For every hour that your project is late you will lose 2% of your project score. For example, ifyou submit the project 4 hours late, your initial score will be multiplied by 0.92.
10 Showing It Off
This section is not graded, and all the information contained herein is merely for personal use.
You have worked hard and selflessly on this project; what better way to enjoy the benefits than showing itoff to family and friends? In this section, we will describe how to convert your project into a JAR file, or aJava ARchive file.
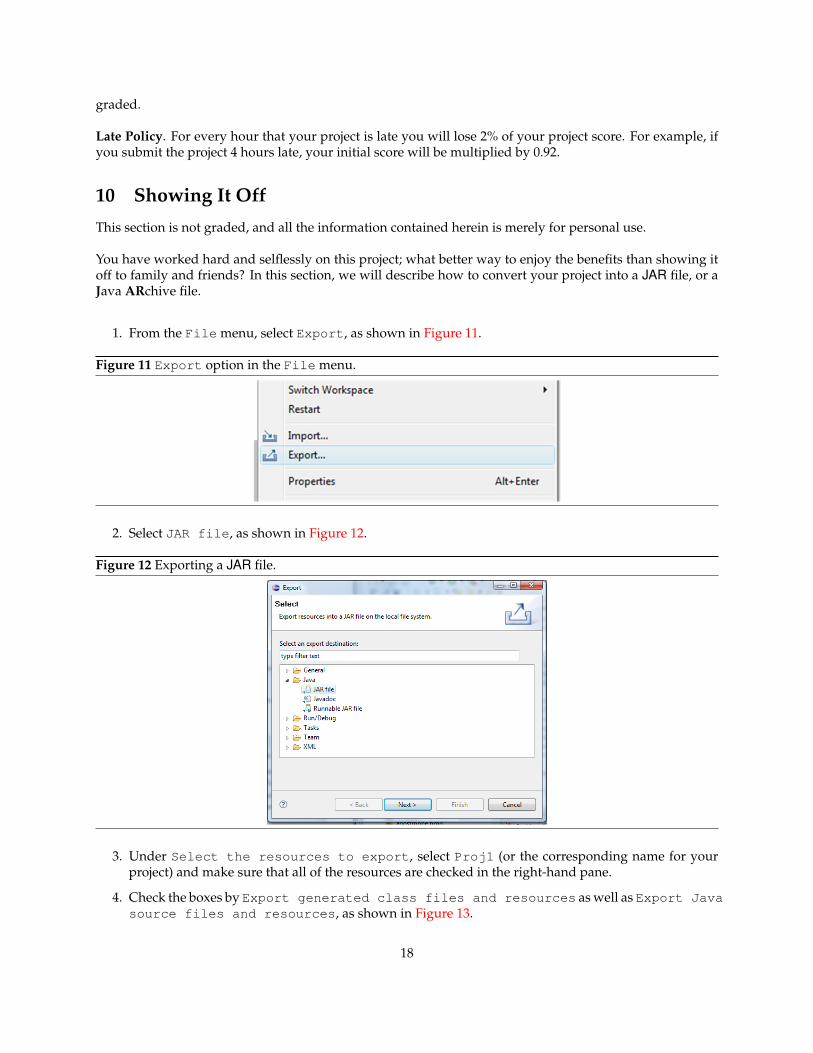
1. From the File menu, select Export, as shown in Figure 11.
Figure 11 Export option in the File menu.
2. Select JAR file, as shown in Figure 12.
Figure 12 Exporting a JAR file.
3. Under Select the resources to export, select Proj1 (or the corresponding name for yourproject) and make sure that all of the resources are checked in the right-hand pane.
4. Check the boxes by Export generated class files and resources as well as Export Javasource files and resources, as shown in Figure 13.
18
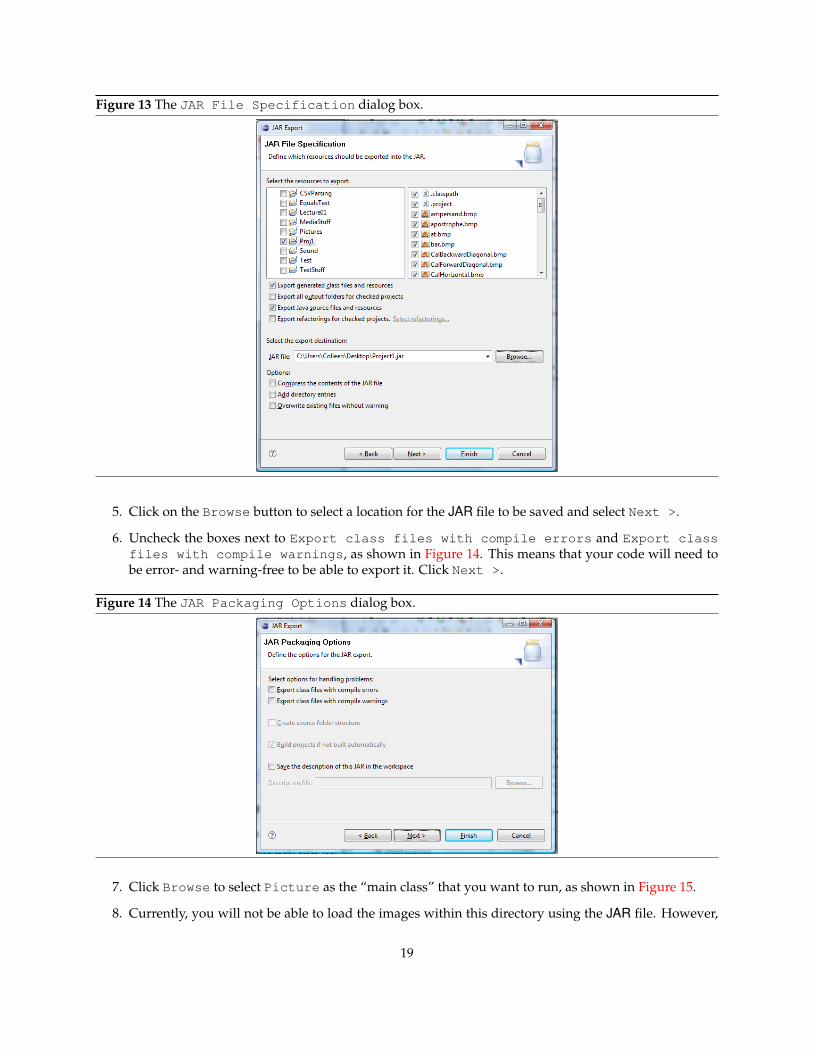
Figure 13 The JAR File Specification dialog box.
5. Click on the Browse button to select a location for the JAR file to be saved and select Next >.
6. Uncheck the boxes next to Export class files with compile errors and Export classfiles with compile warnings, as shown in Figure 14. This means that your code will need tobe error- and warning-free to be able to export it. Click Next >.
Figure 14 The JAR Packaging Options dialog box.
7. Click Browse to select Picture as the “main class” that you want to run, as shown in Figure 15.
8. Currently, you will not be able to load the images within this directory using the JAR file. However,
19
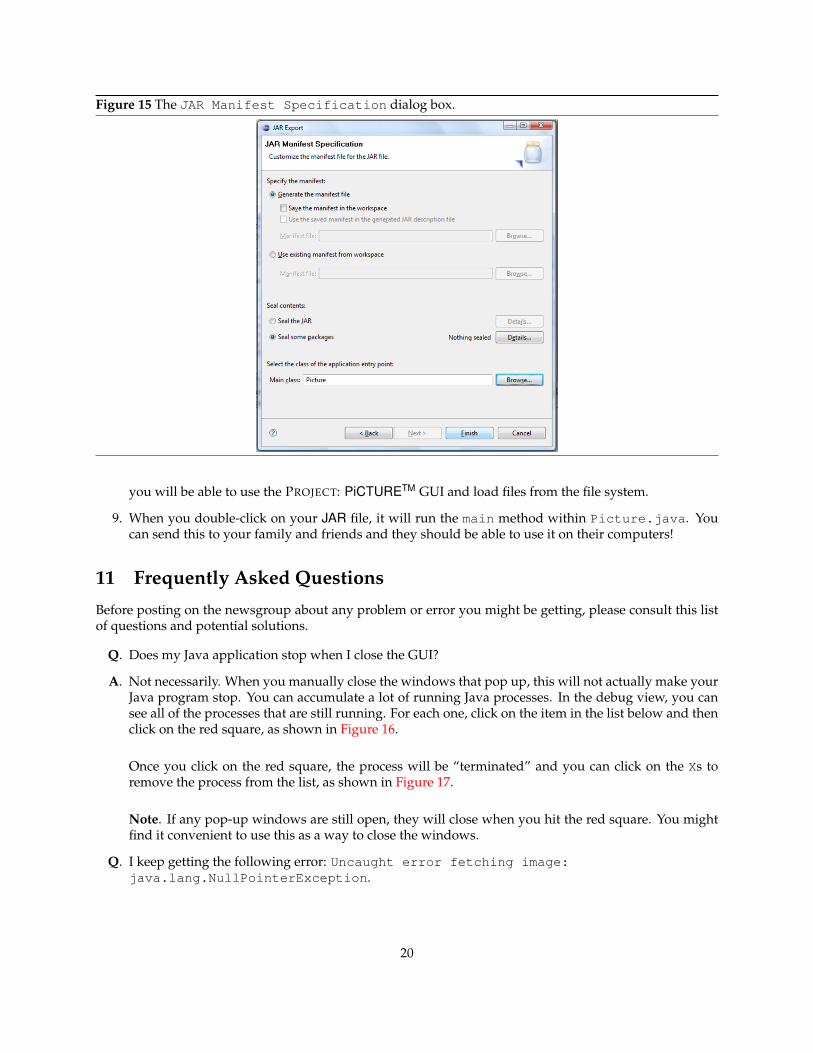
Figure 15 The JAR Manifest Specification dialog box.
you will be able to use the PROJECT: PiCTURETM GUI and load files from the file system.
9. When you double-click on your JAR file, it will run the main method within Picture.java. Youcan send this to your family and friends and they should be able to use it on their computers!
11 Frequently Asked Questions
Before posting on the newsgroup about any problem or error you might be getting, please consult this listof questions and potential solutions.
Q. Does my Java application stop when I close the GUI?
A. Not necessarily. When you manually close the windows that pop up, this will not actually make yourJava program stop. You can accumulate a lot of running Java processes. In the debug view, you cansee all of the processes that are still running. For each one, click on the item in the list below and thenclick on the red square, as shown in Figure 16.
Once you click on the red square, the process will be “terminated” and you can click on the Xs toremove the process from the list, as shown in Figure 17.
Note. If any pop-up windows are still open, they will close when you hit the red square. You mightfind it convenient to use this as a way to close the windows.
Q. I keep getting the following error: Uncaught error fetching image:java.lang.NullPointerException.
20
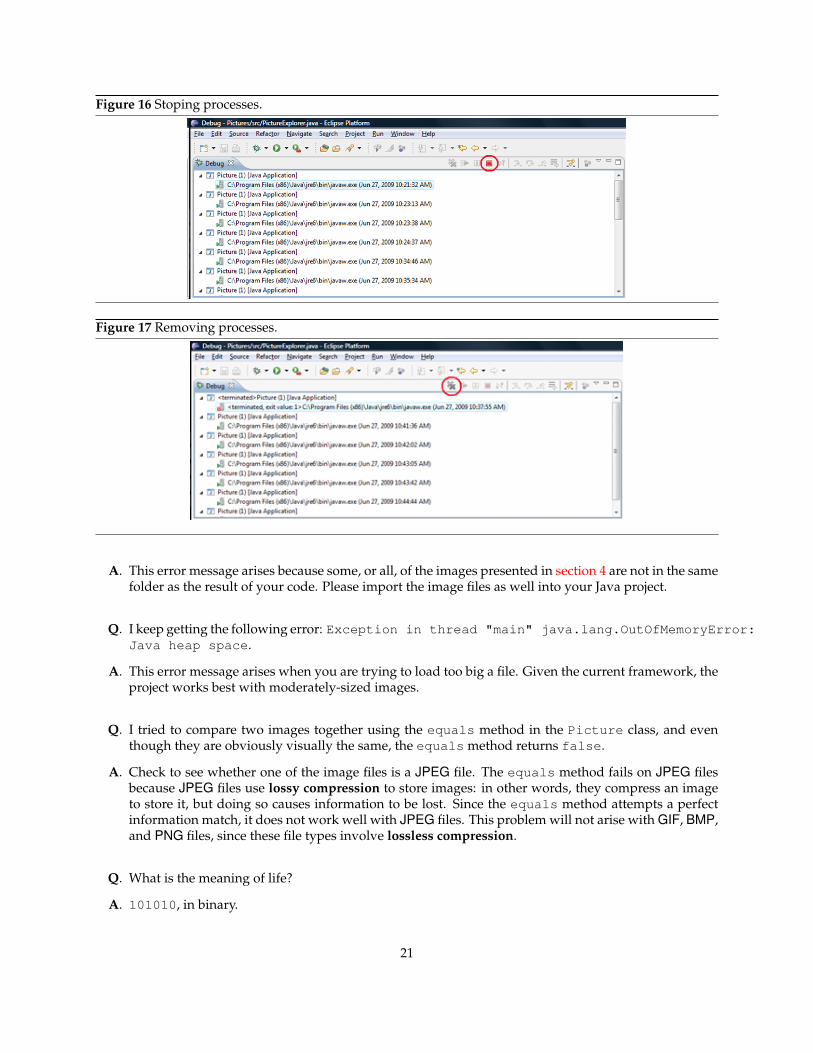
Figure 16 Stoping processes.
Figure 17 Removing processes.
A. This error message arises because some, or all, of the images presented in section 4 are not in the samefolder as the result of your code. Please import the image files as well into your Java project.
Q. I keep getting the following error: Exception in thread "main" java.lang.OutOfMemoryError:Java heap space.
A. This error message arises when you are trying to load too big a file. Given the current framework, theproject works best with moderately-sized images.
Q. I tried to compare two images together using the equals method in the Picture class, and eventhough they are obviously visually the same, the equals method returns false.
A. Check to see whether one of the image files is a JPEG file. The equals method fails on JPEG filesbecause JPEG files use lossy compression to store images: in other words, they compress an imageto store it, but doing so causes information to be lost. Since the equals method attempts a perfectinformation match, it does not work well with JPEG files. This problem will not arise with GIF, BMP,and PNG files, since these file types involve lossless compression.
Q. What is the meaning of life?
A. 101010, in binary.
21
12 Acknowledgments
This project was modified from code written by BARB ERICSON ([email protected]) and KEITHMCDERMOTT ([email protected]) from the Georgia Institute of Technology.
References
[1] Roy Tennant. FreeLargePhotos.com. http://www.freelargephotos.com, 2009.
[2] Wikipedia. ASCII art — Wikipedia, The Free Encyclopedia, 2009. [Online; accessed 28-June-2009].
22

PROJECT: PiCTURETM CHECKOFF SHEET
Due Thursday, July 2, 2009
Before you arrive in lab you should have ready:
1. This document, filled out completely to show your TA.
2. The method negate written and passing the corresponding JUnit test.
One of the most important skills in industry is being able to estimate how long a task will take you. Yourboss will judge you based upon whether you can follow through with how long things take you. You maybe the best coder, but if you consistently underestimate how long tasks will take you will look like a badprogrammer. Please read the PROJECT: PiCTURETM specification carefully and then estimate how longeach method will take. Most people forget to include time for debugging, commenting and testing. A goodestimate will probably be twice as long as you would initially estimate.
Please list either a question or a note aboutyour plan for each method.
TimeEstimate
Actual Time(You might
keep a tally of30-minutechunks of
time.)
Reading spec
Photonegative
Chroma Key
Rotate
23
Blur
Edge Detection
Flip
ASCII Art
Paint Bucket
Other notes:
Signature of TA: . . . . . . . . . . . . . . . . . . . . . . . . . . . . . . . . . . . . . . . . . . . . . . . . . . . . . . . . . . . . . . . . . . . . . . . . . . . . . . . . . . . . . . . . .
24


