Embed Size (px)
Citation preview

Pro5® MHC Pentamer
Handbook
J4971 ProImmune Pentimer Handbook amends V2_0971-PR Handbook 06.3 10/05/2012 16:42 Page 1

Contents
Section 1 Introduction and Assay Principles 2
Section 2 Planning Experimentsn MHC alleles 6n Common epitope frequencies 8n Notes on planning 10
Section 3 Cell Preparation Protocols
n Red blood cell depletion from whole blood 14n Density gradient centrifugation separation of 16
human PBMCs from whole bloodn Isolation of splenocytes from murine spleens 18n Cryopreservation of PBMCs or ammonium 21
chloride-lyzed blood n Thawing cryopreserved cells 24n Allocation of cells prior to staining 26
Section 4 How to Stain Cellsn Introduction 29n Setting up appropriate controls 30n Improvement of data by exclusion 33n Cellular staining protocols 34
- Fluorescent-labeled Pentamer 34- Unlabeled Pentamer 38- Biotin-labeled Pentamer 42
n Protocol optimization 46- Changing temperature and time 46- Titrating the amount of Pentamer 48- Cross-titration of Pentamer with anti-CD8 50
Section 5 Data Acquisitionn Procedure 54n Identification of the cells of interest 55n Instrument set up 57
Page
J4971 ProImmune Pentimer Handbook amends V2_0971-PR Handbook 06.3 10/05/2012 16:42 Page 2

n Setting the live lymphocyte gate 57n Voltage settings for individual colors 59n Compensation 60
Section 6 Data Analysis and Interpretationn Choice of plot 66n Setting gates and quadrants 66n Examples 68
Section 7 Applications of Pro5®
Pentamersn Use of Pro5® Pentamers for cell separation 72
- Separation of antigen-specific T cells 72- Column-based isolation of antigen-specific 74
cells using anti-fluorochrome beads- Column-based isolation of antigen-specific 78
cells using streptavidin beads- Tube-based isolation of antigen-specific 80
cells using streptavidin beadsn Fluorescence Activated Cell Sorting (FACS) 83n Use of Pro5® Pentamers in combination 85
with intracellular cytokine staining- Protocol for human cells 86- Protocol for murine cells 91
Section 8 Troubleshooting Guiden Lack of staining 100n Non-specific staining 102n Technical support 104
AppendicesI Solution components 108II Optimal titration of antibodies 108III Table of fluorochromes 111IV Publications citing ProImmune Pentamers 112V Abbreviations 113
Page
J4971 ProImmune Pentimer Handbook amends V2_0971-PR Handbook 06.3 10/05/2012 16:42 Page 3

J4971 ProImmune Pentimer Handbook amends V2_0971-PR Handbook 06.3 10/05/2012 16:42 Page 4

Section OneIntroduction and Assay Principles
Intr
oduc
tion
J4971 ProImmune Pentimer Handbook amends V2_0971-PR Handbook 06.3 10/05/2012 16:42 Page 1

2
Section 1
Introduction and Assay Principles
This Pentamer Handbook has been designed to assist all users ofProImmune Pro5® MHC Pentamers and related products. It coversthe planning of experiments, preparation of cells, protocols forstaining, protocol optimization and troubleshooting. Werecommend that even experienced flow cytometry users read thishandbook carefully. Follow these guidelines to achieve reliable andconsistent results with Pro5® Pentamers and maximize thethreshold of detection.
ProImmune has developed Pro5® MHC Class I Pentamers fordetecting and enumerating CD8+ single antigen-specific T cellsusing flow cytometry. Pro5® Pentamers bind to T cell receptors of aparticular specificity, as determined by the MHC allele and peptidecombination. Pentamers can readily be used to detect and separateantigen-specific T cell populations as rare as 0.02% of lymphocytes.They are also suitable for detailed epitope characterization as wellas further immune monitoring. Additional co-staining forintracellular cytokines e.g. IFNγ or IL-2, and/or surface markerse.g. CD69 or CD45RO, can yield functional data for the antigen-specific subset.
Pro5® Pentamers can also be used in combination with existingtechnologies such as intracellular cytokine staining and ELISPOTanalysis to establish an accurate profile of the functional phenotypeof antigen-specific CD8+ T cells. Staining with Pro5® Pentamersprovides a quantitative analysis of lymphocytes that express aspecific T cell receptor, whereas ELISPOT measures the ability ofthese cells to produce cytokines. Not all cells that express aparticular T cell receptor have an identical ability to producecytokines. As a consequence the results from these two types ofassays will not correspond exactly. Rather they providecomplementary information about the profile of an immuneresponse.
J4971 ProImmune Pentimer Handbook amends V2_0971-PR Handbook 06.3 10/05/2012 16:42 Page 2

3
Pro5® Pentamers comprise five MHC-peptide complexes assembledthrough a coiled-coil domain. Due to their planar configuration, allfive MHC-peptide complexes in the Pentamer are available forbinding to complementary T cell receptors (TCRs). Each Pro5®
Pentamer also comprises up to five fluorescent or biotin tags forbright and efficient labeling.Pro5® MHC Pentamers are for research use only, and are not foruse in therapeutic or diagnostic procedures.
MHC-peptide complex
Coiled-coil domain
Fluorescent tag
Figure 1: Pro5® MHC Class I Pentamer
J4971 ProImmune Pentimer Handbook amends V2_0971-PR Handbook 06.3 10/05/2012 16:42 Page 3

4
J4971 ProImmune Pentimer Handbook amends V2_0971-PR Handbook 06.3 10/05/2012 16:42 Page 4

Section TwoPlanning Experiments
MHC Alleles
Common Epitope Frequencies
Notes on Planning
Plan
ning
Exp
erim
ents
J4971 ProImmune Pentimer Handbook amends V2_0971-PR Handbook 06.3 10/05/2012 16:42 Page 5

6
Section 2
MHC Alleles
When planning an experiment it is important to decide whichepitopes are to be studied and to know their corresponding MajorHistocompatibility Complex (MHC) restriction.
When using a mouse experimental model it is important to knowwhich MHC allele is expressed by the strain of inbred mouse to beused, Table 1.
For example, H-2 Kb MHC Pentamers can only be used withsamples from C57BL/6 mice. The T cell receptors of these mice arerestricted to H-2 Kb or H-2 Db for class I MHC and therefore willnot interact with H-2 Kd Pentamers, for example.
When analyzing human samples it is important to know that thedonor is positive for the MHC allele to be investigated. Donorsamples therefore either have to be tissue typed or at least serotypedfor the allele(s) of interest. Table 2 shows the frequency of the top30 human class I alleles in four US ethnic groups (White, Black,Hispanic and Asian or Pacific Islander). In certain disease areasand populations the immune response to some epitopes is wellcharacterized, e.g. CMV, EBV. In these cases the publishedliterature will assist experimental planning. The technical supportteam at ProImmune is happy to offer advice about epitopes andMHC alleles to be used in a given study.
Table 1MHC alleles expressed by commonly used inbred mouse strains.
H-2
Class I Class II
Strain Appearance Haplotype K D L IA IEBalb/c albino d Kd Dd Ld IAd IEdC3H/He agouti k Kk Dk - IAk IEkC57BL/6 black b Kb Db - IAb -CBA agouti k Kk Dk - IAk IEk
J4971 ProImmune Pentimer Handbook amends V2_0971-PR Handbook 06.3 10/05/2012 16:42 Page 6

7
Table 2
Frequency of the top 30 human class I MHC alleles in the NorthAmerican population
Data from HLA Matchmaker www.hlamatchmaker.net
Descriptors of ethnic groups are those recommended by the US government.
% chance of allele expressed in an individual
Top 30 expressed alleles
Allele White Allele Black Allele Hispanic Allele Asian orPacific Islander
A*02:01 45.6% C*04:01 29.0% A*02:01 37.1% A*11:01 38.4%C*07:01 27.7% C*07:01 25.4% C*04:01 25.4% A*24:02 33.7%A*01:01 27.4% C*06:02 23.0% A*24:02 24.9% C*07:02 33.3%A*03:01 23.8% A*02:01 22.3% C*07:02 24.2% C*01:02 27.7%C*07:02 21.5% A*23:01 20.7% C*07:01 20.8% A*33:03 23.3%C*04:01 21.2% C*02:02 19.0% C*03:04 14.4% C*08:01 21.6%B*44:02 20.2% A*03:01 18.7% A*03:01 14.3% C*03:04 19.9%B*07:02 18.1% C*07:02 18.1% B*07:02 13.2% A*02:01 18.1%B*08:01 18.1% B*53:01 18.1% B*35:01 12.8% B*40:01 15.2%C*05:01 17.2% B*07:02 15.8% C*06:02 12.3% C*04:01 14.0%C*03:04 16.8% C*16:01 15.7% C*05:01 11.9% B*58:01 13.3%C*06:02 15.7% B*15:03 13.9% A*01:01 11.4% B*46:01 12.7%A*11:01 15.3% B*58:01 13.5% A*11:01 11.0% B*51:01 12.4%B*40:01 13.6% A*68:02 12.7% B*51:01 10.8% C*03:02 12.0%A*24:02 12.1% C*17:01 11.7% C*16:01 10.6% B*38:02 11.4%B*35:01 10.7% B*45:01 10.8% B*44:03 9.9% A*02:07 11.0%C*03:03 10.6% B*42:01 10.5% C*01:02 9.7% B*15:01 9.4%B*51:01 10.4% A*30:01 10.4% A*29:02 9.7% A*02:06 9.3%C*12:03 9.9% B*35:01 10.1% C*08:02 9.3% C*03:03 9.2%B*15:01 9.6% A*01:01 10.0% B*18:01 9.1% B*15:02 9.1%A*29:02 8.9% C*03:04 9.3% A*31:01 8.9% A*02:03 8.8%A*26:01 8.2% A*30:02 9.2% B*52:01 8.6% B*44:03 8.6%A*32:01 8.2% B*08:01 8.5% B*14:02 8.6% C*14:02 8.4%C*08:02 7.7% A*34:02 8.4% C*02:02 7.6% B*35:01 7.2%A*25:01 7.5% A*74:01 8.4% C*12:03 7.6% C*06:02 7.0%B*57:01 7.1% A*33:03 8.0% A*26:01 7.6% B*54:01 6.9%B*14:02 6.7% C*18:01 7.3% A*68:01 7.1% B*13:01 6.6%C*02:02 6.6% A*29:02 7.2% B*08:01 7.0% B*40:02 6.3%B*18:01 6.4% B*44:03 6.9% A*30:02 6.8% B*55:02 6.3%B*44:03 6.4% B*49:01 6.9% B*44:02 6.5% A*26:01 6.0%
J4971 ProImmune Pentimer Handbook amends V2_0971-PR Handbook 06.3 10/05/2012 16:42 Page 7

Examples of the range of Pentamer positive responses for thecommonly expressed epitopes outlined in Table 3. All Pentamerstaining was carried out on PBMCs from healthy donors and 3 dataplots are shown for each Pentamer specificity.
Figure 2 (shown opposite)
8
Section 2
Common Epitope Frequencies
In certain disease areas and populations, the immune response tosome epitopes is well characterized e.g. CMV, EBV. In these casesthe published literature will assist experimental planning. Theinformation provided in Table 3 gives an approximate guide to thenumbers of healthy donors (expressing the relevant alleles) whowould be expected to show a response to these common epitopesthat would be detectable by Pentamer staining. The technicalsupport team at ProImmune is happy to offer advice about epitopesand MHC alleles to be used in a given study.
Table 3
Frequency of healthy donors PBMC giving a detectable Pentamerresponse
Epitope Allele Sequence Frequency of positive donors
CMV pp65 363-373 A*0201 NLVPMVATV 20%Influenza A MP 58-66 A*0201 GILGFVFTL 25%EBV BMLF-1 259-267 A*0201 GLCTLVAML 33%EBV BZLF-1 190-197 B*0801 RAKFKQLL 50-60%EBV EBNA-3A 193-201 B*0801 FLRGRAYGL 20-25%
J4971 ProImmune Pentimer Handbook amends V2_0971-PR Handbook 06.3 10/05/2012 16:42 Page 8

9
100 101 102 103 104
100
101
102
103
104
0.07% 0.31%CM
V p
p65
A*0
201/
NLV
PMVA
TV
100 101 102 103 104
100
101
102
103
0.02% 2.66%
100 101 102 103 104
100
101
102
103
104
0.08% 0.18%
100 101 102 103
100
101
102
103
0.06% 0.17%
Influ
enza
A M
PA
*020
1/G
ILG
FVFT
L
100 101 102 103
100
101
102
103
0.0% 0.02%
100 101 102 103 104
100
101
102
103
104
0.04% 0.46%
1 10 100 10001
10
100
1000
0.04% 0.1%
EBV
BM
LF-1
A*0
201/
GLC
TLVA
ML
1 10 100 1000
0.13% 0.6%
100 101 102 103
100
101
102
103
0.07% 0.25%
100 101 102 103
100
101
102
103
0.01% 024%
EBV
BZL
F-1
B*0
801/
RAK
FKQL
L
100 101 102 103
100
101
102
103
0.01% 0.22%
100 101 102 103
100
101
102
103
0.0% 0.4%
100 101 102 103
100
101
102
103
0.02% 0.47%
EBV
EB
NA
-3A
B*0
801/
FLR
GRA
YG
L
100 101 102 103
100
101
102
103
0.02% 0.39%
100 101 102 103 104
100
101
102
103
104
0.1% 0.44%
CD8
1
10
100
1000
J4971 ProImmune Pentimer Handbook amends V2_0971-PR Handbook 06.3 10/05/2012 16:42 Page 9

10
Notes on Planning
The following notes suggest a starting point for planning yourexperiments.
Protocol worksheet
Prepare a worksheet detailing the staining procedure for each sample. Figure 3 shows an example experimental worksheet.
Experimental controls
The setting up of suitable controls is covered in detail inSection Four.
Equipment
Arrange to have access to the flow cytometer at theappropriate time.
Check the availability of non-standard lab consumables,especially tubes for flow cytometry sample analysis.
Materials
Delivery times for reagents can vary, especially if they arecustom manufactured.
Ensure the availability of donors for human blood, frozensamples or the availability of mice for murine samples.
Section 2
J4971 ProImmune Pentimer Handbook amends V2_0971-PR Handbook 06.3 10/05/2012 16:42 Page 10

11
Figure 3
Example experimental worksheet
[Title]
[Date]
Cells: [Description of Cells, e.g. PBMCs from donor #1]
Antibodies & Pentamers:FL1 ctrl: (e.g. anti-CD8 FITC)FL2 ctrl: (e.g. anti-CD3 R-PE)FL3 ctrl: (e.g. anti-CD8 Biotin + SA PE Cy5)FL4 ctrl: (e.g. anti-CD4 APC)
CD8 FITC (1 μl / test) Clone LT8SA PE Cy5 (optimum μl / test)Unlabeled Pentamer (2 μl / test)R-PE-labeled Pentamer (10 μl / test)APC-labeled Pentamer (10 μl / test)Biotin-labeled Pentamer (10 μl / test)Fluorotag (8 μl / test)
Sample# Cells Temp. Sample ID 1st Layer 2nd Layer Sample#1 PBMCs donor #1 4°C unstained - - 12 PBMCs donor #1 4°C FL1 ctrl anti-CD8 FITC - 23 PBMCs donor #1 4°C FL2 ctrl anti-CD3 PE - 34 PBMCs donor #1 4°C FL3 ctrl anti-CD8 Biotin SA PE Cy5 45 PBMCs donor #1 4°C FL4 ctrl anti-CD4 APC - 56 PBMCs donor #1 22°C Unlabeled Pentamer / R-PE FT Unlabeled Pentamer CD8 FITC + R-PE Fluorotag 67 PBMCs donor #1 22°C Unlabeled Pentamer / APC FT Unlabeled Pentamer CD8 FITC + APC Fluorotag 78 PBMCs donor #1 22°C R-PE labeled Pentamer R-PE-labeled Pentamer CD8 FITC 89 PBMCs donor #1 22°C APC labeled Pentamer APC-labeled Pentamer CD8 FITC 910 PBMCs donor #1 22°C Biotin Pentamer + SA PE Cy5 Biotin-labeled Pentamer CD8 FITC + SA PE Cy5 10
Procedure
1 Prepare cells as appropriate...
J4971 ProImmune Pentimer Handbook amends V2_0971-PR Handbook 06.3 10/05/2012 16:42 Page 11

12
J4971 ProImmune Pentimer Handbook amends V2_0971-PR Handbook 06.3 10/05/2012 16:42 Page 12

Section ThreeCell Preparation Protocols
Red Blood Cell Depletion from Whole Blood
Density Gradient Centrifugation Separation of Human PBMCs from Whole Blood
Isolation of Splenocytes from Murine Spleens
Cryopreservation of PBMCs or Ammonium Chloride-lyzed Blood
Thawing Cryopreserved Cells
Allocation of Cells Prior to Staining
Cell
Prep
arat
ion
Prot
ocol
s
J4971 ProImmune Pentimer Handbook amends V2_0971-PR Handbook 06.3 10/05/2012 16:42 Page 13

14
Section 3
Cell Preparation Protocols
Care should be taken with preparation of cells to maximize recoveryand obtain a sufficient quantity of viable cells for staining. Anexcessive amount of dead or dying cells will result in poor qualitystaining and increased background. It is important to take intoaccount the source and storage conditions of the cells whenpreparing them for flow cytometry and when allocating the numberof cells per staining condition.
Red Blood Cell Depletion from Whole Blood
When drawing venous blood use sodium heparin or EDTA as ananti-coagulant. Mix thoroughly and process samples within 24 hours. If storage is necessary prior to processing, store theblood at room temperature (22ºC), shielded from light, and on arocker. DO NOT refrigerate the cells!
Materials and equipment
n Human or murine blood sample
n Universal 30 ml tubes (sterile)
n 50 ml conical tubes (sterile)
n Serological pipettes of appropriate volumes (sterile)
n Ammonium chloride lyzing solution (Appendix I)
n Wash buffer (Appendix I)
n Benchtop centrifuge (NOT refrigerated) with swing-out rotor and appropriate carriers
n Vortex
n Hemocytometer, light microscope
J4971 ProImmune Pentimer Handbook amends V2_0971-PR Handbook 06.3 10/05/2012 16:42 Page 14

15
Procedure
Note: this procedure may be scaled up or down according torequirements
1 Prepare ammonium chloride lyzing solution.
2 Take the fresh blood sample and add the appropriateamount of ammonium chloride lyzing solution
(1 ml per 100 μl blood, or as defined by the manufacturer ifusing a commercial preparation).
3 Gently vortex immediately after adding the lyzing solution.
4 Incubate at room temperature (22ºC) for 15 minutes,shielded from light.
5 Centrifuge at 400 x g for 5 minutes.
6 Carefully aspirate supernatant without disturbing pellet.
7 Resuspend cells in 10 ml wash buffer.
8 Centrifuge at 400 x g for 5 minutes.
9 Carefully aspirate supernatant without disturbing pellet.
10 Resuspend cells in a final known volume of wash buffer.
11 Count live cells using a hemocytometer and light microscope.
If proceeding straight to staining for flow cytometry, distributethe cells equally between sample tubes.
J4971 ProImmune Pentimer Handbook amends V2_0971-PR Handbook 06.3 10/05/2012 16:42 Page 15

16
Section 3
Density Gradient Centrifugation Separationof Human PBMCs from Whole Blood
Materials and equipment
n Human blood sample
n Disposable Pasteur pipettes (sterile)
n Universal 30 ml tubes (sterile)
n 50 ml conical tubes (sterile)
n Serological pipettes of appropriate volumes (sterile)
n Ficoll-PaqueTM PLUS* (GE Healthcare), warmed to room temperature (22ºC). *Note: Ficoll-Paque™ PLUS may besubstituted by Lymphoprep™ (Axis-Shield), in which case thecentrifuge speed in step 4 should be increased to 800 x g
n RPMI 1640, warmed to room temperature (22ºC)
n Wash buffer (Appendix I)
n Benchtop centrifuge (NOT refrigerated) with swing-out rotor and appropriate carriers
n Hemocytometer, light microscope
Procedure
Note: this procedure may be scaled up or down according torequirements.
Take 50 ml fresh blood and split into 2 x 50 ml Falcontubes. Add 12.5 ml RPMI 1640 to each tube as balancedsalt diluent and gently mix by inversion.
Add 7.5 ml Ficoll-PaqueTM PLUS to each of 4 x 30 mluniversal tubes.
1
2
J4971 ProImmune Pentimer Handbook amends V2_0971-PR Handbook 06.3 10/05/2012 16:42 Page 16

17
Carefully layer 18.75 ml diluted blood on top of theFicoll.
Avoid mixing the two phases.
Carefully balance the weight of the tubes then centrifugeat 400 x g for 30 minutes at room temperature (22ºC).
Accelerate the centrifuge slowly so the gradients do notmix, and ensure the brake is off so that deceleration doesnot disrupt the density gradient.
Immediately remove and discard the top plasma layerusing a plastic disposable pipette.
Draw off the lymphocyte layer at the Ficoll interfaceusing a serological pipette.
Take care to minimize drawing of Ficoll.
Transfer this fraction to fresh 30 ml tubes (one tube per original tube) and top up tube with RPMI 1640.
Centrifuge at 330 x g for 10 minutes (with the brake ofthe centrifuge on) to wash out the Ficoll.
Aspirate the supernatant and resuspend each cell pelletby tapping the tube until no clumps are visible. Vortexgently if necessary. Add room temperature RPMI 1640 then transfer with washings into a single tube.
Centrifuge at 330 x g for 10 minutes, aspiratesupernatant, then resuspend cells in a final known volumeof desired medium (e.g. wash buffer or RPMI 1640).
Count live cells using a hemocytometer and lightmicroscope.
The cell count should be about 1 million PBMCs for eachml of blood drawn, though this number will vary betweenindividuals. If proceeding straight to staining for flowcytometry, distribute the cells equally between sampletubes.
4
5
6
7
8
9
10
3
J4971 ProImmune Pentimer Handbook amends V2_0971-PR Handbook 06.3 10/05/2012 16:42 Page 17

18
Section 3
Isolation of Splenocytes from Murine Spleens
Materials and equipment
n Murine spleen
n Disposable Pasteur pipettes
n Polystyrene Petri dish
n Clean scalpel (optional)
n Cell strainer (70 μm Nylon, e.g. Falcon® #2350)
n 2 ml syringe
n Universal 30 ml tubes (sterile)
n 50 ml conical tubes (sterile)
n Serological pipettes of appropriate volumes (sterile)
n Ammonium chloride lyzing solution (Appendix I)
n Phosphate buffered saline (PBS)
n Wash buffer, cooled to 4ºC (Appendix I)
n Benchtop centrifuge (NOT refrigerated) with swing-out rotorand appropriate carriers
n Hemocytometer, light microscope
Procedure
1 Prepare ammonium chloride lyzing solution.
Leave at room temperature (22ºC).
2 Place a cell strainer in the Petri dish, to serve as asmall bowl in which to mash the spleen. Transfer thespleen and 1 ml of PBS directly into the cell strainer.
If desired, score the outer membrane of the spleen with aclean scalpel before mashing it, but take care to avoidcutting through the strainer mesh.
J4971 ProImmune Pentimer Handbook amends V2_0971-PR Handbook 06.3 10/05/2012 16:42 Page 18

19
Remove the plunger from a 2 ml syringe and use theblack rubber end to mash the spleen and release thesplenocytes into the Petri dish.
Use grinding circular movements to homogenize the tissue.Periodically, draw up liquid from outside the strainer witha disposable pipette, and wash out the cells from within thestrainer. Continue to mash the spleen until all that remainsis the white connective tissue of the outer membrane.
Transfer the homogenized cell suspension into a universaltube. Wash out the Petri dish a few times with fresh PBSto maximize recovery of splenocytes. Make up to the fullvolume of the tube with PBS.
Centrifuge cells for 10 minutes at 400 x g at roomtemperature (22ºC) and aspirate the supernatant.
The resulting cell pellet should be red in color. Thesupernatant may appear cloudy, but this is likely to be dueto smaller particles that cannot be centrifuged at thissetting.
Resuspend the cell pellet in 2 ml PBS per spleen. Add theappropriate amount of ammonium chloride lyzingsolution (1 ml per 100 μl blood, or as defined by themanufacturer if using a commercial preparation) andleave for 15 minutes in the dark at room temperature(22ºC).
Ensure that the cells are fully resuspended before addingthe lysis solution in order to avoid excessive clumping.
3
4
5
6
J4971 ProImmune Pentimer Handbook amends V2_0971-PR Handbook 06.3 10/05/2012 16:42 Page 19

20
Section 3
Centrifuge cells for 5 minutes at 400 x g and aspirate thesupernatant.
Take care not to lose cells as the pellet will be loose. Thecell pellet should be buff colored with minimal red cellcontamination.
Resuspend the cells completely and wash again with a fullvolume of PBS. Centrifuge for 5 minutes at 400 x g,aspirate the supernatant, to then resuspend cells in afinal known volume of wash buffer.
Count live cells using a hemocytometer and lightmicroscope.
If proceeding straight to staining for flow cytometrydistribute the cells equally between sample tubes. Use cellsthe same day.
7
8
9
J4971 ProImmune Pentimer Handbook amends V2_0971-PR Handbook 06.3 10/05/2012 16:42 Page 20

21
Cryopreservation of PBMCs or AmmoniumChloride-lyzed Blood
All reagents should be at room temperature or preferably at 37ºC,to maintain the metabolic activity and membrane lipid fluidity ofthe cells.
Materials and equipment
Cells from human blood sample (PBMCs or ammoniumchloride-lyzed blood)
n Tissue culture grade Dimethyl Sulphoxide (DMSO) (e.g. Sigma#D2650)
n Fetal Calf Serum (FCS)
n Cryogenic vials, 1.8 ml with internal threading (sterile)
n 50 ml conical tubes (sterile)
n Serological pipettes of appropriate volumes (sterile)
n Hemocytometer
n Benchtop centrifuge (NOT refrigerated) with swing-out rotor and appropriate carriers
n Nalgene freezing container (Nalgene #5100 0001), filled with2-Propanol
n -80ºC Freezer
n Liquid nitrogen storage tank, with holders for 1.8 ml cryogenicvials
n
J4971 ProImmune Pentimer Handbook amends V2_0971-PR Handbook 06.3 10/05/2012 16:42 Page 21

22
Section 3
Preparation
Prepare a Freezing Solution of 10% DMSO in FCS; warm to 37ºC.
Label the appropriate number of 1.8 ml cryotubes persample based on the anticipated cell count (1 - 2 millioncells per ml blood drawn). Each tube should containapproximately 5 - 15 million cells. Freezing more cells pertube may lead to cell loss.
Procedure
1 Centrifuge cells at 400 x g for 10 minutes.
Aspirate supernatant from cell pellet and resuspend the cells by tapping the tube until no clumps are visible. Addthe Freezing Solution (warmed to 37ºC) to give a cellconcentration of 2 x 10⁷ per ml.
3 Mix the cells gently by tapping the tube without using a pipette.
Avoid foam formation.
4 Slowly, over a time period of approximately 2 minutes, add a second, equal volume of warm Freezing Solutionto the tube containing the PBMCs while gently swirlingthe tube to permit complete mixing.
2
J4971 ProImmune Pentimer Handbook amends V2_0971-PR Handbook 06.3 10/05/2012 16:42 Page 22

23
Aliquot the PBMC suspension into the pre-labeledcryovials; 1 ml into each 1.8 ml vial.
Pipette gently and slowly to minimize shear forces.
Place cryovials into a room temperature Nalgenefreezing container filled with 2-propanol.
Transfer the freezing container to a -80ºC freezer for aminimum of 12 hours.
Do not open the freezer during this time period. During thecooling process for cryopreservation ice forms first aroundthe cell between -5ºC and -15ºC, leaving the cell supercooled but unfrozen. At this point an osmotic imbalanceoccurs across the cell membrane, leading to water flux outof the cell. To preserve the cell it must dehydrate slowly ata rate critical to cell survival. Fast cooling leads tointracellular ice formation, which ruptures the cellmembrane. Cooling the cells too slowly can lead toelectrolyte imbalances or latent heat creation.
After a minimum of 12 hours and maximum of 48 hours,transfer the cryovials into liquid nitrogen tanks forindefinite storage.
5
6
7
8
J4971 ProImmune Pentimer Handbook amends V2_0971-PR Handbook 06.3 10/05/2012 16:42 Page 23

24
Section 3
Thawing Cryopreserved Cells
Materials and equipment
n Frozen cell sample
n Benzonase Nuclease (Sigma E1014)
n 50 ml conical tubes (sterile)
n Serological pipettes of appropriate volumes (sterile)
n R10 medium, warmed to 37ºC (Appendix I)
n Warm air blower, 37ºC glass bead bath, or 37ºC water bath
n Benchtop centrifuge (NOT refrigerated), with swing-out rotor and appropriate carriers
n Hemocytometer, light microscope
Procedure
1 Raise the temperature in the cryovial rapidly to between25ºC and 37ºC.
If using a 37ºC water bath take care to avoidcontamination of the cells.
2 Top up the cryovial with warm R10 medium containing1 U/ml Benzonase Nuclease.
3 Transfer the cells from the cryovial into a 50 ml conicaltube.
At this point, the contents of up to 3 cryovials from thesame sample can be pooled.
J4971 ProImmune Pentimer Handbook amends V2_0971-PR Handbook 06.3 10/05/2012 16:42 Page 24

25
Very slowly, over 1 to 2 minutes, add R10 medium containing 1 U/ml Benzonase Nuclease (warmed to 37ºC), diluting thetotal to 5x the original volume (e.g. add 4 ml buffer to 1 mlthawed cells). Subsequently, add somewhat faster (overapproximately 30 seconds) an equal amount of warm R10medium containing 1 U/ml Benzonase Nuclease (e.g. anadditional 4 ml).
The gradual dilution of DMSO avoids osmotic shock and thewarm temperature ensures that the cells can activelycompensate the osmotic pressure.
The use of Benzonase Nuclease prevents cells clumpingduring the thawing process.
Centrifuge cells at 330 x g for 10 minutes with rapidacceleration and brake on.
Aspirate supernatant and resuspend the cell pellet bytapping (avoid shear forces) and add 10 ml warm R10medium (plus Benzonase Nuclease if desired).
Centrifuge cells at 330 x g for 10 minutes with rapidacceleration and brake on.
Aspirate supernatant, then resuspend cells in desiredmedium (e.g. R10 medium) to a final known volume.
Count live cells using a hemocytometer and lightmicroscope if desired.
Proceed to allocation of cells for staining for flowcytometry or bead sorting.
4
5
6
7
8
9
10
J4971 ProImmune Pentimer Handbook amends V2_0971-PR Handbook 06.3 10/05/2012 16:42 Page 25

26
Section 3
Allocation of Cells Prior to Staining
The number of cells required per staining condition will depend onthe frequency of antigen-specific T cells expected. If starting witha population that is likely to have a high proportion of dead anddying cells, the number of starting cells allocated should beincreased to ensure that a sufficient number of live cells can begated. See Section Five: Procedure for data acquisition .
Fresh PBMCs
These are often obtained by density gradient centrifugation(protocol page 16) or leukapheresis. Allocate 1-2 x 10⁶ lymphoidcells per staining condition.
Previously frozen PBMCs
Allocate 1-2 x 10⁶ lymphoid cells per staining condition (protocolfor thawing cells, page 24).
Whole blood
Obtain a whole blood sample treated with anti-coagulant such assodium heparin. Allocate 1 ml of whole blood per staining condition(1 x 10⁶ cells). Lyze red blood cells with ammonium chloride lyzingsolution (protocol page 14).
T cell line
Allocate 2-5 x 10⁵ cells per staining condition. Fewer cells arerequired due to the high frequency of antigen-specific T cells.
J4971 ProImmune Pentimer Handbook amends V2_0971-PR Handbook 06.3 10/05/2012 16:42 Page 26

Section FourHow to Stain Cells
Introduction
Setting Up Appropriate Controls
Improvement of Data by Exclusion
Cellular Staining Protocols
Fluorescent-labeled Pentamers
Unlabeled Pentamers
Biotin-labeled Pentamers
Protocol Optimization
Changing Temperature and Time
Titrating the Amount of Pentamer
Cross-titration of Pentamer with Anti-CD8
How
to
Stai
n Ce
lls
J4971 ProImmune Pentimer Handbook amends V2_0971-PR Handbook 06.3 10/05/2012 16:42 Page 27

28
Section 4
J4971 ProImmune Pentimer Handbook amends V2_0971-PR Handbook 06.3 10/05/2012 16:42 Page 28

29
Introduction
Labeling cells for flow cytometry involves using reagents that arespecific to cellular markers, such as fluorescently labeled antibodiesfor detecting phenotypic cell surface molecules, and MHCPentamers for detecting single antigen-specific T cell receptors. Themarkers are typically cell surface proteins, although it is alsopossible to label intracellular proteins by first permeabilizing cells.
Many antibodies used in flow cytometry are directly conjugated toa fluorochrome. However, unlabeled and biotinylated primaryantibodies can also be used in combination with a fluorescent-labeled secondary antibody. A single cell sample can besimultaneously analyzed for multiple markers using antibodiesconjugated to different fluorescent labels. Ongoing advances influorochrome chemistry and cytometry instrumentation providemany flexible options for multi-parameter cell labeling andanalysis.
During preparation cells should be at room temperature (22ºC) tomaintain the metabolic activity and membrane lipid fluidity of thecells. Subsequently, unfixed cells should be kept cold, on ice (4ºC)during staining and analysis. This will help to ensure that cellsurface markers are not internalized following the interaction of thebinding reagent (antibody or Pentamer) with the cell surfacereceptor. The cells must be in single cell suspension for the antibodylabeling to work successfully.
J4971 ProImmune Pentimer Handbook amends V2_0971-PR Handbook 06.3 10/05/2012 16:42 Page 29

30
Section 4
Setting Up Appropriate Controls
Instrument controls
Unstained sample: a sample of unstained cells is required toenable correct set up of the flow cytometer forward scatter andside scatter voltage settings (Section Five).
Single color staining: set up a single color stain of cells foreach fluorochrome channel of the flow cytometer to be used inthe experiment. This is to enable the correct compensationsettings to be made (Section Five). For example, for two-colorstaining with FITC and R-PE use one set of cells stained with only anti-CD8 FITC for FL1 compensation and a second set ofcells stained with only anti-CD3 R-PE for FL2 compensation.Any antibody may be used that stains a distinct population inthe cell sample, but it must also leave a negative unstainedpopulation. Anti-CD8 and anti-CD3 are particularly suitablefor cytotoxic T cell staining. Refer to Appendix III forinformation about which fluorescent labels may be usedalongside each other.
Multicolor staining: a sample stained with two colors may be prepared using the two antibodies that were used in the single color staining; this sample may be used to check that thecompensation settings are correct.
1
2
3
J4971 ProImmune Pentimer Handbook amends V2_0971-PR Handbook 06.3 10/05/2012 16:42 Page 30

31
Other controls
Positive control
Pro5® Pentamers should be tested against a specific T cellline or clone. Use T cells that have not been stimulatedrecently as this has been shown to cause down-regulation ofT cell receptors. Cells should not be used for a minimum of3-4 days after stimulation. If possible wait 10 days afterstimulation for best results. If a T cell line is not availableit is possible to use PBMCs from a known positive donor. Inthis situation the frequency of positive cells will be muchlower and more cells will be required per stain (at least 1 x10⁶). Ideally, collect functional data using a technique such as ELISPOT, to indicate the frequency of positive cells that should be expected.
Negative control
Cells obtained from an unexposed (seronegative) individual may be used. To control for non-specific staining it is alsoadvisable to stain the cell sample with either the A*0201Human Negative Control Pro5® Pentamer, or a mismatchedPro5® Pentamer (irrelevant MHC allele and/or irrelevantpeptide).
ProImmune offers a negative control Pentamer (peptidecode N01), which consists of a multimeric HLA-peptidecomplex assembled with an irrelevant peptide antigen; it isunable to bind T cell receptors on CD8+ cells. Any stainingachieved by using the negative control Pentamer isgenuinely non-specific, so this reagent is ideal for use whenstudying a low frequency of antigen-specific T cells.
J4971 ProImmune Pentimer Handbook amends V2_0971-PR Handbook 06.3 10/05/2012 16:42 Page 31

Markers for cells to be excluded
In order to exclude certain cells from the analysis, cellmarkers may be stained and ‘gated out’ during theacquisition or analysis of results. For example, theexclusion of B cells and/or NK cells is likely to reduce mostof the non-specific background (see next page for anexample of murine cell staining). These markers could allbe conjugated with the same fluorochromes in order tomaximize the number of other channels available foranalysis of the desired cell markers.
Table 4
Markers to exclude unwanted cell types from Pentamer analysis
32
Section 4
Antibody Cell Marker Species
CD19 B cells Mouse / HumanCD49b NK cells MouseCD56 NK cells HumanCD4 Helper T cells Mouse / HumanCD11c Macrophages Mouse / HumanCD13 Monocytes / Neutrophils Mouse / Human
J4971 ProImmune Pentimer Handbook amends V2_0971-PR Handbook 06.3 10/05/2012 16:42 Page 32

33
Improvement of Data by Exclusion
It may be helpful to exclude certain cell types from the analysis. For example, B cells (CD19-positive), may contribute to non-specific staining. If there is more than one set of cells to excludethey may all be stained with antibodies labeled with the same color.They can then be eliminated from analysis by setting a single‘unwanted cell’ gate.
Figure 4
The figure shows the effect of gating out B cells from C57BL/6splenocytes that were previously immunized against a modelovalbumin antigen. 1 x 10⁶ splenocytes were stained with 1 test(10 μl) R-PE labeled Pentamer, followed by 1 test anti-CD8 FITC(clone KT15) plus anti-CD19 PECy5 (clone 6D5) using the standardprotocol for labeled Pentamer staining. (a) shows the livesplenocyte population in which there is considerable non-specificstaining (upper left quadrant) making it difficult to verify that thespecific staining (upper right quadrant) is truly antigen-specific. (b)R2 is set upon the CD19-negative cells. (c) The density plot is gatedupon live cells and R2 to exclude B cells. The non-specific stainingis removed, illustrating that in this case it was attributable to Bcells, and the Pentamer-positive staining can now be clearly identified.
(a) (b) (c)
100 101 102 103 104
100
101
102
103
104
100 101 102 103 104
0
R2
1024
100 101 102 103 104
100
101
102
103
104
0.69% 0.14% 0.02% 0.31%
Pent
amer
R-P
E
Eve
nts
Pent
amer
R-P
E
CD8 FITC CD19 PE CY5 CD8 FITC
J4971 ProImmune Pentimer Handbook amends V2_0971-PR Handbook 06.3 10/05/2012 16:42 Page 33

34
Section 4
Fluorescent-labeled Pentamer CellularStaining Protocol
Materials and equipment
Cell sample, eg. blood sample (RBC depleted), PBMCs or T cell line
Pro5® MHC Class I Pentamer labeled with R-PE or APC,specific for cells of interest
n Fluorescent labeled anti-CD8 antibody
n Additional fluorescent labeled antibodies, as required
n Plastic disposable Pasteur pipettes
n Universal 30 ml tubes
n 50 ml conical tubes
n Serological pipettes of appropriate volume
n Wash buffer, chilled to 4ºC (Appendix I)
n Fix buffer, chilled to 4ºC (Appendix I)
12 x 75 mm polystyrene tubes for flow cytometry (e.g. BDBiosciences #352052)
Benchtop refrigerated centrifuge with swing-out rotor andappropriate tube carriers
n Microcentrifuge
n Vortex
Procedure for washing cells
Dispense 1 ml wash buffer into each sample tube and spin at400 x g for 5 minutes in a chilled centrifuge at 4ºC. Check forpresence of a cell pellet before discarding the supernatant.Resuspend cell pellets in residual liquid (~50 μl).
n
n
n
n
J4971 ProImmune Pentimer Handbook amends V2_0971-PR Handbook 06.3 10/05/2012 16:42 Page 34

35
Figure 5: Labeled Pentamer staining protocol
Figure 5
1 x 10⁶ cells in 50 μl per tube
1 test labeled Pro5®
MHC Pentamer (e.g. R-PE)
anti-CD8 mAb(e.g. FITC labeled)
2 washes
10 minutes room temperaturethen wash
20 minutes on ice
+
100 101 102 103
100
101
102
103
Pent
amer
CD8 Analyze by flow cytometry
J4971 ProImmune Pentimer Handbook amends V2_0971-PR Handbook 06.3 10/05/2012 16:42 Page 35

36
Section 4
Procedure
1 Centrifuge Pro5® Pentamer in a chilled microcentrifuge at 14,000 x g for 3 minutes.
This will help to remove protein aggregates from thesolution that may contribute to non-specific staining.Maintain reagents on ice (4ºC), shielded from light, untilrequired. Ensure that you do not aspirate any part of thepelleted aggregates when taking test volumes for staining.
Allocate the correct number of cells (page 26) intoindividual sample tubes for each staining condition. Washthe cells with ice-cold wash buffer and resuspend in theresidual volume (~50 μl).
Keep tubes chilled on ice for all subsequent steps exceptwhere otherwise indicated.
Add one test (10 μl) of labeled Pentamer to the cells andmix by pipetting up and down.
Incubate the Pentamer-stained samples at roomtemperature (22°C) for 10 minutes, shielded from light.
Wash cells with 2 ml wash buffer per tube and resuspendin residual liquid (~50 μl).
Add an optimal amount of each secondary antibody andmix by pipetting up and down.
e.g. anti-CD8 and other co-staining antibodies such as anti-CD3.
Control samples should also be stained at this stage.
2
3
4
5
6
J4971 ProImmune Pentimer Handbook amends V2_0971-PR Handbook 06.3 10/05/2012 16:42 Page 36

37
Incubate samples on ice (4ºC) for 20 minutes, shieldedfrom light.
Wash cells twice with 2 ml wash buffer per tube.Resuspend cells thoroughly after each wash.
Add 200 μl of fix buffer. Vortex samples thoroughly.
It is important to vortex well when adding fixative so thatcells do not clump. Store tubes in the dark in therefrigerator until ready for data acquisition. The cells maysediment at this stage and must be vortexed again beforeanalysis. The morphology of the cell changes after fixing, soit is advisable to leave the samples for three to four hoursbefore proceeding with data acquisition. Samples can bestored in the dark in a refrigerator for up to 2 days. CellsMUST NOT BE FIXED and must be used immediately ifFluorescent Activated Cell Sorting (FACS) is to beperformed.
NotesIn order to optimize the protocol it is advisable to vary incubation time andtemperature for the Pentamer. Optimal conditions can be antigen dependent. A ten minute incubation at room temperature commonly works best. SeeProtocol Optimization - Changing temperature and time (page 46).
A single test quantity of labeled Pentamer is equivalent to 10 μl of reagent.Ideally, the amount of Pentamer added should be titrated in order to find theoptimum working dilution to use for each individual Pentamer and cell type.See Protocol Optimization - Titrating the amount of Pentamer (page 48).
Ideally, the amount of antibody added should be titrated in order to find theoptimum working dilution. See Appendix II: Optimal titration of antibodies.
Some anti-CD8 antibodies can cause blocking of the MHC-T cell receptorinteraction. Clones LT8 for human cells and KT15 for murine cells have beentested by ProImmune and shown not to interfere with the interaction. Both ofthese antibody clones are available from ProImmune. See Section Eight:Troubleshooting Guide for more about selecting the correct anti-CD8 antibody.
1
2
3
4
7
8
9
J4971 ProImmune Pentimer Handbook amends V2_0971-PR Handbook 06.3 10/05/2012 16:42 Page 37

38
Section 4
Unlabeled Pentamer Cellular StainingProtocol
Materials and equipment
n Cell sample, eg. blood sample (RBC depleted), PBMCs or T cell line
n Pro5® MHC Class I Pentamer, specific for cells of interest
n Pro5® Fluorotag (R-PE or APC labeled)
n Fluorescent labeled anti-CD8 antibody
n Additional fluorescent labeled antibodies, as required
n Plastic disposable Pasteur pipettes
n Universal 30 ml tubes
n 50 ml conical tubes
n Serological pipettes of appropriate volume
n Wash buffer, chilled to 4ºC (Appendix I)
n Fix buffer, chilled to 4ºC (Appendix I)
n 12 x 75 mm polystyrene tubes for flow cytometry (e.g. BD Biosciences #352052)
n Benchtop refrigerated centrifuge with swing-out rotor and appropriate tube carriers
n Microcentrifuge
n Vortex
Procedure for washing cells
Dispense 1 ml wash buffer into each sample tube and spin at400 x g for 5 minutes in a chilled centrifuge at 4ºC. Check forpresence of a cell pellet before discarding the supernatant.Resuspend cell pellets in residual liquid (~50 μl).
J4971 ProImmune Pentimer Handbook amends V2_0971-PR Handbook 06.3 10/05/2012 16:42 Page 38

39
Figure 6
Figure 6: Unlabeled Pentamer cellular stainingprotocol
1 x 10⁶ cells in 50 μl per tube
1 test unlabeled Pro5® MHC Pentamer
anti-CD8 mAb(e.g. FITC labeled)
Pro5® Fluorotag(e.g. R-PE)
2 washes
10 minutes room temperaturethen wash
20 minutes on ice
+
+
100 101 102 103
100
101
102
103
Pent
amer
CD8 Analyze by flow cytometry
J4971 ProImmune Pentimer Handbook amends V2_0971-PR Handbook 06.3 10/05/2012 16:42 Page 39

40
Section 4
Procedure
Centrifuge Pro5® Pentamer and Pro5® Fluorotagreagents in a chilled microcentrifuge, at 14,000 x g for3 minutes.
This will help to remove protein aggregates from thesolution that may contribute to non-specific staining.Maintain reagents on ice (4ºC), shielded from light, untilrequired. Ensure that you do not aspirate any part of thepelleted aggregates when taking test volumes for staining.
Allocate the correct number of cells (page 26) intoindividual sample tubes for each staining condition. Washthe cells with ice-cold wash buffer and resuspend in theresidual volume (~50 μl).
Keep tubes chilled on ice for all subsequent steps exceptwhere otherwise indicated.
Add one test (2 μl) of unlabeled Pentamer to the cells andmix by pipetting up and down.
Incubate the Pentamer-stained samples at roomtemperature (22°C) for 10 minutes.
Wash cells with 2 ml wash buffer per tube and resuspendin residual liquid (~ 50 μl).
Add 8 μl of Fluorotag and an optimal amount of eachsecondary antibody and mix by pipetting up and down.
e.g. anti-CD8 and other co-staining antibodies such as anti-CD3.
Control samples should also be stained at this stage.
1
2
3
4
5
6
J4971 ProImmune Pentimer Handbook amends V2_0971-PR Handbook 06.3 10/05/2012 16:42 Page 40

41
Incubate samples on ice (4ºC) for 20 minutes, shieldedfrom light.
Wash cells twice with 2 ml wash buffer per tube.Resuspend cells thoroughly after each wash.
Add 200 μl of fix buffer. Vortex samples thoroughly.
It is important to vortex well when adding fixative so that cells do not clump. Store tubes in the dark in therefrigerator until ready for data acquisition. The cells maysediment at this stage and must be vortexed again beforeanalysis. The morphology of the cell changes after fixing, soit is advisable to leave the samples for three to four hoursbefore proceeding with data acquisition. Samples can bestored in the dark in a refrigerator for up to 2 days. CellsMUST NOT BE FIXED and must be used immediately ifFluorescent Activated Cell Sorting (FACS) is to beperformed.
NotesIn order to optimize the protocol it is advisable to vary incubation time and
temperature for the Pentamer. Optimal conditions can be antigen dependent. A
ten minute incubation at room temperature commonly works best. See
Protocol Optimization - Changing temperature and time (page 46).
A single test quantity of unlabeled Pentamer is equivalent to 2 μl of reagent.
Ideally, the amount of Pentamer added should be titrated in order to find the
optimum working dilution to use for each individual Pentamer and cell type.
See Protocol Optimization - Titrating the amount of Pentamer (page 48).
Ideally, the amount of antibody added should be titrated in order to find the
optimum working dilution. See Appendix II: Optimal titration of antibodies.
Some anti-CD8 antibodies can cause blocking of the MHC-T cell receptor
interaction. Clones LT8 for human cells and KT15 for murine cells have been
tested by ProImmune and shown not to interfere with the interaction. Both of
these antibody clones are available from ProImmune. See Section Eight:
Troubleshooting Guide for more about selecting the correct anti-CD8 antibody.
1
2
3
4
7
8
9
J4971 ProImmune Pentimer Handbook amends V2_0971-PR Handbook 06.3 10/05/2012 16:42 Page 41

42
Section 4
Biotin-labeled Pentamer Cellular StainingProtocol
Materials and equipment
n Cell sample, eg. blood sample (RBC depleted), PBMCs or T cell line
n Pro5® MHC Class I Pentamer, specific for cells of interest
n Fluorescent-labeled streptavidin conjugate
n Fluorescent-labeled anti-CD8 antibody (different fluorescence to the streptavidin conjugate)
n Additional fluorescent labeled antibodies, as required
n Plastic disposable Pasteur pipettes
n Universal 30 ml tubes
n 50 ml conical tubes
n Serological pipettes of appropriate volume
n Wash buffer, chilled to 4ºC (Appendix I)
n Fix buffer, chilled to 4ºC (Appendix I)
n 12 x 75 mm polystyrene tubes for flow cytometry (e.g. BD Biosciences #352052)
n Benchtop refrigerated centrifuge with swing-out rotor andappropriate tube carriers
n Microcentrifuge
n Vortex
Procedure for washing cells
Dispense 1 ml wash buffer into each sample tube and spin at 400 xg for 5 minutes in a chilled centrifuge at 4ºC. Check for presence ofa cell pellet before discarding the supernatant. Resuspend cellpellets in residual liquid (~50 μl).
J4971 ProImmune Pentimer Handbook amends V2_0971-PR Handbook 06.3 10/05/2012 16:42 Page 42

43
Figure 7: Biotin-labeled Pentamer cellular staining protocol
Figure 7
1 x 10⁶ cells in 50 μl per tube
1 test biotin-labeledPro5® MHC Pentamer
anti-CD8 mAb(e.g. FITC labeled)Fluorescent -
labeledStreptavidin (e.g. R-PE)
2 washes
10 minutes room temperaturethen wash
20 minutes on ice
+
+
100 101 102 103
100
101
102
103
Pent
amer
CD8 Analyze by flow cytometry
J4971 ProImmune Pentimer Handbook amends V2_0971-PR Handbook 06.3 10/05/2012 16:42 Page 43

44
Section 4
Procedure
1 Centrifuge Pro5® Pentamer in a chilled microcentrifuge, at 14,000 x g for 3 minutes.
This will help to remove protein aggregates from thesolution that may contribute to non-specific staining.Maintain reagents on ice (4ºC) until required. Ensure thatyou do not aspirate any part of the pelleted aggregateswhen taking test volumes for staining.
Allocate the correct number of cells (page 26) intoindividual sample tubes for each staining condition. Washthe cells with ice-cold wash buffer and resuspend in theresidual volume (~50 μl).
Keep tubes chilled on ice for all subsequent steps exceptwhere otherwise indicated.
3 Add one test (10 μl) of biotin-labeled Pentamer to thecells and mix by pipetting up and down.
Incubate the Pentamer-stained samples at roomtemperature (22ºC) for 10 minutes.
5 Wash cells with 2 ml wash buffer per tube and resuspendin residual liquid (~50 μl).
Add an optimal amount of fluorescent-labeledstreptavidin and each secondary antibody and mix bypipetting up and down.
e.g. anti-CD8 and other co-staining antibodies such as CD3.
Control samples should also be stained at this stage.
2
4
6
J4971 ProImmune Pentimer Handbook amends V2_0971-PR Handbook 06.3 10/05/2012 16:42 Page 44

45
7 Incubate samples on ice (4ºC) for 20 minutes, shieldedfrom light.
Wash cells twice with 2 ml wash buffer per tube.Resuspend cells thoroughly after each wash.
9 Add 200 μl of fix buffer. Vortex samples thoroughly.
It is important to vortex well when adding fixative so thatcells do not clump. Store tubes in the dark in therefrigerator until ready for data acquisition. The cells maysediment at this stage and must be vortexed again before analysis. The morphology of the cell changes afterfixing, so it is advisable to leave the samples for three tofour hours before proceeding with data acquisition.Samples can be stored in the dark in a refrigerator for upto 2 days. Cells MUST NOT BE FIXED and must be usedimmediately if Fluorescent Activated Cell Sorting (FACS)is to be performed.
NotesIn order to optimize the protocol it is advisable to vary incubation time and
temperature for the Pentamer. Optimal conditions can be antigen dependent. A
ten minute incubation at room temperature commonly works best. See
Protocol Optimization - Changing temperature and time (page 46).
A single test quantity of biotin-labeled Pentamer is equivalent to 10 μl of
reagent. Ideally, the amount of Pentamer added should be titrated in order to
find the optimum working dilution to use for each individual Pentamer and cell
type. See Protocol Optimization - Titrating the amount of Pentamer (page 48).
Ideally, the amount of antibody added should be titrated in order to find the
optimum working dilution. See Appendix II: Optimal titration of antibodies.
Some anti-CD8 antibodies can cause blocking of the MHC-T cell receptor
interaction. Clones LT8 for human cells and KT15 for murine cells have been
tested by ProImmune and shown not to interfere with the interaction. Both of
these antibody clones are available from ProImmune. See Section Eight:
Troubleshooting Guide for more about selecting the correct anti-CD8 antibody.
1
2
3
4
8
J4971 ProImmune Pentimer Handbook amends V2_0971-PR Handbook 06.3 10/05/2012 16:42 Page 45

46
Section 4
Protocol Optimization
Changing Temperature and Time
The incubation temperature and time are variable conditions wherethe protocols for Pro5® MHC Pentamers and conventional MHCtetramers differ. It is recommended to set up staining conditions fora number of different temperatures and times. Pentamer (as well astetramer) complexes have different optimal staining parameters,dependent on the peptide affinity and MHC-allele used.
Staining at room temperature (22ºC) for 10 minutes isrecommended in the first instance. Incubation at 4°C for 40 minutesor at 37°C for 5 to 10 minutes may be tested in order to optimizethe signal to noise ratio. The higher the incubation temperature, theshorter the incubation time required.
Figure 8
Anti-CD8 staining is shown on the x-axis; Pentamer staining isshown on the y-axis. The mean fluorescence intensity is shown in red.
The density plot in the red box (temperature 22°C) shows a highermean fluorescence intensity compared with the first plot at 4°C.When the temperature is increased to 37°C a higher level of non-specific staining is seen (1.3%) and base line negative staining israised. These events interfere with the positive events underinvestigation and affect the data significantly. Although thepercentage of CD8-positive and Pentamer-positive cells hasincreased (0.9%) some of these events are likely to be Pentamer-negative. Fewer cells can be visualized due to clumping that occurs at the higher temperature. Similar characteristics are seen in the plots when a longer staining time (45 minutes) is tried.The conclusion from this experiment is that staining conditions of10 minutes at 22°C should be used for this particular Pentamer andcell sample.
J4971 ProImmune Pentimer Handbook amends V2_0971-PR Handbook 06.3 10/05/2012 16:42 Page 46

47
Figure 8
143.1
4oC
10 min
100 101 102 103 104
100
101
102
103
104
245.4
22oC
100 101 102 103 104
100
101
102
103
104
303.6
37oC
100 101 102 103 104
100
101
102
103
104
181.7
4oC
45 min
100 101 102 103 104
100
101
102
103
104
292.4
22oC
100 101 102 103 104
100
101
102
103
104
64.7
37oC
100 101 102 103 104
100
101
102
103
104
0.1% 0.5% 0.1% 0.6%
0.2% 0.7%0.1% 0.7%
1.3% 0.9% 15.9% 7.6%
Pent
amer
R-P
E
CD8 FITC
J4971 ProImmune Pentimer Handbook amends V2_0971-PR Handbook 06.3 10/05/2012 16:42 Page 47

48
Section 4
Titrating the Amount of Pentamer
The amount of Pentamer added to each staining condition should betitrated in order to find the optimum working dilution to use foreach individual Pentamer and cell type. A suggested titration rangewould be doubling dilutions from 1 test quantity down to 1/16 testquantities.
Figure 9
The figure illustrates the importance of titrating the Pentamer. 1 x10⁶ peripheral blood mononuclear cells (PBMCs) were stained witheither 2.5, 1.0, 0.5, 0.25 or 0.1 test equivalents of Pentamer for 10minutes at 22°C. Following 2 washes, cells were incubated with anoptimal dilution of anti-CD8-FITC for 20 minutes at 4°C. 100,000live events were collected.
When excess Pentamer is used (2.5 tests) the baseline (negativecells) is shifted upwards out of the first log decade of the densityplot when compared with the results seen with 1 test. This shift isdue to excess protein present in the staining reaction and leads tofalse positive results as the negative population is seen in the samequadrant as the CD8-positive, antigen-specific events.
When 1 test of Pentamer is used a clear population of antigen-specific T cells is seen (1.1% of total cells gated). The negative cellsand the CD8-positive Pentamer-negative cells are well within thelower quadrant. The stain of the Pentamer is bright. Comparing 0.5test of Pentamer with 1 test shows that the mean fluorescenceintensity has reduced. With 0.25 test of Pentamer the frequency ofcells detected is lower (1.0%). This is due to some events appearingin the lower quadrants of the plot and being indistinguishable fromthe negative population. When 0.1 test of Pentamer is used thefluorescence intensity has significantly decreased, affecting thefrequency of cells detected.
J4971 ProImmune Pentimer Handbook amends V2_0971-PR Handbook 06.3 10/05/2012 16:42 Page 48

49
The conclusion from this experiment is that 1.0 test or 0.5 test ofPentamer should be used. Any non-specific staining seen with highconcentrations of Pentamer can be reduced to an ideal level.Further titration below this level will reduce the signal intensity. Thelevel of fluorescence intensity required for the application shouldalso be taken into account.
Figure 9
2.5 tests
100 101 102 103 104
100
101
102
103
104
3.4%
Pent
amer
R-P
E
CD8 FITC
0.1 tests
100 101 102 103 104
100
101
102
103
104
0.8%
0.25 tests
100 101 102 103 104
100
101
102
103
104
1.0%
0.5 tests
100 101 102 103 104
100
101
102
103
104
1.1%
1 test
100 101 102 103 104
100
101
102
103
104
1.1%
Baseline shifted upwardscompared to 1 test
J4971 ProImmune Pentimer Handbook amends V2_0971-PR Handbook 06.3 10/05/2012 16:42 Page 49

50
Section 4
Cross-titration of Pentamer with Anti-CD8
It is important to cross-titrate the Pentamer against the anti-CD8antibody. If the concentration of both reagents is too high,background staining will interfere with data analysis. If thequantity of reagent used is too little, the fluorescence intensitysignal may be too low to analyze results accurately. Cross-titrationof the reagents enables the reduction of background staining, whilstmaintaining an optimum fluorescence intensity level. Figure 10illustrates the importance of cross-titration of Pentamer againstanti-CD8 monoclonal antibody.
Figure 10
1 x 10⁶ PBMCs were stained with either 1.0, 0.25 or 0.1 testequivalents of R-PE-labeled Pentamer for 10 minutes at 22°C.Following 2 washes, cells were incubated with either 1.0, 0.5 or 0.1μl of FITC-labeled anti-CD8 (clone LT8) for 20 minutes at 4°C.These results show that the Pentamer should be used at 1 testquantity (10 μl) and the anti-CD8 antibody at either 1.0 or 0.5 μlper sample, depending on the desired degree of separation ofpositive from negative cells.
J4971 ProImmune Pentimer Handbook amends V2_0971-PR Handbook 06.3 10/05/2012 16:42 Page 50

51
Figure 10
1 μl
1 test
100 101 102 103 104
100
101
102
103
104
0.5 μl
100 101 102 103 104
100
101
102
103
104
0.1 μl
100 101 102 103 104
100
101
102
103
104
0.25 tests
100 101 102 103 104
100
101
102
103
104
100 101 102 103 104
100
101
102
103
104
100 101 102 103 104
100
101
102
103
104
0.10% 0.77%
0.02% 0.56% 0.06% 0.50%
0.09% 0.74% 0.68% 0.38%
0.26% 0.27%
0.1 tests
100 101 102 103 104
100
101
102
103
104
100 101 102 103 104
100
101
102
103
104
100 101 102 103 104
100
101
102
103
104
0.03% 0.04% 0.04% 0.06% 0.04% 0.02%
Pent
amer
R-P
E
CD8 FITC
J4971 ProImmune Pentimer Handbook amends V2_0971-PR Handbook 06.3 10/05/2012 16:43 Page 51

52
Section 4
J4971 ProImmune Pentimer Handbook amends V2_0971-PR Handbook 06.3 10/05/2012 16:43 Page 52

Section FiveData Acquisition
Procedure
Identification of the Cells of Interest
Instrument Set Up
Setting the Live Lymphocyte Gate
Voltage Settings for Individual Colors
Compensation
Dat
a A
cqui
sitio
n
J4971 ProImmune Pentimer Handbook amends V2_0971-PR Handbook 06.3 10/05/2012 16:43 Page 53

54
Section 5
Procedure
1 Set up the flow cytometer:
turn on cytometer and carry out any specific start-upprocedures according to your laboratory protocol.
2 Select instrument settings:
before analysis of cells the instrument must be correctly set up using unstained cells. Forward and side scatter voltage settings are determined using cells that have no fluorescent staining (page 57).
3 Adjust the compensation settings:
correct compensation is vital when making simultaneousimmunofluorescent measurements from several labeled, cellbound antibodies or Pentamers (page 60).
4 Collect data from sample tubes:
collect as many events as possible so that the population ofinterest can be clearly defined and distinguished abovebackground.
For controls, it is normally sufficient to collect between10,000 - 15,000 gated events (live lymphocytes). ForPentamer-stained samples it is important to collect a largernumber of events, eg. 50,000 - 200,000 gated livelymphocytes as a starting recommendation. This will ensurethat low-frequency responses can be detected. Forexample, a 0.1% population will yield 100 dots for every100,000 events collected.
After data acquisition is complete carry out cytometershutdown procedures according to your laboratoryprotocol.
5
J4971 ProImmune Pentimer Handbook amends V2_0971-PR Handbook 06.3 10/05/2012 16:43 Page 54

55
Identification of the Cells of Interest
Light scatter is used to analyze specific subsets of cells, such aslymphocytes, within a heterogeneous population and is commonlyused to exclude dead cells, cell aggregates and cell debris from thefluorescence data. As cells pass through the laser beam of the flowcytometer the amount of light scattered varies according to the size(forward scatter) and granularity (side scatter) of each cell. Thisallows large and very granular cells to be differentiated from thesmaller less granular lymphocytes in the blood. It can be difficultto identify the correct live lymphocyte population, but it is veryimportant to do this correctly in order to minimize non-specificstaining events seen. For example, dead or dying cells take upproteins from solution easily and therefore contributedisproptionately to non-specific background.
Forward scatter is strongly influenced by cell size; the larger thecells, the further along the FSC-axis they appear. Each dotrepresents one event. Side scatter reflects granularity or internalcell structure; the larger and more granular a cell the further up theSSC-axis it appears. Cell populations that are close together may bemost easily distinguished using a density plot. It is important toensure that the forward-scatter (FSC) and side-scatter (SSC) gatesare set correctly on the population of interest.
Figure 11 shows the correct live lymphocyte gating for threedifferent cell preparations.
J4971 ProImmune Pentimer Handbook amends V2_0971-PR Handbook 06.3 10/05/2012 16:43 Page 55

56
Section 5
Figure 11
0 10230
1023
Mouse splenocytes
0 10230
1023
Human PBMCs
0 10230
1023
RBC-depleted blood
Examples of density plots for three different cell preparations.
The populations seen in the lower left corner are made up of dead ordying cells, red blood cells and cell debris - these cells are not ofinterest. A tight gate has been set around the lymphocytes (outlinedin red). Cells seen on the right are likely to be granulocytes andmonocytes.
SSC
-H
FSC-H
J4971 ProImmune Pentimer Handbook amends V2_0971-PR Handbook 06.3 10/05/2012 16:43 Page 56

57
Instrument Set Up
Use instrument settings suitable for analysis of lymphoid cells.These should be determined empirically for each differentcytometer. Pass a sample of unstained cells through the cytometerand view these on a 2D density plot showing forward scatter (FSC)on the x-axis and side scatter (SSC) on the y-axis.
The FSC and SSC voltages should be set so that the live lymphocytegate is centered at coordinates 400/200, figure 12a; use the‘voltage’ and ‘amp gain’ adjusters in the detectors/amps window ofthe flow cytometer controls. If the FSC voltage is set too high thecells will appear too far to the right on the x-axis and consequentlythe cells of interest may be off the scale. Ensure that the FSC andSSC mode is set to ‘linear’ or ‘lin’ in the detectors/amps window ofthe flow cytometer.
Setting the Live Lymphocyte Gate
It is essential to set a tight gate on the lymphocyte population ofinterest. This reduces the appearance of non-specific staining in thedensity plot. This is especially important when looking at small Tcell populations. The flow cytometer software gives a name to thepopulation of gated cells, e.g. R1 (Region 1).
Figure 12b shows only the cells gated in R1 on a FL1/FL2 densityplot. In this figure FITC is in the FL1 channel on the x-axis; R-PEis in the FL2 channel on the y-axis. When cells are unstained theR1 population should be set to lie within the first log decade (lowerleft corner) of the density plot on both axes.
J4971 ProImmune Pentimer Handbook amends V2_0971-PR Handbook 06.3 10/05/2012 16:43 Page 57

58
Section 5
Figure 12a
Set FSC/SSC voltages so that thelive lymphocyte gate is centred atco-ordinates 400/200
Figure 12b
Set FL1/FL2 voltages so that thecells in the live lymphocyte gate(R1) are contained within 1st logdecade of FL1 and FL2
0
R1
10230
1023
SSC
-H
FSC-H
CD3
R-P
E (
FL2)
CD8 FITC (FL1)
100 101 102 103 104
100
101
102
103
104
J4971 ProImmune Pentimer Handbook amends V2_0971-PR Handbook 06.3 10/05/2012 16:43 Page 58

59
Voltage Settings for Individual Colors
Following live lymphocyte gating, set the voltages for eachindividual fluorescent channel to be used. Ensure that the ‘FL’channels are set to ‘log’ mode (Detectors/Amps window of flowcytometer controls). Adjust the voltage for FL1 until the cells arecontained within the first log decade, figure 13. Repeat theprocedure for all the channels to be used.
These instrument settings can be used as a starting point for futureexperiments with the same cell type.
Figure 13
100 101 102 103 104
0
64
Eve
nts
CD8 FITC
J4971 ProImmune Pentimer Handbook amends V2_0971-PR Handbook 06.3 10/05/2012 16:43 Page 59

60
Section 5
CompensationA variety of different fluorochromes may be used for multi-color,immunofluorescence analysis of several cell bound antibodies orentities. Figure 14 shows the significant spectral overlap of theemission wavelengths of a number of fluorochromes that arecommonly used for flow-cytometric analysis. The gray bandsrepresent the wavelength range detected by the flow cytometerchannels (the filter path bands, FL1, FL2 etc.). Fluorescence fromFITC (green) is measured in the FL1 channel (525 nm) and R-PEfluorescence (orange) is detected in the FL2 channel (575 nm). Dueto the overlap of the emission spectra, some green fluorescence fromthe FITC molecule will be detected by the FL2 channel and someorange fluorescence from R-PE will be detected by the FL1 channel.If the overlap is not corrected by compensation, the data willinclude the signal from each of the fluorochromes that has beendetected by the inappropriate detector. This could lead to incorrectanalysis of results due to the presence of false-positive cellpopulations, figure 15.
Figure 14
Fluo
resc
ence
Emission Wavelength
FL1 FL2 FL3 FL4
APC
R-PE
FITC
525 575 630 680
PE Cy5
J4971 ProImmune Pentimer Handbook amends V2_0971-PR Handbook 06.3 10/05/2012 16:43 Page 60

61
15a: The antigen-specific population stained with labeled Pentameris fairly clear to see in the upper half of the plot, but there isinterference from the CD8-positive, Pentamer-negative population.
15b: After compensation the antigen-specific population is muchclearer and is seen as a set of well defined events separate from thenegative population.
Figure 15a Figure 15b
Not compensated Compensated
100 101 102 103 104
100
101
102
103
104
100 101 102 103 104
100
101
102
103
104
Pent
amer
R-P
E
CD8 FITC
J4971 ProImmune Pentimer Handbook amends V2_0971-PR Handbook 06.3 10/05/2012 16:43 Page 61

62
Section 5
How to set compensationUse single-color stained controls to adjust compensation settings forall the fluorescent channels required for the experiment. Forexample, for two-color analysis, use one sample with FITC labeledanti-CD8 and one with R-PE labeled anti-CD3.
Select a marker that will stain many cells (~50-70%) in order tofacilitate setting the compensation for that channel. A marker thatoccurs at low frequency (<1% of cells) will only stain a few cells,making it difficult to set the compensation. It is also important tochoose a stain that creates both a positive and negative populationof cells.
Double-stained control samples are helpful for fine-tuning thecompensation settings. Choose control antibodies that stainmutually exclusive cell populations. Alternatively, use a tube ofcells derived by mixing aliquots of the FITC and R-PE single-colorcontrols.
Following the initial instrument set up proceed to set thecompensation using single-stained control samples. Set thecompensation so that the center of the positively stained cellpopulation lies in line with the center of the negative cell populationand parallel with the appropriate axis, figure 16.
Figure 1616a: Cells are stained with FITC-labeled anti-CD8 only. Events areseen in the second log-decade of the y-axis, due to detection of FITCfluorescence emission in the FL2 channel. Compensation is set forthe FL1 channel to correct this.
16b: Cells have been compensated and a theoretical horizontal linecan be drawn parallel to the x-axis, through the center of thepopulation of CD8-negative cells and that of the CD8-positive cells.
16c: Cells are stained with R-PE-labeled anti-CD3 only. Events areseen in the FL1 FITC channel.
16d: Once the compensation in the FL2 channel has been setcorrectly the R-PE stained cells are aligned vertically above thenegative cell population.
J4971 ProImmune Pentimer Handbook amends V2_0971-PR Handbook 06.3 10/05/2012 16:43 Page 62

63
Figure 16a Figure 16b
Before compensation After compensation
100 101 102 103 104
100
101
102
103
104
100 101 102 103 104
100
101
102
103
104
Figure 16c Figure 16d
Before compensation After compensation
100 101 102 103 104
100
101
102
103
104
100 101 102 103 104
100
101
102
103
104
CD3
R-P
E
CD8 FITC
CD3
R-P
E
CD8 FITC
J4971 ProImmune Pentimer Handbook amends V2_0971-PR Handbook 06.3 10/05/2012 16:43 Page 63

64
J4971 ProImmune Pentimer Handbook amends V2_0971-PR Handbook 06.3 10/05/2012 16:43 Page 64

Section SixData Analysis and Interpretation
Choice of Plot
Setting Gates and Quadrants
Examples
Dat
a A
naly
sis
and
Inte
rpre
tatio
n
J4971 ProImmune Pentimer Handbook amends V2_0971-PR Handbook 06.3 10/05/2012 16:43 Page 65

66
Section 6
Choice of PlotThe acquired data must be exported to a specialized softwareprogram for data analysis and interpretation. The data should beviewed using the most appropriate choice of plot. Most softwareanalysis programs for flow cytometry have a choice of differenttypes of plot for data analysis, e.g. 1-Dimensional (1D) histogramplot, 2-Dimensional (2D) dot plot, 2D density plot. The 2D densityplot is most commonly used as it highlights discrete populationsmost effectively. A small population of cells would be hard toidentify using a histogram plot. For example, the low frequency ofPentamer positive events expected in a PBMC or mouse splenocytesample.
Setting Gates and QuadrantsUsing the control sample data, set the live lymphocyte gate and addquadrants to each 2D plot between the positive and negative cellpopulations. Correct gating distinguishes the cells of interest fromthose that are unwanted and irrelevant.
Figure 17 The figure illustrates the different profiles of three cell populations(R1, R2, R3) in a T cell clone sample. In this particular T cell clone,100% of cells should be CD8 positive and specific for a singlePentamer. The sample was stored frozen before use, therefore thereis a significant proportion of dead and dying cells. The threepopulations were gated and their CD8-positive and Pentamer-positive cells are shown.
R1, R2 and R3 events may be distinguished by their forward andside scatter profiles. R1 defines cells that are almost exclusivelyCD8-positive (mature T cells) and Pentamer-positive (i.e. thecorrect population). Two-thirds of the R2 population are CD8-positive and not all stain for Pentamer. The FSC vs. SSC profileindicates that these cells are likely to be mature T cells approachingapoptosis. The population of cells defined by R3 has no CD8-positivecells within it, though a significant number of cells stain for theantigen-specific Pentamer. Their FSC properties define them as verysmall, therefore they are most probably dead cells and debris.
J4971 ProImmune Pentimer Handbook amends V2_0971-PR Handbook 06.3 10/05/2012 16:43 Page 66

67
Figure 17
0 10230
1023
FSC-H
SSC
-H
100 101 102 103 104
0
64
CD8 FITC
R1 events - correct gate
99.0%
100 101 102 103 104
0
64
CD8 FITC
R2 events - cell mixture
85.2%
100 101 102 103 104
0
64
CD8 FITC
R3 events - dead cells
5.4%
100 101 102 103 104
100
101
102
103
104
0.7 99.3
100 101 102 103 104
100
101
102
103
104
10.0 87.0
100 101 102 103 104
100
101
102
103
104
61.1 8.6
Pent
amer
R-P
E
CD8 FITC
J4971 ProImmune Pentimer Handbook amends V2_0971-PR Handbook 06.3 10/05/2012 16:43 Page 67

Examples
Typical analysis of PBMCs stained withPentamer (APC-labeled) vs. CD8 (FITC)
Create a 2D density plot showing FSC vs. SSC. Draw a tightregion around the lymphocyte population (R1), figure 18a.
Create a second density plot, gated only on events encircledwithin R1, showing Pentamer-stained cells on the y-axis andCD8-stained cells on the x-axis. Draw a quadrant that clearlyseparates positive cells from negative cells on both axes, anduse quadrant statistics to obtain quantitative informationabout the frequency of antigen-specific CD8-positive T lymphocytes, figure 18b.
Figure 18
(a) (b)
0 10230
1023
100 101 102 103 104
100
101
102
103
104
R1
FSC-H
SSC
-H
Pent
amer
APC
CD8 FITC
Quadrant Statistics Gate: R1Gated Events: 86686Total Events: 186186
Quad Events %Gated Y MeanUL 28 0.03 91.0UR 134 0.15 453.1LL 61078 70.46 2.0UL 25446 29.35 2.7
1
2
68
Section 6
J4971 ProImmune Pentimer Handbook amends V2_0971-PR Handbook 06.3 10/05/2012 16:43 Page 68

69
100 101 102 103 104
100
101
102
103
Typical analysis of PBMCs triple-stained withPentamer (APC) vs. CD8 (PE-Cy5) vs. CD45RA(PE)This three-color analysis enables the phenotype of the antigen-specific cells to be analyzed further using antibodies specific foractivation markers or cytokines.
Create a 2D density plot showing FSC vs. SSC. Draw a tightregion around the lymphocyte population (R1), figure 19a. Create a second density plot, gated only on events encircledwithin the R1 region. Draw a second gate (R2) to select onlyCD8-positive cells, figure 19b. Create a third density plot, gated on events within regions R1and R2, and draw a quadrant to separate positive and negativecells, figure 19c. Draw a histogram to aid in accurate settingof quadrant lines, figure 19d. Use quadrant statistics toevaluate the proportion of Pentamer-positive cells that co-express a phenotypic marker.
Figure 19
Quadrant Statistics Gate: R1 and R2Gated Events: 54358Total Events: 175588
Quad Events %Gated Y MeanUL 128 0.24 233.0UR 22 0.04 185.3LL 28786 52.96 6.3UL 25422 46.77 5.9
(a)
0 10230
1023
R1
SSC
-Hei
ght
FSC-Height
(b)
R2
Pent
amer
APC
CD8 PE CY5
100 101 102 103 104
0
Eve
nts
CD45RA R-PE
1
2
3
(d)256
104
(c)
Pent
amer
APC
CD45RA R-PE100 101 102 103 104
100
101
102
103
104
J4971 ProImmune Pentimer Handbook amends V2_0971-PR Handbook 06.3 10/05/2012 16:43 Page 69

70
J4971 ProImmune Pentimer Handbook amends V2_0971-PR Handbook 06.3 10/05/2012 16:43 Page 70

Section SevenApplications of Pro5® Pentamers
Use of Pro5® Pentamers for Cell Separation
Separation of Antigen-Specific T Cells
Column-based Isolation of Antigen-Specific CellsUsing Anti-fluorochrome Beads
Column-Based Isolation of Antigen-Specific CellsUsing Streptavidin Beads
Tube-Based Isolation of Antigen-Specific Cells UsingStreptavidin Beads
Fluorescence Activated Cell Sorting (FACS)
Use of Pro5® Pentamers In Combination WithIntracellular Cytokine Staining
Protocol for Human Cells
Protocol for Murine Cells
App
licat
ions
of P
ro5®
Pent
amer
s
J4971 ProImmune Pentimer Handbook amends V2_0971-PR Handbook 06.3 10/05/2012 16:43 Page 71

72
Section 7
Use of Pro5® Pentamers for Cell Separation
Separation of Antigen-Specific T Cells
In addition to detecting antigen-specific T cells, Pro5® MHCPentamers may be used in conjunction with magnetic beads toenrich or deplete for the T cell population of interest.
Magnetic bead sorting is a simple solution for applicationsrequiring enrichment or depletion of antigen-specific T cells; forexample, in the development of therapeutic applications, generationof T cell lines, PCR cloning, gene profiling, and cell cultureexperiments. Alternatively, if magnetic bead sorting is used as apre-enrichment step before Fluorescence Activated Cell Sorting(FACS) it will reduce both the number of cells that will have to besorted and the required sorting time.
There are currently two main technologies for magnetic beadseparation, column- and tube-based methods, illustrated in figure 20.
In the column-based method, cell-bead complexes pass through aseparation column, which is placed in a strong, permanent magnet.The column matrix retains bead-bound cells while non-labeled cellsflow through. Following removal of the column from the magneticfield, the retained cells may be eluted.
In the tube-based method, cell-bead complexes are removed fromthe cell suspension using an external magnet that draws thecomplexes to the inner edge of the tube allowing supernatant to beremoved. Removing the tube from the magnetic field enablesresuspension of the cell-bead complexes.
J4971 ProImmune Pentimer Handbook amends V2_0971-PR Handbook 06.3 10/05/2012 16:43 Page 72

73
Figure 20
General protocols for bead-enrichment
Figure 20Target cells attracted to side of tube sosupernatant can becollected as negativefraction. Tube is thenremoved from magneticfield and remainingpositively-selected cellswashed & resuspendedfor use.
T cell
T cell
wash
wash
Antigen-specific T cells arelabeled with Pro5® MHCPentamers
Pro5® MHC Pentamers bindto magnetic beads
Column-basedseparation
Tube-basedseparation
Flow throughcollected asnegative fraction
Enriched cells may be labeled withantibodies for flow cytometric analysis
Column removed frommagnetic field and retainedtarget cells flushed out aspositively selected cells
J4971 ProImmune Pentimer Handbook amends V2_0971-PR Handbook 06.3 10/05/2012 16:43 Page 73

74
Section 7
Column-Based Isolation of Antigen-SpecificCells Using Anti-Fluorochrome Beads
Materials and equipment
n Pro5® MHC Class I Pentamer, labeled with R-PE or APC,specific for cells of interest
n Anti-fluorochrome magnetic beads e.g. anti-R-PE or anti-APC,(Miltenyi Biotec / BD Biosciences) to detect the fluorescence ofthe Pentamer, suitable for use with magnetic columns
n Anti-CD8 antibody, conjugated with a different fluorescent label to the Pentamer
n Wash buffer, de-gassed (remove air prior to use) (Appendix I)
n Fix solution (Appendix I)
n Magnetic stand e.g. MACS Multistand, Miltenyi Biotec #130-042-303
n Separation unit e.g. MiniMACS separation unit, Miltenyi Biotec #130-042-102
n Magnetic columns e.g. MS Columns, Miltenyi Biotec #130-042-201
n 12 x 75 mm polystyrene tubes for flow cytometry (e.g. BD Biosciences #352052)
n Benchtop refrigerated centrifuge with swing-out rotor andappropriate tube carriers
Procedure for washing cells
Dispense 1 ml wash buffer into each sample tube and spin at 400 xg for 5 minutes in a chilled centrifuge at 4ºC. Check for presence ofa cell pellet before discarding the supernatant. Resuspend cellpellets in residual liquid (~50 μl).
J4971 ProImmune Pentimer Handbook amends V2_0971-PR Handbook 06.3 10/05/2012 16:43 Page 74

75
Procedure
Note: procedure may need adjustment depending on the particularsystem used
Stain 1 x 10⁷ cells with 50 μl (5 tests) fluorescent-labeled Pentamer for 10 minutes at room temperature(22ºC).
2 Wash samples, centrifuge and discard the supernatant.
Resuspend cells in 80 μl wash buffer and add 20 μl anti-fluorochrome magnetic beads per tube (or as directed bythe manufacturer).
4 Incubate for 15 minutes at manufacturer’s recommended temperature (Miltenyi Biotech, 4-8ºC, BD Biosciences,6-12ºC).
5 Wash cell-bead complexes, centrifuge and resuspend in500 μl wash buffer (de-gassed).
Wash a column suitable for positive-selection with 500 μlwash buffer (de-gassed) and place on magnetic stand.
7 Load cell-bead complexes onto the column.
Antigen-specific T cells labeled with Pentamer-beadcomplexes will be retained on the column (positivefraction).
6
1
3
J4971 ProImmune Pentimer Handbook amends V2_0971-PR Handbook 06.3 10/05/2012 16:43 Page 75

76
Section 7
Collect the negative fraction that elutes from the column,including 3 column washes of 500 μl each.
Remove column from magnet and flush out the positivefraction by adding 1 ml wash buffer onto the column andapplying a plunger (provided with the column).
To obtain a purer antigen-specific cell population, thepositive cell fraction may be passed over a secondcolumn.
Stain cells from pre-isolation, positive and negativefractions with anti-CD8 antibody for flow cytometricanalysis.
8
9
10
11
J4971 ProImmune Pentimer Handbook amends V2_0971-PR Handbook 06.3 10/05/2012 16:43 Page 76

77
The figure shows an experiment in which the column-based methodof magnetic separation was used to enrich antigen-specific T cellsfrom peripheral blood cells (PBMCs). 1 x 10⁷ PBMCs wereincubated with 5 tests (50 μl) R-PE-labeled Pentamer for 10minutes at room temperature (22ºC), followed by 20 μl anti-R-PEmicrobeads (Miltenyi Biotec) for 15 minutes at 4ºC. Cells werepassed over an ‘MS’ column using the MidiMACS system and theflow-through fraction discarded. The column was then removedfrom the magnetic field and the retained target cells flushed out aspositively selected cells (positive fraction 1). These cells were thenpassed over a second ‘MS’ column in order to enrich the antigen-specific T cells of interest further (positive fraction 2). Resultantcells were then incubated with anti-CD8 antibody for 20 minutes onice (4ºC) prior to fixation and analysis by flow cytometry. (Due tothe small size of the Miltenyi microbeads, cells may be analyzed byflow cytometry with beads still attached).
Figure 21
Pre-sort
100 101 102 103 104
100
101
102
103
104
Positive fraction 1
100 101 102 103 104
100
101
102
103
104
Positive fraction 2
100 101 102 103 104
100
101
102
103
104
0.37% 38.69% 81.59%
Pent
amer
R-P
E
CD8 FITC
In this experiment the antigen-specific population was enriched220-fold to yield a population of cells suitable for flow cytometry,cell culture, generation of T cell lines, PCR cloning or geneprofiling.
J4971 ProImmune Pentimer Handbook amends V2_0971-PR Handbook 06.3 10/05/2012 16:43 Page 77

78
Section 7
Column-Based Isolation of Antigen-SpecificCells Using Streptavidin Beads
Materials and equipment
n Pro5® MHC Class I Pentamer, specific for cells of interest.
n Streptavidin magnetic beads to detect the biotin label of thePentamer, suitable for use with magnetic columns (e.g.Streptavidin Microbeads, Miltenyi Biotec #130-048-102)
n Streptavidin, conjugated to fluorescent label of choiceAnti-CD8 antibody, conjugated with a different fluorescentlabel to streptavidin
n Wash buffer, de-gassed (remove air prior to use) (Appendix I)n Fix solution (Appendix I)n Magnetic stand e.g. MACS Multistand, Miltenyi Biotec #130-
042-303n Separation unit e.g. MiniMACS separation unit, Miltenyi
Biotec #130-042-102
n Magnetic columns e.g. MS Columns, Miltenyi Biotec #130-042-201
n 12 x 75 mm polystyrene tubes for flow cytometry (e.g. BDBiosciences #352052)
n Benchtop refrigerated centrifuge with swing-out rotor andappropriate tube carriers
Procedure for washing cells
Dispense 1 ml wash buffer into each sample tube and spin at 400 xg for 5 minutes in a chilled centrifuge at 4ºC. Check for presence ofa cell pellet before discarding the supernatant. Resuspend cellpellets in residual liquid (~50 μl).
ProcedureNote: procedure may need adjustment depending on the particularsystem used.
J4971 ProImmune Pentimer Handbook amends V2_0971-PR Handbook 06.3 10/05/2012 16:43 Page 78

79
ProcedureNote: procedure may need adjustment depending on the particularsystem used.
Stain 1 x 10⁷ cells with 50 μl (5 tests) biotin-labeledPentamer for 10 minutes at room temperature (22ºC).
Wash samples, centrifuge and discard the supernatant.
Resuspend cells in 90 μl wash buffer and add 10 μlstreptavidin magnetic beads per tube (or as directed bythe manufacturer).
Incubate for 15 minutes at manufacturer’s recommendedtemperature (Miltenyi Biotec 4-8ºC).
Wash cell-bead complexes, centrifuge and resuspend in500 μl wash buffer (de-gassed).
Wash a column suitable for positive-selection with 500 μlwash buffer (de-gassed) and place on magnetic stand.
Load cell-bead complexes onto the column.
Antigen-specific T cells labeled with Pentamer-beadcomplexes will be retained on the column (positivefraction).
Collect the negative fraction that elutes from the column,including 3 column washes of 500 μl each.
Remove column from magnet and flush out the positivefraction by adding 1 ml wash buffer onto the column andapplying a plunger (provided with the column).
To obtain a purer antigen-specific cell population, thepositive cell fraction may be passed over a secondcolumn.
Stain cells from pre-isolation, positive and negativefractions with anti-CD8 antibody and fluorescentstreptavidin for flow cytometric analysis.
23
4
5
6
7
8
9
10
11
1
J4971 ProImmune Pentimer Handbook amends V2_0971-PR Handbook 06.3 10/05/2012 16:43 Page 79

80
Section 7
Tube-Based Isolation of Antigen-SpecificCells Using Streptavidin Beads
Materials and equipment
n Pro5® MHC Class I Pentamer, specific for cells ofinterest.
n Streptavidin magnetic beads to detect the biotin label of thePentamer, suitable for use with an external magnet (e.g.Dynabeads® M-280 Streptavidin, Invitrogen #112-05D;LodeStarsTM 2.7 Streptavidin, Varian Inc., #PL6727-1001
n Streptavidin, conjugated to fluorescent label of choice
n Anti-CD8 antibody, conjugated with a different fluorescentlabel to streptavidin
n Wash buffer, de-gassed (remove air prior to use) (Appendix I)
n Fix solution (Appendix I)
n Magnetic tube holder for tubes up to 2 ml (e.g. Dynal MPC®-S,Invitrogen #120-20D, or PL-MCS12, Varian Inc., #PL6700-0002 or for larger tubes (e.g. Dynal MPC®-1, Invitrogen#120-01D, or PL-MCS2, Varian Inc. #PL6700-0001)
n 12 x 75 mm polystyrene tubes for flow cytometry (e.g. BDBiosciences #352052)
n Benchtop refrigerated centrifuge with swing-out rotor and appropriate tube carriers
Procedure for washing cells
Dispense 1 ml wash buffer into each sample tube and spin at 400 xg for 5 minutes in a chilled centrifuge at 4ºC. Check for presence ofa cell pellet before discarding the supernatant. Resuspend cellpellets in residual liquid (~50 μl).
J4971 ProImmune Pentimer Handbook amends V2_0971-PR Handbook 06.3 10/05/2012 16:43 Page 80

81
Procedure
Note: procedure may need adjustment depending on the particularsystem used
For best results start with at least 1 x 10⁷ lymphoid cells(PBMCs or splenocytes).
Wash cells with wash buffer and resuspend in 200 μlwash buffer.
Add 1 test (10 μl) biotin-labeled Pentamer per 2 x 10⁶
cells.
Incubate at room temperature (22ºC) for 10 minutes.
Wash the cells in wash buffer and resuspend in 500 μlwash buffer.
6 Add an optimally titrated amount of streptavidin beads
5 beads per cell is recommended.
7 Incubate on ice (4ºC) for 30 minutes with mixing.
Bring the volume in the tube up to 2 ml with wash bufferthen place in a magnetic tube holder.
9 Leave for 3-5 minutes.
Wash the cell-bead complexes 3 times with wash bufferand discard supernatant (negative fraction).
If desired, supernatant can be retained for flow cytometricanalysis to confirm removal of antigen-specific cells,otherwise discard supernatant.
Isolated cell-bead complexes may be placed in cellculture, where beads should dissociate after a few days.
1
2
3
4
5
8
10
11
J4971 ProImmune Pentimer Handbook amends V2_0971-PR Handbook 06.3 10/05/2012 16:43 Page 81
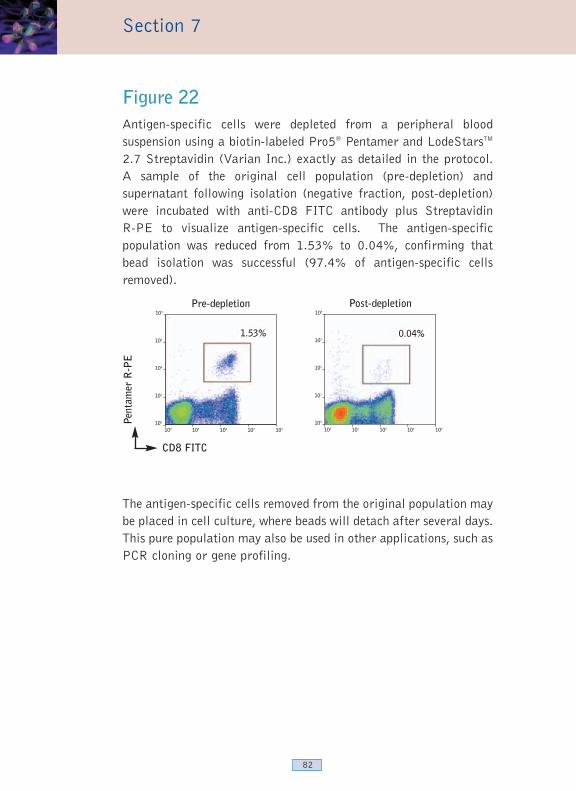
82
Section 7
Figure 22Antigen-specific cells were depleted from a peripheral bloodsuspension using a biotin-labeled Pro5® Pentamer and LodeStarsTM
2.7 Streptavidin (Varian Inc.) exactly as detailed in the protocol. A sample of the original cell population (pre-depletion) andsupernatant following isolation (negative fraction, post-depletion)were incubated with anti-CD8 FITC antibody plus Streptavidin R-PE to visualize antigen-specific cells. The antigen-specificpopulation was reduced from 1.53% to 0.04%, confirming thatbead isolation was successful (97.4% of antigen-specific cellsremoved).
Pre-depletion
100 101 102 103 104
100
101
102
103
104
Post-depletion
100 101 102 103 104
100
101
102
103
104
1.53% 0.04%
Pent
amer
R-P
E
CD8 FITC
The antigen-specific cells removed from the original population maybe placed in cell culture, where beads will detach after several days.This pure population may also be used in other applications, such asPCR cloning or gene profiling.
J4971 ProImmune Pentimer Handbook amends V2_0971-PR Handbook 06.3 10/05/2012 16:43 Page 82

83
Fluorescence Activated Cell Sorting (FACS)
Live Pro5® Pentamer-positive cells can be sorted and collected forfurther manipulation using a Fluorescence Activated Cell Sorter(FACS machine).
For this application it is necessary to remove the sodium azidepreservative from the Pentamer reagent beforehand usingcentrifugal concentrators (e.g. Microcon® YM-10, Millipore#42406). Dilute the reagent to maximum volume with PBS andconcentrate down to original volume. Repeat the procedure 2-3times until the azide is sufficiently diluted. If azide is not removedit will kill the cells.
Protocol notesThe protocol for staining cells for FACS is the same as for flowcytometry analysis, therefore the appropriate protocol for thePentamer reagent in use should be followed (Section Four).However, the amount of Pentamer reagent used should be adjustedso that there is sufficient to stain a larger number of cells. Forexample, 1 test (10 μl) R-PE-labeled Pentamer is sufficient to stain1-2 x 10⁶ cells, but to stain 1 x 10⁷ cells would require 5-10 tests(50-100 μl) Pentamer. Antibody volumes must also be scaled up forthe number of cells to be sorted.
Following staining, the cells MUST NOT be fixed (fixing kills thecells), and sorting should be carried out immediately. If sorting alarge number of cells, it is useful to filter the cells through a cellstrainer and chill the tube during the procedure to preventclumping.
FACS machine set-up is carried out in the same way as for flowcytometry (Section Five). Once the machine has been correctlyprepared for use, the sort gates should be set around the live cellsand the CD8-positive, Pentamer-positive population. It is advisableto set these gates slightly smaller than the desired population areato obtain a pure cell sample.
J4971 ProImmune Pentimer Handbook amends V2_0971-PR Handbook 06.3 10/05/2012 16:43 Page 83

84
Section 7
Figure 23
3 x 10⁷ PBMCs were incubated for 10 minutes at room temperature(22ºC) with 20 tests (200 μl) R-PE-labeled Pentamer. The cellswere then washed twice and incubated with 20 tests (20 μl) anti-CD8 FITC (clone LT8) for 20 minutes on ice. Following a further 2washes, cells were resuspended in 2 ml wash buffer and filteredthrough a nylon mesh filter (e.g. Miltenyi #130-041-407) prior tosorting. The cells were sorted to obtain the Pentamer-positive,CD8-positive population, using a Becton Dickinson FACSAriamachine.
23a: In the starting cell population there were 0.4% CD8-positivePentamer-positive cells, as defined by the white gate that was usedto sort the sub-population of interest.
23b: The sorted sample was analyzed by flow cytometry and shownto be 86.4% pure. Note that the gate used for defining thispopulation is lower than the original sort gate. This is due to the R-PE fluorescence intensity of the labeled cells having been quenchedby the laser beam during sorting.
(a) Pre-sort
100 101 102 103 104
100
101
102
103
105
105
101
0.4%
Pent
amer
R-P
E
CD8 FITC
(b) Post-sort
100 101 102 103 104
100
101
102
103
105
105
101
86.4%
J4971 ProImmune Pentimer Handbook amends V2_0971-PR Handbook 06.3 10/05/2012 16:43 Page 84

85
Use of Pro5® Pentamers In CombinationWith Intracellular Cytokine Staining
Co-staining CD8+ T cells with Pro5® MHC Class I Pentamers andantibodies against intracellular cytokines has now become a routineprocedure in many laboratories. This technique not only enables thefrequency of antigen-specific T cells to be determined but also theireffector function.
Production of cytokines plays an important role in the immuneresponse. Examples include the induction of many anti-viralproteins by Interferon gamma (IFNγ), the induction of T cellproliferation by interleukin-2 (IL-2) and the inhibition of viral geneexpression and replication by TNFα. Cytokines are not preformedfactors; instead they are rapidly produced upon relevantstimulation. Intracellular cytokine staining relies upon thestimulation of T cells in the presence of an inhibitor of proteintransport, thus retaining the produced cytokines inside the cell.
Cellular activation to trigger cytokine production generally resultsin down-regulation of the T cell receptor. For this reason, Pentamerstaining is carried out prior to activation to ensure a good level ofstaining. Pentamers may be internalized with the T cell receptorduring this period, but can still be detected in permeabilized cells.
To analyze the effector function of antigen-specific T cells, the cellsare first stained with Pentamer, then stimulated with antigen. Thisis followed by staining with antibodies specific for extracellularmarkers (such as CD8), then by membrane permeabilization andintracellular cytokine staining.
The following protocols are applicable for Pentamer co-stainingwith antibodies against IFNγ, TNFα, MIP-1β, or IL-2. Certaincytokines such as IL-4 and IL-10 are difficult to detect byintracellular staining methods. In addition to this, frequencies ofPentamer-positive cells producing these cytokines may also beextremely low.
J4971 ProImmune Pentimer Handbook amends V2_0971-PR Handbook 06.3 10/05/2012 16:43 Page 85

86
Pro5® Pentamer and Intracellular CytokineStaining Protocol For Use With Human Cells
Materials and equipment
n Cell sample, eg. PBMCs
n Pro5® MHC Class I Pentamer conjugated to fluorescent labelof choice (e.g. R-PE).
n Fluorescent-labeled anti-cytokine antibody eg. anti-humanIFNγ-FITC; ProImmune (different fluorescent label toPentamer)
n Fluorescent-labeled anti-CD8 antibody
n Peptide (stock at 50 mg/ml in DMSO - may be aliquotted andstored at -20ºC)
n Leukocyte activation cocktail (LAC; optional) for use as acontrol for cytokine production (BD Biosciences #550583 -may be aliquotted and stored at -80ºC)
n Cytokine IC control cells (optional) for use as a positive controlwhen establishing the intracellular cytokine staining protocol(eBioscience #00-4509)
n PBS Wash (2% fetal calf serum, 0.1% sodium azide inPhosphate buffered saline)
n Permeabilization buffer (0.1% saponin, 1% fetal calf serum,0.1% sodium azide in PBS)
n 4% Paraformaldehyde
n Fix buffer (Appendix I)
n R10 medium (Appendix I)
n Brefeldin A (Sigma #15870)
n 12 x 75mm round bottom tubes
Section 7
J4971 ProImmune Pentimer Handbook amends V2_0971-PR Handbook 06.3 10/05/2012 16:43 Page 86

87
n Benchtop refrigerated centrifuge with swing out rotor andappropriate tube carriers
n Chilled microcentrifuge
n Humidified CO2 incubator at 37°C
n Vortex mixer
Protocol applicable for intracellular stainingof IFNγ, TNFα, MIP-1β, or IL-2 withPro5® PentamerAll procedures up to step 10 should be carried out in a suitablesterile tissue culture hood, using sterile buffers and asepticconditions.
Procedure
1 Centrifuge Pro5® Pentamer in a chilled microcentrifugeat 14,000 x g for 5 minutes.
2 Prepare peripheral blood cells in PBS Wash at a cellconcentration of 2 × 10⁷ cells/ml.
3 Transfer the cell suspension to individual tubes in 50 μlaliquots.
4 Add relevant titrated fluorescently labeled Pentamers tothe desired tubes, and incubate for 10 min at 22ºC (non-stimulated single-color controls should not be stained atthis stage). Add 10 μl PBS Wash to remaining tubes.
J4971 ProImmune Pentimer Handbook amends V2_0971-PR Handbook 06.3 10/05/2012 16:43 Page 87

88
5 Add 500 μl PBS Wash to each tube. Centrifuge at 450 × g for 5 minutes at 10°C.
6 Aspirate supernatant. Agitate to disrupt cell pellets andresuspend in 200 μl R10 medium.
7 Dilute peptide stock 1:50 in R10 medium. Add 2 μl ofthis (10 μg/ml final) to each desired tube.
If using Leukocyte Activation cocktail (LAC) as a control, rapidlythaw this at 37°C in a water bath and add 0.33 μl of this to eachdesired tube. After use, discard the unused portion of LeukocyteActivation cocktail.
8 Place the tubes at 37°C in a humidified CO2 incubatorfor 15 minutes to 1 hour.
9 Add Brefeldin A (10 μg/ml final) to the desired tubes(Note: LAC contains Brefeldin A) and return to theincubator. Incubate for 15 hours.
The optimal stimulation period for induction of a given cytokine isvariable and has to be determined. The incubation period of 16hours described above was determined to be optimal for humanPBMCs stimulated with 10 μg/ml peptide to induce an IFNγ
response. The incubation period will vary dependent on the methodof stimulation and the cytokine response you wish to determine.
10 Remove tubes from the incubator. Centrifuge at 450 ×g for 5 minutes at 10°C.
11 Aspirate supernatant. Resuspend desired cell pellets in 50 μl PBS Wash containing an optimally titratedamount of anti-CD8 antibody. Add 50 μl PBS Wash toremaining tubes.
Single-color controls should be stained at this stage. If additional
Section 7
J4971 ProImmune Pentimer Handbook amends V2_0971-PR Handbook 06.3 10/05/2012 16:43 Page 88

89
phenotyping of samples is desired, antibodies to other cell surfacemarkers or receptors may also be added at this time.
12 Incubate for 20 minutes on ice.
13 Add 500 μl PBS Wash to each tube. Centrifuge at 450× g for 5 minutes at 10°C.
14 Aspirate supernatant. Agitate to disrupt cell pellets.
15 Add 200 μl 4% paraformaldehyde to each sample tube.Vortex tubes. Incubate for 20 minutes on ice.
This step will fix the cell morphology of the activated cells.
The procedure can be stopped at this point. Repeat steps 13 and 14.Resuspend the cells in 100 μl/tube PBS Wash. Cover and store thecells at 4°C for up to 3 days. To proceed, repeat steps 13 and 14.Resuspend the cells in 200 μl/tube permeabilization buffer andproceed to step 17.
16 Add 200 μl permeabilization buffer to each tube.
17 Centrifuge at 450 × g for 5 minutes at 10°C. Aspiratesupernatant.
18 Add 100 μl permeabilization buffer to the sample tubesthat are to be stained with anti-cytokine antibody. Add100 μl PBS Wash to the remaining tubes (i.e. Single-color controls).
19 Incubate for 5 minutes at room temperature.
20 Add an optimally titrated amount of FITC-conjugatedanti-cytokine antibody to the desired sample tubes and mix.
21 Incubate for 20 minutes at room temperature.
22 Add 200 μl permeabilization buffer to each tube and
J4971 ProImmune Pentimer Handbook amends V2_0971-PR Handbook 06.3 10/05/2012 16:43 Page 89

90
centrifuge at 450 × g for 5 minutes at 10°C. Aspiratesupernatant and agitate tubes to disrupt the cell pellets.
23 Resuspend the cells in 200 μl fix solution. Vortex tubes.
It is important to vortex well when adding this fixative so that cellsdo not clump.
24 The samples are now ready for data acquisition and analysis on a flow cytometer but may be storedovernight at 4°C in the dark prior to analysis.
NotesIncubation period: The optimal stimulation period for induction of a givencytokine is variable and has to be determined. The incubation period of 16hours described above was determined to be optimal for human PBMCsstimulated with 10 μg/ml peptide to induce an IFNγ response. The incubationperiod will vary dependent on the method of stimulation and the cytokineresponse you wish to determine.
Peptide concentration: Investigate the effect on cytokine response of titratingyour peptide.
Pentamer staining: Cellular activation to trigger cytokine production alsoresults in the down-regulation of the T cell receptor, which can make it difficultto perform Pentamer staining subsequently. For this reason, we recommendPentamer staining prior to activation.
Antibody concentrations: Investigate the effect of titrating your anti-CD8 andanti-cytokine antibodies. Titration of anti-CD8 will prevent any antibody-mediated blocking of or competition with the Pro5® Pentamer-binding site.
Protein Transport Inhibitor: Brefeldin A is an inhibitor of intracellular proteintransport. Incubation of cells in culture with Brefeldin A leads to blockade ofprotein transport to the Golgi complex and accumulation of proteins in theendoplasmic reticulum. Brefeldin A is effective for enhanced detection of amajority of intracellular cytokines; however, it is advised that you investigatethe use and efficacy of this reagent as well as other protein transport inhibitorssuch as Monensin in your specific assay system.
Background staining: When performing Pentamer staining, if the backgroundstaining is unusually high, it may be necessary to first block the cells with Fcblock or 10% mouse serum prior to Pentamer staining. Further suggestions for
Section 7
1
2
3
4
5
6
7
J4971 ProImmune Pentimer Handbook amends V2_0971-PR Handbook 06.3 10/05/2012 16:43 Page 90

91
reduction of background staining can be found on page 102.
To carry out intracellular cytokine staining without Pentamer co-staining omitsteps 1 and 4.
Pro5® Pentamer and Intracellular CytokineStaining Protocol For Use With Murine Cells
Materials and equipment
n Cell sample, eg. murine splenocytes or lymph node cells
n Pro5® MHC Class I Pentamer conjugated to fluorescent labelof choice (e.g. R-PE)
n Fluorescent-labeled anti-cytokine antibody eg. anti-MurineIFNγ-FITC; ProImmune (different fluorescent label toPentamer)
n Fluorescent-labeled anti-CD8 antibody
n Peptide (stock at 50 mg/ml in DMSO - may be aliquotted andstored at -20ºC)
n Leukocyte activation cocktail (LAC; optional) for use as acontrol for cytokine production (BD Biosciences #550583 -may be aliquotted and stored at -80ºC)
n PBS Wash (2% fetal calf serum, 0.1% sodium azide inPhosphate buffered saline)
n Permeabilization buffer (0.1% saponin, 1% fetal calf serum,0.1% sodium azide in PBS)
n 4% Paraformaldehyde
n Fix buffer (Appendix I)
n R10 medium (Appendix I)
n Brefeldin A (Sigma #15870)
n 12 x 75mm round bottom tubes
n Benchtop refrigerated centrifuge with swing out rotor andappropriate tube carriers
J4971 ProImmune Pentimer Handbook amends V2_0971-PR Handbook 06.3 10/05/2012 16:43 Page 91

92
n Chilled Microcentrifuge
n Humidified CO2 incubator at 37°C
n Vortex mixer
Protocol applicable for intracellular stainingof IFNγ with Pro5® PentamerAll procedures up to step 10 should be carried out in a suitablesterile tissue culture hood, using sterile buffers and asepticconditions.
Procedure
1 Centrifuge Pro5® Pentamer in a chilled microcentrifugeat 14,000 x g for 5 minutes.
2 Prepare murine splenocytes by lyzing red cells then washand resuspend in PBS Wash at a cell concentration of 2× 10⁷ cells/ml.
3 Transfer the cell suspension to individual tubes in 50 μlaliquots.
4 Add relevant titrated fluorescently labeled Pentamers tothe desired tubes, and incubate for 10 min at 22ºC (non-stimulated single-color controls should not be stained atthis stage). Add 10 μl PBS Wash to remaining tubes.
5 Add 500 μl PBS Wash to each tube. Centrifuge at 450× g for 5 minutes at 10°C.
6 Aspirate supernatant. Agitate to disrupt cell pellets andresuspend in 200 μl R10 medium.
7 Dilute peptide stock 1:50 in R10 medium. Add 4 μl ofthis (20 μg/ml final) to each desired tube.
Section 7
J4971 ProImmune Pentimer Handbook amends V2_0971-PR Handbook 06.3 10/05/2012 16:43 Page 92

93
If using Leukocyte Activation cocktail (LAC) as a control, rapidlythaw this at 37°C in a water bath and add 0.33 μl of this to eachdesired tube. After use, discard the unused portion of LeukocyteActivation cocktail.
8 Place the tubes at 37°C in a humidified CO2 incubator for15 minutes to 1 hour.
9 Add Brefeldin A (10 μg/ml final) to the desired tubes(Note: LAC contains Brefeldin A) and return to theincubator. Incubate for 24 hours.
10 Remove tubes from the incubator. Centrifuge at 450 × g for 5 minutes at 10°C.
11 Aspirate supernatant. Resuspend desired cell pellets in 50 μl PBS Wash containing an optimally titratedamount of anti-CD8 antibody. Add 50 μl PBS Wash to remaining tubes.
Single-color controls should be stained at this stage. If additionalphenotyping of samples is desired, antibodies to other cell surfacemarkers or receptors may also be added at this time.
12 Incubate for 20 minutes on ice.
13 Add 500 μl PBS Wash to each tube. Centrifuge at 450 × gfor 5 minutes at 10°C.
14 Aspirate supernatant. Agitate to disrupt cell pellets.
15 Add 200 μl 4% paraformaldehyde to each sample tube.Vortex tubes. Incubate for 20 minutes on ice.
This step will fix the cell morphology of the activated cells.
The procedure can be stopped at this point. Repeat steps 13 and 14.Resuspend the cells in 100 μl/tube PBS Wash. Cover and store thecells at 4°C for up to 3 days. To proceed, repeat steps 13 and 14.Resuspend the cells in 200 μl/tube permeabilization buffer and
J4971 ProImmune Pentimer Handbook amends V2_0971-PR Handbook 06.3 10/05/2012 16:43 Page 93

94
proceed to step 17.
16 Add 200 μl permeabilization buffer to each tube.
17 Centrifuge at 450 × g for 5 minutes at 10°C. Aspiratesupernatant.
18 Add 100 μl permeabilization buffer to the sample tubesthat are to be stained with anti-cytokine antibody. Add100 μl PBS Wash to the remaining tubes (i.e. Single-color controls).
19 Incubate for 5 minutes at room temperature.
20 Add an optimally titrated amount of FITC-conjugatedanti-cytokine antibody to the desired sample tubes andmix.
21 Incubate for 20 minutes at room temperature.
22 Add 200 μl permeabilization buffer to each tube andcentrifuge at 450 × g for 5 minutes at 10°C. Aspiratesupernatant and agitate tubes to disrupt the cell pellets.
23 Resuspend the cells in 200 μl fix solution. Vortex tubes.It is important to vortex well when adding this fixativeso that cells do not clump.
24 The samples are now ready for data acquisition andanalysis on a flow cytometer but may be stored overnightat 4°C in the dark prior to analysis.
See page 90 for additional notes for Pro5® Pentamer andintracellular cytokine staining protocol (also applicable to protocolfor use with murine cells).
Section 7
J4971 ProImmune Pentimer Handbook amends V2_0971-PR Handbook 06.3 10/05/2012 16:43 Page 94

95
Create a 2D density plot showing FSC vs. SSC. Draw a tightregion around the lymphocyte population (R1).
Create a second density plot, gated only on events encircledwithin R1, showing CD8 staining on the x-axis and Pentamerstaining on the y-axis. Draw a region around all of the CD8-positive cells (R2).
Create a third density plot, gated on both R1 and R2, showingcytokine staining on the x-axis and Pentamer staining on the y-axis. Draw a quadrant that clearly separates positive cellsfrom negative cells on both axes, and use quadrant statistics toobtain quantitative information about the frequency of antigen-specific, cytokine-positive T lymphocytes.
0 10230
1023
R1
SSC
FSC
1
2
3
100 101 102 103 104
100
101
102
103
104
R2
Pent
amer
CD8
100 101 102 103 104
100
101
102
103
104
Pent
amer
IFNγ
13.59% 2.6% 2.7%
26.7%
Figure 24: Example gating strategy for Pro5®
Pentamer and intracellular cytokine staining
J4971 ProImmune Pentimer Handbook amends V2_0971-PR Handbook 06.3 10/05/2012 16:43 Page 95

96
Section 7
Figure 25: Example staining data for Pro5®
Pentamer and intracellular cytokine staining
100 101 102 103 104
100
101
102
103
104
2.71%2.59%
26.72%
Pent
amer
R-P
E
100 101 102 103 104
100
101
102
103
104
(a) Positive Controlfor IFNγ staining
(b) Negative Controlfor IFNγ staining
IFNγ FITC
0.04%3.39%
0.01%
100 101 102 103 104
100
101
102
103
104
0.01%0.06%
0.58%
Pent
amer
R-P
E
100 101 102 103 104
100
101
102
103
104
(c) Negative Control forPentamer staining
(d) Experimentalconditions
IFNγ FITC
0.52%1.48%
0.05%
J4971 ProImmune Pentimer Handbook amends V2_0971-PR Handbook 06.3 10/05/2012 16:43 Page 96

97
The figures illustrate IFNγ versus Pro5® Pentamer staining of livelymphocytes. PBMCs were incubated with either a negative control(non-specific) Pentamer A*0201/GLCTLVAML (EBV) or aPentamer specific for the cells of interest B*0801/RAKFKQLL(EBV), then stimulated with PMA and ionomycin (nonspecificactivation) or RAKFKQLL peptide (specific peptide activation) for16 hours in the presence of Brefeldin A. Fixation, permeabilizationand staining for IFNγ were carried out exactly as detailed in theprotocol for use with human cells. The results show that IFNγsecretion is specific for activated cells (a, c & d), and that 26% ofPentamer positive cells have secreted IFNγ during a 16 hourincubation period (d).
25a: PBMCs stained with a Pentamer specific for the cells ofinterest, B*0801/RAK, then stimulated with PMA and ionomycin(non-specific activation) for 16 hours in the presence of Brefeldin A.
25b: PBMCs stained with a Pentamer specific for the cells ofinterest, B*0801/RAK, and incubated for 16 hours in the prescenceof Brefeldin A only
25c: PBMCs stained with a negative control (non-specific)Pentamer, A*0201/GLC and incubated with RAKFKQLL peptide(specific peptide activation) for 16 hours in the presence ofBrefeldin A
25d: PBMCs stained with a Pentamer specific for the cells ofinterest, B*0801/RAK, then stimulated with RAKFKQLL peptide(specific peptide activation) for 16 hours in the presence ofBrefeldin A
Figure 25
J4971 ProImmune Pentimer Handbook amends V2_0971-PR Handbook 06.3 10/05/2012 16:43 Page 97

98
J4971 ProImmune Pentimer Handbook amends V2_0971-PR Handbook 06.3 10/05/2012 16:43 Page 98

99
Section EightTroubleshooting Guide
Lack of Staining
Non-Specific Staining
Technical Support
Trou
bles
hoot
ing
Gui
de
J4971 ProImmune Pentimer Handbook amends V2_0971-PR Handbook 06.3 10/05/2012 16:43 Page 99

100
Section 8
Lack of Staining
1 The antigen-specific population is not present
In addition to staining by flow cytometry, it is advisable touse an alternative method to verify the presence or absenceof an antigen-specific population. Functional assays suchas ELISPOT, intracellular cytokine staining or othercytokine secretion assays are recommended.
The antigen-specific population is below the threshold ofdetection
The threshold of detection of antigen-specific eventsdepends on the type of cells used and their method ofpreparation. For human PBMCs the threshold is around0.02%. The threshold of detection for mouse splencoytes islikely to be in the region of 0.1%. Detecting a smallerpopulation is possible but thorough protocol optimizationwill be required.
An improvement in results may be achieved by enriching thepopulation of T cells. This may be done using magneticbeads (Section Seven) or by stimulation of cells in cultureusing peptides or antibodies. It is important to note thatcells will have a different phenotypic profile followingstimulation.
3 Use of sub-optimal anti-CD8 antibody clone
The anti-CD8 antibody used for co-staining should beselected carefully as some clones interfere with Pentamerbinding to the T cell receptor (TCR). ProImmune hascarried out extensive testing of Pentamers with differentanti-CD8 clones and staining conditions. Clones LT8(human) and KT15 (mouse) are recommended, as they donot block binding of Pentamers to the TCR. Both of theseantibody clones are available from ProImmune.
2
J4971 ProImmune Pentimer Handbook amends V2_0971-PR Handbook 06.3 10/05/2012 16:43 Page 100

101
Figure 26
The figure compares staining of R-PE- and APC-labeled Pentamerswith three different anti-CD8 clones. Optimal staining is seen whenthe preferred clone LT8 is used, compared with clones 3B5 andHIT8a, particularly when using APC-labeled Pentamers. The redline aids comparison of the Pentamer positive populations in theplots. The staining is consistently bright when anti-CD8 clone LT8is used.
CD8 (LT8)
CD8 (LT8) CD8 (3B5) CD8 (HIT8a)
R-PE-Labeled Pentamer
100 101 102 103 104
100
101
102
103
104
CD8 (3B5)
100 101 102 103 104
100
101
102
103
104
CD8 (HIT8a)
100 101 102 103 104
100
101
102
103
104
APC-labeled Pentamer
104
100
101
102
103
104
104
100
101
102
103
104
100
101
102
103
104
100 101 102 103 104 100 101 102 103 104 100 101 102 103 104
Pent
amer
CD8
J4971 ProImmune Pentimer Handbook amends V2_0971-PR Handbook 06.3 10/05/2012 16:43 Page 101

102
Section 8
4 Insufficient events acquired
When looking at rare populations, such as antigen-specificT cells, it is important to collect as many cells as possible.If expecting a result of only 0.1% a sample size of 500,000cells would show 500 dots on the density plot. It isimportant to bear in mind the expected frequency of eventsto be collected and adjust the starting sample sizeaccordingly (page 26).
5 Reagent has expired
A considerable amount of time and effort is spent oncellular staining experiments, so it is important to makesure that all your reagents are within their expiry date.ProImmune guarantees all Pro5® MHC Pentamers for sixmonths from delivery when stored according toinstructions. All ProVE® MHC Pentamers are guaranteedfor three months from delivery when stored according toinstructions. Unlabeled and biotin-labeled Pentamers maybe stored for longer periods at -80ºC.
Non-Specific Staining
Non-specific staining is defined as events seen in the CD8-negative,Pentamer-positive quadrant of antigen-specific cells, or Pentamer-positive staining of negative control cells.
Common reasons for non-specific staining
Too much Pentamer for the number of cells
One test of labeled-Pentamer (10μl) should stain 1-2 x 10⁶
antigen-specific cells. However, it is recommended that thePentamer is titrated prior to use (page 48).
1
J4971 ProImmune Pentimer Handbook amends V2_0971-PR Handbook 06.3 10/05/2012 16:43 Page 102

103
Temperature used for staining was too high Pentamer staining should be carried out at roomtemperature (22ºC) where possible. Staining attemperatures above this will increase non-specific staining(page 46).
Incubation time with Pentamer was too long Pentamer staining for 10 minutes at room temperature(22ºC) is sufficient. However, if staining at 4ºC theincubation time may be increased to 30 minutes.Incubation for longer periods may increase background(page 46).
Pentamer was not centrifuged prior to stainingThe Pentamer should be centrifuged at 14,000 x g for 3-5minutes to isolate any aggregates.
Insufficient washing between staining steps
Cells should be washed with a 10x volume of buffer betweenstaining steps (some specificities may require 2 washesbetween steps).
Buffer contains phenol redIf using RPMI 1640, HBSS or DMEM as a medium inwhich to stain cells it is recommended that this does notcontain phenol red, which can contribute toautofluorescence and thus appear as non-specific stainingon analysis plots.
Pentamer binds non-specifically to the cellsIn very rare cases the Pentamer may bind non-specificallyto the cell surface. This can be eliminated by first blockingthe cells with 4 μg/ml pure mouse IgG or 10% human ormouse serum.
Inaccurate setting of the live lymphocyte gate Dead or dying cells incorporate fluorescent entities andmust be excluded correctly (page 57).
2
3
4
5
6
7
8
J4971 ProImmune Pentimer Handbook amends V2_0971-PR Handbook 06.3 10/05/2012 16:43 Page 103

104
Section 8
Technical Support
USA & Canada Telephone, Toll Free: +1 888 505 7765Fax: +1 775 206 4635
All other countries Telephone: +44 870 042 7279
Fax: +44 870 712 0588
All countries E-mail: [email protected]: www.proimmune.com
To help us to provide technical assistance with the minimum possibledelay, please have answers ready to the following questions whenyou call or write.
Product code and batch number of reagent, e.g. Pentamer F001-2A, batch JP/1234-01; if you have purchased more than oneof the same product also note the batch numbers of the otherproducts and whether or not the same problems were encountered.
Type of cells stained e.g. human/mouse, PBMC, splenocytes,lymph nodes, fresh/frozen.
How many cells were stained per sample?
Was the Pentamer centrifuged before use (14,000 x g for 3-5 minutes)?
Volume of Pentamer and/or Fluorotag/Biotag (μl) used persample, and total staining volume.
Temperature at which cells were incubated withPentamer/Fluorotag/Biotag.
Time of incubation with Pentamer/Fluorotag/Biotag.
Order in which Pentamer and anti-CD8 antibody were added tocells e.g. Pentamer first then antibody, or other.
Which anti-CD8 antibody was used (clone and fluorescentlabel)?
What functional evidence do you have to indicate the presenceof antigen-specific cells, e.g. ELISPOT, Chromium releaseassay?
1
2
3
4
5
6
7
8
9
10
J4971 ProImmune Pentimer Handbook amends V2_0971-PR Handbook 06.3 10/05/2012 16:43 Page 104

In order to resolve any Pentamer staining issues as quickly aspossible, it is useful for our technical support team to view stainingdata showing the problem. The data shown in figure 27 gives anexample of the type of data that allows us to diagnose the problem.Data may be sent in MS PowerPoint or PDF format. Raw data files(FCS or LMD) are also accepted.
Figure 27: Example data to supply to technicalsupport team
(a)
0 10230
1023
R1
100 101 102 103 104
0
Eve
nts
CD19 PE Cy5
(b)1024
(c)
100 101 102 103 104
100
101
102
103
104
Live lymphocytegate, set aroundthe highest densitycell population.
Note that cellswhich have beenstimulated mayneed a larger gateto accommodateblast-like cells.
Exclusion gating,e.g. for B cellsand/or NK cells,using antibodies toCD19 and CD49b(mouse) or CD56(human).
Pent
amer
CD8
Negative Control (Naïve mouse)
0.0%0.0%
100 101 102 103 104
100
101
102
103
104
Immunized Mouse
Density plot showing Pentamer vsCD8 with statistics showing %live lymphocytes that arePentamer positive.
0.12%0.04%
105
(d) Details of reagents used
Reagent Channel Label
Pentamer H-2Kb/SIINFEKL FL2 R-PECD8 antibody Rat anti-mouse CD8 (clone KT15) FL1 FITCOther antibodies Rat anti-mouse CD19 (clone 6D5) FL3 PE Cy5Cell Type Splenocytes from immunized mice
J4971 ProImmune Pentimer Handbook amends V2_0971-PR Handbook 06.3 10/05/2012 16:43 Page 105

106
Section 8
J4971 ProImmune Pentimer Handbook amends V2_0971-PR Handbook 06.3 10/05/2012 16:43 Page 106

107
AppendicesI Solution Components
II Optimal Titration of Antibodies
III Table of Fluorochromes
IV Publications citing ProImmune Pentamers
V Abbreviations
J4971 ProImmune Pentimer Handbook amends V2_0971-PR Handbook 06.3 10/05/2012 16:43 Page 107

108
APPENDIX I - Solution Components
Wash Buffer
0.1% BSA, 0.1% sodium azide in PBS
Fix Buffer
1% heat-inactivated fetal calf serum (HI-FCS), 2.5%formaldehyde in PBS
Ammonium Chloride Lyzing Solution
0.15 M NH4Cl, 1 mM KHCO3, 0.1 mM EDTA, or acommercial preparation e.g. PharM LyseTM, BD Biosciences#555899
R10 Medium
RPMI 1640, containing 10% HI-FCS, 10mM HEPES,2mM L-Glutamine, 50mM 2-ME, 100 U/ml Penicillin, 0.1mg/ml Streptomycin
APPENDIX II - Optimal Titration ofAntibodies
1 Make a serial dilution of antibody stock in wash buffer(Appendix I), figure 28 a & b.
2 Make a 150 μl suspension of cells of the appropriate type(to include both positive and negative populations for theantibody under test) at 2 x 10⁸ cells/ml. Add 25 μl toeach tube figure 28c.
3 Incubate for 20 minutes on ice (4ºC), shielded from light.
4 Wash with a 10x volume of wash buffer and centrifuge.
J4971 ProImmune Pentimer Handbook amends V2_0971-PR Handbook 06.3 10/05/2012 16:43 Page 108

109
5 Aspirate supernatant and resuspend cells in Fix solution(Appendix I)
6 Analyze by flow cytometry, gated on viable cells.
7 Print a page with the appropriate histograms, figure 29.
8 Choose a titration.
Use the histograms to select the appropriate dilution; negativecells should be completely contained in the first log decade; thepositive peak should be at optimum fluorescence (i.e. positivecells remain higher up the log scale).
Figure 28(a) Prepare tubes for dilution series
(c) Add 5 x 10⁶ cells in 25 μl buffer
1:10
(b) Make antibody dilutions
1:10 1:20 1:40 1:80 1:160 1:320
1:20 1:40 1:80 1:160 1:320 1:640
25μlmix
45μl buffer5μl Ab
25μl 25μl 25μl 25μl 25μl
25μlmix
25μlmix
25μlmix
25μlmix
25μlmix
J4971 ProImmune Pentimer Handbook amends V2_0971-PR Handbook 06.3 10/05/2012 16:43 Page 109

110
Figure 29Titration of anti-human CD13-FITC on PBMCs
Live gate R1, note: CD13 isexpressed on monocytes but cells arealso gated on lymphocytes in orderto view a negative population.
Negative cells should be completelycontained in the first log decade; thepositive peak should be at optimumfluorescence.
0 10230
1023
R1
SSC
-H
FSC-H
100 101
R2
102 103 104
0
256
Eve
nts
CD13 FITC
1:20
100 101
R2
102 103 104
0
256
Eve
nts
CD13 FITC
1:40
100 101
R2
102 103 104
0
256
Eve
nts
CD13 FITC
1:80
100 101
R2
102 103 104
0
256
Eve
nts
CD13 FITC
1:160
100 101
R2
102 103 104
0
256
Eve
nts
CD13 FITC
1:320
J4971 ProImmune Pentimer Handbook amends V2_0971-PR Handbook 06.3 10/05/2012 16:43 Page 110

111
APPENDIX III - Table of Fluorochromes
Typical Filters Fluorochromes Viability Probe
780/60 APC-Alexa Fluor® 750 APC-Cy7(775 nm) (774 nm)
720/40 APC-Cy5.5 Alexa Fluor® 700(694 nm) (723 nm)
660/20 APC Alexa Fluor® 647 Cy5(660 nm) (668 nm) (666 nm)
780/60 PE-Cy7 PE-Alexa Fluor® 750(767 nm)
695/40 PE-Cy5.5 PE-Alexa Fluor® 700 PerCP-Cy5.5(694 nm) (723 nm) (690 nm)
670/14 PE-Cy5 PerCP 7-AAD(670 nm) (678 nm) (647 nm)
610/20 PE-Alexa Fluor® 610 PE-Texas Red® Propidium Iodide (PI)(628 nm) (615 nm) (620 nm)
575/26 R-PE Cy3(575 nm) (566 nm)
530/30 Alexa Fluor® 488 FITC Green Fluorescent(519 nm) (525 nm) Protein
545/75 Cascade Yellow TM
(558 nm)585/42 Pacific Orange TM
(552 nm)440/40 Alexa Fluor® 405 Pacific Blue TM Cascade Blue®
(421 nm) (445 nm) (420 nm)440/40 DAPI
(461 nm)
Arg
on (
Blu
e) L
aser
488
nm
Vio
let
Lase
r40
5 nm
UV
Lase
r35
5 nm
Gre
en L
aser
543
nm
HeN
e La
ser
633
nm/ R
ed D
iode
635
nm
J4971 ProImmune Pentimer Handbook amends V2_0971-PR Handbook 06.3 10/05/2012 16:43 Page 111

112
APPENDIX IV
Publications citing ProImmune PentamersOver 700 publications citing Pentamers are listed on our website atwww.proimmune.com, indexed by research area.
J4971 ProImmune Pentimer Handbook amends V2_0971-PR Handbook 06.3 10/05/2012 16:43 Page 112

113
APPENDIX V
Abbreviations
APC Allophycocyanin
BSA Bovine Serum Albumin
CD Cluster of Differentiation
CMV Cytomegalovirus
DMSO Dimethyl Sulphoxide
EBV Epstein-Barr Virus
ELISPOT Enzyme-Linked Immunospot assay
FACS Fluorescent Activated Cell Sorting
FCS Fetal Calf Serum
FITC Fluorescein Isothiocyanate
FL Fluorescence Parameter
FSC Forward Scatter
IFNγ Interferon gamma
IL Interleukin
MHC Major Histocompatibility Complex
PBMC Peripheral Blood Mononuclear Cells
PBS Phosphate Buffered Saline
RBC Red Blood Cell
R-PE R-Phycoerythrin
SA Streptavidin
SSC Side Scatter
TCR T Cell Receptor
J4971 ProImmune Pentimer Handbook amends V2_0971-PR Handbook 06.3 10/05/2012 16:43 Page 113

For further informationplease contact:
United Kingdom (Head Office)ProImmune LimitedThe Magdalen CentreOxford Science ParkOxford OX4 4GAUnited KingdomTel : +44 870 042 7279Fax: +44 870 712 0588Registered in EnglandCompany No.: 387 33 86VAT Reg. No.: 749 90 53 87
United States & CanadaProImmune Inc.4281 Express LaneSuite L2378Sarasota, FL 34238, USAToll-free : +1 888 505 7765Fax : +1 775 206 4635
www.proimmune.comemail us at: [email protected]© Copyright ProImmune Ltd. 2006-2012. All Rights Reserved
J4971 ProImmune Pentimer Handbook amends V2_0971-PR Handbook 06.3 10/05/2012 16:43 Page 114