Embed Size (px)
Citation preview
Infrastructure – Practical Exercises
Before starting the lab restart the servers. First, restart LON-DC1, then after
it has fully started, restart LON-SVR1. This will put the servers in sync and
avoid replication and time errors.
Overview
This course comes with a virtual lab environment where you can practice what you
learn. Launch the lab environment from the Welcome > Getting Started > Practice
Lab Environment page.
• You will only have four hours in the practical environment.
• The time is cumulative, so you can work a little bit at a time until it adds
up the total time allowed.
• You may not have enough time to complete all the practical exercises.
So, choose wisely. You may want to consider all the hand-on exercises
and decide which ones you want to make sure you work on first.
In most cases, the userid is Adatum\Administrator and the password is
Pa55w.rd, but read the instructions carefully. This is also the password for any
existing users.
If you are having difficulties with the lab environment check out the Student Lab
Guide. This document is available from the Course Handouts page and includes
basic troubleshooting and the support desk link.
Recommendation: Bookmark the Practice Lab Environment page as
you will return to it frequently to perform your hands-on labs!
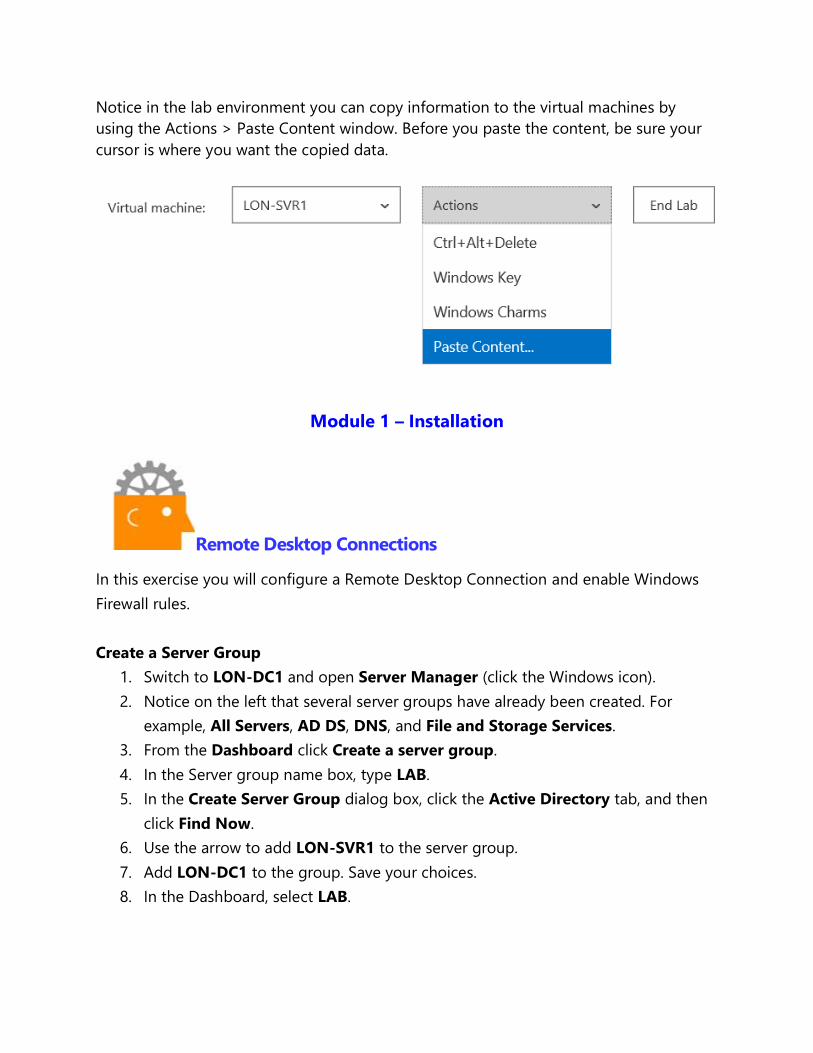
Notice in the lab environment you can copy information to the virtual machines by
using the Actions > Paste Content window. Before you paste the content, be sure your
cursor is where you want the copied data.
Module 1 – Installation
Remote Desktop Connections
In this exercise you will configure a Remote Desktop Connection and enable Windows
Firewall rules.
Create a Server Group
1. Switch to LON-DC1 and open Server Manager (click the Windows icon).
2. Notice on the left that several server groups have already been created. For
example, All Servers, AD DS, DNS, and File and Storage Services.
3. From the Dashboard click Create a server group.
4. In the Server group name box, type LAB.
5. In the Create Server Group dialog box, click the Active Directory tab, and then
click Find Now.
6. Use the arrow to add LON-SVR1 to the server group.
7. Add LON-DC1 to the group. Save your choices.
8. In the Dashboard, select LAB.
9. Notice that you can select each server and then scroll through items like Events,
Services, and Roles and Features. This is a great way to manage multiple servers
from the dashboard.
Enable Remote Desktop Connections
1. Right-click LON-SVR1 and select Remote Desktop Connection.
2. Notice the error that Remote desktop cannot connect to the computer. One of
the reasons listed is remote access to the computer is not enabled.
3. Switch to LON-SVR1 and open Server Manager (use the Windows icon).
4. Click Local Server and review the available information.
5. Next to Remote Desktop, click Disabled.
6. In the System Properties dialog box, click Allow remote connections to this
computer.
7. Apply your changes.
8. Return to LON-DC1.
9. Right-click LON-SVR1 and select Remote Desktop Connection.
10. When prompted, enter the Adatum\Administrator credentials.
11. It may take a minute for the Desktop to appear.
12. Notice you are viewing the LON-SVR1 GUI. This is one way you can administer
the server remotely.
13. Leave the remote connection open.
Enable Windows Firewall Advanced Settings
1. Return to LON-DC1 Server Manager.
2. Right-click LON-SVR1, and then select Computer Management. It make take a
minute for the snap-ins to load.
3. Notice the error and make a note of the Windows Firewall rules that need to be
enabled. Close the Computer Management console windows.
4. Switch to the Remote Desktop connection (LON-SVR1).
5. In Server Manager, click Tools, and then select Windows Firewall with
Advanced Security.
6. Select In-Bound Rules.
• Enable COM+ Network Access (DCOM-IN)
• Enable all rules (3) in the Remote Event Log Management Group
7. You can close the remote session with LON-SVR1.
Manage Services using Computer Management
1. On LON-DC1, right-click LON-SVR1 and then click Computer Management.
2. Notice the console now launches without errors.
3. Take a minute to review the actions you can take on the remote server.
4. Expand Services and Applications, and then click Services.
5. Right-click on each of the following services and view Properties. Notice how the
Startup Type, Log On, and Recovery information is different.
• Optimize Drives – The Startup Type is manual.
• Netlogon – Recovery options for this service are not available. In case of
failure the service restarts the computer.
• Remote Desktop Services – The Logon does not use the local account.
• Explore other services as you have time then close the Computer
Management console.
6. Return to LON-DC1.
7. In the Lab node with LON-SVR1 selected, scroll down and review the Services
information.
8. Notice you can Start, Stop, and Restart Services from within this SERVICES
section by right clicking the service. To configure the service properties you must
use Computer Management console.
Peformance Monitor
Create a data collector set
1. Switch to LON-SVR1.
2. Click the Windows logo, and type perfmon.exe to launch Performance
Monitor.
3. Expand Data Collector Sets, right-click User Defined, point to New, and
then click Data Collector Set.
• Name: LON-SVR1 Performance.
• Create manually (Advanced). Notice the choice to use a Template.
• Select the Performance counter check box.
• Add a few counters such as Processor\% Processor Time and
PhysicalDisk\% Disk Time
• Take some time to check out the other counters you could add to your
data collector set.
• After adding your counters, set the the Sample interval to 1. This for
the lab, and would not be a best practice in a production environment.
• On the Where would you like the data to be saved? page, make a
note of where the data will be saved.
4. Finish creating your data collector set, right-click the set and Start collecting
data.
Create a disk load on the server
1. Click Start, and then click Windows PowerShell.
2. At the Windows PowerShell prompt, type the following command, and then
press Enter:
Fsutil file createnew bigfile 104857600
3. Copy bigfile to bigfile2
Copy bigfile bigfile2
4. Delete bigfile*.*
Analyze the resulting data in a report
1. Return to Performance Monitor.
2. Right-click your data collector set, and select Stop.
3. Under Monitoring Tools select Performance Monitor.
4. Use the second icon from the left to View log data.
5. On the Source tab, Add your log file by navigating to the LON-SVR1_date-
000001 folder, and then double-clicking DataCollector01.blg.
6. On the Data tab, Add the counters that are part of the data collector set.
7. Take a minute to look at the other tabs to see how you can customize the
graphical view.
Module 2 – Logical Components
Sites and Subnets (Server Manager)
In this exercise you will create a site for the Toronto office and assign a subnet to that
site.
Add another domain controller
Note: We will discuss Domain Controllers in more detail in the next module, but for now
go ahead and follow these simple steps to add another domain controller to the
domain.
1. Sign in to LON-SVR1.
2. In the Server Manager Dashboard, select Add roles and features.
3. Proceed to the Server Roles page and select the Active Directory Domain
Services role. Agree to add any features that are required.
4. Read through the rest of the pages and Install the role.
5. After the role installs, select the Notifications icon on the top bar, and select
Promote this server to a domain controller.
6. In the wizard, select add the domain controller to an existing domain. The
domain is Adatum.com and you are using the Adatum\Administrator
credentials.
7. On the Domain Controller options page, notice the Site Name is Default-First-
Site-Name. For the DSRM password use Pa55w.rd.
8. Read through the rest of the pages, take the defaults, ignore any errors, and the
Install.
9. Follow the prompts to restart the server, and sign in again.
Create a Site for Toronto
1. Switch to LON-DC1.
2. In Server Manager, click Tools, and then click Active Directory Sites and
Services.
3. Expand Sites and notice there is only one site called Default-First-Site-Name.
This site was created when the domain controller was installed.
4. Right-click the Default-First-Site-Name and Rename the site to London.
5. Right-click Sites, and then click New Site.
• Name: Toronto
• Select a site-link object for this site: DEFAULTIPSITELINK
6. Read the messages about additional configuration tasks for the Toronto site such
as: linking to other sites, adding subnets to the site, installing domain controllers
in the site, or moving existing domain controllers into the site.
7. Verify that the Toronto site now displays in the Sites list.
Move a domain controller to the Toronto site
1. Expand the Toronto site and the Servers folder.
2. Notice there are no domain controllers for this site.
3. Expand the London site and the Servers folder.
4. Notice LON-DC1 and LON-SVR1 are listed as domain controllers for the site.
5. Right-click LON-SVR1 and Move the domain controller to the Toronto site.
6. Verify the Toronto site now has a domain controller.
Create IP subnets associated with the Toronto and London sites
1. Right-click Subnets, and then click New Subnet.
• Prefix: 172.16.1.0/24.
• Select a site object for this prefix: Toronto
2. Right-click Subnets, and then click New Subnet.
• Prefix: 172.16.100.0/24.
• Select a site object for this prefix: London
3. In the navigation pane, click the Subnets folder. Verify in the right pane that the
two subnets are created and associated with their appropriate site.
Configure site-links between the sites
1. Expland Inter-Site Transports, and then click the IP folder.
2. Notice there is only one site link that replicates every 180 minutes.
3. Right-click IP, and then click New Site Link.
4. Name the link LON-TOR. This link will configure the replication between London
and Toronto.
5. Right-click the completed LON-TOR site link, and click Properties.
6. Notice you can change the Cost and Replicate every values.
7. Click Change Schedule.
• Using the mouse, click at the Monday at 9:00 AM tile and drag the cursor
to the Friday at 3:00 PM tile.
• Click Replication Not Available.
• Notice the white area where during high traffic times replication to the
Toronto site will not occur.
8. At this point you can delete the DEFAULTIPSITELINK site link.
Site and Subnets (PowerShell)
In this exercise you will use PowerShell to create a site, create a subnet, and create a site
link.
Create another Site for Paris
1. Switch to LON-DC1.
2. Open a PowerShell prompt.
3. View commands that pertain to objects.
Get-Command *object
4. View the Help on Get-ADObject. Review the syntax and parameters.
Get-Help Get-ADObject
5. Use Get-ADObject to view the sites in adatum.com. The SearchBase parameter
values are case sensitive.
Get-ADObject -Filter ‘ObjectClass -eq “site” ‘ -SearchBase
“CN=Configuration,DC=adatum,DC=com”
6. If you completed the previous exercise, the London and Toronto sites are
returned. If you did not complete the previous lab, only the Default-First-Site-
Name site will be returned.
7. View commands that pertain to sites.
Get-Command *site*
8. Use New-ADReplicationSite to create the Paris
New-ADReplicationSite -Name Paris
9. Use the previous Get-ADObject cmdlet to verify the site was created.
Create a subnet and site link for the Paris site
1. View commands that pertain to subnets.
Get-Command *subnet*
2. Use the Help to learn about the New-ADReplicationSubnet cmdlet.
Get-Help New-ADReplicationSubnet
3. Use New-ADReplicationSubnet to create a subnet, 172.16.200.0/24, for the
Paris site. The Location is Paris,France.
New-ADReplicationSubnet -Name "172.16.200.0/24" -Site Paris -Location
"Paris,France"
4. Use Get-ADReplicationSite to verify the Paris Subnet Properties.
Get-ADReplicationSite -Identity Paris -Properties *
5. Use New-ADReplicationSiteLink to create a new Inter-site link from London to
Paris. The cost is 100 and the link uses the IP protocol.
New-ADReplicationSiteLink -Name LON-PARIS -SitesIncluded London,Paris
-Cost 100 -IntersiteTransportProtocol IP -ReplicationFrequencyinMinutes 90
6. Return to Server Manager and Refresh the console. Ensure your new site, subnet,
and site link were created.
Module 3 – Physical Components
Windows Server Roles and Features (Server Manager)
In this exercise you will use Server Manager to explore different Window Server roles
and features, and install a role and feature.
Note: Answers to the questions are at the end of this lab.
1. Switch to LON-DC1.
2. Open Server Manager.
3. Click the Manage menu, notice the Add Roles and Features and Remove Roles
and Features menu selections.
4. Select Add Roles and Features.
5. Click Next until you are on the Server Selection page.
6. Notice you can administer different computers, select LON-DC1.
7. On the Server Roles page notice when you select a Role, a general Description
is shown on the right.
8. Use the Descriptions to answer the following questions.
9. Question: Which server role enables you to centrally configure, mange, and
provide temporary IP addresses and related information for client computers?
10. Question: Which server role provides the services that you can use to create and
manage virtual machines and their resources?
11. Question: Which server role provides a reliable, manageable, and scalable Web
application infrastructure?
12. Question: Which server role stores information about objects on the network
and makes this information available to users and network administrators?
13. Question: Which server role allows network administrators to specify the
Microsoft updates that should be installed on different computers?
14. Select Print and Document Services, and when prompted confirm you would
like the RSAT tools.
15. Click Next until you are on the Features page.
16. Notice when you select a Feature, a general Description is shown on the right.
17. Use the Descriptions to answer the following questions.
18. Question: Which server feature allows multiple servers to work together to
provide high availability of server roles?
19. Question: Which server feature includes snap-ins and command line tools for
remotely managing roles and features?
20. Question: Which server feature distributes network traffic across several servers,
using the TCP/IP protocol?
21. Question: Which server feature includes Windows PowerShell cmdlets that
facilitate migration of server roles, operating system settings, files, and shares
from computers that are running earlier versions of Windows Server?
22. Question: Which server feature provides a central framework for managing your
IP address space and DHCP and DNS servers?
23. Select Windows Server Backup. Notice you have added a role and a feature.
24. Read through the additional information, and then Install the new components.
25. You can close the wizard, and use the Notification icon (top) to view the status.
For these components a restart is not required.
Answers:
9. Dynamic Host Configuration Protocol (DHCP) Server. The DHCP server
enables you to centrally configure, manage, and provide temporary IP addresses
and related information for client computers. IP addresses are used to uniquely
identify the client computers on your network.
10. Hyper-V Server. The Hyper-V Server provides services to create and manage
virtual machines and their resources. Each virtual machine is a virtualized
computer system that operates in an isolated execution environment. This allows
you to run multiple operating systems simultaneously.
11. Web Server (IIS). The Web Server provides a reliable, manageable, and scalable
Web application infrastructure. IIS supports hosting of Web content in
production environments.
12. Active Directory Domain Services (AD DS) Server. The AD DS server stores
information about objects on the network and makes this information available
to users and network administrators. Servers that run the AD DS Server role are
called Domain Controllers. These servers provide network users access to
resources through a single logon process.
13. Windows Server Update Services (WSUS) Server. The WSUS server allows
network administrators to specify the Microsoft updates that should be installed
on different computers. Keeping your computers updated with the latest updates
is an important part of securing the network. With WSUS you can automate this
process and create different update schedules for your computers.
18. Failover Clustering. Failover clustering is often used for File Services, virtual
machines, database applications, and mail applications.
19. Remote Server Administration Tools (RSAT). RSAT Tools are divided into
Feature Administration Tools and Role Administration Tools. Feature
Administration Tools include Failover Clustering Tools, IPAM Client, and Network
Load Balancing Tools. Role Administration Tools include Hyper-V Management
Tools, DHCP Server Tools, and Remote Access Management Tools.
20. Network Load Balancing (NLB). NLB is particularly useful for ensuring stateless
applications, such as Web Servers running IIS, are scalable by adding additional
services as the load increases.
21. Windows Server Migration Tools. Windows Server Migration Tools can also
facilitate migration from one computer that is running Windows Server 2012 to
another server that is running Windows Server 2012. For example when you are
creating a backup server.
22. IP Address Management Server (IPAM). IPAM supports automated discovery
of DHCP and DNS servers in the Active Directory forest. IPAM can also track and
monitor IPv4 and IPv6 addresses, as well as providing utilization tools.
Windows Server Roles and Features (PowerShell)
In this exercise you will use Windows PowerShell to manage Windows Server roles and
features.
1. Switch to LON-DC1.
2. Open a Windows PowerShell prompt and ensure you are running in an
administrator context; this can be done by right-clicking the icon in the taskbar
and selecting Run as Administrator.
3. Use Get-Command to view commands that pertain to Windows features. Notice
the Get-WindowsFeature and Install-WindowsFeature commands.
Get-Command *WindowsFeature
4. Review the help that is available on the Get-WindowsFeature command.
Help Get-WindowsFeature -showwindow
5. Review the roles and features installed on the local machine. Notice the Name
which is used for command line actions. Note the InstallState values: Available,
Installed, Removed.
Get-WindowsFeature | More
6. Review the roles and features installed on LON-SVR1.
Get-WindowsFeature -ComputerName LON-SVR1
7. View just the installed features on LON-SVR1.
Get-WindowsFeature -ComputerName LON-SVR1 | Where InstallState -eq
Installed
8. Deploy the XPS Viewer on the local machine.
Install-WindowsFeature XPS-Viewer
9. Deploy WINS on LON-SVR1.
Install-WindowsFeature WINS -ComputerName LON-SVR1
10. Uninstall the XPS Viewer on the local machine.
Uninstall-WindowsFeature XPS-Viewer
11. Features on Demand lets you add and remove role and feature files, also known
as feature payload, from Window Server. This allows you to reduce and conserve
space. To remove WINS and its payload from LON-SVR1. Notice the remove
parameter.
Uninstall-WindowsFeature WINS -ComputerName LON-SVR1 -Remove
To install a role or feature where the payload was removed, but the
installation media is available on a drive you could use:
Install-WindowsFeature –Restart –Source wim:d:\sources\install.wim:4
AD DS Schema
In this exercise you will use the ADSIEdit tool to view objects in the Active Directory
database.
Note: Don't delete or change objects within the Active Directory partitions as this can
cause your Active Directory environment to stop working correctly. The following is just
to help conceptualize where and how this data is stored and managed.
1. Switch to LON-DC1.
2. Open a PowerShell prompt and type ADSIEdit to start the LDAP editor.
3. ADSIEdit is a tool that can be used to view, change, create and delete any object
in the Active Directory database.
4. In the console tree, right-click ADSI Edit, and then select Connect to...
5. In the Connection Point section, ensure that the Select a well known Naming
Context dropdown menu displays Default naming context and then click OK.
6. As soon as you're successfully connected, in the console tree, double-click
Default naming context [LON-DC1.Adatum.com],DC=Adatum,DC=com, double-
click DC=Adatum,DC=com, and then click OU=Managers.
7. Notice the different class types that are within the Managers object. For example,
user and group.
8. To identify an object, you will use a Distinguished Name. For example, the
Distinguished Name for Ed Meadows is as follows: CN=Adam
Hobbs,OU=Managers,DC=Adatum,DC=com.
9. Right-click CN=Harry Lawrence and view the Properties.
10. Scroll through the Attributes and their associated Values.
11. As you have time, browse other parts of the AD DS database, but don't make any
changes.
12. Did this lab give you a better idea of how AD DS is organized?
RODC with Password Caching (Advanced)
A. Datum is adding a new branch office. You have been asked to configure an RODC to
service logon requests at the branch office. You also need to configure password
policies that ensure caching only of passwords for local users in the branch office.
In this exercise you will verify requirements for installing a RODC, install the RODC, and
configure password replication policies.
Note: If the AD DS role has already been installed on LON-SVR1, you must unistall the
role and restart the machine.
Note: In this lab you will pre-create the RODC computer account. By pre-creating this
account, you can delegate the second part of the RODC deployment to a non-
administrative user. For example, if the remote site (branch office) doesn't have any IT
administrators, a non-IT user at the site can complete the installation. If your intention
is to deploy an RODC yourself and you are a domain administrator, you will often
bypass the pre-creation and just go straight to the deployment.
Move LON-SVR1 to a Workgroup
1. LON-SVR1 will be our new RODC and it can not be on the domain when the
RODC account is created on LON-DC1. So, follow these steps to move it
temporarily to a Workgroup.
2. Switch to LON-SVR1.
3. In Server Manager, select Local Server, and then next to Domain click
Adatum.com
4. Click Change and put LON-SVR1 in a workgroup named TEMPORARY.
5. Acknowledge the message that you will need the Administrator’s password to
rejoin the domain.
6. As prompted, restart LON-SVR1.
Create the RODC account on LON-DC1
1. Switch to LON-DC1.
2. In Server Manager, click Tools, and then select Active Directory Users and
Computers.
3. Delete the LON-SVR1 computer account from the Computers container.
4. Read and acknowledge the subtree deletion information.
5. Right-click the Domain Controllers OU, and select Pre-create Read-only
Domain Controller account.
• Network credentials: My current logged on credentials
• Computer name: LON-SVR1
• Site: Default-first-site-name (if you have existing sites, select one of
those)
• Leave selected DNS server and Global catalog
• Delegate to: ADATUM\IT
12. Finish the Wizard and verify LON-SVR1 has been added to the Domain
Controllers OU.
Add the AD DS role to LON-SVR1
1. Switch to LON-SVR1.
2. In the Server Manager Dashboard, click Add roles and features, and then on
the Server Roles page, select the Active Directory Domain Services role.
3. Take all of the default values, and wait for the installation to complete.
4. In Server Manager, click the Notification flag, and select Promote this server
to a domain controller.
5. Complete the post deployment steps using the default options except those
listed below. Notice you are adding a domain controller to an existing domain.
Also, you will use the pre-created RODC account.
• Domain: Adatum.com
• Network credentials: Adatum.com\Administrator
• Password: Pa55w.rd
• Directory Services restore mode password: Pa55w.rd
• Read the Warning message: Use existing RODC account
• Replicate from: LON-DC1.Adatum.com
• Take the defaults for the location of the AD DS database.
• Review your selections and click View Script. Notice the PowerShell
command (Install-ADDSDomainController) that is being used.
6. When the installation is complete, LON-SVR1 will automatically restart.
Configure password replication
1. On LON-DC1, from Server Manager, open Active Directory Users and
Computers.
2. In the Users container, view the membership of the Allowed RODC Password
Replication Group, and verify that there are no current members.
3. In the Research OU, create a new global security group name Remote Office
Users.
4. Right-click the security group and view the Properties.
5. On the Members tab, add Dante, Ida and LON-CL1 to the membership of
Remote Office Users. To add LON-CL1 you will need to add Computers to the
Object Types.
6. In the Domain Controllers OU, open the properties of LON-SVR1.
7. On the Password Replication Policy tab, click Add and include the Remote
Office Users.
8. Click Advanced. On the Resultant Policy tab, add Dante.
Note: If prompted, Allow passwords to for this account to replicate to the RODC.
Monitor credential caching
1. Attempt to sign in to LON-SVR1 as Cai. This sign-in will fail because Cai is not a
member of the IT group.
2. Attempt to sign in to LON-SVR1 as Dante. This sign-in will authenticate.
3. On LON-DC1, in Active Directory Users and Computers, in the Domain
Controllers OU, open the properties of LON-SVR1.
4. On the Password Replication Policy tab, open the Advanced configuration.
5. On the Policy Usage tab, select the Accounts that have been stored on this
Read-only Domain Controller drop-down option. Notice that Dante’s password
has been cached (stored). Cai’s password has not been stored (cached).
6. Select the Accounts that have been authenticated on this Read-only Domain
Controller and notice Cai is listed as having tried to authenticate.
Populate credential caching
1. On LON-DC1, in Active Directory Users and Computers, in the Domain
Controllers OU, right-click LON-SVR1, and then click Properties.
2. On the Password Replication Policy tab, click Advanced.
3. On the Policy Usage tab, prepopulate the password for Ida.
4. Read the list of cached passwords, and then confirm that Ida has been added.
AD DS Database Maintenance
In this exercise you will stop AD DS, defragment the database, check the integrity of the
database, and start AD DS. You will use Server Manager and the NtdsUtil tool to
perform these tasks.
Stop AD DS
1. Switch to LON-DC1.
2. Open a Windows PowerShell prompt.
3. Stop the AD DS service.
Stop-Service ntds
4. Notice that other services are affected by this action including the DNS Server.
Thus, you can't stop the service without using the –Force parameter.
5. Run the Stop-Service ntds –Force command to stop the service.
6. Note that you could also stop the service in Server Manager\Tools\Services.
Perform an offline defragmentation of the AD DS database
1. Run NtdsUtil.exe.
2. At the prompt, view the Help. Pay particular attention to Activate and Files.
?
3. Create an active instance.
activate instance NTDS
4. Manage AD DS database files.
files
5. At the file maintenance prompt, see what is available by typing a question
mark and pressing the Enter key. Notice the compact to and integrity options.
?
6. Compact the database to the c: drive.
compact to c:\
7. Wait for the defragmentation process to complete.
8. Notice the recommendation to backup of the database, now that it is compacted.
Check the integrity of the offline AD DS database
1. Ensure an integrity check of the database completes successfully.
Integrity
2. Run quit two times to exit the utility.
3. At the PowerShell prompt, start the AD DS service
Start-Service ntds
4. Note that you could also start the service in Server Manager\Tools\Services.
Module 4 – Administering AD DS
Windows Server Update Services
Note: There are additional steps to configuring WSUS, but this lab only provides an
overall of the capabilities. In this scenario, LON-SVR1 will be the upstream WSUS
server providing updates to LON-DC1 (downstream server).
Prepare LON-SVR1 as the WSUS update server
1. Switch to LON-SVR1.
2. From Server Manager, launch the Add Roles and Features Wizard, and on
the Server Roles page select the Windows Server Update Services role.
Add any necessary features that are suggested.
3. Continue through the wizard reading the text and taking the defaults.
4. On the Content location selection page, store the updates in
C:\WSUSUpdates.
5. Wait for the installation to complete. It may take a couple of minutes
6. From the Server Manager Tools menu, select Windows Server Update
Services.
7. Read that additional steps are required, then click Run.
8. Wait for the steps to complete, and then close the window.
9. This is all that is needed on LON-SVR1 (role install and update directory
created). You can close the WSUS Configuration Wizard.
Install the WSUS role on LON-DC1 (this server will receive updates from LON-
SVR1)
1. Switch to LON-DC1.
2. From Server Manager, launch the Add Roles and Features Wizard, and on
the Server Roles page select the Windows Server Update Services role.
Add any necessary features that are suggested.
3. Continue through the wizard reading the text and taking the defaults.
4. On the Content location selection page, store the updates in
C:\WSUSUpdates.
5. Wait for the installation to complete. A restart is not required.
Prepare LON-DC1 to receive updates from LON-SVR1
1. Continue on LON-DC1.
2. From the Server Manager Tools menu, select Windows Server Update
Services.
3. Read that additional steps are required, then click Run.
4. Wait for the steps to complete, and then close the window. Continue in the
next wizard that appears. You may see an error after the run, but if the
wizard opens, you will be okay.
Note: If you accidentally close the configuration wizard you can retrieve it
with these steps: In Server Manager, select WSUS from the left menu. In the
Server list, right-click LON-DC1 and select Windows Server Update
Services. Expand LON-DC1, select Options, scroll down in the center pane,
and select Windows Server Configuration Wizard.
5. On the Choose Upstream Server page, click the Synchronize from another
Windows Server Update Services server option, and type LON-
SVR1.Adatum.com. Notice the port is 8530.
6. Click Next and then on the Connect to Upstream Server page, click Start
Connecting. Wait for the upstream server settings to be applied, and then
click Next. This can take a couple of minutes.
7. Notice that you can specify the update languages. Click Next.
8. Notice that you can create a daily synchronization schedule. Click Next.
9. On the Finished page, click the Begin initial synchronization option, and
then click Finish.
10. Note: The wizard may complete with an error. That is okay, we are just
reviewing the basic configuration steps. There are no updates on LON-SVR1.
Explore the WSUS console and configure WSUS groups
1. Continue on LON-DC1, and in the Windows Server Update Services console
(this window may be behind the wizard), expand LON-DC1, and take a
minute to explore the different nodes in the navigation pane.
2. Notice the different types of Updates. This is where you would Approve an
update.
3. Notice the Computers node (All Computers and Unassigned Computers).
Right-click All Computers, and Add Computer Group called Research. This
is how you would organize your computers for Group Policy (next section).
4. Notice by default there are no Downstream Servers from LON-DC1.
5. In the Options pane, click Computers. Notice there are two ways to assign a
computers to update groups. Select Use Group Policy or registry settings
on computers.
6. Notice the Reports node. There are reports for Updates, Computers, and
Synchronization.
Configure Group Policy to deploy WSUS settings to the Research group
1. Continue on LON-DC1 and from the Server Manager Tools menu, open
Group Policy Management.
2. Expand Forest: Adatum.com\Domains\Adatum.com.
3. Right-click the Research organizational unit (OU), and then click Create a
GPO in this domain, and Link it here.
4. Name the new GPO: WSUS Research. Click OK.
5. Expand the Research OU, right-click WSUS Research, and then click Edit.
6. In the Group Policy Management Editor, expand Computer
Configuration\Policies\Administrative Template\Windows Components,
and then click Windows Update.
7. Take a minute to look through all of the different update settings that are
available. If you click the Setting header, it will sort alphabetically.
8. Double-click Configure Automatic Updates, and then click Enabled.
9. Read through the choices for configuring automatic update then select 4 –
Auto download and schedule the install. Click OK.
10. Double-click Specify intranet Microsoft update service location, and then
click Enabled.
11. Read through the choices then in Set the intranet update service for
detecting updates and the Set the intranet statistics server text boxes,
type http://LON-SVR1.Adatum.com:8530. Apply your changes.
12. Double-click Enable client-side targeting. Read through what this policy
does.
13. In the Enable client-side targeting dialog box, click Enabled, in the Target
group name for this computer text box, type Research, and then click OK.
You are applying the policies to the Research group.
14. Close the Group Policy Management Editor and the Group Policy
Management console.
15. In Server Manager, click Tools, and then click Active Directory Users and
Computers.
16. In Active Directory Users and Computers, double-click Adatum.com, click
Computers, right-click LON-CL1, and then click Move.
17. In the Move dialog box, click the Research OU, and then click OK. LON-CL1
will now get the GPOs associated with the Research group.
18. Close Active Directory Users and Computers.
Backup AD DS
In this exercise you will install the Windows Server Backup feature, create a scheduled
backup, perform an interactive backup of the System State.
Note: The backup may take 10 - 20 minutes. To restore the backup (next lab) , you will
need 20- 25 minutes. Ensure you have enough time to complete both labs.
Remove accidental deletion protection on Lab OU
1. Switch to LON-DC1.
2. Open Active Directory Users and Computers.
3. On the View tab, select Advanced Features. This will show you the Protect
object from accidental deletion checkbox.
4. Add a Lab OU to the Research OU.
5. In the right pane, right-click the Lab OU and view the Properties.
6. On the Object tab, deselect the Protect object from accidental deletion option
and then click OK.
Install the Windows Server Backup feature
1. Switch to LON-DC1.
2. In Server Manager, click Add roles and features.
3. Accept the defaults, until the Select features page, and then in the Features list,
select the Windows Server Backup.
4. Read the Description - Windows Server Backup allows you to back up and
recover your operating system, applications, and data.
5. Finish the Wizard by clicking Install.
Create a scheduled backup
1. In Server Manager, click Tools, and then click Windows Server Backup.
2. Click Local Backup, and then click Backup Schedule (Actions pane).
3. In the Backup Schedule Wizard.
• Read about the decisions you need to make about what to back up, when and
how often to back up, and where to store your backups.
• On the Select Backup Configuration page, click Custom. Notice the steps on
the left change.
• Click Add Items, and then select Bare metal recovery. Explore the System
Reserved selection.
• Specify that you would like to back up Once a day at 12:00 am.
• Read about your storage choices and then select Back up to a hard disk that
is dedicated for backups (recommended).
• Click Show All Available Disks, and then select Disk 1.
• The Windows Server Backup dialog box appears, informing you that all data
on the disk will be deleted. Click Yes to continue.
Important: You will cancel the process in the next step to avoid formatting the E:
drive.
o On the Confirmation page, click Cancel to avoid formatting drive E.
Perform an interactive backup
1. In the Actions pane, click Backup Once.
2. In the Backup Once Wizard.
• Select Different options and read about why this choice is used.
• Select a Custom configuration.
• Click Add Items, select System state, and then click Advanced Settings.
• Notice you can use the Exclusions tab to exclude file types such as .mp3.
• On the VSS Settings tab, read about the different options, and then select
VSS full Backup.
• Accept the defaults for the rest of the Wizard, and then click Backup.
3. The backup should take between 10 and 20 minutes to complete.
4. After completing the backup move to the next lab, Restore AD DS.
Restoring AD DS
In this exercise you will create a System State backup, and then perform an authoritative
restore to retrieve a deleted AD object.
Note: Wait until the backup from the previous lab is complete before proceeding.
Delete an organizational unit (OU)
1. Switch to LON-DC1.
2. In Server Manager, click Tools, and then Active Directory Users and
Computers.
3. In the Research OU delete the Lab OU.
Restart in Directory Services Restore Mode (DSRM)
1. Open a Windows PowerShell prompt.
2. Configure the server to start in DSRM.
bcdedit /set safeboot dsrepair
3. Restart LON-DC1.
Restart-Computer -Force
Note: To restore the backup you can use either Server Manager (Option 1) or
command-line (Option 2). Choose one or the other. The command line is a little
more challenging but will provide more verbose status information.
Option 1: Server Manager - Restore system state data
1. Switch to LON-DC1as .\Administrator with password Pa55w.rd.
2. Notice you are logging in to the local machine. Notice the Safe Mode
notifications.
3. In Server Manager, click Tools, and then Windows Server Backup.
4. Click Local Backup in the left pane.
5. In the Actions pane, select Recover.
• Notice that a System state backup is available.
• Select System state as the recovery type.
• Accept the remaining defaults in the wizard, and Recover the backup.
6. The restoration will take about 25 minutes.
7. When prompted restart the machine.
Option 2: Command line - Restore System state data
1. Log on to LON-DC1 as .\Administrator with password Pa55w.rd.
2. Notice you are logging in to the local machine. Notice the Safe Mode
notifications.
3. Open a command prompt.
4. Get help on the wbadmin tool.
wbadmin /?
5. Notice wbadmin can also be used be used to create backups.
6. Get the version identifier for the backup.
wbadmin get versions -backuptarget:E: -machine:LON-DC1
7. Restore the System state information. Use the version number from the previous
command. For example: -version: 02/23/2016-18:18
wbadmin start systemstaterecovery -version:version -backuptarget:E: -
machine:LON-DC1
8. Read through the messages and confirm the restore.
9. The restoration will take about 25 minutes.
10. When prompted restart the machine.
Mark restored information as authoritative
1. Log on to LON-DC1 as .\Administrator with password Pa55w.rd.
2. Press Enter to acknowledge the recovery operation completed successfully.
3. Notice you are logging in to the local machine. Notice the Safe Mode
notifications.
4. In Server Manager, click Tools, and then select Windows Server Backup.
5. Click Local Backup and confirm the System state recovery was Successful.
6. You can double-click the System state recovery and view the files that were
recovered.
7. Open an elevated command prompt and start NtdsUtil.
NtdsUtil
8. Get Help on what is available.
?
9. Activate the ntds instance
activate instance ntds
10. Start the authoritative restore.
Authoritative restore
1. Restore the deleted Lab OU. Notice you need the distinguished name for each
item.
restore subtree “ou=Lab,ou=Research,dc=adatum,dc=com”
2. Run quit twice to exist NtdsUtil.
3. Restart the server normally.
bcdedit /deletevalue safeboot

Verify that the data has been restored
1. Log on to LON-DC1 as Adatum\Administrator with the password Pa55w.rd.
2. In Server Manager, click Tools, and then Active Directory Users and
Computers.
3. Verify the presence of the Research\Lab OU.
Recycle Bin (Server Manager)
In this exercise you will enable the Recycle Bin and practice deleting and restoring AD
objects using the ADAC.
Enable the Active Directory Recycle Bin
1. Switch to LON-DC1.
2. In Server Manager, click Tools, and then click Active Directory Administrative
Center.
3. Right-click Adatum (local), and then Enable Recycle Bin.
4. Acknowledge the warning message that the recycle bin cannot be disabled. Read
the warning about replication and then click OK.
5. Rather than wait for the replication to occur, manually replicate the sites.
6. In Server Manager, click Tools, and then select Active Directory Sites and
Services.
7. Expand Sites\London\Servers\LON-DC1, and then open NTDS Settings.
8. Right-click <automatically generated>, click Replicate Now, and then click OK.
9. Repeat these steps for LON-SVR1.
10. In Active Directory Administrative Center, refresh Adatum (local). Notice the
Enable Recycle Bin selection (right panel) is now greyed out.
11. Notice there is now a Deleted Objects container.
Create and then delete test accounts
1. Select Adatum (local), right-click the Research OU, and the create a new user.
• Full name: Test1
• User UPN logon: Test1
• Password: Pa55w.rd
• Confirm password: Pa55w.rd
2. Repeat the previous steps to create a second user, Test2.
3. Expand the Research OU, and delete both Test1 and Test2.
Restore deleted accounts
1. In the ADAC, open the Deleted Objects container.
2. Right-click Test1, click Restore To, and then select the IT OU.
3. Confirm that Test1 is now located in the IT OU.
4. Leave Test2 in the Recycle Bin.
Recycle Bin (PowerShell)
In this exericse you will enable the Recycle Bin and practice deleting and restoring AD
objects using PowerShell.
Verify the Recycle Bin status
1. Open a Windows PowerShell prompt.
2. Enable the recycle bin.
Note: If you enabled the Recycle Bin in the previous lab, there will be an error
that the object already exists. You can restart the lab, if you want to give it try.
Enable-ADOptionalFeature –Identity ‘CN=Recycle Bin Feature,CN=Optional
Features,CN=Directory Service,CN=Windows
NT,CN=Services,CN=Configuration,DC=adatum,DC=com’ –Scope
ForestOrConfigurationSet –Target ‘adatum.com’
Restore an item from the recycle bin
1. If you completed the previous lab and have a test2 user account in the Deleted
Objects container, then continue. If you did not do the previous lab, quickly
create a user (test2) in the Research OU, and then delete the account.
2. Verify the test2 attributes are obscured and the object cannot be located with a
regular search.
Get-ADObject -Filter {samAccountName -eq “test2”}
3. Run the search again and this time include the Deleted Objects container. Verify
the test2 account is in the container.
Get-ADObject -Filter {samAccountName -eq “test2”} -IncludeDeletedObjects
4. Restore test2 to the IT OU.
Get-ADObject -Filter {samAccountName -eq “test2”} -IncludeDeletedObjects
| Restore-ADObject -TargetPath “OU=IT,dc=adatum,dc=com”
5. Verify test2 has been restored to the IT OU. Remember test2 was originally in
the Research OU.
Get-ADObject -Filter {samAccountName -eq “test2”}
Configure the deleted object lifetime value
1. Verify the deleted object lifetime (tombstoneLifetime) value is 180 days. This
setting is on the Directory Service object.
Get-ADObject -Identity “cn=directory service,cn=windows
nt,cn=services,cn=configuration,dc=adatum,dc=com” -Properties
tombstoneLifetime | FL tombstoneLifetime
2. Change the deleted object lifetime setting to 365 days. This will keep objects in
the Deleted Objects container for one year.
Set-ADObject -Identity “cn=directory service,cn=windows
nt,cn=services,cn=configuration,dc=adatum,dc=com” -
replace:@{“tombstoneLifetime” = 365}
3. Use Get-ADObject (Step #1) to confirm the value has changed.
Microsoft Azure (Optional)
Your practice environment does not have a new Nano server virtual machine, but
you can use Azure to see it in action.
Azure Setup
If you already have a Microsoft Azure subscription, you can skip this section. Otherwise,
follow these steps to create a free trial subscription. You will need to provide a valid
credit card number for verification, but you will not be charged for Azure services – for
more information, see the frequently asked questions on the Azure sign-up page.
1. If you already have a Microsoft account that has not already been used to sign up
for a free Azure trial subscription, you’re ready to get started. If not, don’t worry,
just create a new Microsoft account.
2. After you’ve created a Microsoft account, create your free Microsoft Azure
account. You’ll need to sign-in with your Microsoft account if you’re not already
signed in. Then you’ll need to:
• Enter your cellphone number and have Microsoft send you a text message
to verify your identity.
• Enter the code you have been sent to verify it.
• Provide valid payment details. This is required for verification purposes
only – your credit card won’t be charged for any services you use during
the trial period, and the account is automatically deactivated at the end of
the trial period unless you explicitly decide to keep it active.
PowerShell Setup for Azure
Before you begin, make sure that your client computer has a minimum of PowerShell 4
installed. You can install the latest version of the management framework (including
PowerShell 5.0) by downloading and installing the Windows Management Framework
5.0 software. You can download it from https://www.microsoft.com/en-
us/download/details.aspx?id=50395. Once you verify that your computer has the
minimum required version of PowerShell, you can proceed to download the necessary
modules:
1. From your lab computer, open an elevated PowerShell prompt.
2. Verify Azure related modules are available. If Azure modules are not available
proceed with the following steps.
Get-Module -All
3. Install the AzureRM module for resource management.
Install-Module AzureRM
4. If you get prompted to install and import the NuGet provider, Type Y and then
press the Enter key.
5. If you are notified that the repository is untrusted, confirm that you want to
install the modules by typing Y and then pressing the Enter key. The installation
process will take several minutes as packages are downloaded and installed.
6. After the download and installation is finished, import the module.
Import-Module AzureRM
7. Install the Azure module for service management.
Install-Module Azure command.
8. If you are notified that the repository is untrusted, confirm that you want to
install the modules by typing Y and then pressing the Enter key. The installation
process will take several minutes as packages are downloaded and installed.
9. Once the download and installation is finished, import the module.
Import-Module Azure command.
10. Verify Azure related modules are available.
Get-Module -All
If you have trouble installing the PowerShell modules from the PowerShell gallery, you
can try the WebPI method instead. Visit http://aka.ms/webpi-azps to download and
install the modules.
Create a Windows Server 2016 Nano Server in Azure
In this task, you will create a Windows Nano virtual machine in Azure.
1. Navigate to https://portal.azure.com/ and, when prompted, sign in with your credentials.
2. In the hub menu, on the left-hand side of the portal page, click New (+) > Compute > See all
3. Select Windows Server. A scroll list of Windows Servers is displayed on the right side of the portal.
4. Scroll down and select Windows Server 2016 – Nano Server, then click Create. 5. On the Basics blade, enter a Name for the virtual machine. The name must be 1-15
characters long and it cannot contain special characters. For this exercise, use the name:
• Nano-VM1 6. Select the VM disk type. You have the choice between SSD and HDD. For this
exercise, make sure to select:
• HDD. 7. Enter a User name, and a strong Password that will be used to create a local account
on the VM. The local account is used to sign in to and manage the VM. For this exercise, use the following username and password:
• Student
• Pa55w0rd1234 8. Select an existing Resource group or type the name for a new one. (see terminology
in Module 2 for Resource group information). In this exercise, you will use the existing resource group that automatically appears in the Resource group drop down list.
9. Select an Azure Datacenter Location such as East US. Click OK. 10. Choose a VM size, and then click Select to continue. For this exercise, use:
• Standard_A1 11. Select not to use managed disks. 12. To allow PowerShell Remoting, click on the Network Security Group (firewall) blade.
13. Select Create New. 14. On the Create network security group, remove the predefined default-allow-rdp
rule and replace it with a new rule with the following settings:
• Name: WinRM-https
• Priority: 1000
• Source: Any
• Service: WinRM
• Action: Allow 15. Make sure that the validation passes and, on the Summary blade, click OK.
On the Azure portal dashboard, you will see the Nano Server being deployed. Once it is up and running you will see the Overview > Essentials section of the blade of the new server.
Connect to Windows Server 2016 Nano Server in Azure
In this task, you will connect to a Windows Nano virtual machine in Azure.
In this task, you will connect to the Nano server you deployed in the previous task. In the Azure portal, in the Overview > Essentials section of the blade of the new Nano server, take the note of its public IP address. You can connect to the Nano server using the public IP address and PowerShell remoting. Note: PowerShell Remoting must be setup on the machine you are using
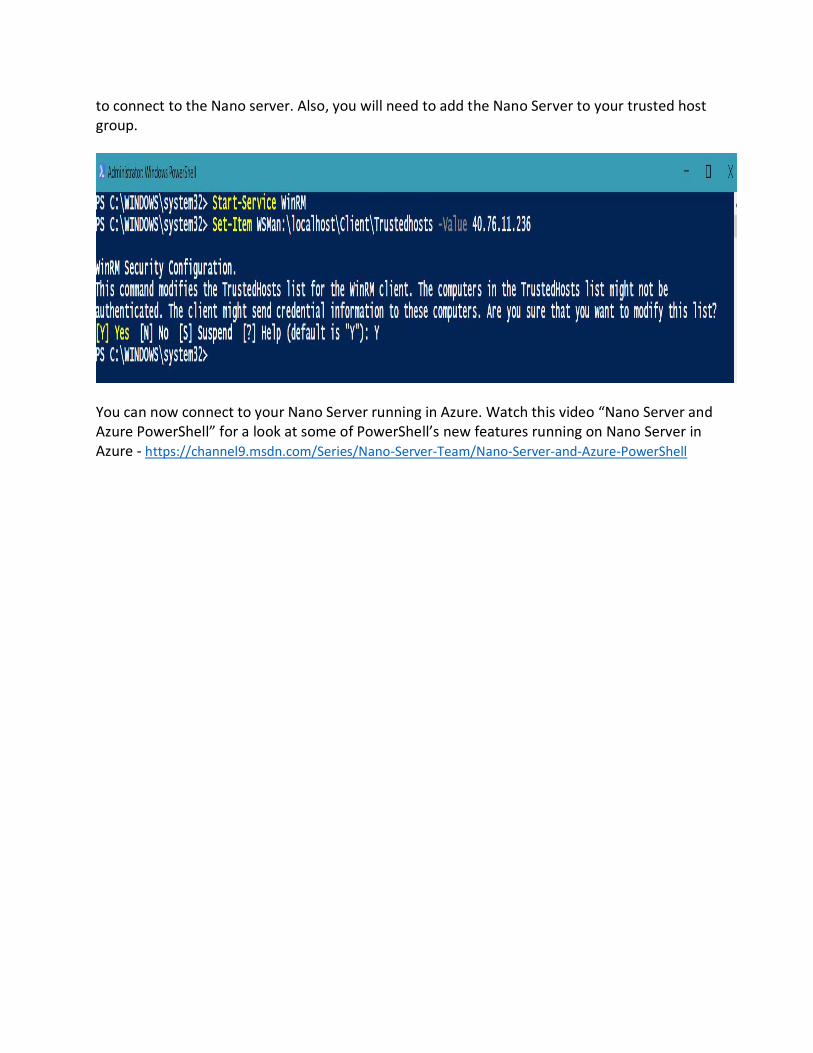
to connect to the Nano server. Also, you will need to add the Nano Server to your trusted host group.
You can now connect to your Nano Server running in Azure. Watch this video “Nano Server and Azure PowerShell” for a look at some of PowerShell’s new features running on Nano Server in Azure - https://channel9.msdn.com/Series/Nano-Server-Team/Nano-Server-and-Azure-PowerShell


