Embed Size (px)
Citation preview

PIVOT E-VAULTOriginal Operational Instructions
This manual is intended to provide you with the information needed to get you on the trail or road. This guide will walk you through the steps necessary to set up all the components and become familiar with the Fazua E-bike System. This document contains some helpful diagrams and reference material to make sure you have everything necessary to maintain your E-Vault and enjoy it to the fullest.
www.pivotcycles.com [email protected] 1.877.857.4868
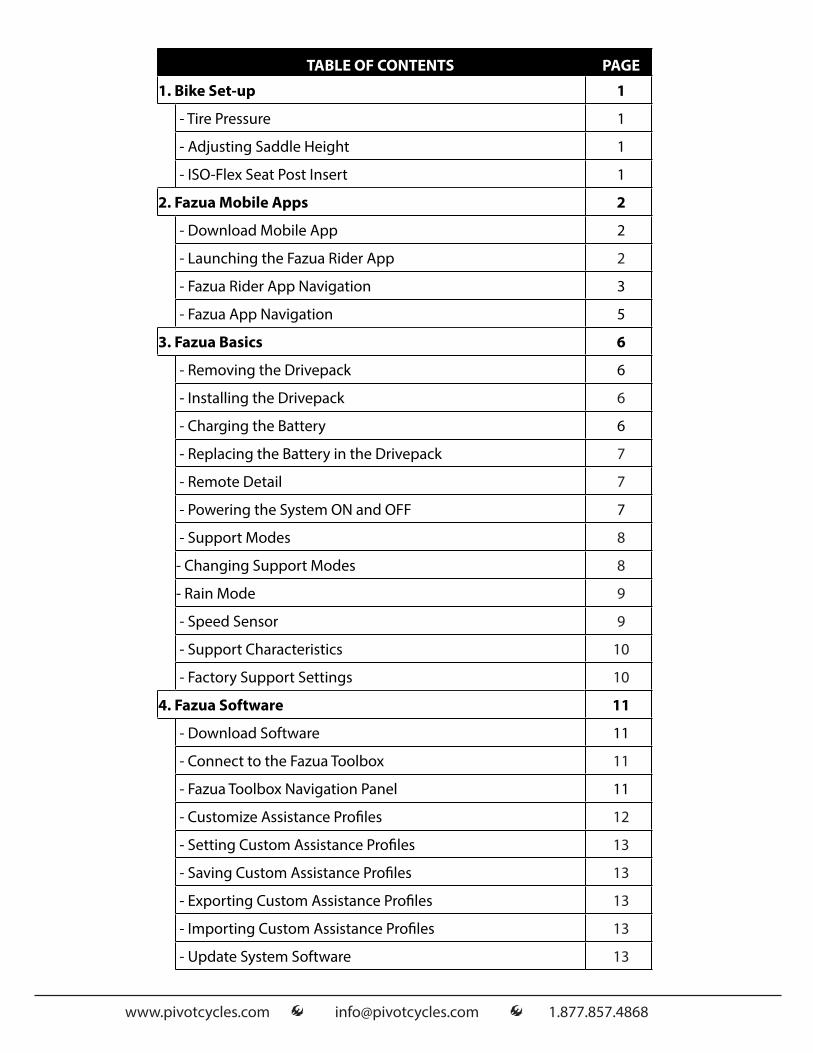
TABLE OF CONTENTS PAGE
1. Bike Set-up 1
- Tire Pressure 1
- Adjusting Saddle Height 1
- ISO-Flex Seat Post Insert 1
2. Fazua Mobile Apps 2
- Download Mobile App 2
- Launching the Fazua Rider App 2
- Fazua Rider App Navigation 3
- Fazua App Navigation 5
3. Fazua Basics 6
- Removing the Drivepack 6
- Installing the Drivepack 6
- Charging the Battery 6
- Replacing the Battery in the Drivepack 7
- Remote Detail 7
- Powering the System ON and OFF 7
- Support Modes 8
- Changing Support Modes 8
- Rain Mode 9
- Speed Sensor 9
- Support Characteristics 10
- Factory Support Settings 10
4. Fazua Software 11
- Download Software 11
- Connect to the Fazua Toolbox 11
- Fazua Toolbox Navigation Panel 11
- Customize Assistance Profiles 12
- Setting Custom Assistance Profiles 13
- Saving Custom Assistance Profiles 13
- Exporting Custom Assistance Profiles 13
- Importing Custom Assistance Profiles 13
- Update System Software 13

www.pivotcycles.com [email protected] 1.877.857.4868
TABLE OF CONTENTS (Cont') PAGE
5. Third Party Compatibility 14
- Compatible Devices 14
- Garmin Pairing 14
6. Troubleshooting 15
- Troubleshooting Table 15
7. Schematics 16
- Fazua Evation System Schematic 16
- Small Parts Schematic 17
- Small Parts Table 18
- Wiring Diagram 19
5. Warnings 20
- Bicycle Safety 20
- Imporper Use Hazards 20
- Health Hazards 21
- Potential Damage Hazards 21
6. Additional Information 22
- Fazua Evation Drive System 22
- Pivot E-Vault 22
- Conformity 22
- Sources 22
www.pivotcycles.com [email protected] 1.877.857.4868 1
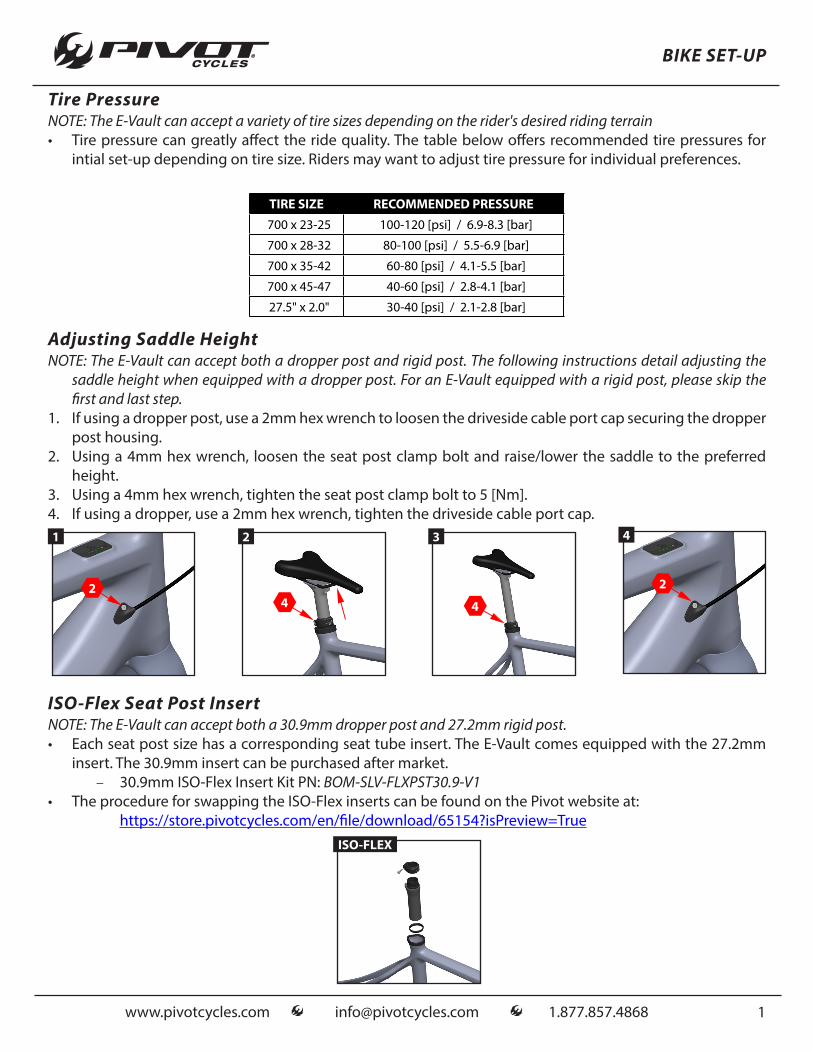
Tire PressureNOTE: The E-Vault can accept a variety of tire sizes depending on the rider's desired riding terrain• Tire pressure can greatly affect the ride quality. The table below offers recommended tire pressures for
intial set-up depending on tire size. Riders may want to adjust tire pressure for individual preferences.
TIRE SIZE RECOMMENDED PRESSURE
700 x 23-25 100-120 [psi] / 6.9-8.3 [bar]
700 x 28-32 80-100 [psi] / 5.5-6.9 [bar]
700 x 35-42 60-80 [psi] / 4.1-5.5 [bar]
700 x 45-47 40-60 [psi] / 2.8-4.1 [bar]
27.5" x 2.0" 30-40 [psi] / 2.1-2.8 [bar]
ISO-Flex Seat Post InsertNOTE: The E-Vault can accept both a 30.9mm dropper post and 27.2mm rigid post.• Each seat post size has a corresponding seat tube insert. The E-Vault comes equipped with the 27.2mm
insert. The 30.9mm insert can be purchased after market. – 30.9mm ISO-Flex Insert Kit PN: BOM-SLV-FLXPST30.9-V1
• The procedure for swapping the ISO-Flex inserts can be found on the Pivot website at:https://store.pivotcycles.com/en/file/download/65154?isPreview=True
ISO-FLEX
Adjusting Saddle HeightNOTE: The E-Vault can accept both a dropper post and rigid post. The following instructions detail adjusting the
saddle height when equipped with a dropper post. For an E-Vault equipped with a rigid post, please skip the first and last step.
1. If using a dropper post, use a 2mm hex wrench to loosen the driveside cable port cap securing the dropper post housing.
2. Using a 4mm hex wrench, loosen the seat post clamp bolt and raise/lower the saddle to the preferred height.
3. Using a 4mm hex wrench, tighten the seat post clamp bolt to 5 [Nm].4. If using a dropper, use a 2mm hex wrench, tighten the driveside cable port cap.1
2
4
24
2 3
4
BIKE SET-UP

www.pivotcycles.com [email protected] 1.877.857.4868 2
FAZUA MOBILE APPS
Fazua Rider App NavigationNOTE: The main page is the map of your current location. To access the Fazua Rider app navigation panel, press on
the three bar icon in the top left corner. The navigation panel options are listed below.MapA) Main menu and naviagation for the Fazua Rider app.B) The map displays your current location along with the route, if a destination has been selected.C) Use the magnifying glass to search for an address so a route to a selected destination can be provided.D) The play button will begin recording your ride so you can track metrics of your ride and review them later.E) The compass will center the map to your current location.F) The data display shows a selected parameter. By clicking on the data display, you can choose to display State of Charge, Speed,
or Power Output.DashboardA) The data display shows a selected parameter. By clicking on the data display, you can choose to display State of Charge, Speed,
or Power Output. This is the same display that will be shown on the Map page.B, C, D) These are secondary data displays. Each display can show various metrics, which can be shown by swiping left or right on the
data display. The data presented in each display can be chosen by tapping on the display. Each display can have the following metrics:
State of charge, Cycle count, Remaining capacity, Health, Current, Battery temperature, Voltage, Speed, Odometer, Drivetrain temperature, Distance to empty, Power, Rider power, Cadence, User torque, Distance to destination, Estimated time of arrival,Trip distance, Trip duration, & Clock. C D E
B
F
A
B
C
D
Launching the Fazua Rider App1. Turn on Bluetooth in the phone settings.2. Turn on the Evation drivesystem fitted to your ebike.3. In the Fazua Rider app, either tap on "Tap to Pair Vehicle" in the start screen or go to the menu in the upper
left corner, tap on "Vehicle" and click on "Tap to Pair Vehicle" there. A connection to you bike only needs to be established once using the Fazua Rider app.
Download Mobile AppsFazua offers two different apps to optimize the use of the drive system. The Fazua Rider app is used for in ride data and display, along with functionality for updating the fX remote firmware. The Fazua app is used to change support mode settings, download new profiles and customize support and settings from a smart phone.1. Go to https://fazua.com/ and click on Support and go to the Help Center.2. In the Help Center you will find both the Fazua Rider app and the Fazua app.3. Select the app you would like to download from the menu, a link will be provided for both the Google
Play Store and the Apple App Store. Follow the link corresponding to the operation system of your mobile device (Android or Apple).
4. Once in the app store on your phone, press "Install".
A
Dashboard ScreenshotMap Screenshot
www.pivotcycles.com [email protected] 1.877.857.4868 3
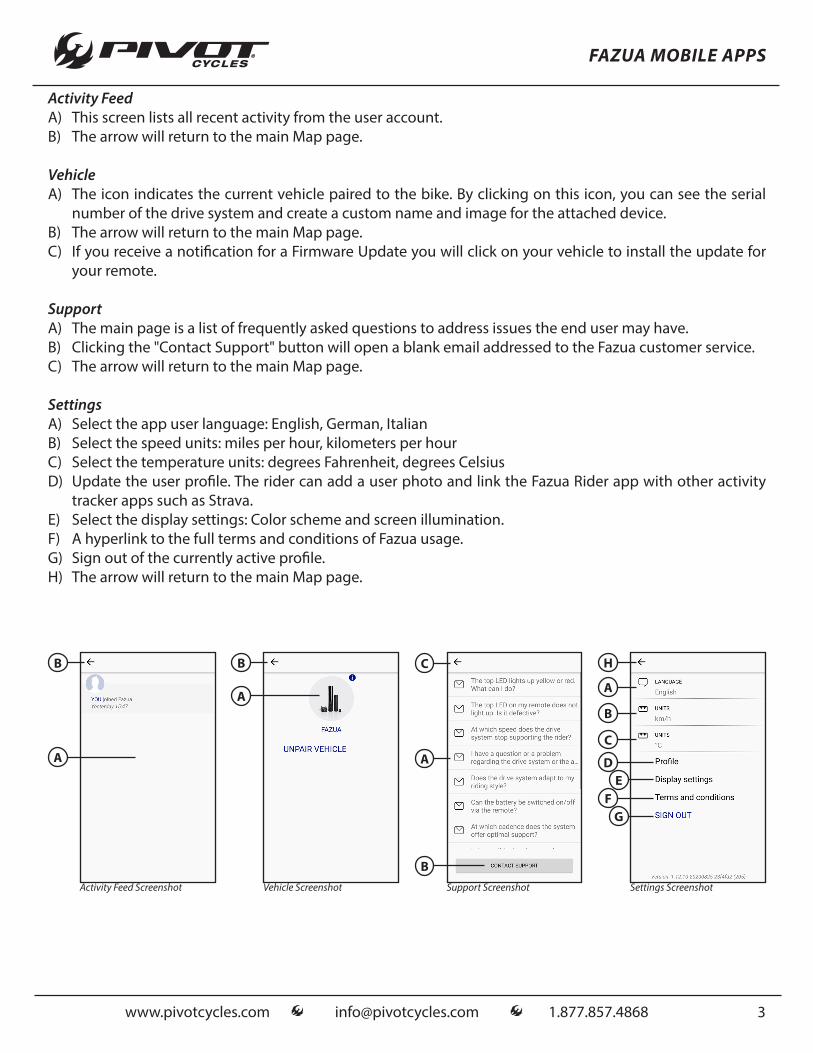
Activity FeedA) This screen lists all recent activity from the user account.B) The arrow will return to the main Map page.
VehicleA) The icon indicates the current vehicle paired to the bike. By clicking on this icon, you can see the serial
number of the drive system and create a custom name and image for the attached device.B) The arrow will return to the main Map page.C) If you receive a notification for a Firmware Update you will click on your vehicle to install the update for
your remote.
SupportA) The main page is a list of frequently asked questions to address issues the end user may have.B) Clicking the "Contact Support" button will open a blank email addressed to the Fazua customer service.C) The arrow will return to the main Map page.
SettingsA) Select the app user language: English, German, ItalianB) Select the speed units: miles per hour, kilometers per hourC) Select the temperature units: degrees Fahrenheit, degrees CelsiusD) Update the user profile. The rider can add a user photo and link the Fazua Rider app with other activity
tracker apps such as Strava.E) Select the display settings: Color scheme and screen illumination.F) A hyperlink to the full terms and conditions of Fazua usage.G) Sign out of the currently active profile.H) The arrow will return to the main Map page.
Activity Feed Screenshot
B
A
Vehicle Screenshot
B
A
Support Screenshot
C
A
BSettings Screenshot
B
C
DE
A
FG
H
FAZUA MOBILE APPS

www.pivotcycles.com [email protected] 1.877.857.4868 4
FAZUA MOBILE APPS
Firmware Notice Screenshot
Remote Firmware Update
1. When you receive a notification in the Fazua Rider App that states: "Firmware update available. Please go to your vehicle settings and update the firmware." Tap OK to close the notification. This means there is a firmware update for the remote on the bike. Updates for the drivepack firmware require it to be connected to a computer with the Fazua Toolbox. Instructions for updating the drivepack are found on page 11.
2. Make sure your battery has a sufficient charge to stay on for several minutes to complete the update.3. Tap the three bar icon in the top left corner of the app screen to view the main menu.4. Tap on Vehicle from the menu.5. Tap the image on the screen showing the parts of the drive system with the yellow triangle notification.6. You will see your remotes information and a blue button at the bottom labeled "UPDATE FIRMWARE."7. Once you select to update the firmware it will display a notification and the loading status of the update.8. When notified the update is complete you will need to turn Bluetooth off and on on your phone to
reconnect. If it does not pair you may need to forget the device in your phones Bluetooth settings and re-pair your phone and bicycle. Further troubleshooting information can be found at https://fazua.com/
App Menu Screenshot Vehicle Menu Screenshot Firmware Update Screenshot
The remote unit is found on the top tube for turning the bike on and off as well as changing support modes. This unit may require firmware updates that can easily be managed from the Fazua Rider app.
www.pivotcycles.com [email protected] 1.877.857.4868 5
FAZUA MOBILE APPS
Home Screenshot Bikes Screenshot Customizer Screenshot Profile Store Screenshot
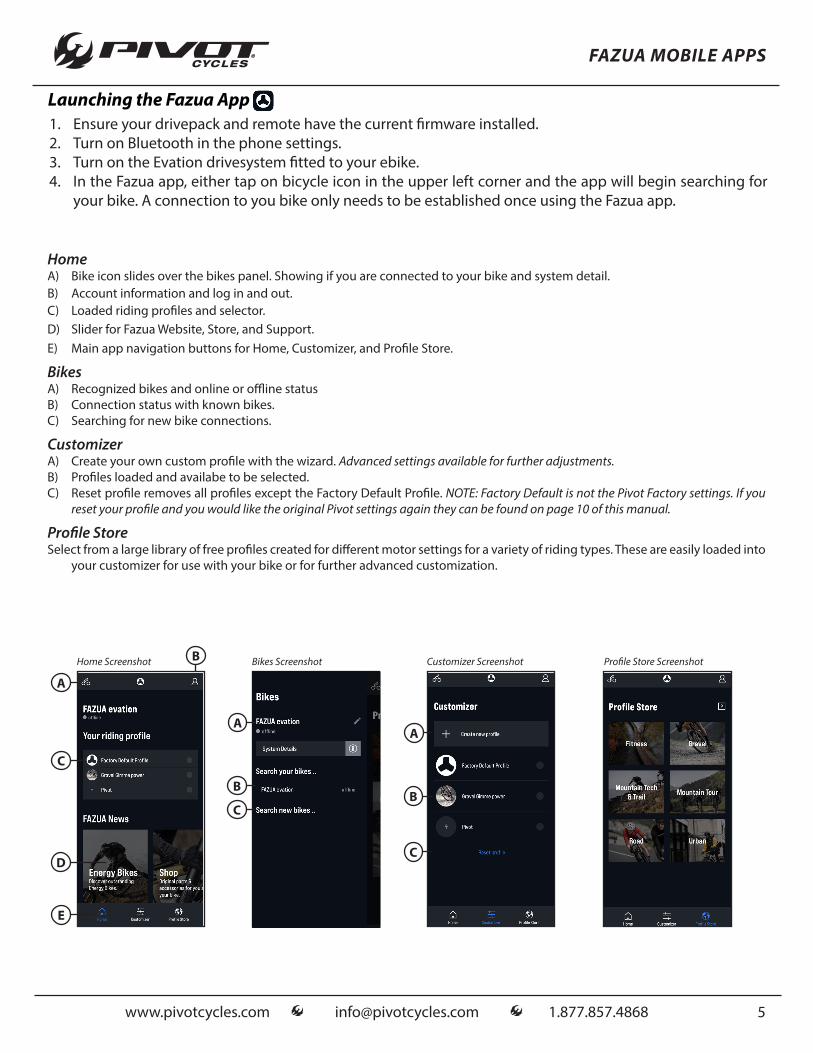
Launching the Fazua App1. Ensure your drivepack and remote have the current firmware installed.2. Turn on Bluetooth in the phone settings.3. Turn on the Evation drivesystem fitted to your ebike.4. In the Fazua app, either tap on bicycle icon in the upper left corner and the app will begin searching for
your bike. A connection to you bike only needs to be established once using the Fazua app.
HomeA) Bike icon slides over the bikes panel. Showing if you are connected to your bike and system detail.B) Account information and log in and out.C) Loaded riding profiles and selector.D) Slider for Fazua Website, Store, and Support.E) Main app navigation buttons for Home, Customizer, and Profile Store.
BikesA) Recognized bikes and online or offline statusB) Connection status with known bikes.C) Searching for new bike connections.
CustomizerA) Create your own custom profile with the wizard. Advanced settings available for further adjustments.B) Profiles loaded and availabe to be selected.C) Reset profile removes all profiles except the Factory Default Profile. NOTE: Factory Default is not the Pivot Factory settings. If you
reset your profile and you would like the original Pivot settings again they can be found on page 10 of this manual.
Profile StoreSelect from a large library of free profiles created for different motor settings for a variety of riding types. These are easily loaded into
your customizer for use with your bike or for further advanced customization.
B
C
D
E
A
A
B
C
A
B
C

www.pivotcycles.com [email protected] 1.877.857.4868 6
Removing the DrivepackNOTE: The battery does not come fully charged and must be completely charged before the first use. The drivepack
must be removed in order to charge the battery.1. Secure the drivepack with one hand. Gently press the the drive pack upward into the downtube to release
some pressure off the locking mechanism.2. Locate the drivepack release lever. Flip the lever down and rotate it as far forward to release the drivepack.3. Carefully tilt the front of the drivepack down to lower it out of its holder in the downtube.4. Remove the drivepack from the interface on the bottom bracket gear box.1 2 3 4
Charging the BatteryNOTE: The battery does not come fully charged and must be completely charged before the first use. In order to
charge the battery, the drivepack must be removed from the frame (see removal instructions above).1. Prepare the charger by plugging the power cable into the power inverter.2. Insert the power plug into the charging socket on the battery.3. Plug the power cable into the mains.4. To ensure a full charge, wait until the five LEDs on the battery are lit. 1 2 3 4
Installing the Drivepack1. Place the drivepack into the downtube with the driving interface of the drivepack aligned with the
corresponding interface on the bottom bracket gear box.2. Rotate the upper end of the drivepack into the downtube.3. Firmly press the drivepack into place. When the drivepack is correctly installed, the locking mechanism will
automatically engage with an audible click and the release lever will return to the closed position.4. Check the drivepack to confirm that it makes a tight fit. If the drivepack does not lock in place, pull it back
out and try again. Do not ride the bike with the drivepack improperly installed.321 4
FAZUA BASICS
www.pivotcycles.com [email protected] 1.877.857.4868 7
FAZUA BASICS
Powering the System ON and OFFNOTE: The system will automatically power down after being idle for 15 minutes. When the system is turned on, the
assistance mode will be the same as it was when the system was last powered down.1. Locate the controller on the top tube, just behind the headtube.2. Power the system on by pressing on the Fazua logo, located in the middle of the controller. The five LEDs
will illuminate blue, from the bottom to top and back down, to indicate that the power is on.3. Once the power-up sequence is complete, the lights will illuminate to indicate the battery charge level. (1 LED = 0-20%, 2 LEDs = 20-40%, 3 LEDs = 40-60%, 4 LEDs = 60-80%, 5 LEDs = 80-100%)4. To turn off the system, press and hold the center Fazua logo button down for 1 second.1 2 3 4
1 sec
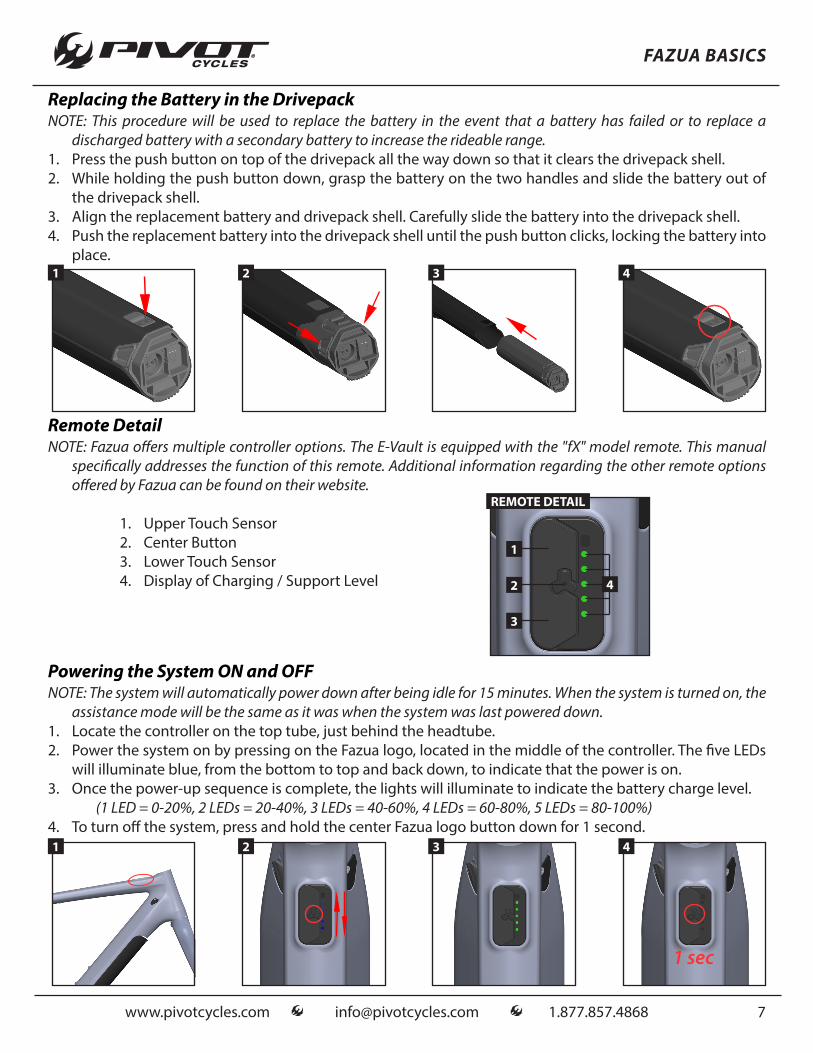
Replacing the Battery in the DrivepackNOTE: This procedure will be used to replace the battery in the event that a battery has failed or to replace a
discharged battery with a secondary battery to increase the rideable range.1. Press the push button on top of the drivepack all the way down so that it clears the drivepack shell.2. While holding the push button down, grasp the battery on the two handles and slide the battery out of
the drivepack shell.3. Align the replacement battery and drivepack shell. Carefully slide the battery into the drivepack shell.4. Push the replacement battery into the drivepack shell until the push button clicks, locking the battery into
place.1 2 3 4
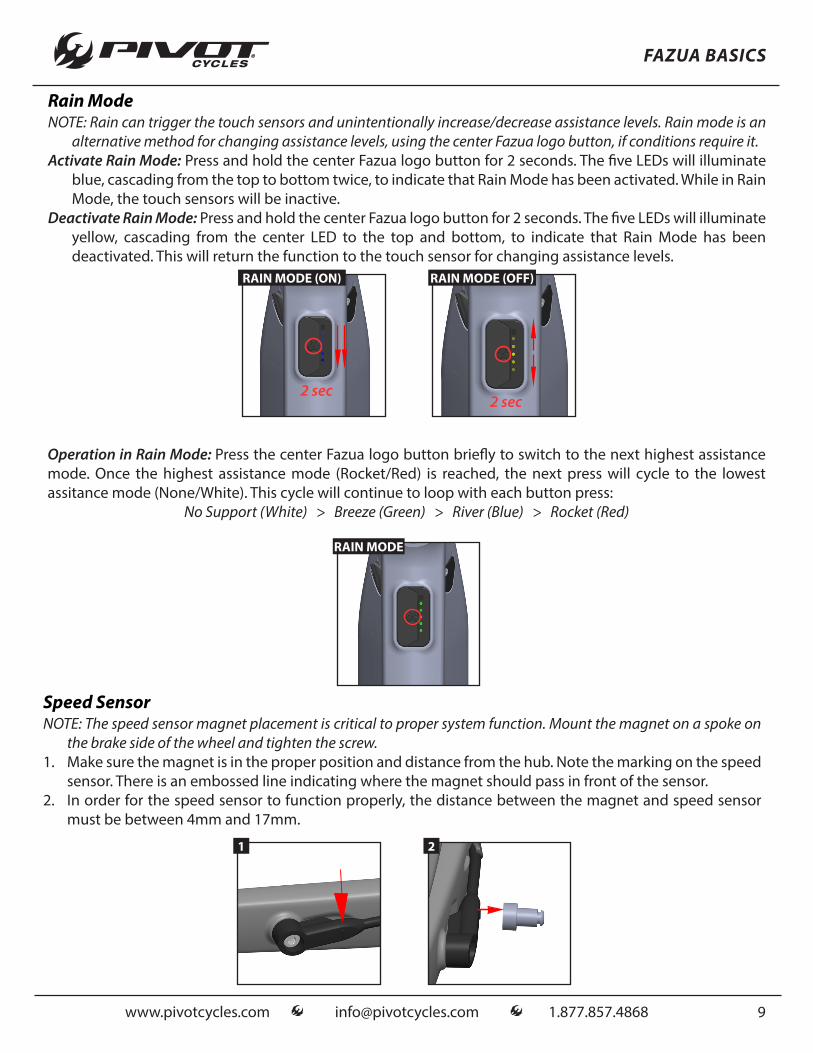
Remote DetailNOTE: Fazua offers multiple controller options. The E-Vault is equipped with the "fX" model remote. This manual
specifically addresses the function of this remote. Additional information regarding the other remote options offered by Fazua can be found on their website.
1. Upper Touch Sensor2. Center Button3. Lower Touch Sensor4. Display of Charging / Support Level
REMOTE DETAIL
1
2
3
4

www.pivotcycles.com [email protected] 1.877.857.4868 8
FAZUA BASICS
BREEZENONE RIVER ROCKET
Support ModesThe E-Vault has 4 support mode options easily selected with the touch sensistive remote on the top top tube.
The 5 LED lights change color to indicate the support level. No support is indicated with while lights. Breeze is the least amount of support and indicated with green lights. River is a moderate amount of support and indicated with blue lights. Rocket is the most support and indicated with red lights.
NOTE: The color of the LEDs indicates the current assistance level. The number of LEDs illuminated indictes the battery charge level.
Modes: There are four support levels (each with a distinct color) listed below from least to most support:
No support (White), Breeze (Green), River (Blue), Rocket (Red)
Changing Support ModesIncrease Assistance: Press the upper touch sensor to switch to the next higher support level.Decrease Assistance: Press the lower touch sensor to switch to the next lower support level.
INCREASE DECREASE
www.pivotcycles.com [email protected] 1.877.857.4868 9
FAZUA BASICS
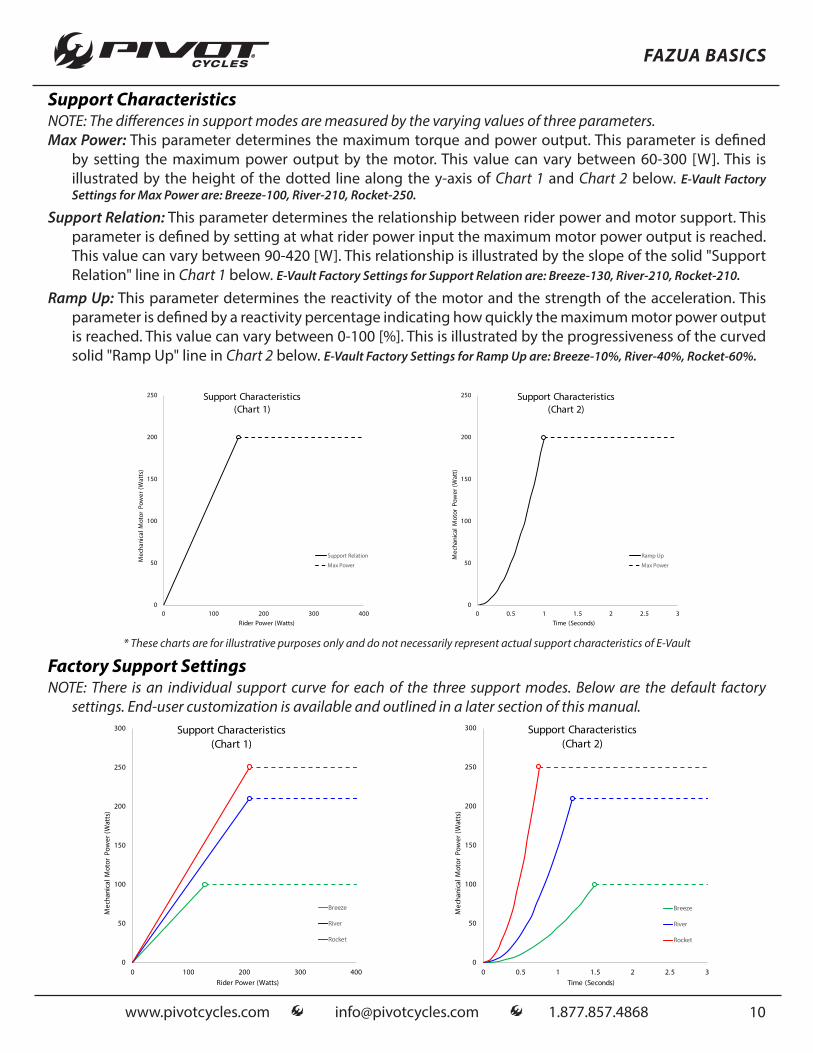
Rain ModeNOTE: Rain can trigger the touch sensors and unintentionally increase/decrease assistance levels. Rain mode is an
alternative method for changing assistance levels, using the center Fazua logo button, if conditions require it.Activate Rain Mode: Press and hold the center Fazua logo button for 2 seconds. The five LEDs will illuminate
blue, cascading from the top to bottom twice, to indicate that Rain Mode has been activated. While in Rain Mode, the touch sensors will be inactive.
Deactivate Rain Mode: Press and hold the center Fazua logo button for 2 seconds. The five LEDs will illuminate yellow, cascading from the center LED to the top and bottom, to indicate that Rain Mode has been deactivated. This will return the function to the touch sensor for changing assistance levels.
RAIN MODE (ON)
2 sec
RAIN MODE (OFF)
2 sec
Operation in Rain Mode: Press the center Fazua logo button briefly to switch to the next highest assistance mode. Once the highest assistance mode (Rocket/Red) is reached, the next press will cycle to the lowest assitance mode (None/White). This cycle will continue to loop with each button press:
No Support (White) > Breeze (Green) > River (Blue) > Rocket (Red)
RAIN MODE
Speed SensorNOTE: The speed sensor magnet placement is critical to proper system function. Mount the magnet on a spoke on
the brake side of the wheel and tighten the screw.1. Make sure the magnet is in the proper position and distance from the hub. Note the marking on the speed
sensor. There is an embossed line indicating where the magnet should pass in front of the sensor.2. In order for the speed sensor to function properly, the distance between the magnet and speed sensor
must be between 4mm and 17mm.
1 2
www.pivotcycles.com [email protected] 1.877.857.4868 10
FAZUA BASICS
Factory Support SettingsNOTE: There is an individual support curve for each of the three support modes. Below are the default factory
settings. End-user customization is available and outlined in a later section of this manual.
0
50
100
150
200
250
300
0 0.5 1 1.5 2 2.5 3
Mec
hani
cal M
otor
Pow
er (W
atts
)
Time (Seconds)
Support Characteristics(Chart 2)
Breeze
River
Rocket
0
50
100
150
200
250
300
0 100 200 300 400
Mec
hani
cal M
otor
Pow
er (W
atts
)
Rider Power (Watts)
Support Characteristics(Chart 1)
Breeze
River
Rocket
Support CharacteristicsNOTE: The differences in support modes are measured by the varying values of three parameters.Max Power: This parameter determines the maximum torque and power output. This parameter is defined
by setting the maximum power output by the motor. This value can vary between 60-300 [W]. This is illustrated by the height of the dotted line along the y-axis of Chart 1 and Chart 2 below. E-Vault Factory Settings for Max Power are: Breeze-100, River-210, Rocket-250.
Support Relation: This parameter determines the relationship between rider power and motor support. This parameter is defined by setting at what rider power input the maximum motor power output is reached. This value can vary between 90-420 [W]. This relationship is illustrated by the slope of the solid "Support Relation" line in Chart 1 below. E-Vault Factory Settings for Support Relation are: Breeze-130, River-210, Rocket-210.
Ramp Up: This parameter determines the reactivity of the motor and the strength of the acceleration. This parameter is defined by a reactivity percentage indicating how quickly the maximum motor power output is reached. This value can vary between 0-100 [%]. This is illustrated by the progressiveness of the curved solid "Ramp Up" line in Chart 2 below. E-Vault Factory Settings for Ramp Up are: Breeze-10%, River-40%, Rocket-60%.
* These charts are for illustrative purposes only and do not necessarily represent actual support characteristics of E-Vault
0
50
100
150
200
250
0 100 200 300 400
Mec
hani
cal M
otor
Pow
er (W
atts
)
Rider Power (Watts)
Support Characteristics(Chart 1)
Support Relation
Max Power
0
50
100
150
200
250
0 0.5 1 1.5 2 2.5 3
Mec
hani
cal M
otor
Pow
er (W
att)
Time (Seconds)
Support Characteristics(Chart 2)
Ramp Up
Max Power
www.pivotcycles.com [email protected] 1.877.857.4868 11
FAZUA SOFTWARE
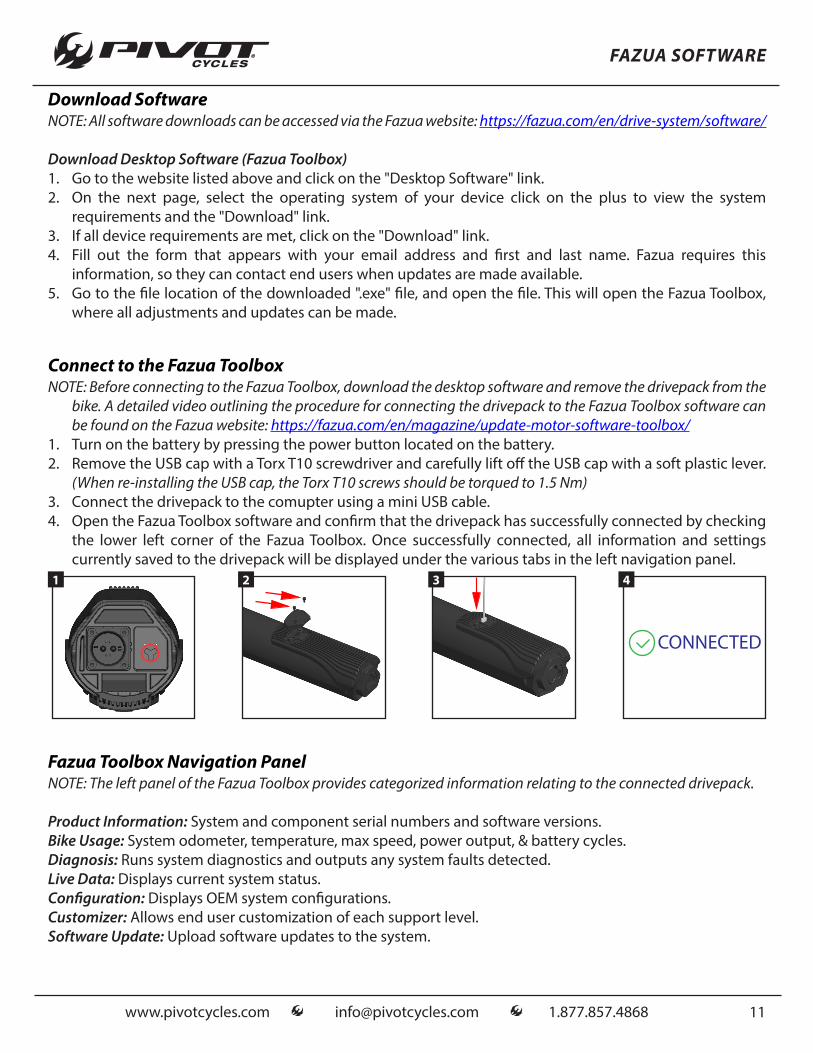
Download SoftwareNOTE: All software downloads can be accessed via the Fazua website: https://fazua.com/en/drive-system/software/
Download Desktop Software (Fazua Toolbox)1. Go to the website listed above and click on the "Desktop Software" link.2. On the next page, select the operating system of your device click on the plus to view the system
requirements and the "Download" link.3. If all device requirements are met, click on the "Download" link.4. Fill out the form that appears with your email address and first and last name. Fazua requires this
information, so they can contact end users when updates are made available.5. Go to the file location of the downloaded ".exe" file, and open the file. This will open the Fazua Toolbox,
where all adjustments and updates can be made.
Connect to the Fazua ToolboxNOTE: Before connecting to the Fazua Toolbox, download the desktop software and remove the drivepack from the
bike. A detailed video outlining the procedure for connecting the drivepack to the Fazua Toolbox software can be found on the Fazua website: https://fazua.com/en/magazine/update-motor-software-toolbox/
1. Turn on the battery by pressing the power button located on the battery.2. Remove the USB cap with a Torx T10 screwdriver and carefully lift off the USB cap with a soft plastic lever.
(When re-installing the USB cap, the Torx T10 screws should be torqued to 1.5 Nm)3. Connect the drivepack to the comupter using a mini USB cable.4. Open the Fazua Toolbox software and confirm that the drivepack has successfully connected by checking
the lower left corner of the Fazua Toolbox. Once successfully connected, all information and settings currently saved to the drivepack will be displayed under the various tabs in the left navigation panel.
1 2 3 4
Fazua Toolbox Navigation PanelNOTE: The left panel of the Fazua Toolbox provides categorized information relating to the connected drivepack.
Product Information: System and component serial numbers and software versions.Bike Usage: System odometer, temperature, max speed, power output, & battery cycles.Diagnosis: Runs system diagnostics and outputs any system faults detected.Live Data: Displays current system status.Configuration: Displays OEM system configurations.Customizer: Allows end user customization of each support level.Software Update: Upload software updates to the system.
www.pivotcycles.com [email protected] 1.877.857.4868 12
FAZUA SOFTWARE
BREEZE RIVER ROCKET
MAX POWER 60 [W] - 300 [W] 60 [W] - 300 [W] 60 [W] - 300 [W]Level of maximum motor power output ----------| ---------- ----------| ---------- ----------| ----------
SUPPORT RELATION 90 [W] - 420 [W] 90 [W] - 420 [W] 90 [W] - 420 [W]Reach of maximum power at defined rider power input ----------| ---------- ----------| ---------- ----------| ----------
RAMP-UP 0% - 100% 0% - 100% 0% - 100%Reactivity of the motor and strength of the acceleration ----------| ---------- ----------| ---------- ----------| ----------
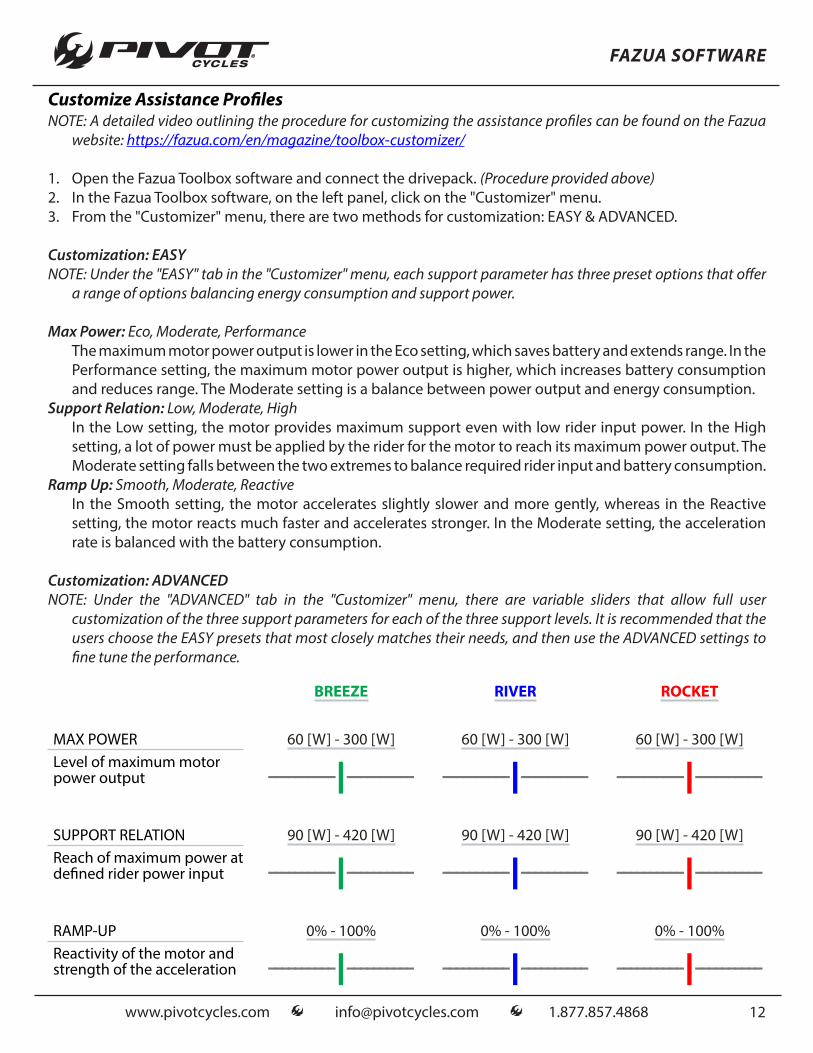
Customize Assistance ProfilesNOTE: A detailed video outlining the procedure for customizing the assistance profiles can be found on the Fazua
website: https://fazua.com/en/magazine/toolbox-customizer/
1. Open the Fazua Toolbox software and connect the drivepack. (Procedure provided above)2. In the Fazua Toolbox software, on the left panel, click on the "Customizer" menu.3. From the "Customizer" menu, there are two methods for customization: EASY & ADVANCED.
Customization: EASYNOTE: Under the "EASY" tab in the "Customizer" menu, each support parameter has three preset options that offer
a range of options balancing energy consumption and support power.
Max Power: Eco, Moderate, PerformanceThe maximum motor power output is lower in the Eco setting, which saves battery and extends range. In the Performance setting, the maximum motor power output is higher, which increases battery consumption and reduces range. The Moderate setting is a balance between power output and energy consumption.
Support Relation: Low, Moderate, HighIn the Low setting, the motor provides maximum support even with low rider input power. In the High setting, a lot of power must be applied by the rider for the motor to reach its maximum power output. The Moderate setting falls between the two extremes to balance required rider input and battery consumption.
Ramp Up: Smooth, Moderate, ReactiveIn the Smooth setting, the motor accelerates slightly slower and more gently, whereas in the Reactive setting, the motor reacts much faster and accelerates stronger. In the Moderate setting, the acceleration rate is balanced with the battery consumption.
Customization: ADVANCEDNOTE: Under the "ADVANCED" tab in the "Customizer" menu, there are variable sliders that allow full user
customization of the three support parameters for each of the three support levels. It is recommended that the users choose the EASY presets that most closely matches their needs, and then use the ADVANCED settings to fine tune the performance.
www.pivotcycles.com [email protected] 1.877.857.4868 13
FAZUA SOFTWARE
Update System SoftwareNOTE: A detailed video outlining the procedure for updating the system software can be found on the Fazua website:
https://fazua.com/en/magazine/update-motor-software-toolbox/1. Open the Fazua Toolbox software and connect the drivepack. (Procedure provided above)2. Go to https://fazua.com/en/drive-system/software/ and click on the "Drive System Software" link.3. On the next page, under the "Latest Version" header, click the "Download" link. Note where this file is saved.4. In the Fazua Toolbox software, at the bottom of the left panel, click on the "Software Update" menu.5. In the "Software Update" menu, click on "Select Software" in the upper right hand corner. This will open a
document search menu.6. In this menu, search for and open the recently downloaded "Drive System Software" file.7. Click "Update"8. Do not move the drivepack during the update process. Gently hold the drivepack in place, as possible
vibrations during calibration can move the drivepack.9. Wait for the update to install and the motor calibration to complete.10. Disconnect the USB cable and install the USB cap using a Torx T10 screwdriver. (Maximum Torque: 1.5 Nm)11. Once you install the drivepack with the new motor software into the ebike, the remote will recieve an
update. The LEDs will flash during this process.
Saving Custom Assistance ProfilesOnce a custom configuration is created, click on "New", give the profile a name and click on "Save". All the
profiles you have saved can be called up in the drop-down menu, even if the drivepack is not connected to the computer. The various profiles are saved to the Fazua Toolbox software and will be available in the drop-down menu everytime the program is opened.
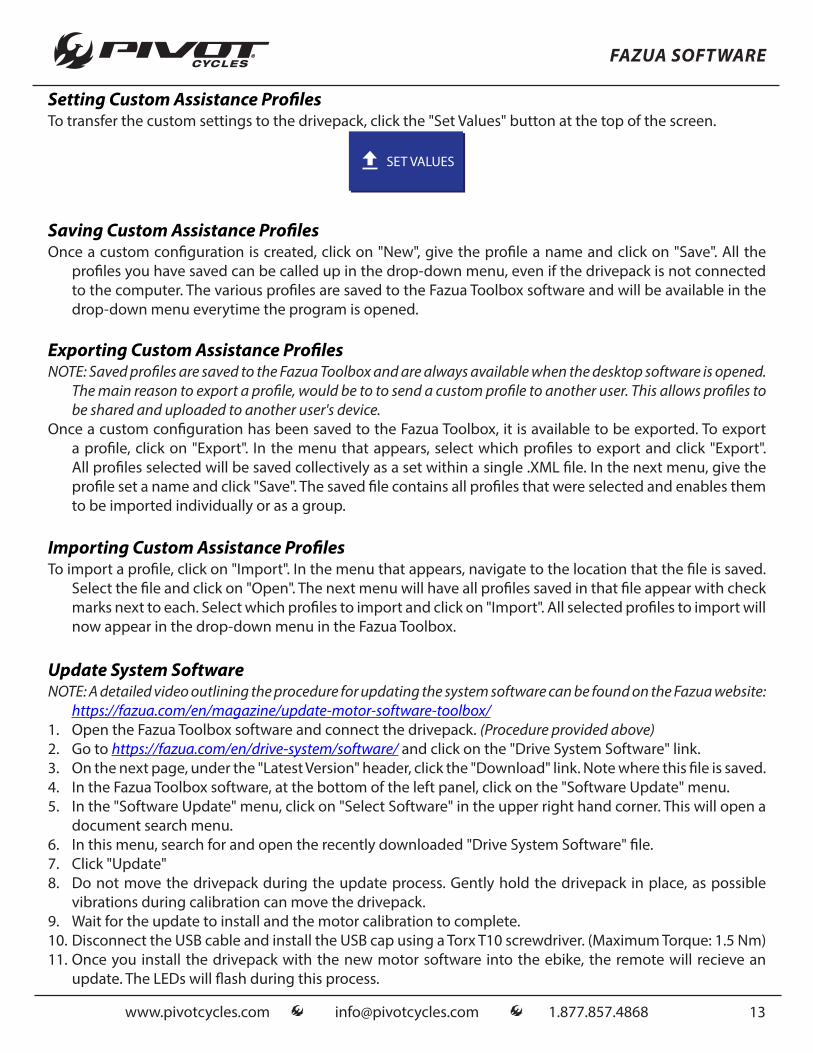
Setting Custom Assistance ProfilesTo transfer the custom settings to the drivepack, click the "Set Values" button at the top of the screen.
Importing Custom Assistance ProfilesTo import a profile, click on "Import". In the menu that appears, navigate to the location that the file is saved.
Select the file and click on "Open". The next menu will have all profiles saved in that file appear with check marks next to each. Select which profiles to import and click on "Import". All selected profiles to import will now appear in the drop-down menu in the Fazua Toolbox.
Exporting Custom Assistance ProfilesNOTE: Saved profiles are saved to the Fazua Toolbox and are always available when the desktop software is opened.
The main reason to export a profile, would be to to send a custom profile to another user. This allows profiles to be shared and uploaded to another user's device.
Once a custom configuration has been saved to the Fazua Toolbox, it is available to be exported. To export a profile, click on "Export". In the menu that appears, select which profiles to export and click "Export". All profiles selected will be saved collectively as a set within a single .XML file. In the next menu, give the profile set a name and click "Save". The saved file contains all profiles that were selected and enables them to be imported individually or as a group.
www.pivotcycles.com [email protected] 1.877.857.4868 14
THIRD PARTY COMPATIBILITY
Compatible DevicesNOTE: A third party device is normally compatible if it includes a BLE interface (Bluetooth 4.0 or higher). The list of
connectable dvices includes the following:
Garmin: Edge 530, Edge 830, Edge 1030, Fenix 5 Plus Series, Fenix 6, Forerunner 945, MARQ
Wahoo: ELEMNT ROAM, ELEMNT BOLT
Sigma: iD.TRI, iD.FREE
Lezyne: Mega XL, Super Pro
Garmin PairingNOTE: A user's Garmin can be paired to the E-Vault to display cadence or power.1. On the Garmin, select the three horizontal bars at the lower right of the screen to access the main menu.2. Select "Sensors".3. Select either "Cadence" or "Power". The Fazua system can provide one or the other, but not both
simulataneously.4. Select "Add Sensor".5. The Garmin will begin searching for the E-Vault. Turn on the E-Vault by pressing the center Fazua botton
on the controller. The lights will flash blue three times.6. The Garmin will find power or cadence/speed depending on what was selected. Select "Add".7. The customer can now choose to add a new data screen to support the newly added sensor.
www.pivotcycles.com [email protected] 1.877.857.4868 15
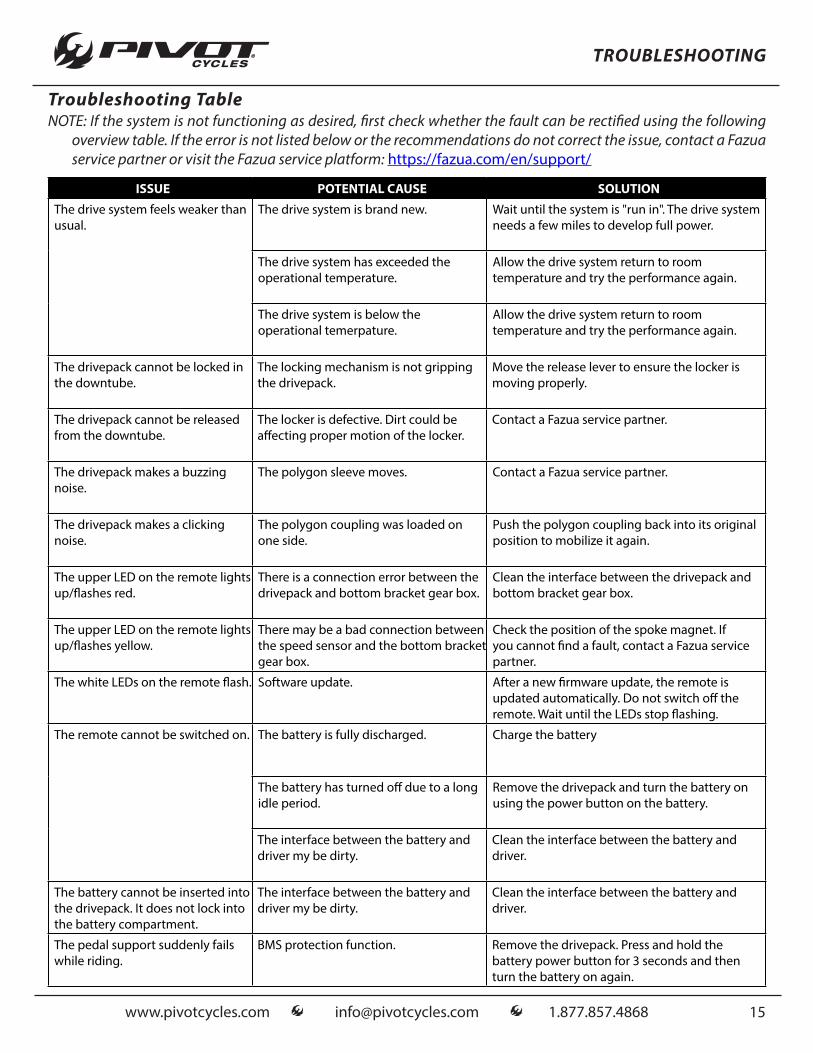
Troubleshooting TableNOTE: If the system is not functioning as desired, first check whether the fault can be rectified using the following
overview table. If the error is not listed below or the recommendations do not correct the issue, contact a Fazua service partner or visit the Fazua service platform: https://fazua.com/en/support/
ISSUE POTENTIAL CAUSE SOLUTION
The drive system feels weaker than usual.
The drive system is brand new. Wait until the system is "run in". The drive system needs a few miles to develop full power.
The drive system has exceeded the operational temperature.
Allow the drive system return to room temperature and try the performance again.
The drive system is below the operational temerpature.
Allow the drive system return to room temperature and try the performance again.
The drivepack cannot be locked in the downtube.
The locking mechanism is not gripping the drivepack.
Move the release lever to ensure the locker is moving properly.
The drivepack cannot be released from the downtube.
The locker is defective. Dirt could be affecting proper motion of the locker.
Contact a Fazua service partner.
The drivepack makes a buzzing noise.
The polygon sleeve moves. Contact a Fazua service partner.
The drivepack makes a clicking noise.
The polygon coupling was loaded on one side.
Push the polygon coupling back into its original position to mobilize it again.
The upper LED on the remote lights up/flashes red.
There is a connection error between the drivepack and bottom bracket gear box.
Clean the interface between the drivepack and bottom bracket gear box.
The upper LED on the remote lights up/flashes yellow.
There may be a bad connection between the speed sensor and the bottom bracket gear box.
Check the position of the spoke magnet. If you cannot find a fault, contact a Fazua service partner.
The white LEDs on the remote flash. Software update. After a new firmware update, the remote is updated automatically. Do not switch off the remote. Wait until the LEDs stop flashing.
The remote cannot be switched on. The battery is fully discharged. Charge the battery
The battery has turned off due to a long idle period.
Remove the drivepack and turn the battery on using the power button on the battery.
The interface between the battery and driver my be dirty.
Clean the interface between the battery and driver.
The battery cannot be inserted into the drivepack. It does not lock into the battery compartment.
The interface between the battery and driver my be dirty.
Clean the interface between the battery and driver.
The pedal support suddenly fails while riding.
BMS protection function. Remove the drivepack. Press and hold the battery power button for 3 seconds and then turn the battery on again.
TROUBLESHOOTING

www.pivotcycles.com [email protected] 1.877.857.4868 16
Fazua Evation System Schematic
LETTER PART DESCRIPTION PART NAME
A Fazua Controller 5002000302
B Drivepack (Battery / Driver) 5002000101
C Bottom Bracket Gear Box 5002000201
D Drivepack Locker 5002000601
E Speed Sensor (Magnet included with Sensor) 5002000901 (Magnet only: AS-5002003401)
F
Battery Charger - US/CA 5002000502
Battery Charger - EU 5002000501 + 5002001602
Battery Charger - UK 5002000501 + 5002001601
SCHEMATICS
(A)
(D)
(C) (B)(E)
(F)

www.pivotcycles.com [email protected] 1.877.857.4868 17
Small Parts Schematic
SCHEMATICS
4
56
7
8
9
1011
13
1415
17
19
20
21
22
23
26
32
33
34
35
12
36
102
101
313029
13 11
x1
13 10
x1
16 18 2524 27
13 10
x1
28
INTERNAL FOAM
www.pivotcycles.com [email protected] 1.877.857.4868 18
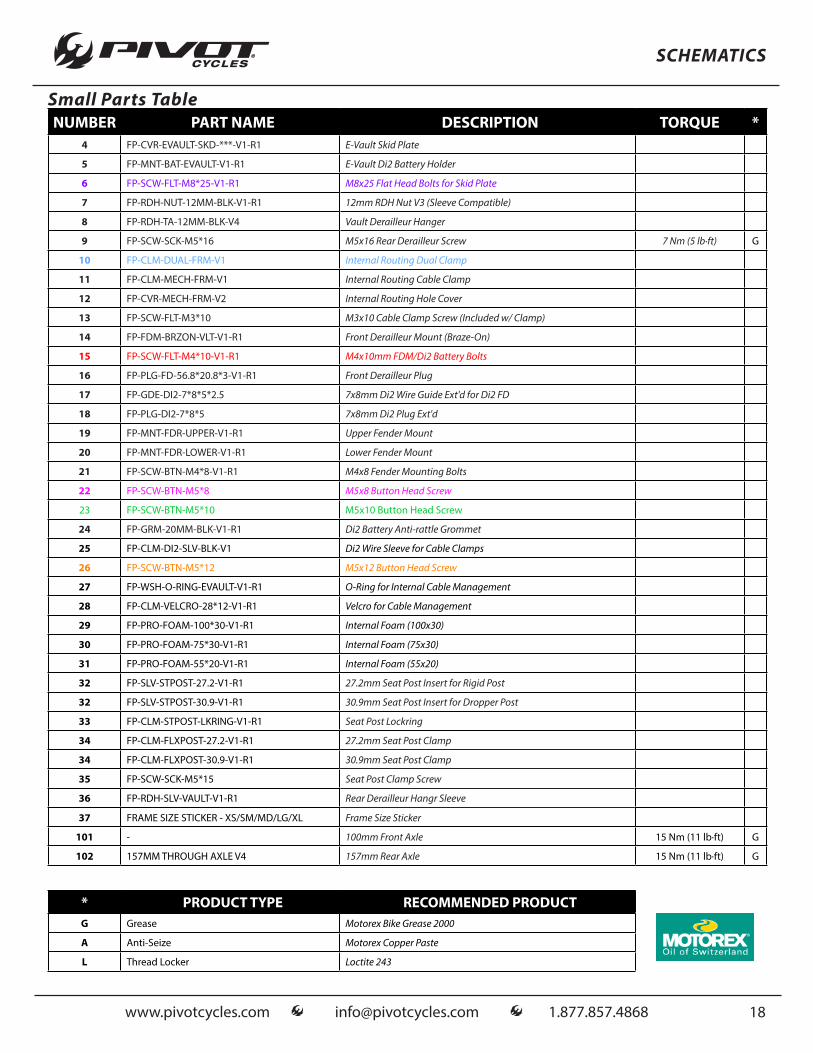
Small Parts Table
SCHEMATICS
NUMBER PART NAME DESCRIPTION TORQUE *4 FP-CVR-EVAULT-SKD-***-V1-R1 E-Vault Skid Plate
5 FP-MNT-BAT-EVAULT-V1-R1 E-Vault Di2 Battery Holder
6 FP-SCW-FLT-M8*25-V1-R1 M8x25 Flat Head Bolts for Skid Plate
7 FP-RDH-NUT-12MM-BLK-V1-R1 12mm RDH Nut V3 (Sleeve Compatible)
8 FP-RDH-TA-12MM-BLK-V4 Vault Derailleur Hanger
9 FP-SCW-SCK-M5*16 M5x16 Rear Derailleur Screw 7 Nm (5 lb·ft) G
10 FP-CLM-DUAL-FRM-V1 Internal Routing Dual Clamp
11 FP-CLM-MECH-FRM-V1 Internal Routing Cable Clamp
12 FP-CVR-MECH-FRM-V2 Internal Routing Hole Cover
13 FP-SCW-FLT-M3*10 M3x10 Cable Clamp Screw (Included w/ Clamp)
14 FP-FDM-BRZON-VLT-V1-R1 Front Derailleur Mount (Braze-On)
15 FP-SCW-FLT-M4*10-V1-R1 M4x10mm FDM/Di2 Battery Bolts
16 FP-PLG-FD-56.8*20.8*3-V1-R1 Front Derailleur Plug
17 FP-GDE-DI2-7*8*5*2.5 7x8mm Di2 Wire Guide Ext'd for Di2 FD
18 FP-PLG-DI2-7*8*5 7x8mm Di2 Plug Ext'd
19 FP-MNT-FDR-UPPER-V1-R1 Upper Fender Mount
20 FP-MNT-FDR-LOWER-V1-R1 Lower Fender Mount
21 FP-SCW-BTN-M4*8-V1-R1 M4x8 Fender Mounting Bolts
22 FP-SCW-BTN-M5*8 M5x8 Button Head Screw
23 FP-SCW-BTN-M5*10 M5x10 Button Head Screw
24 FP-GRM-20MM-BLK-V1-R1 Di2 Battery Anti-rattle Grommet
25 FP-CLM-DI2-SLV-BLK-V1 Di2 Wire Sleeve for Cable Clamps
26 FP-SCW-BTN-M5*12 M5x12 Button Head Screw
27 FP-WSH-O-RING-EVAULT-V1-R1 O-Ring for Internal Cable Management
28 FP-CLM-VELCRO-28*12-V1-R1 Velcro for Cable Management
29 FP-PRO-FOAM-100*30-V1-R1 Internal Foam (100x30)
30 FP-PRO-FOAM-75*30-V1-R1 Internal Foam (75x30)
31 FP-PRO-FOAM-55*20-V1-R1 Internal Foam (55x20)
32 FP-SLV-STPOST-27.2-V1-R1 27.2mm Seat Post Insert for Rigid Post
32 FP-SLV-STPOST-30.9-V1-R1 30.9mm Seat Post Insert for Dropper Post
33 FP-CLM-STPOST-LKRING-V1-R1 Seat Post Lockring
34 FP-CLM-FLXPOST-27.2-V1-R1 27.2mm Seat Post Clamp
34 FP-CLM-FLXPOST-30.9-V1-R1 30.9mm Seat Post Clamp
35 FP-SCW-SCK-M5*15 Seat Post Clamp Screw
36 FP-RDH-SLV-VAULT-V1-R1 Rear Derailleur Hangr Sleeve
37 FRAME SIZE STICKER - XS/SM/MD/LG/XL Frame Size Sticker
101 - 100mm Front Axle 15 Nm (11 lb·ft) G
102 157MM THROUGH AXLE V4 157mm Rear Axle 15 Nm (11 lb·ft) G
* PRODUCT TYPE RECOMMENDED PRODUCTG Grease Motorex Bike Grease 2000
A Anti-Seize Motorex Copper Paste
L Thread Locker Loctite 243
www.pivotcycles.com [email protected] 1.877.857.4868 19
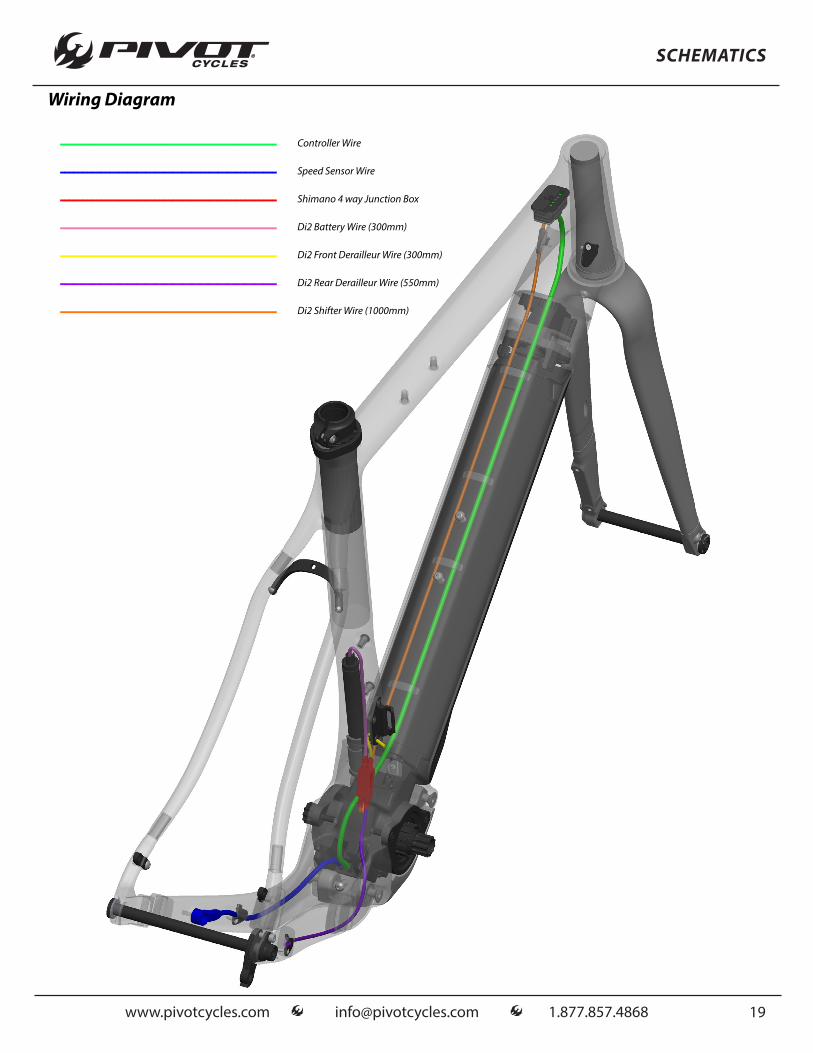
Wiring Diagram
SCHEMATICS
------------------------------------------------ Controller Wire
------------------------------------------------ Speed Sensor Wire
------------------------------------------------ Shimano 4 way Junction Box
------------------------------------------------ Di2 Battery Wire (300mm)
------------------------------------------------ Di2 Front Derailleur Wire (300mm)
------------------------------------------------ Di2 Rear Derailleur Wire (550mm)
------------------------------------------------ Di2 Shifter Wire (1000mm)
www.pivotcycles.com [email protected] 1.877.857.4868 20
WARNINGS
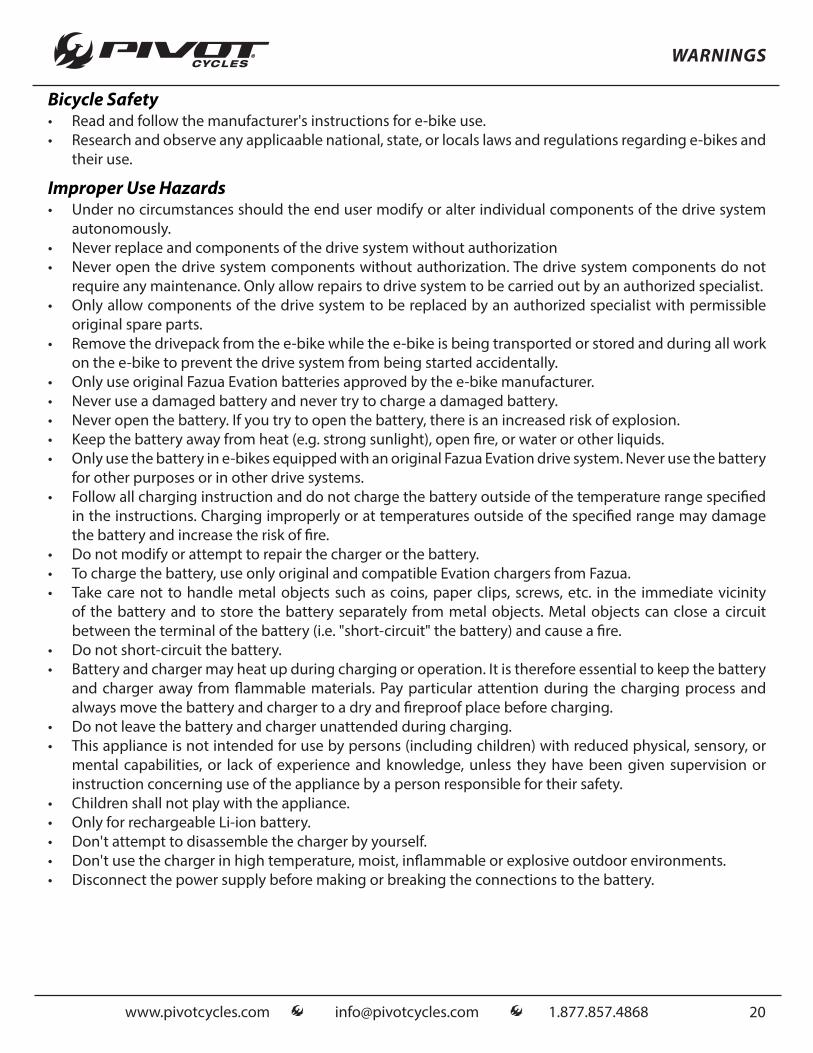
Bicycle Safety• Read and follow the manufacturer's instructions for e-bike use.• Research and observe any applicaable national, state, or locals laws and regulations regarding e-bikes and
their use.
Improper Use Hazards• Under no circumstances should the end user modify or alter individual components of the drive system
autonomously.• Never replace and components of the drive system without authorization• Never open the drive system components without authorization. The drive system components do not
require any maintenance. Only allow repairs to drive system to be carried out by an authorized specialist.• Only allow components of the drive system to be replaced by an authorized specialist with permissible
original spare parts.• Remove the drivepack from the e-bike while the e-bike is being transported or stored and during all work
on the e-bike to prevent the drive system from being started accidentally.• Only use original Fazua Evation batteries approved by the e-bike manufacturer.• Never use a damaged battery and never try to charge a damaged battery.• Never open the battery. If you try to open the battery, there is an increased risk of explosion.• Keep the battery away from heat (e.g. strong sunlight), open fire, or water or other liquids.• Only use the battery in e-bikes equipped with an original Fazua Evation drive system. Never use the battery
for other purposes or in other drive systems.• Follow all charging instruction and do not charge the battery outside of the temperature range specified
in the instructions. Charging improperly or at temperatures outside of the specified range may damage the battery and increase the risk of fire.
• Do not modify or attempt to repair the charger or the battery.• To charge the battery, use only original and compatible Evation chargers from Fazua.• Take care not to handle metal objects such as coins, paper clips, screws, etc. in the immediate vicinity
of the battery and to store the battery separately from metal objects. Metal objects can close a circuit between the terminal of the battery (i.e. "short-circuit" the battery) and cause a fire.
• Do not short-circuit the battery.• Battery and charger may heat up during charging or operation. It is therefore essential to keep the battery
and charger away from flammable materials. Pay particular attention during the charging process and always move the battery and charger to a dry and fireproof place before charging.
• Do not leave the battery and charger unattended during charging.• This appliance is not intended for use by persons (including children) with reduced physical, sensory, or
mental capabilities, or lack of experience and knowledge, unless they have been given supervision or instruction concerning use of the appliance by a person responsible for their safety.
• Children shall not play with the appliance.• Only for rechargeable Li-ion battery.• Don't attempt to disassemble the charger by yourself.• Don't use the charger in high temperature, moist, inflammable or explosive outdoor environments.• Disconnect the power supply before making or breaking the connections to the battery.
www.pivotcycles.com [email protected] 1.877.857.4868 21
WARNINGS
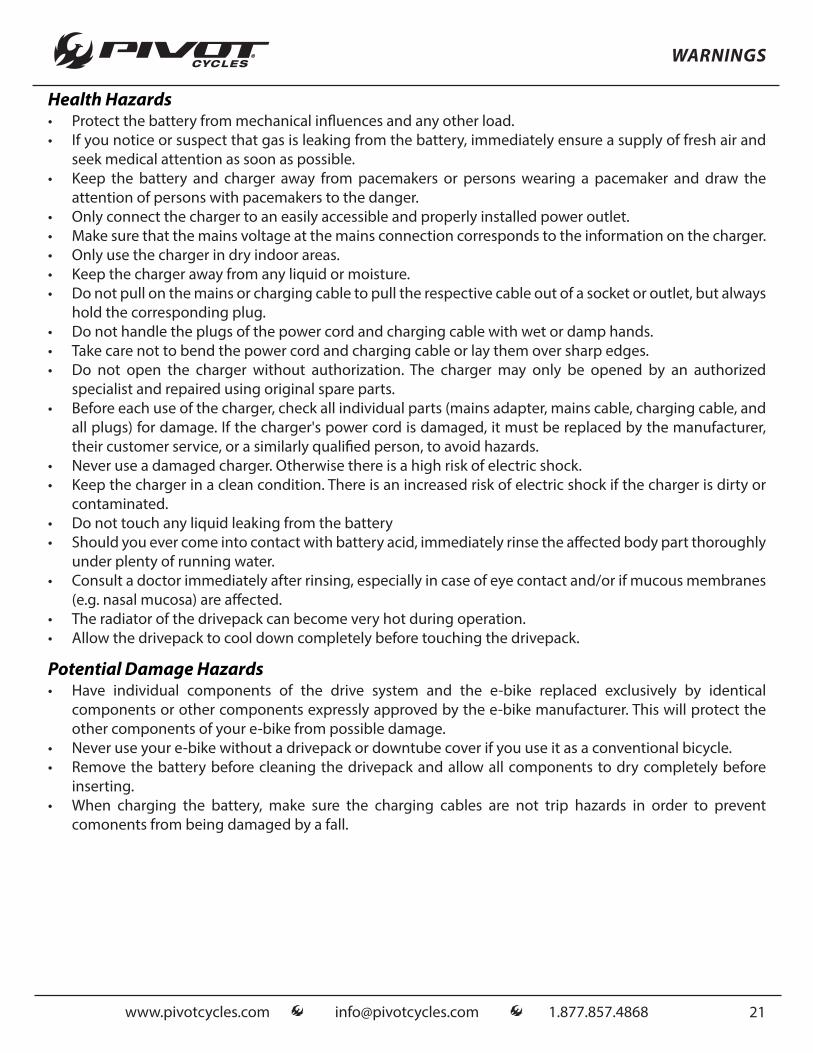
Health Hazards• Protect the battery from mechanical influences and any other load.• If you notice or suspect that gas is leaking from the battery, immediately ensure a supply of fresh air and
seek medical attention as soon as possible.• Keep the battery and charger away from pacemakers or persons wearing a pacemaker and draw the
attention of persons with pacemakers to the danger.• Only connect the charger to an easily accessible and properly installed power outlet.• Make sure that the mains voltage at the mains connection corresponds to the information on the charger.• Only use the charger in dry indoor areas.• Keep the charger away from any liquid or moisture.• Do not pull on the mains or charging cable to pull the respective cable out of a socket or outlet, but always
hold the corresponding plug.• Do not handle the plugs of the power cord and charging cable with wet or damp hands.• Take care not to bend the power cord and charging cable or lay them over sharp edges.• Do not open the charger without authorization. The charger may only be opened by an authorized
specialist and repaired using original spare parts.• Before each use of the charger, check all individual parts (mains adapter, mains cable, charging cable, and
all plugs) for damage. If the charger's power cord is damaged, it must be replaced by the manufacturer, their customer service, or a similarly qualified person, to avoid hazards.
• Never use a damaged charger. Otherwise there is a high risk of electric shock.• Keep the charger in a clean condition. There is an increased risk of electric shock if the charger is dirty or
contaminated.• Do not touch any liquid leaking from the battery• Should you ever come into contact with battery acid, immediately rinse the affected body part thoroughly
under plenty of running water.• Consult a doctor immediately after rinsing, especially in case of eye contact and/or if mucous membranes
(e.g. nasal mucosa) are affected.• The radiator of the drivepack can become very hot during operation.• Allow the drivepack to cool down completely before touching the drivepack.
Potential Damage Hazards• Have individual components of the drive system and the e-bike replaced exclusively by identical
components or other components expressly approved by the e-bike manufacturer. This will protect the other components of your e-bike from possible damage.
• Never use your e-bike without a drivepack or downtube cover if you use it as a conventional bicycle.• Remove the battery before cleaning the drivepack and allow all components to dry completely before
inserting.• When charging the battery, make sure the charging cables are not trip hazards in order to prevent
comonents from being damaged by a fall.

www.pivotcycles.com [email protected] 1.877.857.4868 22
ADDITIONAL INFORMATION
Fazua Evation Drive System• Additional information regarding operation and functionality of the Fazua Evation Drive System can be
found at: https://fazua.com/en/drive-system/evation/• To download the Fazua software and mobile apps to fully utilize the connectivity and customizability of
the Fazua Evation Drive System visit: https://fazua.com/en/drive-system/software/
Pivot E-Vault• For FAQs and additional technical documents regarding the maintenance of the Pivot E-Vault can be found
at: http://www.pivotcycles.com/bike/evault/
ConformityFazua confirm the conformity according to 47 CFR Section 15.105 - Information to the user. This equipment has been tested and found to comply with the limits for a Class B digital device, pursuant to part 15 of the FCC Rules. These limits are designed to provide reasonable protection against harmful interference in a residential installation. This equipment generates, uses and can radiate radio frequency energy and, if not installed and used in accordance with the instructions, may cause harmful interference to radio communications. However, there is no guarantee that interference will not occur in a particular installation. If this equipment does cause harmfulintereference to radio or television reception, which can be determined by turning the equipment off and on, the user is encouraged to try to correct the interference by one or more of the following measures:• Reorient or relocate the receiving antenna• Increase the separation between the equipment and receiver• Connect the equipment into an outlet on a circuit different from that to which the receiver is connected.• Consult the dealer or an experienced radio/television technician for help.
Sources• Portions of this document have been sourced from information provided by Fazua. Additional end-user
documentation can be found at: https://fazua.com/


