Embed Size (px)
Citation preview

ForewordDear users:
Thank you very much for selecting our product. Before your first driving, please read this manual carefully to help you understand the proper operation methods of this product for safe operation and better entertainment experience! Please read this instruction thoroughly before applying various functions. PROTON reserves the right of final interpretation of this instruction.
Important safety information:• Failure to comply with these safety instructions may result in electric shock, traffic
accidents or other injuries, and may also damage GKUI system or vehicle. Please read allthe safety information below before using GKUI system.
• In order to avoid violation of traffic regulations and unnecessary traffic accidents, drivers areprohibited to watch programs and operate the system unit while driving.
• If you make a call using the bluetooth phone function to the passengers’ phone in thevehicle, the sound amplification and significant interference between the phones will causeecho and sound distortion in the vehicle. It is recommended that you do not do this.
• In order to ensure the safety and normal use of the product, do not disassemble or repair thesystem unit by yourself to avoid damage to the system unit and accidents.
Due to the continuous improvement of the product, the actual operation steps may not be completely consistent with those stated in this manual. In this case, the actual operation steps will prevail.
The working voltage of the product is 9 V ~ 16 V. If the vehicle is parked for a long time or the battery is not replaced in time according to the maintenance manual, the battery is fed and the power supply is insufficient, which may cause the product to restart for self-protection.
Perusahaan Otomobil Nasional Sdn. Bhd. Nov 2020
All rights reserved. No part of this manual may be reproduced or copied without the written consent of Perusahaan Otomobil Nasional Sdn. Bhd.
If you have any questions, kindly contact or visit our website as mentioned to locate the
nearest dealer and other available services.
www.proton-edar.com.my
PROTON EDAR SDN. BHD.
Centre of Excellence Complex
Km33.8 Westbound Shah Alam Expressway
47600 Subang Jaya , Selangor Darul Ehsan , Malaysia.
1-800-888-398


2
1
1
ContentsMultimedia system3 Instructions
3 Notice to users4 Safety Information4 Special Statement4 Notes for Navigation7 Notices before using Bluetooth
8 Equipment and operation8 Multi-functional Steering Wheel 10 Basic Operations12 Touchscreen Operation
15 Vehicle communication
19 Media19 Radio 20 Music 20 Media Player 21 Photo & Video21 JOOX Music
23 Navigation23 Getting to Know Your Navigation 27 Searching Destination29 Navigation Update
30 Live Information30 Notice on Vehicle Networking 30 Weather31 Themes31 Member Centre
32 Application Service32 A/C33 Voice Command 42 Setting48 360 Camera *
51 Troubleshooting
51 Common Faults and Troubleshooting
PROTON Link App Centre55 PROTON Link Mobile App56 Home page57 Dashboard58 Map58 POI search59 About “My Account” 61 Settings62 Internet Data Add-On
15 Bluetooth Pairing and Connection 17 Recent Calls 17 Contacts 18 Dial calls

2
1
2
3
Multimedia system
Instructions Notice to Users• Do not use mobile phone while driving.
Park the vehicle in a safe place first ifyou need to use the mobile phone.
• The use of navigation system does notmean that the responsibilities of drivercan be replaced. Observe and obliged tothe traffic rules. Pay attention to thecurrent traffic condition consistently.
• If there is a difference in the trafficregulations and the current trafficcondition always take precedence overthe navigation system.
• For safety reasons, the navigationsystem menu can only be used beforestart driving or when the vehicle isstationary.
• In the situation when there is only oneroad or the road is damage orprohibited to be passed through (e.g.pedestrian street), the navigation systemmay give a warning. Pay more attentionto this situation.
• That's because the navigation systemwill not consider route safety whenplanning a route. Roadblocks, locationsof buildings, height and weight limits,traffic and weather conditions or otherissues that can affect the safety and timeof driving routes will also not beconsidered in the proposed route.Therefore, it is up to the driver to decidewhich route is the most suitable.
• The speed limit stipulated by current roadtraffic regulations should be more reliablethan the system storage most of the time.There is no guarantee that the speed limitshown by the navigation system is thesame as that stipulated by the traffic lawunder any circumstances.
• Do not solely rely on the navigationsystem to find emergency services (e. g.hospitals, fire fighting facilities, etc.).There is no guarantee that all emergencyservices nearby will be kept in thedatabase. In this case, the driver needsto judge for emergency help.
It is not recommended to use the navigation system when the engine is turned off. If this is done, the battery may lose power. Always keep the engine running all the time when using the navigation system.Do not disassemble or modify this product. Otherwise, accidents, fire and electric shock may result.
Laws of some provinces and cities prohibit drivers from watching videos during driving. Use the system carefully.
4
Multimedia system
Safety Information
WARNING indicates a hazardous situation which, if not avoided, could result in death or serious personal injury. The stated procedures must be strictly followed or the provided information must be carefully considered.
Caution indicates that the events stated here must be strictly observed, otherwise your vehicle may be damaged.
It indicates informative statements that can help you better use your vehicle.
It indicates events described herein are related to environmental protection.
AsteriskAn asterisk "*" attached at the end of the title or name indicates that the device or feature described is only available for certain variants of this vehicle and your vehicle may not be equipped with such device or feature.
Important MessageNo part of this publication may be reproduced, stored in a retrieval system, or transmitted, in any form or by any means, electronic, mechanical, photocopying, recording, or otherwise, without the prior written permission from PROTON.The pictures in this manual are for reference purpose only. This manual is the user manual of the current GKUI. PROTON reserves the right of final interpretation of this manual.
PROTON have a right not to provide a service for you in the following cases. After correction, PROTON has the right to decide whether to resume the service on the case to case basis:• Violation of local laws and regulations;•
• Unauthorized use of services;• Application of products and services for
any illegal purpose;• Behaviours which harm to the interests of
other users;• Abuse of user rights;•
• Acts inciting national hatred anddiscrimination, as well as underminingnational unity;
• Acts spreading obscenity, pornography,gambling, violence, murder, terrorism orabetting crime;
• Acts harming national security, divulgingstate secrets, subverting state powerand undermining national unity.
When transferring the vehicle, please remember to pass this manual on to the new user as this manual is an integral part of the vehicle.
Notes when using navigationDescription of terminology• Point of interest: It is a feature point
marked on the map that provide userswith name, attributes and locationinformation, such as petrol servicestations, stations, hotels, schools, etc.
• Positioning: A technology for displayingthe inquired points of interest in thecentre of the navigation screen andprompting the name and location.
Provision of false registration information;
Behaviors violating social customs andsocial morality;
1
2
5
Multimedia system
• Route planning: A technology forselecting a planning method according tothe starting point, the passing point andthe bypassing point, and calculating apath that meets the needs of users.
• Navigation: A technology for planning aroute based on geographic informationsoftware and prompting the user withvoice throughout the travel. Navigation ingeographic information software includessimulated navigation and real navigation.It refers to real navigation unlessotherwise specified.
• Move map mode: Users can move themap by clicking or dragging the mapaccording to their habits. Other terms willbe described in detail in the text, so norepetition is made here.
Navigation systemWelcome to the navigation system. We hope our navigation can provide you convenience and smooth journey! If you have any suggestions or opinions, please feel free to contact us! Please read the following warnings carefully before starting the navigation! For your driving safety, please strictly observe the "Warning" operation!
PROTON will not be responsible for any inconvenience or accident caused by negligence of the stated warnings!
Navigation disclaimer• Map disclaimerDue to the urban construction and the rapiddevelopment of urban-rural highway trafficand the continuous changes in traffic controlinformation and traffic facilities in urbanstreets, there may be situations that are notcompletely consistent with the actualinformation at that time after the product isproduced. Thus, the driver must pay seriousattention to the actual traffic conditions andavoid violating traffic rules. The navigationmap will be released to the public in a timelymanner. Please pay attention to the updateinformation of the navigation map from thedealer.Due to changes in traffic regulations ortemporary road control, the route planned bythe navigation map may not conform to thetraffic control situation on site. Please driveaccording to the actual traffic control ortraffic rules.
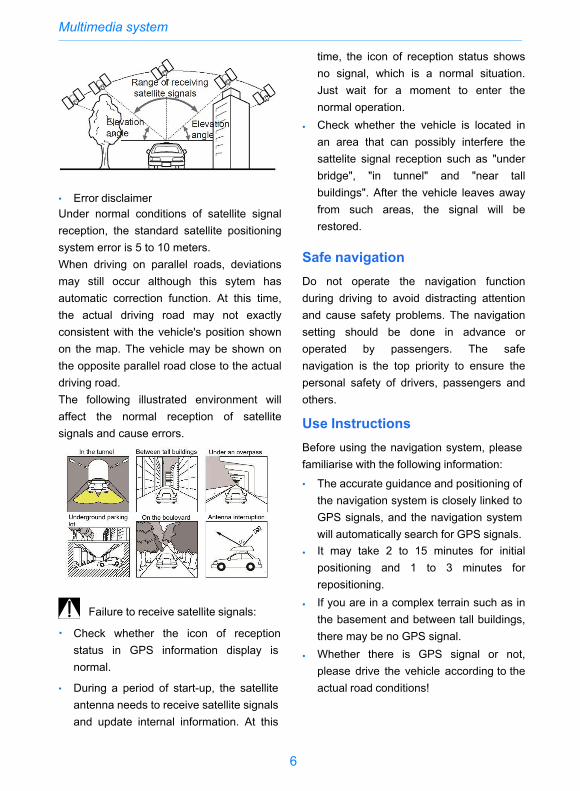
• Navigation disclaimerAs real-time road conditions sometimeschange more or less, the driving routeplanned by the navigation map is only forreference. For example, the route chosen bythe driver in his/her familiar area may bemore effective than the route planned by thenavigation map.• Satellite signal reception disclaimerIn general, the navigation map can calculateyour exact location after only 3 or 4 satellitesignals being received. However, sometimesdue to weather or under the influence of tallbuildings in the city, the reception effect ofsignals will be affected, as shown in thefollowing figure:
6
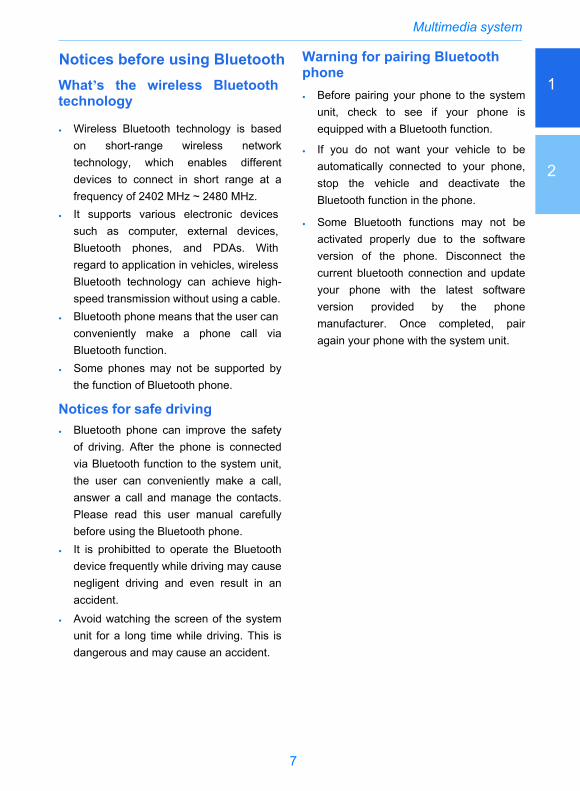
• Error disclaimerUnder normal conditions of satellite signalreception, the standard satellite positioningsystem error is 5 to 10 meters.When driving on parallel roads, deviationsmay still occur although this sytem hasautomatic correction function. At this time,the actual driving road may not exactlyconsistent with the vehicle's position shownon the map. The vehicle may be shown onthe opposite parallel road close to the actualdriving road.The following illustrated environment willaffect the normal reception of satellitesignals and cause errors.
Failure to receive satellite signals:
• Check whether the icon of receptionstatus in GPS information display isnormal.
• During a period of start-up, the satelliteantenna needs to receive satellite signalsand update internal information. At this
time, the icon of reception status shows no signal, which is a normal situation. Just wait for a moment to enter the normal operation.
• Check whether the vehicle is located inan area that can possibly interfere thesattelite signal reception such as "underbridge", "in tunnel" and "near tallbuildings". After the vehicle leaves awayfrom such areas, the signal will berestored.
Safe navigationDo not operate the navigation function during driving to avoid distracting attention and cause safety problems. The navigation setting should be done in advance or operated by passengers. The safe navigation is the top priority to ensure the personal safety of drivers, passengers and others.
Use InstructionsBefore using the navigation system, please familiarise with the following information:• The accurate guidance and positioning of
the navigation system is closely linked toGPS signals, and the navigation systemwill automatically search for GPS signals.
• It may take 2 to 15 minutes for initialpositioning and 1 to 3 minutes forrepositioning.
• If you are in a complex terrain such as inthe basement and between tall buildings,there may be no GPS signal.
• Whether there is GPS signal or not,please drive the vehicle according to theactual road conditions!
Multimedia system
1
2
7
What’s the wireless Bluetoothtechnology
• Wireless Bluetooth technology is basedon short-range wireless networktechnology, which enables differentdevices to connect in short range at afrequency of 2402 MHz ~ 2480 MHz.
• It supports various electronic devicessuch as computer, external devices,Bluetooth phones, and PDAs. Withregard to application in vehicles, wirelessBluetooth technology can achieve high-speed transmission without using a cable.
• Bluetooth phone means that the user canconveniently make a phone call viaBluetooth function.
• Some phones may not be supported bythe function of Bluetooth phone.
Notices for safe driving• Bluetooth phone can improve the safety
of driving. After the phone is connectedvia Bluetooth function to the system unit,the user can conveniently make a call,answer a call and manage the contacts.Please read this user manual carefullybefore using the Bluetooth phone.
• It is prohibitted to operate the Bluetoothdevice frequently while driving may causenegligent driving and even result in anaccident.
• Avoid watching the screen of the systemunit for a long time while driving. This isdangerous and may cause an accident.
Warning for pairing Bluetooth phone• Before pairing your phone to the system
unit, check to see if your phone isequipped with a Bluetooth function.
• If you do not want your vehicle to beautomatically connected to your phone,stop the vehicle and deactivate theBluetooth function in the phone.
• Some Bluetooth functions may not beactivated properly due to the softwareversion of the phone. Disconnect thecurrent bluetooth connection and updateyour phone with the latest softwareversion provided by the phonemanufacturer. Once completed, pairagain your phone with the system unit.
Multimedia system
Notices before using Bluetooth
8
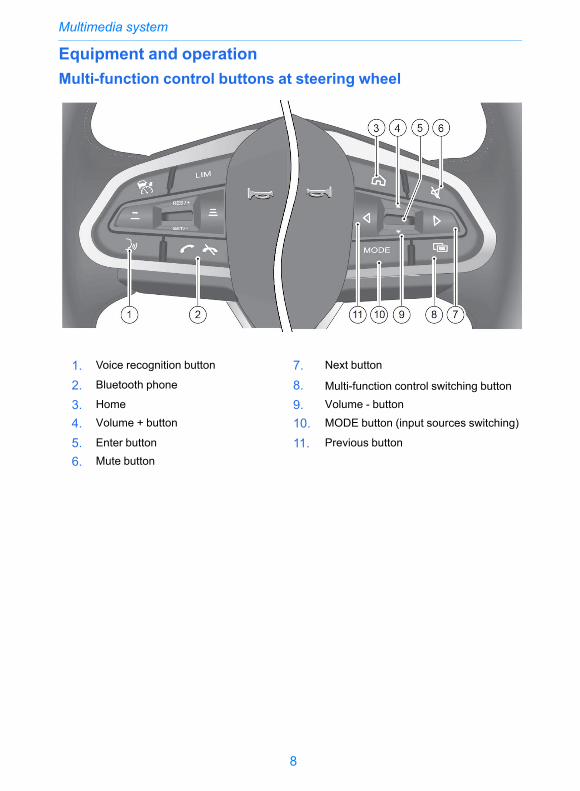
Equipment and operation Multi-function control buttons at steering wheel
1. Voice recognition button 7. Next button
2. Bluetooth phone 8. Multi-function control switching button3. Home 9. Volume - button
4. Volume + button 10. MODE button (input sources switching)
5. Enter button 11. Previous button
6. Mute button
Multimedia system
1
2
9
Multimedia system
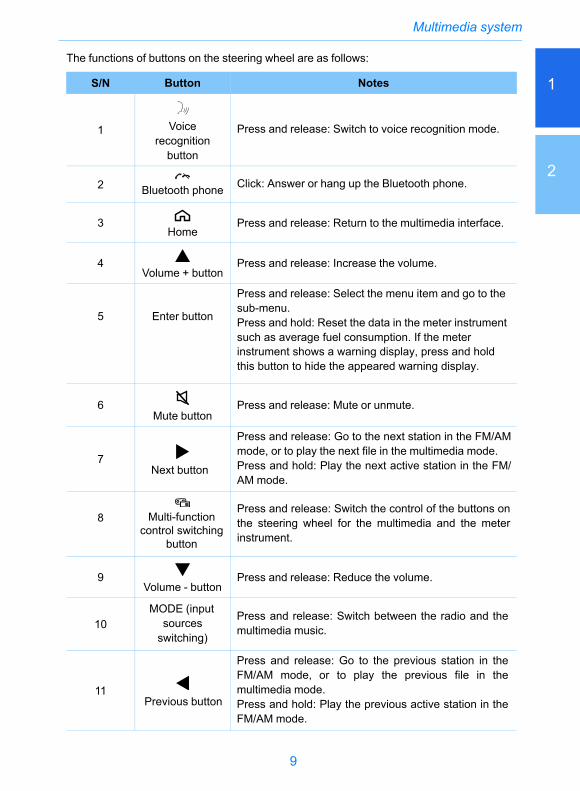
The functions of buttons on the steering wheel are as follows:
S/N Button Notes
1 Voicerecognition
button
Press and release: Switch to voice recognition mode.
2 Bluetooth phone Click: Answer or hang up the Bluetooth phone.
3Home
Press and release: Return to the multimedia interface.
4Volume + button
Press and release: Increase the volume.
5 Enter button
Press and release: Select the menu item and go to the sub-menu.Press and hold: Reset the data in the meter instrument such as average fuel consumption. If the meter instrument shows a warning display, press and hold this button to hide the appeared warning display.
6Mute button
Press and release: Mute or unmute.
7Next button
Press and release: Go to the next station in the FM/AM mode, or to play the next file in the multimedia mode.Press and hold: Play the next active station in the FM/AM mode.
8 Multi-function control switching
button
Press and release: Switch the control of the buttons on the steering wheel for the multimedia and the meter instrument.
9Volume - button
Press and release: Reduce the volume.
10MODE (input
sourcesswitching)
Press and release: Switch between the radio and the multimedia music.
11Previous button
Press and release: Go to the previous station in the FM/AM mode, or to play the previous file in the multimedia mode.Press and hold: Play the previous active station in the FM/AM mode.

10
Multimedia system
Basic Operations
Start-up interface
Warning interface
Initial start-up of the systemPress the ignition switch to turn the power mode to ACC or ON, then the multimedia unit
will be started automatically and the start-up and warning interface will be displayed on the
screen.
1
2
11
Multimedia system
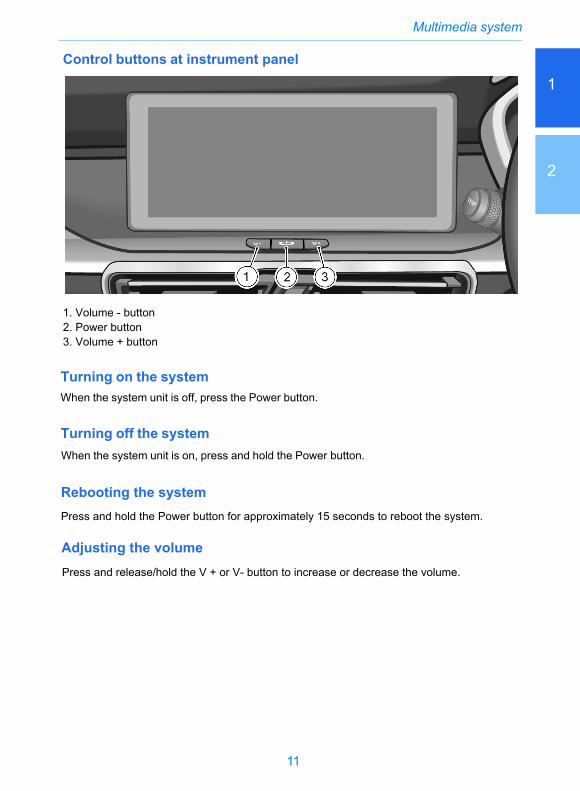
1. Volume - button2. Power button3. Volume + button
Turning on the systemWhen the system unit is off, press the Power button.
Turning off the system
Control buttons at instrument panel
When the system unit is on, press and hold the Power button.
Rebooting the systemPress and hold the Power button for approximately 15 seconds to reboot the system.
Adjusting the volumePress and release/hold the V + or V- button to increase or decrease the volume.
12
Multimedia system
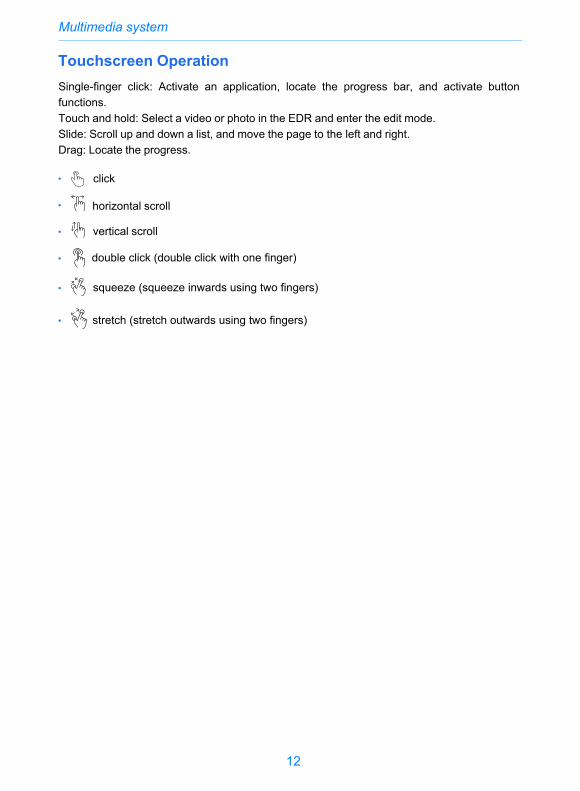
Single-finger click: Activate an application, locate the progress bar, and activate button functions.Touch and hold: Select a video or photo in the EDR and enter the edit mode.Slide: Scroll up and down a list, and move the page to the left and right.Drag: Locate the progress.
Touchscreen Operation
• click
• horizontal scroll
• vertical scroll
• double click (double click with one finger)
• squeeze (squeeze inwards using two fingers)
• stretch (stretch outwards using two fingers)
1
2
13
Multimedia system
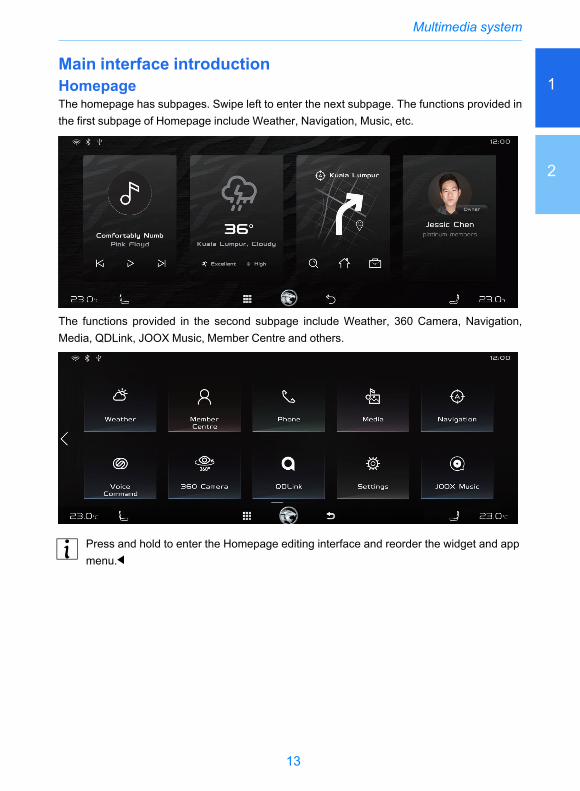
Main interface introductionHomepageThe homepage has subpages. Swipe left to enter the next subpage. The functions provided inthe first subpage of Homepage include Weather, Navigation, Music, etc.
The functions provided in the second subpage include Weather, 360 Camera, Navigation,Media, QDLink, JOOX Music, Member Centre and others.
Press and hold to enter the Homepage editing interface and reorder the widget and appmenu.
14
Multimedia system
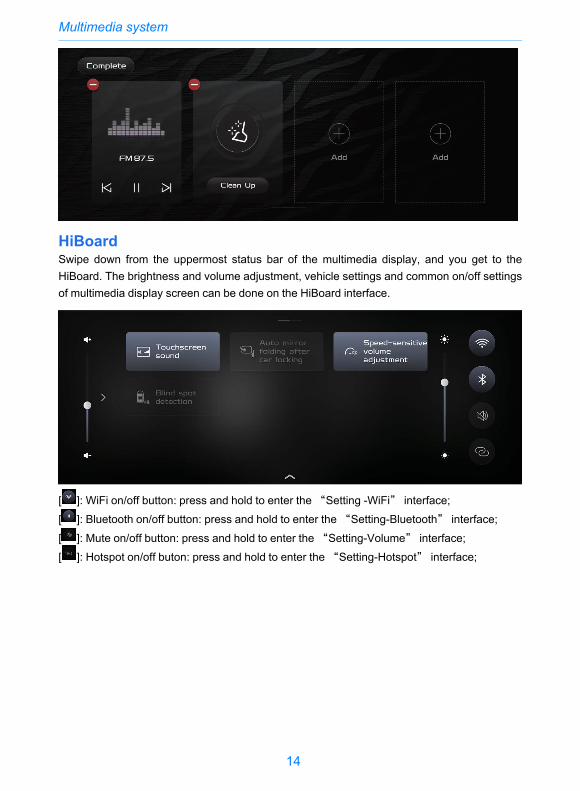
HiBoardSwipe down from the uppermost status bar of the multimedia display, and you get to theHiBoard. The brightness and volume adjustment, vehicle settings and common on/off settingsof multimedia display screen can be done on the HiBoard interface.
[[[[
]: WiFi on/off button: press and hold to enter the “Setting -WiFi” interface;]: Bluetooth on/off button: press and hold to enter the “Setting-Bluetooth” interface;]: Mute on/off button: press and hold to enter the “Setting-Volume” interface;]: Hotspot on/off buton: press and hold to enter the “Setting-Hotspot” interface;
1
2
15
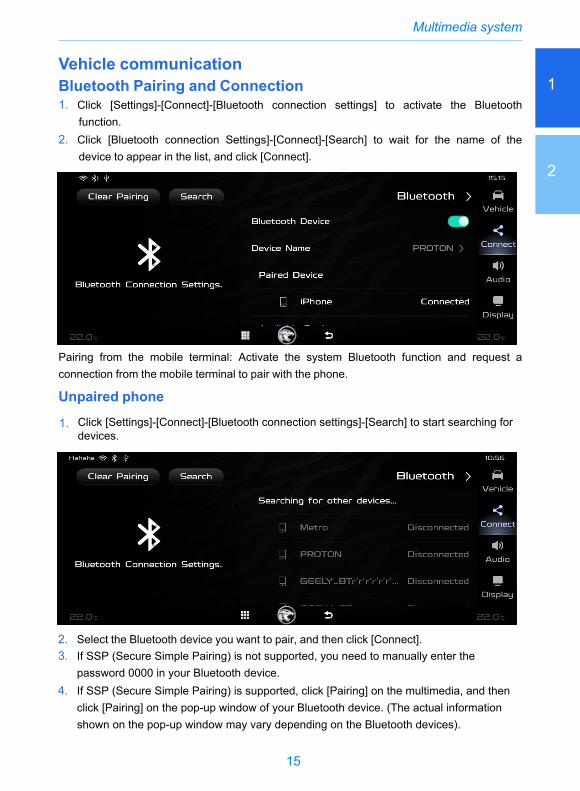
Vehicle communicationBluetooth Pairing and Connection1. Click [Settings]-[Connect]-[Bluetooth connection settings] to activate the Bluetooth
function.2. Click [Bluetooth connection Settings]-[Connect]-[Search] to wait for the name of the
device to appear in the list, and click [Connect].
Pairing from the mobile terminal: Activate the system Bluetooth function and request aconnection from the mobile terminal to pair with the phone.
Unpaired phone
1. Click [Settings]-[Connect]-[Bluetooth connection settings]-[Search] to start searching fordevices.
2. Select the Bluetooth device you want to pair, and then click [Connect].3. If SSP (Secure Simple Pairing) is not supported, you need to manually enter the
password 0000 in your Bluetooth device.4. If SSP (Secure Simple Pairing) is supported, click [Pairing] on the multimedia, and then
click [Pairing] on the pop-up window of your Bluetooth device. (The actual informationshown on the pop-up window may vary depending on the Bluetooth devices).
Multimedia system
16
Multimedia system
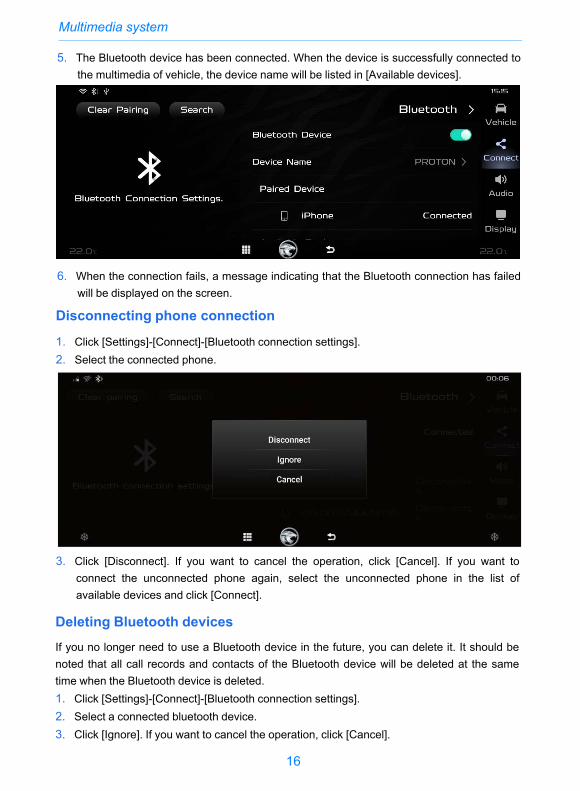
5. The Bluetooth device has been connected. When the device is successfully connected tothe multimedia of vehicle, the device name will be listed in [Available devices].
6. When the connection fails, a message indicating that the Bluetooth connection has failedwill be displayed on the screen.
Disconnecting phone connection
1. Click [Settings]-[Connect]-[Bluetooth connection settings].2. Select the connected phone.
3. Click [Disconnect]. If you want to cancel the operation, click [Cancel]. If you want toconnect the unconnected phone again, select the unconnected phone in the list ofavailable devices and click [Connect].
Deleting Bluetooth devicesIf you no longer need to use a Bluetooth device in the future, you can delete it. It should benoted that all call records and contacts of the Bluetooth device will be deleted at the sametime when the Bluetooth device is deleted.1. Click [Settings]-[Connect]-[Bluetooth connection settings].2. Select a connected bluetooth device.3. Click [Ignore]. If you want to cancel the operation, click [Cancel].

1
2
17
Multimedia system
Recent CallsClick [Phone] in the main interface, and then click [Recents]. The Recent Calls interface willbe displayed and you can call the contact by clicking on the [Contact name].
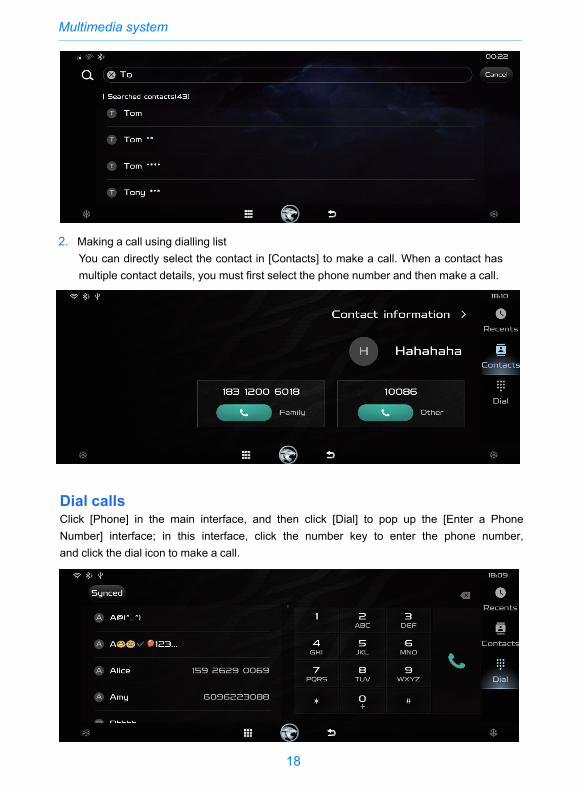
ContactsClick [Phone] in the main interface, and then click [Contacts] to display the contacts interface.It is very convenient to view and search the phone number. It is similar to the viewing andsearching through the phone. You can operate the left slide button or directlytouch the touch screen to view the contacts. You can also click [ ] and enter the name of theperson you want to search.
1. Quickly SearchClick [ ], enter the initials or the name you want to search. After the searching iscompleted, click the phone button to make a call.
18
Multimedia system
2. Making a call using dialling listYou can directly select the contact in [Contacts] to make a call. When a contact hasmultiple contact details, you must first select the phone number and then make a call.
Dial callsClick [Phone] in the main interface, and then click [Dial] to pop up the [Enter a PhoneNumber] interface; in this interface, click the number key to enter the phone number,and click the dial icon to make a call.
1
2
19
Multimedia system
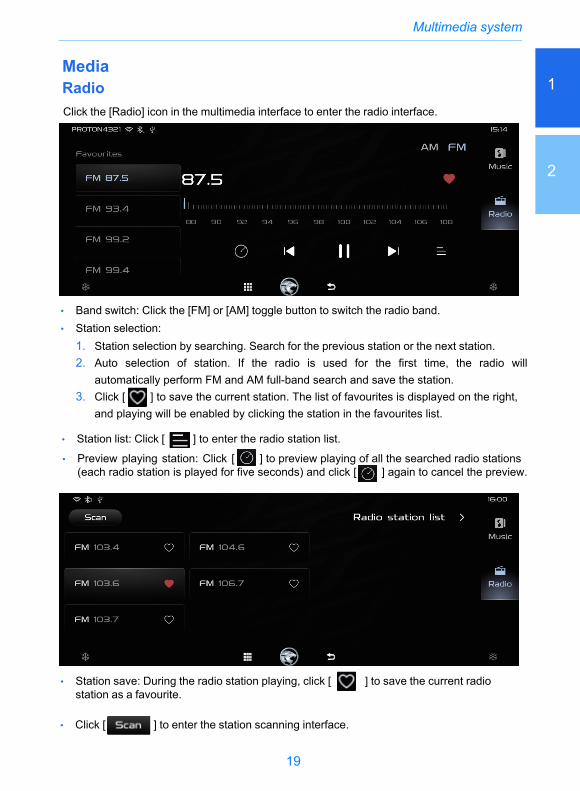
• Band switch: Click the [FM] or [AM] toggle button to switch the radio band.• Station selection:
1. Station selection by searching. Search for the previous station or the next station.2. Auto selection of station. If the radio is used for the first time, the radio will
automatically perform FM and AM full-band search and save the station.3. Click [ ] to save the current station. The list of favourites is displayed on the right,
and playing will be enabled by clicking the station in the favourites list.
Click the [Radio] icon in the multimedia interface to enter the radio interface.
MediaRadio
• Station list: Click [ ] to enter the radio station list.
• Preview playing station: Click [ ] to preview playing of all the searched radio stations (each radio station is played for five seconds) and click [ ] again to cancel the preview.
] to save the current radio • Station save: During the radio station playing, click [station as a favourite.
• Click [ ] to enter the station scanning interface.
20
Multimedia system
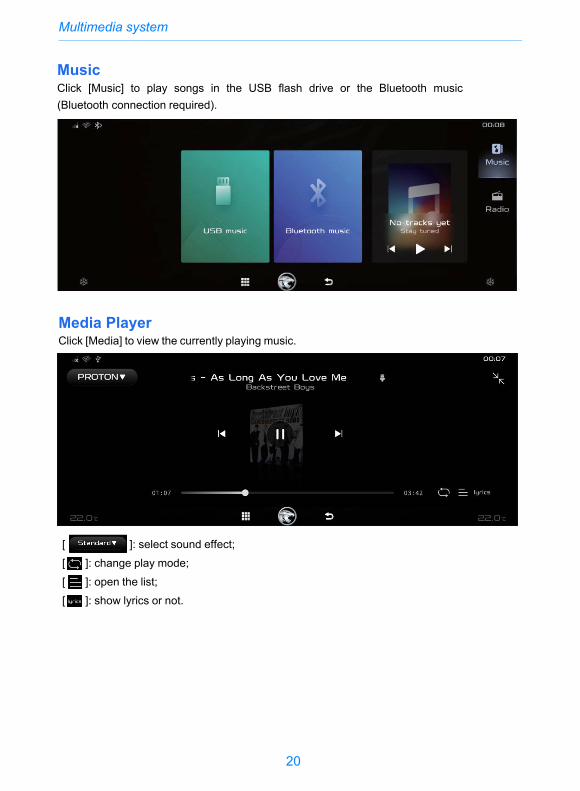
MusicClick [Music] to play songs in the USB flash drive or the Bluetooth music (Bluetooth connection required).
Media PlayerClick [Media] to view the currently playing music.
[ ]: select sound effect; [ ]: change play mode; [ ]: open the list;[ ]: show lyrics or not.
1
2
21
Multimedia system
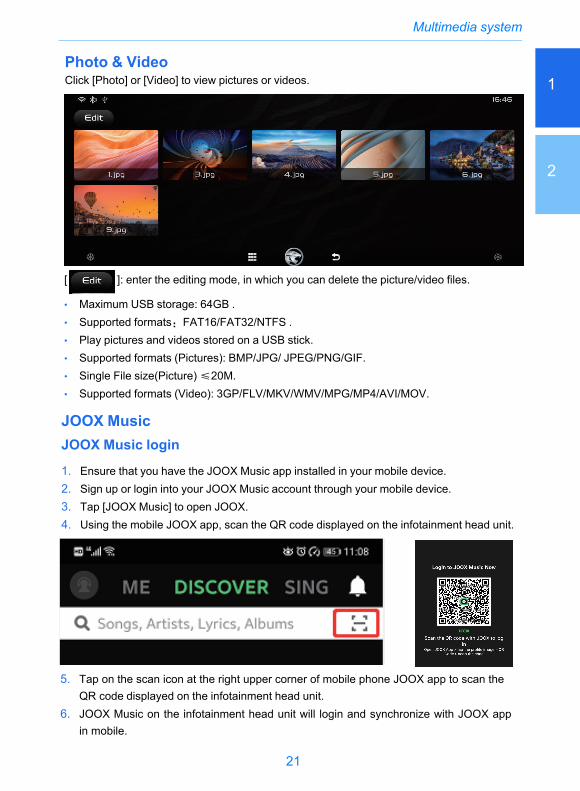
[ ]: enter the editing mode, in which you can delete the picture/video files.
• Maximum USB storage: 64GB .• Supported formats:FAT16/FAT32/NTFS .• Play pictures and videos stored on a USB stick.• Supported formats (Pictures): BMP/JPG/ JPEG/PNG/GIF.• Single File size(Picture)≤20M.• Supported formats (Video): 3GP/FLV/MKV/WMV/MPG/MP4/AVI/MOV.
Photo & VideoClick [Photo] or [Video] to view pictures or videos.
JOOX MusicJOOX Music login
1. Ensure that you have the JOOX Music app installed in your mobile device.2. Sign up or login into your JOOX Music account through your mobile device.3. Tap [JOOX Music] to open JOOX.4. Using the mobile JOOX app, scan the QR code displayed on the infotainment head unit.
5. Tap on the scan icon at the right upper corner of mobile phone JOOX app to scan theQR code displayed on the infotainment head unit.
6. JOOX Music on the infotainment head unit will login and synchronize with JOOX appin mobile.
22
Multimedia system
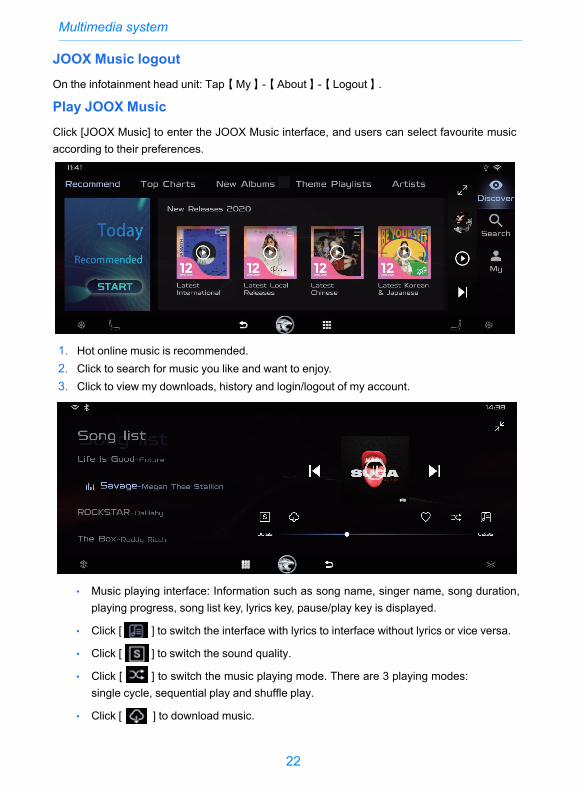
• Music playing interface: Information such as song name, singer name, song duration,playing progress, song list key, lyrics key, pause/play key is displayed.
• Click [
• Click [
• Click [
] to switch the interface with lyrics to interface without lyrics or vice versa.
] to switch the sound quality.
] to switch the music playing mode. There are 3 playing modes: single cycle, sequential play and shuffle play.
• Click [ ] to download music.
1. Hot online music is recommended.2. Click to search for music you like and want to enjoy.3. Click to view my downloads, history and login/logout of my account.
JOOX Music logoutOn the infotainment head unit: Tap【My】-【About】-【Logout】.
Play JOOX MusicClick [JOOX Music] to enter the JOOX Music interface, and users can select favourite musicaccording to their preferences.
1
2
23
Multimedia system
NavigationGetting to Know Your NavigationStart the navigation system
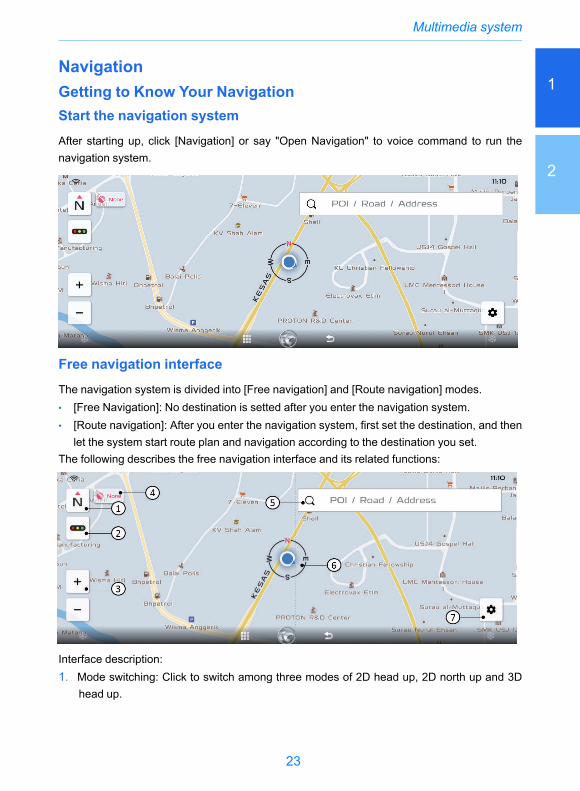
After starting up, click [Navigation] or say "Open Navigation" to voice command to run thenavigation system.
Free navigation interface
The navigation system is divided into [Free navigation] and [Route navigation] modes.• [Free Navigation]: No destination is setted after you enter the navigation system.• [Route navigation]: After you enter the navigation system, first set the destination, and then
let the system start route plan and navigation according to the destination you set.The following describes the free navigation interface and its related functions:
Interface description:1. Mode switching: Click to switch among three modes of 2D head up, 2D north up and 3D
head up.
24
Multimedia system
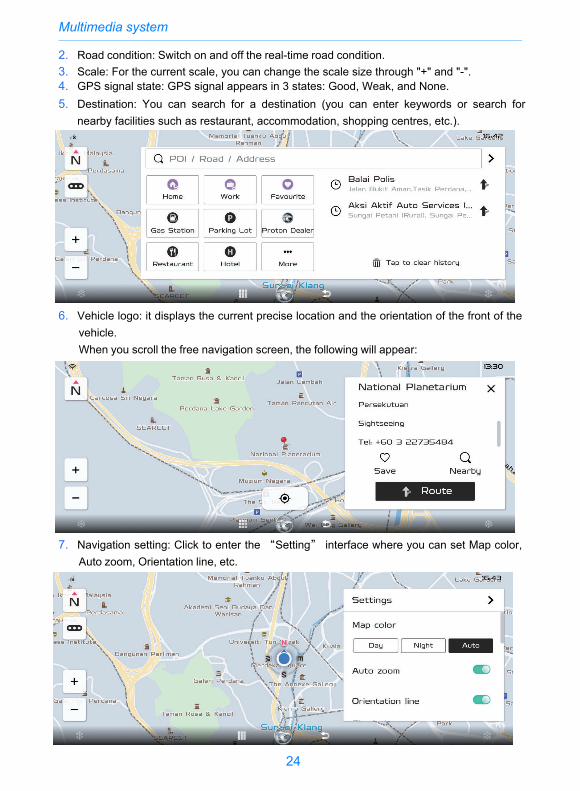
2. Road condition: Switch on and off the real-time road condition.3. Scale: For the current scale, you can change the scale size through "+" and "-".4. GPS signal state: GPS signal appears in 3 states: Good, Weak, and None.5. Destination: You can search for a destination (you can enter keywords or search for
nearby facilities such as restaurant, accommodation, shopping centres, etc.).
6. Vehicle logo: it displays the current precise location and the orientation of the front of thevehicle.When you scroll the free navigation screen, the following will appear:
7. Navigation setting: Click to enter the “Setting” interface where you can set Map color,Auto zoom, Orientation line, etc.
1
2
25
Multimedia system
Route navigation interface
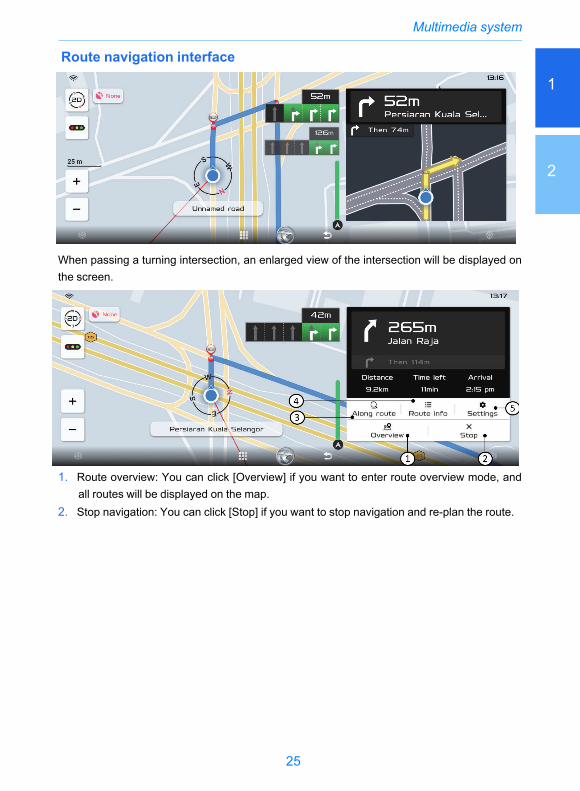
When passing a turning intersection, an enlarged view of the intersection will be displayed onthe screen.
1. Route overview: You can click [Overview] if you want to enter route overview mode, andall routes will be displayed on the map.
2. Stop navigation: You can click [Stop] if you want to stop navigation and re-plan the route.
26
Multimedia system
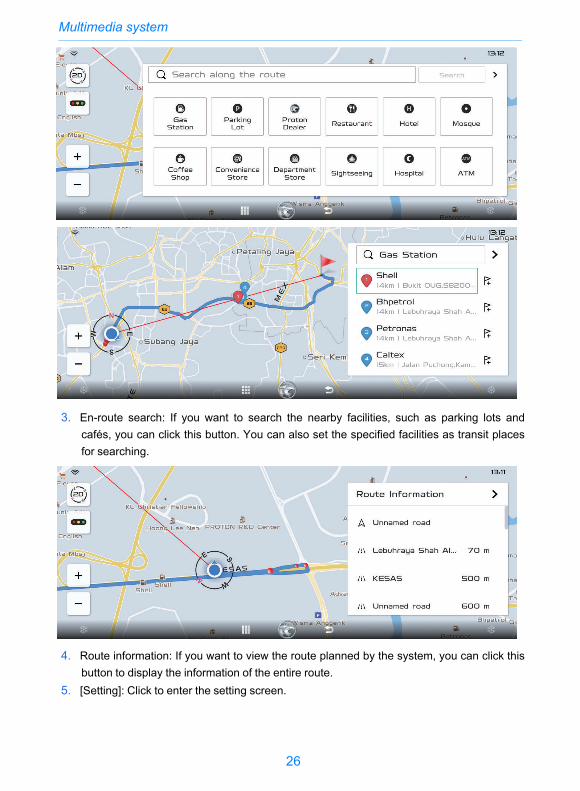
3. En-route search: If you want to search the nearby facilities, such as parking lots andcafés, you can click this button. You can also set the specified facilities as transit placesfor searching.
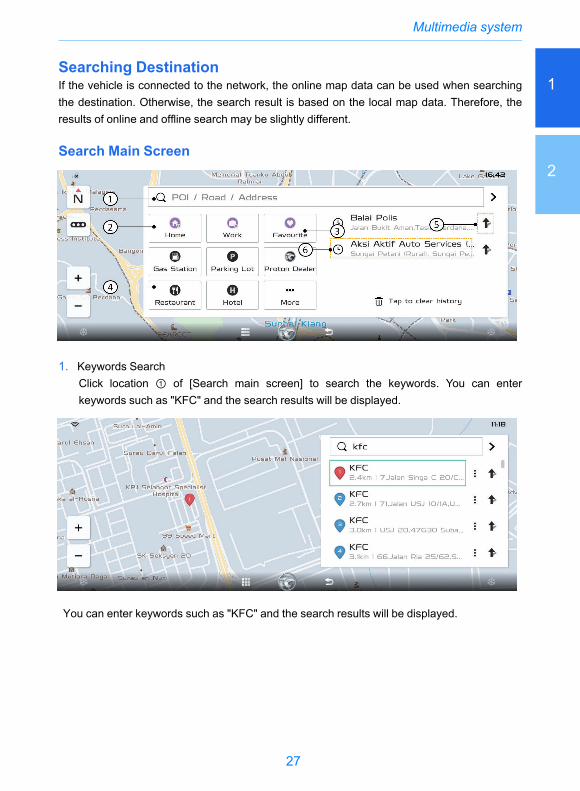
4. Route information: If you want to view the route planned by the system, you can click thisbutton to display the information of the entire route.
5. [Setting]: Click to enter the setting screen.
1
2
27
Multimedia system
Searching DestinationIf the vehicle is connected to the network, the online map data can be used when searchingthe destination. Otherwise, the search result is based on the local map data. Therefore, theresults of online and offline search may be slightly different.
Search Main Screen
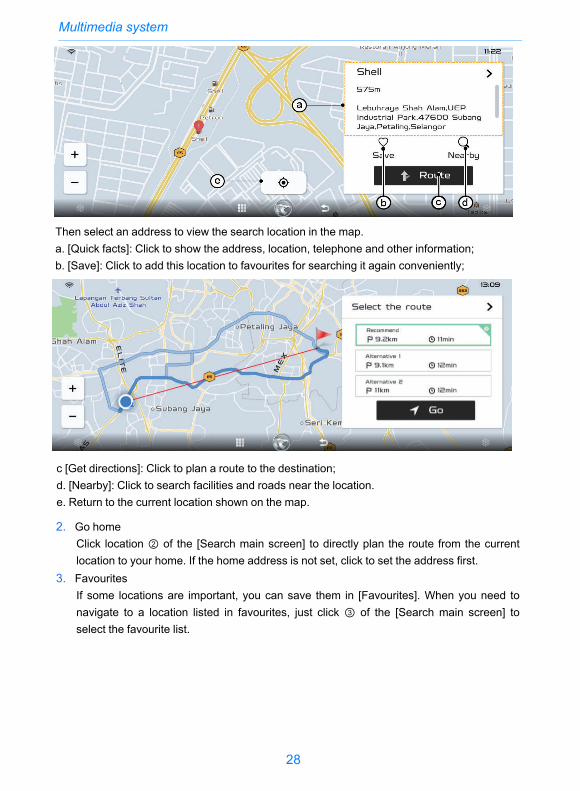
1. Keywords SearchClick location ① of [Search main screen] to search the keywords. You can enterkeywords such as "KFC" and the search results will be displayed.
You can enter keywords such as "KFC" and the search results will be displayed.
28
Multimedia system
2. Go homeClick location ② of the [Search main screen] to directly plan the route from the currentlocation to your home. If the home address is not set, click to set the address first.
3. FavouritesIf some locations are important, you can save them in [Favourites]. When you need tonavigate to a location listed in favourites, just click ③ of the [Search main screen] toselect the favourite list.
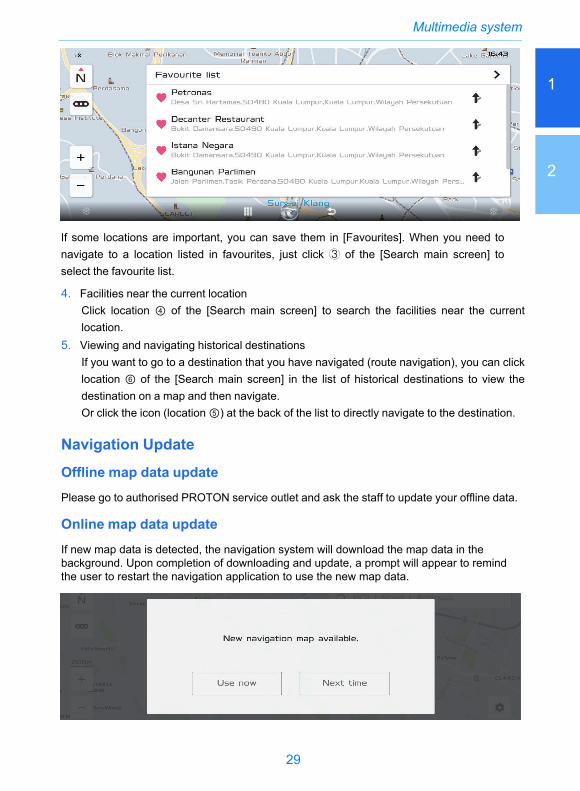
Then select an address to view the search location in the map.a. [Quick facts]: Click to show the address, location, telephone and other information;b. [Save]: Click to add this location to favourites for searching it again conveniently;
c [Get directions]: Click to plan a route to the destination;d. [Nearby]: Click to search facilities and roads near the location.e. Return to the current location shown on the map.
1
2
29
Multimedia system
4. Facilities near the current locationClick location ④ of the [Search main screen] to search the facilities near the currentlocation.
5. Viewing and navigating historical destinationsIf you want to go to a destination that you have navigated (route navigation), you can clicklocation ⑥ of the [Search main screen] in the list of historical destinations to view thedestination on a map and then navigate.Or click the icon (location ⑤) at the back of the list to directly navigate to the destination.
Navigation Update
Offline map data updatePlease go to authorised PROTON service outlet and ask the staff to update your offline data.
Online map data updateIf new map data is detected, the navigation system will download the map data in the background. Upon completion of downloading and update, a prompt will appear to remind the user to restart the navigation application to use the new map data.
If some locations are important, you can save them in [Favourites]. When you need tonavigate to a location listed in favourites, just click ③ of the [Search main screen] toselect the favourite list.
30
Multimedia system
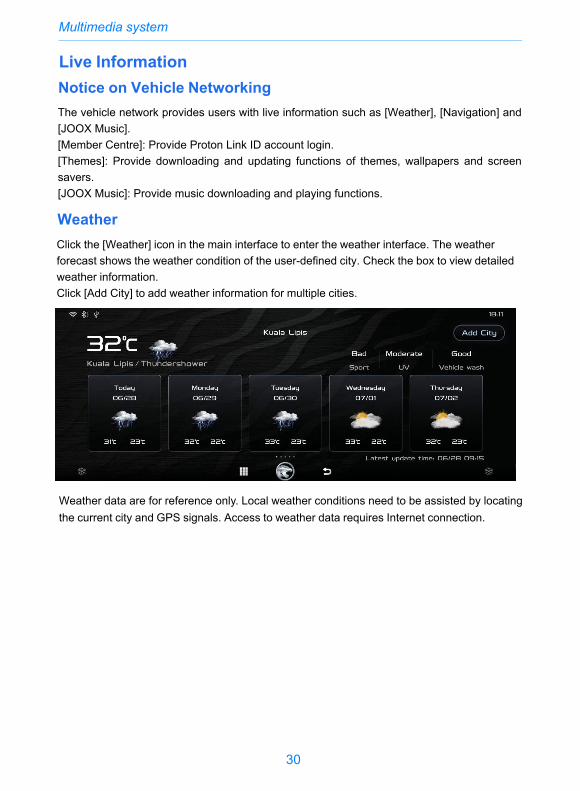
Weather data are for reference only. Local weather conditions need to be assisted by locatingthe current city and GPS signals. Access to weather data requires Internet connection.
Live InformationNotice on Vehicle NetworkingThe vehicle network provides users with live information such as [Weather], [Navigation] and [JOOX Music].[Member Centre]: Provide Proton Link ID account login.[Themes]: Provide downloading and updating functions of themes, wallpapers and screen savers.[JOOX Music]: Provide music downloading and playing functions.
WeatherClick the [Weather] icon in the main interface to enter the weather interface. The weather forecast shows the weather condition of the user-defined city. Check the box to view detailed weather information.Click [Add City] to add weather information for multiple cities.
1
2
31
Multimedia system
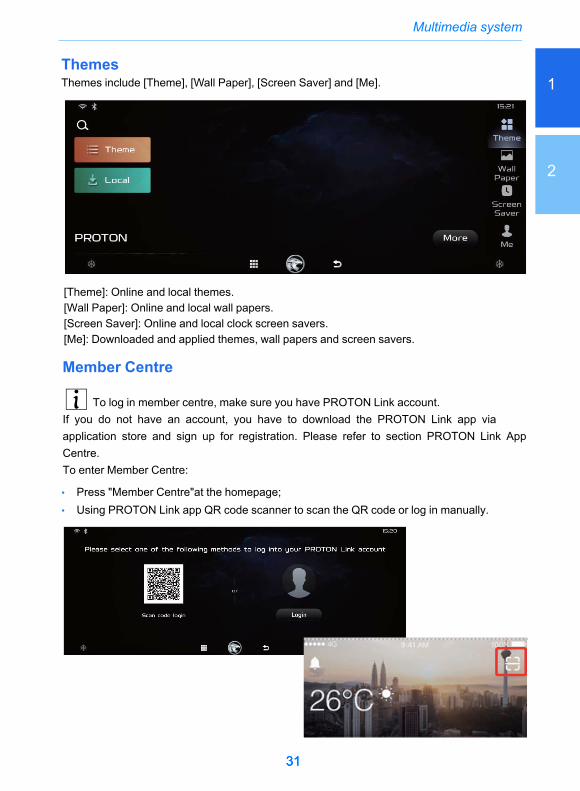
ThemesThemes include [Theme], [Wall Paper], [Screen Saver] and [Me].
3131
[Theme]: Online and local themes.[Wall Paper]: Online and local wall papers.[Screen Saver]: Online and local clock screen savers.[Me]: Downloaded and applied themes, wall papers and screen savers.
Member Centre
To log in member centre, make sure you have PROTON Link account.If you do not have an account, you have to download the PROTON Link app via application store and sign up for registration. Please refer to section PROTON Link App Centre.To enter Member Centre:
• Press "Member Centre"at the homepage;• Using PROTON Link app QR code scanner to scan the QR code or log in manually.
32
Multimedia system
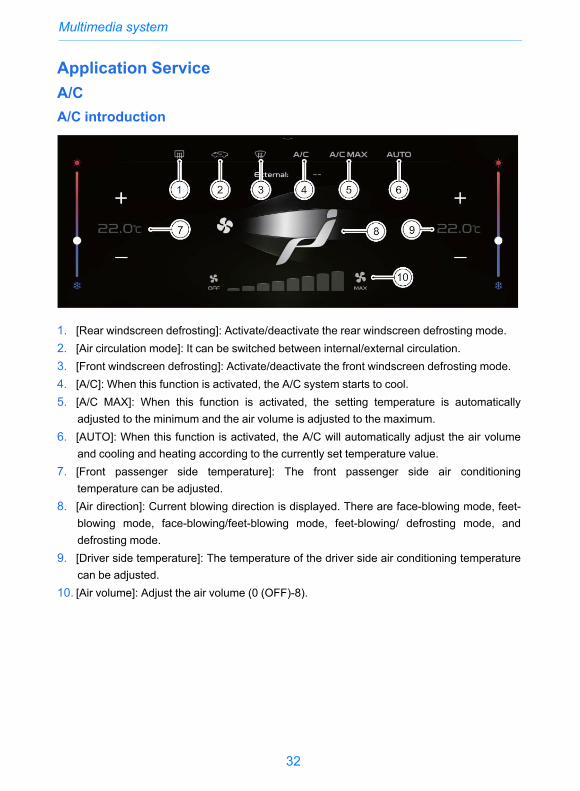
Application ServiceA/CA/C introduction
1. [Rear windscreen defrosting]: Activate/deactivate the rear windscreen defrosting mode.2. [Air circulation mode]: It can be switched between internal/external circulation.3. [Front windscreen defrosting]: Activate/deactivate the front windscreen defrosting mode.4. [A/C]: When this function is activated, the A/C system starts to cool.5. [A/C MAX]: When this function is activated, the setting temperature is automatically
adjusted to the minimum and the air volume is adjusted to the maximum.6. [AUTO]: When this function is activated, the A/C will automatically adjust the air volume
and cooling and heating according to the currently set temperature value.7. [Front passenger side temperature]: The front passenger side air conditioning
temperature can be adjusted.8. [Air direction]: Current blowing direction is displayed. There are face-blowing mode, feet-
blowing mode, face-blowing/feet-blowing mode, feet-blowing/ defrosting mode, anddefrosting mode.
9. [Driver side temperature]: The temperature of the driver side air conditioning temperaturecan be adjusted.
10. [Air volume]: Adjust the air volume (0 (OFF)-8).
1
2
33
Multimedia system
Voice CommandWake up the voice command:
• Say Hi, Proton;
• Or press and release the button on the steering wheel.
After being woke up, the voice command can enable the GKUI system to realize multiple functions:
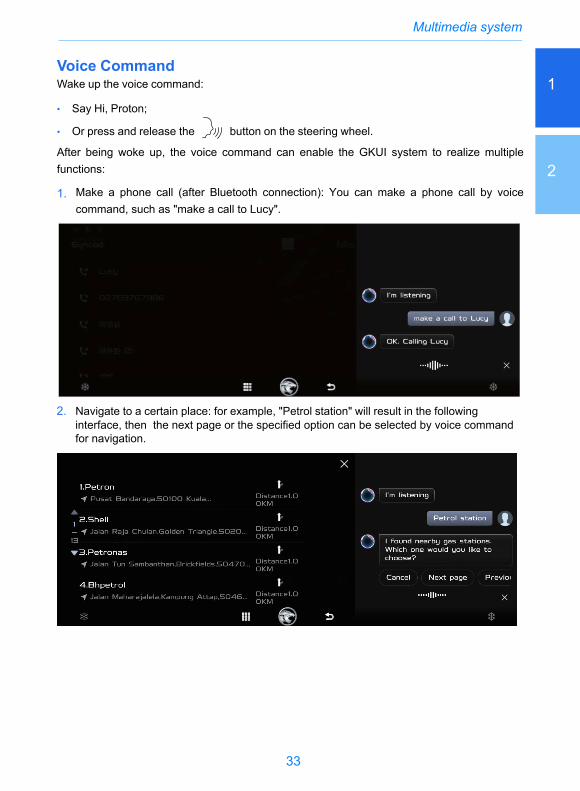
1. Make a phone call (after Bluetooth connection): You can make a phone call by voicecommand, such as "make a call to Lucy".
2. Navigate to a certain place: for example, "Petrol station" will result in the followinginterface, then the next page or the specified option can be selected by voice commandfor navigation.
34
Multimedia system
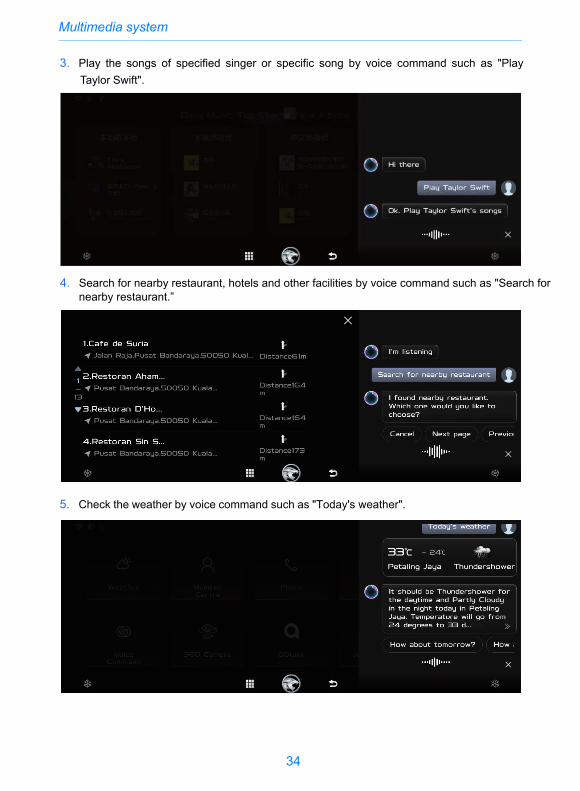
3. Play the songs of specified singer or specific song by voice command such as "PlayTaylor Swift".
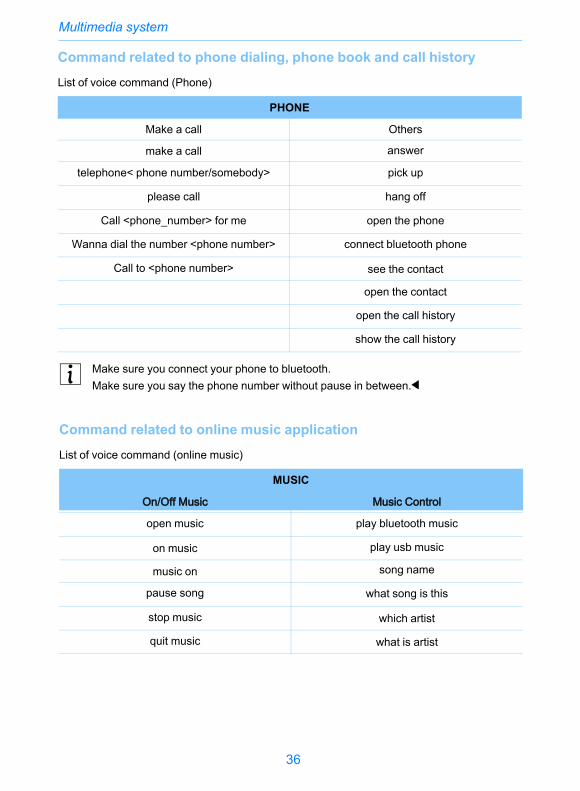
5. Check the weather by voice command such as "Today's weather".
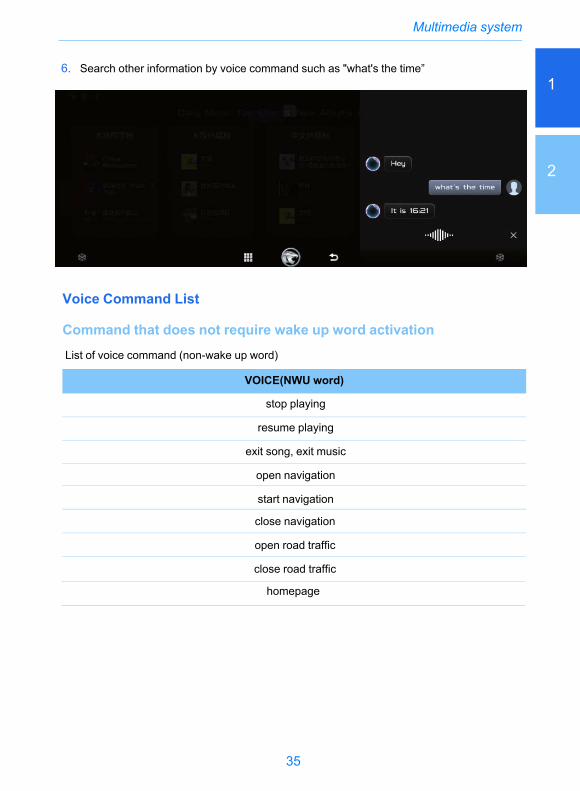
4. Search for nearby restaurant, hotels and other facilities by voice command such as "Search fornearby restaurant.”
1
2
35
Multimedia system
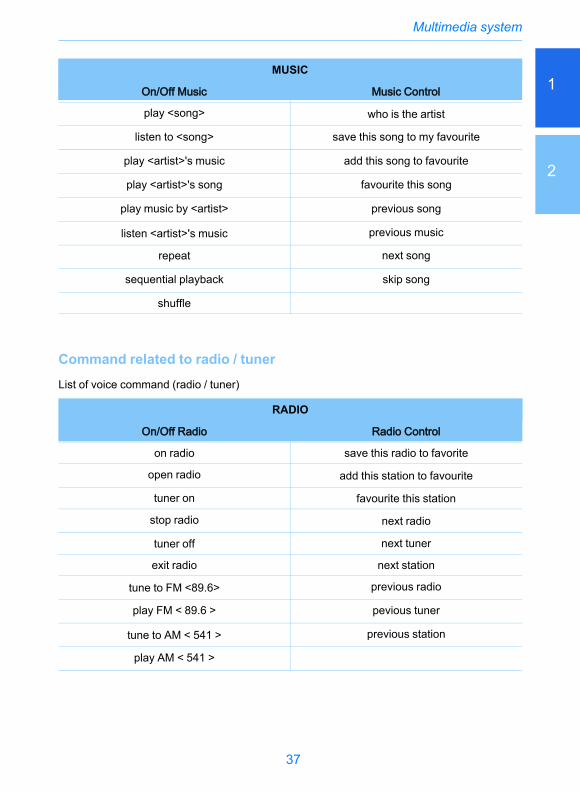
6. Search other information by voice command such as "what's the time”
Voice Command List
Command that does not require wake up word activationList of voice command (non-wake up word)
VOICE(NWU word)
stop playing
resume playing
exit song, exit music
open navigation
start navigation
close navigation
open road traffic
close road traffic
homepage
36
Command related to phone dialing, phone book and call historyList of voice command (Phone)
PHONE
Make a call Others
make a call answer
telephone< phone number/somebody> pick up
please call hang off
Call <phone_number> for me open the phone
Wanna dial the number <phone number> connect bluetooth phone
Call to <phone number> see the contact
open the contact
open the call history
show the call history
Multimedia system
Make sure you connect your phone to bluetooth.Make sure you say the phone number without pause in between.
Command related to online music applicationList of voice command (online music)
MUSIC
On/Off Music Music Control
open music play bluetooth music
on music play usb music
music on song name
pause song what song is this
stop music which artist
quit music what is artist
37
play <song> who is the artist
listen to <song> save this song to my favourite
play <artist>'s music add this song to favourite
play <artist>'s song favourite this song
play music by <artist> previous song
listen <artist>'s music previous music
repeat next song
sequential playback skip song
shuffle
Command related to radio / tunerList of voice command (radio / tuner)
RADIO
On/Off Radio Radio Control
on radio save this radio to favorite
open radio add this station to favourite
tuner on favourite this station
stop radio next radio
tuner off next tuner
exit radio next station
tune to FM <89.6> previous radio
play FM < 89.6 > pevious tuner
tune to AM < 541 > previous station
play AM < 541 >
Multimedia system
MUSIC
On/Off Music Music Control 1
2
38
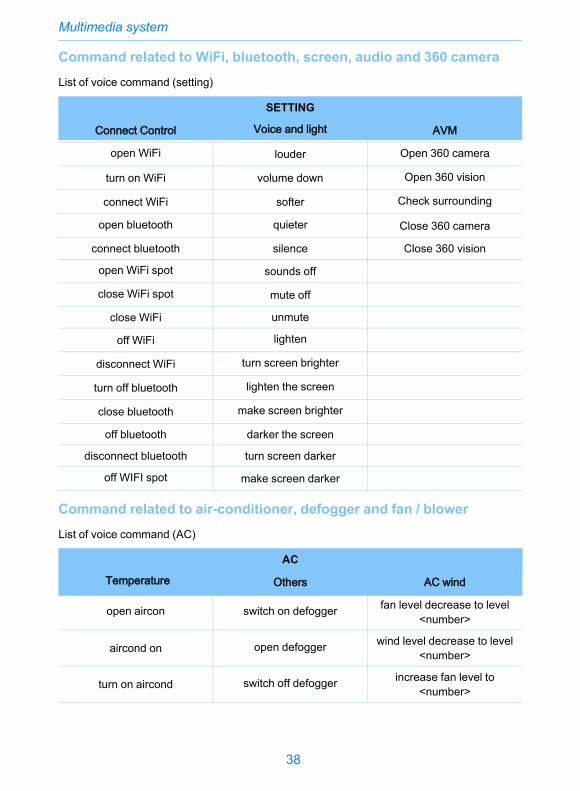
Command related to WiFi, bluetooth, screen, audio and 360 cameraList of voice command (setting)
SETTING
Connect Control Voice and light AVM
open WiFi louder Open 360 camera
turn on WiFi volume down Open 360 vision
connect WiFi softer Check surrounding
open bluetooth quieter Close 360 camera
connect bluetooth silence Close 360 vision
open WiFi spot sounds off
close WiFi spot mute off
close WiFi unmute
off WiFi lighten
disconnect WiFi turn screen brighter
turn off bluetooth lighten the screen
close bluetooth make screen brighter
off bluetooth darker the screen
disconnect bluetooth turn screen darker
off WIFI spot make screen darker
Command related to air-conditioner, defogger and fan / blowerList of voice command (AC)
AC
Temperature Others AC wind
open aircon switch on defogger fan level decrease to level<number>
aircond on open defogger wind level decrease to level<number>
turn on aircond switch off defogger increase fan level to<number>
Multimedia system
39
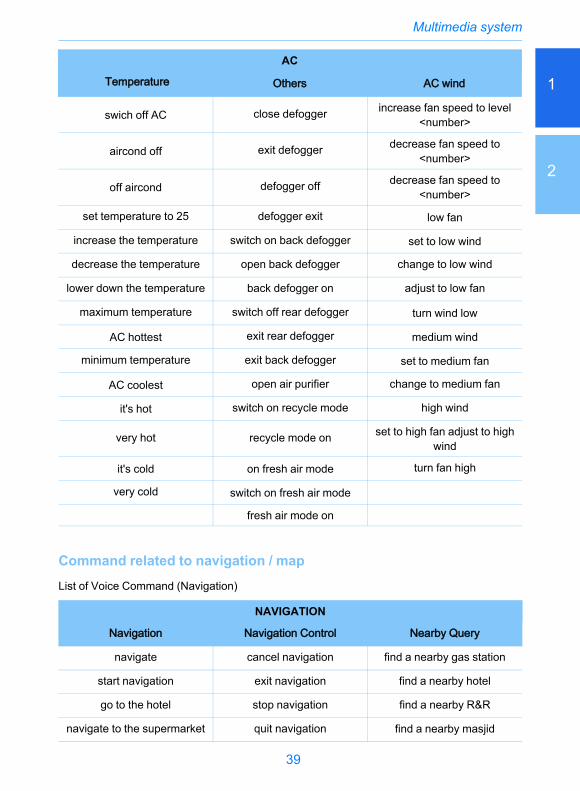
swich off AC close defogger increase fan speed to level<number>
aircond off exit defogger decrease fan speed to<number>
off aircond defogger off decrease fan speed to<number>
set temperature to 25 defogger exit low fan
increase the temperature switch on back defogger set to low wind
decrease the temperature open back defogger change to low wind
lower down the temperature back defogger on adjust to low fan
maximum temperature switch off rear defogger turn wind low
AC hottest exit rear defogger medium wind
minimum temperature exit back defogger set to medium fan
AC coolest open air purifier change to medium fan
it's hot switch on recycle mode high wind
very hot recycle mode on set to high fan adjust to highwind
it's cold on fresh air mode turn fan high
very cold switch on fresh air mode
fresh air mode on
Command related to navigation / mapList of Voice Command (Navigation)
NAVIGATION
Navigation Navigation Control Nearby Query
navigate cancel navigation find a nearby gas station
start navigation exit navigation find a nearby hotel
go to the hotel stop navigation find a nearby R&R
navigate to the supermarket quit navigation find a nearby masjid
Multimedia system
AC
Temperature Others AC wind 1
2

40
drive me to cinema open the Road Trafficinformation
find a nearby clinic
bring me to the hospital close the Road Trafficinformation
find a nearby hospital
take me to the park zoom in I'm going to refuel
I want to go to school zoom out I'm going to withdraw money
I wanna go home switch to 2D I need to go to the toilet
I want to go to the postoffice select 2D mode I'm so hungry
to office switch to head up where am I
take me to office select head up mode
go home switch to 3D
go back home select 3D mode
back to home
how many hours to go
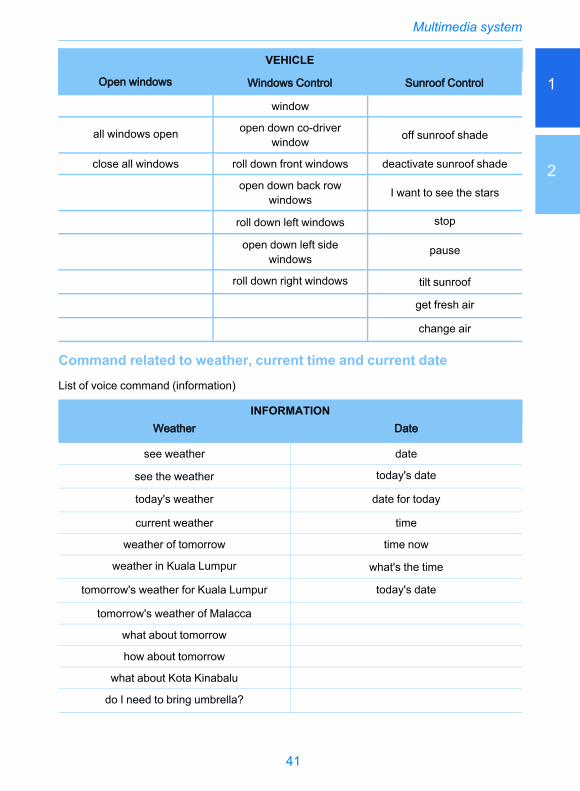
Command related to windows, sunroof and sunshadeList of voice command (vehicle control)
VEHICLE
Open windows Windows Control Sunroof Control
open windows open driver side window open sunroof
windows open roll down driver side window close sunroof
close windows roll down left rear window activate sunroof
windows close open down back left window deactivate sunroof
roll down my window open down right rearwindow
open sunroof shade
roll up all the window open down back rightwindow on sunroof shade
open all windows roll down passenger window activate sunroof shade
roll down all windows open down passenger side close sunroof shade
Multimedia system
NAVIGATION
Navigation Navigation Control Nearby Query
41
window
all windows open open down co-driverwindow off sunroof shade
close all windows roll down front windows deactivate sunroof shade
open down back rowwindows I want to see the stars
roll down left windows stop
open down left sidewindows
pause
roll down right windows tilt sunroof
get fresh air
change air
Command related to weather, current time and current dateList of voice command (information)
INFORMATIONWeather Date
see weather date
see the weather today's date
today's weather date for today
current weather time
weather of tomorrow time now
weather in Kuala Lumpur what's the time
tomorrow's weather for Kuala Lumpur today's date
tomorrow's weather of Malacca
what about tomorrow
how about tomorrow
what about Kota Kinabalu
do I need to bring umbrella?
Multimedia system
VEHICLE
Open windows Windows Control Sunroof Control 1
2
42
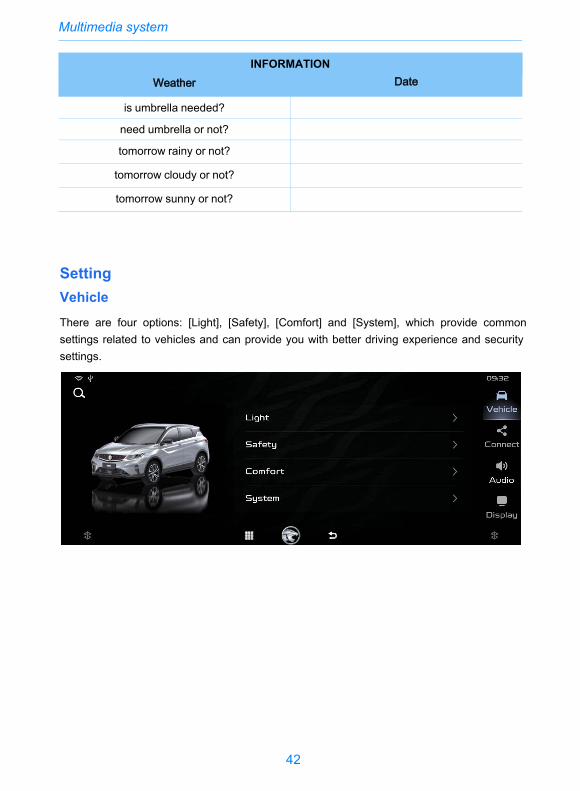
is umbrella needed?
need umbrella or not?
tomorrow rainy or not?
tomorrow cloudy or not?
tomorrow sunny or not?
Multimedia system
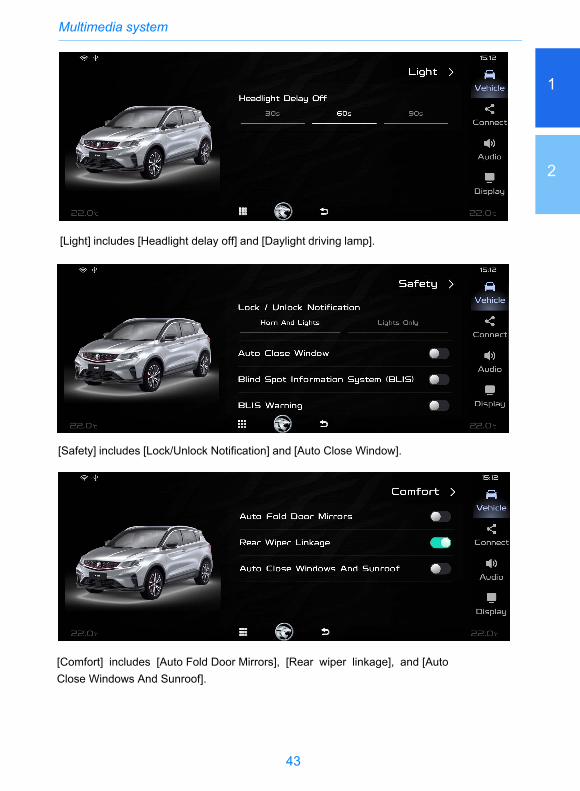
SettingVehicle
There are four options: [Light], [Safety], [Comfort] and [System], which provide common settings related to vehicles and can provide you with better driving experience and security settings.
INFORMATIONWeather Date
43
Multimedia system
1
2
[Comfort] includes [Auto Fold Door Mirrors], [Rear wiper linkage], and [Auto Close Windows And Sunroof].
[Safety] includes [Lock/Unlock Notification] and [Auto Close Window].
[Light] includes [Headlight delay off] and [Daylight driving lamp].
1
2
44
Multimedia system
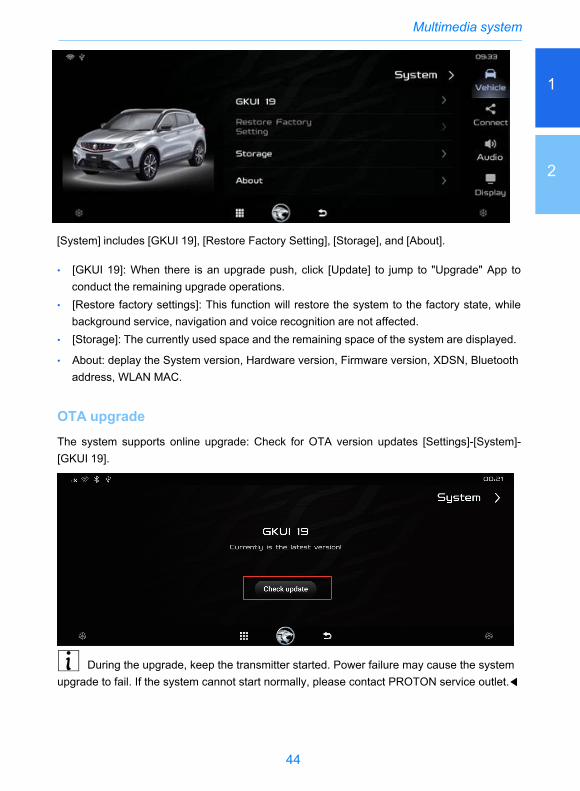
OTA upgradeThe system supports online upgrade: Check for OTA version updates [Settings]-[System]-[GKUI 19].
During the upgrade, keep the transmitter started. Power failure may cause the system upgrade to fail. If the system cannot start normally, please contact PROTON service outlet.
• [GKUI 19]: When there is an upgrade push, click [Update] to jump to "Upgrade" App toconduct the remaining upgrade operations.
• [Restore factory settings]: This function will restore the system to the factory state, whilebackground service, navigation and voice recognition are not affected.
• [Storage]: The currently used space and the remaining space of the system are displayed.
• About: deplay the System version, Hardware version, Firmware version, XDSN, Bluetoothaddress, WLAN MAC.
[System] includes [GKUI 19], [Restore Factory Setting], [Storage], and [About].
45
Multimedia system
1
2
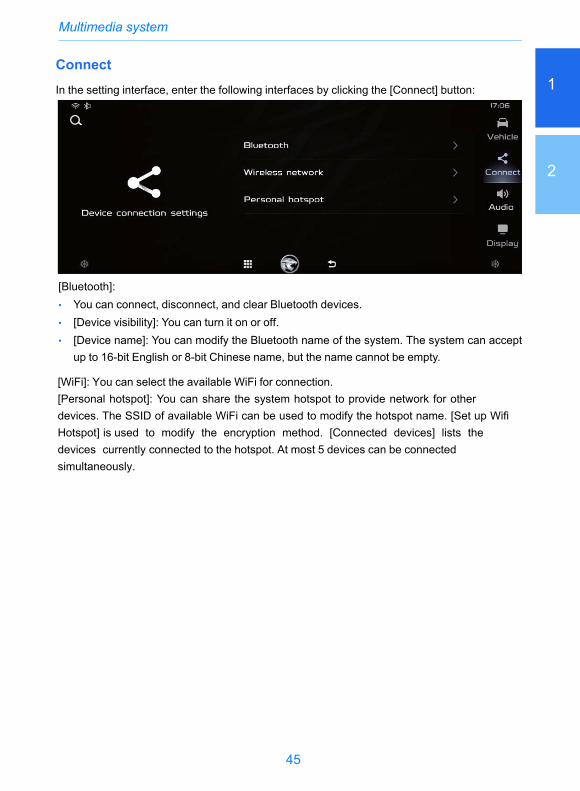
Connect
In the setting interface, enter the following interfaces by clicking the [Connect] button:
[Bluetooth]:• You can connect, disconnect, and clear Bluetooth devices.• [Device visibility]: You can turn it on or off.• [Device name]: You can modify the Bluetooth name of the system. The system can accept
up to 16-bit English or 8-bit Chinese name, but the name cannot be empty.
[WiFi]: You can select the available WiFi for connection.[Personal hotspot]: You can share the system hotspot to provide network for other devices. The SSID of available WiFi can be used to modify the hotspot name. [Set up Wifi Hotspot] is used to modify the encryption method. [Connected devices] lists the devices currently connected to the hotspot. At most 5 devices can be connected simultaneously.
46
Multimedia system
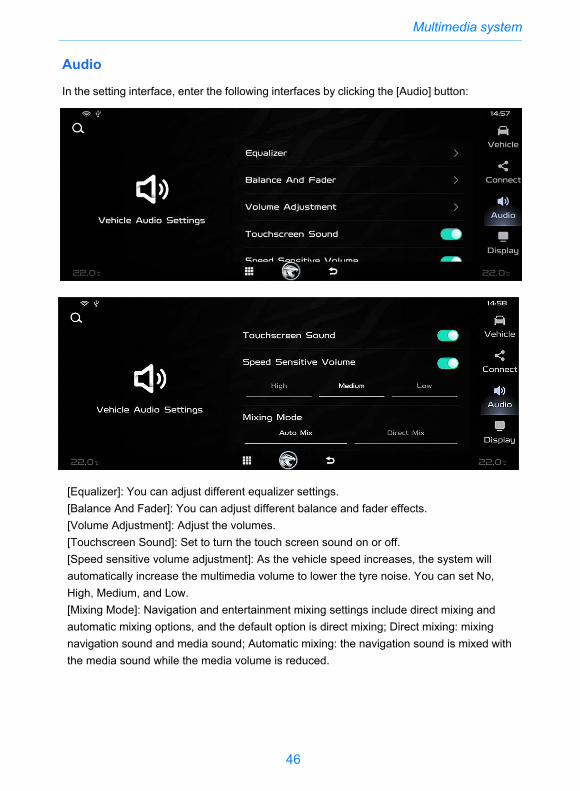
Audio
In the setting interface, enter the following interfaces by clicking the [Audio] button:
[Equalizer]: You can adjust different equalizer settings.[Balance And Fader]: You can adjust different balance and fader effects. [Volume Adjustment]: Adjust the volumes.[Touchscreen Sound]: Set to turn the touch screen sound on or off.[Speed sensitive volume adjustment]: As the vehicle speed increases, the system will automatically increase the multimedia volume to lower the tyre noise. You can set No, High, Medium, and Low.[Mixing Mode]: Navigation and entertainment mixing settings include direct mixing and automatic mixing options, and the default option is direct mixing; Direct mixing: mixing navigation sound and media sound; Automatic mixing: the navigation sound is mixed with the media sound while the media volume is reduced.
1
2
47
Multimedia system
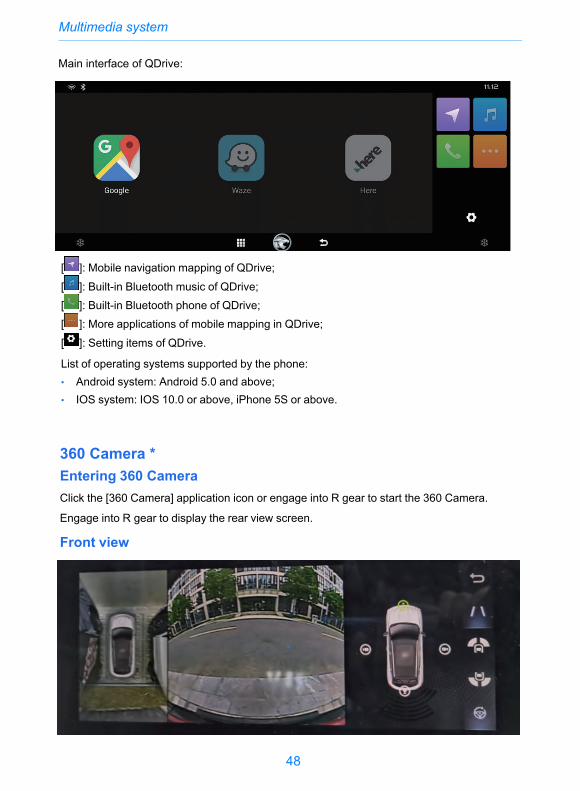
Press [QDLink] to enter the QDLink interface. With QDLink, the screen of the mobile phonecan be projected onto and can be operated directly on the screen of this unit.Establishing connection:1. Plug in one end of the USB cable to the USB port in the centre armrest compartment.2. Plug in another end of the USB cable to your smartphone.3. Select [QDLink] icon on the unit screen.4. Select the [QDLink] icon on your Android Smartphone.5. Continue to follow the instructions as prompted by [QDLink] application.[ ]: Help interface for QDrive connection.Main interface of QDrive:
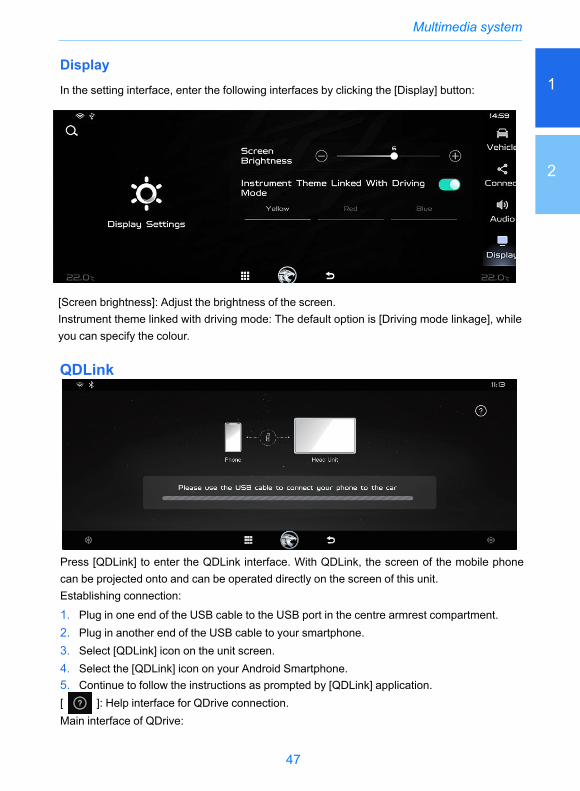
[Screen brightness]: Adjust the brightness of the screen.Instrument theme linked with driving mode: The default option is [Driving mode linkage], whileyou can specify the colour.
QDLink
Display
In the setting interface, enter the following interfaces by clicking the [Display] button:
48
Multimedia system
360 Camera *Entering 360 CameraClick the [360 Camera] application icon or engage into R gear to start the 360 Camera.
Engage into R gear to display the rear view screen.
Front view
[[[[[
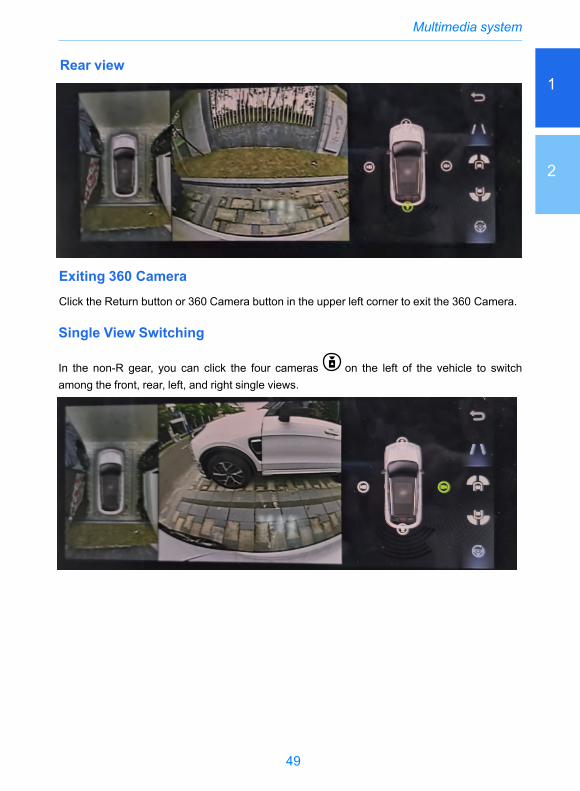
]: Mobile navigation mapping of QDrive;]: Built-in Bluetooth music of QDrive;]: Built-in Bluetooth phone of QDrive;]: More applications of mobile mapping in QDrive;]: Setting items of QDrive.
List of operating systems supported by the phone:• Android system: Android 5.0 and above;• IOS system: IOS 10.0 or above, iPhone 5S or above.
Main interface of QDrive:
1
2
49
Multimedia system
on the left of the vehicle to switch
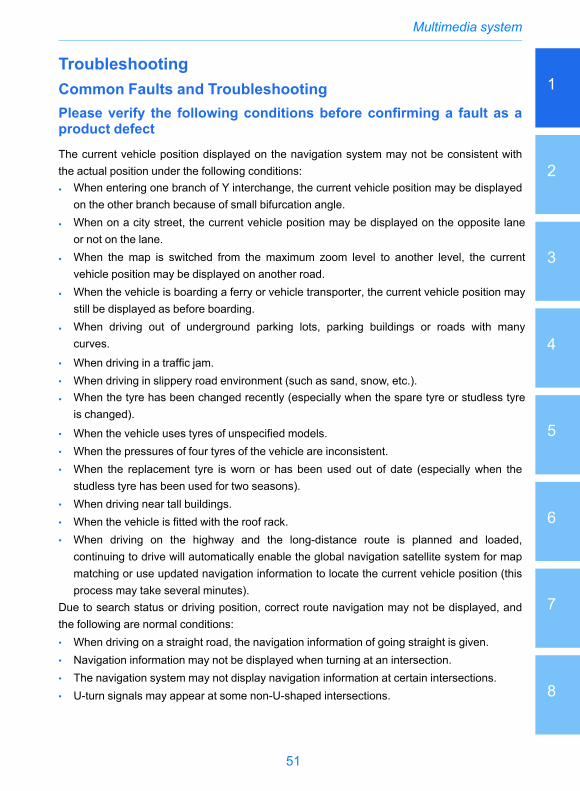
Exiting 360 CameraClick the Return button or 360 Camera button in the upper left corner to exit the 360 Camera.
Single View Switching
In the non-R gear, you can click the four camerasamong the front, rear, left, and right single views.
Rear view

50
Multimedia system
Multiview switching
You can choose front left and right views and rear left and right views respectively.
Steering linkage switch
Click the steering linkage switch to activate or deactivate the user steering linkagefunction. If this function is activated, you can enter the steering linkage function page whenturning the steering wheel.
to display the auxiliary line if R gear is
Dynamic auxiliary line
You can click the dynamic auxiliary line buttonengaged.
1
8
7
6
5
4
3
2
51
Multimedia system
TroubleshootingCommon Faults and TroubleshootingPlease verify the following conditions before confirming a fault as aproduct defect
The current vehicle position displayed on the navigation system may not be consistent withthe actual position under the following conditions:• When entering one branch of Y interchange, the current vehicle position may be displayed
on the other branch because of small bifurcation angle.• When on a city street, the current vehicle position may be displayed on the opposite lane
or not on the lane.• When the map is switched from the maximum zoom level to another level, the current
vehicle position may be displayed on another road.
• When the vehicle is boarding a ferry or vehicle transporter, the current vehicle position maystill be displayed as before boarding.
• When driving out of underground parking lots, parking buildings or roads with manycurves.
• When driving in a traffic jam.• When driving in slippery road environment (such as sand, snow, etc.).• When the tyre has been changed recently (especially when the spare tyre or studless tyre
is changed).• When the vehicle uses tyres of unspecified models.• When the pressures of four tyres of the vehicle are inconsistent.• When the replacement tyre is worn or has been used out of date (especially when the
studless tyre has been used for two seasons).• When driving near tall buildings.• When the vehicle is fitted with the roof rack.• When driving on the highway and the long-distance route is planned and loaded,
continuing to drive will automatically enable the global navigation satellite system for mapmatching or use updated navigation information to locate the current vehicle position (thisprocess may take several minutes).
Due to search status or driving position, correct route navigation may not be displayed, andthe following are normal conditions:• When driving on a straight road, the navigation information of going straight is given.• Navigation information may not be displayed when turning at an intersection.• The navigation system may not display navigation information at certain intersections.• U-turn signals may appear at some non-U-shaped intersections.
52
Multimedia system
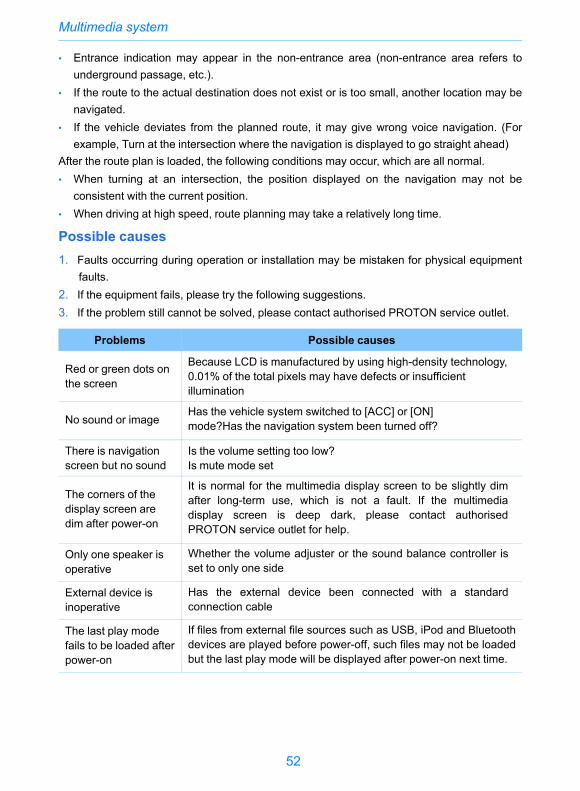
• Entrance indication may appear in the non-entrance area (non-entrance area refers tounderground passage, etc.).
• If the route to the actual destination does not exist or is too small, another location may benavigated.
• If the vehicle deviates from the planned route, it may give wrong voice navigation. (Forexample, Turn at the intersection where the navigation is displayed to go straight ahead)
After the route plan is loaded, the following conditions may occur, which are all normal.• When turning at an intersection, the position displayed on the navigation may not be
consistent with the current position.• When driving at high speed, route planning may take a relatively long time.
Possible causes1. Faults occurring during operation or installation may be mistaken for physical equipment
faults.2. If the equipment fails, please try the following suggestions.3. If the problem still cannot be solved, please contact authorised PROTON service outlet.
Problems Possible causes
Red or green dots onthe screen
Because LCD is manufactured by using high-density technology,0.01% of the total pixels may have defects or insufficientillumination
No sound or imageHas the vehicle system switched to [ACC] or [ON] mode?Has the navigation system been turned off?
There is navigationscreen but no sound
Is the volume setting too low?Is mute mode set
The corners of thedisplay screen aredim after power-on
It is normal for the multimedia display screen to be slightly dim after long-term use, which is not a fault. If the multimedia display screen is deep dark, please contact authorised PROTON service outlet for help.
Only one speaker isoperative
Whether the volume adjuster or the sound balance controller is set to only one side
External device isinoperative
Has the external device been connected with a standard connection cable
The last play modefails to be loaded afterpower-on
If files from external file sources such as USB, iPod and Bluetooth devices are played before power-off, such files may not be loaded but the last play mode will be displayed after power-on next time.
1
2
53
Multimedia system
Problems Possible causes
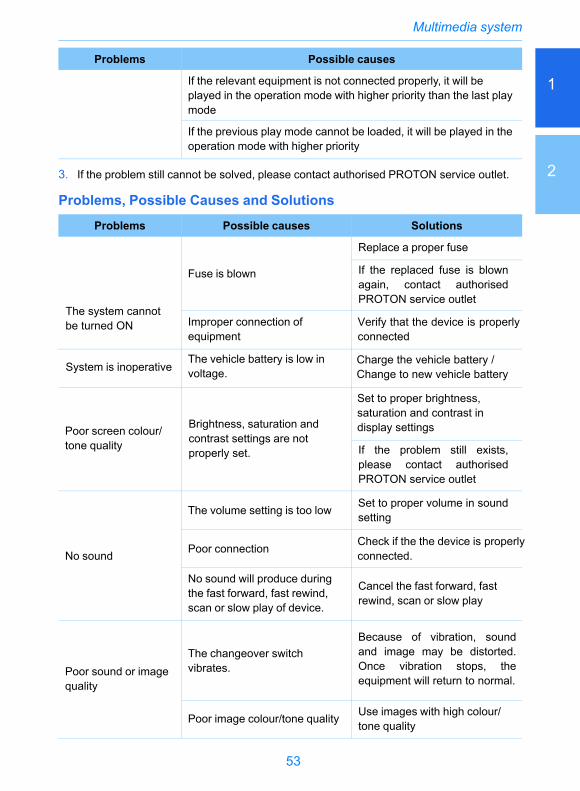
If the relevant equipment is not connected properly, it will beplayed in the operation mode with higher priority than the last playmode
If the previous play mode cannot be loaded, it will be played in theoperation mode with higher priority
3. If the problem still cannot be solved, please contact authorised PROTON service outlet.
Problems, Possible Causes and Solutions
Problems Possible causes Solutions
Fuse is blown
Replace a proper fuse
If the replaced fuse is blown again, contact authorised PROTON service outlet
Improper connection ofequipment
The vehicle battery is low in voltage.
Poor screen colour/tone quality If the problem still exists,
please contact authorised PROTON service outlet
No sound
The volume setting is too low
Poor connection
No sound will produce duringthe fast forward, fast rewind,scan or slow play of device.
Cancel the fast forward, fastrewind, scan or slow play
Poor sound or imagequality
The changeover switchvibrates.
Because of vibration, sound and image may be distorted. Once vibration stops, the equipment will return to normal.
Poor image colour/tone quality Use images with high colour/tone quality
Verify that the device is properly connected
Set to proper brightness, saturation and contrast in display settingsBrightness, saturation and
contrast settings are not properly set.
Charge the vehicle battery / Change to new vehicle battery
The system cannot be turned ON
Set to proper volume in sound setting
Check if the the device is properly connected.
System is inoperative
54
Multimedia system
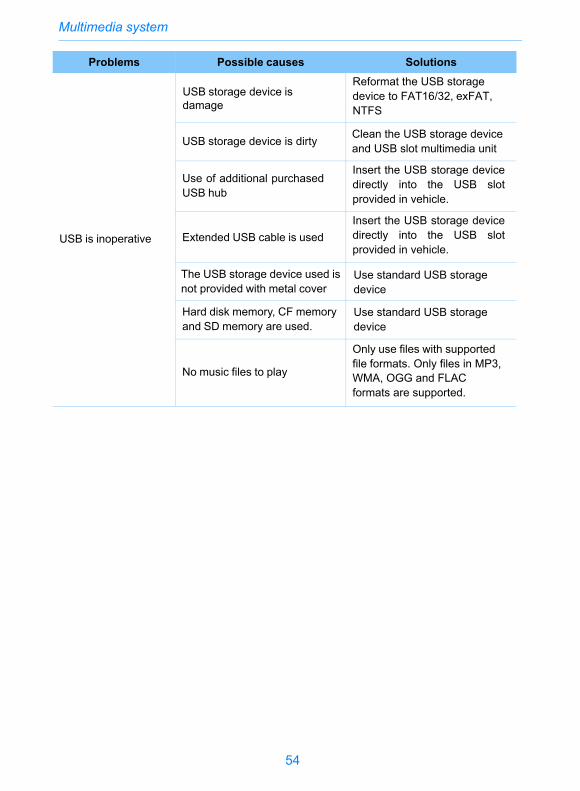
Problems Possible causes Solutions
USB is inoperative
Reformat the USB storage device to FAT16/32, exFAT, NTFS
USB storage device is dirty
Use of additional purchased USB hub
Insert the USB storage device directly into the USB slot provided in vehicle.
Extended USB cable is usedInsert the USB storage device directly into the USB slot provided in vehicle.
The USB storage device used is not provided with metal cover
Hard disk memory, CF memoryand SD memory are used.
No music files to play
Only use files with supported file formats. Only files in MP3, WMA, OGG and FLAC formats are supported.
USB storage device is damage
Clean the USB storage device and USB slot multimedia unit
Use standard USB storage device
Use standard USB storage device
1
55
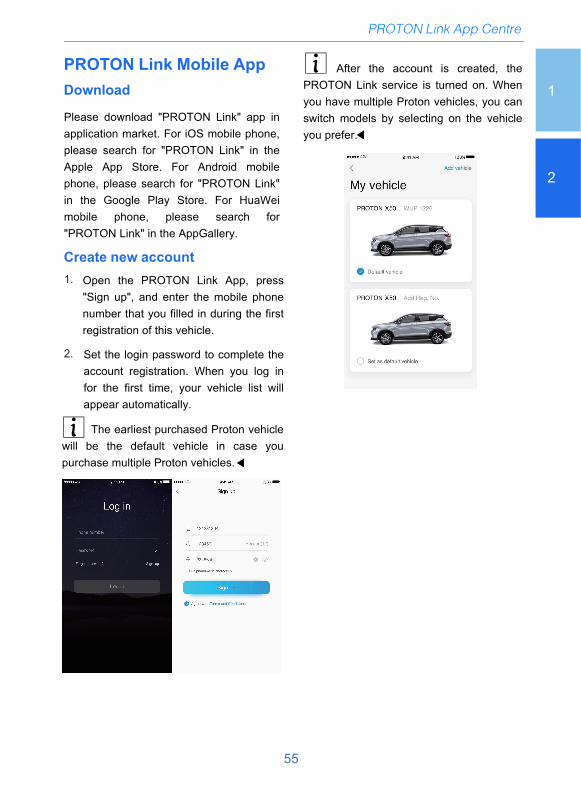
1.
2. Set the login password to complete theaccount registration. When you log infor the first time, your vehicle list willappear automatically.
Open the PROTON Link App, press "Sign up", and enter the mobile phone number that you filled in during the first registration of this vehicle.
Please download "PROTON Link" app in application market. For iOS mobile phone, please search for "PROTON Link" in the Apple App Store. For Android mobile phone, please search for "PROTON Link" in the Google Play Store. For HuaWei mobile phone, please search for "PROTON Link" in the AppGallery.
After the account is created, the PROTON Link service is turned on. When you have multiple Proton vehicles, you can switch models by selecting on the vehicle you prefer.
PROTON Link Mobile AppDownload
Create new account
The earliest purchased Proton vehicle will be the default vehicle in case you purchase multiple Proton vehicles.
PROTON Link App Centre
2
56
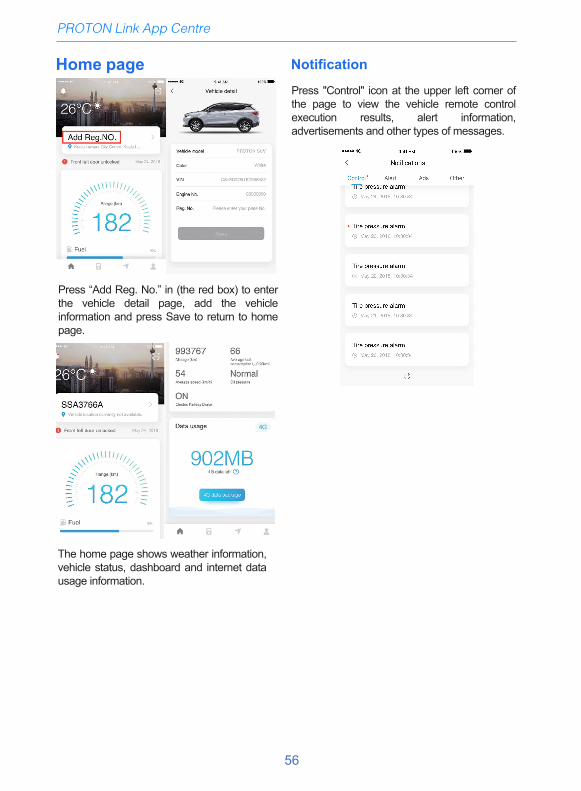
Press “Add Reg. No.” in (the red box) to enter the vehicle detail page, add the vehicle information and press Save to return to home page.
PROTON Link App Centre
Home page
The home page shows weather information, vehicle status, dashboard and internet data usage information.
Notification
Press "Control" icon at the upper left corner of the page to view the vehicle remote control execution results, alert information, advertisements and other types of messages.
1
57
1.
2.
3.
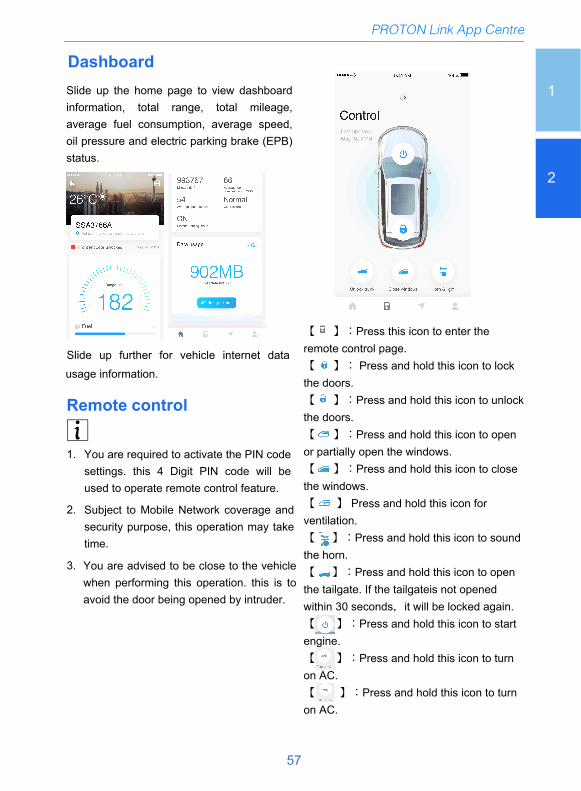
Dashboard
Slide up further for vehicle internet data usage information.
Slide up the home page to view dashboard information, total range, total mileage, average fuel consumption, average speed, oil pressure and electric parking brake (EPB) status.
You are required to activate the PIN code settings. this 4 Digit PIN code will be used to operate remote control feature.
Subject to Mobile Network coverage and security purpose, this operation may take time.
You are advised to be close to the vehicle when performing this operation. this is to avoid the door being opened by intruder.
Remote control
【 】:Press this icon to enter the remote control page.【 】: Press and hold this icon to lock the doors.【 】:Press and hold this icon to unlock the doors.【 】:Press and hold this icon to open or partially open the windows.【 】:Press and hold this icon to close the windows.【 】 Press and hold this icon for ventilation.【 】 】:Press and hold this icon to sound the horn.【 】 】:Press and hold this icon to open the tailgate. If the tailgateis not opened within 30 seconds,it will be locked again.【 】:Press and hold this icon to start engine.【 】:Press and hold this icon to turn on AC.【 1 】:Press and hold this icon to turn on AC.
PROTON Link App Centre
2
58
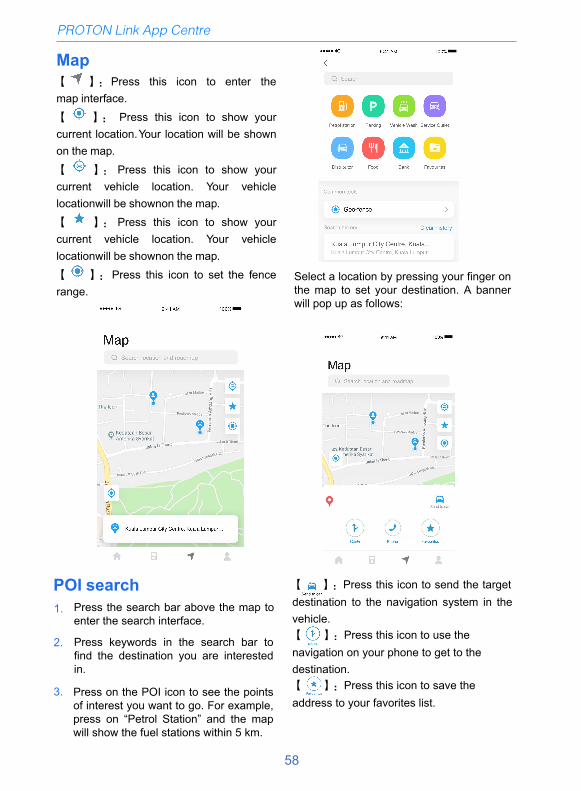
Press the search bar above the map to enter the search interface.
Press keywords in the search bar to find the destination you are interested in.
Press on the POI icon to see the points of interest you want to go. For example, press on “Petrol Station” and the map will show the fuel stations within 5 km.
1.
2.
3.
Select a location by pressing your finger on the map to set your destination. A banner will pop up as follows:
Map【 】:Press this icon to enter themap interface.【 】: Press this icon to show yourcurrent location.Your location will be shownon the map.【 】: Press this icon to show yourcurrent vehicle location. Your vehiclelocationwill be shownon the map.【 】: Press this icon to show yourcurrent vehicle location. Your vehiclelocationwill be shownon the map.【 】: Press this icon to set the fencerange.
POI search 【 】:Press this icon to send the target destination to the navigation system in the vehicle.【 】:Press this icon to use the navigation on your phone to get to the destination.【 】:Press this icon to save the address to your favorites list.
PROTON Link App Centre
1
59
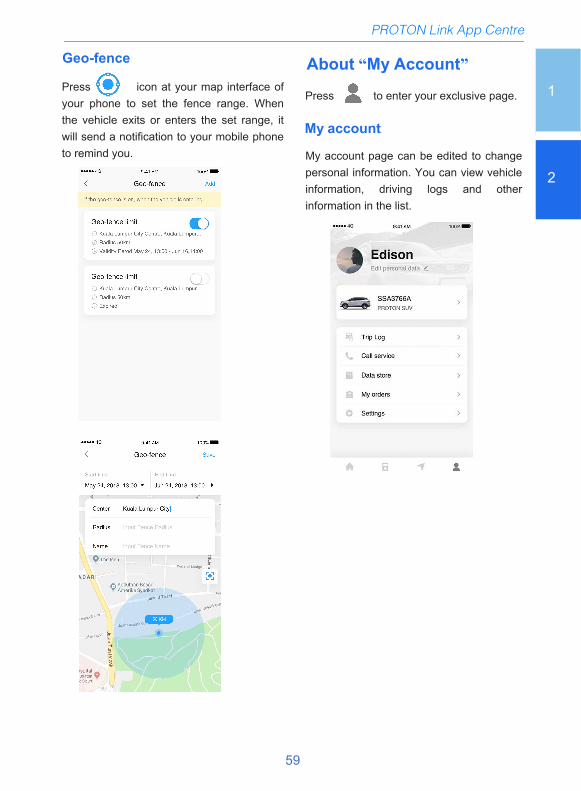
Press to enter your exclusive page.Press icon at your map interface of your phone to set the fence range. When the vehicle exits or enters the set range, it will send a notification to your mobile phone to remind you.
Geo-fence About “My Account”
My account
PROTON Link App Centre
My account page can be edited to change personal information. You can view vehicle information, driving logs and other information in the list.
2
60
1.
2.
Triplog
PROTON Link App Centre
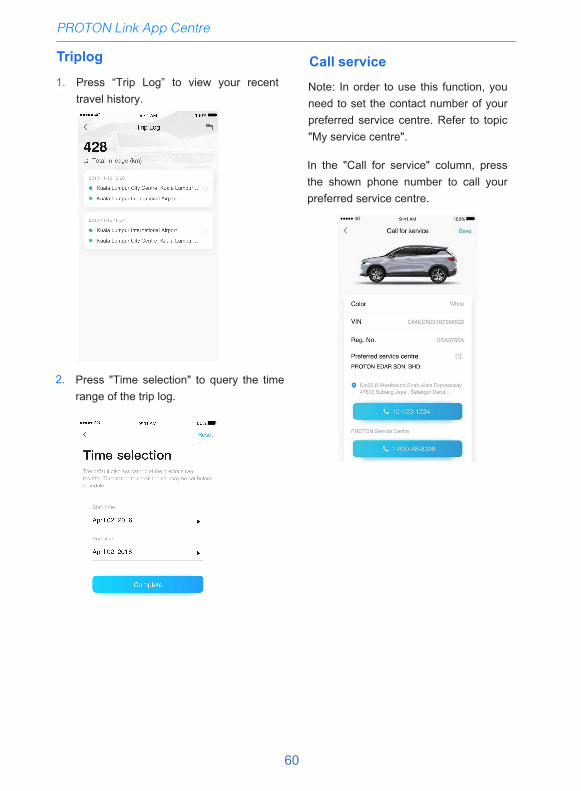
In the "Call for service" column, press the shown phone number to call your preferred service centre.
Note: In order to use this function, you need to set the contact number of your preferred service centre. Refer to topic "My service centre".
Call servicePress “Trip Log” to view your recent travel history.
Press "Time selection" to query the time range of the trip log.
1
2
61
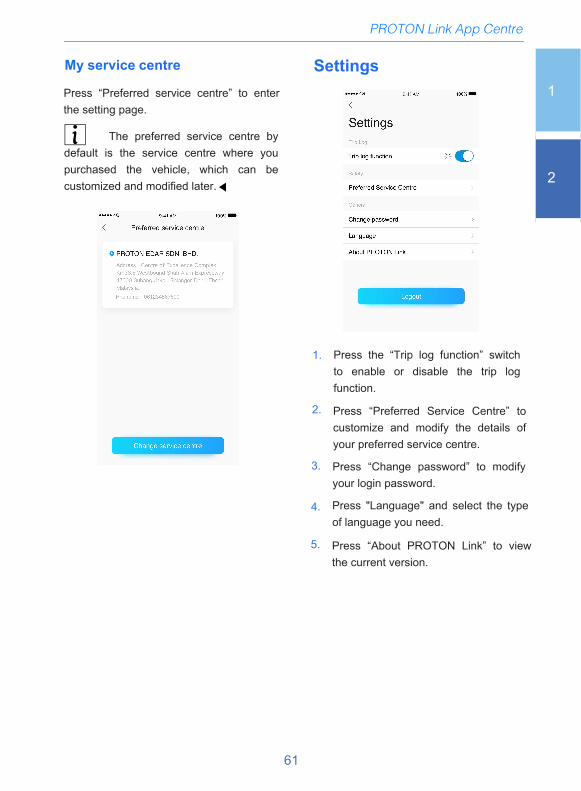
Press “Preferred service centre” to enter the setting page.
The preferred service centre by default is the service centre where you purchased the vehicle, which can be customized and modified later.
PROTON Link App Centre
1.
2.
3.
4.
5.
SettingsMy service centre
Press the “Trip log function” switch to enable or disable the trip log function.
Press “Preferred Service Centre” to customize and modify the details of your preferred service centre.
Press “Change password” to modify your login password.
Press "Language" and select the type of language you need.
Press “About PROTON Link” to view the current version.
62
PROTON Link App Centre
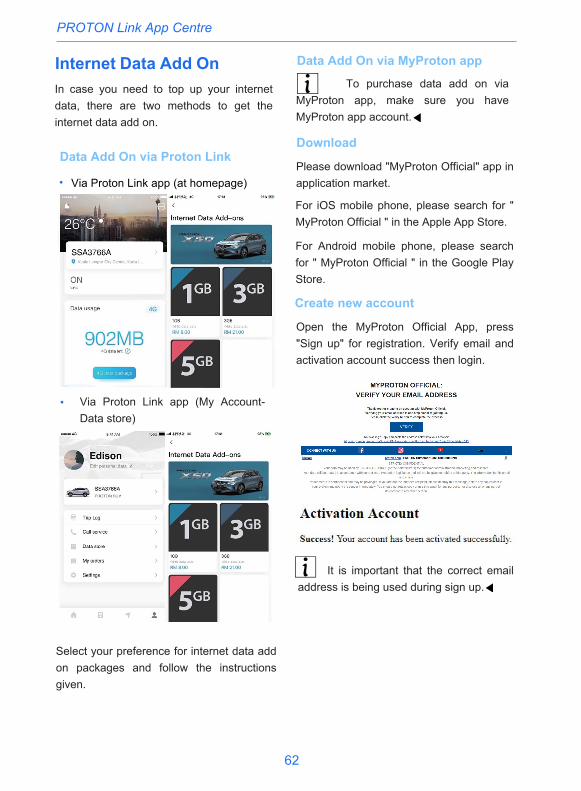
Via Proton Link app (at homepage)•
•
Data Add On via Proton Link
Internet Data Add OnIn case you need to top up your internet data, there are two methods to get the internet data add on.
Select your preference for internet data add on packages and follow the instructions given.
Via Proton Link app (My Account-Data store)
Data Add On via MyProton app
Download
Create new account
To purchase data add on via MyProton app, make sure you have MyProton app account.
Please download "MyProton Official" app in application market.
For iOS mobile phone, please search for " MyProton Official " in the Apple App Store.
For Android mobile phone, please search for " MyProton Official " in the Google Play Store.
Open the MyProton Official App, press "Sign up" for registration. Verify email and activation account success then login.
It is important that the correct email address is being used during sign up.
1
2
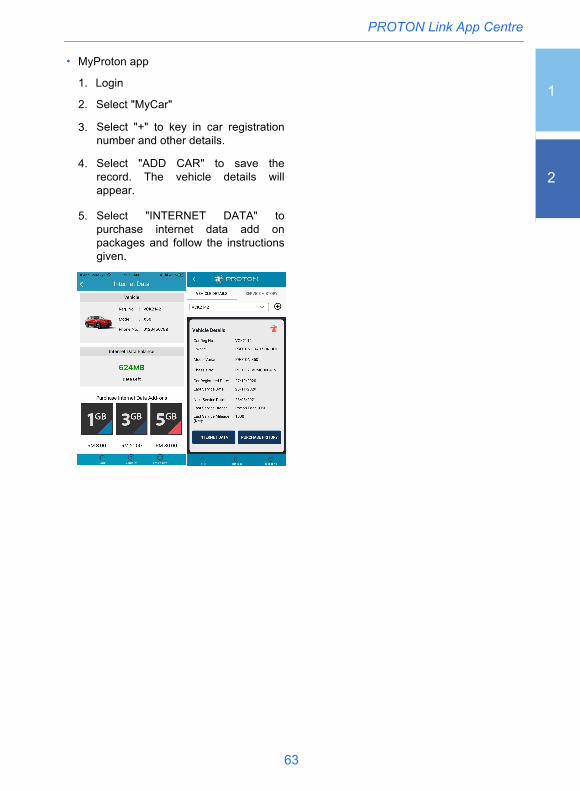
MyProton app
1. Login
2. Select "MyCar"
3. Select "+" to key in car registrationnumber and other details.
4. Select "ADD CAR" to save therecord. The vehicle details willappear.
5. Select "INTERNET DATA" topurchase internet data add onpackages and follow the instructionsgiven.
•
63
PROTON Link App Centre