Embed Size (px)
Citation preview
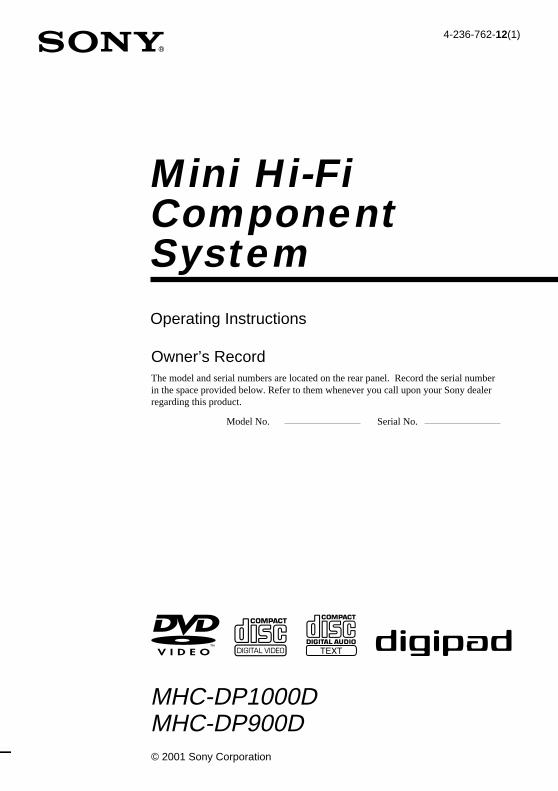
Mini Hi-FiComponentSystemOperating Instructions
4-236-762-12(1)
MHC-DP1000DMHC-DP900D
Owner’s RecordThe model and serial numbers are located on the rear panel. Record the serial numberin the space provided below. Refer to them whenever you call upon your Sony dealerregarding this product.
Model No. Serial No.
© 2001 Sony Corporation
2
WARNING
To prevent fire or shock hazard, do notexpose the unit to rain or moisture.To avoid electrical shock, do not open the cabinet.Refer servicing to qualified personnel only.
Do not install the appliance in a confined space,such as a bookcase or built-in cabinet.
This appliance isclassified as a CLASS 1LASER product. TheCLASS 1 LASERPRODUCT MARKINGis located on the rearexterior.
CAUTIONThe use of optical instruments with this product willincrease eye hazard.As the laser beam used in this CD/DVD Player isharmful to eyes, do not attempt to disassemble thecabinet. Refer servicing to qualified personnel only.
U.S.A. modelThis label is located on the rear exterior.
European modelThe following caution label is located inside theapparatus.
To prevent fire, do not Cover the ventilation of theapparatus with news papers, table-cloths, curtains,etc. And don’t place lighted candles on the apparatus.
To prevent fire or shock hazard, do not place objectsfilled with liquids, such as vases, on the apparatus.
Don’t throw a battery, dispose it asthe injurious wastes.
NOTICE FOR THE CUSTOMERS IN THEU.S.A.
This symbol is intended to alert the user tothe presence of uninsulated “dangerousvoltage” within the product’s enclosure thatmay be of sufficient magnitude to constitutea risk of electric shock to persons.
This symbol is intended to alert the user tothe presence of important operating andmaintenance (servicing) instructions in theliterature accompanying the appliance.
WARNINGThis equipment has been tested and found to complywith the limits for a Class B digital device, pursuantto Part 15 of the FCC Rules. These limits aredesigned to provide reasonable protection againstharmful interference in a residential installation. Thisequipment generates, uses, and can radiate radiofrequency energy and, if not installed and used inaccordance with the instructions, may cause harmfulinterference to radio communications. However, thereis no guarantee that interference will not occur in aparticular installation. If this equipment does causeharmful interference to radio or television reception,which can be determined by turning the equipmentoff and on, the user is encouraged to try to correct theinterference by one or more of the followingmeasures:– Reorient or relocate the receiving antenna.– Increase the separation between the equipment and
receiver.– Connect the equipment into an outlet on a circuit
different from that to which the receiver isconnected.
– Consult the dealer or an experienced radio/TVtechnician for help.
CAUTIONYou are cautioned that any changes or modificationsnot expressly approved in this manual could voidyour authority to operate this equipment.
3
NOTICE FOR THE CUSTOMERS INCANADA
CAUTION:TO PREVENT ELECTRIC SHOCK, DO NOT USETHIS POLARIZED AC PLUG WITH ANEXTENSION CORD, RECEPTACLE OR OTHEROUTLET UNLESS THE BLADES CAN BE FULLYINSERTED TO PREVENT BLADE EXPOSURE.
Note to CATV system installerThis reminder is provided to call the CATV systeminstaller’s attention to Article 820-40 of the NEC thatprovides guidelines for proper grounding and, inparticular, specifies that the cable ground shall beconnected to the grounding system of the building, asclose to the point of cable entry as practical.
NOTICE FOR THE CUSTOMERS IN NORTHAMERICA
ENERGY STAR® is a U.S.registered mark.As an ENERGY STAR® partner,Sony Corporation has determinedthat this product meets the ENERGYSTAR® guidelines for energyefficiency.
This system incorporates Dolby* Digital, Pro LogicSurround, DTS**, and the DTS Digital SurroundSystem.* Manufactured under license from Dolby
Laboratories.“Dolby”, “Pro Logic” and the double-D symbol aretrademarks of Dolby Laboratories.Confidential unpublished works. © 1992-1997Dolby Laboratories. All rights reserved.
**Manufactured under license from Digital TheaterSystems, Inc. US Pat. No. 5,451,942, 5,956,674,5,974,380, 5,978,762 and other world-wide patentsissued and pending. “DTS” and “DTS DigitalSurround” are registered trademarks of DigitalTheater Systems, Inc. © 1996, 2000 DigitalTheater Systems, Inc. All rights reserved.
IMPORTANT NOTICE
Caution: This system is capable of holding astill video image or on-screen display image onyour television screen indefinitely. If you leavethe still video image or on-screen displayimage displayed on your TV for an extendedperiod of time, you risk permanent damage toyour television screen. Projection televisionsare especially susceptible to this.
4
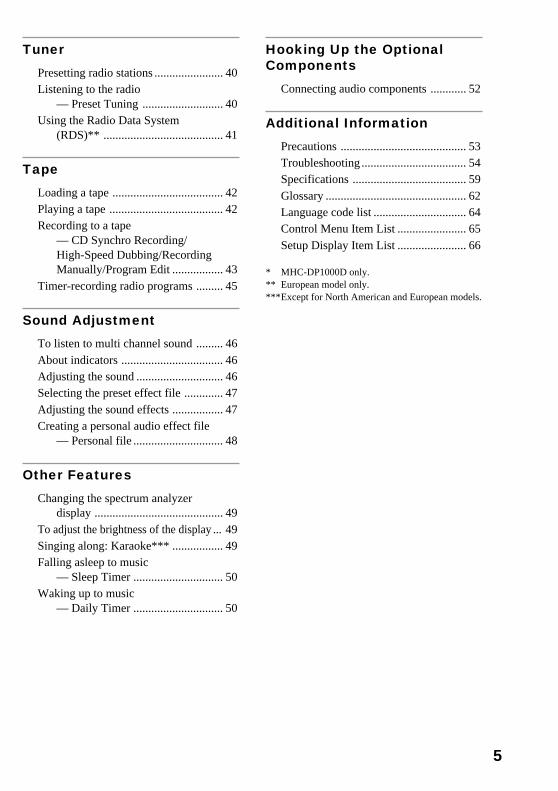
Table of Contents
This system can play the following discs ..... 6
Parts Identification
Main unit ............................................... 7Remote control ...................................... 8digipad operations ................................. 9
Getting Started
Hooking up the system ........................ 10Inserting two size AA (R6) batteries
into the remote .............................. 12Setting up your speakers for
Dolby Pro Logic* .......................... 13Specifying the speaker parameters ...... 14Setting the time .................................... 15Saving the power in standby mode ...... 16
Setting Up for DVD/VIDEO CD/CD
Using the Setup Display ...................... 17Setting the display or sound track
language— LANGUAGE SETUP .............. 18
Settings for the display— SCREEN SETUP ..................... 19
Custom settings— CUSTOM SETUP .................... 20
Speaker settings— SPEAKER SETUP ................... 21
DVD/VIDEO CD/CD
Playing discs:
Loading a disc ..................................... 23Playing a disc
— Normal Play/Shuffle Play/Slow-motion Play/Freeze Frame ... 23
Playing DVDs using the menu ............ 25Playing VIDEO CDs with PBC functions
(Ver. 2.0)— PBC Play .................................. 25
Creating your own program— Program Play ............................ 26
Resuming playback from the point youstopped the disc— Resume Play ............................. 28
Playing repeatedly— Repeat Play .............................. 28
Viewing information about the disc:Checking the playing time and
remaining time .............................. 29Checking the playback information
— ADVANCED ........................... 31
Sound adjustments:
Changing the sound ............................. 32
Enjoying movies:Searching for a title/chapter/track/
index/scene .................................... 34Changing the angles ............................ 35Displaying the subtitles ....................... 35
Using various additional functions:
Locking discs— CUSTOM PARENTALCONTROL/PARENTALCONTROL .................................... 36
5
* MHC-DP1000D only.** European model only.***Except for North American and European models.
Tuner
Presetting radio stations ....................... 40Listening to the radio
— Preset Tuning ........................... 40Using the Radio Data System
(RDS)** ........................................ 41
Tape
Loading a tape ..................................... 42Playing a tape ...................................... 42Recording to a tape
— CD Synchro Recording/High-Speed Dubbing/RecordingManually/Program Edit ................. 43
Timer-recording radio programs ......... 45
Sound Adjustment
To listen to multi channel sound ......... 46About indicators .................................. 46Adjusting the sound ............................. 46Selecting the preset effect file ............. 47Adjusting the sound effects ................. 47Creating a personal audio effect file
— Personal file .............................. 48
Other Features
Changing the spectrum analyzerdisplay ........................................... 49
To adjust the brightness of the display ... 49Singing along: Karaoke*** ................. 49Falling asleep to music
— Sleep Timer .............................. 50Waking up to music
— Daily Timer .............................. 50
Hooking Up the OptionalComponents
Connecting audio components ............ 52
Additional Information
Precautions .......................................... 53Troubleshooting ................................... 54Specifications ...................................... 59Glossary ............................................... 62Language code list ............................... 64Control Menu Item List ....................... 65Setup Display Item List ....................... 66
6
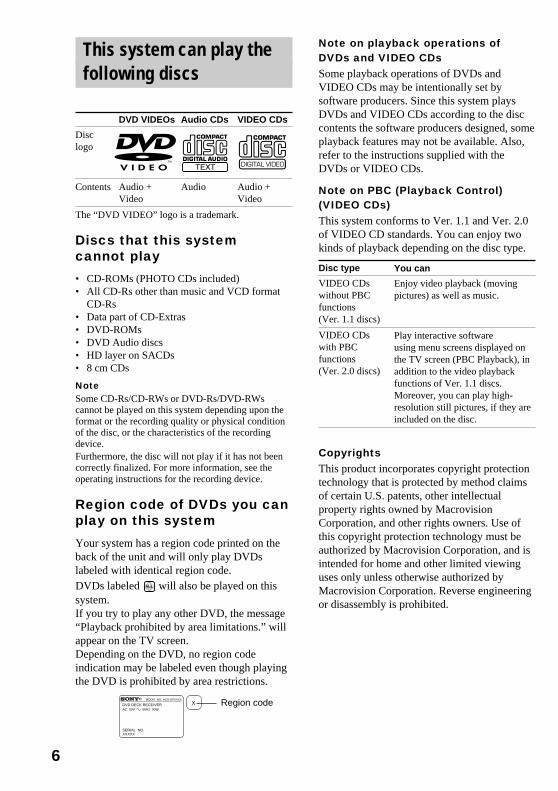
This system can play thefollowing discs
DVD VIDEOs Audio CDs VIDEO CDs
Disclogo
Contents Audio + Audio Audio +Video Video
The “DVD VIDEO” logo is a trademark.
Discs that this systemcannot play
• CD-ROMs (PHOTO CDs included)• All CD-Rs other than music and VCD format
CD-Rs• Data part of CD-Extras• DVD-ROMs• DVD Audio discs• HD layer on SACDs• 8 cm CDs
NoteSome CD-Rs/CD-RWs or DVD-Rs/DVD-RWscannot be played on this system depending upon theformat or the recording quality or physical conditionof the disc, or the characteristics of the recordingdevice.Furthermore, the disc will not play if it has not beencorrectly finalized. For more information, see theoperating instructions for the recording device.
Region code of DVDs you canplay on this system
Your system has a region code printed on theback of the unit and will only play DVDslabeled with identical region code.DVDs labeled ALL will also be played on thissystem.If you try to play any other DVD, the message“Playback prohibited by area limitations.” willappear on the TV screen.Depending on the DVD, no region codeindication may be labeled even though playingthe DVD is prohibited by area restrictions.
Note on playback operations ofDVDs and VIDEO CDsSome playback operations of DVDs andVIDEO CDs may be intentionally set bysoftware producers. Since this system playsDVDs and VIDEO CDs according to the disccontents the software producers designed, someplayback features may not be available. Also,refer to the instructions supplied with theDVDs or VIDEO CDs.
Note on PBC (Playback Control)(VIDEO CDs)This system conforms to Ver. 1.1 and Ver. 2.0of VIDEO CD standards. You can enjoy twokinds of playback depending on the disc type.
Disc type
VIDEO CDswithout PBCfunctions(Ver. 1.1 discs)
VIDEO CDswith PBCfunctions(Ver. 2.0 discs)
CopyrightsThis product incorporates copyright protectiontechnology that is protected by method claimsof certain U.S. patents, other intellectualproperty rights owned by MacrovisionCorporation, and other rights owners. Use ofthis copyright protection technology must beauthorized by Macrovision Corporation, and isintended for home and other limited viewinguses only unless otherwise authorized byMacrovision Corporation. Reverse engineeringor disassembly is prohibited.
You can
Enjoy video playback (movingpictures) as well as music.
Play interactive softwareusing menu screens displayed onthe TV screen (PBC Playback), inaddition to the video playbackfunctions of Ver. 1.1 discs.Moreover, you can play high-resolution still pictures, if they areincluded on the disc.
Region codeMODEL NO. HCD-DPXXXX
DVD DECK RECEIVERAC: 00V 00Hz 00W
SERIAL NO.XXXXX
X
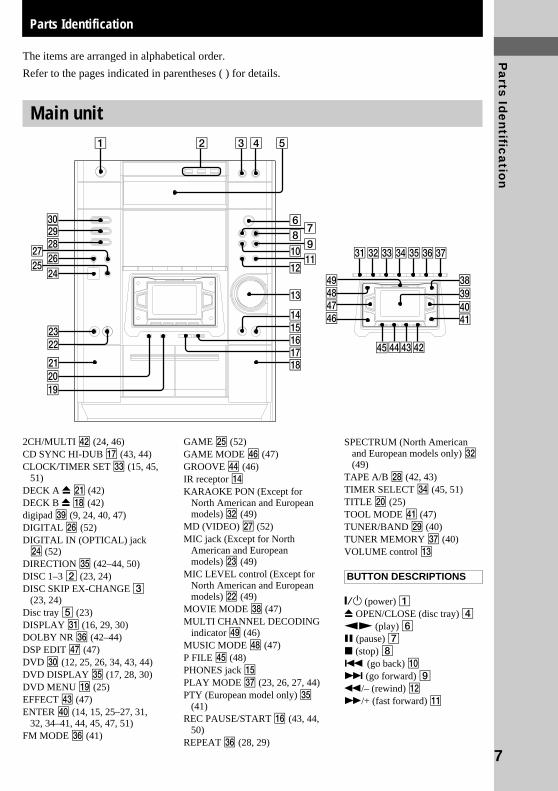
Pa
rts Ide
ntific
atio
n
7
1 2 34 5
6
8
q;
qs
qd
qfqgqhqj
w;ql
wa
wswd
wf
whwjwkwl
wg
7
9
qa
qk
e;
eaesedefegeh
rkrl
rjrh
rgrfrdrs
ra
ej
elek
r;
2CH/MULTI rs (24, 46)CD SYNC HI-DUB qj (43, 44)CLOCK/TIMER SET ed (15, 45,
51)DECK A Z wa (42)DECK B Z qk (42)digipad el (9, 24, 40, 47)DIGITAL wh (52)DIGITAL IN (OPTICAL) jackwf (52)
DIRECTION eg (42–44, 50)DISC 1–3 2 (23, 24)DISC SKIP EX-CHANGE 3
(23, 24)Disc tray 5 (23)DISPLAY ea (16, 29, 30)DOLBY NR eh (42–44)DSP EDIT rj (47)DVD e; (12, 25, 26, 34, 43, 44)DVD DISPLAY eg (17, 28, 30)DVD MENU ql (25)EFFECT rd (47)ENTER r; (14, 15, 25–27, 31,
32, 34–41, 44, 45, 47, 51)FM MODE eh (41)
GAME wg (52)GAME MODE rh (47)GROOVE rf (46)IR receptor qfKARAOKE PON (Except for
North American and Europeanmodels) es (49)
MD (VIDEO) wj (52)MIC jack (Except for North
American and Europeanmodels) wd (49)
MIC LEVEL control (Except forNorth American and Europeanmodels) ws (49)
MOVIE MODE ek (47)MULTI CHANNEL DECODING
indicator rl (46)MUSIC MODE rk (47)P FILE rg (48)PHONES jack qgPLAY MODE ej (23, 26, 27, 44)PTY (European model only) eg
(41)REC PAUSE/START qh (43, 44,
50)REPEAT eh (28, 29)
SPECTRUM (North Americanand European models only) es(49)
TAPE A/B wk (42, 43)TIMER SELECT ef (45, 51)TITLE w; (25)TOOL MODE ra (47)TUNER/BAND wl (40)TUNER MEMORY ej (40)VOLUME control qd
BUTTON DESCRIPTIONS
@/1 (power) 1Z OPEN/CLOSE (disc tray) 4nN (play) 6X (pause) 7x (stop) 8. (go back) q;> (go forward) 9m/– (rewind) qsM/+ (fast forward) qa
Parts Identification
Main unit
The items are arranged in alphabetical order.
Refer to the pages indicated in parentheses ( ) for details.
8
x
Mm>.
nNO
X
v
V
b B
TtCc
1 2 3 45
ed
eg
ej
r;
ek
6
7
98
q;qa
qdqs
qfqgqj
qh
qkql
wa
wd
wg
ws
wf
w;
wh
wkwj
e;
wl
eh
es
ef
el
rs
rf
rg
ra
rd
rj
rl
ta
rh
rk
t;
ea
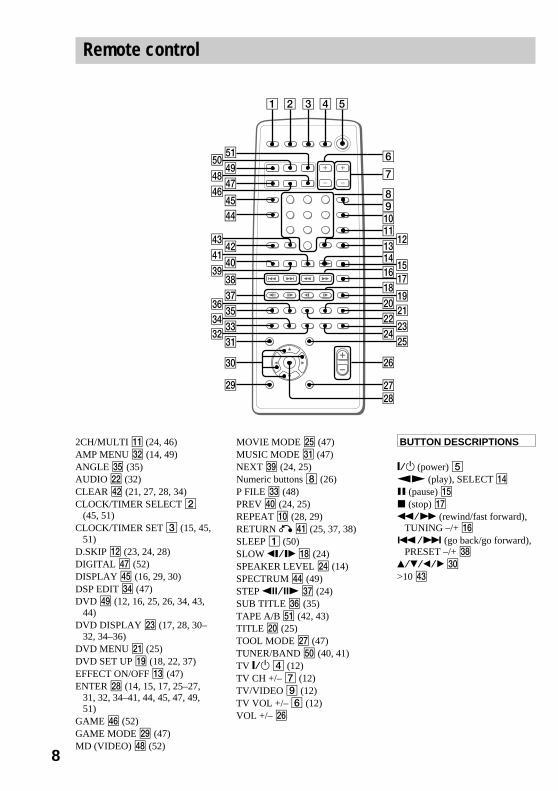
Remote control
2CH/MULTI qa (24, 46)AMP MENU es (14, 49)ANGLE eg (35)AUDIO ws (32)CLEAR rs (21, 27, 28, 34)CLOCK/TIMER SELECT 2
(45, 51)CLOCK/TIMER SET 3 (15, 45,
51)D.SKIP qs (23, 24, 28)DIGITAL rj (52)DISPLAY rg (16, 29, 30)DSP EDIT ef (47)DVD rl (12, 16, 25, 26, 34, 43,
44)DVD DISPLAY wd (17, 28, 30–
32, 34–36)DVD MENU wa (25)DVD SET UP ql (18, 22, 37)EFFECT ON/OFF qd (47)ENTER wk (14, 15, 17, 25–27,
31, 32, 34–41, 44, 45, 47, 49,51)
GAME rh (52)GAME MODE wl (47)MD (VIDEO) rk (52)
MOVIE MODE wg (47)MUSIC MODE ea (47)NEXT el (24, 25)Numeric buttons 8 (26)P FILE ed (48)PREV r; (24, 25)REPEAT q; (28, 29)RETURN O ra (25, 37, 38)SLEEP 1 (50)SLOW t/T qk (24)SPEAKER LEVEL wf (14)SPECTRUM rf (49)STEP c/C ej (24)SUB TITLE eh (35)TAPE A/B ta (42, 43)TITLE w; (25)TOOL MODE wj (47)TUNER/BAND t; (40, 41)TV @/1 4 (12)TV CH +/– 7 (12)TV/VIDEO 9 (12)TV VOL +/– 6 (12)VOL +/– wh
BUTTON DESCRIPTIONS
@/1 (power) 5nN (play), SELECT qfX (pause) qgx (stop) qjm/M (rewind/fast forward),
TUNING –/+ qh./> (go back/go forward),
PRESET –/+ ekv/V/b/B e;>10 rd
Pa
rts Ide
ntific
atio
n
9
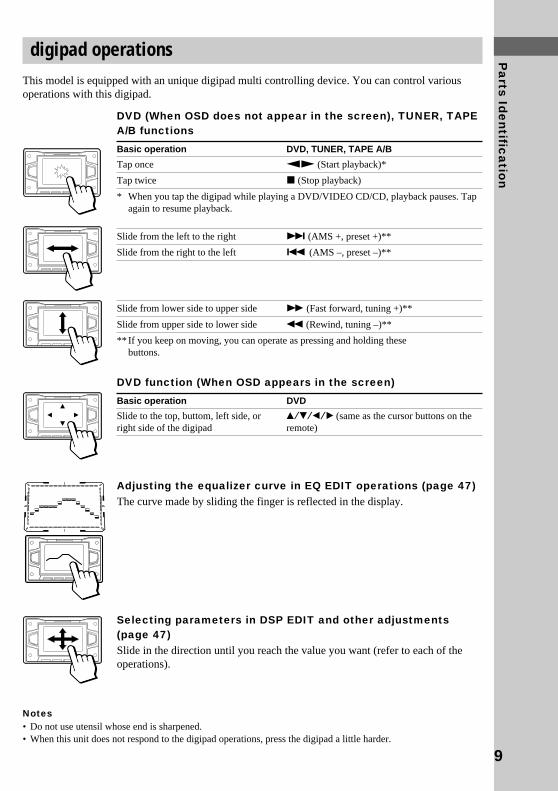
digipad operationsThis model is equipped with an unique digipad multi controlling device. You can control variousoperations with this digipad.
DVD (When OSD does not appear in the screen), TUNER, TAPEA/B functions
Basic operation DVD, TUNER, TAPE A/B
Tap once nN (Start playback)*
Tap twice x (Stop playback)
* When you tap the digipad while playing a DVD/VIDEO CD/CD, playback pauses. Tapagain to resume playback.
Slide from the left to the right > (AMS +, preset +)**
Slide from the right to the left . (AMS –, preset –)**
Slide from lower side to upper side M (Fast forward, tuning +)**
Slide from upper side to lower side m (Rewind, tuning –)**
** If you keep on moving, you can operate as pressing and holding thesebuttons.
DVD function (When OSD appears in the screen)
Basic operation DVD
Slide to the top, buttom, left side, or v/V/b/B (same as the cursor buttons on theright side of the digipad remote)
Adjusting the equalizer curve in EQ EDIT operations (page 47)The curve made by sliding the finger is reflected in the display.
Selecting parameters in DSP EDIT and other adjustments(page 47)Slide in the direction until you reach the value you want (refer to each of theoperations).
Notes• Do not use utensil whose end is sharpened.• When this unit does not respond to the digipad operations, press the digipad a little harder.
v
V
b B
10
+
–
+ R L
7
5
6
3 3 2
2 2
1
1 1
4
3
Getting Started
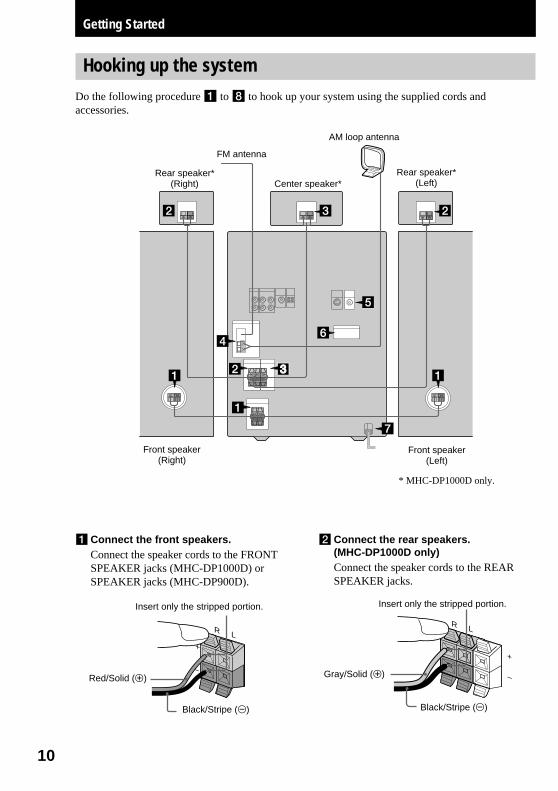
Hooking up the systemDo the following procedure 1 to 8 to hook up your system using the supplied cords andaccessories.
AM loop antenna
Front speaker(Left)
Front speaker(Right)
FM antenna
Rear speaker*(Right)
Rear speaker*(Left)Center speaker*
Insert only the stripped portion.
Black/Stripe (#)
Red/Solid (3)–
R L +
1Connect the front speakers.Connect the speaker cords to the FRONTSPEAKER jacks (MHC-DP1000D) orSPEAKER jacks (MHC-DP900D).
2Connect the rear speakers.(MHC-DP1000D only)Connect the speaker cords to the REARSPEAKER jacks.
Insert only the stripped portion.
Black/Stripe (#)
Gray/Solid (3)
* MHC-DP1000D only.
Ge
tting
Sta
rted
11
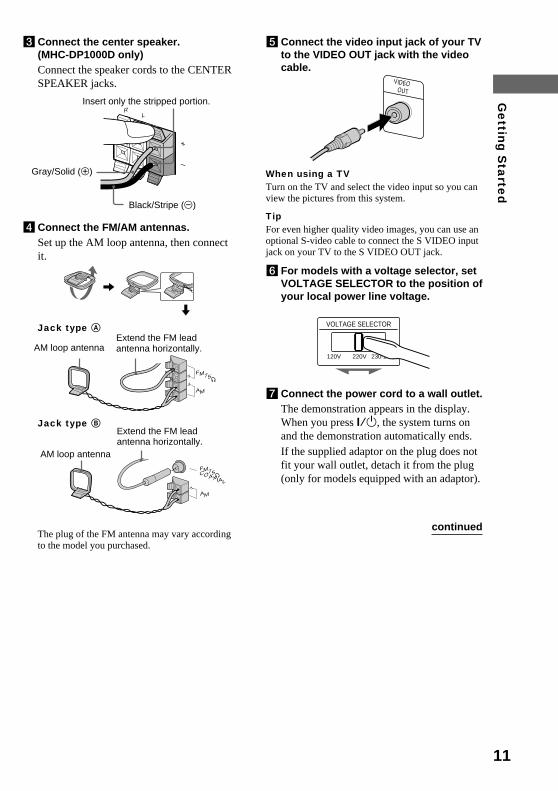
VIDEO OUT
5Connect the video input jack of your TVto the VIDEO OUT jack with the videocable.
When using a TVTurn on the TV and select the video input so you canview the pictures from this system.
TipFor even higher quality video images, you can use anoptional S-video cable to connect the S VIDEO inputjack on your TV to the S VIDEO OUT jack.
6 For models with a voltage selector, setVOLTAGE SELECTOR to the position ofyour local power line voltage.
7Connect the power cord to a wall outlet.The demonstration appears in the display.When you press ?/1, the system turns onand the demonstration automatically ends.If the supplied adaptor on the plug does notfit your wall outlet, detach it from the plug(only for models equipped with an adaptor).
3Connect the center speaker.(MHC-DP1000D only)Connect the speaker cords to the CENTERSPEAKER jacks.
4Connect the FM/AM antennas.Set up the AM loop antenna, then connectit.
The plug of the FM antenna may vary accordingto the model you purchased.
RL
+
–
+
Insert only the stripped portion.
Black/Stripe (#)
Gray/Solid (3)
220V 230-240V120V
VOLTAGE SELECTOR
Extend the FM leadantenna horizontally.
AM loop antennaExtend the FM leadantenna horizontally.
AM loop antenna
Jack type B
FM75
AM
FM75
AM
COAXIAL
Jack type A
continued
12
8 (Except for Pan American andEuropean models)Set the color system according to yourTV.The color system is factory set to NTSC forregion code 3 models, and PAL for otherregion code models. Each time you performthe procedure below, the color systemchanges as follows:NTSC y PALUse the buttons on the unit.
1 Press ?/1 to turn on the system.
2 Press DVD.
3 Press x.
4 Press ?/1 while holding down X.The system turns off.
5 Press ?/1 to turn on the system.The system turns on and the color system ischanged.
To attach the speaker padsAttach the supplied speaker pads to the bottomof the speakers to stabilize the speakers andprevent them from slipping.
Notes• Keep the speaker cords away from the antennas to
prevent noise.• The type of speakers supplied vary according to the
model you purchased (see “Specifications” on page59).
• Do not place the rear speakers on top of a TV. Thismay cause color distortion in the TV screen.
• For MHC-DP1000D, be sure to connect both leftand right rear speakers. Otherwise, the sound willnot be heard.
• When you play a VIDEO CD recorded in thedifferent color system from the one you set to thesystem, the picture image may be distorted.
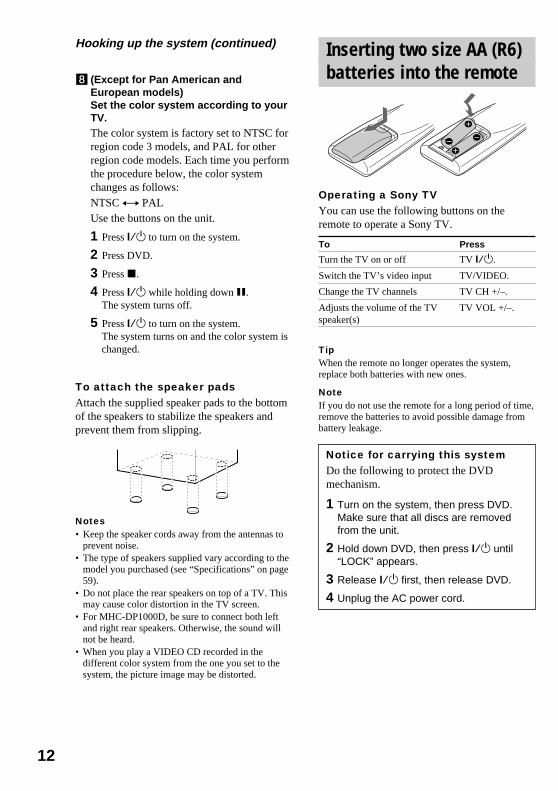
Inserting two size AA (R6)batteries into the remote
Operating a Sony TVYou can use the following buttons on theremote to operate a Sony TV.
To Press
Turn the TV on or off TV ?/1.
Switch the TV’s video input TV/VIDEO.
Change the TV channels TV CH +/–.
Adjusts the volume of the TV TV VOL +/–.speaker(s)
TipWhen the remote no longer operates the system,replace both batteries with new ones.
NoteIf you do not use the remote for a long period of time,remove the batteries to avoid possible damage frombattery leakage.
Notice for carrying this systemDo the following to protect the DVDmechanism.
1 Turn on the system, then press DVD.Make sure that all discs are removedfrom the unit.
2 Hold down DVD, then press ?/1 until“LOCK” appears.
3 Release ?/1 first, then release DVD.
4 Unplug the AC power cord.
}}
]
]
Hooking up the system (continued)
Ge
tting
Sta
rted
13
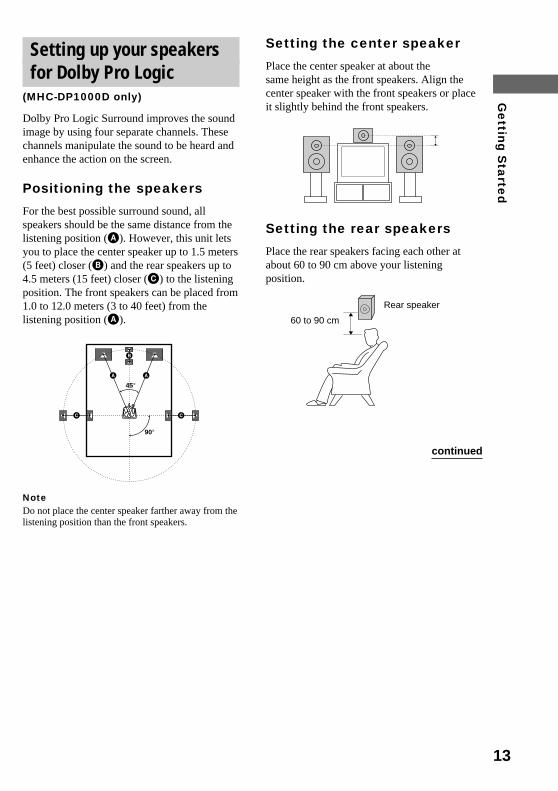
Setting up your speakersfor Dolby Pro Logic
(MHC-DP1000D only)
Dolby Pro Logic Surround improves the soundimage by using four separate channels. Thesechannels manipulate the sound to be heard andenhance the action on the screen.
Positioning the speakers
For the best possible surround sound, allspeakers should be the same distance from thelistening position (A). However, this unit letsyou to place the center speaker up to 1.5 meters(5 feet) closer (B) and the rear speakers up to4.5 meters (15 feet) closer (C) to the listeningposition. The front speakers can be placed from1.0 to 12.0 meters (3 to 40 feet) from thelistening position (A).
NoteDo not place the center speaker farther away from thelistening position than the front speakers.
Setting the center speaker
Place the center speaker at about thesame height as the front speakers. Align thecenter speaker with the front speakers or placeit slightly behind the front speakers.
Setting the rear speakers
Place the rear speakers facing each other atabout 60 to 90 cm above your listeningposition.
continued
45°
90°
A A
B
CC
Rear speaker
60 to 90 cm
14
Specifying the distance ofthe speakers
Use the remote for the operation.
1 Press AMP MENU.
2 From your listening position, press vor V repeatedly to select the parameter.Adjustable parameters are described below.
3 Press b or B repeatedly to select thesetting you want.
4 Repeat steps 2 to 3 to set otherparameters.
5 Press ENTER.
Tips• You can use the digipad instead of the cursor
buttons (v/V/b/B).• You can use “SPEAKER SETUP” in the Setup
Display to specify the distance of the speakers(page 21).
NoteIf each of the front or rear speakers is not placed at anequal distance from your listening position, set thedistance of the closest speaker.
Adjustable parametersThe default settings are in the parentheses.
• FRONT: 1.0 meter to 12.0 meters (2.4 meters)(3 feet to 40 feet (8 feet))*
Front speakers distance.
• CENTER: FRONT to 1.5 meters (2.4 meters)(FRONT to 5 feet (8 feet))*
Center speaker distance.
• REAR: FRONT to 4.5 meters (1.5 meters)(FRONT to 15 feet (5 feet))*
Rear speakers distance.* North American model only.
Notes• To enjoy Dolby Pro Logic surround with 2 channel
PCM or analog input sources, select “NORMALSURR” from the sound effect options (see page 47).
• If you press AMP MENU while adjustingparameters using OSD, the OSD turns off.
Setting up your speakers for DolbyPro Logic (continued) Specifying the speaker
parametersUse the remote for the operation.
1 From your listening position, pressSPEAKER LEVEL.Adjustable menus and parameters aredescribed below.
2 Press v or V repeatedly to select theparameter.
3 Press b or B repeatedly to select thesetting you want.
4 Repeat steps 2 to 3 to set otherparameters.
5 Press ENTER.
Tips• You can use the digipad instead of the cursor
buttons (v/V/b/B).• You can use “SPEAKER SETUP” in the Setup
Display to specify the balance, level, and test toneparameters (page 21).
Adjustable parametersThe default settings are in the parentheses.
x BALANCE
• FRNT L___R: (center)Balance between the front left and rightspeakers.
• (MHC-DP1000D only)REAR L___R: (center)Balance between the rear left and rightspeakers.
Range: 6 dB (L) to 6 dB (R), 1 dB steps
x LEVEL (MHC-DP1000D only)
• REAR ** dB: (0 dB)Level of the rear speakers.Range: –6 dB to 6 dB, 1 dB steps
• CTR ** dB: (0 dB)Level of the center speaker.Range: –6 dB to 6 dB, 1 dB steps
• SW ** dB: (10 dB)Level of the sub woofer.Range: –10 dB to 10 dB, 1 dB steps
Ge
tting
Sta
rted
15
x LFE
• LFE *****: (0 dB)Level of the LFE (Low Frequency Effect)channel output.Range: OFF, –20 dB to 0 dB, 1 dB steps“OFF” cuts the sound of the LFE channel.However, the low frequency sound of thespeakers are output from the sub woofer.“–20 dB” to “0 dB” settings allow you toattenuate the LFE signal. “0 dB” outputs thefull LFE signal at the mix level determined bythe recording engineer.
x D.COMP.
• D.COMP.: (STD)Dynamic range compression.Range: OFF, 0.1 to 0.9, STD, MAX“OFF” does not compress the dynamic range.“0.1” to “0.9” settings allow you to compressthe dynamic range in small steps. “STD”reproduces the sound track with the dynamicrange intended by the recording engineer.“MAX” provides a great compression of thedynamic range.
x T.TONE (MHC-DP1000D only)
• T.TONE: (OFF)Test tone output.Range: OFF, ON“ON” outputs the test tone from each speaker insequence. Adjust the LEVEL and BALANCEparameters so that the volume level of the testtone from each speaker sounds the same usingthe remote from your listening position. Select“OFF” to turn off the test tone.
Notes• When you adjust the level of the subwoofer, set
T.TONE to “OFF”.• Dynamic range compression is possible with Dolby
Digital sources only.• If you press SPEAKER LEVEL while adjusting
parameters using OSD, the OSD turns off.
Setting the time
1 Turn on the system.
2 Press CLOCK/TIMER SET.When you set the time for the first time,proceed to step 5.
3 Press . or > repeatedly to select“CLOCK SET”.
4 Press ENTER.
5 Press . or > repeatedly to set thehour.
6 Press ENTER.
7 Press . or > repeatedly to set theminutes.
8 Press ENTER.
TipIf you have made a mistake or want to change thetime, start over from step 2.
NoteThe clock settings are canceled when you disconnectthe power cord or if a power failure occurs.
16
Saving the power instandby mode
Press DISPLAY repeatedly when thepower is off.Each time you press the button, the systemswitches cyclically as follows:
Demonstration t Clock t Power SavingMode
To cancel the Power Saving modePress DISPLAY once to show thedemonstration, twice to show the clock display.
Tips• ?/1 indicator lights up even in the Power Saving
Mode.• The timer functions during the Power Saving Mode.
NoteDuring the Power Saving Mode, the followingfunctions do not work:– Setting the time.– Changing the AM tuning interval (except for
European and Middle Eastern models).– Pressing a function button to turn the power on.– Switching the function of MD (VIDEO).– Switching the color system.
17
Se
tting
Up
for D
VD
/VID
EO
CD
/CD
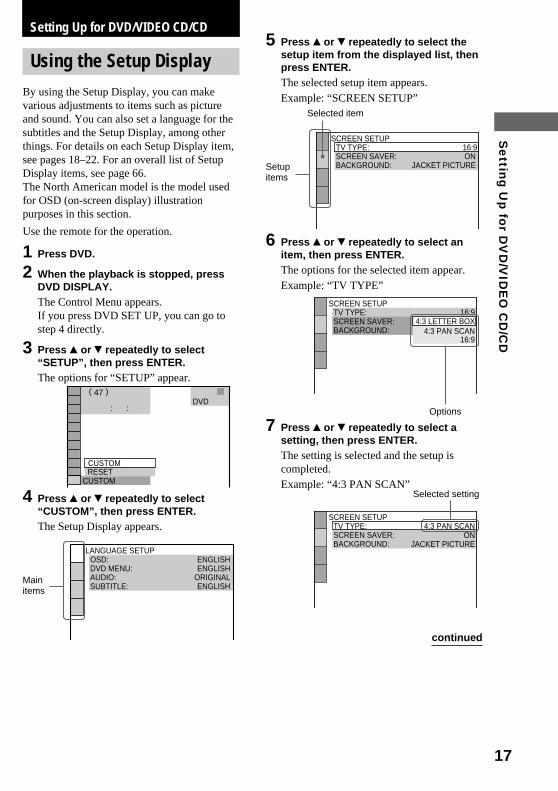
5 Press v or V repeatedly to select thesetup item from the displayed list, thenpress ENTER.The selected setup item appears.Example: “SCREEN SETUP”
6 Press v or V repeatedly to select anitem, then press ENTER.The options for the selected item appear.Example: “TV TYPE”
7 Press v or V repeatedly to select asetting, then press ENTER.The setting is selected and the setup iscompleted.Example: “4:3 PAN SCAN”
Setting Up for DVD/VIDEO CD/CD
Using the Setup DisplayBy using the Setup Display, you can makevarious adjustments to items such as pictureand sound. You can also set a language for thesubtitles and the Setup Display, among otherthings. For details on each Setup Display item,see pages 18–22. For an overall list of SetupDisplay items, see page 66.The North American model is the model usedfor OSD (on-screen display) illustrationpurposes in this section.
Use the remote for the operation.
1 Press DVD.
2 When the playback is stopped, pressDVD DISPLAY.The Control Menu appears.If you press DVD SET UP, you can go tostep 4 directly.
3 Press v or V repeatedly to select“SETUP”, then press ENTER.The options for “SETUP” appear.
4 Press v or V repeatedly to select“CUSTOM”, then press ENTER.The Setup Display appears.
Selected item
Setupitems
Options
Selected setting
SCREEN SETUPTV TYPE:SCREEN SAVER:BACKGROUND:
16:9ON
JACKET PICTURE
SCREEN SETUPTV TYPE:SCREEN SAVER:BACKGROUND: 4:3 PAN SCAN
16:94:3 LETTER BOX
16:9
SCREEN SETUPTV TYPE:SCREEN SAVER:BACKGROUND:
4:3 PAN SCANON
JACKET PICTURE
( 47 )
: :
RESET
DVD
CUSTOM
CUSTOM
LANGUAGE SETUPOSD:DVD MENU:AUDIO:SUBTITLE:
ENGLISHENGLISH
ORIGINALENGLISH
Mainitems
continued
18
To turn off the Setup DisplayPress DVD SET UP or DVD DISPLAYrepeatedly until the Setup Display is turned off.
Tips• If you select “RESET” in step 4, you can reset all of
the “SETUP” settings on pages 18–22 (except forPARENTAL CONTROL) to the default settings.After you select “RESET” and press ENTER, select“YES” to reset the settings (it takes a few secondsto complete), or select “NO” and press ENTER toreturn to the Control Menu. Do not press ?/1 whenresetting the system.
• You can use the digipad instead of cursor buttons(v/V/b/B) when DVD is selected as the currentfunction and OSD appears on the screen.
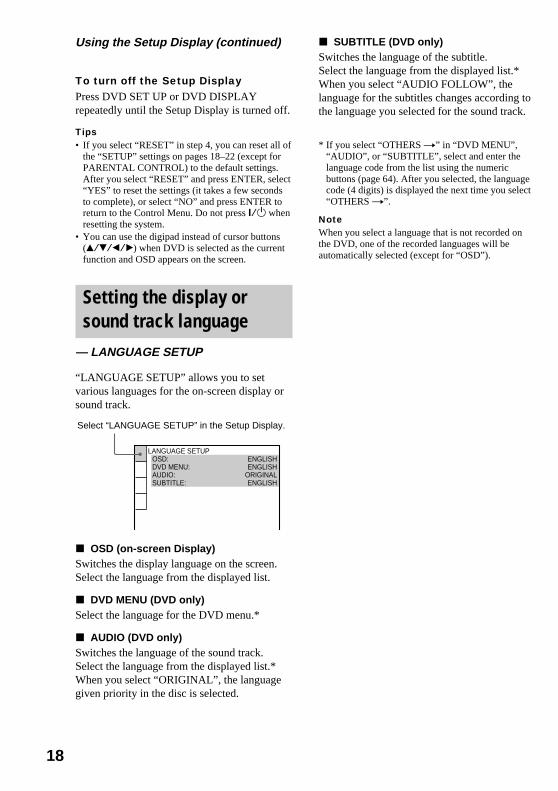
Setting the display orsound track language
— LANGUAGE SETUP
“LANGUAGE SETUP” allows you to setvarious languages for the on-screen display orsound track.
x OSD (on-screen Display)Switches the display language on the screen.Select the language from the displayed list.
x DVD MENU (DVD only)Select the language for the DVD menu.*
x AUDIO (DVD only)Switches the language of the sound track.Select the language from the displayed list.*When you select “ORIGINAL”, the languagegiven priority in the disc is selected.
x SUBTITLE (DVD only)Switches the language of the subtitle.Select the language from the displayed list.*When you select “AUDIO FOLLOW”, thelanguage for the subtitles changes according tothe language you selected for the sound track.
* If you select “OTHERS t” in “DVD MENU”,“AUDIO”, or “SUBTITLE”, select and enter thelanguage code from the list using the numericbuttons (page 64). After you selected, the languagecode (4 digits) is displayed the next time you select“OTHERS t”.
NoteWhen you select a language that is not recorded onthe DVD, one of the recorded languages will beautomatically selected (except for “OSD”).
Select “LANGUAGE SETUP” in the Setup Display.
LANGUAGE SETUPOSD:DVD MENU:AUDIO:SUBTITLE:
ENGLISHENGLISH
ORIGINALENGLISH
Using the Setup Display (continued)
19
Se
tting
Up
for D
VD
/VID
EO
CD
/CD
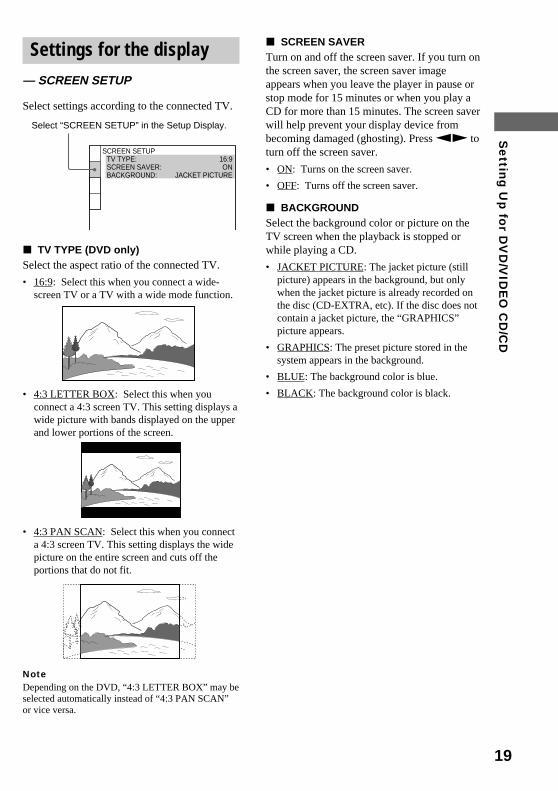
Settings for the display— SCREEN SETUP
Select settings according to the connected TV.
x TV TYPE (DVD only)Select the aspect ratio of the connected TV.
• 16:9: Select this when you connect a wide-screen TV or a TV with a wide mode function.
• 4:3 LETTER BOX: Select this when youconnect a 4:3 screen TV. This setting displays awide picture with bands displayed on the upperand lower portions of the screen.
• 4:3 PAN SCAN: Select this when you connecta 4:3 screen TV. This setting displays the widepicture on the entire screen and cuts off theportions that do not fit.
NoteDepending on the DVD, “4:3 LETTER BOX” may beselected automatically instead of “4:3 PAN SCAN”or vice versa.
x SCREEN SAVERTurn on and off the screen saver. If you turn onthe screen saver, the screen saver imageappears when you leave the player in pause orstop mode for 15 minutes or when you play aCD for more than 15 minutes. The screen saverwill help prevent your display device frombecoming damaged (ghosting). Press nN toturn off the screen saver.
• ON: Turns on the screen saver.
• OFF: Turns off the screen saver.
x BACKGROUNDSelect the background color or picture on theTV screen when the playback is stopped orwhile playing a CD.
• JACKET PICTURE: The jacket picture (stillpicture) appears in the background, but onlywhen the jacket picture is already recorded onthe disc (CD-EXTRA, etc). If the disc does notcontain a jacket picture, the “GRAPHICS”picture appears.
• GRAPHICS: The preset picture stored in thesystem appears in the background.
• BLUE: The background color is blue.
• BLACK: The background color is black.
Select “SCREEN SETUP” in the Setup Display.
SCREEN SETUPTV TYPE:SCREEN SAVER:BACKGROUND:
16:9ON
JACKET PICTURE
20
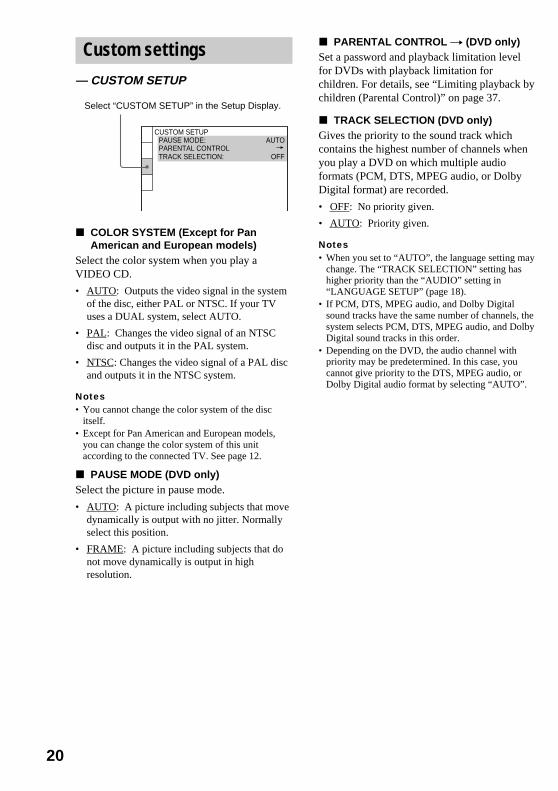
Custom settings— CUSTOM SETUP
x COLOR SYSTEM (Except for PanAmerican and European models)
Select the color system when you play aVIDEO CD.
• AUTO: Outputs the video signal in the systemof the disc, either PAL or NTSC. If your TVuses a DUAL system, select AUTO.
• PAL: Changes the video signal of an NTSCdisc and outputs it in the PAL system.
• NTSC: Changes the video signal of a PAL discand outputs it in the NTSC system.
Notes• You cannot change the color system of the disc
itself.• Except for Pan American and European models,
you can change the color system of this unitaccording to the connected TV. See page 12.
x PAUSE MODE (DVD only)Select the picture in pause mode.
• AUTO: A picture including subjects that movedynamically is output with no jitter. Normallyselect this position.
• FRAME: A picture including subjects that donot move dynamically is output in highresolution.
x PARENTAL CONTROL t (DVD only)Set a password and playback limitation levelfor DVDs with playback limitation forchildren. For details, see “Limiting playback bychildren (Parental Control)” on page 37.
x TRACK SELECTION (DVD only)Gives the priority to the sound track whichcontains the highest number of channels whenyou play a DVD on which multiple audioformats (PCM, DTS, MPEG audio, or DolbyDigital format) are recorded.
• OFF: No priority given.
• AUTO: Priority given.
Notes• When you set to “AUTO”, the language setting may
change. The “TRACK SELECTION” setting hashigher priority than the “AUDIO” setting in“LANGUAGE SETUP” (page 18).
• If PCM, DTS, MPEG audio, and Dolby Digitalsound tracks have the same number of channels, thesystem selects PCM, DTS, MPEG audio, and DolbyDigital sound tracks in this order.
• Depending on the DVD, the audio channel withpriority may be predetermined. In this case, youcannot give priority to the DTS, MPEG audio, orDolby Digital audio format by selecting “AUTO”.
Select “CUSTOM SETUP” in the Setup Display.
CUSTOM SETUPPAUSE MODE:PARENTAL CONTROLTRACK SELECTION: OFF
AUTO
21
Se
tting
Up
for D
VD
/VID
EO
CD
/CD
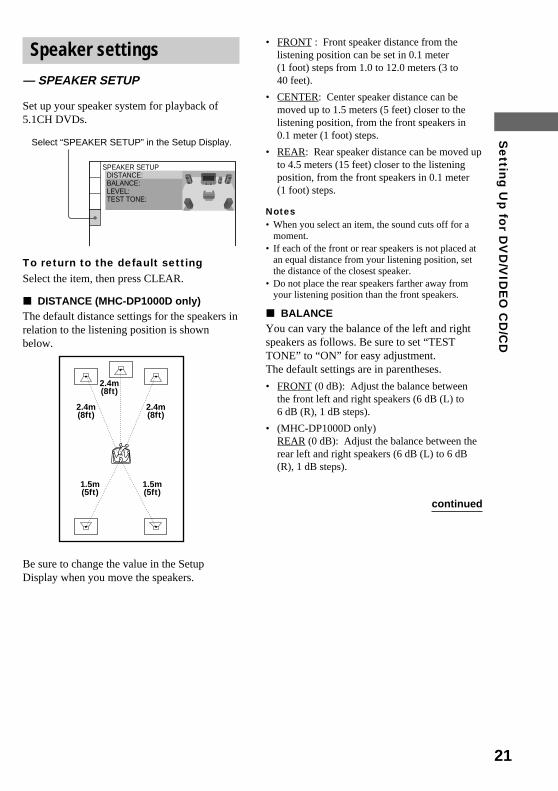
• FRONT : Front speaker distance from thelistening position can be set in 0.1 meter(1 foot) steps from 1.0 to 12.0 meters (3 to40 feet).
• CENTER: Center speaker distance can bemoved up to 1.5 meters (5 feet) closer to thelistening position, from the front speakers in0.1 meter (1 foot) steps.
• REAR: Rear speaker distance can be moved upto 4.5 meters (15 feet) closer to the listeningposition, from the front speakers in 0.1 meter(1 foot) steps.
Notes• When you select an item, the sound cuts off for a
moment.• If each of the front or rear speakers is not placed at
an equal distance from your listening position, setthe distance of the closest speaker.
• Do not place the rear speakers farther away fromyour listening position than the front speakers.
x BALANCEYou can vary the balance of the left and rightspeakers as follows. Be sure to set “TESTTONE” to “ON” for easy adjustment.The default settings are in parentheses.
• FRONT (0 dB): Adjust the balance betweenthe front left and right speakers (6 dB (L) to6 dB (R), 1 dB steps).
• (MHC-DP1000D only)REAR (0 dB): Adjust the balance between therear left and right speakers (6 dB (L) to 6 dB(R), 1 dB steps).
Speaker settings— SPEAKER SETUP
Set up your speaker system for playback of5.1CH DVDs.
To return to the default settingSelect the item, then press CLEAR.
x DISTANCE (MHC-DP1000D only)The default distance settings for the speakers inrelation to the listening position is shownbelow.
Be sure to change the value in the SetupDisplay when you move the speakers.
Select “SPEAKER SETUP” in the Setup Display.
continued
SPEAKER SETUPDISTANCE:BALANCE:LEVEL: TEST TONE:
2.4m(8ft)
2.4m(8ft)
2.4m(8ft)
1.5m(5ft)
1.5m(5ft)
22
Adjusting the speaker volumeand level
1 When the playback is stopped, pressDVD SET UP, then select “SPEAKERSETUP”.
2 Select “TEST TONE” and set “TESTTONE” to “ON”.You will hear the test tone from eachspeaker in sequence.
3 From your listening position, select“BALANCE” or “LEVEL”, then press bor B repeatedly to adjust the value of“BALANCE”, or press v or Vrepeatedly to adjust the value of“LEVEL”.The test tone is emitted from both left andright speakers simultaneously.
4 Select “TEST TONE” and set “TESTTONE” to “OFF” to turn off the testtone.
Notes• When you adjust the speaker settings, the sound
cuts off for a moment.• If you adjust these parameters using OSD while
adjusting the speaker parameters using AMPMENU or SPEAKER LEVEL (pages 14–15), thedisplay on the unit turns off.
x LEVEL (MHC-DP1000D only)You can vary the level of each speakers asfollows. Be sure to set “TEST TONE” to “ON”for easy adjustment.The default settings are in parentheses.
• CENTER (0 dB): Adjust the level of the centerspeaker (–6 dB to +6 dB, 1 dB steps).
• REAR (0 dB): Adjust the level of the rearspeakers (–6 dB to +6 dB, 1 dB steps).
• SUBWOOFER (10 dB): Adjust the level of thesubwoofer (–10 dB to +10 dB, 1 dB steps).
x TEST TONE (MHC-DP1000D only)The speakers will emit a test tone to adjust“BALANCE” and “LEVEL”.
• OFF: The test tone is not emitted from thespeakers.
• ON: The test tone is emitted from each speakerin sequence while adjusting balance or level.When you select one of the “SPEAKERSETUP” items, the test tone is emitted fromboth left and right speakers simultaneously.
NoteWhen you adjust the level of the subwoofer, setT.TONE to “OFF”.
To adjust the volume of all thespeakers at onceTurn VOLUME (or press VOL +/– on theremote).
Speaker settings (continued)
DV
D/V
IDE
O C
D/C
D
23
21
MUSIC MOVIE
A B3
DVD TITLE CHAPTER HOUR MIN SEC
DVD
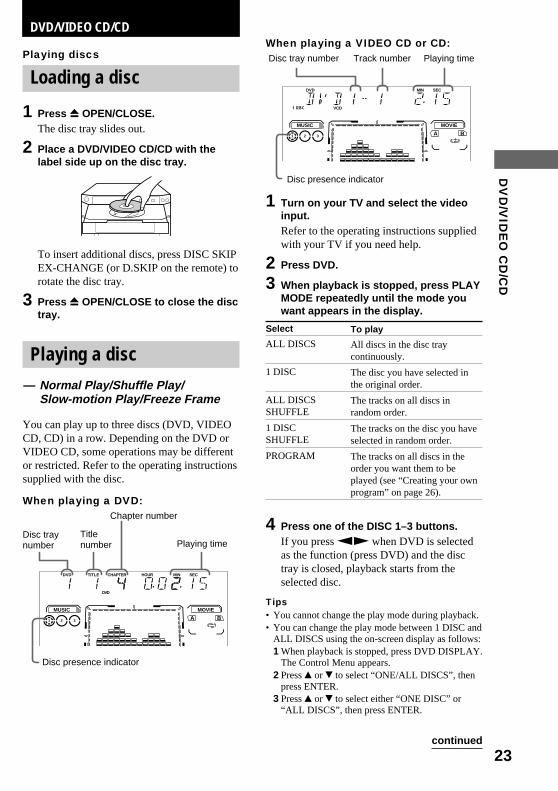
Playing discs
Loading a disc
1 Press Z OPEN/CLOSE.The disc tray slides out.
2 Place a DVD/VIDEO CD/CD with thelabel side up on the disc tray.
To insert additional discs, press DISC SKIPEX-CHANGE (or D.SKIP on the remote) torotate the disc tray.
3 Press Z OPEN/CLOSE to close the disctray.
Playing a disc— Normal Play/Shuffle Play/
Slow-motion Play/Freeze Frame
You can play up to three discs (DVD, VIDEOCD, CD) in a row. Depending on the DVD orVIDEO CD, some operations may be differentor restricted. Refer to the operating instructionssupplied with the disc.
When playing a DVD:
DVD/VIDEO CD/CD
Titlenumber Playing time
Disc traynumber
When playing a VIDEO CD or CD:
1 Turn on your TV and select the videoinput.Refer to the operating instructions suppliedwith your TV if you need help.
2 Press DVD.
3 When playback is stopped, press PLAYMODE repeatedly until the mode youwant appears in the display.
Select
ALL DISCS
1 DISC
ALL DISCSSHUFFLE
1 DISCSHUFFLE
PROGRAM
4 Press one of the DISC 1–3 buttons.If you press nN when DVD is selectedas the function (press DVD) and the disctray is closed, playback starts from theselected disc.
Tips• You cannot change the play mode during playback.• You can change the play mode between 1 DISC and
ALL DISCS using the on-screen display as follows:1 When playback is stopped, press DVD DISPLAY.
The Control Menu appears.2 Press v or V to select “ONE/ALL DISCS”, then
press ENTER.3 Press v or V to select either “ONE DISC” or
“ALL DISCS”, then press ENTER.
To play
All discs in the disc traycontinuously.
The disc you have selected inthe original order.
The tracks on all discs inrandom order.
The tracks on the disc you haveselected in random order.
The tracks on all discs in theorder you want them to beplayed (see “Creating your ownprogram” on page 26).
Disc presence indicator
continued
Track number Playing timeDisc tray number
Chapter number
21
MUSIC MOVIE
A B3
1 DISC VCD
MIN SECDVD
Disc presence indicator
24
Other operations
To
Stop playback
Pause playback
Select a track orchapter
Find a point ina track title orchapter(LockSearch function)
Change theplayback speed*2
(Slow-motion play)
Playing the discframe by framechanging theplayback speed*2
(Freeze Frame)
Select a disc whenplayback is stopped
Switch to DVDfunction fromanother source
Exchange otherdiscs duringplayback
Remove the disc
*1 There may be some disturbance in the videoimage.
*2 DVD and VIDEO CD only.*3 SLOW t and STEP c are not available during
playback of VIDEO CDs.
Tips• You can use the digipad for DVD/VIDEO CD/CD
operations.• You can use the digipad instead of cursor buttons
(v/V/b/B) when DVD is selected as the currentfunction and OSD appears on the screen.
Notes• Depending on the DVD or VIDEO CD, some
operations may be prohibited.• VIDEO CDs cannot be viewed slowly or frame by
frame in the reverse direction.• Under the following circumstances, 2CH/MULTI is
automatically set to “2CH”.– When recording.– When TAPE B is in REC PAUSE mode.– When recording using TAPE B.
• When using headphones, the sound fromheadphones is 2 channel.
• Switch the channel mode to “2CH” by pressing2CH/MULTI when making an analog recordingusing a component connected to the MD OUT jackson this unit. There is no audio output from the MDOUT jacks in the multi channel mode.
• Depending on the DVD, digital recording may notbe done. In this case, perform analog recording.Press 2CH/MULTI to switch the channel mode to“2CH” on this system when making an analogrecording.
• Set the sound to “STEREO” using the AUDIObutton when you play DTS sound tracks on a CD(page 32).
Do this
Press x. The playback stops atthe point x is pressed (ResumePlay). Press x again to cancelthe Resume Play (see page 28).
Press X*1.Press again to resume playback.
During playback or pause, press> (or NEXT on the remote)(to go forward) or . (orPREV on the remote) (to goback).
Press M or m duringplayback. Each time you pressthe button, the speed changes asfollows:1 (slow) y 2 (faster than 1)Press nN to stop searching atthe desired point.
During playback, press SLOWt or T*3 on the remote. Eachtime you press the button, thespeed switches between twoslowed playback speeds. Toreturn to normal playback, pressnN.
During playback, press STEPc or C*3 on the remote.Each time you press the button,playback is advanced a singleframe in the desired direction.To return to normal playback,press nN.
Press one of the DISC 1–3buttons or DISC SKIP EX-CHANGE (or D.SKIP on theremote).
Press one of the DISC 1–3buttons (Automatic SourceSelection).
Press DISC SKIPEX-CHANGE.
Press Z OPEN/CLOSE.
Playing a disc (continued)
DV
D/V
IDE
O C
D/C
D
25
Playing DVDs using themenu
Some discs have a “title menu” or a “DVDmenu”. On some DVDs, this may simply becalled a “menu” or “title”.
Using the title menu
A DVD is divided into long sections of apicture or a music feature called “titles”. Whenyou play a DVD which contains several titles,you can select the title you want using the titlemenu.
1 Press DVD.
2 Press TITLE.The title menu appears on the TV screen.The contents of the menu vary from disc todisc.
3 Press v/V/b/B or the numeric buttonsto select the title you want to play.
4 Press ENTER.The playback starts from the selected title.
Using the DVD menu
Some DVDs allow you to select the disccontents using a menu. When you play theseDVDs, you can select items such as thelanguage for the subtitles and the language forthe sound using the DVD menu.
1 Press DVD.
2 Press DVD MENU.The DVD menu appears on the TV screen.The contents of the menu vary from disc todisc.
3 Press v/V/b/B or the numeric buttonsto select the item you want to change.
4 To change other items, repeat step 3.
5 Press ENTER.
TipYou can use the digipad instead of cursor buttons(v/V/b/B) when DVD is selected as the currentfunction and OSD appears on the screen.
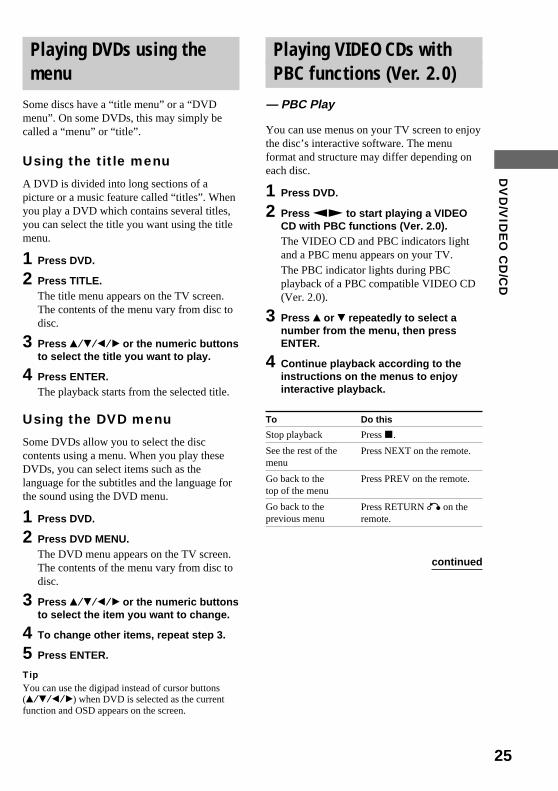
Playing VIDEO CDs withPBC functions (Ver. 2.0)
— PBC Play
You can use menus on your TV screen to enjoythe disc’s interactive software. The menuformat and structure may differ depending oneach disc.
1 Press DVD.
2 Press nN to start playing a VIDEOCD with PBC functions (Ver. 2.0).The VIDEO CD and PBC indicators lightand a PBC menu appears on your TV.The PBC indicator lights during PBCplayback of a PBC compatible VIDEO CD(Ver. 2.0).
3 Press v or V repeatedly to select anumber from the menu, then pressENTER.
4 Continue playback according to theinstructions on the menus to enjoyinteractive playback.
To
Stop playback
See the rest of themenu
Go back to thetop of the menu
Go back to theprevious menu
continued
Do this
Press x.
Press NEXT on the remote.
Press PREV on the remote.
Press RETURN O on theremote.
26
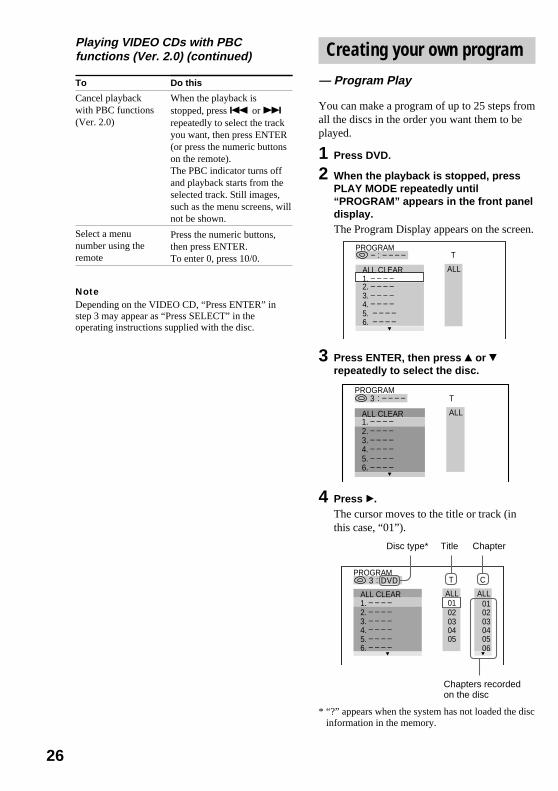
Creating your own program— Program Play
You can make a program of up to 25 steps fromall the discs in the order you want them to beplayed.
1 Press DVD.
2 When the playback is stopped, pressPLAY MODE repeatedly until“PROGRAM” appears in the front paneldisplay.The Program Display appears on the screen.
3 Press ENTER, then press v or Vrepeatedly to select the disc.
4 Press B.The cursor moves to the title or track (inthis case, “01”).
* “?” appears when the system has not loaded the discinformation in the memory.
To
Cancel playbackwith PBC functions(Ver. 2.0)
Select a menunumber using theremote
NoteDepending on the VIDEO CD, “Press ENTER” instep 3 may appear as “Press SELECT” in theoperating instructions supplied with the disc.
Disc type*
Chapters recordedon the disc
PROGRAM
1. – – – –ALL CLEAR
2. – – – –3. – – – –4. – – – –5. – – – –6. – – – –
T
ALL
– : – – – –
T
ALL
PROGRAM
1. – – – –ALL CLEAR
2. – – – –3. – – – –4. – – – –5. – – – –6. – – – –
3 : – – – –
PROGRAM
1. – – – –ALL CLEAR
2. – – – –3. – – – –4. – – – –5. – – – –6. – – – –
T C
ALL010203040506
ALL0102030405
3 : DVD
Title Chapter
Do this
When the playback isstopped, press . or >repeatedly to select the trackyou want, then press ENTER(or press the numeric buttonson the remote).The PBC indicator turns offand playback starts from theselected track. Still images,such as the menu screens, willnot be shown.
Press the numeric buttons,then press ENTER.To enter 0, press 10/0.
Playing VIDEO CDs with PBCfunctions (Ver. 2.0) (continued)
DV
D/V
IDE
O C
D/C
D
27
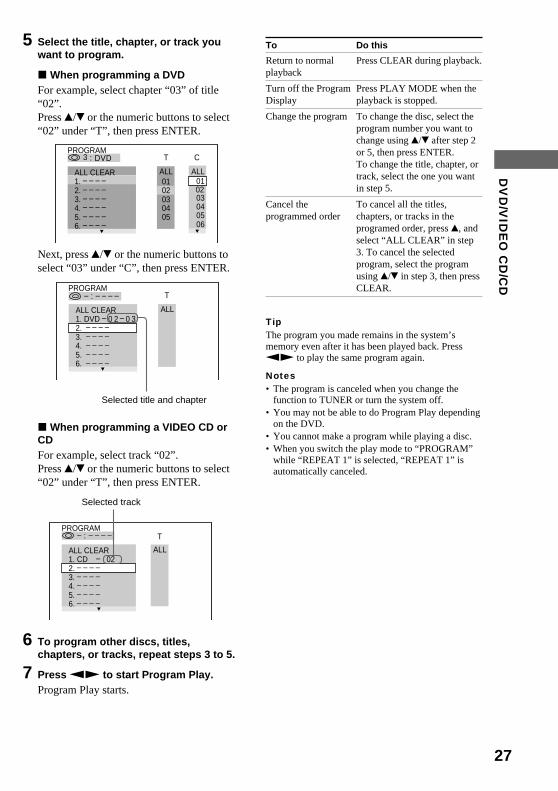
5 Select the title, chapter, or track youwant to program.
x When programming a DVDFor example, select chapter “03” of title“02”.Press v/V or the numeric buttons to select“02” under “T”, then press ENTER.
Next, press v/V or the numeric buttons toselect “03” under “C”, then press ENTER.
x When programming a VIDEO CD orCDFor example, select track “02”.Press v/V or the numeric buttons to select“02” under “T”, then press ENTER.
6 To program other discs, titles,chapters, or tracks, repeat steps 3 to 5.
7 Press nN to start Program Play.Program Play starts.
To
Return to normalplayback
Turn off the ProgramDisplay
Change the program
Cancel theprogrammed order
TipThe program you made remains in the system’smemory even after it has been played back. PressnN to play the same program again.
Notes• The program is canceled when you change the
function to TUNER or turn the system off.• You may not be able to do Program Play depending
on the DVD.• You cannot make a program while playing a disc.• When you switch the play mode to “PROGRAM”
while “REPEAT 1” is selected, “REPEAT 1” isautomatically canceled.
PROGRAM
1. – – – –ALL CLEAR
2. – – – –3. – – – –4. – – – –5. – – – –6. – – – –
C
ALL
03040506
T
ALL0102030405
0201
3 : DVD
T
ALL
PROGRAM
1. DVD – 0 2 – 0 3ALL CLEAR
2. – – – –3. – – – –4. – – – –5. – – – –6. – – – –
– : – – – –
– : – – – –PROGRAM
1. CD – 02ALL CLEAR
2. – – – –3. – – – –4. – – – –5. – – – –6. – – – –
ALL
T
Selected title and chapter
Selected track
Do this
Press CLEAR during playback.
Press PLAY MODE when theplayback is stopped.
To change the disc, select theprogram number you want tochange using v/V after step 2or 5, then press ENTER.To change the title, chapter, ortrack, select the one you wantin step 5.
To cancel all the titles,chapters, or tracks in theprogramed order, press v, andselect “ALL CLEAR” in step3. To cancel the selectedprogram, select the programusing v/V in step 3, then pressCLEAR.
28
Resuming playback fromthe point you stopped thedisc
— Resume Play
This system memorizes the point where youstopped the disc so you can resume from thatpoint.
1 While playing a disc, press x to stopplayback.“RESUME” appears in the display. If“RESUME” does not appear, Resume Playis not available.
2 Press nN.The player starts playback from the pointyou stopped the disc in step 1.
To view from the beginning of thediscWhen “RESUME” appears in the display, pressx, then press nN.
Notes• Depending on where you stopped the disc, the
system may resume playback from a different point.• Resume play is canceled when:
– you press numeric buttons, x, D.SKIP, or./>.
– you remove the disc.– you unplug the unit’s AC power cord.– you change the settings of “DVD MENU”,
“AUDIO”, or “SUBTITLE” in “LANGUAGESETUP” in the setup display.
– you change the settings of “TV TYPE” in”SCREEN SETUP” in the setup display.
– you change the settings of “PARENTALCONTROL” in ”CUSTOM SETUP” in the setupdisplay.
Playing repeatedly— Repeat Play
You can play all the titles/tracks or a singletitle/chapter/track on a disc.
In Shuffle or Program Play mode, the systemrepeats the titles or tracks in the shuffled orprogrammed order.
1 Press DVD DISPLAY.The Control Menu appears.
2 Press v or V repeatedly to select“REPEAT”, then press ENTER.If you do not select “OFF,” the “REPEAT”indicator lights in green.
3 Select the Repeat Play setting.
x When playing a DVD and whenProgram Play is set to OFF
• OFF: does not play repeatedly.
• DISC: repeats all the titles.
• TITLE: repeats the current title on a disc.*
• CHAPTER: repeats the current chapter.
x When playing a VIDEO CD/CD andwhen Program Play is set to OFF
• OFF: does not play repeatedly.
• DISC: repeats all the tracks on a disc.
• TRACK: repeats the current track.*
x When Program Play is set to ON
• OFF: does not play repeatedly.
• ON: repeats Program Play.
* When ALL DISCS SHUFFLE is selected, you canselect the Repeat Play of TITLE or TRACK only.
To cancel Repeat PlayPress CLEAR.
DV
D/V
IDE
O C
D/C
D
29
Tips• You can set Repeat Play when the playback is
stopped. After selecting the “REPEAT” item, pressnN. The Repeat Play starts.
• You can quickly display the “REPEAT” status.Press REPEAT.
Notes• You cannot perform Repeat Play during PBC
playback of VIDEO CDs (page 25).• You may not be able to perform Repeat Play
depending on the DVD.• If you select DISC repeat (with or without Program
Play), the program is repeated up to 5 times.
Viewing information about the disc
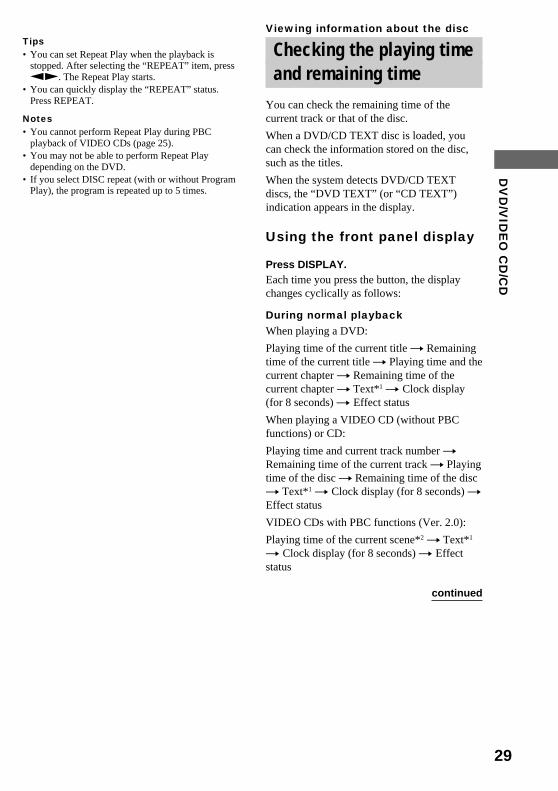
Checking the playing timeand remaining time
You can check the remaining time of thecurrent track or that of the disc.
When a DVD/CD TEXT disc is loaded, youcan check the information stored on the disc,such as the titles.
When the system detects DVD/CD TEXTdiscs, the “DVD TEXT” (or “CD TEXT”)indication appears in the display.
Using the front panel display
Press DISPLAY.Each time you press the button, the displaychanges cyclically as follows:
During normal playbackWhen playing a DVD:
Playing time of the current title t Remainingtime of the current title t Playing time and thecurrent chapter t Remaining time of thecurrent chapter t Text*1 t Clock display(for 8 seconds) t Effect status
When playing a VIDEO CD (without PBCfunctions) or CD:
Playing time and current track number tRemaining time of the current track t Playingtime of the disc t Remaining time of the disct Text*1 t Clock display (for 8 seconds) tEffect status
VIDEO CDs with PBC functions (Ver. 2.0):
Playing time of the current scene*2 t Text*1
t Clock display (for 8 seconds) t Effectstatus
continued
30
When the playback is stoppedDVDs:
Total number of titles*3 t Title name of thedisc*1 t Clock display (for 8 seconds) tEffect status
VIDEO CDs or CDs:
Total number of tracks and the total playingtime*3 t Title name of the disc*1 t Clockdisplay (for 8 seconds) t Effect status
*1 With DVD/CD TEXT discs only (certain characterscannot be displayed). Depending on the disc, DVD/CD text does not appear and “NO TEXT” appears.
*2 May not appear with still images, etc.*3 When the playback is stopped and “RESUME”
appears on the front panel display, the point whereplayback was stopped is displayed.
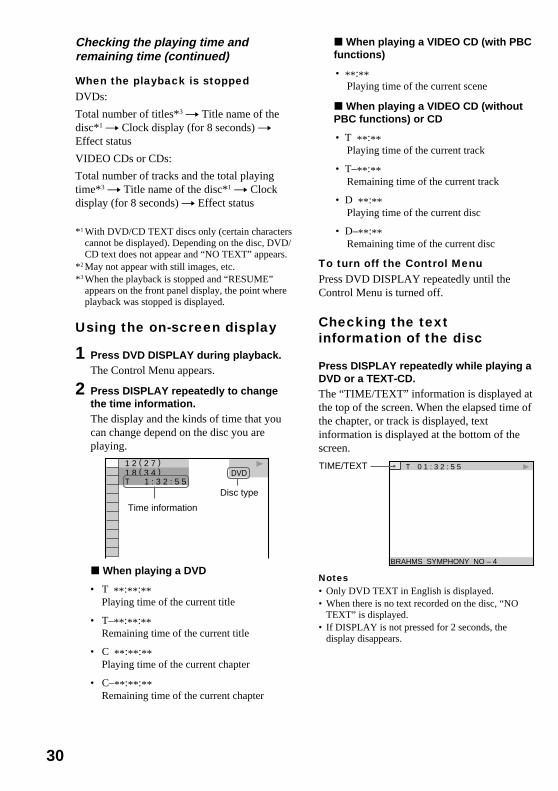
Using the on-screen display
1 Press DVD DISPLAY during playback.The Control Menu appears.
2 Press DISPLAY repeatedly to changethe time information.The display and the kinds of time that youcan change depend on the disc you areplaying.
x When playing a DVD
• T **:**:**Playing time of the current title
• T–**:**:**Remaining time of the current title
• C **:**:**Playing time of the current chapter
• C–**:**:**Remaining time of the current chapter
x When playing a VIDEO CD (with PBCfunctions)
• **:**Playing time of the current scene
x When playing a VIDEO CD (withoutPBC functions) or CD
• T **:**Playing time of the current track
• T–**:**Remaining time of the current track
• D **:**Playing time of the current disc
• D–**:**Remaining time of the current disc
To turn off the Control MenuPress DVD DISPLAY repeatedly until theControl Menu is turned off.
Checking the textinformation of the disc
Press DISPLAY repeatedly while playing aDVD or a TEXT-CD.The “TIME/TEXT” information is displayed atthe top of the screen. When the elapsed time ofthe chapter, or track is displayed, textinformation is displayed at the bottom of thescreen.
Notes• Only DVD TEXT in English is displayed.• When there is no text recorded on the disc, “NO
TEXT” is displayed.• If DISPLAY is not pressed for 2 seconds, the
display disappears.
Checking the playing time andremaining time (continued)
Time information
Disc type
1 8 ( 3 4 )1 2 ( 2 7 )
T 1 : 3 2 : 5 5DVD
T 0 1 : 3 2 : 5 5
BRAHMS SYMPHONY NO – 4
TIME/TEXT

DV
D/V
IDE
O C
D/C
D
31
Checking the playbackinformation
— ADVANCED
(DVD only)
You can check information such as the bit rateor the disc layer that is being played.While playing a disc, an approximate bit rate ofthe playback picture is always displayed asMbps (Mega bit per second) and the audio asKbps (Kilo bit per second).
1 Press DVD DISPLAY during playback.The Control Menu appears.
2 Press v or V repeatedly to select“ADVANCED”, then press ENTER.The options for “ADVANCED” appear.
3 Press v or V repeatedly to select theitem.For each item, see “Displays of each item”.• BIT RATE: Displays the bit rate.• LAYER: Displays the layer and the
pick-up point.
4 Press ENTER.
To close the “ADVANCED” displaySelect “OFF” in step 3.
To turn off the Control MenuPress DVD DISPLAY repeatedly until theControl Menu is turned off.
Displays of each item
By pressing DVD DISPLAY repeatedly, youcan display either “BIT RATE” or “LAYER”,whichever was selected in “ADVANCED”.
BIT RATE
When playing MPEG audio sound tracks:
Bit rate refers to the amount of video/audiodata per second in a disc. The higher the bitrate, the larger the amount of data. When thebit rate level is high, there is a large amount ofdata. However, this does not always mean thatyou can get higher quality pictures or sounds.
LAYER
This item indicates the approximate pointwhere the disc is playing. When the DVD hasdual layers, the system indicates which layer isbeing read (“Layer 0” or “Layer 1”). For detailson the layers, see page 62 (DVD).
Audio
Video
Appears when the DVDhas dual layers
BIT RATE
0 5 10
kbps
Mbps
384
1 8 ( 3 4 )1 2 ( 2 7 )
T 1 : 3 2 : 5 5DVD
BIT RATE
0 5 10
kbps
Mbps
384
OFF
BIT RATE LAYERBIT RATE
BIT RATE
0 5 10
kbps
Mbps0 1000 Audio
Video
32
Changing the soundIf a DVD is recorded with multilingual tracks,you can select the language you want whileplaying the DVD. If the DVD is recorded inmultiple audio formats (PCM, Dolby Digital,MPEG audio, or DTS), you can select the audioformat you want while playing the DVD.
With stereo CDs or VIDEO CDs, you canselect the sound from the right or left channeland listen to the sound of the selected channelthrough both the right and left speakers. (In thiscase, the sound loses its stereo effect.) Forexample, when playing a disc containing a songwith the vocals on the right channel and theinstruments on the left channel, you can selectthe left channel and hear only the instrumentsfrom both speakers.
1 Press DVD DISPLAY during playback.The Control Menu appears.
2 Press v or V repeatedly to select“AUDIO”, then press ENTER.
3 Press v or V repeatedly to select theaudio signal you want.
x When playing a DVDDepending on the DVD, the choice of thelanguage varies. When 4 digits aredisplayed, they represent the language code(see the language code list on page 64).When the same language is displayed twoor more, the DVD is recorded in multipleaudio formats.
x When playing a VIDEO CD or CD• STEREO: The standard stereo sound.• 1/L: The sound of the left channel
(monaural).• 2/R: The sound of the right channel
(monaural).
4 Press ENTER.
To turn off the Control MenuPress DVD DISPLAY repeatedly until theControl Menu is turned off.
TipYou can select “AUDIO” directly by pressingAUDIO on the remote. Each time you press thebutton, the item changes.
Notes• For discs not in multiple audio format, you cannot
change the sound.• During DVD playback, the sound may change
automatically.
Displaying the audioinformation of the disc
(DVD only)
When you select “AUDIO”, the channels beingplayed are displayed on the screen.For example, in Dolby Digital format, multiplesignals ranging from monaural to 5.1 channelsignals can be recorded on a DVD. Dependingon the DVD, the number of the recordedchannels may differ.
* “PCM”, “MPEG”, “DTS”, or “DOLBY DIGITAL”is displayed.For “DOLBY DIGITAL”, the channels in theplaying track are displayed numerically as follows:
For Dolby Digital 5.1 ch:
Current audio format*
Current playing program format**
Rear component 2
Front component 2 +Center component 1
LFE (Low FrequencyEffect) component 1
Sound adjustment
DVD
1: ENGLISH
1 8 ( 3 4 )1 2 ( 2 7 )
T 1 : 3 2 : 5 5
L RC
DOLBY DIGITAL 3/2.1PROGRAM FORMAT
LFELS RS
DOLBY DIGITAL 3 / 2 . 1
DV
D/V
IDE
O C
D/C
D
33
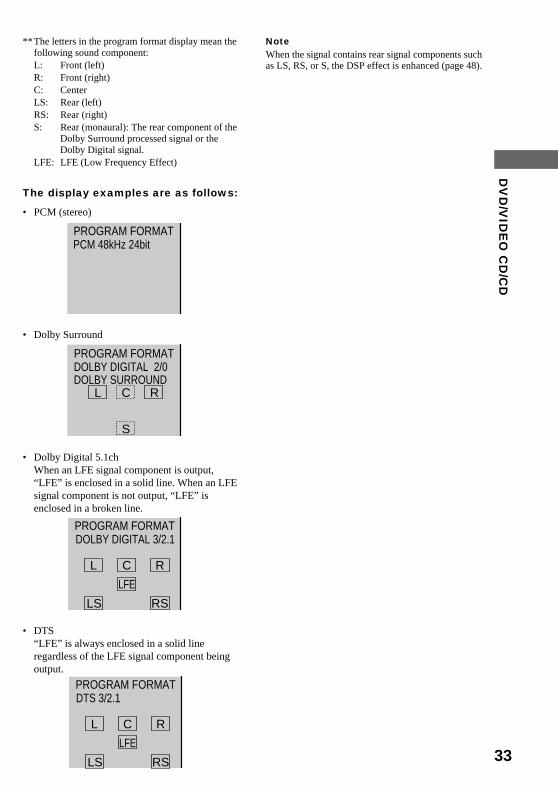
**The letters in the program format display mean thefollowing sound component:L: Front (left)R: Front (right)C: CenterLS: Rear (left)RS: Rear (right)S: Rear (monaural): The rear component of the
Dolby Surround processed signal or theDolby Digital signal.
LFE: LFE (Low Frequency Effect)
The display examples are as follows:
• PCM (stereo)
• Dolby Surround
• Dolby Digital 5.1chWhen an LFE signal component is output,“LFE” is enclosed in a solid line. When an LFEsignal component is not output, “LFE” isenclosed in a broken line.
• DTS“LFE” is always enclosed in a solid lineregardless of the LFE signal component beingoutput.
NoteWhen the signal contains rear signal components suchas LS, RS, or S, the DSP effect is enhanced (page 48).
PCM 48kHz 24bitPROGRAM FORMAT
DOLBY SURROUNDDOLBY DIGITAL 2/0
L RC
S
PROGRAM FORMAT
L RC
DOLBY DIGITAL 3/2.1PROGRAM FORMAT
LFE
LS RS
L RC
DTS 3/2.1PROGRAM FORMAT
LFE
LS RS
34
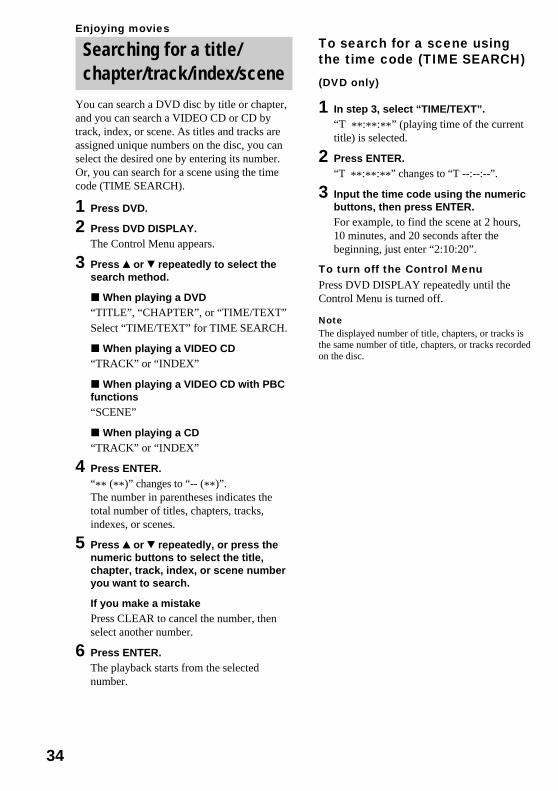
Searching for a title/chapter/track/index/scene
You can search a DVD disc by title or chapter,and you can search a VIDEO CD or CD bytrack, index, or scene. As titles and tracks areassigned unique numbers on the disc, you canselect the desired one by entering its number.Or, you can search for a scene using the timecode (TIME SEARCH).
1 Press DVD.
2 Press DVD DISPLAY.The Control Menu appears.
3 Press v or V repeatedly to select thesearch method.
x When playing a DVD“TITLE”, “CHAPTER”, or “TIME/TEXT”Select “TIME/TEXT” for TIME SEARCH.
x When playing a VIDEO CD“TRACK” or “INDEX”
x When playing a VIDEO CD with PBCfunctions“SCENE”
x When playing a CD“TRACK” or “INDEX”
4 Press ENTER.“** (**)” changes to “-- (**)”.The number in parentheses indicates thetotal number of titles, chapters, tracks,indexes, or scenes.
5 Press v or V repeatedly, or press thenumeric buttons to select the title,chapter, track, index, or scene numberyou want to search.
If you make a mistakePress CLEAR to cancel the number, thenselect another number.
6 Press ENTER.The playback starts from the selectednumber.
To search for a scene usingthe time code (TIME SEARCH)
(DVD only)
1 In step 3, select “TIME/TEXT”.“T **:**:**” (playing time of the currenttitle) is selected.
2 Press ENTER.“T **:**:**” changes to “T --:--:--”.
3 Input the time code using the numericbuttons, then press ENTER.For example, to find the scene at 2 hours,10 minutes, and 20 seconds after thebeginning, just enter “2:10:20”.
To turn off the Control MenuPress DVD DISPLAY repeatedly until theControl Menu is turned off.
NoteThe displayed number of title, chapters, or tracks isthe same number of title, chapters, or tracks recordedon the disc.
Enjoying movies
DV
D/V
IDE
O C
D/C
D
35
Changing the angles(DVD only)
When playing a DVD on which various angles(multi-angles) for a scene are recorded, the“ANGLE” indicator lights in green. This meansthat you can change the viewing angle. Forexample, while playing a scene of a train inmotion, you can display the view from eitherthe front of the train, the left window of thetrain or from the right window without havingthe train’s movement interrupted.
1 Press DVD DISPLAY during playback.The Control Menu appears.
2 Press v or V repeatedly to select“ANGLE”.The angle number appears. The number inparentheses indicates the total number ofangles.
3 Press ENTER.The angle number changes to “–”.
4 Select the angle you want using thenumeric buttons or v/V, then pressENTER.The angle is changed to the selected angle.
To turn off the Control MenuPress DVD DISPLAY repeatedly until theControl Menu is turned off.
TipYou can select the angle by pressing ANGLE on theremote. Each time you press the button, the anglechanges.
NoteDepending on the DVD, you may not be able tochange the angles even if multi-angles are recordedon the DVD.
Displaying the subtitles(DVD only)
With DVDs on which multilingual subtitles arerecorded, you can change the subtitle languagewhile playing a DVD, or turn the subtitles on oroff whenever you want. For example, you canselect the language you want to master and turnthe subtitles on for better understanding.
1 Press DVD DISPLAY during playback.The Control Menu appears.
2 Press v or V repeatedly to select“SUBTITLE”, then press ENTER.The options for “SUBTITLE” appear.
3 Press v or V repeatedly to select thelanguage you want, then press ENTER.The subtitles are displayed in the selectedlanguage.
To cancel the SUBTITLE settingSelect “OFF” in step 3.
To turn off the Control MenuPress DVD DISPLAY repeatedly until theControl Menu is turned off.
TipYou can select the subtitle by pressing SUBTITLE onthe remote. Each time you press the button, thelanguage changes.
Notes• When 4 digits are displayed in step 3, they indicate
the language code. Refer to the language code liston page 64 to see the language the code represents.
• Depending on the DVD, you may not be able tochange the subtitles even if multilingual subtitlesare recorded on the DVD.
36
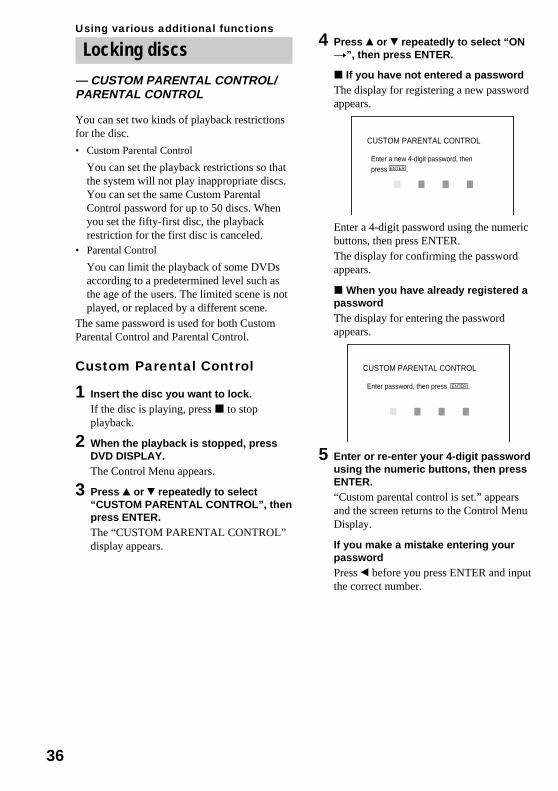
Locking discs— CUSTOM PARENTAL CONTROL/PARENTAL CONTROL
You can set two kinds of playback restrictionsfor the disc.
• Custom Parental Control
You can set the playback restrictions so thatthe system will not play inappropriate discs.You can set the same Custom ParentalControl password for up to 50 discs. Whenyou set the fifty-first disc, the playbackrestriction for the first disc is canceled.
• Parental Control
You can limit the playback of some DVDsaccording to a predetermined level such asthe age of the users. The limited scene is notplayed, or replaced by a different scene.
The same password is used for both CustomParental Control and Parental Control.
Custom Parental Control
1 Insert the disc you want to lock.If the disc is playing, press x to stopplayback.
2 When the playback is stopped, pressDVD DISPLAY.The Control Menu appears.
3 Press v or V repeatedly to select“CUSTOM PARENTAL CONTROL”, thenpress ENTER.The “CUSTOM PARENTAL CONTROL”display appears.
4 Press v or V repeatedly to select “ONt”, then press ENTER.
x If you have not entered a passwordThe display for registering a new passwordappears.
Enter a 4-digit password using the numericbuttons, then press ENTER.The display for confirming the passwordappears.
x When you have already registered apasswordThe display for entering the passwordappears.
5 Enter or re-enter your 4-digit passwordusing the numeric buttons, then pressENTER.“Custom parental control is set.” appearsand the screen returns to the Control MenuDisplay.
If you make a mistake entering yourpasswordPress b before you press ENTER and inputthe correct number.
CUSTOM PARENTAL CONTROL
Enter a new 4-digit password, then press .ENTER
CUSTOM PARENTAL CONTROL
Enter password, then press .ENTER
Using various additional functions
DV
D/V
IDE
O C
D/C
D
37
If you make a mistakePress RETURN O, then start from step 3again.
To turn off the Control MenuPress RETURN O, then press DVDDISPLAY repeatedly until the Control Menu isturned off.
To turn off the Custom ParentalControl function
1 In step 4, select “OFF t”, then pressENTER.
2 Enter your 4-digit password using thenumeric buttons, then press ENTER.
To change the password
1 In step 4, Press v or V repeatedly to select“PASSWORD t”, then press ENTER.The display for entering the passwordappears.
2 Enter your 4-digit password using thenumeric buttons, then press ENTER.
3 Enter a new 4-digit password using thenumeric buttons, then press ENTER.
4 To confirm your password, re-enter it usingthe numeric buttons, then press ENTER.
Playing the disc for whichCustom Parental Control is set
1 Insert the disc for which CustomParental Control is set.The “CUSTOM PARENTAL CONTROL”display appears.
2 Enter your 4-digit password using thenumeric buttons, then press ENTER.The system is ready for playback.
TipIf you forgot your password, enter the 6-digit number“199703” using the numeric buttons when the“CUSTOM PARENTAL CONTROL” display asksyou for your password, then press ENTER. Thedisplay will ask you to enter a new 4-digit password.
Limiting playback by children(Parental Control)
(DVD only)
1 When the playback is stopped, pressDVD SET UP.The Control Menu appears.
2 Press v or V repeatedly to select“CUSTOM SETUP”, then press ENTER.The “CUSTOM SETUP” display appears.
3 Press v or V repeatedly to select“PARENTAL CONTROL t”, then pressENTER.
x If you have not entered a passwordThe display for registering a new passwordappears.
Enter a 4-digit password using the numericbuttons, then press ENTER.The display for confirming the passwordappears.
x When you have already registered apasswordThe display for entering the passwordappears.
CUSTOM SETUPPAUSE MODE: AUTO
TRACK SELECTION OFFPARENTAL CONTROL
CUSTOM SETUP
PARENTAL CONTROL
Enter a new 4-digit password, then press .ENTER
continued
CUSTOM SETUP
PARENTAL CONTROL
Enter password, then press .ENTER
38
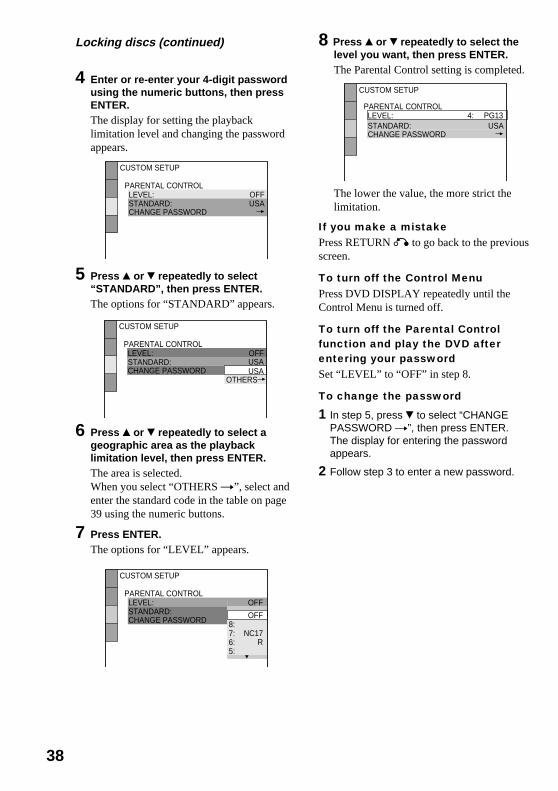
4 Enter or re-enter your 4-digit passwordusing the numeric buttons, then pressENTER.The display for setting the playbacklimitation level and changing the passwordappears.
5 Press v or V repeatedly to select“STANDARD”, then press ENTER.The options for “STANDARD” appears.
6 Press v or V repeatedly to select ageographic area as the playbacklimitation level, then press ENTER.The area is selected.When you select “OTHERS t”, select andenter the standard code in the table on page39 using the numeric buttons.
7 Press ENTER.The options for “LEVEL” appears.
8 Press v or V repeatedly to select thelevel you want, then press ENTER.The Parental Control setting is completed.
The lower the value, the more strict thelimitation.
If you make a mistakePress RETURN O to go back to the previousscreen.
To turn off the Control MenuPress DVD DISPLAY repeatedly until theControl Menu is turned off.
To turn off the Parental Controlfunction and play the DVD afterentering your passwordSet “LEVEL” to “OFF” in step 8.
To change the password
1 In step 5, press V to select “CHANGEPASSWORD t”, then press ENTER.The display for entering the passwordappears.
2 Follow step 3 to enter a new password.
CUSTOM SETUP
PARENTAL CONTROLLEVEL: OFFSTANDARD:CHANGE PASSWORD
USA
CUSTOM SETUP
PARENTAL CONTROLLEVEL: OFF
USASTANDARD:CHANGE PASSWORD USA
OTHERS
CUSTOM SETUP
PARENTAL CONTROLLEVEL: OFF
OFFSTANDARD:CHANGE PASSWORD 8:
7: 6: 5:
NC17R
CUSTOM SETUP
PARENTAL CONTROLLEVEL:STANDARD:CHANGE PASSWORD
USA4: PG13
Locking discs (continued)
DV
D/V
IDE
O C
D/C
D
39
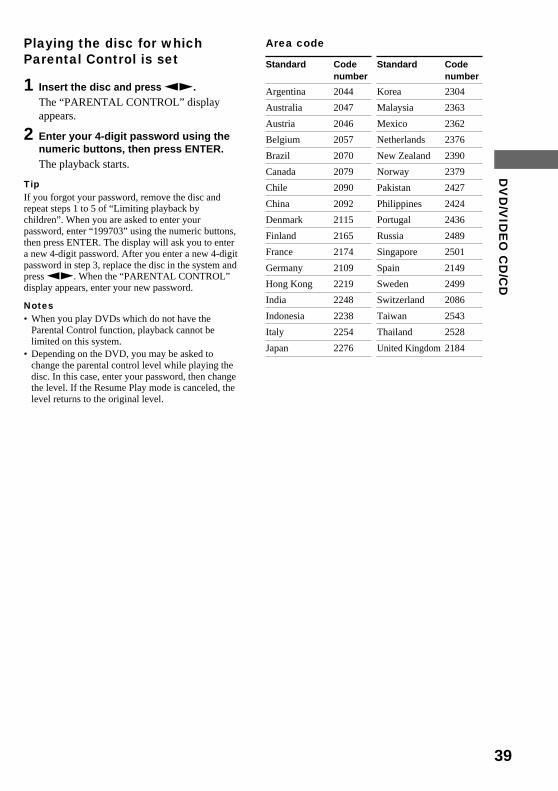
Standard Codenumber
Argentina 2044
Australia 2047
Austria 2046
Belgium 2057
Brazil 2070
Canada 2079
Chile 2090
China 2092
Denmark 2115
Finland 2165
France 2174
Germany 2109
Hong Kong 2219
India 2248
Indonesia 2238
Italy 2254
Japan 2276
Standard Codenumber
Korea 2304
Malaysia 2363
Mexico 2362
Netherlands 2376
New Zealand 2390
Norway 2379
Pakistan 2427
Philippines 2424
Portugal 2436
Russia 2489
Singapore 2501
Spain 2149
Sweden 2499
Switzerland 2086
Taiwan 2543
Thailand 2528
United Kingdom 2184
Area codePlaying the disc for whichParental Control is set
1 Insert the disc and press nN.The “PARENTAL CONTROL” displayappears.
2 Enter your 4-digit password using thenumeric buttons, then press ENTER.The playback starts.
TipIf you forgot your password, remove the disc andrepeat steps 1 to 5 of “Limiting playback bychildren”. When you are asked to enter yourpassword, enter “199703” using the numeric buttons,then press ENTER. The display will ask you to entera new 4-digit password. After you enter a new 4-digitpassword in step 3, replace the disc in the system andpress nN. When the “PARENTAL CONTROL”display appears, enter your new password.
Notes• When you play DVDs which do not have the
Parental Control function, playback cannot belimited on this system.
• Depending on the DVD, you may be asked tochange the parental control level while playing thedisc. In this case, enter your password, then changethe level. If the Resume Play mode is canceled, thelevel returns to the original level.
40
To change the AM tuning interval(Except for European and MiddleEastern models)The AM tuning interval is factory set to 9 kHz(10 kHz in some areas). To change the AMtuning interval, tune in any AM station first,then turn off the power. While holding downthe ENTER button, turn the power back on.When you change the interval, AM presetstations will be erased. To reset the interval,repeat the same procedure.
Listening to the radio— Preset Tuning
Preset radio stations in the tuner’s memory first(see “Presetting radio stations”).
1 Press TUNER/BAND repeatedly toselect FM or AM.
2 Press . or > repeatedly to tune inthe preset station you want.
To Do this
Turn off the radio Press ?/1.
To listen to non-preset radio stationsIn step 2, press m or M repeatedly (ManualTuning) or press and hold m or M(Automatic Tuning).
Notes• When the TUNER function is selected, the OSD
does not appear on the screen.• When DVD is selected as the current function and
TUNER/BAND is pressed to select the TUNERfunction, some time may be necessary before thefunction can be switched.
• When you change the function from DVD toTUNER, “WAIT” may flash on the front paneldisplay. While this flashes, there is no audio output.
MHz
Presetting radio stationsYou can preset 20 stations for FM and10 stations for AM.
1 Press TUNER/BAND repeatedly toselect FM or AM.
2 Press and hold m or M until thefrequency indication starts to change,then release.Scanning stops when the system tunes in astation. “TUNED” and “STEREO” (for astereo program) appear.
3 Press TUNER MEMORY.A preset number appears in the display. Thestations are stored from preset number 1.
4 Press ENTER.The station is stored.
5 Repeat steps 1 to 4 to store otherstations.
To tune in a station with a weaksignalPress m or M repeatedly to tune in thestation manually.
To set another station to an existingpreset numberStart over from step 1. After step 3, press .or > repeatedly to select the preset numberwhere you want to store a new station, thenproceed to step 4.
Tips• Pressing TUNER/BAND while the power is off
automatically turns the power on.• You can use the digipad instead of ./>.• The preset stations are retained for half a day even
if you unplug the power cord or if a power failureoccurs.
TUNED
STEREOMHz
Tuner
Preset number Frequency
Preset number
41
Tu
ne
rTips• Pressing TUNER/BAND while the power is off
automatically turns the power on.• You can use the digipad instead of ./>.• When an FM program is noisy, press FM MODE so
that “MONO” appears in the display. There will beno stereo effect, but the reception will improve.
• To improve broadcast reception, reorient theantennas.
Using the Radio DataSystem (RDS)
(European model only)
What is the Radio DataSystem?
Radio Data System (RDS) is a broadcastingservice that allows radio stations to sendadditional information along with the regularprogram signal. This tuner offers convenientRDS features like station name display andlocation of stations by program type. RDS isavailable only for FM stations.
NoteRDS may not work properly if the station you aretuned to is not transmitting the RDS signal properlyor if the signal is weak.
Receiving RDS broadcasts
Simply select a station from the FM band.When you tune in a station that provides RDSservices, the station name appears in thedisplay.
To check the RDS information
Press DISPLAY.Each time you press the button, the displaychanges cyclically as follows:
Station name* t Frequency t Programtype* t Clock display t Effect status
* If the RDS broadcast is not received, the stationname and program type may not appear in thedisplay.
Locating a station byprogram type (PTY)
You can locate a station you want by selectinga program type. The tuner tunes in the type ofprograms currently being broadcast from theRDS stations stored in the tuner’s presetmemory.
The types of programs include NEWS,AFFAIRS (current news), INFO, SPORT,EDUCATE (education programs), DRAMA,CULTURE, SCIENCE, VARIED (interviews,games and comedy), POP M, ROCK M, EASYM, LIGHT M, CLASSICS, OTHER M,WEATHER, FINANCE, CHILDREN,SOCIAL, RELIGION, PHONE IN, TRAVEL,LEISURE, JAZZ, COUNTRY (country music),NATION M (nation’s popular music),OLDIES, FOLK M, DOCUMENT(investigative features), TEST (test signal foremergency broadcast), ALARM (emergencybroadcast) and NONE (any programs notdefined above).
1 Press PTY while listening to the radio.
2 Press . or > repeatedly to selectthe program type you want.
3 Press ENTER.“PTY SEARCH” and the selected programtype appear alternately in the display.When the tuner receives a program, thepreset station name flashes.
4 Press . or > repeatedly tocontinue searching for the stationname you want.
5 Press ENTER while the preset stationname you want is flashing.
To cancel the PTY searchPress PTY again.
TipYou can use the digipad instead of ./>.
Note“NOT FOUND” appears when the program type youselected is not currently being broadcast.
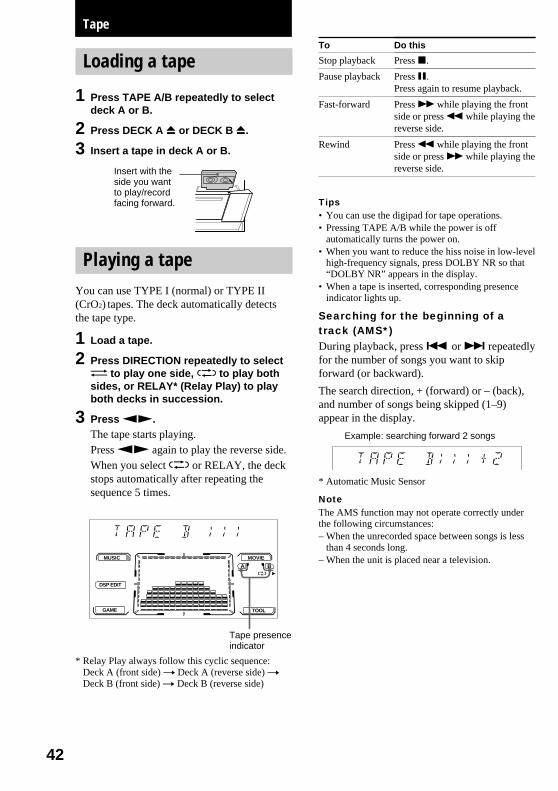
42
To
Stop playback
Pause playback
Fast-forward
Rewind
Tips• You can use the digipad for tape operations.• Pressing TAPE A/B while the power is off
automatically turns the power on.• When you want to reduce the hiss noise in low-level
high-frequency signals, press DOLBY NR so that“DOLBY NR” appears in the display.
• When a tape is inserted, corresponding presenceindicator lights up.
Searching for the beginning of atrack (AMS*)During playback, press . or > repeatedlyfor the number of songs you want to skipforward (or backward).
The search direction, + (forward) or – (back),and number of songs being skipped (1–9)appear in the display.
* Automatic Music Sensor
NoteThe AMS function may not operate correctly underthe following circumstances:– When the unrecorded space between songs is less
than 4 seconds long.– When the unit is placed near a television.MUSIC
DSP EDIT
GAME
MOVIE
A B
TOOL
Tape presenceindicator
Insert with theside you wantto play/recordfacing forward.
Example: searching forward 2 songs
Do this
Press x.
Press X.Press again to resume playback.
Press M while playing the frontside or press m while playing thereverse side.
Press m while playing the frontside or press M while playing thereverse side.
Loading a tape
1 Press TAPE A/B repeatedly to selectdeck A or B.
2 Press DECK A Z or DECK B Z.
3 Insert a tape in deck A or B.
Playing a tapeYou can use TYPE I (normal) or TYPE II(CrO2) tapes. The deck automatically detectsthe tape type.
1 Load a tape.
2 Press DIRECTION repeatedly to selectg to play one side, j to play bothsides, or RELAY* (Relay Play) to playboth decks in succession.
3 Press nN.The tape starts playing.Press nN again to play the reverse side.When you select j or RELAY, the deckstops automatically after repeating thesequence 5 times.
* Relay Play always follow this cyclic sequence:Deck A (front side) t Deck A (reverse side) tDeck B (front side) t Deck B (reverse side)
Tape
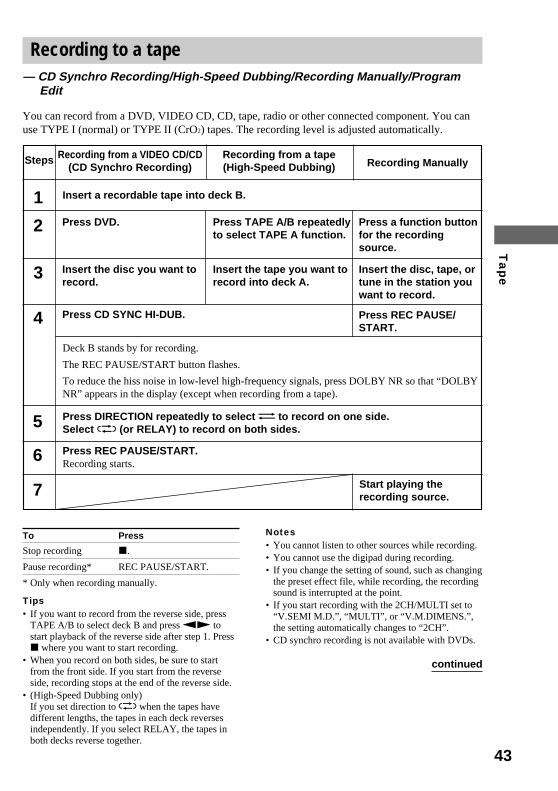
43
Ta
pe
Recording from a tape(High-Speed Dubbing)
Recording from a VIDEO CD/CD(CD Synchro Recording) Recording Manually
Insert a recordable tape into deck B.
Press TAPE A/B repeatedlyto select TAPE A function.
Press DVD. Press a function buttonfor the recordingsource.
Insert the tape you want torecord into deck A.
Insert the disc you want torecord.
Insert the disc, tape, ortune in the station youwant to record.
Press CD SYNC HI-DUB. Press REC PAUSE/START.
Deck B stands by for recording.
The REC PAUSE/START button flashes.
To reduce the hiss noise in low-level high-frequency signals, press DOLBY NR so that “DOLBYNR” appears in the display (except when recording from a tape).
Press DIRECTION repeatedly to select g to record on one side.Select j (or RELAY) to record on both sides.
Press REC PAUSE/START.Recording starts.
Steps
1
2
3
4
5
6
Recording to a tape— CD Synchro Recording/High-Speed Dubbing/Recording Manually/Program
Edit
You can record from a DVD, VIDEO CD, CD, tape, radio or other connected component. You canuse TYPE I (normal) or TYPE II (CrO2) tapes. The recording level is adjusted automatically.
To Press
Stop recording x.
Pause recording* REC PAUSE/START.
* Only when recording manually.
Tips• If you want to record from the reverse side, press
TAPE A/B to select deck B and press nN tostart playback of the reverse side after step 1. Pressx where you want to start recording.
• When you record on both sides, be sure to startfrom the front side. If you start from the reverseside, recording stops at the end of the reverse side.
• (High-Speed Dubbing only)If you set direction to j when the tapes havedifferent lengths, the tapes in each deck reversesindependently. If you select RELAY, the tapes inboth decks reverse together.
Notes• You cannot listen to other sources while recording.• You cannot use the digipad during recording.• If you change the setting of sound, such as changing
the preset effect file, while recording, the recordingsound is interrupted at the point.
• If you start recording with the 2CH/MULTI set to“V.SEMI M.D.”, “MULTI”, or “V.M.DIMENS.”,the setting automatically changes to “2CH”.
• CD synchro recording is not available with DVDs.
7 Start playing therecording source.
continued
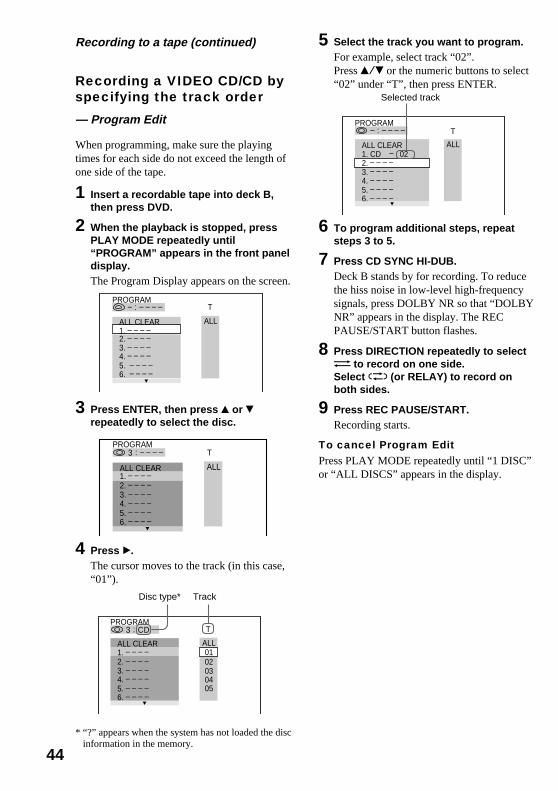
44
Recording to a tape (continued)
Recording a VIDEO CD/CD byspecifying the track order
— Program Edit
When programming, make sure the playingtimes for each side do not exceed the length ofone side of the tape.
1 Insert a recordable tape into deck B,then press DVD.
2 When the playback is stopped, pressPLAY MODE repeatedly until“PROGRAM” appears in the front paneldisplay.The Program Display appears on the screen.
3 Press ENTER, then press v or Vrepeatedly to select the disc.
4 Press B.The cursor moves to the track (in this case,“01”).
* “?” appears when the system has not loaded the discinformation in the memory.
5 Select the track you want to program.For example, select track “02”.Press v/V or the numeric buttons to select“02” under “T”, then press ENTER.
6 To program additional steps, repeatsteps 3 to 5.
7 Press CD SYNC HI-DUB.Deck B stands by for recording. To reducethe hiss noise in low-level high-frequencysignals, press DOLBY NR so that “DOLBYNR” appears in the display. The RECPAUSE/START button flashes.
8 Press DIRECTION repeatedly to selectg to record on one side.Select j (or RELAY) to record onboth sides.
9 Press REC PAUSE/START.Recording starts.
To cancel Program EditPress PLAY MODE repeatedly until “1 DISC”or “ALL DISCS” appears in the display.
PROGRAM
1. – – – –ALL CLEAR
2. – – – –3. – – – –4. – – – –5. – – – –6. – – – –
T
ALL
– : – – – –
T
ALL
PROGRAM
1. – – – –ALL CLEAR
2. – – – –3. – – – –4. – – – –5. – – – –6. – – – –
3 : – – – –
PROGRAM
1. – – – –ALL CLEAR
2. – – – –3. – – – –4. – – – –5. – – – –6. – – – –
T
ALL0102030405
3 : CD
– : – – – –PROGRAM
1. CD – 02ALL CLEAR
2. – – – –3. – – – –4. – – – –5. – – – –6. – – – –
ALL
T
Disc type* Track
Selected track
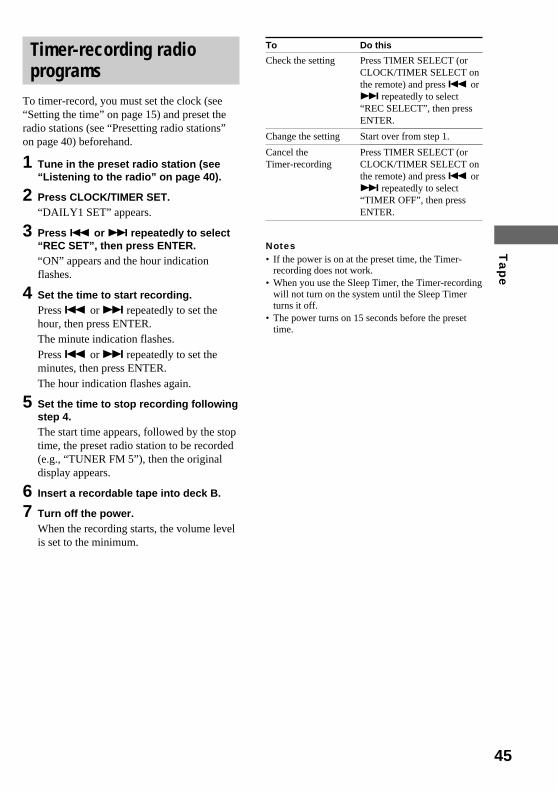
45
Ta
pe
Timer-recording radioprograms
To timer-record, you must set the clock (see“Setting the time” on page 15) and preset theradio stations (see “Presetting radio stations”on page 40) beforehand.
1 Tune in the preset radio station (see“Listening to the radio” on page 40).
2 Press CLOCK/TIMER SET.“DAILY1 SET” appears.
3 Press . or > repeatedly to select“REC SET”, then press ENTER.“ON” appears and the hour indicationflashes.
4 Set the time to start recording.Press . or > repeatedly to set thehour, then press ENTER.The minute indication flashes.Press . or > repeatedly to set theminutes, then press ENTER.The hour indication flashes again.
5 Set the time to stop recording followingstep 4.The start time appears, followed by the stoptime, the preset radio station to be recorded(e.g., “TUNER FM 5”), then the originaldisplay appears.
6 Insert a recordable tape into deck B.
7 Turn off the power.When the recording starts, the volume levelis set to the minimum.
To
Check the setting
Change the setting
Cancel theTimer-recording
Notes• If the power is on at the preset time, the Timer-
recording does not work.• When you use the Sleep Timer, the Timer-recording
will not turn on the system until the Sleep Timerturns it off.
• The power turns on 15 seconds before the presettime.
Do this
Press TIMER SELECT (orCLOCK/TIMER SELECT onthe remote) and press . or> repeatedly to select“REC SELECT”, then pressENTER.
Start over from step 1.
Press TIMER SELECT (orCLOCK/TIMER SELECT onthe remote) and press . or> repeatedly to select“TIMER OFF”, then pressENTER.
46
Sound Adjustment
To listen to multi channelsound
Press 2CH/MULTI.Each time you press the button, the displaychanges cyclically as follows:
2CH t V.SEMI M.D. t MULTI* tV.M.DIMENS.*
2CH: The sound is output in 2-channel stereo.
V.SEMI M.D. (Virtual Semi MultiDimension): Uses 3D sound imaging tocreate virtual rear speakers from the sound ofthe front speakers without using actual rearspeakers. This mode creates 5 sets of virtualspeakers surrounding the listener at a 30° angleof elevation.
MULTI*: The sound is output in multi channel.
V.M.DIMENS. (Virtual Multi Dimension)*:Uses 3D sound imaging to create an array ofvirtual rear speakers positioned higher than thelistener from a single pair of actual rearspeakers. This mode creates 5 sets of virtualspeakers surrounding the listener atapproximately a 30° angle of elevation.
* MHC-DP1000D only.
Notes• When using headphones, this setting is fixed to
“2CH”. You cannot select other settings.• While decoding DTS signals, you cannot select the
sound effect option of MUSIC MODE together with“V.SEMI M.D.” or “V.M.DIMENS.” simultaneously.
About indicatorsMULTI CHANNEL DECODING indicator:Lights up when the unit is decoding signalsrecorded in a multi channel format.
PRO LOGIC indicator (in the display):Lights up when the unit applies Dolby ProLogic processing to 2 channel signals in orderto output the center and rear channel signals.
; DIGITAL indicator (in the display):Lights up when the unit is decoding signalsrecorded in the Dolby Digital format.
dts indicator (in the display): Light up whenDTS signals are input.
Adjusting the sound
Press GROOVE.Each time you press the button, the displaychanges cyclically as follows:
GROOVE ON t V-GROOVE ON tGROOVE OFF
GROOVE: The volume switches to powermode and the equalizer curve changes.
V-GROOVE: The volume switches to powermode, the lower bass frequencies of the soundyou are listening to is powerfully reinforced,and the equalizer curve changes.
47
So
un
d A
dju
stme
nt
Selecting the preseteffect file
Press one of the DSP buttons (MUSICMODE, MOVIE MODE, GAME MODE, orTOOL MODE) repeatedly to select thepreset effect you want.
The preset effect name appears in the display.
See “Sound effect options” below.
To cancelPress EFFECT (or EFFECT ON/OFF on theremote) to select “EFFECT OFF”. All theparameters become flat.
Sound effect optionsYou can enjoy surround sound simply byselecting one of the preset effect according tothe program you want to listen to.
DSP OptionsMODE
MUSIC LIVE HOUSEMODE HALL
S.ENHANCE (SOUND ENHANCE)RADIO SOUND
MOVIE C.STUDIO A (CINEMA STUDIO A)MODE C.STUDIO B (CINEMA STUDIO B)
C.STUDIO C (CINEMA STUDIO C)NORMAL SURR (NORMAL SURROUND)
GAME ARCADEMODE RACING
ADVENTUREBATTLE
TOOL PANMODE FLANGER
KEY CONTROLEXCITERCOMPRESSORREVERBEARLY RFLC. (EARLY REFLECTION)
CINEMA STUDIO A: Reproduces the soundcharacteristics of Sony Pictures Entertainment’sclassic editing studio.CINEMA STUDIO B: Reproduces the soundcharacteristics of Sony Pictures Entertainment’smixing studio which is one of the most up-to-datefacilities in Hollywood.CINEMA STUDIO C: Reproduces the soundcharacteristics of Sony Pictures Entertainment’sBGM recording studio.
Adjusting the soundeffects
Before operation, first select the audio effectyou want for your basic sound.
1 Press DSP EDIT.Each time you press the button, the displaychanges as follows:DSP EDIT* (to adjust DSP) y EQ EDIT(to adjust equalizer)* This menu does not appear depending on the
audio effect.
2 Use the digipad to adjust theparameters.The parameter is adjusted according to thecurve your finger slides on the digipad.Adjustable parameters are described onpage 48. After the curve your finger slidesis displayed for a while, then the curveautomatically adjusted by the unit isdisplayed. For DSP EDIT, the adjustableparameters vary depending on the preseteffect.
3 Press ENTER.
To cancelPress EFFECT (or EFFECT ON/OFF on theremote) to select “EFFECT OFF”. Theadjustment for the selected parameter iscanceled.
continued
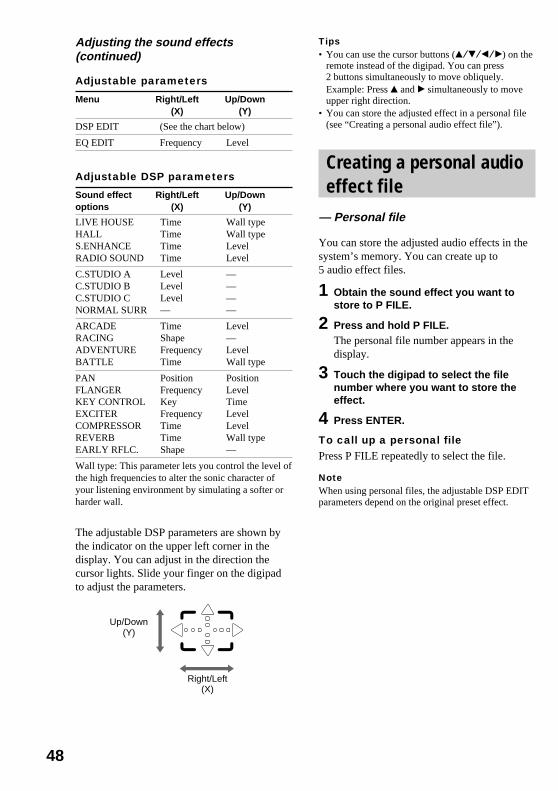
48
Up/Down(Y)
Right/Left(X)
Adjustable parameters
Menu Right/Left Up/Down(X) (Y)
DSP EDIT (See the chart below)
EQ EDIT Frequency Level
Adjustable DSP parameters
Sound effect Right/Left Up/Downoptions (X) (Y)
LIVE HOUSE Time Wall typeHALL Time Wall typeS.ENHANCE Time LevelRADIO SOUND Time Level
C.STUDIO A Level —C.STUDIO B Level —C.STUDIO C Level —NORMAL SURR — —
ARCADE Time LevelRACING Shape —ADVENTURE Frequency LevelBATTLE Time Wall type
PAN Position PositionFLANGER Frequency LevelKEY CONTROL Key TimeEXCITER Frequency LevelCOMPRESSOR Time LevelREVERB Time Wall typeEARLY RFLC. Shape —
Wall type: This parameter lets you control the level ofthe high frequencies to alter the sonic character ofyour listening environment by simulating a softer orharder wall.
The adjustable DSP parameters are shown bythe indicator on the upper left corner in thedisplay. You can adjust in the direction thecursor lights. Slide your finger on the digipadto adjust the parameters.
Tips• You can use the cursor buttons (v/V/b/B) on the
remote instead of the digipad. You can press2 buttons simultaneously to move obliquely.Example: Press v and B simultaneously to moveupper right direction.
• You can store the adjusted effect in a personal file(see “Creating a personal audio effect file”).
Creating a personal audioeffect file
— Personal file
You can store the adjusted audio effects in thesystem’s memory. You can create up to5 audio effect files.
1 Obtain the sound effect you want tostore to P FILE.
2 Press and hold P FILE.The personal file number appears in thedisplay.
3 Touch the digipad to select the filenumber where you want to store theeffect.
4 Press ENTER.
To call up a personal filePress P FILE repeatedly to select the file.
NoteWhen using personal files, the adjustable DSP EDITparameters depend on the original preset effect.
Adjusting the sound effects(continued)
49
Oth
er F
ea
ture
s
Other Features
Changing the spectrumanalyzer display
Press SPECTRUM on the remote.Each time you press the button, the displaychanges cyclically as follows:
PATTERN 1 t PATTERN 2 tPATTERN 3 t PATTERN OFF
To adjust the brightnessof the display
Use the remote for the operation.
1 Press AMP MENU.
2 Press v or V repeatedly to select“DIMMER”.
3 Press b or B repeatedly to select thesetting you want.DIMMER 1 y DIMMER 2 yDIMMER 3
4 Press ENTER.
Singing along: Karaoke(Except for North American andEuropean models)
You can sing along with any disc or tape byturning down the singer’s voice. You need toconnect an optional microphone.
1 Turn MIC LEVEL to MIN to turn downthe microphone volume.
2 Connect an optional microphone to MICjack.
3 Press KARAOKE PON.Each time you press the button, the displaychanges cyclically as follows:
KARAOKE PON t MPX R tMPX L t Effect status*
* KARAOKE PON is cancelled.To sing karaoke by decreasing the vocallevel of a disc or a tape, select “KARAOKEPON”. To sing karaoke of multiplex CD,select “MPX R” or “MPX L”.
4 Start playing the music and adjust thevolume.
5 Adjust the microphone volume byturning MIC LEVEL.
When you use DVDs or VIDEO CDsTurn on your TV and select the video input.Refer to the operating instructions suppliedwith your TV for details.
After you have finishedTurn MIC LEVEL to MIN and disconnect themicrophone from MIC jack, then pressKARAOKE PON repeatedly until “m”disappears.
Notes• With some songs, vocals may not be canceled when
you select “KARAOKE PON”.• If you recall a sound effect, the karaoke mode is
canceled.• During “KARAOKE PON”, “MPX R” or “MPX
L”, DSP effect switches to “KEY CONTROL”.When the karaoke effect is canceled, the DSP effectbefore entering the karaoke effect is applied again.
• The instrumental sound may be reduced as well asthe singer’s voice when the sound is recorded inmonaural.
• The singer’s voice may not be reduced when:— only a few instruments are playing.— a duet is being played.— the source has strong echoes or chorus.— the singer’s voice deviates from the center.— the voice on the source is singing in high
soprano or tenor.
continued
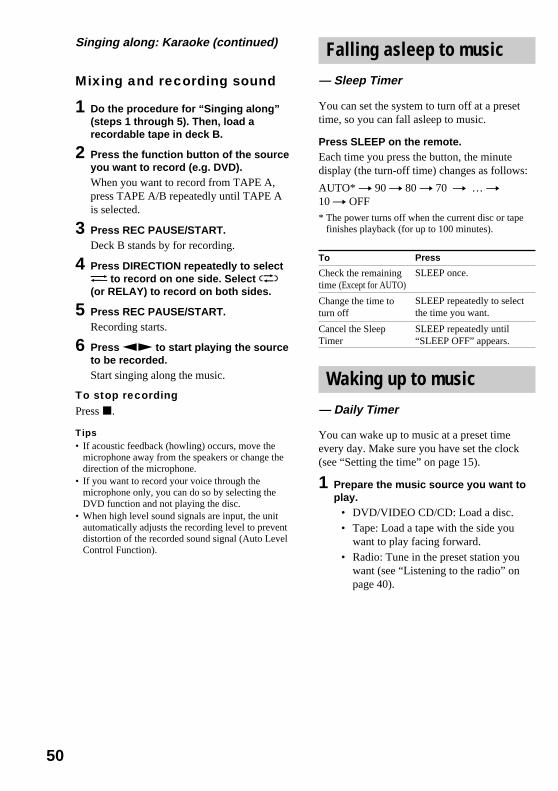
50
Singing along: Karaoke (continued)
Press
SLEEP once.
SLEEP repeatedly to selectthe time you want.
SLEEP repeatedly until“SLEEP OFF” appears.
Mixing and recording sound
1 Do the procedure for “Singing along”(steps 1 through 5). Then, load arecordable tape in deck B.
2 Press the function button of the sourceyou want to record (e.g. DVD).When you want to record from TAPE A,press TAPE A/B repeatedly until TAPE Ais selected.
3 Press REC PAUSE/START.Deck B stands by for recording.
4 Press DIRECTION repeatedly to selectg to record on one side. Select j(or RELAY) to record on both sides.
5 Press REC PAUSE/START.Recording starts.
6 Press nN to start playing the sourceto be recorded.Start singing along the music.
To stop recordingPress x.
Tips• If acoustic feedback (howling) occurs, move the
microphone away from the speakers or change thedirection of the microphone.
• If you want to record your voice through themicrophone only, you can do so by selecting theDVD function and not playing the disc.
• When high level sound signals are input, the unitautomatically adjusts the recording level to preventdistortion of the recorded sound signal (Auto LevelControl Function).
Falling asleep to music— Sleep Timer
You can set the system to turn off at a presettime, so you can fall asleep to music.
Press SLEEP on the remote.Each time you press the button, the minutedisplay (the turn-off time) changes as follows:
AUTO* t 90 t 80 t 70 t … t10 t OFF
* The power turns off when the current disc or tapefinishes playback (for up to 100 minutes).
To
Check the remainingtime (Except for AUTO)
Change the time toturn off
Cancel the SleepTimer
Waking up to music— Daily Timer
You can wake up to music at a preset timeevery day. Make sure you have set the clock(see “Setting the time” on page 15).
1 Prepare the music source you want toplay.
• DVD/VIDEO CD/CD: Load a disc.• Tape: Load a tape with the side you
want to play facing forward.• Radio: Tune in the preset station you
want (see “Listening to the radio” onpage 40).
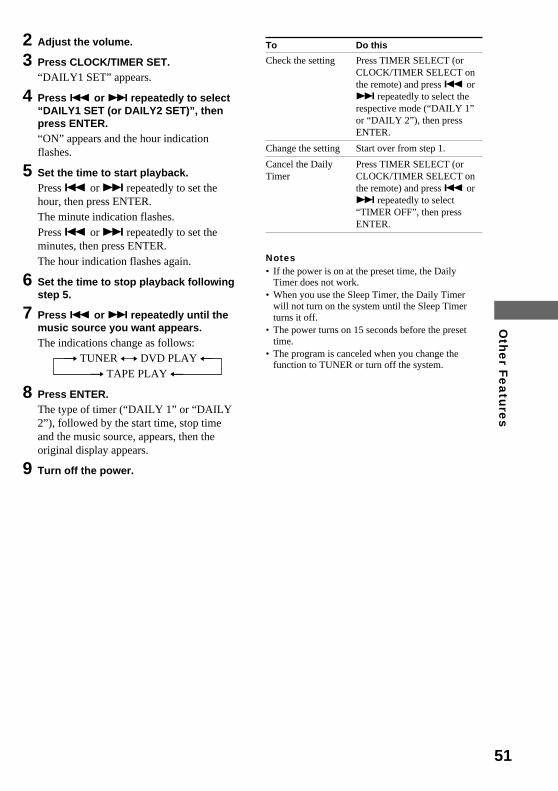
51
Oth
er F
ea
ture
s2 Adjust the volume.
3 Press CLOCK/TIMER SET.“DAILY1 SET” appears.
4 Press . or > repeatedly to select“DAILY1 SET (or DAILY2 SET)”, thenpress ENTER.“ON” appears and the hour indicationflashes.
5 Set the time to start playback.Press . or > repeatedly to set thehour, then press ENTER.The minute indication flashes.Press . or > repeatedly to set theminutes, then press ENTER.The hour indication flashes again.
6 Set the time to stop playback followingstep 5.
7 Press . or > repeatedly until themusic source you want appears.The indications change as follows:
t TUNER y DVD PLAY T t TAPE PLAY T
8 Press ENTER.The type of timer (“DAILY 1” or “DAILY2”), followed by the start time, stop timeand the music source, appears, then theoriginal display appears.
9 Turn off the power.
To
Check the setting
Change the setting
Cancel the DailyTimer
Notes• If the power is on at the preset time, the Daily
Timer does not work.• When you use the Sleep Timer, the Daily Timer
will not turn on the system until the Sleep Timerturns it off.
• The power turns on 15 seconds before the presettime.
• The program is canceled when you change thefunction to TUNER or turn off the system.
Do this
Press TIMER SELECT (orCLOCK/TIMER SELECT onthe remote) and press . or> repeatedly to select therespective mode (“DAILY 1”or “DAILY 2”), then pressENTER.
Start over from step 1.
Press TIMER SELECT (orCLOCK/TIMER SELECT onthe remote) and press . or> repeatedly to select“TIMER OFF”, then pressENTER.
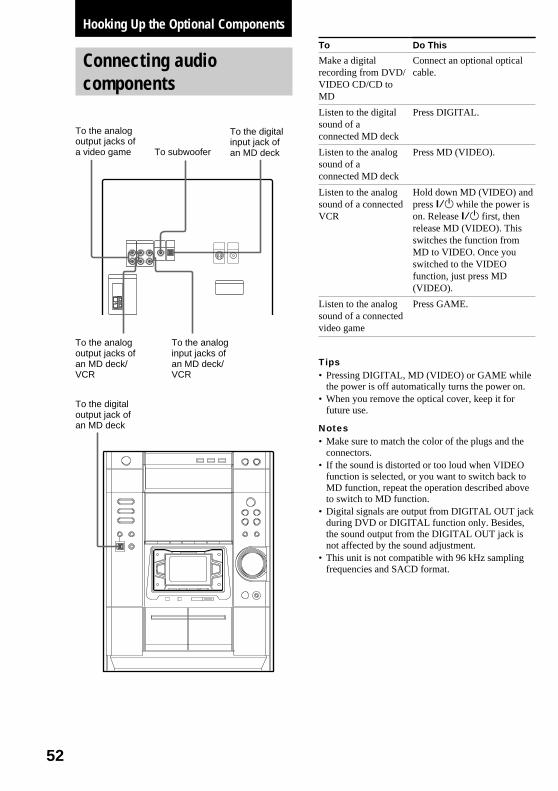
52
Connecting audiocomponents
Hooking Up the Optional ComponentsTo
Make a digitalrecording from DVD/VIDEO CD/CD toMD
Listen to the digitalsound of aconnected MD deck
Listen to the analogsound of aconnected MD deck
Listen to the analogsound of a connectedVCR
Listen to the analogsound of a connectedvideo game
Tips• Pressing DIGITAL, MD (VIDEO) or GAME while
the power is off automatically turns the power on.• When you remove the optical cover, keep it for
future use.
Notes• Make sure to match the color of the plugs and the
connectors.• If the sound is distorted or too loud when VIDEO
function is selected, or you want to switch back toMD function, repeat the operation described aboveto switch to MD function.
• Digital signals are output from DIGITAL OUT jackduring DVD or DIGITAL function only. Besides,the sound output from the DIGITAL OUT jack isnot affected by the sound adjustment.
• This unit is not compatible with 96 kHz samplingfrequencies and SACD format.
To the analogoutput jacks ofa video game To subwoofer
To the digitalinput jack ofan MD deck
To the analogoutput jacks ofan MD deck/VCR
To the analoginput jacks ofan MD deck/VCR
To the digitaloutput jack ofan MD deck
Do This
Connect an optional opticalcable.
Press DIGITAL.
Press MD (VIDEO).
Hold down MD (VIDEO) andpress ?/1 while the power ison. Release ?/1 first, thenrelease MD (VIDEO). Thisswitches the function fromMD to VIDEO. Once youswitched to the VIDEOfunction, just press MD(VIDEO).
Press GAME.
53
Ad
ditio
na
l Info
rma
tion
Additional Information
Precautions
On operating voltageBefore operating the unit, check that the operatingvoltage of your unit is identical with the voltage ofyour local power supply.
On safety• The unit is not disconnected from the AC power
source (mains) as long as it is connected to the walloutlet, even if the unit itself has been turned off.
• Unplug the unit from the wall outlet (mains) if it isnot to be used for an extended period of time. Todisconnect the cord (mains lead), pull it out by theplug. Never pull the cord itself.
• Should any solid object or liquid fall into thecomponent, unplug the unit and have thecomponent checked by qualified personnel beforeoperating it any further.
• The AC power cord must be changed only at aqualified service shop.
On placement• Do not place the unit in an inclined position.• Do not place the unit in locations where it is:
— extremely hot or cold.— dusty or dirty.— very humid.— vibrating.— subject to direct sunlight.
On heat buildup• Although the unit heats up during operation, this is
not a malfunction.• Place the unit in a location with adequate
ventilation to prevent heat build-up in the unit.If you continuously use this unit at a large volume,the cabinet temperature of the top, side and bottomrises considerably. To avoid burning yourself, do nottouch the cabinet.To prevent a malfunction, do not cover the ventilationhole for the cooling fan.
On operation• If the unit is brought directly from a cold to a warm
location, or is placed in a very damp room, moisturemay condense on the lens inside the DVD player.Should this occur, the unit will not operate properly.Remove the disc and leave the unit turned on forabout an hour until the moisture evaporates.
• When you move the unit, take out any discs.If you have any questions or problems concerning theunit, please consult your nearest Sony dealer.
Notes on discs• Before playing, clean the disc with a cleaning cloth.
Wipe the disc from the center out.• Do not use solvents such as benzene, thinner,
commercially available cleaners or anti-static sprayintended for vinyl LPs.
• Do not expose the disc to direct sunlight or heatsources such as hot air ducts, nor leave it in a carparked in direct sunlight.
• Do not use discs encircled with a protection ring.This may cause a malfunction to the system.
• When using discs that have glue or similar tackysubstance on the label side of the disc or that used aspecial ink when the label was printed, there is achance that the disc or label may become attachedto parts inside this unit. When this occurs, it maynot be possible to remove the disc, and may alsocause this unit to malfunction. Be sure to check thatthe label side of the disc is not sticky before using.The following types of disc should not be used:— Rental or used discs with attached seals where
the glue extends beyond the seal. The perimeterof the seal on the disc is tacky.
— Discs that have labels printed using a special inkthat feels tacky when touched.
• Discs with non-standard shapes (e.g., heart, square,star) cannot be played on this unit. Attempting to doso may damage the unit. Do not use such discs.
Note on CD-R/CD-RW playbackDiscs recorded on CD-R/CD-RW drives may not beplayed back because of scratches, dirt, recordingcondition or the drive's characteristics. Besides, thediscs, which are not yet finalized at the end ofrecording, cannot be played back.
Cleaning the cabinetUse a soft cloth slightly moistened with milddetergent solution.
continued
Hooking U
p the Optional C
omponents/A
dditional Information
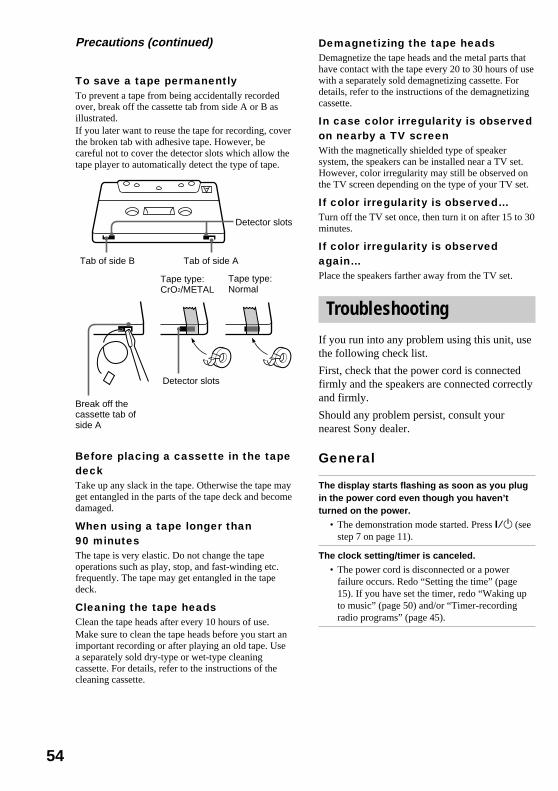
54
Precautions (continued)
To save a tape permanentlyTo prevent a tape from being accidentally recordedover, break off the cassette tab from side A or B asillustrated.If you later want to reuse the tape for recording, coverthe broken tab with adhesive tape. However, becareful not to cover the detector slots which allow thetape player to automatically detect the type of tape.
Before placing a cassette in the tapedeckTake up any slack in the tape. Otherwise the tape mayget entangled in the parts of the tape deck and becomedamaged.
When using a tape longer than90 minutesThe tape is very elastic. Do not change the tapeoperations such as play, stop, and fast-winding etc.frequently. The tape may get entangled in the tapedeck.
Cleaning the tape headsClean the tape heads after every 10 hours of use.Make sure to clean the tape heads before you start animportant recording or after playing an old tape. Usea separately sold dry-type or wet-type cleaningcassette. For details, refer to the instructions of thecleaning cassette.
Demagnetizing the tape headsDemagnetize the tape heads and the metal parts thathave contact with the tape every 20 to 30 hours of usewith a separately sold demagnetizing cassette. Fordetails, refer to the instructions of the demagnetizingcassette.
In case color irregularity is observedon nearby a TV screenWith the magnetically shielded type of speakersystem, the speakers can be installed near a TV set.However, color irregularity may still be observed onthe TV screen depending on the type of your TV set.
If color irregularity is observed…Turn off the TV set once, then turn it on after 15 to 30minutes.
If color irregularity is observedagain…Place the speakers farther away from the TV set.
TroubleshootingIf you run into any problem using this unit, usethe following check list.
First, check that the power cord is connectedfirmly and the speakers are connected correctlyand firmly.
Should any problem persist, consult yournearest Sony dealer.
General
The display starts flashing as soon as you plugin the power cord even though you haven’tturned on the power.
• The demonstration mode started. Press ?/1 (seestep 7 on page 11).
The clock setting/timer is canceled.
• The power cord is disconnected or a powerfailure occurs. Redo “Setting the time” (page15). If you have set the timer, redo “Waking upto music” (page 50) and/or “Timer-recordingradio programs” (page 45).
Tab of side B Tab of side A
Detector slots
Detector slots
Tape type:CrO2/METAL
Tape type:Normal
Break off thecassette tab ofside A
55
Ad
ditio
na
l Info
rma
tion
The radio presetting is canceled.
• The power cord is disconnected or a powerfailure occurs for longer than half a day. Redo“Presetting radio stations” (page 40).
There is no sound.
• Turn VOLUME clockwise.• The headphones are connected.• Insert only the stripped portion of the speaker
cord into the SPEAKER jack. Inserting the vinylportion of the speaker cord will obstruct thespeaker connections.
• The protective device on the amplifier has beenactivated because of a short circuit.(“PROTECT” and “PUSH POWER” flashalternately.) Turn off the power, eliminate theshort-circuit problem and turn on the poweragain.
• The system is in pause mode or in Slow-motionPlay mode. Press nN to return to normal playmode.
• There is no audio output during Timer-recording.
The sound loses stereo effect when you play aVIDEO CD, or a CD.
• Set “AUDIO” to “STEREO” in the ControlMenu (page 32).
• Make sure you connect the systemappropriately.
The surround effect is difficult to hear when youare playing a Dolby Digital or MPEG audio soundtrack.
• Make sure the DSP effect is on (page 47).• Check the speaker connections and settings
(pages 14, 21).• Depending on the DVD, the output signal may
not be the entire 5.1 channel but monaural orstereo even if the sound track is recorded inDolby Digital or MPEG audio format.
There is severe hum or noise.
• A TV or VCR is placed too close to the unit.Move the unit away from the TV or VCR.
The sound from the component connected to theMD (VIDEO) jacks is distorted.
• If “VIDEO” appears in the display when youpress MD (VIDEO), switch to “MD” function(see “Note: Connecting audio components” onpage 52).
“--.--” lights up in the display.
• A power interruption occurred. Set the clock andtimer settings again.
The timer does not function.
• Set the clock correctly.• You cannot activate the Daily timer and the
Timer-recording simultaneously.
“DAILY 1”, “DAILY 2”, or “REC” does not appearwhen you press TIMER SELECT (or CLOCK/TIMER SELECT on the remote).
• Set the timer correctly.• Set the clock.
The remote does not function.
• There is an obstacle between the remote and theunit.
• The remote is not pointing in the direction of theunit’s sensor.
• The batteries have run down. Replace thebatteries.
There is acoustic feedback.
• Decrease the volume level.• Move the microphone away from the speakers or
change the direction of the microphone.
The color irregularity on a TV screen persists.
• Turn off the TV set once, then turn it on after15 to 30 minutes. If the color irregularity stillpersists, place the speakers farther away from theTV set.
“PROTECT” and “PUSH POWER” appearalternately.
• A strong signal is input. Turn off the power,leave the system turned off for a while, then turnon the power again. If “PROTECT” and “PUSHPOWER” still appear alternately, check thespeaker cords.
continued
56
Troubleshooting (continued)
Speakers
Sound comes from only one channel orunbalanced left and right volume.
• Check the speaker connection and speakerplacement.
• The source being played back is monaural.• Adjust the balance parameters (pages 14, 21).
The sound comes from the center speaker only.(MHC-DP1000D only)
• Depending on the disc, the sound may comefrom the center speaker only.
There is no sound from the center speaker.(MHC-DP1000D only)
• Set the center speaker level to the appropriatelevel.
• 2CH/MULTI is set to “2CH”.• Make sure the DSP effect is on (page 47).
There is no sound from the rear speakers.(MHC-DP1000D only)
• Set the rear speakers level to the appropriatelevel.
• 2CH/MULTI is set to “2CH”.• The software being played back has limited
sound effects. Check the volume with the testtone.
No sound or only a very low-level sound is heardfrom the rear speakers.
• Make sure the DSP effect is on (page 47).
Sound lacks bass.
• Check that the speaker’s + and – terminals areconnected correctly.
DVD/VIDEO CD/CD Player
The disc tray does not close.
• The disc is not placed properly.
The disc does not play.
• The disc is not lying flat in the disc tray.• The disc is dirty (see page 53).• The disc is inserted label side down.• Moisture condensation has built up.• The system cannot play CD-ROMs, etc. (page 6).• The region code on the DVD does not match the
system.
The disc does not start playback from thebeginning.
• Program Play, Shuffle Play, or Repeat Play hasbeen selected (pages 23, 24, 26, 28). PressCLEAR to cancel these functions before playinga disc.
• Resume Play has been selected. When theplayback is stopped, press x, then start DVDplayback (page 28).
• The title, DVD or PBC menu automaticallyappears on the screen.
Playback starts automatically.
• The DVD features an auto playback function.
Playback stops automatically.
• Some discs may contain an auto pause signal.While playing such a disc, the playback stops atthe auto pause signal.
You cannot perform some functions such asStop, Search, Slow-motion Play, Repeat Play,Shuffle Play, or Program Play.
• Depending on the disc, you may not be able todo some of the operations above. Refer to theoperating instructions supplied with the disc.
57
Ad
ditio
na
l Info
rma
tion
Picture
There is no picture.
• Press DVD.• Check that the system is connected securely.• The video cable is damaged. Replace it with a
new one.• Make sure you connect the system to the video
input jack of your TV (page 11).• Make sure you turn on the TV.• Make sure you select the video input on the TV
so that you can view the pictures from thesystem.
The picture noise appears.
• Clean the disc.• If video from your DVD player has to go through
your VCR to get to your TV, the copy-protectionapplied to some DVD programs could affectpicture quality. If you still experience problemsafter checking your connections, please tryconnecting your DVD player directly to yourTV’s S video-input, if your TV is equipped withthis input (page 11).
• Except for Pan American and European models,the color system is different. Set the color systemto match your TV (pages 12, 20).
The aspect ratio of the screen cannot bechanged even though you set “TV TYPE” in“SCREEN SETUP” in the Setup Display whenyou play a wide picture.
• The aspect ratio is fixed on your DVD.• If you connect the system with the S-video cable,
connect directly to the TV. Otherwise, you maynot change the aspect ratio.
• Depending on the TV, you may not change theaspect ratio.
Messages do not appear on the screen in thelanguage you want.
• Select the language you want for the on-screendisplay in “OSD” under “LANGUAGE SETUP”in the Setup Display (page 18).
The language for the sound track cannot bechanged.
• Multilingual tracks are not recorded on the DVDbeing played.
• The DVD prohibits changing the language forthe sound track.
The subtitle language cannot be changed.
• Multilingual subtitles are not recorded on theDVD being played.
• The DVD prohibits changing the subtitles.
The subtitle cannot be turned off.
• The DVD prohibits turning off subtitles.
The angles cannot be changed.
• Multi-angles are not recorded on the DVD beingplayed. The angle can be changed only when the“ANGLE” indicator lights up on the front paneldisplay.
• The DVD prohibits changing the angles.
A 5-character service number is displayed onthe screen and on the front panel display.
• The self-diagnosis function is activated. (See thetable on page 58.)
The disc tray does not open and “LOCKED”appears on the front panel display.
• Contact your Sony dealer or local authorizedSony service facility.
continued
58
C:13:00
Tape Deck
The tape does not record.
• The tab has been removed from the cassette (see“To save a tape permanently” on page 54).
• The tape has reeled to the end.
The tape does not record nor play, or there is adecrease in sound level.
• The heads are dirty (see “Cleaning the tapeheads” on page 54).
• The record/playback heads are magnetized (see“Demagnetizing the tape heads” on page 54).
The tape does not erase completely.
• The record/playback heads are magnetized (see“Demagnetizing the tape heads” on page 54).
There is excessive wow or flutter, or the sounddrops out.
• The capstans or pinch rollers are dirty (see“Cleaning the tape heads” on page 54).
Noise increases, or the high frequencies areerased.
• The record/playback heads are magnetized (see“Demagnetizing the tape heads” on page 54).
After pressing nN or Z, there is a mechanicalnoise, “EJECT” appears in the display, and theunit enters standby mode automatically.
• The cassette tape has not inserted correctly.
Tuner
There is severe hum or noise (“TUNED” or“STEREO” flashes in the display).
• Adjust the antenna.• The signal is too weak. Connect an external
antenna.
A stereo FM program cannot be received instereo.
• Press FM MODE so that “MONO” disappears.
If other troubles not described aboveoccur, reset the system as follows:
1 Press x, DISPLAY and DISC 1 at thesame time.
2 Unplug the power cord.
3 Plug the power cord back in.
4 Press ?/1 to turn on the power.The system is reset to the factory settingsexcept for DVD settings. All the settings otherthan DVD settings you made, such as the presetstations, clock, and timer are cleared. Youshould set them again.
Self-diagnosis function
(When letters/numbers appear in thedisplay)
When the self-diagnosis function is activated toprevent the system from malfunctioning, a five-character service number (e.g., C 13 00) with acombination of a letter and digits appears onthe screen. In this case, check the followingtable.
First threecharacters ofthe servicenumber
C 13
C 31
E XX(XX is a number)
Cause and/or CorrectiveAction
The disc is dirty
, Clean the disc with a softcloth (page 53).
The disc is not inserted correctly.
, Re-insert the disc correctly.
To prevent a malfunction, thesystem has performed the self-diagnosis function.
, Contact your nearest Sonydealer or local authorizedSony service facility and givethe 5-character servicenumber.Example: E 61 10
Troubleshooting (continued)
59
Ad
ditio
na
l Info
rma
tion
Specifications
AUDIO POWER SPECIFICATIONS:(MHC-DP1000D USA model only)
POWER OUTPUT AND TOTALHARMONIC DISTORTION
with 8 ohm loads both channels driven, from120 Hz – 10 kHz; rates 100 watts per channelminimum RMS power, with no more than 10%total harmonic distortion from 250 milliwatts torated output.Continuous RMS power outputCenter speaker: 30 wattsRear speakers: 30 + 30 watts
(8 ohms at 1 kHz, 10%THD)
Amplifier sectionCanadian model:MHC-DP1000DContinuous RMS power output (reference)Front speaker: 100 + 100 wattsCenter speaker: 30 wattsRear speakers: 30 + 30 watts
(8 ohms at 1 kHz, 10%THD)
Total harmonic distortion less than 0.07%(8 ohms at 1 kHz, 70 W)
European model:MHC-DP1000DDIN power output (rated) 60 + 60 watts
(8 ohms at 1 kHz, DIN)Continuous RMS power output (reference)Front speaker: 80 + 80 wattsCenter speaker: 30 wattsRear speakers: 30 + 30 watts
(8 ohms at 1 kHz, 10%THD)
Music power output (reference)Front speaker: 150 + 150 wattsCenter speaker: 60 wattsRear speakers: 60 + 60 watts
(8 ohms at 1 kHz, 10%THD)
Other models:MHC-DP900DThe following measured at AC 120, 220, 240 V,50/60 HzDIN power output (rated) 130 + 130 watts
(6 ohms at 1 kHz, DIN)Continuous RMS power output (reference)
180 + 180 watts(6 ohms at 1 kHz, 10%THD)
MHC-DP1000DThe following measured at AC 120, 220, 240 V,50/60 HzDIN power output (rated) 90 + 90 watts
(8 ohms at 1 kHz, DIN)Continuous RMS power output (reference)Front speaker: 120 + 120 wattsCenter speaker: 40 wattsRear speakers: 40 + 40 watts
(8 ohms at 1 kHz, 10%THD)
InputsGAME IN: voltage 250 mV,(phono jacks) impedance 47 kilohmsMD (VIDEO) IN: voltage 450 mV/250 mV,(phono jacks) impedance 47 kilohmsOPTICAL IN:(Square optical connector jacks, front panel)wavelength ——MIC: sensitivity 1 mV,(Except for North impedance 10 kilohmsAmerican andEuropean models)(phone jack)
OutputsMD (VIDEO) OUT: voltage 250 mV(phono jacks) impedance 1 kilohmsVIDEO OUT: max. output level(phono jack) 1 Vp-p, unbalanced, Sync
negative, load impedance75 ohms
S-VIDEO OUT: Y: 1 Vp-p, unbalanced,(4-pin/mini-DIN jack) Sync negative,
C: 0.286Vp-p,load impedance 75 ohms
PHONES: accepts headphones of(stereo mini jack) 8 ohms or moreSPEAKER: accepts impedance of 6 to(MHC-DP900D only) 16 ohmsFRONT SPEAKER : accepts impedance of 8 to(MHC-DP1000D only) 16 ohmsREAR SPEAKER: accepts impedance of 8 to(MHC-DP1000D only) 16 ohmsCENTER SPEAKER: accepts impedance of 8 to(MHC-DP1000D only) 16 ohmsSUB WOOFER: Voltage 1 V,
impedance 1 kilohms
continued
60
Specifications (continued)
DVD player sectionLaser Semiconductor laser
(DVD: λ=650 nm,CD: λ=780 nm)Emission duration:continuous
Frequency response DVD (PCM 48 kHz):2 Hz – 22 kHz = (±1 dB)CD: 2Hz – 20 kHz =(±1 dB)
Signal-to-noise ratio More than 90 dBDynamic range More than 90 dBVideo color system format
NTSC, PALDIGITAL OUT OPTICAL(Square optical connector jack, rear panel)Wavelength 660 nm
Tape player sectionRecording system 4-track 2-channel stereoFrequency response 40 – 13,000 Hz (±3 dB),(DOLBY NR OFF) using Sony TYPE I
cassette,40 – 14,000 Hz (±3 dB),using Sony TYPE IIcassette
Wow and flutter ±0.15% W.Peak (IEC)0.1% W.RMS (NAB)±0.2% W.Peak (DIN)
Tuner sectionFM stereo, FM/AM superheterodyne tuner
FM tuner section
Tuning range 87.5 – 108.0 MHzAntenna FM lead antennaAntenna terminals 75 ohm unbalancedIntermediate frequency 10.7 MHz
AM tuner section
Tuning rangePan American model: 530 – 1,710 kHz
(with the interval set at10 kHz)531 – 1,710 kHz(with the interval set at9 kHz)
European and Middle Eastern models:531 – 1,602 kHz(with the interval set at9 kHz)
Other models: 531 – 1,602 kHz(with the interval set at9 kHz)530 – 1,710 kHz(with the interval set at10 kHz)
Antenna AM loop antennaAntenna terminals External antenna terminalIntermediate frequency 450 kHz
SpeakerFront speakerSS-DP1000DW for MHC-DP1000D (NorthAmerican and European models)Speaker system 2-way, bass-reflex type,
magnetically shielded typeSpeaker unitsWoofer: 17 cm, cone typeTweeter: 5 cm, cone typeNominal impedance 8 ohmsDimensions (w/h/d) Approx. 230 x 360 x 260 mmMass Approx. 4.0 kg net per
speaker
SS-DP1000D/DP900D for MHC-DP1000D/DP900D (Other models)Speaker system 3-way, 3-unit,
bass-reflex type,magnetically shielded type
Speaker unitsWoofer: 15 cm, cone typeSubwoofer: 15 cm, cone typeTweeter: 5 cm, cone typeNominal impedanceSS-DP900D 6 ohmsSS-DP1000D 8 ohmsDimensions (w/h/d) Approx. 250 x 360 x 335 mmMass Approx. 6.5 kg net per
speaker
Rear speaker SS-RS270 for MHC-DP1000DSpeaker system 1-way, 1-unit,
bass-reflex typeSpeaker unitsFull-range: 8 cm, cone typeNominal impedance 8 ohmsDimensions (w/h/d) Approx. 180 x 95 x 100 mmMass Approx. 0.65 kg net per
speaker
Center speaker SS-CT270 for MHC-DP1000DSpeaker system 1-way, 2-unit,
bass-reflex type,magnetically shielded type
Speaker unitsFull-range: 8 cm, cone typeNominal impedance 8 ohmsDimensions (w/h/d) Approx. 225 x 95 x 100 mmMass Approx. 1.2 kg net
For the customers in Canada(MHC-DP1000D only)Use only the supplied SS-RS270 rear speakers forconnection to the REAR SPEAKER jacks, and onlythe supplied SS-CT270 center speaker for connectionto the CENTER SPEAKER jacks on theMHC-DP1000D.
61
Ad
ditio
na
l Info
rma
tion
GeneralPower requirementsNorth American model: 120 V AC, 60 HzEuropean model: 230 V AC, 50/60 HzAustralian model: 230 – 240 V AC,
50/60 HzMexican model: 120 V AC, 60 HzThailand model: 220 V AC, 50/60 HzIndian, Pakistani, Moroccan and Tunisian models:
220 V AC, 50/60 HzOther models: 120 V, 220 V or
230 – 240 V AC,50/60 HzAdjustable with voltageselector
Power consumptionU.S.A. model:MHC-DP1000D 205 wattsCanadian model:MHC-DP1000D 205 wattsEuropean model:MHC-DP1000D 190 watts
0.5 watts (at the PowerSaving Mode)
Other models:MHC-DP900D 210 wattsMHC-DP1000D 225 watts
Dimensions (w/h/d) Approx. 280 x 360 x 365 mm
MassNorth American and European models:MHC-DP1000D Approx. 11.0 kgOther models:MHC-DP900D Approx. 12.5 kgMHC-DP1000D Approx. 12.0 kg
Supplied accessories: AM loop antenna (1)FM lead antenna (1)Remote commander (1)Batteries (2)Video cable (1)Front speaker pads (8)Center and rear speakerpads (MHC-DP1000Donly, 12)
Design and specifications are subject to changewithout notice.
62
DTSDigital audio compression technology that theDigital Theater Systems, Inc. developed. Thistechnology conforms to 5.1-channel surround.The rear channel is stereo and there is discretesubwoofer channel in this format. DTSprovides the same 5.1 discrete channels of highquality digital audio. The good channelseparation is realized because the all channeldata is recorded discrete and processed indigital.
DVDA disc that contains up to 8 hours of movingpictures even though its diameter is the same asa CD.
The data capacity of a single-layer and single-sided DVD, at 4.7 GB (Giga Byte), is 7 timesthat of a CD. Furthermore, the data capacity ofa dual-layer and single-sided DVD is 8.5 GB, asingle-layer and double-sided DVD 9.4 GB,and a dual-layer and double-sided DVD 17 GB.
The picture data uses the MPEG 2 format, oneof the worldwide standards of digitalcompression technology. The picture data iscompressed to about 1/40 of its original size.The DVD also uses the variable rate codingtechnology that changes the data to be allocatedaccording to the status of the picture.
The audio data is recorded in Dolby Digital aswell as in PCM, allowing you to enjoy morereal audio presence. Furthermore, variousadvanced functions such as the multi-angle,multilingual, and Parental Control functions areprovided with the DVD.
Index (CD) / Video Index (VIDEO CD)A number that divides a track into sections toeasily locate the point you want on a VIDEOCD or a CD. Depending on the disc, no indexesmay be recorded.
Glossary
Bit RateValue indicating the amount of video datacompressed in a DVD per second. The unit isMbps (Mega bit per second). 1 Mbps indicatesthat the data per second is 1,000,000 bits. Thehigher the bit rate is, the larger the amount ofdata. However, this does not always mean thatyou can get higher quality pictures.
ChapterSections of a picture or a music piece on aDVD that are smaller than titles. A title iscomposed of several chapters. Each chapter isassigned a chapter number enabling you tolocate the chapter you want.
Dolby DigitalThis sound format for movie theaters is moreadvanced than Dolby Pro Logic Surround. Inthis format, the rear speakers output stereosound with an expanded frequency range and asubwoofer channel for deep bass isindependently provided. This format is alsocalled “5.1” because the subwoofer channel iscounted as 0.1 channel (since it functions onlywhen a deep bass effect is needed). All sixchannels in this format are recorded separatelyto realize superior channel separation.Furthermore, since all the signals are processeddigitally, less signal degradation occurs.
Dolby Pro Logic SurroundAs one method of decoding Dolby Surround,Dolby Pro Logic Surround produces fourchannels from two-channel sound. Comparedwith the former Dolby Surround system, DolbyPro Logic Surround reproduces left-to-rightpanning more naturally and localizes soundsmore precisely. To take full advantage ofDolby Pro Logic Surround, you should haveone pair of rear speakers and a centre speaker.The rear speakers output monaural sound.
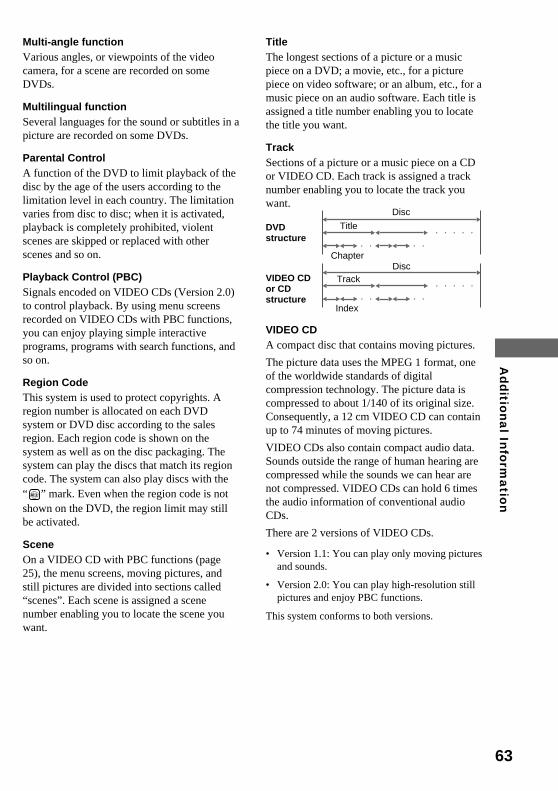
63
Ad
ditio
na
l Info
rma
tion
Multi-angle functionVarious angles, or viewpoints of the videocamera, for a scene are recorded on someDVDs.
Multilingual functionSeveral languages for the sound or subtitles in apicture are recorded on some DVDs.
Parental ControlA function of the DVD to limit playback of thedisc by the age of the users according to thelimitation level in each country. The limitationvaries from disc to disc; when it is activated,playback is completely prohibited, violentscenes are skipped or replaced with otherscenes and so on.
Playback Control (PBC)Signals encoded on VIDEO CDs (Version 2.0)to control playback. By using menu screensrecorded on VIDEO CDs with PBC functions,you can enjoy playing simple interactiveprograms, programs with search functions, andso on.
Region CodeThis system is used to protect copyrights. Aregion number is allocated on each DVDsystem or DVD disc according to the salesregion. Each region code is shown on thesystem as well as on the disc packaging. Thesystem can play the discs that match its regioncode. The system can also play discs with the“ ALL ” mark. Even when the region code is notshown on the DVD, the region limit may stillbe activated.
SceneOn a VIDEO CD with PBC functions (page25), the menu screens, moving pictures, andstill pictures are divided into sections called“scenes”. Each scene is assigned a scenenumber enabling you to locate the scene youwant.
TitleThe longest sections of a picture or a musicpiece on a DVD; a movie, etc., for a picturepiece on video software; or an album, etc., for amusic piece on an audio software. Each title isassigned a title number enabling you to locatethe title you want.
TrackSections of a picture or a music piece on a CDor VIDEO CD. Each track is assigned a tracknumber enabling you to locate the track youwant.
VIDEO CDA compact disc that contains moving pictures.
The picture data uses the MPEG 1 format, oneof the worldwide standards of digitalcompression technology. The picture data iscompressed to about 1/140 of its original size.Consequently, a 12 cm VIDEO CD can containup to 74 minutes of moving pictures.
VIDEO CDs also contain compact audio data.Sounds outside the range of human hearing arecompressed while the sounds we can hear arenot compressed. VIDEO CDs can hold 6 timesthe audio information of conventional audioCDs.
There are 2 versions of VIDEO CDs.
• Version 1.1: You can play only moving picturesand sounds.
• Version 2.0: You can play high-resolution stillpictures and enjoy PBC functions.
This system conforms to both versions.
DVDstructure
VIDEO CDor CDstructure
Title
Disc
Index
Track
ChapterDisc
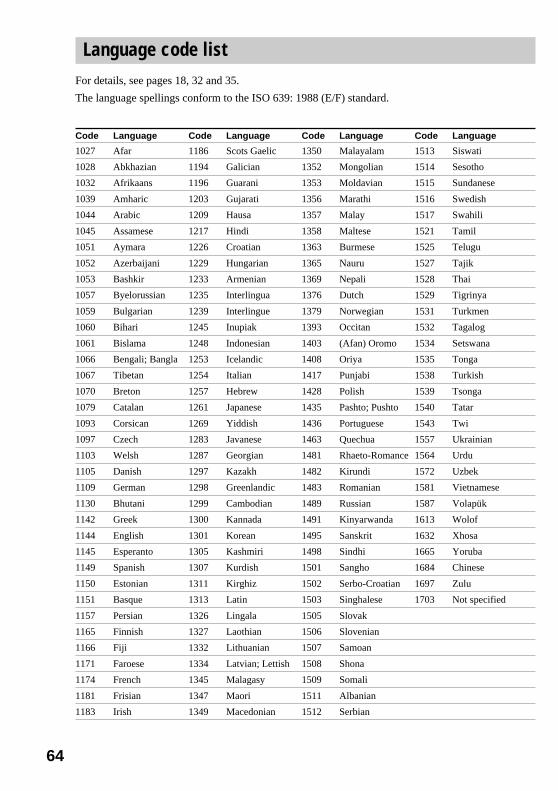
64
Language code listFor details, see pages 18, 32 and 35.
The language spellings conform to the ISO 639: 1988 (E/F) standard.
Code Language Code Language Code Language Code Language
1027 Afar 1186 Scots Gaelic 1350 Malayalam 1513 Siswati
1028 Abkhazian 1194 Galician 1352 Mongolian 1514 Sesotho
1032 Afrikaans 1196 Guarani 1353 Moldavian 1515 Sundanese
1039 Amharic 1203 Gujarati 1356 Marathi 1516 Swedish
1044 Arabic 1209 Hausa 1357 Malay 1517 Swahili
1045 Assamese 1217 Hindi 1358 Maltese 1521 Tamil
1051 Aymara 1226 Croatian 1363 Burmese 1525 Telugu
1052 Azerbaijani 1229 Hungarian 1365 Nauru 1527 Tajik
1053 Bashkir 1233 Armenian 1369 Nepali 1528 Thai
1057 Byelorussian 1235 Interlingua 1376 Dutch 1529 Tigrinya
1059 Bulgarian 1239 Interlingue 1379 Norwegian 1531 Turkmen
1060 Bihari 1245 Inupiak 1393 Occitan 1532 Tagalog
1061 Bislama 1248 Indonesian 1403 (Afan) Oromo 1534 Setswana
1066 Bengali; Bangla 1253 Icelandic 1408 Oriya 1535 Tonga
1067 Tibetan 1254 Italian 1417 Punjabi 1538 Turkish
1070 Breton 1257 Hebrew 1428 Polish 1539 Tsonga
1079 Catalan 1261 Japanese 1435 Pashto; Pushto 1540 Tatar
1093 Corsican 1269 Yiddish 1436 Portuguese 1543 Twi
1097 Czech 1283 Javanese 1463 Quechua 1557 Ukrainian
1103 Welsh 1287 Georgian 1481 Rhaeto-Romance 1564 Urdu
1105 Danish 1297 Kazakh 1482 Kirundi 1572 Uzbek
1109 German 1298 Greenlandic 1483 Romanian 1581 Vietnamese
1130 Bhutani 1299 Cambodian 1489 Russian 1587 Volapük
1142 Greek 1300 Kannada 1491 Kinyarwanda 1613 Wolof
1144 English 1301 Korean 1495 Sanskrit 1632 Xhosa
1145 Esperanto 1305 Kashmiri 1498 Sindhi 1665 Yoruba
1149 Spanish 1307 Kurdish 1501 Sangho 1684 Chinese
1150 Estonian 1311 Kirghiz 1502 Serbo-Croatian 1697 Zulu
1151 Basque 1313 Latin 1503 Singhalese 1703 Not specified
1157 Persian 1326 Lingala 1505 Slovak
1165 Finnish 1327 Laothian 1506 Slovenian
1166 Fiji 1332 Lithuanian 1507 Samoan
1171 Faroese 1334 Latvian; Lettish 1508 Shona
1174 French 1345 Malagasy 1509 Somali
1181 Frisian 1347 Maori 1511 Albanian
1183 Irish 1349 Macedonian 1512 Serbian
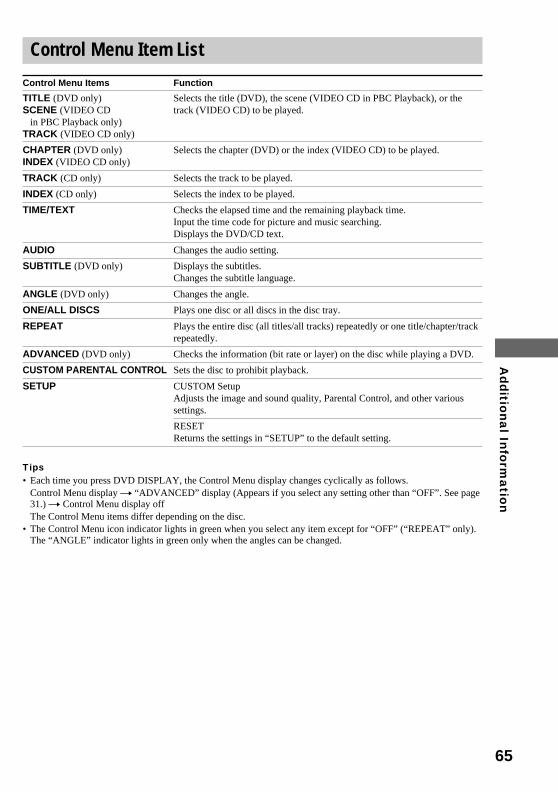
65
Ad
ditio
na
l Info
rma
tion
Control Menu Item List
Control Menu Items
TITLE (DVD only)SCENE (VIDEO CD
in PBC Playback only)TRACK (VIDEO CD only)
CHAPTER (DVD only)INDEX (VIDEO CD only)
TRACK (CD only)
INDEX (CD only)
TIME/TEXT
AUDIO
SUBTITLE (DVD only)
ANGLE (DVD only)
ONE/ALL DISCS
REPEAT
ADVANCED (DVD only)
CUSTOM PARENTAL CONTROL
SETUP
Function
Selects the title (DVD), the scene (VIDEO CD in PBC Playback), or thetrack (VIDEO CD) to be played.
Selects the chapter (DVD) or the index (VIDEO CD) to be played.
Selects the track to be played.
Selects the index to be played.
Checks the elapsed time and the remaining playback time.Input the time code for picture and music searching.Displays the DVD/CD text.
Changes the audio setting.
Displays the subtitles.Changes the subtitle language.
Changes the angle.
Plays one disc or all discs in the disc tray.
Plays the entire disc (all titles/all tracks) repeatedly or one title/chapter/trackrepeatedly.
Checks the information (bit rate or layer) on the disc while playing a DVD.
Sets the disc to prohibit playback.
CUSTOM SetupAdjusts the image and sound quality, Parental Control, and other varioussettings.
RESETReturns the settings in “SETUP” to the default setting.
Tips• Each time you press DVD DISPLAY, the Control Menu display changes cyclically as follows.
Control Menu display t “ADVANCED” display (Appears if you select any setting other than “OFF”. See page31.) t Control Menu display offThe Control Menu items differ depending on the disc.
• The Control Menu icon indicator lights in green when you select any item except for “OFF” (“REPEAT” only).The “ANGLE” indicator lights in green only when the angles can be changed.
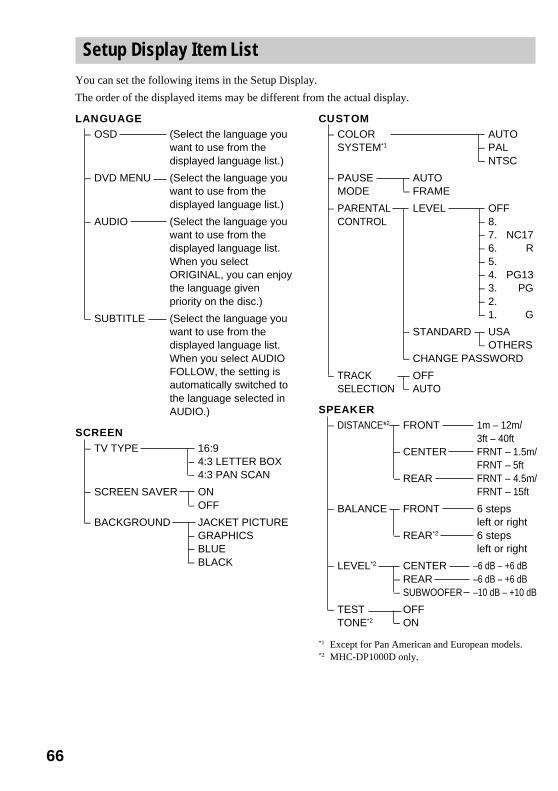
66
Setup Display Item ListYou can set the following items in the Setup Display.
The order of the displayed items may be different from the actual display.
CUSTOM– COLOR AUTO
SYSTEM*1 – PAL– NTSC
– PAUSE AUTOMODE – FRAME
– PARENTAL LEVEL OFFCONTROL – 8.
– 7. NC17– 6. R– 5.– 4. PG13– 3. PG– 2.– 1. G
– STANDARD USA– OTHERS
– CHANGE PASSWORD
– TRACK OFFSELECTION – AUTO
LANGUAGE– OSD (Select the language you
want to use from thedisplayed language list.)
– DVD MENU (Select the language youwant to use from thedisplayed language list.)
– AUDIO (Select the language youwant to use from thedisplayed language list.When you selectORIGINAL, you can enjoythe language givenpriority on the disc.)
– SUBTITLE (Select the language youwant to use from thedisplayed language list.When you select AUDIOFOLLOW, the setting isautomatically switched tothe language selected inAUDIO.)
*1 Except for Pan American and European models.*2 MHC-DP1000D only.
SCREEN– TV TYPE 16:9
– 4:3 LETTER BOX– 4:3 PAN SCAN
– SCREEN SAVER ON– OFF
– BACKGROUND JACKET PICTURE– GRAPHICS– BLUE– BLACK
SPEAKER– DISTANCE*2 FRONT 1m – 12m/
3ft – 40ft– CENTER FRNT – 1.5m/
FRNT – 5ft– REAR FRNT – 4.5m/
FRNT – 15ft
– BALANCE FRONT 6 stepsleft or right
– REAR*2 6 stepsleft or right
– LEVEL*2 CENTER –6 dB – +6 dB– REAR –6 dB – +6 dB– SUBWOOFER –10 dB – +10 dB
– TEST OFFTONE*2 – ON

67
Ad
ditio
na
l Info
rma
tion

68Sony Corporation Printed in Malaysia


