Embed Size (px)
Citation preview

Amherst Media®
PUBLISHER OF PHOTOGRAPHY BOOKS
Techniques and Images
from Master Photographers
Michelle Perkins
PROFESSIONALPORTRAIT POSINGPROFESSIONALPORTRAIT POSING


Copyright © 2007 by Michelle Perkins.All rights reserved.
Front cover image by Tim Schooler.Back cover image by Tim Kelly.
Published by:Amherst Media, Inc.P.O. Box 586Buffalo, N.Y. 14226Fax: 716-874-4508www.AmherstMedia.com
Publisher: Craig AlesseAssistant Editor: Barbara A. Lynch-JohntEditorial Assistance from: Carey A. Maines and Artie Vanderpool
ISBN-13: 978-1-58428-211-2Library of Congress Card Catalog Number: 2006937291
Printed in Korea.10 9 8 7 6 5 4 3 2 1
No part of this publication may be reproduced, stored, or transmitted in any form or by any means, electronic,mechanical, photocopied, recorded or otherwise, without prior written consent from the publisher.
Notice of Disclaimer: The information contained in this book is based on the author’s experience and opinions.The author and publisher will not be held liable for the use or misuse of the information in this book.
ON THE FRONT COVER—Lafayette, LA, portrait photographer Tim Schooler picked up this clay pipe with a metallic finish froma Mexican import shop because he thought it would make a great prop. While Tim cautions his clients to avoid short-sleeved tops for their portraits, many still elect to wear them—and Tim must find some way to make them look good. Foreven thin subjects, bare upper arms can look thick when captured in a portrait. Here, Tim minimized the issue by creat-ing a dramatic pose that lengthens the arms and lifts the torso, yielding a long, slim line that runs the length of the sub-ject’s body. To learn more about Tim’s techniques, turn to page 71.
ON THE BACK COVER—Tight three-quarter-length portraits like these are among Lake Mary, FL, portrait photographer TimKelly’s best sellers. “People like big heads,” he says. “When they’re looking at the images and making selections ona monitor, they ‘ooh’ and ‘ahh’ when a big, beautiful face comes up. This is my way of giving them more face—plusthe design element of hands. I just bring the hands closer to the face. Then, you have a headshot feel but with theelegance of a three-quarter length image.” To learn more about Tim’s techniques, turn to page 82.

Introduction . . . . . . . . . . . . . . . . . . . . . . . . . . . . . . .4
1. Jeff Smith
CORRECTIVE POSING MAKES THE SALE . . . . . . . . . . .5
2. Lori Nordstrom
IN A FAMILY WAY . . . . . . . . . . . . . . . . . . . . . . . .16
3. Bill Lemon
COMMUNICATION IS KEY . . . . . . . . . . . . . . . . . . .29
4. Billy Pegram
FLAWLESS FASHION . . . . . . . . . . . . . . . . . . . . . . .39
5. Rolando Gomez
SUCCESS WITH THE GLAMOUR EDGE . . . . . . . . . . . .50
6. Monte Zucker
CLASSIC STYLE . . . . . . . . . . . . . . . . . . . . . . . . . .61
7. Tim Schooler
SENIOR PORTRAIT SUCCESS . . . . . . . . . . . . . . . . .71
8. Tim Kelly
TIMELESS SIMPLICITY . . . . . . . . . . . . . . . . . . . . .82
9. Chris Nelson
SENIOR STYLE . . . . . . . . . . . . . . . . . . . . . . . . . .94
10. Cherie Steinberg Cote
AN ONGOING EXPERIMENT IN STYLE . . . . . . . . . .107
Conclusion . . . . . . . . . . . . . . . . . . . . . . . . . . . . . .117
Appendix I: Individual Posing Basics . . . . . . . . . . . . .118
Appendix II: Group Posing Basics . . . . . . . . . . . . . . .120
About the Author . . . . . . . . . . . . . . . . . . . . . . . . . .121
Index . . . . . . . . . . . . . . . . . . . . . . . . . . . . . . . . . .122
TABLE OF CONTENTS 3
TABLE OF CONTENTS

Amherst Media’s Pro Photo WorkshopTM series isdesigned to provide professional photographers(and aspiring professionals) with an inside look at
the working practices of leaders in the industry. In eachchapter, you’ll find a detailed look at the way one pho-tographer has conquered the challenges of his or hermarket to build a successful business while still produc-ing images that are creative and personally satisfying.In this particular volume, the challenge in question
is portrait posing. As you’ll see, each of the profiledphotographers approaches this in a unique way, basedon their personal tastes, the requirements and tastes oftheir clients, the realities of the location, and muchmore. But in the end, their goal is almost always the
same: to create a portrait that says something about thesubject and satisfies—hopefully even thrills—theirclient.From commercial imaging, to fashion photography,
to traditional portraiture, the looks that are in style areconstantly evolving. In this book, you’ll see how someof the most successful photographers around are usingthese changes to enhance their work and produce evermore appealing and marketable images.Thanks go out to the photographers who generous-
ly contributed their images, time, and knowledge tocreate this book. Without them, it wouldn’t have beenpossible.
4 PROFESSIONAL PORTRAIT POSING
INTRODUCTION

Jeff Smith is an acclaimed portrait photographerwho specializes in senior portraits. Yet even whenworking with these subjects—people who are
probably the slimmest and most attractive they will everbe—he approaches each shoot with one question inmind: What would this person not want to see in his orher portrait?It may seem like a negative way to approach a ses-
sion, but Jeff actually has his bottom line in mind. Afterall, regardless of the style, the props, or the composi-tion, people ultimately buy portraits that make themlook good. The easiest way to accomplish that goal is toidentify potential problem areas and minimize or dis-guise them. And keep this in mind: whether the appear-ance issues in question are real or imagined from thephotographer’s point of view, it’s the client’s point ofview that matters. Even if you think her nose looks justfine, if a woman feels it’s too big, you’d better de-emphasize it in her portrait if you want to make the sale.
JEFF SMITH: CORRECTIVE POSING MAKES THE SALE 5
is an award-winning senior photographer from Fresno, CA. He owns and operates two studios in Central Cali-fornia and is well recognized as a speaker on lighting and senior photography. He is the author of many books, including CorrectiveLighting, Posing, and Retouching for Digital Photographers and Jeff Smith’s Lighting for Outdoor & Location Portrait Photography (bothfrom Amherst Media), and Senior Contracts (self-published). He can be reached via his web site: www.jeffsmithphoto.com.
JEFF SMITH
1. JEFF SMITH
Corrective Posing Makes the Sale
If there’s one thing that all portrait subjects have in common, it’sthe fact that they all want to look good in their pictures. As Jeffnotes, these are also the portraits that people ultimately buy, somaking subjects look their best is also critical to photographers.

IDENTIFYING PROBLEMSAccording to Jeff, there are two general types of prob-lems that you will come across when working with yourclients: imagined problems and real problems.The imagined problems are usually very slight.
“Most of the time,” says Jeff, “the person who has these‘problems’ is the only one who can see them.” Since noproblems are readily apparent, these are the problemsmost photographers fail to correct. “A typical imaginedproblem,” says Jeff, “is something like, ‘One of my eyesis smaller than the other,’ or ‘My smile is crooked.’”The real problems are the issues that almost every
one of us has. Says Jeff, “We are never as thin as wewould like, we think our noses are too large, our earsstick out too much, and our eyes are too big or toosmall, etc.” These problems are more easily identified asthings that need to be disguised in the portrait.Fortunately, a client’s problems can be evaluated in
a matter of seconds. “When you sit someone down withthe main light turned on,” says Jeff, “you can immedi-
ately start to see what that person’s strengths and weak-nesses are.” As you sum up the problems that need tobe addressed, you can start to make decisions aboutwhat poses you can use to hide this individual’s flaws,which of the client’s outfits would give you the most towork with (in terms of disguising problem areas), if theperson should do full-length images or not, etc.Once you have identified a flaw, you need to adapt
the subject’s pose to cover, disguise, or cast a shadowon the areas of the body and/or face that are problems.“Fortunately,” says Jeff, “many of the more relaxedposes that you will find already hide some of the mostannoying problems that your clients have.”
THE HEAD AND FACEFor a natural look, the client’s head should be slightlytilted (not rigidly straight). This tends to happen natu-rally when you position a client and have them turntoward the main light. “The only time the head usuallyneeds to be repositioned,” says Jeff, “is when the clientis extremely nervous. When this happens, they tend todrop their head too far toward the higher shoulder.”Double Chin. A double chin (or the entire neck
area) is easily hidden by resting the chin on the hands,arms, or shoulders. “Be careful that the subject barelytouches his or her chin down on the supporting ele-ment,” warns Jeff. “Resting on it too heavily will alterthe jawline.”
6 PROFESSIONAL PORTRAIT POSING
GET CREATIVE“Some photographers are so stuck in what they have alwaysdone that they bitterly resist any change,” says Jeff. “I oncetook a class on senior portraits. There was another photogra-pher attending this class who was just starting out. Every timethe photographer conducting the class wasn’t talking, this pho-tographer would ask me all kinds of questions. At lunch, we hadsome extra time, so, with permission, I went into the cameraroom and started showing my newfound friend some of the dif-ferent poses we use with seniors. He loved it. Everything wasgoing fine until the photographer conducting the program camein. I was doing a yearbook pose that had the subject recliningback, to make the shoulders run diagonally through the frame.The photographer conducting the class remarked that this posewas more suited to boudoir than seniors. To reply, I simplyasked both photographers if the subject looked beautiful in thepose. They both responded affirmatively. I said that was all thatmattered.” The moral of the story? People just want to lookgreat—and not like mannequins.
ABOVE—One way to minimize the appearance of a double chin (top)is to have the client stretch their chin forward (bottom). FACING
PAGE—A pose like this can also be useful for concealing a problem-atic neck or chin area—plus, it has a glamorous look most womenwill love.


Another way to make a double chin (orloose skin on the neck) a little easier onyour client’s ego is to stretch the skinunder the chin. To do this, turn the bodyaway from the light, then turn the faceback toward the light. This will stretchout the double chin so that it will not beas noticeable.When a head-and-shoulders pose is
needed (for a yearbook, business publica-tion, etc.) it is sometimes impossible touse the hands or arms to hide this prob-lem area. Posing the body to make theneck stretch can only do so much to hidea large double chin. In a case like this, Jeffrecommends doing what some photogra-phers call the “turkey neck.” To do this,have the subject extend their chin direct-ly toward the camera, which stretches outthe double chin. Then have them bringdown their face to the proper angle. Mostof the time, this eliminates the doublechin from view. It is especially helpfulwhen photographing a man who is wear-ing a shirt and tie. Men who have largedouble chins often also have tight collars,which push up the double chin and makeit even more noticeable.Ears. Corrective posing is also the best
way to combat the problem of ears thatstick out too far. Ladies who have a prob-lem with their ears usually wear their hairover them. In this case, make sure thatthe subject’s hair isn’t tucked behind herears, as this will make them stand out.Larger ears can also stick out through thehair, making them appear really large.Without hair to conceal them, the best
way to reduce the appearance of the earsis to turn the face toward the main lightuntil the ear on the main-light side of the
8 PROFESSIONAL PORTRAIT POSING
In most portraits, your clients will want to see eyecontact—and they want their eyes to look as bigas possible.

face is obscured. Then, move the fill reflector fartherfrom the subject to increase the shadow on the visibleear, or move the main light more to the side of the sub-ject to create a shadow over the ear.Noses. The nose is only seen in a portrait because of
the shadows that are around it. “By turning the facemore toward the light or bringing the main light moretoward the camera, you can reduce the shadow on theside of the nose and reduce the apparent size of thenose,” says Jeff.Eyes. “Most people want their eyes to look as large
as possible,” says Jeff. “By turning the face toward themain light and bringing the subject’s gaze back to thecamera, the pupil shifts more toward the corner of the
eye opening and gives the eye more impact as well as alarger appearance.”With a person with larger eyes that tend to bulge,
the face needs to be directed more toward the camera.You must also make sure that no catchlight appears onthe whites of the eye, as this will draw a great deal ofattention to this area and make it much too bright.Expression. Proper expression depends on the age
of your clients. With babies and small children, parentslove laughing smiles. With children, moody, more seri-ous expressions are salable. In dealing with teens andadults, the best expressions are more subtle.“While squinty expressions are cute on a baby, not
many adults really want to see themselves with no eyes,
JEFF SMITH: CORRECTIVE POSING MAKES THE SALE 9
Paired with a flattering pose, a relaxed, natural expression can produce a portrait that virtually sells itself.

huge chubby cheeks, and every tooth in their mouthvisible,” says Jeff. “Large smiles are unflattering toadults for these reasons, too—but also because thisexpression brings out every line and wrinkle on a per-son’s face.” While retouching can reduce the appear-ance of these lines on the face, it often results in subjectsthat don’t look like themselves.With smiling, timing is important. Once your client
smiles, it is up to you to decide when the perfect smileoccurs and take the pictures. When most people firststart to smile, it is enormous. “If you take the shot atthis point,” says Jeff, “you end up with a laughing oralmost-laughing smile.” A moment later, the expressionstarts to relax. “It isn’t that big a change,” he notes,“but it is the difference between a laughing smile and asmile that is pleasing to an adult client.”
SHOULDERS“This is the anti-stiffness rule,” remarks Jeff. “Whenyou see a portrait of a person in which their shouldersare perfectly horizontal and their spine is perfectly ver-tical, the person looks rigid.” By placing the subject atan angle to the camera and having them recline slightlybackwards, or lean slightly forward, you can create amore relaxed look.
ARMSMost women worry about their upper arms appearingtoo large or about hair showing on their forearms. Mengenerally worry about their arms looking too thin ortoo flabby. The best way to avoid problems with arms isto cover them up with long sleeves. When short sleevesare worn, your choices are: compose the portrait abovethe problem area; use shadows or vignettes to make thearea darker and less noticeable; or, if the client has longhair, use the hair to soften the problem area.
BUSTLINEThe bustline isn’t a problem in most portraits, but if itwill be noticeable in the frame, you must make sure thatit appears even.When a low-cut top is worn, the size of the bustline
is determined by the appearance of cleavage. Cleavage isnothing but a shadow. Increase the shadow by turningthe subject toward the shadow side of the frame and
10 PROFESSIONAL PORTRAIT POSING
Turning the subject to an angle from the main light naturallyenhances the bustline.
Posing the subject with their torso at an angle to the camera pro-duces a slimmer view of the waist.
LEFT—When they slouch, even trim subjects can seems to have rollsat their waist. RIGHT—Instead, have the subject sit up straight—almost to the point of arching her back. This makes a big improve-ment; not only does her stomach look flatter, but the pose also pro-vides a space between her waist and left arm, making her entiretorso look slimmer. Notice, too, the change in the position of thesubject’s feet. Simply by having the subject lift one heel, as in thisimage, her legs look much more shapely.

you will, in turn, increase the apparent size of the bust-line. If a client’s top is too low-cut for the type of por-traits she wants, turning her toward the main light willreduce the shadow in the cleavage area.
WAISTLINEThe widest view of any person is when the person issquared off to the camera. By turning the shoulders,waist, and hips to a side view—preferably toward theshadow side of the frame—you create the thinnest viewof the body. “This works well as long as the person hasa somewhat flat stomach,” says Jeff. “If you do this witha person who has a bulging stomach, you will put the
bulge in silhouette. It’s like doing a profile of a personwith a big nose.”When someone does have a tummy bulge, the easi-
est way to hide the stomach area is to pose the client ina sitting position, then elevate the leg closest to thecamera. This partially obscures the stomach area. “Hav-ing subject rest an elbow on their knee (or knees) willcompletely hide this area,” notes Jeff.However, sitting positions cause significant waist
problems of their own—even for thin people. When thesubject is in a seated position, their clothing and skinwrinkle over the waistband of their pants, giving eventhe thinnest person a roll at the waistline—whether it be
JEFF SMITH: CORRECTIVE POSING MAKES THE SALE 11
Demonstrating poses to your client is oftenthe quickest way to get the pose you have inmind (above). It’s also sure to put the subjectmore at ease.

of cloth or skin. If the person is thin, have her straight-en her back, almost to the point of arching it, to correctthe problem. If the person is heavier, hide this area asdescribed above.Also, when the arms are allowed to hang down to
the sides, the body isn’t defined. It is one mass, makingthe subject appear wider than he or she really is. Whenthe elbows are away from the body, the waistline isdefined and appears smaller.
THIGHS AND LEGSThighs and legs need to appear as thin and toned aspossible. This isn’t a problem for most men, because it’snormally only athletic men who ask to take a photo-graph in clothing that shows their legs or thighs.Women, however, are often told they should weardresses, tight skirts, and tight pants—even when itwould be in their best interest not to.“When posing female subjects in a full-length pose,
I always have the person sitting or laying down. Unlessa person is very tall and thin, she will always look betterposed in this way,” says Jeff. “Whenever I have a womanseated, no matter how thin or heavy she is, I don’t haveher sit flat on her bottom. Instead, I have her roll ontothe hip that is closest to the camera. This is slimming,because it hides a good portion of the seat and thighareas behind the subject.”Anytime the legs are going to be showing and not
covered with pants, Jeff recommends having the subjectwear the tallest heels she owns. “There is a reason whywomen who want to have the greatest impact whenwearing a dress wear very high heels,” he says. “Whenthe heel is pushed up, the calf and thigh muscles flex,making the legs appear longer and firmer.”If the woman is going barefoot, have her push up
her heels just as high-heeled shoes would do.Additionally, just as the arms shouldn’t be posed
right next to the body, the legs shouldn’t be posed nextto each other in standing poses. “There should alwaysbe slight separation between the legs,” says Jeff. “Instanding poses, this can be done by having the client
12 PROFESSIONAL PORTRAIT POSING
ABOVE AND FACING PAGE—When the subject’s heels are flat on the floor(left) her legs don’t look as slim and toned as when her heels arelifted (right). This is why women whose legs will show in their por-traits are advised to wear high-heeled shoes (facing page).
LEFT—Unconventional poses can work very well—but you still haveto make sure that your subject looks his or her very best from headto toe, or you won’t make a sale.


put one foot up on a step or cross one leg over theother. In seated poses, have the subject lift one kneehigher than the other or cross their legs.”Because the legs are easy to pose incorrectly, Jeff has
formulated a list of his “six deadly sins” of leg posing.They are as follows:
1. In a standing pose, never put both feet flat on theground in a symmetrical perspective to the body.
2. Never position the feet so close together that thereis no separation between the legs.
3. Never do the same thing with both legs (with afew exceptions, like when both knees are raisedside by side).
4. Never have both feet dangling; at least one footshould touch the ground or another surface.
5. Never raise a knee so high that it touches theabdomen.
6. Don’t expect one pose to work on everyone.
BRINGING IT ALL TOGETHERThe last of Jeff’s “six deadly sins” of leg posing (“Don’texpect one pose to work on everyone”) is a concept heurges photographers to take more broadly. “You needto understand what you are creating to be able to planyour subject’s session appropriately,” says Jeff. “If youjust go into the camera room and zip through the samefive poses with each client, you lose and they lose. Whenyou take control of your photographs, you can betterproduce exactly what your client is looking for—andwhen clients are truly satisfied, your bank account willgrow with your ability.”
14 PROFESSIONAL PORTRAIT POSING
LOOK FOR OBSTRUCTIONSWhether on location or in the studio, Jeff often employs propsto hide his subjects’ problem areas. When sitting backwards ona chair, for instance, the subject’s stomach area will be con-cealed by the chair back. Sitting your subject on the groundamidst some low foliage will help to obscure the hips andthighs. You could even pose your subject half behind a columnor other architectural structure to reveal less of the width of thebody, creating a slimmer look.
ABOVE AND FACING PAGE—No single pose will work for every client, but when you find one that does work, the results can be spectacular.


16 PROFESSIONAL PORTRAIT POSING
Lori Nordstrom is an acclaimed photographer whospecializes in children’s and maternity portraits.Like many professionals, her life behind the cam-
era is actually a second career. Lori’s first business wasas the owner of a hair salon, which she ran for ten years.As a mom and hobbyist photographer, Lori often dis-played images of her own kids in the salon—and soonclients began asking her to photograph their kids, too.“Eventually, I began enjoying it more than my job,”says Lori, “so I made the decision to quit and went to
2. LORI NORDSTROM
In a Family Way
owns and operates a portraitphotography studio in Winterset, IA. Her unique approach tocapturing her subjects has led her to be featured in numerouspublications, including PPA magazine, Kodak Pro Pass, The Lens,Rangefinder, and Studio Imaging and Design. Additionally, Lorihas earned several Kodak Gallery and Fuji Masterpiece Awards forher images and albums. Lori is also an acclaimed educator whohas presented seminars to professional photographers aroundthe world. To learn more about Lori and see more of her inspir-ing images, visit www.nordstromphoto.com.
LORI NORDSTROM
RIGHT—A crossed-arm pose works well for topless shots, since it’s avery natural position. Lori is conscious to have the subject relax herhands, however, and to ensure that they are posed gracefully. FACING
PAGE—While the majority of Lori’s images are created in black &white, sometimes a subject’s vibrant personality just begs forcolor—and lots of it. That was the case with the mom-to-be fea-tured in this image (as well as the photo on page 18). A profile posecaptured the shape of her belly, and her right hand is folded acrossit in a natural position. Notice the incredible S curve Lori created inthis pose by having the model tilt her head forward.


LORI NORDSTROM: IN A FAMILY WAY 19
work for a studio in my area. In 1998, I started out onmy own.”Since then, Lori has committed herself to creating
images with a “real life” look—a style that both appealsto her own aesthetic sensibilities and perfectly suits herprinciple subjects. It is this natural look that has madeher images a favorite among portrait clients and profes-sional photographers alike.Of course, while she makes it sound easy, anyone
who’s held a camera will recognize that there’s nothingsimple about the results that Lori creates with her deli-cate lighting, clean backgrounds, casual poses, andengaging expressions. Eliciting these looks from clients
takes a skilled eye, solid technical skills, and a truly win-ning personality.“I try to do as much ‘un-posing’ as possible, but
with maternity portraits and newborns, you have topose a little bit more than you would with families orkids,” she says.Making a relaxed system like this work relies largely
on Lori’s ability to put people at ease in front of thecamera—something that can be a challenge when pho-tographing women who are eight months pregnant andfeeling self-conscious about their bodies. Therefore,Lori starts off with a phone consultation. (Because sheis located at least thirty miles from most of her clients,
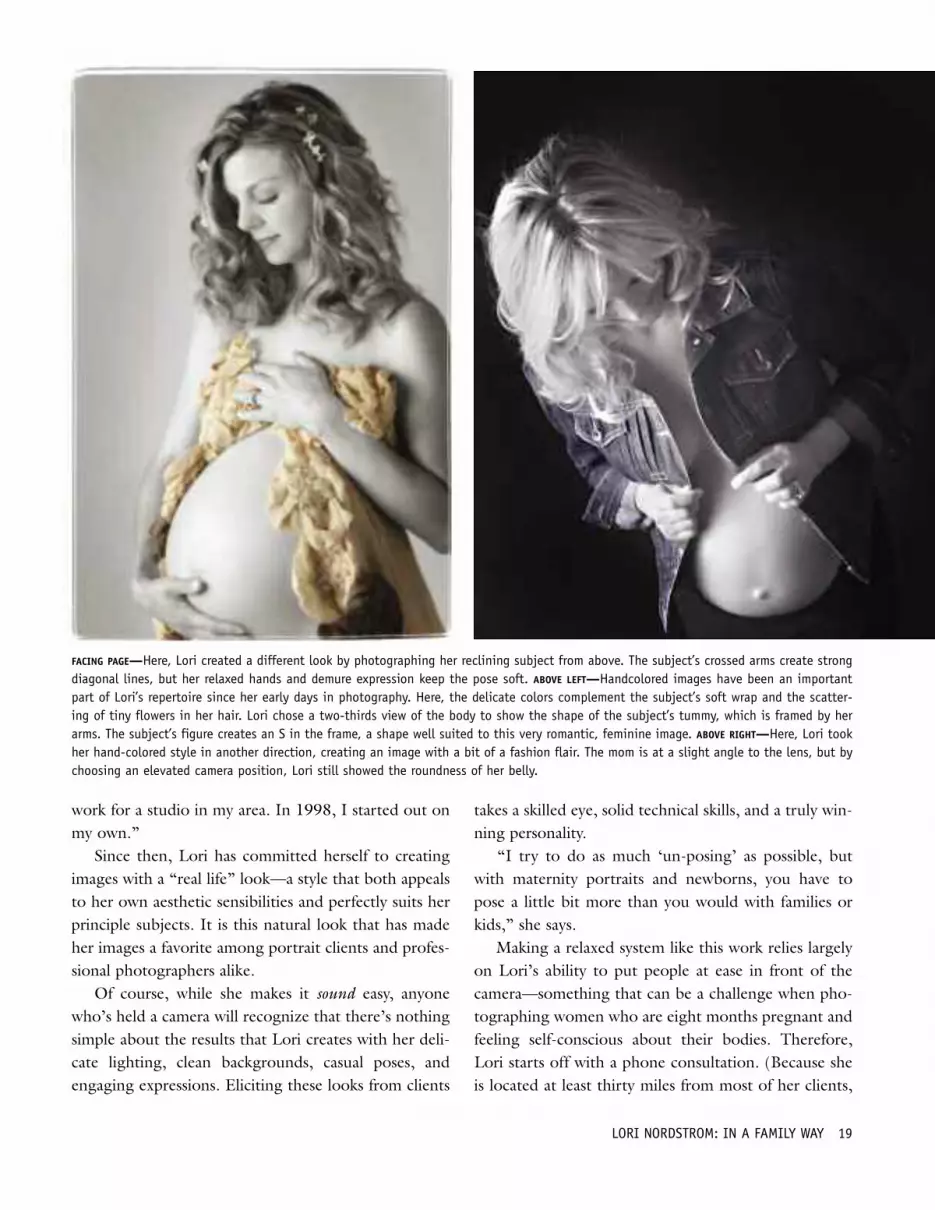
FACING PAGE—Here, Lori created a different look by photographing her reclining subject from above. The subject’s crossed arms create strongdiagonal lines, but her relaxed hands and demure expression keep the pose soft. ABOVE LEFT—Handcolored images have been an importantpart of Lori’s repertoire since her early days in photography. Here, the delicate colors complement the subject’s soft wrap and the scatter-ing of tiny flowers in her hair. Lori chose a two-thirds view of the body to show the shape of the subject’s tummy, which is framed by herarms. The subject’s figure creates an S in the frame, a shape well suited to this very romantic, feminine image. ABOVE RIGHT—Here, Lori tookher hand-colored style in another direction, creating an image with a bit of a fashion flair. The mom is at a slight angle to the lens, but bychoosing an elevated camera position, Lori still showed the roundness of her belly.

a studio consultation is usually impractical.) “Somebodyelse has booked the appointment and made that initialcontact,” says Lori, “so my priority when I make thatphone call is to build the relationship. I want them toknow that I care about them and that I’m excited aboutthem coming. I talk with them about their kids, or theirpregnancy, or whatever it might be. To me, it’s all aboutwho they are as a person, so this is more important than
planning out the shoot. My goal is for them to hang upfeeling good and looking forward to the session.”For a maternity session, Lori also asks the client to
bring a strapless bra (into which she can tuck the fabricsused in her characteristic draped images), and theskimpiest pair of underwear they can find. “I actuallyretouch this off after the shoot,” says Lori. “I don’t everhave them completely nude. Almost nobody is com-
20 PROFESSIONAL PORTRAIT POSING
Lori often likes to add flowers to herimages, and she tries to have freshones on hand for all of her maternitysessions. They add a soft, femininetouch to the images and symbolizethe blossoming of a new life. LEFT—This subject, adorned with and sur-rounded by daisies, has a real “earthmother” feel. Lori had the subject atan angle to the camera with herhands gently clasped down aroundher belly. Tilting the camera creatednice diagonals in the frame, whileshooting from an elevated positionallowed her to fill the frame withthe flowers in the background. FACING
PAGE—One of the reasons Lori starteddoing maternity portraits was thatshe wanted to experiment with lightand form more than she could whenchasing an excited child around theset. This beautifully crafted imageclearly demonstrates that attentionto detail. The subject is sculptedwith light that emphasizes her ele-gant pose—from the tilt of her head,to the framing placement of herhands and arms. Here, flowers areadded in the form of budded stems,clasped gently and trailing downaround the subject’s belly to accentits silhouette.


pletely at ease doing that, and I wantthem to feel as comfortable at the ses-sion as they can be—and to know thatI’m really sensitive to not showing any-thing they wouldn’t want their kids tosee. That’s what it’s really all about—we’re creating their new baby’s firstportrait,” she says.Most women have concerns about
their appearance during pregnancy,and Lori is sure to address them. “Itcomes up during every session—theyare concerned about stretch marks, orfat spots, or seeing cellulite for the firsttime,” she says. “When the topiccomes up, I remind them that preg-nancy is so natural and wonderful thatnone of those other things matter.”Lori also uses that moment when
the client expresses concerns to intro-duce the topic of retouching. “I’ll ask,‘Do you want your stretch marks re-touched? Because some moms don’t,’”she says. Some women consider themtheir battle scars and they don’t wantthem gone. Lori continues, “The vastmajority do want them retouched, but
LORI NORDSTROM: IN A FAMILY WAY 23
FACING PAGE—While many moms-to-be end up do-ing nude or seminude images, others are clearfrom the outset that they aren’t comfortablewith nudity. This woman and her husband had anaturally romantic relationship, so that’s whatLori wanted to capture in the image. Posing thecouple close together, with their heads touchingand his hand raised to her belly, created justthat feeling. It is emphasized by their dreamyexpressions. Additionally, notice the S shapecreated where there bodies meet—a line thatdraws you to their faces. RIGHT—Compare thisimage with the shot on page 17—a portrait ofthe same subject. Here, Lori used a similar pose,but the mood is softer and more romantic. Thisis partially a result of the subject’s gentle smilebut also stems from the change in hand posi-tion. Here, Lori had the subject raise her armsto cover her chest. Her hands are remarkablygraceful, gently turning in toward her body andcreating a soft leading line to her face.

I would never want to offend someone by taking themoff, so it’s nice to have the discussion when it comes upnaturally. Then, we can laugh about it and I can makethem feel comfortable. Plus, if they don’t have any, Ican say, ‘Oh my gosh, I see pregnant women all thetime—you are so fortunate not to have stretch marks!’”When it comes to the mechanics of posing, Lori
laughs, “Well, there aren’t a hundred-and-fifty-twoways to pose a pregnant woman.” Still, she has sometips to offer. Usually a side view is better than straighton. Lori tries to get her clients in for their sessionsabout a month before their due date. “I like that nice,big, round tummy—but I want them in before that dayit goes everywhere,” she laughs. “At one point, you’repregnant in your nose, and toes, and everything! Sofour weeks before the due date is a good time. Even
then, most women will just look big when photo-graphed straight on, so I try to angle them at least a lit-tle to the side—and the profile view is very popular.”Lori also likes to do shots with her subject laying on
the floor. This raises another issue unique to photo-graphing pregnant women: subject mobility and com-fort. “I always ask, ‘Are you comfortable sitting? Areyou comfortable getting down on the floor?’ I makesure, always, that the session is about them,” says Lori.If the subject has trouble getting up from the floor, Lorirecommends offering a sturdy chair. “It’s better to giveher something solid for the extra help she needs ratherthan to try to help her yourself and fail,” she says.Lori doesn’t go into her sessions with a pre-
conceived image or pose in mind, so the images she cre-ates are usually directed both by issues of the subject’s
Lori is well known for her outstanding album designs, one of which featured this layout. The series of images at the bottom of the pagewere created with the subject in a camisole and boy shorts, reclining comfortably on a couch. As you can see, just by having her subjectadjust the pose of her head and arms, Lori was able to produce a wide variety of looks.

comfort and by the nature of their per-sonality. “Some moms, right away, arefunny—or maybe even just nervous—but I can tell it’s going to be a fun ses-sion because we get to laughing,” shesays. “So I might get the fan going andhave the mom play with her top—maybe having her lift it to look at herbelly,” says Lori, noting that she usual-ly starts the session by photographingher subject in whatever she was wearingwhen she arrived.“Other moms are just more roman-
tic; that’s just the way they are in thiswhole experience,” says Lori. “Preg-nancy is one of those times when noth-ing in the whole world matters; it’s allgoing on inside your body. You relateevery single thing back to that baby,and sometimes that really comes out;that’s all we talk about. When that’s thecase, the images also come out a littlebit more quiet and serious.”This level of sensitivity and flexibili-
ty is especially important since most ofLori’s maternity clients don’t actuallycome to the studio seeking maternityimages. “I’m still talking people intoit,” says Lori. “People will call to get
LORI NORDSTROM: IN A FAMILY WAY 25
While crafting maternity portraits is a rewardingpursuit in and of itself, it also plays a big rolein the success of Lori’s business. A great mater-nity session is just the first step in building alifelong relationship with a client who willinvariably come back to Lori for photography astheir baby (and family) grows. TOP RIGHT—Loricarries a black fleece to her location sessions.Here, she threw it over the family’s couch andused window light to create an outstandingimage. BOTTOM RIGHT—Shooting from a high anglecreates a natural perspective with subjects whoare laying down. When posing a group like this(and the top image on this page), Lori gets theadults where she wants them, then adds theinfants. The challenge is usually keeping thesubjects close enough. “I tell them, ‘When youfeel like you’re too close, you’re just closeenough,’“ she says.


information on a newborn session or to ask if we have afirst year collection. Some have seen maternity portraitsand say, ‘My friend had hers done, but I don’t know ifI’ll be that brave.’ I just tell them, ‘You have to comein. It’s a special time, you have to rememberit.’ I will do a free session if I need to—I justthink it’s the best thing I can do (in termsof marketing) for my business. I’m buildinga relationship. By the time I’m done photo-graphing them, and they have their images
back, and they love them, and they look great, andwe’ve made a connection . . . they’re not going any-where else. So I do a lot of free sessions—if I had to, I’dspend money to get them as lifelong clients,” she says.
LORI NORDSTROM: IN A FAMILY WAY 27
In photos of Mom with her new baby, a little moreplanning and posing is used than in some other ses-sions—but the overall intent is the same: to show theclose connection between the subjects. When posing,Lori takes a natural approach, starting with positionsthat moms naturally use when holding their babies,then tweaking them to make the look more photogen-ic. Even with a sleeping baby, however, this can takea little improvisation, though. For the image on thefacing page, Lori had planned to have the baby’sknees tuck up (like in the shot below)—but this littleone would only drift off to sleep when stretched outand rocked on Mom’s knees.

When it’s time for the newborn session, Lori contin-ues to provide client-centered services. She starts byasking the moms to wait to feed their baby until theyarrive at the studio. “I tell them, ‘You’re used to quietcar rides—but this is not going to be one of them!’”Lori laughs. Having the baby fed at the studio gives thesubjects a little time to settle in after their drive andinvariably puts the baby deeply to sleep for the shoot.Lori also warns the mother in advance that the baby
will cry for the entire session. “Then, when they don’tcry—and most don’t—the mom feels like her baby is
the best baby in the world. And if the baby does happento cry, she’s prepared and doesn’t feel upset about it,”says Lori.From start to finish, Lori keeps her client and their
needs at the heart of the session. In terms of posing,that’s the key to getting the natural looks she wants; shebrings out the best in everyone by getting them to relaxand be who they really are. But this concept goes fur-ther: by creating a fun and inviting atmosphere at everyshoot, she ensures great word-of-mouth reviews—andplenty of return visits for more wonderful images.
28 PROFESSIONAL PORTRAIT POSING
Lori designs mom-and-baby poses to show the natural closeness between the pair. A simple pose like this shows the subjects as they are inreal life, capturing a seemingly candid moment. Of course, “candid” poses like this only happen when the subjects are totally at ease—andonly become truly effective portraits when carefully captured by a photographer who has great timing and great compositional sensibilities.

Bill Lemon thrives on capturing beauty—and with the ever-changing variables thatphotographing models presents, his pur-
suit is both challenging and entertaining.“While there are certain constants in this line ofwork, each day is different than the last andeach session is filled with unique rewards,” saysBill.Rising to those challenges starts with a clear
plan—especially when doing location shoots,which are one of Bill’s specialties. “When goingout in the field,” says Bill, “it’s a good idea tohave a few poses and locations in mind. Theseshould be concepts you think will make gooduse of the model’s assets (a beautiful face, longlegs, great eyes, etc.), and produce the kind ofimages she is looking for (softly sensual, artisticnude, fashion, etc.). It is also a good idea to
BILL LEMON: COMMUNICATION IS KEY 29
3. BILL LEMON
Communication is Key
is a professional photographer who specializes in nude and beauty images. Over the years, his images haveappeared on fifteen magazine covers. He has also authored three books: Black & White Model Photography, Professional Secrets ofNude & Beauty Photography, and Professional Digital Techniques for Nude & Glamour Photography (all from Amherst Media). For moreon Bill, please visit www.billlemon.com.
BILL LEMON
Sometimes a pose is all about mood. Here, the model’sbody is posed to produce diagonal lines and soft curves.Her parted lips, tussled hair, and unzipped jeans all con-tribute to the softness and sensuality of the image. By tilt-ing the camera, Bill transformed the vertical wood beamsinto softer diagonal lines that complement the look.


keep in mind the model’s energy level and enthusiasm,as well as her level of experience in front of the camera.Having a point to start from can be very helpful in mak-ing the model feel comfortable and in developing a rap-port with her.”Bill considers developing a rapport with his models
to be one of the key factors in producing the images hewants. Communication with the model is especially crit-ical when it comes to posing. “You’ve got to give themodel praise for what she’s doing,” says Bill. “Carefullywatch what she is doing, and fine-tune the image by
telling her to turn her head a bit or showing her how togracefully position her hands.”As the shoot progresses, Bill recommends talking to
your model and asking if she’s comfortable. If she’s notcomfortable in the pose you’re using, it’s time to re-think your strategy. “Discomfort on the model’s part isalmost always obvious in the final product,” notes Bill,“and it doesn’t reflect well on you.”In nude and glamour photography, the poses tend
to be somewhat exaggerated and more theatrical thanthose required for more traditional portraits. As a result,
BILL LEMON: COMMUNICATION IS KEY 31
FACING PAGE—This model sent Bill an e-mail with some ideas she had for her session, because she didn’t want to do any nude images. Billfelt that this concept, inspired by an image that was once made of Marilyn Monroe, would work well. The image is modest and simple—butits playful, sensual qualities make it extremely effective. ABOVE—There has long been an association between beautiful women and automo-biles. Here, Bill posed his model in the passenger seat, then shot in through the open driver’s side door. The rigid lines of the car providea perfect contrast to her soft, natural pose.


Bill often enjoys working with experienced models.“Professional models are well trained in using theirbody language in a way that adds to the story you arestriving to create,” says Bill. This does not mean, how-ever, that he doesn’t work with amateurs—far from it.With models who are less experienced in front of the
camera, some extra steps are required when selectingposes. First, Bill recommends going through your port-folio with the model before the shoot. Note the imagesthat appeal to her, and use these as the basis for design-ing her poses.Bill also feels it’s a good idea to keep your eyes open
and watch how your model moves, sits, and behaveswhen she’s not in front of the camera. Being in frontof the camera makes many people nervous, which will
FACING PAGE—Sometimes an interesting prop or location is all that’sneeded to inspire a great pose. In this case, Bill and his model wereon their way to another location when they spotted this culvert inan open field. From there, it was a simple matter to seat the modelin the open circle. Her arms were used to cover her chest and herlegs were lifted and posed at slightly different angles to highlightthem in the photograph. As Bill notes, “You don’t need to travel tovast landscapes in exotic locales in order to get unique and artisticimages. Since creating this image, I’ve revisited the location withother models, and it is always a hit.” TOP RIGHT—This is a great posefor a model with long, slim legs who wants to create a sensual imagebut doesn’t want to pose nude. The high French cut of the under-wear lengthens the visual line of her leg, and the wealth of verticalelements in the background increases the visual sense of length youget when looking at the photo. Having the model lift the knee ofher leg closest to the camera gives the most prominent leg its bestshape and creates a beautiful S curve through the length of herbody. Her arm is kept away from her waist, creating a dark spacethat emphasizes this curve. BOTTOM RIGHT—This image is a variationon the same theme. Here, the model was willing to pose seminude,but she didn’t want to expose herself to the camera. “Because shehas a beautiful face and great legs,” says Bill, “I decided to pose herin a way that would show off these two great features at the sametime. To make her legs look their best, I had the model stand on hertoes and point the toes of her raised leg. This tightens the legs andmakes them seem even longer and thinner. To capture the beauty ofher face, the model’s eyes look straight into the camera, and herexpression is soft and sweet.” Notice, too, how the model’s left handis raised to her face, drawing your eye to this additional area ofemphasis. NEXT PAGE—If there’s a word to describe the look of thisimage, it’s “classic.” The model’s pose and expression are subdued,and her knee is drawn up to cover most of her body. The lighting,from a 4x6-foot softbox placed 45 degrees to camera left, enhancesthis natural look by allowing much of her body to fall into deepshadow. Notice how her left hip is posed to take advantage of this;it is moved partially out of the light, creating a slimmer look.


impact their ability to pose naturally. “Above all,” saysBill, “it’s important to talk with your model and discussher comfort level with various clothes and poses.”Keep in mind that new models may feel more com-
fortable creating lingerie or seminude images. You caneven suggest nude images where the model’s arms andlegs, parts of the set, or even shadows are used toobscure private areas. This gives the model some much-needed security while she is getting used to working
36 PROFESSIONAL PORTRAIT POSING
ABOVE—”This photograph was created in my studio with a back-ground of black velvet spread out on a platform,” says Bill. “As youcan see, it makes the model almost seem to float in the frame, andemphasizes her beautiful, smooth skin.” Raising a model’s arms alsolifts her chest. Here, you can see how it also emphasizes the model’stoned musculature and creates diagonal lines that frame her face.FACING PAGE—Water can take a central role or “accessorize” a scene.It can even serve as camouflage for a model who wants to create animplied nude image. Here, the model was positioned right under awaterfall at the far end of the pool. Her pose suggests she has beeninterrupted while bathing, giving the image an intimate feel.


with the photographer and to being in front of the cam-era. “Creating a sensual image isn’t about nudity,” saysBill. In fact, you may note that none of the images fea-tured in this chapter reveal more than a bikini would.Instead, the pose and expression are used to emphasizethe model’s beauty and suggest sensuality.
By communicating with his models, Bill Lemon hasbeen able to develop creative partnerships that yieldstunning images. For the models, this means a funshoot and some breathtaking shots for their web sitesand portfolios. For Bill, it means having the opportuni-ty to achieve his artistic goal: capturing beauty.
38 PROFESSIONAL PORTRAIT POSING
In this symmetrical pose, the model’s body forms a triangle in the frame. By keeping the pose simple, Bill has encouraged the viewer to lookat all the other details—the delicate position of her hands, the model’s smooth skin, her silky hair, and her striking profile. “When photo-graphing a model in profile, keeping her eyes in line with her nose produces a natural, flattering look,” notes Bill.

THE CHALLENGES“Over the years,” says Billy, “I’ve realized that there isan art to posing models—an art that all photographers,in order to be successful, must develop.”Indeed, this is probably especially true when posing
a model for fashion and commercial images where thedemands are many—the model must look her best, thepose must complement the composition, the clientmust like the look, the image must create the intendedemotional response, and the pose must showcase theproduct the model has been hired to display.With such exacting standards in place, it’s no sur-
prise that fashion photographers have developed waysto glamorize and accentuate—or, conversely, downplayand minimize—just about every imaginable part of thehuman body.Because fashion photographers work with models,
many of them professionals, you might expect the sub-jects to do much of the posing themselves. Yet, thephotographers are, in fact, highly involved. “Beginning
BILLY PEGRAM: FLAWLESS FASHION 39
4. BILLY PEGRAM
Flawless Fashion
is a professional photographer whose diverse clients have included Fila, Swatch, and the Goodwill Games.He has also directed over a hundred videos for the American College of Sports Medicine in conjunction with major sponsors likeReebok and Gatorade. Billy is the author of Professional Model Portfolios: A Step-by-Step Guide for Photographers and Posing Techniquesfor Photographing Model Portfolios, both from Amherst Media. For more information on Billy, please visit www.billypegram.com.
BILLY PEGRAM
In fashion photography, the pose must serve a number of func-tions—from making the model look great to highlighting the prod-uct being sold.

models especially must rely on the experience of thephotographer to guide them to flattering poses,” notesBilly. “Experienced models, although they usually de-velop a rather extensive repertoire of poses and movegracefully through a series, still rely on the photogra-pher to fine-tune their poses, emphasizing their bestfeatures while minimizing the weaker ones.”Also, just like many portrait photographers, Billy is
often faced with the challenge of assisting a nervoussubject who simply stands in front of the camera, wait-ing to be told what to do. “If you are an inexperiencedphotographer, it can be difficult to direct the model,”
he says, “especially since photographers tend to be bet-ter at visualizing a pose than communicating it clearlyto a subject.”
SET OBJECTIVESTo make the posing process easier, Billy suggests settingsome objectives.If the image you are creating is designed to showcase
a product (whether it’s a can of soda, an evening gown,or a diamond necklace), ask yourself what it is that youare trying to show. Is it the unique shape of the sodacan? The delicate beading on the back of the gown? The
40 PROFESSIONAL PORTRAIT POSING
Beginning models depend heavily on photographers for direction when it comes to posing—and even experienced models rely on photogra-phers to help them fine-tune their poses and emphasize their best features.

sparkle of the diamonds? Are there features that need tobe hidden (perhaps the clasp on a bracelet or the zipperon a dress)?If your image is designed to showcase the model or
subject, your questions will be much the same. What doyou want to show off? What are the person’s best fea-tures? What features need to be de-emphasized?
DESIGN THE CONCEPTOnce you have determined your objectives, you can de-cide how to reach your goals. This means creating flowand directing the eye.“‘Flow,’” says Billy, “is the term I use to describe
how the viewer’s eye is directed through a photograph.The eye will ‘enter’ from the lower-left corner. Then, itwill search for the brightest thing in the photograph.The arrangement of lines, shapes, colors, and tones inthe frame will guide this search—and the photographer
must use these elements to control the flow, directingthe eye to the intended subject of the image (the prod-uct, the garment, the model’s face, etc.).”“One of the most important tools for achieving this
goal is the positioning of the model’s body,” says Billy.“For example, the viewer’s eye may follow the line of aleg up through the body to the face. Alternately, thebody might be posed so that the viewer’s eye is drawnup the model’s arm to her diamond bracelet. Similarly,the whole body might be posed to draw your eye to theproduct the model is holding.“A helpful way to practice achieving the right flow
in your images is to look at some photographs or mag-azine ads and diagram the flow of your eye to the sub-ject of the photo (or to the logo in an ad shot). It mayhelp to turn the image upside down. This makes it lessrecognizable; instead of a body, the subject is renderedmore as a series of shapes and colors.”
BILLY PEGRAM: FLAWLESS FASHION 41
What does your image need to showcase? If you want to show the comfort of athletic wear (left), a different pose will probably be requiredthan if you want to display the seductive cut and sheer fabric of some lingerie (right).

Stopping the viewer’s gaze is the objective of creat-ing flow—but where should the eye stop? “It might bethe client’s logo, the detail on a garment, or the eyes ofthe model,” says Billy. “It all depends on the intent ofthe image.” Ensuring that the pose accomplishes thissuccessfully is the responsibility of the photographer.For example, a well-executed leg pose will draw theviewer’s eye up the leg, through the body, and to theface—which is the ideal. Incorrectly posed, however, itcan easily misdirect the eye up the body to a portion ofthe anatomy not intended as a point of focus by themodel, client, or photographer.
COMMUNICATE YOUR IDEAS“After settling on an idea or concept, you must commu-nicate it to the model before you start working,” saysBilly. Being able to do this effectively will establish yourcredibility with those on the set and allow the wholeteam to work in a unified direction—critical for makingthe session run smoothly.“Keep in mind that being in front of the camera can
make people nervous,” says Billy, “so being clear withyour instructions and making the session professionalcan also increase your chances of success by putting themodel at ease.”
42 PROFESSIONAL PORTRAIT POSING
During the shoot, ask the subject to change one small element per shot. That way, you can refine the pose with each variation, rather thantrying to cope with something totally new every time.


One way Billy suggests for communicating your in-tent is to show sketches or sample photographs of thestyle, the poses, and the overall feel of the photographyou want to create.“Another trick is to have someone stand in as the
subject and allow the model to look through the cam-era so she can see what you are seeing and understandthe posing,” he says.Finally, you may even try having the model pose
without the camera in place—that sometimes helps torelieve anxiety about the shoot, according to Billy.
REFINE THE BASIC POSE“Once the shoot is under way,” he notes, “don’t havethe model change poses dramatically for every shot.Rather, ask her to change one small element per shot—the tilt of her head, the position of her hand, the angleof her hips, etc.” That way, you can refine the pose with
each variation, rather than trying to cope with some-thing totally new every time the subject moves. The fol-lowing are some of the critical elements to look for.Posture. When a model slumps, it accentuates the
shoulders and leads to the “turtle” effect (where thesubject doesn’t appear to have a neck). It also makes thebustline appear to sag.“To straighten a model’s posture,” advises Billy,
“have her imagine a string attached to either the centerof her chest or the top of the head. Then, ask her to pre-tend that someone is pulling that string up to the ceil-ing. This straightens the spine upward, almost to thepoint of arching the back. It will lengthen the neck,lower the shoulders, firm the bust, and create a muchmore pleasing photo.”Some models also have a tendency to hunch their
shoulders up toward their ears. This is not a good pose,as it also creates a “turtle” effect. “Keep a good distance
44 PROFESSIONAL PORTRAIT POSING
LEFT—Too many photographers allow their subjects to slump, resulting in the visual emphasis being placed on the negative spacebetween the neck and the chest. With female subjects, this also makes the bustline appear to sag. In short, poor posture does notpresent any subject at her best. RIGHT—Good posture leads to a much better image.

between the shoulders and the ears,” says Billy. “Thiswill make the neck appear longer as well.”Feet and Ankles. “Selecting a good pose for the
legs and feet is vital when creating a full-length shot ora shot where the model is just one element in a wideimage,” says Billy. “The feet and legs contribute somuch to the overall feeling of the photograph—fromthe tilt of the hips, to the position of the feet, to thecasualness of the stance, or the relaxed angle of a seatedmodel.”A good way to learn how to pose the feet and legs is
to tear out photographs that you like from magazines.Then draw lines on these images indicating where thebones are positioned in the model’s legs. (“This is a
good exercise for posing the rest of the body too,” Billynotes.) Then, step back and evaluate the feel of the pho-tograph. Does the position enhance this feel?Legs and feet rarely look their best when shown
straight on. “When photographing a model, I am con-stantly asking her to show me a heel,” says Billy. “Evenwhen I am cropping the feet out of the photo I have themodel make sure that one heel is always visible to thecamera. This ensures that the viewer is seeing the frontof one leg and the profile of the other. It also forces themodel to position her hips at an angle to the camera.”Billy also suggests that you try to avoid showing the
model standing flat footed. Shooting the feet with theheel raised adds height to the model, makes her legs
BILLY PEGRAM: FLAWLESS FASHION 45
Women’s legs look their most shapely when the toes are pointed. Presenting a side view of at least one leg is also better than seeing thefronts of both legs. Finally, when cropping the legs, Billy notes that you should never crop at a joint. As shown here, legs should be croppedmid-calf or mid-thigh to avoid an unsettling appearance.

look more toned, and creates a more graceful attitude.When the toes are pointed, the foot instantly becomesan extension of the leg, making the legs appear longer.Hands. A basic rule for hands is to make sure they
are never both at the same level in the photograph.“The space between the two hands creates an imaginaryline,” says Billy. “If the hands are at two different levels,this line will be a diagonal one, which is much moreinteresting than a horizontal line.”In general, you should also show the profile of the
hand. The palm or back of the hand is quite large andwill demand too much attention—often drawing theviewer’s eye away from the subject’s face or the productthe model is selling.
Billy also advises keeping the fingers together and ina slightly bent position. “Spread fingers create too manylines for the viewer’s eyes to read,” he notes. “Anddon’t crop or hide those fingers. When this happens,the hand looks amputated, leaving the viewer to won-der if the model has all her fingers.”Keep the wrists either straight or bent slightly. When
the wrist is bent, the hand should lift slightly upwardtoward the shoulder. The hands should never beallowed to flop down; this will make them look lifeless.“Also,” says Billy, “keep the hands at the same dis-
tance from the camera as the body. Extending them outcloser to the camera will make them look too large inproportion to the body.”
46 PROFESSIONAL PORTRAIT POSING
If the pose you have in mind calls for the model to have her hand(s) on her hips or thighs, the pose you pick will depend on the attitudeyou want to convey in the image—it could be relaxed (left) or have a little more attitude (right).

Finally, be careful to keep the subject’s hands awayfrom any problem area of her body. “Placing handsthere only draws attention to the flaw,” Billy cautions.Eyes. “In photography, the eyes are possibly the
most vital element of the image,” says Billy. “They cre-ate a sense of communication with the viewer, they canshow mood, reveal character, or create tension. Theyliterally create the flow of the photograph. Eyes can givea photograph a sense of power, depth, and intimacy.”In commercial shots, the model generally looks off
camera, since the product takes top billing. For portraits(or in images for a model’s portfolio), however, the eyesshould be looking at the camera, and the photographershould always focus on them. “This is what draws theviewer to the image and forms a connection that can
make the difference between success and failure,” saysBilly. “To establish a connection, I remind the model tofocus on the lens. I ask her to imagine she is placing herface on the film (or, today, the digital image sensor!)and look through the lens to the film.”Inexperienced subjects often stare at the camera in a
“deer in the headlights” manner. “To avoid this,” saysBilly, “I suggest the person periodically look away, thenreturn their focus to the camera in order to maintain afresh, spontaneous look. If the head is at an angle Idon’t want to lose, I’ll instruct the model to simplylower her eyes, then slowly raise them to the camera.”Lips. “Lips are second in importance only to the
eyes,” says Billy. “When training a beginning model, Ihave them use their hands to cover everything except
BILLY PEGRAM: FLAWLESS FASHION 47
“To establish a connection, I remind the model to focus on the lens,” says Billy. “I ask her to imagine she is placing her face on the film(or, today, the digital image sensor!) and look through the lens to the film.”

their lips, then give them words to demonstrate, usingonly their lips—happiness, anger, pride, softness, etc.This way they see the importance and use of lips to cre-ate the intended mood.”“Sometimes it is helpful to direct the model to open
her mouth so that she can just slightly feel the air acrossher lips,” suggests Billy. “This will make the lips appearlarger. It will also relax the jaw, since she cannot clenchher jaw with her lips slightly open.”
Expression. “Expressions must be spontaneous,”says Billy, “even though they are planned to obtain thedesired result.” An experienced model can counterfeitan emotion, but often the photographer must assist herto make it happen. This is accomplished by creating anatmosphere that will evoke a “natural” expression.When a model is struggling with expression, direct
her to use words to both help create expression anddraw her concentration away from her struggle. “Ioften use ‘hot.’ This has a two-fold benefit. First, in say-ing the word, the mouth will take four shapes. If thephotographer is quick, at least one of these will photo-graph well. Also, this word tends to make the modelgiggle, further relaxing her. Another word I have usedis ‘true.’ This creates a bit of a pout.”“Sometimes a model gets really nervous and her
upper lip may stiffen and quiver,” says Billy. “When thishappens, I will ask the model to say, ‘alfalfa.’ The firsttwo syllables will relax the mouth, and the ‘-fa’ syllableproduces a nice shape for the mouth.”
FINAL THOUGHTS“While there are many skills that will help you to estab-lish your reputation in this field,” says Billy, “reallyunderstanding how to pose a model to make her lookher best is one of the most critical. Even with the bestlighting, clothing, makeup, and hairstyling, an image inwhich the pose looks awkward or unflattering will neverbe a success.”“If you have a photogenic friend, try scheduling a
test session to focus on honing your posing tech-niques,” Billy suggest. “Or if you are already working asa portrait photographer, consider adding a few ‘fashion’poses to your portrait sessions—your clients will un-doubtedly like the results!”
48 PROFESSIONAL PORTRAIT POSING
ABOVE AND FACING PAGE—Lips are second in importance only to the eyes and are critical in creating the mood intended in the image.
Expressions must look natural and spontaneous. The photographercan help accomplish this by creating an environment that will evokethe desired expression.


For the past ten years, Rolando Gomez has been onthe forefront of glamour photography, tirelesslyworking as a defender of the often-disdained art-
form he is passionate about. It finally seems like peopleare taking notice.Once the black sheep of the photography industry,
glamour has cast off most of its “cheesecake” reputa-tion, gotten back to its elegant Hollywood roots, andlost some of its stigma. “A good example is the photog-raphy of Jennifer Aniston in Vanity Fair a few yearsago,” says Rolando. “The images were sensual, sultry,and seductive, but with class. That’s glamour today.”Recapturing this classic legacy has also helped glam-
our influences slip into just about every genre of pho-tography, from fashion and editorial work to weddingphotography and portraiture. Driving this trend aremagazines like Maxim, Stuff, and FHM, as well as fash-
ROLANDO GOMEZ: SUCCESS WITH THE GLAMOUR EDGE 51
5. ROLANDO GOMEZ
Success with the Glamour Edge
is a former combat photojournalist turned glamour photographer and the founder of the popular websites www.garageglamour.com and www.glamour1.com—visited by over 500,000 people each month. He has been a guest speaker atthe PhotoImaging & Design Expos and Photo Plus Expos, where he drew standing-room-only crowds. His work has appeared in PlayboySpecial Editions products, Studio Photography & Design (where he is a contributing editor and writer), Peterson’s 4-Wheel Drive, Stars& Stripes, and newspapers nationwide. Gomez is a Lexar Media Elite Photographer, a guest instructor at The Palm Beach PhotographicCenter and FotoFusion, and the author of Garage Glamour: Digital Nude and Beauty Photography Made Simple and Rolando Gomez’sGlamour Photography: Professional Techniques and Images, both from Amherst Media. To learn more, visit www.rolandogomez.com,www.glamour1.com, or www.garageglamour.com.
ROLANDO GOMEZ
RIGHT AND FACING PAGE—Glamour photography isn’t about nudity, it’sabout idealizing the subject. In both of these images, the model’sdirect gaze locks with the viewer’s eyes and slightly parted lips adda sensual quality to the shots.


ion icons like Victoria’s Secret, bebe, and DKNY, whichhave now made glamour photography mainstream.
GLAMOUR DEFINED“Glamour photography is probably the most powerfulform of photography when it comes to its essentialsubject,” says Rolando. “Unlike fashion photography,which relies on the model to display a dress or accesso-ry (the real subject of the photograph), in glamour pho-tography the model is the subject of the photograph.”The other qualities that define a glamour photo have todo with the visual idealization of the portrait’s subject—creating an image that, like a classic Hollywood por-trait, turns a mere mortal into a star.
POSINGBecause glamour photography seeks to idealize the sub-ject, posing is critical. To ensure success, a careful anddetailed evaluation of each pose is needed. “In glamour
ROLANDO GOMEZ: SUCCESS WITH THE GLAMOUR EDGE 53
EYE CONTACT“What’s the big deal about eye contact?” asks Rolando. “It’ssimple—when a model looks at the camera, the viewer natural-ly tends to look straight back into her eyes. Think of it this way:as a vendor of a product—say, a jeweler—I want to sell you mynecklace, so I don’t need you looking at the model’s eyes first;I need you looking my product. As a result, most art directorsand photographers avoid eye-contact shots for fashion images.Therefore, if you do see eye contact in a headshot, consider ita glamour image.”
Today, glamour and fashion photography have become intertwined. Each genre borrows from the other—and the more extreme “fashion”images are actually more sexy and suggestive than some “glamour” photos. In both of the images shown here (above and facing page), themodel is at the edge of an infinity pool. On the facing page, the model is on her knees with her legs and hands forming the base of anasymmetrical triangle. The imaginary lines that form the sides of this triangle draw your eyes up the model’s body to her face. Notice howhaving the model lean forward accents her cleavage. The image above also features a triangular composition with the model’s feet placedjust outside of shoulder width. By shifting her hips and shoulders, Rolando also created a smooth S curve that runs the length of her body.


photography, especially with private glamour photo ses-sions, your subject often relies on your professionalexpertise as a photographer to guide her to greatposes,” says Rolando. “Most models feel lost during aphoto shoot unless they have a good photographer whocan direct them.”Lines. For Rolando, good posing begins with lines.
Some lines (called “implied lines”) are created by ourminds through the perceptions we hold in our con-sciousnesses. “A good example,” says Rolando, “is theimplied lines that are formed when knee or elbow jointsare cropped out of an image while the upper and lowerlimbs are both still visible. As viewers, we don’t eventhink twice about the missing joints—in our minds, wecreate a continuous line of the entire limb.”Imaginary lines, on the other hand, are lines that
make an image appealing to view and come in variousshapes—the most common being the S curve formed by
the upper and lower torso, and diagonals formed by thebody, lighting and shadows, or even props. “One of myfavorite poses,” says Rolando, “is to have the modelbend her legs or arms. This automatically creates diag-onal lines that are pleasing to the eye. The fundamentalrule is simple, ‘If it’s meant to be bent, bend it.’”Diagonal lines may also be produced by simply tilt-
ing the subject’s head. “‘Chin to shoulder’ is one of myfavorite phrases when helping a model pose,” Rolandosays. “By angling the chin toward the shoulder closestto the camera and tilting the forehead toward the sameshoulder, you get a natural diagonal across the face.This makes a great vertical image.”One important point while working to form these
imaginary diagonals with the head, chin, neck, and faceis to avoid shooting up the nostrils and avoid poseswhere the subject’s chin is buried directly into theirchest. “Think about how we walk and look in our
ROLANDO GOMEZ: SUCCESS WITH THE GLAMOUR EDGE 55
These images are all about the models’ long legs. To make them look their best, Rolando selected high heels for the models. By lifting theheels, these provide a longer look to the leg. They also cause the muscles in the calf to tighten, giving a more toned and shapely look thanwhen the foot is flat. There’s one more trick at work here: a low camera angle. Even with a tall model who has great legs, photographingher from above can make them look short. By getting down low, the legs are rendered in better perspective. Depending on the lens selec-tion, they may actually look even longer than they really are.

everyday lives—those with pride walk with their headup high in a charismatic fashion, not down low asthough ashamed,” Rolando notes. “This is typical inHollywood glamour photography; celebrity shooterslike to make their subjects appear as though they are upon a pedestal, slightly higher than their audience.”Comfort. “The key to posing is this: if it looks com-
fortable, it will probably photograph well; if it feelsuncomfortable to the model, it will probably photo-graph even better,” says Rolando. “Now, that’s not tosay we’ll make the model stand on her head, but some-times we’ll position her so she’ll photograph better inthe light and with the specific scene and focal length—even though the model feels it looks funny. This is oneof the great advantages of digital: you can now show themodel what you mean right away so that she will becomfortable—even in an uncomfortable position.”“For example,” continues Rolando, “I like to have
models in a chin-to-shoulder posture that creates a nat-ural diagonal of the face [see page 55]. However, whilethis type of pose looks great, it often feels awkward forthe model—particularly if she’s inexperienced. To over-come this, talk her through the pose and then showexamples as you shoot. If you do this, she will quicklyfeel comfortable with the pose.”Individualized Posing. Posing is the portrayal of
the subject’s body. Does she look tall, short, fat, thin,curvy, etc.? Poses can affect most of these physical traits.Height. A taller model can look short if you employ
a downward shooting angle and place her in a dress.“Instead,” suggests Rolando, “have her sit on the cor-ner of a couch. Then, ask her to hike up her skirt pasther knees while bending her legs at the knees. Presto!You have long legs again.”With a shorter model, Rolando recommends having
her wear heels and place one foot up on a rock, stepstool, etc. Pair this with a low shooting angle and you’llmake the model appear taller. “Some shorter models
also appear to have longer legs if you simply sit them inthe car with the door open (legs to the side) while wear-ing shorts,” he notes.Another simple pose Rolando recommends for
shorter models is to have them in lingerie or a bikiniwhile resting on their hands and knees. This works greatat the beach with a model in swimwear and for models
56 PROFESSIONAL PORTRAIT POSING
What woman wouldn’t love a photo like this for her significantother? The pose is sultry, but less revealing than many swimsuitshots. Notice how Rolando posed the subject’s arms to create diag-onal lines that frame her face and draw your eye in a circle throughthe image—always back to her dramatic eyes and sensuous expres-sion. The pose is also paired realistically with the background, acritical element in the success of any photograph.

in lingerie on a bed. Carefully explain this pose to themodel. If need be, demonstrate it or show her someimages from your portfolio that employ the same pose.You can modify this same hands-and-knees pose by
having the model go down more on her arms. This willnaturally prop her buttocks higher, which can be veryprovocative.
Hips. If you are photographing a model in lingerie,nude, or especially in swimwear and she is standingupright on her feet or knees, make sure to turn her hipsaway from the camera slightly. This will slim the hips fora more flattering image. Use the same technique if youwant to capture more of the model’s backside in yourimage. “Whatever the pose,” says Rolando, “it’s usual-
ROLANDO GOMEZ: SUCCESS WITH THE GLAMOUR EDGE 57

ly best to turn the hips slightly away from the camera orthe light source. It makes them look slimmer.”Breasts. “Breasts are similar,” says Rolando, “except
we turn them slightly away from the camera to makethem look as full as possible. Most female subjectswon’t be happy with your photos if you make their
breasts appear smaller than they are—especially if thesubject has augmented breasts. The easiest way toensure the breasts maintain their curves, or to enhancethe shape of smaller breasts, is to have the model turnher upper torso slightly away from the camera.“There are two things you need to watch out for
when posing a model this way,” says Rolando. “First, ifthe model’s bust is turned in the direction of the light,it can make the breast closest to the camera appear toobright—especially if the subject has light-coloredclothes on. Second, if the model’s breasts are turnedaway from the light source, you’ll get great definingchiaroscuro, but you can wind up with a distractinglybright upper arm or shoulder if the model is wearingsomething without sleeves.”
58 PROFESSIONAL PORTRAIT POSING
USING THE LCD SCREEN“The beauty of shooting digital glamour photography,” saysRolando, “is that you can check your progress and make adjust-ments as you shoot. It never hurts to ‘chimp,’ or view your LCDscreen on the back of your camera and say ‘Ooh!’ and ‘Ahh!’Besides, when a model hears you remarking in favorable tones,it carries a psychological impact that helps build her confi-dence. From time to time, you can also show your subject theLCD screen to keep her in the loop and boost her confidence.”
Headshots with a glamour edge are popular among both men and women. In the image above, diagonal lines are created by the subject’sarms and shoulders, as well as her face. Her direct gaze and slight smile give the image a sultry air. In the portrait on the facing page, themodel’s shoulders and lapels create strong, symmetrical diagonal lines that suggest a powerful physique. His head is also at a slight angleand his sunglasses complete the look, adding a bit of mystery.


Hands. “Poor posing of the hands can kill an imageoutright,” says Rolando. “Yet, the hands are probablythe body part that is most overlooked by photogra-phers.” Hands can be ugly, but more importantly, theycan even look bigger than the face. Sometimes, this is anatural attribute of your subject’s hands, but moreoften it is the result of poor posing and lighting, com-bined with the effects of lens distortion.“The simple rule for posing the hands is to look for
the ‘karate chop’ (or sides of the hands),” says Rolando.“You don’t want to see the front of the hand; this is theleast attractive part. The open palm, of course, whenheld up means ‘Stop!’ (or ‘Stop looking at me!’), so stayaway from such poses.” If you can’t avoid showing thefront of the hand, try to hide or subdue the area withshadows or clothing. You can even use the hands in theimage to hold or pull something; hands tend to lookmore natural when they are doing something.
“If the hands are posed on the hips,” says Rolando,“make sure they are not cupped in such a way that lightpasses through a gap between the hands and the body.Instead, have the model place her hands flat against herbody in the natural pockets of her upper hips. Again,the sides of her hands should be facing the camera.”“The hands and arms can also help you when a
model is lying down and her upper leg is bent down infront of her lower leg,” Rolando adds. “This pose iscommon, but it can appear unflattering if the upperthigh looks thick. Often, placing a hand to follow thethigh will reduce the natural thickening of the area.”“The key to posing is practice, practice, practice,”
says Rolando. “And thanks to digital, you can now dothis inexpensively and instantaneously.” As the imagesin this chapter show, Rolando takes pains to make all hissubjects look amazing—and they thank him for it withtheir repeat business and glowing recommendations.
60 PROFESSIONAL PORTRAIT POSING
In these images, you can clearly see how chiaroscuro can be used to accentuate a subject’s cleavage. In the image on the left, this is accent-ed by having the subject lean forward. This makes her breasts look fuller and places her chest closer to the camera, which further accentsit. Notice, too, the S-curve pose—perfect for accentuating a curvaceous figure. In the image to the right, the effect is much more subtle,but the appearance of cleavage paired with a sultry expression creates a portrait with undeniable sensuality.

When discussing portrait posing techniques withprofessional photographers, one of the namesthat always seems to be mentioned is Monte
Zucker. Monte’s timeless portraits have earned himinternational acclaim, and his thirty-five year commit-ment to educating other photographers has made himan important and often-mentioned influence amongtoday’s leading professionals.Although it’s not always easy to nail down what
makes a “Monte Portrait” (the term he uses for hisimages), there’s something about his work—and theposing in particular—that stands out as uniquely hisown. Never gimmicky or overwrought, Monte’s imagesare, nonetheless, almost instantly identifiable.“A Monte Portrait,” says Monte, “is simple, elegant,
void of distractions, and flattering to the subject. Itmakes a statement mostly about the subject, but at thesame time reflects my interpretation of that person. AMonte Portrait is one that shows the subjects naturallybut also depicts them as I would like them to be. I canphotograph reality when it suits the subjects, or I can
MONTE ZUCKER: CLASSIC STYLE 61
6. MONTE ZUCKER
Classic Style
was a professional photographer who specialized in wedding and portrait photography. During the courseof his career, which spanned over five decades, Monte was bestowed every major honor the photographic profession can offer, includ-ing WPPI’s Lifetime Achievement Award. He was also an acclaimed teacher, and is the author of Monte Zucker’s Portrait PhotographyHandbook (Amherst Media). To learn more about Monte and his work, visit www.montezucker.com.
MONTE ZUCKER
Monte Zucker’s portrait’s have a classic quality that makes themtimeless in their beauty.

idealize them when I feel it is appropriate. Either way, itis a simple statement. I want you to feel a MontePortrait as well as see it. If you are emotionally connect-ed with my subjects when you see their portraits, I feelthat I have done my job.”Monte feels strongly that this is the goal you should
strive for with every person in front of your lens. This isnot a goal that you are likely to achieve by stumblingaround blindly, trying this and that. Instead, you mustmaster the technical skills that will enable you to con-centrate on each subject.
FACIAL ANALYSISIn his teaching and writing, Monte provides a simplemethodology for mastering these critical skills. When itcomes to posing, he begins with an analysis of the sub-ject’s face.
“When I ask photographers what goes through theirminds when they begin to create a portrait, I usuallyhear vague comments but nothing with substance,” saysMonte. “You should begin by studying your subject’sface—and a few specific features in particular. After justa few moments, you will know exactly how to photo-graph each and every one of your subjects.”Monte suggests beginning your analysis with the
subject turned straight toward you. Look at the fullface. Then, turn the head and body slightly, viewing theface from an angle. Finally, turn the subject still more tosee the side view. You can accomplish a similar effect bychanging your own viewpoint, rather than asking thesubject to move. Repeat this evaluation to view theother side of the subject’s face.“What you’re looking for,” he says, “is how the face
seems to change as you view each specific angle. When
62 PROFESSIONAL PORTRAIT POSING
ABOVE AND FACING PAGE—A great pose rarely calls attention to itself; it simply enhances the composition and supports the expression.


viewing the full face, be sure to have the subject facingstraight at you. Examine the hairstyle, the size of botheyes, and how a change in their expression changes thesize of the eyes and the outline of the face.“Eventually, you will be able to do this analysis while
holding a conversation with the person. Of course, thismakes your subjects more comfortable than when theyare aware that you are studying their faces.”Although, each face has its own special characteris-
tics, there are basically only three angles of view to con-sider. First is the full face view, with the subject lookingdirectly into the camera. When not covered by the sub-ject’s hair, both ears will show in this view. “Even ifyou’re beginning a portrait sitting with a full- faceview,” says Monte, “you should think about which wayyou’re going to turn the face for the two-thirds view.Think about the easiest way to go from one facial view
to the other without having to switch the main lightfrom one side to the other.”Second is the two-thirds view, with the subject look-
ing at an angle toward the camera—either to the leftor the right. “The two-thirds view usually slims the face,making the cheekbones stand out more,” Monte notes.“In this view, the eye on the far side of the face shouldgo almost to the edge of the outline of the face, but asmall amount of flesh should still separate this eye from
POSTURE“Just before the exposure is made, the subject should lift to hisor her fullest height to achieve better posture,” says Monte. “Besure that the person’s shoulders are still relaxed downward,however. In the desire to sit erect, people tend to lift theirshoulders. Be aware of this, and gently tap them to relax theirshoulders.”

the background. The tip of the nose should also be con-tained within the outline of the cheek; it should notcome close to the edge of the face or cross over the out-line of the face and protrude into the background.Additionally, the bridge of the nose should not coverany of the eye on the far side of the face. If the subject’snose has a high bridge and begins to cover the eye, easethe face back toward the camera position.”Finally, in a profile view you see exactly half of the
face. “To achieve a pure profile,” says Monte, “turn theface away from the camera until the far eye and eyebrowboth disappear. If they are long enough, you may seethe eyelashes of the second eye, but this is unimportant.All that really matters is that you see an exact profile.Once you have your subject posed for a profile, be sureto reposition any hair that may be showing on the farside of the face—especially below a woman’s chin.”
Whatever view you decide to use, Monte recom-mends sticking with your decision. “If you photographa person from every conceivable angle, you will onlyconfuse them when it comes to making a selection. Ifyou’re totally unsure, of course, then go for both sidesof the face—but I rarely do that.”
FUNDAMENTAL POSESOnce you have determined the desired facial view, youcan decide on the pose to use. For teaching purposes,Monte divides poses into two basic categories, drawingon characteristics that seem to repeat in art forms fromacross the centuries. “For simplicity,” he says, “I havenamed them the basic pose and the feminine pose.”The Basic Pose. “The basic pose is sometimes re-
ferred to as the masculine pose,” says Monte, “but it isactually good for everyone—male or female. It is partic-
MONTE ZUCKER: CLASSIC STYLE 65
There are three basic views of the face available to portrait photographers. These are the profile view (facing page), the full-face view (above,left), the the two-thirds view (above, right).

ularly useful for people who are heavy, because whenthe head is tipped to the low shoulder, the fullnessaround the jawline and neck disappears.”The basic pose is one in which the head and body go
in the same direction—toward the main light. In thispose, the head is also tipped toward the lower shoulderso that it is perpendicular to the slope of the shoulders.Notes Monte, “A common mistake is having the headstraight up and down; this tends to make the subjectlook uncomfortable.”For the basic pose, the subject’s shoulders should
always be at a 45 degree angle to the camera. “Less ofan angle tends to broaden a person’s body too much inthe final portrait,” says Monte. “Conversely, turningthe body more than 45 degrees away from the camerawould necessitate turning the subject’s face back to thelens so much that it would be impossible to keep theface flowing in the same direction the body is facing—making the basic pose impossible to create.”The basic pose works only for full-face and two-
thirds view portraits. When photographing a profile,you must switch over to the feminine pose (for bothmale and female subjects). “A profile needs a broader
base,” says Monte, “which is achieved only with thefeminine pose.”The Feminine Pose. The feminine pose is one in
which the head is turned and tipped to the high shoul-der. The body is then tipped forward at the waist, lean-ing slightly in the opposite direction from the way theface is turned. The position of the shoulders remainsin a fixed relationship with the position of the head,regardless of the angle at which you are photographingthe face. “Once you pose and light someone in a femi-nine pose,” says Monte, “you can leave the subjectalone and simply move the camera position to photo-graph a full-face view, a two-thirds view, and a profile.”The feminine pose creates a very elegant look for
slim women. “However,” notes Monte, “it does notwork for heavier women, because the tip of the head
66 PROFESSIONAL PORTRAIT POSING
Shoulders are always at approximately a 45-degree angle to the camera for pictures using the basic pose. Note that for both the left andright profile views, the pose switches from basic to feminine; the feminine pose is always used for profiles. The basic pose is not just usedfor men, of course—as seen in the portrait on the facing page.
Shoulders are at approximately a 45-degree angle to the camera for most pictures using the feminine pose. The exception is the two-thirdsclose-up view, for which they are turned directly toward the camera.
SEATINGTell your subject exactly which way to face when they sit. “Mostphotographers ask their subjects to sit and then rearrangethem,” says Monte. “You will look a lot more professional whenyou are very explicit: ‘I’d like you to sit down facing this direc-tion—without moving the stool, please.’“


toward the high shoulder can create folds around thejawline.” Other than for the profile, you should alsoavoid the feminine pose for men. The best way to dothis is to make certain that the male subject’s body isturned toward the camera enough that he will not haveto turn his head back in the opposite direction from hisbody to look into the lens.The only exception to the women-only rule with the
feminine pose is when you are shooting a profile. Thisis because a face in profile needs the support of the bodyturned at an angle to the camera—whether the subjectis male or female. “If you try to create a profile with thesubject’s body facing directly toward the camera ortheir back straight into the camera, you will produce avery strained appearance,” says Monte. “I’ve seen thismistake made many times, and I want to spare your sub-jects the agony of having to twist their necks more thannecessary.”
THE EYES AND EXPRESSIONOnce the pose is in place, you must work on creatingthe desired expression. “You can have flawless posingand lighting, but if you don’t have a good expression,the photograph just won’t make it, says Monte.This begins with the eyes. “Undoubtedly, the
strongest insight we have into a person’s character isthrough his eyes,” says Monte. “Direct eye contact,with the subject looking straight into the lens, providesthe most powerful connection between the subject andthe viewer of the portrait. Unfortunately, I have oftenfound that when people look directly into the lens theireyes appear to be slightly closed. When this happens,direct your subject to look at a point slightly above the
68 PROFESSIONAL PORTRAIT POSING
FACING PAGE—Direct eye contact creates the most powerful connec-tion between the subject and the viewer, as shown in the largeimage. When the subject looks off camera, as shown in the insetimage, the mood in more subtle and demure.
ABOVE—Expression can make or break a portrait—and serious expressions seem to have a more enduring quality than big smiles.


lens. Often, their eyes will look much better if they’regazing at the top of your head rather than into the lens.There have been many occasions when I’ve had peoplelooking even higher—yet, when viewed through thecamera, they seem to be looking straight into the lens.”“It’s also a good idea to ask your subjects whether
they prefer themselves to be smiling or more seriousin their portrait,” Monte suggests. “A more seriousexpression is usually more comfortable—and seriousportraits also seem to last longer.“If you feel that the subject will look better with a
smile, though, ask for a slight suggestion of a smile, nota complete smile—especially if it appears to be a forcedsmile. ‘Smile with your eyes!’ is a good prompt to haveup your sleeve. When they do that, they forget about
their mouth—and that’s usually when I get the mostnatural expression.”
IN CLOSING“An effective portrait makes a dual statement,” saysMonte. “First, it makes a statement about the subject.Second, it makes a statement about the photographer.If you look at a person’s portrait and you are drawn intohis or her personality—if you feel that you know some-thing about that person just by looking at the picture—then the photographer has accomplished his or hergoal.” By that standard, it’s clear that Monte’s portraits,with their classic appeal, hit the nail on the head.
70 PROFESSIONAL PORTRAIT POSING
“So, what would you have done in this case?” asks Monte, referring to the above image. “Would you have asked for more of a smile or shotwhen I did? This photograph is one of my favorites. Once in a lifetime do you catch something this fun!”

Most high-school seniors will never have a chanceto be professional models, but when a seniorarrives at Tim Schooler’s Lafayette studio, in
the heart of Louisiana’s Cajun country, they get a tasteof what it would be like. “We treat them like models fora day,” says Schooler. “We don’t limit them in clothingchanges and we take them to exciting locations thatlend themselves to the fashion style of my work.” Thesuccess of this strategy is evident in the sheer length ofhis waiting list for senior portrait sessions; it often has asmany as three hundred names on it.A self-taught photographer, Tim has made it an
ongoing practice to study the work of photographers headmires; this is how he learned photography and howhe continues to evolve as an artist. “My biggest influ-ences when it comes to posing have been Don Blair,
TIM SCHOOLER: SENIOR PORTRAIT SUCCESS 71
7. TIM SCHOOLER
Senior Portrait Success
is a professional portrait photographer who specializes in high-school senior portrait photography. His suc-cessful studio offers a blend of traditional posing and lighting with more of a fashion edge, producing images that appeal to bothteens and parents. While Schooler is especially well known for his location lighting techniques, he is also a master of studio light-ing. To see more of his acclaimed images, visit www.timschooler.com.
TIM SCHOOLER
For this senior portrait, Tim had his subject kneel behind a set thatfeatures paned windows. She then leaned forward to rest her elbowson one of the openings, with her forearms and hands elevated tograsp the edges of the window frame. This separated her arms fromher torso, creating a slim look. Tim shot the portrait from a stand-ing position. This, combined with the forward-leaning pose, allowedthe subject’s body to recede slightly into the background, keepingthe emphasis on her face.

who was the king of posing, and Monte Zucker, also amaster at posing,” says Tim. “I really feel strongly thata lot of people today are struggling with posing becausethey need to learn the traditional rules of flattering thehuman form. Then it’s okay to go and do somethingdifferent—to do funky stuff, try different things, andbreak the rules. But you have to remember that thoserules were created for a reason.”Tim adds, “That’s why I studied the masters. I read
every book I could find, watched videos, and attendedworkshops, because I really admire what they did. Once
I learned the rules, I tried to adapt them to what I do—a more dramatic, edgy type of portraiture. Essentially,I’ve blended those traditional techniques with the workof high-fashion photographers.”Because fashion photography is an ever-evolving
field, Tim keeps up on the latest styles by reading mag-azines like W, Glamour, and Vogue. “I try to see whatthey’re doing, and a lot of times the posing is reallycool—really interesting and different,” says Tim.It’s important to note that Tim’s constant study of
cutting-edge looks isn’t just a self-gratifying creative
72 PROFESSIONAL PORTRAIT POSING
ABOVE—Despite explicit advice to wear long-sleeved tops, many of Schooler’s clients arrive for their sessions in short-sleeved or sleevelessshirts. As a result, Tim is constantly looking for inventive ways to hide their upper arms. “Even with thin subjects, the upper arms can lookheavy when they are bare,” Tim notes. One solution is to create a tight image like this. Here, Tim used the girl’s forearms to guide your eyesto her face and soften the look of her upper arms and shoulders. Paired with some diffusion and vignetting in postproduction, the result isextremely flattering. The pose also gave Tim the opportunity to showcase the girl’s ornate bracelet. “I love when kids bring stuff like this;accessories can add impact to an image—especially with bare arms,” says Tim. FACING PAGE—This young lady is an aspiring country-musicsinger, so she wanted a senior portrait that could do double duty as a promotional image for her music career. “She wanted a Shania Twaintype of image,” said Tim, “but not quite as sexy—something appropriate to her age.” Tim selected this setting of urban decay to contrastwith her beaded dress and high heels. In many ways, this pose follows the traditional rules. First, it has the subject’s face turned into thelight, while her body is turned away from it for a slimming view. Second, her left arm is separated from her waist, revealing a flatteringcurve. Additionally, her face is not in line with her torso, but turned to an angle. On one count, however, the pose is a rule-breaker: noticethat the young lady’s weight is actually on her front leg. “Normally, I’d have the weight on the rear leg and cross the other leg in front ofit rather than behind,” says Tim, “but she fell into this pose naturally and is thin enough to pull it off, so it works.”


exercise; the kids that Tim photographs have grownup in a virtual deluge of media—magazines, web sites,videos, and movies that all set the bar very high when itcomes to imagery. As a result, these teens demandsomething beyond the traditional senior portrait.“The one thing that we hear over and over again is
kids complaining that their friends went to so-and-soand all their photos look the same—and they wanttheirs to be different,” says Tim. “It’s hard to go outevery day and stay within the confines of the rules thatyou know are going to make them look good, but still
do something different—something that doesn’t looklike anyone else’s images. In the busy season, it be-comes almost impossible to do more than just nice, sal-able images that the parents will love and the kids willbe happy with. We really push the envelope at the slow-er times, when we have time to experiment freely andtake more shots.”Pushing the envelope is one thing, but Tim knows
he also has to push it in the right direction for each clientin order to ensure a good sale. “It’s not mandatory, butit’s very strongly suggested that, before they come for
74 PROFESSIONAL PORTRAIT POSING

their session, we have a twenty- to thirty-minute con-sultation with them,” he says. “We show them a slideshow of images set to music. We let them see our latestwork—things we may not yet have had time to put onthe web site. Then, we sit with them and talk aboutwhat they liked and what they didn’t. We determine ifthey want indoor images, outdoor images, or a combi-
nation. Do they like bold colors or muted colors? Wemake notes on all of this and put it in their file. Whenthey come back, we go over it again, so I’m sure I canshoot something they will like.”When it comes to posing, Tim’s approach is similar-
ly tailored to the subject. Sometimes he may have a spe-cific pose in mind for a given subject and scene, other
TIM SCHOOLER: SENIOR PORTRAIT SUCCESS 75
LEFT—Reclining on a triangular set element, this pose is all about the curves. “In a woman’s portrait, that’s what they want—it’s what showsthe femininity,” says Tim. “We have a nice curve from the head to the neck, and a nice curve at the waist.” Another S curve was created byhaving her drop her top knee down in front of her bottom knee, a pose that also slims her hips. RIGHT—Here is the same subject in a dreamyimage. Tim turned her body at a pronounced angle to the camera, then used her raised hand and the flower to draw your eye to her face.


times it develops more organically as the session pro-gresses. “I’ll ask them what they want in each scene. Dothey want close-ups? A full-body shot? About 85 per-cent of our clients are young females, but as thin asmost of them are, many are still self-conscious abouttheir figures and don’t want a full-length image,” saysTim. Students in Tim’s area also make good use of hisweb site, so many come to the consultation or sessionwith ideas about images they’d like to create.
Most of Tim’s clients aren’t experienced in front ofthe camera and need help to look their very best. “I’lldemonstrate a feminine pose for them—and I’m a bigguy, so that always makes them laugh. It relaxes them,and they stop seeing me as intimidating and realize that
TIM SCHOOLER: SENIOR PORTRAIT SUCCESS 77
FACING PAGE—Tim created this outdoor portrait in a spot where hefound almost perfect natural light. This is yet another solution tophotographing clients in short-sleeved shirts: hide them behind aprop or set element. In this pose, even with a trim subject like this,the rear can appear a bit large, so Tim had her bend at the waist,twisting around so that her right shoulder (and the hair pulled outacross it) would conceal this area. ABOVE AND RIGHT—“As soon as theysee it, everyone wants a shot like this,” says Schooler. In the imageabove, Tim added a pom-pom wrap to minimize the chest area andkeep the attention on his subject’s eyes. In the image to the right,Tim used the same basic pose but spread out the skirt of the girl’sprom dress to form the background. In poses like this, he notes thatyou must tilt the subject’s head up slightly to keep the plane of theface parallel with the lens plane. Otherwise, the chin will becometoo prominent.


they’re going to have a good time. Then the whole ses-sion is just great.”“If they’re still not doing quite what I want,” says
Tim, “I’ll ask permission, then move their hand orguide their foot into position by touching their knee.We have to honor those basic rules to flatter their form,but still do something a little bit different.”Tim also notes that, while comfort is important,
poses that look great often feel a little awkward. “A lotof times, a subject will say a pose feels weird,” he says,
“but then I show them the image on the back of thecamera and they love it. I explain that, yes, it feels awk-ward because you don’t normally stand or sit like that—but the reason we’re doing it is that we want to createS curves, or it’s flattering to the figure. I always explainthat to them; it’s part of keeping them involved in thesession. I don’t want anyone to come in and not liketheir photos because they aren’t what they wanted, so Itry to get feedback as we go, reading their expressionsand listening to what they are saying.”
TIM SCHOOLER: SENIOR PORTRAIT SUCCESS 79
FACING PAGE—This young woman wanted a “country girl” image. Tim selected a chair that complemented the rustic theme, then had her adopta casual, cross-legged pose. While the pose reads as natural, note that Tim had her roll onto her far hip, eliminating any flattening on thehip closest to the camera to produce a slim, shapely view. ABOVE—A New Orleans resident who was displaced by Hurricane Katrina, this sub-ject wanted an image with an urban feel that reminded her of home. A casual pose on a fire escape near the studio fit the bill—and hav-ing her raise one arm gives the image a fashion edge that adds to its urban flair.

What Tim’s clients ultimately want is as different asthe individual subjects. Given that the vast majority ofhis clients are female, Tim is well suited to identifyingtheir needs—he has two grown daughters and grew upwith only sisters. “I’ve always had girls all around me,so it’s helped me to become a little more empathetic totheir concerns,” he notes. “Having said that, though, Ican usually tell the differences in their personalities bythe clothes they wear and bring for the session. If theiroutfits are traditional, they’ll want traditional images. Ifthey come with clothes that are edgy or sexy—low topsor short skirts—I know they want something that’s a lit-tle more fashion style. They want to push the envelopea little—keeping it PG or better, of course.”
“I think posing is critical to the success of an image,”says Tim. “No matter how good everything else is, ifthe pose looks awkward, the image won’t work. Somephotographers promote lifestyle photography—peoplejust standing around. I think my clients need posing.They don’t understand what will look good and whatwon’t. It’s up to us to use our experience to create theposes that will flatter them the most. Posing is impor-tant. We’re trying to create stuff they’re not going toget from Mom’s camera, and good posing is one of thethings we can use to help us.”As the fashion-inspired images in this chapter show,
Tim has already more than exceeded this goal. It’s nowonder his clients just can’t get enough.
80 PROFESSIONAL PORTRAIT POSING
ABOVE—Here’s an unusual pose—and one that requires a very trim subject. Tim had the young woman lean back on her elbows and cross herlegs. He then shot from a high camera angle to keep your eyes locked on hers. Note the role of color in the effectiveness of this composi-tion. FACING PAGE—The waterfall shooting area behind Tim’s studio is popular with seniors. Here, a high camera angle pairs with effectivetonal blending (the dark clothes recede into the setting) to keep the face the center of attention—even in a fairly complicated scene.


For more than twenty years, portrait photographerTim Kelly has been recognized throughout theindustry as a master printer, digital pioneer, and
esteemed educator. At the heart of his acclaim, how-ever, is an exceptional body of portrait work—imagesthat eschew gimmicks and special effects in favor ofclean lines, subtle tones, and delicate simplicity.Melding classic lighting and composition with a con-temporary sensibility, Tim’s portraits have a quality thatmakes them almost timeless.When it comes to posing, Tim’s techniques are root-
ed in his training in classic techniques. “I worked in astudio back in the ’60s and ’70s—and then precise pos-ing really mattered, more than today. When we were
doing portraits, we had to do it by the rules becauselighting was much more narrow and film was muchmore expensive. It was very structured, and there werefoundational things you had to know so you didn’twaste your time or your film.”
9. TIM KELLY
Timeless Simplicity
owns a portrait studio in Lake Mary, FL. He holds the Master of Photography and Photographic Craftsman degreesand is a longtime member of Kodak’s Pro Team. In 2001, he was awarded a fellowship in the American Society of Photographers andnamed to the Cameracraftsmen of America. To learn more about Tim and his work, visit www.timkellyportraits.com—where you’ll alsofind an extensive selection of Tim’s acclaimed instructional materials for professional portrait photographers.
TIM KELLY
RIGHT—Tim’s subject for this portrait was a singer and radio person-ality. “He was interesting to me, so we shot a lot of differentthings,” says Tim. The pose turns what would otherwise be a verytraditional portrait into something a bit more avant garde. Note thealternating pattern of light and shadow from left to right (shadowedbackground, to highlight side of face, to shadow side of face, tohighlighted background). FACING PAGE—While Tim gives his subjectsplenty of advice on clothing selection, some clients opt for theirown choices. This young woman chose a colorful sleeveless top.Through careful posing and lighting, Tim made it work—and work sowell that he was able to create an entire album from the session.
82 PROFESSIONAL PORTRAIT POSING


“With the light being smaller and narrower (wewere shooting with parabolics, barndoors, or smallumbrellas) the subject had to be precisely placed. Youcouldn’t just have your subject moving around at will.With large boxes simulating window light, we can nowget away with a lot more—but at that time we had to bevery precise. You had to get that patch of Rembrandt
lighting, the catchlights at 10 o’clock or 2 o’clock—everything had to be just so.”In the years that have passed since those foundation-
al experiences in his career, Tim has worked to blend hisown tastes and sense of creativity with those rules. “Like
84 PROFESSIONAL PORTRAIT POSING
Tight three-quarter-length portraits like these are among Tim’s bestsellers. “People like big heads,” he says. “When they’re looking atthe images and making selections on a monitor, they ‘ooh’ and ‘ahh’when a big, beautiful face comes up. This is my way of giving themmore face—plus the design element of hands. I just bring the handscloser to the face. Then, you have a headshot feel but with the ele-gance of a three-quarter length image.” In the examples shown here,the subjects are both posed backwards in a chair, with their armsfolded across the chair back. This looks natural in the portrait andfeels natural to the subject when posing. Notice that Tim has elect-ed to hide the hands in both portraits. “That’s just personal taste.In an arms-crossed pose, I don’t really like the traditional fingers-up-the-arms pose. I don’t see people standing like that. That’s whatit really comes down to. I follow a more normalized look.”

everything else, it’s an evolution. It seems like withall that structure and all that training, ultimately, thethings that pleased my eye the most were very natural-looking images—meaning something like window light.I made it my goal to re-create window light, because it’svery forgiving, but also very believable to the viewer.”In the early 1980s, large softboxes became his way
to accomplish this goal, and are still the modifiers heuses most today. “With that light, I can more easily posemy subjects in what are, visually, more natural-lookingsituations. I don’t want my images to appear artificially
lit. I want them to seem very natural, so I try to keepthe light in my portraits visually simple. Then, I canpose the subject into that light.”
This is a scenic background that Tim likes to use with many senior-portrait clients. Since he couldn’t choose a single background tocoordinate tonally with this white-and-denim outfit (his normalpractice), he went with one that fit the urban feel of the clothing.“This was a tiny slice of the pie for his senior session, but I felt itwas pretty intense and it worked for me,” says Tim. When posingguys, Tim says he tends to let them do their own thing. “Girls arepretty easy,” says Tim. “Girls are concerned with how they are goingto render. They generally want to do more, and they have more hairand clothing options. In fact, I have to structure my session andpace myself so I don’t end up shooting all my in-head designs onthe first outfit that comes out. With guys, on the other hand, we’reoften lucky to get one alternate outfit.” As a result, senior boyscould be done with their sessions in about fifteen minutes, whilegirls’ sessions typically require an hour or more.


While he sometimes meets with his subjects in ad-vance of the session, Tim says he really likes to discoverpeople when they arrive. “My studio is set up in such away that, technically, the image is already going to be awinner as far as the lighting, background, and capturesystem. The retouching is going to be great, the print-
making is going to be great—so it’s up to me to makea good interpretation of the sitter.”“The way to ensure success, for me, is that I tell
folks to bring several outfits—more than I’m going touse.” Some people know exactly what they are going towear; others need some guidance. In this case, Tim
“Portraits like these are the easiest thing in the world to do once you know what side of the face to shoot,” says Tim. “This is determinedby studying the face, looking at the sizes of the eyes, etc. For me, more often than not, the side of the face left open by the part in thehair is the one.” Both portraits were shot on simple gray backgrounds. The portrait on the facing page features an Indian dancer. “I seemto do a lot of those because I did a few well, and now lots of dancers come here,” says Tim. Notice that he selected a three-quarter facialview. Tim normally places the face at no more than a two-thirds view, but for her, a greater angle seemed to work.

advises them to bring in anything long sleeved anddark. “If they do that, we’ll have a great session,” hesays. Beyond that, Tim emphasizes the need for them tobring a selection of looks. “If we ask for enough, we’llalways end up with something nice,” he says.Clothing is an important starting point when deter-
mining how to present a subject. “The clothing dictates
where you’re going with the pose,” says Tim. “If theclothing is formal, we’re going to go with a formalpose. Formal poses don’t have to be stiff, but they haveto be done in such a way that the clothing, the back-ground, and the attitude all match.”“I also analyze the face and the hair to determine
how I’m going to basically begin my design,” Tim con-
“When a subject is sleeveless, it’s more of a challenge—I can always win, though,” Tim laughs. Here, Tim opted for a square frame. He thenposed the arms to create a square, raising her left hand to her face so that your eye keeps turning back to the focus of the image. “Normally,you can’t get away with a pose like this, but in a square-in-a-square image, it works,” Tim says.

tinues. “I’ll usually start with a basic two-thirds head-shot on both sides of the subject to figure out where Iwant to go. After I get an idea which side of the face Ilike better, I often spend the rest of my session on thatone side. Though there are many interpretations of it, ifsomebody has a good and bad side (or a good and bet-ter side), obviously you’re wise to spend your time onthe better side. If you can assess that in the first threeminutes, why not?”During the session, the poses and design concepts
Tim uses tend to build gradually in complexity. “Youcan go into the dramatic things early in your session,but I don’t. I work my way into the more artistic, inter-
pretive, or looser poses. I start with headshots, then getsome good three-quarters, and if it’s a young person Imight do some standing poses.”When it comes to the mechanics of posing, Tim
adheres to the traditional “rules” . . . at least to somedegree. “In general, I do follow the traditional rules—skinny hands, weight on the back leg, tops turned awayfrom the light—and those things definitely do count forshaping the face and rendering the body. But then youalso learn how to flatter a subject, their form and theirface, at the same time.”It’s also important to Tim that the pose not look
stiff or forced. “I’m trying to make it so people don’t
TIM KELLY: TIMELESS SIMPLICITY 89
Long sleeves, black shirts, soft lighting, and a background that’s in key with the clothing—it all adds up to a good start for a portrait. Bothof these images were created during shoots for Tim’s instructional videos, which are sold on his web site. “We were really just showing howwe could control the lines and the background to force the eye to go where it needs to go,” he says. In both portraits, the body is at a pro-nounced angle, leaning toward the main light, but the head remains vertical. “Photographers are always taught head tilts, both masculineand feminine,” says Tim. “Those rules do apply if you choose to use them—but there are higher laws. I find that leaning bodies are my bestfriends in terms of design. With any subject, male or female, if you can keep the head vertically straight, you can put the body in any direc-tion you want. That’s a ‘rule-breaker’ that always works for me.”


ever feel posed. In fact, the greatest imagesare the ones where we allow them the free-dom to move and lean and be comfortable.That’s one of the real secrets for me—toput them in a place where they can berelaxed and feel comfortable. Then I canjust look for the moment, the angle, the expression—the other things.When refining poses, Tim doesn’t see a problem
with direct assistance. “I definitely handle everybodyand move them around,” he says. “I don’t try to do itfrom afar. I have no qualms about going up there andfixing things for folks. I go in there and put thingswhere they need to be, telling them what I’m doing andwhy.” The key moment then comes when he lets thesubject relax the pose. “If you have someone holding a
pose for more than thirty seconds, it gets stale,” he says.“I often have people take the pose apart and redo it.That’s usually when it’s right.”In the overall success of a portrait, Tim feels that
posing ranks very high, right under lighting and overalldesign. “The images that I show most often—whetherI’m selling them, or hanging them, or publishingthem—rely very heavily on corrective posing. I have somany little rules of my own that it’s incredible,” helaughs. “For example, I never put the body closer to the
TIM KELLY: TIMELESS SIMPLICITY 91
Designing a pose starts with the clothes. If, as is thecase in these two images, the clothing is formal, Timcreates a corresposondingly formal pose. Still, how-ever, the pose must look natural and not stiff. Asyou can see in these images, “formal” posing canrange from quite traditional (facing page) to rathercasual (right).
In the bridal portrait on the facing page, Timwanted to capture the detail and texture on the backof the dress. “I actually shot this on Polaroid,” saysTim. “Shooting a large piece of film is actually oneof my favorite fine-art release valves. You have nocropping, no burning or dodging later—that’s it. Ilike a lot of stuff I get on this old medium.” Whilethis bride is posed in a traditional manner, her pro-filed face is actually turned to face away from themain light. “I wanted a timeless, black & white artimage, so I made the mask of the face less importantthan the dress,” says Tim.
In the portrait to the right, the clothes again dic-tated the mood. The girls are posed in a chair, butthis is almost totally obscured—what’s more impor-tant is the dramatic lean in the pose. This creates agentle S curve that leads your eye to the faces. Timparticularly calls attention to the hands in thisimage. “Really, the arms and hands would not nor-mally be considered elegantly posed,” he notes.“What matters, though, is that we get to the facefirst, then the hair, then the hands. If it goes in thatorder, it’s going to work. This had the facial expres-sion I wanted, the color harmony is there, and thehands are close, as far as the positioning is con-cerned. The diagonal bodies are so strong againstthe diagonal face tilts—there are so many zigs andzags—that you don’t really notice the hands.”

main light than the face, so all my images have the faceleaning into the light. This minimizes the body, whichis ideal for the average subject.”Such refinements lead to a great consistency in
Tim’s portraits—in fact, it’s often impossible to tell if agiven image was made twenty years ago or last week.However, that doesn’t mean that his work stays thesame—far from it. “I’m continually changing it andcoming up with new versions of the look I like. Over
the years, I’ve learned to do better facial analysis, to flat-ter people more, and to be more dramatic.”Overall, Tim’s goal is to create portraits that people
feel good about. “I like to feel like I can get great thingsof any person—any size, any shape, any age—and Iknow I can because I’ve done it a thousand times and Iknow how to correct every feature. That’s why peoplecome here. That’s why photographers are paid whatthey are—we know how to make people look great.”
92 PROFESSIONAL PORTRAIT POSING
ABOVE—“As we work, there are always outtake moments—fun, laughing pictures. I never want to be accused of having everything have thesame look, like, ‘Oh, you’re the guy who makes everyone look serious.’ That’s not true at all,” Tim says. “It happens to be what I show a lotof, and what I sell a lot of, but every session comes complete with smiles—after all, you have to have something for grandmothers. And asmuch as I love the classy, formal pose, I also love people being crazy.” FACING PAGE—The posing Tim uses when employing props must feelnatural to the subject but also look very refined. “Every digit is taken care of,” he says. “It’s all intentional, but it has to feel very good tothem. Even without props, you have to do this, or it’s just going to look sloppy. So the hands are carefully placed, but they are intended toread as utterly believable.” Notice, for example, how Tim had this young lady push her left wrist in to create a graceful curve.


94 PROFESSIONAL PORTRAIT POSING
Wisconsin photographer Chris Nelson got hisstart in professional photography as a photo-journalist, although he also studied fine-art
photography as a minor in college. As a result, he bringsa unique set of skills to his portraiture. Since then, hehas continued to expand his skills, studying within thephotographic industry under such notable photogra-phers as Monte Zucker, Don Blair, Larry Peters, andMichele Gauger, who has been his mentor for morethan a decade. “Classes I’ve taken from photographersthat I admire have really accelerated my learning,” saysChris. In fact, his learning has progressed so well that hehimself has become a respected teacher.As with all of the artists profiled in this book, the
foundations of Chris’s photographic style are evident inthe images he creates, portraits that honor the tradi-tional techniques used to flatter the human form, whilesimultaneously striving to capture something genuineand unique about the subject. “I do not feel like allimages in a senior session should be trendy or right off
an MTV commercial,” says Chris. “Classic images thatdisplay the face and figure in a timeless manner are alsoan important part of my sessions.”Also evident in each image is Chris’s awareness of
what clients want to see in their images (and what theydon’t). This is particularly important when creatingwork for the style-conscious high-school senior market.Chris, who is particularly well known for his images ofteen subjects, markets his senior portrait services withthe phrases “Faces that Speak” and “Styles that Show.”These are portraits that Chris says are “designed toreveal expression, mood, personality, and imagination.”They are portraits that “portray the essence of a persondoing what he or she loves.”
THE “FACE FIRST” RULE“Making your client look his or her best is a sincereform of flattery. I always go by the ‘face first’ rule,because there’s nothing more important than the face,”says Chris. The image on the facing page is a good
10. CHRIS NELSON
Senior Style
is a graduate of the University of Wisconsin–Milwaukee, where he earned a B.A. in English (applied writ-ing and journalism), plus minors in philosophy and fine-art photography. In his days as a photojournalist and reporter, Chris supple-mented his small-market wages shooting weddings, advertising images, and senior portraits. In the process, he found that he enjoyedhis sideline work more than his day job. In 1991, he quit his newspaper gig and started a portraiture business, which moved to FallCreek, Wisconsin, a few years later and became Fall Creek Portrait Design. Since then, he has also earned his Accolades ofPhotographic Mastery and Outstanding Photographic Achievement from WPPI (Wedding and Portrait Photographers International).Chris is the author of Master Guide for Glamour Photography (Amherst Media, 2007), which details his unique approach to creatingand marketing glamour photography. For more information on Chris Nelson, please visit www.fallcreekphoto.com.
CHRIS NELSON


example of this principle, but you can see it as a guidingforce in all of the images in this chapter. For this partic-ular shot, Chris posed his subject in front of a crumpledgold mylar background that complements the otherwarm tones in the image, letting you focus on the sub-ject’s face.The young woman’s face was posed in a two-thirds
view, while her eyes were directed back toward the cam-era to lock the viewer’s attention. For this image, Chrishad the subject turn her face away from the main light,creating a slimming short-light pattern (although amplefill produces a low lighting ratio, so the effect of theshort lighting is very gentle).Note the posing of the subject’s hands. The young
woman’s arms are raised and her fingers intertwinedwith her hair. This creates leading lines that draw youreyes up the frame to her face. The hands, in a mirroredpose, also frame the subject’s face, while the soft lines ofher cascading hair and relaxed fingers help maintain agentle, feminine quality (which is reinforced by the useof soft focus).
Again referring to the image shown on the previouspage, Chris also advises, “Don’t try this pose withoutlong sleeves.” As you can see, he has used his subject’ssleeves to actually conceal the bulk of her forearms andhands, allowing them to read, visually, as part of thesweater. If the hands and arms were bare, the skinwould compete for attention with the face—and that’ssomething you definitely want to avoid.
THREE VIEWS“There are only three correct angles at which to photograph aface: full, two-thirds, and profile,” notes Chris. “In magazinephotography, we see lots of full faces—but keep in mind thatthey’re working with perfect faces and flawless makeup.”
“For most people,” says Chris, “a two-thirds view is general-ly most appealing because of its slimming effect.” As you cansee, most of the images in this chapter are created in this view.
“Profiles are a good variation, because they’re not often seenin snapshots,” he adds, “and when they are, they are usually litincorrectly, giving them a police lineup look.” An example of aback profile appears on page 103.

BEYOND THE HEADSHOTAs with most senior-portrait photographers, headshotsare an integral part of Chris’s photography—but he alsostrives to offer something beyond just a flattering viewof the face.Consider a Horizontal. “Horizontal headshots
look different and will set your work apart from yourcompetition,” says Chris. While this is especially truewith guys’ images (as shown on the facing page), Chrissays this type of image is a big seller for both male andfemale subjects. When it comes to the pose, Chris givesthe eyes prominence by ensuring they fall at the topone-third line in the frame. Chris cautions against usingthe folded-arm pose he typically employs for suchimages with subjects in sleeveless tops or with heavyarms. If you do, the arms will be too prominent or looktoo thick. In either case, they will overpower the sub-ject’s face.
Include the Hands. One technique Chris employsto make his work stand out is including the arms orhands in many of his headshots. The portraits on thisand the facing page fall into that category. Notice, how-ever, that Chris is careful to use these added elements tocreate diagonal or curved leading lines that draw you tothe face. In the images where the arms are crossed (fac-ing page and top right), Chris notes that it is importantto cross the hands away from the camera so they do notbecome too prominent. In the top-left image on thispage, notice how well the hand functions in the compo-sition; your eyes enter at the bottom left of the frame,follow up the forearm, then trace the curved line of thesubject’s fingers to his eyes.Work the Angles. In the images above, it should
also be noted that the subject seems to be leaning at asharp angle into the frame. In the portrait on the left,the camera was tilted to accentuate this angle, and the
CHRIS NELSON: SENIOR STYLE 97

tip of the head toward the low shoulder. In the imageon the right (previous page), the angle was created byhaving the subject pose laying down on a mirror (whichalso acts as a secondary main light).
MAKING THE TRADITIONAL NONTRADITIONAL“Bombarded by advertising, pop culture, and fashionimages, today’s seniors are increasingly sophisticated,”says Chris. “The girls want to look like models—and forthat matter, so do the guys.”Ironically, while his goal may be to produce the edgy
images that teens demand, Chris knows that successrequires a solid grounding in the traditional—the tech-niques that he can rely on to flatter the human body. Ofcourse, while a flattering rendition is critical, he mustalso go beyond that; Chris’s clients demand images in acontemporary style, and they don’t want their photosto look like all of their friends’ senior portraits.
In traditional posing, male subjects are generallyposed in what is called the “basic” style. “In a basicpose,” says Chris, “the subject’s body and face are bothturned toward the main light. The head is then tippedtoward the lower shoulder. The degree of the head tipvaries.” In the three images shown above and on thefacing page, this traditional pose is at the core of theportrait—but Chris has found ways to update the look,making it more suited to the tastes of his teen clients.“Guys prefer a natural, relaxed look rather than a
posed one,” says Chris, “so have them do somethingnatural.” In this case, he had the guys pose with theirinstruments, but poses with sports equipment or otherprops work equally well. The props not only help thesubject pose in a way that looks and feels natural (some-thing that is especially helpful when posing the hands),they also add another level of personalization to theimage, helping it to stand out.
98 PROFESSIONAL PORTRAIT POSING


SETTING THE SCENEChris is well known for his location portraits, which arepart of most seniors’ sessions. He offers students achoice of locations, but all have a look that fits in withhis studio’s image. “Everything about my studio, frommarketing pieces to location selections, shouts ‘FallCreek images are cool!’” says Chris.Posing on location, however, introduces a new set of
challenges. Though some of these can be overcome byusing flash to supplement the natural light, locationportraits still tend to include a wider view of the sceneand more of the subject. This means there is more topose, and more potential distractions. As a result, pre-cise tonal control and careful composition become allthe more important—and posing becomes a critical toolfor keeping the focus of the image on the face.In the top image on the facing page, Chris keeps
your eyes on the face by showing it twice. In the second
image, the figure is small in the frame, but everythingpoints toward the young man’s face. Here, the subject’sbare arms, surrounded by darker tones, act as leadinglines. Equally important is the guitar; while the posereads as very natural, the guitar is placed so that itsbright colors attract your eyes, which then follow theneck of the instrument to the subject’s face.
A FEMININE PERSPECTIVE“In terms of appearance, what makes men and womendifferent?” Chris asks. “The answer is curves! Men’sbodies are typified by straight lines and angles; women’sbodies look feminine because of their curves and round-ness. Therefore, you don’t want to make straight linesin the poses you create for women’s portraits.”In the image above, we have the same basic ingredi-
ents as in the images on the facing page—subject, car,and guitar—but here they are interpreted in a different
CHRIS NELSON: SENIOR STYLE 101

manner. While the masculine poses are all about straightlines, this pose is made feminine by the curves it fea-tures. To create these, Chris had the subject adopt awide stance, then shift her weight to her back hip. Herright shoulder was dropped and her head was tiltedtoward it. Finally, she pulled her arm across her body.The result is a look that conveys, as Chris describes it, a“stylish, scrappy attitude.”The images above show the same type of curvy pose
used with both casual and more formal attire. Whenphotographing women, says Chris, “Our goal is tomake or emphasize a classic hourglass shape for herupper body and join this shape to long, tapering legs. Ifyou look at fashion magazines, you’ll see that the mod-els are almost never posed standing straight up withtheir shoulders square to the camera.”From this, Chris has developed what he calls the
“rule of twos.” “According to this rule, body parts thatcome in pairs shouldn’t optically be on the same plane,”
he says. “This applies to the breasts (they’ll do what theshoulders do), as well as to the arms, hands, hips, legs,feet, eyes, and ears. From this, it follows that the mostunflattering thing you can do to a female body is poseher straight up and down, feet shoulder-width apart,and shoulders square to the camera. That would createstraight lines, and that’s not what we’re after.”The C Pose. “There are basically two poses to flat-
ter a female body: the C and the S,” says Chris.“Both poses start with the feet, which should be at
about a 45-degree angle to the camera with the weighton the back foot,” says Chris. “Her hip should bekicked out slightly, as if she were carrying a sack of gro-ceries in her arms. With her weight on her back foot,her front foot will be free to swing in an arc a little lessthan 90 degrees. That foot can be placed in differentpositions along the arc to create the look you want.“At this point, her shoulders will also be at an angle
to the camera. This will make the far shoulder appear
102 PROFESSIONAL PORTRAIT POSING

lower, because it is receding optically. You can have herrelax and drop that shoulder and/or raise the nearshoulder for emphasis. Having the subject tilt her headtoward her high shoulder completes the classic C pose.”The S Pose. The S pose is all about accentuating a
woman’s curves. “As in the C pose,” says Chris, “thesubject’s weight is on her back leg, but her front foot isplaced almost directly in front of the back foot. Thisforms the bottom portion of the female hourglass, nar-rowing the appearance of the calves and accenting thecurves of the model’s hips.”“The subject’s back is then arched and her front
shoulder is pulled down (you can simply tell your clientto pull her hip and shoulder together on the side of herbody closest to the camera). The combination of back,hip, and shoulder movement slims the waist, while theshoulders then complete the hourglass. Finally, the headis tipped toward the high shoulder, completing the S.
This head tip generally projects some attitude; the morepronounced the tip, the more attitude.”
REVERSE PROFILESAs noted on page 96, profiles (especially properly litones) are something you rarely see in nonprofessionalphotography, making them instant standouts. Evenmore rare is the back profile, as seen below. This type ofpose is especially appropriate when photographing awoman in an outfit that has an interesting back. It cre-ates a classic, yet stylish look.To create this pose, the shoulders are placed at about
a 45-degree angle to the camera (otherwise the subjectwill be unable to comfortably turn their face back farenough to produce the desired view). This naturallymakes the far should seem to drop, as it recedes fromthe camera. Watch the neck in this pose; it may showfolds or wrinkles. Covering it with the hair, as Chris did
CHRIS NELSON: SENIOR STYLE 103


in this image, can be a good option for disguising thisproblem if it occurs.To correctly light a profile, says Chris, “The main
light should be placed at a 45-degree angle to the sideof the subject’s face opposite the camera. This means itis actually angling back toward the camera, so shadeyour lens to prevent flare.”
RECLINING POSESSometimes, success lies in devising something unusual,as in the image seen on the facing page. “This isn’t howyou normally see someone,” says Chris, “and that’s whyit’s interesting.” Note that the subject’s arms and raisedleg are posed to create diagonal lines in the frame, soft-ening the look and making it more feminine.The image above also presents an unexpected view;
it’s one of Chris’s favorite poses. To make the pose flat-
tering, says Chris, “make sure she tips her chin backtoward the camera—double chins are not allowed!” Healso notes that the subject should be instructed to pullher close shoulder down, creating a space between theshoulder and her chin.A key to the appeal of both of these images is the use
of a mirrored surface below the subject. Chris uses bothmylar and mirrors for images with this effect (see page97 for another example). In the image on the facingpage, the distorted inverted triangle of the reflectionadds soft visual interest without distracting from theface. In the image above, a smoother surface provides amore precise reflection.In both of these poses, note that Chris has adjusted
his lighting to accommodate the unusual angle of theface to the camera. In the image on the facing page,where the subject’s face is upside down, the main light
CHRIS NELSON: SENIOR STYLE 105

was placed low and to camera left. In the image on page105, the main light was angled down toward the sub-ject from camera left. In fact, if you turn this book sothat the faces are right-side up, you’ll see that the catch-lights in both images are in the correct positions—either 2 o’clock or 10 o’clock. This is part of creating aprofessional-quality image that renders the face in arealistic and flattering way.
EXPRESSIONWhile most people know that the expression is oftenwhat sells the portrait, it’s also important to make surethat the body language and facial expression agree with
each other. In the images above, you can see that Chrishas taken care to do just that.In the image to the left, the subject was posed with
his close foot raised up on a stool, leaning his forearmsacross that raised knee and dropping his far shoulder.His head is tipped in the same direction, creating a clas-sic masculine pose. This relaxed posture calls for a sim-ilarly casual expression, like the relaxed smile on thisyoung man’s face.In the image on the right, the subject is in a similar
pose, leaning forward on his elbow. Here, the high con-trast and assertive hand position communicate a senseof confidence and intensity. The young man’s direct,subdued gaze was a perfect match.As you can see, Chris Nelson is careful to refine each
aspect of his portraits. This enables him to produce theedgy looks his clients demand while maintaining a clas-sic quality that allows them to be enjoyed for years.
106 PROFESSIONAL PORTRAIT POSING

For Los Angeles photographer Cherie SteinbergCote, every day she spends behind the camera isan experiment—and she wouldn’t have it any
other way. “I can’t do the same thing every day,” shesays. “That’s why I chose to be a photographer; that’sjust my personality.”In fact, asked to define her area of specialty, Cherie
is reluctant to narrow it down, ultimately saying, “I getcalls every day, and if the job appeals to me, I do it. Ifit doesn’t, I don’t.” As a result, her images are morediverse than many other photographers’ work. Whilethis is appealing from an artistic standpoint, it also hassome disadvantages professionally.“People have told me that they like looking at my
images because they’re all different—and that’s a resultof my personality,” she says. “But I don’t know if it’sthe best thing for photographers to do. As a matter offact, when I speak to photographers, I tell them to try
CHERIE STEINBERG COTE: AN ONGOING EXPERIMENT IN STYLE 107
11. CHERIE STEINBERG COTE
An Ongoing Experiment in Style
began her photography career as a photojournalist at the Toronto Sun, where she had thedistinction of being the first female freelance photographer. She currently lives in Los Angeles, and has recently been published inthe L.A. Times, Los Angeles Magazine, and Town & Country. In addition, she is an acclaimed instructor who has presented seminarsto professional photographers from around the country. To learn more about Cherie and her work, visit her at www.cheriefoto.com.
CHERIE STEINBERG COTE
A member of this band had Cherie photograph his wedding, and thegroup later returned to her when they needed new promotionalshots. Cherie used a symmetrical grouping for the five subjects, andeverything in the photo leads your eye to their faces—the ceilingbeams, the guitars, and the legs of the seated and outside subjects.Shooting from a low angle with a wide-angle lens enhanced theeffect, making everything converge toward the center of the frame.

to do the same thing all the time. That way you developa signature look for yourself, and that’s a good thing. Ifyou think about it, that’s what all the great photogra-phers have done. They developed a formula, they stayedwith it for many, many years, and they became famousfor it.”Cherie notes that, in some cases, the diversity of her
work is an obstacle to hiring her. “People come to me
and say, ‘But can you shoot a normal portrait—like fora wedding? Can you do something without their headscut off?’ I’m like, ‘Are you kidding, that’s easy—ofcourse I can shoot that.’ But a lot of people don’t getthat. They need to look at something and say, ‘I want a
108 PROFESSIONAL PORTRAIT POSING
THIS PAGE—Cherie’s shooting partner, Hedley, is a frequent subject forher photographic experimentation. In these sessions, she works onlighting and posing, playing with new concepts and testing out herideas. FACING PAGE, TOP—Sometimes getting the right pose andexpression is all about timing. As a former photojournalist, Cherieknows how important it is to be prepared for happy accidents—likea little dog’s yawn. (The dog, by the way, was almost literally ropedin off the street; Cherie saw his owners out for a walk and invitedthem to bring him in for the shoot. The rest is history!) FACING PAGE,BOTTOM—This image was created as a promotional shot for the heli-copter company, but the subject is a longtime friend of Cherie’s. Sheis a volunteer firefighter who has a part-time job buying and sellinghelicopters. “Owning a helicopter is even more prestigious than hav-ing a personal plane,” says Cherie, “because they can land anywhere.We wanted to show the kind of elegant woman who might have juststepped out of this one.” A confident walking pose communicatesthe needed sense of beauty and affluence.


picture like that on my wall of me and my kids.’ If theycan’t see an example of it, they can’t imagine it.”This begs the question: why doesn’t Cherie herself
develop a concrete style and just stick with it? It comesback to personality. “Once I get something down I getbored with it,” she says. “Ten years ago, I looked atwedding photography and said, ‘If I’m going to do
wedding photography, I need to do something differentwith it.’ So I started to do things like cross processingand infrared. I got really good at those techniques, butthe minute I mastered them, I thought, ‘Okay, I knowhow to do this, I don’t want to do it anymore.’ Sothat’s my problem as an artist—I always want to moveon and learn something new.”
CHERIE STEINBERG COTE: AN ONGOING EXPERIMENT IN STYLE 111
Some time ago, Cherie photographed a wedding and really connected with the bride, Anjale. “She’s beautiful, and an artist,” notes Cherie.“And she’s one of those L.A. girls who are just great in front of the camera.” After the wedding, Cherie decided she wanted to do anothershoot with the bride in her gown. One of the resulting shots from that session made the cover of Nikon World—and since then, they havedone many sessions together. FACING PAGE—During Anjale’s pregnancy, Cherie gave her a maternity session as a gift. For this collaborativeimage, the mom-to-be was wrapped in tulle and photographed holding flowers, things that both she and Cherie like. The pose is modest,with the hands covering her breasts and the tulle gently softening any detail. Yet, because she is posed in profile, the image still empha-sizes her round belly. As a whole, her body creates an elongated S through the frame, leading you to her tilted head and demure expression.ABOVE—After the birth of her son, Anjale returned to the studio. Cherie was, at the time, experimenting with the looks she could create usingsimple white backgrounds, so that’s what she selected for this portrait. Again, Anjale is shown in an S-shaped profile—but this time withher little boy’s body creating the lower curve. Both Mom and son are shown in a two-thirds view that draws your eyes to theirs.

Of course, being open to new experi-ences and ideas has its advantages, too.“I’m always willing to say yes. It’s a ‘if Idon’t know how to do it today, I’ll figureit out for tomorrow’ kind of thing. I like achallenge.” This attitude, paired with asense of fearlessness and good timing(earned in the fast-paced, push-and-shoveworld of photojournalism) lets her walkinto any shoot confident that she can cap-ture memorable images that the client willlove. Of course, those good instincts don’ttotally replace the need for good planningand preparation.“Before a session, I talk with the client,
I learn who they are, I discover what kindof personality they have, and I find outwhat I’m going to get out of them,” saysCherie. “Some people come in, and I dis-cover that they are very laid back and casu-al. They’re going to show up for their ses-sion in blue jeans—that’s their personality,and that’s what they’re going to do. Onthe other hand, I had a client come in theother day who was excited about the ses-sion and suggested taking a couch todowntown Los Angeles (her husband was a
THIS PAGE—Cherie always enjoys the opportunity toexperiment, as she did in these shots. In the topimage, the model was posed sitting on a large urnand leaning over another. In the bottom image, themodel was actually laying on the floor of Cherie’sstudio with her head against the wall. A sharp tilt ofthe camera rendered the image as an almost verticalportrait. Cherie used a LensBaby to create bothimages. FACING PAGE—This portrait was commissionedbefore a wedding. However, it was not the first mar-riage for either the bride or groom, so they didn’twant traditional “couple” portraits. Instead, theywanted images of their new family. Here, the groom’sdaughters are posed with their new stepmother, withwhom they have a close relationship. The idea forthe portrait arose from the enormous vase in thefamily’s home. After clearing a table out of the way,Cherie had the ladies change into white clothing fora white-on-white look. The identical outfits andinterlocking arms make it clear that they are part ofa close-knit family.


cop and could get the street shut down). She wanted todress in a boa and suggested that her child could dressin a ballet costume—and I was like, ‘All right! You gogirl!’ So it really depends on the client. If they arereserved or camera shy, we’ll work with that. If they areflamboyant, we’ll do some cool stuff.”When it comes to posing, Cherie’s approach is
equally relaxed and open to experimentation. “To bequite honest, every session is an experiment. I’m testingthings out all the time,” she laughs. “That’s really whatI do. Every time I shoot, I’m thinking, ‘Okay, I havethis new subject in front of me, and these new lightingconditions—let’s check it out.’”As a result of this spontaneous approach, subject
interaction often plays a significant role in Cherie’simages—and she loves working with people who takean active collaborative role (such as Anjale, seen onpages 110–11). If her subject(s) are confident in frontof the camera, she doesn’t do any more directing than
CHERIE STEINBERG COTE: AN ONGOING EXPERIMENT IN STYLE 115
FACING PAGE—Relationships have many unique dimensions. Tuning into this can allow you to capture some diverse moments—as evi-denced by these very different images of an engaged couple. In thetop image, you see a classic romantic pose. “They both had greatfeatures,” says Cherie, “so I used a profile pose to show this.”Presenting the image as a silhouette lets the viewer concentrate onthese shapes. Just enough detail is visible, however, to reveal theirlocked gaze. With the faces at slightly different heights, the imagi-nary lines between the eyes and lips are rendered as diagonals for amore engaging composition. What’s missing in the romantic por-trait? This couple’s goofy, playful side. “They goofed around likebrother and sister,” Cherie laughs. “They were constantly trying tostrangle each other and making faces.” As a result, she has somevery atypical engagement portraits from this session, as seen in thebottom photo. BELOW—While some clients have a dramatic flair thatcomes out in their images, others are more relaxed and prefer animage that reflects that casual, comfortable sensibility. Here, Cherieused a clean blue background and a simple pose to capture this cou-ple’s engagement portrait. The bride-to-be, seated behind herfiance, simply leaned in and placed her chin on his shoulder. Shewrapped her arms around his waist, and he lifted his left hand tocaress her arm. Their relaxed postures and genuine expressions tellthe rest of the story.

is necessary—and often the results are wonderful (seethe top image on this page). With subjects who are a lit-tle more reticent, creating the right mood on the shootcan often loosen them up. “We make it an experience
for them,” says Cherie, “They get professional stylingand lots of personal attention—and by the time youhave the subject(s), me, Hedley, and a makeup artist onthe set . . . well, that’s pretty close to a party!”Looking at Cherie’s work, this try-anything-once
approach is obvious; in a thousand images, you’d neversee a double. Each portrait is a unique expression, a spe-cial moment transformed by Cherie’s creative vision.
116 PROFESSIONAL PORTRAIT POSING
ABOVE—Some people just light up in front of the camera. Cherie metthis couple when they were guests at a wedding she photographed.“They just kept coming into my field of view,” she says. She lovedthe way they interacted with each other, so once she had finishedher wedding images, she pulled them aside. “I knew if I put them ina beautiful location with beautiful light, something great wouldhappen,” she says. And she was right—the couple quickly fell intothis sweet pose. LEFT—Not all subjects are as comfortable anddynamic in front of the camera, of course. This couple came toCherie for an engagement portrait. They decided on a location—andonce there, the bride fell in love with this lily pond. To capture it,Cherie had the subjects lay down with their heads together. Shethen shot down toward their faces for an appealing composition.

CONCLUSION 117
When photographers discuss portraiture, light-ing is usually the favorite topic—after all, pho-tographers tend to be gadget junkies, and new
lighting tools (or new ways of using existing tools)appeal to these sensibilities. Yet, most of the photogra-phers I interviewed for this book reported that posingcan actually be more challenging than lighting. It oftentook them longer to learn and now takes much longerto teach to their apprentice photographers.This is probably because the variables involved are so
incredibly diverse. Not only are there a large number ofbody parts to be showcased in an appealing manner,those body parts are different for every subject. Unlikelighting setups, which tend to fall into a few major cat-egories, the ways in which you might successfully poseyour client are almost limitless. Additionally, the pose ofthe image plays a huge role in the mood and composi-tion of the portrait, adding additional concerns beyondsimply flattering your client’s figure.As a result of these challenges, there are almost as
many approaches to posing as there are photographers.Some adhere to rigorous guidelines; others adopt amore intuitive approach. Some involve the subject in
creating a pose that “feels” natural; others prioritizeshowing the subject looking his or her absolute bestover being totally comfortable in the pose.If there’s one constant, however, it’s that successful
photographers never stop learning. The artists featuredin this book have a great deal to teach others about pos-ing, but they all remain students of the art as well. Theyattend seminars, read books, and study the work ofother photographers whose images they admire. Notonly is this continuing education critical to keeping upwith the ever-changing demands of the marketplace, it’salso important for continuing to evolve creatively. If youstop learning and trying new techniques, it can be hardto maintain your enthusiasm—and it will show in yourimages.Thanks again to all of the photographers who gra-
ciously contributed their time and images. And to read-ers: study their advice and experiment with the tech-niques that work for them; they are an excellent startingpoint and source of inspiration. Ultimately, however,they are all tools—tools that are best used in helpingyou to refine and achieve your unique creative vision.Good luck!
CONCLUSION

118 PROFESSIONAL PORTRAIT POSING
TYPES OF POSESThere are three basic types of poses, each defined byhow much of the length of the subject’s body is includ-ed in the image. When including less than the full bodyin the frame, it is recommended that you avoid crop-ping at a joint (such as the knee or elbow); this createsan amputated look. Instead, crop between joints.Head and Shoulders or Headshot. A portrait that
shows the subject’s head and shoulders. If the hands arelifted to a position near the face, these may also beincluded.Three-Quarter-Length Portraits. A portrait that
shows the subject from the head down to the mid-thighor mid-calf.Full-Length Portraits. A portrait that shows the
subject from head to toe.
FACIAL VIEWSFull Face. The subject’s nose is pointed at the camera.Seven-Eighths. The subject’s face is turned slightly
away from the camera, but both ears are still visible.Three-Quarters or Two-Thirds. The subject’s face
is angled enough that the far ear is hidden from thecamera’s view. In this pose, the far eye will appear small-er because it is farther away from the camera than theother eye. The head should not be turned so far that the
tip of the nose extends past the line of the cheek or thebridge of the nose obscures the far eye.Profile. The subject’s head is turned 90 degrees to
the camera so that only one eye is visible.
THE SHOULDERSThe subject’s shoulders should be turned at an angleto the camera. Having the shoulders face the cameradirectly makes the person look wider than he or shereally is and can yield a static composition.
THE HEADTilting the Head. Tilting the head slightly producesdiagonal lines that can help a pose feel more dynamic.In men’s portraits, the traditional rule is to tilt the headtoward the far or low shoulder. In women’s portraits,the head is traditionally tilted toward the near or highshoulder for a feminine look. This rule is often broken.Chin Height. A medium chin height is desirable. If
the person’s chin is too high, he may look conceitedand his neck may appear elongated. If the person’s chinis too low, he may look timid and appear to have a dou-ble chin or no neck.Eyes. In almost all portraits, the eyes are the most
important part of the face. Typically, eyes look bestwhen the iris borders the eyelids.
T his section covers the fundamental rules of traditional posing—techniques that are referenced by various pho-tographers throughout this book. While these rules are often selectively broken by contemporary photogra-phers, most remain cornerstones for presenting the human form in a flattering way.
APPENDIX I
Individual Posing Basics

APPENDIX I 119
ARMSWhether male or female, the subject’s arms should beseparated at least slightly from the torso. This creates aspace that slims the appearance of the upper body. Italso creates a triangular base for the composition, lead-ing the viewer’s eye up to the subject’s face. Virtually allportrait photographers request that the subject wearlong-sleeved tops; even if the subject is thin, bare upperarms rarely render attractively in portraits.
HANDSKeep the hands at an angle to the lens to avoid distort-ing their size and shape. Photographing the outer edgeof the hand produces a more appealing look than show-ing the back of the hand or the palm, which may lookunnaturally large (especially when close to the face).Additionally, it is usually advised that the hands shouldbe at different heights in the image. This creates a diag-onal line that makes the pose more dynamic.Wrist. Bending the wrists slightly by lifting the hand
(not allowing it to flop down) creates an appealingcurve that is particularly flattering in women’s portraits.Fingers. Fingers look best when separated slightly.
This gives them form and definition.Men vs. Women. When posing women’s hands,
strive to create a graceful look. When photographingmen, an appearance of strength is generally desirable.Props. Hands are often easiest to pose when they
have something to do—either a prop to hold, or some-thing to rest upon.
CHESTIn portraits of women, properly rendering this area iscritical. Selecting a pose that places the torso at an angleto the camera emphasizes the shape of the chest and,depending on the position of the main light, enhancesthe form-revealing shadows on the cleavage. Turningthe shoulders square to the camera tends to flatten andde-emphasize this area. Good posture, with the chestlifted and shoulders dropped, is also critical to a flatter-ing rendition.
WAIST AND STOMACHSeparating the arms from the torso helps to slim thewaist. In seated poses, a very upright posture (almost to
the point of arching the back) will help to flatten thestomach area, as will selecting a standing pose ratherthan a seated one. It is also generally recommended thatthe body be angled away from the main light. Thisallows the far side of the body to fall into shadow for aslimming effect.
LEGSWhether the subject is standing or seated, the legsshould be posed independently rather than identically.Typically, one leg is straighter and used to support thebody (or in a seated pose, to connect the subject to thefloor). The other leg is bent to create a more interest-ing line in the composition.Standing. Having the subject put his or her weight
on the back foot shifts the body slightly away from thecamera for a more flattering appearance than having theweight distributed evenly on both feet. Having a slightbend in the front knee helps create a less static look.Seated. When the subject is sitting, the legs should
be at an angle to the camera. Allowing for a small spacebetween the leg and the chair will slim the thighs andcalves.One Leg in Profile. In portraits of women where
the legs are bare, it is desirable to show the side of atleast one leg. This better reveals the shape of the ankleand calf.
HIPS AND THIGHSMost female subjects are concerned about this area. Forthe slimmest appearance in a standing pose, turn thehips at an angle to the camera and away from the mainlight. In a seated pose, have the subject shift her weightonto one hip so that more of her rear is turned awayfrom the camera.
FEETFeet often look distorted when the toes are pointeddirectly at the camera. It is best to show the feet froman angle. In portraits of women, the toes are oftenpointed (or the heels elevated, as they would be in high-heeled shoes). This flexes the calf muscles, creating aslimmer appearance and lengthening the visual line ofthe subject’s legs.

120 PROFESSIONAL PORTRAIT POSING
T his section covers the fundamental rules of posing groups. These rules must be considered in addition to thosepresented in Appendix I for posing the individual. In a group portrait, each subject must be posed individu-ally in a flattering way, and the grouping as a whole must also appear interesting and attractive.
BASIC CONCEPTSBookending. Subjects in group portraits should, likeindividual subjects, be posed at an angle to the camera.In portraits of couples, the subjects may both be posedfacing in the same direction. In most other portraits,however, groups look best when the flanking subjectsface in toward the center of the frame. These inward-oriented faces serve to bookend the composition, con-stantly directing the print viewer’s eyes back into theimage.Head Heights. In group portraits, the heads of the
subjects should not be at the same height or directly ontop of each other. (Note: The exception to this ruleoccurs when photographing regimented groups, such assports teams and military- or law-enforcement person-nel. In this case, the subjects are frequently posed inmatching lines.)When posing two people, a good starting point is to
position the higher subject’s lips even with the lowersubject’s mouth. If the height difference between thesubjects is not sufficient to produce this (or is toogreat), it can be quickly accomplished by having onesubject seated on an adjustable posing stool while theother subject stands next to him/her. Alternately, onesubject might sit in an armchair while the other sits onthe arm of the chair.
In larger groups, the heads should be arranged sothat the individual faces create a dynamic patternthroughout the frame. For example, the subjects maybe posed on stairs so their faces form a diagonal linethrough the frame. Alternately, subgroups might bearranged so that their faces form a series of linked cir-cles or diamonds in the frame. Other popular shapesthat can be created with the faces in group portraits areS curves and pyramids.Hands. In group portraits, hands can be a problem.
If the hands will be shown, strive to follow the rulescovered in Appendix I. Additionally, check to ensurethat any hands appearing in the frame are clearly con-nected to an arm (i.e., they do not seem to be eitherfloating or coming out of nowhere). Often, the beststrategy is to hide as many of the hands as possible. Thiscan be accomplished by putting them in pockets, ob-scuring them with other subjects, or concealing themwith props or set elements. For example, a group ofbridesmaids could be photographed holding their bou-quets rather than with their hands free and visible.
GROUPING SUBJECTSProximity. When posing subjects, placing the subjectsrelatively close to each other conveys a sense of warmthand intimacy. Allowing for more space between the sub-
APPENDIX II
Group Posing Basics

jects allows you to employ more intricate, indivualizedposes and may lend a sense of elegance.Whatever strategy you choose, the subject’s faces
should, in most cases, be roughly equidistant. If theyare not, subjects who are visually closer to each otherwill appear to be related in a way that others in theimage are not. Similarly, a subject who is visually fartherfrom the others in the portrait may seem to be removedfrom the group.This principle can be used to great effect when, for
example, photographing an extended family. In thiscase, each nuclear family may have its members tightlyclustered. Providing a bit of additional space betweenthese smaller groups will provide a cohesive family-portrait look, while still showing the relationship be-tween the members of the grouped nuclear families.Focus. Focus is an additional concern when deter-
mining the spacing between subjects. In order to keepall of the faces in focus, they must fall within the planeof focus at the working aperture. With all but the small-est groups, this means that the subjects must be posedso that the faces of those in the back are as close as pos-sible to those in the front.To accomplish this, it may be necessary to have sub-
jects in the back lean slightly forward. To maximize thezone of focus, you can also elevate the camera and angleit slightly down so that the lens plane is parallel (or closeto parallel) to the plane of the subjects’ faces. Keep inmind, however, that this can also cause lens distortion.In large groups, it may also be difficult to keep sub-
jects at the edges of the frame in focus. This is becausethey are more distant from the lens than subjects at thecenter of the grouping. To resolve this issue, you canhave the center subjects move back slightly and the sub-jects at the edge move forward slightly to bow thegroup around the lens. By posing the subjects along an
arc in this manner, you can ensure that they are equidis-tant to the lens.Hierarchy. There are two basic strategies for deter-
mining where individuals should be placed in a groupportrait.The first strategy is to group the subjects into logi-
cal units (nuclear families, office departments, teams,etc.). This is often done to allow the idividual sub-groups to be photographed separately from the largergroup.The other strategy is to group the subjects by size
and shape. Taller subjects might be placed in the back,for example, while children might be posed in front ofthe group.An overarching principle when grouping subjects is
typically to place the most important figures in the cen-ter of the frame. For example, in a family portrait, theoldest members of the family are typically central in theframe. In a wedding portrait, the bride and groom arethe central figures.
FINAL CHECKWhen photographing group portraits, it is especiallyimportant to do a final check of the posing before tak-ing the picture. It can be hard for people to hold thedesired pose, so some refinement will likely be neededfrom time to time.Particular attention should be paid to the edges of
the group, where improper posing (such as a leg or armseeming to project out from the group) will be particu-larly obvious in the final images.Ultimately, each person in the image must look
good. Keep in mind that, even in a large group, every-one looks as themselves first and must be satisfied withwhat they see.
APPENDIX II 121

122 PROFESSIONAL PORTRAIT POSING
Michelle Perkins is a professional technical writer,
graphic designer, and photographer. She has written
for PC Photo magazine and is a regular contributor
to Rangefinder and AfterCapture magazines. She has edited
and designed countless books for professional photographers
and is the author of Beginner’s Guide to Adobe Photoshop,
3rd Ed.; The Practical Guide to Digital Imaging, Professional
Portrait Lighting; Illustrated Dictionary of Photography (co-
authored with Barbara A. Lynch-Johnt); and Digital Landscape
Photography Step by Step, all from Amherst Media.
ABOUT THE AUTHOR

INDEX 123
AArms, 10, 16, 19, 33, 47, 51, 53,
71, 72, 119crossed, 16, 19framing with, 20separate from waist, 33, 71, 72,119
BBasic pose, 65–66, 98Bookending, 120Bustline, 10–11, 44, 53, 58, 60,
119
CClothing, role in posing, 11–12,
36, 58, 60, 71, 80, 82, 88,91, 96
Comfort of subject, 24–25, 31, 56,79
Consultations, 19–20, 74–75, 87Corrective techniques, 5–15,
91–92arms, 10bustline, 10–11double chin, 6–8ears, 8–9expression, 9–10eyes, 9
(Corrective techniques, cont’d)face leaning into the light,91–92
identifying problems, 6legs, 12–14nose, 9shoulders, 10thighs, 12–14waistline, 11–12
C pose, 102–3
DDemonstrating poses, 11, 42–44,
54–55, 77–79, 91Double chin, 6–8
EEars, 8–9Expression, 9–10, 19, 48, 68–70,
106, 108–9Eyes, 9, 47, 51, 53, 68–70direction of gaze, 47, 51, 53
FFace, 6, 8–9, 29, 47–48, 51,
53, 62–65, 68–70, 77, 8488–89, 91–92, 94–96, 118
analyzing, 6, 62–64, 88–89angle to camera, 64–65
(Face, cont’d)ears, 8–9eyes, 9, 47, 51, 53, 68–70importance of in image, 94–96leaning into light, 91–92lips, 29, 47–48, 51nose, 9parallel to lens, 77profile, 65size of in image, 84view of, 64–65, 118
Fashion photography, 19, 39–49,51–53, 71–73, 80, 98, 102
Feet, 12, 33, 45–46, 72, 89, 119weight on rear foot, 72, 89
Feminine pose, 66–68
GGlamour photography, 29–38,
51–60Gomez, Rolando, 50–60Group portraits, 22–23, 25–28,
68–69, 91, 92, 107,112–16, 120–21
bookending, 120final check, 121focus, 121hands in, 120head height, 120
INDEX

(Group portraits, cont’d)hierarchy, 121proximity of subjects, 120–21
HHands, 23, 46–47, 60, 84, 89,
91, 92, 96, 119, 120at different levels, 46, 119bending wrist, 46, 119fingers, 46–47, 119in group portraits, 120in hair, 96on hips, 60showing sides of, 46, 60, 89with props, 92, 119
Head tilt, 16, 20, 66, 118Headshots, 53, 58, 84, 89, 97–98eye contact in, 53hands in, 84, 97horizontal, 97
Height of subject, 56Hips, 57–58, 75, 79, 119
KKelly, Tim, 82–93Knees, 14, 33
LLCD screen, showing poses on, 58Legs, 12–14, 33, 45–46, 53, 107,
119Lemon, Bill, 29–38Lines, 55–56Lips, 29, 47–48, 51Location portraits, 29–39, 101
MMaternity portraits, 16–29,
110–11NNelson, Chris, 94–106Nordstrom, Lori, 16–28Nose, 9
PPegram, Billy, 39–49Posing, 15, 56–60, 82–84evolution of, 82–84individualization, 15, 56–60
Posture, 44, 64Pregnancy, 16–29, 110–11Profiles, reverse, 103–5
RRapport, importance of, 31, 40Reclining poses, 24–25, 60, 75,
77, 80,Refining poses, 42, 44
SSchooler, Tim, 71–81Seating, 66Senior portraits, 5–15, 71–80,
94–106Shoulders, 6, 10–11, 44–45, 63,
66, 102–3, 118Smith, Jeff, 5–15S pose, 103Steinberg Cote, Cherie, 107–16Symmetry, 38
TThighs, 12–14, 119
WWaist, 11–12, 33, 71, 72, 119
ZZucker, Monte, 61–70
124 PROFESSIONAL PORTRAIT POSING

PORTRAIT PHOTOGRAPHER’SHANDBOOK, 3rd Ed.
Bill HurterA step-by-step guide that easily leads the readerthrough all phases of portrait photography. Thisbook will be an asset to experienced photographersand beginners alike. $29.95 list, 8.5x11, 128p, 175color photos, order no. 1844.
MASTER POSING GUIDE FORPORTRAIT PHOTOGRAPHERS
J. D.WackerLearn the techniques you need to pose singleportrait subjects, couples, and groups for studio orlocation portraits. Includes techniques for photo-graphing weddings, teams, children, special events,and much more. $34.95 list, 8.5x11, 128p, 80photos, order no. 1722.
THE ART OF COLORINFRARED PHOTOGRAPHY
Steven H. BegleiterColor infrared photography will open the doors toa new and exciting photographic world. This bookshows readers how to previsualize the scene andget the results they want. $29.95 list, 8.5x11,128p, 80 color photos, order no. 1728.
PROFESSIONAL TECHNIQUES FORDIGITAL WEDDINGPHOTOGRAPHY, 2nd Ed.
Jeff Hawkins and Kathleen HawkinsFrom selecting equipment, to marketing, tobuilding a digital workflow, this book teaches howto make digital work for you. $34.95 list, 8.5x11,128p, 85 color images, order no. 1735.
LIGHTING TECHNIQUES FORHIGH KEY PORTRAITPHOTOGRAPHY
Norman PhillipsLearn to meet the challenges of high key portraitphotography and produce images your clients willadore. $29.95 list, 8.5x11, 128p, 100 colorphotos, order no. 1736.
OTHER BOOKS FROM
Amherst Media®
BYTHE SAME AUTHOR . . .
PROFESSIONALPORTRAIT LIGHTINGTECHNIQUES AND IMAGES FROMMASTER PHOTOGRAPHERS
Take a behind-the-scenes look at thelighting techniques employed by theworld’s top portrait photographers. $34.95list, 8.5x11, 128p, 200 color photos, in-dex, order no. 2000.
BEGINNER’S GUIDETOADOBE® PHOTOSHOP®
3rd Ed.
Enhance your photos or add unique effectsto any image. Short, easy-to-digest lessonswill boost your confidence and ensureoutstanding images. $34.95 list, 8.5x11,128p, 80 color images, 120 screen shots,order no. 1823.
THE PRACTICAL GUIDETO DIGITAL IMAGING
This book takes the mystery (and in-timidation!) out of digital imaging. Short,simple lessons make it easy to master all theterms and techniques. $29.95 list, 8.5x11,128p, 150 color images, index, order no.1799.
DIGITAL LANDSCAPEPHOTOGRAPHYSTEP BY STEP
Using a digital camera makes it fun to learnlandscape photography. Short, easy lessonsensure rapid learning and success! $17.95list, 9x9, 112p, 120 color images, index,order no. 1800.
WEDDING PHOTOGRAPHYCREATIVE TECHNIQUES FOR LIGHTING,POSING,AND MARKETING, 3rd Ed.
Rick FerroCreative techniques for lighting and posing wed-ding portraits that will set your work apart fromthe competition. Covers every phase of weddingphotography. $29.95 list, 8.5x11, 128p, 125color photos, index, order no. 1649.

GROUP PORTRAITPHOTOGRAPHY HANDBOOK2nd Ed.
Bill HurterFeaturing over 100 images by top photographers,this book offers practical techniques for com-posing, lighting, and posing group portraits—whether in the studio or on location. $34.95 list,8.5x11, 128p, 120 color photos, order no. 1740.
THE ART AND BUSINESS OFHIGH SCHOOL SENIORPORTRAIT PHOTOGRAPHY
Ellie VayoLearn the techniques that have made Ellie Vayo’sstudio one of the most profitable senior portraitbusinesses in the U.S. $29.95 list, 8.5x11, 128p,100 color photos, order no. 1743.
THE BEST OF CHILDREN’SPORTRAIT PHOTOGRAPHY
Bill HurterRangefinder editor Bill Hurter draws upon theexperience and work of top professional photog-raphers, uncovering the creative and technical skillsthey use to create their magical portraits of theseyoung subjects. $29.95 list, 8.5x11, 128p, 150color photos, order no. 1752.
WEDDING PHOTOGRAPHYWITH ADOBE® PHOTOSHOP®
Rick Ferro and Deborah Lynn FerroGet the skills you need to make your images looktheir best, add artistic effects, and boost yourwedding photography sales with savvy marketingideas. $34.95 list, 8.5x11, 128p, 100 color images,index, order no. 1753.
THE BEST OFPORTRAIT PHOTOGRAPHY
Bill HurterView outstanding images from top professionalsand learn how they create their masterful images.Includes techniques for classic and contemporaryportraits. $29.95 list, 8.5x11, 128p, 200 colorphotos, index, order no. 1760.
THE ART AND TECHNIQUES OFBUSINESS PORTRAITPHOTOGRAPHY
Andre AmyotLearn the business and creative skills photog-raphers need to compete successfully in thischallenging field. $29.95 list, 8.5x11, 128p, 100color photos, index, order no. 1762.
THE BEST OFTEEN AND SENIORPORTRAIT PHOTOGRAPHY
Bill HurterLearn how top professionals create stunningimages that capture the personality of their teenand senior subjects. $34.95 list, 8.5x11, 128p, 150color photos, index, order no. 1766.
DIGITAL PHOTOGRAPHYFOR CHILDREN’S AND FAMILYPORTRAITURE
Kathleen HawkinsDiscover how digital photography can boost yoursales, enhance your creativity, and improve yourstudio’s workflow. $29.95 list, 8.5x11, 128p, 130color images, index, order no. 1770.
PROFESSIONAL STRATEGIESANDTECHNIQUES FORDIGITAL PHOTOGRAPHERS
Bob CoatesLearn how professionals—from portrait artists tocommercial specialists—enhance their images withdigital techniques. $29.95 list, 8.5x11, 128p, 130color photos, index, order no. 1772.
LIGHTING TECHNIQUES FORLOW KEY PORTRAITPHOTOGRAPHY
Norman PhillipsLearn to create the dark tones and dramaticlighting that typify this classic portrait style. $29.95list, 8.5x11, 128p, 100 color photos, index, orderno. 1773.
THE BEST OF WEDDINGPHOTOJOURNALISM
Bill HurterLearn how top professionals capture these fleetingmoments of laughter, tears, and romance. Featuresimages from over twenty renowned weddingphotographers. $34.95 list, 8.5x11, 128p, 150color photos, index, order no. 1774.
POWER MARKETING FORWEDDING AND PORTRAITPHOTOGRAPHERS
Mitche GrafSet your business apart and create clients for lifewith this comprehensive guide to achieving yourprofessional goals. $29.95 list, 8.5x11, 128p, 100color images, index, order no. 1788.

CORRECTIVE LIGHTING,POSING & RETOUCHINGFOR DIGITAL PORTRAIT
PHOTOGRAPHERS, 2nd Ed.
Jeff SmithLearn tomake every client look his or her bestby using lighting and posing to conceal real orimagined flaws—from baldness, to acne, tofigure flaws. $34.95 list, 8.5x11, 120p, 150color photos, order no. 1711.
PROFESSIONAL SECRETSOF NUDE & BEAUTYPHOTOGRAPHY
Bill LemonLearn the technical aspects of compositionand posing as well as how to ensure thecomfort of your nude models. For photog-raphers of all levels. $29.95 list, 8.5x11, 128p,60 b&w photos, order no. 1713.
POSING FOR PORTRAITPHOTOGRAPHYA HEAD-TO-TOE GUIDE
Jeff SmithAuthor Jeff Smith teaches surefire techniquesfor fine-tuning every aspect of the pose for themost flattering results. $34.95 list, 8.5x11,128p, 150 color photos, index, order no.1786.
PROFESSIONALMODEL PORTFOLIOSA STEP-BY-STEP GUIDE FORPHOTOGRAPHERS
Billy PegramLearn to create portfolios that will get yourclients noticed—and hired! $34.95 list,8.5x11, 128p, 100 color images, index, orderno. 1789.
PROFESSIONAL DIGITAL TECHNIQUESFOR NUDE & GLAMOURPHOTOGRAPHY
Bill LemonMaster the skills you need to create beautifulnude and glamour images—digitally. Includeslighting, posing, and much more. $34.95 list,8.5x11, 128p, 110 color photos, index, orderno. 1816.
GARAGE GLAMOURTM
DIGITAL NUDE AND BEAUTYPHOTOGRAPHY MADE SIMPLE
Rolando GomezGlamour photography is more popular thanever. This book will show you how to producesultry, creative glamour images with a mini-mum of equipment. $34.95 list, 8.5x11,128p, 150 color photos, index, order no.1820.
ROLANDO GOMEZ’SGLAMOUR PHOTOGRAPHYPROFESSIONAL TECHNIQUES ANDIMAGES
Learn how to create classy glamour portraitsyour clients will adore. Rolando Gomez takesyou behind the scenes, offering invaluabletechnical and professional insights. $34.95 list,8.5x11, 128p, 150 color images, index, orderno. 1842.
MASTER GUIDE FORGLAMOUR PHOTOGRAPHY
Chris NelsonEstablish a rapport with your model, ensure asuccessful shoot, and master the essentialdigital fixes your clients demand. Includeslingerie, seminude, and nude images. $34.95list, 8.5x11, 128p, 200 color photos, index,order no. 1836.
JEFF SMITH’S LIGHTING FOROUTDOOR AND LOCATIONPORTRAIT PHOTOGRAPHYLearn how to use light throughout the day—indoors and out—and make location portraitsa highly profitable venture for your studio.$34.95 list, 8.5x11, 128p, 170 color images,index, order no. 1841.
MONTE ZUCKER’S PORTRAITPHOTOGRAPHY HANBOOKInternationally acclaimed portrait photog-rapher Monte Zucker takes you behind thescenes and shows you how to create a “MontePortrait.” Covers clothing selection, posing,lighting, and much more—with techniquesfor both studio and location shoots. $34.95list, 8.5x11, 128p, 200 color photos, index,order no. 1846.
BOOKS BYFEATURED PHOTOGRAPHERS . . .

Posing is one of the most important tools photographers canuse to make their images more memorable, marketable, and
creative. In this book, top professionals share their secrets for flat-
tering the human body. Some use time-tested rules, other prefera more relaxed or offbeat approach, but they all have one thingin common: they make their subjects look wonderful.
Amherst Media®
PUBLISHER OF PHOTOGRAPHY BOOKS
PO Box 586Buffalo, NY 14226
www.AmherstMedia.com
$34.95 USA$43.95 Canada
#2002
FEATURES:
Corrective techniques for minimizing problem areas and
emphasizing a subject’s best features
Posing techniques for classic portraits, glamour images,
senior portraits, maternity images, family portraits, fashion
photography, and more
Tips from industry leaders, who show you the secrets
behind some of their most popular images
Tailoring the pose to each subject for images that will
virtually sell themselves
P RO P H OTO WO R K S H O P TM
TAKE A BEHIND-THE-SCENES LOOK ATTHE POSING TECHNIQUES USED BY TOP PHOTOGRAPHERS


