Embed Size (px)
Citation preview
University of LucknowFaculty of Engineering & Technology
Central WorkshopCourse Code: ME152/ME252/RET409
Manufacturing Practice /Workshop Practice
CARPENTRY
1.1 INTRODUCTIONCarpentry may be defined as the process of making wooden goods and components, viz. roofs, floors, partitions, doors, etc., with the help of carpentry tools. It starts from a marketable form of wood and ends with a finished product. It deals with the specific work of a carpenter like making different types of joints to form a finished product. In this section, tools and works associated with joinery are presented. 1.2 TIMBERThe wood obtained from fully grown trees is cut and is prepared for engineering purposes. This wood is known as timber. Timber of a live tree is called stationary timber, felled treesafter sawing is called rough timber and after cutting into two various sizes as converted timber.
The word, 'grain', as applied to wood, refers to the appearance or pattern of the wood on the cut surfaces. The grain of the wood is a fibrous structure and to make it strong, the timber must be so cut, that the grains run parallel to the length. 1.2.1 Advantages of TimberTimber has the following advantages over the other materials: 1. It is cheaper and easily available.
2. It is lighter and stronger than most of the materials used in construction work.
3. It is very easy to work on it by the help of different tools for getting required shapes.
4. Cost of construction and workmanship is low.
5. Structural construction and joints can be easily made in timber.
6. It has high salvage value.
7. It responds very well to polishing and painting, etc.
8. It is suitable for making soundproof constructions.
9. It is a nonconductor of heat and electricity. 10. It is very suitable for making doors, windows, cabinet work, decorative designs and
fitting, etc.
Er. Abhijjeet MauryaM.Tech (Production Engineering)
University of LucknowFaculty of Engineering & Technology
Central WorkshopCourse Code: ME152/ME252/RET409
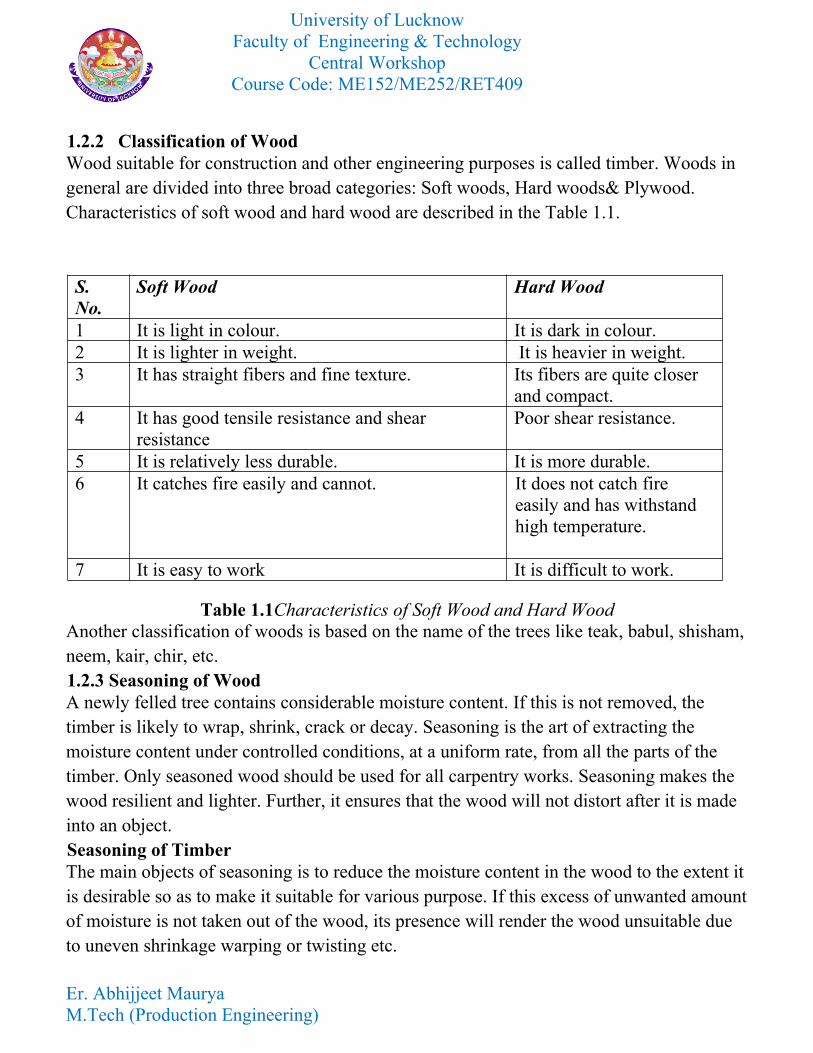
1.2.2 Classification of WoodWood suitable for construction and other engineering purposes is called timber. Woods in general are divided into three broad categories: Soft woods, Hard woods& Plywood. Characteristics of soft wood and hard wood are described in the Table 1.1.
S. No.
Soft Wood Hard Wood
1 It is light in colour. It is dark in colour.2 It is lighter in weight. It is heavier in weight.3 It has straight fibers and fine texture. Its fibers are quite closer
and compact.4 It has good tensile resistance and shear
resistancePoor shear resistance.
5 It is relatively less durable. It is more durable.6 It catches fire easily and cannot. It does not catch fire
easily and has withstand high temperature.
7 It is easy to work It is difficult to work.
Table 1.1Characteristics of Soft Wood and Hard Wood Another classification of woods is based on the name of the trees like teak, babul, shisham,neem, kair, chir, etc. 1.2.3 Seasoning of WoodA newly felled tree contains considerable moisture content. If this is not removed, the timber is likely to wrap, shrink, crack or decay. Seasoning is the art of extracting the moisture content under controlled conditions, at a uniform rate, from all the parts of the timber. Only seasoned wood should be used for all carpentry works. Seasoning makes the wood resilient and lighter. Further, it ensures that the wood will not distort after it is made into an object. Seasoning of TimberThe main objects of seasoning is to reduce the moisture content in the wood to the extent itis desirable so as to make it suitable for various purpose. If this excess of unwanted amountof moisture is not taken out of the wood, its presence will render the wood unsuitable due to uneven shrinkage warping or twisting etc.
Er. Abhijjeet MauryaM.Tech (Production Engineering)
University of LucknowFaculty of Engineering & Technology
Central WorkshopCourse Code: ME152/ME252/RET409
Method of Seasoning
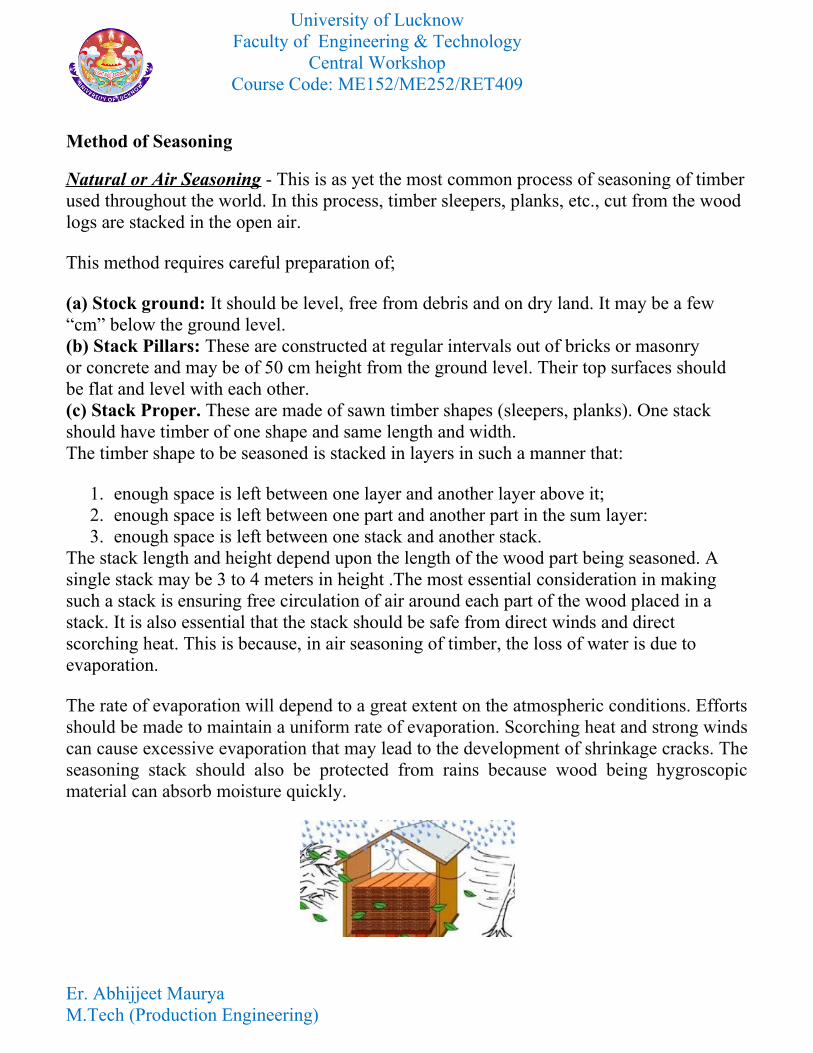
Natural or Air Seasoning - This is as yet the most common process of seasoning of timberused throughout the world. In this process, timber sleepers, planks, etc., cut from the wood logs are stacked in the open air.
This method requires careful preparation of;
(a) Stock ground: It should be level, free from debris and on dry land. It may be a few “cm” below the ground level.(b) Stack Pillars: These are constructed at regular intervals out of bricks or masonry or concrete and may be of 50 cm height from the ground level. Their top surfaces should be flat and level with each other.(c) Stack Proper. These are made of sawn timber shapes (sleepers, planks). One stack should have timber of one shape and same length and width.The timber shape to be seasoned is stacked in layers in such a manner that:
1. enough space is left between one layer and another layer above it;2. enough space is left between one part and another part in the sum layer:3. enough space is left between one stack and another stack.
The stack length and height depend upon the length of the wood part being seasoned. A single stack may be 3 to 4 meters in height .The most essential consideration in making such a stack is ensuring free circulation of air around each part of the wood placed in a stack. It is also essential that the stack should be safe from direct winds and direct scorching heat. This is because, in air seasoning of timber, the loss of water is due to evaporation.
The rate of evaporation will depend to a great extent on the atmospheric conditions. Effortsshould be made to maintain a uniform rate of evaporation. Scorching heat and strong windscan cause excessive evaporation that may lead to the development of shrinkage cracks. Theseasoning stack should also be protected from rains because wood being hygroscopicmaterial can absorb moisture quickly.
Er. Abhijjeet MauryaM.Tech (Production Engineering)
University of LucknowFaculty of Engineering & Technology
Central WorkshopCourse Code: ME152/ME252/RET409
Natural Seasoning
Outline of Stacking Arrangement: The time taken for air seasoning of timber depends onclimatic conditions and thickness of the timber. It may take 1-4 years to bring down the moisture content to 16-17 percent level.The advantages of natural (air) seasoning are:
1. It is highly economical;2. It requires little supervision;3. It is applicable to thicker timber parts as well as a thin section.
Disadvantages of Air Seasoning:
Among the major disadvantages, following are more important:
1. It is a very slow process;2. It keeps the valuable land and timber blocked for longer periods (and hence in some
cases may be uneconomical).3. Moisture content cannot be brought below a certain limit (16-17 percent).4. Seasoning is not always uniform in all the sections of timber.
Water Seasoning of timber.
This is a process of natural seasoning of timber that gives good results with logs of freshlycut trees. When the logs are placed in running water, the sap from the cells can be easilywashed out. In place of sap, the cells get filled with ordinary water. When such logs aretaken out, and wood from them placed for air seasoning, it takes comparatively less time tobecome dry. The timber logs can also be placed in stagnant water if running water is notavailable nearby.
In such a case, the water should be replaced every week. Placing the logs in water alsosaves them from unequal shrinkage (at the cut ends and along the length) if left for moretime in the open without sawing into smaller pieces. Hence it is a useful process in twoways.
2. Artificial Seasoning of Timber (Kiln).This is the modern method of seasoning any type of timber in a short time. It involves drying the timber in a specially designed kiln where there is perfect control over temperature, humidity and air circulation. With the help of kiln seasoning of timber, it is possible to reduce the moisture content to as low level as 6 percent.
The method involves broadly the following steps:
Er. Abhijjeet MauryaM.Tech (Production Engineering)
University of LucknowFaculty of Engineering & Technology
Central WorkshopCourse Code: ME152/ME252/RET409
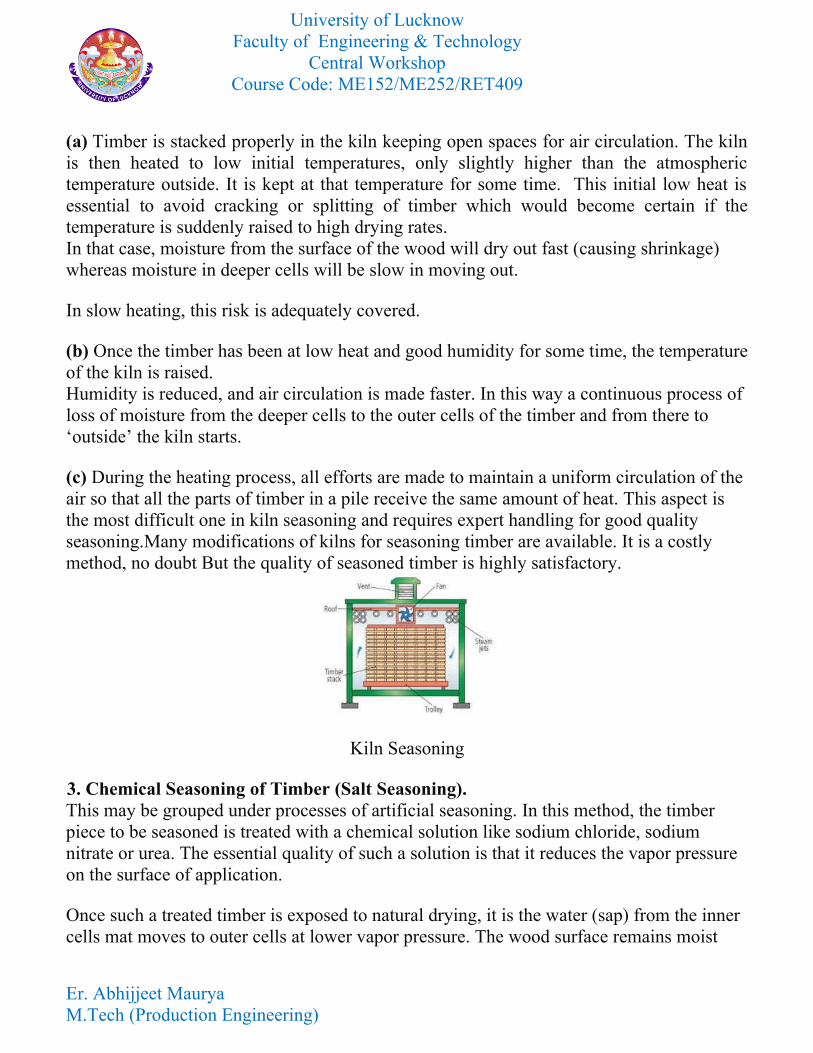
(a) Timber is stacked properly in the kiln keeping open spaces for air circulation. The kilnis then heated to low initial temperatures, only slightly higher than the atmospherictemperature outside. It is kept at that temperature for some time. This initial low heat isessential to avoid cracking or splitting of timber which would become certain if thetemperature is suddenly raised to high drying rates.In that case, moisture from the surface of the wood will dry out fast (causing shrinkage) whereas moisture in deeper cells will be slow in moving out.
In slow heating, this risk is adequately covered.
(b) Once the timber has been at low heat and good humidity for some time, the temperatureof the kiln is raised.Humidity is reduced, and air circulation is made faster. In this way a continuous process of loss of moisture from the deeper cells to the outer cells of the timber and from there to ‘outside’ the kiln starts.
(c) During the heating process, all efforts are made to maintain a uniform circulation of the air so that all the parts of timber in a pile receive the same amount of heat. This aspect is the most difficult one in kiln seasoning and requires expert handling for good quality seasoning.Many modifications of kilns for seasoning timber are available. It is a costly method, no doubt But the quality of seasoned timber is highly satisfactory.
Kiln Seasoning
3. Chemical Seasoning of Timber (Salt Seasoning).This may be grouped under processes of artificial seasoning. In this method, the timber piece to be seasoned is treated with a chemical solution like sodium chloride, sodium nitrate or urea. The essential quality of such a solution is that it reduces the vapor pressure on the surface of application.
Once such a treated timber is exposed to natural drying, it is the water (sap) from the inner cells mat moves to outer cells at lower vapor pressure. The wood surface remains moist
Er. Abhijjeet MauryaM.Tech (Production Engineering)
University of LucknowFaculty of Engineering & Technology
Central WorkshopCourse Code: ME152/ME252/RET409
while moisture from the interior goes on diffusing to the exterior .In other words, chemical seasoning of wood enables the timber to dry first from inside. It is definitely an advantage as it prevents the risk of cracking of outer shell.
4. Electrical Seasoning of Wood.It is of theoretical importance only. Dry wood is a non-conductor of electricity. But when ahigh alternating current is passed through a piece of green timber, heat generated is enoughto dry out the moisture of the cells which do conduct some electricity. In this way, the timber pieces are dried quickly. The technique involves costly equipment, and even the consumption of electricity is so high that the process is uneconomical. Moreover, heating of cell walls causes considerable weakness in them.
5. Seasoning by Boiling.This is also a quick method of removing sap from within the cells. The timber to be seasoned is immersed in water, and the water is raised to boiling temperature.
It is kept boiling for four to five hours. The sap is washed out by this process. On placing in the air, such boiled timber dries quickly. But, at the cost of the strength and elasticity of the fibers. Hence, this method is also rarely used.
1.2.4 Characteristics of Good Timber1. It should have minimum moisture content, i.e., the timber should be well seasoned.
2. The grains of wood should be straight and long.
3. It must retain its straightness after seasoning.
4. It should produce near metallic sound on hammering.
5. It should be free from knots or cracks.
6. It should be of uniform color, throughout the part of the wood.
7. It should respond well to the finishing and polishing operations.
8. During driving the nails and screws, it should not split easily.
1.3 CARPENTRY TOOLSThe following are the tools that are made use of in all the wood working operations:
Er. Abhijjeet MauryaM.Tech (Production Engineering)
University of LucknowFaculty of Engineering & Technology
Central WorkshopCourse Code: ME152/ME252/RET409
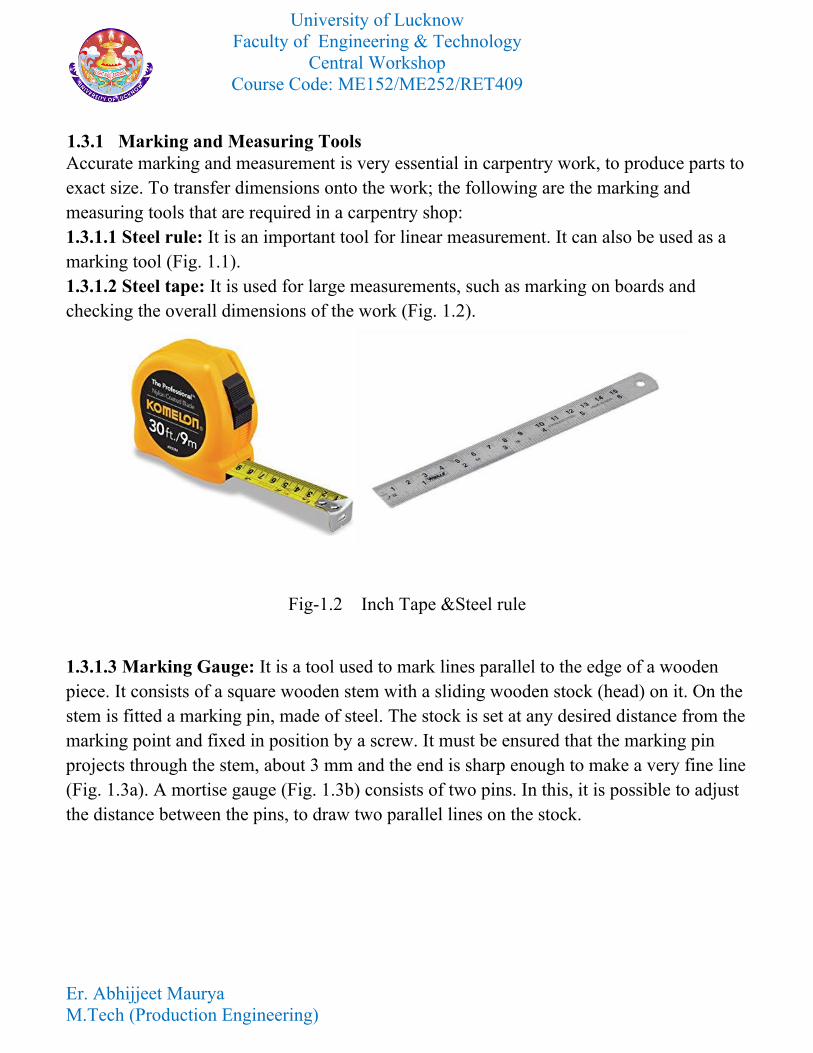
1.3.1 Marking and Measuring ToolsAccurate marking and measurement is very essential in carpentry work, to produce parts toexact size. To transfer dimensions onto the work; the following are the marking and measuring tools that are required in a carpentry shop: 1.3.1.1 Steel rule: It is an important tool for linear measurement. It can also be used as a marking tool (Fig. 1.1). 1.3.1.2 Steel tape: It is used for large measurements, such as marking on boards and checking the overall dimensions of the work (Fig. 1.2).
Fig-1.2 Inch Tape &Steel rule
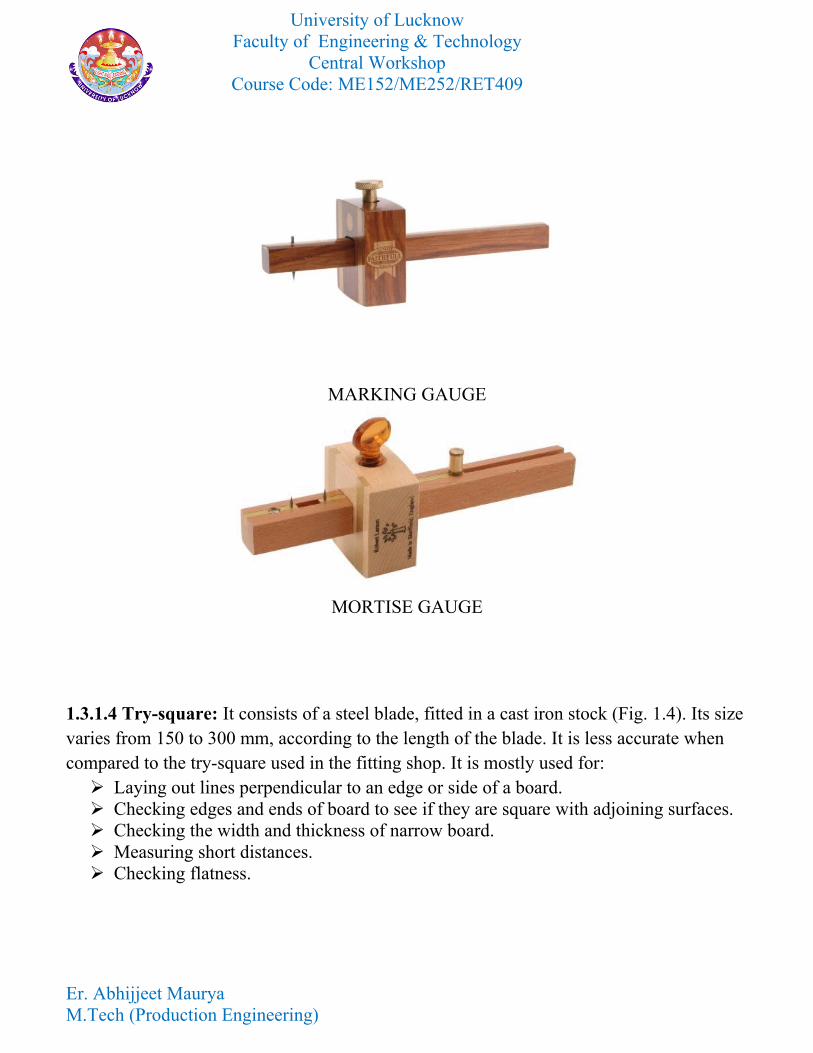
1.3.1.3 Marking Gauge: It is a tool used to mark lines parallel to the edge of a wooden piece. It consists of a square wooden stem with a sliding wooden stock (head) on it. On the stem is fitted a marking pin, made of steel. The stock is set at any desired distance from themarking point and fixed in position by a screw. It must be ensured that the marking pin projects through the stem, about 3 mm and the end is sharp enough to make a very fine line(Fig. 1.3a). A mortise gauge (Fig. 1.3b) consists of two pins. In this, it is possible to adjust the distance between the pins, to draw two parallel lines on the stock.
Er. Abhijjeet MauryaM.Tech (Production Engineering)
University of LucknowFaculty of Engineering & Technology
Central WorkshopCourse Code: ME152/ME252/RET409
MARKING GAUGE
MORTISE GAUGE
1.3.1.4 Try-square: It consists of a steel blade, fitted in a cast iron stock (Fig. 1.4). Its size varies from 150 to 300 mm, according to the length of the blade. It is less accurate when compared to the try-square used in the fitting shop. It is mostly used for:
Laying out lines perpendicular to an edge or side of a board. Checking edges and ends of board to see if they are square with adjoining surfaces. Checking the width and thickness of narrow board. Measuring short distances. Checking flatness.
Er. Abhijjeet MauryaM.Tech (Production Engineering)
University of LucknowFaculty of Engineering & Technology
Central WorkshopCourse Code: ME152/ME252/RET409
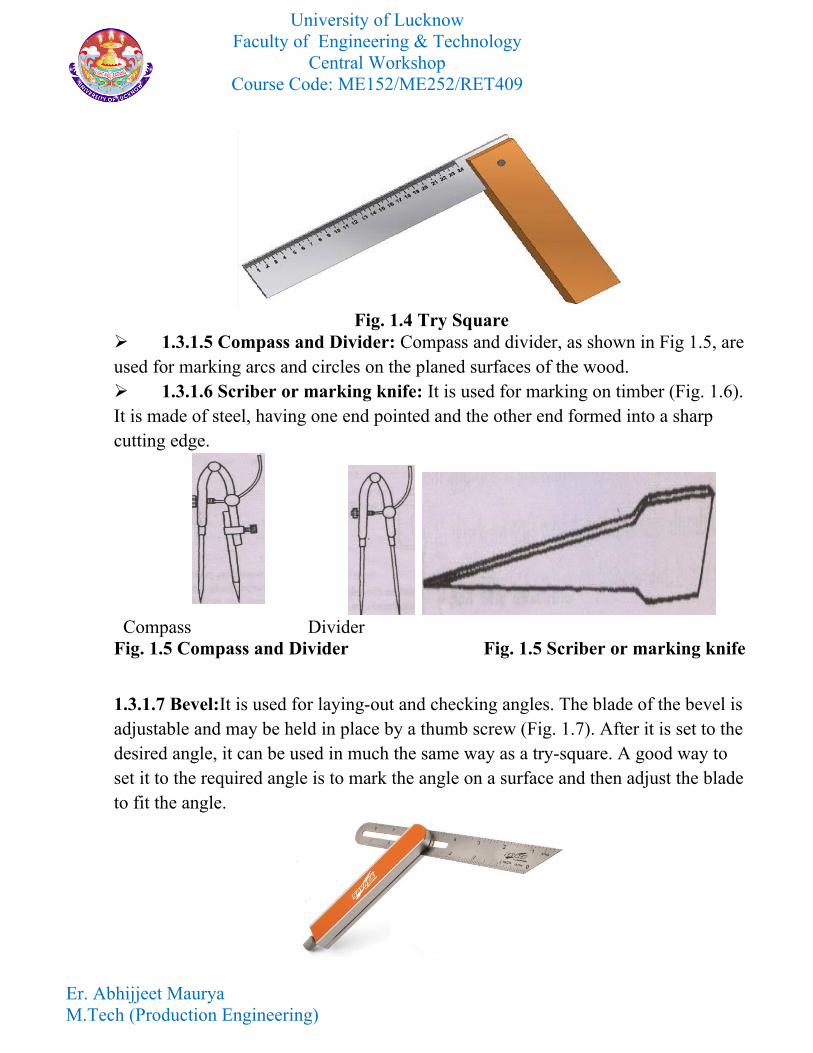
Fig. 1.4 Try Square 1.3.1.5 Compass and Divider: Compass and divider, as shown in Fig 1.5, areused for marking arcs and circles on the planed surfaces of the wood. 1.3.1.6 Scriber or marking knife: It is used for marking on timber (Fig. 1.6). It is made of steel, having one end pointed and the other end formed into a sharp cutting edge.
Compass Divider Fig. 1.5 Compass and Divider Fig. 1.5 Scriber or marking knife
1.3.1.7 Bevel:It is used for laying-out and checking angles. The blade of the bevel is adjustable and may be held in place by a thumb screw (Fig. 1.7). After it is set to the desired angle, it can be used in much the same way as a try-square. A good way to set it to the required angle is to mark the angle on a surface and then adjust the bladeto fit the angle.
Er. Abhijjeet MauryaM.Tech (Production Engineering)
University of LucknowFaculty of Engineering & Technology
Central WorkshopCourse Code: ME152/ME252/RET409
Fig. 1.7 Bevel
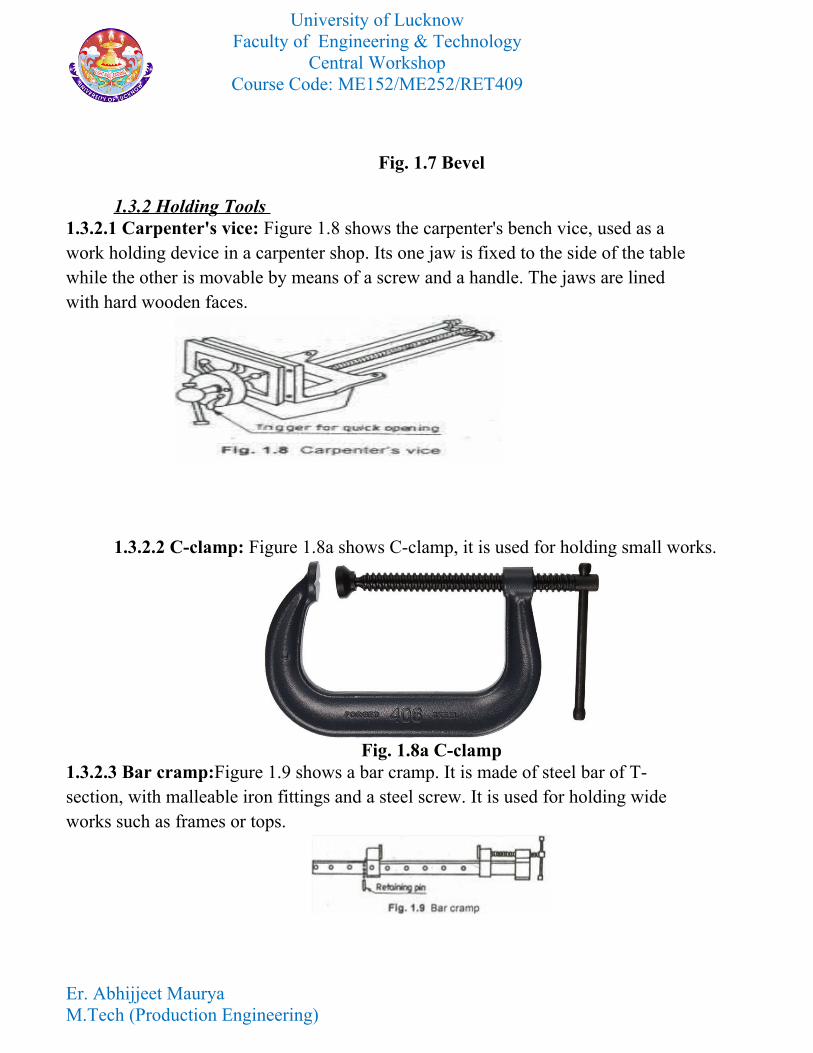
1.3.2 Holding Tools 1.3.2.1 Carpenter's vice: Figure 1.8 shows the carpenter's bench vice, used as a work holding device in a carpenter shop. Its one jaw is fixed to the side of the table while the other is movable by means of a screw and a handle. The jaws are lined with hard wooden faces.
1.3.2.2 C-clamp: Figure 1.8a shows C-clamp, it is used for holding small works.
Fig. 1.8a C-clamp1.3.2.3 Bar cramp:Figure 1.9 shows a bar cramp. It is made of steel bar of T-section, with malleable iron fittings and a steel screw. It is used for holding wide works such as frames or tops.
Er. Abhijjeet MauryaM.Tech (Production Engineering)
University of LucknowFaculty of Engineering & Technology
Central WorkshopCourse Code: ME152/ME252/RET409
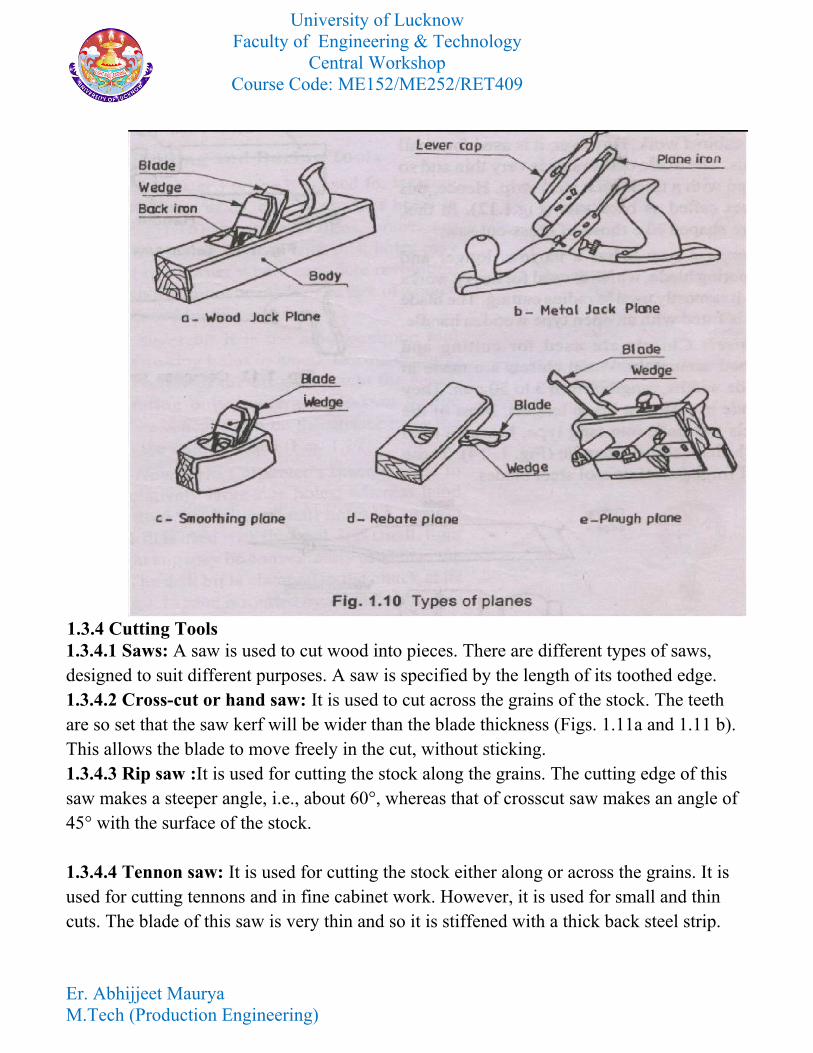
1.3.3 Planning Tools Planning is the operation used to produce flat surfaces on wood. A plane is a hand tool used for the purpose. The cutting blade used in a plane is very similar to a chisel. The bladeof a plane is fitted in a wooden or metallic block, at an angle. 1.3.3.1 Jack plane: It is the most commonly used general purpose plane. It is about 35 cm long. The cutting iron (blade) should have a cutting edge of slight curvature. It is used for quick removal of material on rough work and is also used in oblique planning.
1.3.3.2 Smoothing plane: It is used for finishing work and hence, the blade should have a straight cutting edge. It is about 20 to 25 cm long. Being short, it can follow even the slightdepressions in the stock, better than the jack plane. It is used after using the jack plane. 1.3.3.3 Rebate plane: It is used for making a rebate. A rebate is a recess along the edge of a piece of wood, which is generally used for positioning glass in frames and doors. 1.3.3.4 Plough plane: It is used to cut grooves, which are used to fix panels in a door. Fig. 1.10 shows the various types of planes mentioned above.
Er. Abhijjeet MauryaM.Tech (Production Engineering)
University of LucknowFaculty of Engineering & Technology
Central WorkshopCourse Code: ME152/ME252/RET409
1.3.4 Cutting Tools 1.3.4.1 Saws: A saw is used to cut wood into pieces. There are different types of saws, designed to suit different purposes. A saw is specified by the length of its toothed edge. 1.3.4.2 Cross-cut or hand saw: It is used to cut across the grains of the stock. The teeth are so set that the saw kerf will be wider than the blade thickness (Figs. 1.11a and 1.11 b). This allows the blade to move freely in the cut, without sticking. 1.3.4.3 Rip saw :It is used for cutting the stock along the grains. The cutting edge of this saw makes a steeper angle, i.e., about 60°, whereas that of crosscut saw makes an angle of 45° with the surface of the stock.
1.3.4.4 Tennon saw: It is used for cutting the stock either along or across the grains. It is used for cutting tennons and in fine cabinet work. However, it is used for small and thin cuts. The blade of this saw is very thin and so it is stiffened with a thick back steel strip.
Er. Abhijjeet MauryaM.Tech (Production Engineering)
University of LucknowFaculty of Engineering & Technology
Central WorkshopCourse Code: ME152/ME252/RET409
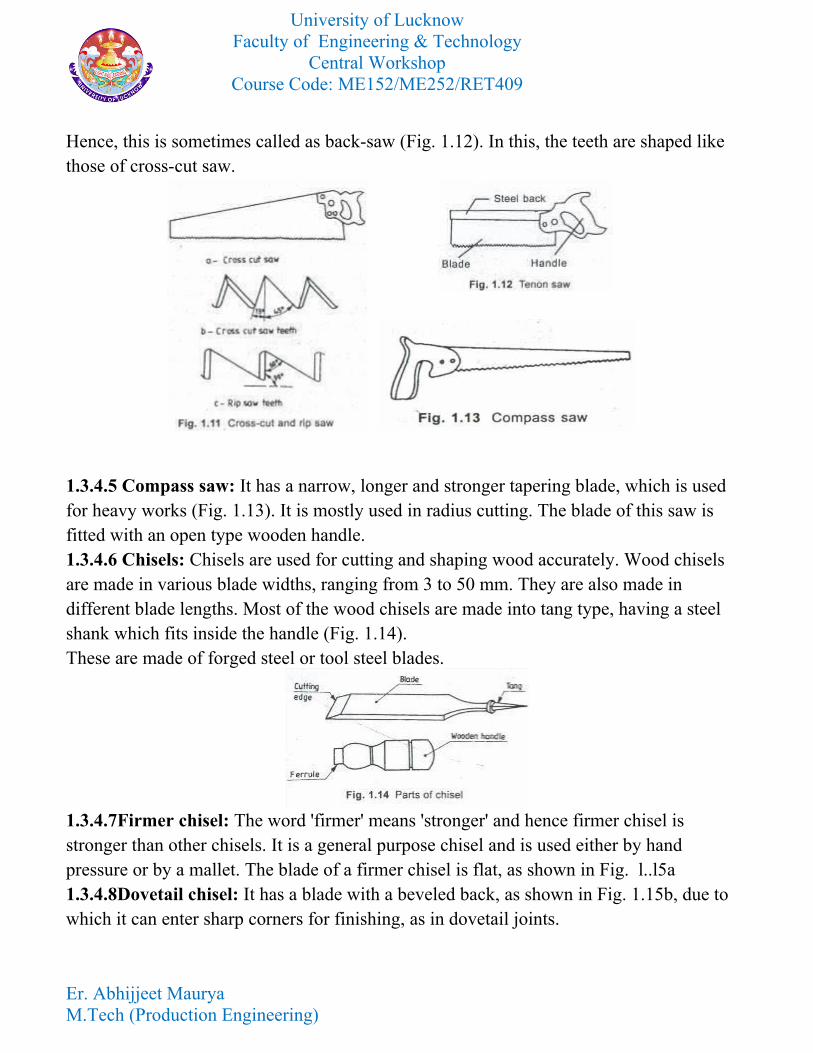
Hence, this is sometimes called as back-saw (Fig. 1.12). In this, the teeth are shaped like those of cross-cut saw.
1.3.4.5 Compass saw: It has a narrow, longer and stronger tapering blade, which is used for heavy works (Fig. 1.13). It is mostly used in radius cutting. The blade of this saw is fitted with an open type wooden handle. 1.3.4.6 Chisels: Chisels are used for cutting and shaping wood accurately. Wood chisels are made in various blade widths, ranging from 3 to 50 mm. They are also made in different blade lengths. Most of the wood chisels are made into tang type, having a steel shank which fits inside the handle (Fig. 1.14).These are made of forged steel or tool steel blades.
1.3.4.7Firmer chisel: The word 'firmer' means 'stronger' and hence firmer chisel is stronger than other chisels. It is a general purpose chisel and is used either by hand pressure or by a mallet. The blade of a firmer chisel is flat, as shown in Fig. l..l5a1.3.4.8Dovetail chisel: It has a blade with a beveled back, as shown in Fig. 1.15b, due to which it can enter sharp corners for finishing, as in dovetail joints.
Er. Abhijjeet MauryaM.Tech (Production Engineering)
University of LucknowFaculty of Engineering & Technology
Central WorkshopCourse Code: ME152/ME252/RET409
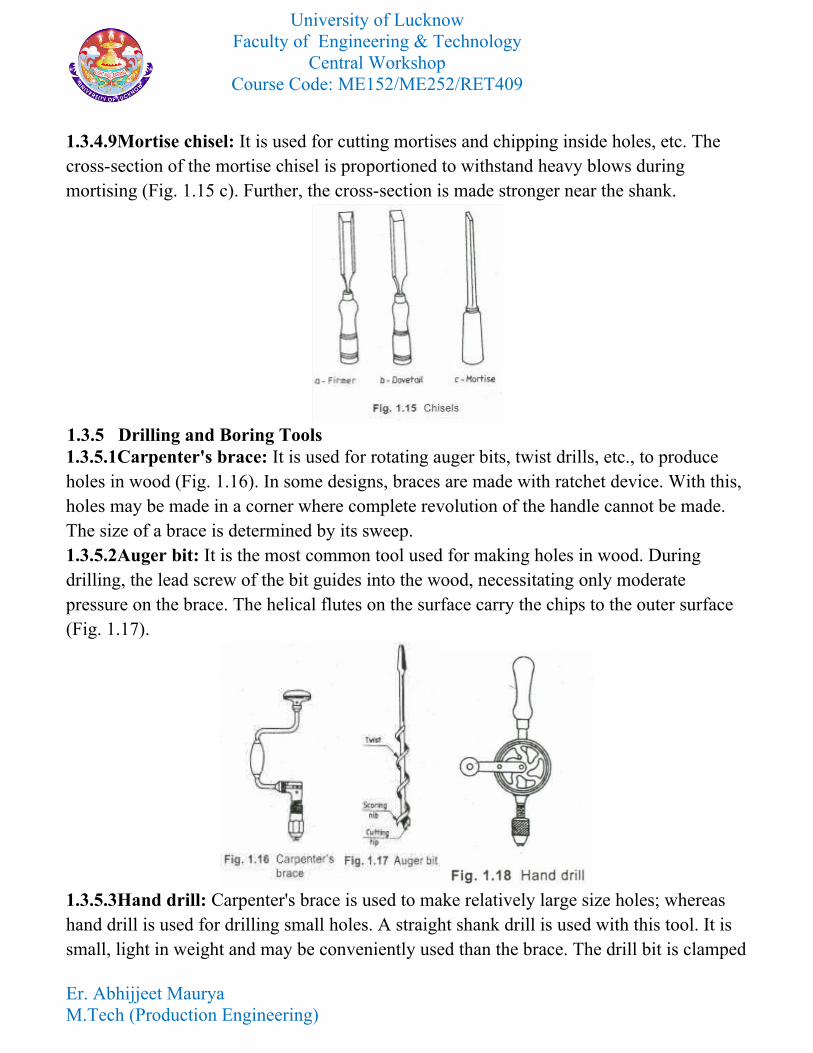
1.3.4.9Mortise chisel: It is used for cutting mortises and chipping inside holes, etc. The cross-section of the mortise chisel is proportioned to withstand heavy blows during mortising (Fig. 1.15 c). Further, the cross-section is made stronger near the shank.
1.3.5 Drilling and Boring Tools1.3.5.1Carpenter's brace: It is used for rotating auger bits, twist drills, etc., to produce holes in wood (Fig. 1.16). In some designs, braces are made with ratchet device. With this, holes may be made in a corner where complete revolution of the handle cannot be made. The size of a brace is determined by its sweep. 1.3.5.2Auger bit: It is the most common tool used for making holes in wood. During drilling, the lead screw of the bit guides into the wood, necessitating only moderate pressure on the brace. The helical flutes on the surface carry the chips to the outer surface (Fig. 1.17).
1.3.5.3Hand drill: Carpenter's brace is used to make relatively large size holes; whereas hand drill is used for drilling small holes. A straight shank drill is used with this tool. It is small, light in weight and may be conveniently used than the brace. The drill bit is clamped
Er. Abhijjeet MauryaM.Tech (Production Engineering)
University of LucknowFaculty of Engineering & Technology
Central WorkshopCourse Code: ME152/ME252/RET409
in the chuck at its end (Fig. 1.18) and is rotated by a handle attached to gear and pinion arrangement.
1.3.5.4 Gimlet: It has cutting edge like a twist drill (Fig. 1.19). It is used for drilling large diameter holes with the hand pressure.
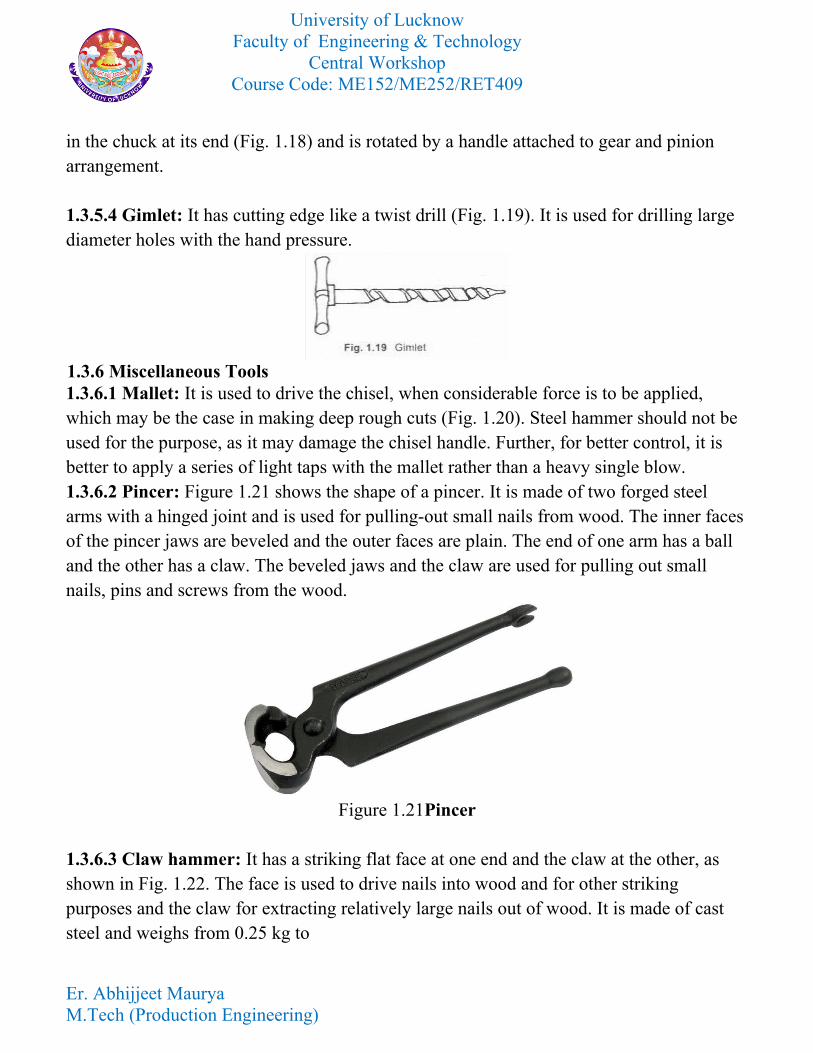
1.3.6 Miscellaneous Tools1.3.6.1 Mallet: It is used to drive the chisel, when considerable force is to be applied, which may be the case in making deep rough cuts (Fig. 1.20). Steel hammer should not be used for the purpose, as it may damage the chisel handle. Further, for better control, it is better to apply a series of light taps with the mallet rather than a heavy single blow. 1.3.6.2 Pincer: Figure 1.21 shows the shape of a pincer. It is made of two forged steel arms with a hinged joint and is used for pulling-out small nails from wood. The inner facesof the pincer jaws are beveled and the outer faces are plain. The end of one arm has a ball and the other has a claw. The beveled jaws and the claw are used for pulling out small nails, pins and screws from the wood.
Figure 1.21Pincer
1.3.6.3 Claw hammer: It has a striking flat face at one end and the claw at the other, as shown in Fig. 1.22. The face is used to drive nails into wood and for other striking purposes and the claw for extracting relatively large nails out of wood. It is made of cast steel and weighs from 0.25 kg to
Er. Abhijjeet MauryaM.Tech (Production Engineering)
University of LucknowFaculty of Engineering & Technology
Central WorkshopCourse Code: ME152/ME252/RET409
0.75 kg.
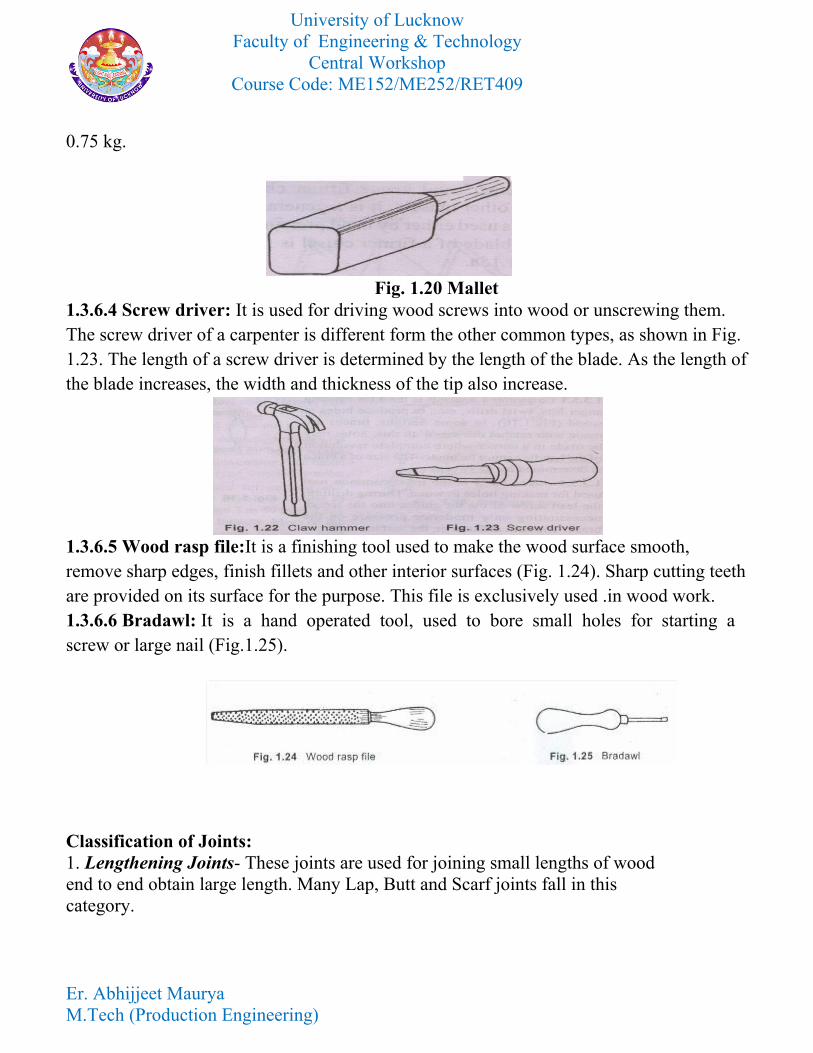
Fig. 1.20 Mallet1.3.6.4 Screw driver: It is used for driving wood screws into wood or unscrewing them. The screw driver of a carpenter is different form the other common types, as shown in Fig. 1.23. The length of a screw driver is determined by the length of the blade. As the length ofthe blade increases, the width and thickness of the tip also increase.
1.3.6.5 Wood rasp file:It is a finishing tool used to make the wood surface smooth, remove sharp edges, finish fillets and other interior surfaces (Fig. 1.24). Sharp cutting teethare provided on its surface for the purpose. This file is exclusively used .in wood work. 1.3.6.6 Bradawl: It is a hand operated tool, used to bore small holes for starting a screw or large nail (Fig.1.25).
Classification of Joints:1. Lengthening Joints- These joints are used for joining small lengths of wood end to end obtain large length. Many Lap, Butt and Scarf joints fall in this category.
Er. Abhijjeet MauryaM.Tech (Production Engineering)
University of LucknowFaculty of Engineering & Technology
Central WorkshopCourse Code: ME152/ME252/RET409
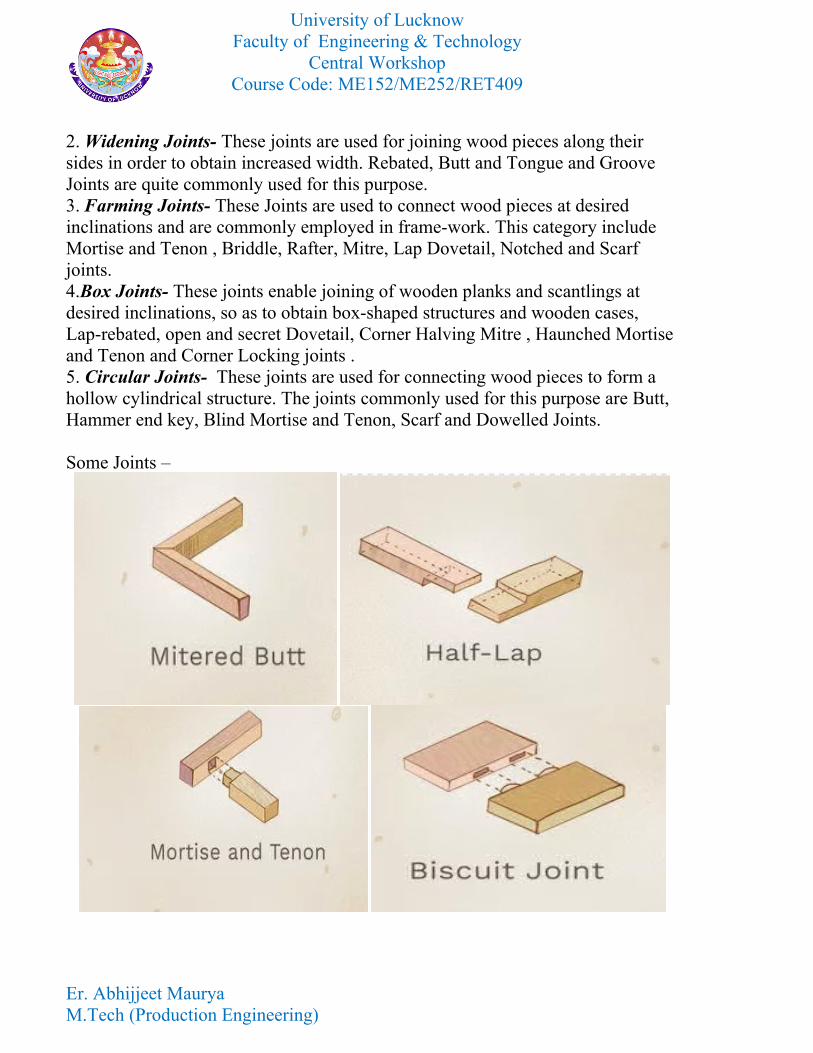
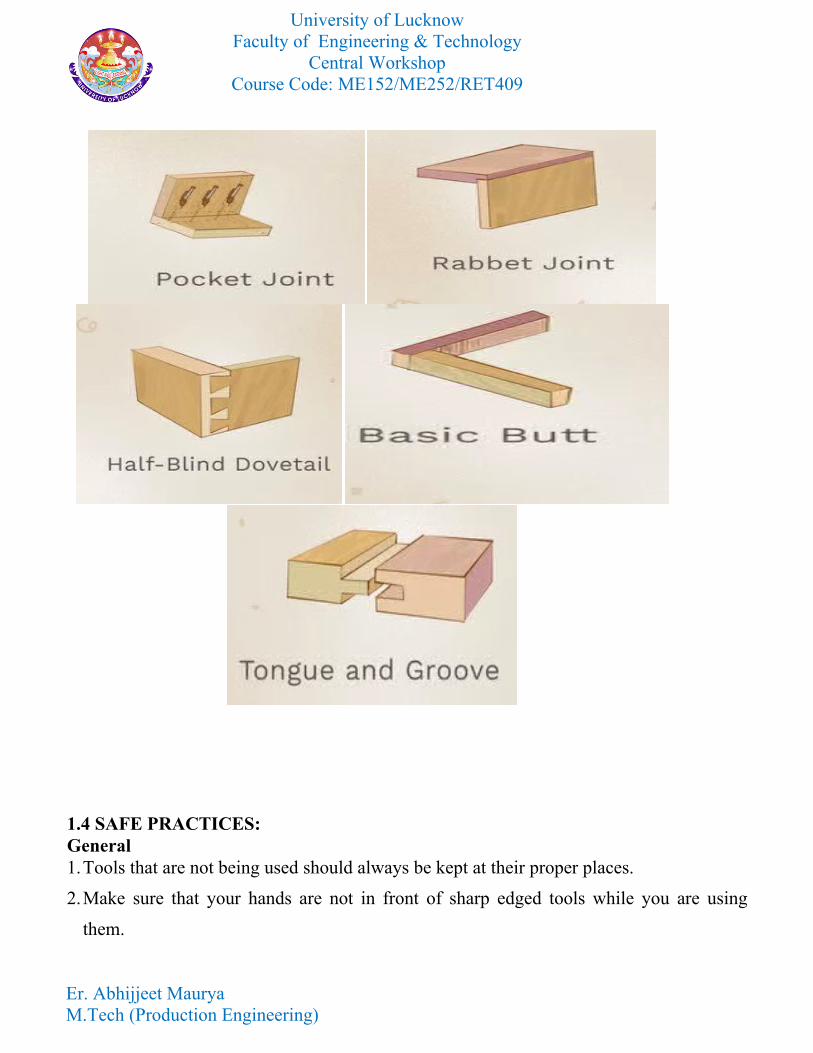
2. Widening Joints- These joints are used for joining wood pieces along their sides in order to obtain increased width. Rebated, Butt and Tongue and Groove Joints are quite commonly used for this purpose. 3. Farming Joints- These Joints are used to connect wood pieces at desired inclinations and are commonly employed in frame-work. This category include Mortise and Tenon , Briddle, Rafter, Mitre, Lap Dovetail, Notched and Scarf joints.4.Box Joints- These joints enable joining of wooden planks and scantlings at desired inclinations, so as to obtain box-shaped structures and wooden cases, Lap-rebated, open and secret Dovetail, Corner Halving Mitre , Haunched Mortiseand Tenon and Corner Locking joints .5. Circular Joints- These joints are used for connecting wood pieces to form a hollow cylindrical structure. The joints commonly used for this purpose are Butt, Hammer end key, Blind Mortise and Tenon, Scarf and Dowelled Joints.
Some Joints –
Er. Abhijjeet MauryaM.Tech (Production Engineering)
University of LucknowFaculty of Engineering & Technology
Central WorkshopCourse Code: ME152/ME252/RET409
1.4 SAFE PRACTICES: General1.Tools that are not being used should always be kept at their proper places.
2.Make sure that your hands are not in front of sharp edged tools while you are using
them.
Er. Abhijjeet MauryaM.Tech (Production Engineering)
University of LucknowFaculty of Engineering & Technology
Central WorkshopCourse Code: ME152/ME252/RET409
3.Use only sharp tools. A dull tool requires excessive pressure, causing the tool to slip.
4.Wooden pieces with nails should never be allowed to remain on the floor. 5.Loose clothing should always be avoided.6.While using chisels, take care that cutting is performed in the direction away from your
body.7.Most of the modern machines are equipped with proper guards for their moving parts
and they should be fully utilized.8.The floor area al around the machine should always be kept free from any obstructions.9.No machine should be operated without the permission of the shop incharge .10. Before starting cutting, allow the saw to attain the full speed.
Er. Abhijjeet MauryaM.Tech (Production Engineering)

University of LucknowF Faculty of Engineering & Technology
Central WorkshopCourse Code: ME152/ME252/RET409
Er. Abhijjeet MauryaM.Tech (Production Engineering)


