Embed Size (px)
Citation preview

Layout Components
ICESOFT TECHNOLOGIES INC. www.icefaces.org

• Here is the general naming scheme for ICEfaces component tags:
– Layout Components: panel*
– Input Components: input*
– Output Components: output*
– Selection Components: select*
Component Naming Schemes
ICESOFT TECHNOLOGIES INC. www.icefaces.org

ice:panelGroup
• Work horse of the panel components
• Renders child components surrounded by a HTML <div></div>
• Base container for the following dynamic behaviours– Drag and drop source and target configuration
– Draggable container option
ICESOFT TECHNOLOGIES INC. www.icefaces.org
– Context menu linking
– Panel tool tip linking
– Effects container
• Default CSS class name is icePnlGrp

ice:panelGrid
• Convenient wrapper for displaying non-iterative data in an HTML <table/> tag
• Child components are each place in a table cell.
• New rows are defined by the integer attribute “columns”. Once x number or child component are rendered a new row is started
ICESOFT TECHNOLOGIES INC. www.icefaces.org
• Default CSS class name applied to the <table /> tag is icePnlGrd. CSS class can be applied to rows and columns
• Warning! No functionality for column or row spanning

ice:panelSeries
• The panelSeries component provides a mechanism for dynamically generating a series of repeating child-components within a panel
• Child components define the rendered layout
• Default CSS name applied to the parent <div/> is icePnlSrs
ICESOFT TECHNOLOGIES INC. www.icefaces.org
• Flexible component iterator -- essentially a dataTable with out the <table />
• Ability to use with an ice:dataPaginator in order to provide pagination of results

ice:panelTabSet
• Renders a table driven tabbed user interface.
• Comes in two flavours, declarative and iterative
• The parent tag <ice:panelTabSet /> contain child tags <ice:panelTab /> in either flavour
• Selected tab change event can be optionally configured
ICESOFT TECHNOLOGIES INC. www.icefaces.org
• Selected tab can also be dynamically changed via a backing bean value
• CSS styling for this component is complex but also very flexible

• This component allows the user to hide content and have it expand when the header is clicked
ice:panelCollabsible
ICESOFT TECHNOLOGIES INC. www.icefaces.org

Other Layout Components
• panelPopup– Modal and popup modes, will be covered in Facelet composite
components
• panelStack– Similar to Swing component of the same name.
– Not a good component to use when trying to minimize the weight of the component tree on the server
ICESOFT TECHNOLOGIES INC. www.icefaces.org
weight of the component tree on the server
• Newer Components:– panelDivider, split pain with dynamic divider
– panelTooltip, popup container
– menuContext, right-click popup context menu

Auto Complete Component
ICESOFT TECHNOLOGIES INC. www.icefaces.org

Auto-Complete Component
• ice:selectInputText component provides an inputText component enhanced with auto-complete functionality
• The component requires developers to implement the matching list search algorithm in their backing bean
• The ice:selectInputText component can generate one of two types of lists:
ICESOFT TECHNOLOGIES INC. www.icefaces.org
– A list of String data
– A list of arbitrarily complex child components
Exercise: Overview
• The goal of this exercise is to add auto-completefunctionality to the city field of the form
• When done, the user will be able to select a city from an auto-complete drop-down list, and the city, provinceId, and postalCode fields will be updated automatically
ICESOFT TECHNOLOGIES INC. www.icefaces.org

Step 1: Auto-Complete Component
• The city field is currently using an ice:inputText component for user entry
• Rename ice:inputText with ice:selectInputText for the city field
ICESOFT TECHNOLOGIES INC. www.icefaces.org

Step 2: Add valueChangeListener for city
• In order to detect that the user has typed in some characters into the city field, we need to add a valueChangeListener
• Add the following attribute to the ice:selectInputText component:valueChangeListener="#{applicantForm.cityListener}"
• Open ApplicantForm.java in the IDE and paste the following method:public void cityListener(ValueChangeEvent valueChangeEvent) {FacesContext facesContext = FacesContext.getCurrentInstance();UIViewRoot uiViewRoot = facesContext.getViewRoot();String cityNameStartsWith = (String)valueChangeEvent.getNewValue();getCitySupport().filterSelectItems(cityNameStartsWith);
ICESOFT TECHNOLOGIES INC. www.icefaces.org
City city = getCitySupport().getCityByName(cityNameStartsWith);if (city != null) {
UIInput cityInputText = (UIInput) uiViewRoot.findComponent("applicantForm:city");cityInputText.setSubmittedValue(city.getCityName());cityInputText.setValue(city.getCityName());UIInput provinceInputText = (UIInput) uiViewRoot.findComponent("applicantForm:provinceId");provinceInputText.setSubmittedValue(Long.toString(city.getProvinceId()));provinceInputText.setValue(city.getProvinceId());UIInput postalCodeInputText = (UIInput) uiViewRoot.findComponent("applicantForm:postalCode");postalCodeInputText.setSubmittedValue(city.getPostalCode());postalCodeInputText.setValue(city.getPostalCode());FacesContextHelper.clearImmediateFacesMessages(facesContext);
}}
• Note the call to getCityByName() which will eliminate the hard coded value of “Orlando” in the backing bean

Step 3: Add immediate attribute
• Normally valueChangeListeners fire during the PROCESS_VALIDATIONS phase of the JSF lifecycle
• But in order to avoid seeing extraneous validation failures, we need to add immediate=“true” to the auto-complete component
• Open the applicantForm.xhtml file in the IDE
ICESOFT TECHNOLOGIES INC. www.icefaces.org
• Open the applicantForm.xhtml file in the IDE
• Add the following to the ice:selectInputText tag:
immediate="true"

Step 4: Replace valueChangeListener for postalCode
• Replace the entire postalCodeListener() method with the following code:
public void postalCodeListener(ValueChangeEvent valueChangeEvent) {
FacesContext facesContext = FacesContext.getCurrentInstance();
UIViewRoot uiViewRoot = facesContext.getViewRoot();
String newPostalCode = (String) valueChangeEvent.getNewValue();
City city = getCitySupport().getCityByPostalCode(newPostalCode);
if (city != null) {
UIInput cityInputText = (UIInput) uiViewRoot.findComponent("applicantForm:city");
cityInputText.setSubmittedValue(city.getCityName());
cityInputText.setValue(city.getCityName());
ICESOFT TECHNOLOGIES INC. www.icefaces.org
UIInput provinceInputText = (UIInput) uiViewRoot.findComponent("applicantForm:provinceId");
provinceInputText.setSubmittedValue(Long.toString(city.getProvinceId()));
provinceInputText.setValue(city.getProvinceId());
UIInput postalCodeInputText = (UIInput) uiViewRoot.findComponent("applicantForm:postalCode");
postalCodeInputText.setSubmittedValue(city.getPostalCode());
postalCodeInputText.setValue(city.getPostalCode());FacesContextHelper.clearImmediateFacesMessages(facesContext);
}
}
• Note the call to getCityByPostalCode() which will eliminate the hard coded value of “32801” for Orlando in the backing bean – now the code will work with any known postal code

Step 5: Add Select Items
• In order to populate the auto-complete list with items:– Add the following “iterator” attributes to the ice:selectInputText
component:listVar="city"
listValue="#{citySupport.selectItems}"– Add the following f:facet component as a child of the ice:selectInputText
component:<f:facet name="selectInputText">
ICESOFT TECHNOLOGIES INC. www.icefaces.org
<f:facet name="selectInputText">
<ice:panelGrid columns="2">
<ice:outputText id="autoCompleteCity" value="#{city.cityName}" />
<ice:outputText id="autoCompletePostalCode" value="#{city.postalCode}" />
</ice:panelGrid>
</f:facet>

Step 6: Add City Transfer Object
• Create a new Java class:– training.jobapplication.transfer.City
• Add the following properties:private long cityId;private long provinceId;private String cityName;private String postalCode;
• Generate getters/setters for each property• Add the following constructor:
ICESOFT TECHNOLOGIES INC. www.icefaces.org
• Add the following constructor:public City(long cityId, long provinceId, String cityName, String postalCode) {
this.cityId = cityId;
this.provinceId = provinceId;
this.cityName = cityName;
this.postalCode = postalCode;
}

Step 7: Remove Obsolete Injection
• Open the ApplicantForm.java file in the IDE• Remove the following line, because we don’t need it anymore:private ProvinceSupport provinceSupport;
• Remove the corresponding getProvinceSupport() and setProvinceSupport() method, because we don’t need it anymore either
• Open the faces-config.xml file in the IDE• Remove the managed-property that injects the provinceSupport into
ICESOFT TECHNOLOGIES INC. www.icefaces.org
• Remove the managed-property that injects the provinceSupport into the applicantForm backing bean:<managed-property>
<property-name>provinceSupport</property-name>
<value>#{provinceSupport}</value>
</managed-property>

Step 8: Add CitySupport Bean
• Create a new Java class:– training.jobapplication.bean.support.CitySupport
• The code we need to paste is too large, so find the CitySupport.java file in the solutions folder and copy the contents
• Note the foreign-key relationship with provinceId, and that
ICESOFT TECHNOLOGIES INC. www.icefaces.org
• Note the foreign-key relationship with provinceId, and that the provinceSupport bean will be injected into the citySupport bean in order to lookup provinceId keys
• Walk through the filterSelectItems() method and look at how the filter is applied

Step 9: Define CitySupport Bean
• Open the following file in the IDE:– jobApplication/WEB-INF/faces-config.xml
• Add the following managed-bean and managed-property:<managed-bean><managed-bean-name>citySupport</managed-bean-name><managed-bean-
class>training.jobapplication.bean.support.CitySupport</managed-bean-class><managed-bean-scope>request</managed-bean-scope>
ICESOFT TECHNOLOGIES INC. www.icefaces.org
<!-- Inject the provinceSupport bean into the --><!-- citySupport bean in order to promote loose coupling --><managed-property>
<property-name>provinceSupport</property-name><value>#{provinceSupport}</value>
</managed-property></managed-bean>

Step 10: Specify Injection into Backing Bean
• Open the faces-config.xml file in the IDE
• Add the following managed-property to the applicantForm backing bean:<!-- Inject the citySupport bean into the --><!-- backing bean in order to promote loose coupling --><managed-property>
<property-name>citySupport</property-name>
ICESOFT TECHNOLOGIES INC. www.icefaces.org
<property-name>citySupport</property-name><value>#{citySupport}</value>
</managed-property>
• Open the ApplicantForm.java file in the IDE
• Add the following property:
private CitySupport citySupport;
• Generate a getters and setters for citySupport

Step 11: Run Application
• Re-publish/deploy the jobApplication project
• Run the application in the browser
• Enter a value for First Name, Last Name, Travel Percentage, and Date of Birth
• Click in the City field and type the letter “A”– Notice that “Atlanta” and “Albany” appear
ICESOFT TECHNOLOGIES INC. www.icefaces.org
– Notice that “Atlanta” and “Albany” appear
• Select Atlanta from the list
• Note that the Province is GA and the Postal Code is 30329
• Enter a postal code: 32801
• Note that the Province is FL and the City is Orlando

Rich Text Editor Component
ICESOFT TECHNOLOGIES INC. www.icefaces.org

Rich Text Editor
• The h:inputTextarea and ice:inputTextarea render themselves as an HTML <textarea /> tag which provides the user with the ability to enter only plain text
• The ice:inputRichText component enables the user to enter rich text like bold, italic, hyperlinks, and bullets:
ICESOFT TECHNOLOGIES INC. www.icefaces.org

Implementation
• The ice:inputRichText component is currently implemented as a wrapper around the FCKEditor open source project– The name comes from the initials of Frederico Caldeira Knabben,
the project founder
• The FCKEditor represents rich text as HTML, and allows the user to click on a “Source” button to work directly with the
ICESOFT TECHNOLOGIES INC. www.icefaces.org
user to click on a “Source” button to work directly with the underlying HTML if desired

• Setting the Toolbar– <ice:inputRichText toolbar="#{inputRichTextBean.toolbarMode}“ …/>
• Toolbar types
– Default
– Basic
Toolbar
ICESOFT TECHNOLOGIES INC. www.icefaces.org
– Basic

• Setting the Language– <ice:inputRichText language="en" …/>
• Available LanguagesEnglish (United Kingdom) (en-uk)Esperanto (eo)Estonian (et)Faroese (fo)Finnish (fi)
Mongolian (mn)Norwegian (no)Norwegian Bokmal (nb)Persian (fa)Polish (pl)
Afrikaans (af)Arabic (ar)Basque (eu)Bengali/Bangla (bn)Bosnian (bs)
Language
ICESOFT TECHNOLOGIES INC. www.icefaces.org
Finnish (fi)French (fr)Galician (gl)German (de)Greek (el)Hebrew (he)Hindi (hi)Hungarian (hu)Italian (it)Japanese (ja)Khmer (km)Korean (ko)Latvian (lv)Lithuanian (lt)Malay (ms)
Polish (pl)Portuguese (Brazil) (pt-br)Portuguese (Portugal) (pt)Romanian (ro)Russian (ru)Serbian (Cyrillic) (sr)Serbian (Latin) (sr-latn)Slovak (sk)Slovenian (sl)Spanish (es)Swedish (sv)Thai (th)Turkish (tr)Ukrainian (uk)Vietnamese (vi)
Bosnian (bs)Bulgarian (bg)Catalan (ca)Chinese Simplified (zh-cn)Chinese Traditional (zh)Croatian (hr)Czech (cs)Danish (da)Dutch (nl)English (en)English (Australia) (en-au)English (Canadian) (en-ca)

• Skins– <ice:inputRichText skin=“office2003” …/>
• Available Skins
– default
– office2003
Skins
ICESOFT TECHNOLOGIES INC. www.icefaces.org
– office2003
– silver

• The default behavior of the ice:inputRichText is to only save its data when the save icon is clicked
• In order to make the ice:inputRichText participate in normal ICEfaces
Save Button / Submit Behavior
ICESOFT TECHNOLOGIES INC. www.icefaces.org
• In order to make the ice:inputRichText participate in normal ICEfaces form submission, the saveOnSubmit attribute must be set to true
<ice:inputRichText saveOnSubmit=“true”…/>

Exercise: Overview
• The goal of this exercise is to replace the ice:inputTextarea component with an ice:inputRichText component
• This will allow the user to enter text like bold, italic, bullets in the resume, rather than simply plain text
ICESOFT TECHNOLOGIES INC. www.icefaces.org

Step 1: Replace Component
• Open the applicantForm.xhtml file in the IDE
• Replace the ice:inputTextarea component with the following markup:
<ice:inputRichText id="resume" saveOnSubmit="true" toolbar="Basic" width="500" height="200"
ICESOFT TECHNOLOGIES INC. www.icefaces.org
width="500" height="200" value="#{applicant.resume}" />

Step 2: Output Submitted Rich Text
• Open the ApplicantForm.java file in the IDE
• Add the following line to the submit() method:
System.out.println("submit() resume=" +
this.applicant.getResume());
ICESOFT TECHNOLOGIES INC. www.icefaces.org

Step 3: Run Application
• Re-publish/deploy the jobApplication project• Run the application in the browser• Enter First Name: John• Enter Last Name: Doe• Enter Travel Percentage: 50• Enter Date of Birth: 1/1/1970• Enter Postal Code: 32801• Click Show Resume
ICESOFT TECHNOLOGIES INC. www.icefaces.org
• Click Show Resume• Enter Rich Text:
– This is some bold text
• Click Submit Application• Note that the Tomcat console has this HTML
fragment as the value for resume:submit() resume=<p>This is some
<strong>bold</strong> text</p>

File Upload Component
ICESOFT TECHNOLOGIES INC. www.icefaces.org

File Upload
• Normal HTML forms look like this:<form enctype=“application/x-www-form-urlencoded”>
…</form>
• But when doing file upload, forms look like this:<form enctype=“multipart/form-data”>
…</form>
ICESOFT TECHNOLOGIES INC. www.icefaces.org
</form>
• The JSF 1.x specification completely ignored the multipart/form-data case – additionally, there is no file-upload component provided by the JSF RI
• Prior to ICEfaces, the only way to intercept these types of postback requests was to implement a PhaseListener

The ice:inputFile Component
• ICEfaces overcomes the JSF file upload shortcoming by providing an ice:inputFile component
• The component renders itself as an <iframe> which points to a small HTML fragment that is generated by the ICEfaces servlet
• The HTML fragment contains markup like this:
ICESOFT TECHNOLOGIES INC. www.icefaces.org
• The HTML fragment contains markup like this:
<input type=“file” … />
• This markup will manifest itself in the browser as a text field with a “Browse…” button and an “Upload” button
• When the user selects a file and clicks the “Upload” button, the ICEfaces uploadServlet receives the file data

Progress Indicator
• The file upload component can be tied to an ice:outputProgress component
• The progress indicator is updated during the file upload via ICEfaces Ajax Push
ICESOFT TECHNOLOGIES INC. www.icefaces.org

Uploaded File
• After the file upload is complete, the file will exist in the folder specified in the com.icesoft.faces.uploadDirectory init-param in web.xml– This can be an absolute or relative folder path
– If relative, it is relative to the Tomcat working directory for the web application
ICESOFT TECHNOLOGIES INC. www.icefaces.org
• Alternatively, the folder can be specified by the uploadDirectory attribute of the ice:inputFile component– See also: uploadDirectoryAbsolute and uniqueFolder attributes

Exercise: Overview
• The goal of this exercise is to replace the ice:inputRichText component with an ice:inputFile component
• This will allow the user to upload a resume document, rather than typing in a resume in the text area
ICESOFT TECHNOLOGIES INC. www.icefaces.org

Step 1: Replace Component
• Replace the ice:inputRichText component with the following markup:
<ice:inputFile id="resume" actionListener="#{resumeUploader.actionListener}" label="#{msgs.uploadResume}" progressListener="#{resumeUploader.progressListener}" />
ICESOFT TECHNOLOGIES INC. www.icefaces.org

Step 2: Add Progress Indicator and Message
• Add the following table row markup just above the table row for the ice:inputFile component:
<tr>
<td>
<ice:outputProgress value="#{resumeUploader.fileProgress}" labelComplete="#{resumeUploader.currentFile.fileName}" />
</td>
</tr>
ICESOFT TECHNOLOGIES INC. www.icefaces.org
</tr>

Step 3: Modify Model Bean
• Open the Applicant.java file in the IDE
• Delete the following line:
private String resume;
• Delete the getResume() and setResume() methods
ICESOFT TECHNOLOGIES INC. www.icefaces.org
Step 7: Add FileUpload Utility Bean
• Create the following utility bean Java class:– training.jobapplication.bean.util.FileUploader
• The size of the source code is too large to copy/paste from slides, so instead, find the file in the solution folder and paste the contents into the IDE
• This is a general purpose utility bean that can be reused by
ICESOFT TECHNOLOGIES INC. www.icefaces.org
• This is a general purpose utility bean that can be reused by other ICEfaces web applications

Step 8: Remove Console Output
• Open the ApplicantForm.java file in the IDE
• Delete this line:
System.out.println("submit() resume=" + this.applicant.getResume());
ICESOFT TECHNOLOGIES INC. www.icefaces.org

Step 9: Message Bundle
• Add the following key+value pair to Msgs_en.properties:
uploadResume=Upload Resume
• This will be the label of the upload button
ICESOFT TECHNOLOGIES INC. www.icefaces.org

Step 10: Define Managed Beans
• Paste the following markup into faces-config.xml:<managed-bean>
<managed-bean-name>resumeUploader</managed-bean-name>
<managed-bean-
ICESOFT TECHNOLOGIES INC. www.icefaces.org
class>training.jobapplication.bean.util.FileUploader</managed-bean-class>
<managed-bean-scope>request</managed-bean-scope>
</managed-bean>
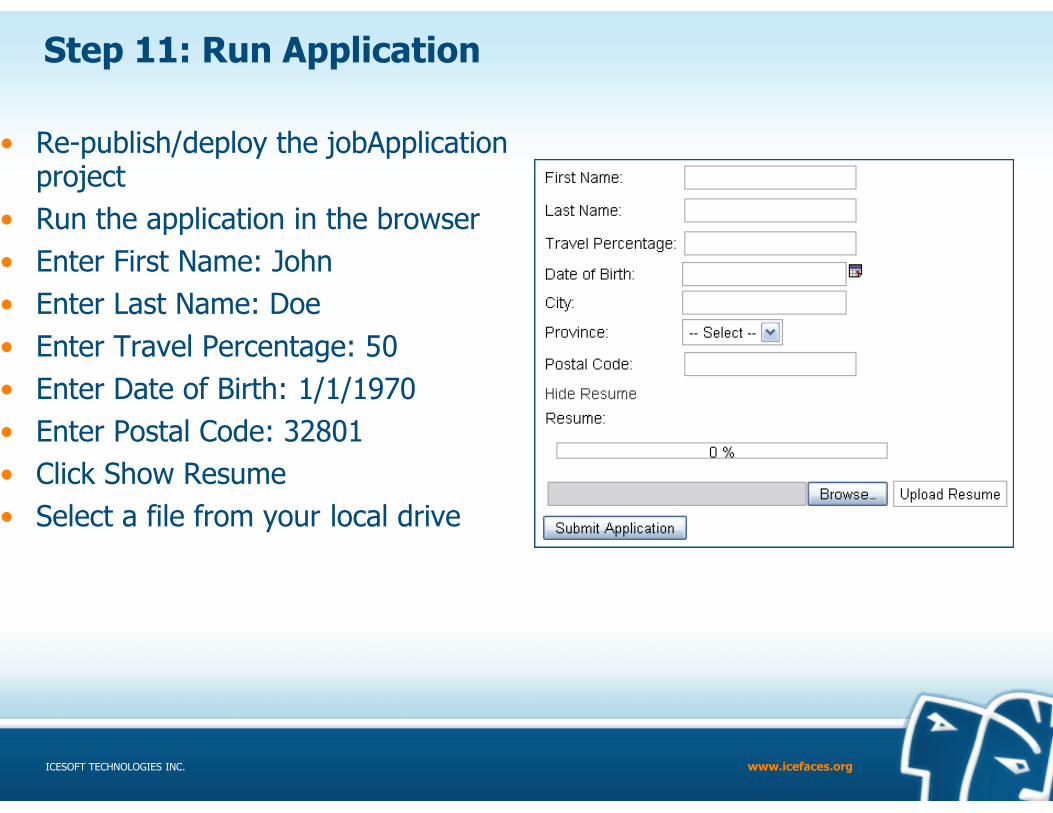
Step 11: Run Application
• Re-publish/deploy the jobApplication project
• Run the application in the browser• Enter First Name: John• Enter Last Name: Doe• Enter Travel Percentage: 50• Enter Date of Birth: 1/1/1970
ICESOFT TECHNOLOGIES INC. www.icefaces.org
• Enter Postal Code: 32801• Click Show Resume• Select a file from your local drive


