Embed Size (px)
Citation preview
Oracle® Retail Invoice Matching
User Guide Release 13.0.1
June 2008
Oracle® Retail Invoice Matching User Guide, Release 13.0.1
Copyright © 2008, Oracle. All rights reserved.
Primary Author: Archana Kishore
The Programs (which include both the software and documentation) contain proprietary information; they are provided under a license agreement containing restrictions on use and disclosure and are also protected by copyright, patent, and other intellectual and industrial property laws. Reverse engineering, disassembly, or decompilation of the Programs, except to the extent required to obtain interoperability with other independently created software or as specified by law, is prohibited.
The information contained in this document is subject to change without notice. If you find any problems in the documentation, please report them to us in writing. This document is not warranted to be error-free. Except as may be expressly permitted in your license agreement for these Programs, no part of these Programs may be reproduced or transmitted in any form or by any means, electronic or mechanical, for any purpose.
If the Programs are delivered to the United States Government or anyone licensing or using the Programs on behalf of the United States Government, the following notice is applicable:
U.S. GOVERNMENT RIGHTS Programs, software, databases, and related documentation and technical data delivered to U.S. Government customers are "commercial computer software" or "commercial technical data" pursuant to the applicable Federal Acquisition Regulation and agency-specific supplemental regulations. As such, use, duplication, disclosure, modification, and adaptation of the Programs, including documentation and technical data, shall be subject to the licensing restrictions set forth in the applicable Oracle license agreement, and, to the extent applicable, the additional rights set forth in FAR 52.227-19, Commercial Computer Software—Restricted Rights (June 1987). Oracle Corporation, 500 Oracle Parkway, Redwood City, CA 94065
The Programs are not intended for use in any nuclear, aviation, mass transit, medical, or other inherently dangerous applications. It shall be the licensee's responsibility to take all appropriate fail-safe, backup, redundancy and other measures to ensure the safe use of such applications if the Programs are used for such purposes, and we disclaim liability for any damages caused by such use of the Programs.
Oracle, JD Edwards, PeopleSoft, and Siebel are registered trademarks of Oracle Corporation and/or its affiliates. Other names may be trademarks of their respective owners.
The Programs may provide links to Web sites and access to content, products, and services from third parties. Oracle is not responsible for the availability of, or any content provided on, third-party Web sites. You bear all risks associated with the use of such content. If you choose to purchase any products or services from a third party, the relationship is directly between you and the third party. Oracle is not responsible for: (a) the quality of third-party products or services; or (b) fulfilling any of the terms of the agreement with the third party, including delivery of products or services and warranty obligations related to purchased products or services. Oracle is not responsible for any loss or damage of any sort that you may incur from dealing with any third party.
Value-Added Reseller (VAR) Language (i) the software component known as ACUMATE developed and licensed by Lucent Technologies Inc. of Murray Hill, New Jersey, to Oracle and imbedded in the Oracle Retail Predictive Application Server – Enterprise Engine, Oracle Retail Category Management, Oracle Retail Item Planning, Oracle Retail Merchandise Financial Planning, Oracle Retail Advanced Inventory Planning and Oracle Retail Demand Forecasting applications.
(ii) the MicroStrategy Components developed and licensed by MicroStrategy Services Corporation (MicroStrategy) of McLean, Virginia to Oracle and imbedded in the MicroStrategy for Oracle Retail Data Warehouse and MicroStrategy for Oracle Retail Planning & Optimization applications.
(iii) the SeeBeyond component developed and licensed by Sun MicroSystems, Inc. (Sun) of Santa Clara, California, to Oracle and imbedded in the Oracle Retail Integration Bus application.
(iv) the Wavelink component developed and licensed by Wavelink Corporation (Wavelink) of Kirkland, Washington, to Oracle and imbedded in Oracle Retail Store Inventory Management.
(v) the software component known as Crystal Enterprise Professional and/or Crystal Reports Professional licensed by Business Objects Software Limited (“Business Objects”) and imbedded in Oracle Retail Store Inventory Management.
(vi) the software component known as Access Via™ licensed by Access Via of Seattle, Washington, and imbedded in Oracle Retail Signs and Oracle Retail Labels and Tags.
(vii) the software component known as Adobe Flex™ licensed by Adobe Systems Incorporated of San Jose, California, and imbedded in Oracle Retail Promotion Planning & Optimization application.
(viii) the software component known as Style Report™ developed and licensed by InetSoft Technology Corp. of Piscataway, New Jersey, to Oracle and imbedded in the Oracle Retail Value Chain Collaboration application.
(ix) the software component known as WebLogic™ developed and licensed by BEA Systems, Inc. of San Jose, California, to Oracle and imbedded in the Oracle Retail Value Chain Collaboration application.
(x) the software component known as DataBeacon™ developed and licensed by Cognos Incorporated of Ottawa, Ontario, Canada, to Oracle and imbedded in the Oracle Retail Value Chain Collaboration application.
iii

Contents Preface .............................................................................................................................. ix
Audience ................................................................................................................................ ix Related Documents............................................................................................................... ix Customer Support................................................................................................................. ix Review Patch Documentation ............................................................................................. ix Oracle Retail Documentation on the Oracle Technology Network................................ ix Conventions.............................................................................................................................x
1 Oracle Retail Invoice Matching................................................................................... 1 Welcome to Oracle Retail Invoice Matching .......................................................................1
Business Processes ...........................................................................................................1 Navigate Invoice Matching....................................................................................................2
Invoice Matching Navigation.........................................................................................2 Flexible Columns .............................................................................................................3 Comments.........................................................................................................................5
2 Enter Documents ......................................................................................................... 7 Document Groups...................................................................................................................7
Create an Invoice Group.................................................................................................7 Edit a Document Group................................................................................................10 Delete a Document Group............................................................................................12 Approve a Document Group .......................................................................................12
EDI Uploads...........................................................................................................................13 Correct a Rejected EDI Invoice.....................................................................................13 Delete EDI Invoices .......................................................................................................14 Correct Multiple Rejected EDI Invoices......................................................................14 Delete Multiple Rejected EDI Invoices........................................................................15
Split Invoices..........................................................................................................................16 Splitting Invoices with Multiple Locations ................................................................16 Set Default Child Invoice Information from a Purchase Order...............................17 Add Invoice Details to a Child Invoice.......................................................................18
3 Create Documents ..................................................................................................... 21 Merchandise Invoices...........................................................................................................21
Create a Merchandise Invoice ......................................................................................21 Add Details to a Merchandise Invoice........................................................................24 Set Default Item Details from a Receipt or Purchase Order.....................................25
Non-Merchandise Invoices..................................................................................................26 Create a Non-Merchandise Invoice .............................................................................26
Document Maintenance .......................................................................................................29 Search for a Document ..................................................................................................29 Maintain a Document Header......................................................................................30 Maintain Document Details..........................................................................................32
v

Pay an Unmatched Invoice...........................................................................................33 View a Document ..........................................................................................................34
4 Match Documents...................................................................................................... 37 Match Credit Notes...............................................................................................................37
Summary Match Credit Notes .....................................................................................37 Detail Match Credit Notes ............................................................................................40
Match Invoices.......................................................................................................................43 Summary Match Invoices .............................................................................................43 Detail Match Invoices....................................................................................................48
5 Resolve Discrepancies.............................................................................................. 55 Cost Discrepancies ................................................................................................................55
Resolve Cost Discrepancies ..........................................................................................55 Quantity Discrepancies ........................................................................................................56
Resolve Quantity Discrepancies ..................................................................................56 VAT Discrepancies................................................................................................................57
Resolve VAT Discrepancies..........................................................................................57 Resolve Header Level VAT Discrepancies .................................................................58
Memos and Requests............................................................................................................59 Create a Credit or Debit Document.............................................................................59 Reverse a Debit Memo ..................................................................................................62 Void a Credit Note Request..........................................................................................64
6 System Administration.............................................................................................. 67 System Options .....................................................................................................................67
Maintain the System Variables.....................................................................................67 Maintain the Document Prefixes .................................................................................69
Supplier Options ...................................................................................................................69 Maintain a Supplier .......................................................................................................70 Create a Grouped Supplier...........................................................................................71 Delete a Grouped Supplier ...........................................................................................72
General Ledger Accounts.....................................................................................................73 Create a General Ledger Account Cross Reference...................................................73 Define General Ledger Options ...................................................................................74
Reason Codes.........................................................................................................................74 Create Reason Codes.....................................................................................................75 Edit Reason Codes .........................................................................................................76 Delete Reason Codes .....................................................................................................77
User Groups...........................................................................................................................77 Create a User Group......................................................................................................78 Delete a User Group ......................................................................................................79 Assign Users to a User Group......................................................................................80 Delete a User from a Group..........................................................................................81 Assign a Department/Class to a User Group............................................................83
vi
Delete a Department/Class from a User Group........................................................85 Assign a Location to a User Group..............................................................................87 Delete a Location from a User Group .........................................................................89 Assign a Reason Code to a User Group......................................................................91 Delete a Reason Code from a User Group..................................................................93
Tolerance Levels....................................................................................................................95 Define the Tolerance Level for the System.................................................................96 Delete the Tolerance Level for the System .................................................................96 Define the Tolerance Level for a Supplier, Supplier Trait, or Department............97 Delete a Tolerance Level for a Supplier, Supplier Trait, or Department................99 Set Default Tolerance Level for a Supplier, Supplier Trait, or Department.........100
Glossary......................................................................................................................... 103
vii

Preface The Oracle Retail Invoice Matching User Guide describes the application user interface and how to navigate through it.
Audience This document is intended for the users and administrators of Oracle Retail Invoice Matching. This may include merchandisers, buyers, and business analysts.
Related Documents For more information, see the following documents in the Oracle Retail Invoice Matching Release 13.0.1 documentation set and the documents in the Oracle Retail Merchandising set: Oracle Retail Invoice Matching Data Model Oracle Retail Invoice Matching Installation Guide Oracle Retail Invoice Matching Release Notes Oracle Retail Invoice Matching Operations Guide Oracle Retail Invoice Matching Online Help
Customer Support https://metalink.oracle.com When contacting Customer Support, please provide the following: Product version and program/module name Functional and technical description of the problem (include business impact) Detailed step-by-step instructions to re-create Exact error message received Screen shots of each step you take
Review Patch Documentation For a base release (".0" release, such as 13.0), Oracle Retail strongly recommends that you read all patch documentation before you begin installation procedures. Patch documentation can contain critical information related to the base release, based on new information and code changes that have been made since the base release.
Oracle Retail Documentation on the Oracle Technology Network In addition to being packaged with each product release (on the base or patch level), all Oracle Retail documentation is available on the following Web site: http://www.oracle.com/technology/documentation/oracle_retail.html Documentation should be available on this Web site within a month after a product release. Note that documentation is always available with the packaged code on the release date.
ix
Conventions Navigate: This is a navigate statement. It tells you how to get to the start of the procedure and ends with a screen shot of the starting point and the statement “the Window Name window opens.”
Note: This is a note. It is used to call out information that is important, but not necessarily part of the procedure.
This is a code sample It is used to display examples of code A hyperlink appears like this.
x
1 Oracle Retail Invoice Matching
Welcome to Oracle Retail Invoice Matching Oracle Retail Invoice Matching (ReIM) allows you to verify merchandise invoice costs and quantities before payment. ReIM receives invoice data through Electronic Data Interchange (EDI), or data can be entered manually. An automatic matching process verifies Invoice records against associated receipts. If invoices are matched to receipts within tolerance at a summary level, they are evaluated for best payment terms and posted to a staging table. The staging table interfaces with your accounts payable system, where payments are processed and corresponding accounting entries are posted. If invoices and receipts are not matched at the summary level after a specified period of time, the auto-matching process attempts to match at the line level within tolerances. If matches are not identified at the line level, the process calculates a cost or quantity discrepancy. Discrepancies are routed to defined user groups for resolution. You resolve discrepancies by applying reason codes based on a set of defined actions (for example, charge-back supplier). The reason codes determine disposition of the discrepancies. The auto-match process routes discrepancies so that you can begin manual identification of summary and detail level matches. You can resolve line-level discrepancies, and you can access invoices and receipts.
Business Processes
Resolve Discrepancies Review cost discrepancies Review quantity discrepancies Review VAT discrepancies Create memos and requests
Enter and Review Invoices Review EDI uploads Split invoices with multiple locations Enter document groups Create a merchandise invoice Create a non merchandise invoice
Match Documents Summary match invoices Detail match invoices Summary match credit notes Detail match credit notes
1
Navigate Invoice Matching
Maintain Invoice Matching Settings Maintain system options Maintain supplier options Maintain general ledger accounts Maintain reason codes Maintain user groups Maintain tolerance levels
Navigate Invoice Matching
Invoice Matching Navigation This section describes how to navigate within ReIM. It describes how to:
Log on to and exit ReIM Navigate within a window Sort and filter columns
Log In and Exit ReIM
Note: The way that you access ReIM depends on how the system is set up at your location. Contact you system administrator for instructions. After you have started ReIM, you are prompted to log on to the system.
Log In to ReIM 1. In the Login window, enter your user name in the Username field.
2. In the Password field, enter your password. 3. Click Log In. The ReIM Main Menu window is displayed.
Exit ReIM 1. From the Main Menu, select Log Out. You are prompted to confirm your decision.
2. Click OK. You return to the Login window.
Navigate Within a Window
Use a Drop-Down list Some fields can accept values only from a predefined list of options. These fields have a down arrow button on the right side of the field.
1. Click the down arrow button. A drop-down list of options is displayed. 2. Select a value from the drop-down list. The selected option is entered in the field.
Use a List of Values Button
The List of Values button is found to the right of a field. The button displays all defined values or options available for the field.
2 Oracle Retail Invoice Matching
Navigate Invoice Matching
Note: The list of values is empty if no values have been defined for the list.
1. Click the LOV button. A list of options is displayed. 2. Select an option from the list. 3. Click OK. The selected option is entered in the field.
Filter and Sort Information You can sort and filter data so that you can view the information you want.
Filter Information Many windows use filters. You can use a filter to limit the records listed to those that match certain criteria. 1. To select the criteria, choose from the values in the drop-down list associated with
the field. You can filter multiple columns at the same time. 2. To display all records, select *All* from each drop-down list.
Sort Information Many windows use underlined column headings to sort table data. 1. To sort the list, click on the underlined column heading of the column you want to
use for sorting. You can only sort by one column at a time. An arrow indicates the column that is currently sorted, as well as the sort order.
2. To reverse the sort order, click the same column heading again.
Flexible Columns You can customize your window view by clicking on the column button. You can change the columns that are hidden or displayed, or the order in which columns appear. After you rearrange the columns, the window view is the same every time you open the window.
Hide or Display a Column 1. Click the column button to the left of the window name. The Column Ordering
window opens.
Oracle Retail Invoice Matching 3
Navigate Invoice Matching
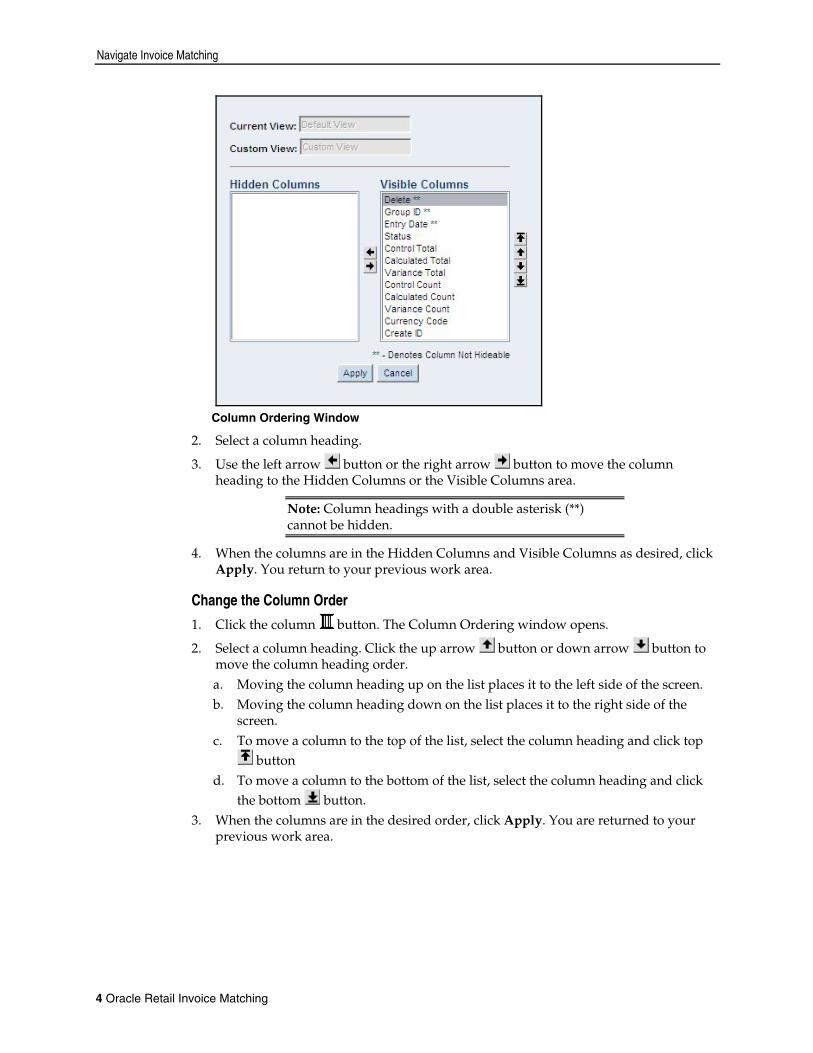
Column Ordering Window
2. Select a column heading.
3. Use the left arrow button or the right arrow button to move the column heading to the Hidden Columns or the Visible Columns area.
Note: Column headings with a double asterisk (**) cannot be hidden.
4. When the columns are in the Hidden Columns and Visible Columns as desired, click Apply. You return to your previous work area.
Change the Column Order 1. Click the column button. The Column Ordering window opens.
2. Select a column heading. Click the up arrow button or down arrow button to move the column heading order. a. Moving the column heading up on the list places it to the left side of the screen. b. Moving the column heading down on the list places it to the right side of the
screen. c. To move a column to the top of the list, select the column heading and click top
button d. To move a column to the bottom of the list, select the column heading and click
the bottom button. 3. When the columns are in the desired order, click Apply. You are returned to your
previous work area.
4 Oracle Retail Invoice Matching
Navigate Invoice Matching
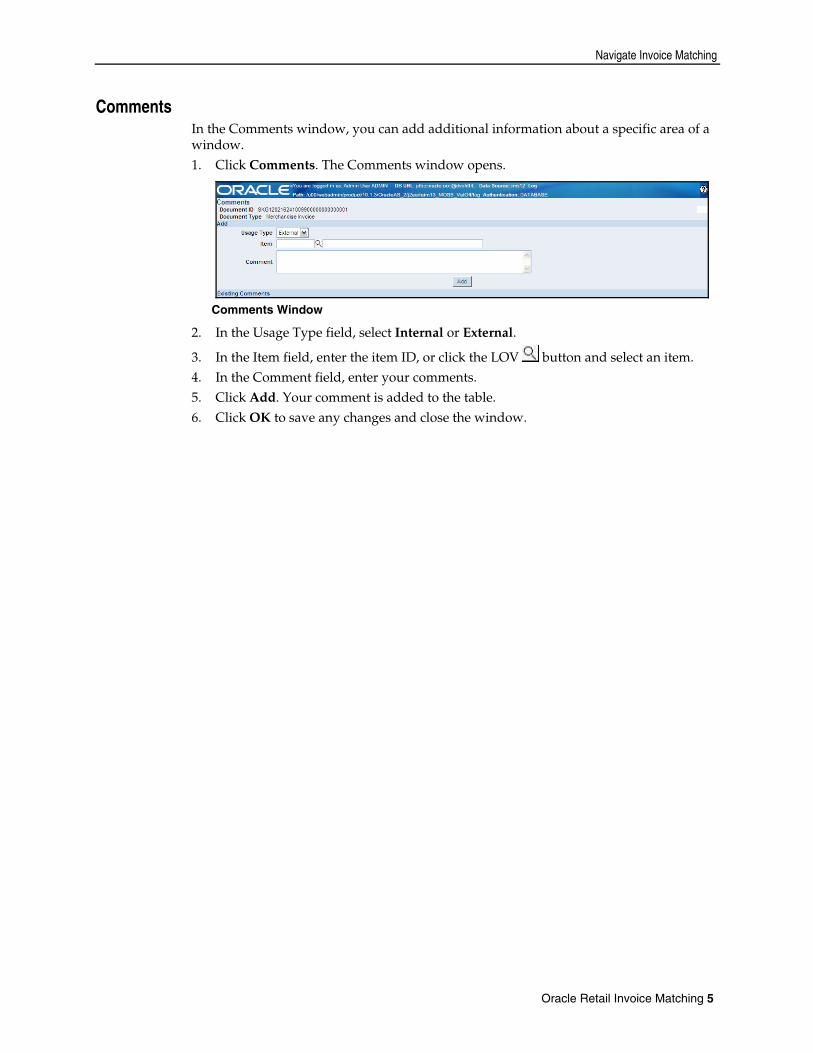
Comments In the Comments window, you can add additional information about a specific area of a window. 1. Click Comments. The Comments window opens.
Comments Window
2. In the Usage Type field, select Internal or External.
3. In the Item field, enter the item ID, or click the LOV button and select an item. 4. In the Comment field, enter your comments. 5. Click Add. Your comment is added to the table. 6. Click OK to save any changes and close the window.
Oracle Retail Invoice Matching 5

2 Enter Documents
Document Groups Invoices can be loaded through Electronic Data Interchange (EDI), group entry, or single invoice entry. In the Group Entry window, you can manually enter merchandise invoices, non-merchandise invoices, and credit notes. When you enter document groups, you can define default criteria that apply to multiple invoices. Alternatively, you can enter invoices without applying default information. After you have entered all the invoices in the group, the control quantity should match the calculated quantity, and the control cost should match the calculated cost of the documents you have entered. When the totals match, you can submit the group for approval. After the group is approved, you can begin matching the invoices. This section includes the following document group instructions:
Create an Invoice Group Edit a Document Group Delete a Document Group Approve a Document Group
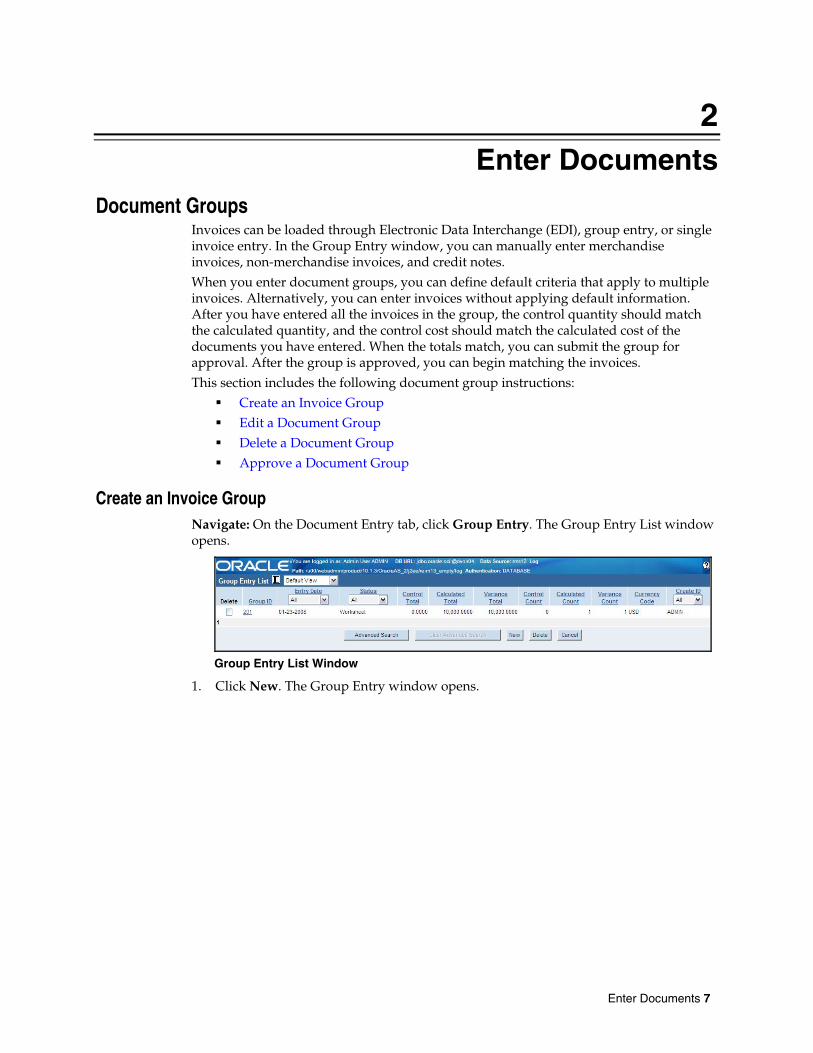
Create an Invoice Group Navigate: On the Document Entry tab, click Group Entry. The Group Entry List window opens.
Group Entry List Window
1. Click New. The Group Entry window opens.
Enter Documents 7
Document Groups
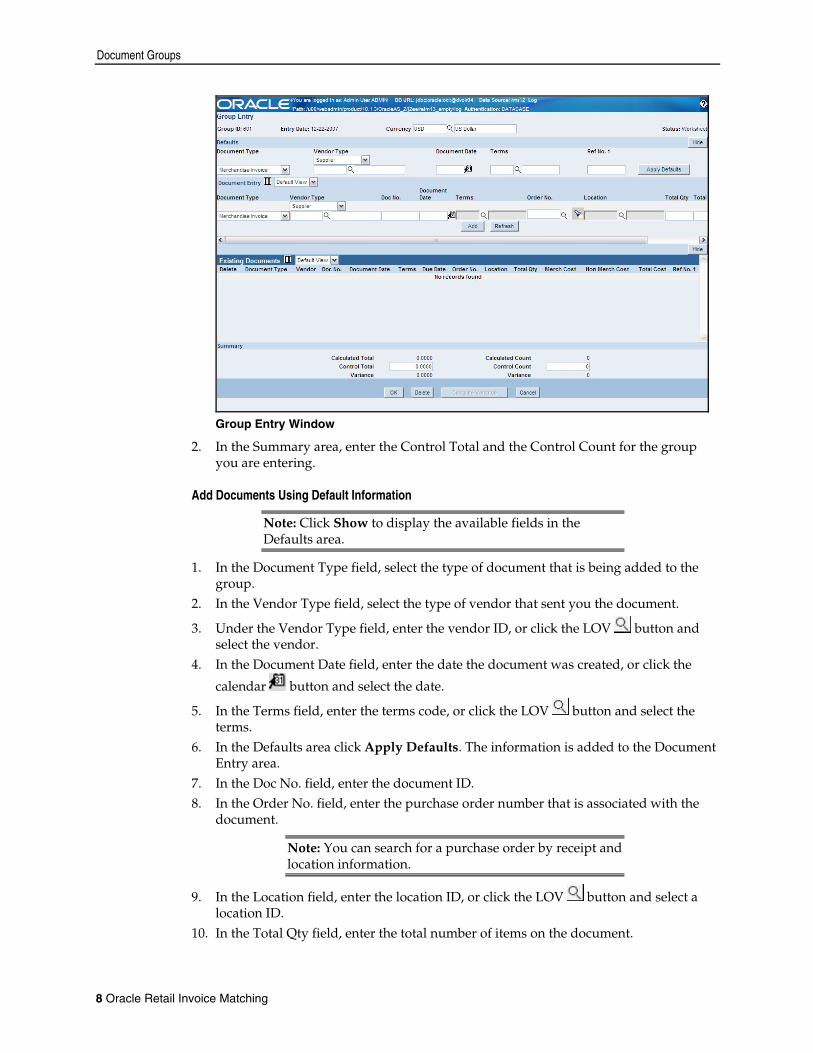
Group Entry Window
2. In the Summary area, enter the Control Total and the Control Count for the group you are entering.
Add Documents Using Default Information
Note: Click Show to display the available fields in the Defaults area.
1. In the Document Type field, select the type of document that is being added to the group.
2. In the Vendor Type field, select the type of vendor that sent you the document.
3. Under the Vendor Type field, enter the vendor ID, or click the LOV button and select the vendor.
4. In the Document Date field, enter the date the document was created, or click the
calendar button and select the date.
5. In the Terms field, enter the terms code, or click the LOV button and select the terms.
6. In the Defaults area click Apply Defaults. The information is added to the Document Entry area.
7. In the Doc No. field, enter the document ID. 8. In the Order No. field, enter the purchase order number that is associated with the
document.
Note: You can search for a purchase order by receipt and location information.
9. In the Location field, enter the location ID, or click the LOV button and select a location ID.
10. In the Total Qty field, enter the total number of items on the document.
8 Oracle Retail Invoice Matching
Document Groups
11. In the Total Cost Ex VAT field, enter the total cost on the document. 12. Complete the document group.
Add Documents Without Default Information 1. In the Document Type field, select the type of document that is being added to the
group.
2. In the Vendor Type field, select the type of vendor that sent you the document.
3. Under the Vendor Type field, enter the vendor ID, or click the LOV button and select the vendor.
4. In the Doc No. field, enter the document ID. 5. In the Document Date field, enter the date the document was created, or click the
calendar button and select the date.
6. In the Terms field, enter the terms code, or click the LOV button and select the terms.
7. In the Order No. field, enter the purchase order number that is associated with the document.
8. In the Location field, enter the location ID, or click the LOV button and select a location ID.
9. In the Total Qty field, enter the total number of items on the document. 10. In the Total Cost Ex VAT field, enter the total cost on the document. 11. Complete the document group.
Complete the Document Group 1. Add non-merchandise costs as necessary.
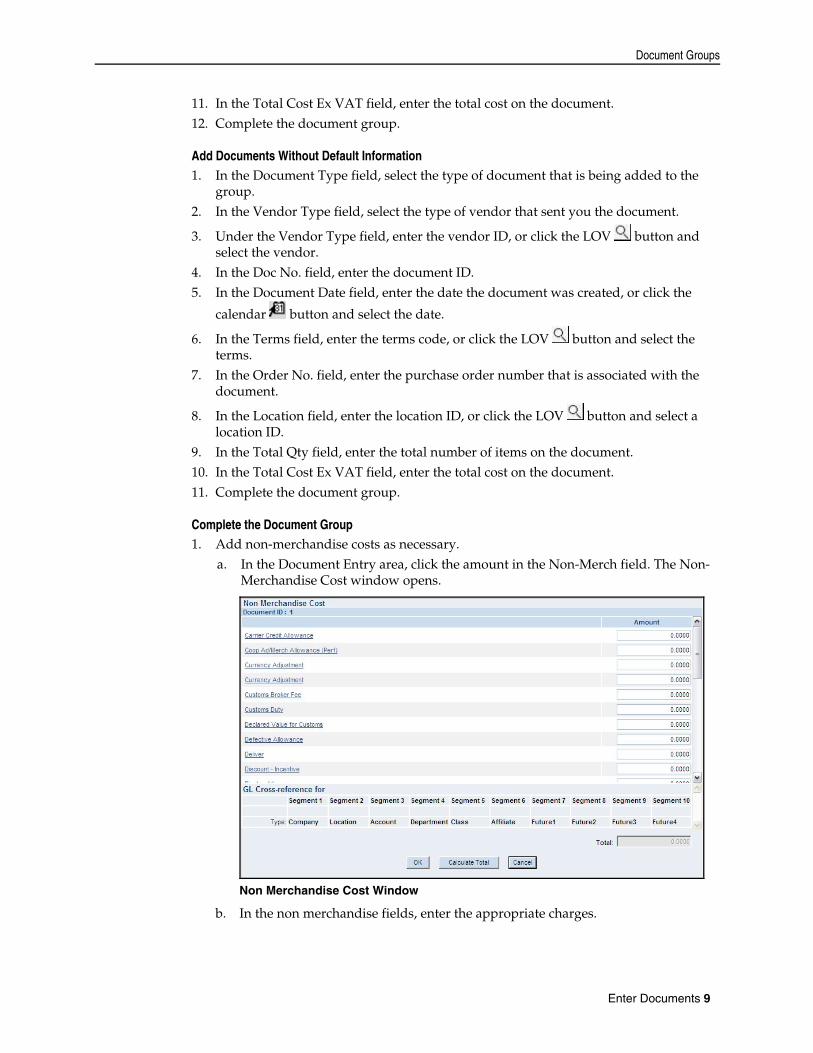
a. In the Document Entry area, click the amount in the Non-Merch field. The Non-Merchandise Cost window opens.
Non Merchandise Cost Window
b. In the non merchandise fields, enter the appropriate charges.
Enter Documents 9

Document Groups
c. In the VAT Code - Rate field, select the appropriate VAT information for the non-merchandise charge.
d. Click Calculate Total. The sum of the non-merchandise costs appears in the Total field.
e. Click OK to save your changes and close the window. 2. Add the invoice VAT cost.
a. In the Document Entry area, click the amount in the Total VAT Amt field. The VAT Breakdown window opens.
VAT Breakdown Window
b. In the Ex VAT Basis field, enter the amount on the invoice that is subject to VAT. c. Click Calculate Total. The amount of VAT appears in the total field.
3. Click Add. The document is added to the Existing Documents area. 4. Click Calculate Variance. The remaining variance appears. 5. Continue adding documents until the totals and counts have no variance. 6. Click OK to submit the group for matching. You return to the Group Entry List
window.
Edit a Document Group Navigate: On the Document Entry tab, click Group Entry. The Group Entry List window opens.
Group Entry List Window
1. To search for a document group:
a. Click Advanced Search. The Group Entry Advanced Search window opens.
10 Oracle Retail Invoice Matching
Document Groups
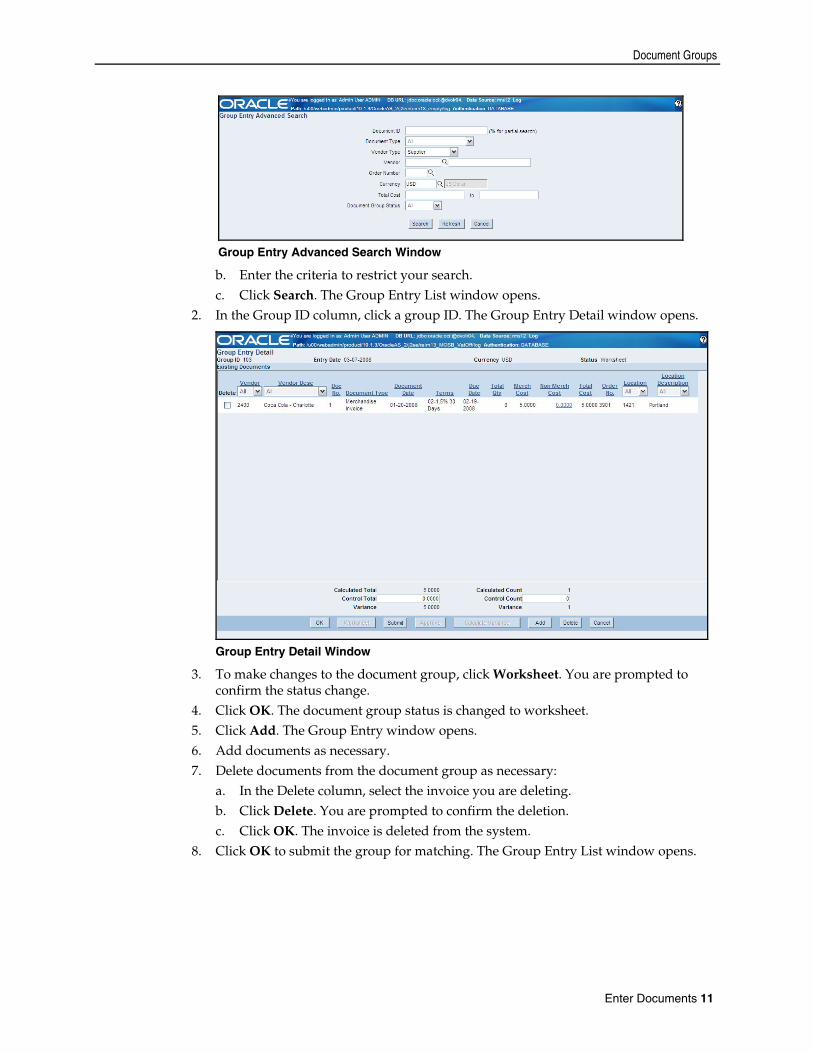
Group Entry Advanced Search Window
b. Enter the criteria to restrict your search. c. Click Search. The Group Entry List window opens.
2. In the Group ID column, click a group ID. The Group Entry Detail window opens.
Group Entry Detail Window
3. To make changes to the document group, click Worksheet. You are prompted to confirm the status change.
4. Click OK. The document group status is changed to worksheet. 5. Click Add. The Group Entry window opens. 6. Add documents as necessary. 7. Delete documents from the document group as necessary:
a. In the Delete column, select the invoice you are deleting. b. Click Delete. You are prompted to confirm the deletion. c. Click OK. The invoice is deleted from the system.
8. Click OK to submit the group for matching. The Group Entry List window opens.
Enter Documents 11
Document Groups
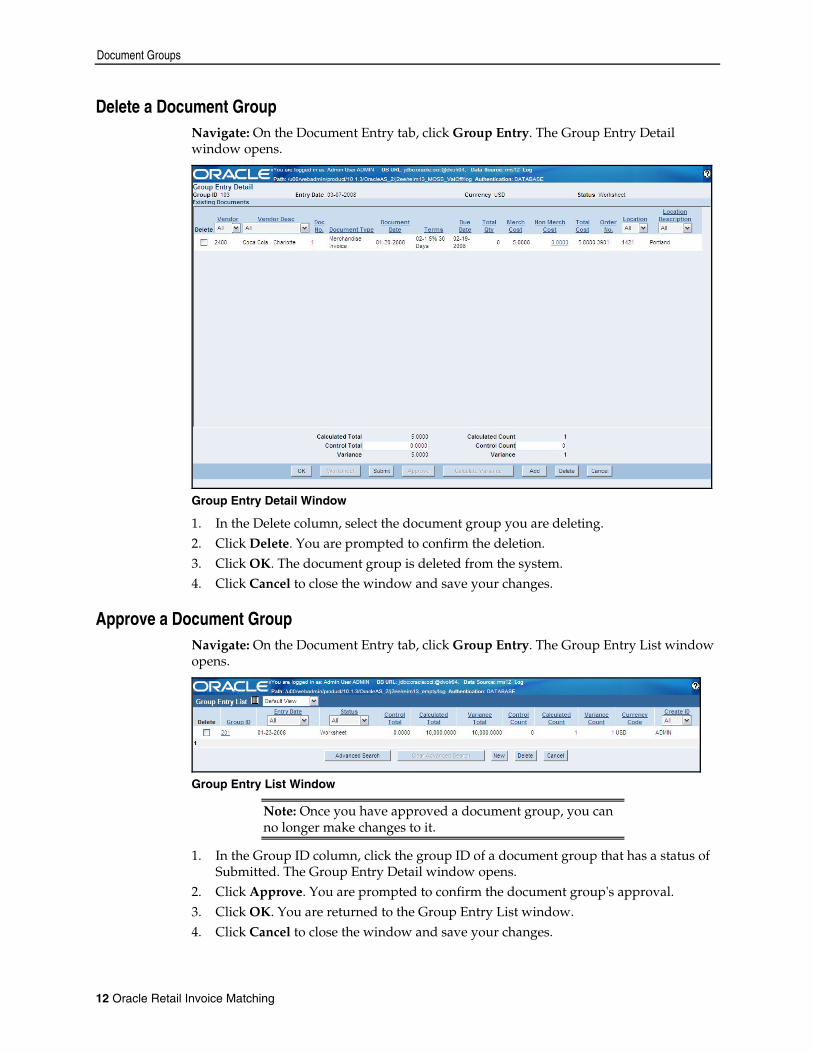
Delete a Document Group Navigate: On the Document Entry tab, click Group Entry. The Group Entry Detail window opens.
Group Entry Detail Window
1. In the Delete column, select the document group you are deleting.
2. Click Delete. You are prompted to confirm the deletion. 3. Click OK. The document group is deleted from the system. 4. Click Cancel to close the window and save your changes.
Approve a Document Group Navigate: On the Document Entry tab, click Group Entry. The Group Entry List window opens.
Group Entry List Window
Note: Once you have approved a document group, you can no longer make changes to it.
1. In the Group ID column, click the group ID of a document group that has a status of Submitted. The Group Entry Detail window opens.
2. Click Approve. You are prompted to confirm the document group's approval. 3. Click OK. You are returned to the Group Entry List window. 4. Click Cancel to close the window and save your changes.
12 Oracle Retail Invoice Matching

EDI Uploads
EDI Uploads Invoices can be loaded through Electronic Data Interchange (EDI), group entry, and single invoice entry. The majority of invoices are sent to Invoice Matching through EDI. When the data on the invoices can be verified, the invoices are ready to match. If the data cannot be verified, you must manually correct the inaccurate data on each invoice. In the EDI Maintenance window, you can update invoice data for invoices that were uploaded with inaccurate data. You can correct the invoices one at a time, or you can correct the order number or item number on multiple invoices. If you correct the order number or item number for all invoices, all invoices with the old value are updated with the new value. This section includes the following EDI instructions:
Correct a Rejected EDI Invoice Delete EDI Invoices Correct Multiple Rejected EDI Invoices Delete Multiple Rejected EDI Invoices
Correct a Rejected EDI Invoice Navigate: On the Document Entry tab, click EDI Maintenance. The EDI Maintenance window opens.
EDI Maintenance Window
1. In the Invoice Number column, click an invoice number. The EDI Rejected Invoice Details window opens.
EDI Rejected Invoice Details Window
2. The fields that must be edited are enabled. a. To select a different supplier, in the Supplier field, enter the correct supplier ID,
or click the LOV button and select a supplier. b. To select a different invoice date, in the Invoice Date field, enter the correct
invoice date, or click the calendar button and select an invoice date.
Enter Documents 13
EDI Uploads
c. To select different terms, in the Terms field, enter the correct term ID, or click the
LOV button and select a term. d. To select a different order number, in the Order No. field, enter the correct order
number, or click the LOV button and select an order number. e. To select a different location, in the Location field, enter the correct location, or
click the LOV button and select a location. f. To select a different UPC, on the table in the UPC/Supplement/SKU/VPN field,
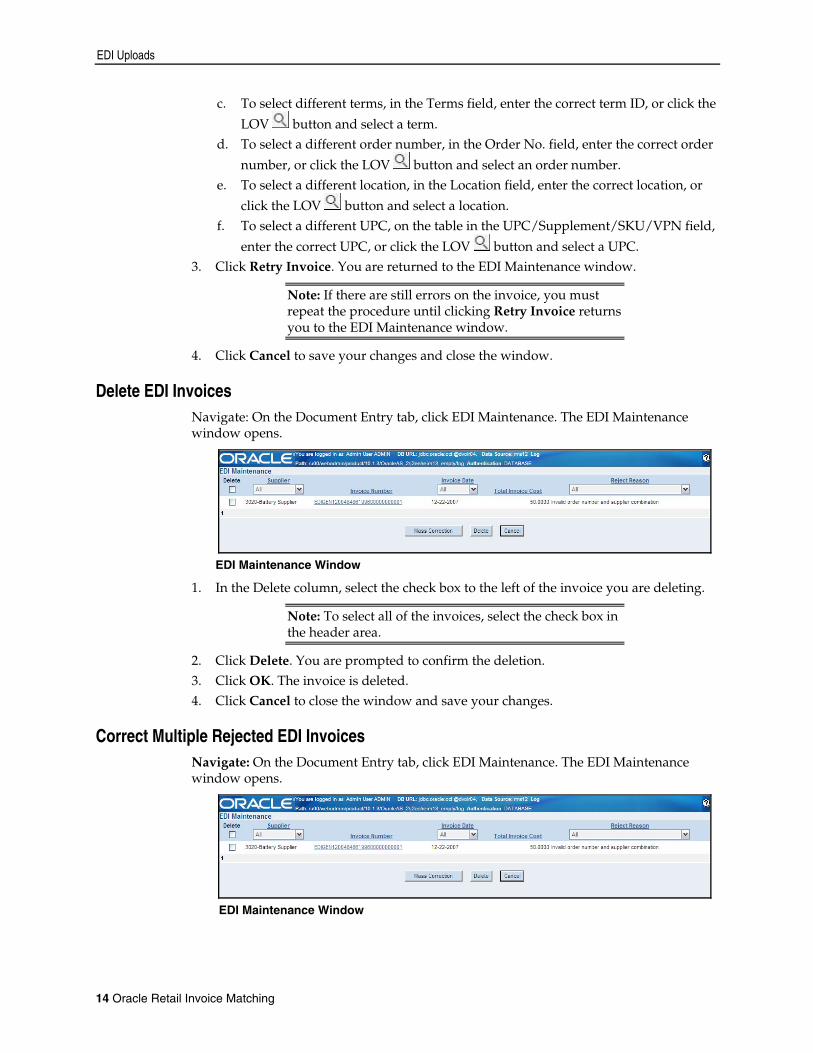
enter the correct UPC, or click the LOV button and select a UPC. 3. Click Retry Invoice. You are returned to the EDI Maintenance window.
Note: If there are still errors on the invoice, you must repeat the procedure until clicking Retry Invoice returns you to the EDI Maintenance window.
4. Click Cancel to save your changes and close the window.
Delete EDI Invoices Navigate: On the Document Entry tab, click EDI Maintenance. The EDI Maintenance window opens.
EDI Maintenance Window
1. In the Delete column, select the check box to the left of the invoice you are deleting.
Note: To select all of the invoices, select the check box in the header area.
2. Click Delete. You are prompted to confirm the deletion. 3. Click OK. The invoice is deleted. 4. Click Cancel to close the window and save your changes.
Correct Multiple Rejected EDI Invoices Navigate: On the Document Entry tab, click EDI Maintenance. The EDI Maintenance window opens.
EDI Maintenance Window
14 Oracle Retail Invoice Matching
EDI Uploads
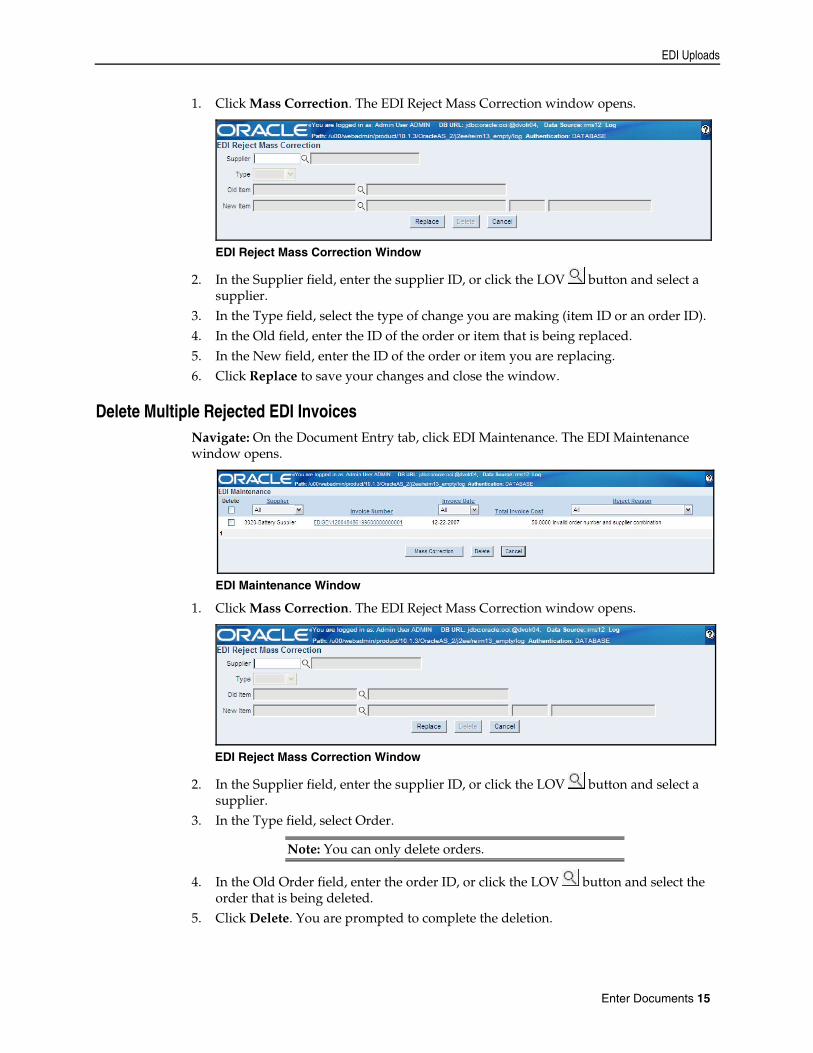
1. Click Mass Correction. The EDI Reject Mass Correction window opens.
EDI Reject Mass Correction Window
2. In the Supplier field, enter the supplier ID, or click the LOV button and select a supplier.
3. In the Type field, select the type of change you are making (item ID or an order ID). 4. In the Old field, enter the ID of the order or item that is being replaced. 5. In the New field, enter the ID of the order or item you are replacing. 6. Click Replace to save your changes and close the window.
Delete Multiple Rejected EDI Invoices Navigate: On the Document Entry tab, click EDI Maintenance. The EDI Maintenance window opens.
EDI Maintenance Window
1. Click Mass Correction. The EDI Reject Mass Correction window opens.
EDI Reject Mass Correction Window
2. In the Supplier field, enter the supplier ID, or click the LOV button and select a supplier.
3. In the Type field, select Order.
Note: You can only delete orders.
4. In the Old Order field, enter the order ID, or click the LOV button and select the order that is being deleted.
5. Click Delete. You are prompted to complete the deletion.
Enter Documents 15
Split Invoices
6. Click OK. You return to the EDI Maintenance window. 7. Click Cancel to return to the main menu.
Split Invoices This section includes the following invoice splitting instructions:
Split Invoices with Multiple Locations Set Default Child Invoice Information from a Purchase Order Add Invoice Details to a Child Invoice
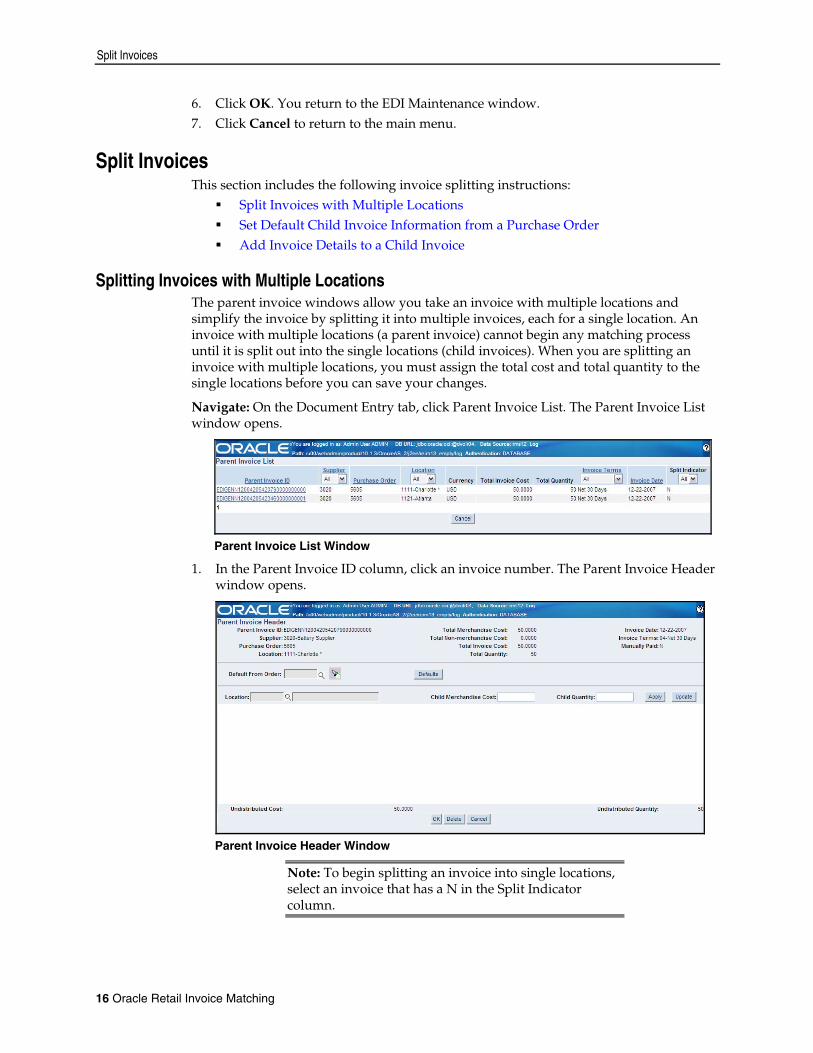
Splitting Invoices with Multiple Locations The parent invoice windows allow you take an invoice with multiple locations and simplify the invoice by splitting it into multiple invoices, each for a single location. An invoice with multiple locations (a parent invoice) cannot begin any matching process until it is split out into the single locations (child invoices). When you are splitting an invoice with multiple locations, you must assign the total cost and total quantity to the single locations before you can save your changes.
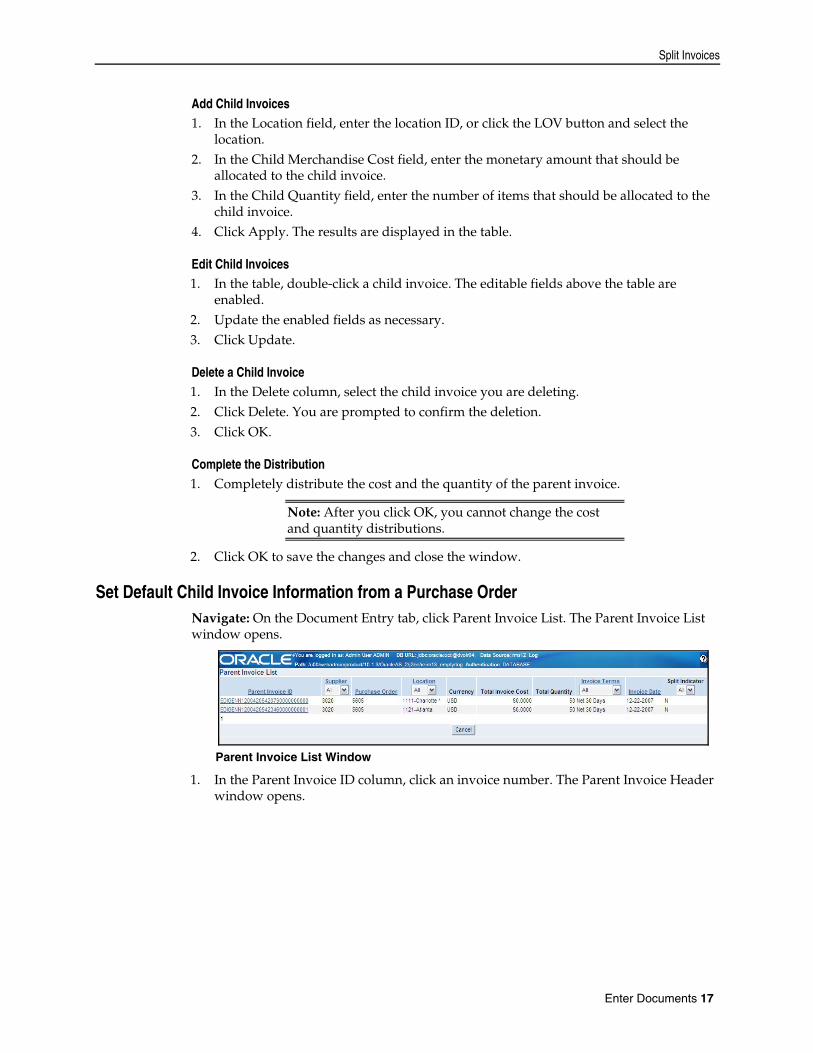
Navigate: On the Document Entry tab, click Parent Invoice List. The Parent Invoice List window opens.
Parent Invoice List Window
1. In the Parent Invoice ID column, click an invoice number. The Parent Invoice Header window opens.
Parent Invoice Header Window
Note: To begin splitting an invoice into single locations, select an invoice that has a N in the Split Indicator column.
16 Oracle Retail Invoice Matching
Split Invoices
Add Child Invoices 1. In the Location field, enter the location ID, or click the LOV button and select the
location. 2. In the Child Merchandise Cost field, enter the monetary amount that should be
allocated to the child invoice. 3. In the Child Quantity field, enter the number of items that should be allocated to the
child invoice. 4. Click Apply. The results are displayed in the table.
Edit Child Invoices 1. In the table, double-click a child invoice. The editable fields above the table are
enabled. 2. Update the enabled fields as necessary. 3. Click Update.
Delete a Child Invoice 1. In the Delete column, select the child invoice you are deleting. 2. Click Delete. You are prompted to confirm the deletion. 3. Click OK.
Complete the Distribution 1. Completely distribute the cost and the quantity of the parent invoice.
Note: After you click OK, you cannot change the cost and quantity distributions.
2. Click OK to save the changes and close the window.
Set Default Child Invoice Information from a Purchase Order Navigate: On the Document Entry tab, click Parent Invoice List. The Parent Invoice List window opens.
Parent Invoice List Window
1. In the Parent Invoice ID column, click an invoice number. The Parent Invoice Header window opens.
Enter Documents 17
Split Invoices
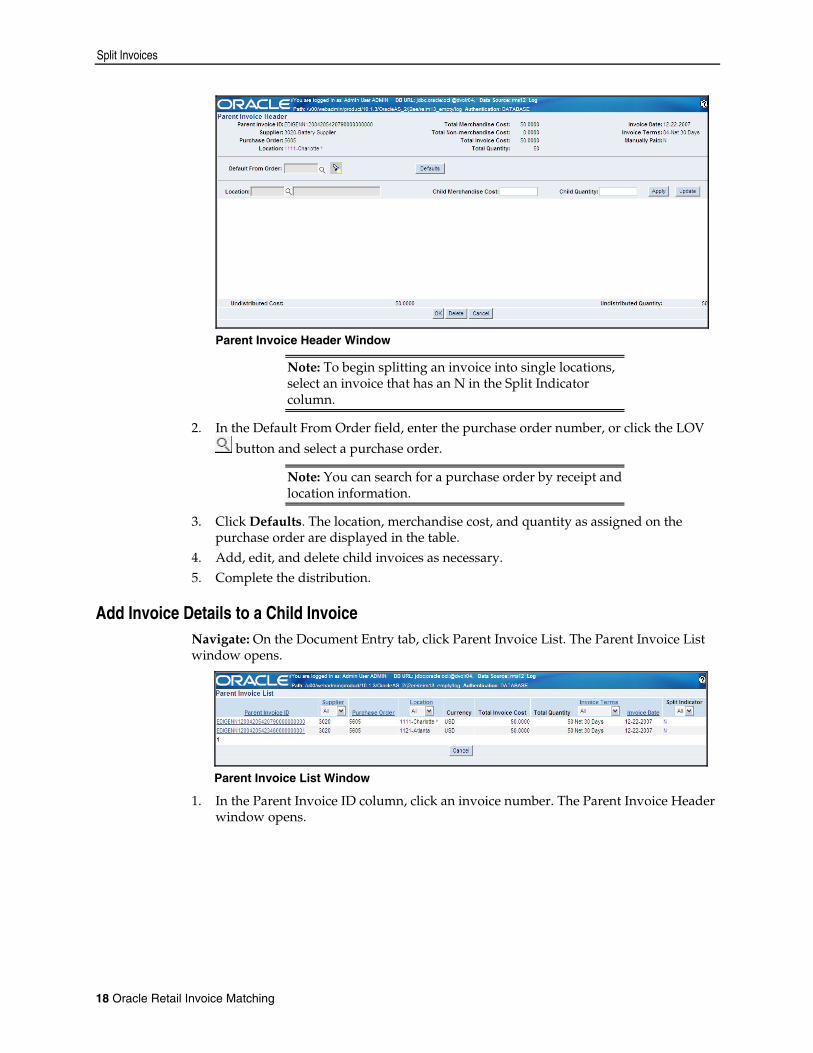
Parent Invoice Header Window
Note: To begin splitting an invoice into single locations, select an invoice that has an N in the Split Indicator column.
2. In the Default From Order field, enter the purchase order number, or click the LOV
button and select a purchase order.
Note: You can search for a purchase order by receipt and location information.
3. Click Defaults. The location, merchandise cost, and quantity as assigned on the purchase order are displayed in the table.
4. Add, edit, and delete child invoices as necessary. 5. Complete the distribution.
Add Invoice Details to a Child Invoice Navigate: On the Document Entry tab, click Parent Invoice List. The Parent Invoice List window opens.
Parent Invoice List Window
1. In the Parent Invoice ID column, click an invoice number. The Parent Invoice Header window opens.
18 Oracle Retail Invoice Matching
Split Invoices
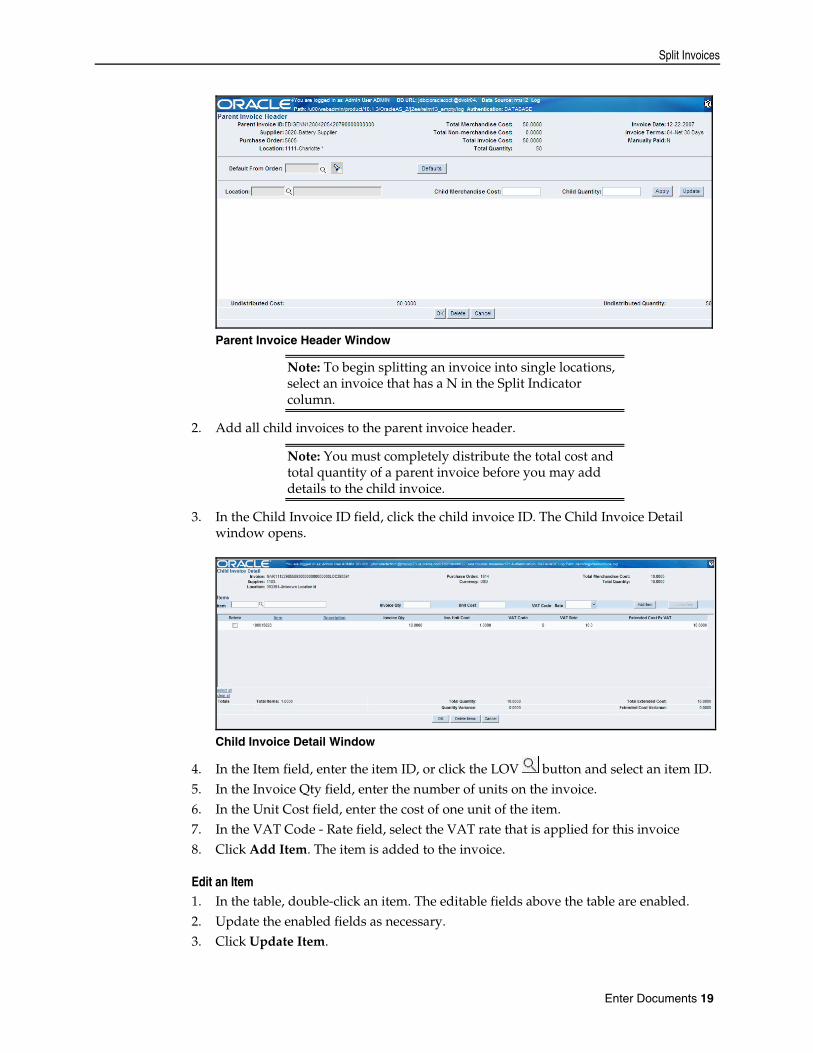
Parent Invoice Header Window
Note: To begin splitting an invoice into single locations, select an invoice that has a N in the Split Indicator column.
2. Add all child invoices to the parent invoice header.
Note: You must completely distribute the total cost and total quantity of a parent invoice before you may add details to the child invoice.
3. In the Child Invoice ID field, click the child invoice ID. The Child Invoice Detail window opens.
Child Invoice Detail Window
4. In the Item field, enter the item ID, or click the LOV button and select an item ID. 5. In the Invoice Qty field, enter the number of units on the invoice. 6. In the Unit Cost field, enter the cost of one unit of the item. 7. In the VAT Code - Rate field, select the VAT rate that is applied for this invoice 8. Click Add Item. The item is added to the invoice.
Edit an Item 1. In the table, double-click an item. The editable fields above the table are enabled.
2. Update the enabled fields as necessary. 3. Click Update Item.
Enter Documents 19

Split Invoices
Delete an Item 1. In the Delete column, select the item you are deleting.
Note: To delete all items on the Child Invoice Detail window, click select all.
2. Click Delete Items. You are prompted to confirm the deletion. 3. Click OK. The item is deleted.
Complete the Invoice 1. Click OK to save the changes and close the Child Invoice Detail window.
2. Click OK to save the changes and close the Parent Invoice Header window.
20 Oracle Retail Invoice Matching
3 Create Documents
Merchandise Invoices There are three ways invoices are loaded into the system: EDI, group entry, and single invoice entry. An invoice is the bill for goods or services received from a supplier or partner. A merchandise invoice is a document that a supplier sends to a retailer for merchandise items. A merchandise invoice can also contain additional non-merchandise costs. Because a merchandise invoice must involve items, only suppliers can send merchandise invoices. In addition, deal bill backs will be available for automatic invoicing, sent to the ReIM from the merchandising system. Any non-merchandise invoices resulting from a deal will be created in either Submitted or Approved status, depending on the system setting selected in the merchandising system. This section includes the following merchandise invoice instructions:
Create a Merchandise Invoice Add Details to a Merchandise Invoice Set Default Item Details from a Receipt or Purchase Order
Create a Merchandise Invoice
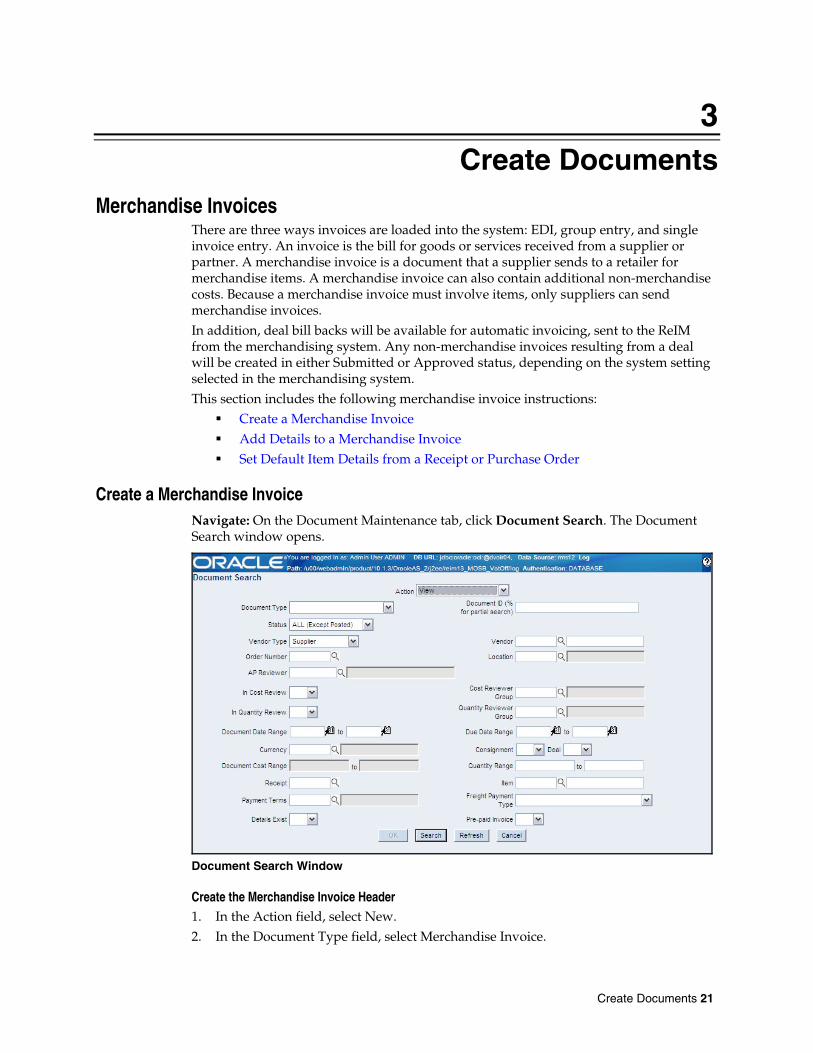
Navigate: On the Document Maintenance tab, click Document Search. The Document Search window opens.
Document Search Window
Create the Merchandise Invoice Header 1. In the Action field, select New.
2. In the Document Type field, select Merchandise Invoice.
Create Documents 21
Merchandise Invoices
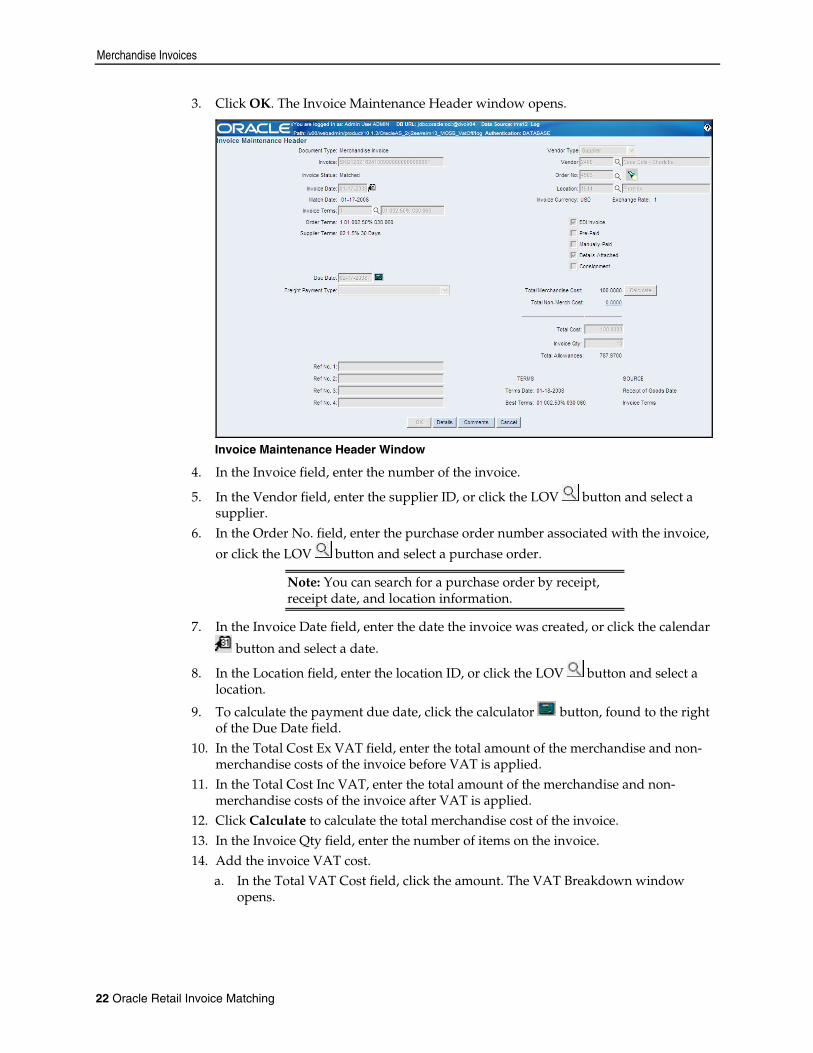
3. Click OK. The Invoice Maintenance Header window opens.
Invoice Maintenance Header Window
4. In the Invoice field, enter the number of the invoice.
5. In the Vendor field, enter the supplier ID, or click the LOV button and select a supplier.
6. In the Order No. field, enter the purchase order number associated with the invoice,
or click the LOV button and select a purchase order.
Note: You can search for a purchase order by receipt, receipt date, and location information.
7. In the Invoice Date field, enter the date the invoice was created, or click the calendar
button and select a date.
8. In the Location field, enter the location ID, or click the LOV button and select a location.
9. To calculate the payment due date, click the calculator button, found to the right of the Due Date field.
10. In the Total Cost Ex VAT field, enter the total amount of the merchandise and non-merchandise costs of the invoice before VAT is applied.
11. In the Total Cost Inc VAT, enter the total amount of the merchandise and non-merchandise costs of the invoice after VAT is applied.
12. Click Calculate to calculate the total merchandise cost of the invoice. 13. In the Invoice Qty field, enter the number of items on the invoice. 14. Add the invoice VAT cost.
a. In the Total VAT Cost field, click the amount. The VAT Breakdown window opens.
22 Oracle Retail Invoice Matching
Merchandise Invoices
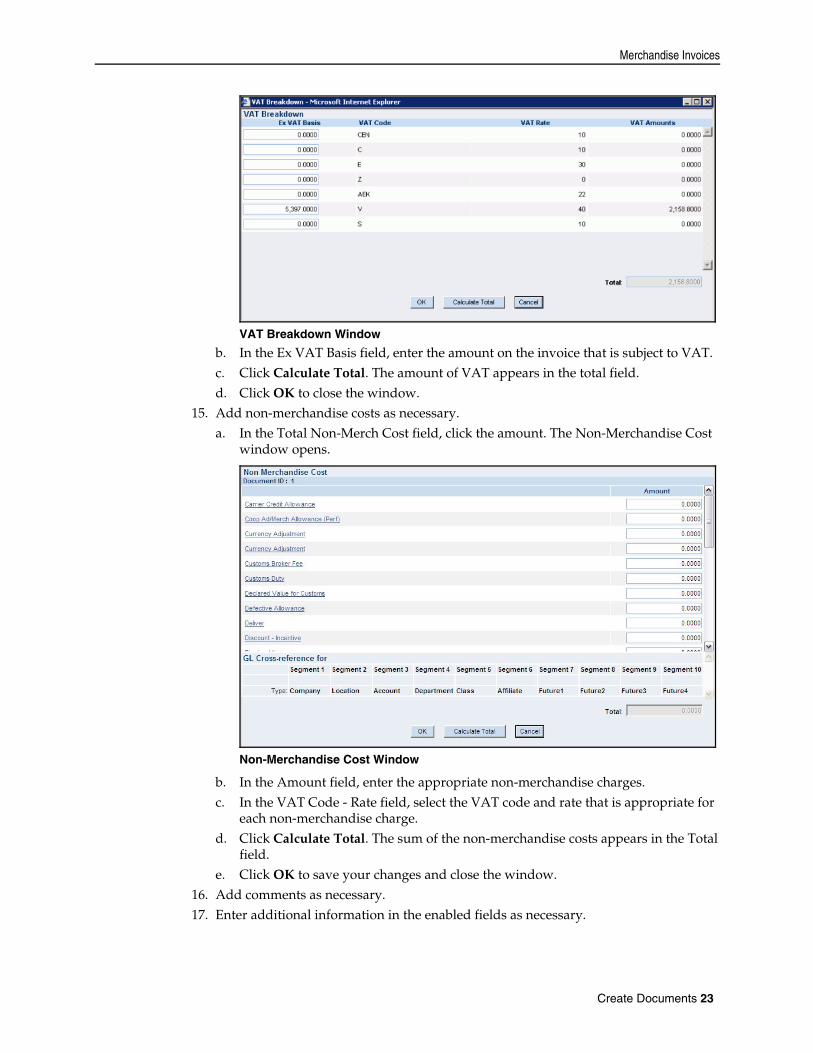
VAT Breakdown Window
b. In the Ex VAT Basis field, enter the amount on the invoice that is subject to VAT. c. Click Calculate Total. The amount of VAT appears in the total field. d. Click OK to close the window.
15. Add non-merchandise costs as necessary. a. In the Total Non-Merch Cost field, click the amount. The Non-Merchandise Cost
window opens.
Non-Merchandise Cost Window
b. In the Amount field, enter the appropriate non-merchandise charges. c. In the VAT Code - Rate field, select the VAT code and rate that is appropriate for
each non-merchandise charge. d. Click Calculate Total. The sum of the non-merchandise costs appears in the Total
field. e. Click OK to save your changes and close the window.
16. Add comments as necessary. 17. Enter additional information in the enabled fields as necessary.
Create Documents 23
Merchandise Invoices
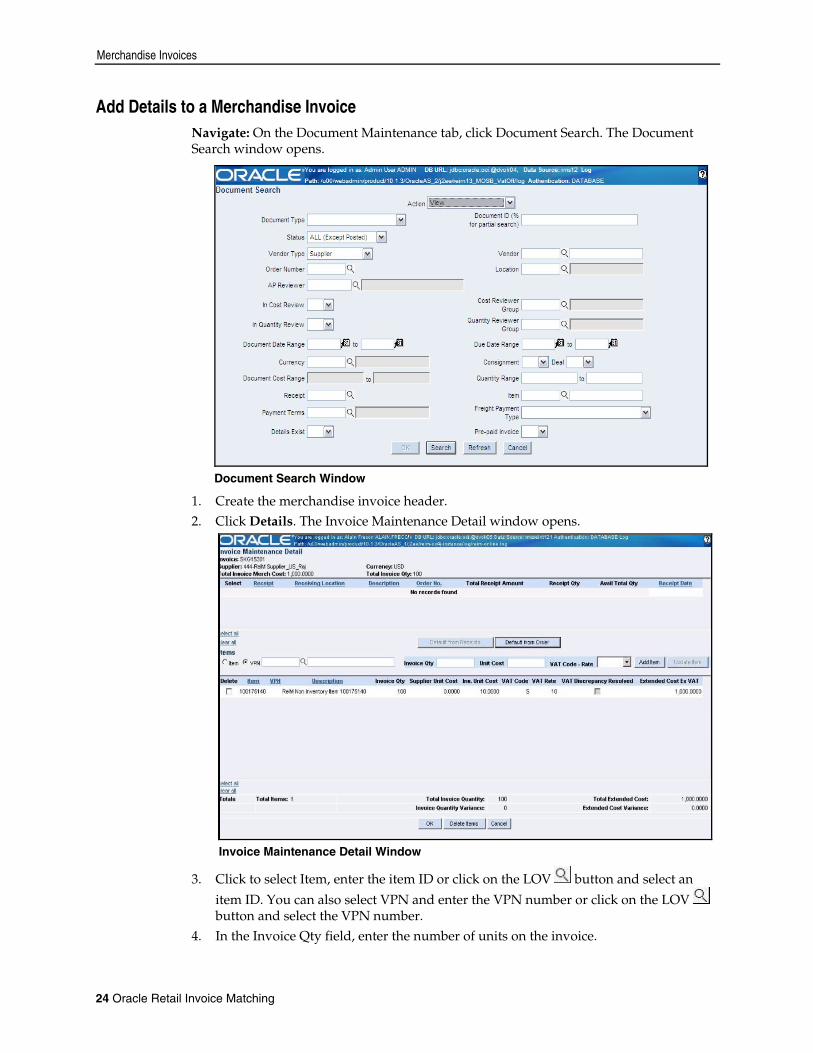
Add Details to a Merchandise Invoice Navigate: On the Document Maintenance tab, click Document Search. The Document Search window opens.
Document Search Window
1. Create the merchandise invoice header.
2. Click Details. The Invoice Maintenance Detail window opens.
Invoice Maintenance Detail Window
3. Click to select Item, enter the item ID or click on the LOV button and select an
item ID. You can also select VPN and enter the VPN number or click on the LOV button and select the VPN number.
4. In the Invoice Qty field, enter the number of units on the invoice.
24 Oracle Retail Invoice Matching
Merchandise Invoices
5. In the Unit Cost field, enter the cost of one unit of the item. 6. Click Add Item. The item is added to the invoice.
Edit an Item 1. In the table, double-click an item. The editable fields above the table are enabled.
2. Update the enabled fields as necessary. 3. Click Update Item. The table is updated with the new information.
Delete an Item 1. In the Delete column, select the item you are deleting.
Note: To delete all items on the Invoice Maintenance Detail window, click select all.
2. Click Delete Items. You are prompted to confirm the deletion. 3. Click OK. The item is deleted.
Complete the Invoice 1. Click OK to save the changes and close the Invoice Maintenance Detail window.
2. Click OK to save the changes and close the Invoice Header Maintenance window.
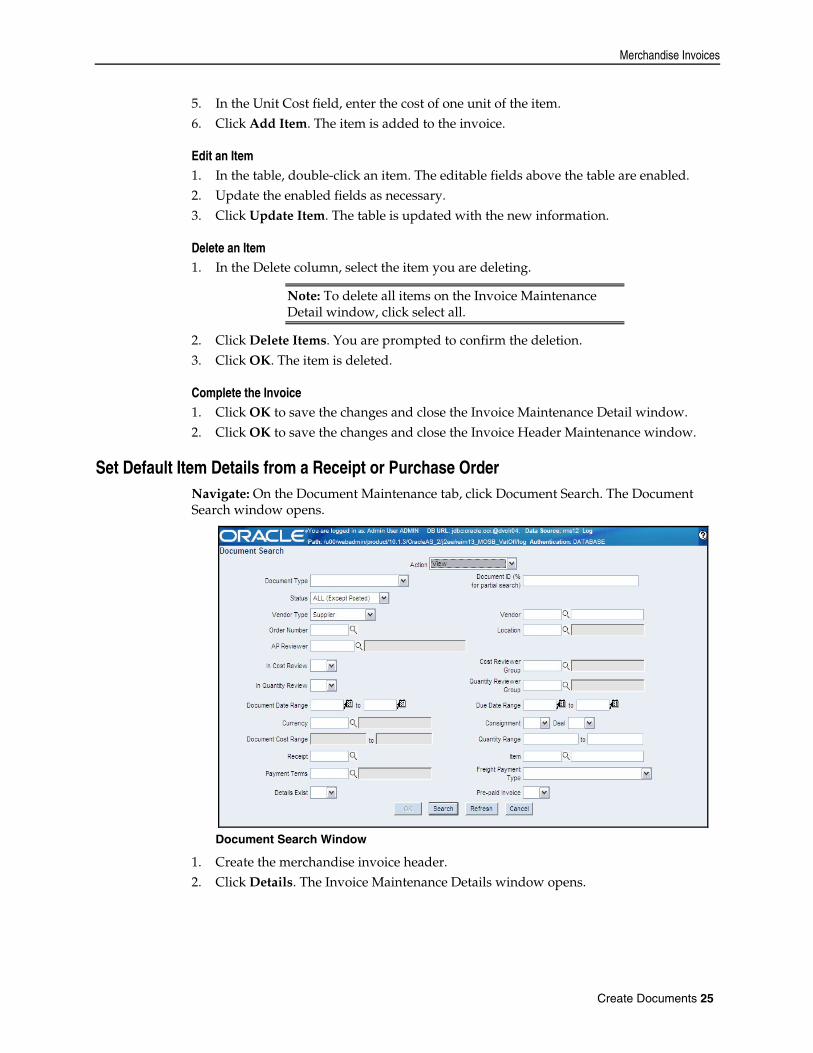
Set Default Item Details from a Receipt or Purchase Order Navigate: On the Document Maintenance tab, click Document Search. The Document Search window opens.
Document Search Window
1. Create the merchandise invoice header.
2. Click Details. The Invoice Maintenance Details window opens.
Create Documents 25
Non-Merchandise Invoices
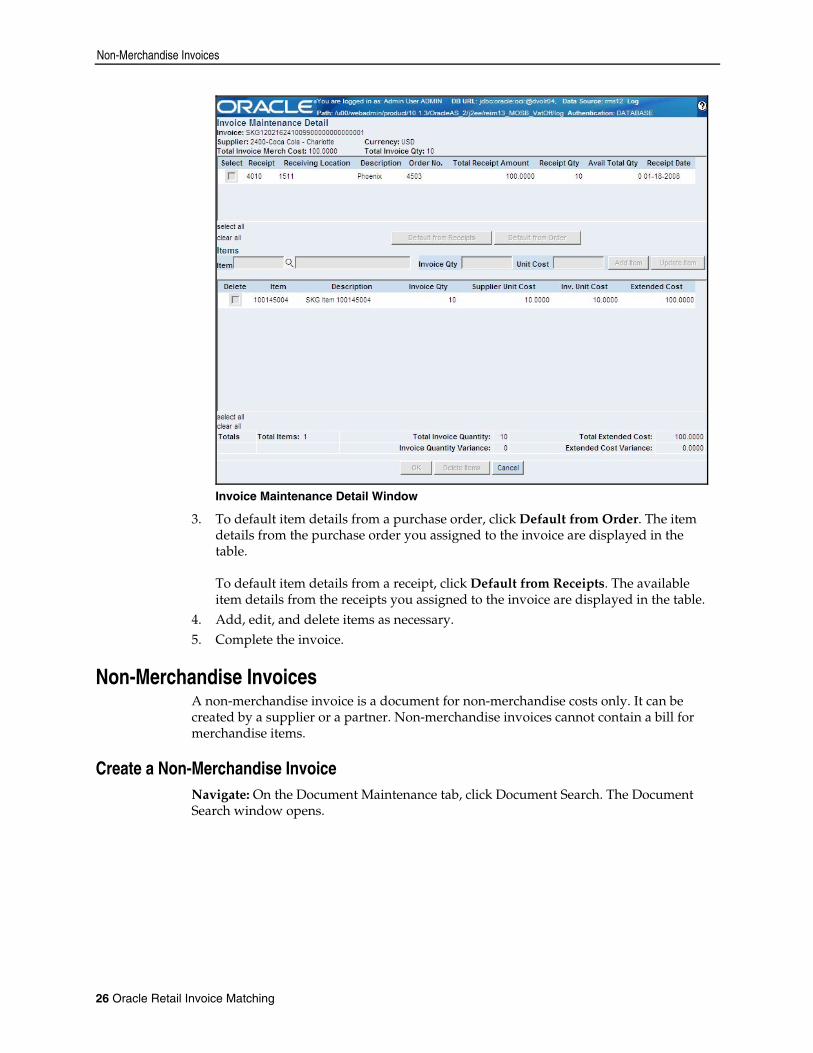
Invoice Maintenance Detail Window
3. To default item details from a purchase order, click Default from Order. The item details from the purchase order you assigned to the invoice are displayed in the table. To default item details from a receipt, click Default from Receipts. The available item details from the receipts you assigned to the invoice are displayed in the table.
4. Add, edit, and delete items as necessary. 5. Complete the invoice.
Non-Merchandise Invoices A non-merchandise invoice is a document for non-merchandise costs only. It can be created by a supplier or a partner. Non-merchandise invoices cannot contain a bill for merchandise items.
Create a Non-Merchandise Invoice Navigate: On the Document Maintenance tab, click Document Search. The Document Search window opens.
26 Oracle Retail Invoice Matching
Non-Merchandise Invoices
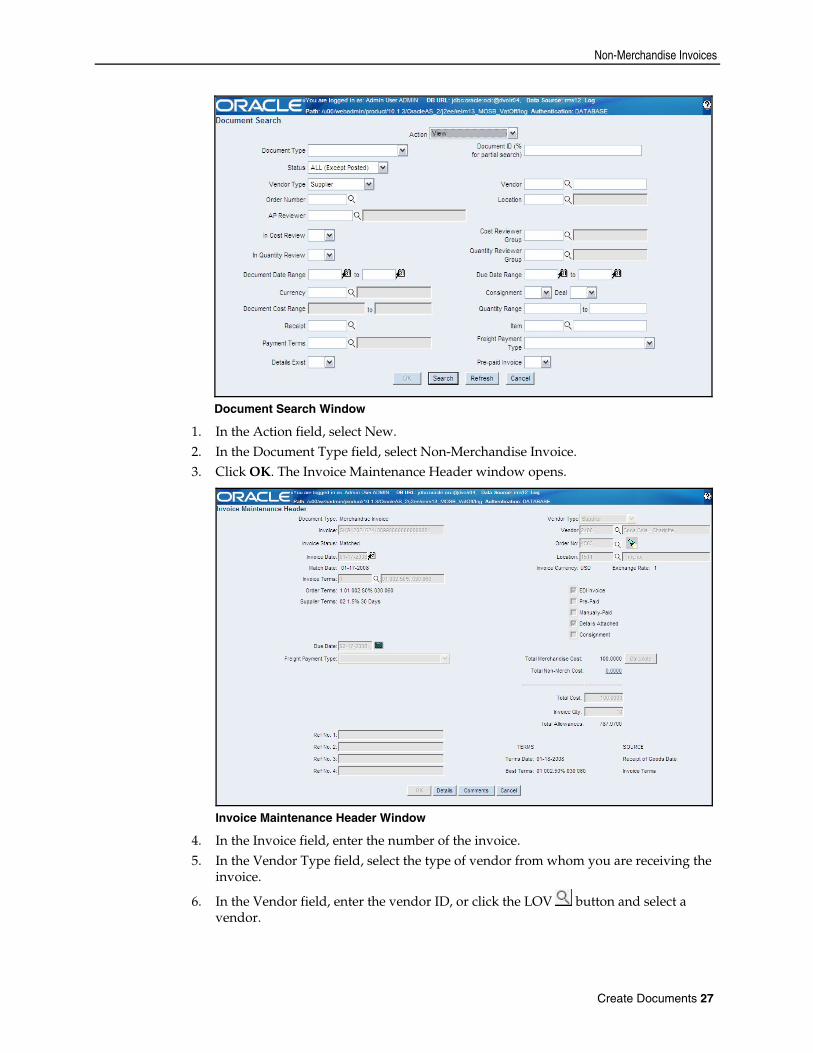
Document Search Window
1. In the Action field, select New.
2. In the Document Type field, select Non-Merchandise Invoice. 3. Click OK. The Invoice Maintenance Header window opens.
Invoice Maintenance Header Window
4. In the Invoice field, enter the number of the invoice. 5. In the Vendor Type field, select the type of vendor from whom you are receiving the
invoice.
6. In the Vendor field, enter the vendor ID, or click the LOV button and select a vendor.
Create Documents 27
Non-Merchandise Invoices
7. In the Location field, enter the location ID, or click the LOV button and select a location
8. In the Invoice Date field, enter the date the invoice was created, or click the calendar
button and select a date.
9. To calculate the payment due date, click the calculator button found to the right of the Due Date field.
10. Enter additional information in the enabled fields as necessary. 11. Add the invoice VAT cost.
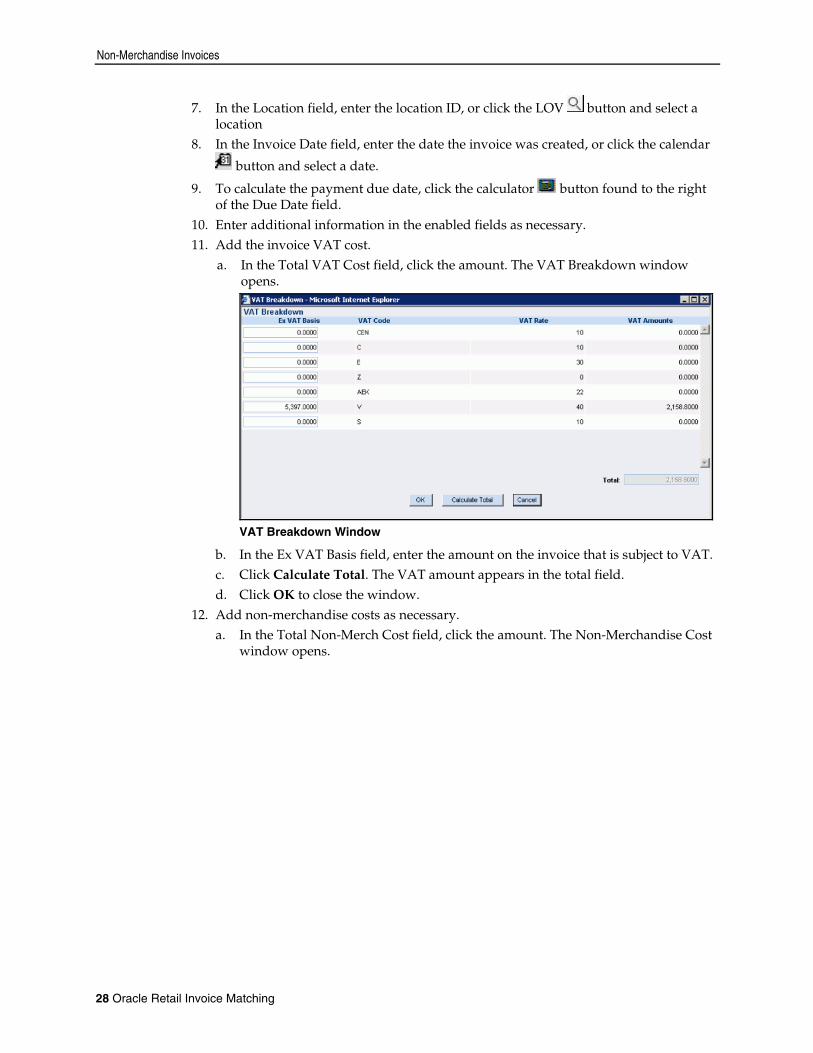
a. In the Total VAT Cost field, click the amount. The VAT Breakdown window opens.
VAT Breakdown Window
b. In the Ex VAT Basis field, enter the amount on the invoice that is subject to VAT. c. Click Calculate Total. The VAT amount appears in the total field. d. Click OK to close the window.
12. Add non-merchandise costs as necessary. a. In the Total Non-Merch Cost field, click the amount. The Non-Merchandise Cost
window opens.
28 Oracle Retail Invoice Matching
Document Maintenance
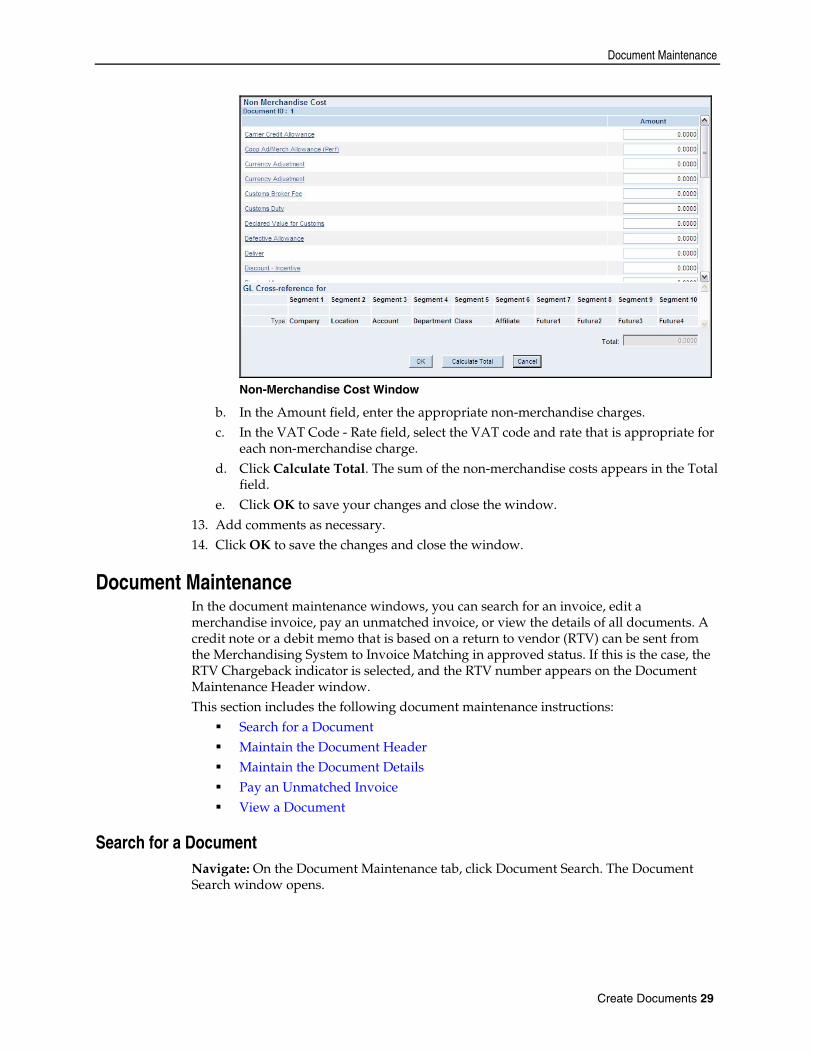
Non-Merchandise Cost Window
b. In the Amount field, enter the appropriate non-merchandise charges. c. In the VAT Code - Rate field, select the VAT code and rate that is appropriate for
each non-merchandise charge. d. Click Calculate Total. The sum of the non-merchandise costs appears in the Total
field. e. Click OK to save your changes and close the window.
13. Add comments as necessary. 14. Click OK to save the changes and close the window.
Document Maintenance In the document maintenance windows, you can search for an invoice, edit a merchandise invoice, pay an unmatched invoice, or view the details of all documents. A credit note or a debit memo that is based on a return to vendor (RTV) can be sent from the Merchandising System to Invoice Matching in approved status. If this is the case, the RTV Chargeback indicator is selected, and the RTV number appears on the Document Maintenance Header window. This section includes the following document maintenance instructions:
Search for a Document Maintain the Document Header Maintain the Document Details Pay an Unmatched Invoice View a Document
Search for a Document Navigate: On the Document Maintenance tab, click Document Search. The Document Search window opens.
Create Documents 29
Document Maintenance
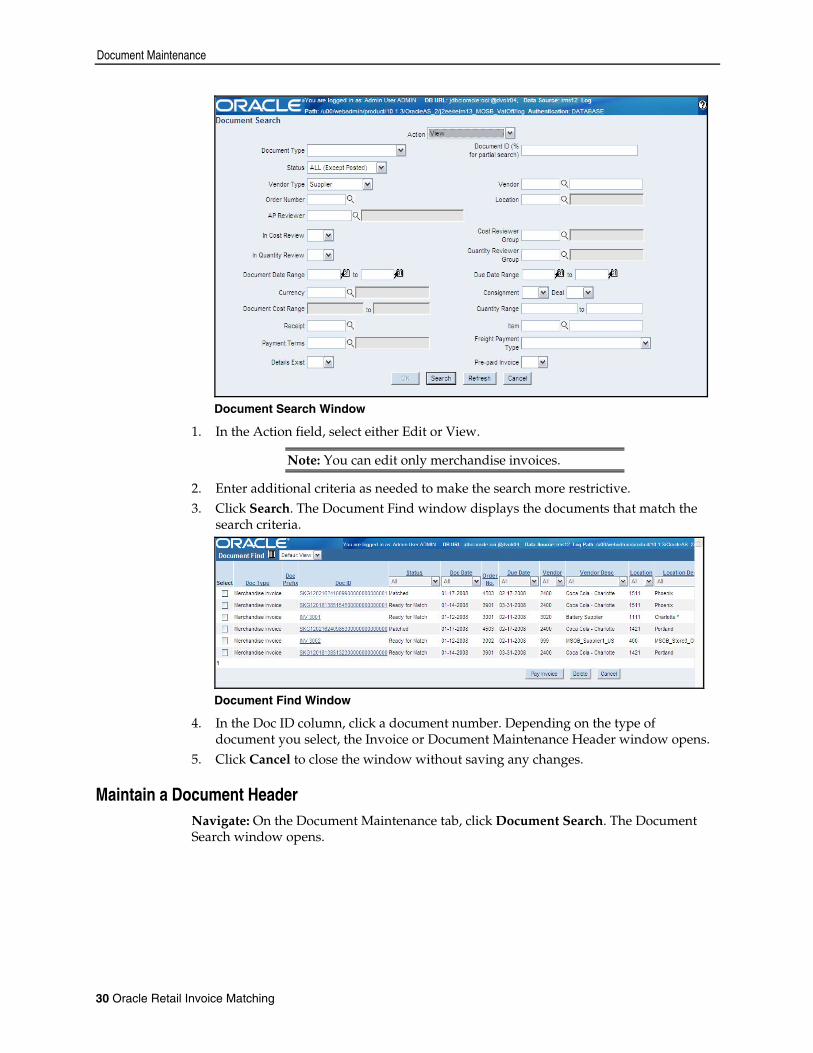
Document Search Window
1. In the Action field, select either Edit or View.
Note: You can edit only merchandise invoices.
2. Enter additional criteria as needed to make the search more restrictive. 3. Click Search. The Document Find window displays the documents that match the
search criteria.
Document Find Window
4. In the Doc ID column, click a document number. Depending on the type of document you select, the Invoice or Document Maintenance Header window opens.
5. Click Cancel to close the window without saving any changes.
Maintain a Document Header Navigate: On the Document Maintenance tab, click Document Search. The Document Search window opens.
30 Oracle Retail Invoice Matching
Document Maintenance
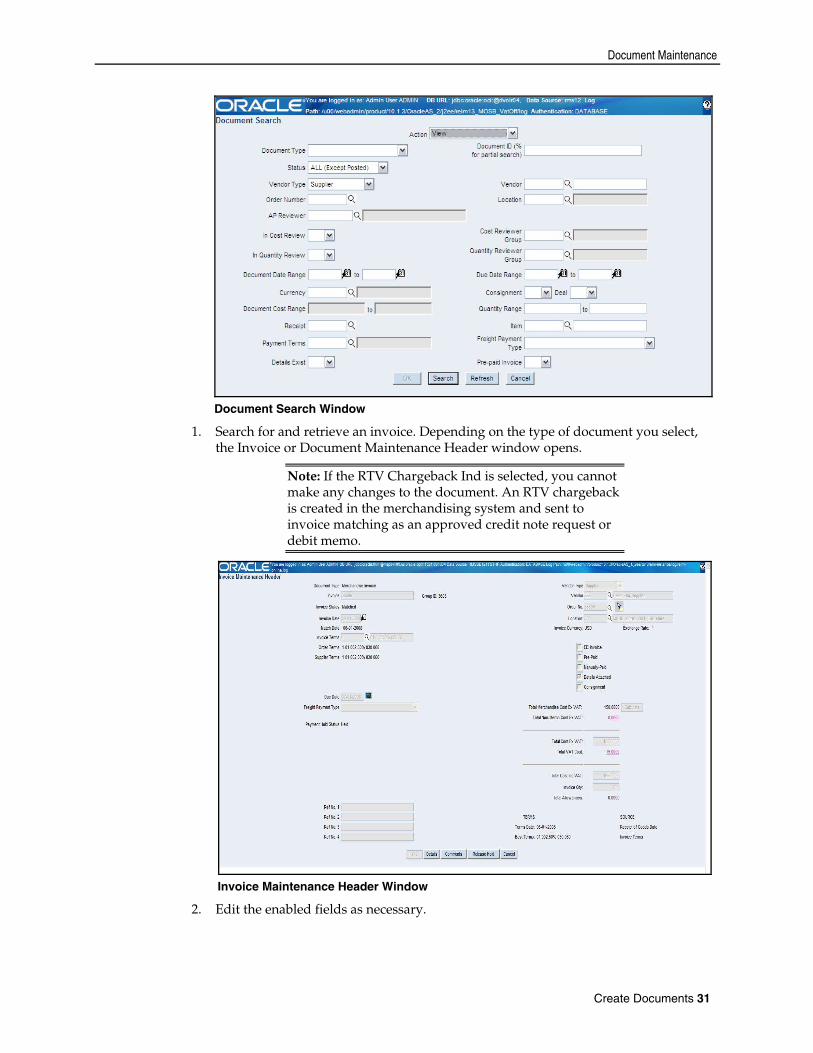
Document Search Window
1. Search for and retrieve an invoice. Depending on the type of document you select, the Invoice or Document Maintenance Header window opens.
Note: If the RTV Chargeback Ind is selected, you cannot make any changes to the document. An RTV chargeback is created in the merchandising system and sent to invoice matching as an approved credit note request or debit memo.
Invoice Maintenance Header Window
2. Edit the enabled fields as necessary.
Create Documents 31
Document Maintenance
Note: The Release Hold button is visible only if you want to edit the document, which implies that the invoice is on hold and you will be able to remove the hold. Otherwise the button will not be displayed at all.
3. Click OK to save your changes and close the window.
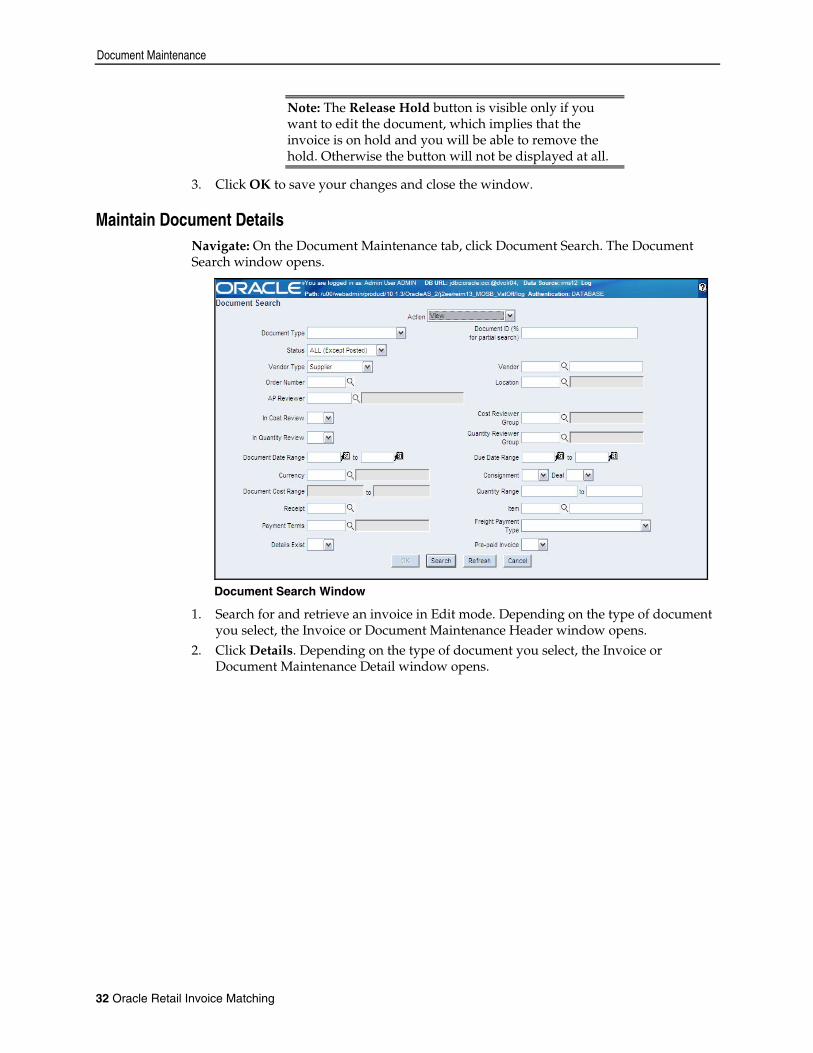
Maintain Document Details Navigate: On the Document Maintenance tab, click Document Search. The Document Search window opens.
Document Search Window
1. Search for and retrieve an invoice in Edit mode. Depending on the type of document you select, the Invoice or Document Maintenance Header window opens.
2. Click Details. Depending on the type of document you select, the Invoice or Document Maintenance Detail window opens.
32 Oracle Retail Invoice Matching
Document Maintenance
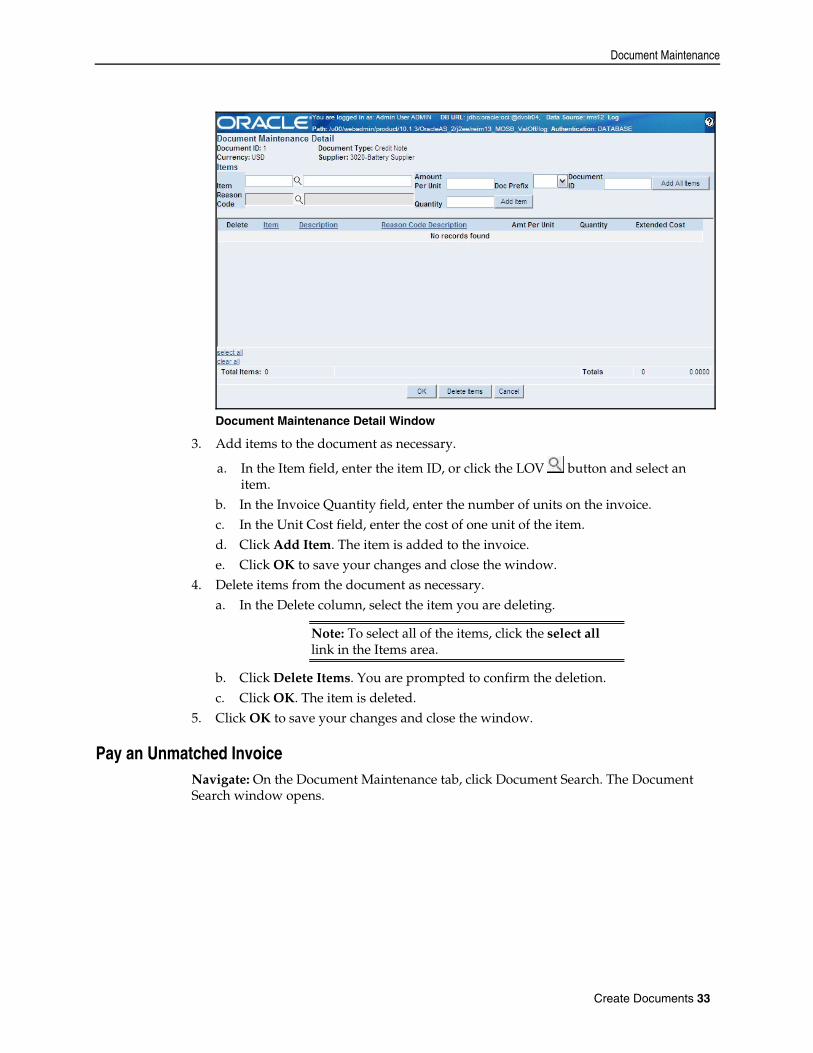
Document Maintenance Detail Window
3. Add items to the document as necessary.
a. In the Item field, enter the item ID, or click the LOV button and select an item.
b. In the Invoice Quantity field, enter the number of units on the invoice. c. In the Unit Cost field, enter the cost of one unit of the item. d. Click Add Item. The item is added to the invoice. e. Click OK to save your changes and close the window.
4. Delete items from the document as necessary. a. In the Delete column, select the item you are deleting.
Note: To select all of the items, click the select all link in the Items area.
b. Click Delete Items. You are prompted to confirm the deletion. c. Click OK. The item is deleted.
5. Click OK to save your changes and close the window.
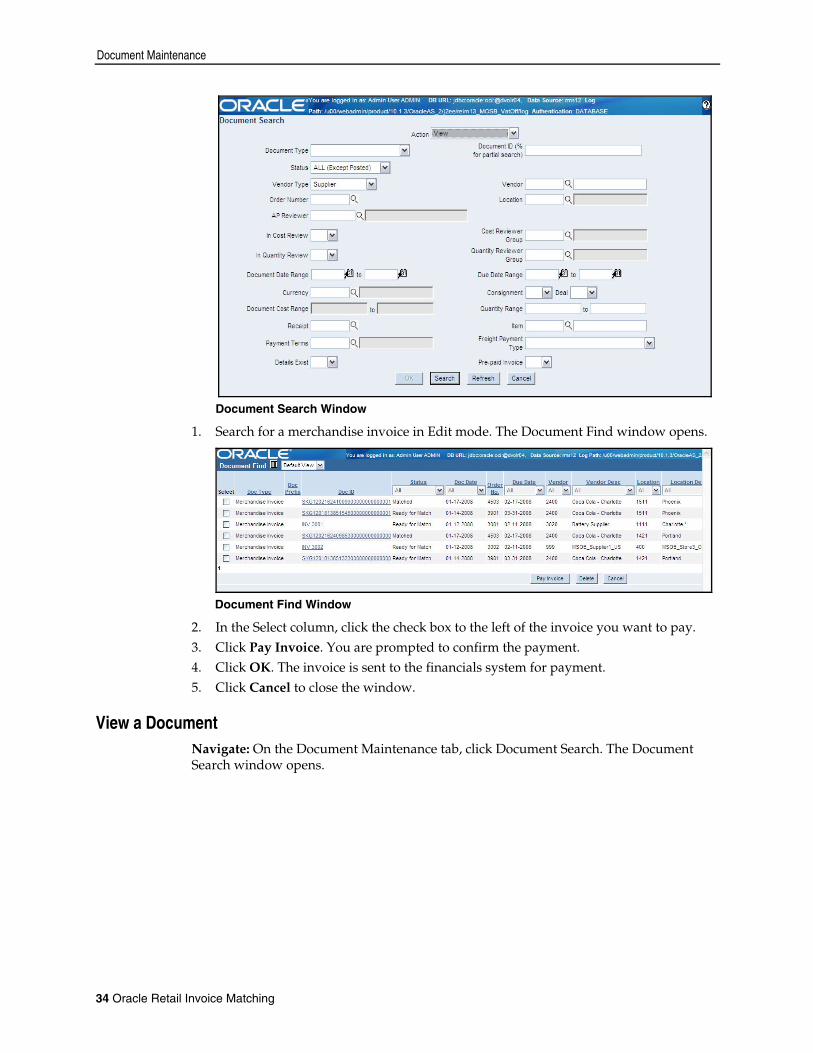
Pay an Unmatched Invoice Navigate: On the Document Maintenance tab, click Document Search. The Document Search window opens.
Create Documents 33
Document Maintenance
Document Search Window
1. Search for a merchandise invoice in Edit mode. The Document Find window opens.
Document Find Window
2. In the Select column, click the check box to the left of the invoice you want to pay. 3. Click Pay Invoice. You are prompted to confirm the payment. 4. Click OK. The invoice is sent to the financials system for payment. 5. Click Cancel to close the window.
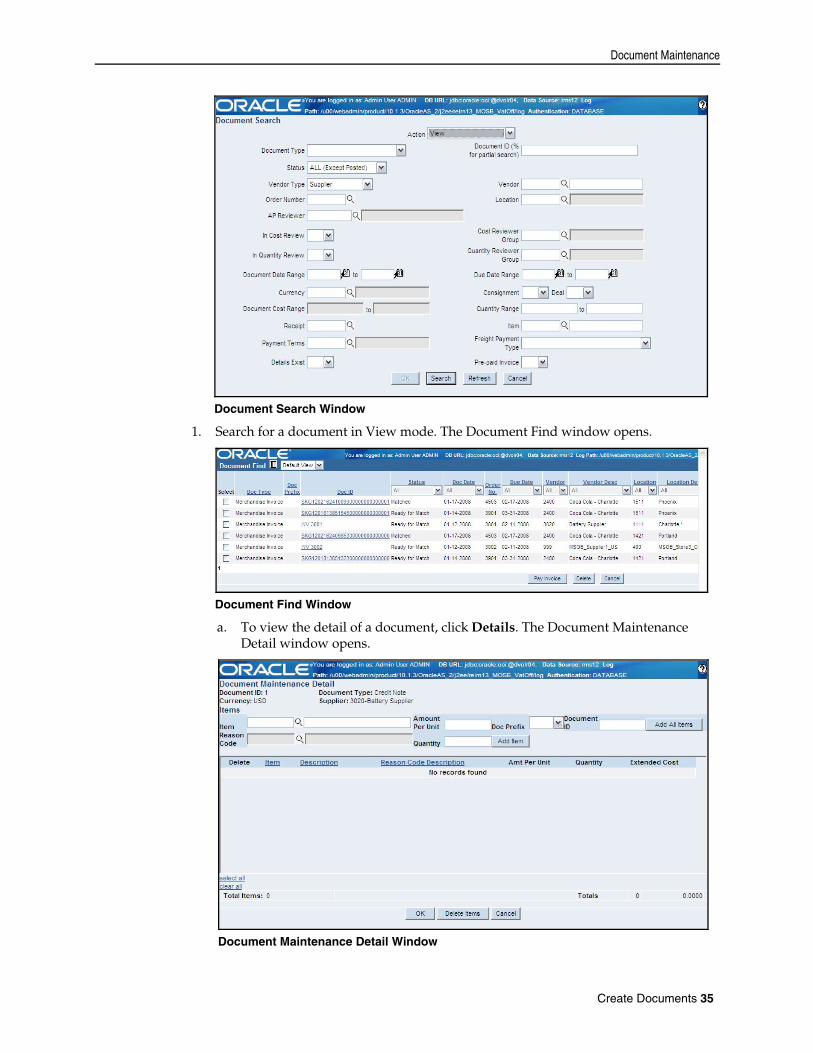
View a Document Navigate: On the Document Maintenance tab, click Document Search. The Document Search window opens.
34 Oracle Retail Invoice Matching
Document Maintenance
Document Search Window
1. Search for a document in View mode. The Document Find window opens.
Document Find Window
a. To view the detail of a document, click Details. The Document Maintenance Detail window opens.
Document Maintenance Detail Window
Create Documents 35
Document Maintenance
b. To view comments associated with the document, click Comments. c. If you are working with a debit memo or credit note request, click Create Credit
Note to create a credit note associated with the debit memo or credit note request.
2. Click Cancel to close the window.
36 Oracle Retail Invoice Matching
4 Match Documents
Match Credit Notes
Summary Match Credit Notes The summary matching windows allow you to match credit notes and credit notes requests. By limiting the credit note request and credit note criteria on the Summary Match Find window, you can view credit note requests and credit notes with similarities. This section includes the following summary credit note matching instructions:
Search for Credit Note Requests and Credit Notes to Match Summary Match Credit Notes and Credit Note Requests
Search for Credit Note Requests and Credit Notes to Match
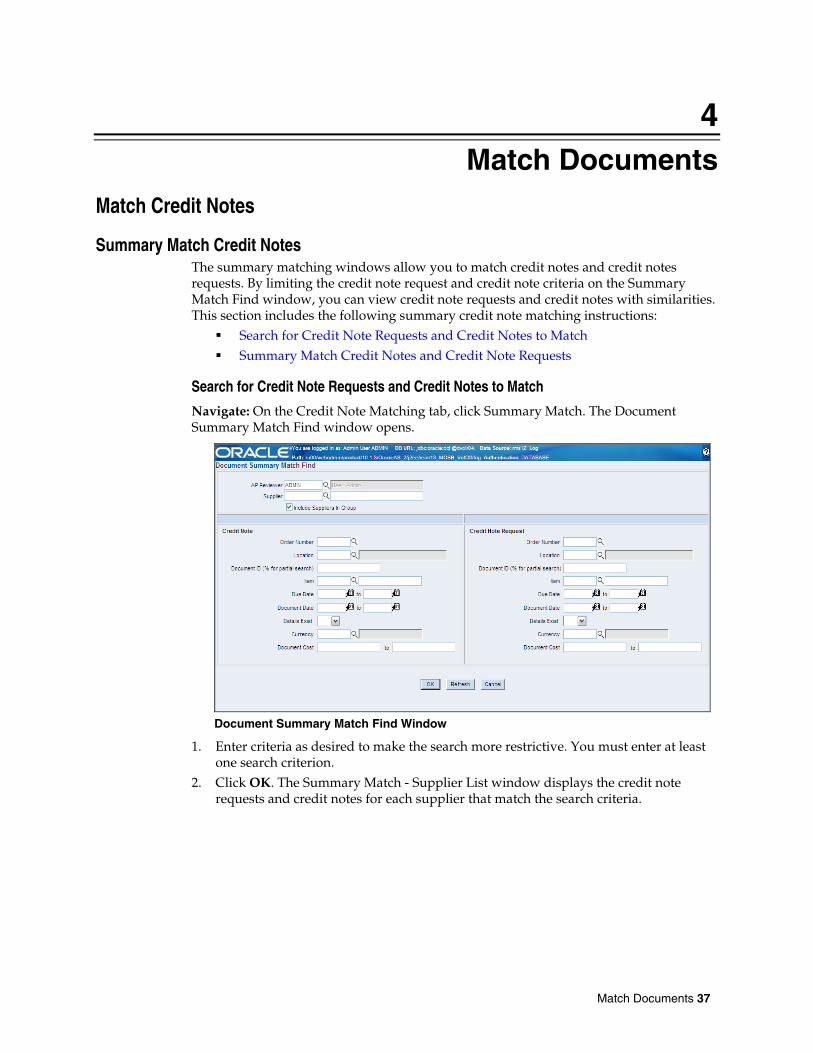
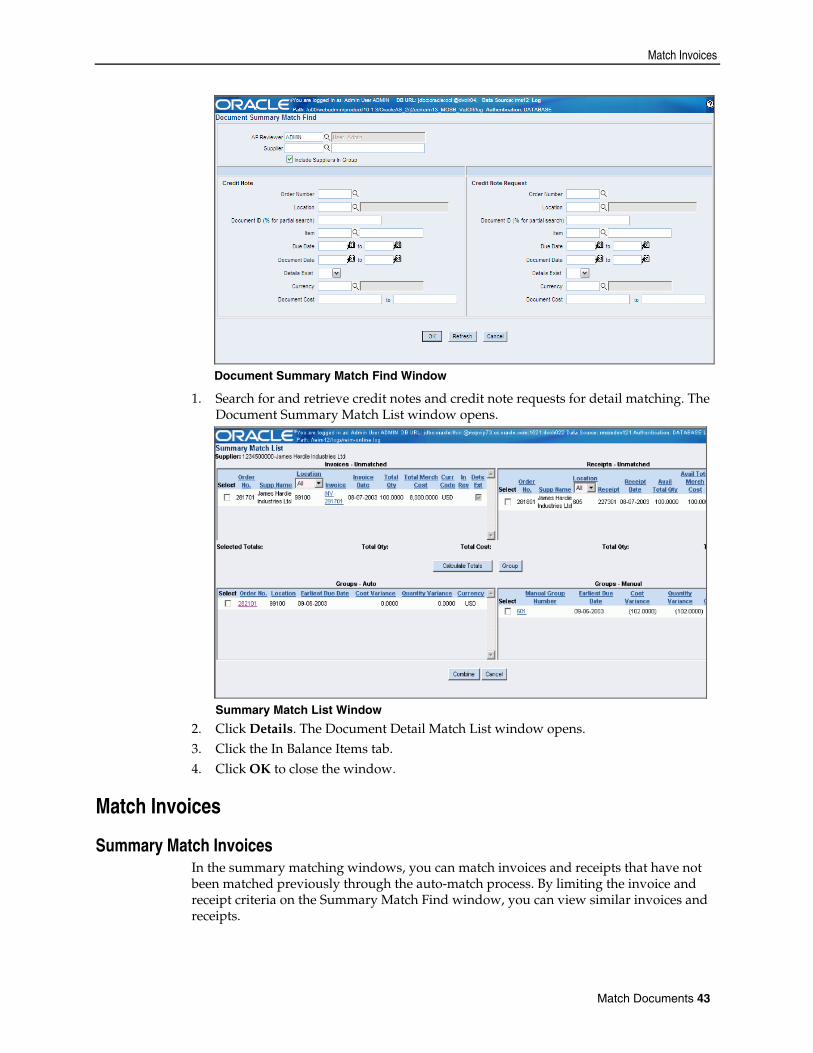
Navigate: On the Credit Note Matching tab, click Summary Match. The Document Summary Match Find window opens.
Document Summary Match Find Window
1. Enter criteria as desired to make the search more restrictive. You must enter at least one search criterion.
2. Click OK. The Summary Match - Supplier List window displays the credit note requests and credit notes for each supplier that match the search criteria.
Match Documents 37
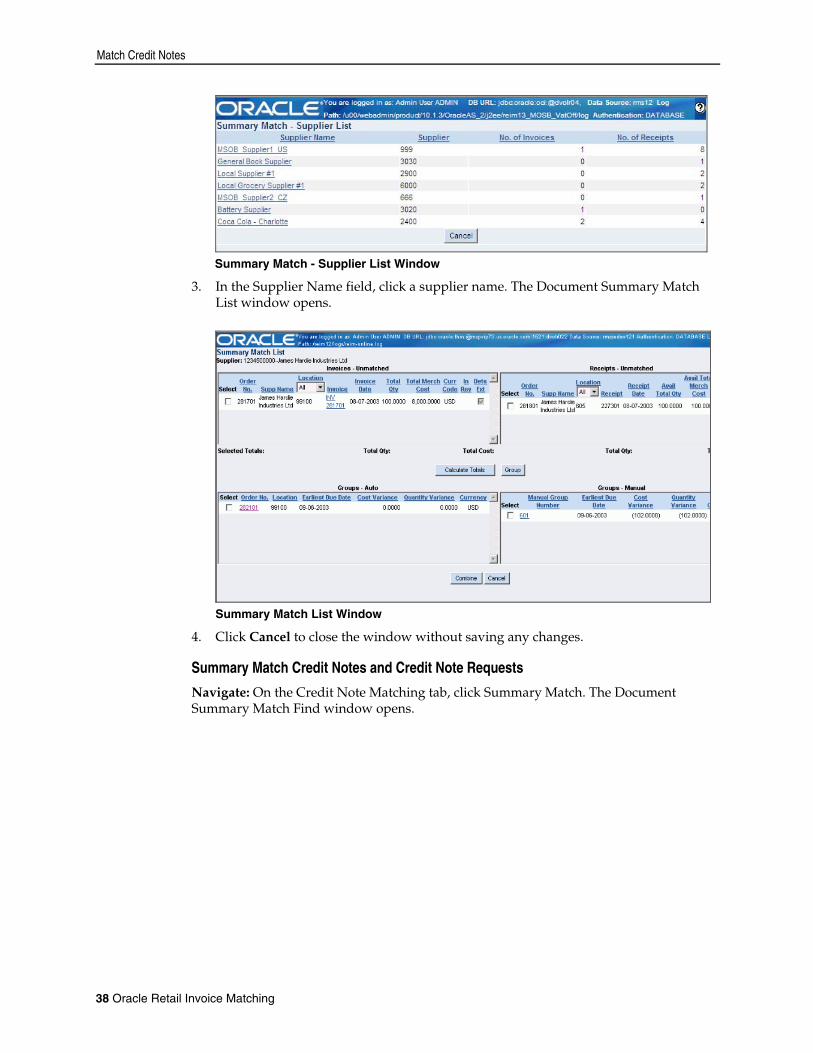
Match Credit Notes
Summary Match - Supplier List Window
3. In the Supplier Name field, click a supplier name. The Document Summary Match List window opens.
Summary Match List Window
4. Click Cancel to close the window without saving any changes.
Summary Match Credit Notes and Credit Note Requests
Navigate: On the Credit Note Matching tab, click Summary Match. The Document Summary Match Find window opens.
38 Oracle Retail Invoice Matching
Match Credit Notes
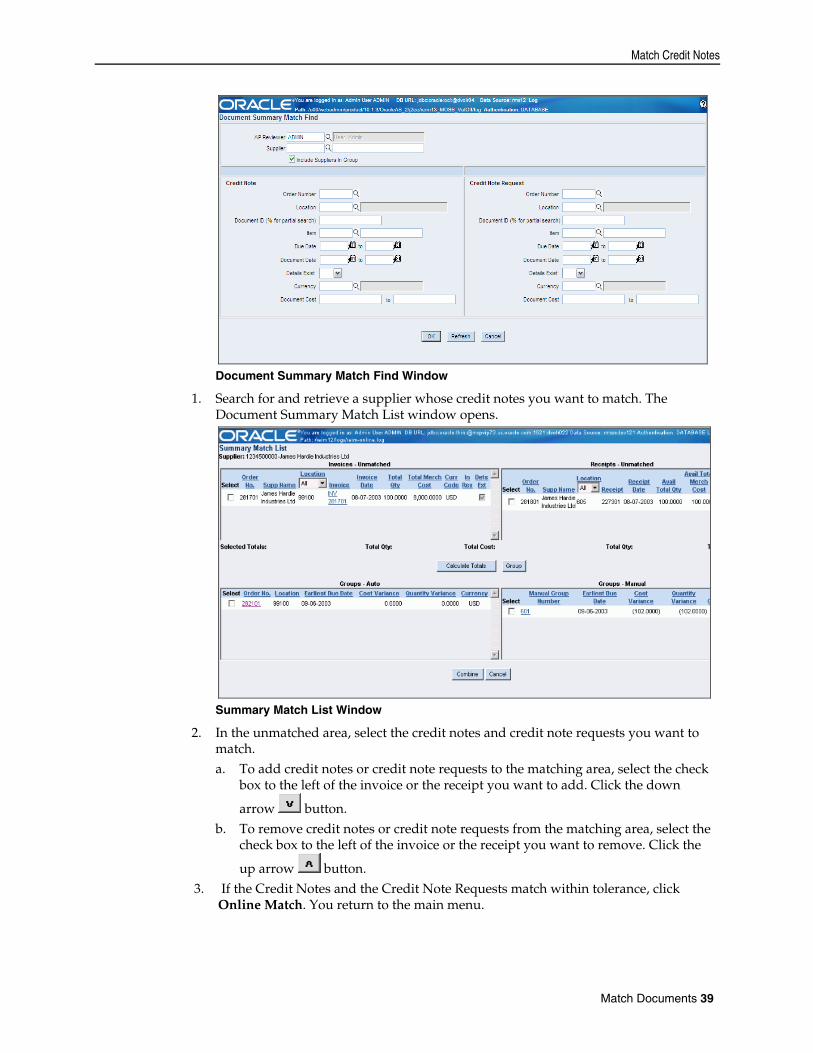
Document Summary Match Find Window
1. Search for and retrieve a supplier whose credit notes you want to match. The Document Summary Match List window opens.
Summary Match List Window
2. In the unmatched area, select the credit notes and credit note requests you want to match. a. To add credit notes or credit note requests to the matching area, select the check
box to the left of the invoice or the receipt you want to add. Click the down
arrow button. b. To remove credit notes or credit note requests from the matching area, select the
check box to the left of the invoice or the receipt you want to remove. Click the
up arrow button. 3. If the Credit Notes and the Credit Note Requests match within tolerance, click
Online Match. You return to the main menu.
Match Documents 39
Match Credit Notes
Note: If you fail to create a summary match, you may begin detail matching. Click Details to open the Detail Matching window. If details are not present, you can add details to a credit note. Click the Document Number to begin adding details.
4. When you are finished making summary matches, click Cancel to close the window and return to the main menu.
Detail Match Credit Notes Detail matching provides the last level of matching possible. The Document Detail Match List window contains two tabs to help you match credit notes and credit note requests at the line item level.
In Discrepancy Items tab: Use this tab to match line items on credit notes and credit note requests. Discrepancies can be sent for cost resolution or quantity resolution.
In Balance Items tab: Use this tab to view line items on a credit note and credit note request that match within tolerance.
This section includes the following detail credit note matching instructions: Group Credit Notes and Credit Note Requests for Detail Matching View the In Balance Items Tab
Group Credit Notes and Credit Note Requests for Detail Matching
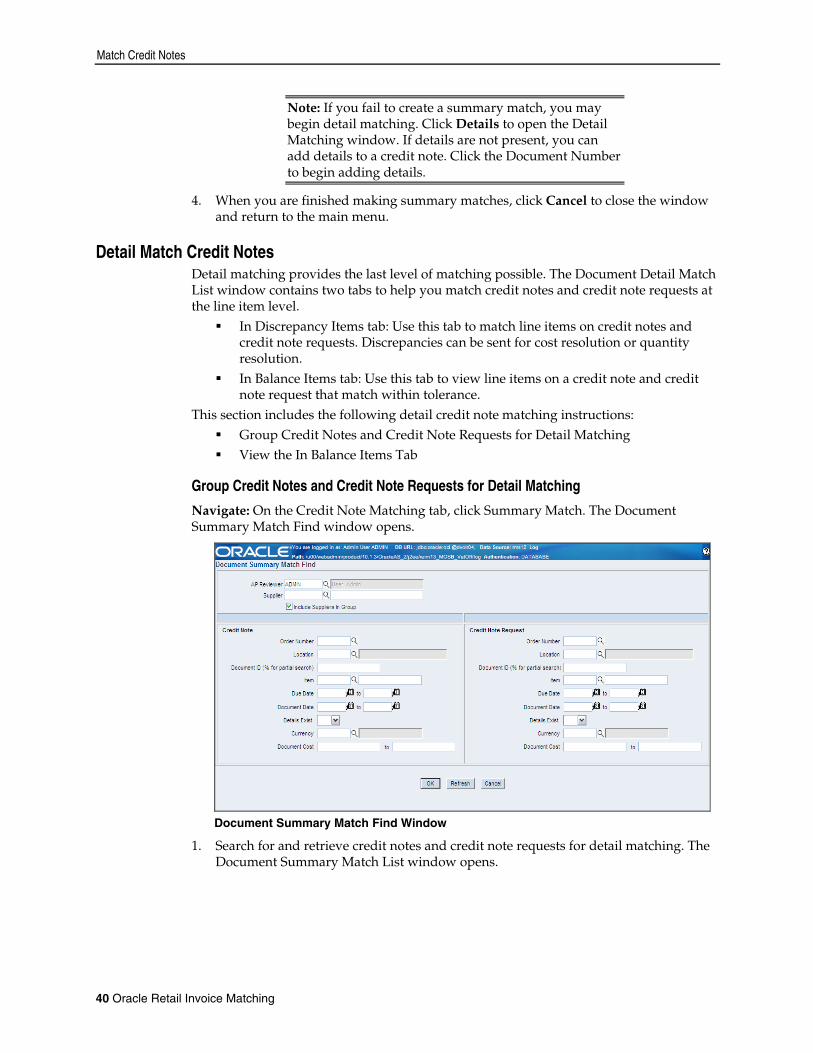
Navigate: On the Credit Note Matching tab, click Summary Match. The Document Summary Match Find window opens.
Document Summary Match Find Window
1. Search for and retrieve credit notes and credit note requests for detail matching. The Document Summary Match List window opens.
40 Oracle Retail Invoice Matching
Match Credit Notes
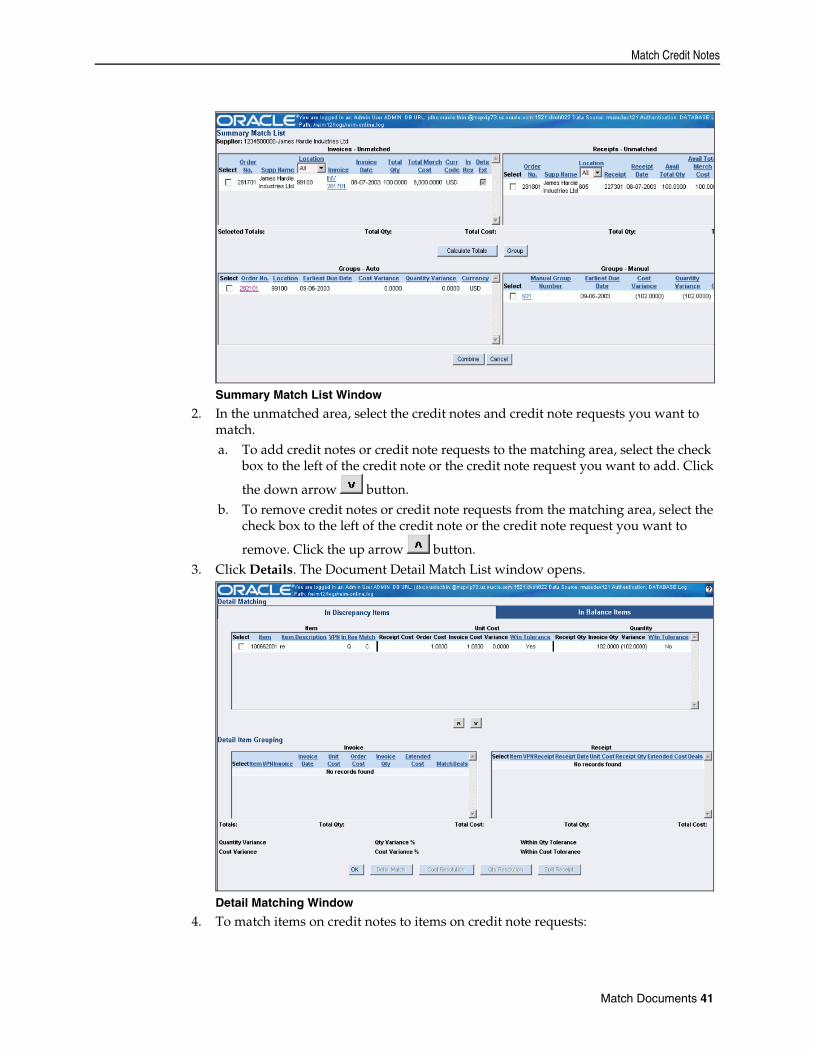
Summary Match List Window 2. In the unmatched area, select the credit notes and credit note requests you want to
match. a. To add credit notes or credit note requests to the matching area, select the check
box to the left of the credit note or the credit note request you want to add. Click
the down arrow button. b. To remove credit notes or credit note requests from the matching area, select the
check box to the left of the credit note or the credit note request you want to
remove. Click the up arrow button. 3. Click Details. The Document Detail Match List window opens.
Detail Matching Window 4. To match items on credit notes to items on credit note requests:
Match Documents 41
Match Credit Notes
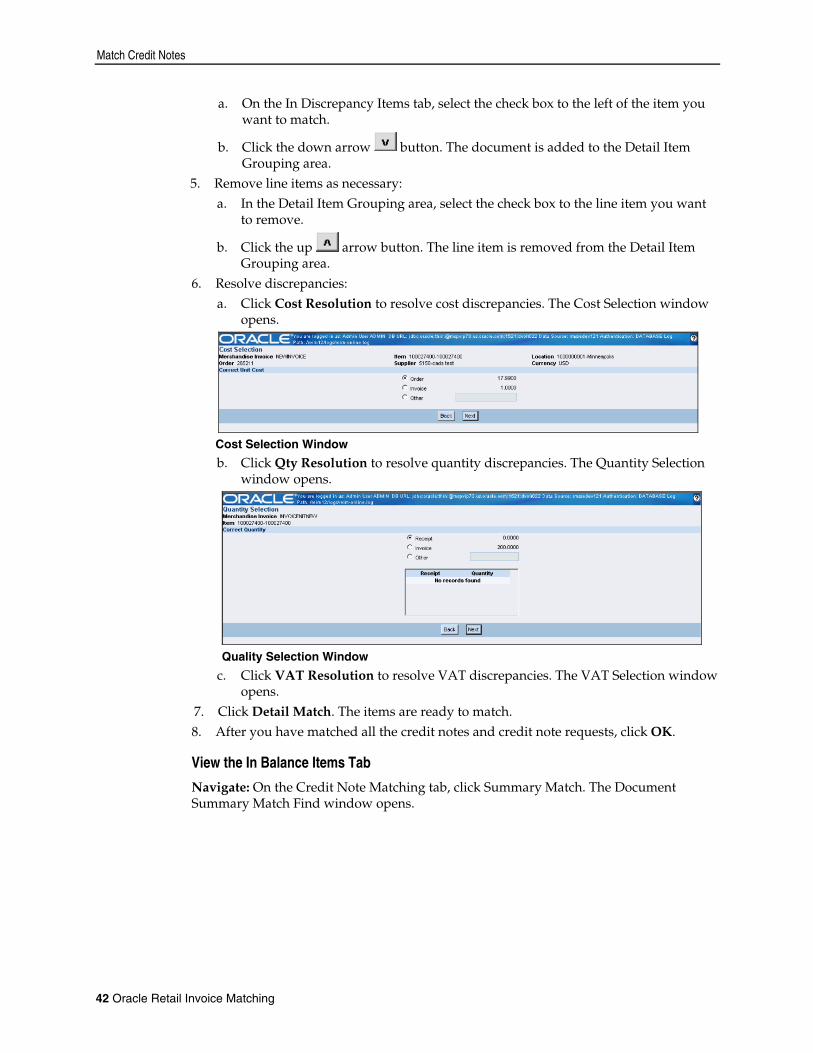
a. On the In Discrepancy Items tab, select the check box to the left of the item you want to match.
b. Click the down arrow button. The document is added to the Detail Item Grouping area.
5. Remove line items as necessary: a. In the Detail Item Grouping area, select the check box to the line item you want
to remove.
b. Click the up arrow button. The line item is removed from the Detail Item Grouping area.
6. Resolve discrepancies: a. Click Cost Resolution to resolve cost discrepancies. The Cost Selection window
opens.
Cost Selection Window
b. Click Qty Resolution to resolve quantity discrepancies. The Quantity Selection window opens.
Quality Selection Window
c. Click VAT Resolution to resolve VAT discrepancies. The VAT Selection window opens.
7. Click Detail Match. The items are ready to match. 8. After you have matched all the credit notes and credit note requests, click OK.
View the In Balance Items Tab
Navigate: On the Credit Note Matching tab, click Summary Match. The Document Summary Match Find window opens.
42 Oracle Retail Invoice Matching
Match Invoices
Document Summary Match Find Window
1. Search for and retrieve credit notes and credit note requests for detail matching. The Document Summary Match List window opens.
Summary Match List Window 2. Click Details. The Document Detail Match List window opens. 3. Click the In Balance Items tab. 4. Click OK to close the window.
Match Invoices
Summary Match Invoices In the summary matching windows, you can match invoices and receipts that have not been matched previously through the auto-match process. By limiting the invoice and receipt criteria on the Summary Match Find window, you can view similar invoices and receipts.
Match Documents 43

Match Invoices
After you find the invoices and receipts you want to match, you can match auto-groups or manual groups. Auto-groups are created when you when you enter the Summary Match window. An auto-group is created by ReIM and consists of potential matches between receipts and invoices. If you modify an auto-group in any way, it becomes a manual group. Manual groups are created when you select an invoice and a receipt in the unmatched area. Your selection is held in the Group - Manual area until you verify that the variances fall within tolerance. This section includes the following summary invoice matching instructions:
Search for Invoices and Receipts to Match Create Groups Summary Match Invoices and Receipts
Search for Invoices and Receipts to Match
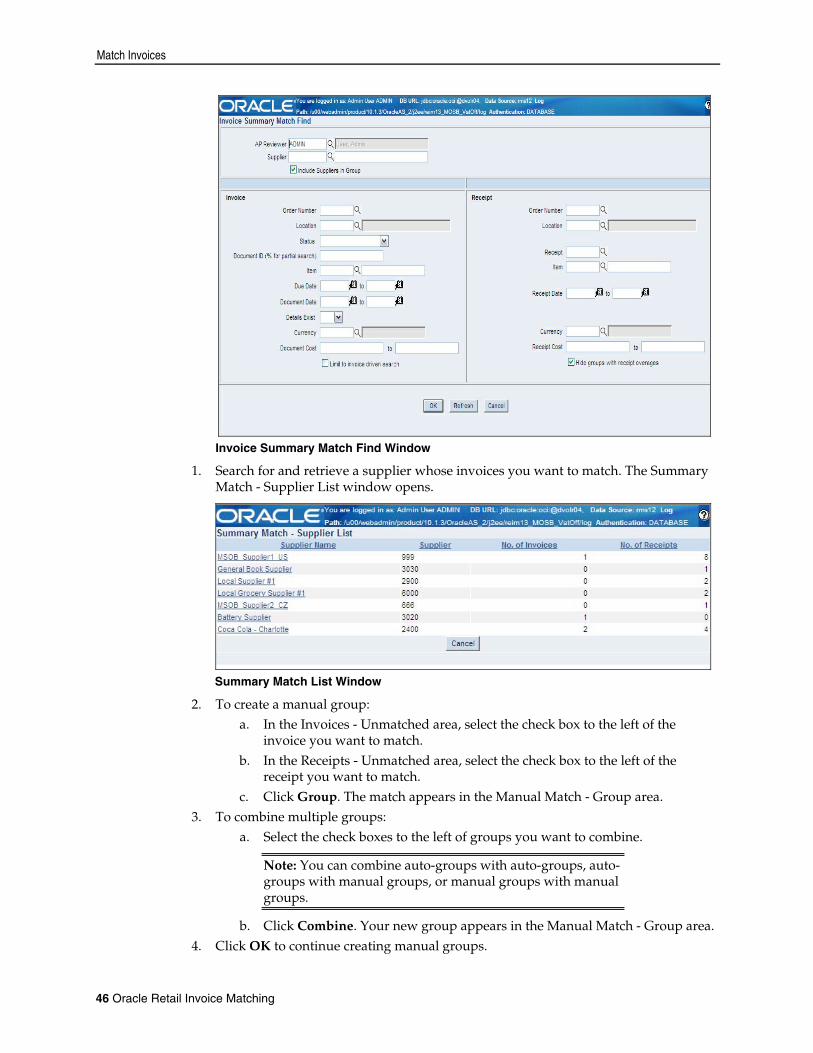
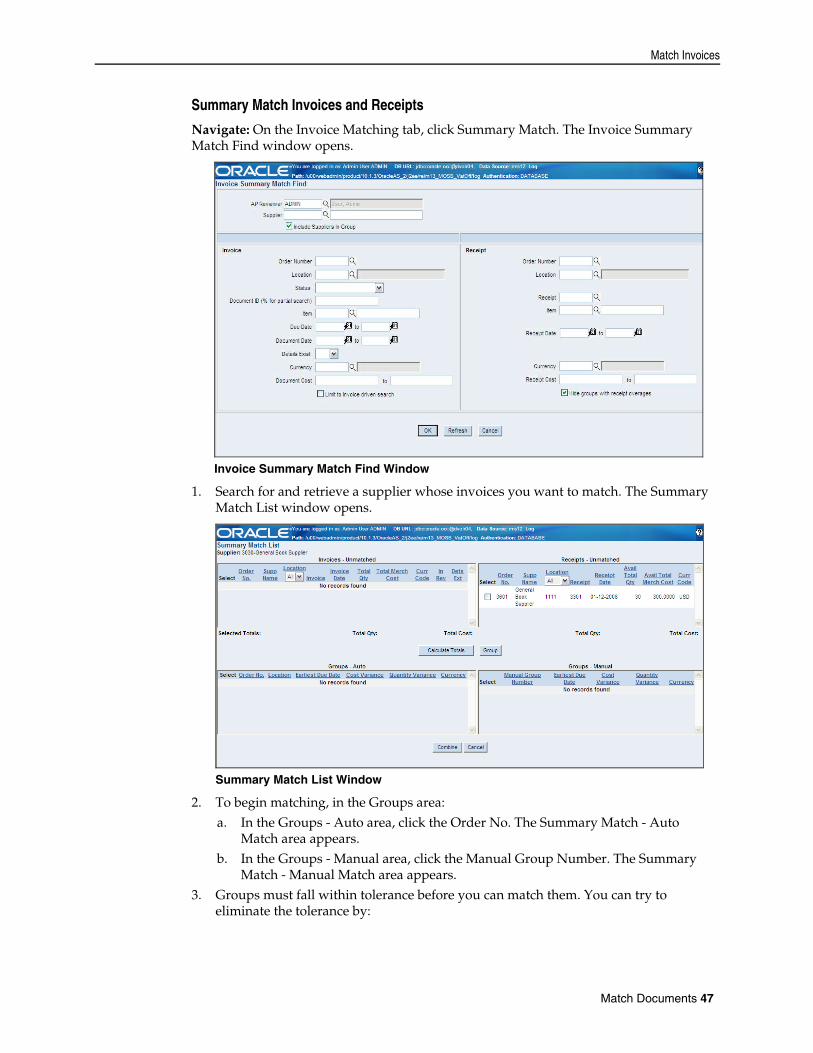
Navigate: On the Invoice Matching tab, click Summary Match. The Invoice Summary Match Find window opens.
Invoice Summary Match Find Window
1. Enter criteria to make the search more restrictive. You must enter at least one search criterion.
2. Click OK. The Summary Match - Supplier List window displays the invoices and receipts for each supplier that match the search criteria.
44 Oracle Retail Invoice Matching
Match Invoices
Summary Match - Supplier List Window
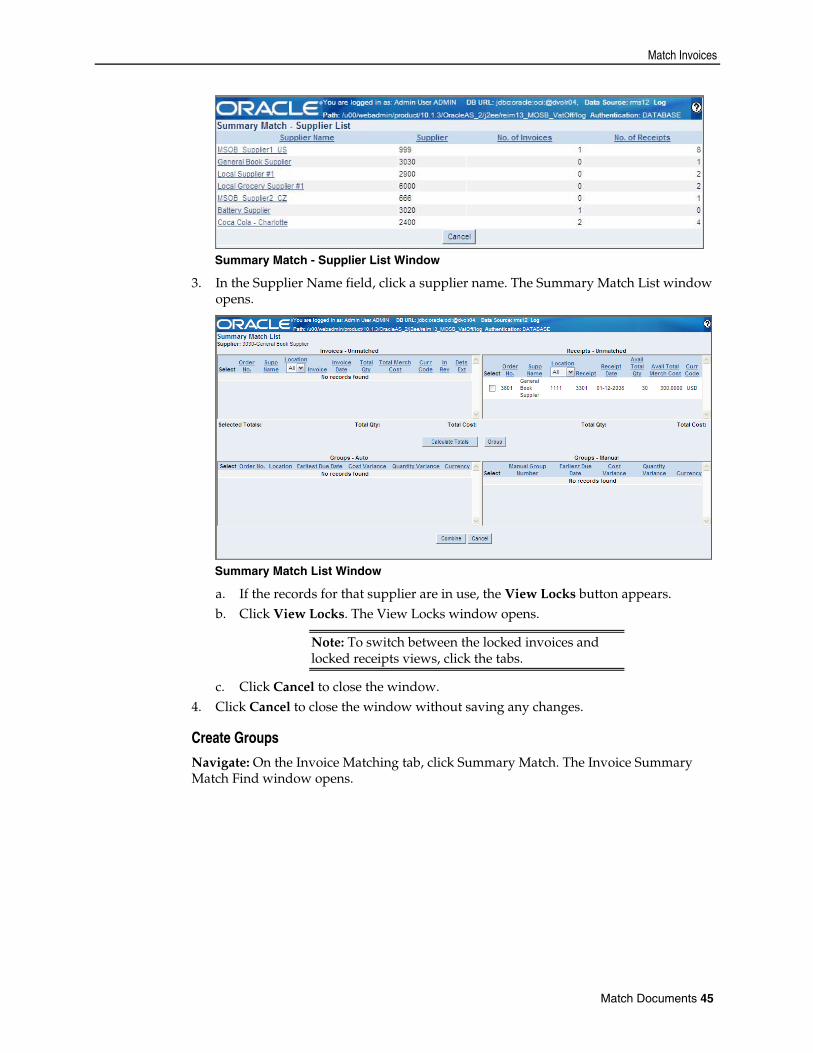
3. In the Supplier Name field, click a supplier name. The Summary Match List window opens.
Summary Match List Window
a. If the records for that supplier are in use, the View Locks button appears. b. Click View Locks. The View Locks window opens.
Note: To switch between the locked invoices and locked receipts views, click the tabs.
c. Click Cancel to close the window. 4. Click Cancel to close the window without saving any changes.
Create Groups
Navigate: On the Invoice Matching tab, click Summary Match. The Invoice Summary Match Find window opens.
Match Documents 45
Match Invoices
Invoice Summary Match Find Window
1. Search for and retrieve a supplier whose invoices you want to match. The Summary Match - Supplier List window opens.
Summary Match List Window
2. To create a manual group: a. In the Invoices - Unmatched area, select the check box to the left of the
invoice you want to match. b. In the Receipts - Unmatched area, select the check box to the left of the
receipt you want to match. c. Click Group. The match appears in the Manual Match - Group area.
3. To combine multiple groups: a. Select the check boxes to the left of groups you want to combine.
Note: You can combine auto-groups with auto-groups, auto-groups with manual groups, or manual groups with manual groups.
b. Click Combine. Your new group appears in the Manual Match - Group area. 4. Click OK to continue creating manual groups.
46 Oracle Retail Invoice Matching
Match Invoices
Summary Match Invoices and Receipts
Navigate: On the Invoice Matching tab, click Summary Match. The Invoice Summary Match Find window opens.
Invoice Summary Match Find Window
1. Search for and retrieve a supplier whose invoices you want to match. The Summary Match List window opens.
Summary Match List Window
2. To begin matching, in the Groups area: a. In the Groups - Auto area, click the Order No. The Summary Match - Auto
Match area appears. b. In the Groups - Manual area, click the Manual Group Number. The Summary
Match - Manual Match area appears. 3. Groups must fall within tolerance before you can match them. You can try to
eliminate the tolerance by:
Match Documents 47
Match Invoices
a. Adding invoices or receipts to the matching area. In the unmatched area, select the check box to the left of the invoice or the receipt you want to add. Click the
down arrow button. b. Removing invoices or receipts from the matching area. In the Summary Match
area, select the check box to the left of the invoice or the receipt you want to
remove. Click the up arrow button. 4. Click Online Match. If a match is created, the Summary Match List window displays
the auto-groups and manual groups.
Note: If you fail to create a summary match, you can begin detail matching. Click Details to open the Detail Matching window.
5. When you are finished making summary matches, click Cancel to close the windows and return to the main menu.
Detail Match Invoices Detail matching provides the last level of matching possible. The Detail Matching window contains two tabs to help you match invoices and receipts at the line item level.
a. In Discrepancy Items tab: Use this tab to match line items on invoices and receipts. Discrepancies can be sent for cost resolution or quantity resolution, or you can split a receipt quantity.
b. In Balance Items tab: Use this tab to view line items on an invoice and receipts that match within tolerance.
This section includes the following detail invoice matching instructions: Group Invoices and Receipts for Detail Matching Split a Receipt View the In Balance Items Tab View Deals Associated with Invoices or Orders
Group Invoices and Receipts for Detail Matching
Navigate: On the Invoice Matching tab, click Summary Match. The Invoice Summary Match Find window opens.
48 Oracle Retail Invoice Matching
Match Invoices
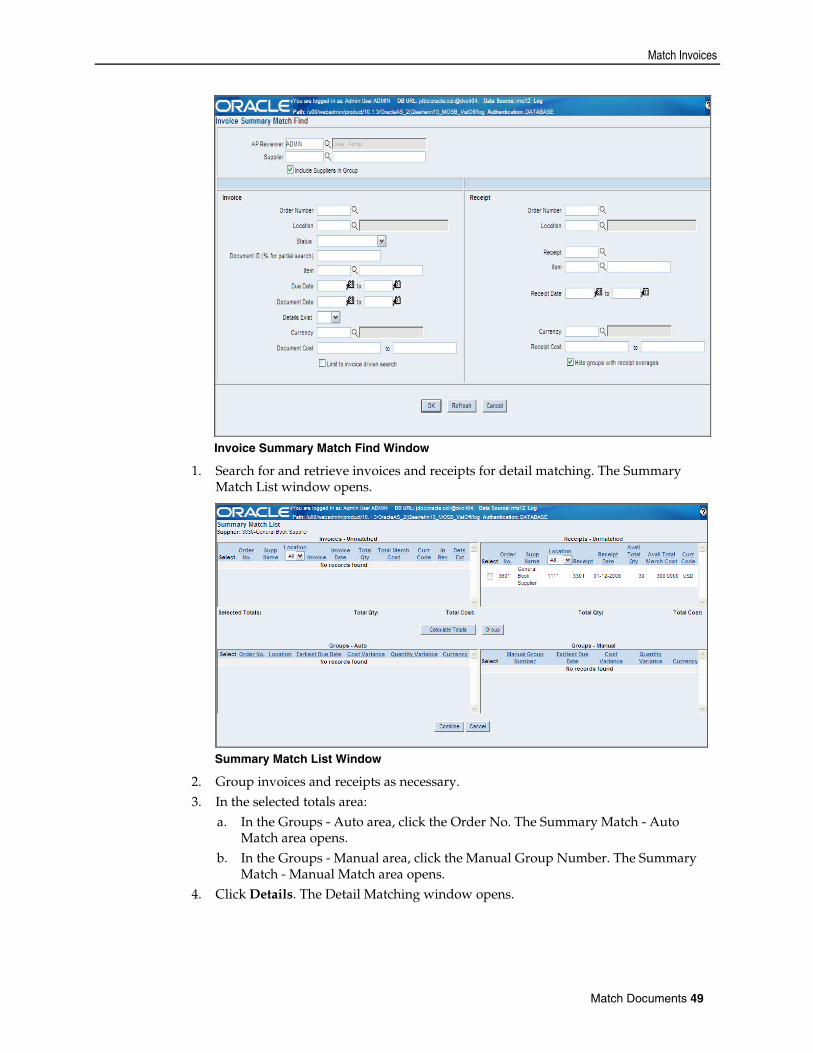
Invoice Summary Match Find Window
1. Search for and retrieve invoices and receipts for detail matching. The Summary Match List window opens.
Summary Match List Window
2. Group invoices and receipts as necessary. 3. In the selected totals area:
a. In the Groups - Auto area, click the Order No. The Summary Match - Auto Match area opens.
b. In the Groups - Manual area, click the Manual Group Number. The Summary Match - Manual Match area opens.
4. Click Details. The Detail Matching window opens.
Match Documents 49
Match Invoices
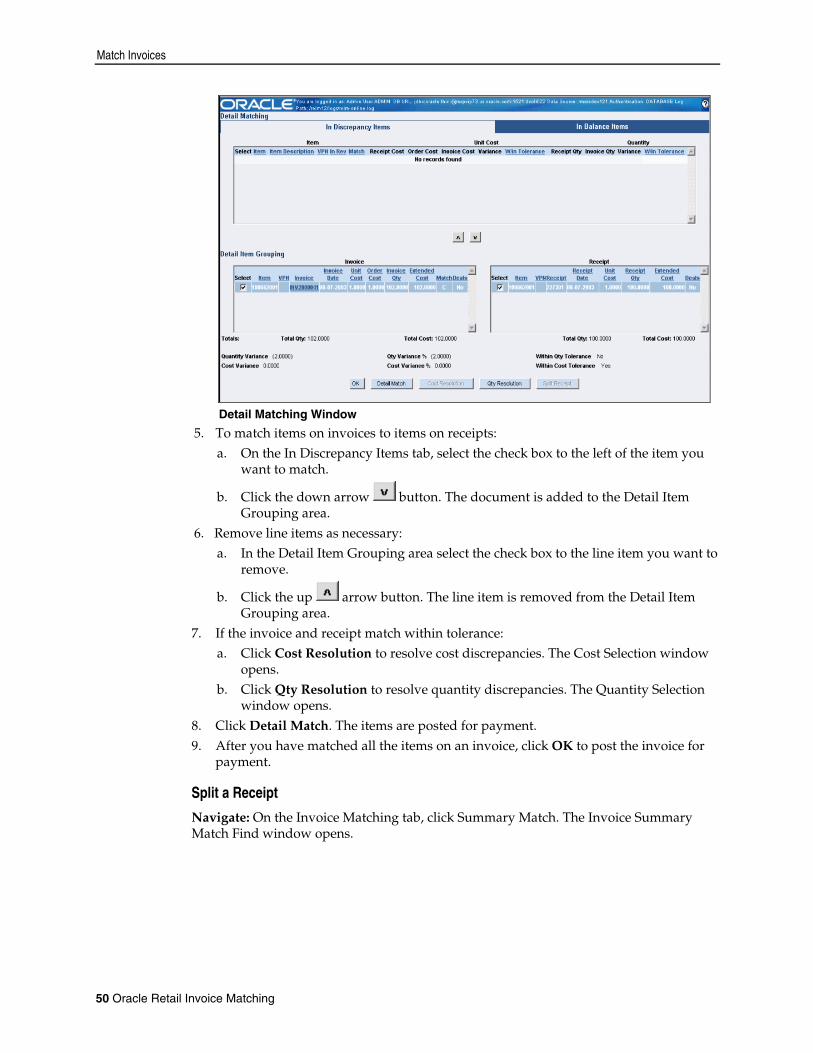
Detail Matching Window 5. To match items on invoices to items on receipts:
a. On the In Discrepancy Items tab, select the check box to the left of the item you want to match.
b. Click the down arrow button. The document is added to the Detail Item Grouping area.
6. Remove line items as necessary: a. In the Detail Item Grouping area select the check box to the line item you want to
remove.
b. Click the up arrow button. The line item is removed from the Detail Item Grouping area.
7. If the invoice and receipt match within tolerance: a. Click Cost Resolution to resolve cost discrepancies. The Cost Selection window
opens. b. Click Qty Resolution to resolve quantity discrepancies. The Quantity Selection
window opens. 8. Click Detail Match. The items are posted for payment. 9. After you have matched all the items on an invoice, click OK to post the invoice for
payment.
Split a Receipt
Navigate: On the Invoice Matching tab, click Summary Match. The Invoice Summary Match Find window opens.
50 Oracle Retail Invoice Matching
Match Invoices
Invoice Summary Match Find Window
1. Search for and retrieve invoices and receipts for detail matching.
2. Group invoices and receipts as necessary. 3. In the Detail Item Grouping area, select the check box to the left of the receipt you
want to split. 4. Click Split Receipt. The Split Receipt window opens.
Split Receipt Window
5. In the Excess Quantity field, enter the amount you want to remove from the receipt. 6. Click OK. The Detail Matching window opens.
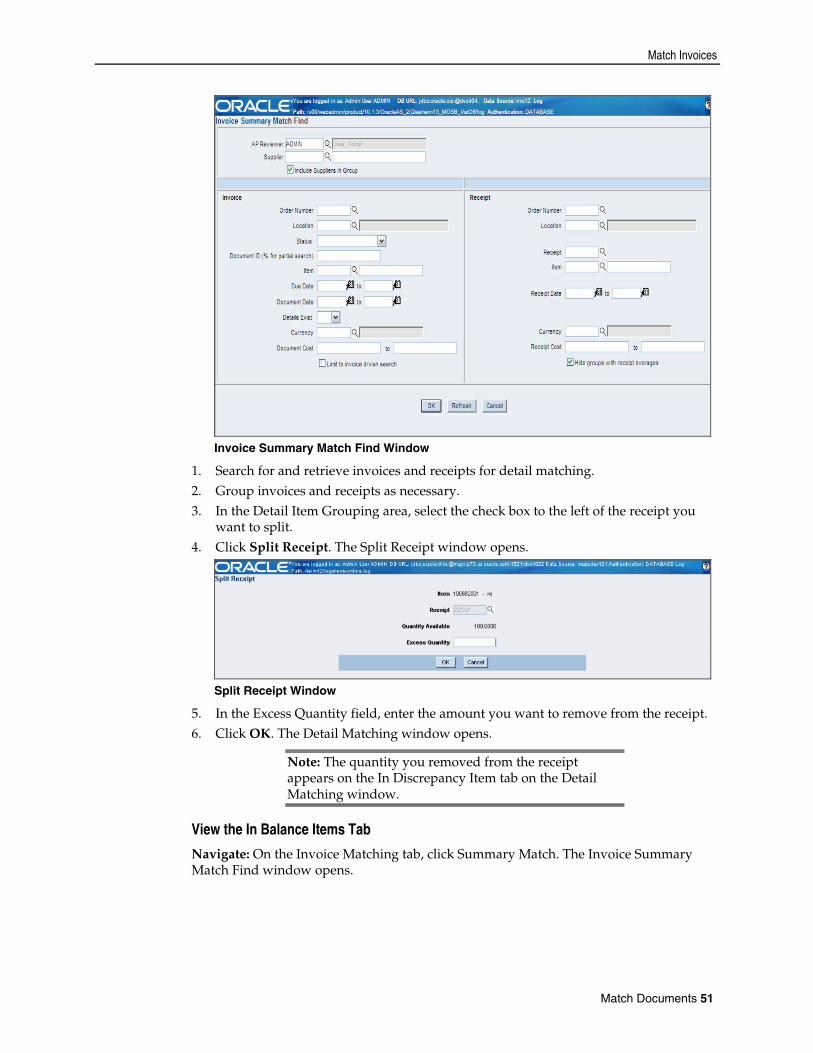
Note: The quantity you removed from the receipt appears on the In Discrepancy Item tab on the Detail Matching window.
View the In Balance Items Tab
Navigate: On the Invoice Matching tab, click Summary Match. The Invoice Summary Match Find window opens.
Match Documents 51

Match Invoices
Invoice Summary Match Find Window
1. Search for and retrieve invoices and receipts for detail matching.
2. Click on the In Balance Items tab. 3. Click OK to close the window.
View Deals Associated with Invoices or Orders
Navigate: On the Invoice Matching tab, click Summary Match. The Invoice Summary Match Find window opens.
Invoice Summary Match Find Window
1. Search for and retrieve invoices and receipts for detail matching.
2. Group invoices and receipts as necessary. 3. To view deal associations:
52 Oracle Retail Invoice Matching

Match Invoices
a. In the Invoice area, click Yes in the Invoice Deals Exist column. The Invoice Deals window opens.
b. In the Receipt area, click Yes in the Order Deals Exist column. The Invoice Deals window opens.
4. Click OK to close the window.
Match Documents 53

5 Resolve Discrepancies
Cost Discrepancies
Resolve Cost Discrepancies A cost discrepancy is the difference between the cost on a receipt and the cost on a merchandise invoice. When there is a cost discrepancy in the system, in either the retailer's or supplier's favor, a reviewer must do a cost review. When a cost discrepancy is identified, you must review and reconcile the discrepancy. Discrepancies are routed to reviewer groups. The cost discrepancy is based on a comparison between the invoice and the receipt. If a receipt is not available, the invoice is compared to the purchase order. Depending on your user permissions, you may or may not be able to access this window or all discrepancies. Cost discrepancies are created during the auto-match process when the invoice cost does not match the purchase order cost. Cost discrepancies are also created when a debit memo is disputed. This section includes the following cost discrepancy resolution instructions:
Resolve Cost Discrepancies
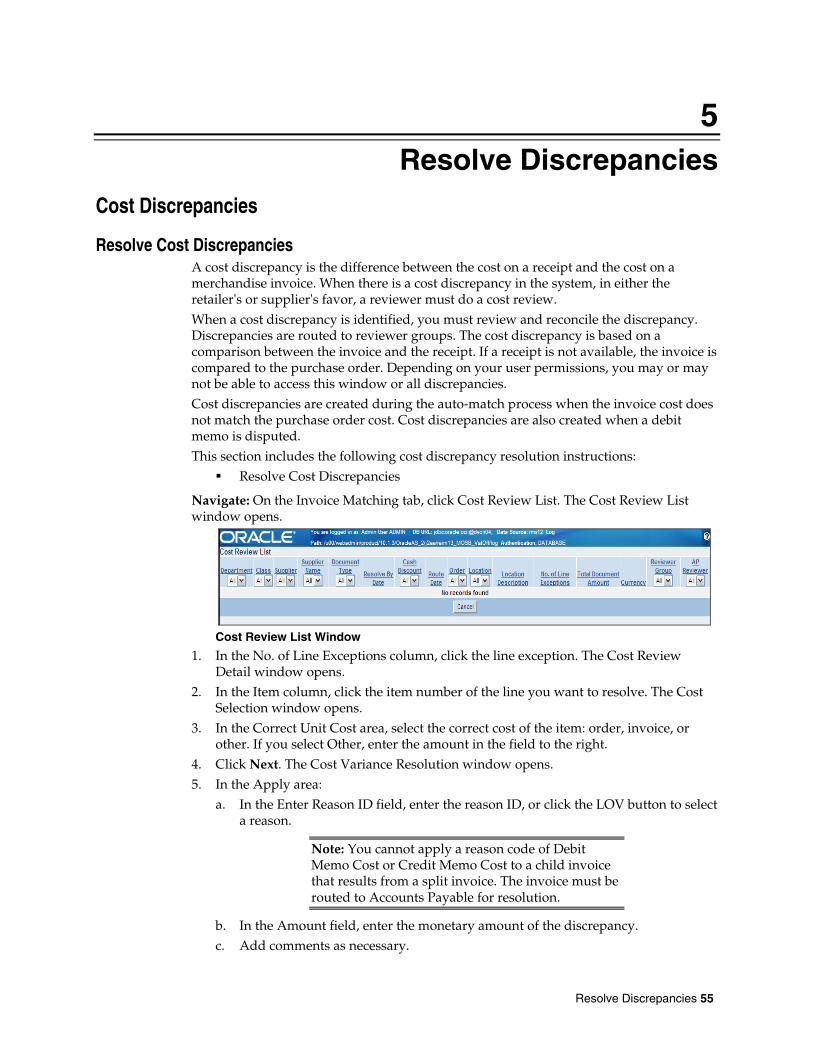
Navigate: On the Invoice Matching tab, click Cost Review List. The Cost Review List window opens.
Cost Review List Window
1. In the No. of Line Exceptions column, click the line exception. The Cost Review Detail window opens.
2. In the Item column, click the item number of the line you want to resolve. The Cost Selection window opens.
3. In the Correct Unit Cost area, select the correct cost of the item: order, invoice, or other. If you select Other, enter the amount in the field to the right.
4. Click Next. The Cost Variance Resolution window opens. 5. In the Apply area:
a. In the Enter Reason ID field, enter the reason ID, or click the LOV button to select a reason.
Note: You cannot apply a reason code of Debit Memo Cost or Credit Memo Cost to a child invoice that results from a split invoice. The invoice must be routed to Accounts Payable for resolution.
b. In the Amount field, enter the monetary amount of the discrepancy. c. Add comments as necessary.
Resolve Discrepancies 55
Quantity Discrepancies
d. If necessary, in the Re-route to Group field, enter the ID of the review group to which you want to send this, or click the LOV button to select a group.
e. Click Apply. The information is added to the Resolution area. 6. To delete a resolution you have added:
a. On the list of cost discrepancy resolutions, select the check box next to the resolution you want to delete.
b. Click Delete. c. You are prompted to confirm the deletion. Click OK.
7. Click OK to save your changes and close the window.
Quantity Discrepancies When a quantity discrepancy has been identified, you must review and reconcile the discrepancy. Discrepancies are routed to reviewer groups. The quantity discrepancy is based on a comparison between the invoice and the receipt. If a receipt is not available, the invoice is compared to the purchase order. Depending on your user permissions, you may or may not be able to access this window or all discrepancies. Quantity discrepancies are created during the auto-match process when the invoice quantity does not match the purchase order quantity. Quantity discrepancies are also created when a debit memo is disputed.
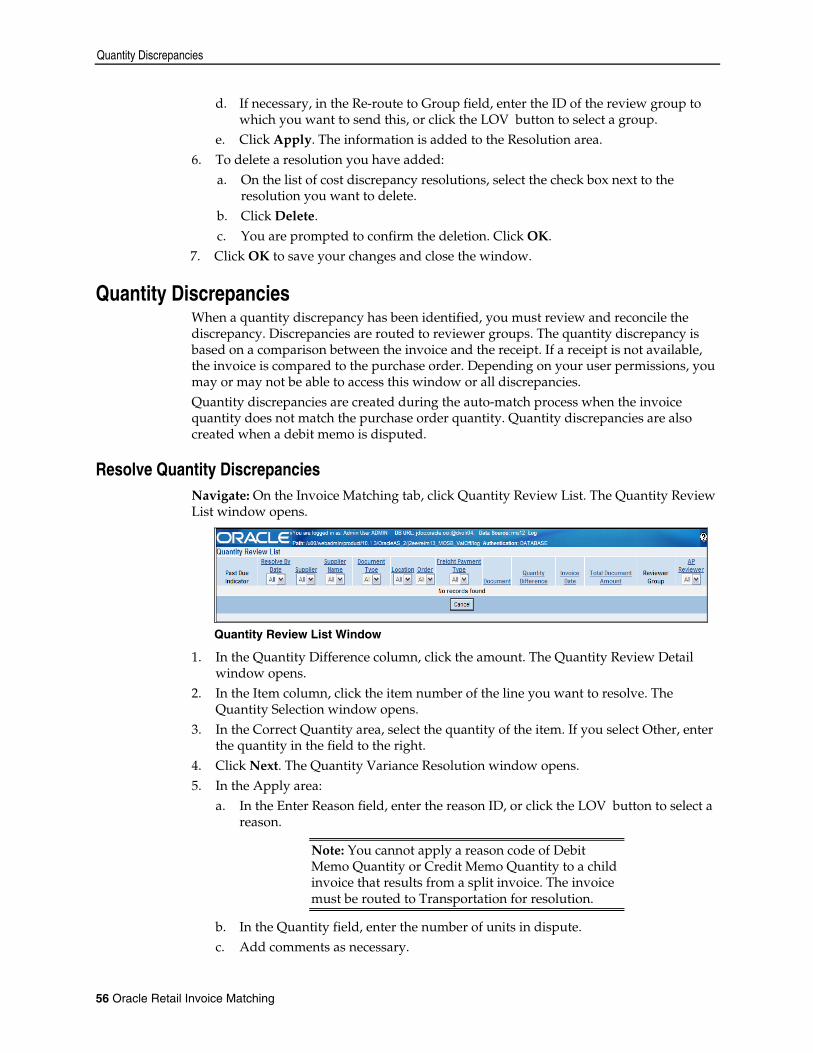
Resolve Quantity Discrepancies Navigate: On the Invoice Matching tab, click Quantity Review List. The Quantity Review List window opens.
Quantity Review List Window
1. In the Quantity Difference column, click the amount. The Quantity Review Detail window opens.
2. In the Item column, click the item number of the line you want to resolve. The Quantity Selection window opens.
3. In the Correct Quantity area, select the quantity of the item. If you select Other, enter the quantity in the field to the right.
4. Click Next. The Quantity Variance Resolution window opens. 5. In the Apply area:
a. In the Enter Reason field, enter the reason ID, or click the LOV button to select a reason.
Note: You cannot apply a reason code of Debit Memo Quantity or Credit Memo Quantity to a child invoice that results from a split invoice. The invoice must be routed to Transportation for resolution.
b. In the Quantity field, enter the number of units in dispute. c. Add comments as necessary.
56 Oracle Retail Invoice Matching
VAT Discrepancies
d. If necessary, in the Re-route to Group field, enter the ID of the group to which you want to send this, or click the LOV button to select a group.
e. In the Receipt field, identify the receipt associated with the discrepancy. f. Click Apply. The information is added to the Resolution area.
6. To delete a resolution you have added: a. On the list of quantity discrepancy resolutions, select the check box next to the
resolution you want the delete. b. Click Delete. c. You are prompted to confirm the deletion. Click OK.
7. Click OK to save your changes and close the window.
VAT Discrepancies A value added tax (VAT) discrepancy is the difference between the VAT on a receipt and the VAT on a merchandise invoice. When there is a VAT discrepancy in either the retailer's or supplier's favor, a reviewer must do a VAT review. VAT discrepancies can also exist for header-only invoices. When a VAT discrepancy is identified, you must review and reconcile the discrepancy. Discrepancies are routed to reviewer groups. The VAT discrepancy is based on a comparison between the invoice and the receipt. If a receipt is not available, the invoice is compared to the purchase order. Depending on your user permissions, you may or may not be able to access these windows or all discrepancies. Header-only VAT discrepancies are resolved on the Invoice Maintenance Header and Detail windows. VAT discrepancies for header-level-only invoices are created during the auto-match process when the invoice VAT does not match the purchase order VAT. VAT discrepancies for invoices with details are created after the invoice is created, when the entered VAT information for an item does not match the system-maintained VAT information for the item. This section includes the following VAT discrepancy resolution instructions:
Resolve VAT Discrepancies Resolve Header Level VAT Discrepancies
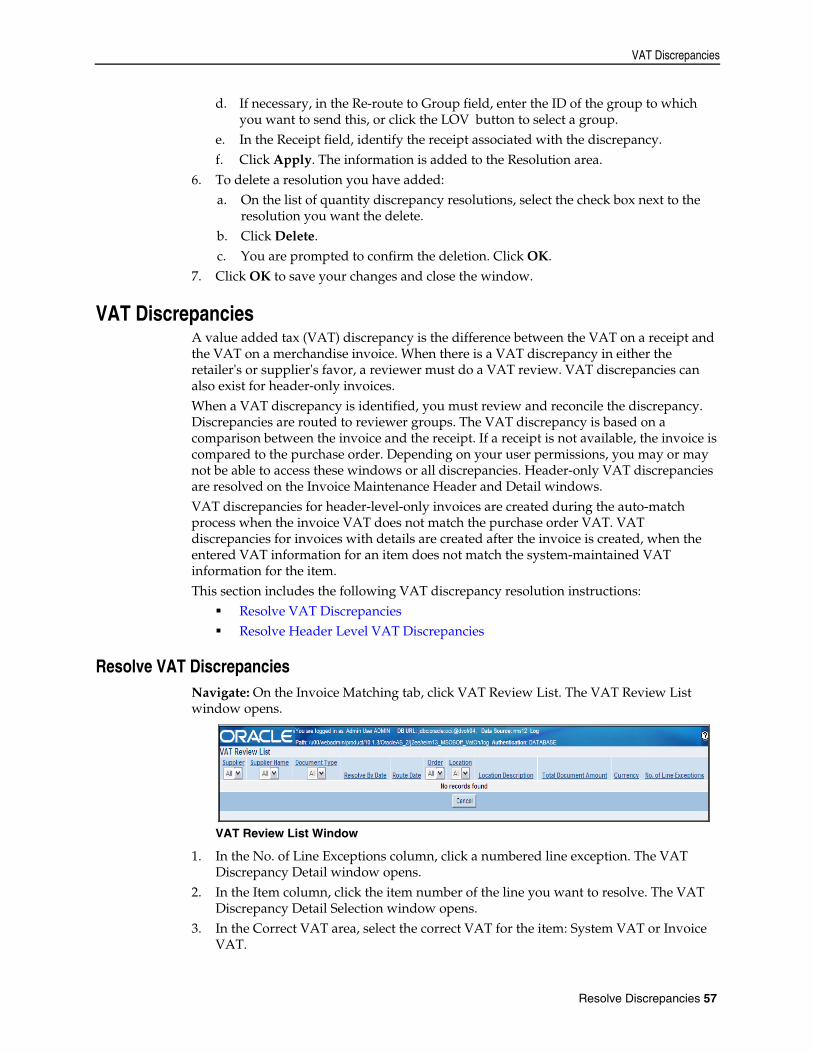
Resolve VAT Discrepancies Navigate: On the Invoice Matching tab, click VAT Review List. The VAT Review List window opens.
VAT Review List Window
1. In the No. of Line Exceptions column, click a numbered line exception. The VAT Discrepancy Detail window opens.
2. In the Item column, click the item number of the line you want to resolve. The VAT Discrepancy Detail Selection window opens.
3. In the Correct VAT area, select the correct VAT for the item: System VAT or Invoice VAT.
Resolve Discrepancies 57
VAT Discrepancies
4. Click Next. The VAT Discrepancy Detail Resolution window opens. 5. In the Apply area:
a. In the Enter Reason ID field, enter the reason ID, or click the LOV button to select a reason.
b. Add comments as necessary. 6. Click OK to save your changes and close the window.
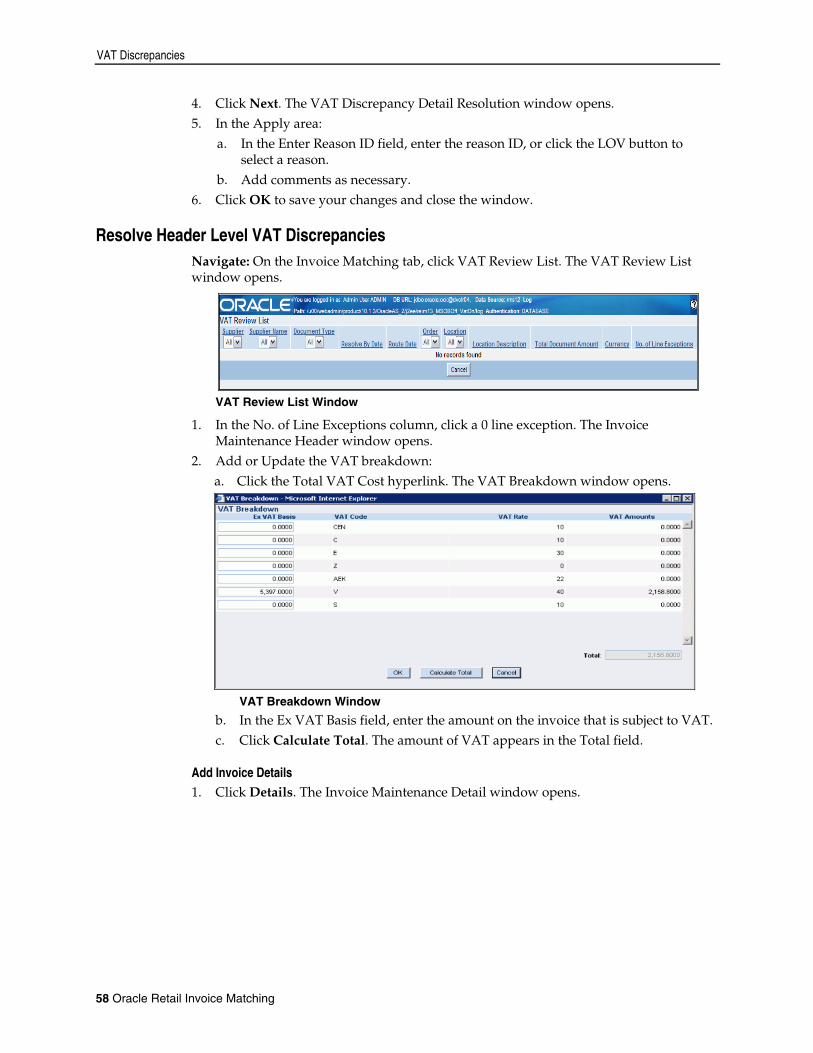
Resolve Header Level VAT Discrepancies Navigate: On the Invoice Matching tab, click VAT Review List. The VAT Review List window opens.
VAT Review List Window
1. In the No. of Line Exceptions column, click a 0 line exception. The Invoice Maintenance Header window opens.
2. Add or Update the VAT breakdown: a. Click the Total VAT Cost hyperlink. The VAT Breakdown window opens.
VAT Breakdown Window
b. In the Ex VAT Basis field, enter the amount on the invoice that is subject to VAT. c. Click Calculate Total. The amount of VAT appears in the Total field.
Add Invoice Details 1. Click Details. The Invoice Maintenance Detail window opens.
58 Oracle Retail Invoice Matching
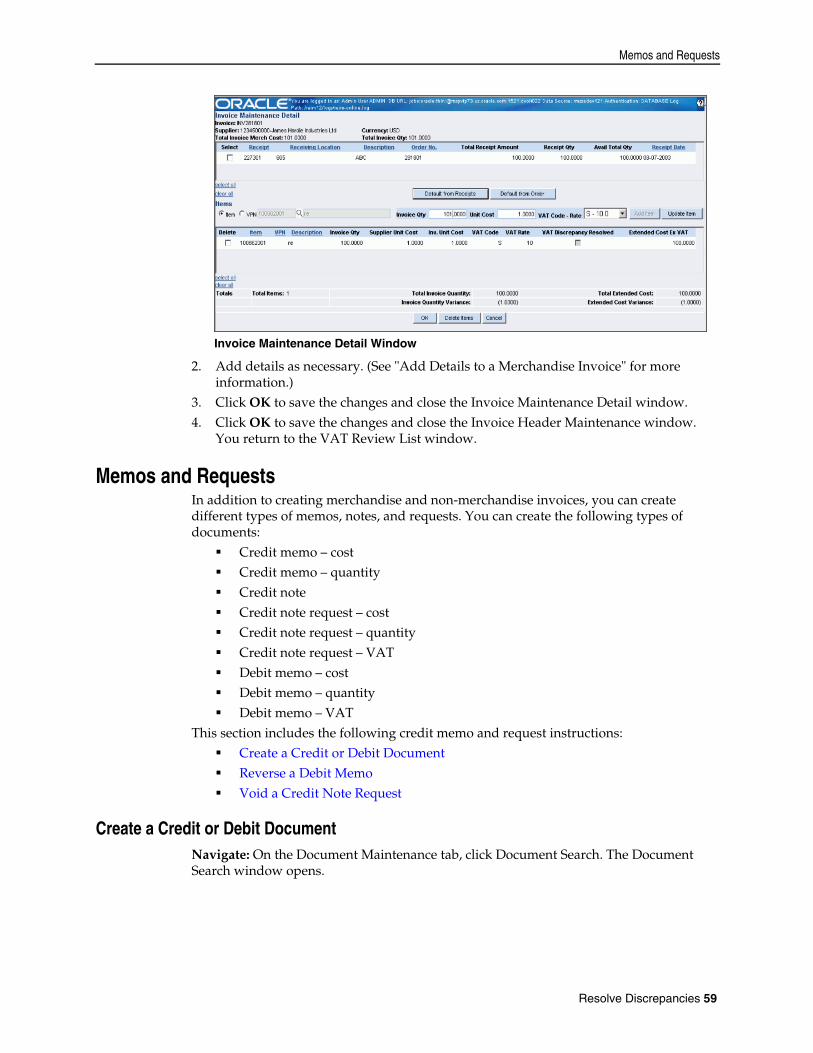
Memos and Requests
Invoice Maintenance Detail Window
2. Add details as necessary. (See "Add Details to a Merchandise Invoice" for more information.)
3. Click OK to save the changes and close the Invoice Maintenance Detail window. 4. Click OK to save the changes and close the Invoice Header Maintenance window.
You return to the VAT Review List window.
Memos and Requests In addition to creating merchandise and non-merchandise invoices, you can create different types of memos, notes, and requests. You can create the following types of documents:
Credit memo – cost Credit memo – quantity Credit note Credit note request – cost Credit note request – quantity Credit note request – VAT Debit memo – cost Debit memo – quantity Debit memo – VAT
This section includes the following credit memo and request instructions: Create a Credit or Debit Document Reverse a Debit Memo Void a Credit Note Request
Create a Credit or Debit Document Navigate: On the Document Maintenance tab, click Document Search. The Document Search window opens.
Resolve Discrepancies 59
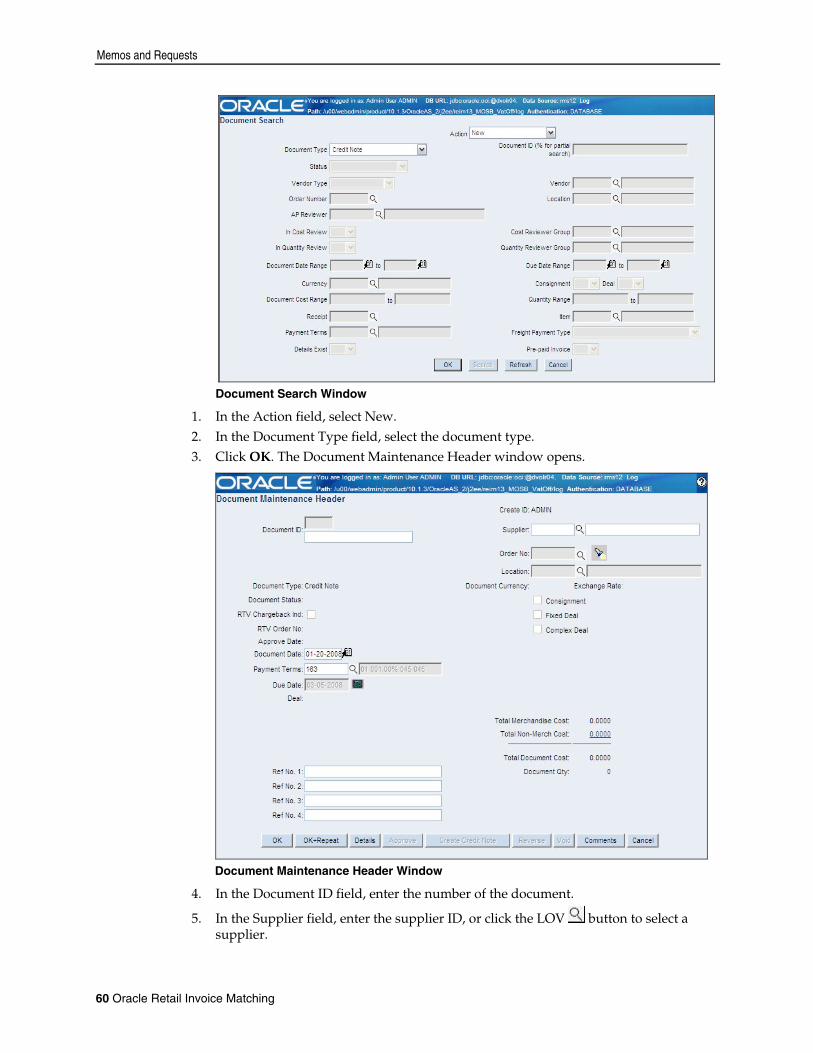
Memos and Requests
Document Search Window
1. In the Action field, select New.
2. In the Document Type field, select the document type. 3. Click OK. The Document Maintenance Header window opens.
Document Maintenance Header Window
4. In the Document ID field, enter the number of the document.
5. In the Supplier field, enter the supplier ID, or click the LOV button to select a supplier.
60 Oracle Retail Invoice Matching
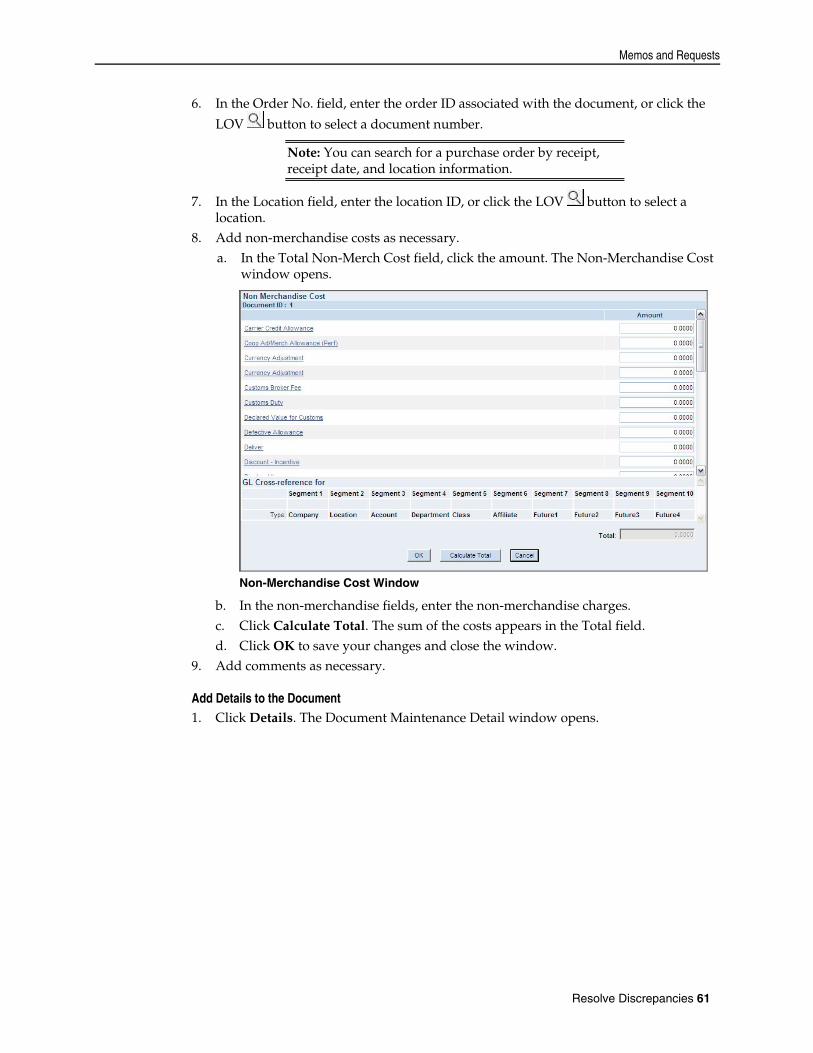
Memos and Requests
6. In the Order No. field, enter the order ID associated with the document, or click the
LOV button to select a document number.
Note: You can search for a purchase order by receipt, receipt date, and location information.
7. In the Location field, enter the location ID, or click the LOV button to select a location.
8. Add non-merchandise costs as necessary. a. In the Total Non-Merch Cost field, click the amount. The Non-Merchandise Cost
window opens.
Non-Merchandise Cost Window
b. In the non-merchandise fields, enter the non-merchandise charges. c. Click Calculate Total. The sum of the costs appears in the Total field. d. Click OK to save your changes and close the window.
9. Add comments as necessary.
Add Details to the Document 1. Click Details. The Document Maintenance Detail window opens.
Resolve Discrepancies 61
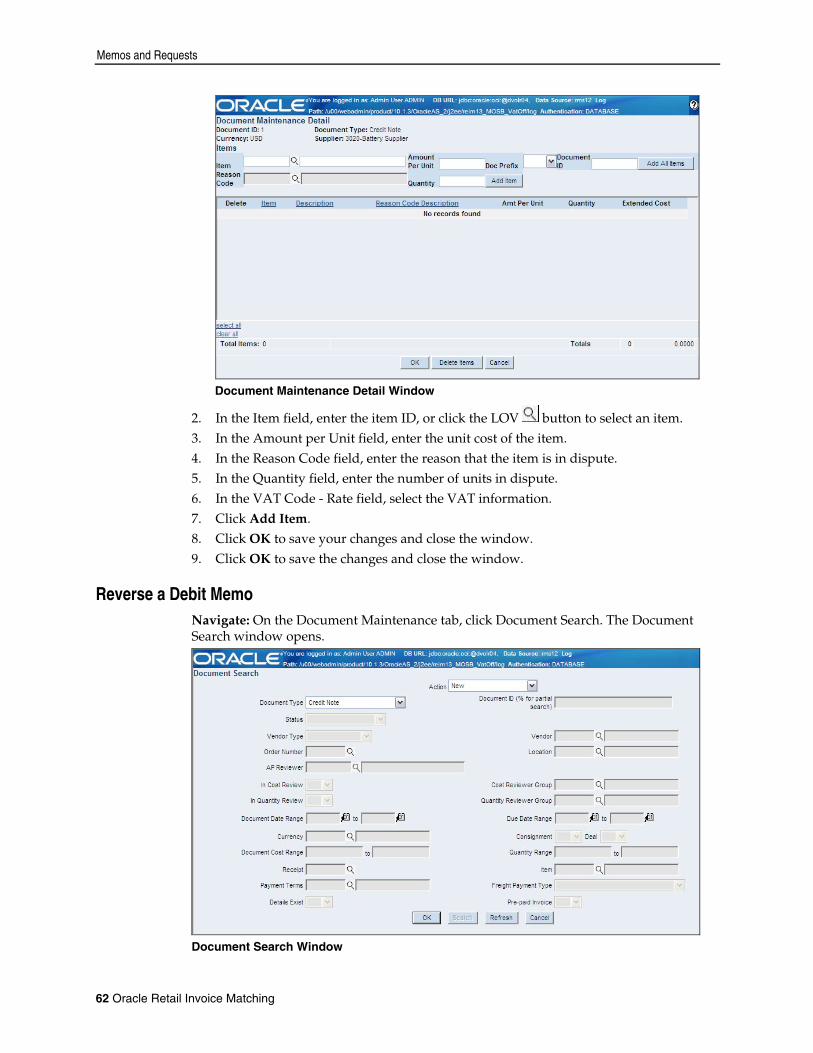
Memos and Requests
Document Maintenance Detail Window
2. In the Item field, enter the item ID, or click the LOV button to select an item. 3. In the Amount per Unit field, enter the unit cost of the item. 4. In the Reason Code field, enter the reason that the item is in dispute. 5. In the Quantity field, enter the number of units in dispute. 6. In the VAT Code - Rate field, select the VAT information. 7. Click Add Item. 8. Click OK to save your changes and close the window. 9. Click OK to save the changes and close the window.
Reverse a Debit Memo Navigate: On the Document Maintenance tab, click Document Search. The Document Search window opens.
Document Search Window
62 Oracle Retail Invoice Matching
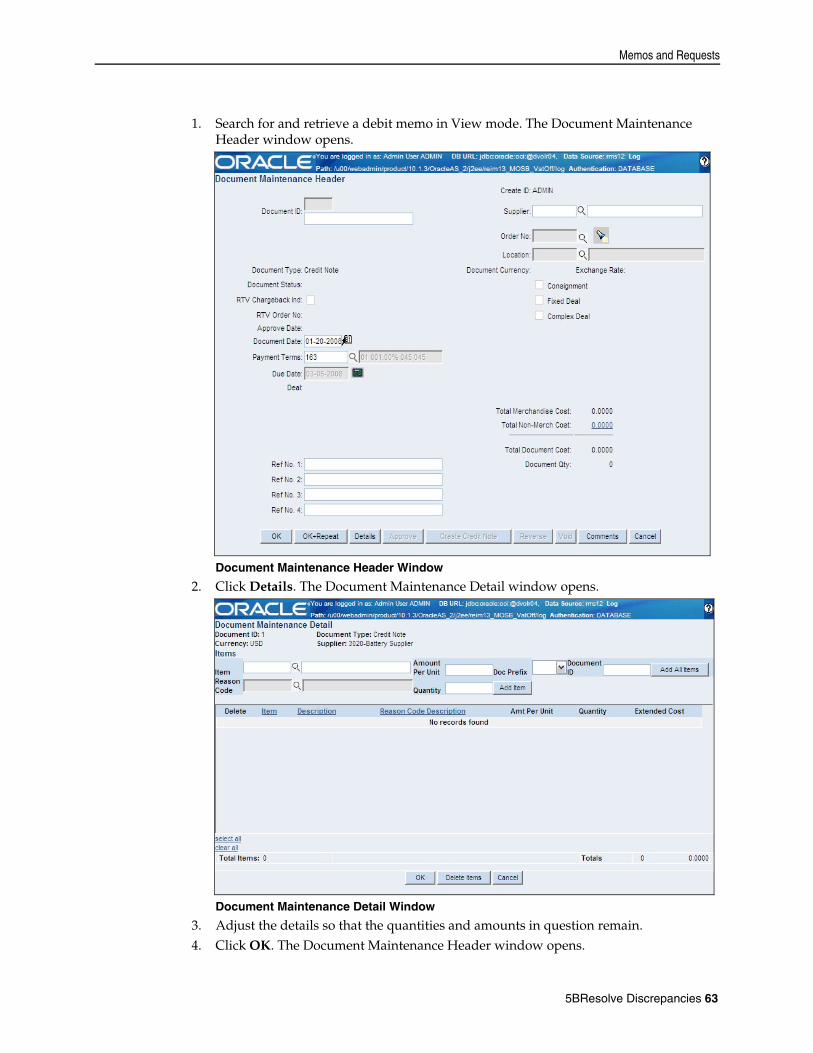
Memos and Requests
1. Search for and retrieve a debit memo in View mode. The Document Maintenance
Header window opens.
Document Maintenance Header Window 2. Click Details. The Document Maintenance Detail window opens.
Document Maintenance Detail Window 3. Adjust the details so that the quantities and amounts in question remain. 4. Click OK. The Document Maintenance Header window opens.
5BResolve Discrepancies 63
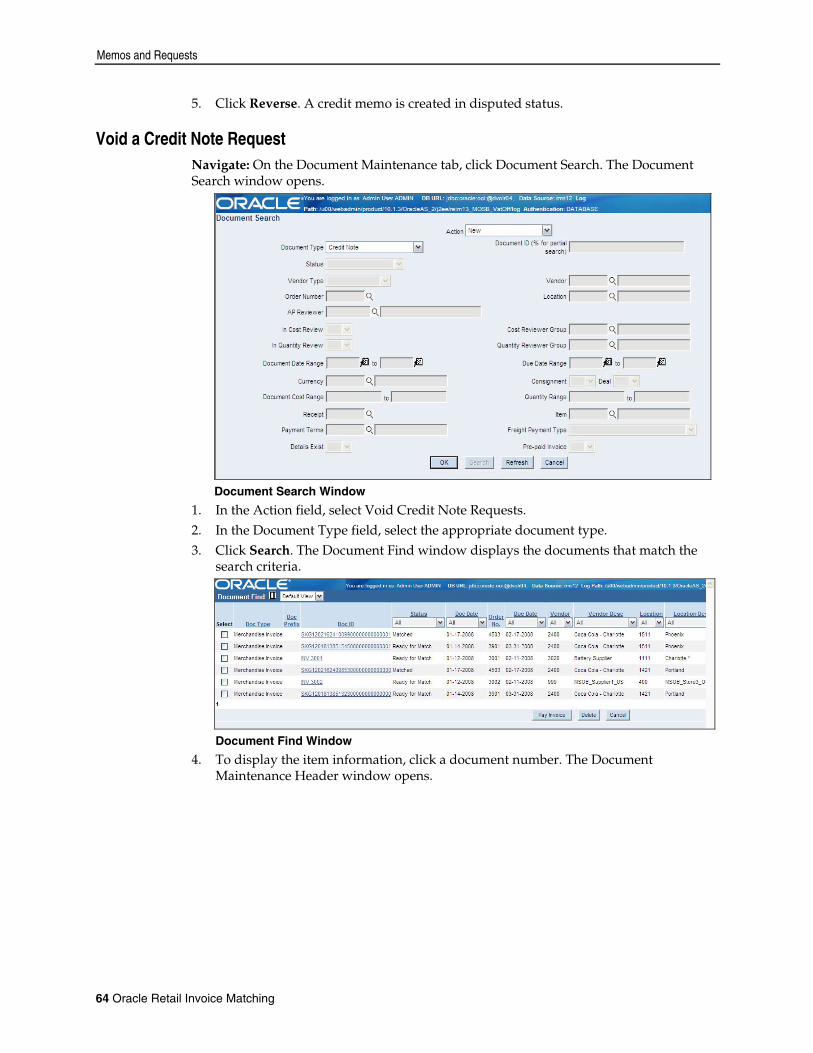
Memos and Requests
5. Click Reverse. A credit memo is created in disputed status.
Void a Credit Note Request Navigate: On the Document Maintenance tab, click Document Search. The Document Search window opens.
Document Search Window
1. In the Action field, select Void Credit Note Requests.
2. In the Document Type field, select the appropriate document type. 3. Click Search. The Document Find window displays the documents that match the
search criteria.
Document Find Window 4. To display the item information, click a document number. The Document
Maintenance Header window opens.
64 Oracle Retail Invoice Matching
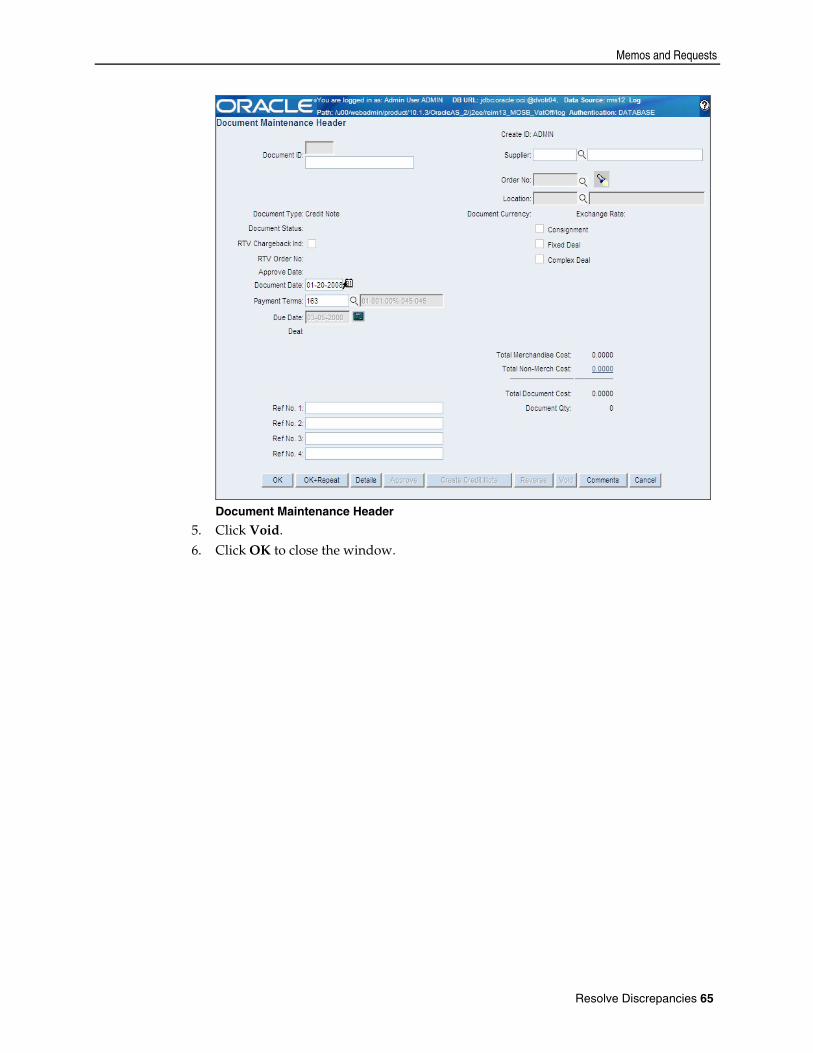
Memos and Requests
Document Maintenance Header
5. Click Void. 6. Click OK to close the window.
Resolve Discrepancies 65

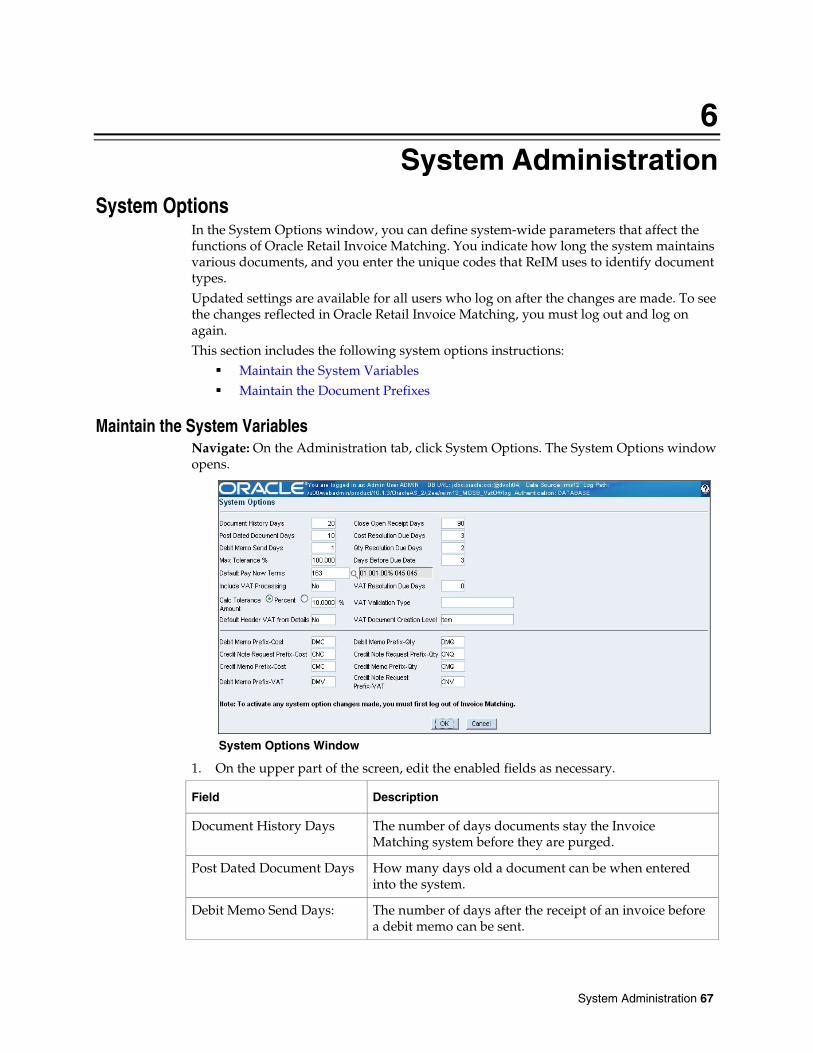
6 System Administration
System Options In the System Options window, you can define system-wide parameters that affect the functions of Oracle Retail Invoice Matching. You indicate how long the system maintains various documents, and you enter the unique codes that ReIM uses to identify document types. Updated settings are available for all users who log on after the changes are made. To see the changes reflected in Oracle Retail Invoice Matching, you must log out and log on again. This section includes the following system options instructions:
Maintain the System Variables Maintain the Document Prefixes
Maintain the System Variables Navigate: On the Administration tab, click System Options. The System Options window opens.
System Options Window
1. On the upper part of the screen, edit the enabled fields as necessary.
Field Description
Document History Days The number of days documents stay the Invoice Matching system before they are purged.
Post Dated Document Days How many days old a document can be when entered into the system.
Debit Memo Send Days: The number of days after the receipt of an invoice before a debit memo can be sent.
System Administration 67
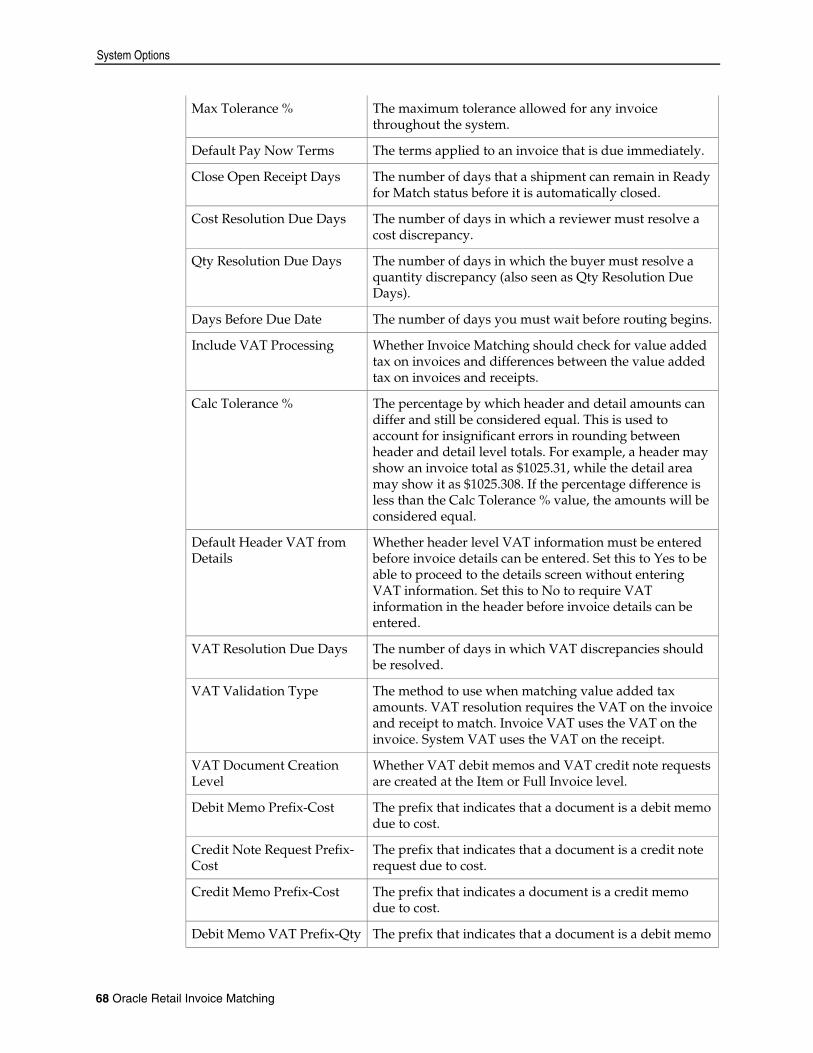
System Options
Max Tolerance % The maximum tolerance allowed for any invoice throughout the system.
Default Pay Now Terms The terms applied to an invoice that is due immediately.
Close Open Receipt Days The number of days that a shipment can remain in Ready for Match status before it is automatically closed.
Cost Resolution Due Days The number of days in which a reviewer must resolve a cost discrepancy.
Qty Resolution Due Days The number of days in which the buyer must resolve a quantity discrepancy (also seen as Qty Resolution Due Days).
Days Before Due Date The number of days you must wait before routing begins.
Include VAT Processing Whether Invoice Matching should check for value added tax on invoices and differences between the value added tax on invoices and receipts.
Calc Tolerance % The percentage by which header and detail amounts can differ and still be considered equal. This is used to account for insignificant errors in rounding between header and detail level totals. For example, a header may show an invoice total as $1025.31, while the detail area may show it as $1025.308. If the percentage difference is less than the Calc Tolerance % value, the amounts will be considered equal.
Default Header VAT from Details
Whether header level VAT information must be entered before invoice details can be entered. Set this to Yes to be able to proceed to the details screen without entering VAT information. Set this to No to require VAT information in the header before invoice details can be entered.
VAT Resolution Due Days The number of days in which VAT discrepancies should be resolved.
VAT Validation Type The method to use when matching value added tax amounts. VAT resolution requires the VAT on the invoice and receipt to match. Invoice VAT uses the VAT on the invoice. System VAT uses the VAT on the receipt.
VAT Document Creation Level
Whether VAT debit memos and VAT credit note requests are created at the Item or Full Invoice level.
Debit Memo Prefix-Cost The prefix that indicates that a document is a debit memo due to cost.
Credit Note Request Prefix-Cost
The prefix that indicates that a document is a credit note request due to cost.
Credit Memo Prefix-Cost The prefix that indicates a document is a credit memo due to cost.
Debit Memo VAT Prefix-Qty The prefix that indicates that a document is a debit memo
68 Oracle Retail Invoice Matching
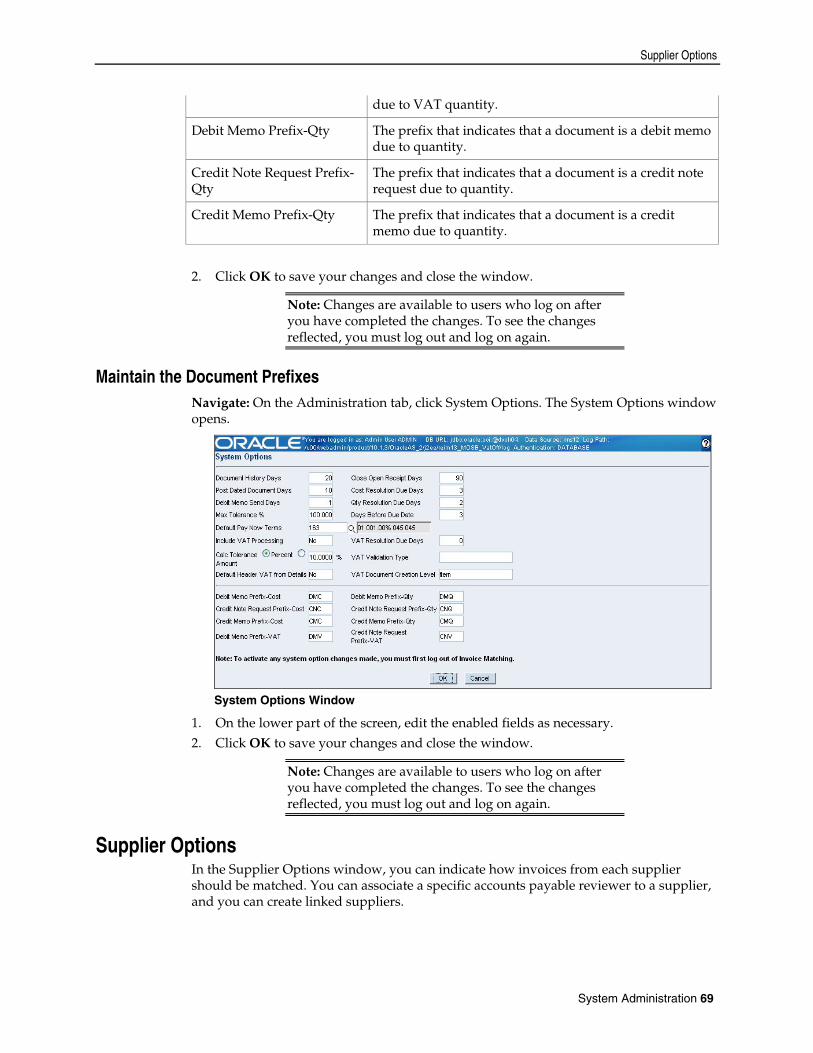
Supplier Options
due to VAT quantity.
Debit Memo Prefix-Qty The prefix that indicates that a document is a debit memo due to quantity.
Credit Note Request Prefix-Qty
The prefix that indicates that a document is a credit note request due to quantity.
Credit Memo Prefix-Qty The prefix that indicates that a document is a credit memo due to quantity.
2. Click OK to save your changes and close the window.
Note: Changes are available to users who log on after you have completed the changes. To see the changes reflected, you must log out and log on again.
Maintain the Document Prefixes Navigate: On the Administration tab, click System Options. The System Options window opens.
System Options Window
1. On the lower part of the screen, edit the enabled fields as necessary.
2. Click OK to save your changes and close the window.
Note: Changes are available to users who log on after you have completed the changes. To see the changes reflected, you must log out and log on again.
Supplier Options In the Supplier Options window, you can indicate how invoices from each supplier should be matched. You can associate a specific accounts payable reviewer to a supplier, and you can create linked suppliers.
System Administration 69
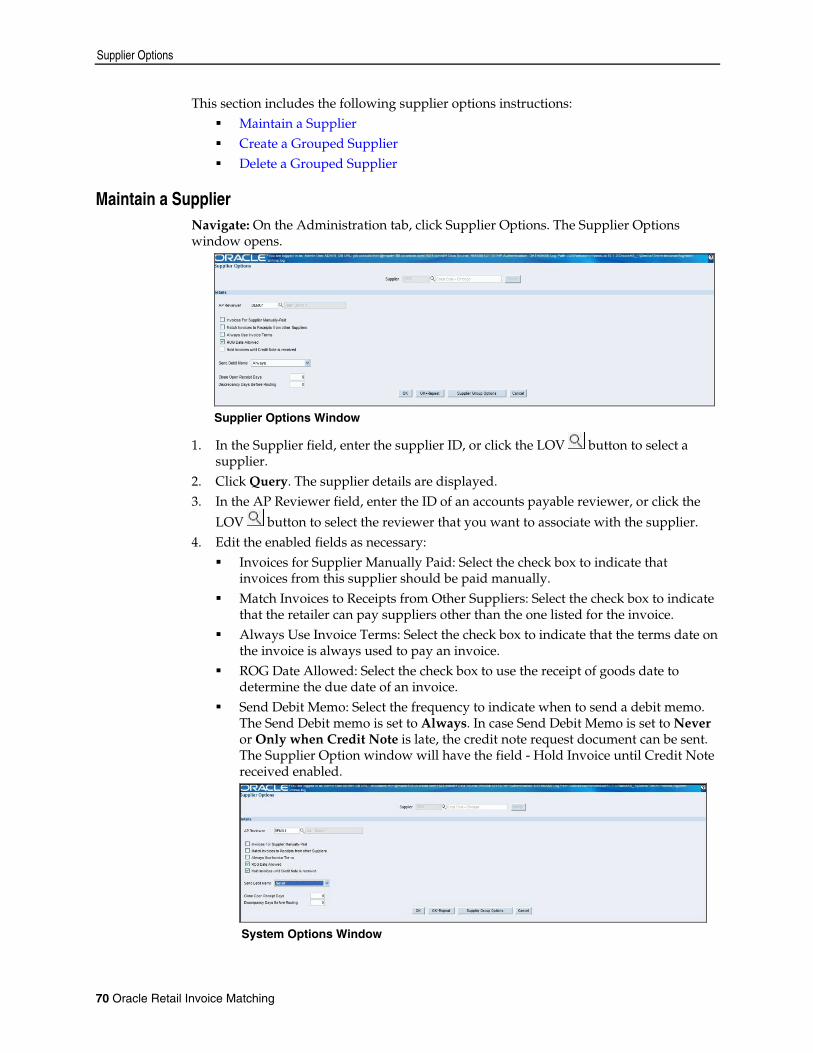
Supplier Options
This section includes the following supplier options instructions: Maintain a Supplier Create a Grouped Supplier Delete a Grouped Supplier
Maintain a Supplier Navigate: On the Administration tab, click Supplier Options. The Supplier Options window opens.
Supplier Options Window
1. In the Supplier field, enter the supplier ID, or click the LOV button to select a supplier.
2. Click Query. The supplier details are displayed. 3. In the AP Reviewer field, enter the ID of an accounts payable reviewer, or click the
LOV button to select the reviewer that you want to associate with the supplier. 4. Edit the enabled fields as necessary:
Invoices for Supplier Manually Paid: Select the check box to indicate that invoices from this supplier should be paid manually.
Match Invoices to Receipts from Other Suppliers: Select the check box to indicate that the retailer can pay suppliers other than the one listed for the invoice.
Always Use Invoice Terms: Select the check box to indicate that the terms date on the invoice is always used to pay an invoice.
ROG Date Allowed: Select the check box to use the receipt of goods date to determine the due date of an invoice.
Send Debit Memo: Select the frequency to indicate when to send a debit memo. The Send Debit memo is set to Always. In case Send Debit Memo is set to Never or Only when Credit Note is late, the credit note request document can be sent. The Supplier Option window will have the field - Hold Invoice until Credit Note received enabled.
System Options Window
70 Oracle Retail Invoice Matching
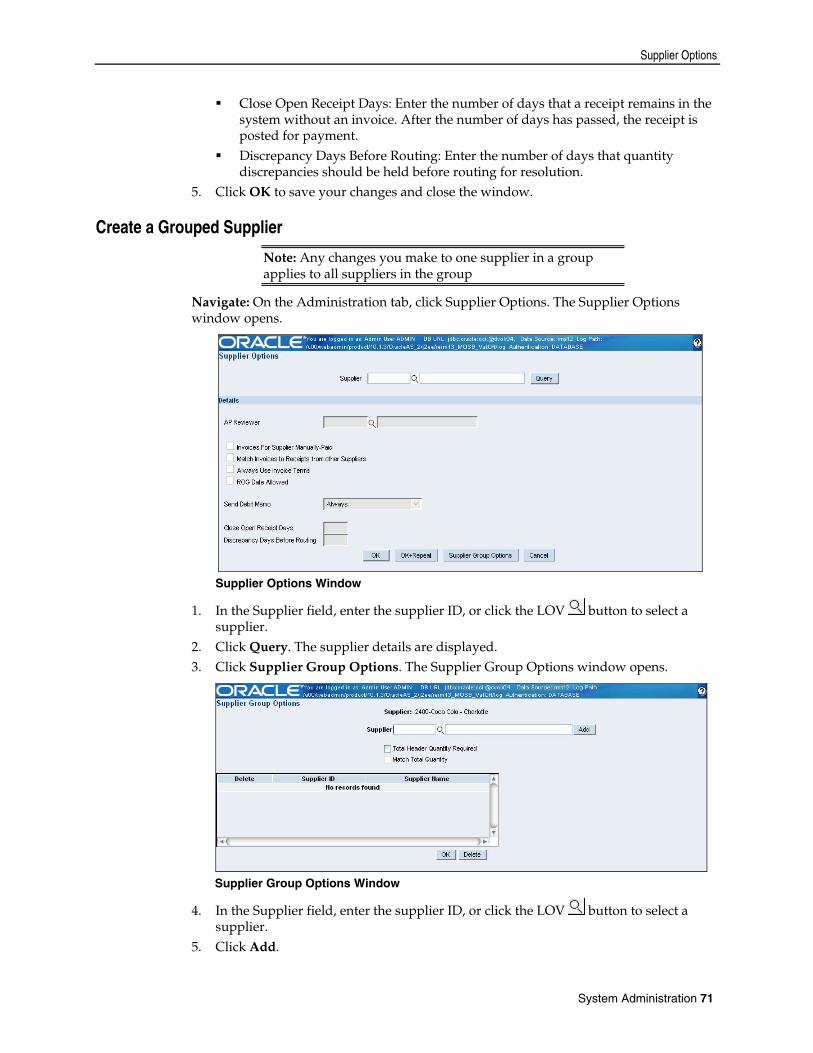
Supplier Options
Close Open Receipt Days: Enter the number of days that a receipt remains in the system without an invoice. After the number of days has passed, the receipt is posted for payment.
Discrepancy Days Before Routing: Enter the number of days that quantity discrepancies should be held before routing for resolution.
5. Click OK to save your changes and close the window.
Create a Grouped Supplier
Note: Any changes you make to one supplier in a group applies to all suppliers in the group
Navigate: On the Administration tab, click Supplier Options. The Supplier Options window opens.
Supplier Options Window
1. In the Supplier field, enter the supplier ID, or click the LOV button to select a supplier.
2. Click Query. The supplier details are displayed. 3. Click Supplier Group Options. The Supplier Group Options window opens.
Supplier Group Options Window
4. In the Supplier field, enter the supplier ID, or click the LOV button to select a supplier.
5. Click Add.
System Administration 71
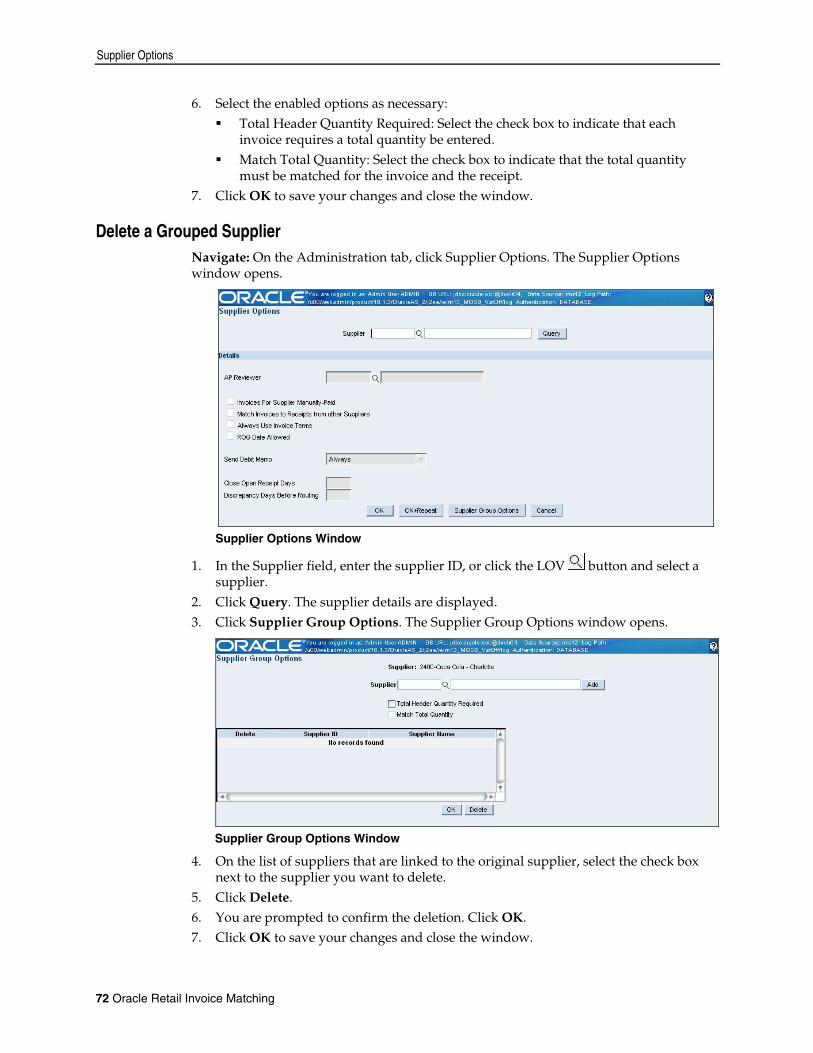
Supplier Options
6. Select the enabled options as necessary: Total Header Quantity Required: Select the check box to indicate that each
invoice requires a total quantity be entered. Match Total Quantity: Select the check box to indicate that the total quantity
must be matched for the invoice and the receipt. 7. Click OK to save your changes and close the window.
Delete a Grouped Supplier Navigate: On the Administration tab, click Supplier Options. The Supplier Options window opens.
Supplier Options Window
1. In the Supplier field, enter the supplier ID, or click the LOV button and select a supplier.
2. Click Query. The supplier details are displayed. 3. Click Supplier Group Options. The Supplier Group Options window opens.
Supplier Group Options Window
4. On the list of suppliers that are linked to the original supplier, select the check box next to the supplier you want to delete.
5. Click Delete. 6. You are prompted to confirm the deletion. Click OK. 7. Click OK to save your changes and close the window.
72 Oracle Retail Invoice Matching
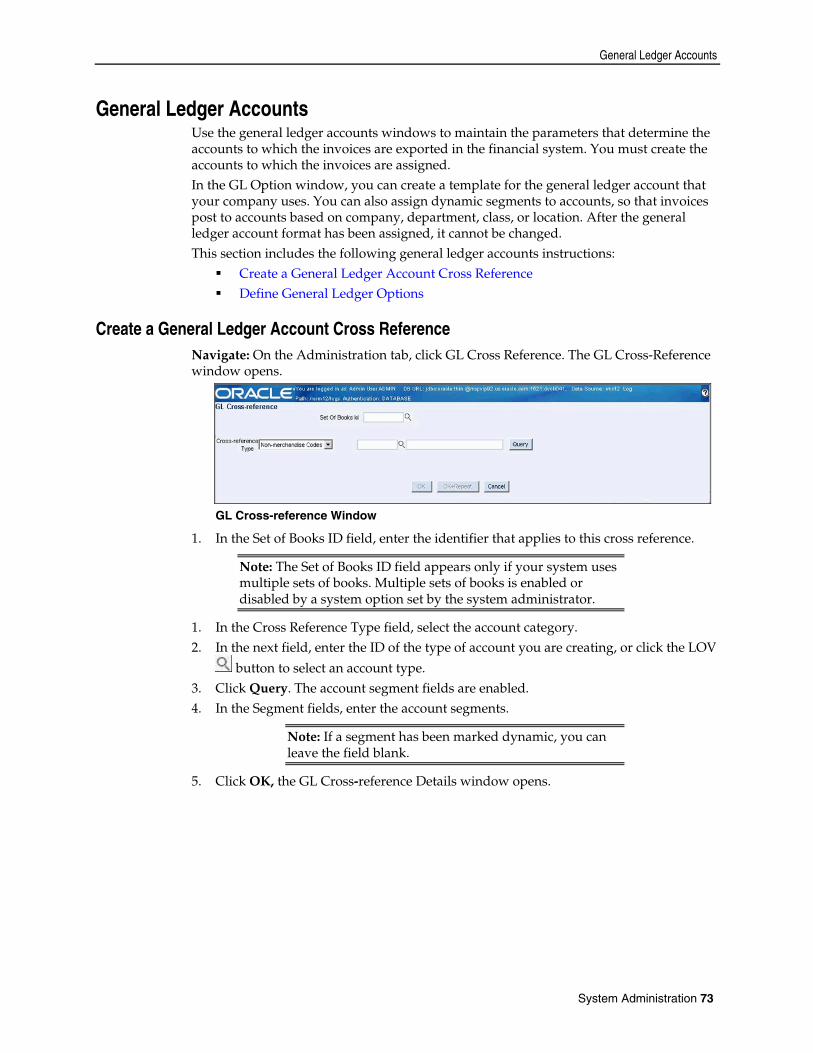
General Ledger Accounts
General Ledger Accounts Use the general ledger accounts windows to maintain the parameters that determine the accounts to which the invoices are exported in the financial system. You must create the accounts to which the invoices are assigned. In the GL Option window, you can create a template for the general ledger account that your company uses. You can also assign dynamic segments to accounts, so that invoices post to accounts based on company, department, class, or location. After the general ledger account format has been assigned, it cannot be changed. This section includes the following general ledger accounts instructions:
Create a General Ledger Account Cross Reference Define General Ledger Options
Create a General Ledger Account Cross Reference Navigate: On the Administration tab, click GL Cross Reference. The GL Cross-Reference window opens.
GL Cross-reference Window
1. In the Set of Books ID field, enter the identifier that applies to this cross reference.
Note: The Set of Books ID field appears only if your system uses multiple sets of books. Multiple sets of books is enabled or disabled by a system option set by the system administrator.
1. In the Cross Reference Type field, select the account category. 2. In the next field, enter the ID of the type of account you are creating, or click the LOV
button to select an account type. 3. Click Query. The account segment fields are enabled. 4. In the Segment fields, enter the account segments.
Note: If a segment has been marked dynamic, you can leave the field blank.
5. Click OK, the GL Cross-reference Details window opens.
System Administration 73
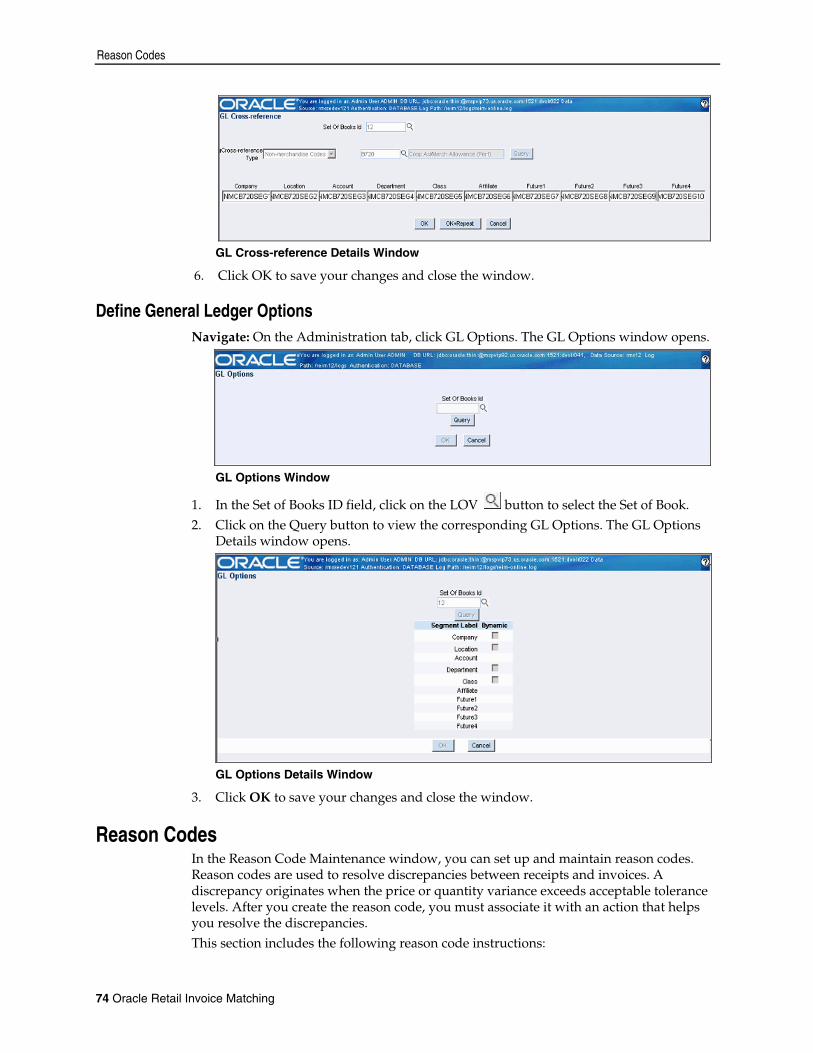
Reason Codes
GL Cross-reference Details Window
6. Click OK to save your changes and close the window.
Define General Ledger Options Navigate: On the Administration tab, click GL Options. The GL Options window opens.
GL Options Window
1. In the Set of Books ID field, click on the LOV button to select the Set of Book. 2. Click on the Query button to view the corresponding GL Options. The GL Options
Details window opens.
GL Options Details Window
3. Click OK to save your changes and close the window.
Reason Codes In the Reason Code Maintenance window, you can set up and maintain reason codes. Reason codes are used to resolve discrepancies between receipts and invoices. A discrepancy originates when the price or quantity variance exceeds acceptable tolerance levels. After you create the reason code, you must associate it with an action that helps you resolve the discrepancies. This section includes the following reason code instructions:
74 Oracle Retail Invoice Matching
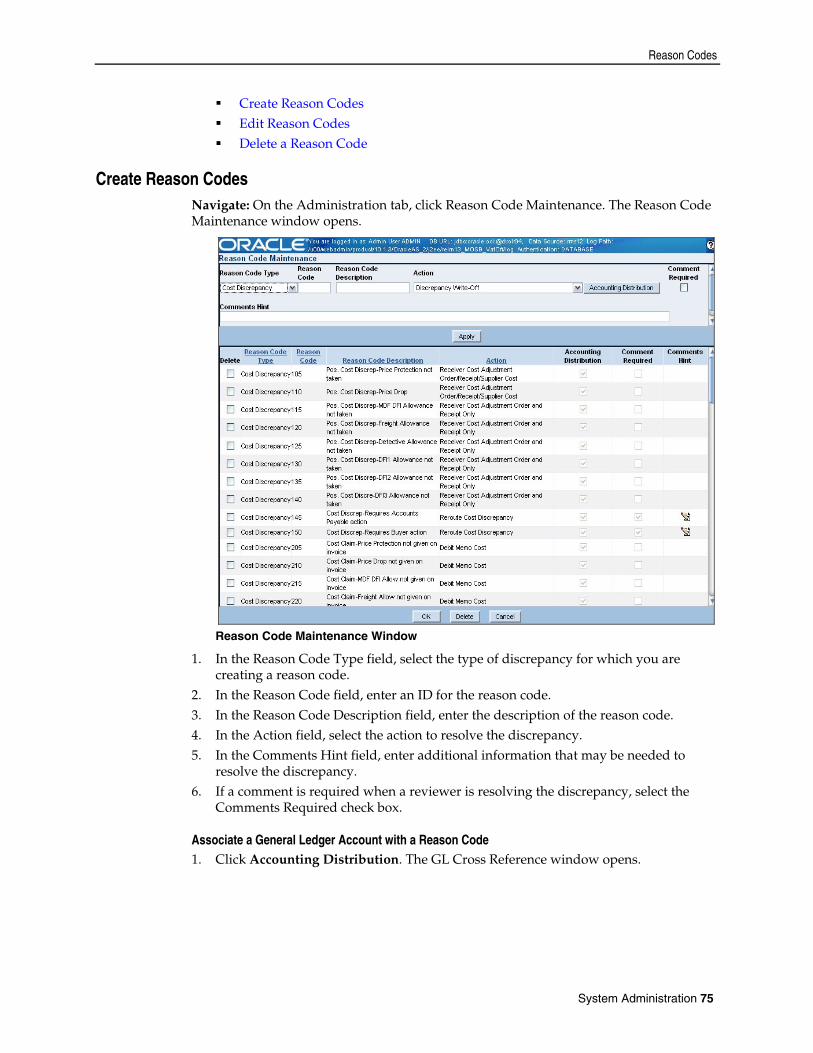
Reason Codes
Create Reason Codes Edit Reason Codes Delete a Reason Code
Create Reason Codes Navigate: On the Administration tab, click Reason Code Maintenance. The Reason Code Maintenance window opens.
Reason Code Maintenance Window
1. In the Reason Code Type field, select the type of discrepancy for which you are creating a reason code.
2. In the Reason Code field, enter an ID for the reason code. 3. In the Reason Code Description field, enter the description of the reason code. 4. In the Action field, select the action to resolve the discrepancy. 5. In the Comments Hint field, enter additional information that may be needed to
resolve the discrepancy. 6. If a comment is required when a reviewer is resolving the discrepancy, select the
Comments Required check box.
Associate a General Ledger Account with a Reason Code 1. Click Accounting Distribution. The GL Cross Reference window opens.
System Administration 75
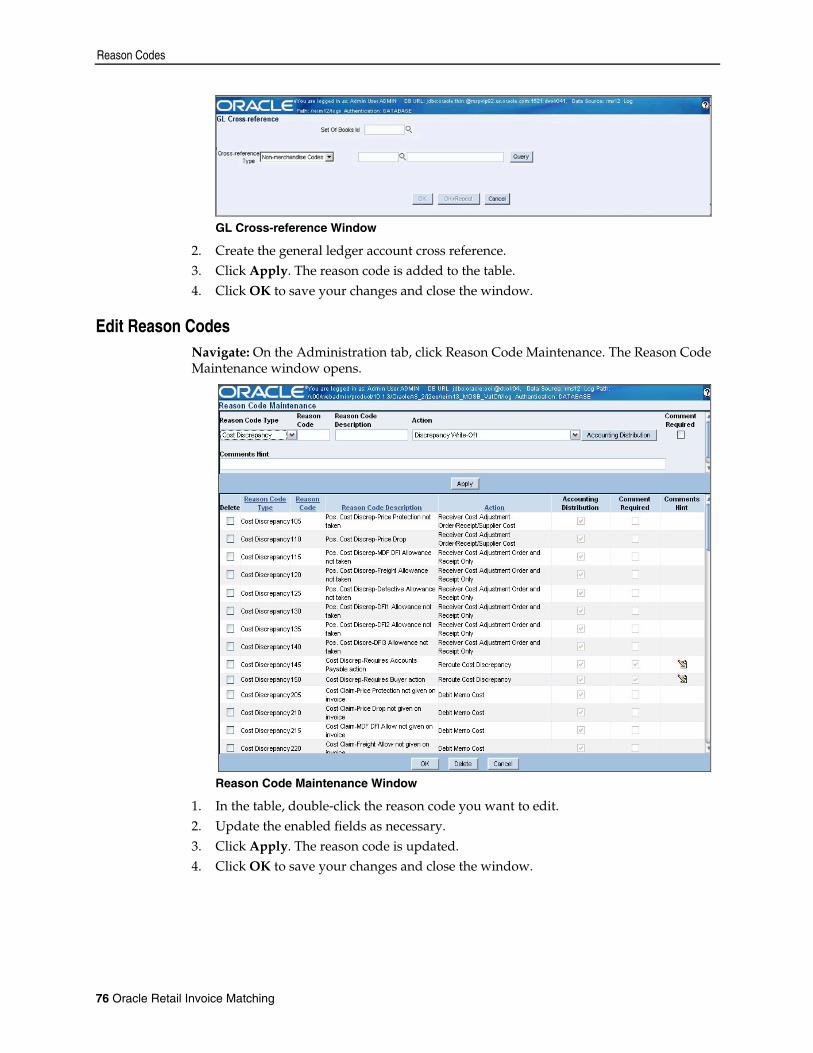
Reason Codes
GL Cross-reference Window
2. Create the general ledger account cross reference. 3. Click Apply. The reason code is added to the table. 4. Click OK to save your changes and close the window.
Edit Reason Codes Navigate: On the Administration tab, click Reason Code Maintenance. The Reason Code Maintenance window opens.
Reason Code Maintenance Window
1. In the table, double-click the reason code you want to edit.
2. Update the enabled fields as necessary. 3. Click Apply. The reason code is updated. 4. Click OK to save your changes and close the window.
76 Oracle Retail Invoice Matching
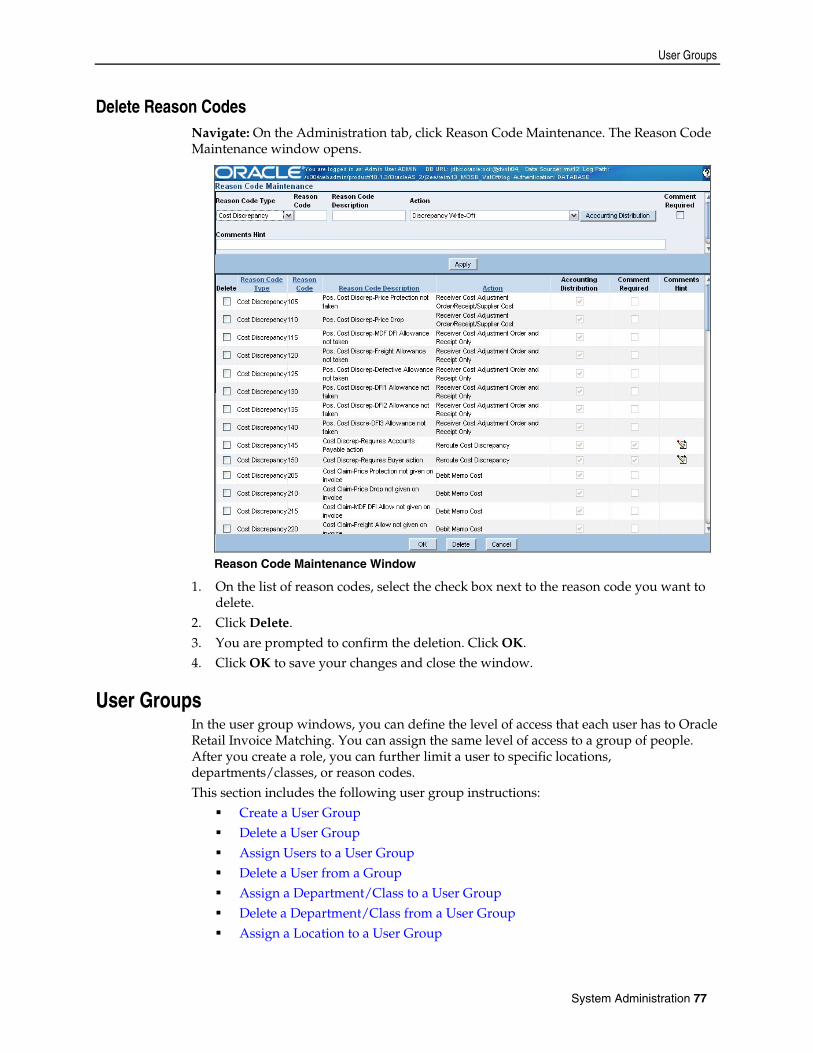
User Groups
Delete Reason Codes Navigate: On the Administration tab, click Reason Code Maintenance. The Reason Code Maintenance window opens.
Reason Code Maintenance Window
1. On the list of reason codes, select the check box next to the reason code you want to delete.
2. Click Delete. 3. You are prompted to confirm the deletion. Click OK. 4. Click OK to save your changes and close the window.
User Groups In the user group windows, you can define the level of access that each user has to Oracle Retail Invoice Matching. You can assign the same level of access to a group of people. After you create a role, you can further limit a user to specific locations, departments/classes, or reason codes. This section includes the following user group instructions:
Create a User Group Delete a User Group Assign Users to a User Group Delete a User from a Group Assign a Department/Class to a User Group Delete a Department/Class from a User Group Assign a Location to a User Group
System Administration 77
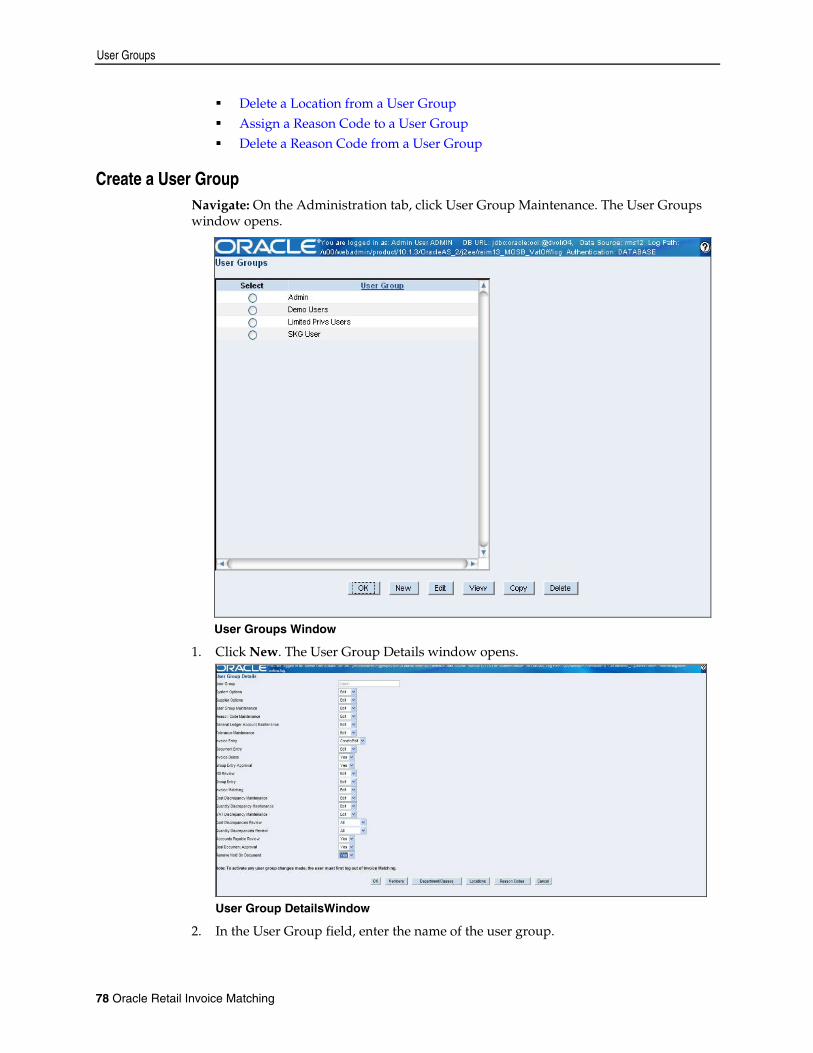
User Groups
Delete a Location from a User Group Assign a Reason Code to a User Group Delete a Reason Code from a User Group
Create a User Group Navigate: On the Administration tab, click User Group Maintenance. The User Groups window opens.
User Groups Window
1. Click New. The User Group Details window opens.
User Group DetailsWindow
2. In the User Group field, enter the name of the user group.
78 Oracle Retail Invoice Matching
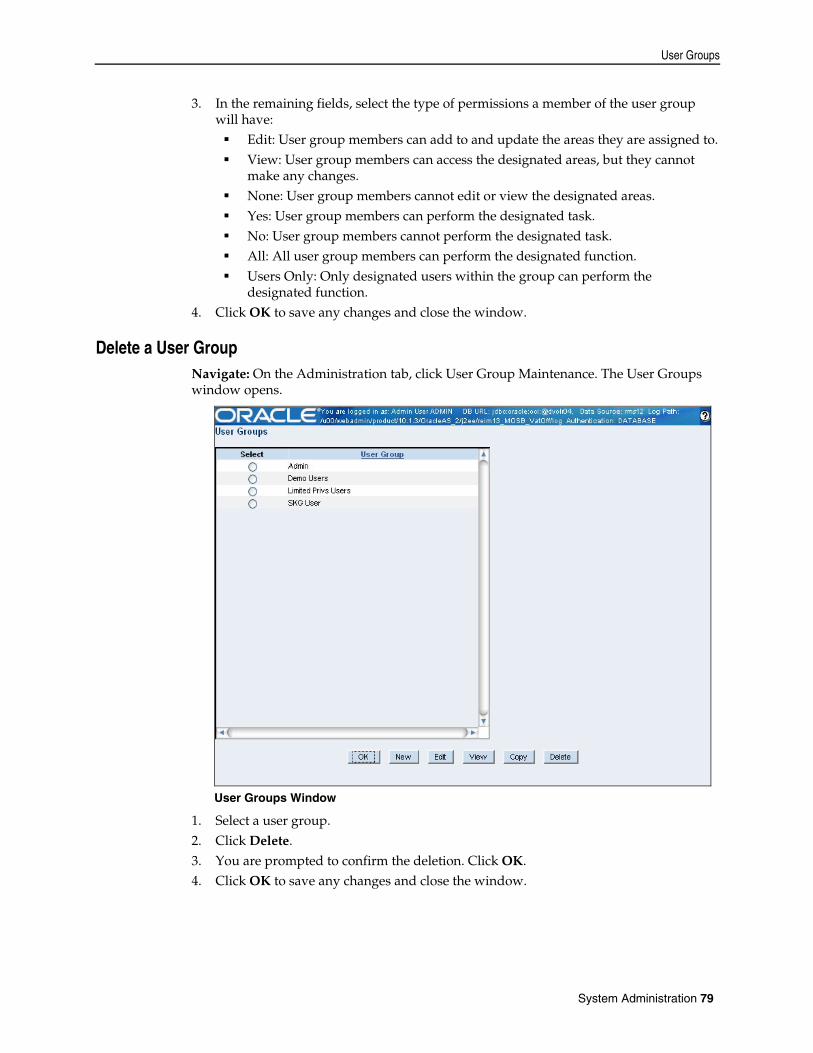
User Groups
3. In the remaining fields, select the type of permissions a member of the user group will have:
Edit: User group members can add to and update the areas they are assigned to. View: User group members can access the designated areas, but they cannot
make any changes. None: User group members cannot edit or view the designated areas. Yes: User group members can perform the designated task. No: User group members cannot perform the designated task. All: All user group members can perform the designated function. Users Only: Only designated users within the group can perform the
designated function. 4. Click OK to save any changes and close the window.
Delete a User Group Navigate: On the Administration tab, click User Group Maintenance. The User Groups window opens.
User Groups Window
1. Select a user group.
2. Click Delete. 3. You are prompted to confirm the deletion. Click OK. 4. Click OK to save any changes and close the window.
System Administration 79

User Groups
Assign Users to a User Group Navigate: On the Administration tab, click User Group Maintenance. The User Groups window opens.
User Groups Window
1. Select a user group.
2. Click Edit. The User Group Details window opens.
User Group Details Window
3. Click Members. The User Group Members window opens.
80 Oracle Retail Invoice Matching
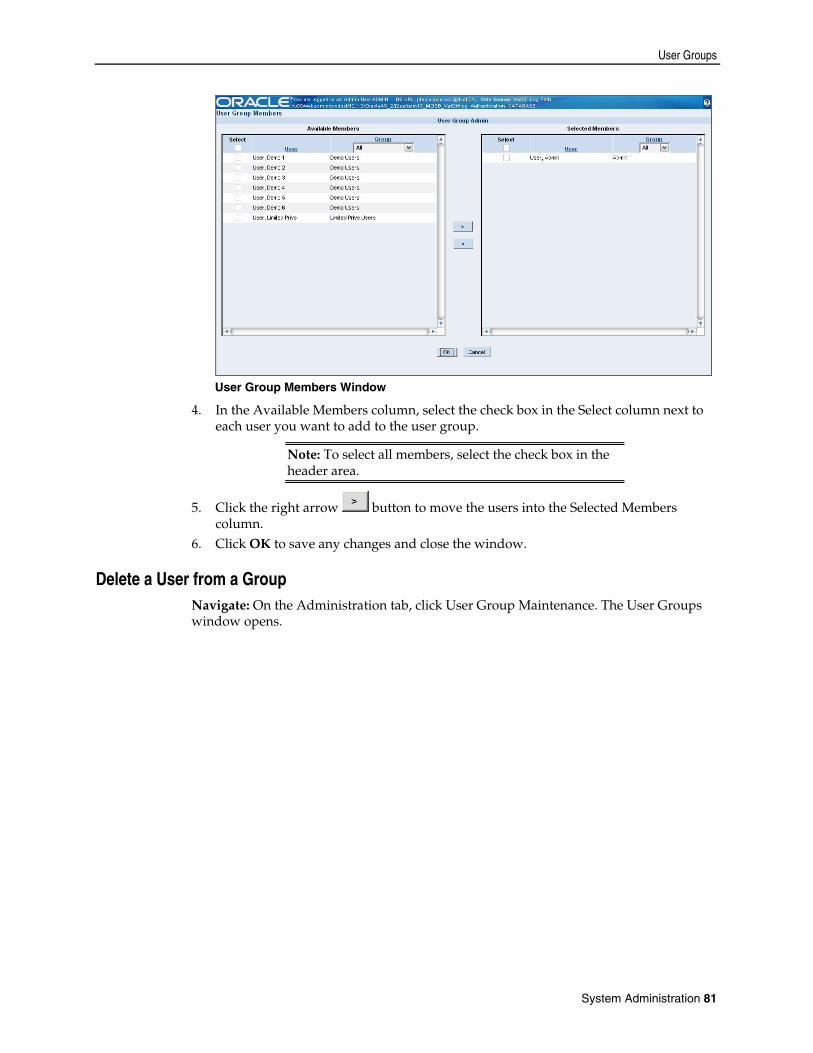
User Groups
User Group Members Window
4. In the Available Members column, select the check box in the Select column next to each user you want to add to the user group.
Note: To select all members, select the check box in the header area.
5. Click the right arrow button to move the users into the Selected Members column.
6. Click OK to save any changes and close the window.
Delete a User from a Group Navigate: On the Administration tab, click User Group Maintenance. The User Groups window opens.
System Administration 81

User Groups
User Groups Window
1. Select a user group.
2. Click Edit. The User Group Details window opens.
User Group Deatils Window
3. Click Members. The User Group Members window opens.
82 Oracle Retail Invoice Matching
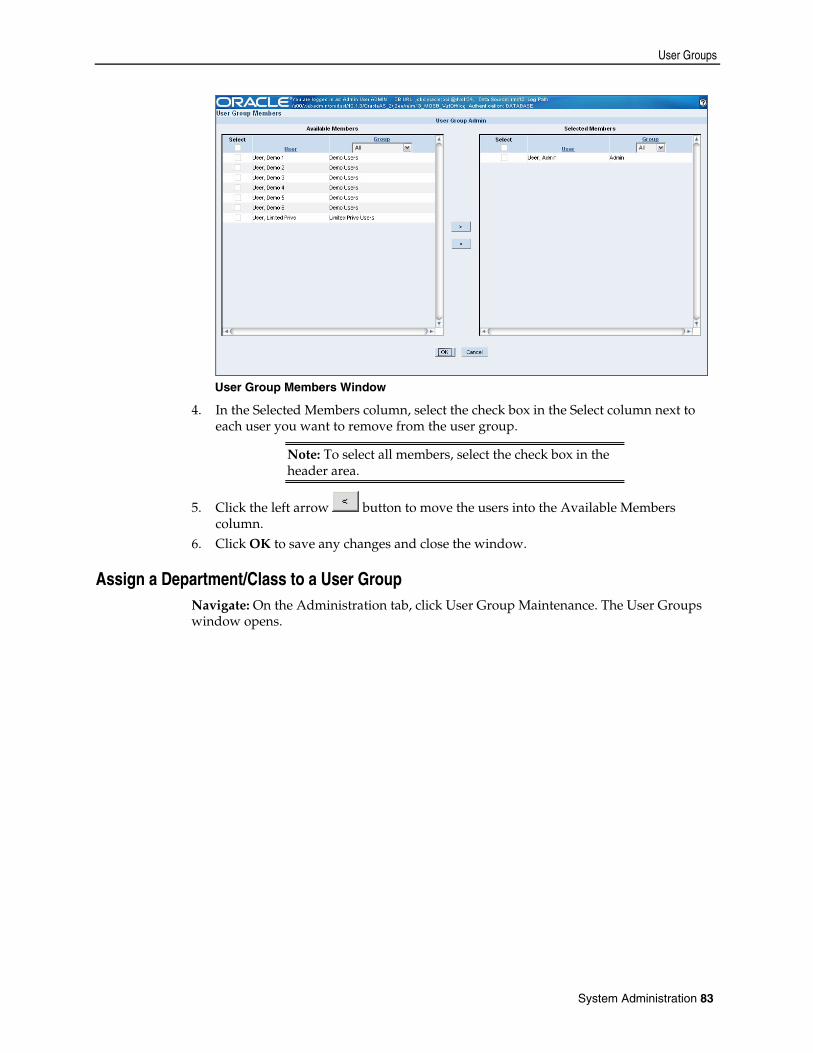
User Groups
User Group Members Window
4. In the Selected Members column, select the check box in the Select column next to each user you want to remove from the user group.
Note: To select all members, select the check box in the header area.
5. Click the left arrow button to move the users into the Available Members column.
6. Click OK to save any changes and close the window.
Assign a Department/Class to a User Group Navigate: On the Administration tab, click User Group Maintenance. The User Groups window opens.
System Administration 83
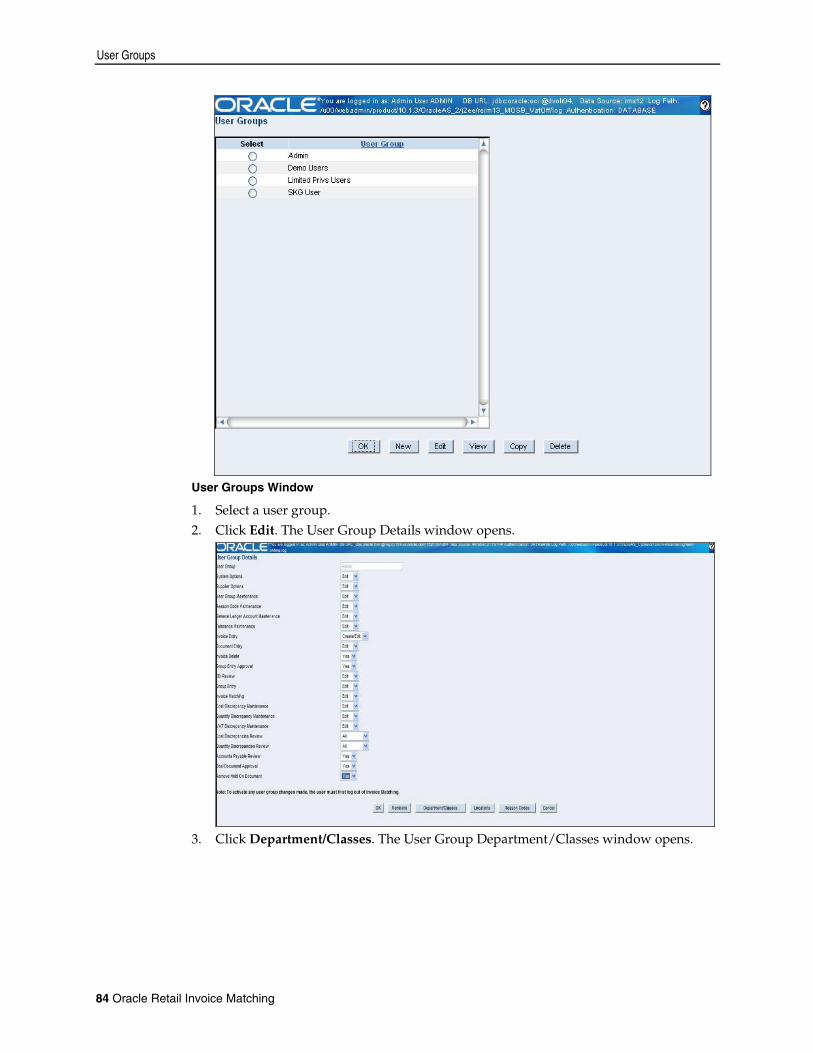
User Groups
User Groups Window
1. Select a user group.
2. Click Edit. The User Group Details window opens.
3. Click Department/Classes. The User Group Department/Classes window opens.
84 Oracle Retail Invoice Matching
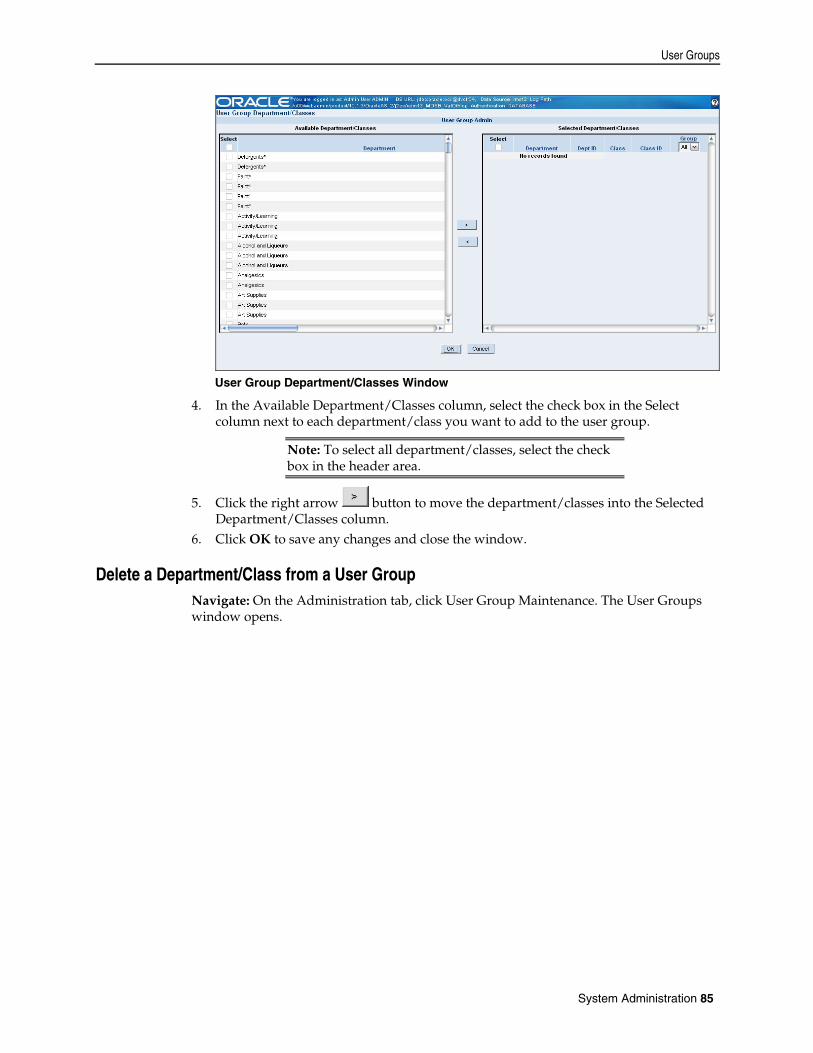
User Groups
User Group Department/Classes Window
4. In the Available Department/Classes column, select the check box in the Select column next to each department/class you want to add to the user group.
Note: To select all department/classes, select the check box in the header area.
5. Click the right arrow button to move the department/classes into the Selected Department/Classes column.
6. Click OK to save any changes and close the window.
Delete a Department/Class from a User Group Navigate: On the Administration tab, click User Group Maintenance. The User Groups window opens.
System Administration 85
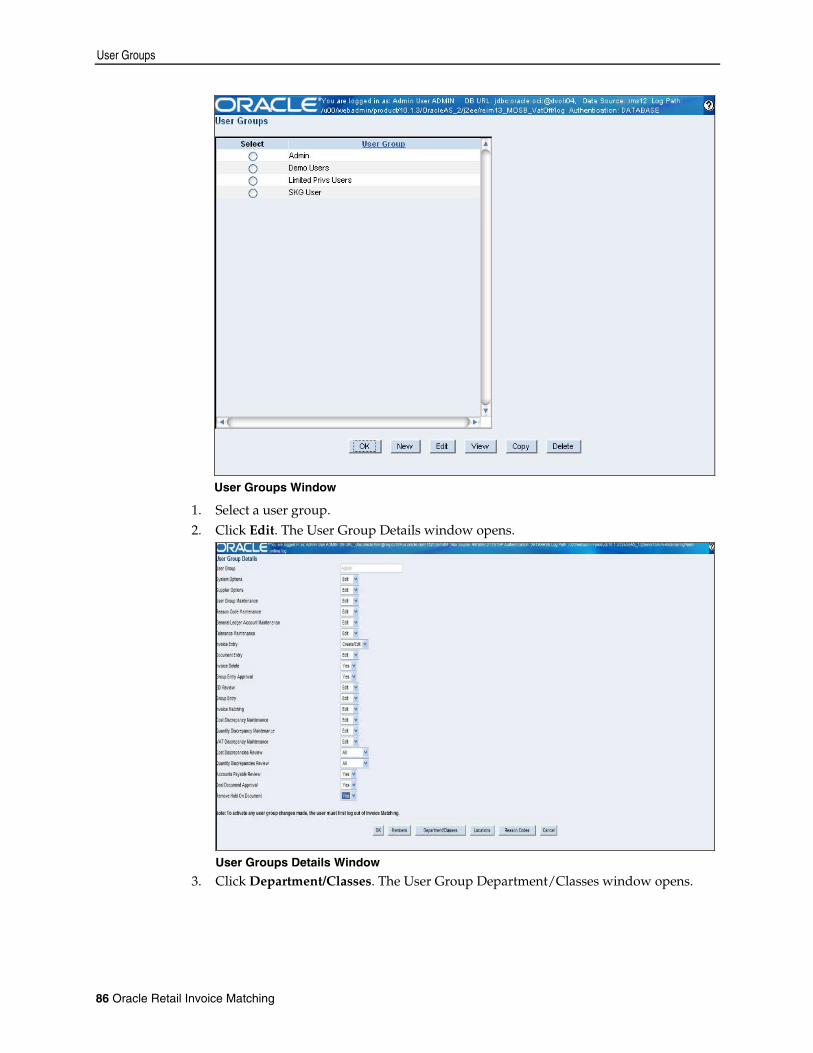
User Groups
User Groups Window
1. Select a user group.
2. Click Edit. The User Group Details window opens.
User Groups Details Window
3. Click Department/Classes. The User Group Department/Classes window opens.
86 Oracle Retail Invoice Matching
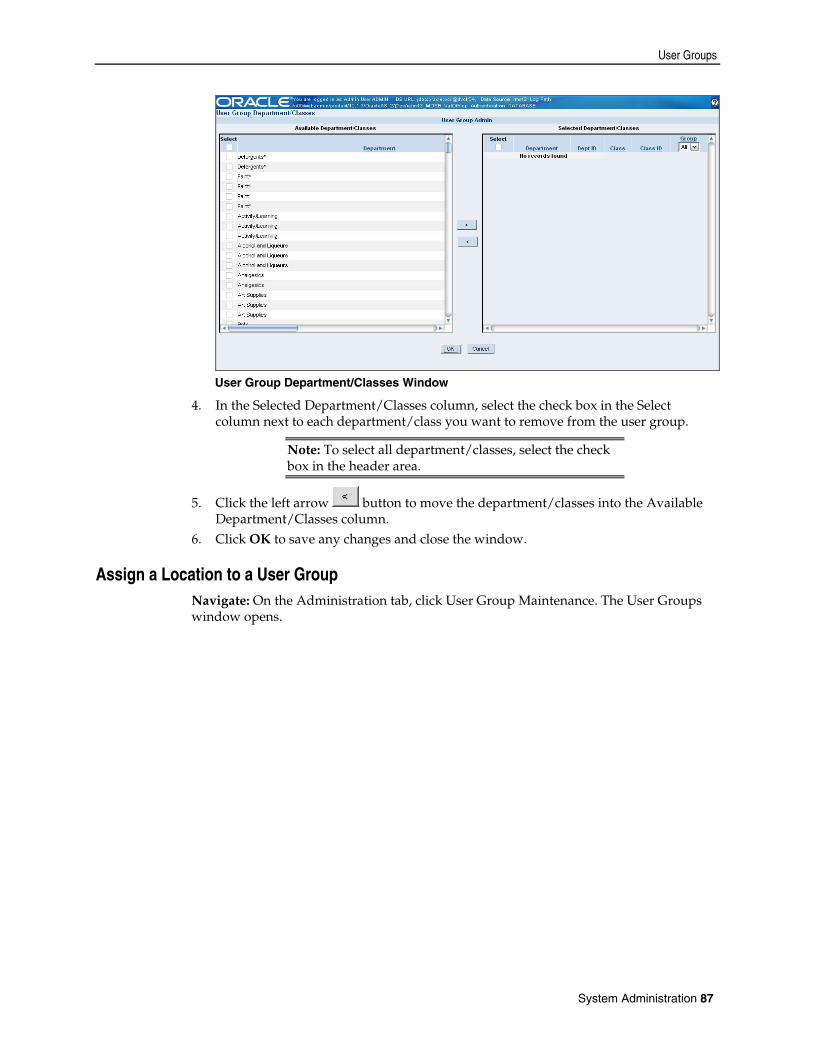
User Groups
User Group Department/Classes Window
4. In the Selected Department/Classes column, select the check box in the Select column next to each department/class you want to remove from the user group.
Note: To select all department/classes, select the check box in the header area.
5. Click the left arrow button to move the department/classes into the Available Department/Classes column.
6. Click OK to save any changes and close the window.
Assign a Location to a User Group Navigate: On the Administration tab, click User Group Maintenance. The User Groups window opens.
System Administration 87
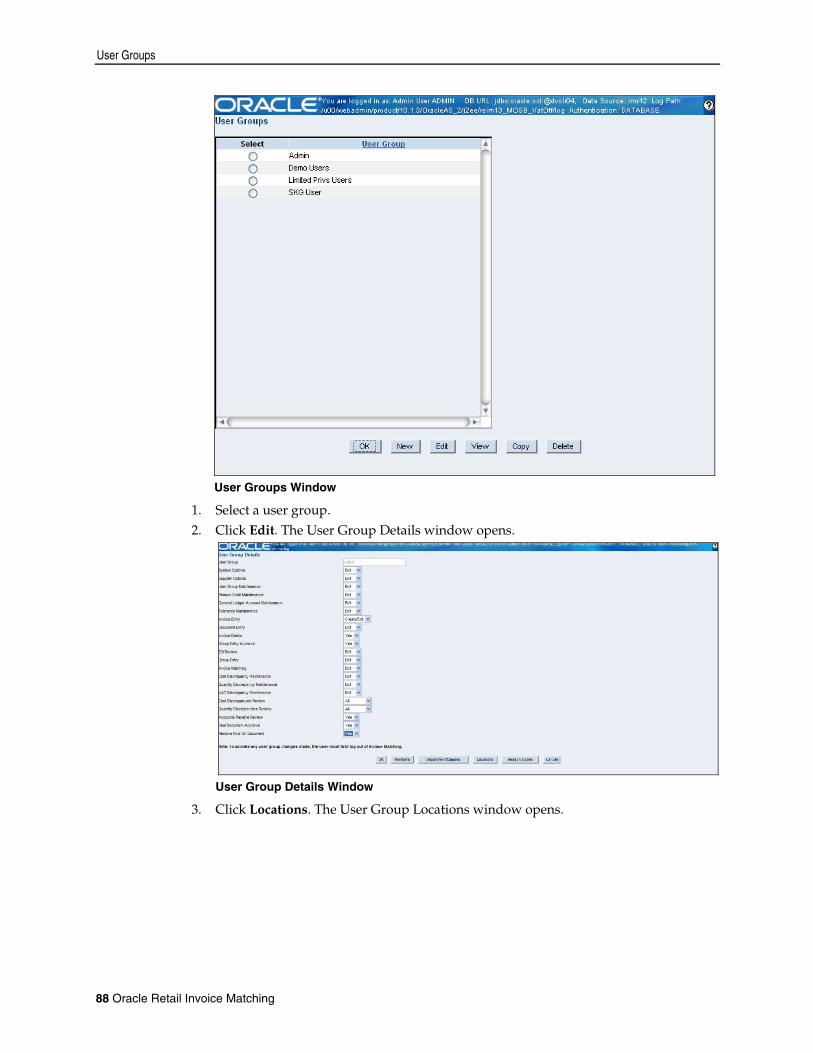
User Groups
User Groups Window
1. Select a user group.
2. Click Edit. The User Group Details window opens.
User Group Details Window
3. Click Locations. The User Group Locations window opens.
88 Oracle Retail Invoice Matching
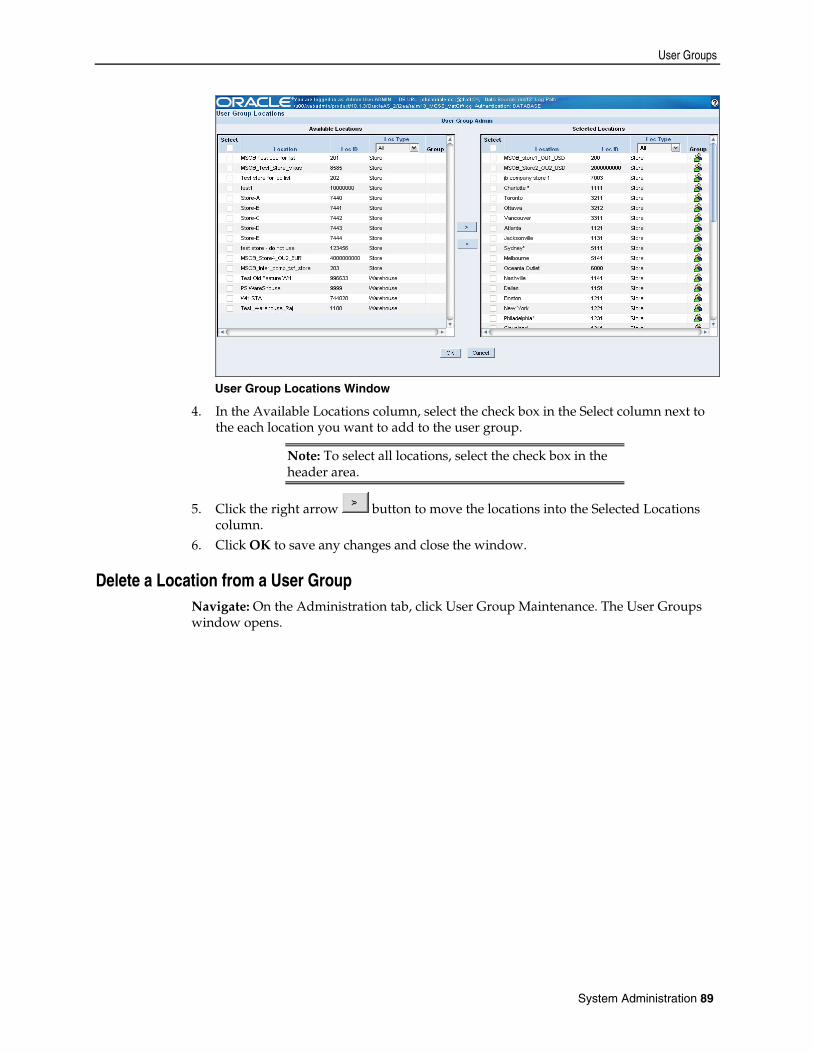
User Groups
User Group Locations Window
4. In the Available Locations column, select the check box in the Select column next to the each location you want to add to the user group.
Note: To select all locations, select the check box in the header area.
5. Click the right arrow button to move the locations into the Selected Locations column.
6. Click OK to save any changes and close the window.
Delete a Location from a User Group Navigate: On the Administration tab, click User Group Maintenance. The User Groups window opens.
System Administration 89

User Groups
User Groups Window
1. Select a user group.
2. Click Edit. The User Group Details window opens.
User Group Details Window
3. Click Locations. The User Group Locations window opens.
90 Oracle Retail Invoice Matching

User Groups
User Group Locations Window
4. In the Selected Locations column, select the check box in the Select column next to each location you want to remove from the user group.
Note: To select all locations, select the check box in the header area.
5. Click the left arrow button to move the users into the Available Locations column.
6. Click OK to save any changes and close the window.
Assign a Reason Code to a User Group Navigate: On the Administration tab, click User Group Maintenance. The User Groups window opens.
System Administration 91

User Groups
User Groups Window
1. Select a user group.
2. Click Edit. The User Group Details window opens.
User Group Details Window
3. Click Reason Codes. The User Group Reason Codes window opens.
92 Oracle Retail Invoice Matching
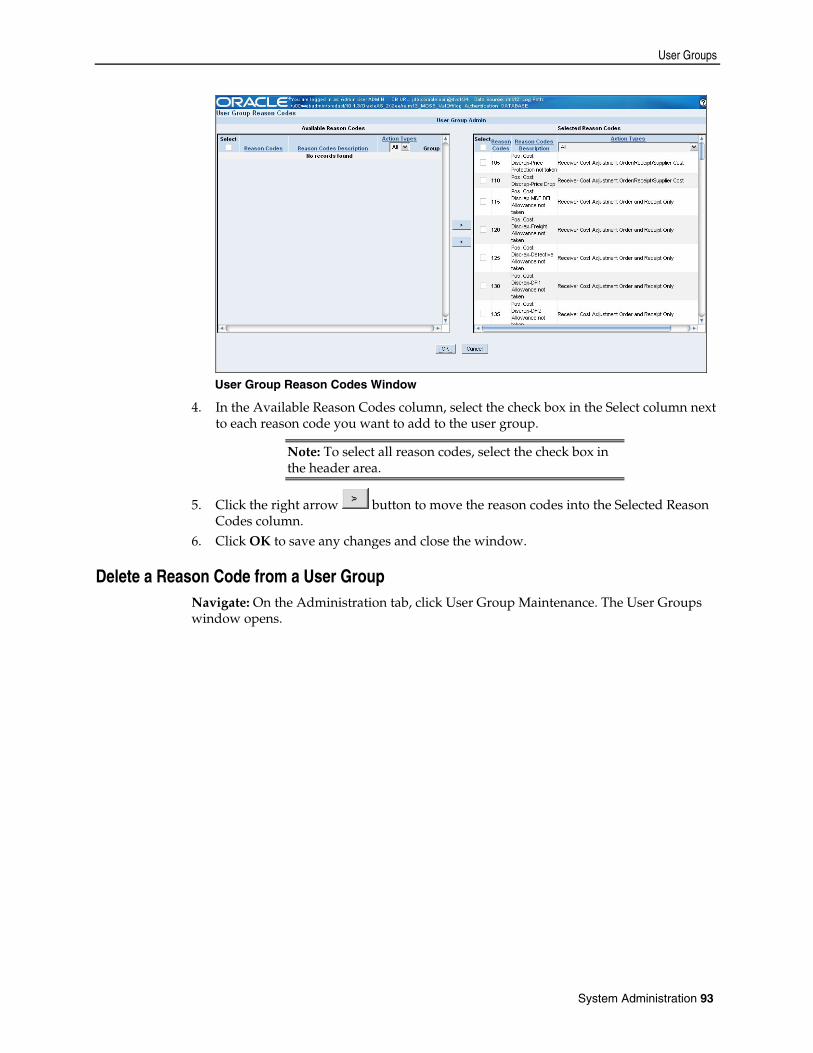
User Groups
User Group Reason Codes Window
4. In the Available Reason Codes column, select the check box in the Select column next to each reason code you want to add to the user group.
Note: To select all reason codes, select the check box in the header area.
5. Click the right arrow button to move the reason codes into the Selected Reason Codes column.
6. Click OK to save any changes and close the window.
Delete a Reason Code from a User Group Navigate: On the Administration tab, click User Group Maintenance. The User Groups window opens.
System Administration 93
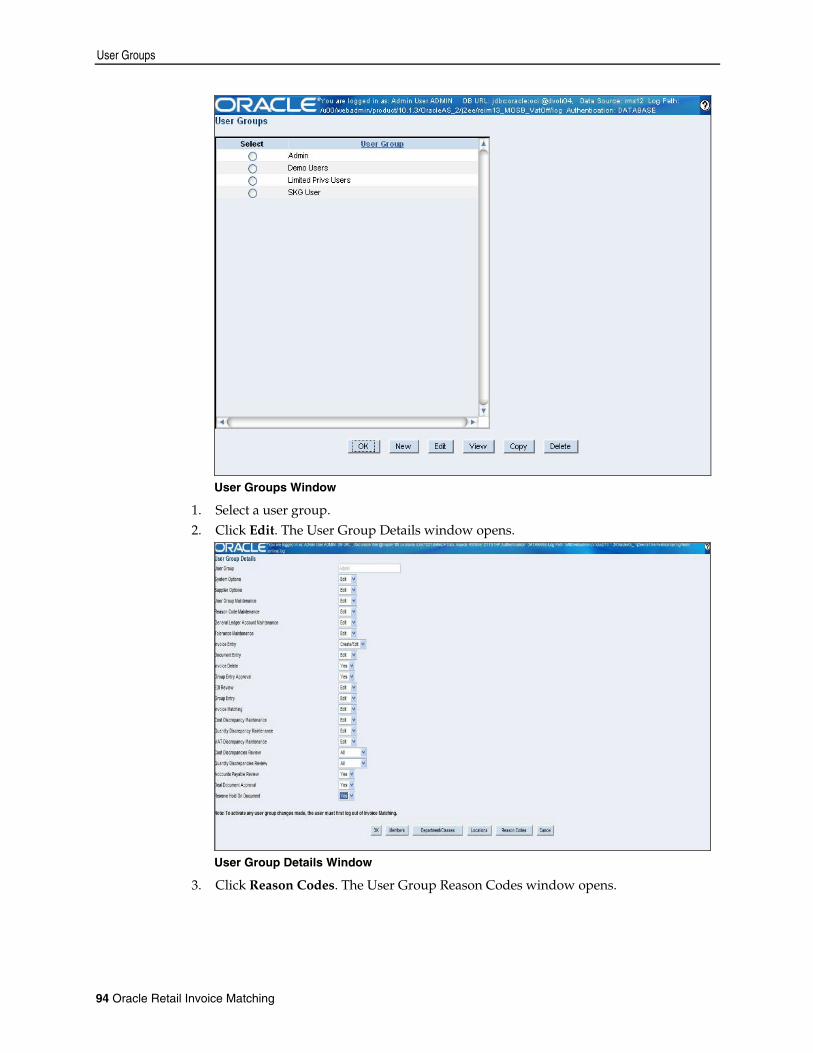
User Groups
User Groups Window
1. Select a user group.
2. Click Edit. The User Group Details window opens.
User Group Details Window
3. Click Reason Codes. The User Group Reason Codes window opens.
94 Oracle Retail Invoice Matching
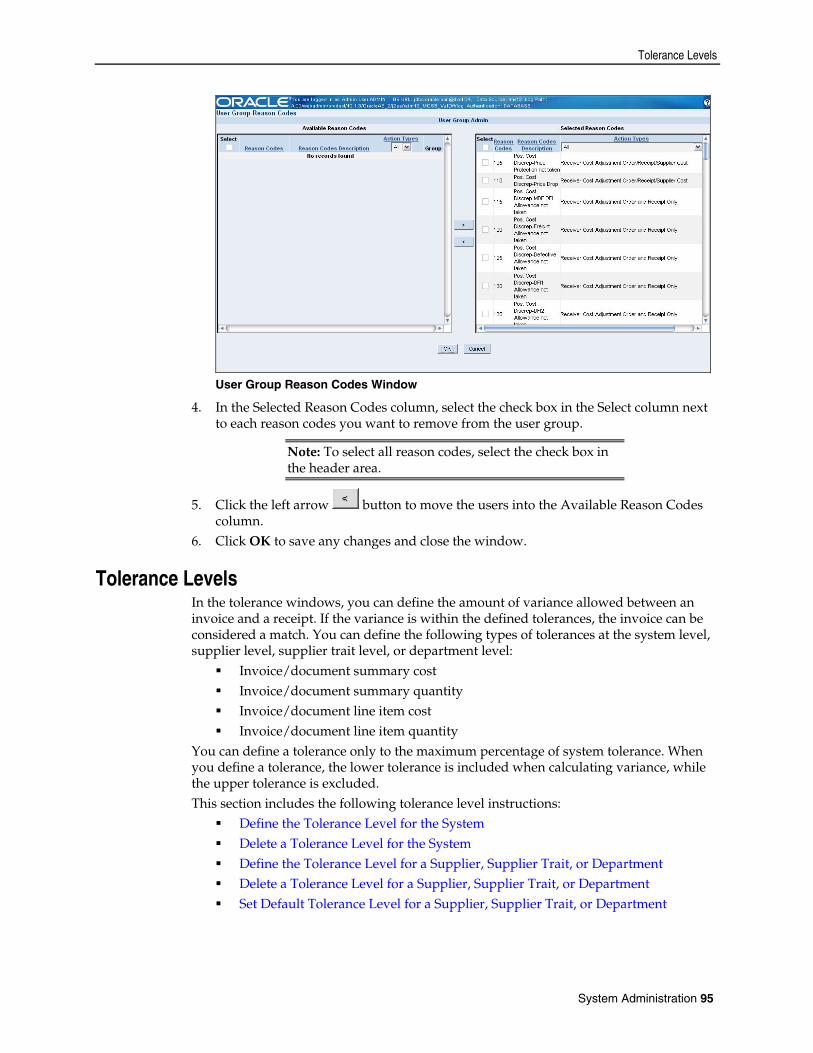
Tolerance Levels
User Group Reason Codes Window
4. In the Selected Reason Codes column, select the check box in the Select column next to each reason codes you want to remove from the user group.
Note: To select all reason codes, select the check box in the header area.
5. Click the left arrow button to move the users into the Available Reason Codes column.
6. Click OK to save any changes and close the window.
Tolerance Levels In the tolerance windows, you can define the amount of variance allowed between an invoice and a receipt. If the variance is within the defined tolerances, the invoice can be considered a match. You can define the following types of tolerances at the system level, supplier level, supplier trait level, or department level:
Invoice/document summary cost Invoice/document summary quantity Invoice/document line item cost Invoice/document line item quantity
You can define a tolerance only to the maximum percentage of system tolerance. When you define a tolerance, the lower tolerance is included when calculating variance, while the upper tolerance is excluded. This section includes the following tolerance level instructions:
Define the Tolerance Level for the System Delete a Tolerance Level for the System Define the Tolerance Level for a Supplier, Supplier Trait, or Department Delete a Tolerance Level for a Supplier, Supplier Trait, or Department Set Default Tolerance Level for a Supplier, Supplier Trait, or Department
System Administration 95
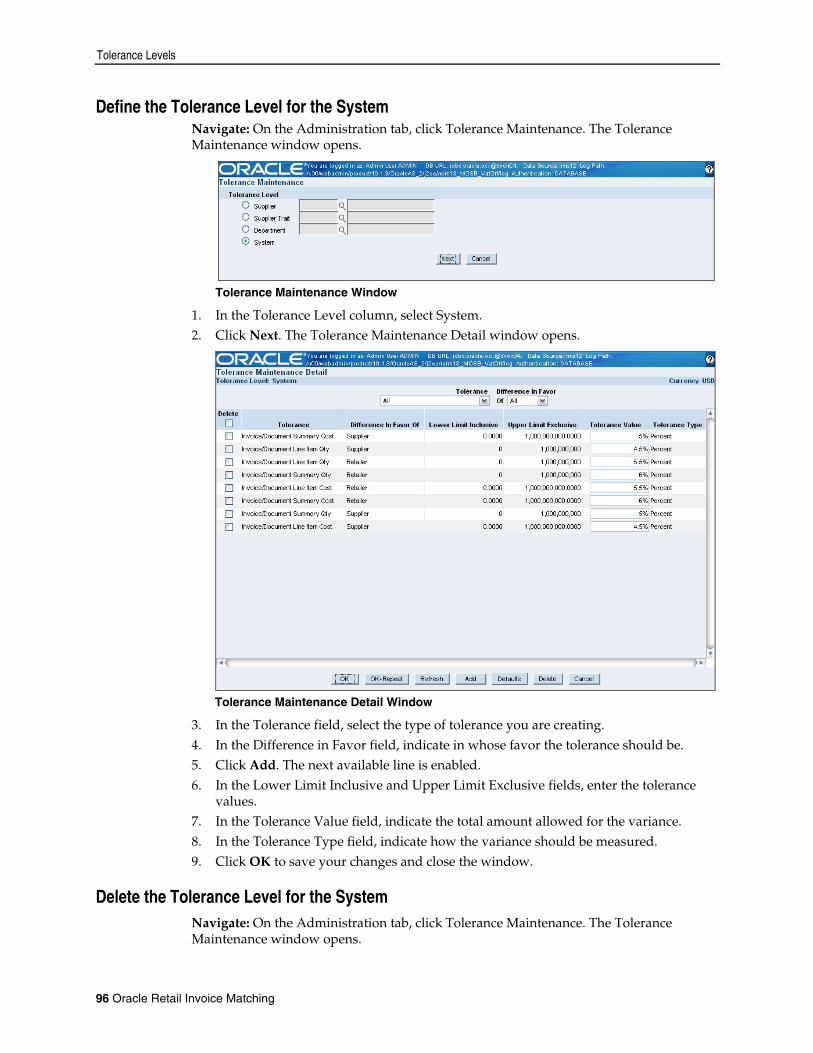
Tolerance Levels
Define the Tolerance Level for the System Navigate: On the Administration tab, click Tolerance Maintenance. The Tolerance Maintenance window opens.
Tolerance Maintenance Window
1. In the Tolerance Level column, select System.
2. Click Next. The Tolerance Maintenance Detail window opens.
Tolerance Maintenance Detail Window
3. In the Tolerance field, select the type of tolerance you are creating. 4. In the Difference in Favor field, indicate in whose favor the tolerance should be. 5. Click Add. The next available line is enabled. 6. In the Lower Limit Inclusive and Upper Limit Exclusive fields, enter the tolerance
values. 7. In the Tolerance Value field, indicate the total amount allowed for the variance. 8. In the Tolerance Type field, indicate how the variance should be measured. 9. Click OK to save your changes and close the window.
Delete the Tolerance Level for the System Navigate: On the Administration tab, click Tolerance Maintenance. The Tolerance Maintenance window opens.
96 Oracle Retail Invoice Matching
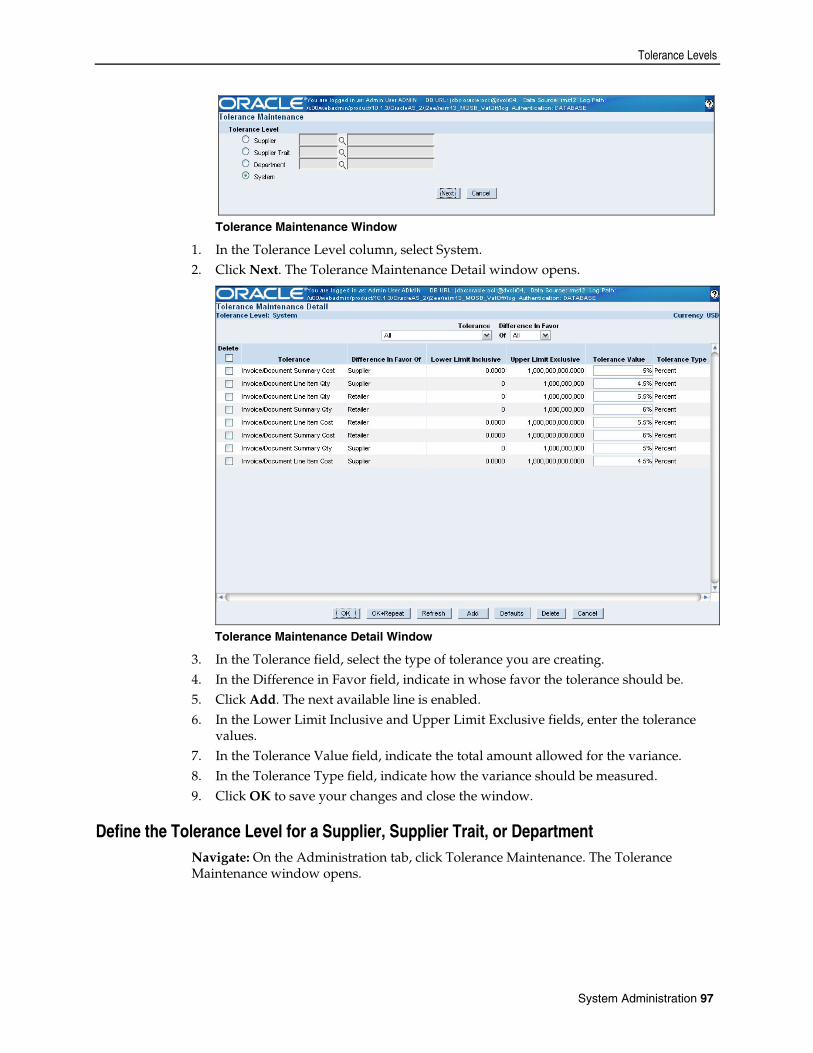
Tolerance Levels
Tolerance Maintenance Window
1. In the Tolerance Level column, select System.
2. Click Next. The Tolerance Maintenance Detail window opens.
Tolerance Maintenance Detail Window
3. In the Tolerance field, select the type of tolerance you are creating. 4. In the Difference in Favor field, indicate in whose favor the tolerance should be. 5. Click Add. The next available line is enabled. 6. In the Lower Limit Inclusive and Upper Limit Exclusive fields, enter the tolerance
values. 7. In the Tolerance Value field, indicate the total amount allowed for the variance. 8. In the Tolerance Type field, indicate how the variance should be measured. 9. Click OK to save your changes and close the window.
Define the Tolerance Level for a Supplier, Supplier Trait, or Department Navigate: On the Administration tab, click Tolerance Maintenance. The Tolerance Maintenance window opens.
System Administration 97
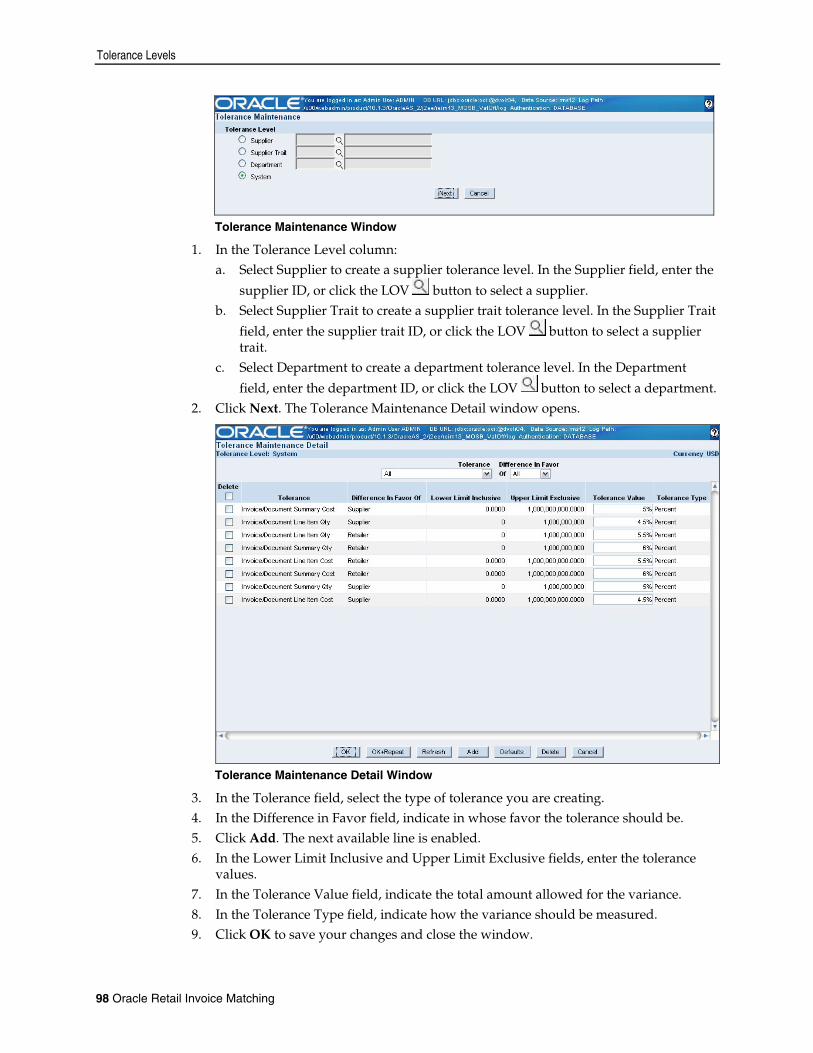
Tolerance Levels
Tolerance Maintenance Window
1. In the Tolerance Level column:
a. Select Supplier to create a supplier tolerance level. In the Supplier field, enter the
supplier ID, or click the LOV button to select a supplier. b. Select Supplier Trait to create a supplier trait tolerance level. In the Supplier Trait
field, enter the supplier trait ID, or click the LOV button to select a supplier trait.
c. Select Department to create a department tolerance level. In the Department
field, enter the department ID, or click the LOV button to select a department. 2. Click Next. The Tolerance Maintenance Detail window opens.
Tolerance Maintenance Detail Window
3. In the Tolerance field, select the type of tolerance you are creating. 4. In the Difference in Favor field, indicate in whose favor the tolerance should be. 5. Click Add. The next available line is enabled. 6. In the Lower Limit Inclusive and Upper Limit Exclusive fields, enter the tolerance
values. 7. In the Tolerance Value field, indicate the total amount allowed for the variance. 8. In the Tolerance Type field, indicate how the variance should be measured. 9. Click OK to save your changes and close the window.
98 Oracle Retail Invoice Matching
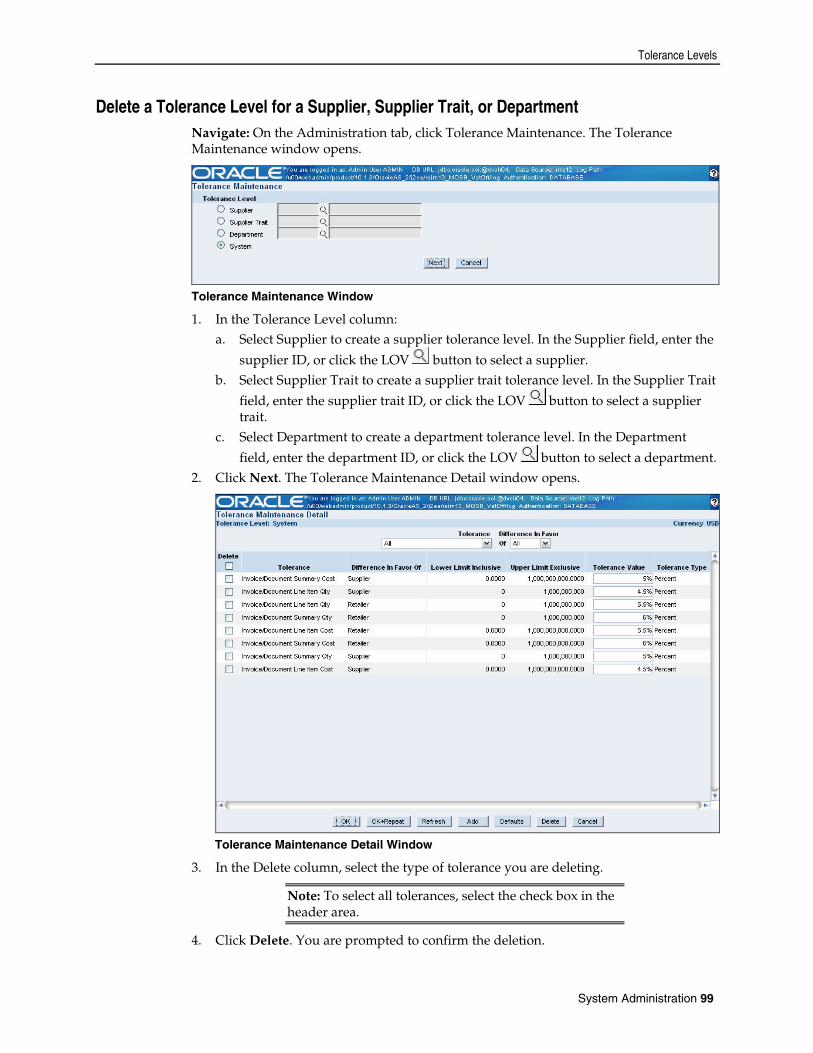
Tolerance Levels
Delete a Tolerance Level for a Supplier, Supplier Trait, or Department Navigate: On the Administration tab, click Tolerance Maintenance. The Tolerance Maintenance window opens.
Tolerance Maintenance Window
1. In the Tolerance Level column:
a. Select Supplier to create a supplier tolerance level. In the Supplier field, enter the
supplier ID, or click the LOV button to select a supplier. b. Select Supplier Trait to create a supplier trait tolerance level. In the Supplier Trait
field, enter the supplier trait ID, or click the LOV button to select a supplier trait.
c. Select Department to create a department tolerance level. In the Department
field, enter the department ID, or click the LOV button to select a department. 2. Click Next. The Tolerance Maintenance Detail window opens.
Tolerance Maintenance Detail Window
3. In the Delete column, select the type of tolerance you are deleting.
Note: To select all tolerances, select the check box in the header area.
4. Click Delete. You are prompted to confirm the deletion.
System Administration 99
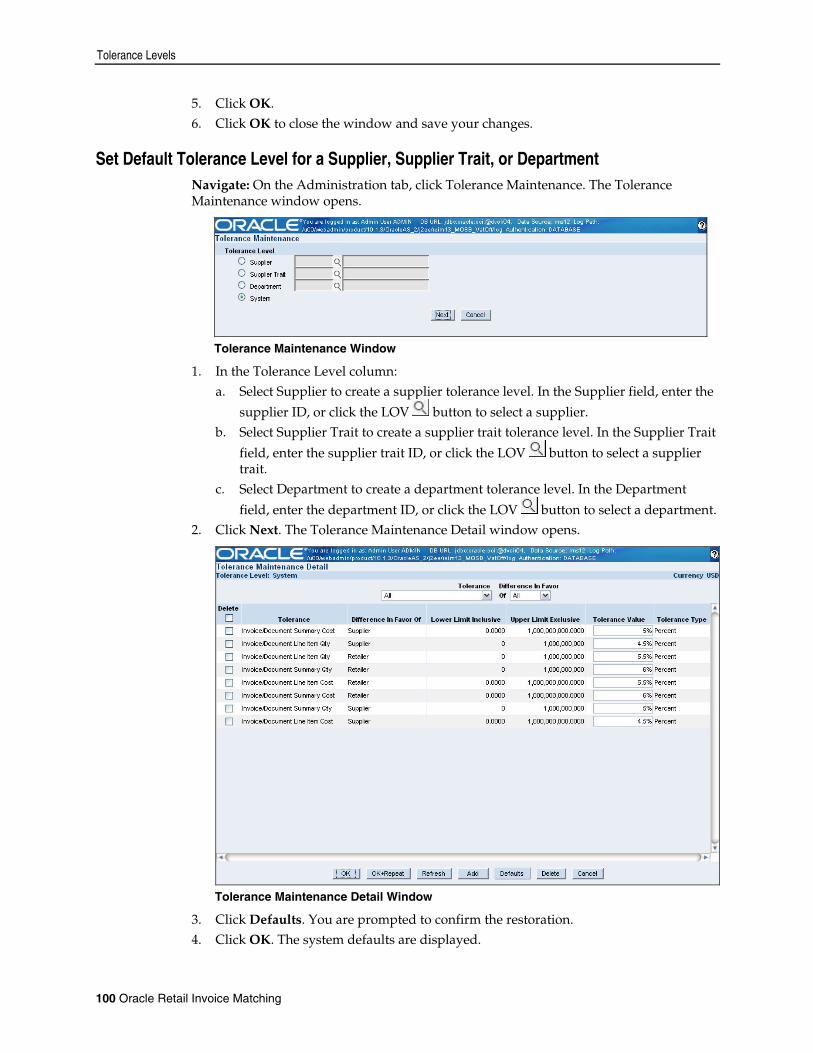
Tolerance Levels
5. Click OK. 6. Click OK to close the window and save your changes.
Set Default Tolerance Level for a Supplier, Supplier Trait, or Department Navigate: On the Administration tab, click Tolerance Maintenance. The Tolerance Maintenance window opens.
Tolerance Maintenance Window
1. In the Tolerance Level column:
a. Select Supplier to create a supplier tolerance level. In the Supplier field, enter the
supplier ID, or click the LOV button to select a supplier. b. Select Supplier Trait to create a supplier trait tolerance level. In the Supplier Trait
field, enter the supplier trait ID, or click the LOV button to select a supplier trait.
c. Select Department to create a department tolerance level. In the Department
field, enter the department ID, or click the LOV button to select a department. 2. Click Next. The Tolerance Maintenance Detail window opens.
Tolerance Maintenance Detail Window
3. Click Defaults. You are prompted to confirm the restoration. 4. Click OK. The system defaults are displayed.
100 Oracle Retail Invoice Matching
Tolerance Levels
5. Click OK to save your changes and close the window.
System Administration 101

Glossary Accounts Payable
The amount due to a creditor on an account.
Accounts payable reviewer
The user who can review invoices from a supplier. Also seen as AP reviewer.
Action
The type of task that will be accomplished for the module.
Amount
The monetary number or quantity.
AP reviewer
The accounts payable (AP) associate that reviews the invoices from a supplier.
Auto match
The process that compares billing information from the supplier with purchase order and receipt information. If the information matches within predefined tolerances, the bill is passed onto the accounts payable system for payment. If the information does not match because there is a cost or quantity discrepancy manual matching will be required.
Avail Total Qty
The unmatched quantity from a partially matched receipt.
Best terms
The term that gives the retailer the opportunity to pay the least amount on an invoice. Calculating the best terms involves comparing the invoice terms, the purchase order terms, and the supplier's default terms to see which term is most advantageous for the retailer.
Calc tolerance
The percentage by which header and detail amounts can differ and still be considered equal. This is used to account for insignificant errors in rounding between header and detail level totals. For example, a header may show an invoice total as $1025.31, while the detail area may show it as $1025.308. If the percentage difference is less than the calc tolerance %, the amounts will be considered equal.
Calculated count
The number of invoices in the group that have been entered to this point.
Calculated total
The total monetary amount of the invoices that have been entered into the system.
Cash Discount
The monetary value of discounts credited by the vendor during the time period at the selected location. Cash discounts increase the gross profit margin.
Glossary 103
Child invoice ID
A unique number that identifies an invoice that originated from an invoice with multiple locations.
Child merchandise cost
The merchandise cost assigned to a location when splitting an invoice into multiple locations.
Child quantity
The number of items assigned to a location when splitting an invoice into multiple locations.
Class
The fifth level in the merchandise hierarchy. The class breaks down the merchandise hierarchy. A class can belong to one department.
Class ID
The number that identifies a class. Each class ID within a department is unique.
Close open receipt days
The number of days that a shipment can remain in "Ready for Match" status before it is automatically closed.
Comments
Additional information added to a record.
Consignment
A marketing arrangement where physical control of merchandise, but not the title of ownership is transferred from one business, the consignor (in our case the vendor) to another, the consignee, (in our case the retailer). The title to the goods remains with the consignor until the goods are sold. Upon sale of the goods, the consignor bills the consignee via an invoice.
Consignment Rate
Represents the consignor's share of the sale. The consignment rate is predetermined by both parties.
Control count
The number of invoices in the group that should be in the system after they have been entered.
Control total
The monetary amount that the invoices should total after they have been entered in the system.
Cost
The amount of money that must be paid to take ownership of something; expense or purchase price.
104 Oracle Retail Invoice Matching
Cost discrepancy
The difference between the cost on a purchase order and the cost on a merchandise invoice. When there is a cost discrepancy in the system, in either the retailer's or supplier's favor, a reviewer will have to do a cost review if the discrepancy is outside tolerances.
Cost resolution due days
The number of days a reviewer has to resolve a cost discrepancy.
Cost review
A cost review is the process where the reviewer examines a cost discrepancy and determines how to resolve it
Cost variance
The amount of difference between the invoice cost and the receipt cost.
Create ID
The user name of the person who entered the group.
Credit memo
A document created to pay back a supplier for a under invoiced amount.
Credit memo prefix-cost
The prefix that indicates a document is a credit memo due to cost.
Credit memo prefix-qty
The prefix that indicates a document is a credit memo due to quantity.
Credit note
A response from the supplier indicating agreement to the terms outlined in a credit note request. A credit note may also be sent by a supplier without a credit note request being sent to the supplier.
Credit note request
A document that is sent from the retailer to the supplier, requesting a credit note for an over invoiced amount.
Credit note request prefix-cost
The prefix that indicates a document is a credit note request due to cost.
Credit note request prefix-qty
The prefix that indicates a document is a credit note request due to quantity.
Cross reference
The association between a general ledger account number and a ReIM transaction code.
Currency
Coins, treasury notes, and banknotes in circulation, used as the medium of exchange.
Currency code
The abbreviation used to indicate which currency the invoice uses. Also seen as Curr code.
Glossary 105
Current order cost
The cost of the item from the purchase order at the time of the invoice.
Date range
A period of time. Date ranges allow you to limit a search by the dates you specify. You may specify ranges for documents, due dates, or receipt dates.
Days before due date
The number of days you have to wait before routing begins.
Deal
The agreement between a retailer an a vendor for rebates or discounts applied to an item when ordered from the supplier or sold to the customer in certain quantities.
Debit memo
A document created to charge a supplier of an over invoiced amount resulting from a price or quantity discrepancy.
Debit memo prefix-cost
The prefix that indicates a document is a debit memo due to cost.
Debit memo prefix-qty
The prefix that indicates a document is a debit memo due to quantity.
Debit Memo Send Days
The number of days following the receipt of an invoice before a debit memo can be sent out.
Debit memo VAT prefix-qty
The prefix that indicates a document is a debit memo due to VAT quantity.
Default header VAT from details
Indicates whether header level VAT information must be entered before invoice details can be entered. Set to Yes to be able to proceed to the details screen without entering VAT information. Set to No to require VAT information in the header before invoice details can be entered.
Default pay now terms
The terms that are applied to an invoice that is due immediately.
Department
Belongs to a group in the merchandise hierarchy and provides a way to define the areas of a group. A department is the fourth division in the merchandise hierarchy.
Department ID
The number that identifies a department. Each department ID within a group is unique.
Description
The name or identifying note for an ID or code.
Detail matching
106 Oracle Retail Invoice Matching
Detail matching is the process of comparing purchase orders and invoices to find matches or discrepancies. This means looking at the quantity and cost of each item at every location. Detail matching generally occurs after summary matching has failed to match the purchase order and the invoice.
Discrepancy comments
Comments that pertain to a discrepancy on an invoice.
Document
Accounting paperwork. Document can refer to invoices, debit memos, credit notes, credit note requests and credit memos.
Document cost
The total cost of the items from the document.
Document date
The date the document was created.
Document group
A document group is a collection of documents. Only documents that are manually entered belong to a document group. The document group is a means of facilitating data entry.
Document group status
The status of a document group indicates the availability of the invoices to process in the system. A document group may be in Worksheet or Submitted status.
Document history days
The length of time documents stay the ReIM system before they are purged.
Document ID
A unique number that identifies a document. Also seen as Document number.
Document type
The type of document. The types of documents that ReIM supports are: Merchandise Invoices, Non-Merchandise Invoices, Credit Memo - Cost, Credit Memo - Quantity, Credit Notes, Credit Note Request - Cost, Credit Note Request - Quantity, Debit Memo - Cost, Debit Memo - Quantity. Also seen as Doc type.
Due date
The date that invoice payment is due to a supplier. The due date is calculated based on the document date and the number of days defined as part of the term.
Dynamic
When selected, indicates that the account segment varies, depending on the value assigned to the field.
Earliest due date
The soonest date that an invoice must be paid.
EDI invoice
An invoice that has been entered into the system via electronic data interchange (EDI).
Glossary 107
Electronic data interchange (EDI)
The standard term for electronic transmission of data. ReIM uses EDI to upload and download documents, such as invoices, memos, and notes.
Entry date
The date an invoice or group of invoices was entered into the system.
Exchange Rate
The factor used to convert a monetary amount of one currency to another.
Extended cost
The total cost of an invoice after unit cost is multiplied by invoice quantity.
Extended cost variance
The difference between the invoice extended cost and the purchase order extended cost.
Freight payment type
Indicates how the merchandise was shipped, and how shipping was paid for.
General Ledger
A company's accounting records. It contains all of the financial accounts and statements.
Group
The sixth level of the merchandise hierarchy.
Group entry
The manual entry of multiple invoices at a single time. An ID is assigned to each invoice group entered.
Group ID
The number that identifies a group of invoice. Each group ID is unique.
Include VAT Processing
Indicates whether ReIM should check for Value Added Tax on invoices and differences between the Value Added Tax on invoices and receipts.
Invoice
The bill for goods or services received from a supplier or partner. In the system, the invoice field or column will display the invoice number, the invoice description, or both.
Invoice cost
The unit cost of the items, according to the invoice.
Invoice date
The date the invoice was created.
Invoice date range
The series of dates when the invoice was issued by the supplier.
Invoice number
A unique number that identifies an invoice. Also seen as Invoice.
108 Oracle Retail Invoice Matching
Invoice quantity: The total number or amount of an item on an invoice. Also seen as Invoice qty.
Invoice quantity variance
The difference between the invoice quantity and the receipt quantity.
Invoice status
The status of the invoice indicates where in the matching process.
Invoice unit cost
The cost for one unit of one item on an invoice.
Item
The merchandise received from a supplier. In the system, the item field or column will display the item number, the item description, or both.
Linked supplier
A linked supplier is two or more suppliers that are connected within the system. For example, a receipt to the supplier can be matched to purchase orders from any of the linked suppliers.
Location
The store or warehouse involved in an event. In the system, the location field or column will display the location number, the location description, or both.
Location description
The name or identifying note for a location.
Location ID
The number that identifies a location.
Location type
Indicates whether the location is a store or a warehouse.
Lower limit
The lowest valid dollar amount that can have a specific tolerance variance can be applied to it. The lower limit figure is included when calculating variances.
Manual group number
The number assigned to invoices and receipts that have been grouped together by the user for summary and detail matching.
Manual matching
A process that occurs after auto-matching has failed to reconcile documents and receipts. Manual matching consists of summary matching and, if summary matching fails to produce results, detail matching.
Manually paid
An invoice that had been paid without matching.
Matched
The invoice has been matched to receipts based on a common supplier, purchase order, and location relationship.
Glossary 109
Matching
The process in which invoices and receipts are compared. If the goods have not yet been received, the purchase order and the receipt are compared. Invoices can be matched by auto-matching or manual matching. The unit cost and quantities of all items on the invoice are compared to the unit cost and quantities on the receipt. If the cost and quantity on the invoice and receipt match within the tolerances defined, there is a match. If the cost and quantity do not match, there will need to be some kind of intervention. This intervention can include creating one of the credit types of documents so that the retailer gets the refund he deserves.
Max tolerance %
The maximum tolerance that is allowed for any invoice throughout the system.
Merchandise costs
Costs that are associated with items on documents. Any other costs on an invoice are non-merchandise costs. The sum of the merchandise costs and non- merchandise costs is the total document cost. Also seen as Merch cost, Total merchandise cost, Total invoice merch cost, Total invoice merchandise cost.
Merchandise invoice
The bill that a supplier sends to a retailer for actual merchandise items. A merchandise invoice can also contain additional non-merchandise costs. Because a merchandise invoice must involve items, only suppliers can send merchandise invoices.
Multi-unresolved match
An invoice can be matched to more than one receipt. Alternatively, a receipt can be matched to more than one invoice. Manual intervention is required to define the match.
Non-merchandise costs
Costs that are not associated with items, such as shipping charges. A document may have both merchandise and non-merchandise costs. A non-merchandise invoice can only have non-merchandise costs and will never have merchandise costs. A merchandise invoice can have merchandise costs for the items on a purchase order and non-merchandise costs for the cost of shipping the items. Also seen as Non-merch costs, Total non-merchandise cost.
Non-merchandise invoice
Bills for non-merchandise costs only. Non-merchandise invoices can not contain items. Either suppliers or partners can create non-merchandise invoices.
Number of invoices
The number of invoices available to be matched to receipts. Also seen as No. of invoices.
Number of line exceptions
The number of line items that are in discrepancy. Also seen as No. of line exceptions.
Number of receipts
The number of receipts available to be matched to invoices. Also seen as No. of receipts.
Open receipt
A receipt is open if no invoice is received to match it against. After a set amount of time has passed, it is written off to a general ledger account. A receipt remains open while the retailer is waiting for invoices.
110 Oracle Retail Invoice Matching
Order comments
Comments associated with the purchase order.
Order cost source
Indicates the source of the cost, as stated on the purchase order.
Order Number
The identifying number on a purchase order.
Order terms
The order term defines the discounts that apply if the invoice is paid early and the number of days until payment is due.
Order UPC
Indicates the UPC associated with the item.
Original Order Cost
The cost of the purchase order after the off invoice deals are deducted.
Parent invoice ID
A unique number that identifies an invoice with multiple locations.
Partner
A person or entity that has an association with your organization in various areas of the procurement process. Partners can include those involved in transporting goods, escheatment, providing credit, and providing services. A partner does not provide items for resale to a retailer.
Past due indicator
When selected, indicates that the due date for the invoice has passed.
Payment date
The date the invoice was paid.
Post dated document days
How many days old a document can be when entered into the system.
Posted
The matched invoice and receipt has been exported to an external accounts payable system.
Pre-paid invoice
The process of sending an invoice to accounts payable without matching it to any receipts. Also seen as Pre-paid.
Prefix
Identifies the document type by attaching the appropriate code to the beginning of the document ID. Also seen as Doc prefix.
Purchase order
An agreement between a retailer and a supplier for the purchase of goods. The retailer records the quantity, cost, and delivery location of items from the supplier. On a single purchase order, the same item going to different locations can have different costs.
Glossary 111
Quantity
The total number of an item.
Quantity difference
The difference between the quantity on a receipt and the quantity on a merchandise invoice.
Quantity discrepancy
The difference between the quantity on a receipt and the quantity on a merchandise invoice. ReIM searches for quantity discrepancies so that the retailer does not pay for goods that were not received. If the quantity discrepancy is not in the retailers favor, a buyer initiates a resolution document to dispute quantity and get a refund for the missing units.
Quantity discrepancy days before routing
The number of days a quantity can exist before it is sent for payment.
Quantity discrepancy review
The process of reviewing variances between the invoice, the receipt, and the purchase order, to determine the correct amount to pay.
Quantity resolution due days
The number of days the buyer has to resolve a quantity discrepancy. Also seen as Qty resolution due days.
Quantity variance
The amount of difference between the invoice quantity and the receipt quantity.
Ready for match
The invoice has not been matched to a receipt. The match is based on a common supplier, purchase order, and location.
Reason code
The resolution or reason that is applied to an event that occurs within a system.
Receipt
A receipt is a document stating that the goods that have arrived to the store or warehouse. For the purposes of ReIM, only goods associated with purchase order are considered.
Receipt cost
The unit cost of the items, according to the receipt.
Receipt date
The date the goods arrived to the store or warehouse.
Receipt quantity
The number of item that were received at the location
Receiving location
The store or warehouse where the items arrived.
112 Oracle Retail Invoice Matching
Reject reason
Indicates the reason that the document could not be loaded into the system via EDI.
Resolution document
A resolution document can be used to resolve an invoice-to-receipt discrepancy: debit memo, credit memo, credit note, and credit note requests.
Resolve by date
The date by which invoice issues should be completed by in order to pay the invoice.
Reviewer group
Indicates which group will review the invoice discrepancy.
ROG
Receipt of goods.
ROG date
The day the items on a purchase order were actually received at the location.
Route date
The day the invoice was sent for discrepancy review.
Segment 1 – 10
Used to build the correct account numbers and ensure that transactions are credited/debited from the appropriate financial accounts.
Segment label
The name for the numeric section of the account number.
Segment position
The place in the account number where the segment label is found.
Shipment
A shipment is a group of items that are in transit. A shipment may be the result on an intra-company transfer or the goods on a purchase order.
Source
The origin of the terms that are applied to an invoice.
Status
When an invoice or group of invoices is added to the system, it must go through a series of checks before it is accessible in the system. Depending on your user role, you may not be able to move the invoice or group of invoices to the next status.
Summary matching
The process of comparing invoice and receipt totals to find matches or discrepancies.
Supplier
The person or entity that provides items to a retailer.
Supplier name
The name or identifying note for a supplier. Also seen as Supplier, Supp name.
Glossary 113
Supplier terms
The terms of payment as defined at the supplier level. A term defines the discounts that apply if the invoice is paid early and the number of days until payment is due.
Supplier Trait
An attribute assigned to a supplier.
System
Retail Invoice Matching (ReIM). When something is defined at the system level, it is a parameter that applies to all levels of ReIM.
System Unit Gross
The total amount a unit costs before any deals are applied.
Terms
The discount that applies if the document is paid early and the number of days until payment is due. Terms are the payment conditions negotiated between suppliers and retailers. Terms are associated with suppliers, purchase orders, invoices, and other documents.
Terms date
The date the payment is due, in order to take advantage of the discount according to the terms.
Tolerance
The range that the receipt can vary from the invoice in terms of amount and quantity and still be considered a match. Tolerances are used in the auto-match and manual match process to determine when quantities are 'close enough' that the difference is not worth the time and effort to investigate and possibly dispute. Summary matching uses supplier level tolerance to manually match the invoice. Detail matching uses department level tolerances to manually match the invoice. The system level tolerances are used if department level tolerances do not exist for an item being detail matched, or supplier level tolerances do not exist for a document being summary matched.
Total allowances
The amount that a deal has saved for all merchandise items across an invoice.
Total cost
The sum of all merchandise and non-merchandise costs on the document. Also seen as Total invoice cost, Invoice total cost, Total document amount, Document amount.
Total extended cost
The total cost of an invoice after unit cost is multiplied by invoice quantity for all items on an invoice.
Total items
The number of items on an invoice.
Total line item cost
The sum of a line item on an invoice. This is calculated by multiplying the quantity of line item by the unit cost of the line item.
114 Oracle Retail Invoice Matching
Total quantity
The sum of all merchandise items on an invoice. Also seen as total invoice quantity, invoice total quantity.
Total quantity variance
The difference between the invoice quantity and the receipt quantity.
Undistributed cost
The amount remaining on a multiple location invoice that needs to be distributed to a single location.
Undistributed quantity
The number of items remaining on a multiple location invoice that needs to be distributed to a single location.
Unit Cost
The cost per unit of the item.
Unit cost variance
The difference between the current order cost and the current invoice cost.
Unit cost variance percent
The percentage representation of the unit cost variance.
Unresolved match
An invoice has been matched to a receipt based on a common supplier, purchase order, and location relationship, but the cost and/or the quantity does not match within tolerance.
UPC
Indicates the Universal Product Code (UPC) for the item selected.
Upper limit
The highest valid dollar amount that can have a specific tolerance variance can be applied to it. The upper limit figure is excluded when calculating variances.
User: A person who is authorized to use the system.
User group
A grouping to associate users by the common functional permissions they are allowed to perform within a system. Also seen as Group.
Variance
The difference between the calculated and the control totals and counts, or the difference betwen the invoice and receipt.
VAT
Value Added Taxes. A common taxation system that adds taxes when value is added to the production of items. It applies to both the purchase and sale of items.
VAT document creation level
Indicates whether VAT debit memos and VAT credit note requests are created at the Item or Full Invoice level.
Glossary 115
VAT resolution due days
The number of days VAT discrepancies should be resolved in.
VAT validation type
The method the system uses when matching Value Added Tax amounts. VAT Resolution requires the VAT on the invoice and receipt to match. Invoice VAT uses the VAT on the invoice. System VAT uses the VAT on the receipt.
Vendor
A generic, inclusive term used to mean either partner or supplier.
Vendor description
The name of the vendor.
Vendor Type
See Vendor.
116 Oracle Retail Invoice Matching