Embed Size (px)
Citation preview
INSTRUCTION MANUAL
After Sales Support
Telephone: 1300 886 649Email: [email protected]
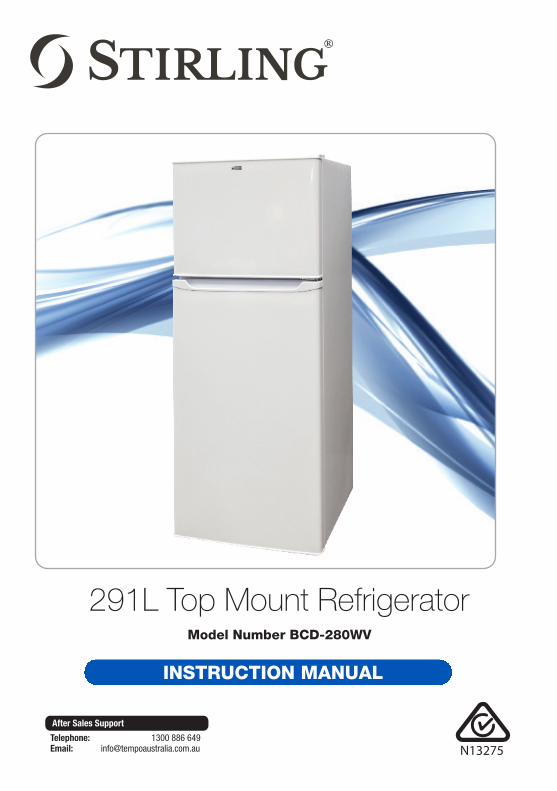
Model Number BCD-280WV
N13275
291L Top Mount Refrigerator
After Sales Support
Telephone: 1300 886 649Email: [email protected]
Contents01 Warranty Details
02 Welcome
03 General Safety Instructions
06 Product Overview
07 Getting Started
09 Instructions
12 Frequently Asked Questions
13 Other Useful Information
22 Repair and Refurbished Goods or Parts Notice
1After Sales Support
Telephone: 1300 886 649Email: [email protected]
Warranty DetailsThe product is guaranteed to be free from defects in workmanship and parts for a period of 36 months from the date of purchase. Defects that occur within this warranty period, under normal use and care, will be repaired, replaced or refunded at our discretion, solely at our option with no charge for parts and labour. The benefits conferred by this warranty are in addition to all rights and remedies in respect of the product that the consumer has under the Competition and Consumer Act 2010 and similar state and territory laws.Our goods come with guarantees that cannot be excluded under the Australian Consumer Law. You are entitled to a replacement or refund for a major failure and to compensation for any other reasonably foreseeable loss or damage. You are also entitled to have the goods repaired or replaced if the goods fail to be of acceptable quality and the failure does not amount to a major failure.
291L Top Mount Refrigerator
2After Sales Support
Telephone: 1300 886 649Email: [email protected]
WelcomeCongratulations on choosing to buy a STIRLING® product.All products brought to you by STIRLING® are manufactured to the highest standards of performance and safety and, as part of our philosophy of customer service and satisfaction, are backed by our comprehensive 3 Year Warranty. We hope you will enjoy using your purchase for many years to come.
3After Sales Support
Telephone: 1300 886 649Email: [email protected]
Read this manual thoroughly before first use, even if you are familiar with this type of product. We have provided many important safety statements in this manual concerning the use of this appliance. Always read and observe all safety statements. They reduce the risk of fire, electric shock and injury when correctly adhered to. Keep the manual in a safe place for future reference, along with the completed warranty card, purchase receipt and carton.If applicable, pass these instructions on to the next owner of the appliance.
General Safety Instructions
Pay particular attention to safety messages that follow this safety alert symbol or the words DANGER, WARNING or CAUTION. They are used to alert you to a potential hazard that can seriously injure you and others. The instructions will tell you how to reduce the chance of injury and let you know what can happen if the instructions are not followed.
Installation• Heavy: This appliance is heavy, take care when moving it. To avoid back or
other injury, consider a two person lift or mechanical aid when installing it.
• Environment: Install the appliance in an indoor area protected from wind, rain, water spray or drips. Do not install it next to an oven, grill or other source of high heat.
• Ventilation: To ensure proper ventilation, the front of the appliance must be completely unobstructed and ventilation openings kept clear. Choose a well ventilated area with temperatures above 16˚C and below 32˚C.
• Refrigerant circuit: The appliance contains the refrigerant R600a, which is flammable. Do not damage the refrigerant circuit during transport and installation.
Electrical safety • Voltage: Make sure your outlet voltage and circuit frequency correspond to
the voltage stated on the appliance rating label.
• Outlet: Plug the appliance into a properly earthed 220-240V AC 50Hz power outlet that cannot easily be turned off accidentally. Do not use an adaptor; do not use an extension cord.
• Electrical circuit: We recommend you connect the appliance to a separate circuit serving only this appliance. This provides the best performance and also prevents overloading the house wiring circuits that could cause a fire hazard from overheating.
4After Sales Support
Telephone: 1300 886 649Email: [email protected]
General Safety Instructions (Cont.)• Electrical work: If the installation of this appliance requires any electrical
work, make sure it is carried out by a qualified electrician.
• Moisture: Do not splash water on the rear of the appliance, as this may cause malfunction or electric shock.
• Power cord: Do not kink or damage the power cord; do not leave it exposed or dangling. Secure it at the back so no one steps on or places anything on the cord or against it. Never unplug the unit by pulling the power cord. Always grip the plug firmly and pull straight out from the power point.
• Damaged cord: Do not use a cord that shows cracks or abrasion damage along its length or at either end. If the power cord is damaged, it must be replaced by the manufacturer or its service agent. Contact the after sales support line to have it replaced.
• Disconnect: Unplug the appliance or disconnect power before cleaning or servicing. Failure to do so can result in electrical shock, injury or death. Do not connect or disconnect the electric plug when your hands are wet. Always grip the plug when disconnecting, do not pull on the cord.
Usage conditions and restrictions• Indoor domestic use only: This appliance is intended for indoor domestic
use only, which includes use in households, staff kitchen areas in shops, offices, in farm houses and in other working environments, use by clients in hotels, motels, bed and breakfast establishments, other residential type environments and in catering and similar non-retail applications. It is NOT suitable for commercial, industrial or outdoor use.
• Intended purpose: Do not use this appliance for anything other than its intended purpose, and only use it as described in this manual. Do not attempt to alter or modify this appliance in any way.
• Electrical type appliances: Do not use any electrical or electronic appliances inside the food storage compartments of the appliance, unless they are specifically recommended in this manual.
• Top of the appliance: Do not place anything heavy, magnetic or containing water (such as a vase or fish bowl) on top of the appliance. Water dripping into the appliance can damage the electrical connections inside.
• Children: Supervise children to ensure they do not play with the appliance. Never allow children to crawl inside the appliance or to hang off or sit on the appliance door. This is dangerous and may overturn the unit and its contents.
5After Sales Support
Telephone: 1300 886 649Email: [email protected]
General Safety Instructions (Cont.)• Usage restrictions: This appliance can be used by children aged 8
years and above and persons with reduced physical, sensory or mental capabilities, or lack of experience and knowledge, if they have been given supervision or instruction concerning use of the appliance in a safe way and understand the hazards involved.
• Flammable and explosive substances: Do not store flammable or explosive substances such as aerosol cans with a flammable propellant in this appliance. The fumes can create a fire hazard or an explosion. Do not use flammable liquids for cleaning.
• Solvents: Do not use solvent based cleaning agents or abrasives on the interior. These cleaners may damage or discolour the interior.
• Service and repair: Do not attempt to repair or replace any part of the appliance unless it is specifically recommended in this manual. Refer all other servicing to a qualified technician. Contact our after sales support line if you notice any abnormal smell or smoke, or for any other advice on repair or service.
• Gas leak: If there is a gas leak from another appliance, do not touch the refrigerator plug until the gas valve is turned off and the air in the room has been exchanged. Otherwise, with gas still present, sparking may occur.
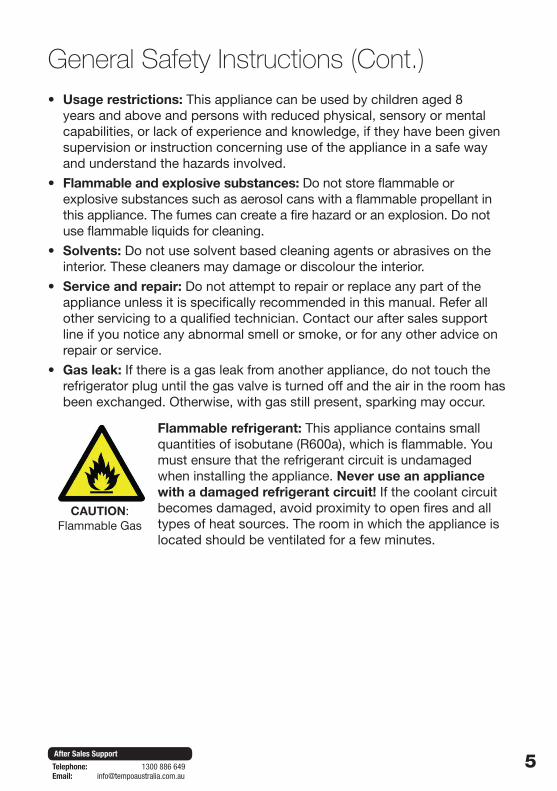
Flammable refrigerant: This appliance contains small quantities of isobutane (R600a), which is flammable. You must ensure that the refrigerant circuit is undamaged when installing the appliance. Never use an appliance with a damaged refrigerant circuit! If the coolant circuit becomes damaged, avoid proximity to open fires and all types of heat sources. The room in which the appliance is located should be ventilated for a few minutes.
CAUTION: Flammable Gas
6After Sales Support
Telephone: 1300 886 649Email: [email protected]
Product Overview
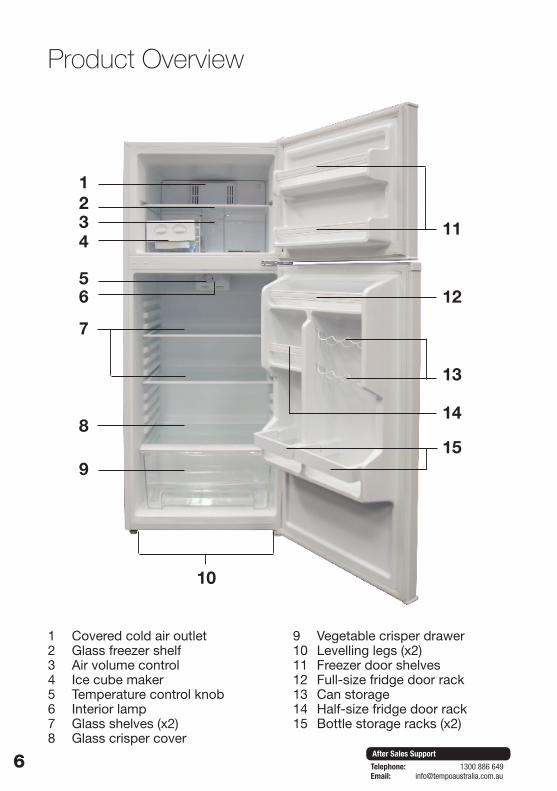
1 Covered cold air outlet2 Glass freezer shelf3 Air volume control4 Ice cube maker5 Temperature control knob6 Interior lamp7 Glass shelves (x2)8 Glass crisper cover
1234
56
7
8
9
10
11
12
13
14
15
9 Vegetable crisper drawer10 Levelling legs (x2)11 Freezer door shelves12 Full-size fridge door rack13 Can storage14 Half-size fridge door rack15 Bottle storage racks (x2)

7After Sales Support
Telephone: 1300 886 649Email: [email protected]
Getting StartedInstallation• Unpack: Keep all packaging materials until you have made sure your new
refrigerator is undamaged and in good working order. Plastic wrapping can be a suffocation hazard for babies and young children, so ensure all packaging materials are out of their reach. Remove any adhesive tape off the drawers, shelves, egg tray and the drain tube plug.
• Remove the poly foam panel from the bottom of the carton before installation.
• Two person installation: Use two or more people to move and install the appliance. Failure to do so can result in back or other injury. See page 15 for advice how to use the in-built rollers at the back of the appliance.
• Safety first: Make sure you read all safety advice on pages 3–5 before installation.
• Door swing: Your appliance has the capability of the door opening from the right or left side. If your setup requires reversal of the door swing, see pages 16-18 for instructions.
• Location: Place the refrigerator in a well ventilated, dry area:•Away from direct sunlight and sources of heat (stove, heater, radiator).•Away from water splashes and areas of high humidity. •Away from extreme cold ambient temperatures.
• Floor: The floor must be sturdy, level and strong enough to support it when it is fully loaded. Unsuitable flooring may cause noise and vibration. Do not place it on soft material such as foam or plastic.
Fig. 1If you have to position the refrigerator on carpet, use a plastic carpet protector underneath the appliance.
• Clearances: Leave a 30cm clearance above the appliance, and 5–10cm between the back and the wall and at the sides, to allow for proper air circulation to cool the compressor and condenser, and to ensure the appliance is not touching a surrounding surface. (Fig. 1)
• Cleaning: To remove any dust from transit and storage, clean the inside of the refrigerator with a damp cloth. Dry thoroughly.
8After Sales Support
Telephone: 1300 886 649Email: [email protected]
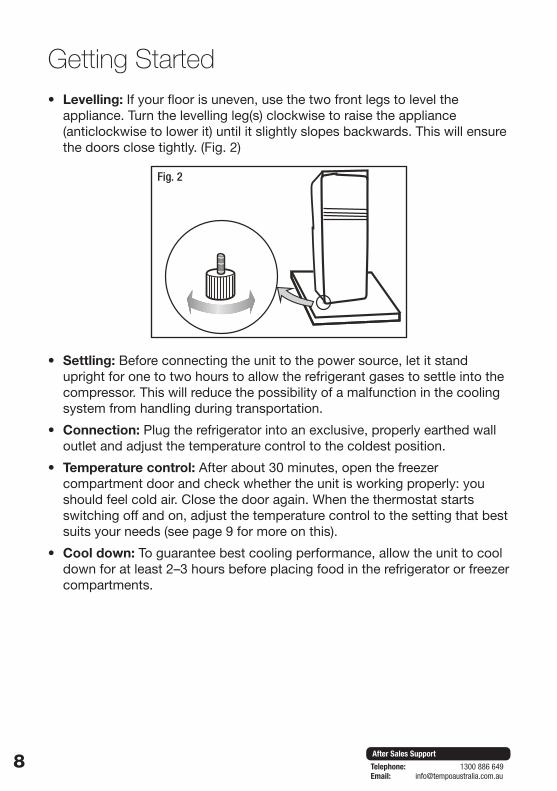
Getting Started• Levelling: If your floor is uneven, use the two front legs to level the
appliance. Turn the levelling leg(s) clockwise to raise the appliance (anticlockwise to lower it) until it slightly slopes backwards. This will ensure the doors close tightly. (Fig. 2)
• Settling: Before connecting the unit to the power source, let it stand upright for one to two hours to allow the refrigerant gases to settle into the compressor. This will reduce the possibility of a malfunction in the cooling system from handling during transportation.
• Connection: Plug the refrigerator into an exclusive, properly earthed wall outlet and adjust the temperature control to the coldest position.
• Temperature control: After about 30 minutes, open the freezer compartment door and check whether the unit is working properly: you should feel cold air. Close the door again. When the thermostat starts switching off and on, adjust the temperature control to the setting that best suits your needs (see page 9 for more on this).
• Cool down: To guarantee best cooling performance, allow the unit to cool down for at least 2–3 hours before placing food in the refrigerator or freezer compartments.
Fig. 2
9After Sales Support
Telephone: 1300 886 649Email: [email protected]
InstructionsTemperature and airflow regulation
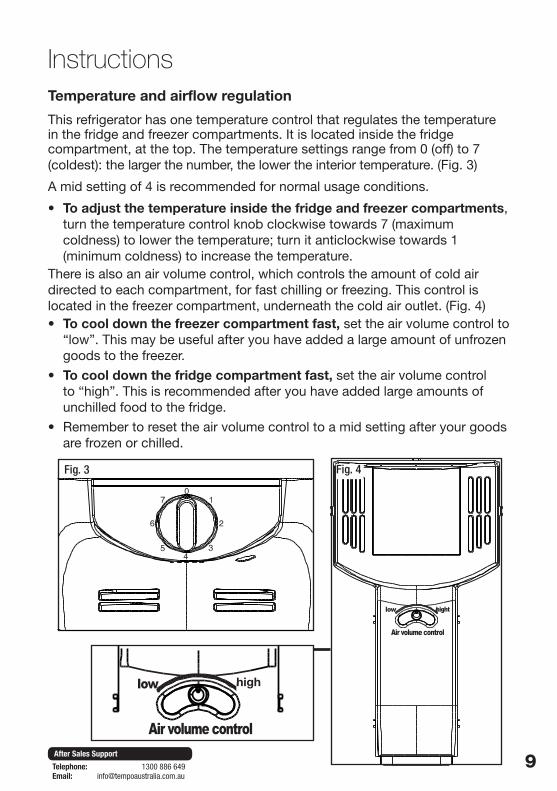
This refrigerator has one temperature control that regulates the temperature in the fridge and freezer compartments. It is located inside the fridge compartment, at the top. The temperature settings range from 0 (off) to 7 (coldest): the larger the number, the lower the interior temperature. (Fig. 3)
A mid setting of 4 is recommended for normal usage conditions.
• To adjust the temperature inside the fridge and freezer compartments, turn the temperature control knob clockwise towards 7 (maximum coldness) to lower the temperature; turn it anticlockwise towards 1 (minimum coldness) to increase the temperature.
There is also an air volume control, which controls the amount of cold air directed to each compartment, for fast chilling or freezing. This control is located in the freezer compartment, underneath the cold air outlet. (Fig. 4)• To cool down the freezer compartment fast, set the air volume control to
“low”. This may be useful after you have added a large amount of unfrozen goods to the freezer.
• To cool down the fridge compartment fast, set the air volume control to “high”. This is recommended after you have added large amounts of unchilled food to the fridge.
• Remember to reset the air volume control to a mid setting after your goods are frozen or chilled.
Fig. 4Fig. 3
high
10After Sales Support
Telephone: 1300 886 649Email: [email protected]
Instructions (Cont.)Fresh food storage
Use the fridge compartment for short-term storage of all your fresh food. The temperature inside the fridge compartment is low enough to limit some bacterial growth, but it is not suitable for long-term storage of perishable foods.
• Let hot food cool down to room temperature before storage. Otherwise the cooling capacity will be affected and power consumption increased.
• Use sealed containers or plastic bags to prevent food from drying out, losing its taste or taking on aromas from other foods.
• In both the fridge and the freezer compartments, keep enough space around items for cold airflow. Do not block ventilation openings.
• Reducing the frequency and duration of door openings will increase the appliance’s energy efficiency and reduce its power consumption.
• Pull out the drawers and shelves gently to prevent damage.
• Under certain conditions, fresh food may freeze in the fridge compartment. To rectify if this happens:• Set the temperature control to a middle level, if it was set to maximum
coldness.• Set the temperature to the minimum level if the ambient (environmental)
temperature is lower than 5°C.
Crisper drawer
• The crisper drawer is designed to control humidity to keep your fruit and vegetables fresh. Make sure to slide the drawer properly into place so the crisper cover sits firmly on top.
• The glass cover has an opening at the top that you can adjust depending on the contents. Fresh, leafy vegetables will stay crisp longer in a more humid environment, so keep the opening closed; slide it open if you are storing primarily fruit, or vegetables with skins, which require a lower humidity than leafy vegetables.
Door racks and shelves
• Use the upper door racks for storing dairy foods, smaller jars and eggs (a small egg rack is supplied).
• Jams, sauces, condiments and small bottles fit into the half-size door racks, and drink cans on the specially designed can storage racks.
• The lower door shelf fits 2L bottles.
11After Sales Support
Telephone: 1300 886 649Email: [email protected]
Instructions (Cont.)
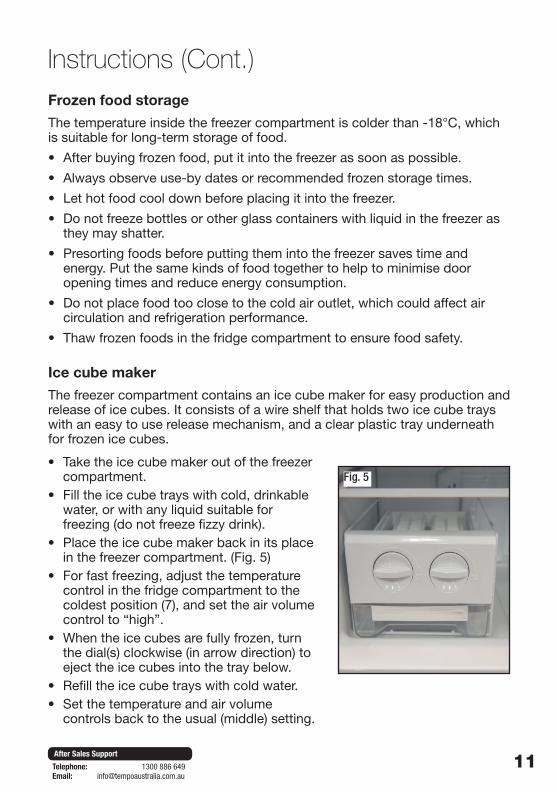
Ice cube maker
The freezer compartment contains an ice cube maker for easy production and release of ice cubes. It consists of a wire shelf that holds two ice cube trays with an easy to use release mechanism, and a clear plastic tray underneath for frozen ice cubes.
Frozen food storage
The temperature inside the freezer compartment is colder than -18°C, which is suitable for long-term storage of food.
• After buying frozen food, put it into the freezer as soon as possible.
• Always observe use-by dates or recommended frozen storage times.
• Let hot food cool down before placing it into the freezer.
• Do not freeze bottles or other glass containers with liquid in the freezer as they may shatter.
• Presorting foods before putting them into the freezer saves time and energy. Put the same kinds of food together to help to minimise door opening times and reduce energy consumption.
• Do not place food too close to the cold air outlet, which could affect air circulation and refrigeration performance.
• Thaw frozen foods in the fridge compartment to ensure food safety.
• Take the ice cube maker out of the freezer compartment.
• Fill the ice cube trays with cold, drinkable water, or with any liquid suitable for freezing (do not freeze fizzy drink).
• Place the ice cube maker back in its place in the freezer compartment. (Fig. 5)
• For fast freezing, adjust the temperature control in the fridge compartment to the coldest position (7), and set the air volume control to “high”.
• When the ice cubes are fully frozen, turn the dial(s) clockwise (in arrow direction) to eject the ice cubes into the tray below.
• Refill the ice cube trays with cold water.• Set the temperature and air volume
controls back to the usual (middle) setting.
Fig. 5
12After Sales Support
Telephone: 1300 886 649Email: [email protected]
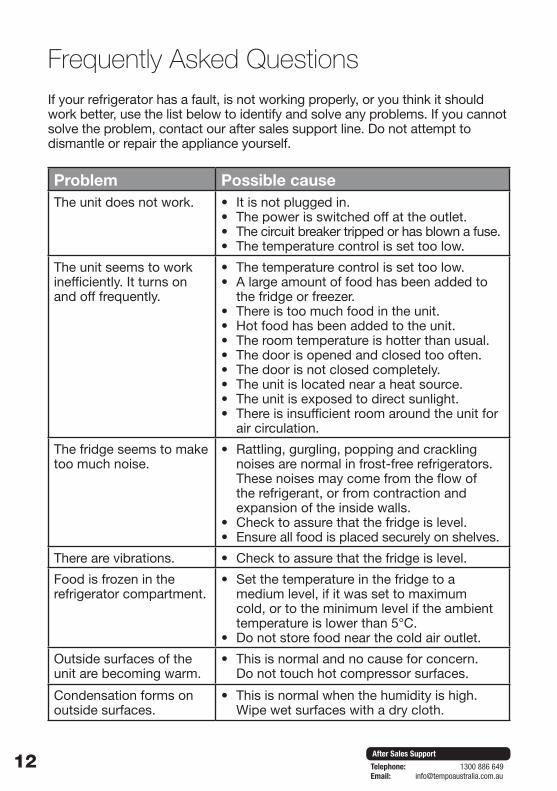
Frequently Asked QuestionsIf your refrigerator has a fault, is not working properly, or you think it should work better, use the list below to identify and solve any problems. If you cannot solve the problem, contact our after sales support line. Do not attempt to dismantle or repair the appliance yourself.
Problem Possible cause The unit does not work. • It is not plugged in.
• The power is switched off at the outlet.• The circuit breaker tripped or has blown a fuse.• The temperature control is set too low.
The unit seems to work inefficiently. It turns on and off frequently.
• The temperature control is set too low. • A large amount of food has been added to
the fridge or freezer.• There is too much food in the unit.• Hot food has been added to the unit.• The room temperature is hotter than usual.• The door is opened and closed too often.• The door is not closed completely.• The unit is located near a heat source.• The unit is exposed to direct sunlight.• There is insufficient room around the unit for
air circulation.
The fridge seems to make too much noise.
• Rattling, gurgling, popping and crackling noises are normal in frost-free refrigerators. These noises may come from the flow of the refrigerant, or from contraction and expansion of the inside walls.
• Check to assure that the fridge is level.• Ensure all food is placed securely on shelves.
There are vibrations. • Check to assure that the fridge is level.
Food is frozen in the refrigerator compartment.
• Set the temperature in the fridge to a medium level, if it was set to maximum cold, or to the minimum level if the ambient temperature is lower than 5°C.
• Do not store food near the cold air outlet.
Outside surfaces of the unit are becoming warm.
• This is normal and no cause for concern. Do not touch hot compressor surfaces.
Condensation forms on outside surfaces.
• This is normal when the humidity is high. Wipe wet surfaces with a dry cloth.
13After Sales Support
Telephone: 1300 886 649Email: [email protected]
Other Useful Information
CAUTION!Before carrying out any maintenance or cleaning work,
make sure the temperature control is turned to the off position [ 0 ] and your refrigerator is disconnected from the power supply.
Cleaning the refrigerator
• Inside: Wipe the inside with a soft cloth, dampened with water — do not flush it with water. If required, use a mild detergent, or a warm water and baking soda solution (2 tablespoons of baking soda to 1 litre of water).
• Outside: Clean the outside with mild detergent and warm water, dry thoroughly.
• Do not use: The following substances may damage the finish and the plastic surfaces: harsh (alkaline) detergents, toilet cleaner, abrasive powders, hot water, acetone, toluene and most organic solvents etc.
• Accessories: If required, disassemble removable accessories before cleaning.
• Door seals: Wipe dust and spills off the rubber door seal. Spilled liquids may cause corrosion, leading to air leakage and increased power consumption.
• Electrical parts: Only use a dry cloth to clean any electrical parts such as the lamp and temperature control knob.
• Freezer cleaning: When removing frozen food packages before cleaning the freezer compartment, take care your hands are dry, as wet hands may freeze and stick to frozen packages.
• Power cord: After cleaning the refrigerator, make it a habit to check the cord and plug for any damage and ensure the unit is installed properly.
• Defrosting: This refrigerator is frost-free, manual defrosting is not required. WARNING: Do not use any equipment or method to accelerate the defrosting process, as it may destroy the cooling system.
14After Sales Support
Telephone: 1300 886 649Email: [email protected]
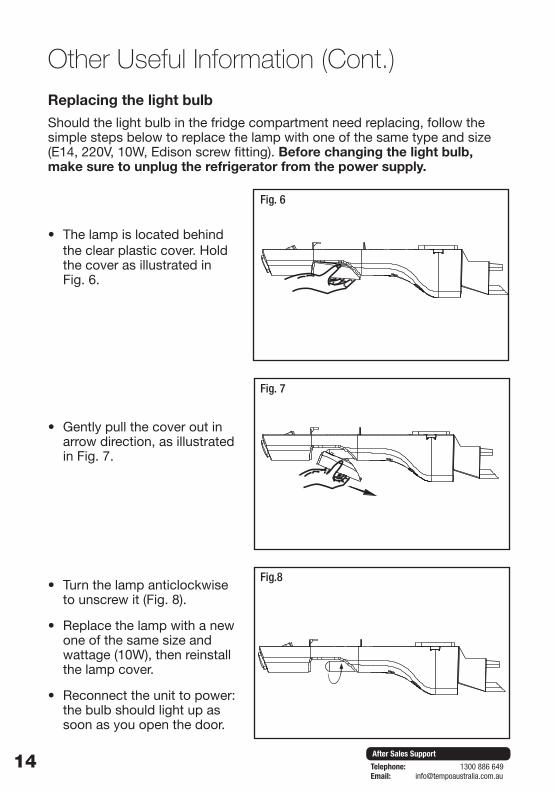
Other Useful Information (Cont.)Replacing the light bulb
Should the light bulb in the fridge compartment need replacing, follow the simple steps below to replace the lamp with one of the same type and size (E14, 220V, 10W, Edison screw fitting). Before changing the light bulb, make sure to unplug the refrigerator from the power supply.
• The lamp is located behind the clear plastic cover. Hold the cover as illustrated in Fig. 6.
• Gently pull the cover out in arrow direction, as illustrated in Fig. 7.
• Turn the lamp anticlockwise to unscrew it (Fig. 8).
• Replace the lamp with a new one of the same size and wattage (10W), then reinstall the lamp cover.
• Reconnect the unit to power: the bulb should light up as soon as you open the door.
Fig. 6
Fig. 7
Fig.8
15After Sales Support
Telephone: 1300 886 649Email: [email protected]
Other Useful Information (Cont.)Moving the refrigerator• If you must move the appliance, empty all food and wipe the inside dry. • Securely tape down all loose items inside the appliance (shelves and
racks), turn the levelling legs up to the base and tape the door shut.• If you want to remove shelves and accessories for transport, take a picture
so you know in which position to reinstall them after the move.• The refrigerator is heavy, take care when moving it. We recommend you
lift it together with another person to avoid injury or an accidental fall and damage to the appliance.
• Do not lift or pull the door by the door handle.• Do not lay the unit completely flat on its side or back as this may cause
damage to the compressor. Do not decline it more than 45°.• Ensure the fridge stays secure in an upright position during transportation.
Protect the outside of the fridge with a blanket or similar item.
Using the rollersThe refrigerator has two rollers at the back that you can use to move the appliance more easily. But only use the rollers on even ground; moving it on uneven ground can damage the rollers. Tilt the refrigerator by about 30 degrees and push forward, or pull backward, while holding the appliance securely on both sides with your hands. Take care of your back! Do not risk injury by tilting the refrigerator too much.
Holiday time• Short holidays: leave the fridge operating during vacations of less than
three weeks.• Long holidays: if the appliance will not be used for several months,
remove all food and unplug the power cord. Clean and dry the interior thoroughly. To prevent odour and mould growth, leave the door open slightly, blocking it open, if necessary.
Power failureTo maintain your fridge and freezer temperatures as cold as possible during a power outage, follow a few simple rules:• Do not put more food into the refrigerator during a power outage.• Do not open the fridge or freezer door frequently.• Any temperature rises in the freezer compartment may affect the storage
time and quality of your frozen food, so please consume any frozen food as soon as possible.
16After Sales Support
Telephone: 1300 886 649Email: [email protected]
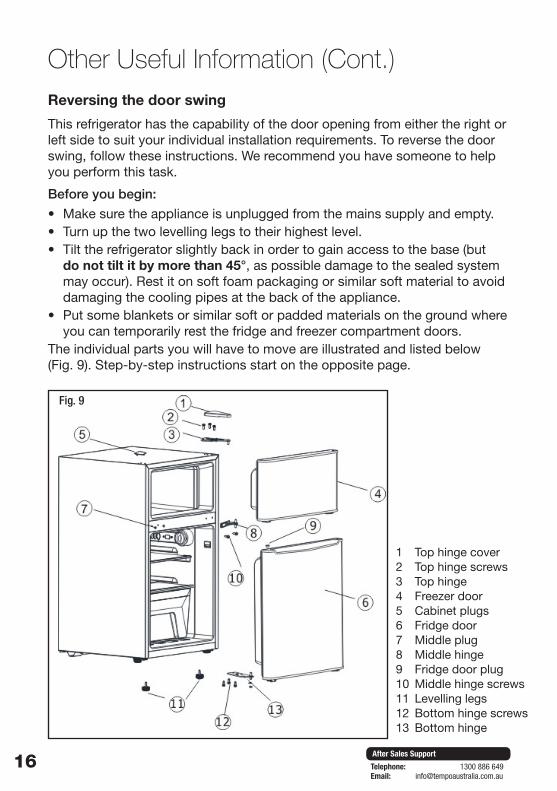
Other Useful Information (Cont.)Reversing the door swing
This refrigerator has the capability of the door opening from either the right or left side to suit your individual installation requirements. To reverse the door swing, follow these instructions. We recommend you have someone to help you perform this task.
Before you begin:
• Make sure the appliance is unplugged from the mains supply and empty.• Turn up the two levelling legs to their highest level. • Tilt the refrigerator slightly back in order to gain access to the base (but
do not tilt it by more than 45°, as possible damage to the sealed system may occur). Rest it on soft foam packaging or similar soft material to avoid damaging the cooling pipes at the back of the appliance.
• Put some blankets or similar soft or padded materials on the ground where you can temporarily rest the fridge and freezer compartment doors.
The individual parts you will have to move are illustrated and listed below (Fig. 9). Step-by-step instructions start on the opposite page.
Refrigerator REFHB31TB/REFHB31TS/REFHB31TW Use and Care Manual Support: 1-877-395-5109
9
REVERSING THE DOOR
1. Top Hinge Cover 2. Top Hinge Screws3. Top Hinge4. Freezer Door 5. Cabinet Plugs6. Fridge Door7. Middle Plug8. Middle Hinge9. Fridge Door Plug10. Middle Hinge Screws11. Leveling Legs12. Bottom Hinge Screws13. Bottom Hinge
Do not tilt the appliance over 45°when revising the door as possible damage to the sealed system may occur.
1. Remove top hinge cover and 3 top hinge screws which are below it. Then remove top hinge.
2. Remove Freezer Door
3. Remove 2 cabinet plugs and 1 door handle plug.
4. Remove middle hinge screws and middle hinge
5. Remove the fridge door.
6. Remove right and left leveling legs.
7. Remove 3 bottom hinge screws and the bottom hinge.
8. Install the bottom hinge on the other side of the leveling legs with 3 bottom hinge screws.
9. Install right and left leveling legs. There are two holes below the refrigerator to fit the two leveling legs.
10. Install the fridge door.
11. Install the middle hinge on the other side.
12. Install freezer door and fix the top hinge with 3 top hinge screws and fix the top hinge cover.
13. Adjust the leveling legs.
1 Top hinge cover2 Top hinge screws3 Top hinge4 Freezer door5 Cabinet plugs6 Fridge door7 Middle plug8 Middle hinge9 Fridge door plug10 Middle hinge screws11 Levelling legs12 Bottom hinge screws13 Bottom hinge
Fig. 9
17After Sales Support
Telephone: 1300 886 649Email: [email protected]
Fig. 10
Fig. 11
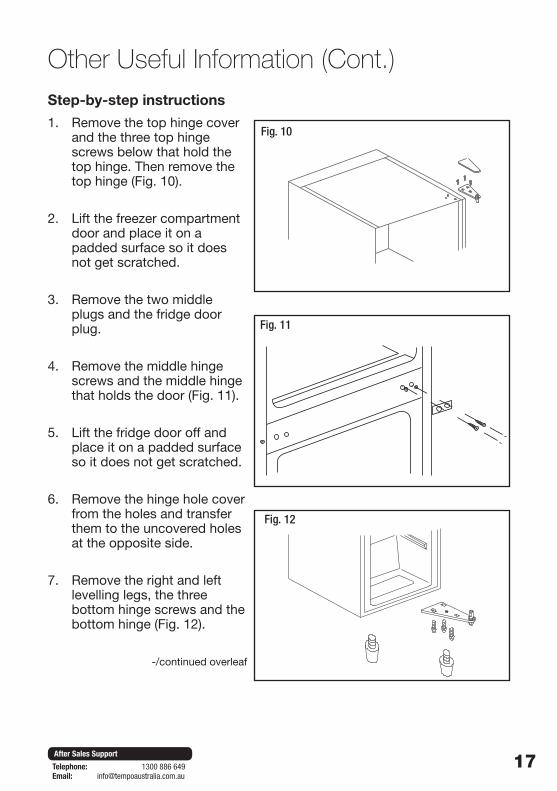
Step-by-step instructions
1. Remove the top hinge cover and the three top hinge screws below that hold the top hinge. Then remove the top hinge (Fig. 10).
2. Lift the freezer compartment door and place it on a padded surface so it does not get scratched.
3. Remove the two middle plugs and the fridge door plug.
4. Remove the middle hinge screws and the middle hinge that holds the door (Fig. 11).
5. Lift the fridge door off and place it on a padded surface so it does not get scratched.
6. Remove the hinge hole cover from the holes and transfer them to the uncovered holes at the opposite side.
7. Remove the right and left levelling legs, the three bottom hinge screws and the bottom hinge (Fig. 12).
-/continued overleaf
Other Useful Information (Cont.)
Fig. 12
18After Sales Support
Telephone: 1300 886 649Email: [email protected]
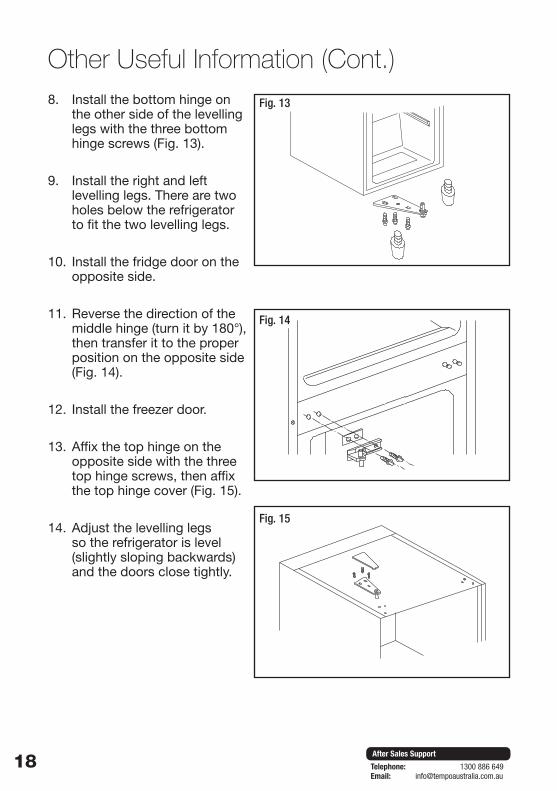
Other Useful Information (Cont.)8. Install the bottom hinge on
the other side of the levelling legs with the three bottom hinge screws (Fig. 13).
9. Install the right and left levelling legs. There are two holes below the refrigerator to fit the two levelling legs.
10. Install the fridge door on the opposite side.
11. Reverse the direction of the middle hinge (turn it by 180°), then transfer it to the proper position on the opposite side (Fig. 14).
12. Install the freezer door.
13. Affix the top hinge on the opposite side with the three top hinge screws, then affix the top hinge cover (Fig. 15).
14. Adjust the levelling legs so the refrigerator is level (slightly sloping backwards) and the doors close tightly.
Fig. 13
Fig. 14
Fig. 15
19After Sales Support
Telephone: 1300 886 649Email: [email protected]
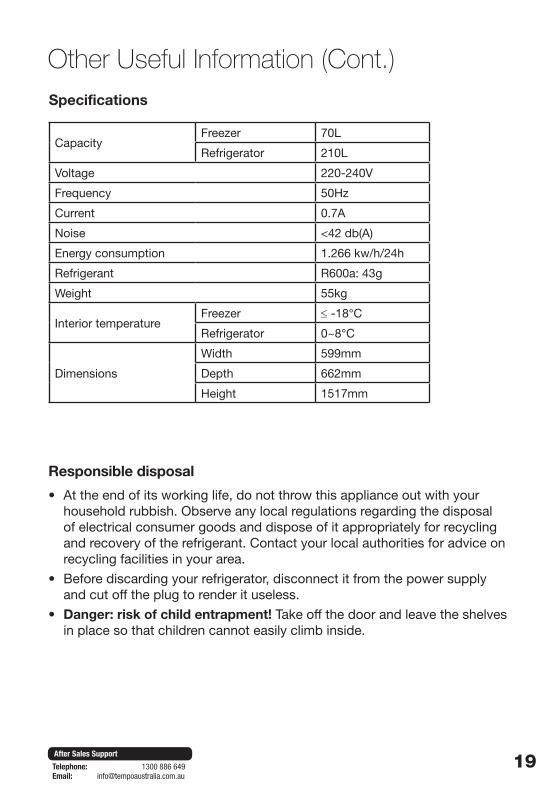
Other Useful Information (Cont.)Specifications
Capacity Freezer 70L
Refrigerator 210L
Voltage 220-240V
Frequency 50Hz
Current 0.7A
Noise <42 db(A)
Energy consumption 1.266 kw/h/24h
Refrigerant R600a: 43g
Weight 55kg
Interior temperatureFreezer ≤ -18°C
Refrigerator 0~8°C
Dimensions
Width 599mm
Depth 662mm
Height 1517mm
Responsible disposal
• At the end of its working life, do not throw this appliance out with your household rubbish. Observe any local regulations regarding the disposal of electrical consumer goods and dispose of it appropriately for recycling and recovery of the refrigerant. Contact your local authorities for advice on recycling facilities in your area.
• Before discarding your refrigerator, disconnect it from the power supply and cut off the plug to render it useless.
• Danger: risk of child entrapment! Take off the door and leave the shelves in place so that children cannot easily climb inside.
After Sales Support
Telephone: 1300 886 649Email: [email protected]
Repair and RefurbishedGoods or Parts Notice
Unfortunately, from time to time, faulty products are manufactured which need to be returned to the supplier for repair.
Please be aware that if your product is capable of retaining user-generated data (such as files stored on a computer hard drive, telephone numbers stored on a mobile telephone, songs stored on a portable media player, games saved on a games console or files stored on a USB memory stick) during the process of repair, some or all of your stored data may be lost. We recommend you save this data elsewhere prior to sending the product for repair.
You should also be aware that rather than repairing goods, we may replace them with refurbished goods of the same type or use refurbished parts in the repair process.
Please be assured though, refurbished parts or replacements are only used where they meet ALDI’s stringent quality specifications.
If at any time you feel your repair is being handled unsatisfactorily, you may escalate your complaint. Please telephone us on 1300 886 649 or write to us at:
Tempo (Aust) Pty Ltd ABN 70 106 100 252 PO BOX 6056 Frenchs Forest, Sydney, Australia NSW 2086 Telephone: 1300 886 649 (Aust) - Fax: (02) 9975 2688 Tempo Help Desk: 1300 886 649 (Aust) (Operating Hours: Mon-Fri 08:30am to 06:00pm EST) Email: [email protected]
291L Top Mount Refrigerator