Embed Size (px)
Citation preview
GLOBAL ONLINE JOINING PROCESS GUIDE Through Mobile POS App & shop.myvestige.com
2
Content
Introduction 5
Chapter 1: Joining through Vestige Mobile POS App 4
Chapter 2: Joining through shop.myvestige.com 10
3
Introduction A distributor can easily add a downline either directly under him/her or any of his/her direct downlines. This
guide will help distributors all over the world to easily do joining using the Vestige POS mobile app or the
shop.myvestige.com website.
To successfully add a distributor through Vestige POS app or through shop.myvestige.com website, a
distributor should refer to the respective processes laid down in the following pages for their convenience.
This guide will help the distributors to get acquainted with the joining process and, in case of any assistance,
they can contact the Vestige IT helpdesk on [email protected]. Please note that for example, we
have selected Saudi Arabia as the test country. The online joining process will be same for all countries.
Please follow the steps carefully and keep joining more distributors to grow your business and rise higher on
the success ladder.
4
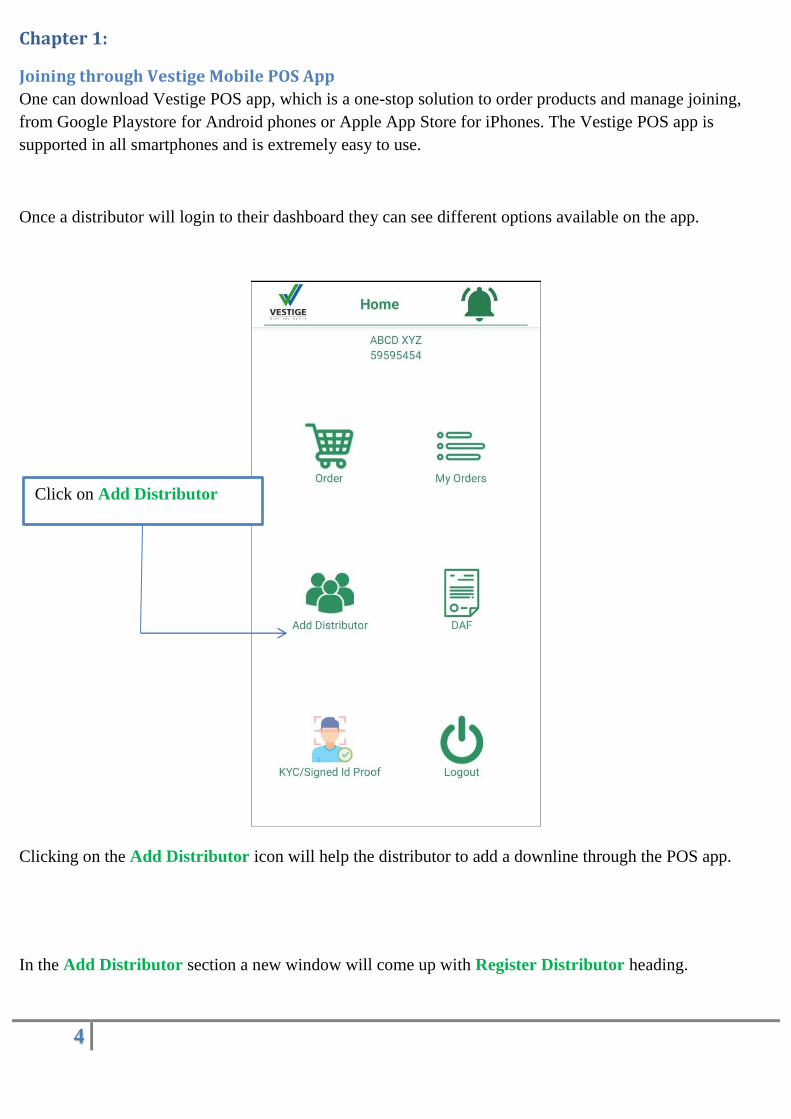
Chapter 1:
Joining through Vestige Mobile POS App
One can download Vestige POS app, which is a one-stop solution to order products and manage joining,
from Google Playstore for Android phones or Apple App Store for iPhones. The Vestige POS app is
supported in all smartphones and is extremely easy to use.
Once a distributor will login to their dashboard they can see different options available on the app.
Clicking on the Add Distributor icon will help the distributor to add a downline through the POS app.
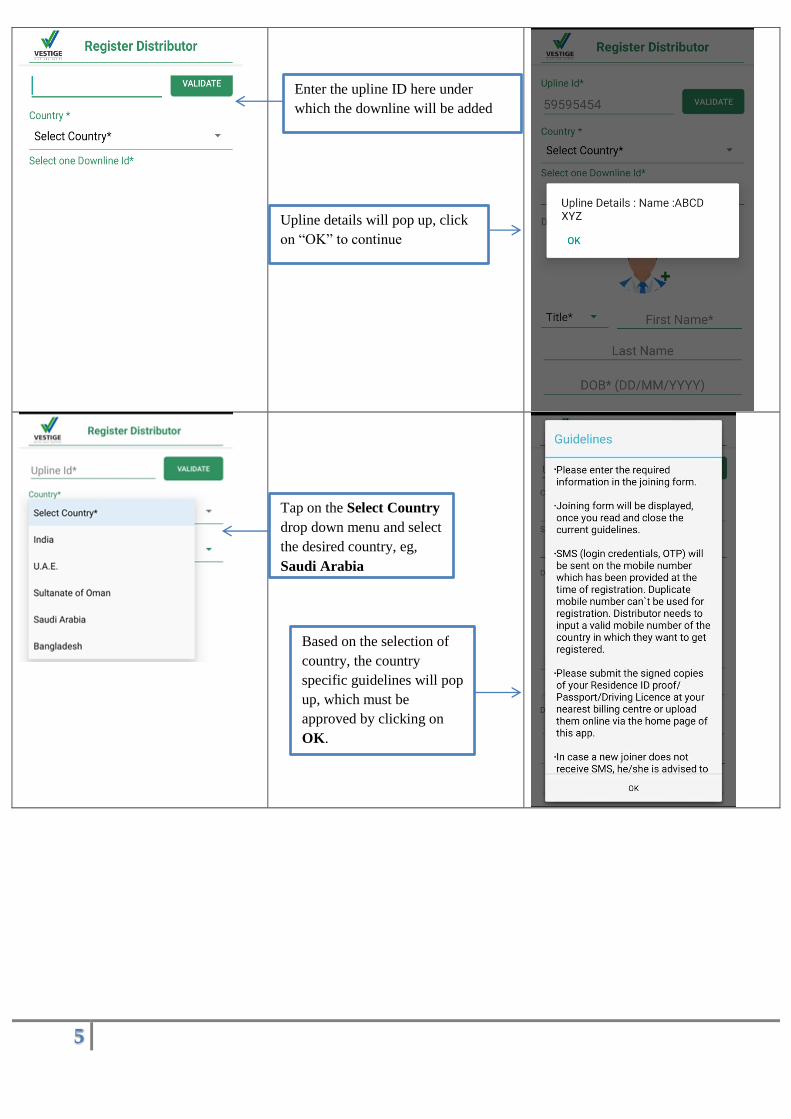
In the Add Distributor section a new window will come up with Register Distributor heading.
Click on Add Distributor
5
Enter the upline ID here under
which the downline will be added
Upline details will pop up, click
on “OK” to continue
Tap on the Select Country
drop down menu and select
the desired country, eg,
Saudi Arabia
Based on the selection of
country, the country
specific guidelines will pop
up, which must be
approved by clicking on
OK.
6
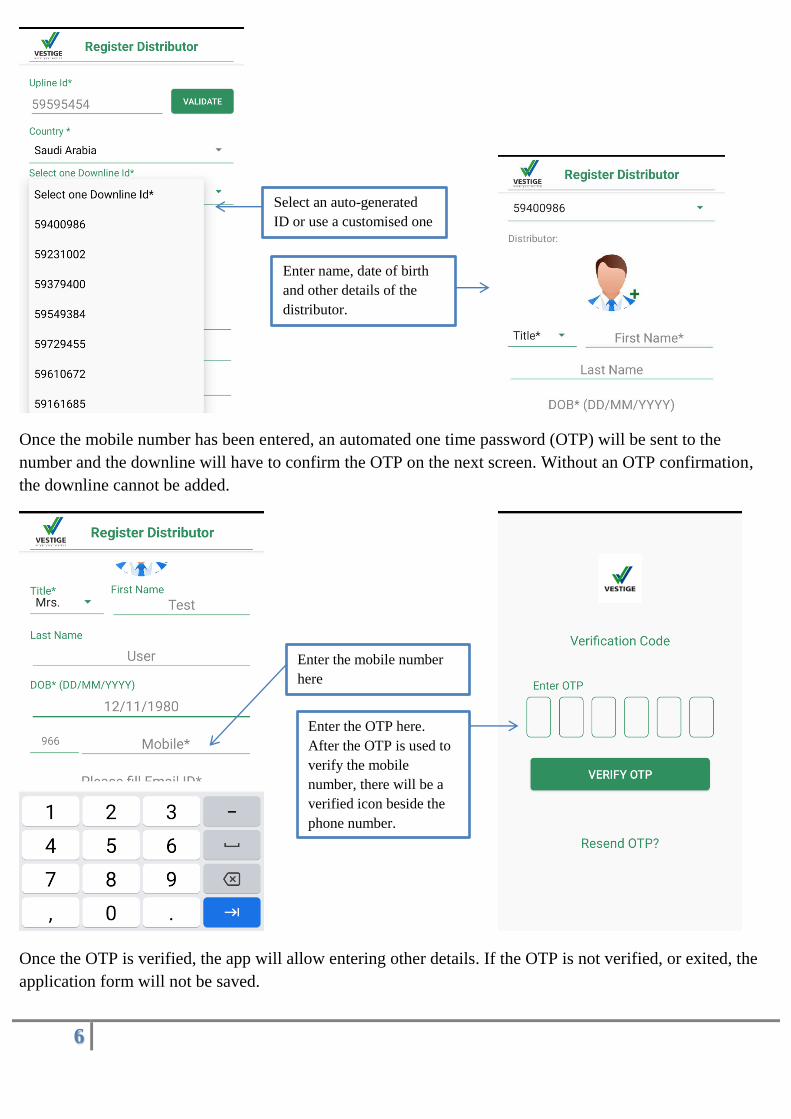
Once the mobile number has been entered, an automated one time password (OTP) will be sent to the
number and the downline will have to confirm the OTP on the next screen. Without an OTP confirmation,
the downline cannot be added.
Once the OTP is verified, the app will allow entering other details. If the OTP is not verified, or exited, the
application form will not be saved.
Select an auto-generated
ID or use a customised one
Enter the OTP here.
After the OTP is used to
verify the mobile
number, there will be a
verified icon beside the
phone number.
Enter the mobile number
here
Enter name, date of birth
and other details of the
distributor.
7
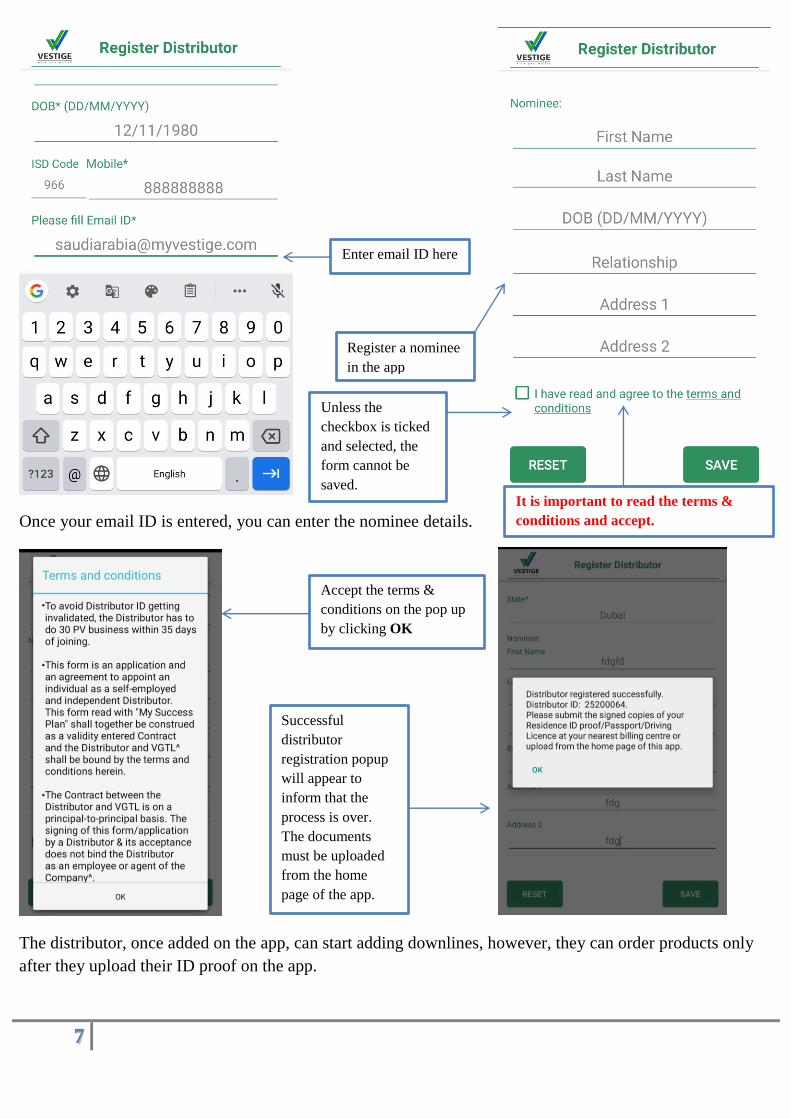
Once your email ID is entered, you can enter the nominee details.
The distributor, once added on the app, can start adding downlines, however, they can order products only
after they upload their ID proof on the app.
Enter email ID here
Register a nominee
in the app
Accept the terms &
conditions on the pop up
by clicking OK
Successful
distributor
registration popup
will appear to
inform that the
process is over.
The documents
must be uploaded
from the home
page of the app.
Unless the
checkbox is ticked
and selected, the
form cannot be
saved. It is important to read the terms &
conditions and accept.
8
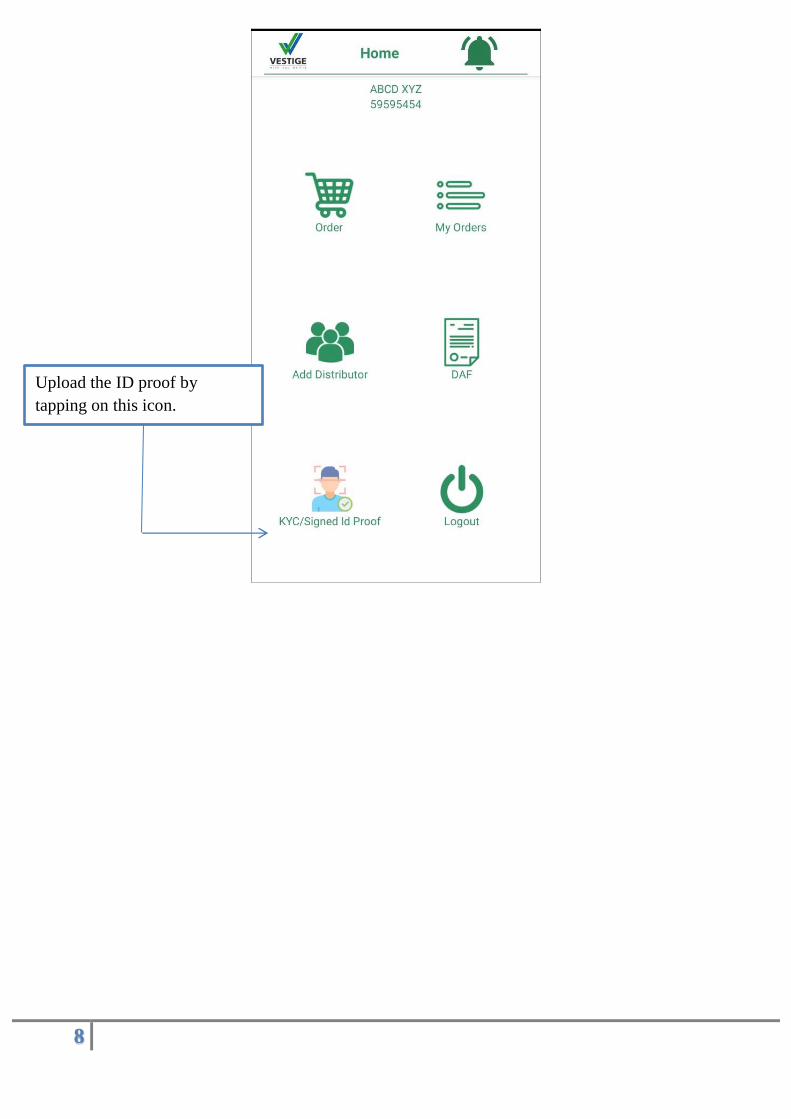
Upload the ID proof by
tapping on this icon.
9
Chapter 2:
Joining through shop.myvestige.com
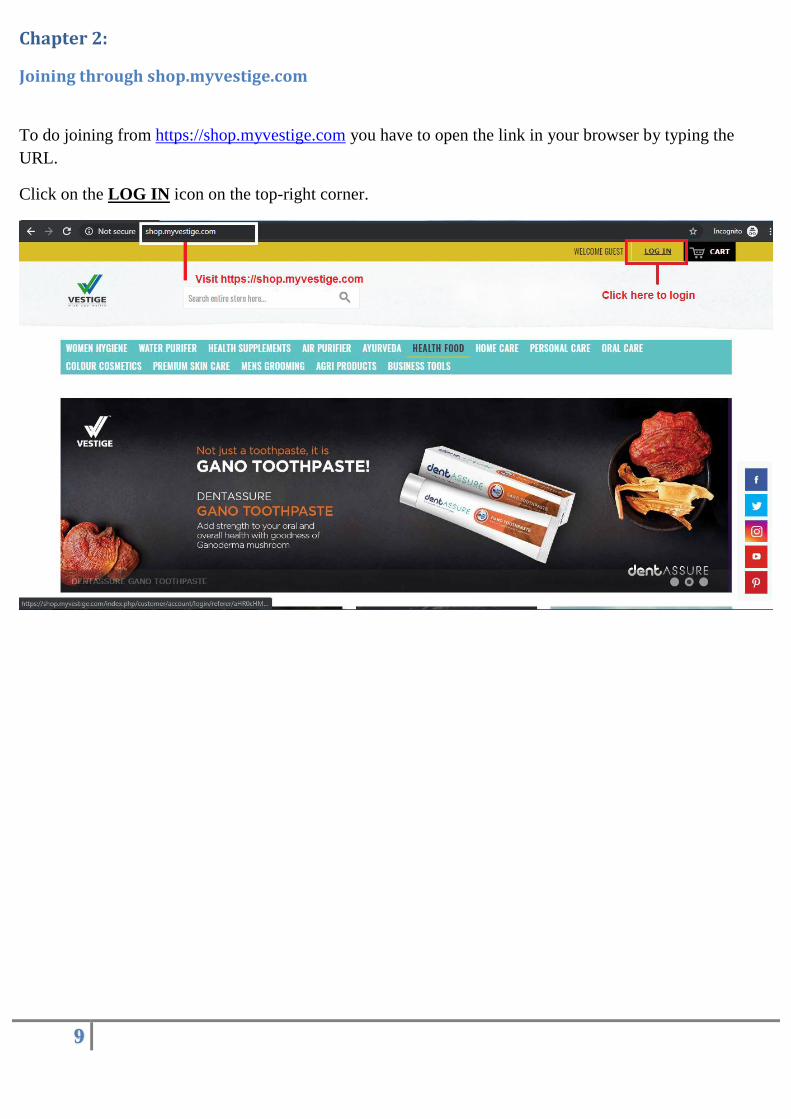
To do joining from https://shop.myvestige.com you have to open the link in your browser by typing the
URL.
Click on the LOG IN icon on the top-right corner.

10
After clicking the link, the login page will appear where the distributor ID and password must be entered to
login.
After the correct user name and password are entered, the distributor can visit the dashboard, where they can
see the REGISTER icon on the top. Clicking on the link will help the distributor to add an upline.
11
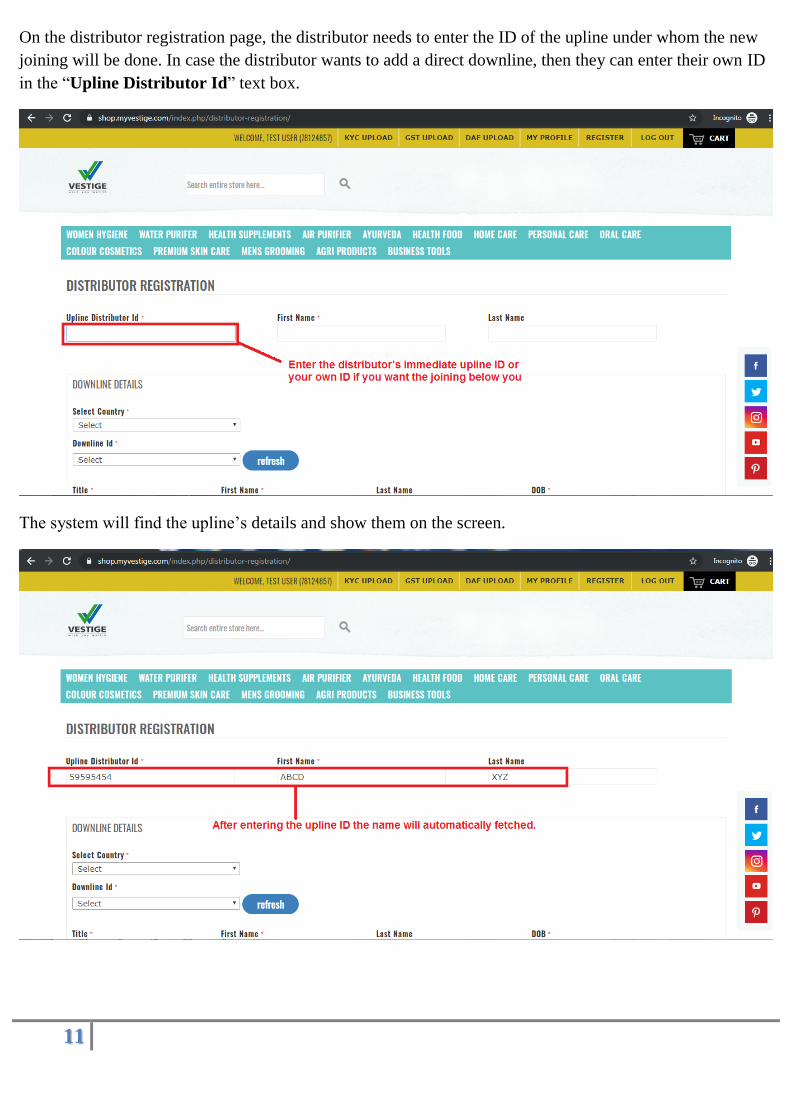
On the distributor registration page, the distributor needs to enter the ID of the upline under whom the new
joining will be done. In case the distributor wants to add a direct downline, then they can enter their own ID
in the “Upline Distributor Id” text box.
The system will find the upline’s details and show them on the screen.
12
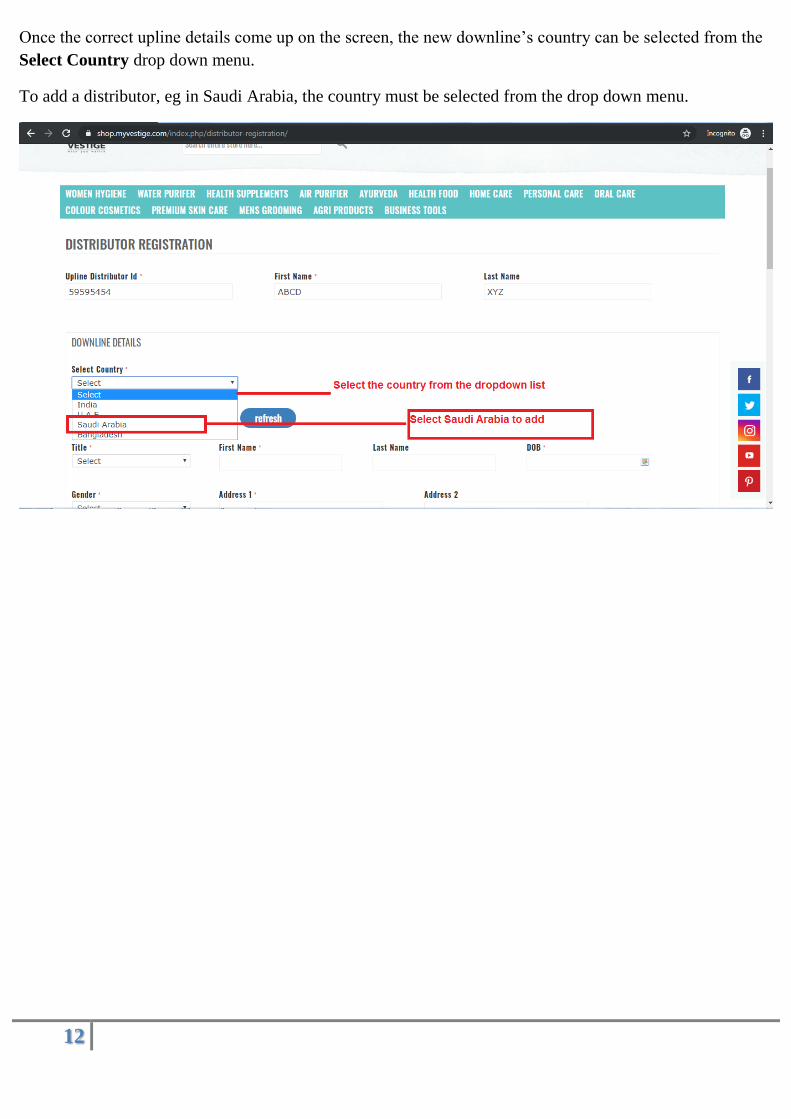
Once the correct upline details come up on the screen, the new downline’s country can be selected from the
Select Country drop down menu.
To add a distributor, eg in Saudi Arabia, the country must be selected from the drop down menu.

13
Once the new joiner’s country is selected, the system will show a list of automatically-generated IDs that are
available. Any of these IDs can be used for the new joiner or the upline can select “Choose your own”
option to create an ID according to their preference. However, a custom ID can be generated only if it is not
already registered.
14
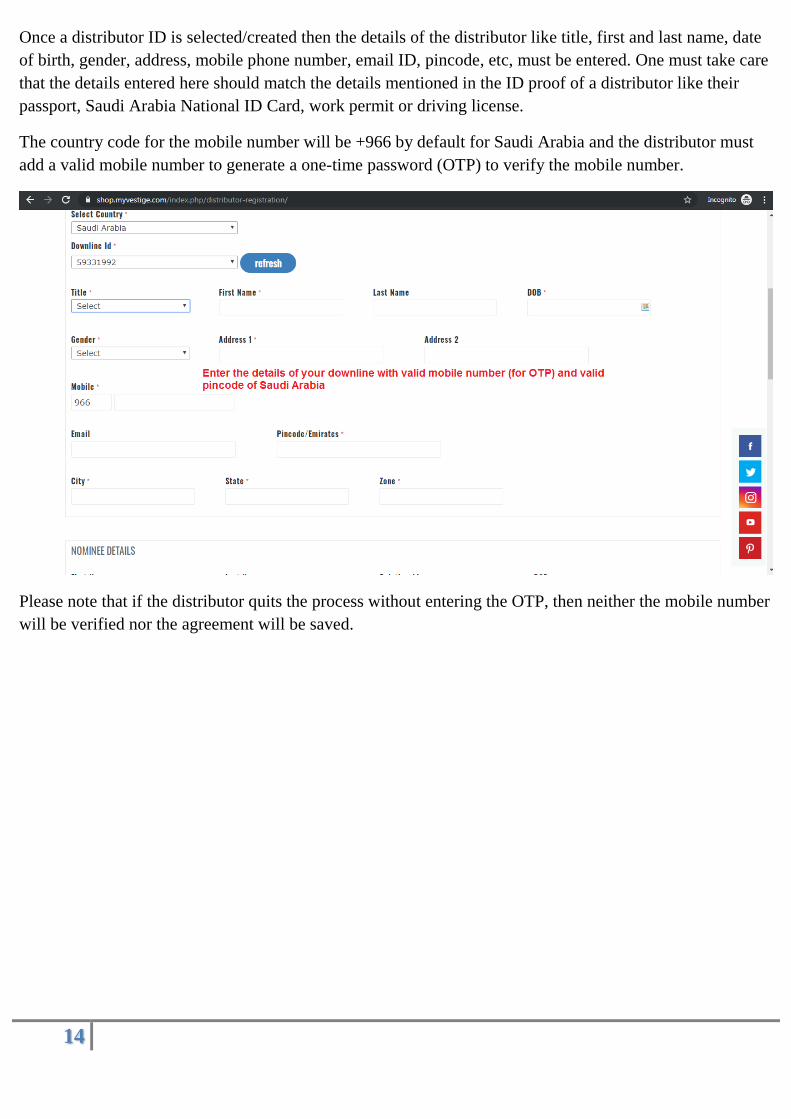
Once a distributor ID is selected/created then the details of the distributor like title, first and last name, date
of birth, gender, address, mobile phone number, email ID, pincode, etc, must be entered. One must take care
that the details entered here should match the details mentioned in the ID proof of a distributor like their
passport, Saudi Arabia National ID Card, work permit or driving license.
The country code for the mobile number will be +966 by default for Saudi Arabia and the distributor must
add a valid mobile number to generate a one-time password (OTP) to verify the mobile number.
Please note that if the distributor quits the process without entering the OTP, then neither the mobile number
will be verified nor the agreement will be saved.
15
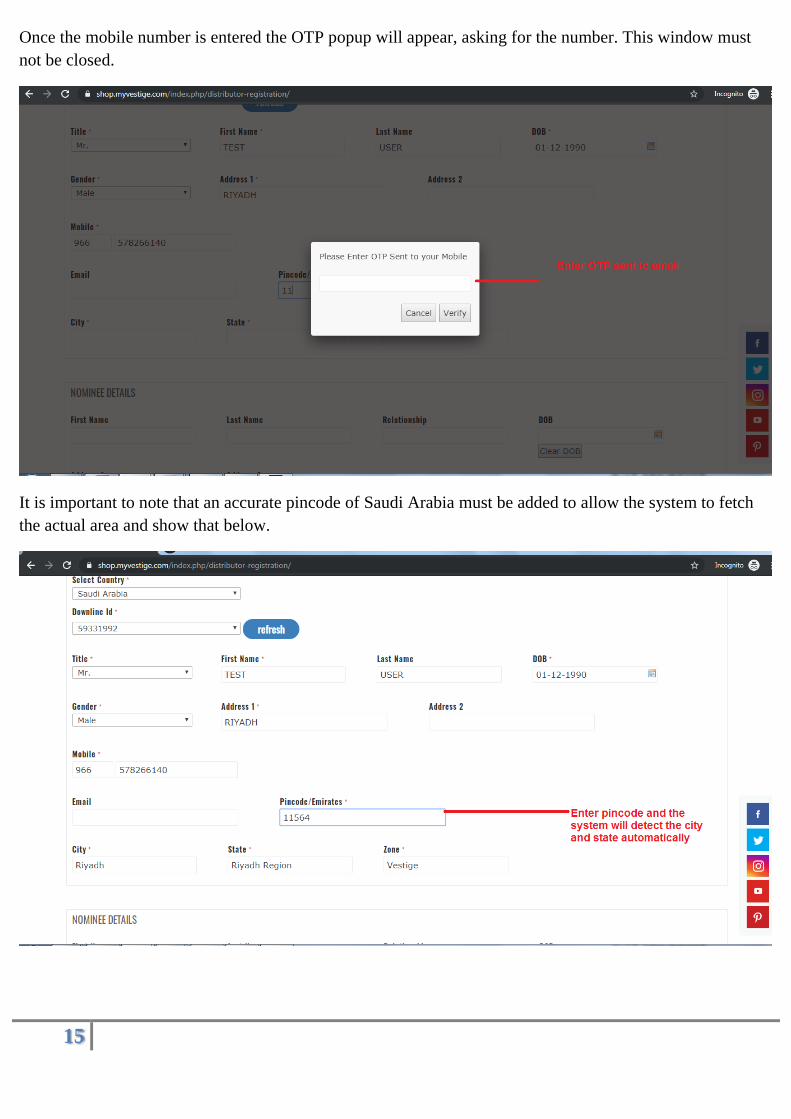
Once the mobile number is entered the OTP popup will appear, asking for the number. This window must
not be closed.
It is important to note that an accurate pincode of Saudi Arabia must be added to allow the system to fetch
the actual area and show that below.
16
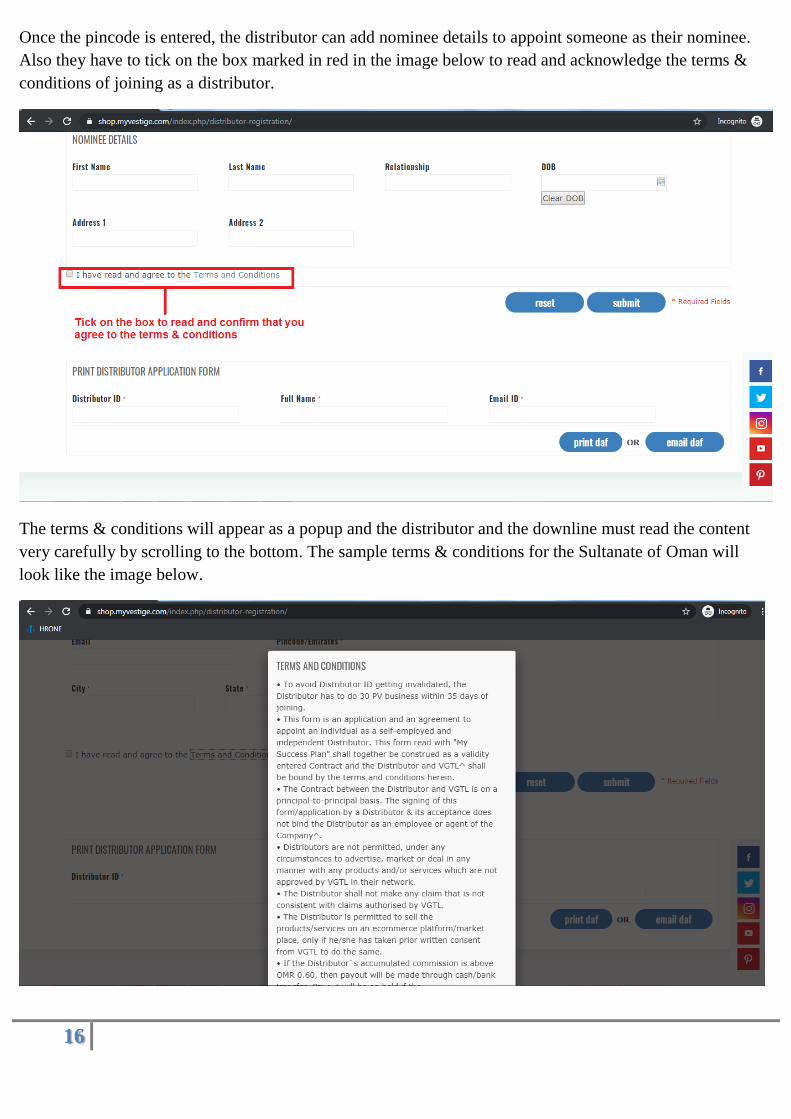
Once the pincode is entered, the distributor can add nominee details to appoint someone as their nominee.
Also they have to tick on the box marked in red in the image below to read and acknowledge the terms &
conditions of joining as a distributor.
The terms & conditions will appear as a popup and the distributor and the downline must read the content
very carefully by scrolling to the bottom. The sample terms & conditions for the Sultanate of Oman will
look like the image below.
17
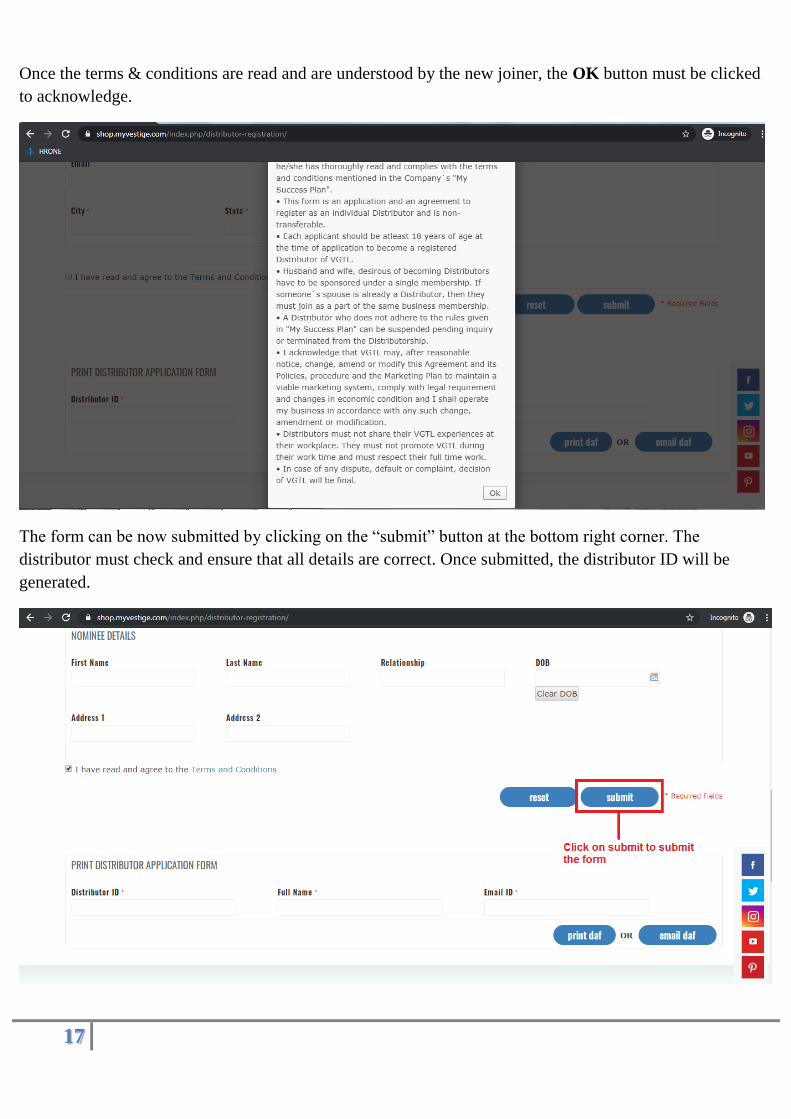
Once the terms & conditions are read and are understood by the new joiner, the OK button must be clicked
to acknowledge.
The form can be now submitted by clicking on the “submit” button at the bottom right corner. The
distributor must check and ensure that all details are correct. Once submitted, the distributor ID will be
generated.
18
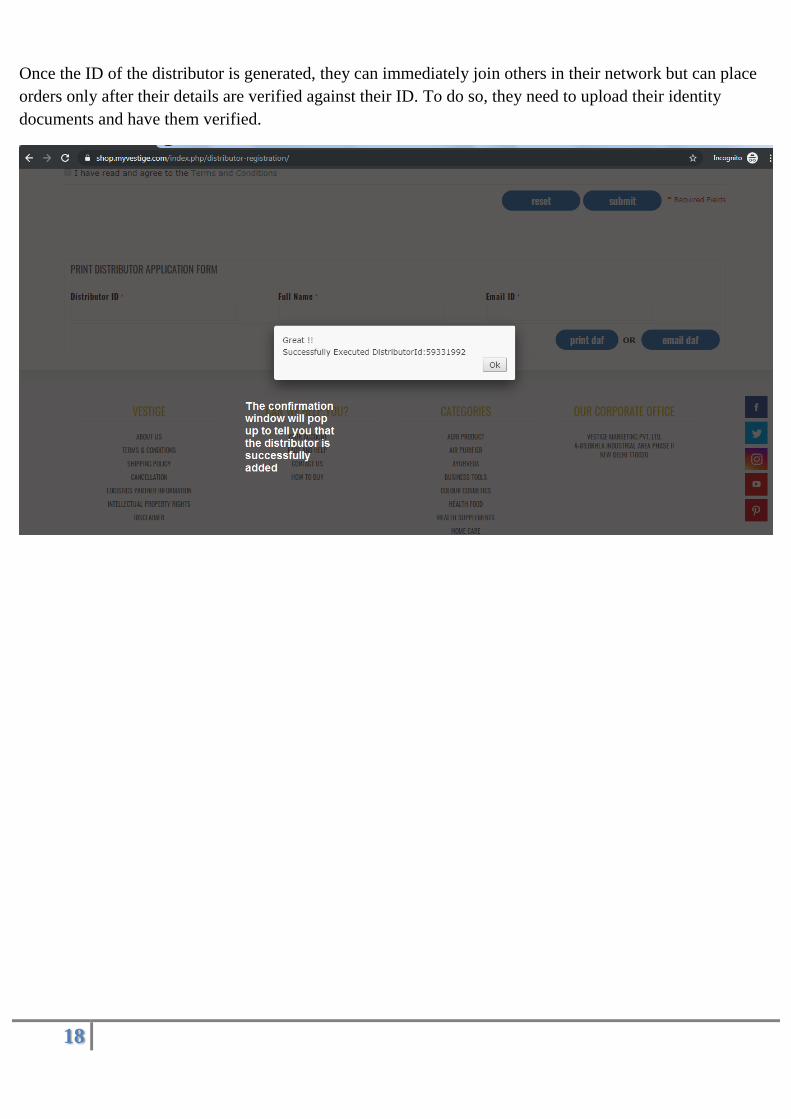
Once the ID of the distributor is generated, they can immediately join others in their network but can place
orders only after their details are verified against their ID. To do so, they need to upload their identity
documents and have them verified.


