Embed Size (px)
Citation preview


The Crypt: a running example
Throughout this book, you develop a text-based adventure game called The Crypt.Players can explore locations on a map, moving from place to place and picking upitems to help them solve challenges and get past obstacles. The last section of eachchapter uses what you’ve learned to develop the game further. You’ll see how the pro-gramming concepts help you build the pieces that are then combined to produce alarge program.
Game element Task JavaScript Chapter
Players Deciding what information you need to know about each player
Variables 2
Collecting player information in one place Objects 3
Displaying information about players on the console
Functions 4–7
Creating a list of items collected by each player
Arrays 8
Organizing player-creation code Constructors 9
Places Creating lots of places to explore, all with a similar structure
Constructors 9
Joining places with exits Square bracket notation 10
Game Adding simple functions for movement, collecting items, and displaying informa-tion
Square bracket notation 10
Maps Joining places with exits Square bracket notation 10

Get Programming with JavaScript

Get Programmingwith JavaScript
JOHN R. LARSEN
M A N N I N GSHELTER ISLAND

For online information and ordering of this and other Manning books, please visitwww.manning.com. The publisher offers discounts on this book when ordered in quantity. For more information, please contact
Special Sales DepartmentManning Publications Co.20 Baldwin RoadPO Box 761Shelter Island, NY 11964Email: [email protected]
©2016 by Manning Publications Co. All rights reserved.
No part of this publication may be reproduced, stored in a retrieval system, or transmitted, in any form or by means electronic, mechanical, photocopying, or otherwise, without prior written permission of the publisher.
Many of the designations used by manufacturers and sellers to distinguish their products are claimed as trademarks. Where those designations appear in the book, and Manning Publications was aware of a trademark claim, the designations have been printed in initial caps or all caps.
Recognizing the importance of preserving what has been written, it is Manning’s policy to have the books we publish printed on acid-free paper, and we exert our best efforts to that end. Recognizing also our responsibility to conserve the resources of our planet, Manning booksare printed on paper that is at least 15 percent recycled and processed without the use of elemental chlorine.
Manning Publications Co. Development editor: Helen Stergius20 Baldwin Road Technical development editors: Chuck Henderson, Ozren HarlovicPO Box 761 Review editor: Ozren HarlovicShelter Island, NY 11964 Project editor: Tiffany Taylor
Copyeditor: Linda RecktenwaldProofreaders: Elizabeth Martin
Bonnie CulverhouseTechnical proofreader: Romin Irani
Typesetter: Dennis DalinnikCover designer: Leslie Haimes
ISBN: 9781617293108Printed in the United States of America1 2 3 4 5 6 7 8 9 10 – EBM – 21 20 19 18 17 16

brief contentsPART 1 CORE CONCEPTS ON THE CONSOLE . .............................1
1 ■ Programming, JavaScript, and JS Bin 3
2 ■ Variables: storing data in your program 16
3 ■ Objects: grouping your data 27
4 ■ Functions: code on demand 40
5 ■ Arguments: passing data to functions 57
6 ■ Return values: getting data from functions 70
7 ■ Object arguments: functions working with objects 83
8 ■ Arrays: putting data into lists 104
9 ■ Constructors: building objects with functions 122
10 ■ Bracket notation: flexible property names 147
PART 2 ORGANIZING YOUR PROGRAMS ..................................169
11 ■ Scope: hiding information 171
12 ■ Conditions: choosing code to run 198
13 ■ Modules: breaking a program into pieces 221
14 ■ Models: working with data 248
v

BRIEF CONTENTSvi
15 ■ Views: displaying data 264
16 ■ Controllers: linking models and views 280
PART 3 JAVASCRIPT IN THE BROWSER.....................................299
17 ■ HTML: building web pages 301
18 ■ Controls: getting user input 323
19 ■ Templates: filling placeholders with data 343
20 ■ XHR: loading data 367
21 ■ Conclusion: get programming with JavaScript 387
22 ■ Node: running JavaScript outside the browser online
23 ■ Express: building an API online
24 ■ Polling: repeating requests with XHR online
25 ■ Socket.IO: real-time messaging online

contentsforeword xviipreface xixacknowledgments xxiabout this book xxii
PART 1 CORE CONCEPTS ON THE CONSOLE. ..................1
1 Programming, JavaScript, and JS Bin 31.1 Programming 31.2 JavaScript 41.3 Learning by doing and thinking 51.4 JS Bin 5
JS Bin panels 6 ■ Following the code listings on JS Bin 7Logging to the console 8 ■ Code comments 9 ■ Further Adventures 9 ■ Error messages 9 ■ Line numbers 10Get an account 10
1.5 The Crypt—our running example 11Playing The Crypt 11 ■ Steps for building The Crypt 12
1.6 Further examples and practice 141.7 Browser support 151.8 Summary 15
vii

CONTENTSviii
2 Variables: storing data in your program 162.1 What is a variable? 172.2 Declaring variables and assigning values 17
Declaring variables 17 ■ Assigning values to variables 18One-step declaration and assignment 20 ■ Using a variable in its own assignment 21
2.3 Choosing good variable names 22Keywords and reserved words 22 ■ Rules for naming variables 23 ■ camelCase 23 ■ Use descriptive variable names 24
2.4 The Crypt—player variables 242.5 Summary 25
3 Objects: grouping your data 273.1 A need for organization 283.2 Creating objects 29
Creating an empty object 30 ■ Properties as key-value pairs 30
3.3 Accessing object properties 323.4 Updating object properties 333.5 Further examples 35
Writing a blog 35 ■ Creating a calendar 35 ■ What’s the weather like? 36 ■ The testing effect 37 ■ Create your own 37
3.6 The Crypt—a player object 373.7 Summary 39
4 Functions: code on demand 404.1 Noticing repetition 40
Displaying object properties as text 41 ■ Adding tax and displaying a summary 42
4.2 Defining and calling functions 43Defining new functions 44 ■ Function expressions and function declarations 45 ■ Using functions 46Functions step by step 47
4.3 Reducing repetition 48A function for displaying object properties as text 48Functions for adding tax and displaying a summary 50

CONTENTS ix
4.4 Making code easier to read and update 52Updating the showMovieInfo function 52
4.5 The Crypt—displaying player information 54A function to display player information 55
4.6 Summary 56
5 Arguments: passing data to functions 575.1 Function reuse and versatility 575.2 Passing information to functions 59
Passing one argument to a function 59 ■ Passing multiple arguments to a function 63
5.3 The Crypt—displaying player information 64Displaying players’ names 65 ■ Displaying players’ health 66Displaying players’ locations 67 ■ Putting it all together—displaying players’ information 68
5.4 Summary 69
6 Return values: getting data from functions 706.1 Returning data from functions 70
The return value replaces the function call 71 ■ The return keyword 72 ■ Using arguments to determine the return value 72
6.2 Experimenting at the console prompt 75Calling functions 75 ■ Declaring new variables 76
6.3 The Crypt—building player information strings 77Building strings for a player’s name, health, and location 78A function for player information—putting the pieces together 79
6.4 Summary 81
7 Object arguments: functions working with objects 837.1 Using objects as arguments 84
Accessing properties of an object argument 84 ■ Adding properties to an object argument 85
7.2 Returning objects from functions 87Building planets—an object creation function 87 ■ Points in 2D space 89

CONTENTSx
7.3 Methods—setting functions as properties of objects 91Namespaces—organizing related functions 91Math methods 92 ■ String methods 94 ■ spacer—more methods for your namespace 96 ■ Deep namespace exploration 98
7.4 The Crypt–player objects as arguments 1017.5 Summary 102
8 Arrays: putting data into lists 1048.1 Creating arrays and accessing elements 104
Creating an array 105 ■ Accessing array elements 106
8.2 Array methods 110Adding and removing elements 111 ■ Slicing and splicing arrays 111 ■ Visiting each element with forEach 113
8.3 The Crypt—a player items array 1188.4 Summary 120
9 Constructors: building objects with functions 1229.1 Using functions to build objects 123
Adding properties 124 ■ Adding methods 125
9.2 Using constructor functions to build objects 127Constructor functions 127 ■ World building—making use of the Planet constructor 130 ■ Telling objects apart with the instanceof operator 131
9.3 Building mastery—two examples of constructors 1329.4 The Crypt—providing places to plunder 134
Building the Place constructor—title and description 135Building the Place constructor—items for your hoard 136Building the Place constructor—exits to explore 137
9.5 The Crypt—streamlining player creation 140Organizing player properties 141 ■ Turning functions into methods 143 ■ Assigning places to players 144Using null as a placeholder for objects 144
9.6 Summary 145
10 Bracket notation: flexible property names 14710.1 Using square brackets instead of dots 148
Brackets in action—people’s names as keys 150 ■ Making the most of square bracket notation—word counts 152

CONTENTS xi
10.2 The Crypt—enhancing exit excitement 155Using an object to hold the exits 156 ■ Creating functions to add and display exits 158 ■ Giving each place object its own set of exits 159 ■ Adding the exits object to the full Place constructor 161 ■ Testing the Place constructor 163
10.3 The Crypt—let the games begin! 164Updating the display—render 165 ■ Exploring the map—go 166 ■ Collecting all the things—get 166Designing a bigger adventure—Jahver’s ship 167
10.4 What’s next? 16710.5 Summary 167
PART 2 ORGANIZING YOUR PROGRAMS.......................169
11 Scope: hiding information 17111.1 The dangers of global variables 172
Access all areas—peeking and tweaking 173 ■ Access all areas—relying on an implementation 174 ■ Naming collisions 176Crazy bugs 177
11.2 The benefits of local variables 17711.3 Interfaces—controlling access and providing
functionality 179Using a function to hide variables 180 ■ Creating multiple independent counters with getCount 181 ■ Creating multiple independent counters with a constructor function 182
11.4 Creating a quick quiz app 183Using an object as a namespace 184 ■ Hiding the questions array 185
11.5 The Crypt—hiding player info 187Our current Player constructor—everything is public 187An updated Player constructor—some variables are hidden 188
11.6 The Crypt—hiding place info 19111.7 The Crypt—user interaction 193
The interface—go and get 194 ■ Hiding the implementation 195
11.8 Summary 196

CONTENTSxii
12 Conditions: choosing code to run 19812.1 Conditional execution of code 199
The strict equality operator, === 199 ■ The if statement 200The else clause 200 ■ Hide the secret number inside a function 202
12.2 Generating random numbers with Math.random() 20412.3 Further conditions with else if 206
Comparison operators 208
12.4 Checking answers in the quiz app 210Multiple declarations with a single var keyword 211Displaying a question 212 ■ Moving to the next question 213Checking the player’s answer 213 ■ Handling a player’s answer 214 ■ Returning the interface object 214
12.5 The Crypt—checking user input 214Step by step through the go method 215 ■ Never trust user input 216 ■ Safe exploration—using the if statement to avoid problems 217
12.6 Summary 219
13 Modules: breaking a program into pieces 22113.1 Understanding bins and files on JS Bin 223
Creating a bin 225 ■ Writing some code 225 ■ Making a note of the filename 225 ■ Viewing an individual code file 226
13.2 Importing files into other projects 226Creating a bin 227 ■ Writing some code 227 ■ Adding a script element 227 ■ Refreshing the page 228 ■ Running the program 228
13.3 Importing the Number Generator—further examples 229Picking random questions in the quiz app 230 ■ Using the between function in your guessing game 231
13.4 Importing multiple files 23213.5 Collisions—when imported code overwrites
your variables 234Variable collisions 236 ■ Minimizing collisions by using namespaces 237

CONTENTS xiii
13.6 Immediately invoked function expressions (IIFE) 238Recognizing function expressions 240 ■ Invoking functions 240Immediately invoking function expressions 241 ■ Returning information from an IIFE 241
13.7 The Crypt—organizing code into modules 242Sharing a namespace across modules 244
13.8 Summary 246
14 Models: working with data 24814.1 Building a fitness app—data and models 249
Defining a User constructor 250 ■ Getting a feel for the data as a JavaScript object 251 ■ Converting the data into a user model 252 ■ What’s next for the fitness app? 253
14.2 The Crypt—separating map data from the game 253Map data 255 ■ Adding challenges to the map data 256Updating the Place constructor to include challenges 258Using the map data to build a game map 258 ■ Bringing all the pieces together to run the game 262
14.3 Summary 263
15 Views: displaying data 26415.1 Building a fitness app—displaying the latest user
data 265Creating your first fitness app view 266 ■ Using modules to switch fitness app views 267 ■ What’s next for the fitness app? 268
15.2 The Crypt—moving view code from Player and Place 268Creating a view for players 269 ■ Creating a view for places 274
15.3 Talking to players—a message view 27815.4 Summary 279
16 Controllers: linking models and views 28016.1 Building a fitness app—controllers 281
What does the controller do? 281 ■ Building the fitness app controller 282 ■ Putting the pieces together for a working fitness app 283 ■ What’s next for the fitness app? 284
16.2 The Crypt—adding a game controller 284What does the controller do? 285 ■ Approaching the controller code 286

CONTENTSxiv
16.3 The Crypt—the structure of the controller code 28716.4 The Crypt—starting and stopping the game 287
Initializing the game 288 ■ Monitoring player health 288Updating the display—functions that use the view modules 289
16.5 The Crypt—giving commands and solving puzzles 290Picking up items with game.get 290 ■ Listing the properties of a challenge 291 ■ Moving with game.go 292Licking the leopard with game.use 294
16.6 The Crypt—running the game 29616.7 The Crypt—what’s next for the app? 29816.8 Summary 298
PART 3 JAVASCRIPT IN THE BROWSER.........................299
17 HTML: building web pages 30117.1 HTML, CSS, JavaScript—building a web page 302
Loading the layers 303 ■ Loading the layers in JS Bin 304
17.2 HTML—a very short introduction 304Starting with an empty page 305 ■ Adding some content 305Marking up a list 306 ■ Some common HTML elements 307
17.3 Adding content to a web page with JavaScript 309Getting an element by its id 310 ■ Function declarations 311What, no JavaScript? 311
17.4 Displaying data from an array 31117.5 The Crypt—displaying players and places with
web views 314Updating the player and place view modules—the render method 315 ■ Updating the player and place view modules—the listings 317 ■ Using JavaScript’s strict mode 318Loading modules and adding placeholders in the HTML 318Adding a touch of CSS 319 ■ Playing the game 320Preparing the message view 320
17.6 Summary 321
18 Controls: getting user input 32318.1 Working with buttons 324
Adding a button to a page 324 ■ Writing functions to update the greeting 325 ■ Listening for clicks 325

CONTENTS xv
18.2 Using a select element to choose an option 327Adding a select element to the page 328 ■ A function to rate movies and a button to call it 329
18.3 Reading user input with text boxes 330Adding a text box to the page 331 ■ Adding an unordered list to display the comments 332 ■ Getting references to the new elements 332 ■ Updating the rateMovie function 332Styling the examples with CSS 334
18.4 The Crypt—player commands via a text box 334Adding controls to the page 335 ■ Mapping text box entries to game commands 336 ■ Issuing orders with split, join, pop, and shift 336 ■ Deciding between options with switch 338Making it so—listening for button clicks 339Enter The Crypt 340
18.5 Summary 341
19 Templates: filling placeholders with data 34319.1 Building a news page—breaking news 344
Comparing the news item data and HTML 345 ■ Constructing the HTML by string concatenation 345 ■ Designing with HTML templates 346 ■ Using script tags for templates 346
19.2 Replacing one string with another 347Chaining calls to replace 348
19.3 While loops—replacing a string multiple times 349Repeating code while a condition is met 350 ■ The while loop 351 ■ Replacing a string while it can be found 352Replacing strings with regular expressions 353
19.4 Automating placeholder replacement for templates 353Matching template placeholders with object properties 353Filling all of the placeholders for each key 355 ■ Building a list of items using a template 355
19.5 Building a news page—news just in 357Creating the templates and data modules 357 ■ Importing the modules 359
19.6 The Crypt—improving the views 360Creating HTML templates for all of the views 361 ■ Updating the views to use the new templates 362 ■ Enter The Crypt 365
19.7 Summary 365
CONTENTSxvi
20 XHR: loading data 36720.1 Building a fitness app—retrieving user data 368
Locating the user data 368 ■ Loading the user data—an outline 370Loading the user data—the XMLHttpRequest constructor 370Loading the user data—parsing the XHR response with JSON.parse 372Loading JS Bin data—a handy function 373 ■ Building the fitness app 374 ■ The fitness app—what’s next? 376
20.2 JSON—a simple data format 377Converting JSON into objects and arrays with JSON.parse 378
20.3 The Crypt—loading a map on demand 378Specifying exits with JS Bin file codes 379 ■ Using a cache—load each place only once 380 ■ Replacing the Map Data and Map Builder modules with Map Manager 380 ■ Updating the game controller to use the Map Manager 383 ■ Building the game page 384 ■ Enter The Crypt 386
20.4 Summary 386
21 Conclusion: get programming with JavaScript 38721.1 Working locally with files 387
Writing code 388 ■ Saving files 388 ■ Opening your pages in a browser 390 ■ Concatenating and minifying files 390
21.2 Getting help 39121.3 What next? 392
The companion site 392 ■ Books 392 ■ Sites 392Practice makes permanent 392
21.4 Summary 393
22 Node: running JavaScript outside the browseravailable online at www.manning.com/books/get-programming-with-javascript
23 Express: building an APIavailable online at www.manning.com/books/get-programming-with-javascript
24 Polling: repeating requests with XHRavailable online at www.manning.com/books/get-programming-with-javascript
25 Socket.IO: real-time messagingavailable online at www.manning.com/books/get-programming-with-javascript
index 395

forewordWhen John emailed me to ask if I would write a foreword for Get Programming withJavaScript, I have to admit the main thing that got me on the hook was that he hadused JS Bin throughout the book to let readers try out live demos. JS Bin was createdin 2008 as a place for programmers to collaborate, test, debug, experiment, and share.Education is close to JS Bin’s heart, so John’s background as a teacher and his practi-cal approach seemed like a great fit with its ethos and purpose. I’m a firm believerthat getting your hands dirty with real code is a great way to learn, and being encour-aged to create, extend, play, and rewrite, all in a safe, no-mistakes-barred space,looked like a good idea for a beginners’ programming book.
As the developer of JS Bin, an application created with JavaScript, I’m alwaysexcited to see JS Bin being used to teach beginners, and that’s exactly what John doeswith this book. It goes without saying that different people in different contexts takedifferent lengths of time to learn programming. But they all benefit from a practicalapproach. JS Bin, as a free resource requiring no installation, provides an instantlyaccessible environment in which to learn, and this book provides the guidance to getstarted, the support to keep practicing, and the encouragement to enjoy the adventure.
I remember seeing object dot notation well over 10 years ago and wondering how Iwas supposed to Google “What does . mean?” If I’d had John’s gentle and thoroughintroduction to JavaScript back then, I would have saved myself a lot of pain wadingthrough many failed search attempts! He doesn’t cover everything, but he takes histime with key concepts, showing patience and consideration for readers and encour-aging them to stretch their knowledge and build their skills. The variety of examples
xvii

FOREWORDxviii
really helps; there’s lots to get your teeth into, but also plenty of support and sugges-tions for further practice. Don’t get lost in The Crypt—trust your guide. It builds into asubstantial project and should help you see how little pieces can make big apps.
I’ve had the privilege of creating a number of tools for the programmer commu-nity, and a number of JavaScript tools in particular. Programming lets us make thingsfor fun, for profit, and for others, and it’s wonderful to welcome newcomers to thefold; who knows what great ideas they’ll have as they build the next big thing (or the nextsmall thing!)? I’m thrilled that their first steps on such an exciting path will be onJS Bin. Welcome! Create bins for your code, tinker, share, and build up your bank ofmodules. Get Programming with JavaScript shows you how to manage your code bins andcombine them into bigger projects. (You even get to play with the HTML and CSSpanels on JS Bin!)
Enjoy the book, dear reader. I expect that by the end of it, you’ll have a firm graspof how to write JavaScript.
REMY SHARP
FOUNDER OF JS BIN

prefaceI started programming using the BASIC language on a Commodore VIC-20 in 1982. Ithad 3.5 KB of RAM, and programming involved me copying a program from a maga-zine, instruction by instruction and line by line. The process was time-consuming anderror-prone, but it certainly built focus and attention to detail! Rather than cut-and-paste, it was read-and-type; but eventually, the program was transferred from theprinted page to the computer’s memory. Then the moment of truth … and alas, itnever worked the first time. And that’s where my learning really began.
Staring at the code, trying to make sense of the instructions and follow the flow ofthe program as it jumped from line to line, I had to think carefully and patiently aboutwhat was going on. Not everything made sense—sometimes squeezing a program into3.5 KB required some seriously supple code gymnastics—but, bit by bit, the program’ssecrets would start to reveal themselves. Sometimes my typos stopped the program fromrunning; sometimes there were mistakes in the code itself. Most of the time, but notalways, I eventually got the program to run.
Half the time, the program would turn out to be rubbish! I’d reach out and hitthe VIC-20’s off switch, and the program would be gone forever. (It took five minutesand a cassette-tape recorder to save, and some programs just weren’t worth it.) Iwasn’t usually upset, and I didn’t see it as a waste of time; from the start, I was amazedby the transformation of text into a working program (even a rubbish one) on thecomputer screen.
Today, in 2016, with our smartphones, tablets, drones, and AI Go champions, thatsense of wonder has grown even stronger. Programming is magical and transformative.
xix

PREFACExx
Even knowing how it works, I still love how my typed instructions turn into a workingwebsite, a fun game, or a useful utility.
As a teacher in the United Kingdom, I’m privileged to be able to teach 16- and17-year-olds programming. My philosophy is to let them get programming from lessonone: to enter code and see the result as soon as possible. I want them to be curiousand experiment at all times. It’s great to see their eyes widen and their smiles grow asthey start their adventures in code and realize they can convert imagination into real-ity. Online code-editing environments such as JS Bin allow them to quickly try outideas and build projects piece by piece. They don’t learn a long list of language fea-tures before beginning; they learn a few concepts at a time, often in response to gettingstuck but also directly from me (they don’t know what they don’t know), and they prac-tice and experiment before moving on. Their skills build day by day and week by week,and code that might have seemed like cryptic hieroglyphs at the start of the coursebecomes second nature by the end. It’s great to be a part of that learning process.
In addition to being a teacher, I’m also a programmer and develop educationapplications, including ones for organizing, sharing, and booking resources; creatingonline handbooks; planning lessons; managing timetables; and generating quizzes.It’s great to see people using the applications as part of their day-to-day work; I’mlucky to understand the target audience, being one of them myself, and to see first-hand my applications used over an extended period—that’s great feedback!
I’ve reviewed a number of book manuscripts for Manning. Having seen my biodescribing me as a programmer and a teacher, Manning suggested that I write a bookof my own. Get Programming with JavaScript is my attempt at translating my approach toteaching programming into book form. It’s packed with code listings to get you think-ing about the concepts as you progress, and there are plenty of exercises and supple-mentary materials online, as detailed shortly. I hope it fires your imagination and getsyou started on your own programming adventures. Good luck, and have fun!

acknowledgmentsThank you to Robin de Jongh at Manning for suggesting I write a book and to my edi-tor Helen Stergius for her patience, advice, and support throughout the writing pro-cess. Thanks also to all of the people who reviewed the book and provided excellentfeedback to make it better, including Philip Arny, Dr. Markus Beckmann, RocioChongtay, Sonya Corcoran, Philip Cusack, Alvin Raj, Conor Redmond, Ivan Rubelj,Craig Sharkie, and Giselle Stidston; in particular, thanks to Ozren Harlovic, ChuckHenderson, Al Sherer, Brian Hanafee, and Romin Irani for their attention to detail,honest reactions, and constructive suggestions.
I’d also like to thank Remy Sharp, the creator of JS Bin, for responding to my ques-tions and requests quickly and positively, for being kind enough to agree to write theforeword for this book, and for creating JS Bin!
Finally, I want to thank the people at Manning who made this book possible: pub-lisher Marjan Bace and everyone on the editorial and production teams, includingJanet Vail, Mary Piergies, Tiffany Taylor, Linda Recktenwald, Dennis Dalinnik, ElizabethMartin, Bonnie Culverhouse, and many others who worked behind the scenes.
xxi

about this bookGet Programming with JavaScript is a book for beginners, for those with no programmingexperience. It makes extensive use of online code listings on the JS Bin website, asandbox where you can experiment with the code and see the results instantly. There’sno setup or installation required; if you’ve got internet access, you can just get pro-gramming straight away. If you don’t have internet access, don’t worry, the printed list-ings include helpful annotations, and all the ideas are explained in the text.
In addition to shorter examples to illustrate the concepts covered, there is anongoing example—a text-based adventure game called The Crypt—that you build asyou progress through the book.
Who should read this bookIf you are happy working with computers, using a variety of applications, and savingand organizing your files but haven’t written programs before and would like to learnhow, then this book is for you. It doesn’t try to cover all of JavaScript, or even all partsof JavaScript; it helps you to get programming with lots of practical examples andexercises that encourage you to think and explore. If you’re already a programmerand are looking for a complete JavaScript reference, then move along. But if youwant a patient introduction to the language, then it’s worth sticking around; a strongunderstanding of the basics will make it much easier to access some of the other excel-lent books for programmers.
xxii

ABOUT THIS BOOK xxiii
RoadmapGet Programming with JavaScript has 21 printed chapters; an additional four chaptersare available online only from the publisher's website at www.manning.com/books/get-programming-with-javascript. The book makes extensive use of code listings andexercises, with successive examples building on previous work. I recommend you readit in order, trying out the examples and exercises online and taking time to under-stand the ideas presented.
Part 1 covers some of the core concepts of programming with JavaScript. It sticksto using the text-based Console panel on JS Bin, letting you focus on the JavaScriptand not worry about web pages and HTML:
■ Chapter 1 looks at programming and programming with JavaScript in particularbefore introducing JS Bin, a website where you can get programming right away,and The Crypt, a text-based adventure game that you build as you progressthrough the book.
■ Chapter 2 describes variables, a way of labeling and using values in your pro-grams. Your variables can hold different types of values, like numbers or text,but their names must follow certain rules.
■ In chapter 3 you learn how to group values into objects. Just like a first-aid kit canbe passed around as a single object and its contents accessed only when needed,JavaScript objects can be treated as a single item and their properties accessedwhen required.
■ Functions are central to JavaScript, helping you to organize your code and exe-cute sets of instructions on-demand and multiple times. They are introducedover four chapters, chapters 4 to 7, so that you get a firm grasp of how to definethem and use them, how to pass data to them and from them, and how theywork beautifully with objects.
■ Chapter 8 shows you how to create ordered lists, or arrays, of values. Whetherthey hold blog posts, calendar events, users, functions, or movie reviews, listsare very common in programming, and you learn how to create them andaccess, manipulate, and remove their items.
■ Objects are at the heart of JavaScript, and programs often create many objects;a calendar could have thousands of events and an adventure game dozens oflocations, for example. Constructor functions are a way of streamlining the cre-ation of many similar objects, and chapter 9 investigates why they’re useful andhow you define them and use them.
■ In chapter 10 you meet square bracket notation, an alternate method of access-ing the values stored in JavaScript objects. Armed with this more flexible wayof getting and setting object properties, you write some example programsthat can cope with unpredictable values that may appear in external data oruser input.

ABOUT THIS BOOKxxiv
Having covered some key, core concepts in part 1, you learn how to better organizeyour code in part 2:
■ Chapter 11 discusses the dangers of global variables, variables that can be seenthroughout a program, and the benefits of local variables, variables definedinside functions. Along the way, you consider who might use your code and thedifference between an interface and an implementation.
■ If you want to find out about conditions, then chapter 12 is the place to go. Onlyexecuting code if a condition is met adds flexibility to your programs and letsyou check input from users before using it.
■ As your programs grow, it usually makes sense to organize the pieces that makethem up into modules, separate files that can be combined and swapped toimprove versatility, focus, portability, and maintainability. Chapter 13 considersways of modularizing your code, including namespaces and the snappily titledimmediately invoked function expressions.
■ Having learned techniques for creating modules, in chapters 14, 15, and 16 yousee three different roles that modules might play. Models help you work withdata (calendar events, blog posts, or movie reviews, for example); views presentthat data to the user (as text, HTML, or a graph, for example); and controllerswork with the models and views, responding to user actions and updating themodels before passing them to the views for display.
Part 3 covers using JavaScript to update web pages and respond to user input via but-tons, drop-down lists, and text boxes. It also introduces templates for displaying repet-itive, dynamic data, and techniques for loading that data into an existing page:
■ Chapter 17 has a brief introduction to HyperText Markup Language (HTML), away of specifying the structure of your content in a web page (headings, para-graphs, or list items, for example) and of loading further resources like images,videos, scripts, and style sheets. It then shows how you can use JavaScript toaccess and update a page’s content.
■ In order to capture user input, you need to use HTML controls, like buttons,drop-down lists, and text boxes. Chapter 18 demonstrates how to set up codethat can work with user input and that the program executes when a user clicksa button.
■ Templates offer a way to design the presentation of data by using placeholders. Inchapter 19 you learn how to include HTML templates in a page and replacetheir placeholders with data. You avoid the confusing mess of JavaScript, HTML,and data all mixed together and create a neat, clear way of populating a webpage with nicely formatted information.
■ Chapter 20 explains how to load further data into a web page by usingXMLHttpRequest objects. Commonly referred to as Ajax, the techniques let youupdate parts of a page with fresh data in response to user actions, leading tomore responsive applications.

ABOUT THIS BOOK xxv
■ Chapter 21 wraps up everything in the printed book, discussing text editors andintegrated development environments and how to organize your own files whencreating projects away from JS Bin. It also suggests sources of further learningabout JavaScript and wishes you well on your programming adventures.
Chapters 22–25 are available online only, at www.manning.com/books/get-programming-with-javascript. They’re more advanced and cover programming on the server withNode.js and Express.js, polling the server with XHR, and real-time communication withSocket.IO.
About the codeThis book contains many examples of source code both in numbered listings and inline with normal text. In both cases, source code is formatted in a fixed-width fontlike this to separate it from ordinary text. Sometimes code is also in bold to high-light code that has changed from previous steps in the chapter, such as when a newfeature adds to an existing line of code.
In many cases, the original source code has been reformatted; we’ve added linebreaks and reworked indentation to accommodate the available page space in thebook. In rare cases, even this was not enough, and listings include line-continuationmarkers (➥). Additionally, comments in the source code have often been removedfrom the listings when the code is described in the text. Code annotations accompanymany of the listings, highlighting important concepts.
Most of the code listings in the book include a link to the same code on the JS Binwebsite, where you can run the code and experiment with it. The code is also availableon GitHub at https://github.com/jrlarsen/getprogramming and on the book’s Man-ning.com page at www.manning.com/books/get-programming-with-javascript.
Other online resourcesThe book’s website at www.room51.co.uk/books/getprogramming/index.html includesanswers to many of the book’s exercises as well as video tutorials, further articles andguides for learning JavaScript, and links to other resources on the Internet.
About the authorJohn Larsen is a mathematics and computing teacher with an interest in educationalresearch. He has an MA in mathematics and an MSc in information technology. Hestarted programming in 1982, writing simple programs for teaching mathematics in1993, building websites in 2001, and developing data-driven web-based applicationsfor education in 2006.
Author OnlinePurchase of Get Programming with JavaScript includes free access to a private web forumrun by Manning Publications where you can make comments about the book, asktechnical questions, and receive help from the author and from other users. To access

ABOUT THIS BOOKxxvi
the forum and subscribe to it, point your web browser to www.manning.com/books/get-programming-with-javascript. This page provides information on how to get onthe forum once you are registered, what kind of help is available, and the rules of con-duct on the forum.
Manning’s commitment to our readers is to provide a venue where a meaningfuldialog between individual readers and between readers and the author can take place.It is not a commitment to any specific amount of participation on the part of theauthor, whose contribution to the Author Online remains voluntary (and unpaid). Wesuggest you try asking the author some challenging questions lest his interest stray!The Author Online forum and the archives of previous discussions will be accessiblefrom the publisher’s website as long as the book is in print.

Part 1
Core conceptson the console
Get Programming with JavaScript starts by introducing the key concepts youuse in every program. The ideas presented form the foundation for all the subse-quent code you write. The discussion starts gently and takes its time, with plentyof examples. There is an overarching theme of organization, which runs through-out the book; you see how to store and retrieve values with variables, group val-ues with objects and arrays, and group instructions with functions.
By the end of part 1, you’ll have built a working version of an adventure gamecalled The Crypt. Players will be able to explore a map of locations and move fromroom to room and tomb to tomb, collecting treasure. Chapter 1 sets the scene,introducing programming, JavaScript, and JS Bin, the online code environment inwhich your adventures take place. Let the games begin!


Programming,JavaScript, and JS Bin
Get Programming with JavaScript is a practical introduction to programming. Throughhands-on code samples coupled with carefully paced explanations, supportingvideo tutorials, and a variety of examples, this book will help you build knowledgeand skills and get you on your way to coding expertise.
This chapter sets the scene with a brief overview of programming and program-ming with JavaScript and then an introduction to JS Bin, the online programmingsandbox you’ll be making full use of while you learn. Finally, you’ll meet The Crypt,our ongoing context for the concepts covered in the book.
1.1 ProgrammingProgramming is about giving the computer a series of instructions in a format itunderstands. Programs are everywhere, running Mars rovers, the Large HadronCollider, engine management systems, financial markets, drones, phones, tablets,
This chapter covers■ Programming■ JavaScript■ JS Bin■ Our ongoing example: The Crypt
3

4 CHAPTER 1 Programming, JavaScript, and JS Bin
TVs, and medical equipment. The power and versatility of programs are astonishing.Programs can be a few lines long or millions of lines long, with complex solutionsbuilt from simple building blocks.
Deep down in a computer’s electronics is a land of binary, counters, registers, bus-ses, and memory allocation. There are low-level programming languages that let uswork in that land, known as machine code and assembly language. Luckily for us,high-level languages have been created that are much easier to read, follow, and use.We can write code that’s almost understandable by anyone; here’s some pretend code(pseudocode) that’s close to what high-level languages allow:
increase score by 100if score is greater than 5000 print "Congratulations! You win!"otherwise load new level
Different languages set out how you might write such code; some use more symbolsthan others, some more natural words. Here’s how it might look in JavaScript:
score = score + 100;if (score > 5000) { alert("Congratulations! You win!");} else { loadNewLevel();}
The parentheses and curly braces and semicolons are all part of the language’s syntax, itsrules for setting out the code so it can be understood by the computer. The code youwrite will be automatically translated into low-level code for the computer to execute.
In the previous JavaScript snippet is the instruction loadNewLevel();, to load anew level in the game, presumably. Somewhere else in the program will be more codewith instructions outlining, step-by-step, how to load a new level. Part of the art of pro-gramming is breaking larger programs into smaller pieces that perform specific jobs.The smaller pieces are then combined to fulfill the purpose of the main program.
There are many, many programming languages. Some you may have heard of areJava, C, PHP, Python, and Swift. Let’s take a look at why you might choose JavaScript.
1.2 JavaScriptJavaScript is an incredibly popular programming language, mostly seen in web brows-ers but gaining popularity in other contexts. On web pages it adds interactivity, fromsimple animation effects to form validation to full-blown single-page applications.Servers—programs that make files, web pages, and other resources available on theinternet—are now written using JavaScript with Node.js. Other programs can bescripted with JavaScript, like Photoshop and Minecraft, and some databases storeJavaScript and let you query data with JavaScript. And as more and more network-enabled objects are added to the Internet of Things, JavaScript is becoming morepopular for programming sensors, robots, drones, and Arduino-style electronics.

5JS Bin
Learning to program gives you a great skill that’s versatile, useful, stimulating, cre-ative, fun, rewarding, and in demand. Learning to program with JavaScript puts oneof the world’s most widely used languages at your fingertips, letting you develop appli-cations for all manner of uses, devices, platforms, and OSes.
1.3 Learning by doing and thinking
Learning follows thinking. The philosophy of Get Programming with JavaScript is that byexperimenting with programs in an online sandbox, finding out firsthand what worksand what doesn’t, and by attempting challenges, you’ll have to think carefully aboutthe concepts in each chapter. That thinking will lead to understanding and learning.
The sandbox lets you run programs and get instant feedback. Sometimes the feed-back will be unexpected and force you to question what you thought you knew. Someideas may click into place quickly whereas others could take longer; careful consider-ation and further experimentation may be needed. Curiosity, commitment, and resil-ience are key attitudes when learning anything, and they’ll certainly help you to be abetter programmer.
That’s not to say learning to program will be a chore! Far from it. Even after morethan 30 years of programming, I still find the transformation of code into a usefuland/or fun application to be almost magical. That lines of simple statements, whencombined, can accomplish such a variety of outcomes is astonishing. And seeing oth-ers use something you’ve created to be more productive or more organized or just tohave more fun is a privilege and a pleasure.
So be prepared for an adventure of discovery, and don’t be disheartened if youfind some concepts tricky at first. Take your time, do the exercises, and don’t forgetthe resources on the Get Programming with JavaScript website; it has links to listings,solutions, videos, and further reading at www.room51.co.uk/books/getProgramming/index.html. Learning to program is worth the effort.
1.4 JS Bin
JavaScript is most commonly run by a web browser. The browser loads a web pagefrom a server, and that page may include JavaScript code or a link to code the browserthen fetches. The browser steps through the code, executing the instructions. For part1 of Get Programming with JavaScript, you avoid the extra considerations of writing andloading web pages and linking to code files. You keep your focus on the JavaScript lan-guage itself. To do that, you make use of JS Bin, a free online service.
JS Bin is an online sandbox for developing and sharing web pages and JavaScriptprograms. All of the code listings in this book are available on JS Bin (www.jsbin.com)to give you hands-on practice with the code and to let you experiment and learn.
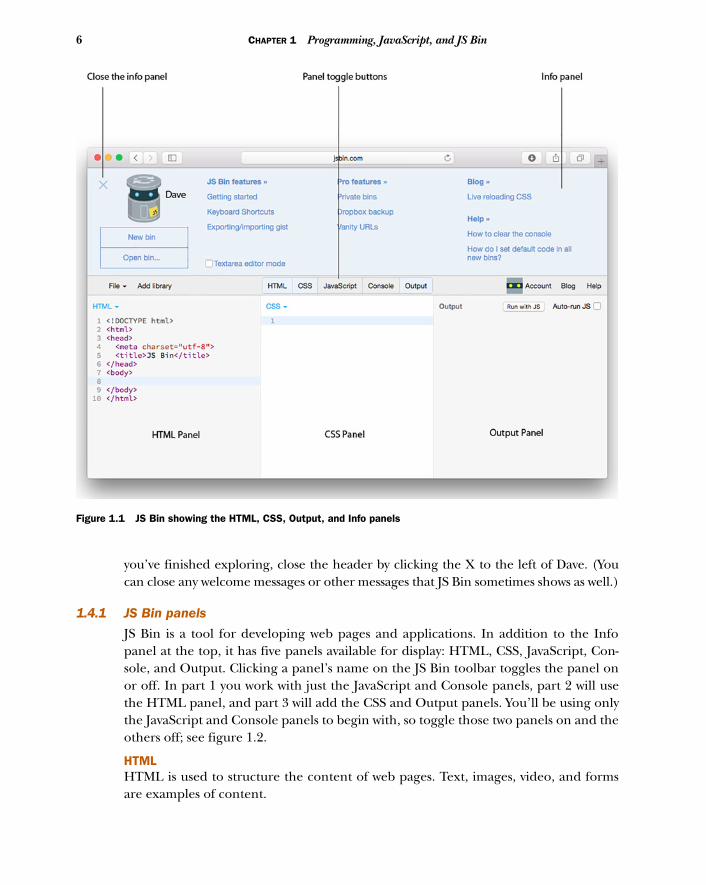
When you first visit the site, you’ll see a header section with a picture of Dave theBinBot and some helpful links to get you started, as shown in figure 1.1. Feel free toexplore, but don’t be put off by any complicated information you might find. Once
6 CHAPTER 1 Programming, JavaScript, and JS Bin
you’ve finished exploring, close the header by clicking the X to the left of Dave. (Youcan close any welcome messages or other messages that JS Bin sometimes shows as well.)
1.4.1 JS Bin panels
JS Bin is a tool for developing web pages and applications. In addition to the Infopanel at the top, it has five panels available for display: HTML, CSS, JavaScript, Con-sole, and Output. Clicking a panel’s name on the JS Bin toolbar toggles the panel onor off. In part 1 you work with just the JavaScript and Console panels, part 2 will usethe HTML panel, and part 3 will add the CSS and Output panels. You’ll be using onlythe JavaScript and Console panels to begin with, so toggle those two panels on and theothers off; see figure 1.2.
HTMLHTML is used to structure the content of web pages. Text, images, video, and formsare examples of content.
Figure 1.1 JS Bin showing the HTML, CSS, Output, and Info panels

7JS Bin
CSSCascading Style Sheets let you specify how your content should be presented. You candefine background color, font details, margins, sizes, and so on.
JAVASCRIPT
JavaScript lets you add behavior and interactivity to your web pages. Or you can use itto write programs not in the context of a web page.
CONSOLE
The console can be used by a program to display information for users and develop-ers. Warnings and errors about a program may be shown here. The console is interac-tive; you can type into it to find out about the state of a program. It’s not normallyused in finished applications, but you’ll make good use of it as a quick and simple wayof interacting with your programs as you learn.
OUTPUT
The Output panel shows a preview of the web page defined in the HTML, CSS, andJavaScript panels. It shows what a visitor to a page would normally see in a browser.
1.4.2 Following the code listings on JS Bin
You’ll write programs by adding lines of code to the JavaScript panel on JS Bin. Theprograms will start simply and slowly increase in complexity as you cover more fea-tures of the language. For most of the code listings in part 1 of the book, you can testthe code on JS Bin by following these steps:
1 Select New on the File menu on JS Bin.2 Toggle the panels so that the JavaScript and Console panels are visible.3 Enter code in the JavaScript panel.4 Click Run.5 Check the result on the Console panel.
Figure 1.2 JS Bin showing the JavaScript and Console panels.

8 CHAPTER 1 Programming, JavaScript, and JS Bin
Figure 1.3 shows the steps on a screenshot from JS Bin. Most of the listings in the book also have a link to the same code on JS Bin. The
listings on JS Bin include extra information and exercises related to the code, dis-cussed further in sections 1.4.4 and 1.4.5.
1.4.3 Logging to the console
At various points you want programs to output information by displaying it on theConsole panel. To display information on the console, use the console.log com-mand. Running the program in this listing displays the following on the console:
> Hello World!
console.log("Hello World!");
You place the message to be displayed between quotation marks, within the parentheses. Notice that the listing title contains a JS Bin link. Click the link to see the live code
on JS Bin. To execute the code in the JavaScript panel, click the Run button at the topof the Console panel. You’ll see your message, “Hello World!”, appear on the console.
Listing 1.1 Using console.log to display information (http://jsbin.com/mujepu/edit?js,console)
Figure 1.3 The steps for running JavaScript on JS Bin

9JS Bin
Try clicking Run a few more times. Every time it’s clicked, your code is executedand “Hello World!” is logged to the console. You can click Clear to clear all the mes-sages from the console.
When following links to code on JS Bin, the program may run automatically. Youcan switch off auto-run in your preferences on JS Bin if you sign up for an account.
1.4.4 Code comments
Along with the code statements, the JS Bin listings for this book include comments, textthat’s not part of the program but is useful for explaining what the code does. Here’sthe first block comment from listing 1.1 on JS Bin:
/* Get Programming with JavaScript * Listing 1.1 * Using console.log */
As well as block comments, which can span multiple lines, you’ll sometimes see single-line comments:
// This is a single-line comment
On JS Bin, the comments are usually shown in green. Programmers add comments totheir code if they feel it needs some explanation to be understood by other program-mers. When a program is executed, the computer ignores the comments.
1.4.5 Further Adventures
Most code listings for Get Programming with JavaScript on JS Bin come with a small setof exercises, called Further Adventures, included as comments after the code. Someare easy, some are repetitive, and some are challenging. The best way to learn pro-gramming is to program, so I urge you to jump in and try the challenges. You canget help on the Manning Forums, and solutions to many of the tasks are given onthe book’s websites at www.manning.com/books/get-programming-with-javascript andwww.room51.co.uk/books/getProgramming/index.html.
1.4.6 Error messages
As you add code to the JavaScript panel, JS Bin is continuously checking for errors.You’ll see a red error section appear at the bottom of the JavaScript panel. Don’tworry about it until you’ve finished adding a line of code. If the error section is stillthere, click it to see the error messages.
For example, try deleting the semicolon from the end of the line of code in list-ing 1.1. Figure 1.4 shows the error that JS Bin displays in response to the deletedsemicolon.

10 CHAPTER 1 Programming, JavaScript, and JS Bin
The semicolon signals the end of a line of code. Each line of code, ending with a semi-colon, is called a statement. If you stop typing but the line does not end with a semico-lon, JS Bin will complain. The program may still run, and JavaScript will try to insertsemicolons where it thinks they should go, but it’s much better practice to put thesemicolons in yourself; the errors in JS Bin are encouraging good practice.
JS Bin does its best to give error messages that help you fix any problems. Deletemore characters, one by one, from the end of your line of code and watch as the errormessages update.
1.4.7 Line numbers
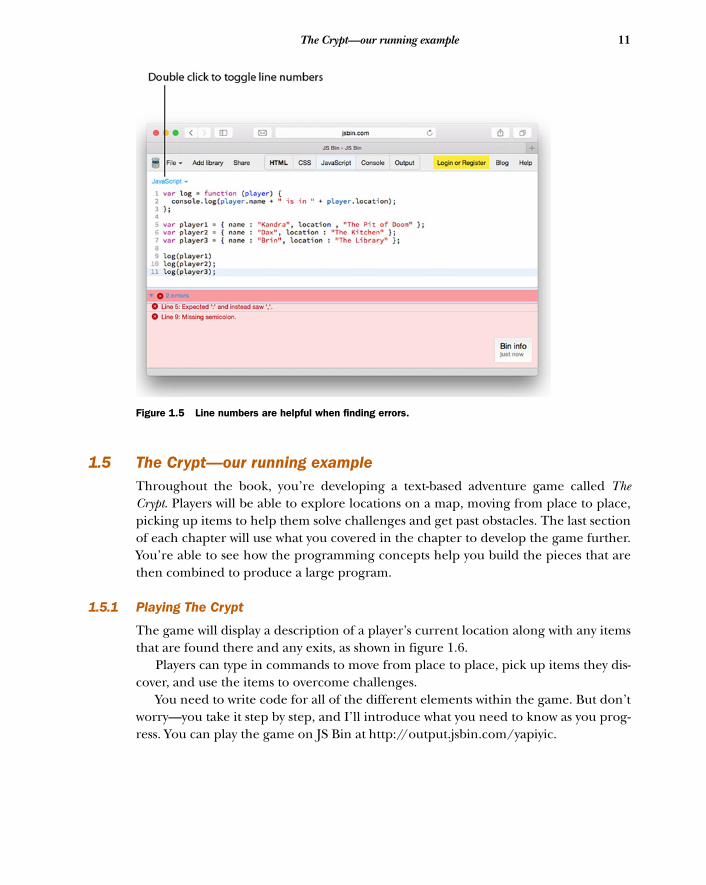
The error message in figure 1.4 told you the line number where the error occurred.You had only one line of code, so the error was on line 1. Programs can get quite long,so it’s helpful to have line numbers you can see. You don’t add line numbers by hand;your text editor, in this case JS Bin, does that automatically. They’re not part of theprogram; they help you while writing and testing the code. Figure 1.5 shows a longerprogram with a couple of errors. Don’t worry about understanding the code for now,but see if you can spot the errors reported by JS Bin in the figure. Without the linenumbers it would be much harder, especially if the program were longer.
To toggle the display of line numbers on JS Bin, double-click the word JavaScript atthe top left of the JavaScript panel (see figure 1.5). A menu will open and close as youdouble-click, but the line numbers should switch from hidden to visible (or vice versa)as well. You can also switch on line numbers in your JS Bin profile, if you’ve registered.
1.4.8 Get an account
It’s worth signing up for a free account on JS Bin. Your work will be saved and you’llbe able to set a lot more preferences. As you start to write your own programs, it’s agreat place to try out your ideas and get immediate previews and feedback.
Figure 1.4 The JS Bin error section (closed and then open)
11The Crypt—our running example
1.5 The Crypt—our running exampleThroughout the book, you’re developing a text-based adventure game called TheCrypt. Players will be able to explore locations on a map, moving from place to place,picking up items to help them solve challenges and get past obstacles. The last sectionof each chapter will use what you covered in the chapter to develop the game further.You’re able to see how the programming concepts help you build the pieces that arethen combined to produce a large program.
1.5.1 Playing The Crypt
The game will display a description of a player’s current location along with any itemsthat are found there and any exits, as shown in figure 1.6.
Players can type in commands to move from place to place, pick up items they dis-cover, and use the items to overcome challenges.
You need to write code for all of the different elements within the game. But don’tworry—you take it step by step, and I’ll introduce what you need to know as you prog-ress. You can play the game on JS Bin at http://output.jsbin.com/yapiyic.
Figure 1.5 Line numbers are helpful when finding errors.

12 CHAPTER 1 Programming, JavaScript, and JS Bin
1.5.2 Steps for building The Crypt
In part 1, while learning some of the core concepts in JavaScript, you write code torepresent the players and the places in the game and to let players move from placeto place and pick up items they find. Figure 1.7 shows the components that you’ll cre-ate for Players, Places, Maps, and the Game as a whole. Don’t worry about all of theterms in the figure—you’ll cover them in detail as you progress through the book.
Figure 1.6 Playing The Crypt
player variables
Players
a player object
showing player info
player items
Player Constructor
Places Maps
place objects
place items
place exits
Place Constructor
showing place info
linking places via exits
Game
render
get
go
Figure 1.7 Game elements in The Crypt for part 1

13The Crypt—our running example
A similar figure will be used in each chapter to highlight the ideas being discussed inthe context of the whole game.
Both parts 1 and 2 will use the console on JS Bin to display game information andto accept input from users. Table 1.1 shows how the game elements correspond to theJavaScript being covered in part 1.
Part 2 adds challenges for players, blocking exits until the players use appropriateitems to solve the puzzles. The programming focus is more about organizing yourcode, hiding how it works, checking user input, and building modules that you canreuse and swap to make the project more flexible.
Figure 1.8 shows how the game is split into modules for map data, constructorsthat you use to create players and places, views for displaying information on the con-sole, and a controller for running the game and linking all of the pieces. Again, thefigures are presented here to give a sense of what to expect and how the full game is
Table 1.1 Game elements and JavaScript in part 1 of The Crypt
Game element Task JavaScript Chapter
Players Deciding on the information we need to know about each player
Variables Chapter 2
Collecting player information in one place
Objects Chapter 3
Displaying information about players on the console
Functions Chapters 4–7
Creating a list of items collected by each player
Arrays Chapter 8
Organizing player creation code Constructors Chapter 9
Places Creating lots of places to explore, all with a similar structure
Constructors Chapter 9
Joining places with exits Square bracket notation Chapter 10
Game Adding simple functions for movement, collecting items, and displaying infor-mation
Square bracket notation Chapter 10
Maps Joining places with exits Square bracket notation Chapter 10

14 CHAPTER 1 Programming, JavaScript, and JS Bin
made up of smaller building blocks—you’re not expected to understand all of theterms at this point. You are allowed to be curious and excited! Each building block willbe fully explained over the next 400 pages; take your time to explore the concepts andplay with the code.
Part 3 updates the display to use HTML templates, modifies the game to load datawhile it’s running, filling the templates with player and place information, and intro-duces text boxes and buttons so that players can enter commands via a web page (fig-ure 1.9).
Part 4, available online, shows how game data can be stored on a server using Node.js.
1.6 Further examples and practiceAlthough The Crypt is our ongoing context for learning JavaScript, each chapterincludes other examples to show you concepts at work in a variety of situations. Someof the smaller examples will also be developed as you progress, letting you see how the
Player
Place
playerView
placeView
messageView
Controller
Utility
spacer
Map data
Map builder
Map
Model Constructors
Views
Controller
Figure 1.8 Game elements in The Crypt for part 2
playerView
placeView
messageView
Map
Map Manager
Templates
Bin Data
Utilities - gpwj Player
Place
Model Constructors
Views
Controller
Controller
Commands
Figure 1.9 Game elements in The Crypt for part 3
15Summary
new concepts help to improve the examples. In particular, you’ll look at a quiz app, afitness-tracking app, a movie ratings web page, and a news headlines page.
1.7 Browser supportBrowsers are evolving all of the time. Some of the JavaScript listings in Get Program-ming with JavaScript may not work in older browsers (Internet Explorer 8 and earlier,for example). The discussions on the book’s website will provide alternative meth-ods to get code working for browsers that aren’t happy with the main methods shownin the listings.
1.8 Summary■ Programs are sets of instructions for computers to follow.■ High-level languages let us write instructions that are easier to read and
understand.■ JavaScript is one of the most widely used programming languages in the world.
Associated most strongly with adding interactivity to web pages, it’s also used inserver-side programming, as a scripting language for applications, and as a wayof programming robots and other devices.
■ Learning follows from thinking. So, get involved in the practical examples inthe book and be curious, committed, and resilient.
■ JS Bin, an online code sandbox, will help you to focus on the JavaScript andgive quick feedback as you experiment and practice.
■ Our main running example is The Crypt. It gives you a context for learning pro-gramming concepts and for building a relatively complicated program fromsimple elements.
■ Further examples will help you to gain depth through breadth and to appreci-ate how the concepts you learn are applied in a wider variety of situations.

Variables: storing datain your program
Get Programming with JavaScript has been written as a gentle introduction to pro-gramming. This chapter, then, is a gentle introduction to a gentle introduction. Asfar as adventures go, you hardly leave the house. You can think of it as the packingstage for your journey, vitally important—you don’t want to get to the airport withoutyour passport or to the Oscars without your selfie stick—but not the main event.
Almost without exception, programs store, manipulate, and display data. Whetheryou’re writing a system for blogging, analyzing engine performance, predicting theweather, or sending a probe to land on a comet in 10 years’ time, you need to con-sider the data you’ll use and what kinds of values that data might take. To work withdata in your programs, you use variables.
This chapter covers■ Storing and using information with variables■ Declaring variables■ Assigning values to variables■ Displaying variable values on the console
16

17Declaring variables and assigning values
2.1 What is a variable?A variable is a named value in your program. Whenever you use the name in the pro-gram, it’s replaced with the value. You could create a variable called score and give itthe value 100. Then, if you tell the computer to “display the score,” it will display 100.Now, variables can change, hence the name, so later in the program, maybe inresponse to some action a player takes, you can update the score. If you add 50 toscore and tell the computer to “display the score,” it will now display 150.
So how can you use JavaScript to make this magic happen?
2.2 Declaring variables and assigning valuesLetting the computer know about information you’d like to store requires two steps:
1 You need to set a name you can use to refer to your data in the program, like scoreor playerName or taxRate.
2 You need to link the name with the value you want to store: something like set scoreequal to 100 or make ‘George’ the playerName or let the tax rate be 12%.
In section 2.2.3, you’ll see how both steps, giving a variable a name and giving it avalue, can be completed in a single JavaScript statement. For now, you take thingsslowly and use a separate statement for each step.
2.2.1 Declaring variables
You’ve been dreaming of making it big with your design for the next mobile appcraze, The Fruitinator! Players are sent back in time to splat fruit with their Smoothie9mm, racking up record scores as they go. Your program needs to track those scores.That means setting up a variable.
Registering a name to represent a value is called variable declaration. You declare avariable by using the var keyword. The following listing shows the code statementneeded to declare a variable called score.
var score;
The var keyword tells the computer to take the next word in the statement and turn itinto a variable. Figure 2.1 annotates the code statement from listing 2.1.
Listing 2.1 Declaring a variable (http://jsbin.com/potazo/edit?js,console)
var score;
The var keyword
You choose the variable name
End each statementwith a semicolon
Figure 2.1 Declaring a variable

18 CHAPTER 2 Variables: storing data in your program
That’s it! You’ve declared a variable called score ready for some splatted fruit action.It’s the very first line of a fruit-based system that might just destroy humanity. Let’sstart scoring points.
2.2.2 Assigning values to variables
Your program now knows about the variable score. But how do you assign it a value?You use the humble equals symbol, =. (Actually, in JavaScript, it’s not so humble. Itturns up all over the place, performing a number of important jobs. A smooth opera-tor.) Figure 2.2 illustrates the equals symbol at work, with listing 2.2 showing its usein context.
var score; score = 100;
You assign the variable score the value 100. In general,you assign the value on the right of the equals sign tothe variable on the left of the equals sign (figure 2.3).When you use the equals sign to assign a value,JavaScript gives it a special name, the assignment operator.
You have declared a variable and assigned it avalue. It’s time to display it on the console. The out-put of the following listing should look somethinglike this:
> 100
var score;score = 100;console.log(score);
Listing 2.2 Assigning a value to a variable (http://jsbin.com/yuvoju/edit?js,console)
Listing 2.3 Using a variable (http://jsbin.com/huvime/edit?js,console)
score = 100;
The assignment operator
Variable name
End each statementwith a semicolon
Value Figure 2.2 Assigning a value to a variable
Declare a variable called scoreAssign the value 100 to score
score = 100;
You assign the value on the right tothe variable on the left
Variable name Value
Figure 2.3 The equals sign is called the assignment operator.

19Declaring variables and assigning values
Using the console.log function, introduced in chapter 1, you tell the computer todisplay the value of the score variable, whatever it happens to be. You’ve just assignedit a value of 100, so that value appears on the console.
Why didn’t you just print out 100 directly, using console.log(100)? Well, the val-ues of variables usually change during the course of a program. By using a variablerather than a literal value, your programs can use current values, whatever they hap-pen to be at the time. The next listing displays the value of score on the console,changes the value, and displays the new value, like this:
> 100> 150
var score;score = 100;console.log(score);
score = 150;console.log(score);
You used the same instruction, console.log(score), twice but the program printedtwo different values on the console. Your instruction used the variable score. Becauseits value had changed, so did the output.
You assigned the score variable numbers, 100 and then 150, as values. Text is easytoo; just wrap the text you want to assign in quotation marks. The next listing displaystwo messages on the console:
> Hello World!> Congratulations! Your tweet has won a prize ...
var message;
message = "Hello World!"; console.log(message);
message = 'Congratulations! Your tweet has won a prize...'; console.log(message);
Programmers call sections of text strings because they’re strings, or sequences, of char-acters. As you saw in listing 2.5, to denote a string you place the text inside quotationmarks. The marks can be double, "Hello World!", or single, 'Congratulations!', aslong as they match. Without the quotation marks, JavaScript would try to interpret thetext as instructions or variables.
Listing 2.4 Variables vary (http://jsbin.com/jasafa/edit?js,console)
Listing 2.5 Assigning text to variables (http://jsbin.com/hobiqo/edit?js,console)
Declare the message variable
Assign the message variable a piece of text, using double quotation marks
Assign a new piece of text to message,using single quotation marks

20 CHAPTER 2 Variables: storing data in your program
2.2.3 One-step declaration and assignment
You’ve seen how to declare variables and then assign them values in two steps. It’s alsopossible to declare a variable and assign it a value in a single statement, as illustratedin figure 2.4.
Listings 2.6 and 2.7 achieve exactly the same outcome, declaring variables and assign-ing them values before displaying the following message:
> Kandra is in The Dungeon of Doom
var playerName;var locationName;
playerName = "Kandra";locationName = "The Dungeon of Doom";
console.log(playerName + " is in " + locationName);
var playerName = "Kandra"; var locationName = "The Dungeon of Doom";
console.log(playerName + " is in " + locationName);
In listing 2.7, you assign the value on the right side of each equals symbol to the newlydeclared variable on the left. In both programs, you create the message displayed onthe console by joining pieces of text using the addition symbol, +. Joining pieces oftext is called string concatenation and + is the string concatenation operator.
If you know the value of a variable at the time you declare it, then this single-stepapproach can be a neat way of assigning the value to the variable. Sometimes, the valuewon’t be known at the time of declaration; maybe some calculations need to be per-formed, user input is required, or you’re waiting for a network response. In that case,declaration and assignment would be separate. It’s common for programmers to declaretheir variables at the top of a program, even if they won’t assign them values until later.
Listing 2.6 Declaring and assigning in two steps (http://jsbin.com/vegoja/edit?js,console)
Listing 2.7 Declaring and assigning in one step (http://jsbin.com/dorane/edit?js,console)
var score = 100;
Declare a variable
Assign it a valueFigure 2.4 You declare a variable and assign it a value in a single statement.
Use the + symbol to join strings
Declare a variable and assign a value to it in a single step

21Declaring variables and assigning values
2.2.4 Using a variable in its own assignment
When you assign a value to a variable, JavaScript evaluates the expression to the right ofthe assignment operator and assigns the result to the variable.
var score;score = 100 + 50;
JavaScript evaluates the expression, 100 + 50, and assigns the result, 150, to the vari-able score.
The values in the expression probably won’t be hard-coded literals like 100 and 50;they’re more likely to be variables. Here’s an example, using the variables callOut-Charge, costPerHour, and numberOfHours, to calculate the total cost when hiring aplumber to do some work:
total = callOutCharge + costPerHour * numberOfHours;
The * symbol is used for multiplication; it is the multiplication operator. You can also use– for subtraction and / for division.
Because JavaScript evaluates the expression on the right first, before assigning itsvalue to the variable on the left, you can even use the current value of a variable to setits new value. Say a player in your app sensation The Fruitinator! has just splatted astrawberry; that’s 50 points! The player needs an update.
> Your score was 100> Great splat!!!> New score: 150> Way to go!
Figure 2.5 shows a statement using the current score when assigning the updated score,and listing 2.8 is your score-updating program.
var score;score = 100;console.log("Your score was " + score);
Listing 2.8 Using a variable’s current value to set its new value (http://jsbin.com/kijuce/edit?js,console)
score = score + 50;
Assign the result to score,updating its value
Evaluate the expressionusing the current value of score
Figure 2.5 Updating a variable with the result of a calculation involving itself

22 CHAPTER 2 Variables: storing data in your program
console.log("Great splat!!!");score = score + 50; console.log("New score: " + score);
console.log("Way to go!");
In the code, you evaluate the expression, score + 50, using the current value of score,100, to give the result 150. This value, 150, is then assigned to score. Next up for TheFruitinator! … kumquats. Worth a cool 100 points! Kumquats are tricky. Never trusta kumquat.
2.3 Choosing good variable namesIn all the code listings so far, there was nothing forcing you to give the variables thenames you did. You tried to choose names that would help anyone reading the codeunderstand the purpose of the variables. You almost have a free choice but must becareful not to tread on JavaScript’s toes; there are names that JavaScript has set asidefor its own use and further rules governing valid variable names.
2.3.1 Keywords and reserved words
JavaScript has a set of keywords, like var and function, that are part of the languageitself and govern the actions and properties available in every program. It also setsaside some reserved words that may turn up as keywords in the language in the future.You can’t use those keywords or reserved words as variable names. Other examples ofkeywords are if, switch, do, and yield, and a full list can be found on the MozillaDeveloper Network (http://mng.bz/28d9). But don’t take my word for it. Head overto JS Bin and try using one of those words as a variable name, as shown in figure 2.6.
Add 50 to the current score and assign the result back to the score variable
Figure 2.6 JavaScript has some words that can’t be used as variable names.

23Choosing good variable names
You don’t have to learn the lists of keywords and reserved words; you’ll pick up mostof them as you do more programming, and they usually throw errors when you try touse them. But do bear them in mind if your program isn’t working and you’re notsure why.
2.3.2 Rules for naming variables
So now that keywords and reserved words are out, is everything else in? Not quite—there are a few further rules. Variable names can start with any letter, a dollar sign, $,or an underscore, _. Subsequent characters can be any of those or numbers. Spacesare not allowed. Listing 2.9 includes one block of valid names and one block of invalidnames. If you visit the code on JS Bin, you’ll see it reports a long list of errors. Take alook and try to make sense of them, but don’t worry if you don’t understand them all;the listing includes invalid names on purpose and JavaScript isn’t happy about it.
var thisIsFine; var $noProblemHere; var _underscore56; var StartWithCapital; var z5;
var 999; var 39Steps; var &nope; var single words only; var yield;
JavaScript is case sensitive. Changing the case of characters in a variable name willgive a different variable. score, Score, and SCORE are three different names. Thesedifferences can be hard to spot, so it’s worth trying to be consistent, as discussed inthe next section.
2.3.3 camelCase
You may have noticed the capitalization of letters in the variable names you’ve beenusing. Where names like costPerHour, playerName, and selfieStickActivated aremade up of multiple words joined together, the first word is lowercase and the follow-ing words start with an uppercase character. This is called camel casing and is anextremely widespread convention that can help to make the names more readable.
Some programmers choose to separate words within variable names with under-scores instead, like cost_per_hour, player_name, and selfie_stick_activated. Howyou name variables is up to you; it’s part of your programming style. I’ll be stickingwith camel case throughout Get Programming with JavaScript.
Listing 2.9 Valid and invalid variable names (http://jsbin.com/biqawu/edit?js,console)
These variable names are valid.
These variable names are not allowed.

24 CHAPTER 2 Variables: storing data in your program
2.3.4 Use descriptive variable names
Try to give your variables names that describe what they’re for or what they do. You’refree to choose the names but costPerHour is much easier to understand than cph.Other programmers may need to read and update your code in the future, and you’llthank yourself when you return to it at some point down the line. As your programsgrow and involve more and more variables, objects, and functions, good variablenames can really help you follow the flow of the program and understand its purpose.So keep those variable names simple, direct, and descriptive.
You’ve seen what variables are for, how to declare and assign them, and whatmakes for a good name. But how do you know what variables you need in a program?Analyzing the problem you’re trying to solve and planning out a solution that fits yourusers is an important part of program design. In the next section, you take a little timeto consider the information you need to represent the players in your ongoing exam-ple, The Crypt.
2.4 The Crypt—player variablesAs discussed in chapter 1, The Crypt includes a number of elements: players, places,game, maps, and challenges. You need to consider the properties of all of those ele-ments as you design and build the game. For now, you focus on the players, as shownin figure 2.7.
As players move from place to place, what does the program need to know to createfun and challenging adventures? You may want to keep track of names, health, itemscarried, or location. Or maybe hairiness of feet or color of lightsaber. Some of thatinformation may stay the same during a game and some may change.
player variables
Players
a player object
showing player info
player items
Player Constructor
Places Maps
place objects
place items
place exits
Place Constructor
showing place info
linking places via exits
Game
render
get
go
Figure 2.7 Elements in The Crypt

25Summary
Part of the art of programming is abstraction, knowing what information to includeand what to leave out. It might be that just how hairy a player’s feet are has a role toplay in the game, but it’s likely to be more than you need to know. You should thinkcarefully about what data you’ll use as the player completes their quest.
Table 2.1 shows some possible properties that you may want to include when repre-senting each player in your program.
You may well need other properties, and you can add and remove properties if neces-sary. Declaring player properties could go something like this:
var playerName = "Kandra";var playerHealth = 50;
Part of a programmer’s expertise is being able to model situations and predict whichvariables will be needed to complete a program. The more you get right ahead oftime, the less chance there’ll be a need for a big rewrite of your program—nobodywants that. Just as you don’t want to realize you’ve forgotten your passport at the air-port, you don’t want to find you’ve overlooked a crucial part of a program whenyou’ve written lots of code.
2.5 Summary■ Variables let you store data for your program to use while it’s running.■ Declare a variable by following the var keyword with a name:
var costPerHour;
■ Choose simple, descriptive names for your variables, avoiding JavaScript’s key-words and reserved words.
Table 2.1 Possible player properties
Property What’s it for? Example values
Name Used when displaying player information and when interacting with other players.
"Kandra", "Dax"
Health Decreased by monsters and poison. Increased by food and potions.
68
Place Where is the player on the map? "The Old Library"
Hairiness of feet A measure of how well the player copes in cold conditions, without boots.
94
Items Keeping track of the items a player has picked up.
"A rusty key", "A purplepotion", "Cheese"
26 CHAPTER 2 Variables: storing data in your program
■ Assign values to variables with the assignment operator, the equals symbol =:
costPerHour = 40;
You assign the value on the right of the equals sign to the variable on the left.■ Use variables in expressions:
total = callOutCharge + costPerHour * numberOfHours;
■ As part of the planning for your programs, consider what variables you’ll needand what kinds of data they’ll hold.

Objects:grouping your data
In chapter 2 you saw how to declare variables and assign them values, and you con-sidered the variables you could use to model a player in The Crypt. As your pro-grams grow, so does the number of variables you use; you need ways to organize allthis data, to make your programs easier to understand and easier to update andadd to in the future.
Sometimes it makes sense to group items and see them as a whole. Consider afirst-aid kit; we happily treat it as a single item—“Have you packed the first-aidkit?” “Pass the first-aid kit.” “We need the first-aid kit, now!”—but will quicklyswitch focus to its contents when the need arises—“Pass the antiseptic and thebandages from the first-aid kit, please.” A number of items is neatly encapsulatedby a single object.
This chapter covers■ Organizing information with JavaScript objects■ Creating objects■ Adding properties to objects■ Accessing properties using dot notation■ Examples of objects
27

28 CHAPTER 3 Objects: grouping your data
This chapter introduces JavaScript objects, a simple and efficient way to collect vari-ables together so that you can pass them around as a group rather than individually.
3.1 A need for organizationYour library of adventure stories is growing, and you decide to write a program to keeptrack of your precious collection. The following listing shows variables you use to gen-erate this test output on the console:
> The Hobbit by J. R. R. Tolkien
var bookTitle; var bookAuthor;
bookTitle = "The Hobbit"; bookAuthor = "J. R. R. Tolkien";
console.log(bookTitle + " by " + bookAuthor);
First, you declare two variables, bookTitle and bookAuthor, using the var keyword.You’re going to use those two names to store and access values in the program. Youthen assign strings (text) to your freshly created variables. You wrap the strings in quo-tation marks so JavaScript doesn’t try to interpret them as keywords or variable names.Finally, you log a message to the console. You build the message by using the concate-nation operator (the + symbol) to join three strings.
It may be early days but you certainly have more than one book. How can you copewith the variables needed as you buy more? You could have a different prefix for eachbook. The next listing ups the number of books to three, printing these messages tothe console:
> There are three books so far ...> The Hobbit by J. R. R. Tolkien> Northern Lights by Philip Pullman> The Adventures of Tom Sawyer by Mark Twain
var book1Title = "The Hobbit"; var book1Author = "J. R. R. Tolkien";
var book2Title = "Northern Lights";var book2Author = "Philip Pullman";
var book3Title = "The Adventures of Tom Sawyer";var book3Author = "Mark Twain";
Listing 3.1 Using variables to represent a book (http://jsbin.com/fucuxah/edit?js,console)
Listing 3.2 Using prefixes to tell book variables apart (http://jsbin.com/qowagi/edit?js,console)
Declare the variables you’ll use in the program
Assign values to the variables
Use the variables to display information about the book
Declare variables and assign them values in one step

29Creating objects
console.log("There are three books so far...");console.log(book1Title + " by " + book1Author);console.log(book2Title + " by " + book2Author);console.log(book3Title + " by " + book3Author);
This works up to a point. But as the number of books and the number of facts abouteach book increase, the number of variables is harder to manage. It would be help-ful to be able to group all of the information about a book together, using a singlevariable.
3.2 Creating objectsIn the same way as it is easier to ask for a first-aid kit rather than for the scissors, anti-septic, bandages, and sticking plasters separately, it can be easier to ask for book1rather than book1Title, book1Author, book1ISBN, and so on separately. JavaScriptprovides us with the ability to create objects to group variables. Very specific notation,or syntax, is used to define a new object. Let’s look at a full example and then break itdown into stages.
Listing 3.3 shows how to create a book as an object rather than as separate vari-ables. Figure 3.1 shows the output on JS Bin when you log the book object to theconsole.
var book;
book = { title : "The Hobbit", author : "J. R. R. Tolkien", published : 1937};
console.log(book);
Listing 3.3 A book as an object (http://jsbin.com/ruruko/edit?js,console)
Figure 3.1 You log an object to the console on JS Bin.

30 CHAPTER 3 Objects: grouping your data
When you run listing 3.3 on JS Bin, the console displays all the properties of your newbook object, as well as telling you it’s an object. Notice that it displays the properties inalphabetical order. The object itself doesn’t order the properties; JS Bin has chosen anordering purely for display.
Let’s break down the object creation to get a clearer idea of what’s going on andwhat all the different bits of notation represent.
3.2.1 Creating an empty object
In chapter 2 you saw that variables can be declared but not assigned a value until laterin a program. You might have to wait for some user input or a response from a serveror a reading from a sensor before you know the value you want to assign to the vari-able. In the same way, you can create an object with no properties, knowing that prop-erties will be added at some point in the future.
To create an object, use curly braces, as in the following listing.
var book;
book = {};
You create an empty object, one with no properties, and assign it to the variable book.It’s not much use without any properties, and you’ll see how to add new properties toan existing object in section 3.4. But how would you create your book object withproperties in place?
3.2.2 Properties as key-value pairs
The book in listing 3.3 includes three properties: its title, its author, and its year ofpublication. The values of those properties are "The Hobbit", "J. R. R. Tolkien",and 1937. In a JavaScript object, the names of the properties are called keys. For bookthe keys are title, author, and published. When creating an object, you add a prop-erty by including its key and value, separated by a colon, between the curly braces. Fig-ure 3.2 shows a property definition.
Listing 3.4 Creating an empty object (http://jsbin.com/kaqatu/edit?js,console)
Declare a variable by using the var keyword
Create an object by using curly braces; assign it to the variable
title : "The Hobbit"
ValueKey
Colons separate keys from values Figure 3.2 Set properties by using key-value pairs.

31Creating objects
Another name for a key-value pair is a name-value pair, but we’ll stick with keys andvalues in this book.
In the next listing you create an object with a single property.
var book;
book = { title : "The Hobbit"};
You declare a variable and then create an object and assign it to the variable. Theobject has a single property. The key of the property is title and its value is "TheHobbit". We usually simply say that the title property of book is "The Hobbit".
Property values aren’t restricted to number and string literals, like 50 or "TheHobbit". You can also use previously declared variables as values. The following listingassigns the name of a book to a variable and then uses that variable as the value of anobject’s property.
var book;var bookName;
bookName = "The Adventures of Tom Sawyer";
book = { title : bookName };
Having an object with a single property is a little extravagant; you might as well stickwith a variable. Let’s see how to create an object with more than one property.
When you need multiple properties, commas separate the key-value pairs. Figure 3.3shows two properties as part of an object definition, and listing 3.7 creates two objects,each with two properties.
Listing 3.5 An object with a single property (http://jsbin.com/robupi/edit?js,console)
Listing 3.6 Using a variable as a property value (http://jsbin.com/bafige/edit?js,console)
Assign the name of the book to a variable
Use the variable as the value of the title property
{
title : "The Hobbit",
author : "J. R. R. Tolkien"
}
Properties are key-value pairs
Start of objectdefinition
End of objectdefinition
Commas separateproperties
Figure 3.3 An object definition with two properties

32 CHAPTER 3 Objects: grouping your data
var book1;var book2;
book1 = { title : "The Hobbit", author : "J. R. R. Tolkien"};
book2 = { title : "Northern Lights", author : "Philip Pullman" };
Now that you’ve created an object, you need to be able to access its properties.
3.3 Accessing object propertiesWe’re comfortable with the concept of a first-aid kit as a sin-gle object we can pass around from person to person andtake from place to place. It’s only when we need to use thekit that we consider what’s inside: antiseptic, scissors, ban-dages, and so on.
For JavaScript objects, to access the values of an object’sproperties you can use dot notation. Join the name of thevariable to the name of the property, its key, with a period ordot. For a first-aid kit as an object you might use kit.anti-septic or kit.scissors or kit.bandages. And for books,to access the author property of the object assigned to thevariable called book, you write book.author (figure 3.4).
In the next listing, you print the title and author properties of the book object tothe console to give the following output:
> The Hobbit> J. R. R. Tolkien
var book;
book = { title : "The Hobbit", author : "J. R. R. Tolkien", published : 1937 };
console.log(book.title); console.log(book.author);
Listing 3.7 Objects with multiple properties (http://jsbin.com/bawiqev/edit?js,console)
Listing 3.8 Using dot notation to access property values (http://jsbin.com/funiyu/edit?js,console)
Separate the properties with a comma
Use key-value pairs to set each property
book.author
Variable name Key
Dot operator
Figure 3.4 Accessing object properties using dot notation
Set properties using key-value pairs
Access property values using dot notation

33Updating object properties
You line up the colons in the object properties in listing 3.8 to aid readability. AlthoughJavaScript will ignore the extra spaces, indenting blocks of code and lining up valuescan make your programs easier to read and follow, especially as they grow in size. Andthe easier your code is to read, the easier it is to maintain and update, both for youand for other programmers.
Replacing a bunch of separate variables with a single object helps you manage thecomplexity of your programs. You can think more clearly about how programs workwhen details are hidden until you need them. You consider a book a single entity inyour program until you need to access the book’s title or author or publication date. Itmay seem that replacing three variables with one variable and three properties isn’t animprovement, but when you start to use objects with functions in chapter 7 and arraysin chapter 8, their economy and clarity will be more obvious.
You use property values just like variables. The code in the following listing concate-nates each book’s title with the string " by " and its author to give this output:
> The Hobbit by J. R. R. Tolkien> Northern Lights by Philip Pullman
var book1;var book2;
book1 = { title: "The Hobbit", author: "J. R. R. Tolkien"};
book2 = { title: "Northern Lights", author: "Philip Pullman"};
console.log(book1.title + " by " + book1.author);console.log(book2.title + " by " + book2.author);
3.4 Updating object propertiesIn a quiz app, players attempt questions one after another. The number of questionsattempted, number of questions correct, and score will change over time. You can cre-ate a player object with initial values set and then update them whenever a question isattempted. Use dot notation to change a property that already exists or to add a newproperty to an object, as in the following listing.
Listing 3.9 Concatenating string properties (http://jsbin.com/yoweti/edit?js,console)

34 CHAPTER 3 Objects: grouping your data
var player1;
player1 = { name: "Max", attempted: 0, correct: 0, };
player1.attempted = 1; player1.correct = 1; player1.score = 50;
Your code in listing 3.10 sets the attempted and correct properties to an initial valuewhen the object is created but then updates them to a new value. It uses the assign-ment operator, =, to assign the value, 1, on the right of the operator, to the property,player1.attempted, on its left. You set the attempted and correct properties andthen immediately update them; in the actual quiz app, the change would be in responseto the player answering a question.
You can add new properties to an object after creating it. In listing 3.10, you assignthe value 50 to the score property of the player1 object.
player1.score = 50;
You didn’t set the score property when creating the object; assigning a value automat-ically creates the property if it does not yet exist.
Just like using variables, you can use properties in a calculation and assign theresult back to the property. The next listing shows code updating a player’s properties:
> Max has scored 0> Max has scored 50
var player1;
player1 = { name: "Max", score: 0};
console.log(player1.name + " has scored " + player1.score);
player1.score = player1.score + 50;
console.log(player1.name + " has scored " + player1.score);
Listing 3.10 Using dot notation to update a property (http://jsbin.com/mulimi/edit?js,console)
Listing 3.11 Using a property in a calculation (http://jsbin.com/cuboko/edit?js,console)
Set initial properties when creating the object
Update the property using dot notation
Add a new property and assign it a value
Evaluate the expression on the right and assign the result to the property

35Further examples
When you update the score property (in bold in the listing), JavaScript evaluates theright side of the assignment first. Because player1.score is 0, the expression becomes 0+ 50, which is 50. JavaScript then assigns that value to the left side, that is, back to thescore property. So, you update player1.score from 0 to 50.
3.5 Further examplesAlthough developing The Crypt program gives you an ongoing context for introducingand discussing new concepts, a broader range of examples will help to deepen yourunderstanding of the different ideas presented. You can also revisit some of theseexamples throughout the book to apply fresh techniques as you master them.
The examples all use curly braces to create an object and then assign the object toa variable created with the var keyword, in a single step.
3.5.1 Writing a blog
A blog is made up of blog posts. It would be good to have more information abouteach author, to be able to tag posts with keywords, and to add comments to each post.For now, here’s a minimal object to represent a single post.
var post = { id : 1, title : "My Crazy Space Adventure", author : "Philae", created : "2015-06-21", body : "You will not believe where I just woke up!! Only on a comet..."};
3.5.2 Creating a calendar
Calendar events clearly involve dates. JavaScript does have a Date object, but youwon’t be using it in the book. The next listing represents dates as strings in a spe-cific format.
var event = { title : "Appraisal Meeting", startDate : "2016-10-04 16:00:00", endDate : "2016-10-04 17:00:00", location : "Martha's office", importance: 1, notes : 'Don\'t forget the portfolio!' };
Listing 3.12 A blog post (http://jsbin.com/jiculu/edit?js,console)
Listing 3.13 A calendar event (http://jsbin.com/viroho/edit?js,console)
Include an apostrophe in the string when the string is delimited by double quotes
Use an escaped apostrophe when the string is delimited by single quotes

36 CHAPTER 3 Objects: grouping your data
Notice how to cope with the apostrophe in the notes property. A backslash characterbefore the apostrophe stops JavaScript from seeing it as the end of the string. Thebackslash is called an escape character and won’t be shown.
event.notes = 'Don\'t forget the portfolio!';
Use the escape character to display double quotes when a string is already wrapped indouble quotes.
var story = "She looked at me. \"What did you say?\" she asked.";
JavaScript also uses the backslash escape character to specify special characters liketabs and new lines. You’ll see it in action throughout the book.
A calendar contains lots of event objects. In chapter 9, you’ll see how to streamlinethe process of creating objects that all have a similar structure when you investigateconstructor functions.
3.5.3 What’s the weather like?
Online weather information services provide weather data you can use in your pro-grams. The data is often formatted using JSON (JavaScript Object Notation—seechapter 20) that’s very similar to the objects you’ve been learning about in this chap-ter. The data can be quite detailed with many properties. The next listing shows a cut-down version of location data supplied by one of these services.
var location = { "city" : "San Francisco", "state" : "CA", "country" : "US", "zip" : "94101", "latitude" : 37.775, "longitude" : -122.418, "elevation" : 47.000};
The property keys are within double quotation marks. JavaScript is happy for you towrap keys, the property names, in quotation marks, single or double, although youhaven’t been doing that in the examples so far. In fact, quotation marks arerequired if the property name doesn’t satisfy the rules for valid variable names dis-cussed in chapter 2. You’ll take a more detailed look at working with such propertynames in chapter 10. The JSON specification, which sets out how programs shouldtransmit JavaScript object data as text across the internet, requires all keys to be indouble quotation marks. Because it’s sometimes required, many programmers rec-ommend that property names always be placed within quotation marks to avoidinconsistency and potential errors.
Listing 3.14 Location for a weather app (http://jsbin.com/diguhe/edit?js,console)

37The Crypt—a player object
This example also lines up the colons in the key-value pairs. Do you think thathelps? Compare it to the other examples in this section. Are they easy to read and fol-low? You don’t have to rigidly stick to one style or the other, although it’s quite com-mon for programmers to adopt particular stylistic habits over time.
3.5.4 The testing effect
A great way to learn is to test yourself often. A quiz app could represent its questionsand answers as properties of objects like the one in the next listing.
var questionAndAnswer = { question: "What is the capital of France?", answer1: "Bordeaux", answer2: "F", answer3: "Paris", answer4: "Brussels", correctAnswer: "Paris", marksForQuestion: 2};
A quiz app is likely to include a small set of question types. Listing 3.15 is an exampleof a multiple-choice question type. Each type of question would have a fixed form ofpresentation. Templates are a great way of presenting copies of similarly structureddata, and we’ll look at them in more detail in chapter 19.
3.5.5 Create your own
Think of some programs you’d like to create. What kinds of objects could youdesign to represent entities in the program? Head to JS Bin and have a go at build-ing objects and displaying properties on the console. Maybe share your creations orask any questions they inspire over on the Get Programming with JavaScript forum athttps://forums.manning.com/forums/get-programming-with-javascript.
3.6 The Crypt—a player objectYou’ll now apply your knowledge of JavaScript objects to The Crypt. Figure 3.5 showswhere the focus of this section, a player object, fits into the overall structure of ourongoing game example.
In chapter 2, you considered the kind of information you need to store for playersin The Crypt. For a single player, you start off with variables like these:
playerName = "Kandra";playerHealth = 50;playerPlace = "The Dungeon of Doom";playerItems = "a rusty key, The Sword of Destiny, a piece of cheese";
Listing 3.15 A question and answer for a quiz app (http://jsbin.com/damoto/edit?js,console)

38 CHAPTER 3 Objects: grouping your data
You then need to replicate those variables for each player in the game, maybe by usingvariable prefixes like player1Name, player2Name, and so on.
Clearly, it’s much neater to use JavaScript objects as a way of grouping all of the infor-mation about a single player. Listing 3.16 shows how you can represent a player as anobject and display some of their properties on the console. The output is as follows:
> Kandra> Kandra is in The Dungeon of Doom> Kandra has health 50> Items: a rusty key, The Sword of Destiny, a piece of cheese
var player;
player = { name: "Kandra", health: 50, place: "The Dungeon of Doom", items: "a rusty key, The Sword of Destiny, a piece of cheese"};
console.log(player.name);console.log(player.name + " is in " + player.place);console.log(player.name + " has health " + player.health);console.log("Items: " + player.items);
The last four lines of the listing are just for displaying player information. Having torepeat those lines of code every time you want to display a player’s information seemsa little tedious. It would be great to be able to write the lines of code once and thencall them up on demand.
You’re in luck! JavaScript lets you define functions to execute blocks of code when-ever you need them. Functions are very powerful and will help streamline the display
Listing 3.16 A player object (http://jsbin.com/qelene/edit?js,console)
player variables
Players
a player object
showing player info
player items
Player Constructor
Places Maps
place objects
place items
place exits
Place Constructor
showing place info
linking places via exits
Game
render
get
go
Figure 3.5 Elements in The Crypt

39Summary
of player properties and the creation of multiple player objects. You’ll take a reallydetailed look at functions over the next four chapters.
3.7 Summary■ Group related variables as properties of an object.■ Define objects as collections of comma-separated properties between curly braces:
var player = { name : "Hadfield", location : "The ISS" };
■ For each property use a key-value pair, with key and value separated by a colon:
name : "Hadfield"
■ Access property values by using dot notation. If the object is assigned to a vari-able, join the property name to the variable name with a dot:
player.name
■ Use properties in expressions just as you would variables:
console.log(player.name + " is in " + player.location);
■ Assign values to properties using the assignment operator, =:
player.location = "On a space walk";
■ Add new properties to existing objects whenever you want:
player.oxygen = 96;

Functions:code on demand
One of the main themes of Get Programming with JavaScript is managing complexitythrough good organization. In chapter 2, you stored information in variables andsaw how choosing good names for those variables helps you understand their pur-pose in a program. In chapter 3, you grouped variables as properties of objects. Youcan focus on objects as a whole or drill down into the details when needed. In thischapter you take a look at another important method for organizing code andavoiding repetition, the function.
4.1 Noticing repetitionAs the programs you write become longer and more complex, you find yourselfrepeating similar sections of code with only slight differences. Common tasks, like
This chapter covers■ Organizing instructions with functions■ Defining a function—specifying code to be
executed on demand■ Calling a function—executing code on demand■ Reducing repetition in code■ Making programs easier to read and update
40

41Noticing repetition
displaying text, animating an image, or saving to a database, may need to be performedoften. You need to notice these recurring bits of code; they’re prime function fodder.
A function is a way of writing code once but using it many times. Section 4.2 looks athow to create functions. This section explores a couple of examples of JavaScriptrepeated.
4.1.1 Displaying object properties as text
Programs use objects and variables to store all kinds of information—profiles, posts,documents, and photos—you name it and someone has stored it on a computer some-where. A common task is to display that information to the user. Say you have someobjects representing movies and need to display the information about each movie onthe console. The kind of output expected is shown in figure 4.1.
As you can see in the following listing, the code required to create the output in fig-ure 4.1 includes five calls to console.log. And that’s just for one movie.
var movie1;
movie1 = { title: "Inside Out", actors: "Amy Poehler, Bill Hader", directors: "Pete Doctor, Ronaldo Del Carmen" };
console.log("Movie information for " + movie1.title); console.log("------------------------------"); console.log("Actors: " + movie1.actors); console.log("Directors: " + movie1.directors); console.log("------------------------------");
Listing 4.1 Displaying an object’s properties on the console (http://jsbin.com/besudi/edit?js, console)
Figure 4.1 Movie information shown on the console in JS Bin
Create a movie object
Use five calls to console.log to display the values of various movie properties

42 CHAPTER 4 Functions: code on demand
If you have to write those five lines of code every time you want to display movie infor-mation and for every movie, that’s going to get pretty repetitive. And if you thendecide to change the information displayed, you’ll have to go through all the placeswhere it appears in the code and make sure it’s changed consistently.
The next listing shows the code repeated for three different movies.
console.log("Movie information for " + movie1.title);console.log("------------------------------");console.log("Actors: " + movie1.actors);console.log("Directors: " + movie1.directors);console.log("------------------------------");
console.log("Movie information for " + movie2.title);console.log("------------------------------");console.log("Actors: " + movie2.actors);console.log("Directors: " + movie2.directors);console.log("------------------------------");
console.log("Movie information for " + movie3.title);console.log("------------------------------");console.log("Actors: " + movie3.actors);console.log("Directors: " + movie3.directors);console.log("------------------------------");
There could be many more than three movies and a number of places where theinformation needs to be displayed. If you later need to change the word information toinfo, you’ll have to make sure you find all the places it’s used.
The three blocks of five statements are almost identical. All that varies is whichmovie’s properties are being displayed. It would be great to be able to define oneblock of statements and ask JavaScript to use that block whenever needed. That’s whatfunctions are for!
The next section has one more example of repetitive code. (Don’t worry, we’ll getto functions before the examples get too repetitive!)
4.1.2 Adding tax and displaying a summary
A simple task like adding tax to a price is the kind of thing that happens again andagain. You calculate the tax and add it to the price to give a total cost.
> price = $140> tax @ 15% = $21> total cost = $161
The following listing shows a program to add tax for three different transactions. Thetwo operators, * and /, perform multiplication and division, respectively.
Listing 4.2 Displaying information from similar objects (http://jsbin.com/gewegi/edit?js,console)

43Defining and calling functions
var sale1;var sale2;var sale3;
sale1 = { price: 140, taxRate: 15 };sale2 = { price: 40, taxRate: 10 };sale3 = { price: 120, taxRate: 20 };
sale1.tax = sale1.price * sale1.taxRate / 100; sale2.tax = sale2.price * sale2.taxRate / 100; sale3.tax = sale3.price * sale3.taxRate / 100;
sale1.total = sale1.price + sale1.tax; sale2.total = sale2.price + sale2.tax; sale3.total = sale3.price + sale3.tax;
console.log("price = $" + sale1.price);console.log("tax @ " + sale1.taxRate + "% = $" + sale1.tax);console.log("total cost = $" + sale1.total);
console.log("price = $" + sale2.price);console.log("tax @ " + sale2.taxRate + "% = $" + sale2.tax);console.log("total cost = $" + sale2.total);
console.log("price = $" + sale3.price);console.log("tax @ " + sale3.taxRate + "% = $" + sale3.tax);console.log("total cost = $" + sale3.total);
Wow! That’s a riot of repetition. As well as the blocks of console.log lines, you repeatthe structure of the calculations. It’s essentially the same code every time you want toperform the calculation. Rest assured, you’ll learn a much better way to write this pro-gram. Enter the function!
4.2 Defining and calling functionsJust as an object is a collection of properties, a function is a collection of statements orinstructions. Functions help you avoid repetition and make your code more organizedand easier to update and maintain. Well-named functions should also make your pro-grams easier to follow. If you find your functions are used a lot in a program andwould be useful in other programs too, you can create libraries of helpful functions toinclude in other projects.
In the previous section you saw two examples of programs where blocks of codewith the same structure were repeated. To reduce the code bloat you want to replacethose blocks with something like the following:
showMovieInfo();showCostBreakdown();
Listing 4.3 Adding tax to find the total cost (http://jsbin.com/kawocu/edit?js,console)
All three calculations have the same structure, using * and / to multiply and divide.
Again, all three calculations have the same structure.

44 CHAPTER 4 Functions: code on demand
The two functions, showMovieInfo and showCostBreakdown, should produce thesame output as the code blocks in listings 4.2 and 4.3, and you should be able to usethem again and again, whenever you want. Let’s see how such code-on-demand magicis conjured.
4.2.1 Defining new functions
Define a function by using the following pieces, as shown in figure 4.2:
■ The function keyword■ Parentheses, ()■ A code block between curly braces, {}
The code block contains the list of instructions you’d like to execute whenever youuse the function. The list of instructions is also called the function body.
It’s common to see function definitions set out like this:
function () { // Lines of code to be executed go here}
Once you’ve defined a function, you can assign it to a variable, just like any value. Thenext listing defines a function to display “Hello World!” on the console and assigns thefunction to the variable sayHello.
var sayHello;
sayHello = function () { console.log("Hello World!"); };
Listing 4.4 A simple function definition and assignment (http://jsbin.com/tehixo/edit?js,console)
function () {
}
function keyword
Parentheses
Code block between curly bracesfor the function body
Figure 4.2 The pieces of a function definition
Declare a variable
Define a function and assign it to the sayHello variable
Include code between the curly braces, to be executed whenever you run the function

45Defining and calling functions
It’s easy to see the different pieces that make up the function definition in listing 4.4:the function keyword, the empty parentheses, and the code block for the functionbody. The function body has only a single statement, console.log("Hello World!");.At this point, you have only defined the function, ready for use later. The code in thefunction body won’t be executed until you run the function—you’ll see how to do thatin section 4.2.3.
The following listing shows a couple more examples of defining functions andthen assigning them to variables.
var findTotal;var displayMenu;
findTotal = function () { result = number1 + number2; };
displayMenu = function () { console.log("Please choose an option:"); console.log("(1) Print log"); console.log("(2) Upload file"); console.log("(9) Quit");};
4.2.2 Function expressions and function declarations
In the previous examples you’ve been using function expressions to define functions andassign them to variables with the assignment operator.
var findTotal = function () { … }; // The function expression is in bold.
You can also use an alternative syntax, called a function declaration. Rather than defin-ing the function and then assigning it to a variable, you can declare a name for thefunction as part of the definition.
function findTotal () { … } // Declare a name with the function
You can treat the two ways of defining functions as equivalent; there are some subtledifferences but we won’t go into them here. Get Programming with JavaScript uses func-tion expressions throughout parts 1 and 2 to highlight the similarities between creat-ing and assigning different values, including objects, functions, and arrays.
var numOfDays = 7; // Assign a number var player = { … }; // Create and assign an object var findTotal = function () { … }; // Define and assign a function var items = []; // Create and assign an array (ch8)
Listing 4.5 Two more function definitions and assignments (http://jsbin.com/xezani/edit?js,console)
The variables result, number1 and number2, would have to have been declared elsewhere.

46 CHAPTER 4 Functions: code on demand
Don’t worry about the function declaration syntax for now or even about the differ-ence between declarations and expressions. You’ll be much more comfortable withfunctions when you meet the declaration syntax again in part 3.
Just defining the functions isn’t enough to make “Hello World!” appear on theconsole, calculate the total, or display the menu. You need a way to tell the function toexecute its list of instructions.
4.2.3 Using functions
Once you’ve assigned a function to a variable, whenever you want to execute the state-ments in the function body, you write the variable name followed by parentheses, ().
sayHello();findTotal();displayMenu();
Other names for running the function are calling the function or invoking the function. In listing 4.6, you call the sayHello function three times. It displays the string
"Hello World!" three times, like this:
> Hello World!> Hello World!> Hello World!
var sayHello;
sayHello = function () { console.log("Hello World!"); };
sayHello(); sayHello(); sayHello();
The next listing uses the findTotal function to update the result variable. It thendisplays the whole calculation on the console:
> 1000 + 66 = 1066
var number1 = 1000;var number2 = 66;var result;var findTotal;
Listing 4.6 Calling the sayHello function three times (http://jsbin.com/vozuxa/edit?js,console)
Listing 4.7 Using the findTotal function to display a calculation (http://jsbin.com/hefuwa/edit?js,console)
Define the function and assign it to a variable
Call the function by adding parentheses after the variable name
Call the function again and again

47Defining and calling functions
findTotal = function () { result = number1 + number2;};
findTotal();
console.log(number1 + " + " + number2 + " = " + result);
Listing 4.8 calls the displayMenu function to, well, display a menu. (These functionsdo exactly what they say on the tin!)
> Please choose an option:> (1) Print log> (2) Upload file> (9) Quit
var displayMenu;
displayMenu = function () { console.log("Please choose an option:"); console.log("(1) Print log"); console.log("(2) Upload file"); console.log("(9) Quit");};
displayMenu();
It may seem strange to use empty parentheses as the notation for calling a function.But, as you’ll see in chapter 5, they’re not always empty … [cue mysterious music].
DEFINITION For those who like their terminology, the parentheses, (), addedto the end of a variable when calling a function are called the function invoca-tion operator or the function call operator.
4.2.4 Functions step by step
Table 4.1 summarizes the steps used to define and call a function.
Listing 4.8 Displaying a menu (http://jsbin.com/cujozo/edit?js,console)
Table 4.1 Steps used to define and call a function
Action Code Comments
Declare a variable var sayHello; Sets aside the name for your use in the program.
Define a function function () { console.log("Hello World!");}
The code in the function body is not executed at this point.
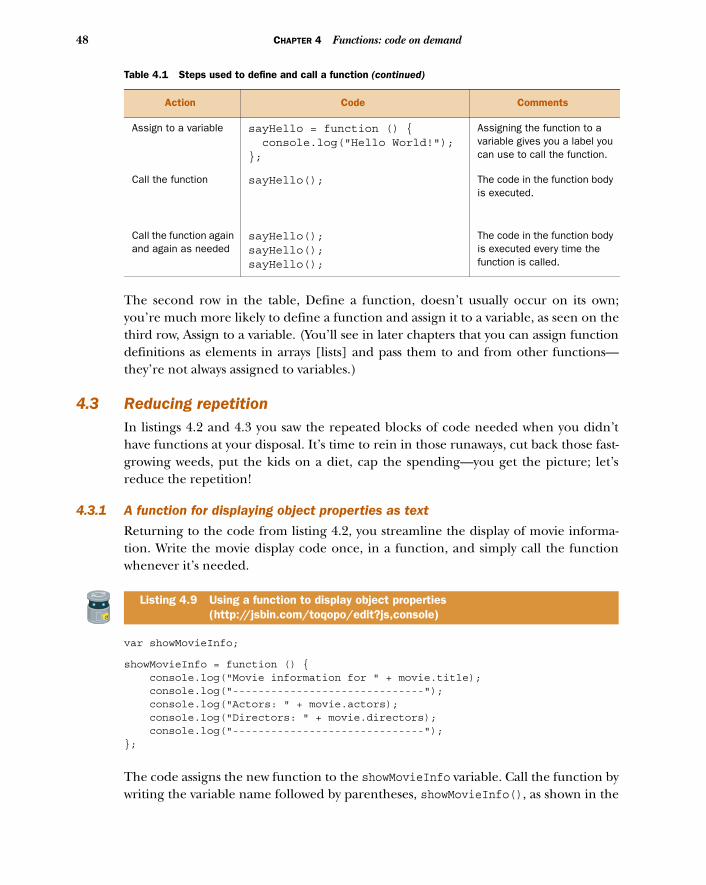
48 CHAPTER 4 Functions: code on demand
The second row in the table, Define a function, doesn’t usually occur on its own;you’re much more likely to define a function and assign it to a variable, as seen on thethird row, Assign to a variable. (You’ll see in later chapters that you can assign functiondefinitions as elements in arrays [lists] and pass them to and from other functions—they’re not always assigned to variables.)
4.3 Reducing repetitionIn listings 4.2 and 4.3 you saw the repeated blocks of code needed when you didn’thave functions at your disposal. It’s time to rein in those runaways, cut back those fast-growing weeds, put the kids on a diet, cap the spending—you get the picture; let’sreduce the repetition!
4.3.1 A function for displaying object properties as text
Returning to the code from listing 4.2, you streamline the display of movie informa-tion. Write the movie display code once, in a function, and simply call the functionwhenever it’s needed.
var showMovieInfo;
showMovieInfo = function () { console.log("Movie information for " + movie.title); console.log("------------------------------"); console.log("Actors: " + movie.actors); console.log("Directors: " + movie.directors); console.log("------------------------------");};
The code assigns the new function to the showMovieInfo variable. Call the function bywriting the variable name followed by parentheses, showMovieInfo(), as shown in the
Assign to a variable sayHello = function () { console.log("Hello World!");};
Assigning the function to a variable gives you a label you can use to call the function.
Call the function sayHello(); The code in the function body is executed.
Call the function again and again as needed
sayHello();sayHello();sayHello();
The code in the function body is executed every time the function is called.
Listing 4.9 Using a function to display object properties (http://jsbin.com/toqopo/edit?js,console)
Table 4.1 Steps used to define and call a function (continued)
Action Code Comments

49Reducing repetition
next listing. You should end up with the following output on the console, matchingthe aim seen way back in figure 4.1.
> Movie information for Inside Out> ------------------------------> Actors: Amy Poehler, Bill Hader> Directors: Pete Doctor, Ronaldo Del Carmen> ------------------------------
var movie1;var showPlayerInfo;var movie;
movie1 = { title: "Inside Out", actors: "Amy Poehler, Bill Hader", directors: "Pete Doctor, Ronaldo Del Carmen"};
showMovieInfo = function () { console.log("Movie information for " + movie.title); console.log("------------------------------"); console.log("Actors: " + movie.actors); console.log("Directors: " + movie.directors); console.log("------------------------------"); };
movie = movie1;
showMovieInfo();
With the movie variable, used by the showMovieInfo function, you can switch whichmovie’s information the function will use. Listing 4.11 shows how to switch betweenmovies. Information for three different movies is printed to the console.
> Movie information for Inside Out> ------------------------------> Actors: Amy Poehler, Bill Hader> Directors: Pete Doctor, Ronaldo Del Carmen> ------------------------------> Movie information for Spectre> ------------------------------> Actors: Daniel Craig, Christoph Waltz> Directors: Sam Mendes> ------------------------------> Movie information for Star Wars: Episode VII – The Force Awakens> ------------------------------> Actors: Harrison Ford, Mark Hamill, Carrie Fisher> Directors: J.J.Abrams> ------------------------------
Listing 4.10 Calling the showMovieInfo function (http://jsbin.com/menebu/edit?js,console)
Define the function. The code in the function body is not executed at this point.
Call the function. Now the code is executed.

50 CHAPTER 4 Functions: code on demand
var movie1;var movie2;var movie3;var movie; var showMovieInfo;
movie1 = { title: "Inside Out", actors: "Amy Poehler, Bill Hader", directors: "Pete Doctor, Ronaldo Del Carmen"};
movie2 = { title: "Spectre", actors: "Daniel Craig, Christoph Waltz", directors: "Sam Mendes"};
movie3 = { title: "Star Wars: Episode VII - The Force Awakens", actors: "Harrison Ford, Mark Hamill, Carrie Fisher", directors: "J.J.Abrams"};
showMovieInfo = function () { console.log("Movie information for " + movie.title); console.log("------------------------------"); console.log("Actors: " + movie.actors); console.log("Directors: " + movie.directors); console.log("------------------------------"); };
movie = movie1; showMovieInfo();
movie = movie2; showMovieInfo();
movie = movie3; showMovieInfo();
4.3.2 Functions for adding tax and displaying a summary
Listing 4.12 shows a function to add tax for sales and display a summary of each transac-tion. Most of the code that you need to repeat is in the two functions, calculateTax anddisplaySale. You call them for each sale object in turn. The output is shown here.
price = $140tax @ 15% = $21total cost = $161price = $40tax @ 10% = $4
Listing 4.11 Using the same function with multiple objects (http://jsbin.com/mavutu/edit?js,console)
Declare a movie variable to hold the current movie for display
The movie variable is used in the showMovieInfo function.
Assign movie1 to the movie variable, ready for display
Switch the movie to be displayed

51Reducing repetition
total cost = $44price = $120tax @ 20% = $24total cost = $144
As with all of the listings on JS Bin, there are “Further Adventures” below the programthat suggest ways of exploring the code and building your understanding. In this case,one challenge is to reduce the repetition of the function calls; calculateTax anddisplaySale are always called together. Although it’s good to have two different func-tions—they do different jobs—can you avoid having to call them both for each saleobject? If you’re connected, click the link above listing 4.12 to head to JS Bin now andembrace the adventure. If you’re reading a print copy of the book, away from technol-ogy, it’s paper and pencil for you! Solutions to most problems are on the Get Programmingwith JavaScript website at www.room51.co.uk/books/getProgramming/listings.html.
var sale1;var sale2;var sale3;var sale; var calculateTax;var displaySale;
sale1 = { price: 140, taxRate: 15 };sale2 = { price: 40, taxRate: 10 };sale3 = { price: 120, taxRate: 20 };
calculateTax = function () { sale.tax = sale.price * sale.taxRate / 100; sale.total = sale.price + sale.tax;};
var displaySale = function () { console.log("price = $" + sale.price); console.log("tax @ " + sale.taxRate + "% = $" + sale.tax); console.log("total cost = $" + sale.total);};
sale = sale1; calculateTax();displaySale();
sale = sale2; calculateTax();displaySale();
sale = sale3; calculateTax();displaySale();
The two functions use the sale variable in their definitions, accessing properties onthe object, sale.price, sale.taxRate, and so on. The code in the function bodies
Listing 4.12 Using functions to add and display tax (http://jsbin.com/raqiri/edit?js,console)
Declare a sale variable to be used by the functions
Use the sale variable here and in the displaySale function
Assign sale1 to sale before calling the two functions to update and display it

52 CHAPTER 4 Functions: code on demand
won’t run until the program calls the two functions, by which time the program willhave assigned one of the sale objects to the sale variable.
The function names calculateTax and displaySale help to make the program inlisting 4.12 easier to follow and understand. Section 4.4 investigates these ideas inmore detail.
4.4 Making code easier to read and updateAs your programs get longer and more complicated, you manage that complexity bybreaking them into well-named objects and functions. Anyone reading your code canfollow its flow and understand the purpose of the pieces and of the whole.
Take a look at the following code snippet; you should get a sense of what’s happen-ing even if you don’t know the details of how the functions work.
...var balance = getAccountBalance();
displayBalance();
addInterest()addBonus();setAccountBalance();
displayBalance();...
Each function should have a single, clear purpose. If you need to investigate what afunction does, you should be able to find it defined in one place. Let’s look at anexample of updating a function.
4.4.1 Updating the showMovieInfo function
In listing 4.11, you created a showMovieInfo function to display information about amovie object. It was great to be able to encapsulate the blocks of display code into a sin-gle function. But having the information for multiple movies squashed together onthe console makes it hard to pick out individual facts about particular movies. It wouldbe useful to add blank lines, making it easier to see each movie.
> Movie information for Inside Out> ------------------------------> Actors: Amy Poehler, Bill Hader> Directors: Pete Doctor, Ronaldo Del Carmen> ------------------------------>> Movie information for Spectre> ------------------------------> Actors: Daniel Craig, Christoph Waltz> Directors: Sam Mendes> ------------------------------>> Movie information for Star Wars: Episode VII – The Force Awakens> ------------------------------> Actors: Harrison Ford, Mark Hamill, Carrie Fisher

53Making code easier to read and update
> Directors: J.J.Abrams> ------------------------------>
Because you have all of the display code inside your showMovieInfo function, you canhead right there and add an extra call to console.log to create the blank line, asshown in the next listing. Your organization is already paying off!
showMovieInfo = function () { console.log("Movie information for " + movie.title); console.log("------------------------------"); console.log("Actors: " + movie.actors); console.log("Directors: " + movie.directors); console.log("------------------------------"); console.log(""); };
So close! Because the JS Bin console wraps strings in speech marks, you don’t quiteget your blank lines. You get empty quotation marks instead. But if you check thebrowser’s own console (see the online guide at www.room51.co.uk/guides/browser-consoles.html), you should see the blank lines expected, as shown in figure 4.3.
Listing 4.13 Updating your display function to add a blank line (http://jsbin.com/cijini/edit?js,console)
Add an extra call to console.log to give you the blank line you want
Figure 4.3 JS Bin displays empty strings in quotation marks but the Safari browser doesn’t.

54 CHAPTER 4 Functions: code on demand
If this example were part of a larger (maybe much larger) program and you didn’thave the player display logic safely nestled in a single function, you’d have to inspectall the code to find the lines where changes should be made. Text editors and devel-opment environments should have tools to help, but they’re not foolproof and yourprogram could end up with coy corners of uncorrected code. You try it out and, tobegin with, everything seems fine. Then later there’s running and, um, screaming.Avoid the nightmare—use functions.
4.5 The Crypt—displaying player informationYou’ll now apply your knowledge of JavaScript functions to The Crypt. Figure 4.4 showswhere the focus of this section, showing player information by using functions, fitsinto the overall structure of our ongoing game example.
In chapter 3 you saw how to group information about a player into a single JavaScriptobject. You create the object using curly braces and set the properties using key-valuepairs, like this:
var player;
player = { name: "Kandra", health: 50, place: "The Dungeon of Doom"};
Once you assign the new object to the player variable, you can get the property valuesby using dot notation. Displaying information about the player involves logging prop-erties to the console.
console.log(player.name + " is in " + player.place);
player variables
Players
a player object
player items
Player Constructor
showing player info
Places
place objects
place items
showing place info
Place Constructor
place exits
using return values
using functions
using arguments
using objects
Maps
Game
linking places
render
get
go
Figure 4.4 Elements of The Crypt

55The Crypt—displaying player information
.
In the game, you may have to display player info a number of times and for a numberof players. You should use your new knowledge of functions to make the display ofinformation more efficient; make it code on demand—code you can execute by call-ing a function.
4.5.1 A function to display player information
The showMovieInfo function from listing 4.13 looks like exactly the kind of functionyou need. Whereas showMovieInfo displays information about movies, listing 4.14shows a showPlayerInfo function doing a very similar job for players, producing thefollowing output:
> Kandra> ------------------------------> Kandra is in The Dungeon of Doom> Kandra has health 50> ------------------------------>> Dax> ------------------------------> Dax is in The Old Library> Dax has health 40> ------------------------------>
var player1; var player2; var player; var showPlayerInfo;
player1 = { name: "Kandra", place: "The Dungeon of Doom", health: 50 };
player2 = { name: "Dax", place: "The Old Library", health: 40 };
showPlayerInfo = function () { console.log(player.name); console.log("------------------------------"); console.log(player.name + " is in " + player.place); console.log(player.name + " has health " + player.health); console.log("------------------------------"); console.log(""); };
Listing 4.14 A function to display player information (http://jsbin.com/mafade/edit?js,console)
Declare the variables you’ll be using
Create objects using curly braces and key-value pairs. Assign them to variables.
Define a functionto display player properties. The code will run when the function is called

56 CHAPTER 4 Functions: code on demand
player = player1; showPlayerInfo();
player = player2; showPlayerInfo();
Excellent! That does the job. A single call to a function now displays player informa-tion. It’s a shame you have to keep assigning different players to the player variable tomake it work; it would be better if you could somehow say to the function, “Show infofor player1” or “Show info for player2.” Well, passing information to and from func-tions will be investigated in detail over the next three chapters. Flexibility, reusability,efficiency, here we come!
4.6 Summary■ A function is a block of code that you write once but use many times. It should
have a clear, single purpose.■ You define a function by using the function keyword, parentheses, and a func-
tion body in a code block between curly braces:
function () { // Statements go here in the function body};
■ You assign the function to a variable with the equals symbol, = , also known asthe assignment operator:
showPlayerInfo = function () { … };
■ Once a function is assigned to a variable, you call or invoke the function by add-ing parentheses to the end of the variable name:
addTax();showPlayerInfo();evadeRaptor();
■ Be on the lookout for repetition; sections of code with the same structureand only slight changes in values or variables used. Move repeated code intoa function.
■ Give functions clear names that communicate their purpose. Use the functionsto organize your code, making your programs easier to follow and maintain.
Assign one of the player objects to the player variable so the function can access it
Call the function to display properties of the player object
Assign the other player object to the player variable
Call the function again.That’s code on demand!

Arguments:passing data to functions
Functions are an essential means of organization; you write them once and usethem many times. But so far, your functions have been tied to the values of variablesaround them. It’s time to set your functions free, letting them name their own vari-ables and passing them the data they need.
5.1 Function reuse and versatilityThe functions you’ve used up to now have relied on variables declared and assignedvalues elsewhere in the program. In the following listing, the showMessage functionrelies on a variable called message, declared outside the function definition.
This chapter covers■ Defining functions with parameters, ready to
accept data■ Calling functions, passing in data with
arguments
57

58 CHAPTER 5 Arguments: passing data to functions
var message;var showMessage;
message = "It's full of stars!";
showMessage = function () { console.log(message); };
showMessage();
In the showMessage function definition, you use a variable called message. The messagevariable has to exist for the function to do its job. If you change the name of the vari-able, the function breaks. If message is renamed msg, as shown in the next listing, andthe program is run on JS Bin, you should get an error something like this: “Referenceerror: Can’t find variable: message.” (Different browsers may give slightly differenterror messages.)
var msg;var showMessage;
msg = "It's full of stars!";
showMessage = function () { console.log(message); };
showMessage();
The instructions in the function body can use variables defined elsewhere in your pro-gram but that couples the function with the external variable; a better practice is topass the information a function needs to the function when it’s called. This helpsavoid the variables a function needs being misnamed, missing, deleted, or changed byother parts of your program and makes it easier to follow the flow of the program andspot mistakes if they occur.
We don’t want arrogant Rock God functions demanding particular variables in theirdressing rooms before they’ll perform; we want easy-going functions that are reliableand happy to strut their stuff wherever they are in the world. By decoupling functionsfrom variables, you make the functions more portable; the function definitions can be
Listing 5.1 Relying on a variable outside the function (http://jsbin.com/taqusi/edit?js,console)
Listing 5.2 Breaking a function by changing a variable name (http://jsbin.com/yaresa/edit?js,console)
Assign the string to be displayed to the message variable
Use the message variable, defined outside the showMessage function, in the function body
Call the showMessage function. It uses the current value of the message variable.
Assign the string to be displayed to the msg variable
Use a variable called message in the function body
Produce an error by trying to call the showMessage function

59Passing information to functions
moved to other parts of your program or be reused in other programs or code libraries,without causing havoc and throwing errors.
So, how is this decoupling achieved?
5.2 Passing information to functionsPassing information to functions is achieved in two stages: when you define the func-tion and when you call the function:
1 When you define the function, you set up variable names, called parameters, readyfor when you call the function.
2 When you call the function, you include data to assign to the variables younamed in step 1.
You’ll look at a number of examples over the course of this chapter (and there areplenty more throughout the rest of the book), but there’s nothing like practice tomake permanent. The Further Adventures section for each code listing on JS Bin shouldget you started.
5.2.1 Passing one argument to a function
It’s time to make use of those empty parentheses in your function definitions! Topass information to functions when you call them, include it between the parenthe-ses, like this:
showMessage("It's full of stars!");showPlayerInfo("Kandra");getMovieActors("The Hobbit");square(12);
You pass each of the four functions some information for their code to use. Each valueincluded in the parentheses is called an argument. Each of the four functions shownhere includes a single argument. The arguments are “It’s full of stars!”, “Kandra”,“The Hobbit”, and 12.
To use the information in the parentheses, you need to make the functions readyto accept it. You add a parameter when you define the function. The parameter showsthat the function expects you to give it some information when you call it, as shown infigure 5.1.
function (param1) {
}
Parameter
param1 is available as a variablein the function body Figure 5.1 Including a
parameter in the parentheses when defining a function

60 CHAPTER 5 Arguments: passing data to functions
For the four functions in the previous example, the function definitions could be some-thing like this:
showMessage = function (message) { … };showPlayerInfo = function (playerName) { … };getMovieActors = function (movieTitle) { … };square = function (numberToSquare) { … };
Each function definition includes a parameter, shown in bold. The parameter is a vari-able that you can use only inside the function body.
Let’s update the showMessage function from listing 5.1 to accept a message,rather than relying on an external variable. When defining the function, include amessage parameter. The message parameter is available as a variable in the functionbody. Now when you call the function, you pass the message to display in parenthe-ses, showMessage("It's full of stars!"). The function adds extra text and dis-plays the following:
> The message is: It's full of stars!
var showMessage;
showMessage = function (message) { console.log("The message is: " + message); };
showMessage("It's full of stars!");
When you call the showMessage function at the end of listing 5.3, you include thestring “It’s full of stars!” in the parentheses. A value included in the function callparentheses like this is called an argument. The program assigns the argument to thevariable named message. The function then uses the message variable to generatethe string that’s logged to the console, "The message is: It's full of stars!"
Table 5.1 lists the steps involved in declaring a function with parameters and thencalling it with different arguments.
Listing 5.3 Passing information to a function (http://jsbin.com/xucemu/edit?js,console)
Table 5.1 Steps used to define and call a function, passing it data
Action Code Comments
Declare a variable var showMessage; Sets aside the name for use in the program.
Include a parameter, message, when defining the function
Use message anywhere inside the function body
When the function “It’s full of stars!” is assigned to message and the statements in the function body are executed

61Passing information to functions
You can call the showMessage function with any text you choose. The text is assignedto the message variable and used as part of the full message logged to the console.
In listing 5.4 you call the showMessage function with three different arguments,leading to three different messages on the console:
> The message is: It's full of stars!> The message is: Hello to Jason Isaacs> The message is: Hello to Jason Isaacs and Stephen Fry
var showMessage;
showMessage = function (message) { console.log("The message is: " + message); };
showMessage("It's full of stars!"); showMessage("Hello to Jason Isaacs"); showMessage("Hello to Jason Isaacs and Stephen Fry");
Define a function with a parameter
function (message) {
}
Sets aside a variable name, message, for use in the function body.
Use the parameter function (message) { console.log(message);}
The parameter is available as a variable within the function body.
Assign the function to a variable
showMessage = function (message) { console.log(message);};
Assigning the function to a variable gives you a label you can use to call the function.
Call the function with an argument
showMessage("It's full of stars!"); The code in the function body is executed with the argument in parentheses assigned to message.
Call the function again and again with different arguments
showMessage("It's full of stars!");showMessage("Yippee!");showMessage("Cowabunga!");
Every time you call the function, the argument is assigned to the message parameter.
Listing 5.4 Calling the same function with different arguments (http://jsbin.com/zavavo/edit?js,console)
Table 5.1 Steps used to define and call a function, passing it data
Action Code Comments
Declare a variable
Define a function with a message parameter; assign the function to a variable
Use the parameter in the function body
Call the function, passing a different argument each time

62 CHAPTER 5 Arguments: passing data to functions
Because you declared the name of the parameter along with the function definition,the showMessage function no longer relies on variable names from elsewhere, makingit less brittle. Decoupling complete.
Listing 5.5 shows the definition of a square function, including a numberToSquareparameter. The function squares the number you pass to it as an argument. You callthe function four times to give the following output:
> 10 * 10 = 100> -2 * -2 = 4> 1111 * 1111 = 1234321> 0.5 * 0.5 = 0.25
var square;
square = function (numberToSquare) { var result; result = numberToSquare * numberToSquare; console.log(numberToSquare + " * " + numberToSquare + " = " + result);};
square(10);square(-2);square(1111);square(0.5);
Listing 5.5 Using the square function (http://jsbin.com/vequpi/edit?js,console)
Parameters vs. argumentsYou knew those parentheses would come in handy!
The names you include in the parentheses when defining the function are availableas variables in the function body. They’re called parameters and show that you expectinformation to be included when the function is called.
var myExample; myExample = function (parameter) { … }
The values you include in the parentheses when calling the function are assignedto the parameter variables to be used in the function body. These values are calledarguments.
myExample(argument);
Don’t worry too much about the terminology; it can take a little while to get usedto. After you’ve created and used a few functions, you’ll pick up an intuitive senseof what’s going on even if you mix up the terms parameter and argument from timeto time.
Square the number by multiplying it by itself; the * is the multiplication operator.

63Passing information to functions
5.2.2 Passing multiple arguments to a function
You can define functions with as many parameters as they need to complete theirwork. Simply separate the parameters with commas in the parentheses of the defini-tion (figure 5.2).
Suppose you want a function to add two numbers together. If you have two pairs ofnumbers, 30 and 23, and 2.8 and -5, the correct output would be
> The sum is 53> The sum is -2.2
How do you do this?
var showSum;
showSum = function (number1, number2) { var total = number1 + number2; console.log("The sum is " + total);};
showSum(30, 23); showSum(2.8, -5);
When you call the showSum function, the program automatically assigns the two argu-ments you provide to the two parameters in the definition, number1 and number2. Forthe first call to showSum in listing 5.6, it’s as if the function body becomes
var number1 = 30;var number2 = 23;var total = number1 + number2;console.log("The sum is " + total);
You can define a function with as many parameters as you want. As the number ofparameters increases, it becomes more likely for people (including you!) to make
Listing 5.6 A function with two arguments (http://jsbin.com/siyelu/edit?js,console)
function (param1, param2, param3) {
}
Parameters
param1, param2, param3, are availableas variables in the function body
Figure 5.2 Including multiple parameters in a function definition
You define the function with two parameters, number1and number2.
You call the function with two arguments, 30 and 23.

64 CHAPTER 5 Arguments: passing data to functions
mistakes when using your function; they might miss an argument or put the argu-ments in the wrong order when calling the function. A neat way to overcome theproblem is to pass an object to the function. The function definition needs only a sin-gle parameter and the function body can access whichever properties it needs. You’lltake a look at using objects with functions in chapter 7.
5.3 The Crypt—displaying player informationYou’ll now apply your knowledge of JavaScript function arguments to The Crypt. Fig-ure 5.3 shows where the focus of this section, showing player information by using func-tions with arguments, fits into the overall structure of our ongoing game example.
In chapter 4, you wrote a showPlayerInfo function as code on demand. You could dis-play player information on the console whenever you wanted, just by calling the func-tion. Unfortunately, it relied on a player variable being set elsewhere in the code.Let’s update the showPlayerInfo function, setting parameters so you can pass it theinformation it needs directly.
In order to display information about each player, you break the job into subtasksand create functions for each piece of information. You then show information abouta player like this:
showPlayerName("Kandra");showPlayerHealth("Kandra", 50);showPlayerPlace("Kandra", "The Dungeon of Doom");
Each function has a specific job to do. If you want to display all of the information atonce, you wrap the individual functions inside one master function and pass it all theinformation it needs:
showPlayerInfo("Kandra", "The Dungeon of Doom", 50);
player variables
Players
a player object
player items
Player Constructor
showing player info
Places
place objects
place items
showing place info
Place Constructor
place exits
using return values
using functions
using arguments
using objects
Maps
Game
linking places
render
get
go
Figure 5.3 Elements of The Crypt

65The Crypt—displaying player information
Over the next few sections, you define the four functions and see them working withplayer objects. The first three functions are very similar; pay attention to what changesand what stays the same. Notice how you use parameters when defining the functionsand how you use arguments when calling them.
5.3.1 Displaying players’ names
Your first function’s job is to display the player’s name. That’s it. No bells or whistles.The next listing shows the showPlayerName function definition and calls the functionwith two different names to produce the following output:
> Kandra> Dax
var showPlayerName;
showPlayerName = function (playerName) { console.log(playerName); };
showPlayerName("Kandra");showPlayerName("Dax");
In the actual The Crypt program, you’re not likely to call the showPlayerName functionwith literal values like "Kandra" and "Dax". You’re much more likely to use variables.In particular, JavaScript objects will represent players. The next listing updates thecode to use a couple of player objects instead.
var player1;var player2;var showPlayerName;
showPlayerName = function (playerName) { console.log(playerName);};
player1 = { name: "Kandra", place: "The Dungeon of Doom", health: 50};
player2 = { name: "Dax", place: "The Old Library", health: 40};
Listing 5.7 Displaying a player’s name (http://jsbin.com/yubahi/edit?js,console)
Listing 5.8 Displaying a player’s name via an object property (http://jsbin.com/juhewi/edit?js,console)
Include a playerName parameter when defining the function
Log the value assigned to the parameter when the function is called

66 CHAPTER 5 Arguments: passing data to functions
showPlayerName(player1.name); showPlayerName(player2.name);
That’s names covered. Next up, health.
5.3.2 Displaying players’ health
The showPlayerHealth function definition in the following listing includes twoparameters, playerName and playerHealth, to produce output like this:
> Kandra has health 50> Dax has health 40
var showPlayerHealth;
showPlayerHealth = function (playerName, playerHealth) { console.log(playerName + " has health " + playerHealth); };
showPlayerHealth("Kandra", 50);showPlayerHealth("Dax", 40);
The call to showPlayerHealth in listing 5.9 used the literal values "Kandra" and 50. Inthe final program, each player’s information is assigned to the properties of a playerobject. Your calls to showPlayerHealth are much more likely to use those propertiesthan hard-coded values. The next listing updates the code to include player objects.
var player1;var player2;var showPlayerHealth;
showPlayerHealth = function (playerName, playerHealth) { console.log(playerName + " has health " + playerHealth);};
player1 = { name: "Kandra", place: "The Dungeon of Doom", health: 50};
player2 = { name: "Dax", place: "The Old Library", health: 40};
Listing 5.9 Displaying a player’s health (http://jsbin.com/nomija/edit?js,console)
Listing 5.10 Displaying a player’s health via object properties (http://jsbin.com/zufoxi/edit?js,console)
Pass the player’s name to the showPlayerName function as an argument
Include two parameters, playerNameand playerHealth, in the definition
Use the values assigned tothe parameters to produce a
string for display

67The Crypt—displaying player information
showPlayerHealth(player1.name, player1.health); showPlayerHealth(player2.name, player2.health);
Name: check. Health: check. That just leaves location.
5.3.3 Displaying players’ locations
The showPlayerPlace function definition in the following listing also includes twoparameters, this time playerName and playerPlace, and produces output like this:
> Kandra is in The Dungeon of Doom> Dax is in The Old Library
var showPlayerPlace;
showPlayerPlace = function (playerName, playerPlace) { console.log(playerName + " is in " + playerPlace);};
showPlayerPlace("Kandra", "The Dungeon of Doom");showPlayerPlace("Dax", "The Old Library");
Once again, switching from the hard-coded literal values in listing 5.11 to object prop-erties gives you an updated version in the next listing.
var player1;var player2;var showPlayerPlace;
showPlayerPlace = function (playerName, playerPlace) { console.log(playerName + " is in " + playerPlace);};
player1 = { name: "Kandra", place: "The Dungeon of Doom", health: 50};
player2 = { name: "Dax", place: "The Old Library", health: 40};
showPlayerPlace(player1.name, player1.place);showPlayerPlace(player2.name, player2.place);
Listing 5.11 Displaying a player’s location (http://jsbin.com/yifahe/edit?js,console)
Listing 5.12 Displaying a player’s location via object properties (http://jsbin.com/mejuki/edit?js,console)
Pass each player’s name and health properties to the showPlayerHealth function as arguments

68 CHAPTER 5 Arguments: passing data to functions
You have the three functions you need to show individual pieces of information aboutplayers. Now it’s time to use the functions together.
5.3.4 Putting it all together—displaying players’ information
The showPlayerInfo function uses your three individual functions—showPlayer-
Name, showPlayerHealth, and showPlayerPlace—and adds a touch of formattingto produce a display of each player’s properties. The output for one player lookslike this:
>> Kandra> ----------------------------> Kandra is in The Dungeon of Doom> Kandra has health 50> ---------------------------->
The next listing leaves out the three component functions to focus on the new func-tion. They’re included on JS Bin.
var showPlayerInfo;
showPlayerInfo = function (playerName, playerPlace, playerHealth) { console.log("");
showPlayerName(playerName);
console.log("----------------------------");
showPlayerPlace(playerName, playerPlace); showPlayerHealth(playerName, playerHealth);
console.log("----------------------------"); console.log("");};
showPlayerInfo("Kandra", "The Dungeon of Doom", 50);showPlayerInfo("Dax", "The Old Library", 40);
You call the showPlayerInfo function with three arguments each time. It, in turn,passes the required arguments on to the showPlayerName, showPlayerHealth, andshowPlayerPlace functions.
You end with all the pieces put together in a single listing, shown next. It includeseach variable declaration and assignment as a single step and uses player object prop-erties, like player1.name, rather than literal values, like "Kandra", when calling show-PlayerInfo.
Listing 5.13 Displaying a player’s information (http://jsbin.com/likafe/edit?js,console)

69Summary
var showPlayerName = function (playerName) { console.log(playerName);};
var showPlayerHealth = function (playerName, playerHealth) { console.log(playerName + " has health " + playerHealth);};
var showPlayerPlace = function (playerName, playerPlace) { console.log(playerName + " is in " + playerPlace);};
var showPlayerInfo = function (playerName, playerPlace, playerHealth) { console.log(""); showPlayerName(playerName); console.log("----------------------------"); showPlayerPlace(playerName, playerPlace); showPlayerHealth(playerName, playerHealth); console.log("----------------------------"); console.log("");};
var player1 = { name: "Kandra", place: "The Dungeon of Doom", health: 50};
var player2 = { name: "Dax", place: "The Old Library", health: 40};
showPlayerInfo(player1.name, player1.place, player1.health);showPlayerInfo(player2.name, player2.place, player2.health);
5.4 Summary■ Define a function with named parameters to show that you expect to pass data to
the function when you call it. Commas separate the parameters inside theparentheses of the definition:
function (param1, param2) { … }
■ Use the parameters inside the function body as if they are variables.■ Call the function with arguments. When you run the program, the arguments
are automatically assigned to the parameters for use in the function body:
myFunction(arg1, arg2)
Listing 5.14 Displaying a player’s information using properties (http://jsbin.com/loteti/edit?js,console)

Return values:getting data from functions
In chapter 4 you discovered how functions can increase your efficiency by allowingyou to write code once but use it many times. In chapter 5, you made functionsmuch more flexible by passing them information with each call; a function can actin different ways and produce different outputs depending on the arguments yougive it. In this chapter you give functions the chance to talk back by returning theresults of their work. You also call functions directly at the console prompt to inves-tigate the values they return.
6.1 Returning data from functionsIt’s often useful to have a function do some work for you and give you back theresult of that work. You can then use the result however you want. In listing 5.6 yousaw a showSum function that displays the sum of two numbers on the console. It maybe better to have an add function that simply adds the numbers and returns theresult. Whereas showSum always displays the result on the console, with add you candisplay the result the function returns if you choose, use it in further calculations,send it across a network, or save it to a database.
This chapter covers■ Returning information from functions■ The return keyword■ Experimenting at the console prompt
70

71Returning data from functions
6.1.1 The return value replaces the function call
Most of the functions you’ve written so far have executed code for you on demandand then logged something to the console. They’ve helped you to break up programsinto understandable chunks. By assigning the functions to well-named variables, you’vemade the programs easier to follow. For an example of well-named variables, here’s asnippet of code for displaying player information in The Crypt:
showPlayerName("Kandra");showLine();showPlayerPlace("Kandra", "The Dungeon of Doom");showPlayerHealth("Kandra", 50);showLine();
Even if you don’t know how the functions perform their jobs, their names give you agood idea of the intentions of the code.
Functions can also return information: the result of a calculation, a constructedpiece of text, or data from a database. You can assign the returned value to a variable oruse it as an argument with other functions. The following examples show, in bold, callsto the four functions add, getPlayerPlace, findPlanetPosition, and getMessage:
var sum = add(50, 23);var placeInfo = getPlayerPlace("Kandra", "The Dungeon of Doom");console.log(findPlanetPosition("Jupiter"));console.log(getMessage());
Each function returns a value and the returned value replaces the function call. Assumingthe functions return the following values in bold, the previous four statements become
var sum = 73;var placeInfo = "Kandra is in The Dungeon of Doom";console.log("Jupiter: planet number 5");console.log("I’m going on an adventure!");
Figure 6.1 shows what happens when you call the add function. To return a value from a function, use the return keyword.
var sum = add(50, 23);
var sum = 73;
You call the add function
The function returns the value 73
The return value replacesthe function call
Figure 6.1 You call the add function and it returns the value 73.

72 CHAPTER 6 Return values: getting data from functions
6.1.2 The return keyword
Return a value from a function by using the return keyword. Whatever follows returnin a statement is the value that replaces the function call.
Listing 6.1 shows the definition of a getMessage function. It includes a return state-ment, a statement that starts with the return keyword:
return "I'm going on an adventure!";
The function returns the string "I'm going on an adventure!" because the string fol-lows the return keyword. The program assigns the string to the response variable andlogs it to the console to show
> I'm going on an adventure!
var getMessage;var response;
getMessage = function () { return "I'm going on an adventure!"; };
response = getMessage();
console.log(response);
The getMessage function always returns the same value. It’s common to determinethe return value by using information you pass in as arguments when you call thefunction.
6.1.3 Using arguments to determine the return value
In chapter 5, you passed information into a function by including parameters in thefunction definition and arguments in the function call. You can use that informationin the function body to determine the value the function returns and so call the func-tion again and again with different arguments to produce different return values.
The following listing shows a getHelloTo function that returns a string including aname passed in as an argument. The program assigns the return value to a variableand logs it to the console.
> Hello to Kandra
var getHelloTo;var fullMessage;
Listing 6.1 Returning a value from a function (http://jsbin.com/yucate/edit?js,console)
Listing 6.2 Using an argument to determine the return value (http://jsbin.com/nijijo/edit?js,console)
Return the message from the function by using the return keyword
Call the getMessage function and assign the returned value to the response variable

73Returning data from functions
getHelloTo = function (name) { return "Hello to " + name; };
fullMessage = getHelloTo("Kandra");
console.log(fullMessage);
In listing 6.2, you assign the return value to a variable, fullMessage, and log it to theconsole. The variable is redundant; you could just log the return value directly, asshown in the next listing, in which you call the getHelloTo function twice to give thefollowing output:
> Hello to Kandra> Hello to Dax
var getHelloTo;
getHelloTo = function (name) { return "Hello to " + name;};
console.log(getHelloTo("Kandra")); console.log(getHelloTo("Dax"));
Functions can return any type of value: strings, numbers, objects, and even other func-tions. Let’s look at an example that returns a number.
Figure 6.2 shows a call to the add function, add(50, 23). The figure shows how thearguments passed to add are used to calculate the return value.
Listing 6.3 Using the return value as an argument (http://jsbin.com/yapic/edit?js,console)
Include a parameter in the function definition
Use the value assigned to the parameter to build the return value
Call the getHelloTo function and use the return value as an argument for console.log
var sum = add( 50 , 23 );
var sum = 73 ;
The return valuereplaces thefunction call
function ( number1 , number2 )
return 73 ;
= 50 + 23 ;
= 73 ;
var total = number1 + number2 ;
Figure 6.2 The addfunction calculates the return value.

74 CHAPTER 6 Return values: getting data from functions
The next listing shows the code to make the add function do its thing. Notice, in par-ticular, the return keyword.
var add;
add = function (number1, number2) { var total = number1 + number2;
return total; };
var sum = add(50, 23);
console.log(sum);
add(50, 23) calls the add function, assigning 50 to number1 and 23 to number2. Thevalue of number1 is then added to the value of number2 and the result assigned to thetotal variable. The return keyword then ends the function and replaces the call tothe function with the value of total.
var sum = add(50, 23);
becomes
var sum = 73;
because add(50, 23) returns 73. Remember, the assignment operator, =, works by assigning the value on its right to
the variable on its left. If a function call is on its right, then it assigns the function’sreturn value.
The total variable in the add function in listing 6.4 isn’t really needed; it’sassigned a value and then immediately returned. You could have returned the resultof the calculation directly, as the totalCost function does in listing 6.5. Given the call-out charge and hourly rate charged by a plumber, totalCost calculates the total costfor a certain number of hours of work. So, say the call-out charge is $30 and theplumber charges $40 per hour, what is the total cost for three hours of work? total-Cost(30, 40, 3) should return the result $150.
var totalCost;
totalCost = function (callOutCharge, costPerHour, numberOfHours) { return callOutCharge + costPerHour * numberOfHours; };
console.log("$" + totalCost(30, 40, 3));
Listing 6.4 Returning the sum of two numbers (http://jsbin.com/haqapu/edit?js,console)
Listing 6.5 A function with three arguments (http://jsbin.com/jedigi/edit?js,console)
Assign the result of the calculation to the total variable
Use the return keyword to pass the result back to where the function is called
Call the add function and assign the value returned to the sum variable
Evaluate the total cost and return the value
The call to totalCost is replaced by the value returned.

75Experimenting at the console prompt
When you call the totalCost function, it evaluates the calculation to the right of thereturn keyword and returns the value. It follows the usual rules of arithmetic: it per-forms the multiplication first and then the addition: 30 + 40 * 3 = 30 + 120 = 150.
6.2 Experimenting at the console promptProgrammers don’t generally use the console in production, that is, in published pro-grams and websites. They use it in development, when designing and writing pro-grams. It provides a convenient way for programmers (that’s you) to log values anderrors and investigate the state of their programs while they’re running. That inter-activity, the chance to get immediate feedback, makes the console really useful forlearning—particularly for learning through experimentation. It’s time to go on anadventure of discovery with the functions you’ve seen so far in this chapter.
6.2.1 Calling functions
The next listing includes four functions from earlier listings. If you run the pro-gram, it won’t produce any output on the console; it doesn’t include any calls toconsole.log.
var getMessage;var getHelloTo;var add;var totalCost;
getMessage = function () { return "I'm going on an adventure!"; };
getHelloTo = function (name) { return "Hello to " + name;};
add = function (number1, number2) { return number1 + number2;};
totalCost = function (callOutCharge, costPerHour, numberOfHours) { return callOutCharge + costPerHour * numberOfHours;};
Running the program assigns the four functions to the four variables declared at thetop of the program. You can then access the variables from the console prompt. Youcan call the functions assigned to the variables to investigate their return values.
Follow the link to the listing on JS Bin and make sure you run the program. At theconsole prompt type
> getMessage()
Listing 6.6 A collection of functions that return values (http://jsbin.com/lijufo/edit?js,console)

76 CHAPTER 6 Return values: getting data from functions
and press Enter. The getMessage function runs and displays its return value:
"I'm going on an adventure!"
At the prompt, press the up arrow on your keyboard. It should bring up the last lineyou typed. (You can navigate through your previous entries at the console with the upand down arrows.) Press Enter to resubmit a command. The getMessage functionalways returns the same string. If you look at its function body, you can see it returns astring literal, a hard-coded value.
return "I'm going on an adventure!";
The next function in the program, getHelloTo, includes a name parameter in its defi-nition. The name parameter allows the return value to vary in response to the argu-ment you pass to the function when you call it.
getHelloTo = function (name) { return "Hello to " + name;};
Have a go at calling the function at the console with different arguments each time:
> getHelloTo("Jason") "Hello to Jason"> getHelloTo("Rosemary") "Hello to Rosemary"
You can immediately see how changing the argument affects the return value.
6.2.2 Declaring new variables
As well as giving you access to variables declared in your programs, the console allowsyou to declare new variables and assign them values.
Carrying straight on from the previous section, at the console type
> var friend
and press Enter. The console displays the value of your previous entry. Because youdidn’t assign a value to the friend variable, undefined is logged to the console.
undefined
Give it a value. Type
> friend = "Amber"
and press Enter. The console displays the new value.
"Amber"
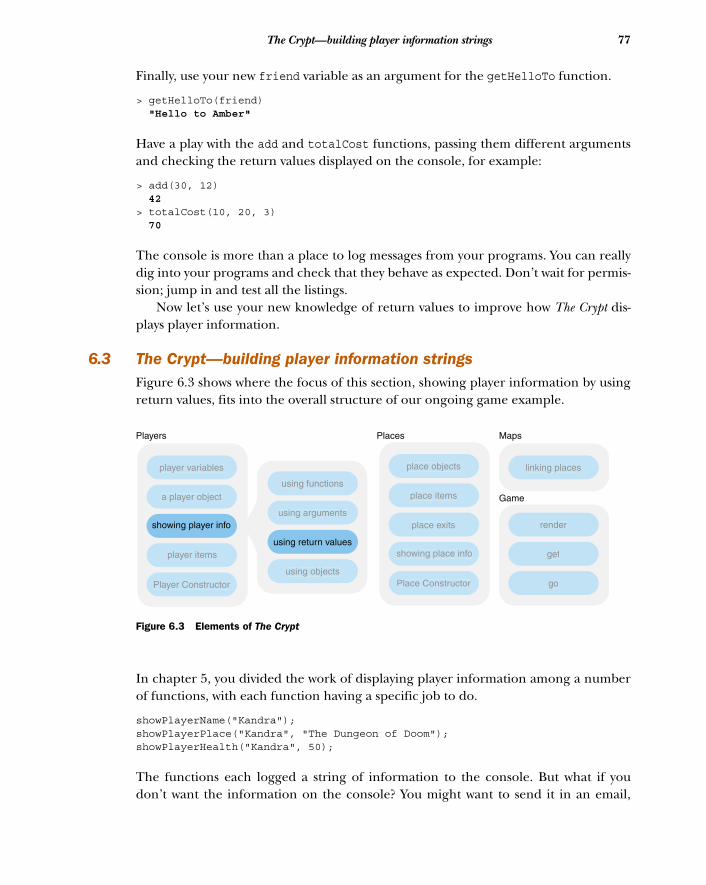
77The Crypt—building player information strings
Finally, use your new friend variable as an argument for the getHelloTo function.
> getHelloTo(friend) "Hello to Amber"
Have a play with the add and totalCost functions, passing them different argumentsand checking the return values displayed on the console, for example:
> add(30, 12) 42> totalCost(10, 20, 3) 70
The console is more than a place to log messages from your programs. You can reallydig into your programs and check that they behave as expected. Don’t wait for permis-sion; jump in and test all the listings.
Now let’s use your new knowledge of return values to improve how The Crypt dis-plays player information.
6.3 The Crypt—building player information stringsFigure 6.3 shows where the focus of this section, showing player information by usingreturn values, fits into the overall structure of our ongoing game example.
In chapter 5, you divided the work of displaying player information among a numberof functions, with each function having a specific job to do.
showPlayerName("Kandra");showPlayerPlace("Kandra", "The Dungeon of Doom");showPlayerHealth("Kandra", 50);
The functions each logged a string of information to the console. But what if youdon’t want the information on the console? You might want to send it in an email,
player variables
Players
a player object
player items
Player Constructor
showing player info
Places
place objects
place items
showing place info
Place Constructor
place exits
using return values
using functions
using arguments
using objects
Maps
Game
linking places
render
get
go
Figure 6.3 Elements of The Crypt
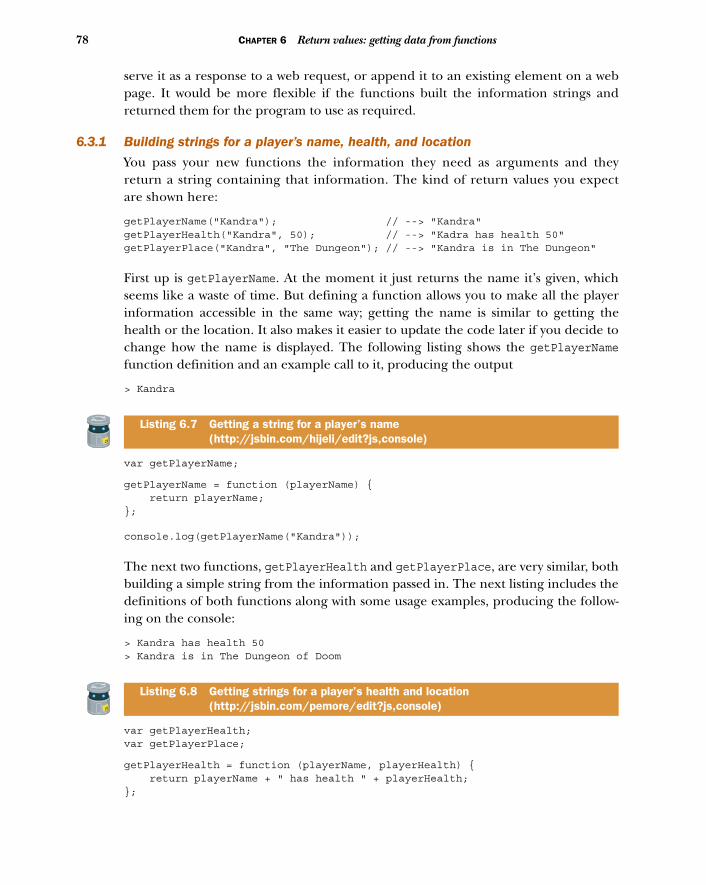
78 CHAPTER 6 Return values: getting data from functions
serve it as a response to a web request, or append it to an existing element on a webpage. It would be more flexible if the functions built the information strings andreturned them for the program to use as required.
6.3.1 Building strings for a player’s name, health, and location
You pass your new functions the information they need as arguments and theyreturn a string containing that information. The kind of return values you expectare shown here:
getPlayerName("Kandra"); // --> "Kandra" getPlayerHealth("Kandra", 50); // --> "Kadra has health 50" getPlayerPlace("Kandra", "The Dungeon"); // --> "Kandra is in The Dungeon"
First up is getPlayerName. At the moment it just returns the name it’s given, whichseems like a waste of time. But defining a function allows you to make all the playerinformation accessible in the same way; getting the name is similar to getting thehealth or the location. It also makes it easier to update the code later if you decide tochange how the name is displayed. The following listing shows the getPlayerNamefunction definition and an example call to it, producing the output
> Kandra
var getPlayerName;
getPlayerName = function (playerName) { return playerName;};
console.log(getPlayerName("Kandra"));
The next two functions, getPlayerHealth and getPlayerPlace, are very similar, bothbuilding a simple string from the information passed in. The next listing includes thedefinitions of both functions along with some usage examples, producing the follow-ing on the console:
> Kandra has health 50> Kandra is in The Dungeon of Doom
var getPlayerHealth;var getPlayerPlace;
getPlayerHealth = function (playerName, playerHealth) { return playerName + " has health " + playerHealth;};
Listing 6.7 Getting a string for a player’s name (http://jsbin.com/hijeli/edit?js,console)
Listing 6.8 Getting strings for a player’s health and location (http://jsbin.com/pemore/edit?js,console)

79The Crypt—building player information strings
getPlayerPlace = function (playerName, playerPlace) { return playerName + " is in " + playerPlace;};
console.log(getPlayerHealth("Kandra", 50));console.log(getPlayerPlace("Kandra", "The Dungeon of Doom"));
Calling the three functions from one main getPlayerInfo function will give you thedisplay string you want. The next section shows how the pieces are assembled.
6.3.2 A function for player information—putting the pieces together
With the pieces in place you can now build the main function to produce a string ofinformation about a player. You want the output to look something like this:
>> Kandra> ********************> Kandra is in The Dungeon of Doom> Kandra has health 50> ********************>
To construct the lines of characters separating the player information, you make useof a getBorder function that returns a line of asterisk symbols. The listing that followsshows the getPlayerInfo definition. It includes calls to other functions not shown inthe printed listing but included in the JS Bin version.
var getPlayerInfo;
getPlayerInfo = function (playerName, playerPlace, playerHealth) { var playerInfo;
playerInfo = "\n" + getPlayerName(playerName); playerInfo += "\n" + getBorder(); playerInfo += "\n" + getPlayerPlace( playerName, playerPlace); playerInfo += "\n" + getPlayerHealth( playerName, playerHealth); playerInfo += "\n" + getBorder(); playerInfo += "\n";
return playerInfo; };
console.log(getPlayerInfo("Kandra", "The Dungeon of Doom", 50));
The getPlayerInfo function builds up the player information string piece by piece,appending the strings returned by the functions called to the playerInfo variable.The extra string, \n, appended at each stage is a new-line character; text following the
Listing 6.9 Getting a string for a player’s information (http://jsbin.com/javuxe/edit?js,console)
Build up the info string by using the other functions to create the pieces
Use += to append a string to an existing string
Return the completed info string

80 CHAPTER 6 Return values: getting data from functions
new-line character will appear on a new line on the console. You use the += operatorto append a string to the end of an existing string.
The final example for this chapter gathers all of the code into a single listing, list-ing 6.10, along with two player objects used to test the getPlayerInfo function. It alsouses a different separator character in the getBorder function, producing output forboth players like this:
>> Kandra> ================================> Kandra is in The Dungeon of Doom> Kandra has health 50> ================================>>> Dax> ================================> Dax is in The Old Library> Dax has health 40> ================================>
var getPlayerName = function (playerName) { return playerName;};
var getPlayerHealth = function ( playerName, playerHealth) { return playerName + " has health " + playerHealth;};
var getPlayerPlace = function ( playerName, playerPlace) { return playerName + " is in " + playerPlace;};
var getBorder = function () { return "================================";};
var getPlayerInfo = function ( playerName, playerPlace, playerHealth) {
var playerInfo;
playerInfo = "\n" + getPlayerName(playerName); playerInfo += "\n" + getBorder(); playerInfo += "\n" + getPlayerPlace(playerName, playerPlace); playerInfo += "\n" + getPlayerHealth(playerName, playerHealth);
Listing 6.10 Displaying player information using objects (http://jsbin.com/puteki/edit?js,console)
Define functions to return strings of specific player info
Define a function to return a string used as a border
Define a function that calls previous functions to build a player info string
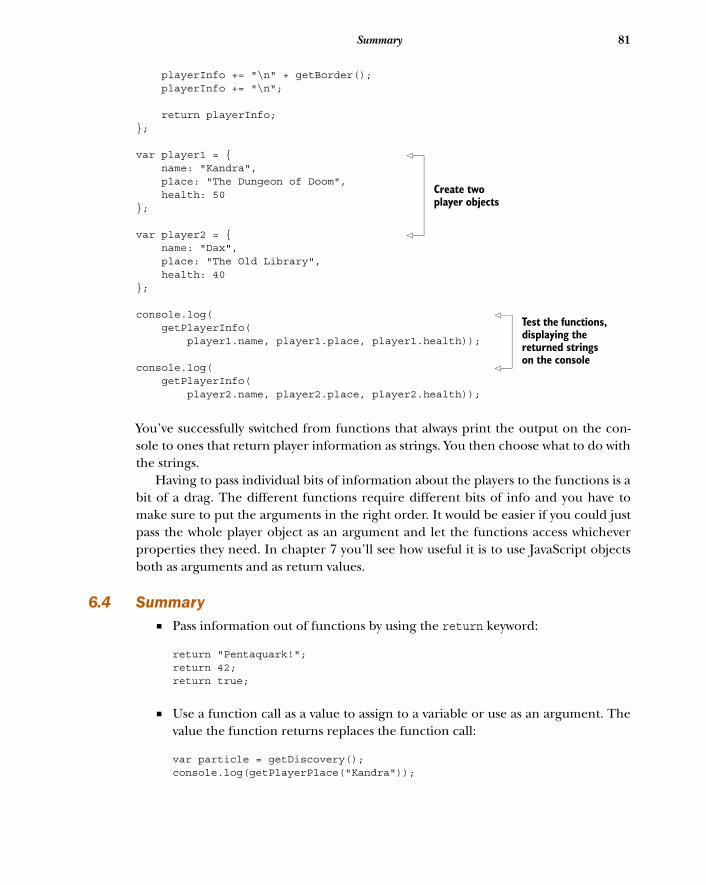
81Summary
playerInfo += "\n" + getBorder(); playerInfo += "\n";
return playerInfo;};
var player1 = { name: "Kandra", place: "The Dungeon of Doom", health: 50};
var player2 = { name: "Dax", place: "The Old Library", health: 40};
console.log( getPlayerInfo( player1.name, player1.place, player1.health));
console.log( getPlayerInfo( player2.name, player2.place, player2.health));
You’ve successfully switched from functions that always print the output on the con-sole to ones that return player information as strings. You then choose what to do withthe strings.
Having to pass individual bits of information about the players to the functions is abit of a drag. The different functions require different bits of info and you have tomake sure to put the arguments in the right order. It would be easier if you could justpass the whole player object as an argument and let the functions access whicheverproperties they need. In chapter 7 you’ll see how useful it is to use JavaScript objectsboth as arguments and as return values.
6.4 Summary■ Pass information out of functions by using the return keyword:
return "Pentaquark!";return 42;return true;
■ Use a function call as a value to assign to a variable or use as an argument. Thevalue the function returns replaces the function call:
var particle = getDiscovery();console.log(getPlayerPlace("Kandra"));
Create two player objects
Test the functions, displaying the returned strings on the console

82 CHAPTER 6 Return values: getting data from functions
■ Include parameters in the function definition and use the arguments passed into the function to determine the value returned:
var sum = add(28, 14);
■ Use the console to explore and test programs.■ Call functions at the console prompt and see their return values displayed.■ Declare variables at the console, assign them values, and use them as arguments
for functions.

Object arguments:functions working
with objects
This is the last of the run of four chapters introducing functions. By now, youknow about using functions to execute code on demand and passing informationto and from functions using parameters, arguments, and the return keyword.You’ve also seen how to use objects to collect values together as named properties.Well, it’s time to combine functions and objects to turbocharge productivity, effi-ciency, and readability.
Remember the first-aid kit from chapter 3? We consider the kit to be a singleobject that we can pass around, pack in a rucksack, and speak about. Such encapsu-lation, or chunking, where we treat a collection as singular, is an important part ofhow we as humans cope with complex information, both in language and in memory.
This chapter covers■ Using objects as arguments■ Accessing object properties from within
a function■ Adding new object properties from within
a function■ Returning objects from functions■ Setting functions as properties of objects
83

84 CHAPTER 7 Object arguments: functions working with objects
When the need arises, we can consider the elements that make up the kit: antiseptic,plasters, bandages, and so on.
You use the same concept of encapsulation throughout this chapter as you passobjects to and from functions as arguments and return values.
7.1 Using objects as argumentsBeing able to pass an object to a function is really useful, especially if the functionneeds to access lots of the object’s properties. You need only a single parameter in thefunction definition and you don’t need a long list of arguments when calling the func-tion. showPlayerInfo(player1) is neater, more easily understood, and less prone toerror than showPlayerInfo(player1.name, player1.location, player1.health).
You can pass the same information to the function but wrapped into a single objectrather than as separate values (figure 7.1).
7.1.1 Accessing properties of an object argument
Inspired by the space adventures of New Horizons, Curiosity, Rosetta, and Philae, youdecide to write a quick app for displaying information about the solar system. One fea-ture of the app is to display information about planets.
Your first listing shows the getPlanetInfo function with a planet parameter.When you call the function using a planet object as an argument, the function bodyreturns a string built using some of the planet’s properties. The code produces the fol-lowing output:
> Jupiter: planet number 5
var planet1;var getPlanetInfo;
planet1 = { name: "Jupiter",
Listing 7.1 Passing a function an object as an argument (http://jsbin.com/tafopo/edit?js,console)
showPlayerInfo( player1 );
showPlayerInfo( player1.name , player1.location , player1.health );
An object as a single argument
Multiple arguments can be harder to work with
Figure 7.1 A single object as an argument is neater than multiple arguments.

85Using objects as arguments
position: 5, type: "Gas Giant", radius: 69911, sizeRank: 1};
getPlanetInfo = function (planet) { return planet.name + ": planet number " + planet.position; };
console.log(getPlanetInfo(planet1));
Passing an object to a function as a single argument is neat and tidy. There’s no needto make sure you’ve included all the required arguments in the right order—a singleargument does the job.
Once you’ve passed an object to a function, JavaScript automatically assigns it tothe parameter included in the function’s definition.
You access the properties of the object through the parameter, as shown in fig-ure 7.2. The function has full control of the object via the parameter; it can evenadd new properties.
7.1.2 Adding properties to an object argument
When you pass an object to a function as an argument, the code in the function bodyhas access to the object’s properties. It can read them, change them, and delete themand can add new properties too.
Listing 7.2 shows two functions with planet parameters. When you pass a planetobject, encapsulating a name and a radius, to the calculateSizes function, the func-tion adds two new properties, area and volume, to the object (figure 7.3).
Include a planet parameter, expecting a planet object to be passed in
Access properties of the planet object
Call the getPlanetInfo function, passing in a planet as an argument
A single parameter
getPlanetInfo = function ( planet ) {
return planet.name + ": planet number " + planet.positio n;
};
The properties of the object can be accessed inside the function body
planet
planet.name planet.position
Figure 7.2 Object properties can be accessed inside the function body.

86 CHAPTER 7 Object arguments: functions working with objects
vopro
The displaySizes function uses the two new properties to print information aboutthe planet on the console:
> Jupiter> surface area = 61426702271.128 square km> volume = 1431467394158943.2 cubic km
var planet1 = { name: "Jupiter", radius: 69911 };
var calculateSizes = function (planet) { var r = planet.radius; planet.area = 4 * 3.142 * r * r; planet.volume = 4 * 3.142 * r * r * r / 3; };
var displaySizes = function (planet) { console.log(planet.name); console.log("surface area = " + planet.area + " square km"); console.log("volume = " + planet.volume + " cubic km");};
calculateSizes(planet1); displaySizes(planet1);
You create the planet object and assign it to the planet1 variable:
planet1 = { name: "Jupiter", radius: 69911 };
Listing 7.2 A function that adds properties to an object (http://jsbin.com/qevodu/edit?js,console)
A single parameter
calculateSizes = function ( planet ) {
var r = planet.radius;
planet.area = 4 * 3.142 * r * r;
planet.volume = 4 * 3.142 * r * r * r / 3;
};
The function addstwo new propertiesto the planet object
planet
planet.area
planet.volume
Figure 7.3 The calculateSizes function adds new properties to the planet object.
Include a planet parameter in the definition of the calculateSizes function
Add an area property to the planet object passed to the function when it’s calledAdd a
lumeperty Include a planet parameter
in the definition of the displaySizes function
Pass the planet1 object as an argument to both functions

87Returning objects from functions
When you call the calculateSizes function, you pass planet1 to it as an argument:
calculateSizes(planet1);
JavaScript assigns the object referred to by planet1 to the planet parameter for usewithin the function. The function uses the planet parameter to add two new proper-ties to the object, planet.area and planet.volume. By the time you call the display-Sizes function, the object has the two new properties needed to display all therequired information:
displaySizes(planet1);
As well as passing objects to functions, you can return objects from functions.
7.2 Returning objects from functionsJust as passing objects to functions as arguments is an efficient way of moving informa-tion to where it’s needed, so is using objects as return values. Functions can eithermanipulate objects that you pass to them and then return them, or they can returnbrand-new objects that they create in the function body.
This section explores two examples: the first uses a number of parameters tobuild a new planet object and the second uses two object parameters to create apoint in 2D space.
7.2.1 Building planets—an object creation function
Back with your solar system app, you decide to streamline the creation of planets. Youwrite a function to which you pass the key facts, and it returns a planet object withproperties set accordingly. Your buildPlanet function lets you create planets like this:
planet1 = buildPlanet("Jupiter", 5, "Gas Giant", 69911, 1);
Figure 7.4 shows how JavaScript assigns the arguments to parameters when you callbuildPlanet. You use the parameters to create a new object.
Listing 7.3 shows the definition of the buildPlanet function. It also has a get-PlanetInfo function that it uses to get planet information for display. Once displayed,the information looks like this:
JUPITER: planet 5NEPTUNE: planet 8
Notice here how the planet names are in uppercase. The getPlanetInfo functionmakes use of a built-in JavaScript function, toUpperCase, that converts strings touppercase. toUpperCase and some other JavaScript functions will be discussed in sec-tion 7.3.
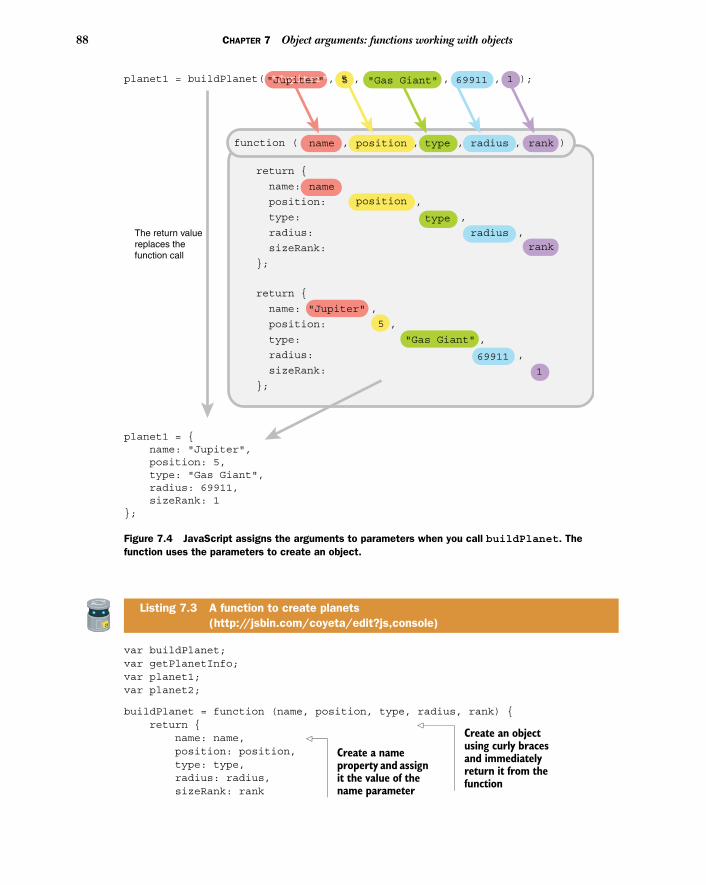
88 CHAPTER 7 Object arguments: functions working with objects
var buildPlanet;var getPlanetInfo;var planet1;var planet2;
buildPlanet = function (name, position, type, radius, rank) { return { name: name, position: position, type: type, radius: radius, sizeRank: rank
Listing 7.3 A function to create planets (http://jsbin.com/coyeta/edit?js,console)
function ( name , position , type , radius , rank )
return {
name: name,
position: position ,
type: type ,
radius: radius ,
sizeRank: rank
};
name
position
type
radius
rank
name position type radius rank
planet1 = buildPlanet( "Jupiter", 5 , "Gas Giant" , 69911 , 1 );"Jupiter" 5 "Gas Giant" 69911 1
return {
name: "Jupiter" ,
position: 5 ,
type: "Gas Giant" ,
radius: 69911 ,
sizeRank: 1
};
"Jupiter"
5
"Gas Giant"
69911
1
planet1 = { name: "Jupiter", position: 5, type: "Gas Giant", radius: 69911, sizeRank: 1};
The return valuereplaces thefunction call
Figure 7.4 JavaScript assigns the arguments to parameters when you call buildPlanet. The function uses the parameters to create an object.
Create an object using curly braces and immediately return it from the function
Create a name property and assign it the value of the name parameter

89Returning objects from functions
};};
getPlanetInfo = function (planet) { return planet.name.toUpperCase() + ": planet " + planet.position;};
planet1 = buildPlanet("Jupiter", 5, "Gas Giant", 69911, 1);planet2 = buildPlanet("Neptune", 8, "Ice Giant", 24622, 4);
console.log(getPlanetInfo(planet1));console.log(getPlanetInfo(planet2));
The key-value pairs inside the object created by the buildPlanet function look a littlestrange at first:
name: name, position: position, and so on.
For each key-value pair, the key is to the left of the colon and the value is to the right.You use the parameters as values, so for the function call
planet1 = buildPlanet("Jupiter", 5, "Gas Giant", 69911, 1);
the object-creation code becomes
name: "Jupiter",position: 5,type: "Gas Giant",radius: 69911,sizeRank: 1
7.2.2 Points in 2D space
Keen to create an animation showing the planets in the solar system, you start to inves-tigate coordinates in two dimensions. All of the coordinates have two values associatedwith them, x and y. This seems like an obvious place to use objects. Each point is anobject with x and y properties:
point1 = { x : 3 , y : 4 };point2 = { x : 0 , y : -2 };
You can access individual values using dot notation: point1.x, point2.y, and so on. As an initial experiment, you write a program to move a point a certain amount
in the x direction and a certain amount in the y direction. Because the change inposition also has x and y components, you use an object for that too. For example,to represent a movement of four across and two down you use the object { x : 4,y : -2 }.
Listing 7.4 includes a move function that takes two arguments, an initial pointobject and a change object. It returns a new point representing the final position ifyou started from the first point and moved by the change specified.

90 CHAPTER 7 Object arguments: functions working with objects
The program uses a showPoint function to produce the following output:
( 2 , 5 )Move 4 across and 2 down( 6 , 3 )
var point1;var point2;var move;var showPoint;
move = function (point, change) { return { x: point.x + change.x, y: point.y + change.y };};
showPoint = function (point) { console.log("( " + point.x + " , " + point.y + " )");};
point1 = { x : 2, y : 5 };
point2 = move(point1, { x : 4, y : -2 });
showPoint(point1);console.log("Move 4 across and 2 down");showPoint(point2);
The second argument you pass to the move function in listing 7.4 is written using anobject literal, { x : 4, y : -2 }. You could assign it to a variable first but, because youuse it only once, a literal value is okay too. The two points are plotted and their coordi-nates shown in figure 7.5.
Listing 7.4 Moving a point in 2D (http://jsbin.com/baxuvi/edit?js,console)
Create an object using curly braces and immediately return it
Set the new coordinates by applying the change to the original point
Pass in the original point as a variable and the change as an object literal
Figure 7.5 The points before and after the move of 4 across and 2 down (plotted using desmos.com—an application written in JavaScript)

91Methods—setting functions as properties of objects
You’ve seen objects being passed to functions and objects being returned from func-tions and, in listing 7.4, a function that uses objects as arguments and returns an object.That’s functions using objects. You can also set functions as properties of objects.
7.3 Methods—setting functions as properties of objectsIn JavaScript, you can use functions as values, just like numbers, strings, and objects.That means you can pass them as arguments, return them from other functions, andset them as properties of objects. In this section, continuing the theme of functionsworking with objects, you look at an example of setting functions as properties ofan object.
7.3.1 Namespaces—organizing related functions
Let’s write some functions to help format text displayed on the console. Displayingtext is a big part of your interactive console applications, so the number of helperfunctions you create will expand. For now, you start with two really simple functions:blank returns an empty string and newLine returns a new-line character.
Because all of the functions are related to the same job, it’s good to collect themtogether. You can do just that by setting each function as the property of a singleobject. Call it spacer:
var spacer = {};
Once you have an object, you can set functions as properties. First, here’s a functionto return an empty string:
spacer.blank = function () { return "";};
Figure 7.6 illustrates how you create the function and then assign it to the blank prop-erty of the spacer object.
spacer.blank = function () { return ""; };
Use dot notationto refer to the blank
property of thespacer object
Assign the function on the right to the property on the left
Create a function thatreturns an empty string
Figure 7.6 Create a function and assign it to an object property

92 CHAPTER 7 Object arguments: functions working with objects
Sometimes it’s useful to include line breaks in a string, to space it over multiple lines.The special escape sequence, "\n", is called the new-line character. Add a function toreturn the new-line character:
spacer.newLine = function () { return "\n";};
Now you have two functions set as properties of the spacer object. When we use anobject to collect functions together in this way, we call it a namespace. The newLine andblank functions belong to the spacer namespace. You can call the functions by add-ing parentheses as normal:
console.log(spacer.blank());console.log("Line 1" + spacer.newLine() + "Line 2");console.log(spacer.blank());
That code snippet produces this output:
>> Line 1> Line 2>
The individual functions don’t have to be added to the namespace one at a time. Youcan use the object literal syntax, curly braces with comma-separated key-value pairs, toset up the namespace with properties in place:
spacer = { blank: function () { return ""; },
newLine: function () { return "\n"; }};
Functions set as properties of an object are called methods. Currently, the spacerobject has two methods, blank and newLine. You’ll return to spacer in sections 7.3.4and 7.3.5, where you’ll add more methods and have a play with it on JS Bin.
JavaScript includes a number of useful objects and methods. Before you expandyour spacer object, let’s investigate Math and String methods.
7.3.2 Math methods
Math is a namespace built into JavaScript that provides properties and functions allrelated to mathematical calculations. Listing 7.5 shows the Math.min and Math.max

93Methods—setting functions as properties of objects
methods in action. They return the smaller of two numbers and the larger of twonumbers, respectively. The program produces the following output:
3 is smaller than 12-10 is smaller than 3
var showSmaller = function (num1, num2) { var smaller = Math.min(num1, num2); var larger = Math.max(num1, num2);
console.log(smaller + " is smaller than " + larger);};
showSmaller(12, 3);showSmaller(-10, 3);
Math.min and Math.max, when used together, are useful for making sure a value is in aspecified range. Say a lineLength variable has to be between 0 and 40 inclusive. Toforce lineLength to be at least zero you can use
lineLength = Math.max(0, lineLength);
If lineLength is greater than zero, it will be the biggest and its value won’t change.But, if lineLength is less than zero, zero will be the biggest and lineLength will beassigned zero.
Similarly, you can force lineLength to be less than or equal to 40:
lineLength = Math.min(40, lineLength);
Listing 7.6 shows such constraints in action. line is a function that returns a separatorline of a specified length. The length must be between 0 and 40. Trying to displaylines of length 30, 40, and 50 produces the following output:
> ==============================> ========================================> ========================================
Notice, the last two lines are both of length 40. Although 50 is specified as the lengthof the last line, the line function constrains the length to 40.
var line = function (lineLength) { var line = "========================================"; lineLength = Math.max(0, lineLength);
Listing 7.5 Using Math.min and Math.max (http://jsbin.com/moyoti/edit?js,console)
Listing 7.6 Using Math.min and Math.max to constrain an argument (http://jsbin.com/qiziyo/edit?js,console)
Assign the smaller of the two numbers to smaller
Assign the larger of the two numbers to larger
Make sure lineLength is at least 0
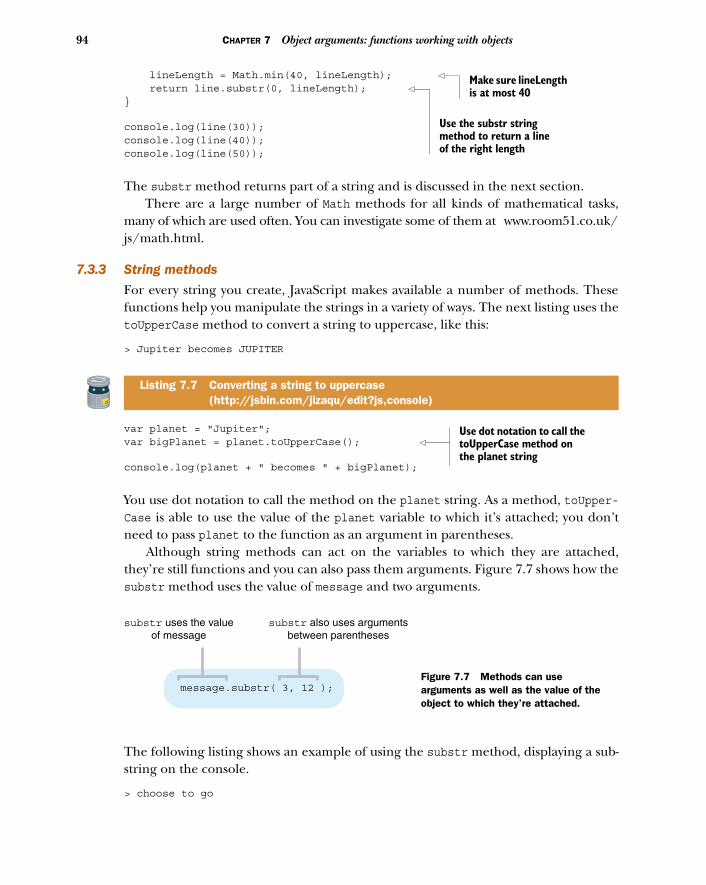
94 CHAPTER 7 Object arguments: functions working with objects
lineLength = Math.min(40, lineLength); return line.substr(0, lineLength); }
console.log(line(30));console.log(line(40));console.log(line(50));
The substr method returns part of a string and is discussed in the next section. There are a large number of Math methods for all kinds of mathematical tasks,
many of which are used often. You can investigate some of them at www.room51.co.uk/js/math.html.
7.3.3 String methods
For every string you create, JavaScript makes available a number of methods. Thesefunctions help you manipulate the strings in a variety of ways. The next listing uses thetoUpperCase method to convert a string to uppercase, like this:
> Jupiter becomes JUPITER
var planet = "Jupiter";var bigPlanet = planet.toUpperCase();
console.log(planet + " becomes " + bigPlanet);
You use dot notation to call the method on the planet string. As a method, toUpper-Case is able to use the value of the planet variable to which it’s attached; you don’tneed to pass planet to the function as an argument in parentheses.
Although string methods can act on the variables to which they are attached,they’re still functions and you can also pass them arguments. Figure 7.7 shows how thesubstr method uses the value of message and two arguments.
The following listing shows an example of using the substr method, displaying a sub-string on the console.
> choose to go
Listing 7.7 Converting a string to uppercase (http://jsbin.com/jizaqu/edit?js,console)
Make sure lineLength is at most 40
Use the substr string method to return a line of the right length
Use dot notation to call the toUpperCase method on the planet string
message.substr( 3, 12 );
substr uses the valueof message
substr also uses argumentsbetween parentheses
Figure 7.7 Methods can use arguments as well as the value of the object to which they’re attached.

95Methods—setting functions as properties of objects
var message = "We choose to go to the Moon!";
console.log(message.substr(3, 12));
The substr method accepts two arguments: the starting position in the original stringand the number of characters to return. When specifying the position of a characterin a string, counting is zero based: the first character is position 0, the second position1, the third position 2, and so on. (I know starting at zero seems a bit odd at first; it’sactually very common in programming languages.)
substr(3, 12) starts with the character at position 3, c, and returns a string oflength 12, from position 3 to position 14.
But you don’t have to spend all your time counting the positions of characters instrings, however exciting that sounds; you can use the indexOf method instead. TheindexOf method returns the position, or index, of the first occurrence of a specifiedsearch string within a string.
The next listing uses indexOf to find the position of the M character in a string. Itthen passes the position to substr to grab a substring of length 3, producing thebovine pronouncement Moo on the console.
var message = "The cow jumped over the Moon!";
var charIndex = message.indexOf("M");
console.log(message.substr(charIndex, 3));
You can use indexOf to find search strings longer than a single character. Here’s anexample using message from listing 7.9:
message.indexOf("cow"); // Returns 4message.indexOf("the"); // Returns 20message.indexOf("not"); // Returns -1
Notice that indexOf is case sensitive, so the and The are different, and it returns -1 if astring is not found.
Just like for Math, there are a lot of String methods available in JavaScript. Onceagain, the book’s website has you covered: www.room51.co.uk/js/string-methods.html.
Listing 7.8 Finding substrings (http://jsbin.com/mesisi/edit?js,console)
0 1 2 3 4 5 6 7 8 9 10 11 12 13 14
W e c h o o s e t o g o
Listing 7.9 Finding a character with indexOf (http://jsbin.com/bidabi/edit?js,console)

96 CHAPTER 7 Object arguments: functions working with objects
7.3.4 spacer—more methods for your namespace
In section 7.3.1 you created a spacer object with a couple of functions attached, blankand newLine. You now add a few more interesting functions to help format your out-put nicely.
■ line is your line separator function, upgraded! It returns a line of a givenlength between 0 and 40 characters long, now with a choice of five gorgeouscharacters! ("*", "+", "=", "-", or " ").
spacer.line(10, "*");spacer.line(6, "+");
> **********> ++++++
■ wrap returns text padded to a given length with added prefix and suffix characters.
spacer.wrap("Saturn", 10, "=");spacer.wrap("Venus", 12, "-");spacer.wrap("Mercury", 14, "+");
> = Saturn => - Venus -> + Mercury +
■ box returns text padded to a given length, with a line of characters above andbelow.
spacer.box("Saturn", 10, "=");spacer.box("Venus", 12, "-");
=========== Saturn ===========
------------- Venus -------------
“So, are strings objects now?”In listing 7.7, the string "Jupiter" is assigned to the planet variable. The toUpper-Case method is then called: planet.toUpperCase();.
If methods are functions set as properties of objects, how is it we can call methodson strings?
Well, behind the scenes, whenever we access a string value, JavaScript creates aspecial String object that wraps the value. That object includes all the handy stringmethods. Once the statement has finished executing, the object is destroyed.
So, no, strings are not objects, but JavaScript provides a useful way to give us prop-erties and methods for working with them.

97Methods—setting functions as properties of objects
The following listing shows the code for your new methods. Notice that spacer.wrapuses spacer.line to pad the text with space characters and spacer.box uses bothspacer.line and spacer.wrap to generate its box outline. You’ll look in detail at howthe new methods work after the listing.
var spacer = { blank: function () { return ""; },
newLine: function () { return "\n"; },
line: function (length, character) { var longString = "****************************************"; longString += "----------------------------------------"; longString += "========================================"; longString += "++++++++++++++++++++++++++++++++++++++++"; longString += " ";
length = Math.max(0, length); length = Math.min(40, length); return longString.substr(longString.indexOf(character), length); },
wrap : function (text, length, character) { var padLength = length - text.length - 3; var wrapText = character + " " + text; wrapText += spacer.line(padLength, " "); wrapText += character; return wrapText; },
box: function (text, length, character) { var boxText = spacer.newLine(); boxText += spacer.line(length, character) + spacer.newLine(); boxText += spacer.wrap(text, length, character) + spacer.newLine(); boxText += spacer.line(length, character) + spacer.newLine(); return boxText; }};
console.log(spacer.box("Mercury", 11, "=")); console.log(spacer.box("Mars", 11, "*"));
TIP Notice how the wrap and box methods use the same parameters in thesame order: text, length, and character. The line method has only two ofthose three parameters but is also consistent with the ordering: length andcharacter. Such a conscious choice of parameter order reduces the chanceof errors when calling the methods.
Listing 7.10 Organizing functions as object properties (http://jsbin.com/kayono/edit?js,console)
Return an empty string
Return a new line character
Return a line of characters of a given length
Pad the text with spaces and add a prefix and suffix character
Surround the text in a box of a specified character
Test the box method

98 CHAPTER 7 Object arguments: functions working with objects
7.3.5 Deep namespace exploration
So how do your wonderful new methods work? Be brave and curious as you indulgein some deep namespace exploration. And remember, you can try code out on JSBin, both in the JavaScript panel and at the prompt. For example, for the linemethod explanation that follows, declare and assign the longString variable at theconsole prompt:
> var longString = "**********----------==========++++++++++ "
Then you can try out the indexOf method:
> longString.indexOf("*") 0> longString.indexOf("=") 20
Be playful and take your time. But don’t worry if you don’t follow everything the firsttime; the methods use a lot of ideas you’ve only just met. Stick with it; learning fol-lows thinking.
THE LINE METHOD
Both the wrap and box methods use the trusty line method. It returns a string of agiven length made up of one of five repeated characters:
line: function (length, character) { var longString = "****************************************"; longString += "----------------------------------------"; longString += "========================================"; longString += "++++++++++++++++++++++++++++++++++++++++"; longString += " ";
length = Math.max(0, length); length = Math.min(40, length); return longString.substr(longString.indexOf(character), length); },
The method starts by creating one long string made up of all of the characters to bemade available. It uses the += operator to append new strings to an existing string.The variable longString ends up as a string of the following form:
longString = "**********----------==========++++++++++ ";
This snippet has 10 of each character, whereas the actual method has 40 of each. Thecode uses the string method indexOf to find the position of the first character thatmatches the one specified when you call line. Here’s an example, using the shortersnippet shown previously:
longString.indexOf("*"); // 0longString.indexOf("-"); // 10

99Methods—setting functions as properties of objects
longString.indexOf("="); // 20longString.indexOf("+"); // 30longString.indexOf(" "); // 40
Having found where the requested character first appears, the code then uses substrto grab a substring of the specified length:
longString.substr(10, 6); // ------longString.substr(30, 3); // +++
But the line method doesn’t use hard-coded values; it uses parameters, length andcharacter, to hold the arguments passed in when you call it:
// Get the index of the first matching charactervar firstChar = longString.indexOf(character);
// Get a string of the requested length, starting at the first matching// charactervar requestedLine = longString.substr(firstChar, length);
The extra variables aren’t really needed, although they could be used to make themethod easier to follow. line finds the substring and returns it in one go:
return longString.substr(longString.indexOf(character), length);
Notice that a space is one of the available characters. Strings of spaces can be used topad titles and boxes on the console. The wrap method uses line to do just that.
THE WRAP METHOD
To form the middle line of some boxed text, the wrap method returns a string of aspecified length. The character argument specifies the first and last characters ofthe string:
wrap : function (text, length, character) { var padLength = length - text.length - 3; var wrapText = character + " " + text; wrapText += spacer.line(padLength, " "); wrapText += character; return wrapText; },
Here are some strings of increasing length returned by wrap:
spacer.wrap("Neptune", 11, "="); // = Neptune = spacer.wrap("Neptune", 12, "="); // = Neptune = spacer.wrap("Neptune", 13, "="); // = Neptune =
The method pads the last character with spaces on its left to make the whole string thecorrect length (figure 7.8).
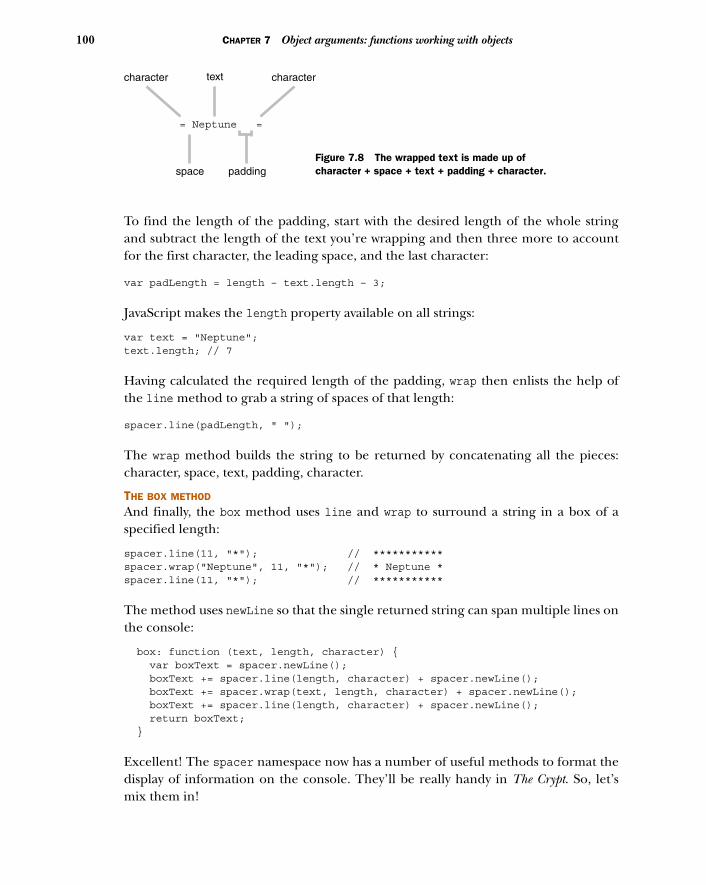
100 CHAPTER 7 Object arguments: functions working with objects
To find the length of the padding, start with the desired length of the whole stringand subtract the length of the text you’re wrapping and then three more to accountfor the first character, the leading space, and the last character:
var padLength = length – text.length – 3;
JavaScript makes the length property available on all strings:
var text = "Neptune";text.length; // 7
Having calculated the required length of the padding, wrap then enlists the help ofthe line method to grab a string of spaces of that length:
spacer.line(padLength, " ");
The wrap method builds the string to be returned by concatenating all the pieces:character, space, text, padding, character.
THE BOX METHOD
And finally, the box method uses line and wrap to surround a string in a box of aspecified length:
spacer.line(11, "*"); // *********** spacer.wrap("Neptune", 11, "*"); // * Neptune *spacer.line(11, "*"); // ***********
The method uses newLine so that the single returned string can span multiple lines onthe console:
box: function (text, length, character) { var boxText = spacer.newLine(); boxText += spacer.line(length, character) + spacer.newLine(); boxText += spacer.wrap(text, length, character) + spacer.newLine(); boxText += spacer.line(length, character) + spacer.newLine(); return boxText; }
Excellent! The spacer namespace now has a number of useful methods to format thedisplay of information on the console. They’ll be really handy in The Crypt. So, let’smix them in!
= Neptune =
character
space
text
padding
character
Figure 7.8 The wrapped text is made up of character + space + text + padding + character.

101The Crypt–player objects as arguments
7.4 The Crypt–player objects as argumentsYou’ll now apply your knowledge of JavaScript objects as arguments, return values,and namespaces to The Crypt. Figure 7.9 shows where the focus of this section, showingplayer information by using functions with objects, fits into the overall structure of ourongoing game example.
In chapter 6 you built up a number of functions to help display information aboutplayers in the game. The functions rely on separate arguments for different playerproperties. Here’s the getPlayerInfo function being called:
getPlayerInfo(player1.name, player1.place, player1.health);
You’ve seen in this chapter that you can simply pass a player object as an argumentand let the function pick out the properties it needs. The getPlayerInfo function callshould become
getPlayerInfo(player1);
Much neater! You can use the helper methods in your spacer namespace to format the text—
box and wrap will do the trick. But how can you find the right box length to snuglywrap the information? The place string will probably be the longest, but might thehealth string sometimes stretch farther?
> ==================================== > +++++++++++++++++++++> = Kandra is in The Dungeon of Doom = > + Dax is in Limbo +> = Kandra has health 50 = > + Dax has health 40 +> ==================================== > +++++++++++++++++++++
player variables
Players
a player object
player items
Player Constructor
showing player info
Places
place objects
place items
showing place info
Place Constructor
place exits
using return values
using functions
using arguments
using objects
Maps
Game
linking places
render
get
go
Figure 7.9 Elements in The Crypt

102 CHAPTER 7 Object arguments: functions working with objects
You have to check which is the longest. The Math.max method has you covered:
var longest = Math.max(place.length, health.length);
Don’t forget the border and single space at either end:
var longest = Math.max(place.length, health.length) + 4;
The following listing uses the spacer namespace methods, so the live example includesthat code on JS Bin.
var getPlayerName = function (player) { return player.name;};
var getPlayerHealth = function (player) { return player.name + " has health " + player.health;};
var getPlayerPlace = function (player) { return player.name + " is in " + player.place;};
var getPlayerInfo = function (player, character) { var place = getPlayerPlace(player); var health = getPlayerHealth(player); var longest = Math.max(place.length, health.length) + 4;
var info = spacer.box(getPlayerName(player), longest, character); info += spacer.wrap(place, longest, character); info += spacer.newLine() + spacer.wrap(health, longest, character); info += spacer.newLine() + spacer.line(longest, character); info += spacer.newLine();
return info;};
var player1 = { name: "Kandra", place: "The Dungeon of Doom", health: 50 };var player2 = { name: "Dax", place: "Limbo", health: 40 };
console.log(getPlayerInfo(player1, "=")); console.log(getPlayerInfo(player2, "+"));
7.5 Summary■ Use objects as arguments and access their properties from within the func-
tion body:
var getPlayerHealth = function (player) { return player.name + " has health " + player.health;};getPlayerHealth(player1);
Listing 7.11 Displaying player information using objects (http://jsbin.com/beqabe/edit?js,console)
Find the longer of the place and health strings
Specify the character to be used when displaying player info

103Summary
■ Update objects and add new properties from within the function body:
var calculateSizes = function (rectangle) { rectangle.area = rectangle.width * rectangle.height; rectangle.perimeter = 2 * (rectangle.width + rectangle.height);};
■ Return new or existing objects from functions, using the return keyword:
var getRectangle = function (width, height) { return { width: width, height: height, area: width * height };};
■ Create methods by setting functions as properties of objects.■ Use objects as namespaces to collect related functions and properties:
var spacer = {};spacer.newLine = function () { return "\n";};
■ Make use of the Math object and its methods, like Math.max and Math.min.■ Use the length property of strings and string methods like indexOf and substr.

Arrays:putting data into lists
Almost everything you’ve covered so far has been about organizing your data ororganizing your code. This chapter continues that theme but with a twist: it’s notjust about grouping items; now you can put them in order.
In The Crypt, you’ll finally have the ability for players to collect items they findon the journey; with arrays they can start on their very own treasure hoards.
8.1 Creating arrays and accessing elementsWorking with lists is an essential part of programming. Blog posts, quiz questions,stock prices, emails, files, tweets, and bank transactions all turn up as lists. Infact, you’ve just read a list of lists! Sometimes the order doesn’t matter andsometimes it does. A list of names could represent the members of a team, withno order, or it could represent places in a race—I’m sure Usain Bolt thinks the
This chapter covers■ Grouping values as lists■ Creating an array■ Accessing elements in an array■ Manipulating the elements in an array■ Using forEach to visit each element
104

105Creating arrays and accessing elements
order is important there! An ordered list is called an array in JavaScript, as it is inmany programming languages.
The items in an array are called its elements and you usually want to work on the ele-ments in some way. You might want to
■ Perform some action with each element, say display it on the console orincrease it by 20%
■ Find only certain elements that match a condition, say all tweets by Lady Gaga,blog posts in a given month, or questions answered correctly
■ Combine all the elements into a single value, say to find the total of a list ofprices or the average number of points scored per game
The array object in JavaScript provides functions to help you perform all of theseactions and more. But, we’re getting ahead of ourselves. Let’s go back to the start andfind out how to create an array.
8.1.1 Creating an array
To create an array, use square brackets. Once it’s created, you can assign the array to avariable so you can refer to it in your code. Figure 8.1 illustrates the process.
The following listing creates two arrays and displays them on the console to give thisoutput:
> [3, 1, 8, 2]> ["Kandra", "Dax", "Blinky"]
var scores; var names;
scores = [ 3, 1, 8, 2 ]; names = [ "Kandra", "Dax", "Blinky" ];
console.log(scores);console.log(names);
Listing 8.1 Creating arrays (http://jsbin.com/cevodu/edit?js,console)
[ "Kandra" , "Blinky" , true , 50 ]
Start of arraydefinition
Commas separatevalues
End of arraydefinition
Values can be of any type
Figure 8.1 Use square brackets to create an array
Create an array of numbers and assign it to the scores variable
Create an array of strings and assign it to the names variable

106 CHAPTER 8 Arrays: putting data into lists
Commas separate the elements, which can be numbers, strings, objects, functions, orany data type or mix of types—you can even have arrays of arrays. Like the curly bracesfor objects and the function keyword for functions, the square brackets tell JavaScriptto create an array. Once it’s created, you can assign the array to a variable, set it as aproperty, include it in another array, or pass it to a function.
Listing 8.2 creates a couple of arrays of objects representing places to visit, this-Year and nextYear. Figure 8.2 shows how JS Bin displays the arrays of objects.
var place1 = { name : "The Pyramids", country : "Egypt" };var place2 = { name : "The Grand Canyon", country : "USA" };var place3 = { name : "Bondi Beach", country : "Australia" };
var thisYear = [ place1, place2 ]; var nextYear = [ place3 ];
console.log(thisYear);console.log(nextYear);
8.1.2 Accessing array elements
You’ve created an array and assigned it to a variable, so now you can pass that variableto functions, like console.log. At some point you’ll want to access the elements thatmake up the array, to peel away the skin to get at the juicy goodness inside. Well, thosesquare brackets do double duty; they enclose the list when you define the array, andyou use them to access individual elements.
As shown in figure 8.3, you specify each element with an index, a whole numbermarking where in the list the element occurs. The first element in an array has an
Listing 8.2 Using existing objects in an array (http://jsbin.com/gizulu/edit?js,console)
Figure 8.2 JS Bin displays each of the two arrays in listing 8.2 between square brackets.
Create an array of objects and assign it to the thisYear variable
Use zero or more elements in an array
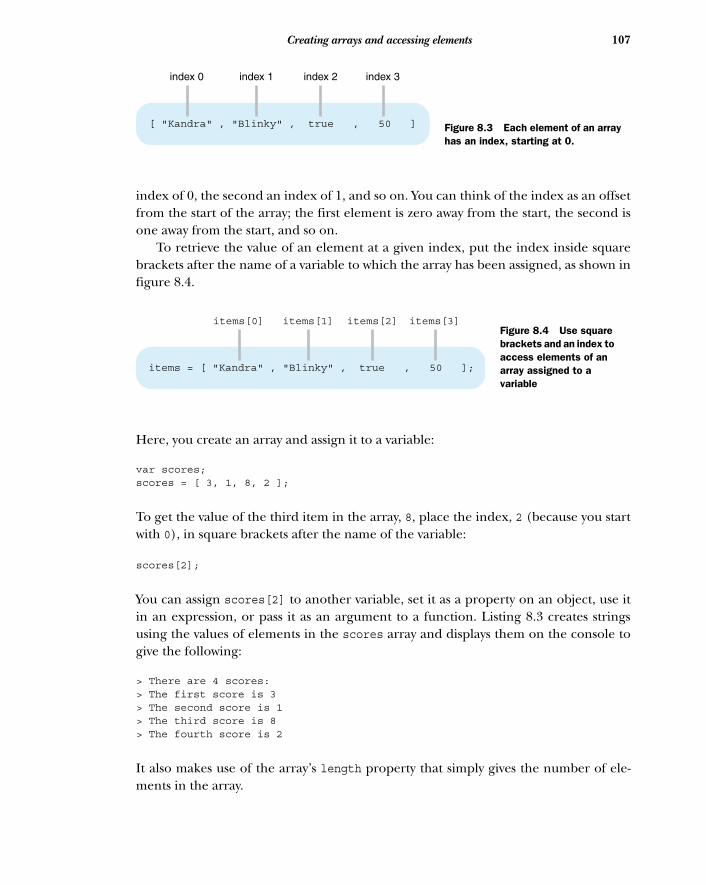
107Creating arrays and accessing elements
index of 0, the second an index of 1, and so on. You can think of the index as an offsetfrom the start of the array; the first element is zero away from the start, the second isone away from the start, and so on.
To retrieve the value of an element at a given index, put the index inside squarebrackets after the name of a variable to which the array has been assigned, as shown infigure 8.4.
Here, you create an array and assign it to a variable:
var scores;scores = [ 3, 1, 8, 2 ];
To get the value of the third item in the array, 8, place the index, 2 (because you startwith 0), in square brackets after the name of the variable:
scores[2];
You can assign scores[2] to another variable, set it as a property on an object, use itin an expression, or pass it as an argument to a function. Listing 8.3 creates stringsusing the values of elements in the scores array and displays them on the console togive the following:
> There are 4 scores:> The first score is 3> The second score is 1> The third score is 8> The fourth score is 2
It also makes use of the array’s length property that simply gives the number of ele-ments in the array.
[ "Kandra" , "Blinky" , true , 50 ]
index 0 index 1 index 2 index 3
Figure 8.3 Each element of an array has an index, starting at 0.
items = [ "Kandra" , "Blinky" , true , 50 ];
items[0] items[1] items[2] items[3]Figure 8.4 Use square brackets and an index to access elements of an array assigned to a variable

108 CHAPTER 8 Arrays: putting data into lists
var scores = [ 3, 1, 8, 2 ];
console.log("There are " + scores.length + " scores:"); console.log("The first score is " + scores[0]); console.log("The second score is " + scores[1]);console.log("The third score is " + scores[2]);console.log("The fourth score is " + scores[3]);
Now, say you have a days array, holding the names of the weekdays, and you want toget the name of a particular day in the week, maybe the fourth day.
var days = ["Monday", "Tuesday", "Wednesday", "Thursday", "Friday"];
There’s a mismatch between the index in JavaScript and the words used to describe aparticular element. The first day of the week has index 0. The fourth day of the weekhas index 3. You might want to access a different day at different times, so you coulduse a variable, dayInWeek, to hold the day in the week you want.
// I want the fourth day of the week dayInWeek = 4;
But using dayInWeek as the index for the array will give you the wrong day. An indexof 4 will give you the fifth day in the week.
The next listing shows code for this scenario. It displays two days on the console:the wrong one (that is, not the fourth day of the week) and then the right one:
> Friday> Thursday
var days = ["Monday", "Tuesday", "Wednesday", "Thursday", "Friday"];var dayInWeek = 4;
console.log( days[dayInWeek] ); console.log( days[dayInWeek - 1] );
The first call to console.log displays the wrong day because the dayInWeek variabledoesn’t take into account that arrays are zero-based; they start with an index of 0,
Listing 8.3 Accessing array elements (http://jsbin.com/qemufe/edit?js,console)
Listing 8.4 Using a variable as an index (http://jsbin.com/veyexa/edit?js,console)
Use the length property to show how many elements are in the array
The first element in the array has an index of 0.
The last element in the array has an index one less than the number of elements.
Use the value of the dayinWeek variable as an index
Subtract 1 from dayInWeek to access the correct element for the day wanted

109Creating arrays and accessing elements
not 1. The second call to console.log fixes the problem by subtracting one fromdayInWeek; the fourth day of the week has an index of 3.
Okay. It’s time to hold onto your hat. In listing 8.5 you’ll define a function and addit to the mix. The local pencil museum records the number of visitors through itsdoors each day. The owners ask you to create a program that, when given a week’sworth of visitor numbers as an array, will display how many visitors there were on agiven day:
> There were 132 visitors on Tuesday
You decide to write a function, getVisitorReport, to generate the report and returnit. You then would have the option of displaying the report on the console, on a webpage, or in an email. In the next listing you generate a report for a Tuesday and dis-play it on the console.
var getVisitorReport = function (visitorArray, dayInWeek) { var days = [ "Monday", "Tuesday", "Wednesday", "Thursday", "Friday" ]; var index = dayInWeek - 1; var visitorReport;
visitorReport = "There were "; visitorReport += visitorArray[index]; visitorReport += " visitors "; visitorReport += "on " + days[index];
return visitorReport; };
var visitors = [ 354, 132, 210, 221, 481 ];
var report = getVisitorReport(visitors, 2);
console.log(report);
You create an array of visitor numbers, assign it to the visitors variable, and pass it tothe getVisitorReport function as an argument. Within the function, the array isassigned to the visitorArray variable and used to generate the report. The report isreturned from the function, assigned to the report variable, and displayed on theconsole. The += operator in the function adds the value on its right to the variable on
Listing 8.5 Passing an array to a function (http://jsbin.com/bewebi/edit?js,console
Include parameters for anarray of visitor numbers andthe day in week of the report
Use the += operator to update visitorReport, concatenating more text to its current value
Return the report from the function
Get the report for Tuesday and assign it to the report variable

110 CHAPTER 8 Arrays: putting data into lists
its left. Because a string has been assigned to the visitorReport variable, += concate-nates the value on its right to the variable on its left.
So, you can create an array and access its elements. But, once you have data in anarray, there’s a whole host of ways you can manipulate it. Let’s get started with a few ofthe most common ways to work with arrays.
8.2 Array methodsArrays are a type of object provided by the JavaScript language to help you managelists. JavaScript also provides you with a number of functions you can use to workwith arrays. When we assign functions to properties of an object, we call the func-tions methods of the object; arrays are a type of object, so their functions are alsocalled methods.
In this section you look at just a few of the many methods available when workingwith arrays: push and pop and splice let you add and remove elements, slice letsyou grab consecutive elements, join lets you concatenate the array elements toform a string, and forEach allows you to pass each element as an argument to aspecified function. These methods are summarized in table 8.1. Further array meth-ods and examples can be found on the book’s website at www.room51.co.uk/js/array-methods.html.
Let’s begin with push, pop, and join.
Table 8.1 Array methods
Method What’s it for? Example
push Appending an element to the end of an array.
items.push("Put me last");
pop Removing an item from the end of an array. wasLast = items.pop();
join Concatenating all of the elements in the array, inserting an optional string between each pair of elements.
allItems = items.join(",");
slice Creating an array from a range of elements in an existing array. Passing in the indexes at which to start and stop the range.
section = items.slice(2, 5);
splice Changing an array by adding and/or remov-ing consecutive elements. Passing in the index at which to start removing elements, the number of elements to remove, and any elements to add.
out = items.splice(1,2,"new");
forEach Passing each element in turn to a speci-fied function.
items.forEach(function (item){ console.log(item);}

111Array methods
8.2.1 Adding and removing elements
In listing 8.6, you create an empty array and assign it to the items variable. The pushmethod is used to append three elements to the array. Once you’ve added the threeelements, you log the whole array to the console:
> ["The Pyramids", "The Grand Canyon", "Bondi Beach"]
You then use the pop method to remove the last item and display it. Finally, you logthe whole array to the console again, this time with the elements joined to make a sin-gle string.
> Bondi Beach was removed> The Pyramids and The Grand Canyon
var items = []; var item = "The Pyramids";var removed;
items.push(item); items.push("The Grand Canyon"); items.push("Bondi Beach");
console.log(items);
removed = items.pop();
console.log(removed + " was removed");console.log(items.join(" and "));
JavaScript makes the push, pop, and join functions available as properties on everyarray. Because they’re properties of the array, you can use dot notation to call thefunctions, items.push(itemToAdd), just as you can to access any object property.
8.2.2 Slicing and splicing arrays
To demonstrate the two array methods, slice and splice, you continue with yourarray of holiday destinations. Play along on the JS Bin console. Commands can spanmultiple lines on the console; press Shift-Enter to move to a new line without execut-ing a statement. If you press Enter by mistake and execute an unfinished statement,you may be able to retrieve your previous entry by pressing the up arrow on your key-board. The statements that you type are shown starting with >. The console automati-cally shows the return value of each function called. I show those values in bold.
Listing 8.6 Manipulating arrays with push, pop, and join (http://jsbin.com/faqabu/edit?js,console)
Create an empty array and assign it to the items variable
Add the value of item to the end of the array
Add a string to the end of the array
Remove the last item and assign it to the removed variable
Use the join method to concatenate the array items, inserting " and " between each pair

112 CHAPTER 8 Arrays: putting data into lists
> var items = [ "The Pyramids", "The Grand Canyon", "Bondi Beach", "Lake Garda"] undefined
> items ["The Pyramids", "The Grand Canyon", "Bondi Beach", "Lake Garda"]
SLICE
The slice method returns a new array made up of part of the original array. It doesn’tchange the original array. The arguments are the index of the first element you wantand the index of the first subsequent element you don’t want. Remember, the first ele-ment has index 0.
> items.slice(0, 2) ["The Pyramids", "The Grand Canyon"]
> items.slice(2, 3) ["Bondi Beach"]
items.slice(2, 3) says you want the items from index 2 onward but not the itemsfrom index 3 onward. In other words, you just want the item with index 2.
Omit the second argument if you want all elements after the one specified by thefirst argument. Omit both arguments if you want the whole array.
> items.slice(2) ["Bondi Beach", "Lake Garda"]
> items.slice() ["The Pyramids", "The Grand Canyon", "Bondi Beach", "Lake Garda"]
SPLICE
The splice method does change the original array. It lets you remove items from anarray and, optionally, insert new items. To remove items, specify the index of the firstelement to remove and the number of elements to remove. The method returns theremoved elements as an array.
> items.splice(2, 1) ["Bondi Beach"]
> items ["The Pyramids", "The Grand Canyon", "Lake Garda"]
> items.splice(0, 2) ["The Pyramids", "The Grand Canyon"]
> items ["Lake Garda"]

113Array methods
To insert new elements into the array, add them as arguments after the start index andthe number of items to remove. In this example, no items are removed:
> items.splice(0, 0, "The Great Wall", "St Basil’s") []
> items ["The Great Wall", "St Basil’s", "Lake Garda"]
In this example, one item is removed:
> items.splice(1, 1, "Bondi Beach", "The Grand Canyon") ["St Basil’s"]
> items ["The Great Wall", "Bondi Beach", "The Grand Canyon", "Lake Garda"]
You’ll use both slice and splice when working with player and place items inThe Crypt.
8.2.3 Visiting each element with forEach
If you have a list of items that you want to display on the console, you could manuallycall a function for each one:
showInfo(items[0]);showInfo(items[1]);showInfo(items[2]);
Unfortunately, it’s common not to know in advance how many items will be in the list,so you can’t hard-code the right number of showInfo calls ahead of time. Also, as thenumber of elements increases, you don’t want to be manually calling a function foreach one.
What you need is a way to make JavaScript call a given function for every elementin the list, however many there are. That’s exactly what the forEach method does. Tocall showInfo for each element in the items array, replace the individual calls with
items.forEach(showInfo);
The forEach method iterates over the array, passing each element in turn as an argu-ment to the function specified in parentheses, as shown in figure 8.5.
Listing 8.7 shows forEach in action, displaying the elements of an items array onthe console:
> The Pyramids> The Grand Canyon> Bondi Beach

114 CHAPTER 8 Arrays: putting data into lists
var items; var showInfo;
items = [ "The Pyramids", "The Grand Canyon", "Bondi Beach"];
showInfo = function (itemToShow) { console.log(itemToShow); };
items.forEach(showInfo);
In listing 8.7, your function to display each item was assigned to the showInfo variable.You then passed the showInfo variable to forEach as an argument.
If you’re going to use a function only once, as the argument for forEach, you cancreate the function and pass it to forEach inline, without the need for an extra vari-able. The code in listing 8.8 passes the function definition directly to forEach. Youalso add extra information to set the scene and improve the output:
> Dream destinations:> - The Pyramids> - The Grand Canyon> - Bondi Beach
Listing 8.7 Iterating over an array with forEach (http://jsbin.com/sokosi/edit?js,console)
items.forEach( showInfo );
[ "The Pyramids" ,
"The Grand Canyon",
"Bondi Beach"];
showInfo( "The Pyramids" )
showInfo( "Bondi Beach" )
showInfo( "The Grand Canyon" )
[ "The Pyramids",
"The Grand Canyon" ,
"Bondi Beach"];
[ "The Pyramids",
"The Grand Canyon",
"Bondi Beach"];
Figure 8.5 items.forEach passes each item in the items array to the showInfo function.
Use the var keyword to declare two variables
Use square brackets to create an array. Assign the array to the items variable.
Use the function keyword to create a function. Assign it to the showInfo variable.
Call the showInfo function for each element in the array

115Array methods
var items = [ "The Pyramids", "The Grand Canyon", "Bondi Beach" ];
console.log("Dream destinations:");
items.forEach(function (item) { console.log(" – " + item);});
The forEach method actually passes three arguments to the specified function: theelement, the index of the current element, and the whole array. You can capturethe extra arguments by including extra parameters in the definition of the functionyou pass to forEach.
items.forEach(function (item, index, wholeArray) { // item is the current item being passed to the function // index is the index of the current item // wholeArray is the same as 'items'});
Listing 8.9 shows all three arguments in action. It uses forEach to pass each player inthe players array to the showArguments function, producing the following output:
> Item: Dax> Index: 0> Array: Dax,Jahver,Kandra> Item: Jahver> Index: 1> Array: Dax,Jahver,Kandra> Item: Kandra> Index: 2> Array: Dax,Jahver,Kandra
var players;var showArguments;
players = [ "Dax", "Jahver", "Kandra" ];
showArguments = function (item, index, wholeArray) { console.log("Item: " + item); console.log("Index: " + index); console.log("Array: " + wholeArray);};
players.forEach(showArguments);
Listing 8.8 Calling forEach with an inline function (http://jsbin.com/yapecu/edit?js,console)
Listing 8.9 Using the arguments passed by forEach (http://jsbin.com/suvegi/edit?js,console)
Use the forEach method, passing it an inline function
Include extra parameters to capture all the arguments passed by forEach

116 CHAPTER 8 Arrays: putting data into lists
The forEach method does the job of calling a function for you. In listing 8.9, it callsthe showArguments function. It calls the function for each element in the playersarray. It always passes the three arguments to the function it calls, although you don’thave to use all three.
You can call array methods like forEach directly on arrays without the need forvariables. Listing 8.10 rewrites listing 8.9 without assigning the array or the functionto variables.
["Dax", "Jahver", "Kandra"].forEach(function (item, index, wholeArray) { console.log("Item: " + item); console.log("Index: " + index); console.log("Array: " + wholeArray);});
If you’re using the array and function only once, the compact syntax in listing 8.10can be appropriate. But the longer form in listing 8.9 is more readable, so if the mean-ing of the code isn’t obvious in context, it might be better to opt for the longer ver-sion. Being able to write something like
players.forEach(showScore);
can help you and other programmers make better sense of your code. To further demonstrate using the index argument, you’re off to the shops in list-
ing 8.11. (If you have your adventure head on, then maybe you’re buying equipmentfor your travels.) You buy four types of items but different amounts of each. The pro-gram calculates the total cost and displays it, like this:
> The total cost is $41.17
It uses two arrays, one for the numbers of each item bought and one for their costs.
var getTotalBill = function (itemCosts, itemCounts) { var total = 0;
itemCosts.forEach(function (cost, i) { total += cost * itemCounts[i]; });
return total;};
var costs = [ 1.99, 4.95, 2.50, 9.87 ];var numOfEach = [ 2, 1, 5, 2 ];
console.log("The total cost is $" + getTotalBill(costs, numOfEach));
Listing 8.10 Using the arguments passed by forEach—compact (http://jsbin.com/pagahe/edit?js,console)
Listing 8.11 Finding the total shopping bill (http://jsbin.com/zizixu/edit?js,console)
Include an extra parameter, i, in the function definition to be assigned the index
Use the += operator to add the result of the calculation to the total variable’s value

117Array methods
Listing 8.11 uses the index to match the current item cost with the correct number ofitems. For this to work, the arrays have to be in the same order. I hope you noticedthat i isn’t a very descriptive variable name! It is so common to need index variablesthat most programmers are happy to use short names—i, j, and k—for them. They’requicker to type and it’s such a well-established convention that most people readingyour code will expect them to be used as a counter or index. If you’d rather call thevariable index or itemIndex or something similar, that’s fine.
As one last example, let’s return to your quiz questions. A multiple-choice questionhas a list of possible answers that need to be displayed to whomever is taking the quiz.Sounds like a good fit for an array and forEach; see listing 8.12. You could even havean array of question-and-answer objects. For now, stick with a single question, dis-played like this:
> What is the capital of France?> A – Bordeaux> B – F> C – Paris> D - Brussels
var displayQuestion = function (questionAndAnswer) { var options = [ "A", "B", "C", "D", "E" ];
console.log(questionAndAnswer.question);
questionAndAnswer.answers.forEach( function (answer, i) { console.log(options[i] + " - " + answer); } );};
var question1 = { question : "What is the capital of France?", answers : [ "Bordeaux", "F", "Paris", "Brussels" ], correctAnswer : "Paris"};
displayQuestion(question1);
You’ll look at actually answering questions when you investigate user interaction inpart 2.
Listing 8.12 Displaying a multiple choice question (http://jsbin.com/lobahu/edit?js,console)
Include a parameter to which the question-and-answer object can be assigned
Access properties of the question-and-answer object via the parameter
Use forEach to visit each element of the array assigned to the answers property
Assign an array to the answers property

118 CHAPTER 8 Arrays: putting data into lists
8.3 The Crypt—a player items arrayYou’ll now apply your knowledge of JavaScript arrays to The Crypt. Figure 8.6 showswhere the focus of this section, displaying a list of player items by using arrays, fits intothe overall structure of our ongoing game example.
In part 1 of Get Programming with JavaScript, we’ve covered some core concepts to helpyou model and use players in The Crypt. You have variables to store and retrieve playerinformation, objects to collect player properties together, arrays so you can list theitems a player collects, array methods to add and remove items in the collection, andfunctions to display information about each player.
Listing 8.13 brings all of these concepts together: creating a player, displayinginformation about them, picking up a new item, and displaying the updated info. Youformat the output using the spacer namespace developed in chapter 7. The elementsthat make up the output are highlighted in figure 8.7.
player variables
Players
a player object
showing player info
player items
Player Constructor
Places Maps
place objects
place items
place exits
Place Constructor
showing place info
linking places via exits
Game
render
get
go
Figure 8.6 Elements of The Crypt
************************************* Kandra ************************************** Kandra is in The Dungeon of Doom ** Kandra has health 50 ************************************* Items: - a trusty lamp - a rusty key
************************************
A box around the player’s name
Player name
Place info
A list of items
Player health
Borders
Figure 8.7 The elements shown when a Player object is displayed on the console

119The Crypt—a player items array
To save space, spacer isn’t shown in the listing (it hasn’t changed) but it is on JS Bin.The code in this listing builds on the player display code from chapter 7, adding theability to list a player’s items.
var getPlayerName = function (player) { return player.name;};
var getPlayerHealth = function (player) { return player.name + " has health " + player.health;};
var getPlayerPlace = function (player) { return player.name + " is in " + player.place;};
var getPlayerItems = function (player) { var itemsString = "Items:" + spacer.newLine();
player.items.forEach(function (item) { itemsString += " - " + item + spacer.newLine(); });
return itemsString;};
var getPlayerInfo = function (player, character) { var place = getPlayerPlace(player); var health = getPlayerHealth(player); var longest = Math.max(place.length, health.length) + 4;
var info = spacer.box(getPlayerName(player), longest, character); info += spacer.wrap(place, longest, character); info += spacer.newLine() + spacer.wrap(health, longest, character); info += spacer.newLine() + spacer.line(longest, character);
info += spacer.newLine(); info += " " + getPlayerItems(player); info += spacer.newLine(); info += spacer.line(longest, character);
info += spacer.newLine();
return info;};
var showPlayerInfo = function (player, character) { console.log(getPlayerInfo(player, character)); };
var player1 = { name: "Kandra", place: "The Dungeon of Doom", health: 50, items : ["a trusty lamp"] };
Listing 8.13 Displaying player items (http://jsbin.com/mecude/edit?js,console)
Define a function to build a string for the display of player items
Use forEach to append each element of the items array to the string
Call getPlayerItems to include the items string in the player info
Create a showPlayerInfo function to display the info string on the console
Give the player an item

120 CHAPTER 8 Arrays: putting data into lists
showPlayerInfo(player1, "=");
player1.items.push("a rusty key");
showPlayerInfo(player1, "*");
The Player object now includes an items array:
var player1 = { name: "Kandra", place: "The Dungeon of Doom", health: 50, items: ["a trusty lamp"]};
It starts with only one element, but you add another by using the push array method:
player1.items.push("a rusty key");
getPlayerItems uses forEach to pass each item in the items array to a function.The function appends the item to a string using +=, building a list of all of theplayer’s items:
player.items.forEach(function (item) { itemString += " - " + item + spacer.newLine();});
The showPlayerInfo function calls getPlayerInfo to retrieve the player informationstring and then displays the information on the console.
You’re starting to build up quite a collection of functions to help with the displayof players; you should really organize them. You could collect them into a name-space or, seeing as they all relate to players, include them as part of each Playerobject. JavaScript provides a way to streamline the creation of many similar objects,incorporating the methods that work with them: constructor functions. That’s whatyou investigate in chapter 9, where you also build the places the players will explorein The Crypt.
8.4 Summary■ Create an array with a comma-separated list of values between square brackets:
[ "Kandra", "Dax", true, 50 ]
■ Assign the array to a variable and then access its elements by adding an index insquare brackets to the variable name. The following code displays "Dax":
var items = [ "Kandra", "Dax", true, 50 ]console.log(items[1]);
Call showPlayerInfo, passing the player and a border character
Use push to add an extra item to the items array

121Summary
■ Remember to use a zero-based index for array elements. items[1] refers to thesecond element in the items array. You can think of the index as an offset fromthe start of the array: the first element is zero away from the start, the second isone away from the start, and so on.
■ Use array methods, functions provided by JavaScript, to add, remove, join, anditerate over array elements. The methods covered in this chapter are push, pop,join, slice, splice, and forEach.

Constructors: buildingobjects with functions
It’s common for programs to create many similar objects—a blog post could havehundreds of posts and a calendar thousands of events—and to include functionsfor working on those objects. Rather than building each object by hand using curlybraces, you can use functions to streamline the process. You want to change
planet1 = { name: "Jupiter", position: 8, type: "Gas Giant"};
This chapter covers■ Using functions to create objects■ The keyword new■ Using constructor functions to create objects■ The special variable this■ Defining constructor functions for players
and places
122

123Using functions to build objects
showPlanet = function (planet) { var info = planet.name + ": planet " + planet.position; info += " - " + planet.type; console.log(info);};
showPlanet(planet1);
into
planet1 = buildPlanet("Jupiter", 8, "Gas Giant");planet1.show();
where the buildPlanet function creates the planet object for you and adds the showmethod automatically. You define a blueprint for your object in the function body ofbuildPlanet and then use that blueprint to generate new objects whenever youneed them. That keeps your object-creation code in one place; you’ve seen through-out the book how such organization makes it easier to understand, maintain, anduse your programs.
You can do even better than a simple function to create many similar objects; youcan use a constructor function. Writing functions to generate objects is so common thatJavaScript includes a built-in way of streamlining the process. With a constructor func-tion, creating and displaying a planet looks like this:
planet1 = new Planet("Jupiter", 8, "Gas Giant");planet1.show();
Constructor functions standardize object creation—standardizing code is generally agood thing—and provide a way of identifying objects, making it easier to differentiateamong planets, players, posts, and positions, for example. They also provide a way ofsharing a single function among many objects by using prototypes, covered in part 4.
In section 9.1 you write your own functions to make it easier to build objects withproperties and methods in place. In section 9.2, you investigate constructor functionsand see how they simplify the process. It’s time to get the production line rolling.
9.1 Using functions to build objectsRather than using curly braces to manually construct each object, create a function todo the heavy lifting. Just pass the function the information it needs and it will return ashiny new object for you. In larger programs, you may well want to create similarobjects in a number of places in the code. Having a single function you can call onsaves you from repeating yourself and makes it easy to make changes if what you needyour object to do develops over time.
Section 9.1.1 shows a simple object-creation function, and section 9.1.2 builds on itto add a method to your created objects.

124 CHAPTER 9 Constructors: building objects with functions
9.1.1 Adding properties
Figure 9.1 shows a buildPlanet function to help you create each planet object. Youpass the function the planet data as arguments and it returns an object with thosearguments set as properties. You’ve only just started learning JavaScript and you’realready building planets!
The first listing shows the code for the buildPlanet function. Notice how it startsby creating an object and ends by returning the object.
var buildPlanet = function (name, position, type) { var planet = {};
planet.name = name; planet.position = position; planet.type = type;
Listing 9.1 Using a function to create an object (http://jsbin.com/jiroyo/edit?js,console)
function ( name , position , type )name position type
planet1 = buildPlanet( "Jupiter", 5 , "Gas Giant" );"Jupiter" 5 "Gas Giant"
planet1 = { name: "Jupiter", position: 5, type: "Gas Giant"};
The return valuereplaces thefunction call
var planet = {};
planet.name = name ;
planet.position = position ;
planet.type = type ;
name
position
type
5
"Gas Giant"
planet.name = name ;
planet.position = ;
planet.type = ;
"Jupiter"
return planet;
1. Create an empty object
2. Assign the arguments
to properties
3. Return the object
Equivalent to
Figure 9.1 The buildPlanet function creates and returns an object.
Create an empty object for the new planet being constructed
Set properties on the planet object using the arguments passed in

125Using functions to build objects
return planet; };
var planet1 = buildPlanet( "Jupiter", 5, "Gas Giant");
console.log(planet1.name);console.log(planet1.position);console.log(planet1.type);
The steps the buildPlanet function takes are important for understanding howJavaScript’s constructor functions streamline the process of object creation. You take alook at constructor functions in section 9.2. But first, you enhance what your createdobjects can do, with methods.
9.1.2 Adding methods
As well as setting some initial properties, you can make buildPlanet add methodsinto the mix. Remember, a method is a just function you assign to an object property.Rather than defining an external function to display information about each planetobject, bake it into the object itself.
In the next listing, you add a showPlanet method to each planet object beforereturning the object. The output looks like this:
> Jupiter: planet 5 - Gas Giant
var buildPlanet = function (name, position, type) { var planet = {};
planet.name = name; planet.position = position; planet.type = type;
planet.showPlanet = function () { var info = planet.name; info += ": planet " + planet.position; info += " - " + planet.type; console.log(info); };
return planet; };
Listing 9.2 Adding methods to your constructed object (http://jsbin.com/zogure/edit?js,console)
Return the new planet object you’ve created
Call the buildPlanet function and assign the object returned to the planet1 variable
Create an empty object for the new planet being constructed
Set properties on the planet object using the arguments passed in
Define a display function and assign it to the showPlanet property
Return the new planet object you have created

126 CHAPTER 9 Constructors: building objects with functions
var planet1 = buildPlanet( "Jupiter", 5, "Gas Giant");
planet1.showPlanet();
In the showPlanet method you build up an information string including the planet’sproperties (name, position, and type) before logging the string to the console. Youuse the += operator to append strings to the info variable.
You can include as many methods as you need to give your objects the functionalityrequired. Every time you call buildPlanet, it returns an object with the propertiesand methods required to do its job in your program. You can put the function towork, churning out as many planet objects as you want. You can’t have too many plan-ets, am I right?
Listing 9.3 uses the buildPlanet function to construct three planets (okay, notquite a production line, but you get the idea!) and display their details on the console:
> Jupiter: planet 5 – Gas Giant> Neptune: planet 8 – Ice Giant> Mercury: planet 1 – Terrestrial
var buildPlanet = function (name, position, type) { var planet = {};
planet.name = name; planet.position = position; planet.type = type;
planet.showPlanet = function () { var info = planet.name; info += ": planet " + planet.position; info += " - " + planet.type; console.log(info); };
return planet;};
var planets = [ buildPlanet( "Jupiter", 5, "Gas Giant" ), buildPlanet( "Neptune", 8, "Ice Giant" ), buildPlanet( "Mercury", 1, "Terrestrial" ) ];
planets.forEach(function (planet) { planet.showPlanet(); });
Listing 9.3 An array of constructed objects (http://jsbin.com/jiweze/edit?js,console)
Use dot notation and parentheses to call the showPlanet method
Define the same buildPlanet function as in listing 9.2
Create an array of planet objects and assign it to the planets variable
Use forEach to pass each planet object to a function that calls showPlanet

127Using constructor functions to build objects
In listing 9.3 you create an array with three elements, the objects that each call tobuildPlanet returns. You assign the array to the planets variable and then iterateover the array using forEach. You don’t need to assign the three planets to individualvariables; the objects are accessible via an array index, with the first planet at index 0:
planets[0].name // "Jupiter"planets[2].type // "Terrestrial"
In defining buildPlanet, you moved object creation into a function, returning thenascent planet once you had set its properties. But JavaScript can create and returnobjects for you. Let’s see how.
9.2 Using constructor functions to build objectsCreating your own function to build objects and attach methods should have givenyou an insight into the steps involved in an object production line. It’s such a commonway to build objects that JavaScript provides its own standard mechanism—the con-structor function.
In the buildPlanet function, you created an empty object and set its properties,and you returned the object.
var buildPlanet = function (name, position, type) { var planet = {}; // You create an empty object
planet.name = name; // planet.position = position; // Assign properties planet.type = type; //
return planet; // You return the object};
Well, JavaScript has you covered; with constructor functions it will create the emptyobject and return it for you free of charge. You still get to set the properties, but therest is automagical. And what mystic invocations transform an ordinary function into aconstructor function? Two keywords: this and new.
9.2.1 Constructor functions
In JavaScript, you define a constructor function just like any other function but call itafter the new keyword. If you have a Planet function, you could create new planetobjects like this:
planet1 = new Planet("Jupiter", 5, "Gas Giant");planet2 = new Planet("Neptune", 8, "Ice Giant");
To use the Planet function as a constructor function you simply add the new keywordbefore the call to Planet. It’s a convention to start the names of constructor func-tions with capital letters so programmers know to use the new keyword when callingthem. Figure 9.2 shows how the constructor function automatically creates andreturns an object.
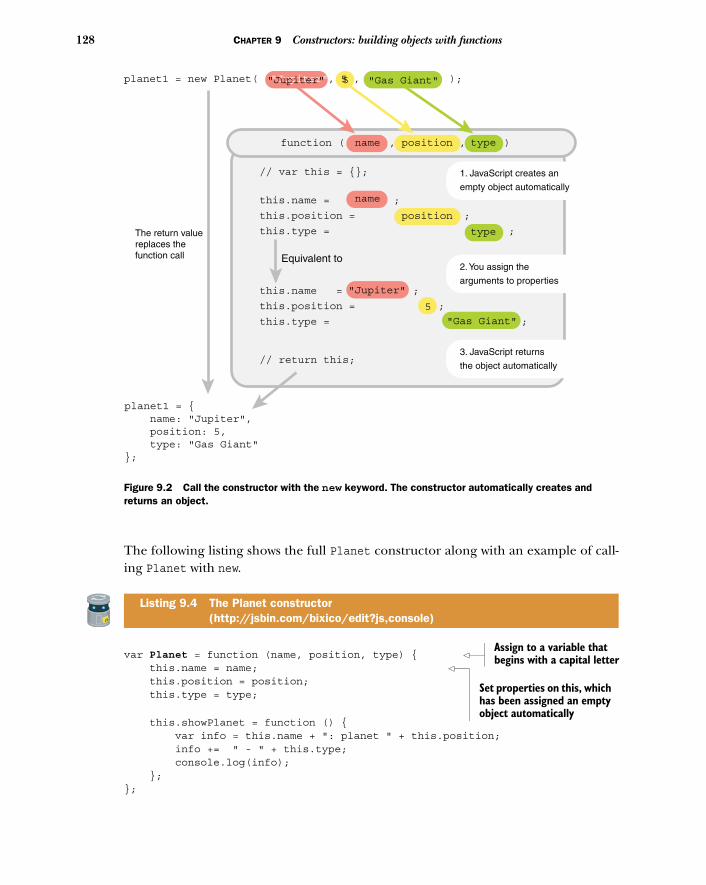
128 CHAPTER 9 Constructors: building objects with functions
The following listing shows the full Planet constructor along with an example of call-ing Planet with new.
var Planet = function (name, position, type) { this.name = name; this.position = position; this.type = type;
this.showPlanet = function () { var info = this.name + ": planet " + this.position; info += " - " + this.type; console.log(info); };};
Listing 9.4 The Planet constructor (http://jsbin.com/bixico/edit?js,console)
function ( name , position , type )name position type
planet1 = new Planet( "Jupiter", 5 , "Gas Giant" );"Jupiter" 5 "Gas Giant"
planet1 = { name: "Jupiter", position: 5, type: "Gas Giant"};
The return valuereplaces thefunction call
// var this = {};
this.name = name ;
this.position = position ;
this.type = type ;
name
position
type
5
"Gas Giant"
this.name = name ;
this.position = ;
this.type = ;
"Jupiter"
// return this;
1. JavaScript creates an
empty object automatically
2. You assign the
arguments to properties
3. JavaScript returns
the object automatically
Equivalent to
Figure 9.2 Call the constructor with the new keyword. The constructor automatically creates and returns an object.
Assign to a variable that begins with a capital letter
Set properties on this, which has been assigned an empty object automatically

129Using constructor functions to build objects
var planet = new Planet( "Jupiter", 5, "Gas Giant");
planet.showPlanet();
Within the function body, but only when you call the function with new, JavaScript cre-ates an empty object for you and assigns it to the special variable this. You can imag-ine the hidden first line of the Planet function being
var this = {};
You can then set properties on this just as you did with planet in the buildPlanetfunction earlier. The function automatically returns the object assigned to this, sothere’s no need to add a return statement. You can imagine the hidden last line ofthe Planet function being
return this;
When you execute the code in listing 9.4, the newly created object replaces the call tothe Planet constructor and is assigned to the planet variable. The following
var planet = new Planet( "Jupiter", 5, "Gas Giant" );
becomes
var planet = { name: "Jupiter", position: 5, type: "Gas Giant", showPlanet: function () { var info = this.name + ": planet " + this.position; info += " - " + this.type; console.log(info); }};
You can add as many properties and methods to the this object as you need. Listing 9.5extends the Planet constructor to add a moons property and an addMoon method tothe generated objects:
> Jupiter: planet 5 – Gas Giant> Moons: Io, Europa.
Call the function with the new keyword to tell JavaScript to assign an empty object to this

130 CHAPTER 9 Constructors: building objects with functions
var Planet = function (name, position, type) { this.name = name; this.position = position; this.type = type; this.moons = [];
this.showPlanet = function () { var info = this.name + ": planet " + this.position; info += " - " + this.type; console.log(info); console.log( "Moons: " + this.moons.join(', ') + "."); };
this.addMoon = function (moon) { this.moons.push(moon); };};
var planet = new Planet( "Jupiter", 5, "Gas Giant" );
planet.addMoon("Io");planet.addMoon("Europa");
planet.showPlanet();
Remember from chapter 8, the push method adds a new element to the end of anarray and the join method joins all of the elements of an array to form a single string,with an optional separator string between each pair of elements.
Planets and moons! Your industriousness knows no bounds. Io, Io, it’s off to workwe go ….
9.2.2 World building—making use of the Planet constructor
Listing 9.6 uses an updated implementation of the Planet constructor. When youcall addMoon, it now prepends new moons at the beginning of the moons array usingan array method you haven’t seen before: unshift. You create three planet objectsand assign them to variables planet1, planet2, and planet3 before calling show-Planet on each one. In the partial output shown here, pay close attention to theorder of the moons:
> Jupiter> Planet 5 – Gas Giant> Moons: Europa, Io.
Listing 9.5 Including a moons array in the Planet constructor (http://jsbin.com/wiguya/edit?js,console)
Create an empty array and assign it to the moons property
Join the elements of the moons array to form a string
Add the new moon to the moons array using the push method
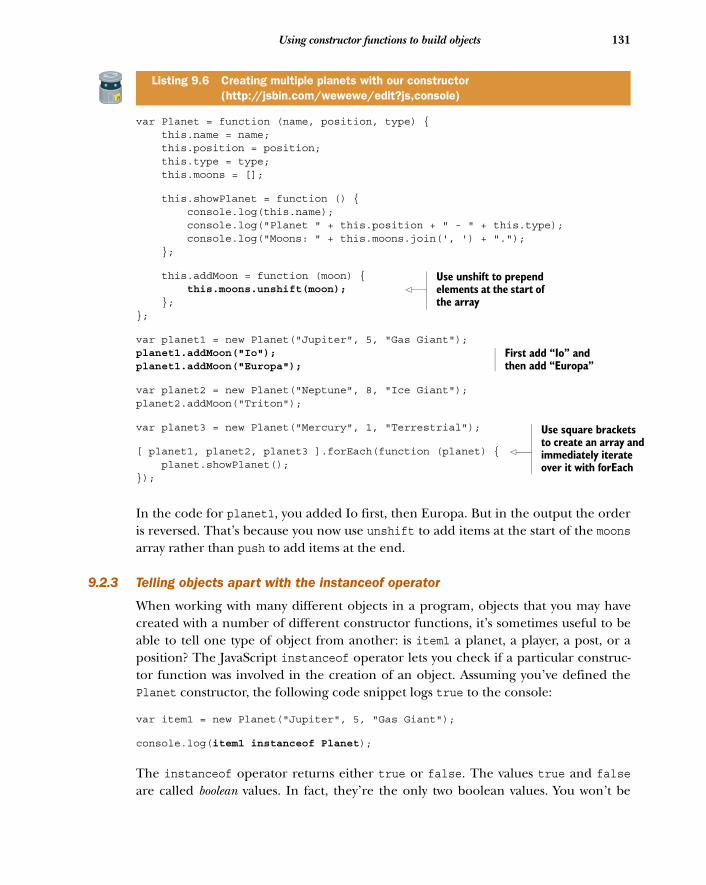
131Using constructor functions to build objects
var Planet = function (name, position, type) { this.name = name; this.position = position; this.type = type; this.moons = [];
this.showPlanet = function () { console.log(this.name); console.log("Planet " + this.position + " - " + this.type); console.log("Moons: " + this.moons.join(', ') + "."); };
this.addMoon = function (moon) { this.moons.unshift(moon); };};
var planet1 = new Planet("Jupiter", 5, "Gas Giant");planet1.addMoon("Io"); planet1.addMoon("Europa");
var planet2 = new Planet("Neptune", 8, "Ice Giant");planet2.addMoon("Triton");
var planet3 = new Planet("Mercury", 1, "Terrestrial");
[ planet1, planet2, planet3 ].forEach(function (planet) { planet.showPlanet();});
In the code for planet1, you added Io first, then Europa. But in the output the orderis reversed. That’s because you now use unshift to add items at the start of the moonsarray rather than push to add items at the end.
9.2.3 Telling objects apart with the instanceof operator
When working with many different objects in a program, objects that you may havecreated with a number of different constructor functions, it’s sometimes useful to beable to tell one type of object from another: is item1 a planet, a player, a post, or aposition? The JavaScript instanceof operator lets you check if a particular construc-tor function was involved in the creation of an object. Assuming you’ve defined thePlanet constructor, the following code snippet logs true to the console:
var item1 = new Planet("Jupiter", 5, "Gas Giant");
console.log(item1 instanceof Planet);
The instanceof operator returns either true or false. The values true and falseare called boolean values. In fact, they’re the only two boolean values. You won’t be
Listing 9.6 Creating multiple planets with our constructor (http://jsbin.com/wewewe/edit?js,console)
Use unshift to prepend elements at the start of the array
First add “Io” and then add “Europa”
Use square brackets to create an array andimmediately iterate over it with forEach

132 CHAPTER 9 Constructors: building objects with functions
using instanceof in the rest of Get Programming with JavaScript—I mention it here asanother reason why a programmer may prefer constructor functions over their ownobject-creation functions. You’ll see a lot more of true and false in parts 2 and 3 ofthe book; they’re central to making decisions and running code only if certain condi-tions are met.
To get a better feel for constructors, it’s worth looking at a few more examples. Thenext section does just that, with constructors for quiz questions and calendar events.
9.3 Building mastery—two examples of constructorsA quiz is likely to have tens of questions and a calendar hundreds or thousands ofevents. The questions will probably all have a similar structure and the events likewise.Both types of objects seem like prime candidates for constructor functions.
In listing 9.7, you use a QuizQuestion constructor to create a single question anddisplay it on the console:
> What is the capital of France?> (1) Bordeaux> (2) F> (3) Paris> (4) Brussels
var QuizQuestion = function (question, answer) { this.question = question; this.answer = answer; this.options = [];
this.addOption = function (option) { this.options.push(option); };
this.showQuestion = function () { console.log(this.question); this.options.forEach(function (option, i) { console.log("(" + (i + 1) + ") " + option); }); };};
var question1 = new QuizQuestion( "What is the capital of France?", "Paris");
question1.addOption("Bordeaux");question1.addOption("F");question1.addOption("Paris");question1.addOption("Brussels");
question1.showQuestion();
Listing 9.7 A quiz question constructor (http://jsbin.com/vuyesi/edit?js,console)
Include a second parameter to catch the index argument
Use brackets to add 1 to the index and use the result in the string

133Building mastery—two examples of constructors
In the showQuestion function in listing 9.7, you use the forEach method to iterateover the options array of possible answers. The forEach method passes each optionand its index to a function that displays the option along with an option number.
function (option, i) { console.log("(" + (i + 1) + ") " + option);}
The index of the first option is 0 but you want the displayed numbers to start at (1).You use (i + 1) rather than i to shift each index up by one for display.
> (1) Bordeaux> (2) F> (3) Paris> (4) Brussels
The next listing is a simple constructor for calendar events. The showEvent methodproduces the following output:
> Annual Review> 3/5/16, from 4.00pm to 5.00pm
var CalendarEvent = function (title, startDate, startTime, endTime) { this.title = title; this.startDate = startDate; this.startTime = startTime; this.endTime = endTime;
this.showEvent = function () { var dateString = [ this.startDate, ", from ", this.startTime, " to ", this.endTime ].join("");
console.log(this.title); console.log(dateString); };};
var calEvent = new CalendarEvent( "Annual Review", "3/5/16", "4.00pm", "5.00pm");
calEvent.showEvent();
Listing 9.8 A calendar event constructor (http://jsbin.com/gemiyu/edit?js,console)
Define a method to display information about the current calendar event
Build up the pieces of the date string as elements in an array
Join the elements of the array to form the full date string

134 CHAPTER 9 Constructors: building objects with functions
In the showEvent method, you create and immediately join an array to form a stringfor the date information. You met the join method in chapter 8. This is quite a neatway of building a string from multiple pieces. JavaScript programmers used to seestring concatenation, for example, using +=, as a relatively slow way of building stringsfrom substrings. Joining the elements of an array was a common alternative. These fol-lowing two ways of building dateString give the same result:
var dateString = [ this.startDate, ", from ", this.startTime, " to ", this.endTime].join("");
var dateString = this.startDate;dateString += ", from ";dateString += this.startTime;dateString += " to ";dateString += this.endTime;
These days, in modern browsers, string concatenation is much faster than it was. I’veincluded an example of using join because you may well come across it in the wild.
Constructor functions provide a standardized, streamlined way of creating multi-ple objects using a single template. A great adventure will involve many locations; let’srevisit The Crypt and use constructors to give your players plenty of places to plunder.
9.4 The Crypt—providing places to plunderYou’ll now apply your knowledge of constructor functions to The Crypt. Figure 9.3shows where the focus of this section, creating Place objects by using constructorfunctions, fits into the overall structure of our ongoing game example.
Up until now, you’ve been focusing on the players in The Crypt. It’s time to buildsome places to explore. Each place needs a title and description, a collection of items,
player variables
Players
a player object
showing player info
player items
Player Constructor
Places Maps
place objects
place items
place exits
Place Constructor
showing place info
linking places via exits
Game
render
get
go
Figure 9.3 Elements of The Crypt

135The Crypt—providing places to plunder
r
and a collection of exits to other places. It also needs methods for adding items andexits and for displaying its information. Figure 9.4 highlights the elements you want tosee when you display a Place object on the console.
Managing all of those elements will require quite a lot of code. As you’ve seen, aconstructor function is a good way to organize all that code and streamline the cre-ation of multiple Place objects. This will be your most complicated constructor yet, solet’s build it in stages.
9.4.1 Building the Place constructor—title and description
Okay, here’s a nice bare-bones constructor to get you started. It simply sets up thetitle and description properties and a basic getInfo method that you can developas you add more properties. The initial output looks like this:
> The Old Library> You are in a library. Dusty books line the walls.
var Place = function (title, description) { this.title = title; this.description = description;
this.getInfo = function () { var infoString = this.title + "\n";
Listing 9.9 A Place constructor, part 1 (http://jsbin.com/pogive/edit?js,console)
==================== The Old Library ====================You are in a library. Dusty books line the walls.
Items: - a rusty key
Exits from The Old Library: - The Kitchen - The Main Hall========================================
A box around the title
A title
A description
A list of items
A list of exits
A border
Figure 9.4 The elements shown when a Place object is displayed on the console.
Assign the constructor function to a variable that begins with a capital lette
Assign values to properties of the automatically created this object
Create a method by assigning a function to a property

136 CHAPTER 9 Constructors: building objects with functions
infoString += this.description + "\n"; return infoString; };};
var library = new Place( "The Old Library", "You are in a library. Dusty books line the walls.");
console.log(library.getInfo());
No boxes or borders yet—just the bare bones. You define a getInfo method thatreturns a string containing the place’s title and description. Remember, "\n" is anescape sequence used to specify a new-line character; the title will be on one line andthe description on the next.
Okay, so you can create places. But how can players plunder those places? Youneed some treasure!
9.4.2 Building the Place constructor—items for your hoard
As players explore their environment they expect to come across items that willhelp them solve puzzles and overcome obstacles like locked doors, putrid zombies,snarling leopards, and over-friendly tentacles. You need a way to add items to theplaces you create and to include the items in the information displayed abouteach location.
Listing 9.10 extends your bare-bones constructor to include the item functionalityneeded. You’ve upgraded the display of information by using the spacer namespacefrom chapter 7; it now looks like this:
==================== The Old Library ====================You are in a library. Dusty books line the walls.Items: - a rusty key========================================
That’s more like your target output from figure 9.4! The spacer code isn’t shown inthe listing but is on JS Bin.
var Place = function (title, description) { this.title = title; this.description = description; this.items = [];
Listing 9.10 A Place constructor, part 2 (http://jsbin.com/qemica/edit?js,console)
Call the constructor function with the new keyword
Call the getInfo method and log the return value to the console
Create an empty array and assign it to the items property

137The Crypt—providing places to plunder
this.getItems = function () { var itemsString = "Items: " + spacer.newLine(); this.items.forEach(function (item) { itemsString += " - " + item; itemsString += spacer.newLine(); });
return itemsString; };
this.getInfo = function () { var infoString = spacer.box( this.title, this.title.length + 4, "=" );
infoString += this.description; infoString += spacer.newLine(); infoString += this.getItems(); infoString += spacer.line(40, "=") + spacer.newLine(); return infoString; };
this.addItem = function (item) { this.items.push(item); }; };
var library = new Place( "The Old Library", "You are in a library. Dusty books line the walls.");
library.addItem("a rusty key");
console.log(library.getInfo());
You use the spacer namespace to add new-line characters, put a box around the title,and end the information string with a border. There’s a detailed description of howthe spacer methods work in chapter 7, so check back there if you need a reminder.
You could have included an items parameter as part of the Place constructorfunction. But you want to be able to add items to a place while the game is running—when a player drops an item, for example—so you’ve kept the constructor functionsimple and included an addItem method instead.
What’s that down that dark passageway? A dragon’s lair? The bridge of a starship?A lost valley of dinosaurs?
9.4.3 Building the Place constructor—exits to explore
One location does not an adventure make; players want to wander vast worlds of won-der. The last addition to your Place constructor is a way to add exits leading to other
Define a getItems method to build a string of the items
Include a call to getItems when building info about a place
Define an addItem method to add a new item to the items array
Use the addItem method to add an item

138 CHAPTER 9 Constructors: building objects with functions
locations. You include an array of exits for each place and a method for adding desti-nations to the array. You need to display the exits, leading to your target output:
==================== The Old Library ====================You are in a library. Dusty books line the walls.
Items: - a rusty key
Exits from The Old Library: - The Kitchen - The Main Hall========================================
Once again, the spacer code has been omitted from the printed listing.
var Place = function (title, description) { var newLine = spacer.newLine();
this.title = title; this.description = description; this.items = []; this.exits = [];
this.getItems = function () { /* see listing 9.10 */ };
this.getExits = function () { var exitsString = "Exits from " + this.title; exitsString += ":" + newLine;
this.exits.forEach(function (exit) { exitsString += " - " + exit.title; exitsString += newLine; });
return exitsString; };
this.getTitle = function () { return spacer.box( this.title, this.title.length + 4, "=" ); };
this.getInfo = function () { var infoString = this.getTitle(); infoString += this.description; infoString += newLine + newLine; infoString += this.getItems() + newLine; infoString += this.getExits();
Listing 9.11 A Place constructor, part 3 (http://jsbin.com/parale/edit?js,console)
Assign the new-line character returned by spacer.newLine() to the newLine variable
Create an empty array and assign it to the exits property
Define a getExits method to build an exit info string
Move the title boxing code to its own method
Use the new methods to help build the info string

139The Crypt—providing places to plunder
infoString += spacer.line(40, "=") + newLine; return infoString; };
this.showInfo = function () { console.log(this.getInfo()); };
this.addItem = function (item) { this.items.push(item); };
this.addExit = function (exit) { this.exits.push(exit); }; };
var library = new Place( "The Old Library", "You are in a library. Dusty books line the walls.");
var kitchen = new Place( "The Kitchen", "You are in the kitchen. There is a disturbing smell.");
var hall = new Place( "The Main Hall", "You are in a large hall. It is strangely empty.");
library.addItem("a rusty key");library.addExit(kitchen); library.addExit(hall);
library.showInfo();
The listing is quite long, but you’ve seen all of the techniques before and there’s somerepetition. Focus on the methods one by one and take your time to follow the code.
You start by setting up a quick shortcut. The spacer.newLine method alwaysreturns the new-line escape sequence, "\n", so you call it once and assign the returnvalue to the newLine variable. You then use newLine instead of spacer.newLine().That saves you some typing without impacting the readability of the code. You alsoadd getExits and getTitle methods that build their part of the place informationstring. And the addExits method is just like the addItems method but—you guessedit—for adding exits instead of items.
The exits property holds an array of Place objects. In other words, each Placeobject contains a collection of Place objects. This ability to nest objects inside objectscan lead to sophisticated models of real-world situations. Although a full model can bequite complicated, each component should be relatively easy to understand. Yourgame, The Crypt, provides you with enough moving parts to appreciate how complicated
Define an addExit method to add a new place to the exits array
Join the library to the kitchen and to the hall

140 CHAPTER 9 Constructors: building objects with functions
programs can be constructed from simple pieces. Let’s revisit a piece you know welland define a constructor function for player objects.
9.5 The Crypt—streamlining player creationFigure 9.5 shows where a Player constructor function fits into the overall structure ofour ongoing game example.
In chapter 8 you added an array of items to Player objects and defined functions toinclude the items when displaying player information. You still created the playersmanually:
var player1 = { name: "Kandra", place: "The Dungeon of Doom", health: 50, items : ["a trusty lamp"]};
You assigned the player display functions to their own variables—you collected quitea bunch!
var getPlayerName = function (player) { … };var getPlayerHealth = function (player) { … };var getPlayerPlace = function (player) { … };var getPlayerItems = function (player) { … };var getPlayerInfo = function (player, character) { … };var showPlayerInfo = function (player, character) { … };
The display functions combined to show information on the console, as shown in fig-ure 9.6.
To add an item to the player’s collection, you pushed it directly to the items array:
player1.items.push("a rusty key");
player variables
Players
a player object
showing player info
player items
Player Constructor
Places Maps
place objects
place items
place exits
Place Constructor
showing place info
linking places via exits
Game
render
get
go
Figure 9.5 Elements of The Crypt

141The Crypt—streamlining player creation
9.5.1 Organizing player properties
It’s time to wrangle all those pieces; you use your mastery of constructor functions tostreamline player creation, make the functions into methods, and do away with thegrowing number of variables. The Player constructor will let you create Playerobjects like this:
var player1 = new Player("Kandra", 50);
The constructor will also add a method you can call to add items, for example:
player1.addItem("a rusty key");
Listing 9.12 shows the code for the Player constructor function. It uses methods fromthe spacer namespace introduced in chapter 7. The spacer code is included on JSBin but is not shown in the listing. To test a Player object created by the Player con-structor, the listing also uses the Place constructor from section 9.4. Again, that codeis omitted here but included on JS Bin. And there’s a new type of value, null, that’sexplained in the sections after the listing.
Once again, there’s quite a lot of code here (and even more on JS Bin), but don’tworry; you’ve seen similar code before. Check the annotations, read the explanationsbelow the listing, and try the Further Adventures on JS Bin. It might be worth having aquick look at The Crypt section from chapter 8 too; this builds on that.
var Player = function (name, health) { var newLine = spacer.newLine();
this.name = name; this.health = health;
Listing 9.12 A Player constructor function (http://jsbin.com/leqahi/edit?js,console)
================================= Kandra ================================== Kandra is in The Old Library == Kandra has health 50 ================================= Items: - a rusty key - The Sword of Doom
================================
A box around the player’s name
Player name
Place info
A list of items
Player health
Borders
Figure 9.6 The elements shown when a Player object is displayed on the console.

142 CHAPTER 9 Constructors: building objects with functions
r
this.items = []; this.place = null;
this.addItem = function (item) { this.items.push(item); };
this.getName = function () { return this.name; };
this.getHealth = function () { return this.name + " has health " + this.health; };
this.getPlace = function () { return this.name + " is in " + this.place.title; };
this.getItems = function () { var itemsString = "Items:" + newLine;
this.items.forEach(function (item, i) { itemsString += " - " + item + newLine; });
return itemsString; };
this.getInfo = function (character) { var place = this.getPlace(); var health = this.getHealth(); var longest = Math.max(place.length, health.length) + 4;
var info = spacer.box(this.getName(), longest, character); info += spacer.wrap(place, longest, character); info += newLine + spacer.wrap(health, longest, character); info += newLine + spacer.line(longest, character);
info += newLine; info += " " + this.getItems(); info += newLine; info += spacer.line(longest, character); info += newLine;
return info; };
this.showInfo = function (character) { console.log(this.getInfo(character)); }; };
// Test the Player constructor
var library = new Place( "The Old Library", "You are in a library. Dusty books line the walls." );
Assign null to the place property until you create a place to assign it
Define a method to add items to the items array
Return strings of player information from the ‘get’ functions
Use the title property of the Place object assigned to this.place
Use the spacemethods to format playerinformation
Define a method to get a player information string and display it on the console
Create a Place object

143The Crypt—streamlining player creation
var player1 = new Player("Kandra", 50);
player1.place = library;
player1.addItem("a rusty key");player1.addItem("The Sword of Doom");
player1.showInfo("=");
Phew! That’s another long listing. Let’s break it down.
9.5.2 Turning functions into methods
In chapters 7 and 8, you defined a number of functions to build up a string of playerinformation and display it, for example,
var getPlayerHealth = function (player) { return player.name + " has health " + player.health;};
You pass a Player object to the function as an argument:
getPlayerHealth(player1);
The function then uses properties of the Player object to build up and return aninformation string.
You’ve now moved the functions into the Player constructor and assigned them toproperties of the special this object.
this.getHealth = function () { return this.name + " has health " + this.health;};
When we assign functions as properties of objects, we call them methods. You invokethe methods by using dot notation and parentheses:
player1.getHealth();
You no longer need to pass the Player object as an argument to the function. Wherethis has been used in the function body, player1 will take its place.
return this.name + " has health " + this.health;
becomes
return player1.name + " has health " + player1.health;
Converting all of the functions into methods of the Player object does away with theneed for a separate variable for each function. It also keeps the function definitionswith the object on which they act. Neat!
Create a Player object
Assign the Place object to the player

144 CHAPTER 9 Constructors: building objects with functions
9.5.3 Assigning places to players
You need to know where players are in The Crypt. In earlier chapters, you assigned astring to each player’s place property:
player1.place = "The Old Library";
But places are more than titles; Place objects created with the Place constructor havetitles, descriptions, arrays of items, exits, and methods. From now on, you’ll assignplayers full Place objects:
var library = new Place( "The Old Library", "You are in a library. Dusty books line the walls.");
var player1 = new Player("Kandra", 50);
player1.place = library;
As players explore their environment, you’re able to update the place property,assigning a previously built Place object for each new location.
Now that you’re assigning full Place objects to a player’s place property, the get-Place method has to do a little extra work to build its information string:
this.getPlace = function () { return this.name + " is in " + this.place.title;};
Previously, this.place held the title of the player’s current location; it now holds aPlace object. The title is now accessed via this.place.title.
9.5.4 Using null as a placeholder for objects
Notice, in listing 9.12, that you assign the special value null to the place property inthe constructor function. This shows that you intend to use a place property in yourprogram but you don’t have a value for it yet; you’ll only be able to assign a player’splace property when you’ve created some places.
player.place = null; // You expect an object to be assigned later
/* other code */
player.place = library; // An object is assigned, as expected
DEFINITION null is its own type of value. It’s not a string, number, boolean(true or false), or undefined. And it’s not an object. Programmers often useit, as you have, to show that they haven’t yet assigned an object to a variable orproperty but expect to assign one at some point.
Now that you have an efficient way of creating many objects, you can build all of theplaces in The Crypt using a constructor function. You can add items and link the places

145Summary
together into a map. You can assign places to players. You still need to find a way forplayers to move from place to place. Once you’ve done that, you’ll have a game envi-ronment you can explore!
9.6 Summary■ Use constructor functions to create objects with similar structures.■ Assign constructor functions to variables starting with a capital letter. Naming
constructor functions this way is a widely followed convention:
var Person = function (name) { … };
■ Call constructor functions with the new keyword. Assign the object returned toa variable:
var person = new Person("Jahver");
■ Use the special this variable to set properties within the constructor function.this is automatically returned from the constructor:
var Person = function (name) { this.name = name; };
var person = new Person("Jahver");
■ Access properties of the returned object just like any other object:
person.name; // Jahver
■ Assign functions to properties to create methods. Call the methods using dotnotation and parentheses:
var Person = function (name) { this.name = name; this.sayHello = function () { return this.name + " says hi."; }; };
var person = new Person("Jahver"); person.sayHello(); // Jahver says hi.
■ Assign the value null to variables or properties if you expect to assign an objectat some point but the object is not yet available:
player1.place = null;
/* other code */
player1.place = library;

146 CHAPTER 9 Constructors: building objects with functions
■ Use the instanceof operator to check if a constructor function was involved increating an object. The operator returns a boolean value, true or false:
var person = new Person("Jahver");
person instanceof Person; // true
person instanceof Planet; // false

Bracket notation:flexible property names
In chapter 3 you saw how to create objects with curly braces and get and set proper-ties with dot notation. You’ve used objects to model players, places, planets, andposts as well as quizzes and calendar events. You’ve added functions as properties tomake methods and passed your objects to and from functions as arguments andreturn values. Objects are the center of the JavaScript universe!
In this chapter you take a look at a new way of working with object propertiesthat gives you more flexibility with the property names, lets you use variables askeys, and gives you the ability to generate new properties from data while programsare running.
We also bring part 1 of Get Programming with JavaScript to a close with a workingversion of The Crypt, finally giving players the chance to explore a map and collect
This chapter covers■ Square brackets as an alternative to dot
notation■ The use of square brackets to set and get
properties■ The flexibility of square bracket notation■ How to build a working game in The Crypt
147

148 CHAPTER 10 Bracket notation: flexible property names
treasure! Square bracket notation provides a better way for you to manage the linksbetween locations in the game, create a web of Place objects, and add a touch of mys-tery to the adventure. Ooooo, mystery …
10.1 Using square brackets instead of dotsUp until now you’ve used dot notation to set and get object properties.
question1.question = "What is the capital of France?";
console.log(player1.name);
this.title = title;
The property name, its key, is joined to a variable name with a period, or dot. JavaScriptalso offers an alternative approach: you can set and get properties by including aproperty’s key as a string between square brackets.
question1["question"] = "What is the capital of France?";
console.log(player1["name"]);
this["title"] = title;
This new approach gives you more flexibility in the strings you can use as keys and letsyou add dynamic properties while your programs are running. Say you had a statesobject that held the abbreviations of U.S. states as values, using the full names of statesas keys. You could use dot notation to find the abbreviation for Ohio
console.log(states.ohio); // OH
but, because of that pesky space, not for New Hampshire
console.log(states.new hampshire); // ERROR!
Square brackets solve the problem (figure 10.1):
console.log(states["new hampshire"]); // NH
states [ "new hampshire" ] = "NH";
Wrap the key in quotation marks
Use square brackets to specify a propertyFigure 10.1 Using square bracket notation to set a property

149Using square brackets instead of dots
And if you had a getStateCode function that used the states object, square bracketnotation would let you use a parameter as a key:
var getStateCode = function (stateName) { var stateCode = states[stateName]; return stateCode;};
Using a parameter to provide the key isn’t possible with dot notation. Table 10.1 showsmore situations in which square bracket notation is needed.
Let’s investigate these ideas with a few more examples.
Table 10.1 Situations in which certain keys do and don’t work
I want to I try Success?
Use ohio as a key in an object literal
states = { ohio : "OH"};
Yes
Use new hampshire as a key in an object literal
states = { new hampshire : "NH"};
No
Use "new hampshire" as a key in an object literal
states = { "new hampshire" : "NH"};
Yes
Use maryland as a key with dot notation
states.maryland = "MD"; Yes
Use south carolina as a key with dot notation
states.south carolina = "SC"; No
Use south carolina as a key with square bracket notation
states["south carolina"] = "SC"; Yes
Use a parameter as a key with dot notation
function (stateName) { return states.stateName;}
No
Use a parameter as a key with square bracket notation
function (stateName) { return states[stateName];}
Yes

150 CHAPTER 10 Bracket notation: flexible property names
10.1.1 Brackets in action—people’s names as keys
Say you need to keep a simple record of people’s ages. You could use an ages objectwhere each person’s name is a key and their age is the corresponding value. List-ings 10.1, 10.2, and 10.3 develop this approach, logging two ages to the console:
> 56> 21
In the first listing, you set the properties using bracket notation and get them usingdot notation.
var ages = {};
ages["Kandra"] = 56; ages["Dax"] = 21;
console.log(ages.Kandra); console.log(ages.Dax);
The two methods are equivalent for the keys used in listing 10.1. If you want toinclude spaces in the property names, you must use bracket notation. The next listingshows a similar example using full names.
var ages = {};
ages["Kandra Smith"] = 56;ages["Dax Aniaku"] = 21;
console.log(ages["Kandra Smith"]);console.log(ages["Dax Aniaku"]);
Trying to use dot notation with property names that include spaces will confuseJavaScript: ages.Kandra Smith will be interpreted as ages.Kandra and Smith will beseen as a separate variable name, as shown in figure 10.2.
Listing 10.1 Bracket notation for object properties (http://jsbin.com/kipedu/edit?js,console)
Listing 10.2 Longer strings as keys (http://jsbin.com/toviya/edit?js,console)
Set the properties using bracket notation and the names as keys
Get the properties using dot notation and the names as keys
ages.Kandra Smith = 56;
JavaScript will look for the Smith variable or keyword
JavaScript will try to find the Kandra propertyFigure 10.2 Spaces in property names don’t work with dot notation.

151Using square brackets instead of dots
The bracket notation immediately gives you the flexibility to use property names thatmay make more sense in context, like people’s names, rather than being restricted tothe single words of dot notation.
Bracket notation also allows you to add properties on the fly, when you may notknow the keys in advance. Maybe a user is entering the information or it’s beingfetched from a file or database. In the next listing, you include an addAge function foradding new people to the ages object. If you run this listing you’ll be able to use thefunction to add new people via the console.
var ages = {};
var addAge = function (name, age) { ages[name] = age; };
addAge("Kandra Smith", 56);addAge("Dax Aniaku", 21);
console.log(ages["Kandra Smith"]);console.log(ages["Dax Aniaku"]);
In listing 10.3 you use the name parameter in the addAge function as the key for theages object. When you call addAge, the first argument you include in the call isassigned to the name parameter. For example,
addAge("Kandra Smith", 56);
assigns "Kandra Smith" to name and 56 to age, so that
ages[name] = age;
becomes
ages["Kandra Smith"] = 56
This ability to use a variable between the square brackets for setting a property givesyou great versatility to dynamically create and mutate objects in your programs. Youmake further use of the technique in sections 10.1.2 and 10.2.
If you want to create an object with properties already in place, then you use thecurly braces syntax, with commas separating the key-value pairs. You can includespaces in the keys if you wrap the keys in quotation marks. The following listing showsthe idea. It also introduces the Object.keys method that returns an array containingall of the keys set on an object. In the listing, you print the keys array to the console.
> ["Kandra Smith", "Dax Aniaku", "Blinky"]
Listing 10.3 Using a function to add ages (http://jsbin.com/pipuva/edit?js,console)
Include a name parameter; you expect a name to be passed to the function as an argument
Use the name passed to the function as the key
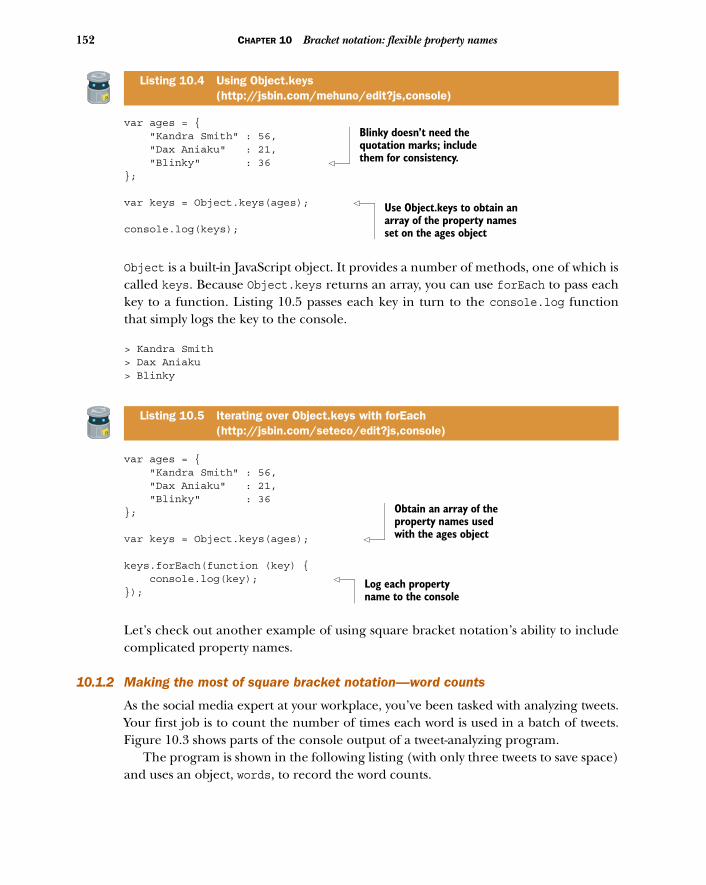
152 CHAPTER 10 Bracket notation: flexible property names
var ages = { "Kandra Smith" : 56, "Dax Aniaku" : 21, "Blinky" : 36 };
var keys = Object.keys(ages);
console.log(keys);
Object is a built-in JavaScript object. It provides a number of methods, one of which iscalled keys. Because Object.keys returns an array, you can use forEach to pass eachkey to a function. Listing 10.5 passes each key in turn to the console.log functionthat simply logs the key to the console.
> Kandra Smith> Dax Aniaku> Blinky
var ages = { "Kandra Smith" : 56, "Dax Aniaku" : 21, "Blinky" : 36};
var keys = Object.keys(ages);
keys.forEach(function (key) { console.log(key); });
Let’s check out another example of using square bracket notation’s ability to includecomplicated property names.
10.1.2 Making the most of square bracket notation—word counts
As the social media expert at your workplace, you’ve been tasked with analyzing tweets.Your first job is to count the number of times each word is used in a batch of tweets.Figure 10.3 shows parts of the console output of a tweet-analyzing program.
The program is shown in the following listing (with only three tweets to save space)and uses an object, words, to record the word counts.
Listing 10.4 Using Object.keys (http://jsbin.com/mehuno/edit?js,console)
Listing 10.5 Iterating over Object.keys with forEach (http://jsbin.com/seteco/edit?js,console)
Blinky doesn’t need the quotation marks; include them for consistency.
Use Object.keys to obtain an array of the property names set on the ages object
Obtain an array of the property names used with the ages object
Log each property name to the console
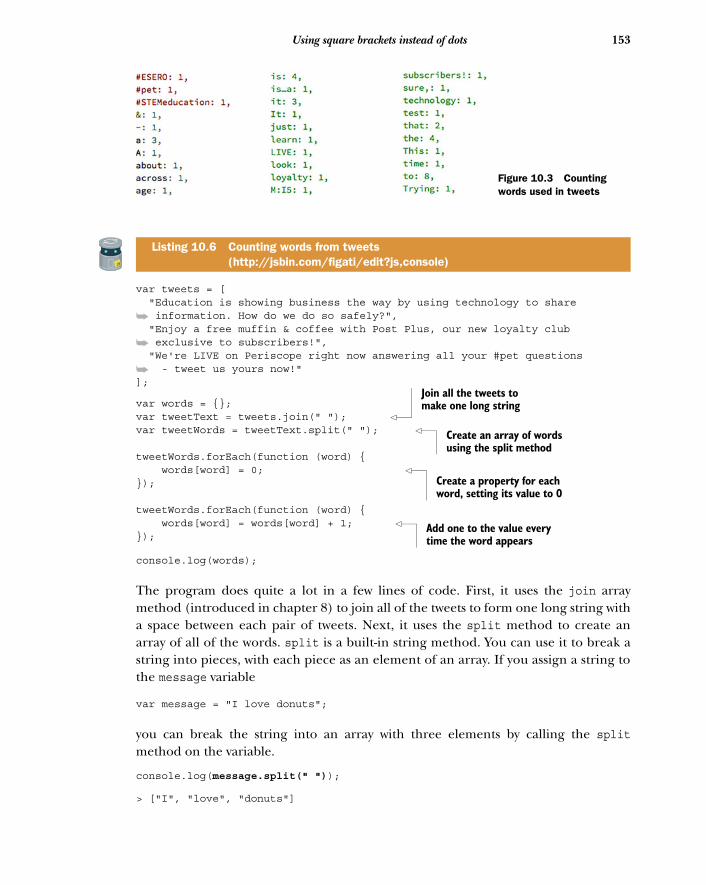
153Using square brackets instead of dots
var tweets = [ "Education is showing business the way by using technology to share
➥ information. How do we do so safely?", "Enjoy a free muffin & coffee with Post Plus, our new loyalty club
➥ exclusive to subscribers!", "We're LIVE on Periscope right now answering all your #pet questions
➥ - tweet us yours now!"];
var words = {};var tweetText = tweets.join(" "); var tweetWords = tweetText.split(" ");
tweetWords.forEach(function (word) { words[word] = 0; });
tweetWords.forEach(function (word) { words[word] = words[word] + 1; });
console.log(words);
The program does quite a lot in a few lines of code. First, it uses the join arraymethod (introduced in chapter 8) to join all of the tweets to form one long string witha space between each pair of tweets. Next, it uses the split method to create anarray of all of the words. split is a built-in string method. You can use it to break astring into pieces, with each piece as an element of an array. If you assign a string tothe message variable
var message = "I love donuts";
you can break the string into an array with three elements by calling the splitmethod on the variable.
console.log(message.split(" "));
> ["I", "love", "donuts"]
Listing 10.6 Counting words from tweets (http://jsbin.com/figati/edit?js,console)
Figure 10.3 Counting words used in tweets
Join all the tweets to make one long string
Create an array of words using the split method
Create a property for each word, setting its value to 0
Add one to the value every time the word appears

154 CHAPTER 10 Bracket notation: flexible property names
The argument you pass to the split method is a string the function uses to decidewhere to split the text. The previous example uses a space as the separator, but anystring will work. Here’s an example using commas:
var csv = "Kandra Smith,50,The Dungeon of Doom";var details = csv.split(",");console.log(details);
> ["Kandra Smith", "50", "The Dungeon of Doom"]
If you pass the empty string, "", as the argument to split, it creates an array of all ofthe individual characters used in the text:
var message = "I love donuts";console.log(message.split(""));
> ["I", " ", "l", "o", "v", "e", " ", "d", "o", "n", "u", "t", "s"]
Back to your tweet analyzer. Once it generates the array of words with split, listing 10.6iterates over the array of words twice. The first time, it creates properties with thewords as keys and zero as the values. ["I", "love", "donuts"] leads to
words["I"] = 0;words["love"] = 0;words["donuts"] = 0;
If a word appears more than once, its property will be assigned zero each time—a littleredundancy but not a problem. On the second iteration, the code adds one to a prop-erty’s value every time the word appears.
words["I"] = words["I"] + 1; words["love"] = words["love"] + 1;words["donuts"] = words["donuts"] + 1;
Alternatively, you could use the += operator to add one to the count for each word.You’ve seen += used to concatenate strings but it also works with numbers, adding anew number to an existing number. The following two statements are equivalent:
words[word] = words[word] + 1;words[word] += 1;
In fact, if you just want to add one each time, there’s an operator for exactly that pur-pose, ++. The following two statements are equivalent:
words[word] += 1;words[word]++;
But you want your code to be easy to follow and ++ is a bit terse (as well as having someother complications we won’t go into). You’ll probably bump into it out and about incodeland, but you won’t use it in this book until part 4.

155The Crypt—enhancing exit excitement
You’ve iterated over all of the words twice. By the end of the second iteration, eachproperty has a word as a key and the word’s count as its value. Well done; have a payraise! Do check out the working example on JS Bin and add more tweets or text fromother sources for analysis.
With a simple tweak, you can perform a letter count instead of a word count. Thenext listing shows how.
var tweets = [ /* unchanged from listing 10.6 */ ];
var letters = {};var tweetText = tweets.join("");var tweetLetters = tweetText.split("");
tweetLetters.forEach(function (letter) { letters[letter.toLowerCase()] = 0; });
tweetLetters.forEach(function (letter) { letters[letter.toLowerCase()] += 1; });
console.log(letters);
Listing 10.7 works in the same way as listing 10.6, using join and split to create anarray and then iterating over the array twice to perform the count.
In the next section, you put square bracket notation’s ability to work with arbitrarystrings to good use managing exits in The Crypt.
10.2 The Crypt—enhancing exit excitementYou’ll now apply your knowledge of square bracket notation to The Crypt. Figure 10.4shows where the focus of this section, linking places via exits, fits into the overall struc-ture of our ongoing game example.
Listing 10.7 Counting letters from tweets (http://jsbin.com/rusufi/edit?js,console)
Pass the empty string to split to create an array of individual characters
Convert all letters to lowercase and use them as keys
Use the += operator to add 1for each occurrence of a letter
player variables
Players
a player object
showing player info
player items
Player Constructor
Places Maps
place objects
place items
place exits
Place Constructor
showing place info
linking places via exits
Game
render
get
go
Figure 10.4 Elements of The Crypt

156 CHAPTER 10 Bracket notation: flexible property names
As it stands, the Place constructor you defined for The Crypt in chapter 9 gives away alittle too much when it lists the exits for the current place in a game:
================ The Kitchen ================You are in a kitchen. There is a disturbing smell.
Items: - a piece of cheese
Exits from The Kitchen: - The Kitchen Garden - The Kitchen Cupboard - The Old Library========================================
It lists what players will find when they leave the current location. By the end of thissection, you inject a bit more mystery by simply listing the directions available ratherthan the destinations.
Exits from The Kitchen: - west - east - south
Players will find out what’s around the corner only when they get there. Feel the tension! To help you focus on using objects with square bracket notation to enhance the
exits—that’s what this chapter is all about after all—you create a new, simplified Placeconstructor on which to experiment. Then, in section 10.2.4, you use your burgeon-ing square bracket skills to update your constructor from chapter 9.
10.2.1 Using an object to hold the exits
To add that extra layer of the unknown, you use an exits object rather than an exitsarray. The object keys are directions, like "north" or "the trapdoor", and the valuesare the destinations. Listing 10.8 displays the directions and destinations on the con-sole. You hide the destinations later.
> north goes to The Kitchen> the trapdoor goes to The Dungeon
var Place = function (title) { this.title = title; };
var kitchen = new Place("The Kitchen"); var dungeon = new Place("The Dungeon");
Listing 10.8 An exits object (http://jsbin.com/daqato/edit?js,console)
Define a simple Place constructor function
Use the Place constructor function to create two Place objects

157The Crypt—enhancing exit excitement
Createm
objectassi
to
vari
var exits = {};
exits["north"] = kitchen; exits["the trapdoor"] = dungeon;
var keys = Object.keys(exits);
keys.forEach(function (key) { console.log(key + " goes to " + exits[key].title); });
In listing 10.8, you begin by defining a very simple Place constructor function. Remem-ber from chapter 9 that when you call a constructor function with the new keyword,JavaScript automatically creates an empty object and assigns it to the special this vari-able. You set the title property of this to the value of the title parameter.
var Place = function (title) { this.title = title;};
You immediately use the constructor function to create two Place objects:
var kitchen = new Place("The Kitchen");var dungeon = new Place("The Dungeon");
To keep things simple, you use a single exits variable for now. Later, you include it aspart of the Place constructor function. So, you create an empty object and assign it tothe exits variable:
var exits = {};
You have two Place objects, kitchen and dungeon, and you want to set them as desti-nations for different directions. You create corresponding properties on the exitsobject, using the directions as keys and the destinations as values:
exits["north"] = kitchen;exits["the trapdoor"] = dungeon;
Finally, you use the forEach method to pass each key (in other words, each direction)in turn to the function specified.
console.log(key + " goes to " + exits[key].title);
The keys are "north" and "the trapdoor", so the code is the same as
console.log("north" + " goes to " + exits["north"].title);console.log("the trapdoor" + " goes to " + exits["the trapdoor"].title);
e anpty
andgn it the
exitsable
Assign the Place objects to properties of the exits object, using directions as keys
Use the title property of each Place to show the destination

158 CHAPTER 10 Bracket notation: flexible property names
But exits["north"] is the kitchen object and exits["the trapdoor"] is the dungeonobject, so the code becomes
console.log("north" + " goes to " + kitchen.title);console.log("the trapdoor" + " goes to " + dungeon.title);
leading to the output shown before the listing.
10.2.2 Creating functions to add and display exits
Okay, so you successfully used square bracket notation to associate directions and des-tinations. In listing 10.9 you add a couple of helper functions to the code, addExitand showExits, to simplify the adding and displaying of exits. The output is the sameas for listing 10.8:
> north goes to The Kitchen> the trapdoor goes to The Dungeon
var Place = function (title) { this.title = title; };
var kitchen = new Place("The Kitchen");var dungeon = new Place("The Dungeon");
var exits = {};
var addExit = function (direction, place) { exits[direction] = place;};
var showExits = function () { var keys = Object.keys(exits);
keys.forEach(function (key) { console.log(key + " goes to " + exits[key].title); });};
addExit("north", kitchen); addExit("the trapdoor", dungeon);
showExits();
The addExit function takes two arguments: a direction string and a Place object.The direction string becomes a new key on the exits object; the Place object becomesthe corresponding value.
addExit("north", kitchen);
Listing 10.9 Functions to add and show exits (http://jsbin.com/mibube/edit?js,console)
Define an addExit function to add a Place for a given direction
Define a showExits function to display the destinations for each exit
Call addExit twice to add two exits
Call showExits to display information about all the exits

159The Crypt—enhancing exit excitement
executes the code
exits["north"] = kitchen;
The showExits function iterates over the keys of the exits object (in other words, ititerates over the directions) and displays the destination for each direction.
10.2.3 Giving each place object its own set of exits
You’ve seen how you can use an exits object to model directions and destinations.But each place object needs its own set of exits. You don’t want to mix up the exitsfrom The Fairy Fun Park with the exits from The Dungeon of Doom. In listing 10.10,you move the exits object into the Place constructor. To test the functionality of thenew Place constructor, you create three places, library, kitchen, and garden, andadd a couple of exits to kitchen. The kitchen exits are then displayed:
> Exits from The Kitchen:> south> west
var Place = function (title, description) { this.title = title; this.exits = {};
this.addExit = function (direction, exit) { this.exits[direction] = exit; };
this.showExits = function () { console.log("Exits from " + this.title + ":");
Object.keys(this.exits).forEach(function (key) { console.log(key); }); };};
var library = new Place("The Old Library"); var kitchen = new Place("The Kitchen"); var garden = new Place("The Kitchen Garden");
kitchen.addExit("south", library); kitchen.addExit("west", garden);
kitchen.showExits();
Listing 10.10 An exits object in the Place constructor (http://jsbin.com/foboka/edit?js,console)
Add an exits object to the constructor so that each place created gets a set of exits
Set the addExit function as a method of each Place object
Set the showExits function as a method of each Place object
Use the Place constructor to create Place objects
Use dot notation to call the addExit method and link the kitchen to the library and garden
Use dot notation to call the showExits method

160 CHAPTER 10 Bracket notation: flexible property names
The addExit and showExits functions are designed to work with Place and exitsobjects, so it makes sense to bundle them with the other place code inside the con-structor. You can then use dot notation and parentheses to call the functions:
kitchen.addExit("south", library);kitchen.showExits();
Listing 10.11 uses the same Place code to build a slightly bigger map, linking fourlocations, as shown in figure 10.5.
The output from two locations is shown on the console:
> Exits from The Old Library:> north> Exits from The Kitchen:> south> west> east
var Place = function (title, description) { this.title = title; this.exits = {};
this.addExit = function (direction, exit) { this.exits[direction] = exit; };
this.showExits = function () { console.log("Exits from " + this.title + ":");
Object.keys(this.exits).forEach(function (key) { console.log(key); }); };};
var library = new Place("The Old Library"); var kitchen = new Place("The Kitchen"); var garden = new Place("The Kitchen Garden"); var cupboard = new Place("The Kitchen Cupboard");
Listing 10.11 A map with four locations (http://jsbin.com/bufico/edit?js,console)
The Kitchen
The Old Library
The Kitchen Garden The Kitchen Cupboard
Figure 10.5 A map with four locations
Use the same Place constructor as listing 10.10
Use the constructor to create four Place objects

161The Crypt—enhancing exit excitement
library.addExit("north", kitchen); garden.addExit("east", kitchen); cupboard.addExit("west", kitchen);
kitchen.addExit("south", library); kitchen.addExit("west", garden); kitchen.addExit("east", cupboard);
library.showExits(); kitchen.showExits();
Notice how, once you’ve defined a Place constructor, you can use it to create and linkas many places as you need. The constructor code can stay the same—you can move itfrom one adventure into another—all you need to change are the places you create,the map data.
10.2.4 Adding the exits object to the full Place constructor
So far in section 10.2, you’ve seen how to combine an exits object with squarebracket notation to manage the links between Place objects in The Crypt. To keep thefocus on the square brackets, you built up the code starting with a new, simple Placeconstructor. It’s time to combine the enhanced exits with the great work you didbuilding constructors in chapter 9, to produce the format of output for each placeshown in figure 10.6.
Listing 10.12 shows the complete Place constructor function code. Most of it was dis-cussed in chapter 9, so head back there if you need to refresh your memory. The newexits code is shown in bold and is annotated. The listing on JS Bin includes map infothat is discussed in the next section.
Add exits to the kitchen
Add exits from the kitchen
Show the exits for the library and kitchen
================ The Kitchen ================You are in a kitchen. There is a disturbing smell.
Items: - a piece of cheese
Exits from The Kitchen: - south - west - east========================================
A list of directionsFigure 10.6 The console output for a Place object when you call showInfo

162 CHAPTER 10 Bracket notation: flexible property names
var Place = function (title, description) { var newLine = spacer.newLine();
this.title = title; this.description = description; this.items = []; this.exits = {};
this.getItems = function () { var itemsString = "Items: " + newLine; this.items.forEach(function (item) { itemsString += " - " + item; itemsString += newLine; }); return itemsString; };
this.getExits = function () { var exitsString = "Exits from " + this.title; exitsString += ":" + newLine;
Object.keys(this.exits).forEach(function (key) { exitsString += " - " + key; exitsString += newLine; });
return exitsString; };
this.getTitle = function () { return spacer.box( this.title, this.title.length + 4, "=" ); };
this.getInfo = function () { var infoString = this.getTitle(); infoString += this.description; infoString += newLine + newLine; infoString += this.getItems() + newLine; infoString += this.getExits(); infoString += spacer.line(40, "=") + newLine; return infoString; };
this.showInfo = function () { console.log(this.getInfo()); };
this.addItem = function (item) { this.items.push(item); };
Listing 10.12 A Place constructor function (http://jsbin.com/zozule/edit?js,console)
Change the exits property from an array to an object
Update the getExits method to show directions rather than destinations

163The Crypt—enhancing exit excitement
this.addExit = function (direction, exit) { this.exits[direction] = exit; }; };
With this latest version of the Place constructor, you can create place objects, managetheir items and exits, and display formatted information (courtesy of spacer) on theconsole. Let’s take it for a spin.
10.2.5 Testing the Place constructor
To test the Place constructor, you re-create the map from listing 10.11 that links fourlocations: kitchen, library, garden, and cupboard. The next listing shows the map-creation code. The output is shown in figure 10.6.
var kitchen = new Place( "The Kitchen", "You are in a kitchen. There is a disturbing smell.");var library = new Place( "The Old Library", "You are in a library. Dusty books line the walls.");var garden = new Place( "The Kitchen Garden", "You are in a small, walled garden.");var cupboard = new Place( "The Kitchen Cupboard", "You are in a cupboard. It's surprisingly roomy.");
kitchen.addItem("a piece of cheese"); library.addItem("a rusty key"); cupboard.addItem("a tin of spam");
kitchen.addExit("south", library); kitchen.addExit("west", garden); kitchen.addExit("east", cupboard);
library.addExit("north", kitchen); garden.addExit("east", kitchen); cupboard.addExit("west", kitchen);
kitchen.showInfo();
You follow the map-creation code with a call to kitchen.showInfo to test that thekitchen object and its items and exits have been created as expected.
Listing 10.13 Testing the Place constructor (http://jsbin.com/zozule/edit?js,console)
Update the addExit function to work with the exits object
Call the Place constructor with the new keyword to create place objects
Add items to each place
Add exits from the kitchen
Add exits to the kitchen
Show the information for the kitchen on the console

164 CHAPTER 10 Bracket notation: flexible property names
10.3 The Crypt—let the games begin!You’re so close! You have everything you need to build and display a universe of worldsfor players to explore:
■ The spacer namespace■ The Player constructor■ The Place constructor■ The map-creation code
There’s one more piece to be added before players can be set free on their adventures:
■ Game controls
Figure 10.7 shows the three game functions you’ll create in this section and how theyfit into the overall structure of our ongoing example.
You want players to be able to issue commands at the console prompt, commands tomove from place to place and to pick up items that they find. For example, to movenorth and pick up an item, a player would type
> go("north")> get()
Luckily, because of the work you put into the constructors, the game control code isactually quite short. It’s shown here.
var render = function () { console.clear(); player.place.showInfo(); player.showInfo("*"); };
Listing 10.14 Playing the game (http://jsbin.com/sezayo/edit?js,console)
player variables
Players
a player object
showing player info
player items
Player Constructor
Places Maps
place objects
place items
place exits
Place Constructor
showing place info
linking places via exits
Game
render
get
go
Figure 10.7 Elements of The Crypt
Define a render function to clear the console and display player and place info

165The Crypt—let the games begin!
var go = function (direction) { player.place = player.place.exits[direction]; render(); return ""; };
var get = function () { var item = player.place.items.pop(); player.addItem(item); render(); return ""; };
var player = new Player("Kandra", 50); player.addItem("The Sword of Doom"); player.place = kitchen;
render();
You create three functions: render, go, and get. Each function is discussed in its ownsection next. Both go and get end by returning an empty string, "". When you callfunctions at the console, it automatically displays their return values. Returning anempty string prevents the console from displaying the return value undefined.
10.3.1 Updating the display—render
At the start of each game and each time a player takes an action, you want to updatethe display on the console. Both Place objects and Player objects have showInfomethods to display their current state; for example,
player.showInfo("*");kitchen.showInfo();
The program assigns the player’s current location to their place property. To displayinformation about the current place, you therefore include the code
player.place.showInfo();
You could keep appending text to the console, but it’s neater to clear it and startfrom a blank slate after each player action. The clear method removes the textfrom the console.
console.clear();
You update the console after a player moves and after they pick up an item. Ratherthan repeating the display code, you wrap it inside the render function and call iton demand.
Define a go function that moves a player to the place in the specified direction
Define a get function that lets a player pick up items
Create a player, give them a sword, and put them in the kitchen
Call render to display initial info about the player and place

166 CHAPTER 10 Bracket notation: flexible property names
10.3.2 Exploring the map—go
To move to a new location, a player calls the go function, specifying the direction inwhich they want to move:
go("south");
You need to find the destination for the direction the player specifies and assign it asthe player’s new location:
player.place = player.place.exits[direction];
In the expression on the right side of the assignment, you use square bracket notationto retrieve the Place object for the direction specified, exits[direction]. You usedot notation to access the exits object:
player; // The Player object
player.place; // The player’s current location // A Place object
player.place.exits; // The exits from the current location. // An object with directions as keys and // destinations as values.
player.place.exits[direction]; // The place is the specified direction. // A Place object.
The Place object for the destination is assigned to the player’s place property, replac-ing their old location. They’ve moved.
10.3.3 Collecting all the things—get
To pick up an item, the player calls the get function:
get();
You remove the item from the current location and add it to the player’s array ofitems. The current location is player.place. The items at the current location areheld in the player.place.items array. To remove and return the last item in theitems array, you use the pop method:
var item = player.place.items.pop();
You then add it to the player’s collection:
player.addItem(item);
And that’s it! You’ve given players the ability to boldly go from place to place, pickingup any treasure they might find.

167Summary
10.3.4 Designing a bigger adventure—Jahver’s ship
Four locations based around a kitchen may not be the world of adventure you werehoping for. To conjure mystical realms, replicate dystopian futures, and weave websof intrigue, all you need to do is change the map section of the code. Have a go atbuilding your own locations, linking them via exits, and stocking them with interest-ing artifacts.
To get you started, there’s a brief adventure you can explore and extend on JS Bin,at http://jsbin.com/yadabo/edit?console. You may need to click Run to start thegame. It’s set on a small space-freighter called The Sparrow. There are six items to col-lect, not including your blaster. Once you’ve collected all of the items, open up theJavaScript panel and try adding a few more locations. Happy hunting!
10.4 What’s next?While it’s great to have a working game, the code for The Crypt isn’t very robust. Aplayer can easily break it, by trying to go in a nonexistent direction, for example. Theycan also access all the game objects at the console—it’s easy to award themselves extratreasure or teleport to a new location:
> player.addItem("riches beyond my wildest dreams")> player.place = treasureRoom
And the game could certainly do with more challenge. There should be puzzles thatcan be overcome only with certain items.
In part 2 of Get Programming with JavaScript, you’ll address those issues by splittingyour code into modules, preventing access to objects, setting conditions for whencode runs, and separating data from the display of data. Such organization will helpyou design and manage programs as they get larger and more complicated and setyou up nicely for working with web pages in part 3.
10.5 Summary■ Use a string between square brackets to specify property names:
player["Kandra"] = 56;exits["north"] = kitchen;words["to"] = words["to"] + 1;
■ In particular, use square brackets when the property names include spaces orother characters not allowed with dot notation:
player["Kandra Smith"] = 56;exits["a gloomy tunnel"] = dungeon;words["!"] = 0;

168 CHAPTER 10 Bracket notation: flexible property names
■ Use function parameters to dynamically assign property names when the func-tion is called:
var scores = {};var updateScore = function (playerName, score) { scores[playerName] = score;};updateScore("Dax", 2000);console.log(scores["Dax"]);
■ Pass an object as an argument to the Object.keys method to create an array ofthe object’s keys:
var scores = { Kandra : 100, Dax : 60, Blinky : 30000};var keys = Object.keys(scores); // ["Kandra", "Dax", "Blinky"]
■ Break a string into an array with the split method. Pass as an argument thestring used to determine where to make the breaks:
var query = "page=5&items=10&tag=pluto";var options = query.split("&"); // ["page=5", "items=10", "tag=pluto"]

Part 2
Organizingyour programs
Sharing code is common among programmers; many problems have beensolved by others already, and your solutions could prove useful in your ownfuture projects, to your team, or to the wider developer community. When codemodules are shared, it’s important to make clear how others should use them bydefining a clear interface, or set of properties and functions you expect users toutilize. The internals of a module—how you make it do its job—should be pro-tected. Part 2 looks at ways of using local rather than global variables to hide amodule’s implementation from other code.
As your programs grow, the need for organization increases, and you’ll start tonotice patterns and procedures you use again and again. Part 2 also looks at waysof using modules in your code to improve flexibility, reuse, and maintainability.Your code’s flexibility may be improved by executing parts of it only if certain con-ditions are met, and you’ll see how to specify those conditions with if statements.
The modules you create will usually perform specific, well-defined tasks withina project. Three common types of module are models, for representing and work-ing with data, views for presenting the data in models, and controllers for updatingmodels and views in response to user or system actions.
By the end of part 2, you’ll have broken The Crypt into modules and updatedthe game to include challenges: puzzles for players to overcome.

Scope: hiding information
You want the user to be able to interact with your console-based programs. But youdon’t want to give them too much control! This chapter explores ways of hidingparts of your program from the user at the console and clearly defining the proper-ties and methods you expect them to use. For example, for a quiz program the usershould be able to submit an answer but not change their score:
> quiz.submit("Ben Nevis") // OK
> quiz.score = 1000000 // Don’t let the user do this!
By separating the public interface from the private variables and functions that makethe program work, you declare your intentions, setting out what a user can do and
This chapter covers■ The dangers of global variables■ The benefits of local variables■ Using namespaces to reduce global variables■ Creating local variables with functions■ Returning an interface for the user
171

172 CHAPTER 11 Scope: hiding information
what other programmers using your code should do, and reduce the risk of code beingmisused. That’s good for the program, for the players, and for other programmers.
Functions are the key. Whereas variables declared outside functions are accessibleeverywhere in the program, those declared inside functions are accessible only withinthe function. This chapter will show you how to return objects from functions withonly those properties and methods you want to be accessible to users. Constructorsare functions too, and you’ll see how to use their special this object to set up publicproperties and methods.
Finally, you’ll apply what you’ve learned to The Crypt, removing user access to con-structors, places, and player properties and providing methods to display player andplace information and to navigate the map. Users will be able to do this:
> game.go("north") // Move from place to place> game.get() // Pick up an item
Users won’t be able to cheat the game by doing this:
> player.health = 1000000> player.place = exit> player.items.push("The Mega-Sword of Ultimate Annihilation")
Let’s start by highlighting the pitfalls of variables you can see anywhere in the pro-gram; they seem like such a good idea! [Spoiler: they’re not.]
11.1 The dangers of global variablesWay back in chapter 2, at the start of your adventures in JavaScript, you discoveredhow to declare, assign, and use variables. The following listing shows a really simpleexample of the process that displays the name of a mountain on the console:
> Ben Nevis
var mountain;
mountain = "Ben Nevis";
console.log(mountain);
You declare the variable, mountain, on the first line of the program. You can then usethe variable throughout the code; you assign it a value and pass it to console.log asan argument.
Functions in the program can also access the mountain variable (figure 11.1).
Listing 11.1 Declare, assign, and use a variable (http://jsbin.com/gujacum/edit?js,console)

173The dangers of global variables
The next listing shows a showMountain function using mountain, leading to the sameoutput as listing 11.1.
var mountain = "Ben Nevis";
var showMountain = function () { console.log(mountain); };
showMountain();
Variables like mountain, declared outside any function and so accessible everywhere,are called global variables. You may think these global variables sound really useful:declare them once and then use them freely from anywhere in your code. Unfortu-nately, they have some serious downsides and are generally considered to be a badthing. Let’s investigate reasons for avoiding these naughty globals.
11.1.1 Access all areas—peeking and tweaking
You want users to be able to interact with your programs at the console. You don’t wantthem to have a sneaky peek at all the geeky variables. The next listing shows a tiny quiz.
var question = "What is the highest mountain in Wales?";var answer = "Snowdon";
console.log(question);
Because question and answer are global variables, they’re accessible throughout theprogram and via the console. At the console prompt, once users run the program,
Listing 11.2 Accessing a variable from within a function (http://jsbin.com/zojida/edit?js,console)
Listing 11.3 A tiny quiz (http://jsbin.com/nubipi/edit?js,console)
functions can see outand use variables declared
outside of them
function () {
console.log(mountain)
}
mountain = "Ben Nevis";
Figure 11.1 The function can see the mountain variable that’s outside the function body.
Declare the mountain variable, outside any function
Use the variable, even inside a function
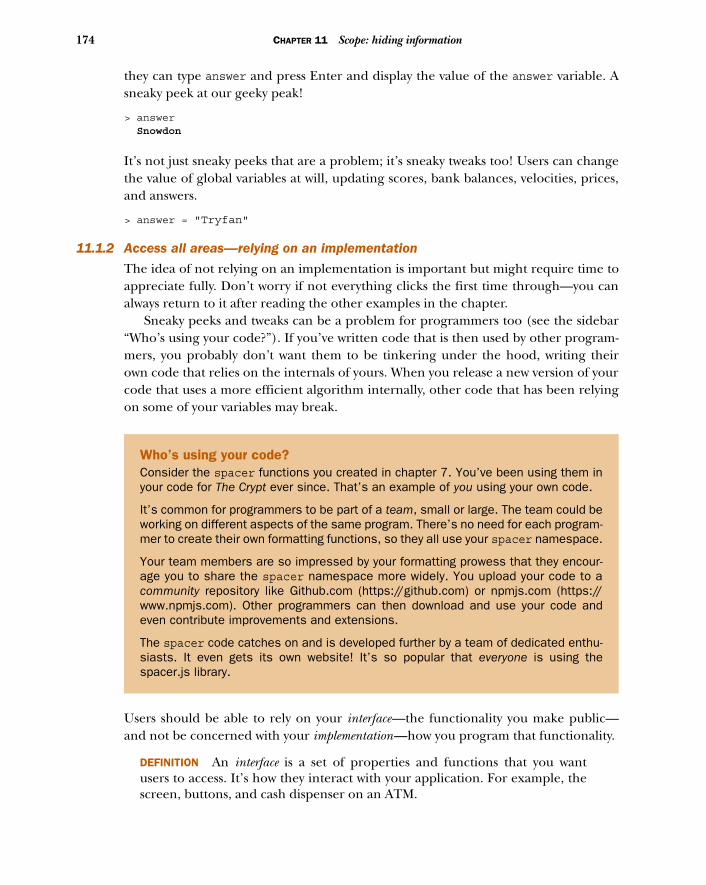
174 CHAPTER 11 Scope: hiding information
they can type answer and press Enter and display the value of the answer variable. Asneaky peek at our geeky peak!
> answer Snowdon
It’s not just sneaky peeks that are a problem; it’s sneaky tweaks too! Users can changethe value of global variables at will, updating scores, bank balances, velocities, prices,and answers.
> answer = "Tryfan"
11.1.2 Access all areas—relying on an implementation
The idea of not relying on an implementation is important but might require time toappreciate fully. Don’t worry if not everything clicks the first time through—you canalways return to it after reading the other examples in the chapter.
Sneaky peeks and tweaks can be a problem for programmers too (see the sidebar“Who’s using your code?”). If you’ve written code that is then used by other program-mers, you probably don’t want them to be tinkering under the hood, writing theirown code that relies on the internals of yours. When you release a new version of yourcode that uses a more efficient algorithm internally, other code that has been relyingon some of your variables may break.
Users should be able to rely on your interface—the functionality you make public—and not be concerned with your implementation—how you program that functionality.
DEFINITION An interface is a set of properties and functions that you wantusers to access. It’s how they interact with your application. For example, thescreen, buttons, and cash dispenser on an ATM.
Who’s using your code?Consider the spacer functions you created in chapter 7. You’ve been using them inyour code for The Crypt ever since. That’s an example of you using your own code.
It’s common for programmers to be part of a team, small or large. The team could beworking on different aspects of the same program. There’s no need for each program-mer to create their own formatting functions, so they all use your spacer namespace.
Your team members are so impressed by your formatting prowess that they encour-age you to share the spacer namespace more widely. You upload your code to acommunity repository like Github.com (https://github.com) or npmjs.com (https://www.npmjs.com). Other programmers can then download and use your code andeven contribute improvements and extensions.
The spacer code catches on and is developed further by a team of dedicated enthu-siasts. It even gets its own website! It’s so popular that everyone is using thespacer.js library.

175The dangers of global variables
DEFINITION An implementation is the code you use to make an application doits job behind the scenes. It isn’t usually visible to users. For example, thecode that makes an ATM work, how it communicates with your bank, andhow it counts the cash.
For example, to implement links between places in The Crypt you might use anexits array for exit directions and a destinations array for the places to which theexits lead.
var exits = [];var destinations = [];
Then, to manage adding new exits you write an addExit function.
var addExit = function (direction, destination) { exits.push(direction); destination.push(destination);};
You expect other programmers working with your Place objects to use the addExitfunction (figure 11.2).
You document the fact that addExit is part of the interface, the set of properties andfunctions that users—in this case programmers—should work with.
addExit("north", kitchen); // Good—using function
But if they have access to the exits and destinations variables, they might choose touse those variables directly, bypassing the function.
exits.push("north"); // Bad—accessing variables directly destinations.push(kitchen);
exitsarray[]
Users shouldcall addExit
Interface
destinationsarray[]
Implementation
addExit
Users should NOT accessexits or destinations
YES
NO
Figure 11.2 Users should use the interface, not the implementation.

176 CHAPTER 11 Scope: hiding information
Everything seems fine and the other programmers’ programs are working well. Then,after reviewing your code, you decide you can improve on having two separate arraysby using a single object.
var exits = {};// No destinations array. No longer needed in new implementation.
To use the new way you’ve implemented exits, you update the addExit function.
var addExit = function (direction, destination) { exits[direction] = destination;};
Programmers who were using the interface will see no change in their programs. Butprogrammers who bypassed the interface and accessed the variables directly will seetheir programs break! (See figure 11.3.)
addExit("north", kitchen); // Good. Works just the same.
exits.push("north"); // ERROR! exits is not an array.destinations.push(kitchen); // ERROR! destinations doesn’t exist.
Allowing access to all areas of our programs by using global variables blurs the linebetween implementation and interface, giving users freedom to peek and tweak andsetting up programs to fail when implementation details change.
11.1.3 Naming collisions
Because our programs can be made up from lots of pieces of code written by differentteams or programmers, it’s quite possible that the same variable names will be used inmultiple places. If one programmer declares a variable name, say spacer (a name-space of formatting functions), and then later in the program another programmerdeclares the same variable name, spacer (a canine character in a console-basedspace-adventure game), the second will overwrite the first—a collision! We really needa way to protect our variables from such collisions. (Chapter 13 looks at collisions inmore detail.)
exitsarray[]
addExit stillworks - the interface is unchanged.
Interface
destinationsarray[]
Implementation
addExit
ERROR - the destinations array no longer exists - the implementation has changed.
YES
NO
Figure 11.3 Relying on the implementation can lead to errors if it changes.

177The benefits of local variables
11.1.4 Crazy bugs
Programs can be thousands of lines long. Relying on global variables that may bedeclared a long way away in the code and that may be peeked at and tweaked by func-tions and instructions throughout the program leads to a fragile program. If anythinggoes wrong with the program (and it probably will), it could be difficult to follow theflow of the code and pin down the location of the problems.
11.2 The benefits of local variablesVariables declared inside the body of a function can’t be accessed outside the func-tion. They’re called local variables; they are local to the function in which they’redeclared (figure 11.4).
Trying to access a local variable outside its function will cause an error. Listing 11.4tries to log the value of the mountain variable to the console but produces a messagelike this:
> ReferenceError: Can’t find variable: mountain
(The error you get might look slightly different. Different browsers may format theerror messages in different ways.)
var hide = function () { var mountain = "Devils Tower"; };
console.log(mountain);
The collection of variables outside all functions is called the global scope. Each functioncreates its own local scope, its own collection of variables. In listing 11.4, the variable
Listing 11.4 A variable hidden from the console (http://jsbin.com/bobilu/edit?js,console)
function () {
var mountain = "Devils Tower"
}
console.log(mountain)
mountain has not been declaredoutside of the function.
The local variable can’t beaccessed here. ERROR!
You can’t seeinto the function
from outside
Figure 11.4 Variables declared inside a function are local to the function.
Declare the mountain variable inside a function
Try to access the mountain variable outside its function
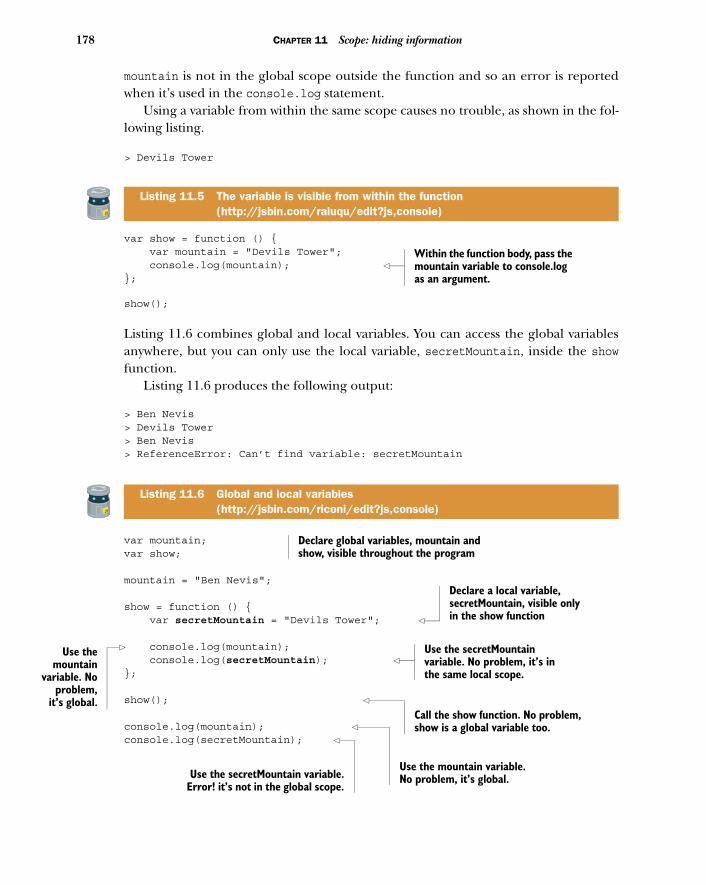
178 CHAPTER 11 Scope: hiding information
Umo
variapr
it’s
mountain is not in the global scope outside the function and so an error is reportedwhen it’s used in the console.log statement.
Using a variable from within the same scope causes no trouble, as shown in the fol-lowing listing.
> Devils Tower
var show = function () { var mountain = "Devils Tower"; console.log(mountain); };
show();
Listing 11.6 combines global and local variables. You can access the global variablesanywhere, but you can only use the local variable, secretMountain, inside the showfunction.
Listing 11.6 produces the following output:
> Ben Nevis> Devils Tower> Ben Nevis> ReferenceError: Can’t find variable: secretMountain
var mountain; var show;
mountain = "Ben Nevis";
show = function () { var secretMountain = "Devils Tower";
console.log(mountain); console.log(secretMountain); };
show();
console.log(mountain); console.log(secretMountain);
Listing 11.5 The variable is visible from within the function (http://jsbin.com/raluqu/edit?js,console)
Listing 11.6 Global and local variables (http://jsbin.com/riconi/edit?js,console)
Within the function body, pass the mountain variable to console.log as an argument.
Declare global variables, mountain and show, visible throughout the program
Declare a local variable, secretMountain, visible only in the show function
se theuntainble. Nooblem,global.
Use the secretMountain variable. No problem, it’s in the same local scope.
Call the show function. No problem, show is a global variable too.
Use the mountain variable. No problem, it’s global.Use the secretMountain variable.
Error! it’s not in the global scope.

179Interfaces—controlling access and providing functionality
11.3 Interfaces—controlling access and providing functionalityYou want users to interact with your program on the console but you don’t want themdigging into its implementation to make changes you didn’t intend. The set of prop-erties and actions you make available to a user is called an interface. You need a way toprovide a simple interface while hiding everything else.
In this section you use a very simple program, a counter, as an example. In sec-tion 11.4, you develop an interface for a quiz app and in sections 11.5, 11.6, and 11.7you apply what you’ve learned to The Crypt.
The following listing shows the first version of the counter program, using a globalvariable to hold the current count.
var counter = 0;
var count = function () { counter = counter + 1; return counter;};
Run the program and follow these steps at the console prompt. (Your actions showthe prompt, >, but the responses do not.)
> count() 1> count() 2> count() 3
It seems to be working, so what’s the problem? Well, because counter is a global vari-able, the user can change it at any time.
> counter = 99 99> count() 100
You probably don’t want the user tweaking your counting variable like that. Next, youuse what you learned about local variables in section 11.2 to hide the counter variablefrom the user.
Listing 11.7 A counter (http://jsbin.com/yagese/edit?js,console)
Declare a global variable, counter, and assign it a value
Access counter from within a function

180 CHAPTER 11 Scope: hiding information
11.3.1 Using a function to hide variables
You want to achieve two outcomes with your counting app:
■ The counter variable is hidden from the user.■ The count function can be seen by the user.
Listing 11.8 shows a solution. Running the program enables the following consoleinteraction, as required:
> count() 1> counter Can’t find variable: counter
(Again, the error your browser displays may be slightly different.)
var getCounter = function () { var counter = 0;
var countUpBy1 = function () { counter = counter + 1; return counter; };
return countUpBy1; };
var count = getCounter();
Table 11.1 summarizes the key ideas as a series of problems and solutions; figure 11.5illustrates how the returned counting function, assigned to count, still has access tothe local counter variable.
Listing 11.8 Hiding the counter variable (http://jsbin.com/fuwuvi/edit?js,console)
Table 11.1 Problems and solutions for the counter app
Problem Solution
I want the counter variable to be hidden from the user.
Declare the counter variable inside the getCounter function. As a local variable, counter won’t be accessible by the user.
My function, countUpBy1, which increments the counter, needs access to the counter variable.
Define the countUpBy1 function inside the getCounter func-tion as well. Because it’s inside getCounter, it will have access to the counter variable.
I want the user to be able to call the counting function.
Return the counting function, countUpBy1, from the get-Counter function. It can then be assigned to a global variable.
Declare counter as a local variable inside the getCounter function
Nest the definition of the counting function, countUpBy1, inside getCounter
Return the counting function so it can be assigned
Assign the counting function returned by getCounter to the count variable, ready for use

181Interfaces—controlling access and providing functionality
By returning a function and assigning it to the count variable (figure 11.5), you’ve giventhe user a way to use the program; you’ve given them an interface—they just call get-Counter() to obtain a counting function and then count() to increment the counter.
11.3.2 Creating multiple independent counters with getCount
In listing 11.8 you defined a function, getCounter, to create counters. Each time youcall getCounter it executes the same three steps:
1 Declare a counter variable and assign it the value 0.2 Define a function to do the counting. The function uses the counter variable
from step 1.3 Return the function that does the counting.
Each time you call getCounter, it declares a counter variable and defines a countingfunction. If you call getCounter multiple times, don’t the counter variables interferewith each other? No, because getCounter creates a fresh local scope each time it runs;you get multiple copies of the counter variable, each within its own isolated collectionof variables, its own local scope.
Listing 11.9 updates the getCounter code to create two counters. You can thenperform the following console interactions:
> climbCount() 1> climbCount() 2
Return the counting function
return countUpBy1;
function ( )
count = getCounter ( )
The return valuereplaces thefunction call
var counter = 0;
var countUpBy1 = function () { counter = counter + 1; return counter;};
count = function () { counter = counter + 1; return counter;};
counter is a local variable
The counting function isdefined in the local scope.It can access counter
The counting functioncan still access counter
Figure 11.5 The returned function still has access to the local counter variable.

182 CHAPTER 11 Scope: hiding information
> climbCount() 3> peakCount() 1> climbCount() 4
peakCount and climbCount do not interfere with each other.
var getCounter = function () { var counter = 0;
return function () { counter = counter + 1; return counter; };};
var peakCount = getCounter(); var climbCount = getCounter();
Having counter as a local variable allows you to have multiple independent counters.
11.3.3 Creating multiple independent counters with a constructor function
If you’re going to be creating lots of counters, you could use a constructor functionto define what a counter is and does. As detailed in chapter 9, a constructor func-tion streamlines the common process of creating objects with similar properties andmethods. You call a constructor by using the new keyword. For counters, you mighthave the following:
var peaks = new Counter();var climbs = new Counter();
The constructor will automatically create an object assigned to the special this vari-able and return it. You can set the counting function as a property of this to make itavailable outside the constructor; see listing 11.10. On the console, you might call thecounting function like this:
> peaks.count() 1> peaks.count(); 2> climbs.count(); 1
Listing 11.9 Multiple counters (http://jsbin.com/sicoce/edit?js,console)
Define the counting function and return it in one step; there’s no need for a variable.
Call getCounter multiple times to create independent counters
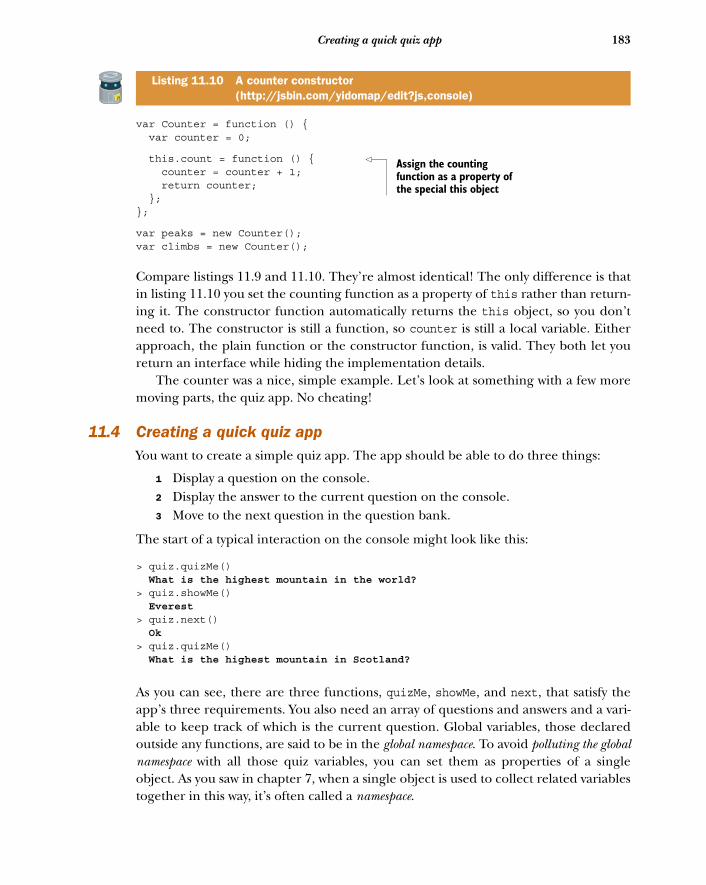
183Creating a quick quiz app
var Counter = function () { var counter = 0;
this.count = function () { counter = counter + 1; return counter; };};
var peaks = new Counter();var climbs = new Counter();
Compare listings 11.9 and 11.10. They’re almost identical! The only difference is thatin listing 11.10 you set the counting function as a property of this rather than return-ing it. The constructor function automatically returns the this object, so you don’tneed to. The constructor is still a function, so counter is still a local variable. Eitherapproach, the plain function or the constructor function, is valid. They both let youreturn an interface while hiding the implementation details.
The counter was a nice, simple example. Let’s look at something with a few moremoving parts, the quiz app. No cheating!
11.4 Creating a quick quiz appYou want to create a simple quiz app. The app should be able to do three things:
1 Display a question on the console.2 Display the answer to the current question on the console.3 Move to the next question in the question bank.
The start of a typical interaction on the console might look like this:
> quiz.quizMe() What is the highest mountain in the world?> quiz.showMe() Everest> quiz.next() Ok> quiz.quizMe() What is the highest mountain in Scotland?
As you can see, there are three functions, quizMe, showMe, and next, that satisfy theapp’s three requirements. You also need an array of questions and answers and a vari-able to keep track of which is the current question. Global variables, those declaredoutside any functions, are said to be in the global namespace. To avoid polluting the globalnamespace with all those quiz variables, you can set them as properties of a singleobject. As you saw in chapter 7, when a single object is used to collect related variablestogether in this way, it’s often called a namespace.
Listing 11.10 A counter constructor (http://jsbin.com/yidomap/edit?js,console)
Assign the counting function as a property of the special this object

184 CHAPTER 11 Scope: hiding information
11.4.1 Using an object as a namespace
The app will create a single global variable, quiz. All of your variables can then be setas properties of the quiz object, as shown in listing 11.11. The array of questions andanswers starts like this:
var quiz = { questions: [ { question: "What is the highest mountain in the world?", answer: "Everest" } ]};
You then access the array via quiz.questions. Remember, array indexes start at 0, soto access the first question-and-answer object, use quiz.questions[0]. To get the firstquestion and the first answer from the questions array, use the following:
quiz.questions[0].question;quiz.questions[0].answer;
You keep track of the current question with the qIndex property.
var quiz = {
questions: [
{ question: "What is the highest mountain in the world?", answer: "Everest" }, { question: "What is the highest mountain in Scotland?", answer: "Ben Nevis" }, { question: "How many munros are in Scotland?", answer: "284" }
],
qIndex: 0,
quizMe: function () { return quiz.questions[quiz.qIndex].question; },
showMe: function () { return quiz.questions[quiz.qIndex].answer; },
Listing 11.11 Improving the quiz app (http://jsbin.com/tupoto/edit?js,console)
Create an object and assign it to the quiz variable Create an array and assign
it to the questions property of the quiz object
Use an object for each question-and-answer pair
Set a question property and an answer property for each object in the array
Create a qIndex property to keep track of the current question
Use quizMe to display the current question
Use showMe to display the current answer

185Creating a quick quiz app
next: function () { quiz.qIndex = quiz.qIndex + 1; return "Ok"; } };
Listing 11.11 satisfies the three requirements of your app and is polite enough to useonly a single global variable, quiz. Everything it needs is within the quiz object.Because all of the properties are accessed as properties of quiz, we say they’re in thequiz namespace.
Unfortunately, your app doesn’t overcome the access all areas drawback of globalvariables seen in section 11.1.1. All of the properties of the quiz object are public—theuser can still steal a peak and tweak all the values.
11.4.2 Hiding the questions array
In listing 11.11, players can access all of the quiz object’s properties at the console.This allows them to cause mischief, changing properties on a whim:
> quiz.qIndex = 300> quiz.questions[2].answer = "282"
But you want them to use only quiz.quizMe, quiz.showMe, and quiz.next. Let’s makethe questions array and the qIndex value private by using local variables, as shown infigure 11.6.
Use next to move to the next question
Return the interface object
function ( )
quiz = getQuiz ( )
The return valuereplaces thefunction call
var qIndex = 0;
var questions = [];
quiz = { quizMe: function () {}, showMe: function () {}, next: function () {}};
qIndex and questionsare local variables
The interface functions aredefined in the local scope.They can access qIndexand questions
The interface functions canstill access qIndex and questions
return { quizMe: function () {}, showMe: function () {}, next: function () {}};
Figure 11.6 Use local variables to make qIndex and questions private

186 CHAPTER 11 Scope: hiding information
The next listing uses the getQuiz function to create a local scope in which to hide thequestions array and the qIndex value.
var getQuiz = function () { var qIndex = 0; var questions = [ { question: "What is the highest mountain in the world?", answer: "Everest" }, { question: "What is the highest mountain in Scotland?", answer: "Ben Nevis" }, { question: "How many munros are in Scotland?", answer: "284" } ];
return { quizMe : function () { return questions[qIndex].question; },
showMe : function () { return questions[qIndex].answer; },
next : function () { qIndex = qIndex + 1; return "Ok"; } };};
var quiz = getQuiz();
The program returns an object with three properties: quizMe, showMe, and next. Thelast line assigns the returned object to the quiz variable. You can then use quiz toaccess the three functions:
> quiz.quizMe() What is the highest mountain in the world?> quiz.answer() Everest
The code that makes the quiz app work is called its implementation. Some of the imple-mentation is hidden in the getQuiz function by using local variables. The object
Listing 11.12 Hiding the questions and answers (http://jsbin.com/qahedu/edit?js,console)
Use a function to create a local scope
Declare local variables inside the function
Return an object with properties for the user to access
Call the function, assigning the object returned to the quiz variable

187The Crypt—hiding player info
returned by the function provides the user with an interface, a public way of interactingwith the program. The user can call the quizMe, showMe, and next functions becausethey’re methods of the interface object. The user can’t access the qIndex and ques-tions variables because they’re local to the getQuiz function.
Figure 11.7 shows how errors are thrown when an attempt is made to access thevariables qIndex and questions at the console prompt on JS Bin. (Your error mes-sages may be slightly different.)
11.5 The Crypt—hiding player infoIn this section, and in sections 11.6 and 11.7, you update your code for The Crypt tohide variables, properties, and functions that are part of the implementation and thatshould not be spied by outside eyes. At the same time, you consider what form yourinterfaces should take—what information and actions you’ll make available to playersand to programmers.
11.5.1 Our current Player constructor—everything is public
Up to this point, you haven’t made any attempt to control a user’s access to the data in aPlayer object. The following listing shows the current form of your Player constructor.
var spacer = { /* visible on JS Bin */ };
var Player = function (name, health) { var newLine = spacer.newLine();
this.name = name; this.health = health; this.items = []; this.place = null;
Listing 11.13 The Player constructor (http://jsbin.com/dacedu/edit?js,console)
Figure 11.7 Trying to access qIndex and questions from the console now causes errors.
Make all data available by setting properties on the this object

188 CHAPTER 11 Scope: hiding information
this.addItem = function (item) { … };
this.getNameInfo = function () { … };
this.getHealthInfo = function () { … };
this.getPlaceInfo = function () { … };
this.getItemsInfo = function () { … };
this.getInfo = function (character) { … };
this.showInfo = function (character) { … }; };
You set all of the player data and all of the functions as properties of the special thisobject. The constructor creates the this object automatically when you call it with thenew keyword. In the snippet that follows, you call the Player constructor to create anew player.
var player1 = new Player("Jahver", 80);
The constructor function automatically returns the this object, and you then assignthe object to the player1 variable. Because you attached everything to this within theconstructor, and this was returned and assigned to player1, you can now use player1to access data and methods: player1.name, player1.items, player1.addItem, player1.getInfo, and player1.showInfo are all accessible, for example.
11.5.2 An updated Player constructor—some variables are hidden
To control users’ access to player data you can use parameters and variables withoutassigning values to properties of the this object. Parameters, between the openingparentheses in a function definition, act just like variables declared within the func-tion body. They’re local to the function and can be used anywhere within the functionbut can’t be accessed by code outside the function.
var Player = function (name, health) {
// name and health are local variables. // They can be used here.
this.getHealthInfo = function () { // name and health can be used here. };};
// name and health can NOT be used here. // This is outside the scope of the player function.
Figure 11.8 shows the change in visibility of variables and properties from the oldPlayer constructor (listing 11.13) to the new (listing 11.14). The new constructorhides most of the functions in the local scope, assigning only four functions to the spe-cial this object as an interface.
Make all methods available by setting properties on the this object
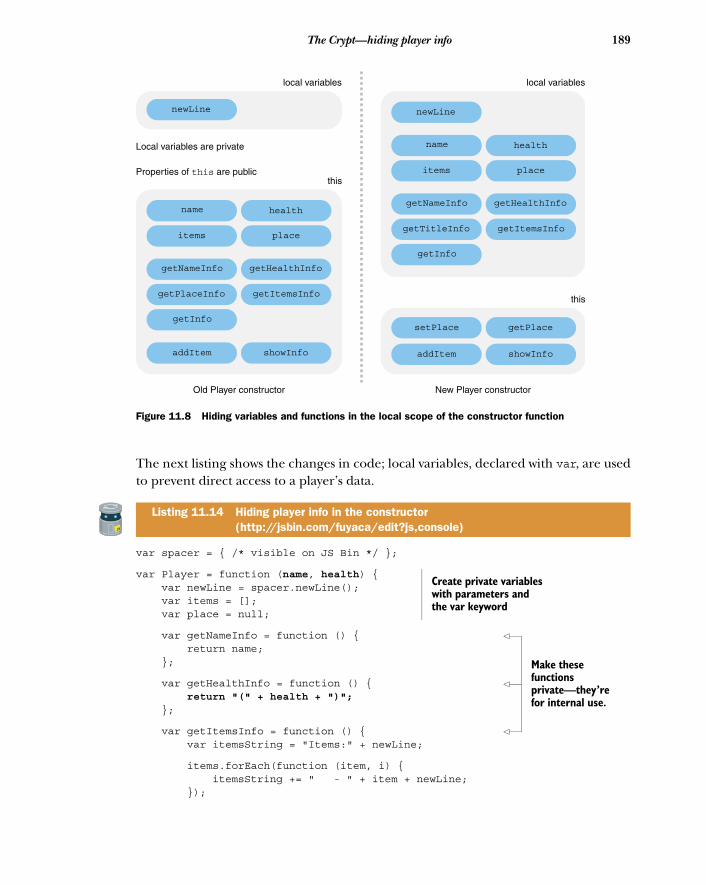
189The Crypt—hiding player info
The next listing shows the changes in code; local variables, declared with var, are usedto prevent direct access to a player’s data.
var spacer = { /* visible on JS Bin */ };
var Player = function (name, health) { var newLine = spacer.newLine(); var items = []; var place = null;
var getNameInfo = function () { return name; };
var getHealthInfo = function () { return "(" + health + ")"; };
var getItemsInfo = function () { var itemsString = "Items:" + newLine;
items.forEach(function (item, i) { itemsString += " - " + item + newLine; });
Listing 11.14 Hiding player info in the constructor (http://jsbin.com/fuyaca/edit?js,console)
newLine
local variables
name health
items place
addItem
getNameInfo getHealthInfo
getPlaceInfo getItemsInfo
getInfo
showInfo
this
Local variables are private
Properties of this are public
Old Player constructor
addItem showInfo
setPlace getPlace
name health
items place
getNameInfo getHealthInfo
getTitleInfo getItemsInfo
getInfo
newLine
local variables
this
New Player constructor
Figure 11.8 Hiding variables and functions in the local scope of the constructor function
Create private variables with parameters and the var keyword
Make these functions private—they’re for internal use.

190 CHAPTER 11 Scope: hiding information
return itemsString; };
var getTitleInfo = function () { return getNameInfo() + " " + getHealthInfo(); };
var getInfo = function () { var info = spacer.box(getTitleInfo(), 40, "*"); info += " " + getItemsInfo(); info += spacer.line(40, "*"); info += newLine;
return info; };
this.addItem = function (item) { items.push(item); };
this.setPlace = function (destination) { place = destination; };
this.getPlace = function () { return place; };
this.showInfo = function (character) { console.log(getInfo(character)); };};
The properties and functions you don’t want to be seen outside the constructor youassign to local variables. The methods you want to make visible you assign as proper-ties of the this object.
var items = []; // Keep private
this.showInfo = function () { }; // Make public
The setPlace and getPlace methods give users access to the place variable. Whybother using a variable to make place private if you’re only going to provide meth-ods to access it anyway? They provide an interface and allow you to hide the imple-mentation and also let you mediate access. When the setPlace method is called,you can check that the destination argument is a valid place before assigning it tothe place variable. When the getPlace method is called, you can check that theuser is allowed to get access before returning the place. You haven’t put those extrachecks in place yet, but your two methods are ready for when you need to addany conditions.
You’ve also simplified the information displayed by showInfo so that it no longerincludes the current place. Place objects have their own showInfo method, so there’s
Make these functions private—they’re for internal use.
Add methods to manage access to the place variable

191The Crypt—hiding place info
no need to double up and display place details as part of a player’s information. Whenyou display player info on the console, it now looks like this:
***************************************** Kandra (50) ***************************************** Items: - The Sword of Doom****************************************
The player’s health is shown in parentheses after their name. To show informationabout a player’s current location, you can call getPlace to retrieve the place objectand then call the place object’s showInfo method:
var place = player.getPlace();place.showInfo();
11.6 The Crypt—hiding place infoYou now do for the Place constructor what you did for the Player constructor. Youhide the data and provide methods that access it as required. The next listing showsthe structure of the previous Place constructor, from chapter 10, with data and meth-ods set on the this object.
var spacer = { /* visible on JS Bin */ };
var Place = function (title, description) { var newLine = spacer.newLine();
this.title = title; this.description = description; this.items = []; this.exits = {};
this.getItemsInfo = function () { }; this.getExitsInfo = function () { }; this.getTitleInfo = function () { }; this.getInfo = function () { };
this.showInfo = function () { }; this.addItem = function (item) { }; this.addExit = function (direction, exit) { }; };
The following listing shows your updated version of the Place constructor, usingparameters and variables to hide data, a new getExit function to return the destina-tion for a specified direction, and a new getLastItem method to return the last itemfrom the items array.
Listing 11.15 The Place constructor (http://jsbin.com/kavane/edit?js,console)
Use properties to hold place data
Create functions that build strings of information
Create functions that update place data and display it

192 CHAPTER 11 Scope: hiding information
var spacer = { /* visible on JS Bin */ };
var Place = function (title, description) { var newLine = spacer.newLine(); var items = []; var exits = {};
var getItemsInfo = function () { var itemsString = "Items: " + newLine; items.forEach(function (item) { itemsString += " - " + item; itemsString += newLine; }); return itemsString; };
var getExitsInfo = function () { var exitsString = "Exits from " + title; exitsString += ":" + newLine;
Object.keys(exits).forEach(function (key) { exitsString += " - " + key; exitsString += newLine; });
return exitsString; };
var getTitleInfo = function () { return spacer.box(title, title.length + 4, "="); };
var getInfo = function () { var infoString = getTitleInfo(); infoString += description; infoString += newLine + newLine; infoString += getItemsInfo() + newLine; infoString += getExitsInfo(); infoString += spacer.line(40, "=") + newLine; return infoString; };
this.showInfo = function () { console.log(getInfo()); };
this.addItem = function (item) { items.push(item); };
this.addExit = function (direction, exit) { exits[direction] = exit; };
Listing 11.16 Hiding place info in the constructor (http://jsbin.com/riviga/edit?js,console)
Create private variables with parameters and the var keyword
Make these functions private. They’re for internal use.

193The Crypt—user interaction
this.getExit = function (direction) { return exits[direction]; };
this.getLastItem = function () { return items.pop(); }; };
You’ve hidden certain properties and functions in the Player and Place constructorswhile making a small set of methods—your interface—visible via the this object.Other parts of your program that use the constructors (or programmers who may useyour code in their own adventure game programs) can use only the methods in theinterface.
For players typing commands at a console, you’ll preserve their enjoyment of thegame by preventing them from stumbling inadvertently over important game valuesthey find they can change. (Cheating is such a nasty word.) You’ll present the playerswith a small, simple set of actions they can take to explore, collect, smite, and destroy—whatever is appropriate as they journey through The Crypt.
11.7 The Crypt—user interactionIn chapter 10 you created a version of The Crypt that let the player move from place toplace and pick up items they found. Unfortunately, you polluted the globalnamespace with all of your variables. Don’t beat yourself up about it; you were youngand naïve. Now you have a way to hide the implementation from the user.
Listing 11.17 shows an outline of the current implementation; the full version is onJS Bin. It’s almost the same as the version from chapter 10 but uses the getPlace andsetPlace player methods and the getExit and getLastItem place methods from thischapter’s constructor updates. The code that uses them is shown in full.
// The spacer namespacevar spacer = { /* formatting functions */ };
// Constructorsvar Player = function (name, health) { … };var Place = function (title, description) { … };
// Game controlsvar render = function () { console.clear(); player.getPlace().showInfo(); player.showInfo(); };
var go = function (direction) { var place = player.getPlace(); var destination = place.getExit(direction);
Listing 11.17 Lots of global variables in the game (http://jsbin.com/dateqe/edit?js,console)
Add a public method to give access to destinations
Add a public method to grab the last item from the items array

194 CHAPTER 11 Scope: hiding information
player.setPlace(destination); render(); return "";};
var get = function () { var place = player.getPlace(); var item = place.getLastItem(); player.addItem(item); render(); return "";};
// Mapvar kitchen = new Place("The Kitchen", "You are in a kitchen…");var library = new Place("The Old Library", "You are in a library…");
kitchen.addItem("a piece of cheese");library.addItem("a rusty key");
kitchen.addExit("south", library);library.addExit("north", kitchen);
// Game initializationvar player = new Player("Kandra", 50);player.addItem("The Sword of Doom");player.setPlace(kitchen);
render();
Notice all the global variables—the spacer namespace, the Player and Place con-structors, the game control functions, all the places, and the player—are assigned tovariables outside any functions. Smelly pollution. Only the game control functions, goand get, need to be available to players. You can hide the rest.
11.7.1 The interface—go and get
There are only two actions you want the user to take for now:
game.go("north"); // Move; e.g. to the place north of the current locationgame.get(); // Pick up an item from the current location
To hide the implementation, you wrap the game code inside a function. Then, toallow the user to take the two desired actions and no more, you return an interfaceobject from the function, with the two methods:
return { go: function (direction) { // Move to a new place },
get: function () { // Pick up an item }};

195The Crypt—user interaction
fun
th
Shin
The interface methods use the functionality of player and place objects to do theirjobs, with those objects created by their respective constructor functions.
11.7.2 Hiding the implementation
To hide the rest of the code from the users, you wrap it in a function to create a localscope. Only your interface object is returned. The listing that follows shows highlightsfrom the updated code. The full listing is available on JS Bin.
var getGame = function () {
var spacer = { … }; var Player = function (name, health) { … }; var Place = function (title, description) { … };
var render = function () { … };
var kitchen = new Place("The Kitchen", "You are in a kitchen…"); var library = new Place("The Old Library", "You are in a library…"); kitchen.addItem("a piece of cheese"); library.addItem("a rusty key"); kitchen.addExit("south", library); library.addExit("north", kitchen);
var player = new Player("Kandra", 50); player.addItem("The Sword of Doom"); player.setPlace(kitchen);
render();
return { go: function (direction) { var place = player.getPlace(); var destination = place.getExit(direction); player.setPlace(destination); render(); return ""; },
get: function () { var place = player.getPlace(); var item = place.getLastItem(); player.addItem(item); render(); return ""; } };};
var game = getGame();
Listing 11.18 Letting users interact with the game via an interface object (http://jsbin.com/yuporu/edit?js,console)
Wrap the implementation in a function to create a local scope
Include spacer and the Player and Place constructor functions
Include action forupdatinge console
Create a player—yep, it’s local—and give them a starting place.
ow initialfo on the
console Return an object to act as the interface; players can access its methods.
Call the getGame function to return the interface object and assign it to the game variable

196 CHAPTER 11 Scope: hiding information
The last statement of the listing calls the getGame function. The function executes andthen returns the interface object that has the go and get methods. The statementassigns the interface object to the game variable. The player can access the go and getmethods via the game variable by using dot notation:
game.get();game.go("east");
The player can’t access any other variables or functions from the game. Your work isdone! At least for this chapter.
The wrap-and-return process of wrapping code in a function from which you thenreturn an interface object is called the module pattern. It’s a common way of separatingthe interface from the implementation and helps package your code for portabilityand reuse. You’ll see it a lot from now on, particularly in chapter 13 when you investi-gate importing modules by using HTML script tags. Before you get to that, you havesome decisions to make in chapter 12. If you’re ready, read on; else take a break, chillout, try the Further Adventures, and gird your loins.
11.8 Summary■ Reduce the number of global variables in your programs. Global variables are
variables declared outside all functions. They can be accessed anywhere in theprogram but pollute the global namespace, expose your implementation, cancreate naming collisions, and can help introduce hard-to-find bugs:
var myGlobal = "Look at me";
var useGlobal = function () { console.log("I can see the global: " + myGlobal); };
console.log("I too can see the global: " + myGlobal);
■ Reduce the number of global variables by collecting related variables and func-tions as properties of a single object. Such an object is often called a namespace:
var singleGlobal = { method1 : function () { … }, method2 : function () { … } };
■ Wrap code in functions to create local scopes, collections of local variables:
var getGame = function () { var myLocal = "A local scope, for local people."; console.log(myLocal); // Displays message };
console.log(myLocal); // ERROR! myLocal is not declared here. // It is not in the global scope.

197Summary
■ Wrap code in functions to make variables private, hide your implementation,avoid naming collisions, and reduce the risk of hard-to-find bugs.
■ Return public interfaces from functions to clearly define the properties andmethods you expect users to access (the module pattern).
■ Return a single function:
var getCounter = function () { var counter = 0; // Private
return function () { … }; };
var count = getCounter();
■ Return an object:
var getGame = function () { // Game implementation
return { // Interface methods }; };
var game = getGame();
■ Remember that constructor functions create a local scope, just like any otherfunctions. The special this variable is automatically returned. It acts as the pub-lic interface:
var Counter = function () { var counter = 0; // Private
this.count = function () { … }; };

Conditions:choosing code to run
So far, all of your code follows a single path. When you call a function, every state-ment in the function body is executed. You’ve managed to get a lot done and cov-ered quite a few core ideas in JavaScript but your programs have lacked flexibility;they haven’t been able to decide whether or not to execute blocks of code.
In this chapter you learn how to run code only when specified conditions are met.Suddenly, your programs can branch, providing options, flexibility, and richness. Youcan increase a player’s score if they splat a kumquat, move to a new location if theuser specifies a valid direction, or post a tweet if it’s less than 141 characters long.
This chapter covers■ Comparing values with comparison operators■ Checking conditions that are true or false■ The if statement—running code only if a
condition is met■ The else clause—running code when a
condition is not met■ Making sure user input won’t break your code■ Generating random numbers with
Math.random()
198

199Conditional execution of code
If you want to find out how your programs can make decisions, read on, else, …well, read on anyway. You really need to know this stuff!
12.1 Conditional execution of codeTo start, create a simple program that asks the user to guess a secret number. If theyguess correctly, the program says, “Well done!” An interaction at the console mightlook like this:
> guess(2) undefined> guess(8) Well done! undefined
What’s with the ugly appearances of undefined? When you call a function at the con-sole, its code is executed and then its return value is displayed. The guess function inthe following listing doesn’t include a return statement so it automatically returnsundefined.
var secret = 8;
var guess = function (userNumber) { if (userNumber === secret) { console.log("Well done!"); }};
The guess function checks to see if the user’s number is equal to the secret number. Ituses the strict equality operator, ===, and an if statement so that you display the “Welldone!” message only if the numbers match. The following sections look at the strictequality operator and the if statement in more detail and introduce the else clause.
12.1.1 The strict equality operator, ===
The strict equality operator compares two values. If they’re equal it returns true; ifthey’re not equal it returns false. You can test it at the console:
> 2 === 8 false> 8 === 8 true> 8 === "8" false> "8" === "8" true
Listing 12.1 Guess the number http://jsbin.com/feholi/edit?js,console
Assign a number to the secret variable
Define a function that accepts the user’s number and assign it to the guess variable
Check if the user’s number matches the secret number
Log “Well done!” to theconsole if the numbers match

200 CHAPTER 12 Conditions: choosing code to run
In the third example, you can see that the strict equality operator doesn’t consider thenumber 8 and the string "8" to be equal. That’s because numbers and strings are dif-ferent types of data. The values true and false are a third type of data; they’re calledboolean values. In fact, true and false are the only possible boolean values. Booleanvalues are useful when deciding what a program should do next; for example, byusing an if statement.
12.1.2 The if statement
To execute a block of code only when a specified condition is met, you use an ifstatement.
if (condition) { // Code to execute }
If the condition in parentheses evaluates to true, then JavaScript executes the state-ments in the code block between the curly braces. If the condition evaluates to false,then JavaScript skips the code block. Notice there’s no semicolon after the curlybraces at the end of an if statement.
Listing 12.1 used the strict equality operator to return a true or false value forthe condition.
if (userNumber === secret) { console.log("Well done!");}
The code logs the “Well done!” message to the console only if the value of user-Number is equal to the value of secret. For example, say the secret is 8 and the userchooses 2:
if (2 === 8) { // The condition is false. console.log("Well done!"); // Not executed}
If the user chooses 8, the if statement becomes
if (8 === 8) { // The condition is true. console.log("Well done!"); // This is executed. }
12.1.3 The else clause
Sometimes we want different code to be executed if the condition in an if statementevaluates to false. We can make that happen by appending an else clause to the ifstatement (figure 12.1).

201Conditional execution of code
From listing 12.2:
if (userNumber === secret) { console.log("Well done!");} else { console.log("Unlucky, try again.");}
If userNumber and secret are equal, JavaScript displays “Well done!” Otherwise, it dis-plays “Unlucky, try again.” Notice there’s no semicolon after the curly braces at theend of an else clause. Once again, say the secret is 8 and the user chooses 2:
if (2 === 8) { // The condition is false. console.log("Well done!"); // Not executed. } else { console.log("Unlucky, try again."); // This is executed. }
If the user chooses 8, the if statement becomes
if (8 === 8) { // The condition is true. console.log("Well done!"); // This is executed. } else { console.log("Unlucky, try again."); // Not executed. }
A guessing game interaction at the console might now look something like this:
> guess(2) Unlucky, try again. undefined> guess(8) Well done! undefined
userNumber === secret
true
false
> Well done!
> Unlucky, try again.
Which code is executeddepends on the valueof the condition,true or false
if (userNumber === secret) {
console.log("Well done!");
} else {
console.log("Unlucky, try again.");
}
Figure 12.1 Executing code depending on the value of a condition, with if and else

202 CHAPTER 12 Conditions: choosing code to run
var secret = 8;
var guess = function (userNumber) { if (userNumber === secret) {
console.log("Well done!");
} else {
console.log("Unlucky, try again.");
}};
Next, you use local variables to make secret secret.
12.1.4 Hide the secret number inside a function
In listing 12.2, both the secret and the guess variables are declared outside any func-tion. You saw in chapter 11 how that makes them global variables, accessible at theconsole and throughout the program. That’s great for guess—you want users to beable to guess numbers—but it’s a disaster for secret—users can peek and tweak itsvalue at will. If you run the code in listing 12.2, you can then perform the followingactions at the console:
> secret // You can access secret. It’s a global variable. 8> guess(8) Well done! undefined> secret = 20 // You can reset secret to whatever you want. 20> guess(20) Well done! undefined
That’s not much of a guessing game! Chapter 11 also discussed how functions are used in JavaScript to create a local
scope, a collection of variables accessible only within the function. Listing 12.3 usesthe getGuesser function to hide the secret number. The function returned by get-Guesser is assigned to the guess variable (figure 12.2).
guess is a global variable, available at the console:
> guess(2) Unlucky, try again undefined
Listing 12.2 Guess the number—the else clause (http://jsbin.com/nakosi/edit?js,console)
Add an if statement with the condition to check in parentheses
Execute this code only if the condition is true
Add an else clause for when the condition is false
Execute this code only if the condition is false
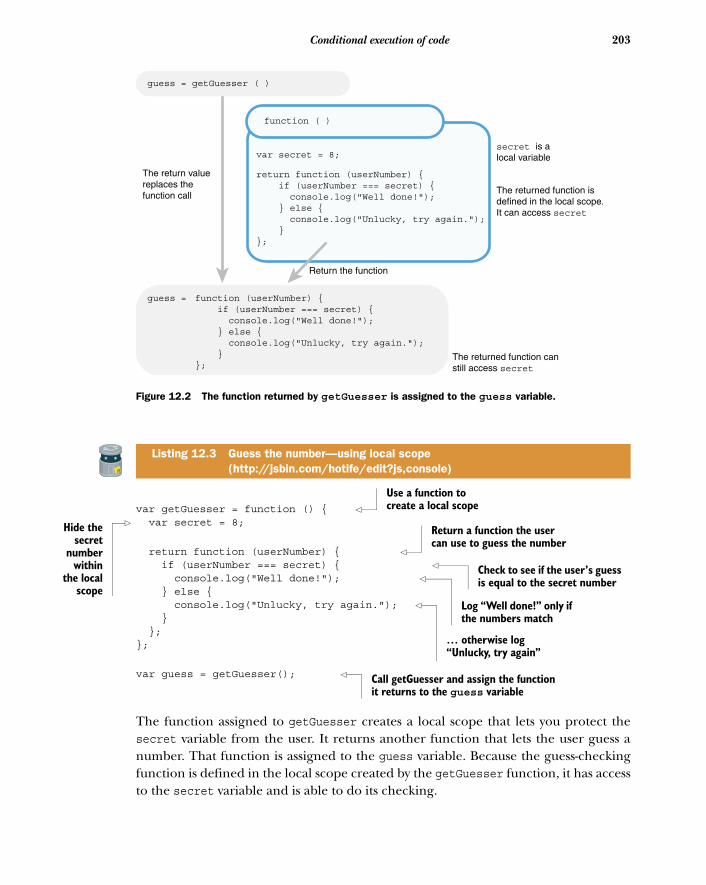
203Conditional execution of code
Hids
nuw
the
var getGuesser = function () { var secret = 8;
return function (userNumber) { if (userNumber === secret) { console.log("Well done!"); } else { console.log("Unlucky, try again."); } };};
var guess = getGuesser();
The function assigned to getGuesser creates a local scope that lets you protect thesecret variable from the user. It returns another function that lets the user guess anumber. That function is assigned to the guess variable. Because the guess-checkingfunction is defined in the local scope created by the getGuesser function, it has accessto the secret variable and is able to do its checking.
Listing 12.3 Guess the number—using local scope (http://jsbin.com/hotife/edit?js,console)
Return the function
function ( )
guess = getGuesser ( )
The return valuereplaces thefunction call
var secret = 8;
guess = function (userNumber) { if (userNumber === secret) { console.log("Well done!"); } else { console.log("Unlucky, try again."); }};
secret is a local variable
The returned function isdefined in the local scope.It can access secret
The returned function canstill access secret
return function (userNumber) { if (userNumber === secret) { console.log("Well done!"); } else { console.log("Unlucky, try again."); }};
Figure 12.2 The function returned by getGuesser is assigned to the guess variable.
Use a function to create a local scope
e theecretmberithin
localscope
Return a function the user can use to guess the number
Check to see if the user’s guess is equal to the secret number
Log “Well done!” only if the numbers match
… otherwise log “Unlucky, try again”
Call getGuesser and assign the function it returns to the guess variable

204 CHAPTER 12 Conditions: choosing code to run
You have a guessing game but it’s always the same secret number. Really, it’s anot-so-secret number! Let’s make use of a couple of methods from JavaScript’s Mathnamespace to inject some extra mystery into our guessing game.
12.2 Generating random numbers with Math.random()The Math namespace provides you with a random method for generating randomnumbers. It always returns a number greater than or equal to 0 and less than 1. Give ita whirl at the console prompt:
> Math.random() 0.7265986735001206> Math.random() 0.07281153951771557> Math.random() 0.552000432042405
Obviously, your numbers will be different because they’re random! Unless you’re reallyinto guessing games and have a lot of free time, those random numbers are probablya bit too tricky for your purposes.
To tame the numbers, scale them up to fall in a range you want and then convertthem to whole numbers (integers). Because they start off less than 1, multiplying by10 will make them less than 10. Here’s a series of assignments using Math.random:
var number = Math.random(); // 0 <= number < 1
To scale the possible numbers, multiply:
var number = Math.random() * 10; // 0 <= number < 10
To shift the possible numbers up or down, add or subtract:
var number = Math.random() + 1; // 1 <= number < 2
To scale and then shift, multiply and then add:
var number = Math.random() * 10 + 1; // 1 <= number < 11
Notice for the last assignment the numbers will be between 1 and 11; they can equal 1but will be less than 11. The <= symbol means less than or equal to, whereas the < sym-bol means less than. The inequality 0 <= number < 1 means the number is between 0and 1 and can equal 0 but not 1 (see section 12.3.1).
Okay, so you’ve scaled up the random numbers, but they’re still a trifle tricky. Atthe console you can see the kind of numbers you’re generating:
> Math.random() * 10 + 1 3.2726867394521832> Math.random() * 10 + 1 9.840337357949466

205Generating random numbers with Math.random()
loor
The last step is to lose the decimal fraction part of each number, to round the num-bers down to integers. For that you use the floor method of the Math namespace.
> Math.floor(3.2726867394521832) 3> Math.floor(9.840337357949466) 9
The floor method always rounds down, whatever the decimals are: 10.00001, 10.2, 10.5,10.8, and 10.99999 are all rounded down to 10, for example. You use floor to get anexpression that returns a random integer between 1 and 10 inclusive:
var number = Math.random() * 10 + 1 // 1 <= number < 11var number = Math.floor(Math.random() * 10 + 1) // 1 <= number <= 10
There’s also a Math.ceil method that always rounds up and a Math.round methodthat rounds up or down, following the usual rules for mathematical rounding. Moreinformation about JavaScript’s Math object can be found on the Get Programming withJavaScript website: http://www.room51.co.uk/js/math.html.
Listing 12.4 puts the Math methods into practice. The guess function now returnsstrings rather than logging them; the console automatically displays the return values,tidying up the interactions:
> guess(2) Unlucky, try again.> guess(8) Unlucky, try again.> guess(7) Well done!
var getGuesser = function () { var secret = Math.floor(Math.random() * 10 + 1);
return function (userNumber) {
if (userNumber === secret) {
return "Well done!";
} else {
return "Unlucky, try again.";
} };};var guess = getGuesser();
Listing 12.4 Guess the random number (http://jsbin.com/mezowa/edit?js,console)
Use Math.random and Math.fto generate a whole numberbetween 1 and 10 inclusive
Use an if statement to execute commands only if the condition evaluates to true
The return value will be displayed on the console when the function is called.
Include an else clause with commands to be executed if the condition evaluates to false
Call getGuesser and assign the function that’s returned to the guess variable

206 CHAPTER 12 Conditions: choosing code to run
Using random numbers has made your guessing game more interesting. But thereisn’t a great deal of strategy involved; it’s just straight guessing. The game could beimproved by giving better feedback after each guess.
12.3 Further conditions with else ifBy receiving better feedback for each guess, users can develop more efficient strate-gies when battling your guessing game. And strategy games are always more fun thanguessing games. If a user’s guess is incorrect, tell them if it’s too high or too low.
> guess(2) Too low!> guess(7) Too high!> guess(5) Well done!
Figure 12.3 shows the conditions used to produce the three possible types of feedbackfor a user’s guess.
The following listing shows how an extra if statement can be used to differentiatebetween the two types of incorrect answer.
var getGuesser = function () { var secret = Math.floor(Math.random() * 10 + 1);
return function (userNumber) { if (userNumber === secret) { return "Well done!";
Listing 12.5 Higher or lower (http://jsbin.com/cixeju/edit?js,console)
userNumber === secret
true
false
> Well done!
userNumber > secret
true
false
> Too high!
> Too low!
Figure 12.3 Nesting conditions can provide multiple options.
Use a condition to check if the user has guessed the secret number

207Further conditions with else if
} else { if (userNumber > secret) { return "Too high!"; } else { return "Too low!"; } } };};
var guess = getGuesser();
If a code block contains a single statement, JavaScript lets us leave out the curlybraces; the following three statements are equivalent:
if (userNumber === secret) { return "Well done!";}
if (userNumber === secret) return "Well done!";
if (userName === secret) return "Well done!";
As if and else clauses get more complicated and when code gets updated over time,if you leave out the curly braces it can sometimes be hard to spot which statements gowith which clauses. Many programmers (including me) recommend that you alwaysuse curly braces for the code blocks (apart from the case of nested if statements, asshown shortly). Others aren’t so strict. Ultimately, it can come down to personal (orteam) preferences. For now, I’d go with whatever you find easiest to understand.
An if statement, even with an else clause, counts as one statement. When an elseclause contains a single if statement, it’s common to leave out the curly braces. Thefollowing three code snippets are equivalent:
First, the code as shown in listing 12.5. The nested if-else statement is inside apair of curly braces.
else { // Curly braces at start if (userNumber > secret) { return "Too high!"; } else { return "Too low!"; }} // Curly braces at end
The inner if-else is a single statement, so it doesn’t need to be wrapped in curlybraces.
else // No curly braces if (userNumber > secret) { return "Too high!";
Execute the first else clause if the guess is incorrect
Check if the user’s guess is greater than the secret number
Include code for when the incorrect guess is not greater than the secret number
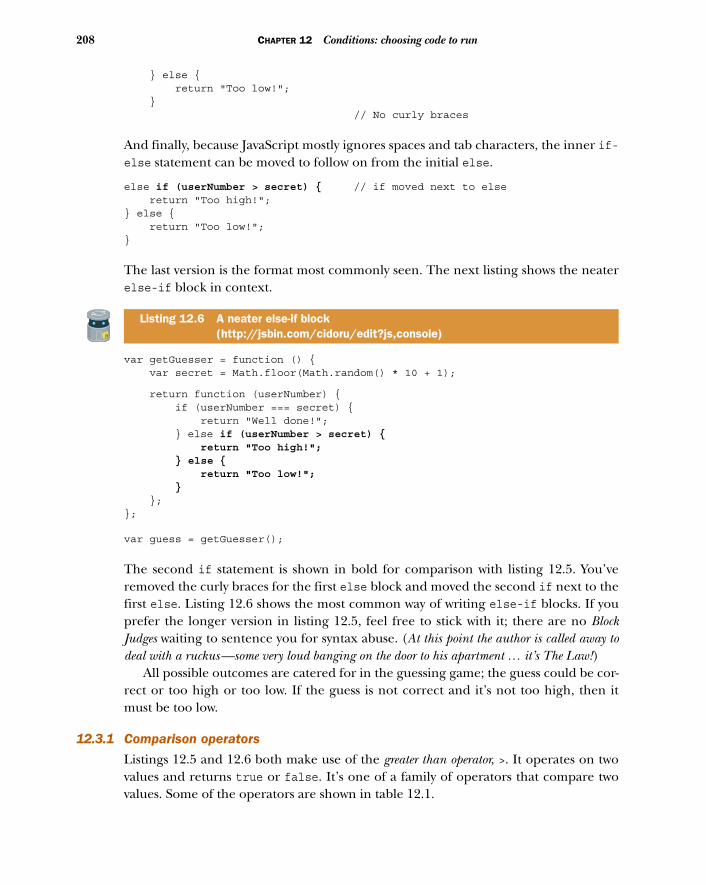
208 CHAPTER 12 Conditions: choosing code to run
} else { return "Too low!"; } // No curly braces
And finally, because JavaScript mostly ignores spaces and tab characters, the inner if-else statement can be moved to follow on from the initial else.
else if (userNumber > secret) { // if moved next to else return "Too high!";} else { return "Too low!";}
The last version is the format most commonly seen. The next listing shows the neaterelse-if block in context.
var getGuesser = function () { var secret = Math.floor(Math.random() * 10 + 1);
return function (userNumber) { if (userNumber === secret) { return "Well done!"; } else if (userNumber > secret) { return "Too high!"; } else { return "Too low!"; } };};
var guess = getGuesser();
The second if statement is shown in bold for comparison with listing 12.5. You’veremoved the curly braces for the first else block and moved the second if next to thefirst else. Listing 12.6 shows the most common way of writing else-if blocks. If youprefer the longer version in listing 12.5, feel free to stick with it; there are no BlockJudges waiting to sentence you for syntax abuse. (At this point the author is called away todeal with a ruckus—some very loud banging on the door to his apartment … it’s The Law!)
All possible outcomes are catered for in the guessing game; the guess could be cor-rect or too high or too low. If the guess is not correct and it’s not too high, then itmust be too low.
12.3.1 Comparison operators
Listings 12.5 and 12.6 both make use of the greater than operator, >. It operates on twovalues and returns true or false. It’s one of a family of operators that compare twovalues. Some of the operators are shown in table 12.1.
Listing 12.6 A neater else-if block (http://jsbin.com/cidoru/edit?js,console)

209Further conditions with else if
Because the operators in table 12.1 return true or false, they can be used in the con-dition for if statements. You may be wondering about the strict part of the strictequality operator—something we’ll be sticking to throughout the book—and whetherthere’s a non-strict version. Yes, there is. For non-strict equality you can use ==. See the“Loose equality and coercion” sidebar.
Now, obviously, guessing numbers is great fun, but you can learn more from a fact-based quiz like the one you’ve considered a few times earlier in the book. Adding theability to check your answers will help raise the quiz app above a mere trivial pursuit.
Table 12.1 Comparison operators
Operator Name Example Evaluates to
> Greater than 5 > 33 > 107 > 7
truefalsefalse
>= Greater than or equal to 5 >= 33 >= 107 >= 7
truefalsetrue
< Less than 5 < 33 < 107 < 7
falsetruefalse
<= Less than or equal to 5 <= 33 <= 107 <= 7
falsetruetrue
=== Strictly equal to 5 === 37 === 77 === "7"
falsetruefalse
!== Not strictly equal to 5 !== 37 !== 77 !== "7"
truefalsetrue
Loose equality and coercionThe loose equality operator, ==, is allowed to coerce values into different types inorder to compare them for equality.
Coercion is the process of converting a value from one type to another, for example,from a string to a number.
So, whereas the strict comparison 7 === "7" evaluates to false, because one valueis a number and the other is a string, the loose comparison 7 == "7" evaluates totrue, because the string is first coerced to a number and 7 == 7 is true.
The rules for coercion are beyond the scope of this book (although ignore people whosay they’re not worth learning), and we’ll stick to strict equality comparisons.

210 CHAPTER 12 Conditions: choosing code to run
12.4 Checking answers in the quiz appNow that you can check conditions in an if statement, you’re finally able to keep ascore for the number of questions a user gets right in the quiz program. A typical con-sole interaction could be this:
> quiz.quizMe() What is the highest mountain in the world?> quiz.submit("Everest") Correct! Your score is 1 out of 1> quiz.quizMe() What is the highest mountain in Scotland?> quiz.submit("Snowdon") No, the answer is Ben Nevis You have finished the quiz Your score is 1 out of 2
The code for the quiz program is shown in the next listing. The getQuiz function con-tains the implementation of the quiz and returns an interface object with only twomethods, quizMe and submit. You take a good look at how the program works afterthe listing.
var getQuiz = function () { var score = 0, qIndex = 0, inPlay = true, questions, next, getQuestion, checkAnswer, submit;
questions = [ { question: "What is the highest mountain in the world?", answer: "Everest" }, { question: "What is the highest mountain in Scotland?", answer: "Ben Nevis" } ];
getQuestion = function () { if (inPlay) { return questions[qIndex].question; } else { return "You have finished the quiz."; } };
Listing 12.7 Checking quiz answers (http://jsbin.com/hidogo/edit?js,console)
Use a single var keyword to declare all the variables in the getQuiz function
Define the getQuestion method to return the current question

211Checking answers in the quiz app
chmetho
if is c
updat
next = function () { qIndex = qIndex + 1;
if (qIndex >= questions.length) { inPlay = false; console.log("You have finished the quiz."); } };
checkAnswer = function (userAnswer) { if (userAnswer === questions[qIndex].answer) { console.log("Correct!"); score = score + 1; } else { console.log("No, the answer is " + questions[qIndex].answer); } };
submit = function (userAnswer) { var message = "You have finished the quiz.";
if (inPlay) { checkAnswer(userAnswer); next(); message = "Your score is " + score + " out of " + qIndex; }
return message; };
return { quizMe: getQuestion, submit: submit }; };
var quiz = getQuiz();
Your new quiz program has a number of moving parts; let’s break it down intosmaller pieces.
12.4.1 Multiple declarations with a single var keyword
Up until now you’ve been using a var keyword for each variable you’ve declared:
var score;var getQuestion;var next;var submit;
Define the next method to move to the next question and check if any questions remain
Define theeckAnswerd to check
the answerorrect ande the score
Define the submit method to handle the user’s submitted answer
Return an interface object with two methods, quizMe and submit
Call the getQuiz function and assign the interface object it returns to the quiz variable

212 CHAPTER 12 Conditions: choosing code to run
JavaScript allows you to declare a list of variables with a single var keyword. Commasseparate the variables, with a semicolon ending the list. The previous declarations canbe rewritten in the following shorter form:
var score, getQuestion, next, submit;
You could even declare the variables on a single line:
var score, getQuestion, next, submit;
Most programmers prefer one variable per line. You can include assignments too:
var score = 0, getQuestion, next, submit = function (userAnswer) { // function body };
The aim is to make sure all variables are declared and the code is easy to read andunderstand. The style in listing 12.7 is what I tend to prefer; I find it slightly easier toread and it’s slightly less typing. Some programmers declare each variable on its ownline with a var keyword, just as we’ve been doing in our listings up until now; it’s eas-ier to cut and paste variables if each has its own var keyword. It’s not worth worryingabout—you’ll probably settle on one style over time.
12.4.2 Displaying a question
The getQuestion function returns a question from the questions array. It uses theqIndex variable to pick the current question-and-answer object from the array. Itreturns the question property of the question-and-answer object.
return questions[qIndex].question;
But it returns the question only if the quiz is still in progress. Otherwise, it returns astring to say the quiz is finished:
return "You have finished the quiz.";
The program uses the inPlay variable to flag when the quiz is in progress and when ithas finished. The inPlay variable has a value of true while the quiz is in progress andfalse when it has finished. The getQuestion function uses the inPlay variable as thecondition in an if statement:
if (inPlay) { return questions[qIndex].question;

213Checking answers in the quiz app
} else { return "You have finished the quiz.";}
When inPlay is true, the question is returned. When inPlay is false, the message isreturned. (Remember, when you call a function at the console prompt, the consoleautomatically displays the return value.)
12.4.3 Moving to the next question
The program calls the next function to move from one question to the next. It movesby incrementing the qIndex variable.
qIndex = qIndex + 1;
The program stores the index of the current element in the questions array in qIn-dex. Remember that the array index is zero based, so for an array of length 4 theindex could be 0, 1, 2, or 3. An index of 4 would be past the end of the array (3 is thelast index). In general, if the index is greater than or equal to the length of the array,you’re past the end of the array. All arrays have a length property. In the quiz, it rep-resents the number of questions.
The next function checks the index to see if it is past the last question:
if (qIndex >= questions.length)
If the index is past the end of the array, then all the questions have been asked and thequiz is over, so inPlay is set to false.
if (qIndex >= questions.length) { inPlay = false; console.log("You have finished the quiz.");}
12.4.4 Checking the player’s answer
The checkAnswer function is straightforward. If the player’s submitted answer is equalto the current answer from the questions array, the player’s score is incremented.Otherwise, the correct answer is displayed.
if (userAnswer === questions[qIndex].answer) { console.log("Correct!"); score = score + 1;} else { console.log("No, the answer is " + questions[qIndex].answer);}

214 CHAPTER 12 Conditions: choosing code to run
12.4.5 Handling a player’s answer
The submit function orchestrates what happens when a player submits an answer. Itreturns either a message with the player’s score or a message to say the quiz is over.
Your score is 1 out of 2 // If inPlay is true
You have finished the quiz. // If inPlay is false
If the quiz is still in progress, submit calls two other functions, checkAnswer and next.Each will execute its code in turn. You’re using the functions to run code on demand.
if (inPlay) { checkAnswer(userAnswer); next(); message = "Your score is " + score + " out of " + qIndex;}
12.4.6 Returning the interface object
You’ve kept the interface object returned by getQuiz simple. It has no implementa-tion code of its own. You assign its two properties functions from within the localscope of getQuiz.
return { quizMe: getQuestion, submit: submit };
As discussed in chapter 11, the interface object allows you to maintain a consistentinterface over time, even if the implementation within getQuiz is changed. The userwill always call quiz.quizMe() and quiz.submit(). You can change which functionsare assigned to those two properties of the interface object and how those functionswork, but you never remove or rename those properties.
Notice how the program is made up of small pieces working together to build itsfunctionality. As ever, your aim is to make the code readable, understandable, andeasy to follow. The if statement and its else clause help you to direct the flow of theprogram to take the appropriate actions at each stage.
It’s time to put these new ideas to work in The Crypt.
12.5 The Crypt—checking user inputIn chapter 11, you created a getGame function that returns a public interface for TheCrypt. Players can call a go method to move from place to place and a get method topick up items:
return { go: function (direction) { var place = player.getPlace(); var destination = place.getExit(direction); player.setPlace(destination);

215The Crypt—checking user input
render(); return ""; },
get: function () { var place = player.getPlace(); var item = place.getLastItem(); player.addItem(item); render(); return ""; }};
12.5.1 Step by step through the go method
Let’s step through the first three lines of the go method. See if you can spot where aproblem could arise.
RETRIEVE THE PLAYER’S LOCATION
You start with the getPlace method. It returns the player’s current location.
var place = player.getPlace();
You then assign the location to the place variable. If the player is currently in thekitchen, then the code is equivalent to
var place = kitchen;
The program assigned the player’s starting location earlier, using the setPlace method:
player.setPlace(kitchen);
USE THE DIRECTION TO FIND THE DESTINATION
Now that you have the current place, you can call its getExit method to retrieve thedestination for a given direction.
var destination = place.getExit(direction);
When the player calls the go method, the argument is assigned to the directionparameter.
> game.go("south")
The previous command will execute code equivalent to the following:
var destination = place.getExit("south");
If The Library is south of The Kitchen, then the code is equivalent to
var destination = library;

216 CHAPTER 12 Conditions: choosing code to run
MOVE THE PLAYER TO THE DESTINATION
You have the destination; you only need to update the player’s location.
player.setPlace(destination);
Fantastic! The user can decide where to go in the game. So, can you let them loose inyour carefully crafted castles? Well, no. You see, users are evil. Pure evil!
12.5.2 Never trust user input
Sorry, I panicked. Of course users aren’t evil. But they do make mistakes. And theysometimes own cats. And most cats can’t type. Whenever a user is expected to provideinput for a program, we must guard against mistakes, whether typos (possibly of catorigin), misunderstandings (which may be our fault), or curiosity-driven explorationsof what the program can do.
The go method expects the user to enter a valid direction as a string. It uses thatdirection to find a destination, the place to which the player is to be moved. If the userenters a direction that doesn’t exist, the whole game breaks!
> game.go("snarf")
Figure 12.4 shows what happened on JS Bin when I entered the previous command whileplaying the chapter 11 version of The Crypt at http://jsbin.com/yuporu/edit?js,console.
Error messages on your browser might be slightly different. Even entering a validdirection after the mistake doesn’t fix things. From the errors in figure 12.4 it lookslike there may be a problem with the place variable. The key statement in the gomethod is the one that uses the user input:
var destination = place.getExit(direction);
If the specified direction is not one of the place’s exits, then the getExit function willreturn undefined. The program assigns undefined to the destination variable andsets that value as the new place for the player:
player.setPlace(destination);
Figure 12.4 Specifying a direction that doesn’t exist breaks The Crypt.

217The Crypt—checking user input
So the player’s location is now undefined, not a place constructed with the Place con-structor. undefined has no showInfo or getExit methods; it has no methods at all!The errors in figure 12.4 should now make more sense.
So how can you guard against users (and their cats) making errors?
12.5.3 Safe exploration—using the if statement to avoid problems
You can use an if statement to check that you have a valid destination before updat-ing the player’s location:
go: function (direction) { var place = player.getPlace(); var destination = place.getExit(direction);
if (destination !== undefined) { player.setPlace(destination); render(); return ""; } else { return "*** There is no exit in that direction ***"; }}
The getExit method returns undefined if the current place doesn’t have an exit forthe specified direction. You just need to check that the destination is not undefinedbefore calling setPlace.
if (destination !== undefined) { // There is a valid destination. }
Remember from table 12.1 that the !== operator returns true when two values are notequal and false when they are equal. You can add an else clause to catch the caseswhere the destination is undefined.
if (destination !== undefined) { // There is a valid destination. } else { // There is no exit in the direction specified. }
Listing 12.8 shows an updated version of the go and get methods returned from thegetGame function. Entering a nonexistent direction at the console now looks like this:
> game.go("snarf") *** You can’t go in that direction ***
Calling get when there are no items to pick up looks like this:
> game.get() *** There is no item to get ***

218 CHAPTER 12 Conditions: choosing code to run
ined
Only partial code is shown in this listing. The full listing with Player and Place con-structors and more places is on JS Bin.
var getGame = function () { var spacer = { … }; var Player = function (name, health) { … }; var Place = function (title, description) { … }; var render = function () { … };
var kitchen = new Place("The Kitchen", "You are in a kitchen…"); var library = new Place("The Old Library", "You are in a library…");
kitchen.addExit("south", library); library.addExit("north", kitchen);
// Game initialization var player = new Player("Kandra", 50); player.addItem("The Sword of Doom"); player.setPlace(kitchen);
render();
return { go: function (direction) { var place = player.getPlace(); var destination = place.getExit(direction);
if (destination !== undefined) {
player.setPlace(destination); render(); return "";
} else {
return "*** You can’t go in that direction ***";
} },
get: function () { var place = player.getPlace(); var item = place.getLastItem();
if (item !== undefined) { player.addItem(item); render(); return ""; } else { return "*** There is no item to get ***"; } } };};
var game = getGame();
Listing 12.8 Checking user input (http://jsbin.com/zoruxu/edit?js,console)
Return an interface object with go and get methods
Use getExit to find the destination for the direction specified by the user
Check that the destination is not undefined; that is, check that it is valid
Only set and show the new place if the destination exists
Add an else clause to handle when the destination is undef
Give the user feedbackabout the invalid direction specified
Update the get method to make similar checks to the go method

219Summary
In the printed listing 12.8, the details of the Player and Place constructors were leftout to make it easier to focus on the changes to the go and get methods. In chapter 13you’ll move each constructor function to its own file and see how to import the files inJS Bin. Such increased modularity can help you focus on one thing at a time and makeit easier to reuse code across multiple projects.
12.6 Summary■ Use comparison operators to compare two values. The operators return true or
false, boolean values:
> 5 === 5 // Strict equality true> 10 > 13 // Greater than false
■ Use an if statement to execute code only if a condition is met:
if (condition) { // Execute code if condition evaluates to true}
■ Set conditions using comparison operators and/or variables:
if (userNumber === secret) { // Execute code if userNumber and secret are equal }
if (inPlay) { // Execute code if inPlay evaluates to true }
■ Add an else clause to execute code when a condition is not met:
if (condition) { // Execute code if condition evaluates to true } else { // Execute code if condition evaluates to false}
■ Include extra if statements in the else clause to cover all possibilities:
if (userNumber === secret) { console.log("Well done!");} else if (userNumber > secret) { console.log("Too high!");} else { console.log("Too low!");}

220 CHAPTER 12 Conditions: choosing code to run
■ Generate random numbers with Math.random(). The numbers generated arebetween 0 and 1. They can equal 0 but not 1:
> Math.random() 0.552000432042405
■ Scale up the random numbers to the range you want:
Math.random() * 10 // 0 <= decimal < 10Math.random() * 10 + 1 // 1 <= decimal < 11
■ Round the random numbers to integers with Math.floor():
Math.floor(Math.random() * 10 + 1) // 1 <= integer <= 10
■ Never trust user input. Put checks in place to make sure any input is valid.

Modules: breakinga program into pieces
As the applications you develop become larger, involving more and more variables,objects, arrays, and functions, it can become harder and harder to work efficientlywithin a single program file. Good text editors and development environments canhelp, but even with their tools, it quickly becomes a good idea to split the codeacross multiple files.
For example, in The Crypt you have spacer, players, places, maps, and the gamelogic itself. You’ve probably noticed how long the code listings have become on JSBin when all of the elements are included. Putting the code for each element in itsown file can help you to focus on one piece of the program at a time and make iteasier for different programmers to develop and test different parts of applications.Figure 13.1 shows your aim of splitting one large program into modules.
This chapter covers■ Importing code into JS Bin with script elements■ Avoiding repeated variable names■ Running functions without assigning them to
variables■ Using modules to organize your (shared)
codebase
221

222 CHAPTER 13 Modules: breaking a program into pieces
Having discrete pieces of functionality and data in different files also promotes codereuse. Rather than cutting and pasting useful functions and snippets of JavaScriptfrom one project into others, they can stay in a single library file that’s imported intoother projects when needed. For example, our trusty spacer namespace from chap-ter 7, for formatting text on the console, could be used in a quiz app and a blog app.Rather than repeating the spacer code in each app, you could place it in its own fileand import it when needed (figure 13.2).
I’m going to loosely call such files modules. There are a number of published Java-Script projects and standards for managing modules that will have their own, stricter
Game init
spacer
Player
Place
Map code
spacer
Player
Place
Map code
Game init
All of the code in a single file
Different sections ofcode perform differentfunctions
Each section of codein its own file
Break into modules
Figure 13.1 Breaking one large program into modules
The spacer code isrepeated in each app.
They each have aseparate copy
The same file is importedby both apps
spacer
Quiz code
spacer
Blog code
spacer
Blog code
Quiz code
The spacer code isin its own file
The copy approach The module approach
Figure 13.2 Moving spacer into a module allows the same single file to be used in many projects.

223Understanding bins and files on JS Bin
definitions for what form a module must take, and the latest versions of JavaScript itselfare introducing a native module system, but I’m happy to keep things simple for now.
This chapter looks at how to import modules into JS Bin using HTML scriptelements. You’ll see how a random number generator function and the text-formattingcapabilities of the spacer namespace can be incorporated into other projects. Whenyou start to include code from various modules into a single program, you have tokeep a close eye on which variable names are being used; there’s a danger thatimported files could overwrite your variables. You also take a look at how to minimizesuch problems by using namespaces and by making use of immediately invokedfunction expressions, a way of running function code without assigning the functionsto variables.
First up, let’s look at how JS Bin works with files.
13.1 Understanding bins and files on JS BinIn chapter 12 you created a simple game that challenged players to guess a numberbetween 1 and 10. You generated the number using the Math.random method. In asimilar way, you now want to update your quiz app to display a random question fromits bank of questions. Both the guessing game and the quiz need to be able to gener-ate a random whole number between two limits. They can both use a function likethe following:
var between = function (lowest, highest) { // Return a whole number between lowest and highest inclusive };
In this section, you create and save a JavaScript file on JS Bin that contains the Num-ber Generator code. In section 13.2 you learn how to load the file, and in section 13.3you load it into the guessing game and the quiz app, as illustrated in figure 13.3.
The same file is imported by both apps
Number Generator
Quiz App Guessing Game
The Number Generator code is in its own file
Figure 13.3 The Number Generator code is imported by the quiz app and the guessing game.

224 CHAPTER 13 Modules: breaking a program into pieces
Before you learn how to import files, we need to take a brief look at how JS Bin savesyour work.
JS Bin is a simple development environment that lets you work on HTML, CSS,and JavaScript code in separate panels. Figure 13.4 shows those three panels open atthe same time, all containing code.
JS Bin combines the code in the HTML, CSS, and JavaScript panels to produce yourweb page, which it shows in the Output panel (figure 13.5). You’ll look at HTML (anda little CSS) in more detail in part 3.
Any errors or warnings that occur when you run your code appear in the Consolepanel. You can also log messages to the Console panel from within your JavaScriptcode—that’s how you’ve been displaying your output so far. You’re focusing on Java-Script, so you haven’t been bothered about the web page generated in the Outputpanel. You can see the page from figures 13.4 and 13.5 on JS Bin at http://jsbin.com/jejunu/edit?output. Toggle the panels to see the code.
Figure 13.4 HTML, CSS, and JavaScript panels on JS Bin
Figure 13.5 The HTML, CSS, and JavaScript code are all used to produce the web page output.

225Understanding bins and files on JS Bin
As well as providing a combined environment for you to edit the different types ofcode that make up a web page, JS Bin gives you access to the HTML, the CSS, and theJavaScript code as separate files. To create JavaScript code and see it as a separate file,follow these steps on JS Bin:
1 Create a bin2 Write some code in the JavaScript panel3 Make a note of the filename4 View an individual code file
13.1.1 Creating a bin
On the File menu on JS Bin, click New. JS Bin will create HTML, CSS, and JavaScriptfiles for you. It calls those three files together a bin and displays the contents of eachfile on its matching panel. The HTML file includes some boilerplate code that’s com-mon to most new web pages; the CSS and JavaScript files are blank.
13.1.2 Writing some code
Add the following code to the JavaScript panel.
var between = function (lowest, highest) { var range = highest - lowest + 1; return lowest + Math.floor(Math.random() * range);};
The between function returns a random whole number between the values of lowestand highest inclusive. For example, between(3, 5) will return 3 or 4 or 5.
13.1.3 Making a note of the filename
JS Bin assigns each bin a code used to edit the bin’s files and to access them individu-ally. Take a look at the current URL in your browser’s address bar. (You may have toclick the address bar to see the full address.) Figure 13.6 shows the URL with the bincode and visible panels highlighted.
Make a note of the bin code for your current work on JS Bin—it will be different fromfigure 13.6. The bin code for my work is qezoce.
http://jsbin.com/qezoce/edit?html,js,console
Bin code Visible panels
Load editing environmentFigure 13.6 Breaking down a JS Bin URL

226 CHAPTER 13 Modules: breaking a program into pieces
13.1.4 Viewing an individual code file
To access individual code files, you use a different format of URL, shown in figure 13.7.It has a prefix of output and ends with the bin code and a file extension. The fileextension specifies what type of file you want to load. Use js for JavaScript.
Visiting http://output.jsbin.com/qezoce.js loads just the JavaScript file, as shown infigure 13.8. All the panels and menus and controls that are part of the JS Bin editingenvironment are not loaded; it’s just the plain text of the JavaScript file.
(The output isn’t always formatted nicely for human readers; unnecessary spaces andline-breaks may have been removed.) Have a go at loading your version of the file,using your bin code from JS Bin.
Great! You can get your hands on your pure JavaScript. But how do you make itappear in another program?
13.2 Importing files into other projectsYou’re going to create a program that uses the number generation function, between,from the last section. You take these steps:
1 Create a bin2 Write some code in the JavaScript panel3 Add a script element to the HTML panel4 Refresh the page5 Run the program
http://output.jsbin.com/qezoce.js
Bin code
File extensionPrefixFigure 13.7 The JS Bin URL for a JavaScript file
Figure 13.8 A JavaScript file on JS Bin

227Importing files into other projects
13.2.1 Creating a bin
Create a bin on JS Bin by clicking New on the File menu. The HTML, CSS, and Java-Script panels are reset.
13.2.2 Writing some code
Enter the following code in the JavaScript panel:
// requires the Number Generator modulevar num = between(3, 7);console.log(num);
Running the program now will cause an error—there’s no between variable declaredor function defined. The between function is in a separate file. This brings up the issueof dependencies; when splitting code into modules, it’s not uncommon for one moduleto depend on another in order to function. The previous code depends on the Num-ber Generator module. More advanced module systems usually let you explicitly recordand automatically load dependencies; for now, you can add comments to show anyrequired modules.
13.2.3 Adding a script element
It’s time to make use of the HTML panel on JS Bin. HTML is the code used for the struc-ture and content of web pages; it’s how you specify headings and paragraphs and lists andlinks and so on. You’ll get a proper introduction in chapter 17 and make good use of itthroughout part 3. For now, your focus is still very much on the JavaScript and using JSBin to help you learn and explore. You’re going to use only a tiny snippet of HTML tohelp you break up longer programs into separate files and load them as needed.
You use an HTML script element to specify the JavaScript file you want to load.Figure 13.9 shows the parts that make up the element.
<script src="http://output.jsbin.com/qezoce.js"></script>
script element
Closing script tagOpening script tag
<script src="http://output.jsbin.com/qezoce.js"></script>
src attribute
Address of the file to load
Figure 13.9 The parts that make up a script element

228 CHAPTER 13 Modules: breaking a program into pieces
Don’t worry too much for now about the names of all of the parts. You can use thescript element to load files without a full understanding of HTML elements, tags,and attributes. You’ll focus on those in chapter 17.
Show the HTML panel on JS Bin. You’ll see some default HTML already in place.You don’t need that for your purposes—you’re not building a web page; you’re justinterested in loading a JavaScript file. Replace the default HTML with code to loadthe JavaScript, using the bin code of the file you created in the last section.
<script src="http://output.jsbin.com/qezoce.js"></script>
The HTML included is a single script element with an src attribute. You use thescript element to load the JavaScript file specified by the src attribute. (src is shortfor source—the address of the file.) In general, to load a file, use the following format:
<script src="path/to/someFile.js"></script>
Modern browsers will assume the file contains JavaScript. For older browsers, you caninclude a type attribute as well.
<script src="path/to/someFile.js" type="text/javascript"></script>
13.2.4 Refreshing the page
JS Bin doesn’t always load files automatically; you may need to refresh the page inyour browser after you add the script element.
13.2.5 Running the program
Click Run. The Console panel should show a number between 3 and 7. Keep clickingRun to generate more random numbers.
Listings 13.1 and 13.2 repeat the HTML and JavaScript you’ve used. The JS Binlinks for the two listings lead to the same bin. Running the program five times pro-duces output something like this (it is random!):
> 5> 7> 7> 3> 4
<script src="http://output.jsbin.com/qezoce.js"></script>
Listing 13.1 Loading JavaScript with a script tag (HTML) (http://jsbin.com/lifugam/edit?html,js,console)

229Importing the Number Generator—further examples
// requires the Number Generator modulevar num = between(3, 7);console.log(num);
When you run the program, JS Bin will first load and run the file specified in thescript element’s src attribute. Then it will run any code in the JavaScript panel. Theloaded file and JavaScript panel code together form the following single program:
// From the loaded filevar between = function (lowest, highest) {
var range = highest - lowest + 1; return lowest + Math.floor(Math.random() * range);
};
// From the JavaScript panelvar num = between(3, 7); console.log(num);
When you click the Run button in the Console panel, it can take a moment for JS Binto load the file specified in the script tag. Once the code runs, the random numberis logged to the console.
13.3 Importing the Number Generator—further examplesYou’ve seen how JS Bin assigns a code to each bin you create and how you can use thatcode to access individual files from your project. You created a random number gen-erator function, between, and accessed the JavaScript file containing the code. One ofthe goals of splitting your work into modules is to use the same code in multiple proj-ects by importing it rather than copying and pasting it; see figure 13.10.
Listing 13.2 Code in the JavaScript panel as well (http://jsbin.com/lifugam/edit?html,js,console)
The same file is imported by both apps
Number Generator
Quiz App Guessing Game
The Number Generator code is in its own file
Figure 13.10 Importing the Number Generator function into two projects

230 CHAPTER 13 Modules: breaking a program into pieces
Let’s see that idea in action by importing the Number Generator into two other proj-ects: the quiz app and the guessing game.
13.3.1 Picking random questions in the quiz app
It’s time to randomize your quiz app. The new version of the app displays a randomquestion from its question bank each time you call quizMe on the console:
> quiz.quizMe() 5 x 6> quiz.submit("30") Correct!> quiz.quizMe() 7 x 8> quiz.submit("30") No, the answer is 56
Listing 13.4 shows the JavaScript for the main quiz app. You import the code for thebetween function by using a script element on the HTML panel (listing 13.3).
<script src="http://output.jsbin.com/qezoce.js"></script>
var getQuiz = function () { var qIndex = 0;
var questions = [ { question: "7 x 8", answer: "56" }, { question: "12 x 12", answer: "144" }, { question: "5 x 6", answer: "30" }, { question: "9 x 3", answer: "27" } ];
var getQuestion = function () { qIndex = between(0, questions.length - 1); return questions[qIndex].question; };
var checkAnswer = function (userAnswer) { if (userAnswer === questions[qIndex].answer) { return "Correct!"; } else { return "No, the answer is " + questions[qIndex].answer; } };
Listing 13.3 Using the Number Generator with the quiz app (HTML) (http://jsbin.com/ponogi/edit?html,js,console)
Listing 13.4 Using the Number Generator with the quiz app (http://jsbin.com/ponogi/edit?html,js,console)
Wrap the code in a function to create a local scope
Use the between function to pick a random question

231Importing the Number Generator—further examples
return { quizMe: getQuestion, submit: checkAnswer }; };
var quiz = getQuiz();
You use the between function to pick a random question from the question bank. Thenumber of elements in the questions array is given by questions.length (every arrayhas a length property) and the question indexes run from 0 to one less than thelength. If there are four elements in the array, then the indexes run from 0 to 3. So, topick a random index you use
qIndex = between(0, questions.length – 1);
You use the wrap-and-return module pattern from chapter 11, hiding your implemen-tation (the code that makes everything work) inside the getQuiz function and return-ing the public interface as an object.
Follow the listing link to the game on JS Bin and test your knowledge of multiplica-tion facts! The answers are stored as strings, so make sure you submit strings for theprogram to check: quiz.submit("30"), not quiz.submit(30).
13.3.2 Using the between function in your guessing game
Listing 13.6 shows the JavaScript code for your guessing game. At the console prompt,players have to guess a number between 5 and 10, inclusive:
> guess(7) Too high!> guess(5) Too low!> guess(6) Well done!
The app uses the between function, so you import it using a script element on theHTML panel (see the following listing).
<script src="http://output.jsbin.com/qezoce.js"></script>
Listing 13.5 Using the Number Generator in the guessing game (HTML) (http://jsbin.com/tixina/edit?html,js,console)
Return an interface object from the getQuiz function
Assign the interface returned from getQuiz to the quiz variable

232 CHAPTER 13 Modules: breaking a program into pieces
var getGuesser = function (lowest, highest) {
var secret = between(lowest, highest);
return function (userNumber) { if (userNumber === secret) { return "Well done!"; } else if (userNumber > secret) { return "Too high!"; } else { return "Too low!"; } };};
var guess = getGuesser(5, 10);
Again, follow the listing link to JS Bin and get guessing! Both the quiz app and the guessing game now import the same Number Genera-
tor file. The number generation code is in one place; there is a single source of truth.Any updates or fixes can be performed on that one file, and all the projects that use itwill load the new version.
Importing one file is useful, but can you load more than one?
13.4 Importing multiple filesIn chapters 7 and 11, you saw that an object can be used as a namespace, a way of orga-nizing properties and methods so that only a single variable is required. As an exam-ple, you created spacer, a namespace of functions for formatting text on the console.The spacer namespace could be useful in a number of projects, whenever you want toformat your text output with borders and boxes. Rather than copying and pasting thespacer code into every program where it’s used, it seems like an obvious candidate tobe saved to its own file and imported as needed. You can view the spacer code athttp://jsbin.com/juneqo/edit?js.
Let’s put spacer to work straight away. In listing 13.6 you updated your guessinggame to import the between function and used it to generate the secret number to beguessed. Say you now want to format the feedback you give to players by wrapping themessages in boxes. That’s what spacer is for! A game on the console will look some-thing like this:
> guess(10) > guess(5) > guess(9) +++++++++++++ ------------ ============== + Too high! + - Too low! - = Well done! = +++++++++++++ ------------ ==============
Listing 13.6 Using the Number Generator in the guessing game (http://jsbin.com/tixina/edit?html,js,console)
Wrap the code in a function to create a local scope
Use the between function to pick a random number
Return a function that players use to make their guesses
Assign the returned function to the guess variable
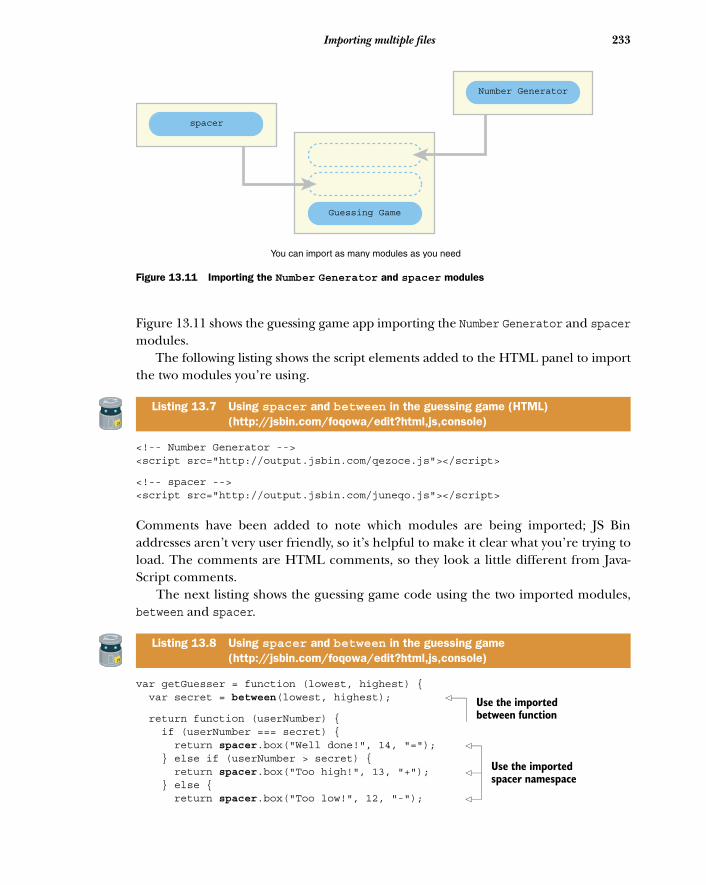
233Importing multiple files
Figure 13.11 shows the guessing game app importing the Number Generator and spacermodules.
The following listing shows the script elements added to the HTML panel to importthe two modules you’re using.
<!-- Number Generator --><script src="http://output.jsbin.com/qezoce.js"></script>
<!-- spacer --><script src="http://output.jsbin.com/juneqo.js"></script>
Comments have been added to note which modules are being imported; JS Binaddresses aren’t very user friendly, so it’s helpful to make it clear what you’re trying toload. The comments are HTML comments, so they look a little different from Java-Script comments.
The next listing shows the guessing game code using the two imported modules,between and spacer.
var getGuesser = function (lowest, highest) { var secret = between(lowest, highest);
return function (userNumber) { if (userNumber === secret) { return spacer.box("Well done!", 14, "="); } else if (userNumber > secret) { return spacer.box("Too high!", 13, "+"); } else { return spacer.box("Too low!", 12, "-");
Listing 13.7 Using spacer and between in the guessing game (HTML) (http://jsbin.com/foqowa/edit?html,js,console)
Listing 13.8 Using spacer and between in the guessing game (http://jsbin.com/foqowa/edit?html,js,console)
Guessing Game
You can import as many modules as you need
spacer
Number Generator
Figure 13.11 Importing the Number Generator and spacer modules
Use the imported between function
Use the imported spacer namespace

234 CHAPTER 13 Modules: breaking a program into pieces
} };};
var guess = getGuesser(5, 10);
Putting previously written and tested code into separate files like this also helps youfocus on new code you’re working on; listing 13.8 can be short and sweet because yourtrusted spacer code is packaged off in an external file.
When you import JavaScript, it’s as if all of the imported code is joined to form asingle file. If different imported files use the same variable names, it’s possible forlater code to inadvertently overwrite earlier code. Boom—you have variable collisions!
13.5 Collisions—when imported code overwrites your variablesYou decide the boxed messages for your guessing game feedback are a bit too much.You’d like the feedback to look like this:
> guess(10) > guess(9) + T-o-o- -h-i-g-h-! + = W-e-l-l- -d-o-n-e-! =
The messages take up less room but are nicely spaced out with dashes between charac-ters. Fortunately, a friend of yours, Kallie, has been working on her own formattingfunctions and has kindly bundled them into a module you can import. The functionyou need is called dasher and is really easy to use:
dasher("message"); // m-e-s-s-a-g-e dasher("Too low!"); // T-o-o- -l-o-w-!
You add a script element to the guessing game HTML panel to import Kallie’s code, asshown next.
<!-- Number Generator --><script src="http://output.jsbin.com/qezoce.js"></script>
<!-- spacer --><script src="http://output.jsbin.com/juneqo.js"></script>
<!-- Kallie’s code --><script src="http://output.jsbin.com/soxeke.js"></script>
No, I haven’t shown you the JavaScript of Kallie’s code. You know dasher is part of theinterface, the variables and functions you’re expected to use, and you know whatdasher does; you shouldn’t need to know how it does what it does, the implementation.Of course, you might (and probably should) be interested in the implementation, butyou don’t need to understand it in order to use the interface, the dasher function.
Listing 13.9 Importing Kallie’s code (HTML) (http://jsbin.com/zusodu/edit?html,js,console)

235Collisions—when imported code overwrites your variables
You update the guessing game to use the dasher function, as shown here.
var getGuesser = function (lowest, highest) { var secret = between(lowest, highest);
return function (userNumber) { var msg; if (userNumber === secret) { msg = dasher("Well done!"); return spacer.wrap(msg, msg.length + 4, "="); } else if (userNumber > secret) { msg = dasher("Too high!"); return spacer.wrap(msg, msg.length + 4, "+"); } else { msg = dasher("Too low!"); return spacer.wrap(msg, msg.length + 4, "-"); } };};
var guess = getGuesser(5, 10);
Happy with your work, you run the program and make a guess. Error! What? Wherehas spacer.wrap gone? Figure 13.12 shows what happened in my browser.
There seems to be a problem with spacer.wrap, which has been a working part ofyour spacer namespace since chapter 7. Why has it chosen now to break? It’s time tocheck inside Kallie’s module. If you take a look at her code in the following listing,you might spot the problem.
var spreader = function (text, character) { return text.split("").join(character); };
Listing 13.10 Using Kallie’s code (http://jsbin.com/zusodu/edit?html,js,console)
Listing 13.11 Kallie’s formatting code (http://jsbin.com/soxeke/edit?js,console)
Use dasher to space out your message
Use spacer.wrap to start and end the message with a character
Figure 13.12 For some reason, the program can’t find spacer.wrap.
Define a function to spread out text with a specified character

236 CHAPTER 13 Modules: breaking a program into pieces
var spacer = function (text) { return spreader(text, " "); };
var dasher = function (text) { return spreader(text, "-"); };
Kallie’s code doesn’t only include the dasher function; it also has a spacer function.The three variables she has used, spreader, spacer, and dasher, are global variables.Your spacer namespace also uses a global variable, spacer. Her spacer has overwrit-ten your spacer, as shown in figure 13.13.
The problem isn’t with the implementation of the functions—they work just fine—it’s with how the functions have been made available within the module. When vari-ables are added to the global scope, possibly by different people in different mod-ules, there’s always the chance that the same name will be used in more than onedeclaration.
13.5.1 Variable collisions
Your modules make their functionality available by using at least one global variable.But what happens if the same variable is used by more than one module? Well, the lastmodule wins, assigning its own value to the variable. In the guessing game code, youload two modules that use a global spacer variable and then you try to use that variable
Define a function to spread out text with spaces
Define a function to spread out text with dashes
Guessing Game
You can import as manymodules as you need, butwatch out for variable collisions
spacer
var spacer = ...
Number Generator
Kallie’s Code
var spacer = ...
Two modules declarethe spacer global variable
The second spacer overwrites the first
Figure 13.13 Two modules declare the same global variable, leading to a collision.

237Collisions—when imported code overwrites your variables
later in the program. The following snippet shows how the second spacer overwritesthe first, leading to an error when you try to use spacer.wrap.
// Code in first modulevar spacer = { line : …, wrap : …, box : … };
// Code in second modulevar spacer = function (text) { … };
// Later in the code spacer.wrap(msg, msg.length + 4, "="); // ERROR! There is no spacer.wrap.
When one declaration supersedes another like this it’s called a variable collision; thesecond variable declaration clobbers the first. You can appreciate why declaring lots ofglobal variables is called polluting the global namespace—the more variables you declare,the greater the chance of collisions. Reduce the number of global variables by usingnamespaces, discussed next, and immediately invoked function expressions, discussedin section 13.6.
13.5.2 Minimizing collisions by using namespaces
Your spacer namespace module is well behaved because it uses only a single globalvariable. Rather than separate global variables for the line, wrap, and box functions, ituses an object as a namespace and assigns the functions to properties of the object.The object is then assigned to the single variable, spacer.
Kallie apologizes for the pollution her module caused—she’s been busy—andupdates the module to use a namespace, as shown in the next listing.
var kalliesCode = {
spreader: function (text, character) { return text.split("").join(character); },
spacer: function (text) { return kalliesCode.spreader(text, " "); },
dasher: function (text) { return kalliesCode.spreader(text, "-"); }};
Listing 13.12 Kallie’s formatting code in a namespace (http://jsbin.com/moheka/edit?js,console)
Wrap the functions in an object assigned to a single global variable
Add the spacer function as a property of the namespace object
Use dot notation when calling kalliesCode functions

238 CHAPTER 13 Modules: breaking a program into pieces
You update your guessing game HTML to import the updated module (listing 13.13)and your JavaScript code to call the dasher function from within the kalliesCodenamespace (listing 13.14).
<!-- Number Generator --><script src="http://output.jsbin.com/qezoce.js"></script>
<!-- spacer --><script src="http://output.jsbin.com/juneqo.js"></script>
<!-- Kallie’s code --><script src="http://output.jsbin.com/moheka.js"></script>
var getGuesser = function (lowest, highest) { var secret = between(lowest, highest);
return function (userNumber) { var msg; if (userNumber === secret) { msg = kalliesCode.dasher("Well done!"); return spacer.wrap(msg, msg.length + 4, "="); } else if (userNumber > secret) { msg = kalliesCode.dasher("Too high!"); return spacer.wrap(msg, msg.length + 4, "+"); } else { msg = kalliesCode.dasher("Too low!"); return spacer.wrap(msg, msg.length + 4, "-"); } };};
var guess = getGuesser(5, 10);
Follow the listing link to JS Bin, run the program, and play the game. Using a name-space has fixed the problem.
= W-e-l-l- -d-o-n-e-! =
Another important way of avoiding polluting the global namespace, this time by usingfunctions, is covered next. It has a great name … and here it is!
13.6 Immediately invoked function expressions (IIFE)If the name of this section has immediately invoked a funky expression on your face, Ihope it’s one of curiosity, intrigue, and adventure rather than befuddlement, fear, or
Listing 13.13 Importing Kallie’s namespace (HTML) (http://jsbin.com/seqahi/edit?html,js,console)
Listing 13.14 Using Kallie’s code (http://jsbin.com/seqahi/edit?html,js,console)
Call the dasher function from the kalliesCode namespace
Happily use spacer.wrap

239Immediately invoked function expressions (IIFE)
horror. Immediately invoked function expressions are just functions that you call straightaway, without even bothering to use a variable. But why would you do that?
In section 13.5, you imported a module of code written by a friend, Kallie. (Hon-estly, you’ve known her for years.) Unfortunately, Kallie’s global variables collidedwith yours (ouch!) and overwrote your beloved spacer namespace. You learned animportant lesson about the dangers of global variables and vowed to do whatever youcan to reduce pollution of the global namespace. You decide to review some of yourcode, on the lookout for global variables you can remove.
You start your review with the quiz app from earlier in the chapter. The followinglisting shows the structure of your code, with global variables, local variables, and theinterface object.
var getQuiz = function () {
var qIndex = 0; var questions = [ … ]; var getQuestion = function () { … }; var checkAnswer = function (userAnswer) { … };
return { quizMe: getQuestion, submit: checkAnswer };
};
var quiz = getQuiz();
The program declares two global variables: getQuiz and quiz. On the first line youdefine a function and assign it to getQuiz.
var getQuiz = function () { … };
Then, on the last line, you immediately call the function.
var quiz = getQuiz();
So, you declare getQuiz as a global variable—nasty pollution—and then use it onlyonce before leaving it hanging around in the global scope like a bad smell. Shame onyou! Remember, global variables run the risk of clobbering other global variables;they may seem fine in small pieces of code, but as projects grow and modules are cre-ated and imported, a faint whiff of unease soon builds to the furious stench of despair.
Listing 13.15 Random quiz questions with two global variables (http://jsbin.com/ponogi/edit?html,js,console)
Define a function to create local scope and assign it to a global variable, getQuiz
Use var inside the function to declare local variables
Return an interface object to give users access to some functions
Call getQuiz and assign the interface returned to a global variable, quiz

240 CHAPTER 13 Modules: breaking a program into pieces
TIP Avoid declaring global variables, polluting the global namespace. Reducethe number of global variables by using objects as namespaces. Declare localvariables inside functions.
You can use an immediately invoked function expression to cut the number of globalvariables in half. To appreciate how to use an IIFE for the benefit of your programs,consider the following points:
■ Recognizing function expressions■ Invoking functions■ Immediately invoking function expressions■ Returning information from an IIFE
13.6.1 Recognizing function expressions
You’ve been using function expressions since chapter 4. You’ve assigned them to variablesand properties, passed them as arguments, and returned them from other functions.
var show = function (message) { // console.log(message); // Assign to a variable}; //
var namespace = { show: function (message) { // console.log(message); // Assign to a property } //};
tweets.forEach(function (message) { // console.log(message); // Pass as an argument to forEach}); //
var getFunction = function () { var localMessage = "Hello Local!";
return function () { // console.log(localMessage); // Return from a function }; //};
You’ve used functions to create blocks of code you can call on demand and to createlocal scopes, hiding variables you want to be private from the peeks and tweaks ofusers and programmers.
13.6.2 Invoking functions
To invoke, or call, a function, you use the function invocation operator, (), a pair of paren-theses. Here’s how to invoke the four example function expressions in the last section:
show("Hello World!"); // Call the show function
namespace.show("Hello World!"); // Call the show method
// Automatically called by forEach

241Immediately invoked function expressions (IIFE)
var show = getFunction(); // getFunction returns a functionshow(); // Call the returned function
You pass arguments to the functions between the parentheses of the invocation opera-tor. Any values that the functions return replace the function call.
13.6.3 Immediately invoking function expressions
You don’t need to assign a function expression to a variable in order to invoke it. Just wrapthe function expression in parentheses and append the function invocation operator:
(function () { console.log("Hello World!");})();
Figure 13.14 shows an annotated version of the code pattern.
The code in the function body runs immediately. But no global variable is used. Thefunction expression has no impact on the global namespace. Breathe in the pollution-free, piquant freshness.
13.6.4 Returning information from an IIFE
So, immediately invoked functions reduce pollution and are great for hiding your pri-vates. But there’s more! Just like any other functions, immediately invoked functionscan return values, such as objects acting as interfaces, giving you controlled access tothe secret goodies inside the functions. (Note: please think carefully about just howmuch access to your privates is appropriate.)
Listing 13.16 demonstrates how an IIFE can return an interface object that youthen assign to a variable. If you run the program, you can access the quiz interface atthe console:
> quiz.quizMe() 12 x 12> quiz.submit("144") Correct!
( function () { console.log("Hello World!"); })();
Immediately call the expressionwith the function invocation operator
Wrap the function expressionin parentheses
Figure 13.14 An immediately invoked function expression

242 CHAPTER 13 Modules: breaking a program into pieces
var quiz = (function () {
var qIndex = 0; var questions = [ … ]; var getQuestion = function () { … }; var checkAnswer = function (userAnswer) { … };
return { quizMe: getQuestion, submit: checkAnswer };
})();
You define a function, immediately invoke it, and assign the object returned to thequiz variable. Using an immediately invoked function expression just does away withthe extra variable. Rather than
var getQuiz = function () { /* private */ return interface;};var quiz = getQuiz();
you have
var quiz = (function () { /* private */ return interface;})();
You don’t need to use the getQuiz variable.The Crypt uses a number of constructors and functions and objects to build the
game. You’ve seen the benefit of modules and immediately invoked function expres-sions; let’s break the game code into modules.
13.7 The Crypt—organizing code into modulesBack at the start of this chapter, you saw how the growing amount of code in The Cryptis motivation for breaking the program into modules. Now that you’ve learned thehows and whys, it’s time to do the deed.
The next listing shows the five HTML script elements you use to load the differentmodules that make up the game.
Listing 13.16 Using an IIFE with the quiz app (http://jsbin.com/titano/edit?html,js,console)
Wrap the function in parentheses
Hide private variables within the function
Return the public interface as an object
Finish wrapping the function in parentheses and invoke it with ()

243The Crypt—organizing code into modules
<!-- spacer --><script src="http://output.jsbin.com/juneqo.js"></script>
<!-- Player constructor --><script src="http://output.jsbin.com/nubijex.js"></script>
<!-- Place constructor --><script src="http://output.jsbin.com/dofuci.js"></script>
<!-- Map code --><script src="http://output.jsbin.com/dipaxo.js"></script>
<!-- Game initialization --><script src="http://output.jsbin.com/fisupe.js"></script>
Notice that the address for the spacer module is the same one you’ve been using through-out the chapter. That’s the beauty of modules! You have a single file that’s used in multipleprojects. If you were to add a new formatting function to the spacer namespace, it wouldimmediately be available to all of the projects that import the module.
The next listing shows the single line of JavaScript needed to get the game started.
var game = theCrypt.getGame();
Run the game; it should work just the same in modular form. All of the functionality isdefined in the modules; it requires minimal code to get the game started.
Apart from spacer, the modules for The Crypt all share the same namespace, the-Crypt (figure 13.15). You start the game by calling the getGame method of the theCryptnamespace, theCrypt.getGame();
Listing 13.17 Importing modules for The Crypt (HTML) (http://jsbin.com/zikuta/edit?html,js,console)
Listing 13.18 Importing modules for The Crypt (http://jsbin.com/zikuta/edit?html,js,console)
spacerPlayer
Place
Map code
Game init
The spacer module usesa different namespace
Only a single line of codeis needed to start the game
Game Start
These modules sharea namespace
Figure 13.15 The game imports five modules. Four of them need to share a namespace.

244 CHAPTER 13 Modules: breaking a program into pieces
You know that using a namespace is a good way to reduce the number of global vari-ables and group related functions, but how can code in different module files sharethe same namespace?
13.7.1 Sharing a namespace across modules
Using what you’ve learned in this chapter, you want to do the following:
■ Use a single global namespace, theCrypt, for all of the modules that form TheCrypt.
■ Assign to the namespace only those properties and functions that are neededby other modules.
■ Hide everything else in the local scope of functions.
Modules add properties to the namespace theCrypt just as they would to any otherobject:
theCrypt.Player = Player;
But which module creates the namespace in the first place? Trying to access an unde-clared variable will cause an error. But it would be inconvenient to have to load themodules in a certain order to ensure whichever one declares theCrypt is first. Fortu-nately, in browsers, global variables are automatically assigned to the special globalobject, window.
THE GLOBAL OBJECT, WINDOW
The window object is part of the way JavaScript works with global variables in browsers.You can test out global variable declarations and window at the console prompt:
> var test = "Hi" undefined> test "Hi"> window.test "Hi"
You declare a global variable, test, and it’s automatically assigned as a property ofwindow. Back at the prompt, try accessing a nonexistent global variable:
> theCrypt "Can't find variable: theCrypt"
An error is thrown (although your browser may display a slightly different error mes-sage). On the other hand, trying to access a nonexistent property of window doesn’tthrow an error; it returns undefined:
> window.theCrypt undefined
You can use the window object to check if theCrypt has been declared as a namespacewithout causing any errors.

245The Crypt—organizing code into modules
USING WINDOW TO CHECK FOR GLOBAL VARIABLES
The next listing shows the Player module. Extra code has been wrapped around theconstructor to modularize it.
(function () {
var Player = function (name, health) { /* unchanged implementation */ };
if (window.theCrypt === undefined) { window.theCrypt = {}; }
theCrypt.Player = Player;
})();
In listing 13.19 the Player module checks the window object to see if theCrypt has beendeclared as a global variable. If the module can’t find theCrypt, then it declares it:
if (window.theCrypt === undefined) { window.theCrypt = {};}
Once the module has ensured that the namespace is present, it adds the Player con-structor as a property:
theCrypt.Player = Player;
The Player constructor is now available to other code that needs it, via the global vari-able theCrypt.
The next listing shows the Place module using the same global namespace.
(function () {
var Place = function (title, description) { /* unchanged implementation */ };
if (window.theCrypt === undefined) { window.theCrypt = {}; }
theCrypt.Place = Place;
})();
Listing 13.19 The Player constructor as a module (http://jsbin.com/nubijex/edit?js)
Listing 13.20 The Place constructor as a module (http://jsbin.com/dofuci/edit?js)
Wrap the constructor in a function to create a local scope
Don’t touch the Player constructor
Ensure there’s a global namespace called theCrypt
Assign the Player constructor to the namespaceImmediately invoke the
function expression
Assign the Place constructor to the namespace

246 CHAPTER 13 Modules: breaking a program into pieces
Having each module check for theCrypt as a global variable on the window objectmeans no one module is required to be loaded first because it’s the one that createsthe namespace. They all check for theCrypt. The first module to be loaded won’t findit and will create it before using it. Modules loaded after the first will find theCryptand assign to it the properties they want to be shared.
ASSIGNING NAMESPACE PROPERTIES TO LOCAL VARIABLES
You like the way a namespace cuts down on global variables, but you’re not so keen onhaving to do more typing to use the shared properties. For example, the map codemodule needs to create places in The Crypt using the Place constructor:
var kitchen = new Place("The Kitchen", "You are in a kitchen…");
But you’ve moved the Place constructor into a namespace, theCrypt. You couldchange all of the references to Place in the map code:
var kitchen = new theCrypt.Place("The Kitchen", "You are in a kitchen…");var library = new theCrypt.Place("The Old Library", "You are in a lib…");
But it can be easier to create a local Place variable and leave the original code alone:
var Place = theCrypt.Place;
var kitchen = new Place("The Kitchen", "You are in a kitchen…");
That’s a handy way to reduce typing if you need to use a namespace property multi-ple times.
Having moved sections of code into their own modules, you can start to think care-fully about what each module does. Could they be split into smaller modules that havemore specific tasks? The next three chapters look at some common tasks and the codepatterns that are often seen in programs that use and display data that changes: mod-els, views, and controllers.
13.8 Summary■ Break up programs into modules, sections of code that can be loaded inde-
pendently.■ Use the same module in multiple projects.■ Load modules in JS Bin by using an HTML script element:
<script src="path/to/module.js"></script>
■ Specify the location of the module file in the script element’s src attribute.■ Minimize variable collisions, where one variable is overwritten by another, by
using namespaces and immediately invoked function expressions.

247Summary
■ Create immediately invoked function expressions by wrapping a function defi-nition in parentheses and appending the function invocation operator, ().
(function () { // Code to be executed immediately })();
■ Return an interface from the immediately invoked function expression. This iscalled the module pattern:
var game = (function () { // Local variables go here
return { // Interface methods }; })();
■ Make sure you load any modules that other modules depend on.

Models: working with data
In chapter 13, you saw how you can use modules to break a program into separatefiles. You can then work on the modules independently, easily switch between mod-ules, and reuse them across multiple projects. You can even publish your modulesand import published modules written by others.
This chapter maintains that spirit of modularization and reuse. You look at mov-ing data out of constructors and functions. You represent the data simply so thatmultiple apps can use the data, even if the apps are written in different program-ming languages. You then consider how to feed that data into constructors andfunctions to build models that add extra functionality. Finally, you define map datafor The Crypt, adding challenges to make the game more engaging.
This chapter covers■ Building models from data■ Using the same data in multiple projects■ Switching between data files■ Specifying map data in The Crypt
248

249Building a fitness app—data and models
14.1 Building a fitness app—data and modelsYour development work has really gotten you noticed (The Fruitinator! was a globalsmash), and you’re now part of a team developing a fitness application. Health-conscioususers track their exercise, logging the date and duration of each session.
Mahesha120 minutes on February 5th, 201735 minutes on February 6th, 2017
2 hours 35 minutes so far.Great work!
The team is working on an Android version of the app using the Python programminglanguage, an iOS version using Swift, and a web-based version using JavaScript. Thesame data will be used in all versions (figure 14.1).
Tasks involved in building the app include:
1 Retrieve user data as a string2 Convert user data into user models3 Display user data4 Provide an interface for users to add sessions
The data is transferred across the internet as text. The format of the text is JSON,which you’ll look at in chapter 20. As you’ll see then, the text is easy to convert into aJavaScript object. The team has asked you to concentrate on the second task, buildinguser models from user data.
The same data is used by all of the apps
Android App iOS App
The fitness app server makes the data available
Web App
User Data
Figure 14.1 The same data is used by the different versions of the app.

250 CHAPTER 14 Models: working with data
14.1.1 Defining a User constructor
You’ve been asked to write JavaScript code to model a fitness app user. Your modelneeds to do the following:
1 Store the user’s name.2 Store a list of exercise sessions for the user, each with a date and duration.3 Include a method for adding sessions to the list.4 Include a method for retrieving data about the user.
Listing 14.1 shows your initial constructor function. You test it on the console:
> var user = new User("Mahesha") undefined> user.addSession("2017-02-05", 120) 120> user.addSession("2017-02-06", 35) 155> user.getData().total 155
var User = function (name) {
var sessions = []; var totalDuration = 0;
this.addSession = function (sessionDate, duration) {
sessions.push({ "sessionDate" : sessionDate, "duration" : duration });
totalDuration += duration;
return totalDuration; };
this.getData = function () { return { "name" : name, "total" : totalDuration, "sessions": sessions.slice() }; };};
The constructor includes a name parameter, some private variables declared using var,and two public methods assigned to the this object, addSession and getData. ThegetData method uses slice with no arguments to grab a copy of the sessions array.
Listing 14.1 The User constructor (http://jsbin.com/suzala/edit?js,console)
Declare private variables
Add a session object to the sessions array
Add the current session’s duration to the total
Define a function to retrieve user data
Use slice to copy the sessions array

251Building a fitness app—data and models
(See chapter 8 for a reminder on array methods like slice.) Providing a copy of thesession information prevents users from tweaking the sessions array outside the add-Session method. The object that getData returns also includes a total property, hold-ing the total duration of the logged sessions.
When you create a JavaScript object using the User constructor, you create a usermodel. The model is more than just data; it includes private variables and public meth-ods for managing the data, as shown in figure 14.2.
If the model is more than the data, what does the data look like?
14.1.2 Getting a feel for the data as a JavaScript object
The data for a user is a simple JavaScript object:
var userData = { "name" : "Mahesha", "sessions" : [ { "sessionDate" : "2017-02-05", "duration" : 120 }, { "sessionDate" : "2017-02-06", "duration" : 35 }, { "sessionDate" : "2017-02-06", "duration" : 45 } ]};
You can access its properties, like userData.name. But it’s still just data; it doesn’t havethe extra capabilities of a model built with the User constructer, like an addSession orgetData method. The data object is shown again in figure 14.3 for comparison withfigure 14.2.
The special this object is returned
user = new User( "Mahesha" )
function ( name )
{ addSession: function (session) { ... }, getData: function () { ... }}
user =
/* private */
this.addSession = function (session) { ... };this.getData = function () { ... };
The return valuereplaces thefunction call
A user model with private data and public methods
The User constructor function
Figure 14.2 A user model created by the User constructor function

252 CHAPTER 14 Models: working with data
Using simple JavaScript objects as the format for data is very common, even in otherprogramming languages and especially on the web. Your team developing the fitnessapp is very happy that the user data is represented in such a well-supported form.
In order to make the most of the extra methods provided by a user model,addSession and getData, you need to define a function to build a model from thebasic data object.
14.1.3 Converting the data into a user model
In listing 14.3, you define the buildUser function that takes data for a single user asa JavaScript object and creates a model by calling the User constructor. You test thebuildUser function by creating a user model with it from a JavaScript object. Add-ing one extra exercise session for the created user produces the following output onthe console:
> 240
You’re using the User constructor from listing 14.1, so you import that by addingan HTML script element to the project (see chapter 13), as shown first in the nextlisting.
<!-- User constructor --><script src="http://output.jsbin.com/suzala.js"></script>
var buildUser = function (userData) {
var user = new User(userData.name);
userData.sessions.forEach(function (session) { user.addSession( session.sessionDate, session.duration); });
return user; };
Listing 14.2 A function to build a user model from user data (HTML) (http://jsbin.com/zenire/edit?html,js,console)
Listing 14.3 A function to build a user model from user data (http://jsbin.com/zenire/edit?html,js,console)
User data as a simple JavaScript object
{ name: "Mahesha", sessions: [ ... ]}
user =
Figure 14.3 User data represented as a simple JavaScript object
Create a new user object with the User constructor
Add each session
Return the newly created user model
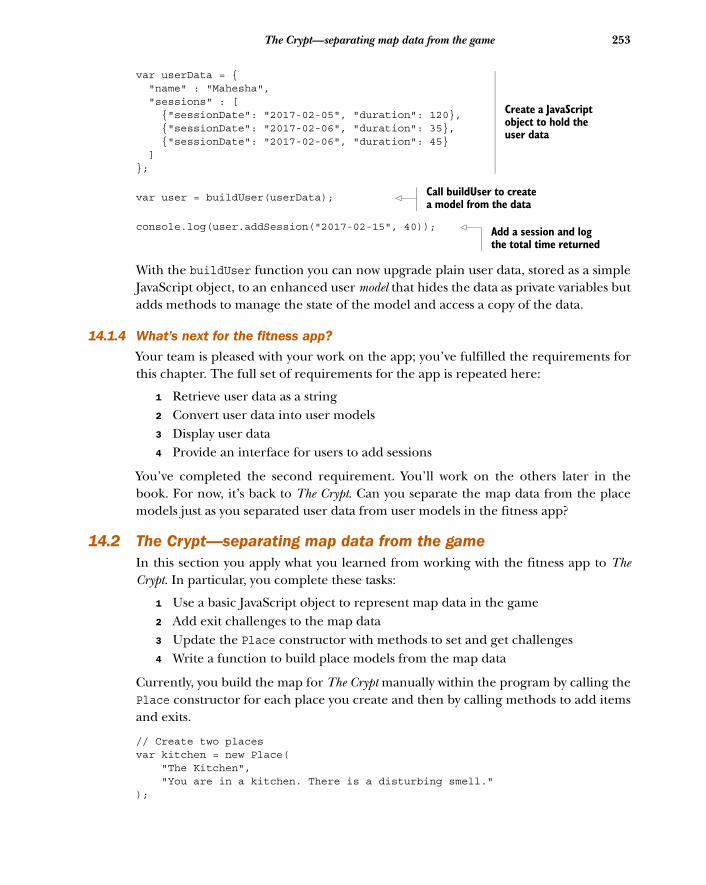
253The Crypt—separating map data from the game
var userData = { "name" : "Mahesha", "sessions" : [ {"sessionDate": "2017-02-05", "duration": 120}, {"sessionDate": "2017-02-06", "duration": 35}, {"sessionDate": "2017-02-06", "duration": 45} ] };
var user = buildUser(userData);
console.log(user.addSession("2017-02-15", 40));
With the buildUser function you can now upgrade plain user data, stored as a simpleJavaScript object, to an enhanced user model that hides the data as private variables butadds methods to manage the state of the model and access a copy of the data.
14.1.4 What’s next for the fitness app?
Your team is pleased with your work on the app; you’ve fulfilled the requirements forthis chapter. The full set of requirements for the app is repeated here:
1 Retrieve user data as a string2 Convert user data into user models3 Display user data4 Provide an interface for users to add sessions
You’ve completed the second requirement. You’ll work on the others later in thebook. For now, it’s back to The Crypt. Can you separate the map data from the placemodels just as you separated user data from user models in the fitness app?
14.2 The Crypt—separating map data from the gameIn this section you apply what you learned from working with the fitness app to TheCrypt. In particular, you complete these tasks:
1 Use a basic JavaScript object to represent map data in the game2 Add exit challenges to the map data3 Update the Place constructor with methods to set and get challenges4 Write a function to build place models from the map data
Currently, you build the map for The Crypt manually within the program by calling thePlace constructor for each place you create and then by calling methods to add itemsand exits.
// Create two placesvar kitchen = new Place( "The Kitchen", "You are in a kitchen. There is a disturbing smell.");
Create a JavaScript object to hold the user data
Call buildUser to create a model from the data
Add a session and log the total time returned

254 CHAPTER 14 Models: working with data
var library = new Place( "The Old Library", "You are in a library. Dusty books line the walls.");
kitchen.addItem("a piece of cheese"); // Add items separatelylibrary.addItem("a rusty key"); //
kitchen.addExit("south", library); // Add exits separatelylibrary.addExit("north", kitchen); //
The map data (the descriptions of places, exits, and items) are bound up with theJavaScript that creates the objects used by the game; the only place in the code youcan find out about map locations is inside calls to the Place constructor.
var library = new Place( "The Old Library", // Data inside "You are in a library. Dusty books line the walls." // constructor);
Details about exits and items for places are separated from the places themselves. You saw in section 14.1 that data can be more easily shared when represented in a
common format; other programs and programming languages can read data format-ted as simple JavaScript objects but don’t know about your Place objects. If you sepa-rate the raw map data from the constructor function and methods like addItem andaddExit, it will be easier to define new maps, store them, switch them, and share them(figure 14.4).
spacer
Player
Place
Map code
Game init
Separate the map datafrom the code that builds
Place objects
Map data
spacer
Player
Place
Map builder
Game init
Map2 data
Map3 data
Switch the map data for differentadventures more easily
and share it with other apps
Current version
New version
Figure 14.4 Splitting the map data from the map builder makes it easier to switch maps.

255The Crypt—separating map data from the game
Give m
To achieve such a separation of data and game code, you have to decide what form thedata will take and then write a function to convert the data into the Place models thatthe game uses.
14.2.1 Map data
A JavaScript object with a title, a list of places, and the name of the starting place willrepresent each map.
{ "title": "The Dark House", "firstPlace" : "The Kitchen", "places" : [ // Array of place objects ]};
Each place within the places array will also be an object. The following snippet showsone such place:
{ "title" : "The Kitchen", "description" : "You are in a kitchen. There is a disturbing smell.", "items" : [ "a piece of cheese" ], "exits" : [ { "direction" : "south", "to" : "The Old Library" }, { "direction" : "west", "to" : "The Kitchen Garden" }, { "direction" : "east", "to" : "The Kitchen Cupboard" } ]};
Each exit is an object with properties for its direction and the title of the place towhich it leads. The data is compact and readable and keeps items and exits with theplaces to which they belong.
The following listing shows a section of map data. The four complete locations areon JS Bin.
var mapData = { "title" : "The Dark House", "firstPlace" : "The Kitchen",
"places" : [ { "title" : "The Kitchen", "description" : "You are in a kitchen. There is a disturbing smell.", "items" : [ "a piece of cheese" ], "exits" : [ { "direction": "south", "to": "The Old Library" }, { "direction": "west", "to": "The Kitchen Garden" },
Listing 14.4 Map data (http://jsbin.com/qonoje/edit?js,console)
eachap atitle
Include the title of the first location in the map
List all of the place objects in the places array
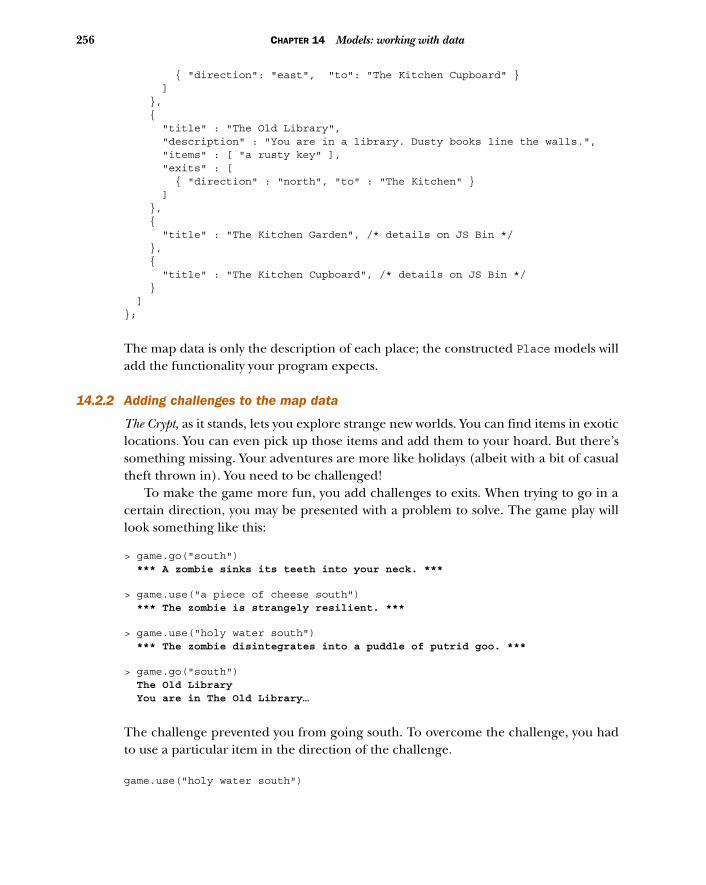
256 CHAPTER 14 Models: working with data
{ "direction": "east", "to": "The Kitchen Cupboard" } ] }, { "title" : "The Old Library", "description" : "You are in a library. Dusty books line the walls.", "items" : [ "a rusty key" ], "exits" : [ { "direction" : "north", "to" : "The Kitchen" } ] }, { "title" : "The Kitchen Garden", /* details on JS Bin */ }, { "title" : "The Kitchen Cupboard", /* details on JS Bin */ } ]};
The map data is only the description of each place; the constructed Place models willadd the functionality your program expects.
14.2.2 Adding challenges to the map data
The Crypt, as it stands, lets you explore strange new worlds. You can find items in exoticlocations. You can even pick up those items and add them to your hoard. But there’ssomething missing. Your adventures are more like holidays (albeit with a bit of casualtheft thrown in). You need to be challenged!
To make the game more fun, you add challenges to exits. When trying to go in acertain direction, you may be presented with a problem to solve. The game play willlook something like this:
> game.go("south") *** A zombie sinks its teeth into your neck. ***
> game.use("a piece of cheese south") *** The zombie is strangely resilient. ***
> game.use("holy water south") *** The zombie disintegrates into a puddle of putrid goo. ***
> game.go("south") The Old Library You are in The Old Library…
The challenge prevented you from going south. To overcome the challenge, you hadto use a particular item in the direction of the challenge.
game.use("holy water south")

257The Crypt—separating map data from the game
If you don’t have the required item, you have to go adventuring in a different direc-tion, overcoming other challenges, until you find the item you need. So, how do youcreate challenges in the game?
All of the information about an adventure in The Crypt needs to be represented inits map data. At the moment, the exits from a place are simple:
{ "direction" : "south", "to" : "The Old Library" }
They have a direction and the title of the place to which they lead. To add a challengeto a particular exit, include a challenge property, like this:
{ "direction" : "south", "to" : "The Old Library", "challenge" : { "message" : "A zombie sinks its teeth into your neck.", "success" : "The zombie disintegrates into a puddle of goo.", "failure" : "The zombie is strangely resilient.", "requires" : "holy water", "itemConsumed" : true, "damage" : 20 }}
Table 14.1 lists the properties of the challenge object along with their purpose andwhether they’re required.
To accommodate the challenges, you need to update the Place constructor.
Table 14.1 Challenge properties
Property What is it for? Required?
message The message displayed to the player when they try to go in the direction of the exit and the challenge has not been overcome
Yes
success The message displayed to the player when they use the item required to overcome the challenge
Yes
failure The message displayed to the player when they try to use the wrong object to overcome the challenge
Yes
requires The item required to overcome the challenge Yes
itemConsumed If the item is removed from the player’s list of items once it is used No
damage The amount subtracted from the player’s health when they try to go in the direction of the exit before they have overcome the challenge
No

258 CHAPTER 14 Models: working with data
14.2.3 Updating the Place constructor to include challenges
You have to update the Place model to allow for challenges. It needs an object inwhich to store the challenges, and methods, addChallenge and getChallenge, foradding and retrieving challenges for a specified direction. The next listing shows thechanges to the Place constructor.
var Place = function (title, description) { // other variables var challenges = {};
// other methods
this.addChallenge = function (direction, challenge) { challenges[direction] = challenge; };
this.getChallenge = function (direction) { return challenges[direction]; }; };
You create a private challenges object to store any challenges. Just like for exits,you use directions as the keys for stored challenges. If a player must overcome achallenge before moving south, the details of the challenge will be stored inchallenges["south"].
To store a challenge use the addChallenge method, and to retrieve a challenge fora specified direction use the getChallenge method.
14.2.4 Using the map data to build a game map
Your implementation of The Crypt uses models created with the Place constructorlinked with exits. Now that your map data is no longer tied up with the game logic,you need a way to convert the map into a set of place models.
You write a function called buildMap that takes a map data object as an argumentand creates the place models, linked by their exits. It returns the model of the firstplace on the map, the starting point of the game.
var firstPlace = buildMap(mapData);
Figure 14.5 shows how the buildMap function uses forEach twice: first to create theplace models and then to join the models by adding exits.
Listing 14.5 A Place constructor with challenges (http://jsbin.com/ruviso/edit?js,console)
Create an empty object in which to store any challenges
The addChallenge method stores a challenge for a specified direction.
The getChallenge method returns the stored challenge for a specified direction.

259The Crypt—separating map data from the game
The buildMap function is shown in listing 14.6 and follows these steps:
1 Create a model for each place (buildPlace)
a Call the Place constructor with the title and descriptionb Add any items to the newly created place modelc Put the place model in the places store
2 Add the exits and challenges for each place (buildExits)
a Retrieve the place model from the places storeb Add an exit to the model for each exit in the place’s datac Add a challenge for each exit in the place’s data
3 Return the model for the first place in the game
var buildMap = function (mapData) { var placesStore = {};
Listing 14.6 The map builder (http://jsbin.com/paqihi/edit?js,console)
Return the place at whichthe game starts
var placesStore = {};
mapData.places.forEach(buildPlace);
mapData.places.forEach(buildExits);
var buildPlace = function (placeData) {...};var buildExits = function (placeData) {...};
return placesStore[mapData.firstPlace];
function ( mapData )
firstPlace = buildMap ( mapData )
firstPlace =
The return valuereplaces thefunction call
Create all theplace models andadd them to theplaces store
Link the placemodels viatheir exits
Figure 14.5 First, all of the place models are created; then they’re linked via their exits.
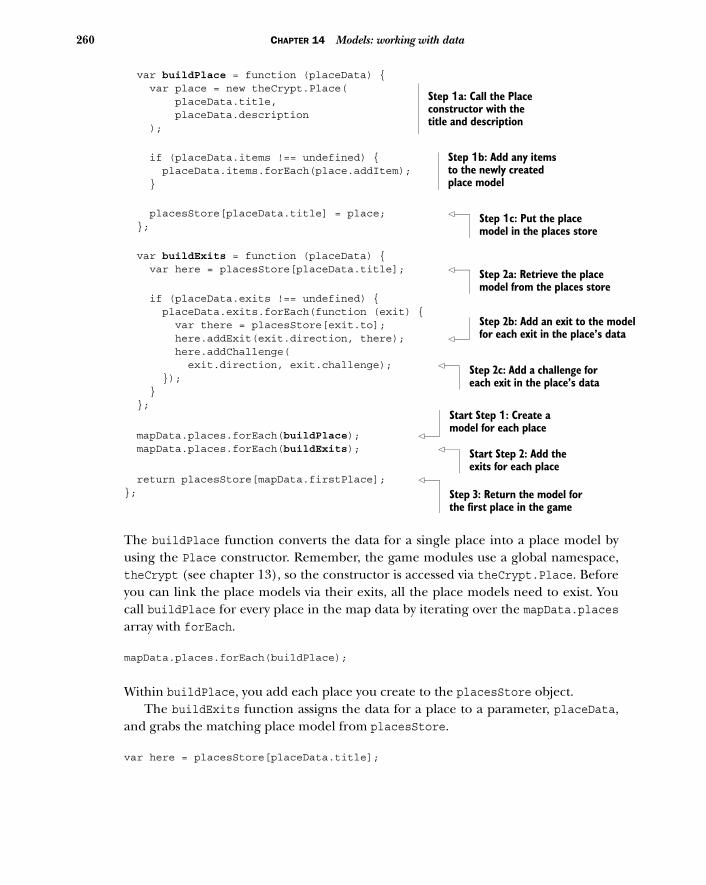
260 CHAPTER 14 Models: working with data
l
var buildPlace = function (placeData) { var place = new theCrypt.Place( placeData.title, placeData.description );
if (placeData.items !== undefined) { placeData.items.forEach(place.addItem); }
placesStore[placeData.title] = place; };
var buildExits = function (placeData) { var here = placesStore[placeData.title];
if (placeData.exits !== undefined) { placeData.exits.forEach(function (exit) { var there = placesStore[exit.to]; here.addExit(exit.direction, there); here.addChallenge( exit.direction, exit.challenge); }); } };
mapData.places.forEach(buildPlace); mapData.places.forEach(buildExits);
return placesStore[mapData.firstPlace]; };
The buildPlace function converts the data for a single place into a place model byusing the Place constructor. Remember, the game modules use a global namespace,theCrypt (see chapter 13), so the constructor is accessed via theCrypt.Place. Beforeyou can link the place models via their exits, all the place models need to exist. Youcall buildPlace for every place in the map data by iterating over the mapData.placesarray with forEach.
mapData.places.forEach(buildPlace);
Within buildPlace, you add each place you create to the placesStore object. The buildExits function assigns the data for a place to a parameter, placeData,
and grabs the matching place model from placesStore.
var here = placesStore[placeData.title];
Step 1a: Call the Place constructor with the title and description
Step 1b: Add any items to the newly created place model
Step 1c: Put the place model in the places store
Step 2a: Retrieve the place model from the places store
Step 2b: Add an exit to the modefor each exit in the place’s data
Step 2c: Add a challenge for each exit in the place’s data
Start Step 1: Create a model for each place
Start Step 2: Add the exits for each place
Step 3: Return the model for the first place in the game

261The Crypt—separating map data from the game
It assigns the model to the here variable. Because place models have an addExitmethod, you can use here.addExit to add exits for the current model. The exits datalooks like this:
"exits" : [ { "direction": "south", "to": "The Old Library", "challenge" : { "message" : "A zombie sinks its teeth into your neck.", "success" : "The zombie disintegrates into a puddle of goo.", "failure" : "The zombie is strangely resilient.", "requires" : "holy water", "itemConsumed" : true, "damage" : 20 } }, { "direction": "west", "to": "The Kitchen Garden" }, { "direction": "east", "to": "The Kitchen Cupboard" }]
So, buildExits runs through the exit data, if it exists, and calls addExit and add-Challenge for each exit it finds.
placeData.exits.forEach(function (exit) { var there = placesStore[exit.to]; here.addExit(exit.direction, there); here.addChallenge(exit.direction, exit.challenge);});
The to property of each exit gives the title of the place to which the exit leads. Theplace model to which the exit leads can thus be found in placesStore by usingexit.to as the key.
You add a challenge to every exit, whether or not a challenge is present in themap data.
here.addChallenge(exit.direction, exit.challenge);
If there’s no challenge for the exit in the map data, then exit.challenge will beundefined. When you write code to work with challenges in chapter 16, you’ll check ifa challenge is undefined before trying to use it.
Et voila! By calling buildPlaces and buildExits for every place, you’ve created aninterlinked map of place models for intrepid adventurers to explore. Will they findriches and glory? Will they discover enlightenment? Or will they meet their doom?Well, they’ll need to start somewhere, and that’s why the buildMap function returnsthe place model specified as the first model on the map.
return placesStore[mapData.firstPlace];

262 CHAPTER 14 Models: working with data
You’ve successfully separated the map data from the game implementation. The datais in a form that can be reused across projects and programming languages.
If you follow the JS Bin link for listing 14.6, you’ll see that the full code wraps thebuildMap function in an immediately invoked function expression and assigns build-Map to your global namespace, theCrypt. It’s the same mechanism used for all of yourmodules, so it isn’t shown in the printed listing.
14.2.5 Bringing all the pieces together to run the game
The game initialization module requires a tiny tweak. Here you update the call tobuildMap, passing it the data from the new map data module.
var getGame = function () {
var render = function () { … };
var firstPlace = theCrypt.buildMap(theCrypt.mapData);
var player = new theCrypt.Player("Kandra", 50); player.addItem("The Sword of Doom"); player.setPlace(firstPlace);
render();
// Return the public interface return { go: function (direction) { … }, get: function () { … } };};
The buildMap function returns the place where the adventure begins, and that is setas the player’s location.
You also need to add an HTML script element to import the map data module inThe Crypt. The next listing shows the HTML panel for the latest version of the game.
<!-- spacer --><script src="http://output.jsbin.com/juneqo.js"></script>
<!-- Player constructor --><script src="http://output.jsbin.com/nubijex.js"></script>
<!-- Place constructor --><script src="http://output.jsbin.com/ruviso.js"></script>
<!-- map data (Kitchen example with challenge) --><script src="http://output.jsbin.com/jayici.js"></script>
Listing 14.7 Using the new map builder (http://jsbin.com/mogano/edit?js,console)
Listing 14.8 Using the map builder (HTML) (http://jsbin.com/rulayu/edit?html,console)
Pass the map data to the buildMap function

263Summary
<!-- map builder --><script src="http://output.jsbin.com/paqihi.js"></script>
<!-- Game initialization --><script src="http://output.jsbin.com/mogano.js"></script>
Have a play. It should work exactly as it did before, with the two commands game.goand game.get available. You won’t spot the zombie (although it’s there, lurking in theshadows of the map data)—you’ll incorporate the challenges into the gameplay inchapter 16.
One of the aims of separating map data from the map building code was to moreeasily switch between maps. So because you’ve done so well, here’s the exact samegame code but with a different map file. (It’s an old Jedi map trick!)
THE SPARROW
Map data: http://jsbin.com/woniqo/edit?js
Game: http://jsbin.com/dequzi/edit?console
You can take this whole modularization drive even further and separate the displayof players and places from the models. Chapter 15 guides you on the next leg ofyour journey.
14.3 Summary■ Represent data in a form that’s easy to reuse across projects, apps, and program-
ming languages. Simple JavaScript objects are a common format for exchang-ing data on the web.
■ Separate the data from the program logic to make it easier to switch betweendata sources.
■ Define models that enhance the data, adding functionality and hiding privatevariables, ready to be used by other parts of your program.
■ Define functions to create models from the data.

Views: displaying data
The console isn’t the only place where you can display information for your users;I’m pretty sure you’re keen to see how to output data on a web page! There are alsodesktop and phone applications, emails, and print documents to consider. Even onthe console you may want the flexibility of a number of different formats for youroutput; maybe you want a simple text version and a fancy version with boxes andborders. You don’t want to have to rewrite large portions of your programs tochange the way they present information.
Views are focused modules of code that concentrate on displaying information.They take data and create visual output based on it. They may include controls like but-tons and text boxes, but you’ll leave that for part 3. Moving your display code into viewslets you switch the type of output you want or display data in multiple ways without hav-ing to change other parts of your code, like the constructor functions for models.
In this chapter, you create views in the context of two examples, the fitness appand The Crypt. For the fitness app, you build a simple console view and then anenhanced version using the spacer namespace for formatting. For The Crypt, you
This chapter covers■ Presenting data with views■ Removing display code from constructors■ Passing the same model to multiple views
264

265Building a fitness app—displaying the latest user data
separate out the display code that’s currently in the Player and Place constructorfunctions, moving it into new player and place views.
All this modularization you’ve been pursuing throughout part 2 may seem like anuphill struggle, but the flexibility it gives you to update functionality by switching simpleblocks of code in and out of a project is well worth the effort. And the views are magnificent!
15.1 Building a fitness app—displaying the latest user dataYou and your team are hard at work writing a multiplatform fitness app that lets userslog their exercise. The tasks involved in building the app include:
1 Retrieving user data as a string.2 Converting user data into user models.3 Displaying user data.4 Providing an interface for users to add sessions.
You’ve already managed to convert a user’s data from a simple JavaScript object into auser model with added functionality, including addSession and getData methods(see chapter 14). Now it’s time to work on displaying the user data.
You’re going to create two views, code that takes a user model and displays datafrom the model. Figure 15.1 shows how different views can work with the same singlemodel to produce different output.
Console View
Mahesha35 minutes on February 5th45 minutes on February 6th
1 hour 20 minutes so far.Great work!
Enhanced View
Mahesha--------------------------35 minutes on February 5th45 minutes on February 6th
1 hour 20 minutes so far.--------------------------**************** Great work! ****************
HTML View
<h2>Mahesha</h2><ul><li>35 minutes on February 5th</li><li>45 minutes on February 6th</li></ul><p>1 hour 20 minutes so far.</p><p><strong>Great work!</strong></p>
User Model
Figure 15.1 The same user model is used by different views to produce different output.
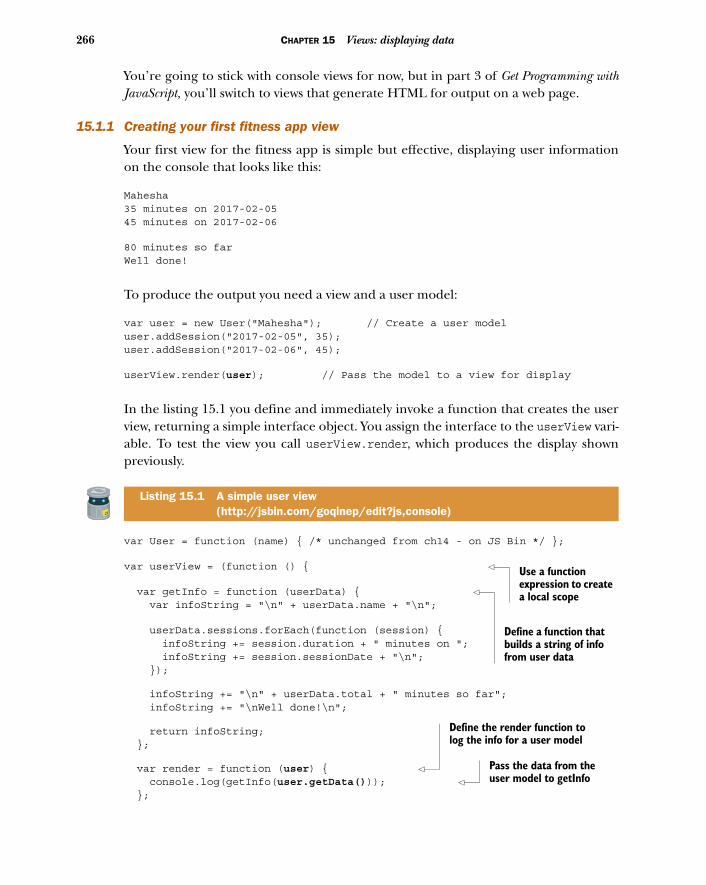
266 CHAPTER 15 Views: displaying data
You’re going to stick with console views for now, but in part 3 of Get Programming withJavaScript, you’ll switch to views that generate HTML for output on a web page.
15.1.1 Creating your first fitness app view
Your first view for the fitness app is simple but effective, displaying user informationon the console that looks like this:
Mahesha35 minutes on 2017-02-0545 minutes on 2017-02-06
80 minutes so farWell done!
To produce the output you need a view and a user model:
var user = new User("Mahesha"); // Create a user modeluser.addSession("2017-02-05", 35);user.addSession("2017-02-06", 45);
userView.render(user); // Pass the model to a view for display
In the listing 15.1 you define and immediately invoke a function that creates the userview, returning a simple interface object. You assign the interface to the userView vari-able. To test the view you call userView.render, which produces the display shownpreviously.
var User = function (name) { /* unchanged from ch14 - on JS Bin */ };
var userView = (function () {
var getInfo = function (userData) { var infoString = "\n" + userData.name + "\n";
userData.sessions.forEach(function (session) { infoString += session.duration + " minutes on "; infoString += session.sessionDate + "\n"; });
infoString += "\n" + userData.total + " minutes so far"; infoString += "\nWell done!\n";
return infoString; };
var render = function (user) { console.log(getInfo(user.getData())); };
Listing 15.1 A simple user view (http://jsbin.com/goqinep/edit?js,console)
Use a function expression to create a local scope
Define a function that builds a string of info from user data
Define the render function to log the info for a user model
Pass the data from the user model to getInfo

267Building a fitness app—displaying the latest user data
return { render: render };
})();
var user = new User("Mahesha"); user.addSession("2017-02-05", 35); user.addSession("2017-02-06", 45);
userView.render(user);
You wrap the view code in an immediately invoked function expression to create alocal scope, hiding implementation details, without the need for an extra global vari-able. (See chapter 13 for more on IIFEs and the perils of global pollution.)
The User constructor for user models from chapter 14 is included at the start ofthe listing. The user model provides a getData method that returns a simple Java-Script object:
{ "name" : "Mahesha", "total" : 80, "sessions" : [ { "sessionDate" : "2017-02-05", "duration" : 35 }, { "sessionDate" : "2017-02-06", "duration" : 45 } ]}
The view’s getInfo function uses that data object to build the string of informationshown before the listing.
But why stop at one view when you can have two?
15.1.2 Using modules to switch fitness app views
Ultimately, you’ll present a number of views to your team from which they’ll choosethe best to go into production with the fitness app. The second view you add to yourportfolio uses the formatting functions from the spacer namespace to add bordersand boxes to the view’s output. It’s called fitnessApp.userViewEnhanced, and you cansee the view’s code as a module on JS Bin:http://jsbin.com/puculi/edit?js,console. Itproduces output like this:
Mahesha----------------------------35 minutes on 2017-02-0545 minutes on 2017-02-06
80 minutes so far----------------------------
*************** Well done! ***************
Return a simple interface object that gives access to the render function Immediately invoke
the enclosing function expression
Create a user model and add two sessions
Display user info

268 CHAPTER 15 Views: displaying data
(The code for the second view is similar to the first. Here, I’m more interested inshowing how multiple views can be used, so I’ve omitted the second view’s code fromthe book.)
The next listing shows the HTML script elements used to import the spacer andfitnessApp modules. Notice, two view modules are imported.
<!-- spacer --><script src="http://output.jsbin.com/juneqo.js"></script>
<!-- fitnessApp.User --><script src="http://output.jsbin.com/fasebo.js"></script>
<!-- fitnessApp.userView --><script src="http://output.jsbin.com/yapahe.js"></script>
<!-- fitnessApp.userViewEnhanced --><script src="http://output.jsbin.com/puculi.js"></script>
The following listing shows the JavaScript used to test the two views you’ve created.
var user = new fitnessApp.User("Mahesha"); user.addSession("2017-02-05", 35); user.addSession("2017-02-06", 45);
fitnessApp.userView.render(user);
fitnessApp.userViewEnhanced.render(user);
What lovely views! They both work well, displaying data from the same user model, soit will be easy to use whichever your team chooses. And it will be easy for you or otherson the team to create more views if needed (that web view would be nice) without hav-ing to touch the user model code.
15.1.3 What’s next for the fitness app?
You’ve created user models from data and displayed that data in a number of waysusing views. Your next job is to give users a simple way to log their exercise sessions atthe console, getting the views to re-render the display as the data changes. You’ll dothat by creating a fitness app controller in chapter 16.
15.2 The Crypt—moving view code from Player and PlaceIn the last section you saw how to create a view from scratch. You had a user model thatprovided data, and you wrote view code to display the data. In this section you workwith existing models, Player and Place, from The Crypt. The code to display model
Listing 15.2 Testing two user views (HTML) (http://jsbin.com/vamuzu/edit?html,js,console)
Listing 15.3 Testing two user views (http://jsbin.com/vamuzu/edit?html,js,console)
Create a user model and add two sessions
Test the first user view
Test the enhanced user view

269The Crypt—moving view code from Player and Place
data is currently mixed in with the models themselves. Figure 15.2 shows all of themodules in the current and new versions of the game. To change to the new version,you’ll separate the display code from the Player and Place models, creating two views,playerView and placeView.
You’ll update players first and then places.
15.2.1 Creating a view for players
On the left of figure 15.3 are the functions currently defined in the Player model,before you make any changes. As it stands, the model includes six functions (on thetop left) for the display of player information. You want the model to be concernedonly with the management of player data, not with its display. The right of figure 15.3
Map data
spacer
Player
Place
Map builder
Game init
New version
Map data
spacerPlayer
playerView
Place
placeView
Map builder
Game init
Current version Move the view code into its own modules
Figure 15.2 Move the view functions from the Player and Place models into their own modules
addItem removeItem
applyDamagehasItem
setPlace getPlace
getData
getNameInfo
getHealthInfo
getItemsInfo
addItem
setPlace getPlace
getTitleInfo
getInfo
showInfo
Player
playerView
Player
Move display functionsto their own module
Keep the datamanagement functions
in the Player model
getNameInfo
getHealthInfo
getItemsInfo
getTitleInfo
getInfo
render
Before
After
Figure 15.3 Move the display functions from the Player model into their own module.

270 CHAPTER 15 Views: displaying data
shows an updated Player model with some extra methods to be added as well as a newmodule called playerView, concerned only with the display of player information.You create those two modules now.
THE MODEL
Models are more than just data. They provide methods for managing the data—add-ing, deleting, updating—and can prevent direct access to the data. To create a playermodel you call the Player constructor with the new keyword.
var player = new Player("Jahver", 80);
Listing 15.4 shows the new Player constructor. Although you don’t want the Playermodel to bother with the display of its data, you do need to make that data available toany view that requires it. You still want to protect the private data from cheeky tweaks,so you create a method, getData, that returns a copy of the data. The data returnedwill look like this:
{ "name" : "Jahver", "health" : 80, "items" : [ "a rusty key" ], "place" : "The Crypt"}
In order to work with challenges in chapter 16, you add three more methods to thePlayer constructor: hasItem, removeItem, and applyDamage. If you head to JS Binand run the code for the new constructor, you can perform the following actions atthe console prompt (responses of undefined have been left out):
Create a player, add a couple of items, and get the player’s data:
> var p = new theCrypt.Player("Dax", 10)> p.addItem("a key")> p.addItem("a lamp")> p.getData() [object Object] { health: 10, items: ["a key", "a lamp"], name: "Dax" }
Use the new item methods to check if the player has an item and to remove an item:
> p.hasItem("a key") true> p.hasItem("a sword") false> p.removeItem("a key")> p.getData().items ["a lamp"]

271The Crypt—moving view code from Player and Place
Apply damage to the player and check their health:
> p.applyDamage(2)> p.getData().health 8> p.applyDamage(10)> p.getData().health -2
(function () {
var Player = function (name, health) { var items = []; var place = null;
this.addItem = function (item) { items.push(item); };
this.hasItem = function (item) { return items.indexOf(item) !== -1; };
this.removeItem = function (item) { var itemIndex = items.indexOf(item); if (itemIndex !== -1) { items.splice(itemIndex, 1); } };
this.setPlace = function (destination) { place = destination; };
this.getPlace = function () { return place; };
this.applyDamage = function (damage) { health = health - damage; };
this.getData = function () { var data = { "name" : name, "health" : health, "items" : items.slice() };
if (place !== null) { data.place = place.title; }
Listing 15.4 The Player constructor (http://jsbin.com/yaneye/edit?js,console)
Return true if the specified item is in the items array
Remove the specified item from the items array
Subtract the specified damage from the player’s health
Define a method to return a copy of the model’s data
Use the slice method with no arguments to copy the items array
Include the title of the player’s location if one has been assigned

272 CHAPTER 15 Views: displaying data
return data; }; };
if (window.theCrypt === undefined) { window.theCrypt = {}; } theCrypt.Player = Player;
})();
The Player constructor no longer assigns any display methods to the models it cre-ates. The methods that are left from the previous version, addItem, setPlace, andgetPlace, are purely for managing the player data the model holds. The display meth-ods have been moved to the new view object.
Both hasItem and removeItem use the indexOf array method. If a specified item isin the items array, indexOf will return the index of that item. If the item is not in thearray, indexOf will return -1.
["a key", "a lamp"].indexOf("a lamp"); // 1 -> second item in array["a key", "a lamp"].indexOf("a sword"); // -1 -> not in array
The removeItem method also uses splice to remove an item from the items array.
items.splice(itemIndex, 1);
The first argument to splice is the index in the array at which to start removingitems. The second argument is the number of items to remove. In removeItem, youwant to remove a single specified item, so the second argument to splice is 1.
THE VIEW
Your player view will re-create the representation that used to be generated by theplayer objects themselves. To display a player, you call the view’s render method, pass-ing the player model as an argument:
theCrypt.playerView.render(kandra);
The render method calls getInfo, the function that builds up a string of player infor-mation, and displays the string returned on the console:
***************************************** Kandra (50) ***************************************** Items: - a rusty key - a piece of cheese****************************************
The next listing shows the code for playerView. The interface assigned to theCrypt.playerView has the single method, render.
Return the data object

273The Crypt—moving view code from Player and Place
(function () {
var getNameInfo = function (playerData) { return playerData.name; };
var getHealthInfo = function (playerData) { return "(" + playerData.health + ")"; };
var getItemsInfo = function (playerData) { var itemsString = "Items:" + spacer.newLine();
playerData.items.forEach(function (item, i) { itemsString += " - " + item + spacer.newLine(); });
return itemsString; };
var getTitleInfo = function (playerData) { return getNameInfo(playerData) + " " + getHealthInfo(playerData); };
var getInfo = function (playerData) { var info = spacer.box( getTitleInfo(playerData), 40, "*"); info += " " + getItemsInfo(playerData); info += spacer.line(40, "*"); info += spacer.newLine();
return info; };
var render = function (player) { console.log(getInfo(player.getData())); };
if (window.theCrypt === undefined) { window.theCrypt = {}; }
theCrypt.playerView = { render: render };
})();
render is the only function that produces any output that the user can see, loggingthe generated player information string to the console. In it, you pass the player’s datato getInfo, and it passes the data on to the helper functions that each build a part ofthe overall information string.
You’ve split the player model from the player view. You’ll see in chapter 17 howeasy it is to change the view so it displays the player information on a web page rather
Listing 15.5 A player view (http://jsbin.com/zucifu/edit?js,console)
Use the player data to build up a string of info
Pass a copy of the player’s data to getInfo
Set the render method as a property of playerView
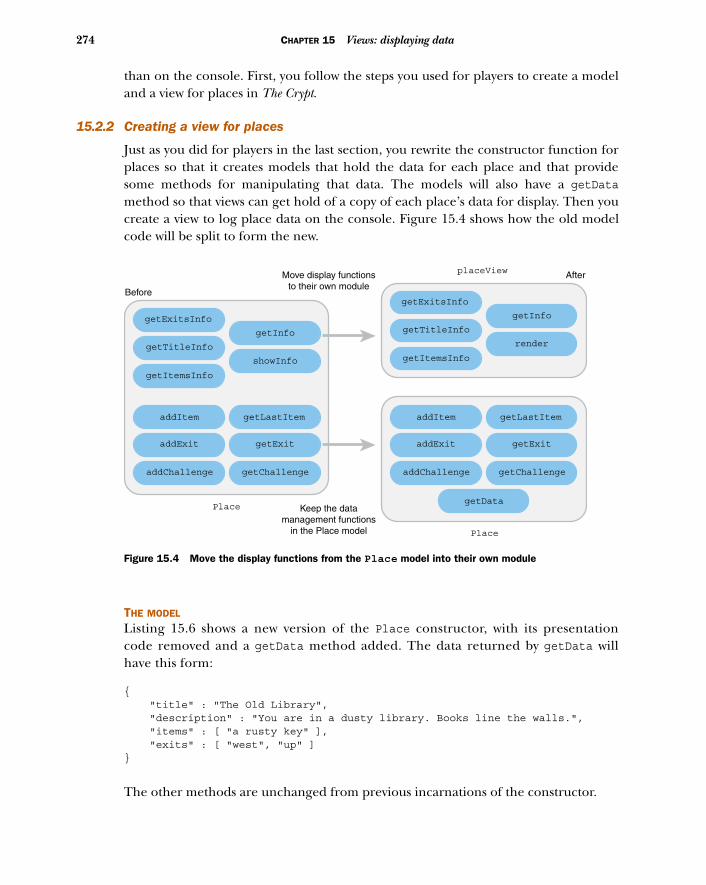
274 CHAPTER 15 Views: displaying data
than on the console. First, you follow the steps you used for players to create a modeland a view for places in The Crypt.
15.2.2 Creating a view for places
Just as you did for players in the last section, you rewrite the constructor function forplaces so that it creates models that hold the data for each place and that providesome methods for manipulating that data. The models will also have a getDatamethod so that views can get hold of a copy of each place’s data for display. Then youcreate a view to log place data on the console. Figure 15.4 shows how the old modelcode will be split to form the new.
THE MODEL
Listing 15.6 shows a new version of the Place constructor, with its presentationcode removed and a getData method added. The data returned by getData willhave this form:
{ "title" : "The Old Library", "description" : "You are in a dusty library. Books line the walls.", "items" : [ "a rusty key" ], "exits" : [ "west", "up" ]}
The other methods are unchanged from previous incarnations of the constructor.
getData
getExitsInfo
getItemsInfo
getTitleInfo
getInfo
showInfo
Place
placeView
Place
Move display functionsto their own module
Keep the datamanagement functions
in the Place model
Before
After
addItem
addExit getExit
addChallenge getChallenge
getLastItem addItem
addExit getExit
addChallenge getChallenge
getLastItem
getExitsInfo
getItemsInfo
getTitleInfo
getInfo
render
Figure 15.4 Move the display functions from the Place model into their own module

275The Crypt—moving view code from Player and Place
(function () {
var Place = function (title, description) { var exits = {}; var items = []; var challenges = {};
this.addItem = function (item) { items.push(item); };
this.getLastItem = function () { return items.pop(); };
this.addExit = function (direction, exit) { exits[direction] = exit; };
this.getExit = function (direction) { return exits[direction]; };
this.addChallenge = function (direction, challenge) { challenges[direction] = challenge; };
this.getChallenge = function (direction) { return challenges[direction]; };
this.getData = function () { var data = { "title" : title, "description" : description, "items" : items.slice(), "exits" : Object.keys(exits) };
return data; }; };
if (window.theCrypt === undefined) { window.theCrypt = {}; }
theCrypt.Place = Place;
})();
Each place model links to destinations. The destinations are also place models. Thedestinations are stored in a place model’s exits object. The keys of the exits objectare the directions of the destinations. For example, exits["south"] might be theplace model with a title property of "The Old Library". The Object.keys method
Listing 15.6 A simplified Place constructor (http://jsbin.com/vuwave/edit?js,console)
Define a method to return a copy of the place’s data
Use Object.keys to assign an array of directions to the exits property
Return the data object

276 CHAPTER 15 Views: displaying data
returns all of the keys of an object as an array. So, Object.keys(exits) returns all ofthe directions of exits from the current place, for example, ["south", "east", "west"].
The getData method in the Place constructor returns a copy of some of thedata about a place, including an array of exit directions generated by using Object.keys(exits). The view will use that array to display the available exits from whichplayers can choose to continue their adventures.
THE VIEW
Listing 15.7 shows the code for the place view module. How it works should be prettyfamiliar by now. It produces output on the console like this:
================ The Kitchen ================You are in a kitchen. There is a disturbing smell.
Items: - a piece of cheese
Exits from The Kitchen: - east - south========================================
(function () {
var getItemsInfo = function (placeData) { var itemsString = "Items: " + spacer.newLine(); placeData.items.forEach(function (item) { itemsString += " - " + item; itemsString += spacer.newLine(); }); return itemsString; };
var getExitsInfo = function (placeData) { var exitsString = "Exits from " + placeData.title; exitsString += ":" + spacer.newLine();
placeData.exits.forEach(function (direction) { exitsString += " - " + direction; exitsString += spacer.newLine(); });
return exitsString; };
var getTitleInfo = function (placeData) { return spacer.box(placeData.title, placeData.title.length + 4, "="); };
Listing 15.7 A place view (http://jsbin.com/royine/edit?js,console)
Pass the place’s data to the helper functions
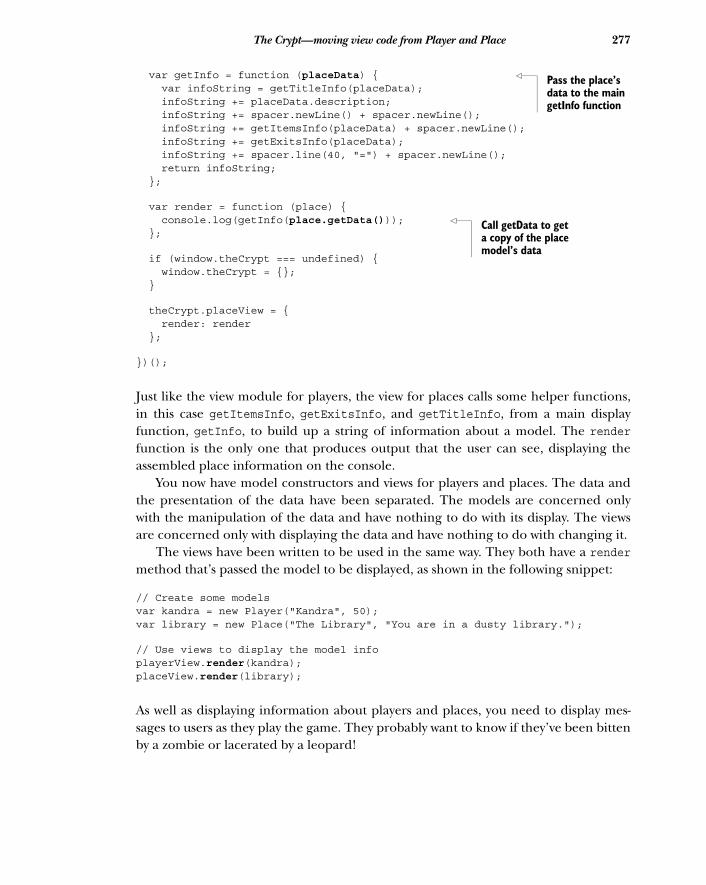
277The Crypt—moving view code from Player and Place
var getInfo = function (placeData) { var infoString = getTitleInfo(placeData); infoString += placeData.description; infoString += spacer.newLine() + spacer.newLine(); infoString += getItemsInfo(placeData) + spacer.newLine(); infoString += getExitsInfo(placeData); infoString += spacer.line(40, "=") + spacer.newLine(); return infoString; };
var render = function (place) { console.log(getInfo(place.getData())); };
if (window.theCrypt === undefined) { window.theCrypt = {}; }
theCrypt.placeView = { render: render };
})();
Just like the view module for players, the view for places calls some helper functions,in this case getItemsInfo, getExitsInfo, and getTitleInfo, from a main displayfunction, getInfo, to build up a string of information about a model. The renderfunction is the only one that produces output that the user can see, displaying theassembled place information on the console.
You now have model constructors and views for players and places. The data andthe presentation of the data have been separated. The models are concerned onlywith the manipulation of the data and have nothing to do with its display. The viewsare concerned only with displaying the data and have nothing to do with changing it.
The views have been written to be used in the same way. They both have a rendermethod that’s passed the model to be displayed, as shown in the following snippet:
// Create some modelsvar kandra = new Player("Kandra", 50); var library = new Place("The Library", "You are in a dusty library.");
// Use views to display the model infoplayerView.render(kandra); placeView.render(library);
As well as displaying information about players and places, you need to display mes-sages to users as they play the game. They probably want to know if they’ve been bittenby a zombie or lacerated by a leopard!
Pass the place’s data to the main getInfo function
Call getData to get a copy of the place model’s data

278 CHAPTER 15 Views: displaying data
15.3 Talking to players—a message viewAs adventurers make their way around The Crypt, you need to let them know what’sgoing on. You use the player view to give them updates on their health and the itemsthey carry. You use the place view to display each place’s title and description and tolist its items and exits. You also need a way of displaying feedback when the playersattempt an invalid action or succumb to their injuries.
> game.go("north") *** There is no exit in that direction ***> game.get("a piece of cheese") *** That item is not here ***> game.use("a lamp north") *** That doesn’t help. The door is still locked. ***
To handle such messages, you create a message view. Like your other views, it has a sin-gle method in its public interface, render. You pass the text to be displayed to therender method:
theCrypt.messageView.render("That item is not here.");
The next listing shows the code for the view. The local getMessageInfo functionreturns a string for display, and the render function logs it to the console.
(function () {
var getMessageInfo = function (messageData) { return "*** " + messageData + " ***"; };
var render = function (message) { console.error(getMessageInfo(message)); };
if (window.theCrypt === undefined) { window.theCrypt = {}; }
theCrypt.messageView = { render: render };
})();
You use the console.error method in the render function. It’s similar to console.log but developers use it to flag errors in programs. The console normally displayserrors differently from standard logged messages. The errors are often shown in red.That suits your purposes for displaying messages to players on the console.
Listing 15.8 A message view (http://jsbin.com/jatofe/edit?js,console)
Format the message to make it seem urgent
Use console.error to log the message as an error

279Summary
In chapter 14 you added challenges to the map data for The Crypt. You’ll use the mes-sage view to display the various success and failure messages associated with each chal-lenge. Knowing when to show those messages requires some code that checks useractions against challenges, updates player and place models as a result, and uses views todisplay the latest state of the game. You need controllers. Chapter 16 has you covered.
15.4 Summary■ Create views to display data from models.■ Maintain a separation of concerns where models manipulate data and views dis-
play data.■ Create multiple views to display the same model data in different ways.■ Keep the interface consistent for all views. For example, all of the views in this
chapter have a render method as their interface. They can all be called thesame way:
fitnessApp.userView.render(user); fitnessApp.userViewEnhanced.render(user); theCrypt.playerView.render(player); theCrypt.placeView.render(place); theCrypt.messageView.render(message);

Controllers:linking models and views
Part 2 of Get Programming with JavaScript has been about organizing your code. Asyour programs grow, that organization pays dividends, making it easier to focuson individual pieces, switch modules to alter functionality, and reuse code in mul-tiple projects.
Breaking programs into modules encourages you to give each module a specifictask. Chapters 14, 15, and 16 form a trilogy, with each chapter looking at a commontask a module might perform. You met models in chapter 14 and views in chapter 15and now you link them with controllers.
To see controllers in action and how they act on user input to manage modelsand update views, you continue your work on two projects: the fitness app and TheCrypt. In the fitness app, users will log sessions of exercise, and in The Crypt, playerswill face puzzles to solve as they explore perilous places. But will they escape beforetheir health reaches zero?
This chapter covers■ Acting on user input■ Updating models in response to user actions■ Passing updated models to views for display■ Completing the console version of The Crypt
280

281Building a fitness app—controllers
16.1 Building a fitness app—controllersYour team members have been telling friends and family about the fitness app you’recreating and they have a list of people lined up to test it out; they’re a super-keenbunch and have been diligently logging their exercise on paper. Your work has gonewell so far—what’s left to do? Here are the requirements set out by the team:
1 Retrieve user data as a string.2 Convert user data into user models.3 Display user data.4 Provide an interface for users to add sessions.
You’ve completed tasks 2 and 3, building models in chapter 14 and views in chapter 15.Task 1 involves retrieving data across the internet—you’ll work on that in part 3. Thatleaves task 4—you need to provide a simple way for those eager fitness fanatics to logthe sessions of exercise they complete.
You decide to provide a single command for users of the app to log their activity:
app.log("2017-02-07", 50)
The users call the app.log method, passing in the date of their session and the dura-tion of their exercise in minutes. But how does that command reach the user model?And how does the view know to update the display? That’s the job of the controller.
16.1.1 What does the controller do?
The controller orchestrates the other pieces of the program, reacting to user inputand updating the models and views. Figure 16.1 shows the modules that your fitnessapp will load when opened in JS Bin. You already have data, the User constructor, andviews from chapters 14 and 15. You need to create a controller to handle the interac-tions between the different parts.
Figure 16.2 shows how your controller is involved in initializing the app, using theUser constructor to build a user model from the data. And when the app is running,the controller reacts to users calling app.log by adding the logged session to the usermodel and then passing the updated model to the view for display.
You know what the controller needs to do; how will you make it do it?
1. Four modules are loaded
Load
Data Constructor View Controller
Figure 16.1 The four modules of the fitness app

282 CHAPTER 16 Controllers: linking models and views
16.1.2 Building the fitness app controller
The snippets that follow show the kind of code you’d expect to see in the controller:
var user = buildUser(userData); // Convert user data into a user model.
> app.log("2017-02-08", 50) // When the user logs a session
user.addSession("2017-02-08", 50); // the controller adds it to the model
fitnessApp.userView.render(user); // and updates the view.
The first listing shows the full code for the controller.
(function () {
var buildUser = function (userData) { var user = new fitnessApp.User(userData.name);
userData.sessions.forEach(function (session) { user.addSession(session.sessionDate, session.duration); });
return user; };
var init = function (userData) {
var user = buildUser(userData);
fitnessApp.userView.render(user);
Listing 16.1 The fitness app controller (http://jsbin.com/goniro/edit?js,console)
View
Model
Controllerlog("2017-02-08", 50)
Controller ModelData
2. The controller uses the User constructor to build a user model from the data
3. The controller updates the model based on user input
4. The controller passes the updated model to the view for display
Initialize
Use
Figure 16.2 The tasks the controller performs in the fitness app
Define a function to build a user model from user data
Define an init function that initializes the app
Build a model from the user data and assign it to the user variable
Pass the new user model to the view for display

283Building a fitness app—controllers
return { log: function (sessionDate, duration) { user.addSession(sessionDate, duration); fitnessApp.userView.render(user); return "Thanks for logging your session."; } }; };
if (window.fitnessApp === undefined) { window.fitnessApp = {}; }
fitnessApp.init = init;
})();
When the controller module is loaded, it adds its init function to the fitnessAppnamespace. You’ll be able to start the app by calling init and passing it the user data.
var app = fitnessApp.init(fitnessApp.userData);
The init function returns an interface with a single method, log. By assigning thereturned interface to app, you let users record their sessions by calling app.log.
16.1.3 Putting the pieces together for a working fitness app
Listings 16.2 and 16.3 show the HTML and JavaScript for the fitness app on JS Bin.Running the program lets you log a session like this:
> app.log("2017-02-08", 55)
The controller adds your logged session to the user model and passes the updatedmodel to the view, producing this output:
Mahesha35 minutes on 2017-02-0545 minutes on 2017-02-0655 minutes on 2017-02-08
135 minutes so farWell done!
Thanks for logging your session.
The following listing uses HTML script elements to load your four fitness app mod-ules. The modules share properties, objects, and functions by assigning them to thefitnessApp namespace.
Return an interface with a single method, log
Make the init method available by adding it to the fitnessApp namespace

284 CHAPTER 16 Controllers: linking models and views
<!-- fitnessApp.userData --><script src="http://output.jsbin.com/tenuwis.js"></script>
<!-- fitnessApp.userView --><script src="http://output.jsbin.com/yapahe.js"></script>
<!-- fitnessApp.User --><script src="http://output.jsbin.com/fasebo.js"></script>
<!-- fitnessApp.controller --><script src="http://output.jsbin.com/goniro.js"></script>
The next listing shows the single line of JavaScript needed to initialize the programand make the app.log method available to users.
var app = fitnessApp.init(fitnessApp.userData);
Run the program and have a go at logging some sessions.
16.1.4 What’s next for the fitness app?
The last step for your app is to grab user data as text from across the internet and thenconvert that text into a JavaScript object ready to pass to fitnessApp.init. You’llreturn to your work on the app in chapter 20.
16.2 The Crypt—adding a game controllerOkay, this is it for The Crypt in part 2 of Get Programming with JavaScript. By the end ofthe chapter, you’ll have a working console app with challenges for players to overcomeand the danger of their health falling to zero, ending the game. There’s one morepiece of the puzzle needed to get the game fully working: a controller.
You have the data, the models, and the views for The Crypt. The controller is themodule that ties everything together. It feeds the map data to the map builder andpasses the model data to the views. It provides the interface that users will access toplay the game and responds to player commands. That’s quite a lot of jobs for onegame module, so it’s worth taking a minute to see how it fits in with the other modulesthat make up The Crypt.
Figure 16.3 shows all of the modules that make up The Crypt. The Controller mod-ule has replaced the module that used to be labelled “Game init.” Now that you’reworking with models and views, it’s more appropriate to call the module a controller.But why? What does the controller do?
Listing 16.2 The fitness app (HTML) (http://jsbin.com/huxuti/edit?html,js,console)
Listing 16.3 The fitness app (http://jsbin.com/huxuti/edit?js,console)

285The Crypt—adding a game controller
16.2.1 What does the controller do?
Your controller will initialize the game and act on user input while the game is run-ning, updating models and views in response to the players’ actions.
INITIALIZE THE GAME
When the game first loads, the controller will:
1 Use the Place constructor to build place models from the map data.2 Use the Player constructor to build a player model.3 Assign the place specified as first in the map data as the player’s location.4 Provide a UI.
Steps 1 and 2 are shown in figure 16.4.
Player
Place
playerView
placeView
messageView
Controller
Utility
spacer
Map data
Map builder
Map
Model Constructors
Views
Controller
Figure 16.3 The modules that make up The Crypt
Controller
Place Models
Player Model
Map Data
Use the Place constructor to buildplace models from the map data
Initialize
Use the Player constructorto build a player model
Figure 16.4 When the game loads, the controller builds the player and place models.

286 CHAPTER 16 Controllers: linking models and views
ACT ON USER INPUT
While the game is running, the controller will:
1 Check that player actions are valid.2 Update player and place models.3 Pass updated models to views for display.4 Pass feedback messages to the message view.5 Stop the game if the player’s health reaches zero.
Steps 2, 3, and 4 are shown in figure 16.5.
The player model includes a getPlace method that the controller uses to access theplayer’s current location (notice how the Place model is connected to the Playermodel in figure 16.5).
16.2.2 Approaching the controller code
You’ve seen what the controller does in The Crypt and are ready to explore the codethat makes it work. Even though you’ve seen a lot of the code before, presenting it asone long listing can make it seem more daunting than it deserves, so your explorationis broken across sections.
■ (16.3) The overall structure of the controller■ (16.4) Initializing the game, monitoring player health, updating the display,
and ending the game■ (16.5) Handling player commands and challenges—get, go, and use■ (16.6) Running the game
Let the games begin!
Player View
Place View
Player Model
Place Model
Controller
game.go("south")
game.get()
game.use("holy water south")
Update the modelsbased on user input
Pass updated modelsto the views for display
While the game is running
Pass feedback messagesMessage Viewto the message view
Figure 16.5 The controller responds to user actions and updates models and views.

287The Crypt—starting and stopping the game
he
16.3 The Crypt—the structure of the controller codeAs you’ve seen, the controller has a number of tasks to perform to start, monitor, andend a game in The Crypt. To help you get a feel for how the parts make up the whole,listing 16.4 omits the function bodies and focuses on the variables in the code. Youcan see the full listing, function bodies and all, by following the link to JS Bin, and thecode is also shown in the sections that follow in this chapter.
(function () {
var player; var inPlay = false;
var init = function (mapData, playerName) { /* Listing 16.5 */ };
var checkGameStatus = function () { /* 16.6 */ };
var render = function () { /* 16.7 */ }; var renderMessage = function (message) {/*16.7*/};
var get = function () { /* 16.8 */ }; var go = function (direction) { /* 16.9 */ }; var use = function (item, direction) {/*16.10*/};
window.game = { get: get, go: go, use: use, init: init };
})();
Listing 16.4 also includes comments pointing you to the listings in this chapter thatinvestigate the missing function bodies.
It’s time to start the game! And stop it! And monitor player health! And update thedisplay! (Sorry for the excitement, but the full game is so close.)
16.4 The Crypt—starting and stopping the gameWhile the main game action takes place in the get, go, and use functions, you alsoneed to easily start and stop the game and keep the display updated with the latestinfo. And now that players are facing cruel challenges, challenges that may drain theirhealth, you need to check that they are still hale and hearty enough to carry on.
Listing 16.4 The game controller (http://jsbin.com/yeqicu/edit?js)
Use inPlay to flag when the game is over
Build the map, create a player, and start the game
Check ifplayer
alth hasdropped
to zero
Call the views to update the display
Respond to user commands
Assign the interface to game, a global variable

288 CHAPTER 16 Controllers: linking models and views
16.4.1 Initializing the game
To get the game started, it needs to be initialized by calling the init method.
game.init(map, playerName);
init builds the map, creates the player model, sets the player’s location to the cor-rect place, and then displays the player and place information, as shown in the fol-lowing listing.
var player;var inPlay = false;
var init = function (mapData, playerName) { var firstPlace = theCrypt.buildMap(mapData);
player = new theCrypt.Player(playerName, 50); player.addItem("The Sword of Doom"); player.setPlace(firstPlace);
inPlay = true;
render(); };
You declare the player and inPlay variables outside the init function so other func-tions in the controller can access them. The buildMap function returns the startingplace in the game, and then you set that place as the player’s current location. Theinit function calls render to display the starting place and player information.
The render, get, go, and use functions use the inPlay variable. They performtheir usual tasks only when inPlay is true. When a player’s health drops to zero, thecontroller sets inPlay to false. For that to happen, you have to keep an eye on theplayer’s health.
16.4.2 Monitoring player health
Whenever a player takes damage, you need to check if their health has reached zero,because that’s “Game over, man. Game over!” The controller’s checkGameStatus func-tion does the checking, setting the isPlay variable to false if the player has suc-cumbed to the litany of zombie bites, leopard lacerations, and nasty splinters theyencounter, as shown in the next listing.
Listing 16.5 The init function (http://jsbin.com/yeqicu/edit?js)
Declare a variable to record if the game is running
Build the map, storing the starting location
Set up the player
Update inPlay: the game is now running
Display the place and player
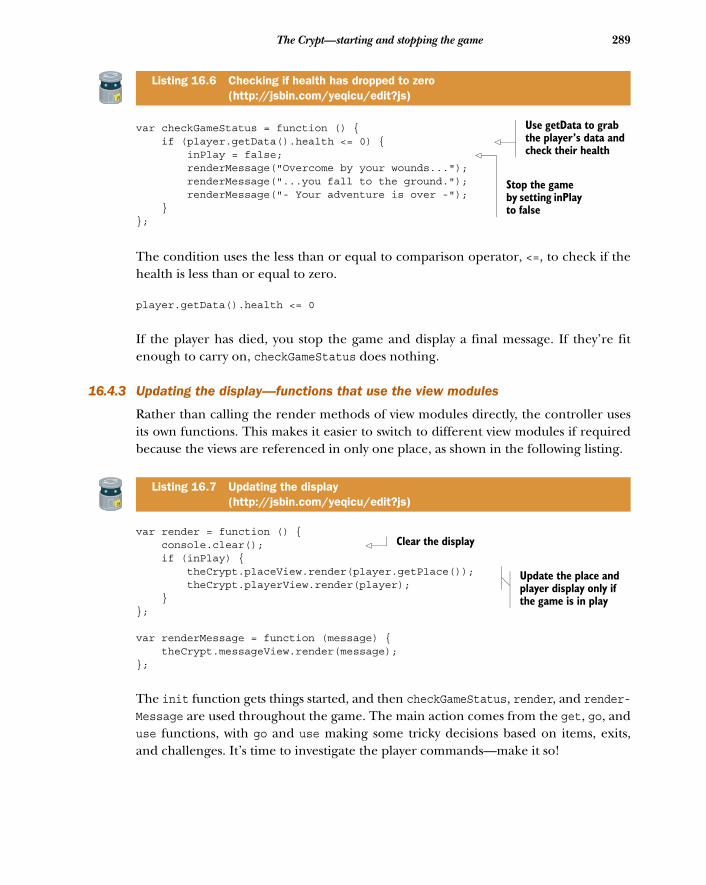
289The Crypt—starting and stopping the game
var checkGameStatus = function () { if (player.getData().health <= 0) { inPlay = false; renderMessage("Overcome by your wounds..."); renderMessage("...you fall to the ground."); renderMessage("- Your adventure is over -"); }};
The condition uses the less than or equal to comparison operator, <=, to check if thehealth is less than or equal to zero.
player.getData().health <= 0
If the player has died, you stop the game and display a final message. If they’re fitenough to carry on, checkGameStatus does nothing.
16.4.3 Updating the display—functions that use the view modules
Rather than calling the render methods of view modules directly, the controller usesits own functions. This makes it easier to switch to different view modules if requiredbecause the views are referenced in only one place, as shown in the following listing.
var render = function () { console.clear(); if (inPlay) { theCrypt.placeView.render(player.getPlace()); theCrypt.playerView.render(player); }};
var renderMessage = function (message) { theCrypt.messageView.render(message);};
The init function gets things started, and then checkGameStatus, render, and render-Message are used throughout the game. The main action comes from the get, go, anduse functions, with go and use making some tricky decisions based on items, exits,and challenges. It’s time to investigate the player commands—make it so!
Listing 16.6 Checking if health has dropped to zero (http://jsbin.com/yeqicu/edit?js)
Listing 16.7 Updating the display (http://jsbin.com/yeqicu/edit?js)
Use getData to grab the player’s data and check their health
Stop the game by setting inPlay to false
Clear the display
Update the place and player display only if the game is in play

290 CHAPTER 16 Controllers: linking models and views
16.5 The Crypt—giving commands and solving puzzlesUsers are permitted to take only a small set of actions when exploring The Crypt. Thecontroller module assigns the following interface to the global window object:
window.game = { get: get, go: go, use: use, init: init};
The user initiates actions in the game by calling the game controller interface meth-ods at the console (game.get() or game.go("south"), for example). The game con-troller then creates, accesses, or updates models in response to the user’s instructionsand passes changed models to the views for display.
You’ve already looked at the init function; this section (16.5) steps through theget, go, and use functions. The get function hasn’t evolved much, but the go functionnow checks for challenges. And use is a completely new function.
16.5.1 Picking up items with game.get
Players exploring The Crypt will find items as they travel from place to place. The itemswill help them to overcome challenges they may face. The get method gives them away of picking up the items they find, as shown next.
var get = function () { if (inPlay) {
var place = player.getPlace(); var item = place.getLastItem();
if (item !== undefined) {
player.addItem(item);
render();
} else { renderMessage("There is no item to get"); }
} else { renderMessage("The game is over!"); } return "";};
Listing 16.8 The get function (http://jsbin.com/yeqicu/edit?js)
Get an item only if the game is still active
Retrieve the last item from the player’s current location
If an item was retrieved, add it to the player’s list
Update the display to show the item has moved
If inPlay is false, let the player know

291The Crypt—giving commands and solving puzzles
An item is removed from the end of the place’s list of items and added to the player’slist of items. If the place has no items, getLastItem will return undefined.
Both the go and use functions involve checking challenges. A quick refresher isin order.
16.5.2 Listing the properties of a challenge
You’re keen on the idea of challenges and want to add a splash of jeopardy. Playershave had a health property right from the start of the book; you’re ready to do das-tardly damage to players as they meekly move around your maze.
You first saw challenges in The Crypt when developing map data in chapter 14, butyou haven’t put them to use until now. Two of the player commands, go and use,check for challenges in a specified direction, so it’s worth reminding yourself of theproperties that make up a challenge:
"challenge" : { "message" : "A zombie sinks its teeth into your neck.", "success" : "The zombie disintegrates into a puddle of goo.", "failure" : "The zombie is strangely resilient.", "requires" : "holy water", "itemConsumed" : true, "damage" : 20}
Table 16.1 lists the properties of the challenge object along with their purpose andwhether they are required.
Table 16.1 Properties of the challenge object
Property What is it for? Required?
message The message displayed to the player when they try to go in the direction of the exit and the challenge has not been overcome.
Yes
success The message displayed to the player when they use the item required to overcome the challenge.
Yes
failure The message displayed to the player when they try to use the wrong object to overcome the challenge.
Yes
requires The item required to overcome the challenge. Yes
itemConsumed If the item is removed from the player’s list of items once it is used.
No
damage The amount subtracted from the player’s health when they try to go in the direction of the exit before they have overcome the challenge.
No
complete Whether the challenge has been completed. Usually missing in the initial data, it’s set to true during the game when a chal-lenge is solved.
No

292 CHAPTER 16 Controllers: linking models and views
To retrieve a challenge from a place object, call getChallenge, specifying a direction:
place.getChallenge("south");
If there’s no challenge in that direction, getChallenge returns undefined. The firstcommand that uses challenges is game.go.
16.5.3 Moving with game.go
Players use the controller’s go function to move from place to place. But if a lock or aleap or a leopard blocks their path, the controller needs to let them know. Players callgo, specifying the direction in which they wish to travel:
> game.go("south")
The full go function is shown here. A walkthrough of the code follows the listing.
var go = function (direction) { if (inPlay) {
var place = player.getPlace(); var destination = place.getExit(direction); var challenge = place.getChallenge(direction);
if (destination === undefined) { renderMessage("There is no exit in that direction"); } else {
if ((challenge === undefined) || challenge.complete) {
player.setPlace(destination); render();
} else {
if (challenge.damage) { player.applyDamage(challenge.damage); }
render();
renderMessage(challenge.message);
checkGameStatus(); } }
} else { renderMessage("The game is over!"); } return "";};
Listing 16.9 The go function (http://jsbin.com/yeqicu/edit?js)
Collect the info needed
If there’s no challenge or it’s complete, move the player and update the display
Apply any damage caused by the challenge
Update the display showing any changes to health
Show the initial challenge message
Check if the player’s health has dropped to zero

293The Crypt—giving commands and solving puzzles
The function starts by collecting the information it needs to act on the player’s request:
var place = player.getPlace();var destination = place.getExit(direction);var challenge = place.getChallenge(direction);
It could be that there’s no exit in the direction the player specified. You need to checkfor that:
if (destination === undefined) { renderMessage("There is no exit in that direction");} else { // Check for challenges}
Okay, say the player isn’t walking into a wall and there’s an exit in the direction speci-fied. If there’s no challenge, or if the player has completed the challenge, you canmove them to the destination.
if ((challenge === undefined) || challenge.complete) { player.setPlace(destination); render();} else { // Mention the leopard // and apply any damage.}
The || symbol in the if condition is the logical OR operator. It lets you check a con-dition made up of two expressions at once. If either the first expression, challenge=== undefined, or the second expression, challenge.complete, evaluates to true,then the whole condition is true. If both expressions evaluate to false, then thewhole condition is false. (JavaScript also has a logical AND operator, &&, that evalu-ates to true if both expressions are true, and false otherwise.)
If the player hasn’t completed a challenge, you need to apply any damage that thechallenge causes (bumps, bruises, leopard bites, and so on).
if (challenge.damage) { player.applyDamage(challenge.damage);}
Finally, update the display to show any changes to health, show the challenge’s ini-tial message, and check that the player’s health is still above zero—the game remainsin play.
render();renderMessage(challenge.message);checkGameStatus();
That takes care of player peregrinations. But what if there is a big, hungry cat blockingthe path? How can players lick the leopard?

294 CHAPTER 16 Controllers: linking models and views
16.5.4 Licking the leopard with game.use
If a lock or a leap or a leopard blocks a player’s path, the player can call the control-ler’s use function to overcome the challenge. They specify the item to use and thedirection in which to use it:
> game.use("a ball of wool", "south") *** The leopard chases the ball of wool, purring loudly. ***
The full use function is shown in listing 16.10. It has a number of nested if state-ments, but don’t worry: the key decisions are shown in figure 16.6, and you venturedown the rabbit hole to see how it works following the listing.
Is there a challengein that direction?
Does the playerhave the item?
Is it the correctitem for the challenge?
Is the item usedup by the challenge?
Yes
No
No
No
Yes
Yes
Yes
renderMessage( "You don't need to use that there");
renderMessage( "You don't have that item");
renderMessage(challenge.failure);
*** The leopard snarls. ***
renderMessage(challenge.success);challenge.complete = true;
player.removeItem(item);
game.use("a ball of wool", "south")
*** The leopard chases the ballof wool, purring loudly. ***
Figure 16.6 The key decisions made by the use function

295The Crypt—giving commands and solving puzzles
e
var use = function (item, direction) { if (inPlay) {
var place = player.getPlace(); var challenge = place.getChallenge(direction);
if ((challenge === undefined) || challenge.complete){ renderMessage("You don't need to use that there"); } else {
if (player.hasItem(item)) {
if (item === challenge.requires) {
renderMessage(challenge.success); challenge.complete = true;
if (challenge.itemConsumed) { player.removeItem(item); }
} else { renderMessage(challenge.failure); }
} else { renderMessage("You don't have that item"); }
} else { renderMessage("The game is over!"); } return "";};
The function starts by collecting the information it needs to act on the player’s request:
var place = player.getPlace();var challenge = place.getChallenge(direction);
It could be that there’s no challenge in the direction the player specified. You need tocheck for that:
if ((challenge === undefined) || challenge.complete) { renderMessage("You don't need to use that there");} else { // There is a challenge to be overcome.}
Listing 16.10 The use function (http://jsbin.com/yeqicu/edit?js)
Get the challenge for the specified direction
Check if the challengis complete or doesn’t exist
Check if the player has the item specified
Check if theitem is the
one requiredto overcome
the challenge
Display the success message and mark the challenge as complete
Remove the item from the player if it’s consumed by the challenge
Display the failure message if the player has used the wrong item
Let the player know theydon’t have the item they’re trying to use

296 CHAPTER 16 Controllers: linking models and views
Some players are sneaky! You need to check that they have the item they’re trying touse. If they don’t, send them a polite message:
if (player.hasItem(item)) { // Check it’s the right item} else { renderMessage("You don't have that item");}
Okay, so they’re using an item they have against an actual challenge. Is it the right toolfor the job? Let them know if it’s not:
if (item === challenge.requires) { // Complete the challenge} else { renderMessage(challenge.failure);}
And finally, at the bottom of the rabbit hole, if they’ve passed all the checks, completethe challenge:
renderMessage(challenge.success);challenge.complete = true;
if (challenge.itemConsumed) { player.removeItem(item);}
Well done; you made it through the get, go, and use function wonderland. The piecesaren’t too taxing, but when you have deeply nested ifs and buts, they can get quitehairy. Throw yourself a tea party! But don’t be late for section 16.6—that’s where youradventure really begins.
16.6 The Crypt—running the gameTo get the game running, you need to include all of the modules you’ve created andthen call the game.init method, passing it the map data and the player’s name. Fig-ure 16.7 shows all of the modules involved.
Player
Place
playerView
placeView
messageView
Controller
Utility
spacer
Map data
Map builder
Map
Model Constructors
Views
Controller
Figure 16.7 The many modules of The Crypt

297The Crypt—running the game
The next listing shows the HTML script elements used to load the modules.
<script> console.log("Loading The Crypt ..."); </script>
<!-- spacer --><script src="http://output.jsbin.com/juneqo.js"></script>
<!-- Place constructor --><script src="http://output.jsbin.com/vuwave.js"></script>
<!-- Player constructor --><script src="http://output.jsbin.com/nonari.js"></script>
<!-- player view --><script src="http://output.jsbin.com/zucifu.js"></script>
<!-- place view --><script src="http://output.jsbin.com/royine.js"></script>
<!-- message view --><script src="http://output.jsbin.com/jatofe.js"></script>
<!-- map data --><script src="http://output.jsbin.com/hozefe.js"></script>
<!-- map builder --><script src="http://output.jsbin.com/paqihi.js"></script>
<!-- game controller --><script src="http://output.jsbin.com/yeqicu.js"></script>
The HTML includes an initial script element that’s different from the rest. It has nosrc attribute. Rather than linking to a file to load, it includes the JavaScript directlybetween the script tags. The module files can take a moment to load, so it’s nice togive players feedback that something is happening. Putting the code in the HTML letsit run straight away; no need to wait for a file to load.
The following listing shows the code needed to get things up and running.
var playerName = "Jahver";var map = theCrypt.mapData;
game.init(map, playerName);
Hide the JavaScript panel, run the game, and start exploring! Be careful though; chal-lenges chip away at your health.
Listing 16.11 Loading the game modules (HTML) (http://jsbin.com/fociqo/edit?html,console)
Listing 16.12 Running the game (http://jsbin.com/fociqo/edit?js,console)
Let players know the modules are loading

298 CHAPTER 16 Controllers: linking models and views
16.7 The Crypt—what’s next for the app?Congratulations! You’ve created a working console-based adventure game with swappa-ble maps and a modular architecture (a fancy way of saying it’s made up of lots of bits).
Part 2 of Get Programming with JavaScript was all about organizing your code to bet-ter cope with larger programs. Your knowledge of private variables, modules, models,views, and controllers equips you to cope with more ambitious projects. By sticking tothe console, you were able to focus on the key JavaScript language concepts; now it’stime to make the jump to HTML and web interfaces. As you’ll see, the work you’vedone building a well-organized program will make your first steps as a web developermuch easier.
16.8 Summary■ Use a controller to manage the models and the views. The controller updates the
models in response to user input and passes data from the models to the viewsfor display.

Part 3
JavaScript in the browser
Up to this point in Get Programming with JavaScript, you’ve been using theconsole as the way of interacting with your programs. You’ve been able to focuson the JavaScript code. Now it’s time to start using a web page as the user inter-face, using HyperText Markup Language (HTML) to specify headings, paragraphs,and list items for presentation; and buttons, drop-down lists, and text boxes foruser input. You use templates as an efficient way to generate HTML from yourdata and XMLHttpRequest objects to load extra data for your web pages.
Part 3 shows you how to organize files on your own computer rather than onJS Bin and suggests some next steps as you continue your JavaScript adventure.The Crypt gets an HTML makeover and the ability to load locations one at a timeas players explore the worlds you create for them.


HTML:building web pages
JavaScript is associated with adding interactivity to web pages: reacting to usersclicking buttons and selecting from drop-down menus, for example, and updatingparts of a page with new content. Having learned the fundamentals of the lan-guage, you’re almost ready to take that step to interactivity and dynamic content.Your focus is still on JavaScript, but you need to learn enough HTML to see howJavaScript can be used to create and manipulate the content of a web page. JS Binstill has you covered while you learn; you can add HTML and view the resulting webpage in the Output panel. In chapter 21 you’ll see how to move on from the JS Binsandbox and organize your own HTML, CSS, and JavaScript files.
You’ve spent a lot of time building The Crypt in a modular fashion. That workpays off in this chapter when you see how easy it is to switch from displaying output
This chapter covers■ Using HTML to display static content■ Tags, elements, and attributes■ Common HTML elements■ Manipulating web page content with JavaScript■ Switching to HTML-based views in The Crypt
301

302 CHAPTER 17 HTML: building web pages
on the console to displaying it on a web page. It will just take a few lines of code—it’salmost magical.
17.1 HTML, CSS, JavaScript—building a web pageYou want to build a movie reviews web page, My Movie Ratings, that displays informa-tion about your favorite movies and lets you rate them (figure 17.1). To build the pageyou use three languages:
■ HTML—You use HTML to annotate the text of the page and specify media tobe loaded; headers, paragraphs, lists, images, and buttons are all specified withHTML. This is your base layer, the essential content, the information you wantvisitors to find and read.
■ CSS—You use the Cascading Style Sheets language to specify the look of thepage, its colors, fonts, margins, borders, and so on. This is your presentationlayer, a visual treat that enhances the content.
■ JavaScript—You use the JavaScript language to add interactivity to the page; yourespond to button clicks, filter content, load extra data, and pop-up messageswith JavaScript. This is your behavior layer, a subtle dash of user interface magicthat smooths the way and can improve the user’s experience and efficiency.
Figure 17.1 includes three screenshots of the My Movie Ratings page and shows howthe CSS and JavaScript layers build on the HTML foundation.
Figure 17.1 CSS and JavaScript build on the HTML content with enhanced presentation and interactivity.

303HTML, CSS, JavaScript—building a web page
Even without CSS and JavaScript, on the left of figure 17.1, the key information aboutthe movie is accessible. The CSS adds visual styles, a sense of identity, and (hopefully)design that guides and delights the visitor. Finally, on the right, the figure shows a mes-sage that has been popped up using JavaScript after a user clicked the Rate button.
Take a look at your My Movie Ratings pages on JS Bin. There’s the base HTML ver-sion at http://jsbin.com/sayayim/edit?output and the version with CSS and JavaScriptat http://jsbin.com/hikuzi/edit?output. (You may have to run the JavaScript to makethe Rate button work.)
17.1.1 Loading the layers
If you had your own website, jahvers.crypt, you’d load the My Movie Ratings web pageby pointing your browser at the page’s URL, jahvers.crypt/movies.html, say. Thebrowser loads the HTML document, movies.html, sent by the server at that address.The movies.html document may contain CSS and JavaScript code within it, betweenstyle and script tags, respectively:
<head> <title>My Movie Ratings</title>
<style> /* CSS goes here */ </style>
<script> /* JavaScript goes here */ </script></head>
<body> <!-- Page content for display goes here --></body>
Don’t worry about all the HTML tags for now; we cover them in section 17.2. You’rewell aware of the benefits of modularization (that’s what part 2 was all about!), soyou’ll be pleased to know that HTML documents can load CSS files as well as Java-Script files:
<head> <title>My Movie Ratings</title>
<link rel="stylesheet" href="movies.css" /> <script src="movies.js"></script></head>
<body> <!-- Page content for display goes here --></body>
You’ve seen the script tags for loading JavaScript modules before; the link tagdoes a similar job for loading CSS. When your browser is reading through your HTML

304 CHAPTER 17 HTML: building web pages
document, ready to display it, it will load the CSS and JavaScript files it finds speci-fied by the link and script elements. You’ll take a proper look at organizing yourown HTML, CSS, and JavaScript files in chapter 21. For now, JS Bin does the workfor you.
17.1.2 Loading the layers in JS Bin
When working on your projects, or bins, on JS Bin, you can add code to three panels:HTML, CSS, and JavaScript. JS Bin automatically merges the code from the three pan-els, embedding the CSS and JavaScript into the HTML and showing the resulting webpage on its Output panel.
You won’t spend much time working on CSS in Get Programming with JavaScript, butwhere it’s used in examples, you can always take a look at the CSS panel yourself; thecode used is mostly straightforward. You return to JavaScript in section 17.3, after say-ing a brief hello to HTML.
17.2 HTML—a very short introductionFor My Movie Ratings, your movie reviews website, you want headings, lists of actorsand directors, a choice of possible ratings, and a button to submit your verdict. Youneed a way of specifying that this text is a heading but that text is a list item; here’s adrop-down list and there’s a button. You’re not on the console anymore, Dorothy—you’ve left the monochrome world of spaces and new-line characters and entered thewonderful, colorful land of HTML. (Rest assured. There are no flying monkeys inthis chapter.)
You use HTML to annotate text and to identify media that you want to embed ina document. The annotations specify the role that each section of text plays withinthe structure of the document. The media can be images, video, audio, or someother format.
The markup itself takes the form of tags. In a document, a section of text might bea heading, a paragraph, a list item, or a quotation, for example, and there are tags tomark up those sections of text. Here’s a heading and a paragraph, each marked upwith an opening and closing tag:
<h1>My Movie Ratings</h1>
<p>Brief info about my favorite movies.</p>
You wrap each section of text with an opening and closing tag. The heading has <h1>and </h1>, the paragraph <p> and </p>. Together, each opening and closing tag pairspecifies an element. The h1 tags specify a heading element; the p tags specify a para-graph element.
When a web browser loads an HTML document, it sees the tags and creates thecorresponding element in its model of the page in memory. The tags specify what typeof element to create and the text between the tags forms the content of the element.

305HTML—a very short introduction
17.2.1 Starting with an empty pageBefore you start adding content to pages, take a look at the HTML that constitutes abare-bones web page. If you create a new bin on JS Bin and view the HTML panel,you’ll see the following markup. (I’ve reformatted it slightly.)
<!DOCTYPE html>
<html> <head> <meta charset="utf-8"> <title>JS Bin</title> </head>
<body>
</body></html>
The DOCTYPE in the first line gives the browser information about the version ofHTML you’re using and helps it decide how to process and display the page. HTMLhas evolved over the years, and a number of versions and variations are specified bycomplicated-looking document type declarations. Fortunately, <!DOCTYPE html> is aneat shorthand for the latest version (currently HTML5).
You wrap the whole document, after the document type, in html tags. Within thedocument, there are two sections, head and body. The head section contains informa-tion about the document: its title and character encoding. The body section is where themain content of the page goes—the content that will be displayed to the user when theyvisit the web page. All of your pages will use the same basic structure shown here.
17.2.2 Adding some contentFigure 17.2 shows some text for My Movie Ratings added between the body tags of anew JS Bin document. The text has been marked up with appropriate HTML tags todenote headings, subheadings, and paragraphs.
Figure 17.2 The hierarchy of headings and the paragraphs

306 CHAPTER 17 HTML: building web pages
The browser represents the hierarchy of headings, h1, h2, h3, by using different font sizes.The following listing shows the HTML used between the body tags for the web page.
<body>
<h1>My Movie Ratings</h1>
<p>Brief info about my favorite movies.</p>
<h2>Movies</h2>
<h3>Inside Out</h3>
<p>An emotional adventure inside the head of a young girl.</p>
</body>
17.2.3 Marking up a list
Each movie includes a list of actors and a list of directors. Use the li tag to mark uplist item elements. A single list item for an actor looks like this:
<li>Amy Poehler</li>
The list items need to be part of a list. You can have an ordered list, if the order of theitems matters, or an unordered list, if it doesn’t. Use ol tags for an ordered list and ultags for an unordered list. Figure 17.3 shows the output for lists of actors and direc-tors. Listing 17.2 shows the new code.
Listing 17.1 My Movie Ratings—headings and paragraphs (HTML) (http://jsbin.com/nosiwi/edit?html,output)
Put the content to be displayed on the web page between the body tags
Use an h1 tag for the main heading on a page
Use heading tags h2, h3, and so on for headings of decreasing importance
Wrap paragraphs in p tags
Figure 17.3 The browser renders the ordered list with numbers and the unordered list with bullets.

307HTML—a very short introduction
<body>
<h1>My Movie Ratings</h1> <p>Brief info about my favorite movies.</p>
<h2>Movies</h2>
<h3>Inside Out</h3> <p>An emotional adventure inside the head of a young girl.</p>
<h4>Actors</h4> <ul> <li>Amy Poehler</li> <li>Bill Hader</li> </ul>
<h4>Directors</h4> <ol> <li>Pete Doctor</li> <li>Ronnie del Carmen</li> </ol>
</body>
As you can see in figure 17.3, the browser automatically adds numbers for an orderedlist and bullets for an unordered list.
17.2.4 Some common HTML elements
Figure 17.4 is a screenshot of a web page made up of some common HTML elements.The content of each element describes the element. You can visit the page on JS Bin:http://jsbin.com/nuriho/edit?html,css,output.
The tags used to create the page in figure 17.4 are shown in table 17.1. There areplenty more HTML tags, but these are enough for you to work with for now.
Listing 17.2 Ordered and unordered lists (HTML) (http://jsbin.com/vegahe/edit?html,output)
Table 17.1 Some common HTML elements for wrapping content
Tag Element What is it for?
<h1> Heading Main heading for a document or part of a document
<h2>…<h6> Subheading Subheadings in decreasing order of importance
<p> Paragraph Paragraphs
<div> Division Wraps a set of elements that belong together as a section of a document
Use ul tags to create an unordered list
Put each of the list items between opening and closing li tags
Use ol tags to create an ordered list

308 CHAPTER 17 HTML: building web pages
<ol> Ordered list Wraps a set of list items where the order of the items is impor-tant (e.g., a numbered list)
<ul> Unordered list Wraps a set of list items where the order of the items is not important (e.g., a bulleted list)
<li> List item Wraps a single item in an ordered or unordered list
<head> Head Wraps elements that provide meta-information about a document and load extra code needed by the document
<body> Body Wraps the main content of the page, the content that is displayed directly on the web page
Table 17.1 Some common HTML elements for wrapping content (continued)
Tag Element What is it for?
Figure 17.4 A web page with self-describing HTML elements

309Adding content to a web page with JavaScript
17.3 Adding content to a web page with JavaScriptLooking for ways to add interest to the site, you decide to welcome visitors to your MyMovie Ratings web page with a random greeting. To test out the idea, you create aminimal page. Figure 17.5 shows what you’re aiming for, with four visits to the pageproducing four different greetings.
Refreshing the page generates a new random greeting. Try it out on JS Bin athttp://output.jsbin.com/mikura.html. The next two listings show how to create thepage. Run the JavaScript to make the message appear.
<p id="greeting">Welcome!</p>
function getGreeting () { var hellos = [ "Nanu nanu!",
Listing 17.3 Adding content to a paragraph with JavaScript (HTML) (http://jsbin.com/mikura/edit?html,js,output)
Listing 17.4 Adding content to a paragraph with JavaScript (http://jsbin.com/mikura/edit?html,js,output)
Figure 17.5 Random greetings from a web page
Create an array of greetings

310 CHAPTER 17 HTML: building web pages
"Wassup!", "Yo!", "Hello movie lover!", "Ay up me duck!", "Hola!" ];
var index = Math.floor(Math.random() * hellos.length);
return hellos[index]; }
function updateGreeting () { para.innerHTML = getGreeting(); }
var para = document.getElementById("greeting");
updateGreeting();
To generate the effect, you follow these steps:
1 Assign an id to an element in the HTML2 Use the id to get a reference to the element in JavaScript3 Use the reference to update the element’s contents
17.3.1 Getting an element by its id
You display the greeting in a paragraph element. To set the greeting, you need to gethold of a reference to that paragraph in JavaScript. You give the HTML element aunique id attribute:
<p id="greeting">Welcome!</p>
To get a reference to the element in a JavaScript program, you use the document.get-ElementById method, passing the id of the element as an argument:
var para = document.getElementById("greeting");
The web browser makes the document object available to your JavaScript code. Thedocument object has properties and methods that allow you to interact with the hierar-chy of elements on a page.
You obtained a reference to the paragraph element by using document.get-ElementById. Having assigned the reference to the para variable, you can now usepara to manipulate the element. You update the content of the paragraph by settingthe element’s innerHTML property.
para.innerHTML = "Ay up me duck!";
Generate a random index from zero to one less than the length of the array
Get a reference to the paragraph
Set the content of the paragraph to a random greeting

311Displaying data from an array
The original content of the paragraph is replaced and becomes
<p id="greeting">Ay up me duck!</p>
17.3.2 Function declarations
You’re now using function declarations rather than function expressions when defin-ing named functions for later use.
var sayHello = function () { // console.log("Hello"); // function expression assigned to variable}; //
function sayHello () { // console.log("Hello"); // function declaration} //
Function declarations were mentioned in chapter 4 as an alternate syntax for definingfunctions. You’ve been using expressions up until now to be consistent with the assign-ment of values, objects, arrays, and functions to variables.
var num = 4;var movie = {};var actors = [];var getRating = function () {};
It’s more common to see function declarations for named functions, so you’veswitched to declarations for part 3 of Get Programming with JavaScript.
17.3.3 What, no JavaScript?
Occasionally, visitors will arrive at your site on devices that either don’t have JavaScriptor have it disabled. Or they’ll be on a slow network, maybe at a hotel or on a train,where it takes longer (much longer!) to load any JavaScript modules for the page. Ifyour page relies on JavaScript to display its content, visitors may be presented with anempty space. Whenever possible, consider including initial content in the page so thatvisiting is not a useless waste of time. Content should be available to everyone, with theextra flexibility, fluidity, and flashiness that JavaScript brings layered on top for thosewhose devices can handle it.
For your random greeting test, you included a greeting, “Welcome!”, in the initialHTML (listing 17.3). A random greeting is a nice bit of fun but isn’t essential.
Having seen how to add some text to a paragraph, you now step things up and adda whole series of elements at once.
17.4 Displaying data from an arrayEach movie on My Movie Ratings has a title and a one-line summary. Figure 17.6 shows alist of three movies on the site.
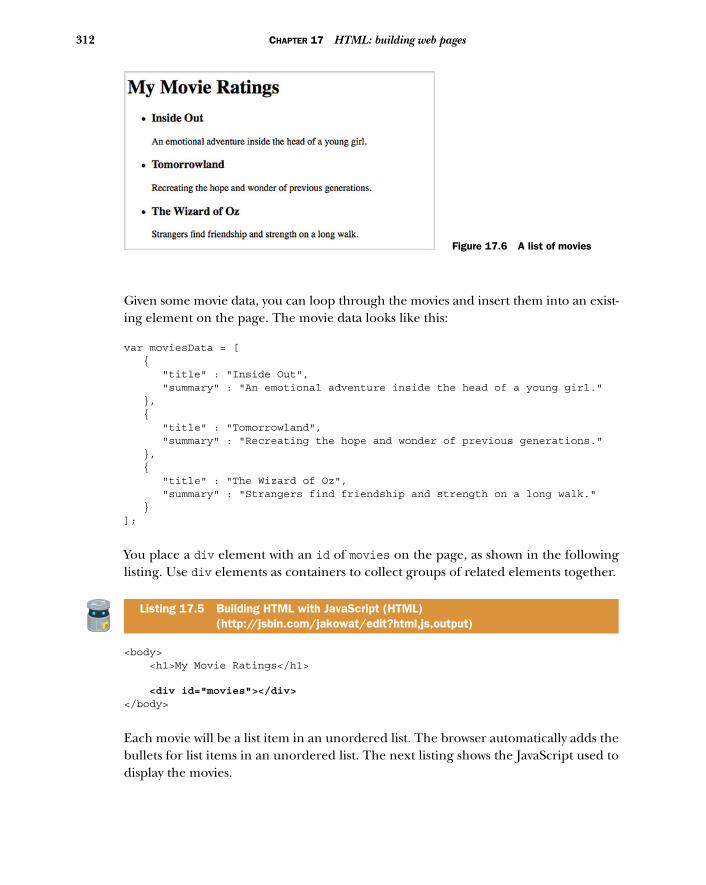
312 CHAPTER 17 HTML: building web pages
Given some movie data, you can loop through the movies and insert them into an exist-ing element on the page. The movie data looks like this:
var moviesData = [ { "title" : "Inside Out", "summary" : "An emotional adventure inside the head of a young girl." }, { "title" : "Tomorrowland", "summary" : "Recreating the hope and wonder of previous generations." }, { "title" : "The Wizard of Oz", "summary" : "Strangers find friendship and strength on a long walk." }];
You place a div element with an id of movies on the page, as shown in the followinglisting. Use div elements as containers to collect groups of related elements together.
<body> <h1>My Movie Ratings</h1>
<div id="movies"></div></body>
Each movie will be a list item in an unordered list. The browser automatically adds thebullets for list items in an unordered list. The next listing shows the JavaScript used todisplay the movies.
Listing 17.5 Building HTML with JavaScript (HTML) (http://jsbin.com/jakowat/edit?html,js,output)
Figure 17.6 A list of movies

313Displaying data from an array
var moviesData = [ /* As above */ ];
function getMovieHTML (movie) { var html = "<h3>" + movie.title + "</h3>"; html += "<p>" + movie.summary + "</p>"; return html;}
function getMoviesHTML (movies) { var html = "";
movies.forEach(function (movie) { html += "<li>" + getMovieHTML(movie) + "</li>"; });
return "<ul>" + html + "</ul>"; }
function render (movies) { var moviesDiv = document.getElementById("movies"); moviesDiv.innerHTML = getMoviesHTML(movies); }
render(moviesData);
The getMovieHTML method builds up the HTML for a single movie by sandwichingthe properties of the movie object between appropriate opening and closing tags.
var html = "<h3>" + movie.title + "</h3>";html += "<p>" + movie.summary + "</p>";
The getMoviesHTML method iterates over the array of movies, building up the HTMLfor all of the movies as it goes. It uses getMovieHTML to get the HTML for each movie,wrapping the returned strings in li tags to create list item elements.
movies.forEach(function (movie) { html += "<li>" + getMovieHTML(movie) + "</li>";});
It then wraps the HTML for the list of items in opening and closing ul tags for anunordered list and returns the complete HTML string.
return "<ul>" + html + "</ul>";
The getMoviesHTML function returns HTML that looks like the following (but withoutthe line breaks and extra spaces):
<ul> <li> <h3>Inside Out</h3>
Listing 17.6 Building HTML with JavaScript (http://jsbin.com/jakowat/edit?html,js,output)
Use the getMovieHTML function to generate a string of HTML for a single movie
Use the getMoviesHTML function to generate a string of HTML for an array of movies
Wrap the response from getMovieHTML in li tags to create a list item
Wrap all list items in an unordered list with ul tags
Update the innerHTML of the element with an id of movies
Call the render method, passing it the data it needs

314 CHAPTER 17 HTML: building web pages
<p>An emotional adventure inside the head of a young girl.</p> </li> <li> <h3>Tomorrowland</h3> <p>Recreating the hope and wonder of previous generations.</p> </li> <li> <h3>The Wizard of Oz</h3> <p>Strangers find friendship and strength on a long walk.</p> </li></ul>
The render method is the one that changes the page. It gets a reference to the targetdiv on the page and sets its innerHTML property with the HTML string returned bygetMoviesHTML.
var moviesDiv = document.getElementById("movies");moviesDiv.innerHTML = getMoviesHTML(movies);
To reduce the number of global variables, you could wrap the getMovieHTML, get-MoviesHTML, and render functions in an immediately invoked function expression(IIFE—see chapter 13) that returns just render in its interface. The listing has beenkept simple to help focus on the generation of HTML and how to update an elementon a web page.
17.5 The Crypt—displaying players and places with web viewsYou’ve split the program for The Crypt across multiple modules, sections of code thatcan be loaded independently. The modules perform different tasks: you have data,models, views, and a controller (figure 17.7).
Player
Place
playerView
placeView
messageView
Controller
Utility
spacer
Map data
Map builder
Map
Model Constructors
Views
Controller
Figure 17.7 The modules that make up The Crypt

315The Crypt—displaying players and places with web views
The promise of modules is that you can switch them easily to change the behavior ofthe program. It’s time to make good on that promise. To build your first HTML ver-sion of The Crypt, follow these steps:
1 Update the player view (two lines of code)2 Update the place view (two lines of code)3 Create an HTML page that has script elements to load all of the game mod-
ules and that has placeholders for the player and place views to fill
You won’t see the output until all of the pieces are in place. But to get a sense of whatyou’re building, figure 17.8 shows your first HTML game in action. The web page outputshows the current states of the player and place. You enter commands at the console.
Before looking at the updated versions of the player and place views, take time to con-sider the awesome power of your modular approach. The single method that displaysinformation for each view is the render method. To reflect its beauty and simplicity, itgets the following section all to itself.
17.5.1 Updating the player and place view modules—the render method
In moving from a console application to a web application, you update the player andplace views. The new versions display information by inserting text into an element ona web page rather than logging the information to the console. Those are the onlychanges you make (figure 17.9), and the changes themselves are small.
Figure 17.8 The Crypt with commands and messages on the Console panel and updates on the Output panel

316 CHAPTER 17 HTML: building web pages
The views in chapter 15 use console.log in a single method, the render method.That was by design; you have a single place where changes need to be made.
The render method for the console-based player view looks like this:
function render (player) { console.log(getInfo(player.getData()));};
The render method for the console-based place view looks like this:
function render (place) { console.log(getInfo(place.getData()));};
Using what you’ve learned in this chapter about updating web page elements, the newplace view’s render method looks like this:
function render (place) { var placeDiv = document.getElementById("place"); placeDiv.innerHTML = getInfo(place.getData());};
The new player view’s render method looks almost identical:
function render (place) { var playerDiv = document.getElementById("player"); playerDiv.innerHTML = getInfo(player.getData());};
Those really are the only changes to the JavaScript that you need. The new methodsuse document.getElementById to get references to elements on the web page. Untilyou create the web page in listing 17.9, those elements won’t exist, so you can’t testyour new views. Be patient; their time will come.
Player
Place
playerView
placeView
messageView
Controller
Utility
spacer
Map data
Map builder
Map
Model Constructors
Views
Controller
To switch from a console-basedto a web-based game, simply
update the views
Figure 17.9 You only need to change the views to switch to a web-based version of The Crypt.

317The Crypt—displaying players and places with web views
17.5.2 Updating the player and place view modules—the listings
Listing 17.7 shows the new player view with its updated render method. Everythingelse is the same as it’s been since chapter 15, so function bodies have been omitted inprint. The JS Bin link is there so you can check the full listing if you want. The mean-ing of "use strict" is discussed after the listings for both views.
(function () { "use strict";
function getNameInfo (playerData) { … } function getHealthInfo (playerData) { … } function getItemsInfo (playerData) { … } function getTitleInfo (playerData) { … } function getInfo (playerData) { … }
function render (player) {
var playerDiv = document.getElementById("player");
playerDiv.innerHTML = getInfo(player.getData());
}
if (window.theCrypt === undefined) { window.theCrypt = {}; } theCrypt.playerView = { render: render };})();
The next listing shows the new place view with its updated render method.
(function () { "use strict";
function getItemsInfo (placeData) { … } function getExitsInfo (placeData) { … } function getTitleInfo (placeData) { … } function getInfo (placeData) { … }
function render (place) {
var placeDiv = document.getElementById("place");
placeDiv.innerHTML = getInfo(place.getData());
}
if (window.theCrypt === undefined) { window.theCrypt = {}; } theCrypt.placeView = { render: render };})();
Listing 17.7 A web-based player view (http://jsbin.com/cehexi/edit?js,console)
Listing 17.8 A web-based place view (http://jsbin.com/cakine/edit?js,console)
Update the render method to work with web page elements
Get a reference to the div element with an id of “player”
Set the content of the div to the string produced by the getInfo method
Update the render method to work with web page elements
Get a reference to the div element with an id of “place”
Set the content of the div to the string produced by the getInfo method

318 CHAPTER 17 HTML: building web pages
Those changes to the render methods are all you need to move the display of playerand place information to the web page from the console. For now, the user continuesto give commands via the console.
17.5.3 Using JavaScript’s strict mode
JavaScript is in use on millions of web pages. Those pages need to continue workingeven as JavaScript evolves and matures. To opt into more recent ways of using the lan-guage that alert you to more errors you might have made, optimize how the languageworks, and prepare the way for further developments, you can run your code in strictmode. To enable strict mode for a function, add "use strict" at the top of the function.
All of your code throughout the book could have been run in strict mode, but I feltit might be distracting while learning the basics. Modules in part 3 will all be in strictmode; listing 17.8 is the first module in part 3, which is why it’s being introduced atthis point. Find out more at www.room51.co.uk/js/strict-mode.html.
17.5.4 Loading modules and adding placeholders in the HTML
The next listing shows the complete HTML for your first web-based version of TheCrypt. It includes script tags to load all of the modules you need.
<!DOCTYPE html><html><head> <meta charset="utf-8"> <title>The Crypt</title> </head>
<body> <h1>The Crypt</h1>
<div id="place"></div>
<div id="player"></div>
<!-- Modules -->
<!-- spacer --> <script src="http://output.jsbin.com/juneqo.js"></script>
<!-- Place constructor --> <script src="http://output.jsbin.com/vuwave.js"></script> <!-- Player constructor --> <script src="http://output.jsbin.com/nonari.js"></script>
<!-- player view --> <script src="http://output.jsbin.com/cehexi.js"></script> <!-- place view --> <script src="http://output.jsbin.com/cakine.js"></script> <!-- message view --> <script src="http://output.jsbin.com/jatofe.js"></script>
Listing 17.9 A web-based The Crypt game (HTML) (http://jsbin.com/zaxaje/edit?html,console,output)
Update the title element
Include a div with an id of “place” for place information
Include a div with an id of “player” for player information
Load all of the modules needed to run the game

319The Crypt—displaying players and places with web views
<!-- map data --> <script src="http://output.jsbin.com/hozefe.js"></script> <!-- map builder --> <script src="http://output.jsbin.com/paqihi.js"></script>
<!-- game controller --> <script src="http://output.jsbin.com/yeqicu.js"></script> </body></html>
You set the title of the page using a title element in the head section. The page titleisn’t always visible when working in the JS Bin editing environment but is normallyused by browsers to label tabs and windows showing the page and when saving thepage as a bookmark or favorite. The script tags for loading modules are added justbefore the closing body tag. This ensures that the two div elements used by the pro-gram are on the page before any code tries to update them with player and placeinformation.
Unfortunately, because your views use the spacer namespace to format the gener-ated text with line breaks and spaces for the console, and web pages don’t honorthose line breaks and spaces, all of the player and place information runs together.Although the output isn’t quite what you wanted, you can still play the game, as shownin figure 17.10.
17.5.5 Adding a touch of CSS
You have one more panel up your sleeve on JS Bin! The CSS panel is used for specify-ing how you want elements to look on a page: their size, color, margins, borders, andso on. With a couple of lines of CSS, you can tell the browser to honor the line breaksgenerated by your view modules and use a font that gives the same amount of space toeach character, just like the font on the console.
The next listing shows the code to add to the CSS panel.
Figure 17.10 The text output runs together but the game is playable.

320 CHAPTER 17 HTML: building web pages
div { white-space: pre; font-family: monospace;}
The first rule tells the browser to preserve the white space (that is, spaces and linebreaks) of text content in div elements. The second specifies that the browser should usea monospace font for text in div elements. Your page uses div elements for the playerinformation and for the place information. The output on the web page is now format-ted as it was on the console. Refer to figure 17.8 to see the nicely formatted output.
17.5.6 Playing the game
You still issue game instructions via the console as methods of game. The methodsavailable are get, go, and use. Run the program at http://jsbin.com/toyahi/edit?con-sole,output and have a go at playing the game, issuing commands on the consolelike this:
> game.get()> game.go("south")> game.use("a rusty key", "north")
Using line breaks and spaces to format the output isn’t the best approach. It would bebetter to use appropriate HTML tags (for headings, paragraphs, and lists) to conveythe structure of the different pieces of information in the output. You’ll look at betterways of formatting the player and place information using HTML in chapter 19 whenyou investigate templates.
The current version of The Crypt is a bit of a hybrid. Although you make use ofHTML to display some information, you still force players to enter commands on theconsole. In chapter 18 you’ll discover how to use simple form elements like buttons,drop-down lists, and text boxes to let players interact with the game directly on theweb page. To prepare the way for that fully HTML-based version, you finish this chap-ter by repeating the changes you made to the place and player views but this time forthe message view.
17.5.7 Preparing the message view
In order to make the UI 100% web page based, you need to update the message viewso that it displays messages on the web page rather than on the console. The followinglisting shows the new module code.
(function () { "use strict";
Listing 17.10 A web-based The Crypt game (CSS) (http://jsbin.com/toyahi/edit?css)
Listing 17.11 A web-based message view (http://jsbin.com/nocosej/edit?js,console)

321Summary
function getMessageInfo (message) { return "*** " + message + " ***"; }
function render (message) { var messageDiv = document.getElementById("messages"); messageDiv.innerHTML = getMessageInfo(message); }
function clear () { var messageDiv = document.getElementById("messages"); messageDiv.innerHTML = ""; }
if (window.theCrypt === undefined) { window.theCrypt = {}; }
theCrypt.messageView = { render: render, clear: clear };})();
The view will need an element with an id of messages. It also adds a clear method forremoving messages from the page.
17.6 Summary■ Annotate text with HTML to specify the role the text plays in the structure of a
document. For example, the text is a heading, a list item, or a paragraph.■ Precede an HTML document with its document type:
<!DOCTYPE html>
■ Use html tags to wrap the entire document:
<html> … </html>
■ The head element of a document contains information about the document,for example, its title and character encoding:
<head> <meta charset="utf-8"> <title>My Web Page</title></head>
■ The body element of a document contains the content to be displayed on theweb page:
<body> … </body>
Display the messageon the page
Define a method toclear any displayedmessages
Include the clear method in the interface
322 CHAPTER 17 HTML: building web pages
■ Use tags appropriate to the content. Among many more tags, there are headings<h1>, <h2>, … , <h6>; paragraphs <p>; list items <li>; and lists <ol> and <ul>.
■ Add id attributes to opening tags to uniquely identify elements on the page.
<p id="message"></p>
■ From JavaScript, get a reference to an HTML element by using the document.getElementById method:
var para = document.getElementById("message");
■ Change the content of an element by setting its innerHTML property:
para.innerHTML = "New text for the paragraph.";

Controls: getting user input
We love buttons! Whether we’re buying books on Amazon, liking a tweet, or send-ing that late-night drunken email, we find it hard to resist clicking those alluring,colorful buttons. Well, it’s time for you to issue your own calls to action and startadding buttons to your pages. And while you’re at it, you need to make space fortext boxes and drop-down lists too.
In chapter 17 you made the jump to HTML and used JavaScript to add contentto a web page. To get user input, however, you stuck with the console. In these daysof flashy web apps you want the users to interact solely via the web page; theyshouldn’t have to know JavaScript and go searching for the console to use the pro-grams you write for them.
This chapter introduces the HTML input, select, and button elements, lettingusers type information and commands into a text box, choose from a drop-down
This chapter covers■ Using buttons to initiate actions■ Collecting user input with text boxes and
drop-down lists■ Calling functions automatically when a button
is clicked
323

324 CHAPTER 18 Controls: getting user input
list, and initiate actions by clicking buttons. You see how to set up functions that areautomatically called when a button is clicked.
It’s fun to click buttons, so let’s start with those. Click!
18.1 Working with buttonsYou’re building a My Movie Ratings website (see chapter 17) and have been testingrandom greetings when visitors arrive at the site. You want to give visitors the ability tocheck out more greetings without reloading the whole page. You decide to add a but-ton to your test page that updates the display with a random greeting (figure 18.1).
Clicking the Say Hi button displays the greeting. But how? How can you make yourJavaScript program respond to a user clicking the button? You need to do three things:
1 Add a button HTML element to the page2 Write a function to update the greeting3 Get the button to call the function when it’s clicked
18.1.1 Adding a button to a page
Well, for starters, you need a button on the page. HTML includes a button element.Put the button text between the tags (figure 18.2):
<button>Button 1</button>
Figure 18.1 Clicking the Say Hi button displays a random greeting.

325Working with buttons
To work with the button in JavaScript, you give it a unique id attribute in HTML.
<button id="btnGreeting">Say Hi</button>
The following listing shows the key HTML for the My Movie Ratings test page. Theparagraph with id of "greeting" is where you’ll insert the random greeting later.
<button id="btnGreeting">Say Hi</button>
<p id="greeting">Welcome!</p>
The output was shown in figure 18.1. Feel free to take a peek at the CSS panel on JSBin if you’re interested in how the styling is applied.
18.1.2 Writing functions to update the greeting
In chapter 17 you wrote two functions, getGreeting and updateGreeting, that chosea random welcome message and updated the display.
function getGreeting () { // Return random greeting};
function updateGreeting () { para.innerHTML = getGreeting();};
var para = document.getElementById("greeting");updateGreeting();
The updateGreeting function updates the display by setting the innerHTML propertyof the paragraph element, para.
So you have your button and paragraph in place in the HTML and you have a func-tion to update the paragraph. Now you want the button to call the updateGreetingfunction when a user clicks it.
18.1.3 Listening for clicks
Click—“Wassup!” … Click—“Hola!” … Click—“Ay up me duck!”
Listing 18.1 My Movie Ratings greetings with button (HTML) (http://jsbin.com/josoqik/edit?html,output)
Figure 18.2 The HTML for three buttons and the output generated

326 CHAPTER 18 Controls: getting user input
“Dear button, please call my updateGreeting function whenever someone clicksyou,” is the instruction you want to send. To give the button an instruction like that,you need a reference to the button in JavaScript.
var btn = document.getElementById("btnGreeting");
Once you have a reference to the button, btn, you can tell the button to call a func-tion whenever the button is clicked:
btn.addEventListener("click", updateGreeting);
The addEventListener method tells the button (or whichever element it’s calledfrom) to call a specified function whenever a specified event occurs—in this case when-ever the button is clicked. It’s like the updateGreeting function is waiting, or listening,for the button to be clicked.
Listing 18.2 shows the final listing for your random greetings test page. It’s thesame as the listing from chapter 17 but with the two lines of button code added. Thecode is wrapped in an immediately invoked function expression to avoid polluting theglobal namespace. It also includes a use strict statement to instruct the browser touse strict mode (see section 17.5.3).
(function () { "use strict";
function getGreeting () { var hellos = [ "Nanu nanu!", "Wassup!", "Yo!", "Hello movie lover!", "Ay up me duck!", "Hola!" ];
var index = Math.floor(Math.random() * hellos.length);
return hellos[index]; };
function updateGreeting () { para.innerHTML = getGreeting(); };
var btn = document.getElementById("btnGreeting"); var para = document.getElementById("greeting");
btn.addEventListener("click", updateGreeting);
updateGreeting();
})();
Take a look back at chapter 12 for a reminder of how to use Math.floor and Math.random to generate a random index for an array.
Listing 18.2 My Movie Ratings greetings with button (http://jsbin.com/josoqik/edit?js,output)
Get a reference to the button
Tell the button to call the updateGreeting function whenever it’s clicked

327Using a select element to choose an option
18.2 Using a select element to choose an optionThe My Movie Ratings website lets users rate movies. They choose a rating from adrop-down menu and click the Rate button. The page then shows a message with theirrating (figure 18.3).
To implement the rating system, you need to do four things:
1 Add a select HTML element to the page with option elements for each rating2 Add a button HTML element to the page with “Rate” as its text3 Write a function to pop up the message with the rating4 Tell the button to call the function when clicked
A marvelous menagerie of eventsClicks aren’t the only events that functions can listen out for; mouse moves, pagescrolling, keys on the keyboard being pressed, and images loading are some others,and taps, flicks, force presses, and shakes are some new events appearing for touch-enabled and mobile devices.
You’ll keep it simple and stick with button clicks for now, but if you’re interested inthe marvelous menagerie of possible events, check out the event reference on theMozilla Developer Network at https://developer.mozilla.org/en-US/docs/Web/Events.
Figure 18.3 Clicking the Rate button pops up a message with your rating.

328 CHAPTER 18 Controls: getting user input
18.2.1 Adding a select element to the page
Web browsers render the select element as a drop-down list. You use option ele-ments to specify the choices in the list (figure 18.4).
<select id="movies"> <option>Inside Out</option> <option>Tomorrowland</option> <option>The Wizard of Oz</option></select>
Test it out on JS Bin. Create a new bin with the HTML, Console, and Output panelsopen. Replace the contents of the HTML panel with the select code in the previoussnippet. You should see the drop-down list appear on the Output panel. At the con-sole prompt, enter these commands:
> var dd = document.getElementById("movies") undefined> dd.value Inside Out
Choose a different film from the drop-down list on the Output panel. Then use Java-Script to check its new value:
> dd.value The Wizard of Oz
You can update the drop-down’s selected value from JavaScript too:
> dd.value = "Tomorrowland" Tomorrowland
Figure 18.4 Two select elements in HTML, displayed on a web page and with a selection in progress

329Using a select element to choose an option
The value set in JavaScript is selected on the Output panel. Figure 18.4 shows the HTML for two select elements and how they’re rendered
on a web page. The next listing shows the HTML for the body of the My Movie Ratings main page,
with a select element and a button to rate the film shown.
<h1>My Movie Ratings</h1><p>Brief info about my favorite movies.</p>
<h2>Movies</h2>
<div id="movieBox">
<h3 id="movie">Inside Out</h3> <p>An emotional adventure inside the head of a young girl.</p>
<h4>Actors</h4> <ul> <li>Amy Poehler</li> <li>Bill Hader</li> </ul>
<h4>Directors</h4> <ul> <li>Pete Doctor</li> <li>Ronnie del Carmen</li> </ul>
<div class="controls">
<select id="rating"> <option>1</option> <option>2</option> <option selected>3</option> <option>4</option> <option>5</option> </select>
<button id="rate">Rate</button>
</div></div>
Notice that you can add an attribute of selected to have that option selected whenthe drop-down list is shown on the web page.
18.2.2 A function to rate movies and a button to call it
To rate a movie, you need a function that gets the user’s choice from the drop-downlist, gets the value of the selected option in the select element, and pops up a mes-sage that includes that value, shown in listing 18.4.
Listing 18.3 My Movie Ratings with a drop-down list (HTML) (http://jsbin.com/hikuzi/edit?html,output)
Add a drop-down list by using a select element
Add choices to the list with option elements
Specify which choice is initially selected
Add a button element

330 CHAPTER 18 Controls: getting user input
(function () { "use strict";
var rateButton = document.getElementById("rate"); var ratingList = document.getElementById("rating"); var movie = document.getElementById("movie");
function rateMovie () {
var rating = ratingList.value;
var movieTitle = movie.innerHTML;
alert("You gave " + movieTitle + " " + rating + " stars!");
// Save the rating to the database }
rateButton.addEventListener("click", rateMovie);
})();
The value property of the drop-down list gives you the user’s rating. You call thealert function, provided by the browser, to display the rating in a pop-up dialog box.Having wrapped the code in a function, rateMovie, you use addEventListener to tellthe Rate button to call rateMovie whenever it’s clicked.
Your users can choose a rating from a list. But what if you want to give them morefreedom to express themselves?
18.3 Reading user input with text boxesCongratulations, the My Movie Ratings site now lets users rate movies! Your successgets you thinking—what about comments? Why not get users to add a brief commentwith their ratings? Figure 18.5 shows the site with two comments added and a thirdin progress.
Users type their comment into the text box, pick a rating from the drop-down list,and click the Rate button. Rather than popping up a message, you now add their com-ment and rating to the comments section for the movie. To add comments to the site,you need to do five things:
1 Add a text box to the page2 Add an unordered list to the HTML as a place for comments to go3 Get a reference to the text box in JavaScript and access its value4 Get a reference to the comments list in JavaScript5 Update the rateMovie function to append a comment to the comments list
Listing 18.4 My Movie Ratings with a drop-down list (http://jsbin.com/hikuzi/edit?js,output)
Collect references to the elements you’re using
Get the selected option from the drop-down
Get the title of the movie
Use the alert function to pop up a message
Tell the button to call the rateMovie function when clicked

331Reading user input with text boxes
18.3.1 Adding a text box to the page
To add a text box to the page, you use an input HTML element with its type attributeset to "text". Include an id attribute to reference the element from JavaScript.
<input type="text" id="txtComment" />
The input element displays form controls on a web page. It doesn’t wrap any othercontent so is written as a self-closing tag. There’s no opening and closing tag pair.Notice the forward slash at the end of the tag; it shows you that this tag doesn’t need aclosing tag. The text box goes in the "controls" div along with the ratings drop-down list and the Rate button.
<div class="controls">
<input type="text" id="txtComment" />
<select id="rating"> <!-- options for ratings --> </select> <button id="rate">Rate</button>
</div>
The input element with a type attribute set to "text" is displayed as a text box on thepage. Other common type attributes for input elements include password, submit,checkbox, and radio. Browser makers such as Microsoft, Apple, Google, Mozilla,and Opera are working to improve support for new types like color pickers, datepickers, and sliders. To find out more about types of input elements, you can visit theMozilla Developer Network at https://developer.mozilla.org/en/docs/Web/HTML/Element/Input.
Figure 18.5 The movie has a text box to add comments and a section to display them.

332 CHAPTER 18 Controls: getting user input
18.3.2 Adding an unordered list to display the comments
You use a ul element for the list of comments, preceding it by a heading. You give thelist an id attribute so you can add list items using JavaScript.
<h4>Comments</h4><ul id="comments"></ul>
You add the comments list after the Actors and Directors lists.
18.3.3 Getting references to the new elements
In order to read comments typed into the text box and to add list items to the list ofcomments, you need to get a reference to the two elements in your JavaScript code.
var commentsList = document.getElementById("comments"); // The list var commentBox = document.getElementById("txtComment"); // The text box
The text entered by the user in the text box is accessed via its value property. To seethe value property in action, you can access and update it at the console. Visit the MyMovie Ratings page at http://jsbin.com/nevaxit/edit?console,output, type “GreatMovie!” into the text box, and then type these commands at the console prompt:
> var txt = document.getElementById("txtComment") undefined> txt.value Great Movie!> txt.value = "Rubbish!" Rubbish!
The last command will update the contents of the text box on the web page.
18.3.4 Updating the rateMovie function
The next listing shows all of the assembled pieces. The comment from the text boxand the rating from the drop-down list are appended as a list item to the existing listof comments.
(function () { "use strict";
function getById (id) { return document.getElementById(id); }
var rateButton = getById("rate"); var ratingList = getById("rating"); var movie = getById("movie");
var commentsList = getById("comments"); var commentBox = getById("txtComment");
Listing 18.5 Movies, comments, and a random greeting (http://jsbin.com/nevaxit/edit?js,output)
Define a function with a shorter name to get elements by id
Get references to the elements used for comments

333Reading user input with text boxes
function rateMovie () { var rating = ratingList.value; var movieTitle = movie.innerHTML;
var comments = commentsList.innerHTML;
var comment = commentBox.value;
comments += "<li>" + comment + " (" + rating + " stars)</li>";
commentsList.innerHTML = comments;
commentBox.value = ""; }
rateButton.addEventListener("click", rateMovie);
/* Random greeting code - see listing 18.2 */
})();
In the listing, you need to get references to five HTML elements. Rather than typingout document.getElementById(id) each time, you create a function that does thesame job but with a shorter name, getById.
Listing 18.6 shows the updated HTML including the text box, comments list, and aspan element for your random greetings. A span wraps text inline, within a paragraph,for example, and lets you describe the purpose of the text it wraps, in this case with anid of "greeting", style it differently (change the color, make it bold, change its size),and access it via JavaScript (to add a random greeting, for example).
The contents of the body element are shown here, and some items have beenomitted or compressed because they’re unchanged from listing 18.3. Everything ison JS Bin.
<h1>My Movie Ratings</h1>
<p>Brief info about my favorite movies. <span id="greeting">Welcome!</span></p>
<h2>Movies</h2>
<div id="movieBox"> <h3 id="movie">Inside Out</h3> <p>An emotional adventure inside the head of a young girl.</p>
<h4>Actors</h4><ul> <!-- actors --> </ul> <h4>Directors</h4><ul> <!-- directors --> </ul>
<h4>Comments</h4> <ul id="comments"></ul>
Listing 18.6 Movies, comments, and a random greeting (HTML) (http://jsbin.com/nevaxit/edit?html,output)
Get the current list items in the comments list
Read the text in the text box
Append a new comment and rating using the += operator
Update the comments list
Remove the comment from the text box
Tell the button to call rateMovie when it’s clicked
Include a span for random greetings
Add an unordered list to display comments and ratings

334 CHAPTER 18 Controls: getting user input
<div class="controls"> <input type="text" id="txtComment" />
<select id="rating"> <!-- options for ratings --> </select> <button id="rate">Rate</button> </div></div>
Try out the web page at http://output.jsbin.com/nevaxit. Add some comments andratings and add them to the list. And check out the random greetings.
18.3.5 Styling the examples with CSS
Many of the examples in part 3 of Get Programming with JavaScript have had colors,fonts, margins, borders, and so on set with CSS rules on the CSS panel. Although thebook doesn’t teach CSS directly, please have a look at the CSS rules. Taken one at atime, most of them are easy to follow. Try changing some values or deleting some orall of the rules. Although they may make the page look nicer, all examples shouldwork just fine without them.
18.4 The Crypt—player commands via a text boxPlayers exploring The Crypt have been entering their get, go, and use commands atthe console prompt. You can now move user input to the game’s web page with com-mands entered via a text box, as shown in figure 18.6.
Add a text box for users to enter comments
Figure 18.6 Commands are now entered into a text box at the bottom of the page.

335The Crypt—player commands via a text box
In order to create a web-based set of user controls, you need to do three things:
1 Add a text box and button to the page.2 Write a function to convert the text in the text box into game commands.3 Write a function to be called when the button is clicked.
You could update the code in the controller module to include the two new func-tions. But the controller module works nicely already, setting up the game and work-ing with the models and views for players, places, and messages (see chapter 16). Abetter plan is to add a separate module that deals with the commands entered intothe text box, calling on the existing controller to execute the get, go, and use meth-ods as necessary. Figure 18.7 shows the modules used by The Crypt, including thenew Commands module.
Get started by adding a text box and button to the HTML for the page.
18.4.1 Adding controls to the page
You need a way for users to enter the command string and submit it. The followinglisting shows the HTML added to your The Crypt web page for the text box and button.The player, place, and messages div elements are initially empty, which is why theycan’t be seen on the Output panel.
<h1>The Crypt</h1>
<div id="place"></div><div id="player"></div><div id="messages"></div>
Listing 18.7 Adding controls to The Crypt (HTML) (http://jsbin.com/rijage/edit?html,output)
playerView
placeView
messageView
Utility
spacer
Map data
Map builder
Map Player
Place
Model Constructors
Views
Add code to converttext box entriesinto commands
Controller
Controller
Commands
Figure 18.7 Modules for The Crypt, including a Commands module to execute commands via a text box
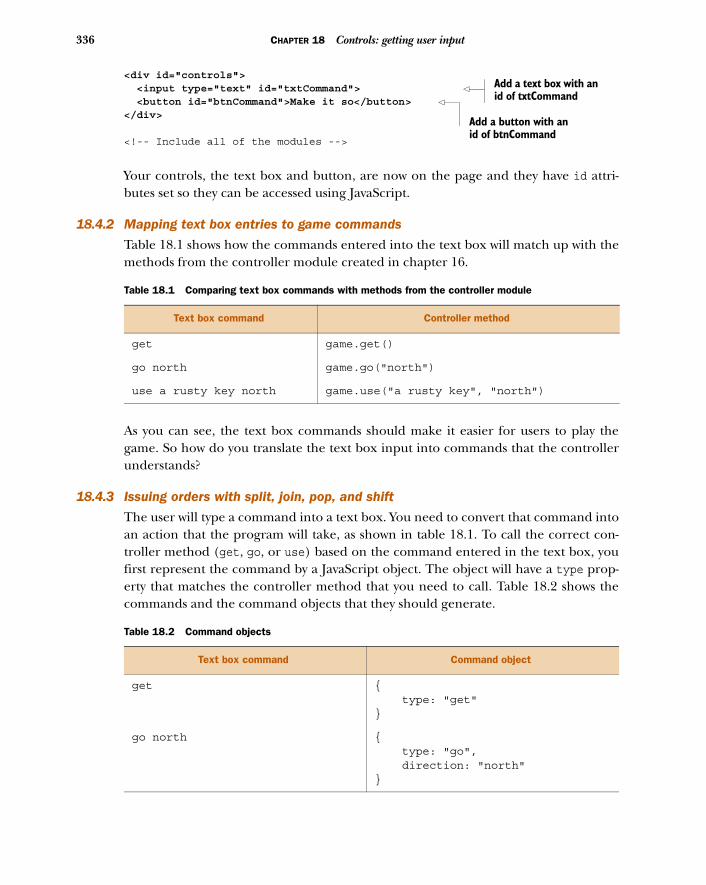
336 CHAPTER 18 Controls: getting user input
<div id="controls"> <input type="text" id="txtCommand"> <button id="btnCommand">Make it so</button> </div>
<!-- Include all of the modules -->
Your controls, the text box and button, are now on the page and they have id attri-butes set so they can be accessed using JavaScript.
18.4.2 Mapping text box entries to game commands
Table 18.1 shows how the commands entered into the text box will match up with themethods from the controller module created in chapter 16.
As you can see, the text box commands should make it easier for users to play thegame. So how do you translate the text box input into commands that the controllerunderstands?
18.4.3 Issuing orders with split, join, pop, and shift
The user will type a command into a text box. You need to convert that command intoan action that the program will take, as shown in table 18.1. To call the correct con-troller method (get, go, or use) based on the command entered in the text box, youfirst represent the command by a JavaScript object. The object will have a type prop-erty that matches the controller method that you need to call. Table 18.2 shows thecommands and the command objects that they should generate.
Table 18.1 Comparing text box commands with methods from the controller module
Text box command Controller method
get game.get()
go north game.go("north")
use a rusty key north game.use("a rusty key", "north")
Table 18.2 Command objects
Text box command Command object
get { type: "get"}
go north { type: "go", direction: "north"}
Add a text box with an id of txtCommand
Add a button with an id of btnCommand

337The Crypt—player commands via a text box
The first word of each text box command gives you the type of the command object.To get at the separate words of the command, you convert the string into an array ofwords using split.
var commandWords = commandString.split(" ");
For example, "get a rusty key" becomes ["get", "a", "rusty", "key"]. The shiftarray method removes and returns the first element in an array. That’s perfect forgrabbing the command type for your command object.
var commandWords = commandString.split(" ");var command = { type: commandWords.shift();};
The command word is no longer in the array. ["get", "a", "rusty", "key"] becomes["a", "rusty", "key"].
For go and use, you grab the direction, the last element in the commandWordsarray, by using the pop array method.
command.direction = commandString.pop();
If there are any elements left in the commandWords array, you join them back togetherto form the name of an item.
command.item = commandWords.join(" ");
For example, ["a", "rusty", "key"] is joined to become "a rusty key". The next listing shows a function that converts a command string into a command
object using the ideas just discussed.
function parseCommand (commandString) {
var commandWords = commandString.split(" ");
use a rusty key north { type: "use", item: "a rusty key", direction: "north"}
Listing 18.8 Converting a command string into a command object (http://jsbin.com/repebe/edit?js,console)
Table 18.2 Command objects
Text box command Command object
Split the command string into an array of separate words

338 CHAPTER 18 Controls: getting user input
Cthe go O
var command = { type: commandWords.shift(); };
if (command.type === "go" || command.type === "use") { command.direction = commandWords.pop(); }
command.item = commandWords.join(" ");
return command;};
With the command object in hand you can now call the matching method of thegame controller. To organize the different possible command types, use a controlstructure tailor made for deciding between many options: the switch block.
18.4.4 Deciding between options with switch
You want to take different actions depending on which command was issued. Youcould use a series of if-else blocks. But a switch block is an alternative that someprogrammers feel is neater. switch lets you define a series of code blocks and executecertain blocks depending on the value of a variable or property. Here’s an examplecomparing the two approaches, using command.type as the switch variable:
switch (command.type) { | | case "get": | if (command.type === "get") { game.get(); | game.get(); break; | } | case "go": | else if (command.type === "go") { game.go(command.direction); | game.go(command.direction); break; | } | case "use": | else if (command.type === "use") { game.use(command.item, | game.use(command.item, command.direction); | command.direction); break; | } | default: | else { game.renderMessage( | game.renderMessage( "I can’t do that"); | "I can’t do that");} | }
If the value of command.type is "get", then the code in the first case block is exe-cuted. If the value of command.type is "go", then the code in the second case isexecuted. Without the break statement, the switch block would continue to executeall of the case blocks after the first one matched. You can include a default case withcode to be executed if no other conditions are matched.
Create an object and assign it to the command variable
Remove the first word in the array and assign it to the type property
heck iftype isR use
Remove the last word in the array and assign it to the direction property
Join any remainingwords to form the
name of an item

339The Crypt—player commands via a text box
There’s not much difference between the two approaches; it’s a bit easier to readthe condition in the switch block, but you have the extra break statements. Onceagain, it comes down to personal preference: if you think the switch block is neater,use it; just don’t forget the break statements.
Listing 18.9 shows the switch block for The Crypt in context, as part of a doActionfunction.
18.4.5 Making it so—listening for button clicks
The final piece of the UI puzzle is to link the JavaScript to the HTML. You need thebutton to call the doAction function from listing 18.9 whenever it’s clicked:
var commandButton = document.getElementById("btnCommand");
commandButton.addEventListener("click", doAction);
The doAction function retrieves the text from the text box:
var txtCommand = document.getElementById("txtCommand");var commandString = txtCommand.value;
The doAction function then parses the command string to create a command object.It uses a switch block to call the matching controller method. Listing 18.9 shows howthe pieces fit together for the command module. It uses the parseCommand functionfrom listing 18.8, which can be seen on JS Bin. Note that the JS Bin listing is for refer-ence; the module won’t run in isolation on JS Bin but will throw an error.
(function () { "use strict";
function parseCommand (commandString) { /* listing 18.8 */ }
function doAction = () {
var txtCommand = document.getElementById("txtCommand"); var commandString = txtCommand.value;
var command = parseCommand(commandString);
theCrypt.messageView.clear();
switch (command.type) { case "get": game.get(); break;
case "go": game.go(command.direction); break;
Listing 18.9 The command module (http://jsbin.com/qedubi/edit?js,console)
Assign the text from the text box to the commandString variable
Parse the text and assign the command object created to the command variable
Clear old messages from the message view

340 CHAPTER 18 Controls: getting user input
case "use": game.use(command.item, command.direction); break;
default: theCrypt.messageView.render("I don't know how to do that"); }
txtCommand.value = ""; txtCommand.focus(); }
var commandButton = document.getElementById("btnCommand");
commandButton.addEventListener("click", doAction); })();
You like to smooth the path for the players, so, after the switch block, you clear theuser’s command from the text box by setting its value property to an empty string.And because you really care, you put the cursor in the text box, ready for their nextcommand, by calling the text box’s focus method. Just before the switch block, youalso use the message view’s clear method, added at the end of chapter 17, to clean upany old messages.
The code for the command module is wrapped inside an immediately invokedfunction expression. As soon as the script is loaded by the web page, it will be exe-cuted and the event listener will be added to the button element.
18.4.6 Enter The Crypt
Rather than changing the existing, working code of the Controller module, you cre-ated a new module, the Commands module, that parses a player’s commands andcalls the controller’s public methods, get, go, and use. That’s neat! The controller isindependent of the player interface; it’s the same one that worked in the console-based game and it will work with new interfaces—could you add a button to get itemsin a room?
Figure 18.8 shows a game of The Crypt in progress with a message being displayedto a player via the message view.
Listing 18.7 included the HTML for the latest version of the game but you needto change the message view script element and add one for the new Commandsmodule:
<!-- message view --><script src="http://output.jsbin.com/nocosej.js"></script>
<!-- Web Page Controls --><script src="http://output.jsbin.com/qedubi.js"></script>
Clear the text box and give it the focus, ready for the next command
Get a reference to the button on the page
Tell the button to call the doAction function whenever it’s clicked

341Summary
Play the game at http://output.jsbin.com/depijo, and see the HTML and JavaScript athttp://jsbin.com/depijo/edit?html,javascript. Be careful not to step in the zombie!
18.5 Summary■ To use controls like buttons, drop-down lists, and text boxes, you need an
HTML element for the control, an id attribute on the element, and a referenceto the element in JavaScript. You can then access the value properties of textboxes or drop-down lists and specify a function to call when a button is clicked.
■ Use a button element to display a button on the page. Include the text to beshown on the button between the opening and closing tags:
<button>Click Me!</button>
■ Include an id attribute in the opening tag so that the button can be accessedfrom JavaScript code:
<button id="messageButton">Click Me!</button>
■ Use the button’s id to get a reference to the button in JavaScript:
var btn = document.getElementById("messageButton");
■ Define a function that can be called when the button is clicked:
var showMessage = function () { var messageDiv = document.getElementById("message"); messageDiv.innerHTML = "You clicked the button!";};
Figure 18.8 The Crypt in progress showing a message to the player

342 CHAPTER 18 Controls: getting user input
■ Add an event listener to the button to call a function when the button is clicked:
btn.addEventListener("click", showMessage);
■ Use an input element with its type attribute set to text to display a text box onthe page. input elements don’t have closing tags:
<input type="text" id="userMessage" />
■ Get or set the text in a text box by using its value property:
var txtBox = document.getElementById("userMessage");var message = txtBox.value;
■ Use a select element with option elements to display a drop-down list:
<select> <option>Choice 1</option> <option>Choice 2</option> <option>Choice 3</option></select>
■ Execute code depending on the value of a variable or property by using aswitch block:
switch (command.type) { case "go": // Execute code when command.type === "go" break;
case "get": // Execute code when command.type === "get" break;
default: // Execute code if no other cases match}

Templates: fillingplaceholders with data
You want your websites to be easy to navigate and a pleasure to use. Their designsshould consider what content to include on each page, its accessibility and usability,the look and feel, and the overall user experience. Members of your team, buildingand maintaining a site, will have different strengths; even as a team of one, it makessense to focus on different aspects of a site at different times.
Get Programming with JavaScript has favored a modular approach to developingapplications, and you’ve seen that although there may be more pieces to manage,the management of each piece is simpler, more flexible, and more focused. Butin moving from pure JavaScript in part 2 to JavaScript and HTML in part 3, therehas been an unwelcome crossing of the streams. You now have views that mix data
This chapter covers■ Replacing one string with another■ Repeating code with while loops■ Using templates to separate HTML from
JavaScript■ Embedding templates in web pages■ Transforming one array into another with map
343

344 CHAPTER 19 Templates: filling placeholders with data
and JavaScript with HTML to produce their output (see chapter 17—or better yet,read on):
var html = "<h3>" + movie.title + "</h3>";html += "<p>" + movie.summary + "</p>";
This chapter shows you how to untangle the HTML from the data and the JavaScriptby using templates. The designers on your team can focus on their HTML and avoidthe tricky JavaScript syntax. And, as ever with a modular approach, isolating the piecesimproves flexibility, swapability, and maintainability. Don’t cross the streams!
19.1 Building a news page—breaking newsIn chapters 14, 15, and 16 you worked on a fitness app that let users log their sessionsof exercise; you’re part of a team of developers working on the app for differentdevices and platforms. Well, the fitness app is gaining a lot of attention; early reportsfrom testers are positive and there’s quite a buzz on social media. You decide to createa news page for the team, to keep developers, testers, and other interested parties upto date with the work you’re doing.
Figure 19.1 shows the news page with two news items. All team members contrib-ute to the news page, adding their items to a central content management system(CMS). Someone else manages the CMS and provides you with the news items asJavaScript data. Your job is to turn the data into HTML for the news page.
Figure 19.1 Fitness App News with two news items
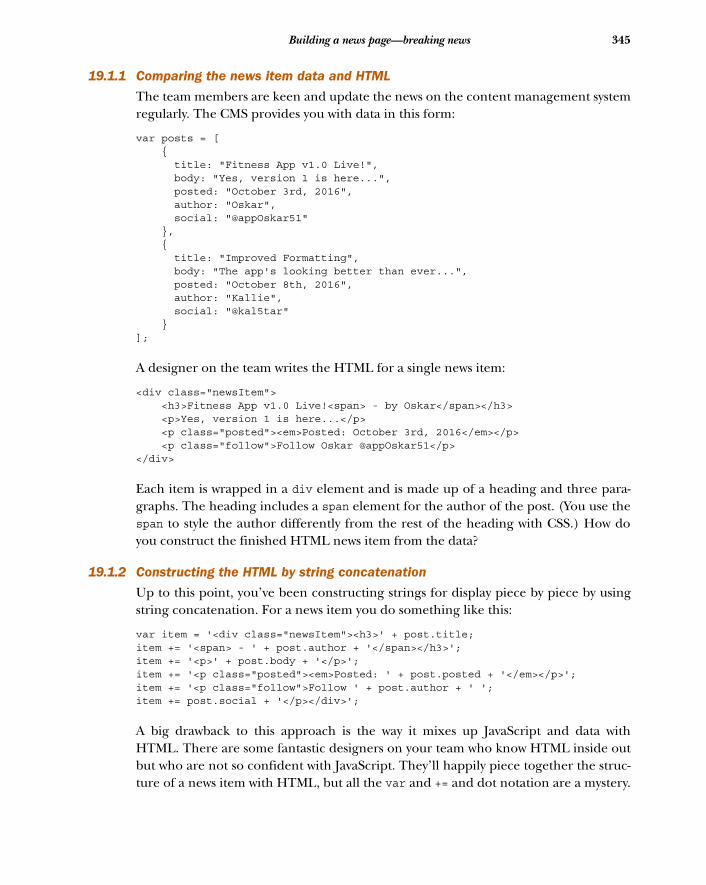
345Building a news page—breaking news
19.1.1 Comparing the news item data and HTML
The team members are keen and update the news on the content management systemregularly. The CMS provides you with data in this form:
var posts = [ { title: "Fitness App v1.0 Live!", body: "Yes, version 1 is here...", posted: "October 3rd, 2016", author: "Oskar", social: "@appOskar51" }, { title: "Improved Formatting", body: "The app's looking better than ever...", posted: "October 8th, 2016", author: "Kallie", social: "@kal5tar" }];
A designer on the team writes the HTML for a single news item:
<div class="newsItem"> <h3>Fitness App v1.0 Live!<span> - by Oskar</span></h3> <p>Yes, version 1 is here...</p> <p class="posted"><em>Posted: October 3rd, 2016</em></p> <p class="follow">Follow Oskar @appOskar51</p></div>
Each item is wrapped in a div element and is made up of a heading and three para-graphs. The heading includes a span element for the author of the post. (You use thespan to style the author differently from the rest of the heading with CSS.) How doyou construct the finished HTML news item from the data?
19.1.2 Constructing the HTML by string concatenation
Up to this point, you’ve been constructing strings for display piece by piece by usingstring concatenation. For a news item you do something like this:
var item = '<div class="newsItem"><h3>' + post.title;item += '<span> - ' + post.author + '</span></h3>';item += '<p>' + post.body + '</p>';item += '<p class="posted"><em>Posted: ' + post.posted + '</em></p>';item += '<p class="follow">Follow ' + post.author + ' ';item += post.social + '</p></div>';
A big drawback to this approach is the way it mixes up JavaScript and data withHTML. There are some fantastic designers on your team who know HTML inside outbut who are not so confident with JavaScript. They’ll happily piece together the struc-ture of a news item with HTML, but all the var and += and dot notation are a mystery.

346 CHAPTER 19 Templates: filling placeholders with data
And even if they were okay with JavaScript, updating the code isn’t exactly a walk inthe park; I’m looking at you, quotation marks! There is a better way: let the HTMLexperts stick to what they know best.
19.1.3 Designing with HTML templates
You want the designers to come up with some elegant, well-structured HTML for ageneric news item, and you’ll then fill it with the latest data. You want them to provideyou with a template for a news item.
<div class="newsItem"> <h3>{{title}}<span> - {{author}}</span></h3> <p>{{body}}</p> <p class="posted"><em>Posted: {{posted}}</em></p> <p class="follow">Follow {{author}} {{social}}</p></div>
That’s much neater than all that string concatenation, right? There’s no potentialconfusion with single and double quotation marks, and the different fields of the data(title, body, author, posted, social) are clearly identified as placeholders with doublecurly braces.
But if the template is included with the HTML, won’t it appear on the web page?Not if you wrap it in script tags.
19.1.4 Using script tags for templates
The HTML templates are kept with the rest of the HTML for a web page, placedwithin script tags. Use a nonstandard type attribute for the script element, andthen when the browser is loading the page it won’t recognize the type and will ignorethe template. The content of the script element won’t appear as part of the output—the visible web page—and won’t be run as JavaScript either.
<script type="text/template" id="newsItemTemplate"> <div class="newsItem"> <h3>{{title}}<span> - {{author}}</span></h3> <p>{{body}}</p> <p class="posted"><em>Posted: {{posted}}</em></p> <p class="follow">Follow {{author}} {{social}}</p> </div></script>
If the script element has a type of "text/javascript" or if the type is missing, thebrowser will try to execute its contents as JavaScript code. But with a type of "text/template", the browser simply passes over the contents.
Although the browser will ignore the template when rendering the page, you canstill access it from JavaScript via its id attribute.
var templateScript = document.getElementById("newsItemTemplate");var templateString = templateScript.innerHTML;

347Replacing one string with another
The first listing shows the contents of the body element for your news page. There’s aheading, a div for the news items, and your template wrapped in a script tag.
<h1>Fitness App News</h1>
<div id="news"></news>
<script type="text/template" id="newsItemTemplate"> <div class="newsItem"> <h3>{{title}}<span> - by {{author}}</span></h3> <p>{{body}}</p> <p class="posted"><em>Posted: {{posted}}</em></p> <p class="follow">Follow {{author}} {{social}}</p> </div> </script>
You only need to find a way to replace the placeholders with the actual data, and you’llhave news items ready for publication. You need to learn how to replace one string, aplaceholder, with another, some data.
19.2 Replacing one string with anotherTo switch one string for another, you use the replace string method, passing thestring to find as the first argument and the string with which to replace it as the sec-ond. The method returns a new string. The following listing shows how to replace thestring "{{title}}" with the string "Fitness App v1.0 Live!". It produces the follow-ing output on the console:
> <h3>{{title}}</h3>> <h3>Fitness App v1.0 Live!</h3>
var before = "<h3>{{title}}</h3>";
var after = before.replace( "{{title}}", "Fitness App v1.0 Live!");
console.log(before); console.log(after);
The replace method searches the string to which it is attached, returning a new string.
before.replace(string1, string2);
This snippet searches the string stored in the variable before.
Listing 19.1 Fitness App News (HTML) (http://jsbin.com/viyuyo/edit?html,output)
Listing 19.2 Replacing one string with another (http://jsbin.com/jeyohu/edit?js,console)
Include a div in which to place the news items
Use a script element to wrap the news item template
Look for the first string and replace it with the second
The original string is not changed

348 CHAPTER 19 Templates: filling placeholders with data
19.2.1 Chaining calls to replace
The replace method acts on strings. It also returns a string. This means replace canbe called on its own return value, allowing you to chain calls like this:
template .replace("{{title}}", "Fitness App v1.0 Live!") .replace("{{author}}", "Oskar");
If template is the string "<h3>{{title}}<span> - by {{author}}</span></h3>",then the previous snippet works through the following steps. First, the {{title}}placeholder is replaced:
"<h3>{{title}}<span> - by {{author}}</span></h3>" .replace("{{title}}", "Fitness App v1.0 Live!") .replace("{{author}}", "Oskar");
Then the {{author}} placeholder is replaced:
"<h3>Fitness App v1.0 Live!<span> - by {{author}}</span></h3>" .replace("{{author}}", "Oskar");
The final result is
"<h3>Fitness App v1.0 Live!<span> - by Oskar</span></h3>";
Listing 19.3 shows an example of chaining two calls to replace. It produces the follow-ing output on the console:
> Follow {{author}} {{social}}> Follow Oskar @appOskar51
var data = { author : "Oskar", social : "@appOskar51" };var before = "Follow {{author}} {{social}}";
var after = before .replace("{{author}}", data.author) .replace("{{social}}", data.social);
console.log(before);console.log(after);
The calls to replace were written across multiple lines in listing 19.3. This has no impacton the program but makes it easier for someone reading the code to pick out the sepa-rate calls. When methods can be chained with dot notation, like replace, they are said
Listing 19.3 Chaining calls to replace (http://jsbin.com/rebugu/edit?js,console)
Call replace on the original string
Call replace on the value returned by the first call

349While loops—replacing a string multiple times
to have a fluent interface. Programmers often design whole suites of objects and methodsto use fluent interfaces so they become easier to use, read, and understand.
19.3 While loops—replacing a string multiple timesKnowing how to use replace to swap one string for another, you write code to test itout for the news page. Figure 19.2 shows what a news item template looks like beforeyou replace its placeholders.
The data for a news item is a JavaScript object with five properties: title, body, author,posted, and social:
var data = { title: "Fitness App v1.0 Live!", body: "Yes, version 1 is here...", posted: "October 3rd, 2016", author: "Oskar", social: "@appOskar51"};
You call replace for each of the properties and, at first, you think things have gonewell. Figure 19.3 shows the rendered news item.
Figure 19.2 A news item with all of its placeholders showing
Figure 19.3 A news item—one of the {{author}} placeholders has not been replaced (bottom right).

350 CHAPTER 19 Templates: filling placeholders with data
Ethe
ftem
Close, but no Pulitzer! One of the placeholders hasn’t been replaced. There’s still astubborn {{author}} in the bottom right of the news item. The following listingshows the code you used. What went wrong?
var data = { title: "Fitness App v1.0 Live!", body: "Yes, version 1 is here...", posted: "October 3rd, 2016", author: "Oskar", social: "@appOskar51" };
var templateScript = document.getElementById("newsItemTemplate");
var templateString = templateScript.innerHTML;
var newsItemHTML = templateString .replace("{{title}}", data.title) .replace("{{author}}", data.author) .replace("{{posted}}", data.posted) .replace("{{body}}", data.body) .replace("{{social}}", data.social);
var newsContainer = document.getElementById("news");
newsContainer.innerHTML = newsItemHTML;
The problem is, the replace method replaces only the first occurrence of the stringit’s trying to match. The news item template has two {{author}} placeholders andyou replace only one of them. Have a go at fixing the problem yourself, by callingreplace twice for the same placeholder.
The template and replace code are all a bit too tightly coupled. If the designerchanges the template to include the {{author}} placeholder a third time (maybe foran email link or a short bio), you’ll have to dig back into the JavaScript and update thecode to add another call to replace.
You want code that automatically keeps calling replace while there are placehold-ers to fill. How can you call replace the correct number of times?
19.3.1 Repeating code while a condition is met
All of the placeholders in your news item template need to be replaced with the corre-sponding data. For example, both instances of {{author}} should be filled withOskar, as shown in the top right and bottom right of figure 19.4.
Listing 19.4 Calling replace once for each property (http://jsbin.com/quroha/edit?js,html,output)
Get a reference to the script element that holds the template
xtract HTMLor theplate Replace each
placeholder with its property value
Get a reference to the div that will hold the news item
Inject the news item HTML into the div

351While loops—replacing a string multiple times
Your code should keep calling replace while it finds a placeholder for each property.In pseudocode (pretend code) it should look something like this:
while there is a placeholder { replace the placeholder with data}
The code block between the curly braces should keep being repeated while there’s aplaceholder. Once no placeholder is found, the code block can be skipped. Here’show to accomplish that goal in JavaScript:
while (filled.indexOf(placeholder) !== -1) { filled = filled.replace(placeholder, data.property);}
You’ll dig into the details shortly, so don’t worry too much if you don’t follow every-thing yet. But you should be able to appreciate the gist of what the code is doing. Let’slook at how the while loop works in general.
19.3.2 The while loop
The while loop keeps calling replace while a placeholder is found in the filledstring. When no placeholder is found, execution continues after the code block. Ingeneral, the while loop lets you repeatedly execute a block of code while a conditionis true. The structure of a while loop looks like this:
while (condition) { // Code to execute if condition is true. }
The loop first evaluates the condition. If it evaluates to true, then the code block isexecuted, just like an if statement. Unlike an if statement, once the code block hasbeen executed, the while loop evaluates the condition again. If the condition stillevaluates to true, then the block is executed again. The loop keeps executing thecode block while the condition is true. If the condition is false, then the code blockis skipped and the program continues with the statements after the block.
Figure 19.4 Both author placeholders have been replaced with Oskar (top right and bottom right).

352 CHAPTER 19 Templates: filling placeholders with data
The next listing shows a while loop being used to display whole numbers from1 to 10.
var count = 1;
while (count < 11) { console.log(count); count++; }
Once the count variable reaches 11, the condition will evaluate to false and the valueof count won’t be logged to the console. The code block should always change thevalue of a variable used in the condition. Otherwise, if the condition’s value starts astrue, it will never become false and the loop will become an infinite loop. In listing 19.5,you use the increment operator, ++, to add 1 to the value of count. Three differentways of adding 1 to the value of a count variable are shown here:
count = count + 1;count += 1;count++;
19.3.3 Replacing a string while it can be found
You can use a while loop to replace multiple occurrences of a placeholder. First,check if the placeholder you want to replace is present with the indexOf method.indexOf returns -1 if a string can’t be found. If the placeholder is found, then indexOfwon’t return -1. Use that fact in the condition of a while loop:
while (filled.indexOf(placeholder) !== -1) { // Make changes to filled}
Listing 19.6 uses a while loop to keep replacing a string until it’s no longer found. Itproduces the following output on the console:
> Starting replacement...> {{title}} by Oskar. Follow {{author}} {{social}}> {{title}} by Oskar. Follow Oskar {{social}}> ...replacement finished.
var template = "{{title}} by {{author}}. Follow {{author}} {{social}}";
var filled = template;
console.log("Starting replacement...");
Listing 19.5 Using a while loop to count (http://jsbin.com/quroga/edit?js,console)
Listing 19.6 Using a while loop with replace (http://jsbin.com/cabaju/edit?js,console)
Use the increment operator, ++, to add 1to the value of count
Use a second variable so that the initial template is unchanged

353Automating placeholder replacement for templates
while (filled.indexOf("{{author}}") !== -1) {
filled = filled.replace("{{author}}", "Oskar"); console.log(filled);
}
console.log("...replacement finished.");
The code first logs that it’s starting the replacement process. The while loop then exe-cutes its code block twice, replacing one instance of {{author}} and then the other.With no more instances of {{author}} to find, filled.indexOf("{{author}}")returns -1 and the while loop ends. Execution continues after the loop, and the codeconcludes by logging that the replacement process has finished.
19.3.4 Replacing strings with regular expressions
There’s an alternative way of replacing strings. It uses regular expressions, a powerful butoften complicated way of specifying patterns of characters you want to match andreplace. Regular expressions are a little beyond the scope of the book, but you caninvestigate a number of examples on the Get Programming with JavaScript website atwww.room51.co.uk/js/regexp.html.
19.4 Automating placeholder replacement for templatesThe fitness app uses data for user exercise sessions, and its news page uses data fornews items. The quiz app uses data for sets of questions and answers, and The Cryptuses data for its maps. It would be great to use HTML templates to display all kinds ofdata you might find in your projects. But you don’t want to have to reinvent the whileevery time you need to fill placeholders with data. So, what’s the key to automatingtemplate use?
19.4.1 Matching template placeholders with object properties
Figure 19.5 shows a news item from the fitness app news page again. The placeholdershave yet to be filled with data.
Check if the placeholder can be found
Replace the placeholder with a value
Figure 19.5 A news item with placeholders unfilled

354 CHAPTER 19 Templates: filling placeholders with data
The data that will fill the placeholders looks like this:
var data = { title: "Fitness App v1.0 Live!", body: "Yes, version 1 is here...", posted: "October 3rd, 2016", author: "Oskar", social: "@appOskar51"};
The property names of the news item data object, its keys, match the names of theplaceholders in the template. For each key, you want to keep replacing its matchingplaceholders while they can be found.
1 Start with title and keep replacing {{title}} with Fitness App v1.0 Live!until there are no more {{title}} placeholders to replace.
2 Move on to body and keep replacing {{body}} with Yes, version 1 is here...until there are no more {{body}} placeholders to replace.
3 Repeat the process for each key until all of the keys have had all of their place-holders replaced.
You can get an array of all of the news item’s property names by using the Object.keys method.
var keys = Object.keys(data);
For the news item, keys = ["title", "body", "posted", "author", "social"]. Armed with the keys, you can easily create the placeholders and replace them with
values in the template. Remember, you can use square bracket notation to retrieve thevalue for a key:
data["title"]; // "Fitness App v1.0 Live!"data["author"]; // "Oskar"
And if you have a property’s key, you can also build the placeholder you need tomatch in the template:
var placeholder = "{{" + key + "}}";
The key for a property is well named; you use it to unlock the value of the property andits placeholder (table 19.1).
Table 19.1 A property’s keys are used to access its value and build its placeholder
Key Value Placeholder
title data["title"] {{title}}
body data["body"] {{body}}
posted data["posted"] {{posted}}

355Automating placeholder replacement for templates
19.4.2 Filling all of the placeholders for each key
It’s time to bring all of the parts together and write some code that will not only filltemplates with data for the fitness app news page but will also work with any data andmatching templates. Listing 19.7 shows a fill function that uses the ideas from theprevious section, iterating over the keys of a data object and replacing the placehold-ers with values.
function fill (template, data) {
Object.keys(data).forEach(function (key) {
var placeholder = "{{" + key + "}}"; var value = data[key];
while (template.indexOf(placeholder) !== -1) { template = template.replace(placeholder, value); }
});
return template; }
// Test the fill function
var data = { title: "Fitness App v1.0 Live!", body: "Yes, version 1 is here...", posted: "October 3rd, 2016", author: "Oskar", social: "@appOskar51"};
var templateScript = document.getElementById("newsItemTemplate"); var templateString = templateScript.innerHTML; var newsContainer = document.getElementById("news");
newsContainer.innerHTML = fill(templateString, data);
Listing 19.7 also includes code to test the fill function. On the last line, it sets thecontents of a div element with the HTML returned by the function.
19.4.3 Building a list of items using a template
You’re already smiling. Yes, the fitness app news page features a list of news items. Andyes, your template fill function works with only a single news item. But you know
Listing 19.7 A function to fill templates with data (http://jsbin.com/bazika/edit?js,output)
Iterate over each key in the data
Use the key to build a placeholder and retrieve the data value
Keep replacing the placeholder with the value until the placeholder can’t be found
Return the filled template
Collect the template and news container reference from the web page
Fill the template with the dataand update the news display

356 CHAPTER 19 Templates: filling placeholders with data
the power of forEach for working with lists. Writing a fillList function is a snap, asshown here.
function fill (template, data) { /* Listing 19.7 */ }
function fillList (template, dataArray) { var listString = "";
dataArray.forEach(function (data) { listString += fill(template, data); });
return listString;}
// Test the function var posts = [ { title: "Fitness App v1.0 Live!", body: "Yes, version 1 is here...", posted: "October 3rd, 2016", author: "Oskar", social: "@appOskar51" }, { title: "Improved Formatting", body: "The app's looking better than ever...", posted: "October 8th, 2016", author: "Kallie", social: "@kal5tar" } /* Two more items on JS Bin */];
var templateScript = document.getElementById("newsItemTemplate");var templateString = templateScript.innerHTML;var newsContainer = document.getElementById("news");
newsContainer.innerHTML = fillList(templateString, posts);
In the fillList function in listing 19.8, you use the forEach method to iterate overthe array of data objects, dataArray, passing each one to the fill function andappending the filled templates it returns to listString.
Now that you have the two template functions you need, you’re keen to get thescoop on the finished fitness app news page.
Listing 19.8 Building a list using a template (http://jsbin.com/hilecu/edit?js,output)
Call the fill function for every item, building up the list string
Fill the template for every news item and update the display with the completed HTML string
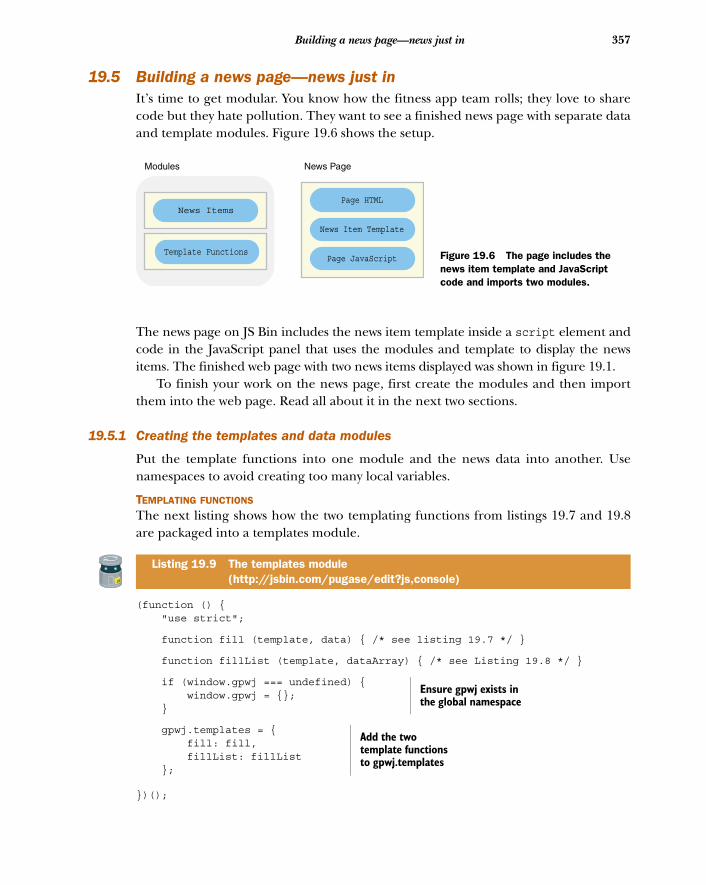
357Building a news page—news just in
19.5 Building a news page—news just inIt’s time to get modular. You know how the fitness app team rolls; they love to sharecode but they hate pollution. They want to see a finished news page with separate dataand template modules. Figure 19.6 shows the setup.
The news page on JS Bin includes the news item template inside a script element andcode in the JavaScript panel that uses the modules and template to display the newsitems. The finished web page with two news items displayed was shown in figure 19.1.
To finish your work on the news page, first create the modules and then importthem into the web page. Read all about it in the next two sections.
19.5.1 Creating the templates and data modules
Put the template functions into one module and the news data into another. Usenamespaces to avoid creating too many local variables.
TEMPLATING FUNCTIONS
The next listing shows how the two templating functions from listings 19.7 and 19.8are packaged into a templates module.
(function () { "use strict";
function fill (template, data) { /* see listing 19.7 */ }
function fillList (template, dataArray) { /* see Listing 19.8 */ }
if (window.gpwj === undefined) { window.gpwj = {}; }
gpwj.templates = { fill: fill, fillList: fillList };
})();
Listing 19.9 The templates module (http://jsbin.com/pugase/edit?js,console)
Modules
Template Functions
News ItemsPage HTML
News Item Template
Page JavaScript
News Page
Figure 19.6 The page includes the news item template and JavaScript code and imports two modules.
Ensure gpwj exists in the global namespace
Add the two template functions to gpwj.templates

358 CHAPTER 19 Templates: filling placeholders with data
You use a new namespace, gpwj (from Get Programming with JavaScript); the templatesmodule will be useful in so many projects that it’s worth having it as part of a generalutilities namespace rather than in with the fitness app or The Crypt or wherever else itwill be used. To call the functions, include the namespace:
var newsItemHTML = gpwj.templates.fill(newsItemTemplate, data);
NEWS DATA
For the real-world news page, the data will come from a central content manage-ment system. You mimic the CMS news feed by creating a module that suppliesdummy data. You can swap the module for one with a live CMS connection furtherdown the line.
The next listing includes the data and a function for getting it assigned to thefitnessApp.news namespace.
(function () { "use strict";
var posts = [ { title: "Fitness App v1.0 Live!", body: "Yes, version 1 is here...", posted: "October 3rd, 2016", author: "Oskar", social: "@appOskar51" } /* more data on JS Bin */ ];
function getNews (numItems) { return posts.slice(0, numItems); }
if (window.fitnessApp === undefined) { window.fitnessApp = {}; }
fitnessApp.news = { getItems: getNews };
})();
To get news items, call getItems, specifying the number of items you want. For exam-ple, to get three news items you’d use the following code:
var itemsData = fitnessApp.news.getItems(3);
Listing 19.10 A news page data module (http://jsbin.com/fupiki/edit?js,console)
Include an array of news items rather than getting data from the CMS
Return the specified number of news items
Ensure the fitnessApp global namespace exists
Add a news namespace to the fitnessApp namespace

359Building a news page—news just in
The real news data module that retrieves items from the CMS will use the same inter-face as listing 19.10. In other words, its news will also be accessed by calling its get-Items method. By using the same interface, you can easily swap modules from yourstatic version to the dynamic CMS version.
19.5.2 Importing the modules
To provide your readers with the latest headlines on developments from the fitnessapp team, you create the simple news page HTML shown here.
<h1>Fitness App News</h1>
<div id="news"></news>
<script type="text/template" id="newsItemTemplate"> <div class="newsItem"> <h3>{{title}}<span> - by {{author}}</span></h3> <p>{{body}}</p> <p class="posted"><em>Posted: {{posted}}</em></p> <p class="follow">Follow {{author}} {{social}}</p> </div> </script>
<!-- templates module --> <script src="http://output.jsbin.com/pugase.js"></script>
<!-- news items data --> <script src="http://output.jsbin.com/fupiki.js"></script>
To bring all of the pieces together, you add JavaScript that retrieves the template fromthe page, fills it with the news item data, and updates the news div with the generatedHTML, as in the next listing.
var templateScript = document.getElementById("newsItemTemplate"); var templateString = templateScript.innerHTML; var newsContainer = document.getElementById("news");
var newsData = fitnessApp.news.getItems(3);
newsContainer.innerHTML = gpwj.templates.fillList(templateString, newsData);
Listing 19.11 A modular news page (HTML) (http://jsbin.com/vemufa/edit?html,output)
Listing 19.12 A modular news page (http://jsbin.com/vemufa/edit?js,output)
Include a div for the news items
Put HTML templates in the page inside script tags
Import the templating and data modules
Grab the pieces you need from the page
Use the news data module to retrieve three news items
Use the template module to generate thenews items HTML and update the page

360 CHAPTER 19 Templates: filling placeholders with data
Using templates is a common way to generate HTML from an application’s data.There are many JavaScript templating libraries freely available for general use; Han-dlebars, Moustache, and Pug are three popular examples.
Stop the press! Your team members love the neat, modular, reusable approachyou’ve taken and vow to add new news items every day. Some of them have alreadystarted incorporating the gpwj.templates functions into their own applications. Youdecide to do the same, as you return to The Crypt.
19.6 The Crypt—improving the viewsIn chapter 17 you created some web-based views for players and places. The informa-tion they displayed, originally intended for the console, was formatted with spaces,line breaks, and boxes and borders from the spacer namespace, rather than HTML.Now that you’ve seen how templates can be used to separate markup and JavaScript,it’s time to improve the views so that appropriate HTML tags are used to wrap data inThe Crypt.
Figure 19.7 shows what The Crypt will look like after the changes. Switching toHTML from plain text makes it possible to style the output with CSS, leading to muchgreater potential for visually interesting designs. Figure 19.8 shows the modules forthe project with new and updated modules highlighted.
Figure 19.7 The latest version of The Crypt uses HTML templates to build page elements.

361The Crypt—improving the views
You created the Templates module earlier in the chapter. Now you create templatesand update the views to use them.
19.6.1 Creating HTML templates for all of the viewsThe following listing shows all of the templates for The Crypt embedded within HTMLscript tags. They’re part of a full web page on JS Bin.
<script type="text/template" id="itemTemplate"> <li>{{item}}</li> </script>
<script type="text/template" id="playerTemplate"> <h3>{{name}}</h3> <p>{{health}}</p>
<ol id="playerItems"></ol></script>
<script type="text/template" id="placeTemplate"> <h3>{{title}}</h3> <p>{{description}}</p>
<div class="placePanel"> <h4>Items:</h4> <ol id="placeItems"></ol> </div>
<div class="placePanel"> <h4>Exits:</h4> <ol id="placeExits"></ol> </div></script>
<script type="text/template" id="messageTemplate"> <p>*** {{message}} ***</p></script>
Listing 19.13 The Crypt with Templates (HTML) (http://jsbin.com/yapiyic/edit?html,output)
playerView
placeView
messageView
Utility
Templates
Map data
Map builder
Map Player
Place
Model Constructors
Views
Controller
Controller
Commands
Figure 19.8 Modules in The Crypt with new or updated modules highlighted
Use script tags to include HTML templates in the page
Give the script tags a nonstandard type attribute so they’re not executed
Include an id attribute so the script elements can be accessed from JavaScript
Include an ordered list element in the template as a container for list items
Give the list containers ids so the items can be added from JavaScript

362 CHAPTER 19 Templates: filling placeholders with data
There’s no JavaScript mixed with the templates. A web designer used to working inHTML could use their knowledge to update the templates without having to unpickthe HTML from any other code. Clearly, this separation of concerns makes the tem-plates neater, easier to read, and easier to use for anyone involved in building theapplication.
19.6.2 Updating the views to use the new templates
With the template strings for The Crypt now embedded as HTML on the page, youneed to update the view modules to grab the template strings and fill them with a mes-sage or with data from the player and place models. Listings 19.14, 19.15, and 19.16show the new view code. Note: The views are designed to be used by the controller and won’twork in isolation. The links to JS Bin are included so you can copy, clone, or change thecode if you choose.
MESSAGES
The simplest view is the message view. Here’s the updated code.
(function () { "use strict";
var messageDiv = document.getElementById("messages"); var templateScript = document.getElementById("messageTemplate"); var template = templateScript.innerHTML;
function render (message) { var data = { message: message }; messageDiv.innerHTML = gpwj.templates.fill(template, data); }
function clear () { messageDiv.innerHTML = ""; }
if (window.theCrypt === undefined) { window.theCrypt = {}; }
theCrypt.messageView = { render: render, clear: clear };
})();
The messages passed to the render method for the message view are just strings. Thetemplate.fill method expects objects (it uses object keys to create placeholders andfind values), so render creates an object, data, from the message to use as the argument.
Listing 19.14 A message view using templates (http://jsbin.com/jojeyo/edit?js,console)
Collect references to elements on the web page
Define a function to fill the message template and update the display
Define a function to empty the message div, clearing the display
Add both functions to the messageView namespace

363The Crypt—improving the views
r
pladiv
j
A message of "hello" becomes { message : "hello" }. The fill method will thenreplace the {{message}} placeholder with the value "hello".
PLAYERS
The player view is slightly more complicated than the message view because playershave items. As well as having a template string to display the player’s name and health,the player view needs another for the items.
The next listing shows the new player view. The code relating to items is shownin bold.
(function () { "use strict";
var playerDiv = document.getElementById("player"); var playerScript = document.getElementById("playerTemplate"); var itemScript = document.getElementById("itemTemplate");
var playerTemplate = playerScript.innerHTML; var itemTemplate = itemScript.innerHTML;
function render (player) { var data = player.getData(); var itemsDiv;
var items = data.items.map(function (itemName) { return { item : itemName }; });
playerDiv.innerHTML = gpwj.templates.fill(playerTemplate, data);
itemsDiv = document.getElementById("playerItems");
itemsDiv.innerHTML = gpwj.templates.fillList(itemTemplate, items); }
if (window.theCrypt === undefined) { window.theCrypt = {}; }
theCrypt.playerView = { render: render };
})();
The player’s items data is an array of strings. Because fillList expects an array ofobjects, you use map to transform the array from strings to objects. You pass a function tothe map method and map builds a new array, with each new element created by the func-tion. The array ["a lamp", "a key"] becomes [{ item : "a lamp" }, { item : "a key" }].
Listing 19.15 A player view using templates (http://jsbin.com/suyona/edit?js,console)
Use map to create an array of item objects from the array of item name strings
Add the HTML generated from the player template to the page
Get aeference
to theyerItems that hasust beenadded tothe page
Add the items HTML to the playerItems div
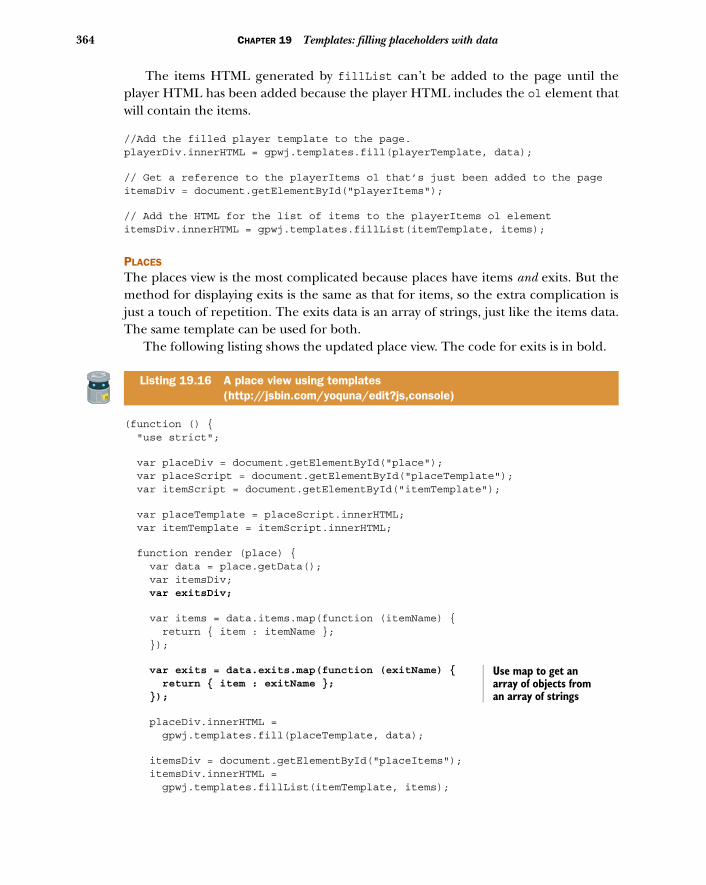
364 CHAPTER 19 Templates: filling placeholders with data
The items HTML generated by fillList can’t be added to the page until theplayer HTML has been added because the player HTML includes the ol element thatwill contain the items.
//Add the filled player template to the page. playerDiv.innerHTML = gpwj.templates.fill(playerTemplate, data);
// Get a reference to the playerItems ol that’s just been added to the pageitemsDiv = document.getElementById("playerItems");
// Add the HTML for the list of items to the playerItems ol elementitemsDiv.innerHTML = gpwj.templates.fillList(itemTemplate, items);
PLACES
The places view is the most complicated because places have items and exits. But themethod for displaying exits is the same as that for items, so the extra complication isjust a touch of repetition. The exits data is an array of strings, just like the items data.The same template can be used for both.
The following listing shows the updated place view. The code for exits is in bold.
(function () { "use strict";
var placeDiv = document.getElementById("place"); var placeScript = document.getElementById("placeTemplate"); var itemScript = document.getElementById("itemTemplate");
var placeTemplate = placeScript.innerHTML; var itemTemplate = itemScript.innerHTML;
function render (place) { var data = place.getData(); var itemsDiv; var exitsDiv;
var items = data.items.map(function (itemName) { return { item : itemName }; });
var exits = data.exits.map(function (exitName) { return { item : exitName }; });
placeDiv.innerHTML = gpwj.templates.fill(placeTemplate, data);
itemsDiv = document.getElementById("placeItems"); itemsDiv.innerHTML = gpwj.templates.fillList(itemTemplate, items);
Listing 19.16 A place view using templates (http://jsbin.com/yoquna/edit?js,console)
Use map to get an array of objects from an array of strings

365Summary
exitsDiv = document.getElementById("placeExits"); exitsDiv.innerHTML = gpwj.templates.fillList(itemTemplate, exits); }
if (window.theCrypt === undefined) { window.theCrypt = {}; }
theCrypt.placeView = { render: render };
})();
Once again, map is used to convert an array of strings into an array of objects, this timefor both items and exits.
19.6.3 Enter The Crypt
Listing 19.13 on JS Bin is a working example of The Crypt using templates and thethree new views. The scripts to import the new modules are shown here:
<!-- gpwj.templates --><script src="http://output.jsbin.com/pugase.js"></script>
<!-- player view --><script src="http://output.jsbin.com/suyona.js"></script><!-- place view --><script src="http://output.jsbin.com/yoquna.js"></script><!-- message view --><script src="http://output.jsbin.com/jojeyo.js"></script>
Make your way to http://output.jsbin.com/yapiyic and have a play.
19.7 Summary■ Use the replace string method to replace one string with another:
"One too three".replace("too", "two"); // Returns "One two three"
■ Chain calls to replace to swap multiple strings:
"One too three".replace("One", "Far").replace("three", "long"); // Returns "Far too long"
■ Use a while loop to execute a block of code while a condition remains true.
var count = 10;
while (count > 5) { // Displays 10 9 8 7 6 on separate lines console.log(count); count = count – 1;}
Once it’s been added, get a reference to the placeExits ol and fill it with the exits HTML

366 CHAPTER 19 Templates: filling placeholders with data
■ Use the map array method to create a new array based on the elements of anexisting array. The function passed to map as an argument returns a new valuebased on an old value:
var planets = ["Mercury", "Venus"];
var bigPlanets = planets.map(function (oldValue) { return oldValue + " becomes " + oldValue.toUpperCase();});
// bigPlanets === ["Mercury becomes MERCURY", "Venus becomes VENUS"]
■ Use template strings with placeholders to avoid mixing JavaScript with displaystrings:
var templateString = "<h3>{{title}}</h3><p>{{body}}</p>";
■ Embed template strings in HTML by using script tags with nonstandard typeattributes.
<script type="text/template" id="postTemplate"> <h3>{{title}}</h3><p>{{body}}</p></script>
■ Access the template from JavaScript via the script tag’s id attribute and theelement’s innerHTML property:
var templateString = document.getElementById("postTemplate").innerHTML;
■ Fill a template with data from an object. It returns a string with the placeholdersreplaced by the properties of the object:
var data = {title: "Out of Office", body: "I’m going on an adventure!"};var template = "<h3>{{title}}</h3><p>{{body}}</p>";gpwj.templates.fill(template, data); // Returns "<h3>Out of Office</h3><p>I’m going on an adventure!</p>"

XHR: loading data
A calendar or movies database or adventure game can use a lot of data. A news sitemay have up-to-the-minute updates with breaking news and sports scores. It’s notalways desirable to load all of the data at once or for a visitor to have to keeprefreshing a web page to get the latest information. It would be great if a pagecould access just the pieces of new data it needs to stay fresh, even after it hasloaded. Stock prices, tweets, comments, scores, and, yes, the current health of zom-bies can all be updated independently without a full page reload.
This chapter shows you how to reach out across the internet and grab data foryour apps while they’re running. In particular, you load exercise data as you switchbetween users in the fitness app, and you load location data, tomb by tomb, as play-ers solve the riddles of The Crypt.
This chapter covers■ Loading data with the XMLHttpRequest object ■ Calling functions once the data loads■ Updating views with loaded data■ JavaScript Object Notation (JSON)■ Converting JSON text into JavaScript objects
367

368 CHAPTER 20 XHR: loading data
20.1 Building a fitness app—retrieving user dataYou and your team have been building a fitness app that lets users track their exercise(see chapters 14 to 16). The app can convert JavaScript data into user models, use achoice of views to display user info on the console, and accept user input at the con-sole prompt. The tasks you were given for the project are these:
1 Retrieve user data as a string.2 Convert user data into user models.3 Display user data.4 Provide an interface for users to add sessions.
You’ve completed tasks 2, 3, and 4, and now it’s time to retrieve user data over theinternet. You want to be able to switch between users while using the app, as shown infigure 20.1.
Figure 20.1 shows an app.loadUser method being called to load data for second andthird users. Before you can get your hands on the data, you need some way of specify-ing the location of the data for each user.
20.1.1 Locating the user data
Different team members are working on versions of the fitness app for different plat-forms and devices. But all of the versions will use the same data, provided by the cen-tral fitness app server, as shown in figure 20.2.
Figure 20.1 Switching between users while using the fitness app

369Building a fitness app—retrieving user data
Up until now, while developing the app, you’ve been using a static data file for a singleuser. You want to be able to swap between users without reloading the whole app andwithout loading the data for all of the users at once (you’re hoping for lots of users!).You decide to define a loadUser method that will load user data for a given user IDand display it on the console:
> app.loadUser("qiwizo") Loading user details...
Mahesha 120 minutes on 2017-02-05 35 minutes on 2017-02-06 45 minutes on 2017-02-06
200 minutes so far Well done!
Your IDs for the fitness app correspond to files on JS Bin; in a real application theymay be IDs from a database or maybe unique usernames. Each file contains the datafor just one user. For example, here’s Mahesha’s data at http://output.jsbin.com/qiwizo.json:
{ "name" : "Mahesha", "sessions" : [ {"sessionDate": "2017-02-05", "duration": 120}, {"sessionDate": "2017-02-06", "duration": 35}, {"sessionDate": "2017-02-06", "duration": 45} ]}
So, how do you load data for a player while your program is running? The secretlies with the strangely named XMLHttpRequest object. But before you load up its
The same data is used by all of the apps
Android App iOS App
The fitness app server makes the data available
Web App
User Data
Figure 20.2 The same data is used by all of the apps.

370 CHAPTER 20 XHR: loading data
secrets, it’ll be worth getting a better sense of the steps involved in working with theremote data.
20.1.2 Loading the user data—an outline
You need to load user data for the fitness app. Whenever a user calls the loadUsermethod, your app needs to reach out across the internet, find the data, retrieve it, andthen use it. To do all that, the app will need the following:
■ A user ID■ A URL at which to find the data■ A function to call once the data is retrieved
The third requirement is worth considering further. The data is across the internet,possibly across the world, on another machine. It will take time for the data to befound and retrieved (hopefully milliseconds, but maybe seconds). Your programneeds the data before it can use it to create a new User and update the display. Youdefine a function, called a callback function, that will be called when the data is loaded.You’ve come across callback functions before: when working with buttons in chapter 18,you asked for a function to be called when a button was clicked. It was as if the func-tion were listening for the click event to happen. For loading user data, your callbackfunction is listening for a load event to happen. Your code for loading user data andusing it to update the app will be something like this:
function updateUser (userData) { // Create a new User from the data // Use a view to update the display}
function loadData (id, callback) { // Build a URL using the id
// Let the app know to run the callback function when the data loads
// Tell the app to go and get the data from the URL}
loadData("qiwizo", updateUser);
You pass the loadData function the id of the user, qiwizo, and a function to call whenthe data has loaded, updateUser.
You have a sense of the steps involved in retrieving the data you need. It’s time tostudy the specifics.
20.1.3 Loading the user data—the XMLHttpRequest constructor
Yes, the XMLHttpRequest constructor has a funny name, although the request bit’sokay. You want to request information from a computer, a server, somewhere in theworld. You can research XML and HTTP as homework. From now on, apart from incode, I’ll call it the XHR constructor. Short. Snappy. Cuddly?

371Building a fitness app—retrieving user data
The XHR constructor is provided by the browser. You use it to create XHR objectsthat include methods for requesting resources from across the internet. You pass anXHR object a URL and a function to call, and when it loads the data it will call yourfunction. Figure 20.3 shows the data retrieved when an XHR object is used to load thedata for a user in the fitness app.
Listing 20.1 has the code, which includes these five steps, required to make the requestfor the data.
1 Use the XHR constructor to create an XHR object2 State or build the URL3 Give the XHR object a function to call when the data has loaded4 Call the open method, passing it the URL5 Call the send method to start the request
var xhr = new XMLHttpRequest();
var url = "http://output.jsbin.com/qiwizo.json";
xhr.addEventListener("load", function () { console.log(xhr.responseText); });
xhr.open("GET", url);
xhr.send();
You call the XHR constructor with the new keyword and it creates and returns an XHRobject. You call the object’s methods to set up and start the request. You provide afunction to call once the data is loaded; in listing 20.1 you use a function expression as
Listing 20.1 Using an XHR object to load user data (http://jsbin.com/qakofo/edit?js,console)
Figure 20.3 The string of data returned by an XHR object
Step 1: Use the XHR constructor to create a new XHR object
Step 2: Store a URL at which to find the data
Step 3: Tell the XHR object to call a function when the data has loaded
Step 4: Call open, specifying the URL
Step 5: Call send to start the request

372 CHAPTER 20 XHR: loading data
the second argument to addEventListener, but you could also use the name of a pre-viously defined function. Once loaded, the data is automatically assigned to theresponseText property of the XHR object and your callback function can access thedata via that property. The first argument to the open function, GET, is the HTTPmethod or verb for the request. You stick with GET for this chapter because you’re get-ting data, but there are other verbs, like POST, PUT, and DELETE.
You can see in figure 20.3 that the data is returned as text. The text is shownbetween double quotation marks (the very first character and the very last). The datais in a format called JavaScript Object Notation (JSON), which is discussed in moredetail in section 20.2. Because it’s text, a string, you can’t access the data as you woulda JavaScript object, with expressions such as data.name or data["sessions"].
Happily, there’s a simple way to convert the JSON text into a JavaScript object.
20.1.4 Loading the user data—parsing the XHR response with JSON.parse
The XHR request runs your callback function once it has loaded the data for a fitnessapp user. The data, as a string, is automatically assigned to the responseText propertyof the XHR object. In order to translate the string into a JavaScript object with proper-ties you can access, like name and sessions, you use the JSON.parse JavaScriptmethod.
var dataAsObject = JSON.parse(dataAsString);
Figure 20.4 shows what the user data looks like once you parse it and log it to the con-sole. Rather than just a string, it’s now an object with properties (compare figures 20.3and 20.4).
The following listing updates listing 20.1, parsing the loaded text to obtain a Java-Script object, before logging the data to the console.
Figure 20.4 Once the JSON text has been parsed, you have a standard JavaScript object.

373Building a fitness app—retrieving user data
var xhr = new XMLHttpRequest();var url = "http://output.jsbin.com/qiwizo.json";
xhr.addEventListener("load", function () { var data = JSON.parse(xhr.responseText); console.log(data);});
xhr.open("GET", url);xhr.send();
You should have a big smile on your face. With just a few lines of code, you can accessdata from anywhere in the world. (Well, from the server hosting your web page. Butthat could be anywhere.) Big hugs.
All of the apps developed in Get Programming with JavaScript could benefit from aneasy way to access data on JS Bin; the bin codes it generates, like qiwizo, are a bit fid-dly. In the next section, you package the XHR code into a load function that makesretrieving data even easier.
20.1.5 Loading JS Bin data—a handy function
The quiz app, the My Movie Ratings page, the fitness app news page, and The Cryptcould all use the ability to load data while running, just like the fitness app itself. Tostreamline the process of loading data from JS Bin, you create a module, Bin Data.
As a general utility function, you add the load function to the gpwj namespace,already home to templating functions (see chapter 19). To load the data in a JS Binfile, you use code of the following form:
function doSomethingWithData (data) { // Do something amazing with the data}
gpwj.data.load("qiwizo", doSomethingWithData);
The next listing shows the function in action. It produces the output in figure 20.4.
(function () { "use strict";
function loadData (bin, callback) { var xhr = new XMLHttpRequest(); var url = "http://output.jsbin.com/" + bin + ".json";
xhr.addEventListener("load", function () { var data = JSON.parse(xhr.responseText); callback(data); });
Listing 20.2 Parsing JSON text to obtain a JavaScript object (http://jsbin.com/rexolo/edit?js,console)
Listing 20.3 A function for loading JS Bin data (http://jsbin.com/suxoge/edit?js,console)
Parse the JSON text to obtain a JavaScript object
Use the bin code to construct the URL
Pass the loaded data to the callback function

374 CHAPTER 20 XHR: loading data
xhr.open("GET", url); xhr.send(); }
if (window.gpwj === undefined) { window.gpwj = {}; }
gpwj.data = { load: loadData };})();
gpwj.data.load("qiwizo", console.log);
You use the load function to grab location data in The Crypt in section 20.3. Data-load-ing versions of the other projects in the book are available on the Get Programming withJavaScript website at www.room51.co.uk/books/getprogramming/projects/. The fit-ness app gets the upgrade right now.
20.1.6 Building the fitness app
The fitness app team is excited to see the working prototype of the console-based pro-gram. There are three tasks remaining:
1 Update the controller module to use the new load function for user data2 Use script elements to load the modules the app uses3 Add a line of JavaScript to initialize the app
The new controller is shown here. It has a loadUser function that calls the gpwj.data.load method. Both loadUser and log are returned from the init method as aninterface.
(function () { "use strict";
var user = null;
function buildUser (userData) { /* Listing 14.3 */ }
function updateUserFromData (userData) { user = buildUser(userData); fitnessApp.userView.render(user); }
function loadUser (id) { gpwj.data.load(id, updateUserFromData); return "Loading user details..."; }
Listing 20.4 The fitness app controller (http://jsbin.com/nudezo/edit?js,console)
Test the function, telling it to call console.log with the loaded data
Create a user from the loaded data and update the display
Load user data and invoke the callback function

375Building a fitness app—retrieving user data
function log (sessionDate, duration) { if (user !== null) { user.addSession(sessionDate, duration); fitnessApp.userView.render(user); return "Thanks for logging your session."; } else { return "Please wait for user details to load."; } }
function init (id) { loadUser(id);
return { log: log, loadUser: loadUser }; }
if (window.fitnessApp === undefined) { window.fitnessApp = {}; }
fitnessApp.init = init;
})();
Because the app loads user data while running, there’s a chance a user may try to logan exercise session before the data has loaded (the fitness app users are super-keen).The log method makes sure the user has been set, user !== null, before allowing log-ging to take place. Remember, null is a special JavaScript value often used to signifythat an object is expected but is missing or not yet assigned.
With all the pieces in place, it’s simply a matter of gathering them together and fir-ing the starting pistol. The four fitness app modules are shown in figure 20.5, with theBin Data module replacing the module that provided static data.
You haven’t had to alter the User constructor or view. The next listing shows thescript elements used to load the four modules.
<!-- fitnessApp.User --><script src="http://output.jsbin.com/fasebo.js"></script>
<!-- fitnessApp.userView --><script src="http://output.jsbin.com/yapahe.js"></script>
Listing 20.5 The fitness app (HTML) (http://jsbin.com/mikigo/edit?html,console)
Define a function to let users log their sessions
Load the data for an initial user
Return an interface object
Bin Data Constructor View Controller
Figure 20.5 The modules that make up the fitness app

376 CHAPTER 20 XHR: loading data
<!-- fitnessApp.controller --><script src="http://output.jsbin.com/nudezo.js"></script>
<!-- gpwj.data --><script src="http://output.jsbin.com/guzula.json"></script>
The following listing shows the JavaScript that fires the starting pistol, calling fitnes-sApp.init with the JS Bin code for an initial user.
var app = fitnessApp.init("qiwizo");
The best place to see the app in action is on JS Bin, but figure 20.1 at the start of thechapter shows a user loading and logging sessions.
You’re thrilled with the working app and so is the development team. But there’ssomething missing (apart from actually being able to save data somewhere). Isn’tpart 3 of Get Programming with JavaScript all about HTML-based apps? Why are youback at the console?
20.1.7 The fitness app—what’s next?
Figure 20.6 shows what you’re really after—an HTML-based fitness app with drop-down lists, text boxes, and buttons. You can choose users from a list, load their details,and log new sessions. With all you’ve learned in the book, could you build the app?There’s nothing like jumping in and trying to build something yourself for helping
Listing 20.6 The fitness app (http://jsbin.com/mikigo/edit?js,console)
Figure 20.6 The fitness app using web-based views
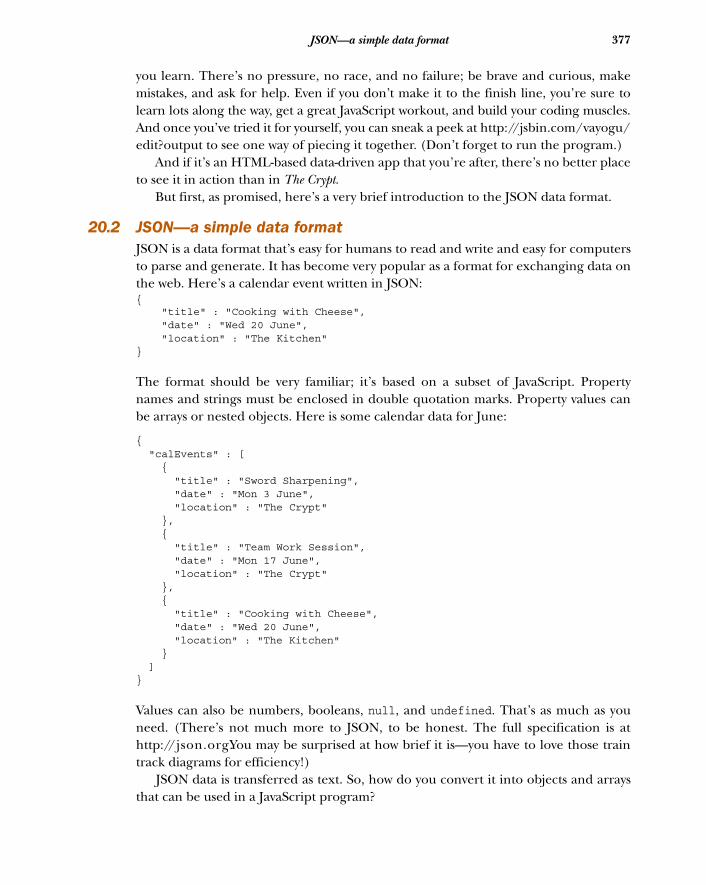
377JSON—a simple data format
you learn. There’s no pressure, no race, and no failure; be brave and curious, makemistakes, and ask for help. Even if you don’t make it to the finish line, you’re sure tolearn lots along the way, get a great JavaScript workout, and build your coding muscles.And once you’ve tried it for yourself, you can sneak a peek at http://jsbin.com/vayogu/edit?output to see one way of piecing it together. (Don’t forget to run the program.)
And if it’s an HTML-based data-driven app that you’re after, there’s no better placeto see it in action than in The Crypt.
But first, as promised, here’s a very brief introduction to the JSON data format.
20.2 JSON—a simple data formatJSON is a data format that’s easy for humans to read and write and easy for computersto parse and generate. It has become very popular as a format for exchanging data onthe web. Here’s a calendar event written in JSON:{ "title" : "Cooking with Cheese", "date" : "Wed 20 June", "location" : "The Kitchen"}
The format should be very familiar; it’s based on a subset of JavaScript. Propertynames and strings must be enclosed in double quotation marks. Property values canbe arrays or nested objects. Here is some calendar data for June:
{ "calEvents" : [ { "title" : "Sword Sharpening", "date" : "Mon 3 June", "location" : "The Crypt" }, { "title" : "Team Work Session", "date" : "Mon 17 June", "location" : "The Crypt" }, { "title" : "Cooking with Cheese", "date" : "Wed 20 June", "location" : "The Kitchen" } ]}
Values can also be numbers, booleans, null, and undefined. That’s as much as youneed. (There’s not much more to JSON, to be honest. The full specification is athttp://json.org. You may be surprised at how brief it is—you have to love those traintrack diagrams for efficiency!)
JSON data is transferred as text. So, how do you convert it into objects and arraysthat can be used in a JavaScript program?

378 CHAPTER 20 XHR: loading data
20.2.1 Converting JSON into objects and arrays with JSON.parse
You turn JSON as text into JavaScript objects by passing it to the JSON.parse method.You can then access the properties or elements in the data using dot or bracket nota-tions. If you’ve used an XHR object to send a request for a single calendar event asJSON, you can convert the response to a JavaScript object like this:
var calEvent = JSON.parse(xhr.responseText);
calEvent.title; // Cooking with CheesecalEvent.date; // Wed 20 JunecalEvent.location; // The Kitchen
That’s quite a brief introduction to JSON, but seeing as the whole book is aboutJavaScript, it should be enough.
It’s time to load map data, mysterious room by mysterious room, as you return toThe Crypt.
20.3 The Crypt—loading a map on demandAdventures in The Crypt involve exploring ancient tombs, sprawling spaceships, andmysterious forests. Each adventure may cover dozens of locations with little chance ofcompletion in a single sitting. Rather than loading the whole map at the start of agame, it might make more sense to load places only when a player visits them. Thegame can store the JSON data for each place in a separate file on JS Bin and useXMLHttpRequest to load the files when needed.
Figure 20.7 shows only the first location, loaded at the start of a game. The loadeddata includes the JS Bin file codes for the exits from the location. The data file for thelocation south of the The Kitchen has the code kacaluy, for example.
The data for each place on the map is loaded only when a player moves to thatplace. Figure 20.8 shows the same map once a player has moved south from TheKitchen. The data for The Old Library has now been loaded.
quludeThe Kitchen
west east
south
kacaluy
jodeyoxulare
Figure 20.7 At the start of the game, only the initial place data is loaded.

379The Crypt—loading a map on demand
To allow step-by-step loading like this, you have to include the JS Bin file codes foreach place’s exits in its map data.
20.3.1 Specifying exits with JS Bin file codes
Say a game in The Crypt starts in The Kitchen. At first, the game will load only the datafor The Kitchen, not for any other places on the map. That’s a lot less data loaded atthe start of the game. The next listing shows the data for that single location. (Thechallenges have been left out so you can focus on the ids.)
{ "title" : "The Kitchen", "id" : "qulude", "description" : "You are in a kitchen. There is a disturbing smell.", "items" : [ "a piece of cheese" ], "exits" : [ { "direction" : "south", "to" : "The Old Library", "id" : "kacaluy" }, { "direction" : "west", "to" : "The Kitchen Garden", "id" : "xulare" }, { "direction" : "east", "to" : "The Kitchen Cupboard", "id" : "jodeyo" } ]}
Listing 20.7 The JSON data for The Kitchen (http://output.jsbin.com/qulude.json)
The Kitchen
The Old Library
quludewest east
south
north
kacaluy
jodeyoxulare
Figure 20.8 The data for The Old Library has been loaded because the player moved there.
Include the code for the destination of each exit so its data can be loaded if it is visited

380 CHAPTER 20 XHR: loading data
Each place has a unique id that corresponds to the JS Bin code of the file where itsdata is stored. You use the id to construct a place’s URL like this:
var url = "http://output.jsbin.com/" + id + ".json";
Players will move back and forth around the map, solving puzzles, collecting treasure,dissolving zombies, and licking leopards. They’re likely to visit some locations severaltimes, and you’d like to avoid loading the same data again and again.
20.3.2 Using a cache—load each place only once
Whenever you create a new place from loaded data, you store it in a cache, using theplace’s id as the key. Further requests for a place can be given the stored place fromthe cache, avoiding repeatedly loading the same data from JS Bin.
var placeStore = {}; // Set up an object to store the loaded places
placesStore[placeData.id] = place; // Use the place’s id as the key
20.3.3 Replacing the Map Data and Map Builder modules with Map Manager
The map builder for The Crypt used to take data for the whole map, create all ofthe place models, and then add the items, exits, and challenges to the places.Once it had done that for the whole map, it would return the first place and thegame was ready to play. You now load one place at a time; you need a function toload the individual place data and a function to build a single place model fromthe loaded data.
Listing 20.8 shows the code for a new Map Manager module that will replace themap-building code you were using in previous versions of The Crypt (figure 20.9). The
playerView
placeView
messageView
Map
Map Manager
Templates
Bin Data
Utilities - gpwj Player
Place
Model Constructors
Views
Controller
Controller
Commands
Figure 20.9 The modules for The Crypt with new or updated modules highlighted

381The Crypt—loading a map on demand
t
re
Map Manager module makes a single method available in its interface, loadPlace.Use it with a previously defined callback function or a function expression:
// Use a previously defined function as the callback theCrypt.map.loadPlace("qiwizo", doSomethingWithPlace);
// Use a function expression as the callbacktheCrypt.map.loadPlace("qiwizo", function (place) { // Use the place model});
(function () { "use strict";
var placesStore = {};
function addPlace (placeData) { var place = new theCrypt.Place( placeData.title, placeData.description);
placesStore[placeData.id] = place;
if (placeData.items !== undefined) { placeData.items.forEach(place.addItem); }
if (placeData.exits !== undefined) { placeData.exits.forEach(function (exit) { place.addExit(exit.direction, exit.id); place.addChallenge( exit.direction, exit.challenge); }); } return place; }
function loadPlace (id, callback) {
var place = placesStore[id];
if (place === undefined) {
gpwj.data.load(id, function (placeData) {
var place = addPlace(placeData); callback(place);
}); } else { callback(place); } }
if (window.theCrypt === undefined) { window.theCrypt = {}; }
Listing 20.8 Map Manager (http://jsbin.com/xesoxu/edit?js)
Use an object to act as a cache for loaded places
Create a Place object from the place data
Cache the newly created place in placesStore, using its id as a key
Add the place id as an exit for the specified direction
Include a callback parameter for a function to be called with the loaded place
Checkhe cache
for thequested
place
Only load the place data if it is not in the cache
Use theBin Data
module toload the
data
Call the callback with a place newly constructed from the data
If the place has already been loaded, call the callback with the cached place

382 CHAPTER 20 XHR: loading data
theCrypt.map = { loadPlace: loadPlace };
})();
The Map Manager is made up of two functions. Let’s explore them in turn.
ADDING A PLACE TO THE STORE
The addPlace function uses the Place constructor to create a model from the data;adds items, exits, and challenges; stores the place in the cache; and returns it.
function addPlace (placeData) { // Create a place model
// Store place in cache
// Add items // Add exits and challenges
// Return the new place model}
There’s nothing more to say for the function; apart from the cache, you’ve seen itall before.
LOADING THE DATA FOR A SINGLE PLACE
When you call the loadPlace function, you give it the id of the place you want and acallback function. Your callback will be called with the place model for the id as anargument.
callback(place);
But where does the loadPlace function get the place model from? First, it tries thecache. If the place isn’t there, it loads the place data from JS Bin.
var place = placesStore[id]; // Try to get the place from the cache
if (place === undefined) { // The place is not in the cache, so // load the place data from JS Bin and // pass the place to the callback callback(place);} else { // The place was in the cache, so // pass it to the callback callback(place); }
If the loadPlace function has to load the data, it uses the Bin Data module’s loadfunction to get it from JS Bin. The place wasn’t in the cache, so the code passes theplace data to addPlace, to create and store the model, before passing the new placemodel to the callback.

383The Crypt—loading a map on demand
o
gpwj.data.load(id, function (placeData) { var place = addPlace(placeData); // Create and store a place model callback(place); // Pass the new place model to the callback});
Now you know how the data loading works, you put it to use in the game controller,for loading an initial location and for moving a player to a new location.
20.3.4 Updating the game controller to use the Map Manager
You’ll need to update two controller methods to make use of the new Map Manager.The init method used to call buildMap to build the whole map for an adventure.Now it will call loadPlace to load only the first place in the game. And because placesare no longer preloaded, the go method will need to call loadPlace to retrieve a placefrom the cache or load it from JS Bin.
The next listing shows the two updated methods in the context of the controller.
(function () { "use strict";
var player; var inPlay = false;
function init (firstPlaceId, playerName) { theCrypt.map.loadPlace( firstPlaceId, function (firstPlace) {
player = new theCrypt.Player(playerName, 50); player.addItem("The Sword of Doom"); player.setPlace(firstPlace);
inPlay = true; render();
}); }
function go (direction) { if (inPlay) { /* Declare variables */
if (destination === undefined) { renderMessage("There is no exit in that direction"); } else { if ((challenge === undefined) || challenge.complete) { theCrypt.map.loadPlace( destination, function (place) { player.setPlace(place); render(); }); } else { // Apply challenge
Listing 20.9 The game controller using the Map Manager (http://jsbin.com/vezaza/edit?js)
Use loadPlace to load the first place in the game and run the init code
Load the place twhich the playeris moving
Once loaded, set the place as the player’s location and update the display

384 CHAPTER 20 XHR: loading data
} } } else { renderMessage("The game is over!"); } }
/* Other functions */
window.game = { … };
})();
The init method can’t do the bulk of its work until the starting place has beenloaded. Most of its code, therefore, is inside the callback function passed to load-Place. Similarly, the go method gets the place with loadPlace before setting it as theplayer’s new location.
20.3.5 Building the game page
All that’s left is to import the modules and add a few lines of JavaScript to initializethe game.
The following listing shows the full HTML for the game. The messages div and thetext box for commands have been moved above the place and player sections.
<!DOCTYPE html><html><head> <meta charset="utf-8"> <title>The Crypt</title></head><body>
<h1>The Crypt</h1>
<div id="messages" class="hidden"></div>
<div id="controls"> <input type="text" id="txtCommand" /> <input type="button" id="btnCommand" value="Make it so" /> </div>
<div id="views"> <div id="place"></div> <div id="player"></div> </div>
<!-- Templates -->
<script type="text/x-template" id="itemTemplate"> <li>{{item}}</li> </script>
Listing 20.10 The Crypt (HTML) (http://jsbin.com/cujibok/edit?html,output)
Assign the public interface

385The Crypt—loading a map on demand
<script type="text/x-template" id="playerTemplate"> <h3>{{name}}</h3> <p>{{health}}</p> <ol id="playerItems"></ol> </script>
<script type="text/x-template" id="placeTemplate"> <h3>{{title}}</h3> <p>{{description}}</p>
<div class="placePanel"> <h4>Items</h4> <ol id="placeItems"></ol> </div>
<div class="placePanel"> <h4>Exits</h4> <ol id="placeExits"></ol> </div> </script>
<script type="text/x-template" id="messageTemplate"> <p>*** {{message}} ***</p> </script>
<!-- Modules -->
<!-- gpwj.templates --> <script src="http://output.jsbin.com/pugase.js"></script> <!-- gpwj.data --> <script src="http://output.jsbin.com/guzula.js"></script>
<!-- Place constructor --> <script src="http://output.jsbin.com/vuwave.js"></script> <!-- Player constructor --> <script src="http://output.jsbin.com/nonari.js"></script>
<!-- player view --> <script src="http://output.jsbin.com/suyona.js"></script> <!-- place view --> <script src="http://output.jsbin.com/yoquna.js"></script> <!-- message view --> <script src="http://output.jsbin.com/jojeyo.js"></script>
<!-- map manager --> <script src="http://output.jsbin.com/xesoxu.js"></script>
<!-- game controller --> <script src="http://output.jsbin.com/vezaza.js"></script> <!-- Web Page Controls --> <script src="http://output.jsbin.com/xoyasi.js"></script></body></html>
The next listing shows the JavaScript initialization code. It now specifies the JS Bincode for the data file of the first place in the game.

386 CHAPTER 20 XHR: loading data
var playerName = "Kandra";var firstPlaceId = "vitewib";
game.init(firstPlaceId, playerName);
20.3.6 Enter The Crypt
Fantastic! The templates for the game are organized with the rest of the HTML; if thedesign needs changing, the templates are easy to find and there’s no intertwining ofJavaScript, data, and HTML to wrangle. Simpler maintenance, fewer mistakes, andhappier designers. Win, win, win!
Now, you just need to survive The Crypt. Test your strength, skill, and stamina andplay the game on JS Bin at http://output.jsbin.com/cujibok. Good luck!
20.4 Summary■ Use XMLHttpRequest objects to load resources for a web page without reloading
the whole page.■ Transfer data for your applications using JSON, a lightweight, readable, JavaScript-
based data exchange format.■ To load data, create an XMLHttpRequest object, set an event listener for the
load event, call the open method with the URL of the resource, and finally callthe send method:
var xhr = new XMLHttpRequest();xhr.addEventListener("load", function () { // Use xhr.responseText});xhr.open("GET", url);xhr.send();
■ Access JSON data when the load event has fired via the responseText propertyof the XHR object.
■ Convert the JSON data string into a JavaScript object by passing it to theJSON.parse method:
var data = JSON.parse(xhr.responseText);
■ Use a JavaScript object as a cache. Place loaded data or models into the cacheand check the cache before using XHR.
Listing 20.11 The Crypt (http://jsbin.com/cujibok/edit?js,output)
Specify the id of the JS Bin file for the first place on the map

Conclusion:get programming
with JavaScript
So, how do you get programming with JavaScript?
Well, you just get programming with JavaScript.
If you really want to understand programming, you have to jump in and write pro-grams. Reading books and pondering code can be fun and informative, but it’s try-ing to solve problems and create code yourself that really builds up your skills,experience, and resilience. But you’re not alone. In this chapter you look at waysyou can get help if you get stuck on a project or are just curious about how thingswork. First, you investigate using JavaScript in web pages saved on your own compu-ter, rather than on JS Bin.
21.1 Working locally with filesJS Bin and other online coding sites are great for trying out your ideas and check-ing that your code works. But you want to break out from the sandbox and createyour own sites. This section looks at writing and saving your files locally (on yourown computer) and opening them in your browser.
This chapter covers■ Carrying on your good work■ Working locally with files■ Books and resources
387

388 CHAPTER 21 Conclusion: get programming with JavaScript
21.1.1 Writing code
JavaScript and HTML files are just text files. You can write them in any text editor.Notepad for Windows and TextEdit on OS X would both do the job, although they’revery basic. More advanced text editors perform syntax highlighting, using colors todifferentiate keywords from variables, arguments, strings, and so on, and they per-form code completion, suggesting what you might be trying to type and letting youinsert the suggestions quickly. Some popular editors are Sublime Text, BBEdit, Note-pad++, Atom, and Emacs.
There are also integrated development environments (IDEs) that provide extratools that let you manage projects, collaborate, track versions, merge files, minify andcompress files, and lots more. Examples are Visual Studio, Dreamweaver, Eclipse, andWebStorm. Figure 21.1 shows three editors with increasing levels of project support.
21.1.2 Saving files
Save your files in an organized way, with sensible folders splitting them into types orsubprojects. Figure 21.2 shows a possible structure of files for The Crypt. There are sep-arate folders for style sheets, JavaScript files, and game maps. The main HTML file is
Figure 21.1 Notepad, Notepad++, and WebStorm provide increasing levels of project support.

389Working locally with files
in the root of the project. Various project folders from Get Programming with JavaScriptare available in its GitHub repository: https://github.com/jrlarsen/GetProgramming.
The files have names that represent their purpose. Just because JS Bin assigns ran-dom names to files, that doesn’t mean you should. The following listing shows theHTML file for the game with the script elements used to load the JavaScript. There’salso a link element in the head section that loads the CSS file that styles the page. Thetemplates have been omitted because they haven’t changed.
<!DOCTYPE html><html lang="en"><head> <meta charset="UTF-8"> <link rel="stylesheet" href="css/theCrypt.css" /> <title>The Crypt</title></head><body>
<h1>The Crypt</h1>
<div id="player"></div><div id="place"></div><div id="messages"></div>
<p id="controls"> <input type="text" id="txtCommand"> <button id="btnCommand">Make it so</button></p>
Listing 21.1 script elements in theCrypt.html
Figure 21.2 A possible structure of folders and files for The Crypt
Load the CSS file to set the styles for the page

390 CHAPTER 21 Conclusion: get programming with JavaScript
<!-- Templates --> <!-- unchanged – see previous chapters -->
<!-- Modules --><script src="maps/TheDarkHouse.js"></script> <script src="js/mapManager.js"></script><script src="js/template.js"></script><script src="js/player.js"></script><script src="js/place.js"></script><script src="js/playerView.js"></script><script src="js/placeView.js"></script><script src="js/messageView.js"></script><script src="js/gameController.js"></script><script src="js/commands.js"></script></body></html>
The paths used in the src attributes to tell the browser where to find the files to loadare relative to theCrypt.html. For example, maps/TheDarkHouse.js means “startingfrom the same folder as theCrypt.html, find the maps folder, and in that folder findthe file called TheDarkHouse.js.”
21.1.3 Opening your pages in a browser
In your browser menu, choose File > Open and browse your filesystem for theCrypt.html.The page should open in the browser.
21.1.4 Concatenating and minifying files
If you were hosting your project on a web server for users to access over the internet, itwould be better to place all of your JavaScript modules into a single file. For eachscript element, the browser will make a request to the server for the file specified bythe src attribute. If all of the files are needed to make the application work, then itwill be quicker to load one large file rather than many small files.
You can see a version of The Crypt on JS Bin with all of the JavaScript in the one bin:http://jsbin.com/xewozi/edit?js,output.
While developing the application, using separate files helps with focus, reuse, andflexibility. But when the time comes to publish the app, merging the files will help thecode load more quickly. You can copy the code by hand into a single file, but there aretools to help. They may be a bit advanced for beginners, but if you’re interested, lookout for Grunt, Gulp, Browserify, and CodeKit.
The tools will also minify your code, squashing it down into a smaller file. When thebrowser runs your JavaScript, it doesn’t need the spaces and line breaks that help youread the code. It doesn’t need well-named variables either; a, b, and c will do the jobjust as well as loadData, checkGameStatus, and renderMessage. The tools will stripthe spaces and rename the variables to create a smaller file that does exactly the samejob. The next two listings show the same code, the use function from The Crypt con-troller module.
You can use relative paths to load the script files.

391Getting help
function r(e,a){if(s){var o=l.getPlace(),i=o.getChallenge(a);void 0===i||i.complete===!0?t("You don't need to use that there"):l.hasItem(e)?e===i.requires?(t(i.success),i.complete=!0,i.itemConsumed&&l.removeItem(e)):t(i.failure):t("You don't have that item")}else t("The game is over!")}
function use (item, direction) { if (inPlay) { var place = player.getPlace(); var challenge = place.getChallenge(direction);
if (challenge === undefined || challenge.complete === true) { renderMessage("You don't need to use that there"); } else if (player.hasItem(item)) {
if (item === challenge.requires) { renderMessage(challenge.success); challenge.complete = true; if (challenge.itemConsumed) { player.removeItem(item); } } else { renderMessage(challenge.failure); }
} else { renderMessage("You don't have that item"); } } else { renderMessage("The game is over!"); }}
You can probably appreciate that file-size savings can be significant.
21.2 Getting helpThe fact that you’ve read this book shows you appreciate guided, organized instruc-tion. Once you’re up and running, though, it’s great to be able to dip in and out ofresources, look things up, and ask for help with specific problems. For reference, agreat site is the Mozilla Developer Network (https://developer.mozilla.org) which hasdocumentation and examples for HTML, CSS, JavaScript, and more. For answers tospecific questions, join the forums at stackoverflow (http://stackoverflow.com). Mem-bers of the community usually answer questions quickly. JavaScript was the first lan-guage to reach one million questions asked!
Listing 21.2 The use function (minified)
Listing 21.3 The use function

392 CHAPTER 21 Conclusion: get programming with JavaScript
21.3 What next?Get Programming with JavaScript was written as an introduction to programming.Whereas part 1 looked at the building blocks of the JavaScript language, parts 2 and 3had a greater emphasis on organizing larger projects and getting a taste for things tocome. The book was not written as a complete reference but as a practical experienceof programming. So where next?
21.3.1 The companion site
Articles, tutorials, videos, resources, examples, and links to other support and refer-ence sites will continue to be added to the Get Programming with JavaScript website atwww.room51.co.uk/books/getProgramming/index.html. Some topics that have beenleft out of the book, like prototypes, inheritance, working with this, Node.js, andrecent additions to JavaScript, will be covered there along with guides to improvingthe examples from the book, like the quiz app, the fitness app, fitness app news, andMy Movie Ratings.
21.3.2 Books
There are many, many books on JavaScript. Here are a couple I’ve read and enjoyed.The first would follow nicely from this one, and the second is a much more in-depthdive into the language:
■ Eloquent JavaScript: A Modern Introduction to Programming (No Starch Press; 2nded., 2014) by Marijn Haverbeke
■ Professional JavaScript for Web Developers (Wrox; 3rd ed., 2012) by Nicholas C. Zakas
21.3.3 Sites
A number of sites mix video tutorials with interactive exercises. One I particularly likeis Code School, http://codeschoo l . com.The folks at Code School have also built anice introductory JavaScript site at http://javascript.com.
21.3.4 Practice makes permanent
Keep practicing. Get on JS Bin and try things out. There are a number of suggestionsfor projects on the book’s website. If you get stuck, feel free to post a question on thebook’s forum (https://forums.manning.com/forums/get-programming-with-javascript)at Manning.com or join the community at stackoverflow.com.
I hope you’ve enjoyed working through the book, tinkering with all of the code,making conjectures, and testing out your ideas on JS Bin. Stay curious and Get Pro-gramming with JavaScript!

393Summary
21.4 Summary■ Use a text editor to write and save JavaScript and HTML files.■ Organize the files for a project using folders and appropriate filenames.■ Open the HTML files in your browser.■ Find out more and get help at the Mozilla Developer Network and stackover-
flow.com.■ Make the most of the resources on the book’s website.■ Practice, practice, practice.■ Be curious, adventurous, resilient, and patient. Good luck on your adventures!


index
Symbols
!== operator 209* operator 21, 42+ symbol 28+= operator 98, 110, 126, 154<= operator 209, 289= operator 74<= symbol 204= symbol 18=== operator 199–200, 209/ operator 42< operator 209> operator 209>= operator 209|| symbol 293
A
abstraction 25add function 70–71, 73–74addAge function 151addChallenge method 258addEventListener method 326, 330, 372addExit method 158, 175–176, 254, 261addExits method 139addItem method 137, 254, 272addItems method 139addMoon method 129addPlace method 382addSession method 250–251, 265alert function 330answer variable 174app.loadUser method 368app.log method 281, 284applyDamage method 270
area property 85arguments
determining return value using 72–75passing multiple arguments to function 63–64passing one argument to function 59–62using objects as 84–87
accessing properties of object argument84–85
adding properties to object argument 85–87vs. parameters 62
arrays 104–121array methods 110–117
adding and removing elements 111forEach method 113–117slice method 112splice method 112–113
converting JSON data into objects and arrays with 378
creating 105–106displaying data from 311–314elements of, accessing 106–110player items array 118–121
assignment operator 18, 74attempted property 34{{author}} placeholder 348, 350author property 349
B
backslash character 36between function, using in guessing game 231–232bins, creating 225, 227blank function 91–92blogs, writing 35body element 333body key 354
395
INDEX396
body property 349body tag 308, 319book variable 30bookAuthor variable 28bookTitle variable 28boolean values 200box method 100bracket notation 147–168
using square brackets instead of dots 148–155people’s names as keys 150–152word counts 152–155
using with Cryptgame controls 164–167linking places via exits 155–163
break statement 338browser support 15browser, opening local files in 390buildExits function 259–261buildMap function 258–259, 261–262, 288, 383buildPlace function 259buildPlaces function 261buildPlanet function 87, 89, 123–127, 129buildUser function 252–253buttons 324–327
adding to page 324–325listening for clicks 325–327, 339–340writing functions to update greeting 325
C
cache, Crypt game 380calculateSizes function 85–87calculateTax function 50calendars, creating 35–36callback function 370calling functions 46–48callOutCharge variable 21camel casing 23Cascading Style Sheets. See CSSchaining calls, replacing one string with
another 348–349challenges object 258challenges, Crypt game 291–292character argument 99checkAnswer function 214checkGameStatus 289, 390clear method 165, 321, 340climbCount 182closing tags 304CMS (content management system) 344–345, 358code on demand 55coercion 209collisions 234–238
using namespaces to minimize 237–238variable collisions 236–237
Commands module 335, 340, 342commands. See player commandscommandWords array 337comparison operators, else if statement 208–209complete property 291concatenating local files 390–391conditions 198–220
checking answers in quiz app 210–214checking player’s answer 213displaying question 212–213handling player’s answer 214moving to next question 213multiple declarations with single var
keyword 211–212returning interface object 214
conditional execution of code 199–204else clause 200–202hiding secret number inside functions
202–204if statement 200strict equality operator 199–200
Crypt-checking user input 214–220error messages 216–217go method 215–216using if statement to avoid problems 217–220
else if statement 206–209generating random numbers with
Math.random() method 204–206Console panel 7, 224, 228–229console prompt 75–77
calling functions at 75–76declaring new variables at 76–77
console.error method 278console.log function 8, 19, 41, 75, 106, 109, 152,
172, 316constructors 122–146
creating multiple independent counters with 182–183
examples of 132–134using to build objects 127–132
overview 127–130telling objects apart with instanceof
operator 131–132world building-making use of Planet
constructor 130–131using with Crypt
creating Place objects 134–140streamlining player creation 140–146
content management system. See CMSController module 284controllers 280–298
Crypt game 284–286approaching controller code 286controller code structure 287get function 290–291

INDEX 397
controllers (continued)go function 292–293initializing game 285, 288listing properties of challenge 291–292monitoring player health 288–289overview 285–286running game 296–297updating display-functions that use view
modules 289use function 294–296user input 286
fitness app 281–284controls 323–342
buttons 324–327adding to page 324–325listening for clicks 325–327writing functions to update greeting 325
Crypt game 334–342select element 327–330
adding to page 328–329rateMovie function 329–330
text boxes 330–334adding to page 331adding unordered list to display
comments 332CSS 334getting references to new elements 332rateMovie function 332–334
correct property 34costPerHour variable 21counter variable 179–181countUpBy1 function 180Crypt game 11–14, 268–277, 314–322, 378–386
building 12–14building game page 384–385building player information strings 77–82
for player’s name, health, and location 78–79function for player information 79–82
cache 380checking user input 214–220
error messages 216–217go method 215–216using if statement to avoid problems 217–220
controllers 284–286approaching controller code 286controller code structure 287get function 290–291go function 292–293initializing game 285, 288listing properties of challenge 291–292monitoring player health 288–289overview 285–286running game 296–297updating display-functions that use view
modules 289
use function 294–296user input 286
CSS 319–320displaying player information 54–56, 64–69
health 66–67locations 67–68names 65–66
hiding place info 191–193hiding player info 187–191JavaScript’s strict mode 318map data 253–263
adding challenges to 256–257overview 255–256running game 262–263updating Place constructor 258using to build game map 258–262
Map Manager module 380–384adding place to store 382loading data for single place 382–383updating game controller to use 383–384
message view 320modules
listings 317–318loading 318–319render method 315–316
organizing code into modules 242–247place views 274–277
model 274–276view 276–277
placeholders, adding 318–319player commands via text box 334–342
adding controls to page 335–336Commands module 340–342join command 336–338listening for button clicks 339–340mapping text box entries to game
commands 336pop command 336–338shift command 336–338split command 336–338switch block 338–339
player items array 118–121player object in 37–39player objects as arguments 101–103player variables 24–26player views 269–274
model 270–272view 272–274
playing 11, 320specifying exits with JS Bin file codes 379–380user interaction 193–197using bracket notation with 155–163using constructors with
creating Place objects 134–140streamlining player creation 140–146

INDEX398
Crypt game (continued)views 360–366
creating HTML templates for 361–362updating to use new templates 362–365
CSS (Cascading Style Sheets)Crypt game 319–320overview 302text boxes 334
CSS panel, JS Bin 7curly braces 44, 351
D
damage property 257, 291dasher function 234–236, 238data loading 367–386
Crypt game 378–386building game page 384–385cache 380Map Manager module 380–384specifying exits with JS Bin file codes
379–380fitness app 368–377
building 374–376JS Bin data 373–374locating user data 368–370overview 370parsing XHR response with JSON.parse
372–373XMLHttpRequest constructor 370–372
JSON data 377–378data object, fitness app 251–252data. See displaying datadataArray function 356dataObject.name 251dateString function 134dayInWeek variable 108defining functions
new functions 44–45using function expressions and function
declarations 45–46dependencies 227description property 135destination argument 190destinations variable 175, 216direction parameter 215direction string 158displaying data 264–279
fitness app 265–268creating views 266–267using modules to switch views 267–268
from array 311–314message view 278place views 274–277player views 269–274
displayMenu function 47displaySale function 50displaySizes function 86–87div elements 312, 319–320, 345, 355<div> tag 307do keyword 22doAction function 339DOCTYPE tag 305document.getElementById method 310, 316dot notation 32, 89, 147–151, 160, 166–167, 345double curly braces 346double quotation marks 346
E
else clause 200–202, 207else if statement 206, 208–209empty object 30equals symbol 18error messages
checking user input 216–217JS Bin 9–10
escape sequence 92exits variable 175, 275exits, in Crypt game 155–163
adding exits object to full Place constructor 161–163
creating functions to add and display exits 158–159
giving each place object its own set of exits 159–161
testing Place constructor 163using an object to hold exits 156–158
F
failure property 257, 291files
filenames 225importing into other projects 226–229
adding script element 227–228creating bins 227refreshing page 228running program 228–229writing code 227
importing multiple files 232–234viewing individual code file 226See also local files
fill function 355–356fillList function 356findPlanetPosition function 71findTotal function 46fitness app 249–253, 265–268
building 374–376controllers 281–284

INDEX 399
fitness app (continued)converting data into user model 252–253creating views 266–267data object 251–252loading data 368–377
JS Bin data 373–374locating user data 368–370overview 370parsing XHR response with JSON.parse
372–373XMLHttpRequest constructor 370–372
user constructor 250–251using modules to switch views 267–268
floor method 205focus method 340forEach method 110, 113–117, 133, 157friend variable 76–77fullMessage variable 73function body 44function invocation operator 240function keyword 22, 44–45, 56, 106functions 40–56
calling 46–48calling at console prompt 75–76defining
new functions 44–45using function expressions and function
declarations 45–46hiding secret number inside 202–204hiding variables using 180–181invoking 240–241passing information to 59–64
passing multiple arguments to function63–64
passing one argument to function 59–62recognizing function expressions 240repetition in code and 40–43
adding tax and displaying summary 42–43, 50–52
displaying object properties as text 41–42, 48–49
returning data fromreturn keyword 72return value as replacement for function
call 71using arguments to determine return
value 72–75returning objects from 87–91reuse and versatility of 57–59setting as properties of arguments
(methods) 91–100box method 100line method 98–99math methods 92–94namespaces 91–92
spacer 96–97string methods 94–95wrap method 99–100
using to build objects 123–127adding methods 125–127adding properties 124–125
Further Adventures exercises, JS Bin 9
G
game.get() method 336game.init method 296get method 214, 218, 287, 290–291, 334getBorder function 79–80getById function 333getChallenge method 258, 292getCount, creating multiple independent
counters with 181–182getCounter function 180getData method 250–251, 265, 267, 274,
276getExit method 191, 193, 215–217getExits method 139getExitsInfo function 277getGame function 195–196, 214, 217, 243getGreeting function 325getGuesser function 202–203getHelloTo function 72–73, 77getInfo method 135–136, 272getItems method 359getItemsInfo function 277getLastItem method 191, 193, 291getMessage function 71–72, 76getMessageInfo function 278getMovieHTML method 313getPlace method 144, 190, 193, 272, 286getPlanetInfo function 84, 87getPlayerHealth function 78getPlayerInfo function 79–80, 101, 120getPlayerName function 78getPlayerPlace function 71, 78getQuestion function 212getQuiz function 186, 210, 239getStateCode function 149getTitle method 139getTitleInfo function 277getVisitorReport function 109global namespace 183global variables 173, 183, 240
dangers of 172–177bugs 177naming collisions 176peeking and tweaking 173–174relying on implementation 174–176
using window object to check for 245–246

INDEX400
go method 166, 214–216, 218, 287, 290, 383–384
checking user input with 215–216moving player to destination 216retrieving player’s location 215using direction to find destination 215
Crypt game 292–293gpwj namespace 358, 373gpwj.data.load method 374gpwj.templates function 360greater than operator 209greater than or equal to operator 209guess function 199, 205guess variable 202
H
<h1> tag 304, 307<h2> tag 307hasItem method 270, 272head section 319, 389<head> tag 308help resources 391–392HTML 301–322
adding content 305–306function declarations 311id attribute 310–311to web page with JavaScript 309–311when user doesn’t have JavaScript 311
common elements 307–308comparing news item data and 345constructing by string concatenation
345–346Crypt game 314–322
CSS 319–320JavaScript’s strict mode 318message view 320modules 315–319placeholders 318–319playing game 320
displaying data from array 311–314lists 306–307loading layers 303–304overview 302–304starting with empty page 305
HTML panel, JS Bin 6html tags 305
I
id attribute 310–311, 325, 331–332IDEs (integrated development environments)
388if condition 293if keyword 22
if statement 199, 351conditional execution of code 200using to avoid user input problems 217–220
if-else blocks 338if-else statement 207IIFE (immediately invoked function
expressions) 238–242invoking functions 240–241overview 241recognizing function expressions 240returning information from 241–242
implementation 175, 186importing
files into other projectsadding script element 227–228creating bins 227refreshing page 228running program 228–229writing code 227
modules 359–360multiple files 232–234number generator 229–232
picking random questions in quiz app 230–231
using between function in guessing game 231–232
index variable 117indexOf method 95, 98, 272, 352infinite loop 352init method 283, 288, 296, 374, 383–384innerHTML property 310, 314, 325inPlay variable 212, 288input element 331instanceof operator, telling objects apart
with 131–132integrated development environments. See IDEsinterfaces 174, 179–183
creating multiple independent counters with constructor function 182–183
creating multiple independent counters with getCount 181–182
using function to hide variables 180–181invoking functions 46itemConsumed property 257, 291itemIndex variable 117items array 113–114, 118, 120items parameter 137items variable 111
J
JavaScript panel, JS Bin 7join array method 153join command 336–338join method 110, 130

INDEX 401
JS Bin 5–10, 223–226account, getting 10code comments 9creating bins 225error messages 9–10filenames 225following code listings on 7–8Further Adventures exercises 9line numbers 10loading data 373–374loading HTML layers in 304logging to console 8–9panels 6–7
Console panel 7CSS panel 7HTML panel 6JavaScript panel 7Output panel 7
specifying Crypt game exits 379–380viewing individual code file 226writing code 225
JSON.parseconverting JSON data into objects and arrays
with 378parsing XHR response with 372–373
K
kalliesCode namespace 238keys array 151key-value pairs, properties as 30–32keywords 22–23
L
layers, HTML 303–304length property 100, 103, 107, 213, 231less than operator 209less than or equal to comparison operator
289less than or equal to operator 209<li> tag 306, 308line method 93, 96, 98–99line numbers, JS Bin 10lineLength variable 93link element 304, 389link tag 303lists
building with template 355–356HTML 306–307
load function 373–374, 382loadData function 370, 390loadNewLevel() method 4loadPlace method 381–382, 384loadUser method 369–370, 374
local files 387–391concatenating and minifying 390–391opening in browser 390saving 388–390writing code 388
local scope 177local variables 240
assigning namespace properties to 246–247benefits of 177–178
log method 283longString variable 98
M
map data, Crypt game 253–263adding challenges to 256–257overview 255–256running game 262–263updating Place constructor 258using to build game map 258–262
Map Manager module, Crypt game 380–384adding place to store 382loading data for single place 382–383updating game controller to use 383–384
mapData.places array 260math methods 92–94Math namespace 205Math.ceil method 205Math.floor 326Math.max method 93, 102Math.min method 92Math.random() method, generating random
numbers with 204–206Math.round method 205message parameter 60–61message property 257, 291message variable 57–58, 60–61message view
Crypt game 320overview 278using templates 362–363
methods 91–100array methods 110–117
adding and removing elements 111forEach method 113–117slice method 112splice method 112–113
box method 100line method 98–99math methods 92–94namespaces and 91–92spacer 96–97string methods 94–95wrap method 99–100
minifying local files 390–391
INDEX402
models 248–263fitness app 249–253
converting data into user model 252–253data object 251–252user constructor 250–251
map data 253–263adding challenges to 256–257overview 255–256running game 262–263updating Place constructor 258using to build game map 258–262
See also controllersmodules 221–247
collisions 234–238using namespaces to minimize 237–238variable collisions 236–237
Crypt gamelistings 317–318loading 318–319render method 315–316
immediately invoked function expressions238–242
invoking functions 240–241overview 241recognizing function expressions 240returning information from 241–242
importing files into other projects 226–229adding script element 227–228creating bins 227refreshing page 228running program 228–229writing code 227
importing multiple files 232–234importing number generator 229–232
picking random questions in quiz app 230–231using between function in guessing
game 231–232JS Bin 223–226
creating bins 225filenames 225viewing individual code file 226writing code 225
news page (fitness app) 357–360importing modules 359–360news data 358–359templating functions 357–358
organizing code into 242–247sharing namespace across modules 244–247
using to switch views 267–268moons property 129mountain variable 172–173, 177move function 89–90movie variable 49multiplication operator 21My Movie Ratings page 325, 329
N
name parameter 76, 250namespaces 91–92, 183
minimizing collisions with 237–238sharing across modules 244–247
assigning namespace properties to local variables 246–247
window object 244–246using object as 184–185
name-value pair 31new keyword 127, 157, 182, 188, 270new-line character 91–92newLine function 91–92news page (fitness app) 344–347, 357–360
comparing news item data and HTML 345constructing HTML by string
concatenation 345–346designing with HTML templates 346modules 357–360
importing 359–360news data 358–359templating functions 357–358
using script tags for templates 346–347next function 183, 214nextYear array 106not strictly equal to operator 209notes property 36null value 141Number Generator code 223number generator, importing 229–232
picking random questions in quiz app 230–231using between function in guessing game
231–232numberOfHours variable 21numberToSquare parameter 62
O
object properties, matching template placeholders with 353–354
Object.keys method 151, 354objects 27–39, 83–103
accessing properties of 32–33converting JSON data into objects and arrays
with 378creating 29–32
empty object 30properties as key-value pairs 30–32
Crypt game player object 37–39overview 28–29player objects as arguments 101–103returning from functions 87–91setting functions as properties of
(methods) 91–100

INDEX 403
objects (continued)box method 100line method 98–99math methods 92–94namespaces 91–92spacer 96–97string methods 94–95wrap method 99–100
updating properties of 33–35using as arguments 84–87
accessing properties of object argument84–85
adding properties to object argument85–87
using as namespace 184–185using constructors to build 127, 132
overview 127, 130telling objects apart with instanceof
operator 131–132world building-making use of Planet
constructor 130–131using functions to build 123–127
adding methods 125–127adding properties 124–125
<ol> tag 306–308opening tags 304option elements 327–328options array 133OR operator 293Output panel, JS Bin 7
P
<p> tag 304, 306–307parameters vs. arguments 62parentheses 44, 47parseCommand function 339peakCount function 182Place constructor, updating 258Place object 135, 139, 144, 158, 161, 166place property 142, 144place variable 215–216place views 274–277
model 274–276using templates 364–365view 276–277
placeholdersautomating placeholder replacement for
templates 353–356building lists 355–356filling all placeholders for each key 355matching template placeholders with object
properties 353–354Crypt game 318–319See also templates
places array 255placesStore object 260placeView function 269Planet function 127, 129planet parameter 84, 87planet1 variable 86planet.area property 87planets variable 126–127planet.volume property 87player commands, Crypt game 334–342
adding controls to page 335–336Commands module 340–342join command 336–338listening for button clicks 339–340mapping text box entries to game
commands 336pop command 336–338shift command 336–338split command 336–338switch block 338–339
Player constructor 243, 245, 270–271, 285player information, displaying 64–69
health 66–67locations 67–68names 65–66
Player module 245Player objects 140, 165player variable 54, 56, 64, 288player views 269–274
model 270–272using templates 363–364view 272–274
playerHealth parameter 66playerInfo variable 79playerName parameter 66–67playerPlace parameter 67player.place.items array 166players array 115–116playerView function 269polluting global namespace 183, 237pop command, Crypt game 336–338pop method 110–111posted key 354posted property 349programming 3–4properties of objects
accessing 32–33as key-value pairs 30–32updating 33–35
properties, displaying as text 41–42property values 33prototypes 123push method 110–111, 130
INDEX404
Q
qIndex property 184–186qIndex variable 212–213questions array 212–213, 231quiz app 37, 210–214
checking player’s answer 213creating 183–187
hiding questions array 185–187using object as namespace 184–185
displaying question 212–213handling player’s answer 214moving to next question 213multiple declarations with single var
keyword 211–212picking random questions in 230–231returning interface object 214
quiz variables 183, 185, 239quizMe method 183, 186, 210, 230quiz.next 185QuizQuestion constructor 132quiz.questions array 184quiz.showMe 185quiz.submit() method 214
R
random numbers, generating with Math.random() method 204–206
Rate button 327rateMovie function 329–330, 332–334refreshing page, JS Bin 228regular expressions, replacing string multiple
times with 353removeItem method 270, 272render method 272, 277–278, 313–317,
362renderMessage 289, 390repetition in code 40–43
adding tax and displaying summary42–43
displaying object properties as text41–42
replace method 347–348, 350requires property 257, 291reserved words, for naming variables
22–23resources 391–392responseText property 372result variable 46return keyword 72, 83return statement 72, 129return value
as replacement for function call 71determining using arguments 72–75
returning data from functions 70–75return keyword 72return value as replacement for function
call 71using arguments to determine return
value 72–75running program, JS Bin 228–229
S
sale variable 52saving local files 388–390Say Hi button 324sayHello function 44, 46scope 171–197
Crypt gamehiding place info 191–193hiding player info 187–191user interaction 193–197
global variables, dangers of 172–177bugs 177naming collisions 176peeking and tweaking 173–174relying on implementation 174–176
interfaces 179–183creating multiple independent counters
with constructor function 182–183creating multiple independent counters
with getCount 181–182using function to hide variables
180–181local variables, benefits of 177–178quiz app, creating 183–187
hiding questions array 185–187using object as namespace 184–185
score property 34–35score variable 17script element, adding 227–228script tags, using for templates 346–347secret variable 202secretMountain variable 178select element 327–330
adding to page 328–329rateMovie function 329–330
selected attribute 329self-closing tag 331semicolon character 10sessions array 250setPlace method 190, 193, 215, 272shift array 337shift command, The Crypt game 336–338show function 178showArguments function 115–116showCostBreakdown function 44showEvent method 133–134

INDEX 405
showExits function 158–159showInfo method 113–114, 165, 190, 217showMe function 183, 186showMessage function 57–58, 60–62showMountain function 173showMovieInfo function 44, 49, 55showPlanet method 125–126showPlayerHealth function 68showPlayerInfo function 55, 64, 68, 84, 120showPlayerName function 65, 68showPlayerPlace function 67–68showQuestion function 133showSum function 63, 70slice method 110, 112smooth operator 18social property 349spacer function 236spacer.line 97spacer.newLine method 139spacer.wrap 97span element 333, 345splice method 110, 112–113split command, The Crypt game 336–338split method 153–154square brackets 107, 149square function 62src attribute 228–229, 297, 390statement 10states object 148–149strict equality operator 199–200strict mode (JavaScript) 318strictly equal to operator 209string concatenation operator 20string methods 94–95strings
constructing HTML by string concatenation 345–346
replacing multiple times 349–353repeating code while condition is met
350–351replacing string while it can be found
352–353replacing strings with regular expressions
353while loop 351–352
replacing one string with another 347–349style tag 303submit method 210substr method 94–95success property 257, 291switch block, The Crypt game 338–339switch keyword 22switch variable 338
T
template.fill method 362templates 37, 343–366
automating placeholder replacement for353–356
building lists 355–356filling all placeholders for each key 355matching template placeholders with object
properties 353–354news page (fitness app) 344–347, 357–360
comparing news item data and HTML 345constructing HTML by string
concatenation 345–346designing with HTML templates 346modules 357–360using script tags for templates 346–347
replacing stringsmultiple times 349–353replacing one string with another 347–349
views 360–366creating HTML templates for 361–362updating to use new templates 362–365
Templates module 361text boxes 330–334
adding to page 331adding unordered list to display comments 332CSS 334getting references to new elements 332rateMovie function 332–334
text, displaying object properties as 41–42this variable 157, 172, 182–183, 187–188, 190–191,
193thisYear array 106tightly coupled 350title element 318–319title key 354title property 135, 157, 349total property 251total variable 74totalCost function 74–75toUpperCase method 87, 94, 96type attribute 331, 346type property 336
U
<ul> tag 306–308, 313unordered lists, adding to display comments 332unshift method 130updateGreeting function 325–326updating properties of objects 33–35use function 287, 290, 294–296, 334use strict statement 326user constructor, fitness app 250–251

INDEX406
user input, checking 214–220error messages 216–217go method 215–216
moving player to destination 216retrieving player’s location 215using direction to find destination 215
using if statement to avoid problems217–220
user model, converting data into 252–253userView variable 266
V
value property 330, 332, 340values, assigning to variables 18–19
one-step declaration and assignment 20using variable in its own assignment 21–22
var keyword 17, 22, 28, 30, 35, 211–212variable collisions 236–237variables 16–26
assigning namespace properties to local variables 246–247
assigning values to 18–19one-step declaration and assignment 20using variable in its own assignment
21–22choosing good names for 22–24
camel casing 23descriptive names 24keywords and reserved words 22–23rules for naming variables 23
Crypt game player variables 24–26declaring 17–18, 20declaring at console prompt 76–77global, dangers of 172–177
bugs 177naming collisions 176peeking and tweaking 173–174relying on implementation 174–176
local, benefits of 177–178overview 17using window object to check for global
variables 245–246views 264–279, 360–366
creating HTML templates for 361–362fitness app 265–268
creating views 266–267using modules to switch views 267–268
message view 278place views 274–277
model 274–276view 276–277
player views 269–274model 270–272view 272–274
updating to use new templates 362–365messages 362–363places 364–365players 363–364
See also controllersvisitorArray variable 109visitors variable 109volume property 85
W
weather app 36–37web page, adding content with JavaScript 309–311
function declarations 311id attribute 310–311when user doesn’t have JavaScript 311
while loops, replacing string multiple times349–353
overview 351–352repeating code while condition is met 350–351replacing string while it can be found 352–353with regular expressions 353
window object 244–246word counts 152–155words object 152wrap method 99–100wrap-and-return process 196wrapping code 196writing blog 35writing code
JS Bin 227local files 388
X
XHR data loading 367–386Crypt game 378–386
building game page 384–385cache 380Map Manager module 380–384specifying exits with JS Bin file codes 379–380
fitness app 368–377building 374–376JS Bin data 373–374locating user data 368–370overview 370parsing XHR response with JSON.parse
372–373XMLHttpRequest constructor 370–372
JSON data 377–378XMLHttpRequest object 367, 369–372, 378
Y
yield keyword 22

The Crypt: a running example
In part 1 of this book, while learning core JavaScript concepts, you write code to rep-resent the players and the places in the game and to let players move from place toplace and pick up items. The following figure shows the components you create; asimilar figure in each chapter highlights the ideas being discussed in the context ofthe entire game.
Part 2 of the book adds challenges for players: blocking exits until players solve puz-zles. The focus is on organizing your code, hiding how it works, checking user input, andbuilding modules that you can reuse and swap to make the project more flexible.
In part 3, you update the display to use HTML templates, modify the game to loaddata while it’s running, fill the templates with player and place information, and addtext boxes and buttons so that players can enter commands via a web page.
player variables
Players
a player object
showing player info
player items
Player Constructor
Places Maps
place objects
place items
place exits
Place Constructor
showing place info
linking places via exits
Game
render
get
go


