Embed Size (px)
Citation preview
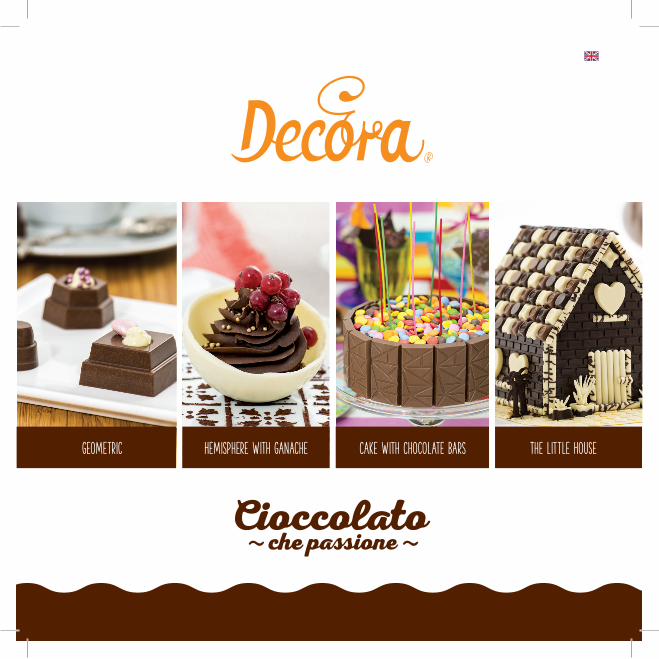
Geometric Hemisphere with Ganache Cake with Chocolate Bars The Little House
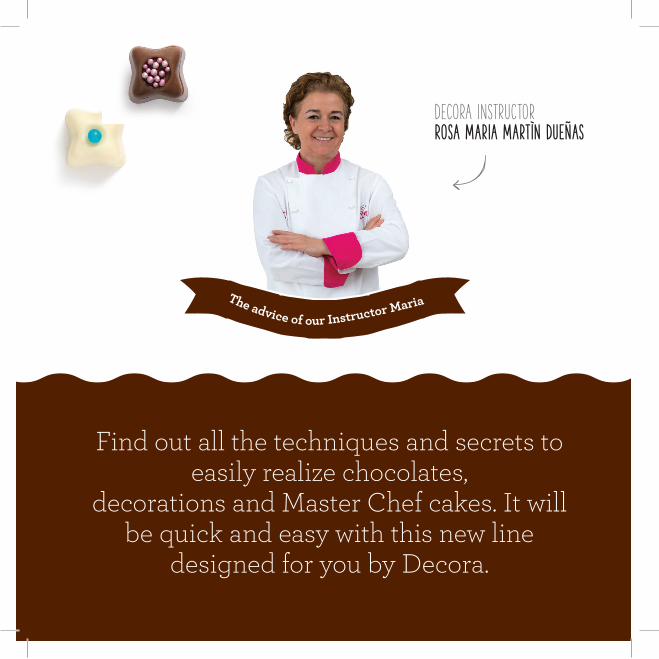
Decora InstructorRosa Maria Martìn Dueñas
The advice of our Instructor Maria
Find out all the techniques and secrets to easily realize chocolates,
decorations and Master Chef cakes. It will be quick and easy with this new line
designed for you by Decora.
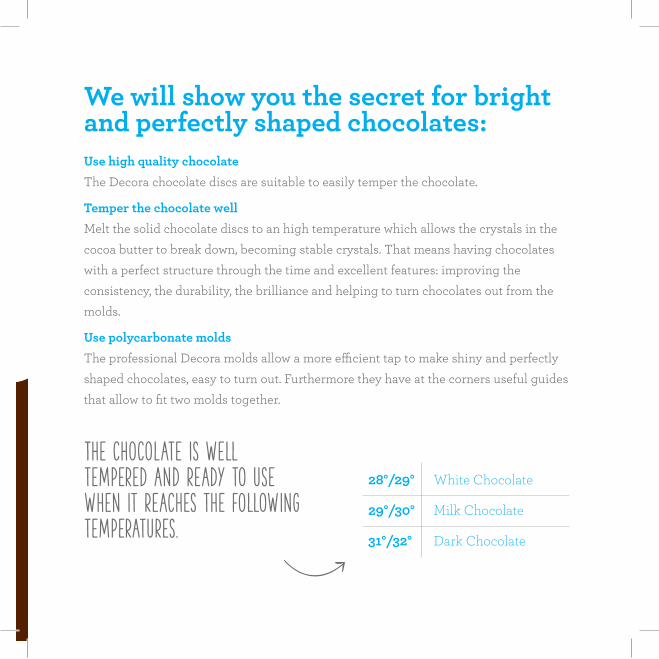
Use high quality chocolateThe Decora chocolate discs are suitable to easily temper the chocolate.
Temper the chocolate well Melt the solid chocolate discs to an high temperature which allows the crystals in the cocoa butter to break down, becoming stable crystals. That means having chocolates with a perfect structure through the time and excellent features: improving the consistency, the durability, the brilliance and helping to turn chocolates out from the molds.
Use polycarbonate moldsThe professional Decora molds allow a more efficient tap to make shiny and perfectly shaped chocolates, easy to turn out. Furthermore they have at the corners useful guides that allow to fit two molds together.
The chocolate is well tempered and ready to use when it reaches the following temperatures.
We will show you the secret for bright and perfectly shaped chocolates:
28°/29°
29°/30°
31°/32°
White Chocolate
Milk Chocolate
Dark Chocolate
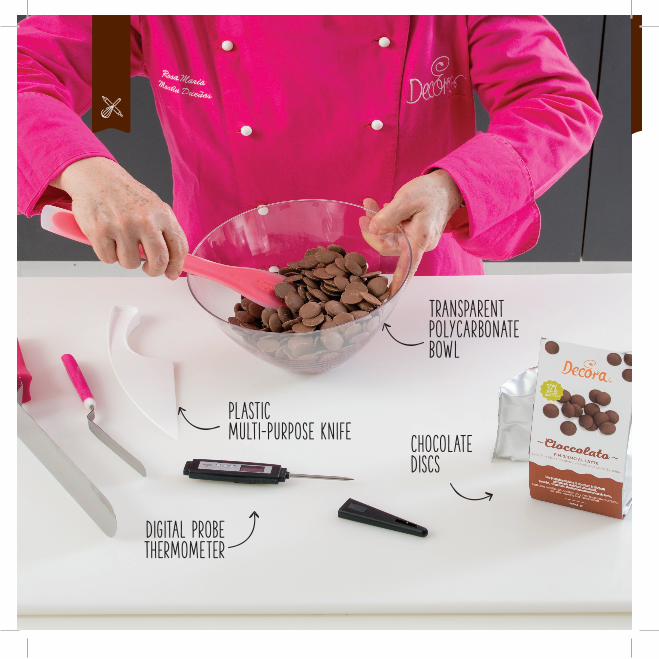
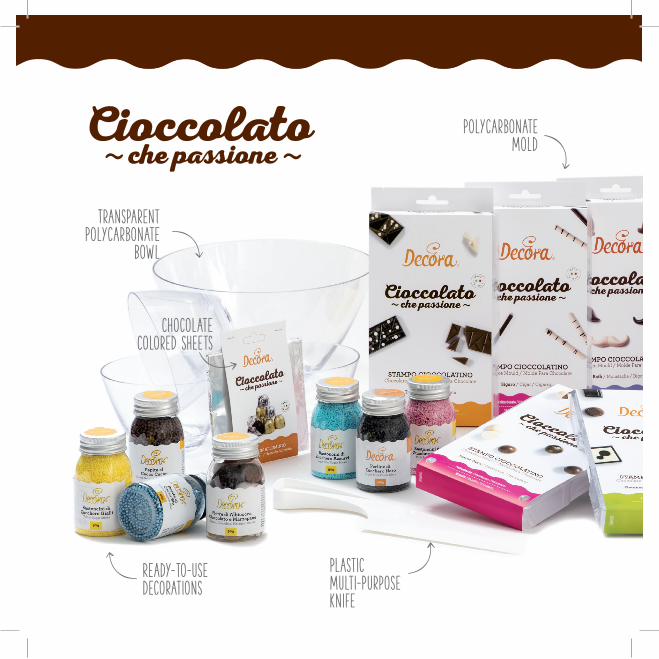
Chocolate Discs
Plastic Multi-Purpose Knife
Digital Probe Thermometer
Transparent Polycarbonate Bowl
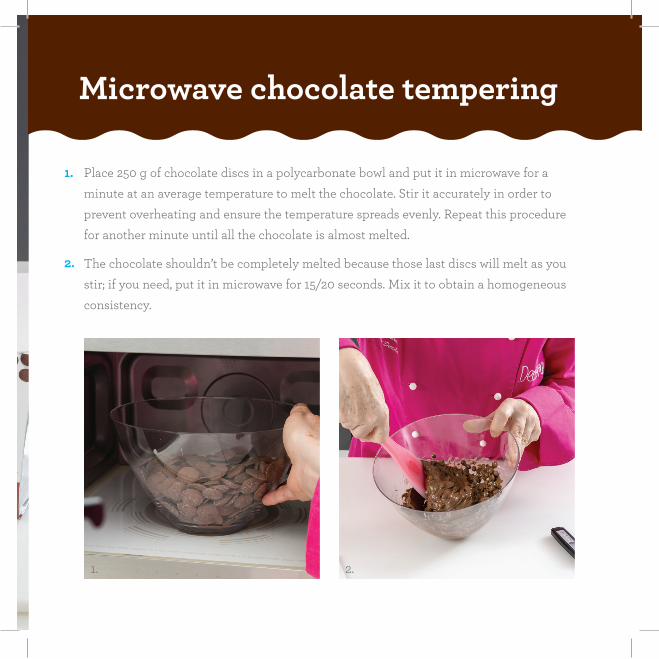
Microwave chocolate tempering
Place 250 g of chocolate discs in a polycarbonate bowl and put it in microwave for a minute at an average temperature to melt the chocolate. Stir it accurately in order to prevent overheating and ensure the temperature spreads evenly. Repeat this procedure for another minute until all the chocolate is almost melted.
The chocolate shouldn’t be completely melted because those last discs will melt as you stir; if you need, put it in microwave for 15/20 seconds. Mix it to obtain a homogeneous consistency.
1.
1. 2.
2.
3.
4.
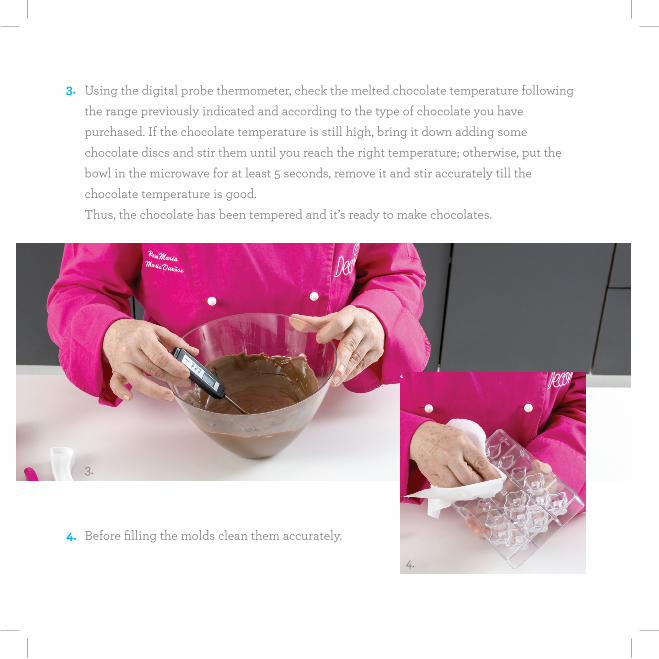
Using the digital probe thermometer, check the melted chocolate temperature following the range previously indicated and according to the type of chocolate you have purchased. If the chocolate temperature is still high, bring it down adding some chocolate discs and stir them until you reach the right temperature; otherwise, put the bowl in the microwave for at least 5 seconds, remove it and stir accurately till the chocolate temperature is good. Thus, the chocolate has been tempered and it’s ready to make chocolates.
3.
4. Before filling the molds clean them accurately.
5.
6. 7.
5.
6.
7.
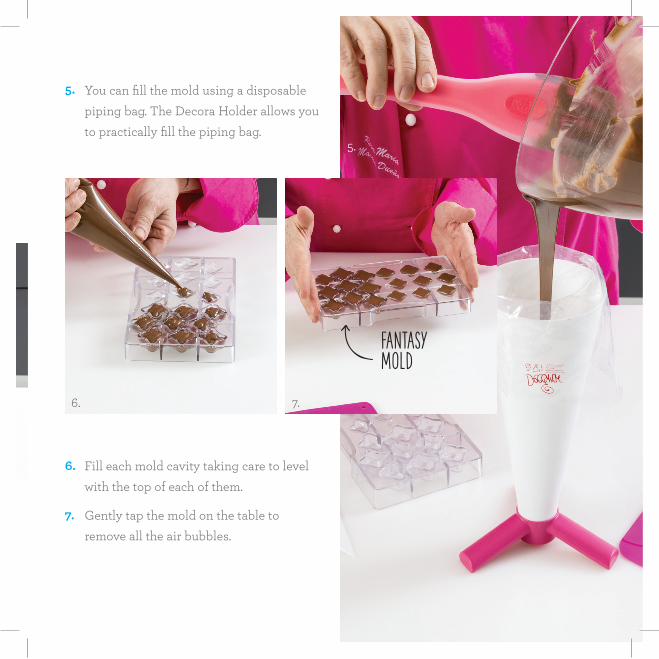
You can fill the mold using a disposable piping bag. The Decora Holder allows you to practically fill the piping bag.
Fill each mold cavity taking care to level with the top of each of them.
Gently tap the mold on the table to remove all the air bubbles.
FANTASYMOLD
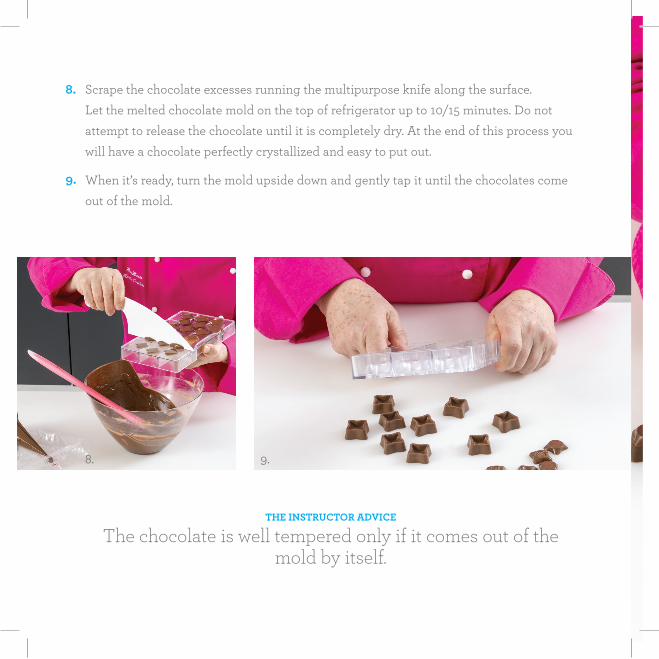
8.
THE INSTRUCTOR ADVICE
The chocolate is well tempered only if it comes out of the mold by itself.
9.
Scrape the chocolate excesses running the multipurpose knife along the surface.Let the melted chocolate mold on the top of refrigerator up to 10/15 minutes. Do not attempt to release the chocolate until it is completely dry. At the end of this process you will have a chocolate perfectly crystallized and easy to put out.
When it’s ready, turn the mold upside down and gently tap it until the chocolates come out of the mold.
8.
9.
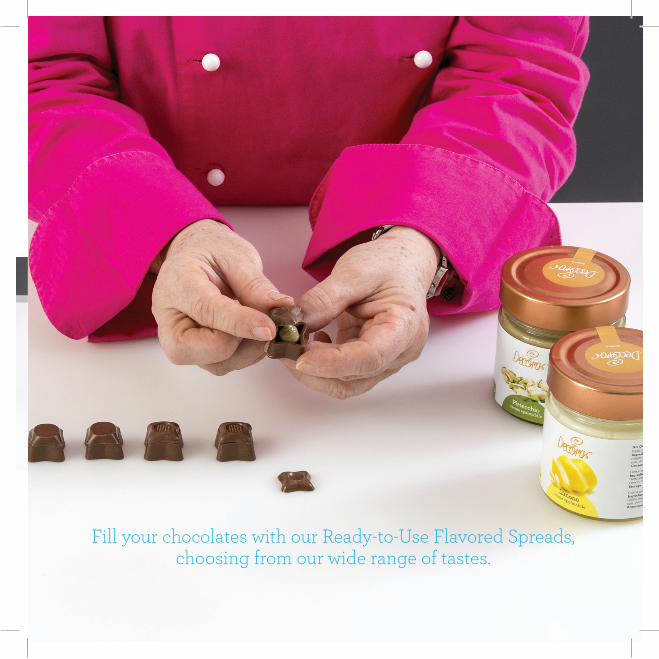
Fill your chocolates with our Ready-to-Use Flavored Spreads, choosing from our wide range of tastes.
1.
2. 3.
4.
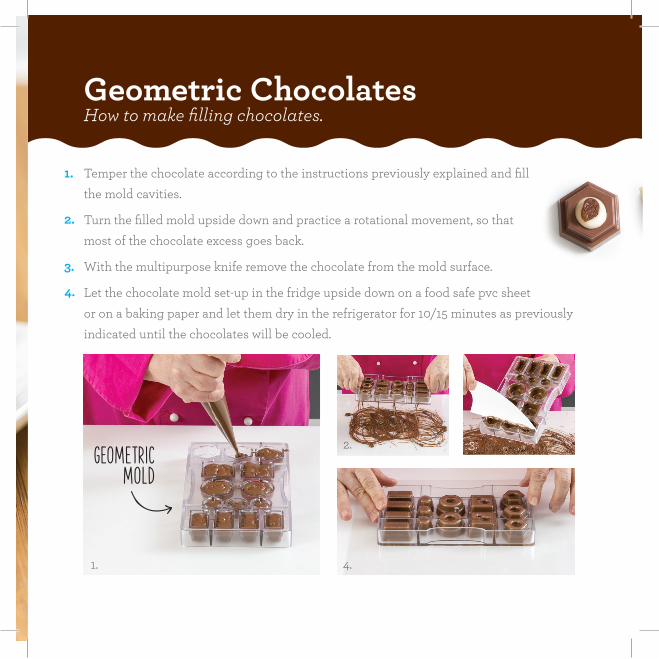
Geometric ChocolatesHow to make filling chocolates.
Temper the chocolate according to the instructions previously explained and fill the mold cavities.
Turn the filled mold upside down and practice a rotational movement, so that most of the chocolate excess goes back.
With the multipurpose knife remove the chocolate from the mold surface.
Let the chocolate mold set-up in the fridge upside down on a food safe pvc sheet or on a baking paper and let them dry in the refrigerator for 10/15 minutes as previously indicated until the chocolates will be cooled.
1.
4.
3.
2.
GEOMETRIC MOLD
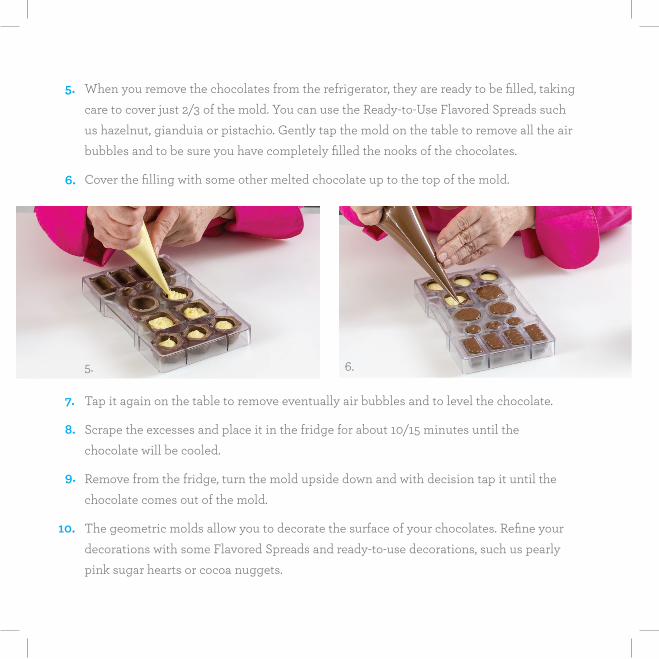
When you remove the chocolates from the refrigerator, they are ready to be filled, taking care to cover just 2/3 of the mold. You can use the Ready-to-Use Flavored Spreads such us hazelnut, gianduia or pistachio. Gently tap the mold on the table to remove all the air bubbles and to be sure you have completely filled the nooks of the chocolates.
Cover the filling with some other melted chocolate up to the top of the mold.
5.
6.
7.
8.
9.
10.
5. 6.
Tap it again on the table to remove eventually air bubbles and to level the chocolate.
Scrape the excesses and place it in the fridge for about 10/15 minutes until the chocolate will be cooled.
Remove from the fridge, turn the mold upside down and with decision tap it until the chocolate comes out of the mold.
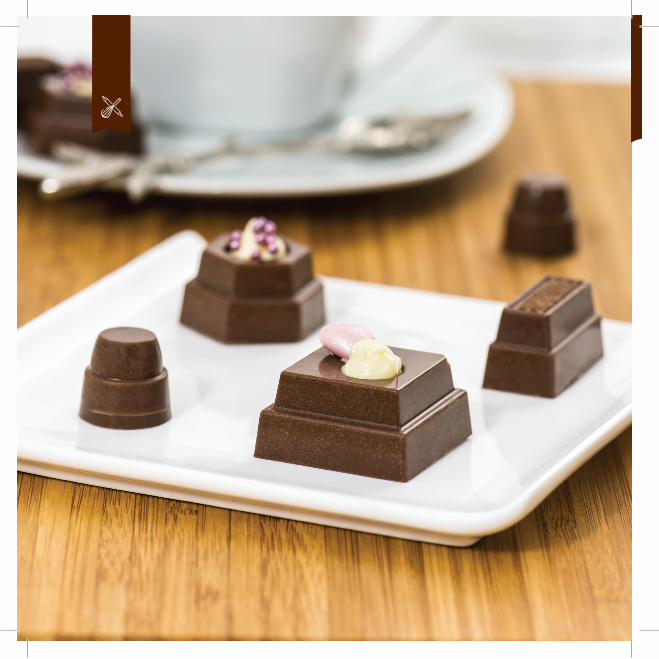
The geometric molds allow you to decorate the surface of your chocolates. Refine your decorations with some Flavored Spreads and ready-to-use decorations, such us pearly pink sugar hearts or cocoa nuggets.

7.
9.
8.
10.
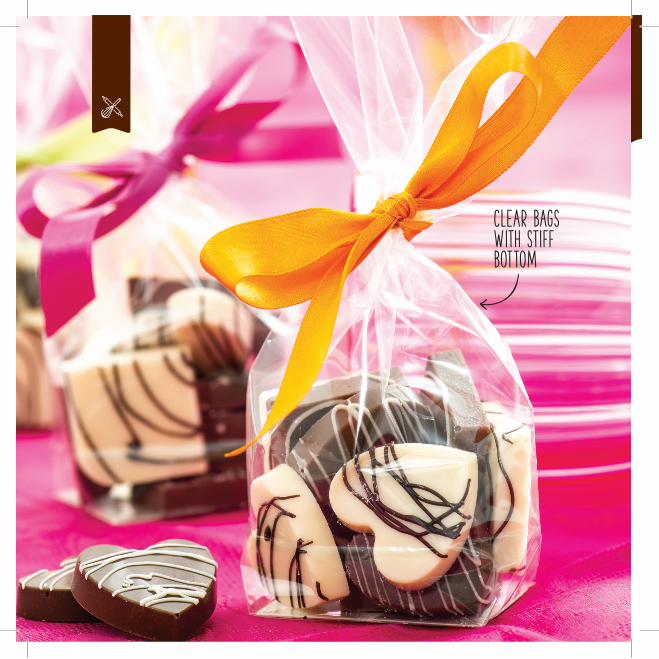
Clear bags with stiff bottom

A cloverleaf for your gift ideasChocolates, bags and ribbons for an original gift.
Use the cloverleaf mold to realize fantastic chocolates following the instructions previously exposed.Make a simple decoration with some white chocolate and a piping bag.
IDEA
Wrap them in a clear bag with stiff bottom, closed with a colored ribbon to give and share your creations.
OUR INSTRUCTOR ADVICE:
The white chocolate used has to be previously tempered.
CLOVERLEAF MOLD
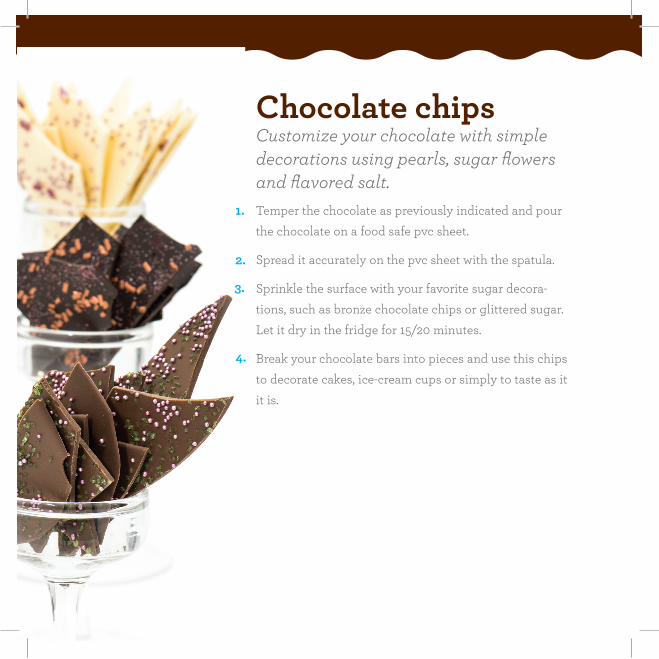
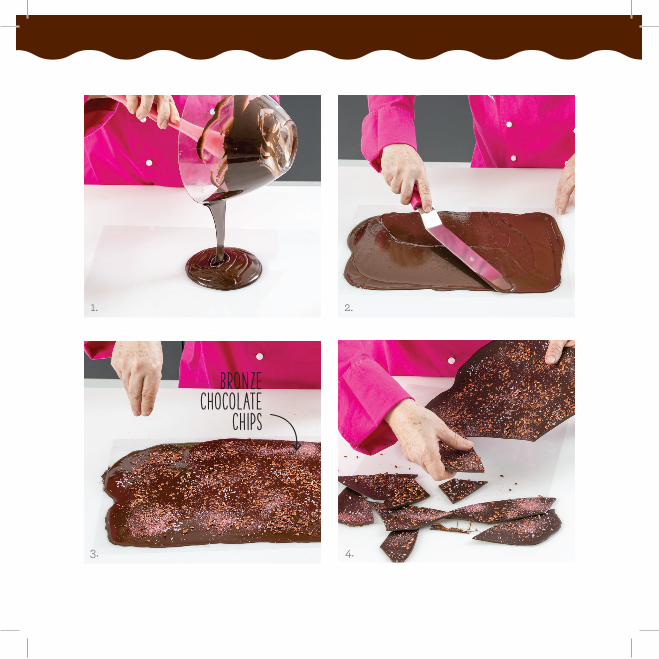
Chocolate chipsCustomize your chocolate with simple decorations using pearls, sugar flowers and flavored salt.Temper the chocolate as previously indicated and pour the chocolate on a food safe pvc sheet.
Spread it accurately on the pvc sheet with the spatula.
Sprinkle the surface with your favorite sugar decora-tions, such as bronze chocolate chips or glittered sugar. Let it dry in the fridge for 15/20 minutes.
Break your chocolate bars into pieces and use this chips to decorate cakes, ice-cream cups or simply to taste as it it is.
1.
2.
4.
3.
1.
3.
2.
4.
Bronze chocolate
chips

1. 2. 3. 4.
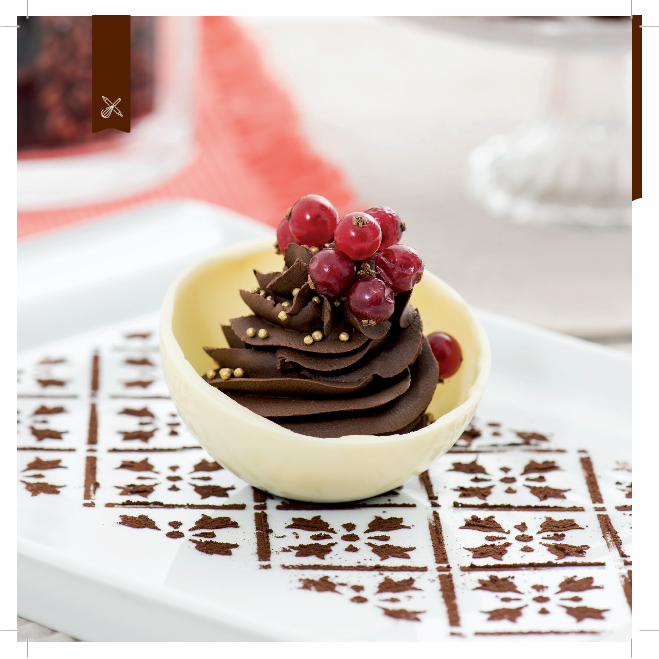
Ingredients for the ganache:200 g fresh cream200 g dark chocolate discsBerries Flavor
White chocolate hemisphere with dark chocolate ganache
Bring the cream to the boil and pour it in a bowl.
Add the chocolate discs and stir with a whip until the chocolate melts.
Then add the flavor.
Blend it well to obtain a homogeneous mixture. Let it dry until the temperature is 22/23° C. Its consistency makes it suitable for piping bag decorations or to use for filling cakes.
1.
2.
3.
4.
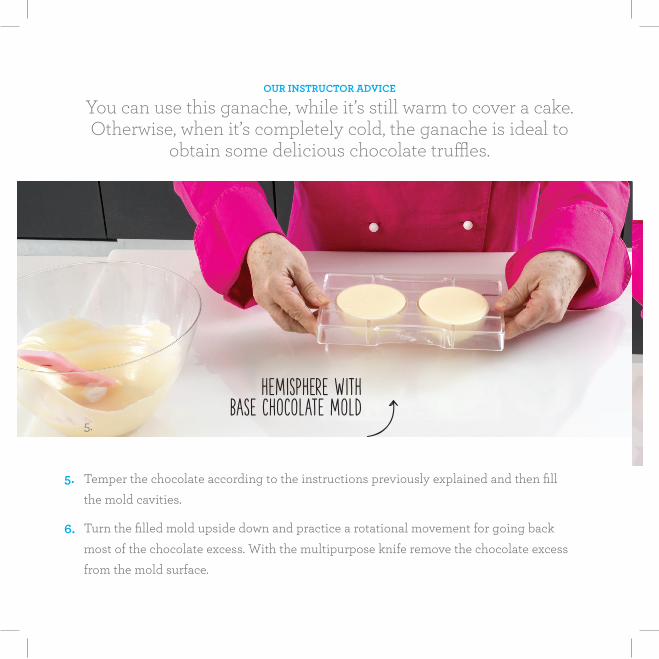
OUR INSTRUCTOR ADVICE
You can use this ganache, while it’s still warm to cover a cake. Otherwise, when it’s completely cold, the ganache is ideal to
obtain some delicious chocolate truffles.
5.
HEMISPHERE WITH BASE CHOCOLATE MOLD
Temper the chocolate according to the instructions previously explained and then fill the mold cavities.
Turn the filled mold upside down and practice a rotational movement for going back most of the chocolate excess. With the multipurpose knife remove the chocolate excess from the mold surface.
5.
6.
7.
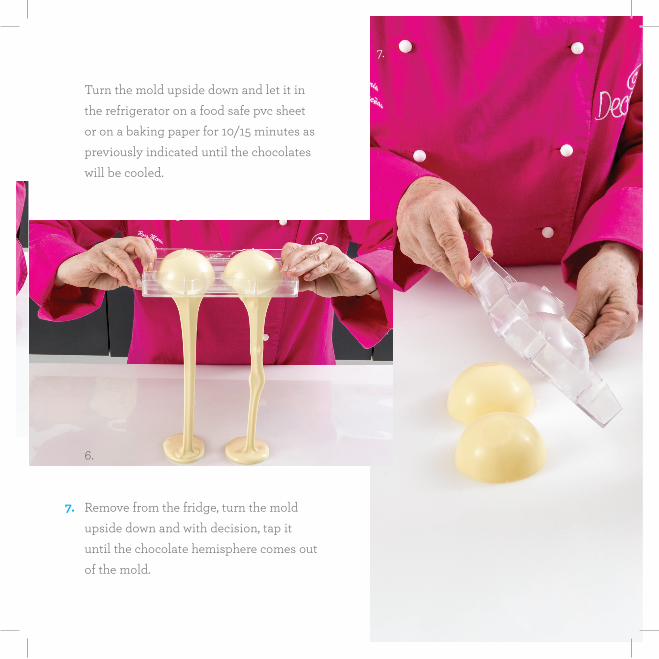
Turn the mold upside down and let it in the refrigerator on a food safe pvc sheet or on a baking paper for 10/15 minutes as previously indicated until the chocolates will be cooled.
6.
7.
Remove from the fridge, turn the mold upside down and with decision, tap it until the chocolate hemisphere comes out of the mold.
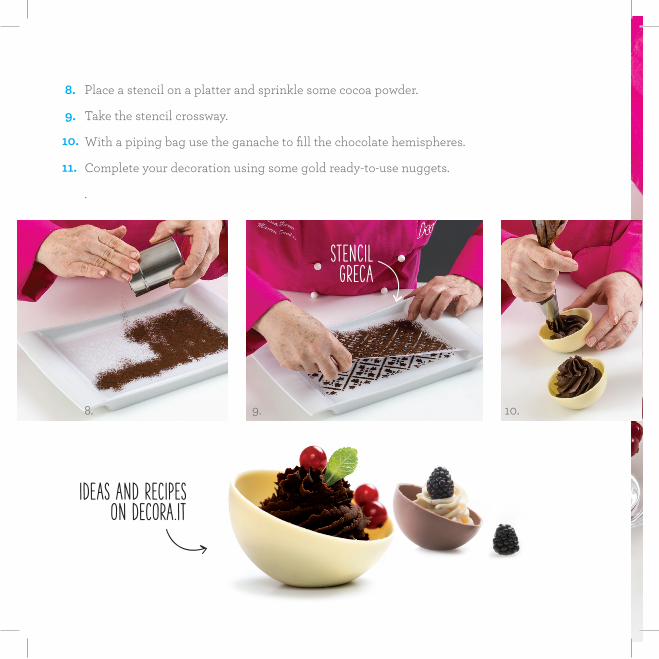
Place a stencil on a platter and sprinkle some cocoa powder.
Take the stencil crossway.
With a piping bag use the ganache to fill the chocolate hemispheres.
Complete your decoration using some gold ready-to-use nuggets.
.
8.
11.
10.
9.
8. 9. 10.
IDEAS AND RECIPES ON DECORA.IT
stencilgreca
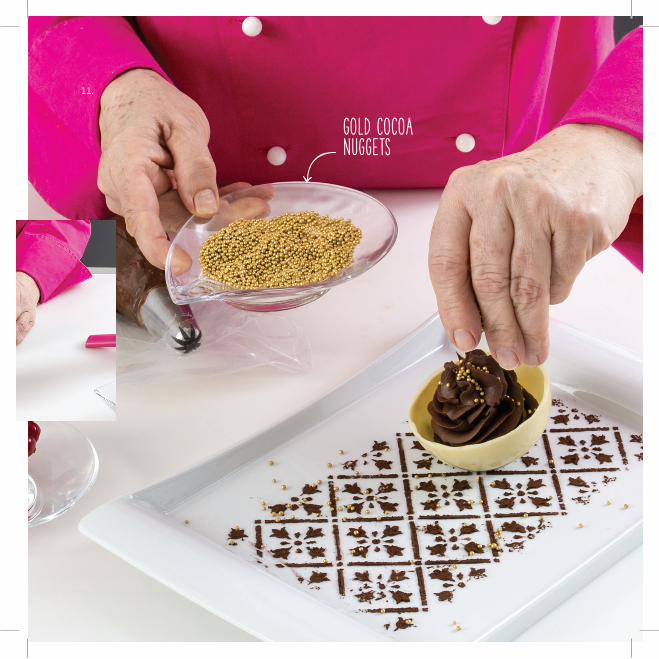
Gold Cocoa Nuggets
11.
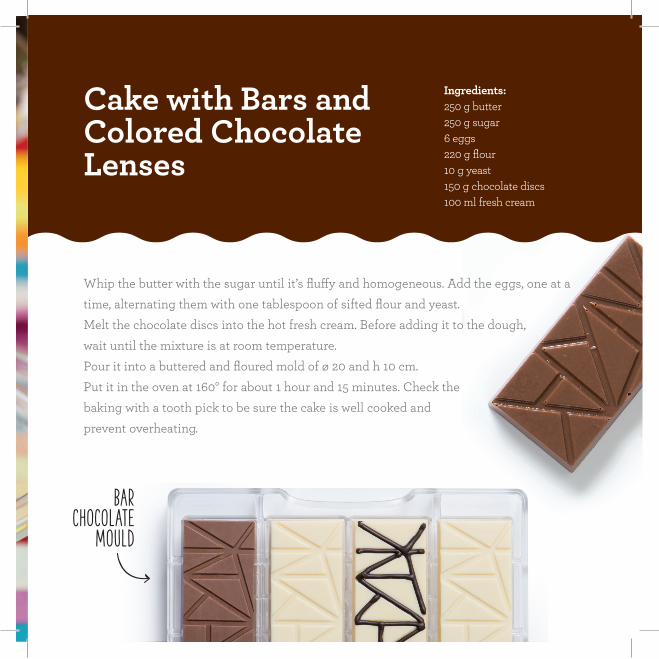
Ingredients:250 g butter250 g sugar 6 eggs220 g flour10 g yeast150 g chocolate discs 100 ml fresh cream
BarCHOCOLATE
MOULD
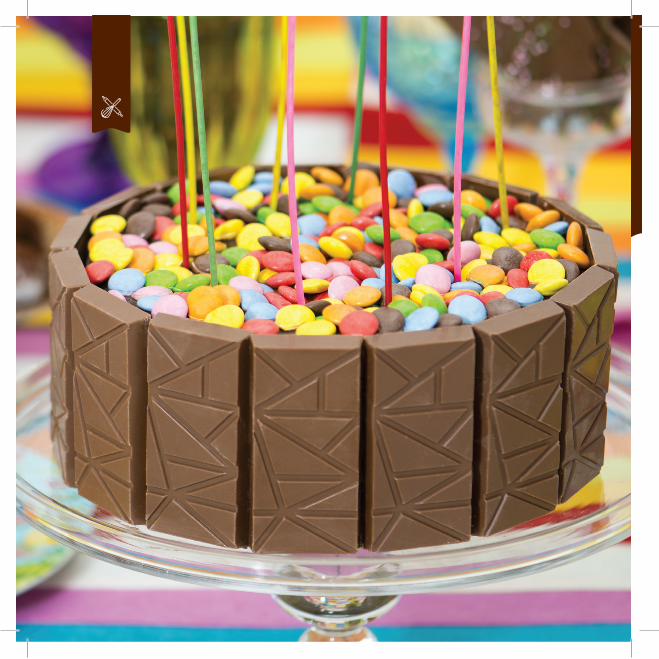
Cake with Bars and Colored Chocolate Lenses
Whip the butter with the sugar until it’s fluffy and homogeneous. Add the eggs, one at a time, alternating them with one tablespoon of sifted flour and yeast.Melt the chocolate discs into the hot fresh cream. Before adding it to the dough, wait until the mixture is at room temperature. Pour it into a buttered and floured mold of ø 20 and h 10 cm. Put it in the oven at 160° for about 1 hour and 15 minutes. Check the baking with a tooth pick to be sure the cake is well cooked and prevent overheating.
1. 2.
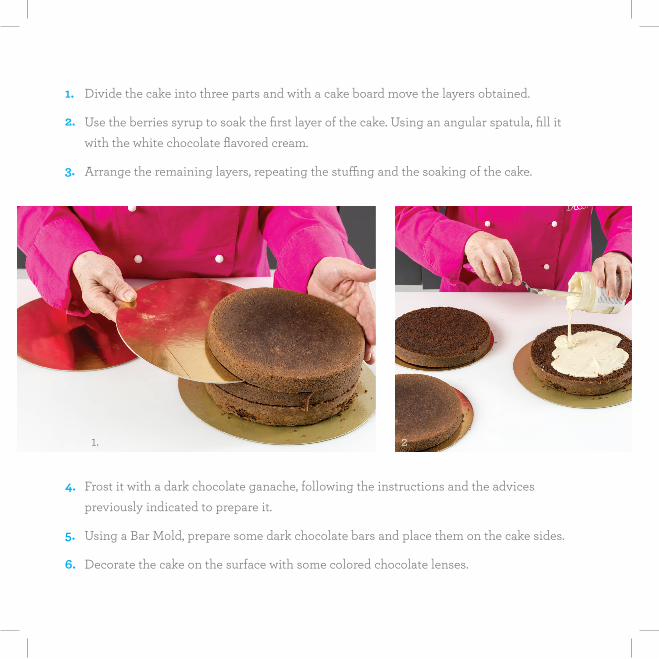
Divide the cake into three parts and with a cake board move the layers obtained.
Use the berries syrup to soak the first layer of the cake. Using an angular spatula, fill it with the white chocolate flavored cream.
Arrange the remaining layers, repeating the stuffing and the soaking of the cake.
1.
2.
3.
4.
5.
6.
Frost it with a dark chocolate ganache, following the instructions and the advices previously indicated to prepare it.
Using a Bar Mold, prepare some dark chocolate bars and place them on the cake sides.
Decorate the cake on the surface with some colored chocolate lenses.
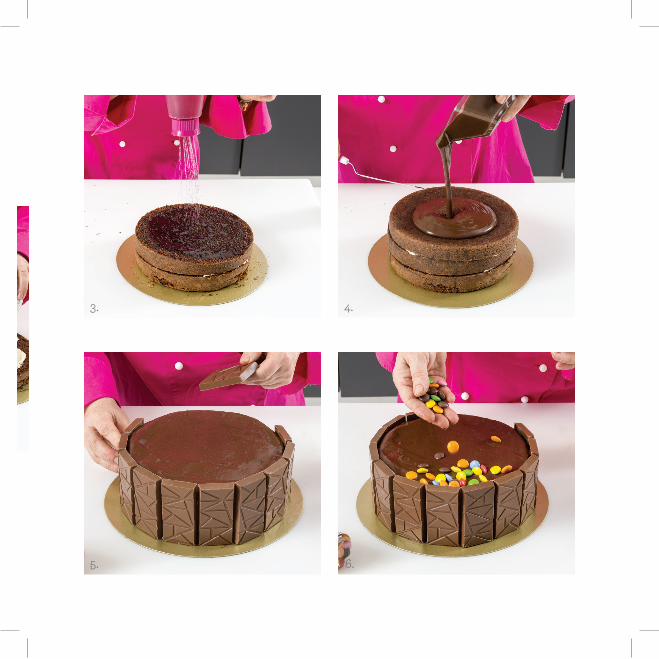
3.
5.
4.
6.
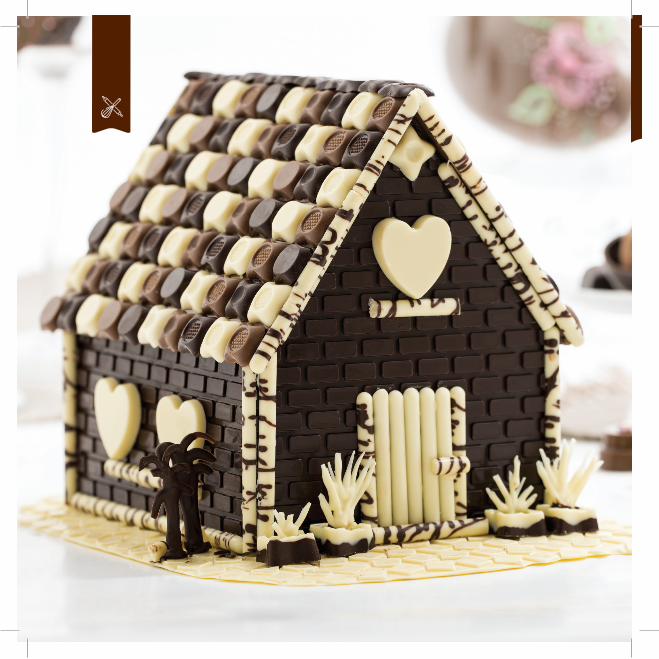

Our IdeaA little chocolate house
1. 2. 3.
Temper the chocolate according to the instructions previously explained and pour it on the food safe pvc sheet.
With the help of a spatula flatten the surface to a thickness of 3/4 mm.
Beat the acetate sheet on the work top to remove any air bubbles and let it rest at room temperature.
1.
3.
2.
5. 6.
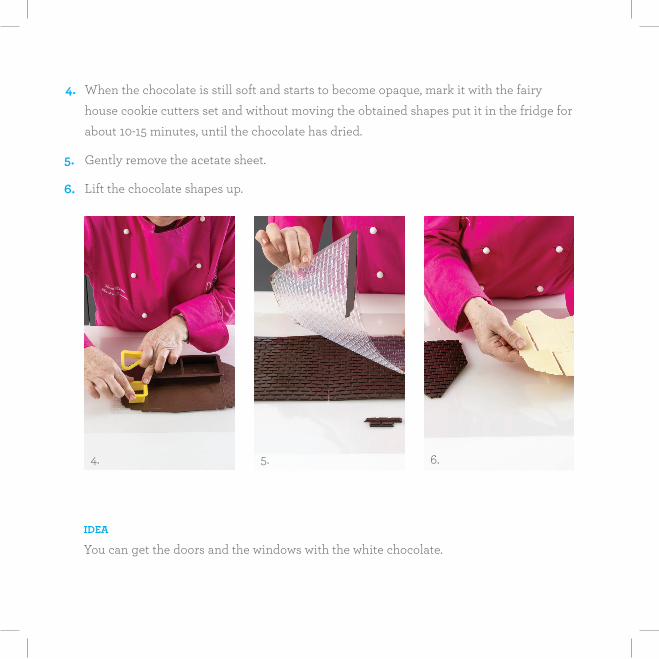
When the chocolate is still soft and starts to become opaque, mark it with the fairy house cookie cutters set and without moving the obtained shapes put it in the fridge for about 10-15 minutes, until the chocolate has dried.
Gently remove the acetate sheet.
Lift the chocolate shapes up.
5.
4.
6.
4.
IDEA
You can get the doors and the windows with the white chocolate.
9.8.7.
THE ADVICE OF OUR INSTRUCTOR
You can make the base with white chocolate, otherwise you can simply use a cake-board.
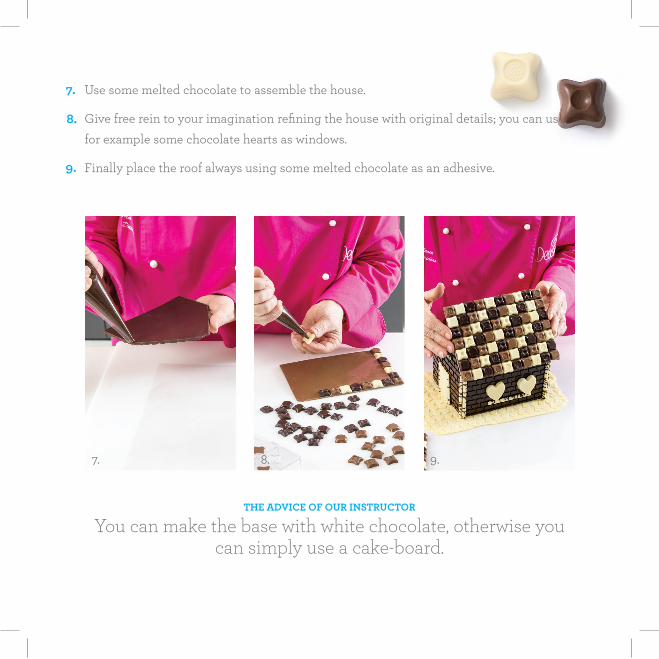
Use some melted chocolate to assemble the house.
Give free rein to your imagination refining the house with original details; you can use for example some chocolate hearts as windows.
Finally place the roof always using some melted chocolate as an adhesive.
8.
9.
7.
10.
Food safepvc sheet
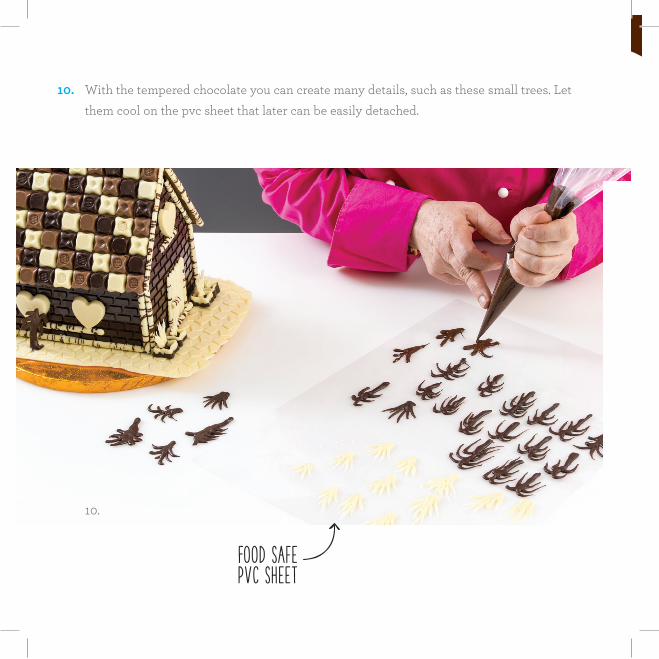
With the tempered chocolate you can create many details, such as these small trees. Let them cool on the pvc sheet that later can be easily detached.
10.

OUR INSTRUCTOR ADVICES
Find out on decora.it how to realize a little house for every occasion.
Fairy tales House Cookie cutters set
PolycarbonateMold
Transparent Polycarbonate
Bowl
Chocolate Colored Sheets
Ready-to-use decorations
Plastic Multi-Purpose Knife
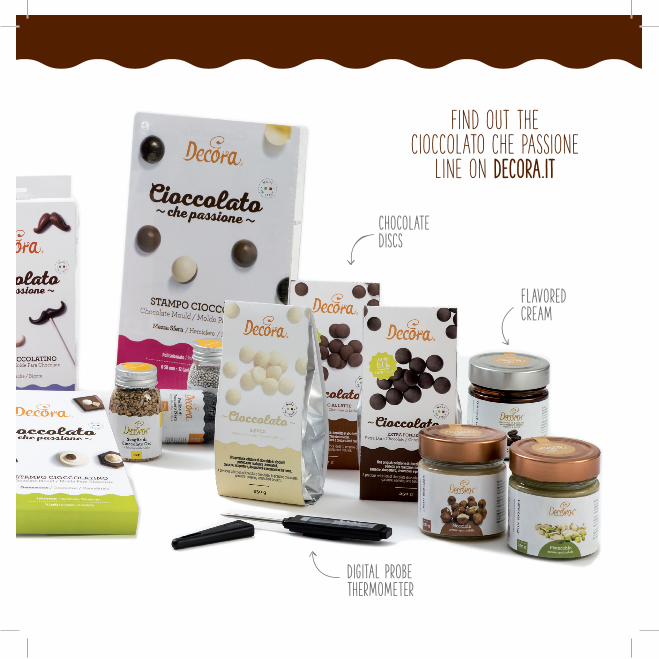
Digital Probe Thermometer
Flavored cream
Chocolate Discs
FIND OUT THE CIOCCOLATO CHE PASSIONE
LINE ON DECORA.IT