Embed Size (px)
Citation preview

http://www.instructables.com/id/DIY-CLAW-MACHINE/
technology workshop craft home food play outside costumes
DIY CLAW MACHINEby creativeGuy88 on March 24, 2016
Table of Contents
DIY CLAW MACHINE . . . . . . . . . . . . . . . . . . . . . . . . . . . . . . . . . . . . . . . . . . . . . . . . . . . . . . . . . . . . . . . . . . . . . . . . . . . . . . . . . . . . . . . . . . . . . . . . . . . . . . . . . . 1
Intro: DIY CLAW MACHINE . . . . . . . . . . . . . . . . . . . . . . . . . . . . . . . . . . . . . . . . . . . . . . . . . . . . . . . . . . . . . . . . . . . . . . . . . . . . . . . . . . . . . . . . . . . . . . . . . . . 2
Step 1: Starting the project . . . . . . . . . . . . . . . . . . . . . . . . . . . . . . . . . . . . . . . . . . . . . . . . . . . . . . . . . . . . . . . . . . . . . . . . . . . . . . . . . . . . . . . . . . . . . . . . . . . 3
Step 2: Buying materials . . . . . . . . . . . . . . . . . . . . . . . . . . . . . . . . . . . . . . . . . . . . . . . . . . . . . . . . . . . . . . . . . . . . . . . . . . . . . . . . . . . . . . . . . . . . . . . . . . . . . 3
Step 3: Start building . . . . . . . . . . . . . . . . . . . . . . . . . . . . . . . . . . . . . . . . . . . . . . . . . . . . . . . . . . . . . . . . . . . . . . . . . . . . . . . . . . . . . . . . . . . . . . . . . . . . . . . . 3
Step 4: Electronics . . . . . . . . . . . . . . . . . . . . . . . . . . . . . . . . . . . . . . . . . . . . . . . . . . . . . . . . . . . . . . . . . . . . . . . . . . . . . . . . . . . . . . . . . . . . . . . . . . . . . . . . . 5
Step 5: Mechanics . . . . . . . . . . . . . . . . . . . . . . . . . . . . . . . . . . . . . . . . . . . . . . . . . . . . . . . . . . . . . . . . . . . . . . . . . . . . . . . . . . . . . . . . . . . . . . . . . . . . . . . . . . 8
Step 6: The Claw . . . . . . . . . . . . . . . . . . . . . . . . . . . . . . . . . . . . . . . . . . . . . . . . . . . . . . . . . . . . . . . . . . . . . . . . . . . . . . . . . . . . . . . . . . . . . . . . . . . . . . . . . . 8
Step 7: Finish the project . . . . . . . . . . . . . . . . . . . . . . . . . . . . . . . . . . . . . . . . . . . . . . . . . . . . . . . . . . . . . . . . . . . . . . . . . . . . . . . . . . . . . . . . . . . . . . . . . . . . . 9
Related Instructables . . . . . . . . . . . . . . . . . . . . . . . . . . . . . . . . . . . . . . . . . . . . . . . . . . . . . . . . . . . . . . . . . . . . . . . . . . . . . . . . . . . . . . . . . . . . . . . . . . . . . . . . 11
Advertisements . . . . . . . . . . . . . . . . . . . . . . . . . . . . . . . . . . . . . . . . . . . . . . . . . . . . . . . . . . . . . . . . . . . . . . . . . . . . . . . . . . . . . . . . . . . . . . . . . . . . . . . . . . . . . . . 11
Comments . . . . . . . . . . . . . . . . . . . . . . . . . . . . . . . . . . . . . . . . . . . . . . . . . . . . . . . . . . . . . . . . . . . . . . . . . . . . . . . . . . . . . . . . . . . . . . . . . . . . . . . . . . . . . . . . 11
http://www.instructables.com/id/DIY-CLAW-MACHINE/
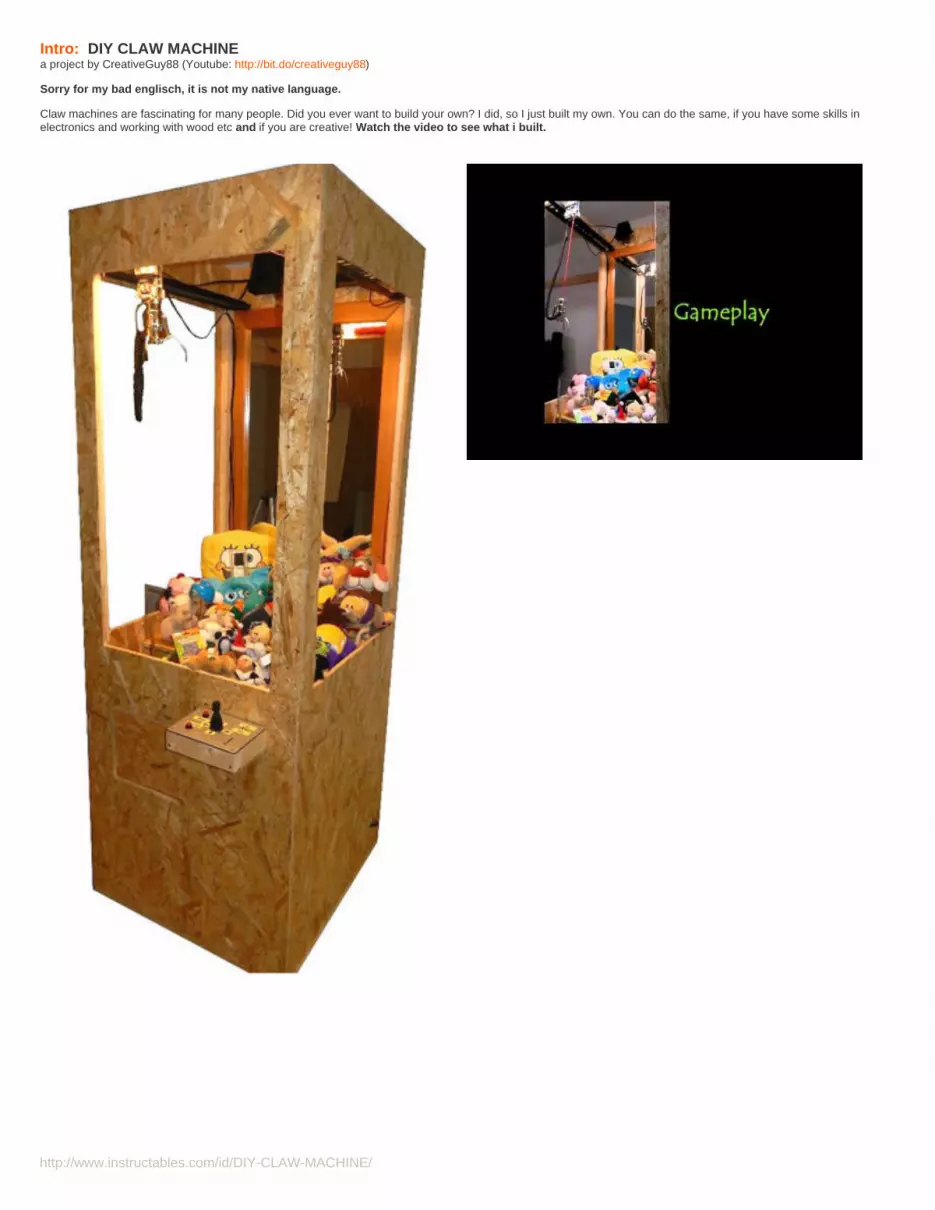
Intro: DIY CLAW MACHINEa project by CreativeGuy88 (Youtube: http://bit.do/creativeguy88)
Sorry for my bad englisch, it is not my native language.
Claw machines are fascinating for many people. Did you ever want to build your own? I did, so I just built my own. You can do the same, if you have some skills inelectronics and working with wood etc and if you are creative! Watch the video to see what i built.

http://www.instructables.com/id/DIY-CLAW-MACHINE/
Step 1: Starting the projectTo build this claw machine, it took me about half an year, and even now it isn´t finished. You can always work on it and improve it. For example, I didn´t built-in acrylicglass yet, and i also didn´t paint it yet. I want to do that when the claw game is perfect for me.
The question everyone is interested in first: How much money it will take?
Well, it depends on how much materials you already have at home, like woods and cables. But if you do have basic things like tools etc. already, it will cost about 150$.
For my first inspiration I searched an ELAUT claw machine instructions and found this one (pictures on top)
Step 2: Buying materialsFirst you need some materials for the machine, I used OSB wood for the housing and plastic as "rails" for the moving part one the top. Of course you also need theelectronic parts, here is a list with some useful parts (for what you need them is explained later)
-a few Relays with 12 V Coil Voltage
-a lot of cables
-joystick and some buttons for the X/Y/Z movement
-for decoration some lights like LED´s
-other parts you will need are explained later
Step 3: Start buildingAs the second Step you have to build the housing for your claw machine. It will help to design the different panels first .
Now you just have to cut out the shapes for the four sides of the machine: the front, left and right side are the same, expect of the price output on the front and the dooron the right for the electronics.
Now you have to put the wood panels together. I used some wood slats on which i drilled the panels.
For the price issue you need the small wood you just cut out and add a hinge so that you can open and close it.
A more complicated thing is to build the shaft where the prices fall in. You have to be creative, be free and let inspire yourself of the pictures.

http://www.instructables.com/id/DIY-CLAW-MACHINE/
Image Notes1. price issue2. hole for cables
Image Notes1. hole for the electronics
Image Notes1. shaft for the prices and preice issue

http://www.instructables.com/id/DIY-CLAW-MACHINE/
Image Notes1. roller to move the machine simply
Image Notes1. base
Image Notes1. left panel2. back panel
Image Notes1. view form the right side
Step 4: ElectronicsIn the picture you see a circuit diagram as a example the claw works.
The basic problem is that the motores have to move left/right, backwards/forwards and up/down. To control this motions with a joystick for the X/Y movement and withbuttons for the Z movement you need the relays. Just link them up for the cable network like in the picture.
When you insert a coin, a one minute timer is started, the joystick is unlocked and a game music starts. I used an old DVD player; the DVD menu is the backgroundmusic that is played every two minutes and the "film" that is started with the insert of the coin is the game music.

http://www.instructables.com/id/DIY-CLAW-MACHINE/
Image Notes1. UP2. DOWN3. joystick4. claw control: open & close5. coin insert
Image Notes1. joystick2. coin saver3. hole for cables
Image Notes1. main control2. timer3. DVD player for music
Image Notes1. 230 V relay for lighting

http://www.instructables.com/id/DIY-CLAW-MACHINE/
4. motor power supply
Image Notes1. relays2. housing of old TV receiver
Image Notes1. timer of a KOSMOS experimental set
Image Notes1. cable to "PLAY" button
Image Notes1. patchcable for easy plug and unplug
Image Notes

http://www.instructables.com/id/DIY-CLAW-MACHINE/
1. alternative coin insert :D
Step 5: MechanicsThat is the most complicated part of the project: The mechanics. These are the main part for the machine, because the claw have to move in X/Y/Z axis. I mostly usedLEGOs because it is easy to build with them and they are very strong.
Step 6: The ClawThe most important thing is not just the mechanics, it is the Claw. That is the only part i did not built myself. I searched where I can buy a claw as a replacement part for areal claw machine. I found it on
http://bit.do/twistedquarter-claw
(On this website you also can find other things for arcade games, the only bad thing is: If you are living in Europe like me, the shipping costs are very high, about 60$)
The claw works with a magnet coil

http://www.instructables.com/id/DIY-CLAW-MACHINE/
Image Notes1. LEGO motors2. cord reel3. claw
Step 7: Finish the projectHere are some pictures of the first version and of the latest version.
Thank you for your interest in my project! If you have questions or critics, please write a comment! If you built your own claw machine, please post a picture of it!
Image Notes1. the very first version

http://www.instructables.com/id/DIY-CLAW-MACHINE/
Image Notes1. the latest version
Image Notes1. the first claw worked with pneumatic2. old version of moving part3. old version of moving part4. old version of moving part

http://www.instructables.com/id/DIY-CLAW-MACHINE/
Related Instructables
Claw MachinePicker-Upper bymarc.cryan
Arduino ClawMachine byrbates4
K'nex ClawMachine Gameby T86157
knex clawmachine [firston site] that hasinstructans byknexinventer
Motorized K'nexClaw by T86157
Build a bigcrane game bymarc.cryan
Advertisements
Comments
1 comments Add Comment
DIY Hacks and How Tos says: Mar 26, 2016. 2:03 PM REPLYThis is awesome! I love claw games.


