Embed Size (px)
Citation preview
© Dartfish. All rights reserved.
Dartfish
User Guide
24/07/2013

ITable of contents
© Dartfish. All rights reserved.- Version 7 -
Table of contents
21 Introduction
................................................................................................................................... 31.1 Support and help to use your software
62 Getting familiar with Dartfish
................................................................................................................................... 62.1 The Dartfish workspace
......................................................................................................................................................... 7The Start Page 2.1.1
......................................................................................................................................................... 8Displaying Dartfish Modules 2.1.2
......................................................................................................................................................... 8The Library 2.1.3
......................................................................................................................................................... 9Resizing windows 2.1.4
................................................................................................................................... 92.2 Video playback
......................................................................................................................................................... 10The Timeline 2.2.1
......................................................................................................................................................... 10Trimming video clips 2.2.2
......................................................................................................................................................... 11Video panel controls 2.2.3
......................................................................................................................................................... 11Repeat mode 2.2.4
................................................................................................................................... 122.3 Saving projects and videos
......................................................................................................................................................... 12Saving a project 2.3.1
......................................................................................................................................................... 13Saving a new video 2.3.2
................................................................................................................................... 142.4 Sharing video files
......................................................................................................................................................... 14Video Sharing Wizard 2.4.1
......................................................................................................................................................... 15Converting video 2.4.2
................................................................................................................................... 172.5 Remote controlling Dartfish
......................................................................................................................................................... 18Streamzap remote control 2.5.1
......................................................................................................................................................... 19Jumi remote control 2.5.2
................................................................................................................................... 202.6 The next steps
223 Video Library
................................................................................................................................... 223.1 Defining your library
................................................................................................................................... 233.2 The Library workspace
......................................................................................................................................................... 24The Library Toolbar 3.2.1
......................................................................................................................................................... 24The Items List 3.2.2
......................................................................................................................................................... 25Item Properties 3.2.3
......................................................................................................................................................... 27The Tray 3.2.4
................................................................................................................................... 283.3 Organizing your library
......................................................................................................................................................... 28Understanding Keywords 3.3.1
......................................................................................................................................................... 28Defining your categories 3.3.2
......................................................................................................................................................... 29Editing categories 3.3.3
......................................................................................................................................................... 29Editing keywords 3.3.4
......................................................................................................................................................... 30Classifying video clips 3.3.5
......................................................................................................................................................... 30Removing keywords from video clips 3.3.6
......................................................................................................................................................... 31Importing/exporting keyword sets 3.3.7
......................................................................................................................................................... 32Exporting keyword data 3.3.8
................................................................................................................................... 333.4 Locating video files
......................................................................................................................................................... 33Using Keywords 3.4.1
......................................................................................................................................................... 34Using Search 3.4.2
......................................................................................................................................................... 34Using Folders 3.4.3
Dartfish User GuideII
© Dartfish. All rights reserved. - Version 7 -
................................................................................................................................... 353.5 Saving the tray's content
......................................................................................................................................................... 35Creating a playlist 3.5.1
......................................................................................................................................................... 36Reusing a playlist 3.5.2
......................................................................................................................................................... 36Modifying a playlist 3.5.3
................................................................................................................................... 363.6 Sharing video files
................................................................................................................................... 363.7 Converting video clips
................................................................................................................................... 373.8 Video Formats and Dartfish
................................................................................................................................... 383.9 Correcting video property errors
................................................................................................................................... 393.10 The next steps
424 Importing files to the library
................................................................................................................................... 434.1 Using the Video File Importer
......................................................................................................................................................... 44Video File Importer - selecting files 4.1.1
......................................................................................................................................................... 44Video File Importer - naming and filing videos 4.1.2
................................................................................................................................... 454.2 Video Recorder: capture a video stream
......................................................................................................................................................... 47Setting up the capture device 4.2.1
......................................................................................................................................................... 48Setting up the Lifecam webcam 4.2.2
......................................................................................................................................................... 52Using Network (IP) cameras 4.2.3
.................................................................................................................................................. 53Configure an IP camera
.................................................................................................................................................. 54IP camera setup in Dartfish
.................................................................................................................................................. 57Pan-tilt-zoom control
......................................................................................................................................................... 58Setting Clip Properties 4.2.4
......................................................................................................................................................... 59Using Recording options 4.2.5
......................................................................................................................................................... 60Selecting a recording location 4.2.6
......................................................................................................................................................... 61Using an encoding profile 4.2.7
......................................................................................................................................................... 62The background task manager 4.2.8
......................................................................................................................................................... 63Capturing video to Library 4.2.9
................................................................................................................................... 644.3 The next steps
665 Live capture & instant replay during training
................................................................................................................................... 665.1 Preparing InTheAction for use
......................................................................................................................................................... 66Selecting capture device 5.1.1
......................................................................................................................................................... 67Using more than one camera 5.1.2
......................................................................................................................................................... 68Defining recording folder 5.1.3
......................................................................................................................................................... 68Defining clip properties 5.1.4
......................................................................................................................................................... 68Defining pre-record & clip durations 5.1.5
......................................................................................................................................................... 70Defining a replay sequence 5.1.6
......................................................................................................................................................... 70About pre-record buffer 5.1.7
................................................................................................................................... 715.2 Instant visual feedback during training
......................................................................................................................................................... 71Capturing and replaying 5.2.1
......................................................................................................................................................... 72Controlling the replay 5.2.2
......................................................................................................................................................... 72Remote controlling InTheAction 5.2.3
......................................................................................................................................................... 73Using a sound trigger 5.2.4
................................................................................................................................... 745.3 Comparing clips during training
......................................................................................................................................................... 75Setting reference 5.3.1
......................................................................................................................................................... 75Working with comparison view 5.3.2
......................................................................................................................................................... 76Synchronizing clips in InTheAction 5.3.3
................................................................................................................................... 765.4 Using drawings in InTheAction
......................................................................................................................................................... 76Drawing Library 5.4.1
................................................................................................................................... 775.5 Self coaching with live delay
......................................................................................................................................................... 77Live delay settings 5.5.1
IIITable of contents
© Dartfish. All rights reserved.- Version 7 -
................................................................................................................................... 775.6 Next steps
806 Unique ways to view sport - SimulCam &
StroMotion
................................................................................................................................... 806.1 Compare with SimulCam
......................................................................................................................................................... 81Getting good SimulCam results 6.1.1
......................................................................................................................................................... 81Step 1 - clip selection and synchronization 6.1.2
.................................................................................................................................................. 82Loading video clips
.................................................................................................................................................. 82Synchronizing video clips
.................................................................................................................................................. 83Trimming the clips
......................................................................................................................................................... 83Step 2 - camera movement calculation 6.1.3
.................................................................................................................................................. 84Drag & zoom alignment method
.................................................................................................................................................. 85Checking alignment
.................................................................................................................................................. 86Matched alignment points method
.................................................................................................................................................. 87Adding new alignment frames
......................................................................................................................................................... 88Step 3 - blending, preview and saving 6.1.4
.................................................................................................................................................. 88Blending mode
.................................................................................................................................................. 88Previewing your clip
.................................................................................................................................................. 89Saving SimulCam results
......................................................................................................................................................... 89Publishing new video clips 6.1.5
.................................................................................................................................................. 89Choosing video settings
.................................................................................................................................................. 89Assigning file name, destination and categories
.................................................................................................................................................. 90Video creation
......................................................................................................................................................... 90Next steps 6.1.6
................................................................................................................................... 916.2 Dissect motion with StroMotion
......................................................................................................................................................... 92Step 1 - Load & trim the video clip 6.2.1
......................................................................................................................................................... 92Step 2 - Camera movement computation 6.2.2
......................................................................................................................................................... 94Step 3 - Panorama reconstruction 6.2.3
......................................................................................................................................................... 94Step 4 - Draw clones & save results 6.2.4
.................................................................................................................................................. 94Identifying key frames
.................................................................................................................................................. 94Drawing clone objects
.................................................................................................................................................. 96Publishing StroMotion
.................................................................................................................................................. 96Saving StroMotion
......................................................................................................................................................... 97Next steps 6.2.5
1007 Tagging Video
................................................................................................................................... 1017.1 What is Tagging?
................................................................................................................................... 1017.2 The Tagging Workspace
......................................................................................................................................................... 102The Library 7.2.1
......................................................................................................................................................... 103The Video Panel 7.2.2
......................................................................................................................................................... 104The Tagging Panel 7.2.3
......................................................................................................................................................... 105The Events List 7.2.4
................................................................................................................................... 1067.3 Creating Tagging panels
......................................................................................................................................................... 107Adding/deleting/moving/copying tools 7.3.1
......................................................................................................................................................... 108Modifying properties 7.3.2
......................................................................................................................................................... 109Planning a tagging panel 7.3.3
......................................................................................................................................................... 111Panel layout tools 7.3.4
......................................................................................................................................................... 113Event creation buttons 7.3.5
......................................................................................................................................................... 114Keyword addition tools 7.3.6
......................................................................................................................................................... 116The Zone Tool 7.3.7
......................................................................................................................................................... 117Team Manager tool 7.3.8
......................................................................................................................................................... 118Team Group Box and Player List Selector 7.3.9
......................................................................................................................................................... 120The Filename Template tool 7.3.10
Dartfish User GuideIV
© Dartfish. All rights reserved. - Version 7 -
......................................................................................................................................................... 120PTZ move button 7.3.11
......................................................................................................................................................... 120Properties list 7.3.12
......................................................................................................................................................... 123Automating tagging 7.3.13
......................................................................................................................................................... 124Using variable keywords 7.3.14
......................................................................................................................................................... 125Saving Tagging Panels 7.3.15
................................................................................................................................... 1267.4 Tagging video
......................................................................................................................................................... 126Using tagging panels 7.4.1
......................................................................................................................................................... 128Tag Video Clip mode 7.4.2
......................................................................................................................................................... 129Tag Live mode 7.4.3
......................................................................................................................................................... 130Using the Team Manager 7.4.4
......................................................................................................................................................... 130Using keyboard shortcuts 7.4.5
......................................................................................................................................................... 131Manual tagging 7.4.6
................................................................................................................................... 1317.5 Importing events
......................................................................................................................................................... 133Importing events using add-ins 7.5.1
......................................................................................................................................................... 135Synchronizing imported events 7.5.2
......................................................................................................................................................... 136Quick Import 7.5.3
................................................................................................................................... 1377.6 Review & edit events
......................................................................................................................................................... 137Selecting events from the Events List 7.6.1
......................................................................................................................................................... 137Editing the event 7.6.2
......................................................................................................................................................... 138Editing event timings 7.6.3
......................................................................................................................................................... 139Hiding unused categories 7.6.4
......................................................................................................................................................... 139Reviewing events and video during live tagging 7.6.5
................................................................................................................................... 1407.7 Filtering and viewing statistics
......................................................................................................................................................... 141The table search 7.7.1
......................................................................................................................................................... 141Undo searches 7.7.2
................................................................................................................................... 1417.8 Producing & sharing tagging resources
......................................................................................................................................................... 142Sharing game video 7.8.1
......................................................................................................................................................... 144Publishing events 7.8.2
......................................................................................................................................................... 147Adding notes to events 7.8.3
......................................................................................................................................................... 147Storyboard 7.8.4
......................................................................................................................................................... 147Exporting events 7.8.5
1508 Displaying metadata from external devices
................................................................................................................................... 1508.1 Support for metadata in Dartfish Software
................................................................................................................................... 1518.2 Setting Advanced Options
......................................................................................................................................................... 151Analyzer Advanced Options 8.2.1
......................................................................................................................................................... 152InTheAction Advanced Options 8.2.2
......................................................................................................................................................... 152Section summary 8.2.3
................................................................................................................................... 1528.3 Capturing & displaying Metadata with the InTheAction
......................................................................................................................................................... 153Checking that Metadata is received 8.3.1
......................................................................................................................................................... 154Displaying Metadata in Live Mode 8.3.2
......................................................................................................................................................... 156Section summary 8.3.3
................................................................................................................................... 1568.4 Using Metadata in the Analyzer
......................................................................................................................................................... 156Displaying Metadata diagrams 8.4.1
......................................................................................................................................................... 158Displaying Metadata on the Video 8.4.2
................................................................................................................................... 1588.5 Using the Drawing Library
......................................................................................................................................................... 159Managing Overlay Templates 8.5.1
......................................................................................................................................................... 160Selecting the current Template 8.5.2
1629 Dartfish Readers
................................................................................................................................... 1639.1 Linking CSV Data
......................................................................................................................................................... 165CSV document properties 9.1.1
VTable of contents
© Dartfish. All rights reserved.- Version 7 -
......................................................................................................................................................... 166Time Stamp 9.1.2
......................................................................................................................................................... 167Selecting columns as Data Streams 9.1.3
................................................................................................................................... 1689.2 Linking SRM Data
................................................................................................................................... 1699.3 Managing links
................................................................................................................................... 1709.4 Viewing data
......................................................................................................................................................... 171Synchronization 9.4.1
......................................................................................................................................................... 171Drawings 9.4.2
................................................................................................................................... 1739.5 Sharing linked data
......................................................................................................................................................... 173Publishing video 9.5.1
......................................................................................................................................................... 173Sharing data 9.5.2

Chapter
I
Introduction
2 Dartfish User Guide
© Dartfish. All rights reserved. - Version 7 -
1 IntroductionDartfish software provides advanced video tools to enhance your training programs and improveathletic performance. The system works both during workout and afterward when time allowsfor a more in-depth analysis of a performance.
During the workout
Using Dartfish InTheAction*, you will be able to provide instant visual feedback to your athletes.This feedback will supplement your personal coaching and allow you to maximize the benefits ofusing the muscle memory (proprioceptive) of your athletes and students. Thanks to a widevariety of customizable play modes, the use of video can be fully integrated into your usualactivities with athletes on the field.
After the workout
Dartfish software's set of video analysis features allow you to create new perspectives andinnovative views of your athletes' performances:
You are able to compare and view performances as never before to highlight areas needingimprovement.
You can annotate video with text and drawings to aid and communicate analysis
Dartfish's video management system helps you manage all your training videos with ease andefficiency.
Share your analysis
You can share your analysis with anyone, anywhere to continue the communication and learningexperience. You can send video clips via e-mail, create enhanced CD/DVDs or even publishinteractive analysis on the Internet.
Make sense of competition footage
Tagging* is Dartfish's notational analysis tool. Use it to create a descriptive index of the keyevents in a game or other long video. Tagging has tools to turn your index into a focussed teamfeedback presentation and also display frequency statistics of each event. Tags are created byclicking a set of fully customizable buttons, or by import from your sports own statistical tools,or even from the Dartfish Easytag app for iPhone or iPad, available from the Apple App Store.
Display data on video
For those working quantitatively, measurements of time, distance and angle can be made onvideo and recorded in a Data Table. The Data Table can even record changes in measurement orchanges in position of tracked* objects.
Using the Data Reader add-ons*, you can import data from any device or software that cancreate a CSV (character separated value) file and relate the output to what the video shows.
Dartfish is also capable of simultaneously recording video and data using InTheAction* . Thisallows data to be displayed or graphed on video immediately after capture. Dartfish hasdeveloped links to several force platforms but also makes its SDK (software developer kit)available to you to develop your own links.
Use Dartfish special effects for unique analysis opportunities
Strom otion* and Sim ulcam* are tools used by sports broadcasters world-wide to analyze andexplain movement to their audience. Users of Dartfish can also benefit from these tools. Simulcam is the only way to get a realistic comparison of video when the camcorder is panning.Stromotion and ball tails* give an understanding of how performers and objects move from oneposition to another.
*Asterisked features are not available in all Dartfish editions
3Introduction
© Dartfish. All rights reserved.- Version 7 -
1.1 Support and help to use your software
This manual provides help to learn the range of Dartfish software features but it isn't the onlysource of help available to you.
Start with the video demonstrations on the Start page, which guide you through getting startedwith the basic features. Then, increase your understanding by reading these help chapters orusing the more comprehensive video based tutorials available online.
The Dartfish Customer Care Portal
In addition to this help, a wide range of support is available to you and the easiest way to accessall of this is by following the links on the Start Page of your Dartfish software. This is yourgateway to:
T raining Resources: Learn at your own pace with tutorials, comprehensive guides, instructor-ledonline seminars or arrange tailored training courses.
Technical Support: Search the Dartfish knowledge base and find answers to your questions orcontact our experienced team directly.
Download Section: Get your products, updates, drivers and release notes online.
Product Inform ation: Get an overview of your previously registered products, retrieve yourlicense key at any time or register another product.
An alternative way to access the Customer Care Portal is to use your Browser to takeyou to http://support.dartfish.com
Registering your software
Your first step in getting support is to register your software because the possibilities available toyou vary according to the support package supplied with your software. In the case where youhave multiple users of the same software, each user can register and create their own loginbecause the support package is linked to the software and not to its users.
Note that registering your software is not the same as providing the licence key duringinstallation or activating it after installation. Registration is the process that identifies you as auser of your software and it is highly recommended that all users should register in order tobenefit from Dartfish support.
Talk to us
Dartfish has evolved and developed thanks to a continuous dialogue with users, we look forwardto your comments and suggestions to help enhance future versions. Our continuing goal is tomake every software release better to fit the needs of our users.

Chapter
II
Getting familiar withDartfish
6 Dartfish User Guide
© Dartfish. All rights reserved. - Version 7 -
2 Getting familiar with DartfishWhether you are new to Dartfish or looking to improve your knowledge, this chapter is essentialreading. It covers all the basic information and skills that you will need in order to be able to useDartfish effectively.
You will become familiar with
The Dartfish workspace and the Start Page
Video playback
The basics of the Video Library
Saving projects and videos
Sharing video clips between Dartfish's different modules and with other athletes or coaches.
Remote controlling Dartfish software.
After "getting familiar with Dartfish" you will be well on your way to using the broad range ofanalysis, instructional and video sharing features that comprise this complete Sports coachingtool.
2.1 The Dartfish workspace
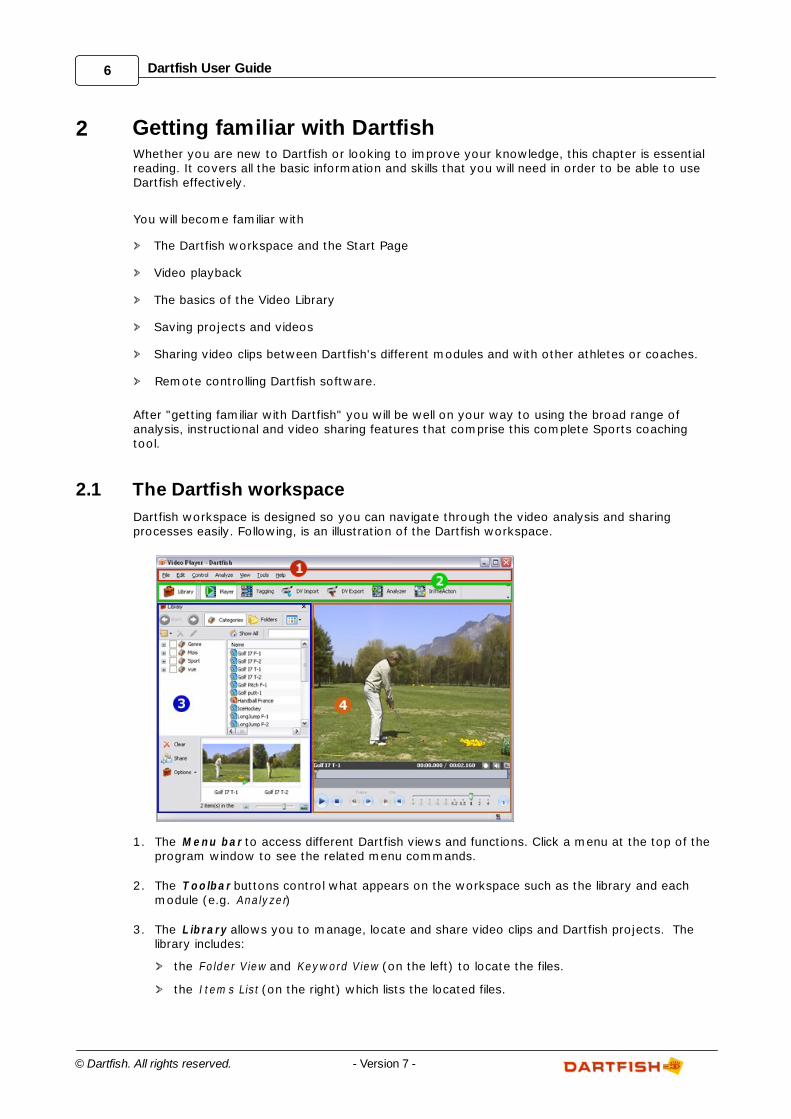
Dartfish workspace is designed so you can navigate through the video analysis and sharingprocesses easily. Following, is an illustration of the Dartfish workspace.
1. The Menu bar to access different Dartfish views and functions. Click a menu at the top of theprogram window to see the related menu commands.
2. The T oolbar buttons control what appears on the workspace such as the library and eachmodule (e.g. Analyzer)
3. The L ibrary allows you to manage, locate and share video clips and Dartfish projects. Thelibrary includes:
the Folder View and Keyword View (on the left) to locate the files.
the Item s List (on the right) which lists the located files.
7Getting familiar with Dartfish
© Dartfish. All rights reserved.- Version 7 -
the T ray (at the bottom) is a working area for storing video clips that you want to work
with.
4. The Module window is to carry out your tasks such as video capture, replay, comparison anddrawings.
Context menus are also available throughout the program. Place the mouse pointer in thepane in which you want to work. Press the right mouse button, and select a command from themenu.
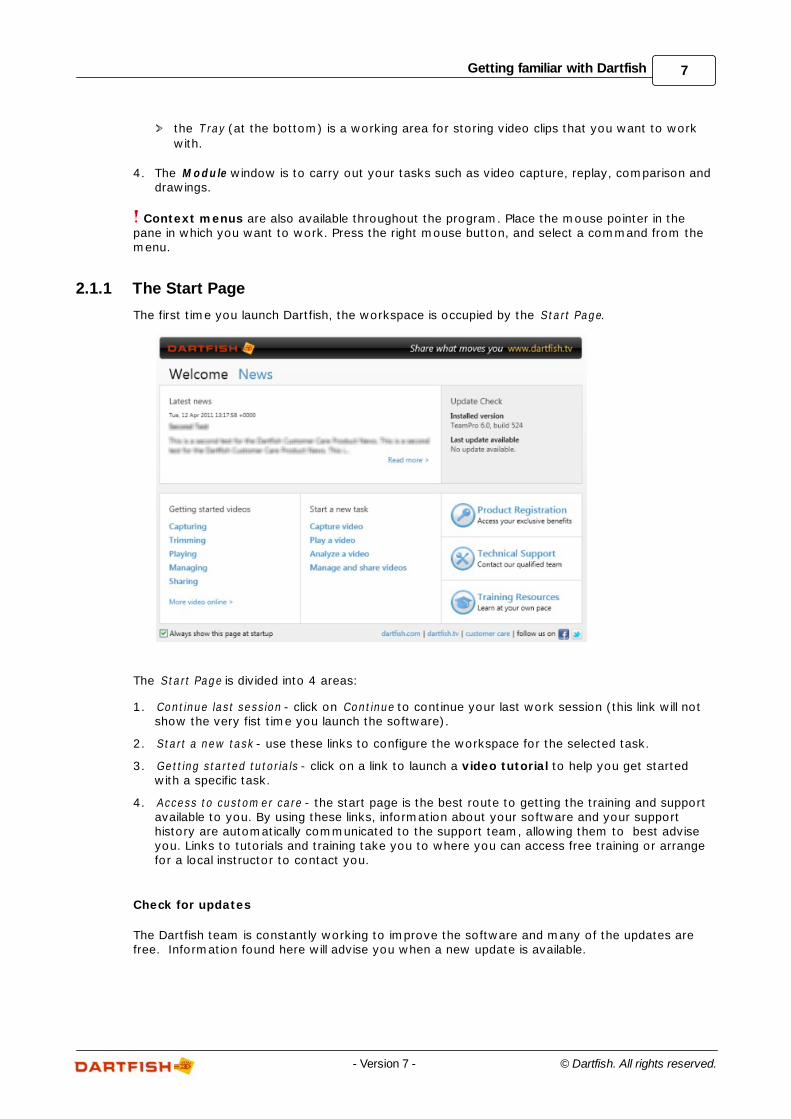
2.1.1 The Start Page
The first time you launch Dartfish, the workspace is occupied by the Start Page.
The Start Page is divided into 4 areas:
1. Continue last session - click on Continue to continue your last work session (this link will notshow the very fist time you launch the software).
2. Start a new task - use these links to configure the workspace for the selected task.
3. Getting started tutorials - click on a link to launch a video tutorial to help you get startedwith a specific task.
4. Access to custom er care - the start page is the best route to getting the training and supportavailable to you. By using these links, information about your software and your supporthistory are automatically communicated to the support team, allowing them to best adviseyou. Links to tutorials and training take you to where you can access free training or arrangefor a local instructor to contact you.
Check for updates
The Dartfish team is constantly working to improve the software and many of the updates arefree. Information found here will advise you when a new update is available.
8 Dartfish User Guide
© Dartfish. All rights reserved. - Version 7 -
Closing the Start Page
If you wish, you can disable the Start Page when you launch your Dartfish software by"unchecking" Always display the Start Page at startup which is at the bottom left hand side ofthe Start Page.
It is possible to re-start the Start Page at any time by selecting Tools > Start Page in the M enubar. The Start Page is closed by selecting any other Dartfish module from the Toolbar or Toolsm enu.
2.1.2 Displaying Dartfish Modules
Dartfish is composed of M odules - each with individual functions for analysis, instruction, sharingetc. A module is displayed in two ways:
1. by clicking the appropriate Toolbar button.
2. by selecting the module from the Tools menu in the M enu bar
You do not need to close a module to open a new one - clicking on a module buttonautomatically replaces the old one with your selection. Only the Library can be simultaneouslydisplayed next to a module.
The core modules are listed below. More modules can be available based on the Dartfishsoftware edition you purchased. Read the relevant help chapters to learn how to use them.
Im porter - import video files from a range of video devices and drives.
Player - playback and trimming of video clips
Analyzer - comparison of clips, drawing tools, key position analysis and publishing.
2.1.3 The Library
The Library allows you to locate, load, manage and share video clips. It is displayed and hiddenusing the Library button on Dartfish's toolbar.
F8 keyboard shortcut - closes/opens the library; it has the same function as clicking the librarybutton.
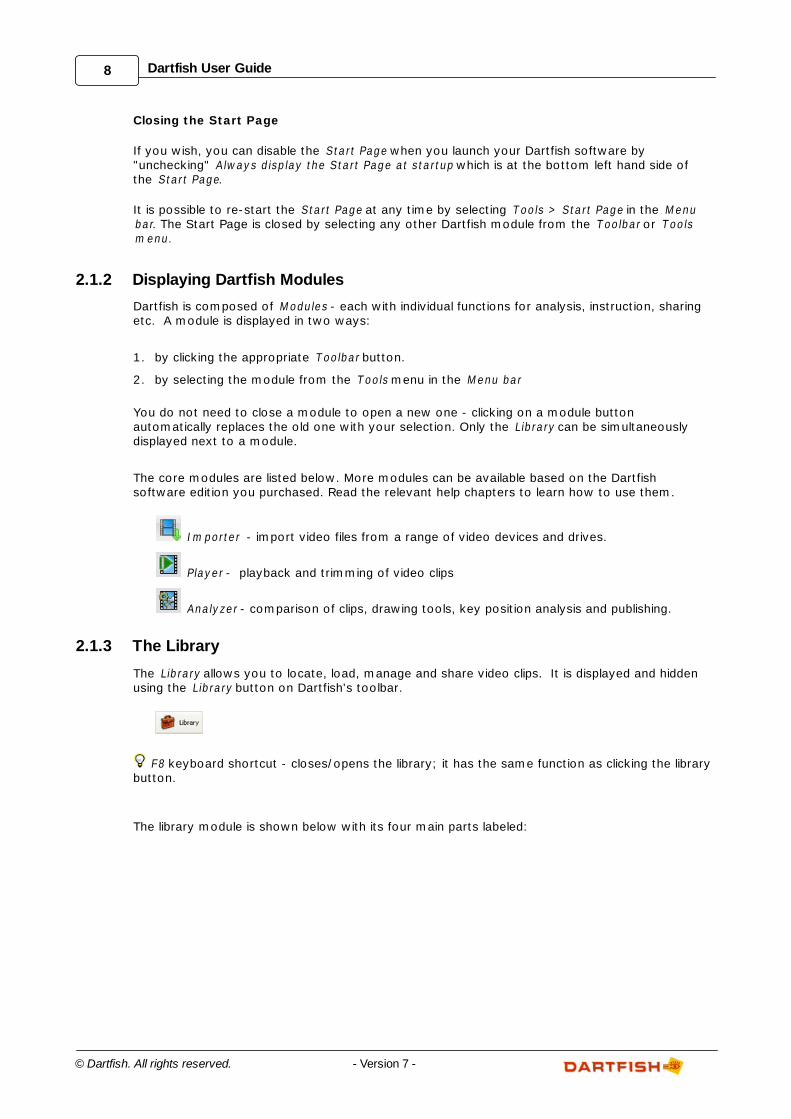
The library module is shown below with its four main parts labeled:
9Getting familiar with Dartfish
© Dartfish. All rights reserved.- Version 7 -
1. The Library Toolbar contains buttons used to control the appearance and content of theItem s List.
2. The Keywords View is used to locate video clips matching categories and values selected (seelink). When this area displays its Folders View, the content of selected windows folders will bedisplayed in the Item s List.
3. The Item s List is a list of video, image and project files that can be used by Dartfish.
4. The T ray is a working area for storing video clips that you want to work with. It is used toshare video clips between Dartfish modules and also share by email, CD ROM and Internet.
2.1.4 Resizing windows
You can resize windows in the workspace as follows:
1. Place your cursor near the boundary between two windows.
2. Once the cursor changes into a bar with two small arrows on either side, click and hold downthe left button of your mouse. Then you can move the cursor until the window is at yourdesired size.
The windows can be resized both vertically or horizontally.
When you close the software, the new layout is saved.
2.2 Video playback
The ability to control playback (play, pause, play frame-by-frame, modifying playback speed,etc.) is one of the simplest benefits of using video analysis software.
To visualize a video clip, first open it by:
10 Dartfish User Guide
© Dartfish. All rights reserved. - Version 7 -
Double clicking the corresponding file name in the Item s List of the Library OR
Drag & drop your chosen clip onto the video panel of the module.
2.2.1 The Timeline
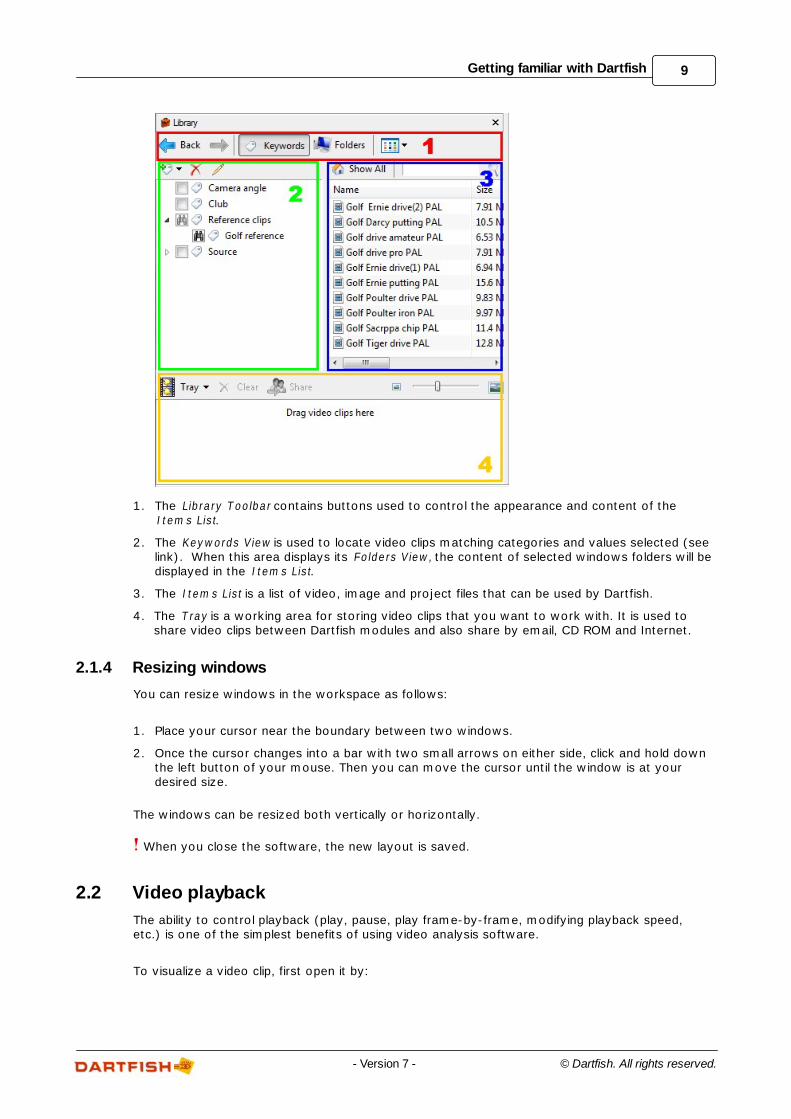
The T im eline is a visual representation of the video clip(s) currently loaded in a module.
The overall length of the video clip is represented by the bar along the bottom of the T im eline.The part of the clip that will actually play is represented by the pale blue area between the cue in
point ( ) and the cue out point ( ). The current playing position (the Playhead) is marked by
. The image displayed in a module screen corresponds to the playhead's current position.
2.2.2 Trimming video clips
Trimming video clips, that is setting new cue in/out points, is often necessary. Perhaps becauseunnecessary footage has been captured at the start or end of the clip. Perhaps because you cananalyze or coach more effectively if the clip is shortened to show only specific actions.
Setting cue in/out points
1. Point the mouse at the cue in/out marker ( / ).
2. Click and drag to the chosen start/end point. The video display will show the selected start/end frame as you drag.
3. Release the mouse button.
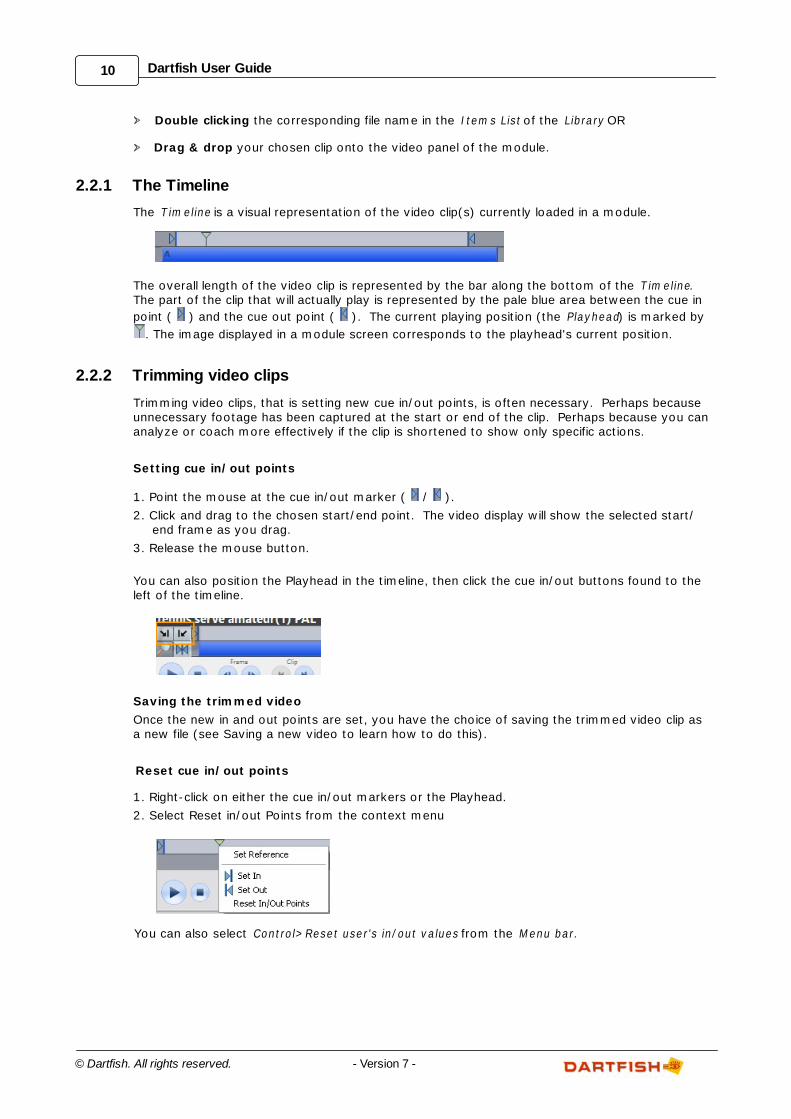
You can also position the Playhead in the timeline, then click the cue in/out buttons found to theleft of the timeline.
Saving the trimmed video
Once the new in and out points are set, you have the choice of saving the trimmed video clip asa new file (see Saving a new video to learn how to do this).
Reset cue in/out points
1. Right-click on either the cue in/out markers or the Playhead.
2. Select Reset in/out Points from the context menu
You can also select Control>Reset user's in/out values from the M enu bar.
11Getting familiar with Dartfish
© Dartfish. All rights reserved.- Version 7 -
2.2.3 Video panel controls
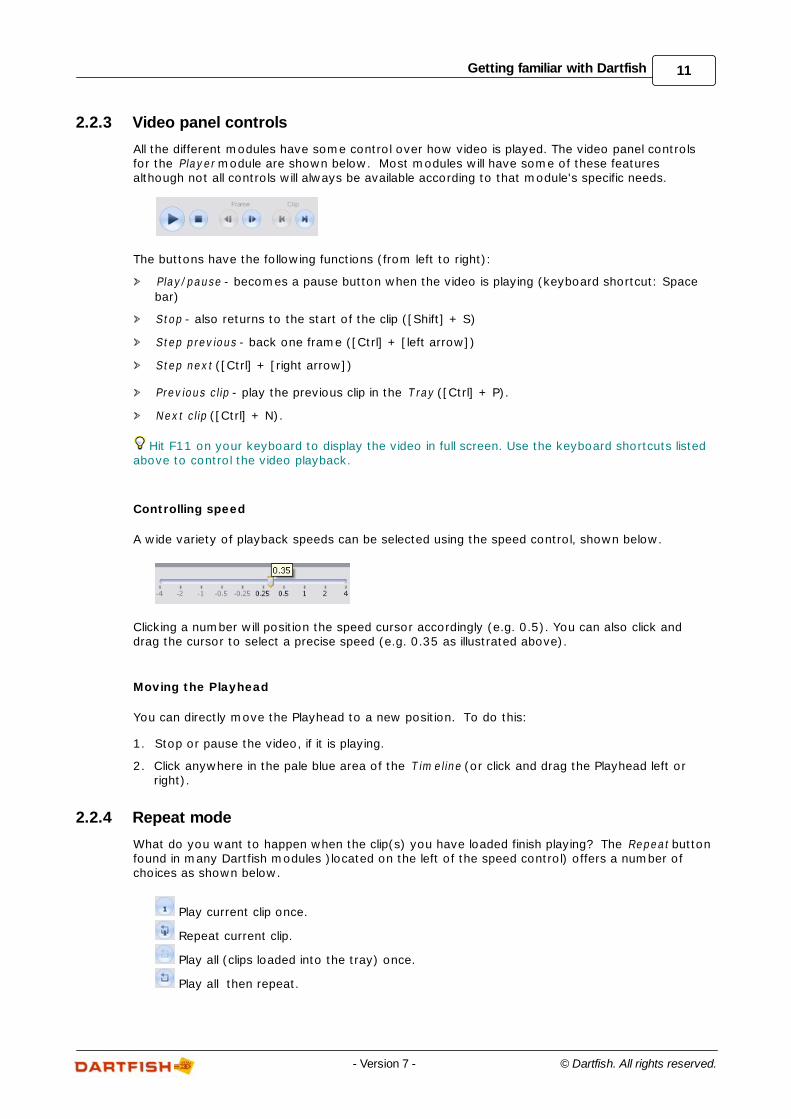
All the different modules have some control over how video is played. The video panel controlsfor the Player module are shown below. Most modules will have some of these featuresalthough not all controls will always be available according to that module's specific needs.
The buttons have the following functions (from left to right):
Play/pause - becomes a pause button when the video is playing (keyboard shortcut: Space
bar)
Stop - also returns to the start of the clip ([Shift] + S)
Step previous - back one frame ([Ctrl] + [left arrow])
Step next ([Ctrl] + [right arrow])
Previous clip - play the previous clip in the T ray ([Ctrl] + P).
Next clip ([Ctrl] + N).
Hit F11 on your keyboard to display the video in full screen. Use the keyboard shortcuts listedabove to control the video playback.
Controlling speed
A wide variety of playback speeds can be selected using the speed control, shown below.
Clicking a number will position the speed cursor accordingly (e.g. 0.5). You can also click anddrag the cursor to select a precise speed (e.g. 0.35 as illustrated above).
Moving the Playhead
You can directly move the Playhead to a new position. To do this:
1. Stop or pause the video, if it is playing.
2. Click anywhere in the pale blue area of the T im eline (or click and drag the Playhead left orright).
2.2.4 Repeat mode
What do you want to happen when the clip(s) you have loaded finish playing? The Repeat buttonfound in many Dartfish modules )located on the left of the speed control) offers a number ofchoices as shown below.
Play current clip once.
Repeat current clip.
Play all (clips loaded into the tray) once.
Play all then repeat.
12 Dartfish User Guide
© Dartfish. All rights reserved. - Version 7 -
To change the repeat mode
Click the repeat mode button. Each time it is clicked, the mode (and the button icon) willchange.
The tooltip (the yellow box which appears when you point your mouse at a button or control)shows both the mode that will be activated when the repeat mode button is clicked and thecurrent mode in parenthesis.
2.3 Saving projects and videos
When working with many Dartfish modules you will have the choice of saving a "project" orsaving the video file resulting from the project.
Saving a project
When you save a project you are saving all the information that relates to the creation of thatproject; the video files used, the settings chosen etc. Generally you will save projects if you wishto make changes to the project to get a better result or because you wish to base a new projecton the settings used previously.
It is important to note that projects do not actually include the video files used by the project.For example, saving a project using two 5Mb video clips will not end up in a project filesomewhere over 10Mb. It also means that if sharing projects with other Dartfish users, you willalso need to give them the video files used by that project.
Saving a video clip
When you save a video clip you are creating a new video file that can be used by other Dartfishmodules or shared with others - even those who do not have the Dartfish software will be ableto play back video clips on their own computers.
2.3.1 Saving a project
Select F ile>Save (or F ile>Save As...) from the M enu bar to save a project. The type of project(and project file icon) depends on the module currently in use when saving:
- Analyzer project
- SimulCam project
- StroMotion project
If a project is saved in a M onitored folder of your Library (see section Defining your library inthe Library chapter), it will be displayed in the Item s List.
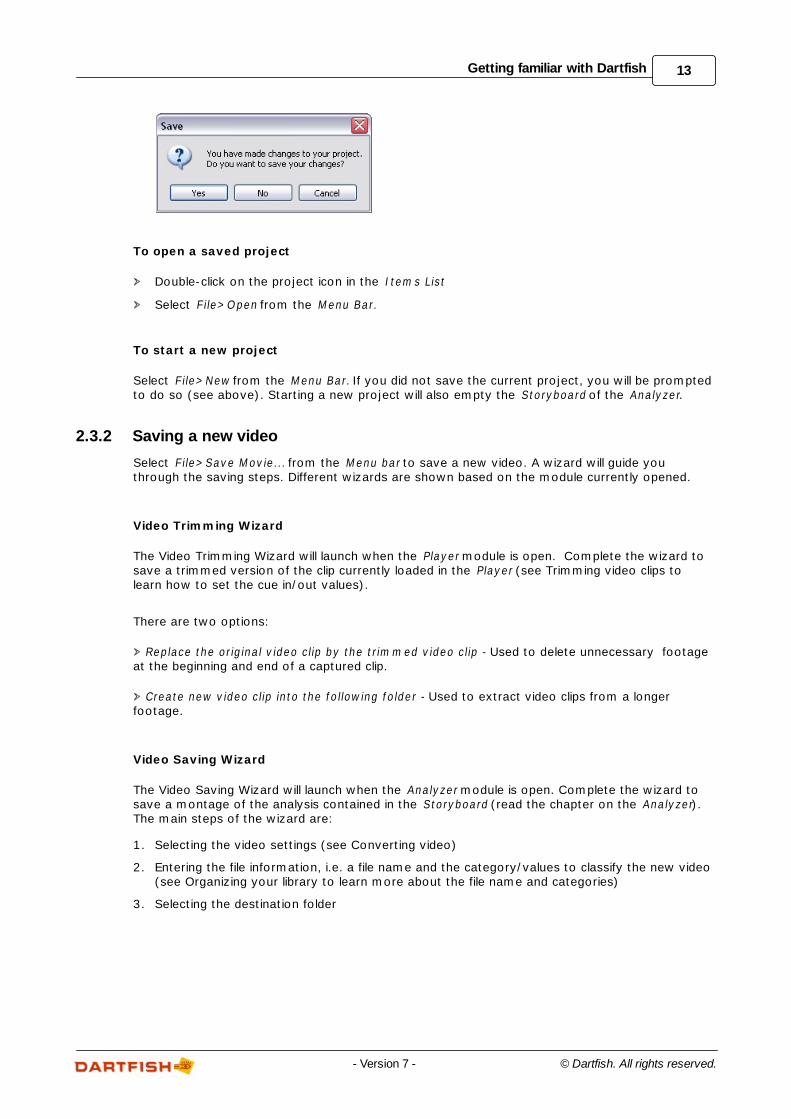
If you did not save a project when changing modules, you will be prompted to do so. SelectYes to save a project.
13Getting familiar with Dartfish
© Dartfish. All rights reserved.- Version 7 -
To open a saved project
Double-click on the project icon in the Item s List
Select F ile>Open from the M enu Bar.
To start a new project
Select F ile>New from the M enu Bar. If you did not save the current project, you will be promptedto do so (see above). Starting a new project will also empty the Storyboard of the Analyzer.
2.3.2 Saving a new video
Select F ile>Save M ovie... from the M enu bar to save a new video. A wizard will guide youthrough the saving steps. Different wizards are shown based on the module currently opened.
Video Trimming Wizard
The Video Trimming Wizard will launch when the Player module is open. Complete the wizard tosave a trimmed version of the clip currently loaded in the Player (see Trimming video clips tolearn how to set the cue in/out values).
There are two options:
Replace the original video clip by the trim m ed video clip - Used to delete unnecessary footageat the beginning and end of a captured clip.
Create new video clip into the following folder - Used to extract video clips from a longerfootage.
Video Saving Wizard
The Video Saving Wizard will launch when the Analyzer module is open. Complete the wizard tosave a montage of the analysis contained in the Storyboard (read the chapter on the Analyzer).The main steps of the wizard are:
1. Selecting the video settings (see Converting video)
2. Entering the file information, i.e. a file name and the category/values to classify the new video(see Organizing your library to learn more about the file name and categories)
3. Selecting the destination folder
14 Dartfish User Guide
© Dartfish. All rights reserved. - Version 7 -
2.4 Sharing video files
Dartfish offers many ways of sharing videos with athletes or other coaches. The Video SharingW izard guides you through the process of selecting and compressing video before exporting it tothe appropriate media. The choices of sharing destination are:
M y Com puter - copy your video to a folder, to an external drive or to a network server.
Em ail - the video clip is compressed and attached to an email in your default email program
(see note below).
Recordable CD or DVD - burn video to CD or data DVD directly from Dartfish.
Enhanced Recordable CD or DVD - creates a CD with an easy-to-use interface customized
with your branding and contact information.
Internet - send video to a FTP location.
Dartf ish TV - Dartfish's online media sharing platform.
The share by email option works for any MAPI email software such as MS Outlook or OutlookExpress. For other email software or web-based email like Hotmail you will have to attach videofiles through the software or website itself.
2.4.1 Video Sharing Wizard
Loading clips for sharing
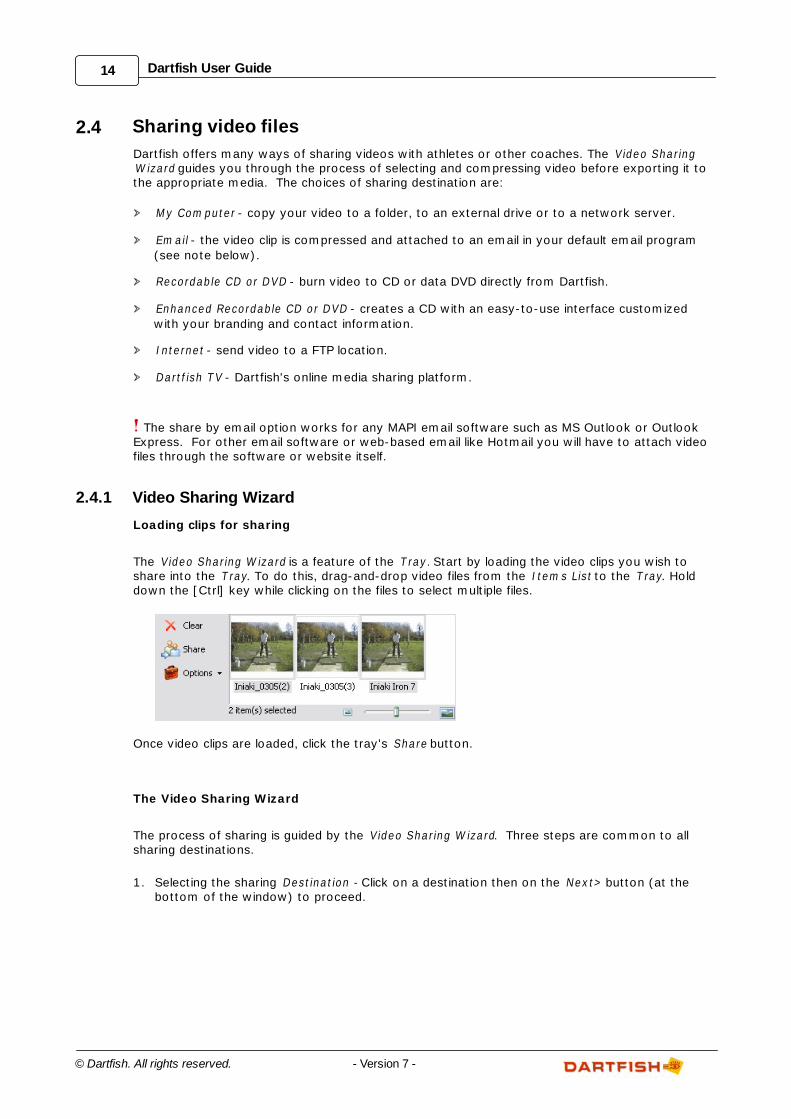
The Video Sharing W izard is a feature of the T ray. Start by loading the video clips you wish toshare into the T ray. To do this, drag-and-drop video files from the Item s List to the T ray. Holddown the [Ctrl] key while clicking on the files to select multiple files.
Once video clips are loaded, click the tray's Share button.
The Video Sharing Wizard
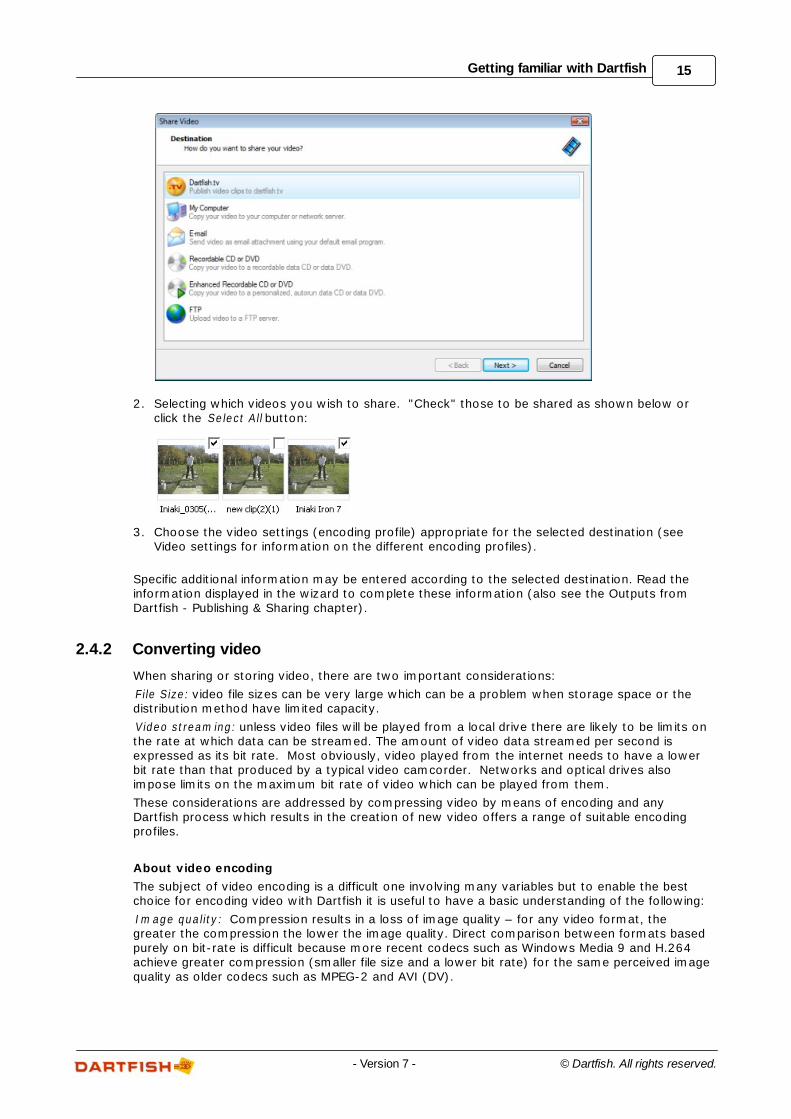
The process of sharing is guided by the Video Sharing W izard. Three steps are common to allsharing destinations.
1. Selecting the sharing Destination - Click on a destination then on the Next> button (at the
bottom of the window) to proceed.
15Getting familiar with Dartfish
© Dartfish. All rights reserved.- Version 7 -
2. Selecting which videos you wish to share. "Check" those to be shared as shown below orclick the Select All button:
3. Choose the video settings (encoding profile) appropriate for the selected destination (seeVideo settings for information on the different encoding profiles).
Specific additional information may be entered according to the selected destination. Read theinformation displayed in the wizard to complete these information (also see the Outputs fromDartfish - Publishing & Sharing chapter).
2.4.2 Converting video
When sharing or storing video, there are two important considerations:
F ile Size: video file sizes can be very large which can be a problem when storage space or thedistribution method have limited capacity.
Video stream ing: unless video files will be played from a local drive there are likely to be limits onthe rate at which data can be streamed. The amount of video data streamed per second isexpressed as its bit rate. Most obviously, video played from the internet needs to have a lowerbit rate than that produced by a typical video camcorder. Networks and optical drives alsoimpose limits on the maximum bit rate of video which can be played from them.
These considerations are addressed by compressing video by means of encoding and anyDartfish process which results in the creation of new video offers a range of suitable encodingprofiles.
About video encoding
The subject of video encoding is a difficult one involving many variables but to enable the bestchoice for encoding video with Dartfish it is useful to have a basic understanding of the following:
Im age quality: Compression results in a loss of image quality – for any video format, thegreater the compression the lower the image quality. Direct comparison between formats basedpurely on bit-rate is difficult because more recent codecs such as Windows Media 9 and H.264achieve greater compression (smaller file size and a lower bit rate) for the same perceived imagequality as older codecs such as MPEG-2 and AVI (DV).

16 Dartfish User Guide
© Dartfish. All rights reserved. - Version 7 -
HD versus SD: High definition (HD) video images appear sharper than standard definition (SD)because they have higher resolution (more pixels). When Dartfish encodes video it almostalways retains the resolution of the source video; so when an encoding profile name refers to HDor SD this is a reflection of the resulting bit-rate and perceived image quality and does notindicate a change in resolution.
Intended use: This, more than any other factor, will influence the encoding profile chosen. ForDartfish analysis one of the Windows Media profiles is generally the best choice but if the video isbeing created for playback on an iPhone or upload to Dartfish.tv, one of those specific profilesmight be used. If video is being created for use on the internet your web master may have apreferred video format.
Encoding versus re-encoding: Dartfish processes such as Save M ovie (Player), Convert, Shareand Publish Events (tagging) re-encode the source video using the selected profile. Changingthe video format can result in a loss of quality, although this won't be noticeable unless repeated. This is not an issue for Dartfish processes which create new video; Save M ovie (Analyzer),Sim ulcam /Strom otion, Analysis recorder.
Dartfish encoding profiles
A complete list of Dartfish encoding profiles, their bit rates and suggested use can be found in theOptions (Tools menu > Options > Encoding Prof iles). The different formats available aresummarized below
Form at Intended use
Windows Media Windows media encoding offers a good quality to compression ratioand is the preferred option for producing video from Dartfish whenthe output will be played on a computer's media player or in Dartfish.
Windows media video can also be used for internet but your websiteadministrator may prefer another format.
Windows Media forAnalysis Recorder
Highly compressed and reduced frame rate WMV used by theDartfish Analysis Recorder to encode video (Pro and TeamProeditions)
MPEG-2 MPEG-2 video is produced by many camcorders and is also theencoding used for DVDs.
These profiles will be the preferred encoding for users who wish tomaintain a library of MPEG-2 video or who produce DVDs.
To carry out analysis tasks Dartfish needs to create an index for eachMPEG-2 file. Encoding by Dartfish creates the index but if the file ismoved or shared with other Dartfish users the index needs torecreated, which delays access to the file. This may be a reason forsome users to avoid MPEG-2.
MPEG-4 (H.264) The MPEG-4 encoding profiles are used to produce H.264 encodedvideo for playback on mobile devices and YouTube.
AVI (DV) AVI (DV) is the video format created from camcorders using DV tape.AVI (DV) is an old format which is less compressed than WMV orMPEG and this encoding will be primarily used by tape camcorderusers who wish to maintain a library of DV video.
Dartfish.tv encodingprofiles
Contributors to Dartfish.tv can download the encoding profiles usedto produce video for their channel. Use of these profiles offers thepossibility to create video which is already encoded, thereby speedingup the publication process.
These profiles can be exported/imported to distribute within anorganization.
SWF (Flash) Flash encoding is only used by Dartfish to create video for AnalyzerMediabooks.
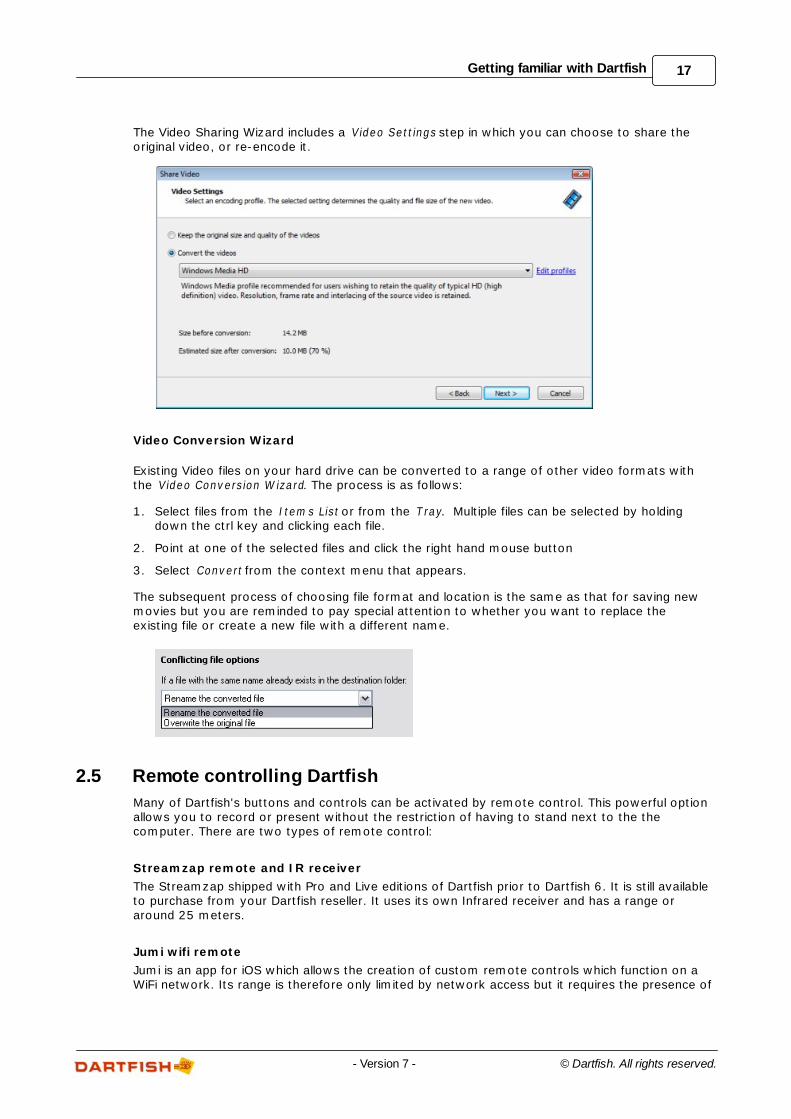
Video Settings in the Sharing Wizard
17Getting familiar with Dartfish
© Dartfish. All rights reserved.- Version 7 -
The Video Sharing Wizard includes a Video Settings step in which you can choose to share theoriginal video, or re-encode it.
Video Conversion Wizard
Existing Video files on your hard drive can be converted to a range of other video formats withthe Video Conversion W izard. The process is as follows:
1. Select files from the Item s List or from the T ray. Multiple files can be selected by holdingdown the ctrl key and clicking each file.
2. Point at one of the selected files and click the right hand mouse button
3. Select Convert from the context menu that appears.
The subsequent process of choosing file format and location is the same as that for saving newmovies but you are reminded to pay special attention to whether you want to replace theexisting file or create a new file with a different name.
2.5 Remote controlling Dartfish
Many of Dartfish's buttons and controls can be activated by remote control. This powerful optionallows you to record or present without the restriction of having to stand next to the thecomputer. There are two types of remote control:
Streamzap remote and IR receiver
The Streamzap shipped with Pro and Live editions of Dartfish prior to Dartfish 6. It is still availableto purchase from your Dartfish reseller. It uses its own Infrared receiver and has a range oraround 25 meters.
Jumi wifi remote
Jumi is an app for iOS which allows the creation of custom remote controls which function on aWiFi network. Its range is therefore only limited by network access but it requires the presence of
18 Dartfish User Guide
© Dartfish. All rights reserved. - Version 7 -
a WiFi network which allows the communicatoin between the app and the computer.
2.5.1 Streamzap remote control
To install the remote control drivers:
1. Run the Dartfish software installation program and wait for the list of options to be displayed.
2. Choose Drivers from the list of choices
3. Choose Stream zap rem ote. You are guided through the process of installing the receiver.
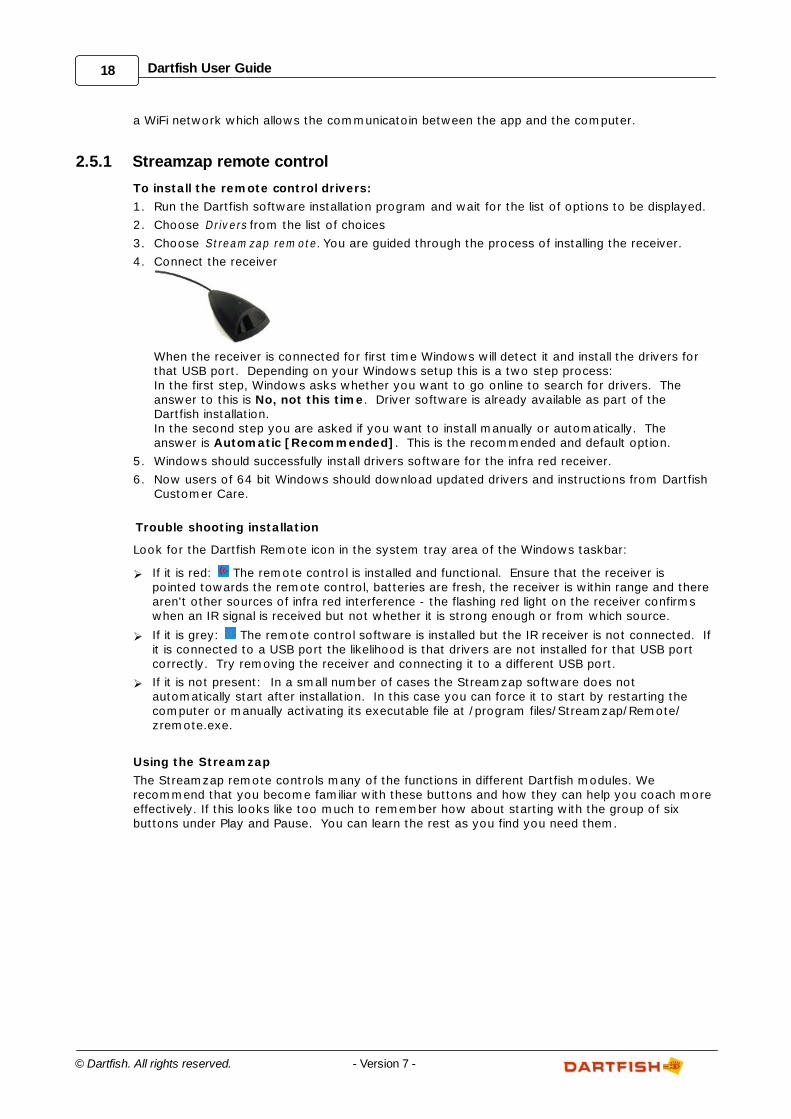
4. Connect the receiver
When the receiver is connected for first time Windows will detect it and install the drivers forthat USB port. Depending on your Windows setup this is a two step process: In the first step, Windows asks whether you want to go online to search for drivers. Theanswer to this is No, not this time. Driver software is already available as part of theDartfish installation.In the second step you are asked if you want to install manually or automatically. Theanswer is Automatic [Recommended]. This is the recommended and default option.
5. Windows should successfully install drivers software for the infra red receiver.
6. Now users of 64 bit Windows should download updated drivers and instructions from DartfishCustomer Care.
Trouble shooting installation
Look for the Dartfish Remote icon in the system tray area of the Windows taskbar:
If it is red: The remote control is installed and functional. Ensure that the receiver ispointed towards the remote control, batteries are fresh, the receiver is within range and therearen't other sources of infra red interference - the flashing red light on the receiver confirmswhen an IR signal is received but not whether it is strong enough or from which source.
If it is grey: The remote control software is installed but the IR receiver is not connected. Ifit is connected to a USB port the likelihood is that drivers are not installed for that USB portcorrectly. Try removing the receiver and connecting it to a different USB port.
If it is not present: In a small number of cases the Streamzap software does notautomatically start after installation. In this case you can force it to start by restarting thecomputer or manually activating its executable file at /program files/Streamzap/Remote/zremote.exe.
Using the Streamzap
The Streamzap remote controls many of the functions in different Dartfish modules. Werecommend that you become familiar with these buttons and how they can help you coach moreeffectively. If this looks like too much to remember how about starting with the group of sixbuttons under Play and Pause. You can learn the rest as you find you need them.
19Getting familiar with Dartfish
© Dartfish. All rights reserved.- Version 7 -
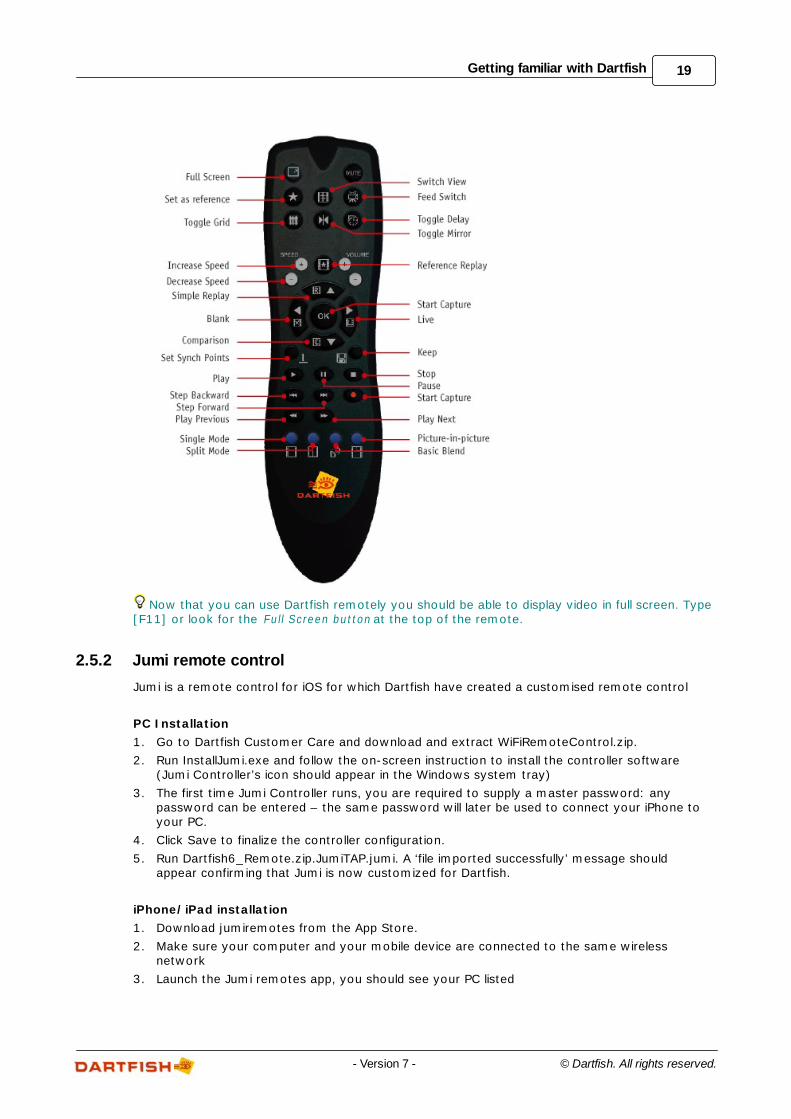
Now that you can use Dartfish remotely you should be able to display video in full screen. Type[F11] or look for the Full Screen button at the top of the remote.
2.5.2 Jumi remote control
Jumi is a remote control for iOS for which Dartfish have created a customised remote control
PC Installation
1. Go to Dartfish Customer Care and download and extract WiFiRemoteControl.zip.
2. Run InstallJumi.exe and follow the on-screen instruction to install the controller software(Jumi Controller’s icon should appear in the Windows system tray)
3. The first time Jumi Controller runs, you are required to supply a master password: anypassword can be entered – the same password will later be used to connect your iPhone toyour PC.
4. Click Save to finalize the controller configuration.
5. Run Dartfish6_Remote.zip.JumiTAP.jumi. A ‘file imported successfully’ message shouldappear confirming that Jumi is now customized for Dartfish.
iPhone/iPad installation
1. Download jumiremotes from the App Store.
2. Make sure your computer and your mobile device are connected to the same wirelessnetwork
3. Launch the Jumi remotes app, you should see your PC listed
20 Dartfish User Guide
© Dartfish. All rights reserved. - Version 7 -
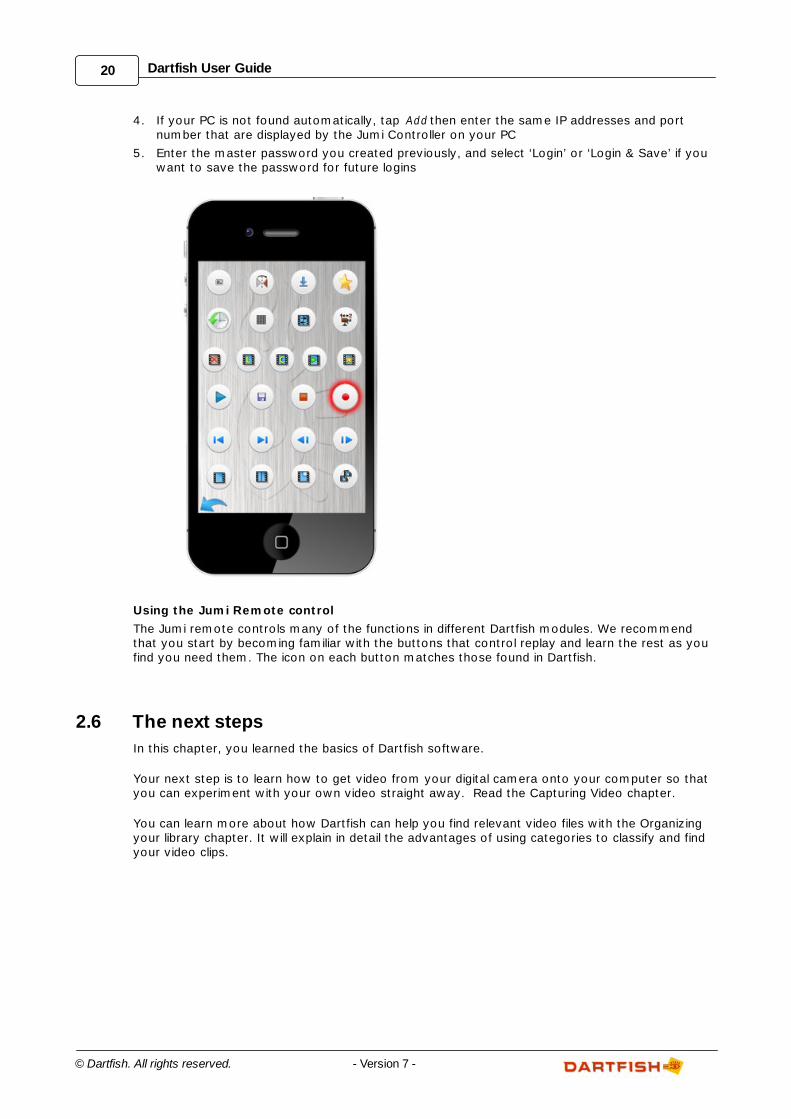
4. If your PC is not found automatically, tap Add then enter the same IP addresses and portnumber that are displayed by the Jumi Controller on your PC
5. Enter the master password you created previously, and select ‘Login’ or ‘Login & Save’ if youwant to save the password for future logins
Using the Jumi Remote control
The Jumi remote controls many of the functions in different Dartfish modules. We recommendthat you start by becoming familiar with the buttons that control replay and learn the rest as youfind you need them. The icon on each button matches those found in Dartfish.
2.6 The next steps
In this chapter, you learned the basics of Dartfish software.
Your next step is to learn how to get video from your digital camera onto your computer so thatyou can experiment with your own video straight away. Read the Capturing Video chapter.
You can learn more about how Dartfish can help you find relevant video files with the Organizingyour library chapter. It will explain in detail the advantages of using categories to classify and findyour video clips.

Chapter
III
Video Library
22 Dartfish User Guide
© Dartfish. All rights reserved. - Version 7 -
3 Video LibraryThe Video Library is a complete set of features used to locate and manage the files you wish toanalyze or share:
The video library is "built" from the Windows folders containing those files that are relevant
for use with Dartfish.
Because you are likely to analyze many video files, Dartfish helps you locate relevant content
using a flexible video content management system called Keywords which allow you todescribe the content of video clips more comprehensively than relying on organizing videointo different Windows folders.
Dartfish uses a Library module which offers rapid access to your content as well as a variety
of tools to help you locate relevant video files.
The Library module has a powerful sharing feature called the T ray. It provides a workspace
containing files which are being worked with. This not only makes them readily accessible foruse in Dartfish but also allows you to both archive on CD/DVD and share its content by avariety of media including email, Internet and CD ROM.
In this chapter you will learn how to:
Define your library. Learn how to include the content you wish to see in the Dartfish Library.
Organize your library using Dartfish's Keywords.
Locate video files using Dartfish's array of search tools.
Create Playlists from the contents of the library.
Share video files by email, CD/DVD or Internet.
Convert video clips
Correct video errors such as incorrect interlacing, aspect ratio or orientation.
3.1 Defining your library
The library is the collection of ALL the video files that you want to use with Dartfish. These filescan be stored on several folders on your hard drive.
To define the library you must tell Dartfish which folders to monitor. Only the video clips found inthese folders will show in the Library module. The default monitored folder is the windows Videosfolder
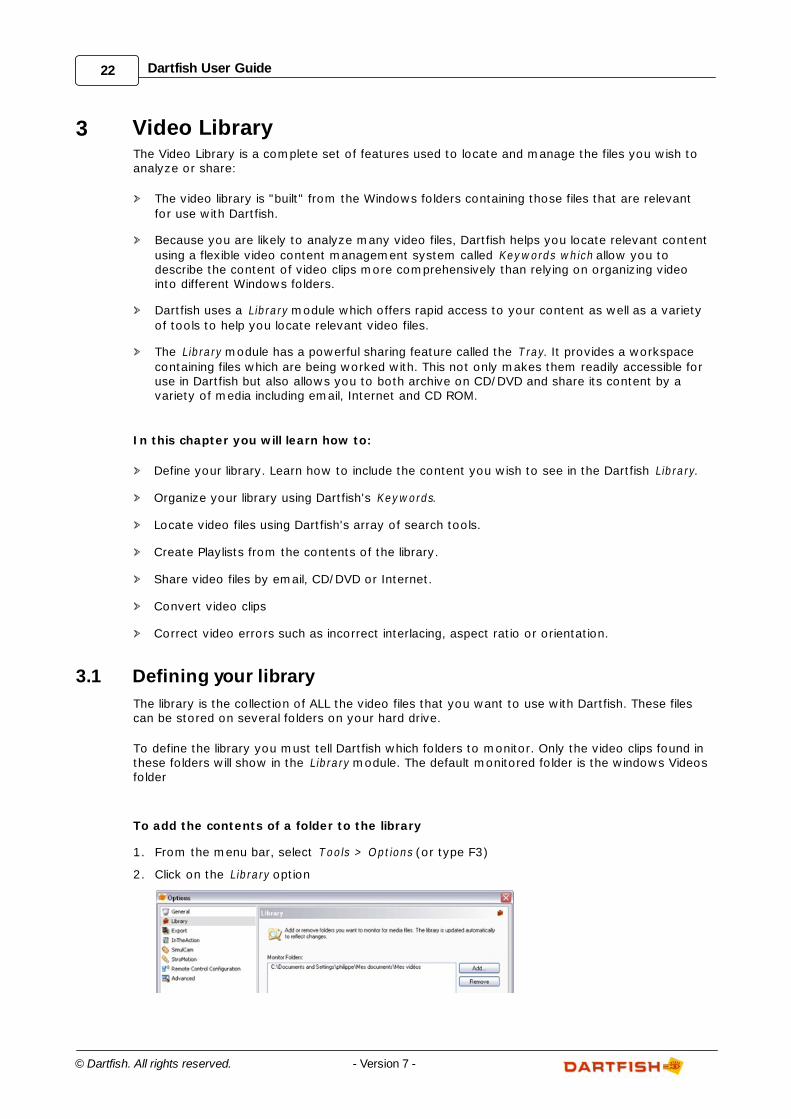
To add the contents of a folder to the library
1. From the menu bar, select Tools > Options (or type F3)
2. Click on the Library option
23Video Library
© Dartfish. All rights reserved.- Version 7 -
3. Click on the Add... button. A browser window will open.
4. Chose a folder and click on OK. The sub folders of this folder will also be included in the library.
5. Repeat steps 3 and 4 to add additional folders.
6. To remove a folder from the list, click the folder in the list and click on the Rem ove button.
3.2 The Library workspace
The Library module is your route to accessing the content of the library. It is displayed and hiddenusing the Library button on Dartfish's toolbar.
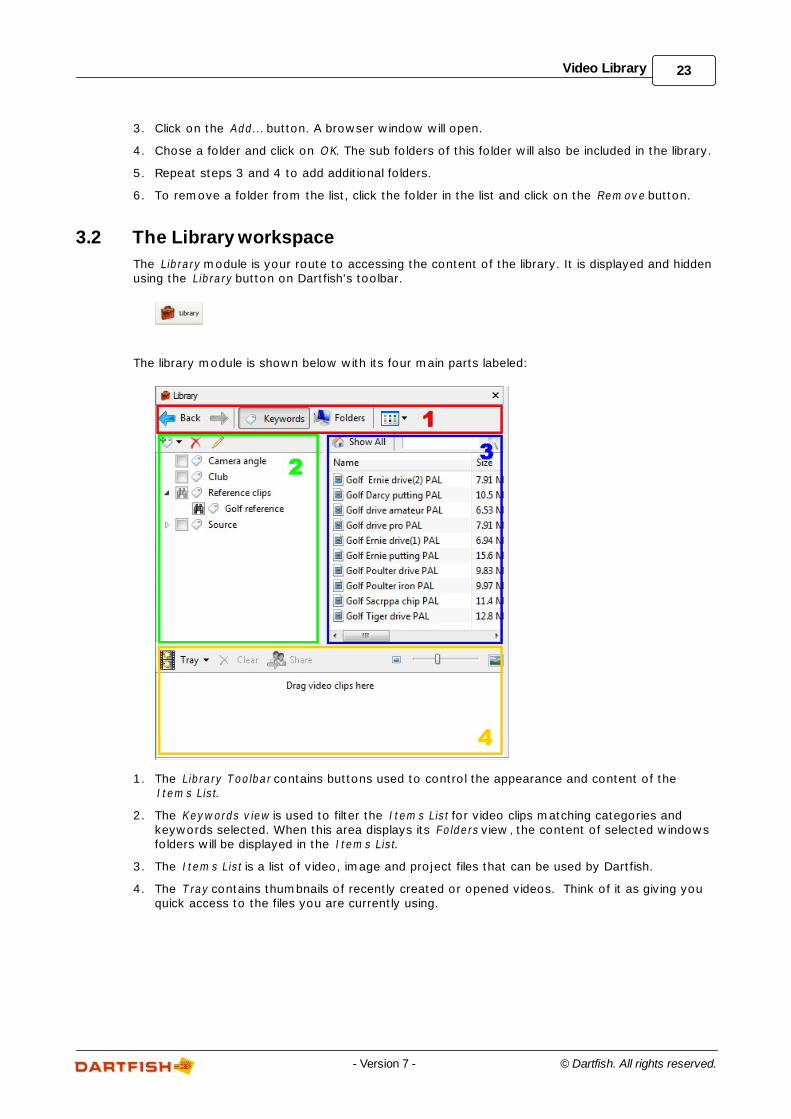
The library module is shown below with its four main parts labeled:
1. The Library Toolbar contains buttons used to control the appearance and content of theItem s List.
2. The Keywords view is used to filter the Item s List for video clips matching categories andkeywords selected. When this area displays its Folders view , the content of selected windowsfolders will be displayed in the Item s List.
3. The Item s List is a list of video, image and project files that can be used by Dartfish.
4. The T ray contains thumbnails of recently created or opened videos. Think of it as giving youquick access to the files you are currently using.
24 Dartfish User Guide
© Dartfish. All rights reserved. - Version 7 -
3.2.1 The Library Toolbar
The function of the Library Toolbar's buttons is to help you locate the items you wish to use fromthe Item s List. These buttons have the following functions:
Keywords button - to display a list of categories and values by which the Item s List can be
filtered. To learn more about doing this see the topic Locating video files.
Folders button - this displays a list of Windows folders. The Item s List will show the contentsof the folder selected from this list.
View Type button - to control how items are represented in the Item s List. Items can be
displayed in a simple list or showing details such as file size and category/values used. Thethumbnail views show an image of the first frame of video.
Back/forward navigation buttons - As different categories and folders are selected from the
Folders view or Categories view the Back and forward buttons become available to navigatebetween them.
3.2.2 The Items List
The Item s List is a list of items that Dartfish is able to use. This includes video clips, images andDartfish projects, each represented by its own icon examples of which are shown below:
- Video clips
- Picture files
- Analyzer projects
- SimulCam projects
- StroMotion projects
File management using the Item s L ist
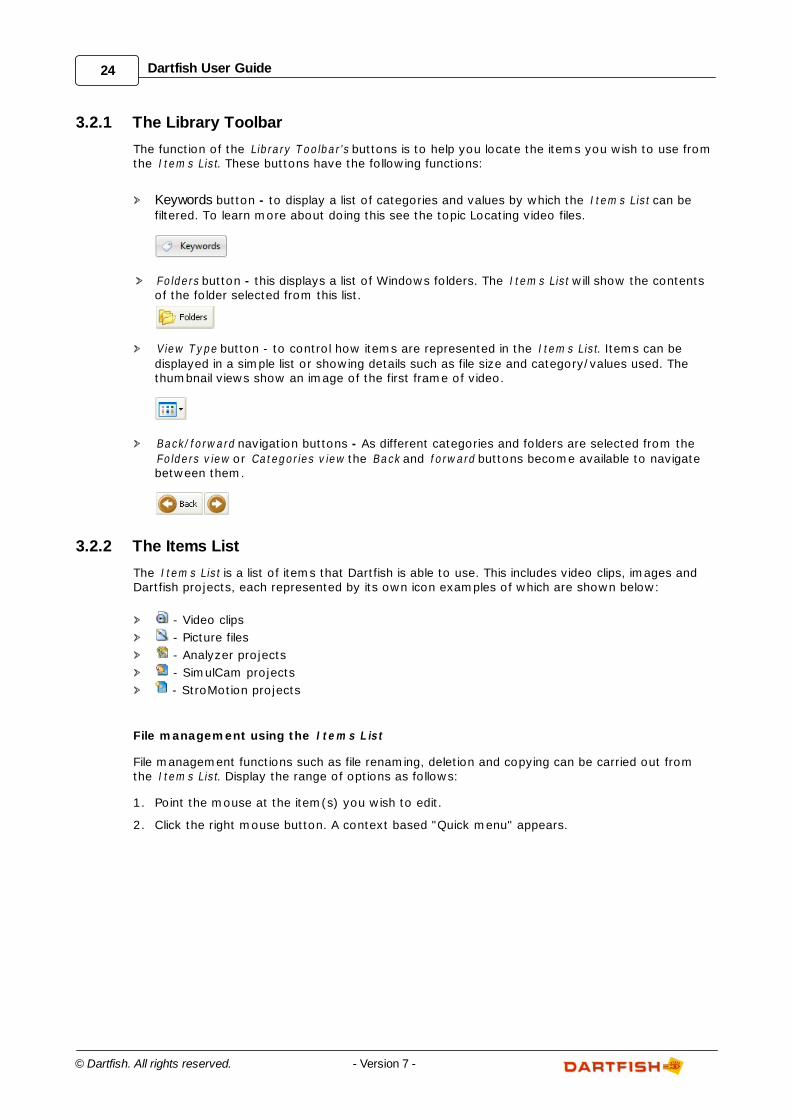
File management functions such as file renaming, deletion and copying can be carried out fromthe Item s List. Display the range of options as follows:
1. Point the mouse at the item(s) you wish to edit.
2. Click the right mouse button. A context based "Quick menu" appears.
25Video Library
© Dartfish. All rights reserved.- Version 7 -
3. Left click the function you wish to use.
The use of the Convert function is explained in the topic Converting video clips.
Opening video clips
There are three methods of opening a video file from the Item s List:
1. Point at the item and double click the mouse.
2. Drag and drop the item from the Item s List on to the video display. This method offers moreflexibility when there is more than one video display to choose from.
3. Drag and drop the item onto the T ray section of the Library module. From here it can beadded to the video display as needed.
Opening Projects
Projects must be opened using the relevant Dartfish module. Either the appropriate module isopened first or, if a project item is double clicked (method 1 above), the appropriate module willstart, closing the current module if necessary.
Opening Images
Image files can be opened by double clicking them however they will not be opened into Dartfish,instead the default image viewing software on your computer will be used.
3.2.3 Item Properties
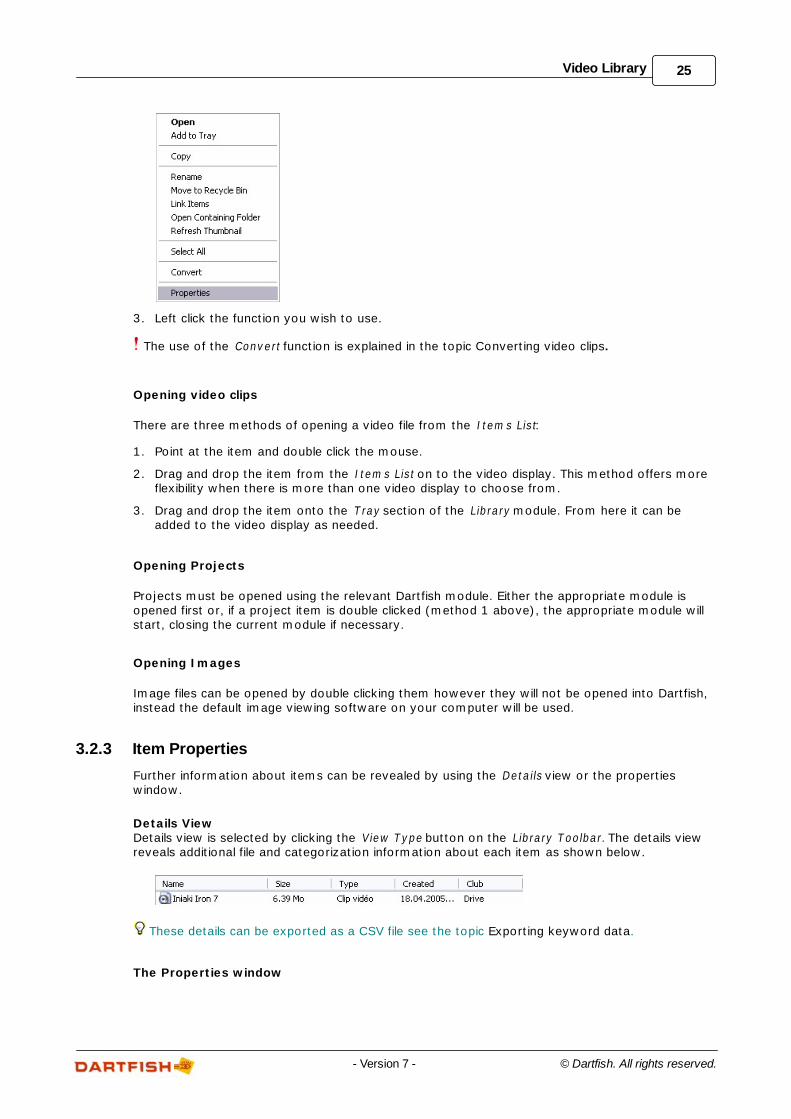
Further information about items can be revealed by using the Details view or the propertieswindow.
Details ViewDetails view is selected by clicking the View Type button on the Library Toolbar. The details viewreveals additional file and categorization information about each item as shown below.
These details can be exported as a CSV file see the topic Exporting keyword data.
The Properties window
26 Dartfish User Guide
© Dartfish. All rights reserved. - Version 7 -
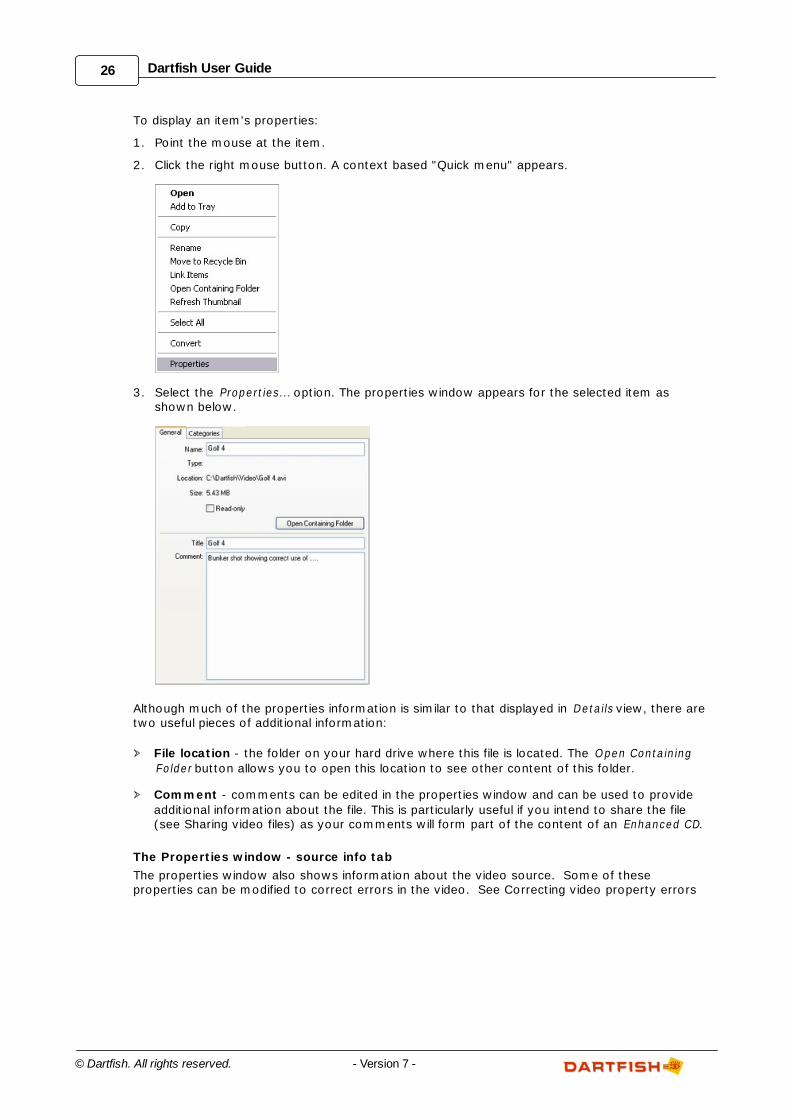
To display an item's properties:
1. Point the mouse at the item.
2. Click the right mouse button. A context based "Quick menu" appears.
3. Select the Properties... option. The properties window appears for the selected item asshown below.
Although much of the properties information is similar to that displayed in Details view, there aretwo useful pieces of additional information:
File location - the folder on your hard drive where this file is located. The Open Containing
Folder button allows you to open this location to see other content of this folder.
Comment - comments can be edited in the properties window and can be used to provide
additional information about the file. This is particularly useful if you intend to share the file(see Sharing video files) as your comments will form part of the content of an Enhanced CD.
The Properties window - source info tab
The properties window also shows information about the video source. Some of theseproperties can be modified to correct errors in the video. See Correcting video property errors
27Video Library
© Dartfish. All rights reserved.- Version 7 -
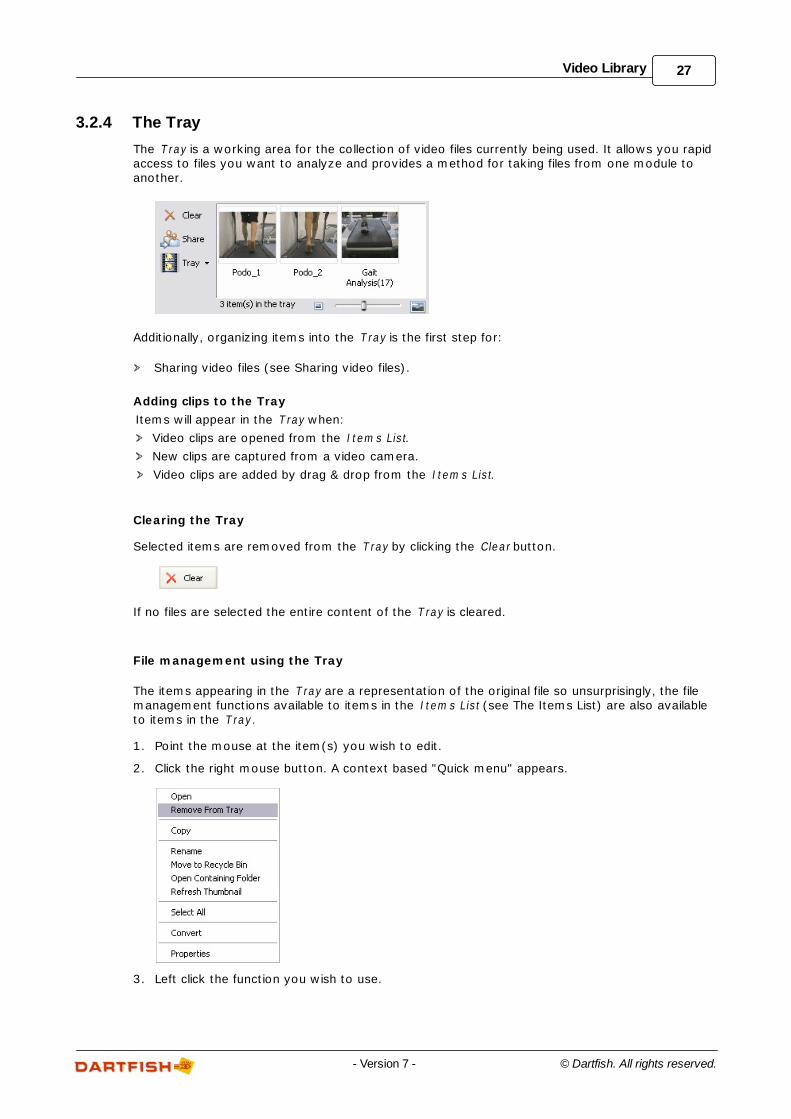
3.2.4 The Tray
The T ray is a working area for the collection of video files currently being used. It allows you rapidaccess to files you want to analyze and provides a method for taking files from one module toanother.
Additionally, organizing items into the T ray is the first step for:
Sharing video files (see Sharing video files).
Adding clips to the Tray
Items will appear in the T ray when:
Video clips are opened from the Item s List.
New clips are captured from a video camera.
Video clips are added by drag & drop from the Item s List.
Clearing the Tray
Selected items are removed from the T ray by clicking the Clear button.
If no files are selected the entire content of the T ray is cleared.
File management using the Tray
The items appearing in the T ray are a representation of the original file so unsurprisingly, the filemanagement functions available to items in the Item s List (see The Items List) are also availableto items in the T ray.
1. Point the mouse at the item(s) you wish to edit.
2. Click the right mouse button. A context based "Quick menu" appears.
3. Left click the function you wish to use.
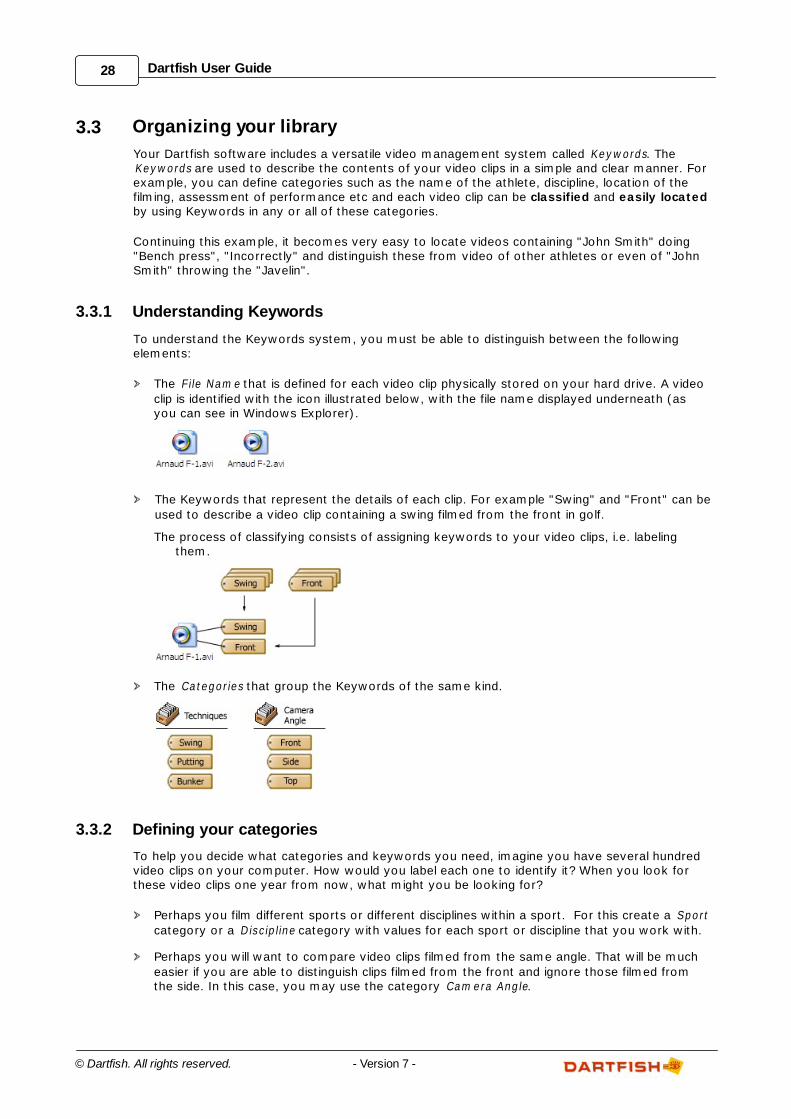
28 Dartfish User Guide
© Dartfish. All rights reserved. - Version 7 -
3.3 Organizing your library
Your Dartfish software includes a versatile video management system called Keywords. TheKeywords are used to describe the contents of your video clips in a simple and clear manner. Forexample, you can define categories such as the name of the athlete, discipline, location of thefilming, assessment of performance etc and each video clip can be classified and easily locatedby using Keywords in any or all of these categories.
Continuing this example, it becomes very easy to locate videos containing "John Smith" doing"Bench press", "Incorrectly" and distinguish these from video of other athletes or even of "JohnSmith" throwing the "Javelin".
3.3.1 Understanding Keywords
To understand the Keywords system, you must be able to distinguish between the followingelements:
The F ile Nam e that is defined for each video clip physically stored on your hard drive. A video
clip is identified with the icon illustrated below, with the file name displayed underneath (asyou can see in Windows Explorer).
The Keywords that represent the details of each clip. For example "Swing" and "Front" can be
used to describe a video clip containing a swing filmed from the front in golf.
The process of classifying consists of assigning keywords to your video clips, i.e. labelingthem.
The Categories that group the Keywords of the same kind.
3.3.2 Defining your categories
To help you decide what categories and keywords you need, imagine you have several hundredvideo clips on your computer. How would you label each one to identify it? When you look forthese video clips one year from now, what might you be looking for?
Perhaps you film different sports or different disciplines within a sport. For this create a Sport
category or a Discipline category with values for each sport or discipline that you work with.
Perhaps you will want to compare video clips filmed from the same angle. That will be much
easier if you are able to distinguish clips filmed from the front and ignore those filmed fromthe side. In this case, you may use the category Cam era Angle.
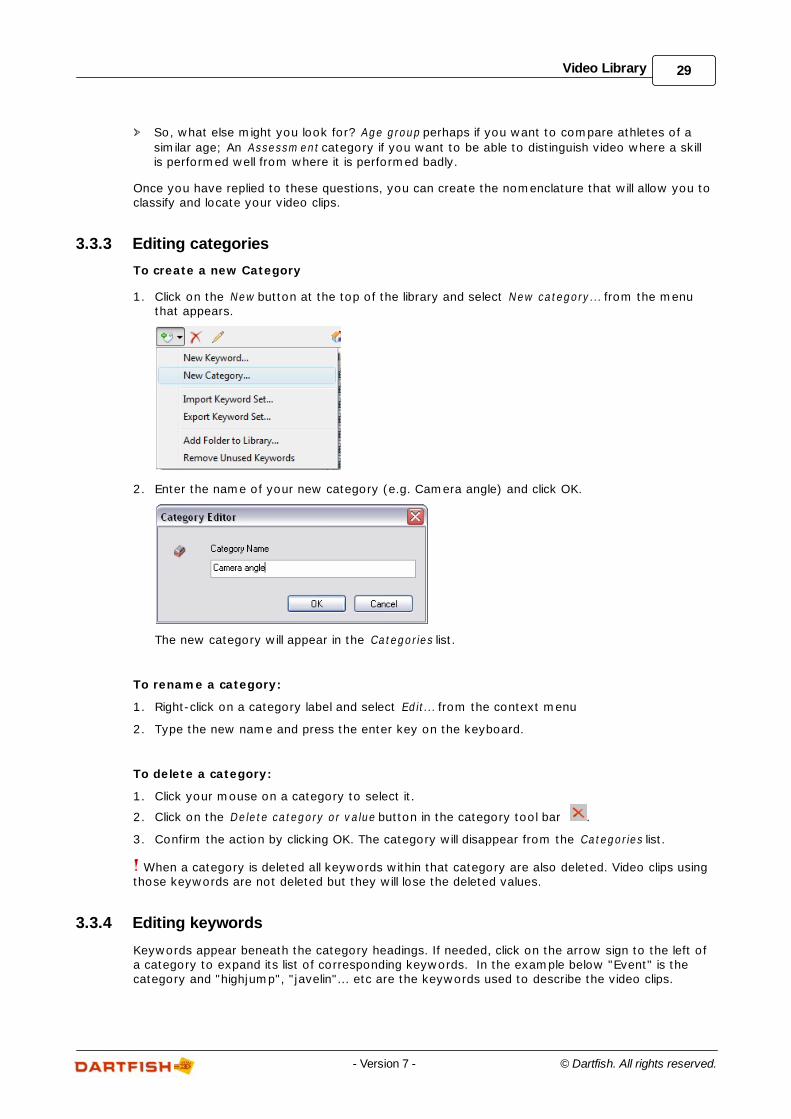
29Video Library
© Dartfish. All rights reserved.- Version 7 -
So, what else might you look for? Age group perhaps if you want to compare athletes of a
similar age; An Assessm ent category if you want to be able to distinguish video where a skillis performed well from where it is performed badly.
Once you have replied to these questions, you can create the nomenclature that will allow you toclassify and locate your video clips.
3.3.3 Editing categories
To create a new Category
1. Click on the New button at the top of the library and select New category... from the menuthat appears.
2. Enter the name of your new category (e.g. Camera angle) and click OK.
The new category will appear in the Categories list.
To rename a category:
1. Right-click on a category label and select Edit... from the context menu
2. Type the new name and press the enter key on the keyboard.
To delete a category:
1. Click your mouse on a category to select it.
2. Click on the Delete category or value button in the category tool bar .
3. Confirm the action by clicking OK. The category will disappear from the Categories list.
When a category is deleted all keywords within that category are also deleted. Video clips usingthose keywords are not deleted but they will lose the deleted values.
3.3.4 Editing keywords
Keywords appear beneath the category headings. If needed, click on the arrow sign to the left ofa category to expand its list of corresponding keywords. In the example below "Event" is thecategory and "highjump", "javelin"... etc are the keywords used to describe the video clips.
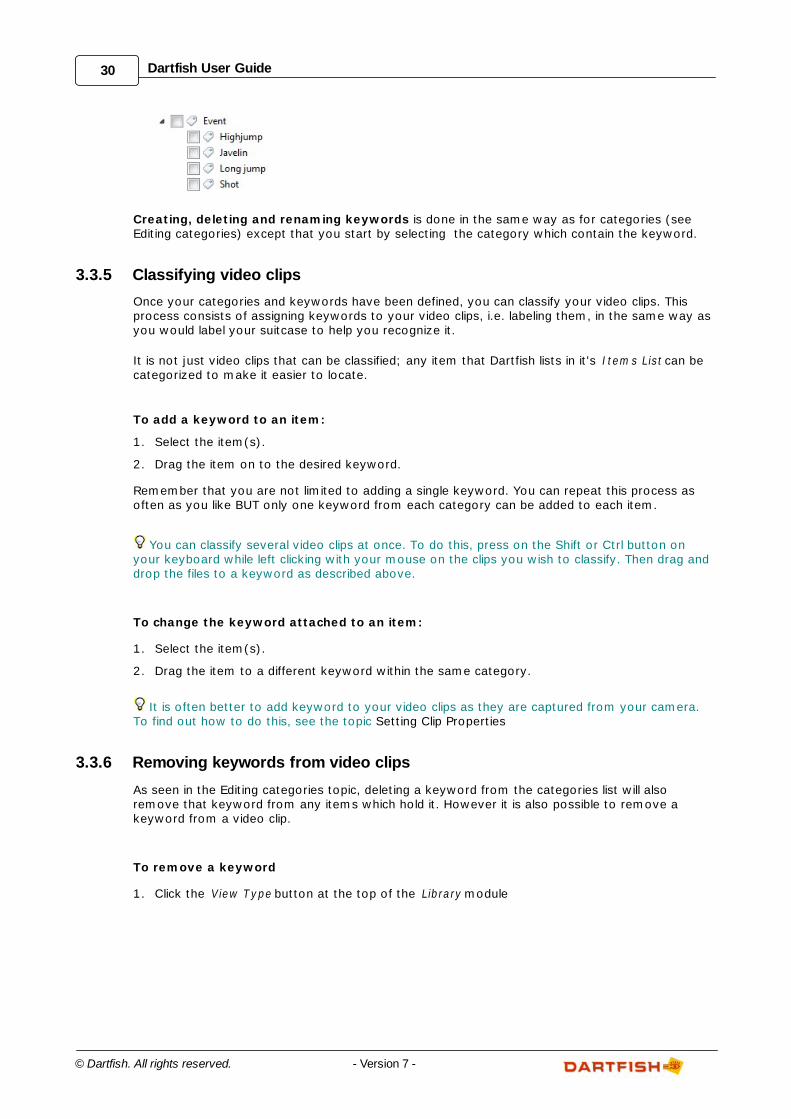
30 Dartfish User Guide
© Dartfish. All rights reserved. - Version 7 -
Creating, deleting and renaming keywords is done in the same way as for categories (seeEditing categories) except that you start by selecting the category which contain the keyword.
3.3.5 Classifying video clips
Once your categories and keywords have been defined, you can classify your video clips. Thisprocess consists of assigning keywords to your video clips, i.e. labeling them, in the same way asyou would label your suitcase to help you recognize it.
It is not just video clips that can be classified; any item that Dartfish lists in it's I tem s List can becategorized to make it easier to locate.
To add a keyword to an item:
1. Select the item(s).
2. Drag the item on to the desired keyword.
Remember that you are not limited to adding a single keyword. You can repeat this process asoften as you like BUT only one keyword from each category can be added to each item.
You can classify several video clips at once. To do this, press on the Shift or Ctrl button onyour keyboard while left clicking with your mouse on the clips you wish to classify. Then drag anddrop the files to a keyword as described above.
To change the keyword attached to an item:
1. Select the item(s).
2. Drag the item to a different keyword within the same category.
It is often better to add keyword to your video clips as they are captured from your camera.To find out how to do this, see the topic Setting Clip Properties
3.3.6 Removing keywords from video clips
As seen in the Editing categories topic, deleting a keyword from the categories list will alsoremove that keyword from any items which hold it. However it is also possible to remove akeyword from a video clip.
To remove a keyword
1. Click the View Type button at the top of the Library module
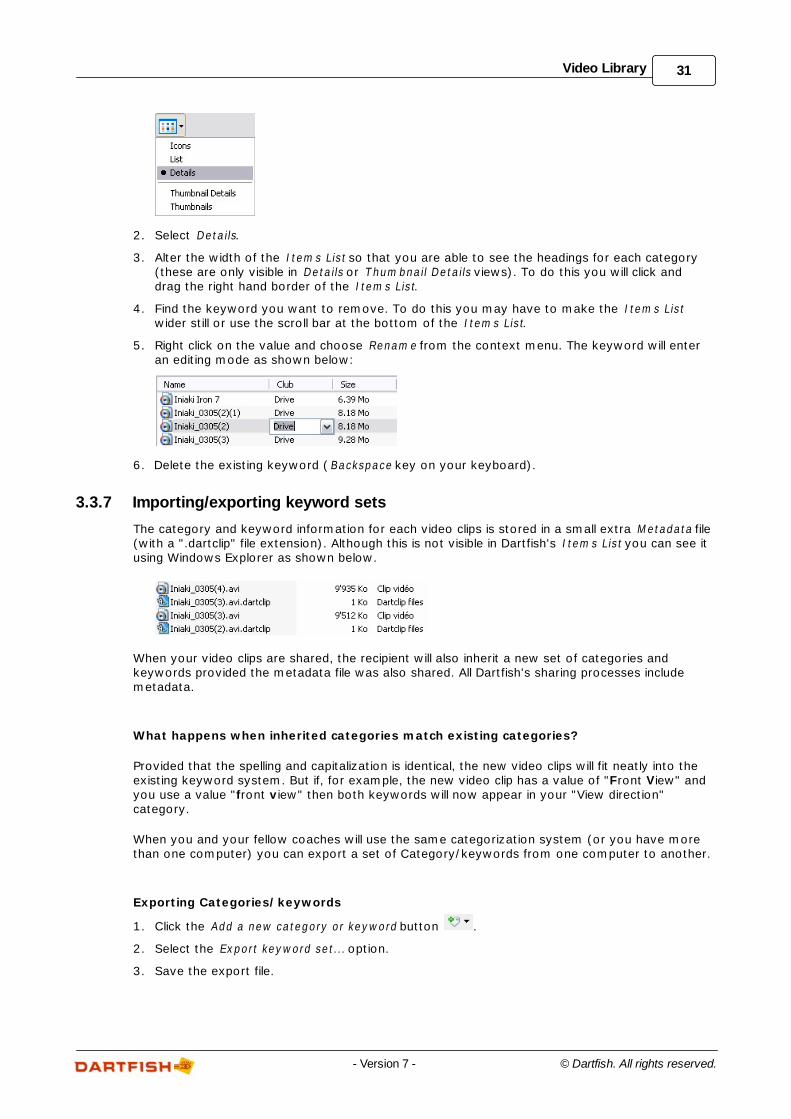
31Video Library
© Dartfish. All rights reserved.- Version 7 -
2. Select Details.
3. Alter the width of the Item s List so that you are able to see the headings for each category(these are only visible in Details or Thum bnail Details views). To do this you will click anddrag the right hand border of the Item s List.
4. Find the keyword you want to remove. To do this you may have to make the Item s Listwider still or use the scroll bar at the bottom of the Item s List.
5. Right click on the value and choose Renam e from the context menu. The keyword will enteran editing mode as shown below:
6. Delete the existing keyword (Backspace key on your keyboard).
3.3.7 Importing/exporting keyword sets
The category and keyword information for each video clips is stored in a small extra M etadata file(with a ".dartclip" file extension). Although this is not visible in Dartfish's I tem s List you can see itusing Windows Explorer as shown below.
When your video clips are shared, the recipient will also inherit a new set of categories andkeywords provided the metadata file was also shared. All Dartfish's sharing processes includemetadata.
What happens when inherited categories match existing categories?
Provided that the spelling and capitalization is identical, the new video clips will fit neatly into theexisting keyword system. But if, for example, the new video clip has a value of "Front View" andyou use a value "front view" then both keywords will now appear in your "View direction"category.
When you and your fellow coaches will use the same categorization system (or you have morethan one computer) you can export a set of Category/keywords from one computer to another.
Exporting Categories/keywords
1. Click the Add a new category or keyword button .
2. Select the Export keyword set... option.
3. Save the export file.
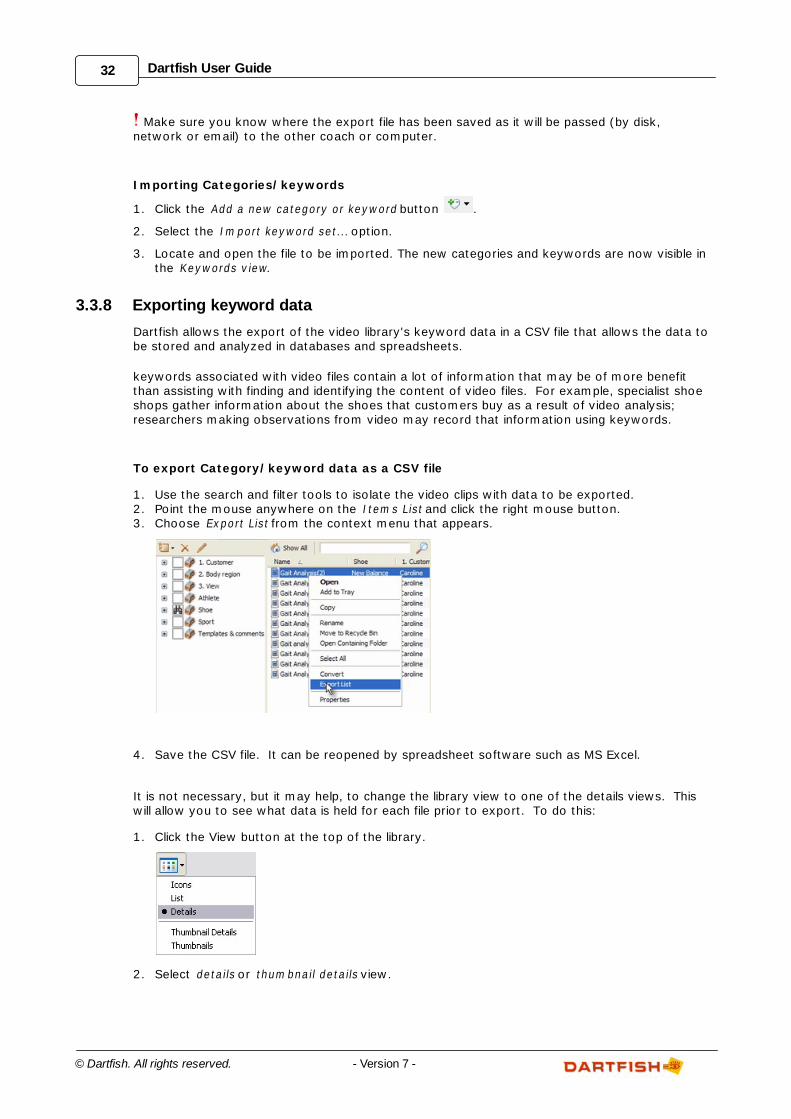
32 Dartfish User Guide
© Dartfish. All rights reserved. - Version 7 -
Make sure you know where the export file has been saved as it will be passed (by disk,network or email) to the other coach or computer.
Importing Categories/keywords
1. Click the Add a new category or keyword button .
2. Select the Im port keyword set... option.
3. Locate and open the file to be imported. The new categories and keywords are now visible inthe Keywords view.
3.3.8 Exporting keyword data
Dartfish allows the export of the video library's keyword data in a CSV file that allows the data tobe stored and analyzed in databases and spreadsheets.
keywords associated with video files contain a lot of information that may be of more benefitthan assisting with finding and identifying the content of video files. For example, specialist shoeshops gather information about the shoes that customers buy as a result of video analysis;researchers making observations from video may record that information using keywords.
To export Category/keyword data as a CSV file
1. Use the search and filter tools to isolate the video clips with data to be exported.2. Point the mouse anywhere on the Item s List and click the right mouse button.3. Choose Export List from the context menu that appears.
4. Save the CSV file. It can be reopened by spreadsheet software such as MS Excel.
It is not necessary, but it may help, to change the library view to one of the details views. Thiswill allow you to see what data is held for each file prior to export. To do this:
1. Click the View button at the top of the library.
2. Select details or thum bnail details view.
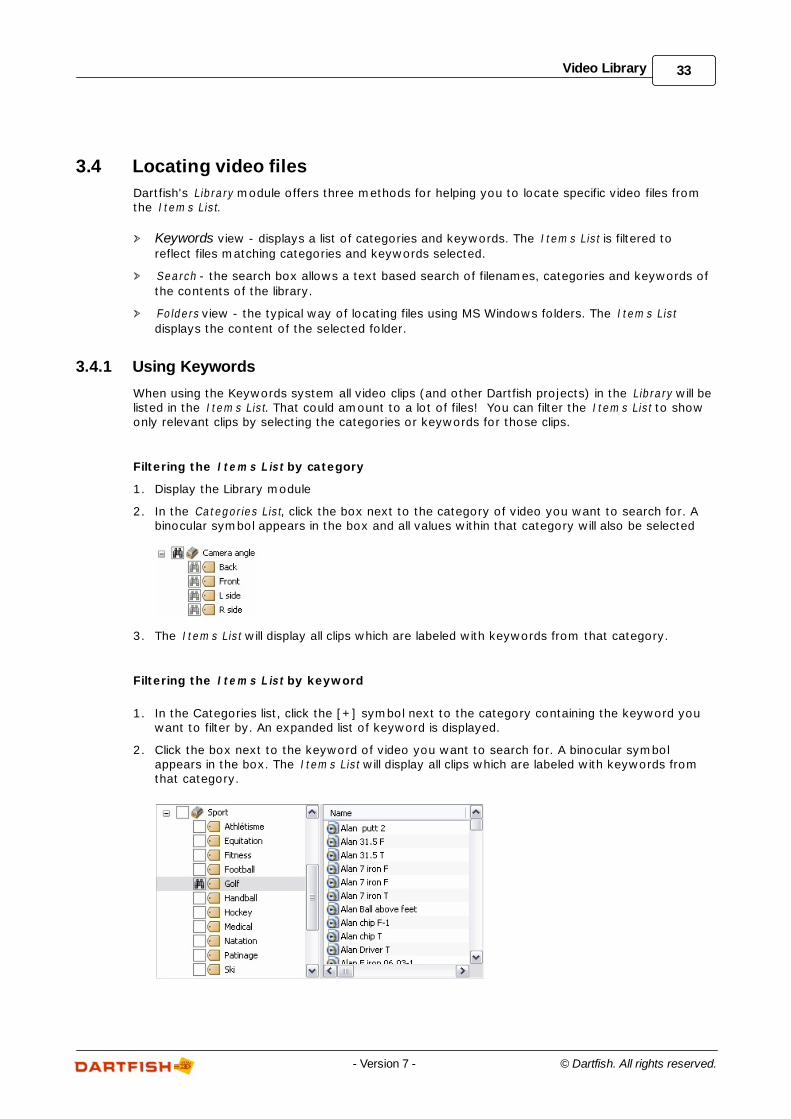
33Video Library
© Dartfish. All rights reserved.- Version 7 -
3.4 Locating video files
Dartfish's Library module offers three methods for helping you to locate specific video files fromthe Item s List.
Keywords view - displays a list of categories and keywords. The Item s List is filtered to
reflect files matching categories and keywords selected.
Search - the search box allows a text based search of filenames, categories and keywords of
the contents of the library.
Folders view - the typical way of locating files using MS Windows folders. The Item s List
displays the content of the selected folder.
3.4.1 Using Keywords
When using the Keywords system all video clips (and other Dartfish projects) in the Library will belisted in the Item s List. That could amount to a lot of files! You can filter the Item s List to showonly relevant clips by selecting the categories or keywords for those clips.
Filtering the Item s L ist by category
1. Display the Library module
2. In the Categories List, click the box next to the category of video you want to search for. Abinocular symbol appears in the box and all values within that category will also be selected
3. The Item s List will display all clips which are labeled with keywords from that category.
Filtering the Item s L ist by keyword
1. In the Categories list, click the [+] symbol next to the category containing the keyword you
want to filter by. An expanded list of keyword is displayed.
2. Click the box next to the keyword of video you want to search for. A binocular symbolappears in the box. The Item s List will display all clips which are labeled with keywords fromthat category.
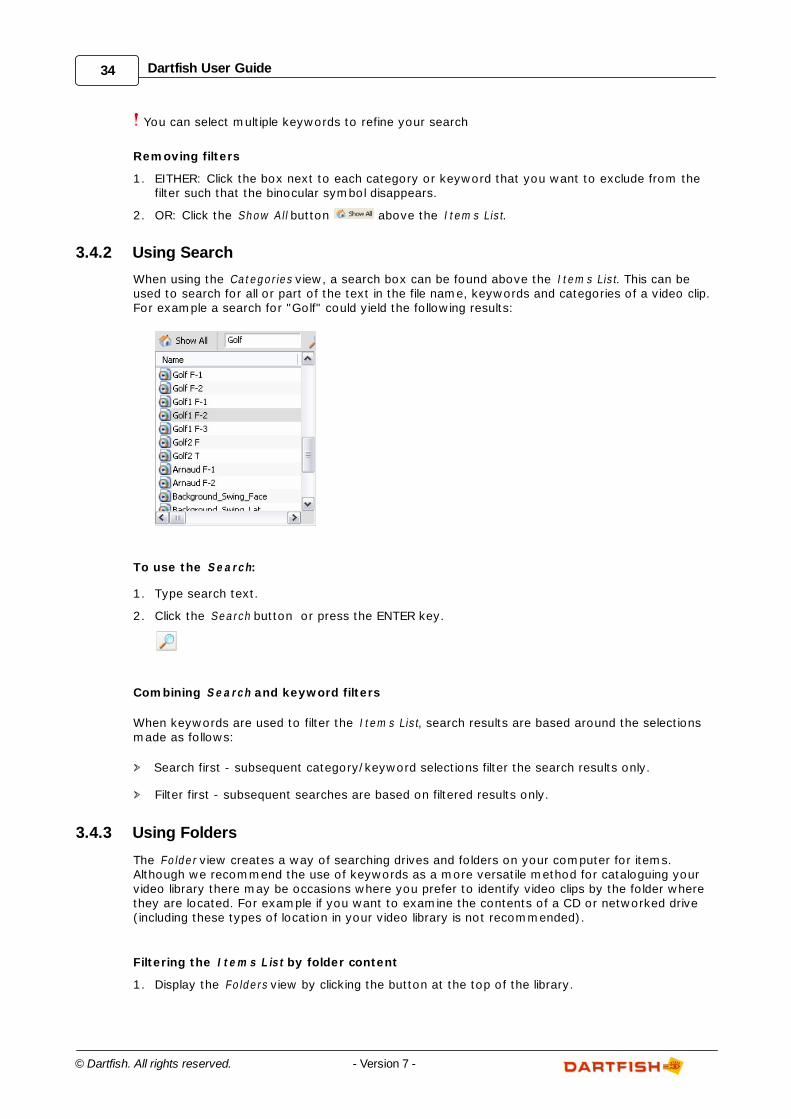
34 Dartfish User Guide
© Dartfish. All rights reserved. - Version 7 -
You can select multiple keywords to refine your search
Removing filters
1. EITHER: Click the box next to each category or keyword that you want to exclude from thefilter such that the binocular symbol disappears.
2. OR: Click the Show All button above the Item s List.
3.4.2 Using Search
When using the Categories view, a search box can be found above the Item s List. This can beused to search for all or part of the text in the file name, keywords and categories of a video clip.For example a search for "Golf" could yield the following results:
To use the Search:
1. Type search text.
2. Click the Search button or press the ENTER key.
Combining Search and keyword filters
When keywords are used to filter the Item s List, search results are based around the selectionsmade as follows:
Search first - subsequent category/keyword selections filter the search results only.
Filter first - subsequent searches are based on filtered results only.
3.4.3 Using Folders
The Folder view creates a way of searching drives and folders on your computer for items.Although we recommend the use of keywords as a more versatile method for cataloguing yourvideo library there may be occasions where you prefer to identify video clips by the folder wherethey are located. For example if you want to examine the contents of a CD or networked drive(including these types of location in your video library is not recommended).
Filtering the Item s L ist by folder content
1. Display the Folders view by clicking the button at the top of the library.
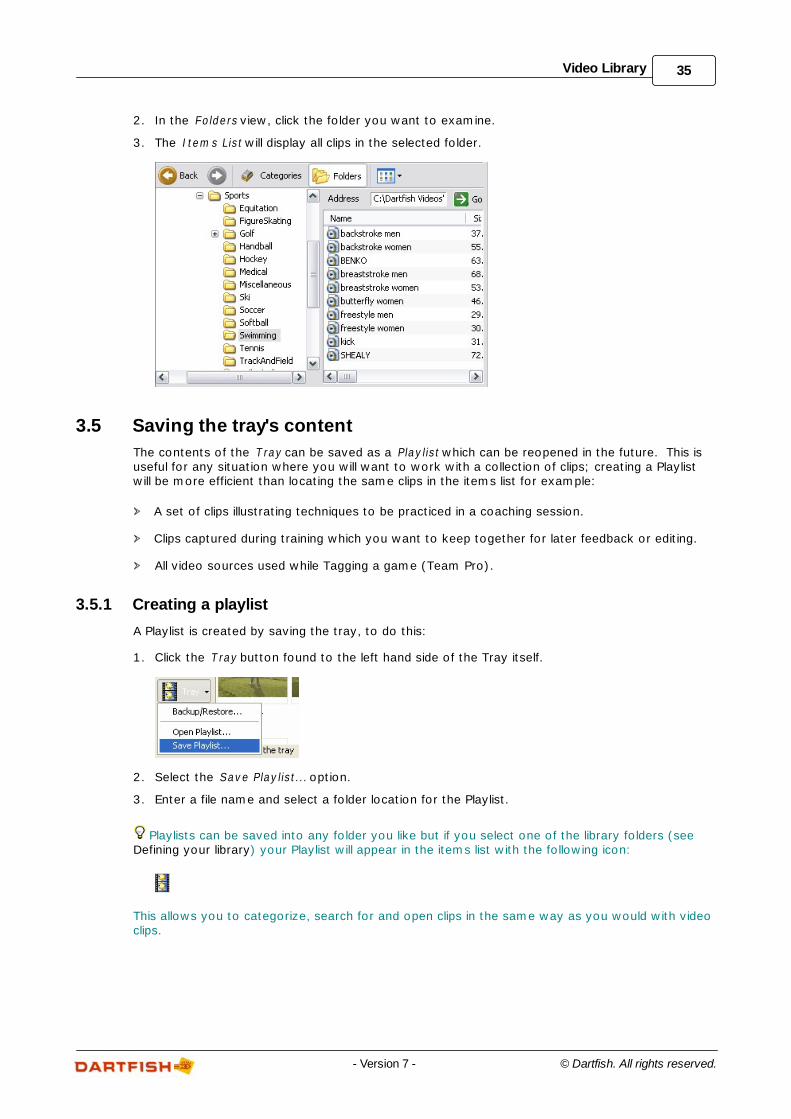
35Video Library
© Dartfish. All rights reserved.- Version 7 -
2. In the Folders view, click the folder you want to examine.
3. The Item s List will display all clips in the selected folder.
3.5 Saving the tray's content
The contents of the T ray can be saved as a Playlist which can be reopened in the future. This isuseful for any situation where you will want to work with a collection of clips; creating a Playlistwill be more efficient than locating the same clips in the items list for example:
A set of clips illustrating techniques to be practiced in a coaching session.
Clips captured during training which you want to keep together for later feedback or editing.
All video sources used while Tagging a game (Team Pro).
3.5.1 Creating a playlist
A Playlist is created by saving the tray, to do this:
1. Click the T ray button found to the left hand side of the Tray itself.
2. Select the Save Playlist... option.
3. Enter a file name and select a folder location for the Playlist.
Playlists can be saved into any folder you like but if you select one of the library folders (seeDefining your library) your Playlist will appear in the items list with the following icon:
This allows you to categorize, search for and open clips in the same way as you would with videoclips.
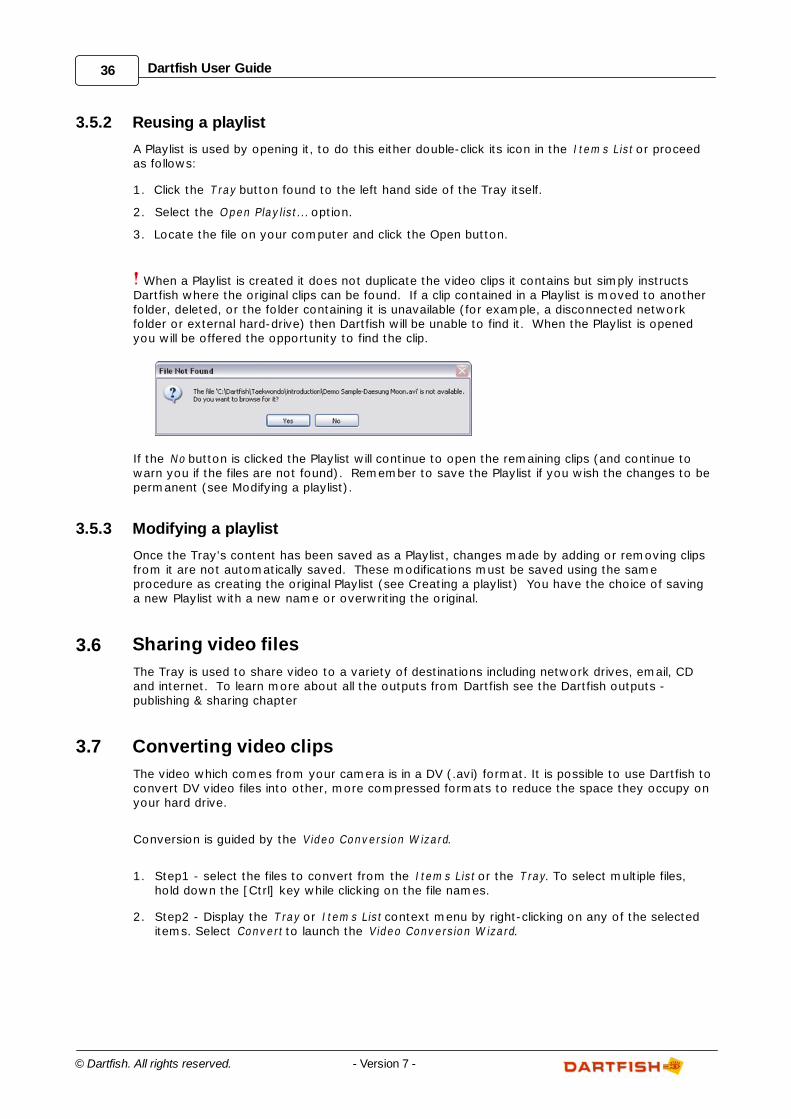
36 Dartfish User Guide
© Dartfish. All rights reserved. - Version 7 -
3.5.2 Reusing a playlist
A Playlist is used by opening it, to do this either double-click its icon in the Item s List or proceedas follows:
1. Click the T ray button found to the left hand side of the Tray itself.
2. Select the Open Playlist... option.
3. Locate the file on your computer and click the Open button.
When a Playlist is created it does not duplicate the video clips it contains but simply instructsDartfish where the original clips can be found. If a clip contained in a Playlist is moved to anotherfolder, deleted, or the folder containing it is unavailable (for example, a disconnected networkfolder or external hard-drive) then Dartfish will be unable to find it. When the Playlist is openedyou will be offered the opportunity to find the clip.
If the No button is clicked the Playlist will continue to open the remaining clips (and continue towarn you if the files are not found). Remember to save the Playlist if you wish the changes to bepermanent (see Modifying a playlist).
3.5.3 Modifying a playlist
Once the Tray's content has been saved as a Playlist, changes made by adding or removing clipsfrom it are not automatically saved. These modifications must be saved using the sameprocedure as creating the original Playlist (see Creating a playlist) You have the choice of savinga new Playlist with a new name or overwriting the original.
3.6 Sharing video files
The Tray is used to share video to a variety of destinations including network drives, email, CDand internet. To learn more about all the outputs from Dartfish see the Dartfish outputs -publishing & sharing chapter
3.7 Converting video clips
The video which comes from your camera is in a DV (.avi) format. It is possible to use Dartfish toconvert DV video files into other, more compressed formats to reduce the space they occupy onyour hard drive.
Conversion is guided by the Video Conversion W izard.
1. Step1 - select the files to convert from the Item s List or the T ray. To select multiple files,hold down the [Ctrl] key while clicking on the file names.
2. Step2 - Display the T ray or I tem s List context menu by right-clicking on any of the selecteditems. Select Convert to launch the Video Conversion W izard.
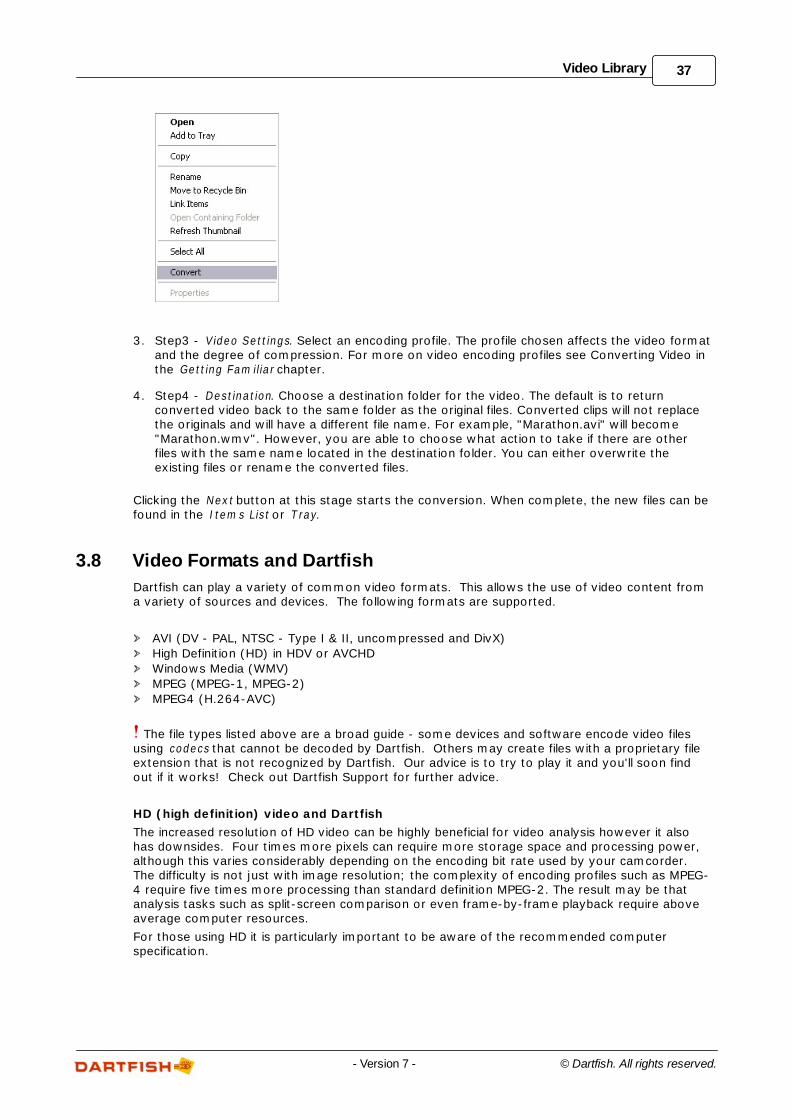
37Video Library
© Dartfish. All rights reserved.- Version 7 -
3. Step3 - Video Settings. Select an encoding profile. The profile chosen affects the video formatand the degree of compression. For more on video encoding profiles see Converting Video inthe Getting Fam iliar chapter.
4. Step4 - Destination. Choose a destination folder for the video. The default is to returnconverted video back to the same folder as the original files. Converted clips will not replacethe originals and will have a different file name. For example, "Marathon.avi" will become"Marathon.wmv". However, you are able to choose what action to take if there are otherfiles with the same name located in the destination folder. You can either overwrite theexisting files or rename the converted files.
Clicking the Next button at this stage starts the conversion. When complete, the new files can befound in the Item s List or T ray.
3.8 Video Formats and Dartfish
Dartfish can play a variety of common video formats. This allows the use of video content froma variety of sources and devices. The following formats are supported.
AVI (DV - PAL, NTSC - Type I & II, uncompressed and DivX)
High Definition (HD) in HDV or AVCHD
Windows Media (WMV)
MPEG (MPEG-1, MPEG-2)
MPEG4 (H.264-AVC)
The file types listed above are a broad guide - some devices and software encode video filesusing codecs that cannot be decoded by Dartfish. Others may create files with a proprietary fileextension that is not recognized by Dartfish. Our advice is to try to play it and you'll soon findout if it works! Check out Dartfish Support for further advice.
HD (high definition) video and Dartfish
The increased resolution of HD video can be highly beneficial for video analysis however it alsohas downsides. Four times more pixels can require more storage space and processing power,although this varies considerably depending on the encoding bit rate used by your camcorder. The difficulty is not just with image resolution; the complexity of encoding profiles such as MPEG-4 require five times more processing than standard definition MPEG-2. The result may be thatanalysis tasks such as split-screen comparison or even frame-by-frame playback require aboveaverage computer resources.
For those using HD it is particularly important to be aware of the recommended computerspecification.
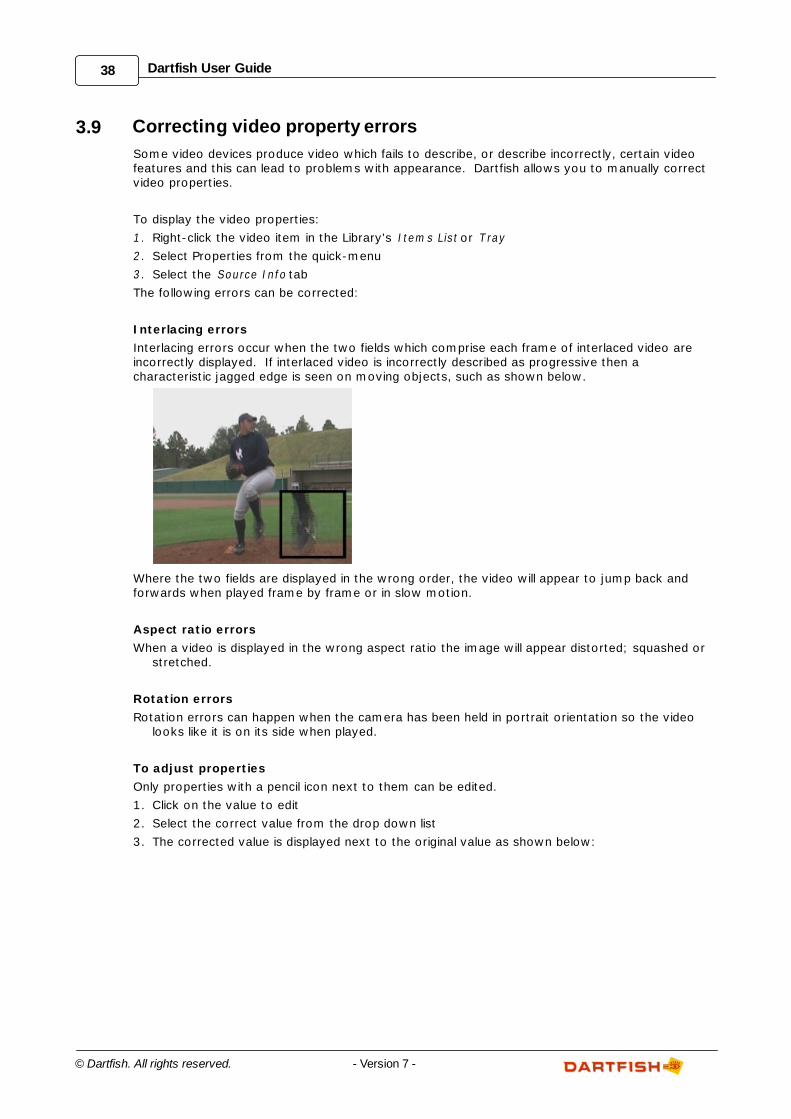
38 Dartfish User Guide
© Dartfish. All rights reserved. - Version 7 -
3.9 Correcting video property errors
Some video devices produce video which fails to describe, or describe incorrectly, certain videofeatures and this can lead to problems with appearance. Dartfish allows you to manually correctvideo properties.
To display the video properties:
1 . Right-click the video item in the Library's I tem s List or T ray
2 . Select Properties from the quick-menu
3. Select the Source Info tab
The following errors can be corrected:
Interlacing errors
Interlacing errors occur when the two fields which comprise each frame of interlaced video areincorrectly displayed. If interlaced video is incorrectly described as progressive then acharacteristic jagged edge is seen on moving objects, such as shown below.
Where the two fields are displayed in the wrong order, the video will appear to jump back andforwards when played frame by frame or in slow motion.
Aspect ratio errors
When a video is displayed in the wrong aspect ratio the image will appear distorted; squashed orstretched.
Rotation errors
Rotation errors can happen when the camera has been held in portrait orientation so the videolooks like it is on its side when played.
To adjust properties
Only properties with a pencil icon next to them can be edited.
1. Click on the value to edit
2. Select the correct value from the drop down list
3. The corrected value is displayed next to the original value as shown below:
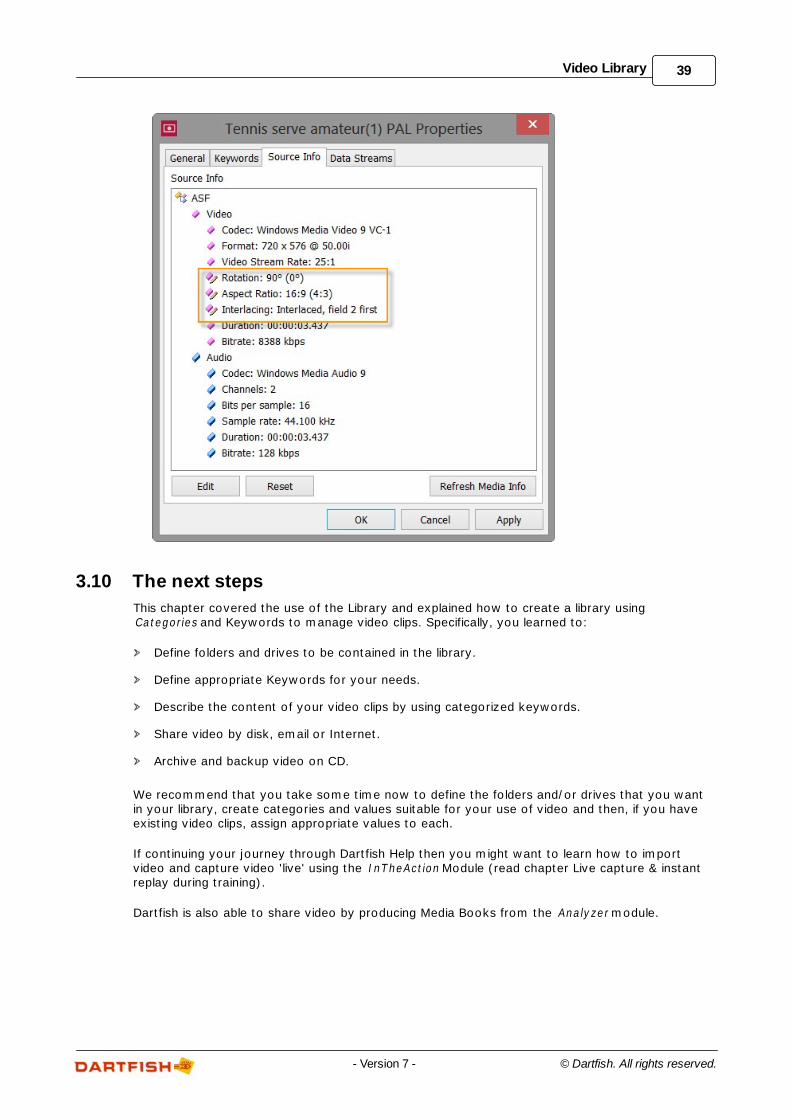
39Video Library
© Dartfish. All rights reserved.- Version 7 -
3.10 The next steps
This chapter covered the use of the Library and explained how to create a library using Categories and Keywords to manage video clips. Specifically, you learned to:
Define folders and drives to be contained in the library.
Define appropriate Keywords for your needs.
Describe the content of your video clips by using categorized keywords.
Share video by disk, email or Internet.
Archive and backup video on CD.
We recommend that you take some time now to define the folders and/or drives that you wantin your library, create categories and values suitable for your use of video and then, if you haveexisting video clips, assign appropriate values to each.
If continuing your journey through Dartfish Help then you might want to learn how to importvideo and capture video 'live' using the InTheAction Module (read chapter Live capture & instantreplay during training).
Dartfish is also able to share video by producing Media Books from the Analyzer module.

Chapter
IV
Importing files to thelibrary
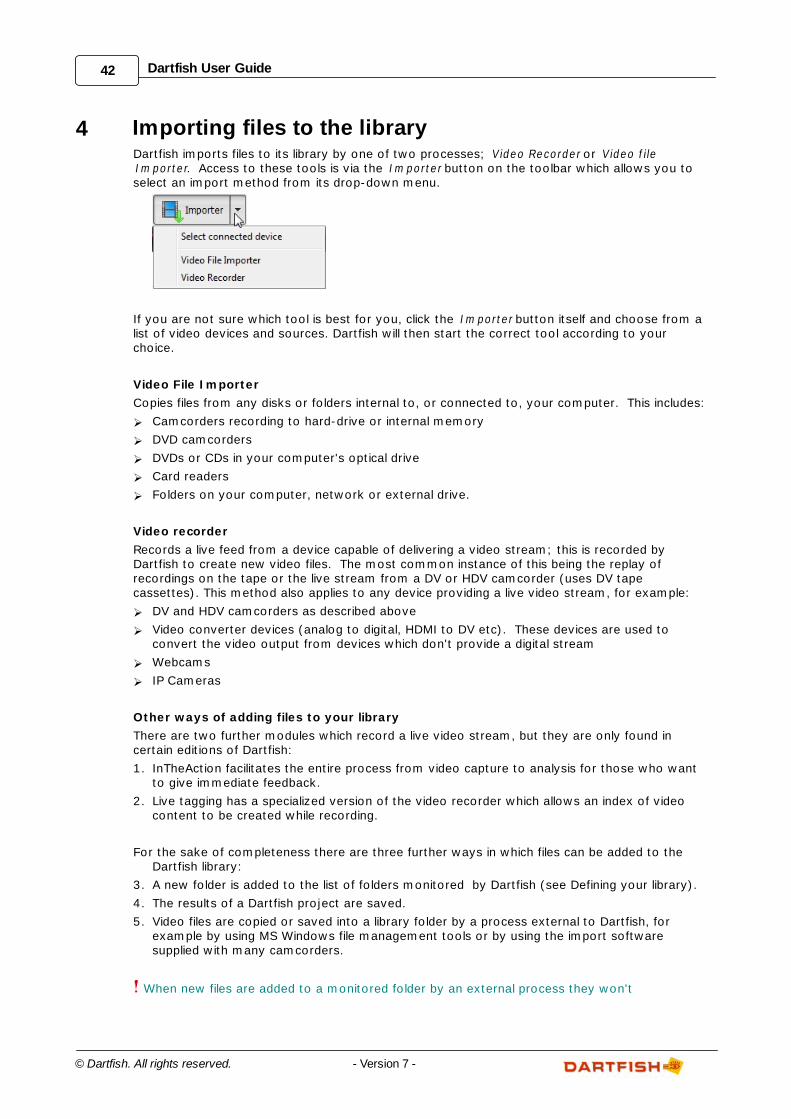
42 Dartfish User Guide
© Dartfish. All rights reserved. - Version 7 -
4 Importing files to the libraryDartfish imports files to its library by one of two processes; Video Recorder or Video f ileIm porter. Access to these tools is via the Im porter button on the toolbar which allows you toselect an import method from its drop-down menu.
If you are not sure which tool is best for you, click the Im porter button itself and choose from alist of video devices and sources. Dartfish will then start the correct tool according to yourchoice.
Video File Importer
Copies files from any disks or folders internal to, or connected to, your computer. This includes:
Camcorders recording to hard-drive or internal memory
DVD camcorders
DVDs or CDs in your computer's optical drive
Card readers
Folders on your computer, network or external drive.
Video recorder
Records a live feed from a device capable of delivering a video stream; this is recorded byDartfish to create new video files. The most common instance of this being the replay ofrecordings on the tape or the live stream from a DV or HDV camcorder (uses DV tapecassettes). This method also applies to any device providing a live video stream, for example:
DV and HDV camcorders as described above
Video converter devices (analog to digital, HDMI to DV etc). These devices are used toconvert the video output from devices which don't provide a digital stream
Webcams
IP Cameras
Other ways of adding files to your library
There are two further modules which record a live video stream, but they are only found incertain editions of Dartfish:
1. InTheAction facilitates the entire process from video capture to analysis for those who wantto give immediate feedback.
2. Live tagging has a specialized version of the video recorder which allows an index of videocontent to be created while recording.
For the sake of completeness there are three further ways in which files can be added to theDartfish library:
3. A new folder is added to the list of folders monitored by Dartfish (see Defining your library).
4. The results of a Dartfish project are saved.
5. Video files are copied or saved into a library folder by a process external to Dartfish, forexample by using MS Windows file management tools or by using the import softwaresupplied with many camcorders.
When new files are added to a monitored folder by an external process they won't
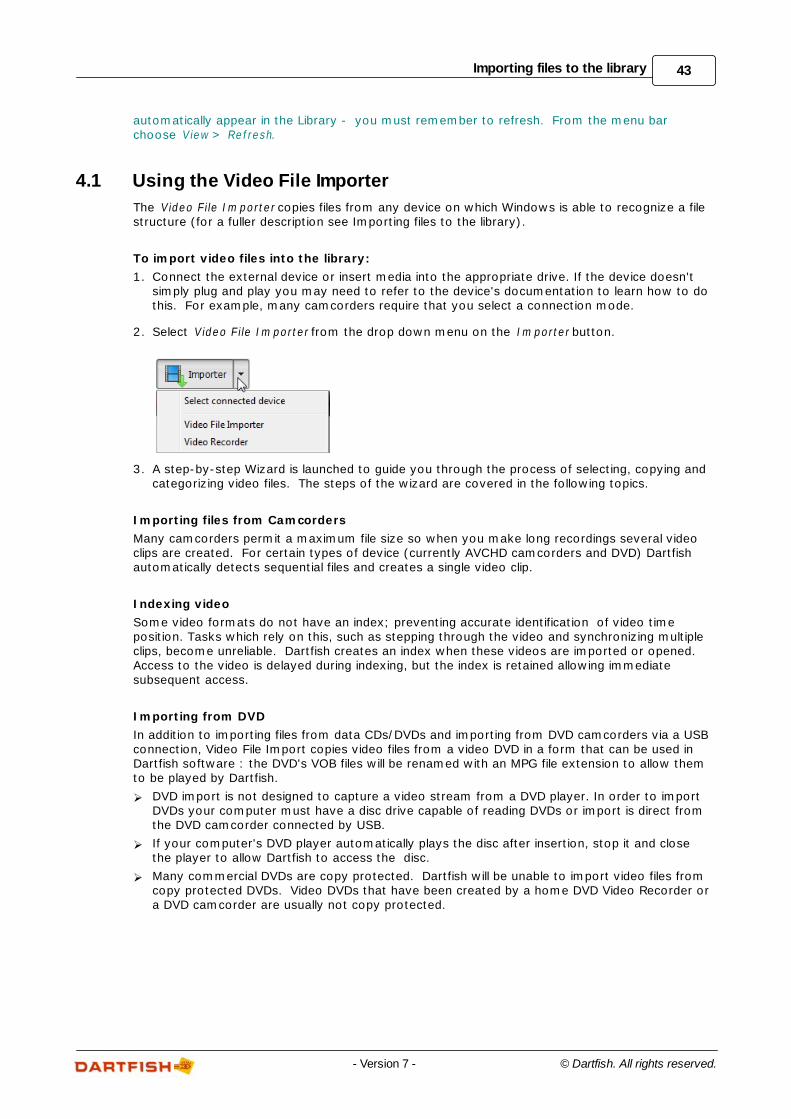
43Importing files to the library
© Dartfish. All rights reserved.- Version 7 -
automatically appear in the Library - you must remember to refresh. From the menu barchoose View > Refresh.
4.1 Using the Video File Importer
The Video F ile Im porter copies files from any device on which Windows is able to recognize a filestructure (for a fuller description see Importing files to the library).
To import video files into the library:
1. Connect the external device or insert media into the appropriate drive. If the device doesn'tsimply plug and play you may need to refer to the device's documentation to learn how to dothis. For example, many camcorders require that you select a connection mode.
2. Select Video F ile Im porter from the drop down menu on the Im porter button.
3. A step-by-step Wizard is launched to guide you through the process of selecting, copying andcategorizing video files. The steps of the wizard are covered in the following topics.
Importing files from Camcorders
Many camcorders permit a maximum file size so when you make long recordings several videoclips are created. For certain types of device (currently AVCHD camcorders and DVD) Dartfishautomatically detects sequential files and creates a single video clip.
Indexing video
Some video formats do not have an index; preventing accurate identification of video timeposition. Tasks which rely on this, such as stepping through the video and synchronizing multipleclips, become unreliable. Dartfish creates an index when these videos are imported or opened.Access to the video is delayed during indexing, but the index is retained allowing immediatesubsequent access.
Importing from DVD
In addition to importing files from data CDs/DVDs and importing from DVD camcorders via a USBconnection, Video File Import copies video files from a video DVD in a form that can be used inDartfish software : the DVD's VOB files will be renamed with an MPG file extension to allow themto be played by Dartfish.
DVD import is not designed to capture a video stream from a DVD player. In order to importDVDs your computer must have a disc drive capable of reading DVDs or import is direct fromthe DVD camcorder connected by USB.
If your computer's DVD player automatically plays the disc after insertion, stop it and closethe player to allow Dartfish to access the disc.
Many commercial DVDs are copy protected. Dartfish will be unable to import video files fromcopy protected DVDs. Video DVDs that have been created by a home DVD Video Recorder ora DVD camcorder are usually not copy protected.
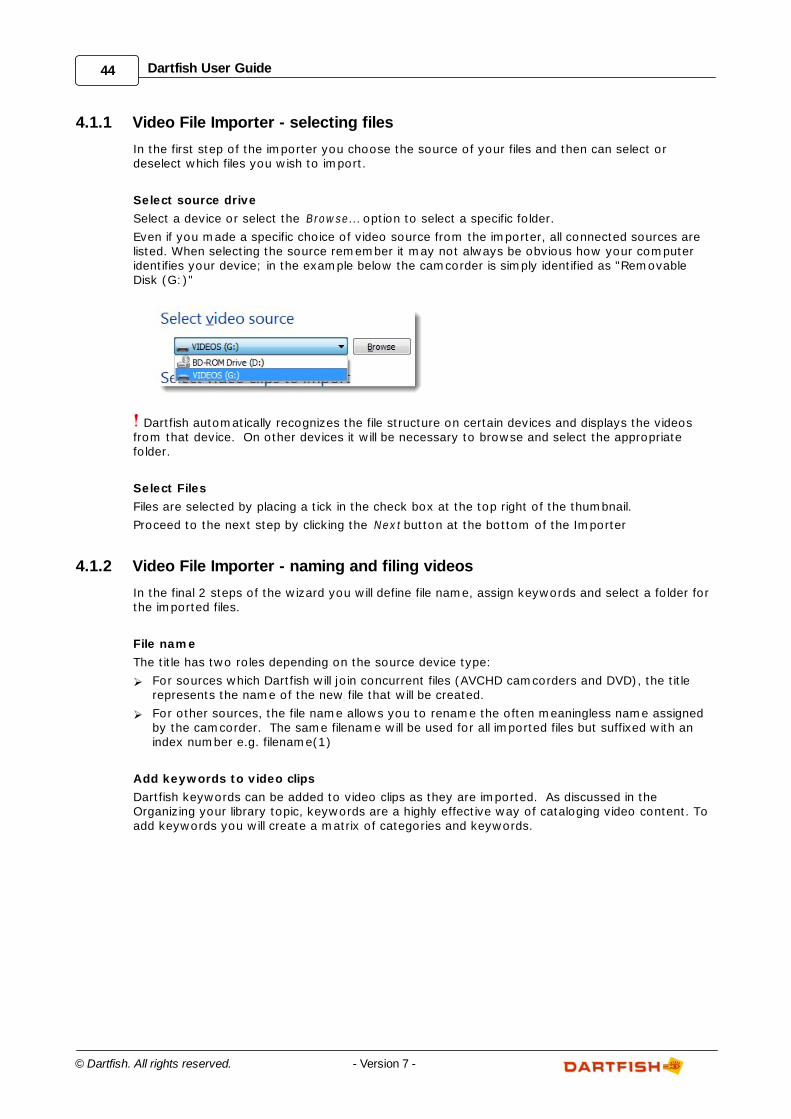
44 Dartfish User Guide
© Dartfish. All rights reserved. - Version 7 -
4.1.1 Video File Importer - selecting files
In the first step of the importer you choose the source of your files and then can select ordeselect which files you wish to import.
Select source drive
Select a device or select the Browse... option to select a specific folder.
Even if you made a specific choice of video source from the importer, all connected sources arelisted. When selecting the source remember it may not always be obvious how your computeridentifies your device; in the example below the camcorder is simply identified as "RemovableDisk (G:)"
Dartfish automatically recognizes the file structure on certain devices and displays the videosfrom that device. On other devices it will be necessary to browse and select the appropriatefolder.
Select Files
Files are selected by placing a tick in the check box at the top right of the thumbnail.
Proceed to the next step by clicking the Next button at the bottom of the Importer
4.1.2 Video File Importer - naming and filing videos
In the final 2 steps of the wizard you will define file name, assign keywords and select a folder forthe imported files.
File name
The title has two roles depending on the source device type:
For sources which Dartfish will join concurrent files (AVCHD camcorders and DVD), the titlerepresents the name of the new file that will be created.
For other sources, the file name allows you to rename the often meaningless name assignedby the camcorder. The same filename will be used for all imported files but suffixed with anindex number e.g. filename(1)
Add keywords to video clips
Dartfish keywords can be added to video clips as they are imported. As discussed in the Organizing your library topic, keywords are a highly effective way of cataloging video content. Toadd keywords you will create a matrix of categories and keywords.
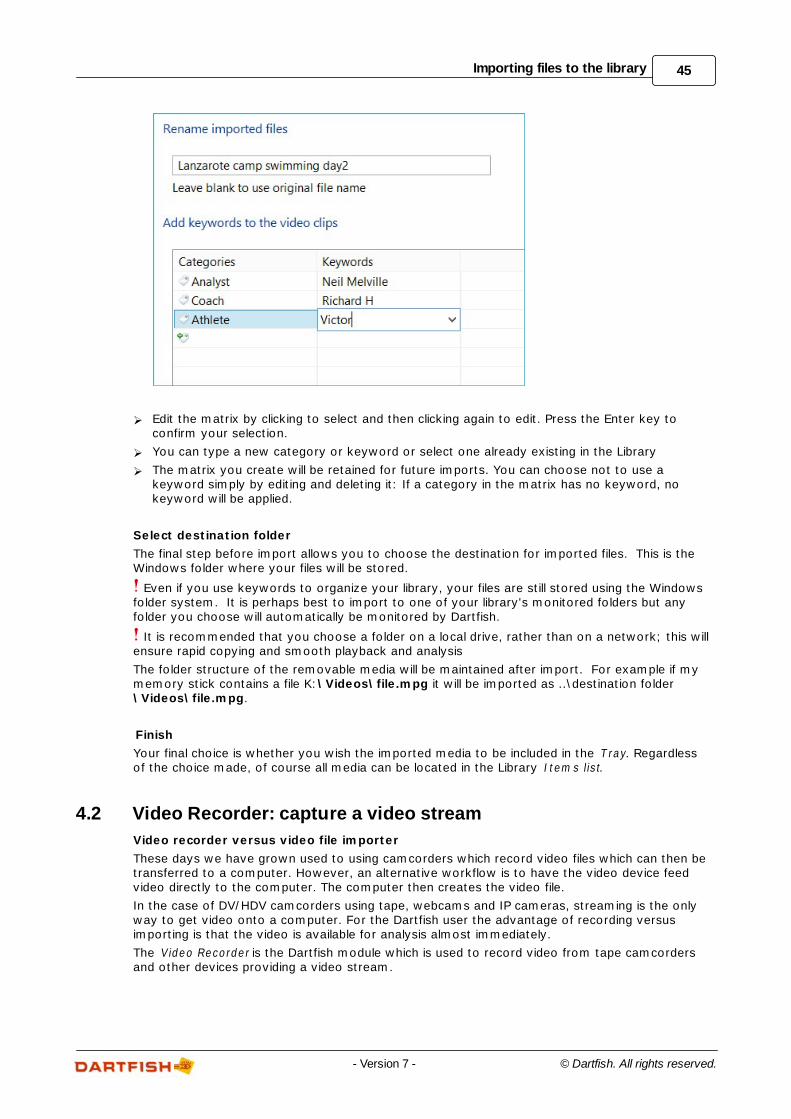
45Importing files to the library
© Dartfish. All rights reserved.- Version 7 -
Edit the matrix by clicking to select and then clicking again to edit. Press the Enter key toconfirm your selection.
You can type a new category or keyword or select one already existing in the Library
The matrix you create will be retained for future imports. You can choose not to use akeyword simply by editing and deleting it: If a category in the matrix has no keyword, nokeyword will be applied.
Select destination folder
The final step before import allows you to choose the destination for imported files. This is theWindows folder where your files will be stored.
Even if you use keywords to organize your library, your files are still stored using the Windowsfolder system. It is perhaps best to import to one of your library's monitored folders but anyfolder you choose will automatically be monitored by Dartfish.
It is recommended that you choose a folder on a local drive, rather than on a network; this willensure rapid copying and smooth playback and analysis
The folder structure of the removable media will be maintained after import. For example if mymemory stick contains a file K:\Videos\file.mpg it will be imported as ..\destination folder\Videos\file.mpg.
Finish
Your final choice is whether you wish the imported media to be included in the T ray. Regardlessof the choice made, of course all media can be located in the Library Item s list.
4.2 Video Recorder: capture a video stream
Video recorder versus video file importer
These days we have grown used to using camcorders which record video files which can then be transferred to a computer. However, an alternative workflow is to have the video device feedvideo directly to the computer. The computer then creates the video file.
In the case of DV/HDV camcorders using tape, webcams and IP cameras, streaming is the onlyway to get video onto a computer. For the Dartfish user the advantage of recording versusimporting is that the video is available for analysis almost immediately.
The Video Recorder is the Dartfish module which is used to record video from tape camcordersand other devices providing a video stream.
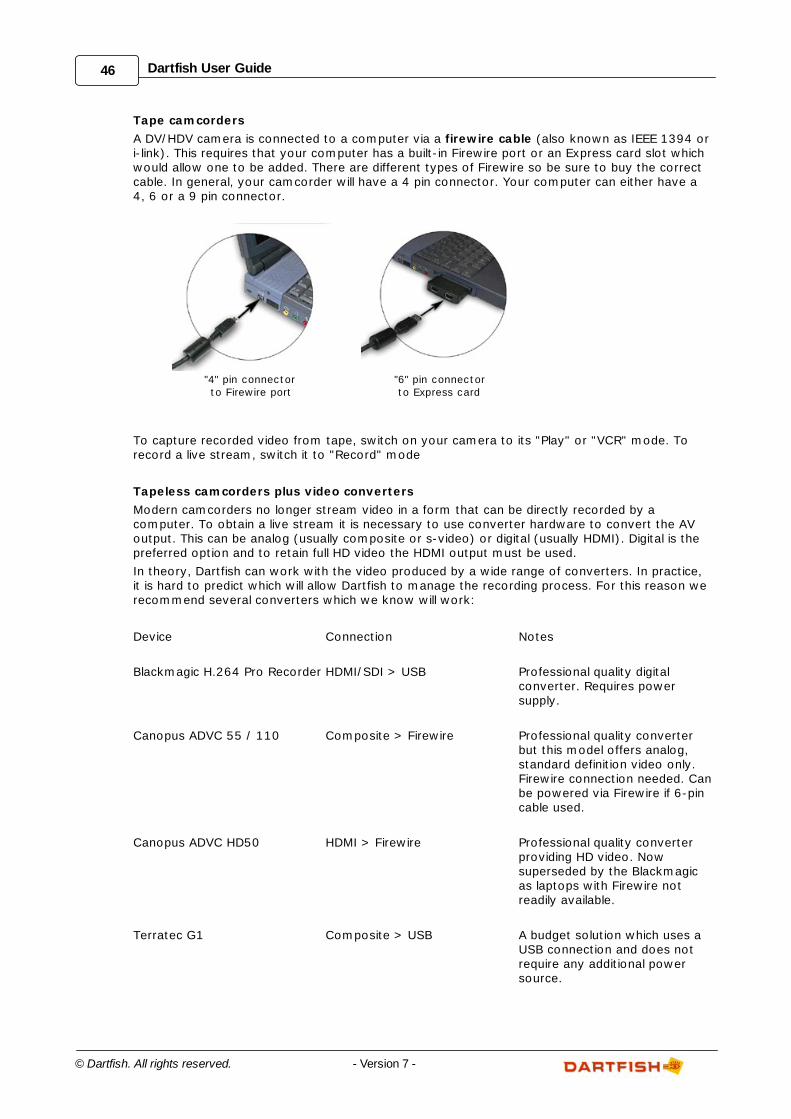
46 Dartfish User Guide
© Dartfish. All rights reserved. - Version 7 -
Tape camcorders
A DV/HDV camera is connected to a computer via a firewire cable (also known as IEEE 1394 ori-link). This requires that your computer has a built-in Firewire port or an Express card slot whichwould allow one to be added. There are different types of Firewire so be sure to buy the correctcable. In general, your camcorder will have a 4 pin connector. Your computer can either have a4, 6 or a 9 pin connector.
"4" pin connector to Firewire port
"6" pin connectorto Express card
To capture recorded video from tape, switch on your camera to its "Play" or "VCR" mode. Torecord a live stream, switch it to "Record" mode
Tapeless camcorders plus video converters
Modern camcorders no longer stream video in a form that can be directly recorded by acomputer. To obtain a live stream it is necessary to use converter hardware to convert the AVoutput. This can be analog (usually composite or s-video) or digital (usually HDMI). Digital is thepreferred option and to retain full HD video the HDMI output must be used.
In theory, Dartfish can work with the video produced by a wide range of converters. In practice,it is hard to predict which will allow Dartfish to manage the recording process. For this reason werecommend several converters which we know will work:
Device Connection Notes
Blackmagic H.264 Pro Recorder HDMI/SDI > USB Professional quality digitalconverter. Requires powersupply.
Canopus ADVC 55 / 110 Composite > Firewire Professional quality converterbut this model offers analog,standard definition video only.Firewire connection needed. Canbe powered via Firewire if 6-pincable used.
Canopus ADVC HD50 HDMI > Firewire Professional quality converterproviding HD video. Nowsuperseded by the Blackmagicas laptops with Firewire notreadily available.
Terratec G1 Composite > USB A budget solution which uses aUSB connection and does notrequire any additional powersource.
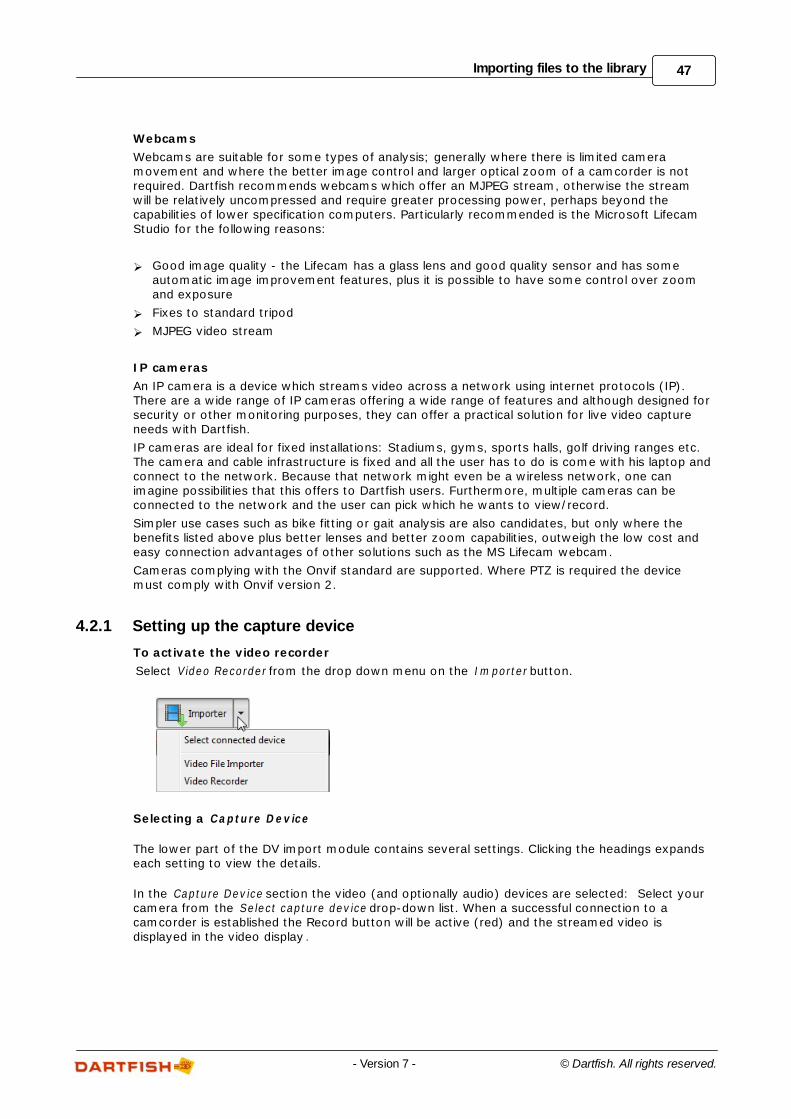
47Importing files to the library
© Dartfish. All rights reserved.- Version 7 -
Webcams
Webcams are suitable for some types of analysis; generally where there is limited cameramovement and where the better image control and larger optical zoom of a camcorder is notrequired. Dartfish recommends webcams which offer an MJPEG stream, otherwise the streamwill be relatively uncompressed and require greater processing power, perhaps beyond thecapabilities of lower specification computers. Particularly recommended is the Microsoft LifecamStudio for the following reasons:
Good image quality - the Lifecam has a glass lens and good quality sensor and has someautomatic image improvement features, plus it is possible to have some control over zoomand exposure
Fixes to standard tripod
MJPEG video stream
IP cameras
An IP camera is a device which streams video across a network using internet protocols (IP).There are a wide range of IP cameras offering a wide range of features and although designed forsecurity or other monitoring purposes, they can offer a practical solution for live video captureneeds with Dartfish.
IP cameras are ideal for fixed installations: Stadiums, gyms, sports halls, golf driving ranges etc.The camera and cable infrastructure is fixed and all the user has to do is come with his laptop andconnect to the network. Because that network might even be a wireless network, one canimagine possibilities that this offers to Dartfish users. Furthermore, multiple cameras can beconnected to the network and the user can pick which he wants to view/record.
Simpler use cases such as bike fitting or gait analysis are also candidates, but only where thebenefits listed above plus better lenses and better zoom capabilities, outweigh the low cost andeasy connection advantages of other solutions such as the MS Lifecam webcam.
Cameras complying with the Onvif standard are supported. Where PTZ is required the devicemust comply with Onvif version 2.
4.2.1 Setting up the capture device
To activate the video recorder
Select Video Recorder from the drop down menu on the Im porter button.
Selecting a Capture Device
The lower part of the DV import module contains several settings. Clicking the headings expandseach setting to view the details.
In the Capture Device section the video (and optionally audio) devices are selected: Select yourcamera from the Select capture device drop-down list. When a successful connection to acamcorder is established the Record button will be active (red) and the streamed video isdisplayed in the video display .
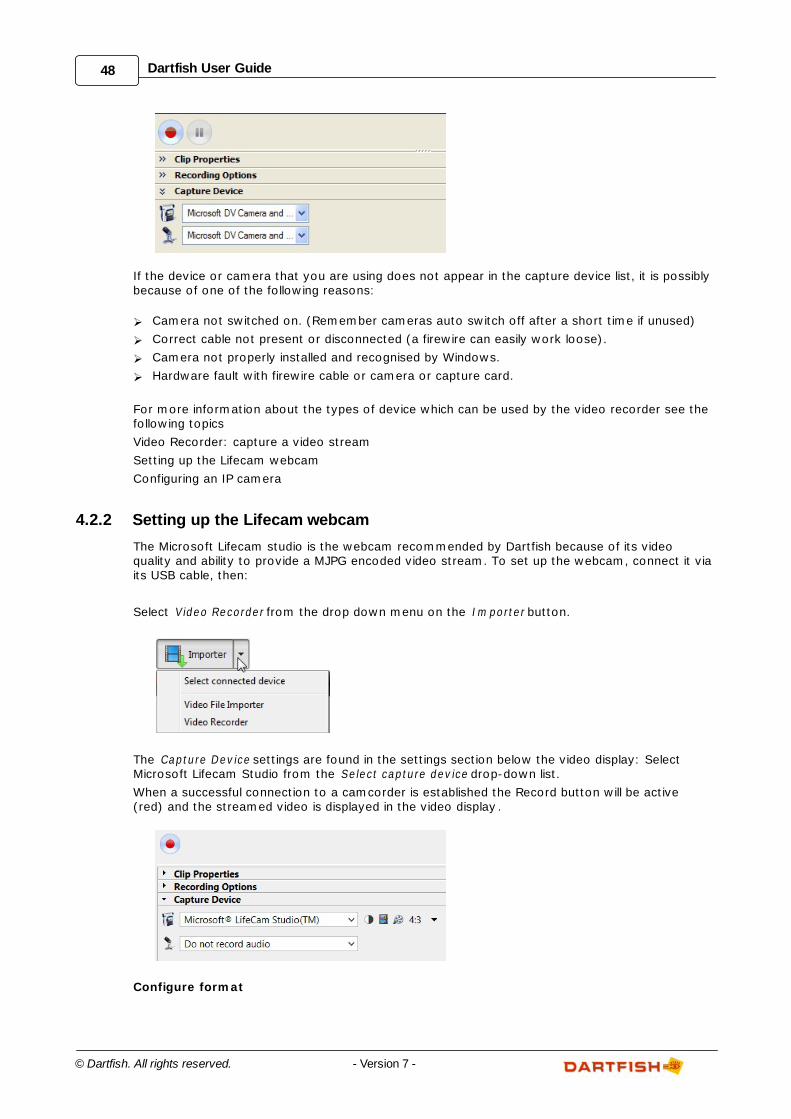
48 Dartfish User Guide
© Dartfish. All rights reserved. - Version 7 -
If the device or camera that you are using does not appear in the capture device list, it is possiblybecause of one of the following reasons:
Camera not switched on. (Remember cameras auto switch off after a short time if unused)
Correct cable not present or disconnected (a firewire can easily work loose).
Camera not properly installed and recognised by Windows.
Hardware fault with firewire cable or camera or capture card.
For more information about the types of device which can be used by the video recorder see thefollowing topics
Video Recorder: capture a video stream
Setting up the Lifecam webcam
Configuring an IP camera
4.2.2 Setting up the Lifecam webcam
The Microsoft Lifecam studio is the webcam recommended by Dartfish because of its videoquality and ability to provide a MJPG encoded video stream. To set up the webcam, connect it viaits USB cable, then:
Select Video Recorder from the drop down menu on the Im porter button.
The Capture Device settings are found in the settings section below the video display: SelectMicrosoft Lifecam Studio from the Select capture device drop-down list.
When a successful connection to a camcorder is established the Record button will be active(red) and the streamed video is displayed in the video display .
Configure format
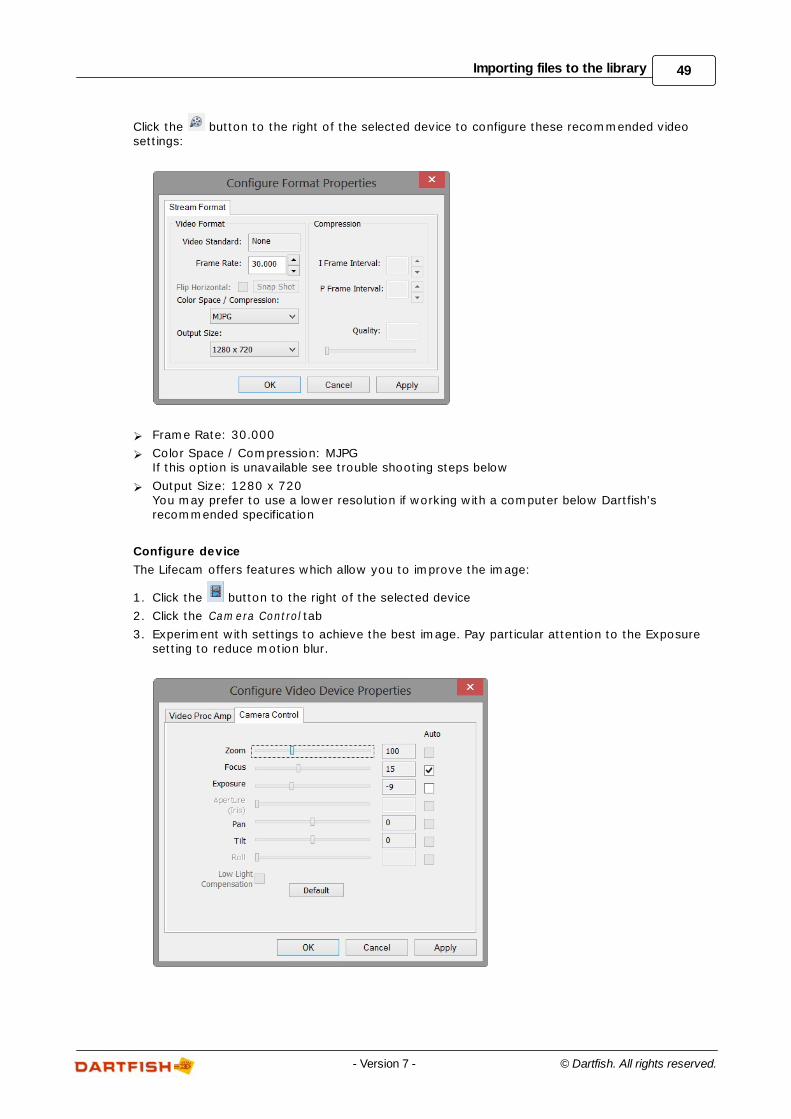
49Importing files to the library
© Dartfish. All rights reserved.- Version 7 -
Click the button to the right of the selected device to configure these recommended videosettings:
Frame Rate: 30.000
Color Space / Compression: MJPG If this option is unavailable see trouble shooting steps below
Output Size: 1280 x 720You may prefer to use a lower resolution if working with a computer below Dartfish'srecommended specification
Configure device
The Lifecam offers features which allow you to improve the image:
1. Click the button to the right of the selected device
2. Click the Cam era Control tab
3. Experiment with settings to achieve the best image. Pay particular attention to the Exposuresetting to reduce motion blur.
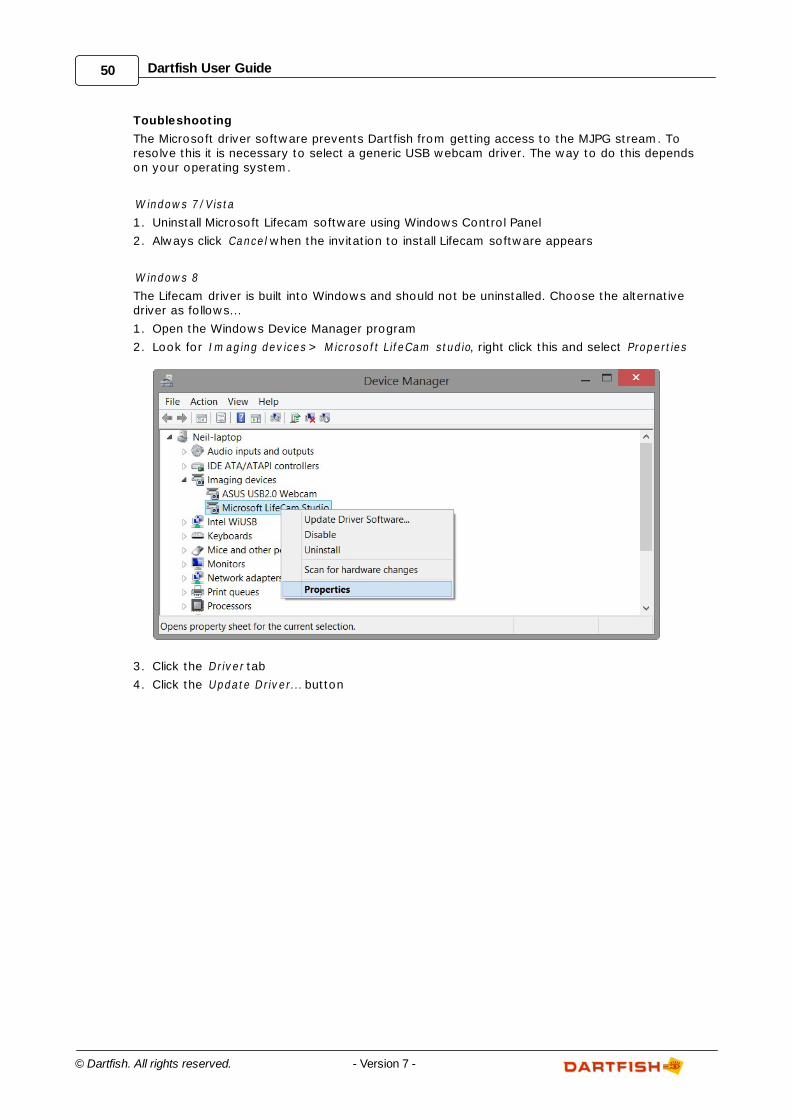
50 Dartfish User Guide
© Dartfish. All rights reserved. - Version 7 -
Toubleshooting
The Microsoft driver software prevents Dartfish from getting access to the MJPG stream. Toresolve this it is necessary to select a generic USB webcam driver. The way to do this dependson your operating system.
W indows 7/Vista
1. Uninstall Microsoft Lifecam software using Windows Control Panel
2. Always click Cancel when the invitation to install Lifecam software appears
W indows 8
The Lifecam driver is built into Windows and should not be uninstalled. Choose the alternativedriver as follows...
1. Open the Windows Device Manager program
2. Look for Im aging devices > M icrosoft LifeCam studio, right click this and select Properties
3. Click the Driver tab
4. Click the Update Driver... button
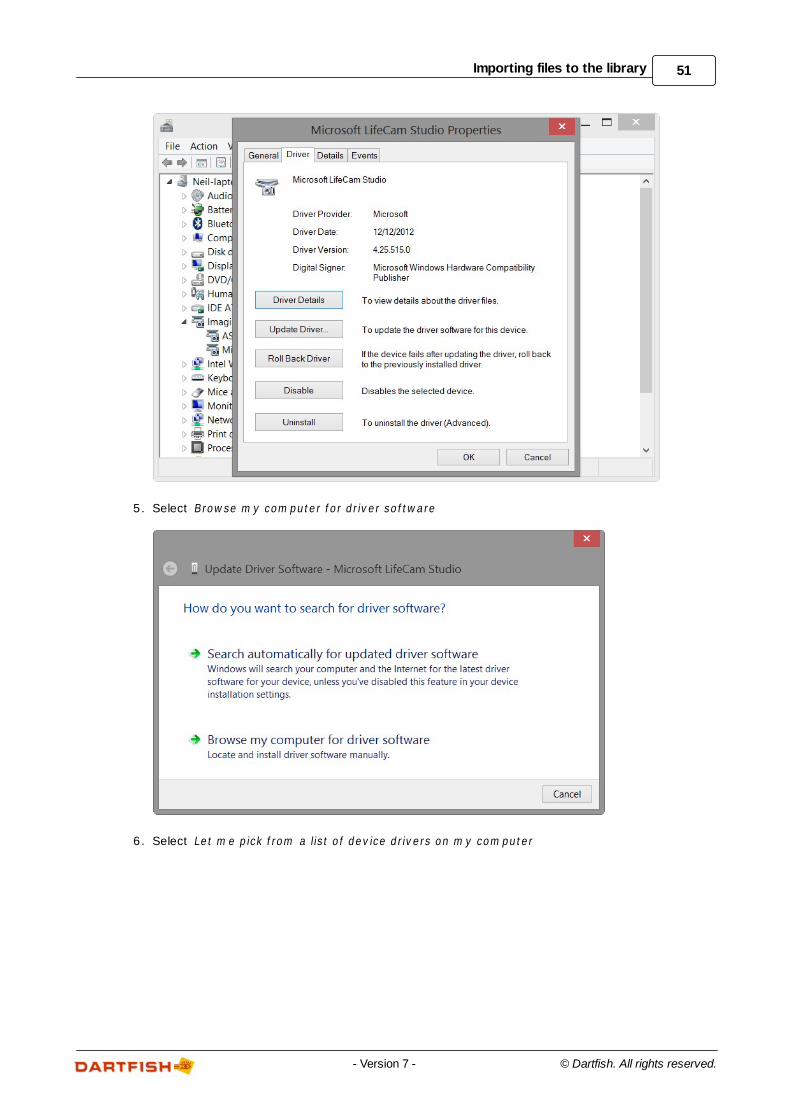
51Importing files to the library
© Dartfish. All rights reserved.- Version 7 -
5. Select Browse m y com puter for driver software
6. Select Let m e pick from a list of device drivers on m y com puter
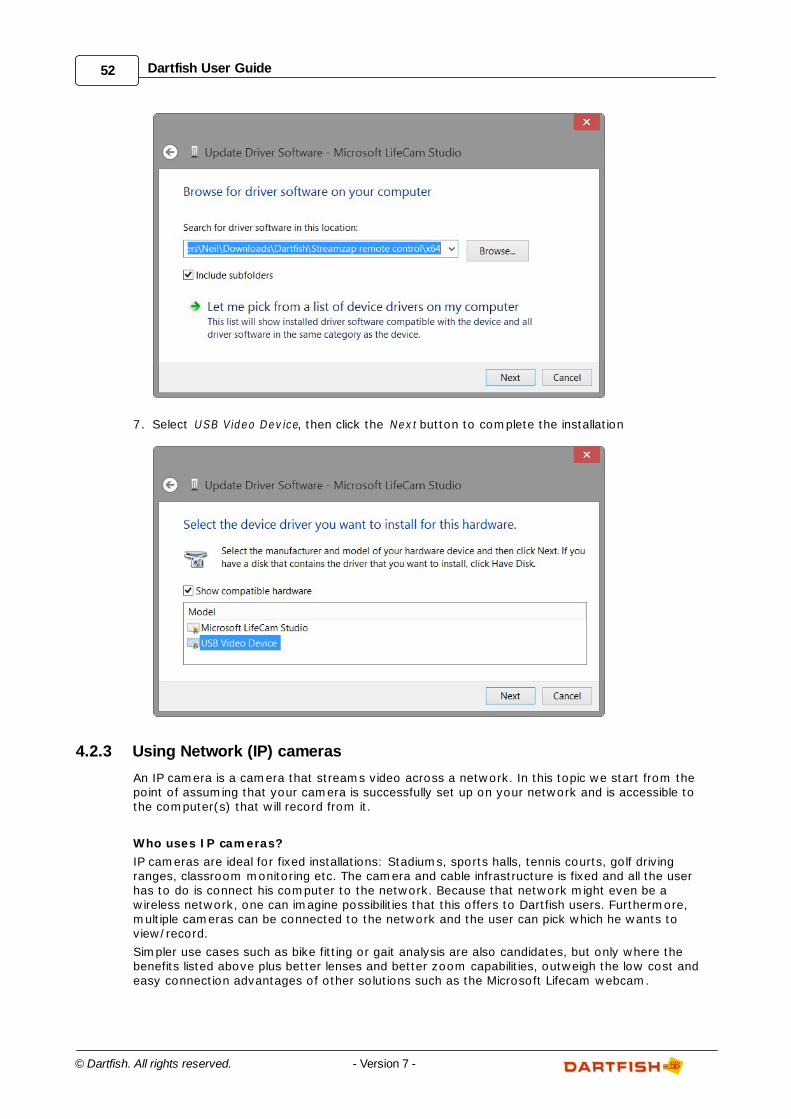
52 Dartfish User Guide
© Dartfish. All rights reserved. - Version 7 -
7. Select USB Video Device, then click the Next button to complete the installation
4.2.3 Using Network (IP) cameras
An IP camera is a camera that streams video across a network. In this topic we start from thepoint of assuming that your camera is successfully set up on your network and is accessible tothe computer(s) that will record from it.
Who uses IP cameras?
IP cameras are ideal for fixed installations: Stadiums, sports halls, tennis courts, golf drivingranges, classroom monitoring etc. The camera and cable infrastructure is fixed and all the userhas to do is connect his computer to the network. Because that network might even be awireless network, one can imagine possibilities that this offers to Dartfish users. Furthermore,multiple cameras can be connected to the network and the user can pick which he wants toview/record.
Simpler use cases such as bike fitting or gait analysis are also candidates, but only where thebenefits listed above plus better lenses and better zoom capabilities, outweigh the low cost andeasy connection advantages of other solutions such as the Microsoft Lifecam webcam.
53Importing files to the library
© Dartfish. All rights reserved.- Version 7 -
Dartfish support for IP cameras
Cameras compliant with the ONVIF standard are supported. Where PTZ is required the devicemust comply with ONVIF version 2.
In theory, Dartfish should be able to record from any ONVIF compliant device. In practice, theimplementation of the standard is variable between manufacturers and we are continuing to learnhow to make all function optimally with Dartfish. As we learn more about how ONVIF isimplemented, we can expect a wide range of cameras to function without any need for furthersoftware updates.
There are three parts to configuring an IP camera:
1. Use the camera's own configuration tools to define some essential parameters as well asother features of the video
2. Enable Onvif plugin
3. Select camera and (optionally configure video/audio stream)
4.2.3.1 Configure an IP camera
The initial configuration of the camera is typically done via its web page simply by entering the IPaddress of the camera into a browser but a dedicated utility may be provided by the cameramanufacturer. Consult the camera user manual on how to access and configure the device.
Important parameters
Some properties of the video stream can be modified directly from Dartfish later. Among thosewhich can only be defined from the camera configuration, it is important to check the following:
Update f irm ware: There may be a button or link to do this on the configuration page.Otherwise, the manufacturer’s support website should be checked to discover if there is anupdate. Interoperability with Dartfish may depend on this.
Set date and tim e of cam era: This may be important to ensure correct communicationbetween the camera and computer.
Set sensor base fram e rate: The sensor frame rate must be set to the frequency of the ACpower of your country e.g. 60 Hz/fps for the US and 50 Hz/fps for Europe. Failure to do thismay result in poor image quality and flickering video.
The sensor frame rate is not the same as the frame rate of the video received by Dartfish. Youcan configure that from Dartfish.

54 Dartfish User Guide
© Dartfish. All rights reserved. - Version 7 -
4.2.3.2 IP camera setup in Dartfish
Enable network camera
1. From the Dartfish Tools m enu > Options > Network cam eras
2 . From the list of plug-ins, select ONVIF IP Cam era then check the Enable plug-in option
3. Enter user name and password (if user profiles defined for camera require login)
The login relates to user profiles created on the camera. Dartfish does not allow the user tologin to individual cameras but instead offers a global login which gives the user access to all thecameras with user profiles with those login credentials.
HTTPS or HTTP?
Selecting the Use HTTPS when available option ensures that communication between cameraand computer is secure. However, be aware that:
Not all devices offer HTTPS encryption. Ticking the box here has no effect.
HTTPS does not encrypt video, it only provides secure communication between camera andcomputer of information such as login.
Device selection
Select Video Recorder from the drop down menu on the Im porter button.
Any available camera can be selected in the Capture device section of the module.
After selecting a camera, buttons to configure video, audio and (if available) PTZ settings will bedisplayed next to the selected device.
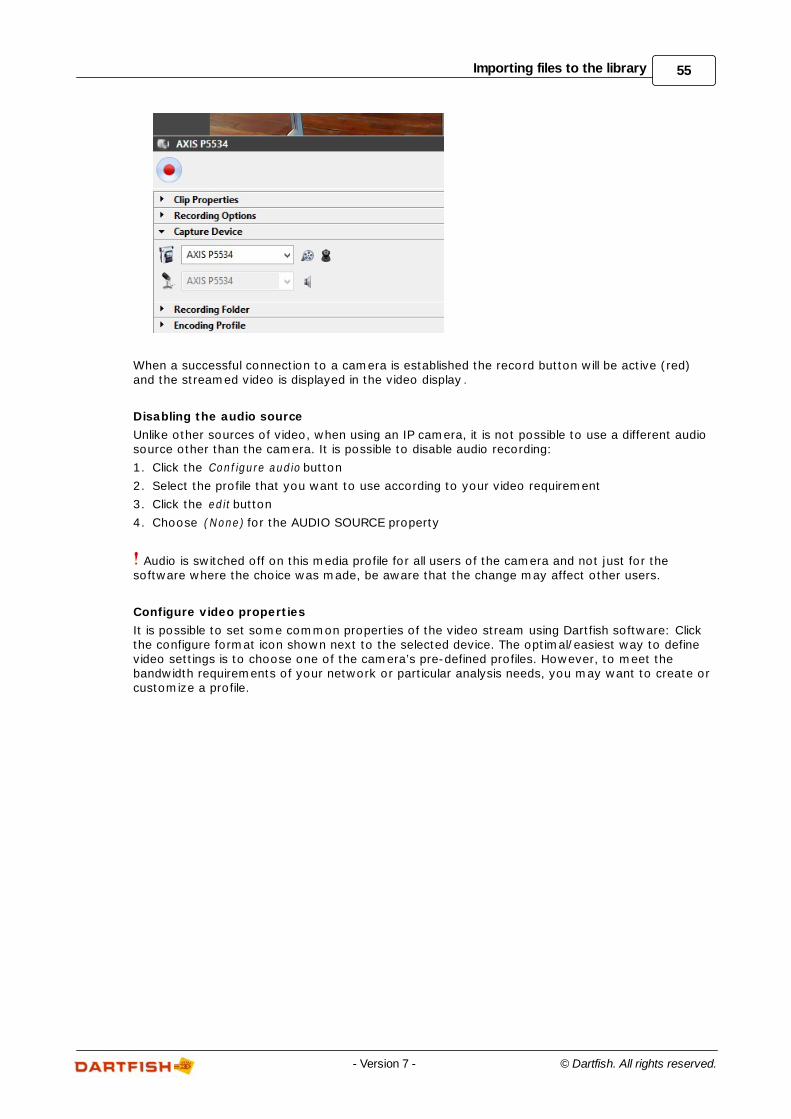
55Importing files to the library
© Dartfish. All rights reserved.- Version 7 -
When a successful connection to a camera is established the record button will be active (red)and the streamed video is displayed in the video display .
Disabling the audio source
Unlike other sources of video, when using an IP camera, it is not possible to use a different audiosource other than the camera. It is possible to disable audio recording:
1. Click the Conf igure audio button
2. Select the profile that you want to use according to your video requirement
3. Click the edit button
4. Choose (None) for the AUDIO SOURCE property
Audio is switched off on this media profile for all users of the camera and not just for thesoftware where the choice was made, be aware that the change may affect other users.
Configure video properties
It is possible to set some common properties of the video stream using Dartfish software: Clickthe configure format icon shown next to the selected device. The optimal/easiest way to definevideo settings is to choose one of the camera’s pre-defined profiles. However, to meet thebandwidth requirements of your network or particular analysis needs, you may want to create orcustomize a profile.
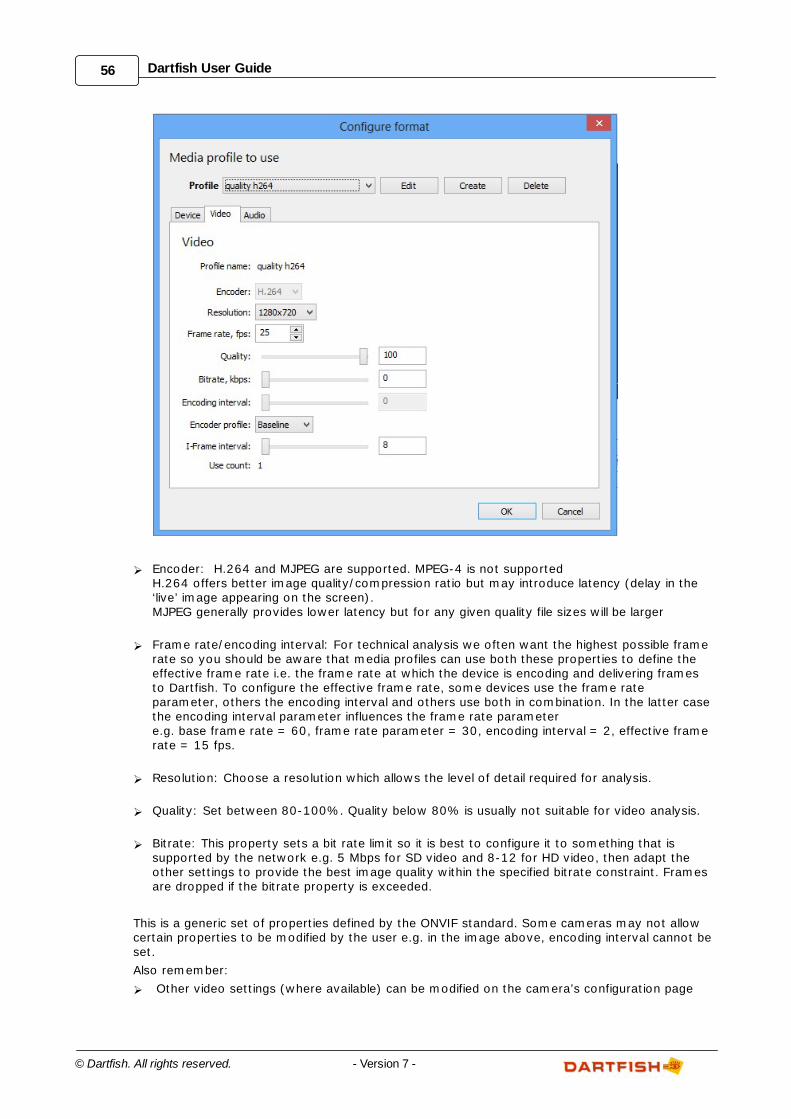
56 Dartfish User Guide
© Dartfish. All rights reserved. - Version 7 -
Encoder: H.264 and MJPEG are supported. MPEG-4 is not supportedH.264 offers better image quality/compression ratio but may introduce latency (delay in the‘live’ image appearing on the screen).MJPEG generally provides lower latency but for any given quality file sizes will be larger
Frame rate/encoding interval: For technical analysis we often want the highest possible framerate so you should be aware that media profiles can use both these properties to define theeffective frame rate i.e. the frame rate at which the device is encoding and delivering framesto Dartfish. To configure the effective frame rate, some devices use the frame rateparameter, others the encoding interval and others use both in combination. In the latter casethe encoding interval parameter influences the frame rate parameter e.g. base frame rate = 60, frame rate parameter = 30, encoding interval = 2, effective framerate = 15 fps.
Resolution: Choose a resolution which allows the level of detail required for analysis.
Quality: Set between 80-100%. Quality below 80% is usually not suitable for video analysis.
Bitrate: This property sets a bit rate limit so it is best to configure it to something that issupported by the network e.g. 5 Mbps for SD video and 8-12 for HD video, then adapt theother settings to provide the best image quality within the specified bitrate constraint. Framesare dropped if the bitrate property is exceeded.
This is a generic set of properties defined by the ONVIF standard. Some cameras may not allowcertain properties to be modified by the user e.g. in the image above, encoding interval cannot beset.
Also remember:
Other video settings (where available) can be modified on the camera’s configuration page
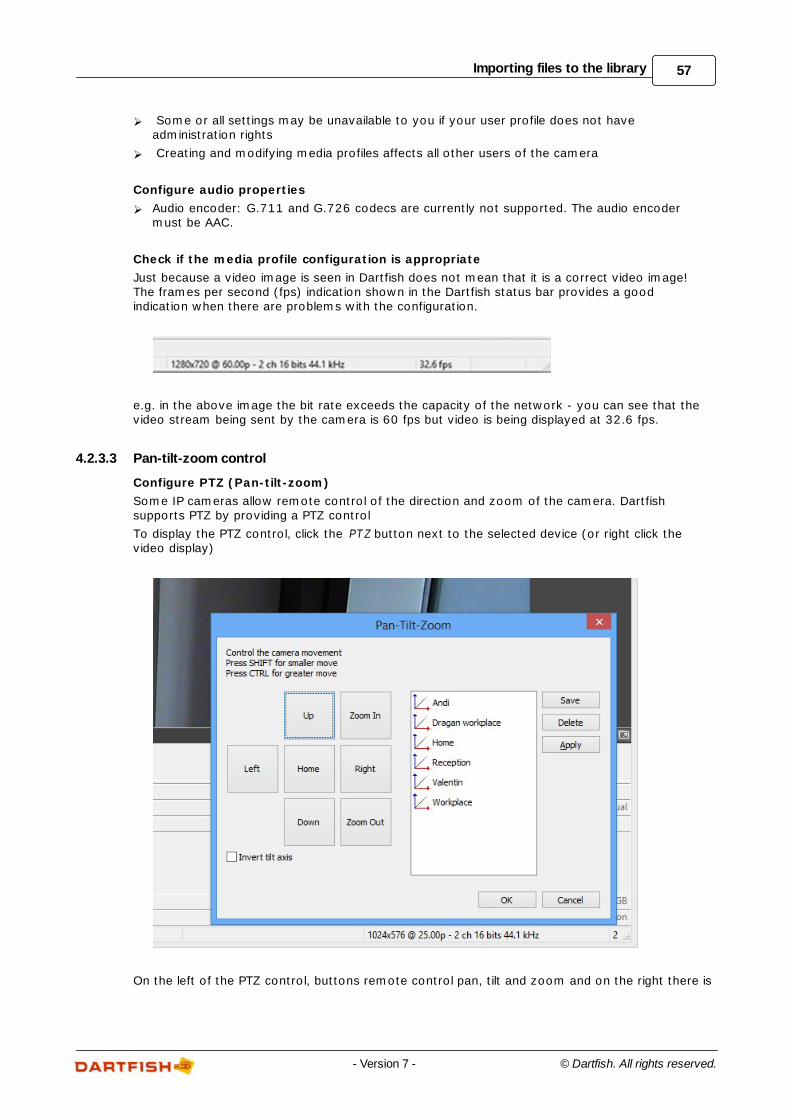
57Importing files to the library
© Dartfish. All rights reserved.- Version 7 -
Some or all settings may be unavailable to you if your user profile does not haveadministration rights
Creating and modifying media profiles affects all other users of the camera
Configure audio properties
Audio encoder: G.711 and G.726 codecs are currently not supported. The audio encodermust be AAC.
Check if the media profile configuration is appropriate
Just because a video image is seen in Dartfish does not mean that it is a correct video image!The frames per second (fps) indication shown in the Dartfish status bar provides a goodindication when there are problems with the configuration.
e.g. in the above image the bit rate exceeds the capacity of the network - you can see that thevideo stream being sent by the camera is 60 fps but video is being displayed at 32.6 fps.
4.2.3.3 Pan-tilt-zoom control
Configure PTZ (Pan-tilt-zoom)
Some IP cameras allow remote control of the direction and zoom of the camera. Dartfishsupports PTZ by providing a PTZ control
To display the PTZ control, click the PTZ button next to the selected device (or right click thevideo display)
On the left of the PTZ control, buttons remote control pan, tilt and zoom and on the right there is

58 Dartfish User Guide
© Dartfish. All rights reserved. - Version 7 -
a list of preset positions.
Create a preset by:
1. Pointing and zooming the camera
2. Click the Save button
3. Enter a name for the preset
Users of Dartfish tagging can add a PTZ move button to a tagging panel to integratecamera control into the tagging workflow.
4.2.4 Setting Clip Properties
Use the Clip Properties to set the F ile Nam e, Categories and Keywords for newly captured clips.This information defines a so-called Capture Form that will be used to categorize the video clipsduring capture.
Read the section Organizing your library to learn more about categories and keywords.
Defining the Capture Form
1. Click the Add a category link . The Add Category dialog will appear.
2. Select a category from the list or create a new one.
3. Click OK. A new category box will appear on your Capture Form.
4. Repeat steps 1-3 until boxes for all the categories you want to use are displayed on yourform.
Using the Capture Form
1. Type a file name in the file name text box.
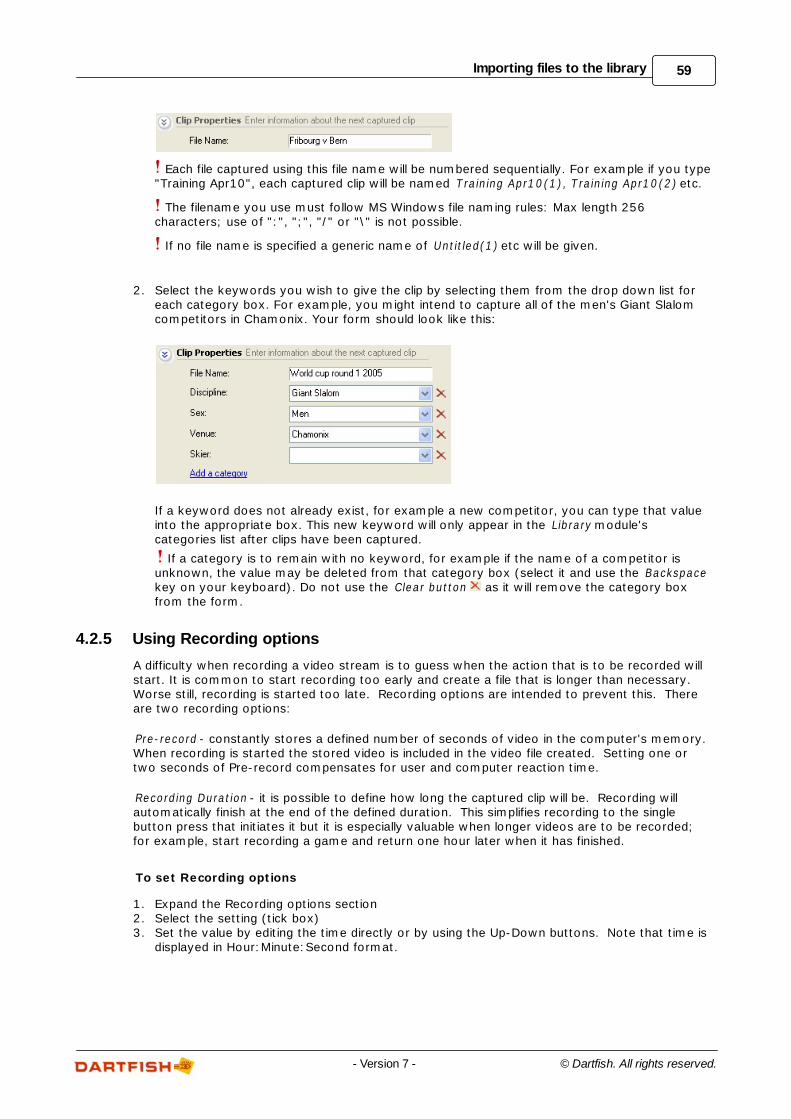
59Importing files to the library
© Dartfish. All rights reserved.- Version 7 -
Each file captured using this file name will be numbered sequentially. For example if you type"Training Apr10", each captured clip will be named T raining Apr10(1), T raining Apr10(2) etc.
The filename you use must follow MS Windows file naming rules: Max length 256characters; use of ":", ";", "/" or "\" is not possible.
If no file name is specified a generic name of Untitled(1) etc will be given.
2. Select the keywords you wish to give the clip by selecting them from the drop down list foreach category box. For example, you might intend to capture all of the men's Giant Slalomcompetitors in Chamonix. Your form should look like this:
If a keyword does not already exist, for example a new competitor, you can type that valueinto the appropriate box. This new keyword will only appear in the Library module'scategories list after clips have been captured.
If a category is to remain with no keyword, for example if the name of a competitor isunknown, the value may be deleted from that category box (select it and use the Backspacekey on your keyboard). Do not use the Clear button as it will remove the category boxfrom the form.
4.2.5 Using Recording options
A difficulty when recording a video stream is to guess when the action that is to be recorded willstart. It is common to start recording too early and create a file that is longer than necessary.Worse still, recording is started too late. Recording options are intended to prevent this. Thereare two recording options:
Pre-record - constantly stores a defined number of seconds of video in the computer's memory.When recording is started the stored video is included in the video file created. Setting one ortwo seconds of Pre-record compensates for user and computer reaction time.
Recording Duration - it is possible to define how long the captured clip will be. Recording willautomatically finish at the end of the defined duration. This simplifies recording to the singlebutton press that initiates it but it is especially valuable when longer videos are to be recorded;for example, start recording a game and return one hour later when it has finished.
To set Recording options
1. Expand the Recording options section2. Select the setting (tick box)3. Set the value by editing the time directly or by using the Up-Down buttons. Note that time is
displayed in Hour:Minute:Second format.
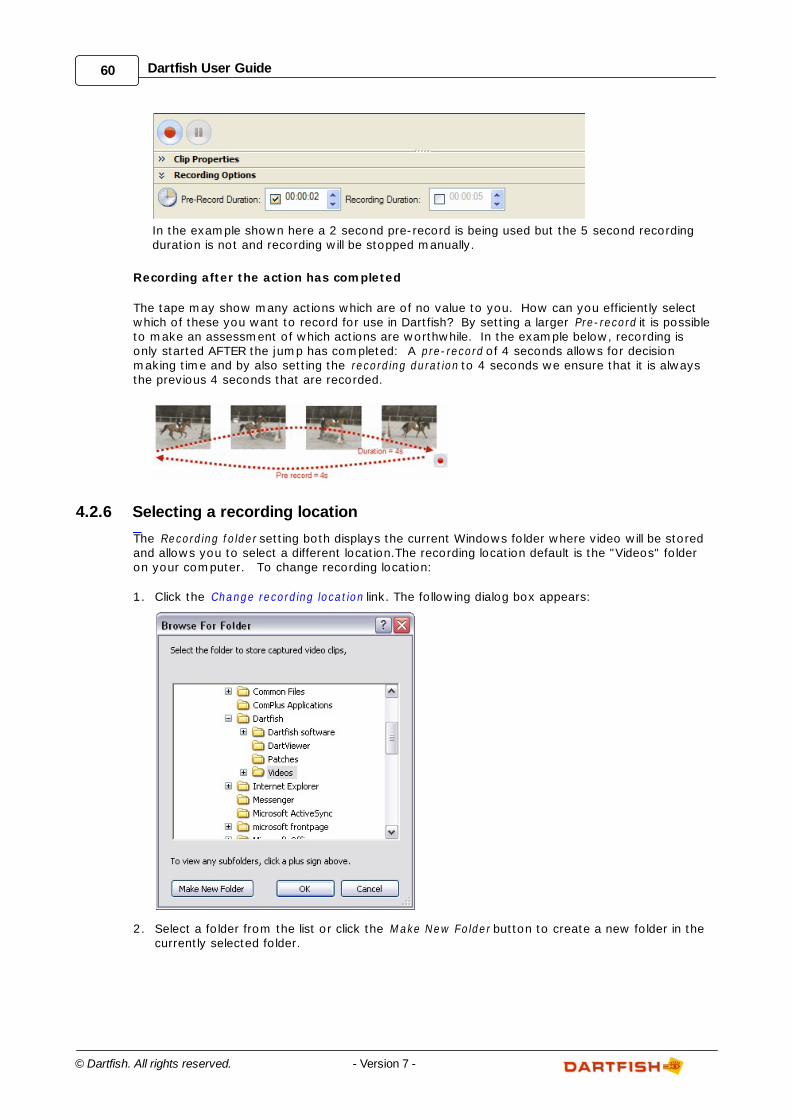
60 Dartfish User Guide
© Dartfish. All rights reserved. - Version 7 -
In the example shown here a 2 second pre-record is being used but the 5 second recordingduration is not and recording will be stopped manually.
Recording after the action has completed
The tape may show many actions which are of no value to you. How can you efficiently selectwhich of these you want to record for use in Dartfish? By setting a larger Pre-record it is possibleto make an assessment of which actions are worthwhile. In the example below, recording isonly started AFTER the jump has completed: A pre-record of 4 seconds allows for decisionmaking time and by also setting the recording duration to 4 seconds we ensure that it is alwaysthe previous 4 seconds that are recorded.
4.2.6 Selecting a recording location
The Recording folder setting both displays the current Windows folder where video will be storedand allows you to select a different location.The recording location default is the "Videos" folderon your computer. To change recording location:
1. Click the Change recording location link. The following dialog box appears:
2. Select a folder from the list or click the M ake New Folder button to create a new folder in thecurrently selected folder.
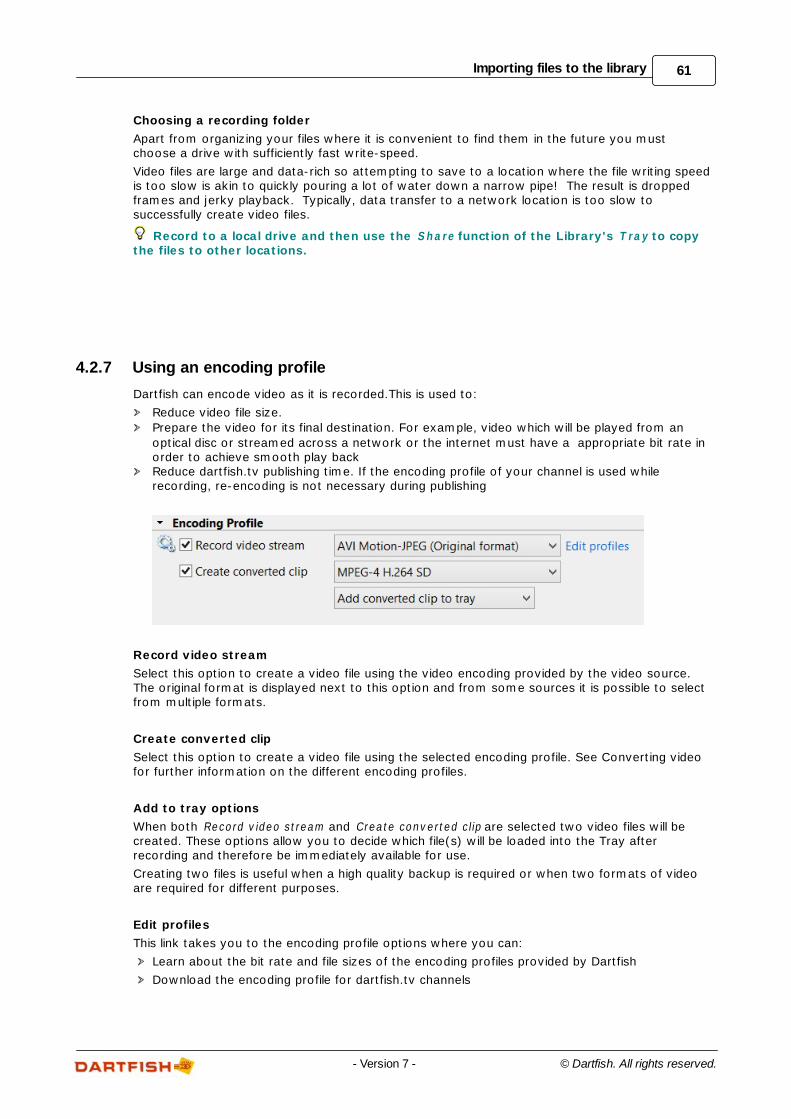
61Importing files to the library
© Dartfish. All rights reserved.- Version 7 -
Choosing a recording folder
Apart from organizing your files where it is convenient to find them in the future you mustchoose a drive with sufficiently fast write-speed.
Video files are large and data-rich so attempting to save to a location where the file writing speedis too slow is akin to quickly pouring a lot of water down a narrow pipe! The result is droppedframes and jerky playback. Typically, data transfer to a network location is too slow tosuccessfully create video files.
Record to a local drive and then use the Share function of the Library's T ray to copythe files to other locations.
4.2.7 Using an encoding profile
Dartfish can encode video as it is recorded.This is used to:
Reduce video file size.
Prepare the video for its final destination. For example, video which will be played from an
optical disc or streamed across a network or the internet must have a appropriate bit rate inorder to achieve smooth play backReduce dartfish.tv publishing time. If the encoding profile of your channel is used whilerecording, re-encoding is not necessary during publishing
Record video stream
Select this option to create a video file using the video encoding provided by the video source.The original format is displayed next to this option and from some sources it is possible to selectfrom multiple formats.
Create converted clip
Select this option to create a video file using the selected encoding profile. See Converting videofor further information on the different encoding profiles.
Add to tray options
When both Record video stream and Create converted clip are selected two video files will becreated. These options allow you to decide which file(s) will be loaded into the Tray afterrecording and therefore be immediately available for use.
Creating two files is useful when a high quality backup is required or when two formats of videoare required for different purposes.
Edit profiles
This link takes you to the encoding profile options where you can:
Learn about the bit rate and file sizes of the encoding profiles provided by Dartfish
Download the encoding profile for dartfish.tv channels
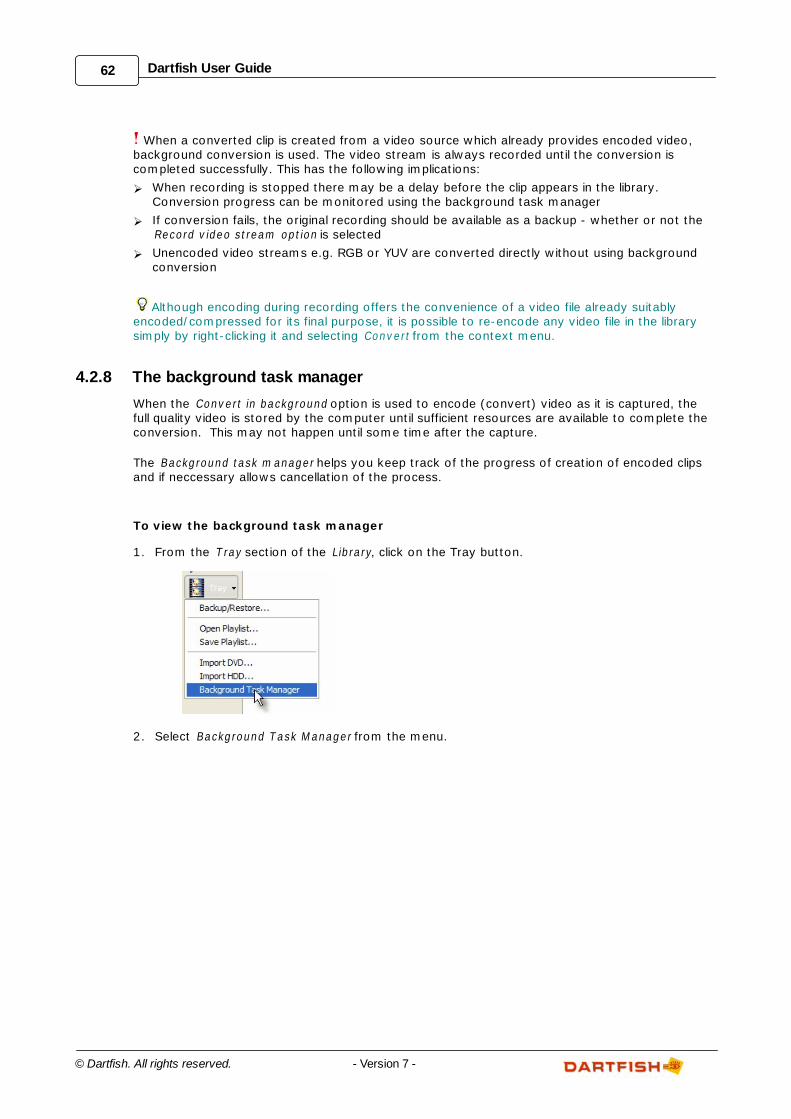
62 Dartfish User Guide
© Dartfish. All rights reserved. - Version 7 -
When a converted clip is created from a video source which already provides encoded video,background conversion is used. The video stream is always recorded until the conversion iscompleted successfully. This has the following implications:
When recording is stopped there may be a delay before the clip appears in the library.Conversion progress can be monitored using the background task manager
If conversion fails, the original recording should be available as a backup - whether or not theRecord video stream option is selected
Unencoded video streams e.g. RGB or YUV are converted directly without using backgroundconversion
Although encoding during recording offers the convenience of a video file already suitablyencoded/compressed for its final purpose, it is possible to re-encode any video file in the librarysimply by right-clicking it and selecting Convert from the context menu.
4.2.8 The background task manager
When the Convert in background option is used to encode (convert) video as it is captured, thefull quality video is stored by the computer until sufficient resources are available to complete theconversion. This may not happen until some time after the capture.
The Background task m anager helps you keep track of the progress of creation of encoded clipsand if neccessary allows cancellation of the process.
To view the background task manager
1. From the T ray section of the Library, click on the Tray button.
2. Select Background Task M anager from the menu.

63Importing files to the library
© Dartfish. All rights reserved.- Version 7 -
To cancel tasks
If the progress indicator for a task shows that it is not yet complete then the task
can be cancelled by clicking its close button . Clicking the same button on completed tasksdoes not undo the process, it simply removes the item from the list. All complete tasks can beremoved by clicking the C lear button. This may help in identifying which tasks are stillincomplete.
4.2.9 Capturing video to Library
Once setup, the process of capturing video is a simple one; you have to locate the position onthe tape where the footage of interest is recorded and then click a single button to start and thenstop capture at the beginning and end.
Finding footage on tape
The DV Import module has a set of controls that you can use to control the camera.
Alternatively, you can use the equivalent controls on the camera itself.
Capture video
Click the record button at the start and end of the clip.
The pause recording button allows you to pause capture while the tape continues to run. Thisallows you to create a single clip when the action is split. For example, coach intervention in themiddle of a trampoline routine or a fall while skiing can be ignored.
Replaying captured clips
The clips you have captured will now be listed in both the T ray and Item s List of the Librarymodule. Load the video by double clicking on it. The video clip will open in the Player module.
64 Dartfish User Guide
© Dartfish. All rights reserved. - Version 7 -
4.3 The next steps
This lesson covered ways to import video files or record a video stream
If continuing your journey through Dartfish Help then you might want to learn how to capturevideo 'live' using the InTheAction Module (read chapter Live capture & instant replay duringtraining).
Dartfish is also able to share video by producing Media Books from the Analyzer module.
Chapter
V
Live capture & instantreplay during training

66 Dartfish User Guide
© Dartfish. All rights reserved. - Version 7 -
5 Live capture & instant replay during trainingThe InTheAction module is a combination of Dartfish capture, replay, comparison and analysisfeatures brought together in a way that allows the delivery of video feedback during trainingsessions.
The aim here has been to make the technology easy to use without the presence of a computerbeing disruptive to training itself. Some of the key features which allow this to happen are:
Remote controlled - for complete ease of use, a single button on the remote control can controlboth capture and replay.
Simplified video capture - in automatic mode only trigger capture at the start of the action. Afixed number of seconds is captured from this point.
Automatic instant replay - replay happens automatically as soon as capture is complete. Pauseand set replay speed by remote control.
Comparison - compare captured clips side by side with a reference clip.
Synchronization - synchronization of clips is based around the moment when you triggercapture making comparison of 2 clips both easy and quick.
Drawing/annotation tools - illustrate coaching points using a range of drawing tools
5.1 Preparing InTheAction for use
At the start of your coaching session using InTheAction you will spend a short time preparingInTheAction for use. Of course you'll need to connect the camera, perhaps more than one camera,also in this section you will learn to adapt the recording and play parameters according to yourspecific needs.
5.1.1 Selecting capture device
IMPORTANT NOTE: About using video devices with InTheAction
InTheAction works by establishing a link that allows live images to pass directly from camcorderto computer. For this reason it only works with camcorders and devices capable of providing avideo stream. DV and HDV tape camcorders can do this streaming but the latest HDD and SDcard camcorders do not offer this functionality.
It is still possible to use InTheAction with these camcorders in conjunction with converterhardware: the camcorder's video output to TV is connected to the converter which creates adigital video stream which can be used by Dartfish. Converters can be used with analog and HDMIvideo sources.
Further advice on sources of video can be found in the topic Video Recorder: capture a videostream
The latest advice on the use of camcorders and other imaging devices can be found on the
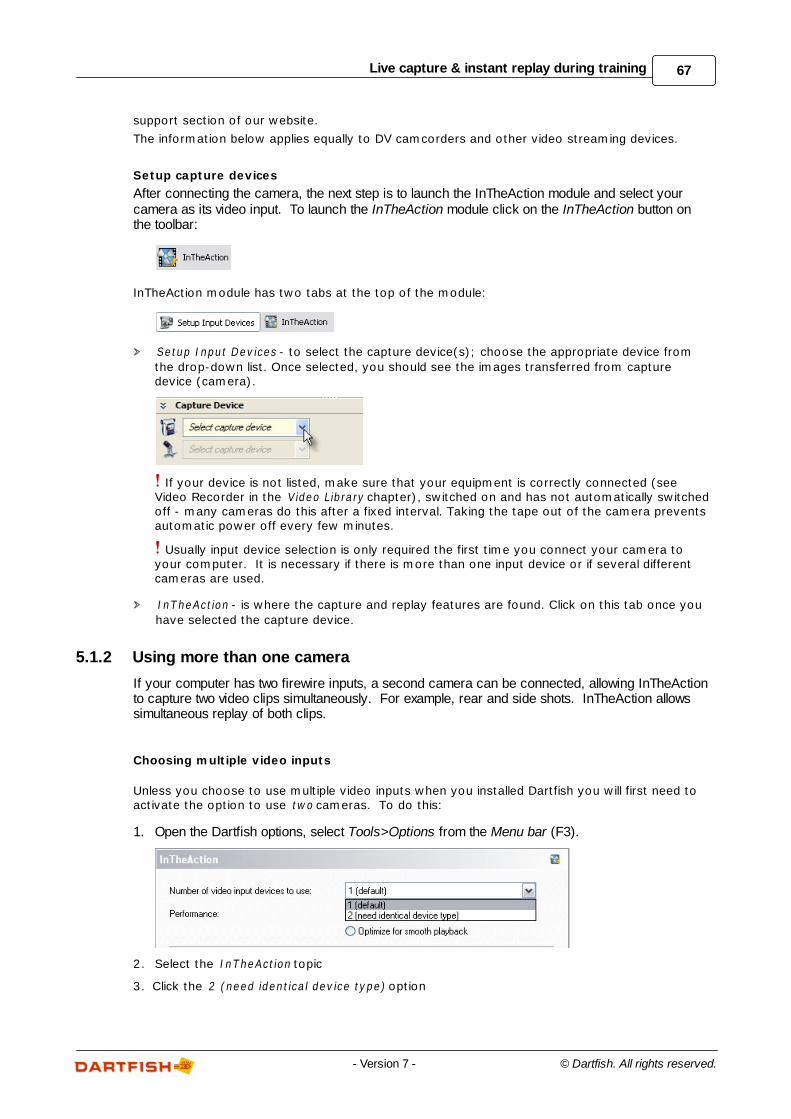
67Live capture & instant replay during training
© Dartfish. All rights reserved.- Version 7 -
support section of our website.
The information below applies equally to DV camcorders and other video streaming devices.
Setup capture devices
After connecting the camera, the next step is to launch the InTheAction module and select yourcamera as its video input. To launch the InTheAction module click on the InTheAction button onthe toolbar:
InTheAction module has two tabs at the top of the module:
Setup Input Devices - to select the capture device(s); choose the appropriate device from
the drop-down list. Once selected, you should see the images transferred from capturedevice (camera).
If your device is not listed, make sure that your equipment is correctly connected (seeVideo Recorder in the Video Library chapter), switched on and has not automatically switchedoff - many cameras do this after a fixed interval. Taking the tape out of the camera preventsautomatic power off every few minutes.
Usually input device selection is only required the first time you connect your camera toyour computer. It is necessary if there is more than one input device or if several differentcameras are used.
InTheAction - is where the capture and replay features are found. Click on this tab once you
have selected the capture device.
5.1.2 Using more than one camera
If your computer has two firewire inputs, a second camera can be connected, allowing InTheActionto capture two video clips simultaneously. For example, rear and side shots. InTheAction allowssimultaneous replay of both clips.
Choosing multiple video inputs
Unless you choose to use multiple video inputs when you installed Dartfish you will first need toactivate the option to use two cameras. To do this:
1. Open the Dartfish options, select Tools>Options from the Menu bar (F3).
2. Select the InTheAction topic
3. Click the 2 (need identical device type) option
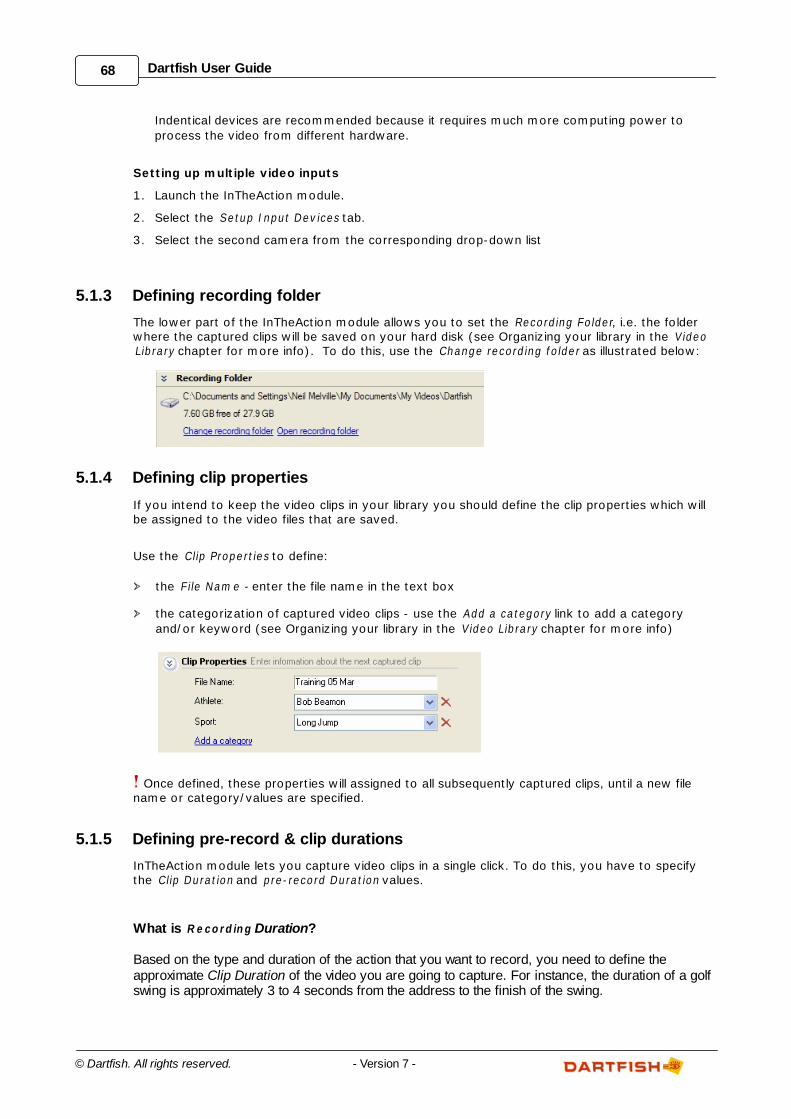
68 Dartfish User Guide
© Dartfish. All rights reserved. - Version 7 -
Indentical devices are recommended because it requires much more computing power to
process the video from different hardware.
Setting up multiple video inputs
1. Launch the InTheAction module.
2. Select the Setup Input Devices tab.
3. Select the second camera from the corresponding drop-down list
5.1.3 Defining recording folder
The lower part of the InTheAction module allows you to set the Recording Folder, i.e. the folderwhere the captured clips will be saved on your hard disk (see Organizing your library in the VideoLibrary chapter for more info). To do this, use the Change recording folder as illustrated below:
5.1.4 Defining clip properties
If you intend to keep the video clips in your library you should define the clip properties which willbe assigned to the video files that are saved.
Use the Clip Properties to define:
the F ile Nam e - enter the file name in the text box
the categorization of captured video clips - use the Add a category link to add a category
and/or keyword (see Organizing your library in the Video Library chapter for more info)
Once defined, these properties will assigned to all subsequently captured clips, until a new filename or category/values are specified.
5.1.5 Defining pre-record & clip durations
InTheAction module lets you capture video clips in a single click. To do this, you have to specifythe Clip Duration and pre-record Duration values.
What is Recording Duration?
Based on the type and duration of the action that you want to record, you need to define theapproximate Clip Duration of the video you are going to capture. For instance, the duration of a golfswing is approximately 3 to 4 seconds from the address to the finish of the swing.
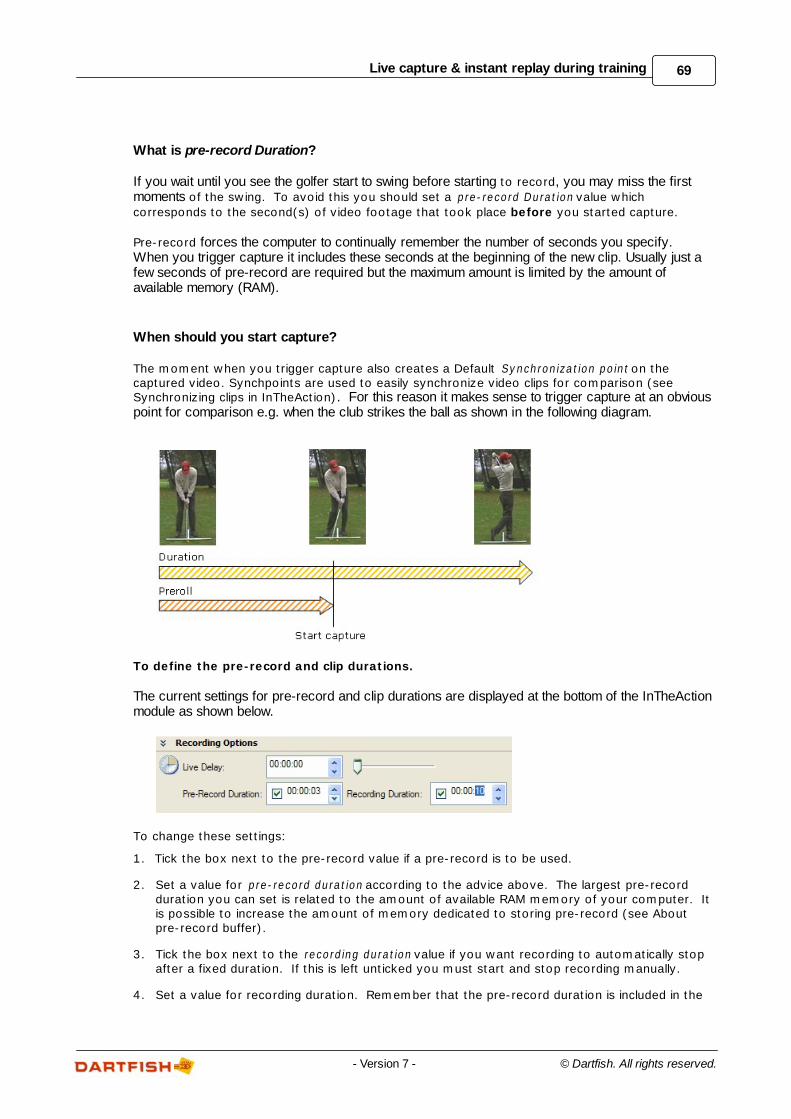
69Live capture & instant replay during training
© Dartfish. All rights reserved.- Version 7 -
What is pre-record Duration?
If you wait until you see the golfer start to swing before starting to record, you may miss the firstmoments of the swing. To avoid this you should set a pre-record Duration value which
corresponds to the second(s) of video footage that took place before you started capture.
Pre-record forces the computer to continually remember the number of seconds you specify.When you trigger capture it includes these seconds at the beginning of the new clip. Usually just afew seconds of pre-record are required but the maximum amount is limited by the amount ofavailable memory (RAM).
When should you start capture?
The moment when you trigger capture also creates a Default Synchronization point on thecaptured video. Synchpoints are used to easily synchronize video clips for comparison (see Synchronizing clips in InTheAction). For this reason it makes sense to trigger capture at an obviouspoint for comparison e.g. when the club strikes the ball as shown in the following diagram.
To define the pre-record and clip durations.
The current settings for pre-record and clip durations are displayed at the bottom of the InTheActionmodule as shown below.
To change these settings:
1. Tick the box next to the pre-record value if a pre-record is to be used.
2. Set a value for pre-record duration according to the advice above. The largest pre-recordduration you can set is related to the amount of available RAM memory of your computer. Itis possible to increase the amount of memory dedicated to storing pre-record (see Aboutpre-record buffer).
3. Tick the box next to the recording duration value if you want recording to automatically stopafter a fixed duration. If this is left unticked you must start and stop recording manually.
4. Set a value for recording duration. Remember that the pre-record duration is included in the
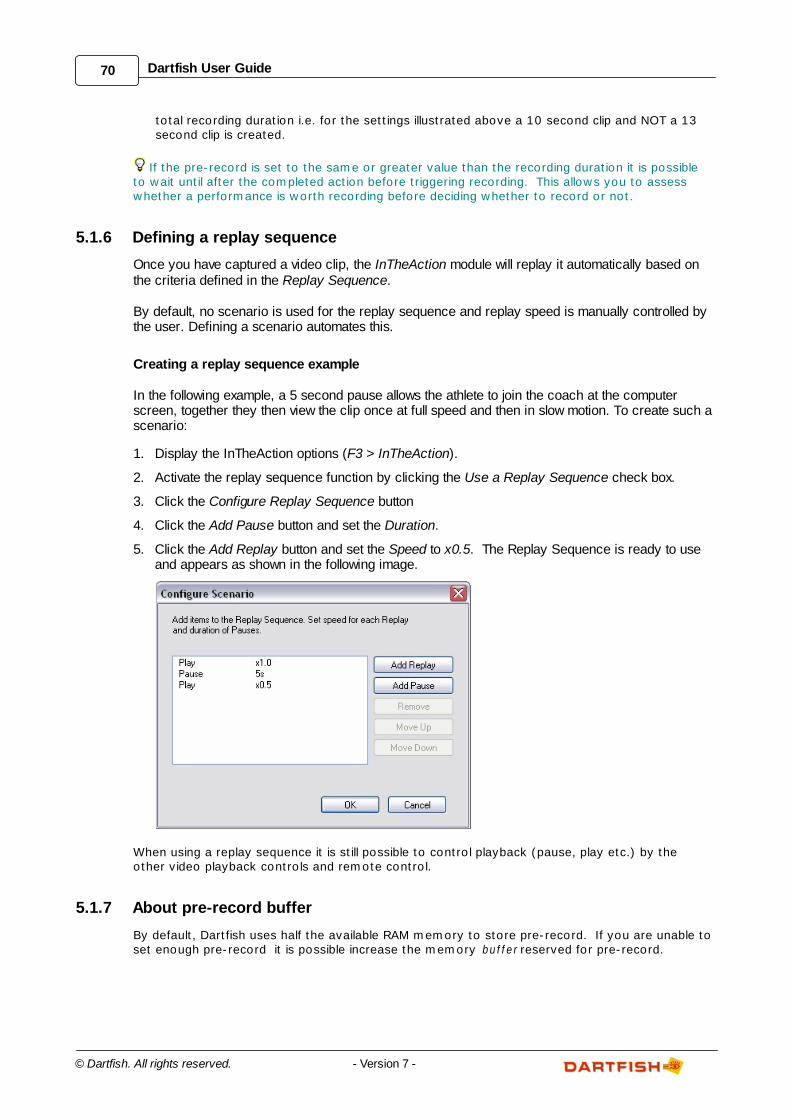
70 Dartfish User Guide
© Dartfish. All rights reserved. - Version 7 -
total recording duration i.e. for the settings illustrated above a 10 second clip and NOT a 13second clip is created.
If the pre-record is set to the same or greater value than the recording duration it is possibleto wait until after the completed action before triggering recording. This allows you to assesswhether a performance is worth recording before deciding whether to record or not.
5.1.6 Defining a replay sequence
Once you have captured a video clip, the InTheAction module will replay it automatically based onthe criteria defined in the Replay Sequence.
By default, no scenario is used for the replay sequence and replay speed is manually controlled bythe user. Defining a scenario automates this.
Creating a replay sequence example
In the following example, a 5 second pause allows the athlete to join the coach at the computerscreen, together they then view the clip once at full speed and then in slow motion. To create such ascenario:
1. Display the InTheAction options (F3 > InTheAction).
2. Activate the replay sequence function by clicking the Use a Replay Sequence check box.
3. Click the Configure Replay Sequence button
4. Click the Add Pause button and set the Duration.
5. Click the Add Replay button and set the Speed to x0.5. The Replay Sequence is ready to useand appears as shown in the following image.
When using a replay sequence it is still possible to control playback (pause, play etc.) by theother video playback controls and remote control.
5.1.7 About pre-record buffer
By default, Dartfish uses half the available RAM memory to store pre-record. If you are unable toset enough pre-record it is possible increase the memory buffer reserved for pre-record.
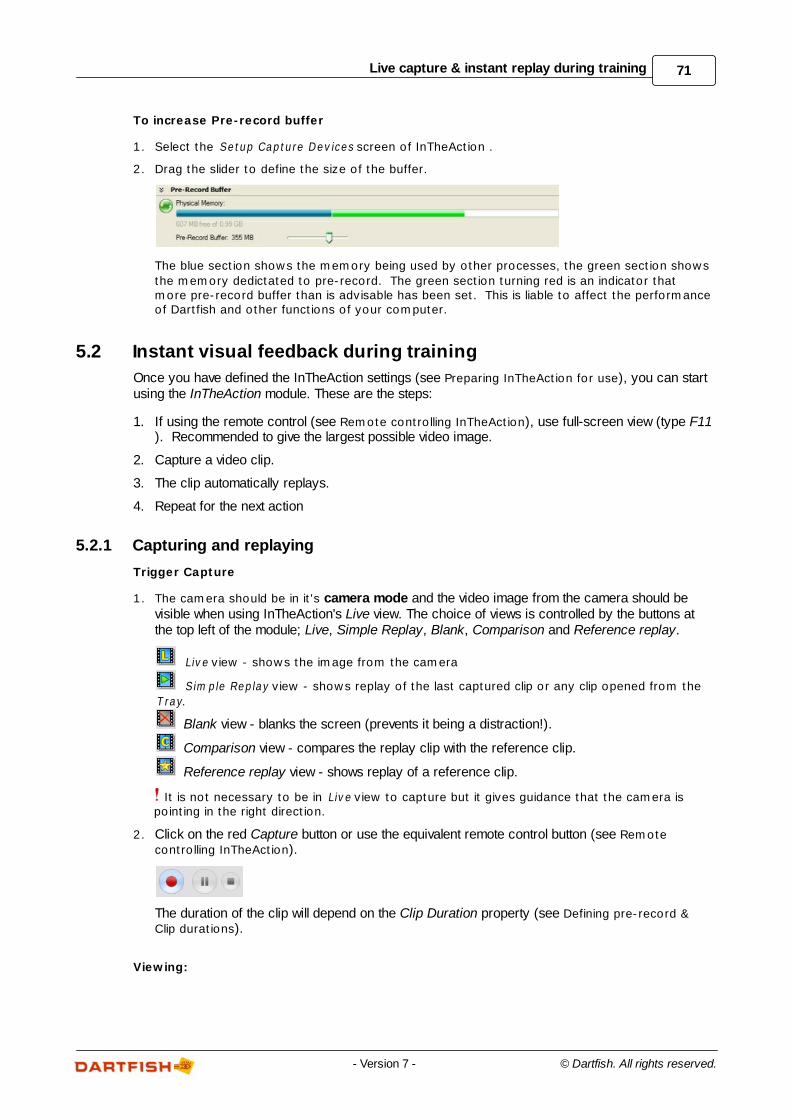
71Live capture & instant replay during training
© Dartfish. All rights reserved.- Version 7 -
To increase Pre-record buffer
1. Select the Setup Capture Devices screen of InTheAction .
2. Drag the slider to define the size of the buffer.
The blue section shows the memory being used by other processes, the green section shows
the memory dedictated to pre-record. The green section turning red is an indicator thatmore pre-record buffer than is advisable has been set. This is liable to affect the performanceof Dartfish and other functions of your computer.
5.2 Instant visual feedback during training
Once you have defined the InTheAction settings (see Preparing InTheAction for use), you can startusing the InTheAction module. These are the steps:
1. If using the remote control (see Remote controlling InTheAction), use full-screen view (type F11). Recommended to give the largest possible video image.
2. Capture a video clip.
3. The clip automatically replays.
4. Repeat for the next action
5.2.1 Capturing and replaying
Trigger Capture
1. The camera should be in it's camera mode and the video image from the camera should bevisible when using InTheAction's Live view. The choice of views is controlled by the buttons atthe top left of the module; Live, Simple Replay, Blank, Comparison and Reference replay.
Live view - shows the image from the camera
Sim ple Replay view - shows replay of the last captured clip or any clip opened from the
T ray.
Blank view - blanks the screen (prevents it being a distraction!).
Comparison view - compares the replay clip with the reference clip.
Reference replay view - shows replay of a reference clip.
It is not necessary to be in Live view to capture but it gives guidance that the camera ispointing in the right direction.
2. Click on the red Capture button or use the equivalent remote control button (see Remote
controlling InTheAction).
The duration of the clip will depend on the Clip Duration property (see Defining pre-record &
Clip durations).
Viewing:
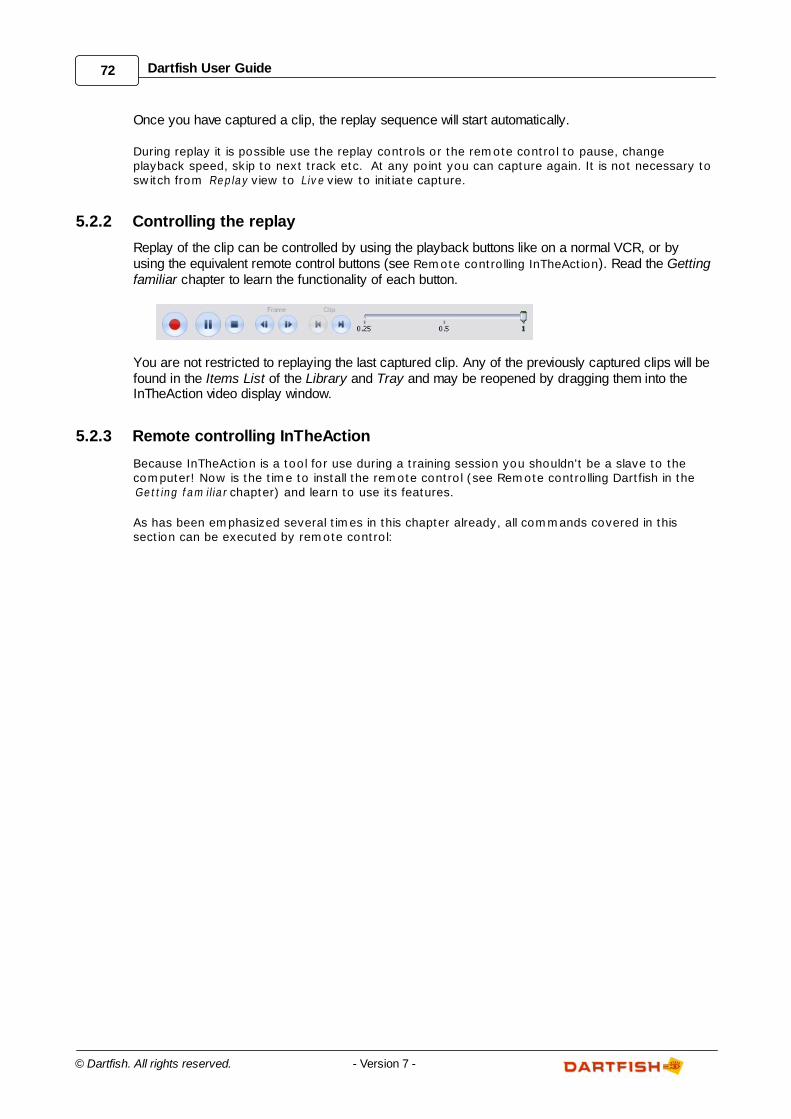
72 Dartfish User Guide
© Dartfish. All rights reserved. - Version 7 -
Once you have captured a clip, the replay sequence will start automatically.
During replay it is possible use the replay controls or the remote control to pause, changeplayback speed, skip to next track etc. At any point you can capture again. It is not necessary toswitch from Replay view to Live view to initiate capture.
5.2.2 Controlling the replay
Replay of the clip can be controlled by using the playback buttons like on a normal VCR, or byusing the equivalent remote control buttons (see Remote controlling InTheAction). Read the Gettingfamiliar chapter to learn the functionality of each button.
You are not restricted to replaying the last captured clip. Any of the previously captured clips will befound in the Items List of the Library and Tray and may be reopened by dragging them into theInTheAction video display window.
5.2.3 Remote controlling InTheAction
Because InTheAction is a tool for use during a training session you shouldn't be a slave to thecomputer! Now is the time to install the remote control (see Remote controlling Dartfish in theGetting fam iliar chapter) and learn to use its features.
As has been emphasized several times in this chapter already, all commands covered in thissection can be executed by remote control:
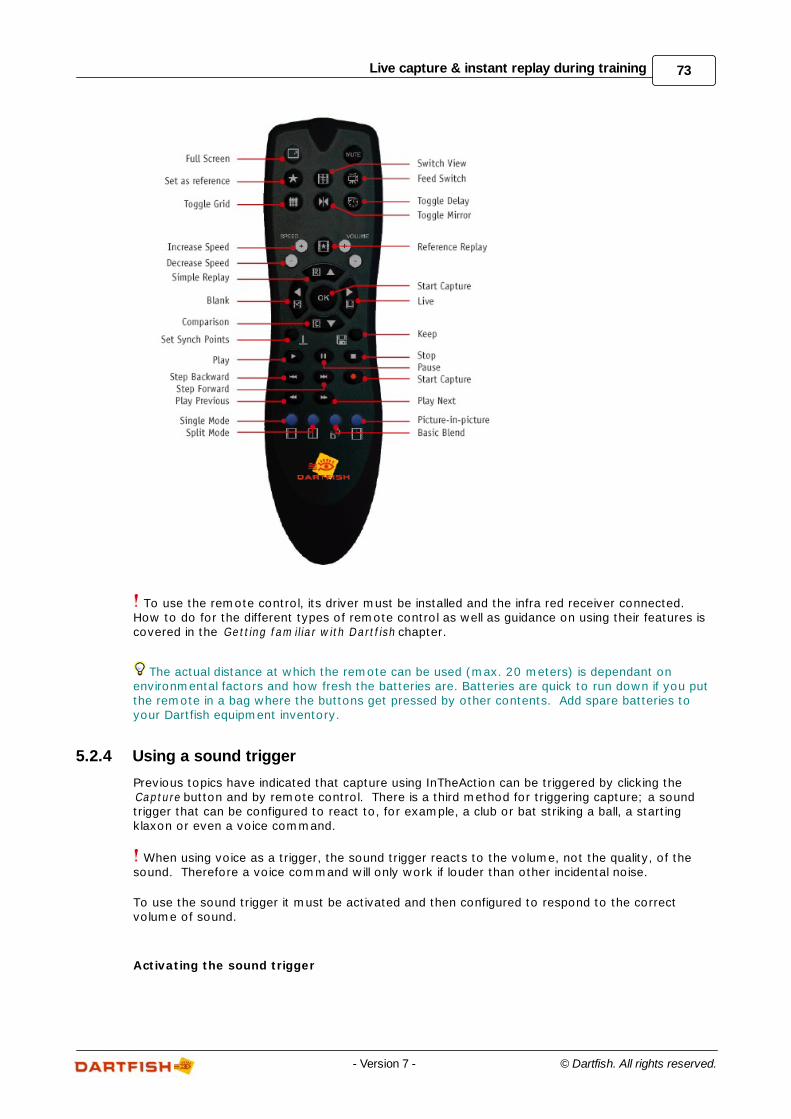
73Live capture & instant replay during training
© Dartfish. All rights reserved.- Version 7 -
To use the remote control, its driver must be installed and the infra red receiver connected.How to do for the different types of remote control as well as guidance on using their features iscovered in the Getting fam iliar with Dartf ish chapter.
The actual distance at which the remote can be used (max. 20 meters) is dependant onenvironmental factors and how fresh the batteries are. Batteries are quick to run down if you putthe remote in a bag where the buttons get pressed by other contents. Add spare batteries toyour Dartfish equipment inventory.
5.2.4 Using a sound trigger
Previous topics have indicated that capture using InTheAction can be triggered by clicking the Capture button and by remote control. There is a third method for triggering capture; a soundtrigger that can be configured to react to, for example, a club or bat striking a ball, a startingklaxon or even a voice command.
When using voice as a trigger, the sound trigger reacts to the volume, not the quality, of thesound. Therefore a voice command will only work if louder than other incidental noise.
To use the sound trigger it must be activated and then configured to respond to the correctvolume of sound.
Activating the sound trigger
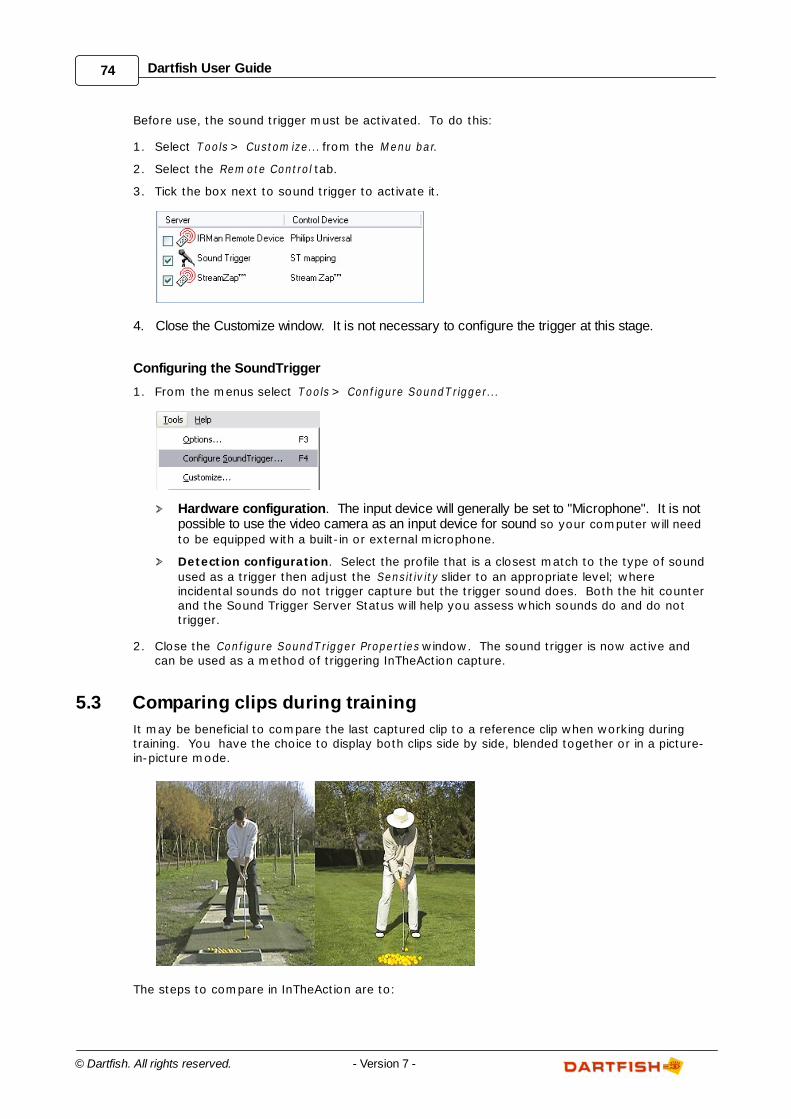
74 Dartfish User Guide
© Dartfish. All rights reserved. - Version 7 -
Before use, the sound trigger must be activated. To do this:
1. Select Tools > Custom ize... from the M enu bar.
2. Select the Rem ote Control tab.
3. Tick the box next to sound trigger to activate it.
4. Close the Customize window. It is not necessary to configure the trigger at this stage.
Configuring the SoundTrigger
1. From the menus select Tools > Conf igure SoundT rigger...
Hardware configuration. The input device will generally be set to "Microphone". It is notpossible to use the video camera as an input device for sound so your computer will need
to be equipped with a built-in or external microphone.
Detection configuration. Select the profile that is a closest match to the type of sound
used as a trigger then adjust the Sensitiv ity slider to an appropriate level; whereincidental sounds do not trigger capture but the trigger sound does. Both the hit counterand the Sound Trigger Server Status will help you assess which sounds do and do nottrigger.
2. Close the Conf igure SoundT rigger Properties window. The sound trigger is now active andcan be used as a method of triggering InTheAction capture.
5.3 Comparing clips during training
It may be beneficial to compare the last captured clip to a reference clip when working duringtraining. You have the choice to display both clips side by side, blended together or in a picture-in-picture mode.
The steps to compare in InTheAction are to:
75Live capture & instant replay during training
© Dartfish. All rights reserved.- Version 7 -
1. Define (set) a reference clip.
2. Activate the Com parison view and capture a clip. The captured clip is automatically compared
to the reference clip
3. If needed, synchronize the last captured clip with the reference
5.3.1 Setting reference
To Set a reference clip, proceed as follows:
1. Load a clip from the T ray or from the Library items into the InTheAction module
2. Click the Set Reference button found below InTheAction playback controls.
You can use any other clip already saved on your hard drive as a reference clip.
Viewing the reference clip
The reference clip can be viewed at any time by clicking on the Reference replay button.
5.3.2 Working with comparison view
To work with comparison view, click on the Comparison view button on the left edge of theInTheAction module. Comparison view is
The screen display will be split in two, the reference clip on the right and on the left the lastcaptured clip. Both clips will be replayed in function of the scenario that you defined (see Defining a
replay sequence).
To work with the Compare mode:
1. Capture a video clip.
2. At the end of the capture, the clip is automatically displayed next to the reference clip.
3. Use the playback buttons to control the replay
To select the comparison layout:
Use the following buttons:
Split Screen - where the clips will be displayed side-by-side.
Basic Blend - both clips will be superimposed on top of each other.
Picture-in-Picture - the reference is displayed in the corner of the replay clip.
76 Dartfish User Guide
© Dartfish. All rights reserved. - Version 7 -
5.3.3 Synchronizing clips in InTheAction
In order to effectively compare two clips, obviously they must be showing comparable activities,for example, you can't compare two divers if one is at a different point in the routine.
Synchronizing clips is often unnecessary with InTheAction because a synchronization point is setwhen capture is triggered. Provided that you always trigger at an obvious moment each timeyou capture, clips will always be synchronized.
To change or set synchronization points
1. Activate the Replay view (see Capturing and replaying).
2. Find the moment on the clip that is to be the synchronization point. Use the Play/Pause andFram e-by-Fram e buttons to do this.
3. Click .
4. Repeat for the reference clip if necessary (use the Reference replay button to display thereference clip).
5.4 Using drawings in InTheAction
The right-hand side of the InTheAction module has a range of drawing tools which can be used toannotate video images, assist with analysis or coaching. The use of these tools is identical tothe Analyzer module's drawing tools and is explained in that chapter.
5.4.1 Drawing Library
One unique feature of InTheAction drawing tools is that it is possible to store up to nine sets ofdrawings in the Drawing Library. This allows you to reuse drawings from one InTheActionanalysis to another.
Displaying the Drawing Library
1. To use the drawing library it must first be activated. To do this:
2. Display the Dartfish options (F3 or Tools > Options menu).
3. Select the Advanced topics.
4. From the ITA Settings, select the Use overlay drawing repository option.
5. After applying the change, the Drawing library control will be displayed on the InTheActionmodule as shown below.
Using the Drawing Library
1. Select an overlay from the list (up to nine overlays are possible)
2. Add drawings to the video image
3. As each new video is captured, the drawings from the currently selected overlay will appearon the video image.
Remember, at any time drawings can be hidden by clicking the Show/Hide drawing button.
77Live capture & instant replay during training
© Dartfish. All rights reserved.- Version 7 -
The Drawing library is one of the many features that Dartfish have added in response torequests from our users but at the current time, this feature continues to be developed. If theidea of a Drawing Library is valuable for the way you use Dartfish then you can look forward tofurther enhancements to this feature in future releases of Dartfish.
5.5 Self coaching with live delay
Live delay provides a completely hands-free way of reviewing video during training which makesit especially useful for self-coaching. It simply delays the display on the computer screen of theimages that the camera continuously observes. It's like a mirror but one that waits a predefinednumber of seconds before showing your reflection. Enough time for the athlete to finish aroutine, drill or exercise then assess how he or she performed.
For example, a coach might explain adjustments required using the range of InTheAction featuresexplained earlier in this chapter and then leave the athlete to practice, using Live Delay to confirmthe adjustment is being executed correctly.
5.5.1 Live delay settings
Before using live delay the camera should be connected and switched to it's camera mode. TheInTheAction module is activated and video input set up as described previously (see Preparing
InTheAction for use).
To use Live Delay, you must determine the duration of the movement that you will review andthen add 1-2 seconds as a margin. For instance a Golf swing takes 3-4 seconds, it might take afurther 5 seconds to get to a position to view the computer display - you would then set an 11second live delay (2+4+5).
Setting the amount of delay
1. From InTheAction's Recording Options change the live delay value. The largest amount ofseconds you can set is related to the amount of available RAM memory of your computer.
2. Click on the Live Delay view button.
3. Press F11 on your keyboard to have a full screen view (press F11 again to come back tonormal view).
That's it! No button presses, no files recorded, no comparison, no pause or replay. Just asimple tool to help with self coaching.
Using live delay doesn't stop the use of other InTheAction features. As soon as the capturebutton is pressed/clicked, capture begins according to the pre-record and duration settings andreplay commences straight away. However, to trigger the capture, always refer to the live actionand not to what you seen on the screen.
5.6 Next steps
InTheAction allows you to review and compare performance while training takes place but to reviewthese performances at a later date you should learn how to load, synchronize and compare clips inthe Analyzer module.
78 Dartfish User Guide
© Dartfish. All rights reserved. - Version 7 -
The Analyzer module will also allow you to publish your clips into a media book; a remote coachingtool complete with audio and text guidance (read the chapter on the Analyzer).
Chapter
VI
Unique ways to view sport- SimulCam & StroMotion
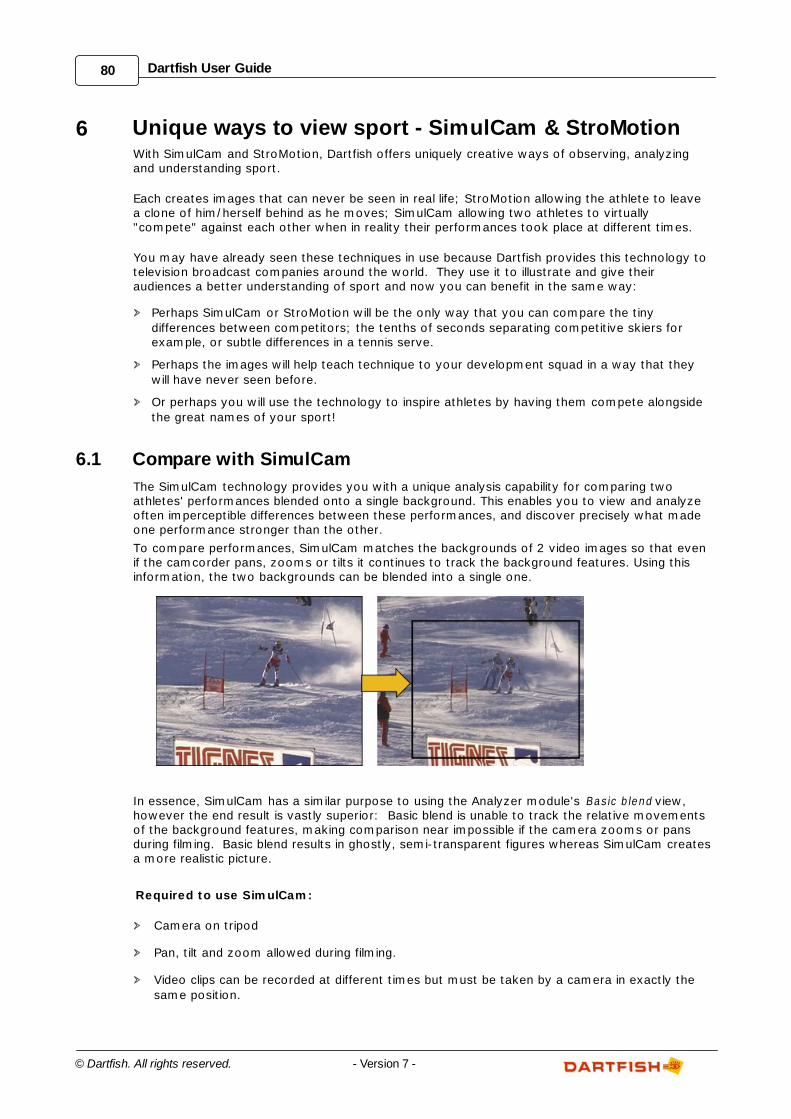
80 Dartfish User Guide
© Dartfish. All rights reserved. - Version 7 -
6 Unique ways to view sport - SimulCam & StroMotionWith SimulCam and StroMotion, Dartfish offers uniquely creative ways of observing, analyzingand understanding sport.
Each creates images that can never be seen in real life; StroMotion allowing the athlete to leavea clone of him/herself behind as he moves; SimulCam allowing two athletes to virtually"compete" against each other when in reality their performances took place at different times.
You may have already seen these techniques in use because Dartfish provides this technology totelevision broadcast companies around the world. They use it to illustrate and give theiraudiences a better understanding of sport and now you can benefit in the same way:
Perhaps SimulCam or StroMotion will be the only way that you can compare the tiny
differences between competitors; the tenths of seconds separating competitive skiers forexample, or subtle differences in a tennis serve.
Perhaps the images will help teach technique to your development squad in a way that they
will have never seen before.
Or perhaps you will use the technology to inspire athletes by having them compete alongside
the great names of your sport!
6.1 Compare with SimulCam
The SimulCam technology provides you with a unique analysis capability for comparing twoathletes' performances blended onto a single background. This enables you to view and analyzeoften imperceptible differences between these performances, and discover precisely what madeone performance stronger than the other.
To compare performances, SimulCam matches the backgrounds of 2 video images so that evenif the camcorder pans, zooms or tilts it continues to track the background features. Using thisinformation, the two backgrounds can be blended into a single one.
In essence, SimulCam has a similar purpose to using the Analyzer module's Basic blend view,however the end result is vastly superior: Basic blend is unable to track the relative movementsof the background features, making comparison near impossible if the camera zooms or pansduring filming. Basic blend results in ghostly, semi-transparent figures whereas SimulCam createsa more realistic picture.
Required to use SimulCam:
Camera on tripod
Pan, tilt and zoom allowed during filming.
Video clips can be recorded at different times but must be taken by a camera in exactly the
same position.
81Unique ways to view sport - SimulCam & StroMotion
© Dartfish. All rights reserved.- Version 7 -
The steps in using it are to:
1. Step 1 - clip selection and synchronization. Two video clips are loaded. To be comparable thetwo clips should then be synchronized.
2. Step 2 - camera movement calculation. Background features are matched and the amountof camera pan and zoom is calculated.
3. Step 3 - blending, preview and saving the clips. You can also save the SimulCam project ifyou wish to make changes to any of these steps later.
6.1.1 Getting good SimulCam results
Remember, the SimulCam technology matches backgrounds of two video clips; it will havedifficulty doing this under the following conditions:
Insufficient number of background objects
For example; snow. Imagine trying to identify the same point on a white background fromframe to frame. Your brain is still better than a computer's so "what the eyes cannot see, thecomputer cannot!".
Avoid this by not zooming too closely on the subject. Even on snow, shadows, rocks,
slalom gates etc can still be used but only if enough of these distinguishable objects appear ineach frame of video.
Background is blurred
Its the same problem, if background objects become blurred or out of focus, SimulCam is unableto calculate where they have moved to.
Use a tripod or another solid object to mount the camera.
Zoom and pan smoothly and slowly.
Backgrounds are different
SimulCam can only compare if the content of the background is similar in each video clip.
Always film from the same position. If it helps you remember, mark the spot!
It does not matter if a different zoom has been used for each clip - the backgrounds only
have to contain similar objects filmed from the same direction. SimulCam will calculate thedifference in zoom.
6.1.2 Step 1 - clip selection and synchronization
Step 1 of the SimulCam clip creation process consists of:
Loading two video clips containing the performances to analyze.
Synchronizing the clips for optimum comparison.
Trimming the video by selecting appropriate cue in & out points.
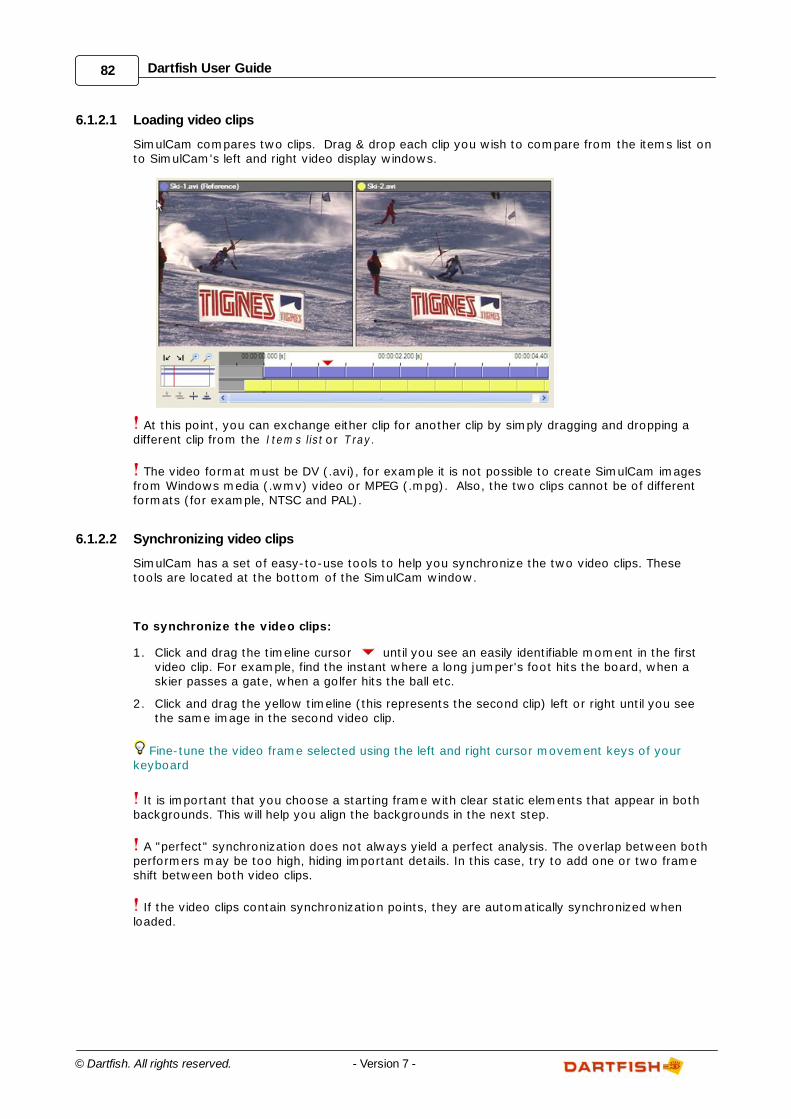
82 Dartfish User Guide
© Dartfish. All rights reserved. - Version 7 -
6.1.2.1 Loading video clips
SimulCam compares two clips. Drag & drop each clip you wish to compare from the items list onto SimulCam's left and right video display windows.
At this point, you can exchange either clip for another clip by simply dragging and dropping adifferent clip from the Item s list or T ray.
The video format must be DV (.avi), for example it is not possible to create SimulCam imagesfrom Windows media (.wmv) video or MPEG (.mpg). Also, the two clips cannot be of differentformats (for example, NTSC and PAL).
6.1.2.2 Synchronizing video clips
SimulCam has a set of easy-to-use tools to help you synchronize the two video clips. Thesetools are located at the bottom of the SimulCam window.
To synchronize the video clips:
1. Click and drag the timeline cursor until you see an easily identifiable moment in the firstvideo clip. For example, find the instant where a long jumper's foot hits the board, when askier passes a gate, when a golfer hits the ball etc.
2. Click and drag the yellow timeline (this represents the second clip) left or right until you seethe same image in the second video clip.
Fine-tune the video frame selected using the left and right cursor movement keys of yourkeyboard
It is important that you choose a starting frame with clear static elements that appear in bothbackgrounds. This will help you align the backgrounds in the next step.
A "perfect" synchronization does not always yield a perfect analysis. The overlap between bothperformers may be too high, hiding important details. In this case, try to add one or two frameshift between both video clips.
If the video clips contain synchronization points, they are automatically synchronized whenloaded.
83Unique ways to view sport - SimulCam & StroMotion
© Dartfish. All rights reserved.- Version 7 -
6.1.2.3 Trimming the clips
This means selecting the portion of the video clips you want to analyze. This is done by settingcue in and cue out points.
To set cue in & out points
1. Position the red cursor at the beginning of the portion and click on the Set In button ( ).2. Position the cursor at the end of the portion and click on the Set Out button ( ).
It is worth taking time to trim the clip to the section of the video you wish to compare as thisconsiderably reduces the time taken to produce the final result clip. Also, experienced SimulCamusers will be able to avoid sections of video where SimulCam is not able to make comparisons.
6.1.3 Step 2 - camera movement calculation
In this step, calculation of the camera movements is initiated. This is required by SimulCam toblend the two performances onto a single background.
In this process, similar features in the backgrounds of the two video clips are manually aligned byone of two methods:
1. Drag & zoom alignm ent - Backgrounds are aligned by blending the first frame of each clipthen zooming and dragging one frame above the other until backgrounds match.
2. M atched alignm ent points - Several matching static background features are marked withalignment points on the first frame of each clip.
Which method is best?
We recommend that you try both methods to decide which one is most comfortable for you. Bydefault, your software uses the Drag & zoom alignm ent method. Use the following notes as aguide.
In general, manual alignment by the Drag & zoom alignm ent method is quicker.
Drag & zoom alignm ent requires you to zoom using scroll function of your mouse or the [+]
and [-] keys of your numeric keypad (refer to your laptop documentation). If neither ofthese are convenient for you then M atched alignm ent points might be a better choice.
The M atched alignm ent points method is sometimes a better choice when the video images
do not match well.
To select the calculation method
The calculation method can be changed at any time before or during SimulCam.
1. Select Tools>Options from the menu bar (or press F3).
2. Select the Sim ulCam topic from the list on the left.
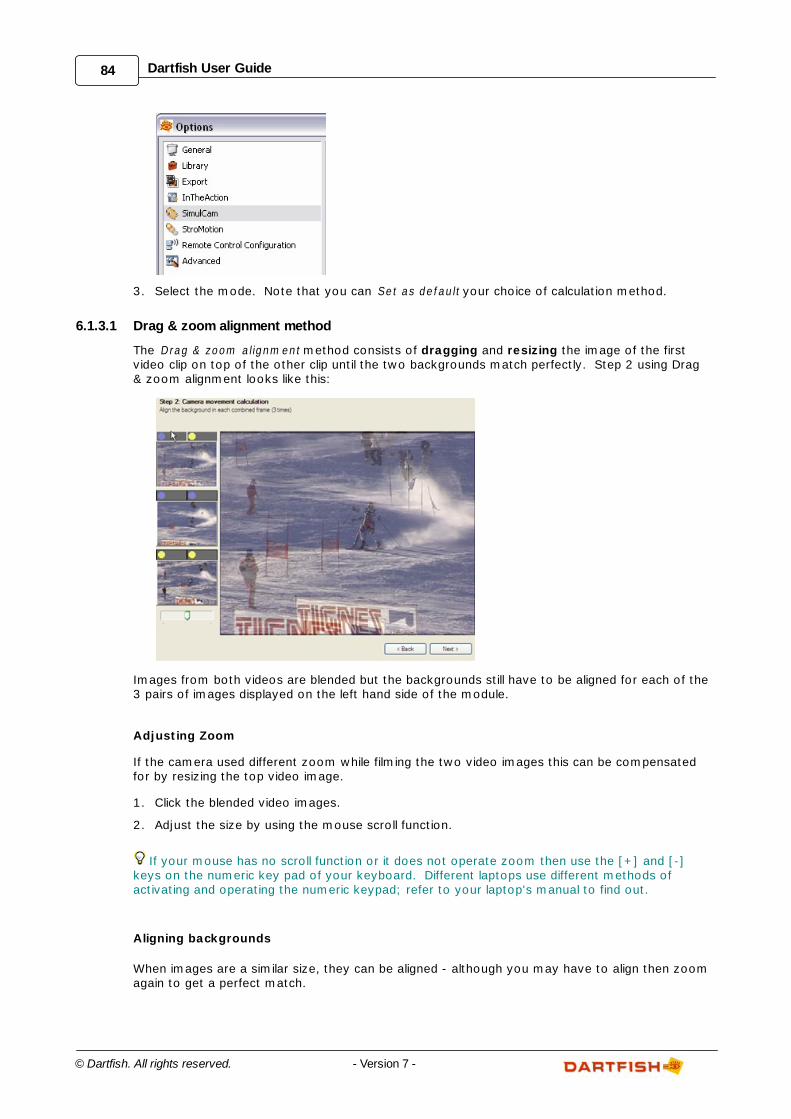
84 Dartfish User Guide
© Dartfish. All rights reserved. - Version 7 -
3. Select the mode. Note that you can Set as default your choice of calculation method.
6.1.3.1 Drag & zoom alignment method
The Drag & zoom alignm ent method consists of dragging and resizing the image of the firstvideo clip on top of the other clip until the two backgrounds match perfectly. Step 2 using Drag& zoom alignment looks like this:
Images from both videos are blended but the backgrounds still have to be aligned for each of the3 pairs of images displayed on the left hand side of the module.
Adjusting Zoom
If the camera used different zoom while filming the two video images this can be compensatedfor by resizing the top video image.
1. Click the blended video images.
2. Adjust the size by using the mouse scroll function.
If your mouse has no scroll function or it does not operate zoom then use the [+] and [-]keys on the numeric key pad of your keyboard. Different laptops use different methods ofactivating and operating the numeric keypad; refer to your laptop's manual to find out.
Aligning backgrounds
When images are a similar size, they can be aligned - although you may have to align then zoomagain to get a perfect match.
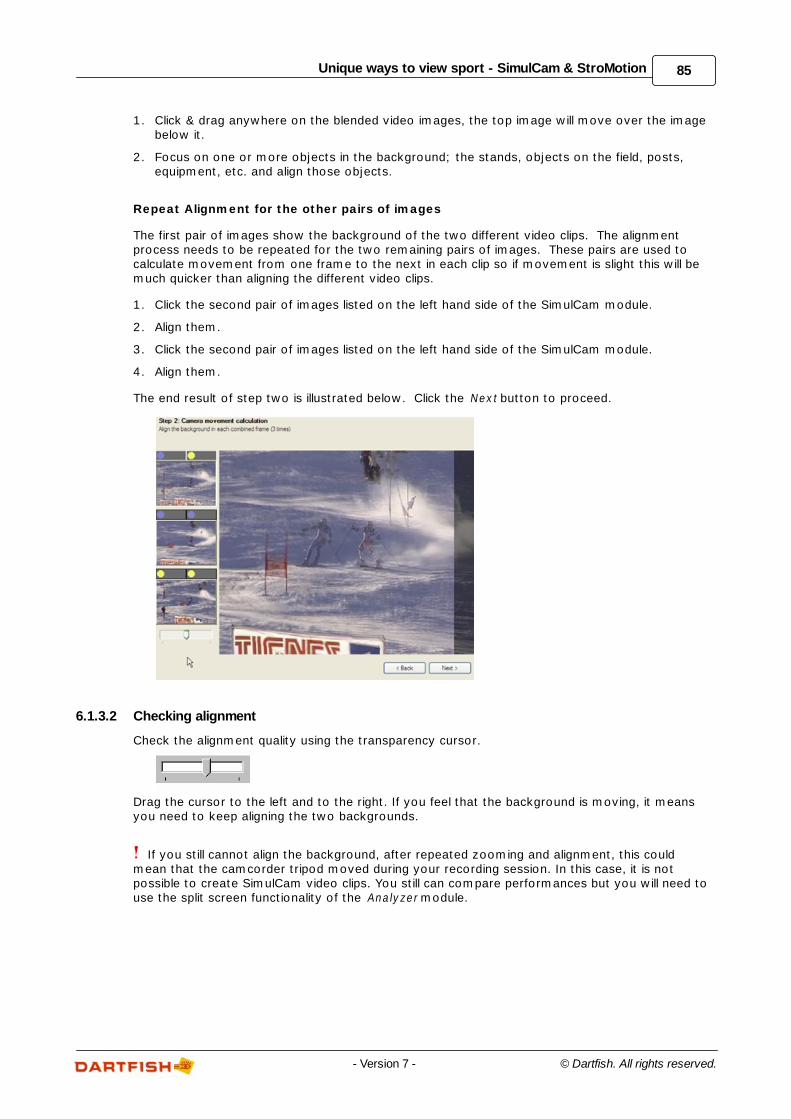
85Unique ways to view sport - SimulCam & StroMotion
© Dartfish. All rights reserved.- Version 7 -
1. Click & drag anywhere on the blended video images, the top image will move over the imagebelow it.
2. Focus on one or more objects in the background; the stands, objects on the field, posts,equipment, etc. and align those objects.
Repeat Alignment for the other pairs of images
The first pair of images show the background of the two different video clips. The alignmentprocess needs to be repeated for the two remaining pairs of images. These pairs are used tocalculate movement from one frame to the next in each clip so if movement is slight this will bemuch quicker than aligning the different video clips.
1. Click the second pair of images listed on the left hand side of the SimulCam module.
2. Align them.
3. Click the second pair of images listed on the left hand side of the SimulCam module.
4. Align them.
The end result of step two is illustrated below. Click the Next button to proceed.
6.1.3.2 Checking alignment
Check the alignment quality using the transparency cursor.
Drag the cursor to the left and to the right. If you feel that the background is moving, it meansyou need to keep aligning the two backgrounds.
If you still cannot align the background, after repeated zooming and alignment, this couldmean that the camcorder tripod moved during your recording session. In this case, it is notpossible to create SimulCam video clips. You still can compare performances but you will need touse the split screen functionality of the Analyzer module.
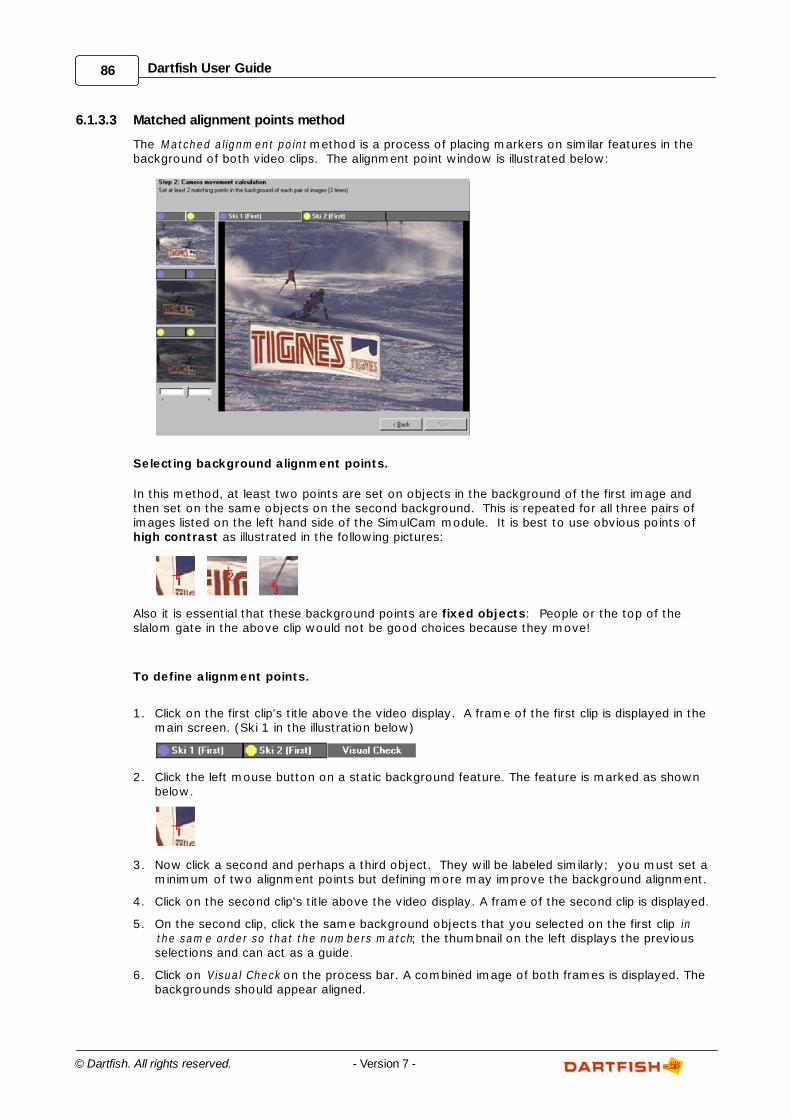
86 Dartfish User Guide
© Dartfish. All rights reserved. - Version 7 -
6.1.3.3 Matched alignment points method
The M atched alignm ent point method is a process of placing markers on similar features in thebackground of both video clips. The alignment point window is illustrated below:
Selecting background alignment points.
In this method, at least two points are set on objects in the background of the first image andthen set on the same objects on the second background. This is repeated for all three pairs ofimages listed on the left hand side of the SimulCam module. It is best to use obvious points of high contrast as illustrated in the following pictures:
Also it is essential that these background points are fixed objects: People or the top of theslalom gate in the above clip would not be good choices because they move!
To define alignment points.
1. Click on the first clip's title above the video display. A frame of the first clip is displayed in themain screen. (Ski 1 in the illustration below)
2. Click the left mouse button on a static background feature. The feature is marked as shownbelow.
3. Now click a second and perhaps a third object. They will be labeled similarly; you must set aminimum of two alignment points but defining more may improve the background alignment.
4. Click on the second clip's title above the video display. A frame of the second clip is displayed.
5. On the second clip, click the same background objects that you selected on the first clip inthe sam e order so that the num bers m atch; the thumbnail on the left displays the previousselections and can act as a guide.
6. Click on Visual Check on the process bar. A combined image of both frames is displayed. Thebackgrounds should appear aligned.
87Unique ways to view sport - SimulCam & StroMotion
© Dartfish. All rights reserved.- Version 7 -
If you need to delete a numbered mark because the elements are not in the second image
or are not positioned correctly, right-click on the mark you wish to delete. Then left-click inthe correct position and a marker with the same number appears again.
If the backgrounds do not match in the Visual Check, make sure that the alignment points
are placed correctly and that point 1 matches point 1 in each image etc. If backgrounds stilldo not match then adding further points will improve accuracy.
7. Select the second pair of images from the thumbnails on the left of the SimulCam module.These images compare camera movement form one frame to the next in the same videoclip.
8. This time feature points are already set but you need to check they are positioned correctly.Use the techniques described in step 6 to remove and reposition feature points as required.
9. Repeat for the third pair of images.
10.When complete proceed to the next step by clicking on the Next button.
6.1.3.4 Adding new alignment frames
Both methods to complete step 2 require that you match the backgrounds in the starting frameof your clips. However, if the backgrounds in this frame are too different, they do not includeclear common background elements or the objects are blurred you will need to set a differentstart frame.
To set a new start frame.
1. Go back to step 1 by clicking the back button.
2. Set a new cue in at a start frame that is more appropriate.
3. Repeat step 2.
Setting new alignment frames.
It is essential that the start frames match but additional frames can be set where backgroundscan be realigned. This might be necessary for clips that "jump" because of a change of cameraangle, or because the images have become blurred during panning or the clip does not includepart of the action in a particular frame.
New alignment frames are represented by flags in the timeline. Once you add a flag, you will beable to realign the backgrounds in that particular frame as described previously.
To add a flag.
1. Go back to step 1 by clicking the back button.2. Drag the current position indicator along the timeline to the new alignment frame.
3. Click on the Add f lag button . A new flag is added to the timeline. A red flag indicates thatthe background alignment still needs to be performed for this particular moment
4. Other icons allow you to jump to the next or previous flag and to delete a flag.
5. Repeat step 2 for each flag added.
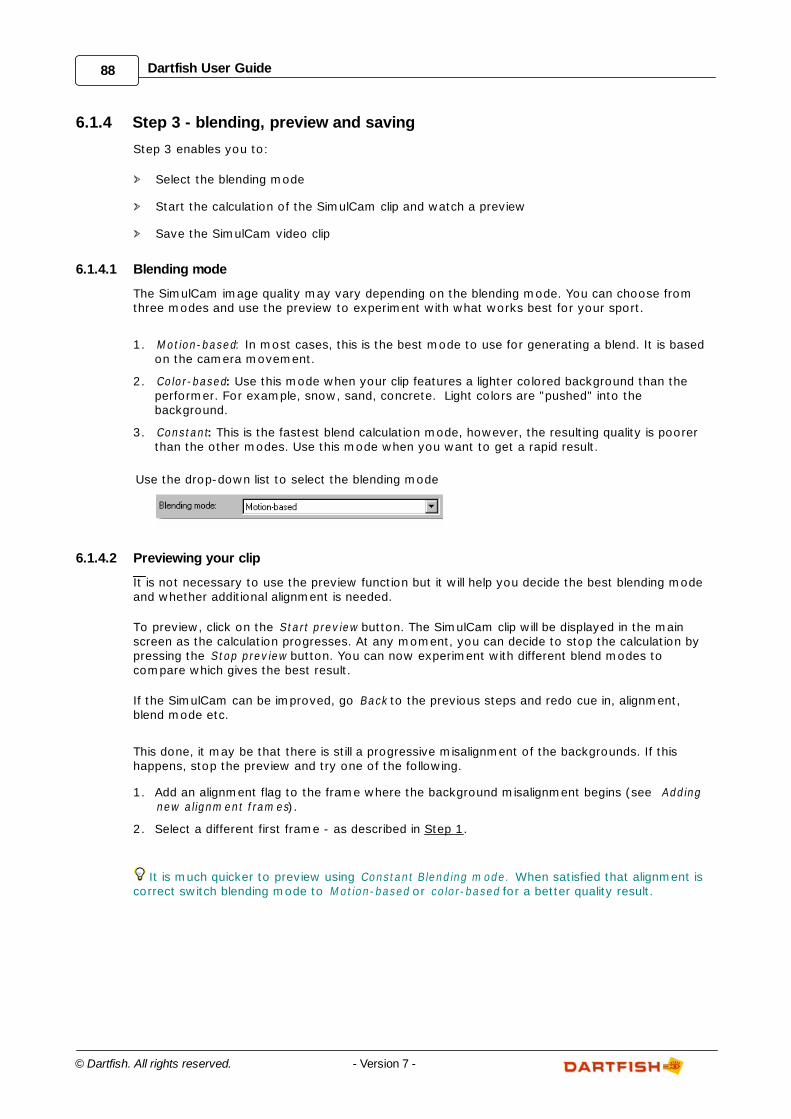
88 Dartfish User Guide
© Dartfish. All rights reserved. - Version 7 -
6.1.4 Step 3 - blending, preview and saving
Step 3 enables you to:
Select the blending mode
Start the calculation of the SimulCam clip and watch a preview
Save the SimulCam video clip
6.1.4.1 Blending mode
The SimulCam image quality may vary depending on the blending mode. You can choose fromthree modes and use the preview to experiment with what works best for your sport.
1. M otion-based: In most cases, this is the best mode to use for generating a blend. It is basedon the camera movement.
2. Color-based: Use this mode when your clip features a lighter colored background than theperformer. For example, snow, sand, concrete. Light colors are "pushed" into thebackground.
3. Constant: This is the fastest blend calculation mode, however, the resulting quality is poorerthan the other modes. Use this mode when you want to get a rapid result.
Use the drop-down list to select the blending mode
6.1.4.2 Previewing your clip
It is not necessary to use the preview function but it will help you decide the best blending modeand whether additional alignment is needed.
To preview, click on the Start preview button. The SimulCam clip will be displayed in the mainscreen as the calculation progresses. At any moment, you can decide to stop the calculation bypressing the Stop preview button. You can now experiment with different blend modes tocompare which gives the best result.
If the SimulCam can be improved, go Back to the previous steps and redo cue in, alignment,blend mode etc.
This done, it may be that there is still a progressive misalignment of the backgrounds. If thishappens, stop the preview and try one of the following.
1. Add an alignment flag to the frame where the background misalignment begins (see Addingnew alignm ent fram es).
2. Select a different first frame - as described in Step 1.
It is much quicker to preview using Constant Blending m ode. When satisfied that alignment iscorrect switch blending mode to M otion-based or color-based for a better quality result.
89Unique ways to view sport - SimulCam & StroMotion
© Dartfish. All rights reserved.- Version 7 -
6.1.4.3 Saving SimulCam results
There are two potential end results of a SimulCam project:
the creation of a new video clip using the Publish process
the SimulCam project itself.
Saving the SimulCam project
To do this select the Save... option from the F ile menu. Saving the project is not alwaysnecessary but may be useful if you wish to return to the project to make changes in the future. SimulCam projects appear in the Item s List represented by the following icon:
Starting a new SimulCam project
To initiate a new project select the New option from the F ile menu.
6.1.5 Publishing new video clips
The publish process uses a wizard to guide you through creating new video clips resulting fromSimulCam, SimulCam Fixed, Stromotion and Stromotion fixed. It is used to:
Save and name the video clip.
Categorize the new clip using categories.
Initiate the Publish process by clicking the Publish button at the bottom right of each module.
6.1.5.1 Choosing video settings
The first step is to select which encoding profile you wish to use for the clip. A range of encodingprofiles exist to allow you to select an appropriate format for the eventual use and location forthe video. For example, if the video clip is lengthy or needs to be sent by email, you may decideto use an encoding profile which compresses the result into a file of smaller size (see Convertingvideo in the Getting Familiar chapter to learn more about video settings).
After selecting a profile, click the Next button to continue.
6.1.5.2 Assigning file name, destination and categories
File name
Type a name for the video clip in the F ile Nam e text box. If this box is left blank the genericfilename of "Untitled" will be applied.
Categorize clips while saving
If you use Dartfish's Keyword video management system (see Organizing your library in theVideo Library chapter) then you can benefit from categorizing new video clips as they are saved.The method for doing this is to create a form listing a box each category that you wish to usethen selecting existing keywords from these categories or entering new ones. An example isshown below. The same method is used for categorizing captured video.
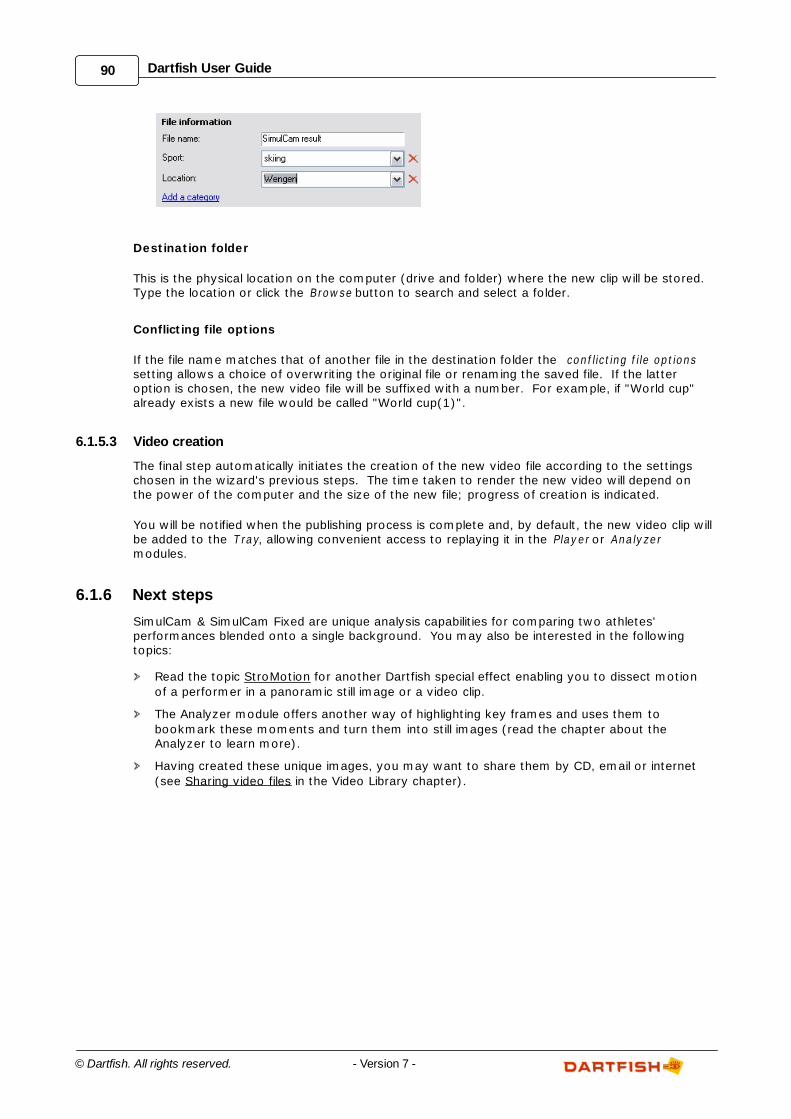
90 Dartfish User Guide
© Dartfish. All rights reserved. - Version 7 -
Destination folder
This is the physical location on the computer (drive and folder) where the new clip will be stored.Type the location or click the Browse button to search and select a folder.
Conflicting file options
If the file name matches that of another file in the destination folder the conf licting f ile optionssetting allows a choice of overwriting the original file or renaming the saved file. If the latteroption is chosen, the new video file will be suffixed with a number. For example, if "World cup"already exists a new file would be called "World cup(1)".
6.1.5.3 Video creation
The final step automatically initiates the creation of the new video file according to the settingschosen in the wizard's previous steps. The time taken to render the new video will depend onthe power of the computer and the size of the new file; progress of creation is indicated.
You will be notified when the publishing process is complete and, by default, the new video clip willbe added to the T ray, allowing convenient access to replaying it in the Player or Analyzermodules.
6.1.6 Next steps
SimulCam & SimulCam Fixed are unique analysis capabilities for comparing two athletes'performances blended onto a single background. You may also be interested in the followingtopics:
Read the topic StroMotion for another Dartfish special effect enabling you to dissect motion
of a performer in a panoramic still image or a video clip.
The Analyzer module offers another way of highlighting key frames and uses them to
bookmark these moments and turn them into still images (read the chapter about theAnalyzer to learn more).
Having created these unique images, you may want to share them by CD, email or internet
(see Sharing video files in the Video Library chapter).
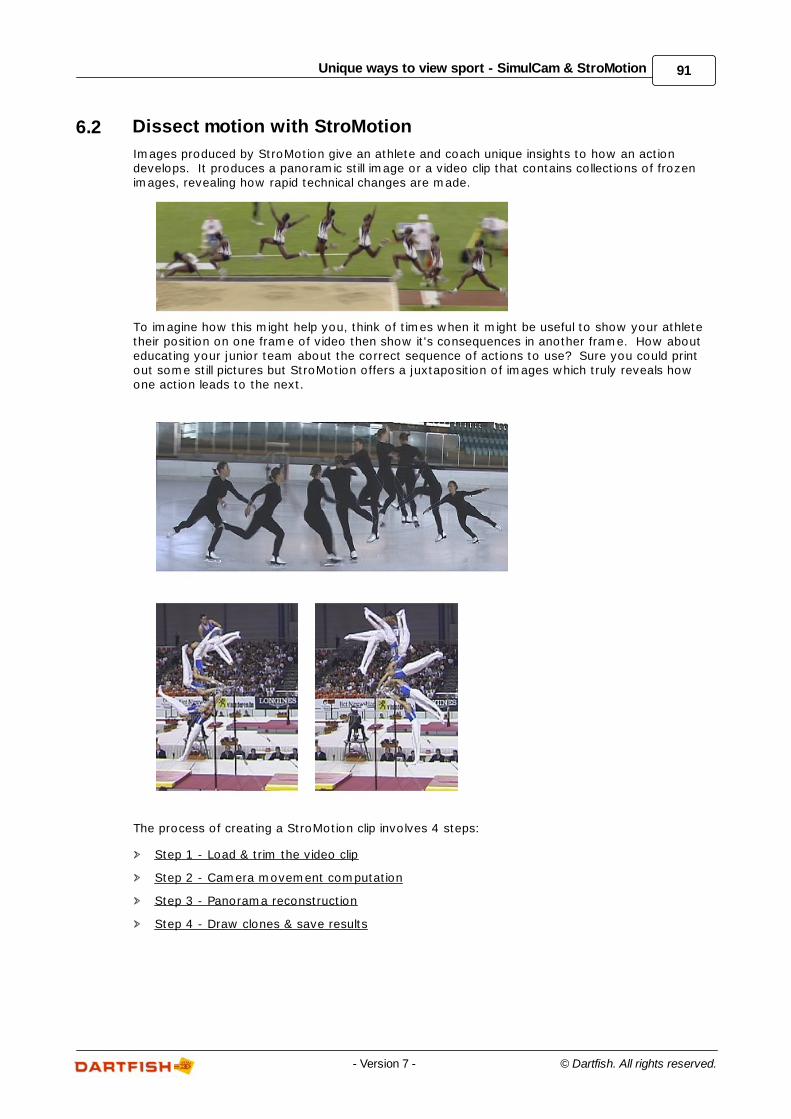
91Unique ways to view sport - SimulCam & StroMotion
© Dartfish. All rights reserved.- Version 7 -
6.2 Dissect motion with StroMotion
Images produced by StroMotion give an athlete and coach unique insights to how an actiondevelops. It produces a panoramic still image or a video clip that contains collections of frozenimages, revealing how rapid technical changes are made.
To imagine how this might help you, think of times when it might be useful to show your athletetheir position on one frame of video then show it's consequences in another frame. How abouteducating your junior team about the correct sequence of actions to use? Sure you could printout some still pictures but StroMotion offers a juxtaposition of images which truly reveals howone action leads to the next.
The process of creating a StroMotion clip involves 4 steps:
Step 1 - Load & trim the video clip
Step 2 - Camera movement computation
Step 3 - Panorama reconstruction
Step 4 - Draw clones & save results
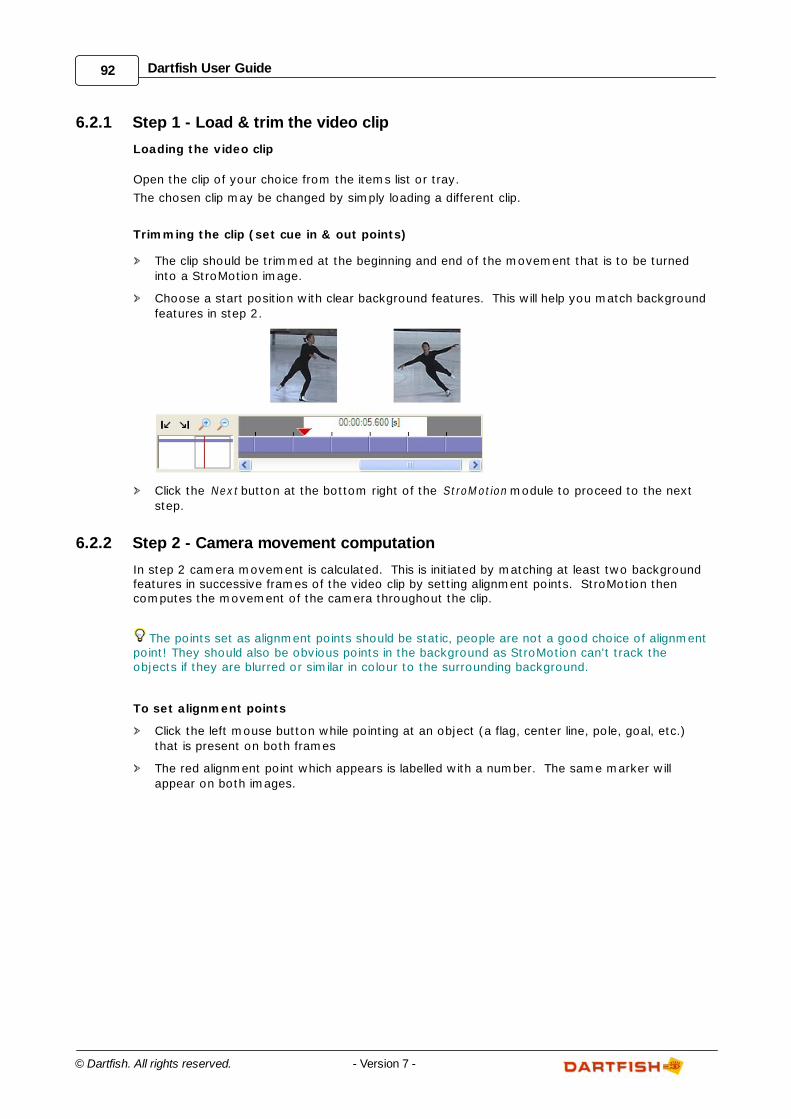
92 Dartfish User Guide
© Dartfish. All rights reserved. - Version 7 -
6.2.1 Step 1 - Load & trim the video clip
Loading the video clip
Open the clip of your choice from the items list or tray.
The chosen clip may be changed by simply loading a different clip.
Trimming the clip (set cue in & out points)
The clip should be trimmed at the beginning and end of the movement that is to be turned
into a StroMotion image.
Choose a start position with clear background features. This will help you match background
features in step 2.
Click the Next button at the bottom right of the StroM otion module to proceed to the next
step.
6.2.2 Step 2 - Camera movement computation
In step 2 camera movement is calculated. This is initiated by matching at least two backgroundfeatures in successive frames of the video clip by setting alignment points. StroMotion thencomputes the movement of the camera throughout the clip.
The points set as alignment points should be static, people are not a good choice of alignmentpoint! They should also be obvious points in the background as StroMotion can't track theobjects if they are blurred or similar in colour to the surrounding background.
To set alignment points
Click the left mouse button while pointing at an object (a flag, center line, pole, goal, etc.)
that is present on both frames
The red alignment point which appears is labelled with a number. The same marker will
appear on both images.
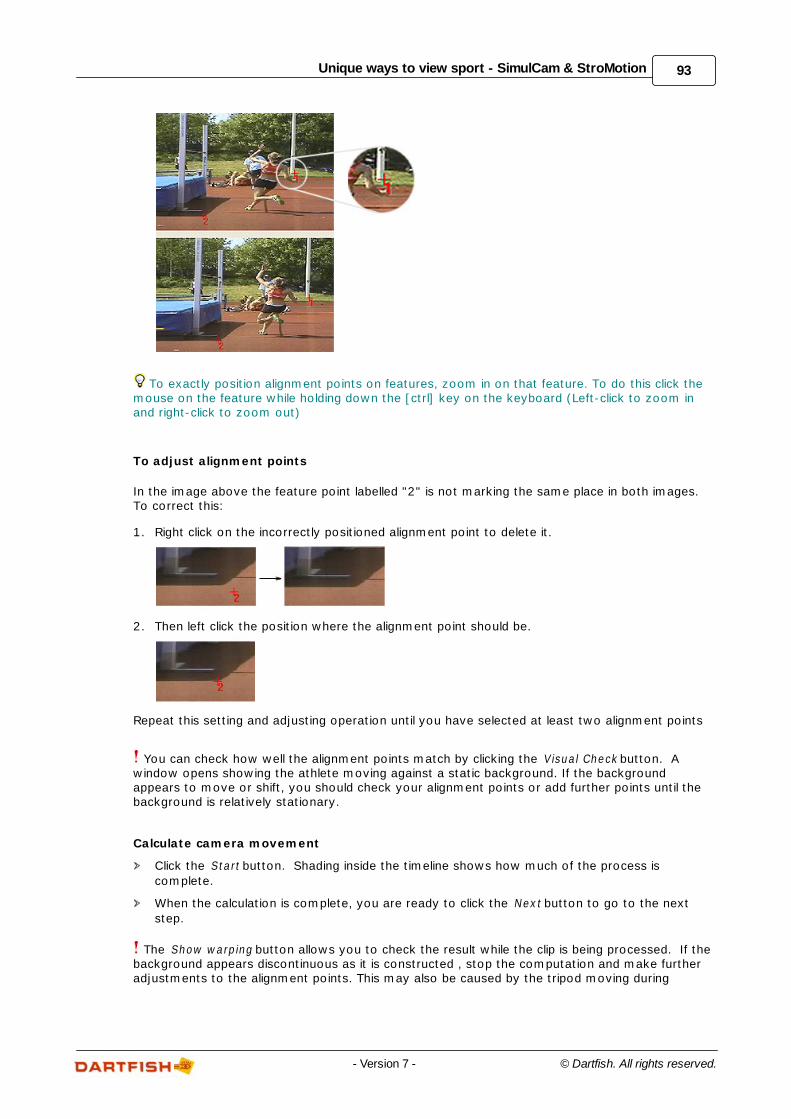
93Unique ways to view sport - SimulCam & StroMotion
© Dartfish. All rights reserved.- Version 7 -
To exactly position alignment points on features, zoom in on that feature. To do this click themouse on the feature while holding down the [ctrl] key on the keyboard (Left-click to zoom inand right-click to zoom out)
To adjust alignment points
In the image above the feature point labelled "2" is not marking the same place in both images. To correct this:
1. Right click on the incorrectly positioned alignment point to delete it.
2. Then left click the position where the alignment point should be.
Repeat this setting and adjusting operation until you have selected at least two alignment points
You can check how well the alignment points match by clicking the Visual Check button. Awindow opens showing the athlete moving against a static background. If the backgroundappears to move or shift, you should check your alignment points or add further points until thebackground is relatively stationary.
Calculate camera movement
Click the Start button. Shading inside the timeline shows how much of the process is
complete.
When the calculation is complete, you are ready to click the Next button to go to the next
step.
The Show warping button allows you to check the result while the clip is being processed. If thebackground appears discontinuous as it is constructed , stop the computation and make furtheradjustments to the alignment points. This may also be caused by the tripod moving during
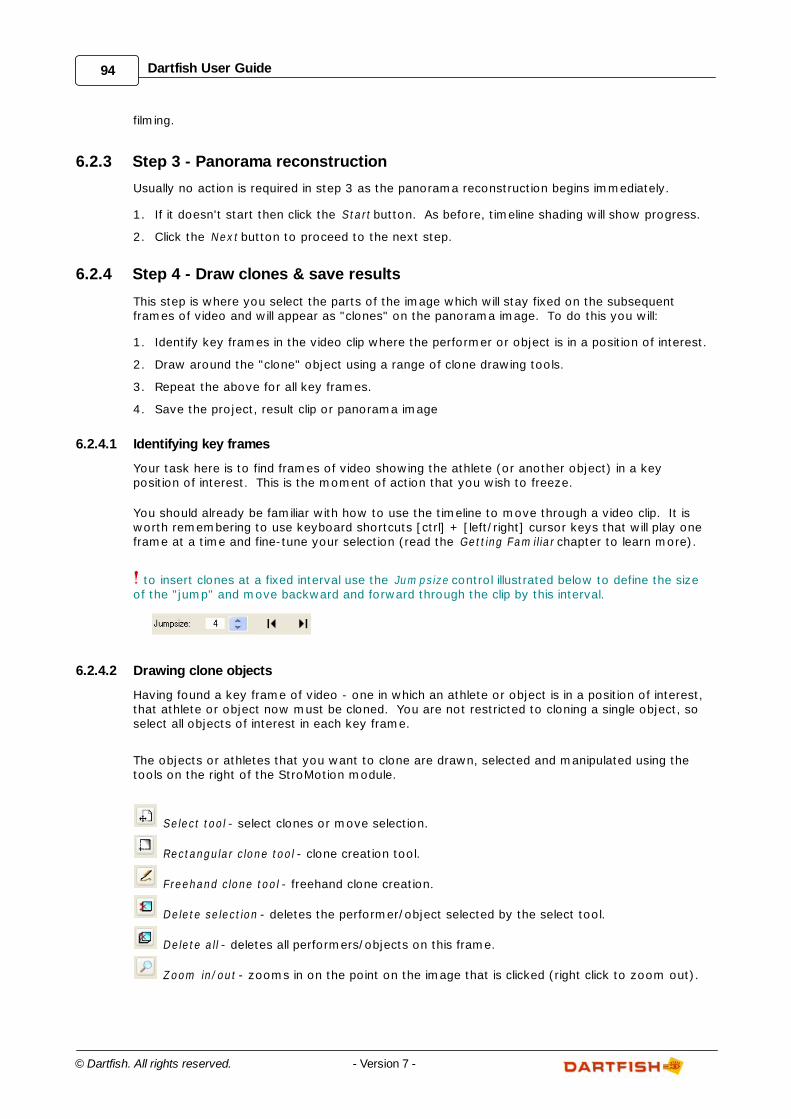
94 Dartfish User Guide
© Dartfish. All rights reserved. - Version 7 -
filming.
6.2.3 Step 3 - Panorama reconstruction
Usually no action is required in step 3 as the panorama reconstruction begins immediately.
1. If it doesn't start then click the Start button. As before, timeline shading will show progress.
2. Click the Next button to proceed to the next step.
6.2.4 Step 4 - Draw clones & save results
This step is where you select the parts of the image which will stay fixed on the subsequentframes of video and will appear as "clones" on the panorama image. To do this you will:
1. Identify key frames in the video clip where the performer or object is in a position of interest.
2. Draw around the "clone" object using a range of clone drawing tools.
3. Repeat the above for all key frames.
4. Save the project, result clip or panorama image
6.2.4.1 Identifying key frames
Your task here is to find frames of video showing the athlete (or another object) in a keyposition of interest. This is the moment of action that you wish to freeze.
You should already be familiar with how to use the timeline to move through a video clip. It isworth remembering to use keyboard shortcuts [ctrl] + [left/right] cursor keys that will play oneframe at a time and fine-tune your selection (read the Getting Fam iliar chapter to learn more).
to insert clones at a fixed interval use the Jum psize control illustrated below to define the sizeof the "jump" and move backward and forward through the clip by this interval.
6.2.4.2 Drawing clone objects
Having found a key frame of video - one in which an athlete or object is in a position of interest,that athlete or object now must be cloned. You are not restricted to cloning a single object, soselect all objects of interest in each key frame.
The objects or athletes that you want to clone are drawn, selected and manipulated using thetools on the right of the StroMotion module.
Select tool - select clones or move selection.
Rectangular clone tool - clone creation tool.
Freehand clone tool - freehand clone creation.
Delete selection - deletes the performer/object selected by the select tool.
Delete all - deletes all performers/objects on this frame.
Zoom in/out - zooms in on the point on the image that is clicked (right click to zoom out).
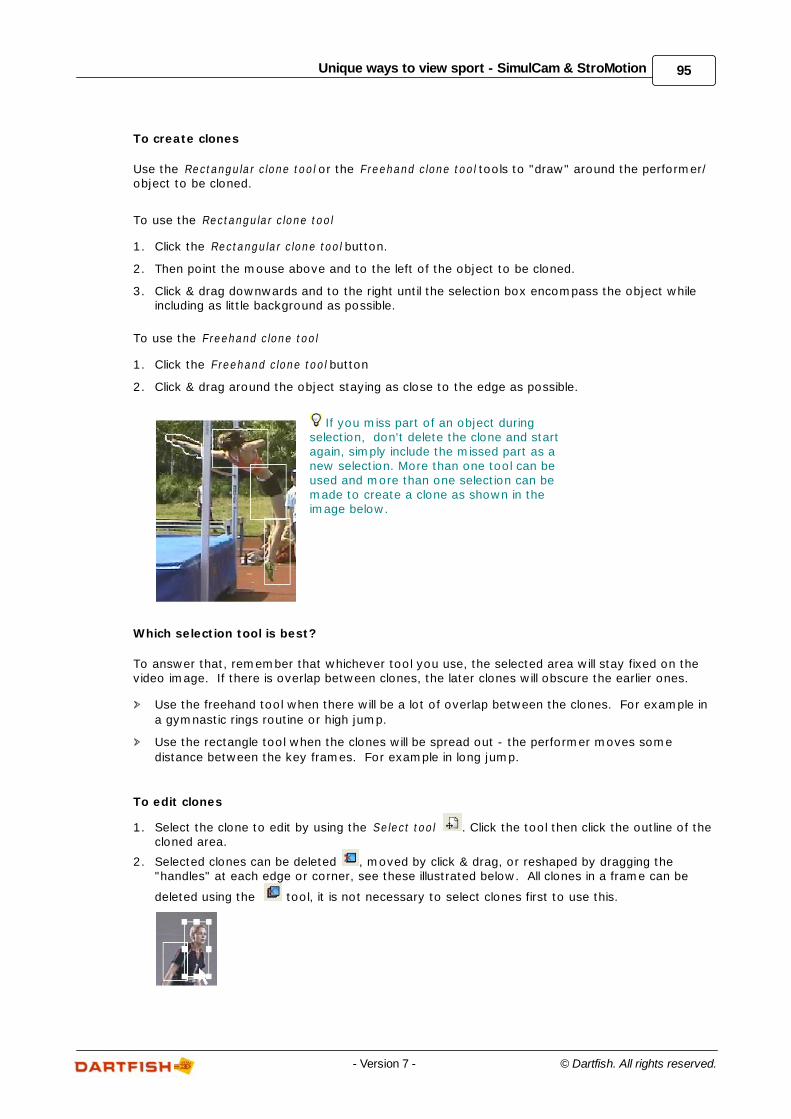
95Unique ways to view sport - SimulCam & StroMotion
© Dartfish. All rights reserved.- Version 7 -
To create clones
Use the Rectangular clone tool or the Freehand clone tool tools to "draw" around the performer/object to be cloned.
To use the Rectangular clone tool
1. Click the Rectangular clone tool button.
2. Then point the mouse above and to the left of the object to be cloned.
3. Click & drag downwards and to the right until the selection box encompass the object whileincluding as little background as possible.
To use the Freehand clone tool
1. Click the Freehand clone tool button
2. Click & drag around the object staying as close to the edge as possible.
If you miss part of an object duringselection, don't delete the clone and startagain, simply include the missed part as anew selection. More than one tool can beused and more than one selection can bemade to create a clone as shown in theimage below.
Which selection tool is best?
To answer that, remember that whichever tool you use, the selected area will stay fixed on thevideo image. If there is overlap between clones, the later clones will obscure the earlier ones.
Use the freehand tool when there will be a lot of overlap between the clones. For example in
a gymnastic rings routine or high jump.
Use the rectangle tool when the clones will be spread out - the performer moves some
distance between the key frames. For example in long jump.
To edit clones
1. Select the clone to edit by using the Select tool . Click the tool then click the outline of thecloned area.
2. Selected clones can be deleted , moved by click & drag, or reshaped by dragging the"handles" at each edge or corner, see these illustrated below. All clones in a frame can be
deleted using the tool, it is not necessary to select clones first to use this.
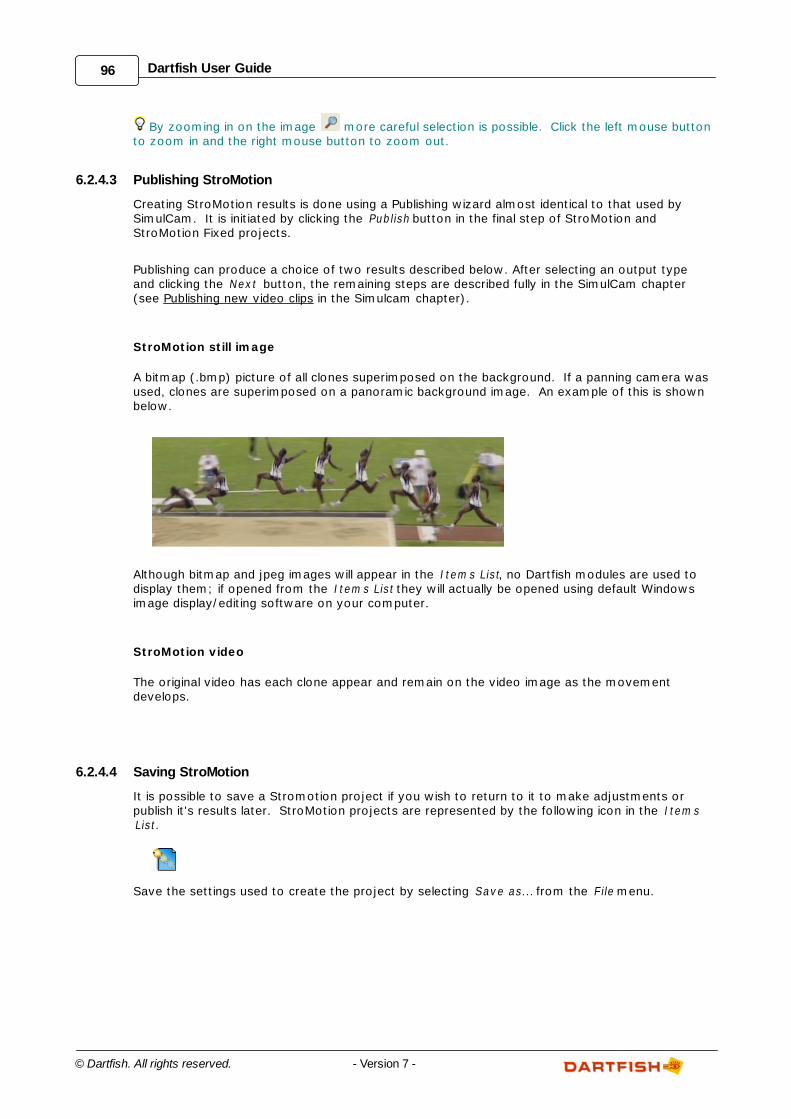
96 Dartfish User Guide
© Dartfish. All rights reserved. - Version 7 -
By zooming in on the image more careful selection is possible. Click the left mouse buttonto zoom in and the right mouse button to zoom out.
6.2.4.3 Publishing StroMotion
Creating StroMotion results is done using a Publishing wizard almost identical to that used bySimulCam. It is initiated by clicking the Publish button in the final step of StroMotion andStroMotion Fixed projects.
Publishing can produce a choice of two results described below. After selecting an output typeand clicking the Next button, the remaining steps are described fully in the SimulCam chapter(see Publishing new video clips in the Simulcam chapter).
StroMotion still image
A bitmap (.bmp) picture of all clones superimposed on the background. If a panning camera wasused, clones are superimposed on a panoramic background image. An example of this is shownbelow.
Although bitmap and jpeg images will appear in the Item s List, no Dartfish modules are used todisplay them; if opened from the Item s List they will actually be opened using default Windowsimage display/editing software on your computer.
StroMotion video
The original video has each clone appear and remain on the video image as the movementdevelops.
6.2.4.4 Saving StroMotion
It is possible to save a Stromotion project if you wish to return to it to make adjustments orpublish it's results later. StroMotion projects are represented by the following icon in the Item sList.
Save the settings used to create the project by selecting Save as... from the F ile menu.
97Unique ways to view sport - SimulCam & StroMotion
© Dartfish. All rights reserved.- Version 7 -
6.2.5 Next steps
StroMotion & StroMotion Fixed are one of Dartfish's special effects allowing you to viewmovement in unique ways. You may also be interested in the following topics:
Read the topic SimulCam for another Dartfish special effect enabling you to place two
performers together in the same place and time.
The spline drawing tool (see chapter on Analyzer) is another way of tracking and illustrating
movement.
The Analyzer module offers another way of identifying key positions and uses them to
bookmark these moments and turn them into still images.
Having created these unique images, you may want to share them by CD, email or internet
(see Sharing video files in the Video Library chapter).

Chapter
VII
Tagging Video
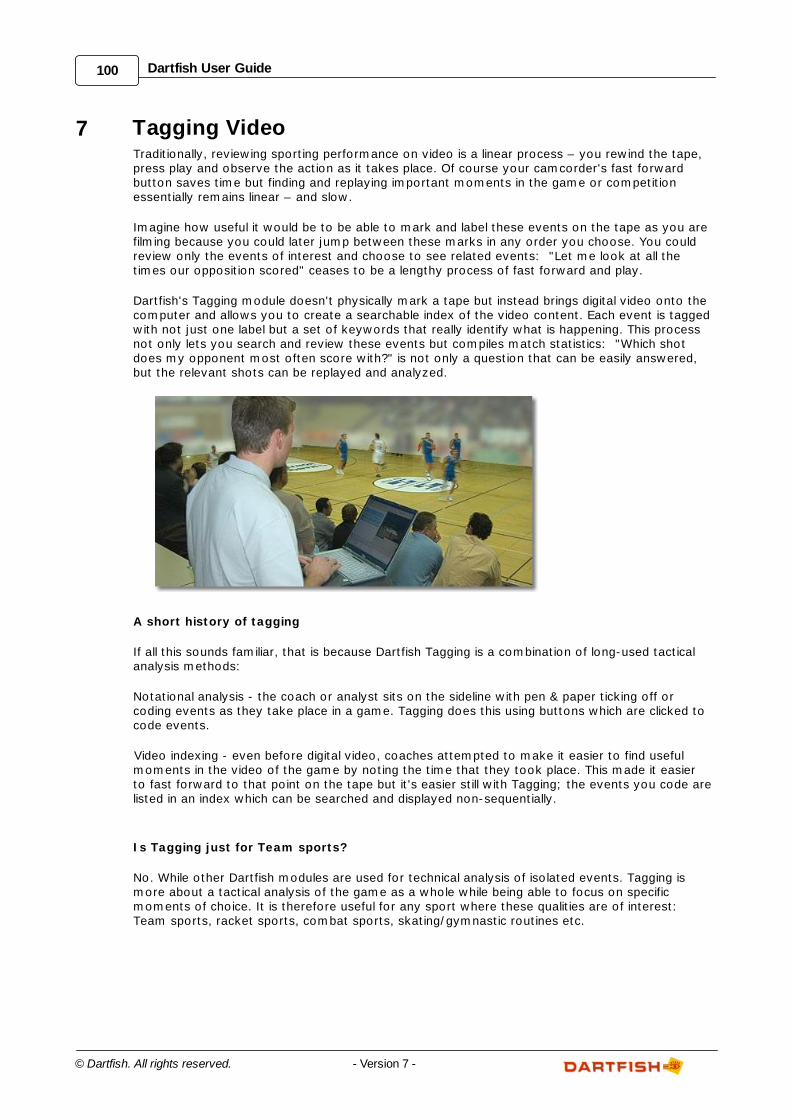
100 Dartfish User Guide
© Dartfish. All rights reserved. - Version 7 -
7 Tagging VideoTraditionally, reviewing sporting performance on video is a linear process – you rewind the tape,press play and observe the action as it takes place. Of course your camcorder's fast forwardbutton saves time but finding and replaying important moments in the game or competitionessentially remains linear – and slow.
Imagine how useful it would be to be able to mark and label these events on the tape as you arefilming because you could later jump between these marks in any order you choose. You couldreview only the events of interest and choose to see related events: "Let me look at all thetimes our opposition scored" ceases to be a lengthy process of fast forward and play.
Dartfish's Tagging module doesn't physically mark a tape but instead brings digital video onto thecomputer and allows you to create a searchable index of the video content. Each event is taggedwith not just one label but a set of keywords that really identify what is happening. This processnot only lets you search and review these events but compiles match statistics: "Which shotdoes my opponent most often score with?" is not only a question that can be easily answered,but the relevant shots can be replayed and analyzed.
A short history of tagging
If all this sounds familiar, that is because Dartfish Tagging is a combination of long-used tacticalanalysis methods:
Notational analysis - the coach or analyst sits on the sideline with pen & paper ticking off orcoding events as they take place in a game. Tagging does this using buttons which are clicked tocode events.
Video indexing - even before digital video, coaches attempted to make it easier to find usefulmoments in the video of the game by noting the time that they took place. This made it easierto fast forward to that point on the tape but it's easier still with Tagging; the events you code arelisted in an index which can be searched and displayed non-sequentially.
Is Tagging just for Team sports?
No. While other Dartfish modules are used for technical analysis of isolated events. Tagging ismore about a tactical analysis of the game as a whole while being able to focus on specificmoments of choice. It is therefore useful for any sport where these qualities are of interest: Team sports, racket sports, combat sports, skating/gymnastic routines etc.
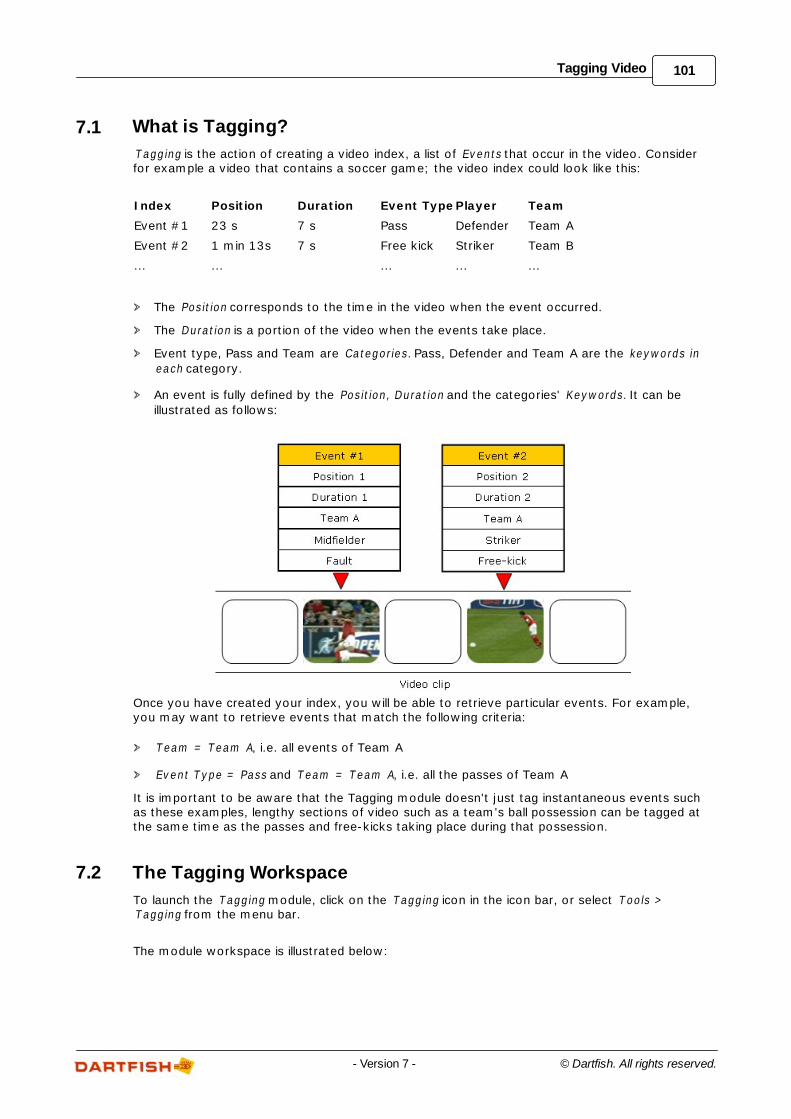
101Tagging Video
© Dartfish. All rights reserved.- Version 7 -
7.1 What is Tagging?
Tagging is the action of creating a video index, a list of Events that occur in the video. Considerfor example a video that contains a soccer game; the video index could look like this:
Index Position Duration Event TypePlayer Team
Event #1 23 s 7 s Pass Defender Team A
Event #2 1 min 13s 7 s Free kick Striker Team B
... ... ... ... ...
The Position corresponds to the time in the video when the event occurred.
The Duration is a portion of the video when the events take place.
Event type, Pass and Team are Categories. Pass, Defender and Team A are the keywords in
each category.
An event is fully defined by the Position, Duration and the categories' Keywords. It can be
illustrated as follows:
Once you have created your index, you will be able to retrieve particular events. For example,you may want to retrieve events that match the following criteria:
Team = Team A, i.e. all events of Team A
Event T ype = Pass and Team = Team A, i.e. all the passes of Team A
It is important to be aware that the Tagging module doesn't just tag instantaneous events suchas these examples, lengthy sections of video such as a team's ball possession can be tagged atthe same time as the passes and free-kicks taking place during that possession.
7.2 The Tagging Workspace
To launch the Tagging module, click on the Tagging icon in the icon bar, or select Tools >Tagging from the menu bar.
The module workspace is illustrated below:
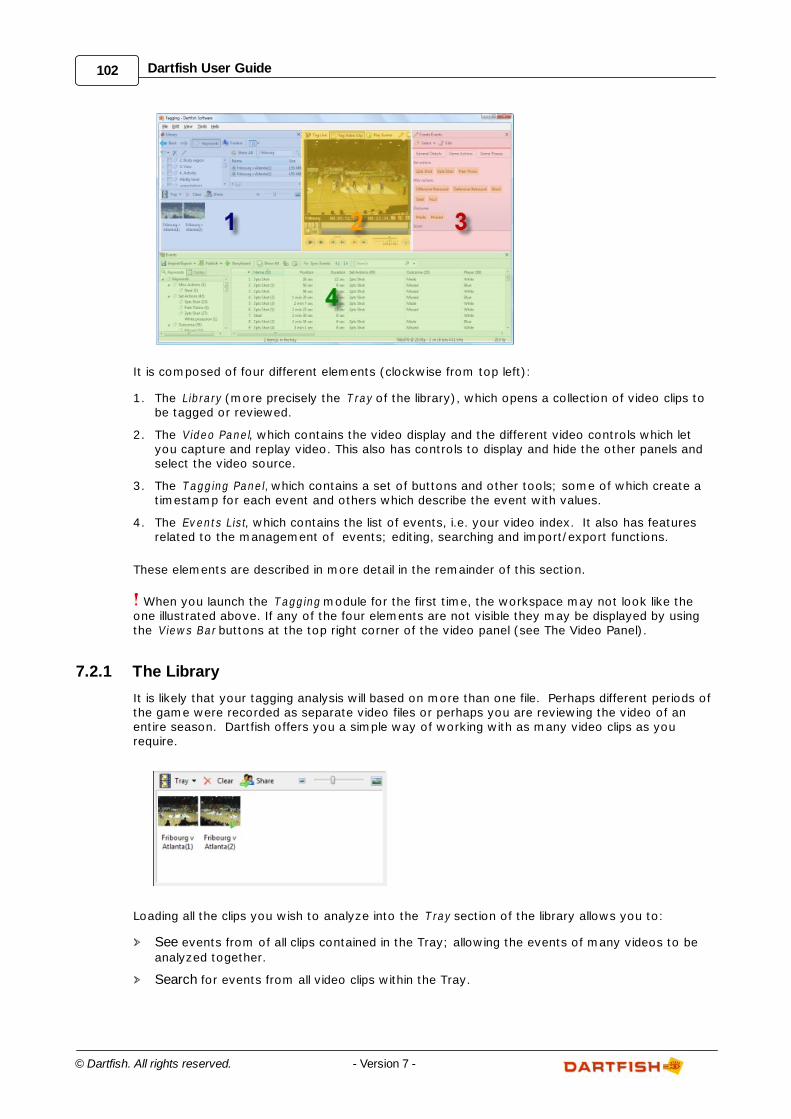
102 Dartfish User Guide
© Dartfish. All rights reserved. - Version 7 -
It is composed of four different elements (clockwise from top left):
1. The Library (more precisely the T ray of the library), which opens a collection of video clips tobe tagged or reviewed.
2. The Video Panel, which contains the video display and the different video controls which letyou capture and replay video. This also has controls to display and hide the other panels andselect the video source.
3. The Tagging Panel, which contains a set of buttons and other tools; some of which create atimestamp for each event and others which describe the event with values.
4. The Events List, which contains the list of events, i.e. your video index. It also has featuresrelated to the management of events; editing, searching and import/export functions.
These elements are described in more detail in the remainder of this section.
When you launch the Tagging module for the first time, the workspace may not look like theone illustrated above. If any of the four elements are not visible they may be displayed by usingthe Views Bar buttons at the top right corner of the video panel (see The Video Panel).
7.2.1 The Library
It is likely that your tagging analysis will based on more than one file. Perhaps different periods ofthe game were recorded as separate video files or perhaps you are reviewing the video of anentire season. Dartfish offers you a simple way of working with as many video clips as yourequire.
Loading all the clips you wish to analyze into the T ray section of the library allows you to:
See events from of all clips contained in the Tray; allowing the events of many videos to be
analyzed together.
Search for events from all video clips within the Tray.
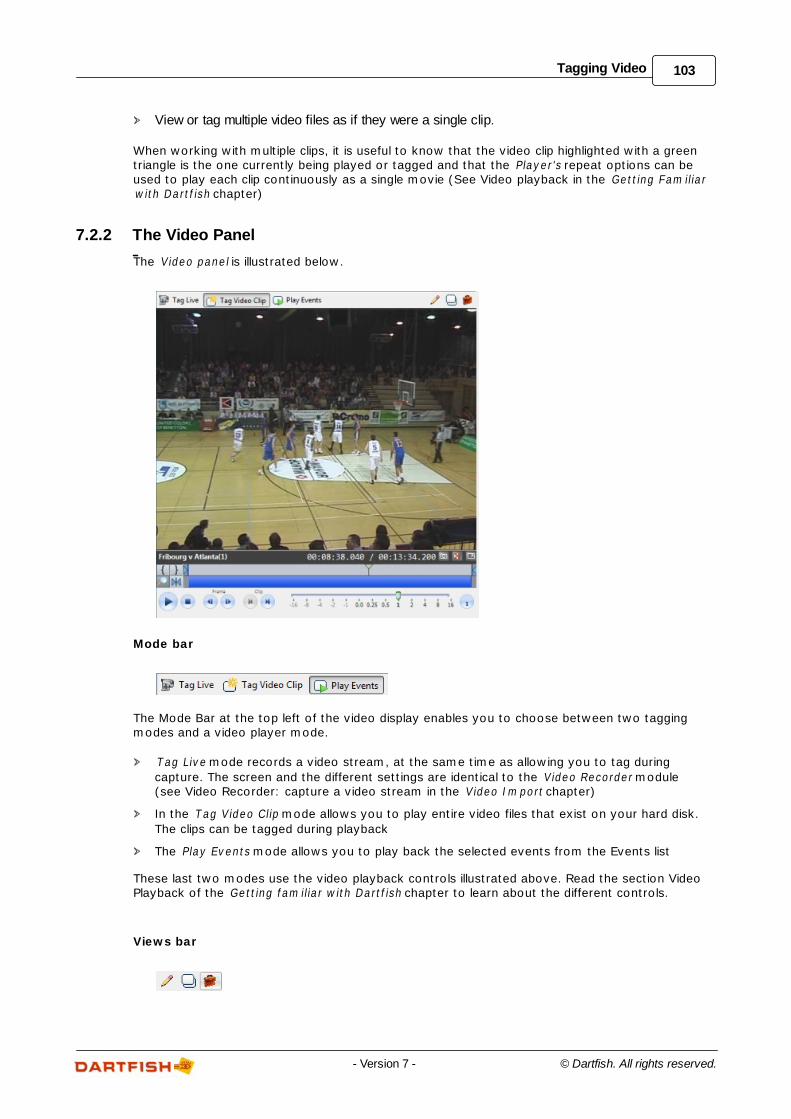
103Tagging Video
© Dartfish. All rights reserved.- Version 7 -
View or tag multiple video files as if they were a single clip.
When working with multiple clips, it is useful to know that the video clip highlighted with a greentriangle is the one currently being played or tagged and that the Player's repeat options can beused to play each clip continuously as a single movie (See Video playback in the Getting Fam iliarwith Dartf ish chapter)
7.2.2 The Video Panel
The Video panel is illustrated below.
Mode bar
The Mode Bar at the top left of the video display enables you to choose between two taggingmodes and a video player mode.
Tag Live mode records a video stream, at the same time as allowing you to tag during
capture. The screen and the different settings are identical to the Video Recorder module(see Video Recorder: capture a video stream in the Video Im port chapter)
In the Tag Video Clip mode allows you to play entire video files that exist on your hard disk.
The clips can be tagged during playback
The Play Events mode allows you to play back the selected events from the Events list
These last two modes use the video playback controls illustrated above. Read the section VideoPlayback of the Getting fam iliar with Dartf ish chapter to learn about the different controls.
Views bar
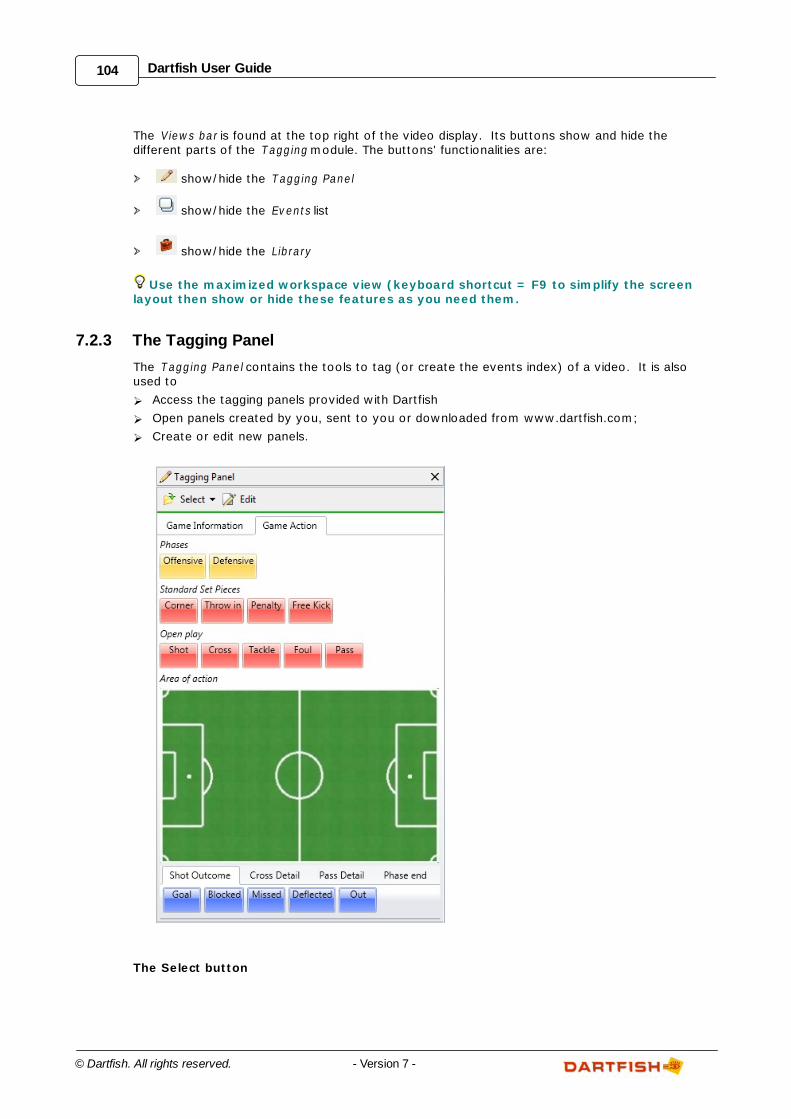
104 Dartfish User Guide
© Dartfish. All rights reserved. - Version 7 -
The Views bar is found at the top right of the video display. Its buttons show and hide thedifferent parts of the Tagging module. The buttons' functionalities are:
show/hide the Tagging Panel
show/hide the Events list
show/hide the Library
Use the maximized workspace view (keyboard shortcut = F9 to simplify the screenlayout then show or hide these features as you need them.
7.2.3 The Tagging Panel
The Tagging Panel contains the tools to tag (or create the events index) of a video. It is alsoused to
Access the tagging panels provided with Dartfish
Open panels created by you, sent to you or downloaded from www.dartfish.com;
Create or edit new panels.
The Select button

105Tagging Video
© Dartfish. All rights reserved.- Version 7 -
The select button is used to open tagging panels which you have created or those which youhave been given. Select also gives access to the built-in panels and to create new panels tomeet your specific needs (see Creating Tagging Panels).
Tagging panels are saved as files just like Word documents or Excel spreadsheets. In otherwords, they exist independently of Dartfish software, they can be saved and organized usingWindows file management, and can be attached to emails to be shared with others.
The Edit button
Opens the tagging panel editor. A tagging panel must already be open before the edit button canbe used.
The tagging panel
Although Dartfish tagging panels allow great flexibility and creativity in how they can be used, thetools on them principally have one of three functions:
1. Event tools - used to create events by time stamping the event and assigning it a descriptivevalue
2. Keyword tools - used to add additional keywords to events
3. Grouping tools - used to organize other tools into groups; either to improve the layoutvisually or ergonomically or to confer shared features on the group
Tagging panels can consist of one or more pages, accessed by tabs. Buttons and tools for useat different times in the tagging process are placed on different pages to improve the ergonomicsof the panel.
7.2.4 The Events List
The Events List contains the list of all events for all video clips in the current T ray:
Events are selected by clicking on the row containing them. The video playhead moves to thestart of the event. Double-clicking an event both plays it and places Dartfish tagging in its PlayEvents mode.
Selected events may also be:
Deleted using the Delete button
Analyzed in Dartfish's Analyzer module (Storyboard button)
Exported as .csv files using the Im port/Export button
Published as new video clips that can be stored on your hard drive (e.g. to make a highlights
movie using video editing software) or directly burned onto a CD or data DVD (e.g. to give to
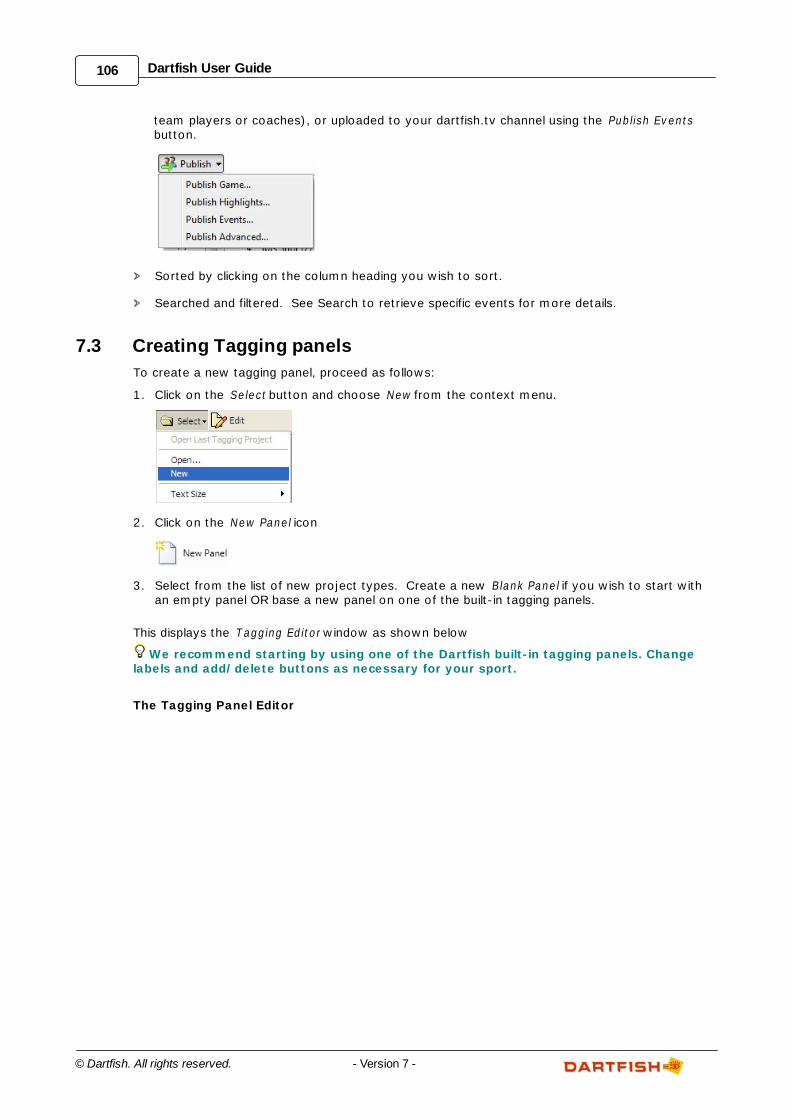
106 Dartfish User Guide
© Dartfish. All rights reserved. - Version 7 -
team players or coaches), or uploaded to your dartfish.tv channel using the Publish Eventsbutton.
Sorted by clicking on the column heading you wish to sort.
Searched and filtered. See Search to retrieve specific events for more details.
7.3 Creating Tagging panels
To create a new tagging panel, proceed as follows:
1. Click on the Select button and choose New from the context menu.
2. Click on the New Panel icon
3. Select from the list of new project types. Create a new Blank Panel if you wish to start withan empty panel OR base a new panel on one of the built-in tagging panels.
This displays the Tagging Editor window as shown below
We recommend starting by using one of the Dartfish built-in tagging panels. Changelabels and add/delete buttons as necessary for your sport.
The Tagging Panel Editor
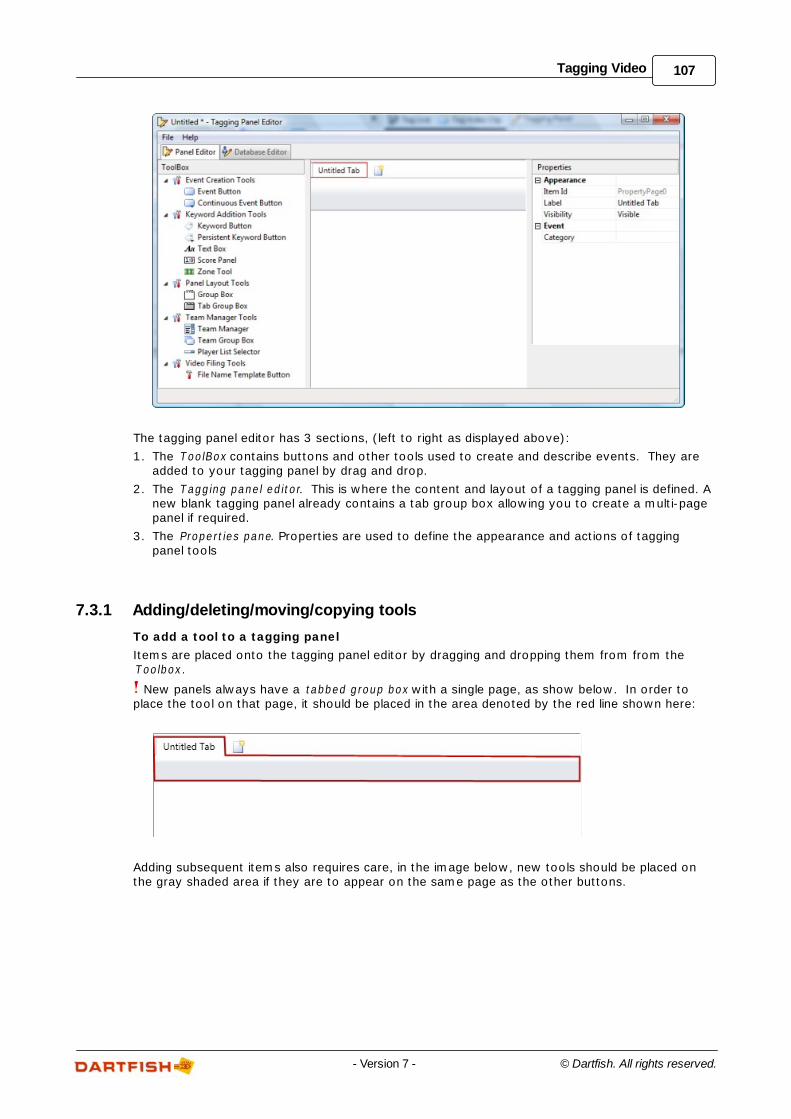
107Tagging Video
© Dartfish. All rights reserved.- Version 7 -
The tagging panel editor has 3 sections, (left to right as displayed above):
1. The ToolBox contains buttons and other tools used to create and describe events. They areadded to your tagging panel by drag and drop.
2. The Tagging panel editor. This is where the content and layout of a tagging panel is defined. Anew blank tagging panel already contains a tab group box allowing you to create a multi-pagepanel if required.
3. The Properties pane. Properties are used to define the appearance and actions of taggingpanel tools
7.3.1 Adding/deleting/moving/copying tools
To add a tool to a tagging panel
Items are placed onto the tagging panel editor by dragging and dropping them from from theToolbox.
New panels always have a tabbed group box with a single page, as show below. In order toplace the tool on that page, it should be placed in the area denoted by the red line shown here:
Adding subsequent items also requires care, in the image below, new tools should be placed onthe gray shaded area if they are to appear on the same page as the other buttons.
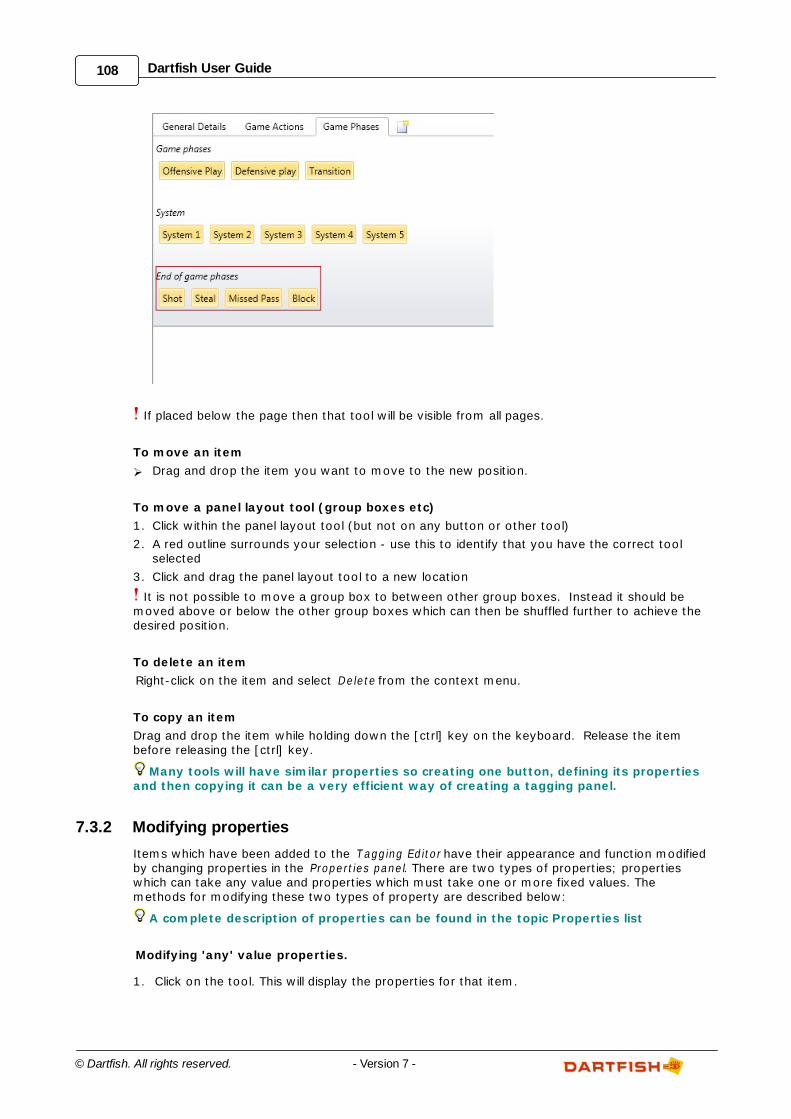
108 Dartfish User Guide
© Dartfish. All rights reserved. - Version 7 -
If placed below the page then that tool will be visible from all pages.
To move an item
Drag and drop the item you want to move to the new position.
To move a panel layout tool (group boxes etc)
1. Click within the panel layout tool (but not on any button or other tool)
2. A red outline surrounds your selection - use this to identify that you have the correct toolselected
3. Click and drag the panel layout tool to a new location
It is not possible to move a group box to between other group boxes. Instead it should bemoved above or below the other group boxes which can then be shuffled further to achieve thedesired position.
To delete an item
Right-click on the item and select Delete from the context menu.
To copy an item
Drag and drop the item while holding down the [ctrl] key on the keyboard. Release the itembefore releasing the [ctrl] key.
Many tools will have similar properties so creating one button, defining its propertiesand then copying it can be a very efficient way of creating a tagging panel.
7.3.2 Modifying properties
Items which have been added to the Tagging Editor have their appearance and function modifiedby changing properties in the Properties panel. There are two types of properties; propertieswhich can take any value and properties which must take one or more fixed values. Themethods for modifying these two types of property are described below:
A complete description of properties can be found in the topic Properties list
Modifying 'any' value properties.
1. Click on the tool. This will display the properties for that item.
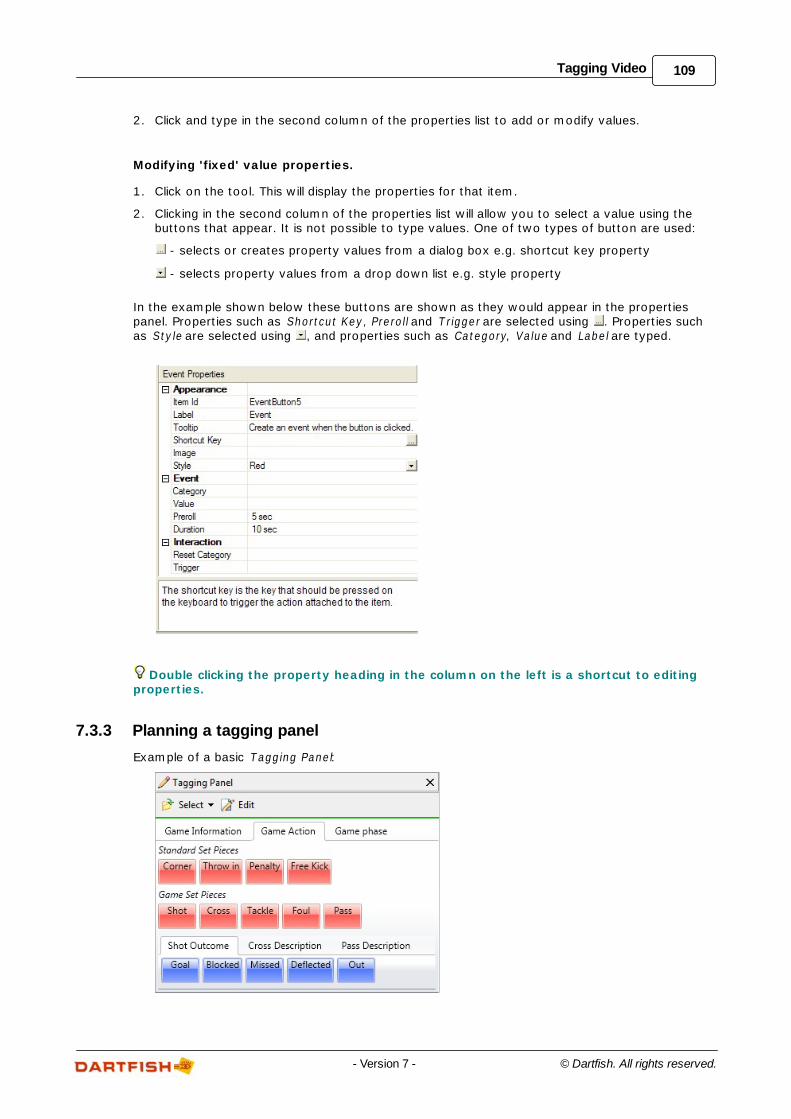
109Tagging Video
© Dartfish. All rights reserved.- Version 7 -
2. Click and type in the second column of the properties list to add or modify values.
Modifying 'fixed' value properties.
1. Click on the tool. This will display the properties for that item.
2. Clicking in the second column of the properties list will allow you to select a value using thebuttons that appear. It is not possible to type values. One of two types of button are used:
- selects or creates property values from a dialog box e.g. shortcut key property
- selects property values from a drop down list e.g. style property
In the example shown below these buttons are shown as they would appear in the propertiespanel. Properties such as Shortcut Key, Preroll and T rigger are selected using . Properties suchas Style are selected using , and properties such as Category, Value and Label are typed.
Double clicking the property heading in the column on the left is a shortcut to editingproperties.
7.3.3 Planning a tagging panel
Example of a basic Tagging Panel:
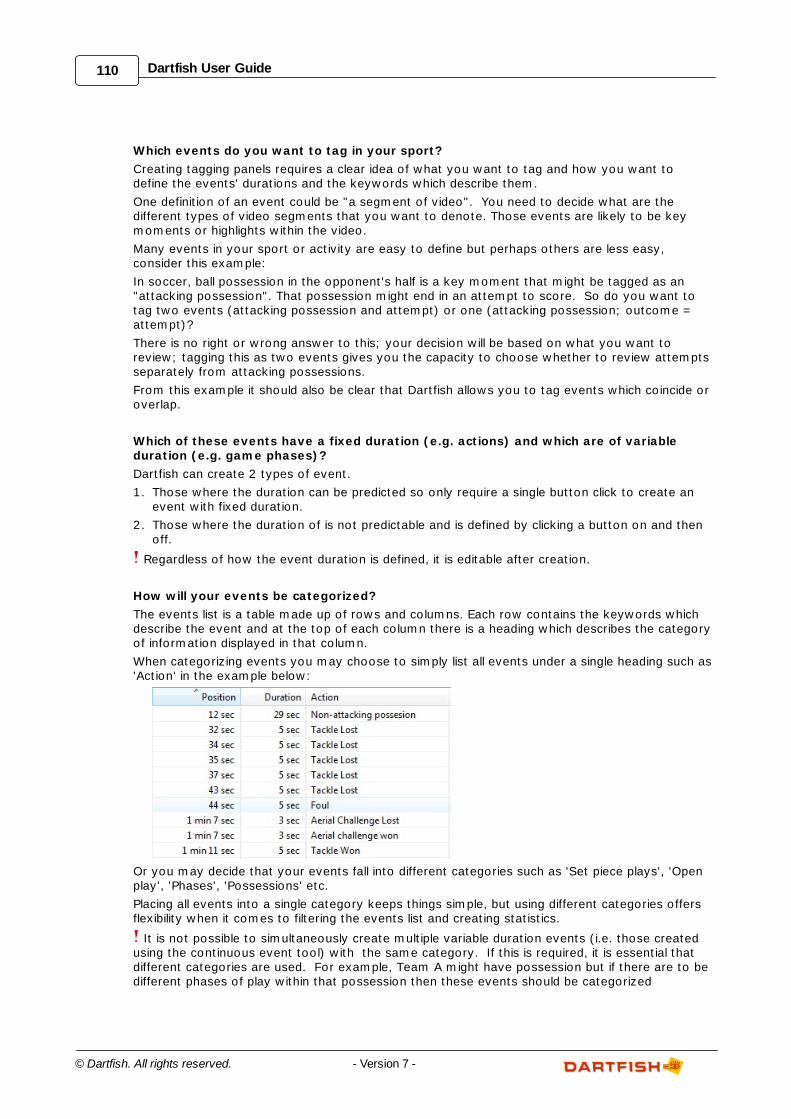
110 Dartfish User Guide
© Dartfish. All rights reserved. - Version 7 -
Which events do you want to tag in your sport?
Creating tagging panels requires a clear idea of what you want to tag and how you want todefine the events' durations and the keywords which describe them.
One definition of an event could be "a segment of video". You need to decide what are thedifferent types of video segments that you want to denote. Those events are likely to be keymoments or highlights within the video.
Many events in your sport or activity are easy to define but perhaps others are less easy,consider this example:
In soccer, ball possession in the opponent's half is a key moment that might be tagged as an"attacking possession". That possession might end in an attempt to score. So do you want totag two events (attacking possession and attempt) or one (attacking possession; outcome =attempt)?
There is no right or wrong answer to this; your decision will be based on what you want toreview; tagging this as two events gives you the capacity to choose whether to review attemptsseparately from attacking possessions.
From this example it should also be clear that Dartfish allows you to tag events which coincide oroverlap.
Which of these events have a fixed duration (e.g. actions) and which are of variableduration (e.g. game phases)?
Dartfish can create 2 types of event.
1. Those where the duration can be predicted so only require a single button click to create anevent with fixed duration.
2. Those where the duration of is not predictable and is defined by clicking a button on and thenoff.
Regardless of how the event duration is defined, it is editable after creation.
How will your events be categorized?
The events list is a table made up of rows and columns. Each row contains the keywords whichdescribe the event and at the top of each column there is a heading which describes the categoryof information displayed in that column.
When categorizing events you may choose to simply list all events under a single heading such as'Action' in the example below:
Or you may decide that your events fall into different categories such as 'Set piece plays', 'Openplay', 'Phases', 'Possessions' etc.
Placing all events into a single category keeps things simple, but using different categories offersflexibility when it comes to filtering the events list and creating statistics.
It is not possible to simultaneously create multiple variable duration events (i.e. those createdusing the continuous event tool) with the same category. If this is required, it is essential thatdifferent categories are used. For example, Team A might have possession but if there are to bedifferent phases of play within that possession then these events should be categorized
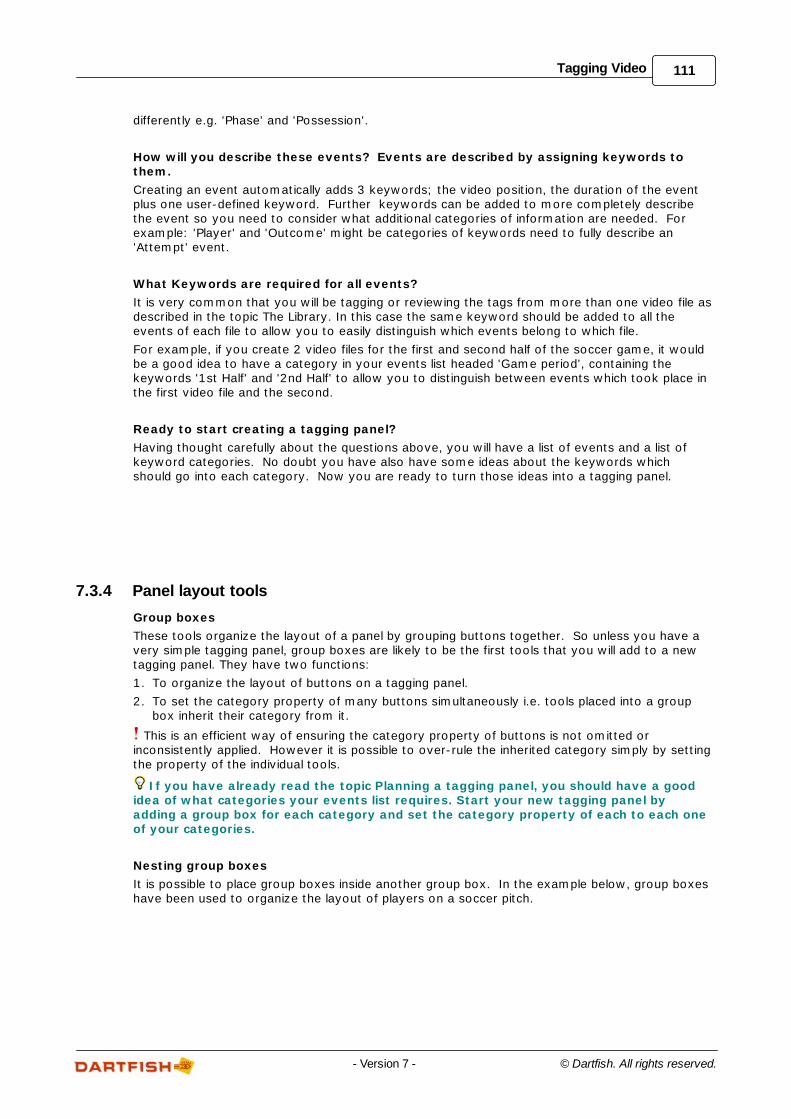
111Tagging Video
© Dartfish. All rights reserved.- Version 7 -
differently e.g. 'Phase' and 'Possession'.
How will you describe these events? Events are described by assigning keywords tothem.
Creating an event automatically adds 3 keywords; the video position, the duration of the eventplus one user-defined keyword. Further keywords can be added to more completely describethe event so you need to consider what additional categories of information are needed. Forexample: 'Player' and 'Outcome' might be categories of keywords need to fully describe an'Attempt' event.
What Keywords are required for all events?
It is very common that you will be tagging or reviewing the tags from more than one video file asdescribed in the topic The Library. In this case the same keyword should be added to all theevents of each file to allow you to easily distinguish which events belong to which file.
For example, if you create 2 video files for the first and second half of the soccer game, it wouldbe a good idea to have a category in your events list headed 'Game period', containing thekeywords '1st Half' and '2nd Half' to allow you to distinguish between events which took place inthe first video file and the second.
Ready to start creating a tagging panel?
Having thought carefully about the questions above, you will have a list of events and a list ofkeyword categories. No doubt you have also have some ideas about the keywords whichshould go into each category. Now you are ready to turn those ideas into a tagging panel.
7.3.4 Panel layout tools
Group boxes
These tools organize the layout of a panel by grouping buttons together. So unless you have avery simple tagging panel, group boxes are likely to be the first tools that you will add to a newtagging panel. They have two functions:
1. To organize the layout of buttons on a tagging panel.
2. To set the category property of many buttons simultaneously i.e. tools placed into a groupbox inherit their category from it.
This is an efficient way of ensuring the category property of buttons is not omitted orinconsistently applied. However it is possible to over-rule the inherited category simply by settingthe property of the individual tools.
If you have already read the topic Planning a tagging panel, you should have a goodidea of what categories your events list requires. Start your new tagging panel byadding a group box for each category and set the category property of each to each oneof your categories.
Nesting group boxes
It is possible to place group boxes inside another group box. In the example below, group boxeshave been used to organize the layout of players on a soccer pitch.
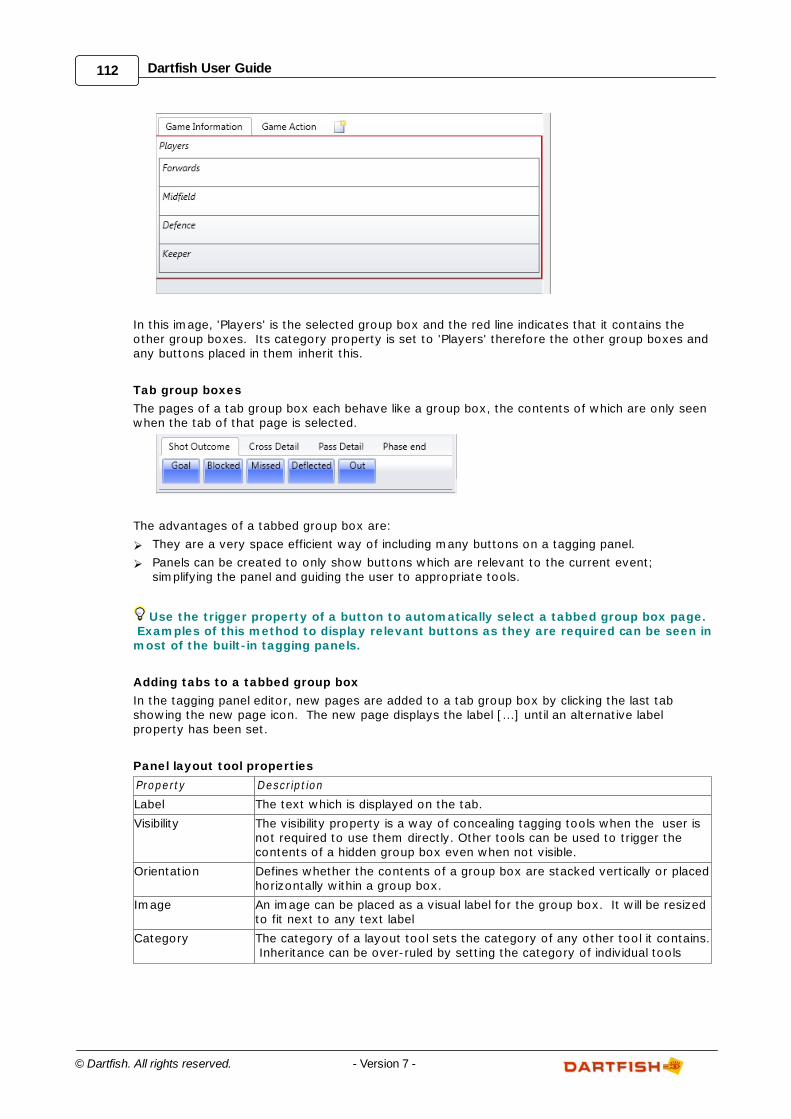
112 Dartfish User Guide
© Dartfish. All rights reserved. - Version 7 -
In this image, 'Players' is the selected group box and the red line indicates that it contains theother group boxes. Its category property is set to 'Players' therefore the other group boxes andany buttons placed in them inherit this.
Tab group boxes
The pages of a tab group box each behave like a group box, the contents of which are only seenwhen the tab of that page is selected.
The advantages of a tabbed group box are:
They are a very space efficient way of including many buttons on a tagging panel.
Panels can be created to only show buttons which are relevant to the current event;simplifying the panel and guiding the user to appropriate tools.
Use the trigger property of a button to automatically select a tabbed group box page. Examples of this method to display relevant buttons as they are required can be seen inmost of the built-in tagging panels.
Adding tabs to a tabbed group box
In the tagging panel editor, new pages are added to a tab group box by clicking the last tabshowing the new page icon. The new page displays the label [...] until an alternative labelproperty has been set.
Panel layout tool properties
Property Description
Label The text which is displayed on the tab.
Visibility The visibility property is a way of concealing tagging tools when the user isnot required to use them directly. Other tools can be used to trigger thecontents of a hidden group box even when not visible.
Orientation Defines whether the contents of a group box are stacked vertically or placedhorizontally within a group box.
Image An image can be placed as a visual label for the group box. It will be resizedto fit next to any text label
Category The category of a layout tool sets the category of any other tool it contains. Inheritance can be over-ruled by setting the category of individual tools
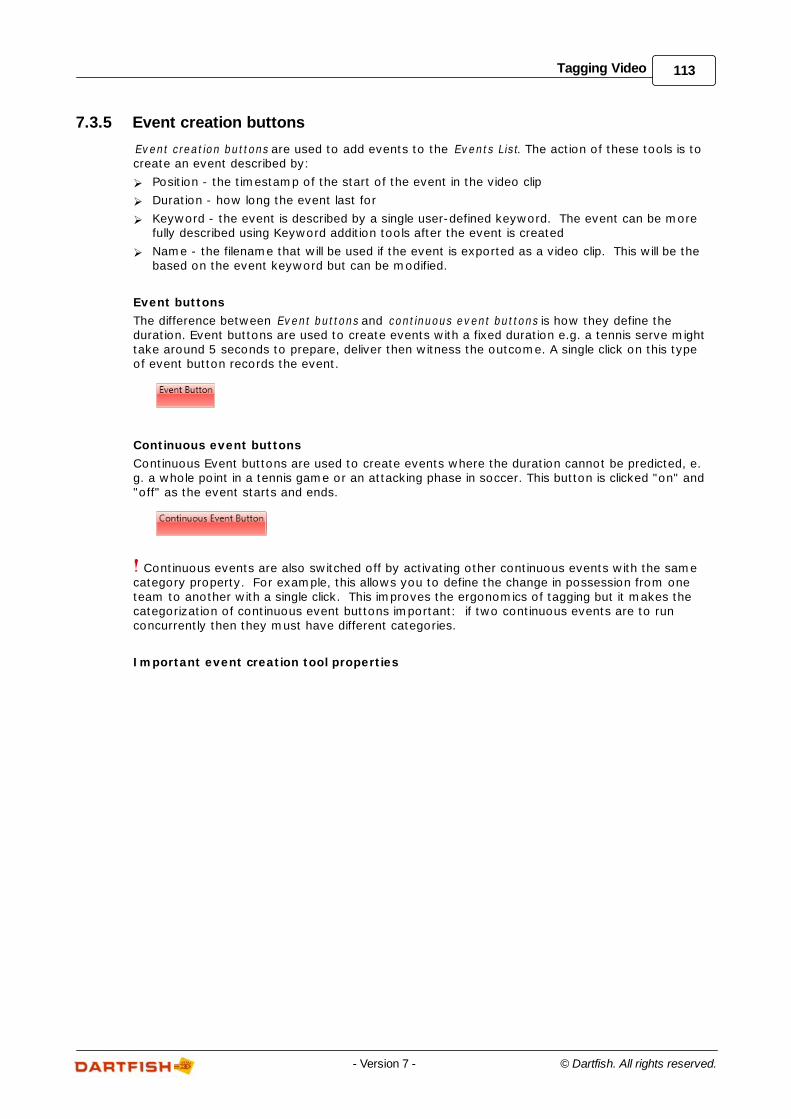
113Tagging Video
© Dartfish. All rights reserved.- Version 7 -
7.3.5 Event creation buttons
Event creation buttons are used to add events to the Events List. The action of these tools is tocreate an event described by:
Position - the timestamp of the start of the event in the video clip
Duration - how long the event last for
Keyword - the event is described by a single user-defined keyword. The event can be morefully described using Keyword addition tools after the event is created
Name - the filename that will be used if the event is exported as a video clip. This will be thebased on the event keyword but can be modified.
Event buttons
The difference between Event buttons and continuous event buttons is how they define theduration. Event buttons are used to create events with a fixed duration e.g. a tennis serve mighttake around 5 seconds to prepare, deliver then witness the outcome. A single click on this typeof event button records the event.
Continuous event buttons
Continuous Event buttons are used to create events where the duration cannot be predicted, e.g. a whole point in a tennis game or an attacking phase in soccer. This button is clicked "on" and"off" as the event starts and ends.
Continuous events are also switched off by activating other continuous events with the samecategory property. For example, this allows you to define the change in possession from oneteam to another with a single click. This improves the ergonomics of tagging but it makes thecategorization of continuous event buttons important: if two continuous events are to runconcurrently then they must have different categories.
Important event creation tool properties
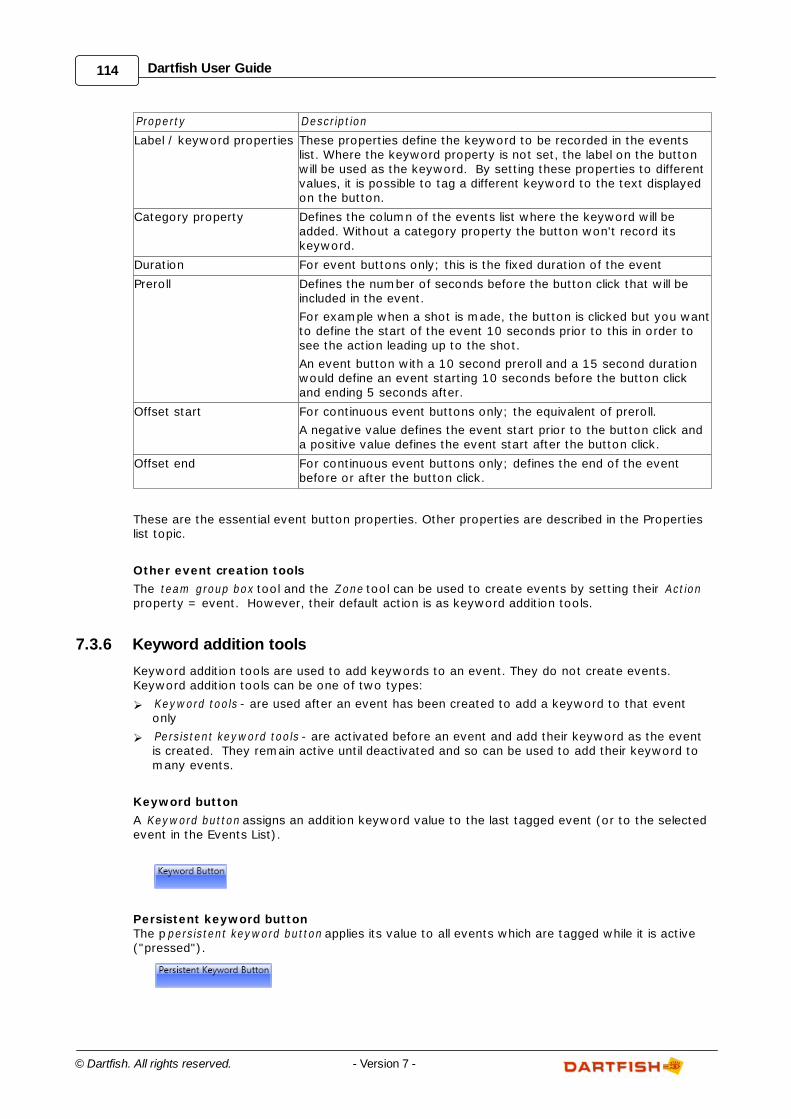
114 Dartfish User Guide
© Dartfish. All rights reserved. - Version 7 -
Property Description
Label / keyword properties These properties define the keyword to be recorded in the eventslist. Where the keyword property is not set, the label on the buttonwill be used as the keyword. By setting these properties to differentvalues, it is possible to tag a different keyword to the text displayedon the button.
Category property Defines the column of the events list where the keyword will beadded. Without a category property the button won't record itskeyword.
Duration For event buttons only; this is the fixed duration of the event
Preroll Defines the number of seconds before the button click that will beincluded in the event.
For example when a shot is made, the button is clicked but you wantto define the start of the event 10 seconds prior to this in order tosee the action leading up to the shot.
An event button with a 10 second preroll and a 15 second durationwould define an event starting 10 seconds before the button clickand ending 5 seconds after.
Offset start For continuous event buttons only; the equivalent of preroll.
A negative value defines the event start prior to the button click anda positive value defines the event start after the button click.
Offset end For continuous event buttons only; defines the end of the eventbefore or after the button click.
These are the essential event button properties. Other properties are described in the Propertieslist topic.
Other event creation tools
The team group box tool and the Zone tool can be used to create events by setting their Actionproperty = event. However, their default action is as keyword addition tools.
7.3.6 Keyword addition tools
Keyword addition tools are used to add keywords to an event. They do not create events.Keyword addition tools can be one of two types:
Keyword tools - are used after an event has been created to add a keyword to that eventonly
Persistent keyword tools - are activated before an event and add their keyword as the eventis created. They remain active until deactivated and so can be used to add their keyword tomany events.
Keyword button
A Keyword button assigns an addition keyword value to the last tagged event (or to the selectedevent in the Events List).
Persistent keyword buttonThe ppersistent keyword button applies its value to all events which are tagged while it is active("pressed").
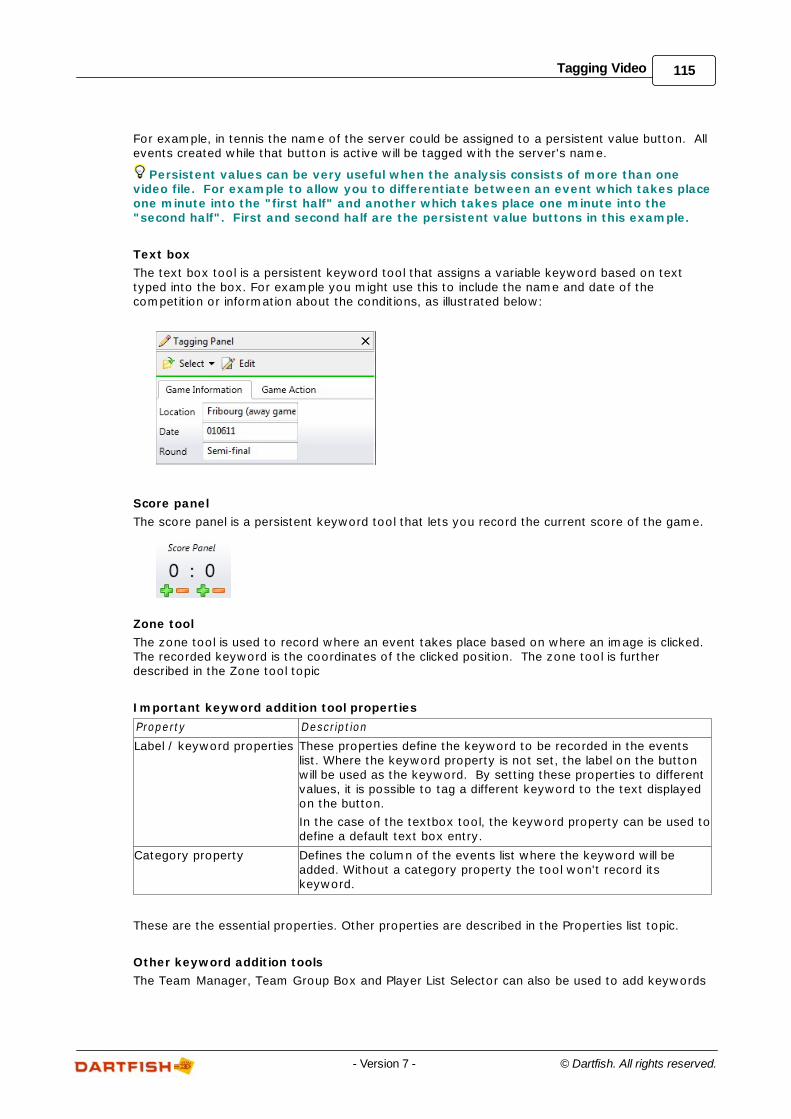
115Tagging Video
© Dartfish. All rights reserved.- Version 7 -
For example, in tennis the name of the server could be assigned to a persistent value button. Allevents created while that button is active will be tagged with the server's name.
Persistent values can be very useful when the analysis consists of more than onevideo file. For example to allow you to differentiate between an event which takes placeone minute into the "first half" and another which takes place one minute into the"second half". First and second half are the persistent value buttons in this example.
Text box
The text box tool is a persistent keyword tool that assigns a variable keyword based on texttyped into the box. For example you might use this to include the name and date of thecompetition or information about the conditions, as illustrated below:
Score panel
The score panel is a persistent keyword tool that lets you record the current score of the game.
Zone tool
The zone tool is used to record where an event takes place based on where an image is clicked. The recorded keyword is the coordinates of the clicked position. The zone tool is furtherdescribed in the Zone tool topic
Important keyword addition tool properties
Property Description
Label / keyword properties These properties define the keyword to be recorded in the eventslist. Where the keyword property is not set, the label on the buttonwill be used as the keyword. By setting these properties to differentvalues, it is possible to tag a different keyword to the text displayedon the button.
In the case of the textbox tool, the keyword property can be used todefine a default text box entry.
Category property Defines the column of the events list where the keyword will beadded. Without a category property the tool won't record itskeyword.
These are the essential properties. Other properties are described in the Properties list topic.
Other keyword addition tools
The Team Manager, Team Group Box and Player List Selector can also be used to add keywords
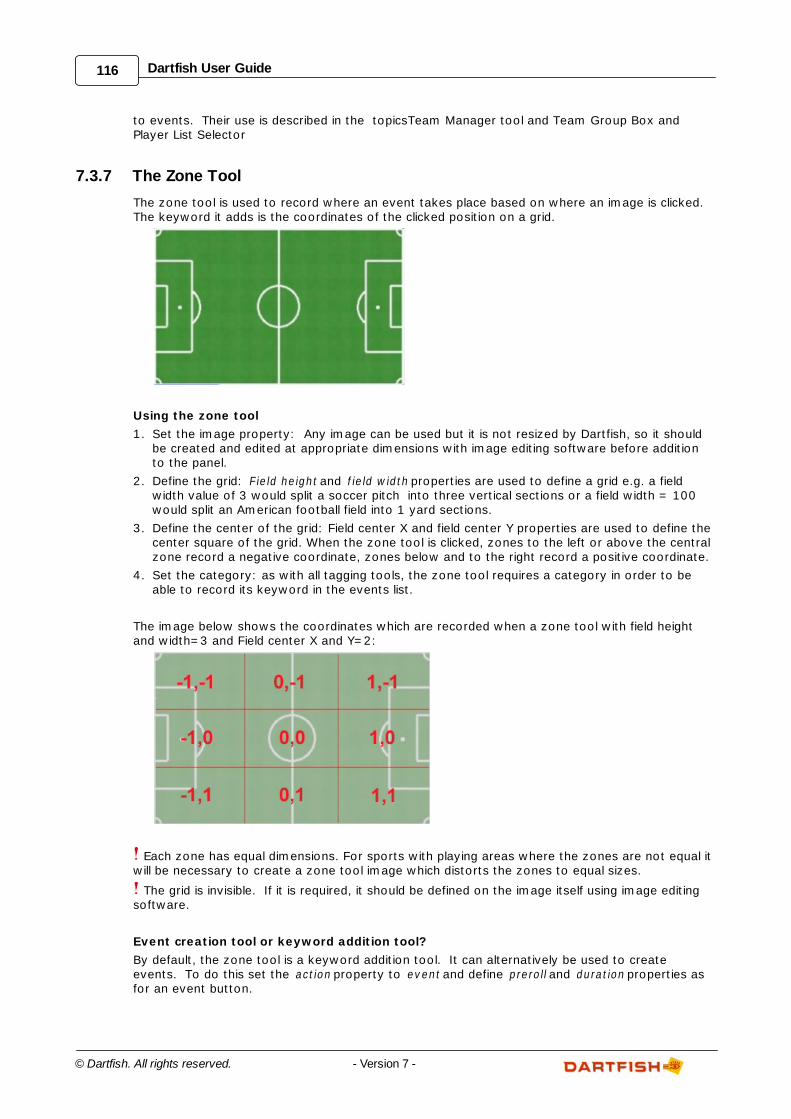
116 Dartfish User Guide
© Dartfish. All rights reserved. - Version 7 -
to events. Their use is described in the topicsTeam Manager tool and Team Group Box andPlayer List Selector
7.3.7 The Zone Tool
The zone tool is used to record where an event takes place based on where an image is clicked. The keyword it adds is the coordinates of the clicked position on a grid.
Using the zone tool
1. Set the image property: Any image can be used but it is not resized by Dartfish, so it shouldbe created and edited at appropriate dimensions with image editing software before additionto the panel.
2. Define the grid: F ield height and f ield width properties are used to define a grid e.g. a fieldwidth value of 3 would split a soccer pitch into three vertical sections or a field width = 100would split an American football field into 1 yard sections.
3. Define the center of the grid: Field center X and field center Y properties are used to define thecenter square of the grid. When the zone tool is clicked, zones to the left or above the centralzone record a negative coordinate, zones below and to the right record a positive coordinate.
4. Set the category: as with all tagging tools, the zone tool requires a category in order to beable to record its keyword in the events list.
The image below shows the coordinates which are recorded when a zone tool with field heightand width=3 and Field center X and Y=2:
Each zone has equal dimensions. For sports with playing areas where the zones are not equal itwill be necessary to create a zone tool image which distorts the zones to equal sizes.
The grid is invisible. If it is required, it should be defined on the image itself using image editingsoftware.
Event creation tool or keyword addition tool?
By default, the zone tool is a keyword addition tool. It can alternatively be used to createevents. To do this set the action property to event and define preroll and duration properties asfor an event button.
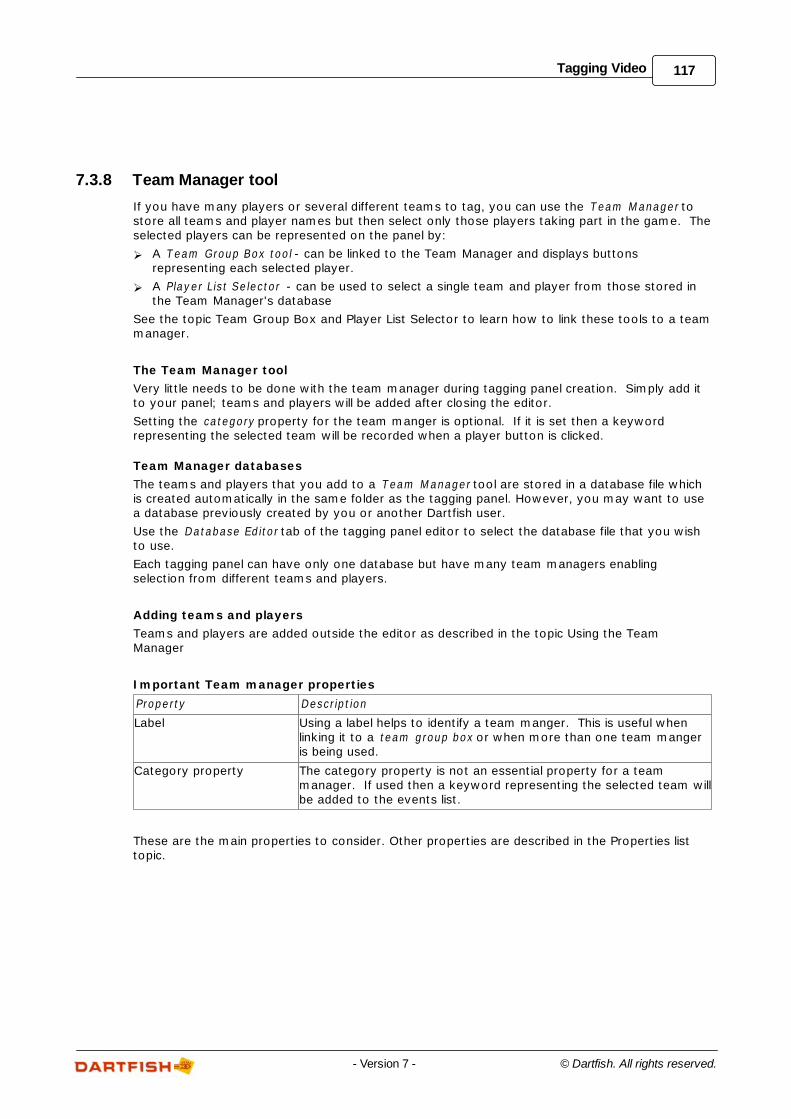
117Tagging Video
© Dartfish. All rights reserved.- Version 7 -
7.3.8 Team Manager tool
If you have many players or several different teams to tag, you can use the Team M anager tostore all teams and player names but then select only those players taking part in the game. Theselected players can be represented on the panel by:
A Team Group Box tool - can be linked to the Team Manager and displays buttonsrepresenting each selected player.
A Player List Selector - can be used to select a single team and player from those stored inthe Team Manager's database
See the topic Team Group Box and Player List Selector to learn how to link these tools to a teammanager.
The Team Manager tool
Very little needs to be done with the team manager during tagging panel creation. Simply add itto your panel; teams and players will be added after closing the editor.
Setting the category property for the team manger is optional. If it is set then a keywordrepresenting the selected team will be recorded when a player button is clicked.
Team Manager databases
The teams and players that you add to a Team M anager tool are stored in a database file whichis created automatically in the same folder as the tagging panel. However, you may want to usea database previously created by you or another Dartfish user.
Use the Database Editor tab of the tagging panel editor to select the database file that you wishto use.
Each tagging panel can have only one database but have many team managers enablingselection from different teams and players.
Adding teams and players
Teams and players are added outside the editor as described in the topic Using the TeamManager
Important Team manager properties
Property Description
Label Using a label helps to identify a team manger. This is useful whenlinking it to a team group box or when more than one team mangeris being used.
Category property The category property is not an essential property for a teammanager. If used then a keyword representing the selected team willbe added to the events list.
These are the main properties to consider. Other properties are described in the Properties listtopic.
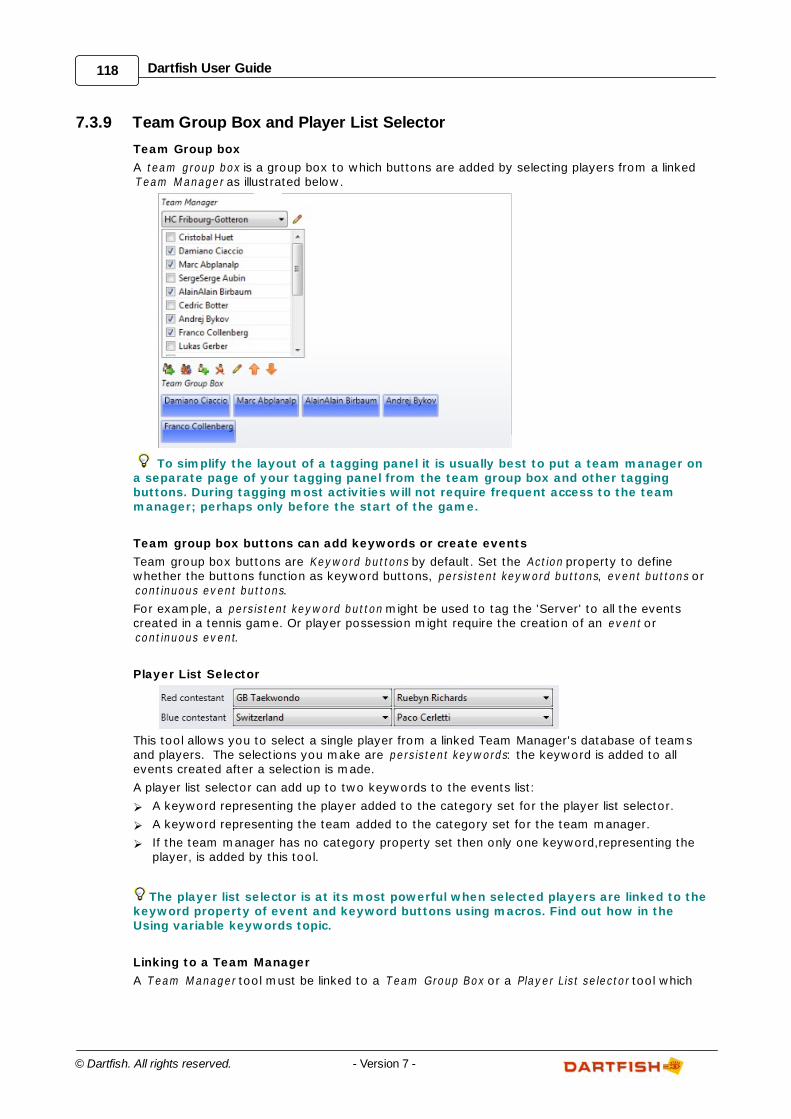
118 Dartfish User Guide
© Dartfish. All rights reserved. - Version 7 -
7.3.9 Team Group Box and Player List Selector
Team Group box
A team group box is a group box to which buttons are added by selecting players from a linkedTeam M anager as illustrated below.
To simplify the layout of a tagging panel it is usually best to put a team manager ona separate page of your tagging panel from the team group box and other taggingbuttons. During tagging most activities will not require frequent access to the teammanager; perhaps only before the start of the game.
Team group box buttons can add keywords or create events
Team group box buttons are Keyword buttons by default. Set the Action property to definewhether the buttons function as keyword buttons, persistent keyword buttons, event buttons orcontinuous event buttons.
For example, a persistent keyword button might be used to tag the 'Server' to all the eventscreated in a tennis game. Or player possession might require the creation of an event orcontinuous event.
Player List Selector
This tool allows you to select a single player from a linked Team Manager's database of teamsand players. The selections you make are persistent keywords: the keyword is added to allevents created after a selection is made.
A player list selector can add up to two keywords to the events list:
A keyword representing the player added to the category set for the player list selector.
A keyword representing the team added to the category set for the team manager.
If the team manager has no category property set then only one keyword,representing theplayer, is added by this tool.
The player list selector is at its most powerful when selected players are linked to thekeyword property of event and keyword buttons using macros. Find out how in the Using variable keywords topic.
Linking to a Team Manager
A Team M anager tool must be linked to a Team Group Box or a Player List selector tool which
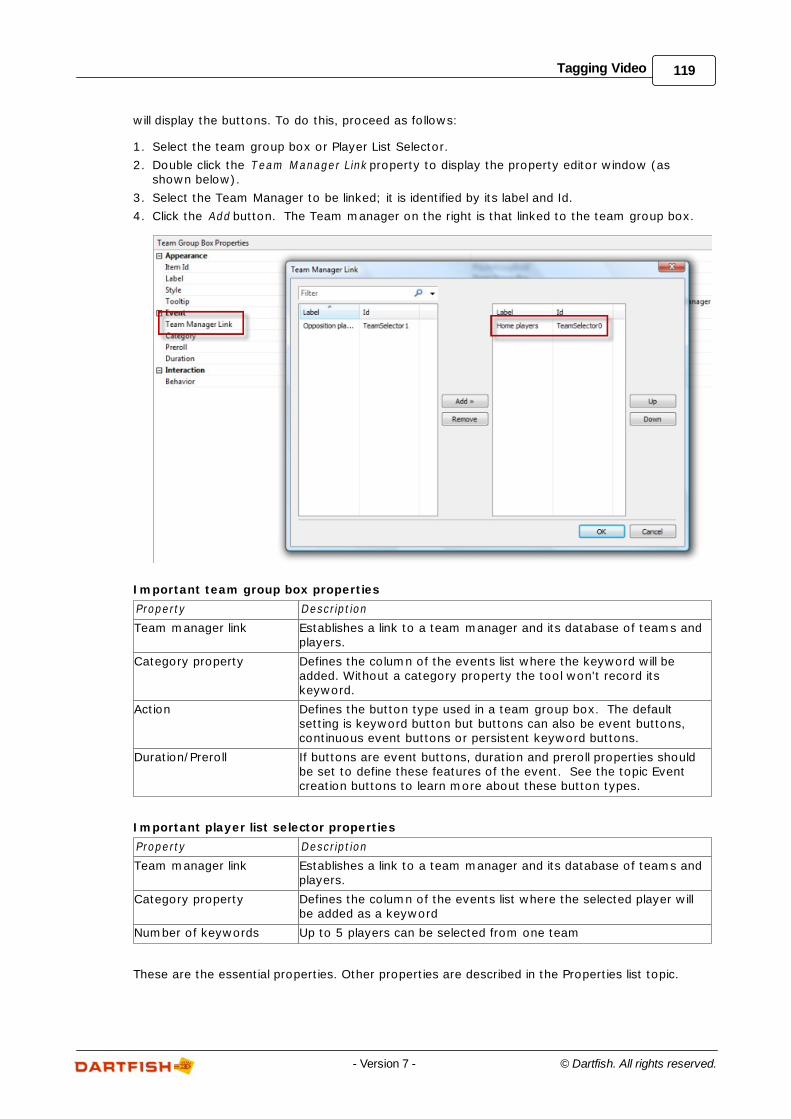
119Tagging Video
© Dartfish. All rights reserved.- Version 7 -
will display the buttons. To do this, proceed as follows:
1. Select the team group box or Player List Selector.
2. Double click the Team M anager Link property to display the property editor window (asshown below).
3. Select the Team Manager to be linked; it is identified by its label and Id.
4. Click the Add button. The Team manager on the right is that linked to the team group box.
Important team group box properties
Property Description
Team manager link Establishes a link to a team manager and its database of teams andplayers.
Category property Defines the column of the events list where the keyword will beadded. Without a category property the tool won't record itskeyword.
Action Defines the button type used in a team group box. The defaultsetting is keyword button but buttons can also be event buttons,continuous event buttons or persistent keyword buttons.
Duration/Preroll If buttons are event buttons, duration and preroll properties shouldbe set to define these features of the event. See the topic Eventcreation buttons to learn more about these button types.
Important player list selector properties
Property Description
Team manager link Establishes a link to a team manager and its database of teams andplayers.
Category property Defines the column of the events list where the selected player willbe added as a keyword
Number of keywords Up to 5 players can be selected from one team
These are the essential properties. Other properties are described in the Properties list topic.
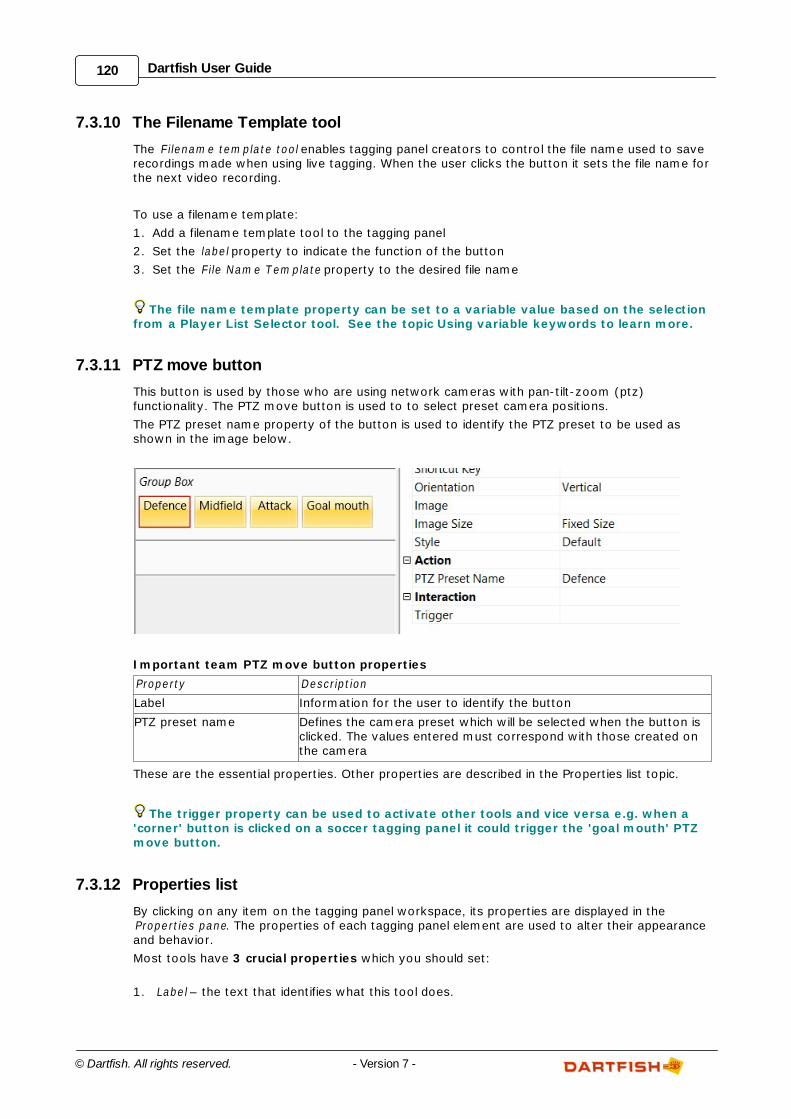
120 Dartfish User Guide
© Dartfish. All rights reserved. - Version 7 -
7.3.10 The Filename Template tool
The F ilenam e tem plate tool enables tagging panel creators to control the file name used to saverecordings made when using live tagging. When the user clicks the button it sets the file name forthe next video recording.
To use a filename template:
1. Add a filename template tool to the tagging panel
2. Set the label property to indicate the function of the button
3. Set the F ile Nam e Tem plate property to the desired file name
The file name template property can be set to a variable value based on the selectionfrom a Player List Selector tool. See the topic Using variable keywords to learn more.
7.3.11 PTZ move button
This button is used by those who are using network cameras with pan-tilt-zoom (ptz)functionality. The PTZ move button is used to to select preset camera positions.
The PTZ preset name property of the button is used to identify the PTZ preset to be used asshown in the image below.
Important team PTZ move button properties
Property Description
Label Information for the user to identify the button
PTZ preset name Defines the camera preset which will be selected when the button isclicked. The values entered must correspond with those created onthe camera
These are the essential properties. Other properties are described in the Properties list topic.
The trigger property can be used to activate other tools and vice versa e.g. when a'corner' button is clicked on a soccer tagging panel it could trigger the 'goal mouth' PTZmove button.
7.3.12 Properties list
By clicking on any item on the tagging panel workspace, its properties are displayed in the Properties pane. The properties of each tagging panel element are used to alter their appearanceand behavior.
Most tools have 3 crucial properties which you should set:
1. Label – the text that identifies what this tool does.
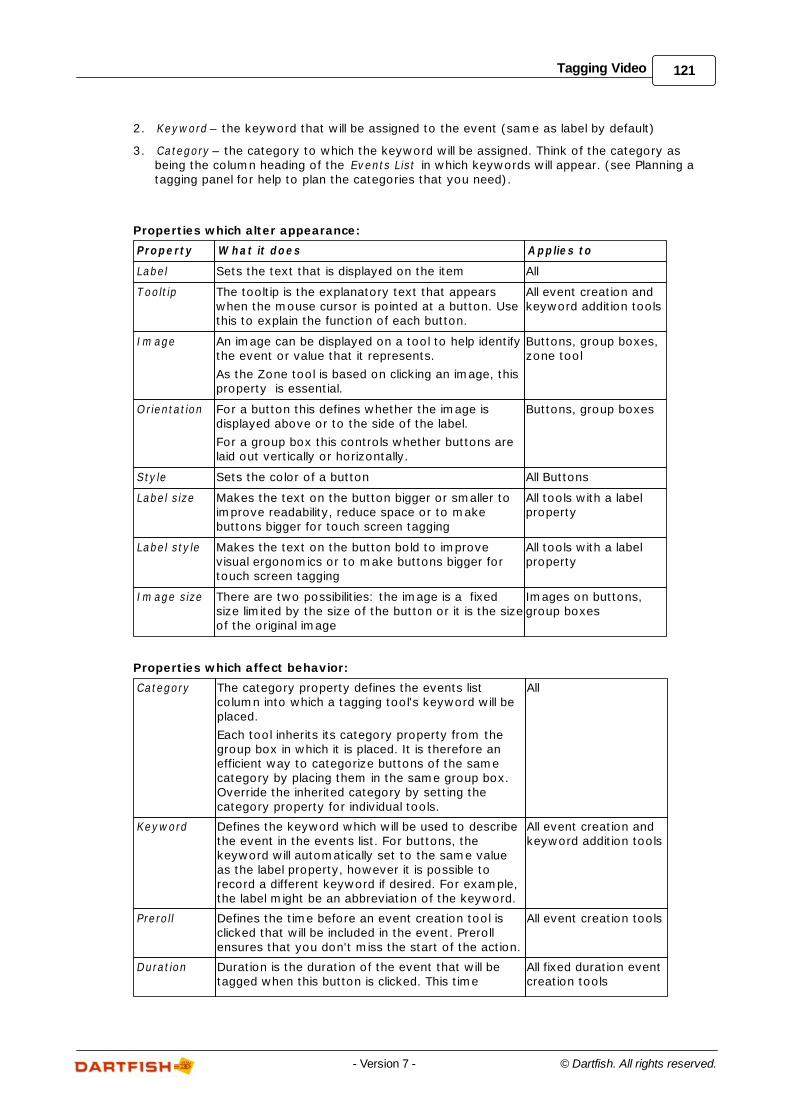
121Tagging Video
© Dartfish. All rights reserved.- Version 7 -
2. Keyword – the keyword that will be assigned to the event (same as label by default)
3. Category – the category to which the keyword will be assigned. Think of the category asbeing the column heading of the Events List in which keywords will appear. (see Planning atagging panel for help to plan the categories that you need).
Properties which alter appearance:
Property W hat it does Applies to
Label Sets the text that is displayed on the item All
Tooltip The tooltip is the explanatory text that appearswhen the mouse cursor is pointed at a button. Usethis to explain the function of each button.
All event creation andkeyword addition tools
Im age An image can be displayed on a tool to help identifythe event or value that it represents.
As the Zone tool is based on clicking an image, thisproperty is essential.
Buttons, group boxes,zone tool
Orientation For a button this defines whether the image isdisplayed above or to the side of the label.
For a group box this controls whether buttons arelaid out vertically or horizontally.
Buttons, group boxes
Style Sets the color of a button All Buttons
Label size Makes the text on the button bigger or smaller toimprove readability, reduce space or to makebuttons bigger for touch screen tagging
All tools with a labelproperty
Label style Makes the text on the button bold to improvevisual ergonomics or to make buttons bigger fortouch screen tagging
All tools with a labelproperty
Im age size There are two possibilities: the image is a fixedsize limited by the size of the button or it is the sizeof the original image
Images on buttons,group boxes
Properties which affect behavior:
Category The category property defines the events listcolumn into which a tagging tool's keyword will beplaced.
Each tool inherits its category property from thegroup box in which it is placed. It is therefore anefficient way to categorize buttons of the samecategory by placing them in the same group box.Override the inherited category by setting thecategory property for individual tools.
All
Keyword Defines the keyword which will be used to describethe event in the events list. For buttons, thekeyword will automatically set to the same valueas the label property, however it is possible torecord a different keyword if desired. For example,the label might be an abbreviation of the keyword.
All event creation andkeyword addition tools
Preroll Defines the time before an event creation tool isclicked that will be included in the event. Prerollensures that you don't miss the start of the action.
All event creation tools
Duration Duration is the duration of the event that will betagged when this button is clicked. This time
All fixed duration eventcreation tools
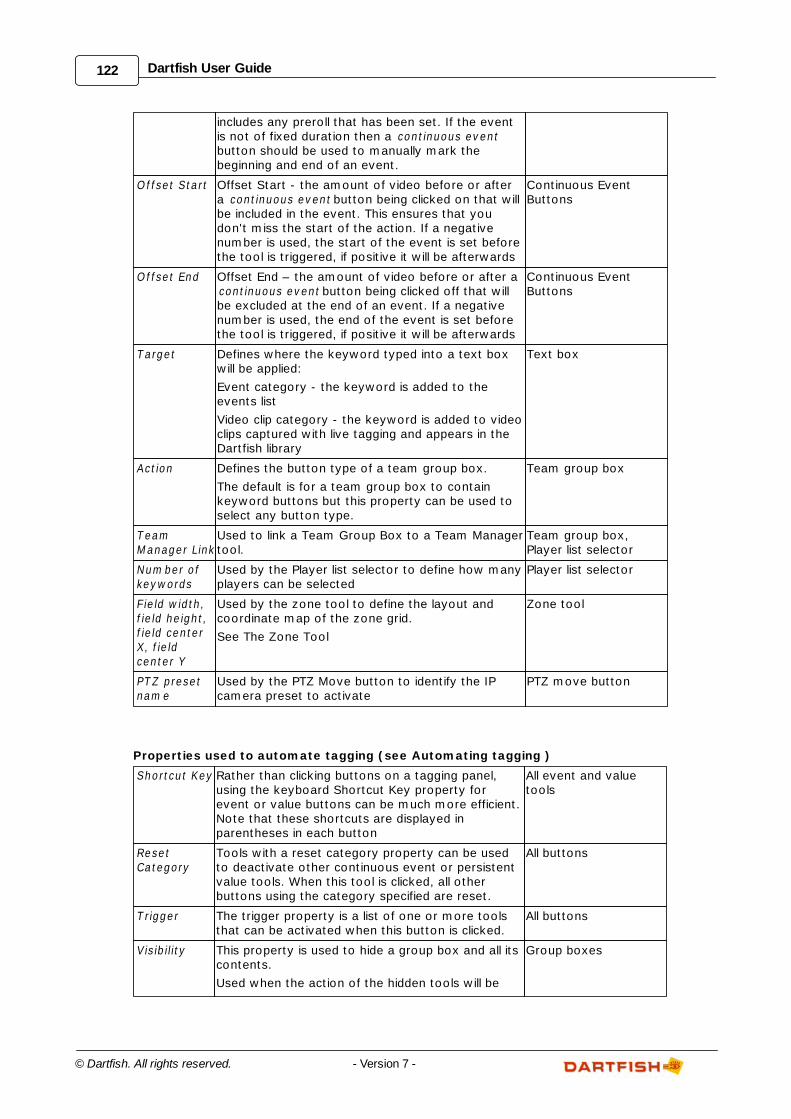
122 Dartfish User Guide
© Dartfish. All rights reserved. - Version 7 -
includes any preroll that has been set. If the eventis not of fixed duration then a continuous eventbutton should be used to manually mark thebeginning and end of an event.
O ffset Start Offset Start - the amount of video before or after a continuous event button being clicked on that willbe included in the event. This ensures that youdon't miss the start of the action. If a negativenumber is used, the start of the event is set beforethe tool is triggered, if positive it will be afterwards
Continuous EventButtons
Offset End Offset End – the amount of video before or after a continuous event button being clicked off that willbe excluded at the end of an event. If a negativenumber is used, the end of the event is set beforethe tool is triggered, if positive it will be afterwards
Continuous EventButtons
Target Defines where the keyword typed into a text boxwill be applied:
Event category - the keyword is added to theevents list
Video clip category - the keyword is added to videoclips captured with live tagging and appears in theDartfish library
Text box
Action Defines the button type of a team group box.
The default is for a team group box to containkeyword buttons but this property can be used toselect any button type.
Team group box
TeamM anager Link
Used to link a Team Group Box to a Team Managertool.
Team group box,Player list selector
Num ber ofkeywords
Used by the Player list selector to define how manyplayers can be selected
Player list selector
F ield width,f ield height,f ield centerX, f ieldcenter Y
Used by the zone tool to define the layout andcoordinate map of the zone grid.
See The Zone Tool
Zone tool
PTZ presetnam e
Used by the PTZ Move button to identify the IPcamera preset to activate
PTZ move button
Properties used to automate tagging (see Automating tagging )
Shortcut Key Rather than clicking buttons on a tagging panel,using the keyboard Shortcut Key property forevent or value buttons can be much more efficient.Note that these shortcuts are displayed inparentheses in each button
All event and valuetools
ResetCategory
Tools with a reset category property can be usedto deactivate other continuous event or persistentvalue tools. When this tool is clicked, all otherbuttons using the category specified are reset.
All buttons
T rigger The trigger property is a list of one or more toolsthat can be activated when this button is clicked.
All buttons
Visibility This property is used to hide a group box and all itscontents.
Used when the action of the hidden tools will be
Group boxes
123Tagging Video
© Dartfish. All rights reserved.- Version 7 -
defined by the tagging panel creator and shouldn'tbe modified by the user or when it will be triggeredby other buttons.
Clicking on a property title in the properties panel displays a description of thatproperty. Double clicking on the property title allows you to change that property.
7.3.13 Automating tagging
Large tagging panels with many buttons present two problems to the user:
1. Many mouse clicks might be required to record an event, making it hard to keep up with afast moving game
2. It becomes more difficult to locate the buttons you want to use.
This topic explains properties and features which assist with these problems
Reset Category property
Tools with a reset category property can be used to deactivate other continuous event orpersistent keyword buttons. When the tool is clicked, all other buttons with the specifiedcategory are reset.
This behavior is equivalent to that of continuous event buttons (see the topic Event creationbuttons) which automatically deactivate all other continuous event buttons sharing the samecategory, except that the reset category property will deactivate buttons from any othercategory that you specify.
Be careful with spelling and use of spaces - the reset category you specify must match thecategory of the tools that you wish to reset. However the case used is unimportant.
T rigger property
The trigger property is used to activate or deactivate other tools. This property specificallyidentifies which tools will be triggered by selecting them from a list selected from a list.
Examples of the use of the trigger property can be seen in some of Dartfish's built-in taggingpanels where clicking an event button triggers a page of a tab group box revealing keywordbuttons associated with that event.
For example, when a scoring event is tagged the trigger property could be used to activate thetab group box which contains a score tool.
To set a trigger property:
1. Select the tool which will trigger other tools.
2. In the properties panel, double-click the property heading T rigger
3. In the trigger dialog (see below) select the tool which will be triggered. Tools are identified byboth their label and Id; be careful to select the correct tool in the case where more than onetool has the same label
4. Click the Add button
5. Repeat as often as required to create a list of tools which will be triggered
6. Use the Up and Down buttons to specify the order in which tools will be triggered

124 Dartfish User Guide
© Dartfish. All rights reserved. - Version 7 -
Shortcut key property
Shortcut keys are used to trigger buttons without having to use a mouse. This can be usefulbecause once you know which keys to press tagging can be much quicker.
To set a shortcut key:
1 . In the properties panel, double-click the property heading Shortcut key
2 . Type a shortcut key
3. Click the Assign button. This must be done before clicking OK
As you can see here; more than one shortcut key can be assigned; and any combination ofkeys can be used e.g. 'S' might be used for a home team shot and 'ctrl+S' might be used for anopposition shot.
7.3.14 Using variable keywords
A simple macro can be used to generate a variable keyword or category for a tagging tool.
Syntax
$(Item_Id.property[#])
Example: $(teamlistselector.keyword1)
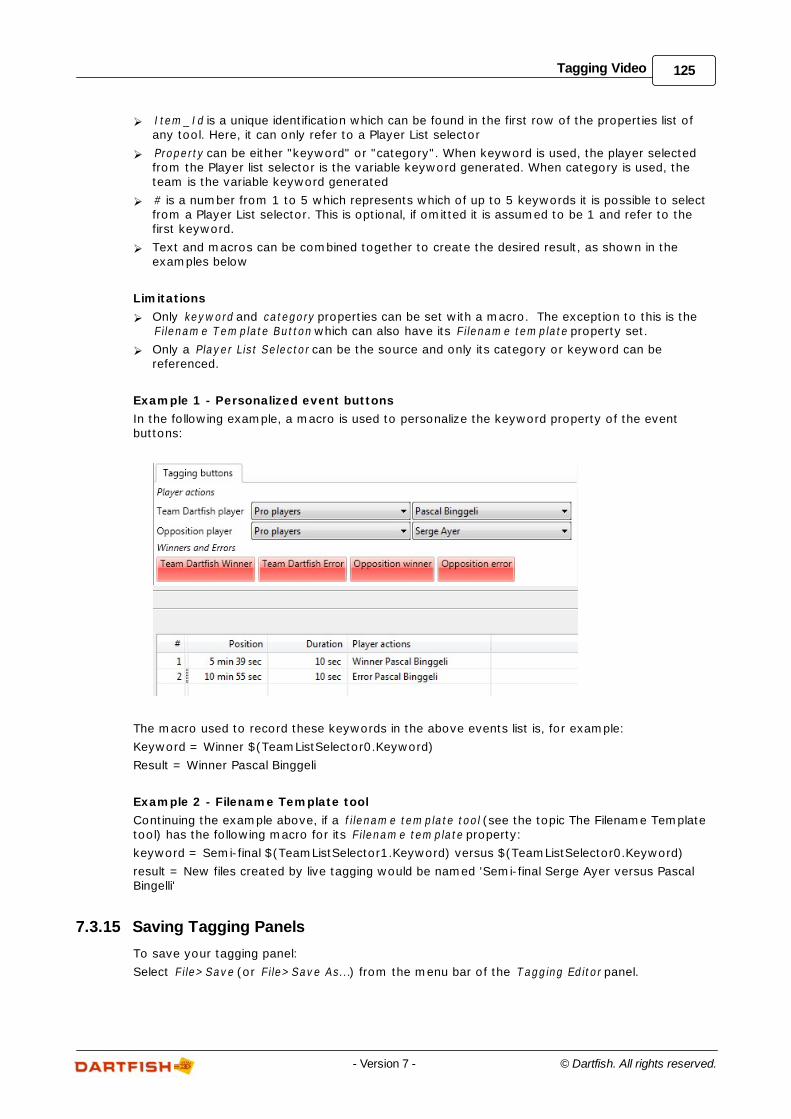
125Tagging Video
© Dartfish. All rights reserved.- Version 7 -
I tem _Id is a unique identification which can be found in the first row of the properties list ofany tool. Here, it can only refer to a Player List selector
Property can be either "keyword" or "category". When keyword is used, the player selectedfrom the Player list selector is the variable keyword generated. When category is used, theteam is the variable keyword generated
# is a number from 1 to 5 which represents which of up to 5 keywords it is possible to selectfrom a Player List selector. This is optional, if omitted it is assumed to be 1 and refer to thefirst keyword.
Text and macros can be combined together to create the desired result, as shown in theexamples below
Limitations
Only keyword and category properties can be set with a macro. The exception to this is theFilenam e Tem plate Button which can also have its F ilenam e tem plate property set.
Only a Player List Selector can be the source and only its category or keyword can bereferenced.
Example 1 - Personalized event buttons
In the following example, a macro is used to personalize the keyword property of the eventbuttons:
The macro used to record these keywords in the above events list is, for example:
Keyword = Winner $(TeamListSelector0.Keyword)
Result = Winner Pascal Binggeli
Example 2 - Filename Template tool
Continuing the example above, if a f ilenam e tem plate tool (see the topic The Filename Templatetool) has the following macro for its F ilenam e tem plate property:
keyword = Semi-final $(TeamListSelector1.Keyword) versus $(TeamListSelector0.Keyword)
result = New files created by live tagging would be named 'Semi-final Serge Ayer versus PascalBingelli'
7.3.15 Saving Tagging Panels
To save your tagging panel:
Select F ile>Save (or F ile>Save As...) from the menu bar of the Tagging Editor panel.
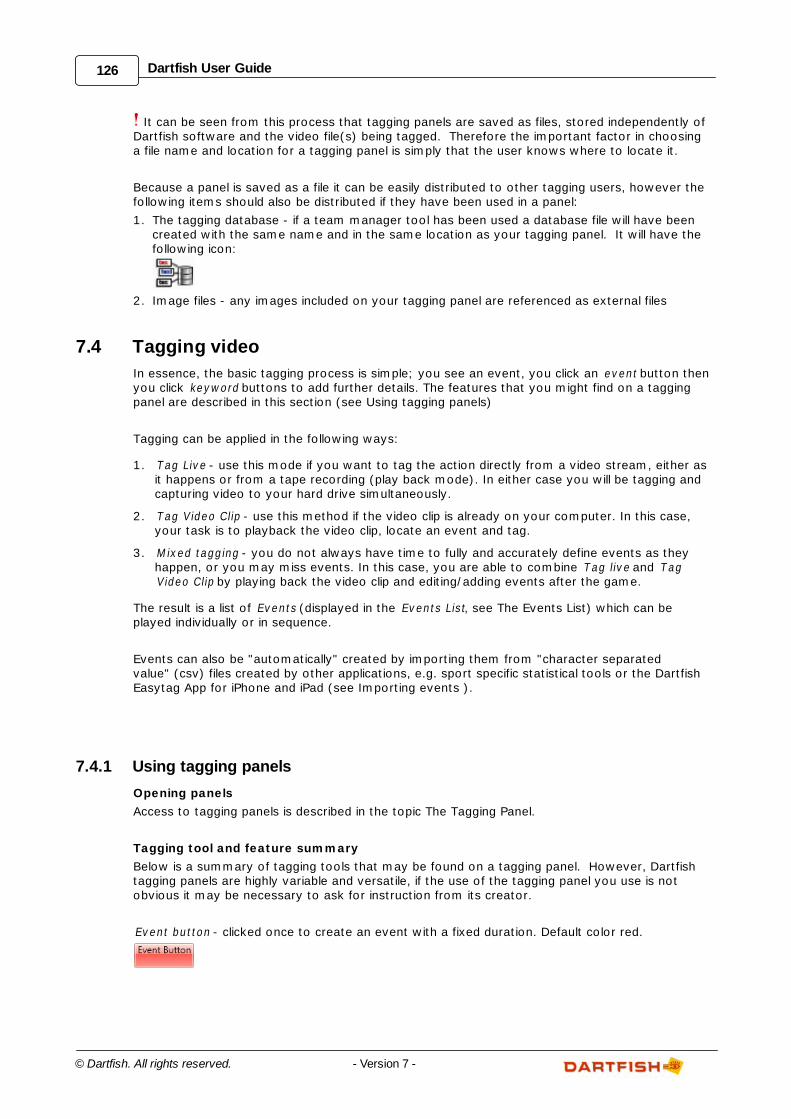
126 Dartfish User Guide
© Dartfish. All rights reserved. - Version 7 -
It can be seen from this process that tagging panels are saved as files, stored independently ofDartfish software and the video file(s) being tagged. Therefore the important factor in choosinga file name and location for a tagging panel is simply that the user knows where to locate it.
Because a panel is saved as a file it can be easily distributed to other tagging users, however thefollowing items should also be distributed if they have been used in a panel:
1. The tagging database - if a team manager tool has been used a database file will have beencreated with the same name and in the same location as your tagging panel. It will have thefollowing icon:
2. Image files - any images included on your tagging panel are referenced as external files
7.4 Tagging video
In essence, the basic tagging process is simple; you see an event, you click an event button thenyou click keyword buttons to add further details. The features that you might find on a taggingpanel are described in this section (see Using tagging panels)
Tagging can be applied in the following ways:
1. Tag Live - use this mode if you want to tag the action directly from a video stream, either asit happens or from a tape recording (play back mode). In either case you will be tagging andcapturing video to your hard drive simultaneously.
2. Tag Video Clip - use this method if the video clip is already on your computer. In this case,your task is to playback the video clip, locate an event and tag.
3. M ixed tagging - you do not always have time to fully and accurately define events as theyhappen, or you may miss events. In this case, you are able to combine Tag live and TagVideo Clip by playing back the video clip and editing/adding events after the game.
The result is a list of Events (displayed in the Events List, see The Events List) which can beplayed individually or in sequence.
Events can also be "automatically" created by importing them from "character separatedvalue" (csv) files created by other applications, e.g. sport specific statistical tools or the DartfishEasytag App for iPhone and iPad (see Importing events ).
7.4.1 Using tagging panels
Opening panels
Access to tagging panels is described in the topic The Tagging Panel.
Tagging tool and feature summary
Below is a summary of tagging tools that may be found on a tagging panel. However, Dartfishtagging panels are highly variable and versatile, if the use of the tagging panel you use is notobvious it may be necessary to ask for instruction from its creator.
Event button - clicked once to create an event with a fixed duration. Default color red.
127Tagging Video
© Dartfish. All rights reserved.- Version 7 -
Continuous event button - appearance identical to event buttons but when clicked, it remainsactivated until clicked a second time. Used to tag events of unknown duration such aspossession or phases of play.
Keyword button - keyword buttons add addition keyword to events. They are not used to createevents. Default color blue.
Persistent keyword button - appearance identical to keyword buttons but when clicked, it remainsactivated until clicked a second time. Used to add a keyword to many events. Must be activatedbefore events are created and remains active until clicked a second time.
Text box - a persistent keyword tool which adds of a variable keyword to events as they arecreated.
Score panels - a persistent keyword tool which adds the current score to events as they arecreated.
Team m anager - Displays a variable set of tagging buttons in a Team Group Box according towhich team and players are selected. Has buttons to enable addition of teams and players.
Player List Selector - adds a persistent keyword based on the player selected.
Tab group box - used to simplify the layout of a panel by grouping related buttons together. Clickthe tab to see the buttons; often selection of a tab is automated by the action of another
128 Dartfish User Guide
© Dartfish. All rights reserved. - Version 7 -
button.
Zone tool - records the coordinates of where the image is clicked. Can be either used for eventcreation or keyword addition.
File name template tool - used to set the filename of recordings made during live tagging.
7.4.2 Tag Video Clip mode
Use this mode to tag video file already existing in the library - it has been imported from thecamcorder or other storage media. Tag video clip mode is selected by clicking the button at thetop left of the video display.
Tagging a video clip principally consists of these steps:
1. Loading all the video clips to be tagged into the T ray (see the topic The Library in the Taggingworkspace section)
2. Selecting Tag Video Clip mode
3. Finding the relevant position on the video clip (see below).
4. Tagging an event in the video clip by clicking on an event button on the tagging panel.
5. Adding further keywords to that event by clicking on keyword buttons.
Finding the relevant position
Compared with Live tagging where events must be created in real time and in order, tagging avideo clip allows the user greater flexibility. There are many ways to quickly navigate the videoclip find the positions where events take place:
Drag the playhead to quickly position the video clip. Watch the time information next to the
playhead as you drag it. It can help you position the video if you approximately know whenan event took place.
Use the speed control to fast-forward and/or fast-rewind the video. To do this, set the speed
to values greater than 1 (or -1 for fast-rewind) and play the video. Whenever you see anevent, either click on an event button or pause the video first, and then select the appropriatebuttons to tag the event.
Position the playhead to a previously tagged event and continue tagging from there. The wayto do this depends on the tagging mode being used:
129Tagging Video
© Dartfish. All rights reserved.- Version 7 -
In Tag Video Clip mode, click the event once to move the playhead to the start of that eventIn Play Events mode, double click the event then switch back to Tag Video Clip mode tocontinue tagging. The playhead remains at the position of the selected tagged event.
When the action is too fast to tag as the video plays, the video can be quickly pausedby tapping the space bar on the keyboard. Now add tags before tapping the space bar asecond time to resume playback.
7.4.3 Tag Live mode
Tag live mode allows you to tag while recording video from a live video stream. This allowstagging to take place during the game and be ready for analysis immediately afterward. Tag livemode is selected by clicking the button at the top left of the video display (see The Video Panel).
The Tag live interface
The interface is identical to the Video Recorder interface: Read the section Video Recorder:capture a video stream in the Video Im port chapter to learn how to use it.
Tag live process:
1. Click the Record button. The video clip starts being captured to your hard disk. The livefeed is displayed in the Video Panel. Use the tagging panel buttons to tag events as theyhappen. In tag live mode it is not possible to tag without firs starting to record.
2. Tag an event by clicking an event button on the tagging panel.
3. Add further keywords to that event by clicking on keyword buttons.
4. Click Pause Recording (optional). You may wish to use this during parts of thecompetition of no interest to you; half time, injury stoppage, gaps between competitors etc. Pause recording is only possible when using DV video streams
5. Click Resume Recording (optional), to continue recording. Note that the pause/resumerecording does not create a new video clip.
6. Click Stop Recording at the end of the game. A new clip is saved on your hard drive anda thumbnail appears in the Tray.
It takes practice before you are able to accurately tag all events as they happen.Start simply by tagging "important" events without adding too many additional values.Read the section Review & edit events to see how you can edit and/or add events afterthey have taken place.
If tagging from the replay of a tape, a set of controls allowing control of the video cameraappear on the video display.
Time shifted recording
When tagging live it is possible to use time shifted recording when the video source provides aDV, HDV, M2TS, MP4 or H.264 video stream. Time shifted recording allows you to review earlierparts of the recording while continuing to record. This can be done by:
Clicking the time line to move the playhead to that point of the recording
Selecting an event from the events list
To return to the 'live' view of the video feed from the camera, click the Live button
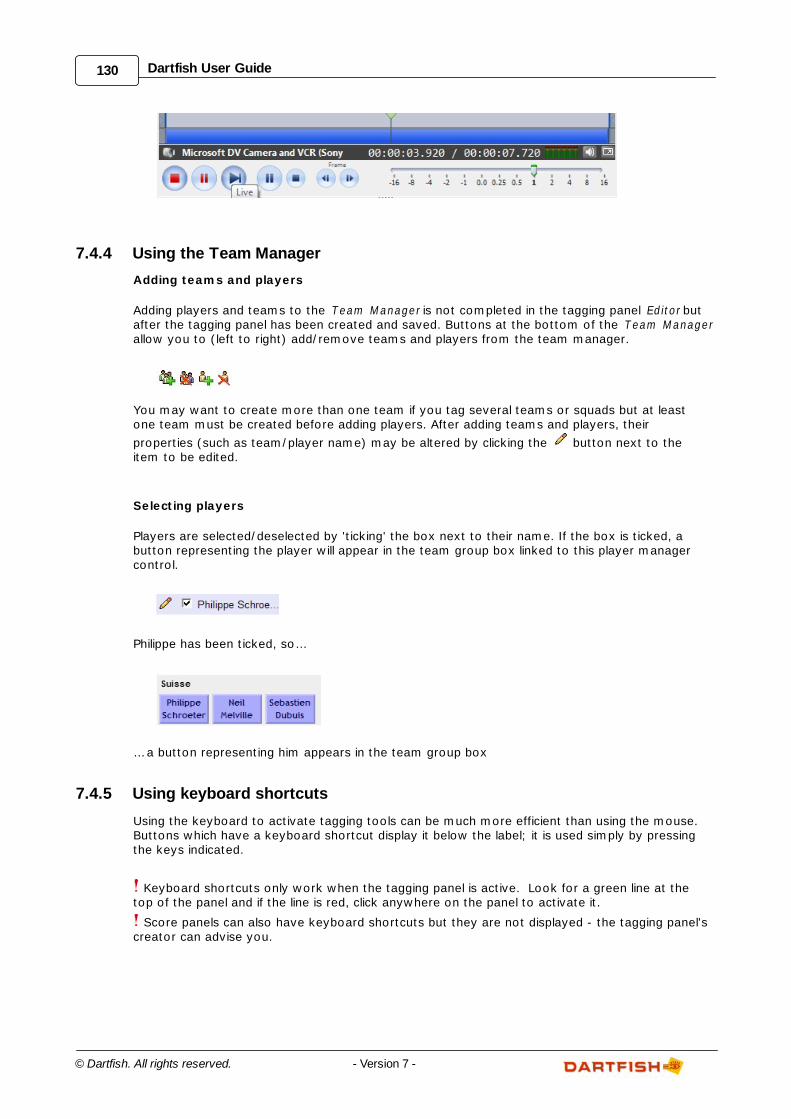
130 Dartfish User Guide
© Dartfish. All rights reserved. - Version 7 -
7.4.4 Using the Team Manager
Adding teams and players
Adding players and teams to the Team M anager is not completed in the tagging panel Editor butafter the tagging panel has been created and saved. Buttons at the bottom of the Team M anagerallow you to (left to right) add/remove teams and players from the team manager.
You may want to create more than one team if you tag several teams or squads but at leastone team must be created before adding players. After adding teams and players, their
properties (such as team/player name) may be altered by clicking the button next to theitem to be edited.
Selecting players
Players are selected/deselected by 'ticking' the box next to their name. If the box is ticked, abutton representing the player will appear in the team group box linked to this player managercontrol.
Philippe has been ticked, so…
… a button representing him appears in the team group box
7.4.5 Using keyboard shortcuts
Using the keyboard to activate tagging tools can be much more efficient than using the mouse.Buttons which have a keyboard shortcut display it below the label; it is used simply by pressingthe keys indicated.
Keyboard shortcuts only work when the tagging panel is active. Look for a green line at thetop of the panel and if the line is red, click anywhere on the panel to activate it.
Score panels can also have keyboard shortcuts but they are not displayed - the tagging panel'screator can advise you.
131Tagging Video
© Dartfish. All rights reserved.- Version 7 -
7.4.6 Manual tagging
Manual tagging divides a video clip into a series of sequential segm ents where adding a newsegment defines the end of the previous one. Each segment is described by a label, descriptionand keywords which are manually entered as required.
Events can be added to segments . Their duration is defined by the point at which they are addeduntil the end of the segment. They inherit all of their segment's keywords as well as being furtherdescribed by their own keywords.
Typical uses
1. Manual tagging is a simplified form of tagging where it is not necessary to create a taggingpanel and keywords can simply be added as required.
2. Segments are useful for dividing a video into sections. Their label, description and keywordsare especially useful when they are exported as video clips or the tagged video is uploaded todartfish.tv.
3. Segments can also be considered as a way of tagging events in the same way that a text boxadds a persistent keyword to events on a button-based tagging panel.
To understand its intended use it may help to know its origins, it was created for The City ofLausanne to distribute video of council meetings on dartfish.tv. The segments are of each sessionand events are used to identify minuted details. Their dartfish.tv channel uses the keywords anddescriptions applied by manual tagging to enable citizens to search for discussions. However,Manual Tagging has applications as a tagging tool for many other situations.
Creating Segments
1. Click the tagging panel's Select button and choose M anual T agging from the menu
2. Click the New Segm ent tab of the tagging panel
3. Enter a label and a description. This information is used to describe the Segment whenpublished to dartfish.tv
4. Segments are defined by adding categories and keywords to the table. One segment can bedefined by many keywords.
5. When the segment is fully described, click the Add button to create an event in the Events list.
6. Repeat steps 3-5 to add further segments. Each one added alters the previous segment'sduration so that each segment ends as the next begins.
Creating Events
1. Click the New Event tab of the manual tagging panel
2. Enter a label and a description. This information is used to describe the event when publishedto dartfish.tv
3. Events are defined by adding categories and keywords.
4. When the Event is fully described, click the Add button to create it in the Events list.
5. When a new segment is added, the durations of all the events from the previous segment areset.
7.5 Importing events
You can create events by importing them from a .csv (character separated value) file providedthat the data contains a column of time-stamps representing the position of each event. This willbe useful to the following groups:
Those using the Dartfish EasyTag App for Apple and Android mobile devices. EasyTag allows
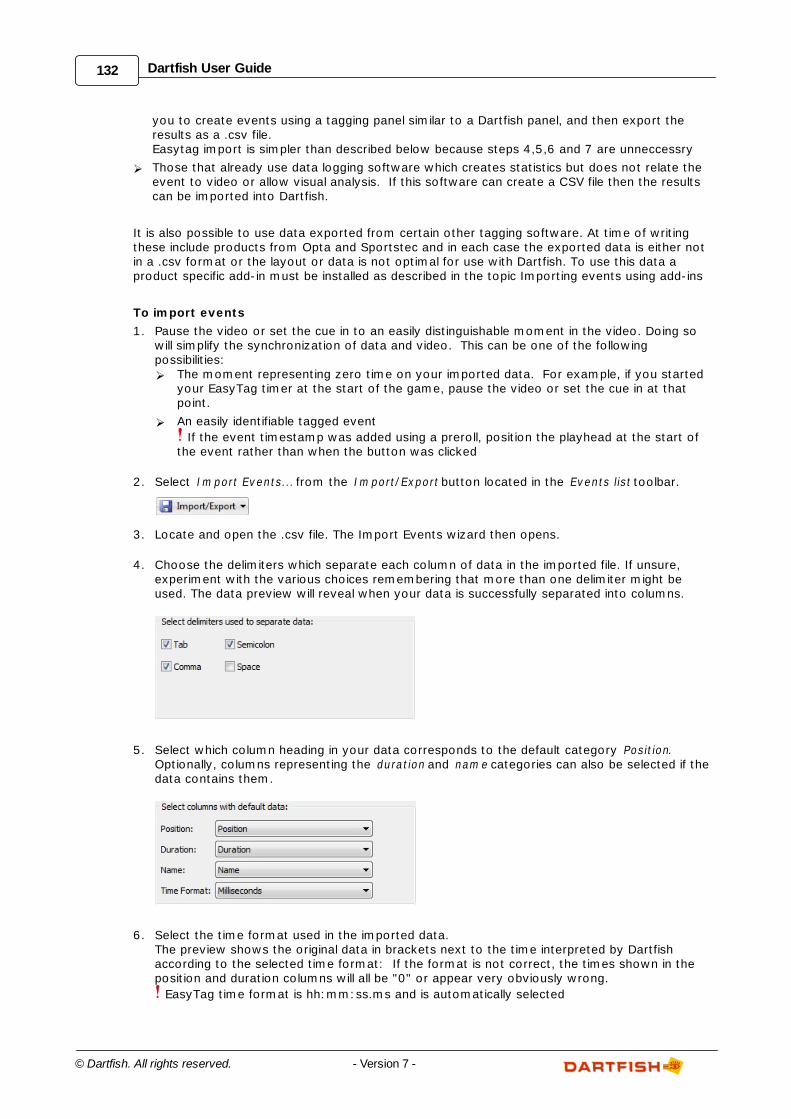
132 Dartfish User Guide
© Dartfish. All rights reserved. - Version 7 -
you to create events using a tagging panel similar to a Dartfish panel, and then export theresults as a .csv file.Easytag import is simpler than described below because steps 4,5,6 and 7 are unneccessry
Those that already use data logging software which creates statistics but does not relate theevent to video or allow visual analysis. If this software can create a CSV file then the resultscan be imported into Dartfish.
It is also possible to use data exported from certain other tagging software. At time of writingthese include products from Opta and Sportstec and in each case the exported data is either notin a .csv format or the layout or data is not optimal for use with Dartfish. To use this data aproduct specific add-in must be installed as described in the topic Importing events using add-ins
To import events
1. Pause the video or set the cue in to an easily distinguishable moment in the video. Doing sowill simplify the synchronization of data and video. This can be one of the followingpossibilities:
The moment representing zero time on your imported data. For example, if you startedyour EasyTag timer at the start of the game, pause the video or set the cue in at thatpoint.
An easily identifiable tagged event
If the event timestamp was added using a preroll, position the playhead at the start ofthe event rather than when the button was clicked
2. Select Im port Events... from the Im port/Export button located in the Events list toolbar.
3. Locate and open the .csv file. The Import Events wizard then opens.
4. Choose the delimiters which separate each column of data in the imported file. If unsure,experiment with the various choices remembering that more than one delimiter might beused. The data preview will reveal when your data is successfully separated into columns.
5. Select which column heading in your data corresponds to the default category Position.Optionally, columns representing the duration and nam e categories can also be selected if thedata contains them.
6. Select the time format used in the imported data. The preview shows the original data in brackets next to the time interpreted by Dartfishaccording to the selected time format: If the format is not correct, the times shown in theposition and duration columns will all be "0" or appear very obviously wrong.
EasyTag time format is hh:mm:ss.ms and is automatically selected
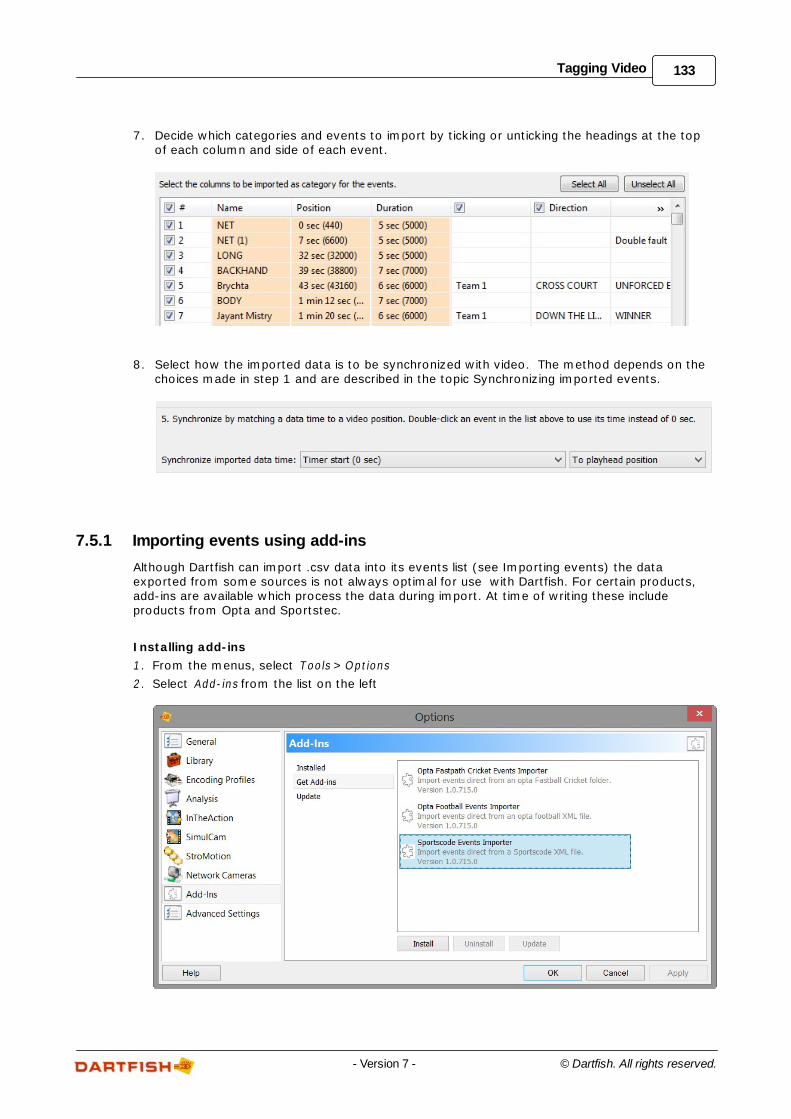
133Tagging Video
© Dartfish. All rights reserved.- Version 7 -
7. Decide which categories and events to import by ticking or unticking the headings at the topof each column and side of each event.
8. Select how the imported data is to be synchronized with video. The method depends on thechoices made in step 1 and are described in the topic Synchronizing imported events.
7.5.1 Importing events using add-ins
Although Dartfish can import .csv data into its events list (see Importing events) the dataexported from some sources is not always optimal for use with Dartfish. For certain products,add-ins are available which process the data during import. At time of writing these includeproducts from Opta and Sportstec.
Installing add-ins
1. From the menus, select Tools >Options
2 . Select Add-ins from the list on the left
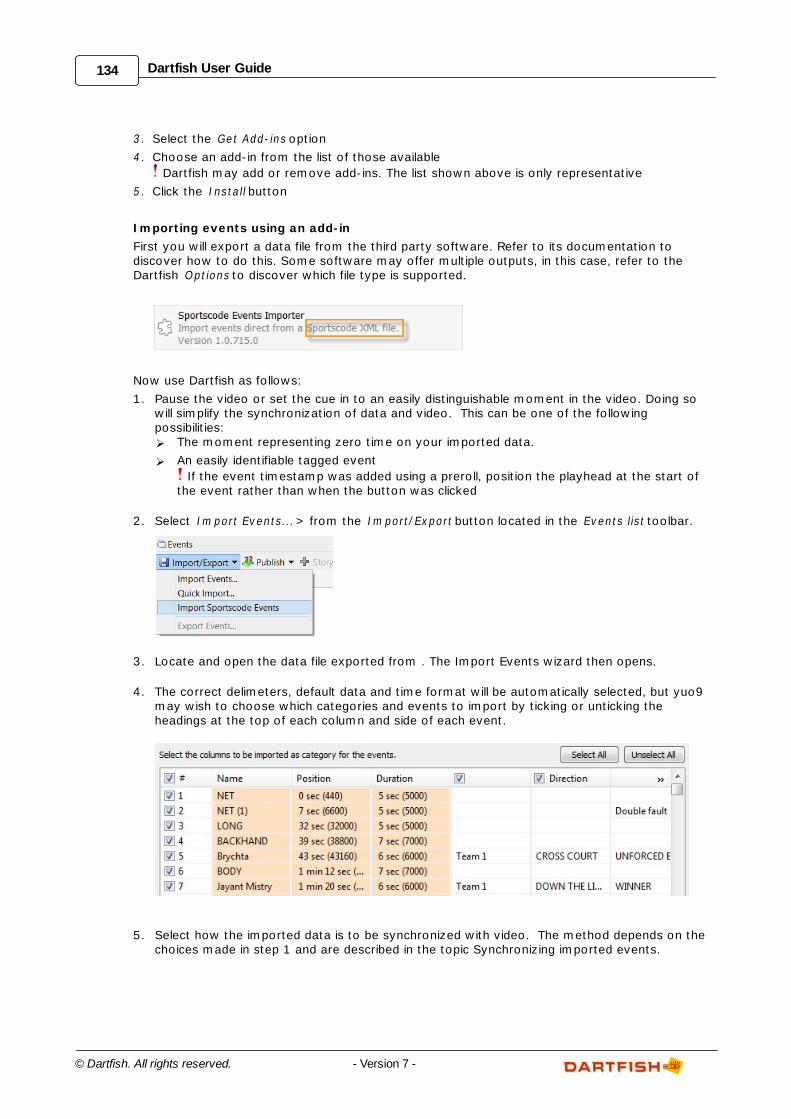
134 Dartfish User Guide
© Dartfish. All rights reserved. - Version 7 -
3. Select the Get Add-ins option
4. Choose an add-in from the list of those available
Dartfish may add or remove add-ins. The list shown above is only representative
5 . Click the Install button
Importing events using an add-in
First you will export a data file from the third party software. Refer to its documentation todiscover how to do this. Some software may offer multiple outputs, in this case, refer to theDartfish Options to discover which file type is supported.
Now use Dartfish as follows:
1. Pause the video or set the cue in to an easily distinguishable moment in the video. Doing sowill simplify the synchronization of data and video. This can be one of the followingpossibilities:
The moment representing zero time on your imported data.
An easily identifiable tagged event
If the event timestamp was added using a preroll, position the playhead at the start ofthe event rather than when the button was clicked
2. Select Im port Events... > from the Im port/Export button located in the Events list toolbar.
3. Locate and open the data file exported from . The Import Events wizard then opens.
4. The correct delimeters, default data and time format will be automatically selected, but yuo9may wish to choose which categories and events to import by ticking or unticking theheadings at the top of each column and side of each event.
5. Select how the imported data is to be synchronized with video. The method depends on thechoices made in step 1 and are described in the topic Synchronizing imported events.
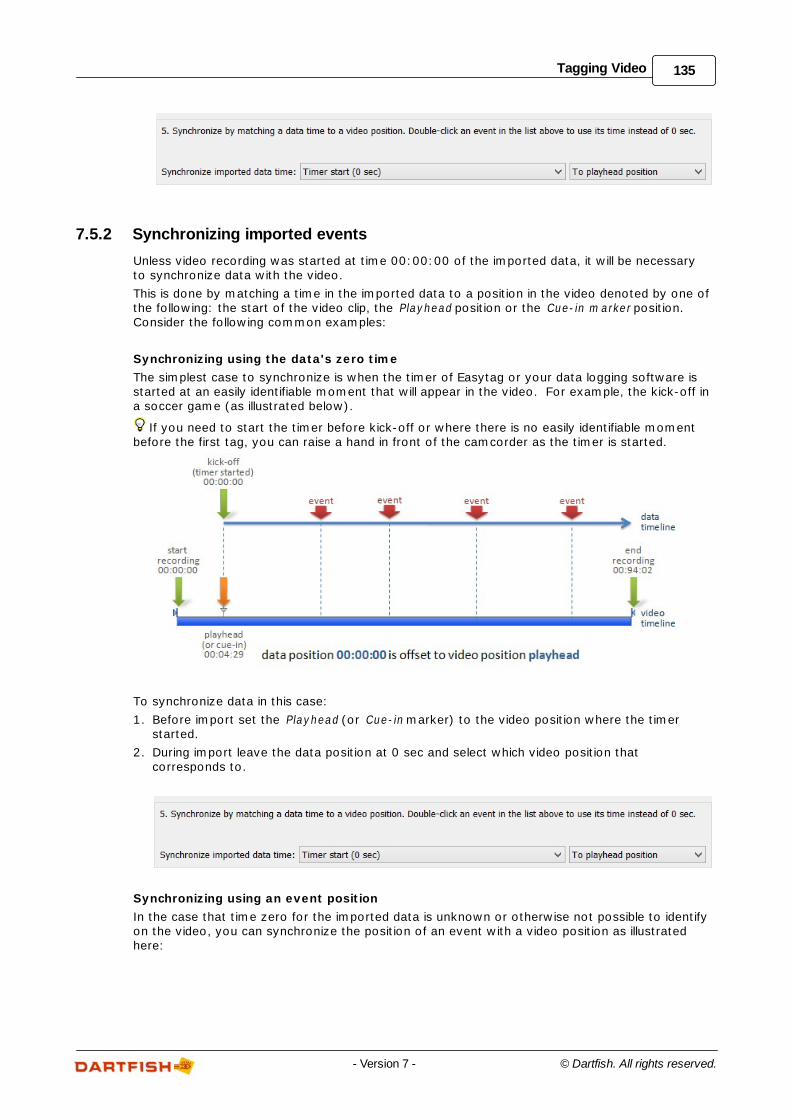
135Tagging Video
© Dartfish. All rights reserved.- Version 7 -
7.5.2 Synchronizing imported events
Unless video recording was started at time 00:00:00 of the imported data, it will be necessaryto synchronize data with the video.
This is done by matching a time in the imported data to a position in the video denoted by one ofthe following: the start of the video clip, the Playhead position or the Cue-in m arker position.Consider the following common examples:
Synchronizing using the data's zero time
The simplest case to synchronize is when the timer of Easytag or your data logging software isstarted at an easily identifiable moment that will appear in the video. For example, the kick-off ina soccer game (as illustrated below).
If you need to start the timer before kick-off or where there is no easily identifiable momentbefore the first tag, you can raise a hand in front of the camcorder as the timer is started.
To synchronize data in this case:
1. Before import set the Playhead (or Cue-in marker) to the video position where the timerstarted.
2. During import leave the data position at 0 sec and select which video position thatcorresponds to.
Synchronizing using an event position
In the case that time zero for the imported data is unknown or otherwise not possible to identifyon the video, you can synchronize the position of an event with a video position as illustratedhere:
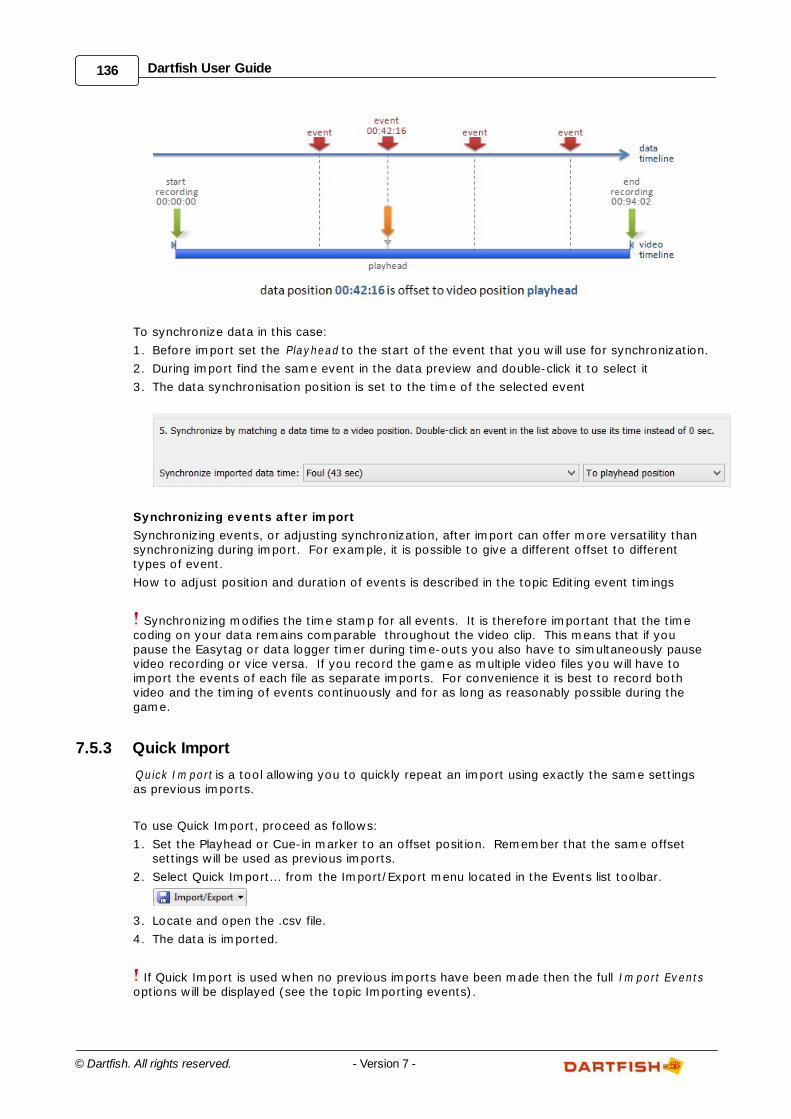
136 Dartfish User Guide
© Dartfish. All rights reserved. - Version 7 -
To synchronize data in this case:
1. Before import set the Playhead to the start of the event that you will use for synchronization.
2. During import find the same event in the data preview and double-click it to select it
3. The data synchronisation position is set to the time of the selected event
Synchronizing events after import
Synchronizing events, or adjusting synchronization, after import can offer more versatility thansynchronizing during import. For example, it is possible to give a different offset to differenttypes of event.
How to adjust position and duration of events is described in the topic Editing event timings
Synchronizing modifies the time stamp for all events. It is therefore important that the timecoding on your data remains comparable throughout the video clip. This means that if youpause the Easytag or data logger timer during time-outs you also have to simultaneously pausevideo recording or vice versa. If you record the game as multiple video files you will have toimport the events of each file as separate imports. For convenience it is best to record bothvideo and the timing of events continuously and for as long as reasonably possible during thegame.
7.5.3 Quick Import
Quick Im port is a tool allowing you to quickly repeat an import using exactly the same settingsas previous imports.
To use Quick Import, proceed as follows:
1. Set the Playhead or Cue-in marker to an offset position. Remember that the same offsetsettings will be used as previous imports.
2. Select Quick Import... from the Import/Export menu located in the Events list toolbar.
3. Locate and open the .csv file.
4. The data is imported.
If Quick Import is used when no previous imports have been made then the full Im port Eventsoptions will be displayed (see the topic Importing events).
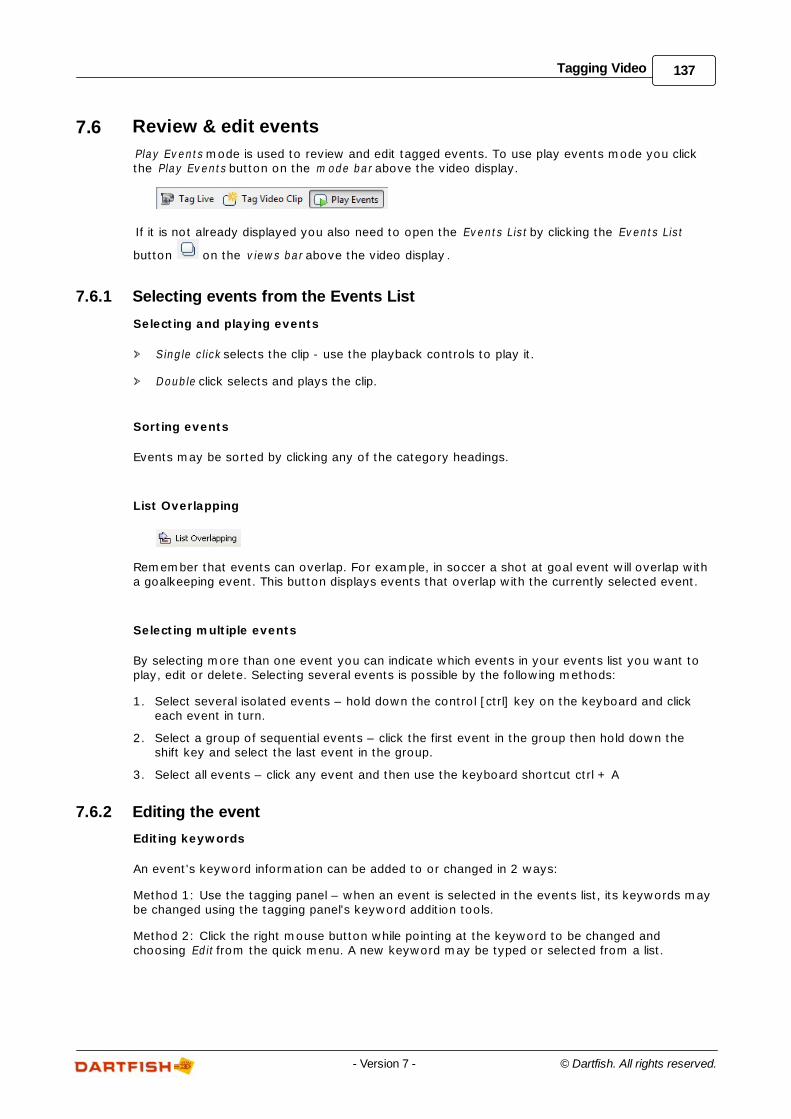
137Tagging Video
© Dartfish. All rights reserved.- Version 7 -
7.6 Review & edit events
Play Events mode is used to review and edit tagged events. To use play events mode you clickthe Play Events button on the m ode bar above the video display.
If it is not already displayed you also need to open the Events List by clicking the Events List
button on the views bar above the video display .
7.6.1 Selecting events from the Events List
Selecting and playing events
Single click selects the clip - use the playback controls to play it.
Double click selects and plays the clip.
Sorting events
Events may be sorted by clicking any of the category headings.
List Overlapping
Remember that events can overlap. For example, in soccer a shot at goal event will overlap witha goalkeeping event. This button displays events that overlap with the currently selected event.
Selecting multiple events
By selecting more than one event you can indicate which events in your events list you want toplay, edit or delete. Selecting several events is possible by the following methods:
1. Select several isolated events – hold down the control [ctrl] key on the keyboard and clickeach event in turn.
2. Select a group of sequential events – click the first event in the group then hold down theshift key and select the last event in the group.
3. Select all events – click any event and then use the keyboard shortcut ctrl + A
7.6.2 Editing the event
Editing keywords
An event's keyword information can be added to or changed in 2 ways:
Method 1: Use the tagging panel – when an event is selected in the events list, its keywords maybe changed using the tagging panel's keyword addition tools.
Method 2: Click the right mouse button while pointing at the keyword to be changed andchoosing Edit from the quick menu. A new keyword may be typed or selected from a list.
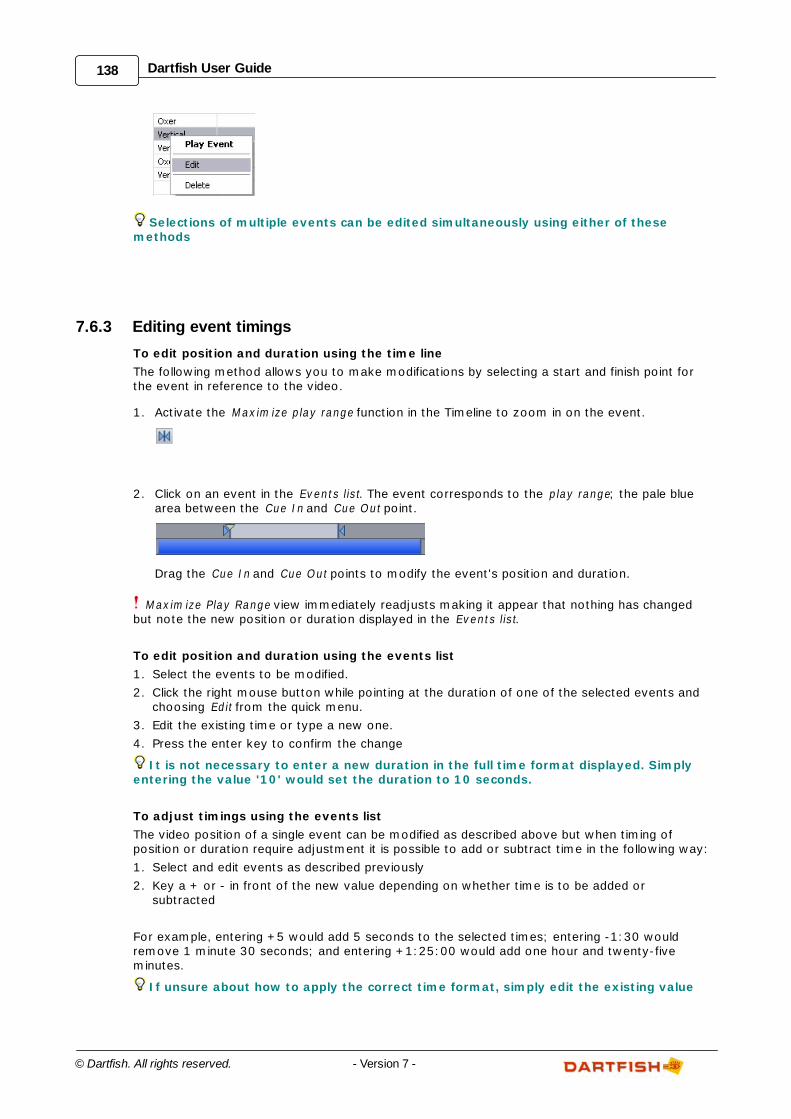
138 Dartfish User Guide
© Dartfish. All rights reserved. - Version 7 -
Selections of multiple events can be edited simultaneously using either of thesemethods
7.6.3 Editing event timings
To edit position and duration using the time line
The following method allows you to make modifications by selecting a start and finish point forthe event in reference to the video.
1. Activate the M axim ize play range function in the Timeline to zoom in on the event.
2. Click on an event in the Events list. The event corresponds to the play range; the pale bluearea between the Cue In and Cue Out point.
Drag the Cue In and Cue Out points to modify the event's position and duration.
M axim ize Play Range view immediately readjusts making it appear that nothing has changedbut note the new position or duration displayed in the Events list.
To edit position and duration using the events list
1. Select the events to be modified.
2. Click the right mouse button while pointing at the duration of one of the selected events andchoosing Edit from the quick menu.
3. Edit the existing time or type a new one.
4. Press the enter key to confirm the change
It is not necessary to enter a new duration in the full time format displayed. Simplyentering the value '10' would set the duration to 10 seconds.
To adjust timings using the events list
The video position of a single event can be modified as described above but when timing ofposition or duration require adjustment it is possible to add or subtract time in the following way:
1. Select and edit events as described previously
2. Key a + or - in front of the new value depending on whether time is to be added orsubtracted
For example, entering +5 would add 5 seconds to the selected times; entering -1:30 wouldremove 1 minute 30 seconds; and entering +1:25:00 would add one hour and twenty-fiveminutes.
If unsure about how to apply the correct time format, simply edit the existing value
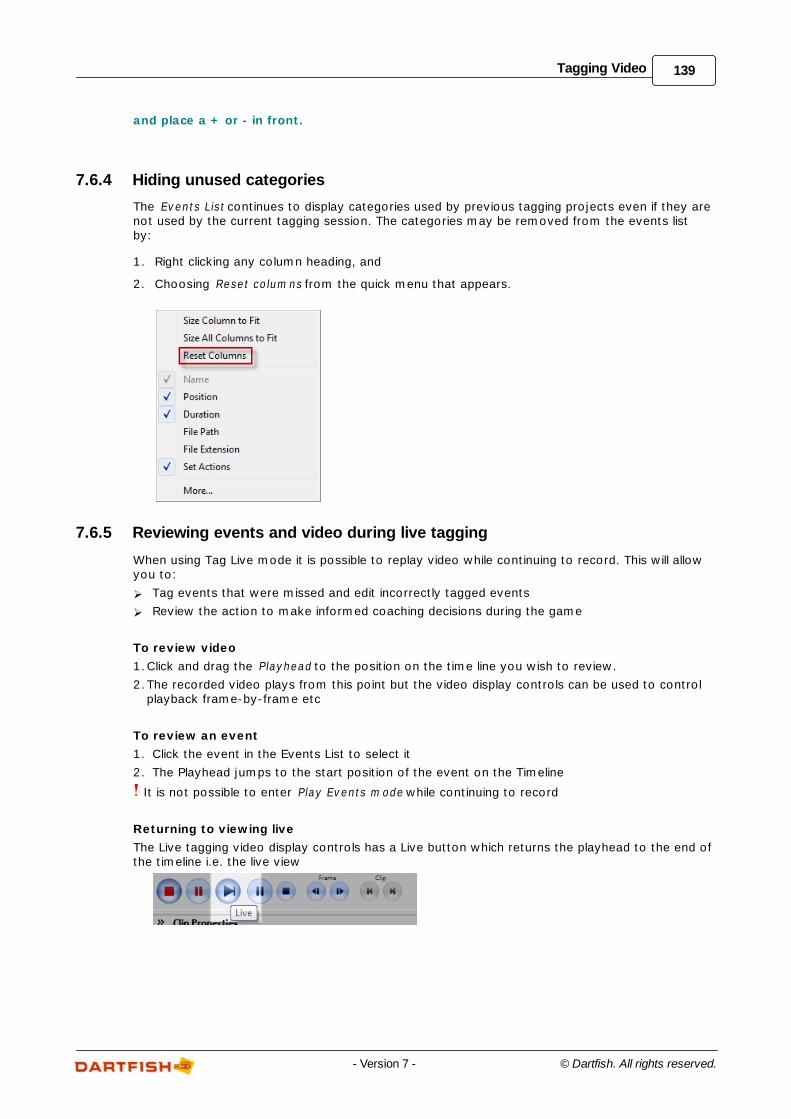
139Tagging Video
© Dartfish. All rights reserved.- Version 7 -
and place a + or - in front.
7.6.4 Hiding unused categories
The Events List continues to display categories used by previous tagging projects even if they arenot used by the current tagging session. The categories may be removed from the events listby:
1. Right clicking any column heading, and
2. Choosing Reset colum ns from the quick menu that appears.
7.6.5 Reviewing events and video during live tagging
When using Tag Live mode it is possible to replay video while continuing to record. This will allowyou to:
Tag events that were missed and edit incorrectly tagged events
Review the action to make informed coaching decisions during the game
To review video
1.Click and drag the Playhead to the position on the time line you wish to review.
2.The recorded video plays from this point but the video display controls can be used to controlplayback frame-by-frame etc
To review an event
1. Click the event in the Events List to select it
2. The Playhead jumps to the start position of the event on the Timeline
It is not possible to enter Play Events m ode while continuing to record
Returning to viewing live
The Live tagging video display controls has a Live button which returns the playhead to the end ofthe timeline i.e. the live view
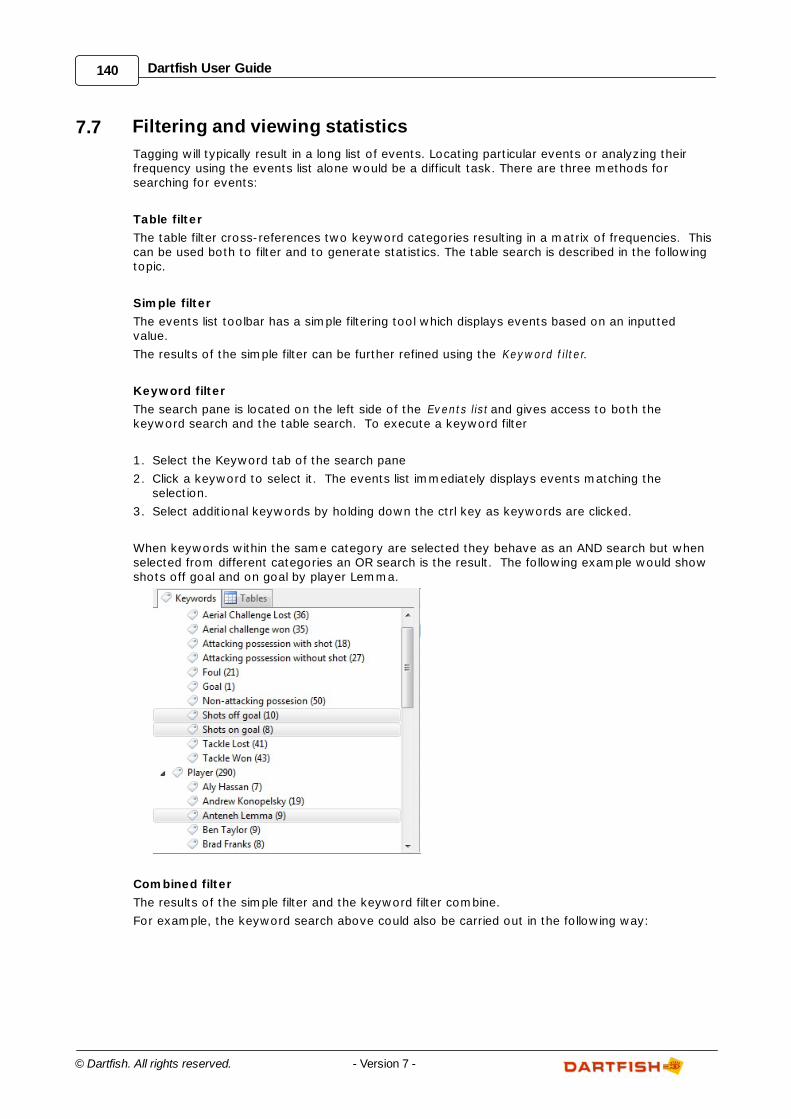
140 Dartfish User Guide
© Dartfish. All rights reserved. - Version 7 -
7.7 Filtering and viewing statistics
Tagging will typically result in a long list of events. Locating particular events or analyzing theirfrequency using the events list alone would be a difficult task. There are three methods forsearching for events:
Table filter
The table filter cross-references two keyword categories resulting in a matrix of frequencies. Thiscan be used both to filter and to generate statistics. The table search is described in the followingtopic.
Simple filter
The events list toolbar has a simple filtering tool which displays events based on an inputtedvalue.
The results of the simple filter can be further refined using the Keyword f ilter.
Keyword filter
The search pane is located on the left side of the Events list and gives access to both thekeyword search and the table search. To execute a keyword filter
1. Select the Keyword tab of the search pane
2. Click a keyword to select it. The events list immediately displays events matching theselection.
3. Select additional keywords by holding down the ctrl key as keywords are clicked.
When keywords within the same category are selected they behave as an AND search but whenselected from different categories an OR search is the result. The following example would showshots off goal and on goal by player Lemma.
Combined filter
The results of the simple filter and the keyword filter combine.
For example, the keyword search above could also be carried out in the following way:
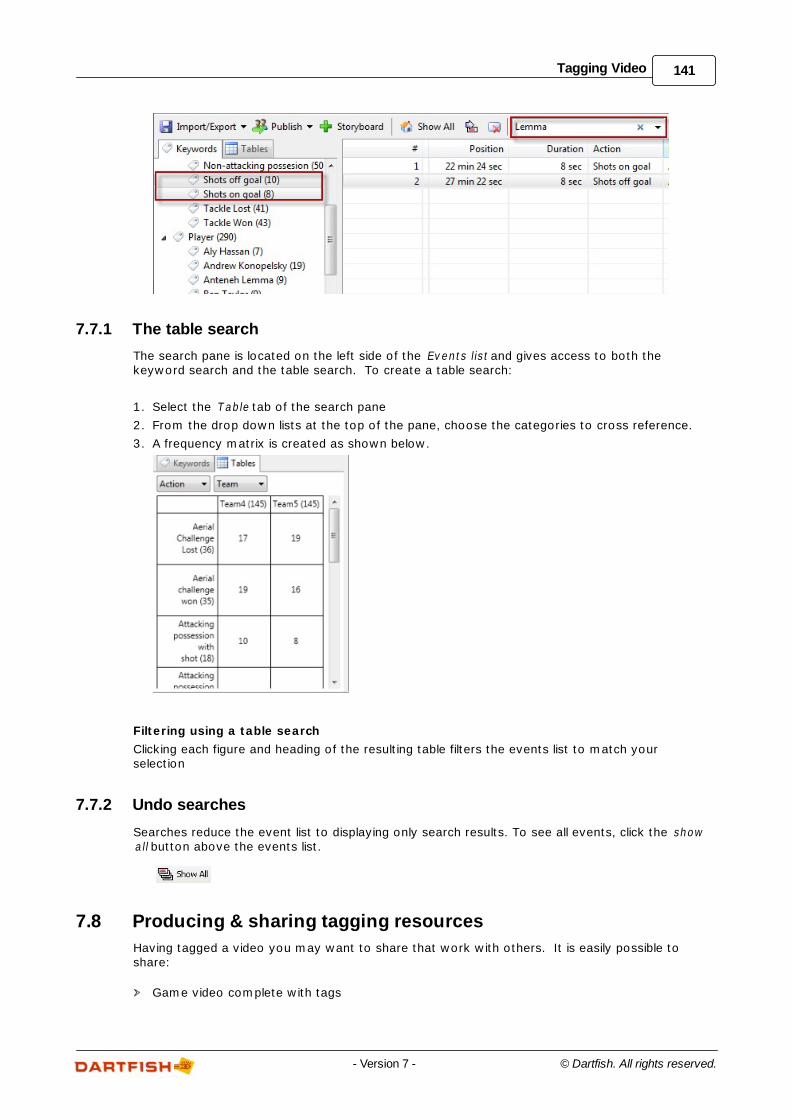
141Tagging Video
© Dartfish. All rights reserved.- Version 7 -
7.7.1 The table search
The search pane is located on the left side of the Events list and gives access to both thekeyword search and the table search. To create a table search:
1. Select the Table tab of the search pane
2. From the drop down lists at the top of the pane, choose the categories to cross reference.
3. A frequency matrix is created as shown below.
Filtering using a table search
Clicking each figure and heading of the resulting table filters the events list to match yourselection
7.7.2 Undo searches
Searches reduce the event list to displaying only search results. To see all events, click the showall button above the events list.
7.8 Producing & sharing tagging resources
Having tagged a video you may want to share that work with others. It is easily possible toshare:
Game video complete with tags
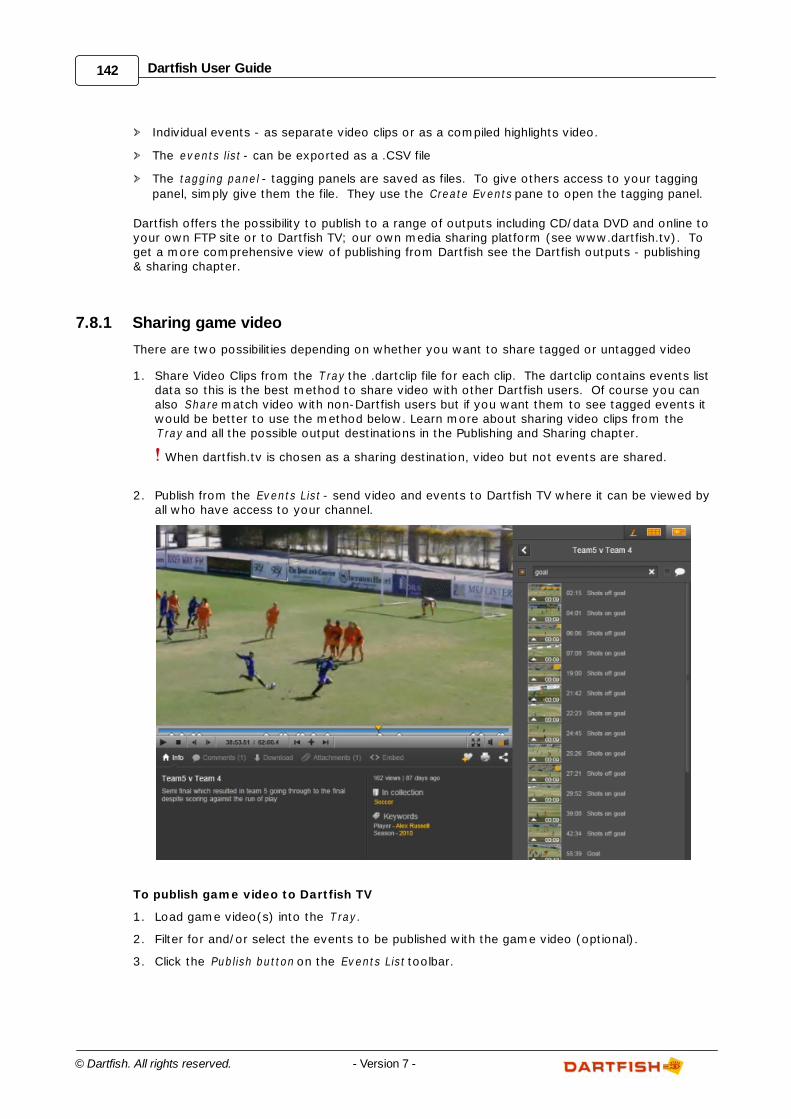
142 Dartfish User Guide
© Dartfish. All rights reserved. - Version 7 -
Individual events - as separate video clips or as a compiled highlights video.
The events list - can be exported as a .CSV file
The tagging panel - tagging panels are saved as files. To give others access to your tagging
panel, simply give them the file. They use the Create Events pane to open the tagging panel.
Dartfish offers the possibility to publish to a range of outputs including CD/data DVD and online toyour own FTP site or to Dartfish TV; our own media sharing platform (see www.dartfish.tv). Toget a more comprehensive view of publishing from Dartfish see the Dartfish outputs - publishing& sharing chapter.
7.8.1 Sharing game video
There are two possibilities depending on whether you want to share tagged or untagged video
1. Share Video Clips from the T ray the .dartclip file for each clip. The dartclip contains events listdata so this is the best method to share video with other Dartfish users. Of course you canalso Share match video with non-Dartfish users but if you want them to see tagged events itwould be better to use the method below. Learn more about sharing video clips from the T ray and all the possible output destinations in the Publishing and Sharing chapter.
When dartfish.tv is chosen as a sharing destination, video but not events are shared.
2. Publish from the Events List - send video and events to Dartfish TV where it can be viewed byall who have access to your channel.
To publish game video to Dartfish TV
1. Load game video(s) into the T ray.
2. Filter for and/or select the events to be published with the game video (optional).
3. Click the Publish button on the Events List toolbar.
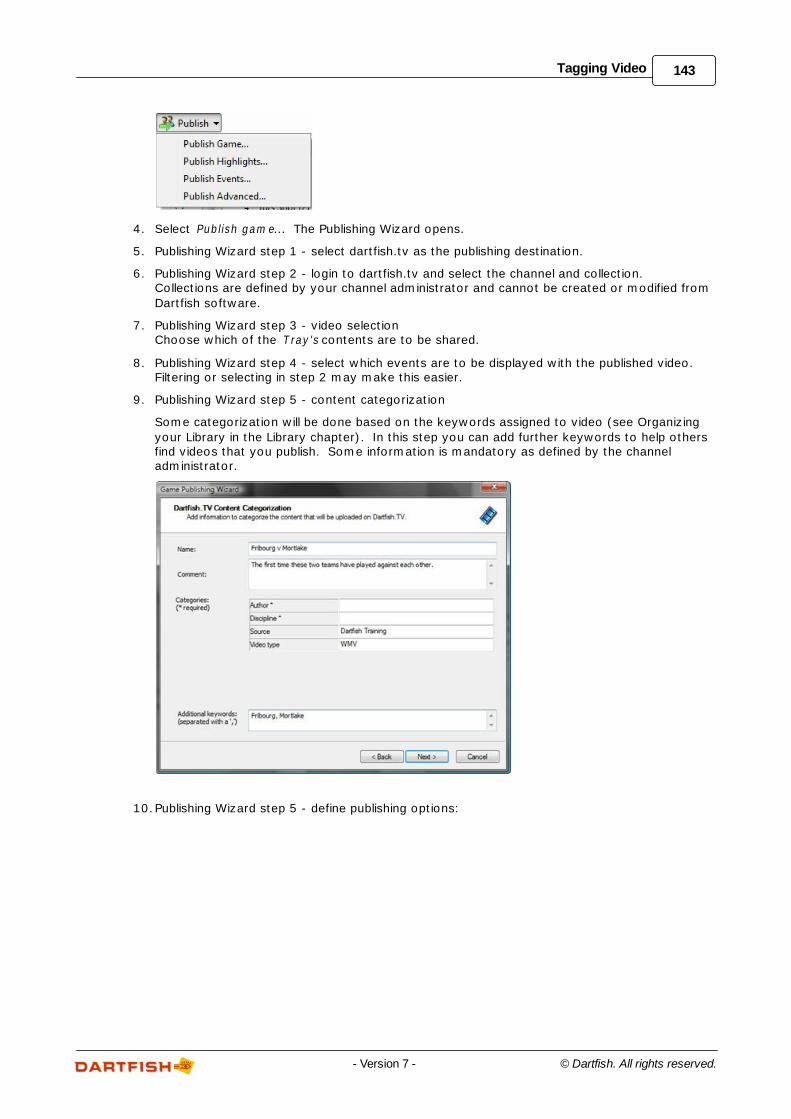
143Tagging Video
© Dartfish. All rights reserved.- Version 7 -
4. Select Publish gam e... The Publishing Wizard opens.
5. Publishing Wizard step 1 - select dartfish.tv as the publishing destination.
6. Publishing Wizard step 2 - login to dartfish.tv and select the channel and collection.Collections are defined by your channel administrator and cannot be created or modified from
Dartfish software.
7. Publishing Wizard step 3 - video selectionChoose which of the T ray's contents are to be shared.
8. Publishing Wizard step 4 - select which events are to be displayed with the published video.Filtering or selecting in step 2 may make this easier.
9. Publishing Wizard step 5 - content categorization
Some categorization will be done based on the keywords assigned to video (see Organizing
your Library in the Library chapter). In this step you can add further keywords to help othersfind videos that you publish. Some information is mandatory as defined by the channeladministrator.
10.Publishing Wizard step 5 - define publishing options:
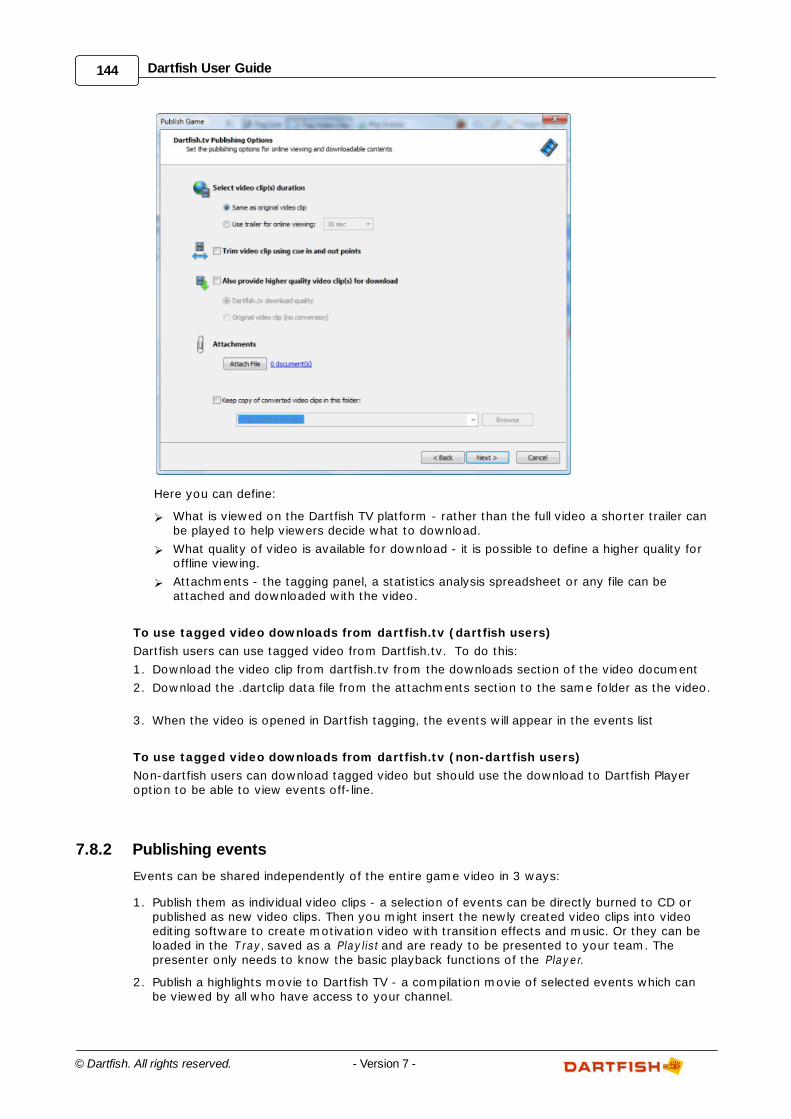
144 Dartfish User Guide
© Dartfish. All rights reserved. - Version 7 -
Here you can define:
What is viewed on the Dartfish TV platform - rather than the full video a shorter trailer canbe played to help viewers decide what to download.
What quality of video is available for download - it is possible to define a higher quality foroffline viewing.
Attachments - the tagging panel, a statistics analysis spreadsheet or any file can beattached and downloaded with the video.
To use tagged video downloads from dartfish.tv (dartfish users)
Dartfish users can use tagged video from Dartfish.tv. To do this:
1. Download the video clip from dartfish.tv from the downloads section of the video document
2. Download the .dartclip data file from the attachments section to the same folder as the video.
3. When the video is opened in Dartfish tagging, the events will appear in the events list
To use tagged video downloads from dartfish.tv (non-dartfish users)
Non-dartfish users can download tagged video but should use the download to Dartfish Playeroption to be able to view events off-line.
7.8.2 Publishing events
Events can be shared independently of the entire game video in 3 ways:
1. Publish them as individual video clips - a selection of events can be directly burned to CD orpublished as new video clips. Then you might insert the newly created video clips into videoediting software to create motivation video with transition effects and music. Or they can beloaded in the T ray, saved as a Playlist and are ready to be presented to your team. Thepresenter only needs to know the basic playback functions of the Player.
2. Publish a highlights movie to Dartfish TV - a compilation movie of selected events which canbe viewed by all who have access to your channel.
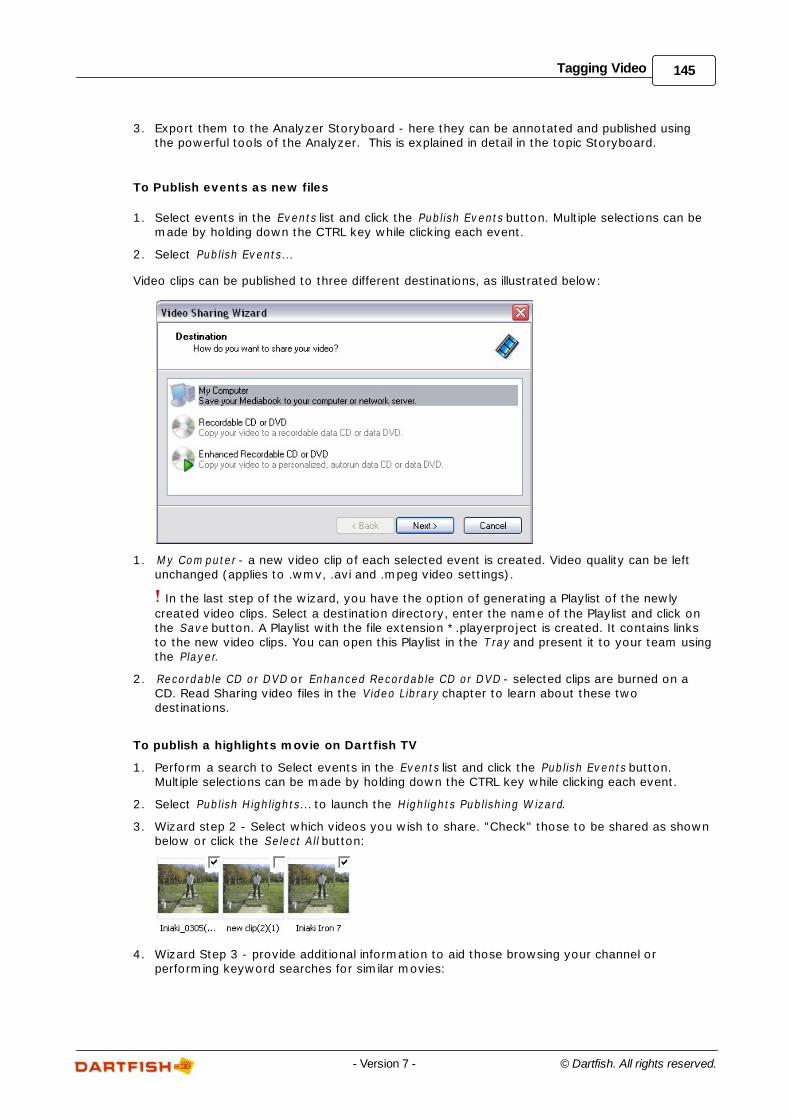
145Tagging Video
© Dartfish. All rights reserved.- Version 7 -
3. Export them to the Analyzer Storyboard - here they can be annotated and published usingthe powerful tools of the Analyzer. This is explained in detail in the topic Storyboard.
To Publish events as new files
1. Select events in the Events list and click the Publish Events button. Multiple selections can bemade by holding down the CTRL key while clicking each event.
2. Select Publish Events...
Video clips can be published to three different destinations, as illustrated below:
1. M y Com puter - a new video clip of each selected event is created. Video quality can be leftunchanged (applies to .wmv, .avi and .mpeg video settings).
In the last step of the wizard, you have the option of generating a Playlist of the newly
created video clips. Select a destination directory, enter the name of the Playlist and click onthe Save button. A Playlist with the file extension *.playerproject is created. It contains linksto the new video clips. You can open this Playlist in the T ray and present it to your team usingthe Player.
2. Recordable CD or DVD or Enhanced Recordable CD or DVD - selected clips are burned on aCD. Read Sharing video files in the Video Library chapter to learn about these twodestinations.
To publish a highlights movie on Dartfish TV
1. Perform a search to Select events in the Events list and click the Publish Events button.Multiple selections can be made by holding down the CTRL key while clicking each event.
2. Select Publish Highlights... to launch the Highlights Publishing W izard.
3. Wizard step 2 - Select which videos you wish to share. "Check" those to be shared as shownbelow or click the Select All button:
4. Wizard Step 3 - provide additional information to aid those browsing your channel orperforming keyword searches for similar movies:
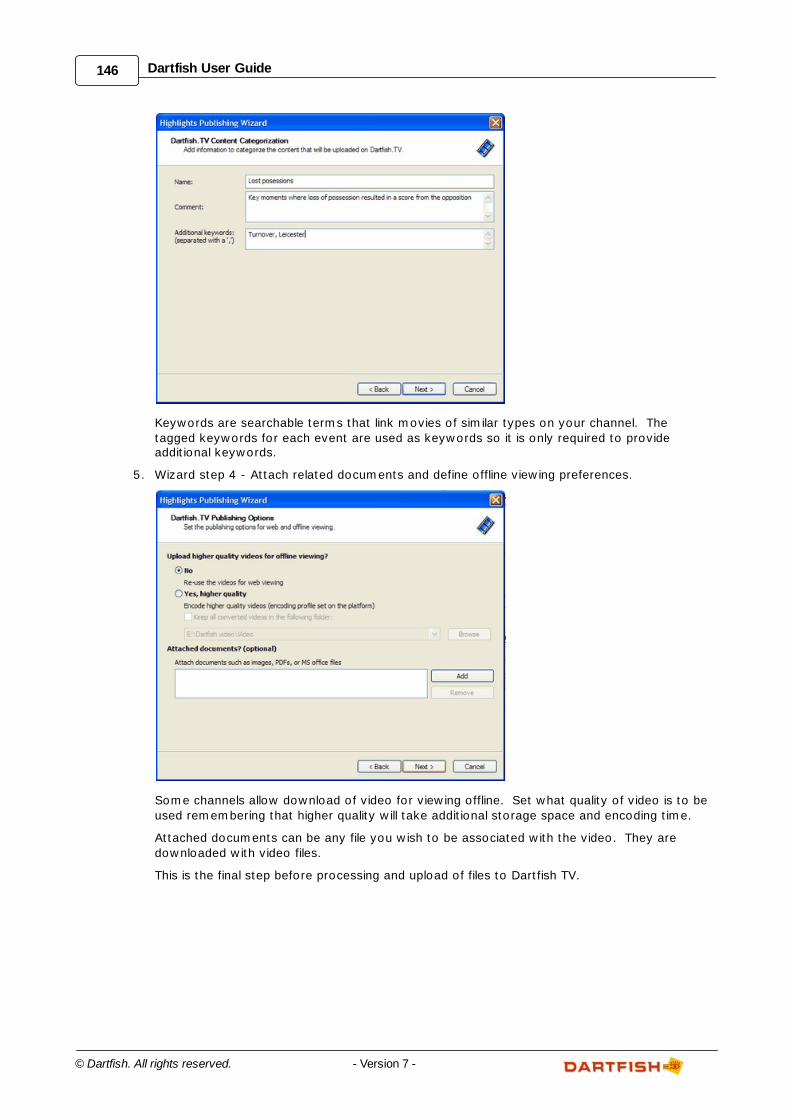
146 Dartfish User Guide
© Dartfish. All rights reserved. - Version 7 -
Keywords are searchable terms that link movies of similar types on your channel. The
tagged keywords for each event are used as keywords so it is only required to provideadditional keywords.
5. Wizard step 4 - Attach related documents and define offline viewing preferences.
Some channels allow download of video for viewing offline. Set what quality of video is to be
used remembering that higher quality will take additional storage space and encoding time.
Attached documents can be any file you wish to be associated with the video. They are
downloaded with video files.
This is the final step before processing and upload of files to Dartfish TV.
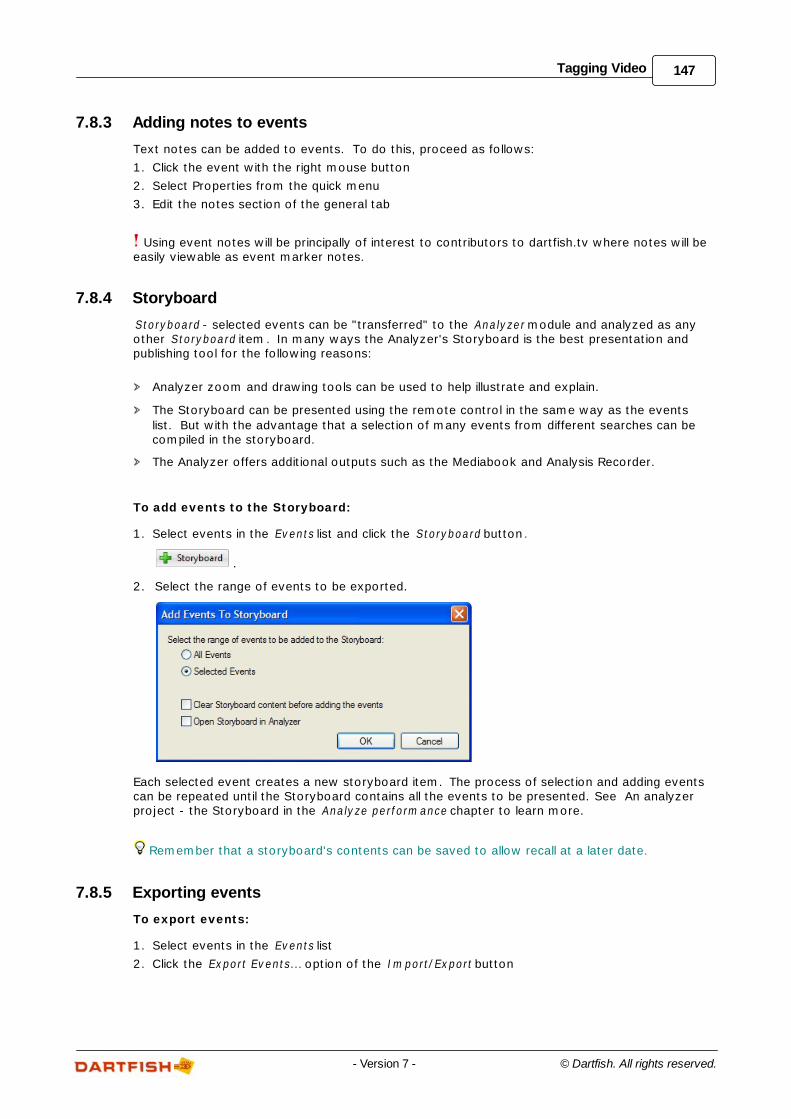
147Tagging Video
© Dartfish. All rights reserved.- Version 7 -
7.8.3 Adding notes to events
Text notes can be added to events. To do this, proceed as follows:
1. Click the event with the right mouse button
2. Select Properties from the quick menu
3. Edit the notes section of the general tab
Using event notes will be principally of interest to contributors to dartfish.tv where notes will beeasily viewable as event marker notes.
7.8.4 Storyboard
Storyboard - selected events can be "transferred" to the Analyzer module and analyzed as anyother Storyboard item . In many ways the Analyzer's Storyboard is the best presentation andpublishing tool for the following reasons:
Analyzer zoom and drawing tools can be used to help illustrate and explain.
The Storyboard can be presented using the remote control in the same way as the events
list. But with the advantage that a selection of many events from different searches can becompiled in the storyboard.
The Analyzer offers additional outputs such as the Mediabook and Analysis Recorder.
To add events to the Storyboard:
1. Select events in the Events list and click the Storyboard button.
.
2. Select the range of events to be exported.
Each selected event creates a new storyboard item. The process of selection and adding eventscan be repeated until the Storyboard contains all the events to be presented. See An analyzerproject - the Storyboard in the Analyze perform ance chapter to learn more.
Remember that a storyboard's contents can be saved to allow recall at a later date.
7.8.5 Exporting events
To export events:
1. Select events in the Events list
2. Click the Export Events... option of the Im port/Export button
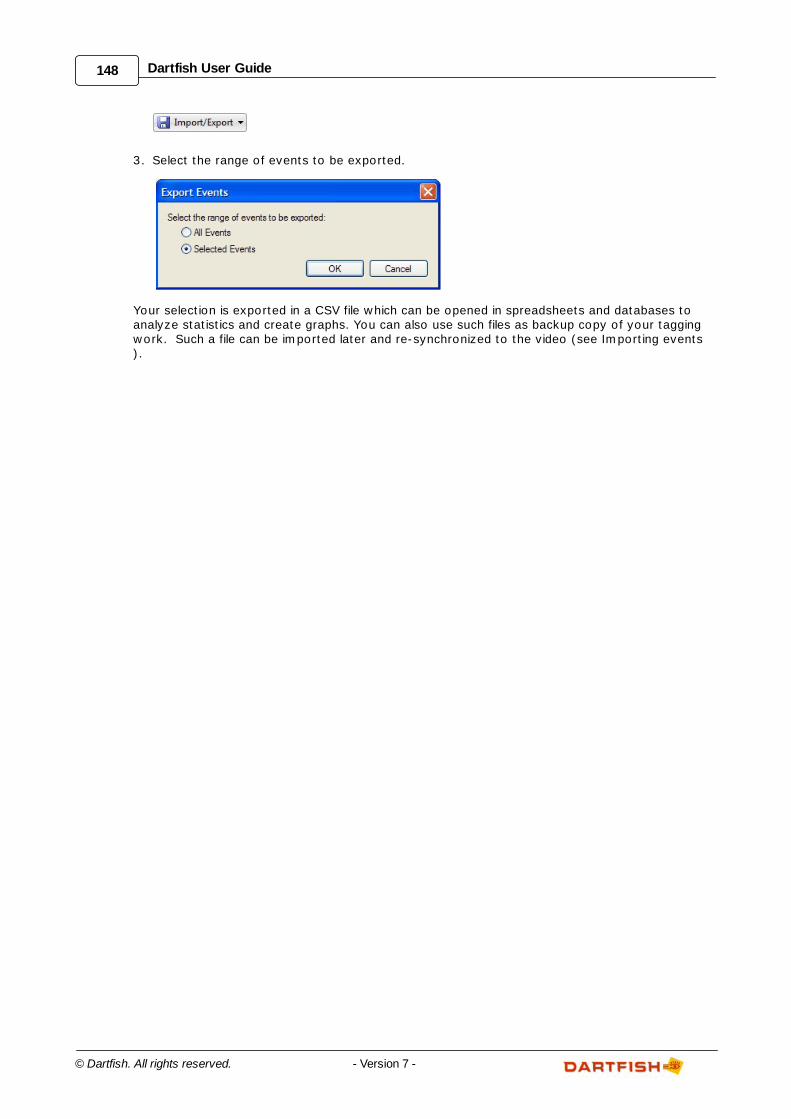
148 Dartfish User Guide
© Dartfish. All rights reserved. - Version 7 -
3. Select the range of events to be exported.
Your selection is exported in a CSV file which can be opened in spreadsheets and databases toanalyze statistics and create graphs. You can also use such files as backup copy of your taggingwork. Such a file can be imported later and re-synchronized to the video (see Importing events).
Chapter
VIII
Displaying metadata fromexternal devices

150 Dartfish User Guide
© Dartfish. All rights reserved. - Version 7 -
8 Displaying metadata from external devicesDartfish's Analyzer and InTheAction modules support the display of data from othersoftware applications. For example, timing devices, heartrate monitors or powermeasurement devices that use sensors linked to software can use Dartfish'sMetadata toolkit to send the processed data to Dartfish Software. Such metadataadds to the interpretation of video images by relating them to the effort of theperformer.
Throughout this tutorial, the term "metadata" will refer to data (in a broad sense)generated by entities external to Dartfish Software and captured by DartfishSoftware while capturing a video clip. Examples of such metadata are heart rate,speed, etc.
It is assumed here that you are already familiar with the use of InTheAction (seexxx) and the Analyzer (see xxx).
To display metadata on Dartfish video images need to:
Activate advanced options supporting metadata capture and display.
Use the InTheAction module to capture metadata streams while capturingrelated video images.
Link drawings superimposed on video displays to metadata values.
Use the Analyzer module to replay previously captured video with relatedmetadata.
This tutorial covers how to do this and additionally how the Drawing Libraries canbe used to make the display of metadata. You will also learn how to displaymetadata values graphically next to video images.
8.1 Support for metadata in Dartfish Software
For data from external software and devices to be displayed in Dartfish it isobviously not as straightforward as connecting the device
Metadata can be captured and displayed. These tasks are performed using 2modules:
InTheAction module, for capturing video clips and metadata synchronously.
Analyzer module, for displaying metadata and performing some analysis.
Apart from these 2 modules, there is no support for metadata. For example, it isnot possible to display metadata with the Player.
In these 2 modules, the metadata features are enabled by advanced settings thatare available in the "Options" dialog (Advanced Options).
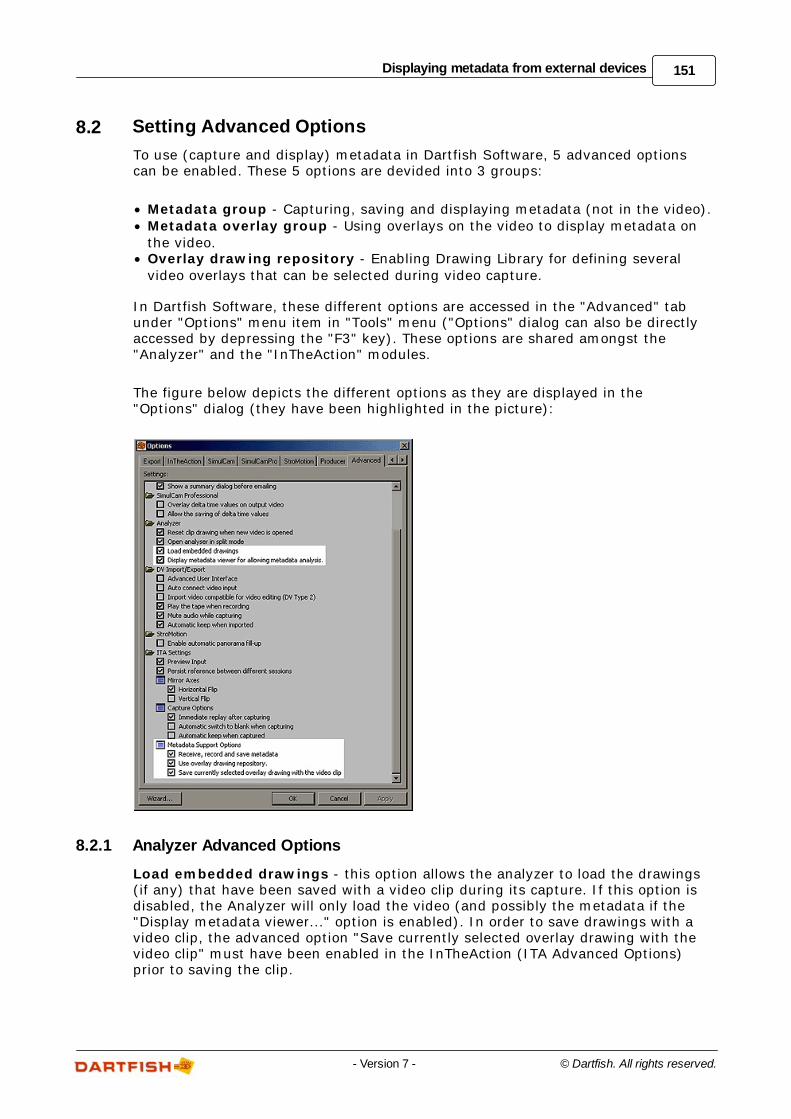
151Displaying metadata from external devices
© Dartfish. All rights reserved.- Version 7 -
8.2 Setting Advanced Options
To use (capture and display) metadata in Dartfish Software, 5 advanced optionscan be enabled. These 5 options are devided into 3 groups:
Metadata group - Capturing, saving and displaying metadata (not in the video).Metadata overlay group - Using overlays on the video to display metadata onthe video.Overlay drawing repository - Enabling Drawing Library for defining severalvideo overlays that can be selected during video capture.
In Dartfish Software, these different options are accessed in the "Advanced" tabunder "Options" menu item in "Tools" menu ("Options" dialog can also be directlyaccessed by depressing the "F3" key). These options are shared amongst the"Analyzer" and the "InTheAction" modules.
The figure below depicts the different options as they are displayed in the"Options" dialog (they have been highlighted in the picture):
8.2.1 Analyzer Advanced Options
Load embedded drawings - this option allows the analyzer to load the drawings(if any) that have been saved with a video clip during its capture. If this option isdisabled, the Analyzer will only load the video (and possibly the metadata if the"Display metadata viewer..." option is enabled). In order to save drawings with avideo clip, the advanced option "Save currently selected overlay drawing with thevideo clip" must have been enabled in the InTheAction (ITA Advanced Options)prior to saving the clip.
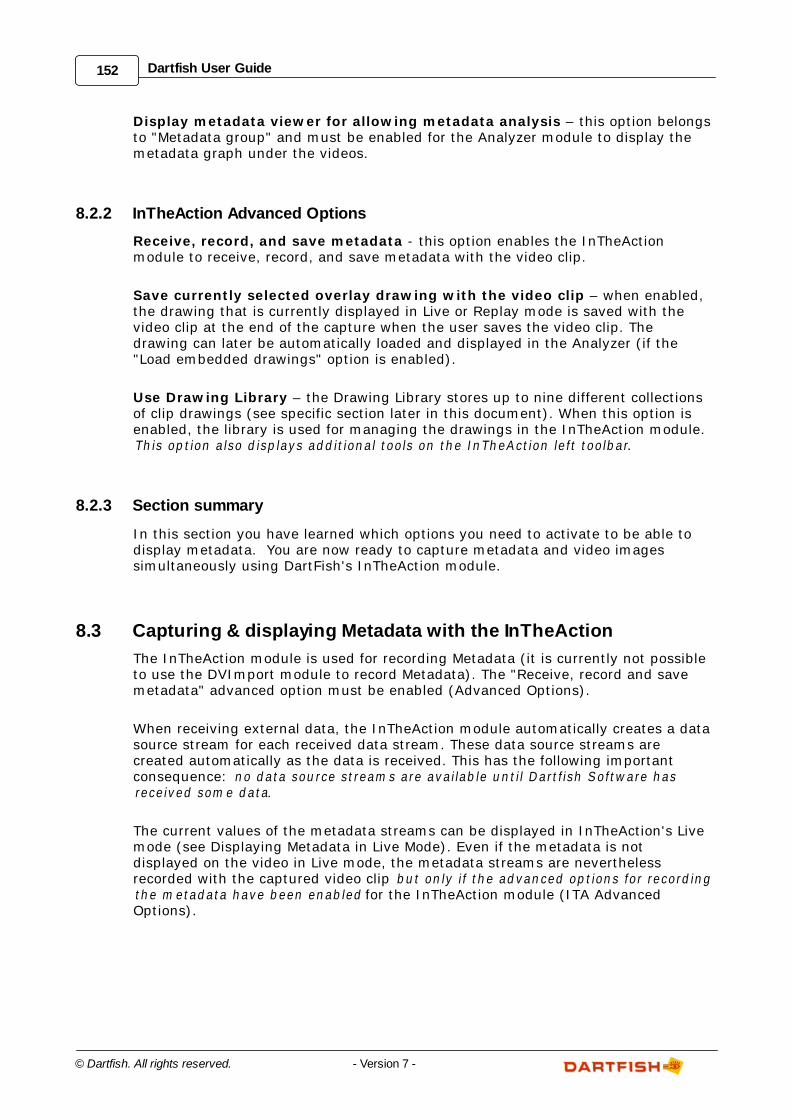
152 Dartfish User Guide
© Dartfish. All rights reserved. - Version 7 -
Display metadata viewer for allowing metadata analysis – this option belongsto "Metadata group" and must be enabled for the Analyzer module to display themetadata graph under the videos.
8.2.2 InTheAction Advanced Options
Receive, record, and save metadata - this option enables the InTheActionmodule to receive, record, and save metadata with the video clip.
Save currently selected overlay drawing with the video clip – when enabled,the drawing that is currently displayed in Live or Replay mode is saved with thevideo clip at the end of the capture when the user saves the video clip. Thedrawing can later be automatically loaded and displayed in the Analyzer (if the"Load embedded drawings" option is enabled).
Use Drawing Library – the Drawing Library stores up to nine different collectionsof clip drawings (see specific section later in this document). When this option isenabled, the library is used for managing the drawings in the InTheAction module. This option also d isp lays add itional tools on the InTheAction left toolbar.
8.2.3 Section summary
In this section you have learned which options you need to activate to be able todisplay metadata. You are now ready to capture metadata and video imagessimultaneously using DartFish's InTheAction module.
8.3 Capturing & displaying Metadata with the InTheAction
The InTheAction module is used for recording Metadata (it is currently not possibleto use the DVImport module to record Metadata). The "Receive, record and savemetadata" advanced option must be enabled (Advanced Options).
When receiving external data, the InTheAction module automatically creates a datasource stream for each received data stream. These data source streams arecreated automatically as the data is received. This has the following importantconsequence: no data source stream s are availab le until Dartfish Software hasreceived som e data.
The current values of the metadata streams can be displayed in InTheAction's Livemode (see Displaying Metadata in Live Mode). Even if the metadata is notdisplayed on the video in Live mode, the metadata streams are neverthelessrecorded with the captured video clip but on ly if the advanced options for record ingthe m etadata have been enab led for the InTheAction module (ITA AdvancedOptions).
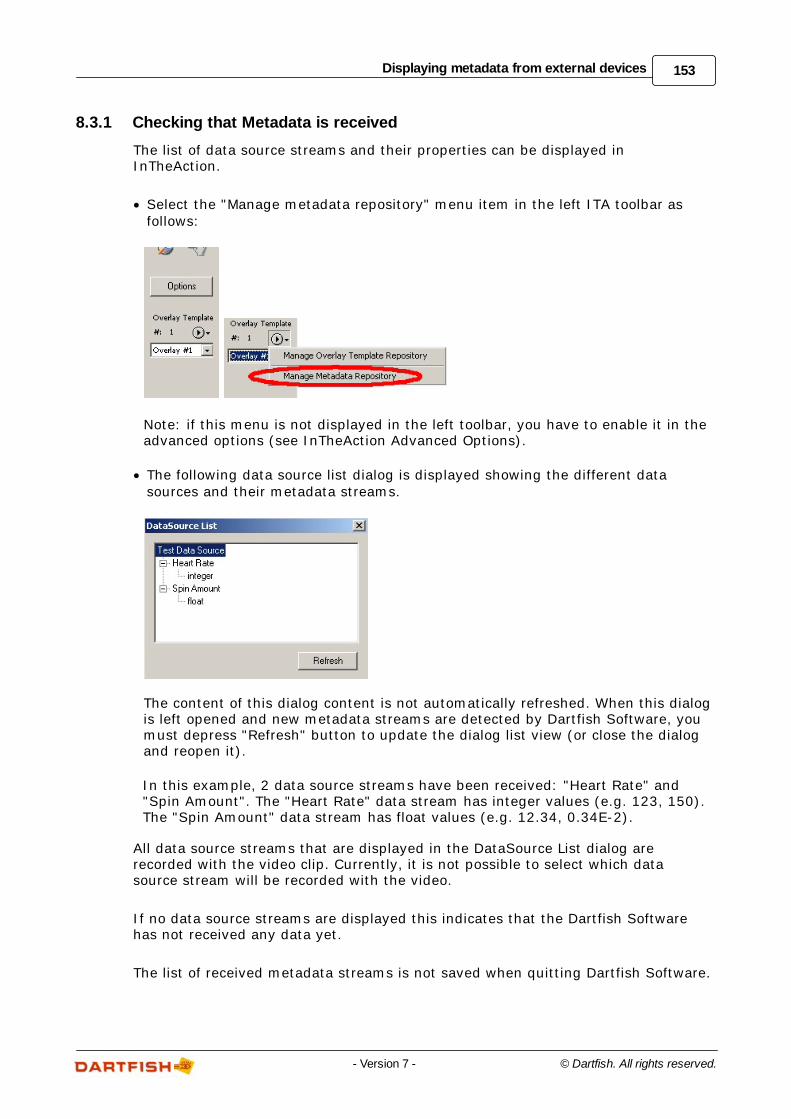
153Displaying metadata from external devices
© Dartfish. All rights reserved.- Version 7 -
8.3.1 Checking that Metadata is received
The list of data source streams and their properties can be displayed inInTheAction.
Select the "Manage metadata repository" menu item in the left ITA toolbar asfollows:
Note: if this menu is not displayed in the left toolbar, you have to enable it in theadvanced options (see InTheAction Advanced Options).
The following data source list dialog is displayed showing the different datasources and their metadata streams.
The content of this dialog content is not automatically refreshed. When this dialogis left opened and new metadata streams are detected by Dartfish Software, youmust depress "Refresh" button to update the dialog list view (or close the dialogand reopen it).
In this example, 2 data source streams have been received: "Heart Rate" and"Spin Amount". The "Heart Rate" data stream has integer values (e.g. 123, 150).The "Spin Amount" data stream has float values (e.g. 12.34, 0.34E-2).
All data source streams that are displayed in the DataSource List dialog arerecorded with the video clip. Currently, it is not possible to select which datasource stream will be recorded with the video.
If no data source streams are displayed this indicates that the Dartfish Softwarehas not received any data yet.
The list of received metadata streams is not saved when quitting Dartfish Software.
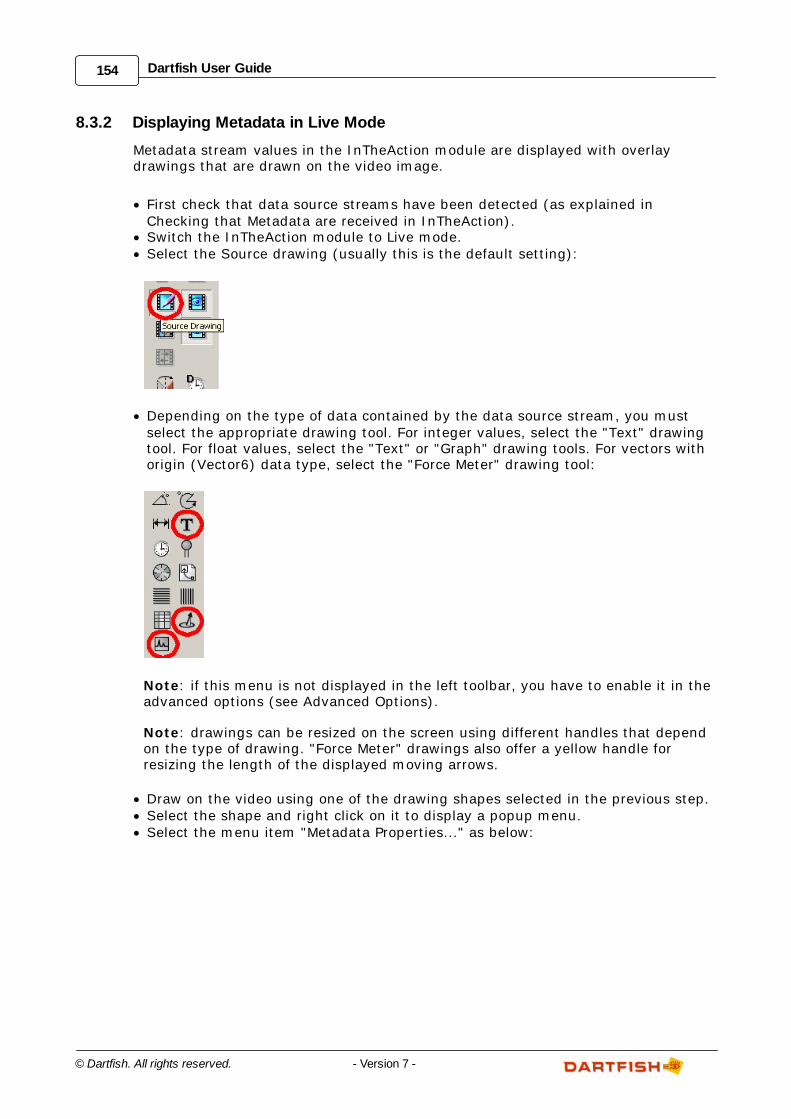
154 Dartfish User Guide
© Dartfish. All rights reserved. - Version 7 -
8.3.2 Displaying Metadata in Live Mode
Metadata stream values in the InTheAction module are displayed with overlaydrawings that are drawn on the video image.
First check that data source streams have been detected (as explained inChecking that Metadata are received in InTheAction).Switch the InTheAction module to Live mode.Select the Source drawing (usually this is the default setting):
Depending on the type of data contained by the data source stream, you mustselect the appropriate drawing tool. For integer values, select the "Text" drawingtool. For float values, select the "Text" or "Graph" drawing tools. For vectors withorigin (Vector6) data type, select the "Force Meter" drawing tool:
Note: if this menu is not displayed in the left toolbar, you have to enable it in theadvanced options (see Advanced Options).
Note: drawings can be resized on the screen using different handles that dependon the type of drawing. "Force Meter" drawings also offer a yellow handle forresizing the length of the displayed moving arrows.
Draw on the video using one of the drawing shapes selected in the previous step.Select the shape and right click on it to display a popup menu.Select the menu item "Metadata Properties..." as below:
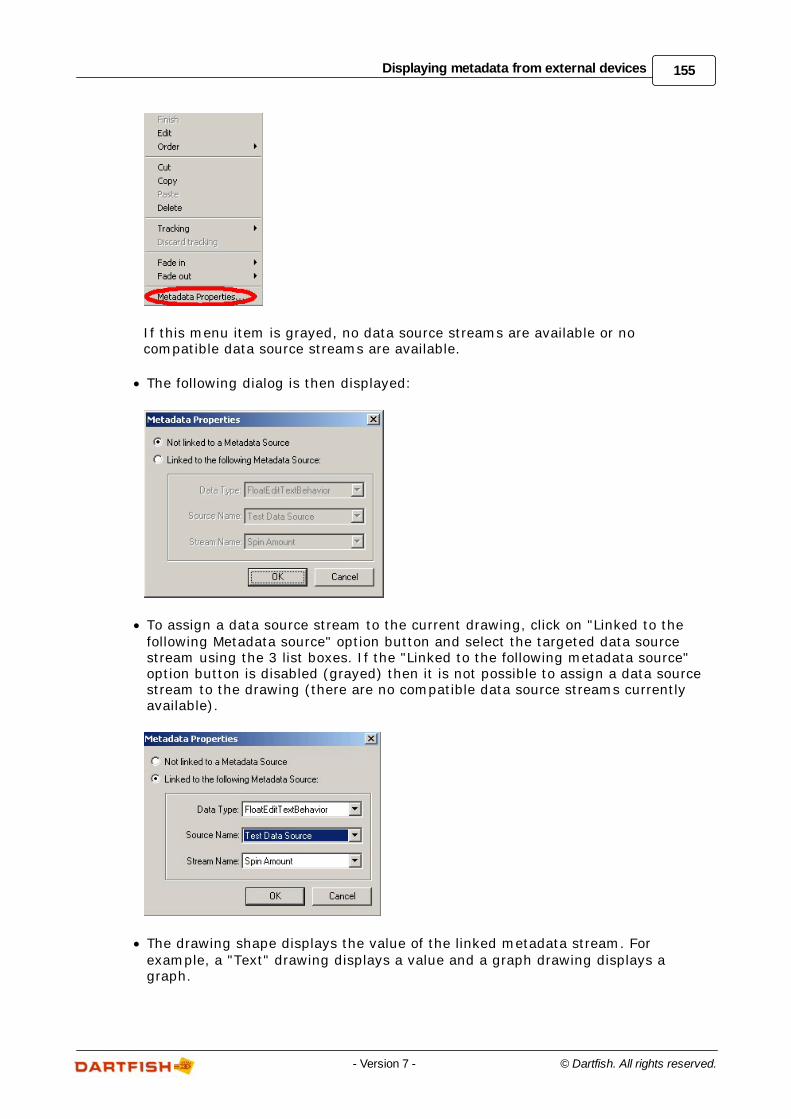
155Displaying metadata from external devices
© Dartfish. All rights reserved.- Version 7 -
If this menu item is grayed, no data source streams are available or nocompatible data source streams are available.
The following dialog is then displayed:
To assign a data source stream to the current drawing, click on "Linked to thefollowing Metadata source" option button and select the targeted data sourcestream using the 3 list boxes. If the "Linked to the following metadata source"option button is disabled (grayed) then it is not possible to assign a data sourcestream to the drawing (there are no compatible data source streams currentlyavailable).
The drawing shape displays the value of the linked metadata stream. Forexample, a "Text" drawing displays a value and a graph drawing displays agraph.
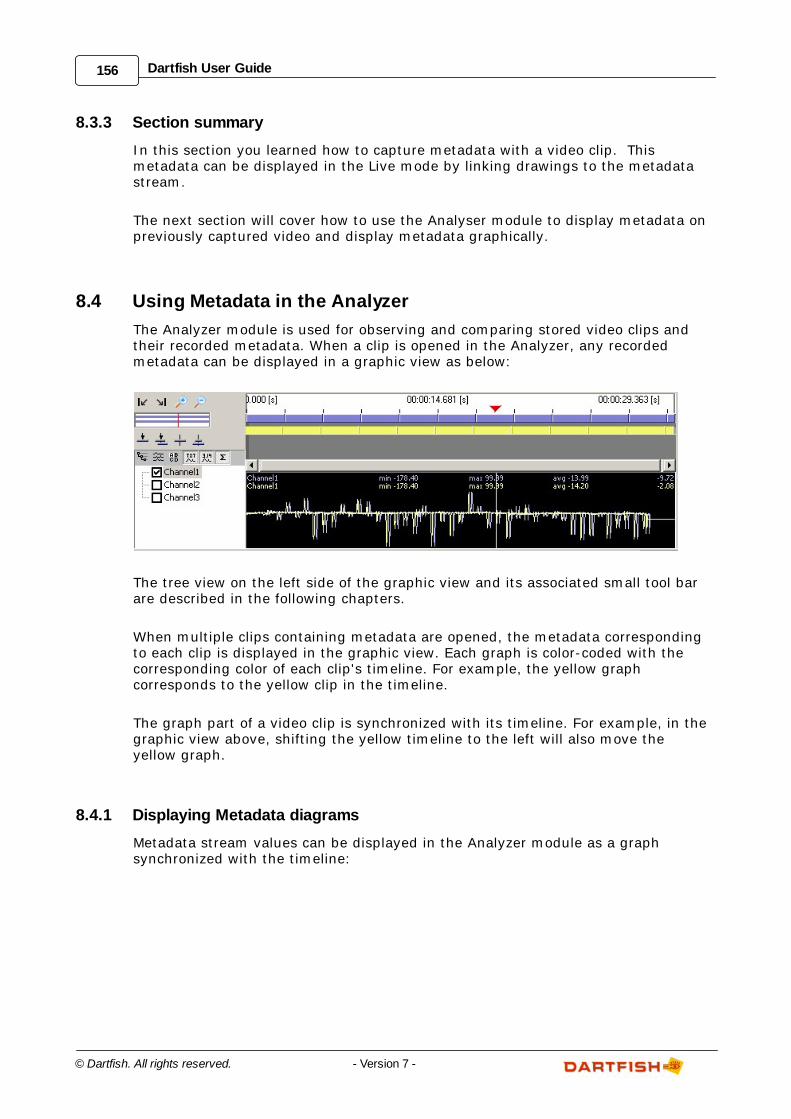
156 Dartfish User Guide
© Dartfish. All rights reserved. - Version 7 -
8.3.3 Section summary
In this section you learned how to capture metadata with a video clip. Thismetadata can be displayed in the Live mode by linking drawings to the metadatastream.
The next section will cover how to use the Analyser module to display metadata onpreviously captured video and display metadata graphically.
8.4 Using Metadata in the Analyzer
The Analyzer module is used for observing and comparing stored video clips andtheir recorded metadata. When a clip is opened in the Analyzer, any recordedmetadata can be displayed in a graphic view as below:
The tree view on the left side of the graphic view and its associated small tool barare described in the following chapters.
When multiple clips containing metadata are opened, the metadata correspondingto each clip is displayed in the graphic view. Each graph is color-coded with thecorresponding color of each clip's timeline. For example, the yellow graphcorresponds to the yellow clip in the timeline.
The graph part of a video clip is synchronized with its timeline. For example, in thegraphic view above, shifting the yellow timeline to the left will also move theyellow graph.
8.4.1 Displaying Metadata diagrams
Metadata stream values can be displayed in the Analyzer module as a graphsynchronized with the timeline:
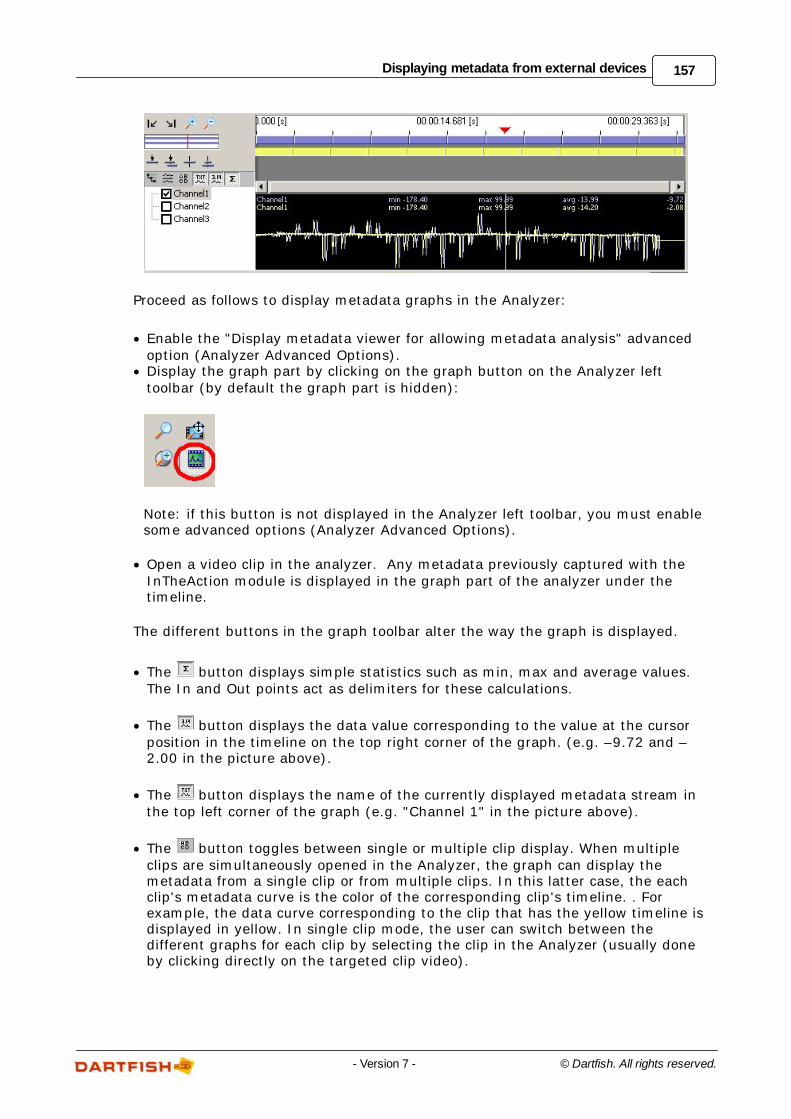
157Displaying metadata from external devices
© Dartfish. All rights reserved.- Version 7 -
Proceed as follows to display metadata graphs in the Analyzer:
Enable the "Display metadata viewer for allowing metadata analysis" advancedoption (Analyzer Advanced Options).Display the graph part by clicking on the graph button on the Analyzer lefttoolbar (by default the graph part is hidden):
Note: if this button is not displayed in the Analyzer left toolbar, you must enablesome advanced options (Analyzer Advanced Options).
Open a video clip in the analyzer. Any metadata previously captured with theInTheAction module is displayed in the graph part of the analyzer under thetimeline.
The different buttons in the graph toolbar alter the way the graph is displayed.
The button displays simple statistics such as min, max and average values.The In and Out points act as delimiters for these calculations.
The button displays the data value corresponding to the value at the cursorposition in the timeline on the top right corner of the graph. (e.g. –9.72 and –2.00 in the picture above).
The button displays the name of the currently displayed metadata stream inthe top left corner of the graph (e.g. "Channel 1" in the picture above).
The button toggles between single or multiple clip display. When multipleclips are simultaneously opened in the Analyzer, the graph can display themetadata from a single clip or from multiple clips. In this latter case, the eachclip's metadata curve is the color of the corresponding clip's timeline. . Forexample, the data curve corresponding to the clip that has the yellow timeline isdisplayed in yellow. In single clip mode, the user can switch between thedifferent graphs for each clip by selecting the clip in the Analyzer (usually doneby clicking directly on the targeted clip video).
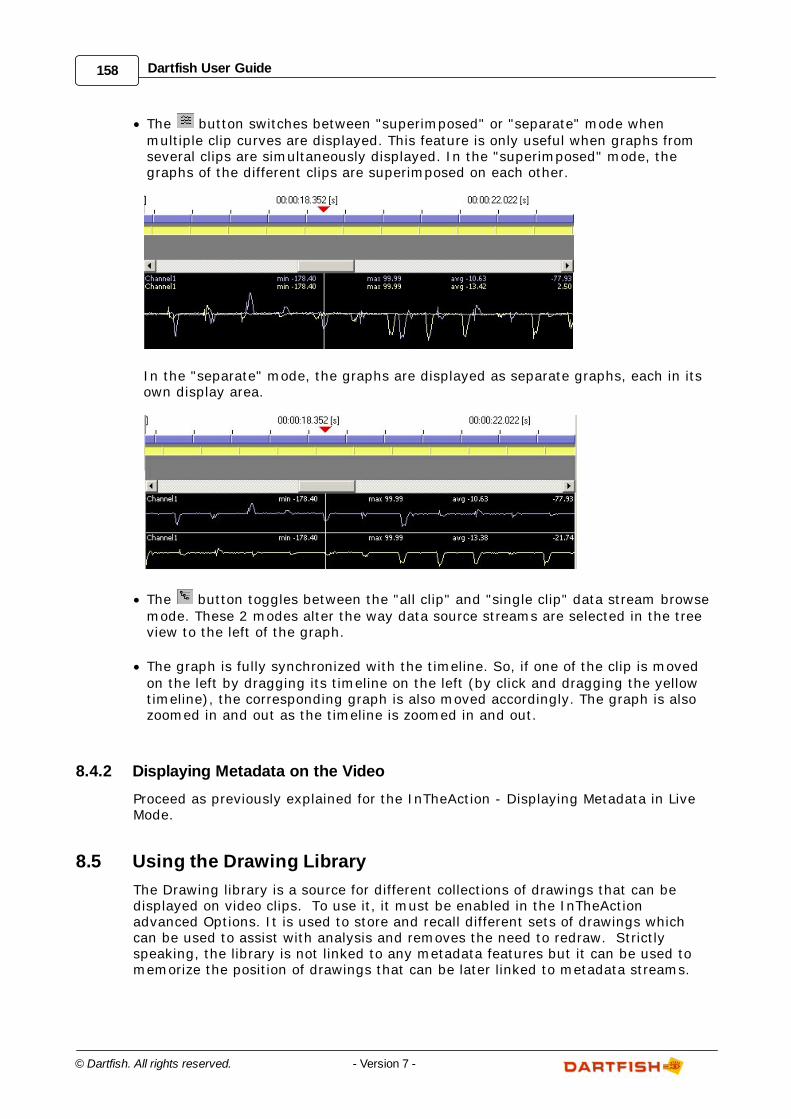
158 Dartfish User Guide
© Dartfish. All rights reserved. - Version 7 -
The button switches between "superimposed" or "separate" mode whenmultiple clip curves are displayed. This feature is only useful when graphs fromseveral clips are simultaneously displayed. In the "superimposed" mode, thegraphs of the different clips are superimposed on each other.
In the "separate" mode, the graphs are displayed as separate graphs, each in itsown display area.
The button toggles between the "all clip" and "single clip" data stream browsemode. These 2 modes alter the way data source streams are selected in the treeview to the left of the graph.
The graph is fully synchronized with the timeline. So, if one of the clip is movedon the left by dragging its timeline on the left (by click and dragging the yellowtimeline), the corresponding graph is also moved accordingly. The graph is alsozoomed in and out as the timeline is zoomed in and out.
8.4.2 Displaying Metadata on the Video
Proceed as previously explained for the InTheAction - Displaying Metadata in LiveMode.
8.5 Using the Drawing Library
The Drawing library is a source for different collections of drawings that can bedisplayed on video clips. To use it, it must be enabled in the InTheActionadvanced Options. It is used to store and recall different sets of drawings whichcan be used to assist with analysis and removes the need to redraw. Strictlyspeaking, the library is not linked to any metadata features but it can be used tomemorize the position of drawings that can be later linked to metadata streams.
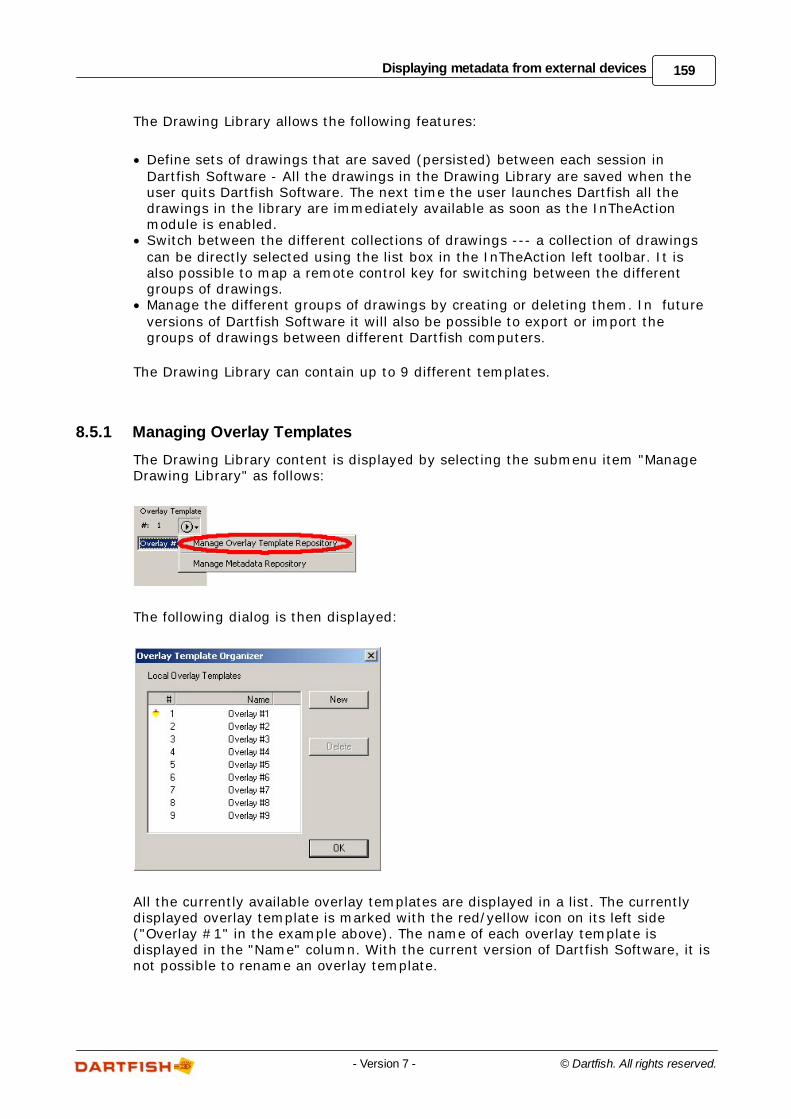
159Displaying metadata from external devices
© Dartfish. All rights reserved.- Version 7 -
The Drawing Library allows the following features:
Define sets of drawings that are saved (persisted) between each session inDartfish Software - All the drawings in the Drawing Library are saved when theuser quits Dartfish Software. The next time the user launches Dartfish all thedrawings in the library are immediately available as soon as the InTheActionmodule is enabled.Switch between the different collections of drawings --- a collection of drawingscan be directly selected using the list box in the InTheAction left toolbar. It isalso possible to map a remote control key for switching between the differentgroups of drawings. Manage the different groups of drawings by creating or deleting them. In futureversions of Dartfish Software it will also be possible to export or import thegroups of drawings between different Dartfish computers.
The Drawing Library can contain up to 9 different templates.
8.5.1 Managing Overlay Templates
The Drawing Library content is displayed by selecting the submenu item "ManageDrawing Library" as follows:
The following dialog is then displayed:
All the currently available overlay templates are displayed in a list. The currentlydisplayed overlay template is marked with the red/yellow icon on its left side("Overlay #1" in the example above). The name of each overlay template isdisplayed in the "Name" column. With the current version of Dartfish Software, it isnot possible to rename an overlay template.
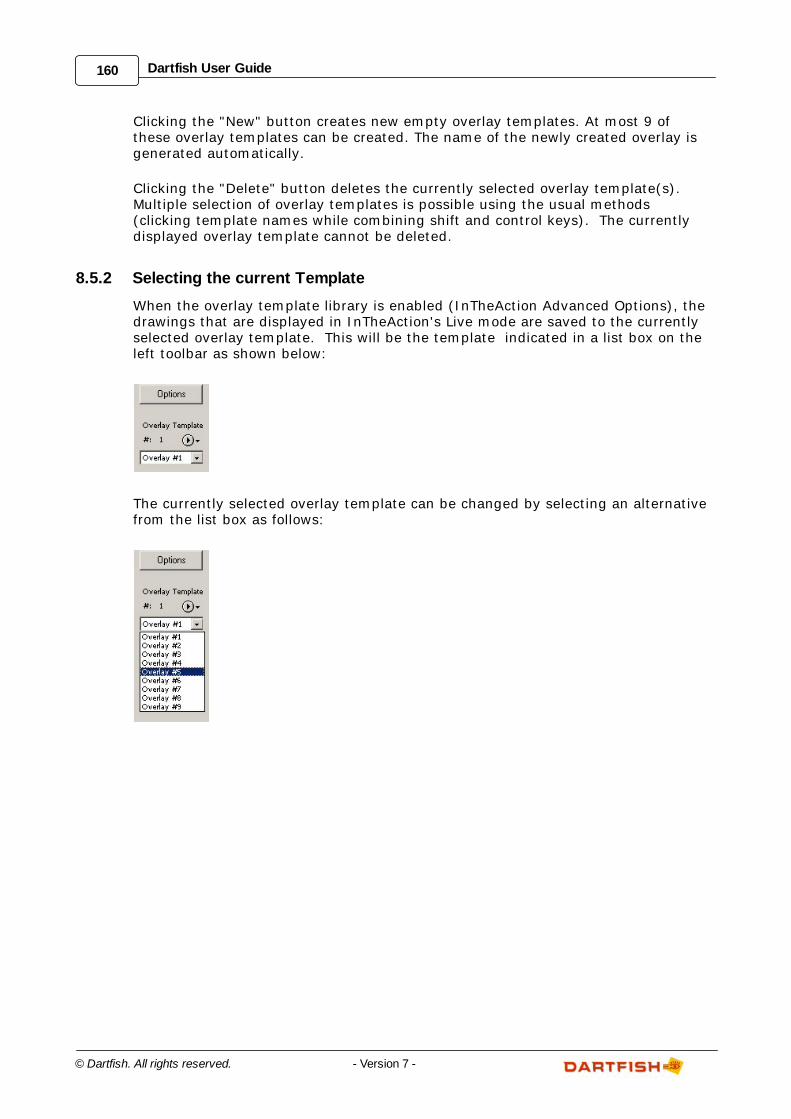
160 Dartfish User Guide
© Dartfish. All rights reserved. - Version 7 -
Clicking the "New" button creates new empty overlay templates. At most 9 ofthese overlay templates can be created. The name of the newly created overlay isgenerated automatically.
Clicking the "Delete" button deletes the currently selected overlay template(s).Multiple selection of overlay templates is possible using the usual methods(clicking template names while combining shift and control keys). The currentlydisplayed overlay template cannot be deleted.
8.5.2 Selecting the current Template
When the overlay template library is enabled (InTheAction Advanced Options), thedrawings that are displayed in InTheAction's Live mode are saved to the currentlyselected overlay template. This will be the template indicated in a list box on theleft toolbar as shown below:
The currently selected overlay template can be changed by selecting an alternativefrom the list box as follows:

Chapter
IX
Dartfish Readers

162 Dartfish User Guide
© Dartfish. All rights reserved. - Version 7 -
9 Dartfish ReadersData Readers are used to link a video file to a data source file. Once linked, you'll be able tosynchronize the data stream s and video in the Analyzer and to view both simultaneously usingthe Data Graph. Drawing tools can be used to display data on the video image.
In earlier versions of Dartfish, the readers were available as add-in software to Dartfish Proeditions. For version 6.1 and later readers will form part of the TeamPro Data edition of Dartfish.
There are two Data Readers available:
CSV Reader
Used to link video to character separated value (csv) files. CSV files are commonly producedor can be exported from a wide range of devices.
This reader can read many text file formats provided the following conditions are met:
1. The data can be separated (parsed) into columns which are delimited by a text character(tab, comma, semi colon, space etc)
2. The resulting table has no more than one row of column headers.
Where condition 2 is not met, it is usually possible to open, parse and edit a text file in aspreadsheet program such as Microsoft Excel. By this method data can be rearranged andextra headings removed. The edited data should be saved as a .csv file rather than aspreadsheet file.
Source name: This Reader names the source by the file name of the CSV file. Optionally youcan input a source name of your choice.
Data streams: The CSV Reader parses character separated data into columns, eachof which represents a different data stream. You are able to select which ofthese columns you wish to link to Dartfish.
See linking CSV data
SRM Reader
Used to link video to .srm files created by SRM power cranks and training system. This includesa Powermeter and a Powercontrol to record biodata held in SRM files (*.srm). Thanks to thissystem, cyclists can record the power, the heart rate, the cadence, the speed and other dataderiving from them.
Source name: This Reader names the source by the initials of the person set in thePowermeter and the date of the training.
Data streams: Five streams are fed:
Power developed on the crank in [watts]
Cadence of the crank [rpm]
Speed of the cycle [km/h]
Heart rate of the athlete [bpm]
Time of the day at which the training session happened [hh:mm:ss.xxxx]
See linking SRM data
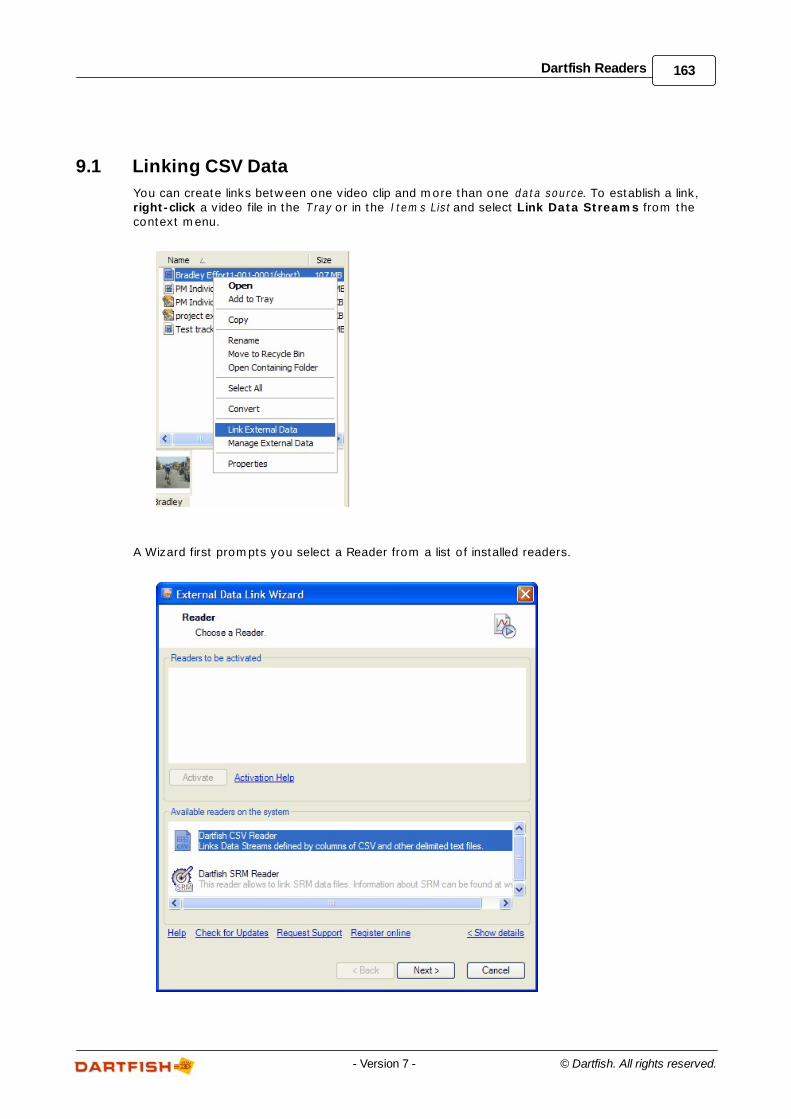
163Dartfish Readers
© Dartfish. All rights reserved.- Version 7 -
9.1 Linking CSV Data
You can create links between one video clip and more than one data source. To establish a link,right-click a video file in the T ray or in the Item s List and select Link Data Streams from thecontext menu.
A Wizard first prompts you select a Reader from a list of installed readers.
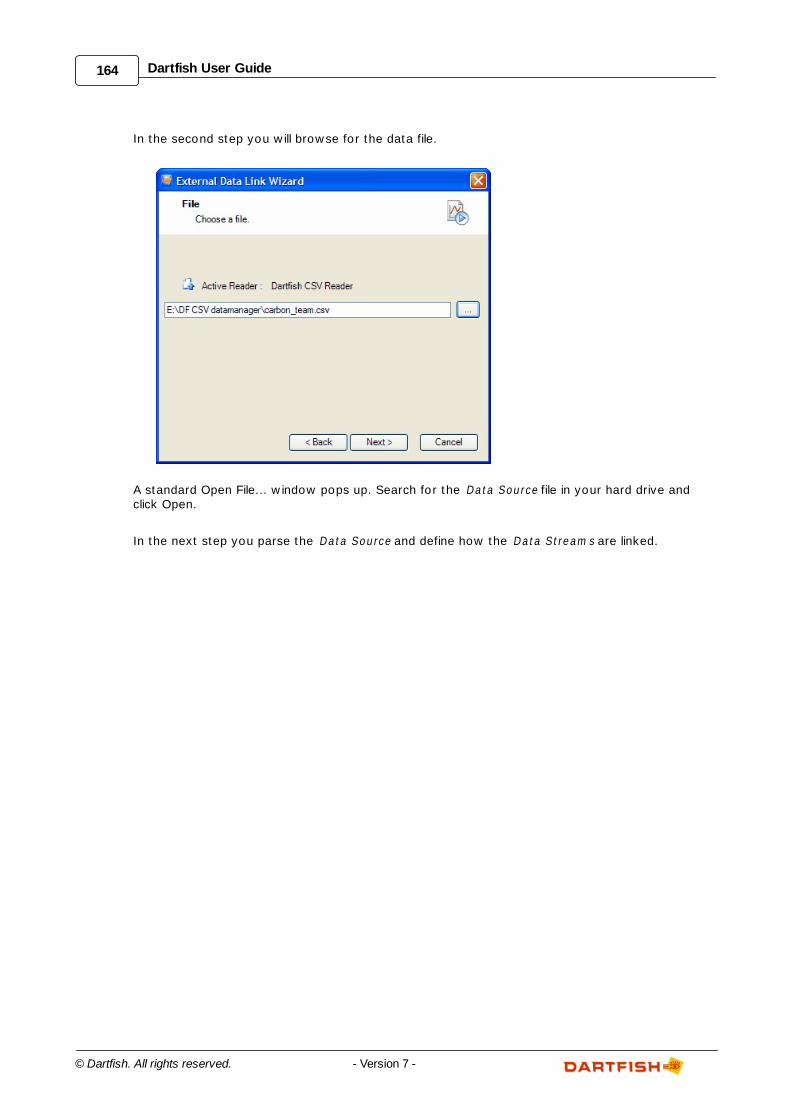
164 Dartfish User Guide
© Dartfish. All rights reserved. - Version 7 -
In the second step you will browse for the data file.
A standard Open File... window pops up. Search for the Data Source file in your hard drive andclick Open.
In the next step you parse the Data Source and define how the Data Stream s are linked.
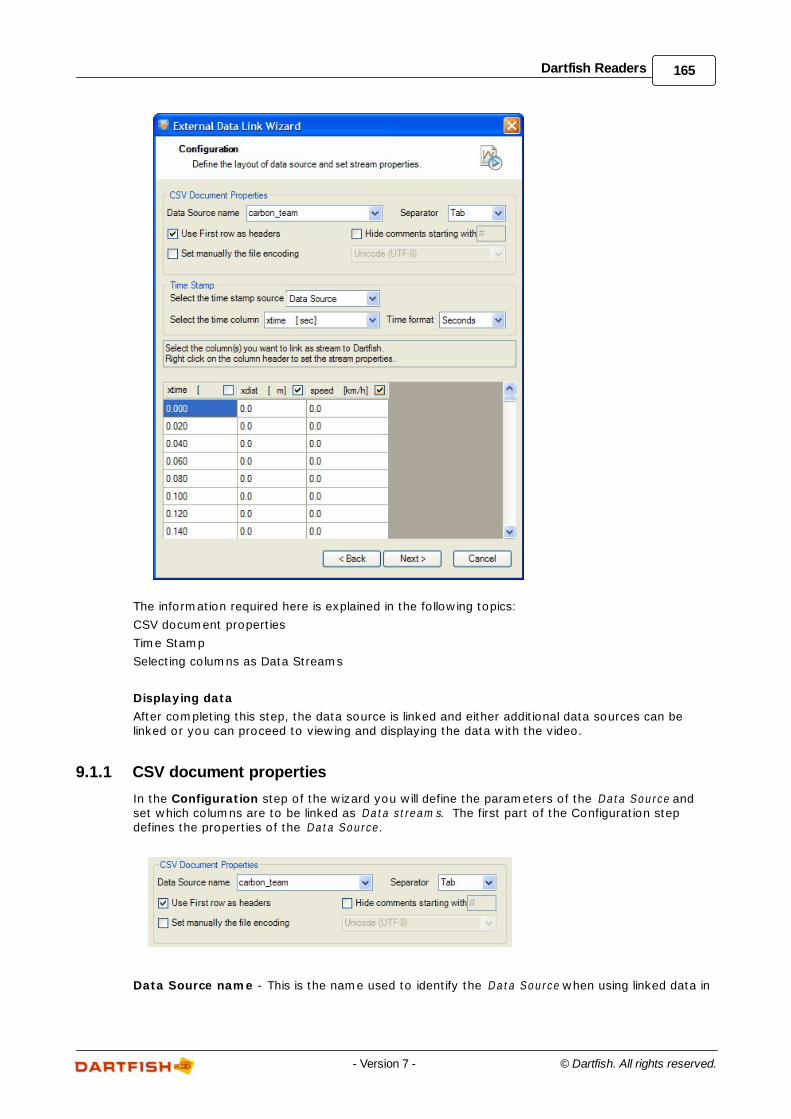
165Dartfish Readers
© Dartfish. All rights reserved.- Version 7 -
The information required here is explained in the following topics:
CSV document properties
Time Stamp
Selecting columns as Data Streams
Displaying data
After completing this step, the data source is linked and either additional data sources can belinked or you can proceed to viewing and displaying the data with the video.
9.1.1 CSV document properties
In the Configuration step of the wizard you will define the parameters of the Data Source andset which columns are to be linked as Data stream s. The first part of the Configuration stepdefines the properties of the Data Source.
Data Source name - This is the name used to identify the Data Source when using linked data in
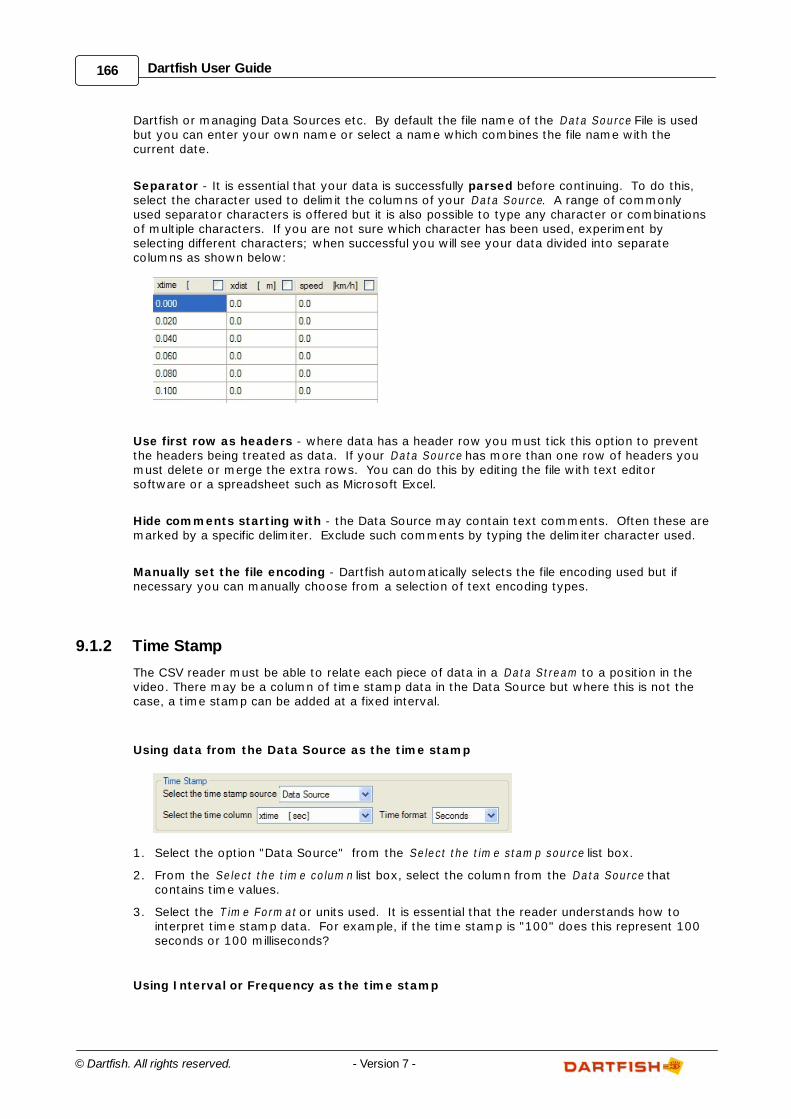
166 Dartfish User Guide
© Dartfish. All rights reserved. - Version 7 -
Dartfish or managing Data Sources etc. By default the file name of the Data Source File is usedbut you can enter your own name or select a name which combines the file name with thecurrent date.
Separator - It is essential that your data is successfully parsed before continuing. To do this,select the character used to delimit the columns of your Data Source. A range of commonlyused separator characters is offered but it is also possible to type any character or combinationsof multiple characters. If you are not sure which character has been used, experiment byselecting different characters; when successful you will see your data divided into separatecolumns as shown below:
Use first row as headers - where data has a header row you must tick this option to preventthe headers being treated as data. If your Data Source has more than one row of headers youmust delete or merge the extra rows. You can do this by editing the file with text editorsoftware or a spreadsheet such as Microsoft Excel.
Hide comments starting with - the Data Source may contain text comments. Often these aremarked by a specific delimiter. Exclude such comments by typing the delimiter character used.
Manually set the file encoding - Dartfish automatically selects the file encoding used but ifnecessary you can manually choose from a selection of text encoding types.
9.1.2 Time Stamp
The CSV reader must be able to relate each piece of data in a Data Stream to a position in thevideo. There may be a column of time stamp data in the Data Source but where this is not thecase, a time stamp can be added at a fixed interval.
Using data from the Data Source as the time stamp
1. Select the option "Data Source" from the Select the tim e stam p source list box.
2. From the Select the tim e colum n list box, select the column from the Data Source thatcontains time values.
3. Select the T im e Form at or units used. It is essential that the reader understands how tointerpret time stamp data. For example, if the time stamp is "100" does this represent 100seconds or 100 milliseconds?
Using Interval or Frequency as the time stamp
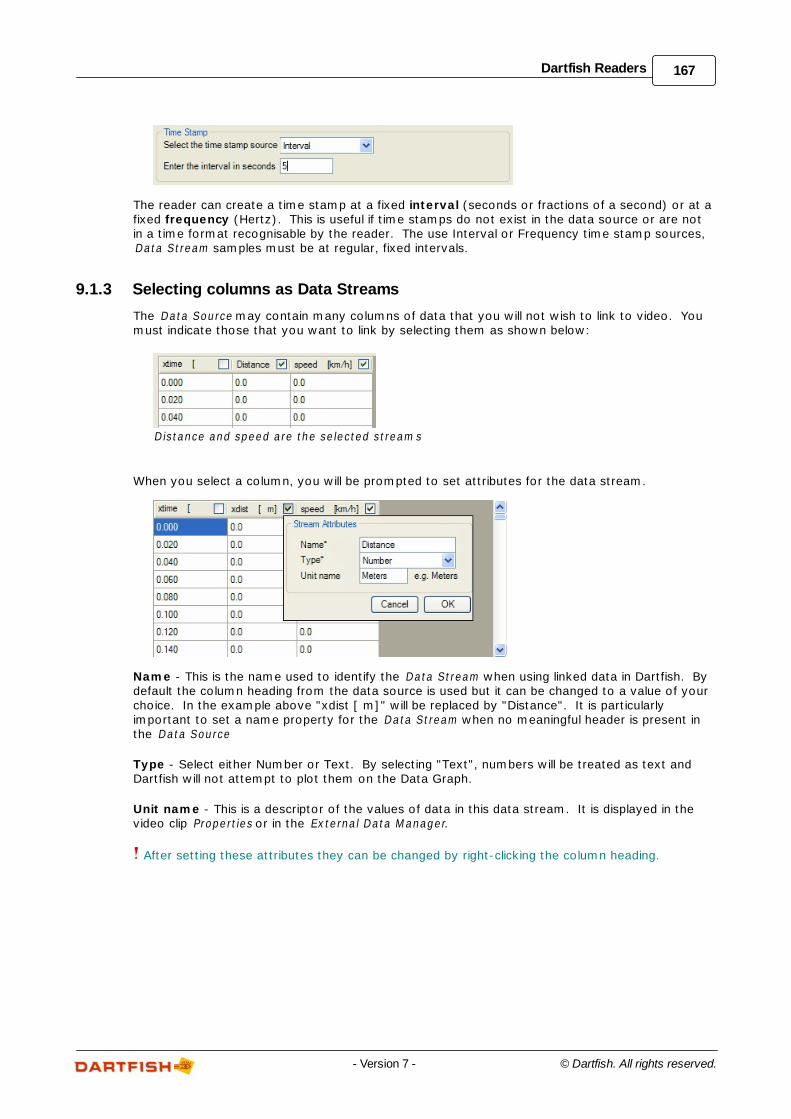
167Dartfish Readers
© Dartfish. All rights reserved.- Version 7 -
The reader can create a time stamp at a fixed interval (seconds or fractions of a second) or at afixed frequency (Hertz). This is useful if time stamps do not exist in the data source or are notin a time format recognisable by the reader. The use Interval or Frequency time stamp sources, Data Stream samples must be at regular, fixed intervals.
9.1.3 Selecting columns as Data Streams
The Data Source may contain many columns of data that you will not wish to link to video. Youmust indicate those that you want to link by selecting them as shown below:
Distance and speed are the selected stream s
When you select a column, you will be prompted to set attributes for the data stream.
Name - This is the name used to identify the Data Stream when using linked data in Dartfish. Bydefault the column heading from the data source is used but it can be changed to a value of yourchoice. In the example above "xdist [ m]" will be replaced by "Distance". It is particularlyimportant to set a name property for the Data Stream when no meaningful header is present inthe Data Source
Type - Select either Number or Text. By selecting "Text", numbers will be treated as text andDartfish will not attempt to plot them on the Data Graph.
Unit name - This is a descriptor of the values of data in this data stream. It is displayed in thevideo clip Properties or in the External Data M anager.
After setting these attributes they can be changed by right-clicking the column heading.
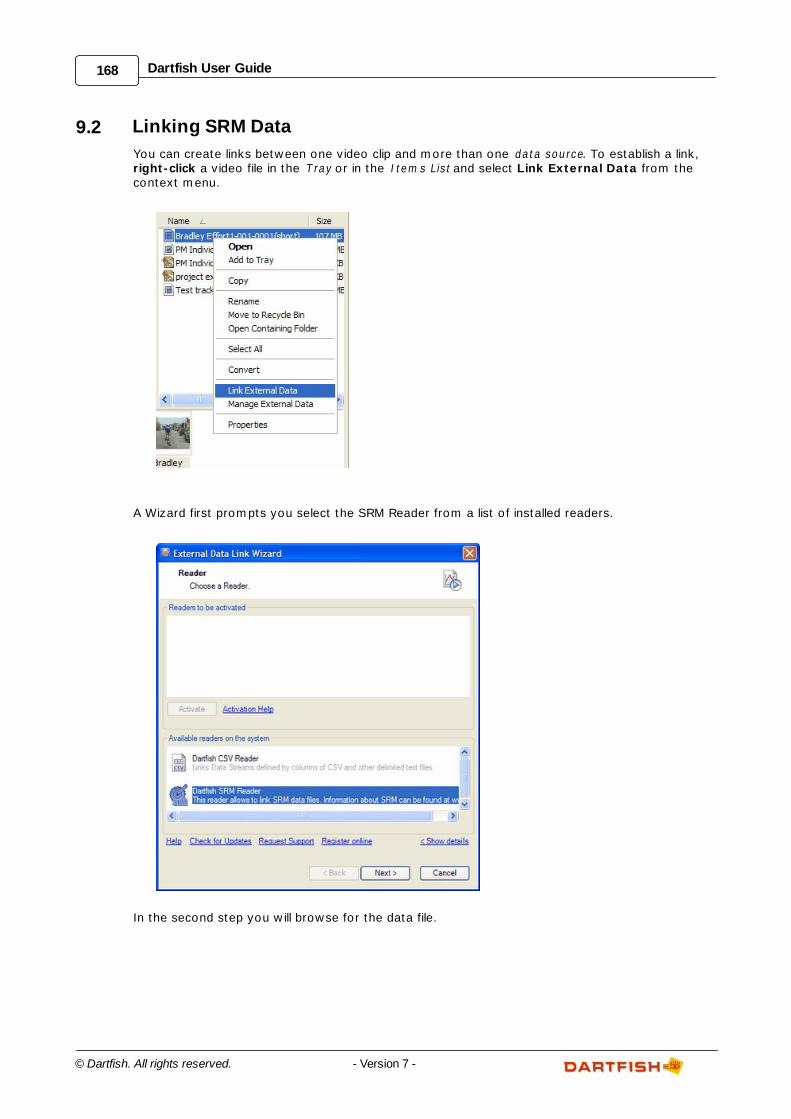
168 Dartfish User Guide
© Dartfish. All rights reserved. - Version 7 -
9.2 Linking SRM Data
You can create links between one video clip and more than one data source. To establish a link,right-click a video file in the T ray or in the Item s List and select Link External Data from thecontext menu.
A Wizard first prompts you select the SRM Reader from a list of installed readers.
In the second step you will browse for the data file.
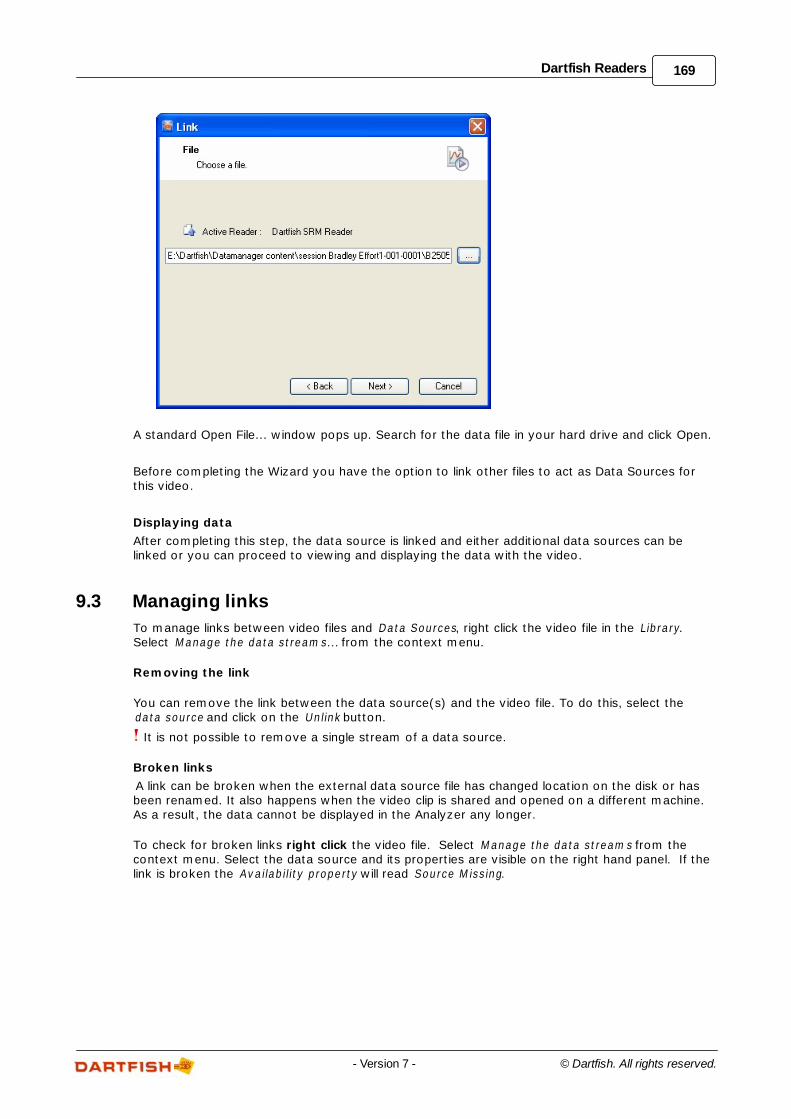
169Dartfish Readers
© Dartfish. All rights reserved.- Version 7 -
A standard Open File... window pops up. Search for the data file in your hard drive and click Open.
Before completing the Wizard you have the option to link other files to act as Data Sources forthis video.
Displaying data
After completing this step, the data source is linked and either additional data sources can belinked or you can proceed to viewing and displaying the data with the video.
9.3 Managing links
To manage links between video files and Data Sources, right click the video file in the Library.Select M anage the data stream s... from the context menu.
Removing the link
You can remove the link between the data source(s) and the video file. To do this, select the data source and click on the Unlink button.
It is not possible to remove a single stream of a data source.
Broken links
A link can be broken when the external data source file has changed location on the disk or hasbeen renamed. It also happens when the video clip is shared and opened on a different machine.As a result, the data cannot be displayed in the Analyzer any longer.
To check for broken links right click the video file. Select M anage the data stream s from thecontext menu. Select the data source and its properties are visible on the right hand panel. If thelink is broken the Availability property will read Source M issing.
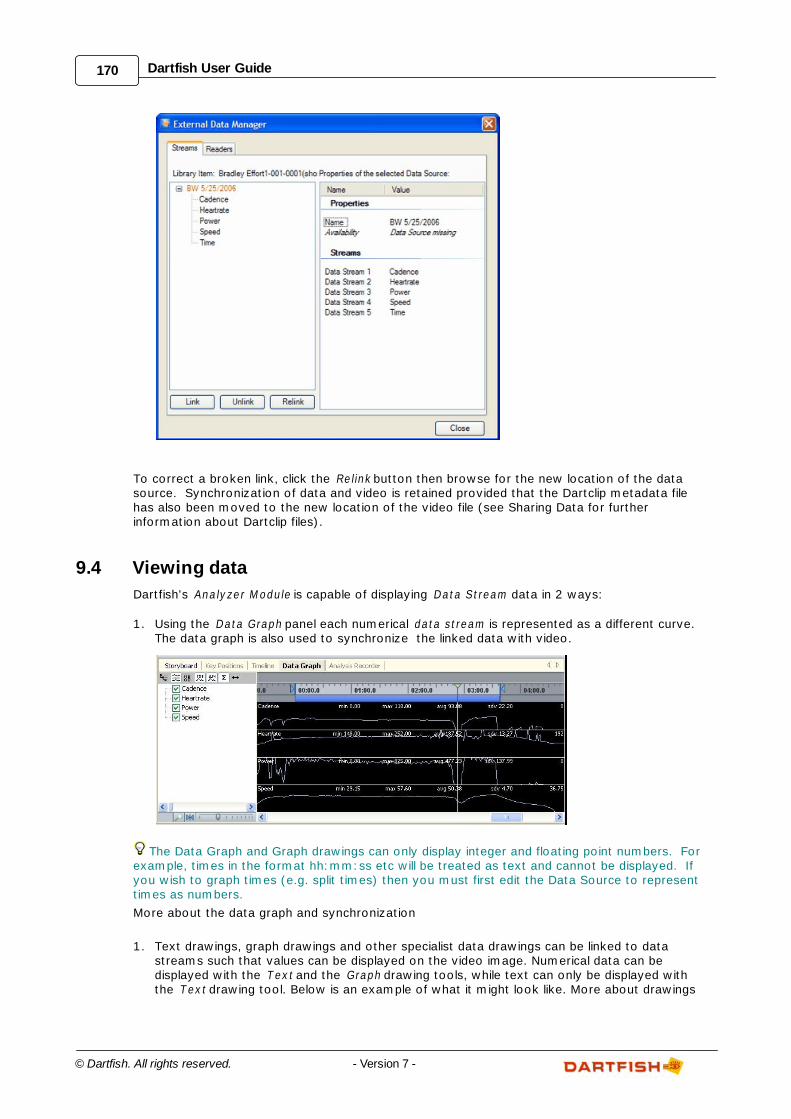
170 Dartfish User Guide
© Dartfish. All rights reserved. - Version 7 -
To correct a broken link, click the Relink button then browse for the new location of the datasource. Synchronization of data and video is retained provided that the Dartclip metadata filehas also been moved to the new location of the video file (see Sharing Data for furtherinformation about Dartclip files).
9.4 Viewing data
Dartfish's Analyzer M odule is capable of displaying Data Stream data in 2 ways:
1. Using the Data Graph panel each numerical data stream is represented as a different curve.The data graph is also used to synchronize the linked data with video.
The Data Graph and Graph drawings can only display integer and floating point numbers. Forexample, times in the format hh:mm:ss etc will be treated as text and cannot be displayed. Ifyou wish to graph times (e.g. split times) then you must first edit the Data Source to representtimes as numbers.
More about the data graph and synchronization
1. Text drawings, graph drawings and other specialist data drawings can be linked to datastreams such that values can be displayed on the video image. Numerical data can bedisplayed with the Text and the Graph drawing tools, while text can only be displayed withthe Text drawing tool. Below is an example of what it might look like. More about drawings
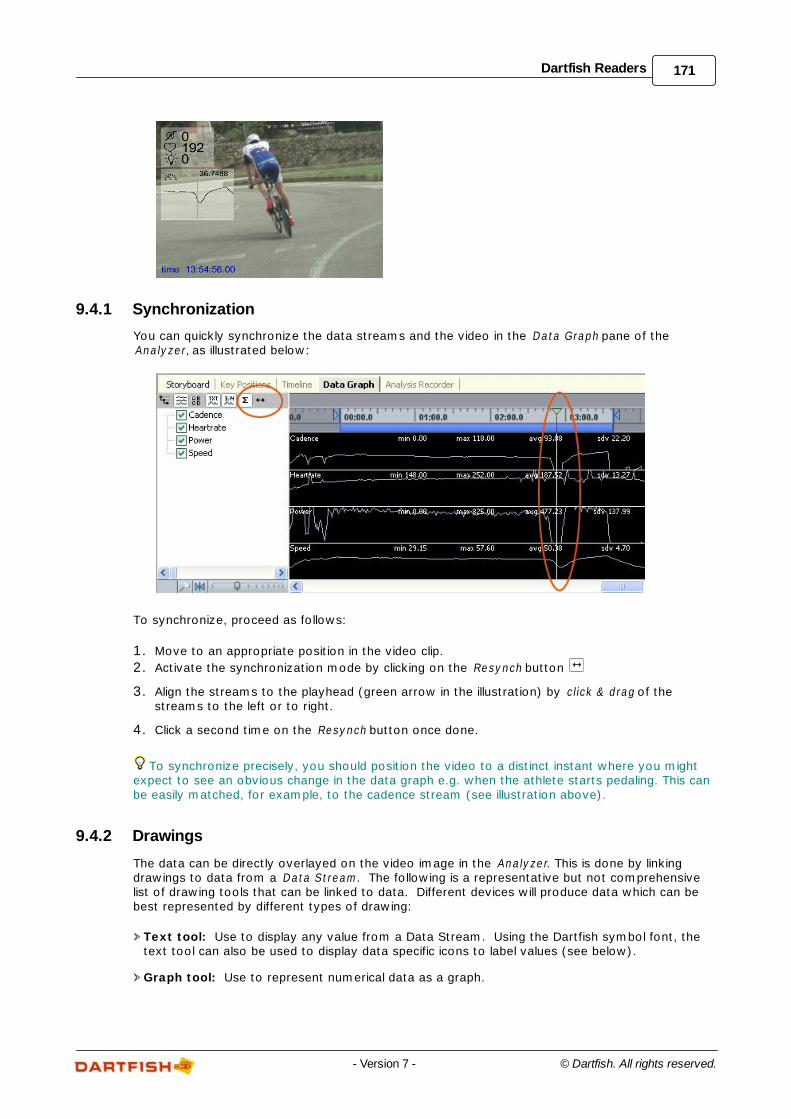
171Dartfish Readers
© Dartfish. All rights reserved.- Version 7 -
9.4.1 Synchronization
You can quickly synchronize the data streams and the video in the Data Graph pane of theAnalyzer, as illustrated below:
To synchronize, proceed as follows:
1. Move to an appropriate position in the video clip.
2. Activate the synchronization mode by clicking on the Resynch button
3. Align the streams to the playhead (green arrow in the illustration) by click & drag of thestreams to the left or to right.
4. Click a second time on the Resynch button once done.
To synchronize precisely, you should position the video to a distinct instant where you mightexpect to see an obvious change in the data graph e.g. when the athlete starts pedaling. This canbe easily matched, for example, to the cadence stream (see illustration above).
9.4.2 Drawings
The data can be directly overlayed on the video image in the Analyzer. This is done by linkingdrawings to data from a Data Stream. The following is a representative but not comprehensivelist of drawing tools that can be linked to data. Different devices will produce data which can bebest represented by different types of drawing:
Text tool: Use to display any value from a Data Stream. Using the Dartfish symbol font, thetext tool can also be used to display data specific icons to label values (see below).
Graph tool: Use to represent numerical data as a graph.
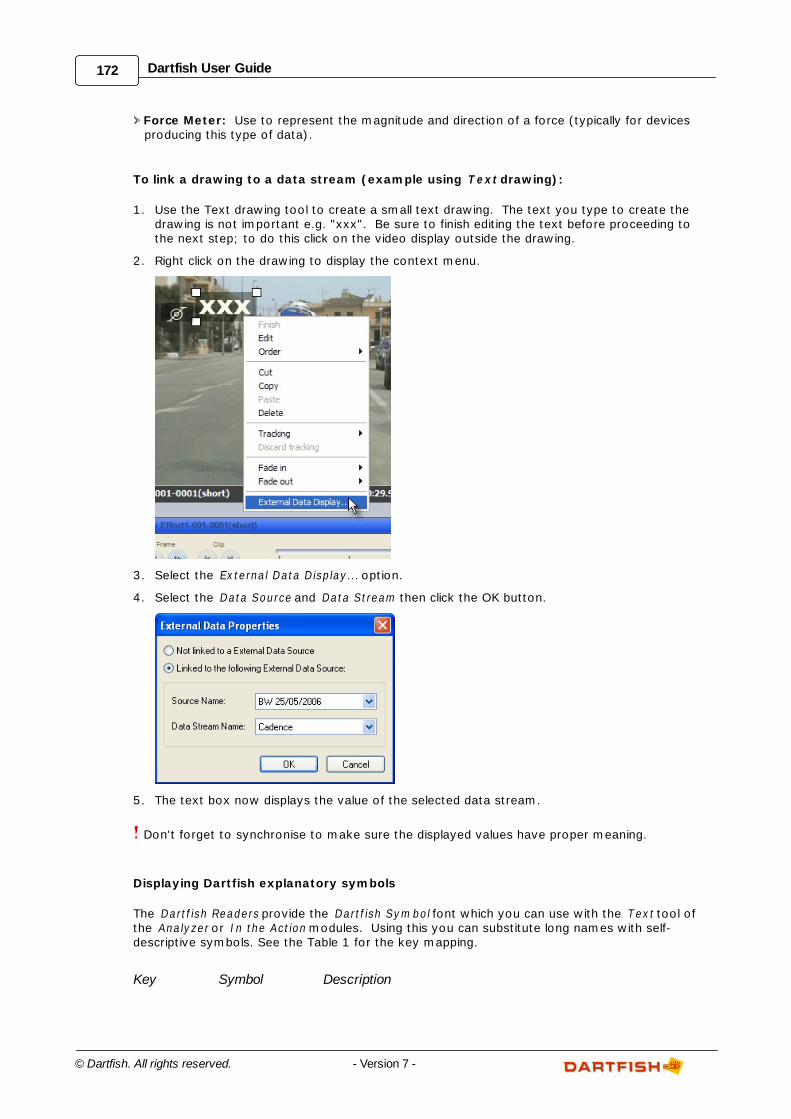
172 Dartfish User Guide
© Dartfish. All rights reserved. - Version 7 -
Force Meter: Use to represent the magnitude and direction of a force (typically for devicesproducing this type of data).
To link a drawing to a data stream (example using T ext drawing):
1. Use the Text drawing tool to create a small text drawing. The text you type to create thedrawing is not important e.g. "xxx". Be sure to finish editing the text before proceeding tothe next step; to do this click on the video display outside the drawing.
2. Right click on the drawing to display the context menu.
3. Select the External Data Display... option.
4. Select the Data Source and Data Stream then click the OK button.
5. The text box now displays the value of the selected data stream.
Don't forget to synchronise to make sure the displayed values have proper meaning.
Displaying Dartfish explanatory symbols
The Dartf ish Readers provide the Dartf ish Sym bol font which you can use with the Text tool ofthe Analyzer or In the Action modules. Using this you can substitute long names with self-descriptive symbols. See the Table 1 for the key mapping.
Key Symbol Description

173Dartfish Readers
© Dartfish. All rights reserved.- Version 7 -
(character)
S or s Speed
P or p Power
C or c Cadence (pedals)
H or h Heart rate
The Dartf ish Sym bol font is automatically installed with Dartf ish software.
9.5 Sharing linked data
In order for others to see linked data you have two options:
1. You can publish a movie from the Analyzer. This will include drawings that have been addedto the video clip - including those displaying Data Streams.
2. You can share the video f ile and the Data Source with other Dartfish users. Although therecipient will need to re-establish the link using their own reader, synchronization is retained.
9.5.1 Publishing video
You can publish the video with overlayed data from the Analyzer (see Saving movies from theAnalyzer to learn how to do this) as illustrated below:
In this case, the result is a video that can be shared in your team. It does not require Dartfish toplay it.
9.5.2 Sharing data
The Dartf ish Readers do not embed data in the video file (i.e. in the .dartclip file associated withthe video clip). They create a "live" link between the data and video files. Therefore if you wishto share video and linked data with other Dartfish users the following are required:
The recipient must have a Dartfish Software edition which includes the reader
You must provide the video clip, the Data Source file and (optionally) the Dartclip file as
shown below.
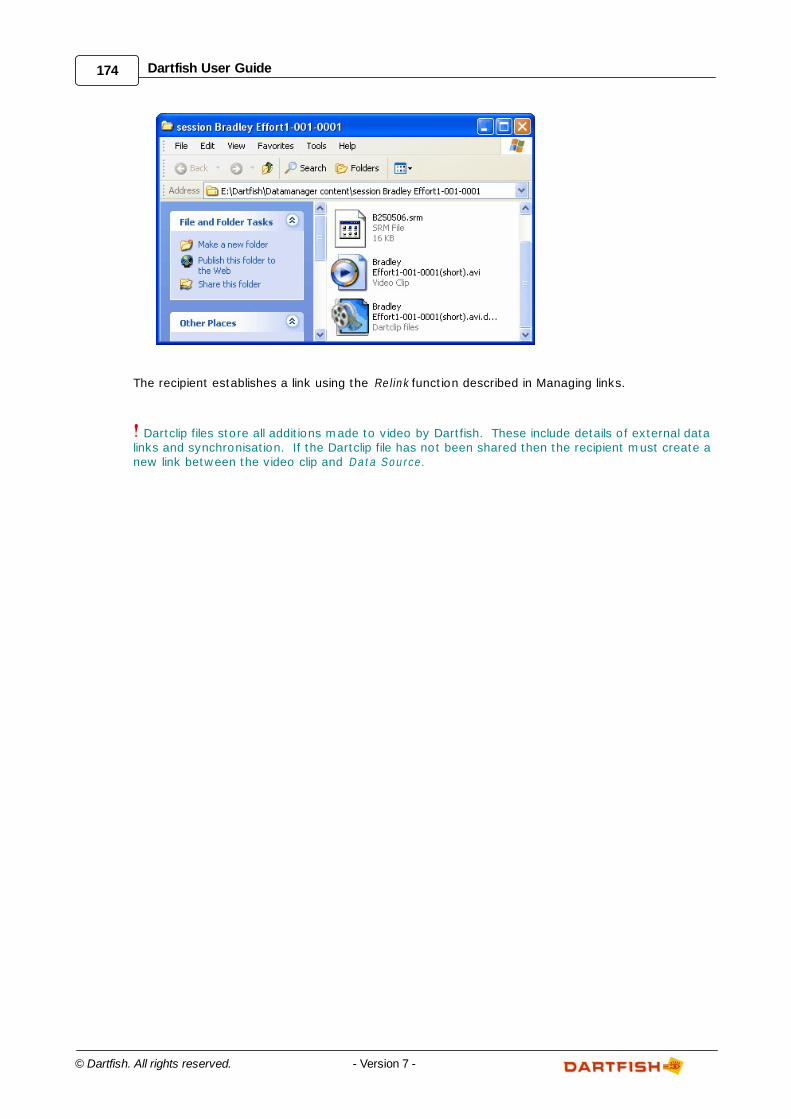
174 Dartfish User Guide
© Dartfish. All rights reserved. - Version 7 -
The recipient establishes a link using the Relink function described in Managing links.
Dartclip files store all additions made to video by Dartfish. These include details of external datalinks and synchronisation. If the Dartclip file has not been shared then the recipient must create anew link between the video clip and Data Source.
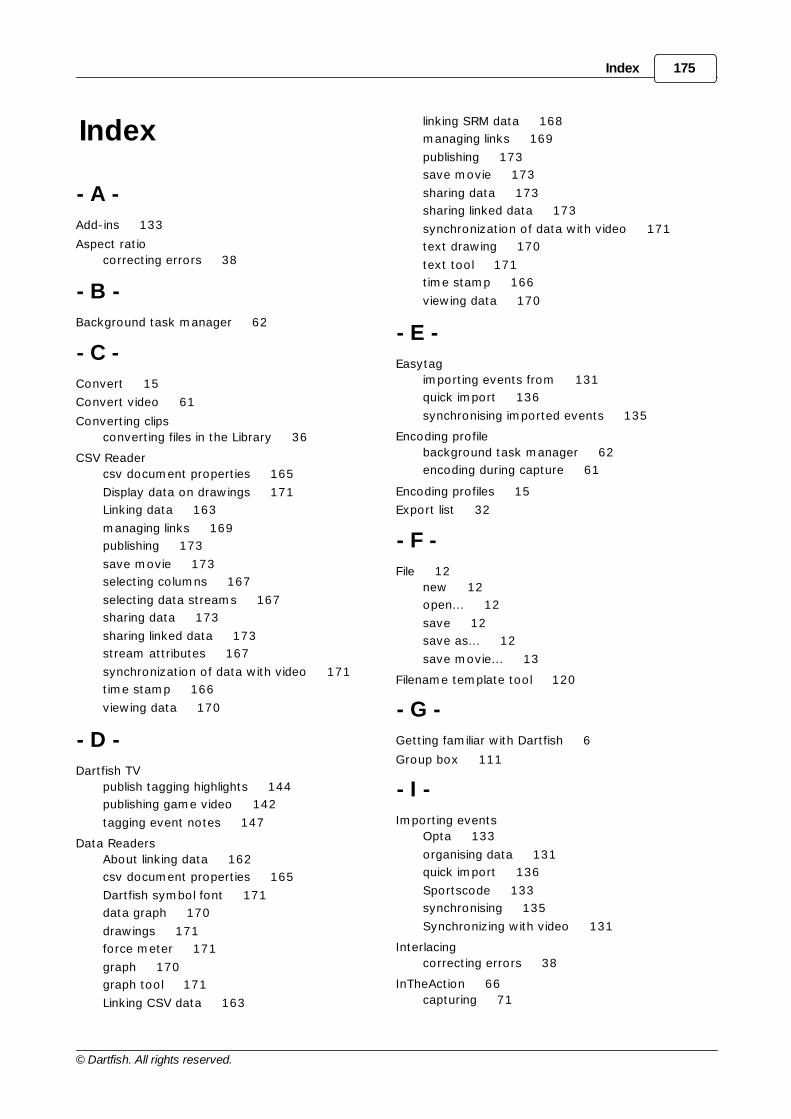
Index
© Dartfish. All rights reserved.
175
Index
- A -
Add-ins 133
Aspect ratio
correcting errors 38
- B -
Background task manager 62
- C -
Convert 15
Convert video 61
Converting clips
converting files in the Library 36
CSV Reader
csv document properties 165
Display data on drawings 171
Linking data 163
managing links 169
publishing 173
save movie 173
selecting columns 167
selecting data streams 167
sharing data 173
sharing linked data 173
stream attributes 167
synchronization of data with video 171
time stamp 166
viewing data 170
- D -
Dartfish TV
publish tagging highlights 144
publishing game video 142
tagging event notes 147
Data Readers
About linking data 162
csv document properties 165
Dartfish symbol font 171
data graph 170
drawings 171
force meter 171
graph 170
graph tool 171
Linking CSV data 163
linking SRM data 168
managing links 169
publishing 173
save movie 173
sharing data 173
sharing linked data 173
synchronization of data with video 171
text drawing 170
text tool 171
time stamp 166
viewing data 170
- E -
Easytag
importing events from 131
quick import 136
synchronising imported events 135
Encoding profile
background task manager 62
encoding during capture 61
Encoding profiles 15
Export list 32
- F -
File 12
new 12
open... 12
save 12
save as... 12
save movie... 13
Filename template tool 120
- G -
Getting familiar with Dartfish 6
Group box 111
- I -
Importing events
Opta 133
organising data 131
quick import 136
Sportscode 133
synchronising 135
Synchronizing with video 131
Interlacing
correcting errors 38
InTheAction 66
capturing 71
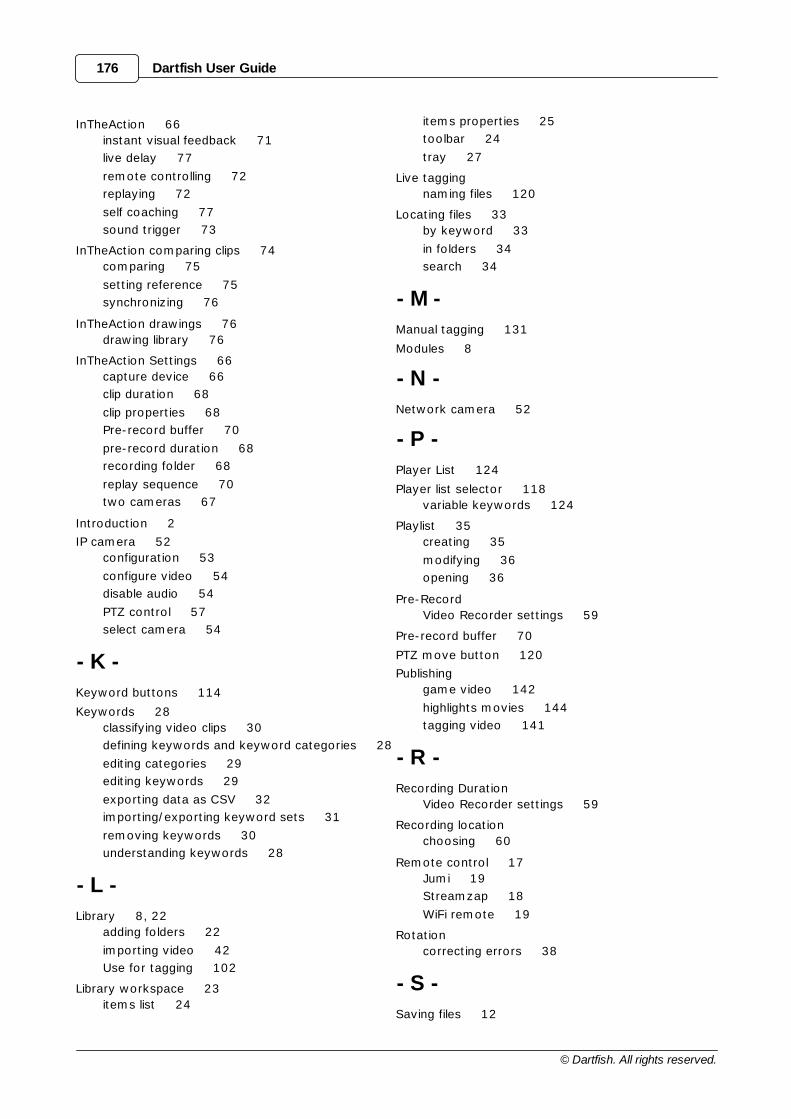
Dartfish User Guide
© Dartfish. All rights reserved.
176
InTheAction 66
instant visual feedback 71
live delay 77
remote controlling 72
replaying 72
self coaching 77
sound trigger 73
InTheAction comparing clips 74
comparing 75
setting reference 75
synchronizing 76
InTheAction drawings 76
drawing library 76
InTheAction Settings 66
capture device 66
clip duration 68
clip properties 68
Pre-record buffer 70
pre-record duration 68
recording folder 68
replay sequence 70
two cameras 67
Introduction 2
IP camera 52
configuration 53
configure video 54
disable audio 54
PTZ control 57
select camera 54
- K -
Keyword buttons 114
Keywords 28
classifying video clips 30
defining keywords and keyword categories 28
editing categories 29
editing keywords 29
exporting data as CSV 32
importing/exporting keyword sets 31
removing keywords 30
understanding keywords 28
- L -
Library 8, 22
adding folders 22
importing video 42
Use for tagging 102
Library workspace 23
items list 24
items properties 25
toolbar 24
tray 27
Live tagging
naming files 120
Locating files 33
by keyword 33
in folders 34
search 34
- M -
Manual tagging 131
Modules 8
- N -
Network camera 52
- P -
Player List 124
Player list selector 118
variable keywords 124
Playlist 35
creating 35
modifying 36
opening 36
Pre-Record
Video Recorder settings 59
Pre-record buffer 70
PTZ move button 120
Publishing
game video 142
highlights movies 144
tagging video 141
- R -
Recording Duration
Video Recorder settings 59
Recording location
choosing 60
Remote control 17
Jumi 19
Streamzap 18
WiFi remote 19
Rotation
correcting errors 38
- S -
Saving files 12
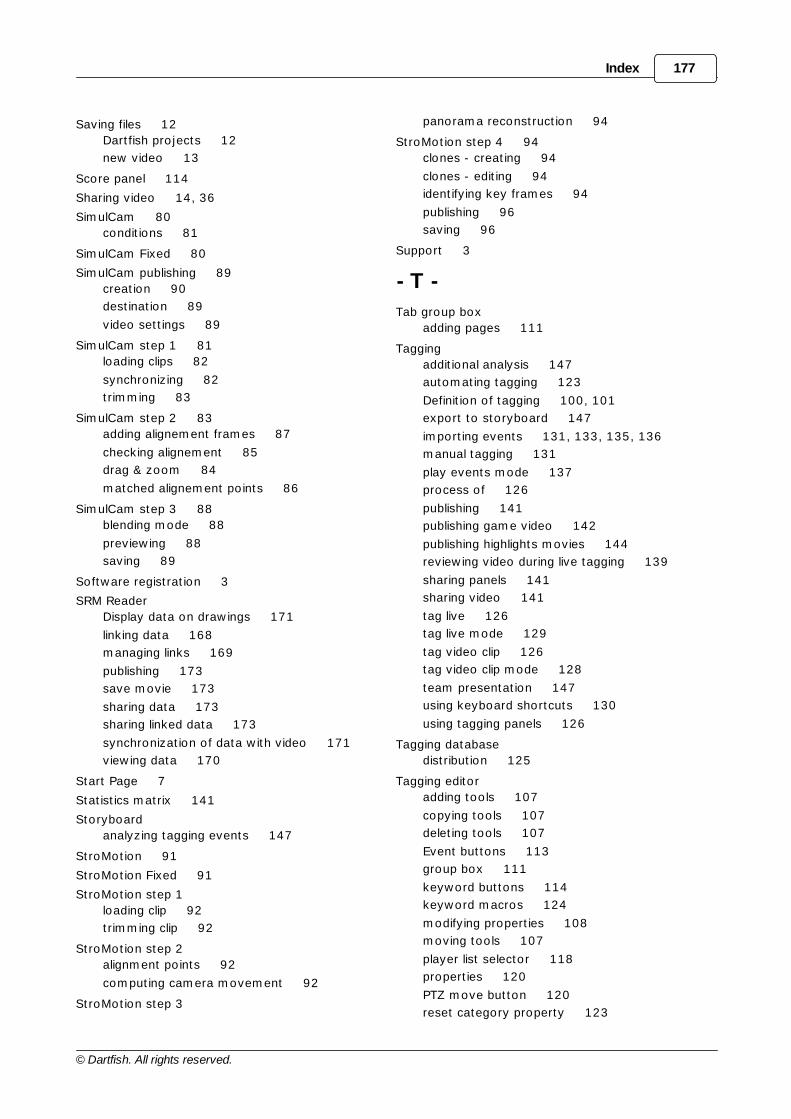
Index
© Dartfish. All rights reserved.
177
Saving files 12
Dartfish projects 12
new video 13
Score panel 114
Sharing video 14, 36
SimulCam 80
conditions 81
SimulCam Fixed 80
SimulCam publishing 89
creation 90
destination 89
video settings 89
SimulCam step 1 81
loading clips 82
synchronizing 82
trimming 83
SimulCam step 2 83
adding alignement frames 87
checking alignement 85
drag & zoom 84
matched alignement points 86
SimulCam step 3 88
blending mode 88
previewing 88
saving 89
Software registration 3
SRM Reader
Display data on drawings 171
linking data 168
managing links 169
publishing 173
save movie 173
sharing data 173
sharing linked data 173
synchronization of data with video 171
viewing data 170
Start Page 7
Statistics matrix 141
Storyboard
analyzing tagging events 147
StroMotion 91
StroMotion Fixed 91
StroMotion step 1
loading clip 92
trimming clip 92
StroMotion step 2
alignment points 92
computing camera movement 92
StroMotion step 3
panorama reconstruction 94
StroMotion step 4 94
clones - creating 94
clones - editing 94
identifying key frames 94
publishing 96
saving 96
Support 3
- T -
Tab group box
adding pages 111
Tagging
additional analysis 147
automating tagging 123
Definition of tagging 100, 101
export to storyboard 147
importing events 131, 133, 135, 136
manual tagging 131
play events mode 137
process of 126
publishing 141
publishing game video 142
publishing highlights movies 144
reviewing video during live tagging 139
sharing panels 141
sharing video 141
tag live 126
tag live mode 129
tag video clip 126
tag video clip mode 128
team presentation 147
using keyboard shortcuts 130
using tagging panels 126
Tagging database
distribution 125
Tagging editor
adding tools 107
copying tools 107
deleting tools 107
Event buttons 113
group box 111
keyword buttons 114
keyword macros 124
modifying properties 108
moving tools 107
player list selector 118
properties 120
PTZ move button 120
reset category property 123

Dartfish User Guide
© Dartfish. All rights reserved.
178
Tagging editor
score panel 114
tab group box 111
team group box 117, 118
team manager 117
team manager database 117
text box 114
trigger property 123
variable keywords 124
zone tool 114, 116
Tagging events list
adding notes to events 147
analyzing events in a spreadsheet 147
editing keywords 137
editing position and duration 138
export events 147
features 105
introduction 105
reset columns 139
selecting events 137
sorting events 137
Tagging multiple files 102
Tagging panels
creating 106
editing 106
feature summary 126
introduction 104
introduction to 106
manual tagging panel 131
opening 104
planning layout 109
saving 125
selecting 104
use of 126
Tagging search events 140
show all 141
table search 141
Tagging video in real time 129
Tagging workspace 101
Using Tray to load video 102
video panel features 103
Team group box 117, 118
Team manager 117
use of 130
Text box 114
Time shifted recording 129
Timeline 10
Tray 27
Trimming video clips 10
- V -
Video Conversion Wizard 15
Video error correction 38
Video file importer
DVD import 43
file destination 44
indexing 43
joining video clips 43
naming files 44
notes 43
Selecting files 44
Video playback 9, 11
controls 11
repeat mode 11
speed 11
Video properties
source info 38
Video Recorder 45, 59
clip properties 58
Pre-record 59
recording options 59
recording video 63
setting up capture 47
webcam 48
Video settings 15
Video Sharing Wizard 14
Video types
usable by Dartfish 37
- W -
Webcam
Lifecam Studio 48
recording from 48
Workspace 6
resizing 9
- Z -
Zone tool 114, 116


