Embed Size (px)
Citation preview

AbsoluteUserGuide
www.absolute.comApril 2022

Absolute User Guide, Absolute 7.x—Document Revision 17
This document, as well as the software described in it, is confidential and contains proprietaryinformation protected by non-disclosure agreements. No part of this document may be reproduced inany form or disclosed to any party not bound by a non-disclosure agreement without the expresswritten consent of Absolute® Software Corporation.
Absolute Software Corporation reserves the right to revise this document and to periodically makechanges in the content hereof without obligation of such revisions or changes unless required to do soby prior agreement.
Information contained herein is believed to be correct, but is provided solely for guidance in productapplication and not as a warranty of any kind. Absolute Software Corporation assumes noresponsibility for use of this information, nor for any infringements of patents or other rights of thirdparties resulting from the use of this information.
Absolute Software CorporationSuite 1400 Four Bentall Centre1055 Dunsmuir StreetPO Box 49211Vancouver, British ColumbiaCanada V7X 1K8
©2017-2022 Absolute Software Corporation. All rights reserved. Reproduction or transmission inwhole or in part, in any form, or by any means (electronic, mechanical, or otherwise) is prohibitedwithout the prior written consent of the copyright owner. ABSOLUTE, the ABSOLUTE logo, andPERSISTENCE are registered trademarks of Absolute Software Corporation. Other names or logosmentioned herein may be the trademarks of Absolute or their respective owners.
Absolute User Guide
Absolute 7.x 2

ContentsChapter 1: Introduction 10About this Guide 10Audience 10User Roles 10Other User Roles 11
Using this Guide 11Conventions Used in this Guide 12
Chapter 2: Setting Up Your Work Environment 13Alerts 13About Predefined Alerts 14Creating New Custom Alerts 16Examples of Alert Conditions 19Creating a Geofence Alert 19Creating a Security Action Alert 19
Managing Alerts 20Viewing Alerts 20Searching for a Specific Alert 21Activating Alerts 22Editing Alerts 22Reactivating Suspended Alerts 22Resetting Alerts 22Suspending Alerts 23Deleting Alerts 24
Managing Triggered Alert Events 24Viewing Triggered Alert Events 24Downloading Alert Events 25
End User Messaging 26Creating End User Messages 27Creating Custom End User Messages 27Creating URL End User Messages 29
Previewing End User Messages 30Editing End User Messages 30Editing a Custom End User Message 30Editing a URL End User Message 32
Activating an End User Message 33Suspending an End User Message 34Viewing End User Message Acknowledgements 34Resending End User Messages 35Deleting End User Messages 36
Device Groups 36Creating a New Device Group 36Viewing a Device Group 38Editing a Device Group 39Managing Devices in a Device Group 39Associating Devices with Device Groups 40Adding Devices to a Device Group 40Adding Devices to a Device Group Automatically Based on Local IP Addresses 41
Absolute User Guide
Absolute 7.x 3
Using Bulk Uploads to Change Device Group Associations 43Viewing Devices in a Device Group 45Removing Devices from a Device Group 46
Deleting Device Groups 46Software Policies 47Viewing the List of Software Policies 47Viewing Device Groups Without a Software Policy 47Creating a Software Policy 48Copying a Software Policy 49Viewing a Software Policy 50Editing a Software Policy and its Device Group Associations 50Deleting a Software Policy 50
Managing Account Settings 51Editing Classic Account Settings 51Managing Service Guarantee Licenses 54
Manually Editing Service Guarantee License Assignment 55Managing Event Calling for Your Account 55Events That Can Trigger an Event Call 56Understanding the Minimum Event Call Period 57Turning on Event Calling for Your Account 58Editing Event Calling Settings 59Turning Off Event Calling 59Viewing the List of Devices with Event Calling Turned On 60
Managing SCCM Status Reporting and Repair for your Account 60Managing SCCM Status Reporting for Your Account 61Managing SCCM Repair for Your Account 62Viewing the List of Devices with SCCM Status Reporting Turned On 62
Downloading the Absolute Agent for Android Devices 63Upgrading to the Latest Version of the Agent 64
Managing System Notifications 64Updating the System Notifications Page 65Devices With the Service Guarantee Not Calling 65Resolving a Recovery Flag Disparity 65
Managing the Investigation Report Contact List 66Accessing the Investigation Report Contact List 66Adding Contacts to the Investigation Report Contact List 67Editing Contact Information 67Viewing and Printing the Investigation Report Contact List 68Disabling Contacts 69Activating Disabled Contacts 69
Chapter 3: Generating Reports 71Running Reports 71Navigating Reports 72Expanding and Collapsing the Search Criteria Information 72Using the Choose Feature 72Viewing an Entire Row in a Report Record 72Moving Between the Pages of a Report 73Changing the Number of Records That Show in a Report 73Changing the Sort Order 73
Absolute User Guide
Absolute 7.x 4

Editing Asset Information 73Device Information on the Device Summary Page 75Hardware Summary Tab 76Software Summary Tab 77Call Tracking Tab 77SCCM Status History Tab 78
Managing Event Calling for a Device 79Configuring Event Calling for a Device 79Viewing the Call History for a Device 80
Managing SCCM Status Reporting for a Windows Device 80Managing SCCM Repair for a Windows Device 81Using the Assigned Username Field 82Using the Dormant Devices Field 82
Printing Reports 82Saving Report Filters 83Editing Saved Report Filters 83Downloading Reports 84Multi-level Security 84
Chapter 4: Working with Reports 85Hardware Assets Reports 85Opening the Hardware Assets Page 85Asset Report 86Printer Report 86Monitor Report 87Hardware Configuration and OS Change Report 88Hard Disk Space Report 89Device Readiness Report 90Mobile Broadband Adapter Report 92Mobile Device Report 94
Software Assets Reports 94Security Reports 94Opening the Security Page 94Operating System Updates Report 95Internet Browsing Configuration Report 95Unauthorized Software Report 96Anti-Malware Report 97Missing Anti-Malware Report 97Modem Addition Report 97Suspicious Devices Report 98Scenarios 98
Absolute Secure Drive Authentication Failures Report 100Full-Disk Encryption Status Report 102SCCM Status Reports 102About Collecting SCCM Status FromWindows Devices 102About Repairing SCCM Clients 103Working with the SCCM Status Report 103Viewing the SCCM Status Report 104Managing SCCM Status Reporting and Repair in the SCCM Status Report 106
Absolute User Guide
Absolute 7.x 5

Working with the SCCM Status History Report 107Viewing the Details of a SCCM Status Change 109Troubleshooting Failed SCCM Repairs 112
Security Posture Report 112Call History and Loss Control Reports 113Opening the Call History and Loss Control Page 114About Extended IP Call Information 114Call History Report 114Missing Devices Report 116Device Drift by Device Name Report 116Device Drift by Username Report 116Activation Report 116Geolocation Tracking Reports 119Geolocation System Requirements 119Understanding Location Technologies 121Types of Location Technologies 121Limitations of Global Positioning Systems (GPS) 122Limitations of Wi-Fi Positioning 122Collecting Location Data 122
Device Location Report 122Device Location History Report 126
Lease and Inventory Management Reports 129Lease Completion Report 129
User-Entered Data 131Generating a User-Entered Data Report 131Selecting the Data Points YouWant to See 133
Account Management Reports 133Opening the Account Management Page 134License Usage Summary Report 134Calling Profiles Report 135User Audit Report 136User Event Report 136Security Audit Logs Report 137
My Content 139My Reports 139My Filters 139Editing Saved Report Filters 140
Chapter 5: Using Real-Time Technology 141What is Real-Time Technology? 141Minimum System Requirements 141Working with RTT 142Viewing Mobile Broadband Adapter Information 143Editing the Phone Number Override 144Viewing the Forced Call Log 144Initiating a Forced Call 144
Chapter 6: Using Real-Time Technology over IP 146Minimum System Requirements 146Understanding How RTT-IP Works 146
Absolute User Guide
Absolute 7.x 6

Prerequisites of RTT-IP 147Accelerating Operations With RTT-IP 147Viewing RTT-IP Status for a Device 147
Enabling RTT-IP 148Enabling RTT-IP for All Devices in Your Account 148Enabling RTT-IP for an Individual Device 148
Requesting a full agent call using RTT-IP 149Editing the RTT-IP Ping Period 149Editing the RTT-IP Ping Period for All Devices in Your Account 149Editing the RTT-IP Ping Period for a Device 150
Viewing RTT-IP Status for All Devices 150Disabling RTT-IP 151Disabling RTT-IP for All Devices in Your Account 152Disabling RTT-IP for an Individual Device 152
Chapter 7: Securing Your Data and Devices 153Authorizing Security Services 153Requesting a Security Authorization Code 153Changing E-mail Addresses for Authorized Security Personnel 154
Disabling Security Access 154Disabling Security Access for All Authorized Security Users 154Suspending Security Access for an Individual User 155
Managing Custom Action Fields 155Creating Custom Action Fields 156Editing Custom Action Fields 156Deleting Custom Action Fields 157
Chapter 8: Using Data Delete 158Tracking Data Delete Status 158Viewing Data Delete Status 158Data Delete Details Page 160Viewing or Printing an End of Life Data Delete Certificate 162Removing Details of a Data Delete Operation 163Forcing a Data Delete Operation to Complete 164Clearing Perpetual Data Delete 164
Deleting or Cancelling a Data Delete Request 164Deleting a Draft Data Delete Request 165Cancelling a Data Delete Request for a Single Device 165Cancelling Data Delete Requests for Multiple Devices 165
Deletion Log Files 165Viewing the Deletion Log File 167Viewing the Deletion Log for a Single Device 167Viewing the Deletion Logs for Multiple Devices 167Viewing the Deletion Log on a Mobile Device 168
Chapter 9: Using Device Freeze 169Minimum System Requirements 169Working with Device Freeze Requests 170Requesting a Device Freeze 170
Absolute User Guide
Absolute 7.x 7
Cancelling a Device Freeze Request 173Cancelling a Device Freeze Request For a Single Device 174Cancelling Device Freeze Requests For Multiple Devices 174
Removing Device Freeze Request Details 175Removing Details of a Single Device Freeze Request 175Removing Details of Multiple Device Freeze Requests 175
Managing Device Freeze Offline Policies 176Creating a Device Freeze Offline Policy 177Working with Existing Offline Policies 179Searching for a Device Freeze Offline Policy 180Editing a Device Freeze Offline Policy 180Designating a Default Offline Policy 181Managing Devices Associated with a Device Freeze Offline Policy 182Viewing Devices Associated With an Offline Policy 183Adding Devices to an Offline Policy 183Removing Devices from an Offline Policy 184
Deleting a Device Freeze Offline Policy 185Tracking Device Freeze Status 186Viewing Device Freeze Status 186Viewing Device Freeze Requests 189Viewing Details about a Device Freeze Request 189
Viewing Devices Frozen by an Offline Policy 191Unfreezing a Frozen Device 192Unfreezing a Device on Agent Call 192Unfreezing a Single Device on Agent Call 193Unfreezing Multiple Devices on Agent Call 193
Using an Unfreeze Passcode on the Targeted Device 193Viewing the Unfreeze Passcode 194Unfreezing a Device With a Passcode 194
Managing Custom Device Freeze Messages 195Creating a Custom Device Freeze Message 195Including Phone Numbers in Custom Device Freeze Messages 197Editing Existing Custom Device Freeze Messages 197Deleting Existing Custom Device Freeze Messages 198
Chapter 10: Managing Geofences 199Using Geofence Technology 199Understanding Geolocation Maps 200Map Navigation Tools 200Geofence Tools 201
Creating Geofences 201Viewing Geofences 203Editing Geofences 203Deleting Geofences 204
Chapter 11: Using Remote File Retrieval 205Minimum System Requirements 205Before You Begin 205Requesting a Remote File Retrieval 205
Absolute User Guide
Absolute 7.x 8

Viewing the File Retrieval Status 206Downloading Retrieved Files 207Downloading Retrieved Files Using Internet Explorer 208Downloading Retrieved Files Using FireFox or Another Browser 208
Changing the File Retrieval Status 208Cancelling a File Retrieval Request 209Removing Retrieved Files and Log Files 209
Chapter 12: Using File List 211Overview 211Minimum System Requirements 212Retrieving a List of Files on Stolen Devices 212Downloading a File List Request 213
Tracking File List Status 213Viewing the Status of a File List Request 214Changing a File List Status 215Cancelling a File List Request 215Removing Retrieved Files and Log Files 215
Chapter 13: Absolute for Chromebooks 217Device compatibility 217Configuring and deploying the Chromebook extension 217Before you begin 218Adding your Google account to Absolute 218Configuring settings in the Google Admin console 219Editing Device Settings 219Reviewing Device Settings 219Editing User & Browser Settings 220Reviewing User & Browser Settings 220
Deploying the Chromebook extension to users 221Configuring the Stolen OU 222Creating the Stolen OU 222Deleting the Kiosk App 222Configuring the Stolen OU 223What effect does a Managed guest session have on a stolen Chromebook? 225
Managing your Google account in the Absolute console 225Editing Google Account Details 225Deleting Google Account Details 226
Working with Chromebooks in the Absolute console 226Removing the Chromebook extension 227Removing the Chromebook extension from all users in an OU 227Removing the Chromebook extension from specific users 228
Glossary 229
Index 243
Absolute User Guide
Absolute 7.x 9

Chapter 1: Introduction
Absolute® brings a fundamentally new approach to cybersecurity by enabling self-healing endpointsecurity to ensure uncompromised visibility and near real-time remediation of breaches at the source.Our cloud-based platform and embedded Persistence technology puts IT and security professionals incontrol of devices, data, and applications — whether they are on or off the network — to improve ITasset management, ensure compliance, protect data, and reduce insider threats. Patented Persistencetechnology is embedded in the firmware of more than 1 billion popular PC and mobile devices fromglobal manufacturers including Acer, Asus, Dell, Fujitsu, HP, Intel, Lenovo, Microsoft, Panasonic,Samsung and Toshiba.
Absolute is an adaptive endpoint security solution. Its technology platform is a client/server architecturethat delivers device security, data security, and asset management of endpoints, even if a device is offthe network or in the hands of an unauthorized user.
The persistent connection between the secure and patented agent (client) and the Absolute MonitoringCenter (server) ensures organizations have protected access to up-to-date information about theirentire device inventory. Authorized users can use the built-in tools in the Absolute console to trackdevices and initiate data and device security operations for the purposes of enforcing compliancepolicies, identifying at-risk computers, and taking preemptive and reactive measures if a securityincident occurs.
About this GuideThis document contains detailed information about various classic tools and functionality available toauthorized users.
This section provides information on the following topics:● Audience● Using this Guide● Conventions Used in this Guide
AudienceThis guide provides instructions for system administrators who use the Absolute console to managetheir IT assets (devices), to report missing or stolen devices, and to request and monitor data anddevice security operations. System administrators are assigned to the Security Administrator orAdministrator user roles, depending on their organization’s specific requirements.
User RolesThere are five distinct user roles that can be filled by one or more people.
● Administrators manage their organization’s devices and IT assets, and report device loss ortheft. Administrators also create and manage various system communications, such as enduser messaging, system notifications, and alerts and suspicious alert events.
● Security Administrators exist in those organizations that choose to designate certainAdministrators as Security Administrators to manage the device and data security of assets.This user role has more access rights than Administrators.
Absolute7.x 10

Security Administrators are authorized to configure, target, and start File Retrieval, DeviceFreeze, and Data Delete services. Security Administrators use the Absolute console to track andmanage devices, both within the organization’s local area network and outside of it.
● Power Users have access rights to most features excluding security features. Administratorscan restrict Power Users rights to specific Identifiers or Device Groups.
● Security Power Users exist in those organizations that choose to designate certain PowerUsers as Security Power Users to manage the device and data security of assets. This userrole has more access rights than Power Users.Security Power Users are authorized to configure, target, and start File Retrieval, Device Freeze,and Data Delete services for devices in their assigned Device Group. Security Power Users usethe Absolute console to track and manage devices within the organization’s local area network.
● Guest Users have limited access to information and reports. These users cannot alter orassign user access rights and cannot alter details on the page. Members of the Guest Usergroup can only browse Investigation Reports they have created and can only view reports theyhave saved.
Other User RolesThe following user roles, although not defined in the User section of the Absolute console, areimportant to its overall operation.
● Signing Officers assume responsibility for the Security Administrators’ and Security PowerUsers’ actions. Signing Officers are notified each time a Data Delete request is made.Signing Officers are two senior managers in an organization who have signing authority on theircompany’s behalf.
● IT Technicians are usually responsible for installing the agents on devices within theirorganizations.
Using this GuideThe Absolute User Guide is comprised of the following chapters:
● "Introduction" (this chapter) provides an overview of this document.● "Setting Up Your Work Environment" describes the features included under the Administration
section of the console, including procedures required to set up event alerts, device groups, andend user messaging.
● " Generating Reports" describes the procedures required to generate basic and customizedclassic reports based on the data collected from your managed devices.
● "Working with Reports" describes the classic reports, and how to run them and view the results.● "Using Real-Time Technology" describes the Real-Time Technology (RTT) feature and
provides tasks that are specific to using it.● "Using Real-Time Technology over IP" describes the Real-Time Technology over Internet
Protocol (RTT-IP) feature and provides tasks that are specific to using it.● "Securing Your Data and Devices" describes data and device security services that enable
users with security authorization to ensure that managed devices and their data are notcompromised in cases of device loss or theft.
● "Using Data Delete" describes the Data Delete functionality, and the procedures required tomanage Data Delete operations.
Chapter 1: Introduction Absolute User Guide
Absolute 7.x 11

● "Using Device Freeze" describes the Device Freeze functionality, including how to initiatefreeze requests and create custom freeze messages.
● "Managing Geofences" describes the Geofencing functionality and the procedures required tomanage Geofencing boundaries.
● "Using Remote File Retrieval" describes the Remote File Retrieval functionality.● "Using File List" describes how to remotely request a File List, which facilitates requesting a
Remote File Retrieval.● "Absolute for Chromebooks" describes how to manage your Chromebook devices in the
Absolute console.● "Glossary" provides a list of acronyms, as well as the terms and their definitions used
throughout this guide.
Conventions Used in this GuideThe following conventions are used throughout the Absolute User Guide:
● Directory names, file names, field names, and UI objects are represented using bold; forexample:○ In Windows 7, the notepad.exe file is located in the windows\system32 directory.○ UserID: enter your user identification number in this field.○ Click Apply.
● Computer input and output, such as sample code and commands or statements are shownusing the Courier typeface; for example:lanmake ctinst.txt
● Cross references to other locations within this user guide and hyperlinks are indicated in greentext with an underscore; for example: see Conventions Used in this Guide. Clicking a crossreference takes you to that location in the guide.
● Throughout this guide, getting to the appropriate page in the quickest way is represented asfollows:On the navigation bar click > Alerts to open the View and Manage Alerts page.
● The output that is generated by the information you enter in the Search Criteria area ispresented in an area referred to as the results grid.
Chapter 1: Introduction Absolute User Guide
Absolute 7.x 12
Chapter 2: Setting Up Your Work Environment
This chapter provides information on the following topics:● Alerts● End User Messaging● Device Groups● Managing Account Settings● Downloading the Absolute Agent for Android Devices● Managing System Notifications● Managing the Investigation Report Contact List
AlertsThe Alerts feature is used to notify Administrators of notable events regarding managed devices. Forexample, you may want to know if a device has not connected to the network for an unusually longperiod of time, potentially indicating a lost device that requires further investigation. In this example, youcould use an alert based on the Last Call Time condition.
When you configure alerts for your organization, a managed device triggers an active alert, which thencreates an alert event (basically a log file entry) and notifies you by email or pager according to thealert’s settings. The e-mail or pager message contains a summary of the conditions that triggered thealert and a link to the Absolute console’s home page. After an alert notification is sent, the alert is nottriggered again for that device until the alert is reset. You configure the alert to have either a manualreset or an automatic reset after a specified period of time.
The Alerts feature is the foundation of the Suspicious Devices functionality. When you create an alert,you can assign a suspicion level value. A single alert event may seem unremarkable, however whenmultiple, seemingly insignificant alert events occur within a brief period of time, the activity becomessuspicious. When a device triggers one or more alerts for which you’ve assigned suspicion levelvalues, these values are consolidated and, if the result exceeds your threshold, the alert events showon the Suspicious Devices Report (see "Suspicious Devices Report" on page 98.). You can use thisreport to view and manage a list of devices that have a high level of suspicious activity.
There are two types of alerts:● Predefined: Absolute includes preconfigured (default) alerts that, when activated, notify you
when certain events occur.● Custom: You can also create user-defined alerts that use a single criterion or multiple criteria.
These alerts can target or exclude a single device, or groups of devices.
Alerts have two states:● Active: The alert scans your organization’s managed devices for its alert conditions and logs
alert events when found.● Suspended: The alert is not scanning for its alert conditions and no alert events are logged. By
default, all predefined alerts are in the Suspended state.
This section provides information about the following topics and tasks:● About Predefined Alerts● Creating New Custom Alerts
Absolute7.x 13

● Examples of Alert Conditions● Managing Alerts● Managing Triggered Alert Events
About Predefined Alerts
The Absolute console includes numerous predefined alerts, which you can see on the View andManage Alerts page described in the task, "Viewing Alerts" on page 20.
When the predefined alerts are activated, they perform as described in the following table. See"Activating Alerts" on page 22.
By default, all predefined alerts are configured for manual reset, but you can configure an alert to resetautomatically after a specified number of days. See "Resetting Alerts" on page 22.
NOTE If you attempt to delete a predefined alert, it is recreated automatically in a Suspended state.
Predefined (Default) Alerts Description
Agent Is Newly Installed This alert is triggered when the agent is installed on a device.This alert should have a reset type of manual and should not be resetfrom the Alert Events page. Doing so results in alerts getting generatedfor new devices as they activate, but not re-sending alerts forpreviously activated devices.
Change in Serial Number This alert is triggered when a serial number change is detected on amanaged device.When this alert is configured to reset automatically, it tests for thiscondition every x days, where x is the defined frequency.
NOTE If a managed device makes a call in which a serial numberchange is detected and then makes no calls for a period of time greaterthan x, it is possible for the alert to trigger more than once for the samedevice. When another call is made, however, causing the two mostrecent Alert Event records to not show a change in serial number, thealert stops triggering.
Device Name Changed This alert is triggered when a device name change is detected on amanaged device. It is set with a Suspicion level of 3.
Device Rebuild This alert is used to proactively notify the administrator that a devicemay be stolen. It is set with a Suspicion level of 3 and is triggered whenboth of the following conditions are met:● Operating system product key is changed● Device has made a Self Healing Call
Predefined Alerts and their Descriptions
Chapter 2: Setting Up Your Work Environment Absolute User Guide
Absolute 7.x 14

Predefined (Default) Alerts Description
Hard Drive Nearly Full This alert is triggered when the hard drive free space is less than orequal to 10% of the total hard drive size. This alert matches the resultsin the Hard Drive Space Available Report, if that report uses the samedevice group and setting of 10%.If this alert is configured to reset automatically, it tests for this conditionevery x days and triggers on the same devices each time until the harddrive space is cleaned to more than 10% available.
Last called 20 days ago The trigger for this alert is the Last Call Time condition. If configured toreset automatically, this alert tests the condition every x days andtriggers on the same devices each time until they make another call. Inother words, when the device calls in, the alert no longer triggers forthat device.It is best practice to configure this alert to reset automatically to keepconstant track of your devices that fail to call in, even though thisconfiguration may result in a large number of e-mail notifications.
Lease Ending This alert compares the date in the Lease End Date condition to thesettings configured for the alert. When the Lease End Date is less thanor equal to 14 days from the current date, the default setting triggers analert, which sends an e-mail message with a list of all devices thatmatch this criteria.If this alert is configured to reset automatically, it re-sends the alertevery x days, where x is the frequency configured in the alert settings.This alert continues to trigger when the Lease End Date has passedunless you reset it.
Local IP Address Changed This alert is triggered when a Local IP Address change is detected on amanaged device. It is set with a Suspicion level of 1.
Major Change This alert is used to proactively notify the administrator that a devicemay be stolen. It is set with a highest Suspicion level of 5 and istriggered when all of the following conditions are met:● Operating system product key is changed● Device name is changed● Username is changed● Device has made a Self Healing Call
Modem Changed This alert is triggered whenever there is a change in modem statusbetween the second-to-last and the last calls made for a specificmanaged device. This alert does not indicate the date of the second-to-last call, however you can see it on the Call History Report.Because this alert compares the last two call dates for a particularmanaged device, resetting the alert could result in it getting generatedmore than once for a single device.
Network Changed This alert is triggered when both the Local IP Address and the Public IPAddress change on a device, which may indicate that the device is nolonger on the network. It is set with a Suspicion level of 2.
Predefined Alerts and their Descriptions (continued)
Chapter 2: Setting Up Your Work Environment Absolute User Guide
Absolute 7.x 15

Predefined (Default) Alerts Description
New Program File Detected Both new and updated applications trigger this alert. Regardless of thenumber of new applications installed on a specific managed device,this alert triggers once and does not trigger again until you reset it.If the alert is configured to reset automatically, it tests for the alertcondition every x days, where x is the defined frequency. Because thecondition is based on comparing the software detected date to the alertmodified date, it triggers an alert on the same applications every x daysunless the alert itself is changed and saved, thereby changing themodified date of the alert.However, if the alert is configured to reset manually, it only triggersonce on a specific managed device until it is reset, even if a newapplication is installed subsequently.
Operating System Changed This alert is triggered when an operating system change is detected ona device. This change may be attributed to reimaging of the device, butit may also indicate that the device is stolen. It is set with a Suspicionlevel of 2.
Operating System Product KeyChanged
This alert is triggered when an operating system product key change isdetected on a device, which may indicate that the device is stolen andthe thief may have reformatted the device. It is set with a Suspicionlevel of 3.
Public IP Address Changed This alert is triggered when a Public IP Address change is detected ona managed device. It is set with a Suspicion level of 1.
Self Healing Call This alert is triggered when a device makes a Self Healing Call. It isused to notify an administrator that the agent on a device has beentampered with or removed from a device. The agent could have beentemporarily removed during a normal IT process, but it could also signala malicious attempt to remove the agent from the device. It is set with aSuspicion level of 3.
Username Changed This alert is triggered when a username change is detected on adevice, which may indicate that the device is being used by anotheruser and it may be stolen. It is set with a Suspicion level of 3.
Warranty Ending This alert compares the date in theWarranty End Date field to thesettings configured for the alert. The default setting triggers the alertwhen theWarranty End Date is less than or equal to 14 days from thecurrent date. When triggered, this alert sends an e-mail notification thatincludes a list of all devices that match the criteria.If this alert is configured to reset automatically, it re-sends the alertevery x days, where x is the frequency configured in the alert settings.This alert continues to trigger after theWarranty End Date has passeduntil you reset it.
Predefined Alerts and their Descriptions (continued)
Creating New Custom AlertsYou can create alerts that meet your organization’s specific needs.
Chapter 2: Setting Up Your Work Environment Absolute User Guide
Absolute 7.x 16

To create a new custom alert:
1. On the navigation bar click , click the Rules tab, and then click the Go to the Classic
Alerts Page link at the bottom of the page.
2. On the View and Manage Alerts page click Create alert ....
3. On the Create and Edit Alerts page in the Alert name field enter a meaningful name for thealert. This name shows in the Alert Name column in the results grid of the Alert Events page.
4. In the Alert description field enter a detailed description for this alert.
5. In the Suspicion level field open the list and select a severity level for suspicious events.Possible values range from Not Suspicious to the highest suspicion level of 5.
This value is shown on the Suspicious Devices Report, which highlights devices with suspiciousactivity. See "Suspicious Devices Report" on page 98.
NOTE When setting suspicion levels, you need to consider the implications of the alert. Forexample, a lease ending is expected behavior, whereas replacing a hard drive could indicate astolen device.
6. In the Conditions area define the conditions that trigger the alert.
A single alert can have several separate conditions that must all be met to trigger user notification.
IMPORTANT Conditions prefixed with an asterisk (*) are not triggered by an agent call andyou can only combine them with other conditions that have an asterisk.
a) Open the Field list and select the appropriate value.b) Open the Rule list and select the appropriate value. This list includes all applicable rules
for the field you selected in the Field list.c) Depending on your selections from the Field and Rule lists, the Criteria field may open.
Do one of the following to provide the information for the Criteria field:
● Type the appropriate value.● Click Choose to open a dialog that provides you with a list of all existing criteria. Click
the appropriate value from the list. The dialog closes, and refreshes the Create andEdit Alerts page, populating the Criteria field with your selection.
d) Click Add Condition. The page refreshes to show the new condition in the Conditionstable.Repeat this step until all appropriate conditions are added.
NOTE To delete an existing condition from an alert, click Delete.
7. In the Scope area, indicate which device groups meet the specified criteria and are included in,or excluded from, the alert you are creating.
● In the Includes area, select the device that you want to include in the report as follows:○ Open the Devices in the group list and select the device group to which this alert
applies.
Chapter 2: Setting Up Your Work Environment Absolute User Guide
Absolute 7.x 17

NOTE If one or more of the devices in your selected device group were reported asstolen, the Alert does not apply to these devices.
○ Open the Only where the list and select the appropriate value. The values includeAny of the fields in this list, Identifier, Device Name, Username, and SerialNumber.
○ In the is or contains field enter the search criteria. You can also use Choose to selecta value from the list of all existing criteria.
● In the Excludes area, select the devices that you want to exclude from the report:○ Open the Devices in the group list and select the device group to which this alert
does not apply.○ Open the Only where the list and select the appropriate value. The values include
Any of the fields in this list, Identifier, Device Name, Username, and SerialNumber.
○ In the is or contains field enter the search criteria. You can also use Choose to selecta value from the list of all existing criteria.
8. When a device triggers an alert, the same device cannot trigger the alert again until the alertevent is reset for the single device or for all devices. Devices reported as stolen do not triggeran alert.
At the Alert Type area define how the alert is reset for the device that triggered it:
● To create an alert that you need to reset manually from the Alert Events page, select theManual reset option.
● To create an alert that resets automatically after a specific number of days, select theAutomatic reset after option, and then enter a value in the day(s) field.
9. At the Alert Option area specify whether a single alert e-mail or multiple alert e-mails are sentwhen this alert is triggered by multiple devices.
● To send a consolidated single e-mail message that provides details for each device thathas triggered the alert, select the Single e-mail option.
● To send an individual e-mail from each device that triggers the alert, select the Multiple e-mails option, which may result in a large number of e-mails.
10. At the Action area define how the alert is handled when it is triggered.
Triggered alerts are logged for the Suspicious Devices Report. By default, Administrators arenotified by email or pager message when an alert is triggered.
You can set an alert so that no notifications are sent; for example, when you create an alert withlow impact.
● To send no notification when the alert is triggered select Log event.● To contact Administrators automatically using e-mail or pager messages when the alert is
triggered select Log event and notify.● To send alert notifications by e-mail, in the E-mail address field enter one or more
addresses. Separate multiple e-mail addresses with a semicolon.● To send alert notifications to an alpha-numeric pager, in the Pager field enter the
destination pager address. You can enter multiple recipients by separating the addresseswith a semicolon.
Chapter 2: Setting Up Your Work Environment Absolute User Guide
Absolute 7.x 18

11. If you do not want to activate the alert at this time, select the Suspend alert scanning option.
12. Click Save.
You are returned to the page from which you navigated to the Create and Edit Alerts page and areshown a confirmation message on that page.
Examples of Alert ConditionsThe following examples describe some commonly used conditions for alerts:
● Creating a Geofence Alert● Creating a Security Action Alert
Creating a Geofence Alert
NOTE If your account has been migrated to ABS 7 Geolocation, Geofence Location alerts may havebeen replaced by the Rules feature. For more information, see Getting started with Rules in the onlineHelp.
To set an alert condition to trigger an alert when a device moves outside of its geofence location:
1. On the navigation bar click , click the Rules tab, and then click the Go to the Classic
Alerts Page link at the bottom of the page.
2. On the View and Manage Alerts page click Create alert ....
3. On the Create and Edit Alerts page in the Conditions area, open the Field list and select thevalue Geofence Location.
4. The Condition area refreshes. Complete the following steps:
a) Open the Rule list and select one of the following options:● Is Inside: creates an alert whenever a device travels inside a specified Geofence
boundary.● Is Outside: creates an alert whenever a device travels outside a specified Geofence
boundary.
b) The field next to the Rule field contains the list of Geofences that exist for your account.Open the list and select the appropriate Geofence name.
c) The remaining fields let you specify the time frame after which the alert is triggered. Enterthe appropriate number in the for at least field and select Hours, Days, or Weeks tospecify the unit of time.
5. Click Add condition.
6. Enter the rest of the information that is appropriate to this Geofence alert as described in step 7through step 12 of the task, "Creating New Custom Alerts" on page 16.
Creating a Security Action AlertYou can create an alert that is triggered when a user initiates an action related to a Data Delete orDevice Freeze request.
Chapter 2: Setting Up Your Work Environment Absolute User Guide
Absolute 7.x 19

To trigger an alert when a security action occurs:
1. On the navigation bar click , click the Rules tab, and then click the Go to the Classic
Alerts Page link at the bottom of the page.
2. On the View and Manage Alerts page click Create alert ....
3. On the Create and Edit Alerts page in the Conditions area, open the Field list and selectSecurity Action.
4. Open the Rule list and select one of the following actions:
● Data Delete Request Cancelled● Data Delete Details Removed● Data Delete Log File Downloaded● Data Delete Requested● Device Freeze Details Removed● Device Freeze Requested● Device Freeze Request Cancelled● Unfreeze Requested● Unfreeze Request Cancelled
5. Click Add condition.
6. Enter the rest of the information that is appropriate to this alert as described in step 7 throughstep 12 of the task, "Creating New Custom Alerts" on page 16.
Managing AlertsNOTE Depending on the configuration of your account, you may not be able to manage yourGeofence Location alerts because they were migrated to the Rules feature. For more information, seeGetting started with Rules in the online Help.
You manage predefined and custom alerts in the same way, and you can perform the following taskson both types of alerts:
● Viewing Alerts● Searching for a Specific Alert● Activating Alerts● Editing Alerts● Reactivating Suspended Alerts● Resetting Alerts● Suspending Alerts● Deleting Alerts
Viewing AlertsThe View and Manage Alerts page shows a table that contains a record for all existing alerts, includingthe attributes and status for each alert.
Chapter 2: Setting Up Your Work Environment Absolute User Guide
Absolute 7.x 20

NOTE You can apply an alert to a single device or to a device group, whereas alert events alwaysapply to a single device.
To view existing alerts:
1. On the navigation bar click , click the Rules tab, and then click the Go to the Classic
Alerts Page link at the bottom of the page.
On the View and Manage Alerts page, the results grid shows all existing alerts, organized in thefollowing columns:
● Alert ID provides the identification number generated for the alert.● Alert Name is the name for this alert.● Conditions shows the conditions that are set for this alert.● Scope Include indicates the specified criteria for devices that trigger this alert.● Scope Exclude indicates the specified criteria for devices that are excluded from this alert.● Suspicion Level is the level of suspicion set for this alert. If no value exists a suspicion
level was not set.● Status shows the device’s current status.● Type indicates how the alert is reset after it is triggered, such as Manual or Automatic
reset.
Searching for a Specific AlertYou can use the Search Criteria option to find a specific alert.
To search for a specific alert:
1. On the navigation bar click , click the Rules tab, and then click the Go to the Classic
Alerts Page link at the bottom of the page.
2. On the View and Manage Alerts page, you can search as follows:
● At the Search Criteria area open the the Alert ID is list and select the appropriate IDnumber.
● In the and the Alert Name contains field, enter all or part of the alert name that you wantto find.
● Next to and the Suspicion Level is:i) Open the first list and select one of the following options:
– > greater than– >= greater than or equal to– = equal to– <= less than or equal to– < less than
ii) Open the second list and select a value from 0 to 5.
3. Click Show results to regenerate the report using the defined criteria.
Chapter 2: Setting Up Your Work Environment Absolute User Guide
Absolute 7.x 21

Activating AlertsPredefined and custom alerts show in the Suspended state until you activate them.
To activate an alert:
1. On the navigation bar click , click the Rules tab, and then click the Go to the Classic
Alerts Page link at the bottom of the page.
2. On the View and Manage Alerts page the list of alerts show in the results grid. Choose thealerts you want to activate in one of the following ways:
● To activate one or more alerts, review the list of alerts and select the checkbox for eachalert you want to activate.
● To activate all alerts, select the checkbox in the heading row of the column next to AlertID. All checkboxes in that column are now selected.
3. Click Activate.
In the results grid the Status for the selected alerts is now Active.
Editing AlertsYou can edit both predefined and custom alerts.
To edit an alert:
1. On the navigation bar click , click the Rules tab, and then click the Go to the Classic
Alerts Page link at the bottom of the page.
2. On the View and Manage Alerts page in the results grid, click the Alert ID for the alert youwant to edit.
3. On the Create and Edit Alerts page, edit the values as described in step 3 through step 12 ofthe task, "Creating New Custom Alerts" on page 16.
Reactivating Suspended AlertsYou can reactivate alerts that you suspended; for example, full-disk encryption alerts if you decided toturn off full-disk encryption for a group of devices.
To reactivate suspended alerts:
1. On the navigation bar click , click the Rules tab, and then click the Go to the Classic
Alerts Page link at the bottom of the page.
2. On the View and Manage Alerts page in the results grid, find the Suspended alert you want toreactivate and select its checkbox.
3. Click Activate.
Resetting AlertsYou can configure an alert to reset automatically or on-demand (manually) after the alert is triggered bya device. The device will not trigger the alert again until it is reset. Other devices will still trigger thisalert.
Chapter 2: Setting Up Your Work Environment Absolute User Guide
Absolute 7.x 22

To reset an alert:
1. On the navigation bar click , click the Rules tab, click the Go to the Classic Alerts Page
link at the bottom of the page, and then do one of the following:
● To reset an alert on all devices on which the alert was triggered:iii) On the View and Manage Alerts page select the checkbox for the Active alert you want
to reset. You cannot reset a Suspended alert.iv) Click Reset.The alert is reset on all devices on which it was triggered.
● To reset an alert on individual devices:i) Click Alert Events.ii) On the Alert Events page select the checkbox for the alert you want to reset. You can
select multiple alerts.iii) Click Reset.The alert is reset on each associated device , as indicated in the Identifier column. Thecurrent date and time show in the Reset Date column
NOTE If the conditions that initially triggered the alert are still present, the alert is triggeredagain and notification messages resume.
Suspending AlertsThere may be times when you want to suspend alerts. For example, if you are a school district andcurrently receive alerts from your managed devices when they do not call in every three weeks, youmay want to suspend this alert during summer vacation.
To suspend an alert:
1. On the navigation bar click , click the Rules tab, and then click the Go to the Classic
Alerts Page link at the bottom of the page.
2. You can suspend alerts in one of the following ways:
● To create a custom alert in the Suspended state:i) Click Create and Edit Alerts.ii) Follow the instructions provided in the task, "Creating New Custom Alerts" on page 16.iii) At the bottom of the page, select the Suspend alert scanning checkbox.iv) Click Save. This alert is not scanned until you activate it.
● To suspend one or more alerts:i) Click View and Manage Alerts.ii) In the results grid select the alerts you want to suspend in one of the following ways:
○ To suspend one or more alerts, review the list of alerts and select the checkbox foreach alert you want to suspend.
○ To suspend all alerts, select the checkbox in the heading row of the column next toAlert ID. All checkboxes in that column are now selected.
iii) Click Suspend. In the results grid the Status for the selected alerts is nowSuspended.
Chapter 2: Setting Up Your Work Environment Absolute User Guide
Absolute 7.x 23

Deleting AlertsYou can delete alerts that you, or other users, have created. However, if you attempt to delete apredefined alert, it is recreated in a Suspended state.
To delete an alert:
1. On the navigation bar click , click the Rules tab, and then click the Go to the Classic
Alerts Page link at the bottom of the page.
2. On the View and Manage Alerts page in the results grid, find the alert you want to delete andthen do one of the following:
● Select the checkbox for the alert and click Delete.● Click the link under the Alert ID column and on the Create and Edit Alerts page, click
Delete.
3. A warning dialog opens indicating that if you delete this alert, you also delete all records (suchas alert events) associated with it.
Click Continue to delete this alert.
NOTE If the alert you deleted was a predefined alert, its status is updated to Suspended andit shows at the bottom of the results grid with a new Alert ID.
Managing Triggered Alert EventsThis section provides the following information and tasks:
● Viewing Triggered Alert Events● Downloading Alert Events
Viewing Triggered Alert EventsThe Alert Events page shows a table (results grid) that contains records of the alerts that weretriggered for each device.
NOTE By default, seven days of information shows in the results grid. You can change what showsbased on the dates set in the and the Event occurred area.
To filter and view alert events:
1. On the navigation bar click , click the Rules tab, and then click the Go to the Classic
Alerts Page link at the bottom of the page.
2. Click Alert Events.
3. On the Alert Events page, at the Search Criteria area, set the preferred filtering and displayoptions using one or more of the following criteria:
● To filter your results by a specific alert event, do the following:i) Open the the field list and select one of the following values:
○ Identifier: a unique Electronic Serial Number assigned to the agent that is installedon a device. Click an Identifier shown in the results grid to open that device’sDevice Summary page.
Chapter 2: Setting Up Your Work Environment Absolute User Guide
Absolute 7.x 24
○ Device Name: the name assigned to the device in the operating system.○ Username: the unique name detected by the agent that identifies the person who
is associated with this device.○ Alert Id: the identification number generated for the alert○ Alert Name: the name for the alert.
ii) In the is or contains field, enter a value.● To filter your results by the suspicion level, do the following:
i) Open the list next to and Suspicion Level and select one of the following:○ < for a value that is less than○ <= for a value that is less than or equal to○ = for a value that equals○ >= for a value that is greater than or equal to○ > for a value that is greater than
ii) Open the second list and select a value from 0 to 5.● To filter your results by the date when the alert event was triggered, at the and the Event
occurred area, do one of the following:○ Click the in the last <n> days option and enter the appropriate number of days in the
field. Values from 1 through 365 are supported. A higher value results in a larger reportthat takes longer to generate.
○ Click the between option and enter the start and end dates (dd/mm/yyyy).Alternatively, click the Calendar icon next to each date field to open the calendardialog. Enter the start date in the first date field and the end date in the second.
4. Click Show results. The results grid refreshes to show the list of alerts that were triggered andhad notifications sent by e-mail. The following data is returned according to your filteringchoices:
● Alert Id is the identification number generated for the alert● Alert Name is the name for this alert.● Identifier is the unique identifier (electronic serial number) for this device.● Username is the user who was logged in to this device.● Device Name is the name of this device.● Reset Date indicates the date this alert was reset so it continues to trigger the alert.● Last Event indicates the date and time of the last alert event for this device.● Suspicion Level is the level of suspicion set for this alert. No value in this cell indicates
that no suspicion level was set.● Status indicates whether the alert is Active or Suspended.
Downloading Alert EventsThe Alert Events page shows a table (results grid) that contains records of the alerts that weretriggered for each device.
NOTE By default, seven days of information show in the results grid. You can change what showsbased on the dates set in the and the Event occurred area.
Chapter 2: Setting Up Your Work Environment Absolute User Guide
Absolute 7.x 25

To download alert events:
1. Complete the task, "Viewing Triggered Alert Events" on page 24.
2. In the results grid, select the appropriate alert events you want to download by doing one of thefollowing:
● To select one or more alert events, review the list of alert events and select the checkboxfor each alert event you want to download.
● To select all alert events, select the checkbox in the heading row of the column next toAlert Id. All checkboxes in that column are now selected.
3. At the top of the results grid click .
4. On the Request Report: Alert Events page, in the Report Name field, enter a name for thisreport you want to download.
5. Open the Report Format list and select a file format.
6. At the Create E-mail Alert area, if you want to receive e-mail notification when the file isavailable, enter your e-mail address in the Your E-mail Address field.
7. Click Continue.
You will receive an e-mail when your report is generated. You can retrieve the report file from the MyReports page. For information on retrieving reports, see "Downloading Reports" on page 84.
End User MessagingThe End User Messaging feature lets Administrators communicate with the end users of manageddevices through custom or URL messages. End User Messaging occurs during the agent call to theMonitoring Center. Administrators can also solicit information from end users through end usermessaging that populates Custom Device Fields. For more information, see the online Help.
Administrators can create any number of end user messages and deploy them to all of theirorganization’s devices, a specific device group, or a particular device.
There are two types of end user messages:● Custom messages that can solicit data from end users. See "Creating Custom End User
Messages" on page 27.● URL messages that open the end users’ browser windows to a specified website. See
"Creating URL End User Messages" on page 29.
End User Messaging is available on devices running the following supported operating systems:● Windows operating systems with Internet Explorer
NOTE To show an end user message in Internet Explorer 7, 8, or 10, the TLS 1.2 protocolneeds to be enabled in Internet Options on each device. This option is enabled by default onWindows 10 and 11 devices, but not Windows 7 or 8.1 devices. For more information aboutenabling the TLS 1.2 protocol in Internet Explorer, see Microsoft documentation.
● Mac operating systems
Chapter 2: Setting Up Your Work Environment Absolute User Guide
Absolute 7.x 26

This section describes the following tasks:● Creating End User Messages● Previewing End User Messages● Editing End User Messages● Activating an End User Message● Suspending an End User Message● Viewing End User Message Acknowledgements● Resending End User Messages● Deleting End User Messages
NOTE To perform the tasks in this section, you must log in to the Absolute console as anAdministrator.
Creating End User MessagesThis section describes the following tasks:
● Creating Custom End User Messages● Creating URL End User Messages
Creating Custom End User Messages
To create a custom end user message:
1. On the navigation bar click > Data > End User Messaging. The End User Messaging pageshows a list of end user messages.
2. Click Create new end user message.
3. On the Create End User Message page at the Message information area, in the MessageName field enter a descriptive name for the new message. The message name is for yourreference only and is not shown to the end user.
4. At the Message content area, complete the following information:
a) In the Message Type options, click the Custom message option.b) In the Message Title field enter the title that you want to show on the title bar of the
message sent to end users.c) In the Message Text field you can enter text and URL links, as well as the following
standard HTML tags:
<a> <b> <i> <u>
<font> <p> <br>
d) If you want to include an image with your message, do the following:● Enter the Image URL for the image you want to show.● Open the Image Display Location list and select where in the message you want to
image to show.● In the Image Hyperlink field, enter or paste the appropriate hyperlink to the image you
want to show.You are limited to one image per message.
Chapter 2: Setting Up Your Work Environment Absolute User Guide
Absolute 7.x 27

e) If you are soliciting information from your end users, click Choose fields, which opens theCustom Fields Dialog. The left column of the dialog shows all Available Fields, which youcan add to the message. The right column of the dialog provides a list of all currentlySelected Fields.From the Available Fields list, click the fields you want to include in the message and click >to move them to the Selected Fields list. Click >> to move all available fields to the SelectedFields list. If you mistakenly move an available field to the Selected Fields list, you canselect it and click < to move it back to the Available Fields list. When finished, clickOK.
The Fields dialog closes and the Create End User Message page refreshes to show theSelected Fields as a list of checkboxes at the Included Fields area.
f) Under the Required heading, select the checkbox for each field you want to specify asmandatory.The end user needs to provide information for these mandatory fields to successfully submit aresponse to the End User Message.
5. At the Message destination area in the Send To area, indicate the appropriate option thatdefines the devices that receive the message as follows:
● Click All Devices to send the end user message to all devices, which includes futureactivations.
● Click Specific Device, click Choose device, and then select the device you want toreceive the end user message.
● Click Specific Group, click Choose group, and then select the Group Nameyou want toreceive the end user message. Any device added to or removed from this group is similarlyadded to or removed from the message. You must define the device group before you canselect it. For more information, see "Creating a New Device Group" on page 36.
IMPORTANT When an End User Message is applied to a Specific Group, any deviceadded to or removed from that group is similarly associated or disassociated with the enduser message.
6. At the Message display area in the Message Display Criteria (Rules) options, select theoption that defines the frequency with which the message is presented to end users from thefollowing available options:
● On next call presents the message to end users on the device’s next call to the MonitoringCenter.
● On or after opens a field where you enter the date or you can click the Calendar icon toselect the appropriate date to send the message.
7. Review the message you have created and then take one of the following options to save themessage:
● Click Save & activate. The message is activated and shows on qualifying devicesaccording to the defined Message Display option.
● Click Save & suspend to preview the message. Before activating it, see "Previewing EndUser Messages" on page 30. No devices receive this message until it is activated. Thisoption is recommended.
Chapter 2: Setting Up Your Work Environment Absolute User Guide
Absolute 7.x 28

The End User Messaging page refreshes the results grid to include the new Custom End Usermessage.
Creating URL End User MessagesA Uniform Resource Locator (URL) message shows any World Wide Web address in the end user’sbrowser. The Absolute console does not make a record of when the end user acknowledges receipt ofa URL message.
To create a URL message:
1. On the navigation bar click > Data > End User Messaging.
2. On the End User Messaging page, click Create new end user message.
3. On the Create End User Message page, at the Message information area in the MessageName field, enter a descriptive name for the new message. This message name is for yourreference only and is not shown to the user.
4. In the Message content area, do the following:
a) Click the URL option and type the address including the protocol; for example, http://.b) Select one of the following options for delivering your end user message:
● Attempt to send once indicates that the message is sent only once, on the next agentcall.
● Send repeatedly indicates that the message is sent on all agent calls.This frequency is useful when the end user has signed out a device and failed to return itby the due date. When the device is returned, you can suspend or delete the message.
5. At the Message destination area in the Send To area, indicate the appropriate option thatdefines the devices that receive the message as follows:
● To send the end user message to all devices, including future activations, click AllDevices.
● To send the end user message to a single device, click Specific Device, click Choosedevice, and then select the device.
● To send the end user message to all devices in a device group, click Specific Group, clickChoose group, and then select the Group Name you want to receive the end usermessage. You must define the group before you can select it. For more information, see"Creating a New Device Group" on page 36.
IMPORTANT When an End User Message is applied to a Specific Group, any deviceadded to or removed from that group is similarly associated or disassociated with the enduser message.
6. At the Message display area in the Message Display Criteria (Rules) options, select theoption that defines the frequency with which the web page is presented to end users from thefollowing available options:
● On next call presents the web page to end users on the device’s next call to theMonitoring Center.
● On or after opens a field where you enter the date or you can click the Calendar icon toselect the appropriate date to send the message.
Chapter 2: Setting Up Your Work Environment Absolute User Guide
Absolute 7.x 29

7. Review the message you have created and save it using one of the following options:
● Click Save & activate to save the message and activate it immediately.● Click Save & suspend to save the message and suspend it. You can activate the
message later.
The End User Messaging page refreshes to show the new URL message in the results grid,which shows a list of end user messages.
Previewing End User MessagesAfter you create a custom or URL end user message, preview the message before sending it to endusers.
To preview an end user message:
1. On the navigation bar click > Data > End User Messaging.
2. On the End User Messaging page in the results grid, click the Message Name link for themessage you want to preview.
3. On the Create End User Message page, click Preview in New Window to open the messagein a new window.
NOTE Ensure your browser is configured to allow popups.
Review the message and close the window.
4. Choose from one of the following options:
● Edit the message. See "Editing End User Messages" on page 30.● Click Save & activate. The message shows on qualifying devices on their next agent call.● Click Save & suspend. No devices receive this message until the message is activated.
Editing End User MessagesThis section describes the following tasks:
● Editing a Custom End User Message● Editing a URL End User Message
Editing a Custom End User Message
To edit an existing custom end user message:
1. On the navigation bar click > Data > End User Messaging.
2. On the End User Messaging page, in the results grid click the Message Name or the Edit linkfor the Active message you want to edit. (You cannot edit a Suspended message.)
3. On the Create End User Message page, make the appropriate changes to the message asfollows:
a) At the Message information area in the Message Name field, enter the appropriateinformation.
Chapter 2: Setting Up Your Work Environment Absolute User Guide
Absolute 7.x 30

b) At the Message Status area, click Suspend so you can make these changes before thequalifying devices call the Monitoring Center.
c) At the Message content area, select Custom message under Message Type and do thefollowing:● Click the Message Title field and enter the updated information.● Click the Message Text field and type the appropriate updates.● If you want to use a different image, enter the appropriate information in the Image
URL field, open the list for Image Display Location and select the correct option, andin the Image Hyperlink field enter the updated information.
d) If you are editing the information you requested from your end users, click Choose fields,which opens the Custom Fields dialog.The left column of the dialog shows all Available Fields, which you can add to the message.The right column of the dialog provides a list of all currently Selected Fields.
Click the fields you want to include in the message and click > to move to the Selected Fieldslist. Click >> to move all available fields to the Selected Fields list. If you mistakenly move anavailable field to the Selected Fields list, you can select it and click < to move it back to theAvailable Fields list. When finished, clickOK.
The Fields dialog closes and the End User Message page refreshes to show the SelectedFields as a list of checkboxes at the Included Fields options location.
e) Select the Required checkbox for each field you want to specify as mandatory.The end user needs to provide information for these fields to successfully submit a responseto the end user message.
f) Click OK.The Fields dialog closes and the End User Message page refreshes to show the SelectedFields as a list of checkboxes at the Included Fields options location.
g) Select the Required checkbox for each field you want to specify as mandatory.The end user needs to provide information for these fields to successfully submit a responseto the end user message.
4. At the Message destination area in the Send To options, define the end users who receivethe message as follows:
● To send the end user message to all devices, including future activations, click AllDevices.
● To send the end user message to a single device, click Specific Device, click Choosedevice, and then select the device.
● To send the end user message to all devices in a device group, click Specific Group, clickChoose group, and then select the Group Name you want to receive the end usermessage. You must define the group before you can select it. For more information, see"Creating a New Device Group" on page 36.
IMPORTANT When an End User Message is applied to a Specific Group, any deviceadded to or removed from that group is similarly associated or disassociated with the enduser message.
Chapter 2: Setting Up Your Work Environment Absolute User Guide
Absolute 7.x 31

5. At the Message display location, in the Message Display Criteria (Rules) options, select theoption that defines the frequency that the web page is presented to end users from thefollowing available options:
● On next call presents the web page to end users only once, that is on the device’s nextcall to the Monitoring Center.
● On or after opens a calendar dialog where you select the appropriate date to send themessage.
Leave the Re-send checkbox unchecked. For more information, see "Resending End UserMessages" on page 35.
6. Review the changes you have made to this message. You have the following options to savethe message:
● Click Save & activate to save the message and activate it immediately.The End User Messaging page refreshes the results grid with a list of end user messagesthat includes the message you edited. Notice that the Status has changed to Active.
● Click Save & suspend to save the message and suspend it. You can activate themessage later.The End User Messaging page refreshes the results grid with a list of end user messagesthat includes the message you edited. Notice that the Status is Suspended.
Editing a URL End User Message
To edit an existing URL end user message:
1. On the navigation bar click > Data > End User Messaging.
2. On the End User Messaging page, in the grid click the Message Name or the Edit link for themessage you want to edit.
3. On the Create End User Message page at the Message information area, make theappropriate changes to the message as follows:
a) In the Message Name field, enter the appropriate information.b) At the Message Status location, click Suspend so you can make these changes before the
qualifying devices call the Monitoring Center.
4. At the Message content area at the Message Type options, in the URL option field, do thefollowing:
a) In the field type the address including the protocol; for example, http://.b) Select one of the following options for delivering your end user message:
● Attempt to send once indicates that the message is sent only once, on the next agentcall.
● Send repeatedly indicates that the message is sent on all agent calls.This frequency is useful when the end user has signed out a device and failed to return itby the due date. When the device is returned, you can suspend or delete the message.
5. At the Message destination location, in the Send To options, define the end users who receivethe message as follows:
Chapter 2: Setting Up Your Work Environment Absolute User Guide
Absolute 7.x 32

● To send the end user message to all devices, including future activations, click AllDevices.
● To send the end user message to a single device, click Specific Device, click Choosedevice, and then select the device.
● To send the end user message to all devices in a device group, click Specific Group, clickChoose group, and then select the Group Name you want to receive the end usermessage. You must define the group before you can select it. For more information, see"Creating a New Device Group" on page 36.
IMPORTANT When an End User Message is applied to a Specific Group, any deviceadded to or removed from that group is similarly associated or disassociated with the enduser message.
6. At the Message display location, in the Message Display Criteria (Rules) options, select theoption that defines the frequency that the web page is presented to end users from thefollowing available options:
● On next call presents the web page to end users on the device’s next call to theMonitoring Center.
● On or after opens a calendar dialog where you select the appropriate date to send themessage.
● The Re-send checkbox lets you resend messages that were already sent andacknowledged. For more information, see "Resending End User Messages" on page 35.
7. Review the changes you have made to this message. You have the following options to savethe message:
● Click Save & activate to save the message and activate it immediately.The End User Messaging page refreshes the results grid with a list of end user messagesthat includes the message you edited. Notice that the Status has changed to Active.
● Click Save & suspend to save the message and suspend it. You can activate themessage later.The End User Messaging page refreshes the results grid with a list of end user messagesthat includes the message you edited. Notice that the Status is Suspended.
Activating an End User MessageOnly activated end user messages are sent to managed devices that meet the message criteria.
To activate existing custom and URL end user messages:
1. On the navigation bar click > Data > End User Messaging.
2. On the End User Messaging page in the results grid, click the Message Name or Edit link fora Suspended message you want to activate.
3. On the Create End User Message page click Save & activate.
4. The End User Messaging page refreshes. Look at the results grid to see that the message youselected now reads Active in the Status column.
Chapter 2: Setting Up Your Work Environment Absolute User Guide
Absolute 7.x 33

Suspending an End User MessageYou can suspend messages that you temporarily do not want to send to end users.
To suspend an end user message:
1. On the navigation bar click > Data > End User Messaging.
2. On the End User Messaging page in the results grid, click the Message Name or Edit link foran Active message that you want to suspend.
3. On the Create End User Message page click Save & suspend.
4. The End User Messaging page refreshes. Look at the results grid to see the message youselected now reads Suspended in the Status column.
Viewing End User Message AcknowledgementsYou can see the custom end user messages that were and were not acknowledged by end users. Youcan also download the details in a report. If you solicited information from end users in a message, youcan review the responses. For those devices that did not acknowledge the message, you may want toresearch why that is the case.
To view end user message acknowledgements:
1. On the navigation bar click > Data > End User Messaging.
2. On the End User Messaging page in the results grid, review the Devices Acknowledgedcolumn. The hyperlinked numbers shown in this column represent the number of devices thathave acknowledged the respective end user messages.
To see which devices have acknowledged the end user message you sent, click the numeric link.
3. On the Devices that have acknowledged End User Message page, you can see the devicesthat have responded to your message. If you have solicited information from the end user, youcan find it here.
For more information about this device and the device’s user, click the Identifier.
On the Device Summary, you can see who to contact to get further information or possibly to sendanother message.
4. Click the Back link to return to the Devices that have acknowledged End User Message page.
5. To download a report of the devices that have acknowledged the end user message, at the top
of the results grid click .
On the Request Report page, complete the following steps:
a) In the Report Name field, enter a name for this report you want to download.b) Open the Report Format list and select a file format.c) At the Create E-mail Alert area, if you want to receive e-mail notification when the file is
available, enter your e-mail address in the Your E-mail Address field.d) Click Continue.When your request is processed, you can retrieve the report file from the My Reports page. Forinformation on retrieving reports, see "Downloading Reports" on page 84.
Chapter 2: Setting Up Your Work Environment Absolute User Guide
Absolute 7.x 34
6. Click the Back link to return to the End User Messaging page.
To view end user messages that were not acknowledged by the targeted devices:
1. On the navigation bar click > Data > End User Messaging.
2. On the End User Messaging page in the results grid, review the Devices Not Acknowledgedcolumn. The hyperlinked numbers shown in this column represent the number of devices thathave not acknowledged the respective end user messages.
To see which devices have not acknowledged the end user message you sent, click the numericlink.
3. On the Devices that have NOT acknowledged End User Message page, you see the devicesthat have failed to respond. For more information about this device and the device’s user, clickthe Identifier.
On the Device Summary, you can see who to contact to get further information or possibly to sendanother message.
4. Click the Back link to return to the Devices that have NOT acknowledged End User Messagepage.
5. To download a report of the devices that have not acknowledged the end user message, at the
top of the results grid click .
On the Request Report page, complete the following steps:
a) In the Report Name field, enter a name for this report you want to download.b) In the Report Format field, open the list and select a file format.c) At the Create E-mail Alert area, if you want to receive e-mail notification when the file is
available, enter your e-mail address in the Your E-mail Address field.d) Click Continue.When your request is processed, you can retrieve the report file from the My Reports page. Forinformation on retrieving reports, see "Downloading Reports" on page 84.
6. Click the Back link to return to the End User Messaging page.
Resending End User MessagesThere are times when it is useful to resend a message that was already received and acknowledged byend users. For example, you could edit an existing complex custom message and resend it, instead oftaking the time to create a new custom message.
To resend an end user message:
1. On the navigation bar click > Data > End User Messaging.
2. On the End User Messaging page in the results grid, click the Message Name or Edit link forthe message you want to resend.
3. On the Create End User Message page at the Message Display location, select the Re-sendcheckbox.
4. To save this setting, do one of the following:
Chapter 2: Setting Up Your Work Environment Absolute User Guide
Absolute 7.x 35

● Click Save & activate to save the message. This message is shown to qualifying devicesaccording to the defined Message Display option.
● Click Save & suspend to save the message and suspend it. You can activate themessage later. No devices receive this message until you activate it.
Deleting End User MessagesYou may want to delete end user messages that are no longer required.
To delete end user messages:
1. On the navigation bar click > Data > End User Messaging.
2. On the End User Messaging page in the results grid, click the Message Name or Edit link forthe message you want to delete.
3. On the Create End User Message page, click Delete.
The End User Message page refreshes with a confirmation indicating the message you selectedis deleted.
Device GroupsYou can organize your managed devices into logical groupings that fit your business model. Forexample, you can group computers by management levels, security risk assessment (those laptopsthat contain confidential data), geographical locations (such as building, floor, or room the computersare in), and other criteria.
The Device Groups page has a filter area at the top of the page and a table (results grid) that includesall device groups associated with your account. You can use the Search Criteria filters to locate thedevice group, or device groups, you want to view.
You can define groups when filtering reports or targeting devices for alerts or end user messaging.
This section describes the following tasks:● Creating a New Device Group● Viewing a Device Group● Editing a Device Group● Managing Devices in a Device Group● Deleting Device Groups
IMPORTANT All tasks, except for the viewing ones, require that you log in to the Absolute console asan Administrator.
Creating a New Device Group
To create a new device group:
1. On the navigation bar, click to open the Assets > Devices page.
2. On the sidebar, click Classic Groups.
3. On the Device Groups page, click Create new Device Group.
Chapter 2: Setting Up Your Work Environment Absolute User Guide
Absolute 7.x 36

4. On the Create and Edit Device Group page, at the Group information area, do the following:
a) In the Group Name field, enter a name for the new device group. Click the Check nameavailability link to verify that the name you created is not in use.
b) In the Group Description field, enter a description for the device group.c) To ensure that only Administrators can change this information, at the Group information
area, click the Lock as Read-Only checkbox. However, for the purposes of this task,unless you are an Administrator or Security Administrator, do not select this checkbox. Ifthis checkbox is activated, you cannot perform step 5 of this task.
d) Click Save group information to save your device group information and to refresh theCreate and Edit Device Group page. You see a confirmation line that the device group wascreated successfully.
NOTE When first created, device groups do not have any devices associated with them.
5. To add devices to this group, at the Group Members area do one of the following:
● To select the devices you want to add to this device group from a list, click Add Devices.i) On the Choose Device(s) to add to the group dialog, do one of the following to select
the devices:● Select the checkbox next to each device you want to add to the group.● Select the Select All checkbox to select all devices that show on this page of the
table.ii) Click Choose device(s). The Choose Device(s) to add to the group dialog closes.
On the Create and Edit Device Group page, you see a confirmation line stating the devicewas added successfully to this group.
Also, the results grid refreshes and shows the devices you added, with specificinformation for each device in the following columns:
● Identifier, which is a unique Electronic Serial Number assigned to the agentinstalled on each device you selected.
● Department to which this device belongs. A Departments is a user-createdattribute for a device that is included in the filter of many reports.
● Device Name, which is the name given to a device.● Username, which is a unique name detected by the agent that identifies a person
who is associated with or using a device.● Make, which is the manufacturer of a device.● Model Number, which is the product type of a device.● Serial Number, which is the serial number of the device.● Asset Number, which is an alphanumeric identifier for a device entered by a user.
NOTE You can sort the results in ascending and descending order for each column,except the contents in the Identifier column.
iii) Above the results grid, in the field next to the Filter Members button, you can filter thelist shown in the results grid by entering one of the following items for a device:● Identifier, which is a unique Electronic Serial Number assigned to the agent
installed on each device you selected.
Chapter 2: Setting Up Your Work Environment Absolute User Guide
Absolute 7.x 37
● Device Name, which is the name given to a device.● Username, which is a unique name detected by the agent that identifies a person
who is associated with or using a device.● Serial Number, which is the serial number of the device.
Click Filter Members and the results grid refreshes to show a list of devices based onyour filter selection.
● To add devices to the group by manually specifying devices in a text file, click Upload aList of Devices.
IMPORTANT Lenovo serial numbers with seven characters may be associated with morethan one device and may cause errors when you upload a list of devices using a text file.When uploading a list of Lenovo devices, use complete serial numbers or the deviceIdentifiers, both of which are unique to each managed device.
i) On the Upload List of Devices for Device Group dialog, under the Upload List ofSerial Numbers or Identifiers area, in the File Path field, click Browse and find thelocation of the file you want to upload.You can enter a list of devices in a single column, separating each entry with a return(press Enter). Do not use any punctuation. ClickOpen to select this file path.
ii) In the File List Type area, click one of the following options:● Serial Numbers● Identifiers
iii) Click Upload File. Follow the instructions provided on-screen to continue with thisprocedure.
The devices are added to the device group.
6. Click Back to show the Devices sidebar.
Viewing a Device Group
To use filters to locate and view a specific device group:
1. On the navigation bar, click to open the Assets > Devices page.
2. On the sidebar, click Classic Groups.
3. On the Device Groups page, filter your data to show a specific device group using the SearchCriteria fields as follows:
● In the Group Name is or contains field, enter the name of the device group you want toview.
● In the and Group Description is or contains field, enter several letters that you know arein the device group’s description that you want to view.
● Open the or the group contains a Device where the field list and select the appropriatefield from the following:○ Any Field○ Identifier○ Device Name
Chapter 2: Setting Up Your Work Environment Absolute User Guide
Absolute 7.x 38
○ Username
● In the is or contains field, either use Choose or enter the appropriate value for the devicegroup you want to view.
4. Click Show results to refresh the results grid. If you are logged in as a Power User or aGuest, only those device groups to which you are assigned are included in the results.
The columns provide the following information:
● Device Group Name is the name of the group.● Count shows how many devices are in this group,● Description for this group, which you provided when you created it.● Created By shows who created this group.● Last Modified provides the date that this device group was created or when it was edited
last.
5. Click Back to show the Devices sidebar.
Editing a Device Group
To edit a device group’s information:
1. Complete the task, "Viewing a Device Group" on page 38.
2. Open the Create and Edit Device Group page with the details of the device group that you wantto edit in one of the following ways:
● Filter the results grid to show a particular device group.● In results grid, click the Device Group Name link for the device group you want to edit.
3. At the Group information location, you can edit the following details:
a) In the Group Name field, enter a different name for this group. Click the Check nameavailability link to verify that the name you want to use is not already used.
b) In the Group Description field, edit an appropriate description for the group, if you want tochange it.
c) Select or clear the Lock as Read-Only checkbox.d) Click Save to save your changes to the Group information and refresh the Create and Edit
Device Group page.You see a confirmation line that the device group was updated successfully.
4. If you want to add more devices to this device group, see "Adding Devices to a Device Group"on page 40.
You can also remove selected devices from the group. For more information, see "RemovingDevices from a Device Group" on page 46.
Managing Devices in a Device GroupYou can use the Device Group page to manage Device Group memberships, which includes thefollowing tasks:
● Associating Devices with Device Groups● Viewing Devices in a Device Group
Chapter 2: Setting Up Your Work Environment Absolute User Guide
Absolute 7.x 39

● Removing Devices from a Device Group
Associating Devices with Device GroupsAfter you have created a device group, you can add devices to it.
NOTE A device can belong to more than one device group.
There are several ways to associate devices with device groups, including:● Adding Devices to a Device Group● Adding Devices to a Device Group Automatically Based on Local IP Addresses● Using Bulk Uploads to Change Device Group Associations
Adding Devices to a Device Group
To add devices to a device group:
1. Complete the task, "Viewing a Device Group" on page 38.
2. In the results grid of the Device Groups page, click the Device Group Name to which youwant to add devices.
3. To add devices to this group, at the Group Members area do one of the following:
● To select the devices you want to add to this device group from a list, click Add Devices.i) On the Choose Device(s) to add to the group dialog, do one of the following to select
the devices:● Select the checkbox next to each device you want to add to the group.● Select the Select All checkbox to select all devices that show on this page of the
table.ii) Click Choose device(s). The Choose Device(s) to add to the group dialog closes.
On the Create and Edit Device Group page, you see a confirmation line stating thedevices were added successfully to this group.
Also, the results grid refreshes and shows the devices you added, with specificinformation for each device in the following columns:
● Identifier, which is a unique Electronic Serial Number assigned to the agentinstalled on each device you selected.
● Department to which this device belongs. A Departments is a user-createdattribute for a device that is included in the filter of many reports.
● Device Name, which is the name given to a device.● Username, which is a unique name detected by the agent that identifies a person
who is associated with or using a device.● Make, which is the manufacturer of a device.● Model Number, which is the product type of a device.● Serial Number, which is the serial number of the device.● Asset Number, which is an alphanumeric identifier for a device entered by a user.
Chapter 2: Setting Up Your Work Environment Absolute User Guide
Absolute 7.x 40

NOTE You can sort the results in ascending and descending order for each column,except the contents in the Identifier column.
iii) Above the results grid, in the field next to the Filter Members button, you can filter thelist shown in the results grid by entering one of the following items for a device:● Identifier, which is a unique Electronic Serial Number assigned to the agent
installed on each device you selected.● Device Name, which is the name given to a device.● Username, which is a unique name detected by the agent that identifies a person
who is associated with or using a device.● Serial Number, which is the serial number of the device.
Click Filter Members and the results grid refreshes to show a list of devices based onyour filter selection.
● To add devices to the group by manually specifying devices in a text file, click Upload aList of Devices.
IMPORTANT Lenovo serial numbers with seven characters may be associated with morethan one device and may cause errors when you upload a list of devices using a text file.When uploading a list of Lenovo devices, use complete serial numbers or the deviceIdentifiers, both of which are unique to each managed device.
i) On the Upload List of Devices for Device Group dialog, under the Upload List ofSerial Numbers or Identifiers area, in the File Path field, click Browse and find thelocation of the file you want to upload.You can enter a list of devices in a single column, separating each entry with a return(press Enter). Do not use any punctuation. ClickOpen to select this file path.
ii) In the File List Type area, click one of the following options:● Serial Numbers● Identifiers
iii) Click Upload File. Follow the instructions provided on-screen to continue with thisprocedure.
The devices are added to the device group.
Adding Devices to a Device Group Automatically Based on Local IP AddressesYou can assign devices to device groups automatically, based on the devices’ local calling IP address.This feature is useful if your network includes multiple subnets, each with a range of local IP addresses.
The following rules apply:● When a device calls the Monitoring Center and its IP address is within the IP range specified
for a device group, it is assigned to the device group associated with that subnet.● When a device calls in from an IP address that is not part of a range specified in a device
group, the device is not assigned to any group.● When a device is already in a device group and calls in from an IP address that is not part of
that device group or any other defined device group, the device stays in the original devicegroup.
Chapter 2: Setting Up Your Work Environment Absolute User Guide
Absolute 7.x 41

● When a device is already in a device group, and calls in from an IP address that is part ofanother defined device group, the device is reassigned to that device group associated withthat subnet.
ExampleA school district is using the Absolute technology. The following auto-grouping rules are defined for twohigh schools in the district:● Auto-group Lincoln High School: local IP subnet 172.165.50.*● Auto-group Washington High School:local IP subnet 172.165.60.*If a teacher's computer calls in with the IP 172.165.50.25, it is auto-assigned to the Lincoln High Schoolgroup. The teacher then takes the computer home for the weekend and it calls in from the teacher's homewith the IP 123.134.75.13. There is no auto-group rule for that IP subnet, so the computer stays in theLincoln High School group.However, if the teacher then takes the computer toWashington High School for a few days, and it callsin from 172.165.60.150, the computer gets unassigned from the Lincoln High School group and assignedto the Washington High School group. Unlike the teacher’s IP address at home, there is an auto-groupconfigured for that IP (Washington High School), so the computer is moved.
To use the auto-grouping feature to add devices to a device group automatically:
1. Create a CSV (comma separated value) file or spreadsheet as follows:
a) The first row must be the column headings GroupName and IPSubnet.b) Subsequent rows should include the “<device group names>” that you want to use, a
comma (,) as the separator, and the associated local IPSubnet.Use the asterisk (*) as a wild card to group devices calling from different local subnets, asshown in the following example:
GroupName,IPSubnet
"Device Group Name 1",192.168.*.*
"Device Group Name 2",172.16.*.*
"Device Group Name 3",10.*.*.*
c) Choose the appropriate option to save the file to your local device.
2. Upload the CSV file prepared in the preceding step as follows:
a) On the quick access toolbar, click and click Import Classic Group <-> IP Mapping.
The on-screen instructions provide both guidance about creating a spreadsheet and asample file you can view. You created this file in step 1.
b) In the Name field, enter an appropriate name for your import. This name is used to trackthe status of the CSV file import.
c) If you want to receive e-mail notification when the import is processed, in the E-mail fieldenter your e-mail address.
d) In the Filename field, click Browse to open the Choose File to Upload dialog and completethe following steps:i) Browse to the location where you saved the edited CSV file earlier in step 1.ii) Click the file you want to upload and then click Open to select the file.
Chapter 2: Setting Up Your Work Environment Absolute User Guide
Absolute 7.x 42

The Import Groups page opens to show the path to the selected file in the Filename field. ClickUpload.
NOTE CSV file imports are queued and processed in the background. You can track theprogress of your import using the Import Group <-> IP Mapping Status page, described next.
3. Verify that the CSV file was imported successfully:
a) On the navigation bar, click and click Import/Export on the Settings sidebar.
a) On the Import/Export sidebar, click Import Classic Group <-> IP Mapping Status.b) On the Import Group <-> IP Mapping Status page in the table, review the import Status.
When the import process is complete, the status reads Ready. If you entered an e-mailaddress, notification is sent.
c) To verify the success of the import, click the Ready link and view the status CSV file.The status CSV file is identical to the CSV file you uploaded, with the addition of two columns thatindicate the success of the import line by line.
NOTE For more information, see Technical Note 050221 – Dynamic Group to IP Subnet Mapping onthe Documentation page.
Using Bulk Uploads to Change Device Group AssociationsManipulating device group associations with large numbers of devices can be an arduous process. Tomake things easier and quicker, you can extract information from the Absolute console, manipulate it,and then upload the changes back to the Absolute console.
You can associate each device to a maximum of 20 different device groups, as follows:● Download a CSV file of devices and their current Device Group associations.● Edit the CSV file to update the device group associations. You can remove any devices whose
device group associations are not changing.● Upload the CSV file to the Absolute console, which updates the device group associations.
To extract, edit, and upload device group associations:
1. On the quick access toolbar, click and click Export Classic Groups to open the Export
Groups page.
2. Request a download of devices in a current device group, as follows:
a) At the Search Criteria location, in The Group is field, open the list and select theappropriate device group.
IMPORTANT Ensure the download includes all of the devices that you want tomanipulate. After you have extracted the information you cannot add more devices to theexported CSV file. If necessary, downloading the All Devices group ensures you haveevery managed device in the CSV file.
b) At the Name and Format location, do the following:i) In the Name field, enter an appropriate name. This name shows on the Export Group
Status page.
Chapter 2: Setting Up Your Work Environment Absolute User Guide
Absolute 7.x 43

ii) Open the Format list and select CSV because you can only import a CSV file.c) At the Create E-mail Alert area, if you want to receive e-mail notification when the file is
available, enter your e-mail address in the Your E-mail Address field.d) Click Continue, which refreshes the Export Groups page that provides information about
being notified when the report is ready.
3. Retrieve the downloaded CSV file you just requested as follows:
a) On the navigation bar, click and click Import/Export on the Settings sidebar.
b) On the Import/Export sidebar, click Export Classic Group Status to open the ExportGroups Status page.If you entered an e-mail address in the preceding step, you can also click the link on themessage you received.
c) When your request is processed, in the table under the Status column click the appropriateReady link.
d) Follow the on-screen instructions to Open the CSV file. If prompted, choose the option toSave the file to your local device.
IMPORTANT You can open the CSV file with almost any text editing program. However,Absolute recommends editing the file with a spreadsheet editor to preserve the tablelayout. If the layout of the file is not preserved, the import process fails.
e) Edit the extracted CSV file, as follows:
IMPORTANT Do not alter the format of the CSV file. Doing so causes the data importprocess to fail.
● The first few columns for each row contain the device’s Identifier, Username, DeviceMake, and Device Model.
● Use these columns for identification purposes only. Do not edit them.● Columns named Group1 through Group20 contain the group associations that you
can edit. Enter precise group names (case-sensitive and accurate spelling) toassociate the device with a device group. You can disassociate a device from a devicegroup by removing the value.
● You can remove rows for devices that you are not editing.● You cannot add rows for devices in the CSV file.
f) Save the edited CSV file to the preferred location.
IMPORTANT Absolute recommends that you archive a copy of the original download file.Should an error occur during the import process, you can use the CSV file to restore thedata to its original state.
4. Upload the edited CSV file, as follows:
a) On the quick access toolbar, click and click Import Classic Groups to open the Import
Groups page.b) In the Name field, enter a name for your import file. This name is used to track the status of
the CSV file import.
Chapter 2: Setting Up Your Work Environment Absolute User Guide
Absolute 7.x 44

NOTE CSV file imports are queued and processed in the background. You can track theprogress of your import using the Import Groups Status page.
c) If you want to receive e-mail notification when the import is processed in the E-mail field,enter your e-mail address.
d) In the Filename field, click Browse to open the Choose File to Upload dialog and completethe following steps:i) Browse to the location where you saved the edited CSV file.ii) Click the file you want to upload and then click Open to select it.The Import Groups page shows the path to the selected file in the Filename field.
e) To specify whether to retain or remove existing group membership, select one of thefollowing options:● DO NOT Delete Identifier Group Membership If Group Missing From Import
retains the existing group membership settings even if the existing device groupassociations are removed from the imported file. After the import process is complete,any new device groups specified in the imported file are associated with the device.
● Delete Identifier Group Membership If Group Missing From Import removes adevice’s existing group associations if they are not included in the imported file. Afterthe import process is complete, the device is only associated with the device groupsspecified in the imported file.
f) Click Upload to start the file import process. The Import Groups page refreshes to provideinformation that your file uploaded successfully. The file is queued for processing.
5. Verify that the CSV file was processed successfully:
a) On the navigation bar, click and click Import/Export on the Settings sidebar.
b) On the Import/Export sidebar, click Import Classic Group Status.c) On the Import Groups Status page in the table, review the import Status.
When complete, the status is Ready. If you entered an e-mail address, notification is sent.
d) To verify the success of the import, click the Ready link to open a CSV file that reports theprocessing success or failure by device.This file is identical to the CSV file you uploaded, with the addition of two columns indicatingthe success or failure of the import line by line.
Viewing Devices in a Device Group
To view the devices in a device group:
1. Complete the task, "Viewing a Device Group" on page 38.
2. On the Device Groups page look at the results grid, which shows all device groups.
3. To see what devices are in a particular device group, click the appropriate device group namelink, which opens the Create and Edit Device Group page.
4. Look at the results grid, where you find a list of all devices that you assigned to this devicegroup.
Chapter 2: Setting Up Your Work Environment Absolute User Guide
Absolute 7.x 45

5. If you want to review the details for a particular device, click the Identifier link. For moreinformation, see "Editing Asset Information" on page 73.
Removing Devices from a Device Group
To remove any or all devices from a device group:
1. Complete the task, "Viewing a Device Group"
2. On the Device Groups page, use one of the following methods to open the Create and EditDevice Group page with the details of the device group that you want to edit:
● Filter the results grid to show the particular device group that you want to remove.● In the results grid, click the Device Group Name link for the device group that you want to
remove.
3. On the Create and Edit Device Group page use one of the following ways to select the deviceor devices you want to remove:
● From the Select All column, select the checkbox for each device you want to remove fromthe device group.
● Select the checkbox in the heading row of the Select All column to select all devicesshowing in the results grid.
4. Click Remove Selected Device(s).
The Create and Edit Device Group page refreshes with a confirmation message that provides theIdentifiers for each device you removed.
Deleting Device Groups
To delete a device group:
1. Complete the task, "Viewing a Device Group"
2. Ensure that no users are assigned to the device group you want to delete.
3. On the Device Groups page in the results grid, click the Device Group Name link for thedevice group you want to delete.
4. On the Create and Edit Device Group page, click Delete this group.
A confirmation dialog opens with a warning that all associations to the device group will also bedeleted. This means that the group is no longer shown in report filters and any alerts applied tothe device group no longer function.
5. Click Delete this group.
NOTE If any users are assigned to the device group that you want to delete, a warningmessage shows and you cannot delete the device group. The message includes the list ofassigned users. Before you can delete the device group you need to reassign these users toanother device group.
Chapter 2: Setting Up Your Work Environment Absolute User Guide
Absolute 7.x 46

Software PoliciesSoftware policies allow Administrators to define their organization’s software rules. A software policy isa list of Banned and Required software titles.
A single device may belong to multiple device groups, so it is possible for multiple software policies toapply to a single device.
This section describes the following tasks:● Viewing the List of Software Policies● Viewing Device Groups Without a Software Policy● Creating a Software Policy● Copying a Software Policy● Viewing a Software Policy● Editing a Software Policy and its Device Group Associations● Deleting a Software Policy
IMPORTANT All tasks require that you log in to the Absolute console as an Administrator.
Viewing the List of Software Policies
To view the software policies that apply to device groups:
1. On the navigation bar click > Policy Groups > Software Policies.
2. On the View and Manage Software Policies page, the table shows the following informationabout your existing software policies:
● Policy Name is the name of the policy.● Created By is the username for the person who created the policy.● Created At is the date and time when the policy was originally created.● Last Updated By is the username of the last person who edited the policy.● Last Updated At is the date and time stamp when this policy was last edited.● Group Count indicates the number of device groups to which this policy applies. Click the
link to open the Device Groups Added to <Policy Name> Software Policy dialog.● The Edit link opens the Create and Edit a Software Policy page for each policy.
Viewing Device Groups Without a Software Policy
To view a list of device groups that do not have a software policy:
1. Complete the task, "Viewing the List of Software Policies" on page 47.
2. Click View groups without a policy, which opens the Software Policy: Groups Without APolicy dialog.
3. The table shows those device groups that do not have software policies applied to them andthe Number of Devices this situation affects.
4. Click Print to print the list.
Chapter 2: Setting Up Your Work Environment Absolute User Guide
Absolute 7.x 47

You can now assign a software policy to the appropriate device groups as instructed in one of thefollowing locations:
● To create a new software policy and apply it to a device group without a policy, complete thetask, "Creating a Software Policy" on page 48.
● To apply an existing software policy to a device group without a policy, complete the task,"Editing a Software Policy and its Device Group Associations" on page 50.
Creating a Software Policy
To create a software policy:
1. On the navigation bar click > Policy Groups > Software Policies.
2. Click Create software policy... to open the Create and Edit a Software Policy page.
3. In the Policy Name field, enter a descriptive name for the policy.
4. In the Description field, enter a brief description of the policy.
5. At the right side of the Policy Groups field, click Add Classic Groups to open the ChooseClassic Groups for Software Policy dialog.
6. In the Available list, select the appropriate device groups, as follows:
NOTE The list includes Classic device groups only. Any device groups created in >Device Groups are not listed.
a) To filter the Available list, in the Filter field enter the criteria that you want to use and clickShow results.
b) Select the device groups you want to include in the software policy and click > to move asingle device group to the Selected list.
c) Click >> to move all available device groups to the Selected list.d) Click All Devices to select all device groups.
NOTE If you mistakenly move an available device group to the Selected list, you canselect the device group and click < to move it back to the Available list.
e) When finished, click OK.The Create and Edit a Software Policy page refreshes with an updated list of the selecteddevice groups in the Policy Groups field based on your selections.
7. Define the Banned Items for the software policy as follows:
a) Click the Banned Items tab and click Add.On the Choose Software Licenses or Executable Programs dialog, the list shows all availablePublisher and Applications by default. You can use the filter to search the database to reducethe list, which makes it easier to find the application you want.
b) To filter the list, do the following:i) In the Filter field enter part or all of a Publisher or Applications name.ii) Select the appropriate option to show licenses and/or executables:
● Show Licenses Only
Chapter 2: Setting Up Your Work Environment Absolute User Guide
Absolute 7.x 48

● Show Executable Programs Only● Show Both Licenses and Executable Programs (recommended)● Show Version Independent Licenses/Executables● Show Version Specific Licenses/Executables
iii) To see only the licenses installed on your organization’s devices, click the Show OnlyLicenses or Executable Programs Installed On Your Organization’s Devicescheckbox.
iv) Click Filter.c) Add one or more applications to the Banned List:
i) Under the Publisher column, click a specific name to show all applications for thatpublisher in the Applications column.
ii) Select applications to add as follows:● To select one application, click an Applications name and click > to move a single
application to the Selected list.● To select all applications from a publisher, click >> to move all available
applications to the Selected list.● To remove an application from the Selected list, click the name in that list and then
click < to move it to the Applications list.● To remove all applications from the Selected list, click << to move them all to the
Applications list.
iii) Click OK.
8. Define the Required Items for the software policy as follows:
a) Click the Required Items tab and click Add, which opens the Choose Software Licensesor Executable Programs dialog.
b) The process of filtering the list and adding applications to the Required Items list isidentical to the process described for the Banned Items list. For more information, seestep 7.
9. Save the Software Policy by doing one of the following:
● Click Save & Close to save the changes and go to the View and Manage SoftwarePolicies page.
● Click Save to save the changes and refresh the Create and Edit Software Policy page.
Copying a Software Policy
To create a new software policy by copying an existing one:
1. On the navigation bar click > Policy Groups > Software Policies.
2. On the sidebar, select the software policy that you to copy.
3. On the Create and Edit a Software Policy page, click Copy to create a new software policy.
The Create and Edit Software Policy page refreshes showing the new policy. The words “Copy of”are appended to the name of the copied software policy.
Chapter 2: Setting Up Your Work Environment Absolute User Guide
Absolute 7.x 49

4. Edit the Software Policy as appropriate. See "Editing a Software Policy and its Device GroupAssociations" on page 50.
Viewing a Software Policy
To view a software policy:
1. Complete the task, "Viewing the List of Software Policies" on page 47.
2. Find the Policy Name of the policy you want to view and click the corresponding Edit link.
Editing a Software Policy and its Device Group Associations
To edit an existing software policy and its the associated device groups:
1. On the navigation bar click > Policy Groups > Software Policies.
2. On the sidebar, select the software policy that you to edit.
3. On the Create and Edit a Software Policy page, edit the Software Policy as follows:
● In the Policy Name field, edit the existing name as appropriate.● In the Policy Description field, edit the description as appropriate.
4. To add more device groups to this software policy, do the following:
a) In the Policy Groups field, you can add this software policy to more groups by clickingAdd.
b) On the Choose Groups For Software Policy dialog, ensure that the appropriate devicegroups are moved from the Available list to the Selected list.
c) Click OK to make the changes to the Policy Groups.
5. To remove a device group from this software policy, in the Policy Groups field, select theappropriate device group and click Remove.
6. To add or remove software titles from the Banned Items and Required Items software lists,perform the instructions provided in step 7 of the task, "Creating a Software Policy" on page 48.
7. Do one of the following:
● Click Save & Close to save your changes, and return to the View and Manage SoftwarePolicies page.
● Click Save to save your changes, and remain on the updated Create and Edit a SoftwarePolicy page.
● To export the information for this software policy to a spreadsheet, click Export to Excel.Do one of the following:○ Click Open to show the contents of this software policy in Microsoft Excel.○ Click Save to save the spreadsheet and open it later.
Deleting a Software Policy
To delete a software policy:
1. Complete the task, "Viewing a Software Policy" on page 50.
Chapter 2: Setting Up Your Work Environment Absolute User Guide
Absolute 7.x 50

2. Select the appropriate Software Policy and click Delete.
IMPORTANT Exercise caution. When you click Delete, the policy is deleted withoutprompting you for confirmation.
Managing Account SettingsThe Classic Account Settings section is where you configure settings that apply to your entire accountand the managed devices within it. For example, you can set your default locale and time zone, edit theautomatic assignment of devices under the Service Guarantee, and turn on or turn off the followingfeatures for your devices:
● Event Calling● SCCM Status and Repair● Google Maps Wi-Fi Positioning● RTT-IP
NOTE To configure settings for Single Sign-on or Two-Factor Authentication, go to the Administration> Account Settings page. For more information, see the online Help.
This section provides information on the following topics:● Managing Account Settings● Managing Service Guarantee Licenses● Managing Event Calling for Your Account● Managing SCCM Status Reporting and Repair for your Account
NOTE You must log in to the Absolute console as an Administrator to perform these tasks. PowerUsers and Guests can view existing account settings, but they cannot edit them.
Editing Classic Account Settings
To edit your Classic Account Settings:
1. On the navigation bar click > Classic Account Settings.
2. To change the default language and time display formats showing across all pages in theAbsolute console select a value from the Default Language and Locale list.
3. To show local times across all pages in the Absolute console select a value from the DefaultTimezone list.
4. The Automatically assign available Service Guarantee Licenses to devices checkbox isselected by default. It controls whether available Service Guarantee licenses are assignedautomatically to newly activated devices. To turn off auto-assignment of licenses, clear thecheckbox.
For more information about Absolute products with a Service Guarantee, see "Managing ServiceGuarantee Licenses" on page 54.
Chapter 2: Setting Up Your Work Environment Absolute User Guide
Absolute 7.x 51

NOTE Auto-assignment of licenses applies to new devices only. If a Service Guaranteelicense becomes available and an existing device is unlicensed, the license is not automaticallyassigned to the device. To assign a license to an existing device, see "Manually Editing ServiceGuarantee License Assignment" on page 55.
5. At the Full Disk Encryption Status area, do one of the following:
● To turn on full-disk encryption data collection from the devices in your account, select theCollect full disk encryption data from devices checkbox.
NOTE Full-disk encryption data collection is supported for Windows and Mac devicesonly. When data collection is turned on, the collection process starts when the devicemakes its next agent call. Therefore, depending on the agent’s call frequency, the Full-DiskEncryption Status Report may be updated within a timeframe from several minutes up to 24hours.
● To stop collecting data about full-disk encryption from your devices, clear the Collect fulldisk encryption data from devices checkbox. This action does not delete any current orhistorical data, however encryption alerts are suspended automatically.
● If you want to turn on full-disk encryption data collection again, enable this setting andmanually activate the encryption alerts. For more information, see "Reactivating SuspendedAlerts" on page 22.
For more information about full-disk encryption, see "Full-Disk Encryption Status Report" on page102.
6. At the Absolute Secure Drive area, do one of the following:
● To turn on data collection, select the Collect Absolute Secure Drive Failed Login datafrom devices checkbox. For more information, see "Absolute Secure Drive AuthenticationFailures Report" on page 100.
NOTE By default, data collection for Absolute Secure Drive Failed Logins is turned on forall accounts.
● To turn off data collection, clear the Collect Absolute Secure Drive Failed Login datafrom devices checkbox. The data collected before turning off this option is not deleted andcontinues to show on the Absolute Secure Drive Authentication Failures Report. For moreinformation, see "Absolute Secure Drive Authentication Failures Report" on page 100.
7. At the Absolute Customer Service Account Access area, we recommend that you selectthe Allow Absolute customer service staff access to your account option, if it is notselected by default. From time to time, it may be necessary for an Absolute representative tolog in to your account to investigate a problem or correct an issue, and this option enablesthem to perform these actions.
Note that when the option is enabled:
● Absolute customer service staff can't perform the following actions on your account:○ Submit a request for any of the following security actions:
– Device Freeze
○ Submit an Investigation Report
Chapter 2: Setting Up Your Work Environment Absolute User Guide
Absolute 7.x 52

● All login and logout events performed by Absolute customer service staff are logged foryour account.
8. If you want your managed Windows devices to log the date and time when a file was lastaccessed, in the Last Access Time Stamp area, select the checkbox next to Enable last fileaccess date and time stamps (Windows devices only).
NOTE For Mac devices, no setting is required. Last file access dates and times are alwayslogged and included in the Deletion log file.
NOTE On supported Windows devices, the following registry key controls the logging of fileaccess time stamps:HKEY_LOCAL_MACHINE\SYSTEM\CurrentControlSet\Control\FileSystem\NtfsDisableLastAccessUpdateBy default, this registry key is set to "1". When you enable the Last Access Time Stampsetting, the registry key is set to "0" (zero), which may slow performance slightly on someWindows devices.
9. To use Google Maps™ Wi-Fi Positioning to find the locations of your managed devices, in theGoogle Maps™ Wi-Fi Positioning area, select the Use Google Geolocation for Wi-FiPoints checkbox.
When you enable this setting:
● Google Maps Wi-Fi Positioning can be used to find the locations of your managed devices.For more information, see "Understanding Location Technologies" on page 121.
● The Google Maps™ Wi-Fi Positioning option is available, and selected by default, in theGeofences feature and Geolocation Tracking reports. For more information, see thefollowing topics:○ "Creating Geofences" on page 201○ "Geolocation Tracking Reports" on page 119
● The setting is hidden on the Classic Account Settings page.
NOTE This setting is applicable only if Geolocation Tracking is authorized for your account.For more information, see "Authorizing Geolocation Tracking"
10. At the SCCM Status and Repair area, configure SCCM Status reporting and SCCM Repair forthe Windows devices in your account.
IMPORTANT With the release of Absolute 7.2, you can now use the Application Persistencefeature to report on and repair SCCM clients installed on your Windows devices. If you haveSCCM Report and Repair enabled, we recommend that you disable it and activate theApplication Persistence: Microsoft SCCM policy in one or more policy groups. For moreinformation, see About Application Persistence: Microsoft SCCM policies in the online Help.
For more information, see "Managing SCCM Status Reporting and Repair for your Account" onpage 60.
Chapter 2: Setting Up Your Work Environment Absolute User Guide
Absolute 7.x 53

11. At the RTT-IP Setting area, make any changes to your account-wide RTT-IP settings. Formore information about RTT-IP and its various settings see "Using Real-Time Technology overIP" on page 146.
12. At the Call Settings area, configure whether an agent call is made when specific events occuron the account’s managed devices. For more information, see "Managing Event Calling forYour Account" on page 55.
NOTE You can also manage Event Calling at the device level. For more information, see"Editing Asset Information" on page 73.
13. If the Chromebooks - Google Account area is available, and you want to manage yourChromebook devices in the Absolute console, see "Managing your Google account in theAbsolute console" on page 225.
14. Click Save changes.
Managing Service Guarantee LicensesWhen a device that is assigned a Service Guarantee license is stolen and Absolute is unable to recoverthe device, or start a Data Delete operation, you may be eligible for a service guarantee payout on thatdevice. To be eligible for this payout, the devices in your account must be correctly flagged as beingService Guarantee-applicable before a theft incident occurs.
One of the following scenarios is applicable:● Your account includes Absolute products with the Service Guarantee and you have
licenses available: By default, if your account includes Absolute products with the ServiceGuarantee, and you have additional licenses available, a Service Guarantee license isautomatically assigned to each new device making the device eligible for Service Guaranteepayouts.
IMPORTANT If you turn auto-assignment of Service Guarantee licenses off, you mustmanually assign the service guarantee license to applicable devices in your account. For moreinformation on manually assigning a service guarantee license, see "Manually Editing ServiceGuarantee License Assignment" on page 55.
● Your account includes Absolute products with the Service Guarantee and you do nothave licenses available: If your account contains more devices than licenses, automaticassignment of licenses to devices is disabled until you either add more licenses to your accountor manually remove the Service Guarantee license from some devices.For example, if you have 1000 licenses, and 1250 devices contacting our Monitoring Center, then250 devices are neither assigned licenses, nor are they eligible for the service guarantee.
For more information on manually removing the Service Guarantee license from devices, see"Manually Editing Service Guarantee License Assignment" on page 55.
● Your account contains products both with and without the Service Guarantee: If youraccount contains a mix of Absolute products, where some products include the ServiceGuarantee and others don’t, the Service Guarantee licenses for your account may be assignedincorrectly.
Chapter 2: Setting Up Your Work Environment Absolute User Guide
Absolute 7.x 54

To address such an issue, you must edit the Service Guarantee license assignment manually.For more information, see "Manually Editing Service Guarantee License Assignment" on page55.
Manually Editing Service Guarantee License AssignmentYou can either assign or remove the Service Guarantee License for each device individually or usedevice groups to make the change.
● Editing the value for a single device: If you want to assign or remove the Service Guaranteelicense for a single device, you can do so from the View or Edit Custom Device Fields page forthe device.○ To assign the Service Guarantee license to a device, open the View or Edit Custom Device
Fields page, open the Has Service Guarantee list, and click Yes.○ To remove the Service Guarantee license for a device, open the View or Edit Custom
Device Fields page, open the Has Service Guarantee list, and click No.
For more information, see the online Help.
● Editing the value for a group of devices: The quickest way to manually assign or removeService Guarantee licenses from devices is to create a device group and change the HasService Guarantee value.To change the Service Guarantee License assignment for a group of devices:
a) Create a device group containing the devices for which you want to assign or removeService Guarantee licenses. For example, if you want to assign the Service Guarantee toall the employees working in the Sales department, create a device group containing thedevices of all the Sales employees.
b) Open the View and Edit Custom Device Fields page for the device group you have justcreated in step a, open the Has Service Guarantee list, and click Yes to assign or No toremove the Service Guarantee licenses, whichever is appropriate. For information onchanging a Custom Device Field for a device group, see the online Help.
Managing Event Calling for Your AccountDepending on the product your organization purchased, this feature may not be available for youraccount.
You can turn on Event Calling for all active Windows and Mac devices within an account. Event Callinglets these managed devices make an agent call when a significant change event occurs on a device. Achange to any of the following device attributes can trigger an event call:
● device location● hardware configuration● installed software● network information (Public IP)● logged in user
For more information about the change events that trigger an event call, see "Events That Can Triggeran Event Call" on page 56.
Chapter 2: Setting Up Your Work Environment Absolute User Guide
Absolute 7.x 55

Event calls supplement the scheduled calls that occur automatically from each managed device every24.5 hours. However, when an event call occurs it resets the regular call schedule. Typically, whenEvent Calling is turned on, device information in the Absolute console is more up-to-date, which meansthat Alerts are triggered on a more timely basis and your reports are more accurate.
For example, a Windows device makes a scheduled agent call to the Monitoring Center at 9:00 a.m. At10:30 a.m. the device’s Public IP changes, which is considered a rule violation based on the settingsmade by the Administrator.
One of the following outcomes may occur, depending on whether Event Calling is turned on:
Event Callingturned on? Outcome
Yes An event call is triggered immediately, which updates the device’s Public IPaddress in the Absolute console. If a Public IP related Alert was created, the eventcall triggers an Alert to notify the Administrator that a rule violation has occurred.If RTT-IP is enabled for the account, the Administrator immediately requests asecurity operation, such as a Device Freeze. If the device is online, the agent isinstructed at the next RTT-IP ping to make a full agent call and the securityoperation is performed. If the device is off-line, the security operation is performedon the next reboot.
No The next scheduled agent call occurs at 9:30 a.m. the following day (23 hours afterthe Public IP change event). The device’s Public IP address is updated in theAbsolute console. If a Public IP related Alert was created, the agent call triggers anAlert to notify the Administrator that a rule violation has occurred, but by then, thedevice has been off the network for 23 hours.If RTT-IP is enabled for the account, the Administrator immediately requests asecurity operation, such as a Device Freeze. If the device is online, the securityoperation is performed at the next RTT-IP ping, but RTT-IP alone does notaccelerate the initiation of the Alert itself.
For more information about Alerts, see "Alerts" on page 13. For more information about RTT-IP, see "Using Real-Time Technology over IP" on page 146.
This section provides information on the following topics:● Events That Can Trigger an Event Call● Understanding the Minimum Event Call Period● Turning on Event Calling for Your Account● Editing Event Calling Settings● Turning Off Event Calling● Viewing the List of Devices with Event Calling Turned On
NOTE By default, Event Calling is turned off for all devices. You can turn on Event Calling for allactive Windows and Mac devices within an account, or for individual managed devices. For moreinformation about turning on Event Calling for an individual device, see "Editing Asset Information" onpage 73.
Events That Can Trigger an Event CallAn event call is triggered when a change event (change in a device attribute) occurs on the device. Thefollowing table describes the change events that can be configured to trigger an event call.
Chapter 2: Setting Up Your Work Environment Absolute User Guide
Absolute 7.x 56

Change event/Configuration option
Description
Location change A change in the location of a deviceWi-Fi hotspots are used to identify changes in device location. If the signalstrength or availability of the Wi-Fi hotspots stored in a device changes, the deviceis considered to have changed its location. A location change event is logged onlyif the current Wi-Fi hotspots indicate that the device moved approximately 200meters, which is the average range of a Wi-Fi hotspot.
Hardware change A change to the memory, CPU, or hard drive on a deviceAdding or removing the following devices does not trigger a hardware change:● Printers● Firewire devices● Thunderbolt devices● Bluetooth devices
NOTE To detect a hardware change, the device needs to be restarted. Thedevice’s hardware inventory is compared before and after the restart. If theinventories do not match, a hardware change event is logged and an event call istriggered.
Software change A change to the inventory of installed software applications, or changes to theoperating system of the device
Logged in user change A change of the user of the deviceThe username of the currently logged in user is compared to the usernameassociated with the previous session. If they do not match, a user change event islogged and an event call is triggered.OnWindows devices, a user change event is also logged when the Switch Userfeature is used.
Network change A change to the Public IP Address of a deviceWhen a managed device’s local IP address changes, the device’s public IPaddress is checked to determine if it has also changed. If so, a network changeevent is logged and an event call is triggered.
Description of change events that trigger an event call
Understanding the Minimum Event Call PeriodWhen you configure Event Calling, you need to specify a Minimum Event Call Period, which controlsthe minimum amount of time that must elapse between event calls from a device. This setting lets youdetermine how frequently a device calls the Monitoring Center when multiple change events occur on adevice in rapid succession.
The purpose of the Minimum Event Call Period setting is to reduce the flow of unnecessary traffic toyour network gateways. We recommend that you experiment with the various settings to determine theoptimal setting for your organization.
Possible values are:
● 15 minutes ● 2 hours
● 20 minutes ● 3 hours
Chapter 2: Setting Up Your Work Environment Absolute User Guide
Absolute 7.x 57

● 30 minutes ● 4 hours
● 45 minutes ● 6 hours
● 1 hour
ExampleEvent Calling is activated on a device and the Minimum Event Call Period is set to 2 hours.The next day, two software changes occur on the device 10 minutes apart. The first software change triggers anevent call immediately, but the second call must wait for the Minimum Event Call Period to expire.A network change then occurs on the device 20 minutes after the second software change. No event call is madebecause the Minimum Event Call Period has not yet expired.The Minimum Event Call Period expires two hours after the first event call. A new event call is triggered from thedevice to send the details of the second software change and the network change to the Monitoring Center.
Turning on Event Calling for Your AccountBy default, Event Calling is turned off at the account level. To turn on Event Calling for all devices inyour account:
1. On the navigation bar click > Classic Account Settings.
2. Scroll to the Call Settings area.
3. Click the field and select one of the following options:
● Set call settings for all capable devices: Turn on Event Calling for all existing and newlyactivated Windows and Mac devices. As new Windows and Mac devices are activated, turnon Event Calling and apply the specified call settings.
● Set call settings for new devices: As new Windows and Mac devices are activated, turnon Event Calling and apply the specified call settings.
● Turn on event calling for all devices where event calling is turned off: Turn on EventCalling for existing Windows and Mac devices only.
4. In the Minimum Event Call Period list select the minimum amount of time that must elapsebetween agent calls from a device. Possible values range from 15 minutes to 6 hours. Formore information, see "Understanding the Minimum Event Call Period" on page 57.
5. All Configuration Options are selected by default. To exclude one or more ConfigurationOptions, clear each applicable checkbox.
NOTE For more information about each option, hover over next to Configuration Options.For detailed information about the device changes associated with each option, see "EventsThat Can Trigger an Event Call" on page 56.
6. Click Save changes. Event Calling is activated on each device on the next scheduled agentcall.
NOTE If you selected a call setting option that applies to newly activated devices, theMinimum Event Call Period and Configuration Options that will be applied to those devicesshow under Current default call settings for new devices.
Chapter 2: Setting Up Your Work Environment Absolute User Guide
Absolute 7.x 58

Editing Event Calling SettingsIf Event Calling is turned on at the account level, you can edit the Minimum Event Call Period andConfiguration Options at any time.
To edit the call settings for devices associated with the account:
1. On the navigation bar click > Classic Account Settings.
2. Scroll to the Call Settings area.
3. Click the field and select one of the following options:
● Set call settings for all capable devices: Update the call settings for all existing andnewly activated Windows and Mac devices.
● Set call settings for new devices: Update the call settings for newly activated Windowsand Mac devices only.
● Change call settings for all devices where event calling is turned on: Update the callsettings for all existing Windows and Mac devices that currently have Event Calling turnedon. If Event Calling was turned off for one or more devices at the device level, thosedevices are left unchanged.
● Turn on event calling for all devices where event calling is turned off: Turn on EventCalling for the following Windows and Mac devices:○ Devices with Event Calling turned off at the device level○ Newly activated devices without Event Calling turned on
NOTE This option is available only if Event Calling is turned on at the account level, but itis turned off for some devices. For more information about managing Event Calling at thedevice level, see "Configuring Event Calling for a Device" on page 79.
4. Edit the Minimum Event Call Period. Possible values range from 15 minutes to 6 hours. Formore information, see "Understanding the Minimum Event Call Period" on page 57.
5. Edit the Configuration Options by selecting or clearing each applicable checkbox.
NOTE For more information about each option, hover over next to Configuration Options.For detailed information about the device changes associated with each option, see "EventsThat Can Trigger an Event Call" on page 56.
6. Click Save changes. The updated call settings are activated on each device on the nextscheduled agent call.
Turning Off Event CallingIf Event Calling is turned on at the account level, you can turn it off for all devices in the account.
NOTE To turn off Event Calling for individual devices, see "Configuring Event Calling for a Device" onpage 79.
To turn off Event Calling for all devices in the account:
1. On the navigation bar click > Classic Account Settings.
Chapter 2: Setting Up Your Work Environment Absolute User Guide
Absolute 7.x 59

2. Scroll to the Call Settings area.
3. Click the field and select Turn off event calling.
4. Click Save changes. Event Calling is turned off on each device on the next scheduled agentcall.
Viewing the List of Devices with Event Calling Turned On
To view the list of managed devices that have Event Calling turned on:
1. On the navigation bar, click > Classic Account Settings.
2. Scroll to the Call Settings area.
3. Under Devices with event calling turned on, click View. A dialog opens.
4. Filter the list of devices using any of the following criteria:
● Identifier: a unique Electronic Serial Number assigned to the agent that is installed on adevice
● Username: the unique name detected by the agent that identifies the person who isassociated with this device
● Device Name: the name assigned to the device in the operating system● Serial Number: the serial number of the device or other hardware● Event Call Settings: the Configuration Options enabled when Event Calling was turned on● Minimum Event Call Period: the time period selected when Event Calling was turned on● Last Call Reason: the reason for the last agent call from the device. Possible values are
Scheduled or Event | <type of change>.
NOTE The results cannot be filtered by the Last Call Time, which is the date and time of thelast agent call from the device.
5. Sort the list by clicking a column heading.
NOTE You cannot sort on the Event Call Settings or Last Call Reason columns.
6. To view the Device Summary page for a device, click the Identifier link.
7. Click Cancel to close the dialog.
Managing SCCM Status Reporting and Repair for your AccountIMPORTANT With the release of Absolute 7.2, you can now use the Application Persistence featureto report on and repair SCCM clients installed on your Windows devices. If you have SCCM Report andRepair enabled, we recommend that you disable it and activate the Application Persistence: MicrosoftSCCM policy in one or more policy groups. For more information, see About Application Persistence:Microsoft SCCM policies in the online Help.
If you use Microsoft Service Center 2012 Configuration Manager (SCCM), you can configure thefollowing options on the Classic Account Settings page:
Chapter 2: Setting Up Your Work Environment Absolute User Guide
Absolute 7.x 60

● Collect SCCM Status on Windows devices: track the status of the SCCM client installed onthe Windows devices in your account. For more information about SCCM and detecting SCCMStatus information, see "About Collecting SCCM Status From Windows Devices" on page 102.
● Enable SCCM Repair: repair any SCCM clients that are not functioning correctly. For moreinformation about this feature, see "About Repairing SCCM Clients" on page 103.
This section provides information on the following topics:● Managing SCCM Status Reporting for Your Account● Managing SCCM Repair for Your Account● Viewing the List of Devices with SCCM Status Reporting Turned On
Managing SCCM Status Reporting for Your Account
IMPORTANT With the release of Absolute 7.2, you can now use the Application Persistence featureto report on and repair SCCM clients installed on your Windows devices. If SCCM Status Reporting isenabled, we recommend that you disable it and activate the Application Persistence: Microsoft SCCMpolicy in one or more policy groups. For more information, see About Application Persistence: MicrosoftSCCM policies in the online Help.
You can track the status of the SCCM client installed on the Windows devices in your account.
When SCCM Status reporting is enabled at the account level:● The agent is updated on each device on the next agent call. The update includes a script, run
every six hours, to detect the status of the device's SCCM client. The script performs a seriesof health check tests to determine if the client is present and functioning correctly.
● As new Windows devices are activated, SCCM Status reporting is automatically enabled onthose devices.
● The most recent SCCM Status information for each Windows device shows in the SCCMStatus Report.
● A history of SCCM Status changes for each Windows device shows in the SCCM StatusHistory Report, and the SCCM Status History tab of each device's Device Summary page.
● You can use the Alerts feature to trigger an alert notification when a SCCM Status changeoccurs. For more information about creating Alerts, see "Creating New Custom Alerts" on page16.
NOTE You can also manage SCCM Status reporting for individual devices or groups of devices. Formore information, see the following topics:- "Managing SCCM Status Reporting for a Windows Device" on page 80- "Managing SCCM Status Reporting and Repair in the SCCM Status Report" on page 106
To disable SCCM Status Reporting for all devices in your account:
1. On the navigation bar click > Classic Account Settings.
2. Scroll to the SCCM Status and Repair area.
3. Clear the Collect SCCM Status from Windows devices checkbox.
4. Click Save changes.
Chapter 2: Setting Up Your Work Environment Absolute User Guide
Absolute 7.x 61

Managing SCCMRepair for Your Account
IMPORTANT With the release of Absolute 7.2, you can now use the Application Persistence featureto report on and repair SCCM clients installed on your Windows devices. If you have SCCM Repairenabled, we recommend that you disable it and activate the Application Persistence: Microsoft SCCMpolicy in one or more policy groups. For more information, see About Application Persistence: MicrosoftSCCM policies in the online Help.
You can use the SCCM Repair feature to repair any SCCM clients that are installed on your managedWindows devices and are not functioning correctly.
This feature works in conjunction with the SCCM Status reporting feature. When SCCM Repair isenabled at the account level:
● The agent is updated on each device on the next agent call. The update includes a script, runevery six hours, to detect the status of the device's SCCM client and automatically repair theclient if it is not functioning correctly.
● As new Windows devices are activated, SCCM Repair is automatically enabled on thosedevices.
● The most recent SCCM Repair information for each Windows device shows in the SCCMStatus Report.
● A history of SCCM Repair information for each Windows device shows in the SCCM StatusHistory Report, and the SCCM Status History tab of each device's Device Summary page.
● You can use the Alerts feature to trigger an alert notification when SCCM Repair occurs on adevice. For more information about creating Alerts, see "Creating New Custom Alerts" on page16.
To disable SCCM Repair for all devices in your account:
1. On the navigation bar click > Classic Account Settings.
2. Scroll to the SCCM Status and Repair area.
3. Clear the Enable SCCM Repair checkbox.
4. Click Save changes.
5. On the Confirm message dialog, review the details of the requested action to confirm that theyare correct, and click Continue.
Viewing the List of Devices with SCCM Status Reporting Turned On
To view the list of managed Windows devices that have SCCM Status Reporting turned on:
1. On the navigation bar click > Classic Account Settings.
2. Scroll to the SCCM Status and Repair area.
3. Under Devices with SCCM Status reporting turned on, click View. A dialog opens.
4. Filter the list of devices using any of the following criteria:
● Identifier: a unique Electronic Serial Number assigned to the agent that is installed on adevice
Chapter 2: Setting Up Your Work Environment Absolute User Guide
Absolute 7.x 62

● Username: the unique name detected by the agent that identifies the person who isassociated with this device
● Device Name: the name assigned to the device in the operating system● SCCM Status: the current status of the SCCM client on this device. Possible values are:
○ Absent: the SCCM client is not installed on the device.○ Needs attention:One or more health check tests failed and SCCM Repair is not
enabled on the device. You may want to enable SCCM Repair for the device.○ OK: all health check tests passed and the SCCM client is functioning correctly.○ Repair failed: SCCM Repair is enabled on the device. An attempt was made to repair
the SCCM client because it was not functioning correctly. The client was not repaired.For more details about why the repair failed, click the link.
○ Repair successful: SCCM Repair is enabled. An attempt was made to repair theSCCM client because it was not functioning correctly. The client was repaired.
To view the results of each health check test, click the link. For more information, see"Viewing the Details of a SCCM Status Change " on page 109.
5. Sort the list by clicking a column heading.
6. To view the Device Summary page for a device, click the Identifier link.
7. Click Cancel to close the dialog.
Downloading the Absolute Agent for Android DevicesThe Agent section on the Download Packages page provides links to Android agent installationpackages which are stamped for your account. The following information is listed for each installationpackage:
● Agent Type: the platform-specific agent type● Agent Version: the version (build) number of the agent● Supported Platforms: the operating systems that are supported by each agent● Last Updated: the date and time the agent files were created● Last Downloaded: the date and time the agent files were last downloaded
NOTE To download Windows and Mac agent installation packages, go to the Agent Managementpage in the Settings area. For more information, see Downloading the Absolute agent for Windows andMac devices in the online Help.
To download the stamped agent installation files:
1. On the navigation bar click > Agent Management.
2. At the bottom of the page, click Go to the Classic Download Packages Page.
3. In the Agent for Mobile Operating Systems section, click the appropriate link in the AgentType column.
4. Follow the on-screen instructions to complete the download.
After the agent is installed on a client device, the device is automatically associated with youraccount.
Chapter 2: Setting Up Your Work Environment Absolute User Guide
Absolute 7.x 63

For more information about installing the agent on Android devices, see Installing the Android agent inthe Help.
Upgrading to the Latest Version of the AgentPeriodically, Absolute releases a new version of the Absolute agent for Android devices. When a newagent is available, the following steps are taken:
● An announcement is posted in the console.● New agent packages are automatically created for your account and added to the Download
Packages page (assuming the Agent Type applies to your account).● Your existing managed devices are automatically upgraded to the new agent, as applicable.
Managing System NotificationsThe System Notifications page lets Administrators configure a list of recipients for system notificationmessages. System notifications are auto-generated messages warning users of potential problems withthe account.
For example, if one of your Devices covered by the Service Guarantee stops calling the MonitoringCenter, the Devices With The Service Guarantee Not Calling system notification warns you that thedevice is no longer calling.
System notifications are sent to the list of recipients by e-mail. You likely want to include allAdministrators on your recipient list. You are limited to 20 recipients per notification.
IMPORTANT All tasks in this section require that you log in to the Absolute console as anAdministrator.
This section describes the following tasks:● Updating the System Notifications Page● Devices With the Service Guarantee Not Calling● Resolving a Recovery Flag Disparity
Chapter 2: Setting Up Your Work Environment Absolute User Guide
Absolute 7.x 64

Updating the System Notifications Page
To update the System Notifications page:
1. On the navigation bar click > System Notifications.
2. On the System Notifications page click the appropriate tab and edit the list of e-mail addresses.
3. Click Save.
Devices With the Service Guarantee Not CallingThe Devices With The Service Guarantee Not Calling system notification warns recipients that oneor more of their devices covered by the Service Guarantee has stopped calling the Monitoring Center.
To edit the Devices With The Service Guarantee Not Calling system notification:
1. On the navigation bar click > System Notifications.
2. On the System Notifications page click the Devices With The Service Guarantee NotCalling tab and do one of the following:
● To add recipients, select the Enable Notification for All E-mail Addresses Below optionand enter the e-mail addresses of the appropriate recipients in the E-mail Addresses forNotification field.
NOTE You can add a maximum of twenty (20) e-mail addresses in this field. Separateeach entry with a semicolon.
● To remove recipients, select the Disable Notification for All E-mail Addresses Belowoption and enter the e-mail addresses of the appropriate recipients in the E-mailAddresses for Notification field. To remove multiple recipients simultaneously, separateeach entry with a semicolon. Click Save to save any changes.
● To disable the system notification, select the Disable Notification for All E-mailAddresses Below option and remove all e-mail addresses from the list of the recipients.
3. Click Save.
Resolving a Recovery Flag DisparityThe Recovery Flag Disparity system notification warns recipients that the number of devices with therecovery flag set exceeds the number of licenses with the recovery service purchased.
To resolve a recovery flag disparity:
1. On the navigation bar click > System Notifications.
2. On the System Notifications page, click the Recovery Flag Disparity tab and do one of thefollowing:
● To add recipients, enter the e-mail addresses of the appropriate recipients in the E-mailAddresses for Notification field.
Chapter 2: Setting Up Your Work Environment Absolute User Guide
Absolute 7.x 65

NOTE You can add a maximum of twenty (20) e-mail addresses in this field. Separateeach entry with a semicolon.
● To remove recipients, remove the e-mail addresses of the appropriate recipients in the E-mail Addresses for Notification field. Make sure that all remaining entries are separatedwith a semicolon, with no spaces.
● To disable the system notification, remove all e-mail addresses from the recipient list.
3. Click Save.
Managing the Investigation Report Contact ListThe Investigation Report Contact List contains contact information for the individuals within yourorganization who receive notifications about theft reports that are under investigation. When userssubmit a theft report, they can click a link on the Create and Edit Investigation Report page to view thecontact list. See Reporting a device missing or stolen in the online Help.
Only Security Administrators are authorized to manage the Investigation Report Contact List. They canadd new contacts to the list, edit contact information, and update the Contact Status of a contact.
Possible values for Contact Status are:● Active: the contact receives notifications via the contact information recorded in the
Investigation Report Contact List.● Disabled: the contact’s information is stored but the individual does not receive notifications.
NOTE When you first access the Investigation Report Contact List it may be prepopulated with contactinformation collected from previously submitted theft reports. If some of these contacts are no longerapplicable, you can disable their contact record.
Contacts cannot be deleted. If you need to prevent a former contact from receiving notifications, disablethe contact in the Investigation Report Contact List. See "Disabling Contacts" on page 69.
This section provides information on the following topics:● Accessing the Investigation Report Contact List● Adding Contacts to the Investigation Report Contact List● Editing Contact Information● Viewing and Printing the Investigation Report Contact List● Disabling Contacts● Activating Disabled Contacts
IMPORTANT To perform the tasks in this section requires you log in to the Absolute console as aSecurity Administrator.
Accessing the Investigation Report Contact List
To access the Contact List:
1. On the navigation bar, click to open the Settings area.
2. Click Investigations Contact List. The Investigation Report Contact List page opens.
Chapter 2: Setting Up Your Work Environment Absolute User Guide
Absolute 7.x 66

Adding Contacts to the Investigation Report Contact List
To add a new contact to the Investigation Report Contact List:
1. On the Investigation Report Contact List page, click New Contact.
2. On the Create and Edit Investigation Report Contact Details page in the General Informationsection, enter the following information about the individual:
● First Name● Last Name● Title: the individual’s title within your organization● Language: select the preferred language of the individual from the list
NOTE First Name and Last Name are required fields.
3. If your account includes Absolute products with the Service Guarantee, you need to designateone contact in your organization as the Service Guarantee Contact. If this applies to thisindividual, select the checkbox.
NOTE If this option is disabled, another contact has already been specified as the ServiceGuarantee Contact.
4. In the Contact section, enter the following information about the individual:
● E-mail Address (required field)● Phone and Ext● Fax● Cell● Pager
5. If you want to add additional information, enter a comment in the Note field.
6. Click Save.
On the Investigation Report Contact List page, the new contact is added to the list and theContact Status is set to Active.
Editing Contact InformationIf the contact information for an individual has changed, you can update that information in theInvestigation Report Contact List.
To edit a contact’s contact information:
1. Open the Investigation Report Contact List page.
2. In the Search Criteria area, do the following:
a) Use one or more of the following criteria to find the contact you want to edit:● contact name: search using all or part of the name of the contact● e-mail address: search using all or part of the e-mail address of the contact
Chapter 2: Setting Up Your Work Environment Absolute User Guide
Absolute 7.x 67

● phone: search using all or part of the contact’s phone number, if recorded in theAbsolute console
b) To include disabled contacts in the search results, select the Include Disabled Contactscheckbox.
c) Click Show results. The search results show in the results grid.
3. Click the Contact Name link of the contact you want to edit.
4. On the Create and Edit Investigation Report Contact Details page, edit the contact informationfor the individual.
5. Select or clear Service Guarantee Contact as applicable. For more information, see step 3 ofthe task, "Adding Contacts to the Investigation Report Contact List" on page 67.
6. If applicable, edit the content in the Note field.
7. Do one of the following:
● To save the edits and set the Contact Status of the contact to Active, click Save &Activate.
● To save the edits and set the Contact Status of the contact to Disabled, click Save &Disable.
Viewing and Printing the Investigation Report Contact List
To view the Investigation Report Contact List and save it to a CSV file for printing:
1. Open the Investigation Report Contact List page.
By default, only Active contacts show in the contact list. The following information about eachcontact is presented in columns in the results grid:
● Contact Name● Phone● E-mail Address● Service Guarantee Contact● Note● Contact Status
2. To search for a contact, in the Search Criteria area do the following:
a) Use one or more of the following criteria to find the contact:● contact name: search using all or part of the name of the contact● e-mail address: search using all or part of the e-mail address of the contact● phone: search using all or part of the contact’s phone number, if recorded in the
Absolute console
b) To include disabled contacts in the search results, select the Include Disabled Contactscheckbox.
c) Click Show results. The search results show in the results grid.
3. The list is sorted by contact creation date in descending order; the most recently added contactis at the top of the list. To sort the list by one of the columns, click the column header.
Chapter 2: Setting Up Your Work Environment Absolute User Guide
Absolute 7.x 68

4. To send an e-mail to a contact, click the contact’s E-mail Address. A new message dialogopens.
5. To print the current page of the contact list:
a) Click . If your browser’s security is set to prompt you before opening or downloadingfiles, click Open to open the CSV file.The content is exported to a CSV file, which you can view in a spreadsheet application, suchas Microsoft® Excel.
b) Print the file.
Disabling ContactsYou can change the Contact Status of a contact from Active to Disabled. Disabled contacts do notreceive notifications.
NOTE To ensure that contact information for closed theft reports is retained, you cannot delete acontact.
To disable a contact:
1. Open the Investigation Report Contact List page.
2. In the Search Criteria area, do the following:
a) Use one or more of the following criteria to find the contacts you want to disable:● contact name: search using all or part of the name of the contact● e-mail address: search using all or part of the e-mail address of the contact● phone: search using all or part of the contact’s phone number, if recorded in the
Absolute console
b) Click Show results. The search results show in the results grid.
3. In the results grid, select the checkbox next to each contact you want to disable. To select allcontacts on the current page of the results grid, select the checkbox next to Contact Name inthe header.
4. Click Disable. The Contact Status is set to Disabled.
NOTE By default, Disabled contacts are not visible in the Investigation Report Contact List. Toview and edit them, select the Include Disabled Contacts checkbox in the Search Criteriaarea and perform a search.
Activating Disabled ContactsYou can change the Contact Status of a contact from Disabled to Active. Only Active contacts receivenotifications.
To activate a disabled contact:
1. Open the Investigation Report Contact List page.
2. In the Search Criteria area, do the following:
Chapter 2: Setting Up Your Work Environment Absolute User Guide
Absolute 7.x 69
a) Use one or more of the following criteria to find the contacts you want to activate:● contact name: search using all or part of the name of the contact● e-mail address: search using all or part of the e-mail address of the contact● phone: search using all or part of the contact’s phone number, if recorded in the
Absolute console
b) Select the Include Disabled Contacts checkbox.c) Click Show results. The search results show in the results grid.
3. Select the check box next to each contact you want to activate. To select all contacts on thecurrent page of the results grid, select the checkbox next to Contact Name in the header.
4. Click Activate. The Contact Status for all selected contacts is set to Active.
Chapter 2: Setting Up Your Work Environment Absolute User Guide
Absolute 7.x 70

Chapter 3: Generating Reports
This chapter describes how to generate reports based on the data the agent collects from manageddevices. You can customize and filter reports to focus on key areas of interest. For specific detailsabout each report, see "Working with Reports" on page 85.
You can open the report you want, set the appropriate filter criteria, and generate the report results.You can also download report results in CSV or XML formats. For the following reports, the results areavailable in CSV or XML format only:
● Printer Report● Monitor Report● Microsoft Audit Summary Report● License Usage Summary Report● Calling Profiles Report● User Audit Report
When you create a custom report, you can save the report’s filter criteria. You can retrieve savedreports on subsequent visits to the Absolute console and regenerate the report to show updatedresults.
NOTE When a report is saved, the filter criteria is saved instead of the results because data changesover time.
Several tasks are common to most reports, including:● Running Reports● Navigating Reports● Editing Asset Information● Printing Reports● Saving Report Filters● Editing Saved Report Filters● Downloading Reports● Multi-level Security
Running ReportsFor an overview of each report, see "Working with Reports" on page 85.
NOTE Depending on the user role to which you are assigned, you see only those reports that aredesignated as appropriate to that user role.
To run and view a report in the Absolute console:
1. On the navigation bar, click to open the Reports page.
2. Near the bottom of the page, click Go to Classic Reports Page.
3. If necessary, click Accept to agree to the terms and conditions of running the report.
Absolute7.x 71
4. In the Search Criteria location, specify how to filter the report’s results.
NOTE When first opened, some reports return results that are based on default filter criteria.For information about using the Choose feature, see "Using the Choose Feature" on page 72.
5. Click Show Results. If no records match your filter criteria, the message No records foundmatching your search criteria shows.
NOTE For information about downloading CSV or XML output for reports that show onscreen, see "Downloading Reports" on page 84. For information about preparing reports withresults only available for download, see "Working with Reports" on page 85.
If your session times out while you are viewing a report, a time-out warning message opens withinstructions about how to continue.
Navigating ReportsTo navigate the reports, there are some common features, which are noted next:
● Expanding and Collapsing the Search Criteria Information● Using the Choose Feature● Viewing an Entire Row in a Report Record● Moving Between the Pages of a Report● Changing the Number of Records That Show in a Report● Changing the Sort Order
Expanding and Collapsing the Search Criteria InformationThe Search Criteria can expand or collapse . Depending on whether the Search Criteria section isexpanded or collapsed, these buttons show the upward arrows or downward arrows.
Using the Choose FeatureMany areas of the Absolute console require that you enter specific data, such as an Identifier or serialnumber. To avoid human error, most reports include a Choose button.
To use the Choose feature:
1. Click Choose on any page. The Choose dialog opens with a list of all available and validvalues for the data field.
2. Click the appropriate value to select it.
A progress indicator opens to provide information about the selection process. When processingis complete, the selected value is entered into the appropriate field of the report filter.
Viewing an Entire Row in a Report RecordColumns in a report’s results grid are presented in a horizontal format, with columns and rows. Drag thescroll bar at the bottom of the page to the right to see the entire row of a report record.
Chapter 3: Generating Reports Absolute User Guide
Absolute 7.x 72

Moving Between the Pages of a ReportYou can move to various locations in a report, as follows:
● to the first page by clicking <<First or the link for page number 1● to a previous page by clicking <Prev● to a specific page by clicking the link for the page number you want● to the next page by clicking Next>● to the last page by clicking Last>>
Changing the Number of Records That Show in a ReportThe default number of records shown in each report depends upon the report. For example, when you
open a report you may see above and below the results grid at its right side.
To change the number of records that show in a report:
1. Log in to the Absolute console and open the appropriate report. See "Running Reports" onpage 71.
2. Change the default value by opening the list.
3. Select the appropriate number of records to show in the report from these options:
Changing the Sort OrderInitially most reports are sorted by Identifier, however, you can sort using any column heading.
To sort a report by any other criteria:
1. Log in to the Absolute console and open the appropriate report. See "Running Reports" onpage 71.
2. In the results grid click the column heading by which you want to sort the report.
Editing Asset InformationEach device on which the agent is installed is given a unique Identifier by the Monitoring Center. Clickan Identifier to open the Device Summary page where you can update the information associated witha particular device. For example, if an Identifier is transferred to a new device, you can change thedevice information attached to that Identifier.
To edit the information associated with a device:
1. Log in to the Absolute console and open the appropriate report following the task "RunningReports" on page 71.
Chapter 3: Generating Reports Absolute User Guide
Absolute 7.x 73

2. In any report, click the Identifier you want to edit, which opens the Device Summary page.
The Device Summary page provides information about the device.
Some information on this page is editable and some is read-only. For more information aboutworking with the information on the Device Summary page, see "Device Information on theDevice Summary Page" on page 75.
NOTE Depending on the type of device, some values on the Device Summary are notpopulated. For example, if the Identifier is associated with an Android device, only the subset ofthe hardware and software information relevant to an Android device is shown. For detailsabout the specific information detected for each supported operating system, go to theDocumentation page and see Absolute Products and Services—Data Points Collected.
3. If you changed any device information, click Save Changes. The Device Summary pageupdates to confirm that your changes are saved.
4. To regenerate the report and view any changes you made, click the Back link.
NOTE To return to the report, click the browser’s Back button. Notice that returning does notrefresh the report with changes. You must regenerate the report to see your changes.
This section provides information on the following topics:● Device Information on the Device Summary Page● Managing Event Calling for a Device● Managing SCCM Status Reporting for a Windows Device● Managing SCCM Repair for a Windows Device● Using the Assigned Username Field● Using the Dormant Devices Field
Chapter 3: Generating Reports Absolute User Guide
Absolute 7.x 74
Device Information on the Device Summary PageThis page opens when you click an Identifier that shows on any of the Classic Reports. The DeviceSummary page provides the following information about the device:
● Identifier, which is a unique identifier for this device● Make● Model● Serial Number1
● RTT-IP for Windows and Mac devices onlyFor more information about this section, see "EnablingRTT-IP for an Individual Device" on page 148.
● Call Settings for Windows and Mac devices onlyFor more information about this section, see"Managing Event Calling for a Device" on page 79.
● SCCM Status and Repair for Windows devices onlyFor more information about this section, see thefollowing topics:- "Managing SCCM Status Reporting for a WindowsDevice" on page 80- "Managing SCCMRepair for a Windows Device" onpage 81
● Device Name
● Full Windows Device Name for Windows devicesonly
● Windows Domain for Windows devices only● Workgroup for Windows devices only● Department, which you can edit● Detected Username● Assigned Username, which you can edit. For moreinformation, see "Using the Assigned UsernameField" on page 82.
● Assigned User E-mail Address, which you can edit● Detected Asset Number● Assigned Asset Number, which you can edit● Device Groups shows the device groups to whichthis managed device belongs.To edit a device group, click the applicable devicegroup link. For more information, see "Editing aDevice Group" on page 39.
● View and Edit Custom Device Field Data linkopens the View and Edit Custom Device Field page,where you can enter values for the device's customfields
IMPORTANT You can edit values in the Department, Assigned Username, Assigned User E-mailAddress, and Assigned Asset Number fields. If you edit any of these fields, click Save Changes.
More information about the device is available on the following tabs:● Hardware Summary Tab● Software Summary Tab● Call Tracking Tab● SCCM Status History Tab (Windows devices only)
1 When detecting hard drive serial numbers, the agent queries the disk controller first. If that fails, then the agentuses Microsoft’s Windows Management Interface (WMI) to get the hard disk serial numbers. For Microsoft'sdescription of a scenario where this problem may occur, see:connect.microsoft.com/VisualStudio/feedback/details/623282
Chapter 3: Generating Reports Absolute User Guide
Absolute 7.x 75
Hardware Summary TabThe Hardware Summary tab provides information about the following identification points:
NOTE Values listed in the Hardware Summary section for Detected Make, Detected Model andDetected Serial Number are captured by the agent and may differ from the manually entered valueslisted in the Asset Summary section.
● Detected Make● Detected Model● Detected Serial number values shown in the Hardware Summary section for Detected Make, Detected Model,and Detected Serial number are captured by the agent and may differ from the manually entered valuesprovided in the Asset Summary section.
● CPU● RAM● Disk Drive Information shows detected information about the installed hard drives on the device, whichincludes:
○ Physical Drives: the name of the detected hard Drive partition and the Serial Number for each○ Volumes: the name of the detected hard drive partition– Type: the type of hard drive– Filesystem: the storage and organization method for the data and files saved on the device
– Total Space: the aggregate of used and unused storage capacity of the hard drive– Free Space: the unused storage capacity of the hard drive
● Mobile Network Radios: This area is shown if any radios are detected on a mobile device. The followinginformation is available:
○ Radio Type: the mobile network radio available on the device. Possible values are:– GSM (Global System for Mobile Communication)– CDMA (Code Division Multiple Access)
○ Equipment ID: the identification number unique to the mobile device.○ Subscriber ID: also known as International Mobile Subscriber Identity (IMSI), the unique identifier associatedwith the subscriber
○ Detected Phone Number: the phone number associated with the mobile device, as reported by the device.○ Phone Number Override: the alternative or override phone number associated with the mobile device. If theagent does not detect the phone number automatically, the device automatically sends an SMS to theMonitoring Center. The reply-to address from the SMS becomes the value for the Phone Number Overridefield.
● See hardware details: provides more information about the device’s hardware.Click to open the list to view the following detected information:
○ Local IP○ Public IP○ Network Card 1 Description○ Network Card 1 MAC Address○ Network Card 1 IP
Chapter 3: Generating Reports Absolute User Guide
Absolute 7.x 76

○ Network Card 2 Description○ Network Card 2 MAC Address○ Network Card 2 IP○ Number Of CPUs○ System BIOS/Firmware Date○ System BIOS/Firmware Version○ Video Device Description○ Video Display Color Depth○ Video Display Resolution
NOTE The Printer Driver report provides a list of all printer drivers installed on the device. To download thisreport click the Download Printer Report link. This report is identical to the Printer Report, with the exceptionthat these results are limited to printer drivers installed on this device.
Software Summary TabThe Software Summary tab provides information about the following identification points:
● Operating System● Detected Anti-Malware● OS Service Pack● See installed Microsoft Hotfixes: a table that shows the following information about installed packages:○ Application○ Package Name○ Hotfix Number○ Details○ Installed By name○ Installed On date
Call Tracking TabThe Call Tracking tab provides information about the operation of the agent, including:
● Call History Report: a link to this report. To view Extended IP Call Information details, click the link under thePublic IP Address column in the results grid of the report.
● Agent first installed on (first call): date and time of the first agent call to the Monitoring Center● Agent version: agent version and number● Agent last called on: date and time of the last agent call to the Monitoring Center● Agent last called from: IP address from which the agent last called
● Agent next call expected on: date and time for the next agent call to the Monitoring Center● Asset tracking data last collected on: date and time the Asset tracking data was last collected● If the device is equipped with Geolocation Tracking functionality, the Call Tracking tab also shows the Lastknown location and the Location Determination Date for the device.
Chapter 3: Generating Reports Absolute User Guide
Absolute 7.x 77

NOTE To view the Call History Report for this Identifier, go to the Call History Report. To get detailed IP trackingor caller ID information, click the IP address or telephone number listed in the Agent Last Called From field. TheExtended Call Information page opens. This page lists details regarding the location of the IP address ortelephone number. See "Running Reports" on page 71.
SCCM Status History Tab
NOTE This tab applies only if you are using System Center 2012 Configuration Manager and theSCCM Status reporting feature is turned on for this Windows device. For more information aboutenabling SCCM Status reporting, see the following topics:- "Managing SCCM Status Reporting and Repair for your Account" on page 60- "Managing SCCM Status Reporting for a Windows Device" on page 80- "Managing SCCM Status Reporting and Repair in the SCCM Status Report" on page 106
The SCCM Status History tab shows information about changes to the status of the SCCM clientinstalled on a Windows device. If the device's agent detects that the status of the SCCM client haschanged, a row is added to the results grid. The following information is provided:
● Issue Count: the total number of times the device's SCCM Status has changed from OK to an unhealthy state.The Issue Count is incremented each time one of the following status changes occurs. Possible status changesdepend on whether SCCM Repair is enabled.
○ SCCM Repair is enabled:– OK to Repair successful– OK to Repair failed– OK to Absent– Repair Failed to Absent– Repair successful to Repair successful– Repair successful to Repair failed– Repair successful to Absent– Absent to Repair failed– Absent to Repair successful
○ SCCMRepair is disabled:– OK to Absent– OK to Needs attention– Needs attention to Absent– Absent to Needs attention
● Status Date: the date and time when the status of the SCCM client on the device changed.
● SCCM Status: the current status of the SCCM client on this device, reported at the last successful agent call.Possible values are:○ Absent: the SCCM client is not installed on the device.○ Needs attention: one or more health check tests failed and SCCMRepair is not enabled on the device. Youmay want to enable SCCM Repair for this device.
○ OK: all health check tests passed and the SCCM client is functioning correctly.○ Repair failed: SCCM Repair is enabled on the device. An attempt was made to repair the SCCM clientbecause it was not functioning correctly. The client was not repaired. For more details about why the repairfailed, click the link. If repeated attempts to repair the SCCM client fail, see "Troubleshooting Failed SCCMRepairs" on page 112.
○ Repair successful: SCCM Repair is enabled on the device. An attempt was made to repair the SCCM clientbecause it was not functioning correctly. The client was repaired.
To view the results of each health check test, click the link. For more information, see "Viewing the Details of aSCCM Status Change " on page 109.
Chapter 3: Generating Reports Absolute User Guide
Absolute 7.x 78
Managing Event Calling for a DeviceDepending on the product your organization purchased, this feature may not be available.
You can use the Call Settings area of the Device Summary page to configure Event Calling for thedevice. Event Calling is independent of and in addition to the standard scheduled agent calls that occurautomatically from each managed device.
NOTE Event Calling can be turned on at the account or device level. For more information aboutEvent Calling, and instructions for turning it on at the account level, see "Managing Event Calling forYour Account" on page 55.
Configuring Event Calling for a Device
To configure Event Calling for a managed device:
1. Navigate to the Call Settings area of the Device Summary page.
NOTE For more information about each option, hover over next to Configuration Options.For detailed information about the device changes associated with each option, see "EventsThat Can Trigger an Event Call" on page 56.
2. Do one of the following:
● To turn on Event Calling:i) Select the Turn on event calling for the device checkbox.
NOTE Event Calling is activated when the device makes its next scheduled agent call.The Scheduled Call field shows the current scheduled call frequency for the device.
ii) In the Minimum Event Call Period list select the minimum amount of time that mustelapse between agent calls from a device. Possible values range from 15 minutes to 6hours.For more information, see "Understanding the Minimum Event Call Period" on page 57.
iii) All Configuration Options are selected by default. To exclude one or moreConfiguration Options, clear each applicable checkbox.
● To edit the existing call settings for a device that has Event Calling turned on:i) Edit the Minimum Event Call Period. Possible values range from fifteen minutes to
six hours. For more information, see "Understanding the Minimum Event Call Period"on page 57.
ii) Edit the Configuration Options by selecting or clearing each applicable checkbox.● To turn off Event Calling, clear the Turn on event calling for the device checkbox.
3. Click Save changes.
Event Calling is configured on the device on the next scheduled agent call.
Chapter 3: Generating Reports Absolute User Guide
Absolute 7.x 79

Viewing the Call History for a DeviceYou can view details about the agent calls made from a Windows or Mac device over the past 365days.
To view a device’s call history:
1. Navigate to the Call Settings area of the Device Summary page.
The Last Call Reason field shows the details of the most recent agent call from the device.Possible values are:
● Scheduled● Event | <type of change>
For example: Event | Software removed, Software installed, Logged in user changed
2. Click View Call History to open the Call History dialog.
The following information about each agent call is provided:
● Call Time: the date and time of the call● Reason: the type of agent call
For event calls, the type of change is provided. Possible values are:
○ Location changed○ Hardware changed○ Software installed○ Software removed○ Logged in user changed○ Public IP changed
For more information about these changes, see "Events That Can Trigger an Event Call" onpage 56.
3. To sort the information, click the applicable column heading.
4. To close the dialog click Cancel.
Managing SCCM Status Reporting for a Windows DeviceIMPORTANT With the release of Absolute 7.2, you can now use the Application Persistence featureto report on and repair SCCM clients installed on your Windows devices. If you have SCCM StatusReporting enabled, we recommend that you disable it and activate the Application Persistence:Microsoft SCCM policy in one or more policy groups. For more information, see About ApplicationPersistence: Microsoft SCCM policies in the online Help.
If you use Microsoft Service Center 2012 Configuration Manager (SCCM), you can track the status ofthe SCCM client installed on a Windows device by configuring a setting on the device's DeviceSummary page.
NOTE For more information about SCCM and detecting SCCM Status information, see "AboutCollecting SCCM Status From Windows Devices" on page 102.
Chapter 3: Generating Reports Absolute User Guide
Absolute 7.x 80

When you enable SCCM Status reporting:● The agent is updated on the device on the next agent call. The update includes a script, run
every six hours, to detect the status of the device's SCCM client. The script performs a seriesof health check tests to determine if the client is present and functioning correctly.
● The most recent SCCM Status information for the device shows in the SCCM Status Report.● A history of SCCM Status changes for the device shows in the SCCM Status History Report
and the SCCM Status History tab of the Device Summary page.
● You can use the Alerts feature to trigger an alert notification when a SCCM Status changeoccurs on the device. For more information about creating Alerts, see "Creating New CustomAlerts" on page 16.
NOTE You can also manage SCCM Status reporting for all Windows devices in your account or for agroup of devices. For more information, see the following topics:- "Managing SCCM Status Reporting for Your Account" on page 61- "Managing SCCM Status Reporting and Repair in the SCCM Status Report" on page 106
To configure SCCM Status reporting for a Windows device:
1. Navigate to the SCCM Status and Repair area of the Device Summary page.
2. Do one of the following:
● To turn on SCCM Status reporting, select the Collect SCCM Status for the devicecheckbox.
● To turn off SCCM Status reporting, clear the Collect SCCM Status for the devicecheckbox.
NOTE If SCCM Status reporting is turned on at the account level, you can turn it off forthis device by clearing the checkbox.
3. Click Save changes.
Managing SCCMRepair for a Windows DeviceIMPORTANT With the release of Absolute 7.2, you can now use the Application Persistence featureto report on and repair SCCM clients installed on your Windows devices. If you have SCCM Repairenabled, we recommend that you disable it and activate the Application Persistence: Microsoft SCCMpolicy in one or more policy groups. For more information, see About Application Persistence: MicrosoftSCCM policies in the online Help.
You can use the SCCM Repair feature to repair a SCCM client that is installed on a managed Windowsdevice and is not functioning correctly.
This feature works in conjunction with the SCCM Status reporting feature. When SCCM Repair isenabled:
● The agent is updated on the device on the next agent call. The update includes a script, runevery six hours, to detect the status of the device's SCCM client and automatically repair theclient if it is not functioning correctly.
● The most recent SCCM Repair information for the device shows in the SCCM Status Report.
Chapter 3: Generating Reports Absolute User Guide
Absolute 7.x 81

● A history of SCCM Repair information for the device shows in the SCCM Status History Report,and the SCCM Status History tab of each device's Device Summary page.
● You can use the Alerts feature to trigger an alert notification when SCCM Repair occurs on adevice. For more information about creating Alerts, see "Creating New Custom Alerts" on page16.
For more information about the SCCM Repair feature, see "About Repairing SCCM Clients" on page103.
NOTE You can also manage SCCM Repair for all Windows devices in your account or for a group ofdevices. For more information, see the following topics:- "Managing SCCM Repair for Your Account" on page 62- "Managing SCCM Status Reporting and Repair in the SCCM Status Report" on page 106
To disable SCCM Repair for a Windows device:
1. Navigate to the SCCM Status and Repair area of the Device Summary page.
2. Clear the Turn on SCCM Repair for the device checkbox.
3. Click Save changes.
Using the Assigned Username FieldThe Assigned Username field on the Device Summary page is a static, editable field that letsAdministrators identify to whom a device was assigned originally. This static field is useful inorganizations where end-user network IDs are not easily identifiable.
Also, in many organizations, staff members periodically swap their devices. In these environments, anetwork ID or e-mail address does not accurately identify the actual owner of a device.
For more information about setting the Assigned Username field, see the online Help.
NOTE The Assigned Username field is appended to all report downloads that include an Identifieror Username, regardless of whether or not the Assigned Username field is included in the actualreport.
Using the Dormant Devices FieldThe Dormant field helps administrators distinguish those devices that are truly missing from thosedevices that are located in places without access to an Internet connection, such as storage facilities.
The Dormant field is a static, editable field that administrators can use to identify devices that are notexpected to contact the Monitoring Center. For more information about how to set values for CustomDevice Fields, see the online Help.
Printing ReportsYou can print reports in whole or in part. Each page of a report includes a Print icon, such as .
NOTE By default, the current page shows 10 records from the entire report. To print a larger selectionof records, open the Per Page list and select the appropriate number of records to show on the page.
Chapter 3: Generating Reports Absolute User Guide
Absolute 7.x 82

To generate a version of the current page of a report for printing, which is optimized for creating a hardcopy:
1. Log in to the Absolute console and open the appropriate report. See "Running Reports" onpage 71.
2. Open any report page and click .
3. The current page is downloaded into a Microsoft Excel spreadsheet and you can print thereport page using Excel.
Saving Report FiltersMost reports allow you to edit the data shown. You can save custom reports using the Save ReportFilter feature.
NOTE Saved reports define the criteria for a report, not the existing data. The actual data, whichmeets the criteria, changes with time, thereby changing the content of the saved report.
To save a report filter:
1. Log in to the Absolute console and open the appropriate report. See "Running Reports" onpage 71.
2. On any report page click .
3. In the Save Report Filter dialog, enter a name (up to 48 characters in length) for the savedreport.
4. Click OK, which refreshes the dialog to show that the report was saved successfully.
5. Click Close to exit the dialog.
The saved report is available underMy Filters in theMy Content section.
Editing Saved Report FiltersTo edit a saved report filter:
1. On the navigation bar, click to open the Reports page.
2. Near the bottom of the page, click Go to Classic Reports Page.
3. Under My Content click My Filters. The My Filters page opens to show a list of saved filters.
4. Click the appropriate Filter name to select it. The report page opens, showing the filters thatyou have saved. For more information, see "Saving Report Filters" on page 83.
5. Edit the existing filters, as required, and do one of the following:
● To update the existing report filter, click Show results. The changes are saved to thereport filter.
● To create a new saved report filter:
i) In the report header click .ii) In the Save Report Filter dialog, enter a name (up to 48 characters in length) for the
report and click OK.
Chapter 3: Generating Reports Absolute User Guide
Absolute 7.x 83

A new saved report filter is created, and the original saved report filter remains unchanged.
Downloading ReportsUsers can download any full or partial report. Requests for report downloads are queued andprocessed offline. When processed, report downloads are available from the My Reports page. Youcan download report data in a Comma Separated Values (CSV) or an eXtensible Markup Language(XML) format.
Downloading a report typically provides more information in the results grid than viewing the output forthe same report on screen.
To download a report:
1. Log in to the Absolute console and open the appropriate report following the task, "RunningReports" on page 71.
2. On any report page, define any appropriate filters.
3. Click Show results.
4. When the report shows, click .
5. Enter a name for the report in the Report Name field.
6. In the Report Format list select a value (CSV or XML).
Remember, if you plan to upload the report, you can only do so with a CSV file.
7. If you want to receive e-mail notification when the download is available, enter your e-mailaddress in the Create Email Alert field.
8. Click Continue to queue the download.
When your request is processed, you can retrieve the report file from theMy Reports page.
To retrieve a report that was processed:
1. On the navigation bar, click the My Content > My Reports link.
2. On the My Reports page, in the Status column click the Ready link.
3. Follow the instructions that are provided on screen to download the file.
NOTE While your file request is being processed, the Status column shows Queued and thereport is not available. When processing in complete, the Status column shows the Ready linkand, if configured to do so, you receive an e-mail notification.
Multi-level SecurityMulti-level security features let an authorized user grant different access rights and privileges on reportsto specific users or groups of users. There are five different user access levels: Security Administrator,Administrator, Security Power User, Power User, and Guest.
Chapter 3: Generating Reports Absolute User Guide
Absolute 7.x 84

Chapter 4: Working with Reports
Reports help you track and manage your assets, allowing you to review many information types, suchas:
● Lease deadlines● Hardware requirements● Necessary upgrades
The reports in the Absolute console vary widely in scope. Some reports are broad and include asummary of numerous assets, and others focus and specify precise details pertaining to a singledevice. Each report is described in this chapter.
This chapter includes the following sections:● Hardware Assets Reports● Software Assets Reports● Security Reports● Call History and Loss Control Reports● Lease and Inventory Management Reports● Account Management Reports● My Content
Hardware Assets ReportsThe reports that show under the Hardware Assets page are determined by the product yourorganization purchased and may include the following:
● Asset Report● Printer Report● Monitor Report● Hardware Configuration and OS Change Report● Hard Disk Space Report● Device Readiness Report● Mobile Broadband Adapter Report● Mobile Device Report
Opening the Hardware Assets PageComplete the following task to open any of the Hardware Assets reports included in this classification.
To open the Hardware Assets page:
1. On the navigation bar, click to open the Reports page.
2. Near the bottom of the page, click Go to Classic Reports Page.
Absolute7.x 85

3. Click Hardware Assets.
The Hardware Assets page shows all of the available reports under this category.
Asset ReportThe Asset Report has been deprecated. To view your devices, go to the Assets area and view the AllDevices page. For more information, see Working with your active devices in the online Help.
Printer ReportThe Printer Report does not show data on-screen. Instead, the Printer Report lets users download aComma Separated Value CSV) or eXtensible Markup Language (XML) file that identifies installedprinter drivers, printer ports, and devices by printer.
To generate a Printer Report:
1. On the Hardware Assets page, click Printer Report.
2. On the Printer Report page, at the Search Criteria area, set the preferred display options forthe report using one or more of the following criteria:
● In the Display field, select one of the following options:○ Printer Drivers returns a CSV or XML file that organizes printer driver data according
the printer driver’s name. The printer driver data can provide important information forhelp desk troubleshooting.Printer Driver CSV or XML files include the following columns:
– Server Name: the server hosting the printer.– Share Name: the printer’s network name.– Printer Driver: the printer driver’s name.– Printer Name: the printer’s name.– Port: the port under which the printer operates.– Attribute: indicates whether the printer is installed locally or is installed on a
network as a shared printer.
○ Printer Ports returns a CSV or XML file that organizes printer driver data according totheir port.Printer Port CSV or XML files include the following columns:
– Port: the port under which the printer operates.– Server Name: the server hosting the printer.– Share Name: the printer’s network name.– Printer Driver: the printer driver’s name.– Printer Name: the printer’s name.– Attribute: indicates whether the printer is installed locally or is a network share.
○ Devices by Printer returns a CSV or XML file that lists all devices with installed printerdrivers.
Chapter 4: Working with Reports Absolute User Guide
Absolute 7.x 86

When the report criteria is set to this value, the page refreshes to include the Group isfield. To filter your results by Device Group, open the list and select the appropriatedevice group.
Devices by Printer CSV or XML files include the following columns:
– Server Name: the server hosting the printer.– Share Name: the printer’s network name.– Printer Driver: the printer driver’s name.– Printer Name: the printer’s name.– Attribute: indicates whether the printer is installed locally or is a network share.– Identifier: the unique identifying number associated with the device.– Device Name: the name assigned to this device in the operating system.– Username: the unique name detected by the agent that identifies the person who
is associated with this device.– Department: the department the device belongs to.
● In the Group is field, open the list to show all Device Groups in your account and selectAll Devices or the appropriate Device Group name.
3. At the Name and Format area, in the Name field enter a unique name for your report.
4. In the Format field, open the list and select one of the following options:
● CSV: a plain text file with comma separated columns that is opened with software includedin your operating system. Recommended for SQL queries and uploading large data files.
● XML: a Unicode language file that is opened with an XML editor such as Microsoft Excel orOpenOffice. Recommended for filtering and formatting data.
5. At the Create E-mail Alert location, in the Your E-mail address field enter your e-mail addressif you want to receive an e-mail notification when the report is processed.
6. Click Continue to queue the download.
7. When your request is processed, you can retrieve the CSV or XML file of the report from theMy Reports page. For more information, see "Downloading Reports" on page 84.
Monitor ReportThe Monitor Report does not show data on-screen. Instead, the Monitor Report enables users todownload a CSV (Comma Separated Value) or XML (eXtensible Markup Language) file that identifiesthe installed monitor drivers.
To generate a Monitor Report:
1. On the Hardware Assets page, click Monitor Report.
2. On the Monitor Report page, at the Search Criteria area, set the preferred filtering and displayoptions for the report using one or more of the following criteria:
● To filter results by Device Group, open the Group is list and select the appropriate devicegroup.
● To filter your results by specific device, open the and the field list and select one of thefollowing values:
Chapter 4: Working with Reports Absolute User Guide
Absolute 7.x 87

○ Identifier: a unique Electronic Serial Number assigned to the agent that is installed ona device.
○ Username: the unique name detected by the agent that identifies the person who isassociated with this device.
○ Device Name: the name assigned to the device in the operating system.○ Serial Number: the serial number of the device or other hardware.○ Asset Number: the identification number associated with a device in the Absolute
console.○ Department: the department to which this device belongs.○ Make: the manufacturer of a device or other hardware.○ Model: the product type of a device or other hardware.○ Monitor manufacturer: the manufacturer of the device’s monitor.○ Monitor type: the monitor configuration such as Default or Plug and Play.○ Monitor refresh frequency: the number of times in a second that a monitor draws the
data. Increasing the refresh rate decreases flickering and reduces eye strain.○ Video device description: the name of the device’s video card.○ Video display resolution: the number of distinct pixels that can be displayed by the
monitor quoted as width × height, with the units in pixels such as 1024 × 768.○ Video display color depth: the number of bits used to indicate the color of a single
pixel in a bitmap image or video such as 1-bit monochrome or 8-bit grayscale.
Depending on the value you selected from the preceding list, you may want to further definethis field. In the is or contains field, click Choose and select a value from the list.
3. At the Name and Format area, in the Name field enter a unique name for your report.
4. In the Format field, open the list and select one of the following options:
● CSV: a plain text file with comma separated columns that is opened with software includedin your operating system. Recommended for SQL queries and uploading large data files.
● XML: a Unicode language file that is opened with an XML editor such as Microsoft Excel orOpenOffice. Recommended for filtering and formatting data.
5. At the Create E-mail Alert location, in the Your E-mail address field enter your e-mailaddress if you want to receive an e-mail notification when the report is processed.
6. Click Continue to queue the download.
7. When your request is processed, you can retrieve the CSV or XML file of the report from theMy Reports page. For more information, see "Downloading Reports" on page 84.
NOTE If a managed device uses a generic device driver for its monitor or video card, some values inthe Monitor Report may be recorded and shown as Standard Monitor Type, Plug and Play Monitor,Generic Monitor, or Standard Monitor.
Hardware Configuration and OS Change ReportThe Hardware Configuration and OS Change Report has been deprecated. To view devices withchanges to their critical hardware or operating system (OS) during a particular time period, go to theHistory area and view the Events page. For more information, see Monitoring events in the online Help.
Chapter 4: Working with Reports Absolute User Guide
Absolute 7.x 88

Hard Disk Space ReportThe Hard Disk Space Report shows total, used, and available hard disk space on each disk volumedetected on tracked devices. The data collected using this report lets you track devices that may not beable to accept software upgrades or that are running out of available hard disk space.
To generate a Hard Disk Space Report:
1. On the Hardware Assets page, click Hard Disk Space Report.
2. On the Hard Disk Space Report page, at the Search Criteria area, set the preferred filteringand display options for the report using one or more of the following criteria:
● To filter results by Device Group, in the Group is field, open the list and select theappropriate device group.
● To filter your results by specific device, in the and the field area, open the list and selectone of the following values:○ Any of the fields in this list: selects all the values in the list.○ Identifier: a unique Electronic Serial Number assigned to the agent that is installed on
a device.○ Device Name: the name assigned to the device in the operating system.○ Username: the unique name detected by the agent that identifies the person who is
associated with this device.○ [Custom Device Fields]: if one or more Custom Device Fields have been created for
your account you can use them as filter criteria.Depending on the criteria you selected from the preceding list, enter a value in the field orclick Choose and select a value from the list.
● To filter your results by Department, in the and the Department field, open the list andselect the appropriate department.
● To filter your results by the amount of available hard disk space on the device, at the andany Volume has less than area, do one of the following:○ Open the list and select a value for available hard disk space.○ At the bottom of the Search Criteria pane, select the Display hard drive size and
space available for all selected devices checkbox to show all devices with less than100% of available hard disk space.
3. Click Show results. The results grid refreshes to show the following data returned accordingto your filtering choices. Some of the columns in the report may not be visible on your screen.To view all the columns in the report, use the arrow key on your keyboard to scroll to the right.
● Identifier: a unique Electronic Serial Number assigned to the agent that is installed on adevice. Click the link to open this device’s Device Summary page. For more information,see "Editing Asset Information" on page 73.
● Device Name: the name assigned to this device in the operating system.● Username: the unique name detected by the agent that identifies the person who is
associated with this device.● E-mail Address: the e-mail address for the person associated with this device or activity.
Chapter 4: Working with Reports Absolute User Guide
Absolute 7.x 89

● Threshold Value (MB): the minimum amount of available hard disk space required by theoperating system to function before affecting the performance of your device. If the value inthe Volume Free Space column is less than the Threshold Value, your device may run therisk of shutting down.
● Volume: a partition of storage space on the hard disk identified by a letter such as A:\ orB:\.
● Volume Label: the descriptive name assigned to a volume on the hard disk such as LocalDisk or Public.
● Volume Size (MB): the storage capacity of the volume in megabytes (MBs).● Volume Free Space (MB): the amount of available space in the volume in megabytes
(MBs).● Volume Used Space (MB): the amount of storage space used on the volume in
megabytes (MBs).● Hard Disk Size (MB): the amount of data storage on the device in megabytes (MBs).● Hard Disk Free Space (MB): the amount of available storage space on the hard disk in
megabytes (MBs).● Hard Disk Used Space (MB): the amount of available storage space used on the hard
disk in megabytes (MBs).
Device Readiness ReportDepending on your needs, you can generate a Device Readiness Report to show the list of devicesthat meets, or fails to meet, a set of operating system and hardware requirements.
For example, you can generate a Device Readiness Report to do the following:● Locate devices that can (or cannot) support a particular software or operating system rollout.● Find devices that are ready for retirement.● Identify hardware components that require an upgrade.
To generate a Device Readiness Report:
1. On the Hardware Assets page, click Device Readiness Report.
2. On the Device Readiness Report page, at the Search Criteria area, set the preferred filters forthe report using one or more of the following criteria:
● To filter results by Device Group, in the Group is field, open the list and select theappropriate device group.
● To filter your results by Department, in the and the Department field, open the list andselect the appropriate department.
● To filter your results by specific device, in the and the field area, open the list and selectone of the following values:○ Make: the manufacturer of a device or other hardware.○ Model: the product type of a device or other hardware.○ [Custom Device Fields]: if one or more Custom Device Fields have been created for
your account you can use them as filter criteria.
Depending on the criteria you selected from the preceding list, enter a value in the field orclick Choose and select a value from the list.
Chapter 4: Working with Reports Absolute User Guide
Absolute 7.x 90
3. To filter the results based on system requirements, select one of the following options:
● Any: shows devices that meet any of the system requirements you enter.● All of the following conditions are true: shows devices that meet all of the system
requirements you enter.
4. To set the system requirements to apply to the report, do one or more of the following:
● To narrow your results by operating system, select the O/S checkbox.i) Open the list and select one of the following:
○ Is shows devices that have the selected operating system.○ Is Not excludes devices that have the selected operating system.
ii) Click Choose. On the Choose O/S dialog, select an operating system in the AvailableFields pane and click > to add it to the Selected Fields pane. To add all fields, click >>.
iii) To remove a field, select the field in the Selected Fields pane, and then click <. Toremove all fields, click <<.
● To narrow your results by a specific processor type, select the CPU checkbox.i) Open the list and select one of the following:
○ Is shows devices that have the CPU you selected.○ Is Not excludes devices that have the CPU you selected.
ii) Click Choose. On the Choose CPU dialog, select a CPU in the Available Fields paneand click > to add it to the Selected Fields pane. To add all fields, click >>.
iii) To remove a field, select the field in the Selected Fields pane, and then click <. Toremove all fields, click <<.
● To filter your results by a specific processor speed, at the Max detected CPU area:i) Open the list and select one of the following options:
○ <: for a value that is less than○ <=: for a value that is less than or equal to○ =: for a value that equals○ >=: for a value that is greater than or equal to○ >: for a value that is greater than
ii) In the MHz field, enter a value for the processor speed. The default value is 300 MHz.
● To filter your results by a specific memory size, at the RAM area:i) Open the list and select one of the following options:
○ <: for a value that is less than○ <=: for a value that is less than or equal to○ =: for a value that equals○ >=: for a value that is greater than or equal to○ >: for a value that is greater than
ii) In the MB field, enter a value for the RAM size. The default value is 128 MB.
● To filter your results by a hard disk size, at the HD size area:i) Open the list and select one of the following options:
○ <: for a value that is less than
Chapter 4: Working with Reports Absolute User Guide
Absolute 7.x 91
○ <=: for a value that is less than or equal to○ =: for a value that equals○ >=: for a value that is greater than or equal to○ >: for a value that is greater than
ii) In the MB field, enter a value for the size of the device’s hard disk. The default value is2000 MB.
● To filter results by the amount of free space on the hard disk, at the HD free space area:i) Open the list and select one of the following options:
○ <: for a value that is less than○ <=: for a value that is less than or equal to○ =: for a value that equals○ >=: for a value that is greater than or equal to○ >: for a value that is greater than
ii) In the MB field, enter a value for the amount of free space on the device’s hard disk.The default value is 1500 MB.
5. Click Show results. The results grid refreshes to show the following data returned accordingto your filtering choices.
Mobile Broadband Adapter ReportIMPORTANT Before using Real Time Technology (RTT) features including Mobile Broadband Adapterasset tracking and Monitoring Center Initiated Calling, you need to activate these features for youraccount or individual Identifiers within your account. Contact Absolute Technical Support(www.absolute.com/en/support) to activate these features.
The Mobile Broadband Adapter Report shows a list of mobile broadband adapters, also known ascellular modems, installed and operational on managed devices.
Information showing in the Mobile Broadband Adapter Report is also available on the Device Summarypage for a specific device. For more information, see "Editing Asset Information" on page 73.
To generate a Mobile Broadband Adapter Report:
1. On the Hardware Assets page, click Mobile Broadband Adapter Report.
2. On the Mobile Broadband Adapter Report page, at the Search Criteria area, set thepreferred filtering and display options for the report using one or more of the following criteria:
● To filter results by Device Group, in the Group is field, open the list and select theappropriate device group.
● To filter your results by specific device, in the and the field area, open the list and selectone of the following values:○ Any of the fields in this list: selects all the values in the list.○ Identifier: a unique Electronic Serial Number assigned to the agent that is installed on
a device.○ Mobile Broadband Adapter Manufacturer: the name of the manufacturer of the
mobile broadband adapter.
Chapter 4: Working with Reports Absolute User Guide
Absolute 7.x 92

○ Mobile Broadband Adapter Model: the model number, if available, of the mobilebroadband adapter.
○ Mobile Broadband Adapter Equipment ID: the adapter’s identification number.○ Mobile Broadband Adapter Subscriber ID: the unique number associated with the
subscriber, stored in the adapter, the Subscriber Identity Module (SIM) card, orequivalent.
○ Mobile Broadband Adapter Network: the mobile service provider associated with themobile broadband adapter.
○ Either Phone Number: the Detected Phone Number or the Phone Number Overrideassociated with the device.
○ Detected Phone Number: the phone number associated with the mobile broadbandadapter as reported by the device.
○ Phone Number Override: the alternative or override phone number associated withthe mobile device or broadband adapter provided by an Administrator when a phonenumber is not automatically detected.
Depending on the value you selected from the preceding list, enter a value in the field or clickChoose and select a value from the list.
● To filter your results by Department, in the and the Department field, open the list andselect the appropriate department.
3. Click Show results. The results grid refreshes to show the following data returned accordingto your filtering choices.
● Identifier: a unique Electronic Serial Number assigned to the agent that is installed on adevice. Click the link to open this device’s Device Summary page. For more information,see "Editing Asset Information" on page 73.
● Device Username: the unique name detected by the agent that identifies the person whois associated with this device.
● Device Name: the name assigned to this device in the operating system.● Device Make: the manufacturer of the mobile device.● Device Model: the product type of the mobile device.● Adapter Last Detected: the date and time when the adapter installed on the device most
recently contacted the Monitoring Center.● Adapter Manufacturer: the name of the company that made the mobile broadband
adapter.● Adapter Model: the product type of a mobile broadband network adapter.● Equipment ID: the identification number unique to a smartphone. The equipment ID is
typically found on a printed label on the battery. For CDMA smartphones, the ElectronicSerial Number (ESN) or the Mobile Equipment ID (MEID) are reported. For GSM andUMTS smartphones, the International Mobile Equipment Identifier (IMEI) is reported.
● Subscriber ID: the unique number associated with the smartphone network servicesubscriber. The number is retrieved from the Smartphone hardware, the Subscriber IdentityModule (SIM) card, or an equivalent.
● Network: the mobile service provider associated with a mobile broadband adapter.● Detected Phone Number: the phone number associated with a mobile broadband
adapter, as reported by the device.
Chapter 4: Working with Reports Absolute User Guide
Absolute 7.x 93

● Phone Number Override: the alternative phone number associated with a mobile deviceor broadband adapter. If a phone number for a device is not automatically detected, thedevice sends a Short Message Service (SMS), also known as a text message, to theMonitoring Center.The Reply-to address in the text message becomes the value in the Phone NumberOverride field. You can also specify an override number on the Device Summary Page.When sending text messages to a device, the value in the Phone Number Override fieldtakes precedence over the value in the Detected Phone Number field.
[Custom Device Fields]: if one or more Custom Device Fields have been created for youraccount you can use them as filter criteria.
Mobile Device ReportThe Mobile Device Report has been deprecated. To view your smartphone and tablet devices, go tothe Assets area and filter the All Devices page by platform type. For more information, see Workingwith your active devices in the online Help.
Software Assets ReportsAll Software Assets reports have been deprecated.
To view information about the applications installed on your devices:● Review the reports in the Applications report category on the Reports page. For more
information, see Getting started with Application reports in the console Help.● Go to the Applications page in the Assets area. For more information, see Viewing installed
applications in the console Help.
Security ReportsThe reports that show under the Security Reports page are determined by the Absolute product yourorganization purchased and may include the following:
● Operating System Updates Report● Internet Browsing Configuration Report● Unauthorized Software Report● Anti-Malware Report● Missing Anti-Malware Report● Modem Addition Report● Suspicious Devices Report● Absolute Secure Drive Authentication Failures Report● Full-Disk Encryption Status Report● SCCM Status Reports● Security Posture Report
Opening the Security PageComplete the following task to open any of the Security reports included in this classification.
Chapter 4: Working with Reports Absolute User Guide
Absolute 7.x 94

To open the Security page:
1. On the navigation bar, click to open the Reports page.
2. Near the bottom of the page, click Go to Classic Reports Page.
3. Click Security.
The Security page opens showing all of the available reports.
Operating System Updates ReportThe Operating System Updates Report has been deprecated. To view operating system information fora device, go to the Reports area and view the Operating Systems report. For more information, seeOperating Systems report in the online Help.
Internet Browsing Configuration ReportThe Internet Browsing Configuration Report identifies the browser type and version on a device, as wellas the monitor resolution settings for all monitored devices. You can use the report to identify devicesthat use an older version of a browser.
IMPORTANT You must log in as a Security Administrator to open the Internet Browsing ConfigurationReport.
To generate an Internet Browsing Configuration Report:
1. On the Security page, click Internet Browsing Configuration Report.
2. On the Internet Browsing Configuration Report page, at the Search Criteria area, set thepreferred filtering and display options for the report using one or more of the following criteria:
● To filter your results by Device Group, in the Group is field, open the list and select theappropriate device group.
● To filter your results by specific device, in the and the field area, open the list and selectone of the following values:○ Identifier: a unique Electronic Serial Number assigned to the agent that is installed on
a device.○ Device Name: the name assigned to the device in the operating system.○ Username: the unique name detected by the agent that identifies the person who is
associated with this device.Depending on the value you selected from the preceding list, you may want to further definethis field using the is or contains field by clicking Choose.
● To filter your results by Browser, in the and the Browser Name is or contains field, enterall or part of the name of the browser.
● To filter your results by Browser Version, in the and the Browser Version number is orcontains field, enter the browser’s version number.
3. Click Show results. The results grid refreshes to show the following data returned accordingto your filtering choices.
Chapter 4: Working with Reports Absolute User Guide
Absolute 7.x 95

● Identifier: a unique Electronic Serial Number assigned to the agent that is installed on adevice. Click the link to open this device’s Device Summary page. For more information,see "Editing Asset Information" on page 73.
● Username: the unique name detected by the agent that identifies the person who isassociated with this device.
● Device Name: the name assigned to this device in the operating system.● Browser Name: the name of the program used to access the Internet and view web pages
on a device.● Browser Version: a number that distinguishes releases of the Internet browser as
detected by the agent, and reported in the Absolute console.● Display Resolution: the number of pixels that can be displayed on a device monitor
quoted as width × height in units of pixels such as 1024 × 768.● Color Depth: the number of distinct colors that can be represented by a piece of hardware
or software.
Unauthorized Software ReportThe Unauthorized Software Report lets users search for devices that contain unauthorized softwareapplications.
IMPORTANT You must log in as a Security Administrator to open the Unauthorized Software Report.
To generate an Unauthorized Software Report:
1. On the Security page, click Unauthorized Software Report.
2. On the Unauthorized Software Report page, at the Search Criteria area, set the preferredfiltering and display options for the report using one or more of the following criteria:
● To filter your results by Device Group, in the Group is field, open the list and select theappropriate device group.
● To filter your results by Department, in the and the Department field, open the list andselect the appropriate department.
● To filter your results by a Program, in the and the field area, open the list and select oneof the following values.○ Publisher: the organization creating a software application.○ Program: an executable file on a device that is detected by the agent and reported in
the Absolute console.○ Application: the smallest unit of software installed on a device that is detected by the
agent and reported in the Absolute console.○ Version: a number that distinguishes releases of the same software application.
● To filter results by a keyword, in the contains any of the words field, enter the keywords.● To filter results by a specific keyword, in the contains all of the words field, enter specific
keywords.● To filter results by a specific phrase, in the and contains exactly the phrase field, enter
the exact phrase.● To filter results excluding keywords, in the and does not contain the words field, enter
the keywords.
Chapter 4: Working with Reports Absolute User Guide
Absolute 7.x 96

3. Click Show results. The results grid refreshes to show the following data returned accordingto your filtering choices.
● Identifier: a unique Electronic Serial Number assigned to the agent that is installed on adevice. Click the link to open this device’s Device Summary page. For more information,see "Editing Asset Information" on page 73.
● Username: the unique name detected by the agent that identifies the person who isassociated with this device.
● Device Name: the name assigned to this device in the operating system.● Department: the department to which this device belongs.● Publisher: the organization creating a software application.● Application Name: the title of an executable file. In practice, many publishers mutually
exchange Application Name and Program Name values.● Program Name: the name of an executable file on a device that is detected by the agent
and reported in the Absolute console.● Version: a unique name or number assigned to an identified and documented body of
software.● Date First Detected: the date and time identified by the agent during the call to the
Monitoring Center.
Anti-Malware ReportThe Anti-Malware Report has been deprecated. To view information about the anti-malwareapplications installed on your devices, go to the Reports area and under Security, open the Anti-Malware report. For more information, see Anti-Malware report in the online Help.
Missing Anti-Malware ReportThe Missing Anti-Malware Report has been deprecated. To configure a report that shows the deviceswithout an anti-malware application installed, go to the Reports area and under Security, open theAnti-Malware report. For more information, see Anti-Malware report in the online Help.
Modem Addition ReportThe Modem Addition Report identifies all devices that have a modem installed or reconfigured in agiven date range.
IMPORTANT You must log in as a Security Administrator to open the Modem Addition Report.
To generate a Modem Addition Report:
1. On the Security page, click Modem Addition Report.
2. On the Modem Addition Report page, at the Search Criteria area, set the preferred filteringand display options for the report using one or more of the following criteria:
● To filter your results by Device Group, in the Group is field, open the list and select theappropriate device group.
● To filter your results by Department, in the and the Department field, open the list andselect the appropriate department.
Chapter 4: Working with Reports Absolute User Guide
Absolute 7.x 97

● To filter your results by specific device, in the and the field area, open the list and selectone of the following values:○ Identifier: a unique Electronic Serial Number assigned to the agent that is installed on
a Device.○ Device Name: the name assigned to this device in the operating system.○ Username: the unique name detected by the agent that identifies the person who is
associated with this device.
Depending on the value you selected from the preceding list, you may want to further define thisfield. In the is or contains field, click Choose and select a value from the list.
● To filter your results by date, at the and a Modem was installed or re-configuredbetween area, do one of the following:○ In the in the last <n> days field, click the option and enter the appropriate number of
days. Any value from 1 through 365 is appropriate. A higher value in this field will resultin a larger report and will take longer to generate results.
○ In the between field, click the option and enter the dates (dd/mm/yyyy) or click theCalendar icon to open the calendar dialog. Enter the dates in chronological order, withthe earliest date entered first and the later date entered second.
3. Click Show results. The results grid refreshes to show the following data returned accordingto your filtering choices.
● Identifier: a unique Electronic Serial Number assigned to the agent that is installed on adevice. Click the link to open this device’s Device Summary page. For more information,see "Editing Asset Information" on page 73.
● Username: the unique name detected by the agent that identifies the person who isassociated with this device.
● Device Name: the name assigned to this device in the operating system.● Detected Date: the date and time when the data was detected on the device.● Current Model Name: the product type of a device or other hardware detected by the
agent.● Current Port: the port under which the modem operates as detected by the agent.● Previous Model Name: the product type of a device or other hardware previously detected
by the agent.● Previous Port: the port under which the modem operates as previously detected by the
agent.
Suspicious Devices ReportThe Suspicious Devices Report identifies all devices that have triggered one or more alert notificationsdefined as representing suspicious activity. You can use the Alerts area to specify events that triggersuspicious alert notifications. For more information about creating and managing alerts, see "Alerts" onpage 13.
ScenariosFor example, if a group of devices is not meant to be removed from the network at your organization,you can use the Public IP Address Changed alert to log any occurrences when a device in the group isassigned a different IP address to access the Internet.
Chapter 4: Working with Reports Absolute User Guide
Absolute 7.x 98

Another example is to use the Major Change alert to notify Administrators immediately when a device isdetected that has the Device Name, Username, and Operating System Product Key changedsimultaneously, with the agent subsequently making a self-healing call.
IMPORTANT You must log in as a Security Administrator to open the Suspicious Devices Report.
To generate a Suspicious Devices Report:
1. On the Security page, click Suspicious Devices Report.
2. On the Suspicious Devices Report, at the Search Criteria area, set the preferred filtering anddisplay options for the report using one or more of the following criteria:
● To filter your results by Device Group, in the Group is field, open the list and select theappropriate device group.
● To filter your results by Department, in the and the Department field open the list andselect the appropriate department.
● To filter your results by specific device, in the and the field area open the list and selectone of the following values:○ Identifier: a unique Electronic Serial Number assigned to the agent that is installed on
a device.○ Device Name: the name given to a device.○ Username: the unique name detected by the agent that identifies the person who is
associated with this device.
Depending on the value you selected from the preceding list, you may want to further definethis field. In the is or contains field, click Choose and select a value from the list.
● To filter your results by date, in the and the suspicious event occurred area, do one ofthe following:○ In the in the last <n> days field, click the option and enter the appropriate number of
days. Any value from 1 through 365 is appropriate. A higher value in this field will resultin a larger report and will take longer to generate results.
○ In the between field, click the option and enter the dates (dd/mm/yyyy) or click theCalendar icon to open the calendar dialog. Enter the dates in chronological order, withthe earliest date entered first and the later date entered second.
● To filter your results by Suspicion Level, in the and the Suspicion level is area:i) Open the list and select a value for Greater than, Equal to, or Less than.ii) Open the list and select the appropriate Suspicion Level.
3. Click Show results. The results grid refreshes to show the following data returned accordingto your filtering choices.
● Identifier: a unique Electronic Serial Number assigned to the agent that is installed on adevice. Click the link to open this device’s Device Summary page. For more information,see "Editing Asset Information" on page 73.
● Asset Number: the identification number associated with a device in the Absolute console.● IMEI: the International Mobile Equipment Identity (IMEI) number of the device, if applicable● Subscriber ID: also known as International Mobile Subscriber Identity (IMSI), the unique
identifier associated with the subscriber
Chapter 4: Working with Reports Absolute User Guide
Absolute 7.x 99

● Phone Number: the phone number associated with the mobile device, if applicable● Username: the unique name detected by the agent that identifies the person who is
associated with this device.● Device Name: the name given to a device.● Make: the manufacturer of a device or other hardware.● Model: the product type of a device or other hardware.● Suspicion Level: the severity level of a suspicious event. Possible values range from Not
Suspicious to a suspicion level of 5.● Suspicious Events: click the value to open the Alert Events page to view the Alert Name
and description.
Absolute Secure Drive Authentication Failures ReportThe Absolute Secure Drive Authentication Failures Report shows a list of those devices that AbsoluteSecure Drive failed to authenticate based on the options you set.
You can filter this report based on how often authentication failed, or the authentication or failure typesavailable.
You can also set an alert to notify you about failed Absolute Secure Device login attempts by selectingthe Absolute Secure Drive failed login condition on the Create and Edit Alerts page. For moreinformation, see "Creating New Custom Alerts" on page 16.
To generate an Absolute Secure Drive authentication failures Report:
1. On the Security page, click Absolute Secure Drive Report.
2. On the Absolute Secure Drive Authentication Failures Report, at the Search Criteria area, setthe preferred filtering and display options for the report using one or more of the followingcriteria:
● To filter your results by Device Group, in the Group is field, open the list and select theappropriate device group.
● To filter your results by specific device, in the and the field area open the list and selectone of the following values:○ Identifier: a unique Electronic Serial Number assigned to the agent that is installed on
a device.○ Device Name: the name given to a device.○ Username: the unique name detected by the agent that identifies the person who is
associated with this device.
Depending on the value you selected from the preceding list, you may want to further definethis field. In the is or contains field, click Choose and select a value from the list.
● To filter your results by date, in the and when unsuccessful authentication attemptsoccurred area, do one of the following:○ In the or more times field, enter the appropriate number of failed login attempts you
want to see in your report.○ Select one of the following options:
Chapter 4: Working with Reports Absolute User Guide
Absolute 7.x 100

– In the in the last <n> days field, click the option and enter the appropriate numberof days. Any value from 1 through 365 is appropriate. A higher value in this fieldwill result in a larger report and will take longer to generate results.
– In the between field, click the option and enter the dates (dd/mm/yyyy) or click theCalendar icon to open the calendar dialog. Enter the dates in chronological order,with the earliest date entered first and the later date entered second.
● To filter your results by authentication failure type, in the and the failure type is area:i) Open the Authentication Types list and select one of the following values:
○ All Authentication Types where the authentication component is one or more ofthe following values.
○ Master Password where the password entered is authenticated against a currentpassword.
○ Fingerprint where input from the fingerprint scanner is authenticated against thecurrent value.
○ RFID where input from an RFID device is authenticated against the current value.○ SmartCard where input from a chip card or an integrated circuit card (ICC) is
authenticated against the current value.
ii) Open the Failure Types list and select one of the following values:○ All Failure Types where the failure is one or more of the following values.○ Authentication Failed where the password or login authentication did not match
the current value.○ Component Failure where the authentication component, such as RFID or
fingerprint recognition device, failed.○ Unknown User where the username is unknown or does not match the current
value.○ Too Many Attempts where the username or component attempted to login more
than a specified number of times with incorrect credentials.
3. Click Show results. The results grid refreshes to show the following data returned accordingto your filtering choices.
● Identifier: a unique Electronic Serial Number assigned to the agent that is installed on adevice. Click the link to open this device’s Device Summary page. For more information,see "Editing Asset Information" on page 73.
● Device Name: the name given to a device.● Username: the unique name detected by the agent that identifies the person who is
associated with this device.● Number of Failed Logins: the number of Absolute Secure Drive login attempts that failed
to authenticate.● Call Time: when the device contacted the Monitoring Center.● Logged Date (UTC): the date and time when the authentication failures were logged.● Attempted Username: the username that was used when the authentication failure
occurred.● Type of Failed Login: the type of authentication failure, which is a mix of the
Authentication Type and Failure Type fields, for example, Master Password: Failed orMaster Password: Unknown User.
Chapter 4: Working with Reports Absolute User Guide
Absolute 7.x 101

● Encryption Status: the status of encryption available on the device. Click the ViewEncryption Status link to open the Full-Disk Encryption Status Report.
Full-Disk Encryption Status ReportThe Full-Disk Encryption Status Report has been deprecated. To view the encryption status of yourdevices, go to the Reports area and under Security, open the Full-Disk Encryption Status report. Formore information, see Full-Disk Encryption Status report in the online Help.
SCCM Status ReportsSCCM Status reports show current and historical information about the status of the SCCM clientinstalled on your managed Windows devices.
SCCM Status reports are applicable only if you are using System Center 2012 Configuration Manager,and the SCCM Status feature is turned on in the Absolute console. This feature can be turned on at theaccount level, the device level, or in this report. For more information, see the following topics:
● "Managing SCCM Status Reporting and Repair for your Account" on page 60● "Managing SCCM Status Reporting for a Windows Device" on page 80● "Managing SCCM Status Reporting and Repair in the SCCM Status Report" on page 106
This section includes the following topics:● About Collecting SCCM Status From Windows Devices● About Repairing SCCM Clients● Working with the SCCM Status Report● Working with the SCCM Status History Report● Viewing the Details of a SCCM Status Change
NOTE To export a report that provides statistical information about the status of the SCCM clientsinstalled on your Windows devices, see "Security Posture Report" on page 112.
About Collecting SCCM Status FromWindows DevicesMicrosoft System Center Configuration Manager (SCCM) is a system management software productthat lets IT administrators manage their Windows devices by performing tasks remotely, such as:
● Deploying operating systems, software applications, and software updates● Monitoring and reconciling compliance settings● Monitoring hardware and software inventory
NOTE The SCCM Status feature supports System Center 2012 Configuration Manager only.
If your organization uses SCCM to manage its Windows devices, a small software application, theSCCM client, is installed on each Windows device to allow the device to connect to the SCCM serverand be managed remotely. From time to time, the SCCM client may stop functioning correctly causingthe device to lose contact with the SCCM server.
Chapter 4: Working with Reports Absolute User Guide
Absolute 7.x 102

When the SCCM Status reporting feature is turned on, the agent detects the status of a device's SCCMclient by running a script on the device every six hours. The script performs a series of health checktests to determine if the client is present and functioning correctly. You can view the results of thesetests, and the device's SCCM Status, in the following reports:
● SCCM Status Report● SCCM Status History Report
For more information about the components of the SCCM client that are tested, see "Viewing theDetails of a SCCM Status Change " on page 109.
NOTE You can use the Alerts feature to trigger an alert notification when a device's SCCM Statuschanges. For more information about creating Alerts, see "Creating New Custom Alerts" on page 16.
About Repairing SCCMClientsIf the SCCM Status reporting feature is enabled, you can also enable the SCCM Repair feature. Thisfeature initiates the repair of SCCM clients if they are not functioning correctly.
For more information about enabling SCCM Repair, see the following topics:● "Managing SCCM Repair for Your Account" on page 62● "Managing SCCM Repair for a Windows Device" on page 81● "Managing SCCM Status Reporting and Repair in the SCCM Status Report" on page 106
When you enable the SCCM Repair feature, the agent runs a script every six hours to check the statusof the SCCM client. The script performs a series of health check tests to determine if the client ispresent and functioning correctly. If any health check tests fail, an attempt is made to fix the problem. Ifthe fixes are successful, the SCCM Status is updated to Repair successful on the next agent call. Ifany fixes fail, the status is updated to Repair failed on the next agent call, but the agent continues toattempt to fix the problem.
For more information about the components of the SCCM client that are tested and potentially fixed,see "Viewing the Details of a SCCM Status Change " on page 109.
NOTE If the SCCM client is absent from a device, SCCM Repair does not install the client.
You can view the results of each SCCM Repair on the following reports and pages:● SCCM Status Report● SCCM Status History Report● SCCM Status History tab
NOTE You can use the Alerts feature to trigger an alert notification when SCCM Repair occurs on adevice. For more information about creating Alerts, see "Creating New Custom Alerts" on page 16.
Working with the SCCM Status ReportThe SCCM Status Report shows information about the current status of the SCCM client installed onyour managed Windows devices. You can use this report to see if the client is missing or notfunctioning correctly on any of your Windows devices. You can also enable or disable SCCM Statusreporting and Repair in the SCCM Status Report.
Chapter 4: Working with Reports Absolute User Guide
Absolute 7.x 103

This section includes the following topics:● Viewing the SCCM Status Report● Managing SCCM Status Reporting and Repair in the SCCM Status Report
Viewing the SCCM Status Report
NOTE After the SCCM Status reporting feature is turned on, a device needs to make two successfulagent calls before its initial SCCM Status is available in the report.
To view the SCCM Status of one or more Windows devices:
1. On the Security page, click SCCM Status Report.
2. On the SCCM Status Report page, at the Search Criteria area, enter the appropriate filteringdata:
● To filter your results by Device Group, in the the Group is field, open the list and selectthe appropriate device group.
● To find a specific device, in the and the field area, open the list and select one of thefollowing values:○ Any of the fields in this list: selects all the values in the list○ Identifier: a unique Electronic Serial Number assigned to the agent that is installed on
a device○ Device Name: the name given to a device○ Username: the unique name detected by the agent that identifies the person who is
associated with this device
Depending on the value you selected from the list, you may want to further define this field. Inthe is or contains field, click Choose and select a value from the list.
● To filter your results by SCCM Status, click the and the SCCM status is field and selectone of the following values:○ Absent: the SCCM client is not installed on the device.○ Needs attention: one or more health check tests failed and SCCM Repair is currently
not enabled on the device○ OK: all health check tests passed and the SCCM client is functioning correctly.○ Repair failed: SCCM Repair is enabled on the device. An attempt was made to repair
the SCCM client because it was not functioning correctly. The client failed to berepaired.
○ Repair successful: SCCM Repair is enabled on the device. An attempt was made torepair the SCCM client because it was not functioning correctly. The client wasrepaired.
● To filter your results by date, in the and the last call in occurred area do one of thefollowing:○ To not limit the report based on the date of the last call, select at any time. This option
may result in a very large report that takes longer to generate.
Chapter 4: Working with Reports Absolute User Guide
Absolute 7.x 104

○ To limit the report to devices that have called within a specific number of days, in the inthe last <n> days field, click the option and enter the appropriate number of days. Anyvalue from 1 through 365 is appropriate. A higher value in this field results in a largerreport that takes longer to generate.
○ To limit the report to devices that have called during a specific data range, in thebetween field, click the option and enter the dates (dd/mm/yyyy) or click the Calendaricon to open the calendar dialog. Enter the dates in chronological order, with theearliest date entered first and the later date entered second.
● To filter your results by SCCM configuration, in the and SCCM Settings are area clearone or more of the following checkboxes:○ Repair enabled○ Repair disabled○ Reporting enabled○ Reporting disabled
3. Click Show results.
The results grid refreshes and shows the following information:
● SCCM Reporting: shows an indicator of whether SCCM Status reporting is currentlyenabled for the device.
● SCCM Repair: shows an indicator of whether SCCM Repair is currently enabled for thedevice.
● Identifier: a unique Electronic Serial Number assigned to the agent that is installed on adevice. Click the link to open this device’s Device Summary page. For more information,see "Editing Asset Information" on page 73.
● Device Name: the name given to a device.● SCCM Status: the status of the SCCM client on this device, reported at the last successful
agent call. Possible values are:○ Absent: the SCCM client is not installed on the device.○ Needs attention: one or more health check tests failed and SCCM Repair is not
enabled on the device. You may want to enable SCCM Repair for this device.○ OK: all health check tests passed and the SCCM client is functioning correctly.○ Repair failed: SCCM Repair is enabled on the device. An attempt was made to repair
the SCCM client because it was not functioning correctly. The client was not repaired.For more details about why the repair failed, click the link.
NOTE If repeated attempts to repair the SCCM client fail, see "Troubleshooting FailedSCCM Repairs" on page 112.
○ Repair successful: SCCM Repair is enabled. An attempt was made to repair theSCCM client because it was not functioning correctly. The client was repaired.
To view the results of each health check test, click the link to open the SCCM Status Detailsdialog. If SCCM Repair is enabled, any applicable repair results also show. For moreinformation, see "Viewing the Details of a SCCM Status Change " on page 109.
● Status Date: the date and time of the agent call when the SCCM Status was reported
Chapter 4: Working with Reports Absolute User Guide
Absolute 7.x 105

● Issue Count: the total number of times the device's SCCM Status has changed from OK toan unhealthy state. The Issue Count is incremented each time one of the following statuschanges occurs
NOTE Possible status changes depend on whether SCCM Repair is enabled.
SCCM Repair Status changes that increment Issue CountEnabled ● OK to Repair successful
● OK to Repair failed● OK to Absent● Repair failed to Absent● Repair successful to Repair successful● Repair successful to Repair failed● Repair successful to Absent● Absent to Repair failed● Absent to Repair successful
Disabled ● OK to Absent● OK to Needs attention● Needs attention to Absent● Absent to Needs attention
Click the linked numeral to open the SCCM Status History Report page and view the device'sstatus history.
● Username: the unique name detected by the agent that identifies the person who isassociated with this device
● Serial Number: the serial number of the device● Make: the manufacturer of a device● Model: the product type of a device● Operating System: software that controls the operation and applications of the device,
and may provide various services
Managing SCCM Status Reporting and Repair in the SCCM Status Report
IMPORTANT With the release of Absolute 7.2, you can now use the Application Persistence featureto report on and repair SCCM clients installed on your Windows devices. If you have SCCM StatusReporting and Repair enabled, we recommend that you disable it and activate the ApplicationPersistence: Microsoft SCCM policy in one or more policy groups. For more information, see AboutApplication Persistence: Microsoft SCCM policies in the online Help.
You can manage SCCM Status reporting or SCCM Repair for one or more Windows devices that showin the SCCM Status report.
NOTE To disable SCCM Status reporting and SCCM Repair for all devices in your account, see"Managing SCCM Status Reporting and Repair for your Account" on page 60.
IMPORTANT You must log in as an Administrator or Power User to perform these SCCM tasks.
Chapter 4: Working with Reports Absolute User Guide
Absolute 7.x 106

To manage SCCM Status reporting and Repair for one or more Windows devices:
1. On the Security page, click SCCM Status Report.
2. On the SCCM Status Report page, at the Search Criteria area, enter the appropriate filteringdata to generate the desired list of devices in the results grid. For more information, see"Viewing the SCCM Status Report" on page 104.
3. Click Show results.
4. In the results grid, select the devices that you want to update by doing one of the following:
NOTE Each device's SCCM Reporting indicator shows whether SCCM Status reporting iscurrently enabled or disabled. Similarly, each device's SCCM Repair indicator shows whetherSCCM Repair is currently enabled or disabled. If you want to enable these features on somedevices and disable other devices, you need to perform two separate tasks.
● To select individual devices, select the checkbox for each device.● To select all devices shown on this page, select the checkbox in the header.● To select all devices in the results, hover your mouse over the down arrow in the header.
Click the Select All <n> Records (where <n> is the number of records) to select all of thedevices that meet the filter criteria you set earlier.
5. To manage SCCM Status reporting for the selected devices, select Disable SCCM Reportingfrom the list.
6. To manage SCCM Repair for the selected devices, select Disable SCCM Repair from the list.
7. Click Save changes.
8. If the Confirm dialog shows, review the details of the requested action to confirm that they arecorrect and click Continue.
On the SCCM Status Report page, the applicable SCCM indicators are refreshed to show theirnew status.
Working with the SCCM Status History ReportThe SCCM Status History Report shows information about changes to the status of the SCCM clientinstalled on your managed Windows devices. You can use this report to see if a device's SCCM clientis repeatedly experiencing issues that prevent it from functioning correctly.
NOTE After the SCCM Status feature is turned on, a device needs to make two successful agent callsbefore its initial SCCM Status is available in the report.
To view the SCCM status of one or more Windows devices:
1. On the Security page, click SCCM Status History Report.
2. On the SCCM Status History Report page, at the Search Criteria area, enter the appropriatefiltering data:
● To filter your results by Device Group, in the the Group is field, open the list and selectthe appropriate device group.
● To find a specific device, in the and the field area, open the list and select one of thefollowing values:
Chapter 4: Working with Reports Absolute User Guide
Absolute 7.x 107

○ Any of the fields in this list: selects all the values in the list○ Identifier: a unique Electronic Serial Number assigned to the agent that is installed on
a device○ Device Name: the name given to a device○ Username: the unique name detected by the agent that identifies the person who is
associated with this device
Depending on the value you selected from the list, you may want to further define this field. Inthe is or contains field, click Choose and select a value from the list.
● To filter your results by SCCM Status, click the and the SCCM status is field and selectone of the following values:○ Absent: the SCCM client is not installed on the device.○ Needs attention: one or more health check tests failed and SCCM Repair is currently
not enabled on the device○ OK: all health check tests passed and the SCCM client is functioning correctly.○ Repair failed: SCCM Repair is enabled on the device. An attempt was made to repair
the SCCM client because it was not functioning correctly. The client was not repaired.○ Repair successful: SCCM Repair is enabled. An attempt was made to repair the
SCCM client because it was not functioning correctly. The client was repaired.
● To filter your results by date, in the and the last call in occurred area do one of thefollowing:○ In the in the last <n> days field, click the option and enter the appropriate number of
days. Any value from 1 through 365 is appropriate. A higher value in this field results ina larger report and takes longer to generate results.
○ In the between field, click the option and enter the dates (dd/mm/yyyy) or click theCalendar icon to open the calendar dialog. Enter the dates in chronological order, withthe earliest date entered first and the later date entered second.
3. Click Show results.
The results grid refreshes and shows the following information:
● Identifier: a unique Electronic Serial Number assigned to the agent that is installed on adevice. Click the link to open this device’s Device Summary page. For more information,see "Editing Asset Information" on page 73.
● Device Name: the name given to a device.● SCCM Status: the status of the SCCM client on this device, reported at the last successful
agent call. Possible values are:○ Absent: the SCCM client is not installed on the device.○ Needs attention: one or more health check tests failed and SCCM Repair is not
enabled on the device. You may want to enable SCCM Repair for this device.○ OK: all health check tests passed and the SCCM client is functioning correctly.○ Repair failed: SCCM Repair is enabled on the device. An attempt was made to repair
the SCCM client because it was not functioning correctly. The client was not repaired.For more details about why the repair failed, click the link.
Chapter 4: Working with Reports Absolute User Guide
Absolute 7.x 108
NOTE If repeated attempts to repair the SCCM client fail, see "Troubleshooting FailedSCCM Repairs" on page 112.
○ Repair successful: SCCM Repair is enabled. An attempt was made to repair theSCCM client because it was not functioning correctly. The client was repaired.
To view the results of each health check test, click the link to open the SCCM Status Detailsdialog. If SCCM Repair is enabled, any applicable repair results also show. For moreinformation, see "Viewing the Details of a SCCM Status Change " on page 109.
NOTE Each row in the SCCM Status History Report corresponds to a SCCM Statuschange. A SCCM Status change is logged if the details of a test result change betweenagent calls (date and time changes are excluded). This means that it is possible for theSCCM Status History Report for a device to include consecutive entries with the sameSCCM Status.For example, a device with SCCM Repair enabled shows on the report with a status ofNeeds attention because two health check tests failed. At the next agent call, the script isrun again and three health check tests fail. Although the SCCM Status for the deviceremains set to Needs attention, a status change is logged because the results of thehealth check tests changed. Similarly, if a SCCM attribute changes when a device's statusis OK, a status change is logged, but the status remains set to OK.
● Status Change Date: the date and time when the SCCM Status change occurred● Username: the unique name detected by the agent that identifies the person who is
associated with this device● Serial Number: the serial number of the device● Make: the manufacturer of a device● Model: the product type of a device● Operating System: software that controls the operation and applications of the device,
and may provide various services
Viewing the Details of a SCCM Status ChangeFrom the SCCM Status report, you can view the individual test results that led to a device's SCCMStatus change.
To view the details of a SCCM Status change:
1. Open the SCCM Status Report or the SCCM Status History Report and enter the appropriatesearch criteria to generate the report. For more information, see the following topics:
● "Viewing the SCCM Status Report" on page 104● "Working with the SCCM Status History Report" on page 107
2. In the results grid, click the applicable link in the SCCM Status column. You can view testresults for all SCCM statuses.
Chapter 4: Working with Reports Absolute User Guide
Absolute 7.x 109

The SCCM Status Details dialog opens to show the following information:
Section Attribute DescriptionOverall Status SCCMStatus The status of the SCCM client, as determined by the health
check testsPossible values are Absent, Needs attention andOK.
StatusChangeDate The date and time when the test results were collected andthe device's SCCM Status changed
RepairResult
NOTE Applies only ifSCCM Repair isenabled for the device.
The overall status of an attempt to repair the SCCM client.Possible values are Repairs succeeded, At least onerepair failed and N/A.
NOTE N/A indicates that a repair was not attemptedbecause all health check tests passed.
If repeated attempts to repair the SCCM client fail, see"Troubleshooting Failed SCCMRepairs" on page 112.
ClientInformation
CCMInstallPath The directory where the Microsoft Configuration ClientManager (CCM) is installedCCM is a component of SCCM and is used to install theSCCM client.
AssignedSite The primary SCCM site that the device is assigned to
ManagementPoint The site system role that provides policy and servicelocation information to the SCCM client and receivesconfiguration data from the client
SCCMClientVersion The version number of the installed SCCM client
Domain The current domain of the computer
CacheInformation
DriveLetter The drive where the cache folder is stored
Location The temporary download location for software, applications,and software updates that are deployed to the SCCM clientThe default location is %windir%\ccmcache.
TotalSize The maximum size (MB) of the cache folderThe default value is 5120 MB.
FreeSize The unused space (MB) in the cache folder
InventoryScans
LastHWScan The date and time of the last scan by the SCCM client ofinstalled hardware
LastSoftwareScan The date and time of the last scan by the SCCM client ofinstalled software
Chapter 4: Working with Reports Absolute User Guide
Absolute 7.x 110

Section Attribute DescriptionTests Test Description The SCCM component that was tested and the purpose of
the testThe following components are tested:● Windows Management Instrumentation (WMI): aninfrastructure that is critical for the operation of the SCCMclient. The test checks that it can connect to the WMI andmake a simple query.
● Admin share: used to deploy the SCCM softwareremotely by allowing administrative remote access to thedisk volume over the network. The test checks that thisshare is present and enabled.
● Local CCM Path: the test checks the path to the CCMcomponent.
● CCM Service Status: the test checks that the CCMcomponent is running.
● Services: the test checks that the SCCM client serviceand its dependent services are running. The followingservices are checked: winmgmt, lanmanserver,rpcss, bits, and ccmexec.
● Registry: the test checks the registry to ensure thatDCOM is enabled. DCOM is a protocol that allows forremote client connections.
● Client version: the test checks the version number of theinstalled SCCM client.
● Client variables: the test checks that it can retrieve theSCCM client variables.
● Assigned site: the test check for the primary SCCM site.● Hardware inventory: the test checks for the last hardwareinventory date and time. The test fails if a hardware scanhas never been run, or the value cannot be retrieved.
● Software inventory: the test checks for the last softwareinventory date and time. The test fails if a software scanhas never been run, or a value cannot be retrieved.
TestStatus The result of the testPossible values are Pass and Fail.
TestResultsDetails A brief description of the test result
Tests RepairResults
NOTE Applies only ifSCCM Repair isenabled for the device.
The result of an attempt to repair a particular component ofthe SCCM clientPossible values are Repair succeeded, Repair failed, andN/A (repair not attempted because the health check testpassed).
3. To close the dialog, click Close.
Chapter 4: Working with Reports Absolute User Guide
Absolute 7.x 111
Troubleshooting Failed SCCM RepairsWhen SCCM Repair is enabled on a device, and the SCCM client is not functioning correctly, thedevice's agent attempts to repair the SCCM client at six hour intervals.
You may find that repeated attempts to repair the client are unsuccessful. If this is the case, Absoluterecommends that you perform the following steps to troubleshoot the issue with the device's SCCMclient:
1. Review the details of each of the device's failed repair attempts. In particular, review theinformation provided in the TestResultDetails attribute for each failed HealthCheck test. Formore information, see "Viewing the Details of a SCCM Status Change " on page 109.
2. If one or more services failed to be repaired, contact the user and ask them to restart thedevice. Some services, specifically lanmanserver and ccmexec, require a device rebootafter the service is repaired.
3. If the SCCM client is not repaired after step 2 is completed, refer to System Center 2012Configuration Manager documentation, or search the articles and posts available fromMicrosoft TechNet Support at https://technet.microsoft.com/en-us/ms772425.
Security Posture ReportYou can use the Security Posture Report to assess the overall security status of your devices. Thereport contains the following information for the devices in your account, in a summarized format:
● Domains● Windows product keys (for Windows devices only)● Full-disk encryption status, if applicable● SCCM status (for Windows devices only)● Anti-virus definition status● Last agent call statistics● Device counts for Device Freeze, Data Delete, and Investigation Reports
The report consists of two components:● An Excel template, which you download to your workstation from the Security Posture Report
page. This template contains a set of macros that processes the raw report data into a formatthat supports easy analysis.
NOTE The Security Posture Report template supports Microsoft Excel 2013 and 2010 only.
● A CSV file of exported report data, which you export using the Security Posture Report pageand then download from the My Reports page.
You can then generate the report by importing the CSV file into the Excel template. Details aboutcustomizing the template and importing the CSV file are provided on the Getting Started sheet of theExcel template.
IMPORTANT You must log in as an Administrator to open the Security Posture Report.
To generate a Security Posture Report:
1. On the Security page, click Security Posture Report.
Chapter 4: Working with Reports Absolute User Guide
Absolute 7.x 112

2. On the Security Posture Report page, do one of the following:
● If this is your first time exporting a Security Posture Report you need to download thereport's Excel template. Click Download Template and follow your browser's prompts tosave the template to your workstation.
● If you have downloaded the Security Posture Report template before, you most likelymodified the template variables to suit the needs of your organization, so you'll want to usethat template. Go to step 3.
3. In the field under Export Report Data, type a unique file name for the CSV file you are aboutto export. Record the filename so you can locate the file on the My Reports page after theexport is processed.
4. You will receive an email notification when the export process is complete. To send an emailnotification to other users, add their email addresses to the email address field. Use asemicolon (;) to separate email addresses.
5. Click Export Data to queue the export.
6. In the Data export in progress dialog click Close.
7. After you receive the notification email stating that your request is processed, go to the MyReports page and download the CSV file. For more information, see "Downloading Reports"on page 84.
NOTE While your file request is being processed, the Status column on the My Reports pageshows In Queue and the report is not available. When processed, the Status column showsthe Ready link and, if configured to do so, you receive an email notification.
8. On your workstation, navigate to the Excel template that you downloaded and open it in Excel2013 or 2010.
For detailed instructions about customizing the template, importing the CSV file of report data,and viewing the report results, see the template'sGetting Started sheet.
Call History and Loss Control ReportsUse the Call History and Loss Control reports to ensure that your devices call the Monitoring Centerregularly from expected locations and that they indicate expected users. If a device calls the MonitoringCenter regularly, the chance of recovery is much higher when a device goes missing. To be eligible forthe Service Guarantee payment after a device is missing, the device must make at least one post-theftcall.
The following information and reports are included in this section:● About Extended IP Call Information● Call History Report● Missing Devices Report● Device Drift by Device Name Report● Device Drift by Username Report● Activation Report● Geolocation Tracking Reports
Chapter 4: Working with Reports Absolute User Guide
Absolute 7.x 113

Opening the Call History and Loss Control PageComplete the following task to open any of the Call History and Loss Control reports included in thisclassification.
To open the Call History and Loss Control page:
1. On the navigation bar, click to open the Reports page.
2. Near the bottom of the page, click Go to Classic Reports Page.
3. Click Call History and Loss Control.
The Call History and Loss Control page shows all of the available reports.
About Extended IP Call InformationCall History reports may contain caller identification information. The caller identification informationusually shows as a link. Clicking the link opens the Extended IP Call Information page, which providesdetails about the location or origin of an IP address or telephone number. The information is usefulwhen locating devices that are outside of a corporate network.
The Extended IP Call Information page lists the following information:
● Identifier ● MAC Address
● Server Time ● Local IP RDNS
● Local IP Address ● Proxy IP RDNS
● Proxy IP Address ● ARINWho IS Info
● Host Name
Call History ReportThe Call History Report shows all communications to the Monitoring Center made by a specificIdentifier or group of Identifiers.
IMPORTANT Call data is stored online for one year, after which time data is archived. If a Call HistoryReport is configured to show data from over a year ago, the data must be retrieved from the archiveserver and it takes longer to generate results.
To generate a Call History Report:
1. On the Call History and Loss Control page, click Call History Report.
2. On the Call History Report, at the Search Criteria area, set the preferred filtering and displayoptions for the report using one or more of the following criteria:
● To filter your results by Device Group, in the Group is field, open the list and select theappropriate device group.
● To filter your results by specific device, in the and the field area, open the list and selectone of the following filter criteria.○ Identifier: a unique Electronic Serial Number assigned to the agent that is installed on
a device.
Chapter 4: Working with Reports Absolute User Guide
Absolute 7.x 114
○ Username: the unique name detected by the agent that identifies the person who isassociated with this device.
○ Assigned Username: the username assigned to a device by a system administratoron the View and Edit Custom Device Fields page.
○ Serial Number: the serial number of the device or other hardware.○ Asset Number: the identification number associated with a device in the Absolute
console.
○ IMEI: the International Mobile Equipment Identity (IMEI) number of the device, ifapplicable
○ Subscriber ID: also known as International Mobile Subscriber Identity (IMSI), theunique identifier associated with the subscriber
○ Phone Number: the phone number associated with the mobile device, if applicable○ [Custom Device Fields]: if one or more Custom Device Fields have been created for
your account you can use them as filter criteria.
Depending on the criteria you selected from the preceding list, enter a value in the field, clickChoose and select a value from the list, or use the Date Picker to specify a date or daterange.
● To filter your results by Department, in the and the Department is field, open the list andselect the appropriate department.
● To filter your results by date, in the and the call occurred area, do one of the following:○ In the in the last <n> days field, click the option and enter the appropriate number of
days. Any value from 1 through 365 is appropriate. A higher value in this field will resultin a larger report and will take longer to generate results.
○ In the between field, click the option and enter the dates (dd/mm/yyyy) or click theCalendar icon to open the calendar dialog. Enter the dates in chronological order, withthe earliest date entered first and the later date entered second.
● To filter your results by a specific IP address, in the and IP address for location:i) Open the list and select one of the following options:
○ Public IP○ Local IP
ii) Enter a valid IP address.
3. Click Show results. The results grid refreshes to show the following data returned accordingto your filtering choices.
NOTE The background color of each column header indicates the applicability of theinformation. Current information has a lighter background whereas information that applied atthe time of the agent call has a slightly darker background.
● Identifier: a unique Electronic Serial Number assigned to the agent that is installed on adevice. Click the link to open this device’s Device Summary page. For more information,see "Editing Asset Information" on page 73.
● Serial Number: the serial number of the device or other hardware.● Asset Number: the identification number associated with a device in the Absolute console.● IMEI: the International Mobile Equipment Identity (IMEI) number of the device, if applicable
Chapter 4: Working with Reports Absolute User Guide
Absolute 7.x 115
● Subscriber ID: also known as International Mobile Subscriber Identity (IMSI), the uniqueidentifier associated with the subscriber
● Phone Number: the phone number associated with the mobile device, if applicable● Make: the manufacturer of the device.● Model: the product type of a device or other hardware.● Device Name: the name assigned to this device in the operating system.● Username: the unique name detected by the agent that identifies the person who is
associated with this device.● Call Time: when the device contacted the Monitoring Center.● Location (Latitude & Longitude): the position of the device on the surface of the earth
expressed in latitude and longitude.● Local IP Address: the IP address assigned to a device on the Local Area Network (LAN)
when calling the Monitoring Center.● Public IP Address: the IP address used to communicate with the Internet. For modem
calls, caller ID information is reported instead. Click the Public IP Address link to open theExtended IP Call Information page. See "About Extended IP Call Information" on page 114.
Missing Devices ReportThe Missing Devices Report has been deprecated. To view your devices that haven't called in to theAbsolute Monitoring Center for 30 days or more, go to the Reports area and view the Dark Devicesreport. For more information, see Dark Devices report in the online Help.
Device Drift by Device Name ReportThe Device Drift by Device Name Report has been deprecated. To view the devices with device namethat changed within a specific time period, go to the History area and view the Events page. For moreinformation, see Monitoring events in the online Help.
Device Drift by Username ReportThe Device Drift by Username Report has been deprecated. To view the devices with a username thatchanged within a specific time period, go to the History area and view the Events page. For moreinformation, see Monitoring events in the online Help.
Activation ReportThe Activation report identifies, in real time, all devices that have completed a first call to the MonitoringCenter within a given period of time.
NOTE The default configuration of the Activation report may not show any results. You may need todefine the date range for the results grid to contain any information.
To generate an Activation report:
1. On the Call History and Loss Control page, click Activation Report.
2. On the Activation report, at the Search Criteria area, set the preferred filtering and displayoptions for the report using one or more of the following criteria:
Chapter 4: Working with Reports Absolute User Guide
Absolute 7.x 116

● To filter your results by Device Group, in the Group is field, open the list and select theappropriate device group.
NOTE Devices that were recently activated may not yet be associated with a DeviceGroup. To show these devices, select All Devices in the Group is list.
● To filter your results by specific device, at the and the field area, open the list and selectone of the following values.○ Identifier: a unique Electronic Serial Number assigned to the agent that is installed on
a device.○ Assigned Username: The username assigned to a device by a system administrator
on the View and Edit Custom Device Fields page.○ Model: the product type of a device or other hardware.○ Serial Number: the serial number of this device.○ Asset Number: the identification number associated with a device in the Absolute
console.○ Device Name: the name assigned to this device in the operating system.○ IMEI: the International Mobile Equipment Identity (IMEI) number of the device, if
applicable.○ Subscriber ID: also known as International Mobile Subscriber Identity (IMSI), the
unique identifier associated with the subscriber.○ Phone Number: the phone number associated with the mobile device, if applicable.
Depending on the value you selected from the preceding list, you may want to further definethis field. In the is or contains field, click Choose and select a value from the list.
● To filter your results by Department, in the and the Department is field, open the list andselect the appropriate department.To return a report that shows devices that have been recently activated, select the ShowMost Recent Activations checkbox. Selecting this option will turn the Persistence Statusfilter off.
● To filter your results by date, at the and the Activation Date area, do one of the following:○ In the in the last <n> days field, select the option and enter the number of days you
want to include in the report. For example, enter a value of "500" to include allactivations that occurred over the past 500 days.
NOTE Entering a higher value in this field may result in a larger report and may takelonger to generate results.
○ In the between field, select the option and enter the dates (dd/mm/yyyy), or click theCalendar icon to open the calendar dialog. Enter the dates in chronological order withthe earliest date entered first and the later date entered second.
● To filter results by agent type and version, at the and the Agent area:i) In the Type field open the list and select the appropriate type of agent as follows:
○ Any Type returns a report that shows devices with all agent types.○ Android returns a report that shows only Android devices.○ Chromebook returns a report that shows only Chromebooks and Chrome devices.
Chapter 4: Working with Reports Absolute User Guide
Absolute 7.x 117

○ Mac returns a report that shows only Mac devices.○ Windows returns a report that shows only devices running a Windows operating
system.ii) In the and version field, open the list and select the appropriate agent version for the
agent Type you selected previously.For example, if you want to show all devices that have the 898 version of the agentinstalled on them, in the type field, open the list and select Any Type and in the andversion field open the list and select 898.
IMPORTANT SHC (Self-Healing Call) returns a report that shows devices with agentsthat called in from Persistence. This option shows when a Self Healing Call hasoccurred.
● To filter your results by the condition of the Persistence Technology, at the and thePersistence Status is area, select one of the following values:○ All: returns results for all devices regardless of their Persistence state.○ BIOS/Firmware Active: returns results for devices with activated firmware-based
Persistence modules. Firmware Persistence is Active and is providing applicationagent health checks when the devices are restarted.
○ BIOS/Firmware Pending: returns results for devices with firmware-based Persistencemodules that are in the process of activating. Additional automatic agent calls may berequired before this device transitions to Active status.
○ N/A: describes devices that have no Persistence whatsoever; for example, a Maccomputer.
NOTE Before you can detect BIOS/Firmware Persistence on an activated device, youneed to reboot the device once after it is activated and have it make at least two agentcalls.
3. Click Show results. The results grid refreshes to show the following data returned accordingto your filtering choices.
● Identifier: a unique Electronic Serial Number assigned to the agent that is installed on adevice. Click the link to open this device’s Device Summary page. For more information,see "Editing Asset Information" on page 73.
● Username: the unique name detected by the agent that identifies the person who isassociated with this device.
● Device Name: the name assigned to this device in the operating system.● Department: the department to which this device belongs.● Assigned Username: the username assigned to a device by a system administrator on
the View and Edit Custom Device Fields page.● Make: the manufacturer of a device or other hardware.● Model: the product type of a device or other hardware.● Serial Number: the serial number of this device.● Asset Number: the identification number associated with a device in the Absolute console.● Activation Date/Time: the date and time the device completed its first call to the
Monitoring Center.
Chapter 4: Working with Reports Absolute User Guide
Absolute 7.x 118

● Last Call Date/Time: when the agent installed on a device most recently contacted theMonitoring Center.
● Version: the version number of the Absolute agent that contacts the Monitoring Center.● Persistence Status: how the agent is automatically restored when necessary.● System BIOS/Firmware Version: the unique name and number assigned to the Basic
Input/Output System (BIOS) of a device.● System BIOS/Firmware Date: the date and time the Basic Input/Output System (BIOS)
installed on the device was released.
● IMEI: the International Mobile Equipment Identity (IMEI) number of the device, if applicable.● Subscriber ID: also known as International Mobile Subscriber Identity (IMSI), the unique
identifier associated with the subscriber.● Phone Number: the phone number associated with the mobile device, if applicable.
Geolocation Tracking ReportsNOTE Depending on the Absolute product your organization purchased, Geolocation TrackingReports may not be available.
Geolocation Tracking reports include the Device Location Report and the Device Location HistoryReport. These reports can be used to monitor the locations of your managed devices using any or all ofthe supported location technologies.
IMPORTANT Only Administrators and Power Users can view Geolocation Tracking reports. Guestusers do not have sufficient access privileges to access Geolocation Tracking data. The first time youaccess any geolocation page in a login session, a confirmation page prompts you to accept the Termsand Conditions of use.
This section provides information on the following topics:● Geolocation System Requirements● Understanding Location Technologies● Device Location Report● Device Location History Report
Geolocation System RequirementsYou must install a supported version of the agent on devices that you want to be tracked usinggeolocation.
The Geolocation Tracking feature supports the following platforms, hardware, and software on devices:
NOTE The Geolocation Tracking feature is not supported on devices running a Linux-based operatingsystem.
● For Windows devices:○ Operating Systems: for more information about the requirements for Windows devices,
open the Absolute console's help system and search for supported platforms for manageddevices.
Chapter 4: Working with Reports Absolute User Guide
Absolute 7.x 119
○ Current version of the agent. See "Downloading the Absolute Agent for Android Devices"on page 63.
○ If you want locations using GPS, you need a supported GPS receiver from the followinglist:
IMPORTANT Most GPS receivers available for Windows devices are supported. Thefollowing list is not exhaustive. Location data is not collected from a tether, using aBluetooth wireless, USB, or serial connection, for example, to a device that has a GPSreceiver. Ensure that you install the driver for the GPS receiver and that the wireless switchis enabled.
– Qualcomm UNDP-1 (Gobi 1000) mobile broadband adapters– Qualcomm 9202 mobile broadband adapter– Ericsson F3507g and F3607gw mobile broadband adapters– HP un2400 & un2420 mobile broadband adapters– Dell 5600 mobile broadband adapter
○ If you want locations using Wi-Fi, the device must have a built-in Wi-Fi network adapterthat is enabled.
● For Mac devices:○ Operating Systems: for more information about the requirements for Mac devices, open the
Absolute console's help system and search for supported platforms for managed devices○ Mac agent version 914 or higher. See "Downloading the Absolute Agent for Android
Devices" on page 63.○ If you want locations using Wi-Fi, the device must have a built-in Wi-Fi network adapter
that is enabled.
NOTE Core Location is not supported at this time.
● For Android devices:○ Operating Systems: for more information about the requirements for Android devices, open
the Absolute console's help system and search for supported platforms for manageddevices.
○ If you want locations using GPS, the device must have a built-in GPS/A-GPS receiver thatis enabled.
○ If you want locations using Wi-Fi positioning, the device must have a built-in Wi-Fi networkadapter that is enabled.
○ If you want locations using Cell Tower/Network location technology, the device mustsupport this feature, which needs to be enabled.
● For Chromebooks:○ Operating Systems: for more information about the requirements for Chromebooks, open
the Absolute console's help system and search for supported platforms for manageddevices
NOTE Chromebooks support API and IP Georesolution location technologies only.
Chapter 4: Working with Reports Absolute User Guide
Absolute 7.x 120

Understanding Location TechnologiesThis section provides information on the following topics:
● Types of Location Technologies● Limitations of Global Positioning Systems (GPS)● Limitations of Wi-Fi Positioning● Collecting Location Data
Types of Location TechnologiesIn order of accuracy and reliability, location information can be collected using any of the followingtechnologies:
Location Technology Description
Google Maps™Wi-FiPositioning
Google MapsWi-Fi Positioning determines a device's location by comparing Wi-Fihotspots detected by the device with Google's extensive database of knownhotspots and their locations. The device does not need to be connected to a Wi-Fihotspot for the hotspot to be detected. This technology is most effective in urbanareas where Wi-Fi hotspots are plentiful. It works with Windows and Mac devices,and Android mobile devices.To use Google MapsWi-Fi Positioning, a setting needs to be enabled in youraccount. For information about enabling this setting, see "Editing Classic AccountSettings" on page 51.
NOTE If a managed device is in a country where Google Maps is prohibited,Google MapsWi-Fi Positioning cannot be used to resolve the device’s location.
Global PositioningSystem (GPS)
Global Positioning System (GPS) technology determines a device's location usingbuilt-in sensors to capture satellite signals that indicate the device's location. GPSis most effective when the device is outdoors. This technology works with Windowsdevices and Android mobile devices that are equipped with a supported GPSreceiver.
Other LocationTechnologies
Includes the following technologies:● API, such as the Microsoft Windows Sensor and Location API and theGeolocation API, use a variety of methods to identify device locations. Thistechnology works with Windows and Chromebook devices.
● Cell, identifies device locations using Cell Tower/Network location technology.This information is typically determined using triangulation techniques that arebased on known locations of 2G, 3G, and 4G base stations and/or knownlocations of Wi-Fi networks. These known locations are maintained by the devicemanufacturer or by the mobile network operator. This technology works withAndroid mobile devices.
Absolute Wi-FiPositioning
Absolute Wi-Fi Positioning determines a device’s location by comparing Wi-Fihotspots detected by the device with Absolute's database of known hotspots andtheir locations. The device does not need to be connected to the Wi-Fi hotspot forthe hotspot to be detected. This technology is most effective in urban areas whereWi-Fi hotspots are plentiful. It works with Windows and Mac devices, and Androidmobile devices.
Chapter 4: Working with Reports Absolute User Guide
Absolute 7.x 121

Location Technology Description
IP Georesolution IP Georesolution uses a database of IP addresses and their locations to determinea device's location. This technology is typically accurate at the country level, butdevice locations within a region or city are less reliable. This technology works withWindows , Mac, Android, and Chromebook devices.
Limitations of Global Positioning Systems (GPS)GPS receivers are designed to receive a signal from satellites reliably when outside with anunobstructed view of the sky. Therefore, GPS receivers are unlikely to work well when surrounded byhigh-rise buildings or inside metal-framed or concrete buildings. GPS receivers may work inside non-metal framed buildings or near a window.
The accuracy of the location reported by a GPS depends on environmental issues such as how manysatellites are in view, potential reflection of satellite signals from nearby objects, or atmospheric effects.In ideal conditions, the GPS available typically reports locations within 10 m of actual location. Whenconditions are less favorable, error may increase to 100 m or more. GPS coordinates are unlikely to beexact.
Limitations of Wi-Fi PositioningWi-Fi positioning is a correlational tracking method based on the known GPS location of Wi-Fi hotspotsdetected near a device. The measured strength of the Wi-Fi signal helps to determine the device’sproximity to a given hotspot. Typically, Wi-Fi positioning provides a location accurate to within a few cityblocks.
Collecting Location Data
For all location technologies, except Google Maps Wi-Fi Positioning and IP Georesolution, location datais collected hourly and uploaded to the Absolute console each time a device calls the Monitoring Center(usually once a day). For Google Maps Wi-Fi Positioning and IP Georesolution, locations are collectedevery time the device calls the Monitoring Center.
NOTE If you want to upload location data every time a device changes its location, you can enableEvent Calling for your managed Windows and Mac devices. For more information, see "ManagingEvent Calling for Your Account" on page 55.
End users of a device can disable the location technology; for example, users can disable GPS or Wi-Fifor all applications. To collect location information, at least one of the supported location technologiesmust be enabled on the device.
Device Location Report
NOTE If your account has been migrated to ABS 7 Geolocation, the Device Location Report mayhave been replaced by ABS 7 map view. For more information, see Viewing the location of yourdevices in the online Help.
The Device Location Report shows the most recent geographic locations, also called geolocations, ofdevices based on the best location technology available on a device when reporting a location.
Chapter 4: Working with Reports Absolute User Guide
Absolute 7.x 122

To generate a Device Location Report:
1. On the Call History and Loss Control page, click Device Location Report. The GeolocationTracking page opens.
2. On the Geolocation Tracking page, click Accept to accept the terms and conditions of theService Agreement.
3. On the Device Location Report, at the Search Criteria area, set the preferred filtering anddisplay options for the report using one or more of the following criteria:
● To filter your results by Device Group, in the Group is field, open the list and select theappropriate device group.
● To filter your results by a specific device, at the and the field area, open the list and selectone of the following values.○ Identifier: a unique Electronic Serial Number assigned to the agent that is installed on
a Device.○ Device Name: the name assigned to this device in the operating system.○ Username: the unique name detected by the agent that identifies the person who is
associated with this device.○ Make: the manufacturer of a device or other hardware.○ Model: the product type of a device or other hardware.○ Serial Number: the serial number of this device.○ Asset Number: the identification number associated with a device in the Absolute
console.○ Assigned Username: the username assigned to a device by a system administrator.○ Warranty Contract Vendor: the warranty provider for a device.
Depending on the value you selected from the preceding list, you may want to further definethis field. In the is or contains field, click Choose and select a value from the list.
● To filter your results by date, at the and when the area, do one of the following:○ In the in the last <n> days field, click the option and enter the appropriate number of
days. Any value from 1 through 365 is appropriate. A higher value in this field will resultin a larger report and will take longer to generate results
○ In the between field, click the option and enter the dates (dd/mm/yyyy) or click theCalendar icon to open the calendar dialog. Enter the dates in chronological order, withthe earliest date entered first and the later date entered second.
● To filter results by agent type and version, at the and the Agent area:i) In the Type field open the list and select the appropriate type of agent as follows:
○ Any Type returns a report that shows devices with all agent types.○ Android returns a report that shows only Android devices.○ Mac returns a report that shows only Mac devices.○ Windows returns a report that shows only devices running a Windows operating
system.○ Chromebook returns a report that shows only Chromebooks and Chrome devices.
ii) In the and version field, open the list and select the appropriate agent Version for theagent Type you selected previously.
Chapter 4: Working with Reports Absolute User Guide
Absolute 7.x 123

For example, if you want to show all devices that have the 898 version of the agentinstalled on them, in the type field, open the list and select Any Type and in the versionfield open the list and select 898.
NOTE SHC (Self Healing Call) returns a report that shows devices with agents thatcalled in from Persistence. This option appears when a Self Healing Call has occurred.
● To filter your results by Department, in the and the Department is field, open the list andselect the appropriate department.
● To filter your results by the agent status, in the and Status is field, open the list and selectone of the following options.○ All shows those specified devices where the operating condition of the agent is Active,
Inactive, or Disabled.○ Active shows only those devices whose agent has called the Monitoring Center.○ Inactive shows only those devices whose agent has not yet called the Monitoring
Center.○ Disabled shows only those devices whose agent is either flagged for removal or
removed from the device.
● To filter your results by Location, at the and the Location area, select one or both of thefollowing options:○ Only show locations with high Confidence Levels○ Only show a maximum of 500 locations
● To filter your results by Location Technology, at the and the Location was obtained viaarea, select one of the following options:○ Google Maps™ Wi-Fi Positioning
If this option is grayed out, this location technology is not available because the UseGoogle Geolocation for Wi-Fi Points setting is not enabled in your account. Forinformation about enabling this setting, see "Editing Classic Account Settings" on page51.
If this option is not shown, Google Maps and its location technology are prohibited in yourcountry (determined by the IP address of your computer).
○ GPS○ Other Location Technologies○ Absolute Wi-Fi Positioning○ IP Georesolution
For more information about each location technology, see "Types of Location Technologies"on page 121.
4. Click Show results. The results grid refreshes to show the following data returned accordingto your filtering choices.
In the results grid, devices equipped with Geolocation Tracking show as icons on the map. Allexisting Geofence boundaries for your account also show.
You can navigate the map using the following tools:
Chapter 4: Working with Reports Absolute User Guide
Absolute 7.x 124

Tool Description
Pan Use the Pan tool to move to a specific area of the map. Click one or more of the arrowsuntil the desired area is in view. This tool is typically used in conjunction with the Zoomtool.
Zoom Use the Zoom tool to zoom in or out of specific areas of the map.
● To zoom in, click repeatedly, or move the slider towards the button. You can alsozoom in by double-clicking the map or moving your mouse scroll wheel.
● To zoom out, click repeatedly, or move the slider towards the button. You can zoomout by moving your mouse scroll wheel.
Map |Satellitepicker
Use the Map | Satellite tool to select a map type.To select a map type, perform one of the following actions:● To show a street map, clickMap. This is the default option.● To show a street map with terrain and vegetation information, clickMap and selectTerrain.
● To show a map of satellite images click Satellite.● To show a map of satellite images with place names, click Satellite and select Labels.
Go toAddress
Use the Go to Address tool to view a specific location on the map.To find a location, click the icon, enter the address of the location in the provided field, andpress Enter. For greater accuracy provide a street address as well as city and statenames.
FindBoundariesand Markers
If multiple boundaries show on a map, use the Find Boundaries and Markers tool to viewthe boundaries individually.Click the icon repeatedly to step through each Geofence boundary and marker on themap.
NOTE The geolocation map in the Device Location Report is a Google Map. If Google Mapsare prohibited in your country (determined by the IP address of your computer), an ESRI® mapshows instead. For more information about working with ESRI maps, go to www.esri.com.
Each type of location technology shows a specific icon on the map:
Google MapsWi-Fi Positioning
NOTE If a device is located in a country where Google Maps are prohibited, this technologycannot be used to resolve the device’s location.
GPS
Computers using other location technologies, such as API
Mobile devices using other location technologies, such as CELL
Absolute Wi-Fi Positioning
IP Georesolution
Chapter 4: Working with Reports Absolute User Guide
Absolute 7.x 125
A small number in the top right corner of an icon indicates the number of devices in the area onthe map under the icon. If all devices in the map area under the icon use the same type of locationtechnology, the icon shows the location technology. Otherwise, the icon does not show anylocation technology.
5. Click an icon to open a dialog containing a Zoom In link to view the location, as well as thefollowing details about devices that the icon represents:
● Identifier is the unique identifying number associated with the device.● Device Name is the name assigned to this device in the operating system.● Username is the unique name detected by the agent that identifies the person who is
associated with this device.● Make is the name of the device manufacturer as captured by the agent.● Model is the model number of the device as captured by the agent.● Location is a link that lets you zoom in to the last known location of the device.● Location Time is the date and time of the last known location of the device. Clicking the
History link opens the Device Location History Report for the device.● Location Technology is the technology used to determine the location of the device.
6. The results grid below the map provides full location details for each device. Click a link in theLast Known Location (Latitude, Longitude) column to view a device’s location on the map.
For more information about using geotechnology, see "Managing Geofences" on page 199.
Device Location History Report
NOTE If your account has been migrated to ABS 7 Geolocation, the Device Location History Reportmay not show the most up-to-date location data. For more information, see Viewing a device's recentlocation changes in the online Help.
The Device Location History Report tracks the location of a single device over time, using the bestlocation technology available when the device reported a location. For a list of available locationtechnologies organized in order of accuracy and reliability, see "Types of Location Technologies" onpage 121.
The position of a device over time is represented as a set of icons on a map. The color of the iconindicates the timeframe of the information. The most recent locations are red, while locations reportedin the past fade from red to white as they grow older. Clicking an icon opens a dialog that shows detailsabout the devices that the icon represents.
Information in the results grid that shows below the map represents latitude and longitude coordinates,measured in decimal degrees.
For more information about using geotechnology, see "Managing Geofences" on page 199.
NOTE You must log in to the Absolute console as an Administrator or Power User to perform the nexttask. Also note that the first time you access any geolocation page in a login session, a confirmationpage prompts you to accept the Terms and Conditions of use.
To generate a Device Location History Report:
1. On the Call History and Loss Control page, click Device Location History Report.
Chapter 4: Working with Reports Absolute User Guide
Absolute 7.x 126

2. On the Device Location History Report, at the Search Criteria area, set the preferred filteringand display options for the report using one or more of the following criteria:
● To filter your results by Device, in the Device is field, click Choose to open the list andselect the appropriate device.
● To filter your results by date, at the and a Location was determined between area, doone of the following:○ In the in the last <n> days field, click the option and enter the appropriate number of
days. Any value from 1 through 365 is appropriate. A higher value in this field will resultin a larger report and will take longer to generate results.
○ In the between field, click the option and enter the dates (dd/mm/yyyy) or click thecalendar icon to open the calendar dialog. Enter the dates in chronological order, withthe earliest date entered first and the later date entered second.
● To filter your results by Location, at the and the Confidence is area, select one or both ofthe following options:○ Only show locations with high Confidence Levels○ Only show a maximum of 500 locations
● To filter your results by location technology, at the and the Location was obtained viaarea, select one or more of the following options:○ Google Maps™ Wi-Fi Positioning
If this option is grayed out, this location technology is not available because the UseGoogle Geolocation for Wi-Fi Points setting is not enabled in your account. Forinformation about enabling this setting, see "Editing Classic Account Settings" on page51. If this option is not shown, Google Maps and its location technology are prohibited inyour country (determined by the IP address of your computer).
○ GPS○ Other Location Technologies○ Absolute Wi-Fi Positioning○ IP Georesolution
For more information about each location technology, see "Types of Location Technologies"on page 121.
● Click the and show location field and select one of the following options to indicate thescope of the location data to include in the report:○ between calls (all intermediate known locations)○ at last call (last known location at last call)
NOTE If you selected only the Google Maps™ Wi-Fi Positioning option in thepreceding step, the at last call option is selected by default and cannot be changed.This location technology collects location data at agent calls only.
3. Click Show results. The results grid refreshes to show the following data returned accordingto your filtering choices.
In the results grid, the device’s locations show as icons on the map. All existing Geofenceboundaries for your account also show.
You can navigate the map using the following tools:
Chapter 4: Working with Reports Absolute User Guide
Absolute 7.x 127
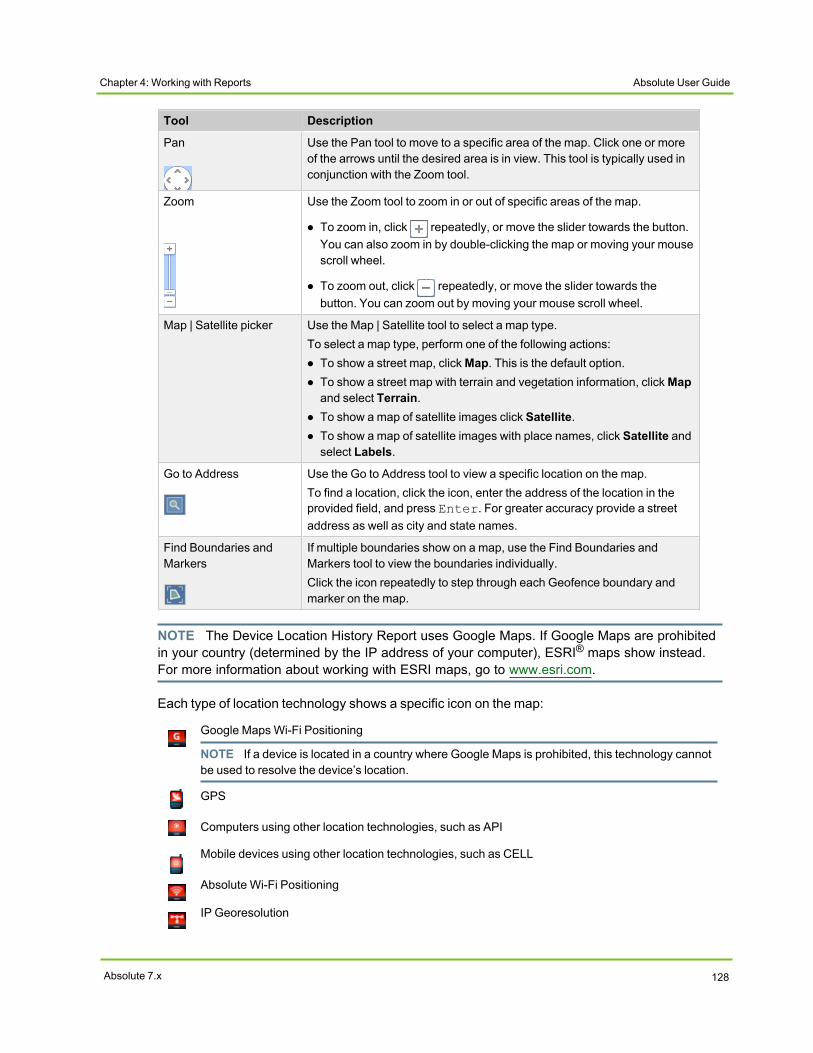
Tool Description
Pan Use the Pan tool to move to a specific area of the map. Click one or moreof the arrows until the desired area is in view. This tool is typically used inconjunction with the Zoom tool.
Zoom Use the Zoom tool to zoom in or out of specific areas of the map.
● To zoom in, click repeatedly, or move the slider towards the button.You can also zoom in by double-clicking the map or moving your mousescroll wheel.
● To zoom out, click repeatedly, or move the slider towards thebutton. You can zoom out by moving your mouse scroll wheel.
Map | Satellite picker Use the Map | Satellite tool to select a map type.To select a map type, perform one of the following actions:● To show a street map, clickMap. This is the default option.● To show a street map with terrain and vegetation information, clickMapand select Terrain.
● To show a map of satellite images click Satellite.● To show a map of satellite images with place names, click Satellite andselect Labels.
Go to Address Use the Go to Address tool to view a specific location on the map.To find a location, click the icon, enter the address of the location in theprovided field, and press Enter. For greater accuracy provide a streetaddress as well as city and state names.
Find Boundaries andMarkers
If multiple boundaries show on a map, use the Find Boundaries andMarkers tool to view the boundaries individually.Click the icon repeatedly to step through each Geofence boundary andmarker on the map.
NOTE The Device Location History Report uses Google Maps. If Google Maps are prohibitedin your country (determined by the IP address of your computer), ESRI® maps show instead.For more information about working with ESRI maps, go to www.esri.com.
Each type of location technology shows a specific icon on the map:
Google MapsWi-Fi Positioning
NOTE If a device is located in a country where Google Maps is prohibited, this technology cannotbe used to resolve the device’s location.
GPS
Computers using other location technologies, such as API
Mobile devices using other location technologies, such as CELL
Absolute Wi-Fi Positioning
IP Georesolution
Chapter 4: Working with Reports Absolute User Guide
Absolute 7.x 128

A small number in the top right corner of an icon indicates the number of locations in the area onthe map under the icon. If all locations used the same type of location technology, the icon showsthe location technology. Otherwise, the icon does not show any location technology.
4. Click an icon to open a dialog containing a Zoom In link to view the icon location, as well asthe following details:
● Location Time: the date and time of the last known location of the device.● Location: a link letting you zoom in to the last known location of the device.● Location Technology: the technology used to determine the location of the device.
5. The results grid below the map provides full details about the device’s locations. Click a link inthe Location (Latitude, Longitude) column to view a particular location on the map.
Lease and Inventory Management ReportsThis section provides information on the following reports:
● Lease Completion Report● User-Entered Data
Lease Completion ReportThe Lease Completion Report identifies all assets that have leases expiring in a given time period. TheLease Completion Report does not show fields with null values.
By default, the Lease Completion Report’s output includes devices that have a lease expiring within thenext 30 days. You can change the range of dates to include in the results grid.
NOTE For detailed instructions on entering new lease information or updating information on existingleases, see Editing Device Field data in the online Help.
To generate a Lease Completion Report:
1. On the navigation bar, click to open the Reports page.
2. Near the bottom of the page, click Go to Classic Reports Page.
1. Under Lease and Inventory Management click Lease Completion Report.
2. On the Lease Completion Report, at the Search Criteria area. set the preferred filtering anddisplay options for the report using one or more of the following criteria:
● To filter your results by Device Group, in the Group is field, open the list and select theappropriate device group.
● To filter your results by specific device, in the and the field area, open the list and selectone of the following values:○ Asset Number: the identification number associated with a device in the Absolute
console.○ Assigned Username: the username assigned to a device by a system administrator.○ Cost Center/Code: a unique identifier for a unit for which costs are accumulated or
computed.○ Device Name: the name assigned to the device in the operating system.○ IP Address: a unique number identifying a device on the Internet.
Chapter 4: Working with Reports Absolute User Guide
Absolute 7.x 129

○ Lease Number: a unique identifier assigned to a lease.○ Lease Responsibility: a party accountable for let goods.○ Lease Vendor: the provider of let goods. Not all equipment lessors provide
maintenance and service support. For this reason, the lease vendor and service vendormay not be the same and the contract dates may differ.
○ Purchase Order Reference: a unique identifier associated with an authorization tobuy goods or services.
○ Serial: the serial number of this device.○ Service Contract: a provision of support and maintenance of goods.○ User Phone/Extension: the complete telephone number of an individual associated
with a device.○ Username: the unique name detected by the agent that identifies the person who is
associated with this device.○ Warranty Contract Vendor: the warranty provider for a device.○ Physical/Actual Location: where the device resides.○ Any Custom Device Fields that you may have set are listed here and you can use them
to filter your report.
Depending on the value you selected from the preceding list, you may want to further definethis field. In the is or contains field, click Choose and select a value from the list.
● To filter your results by date, at the and Lease End date is area, do one of the following:○ In the in the last <n> days field, click the option and enter the appropriate number of
days. Any value from 1 through 365 is appropriate. A higher value in this field will resultin a larger report and will take longer to generate results.
○ In the between field, click the option and enter the dates (dd/mm/yyyy) or click theCalendar icon to open the calendar dialog. Enter the dates in chronological order, withthe earliest date entered first and the later date entered second.
● To filter your results by dates in a customer agreement, at the and when the area:i) Open the list and select one of the following options:
○ Lease End Date○ Lease Start Date○ Service Contract End Date○ Service Contract Start Date○ Warranty End Date○ Warranty Start Date○ Device Purchase Date
ii) In the is field, select one of the following options:○ Before○ On or after○ On
iii) Enter the date (dd/mm/yyyy) or click the Calendar icon to select it.By default, the Lease Completion Report’s output includes devices that have a lease expiringwithin the next 30 days.
Chapter 4: Working with Reports Absolute User Guide
Absolute 7.x 130

3. Click Show results. The results grid refreshes to show the following data returned accordingto your filtering choices.
● Identifier: a unique Electronic Serial Number assigned to the agent that is installed on adevice. Click the link to open this device’s Device Summary page. For more information,see "Editing Asset Information" on page 73.
● Field Name: the custom device field used to filter the report in step 2.● Field Value: the value of the custom device field used to filter the report in step 2.● Department: the department to which this device belongs● Username: the unique name detected by the agent that identifies the person who is
associated with this device.● Make: the manufacturer of a device or other hardware.● Model: the product type of a device or other hardware.● Serial Number: the serial number of this device.● Asset Number: the identification number associated with a device in the Absolute console.
User-Entered DataThe User-Entered Data Report lets you view all manually-entered data associated with your trackeddevices, including all data stored in Custom Device Fields and data points that the agent is unable tocapture automatically.
NOTE For more information about Custom Device Fields, see the online Help.
This section provides the following tasks:● Generating a User-Entered Data Report● Selecting the Data Points You Want to See
Generating a User-Entered Data Report
To generate a User-Entered Data Report:
1. On the navigation bar, click to open the Reports page.
2. Near the bottom of the page, click Go to Classic Reports Page.
1. Under Lease and Inventory Management click User-Entered Data Report.
2. On the User-Entered Data Report, at the Search Criteria area, set the preferred filtering anddisplay options for the report using one or more of the following criteria:
● To filter your results by Device Group, in the Group is field, open the list and select theappropriate device group.
● To filter your results by specific device, in the and the field area, open the list and selectone of the following values:○ Asset Number: the identification number associated with a device in the Absolute
console.○ Assigned Username: the username assigned to a device by a system administrator.○ Cost Center/Code: a unique identifier for a unit for which costs are accumulated or
computed.
Chapter 4: Working with Reports Absolute User Guide
Absolute 7.x 131

○ Device Name: the name assigned to the device in the operating system.○ Device Purchase Date: the date the device was purchased.○ Identifier: a unique Electronic Serial Number assigned to the agent that is installed on
a Device.○ Installation Date: the date and time of first agent call to the Monitoring Center.○ Lease Number: a unique identifier assigned to a lease.○ Lease Responsibility: a party accountable for let goods.○ Lease Vendor: the provider of let goods. Not all equipment lessors provide
maintenance and service support. For this reason, the lease vendor and service vendormay not be the same and the contract dates may differ.
○ Purchase Order Reference: a unique identifier associated with an authorization tobuy goods or services.
○ Serial: the serial number of this device.○ Service Contract End Date: when a provision of support and maintenance of goods
ends.○ Service Contract Start Date: when a provision of support and maintenance of goods
begins.○ Service Contract Vendor: the name of the provider of support and maintenance of
goods.○ User Phone/Extension: the complete telephone number of an individual associated
with a device.○ Username: the unique name detected by the agent that identifies the person who is
associated with this device.○ Warranty Contract Vendor: the warranty provider for a device.○ Physical/Actual Location: the physical location of the device.○ Any Custom Device Field that you may have set are listed here and you can use them
to filter your report.
Depending on the value you selected from the preceding list, you may want to further definethis field. In the is or contains field, click Choose and select a value from the list.
● To filter your results by date, at the and when area:i) Open the list and select one of the following options:
○ Device Purchase Date○ Installation Date○ Lease End Date○ Lease Start Date○ Service Contract End Date○ Service Contract Start Date○ Warranty End Date○ Warranty Start Date
ii) Do one of the following:○ In the in the last <n> days field, click the option and enter the appropriate number
of days. Any value from 1 through 365 is appropriate. A higher value in this fieldwill result in a larger report and will take longer to generate results.
Chapter 4: Working with Reports Absolute User Guide
Absolute 7.x 132

○ In the between field, click the option and enter the dates (dd/mm/yyyy) or click theCalendar icon to open the calendar dialog. Enter the dates in chronological order,with the earliest date entered first and the later date entered second.
● To filter your results by department, in the and the Department field, open the list andselect the appropriate department.
3. Click Show results. The results grid refreshes to show the following data returned accordingto your filtering choices.
● Identifier: a unique Electronic Serial Number assigned to the agent that is installed on adevice. Click the link to open this device’s Device Summary page. For more information,see "Editing Asset Information" on page 73.
● Asset Number: the identification number associated with a device in the Absolute console.● Device Name: the name assigned to this device in the operating system.● IP Address: a unique number identifying a device on the Internet.
Selecting the Data Points YouWant to See
To select which data points show in the results grid:
1. Complete the task, "Generating a User-Entered Data Report" on page 131.
2. In the results grid, click Choose Columns.
3. On the Custom Fields dialog, select the appropriate field in the Available Fields pane, and thenclick > to add the field to the Selected Fields pane. To add all fields, click >>.
To remove a field from the results grid, select the field in the Selected Fields pane, and then click<. To remove all fields, click <<.
4. Repeat step 3 as needed to prepare the results grid format.
5. Click OK to return to the User-entered Data report page.
Account Management ReportsYou can use Account Management reports to monitor and track agent licenses belonging to yourorganization, and to help resolve licensing issues.
NOTE Guest Users cannot access the Account Management Reports area and, therefore, cannot seeany of the reports contained therein.
This section provides information on the following reports:● License Usage Summary Report● Calling Profiles Report● User Audit Report● User Event Report● Security Audit Logs Report
Chapter 4: Working with Reports Absolute User Guide
Absolute 7.x 133

Opening the Account Management PageComplete the following task to open any of the Account Management reports included in thisclassification.
To open the Account Management page:
1. On the navigation bar, click to open the Reports page.
2. Near the bottom of the page, click Go to Classic Reports Page.
3. Click Account Management.
The Account Management page shows all of the available reports.
License Usage Summary ReportThe License Usage Summary Report provides details regarding the current licensing status of youraccount, including the installation rate.
To download the License Usage Summary Report:
1. On the Account Management page, click License Usage Summary Report.
2. On the License Usage Summary Report, in the Name field, enter a unique name for yourreport.
3. In the Format field, open the list and select one of the following options:
● CSV: a plain text file with comma separated columns that is opened with software includedin your operating system. Recommended for SQL queries and uploading large data files.
● XML: a Unicode language file that is opened with an XML editor such as Microsoft Excel orOpenOffice. Recommended for filtering and formatting data.
4. At the Create E-mail Alert location, in the Your E-mail address field, enter your e-mail addressif you want to receive an e-mail notification when the report is processed.
5. Click Continue to queue the download.
6. When your request is processed, you can retrieve the CSV or XML file of the report from theMy Reports page. For more information, see "Downloading Reports" on page 84.
The downloaded License Usage Summary shows the total number of licenses for each product. Italso shows the following data:
● Total Installed: combined total of all licenses installed under your account.● Over(-) or Under Install (+): total number of licenses purchased, minus the total number
installed.● Install Rate: percentage of purchased licenses that are installed.● Called In Last 30 Days: combined total of licenses that have called the Monitoring Center
in the last 30 days.● Recent Call In Rate: the above value as a percentage.● Service Guarantee Installed: total number of Service Guarantee licenses installed.● Over(-) or Under Install(+): total number of Service Guarantee licenses purchased, minus
the total number of Service Guarantee licenses installed.● Install Rate: percentage of purchased Service Guarantee licenses that are installed.
Chapter 4: Working with Reports Absolute User Guide
Absolute 7.x 134

● Called In Last 30 Days: total number of Service Guarantee licenses that have called theMonitoring Center in the last 30 days.
● Recent Call In Rate: the total number of Service Guarantee licenses that have called theMonitoring Center in the last 30 days as a percentage.
Calling Profiles ReportThe Calling Profiles Report provides detailed information on the calling patterns of each active device.
To download the Calling Profiles Report:
1. On the Account Management page, click Calling Profiles Report link.
2. On the Calling Profiles Report, at the Search Criteria area, set the preferred filtering anddisplay options for the report using one or more of the following criteria:
● To filter your results by Device Group, in the Group is field, open the list and select theappropriate device group.
● To filter your results by Department, in the and the Department field, open the list andselect the appropriate department.
● To filter your results by specific device, in the and the field area, open the list and selectone of the following values.○ Any of the fields in this list: selects all the values in the list.○ Identifier: a unique Electronic Serial Number assigned to the agent that is installed on
a device.○ Device Name: the name assigned to the device in the operating system.○ Username: the unique name detected by the agent that identifies the person who is
associated with this device.○ Serial Number: the serial number of this device.○ Asset Number: the identification number associated with a device in the Absolute
console.○ Make: the manufacturer of a device or other hardware.○ Model: the product type of a device or other hardware.○ Assigned Username: the username assigned to a device by a system administrator.
Depending on the value you selected from the preceding list, you may want to further definethis field. In the is or contains field, click Choose and select a value from the list.
3. At the Name and Format area, in the Name field, enter a unique name for your report.
4. In the Format field, open the list and select one of the following options:
● CSV: a plain text file with comma separated columns that is opened with software includedin your operating system. Recommended for SQL queries and uploading large data files.
● XML: a Unicode language file that is opened with an XML editor such as Microsoft Excel orOpenOffice. Recommended for filtering and formatting data.
5. At the Create E-mail Alert location, in the Your E-mail address field enter your e-mail addressif you want to receive an e-mail notification when the report is processed.
6. Click Continue to queue the download.
Chapter 4: Working with Reports Absolute User Guide
Absolute 7.x 135

7. When your request is processed, retrieve the CSV or XML file of the report from the MyReports page. For more information, see "Downloading Reports" on page 84.
The downloaded Calling Profiles includes the following data for each active device:
● ESN: the device’s Electronic Serial Number.● Device Make: the manufacturer of a device or other hardware.● Device Model: the product type of a device or other hardware.● Department:: the department to which this device belongs.● Last Host Name: the name of the server the agent called from.● Last Username: the unique name detected by the agent that identifies the person who is
associated with this device at the last agent call.● Serial Number: the serial number for this device.● Asset Number: the identification number associated with a device in the Absolute console● Activation Date: the date the agent first contacted the Monitoring Center from a device.● Last Caller ID: the IP address for the origin of the incoming call by the agent to the
Monitoring Center.● Local IP: the IP address assigned to a device on the Local Area Network (LAN) when
calling the Monitoring Center.● Agent Version Number: the version number of the Absolute agent that contacts the
Monitoring Center.● First Call: the date and time of the first agent call to the Monitoring Center.● Last Call: the date and time of the most recent agent call to the Monitoring Center.● Second to Last Call: the date and time of the second to last agent call to the Monitoring
Center.● Third Last Call: the date and time of the third last agent call to the Monitoring Center.● Fourth Last Call: the date and time of the fourth last agent call to the Monitoring Center.● Fifth Last Call: the date and time of the fifth last agent call to the Monitoring Center.● Calls 0-30 Days: the number of agent calls to the Monitoring Center in the last 30 days.● Calls 31-60 Days: the number of agent calls to the Monitoring Center in the last 31-60
days.● Calls 61-90 Days: the number of agent calls to the Monitoring Center in the last 61-90
days.● Calls Over 90 Days: the number of agent calls to the Monitoring Center more than 90
days.● All Calls: the total number of agent calls to the Monitoring Center.
User Audit ReportThe User Audit Report has been deprecated. To view changes to user accounts, go to the History areaand view the Events page. For more information, see Monitoring events in the online Help.
User Event ReportThe User Event Report has been deprecated. To view changes to user accounts, go to the History areaand view the Events page. For more information, see Monitoring events in the online Help.
Chapter 4: Working with Reports Absolute User Guide
Absolute 7.x 136

Security Audit Logs ReportSecurity Administrators can use the Security Audit Logs Report to view details about the followingcompleted security actions related to Data Delete and Device Freeze requests:
● Device Freeze Requested● Device Freeze Request Cancelled● Device Freeze Details Removed● Scheduled Freeze Pending● Device Freeze Scheduled● Unfreeze Requested
● Data Delete Requested● Data Delete Request Cancelled● Data Delete Log File Downloaded● Data Delete Details Removed● Unfreeze Request Cancelled
The report includes all logged information that is typically used for audit purposes, such as theusername of the user who initiated the security action, the date and time of the security action, and thedevice Identifier.
NOTE You can create an Alert to notify you when a particular security action occurs. For moreinformation, see "Creating a Security Action Alert" on page 19.
IMPORTANT You need to log in to the Absolute console as a Security Administrator to perform thenext task.
To generate a Security Audit Logs Report:
1. On the Account Management page, click Security Audit Logs Report.
2. On the Security Audit Logs Report page, at the Search Criteria area, set the preferred filteringand display options for the report using one or more of the following criteria:
● To filter your results by Device Group, in the Group is field, open the list and select theappropriate device group.
● To filter your results by device, in the and the field area, open the list and select one ofthe following values.○ Any of the fields in this list: selects all the values in the list○ Identifier: a unique Electronic Serial Number assigned to the agent that is installed on
a device○ Device Name: the name assigned to the device in the operating system○ Username: the unique name detected by the agent that identifies the person who is
associated with the device○ Make: the manufacturer of a device or other hardware○ Model: the product type of a device or other hardware○ Serial Number: the serial number of the device○ Requested By: the username of the Security Administrator or Security Power User
who submitted the request○ Data Delete Policy: the name of the Data Delete policy associated with the request, if
applicable○ IMEI: the International Mobile Equipment Identity (IMEI) number of the device, if
applicable
Chapter 4: Working with Reports Absolute User Guide
Absolute 7.x 137

Depending on the value you selected from the preceding list, you may want to further definethis field. In the is or contains field, click Choose and select a value from the list.
● To filter your results by date, in the and the Security Action occurred area do one of thefollowing:○ Select the in the last <n> days option and enter a number of days in the field. Values
between 1 and 365 are supported.○ Select the between option and enter the applicable dates (dd/mm/yyyy) in the two
fields. Enter the dates in chronological order (earliest date in the first field and the laterdate in the second field). Alternatively, click the Calendar icons to open the calendardialog.
● To filter your results by the security action associated with the Data Delete request, clickthe and the Security Action is field and select an option.
3. Click Show results. The results grid refreshes to show the following information based on yourdefined search criteria:
● Date and Time: the date and time when the security action was completed● Request ID: the identifier assigned to the Data Delete request by the system● Identifier: a unique Electronic Serial Number assigned to the agent that is installed on a
device● Requested By: the username of the Security Administrator or Security Power User who
submitted the request● Security Action: the security action associated with the logged event
Possible values are:
○ Data Delete Requested○ Data Delete Request Cancelled○ Data Delete Log File Downloaded○ Data Delete Details Removed
● Freeze Message: a link to the Freeze message associated with a Device Freeze request,if applicableClick View Message to view the message text.
● Data Delete Type: the setting associated with a Data Delete request, if applicablePossible values are:
○ Custom Policy○ All Files○ Lost or Stolen Device - Delete all Files and OS○ Device End of Life - Delete all Files, Sector Wipe, and OS○ Firmware Drive Wipe○ Mobile Device
For more information about these options, see "Data Delete Settings" on page 1.
● Data Delete Policy: the name of the Data Delete policy associated with the request, ifapplicable
Chapter 4: Working with Reports Absolute User Guide
Absolute 7.x 138

● Username:the unique name detected by the agent that identifies the person who isassociated with this device
● Device Name: the name assigned to the device in the operating system● Serial Number: the serial number of this device● IMEI: the International Mobile Equipment Identity number of the device, if applicable● Make: the manufacturer of a device or other hardware● Model: the product type of a device or other hardware
My ContentThe My Content reporting area is where you store your saved reports and filter criteria. The reportsprovided in the My Content area include:
● My Reports● My Filters
My ReportsAll reports can be downloaded as a Comma Separated Value (CSV) or eXtensible Markup Language(XML) file. Report download requests are queued and processed offline. When the processing iscomplete, the CSV or XML files are made available through the My Reports page.
The My Reports page shows all requested report downloads and includes the following information foreach report:
● Report Requested On: shows the date and time when the CSV or XML file was requested.● Report Name: shows the name assigned to the CSV or XML request.● Report Type: indicates the report type; for example, Group Import.● File Size: shows the size of the report file you requested.● Status: indicates the status of the request, which can have the possible values of In Queue,
Ready, and Error.
To view the My Reports page and download a processed report:
1. On the navigation bar, click to open the Reports page.
2. Near the bottom of the page, click Go to Classic Reports Page.
3. Under My Content, click My Reports.
4. On the My Reports page, in the row containing the appropriate report in the Status column,click the Ready link and follow the on-screen instructions to download the report.
NOTE When your file request is being processed, the Status column shows In Queue andthe report is not available. When processed, the Status column shows the Ready link and, ifrequested, you receive an e-mail notification.
My FiltersThe My Filters page shows all saved report filters. Saved filters define the criteria for a report, not thereport’s output contained in the results grid. Data that meets this criteria may change with time, so thereport output can change as well.
Chapter 4: Working with Reports Absolute User Guide
Absolute 7.x 139

To use a saved report filter:
1. On the navigation bar, click to open the Reports page.
2. Near the bottom of the page, click Go to Classic Reports Page.
3. Under My Content, click My Filters.
4. On the My Filters page, click the appropriate Filter name in the table.
The report is regenerated based on the saved filter criteria.
Editing Saved Report Filters
To edit a saved report filter:
1. On the navigation bar, click to open the Reports page.
2. Near the bottom of the page, click Go to Classic Reports Page.
3. Under My Content, click My Filters.
4. On the My Filters page, click the appropriate Filter name in the table.
5. The report is regenerated based on the saved filter criteria.
Edit the existing filters and click Show results. The report regenerates and shows on the page.
6. If necessary, save the modified filters as a new saved filter. For more information, see "SavingReport Filters" on page 83.
NOTE The original saved report remains unchanged.
Chapter 4: Working with Reports Absolute User Guide
Absolute 7.x 140
Chapter 5: Using Real-Time Technology
The optional Real-Time Technology (RTT) feature provides real-time communications with supporteddevices, which is enabled using a web application that sends and receives communication.
If your device is equipped with a supported mobile broadband adapter and meets the minimum systemrequirements, you can use the RTT feature to do the following:
● Manage the mobile broadband-enabled equipment in your asset base.● Force an agent call from a device using SMS messaging. If the managed device has an
Internet connection, it contacts the Monitoring Center to receive instructions and takeimmediate action.
What is Real-Time Technology?Real-Time Technology (RTT) lets you better track your mobile broadband-enabled devices.Additionally, RTT leverages mobile broadband and SMS messaging, also known as text messaging, todramatically increase the performance of the Absolute Asset Tracking and Recovery features.
RTT encompasses the following features:● Mobile Broadband Adapter Tracking (MBAT): MBAT permits Absolute customers to view a
list of mobile broadband adapters and their attributes including equipment, subscriber, andnetwork information in the Absolute console. MBAT is a unique feature letting customers trackand manage devices using mobile broadband adapters and data plans in their asset base.
● Monitoring Center-initiated Calling (MCIC): MCIC lets customers remotely initiate an agentcall using the Absolute console. Monitoring Center-initiated calling, under specificcircumstances, enables a drastic reduction in the time required to initiate action on the targeteddevice. For example, MCIC can be used to initiate Data Delete and Freeze operations on thetargeted device within minutes of submitting a request in the Absolute console. MCIC alsoenables near real-time geolocation updates and tracking for the asset. In the absence of MCIC,each of these operations will only start at the next scheduled agent call. Under somecircumstances, MCIC also permits communications with computers that do not have an activeIP connection.
Minimum System RequirementsCurrently, RTT and MCIC technology is not available for Mac devices.
To use the RTT feature, you need to meet the following minimum system requirements:● Operating System: The targeted device must be running a supported version of one of the
following operating systems:○ Windows○ Android
For details, open the Absolute console help system and search for supported platforms formanaged devices.
● Agent: The targeted device must have an active agent installed and must regularly call in tothe Absolute Monitoring Center. For information about the most current agent versions, see"Downloading the Absolute Agent for Android Devices" on page 63.
Absolute7.x 141

● Broadband Adapter: The mobile broadband adapter installed on the targeted device must besupported for RTT.
● Valid Data Subscription with SMS Support: The targeted device must have a valid mobiledata subscription that supports SMS messaging.
IMPORTANT Before using RTT, ensure that the targeted device has an active agent regularly callingin to the Absolute Monitoring Center. Additionally, you should be able to establish a data connectionand send and receive SMS messages using the “watcher application” provided with your mobilebroadband adapter. For more information, refer to the instructions provided with your mobile broadbandadapter or the device.
Working with RTTTo successfully receive and process Real-Time Technology (RTT) and Monitoring Center InitiatedCalling (MCIC) features such as SMS messages, the targeted device must be powered on and themobile broadband adapter on the device must be:
● powered on● associated with an active SMS service● in the network coverage area
For more information about searching for devices in your account with mobile broadband adapters, see"Mobile Broadband Adapter Report" on page 92.
For more information about the MCIC features such as SMS messages, see the following topics:● "Viewing the Forced Call Log" on page 144● "Initiating a Forced Call" on page 144
To take advantage of RTT functionality, your devices need to meet the following requirements:● The RTT feature, including Mobile Broadband Adapter asset tracking and Monitoring Center
Initiated Calling, is enabled for your account or the device. To activate these features, contactAbsolute Technical Support (www.absolute.com/en/support).
● The device meets the system requirements. See "Minimum System Requirements" on page141.
● The agent is installed and the device is regularly calling the Monitoring Center● The device has a supported mobile broadband adapter with an active data plan that has Short
Message Service (SMS) support.
IMPORTANT Only Security Administrators can change RTT settings in the Absolute console.Administrators, Security Power Users, Power Users, and Guest Users can only view and filter the list ofRTT devices.
This section includes the following tasks:● Viewing Mobile Broadband Adapter Information● Editing the Phone Number Override● Viewing the Forced Call Log● Initiating a Forced Call
Chapter 5: Using Real-Time Technology Absolute User Guide
Absolute 7.x 142

Viewing Mobile Broadband Adapter Information
To view the mobile broadband adapter details for an RTT-enabled device:
1. On the navigation bar, click to open the Reports page.
2. Near the bottom of the page, click Go to Classic Reports Page.
3. On the Reports page, click Mobile Broadband Adapter Report.
4. On the Mobile Broadband Adapter Report page, use the filter to limit your search and clickShow results.
5. In the results grid, click the Identifier link for the device that you want to view.
6. On the Device Summary page, you see the details for the selected device.
This page opens with the contents of the Hardware Summary tab showing. If you are using theRTT feature, partway down the page you see theMobile Broadband Adapters area.
7. Click the Details link for the appropriate device.
The Mobile Broadband Adapter Details dialog opens, which provides the following details for thedevice:
● Time Attributes Collected: the date and time when information about the mobilebroadband adapter installed on the device was collected.
● Manufacturer: the name of the manufacturer of the mobile broadband adapter.● Model: the model number, if available, of the mobile broadband adapter.● Equipment ID: the identification number unique to the mobile broadband adapter; usually
available on the bottom of the notebook or on the removable mobile broadband adapter.For EVDO adapters, the Electronic Serial Number (ESN) and/or the Mobile Equipment ID(MEID) may be reported. For UMTS networks, the International Mobile Equipment Identifier(IMEI) is reported.
● Subscriber ID: the unique number associated with the subscriber; stored in the adapter,the Subscriber Identity Module (SIM) card, or equivalent.
● Network: the mobile service provider associated with the mobile device.● Service Status: the last reported status of the availability of the associated network.● Detected Phone Number: the phone number associated with the mobile broadband
adapter, as reported by the device.● Phone Number Override: the alternative or override phone number associated with the
mobile device or broadband adapter. If the agent does not detect the phone numberautomatically, the device automatically sends an SMS to the Monitoring Center. The reply-to address from the SMS becomes the value for the Phone Number Override field. Youcan edit the phone number using the Edit Phone Number Override dialog. See "Editingthe Phone Number Override" on page 144.
8. On the Mobile Broadband Adapter Details dialog, click Close to return to the Device Summarypage.
Chapter 5: Using Real-Time Technology Absolute User Guide
Absolute 7.x 143

Editing the Phone Number OverrideThe Edit Phone Number Override dialog allows you to enter a new phone number to use instead of thedetected phone number when sending SMS text messages to the adapter. SMS text messages areused to contact devices as part of the MCIC feature.
To set an override phone number:
1. Open the Device Summary page for the device on which you want to attempt a forced call bycompleting step 1 through step 5 of the task, "Viewing Mobile Broadband Adapter Information"on page 143.
For more information about the Device Summary page, see "Editing Asset Information" on page73.
2. On the Hardware Summary tab in the Mobile Broadband Adapters area, for the appropriateadapter, click the Edit link under the Phone Number Override column.
3. On the Edit Phone Number Override dialog, type the new phone number including countryand area codes in the Phone Number Override field. The phone number should follow theformat: +16045556789, without spaces, parentheses, periods, or hyphens.
4. Click Set Override.
The Edit Phone Number dialog closes and the Device Summary page refreshes to show the newphone number override value in the Phone Number Override column.
Viewing the Forced Call LogOn the Device Summary page, the Forced Call Log tab shows detailed information about eventsassociated with all forced calls attempted on a device. The Forced Call Log shows information aboutSMS messages sent to and received from the device. The following information is available:
● Time: the date and time associated with a forced call-related event.● Type: the category of the event related to the forced call. Possible events are: information,
warning, or an error message.● Description: the details of the events prompting the SMS message or forced call. When
sending an SMS message, the description includes the phone number and initial status of themobile service provider.When receiving a response, the description includes the phone number only.
Initiating a Forced CallMonitoring Center Initiated Calling (MCIC), also known as forced calls, are SMS messages sent fromthe Monitoring Center to a RTT enabled device prompting the device to initiate an agent call.
IMPORTANT The following task requires that you log in to the Absolute console as an Administrator.
To force a call from a device:
1. On the navigation bar, click to open the Reports page.
2. Near the bottom of the page, click Go to Classic Reports Page.
3. On the Reports page, click Mobile Broadband Adapter Report.
Chapter 5: Using Real-Time Technology Absolute User Guide
Absolute 7.x 144

4. On the Mobile Broadband Adapter Report page, use the filter to limit your search and clickShow results.
5. In the results grid, click the Identifier link to open the Device Summary page for the device.
6. Follow the appropriate steps below to force a call to the device:
● For Windows devices:i) On the Hardware Summary tab in the Mobile Broadband Adapters area, in the row
for the appropriate adapter, click Attempt forced call.ii) On the Attempt Forced Call dialog, click Attempt call.iii) The Forced Call Status dialog opens, where you see the success or failure of your
request.● The Monitoring Center sends an SMS to the adapter, requesting an immediate call
from the agent. If the device is on and the mobile broadband adapter is withinnetwork coverage, the agent initiates a call to the Monitoring Center.
● The message is queued if the mobile broadband adapter cannot receive it.● If the agent does not have an Internet connection, the agent will contact as soon as
it is back online.iv) Click Close, which returns you to the Device Summary page for the device.
● For Android devices, on the Hardware Summary tab, in the Smart Phone Radio area,click Attempt Forced Call.The Monitoring Center sends an SMS to the mobile device, requesting an immediate call fromthe agent.
If the device is on and the mobile broadband adapter is within network coverage, the agentinitiates a call to the Monitoring Center. If conducive circumstances are not available, theagent calls in when all conditions are conducive and the mobile device is able to receive theSMSmessage and/or initiate a call.
You can view the status of the forced call request on the Forced Call Log tab. For more information,see "Viewing the Forced Call Log" on page 144.
You can also force calls using MCIC as part of Data Delete and Device Freeze requests.
Chapter 5: Using Real-Time Technology Absolute User Guide
Absolute 7.x 145

Chapter 6: Using Real-Time Technology over IP
Real-Time Technology over IP (RTT-IP) reduces the time it takes for an account Administrator toinvoke remote operations such as Data Delete on managed Windows and Mac devices. Using RTT-IPcan significantly reduce the window of opportunity for data loss or for unauthorized access to systems.
The RTT-IP feature is not turned on by default, and an Administrator must manually enable it for youraccount.
This chapter provides information on the following topics:● Minimum System Requirements● Understanding How RTT-IP Works● Accelerating Operations With RTT-IP● Enabling RTT-IP● Requesting a full agent call using RTT-IP● Editing the RTT-IP Ping Period for a Device● Viewing RTT-IP Status for All Devices● Disabling RTT-IP
IMPORTANT To perform the tasks in this chapter, you need to log in to the Absolute console as aSecurity Administrator.
Minimum System RequirementsRTT-IP works on devices with Internet access that are running a supported version of the Windows orMac operating system.
Understanding How RTT-IP WorksNormally, when you request a security operation, such as Data Delete or Device Freeze, on yourdevices, you need to wait until the next scheduled agent call for the operation to occur. By default,devices are scheduled to make an agent call once every 24.5 hours. Therefore, you could wait up tothis length of time for the security operation to take effect on your device.
RTT-IP reduces this wait time in time-critical situations. The Ping Period, which is independent of theagent call period, is configurable. The RTT-IP feature is not turned on by default, and an Administratormust manually enable it for your account. To accommodate a shorter time delay, the Windows or Macagent on RTT-IP enabled devices makes a lightweight ping, sending 24 bytes of data, not includingHTTP header bandwidth. This ping is sent to an RTT-IP server at a specified interval using a separatechannel than regular agent calls. Enabling RTT-IP will increase the load on your network infrastructureincluding any DNS servers, firewalls, and proxies. You need to coordinate with your networkadministrator before enabling or modifying your RTT-IP settings. In particular, enabling RTT-IP for alarge number of devices with a high Ping Period may have an adverse impact on your network. Formore information about the additional network infrastructure load, see the Technical Note TN130222 –RTT Over IP Network Infrastructure Load available on the Documentation page.
Absolute7.x 146

When you enable the RTT-IP feature for your account, you can select the Ping Period that isappropriate for your organization. In the Absolute console, the fastest Ping Period that you can set fordevices in your account is one ping every 15 minutes. If you want to purchase faster Ping Periods of 1to 15 minutes, contact Absolute Technical Support (www.absolute.com/en/support).
The RTT-IP feature is implemented in such a way that when you request a security operation, theagent is instructed automatically on the device’s next ping to make a full agent call and, thereby, initiatethe specific security operation you requested.
You can force a call when you want to test the feature and validate that it is working on a device.
Prerequisites of RTT-IPCustomers who want to use RTT-IP need to ensure their devices meet the minimum systemrequirements. For more information, see "Minimum System Requirements" on page 146.
Accelerating Operations With RTT-IPFor accounts that are set up for RTT-IP, the RTT-IP feature interacts with security operations and,therefore, requires users who are familiar with Absolute, preferably network administrators or IT staffmembers in your organization.
The RTT-IP feature is implemented in such a way that when you request a security operation, theagent is instructed automatically on the device’s next ping to make a full agent call and, thereby, initiatethe specific security operation you requested.
This capability works with the following security operations:● Data Delete requests● Freeze and Remove Freeze requests● Remote File List requests● Remote File Retrieval requests● Investigation Report submissions
Viewing RTT-IP Status for a Device
On a device’s Device Summary page, the RTT-IP area shows the following information:● RTT-IP status of the device: If RTT-IP is turned on, the check box is selected.● The Ping Period for the device: When you turn on the RTT-IP feature for your account, you
have to select a default Ping Period. Unless you have specified a different Ping Period for thisdevice, the value in this field matches the account defaults.
● The Last Ping Time for the device: Indicates the last time the device pinged the RTT-IPserver.
For more information about a device’s Device Summary page, see "Editing Asset Information" on page73.
Your organization may choose to group all devices that are enabled for RTT-IP together, in which caseyou can follow the instructions provided in the task, "Enabling RTT-IP for All Devices in Your Account"on page 148.
Chapter 6: Using Real-Time Technology over IP Absolute User Guide
Absolute 7.x 147

Enabling RTT-IPThere are several ways to enable RTT-IP for your organization’s devices:
● Enabling RTT-IP for All Devices in Your Account● Enabling RTT-IP for an Individual Device
Enabling RTT-IP for All Devices in Your AccountWhen you use the Classic Account Settings page to enable RTT-IP, you set a default value thatenables this feature for all devices in your account.
To enable RTT-IP for all devices in your account:
1. On the navigation bar click > Classic Account Settings.
2. Scroll down to the RTT-IP Setting area, open theCurrent Ping Period list, and select theappropriate value.
IMPORTANT Enabling RTT-IP increases the load on your network infrastructure including anyDNS servers, firewalls and proxies. Please coordinate with your network administrator beforeenabling or changing your RTT-IP settings. In particular, enabling RTT-IP for a large number ofdevices with a high Ping Period may have an adverse impact on your network.
Initially, set this interval for a faster period or whatever is appropriate for your organization. Thefastest Ping Period you can select is one ping every 15 minutes. If you want to purchase fasterPing Periods of 1 to 15 minutes, contact Absolute Technical Support(www.absolute.com/en/support).
3. Click Save changes.
4. On the Apply changes to dialog, ensure that the All devices checkbox is selected and clickContinue.
For all existing devices in the account, RTT-IP is enabled on the next scheduled agent call fromthe device. When new devices are activated on the account, RTT-IP is enabled and the PingPeriod is applied.
Enabling RTT-IP for an Individual DeviceYou can enable RTT-IP for individual devices in your account using the Device Summary page.
To enable RTT-IP for an individual device:
1. On the navigation bar, click to open the All Devices page.
2. Search for the device and click the device's device name.
3. In Device Details, click View Device Summary.
4. On the Device Summary, select the Turn on the RTT-IP feature for this Identifier checkboxto enable RTT-IP for this device.
5. Set the RTT-IP Ping Period for this device.
Chapter 6: Using Real-Time Technology over IP Absolute User Guide
Absolute 7.x 148

IMPORTANT Enabling RTT-IP will increase the load on your network infrastructure includingany DNS servers, firewalls and proxies. Please coordinate with your network administratorbefore enabling or modifying your RTT-IP settings. In particular, enabling RTT-IP for a largenumber of devices with a high Ping Period may have an adverse impact on your network.
Initially, set this interval for a faster period or whatever is appropriate for your organization. Thefastest Ping Period you can select is one ping every 15 minutes. If you want to purchase fasterPing Periods of 1 to 15 minutes, contact Absolute Technical Support(www.absolute.com/en/support).
6. Click Save changes.
Requesting a full agent call using RTT-IPTo perform a full scan of a device to collect up-to-date device information, you can request that thedevice make a full agent call to the Monitoring Center during its next RTT-IP ping period.
To request a full agent call using RTT-IP:
1. On the navigation bar, click to open the All Devices page.
2. Search for the device and click the device's device name.
3. In Device Details, click View Device Summary.
4. On the Device Summary page at the RTT-IP area, click Request Full Inventory Call.
5. On the Forced Call Status confirmation dialog, you are notified that your request is submitted. Ifthe device is currently online, it will call during the next ping period. If it is offline, a call isinitiated when the device comes online.
On the dialog click Close.
6. If you want to determine when the next ping is scheduled to occur:
a) In the RTT-IP area, make note of the setting for Ping Period.b) Open the All Devices page again and check the device's Last connected column to see
when the last call was made.
Editing the RTT-IP Ping PeriodThere are two ways to edit the RTT-IP Ping Period for your organization’s devices:
● Editing the RTT-IP Ping Period for All Devices in Your Account● Editing the RTT-IP Ping Period for a Device
Editing the RTT-IP Ping Period for All Devices in Your AccountIf the current Ping Period set at the account level is not satisfactory you can change it. The new PingPeriod can be applied to all devices in your account, or select groups of devices.
To edit the RTT-IP Ping Period at the account level:
1. On the navigation bar click > Classic Account Settings.
Chapter 6: Using Real-Time Technology over IP Absolute User Guide
Absolute 7.x 149

2. Scroll down to the RTT-IP Setting area, open the Current Ping Period list, and select theappropriate value.
3. Click Save changes.
4. On the Apply changes to dialog, do one of the following:
● To apply the Ping Period to all existing and newly activated devices for the account, ensurethat the All devices checkbox is selected.
● To apply the changes to specific devices, clear the All devices checkbox and select one ormore of the following options:○ Make the Ping Period for new RTT-IP capable devices: when new devices are
activated for the account, RTT-IP is enabled and the selected Ping Period is applied.○ Turn on the RTT-IP feature for all devices where RTT-IP is turned off: enables
RTT-IP and applies the selected Ping Period to existing devices.○ Change the devices with a RTT-IP Ping Period of <current value> to <new value>:
applies the selected Ping Period to devices that are RTT-IP enabled and their currentPing Period matches the <current value>.
○ Change the devices that do not have a RTT-IP Ping Period of <current value> to<new value>: applies the selected Ping Period to devices that are RTT-IP enabled andtheir current Ping Period does not match the <current value>.
5. Click Continue.
The new Ping Period is applied when the agent on each device makes the next scheduled agentcall to the Monitoring Center.
Editing the RTT-IP Ping Period for a DeviceThe default setting for the Ping Period for devices is 30 minutes. You can change that period based onyour organization’s requirements.
To edit the Ping Period for an individual device:
1. On the navigation bar, click to open the All Devices page.
2. Search for the device and click the device's device name.
3. In Device Details, click View Device Summary.
4. On the Device Summary page, in the Change RTT-IP Ping Period list, select the appropriatevalue.
5. Click Save changes. The device receives the new Ping Period when the agent on the devicemakes the next scheduled agent call to the Monitoring Center. Agent calls to the MonitoringCenter occur once every 24.5 hours.
Viewing RTT-IP Status for All DevicesIf RTT-IP is enabled for your account, you can view the RTT-IP status of all devices in a results grid.
To view the RTT-IP status for all devices:
1. On the navigation bar click > Classic Account Settings.
Chapter 6: Using Real-Time Technology over IP Absolute User Guide
Absolute 7.x 150

2. Scroll to the RTT-IP Setting area and under RTT-IP Status click the View link.
NOTE The View link is available only if a Ping Period has been set.
In the Devices that have the RTT-IP feature turned on window, the following information is shownfor each device:
● Identifier: the identifier associated with the device. Click this link to open the DeviceSummary page for the device.
● Username: the unique name detected by the agent that identifies the person who isassociated with this device
● Operating System: the software that controls the running of computer programs andservices on the device.
● Agent Version: the version number of the agent installed on the device.● Ping Period: the time period between pings by the device to the RTT-IP server.● Last Ping Time (UTC): the last time the device pinged the RTT-IP server.
3. To navigate, filter, and sort the results, do the following:
● To change the number of records shown on each page of the results grid, click the PerPage field and select an option from the list. The following options are available:○ 10○ 20○ 50○ 100○ 500○ 1000
● To go to another page in the results, click the applicable page link (<<First, <Prev, <page#>, Next>, or Last>>).
● To filter the results, enter a value for Identifier, Username, Operating System, AgentVersion, or Ping Period in the field, and click Filter.
NOTE If you enter only a portion of the value, the filtered results include all records thatsatisfy the filter criteria. For example, if you type “win” to filter by the Windows operatingsystem, all results that contain “win”, such as Username “Winston”, are included in thefiltered results.
● By default, the results are sorted by Identifier. To sort the results by another criterion, clickthe applicable column heading.
4. When you are finished reviewing the information, close the window.
Disabling RTT-IPThere are two ways to disable RTT-IP for your organization’s devices:
● Disabling RTT-IP for All Devices in Your Account● Disabling RTT-IP for an Individual Device
Chapter 6: Using Real-Time Technology over IP Absolute User Guide
Absolute 7.x 151

Disabling RTT-IP for All Devices in Your AccountWhen you use the Classic Account Settings page to edit RTT-IP settings, you set a default value forthis feature for all devices in your account.
To disable RTT-IP for all devices in your account:
1. On the navigation bar click > Classic Account Settings.
2. Scroll down to the RTT-IP Setting area, open the Current Ping Period list, scroll down to theend of the list, and click Turn off RTT-IP.
3. Click Save changes.
Disabling RTT-IP for an Individual DeviceYou can disable RTT-IP for individual devices in your account using the Device Summary page.
To disable RTT-IP for an individual Device:
1. On the navigation bar, click to open the All Devices page.
2. Search for the device and click the device's device name.
3. In Device Details, click View Device Summary.
4. On the Device Summary page, clear the Turn on the RTT-IP feature for this Identifiercheckbox to disable RTT-IP for this device.
5. Click Save changes.
Chapter 6: Using Real-Time Technology over IP Absolute User Guide
Absolute 7.x 152

Chapter 7: Securing Your Data and Devices
The following security operations are available, which enable Security Administrators and SecurityPower Users to ensure that managed devices, and the data they contain, are not compromised incases of device loss or theft:
● Device Freeze (see "Using Device Freeze" on page 169.)
To access Device Freeze, authorized Security Administrators and Security Power Users are required touse an emailed authorization code.
NOTE Security Power Users can perform security operations on only those devices that are in theDevice Group to which the Security Power User is assigned.
This chapter includes information on the following tasks:● Authorizing Security Services● Disabling Security Access● Managing Custom Action Fields
Authorizing Security ServicesA Security Administrator or Security Power User must request a unique authorization code in theAbsolute console before submitting a Device Freeze request.
A security authorization code is a globally unique identifier (GUID) that is required to substantiate eachsecurity operation. An e-mail message that includes the security authorization code is sent to the e-mailaccount on file for this user.
The following conditions apply to the security authorization code:● It is valid for two (2) hours from the time it is issued to the appropriate recipient.● Only the user who requests the security authorization code can use it.● The security authorization code can be used only once.
This section provides the following information for those accounts that opted to have securityauthorization codes sent to specific Security Administrator and Security Power User e-mail addresses:
● Requesting a Security Authorization Code● Changing E-mail Addresses for Authorized Security Personnel
Requesting a Security Authorization CodeIf your company uses e-mailed authorization codes to substantiate security operations, you mustrequest a security authorization code before initiating any action in the Data and Device Securitysection.
When you receive your security authorization code, you use it to validate the requested securityservice.
Absolute7.x 153

IMPORTANT To perform the following task you need to log in to the Absolute console as a SecurityAdministrator or Security Power User.
To request a security authorization code be provided in an e-mail message:
1. On the quick access toolbar, click and click Authorization Code.
2. On the Security Authorization page, click Request Authorization Code.
A confirmation message indicates that an authorization code is generated and the securityauthorization code is sent in an e-mail message to the e-mail account on file for the SecurityAdministrator or Security Power User who requested it.
3. From the e-mail message, copy the security authentication code to use where appropriate.
Changing E-mail Addresses for Authorized Security PersonnelSecurity Administrators and Security Power Users can change their e-mail addresses. When doing so,it is important to know that those users are temporarily suspended from performing security operationsfor the next 72 hours. For more information, see Suspending or restoring a user in the online Help.
Disabling Security AccessYou can disable security services for your entire account or for an individual Security Administrator orSecurity Power User.
This section includes the following topics:● Disabling Security Access for All Authorized Security Users● Suspending Security Access for an Individual User
Disabling Security Access for All Authorized Security UsersIf you believe that the integrity of your security operations was compromised for any reason, you candisable the security access authorization, which suspends security access for all authorized personnel.
WARNING! Exercise caution.Disabling security access authorization suspends all SecurityAdministrators and Security Power Users, preventing those users from requesting new securityoperations. All pending security operation requests are processed as usual.
To enable access to features that require security authorization again, you must contact AbsoluteTechnical Support. For details, see Contacting Technical Support in the console Help.
To disable all Security Administrator’s security access to the Absolute console:
1. On the navigation bar click > Disable Pre-Authorization.
IMPORTANT Careful: There is no confirmation dialog for this action.
2. On the Disable Preauthorization page click Disable.
Chapter 7: Securing Your Data and Devices Absolute User Guide
Absolute 7.x 154

IMPORTANT To enable Security Authorization again, you must contact Absolute Technical Support.For details, see Contacting Technical Support in the console Help.
Suspending Security Access for an Individual UserNOTE The instructions for this task apply to both Security Administrators and Security Power Users.For the purpose of explanation only, the information in this section refers to the Security Administratoronly.
You can suspend a user’s account to prevent that user from logging any new requests for securityoperations, but it does not impact any pending requests. For example, if Security Administrator A hasan open Data Delete request and has their user account suspended, the Data Delete request runs asspecified on the next agent call.
To remove security access for an existing Security Administrator by suspending this user’s rights:
1. On the navigation bar, click > User Management > Users to see the list of all users.
2. Find the security administrator you want to suspend in the list and click the corresponding linkto open the Edit User page for this person.
3. Click User Status and Suspension Settings and under the User Status area, click theTemporarily suspended until option, click the calendar and select a date at least four days inthe future.
NOTE During the time interval you select, this particular user cannot log in to the Absoluteconsole.
4. Click Save.
Managing Custom Action FieldsSecurity Administrators can create up to five custom fields to show on the Request Device Freezepage.
Depending on the needs of your organization, users can use these fields to record additionalinformation about a security operation request. For example, you can create a Reason field to show onthe Device Freeze Request page to allow users to explain why the Device Freeze request is required.
All information entered in the custom fields is retained with the request and shows on the DeviceFreeze Summary Report and the Device Freeze Details page.
This section describes the following tasks:● Creating Custom Action Fields● Editing Custom Action Fields● Deleting Custom Action Fields
IMPORTANT The tasks in this section require that you log in to the Absolute console as a SecurityAdministrator.
Chapter 7: Securing Your Data and Devices Absolute User Guide
Absolute 7.x 155

Creating Custom Action Fields
To create a new custom field to show on the Request Data Delete page or the Request Device Freezepage:
1. On the navigation bar, click > Custom Action Fields.
2. On the Manage Custom Action Fields page, click Create Custom Action Field for DeviceFreeze.
NOTE You can create up to five fields. If the Create button is inaccessible, you need to deletea field before you can add a new one.
3. On the Create Custom Action Field page, in the Field Label field, enter a name for the newfield.
4. Select one of the following Field Type options:
● Text (50 character maximum): the field accepts plain text up to 50 characters in length.● Date: the field accepts date values in the form m/d/yyyy. A Calendar picker is also
available for this field.● Drop-down list: the field contains a list of options.
If you selected the Drop-down list option, enter the list options in the Drop-down List Valuesfield. Use commas to separate the list options.
NOTE You don't need to type the double quotes. When you click outside the text field, thedouble quotes are added to each option.
5. If the user is not required to complete the custom field, in the Field Option area clear theRequired field checkbox.
6. Click Save.
The new field shows in the Custom Action Fields section of the applicable Request page.
Editing Custom Action Fields
To edit a Custom Action Field:
1. On the navigation bar, click > Custom Action Fields.
2. On the Manage Custom Action Fields page, click the Edit link that is associated with thecustom field you want to change.
3. On the Edit Custom Action Field page, in the Field Label field, change the name asappropriate.
NOTE The Field Type options are not available for edit. If you want to change thisinformation, you need to Delete the custom field and create a new one with the appropriateinformation. For more information, see "Deleting Custom Action Fields" on page 157.
Chapter 7: Securing Your Data and Devices Absolute User Guide
Absolute 7.x 156

4. If this field is a Drop-down list, in the Drop-down List Values field add or remove list optionsas appropriate. Use commas to separate the list options.
NOTE You don't need to type the double quotes. When you click outside the text field, thedouble quotes are added to each option.
5. Select or clear the Required field checkbox as appropriate.
6. Click Save changes.
Deleting Custom Action FieldsYou can delete a Custom Action Field that is no longer required.
IMPORTANT When you delete a custom field, all of the information that users have entered in thatfield, in all existing requests, is also deleted.
To delete a Custom Action Field:
1. On the navigation bar, click > Custom Action Fields.
2. On the Manage Custom Action Fields page, click the Edit link that is associated with thecustom field you want to delete.
3. On the Edit Custom Action Field page, click Delete.
4. On the confirmation dialog, click Continue.
The Manage Custom Action Fields page refreshes and the field is deleted.
Chapter 7: Securing Your Data and Devices Absolute User Guide
Absolute 7.x 157

Chapter 8: Using Data Delete
IMPORTANT The Data Delete feature is no longer available.That is, you can no longer submit newData Delete requests or create Deletion Policies. However, you can still work with any Data Deleterequests that are in progress, and view all completed requests.
To delete files and folders from your devices, use the File Delete or Wipe features. For moreinformation, see the online Help.
This chapter includes the following sections:● Tracking Data Delete Status● Deleting or Cancelling a Data Delete Request● Deletion Log Files
IMPORTANT All tasks in this chapter require that you log in to the Absolute console as a SecurityAdministrator or Security Power User.
Tracking Data Delete StatusYou can view real-time status updates on the progress of Data Delete requests. Additionally, uponsuccessful completion of a Data Delete operation, a Deletion Log is created that shows all files andfolders that were deleted.
NOTE To view an audit log of completed security actions related to Data Delete requests, see"Security Audit Logs Report" on page 137. To export a report that provides statistics on the Data Deleterequests submitted for your account, see "Security Posture Report" on page 112.
Viewing Data Delete Status
To view the status of a Data Delete request:
1. On the navigation bar click > Data Delete > Data Delete Summary Report.
2. On the Data Delete Summary Report page at the Search Criteria area, set the preferredfiltering and display options for the results using one or more of the following criteria:
● To filter results by device group, in the Group is field open the list and select theappropriate Device Group.
NOTE If you are logged in as a Security Power User, you can select only the DeviceGroup to which you are assigned.
● To filter results by a specific Identifier, Make, Model, or Serial Number, or custom field (ifapplicable), in the and the field open the list and select the value type.In the is or contains field enter the value to search for or use the Choose feature. For moreinformation on the Choose feature, see "Editing Asset Information" on page 73.
Absolute7.x 158

● To filter by request name, in the and the Request Name is or contains field, enter all orpart of the complete name of the Data Delete request.
● To filter by Status, in the and the Data Delete Status is area, select one or morecheckboxes from these possible values:○ Requested: The request was submitted and is in a transitory state while the Data
Delete instructions are set up. Data Delete requests stay in this state briefly.○ Launched: The Data Delete instructions were sent to the targeted device, and that
device has called in and received the Data Delete request instructions.○ Triggered: For the Panasonic BIOS wipe only, this state is similar to Launched, but it
is a final state. Panasonic BIOS wipe does not return a Fail or Done state for DataDelete requests.
○ Canceled: The Data Delete request was cancelled.○ Cleared: The targeted device was recovered before the Data Delete operation started.
The Absolute Investigations team has cancelled the request.○ Set, Awaiting Call: The Monitoring Center is configured to send the Data Delete
instructions to the targeted device on its next call.○ Completed, Attempting to Upload Log File (If Applicable): Data Delete has
completed on the targeted device, however the agent is unable to send the log file tothe Monitoring Center. If specified for your account or the device, the agent continuesto initiate calls to the Monitoring Center until the log file is uploaded to it.
○ Completed, Log File Uploaded: Data Delete has completed on the targeted deviceand the agent has sent a log file with details of the Data Delete operation to theMonitoring Center.
○ Failed: The Data Delete request failed to run on the targeted device. Contact AbsoluteTechnical Support (www.absolute.com/en/support).
○ Processing: The Data Delete request is being created. Data Delete requests gothrough the Processing state before they enter the Requested state.
● To filter by Data Delete options, in the and the Data Delete Type is area, select one ormore checkboxes from the following possible choices:○ Custom Policy○ All Files○ Lost or Stolen Device - Delete all Files and OS○ Device End of Life - Delete all Files, Sector Wipe, and OS○ Firmware Drive Wipe○ Mobile Device
For more information about these options, see "Data Delete Settings" on page 1.
● To filter by reason, in the and the Data Delete Reason is area, select one or morecheckboxes from the following possible choices:○ Missing indicates the device is lost or misplaced.○ End of Lease / Life indicates the device is at the end of its functional lease or life.○ Other represents all other reasons for the Data Delete request.
3. Click Show results to regenerate the report using specified criteria.
Chapter 8: Using Data Delete Absolute User Guide
Absolute 7.x 159

The Data Delete Summary Report shows all devices that have had Data Delete requested. Foreach device listed, the Data Delete Summary Report includes the following information:
● Identifier: the targeted device’s Identifier.● Request ID: the identifier assigned to the Data Delete request by the system.● Request Name: the name of the Data Delete request.● Make: the targeted device’s make.● Model: the targeted device’s model.● Serial Number: the targeted device’s serial number.● Requested On: the date and time when the Data Delete was requested.● Status: the current status of the Data Delete request. Possible values include:● Type: the Data Delete policy and options that were set for this request.● Reason: the reason for the Data Delete request.
NOTE If Custom Action Fields are associated with the Data Delete request, a column for eachcustom field shows on the far right of the report. For more information, see "Managing CustomAction Fields" on page 155.
You can perform the following additional tasks on the generated report, if desired:
● To download the report, click . For more information, see "Downloading Reports" onpage 84.
● To print the current page of the report, click . For more information, see "PrintingReports" on page 82.
● To save the filters you used to generate the report, click . For more information, see"Saving Report Filters" on page 83.
Data Delete Details PageThe Data Delete Details page shows the setup information for each Data Delete request. This pagealso provides a link to the Deletion Log file after the Data Delete operation has completed. See"Deletion Log Files" on page 165.
To open the Data Delete Details page:
1. Complete the steps in the task, "Viewing Data Delete Status" on page 158.
2. On the Data Delete Summary Report page, click the view link for the appropriate device. TheData Delete Details page opens showing the following information:
● Request ID: the identifier assigned to the Data Delete request by the system.● Identifier: the targeted device’s Identifier.● Make: the targeted device’s make.● Model: the targeted device’s model.● Serial Number: the targeted device’s serial number.● Asset Number: the asset number of the targeted device.● Last Call: the date and time (including the timezone) of the targeted device’s last call to
the Monitoring Center.
Chapter 8: Using Data Delete Absolute User Guide
Absolute 7.x 160

● Reason for Data Delete Request: the reason specified for initiating the Data Deleteoperation on this device, which could include one of the following:○ Missing means the device is lost, but not stolen.○ End of Lease / Life means the device is nearing the end of its lease, is going to be
retired, or is going to be taken out of commission.
IMPORTANT For a Device End of Life - Data Delete request to completesuccessfully, the device must be connected to the Internet through a LAN connection. Ifa device is using a wireless connection, its Data Delete request remains pending.
○ Other means this device is being prepared for reassignment or removed for somereason other than those provided.
● Perpetual Deletion: shows a Yes or No value, depending on whether perpetual deletionwas applied.
● Ignore hard drive serial number check: specify whether Data Delete should override theHard Disk Serial Number (HDSN) check and continue even when the HDSN is unknown orchanges during the request’s lifecycle.
IMPORTANT Use the Ignore hard drive serial number check option with caution.Overriding the HDSN check before you perform a Data Delete operation may delete datacreated or owned by any post-loss possessors of the device or on an unrelated hard drive.
● Number of Data Overwrites: shows the number of data wipes selected. Possible valuesare 1, 3, or 7.
● Data Delete type: shows the delete options configured for the request, with the followingpossible values:○ Custom Policy: the operation deletes specific files and folders.○ All Files: the operation deletes all files except the Operating System.○ Lost or Stolen Device - Delete all Files and OS: the operation deletes all files,
including the Operating System, and, upon completion of the first Data Deleteoperation, wipes the connected hard drives. The Data Delete request is prompted by asecurity breach and a need to remove sensitive data from a device.
○ Device End of Life - Delete all Files, Sector Wipe & OS: the operation deletes allfiles including the Operating System and wipes the hard drive after the request iscomplete. The Data Delete request is prompted by the need to retire the devicebecause of end of lease or life requirements.
IMPORTANT For a Device End of Life - Data Delete request to completesuccessfully, the device must be connected to the Internet through a LAN connection. Ifa device is using a wireless connection, its Data Delete request remains pending.
○ Firmware Drive Wipe: also known as the Panasonic BIOS Wipe, this type of DataDelete is supported on the BIOS level for specific Panasonic devices.
○ Mobile Device: the operation runs on the mobile device and deletes all e-mailmessages, e-mail accounts, contacts, phone logs, and any other type of data saved onthe device.
● Set for deletion: shows the directory for the information you want to delete.
Chapter 8: Using Data Delete Absolute User Guide
Absolute 7.x 161

● Include File Date Attributes in the Data Delete log: indicates whether the file dateattributes are included in the Deletion log file. For more information, see "Deletion LogFiles" on page 165.
● Agreement: indicates whether the I Accept the agreement checkbox was selected whenthe request was prepared.
● Requestor Username: shows the name of the Security Administrator or Security PowerUser who submitted the request.
● Data Delete Comment: shows the comment made by the Security Administrator orSecurity Power User who submitted the request.
● [Custom Action Fields]: shows the value for each custom field, if one or more CustomAction Fields are associated with the Data Delete request. For more information, see"Managing Custom Action Fields" on page 155.
● Data Delete Status table: shows information on the status of the delete request andincludes the date and time when each status was achieved. This table includes:○ the progressive steps that form the Data Delete operations performed on this device○ the Status of each Data Delete operation○ the Date in the dd/mm/yyyy hh:mm:ss AM or PM format○ the User who requested this operation○ any Details
Viewing or Printing an End of Life Data Delete CertificateFor devices that are at the end of their lifecycle or are nearing the end of a lease period, you canrequest a Data Delete to remove sensitive information from such devices. In such cases, if the DataDelete type is Device End of Life - Delete all Files, Sector Wipe, & OS, Security Administrators andSecurity Power Users can view and print an End of Life (EOL) Data Delete Certificate for compliancepurposes. Such certificates are useful in proving that the device that was retired or taken out ofcirculation does not contain sensitive information.
The following information is available in the certificate:● Information about the Data Delete Request and the device, including:
○ Request Name: the name of the Data Delete request○ Identifier: the device’s Identifier○ Make: the name of the device manufacturer○ Model: the model name and number of the device○ Serial Number: the device’s serial identification number○ Asset Tag: any specific tag added to the device○ Device Name: name of the device○ Data Delete Type: type of the Data Delete request, that is All Files, Sector Wipe & OS○ Started: date and time when the Data Delete request started running on the device○ Finished: date and time when the Data Delete request completed○ Data Delete Launched By: e-mail address or username of the Security Administrator or
Security Power User who requested the Data Delete operation
● Information about the hard drive where the Data Delete operation happened, including:○ Drive: the number of the drive in the device
Chapter 8: Using Data Delete Absolute User Guide
Absolute 7.x 162

○ Model: the model number of the drive○ Serial Number: the serial number of the drive○ Interface Type: the type of drive, for example, whether it is a disk drive or a solid state
drive○ Sector Size: the size of individual sectors on the drive○ Total Sectors: the total number of individual sectors on the drive○ Reallocated Sectors: the number of sectors that were reallocated due to the Data Delete
operation○ SMART Drive Status: information about whether the drive contains Self-Monitoring,
Analysis and Reporting Technology (S.M.A.R.T)○ Size: the total size of the drive○ Data Delete Speed (MB/sec): the speed in MegaBytes (MB) per second at which the Data
Delete operation was run○ Data Delete Duration (mm:ss): the total duration in minutes that it took for the Data
Delete operation to run○ Status: the status of the drive, whether the information was wiped or otherwise
● Information about the certifying authority including:○ Name and signature of the Data Security Operator, commonly also the Security
Administrator○ Name and signature of the supervisor of the Data Security Operator
To view or print an End of Life Data Delete Certificate:
1. On the Data Delete Summary Report, click the view link of the Data Delete operation for whichyou want to view or print the End of Life Data Delete certificate.
2. On the Data Delete Details page, click View Certificate (PDF) to open the certificate file.
NOTE If your browser’s security is set to prompt you before opening or downloading files,click Open or Save As to open or save the PDF file.
3. Print the certificate PDF using the appropriate printer attached to your device.
Removing Details of a Data Delete OperationIn certain circumstances, you may no longer need to save the details of a particular Data DeleteRequest. Some examples are when a Data Delete Request was cancelled, completed, or the devicerecovered successfully. You can remove the details of such a Data Delete operation from the Absoluteconsole.
IMPORTANT Exercise caution in removing the details of a Data Delete operation, because after youremove the details of a Data Delete operation, you cannot restore the details.
To remove details of a Data Delete operation:
1. On the Data Delete Summary Report page, click the view link of the Data Delete operation forwhich you want to remove details.
Chapter 8: Using Data Delete Absolute User Guide
Absolute 7.x 163

NOTE If you have not done so already, it is strongly recommended that you download the logfile first, before you remove these Data Delete details.
2. On the Data Delete Details page, click Remove Details.
3. A confirmation message opens. Click OK to remove the details of the Data Delete operationand the log file.
Forcing a Data Delete Operation to CompleteYou cannot start a second Data Delete operation on a specific device when an existing process isalready underway.
If a Data Delete operation fails to complete, you can force it to complete, which sets the status of theData Delete operation in the database to Complete, and lets you start a new Data Delete operation.Doing this does not affect any processes currently running on any devices, and does not stop any DataDelete operations that are currently in progress.
After you have forced a Data Delete operation to complete, you are not able to undo the status change.
To force a Data Delete operation to complete:
1. On the Data Delete Summary Report page, click the view link of the Data Delete operation youwant to force to completion.
2. On the Data Delete Details page, click Complete Request.
3. On the confirmation message, click OK to complete the Data Delete operation.
Clearing Perpetual Data DeleteIf a Data Delete request was submitted with the Perpetual Deletion option, you can stop the PerpetualData Delete on a targeted device.
IMPORTANT Perpetual Data Delete can be stopped only after the initial deletion cycle has completed.
To clear Perpetual Data Delete:
1. On the Data Delete Summary Report page, click the view link of the Data Delete operation thatwas requested with the Perpetual Deletion option.
2. Click Clear Perpetual Data Delete Flag.
3. On the confirmation message, click OK to clear Perpetual Data Delete for the Data Deleterequest.
Deleting or Cancelling a Data Delete RequestBefore Data Delete is started on the targeted device, you can delete or cancel a Data Delete request,depending on its status. If the Data Delete request’s status is Draft, it can be deleted. If the DataDelete status is Requested or Set Awaiting Call, the request cannot be deleted, but you can cancel it.
The following tasks are included in this section:● Deleting a Draft Data Delete Request● Cancelling a Data Delete Request for a Single Device
Chapter 8: Using Data Delete Absolute User Guide
Absolute 7.x 164

● Cancelling Data Delete Requests for Multiple Devices
Deleting a Draft Data Delete Request
To delete a draft Data Delete request:
1. On the Data Delete Summary Report page, click the view link for the draft Data Deleteoperation.
2. Review the details of the draft to ensure it is the one you want to delete.
3. Scroll to the bottom of the page and click Delete.
4. On the confirmation message, click OK to confirm the delete operation.
Cancelling a Data Delete Request for a Single Device
To cancel a Data Delete request with a status of either Requested or Set, Awaiting Call:
1. On the Data Delete Summary page, click the view link for the appropriate Data Deleteoperation.
2. Review the details of the request to ensure this is the one you want to cancel.
3. Click Cancel Request to cancel the Data Delete request.
4. On the confirmation message, click OK to confirm the cancellation.
Cancelling Data Delete Requests for Multiple Devices
To cancel multiple Data Delete requests with a status of either Requested or Set, Awaiting Call:
1. On the Data Delete Summary page in the results grid, do one of the following:
● To cancel one or more Data Delete operations, select the checkbox next to each DataDelete operation you want to cancel.
● To cancel all Data Delete operations on the current page, select the checkbox next toIdentifier in the top row of the results grid.
2. Click Edit Requests for Selected Devices. The Edit Selected Devices dialog opens.
3. In the Action column of the Requested and Set, Awaiting Call rows, open the list and selectCancel Request.
4. Click Submit. The Data Delete requests for all selected devices are cancelled.
Deletion Log FilesWhen a Data Delete request is complete, a Deletion Log file is uploaded and made available on theData Delete Details page. A Deletion Log file provides details on what was deleted from the targeteddevice.
NOTE Dates and times in a log file are expressed in the Coordinated Universal Time (UTC) format.
Chapter 8: Using Data Delete Absolute User Guide
Absolute 7.x 165

Deletion Log Files include the following information about the Data Delete operation:● Completion Date: the date and time when the delete request completed on the targeted
device.● Data Delete Type: indicates the deletion type. Possible values are:
○ All Files Except OS○ All Files Including OS○ Specific Files/Directories (Windows devices only)
● Data Delete Reason: indicates why the Data Delete request was run. Possible values are:○ Missing○ End of Life / Lease○ Other
● Identifier: the Identifier of the targeted device.● Model: the targeted device’s model.● Make: the targeted device’s make.● Serial Number: the targeted device’s serial number.● Asset Tag: the targeted device’s asset tag, which is an optional user-defined tracking number.● Device Name: the targeted device’s network name.● Started: the date and time when Data Delete began running on the targeted device.● Deleted File List: the full path of all deleted files.● Finished: the date and time when the Data Delete process was completed.● Data Overwrites: the number of data wipes performed.● File List: a list of all files deleted in the operation.
If the Include File Date Attributes option was selected when the Date Delete was requested, thefile date attributes (Created,Modified, and Accessed) for each file are listed in tab-delimitedformat.
NOTE For Windows devices, the Accessed date shows only if the following setting is enabledin Classic Account Settings: Enable last file access date and time stamps (Windowsdevices only). For more information, see "Editing Classic Account Settings" on page 51. ForMac devices, no setting is required. Last file access dates and times are always logged andincluded in the Deletion log file.
IMPORTANT In a post-theft scenario, the Accessed date for a file may be later than theIncident Date. The Accessed date is not necessarily indicative of a file which was compromisedpost-theft. Undetected malware, antivirus and spyware scans, automated backup and othersimilar applications may all trigger an Accessed date change, indicating when the file was lastaccessed. As a result, this value should be considered useful for determining whether a file hasdefinitively not been accessed, but not the converse.
● e-mail Accounts: for Android phones only: a list of all e-mail accounts deleted from the mobiledevice during the Data Delete operation.
● Recoverable Files Deletion Start Date applies to All Files and All Files - Security optionsonly: the date and time when the Data Delete operation started wiping the recoverable files.
Chapter 8: Using Data Delete Absolute User Guide
Absolute 7.x 166
● Recoverable Files Deletion End Date applies to All Files and All Files - Security optionsonly: indicates the date and time when the Data Delete Operation finished wiping therecoverable files.
Viewing the Deletion Log FileWhen the Data Delete request is complete, the status updates to Completed, Log File Uploaded andthe Deletion Log becomes available, letting you download and view the results of the Data Deleteoperation.
The following tasks are included in this section:● Viewing the Deletion Log for a Single Device● Viewing the Deletion Logs for Multiple Devices● Viewing the Deletion Log on a Mobile Device
Viewing the Deletion Log for a Single Device
To download and view the Deletion Log file:
1. On the Data Delete Summary Report page, click the view link for the appropriate Data Deleteoperation.
2. On the Data Delete Details page, click View deletion log.
3. The File Download dialog opens, where you take one of the following actions:
● Click Open to open the log file.● Click Save to save the file to your local device.
The log file is in text (.txt) format and can be viewed using any text file editor.
Viewing the Deletion Logs for Multiple Devices
To download a .ZIP file containing the log files for multiple Data Delete operations:
1. On the Data Delete Summary page in the results grid, do one of the following:
● To view the log file for one or more completed Data Delete operations, select the checkboxnext to each Data Delete operation.
● To view the log files for all completed Data Delete operations on the current page, selectthe checkbox next to Identifier in the top row of the results grid.
2. Click Download Log Files for Selected Devices.
3. If the Download Log File(s) for Selected Devices dialog opens, click Download.
NOTE This dialog is shown only if you selected one or more Data Delete operations that donot have a status of Completed, Log File Uploaded.
4. The File Download dialog opens, where you take one of the following actions:
● Click Open to extract the .ZIP file and view the individual log files.● Click Save to save the .ZIP file to your local device.
The individual log files are in text (.txt) format and can be viewed using any text file editor.
Chapter 8: Using Data Delete Absolute User Guide
Absolute 7.x 167

Viewing the Deletion Log on a Mobile Device
To download and view the log file on a mobile device:
1. On the Data Delete Summary Report page, click the view link for the appropriate Data Deleteoperation.
2. On the Data Delete Details page, click View deletion log.
3. In the File Download dialog, click Save to save the file to your local device.
4. Save the log file with an .xml file extension.
You can view the log file using any XML viewer or a web browser.
Chapter 8: Using Data Delete Absolute User Guide
Absolute 7.x 168

Chapter 9: Using Device Freeze
The Device Freeze feature lets Security Administrators and Security Power Users target specificdevices and show a full screen message restricting users from operating the device.
NOTE Depending on the configuration of your account, the Device Freeze functionality described inthis chapter may not be available.
The Device Freeze operation happens at the operating system (OS) level and, when it is in effect, a fullscreen message shows on the device. When you freeze a device, only the selected message is shownon-screen and no Windows components (such as Task Manager) are accessible. Windows continuesto run in the background and the user is able to switch between Windows by pressing Alt+Tab keys tosave any open documents or close any windows open at the time.
The Device Freeze feature is persistent. The frozen state persists on device reboot even when thedevice is rebooted in safe mode. The freeze shows again when the OS reloads. If a user reinstalls theOS, the device freezes again when the agent self-heals.
Security Administrators and Security Power Users can manage Device Freeze operations in thefollowing ways:
● Submit Device Freeze requests● Create and manage Device Freeze offline policies● Track the Device Freeze status of devices● Unfreeze a frozen device
NOTE Security Power Users can perform Device Freeze operations on only those devices that belongto the Device Group to which they are assigned.
This chapter includes the following sections:● Minimum System Requirements● Working with Device Freeze Requests● Managing Device Freeze Offline Policies● Tracking Device Freeze Status● Unfreezing a Frozen Device● Managing Custom Device Freeze Messages
Minimum System RequirementsCurrently, the Device Freeze feature is available for devices that meet the following minimum systemrequirements:
● Operating systems: the targeted device must be running a supported version (open theAbsolute console's help system and search for supported platforms for managed devices) ofone of the following operating systems:
– Windows– macOS– Android
Absolute7.x 169

– Chrome OS (installed on Chromebooks only)
NOTE Device Freeze offline policies are supported on Windows devices only.
● Agent: For Windows, Mac, and Android devices, the targeted device must have an agentstatus of Active, meaning that the agent is installed and regularly calling in to the AbsoluteMonitoring Center.
● Chromebook extension: The Chromebook extension must be activated on the targeteddevice, meaning that the extension is deployed and regularly calling in to the AbsoluteMonitoring Center.
NOTE Chromebook devices showing an Agent Version of 2200 are ineligible for DeviceFreeze. This agent version indicates that Absolute has synced the devices from your Googleaccount, but the extension has not yet been deployed. To view a device's agent version, go tothe Call Tracking tab of the device's Device Summary page.
Working with Device Freeze RequestsAuthorized security personnel can submit a Device Freeze request, which is associated with a DeviceFreeze message, on any device in their account. The device can be set to freeze on the next agentcall, or on a specific date in the future. You need an authorization code to request a Device Freeze. Formore information, see "Requesting a Security Authorization Code" on page 153.
When initiated, the Device Freeze operation runs on the next agent call, even if the user does not log into the operating system. If a system restart interrupts the Device Freeze operation, the freeze persistson the device on restart and when the operating system loads. When a device is frozen, you can eitheruse the Absolute console to unfreeze it or generate a passcode to let users manually unfreeze thedevice. For more information, see the following topics:
● "Viewing the Unfreeze Passcode" on page 194● "Unfreezing a Frozen Device" on page 192
This section provides information on the following topics:● Requesting a Device Freeze● Cancelling a Device Freeze Request● Removing Device Freeze Request Details
NOTE You can create Alerts to notify you when these security actions are initiated. For moreinformation, see "Creating New Custom Alerts" on page 16.
Requesting a Device Freeze
To request a Device Freeze:
1. On the navigation bar click > Device Freeze > Request Device Freeze to open theRequest Device Freeze page.
2. At the Request Authorization Code area, click Request Code.
Chapter 9: Using Device Freeze Absolute User Guide
Absolute 7.x 170

A confirmation message indicates that an authorization code is requested and sent to your-emailaddress. Check your e-mail for the message.
3. In the Request Name field, enter an appropriate name for your Device Freeze request. Thisvalue does not need to be unique.
4. Click Select devices.
5. On the Select devices dialog, select one or more devices by doing the following:
a) In the Where Group is field, open the list and select the appropriate Device Group.
NOTE If you are logged in as a Security Power User, you can select only the devicegroup to which you are assigned.
b) In the Please select a field field, open the list and select one of the following filtercriterion:○ Identifier: a unique Electronic Serial Number assigned to the agent that is installed on
a device.○ Device Name: the name assigned to the device in the operating system.○ Username: the unique name detected by the agent that identifies the person who is
associated with this device.○ Serial Number: the serial number of the device or other hardware.○ Asset Number: the identification number associated with a device in the Absolute
console.○ IMEI: the International Mobile Equipment Identity (IMEI) number of the device, if
applicable○ Subscriber ID: also known as International Mobile Subscriber Identity (IMSI), the
unique identifier associated with the subscriber○ Phone Number: the phone number associated with the mobile device, if applicable
c) If you want to show devices that meet specific criteria, enter the appropriate information inthe remaining two fields. For example, you may want to show only those devices where theUsername field begins with the letters Admin.Alternatively, to show all devices in the selected Device Group, leave these two fields blank.
d) Click Filter. The Select devices dialog refreshes to show a list of devices that match yourcriteria.
e) Select the appropriate devices by doing one of the following:● To select individual devices, select the checkbox for each device.● To select all devices shown on this page, select the checkbox in the header.● To select all devices in this device group, hover your mouse over the down arrow in the
checkbox in the header. Click the Select All <n> Records (where <n> is the numberof records) to select all of the devices that meet the filter criteria you set earlier.
f) With the appropriate devices selected, click Select devices. The Request Device Freezepage refreshes with a list of all selected devices.
Chapter 9: Using Device Freeze Absolute User Guide
Absolute 7.x 171

NOTE If you find that the list of selected devices includes devices that were included in error,you can remove these devices from the list. To remove such devices, click the Remove link inthe last column for the appropriate device. The Request Device Freeze page refreshes to showthe updated list of devices.
6. In the Select a message field, open the list and select the message you want to associate withthis Device Freeze request. A preview of the message shows in the Preview of the messagefield.
7. In the Schedule Freeze Date area, click the field and select one of the following options tospecify when you want the freeze to occur:
● To freeze the selected devices the next time they successfully connect to the AbsoluteMonitoring Center, select On next agent call.
● To schedule the selected devices to be frozen on a future date:i) Select On or after date.ii) In the date field, enter a date in the defined date format, or click the Calendar icon and
select a date. Any future date within one year of the current date is supported.
NOTE Each device will be frozen on its first successful connection to the AbsoluteMonitoring Center on or after the selected date.
8. In the Select a Passcode Option area, do the following:
a) Click the Select code length field and select the length of the passcode. The options are 4digits and 8 digits.
NOTE If you are freezing one or more Android devices, select 4 digits.
b) Select one of the following options for generating the unfreeze passcode:● Generate a different random passcode for each device to auto-generate and use a
different unlock passcode for each of the targeted devices.● Generate the same random passcode for each device to auto-generate and use
the same unlock passcode for each of the targeted devices.● Specify a numeric passcode of the selected length for each device to enter a
custom passcode to use for all devices in this request. Enter the passcode in the field,ensuring that the length of the passcode matches the option you selected in step a.
For more information about the unfreeze passcode, see "Viewing the Unfreeze Passcode"on page 194.
9. If the Custom Action Fields area shows, complete the fields, as required, to add additionalinformation about this Device Freeze request.
NOTE For more information about adding, editing, and removing Custom Action Fields, see"Managing Custom Action Fields" on page 155.
10. At the Email Notification area, do the following:
a) If you want to receive a notification when the Device Freeze status of any of the deviceschanges, select the Send me status updates for each device checkbox.
Chapter 9: Using Device Freeze Absolute User Guide
Absolute 7.x 172

b) To send status update notifications to other users, in the field type the e-mail address ofeach contact, separated by a semicolon.
NOTE If the request applies to multiple devices, you may receive numerous email messages.
11. The Force reboot before freezing device (Windows Devices Only) checkbox is selected bydefault. This setting forces the device to reboot when the Device Freeze request is deployed,which prevents the current user from switching between applications and saving their work. Italso enables the Device Freeze message to show on the device before a user attempts to login to the operating system.
If your targeted device is running the Windows operating system, ensure that you leave thischeckbox selected.
NOTE Devices running Mac operating systems automatically reboot when the Device Freezerequest runs, regardless of whether this checkbox is selected or not.
12. At the Consent to Install Software area, select the checkbox to indicate that you consent tothe installation of additional software components on the selected devices for the purpose ofprocessing the Device Freeze.
13. Click Submit, to refresh the Request Device Freeze page and show the ProvideAuthentication area. Enter your Password and emailed Authorization Code.
14. Click OK.
The Device Freeze request is created.
IMPORTANT After you click OK on the Provide Authentication page, you cannot change theDevice Freeze Request. However, you can cancel the request, provided it has was not startedon the targeted device. See "Managing Custom Device Freeze Messages" on page 195.
15. If the request is not scheduled to occur at a future date and the device is RTT enabled, a dialogopens prompting you to force a call to the device using MCIC. If necessary, force a call to thedevice. For more information, see "Initiating a Forced Call" on page 144.
When the device receives and processes the SMSmessage, depending upon the Device Freezedefaults set for the account, the device freezes.
Depending on the option you selected in the Schedule Freeze Date area, one of the followingscenarios applies:
● If you selected On next agent call, the request has a status of Freeze Requested and thedevice is frozen on the next successful agent call.
● If you selected On or after date, the request has a status of Scheduled Freeze Pending andthe device will be frozen on the first successful agent call that occurs on or after the selecteddate.
Cancelling a Device Freeze RequestYou cannot file an Investigation Report for a stolen device until all outstanding freeze requests arecompleted or cancelled.
Chapter 9: Using Device Freeze Absolute User Guide
Absolute 7.x 173

If the stolen device is frozen, you need to unfreeze it before you can submit an Investigation Report. Tosubmit an unfreeze request to return the frozen device to an operational state, follow the task,"Unfreezing a Frozen Device" on page 192..
IMPORTANT You can cancel a Device Freeze request before it is deployed on the targeted device;therefore the Device Freeze request must have a status of Freeze Requested, Scheduled FreezePending, or Freeze Scheduled.
You can cancel the Device Freeze request for a single device or for multiple devices:● Cancelling a Device Freeze Request For a Single Device● Cancelling Device Freeze Requests For Multiple Devices
Cancelling a Device Freeze Request For a Single Device
To cancel a Device Freeze request for a single device:
1. On the navigation bar click > Device Freeze > Device Freeze Summary Report.
2. On the Device Freeze Summary Report page at the Search Criteria area, enter all appropriatecriteria and click Show results.
The Device Freeze Summary Report refreshes and the results grid shows a list of all devices foryour account that contain a Device Freeze request.
3. At the far right side of the grid click the Edit or View link for the appropriate device.
4. The Device Freeze Details page opens to show the details for the selected request. ClickCancel Request. The Device Freeze request is cancelled.
Cancelling Device Freeze Requests For Multiple Devices
To cancel the Device Freeze requests for multiple devices at the same time:
1. On the navigation bar click > Device Freeze > Device Freeze Summary Report.
2. On the Device Freeze Summary Report page at the and the Device Freeze Status is area,select the Frozen checkbox and clear all other checkboxes.
3. Enter all other appropriate criteria and click Show results.
The Device Freeze Summary Report refreshes and the results grid shows a list of all devices foryour account that match your search criteria.
4. Select the devices in one of the following ways:
● This Page Only: in the leftmost column of the top row of the results grid select thecheckbox to select only those devices that show on the current page of the Device FreezeSummary Report results grid.
● Select All Records: hover your mouse over the list button in the leftmost column of the toprow of the results grid and click the Select All <n> Records link, where <n> is the totalnumber of devices that match your filter criteria. These devices show up on different pagesof the Device Freeze Summary Report results grid.
Chapter 9: Using Device Freeze Absolute User Guide
Absolute 7.x 174

The Device Freeze Summary Report refreshes to show the checkboxes for the selected deviceschecked.
5. Click Edit selected devices to open the Edit Selected Devices dialog.
6. In the Action column of the Freeze Requested row, open the list and select Cancel Request.
7. Click Submit. The Device Freeze requests for all selected devices are cancelled.
Removing Device Freeze Request DetailsIn certain circumstances, you may no longer need to save the details of a particular Device FreezeRequest. Some examples include when a Device Freeze Request is cancelled or completed, or whenthe device is recovered successfully.
WARNING! Exercise caution when removing the details of a Device Freeze Request because whenremoved, you cannot restore these details.
You can remove the details of the Device Freeze Request for a single device or for multiple devices:● Removing Details of a Single Device Freeze Request● Removing Details of Multiple Device Freeze Requests
Removing Details of a Single Device Freeze Request
To remove details of a single Device Freeze Request:
1. On the navigation bar click > Device Freeze > Device Freeze Summary Report.
2. On the Device Freeze Summary Report page enter all appropriate criteria and click Showresults.
The Device Freeze Summary Report refreshes and the results grid shows a list of all devices foryour account that contain a Device Freeze request.
3. Click the View or Edit link for the appropriate request. The Device Freeze Details page opensto show the details for the selected request.
4. Click Remove Details. The Confirm Removal of Device Freeze Details page opens.
5. Click OK. The Device Freeze Request details are deleted from the Absolute console.
Removing Details of Multiple Device Freeze Requests
To remove details of multiple Device Freeze Requests:
1. On the navigation bar click > Device Freeze > Device Freeze Summary Report.
2. On the Device Freeze Summary Report page at the and the Device Freeze Status is area,select the Unfrozen With Agent Call, Request Cancelled, and Unfrozen With Passcodecheckboxes. Clear all other checkboxes.
3. Enter all other appropriate criteria on this page, and then click Show results.
The Device Freeze Summary Report refreshes and the results grid shows a list of all devices foryour account that match each selected Device Freeze Status.
Chapter 9: Using Device Freeze Absolute User Guide
Absolute 7.x 175

4. Select the devices in one of the following ways:
● This Page Only: in the leftmost column of the top row of the results grid and select thecheckbox to select only those devices that show on the current page of the Device FreezeSummary Report results grid.
● Select All Records by hovering your mouse over the list button in the leftmost column ofthe top row of the results grid and clicking the Select All <n> Records link, where <n> isthe total number of devices that match your filter criteria. These devices show up ondifferent pages of the Device Freeze Summary Report results grid.
The Device Freeze Summary Report refreshes to show the selected devices.
5. Click Edit selected devices to open the Edit Selected Devices dialog.
6. In the Action list for each Device Status, select Remove Details.
7. Click Submit. The Device Freeze Request details for all selected devices are deleted from theAbsolute console.
Managing Device Freeze Offline PoliciesAuthorized security personnel can create a Device Freeze offline policy to freeze devices that have notcontacted the Monitoring Center for a specified number of days. Offline policies ensure that yourmanaged devices are protected even when a device is powered off or a network connection is notavailable.
Depending on the needs of your organization, you may want to create one offline policy and apply it toall of your managed devices, or create multiple offline policies, with different settings, and assigngroups of devices to each of them. You can also designate an offline policy as the default policy toapply automatically to newly activated devices.
A new offline policy is activated on its associated devices on the next agent call. The policy’s Timerthen begins to count down on each device. You can set the Timer Period to any value between 4 daysand 365 days, and it is reset after each successful agent call. If a device does not call the MonitoringCenter before the Timer Period elapses, the device is frozen and an email notification is sent to theSecurity Administrator or Security Power User who created the offline policy.
Devices that are frozen by an offline policy are included on the Device Freeze Summary Report. Youcan view these devices and unfreeze them as required.
NOTE Device Freeze offline policies are supported on Windows devices only.
This section provides information on the following topics:● Creating a Device Freeze Offline Policy● Working with Existing Offline Policies● Searching for a Device Freeze Offline Policy● Editing a Device Freeze Offline Policy● Designating a Default Offline Policy● Managing Devices Associated with a Device Freeze Offline Policy● Deleting a Device Freeze Offline Policy
Chapter 9: Using Device Freeze Absolute User Guide
Absolute 7.x 176

Creating a Device Freeze Offline Policy
To create a Device Freeze offline policy and assign devices to it:
1. On the navigation bar click > Device Freeze > Create a Device Freeze Offline Policy.
2. At the Request Authorization Code area, click Request Code.
A confirmation message indicates that an authorization code is requested and sent to your-emailaddress. Check your e-mail for the message.
3. Under Policy information, enter the following information:
a) Type a name in the Policy Name field and click the Check name availability link to verifythat the name you typed is not in use.
b) Enter a Policy Description.c) In the Timer Period field type the number of days that must elapse before a device
associated with this policy is frozen. Values between 4 days and 365 days are supported.
4. Click the Freeze Message field and select the message you want to show on a device when itis frozen. The message text shows in the Preview of the message field.
If the appropriate message does not exist, click the Create Message link to create a new one. Formore information, see "Creating a Custom Device Freeze Message" on page 195.
5. Under Timer Action, select one of the following options:
● Freeze immediately: After the Timer Period elapses, a forced restart occurs on the deviceto freeze it immediately.
● Freeze on next restart: After the Timer Period elapses, the device is frozen the next timeit is started. This is the default option.
6. In the Passcode Options area, select one of the following options:
● Generate a different random passcode for each device to auto-generate and use adifferent unlock passcode for each of the targeted devices.
● Generate the same random passcode for each device to auto-generate and use thesame unlock passcode for each of the targeted devices.
● Specify an 8-digit passcode for each device to use a previously generated or custompasscode. Click the field and enter (or copy and paste) the passcode to use on eachdevice. For more information, see "Viewing the Unfreeze Passcode" on page 194.
7. If you want to assign this Device Freeze offline policy to each newly activated device, select thecheckbox next to Default policy for newly activated devices.
If this option is disabled, another offline policy is already set as the default. To set this policy asthe default, you need to remove this designation from the other policy and then set the optionhere. For more information, see "Designating a Default Offline Policy" on page 181.
8. Click Save Policy and in the Provide Authentication dialog, enter your Password and emailedAuthorization Code.
9. Click OK. A message confirms that the offline policy is created.
10. Do one of the following, depending on whether you want to associate devices with the offlinepolicy:
● If you do not want to add devices at this time, click Back.
Chapter 9: Using Device Freeze Absolute User Guide
Absolute 7.x 177

The Manage Device Freeze Policies page opens. The status of the offline policy is set toInactive until the policy is assigned to one or more devices. For more information aboutadding devices to an existing offline policy, see "Adding Devices to an Offline Policy" onpage 183.
● If you want to add devices to the offline policy, do the following:i) Under Policy Members, at the Request Authorization Code area, click Request Code.
A confirmation message indicates that an authorization code is requested and sent toyour-email address. Check your e-mail for the message.
ii) Click Add Devices. A dialog opens.iii) On the Choose devices to add to this policy dialog, open the where Group is list
and select the appropriate Device Group.
NOTE If you are logged in as a Security Power User, you can select only the DeviceGroup to which you are assigned.
iv) In the Please select a field field, open the list and select a filter criterion.v) If you want to show devices that meet specific criteria, enter the appropriate information
in the remaining two fields. For example, you may want to show only those deviceswhere the Username field begins with the letters Admin.Alternatively, to show all devices in the selected Device Group, leave these remainingtwo fields blank.
vi) By default, the list of devices in the results grid is limited to only those devices that areeligible for assignment to an offline policy. If you want to show all devices that matchthe criteria you specified, clear the Show eligible devices only checkbox.
NOTE A device may be associated with only one offline policy.
vii) Click Filter. The Choose devices to add to this policy dialog refreshes to show a listof devices matching your criteria.
viii) Select the devices that you want to add:○ To select individual devices, select the checkbox next to each device you want to
add.○ To select all devices on this page of the table, select the Select All checkbox.
NOTE You can change the number of records shown per page. For more information,see "Changing the Number of Records That Show in a Report" on page 73.
ix) Select the checkbox to indicate that you consent to the installation of additionalsoftware components on the selected devices to enable the Device Freeze offlinepolicy.
x) Click Choose device(s) and in the Provide Authentication dialog, enter yourPassword and emailed Authorization Code.
xi) Click OK.The dialog closes and the results grid on the Manage Device Freeze Policies page refreshesto show the devices you added.
Chapter 9: Using Device Freeze Absolute User Guide
Absolute 7.x 178

The policy is applied to the added devices on the next successful agent call. In the interim,each device's status is set to Assignment Pending.
Going forward, if a device fails to call the Monitoring Center before the Timer Period elapses,the device is frozen and an email notification is sent to the Security Administrator or SecurityPower User who created the offline policy.
Working with Existing Offline PoliciesYou can use the Manage Device Freeze Offline Policies page to create new offline policies, view andedit existing offline policies, and manage the devices associated with an offline policy.
To view the list of existing Device Freeze offline policies, and perform actions on them:
1. On the navigation bar click > Device Freeze > Manage Device Freeze Offline Policies.
The Manage Device Freeze Offline Policies page opens to show the list of existing policies. Thefollowing information shows in the table for each policy:
● Policy Name: the name assigned to the policy.● Device Count: the number of devices associated with the policy.● Description: a description of the policy.● Created By: the username of the user who created the policy.● Last Modified: the date and time when the policy was last updated.● Status: the current status of the offline policy. Possible values are Active and Inactive.
NOTE A status of Inactive indicates that the offline policy is deleted, but one or more of itsassociated devices have not yet called the Monitoring Center to receive the update. Afterall devices make an agent call, the policy is removed from the system. For moreinformation, see "Deleting a Device Freeze Offline Policy" on page 185.
● Default Policy: you can set only one policy as the Default Policy. A value of Yes indicatesthat the policy is designated as the default policy to be assigned to all newly activateddevices.
From the Manage Device Freeze Offline Policies page you can perform the following tasks if youare logged in as a Security Administrator or Security Power User:
● To search for an offline policy, enter Search Criteria and click Show results. For moreinformation, see "Searching for a Device Freeze Offline Policy" on page 180.
● To open an offline policy for editing, in the results grid click the Policy Name link. Formore information, see "Editing a Device Freeze Offline Policy" on page 180.
● To add or remove devices, in the results grid click the Policy Name link. For moreinformation, see "Managing Devices Associated with a Device Freeze Offline Policy" onpage 182.
● To create a new offline policy, click New policy. The Create and Edit Device FreezeOffline Policy page opens. For more information, see "Creating a Device Freeze OfflinePolicy" on page 177.
● To download the list of policies, click . For more information, see "DownloadingReports" on page 84.
Chapter 9: Using Device Freeze Absolute User Guide
Absolute 7.x 179

● To print the current page of the list of policies, click . For more information, see "PrintingReports" on page 82.
● To save the filters you used to generate the list of policies, click . For more information,see "Saving Report Filters" on page 83.
Searching for a Device Freeze Offline Policy
To search for a Device Freeze offline policy:
1. On the navigation bar click > Device Freeze > Manage Device Freeze Offline Policies.
2. On the Manage Device Freeze Offline Policies page, search for the policy that you want to viewusing any of the Search Criteria fields as follows:
● In the Policy Name is or contains field, enter the name of the offline policy.● In the and Policy Description is or contains field, enter several letters that you know are
in the offline policy description.● Click the field next to or the policy contains a device where the field, select the
appropriate field from the list, and then in the is or contains field, either use Choose orenter the appropriate value for the offline policy you want to view.
3. Click Show results. The results grid refreshes to show the results of the search.
Editing a Device Freeze Offline PolicyYou can change the settings for an offline policy at any time. If you make changes to the Timer Period,Freeze Message, or Timer Action settings, your changes are effective on the offline policy’s devicesafter the next agent call.
NOTE To change the devices associated with an offline policy, see "Managing Devices Associatedwith a Device Freeze Offline Policy" on page 182.
To edit a Device Freeze offline policy:
1. On the Manage Device Freeze Offline Policies page, search for the policy that you want to edit.See "Searching for a Device Freeze Offline Policy" on page 180.
2. In the results grid, click the Policy Name for the policy you want to edit. The Edit a DeviceFreeze Offline Policy page opens.
3. At the Request Authorization Code area, click Request Code.
A confirmation message indicates that an authorization code is requested and sent to your-emailaddress. Check your e-mail for the message.
4. Under Policy information, edit the following information, as required:
a) Edit the name in the Policy Name field and click the Check name availability link to verifythat the name you typed is not in use.
b) Edit the Policy Description.c) In the Timer Period field edit the number of days that must elapse before a device is
frozen. Values between 4 days and 365 days are supported.
Chapter 9: Using Device Freeze Absolute User Guide
Absolute 7.x 180

5. Click the Freeze Message field and select the message you want to show on a device when itis frozen. The message text shows in the Preview of the message field.
If the appropriate message does not exist, click the Create Message link to create a new one. Formore information, see "Creating a Custom Device Freeze Message" on page 195.
6. Under Timer Action, select one of the following options:
● Freeze immediately: After the Timer Period elapses, a forced restart occurs on the deviceto freeze the device immediately.
● Freeze on next restart: After the Timer Period elapses, the device is frozen the next timeit is started. This is the default option.
7. A passcode is used to unfreeze a frozen device. In the Passcode Options area, select one ofthe following options:
● Generate a different random passcode for each device to auto-generate and use adifferent unlock passcode for each device.
● Generate the same random passcode for each device to auto-generate and use thesame unlock passcode for each device.
● Specify an 8-digit passcode for each device to use a previously generated or custompasscode. Click the field and enter (or copy and paste) the passcode to use on eachdevice. For more information, see "Viewing the Unfreeze Passcode" on page 194.
8. If you want to assign this offline policy to each newly activated device, select the checkbox nextto Default policy for newly activated devices.
NOTE If this option is disabled, another Device Freeze offline policy is already set as thedefault policy. To set the policy you are editing as the default, you need to remove thisdesignation from the other policy and then set the option here. For more information, see"Designating a Default Offline Policy" on page 181.
9. Click Save Policy and in the Provide Authentication dialog, enter your Password and emailedAuthorization Code.
10. Click OK. A message confirms that the policy is edited.
The offline policy is updated on each device on the next agent call. In the interim, the device’sstatus is set to Update Pending.
NOTE If a device is frozen, the policy on that device is updated after the device is unfrozen.
Designating a Default Offline PolicyYou can designate an offline policy as the default policy to be assigned to all newly activated devices.You can set only one policy as the default policy.
To designate a policy as the default policy:
1. On the navigation bar click > Device Freeze > Manage Device Freeze Offline Policies.
The Manage Device Freeze Offline Policies page opens to show the list of existing policies.
Chapter 9: Using Device Freeze Absolute User Guide
Absolute 7.x 181

2. In the results grid, review the values in the Default Policy column to determine if a policy isalready set as the Default Policy (column value is set to Yes).
3. Do one of the following:
● If no policies are set as the default policy, go to step 4.● If an offline policy is set as the default policy and you want to designate another policy as
the default, do the following:i) Click the Policy Name link of the policy that is currently set as the default policy. The
Edit a Device Freeze Offline Policy page opens.ii) At the Request Authorization Code area, click Request Code.
A confirmation message indicates that an authorization code is requested and sent toyour-email address. Check your e-mail for the message.
iii) Clear the checkbox next to Default policy for newly activated devices.iv) Click Save Policy and in the Provide Authentication dialog, enter your Password and
emailed Authorization Code.v) Click OK.
4. Click the Policy Name link of the policy that you want to set as the default policy. The Edit aDevice Freeze Offline Policy page opens.
5. If you haven't requested an authorization code yet, at the Request Authorization Code area,click Request Code.
A confirmation message indicates that an authorization code is requested and sent to your-emailaddress. Check your e-mail for the message.
6. Select the checkbox next to Default policy for newly activated devices.
7. Click Save Policy and in the Provide Authentication dialog, enter your Password andAuthorization Code.
8. Click OK.
As new devices are activated, the offline policy is applied on each device. Going forward, if adevice fails to call the Monitoring Center before the offline policy’s Timer Period elapses, thedevice is frozen automatically and an email notification is sent to the Security Administrator orSecurity Power User who created the offline policy.
Managing Devices Associated with a Device Freeze Offline PolicyYou can view details about an offline policy’s devices. You can also add devices to an existing offlinepolicy or remove devices.
NOTE You can associate a device with only one offline policy.
This section describes the following tasks:● Viewing Devices Associated With an Offline Policy● Adding Devices to an Offline Policy● Removing Devices from an Offline Policy
Chapter 9: Using Device Freeze Absolute User Guide
Absolute 7.x 182

Viewing Devices Associated With an Offline Policy
To view the devices associated with a Device Freeze offline policy:
1. On the Manage Device Freeze Offline Policies page, search for the offline policy that you wantto view. For more information, see "Searching for a Device Freeze Offline Policy" on page 180.
2. In the results grid, click the appropriate Policy Name link to open the policy.
3. Scroll to the Policy Members area. The results grid shows the devices associated with thispolicy.
4. Review the list of devices and their associated device details. A device may have any of thefollowing statuses:
● Assignment Pending: the policy is assigned to the device in the Absolute console, but thedevice has not yet called the Monitoring Center. After a successful agent call, the offlinepolicy is activated on the device and the device’s status is updated to Assigned.
● Assigned: the offline policy is deployed to the device and the Timer is running.● Update Pending: the offline policy was edited, but the device has not yet called the
Monitoring Center. After a successful agent call, the offline policy is updated on the deviceand the status is updated to Assigned.
● Removal Pending: the device was removed from an offline policy, but the device has notyet called the Monitoring Center. After a successful agent call, the device is removed fromthe offline policy's list of associated devices on the Manage Device Freeze Offline Policiespage.
5. To find a specific device, type an Identifier, Device Name, Username, or Serial Number in thetext field and click Filter Members.
6. To sort the list by specific information, such as Username, click the appropriate column header.To reverse the sort order, click the column header again.
Adding Devices to an Offline PolicyYou can add devices to an existing offline policy at any time. The policy is activated on the device atthe next agent call.
NOTE You can associate a device with only one offline policy.
To add devices to a Device Freeze offline policy:
1. On the Manage Device Freeze Offline Policies page, search for the offline policy that you wantto add devices to. See "Searching for a Device Freeze Offline Policy" on page 180.
2. In the results grid, click the appropriate Policy Name link to open the offline policy.
3. Under Policy Members, at the Request Authorization Code area, click Request Code.
A confirmation message indicates that an authorization code is requested and sent to your-emailaddress. Check your e-mail for the message.
4. The results grid shows the devices currently associated with this offline policy. Click AddDevices.
Chapter 9: Using Device Freeze Absolute User Guide
Absolute 7.x 183

5. On the Choose devices to add to this policy dialog, open the where Group is list andselect the appropriate Device Group.
NOTE If you are logged in as a Security Power User, you can select only the Device Group towhich you are assigned.
6. In the Please select a field field, open the list and select a filter criterion.
7. If you want to show devices that meet specific criteria, enter the appropriate information in theremaining two fields. For example, you may want to show only those devices where theUsername field begins with the letters Admin.
Alternatively, to show all devices in the selected Device Group, leave these two fields blank.
8. By default, the list of devices in the results grid is limited to only those devices that are eligiblefor assignment to an offline policy. If you want to show all devices that match the criteria youspecified, clear the Show eligible devices only checkbox.
9. Click Filter. The Choose devices to add to this policy dialog refreshes to show a list ofdevices matching your criteria.
10. Select the devices that you want to add:
● To select individual devices, select the checkbox next to each device you want to add.● To select all devices on this page of the table, select the Select All checkbox.
NOTE You can change the number of records shown per page. See "Changing theNumber of Records That Show in a Report" on page 73.
11. Select the checkbox to indicate that you consent to the installation of additional softwarecomponents on the selected devices to enable the Device Freeze offline policy.
12. Click Choose devices and in the Provide Authentication dialog, enter your Password andemailed Authorization Code.
13. Click OK.
The dialog closes and the results grid refreshes to show the devices you added. The offlinepolicy is assigned to each device on the next successful agent call. In the interim, the device’sstatus is set to Assignment Pending.
Going forward, if a device fails to call the Monitoring Center before the offline policy’s TimerPeriod elapses, the device is frozen and an email notification is sent to the Security Administratoror Security Power User who created the offline policy.
Removing Devices from an Offline PolicyYou may need to remove devices from an existing offline policy. For example, you cannot submit aInvestigation Report on a device until the device is removed from its offline policy.
NOTE If a device’s status is Frozen By Policy, or a change to this status is imminent, you cannotremove the device from the offline policy.
Chapter 9: Using Device Freeze Absolute User Guide
Absolute 7.x 184

To remove devices from a Device Freeze offline policy:
1. On the Manage Device Freeze Offline Policies page, search for the policy from which you wantto remove devices. See "Searching for a Device Freeze Offline Policy" on page 180.
2. In the results grid, click the appropriate Policy Name link to open the offline policy.
3. Scroll to the Policy Members area. The results grid shows the devices associated with thisoffline policy.
4. Select the devices that you want to remove:
● To select individual devices, select the checkbox next to each device you want to add.● To select all devices on this page of the table, select the Select All checkbox.
NOTE You can change the number of records shown per page. See "Changing theNumber of Records That Show in a Report" on page 73.
5. Click Remove Selected Devices.
A message confirms that the selected devices are removed from the offline policy, but the offlinepolicy is not removed from the device until the next successful agent call. In the interim, thedevice’s status is set to Removal Pending.
NOTE Devices that are removed from an offline policy are not frozen if they are offline for a period oftime. To ensure that your managed devices are protected at all times, add these removed devices toanother offline policy.
Deleting a Device Freeze Offline PolicyIf a Device Freeze offline policy is no longer required you can delete it.
When you delete an offline policy the policy's status is set to Inactive while it waits for its devices to callthe Monitoring Center and receive the update to the policy. After the policy is removed from all of itsdevices, the policy is deleted from the system.
NOTE The devices that were associated with a deleted policy are not frozen if they are offline for aperiod of time. To ensure that these devices are protected at all times, add these devices to anotheroffline policy. For more information, see "Adding Devices to an Offline Policy" on page 183.
To delete a Device Freeze offline policy:
1. On the Manage Device Freeze Offline Policies page, search for the offline policy that you wantto delete. See "Searching for a Device Freeze Offline Policy" on page 180.
2. In the results grid, click the appropriate Policy Name link to open the offline policy.
3. Click Delete Policy.
4. On the confirmation message click Delete Policy.
On the Manage Device Freeze Offline Policies page, the offline policy's status is changed toInactive and each device's policy status is changed to Removal Pending.
On the next successful agent call the offline policy is removed from each device. After the offlinepolicy is removed from all of the policy's devices, the policy is deleted from the system.
Chapter 9: Using Device Freeze Absolute User Guide
Absolute 7.x 185
IMPORTANT The policy cannot be removed from devices with a status of Frozen By Policy.You need to unfreeze these devices before the policy can be deleted. For more informationabout unfreezing frozen devices, see "Unfreezing a Frozen Device" on page 192.
Tracking Device Freeze StatusYou can view near real-time status updates on the progress of Device Freeze requests and DeviceFreeze offline policies. The Device Freeze Summary Report shows all devices that have had a DeviceFreeze requested or are associated with an offline policy. You can filter this report by Device Freezestatus to view specific devices.
NOTE To view an audit log of completed security actions related to Device Freeze requests, see"Security Audit Logs Report" on page 137. To export a report that provides statistics on Device Freezerequests submitted for your account, see "Security Posture Report" on page 112.
This section provides information on the following topics:● Viewing Device Freeze Status● Viewing Device Freeze Requests● Viewing Devices Frozen by an Offline Policy
Viewing Device Freeze Status
To view the status of all Device Freeze requests:
1. On the navigation bar click > Device Freeze > Device Freeze Summary Report.
2. On the Device Freeze Summary Report page at the Search Criteria area, set the preferredfiltering and display options for the results using one or more of the following criteria:
● To filter results by device group, in the Group is field open the list and select theappropriate Device Group.
NOTE If you are logged in as a Security Power User, you can select only the DeviceGroup to which you are assigned.
● To filter results by a specific Identifier, IMEI, Subscriber ID, Phone Number, Make,Model, Serial Number, or custom field (if applicable), in the and the field open the listand select the value type.In the is or contains field enter the value to search for or use the Choose feature. For moreinformation on the Choose feature, see "Editing Asset Information" on page 73.
● To filter results by request name or policy name, in the and the Request Name/PolicyName is or contains field enter all or part of the name.
● To filter results by the date the Device Freeze was requested, at the and the RequestedDate area, do one of the following:○ In the in the last <n> days field, click the option and enter the appropriate number of
days. Any value from 1 through 365 is appropriate. A higher value in this field will resultin a larger report and will take longer to generate results.
Chapter 9: Using Device Freeze Absolute User Guide
Absolute 7.x 186

○ In the between field, click the option and enter the dates (dd/mm/yyyy) or click theCalendar icon to open the calendar dialog. Enter the dates in chronological order, withthe earliest date entered first and the later date entered second.
● To filter by status, in the and the Device Freeze Status is area, select one or morecheckboxes from these possible values:○ Freeze Requested: the request was submitted and is in a transitory state when waiting
for an agent call or when the instruction setup process is running on the targeteddevice.
○ Frozen By Request: the Device Freeze instructions were sent to the targeted deviceand the freeze message shows on the targeted device.
○ Unfreeze Requested: instructions to unfreeze the frozen device are queued and aresent to the device on the next agent call. This status is typically set when an unfreezerequest is set using the Absolute console.
○ Frozen By Policy: the device was frozen by a Device Freeze offline policy because itdid not make contact with the Monitoring Center before the policy’s Timer Periodelapsed. The freeze message shows on the targeted device.
○ Unfrozen with Agent Call: the device was unfrozen by sending an unfreeze requeston the next agent call.
○ Request Cancelled: the Device Freeze request was cancelled.○ Unfrozen with Passcode: the end user has unfrozen the device by entering a
Passcode on the frozen device.○ Pending:
– For offline policies, the policy is pending because a Device Freeze request wassubmitted on the device. After the request is processed, the status is changed toPolicy Assigned.
○ Policy Assigned: a Device Freeze offline policy is assigned to the device. If the devicedoes not make contact with the Monitoring Center before the policy’s Timer Periodelapses, the device is frozen.
○ Processing: the Device Freeze request was sent to the device and is in progress.
○ Scheduled Freeze Pending: the submitted Device Freeze request is scheduled tooccur on or after a future date. When the scheduled date is reached, the statuschanges to Freeze Scheduled.
○ Freeze Scheduled: the current date equals or exceeds the date on which the device isscheduled to be frozen. After the device makes a successful call to the MonitoringCenter, the device is frozen.
○ Frozen by Scheduled Freeze: the device was frozen by a Device Freeze request thatwas scheduled to occur on or after a specified date.
3. Click Show results to regenerate the report using the specified criteria.
The Device Freeze Summary Report shows all devices that have a Device Freeze requested. Foreach device listed, the Device Freeze Summary Report includes the following information:
● Identifier: the targeted device’s Identifier● Request ID: the identifier assigned to the Device Freeze request by the system.● Request Name/Policy Name: the name assigned to this Device Freeze request, or the
name of the Device Freeze offline policy assigned to the device
Chapter 9: Using Device Freeze Absolute User Guide
Absolute 7.x 187

● Make: the targeted device’s make● Model: the targeted device’s model● Serial Number: the targeted device’s serial number● IMEI: the International Mobile Equipment Identity (IMEI) number of the device, if applicable● Subscriber ID: the unique identifier associated with the subscriber at the time the Device
Freeze was requested. This identifier is also known as the International Mobile SubscriberIdentity (IMSI).
● Phone Number: the phone number associated with the mobile device, at the time theDevice Freeze was requested
● Requested on: the date and time when the Device Freeze request was submitted● Requested By: the username of the Security Administrator or Security Power User who
submitted the request● Timer Period (days): the duration of the Timer Period in number of days. Possible values
are between 4 and 365 days. This column applies to only those devices that are associatedwith a Device Freeze offline policy.
● Timer Action: the action to perform if the Timer Period elapses on a device. This columnapplies to only those devices that are associated with a Device Freeze offline policy.
● Status: the current status of the device’s Device Freeze request or Device Freeze offlinepolicy.
● Scheduled for: the date when a Device Freeze request is set to be processed. The deviceis frozen on the first successful agent call on or after this date.
NOTE The Scheduled for column applies only to Device Freeze requests that arescheduled to occur on or after a future date. See step 7 in "Requesting a Device Freeze"on page 170.
● Passcode: the passcode used to unfreeze a device manually. For more information, see"Using an Unfreeze Passcode on the Targeted Device" on page 193.
NOTE If Custom Action Fields are associated with the Device Freeze request, a column foreach custom field shows on the far right of the report. For more information, see "ManagingCustom Action Fields" on page 155.
You can perform the following additional tasks on the generated report, if desired:
● To download the report, click . For more information, see "Downloading Reports" onpage 84.
NOTE Depending on your account, the Download icon may not be available.
● To print the current page of the report, click . For more information, see "PrintingReports" on page 82.
● To save the filters you used to generate the report, click . For more information, see"Saving Report Filters" on page 83.
Chapter 9: Using Device Freeze Absolute User Guide
Absolute 7.x 188

Viewing Device Freeze Requests
To view the status and other details for a Device Freeze request:
1. On the navigation bar click > Device Freeze > Device Freeze Summary Report.
2. On the Device Freeze Summary Report page enter all appropriate criteria to generate thereport. See "Viewing Device Freeze Status" on page 186.
The Device Freeze Summary Report refreshes and the results grid shows a list of all devices foryour account that contain a Device Freeze request.
3. Do one of the following, depending on the status of the Device Freeze request:
● If the status of the Device Freeze request is Policy Assigned, Unfrozen With Agent Call,Unfrozen With Passcode, or Request Cancelled, click the View link to open the DeviceFreeze Details page in a read-only state for the selected request.
● If the status of the Device Freeze request is one of the following, click the Edit or View linkto open the Device Freeze Details page in an editable state for the selected request:
○ Freeze Requested○ Scheduled Freeze Pending○ Freeze Scheduled○ Frozen By Request○ Frozen By Policy○ Frozen By Scheduled Freeze○ Unfreeze Requested○ Pending
● If the status of the Device Freeze request is Processing and you want to cancel therequest, click Cancel.
Viewing Details about a Device Freeze RequestThe Device Freeze Details page contains the following detailed information about the Device Freezerequest:
● Current Status: the current status of the Device Freeze request. Possible values are:○ Freeze Requested: the request was submitted and is in a transitory state when waiting for
an agent call or when the instruction setup process is running on the targeted device.○ Frozen By Request: the Device Freeze instructions are sent to the targeted device and
the freeze message is shown on the targeted device.○ Frozen By Policy: the device was frozen by a Device Freeze offline policy because it did
not make contact with the Monitoring Center before the policy’s Timer Period elapsed. Thefreeze message shows on the targeted device.
○ Unfreeze Requested: instructions to unfreeze the frozen device are queued and are sentto the device on the next agent call. This status is typically set when an unfreeze request isset using the Absolute console.
○ Unfrozen with Agent Call: the device was unfrozen by sending an unfreeze request onthe next agent call.
○ Unfrozen with Passcode: the end user has unfrozen the device by entering a Pass Codeon the frozen device
Chapter 9: Using Device Freeze Absolute User Guide
Absolute 7.x 189

○ Policy Assigned: a Device Freeze offline policy is assigned to the device. If the devicedoes not make contact with the Monitoring Center before the policy’s Timer Period elapses,the device is frozen.
○ Processing: the Device Freeze request was sent to the device and is in progress. Thisstatus is used for Device Freeze requests for more than one device.
○ Request Cancelled: the Device Freeze request was cancelled before being deployed tothe targeted device.
○ Scheduled Freeze Pending: A scheduled Device Freeze request was submitted for thedevice. The Device Freeze is scheduled to occur on or after a future date. When thescheduled date is reached, the status changes to Freeze Scheduled.
○ Freeze Scheduled: A scheduled Device Freeze was submitted for the device. The currentdate equals or exceeds the date on which the device is scheduled to freeze. The devicewill be frozen after it makes a successful call to the Monitoring Center.
○ Frozen by Scheduled Freeze: the device was frozen by a Device Freeze request that wasscheduled to occur on or after a specified date.
● Scheduled for: the date when the Device Freeze request is set to be processed. The device isfrozen on the first successful agent call on or after this date.
NOTE The Scheduled for field applies only to Device Freeze requests that are scheduled tooccur on or after a future date. See step 7 in "Requesting a Device Freeze" on page 170.
● Identifier: the targeted device’s Identifier● IMEI: the International Mobile Equipment Identity number of the device, if applicable● Subscriber ID: the unique identifier associated with the subscriber at the time the Device
Freeze was requested. This identifier is also known as the International Mobile SubscriberIdentity (IMSI).
● Phone Number: the phone number associated with the mobile device, at the time the DeviceFreeze was requested
● Make: the targeted device’s make and manufacturer name● Model: the targeted device’s model● Serial: the targeted device’s serial number● Asset: the targeted device’s inventory tracking or asset number as assigned by the network
administrator in the organization● Last Call: the date and time of the device’s last agent call to the Monitoring Center● Unfreeze Passcode: the passcode used to unfreeze a device manually. For more information,
see "Using an Unfreeze Passcode on the Targeted Device" on page 193.● [Custom Action Fields]: shows the value for each custom field, if one or more Custom Action
Fields are associated with the Device Freeze Delete request. For more information, see"Managing Custom Action Fields" on page 155.
● Status table: the detailed information about the freeze/unfreeze activity on the targeted device.The following information is shown:○ Step: the sequential number of the status change○ Status: the status of the Freeze Request○ Date: the date and time when the change in status occurred
Chapter 9: Using Device Freeze Absolute User Guide
Absolute 7.x 190

○ Username: the username of the Security Administrator or Security Power User whorequested the status change
In addition to this information, the Device Freeze Details page contains the following buttons letting youperform additional tasks, such as:
● Unfreeze device: click to unfreeze a frozen device on the next agent call. For moreinformation, see "Unfreezing a Device on Agent Call" on page 192.
● Cancel request: click to cancel a Device Freeze request before the device is frozen. For moreinformation, see "Managing Custom Device Freeze Messages" on page 195.
● Remove details: click to remove the details of a Device Freeze Request. For moreinformation, see "Removing Device Freeze Request Details" on page 175.
Viewing Devices Frozen by an Offline PolicyWhen an offline policy is assigned to a device, and the device fails to contact the Monitoring Center forthe number of days specified in the offline policy’s Timer Period, the device is frozen. Administratorsreceive a daily email notification listing the devices that were frozen by an offline policy during the past24 hours.
NOTE After an e-mail notification is sent for a device no further e-mails are sent, regardless of howmany days the device remains frozen.
In the Device Freeze Summary report, you can view a list of all devices that are currently frozen by anoffline policy and determine which ones you want to unfreeze, and which require further action.
To view devices that are frozen by an offline policy:
1. On the navigation bar click > Device Freeze > Device Freeze Summary Report.
2. In the Search Criteria location, clear all checkboxes in the and the Device Freeze Status isarea except Frozen By Policy.
3. Click Show results. The results grid refreshes to show only those devices that are frozenbecause they have not contacted the Monitoring Center for the number of days specified intheir policy’s Timer Period.
4. To sort the results by Policy Name, Timer Period, or Timer Action, click the appropriate columnheader.
5. To view details about the frozen device, click the Edit or View link. The Device Freeze Detailspage opens and shows the following information:
● Current Status: shows Frozen By Policy, which is the current status of the frozen device● Identifier: the device’s Identifier● IMEI: not applicable to Windows devices● Subscriber ID: the unique identifier associated with the subscriber at the time the Device
Freeze was requested. This identifier is also known as the International Mobile SubscriberIdentity (IMSI)
● Phone Number: not applicable to Windows devices● Make: the device’s make and manufacturer name● Model: the device’s model
Chapter 9: Using Device Freeze Absolute User Guide
Absolute 7.x 191

● Serial: the device’s serial number● Asset: the device’s inventory tracking or asset number as assigned by the network
administrator in the organization● Last Call: the date and time of the device’s last agent call to the Monitoring Center.● Unfreeze Passcode: the passcode used to unfreeze a device manually. For more
information, see "Using an Unfreeze Passcode on the Targeted Device" on page 193.● Status table: the detailed information about the freeze/unfreeze activity on the targeted
device. The following information is shown:○ Step: the sequence number of the status change○ Status: the status of the device’s offline policy○ Date: the date and time when the change in status occurred○ Username: the username of the Security Administrator or Security Power User who
requested the status change
In addition to this information, the Device Freeze Details page includes an Unfreeze device button tounfreeze a frozen device on the next agent call. For more information, see "Unfreezing a Device onAgent Call" on page 192.
Unfreezing a Frozen DeviceDevices can be frozen by a Device Freeze request or a Device Freeze offline policy. Authorizedsecurity personnel can unfreeze a device and make it operational in the following two ways:
● Unfreezing a Device on Agent Call● Using an Unfreeze Passcode on the Targeted Device
IMPORTANT Unfreezing a device forces its operating system to restart.
NOTE You can create an Alert to notify you when a device is unfrozen. For more information, see"Creating New Custom Alerts" on page 16.
Unfreezing a Device on Agent CallAuthorized security personnel can unfreeze a device from the Device Freeze Details page. When theUnfreeze request is set, the targeted device is unfrozen on the next agent call to the Monitoring Center.When a device is frozen, the agent calls the Monitoring Center every 9 minutes.
This section provides instructions for the following tasks:● Unfreezing a Single Device on Agent Call● Unfreezing Multiple Devices on Agent Call
NOTE When an Android device with no screen lock protection (PIN or password) is frozen, its lockscreen PIN is automatically set to 1234. When you unfreeze the device one of two scenarios applies,depending on the type of Android device:- If the device supports Persistence Technology, and is running Android 7 or higher, the user receives anotification that they need to enter 1234 to unlock the device. The user can then go to Settings toremove or reset the PIN.- For all other devices, the PIN is cleared when the device is unfrozen.
Chapter 9: Using Device Freeze Absolute User Guide
Absolute 7.x 192

Unfreezing a Single Device on Agent Call
To unfreeze a single targeted device using the Absolute console:
1. On the navigation bar click > Device Freeze > Device Freeze Summary Report.
2. On the Device Freeze Summary Report page enter all appropriate criteria and click Showresults. The Device Freeze Summary Report refreshes to show a list of all devices for youraccount matching your search criteria in the results grid.
NOTE Security Power Users can unfreeze only those devices that belong to the Device Groupto which they are assigned.
3. For the appropriate device, click the Edit or View link.
4. On the Device Freeze Details page click Unfreeze device. The device is unfrozen on the nextagent call.
Unfreezing Multiple Devices on Agent Call
To unfreeze multiple targeted devices at the same time using the Absolute console:
1. On the navigation bar click > Device Freeze > Device Freeze Summary Report.
2. On the Device Freeze Summary Report page at the and the Device Freeze Status is area,select the Frozen checkbox.
3. Enter all other appropriate criteria on this page and click Show results. The Device FreezeSummary Report refreshes to show a list of all frozen devices for your account matching yoursearch criteria in the results grid.
4. Do one of the following:
● To select all devices on the current page of the results grid, select the checkbox in theheader of the leftmost column. All devices on the page are selected.
● To select all devices in the results grid, hover your mouse over the checkbox in the headerof the leftmost column and click Select All <n> Records. All devices in the report areselected.
5. Click Edit selected devices.
6. On the Edit Selected Devices page, in the Action list for the Frozen row, click the field andselect Unfreeze.
7. Click Submit. The device is unfrozen on the next agent call.
Using an Unfreeze Passcode on the Targeted DeviceMost frozen devices call in to the Monitoring Center every 9 minutes. In cases where the device isunable to make agent calls, it is possible to unfreeze the device manually.
This section provides information on the following topics:● Viewing the Unfreeze Passcode● Unfreezing a Device With a Passcode
Chapter 9: Using Device Freeze Absolute User Guide
Absolute 7.x 193

Viewing the Unfreeze PasscodeIn some circumstances, it is not feasible to wait for the next agent call to unfreeze a device. In suchcases, it is possible to unfreeze a device by entering a passcode on the frozen device. The passcode isgenerated when the Device Freeze request is created and is shown on the Device Freeze Detailspage.
To view the unfreeze Passcode associated with a Device Freeze request:
1. On the navigation bar click > Device Freeze > Device Freeze > Device Freeze SummaryReport.
2. On the Device Freeze Summary Report page enter all appropriate criteria and click Showresults.
The Device Freeze Summary Report refreshes and the results grid shows a list of all devices foryour account that contain a Device Freeze request.
3. Click the Edit or View link for the appropriate device. The Device Freeze Details page opens toshow the details for the selected request.
4. Record the Unfreeze Passcode.
The next step is to enter the passcode on the frozen device. For more information, see "Using anUnfreeze Passcode on the Targeted Device" on page 193.
Unfreezing a Device With a Passcode
To unfreeze a device manually:
1. The user contacts their organization’s Customer Support, or a Security Administrator orSecurity Power User for their account, to initiate a manual unfreeze request.
2. The Security Administrator or Security Power User provides the passcode to the user withdetailed instructions about unfreezing the device. For more information on finding a device'sUnfreeze Passcode, see "Viewing the Unfreeze Passcode" on page 194.
3. The user unfreezes the device as follows:
● For Windows devices:i) On the frozen device (which does not show any supporting fields to facilitate code
entry) press the Esc key on the keyboard.ii) Enter the Passcode using the number keys in the upper row of the keyboard. If you
enter the Passcode using the numeric keypad, the frozen device does not unfreeze.The device is immediately unfrozen.
● For Mac devices:i) On the frozen device (which does not show any supporting fields to facilitate code
entry) press the Esc key on the keyboard.ii) Enter the Passcode using the number keys in the upper row of the keyboard. If you
enter the Passcode using the numeric keypad, the frozen device does not unfreeze.iii) Press the return key on the keyboard. The device is immediately unfrozen.
● For Android devices:i) Power on the frozen device.
Chapter 9: Using Device Freeze Absolute User Guide
Absolute 7.x 194

ii) If the full screen Device Freeze message shows, click Unfreeze Device at the bottomof the message.
iii) In the Enter Unfreeze Code field, enter the device's Unfreeze Passcode you recordedin step 4 of the section, Viewing the Unfreeze Passcode. The device is immediatelyunfrozen.
iv) Do one of the following:○ If a PIN or password was set on the device before it was frozen, unlock the device
as you normally would.○ If there was no PIN or password set on the device before it was frozen, a
notification message may show indicating that the device's screen lock PIN is nowset to 1234. Click OK and enter 1234 to unlock the device. To remove or reset thePIN, go to Settings.
Managing Custom Device Freeze MessagesAuthorized security personnel can create and edit custom Device Freeze messages using acombination of plain text and HTML formatting. Custom messages help you ensure that the appropriateinformation is available to the users of a frozen device. Such messages typically state that the devicehas been frozen and may include instructions and contact information to help an authorized userrestore functionality to their frozen device.
This section provides instructions for the following tasks:● Creating a Custom Device Freeze Message● Including Phone Numbers in Custom Device Freeze Messages● Editing Existing Custom Device Freeze Messages● Deleting Existing Custom Device Freeze Messages
Creating a Custom Device Freeze MessageNOTE If you intend to include a contact phone number in a Device Freeze message that shows onAndroid devices, also see "Including Phone Numbers in Custom Device Freeze Messages " on page197.
To create a custom Device Freeze message:
1. On the navigation bar click > Device Freeze > Device Freeze > Create Device FreezeMessage.
NOTE Alternatively, you can also click New message on the Manage Device FreezeMessages page to open the Create Device Freeze Message page.
2. On the Create Device Freeze Message page in the Message Name field, type an appropriatetitle for the new Device Freeze message. The title shows as an option in the Select amessage list on the Request Device Freeze page.
3. In the Message Text field, type the text you want to show on frozen devices. You can use plaintext or a combination of text and the following HTML formatting tags:
Chapter 9: Using Device Freeze Absolute User Guide
Absolute 7.x 195

HTML tag Description
<body>, including <body bgcolor> Apply a style, such as a background color, to your entire message
<img src> Insert an image
<b> Bold text
<i> Italicize text
<u> Underline text
<font face="font_family"> Specify the font to apply to text
<p> Define a paragraph with default spacing before and after text
<p align> Set the alignment for a paragraph
<center> Center a paragraph
<br> Add a line break without default spacing
You can also include the following device attributes in your message:
Device attribute Variable Description
IMEI [%IMEI%] Insert an Android device's IMEI. When you previewthe message, the variable is replaced by a samplevalue.
IMSI [%IMSI%] Insert an Android device's IMSI (also known asSubscriber ID). When you preview the message, thevariable is replaced by a sample value.
Detected PhoneNumber
[%Detected Phone Number%] Insert an Android device's Detected Phone Number.When you preview the message, the variable isreplaced by a sample value.
Detected SerialNumber
[%Detected Serial Number%] Insert the target device's Detected Serial Number.When you preview the message, the variable isreplaced by a sample value.
Serial Number [%Serial Number%] Insert the target device's Serial Number. When youpreview the message, the variable is replaced by asample value.
Any Fixed Field [%CDF:<Fixed FieldName>%]
NOTE Replace "<Fixed FieldName>" with the name of theFixed Field you want toinclude in the message.
Insert the target device's value for the specified FixedField.
Any CustomDevice Field
[%CDF:<Custom Device FieldName>%]
NOTE Replace "<CustomDevice Field Name>" with thename of the Custom DeviceField you want to include inthe message.
Insert the target device's value for the specifiedCustom Device Field.
Chapter 9: Using Device Freeze Absolute User Guide
Absolute 7.x 196

4. Click Save. The new message is saved and the Create Device Freeze Message pagerefreshes to show a confirmation message.
Including Phone Numbers in Custom Device Freeze MessagesNOTE This section applies only to Android devices running the Absoluteagent version 3219 or higher.
You can include a contact phone number in a Device Freeze message that allows the user of a frozenAndroid device to tap the hyperlinked phone number and place a call directly to that number. Thisfeature is intended to allow users to use their frozen Android device to call for assistance, even thoughtheir device is otherwise unusable.
To include a phone number in a custom Device Freeze message:
1. On the navigation bar click > Device Freeze > Device Freeze > Create Device FreezeMessage.
2. On the Create Device Freeze Message page in the Message Name field, type an appropriatetitle for the new Device Freeze message.
3. In the Message Text field, type the text you want to show on frozen Android devices, includinga contact phone number. Only international phone numbers are supported, in the followingformat:
+<country code> <phone number>
For example, +33 509 758 351 or +1 555-1234
The phone number must contain a minimum of eight (8) digits, not including the leading plus sign(+). It can include spaces ( ) or hyphens (-) for readability.
Alternatively, you can create a Custom Device Field that includes the contact phone number andthen include the field in the Device Freeze message. The phone number format requirementsdescribed above also apply. For more information about creating a Custom Device Field, see theonline Help.
NOTE Only those phone numbers that adhere to the defined format requirements will behyperlinked and tappable on an Android device.
4. Click Save. The new message is saved and the Create Device Freeze Message pagerefreshes to show a confirmation message.
Editing Existing Custom Device Freeze Messages
To edit existing Device Freeze messages:
1. On the navigation bar click > Device Freeze > Device Freeze > Manage Device FreezeMessages.
The Manage Device Freeze Messages page opens to show a list of all messages available for youraccount.
2. Click the Message Name or the Edit link for the message you want to edit.
Chapter 9: Using Device Freeze Absolute User Guide
Absolute 7.x 197

3. On the Create Device Freeze Message page at the Message Text field, edit the message asappropriate.
4. Click Save.
The change is saved and the Create Device Freeze Message page refreshes to show aconfirmation message.
Deleting Existing Custom Device Freeze Messages
To delete existing Device Freeze messages:
1. On the navigation bar click > Device Freeze > Device Freeze > Manage Device FreezeMessages.
The Manage Device Freeze Messages page opens to show a list of all messages available foryour account.
2. Click the Message Name or the Edit link for the message you want to delete.
3. Click Delete. The message is deleted and the Create Device Freeze Message page refreshesto show a confirmation message.
Chapter 9: Using Device Freeze Absolute User Guide
Absolute 7.x 198

Chapter 10:Managing Geofences
NOTE If your account has been migrated to ABS 7 Geolocation, the (Classic) Geofences feature hasbeen replaced by the Rules feature. For more information about creating a geofence in a rule, seeGetting started with Rules in the online Help.
Administrators can use the Geofences feature to specify boundaries based on Geolocation Trackingdata to track monitored devices.
The Geolocation Tracking and Geofences features let your organization determine the physical locationof a specific computing device, more precisely and immediately, as of the most recent agent call to theMonitoring Center. It is also assumed that the device is properly equipped with a positioning deviceapproved for use with these features.
An Administrator can specify boundaries using the Geofences Editor and track the movement ofdevices through these locations. Whenever a device crosses a boundary set using the Geofencesfeature, alerts are triggered and, depending upon the settings specified for the account, result in e-mailnotifications to administrators and/or other events on the Absolute console. Geofencing is available toall accounts authorized for the Geolocation Tracking feature. Further, Geofencing is supported for allagents (devices) in that account for which Geolocation Tracking data is available.
For information about geolocation system requirements, see "Understanding Location Technologies" onpage 121.
This chapter includes the following sections:● Using Geofence Technology● Understanding Geolocation Maps● Creating Geofences● Viewing Geofences● Editing Geofences● Deleting Geofences
Using Geofence TechnologyGeofences are used primarily as building blocks of security policies based on the location of devices.Geofences, in combination with Geolocation Tracking, can be used to pinpoint the location of a deviceand consequently ensure that the security of these devices is not breached. For example, a Geofencespecifying the entire state of New York as a secure zone and an accompanying alert in the Absoluteconsole are created for Account A. When one of the devices in Account A travels outside New Yorkstate, all administrators for that account are alerted through an automated notification e-mail.Depending upon the location and the secure status of the device, the Administrator can then choose toimplement other security measures, such as performing a Data Delete or requesting a Device Freeze.
To use Geofences effectively, you first create a Geofence and then create an alert that links to theGeofence. When you create an alert for a Geofence, you need to specify the rules for triggering thealert based on the following options:
● Location:○ Outside: Create an alert when a device travels outside a specified Geofence boundary.
Absolute7.x 199

○ Inside: Create an alert when a device travels inside a specified Geofence boundary.
● Geofence Name: The Geofence to which the alert pertains.● Duration: The length of time after the specified rules are broken required to trigger the alert.
You can specify the length of time in hours, days or weeks.
To set up a functioning Geofence:
1. Create an appropriate Geofence using the Create and Edit Geofences page. For moreinformation, see "Creating Geofences" on page 201.
NOTE If a Geofence matching your criteria already exists, you do not need to create a newone.
2. Create an alert based on the newly created Geofence using the Create and Edit Alerts page. Inthe Field list, select the value Location, and then specify the appropriate rules.
For more information on creating Alerts, see "Creating New Custom Alerts" on page 16.
Understanding Geolocation MapsGeolocation maps show on any geolocation pages within the Absolute console. These pages include:
● The Create and Edit Geofences page, which includes the Geofence Editor. You can use theGeofence Editor to add, edit, and find Geofences on a map.
● Geolocation Tracking reports, which provide location information about your devices. TheGeofences created for your account show on Geolocation Tracking reports. For moreinformation, see "Geolocation Tracking Reports" on page 119.
NOTE The Geofence Editor and Geolocation Tracking reports use Google Maps™. If Google Mapsare prohibited in your country (determined by the IP address of your computer), ESRI® maps are usedinstead. For more information about working with ESRI maps, go to www.esri.com.
Map Navigation ToolsThe following Google Map navigation tools are available:
Tool Description
Pan Use the Pan tool to move to a specific area of the map. Click one or more of thearrows until the desired area is in view. This tool is typically used in conjunctionwith the Zoom tool.
Zoom Use the Zoom tool to zoom in or out of specific areas of the map.
● To zoom in, click repeatedly, or move the slider towards the button. You canalso zoom in by double-clicking the map or moving your mouse scroll wheel.
● To zoom out, click repeatedly, or move the slider towards the button. Youcan zoom out by moving your mouse scroll wheel.
Chapter 10: Managing Geofences Absolute User Guide
Absolute 7.x 200

Tool Description
Map | Satellite picker Use the Map | Satellite tool to select a map type.To select a map type, perform one of the following actions:● To show a street map, clickMap. This is the default option.● To show a street map with terrain and vegetation information, clickMap andselect Terrain.
● To show a map of satellite images click Satellite.● To show a map of satellite images with place names, click Satellite and selectLabels.
Geofence ToolsThe following controls are available to add, edit, and find Geofences:
Geofence tool Description
Go to Address Use the Go to Address tool to view a specific location on the map.To find a location, click the icon, enter the address of the location in the providedfield, and press Enter. For greater accuracy provide a street address as well ascity and state names.
Find Boundaries andMarkers
If multiple boundaries show on a map, use the Find Boundaries and Markers tool toview the boundaries individually.Click the icon repeatedly to step through each Geofence boundary and marker onthe map.
Draw a Boundary Use the Draw a Boundary tool to create new boundary polygons that define theGeofence.To create a boundary polygon click the icon and then click the map where you wantto start the polygon. For detailed instructions, see "Creating Geofences" on page201.
Edit a Boundary Use the Edit a Boundary tool to edit an existing boundary polygon.To change the size or shape of a boundary polygon click the icon and then click thepolygon you want to edit. For detailed instructions, see "Editing Geofences" onpage 203.
Remove a Boundary Use the Remove a Boundary tool to delete a boundary polygon for your account.To delete a boundary polygon click the icon and click the polygon you want toremove.
Creating GeofencesYou can use the Create and Edit Geofences page to define the boundaries of a new Geofence.
A Geofence can include a single boundary polygon that covers one area, or you can draw multiplepolygons to include several areas in a single Geofence.
NOTE The first time you access any geolocation page in a session, a confirmation page prompts youto accept the Terms and Conditions of use.
Chapter 10: Managing Geofences Absolute User Guide
Absolute 7.x 201
To create a Geofence for devices in your account:
1. On the quick access toolbar, click and click Geofence.
2. On the Geolocation Tracking page, read the information and if you agree click Accept the useof the Geolocation Tracking feature.
3. On the Create and Edit Geofences page, in the Geofence Name and Geofence Descriptionfields, enter a name and description for the new Geofence.
4. To consider only collected device locations that have a high probability of being accurate inrelation to the Geofence, select Only test locations with high Confidence Levels againstGeofence boundaries in the Applicable Confidence Levels area.
5. In the Applicable Location Technologies area, select the location technologies that you wantto apply to the Geofence. For more information on location technologies, see "UnderstandingLocation Technologies" on page 121.
If the Google Maps™Wi-Fi Positioning option is grayed out, this location technology is notenabled for the devices in your account. To enable this technology for all new and existingGeofences, see "Editing Classic Account Settings" on page 51.
IMPORTANT IP Georesolution is accurate to the city level at best and varies from the citylevel to country level. Therefore, do not enable IP Georesolution for small Geofences.
6. Create a boundary polygon using the map and tools in the Geofence Editor, as follows:
a) Use the map navigation tools to show the area on the map where you want to create aboundary. For more information about using the navigation tools, see "Map NavigationTools" on page 200.
b) Click .c) Click the location on the map where you want to start the polygon.d) Click the location on the map where you want to create the first corner. The first side of the
polygon is added to the map.e) Use the method described in step d to create each side of the polygon, except the final
side.f) To complete the polygon, double-click the end point of the last side you created. The
polygon is closed.
IMPORTANT The lines of a boundary polygon cannot cross or intersect, except at the endpoints. To compensate for accuracy limitations of location technology, draw a slightly largerboundary polygon than is required.
7. Repeat step 6 for each boundary polygon that you want to include in this Geofence.
8. Click Save.
The View and Manage Geofences page opens with the new Geofence shown in the Geofencestable. Geofences that are too small to show accurately at a particular zoom level show on the mapas small round markers.
Chapter 10: Managing Geofences Absolute User Guide
Absolute 7.x 202

Viewing GeofencesThe View and Manage Geofences page lets you view a summary of all Geofences matching specifiedsearch criteria.
To view a list of existing Geofences for your account:
1. On the navigation bar click and click Geofences. The sidebar provides a list of eachGeofence created for your account.
2. On the View and Manage Geofences page, in the Geofence Name field, enter all of or part ofthe Geofence name that you want to view, and click Show results.
The View and Manage Geofences page refreshes to show a list of all Geofences matching thesearch criteria in the results grid.
3. Click the Name link, which opens the Create and Edit Geofences page for the selectedGeofence.
Editing GeofencesYou can edit a Geofence’s properties and settings. You can also use the Geofence Editor to move,reshape, and delete boundary polygons for an existing Geofence.
To edit an existing Geofence:
1. Open the Geofence that you want to edit by doing one of the following:
● From the View and Manage Geofences page, click the name of the Geofence you want toedit.
● From the list of Geofences presented on the sidebar, click the Geofence you want to edit.
For more information, see "Viewing Geofences" on page 203.
2. On the Create and Edit Geofences page (that shows a Delete option), edit the values in theGeofence Name and Geofence Description fields, if required.
3. Update the selections in the Applicable Confidence Levels area and the ApplicableLocation Technologies area, if required.
4. To change the size or shape of a boundary polygon:
a) Click .
b) Click the polygon you want to edit. Handles show at the corners of the polygon and on thecenter points of each line.
c) Click a handle and drag it to its new location. To undo a change click .d) Repeat step c until the polygon is the required size and shape.
5. To move a boundary polygon:
a) Click .
b) Click the polygon you want to edit. Handles show at the corners of the polygon and on thecenter points of each line.
c) Click anywhere in the polygon and drag it to its new location.
Chapter 10: Managing Geofences Absolute User Guide
Absolute 7.x 203

6. To remove a boundary polygon:
a) Click .
b) Click the polygon you want to remove.
7. Click Save. The Geofence data is updated and the View and Manage Geofences page opensto show the edited values in the results grid.
Deleting GeofencesIMPORTANT You cannot delete Geofences that are associated with one or more alerts.
To delete a Geofence:
1. Open the Geofence that you want to delete. For more information, see "Viewing Geofences" onpage 203.
2. On the Create and Edit Geofences page click Delete. The View and Manage Geofences pageopens and the Geofence is deleted from the results grid.
Chapter 10: Managing Geofences Absolute User Guide
Absolute 7.x 204
Chapter 11: Using Remote File Retrieval
The Remote File Retrieval feature allows Security Administrators and Security Power Users to remotelyretrieve files that may contain important information from the Windows devices in your account.
This chapter provides information on the following topics:● Minimum System Requirements● Before You Begin● Requesting a Remote File Retrieval● Viewing the File Retrieval Status● Downloading Retrieved Files● Changing the File Retrieval Status
IMPORTANT All tasks in this chapter require that you log in to the Absolute console as a SecurityAdministrator or Security Power User.
Minimum System RequirementsRemote File Retrieval is available for devices that meet the following system requirements:
● Windows operating system: The targeted device must have one of the supported WindowsOperating Systems installed. For more information, open the Absolute console's help systemand search for supported platforms for managed devices.
● Current version of the Absolute agent for Windows devices.
NOTE The Remote File Retrieval feature is supported on Windows devices only.
Before You BeginThese are some important considerations to make before you request a Remote File Retrieval, suchas:
● Stolen Devices: You can only retrieve the files that were created before the Incident Daterecorded on the devices Investigation Report.
● File Paths: You need file paths using the File List feature to specify the files to retrieve. Formore information, see "Using File List" on page 211.
● File Size: You can make Remote File Retrieval requests for files under 2 GB in size. However,for files larger than 1 GB in size, the chances of successful file retrieval diminish.
● Number of Files: You can retrieve up to 20 files per request.● Accessibility of Retrieved Files: You can access and download the retrieved files for 30 days
after the files are retrieved. After 30 days, the files are no longer available.
Requesting a Remote File RetrievalTo request a Remote File Retrieval:
1. On the quick access toolbar, click and click Request File Retrieval.
Absolute7.x 205

2. On the Request File Retrieval page in the Request Name field, type an appropriate name forthe new request.
3. In the Select a Device area, click Choose to open the list and select the appropriate device.
Click the appropriate device Identifier to select it. The Choose dialog closes and the Request FileRetrieval page refreshes to show the selected device.
4. In the File Path to Retrieve field, specify the path of the file you want to retrieve.
5. Click Add. The path is added to the File Path list.
Repeat to add multiple paths to the list.
NOTE To remove a path from the list, click Remove next to the path you want to remove.
6. Read the Legal Notice carefully and select the I agree checkbox to indicate that you haveread the notice and agree to the terms, and have the authority to take this action.
7. Click Submit.
The Remote File Retrieval request is created and is deployed to the device on its next agent call.
Viewing the File Retrieval StatusYou can view near real-time status updates on the progress of Remote File Retrieval requests. The FileRetrieval Summary Report provides a list of all devices for which you made the requests.
To view the File Retrieval status:
1. On the navigation bar click > File Retrieval Summary Report.
2. On the File Retrieval Summary Report at the Search Criteria area, set the preferred filteringand display options for the report using one or more of the following criteria:
● To filter results by Device Group, in the Group is field open the list and select theappropriate Device Group.
NOTE If you are logged in as a Security Power User, you can select only the DeviceGroup to which you are assigned.
● To filter results by specific device, in the and the field area open the list and select one ofthe following values:○ Identifier: A unique Electronic Serial Number assigned to the agent that is installed on
a device.○ Device Name: The name assigned to the device in the operating system.○ Username: The name of an individual who is associated with a particular device.○ Make: The manufacturer of a device or other hardware.○ Model: The product type of a device or other hardware.
● To filter results by the File Retrieval status, in the and the Retrieval Status is area, selectone or more of the following values:○ Requested: The request was submitted and is in a transitory state when waiting for an
agent call or when the targeted device is preparing for the File Retrieval operation.
Chapter 11: Using Remote File Retrieval Absolute User Guide
Absolute 7.x 206
○ Retrieving: The File Retrieval operation is in progress to retrieve the requested file.○ Ready: The File Retrieval operation has finished retrieving the requested file. The file is
ready for download.○ Cancelled: The File Retrieval request was cancelled. For more information about
cancelling a File Retrieval request, see "Cancelling a File Retrieval Request" on page209.
○ Failed: The File Retrieval request failed to run on the targeted device.○ Purged: The retrieved file was deleted from the servers.
3. Click Show results. The results grid refreshes to show the following data returned accordingto your filtering choices.
● Identifier: A unique Electronic Serial Number assigned to the agent that is installed on aDevice. Clicking an Identifier shown in the results grid opens the Device Summary page.For more information, see "Editing Asset Information" on page 73.
● Request Name: The name of the Remote File Retrieval request● Status: The current status of the File Retrieval request, which includes the following
possible values:○ Requested: The request was submitted and is in a transitory state when waiting for an
agent call or when the targeted device is preparing for the File Retrieval operation.○ Retrieving: The File Retrieval operation is in progress to retrieve the requested file.○ Ready: The File Retrieval operation has finished retrieving the requested file. The file is
ready for download.○ Cancelled: The File Retrieval request was cancelled. For more information, see
"Cancelling a File Retrieval Request" on page 209.○ Failed: The File Retrieval request failed to run on the targeted device.○ Purged: The retrieved file was deleted from the servers.
● Action: The action you can perform on the request● File Name: The name of the retrieved file● File Size: The file size of the retrieved file● Device Name: The name assigned to this device in the operating system.● Username: The unique name detected by the agent that identifies the person who is
associated with this device● Make: The manufacturer of the device● Model: The product type of a device or other hardware● Requested On: The date of the request● Requested By: The name of the Security Administrator or Security Power User who
submitted the request
Downloading Retrieved FilesAfter you have successfully created a File Retrieval request, the request runs on the targeted device onthe next agent call. When the retrieval is complete, you can download the retrieved files to your localdevice.
Chapter 11: Using Remote File Retrieval Absolute User Guide
Absolute 7.x 207

You can select one of the following methods to download retrieved files depending on the browser youuse:
● Downloading Retrieved Files Using Internet Explorer● Downloading Retrieved Files Using FireFox or Another Browser
Downloading Retrieved Files Using Internet Explorer
To download a file using Internet Explorer:
1. On the Security tab of the Internet Options dialog, add the Absolute console domain(cc.absolute.com) as a trusted site.
2. For all trusted sites, click Custom Level, and in the Security Settings - Trusted Sites Zonedialog, enable the Automatic prompting for Downloads option.
3. Use the File Retrieval Summary report to search for the appropriate request. If the file isavailable for download, the Status column shows Ready.
4. In the File Name column, click the file name link.
5. Enter your Password and emailed Authorization Code.
6. Follow the on-screen instructions to save the file to your local drive.
Downloading Retrieved Files Using FireFox or Another Browser
To download a file using a browser other than Internet Explorer:
1. Use the File Retrieval Summary report to search for the appropriate request. If the file isavailable for download, the Status column shows Ready.
2. In the File Name column, click the file name link.
3. Enter your Password and emailed Authorization Code.
4. Follow the on-screen instructions to save the file to your local drive.
Changing the File Retrieval StatusDepending on the current File Retrieval status, you can do one of the following:
● Cancelling a File Retrieval Request● Removing Retrieved Files and Log Files
The following table provides a list of possible File Retrieval states and the actions that you can performfor each of them.
Status Action
Requested Cancel
Retrieving
Available File Retrieval States and Actions
Chapter 11: Using Remote File Retrieval Absolute User Guide
Absolute 7.x 208

Status Action
Ready Remove
Cancelled
Failed
Purged
Available File Retrieval States and Actions (continued)
Cancelling a File Retrieval RequestIf the status of the File Retrieval process is set to Requested or Retrieving, you can cancel therequest and stop the file retrieval.
To cancel a File Retrieval request:
1. On the navigation bar click > File Retrieval Summary Report.
2. On the File Retrieval Summary Report in the and the Request Name is or contains field,enter the request name to search the appropriate File Retrieval request.
If the File Retrieval request has not yet run, or it is running currently, the Status column showsRequested or Retrieving.
3. In the Action column of the File Retrieval request you want to cancel, click the Cancel link.
4. To cancel the request, click OK when prompted.
The File Retrieval Summary Report refreshes to show Cancelled in the Status column next tothe Remote File Retrieval request you cancelled.
Removing Retrieved Files and Log FilesWhen you run a File Retrieval request, a directory log file is also generated. This log file provides a listof all files and their retrieval status.
When a File Retrieval request is successful, the files that you requested are available in the Absoluteconsole. You can download these files to a folder on your local device. After the File Retrieval requestis complete or if you have cancelled a File Retrieval request, you may want to delete the downloadedfiles and the directory log file.
To remove downloaded files and the directory log file:
1. On the navigation bar click > File Retrieval Summary Report.
2. On the File Retrieval Summary Report page search for the appropriate File Retrieval request.
● If the File Retrieval request is complete and the files are available for download, the Statuscolumn shows Ready and the Action column shows Remove.
● If the File Retrieval request is not complete or was cancelled, the Status column showsFailed or Cancelled and the Action column shows Remove.
3. In the Action column of the appropriate File Retrieval request, click the Remove link.
Chapter 11: Using Remote File Retrieval Absolute User Guide
Absolute 7.x 209

4. When prompted, if you want to remove the retrieved files and the log files, click OK to confirm.
The File Retrieval Summary Report refreshes without any details about the File Retrieval requestyou just removed.
Chapter 11: Using Remote File Retrieval Absolute User Guide
Absolute 7.x 210

Chapter 12: Using File List
The File List feature lets Security Administrators, Administrators, and Security Power Users retrieve alist of files from a device remotely. You can use the full file paths to make Remote File Retrievalrequests.
This following tasks are included in this section:● Overview● Minimum System Requirements● Retrieving a List of Files on Stolen Devices● Tracking File List Status
IMPORTANT All tasks in this chapter require that you log in to the Absolute console as a SecurityAdministrator or Security Power User.
OverviewYou can use the Request File List page to send a request to retrieve a list of files with specific fileextensions available in a specific location on a targeted device.
For ease of use, the Request File feature contains a variety of predefined file extensions that you canretrieve. If you do not see the file extension you want on the Request File List page, you can alsospecify the file extension using the Other checkbox.
The following table provides a list of the predefined file types that are available to you on the RequestFile List page.
File Types File Extensions
Microsoft Word files *.doc, *.dot
Microsoft Excel files *.xls, *.xlt, *.xlam
Microsoft PowerPoint files *.ppt, *.pot, *.pps, *.ppam
Microsoft Visio files *.vsd, *.vss, *.vst, *.vdx, *.vsx, *.vtx
Microsoft Access files *.mar, *.maq, *.mdb, *.accdb, *.accde, *.accdt, *.accd
Microsoft Project files *.mpp*. *.mpt*. *.mpx, *.mpd
Adobe files *.pdf,*.pm3, *.pm4, *.pm5, *.pm6, *.psd
Autocad files *.dwg, *.dxf
Corel Draw files *.cdt
Eudora Email files *.mbx, *.toc
HTML files *.htm
Image files *.bmp, *.gif, *.jpg, *.jpeg, *.tif, *.pcx
Lotus 1-2-3 Spreadsheet files *.wk*
Microsoft Office (and other) Backup files *.bak
Predefined File Types and File Extensions
Absolute7.x 211

File Types File Extensions
Microsoft Outlook files *.pst, *.ost, *.wab
Microsoft Outlook Express files *.dbx
Open Office Writer files *.sdw, *.sxw, *.odt, *.ott
Open Office Calc files *.sdc, *.sxc, *.ods, *.ots
Open Office Impress files *.sdd, *.sxi, *.odp, *.otp
Open Office Draw files *.sda, *.sxd, *.odg, *.otg
Office Base files *.sdb, *.odb
Open Office Math files *.smf, *.sxm, *.odf
Open Office Schedule files *.sds
Paintshop Pro files *.psp, *.ps
Rich-Text files *.rtf
Sound files *.mp3, *.wav, *.ogg, *.aif, *.cda, *.rm, *.ram, *.mid, *.m4p
Text Files *.txt
Video files *.mov, *.avi, *.mkv, *.mpg, *.mpeg, *.mp4, *.rm, *.ram
WordPerfect documents *.wkb, *.wpd
Predefined File Types and File Extensions (continued)
Minimum System RequirementsFile List is available for devices that meet the following system requirements:
● Windows operating systems: The targeted device must have one of the supported WindowsOperating Systems installed. For more information, open the Absolute console's help systemand search for supported platforms for managed devices.
● Current version of the Absolute agent for Windows devices.
NOTE The File List feature only works on Windows devices with .NET Framework 2.0 or higherinstalled.
Retrieving a List of Files on Stolen DevicesYou can use the File List feature to provide a list of the files on a stolen device. However, you can onlyretrieve a list of files that were created before the reported Incident Date.
To request a File List:
1. On the navigation bar click > File List Summary Report.
2. On the File List Summary Report page click Request a new file list.
3. On the Request File List page in the Request Name field, type an appropriate name for thenew request.
Chapter 12: Using File List Absolute User Guide
Absolute 7.x 212

4. In the Select a Device area, click Choose to open the list and select the appropriate device.Click the appropriate device Identifier to select it. The Choose dialog closes and the RequestFile Retrieval page refreshes to show the selected device.
NOTE If you are logged in as a Security Power User, you can only select a device from theDevice Group to which you are assigned.
5. In the Select a Volume to Scan area, open the list and select the volume from where youwant to retrieve the file list.
NOTE If you do not see the volume where your files are available, select the volume you wantin the Other list.
6. Retrieve the list of files you want in one of the following ways:
● Select the checkboxes for the specific file types you want to retrieve.● Specify a file type that is not included in the list of predefined file types list by selecting the
Other checkbox located at the end of the list, and entering the appropriate file extension.For multiple entries, separate your choices using commas, such as .mov, .avi.
7. Click Submit to create the File List request.
Downloading a File List Request
To download a File List:
1. On the navigation bar click > File List Summary Report.
2. On the File List Summary Report page click Show results and from the table under theRequest Name column, click the link for the request’s name you want to download.
3. Open the downloaded file and follow the on-screen instructions to save the .txt file to yourdevice.
Tracking File List StatusYou can view near real-time status updates on the progress of File List requests. The File ListSummary Report provides a list of all devices for which you made the requests.
For each device in the list, the File List Summary Report includes the following information:● Identifier: A unique Electronic Serial Number assigned to the agent that is installed on a
device. Click the link to open the device's Device Summary page. For more information, see"Editing Asset Information" on page 73.
● Request Name: the name of the File List request● Status: the current status of the File List request. Possible values include:
○ Requested: The request was submitted and is in a transitory state while waiting for anagent call or while the instruction setup process is running on the targeted device.
○ Retrieving: The File List operation is in progress to retrieve the list from the requesteddevice.
○ Ready: The File List operation has finished and the list is ready for download.○ Cancelled: The File List request was cancelled.
Chapter 12: Using File List Absolute User Guide
Absolute 7.x 213

○ Failed: The File List request failed to run on the targeted device.
● Action: the action you can perform on the request, which includes the following actionsdepending on the request’s status:
Status Action
Requested Cancel
Retrieving
Ready Remove
Cancelled
Failed
● Device Name: The name assigned to this device in the operating system.● Username: The unique name detected by the agent that identifies the person who is
associated with this device● Make: The manufacturer of the device● Model: The product type of a device or other hardware● Requested On: the date of the request● Requested By: the name of the administrator who submitted the request
Viewing the Status of a File List Request
To view the status of a File List request:
1. On the navigation bar click > File List Summary Report.
2. On the File List Summary Report page at the Search Criteria area, set the preferred filteringand display options for the report using one or more of the following criteria:
● To filter results by Device Group, in the Group is field open the list and select theappropriate device group.
NOTE If you are logged in as a Security Power User, you can select only the DeviceGroup to which you are assigned.
● To filter results by specific device, in the and the field area open the list and select one ofthe following values:○ Identifier: A unique Electronic Serial Number assigned to the agent that is installed on
a device. Click the link to open the device's Device Summary page. For moreinformation, see "Editing Asset Information" on page 73.
○ Device Name: The name assigned to the device in the operating system○ Username: The name of an individual who is associated with a particular device○ Make: The manufacturer of a device or other hardware○ Model: The product type of a device or other hardware○ File Name: The name of the retrieved file
● To filter results by the File Retrieval status, in the and the Retrieval Status is area, selectone or more of the following values:
Chapter 12: Using File List Absolute User Guide
Absolute 7.x 214

○ Requested: The request was submitted and is in a transitory state while waiting for anagent call or while the instruction setup process is running on the targeted device.
○ Retrieving: The File List operation is in progress to retrieve the list from the requesteddevice.
○ Ready: The File List operation has finished and the list is ready for download.○ Cancelled: The File List request was cancelled.○ Failed: The File List request failed to run on the targeted device.
Changing a File List StatusDepending on the current File List status, you can do one of the following:
● Cancelling a File List Request● Removing Retrieved Files and Log Files
For a list of possible File List states and the actions you can perform for each of them, see "TrackingFile List Status" on page 213.
Cancelling a File List RequestIf the status of the File List process is set to Requested or Retrieving, you can cancel the request andstop the file list retrieval.
To cancel a File List request:
1. On the navigation bar click > File List Summary Report.
2. On the File List Summary Report page, click Show results and in the table search for theappropriate File List request.
If the File List request has not yet run or is currently running, the Status column shows Requestedor Retrieving.
3. In the Action column of the File List request you want to cancel, click the Cancel link.
4. When prompted, if you want to cancel the request, click OK to confirm.
The File List Summary Report refreshes to show Cancelled in the Status column next to the FileList request you cancelled.
Removing Retrieved Files and Log FilesWhen you run a File List request, a directory log file is also generated. This log file provides a list of allfile lists and their retrieval status.
When a File List request is successful, the file list that you requested is available in the Absoluteconsole. You can download these file lists to a folder on your local device. After the File List request iscomplete or if you have cancelled a File List request, you may need to delete the downloaded files andthe directory log file.
To remove downloaded files and/or the directory log file:
1. On the navigation bar click > File List Summary Report.
Chapter 12: Using File List Absolute User Guide
Absolute 7.x 215

2. On the File List Summary Report page click Show results and in the table search for theappropriate File List request.
If the File List request was run successfully and the list is available for download, the Statuscolumn shows Ready and the Action column shows Remove.
If the File List request did not run or was cancelled, the Status column shows Failed orCancelled, and the Action column shows Remove.
3. In the Action column of the appropriate File List request, click the Remove link.
4. When prompted, if you want to remove the retrieved file list and the log files, click OK toconfirm.
The File List Summary Report refreshes without any details about the File List request you justremoved.
Chapter 12: Using File List Absolute User Guide
Absolute 7.x 216
Chapter 13: Absolute for Chromebooks
The Absolute for Chromebooks service lets you safeguard your Chromebooks in cases of loss or theft.
IMPORTANT To perform the tasks in this chapter requires that you log in to the Absolute console asan Administrator.
Chromebooks run the Chrome OS operating system, which is a lightweight Linux-based operatingsystem that is integrated with the Chrome browser and designed to primarily run web applications. Userdata is stored in the "cloud" rather than on the device’s hard drive.
Due to the unique nature of the Chrome operating system, the Absolute agent can't be installed on aChromebook. Instead, you manage your Chromebooks in Absolute by deploying the Chromebookextension to each device. The extension is a small software program that enables Chromebooks tosecure a connection with the Absolute Monitoring Center and allows you to manage these devices inthe Absolute console.
These instructions describe how to deploy the Absolute for Chromebook extension (Chromebookextension) to your Chromebooks, manage your Google account in Absolute, and remove theChromebook extension.
This section includes information about the following topics and tasks:● "Device compatibility" on page 217● "Configuring and deploying the Chromebook extension" on page 217● "Managing your Google account in the Absolute console" on page 225● "Working with Chromebooks in the Absolute console" on page 226● "Removing the Chromebook extension" on page 227
Device compatibilityTo support the Chromebook extension, devices must be running Chrome OS version 73 or higher.Devices must also be managed in the Google Admin console.
Configuring and deploying the Chromebook extensionThe instructions in this section are for deploying the Chromebook extension on devices, which doesn'trequire hands-on contact with each target device. To use the Chromebook extension, add your Googleaccount to the Absolute console and make changes to the settings in the Google Admin console. If youare licensed for Investigations support, configure a "Stolen" organizational unit (OU).
IMPORTANT To ensure the proper deployment of the Chromebook extension, you must complete allthree of the following tasks:
● "Adding your Google account to Absolute" on page 218● "Configuring settings in the Google Admin console" on page 219● "Deploying the Chromebook extension to users" on page 221
You only need to complete "Configuring the Stolen OU" on page 222 if you are licensed forinvestigations support.
Absolute7.x 217

Before you beginBefore you begin the tasks described in this section, make sure that:
● You are assigned a Google Admin role with the following set of administrator privileges:○ Organizational Units, including Create, Read, Update, and Delete privileges○ Users, including Read privileges○ Services > Chrome management, including Manage Devices, Manage User Settings,
and Manage Device Settings privileges
These privileges are assigned by default to the Super Administrator role, or you can create a UserCreated role and assign these privileges to it. For more information about Google Admin rolesand privileges, refer to Google's Admin console Help.
● You have added at least one OU under your domain in your Google account and theChromebook devices you want to add to the Absolute console are contained in it.For more information about creating Google OUs, see Google Admin console documentation.
NOTE If you have not purchased enough licenses for all the Chromebooks in your fleet,ensure that the Chromebooks you want to add to the Absolute console are in their own OUsdirectly under your organization. By doing so, you ensure that only available licenses areconsumed.
To simplify the configuration of OUs in the Google Admin console, you can create a parent OU thatcontains all the OUs with devices you want to sync to the Absolute console and all the OUs with usersthat you want to deploy the Chromebook extension to. Child OUs inherit the settings from the parentOU by default. You can deselect child OUs in the Absolute console if you don't want to sync thedevices in it to your Absolute account.
Adding your Google account to AbsoluteTo add your Chromebooks to your Absolute account, you need to add your Google account in theAbsolute console and select the OUs that you want to sync. This allows Absolute to retrieve the dataused to activate the Chromebook extension and supplement data reported by the Chromebookextension.
To add Chromebooks to your Absolute account, you need to do the following:
1. Log in to the Absolute console as an Administrator.
2. On the navigation bar, click > Classic Account Settings.
3. Scroll to the Chromebooks - Google Account area and in the Account Name field enter theemail address you use to log in to your organization’s Google account.
4. Click Add.
5. You are redirected to Google's authentication page. Follow the prompts provided by Google tosign in to your account and allow Absolute access.
6. In the Select Organizational Units dialog, select each OU containing the Chromebooks youwant to add to your Absolute account.
IMPORTANT You must select at least one OU.
Chapter 13: Absolute for Chromebooks Absolute User Guide
Absolute 7.x 218

7. To save your changes and close the dialog, click Continue.
Absolute begins to add all Chromebooks associated with the selected Google OUs to the Absoluteconsole. When this process is complete, each device's Absolute Last Sync with Google reportcolumn is populated with the date and time.
In reports, the sync from the Google account shows as an agent connection with an Agent Version of2200.
Go to "Configuring settings in the Google Admin console" on page 219 to complete the next step.
Configuring settings in the Google Admin consoleTo ensure that your Chromebook devices fully support the Chromebook extension, you must configureboth Device Settings and User & Browser Settings in the Google Admin console. There are additionalsettings that only need to be updated if they are no longer set to their default values. Occasionally,review all your Chromebook settings to ensure they haven't been changed accidentally.
Editing Device Settings
NOTE If all of your devices are in OUs under a parent OU, complete the following steps once with theparent OU selected. If they are not under a parent OU, make sure you complete these steps for eachOU that contains Chromebook devices that you want to synchronize with the Absolute console.
To edit device settings
1. Log in to the Google Admin console using the credentials for the account that you use tomanage your devices.
2. Navigate to Device Settings:
a) From the Google Admin console home page, click Devices.b) On the navigation bar, expand Chrome.c) On the navigation bar under Chrome, expand Settings.d) On the navigation bar under Chrome > Settings, click Device.
3. On the navigation bar, search for and select the OU containing the Chromebook devices youwant to add to Absolute and edit its Device Settings as follows:
a) In the Enrollment and access section, set the Forced re-enrollment field to Force deviceto automatically re-enroll after wiping.
b) In the Sign-in settings section:i) set the Guest mode field to Disable guest mode.ii) set the Sign-in restriction field to Restrict sign-in to a list of users and enter
*@<YourDomain.com> in User whitelist.
4. Click SAVE.
Reviewing Device SettingsIf you haven't changed the default values for the following settings, no action is required. If you areunsure, you can verify these settings and update them if they differ.
● In the Device update settings section:
Chapter 13: Absolute for Chromebooks Absolute User Guide
Absolute 7.x 219

○ the Auto-update settings > Automatic updates field should be set to Allow autoupdates, which enables updates to the Chromebook extension to be deployedautomatically to the device.
○ the Release channel field should be set to Stable channel.● In the Kiosk settings section, set Managed guest session to Do not allow managed guest
sessions.
Editing User & Browser Settings
NOTE If all of your users are in OUs under a parent OU, complete the following steps once with theparent OU selected. If they are not under a parent OU, make sure you complete these steps for eachOU containing users you want to deploy the Chromebook extension to.
To edit User & Browser Settings:
1. Log in to the Google Admin console using the credentials that you use to manage your users.
2. Navigate to User & Browser Settings:
a) From the Google Admin console home page, click Devices.b) On the navigation bar, expand Chrome.c) On the navigation bar under Chrome, expand Settings.d) On the navigation bar under Chrome > Settings, click Users & browsers.
3. On the navigation bar, search for and select the OU containing the users you want to deploythe Chromebook extension to and edit its User & Browser Settings as follows:
a) In the Security section, set the Geolocation field to Allow sites to detect users'geolocation.
NOTE If the Geolocation field is set to Do not allow sites to detect users'geolocation, no location data is sent to Absolute.If the Geolocation field is set to Allow the user to decide or to Always ask the user if asite wants to detect their geolocation, and the user turns off geolocation, no locationdata is sent to Absolute.
b) In the User experience section, set the Developer tools field to either Allow use of built-in developer tools except for force-installed extensions or Never allow use of built-in developer tools.
4. Click SAVE.
5. Scroll up to the Apps and extensions section and click application settings page.
6. In the Additional applications settings section, select all the apps and extensions in Allowedtypes of apps and extensions.
7. Click SAVE.
Reviewing User & Browser SettingsIf you haven't changed the defaults for the following settings, no action is required. If you are unsure,you can verify these settings and update them if they differ.
● In the Enrollment controls section:
Chapter 13: Absolute for Chromebooks Absolute User Guide
Absolute 7.x 220

○ the Device enrollment field should be set to Keep Chrome device in current location.○ the Enrollment permissions field should be set to Allow users in this organization to
enroll new or re-enroll existing devices.● In the Connected devices section, the Smart Lock field should be set to Do not allow Smart
Lock.
Go to "Deploying the Chromebook extension to users" on page 221 to complete the next step.
Deploying the Chromebook extension to usersAbsolute distributes the Chromebook extension through the Chrome Web Store. This section describeshow to use the Extension ID to find the extension and configure it as a force-installed app in the GoogleAdmin console. The extension only loads and operates properly on Chromebooks that are active in theAbsolute console.
NOTE If all of your users are in OUs under a parent OU, complete the following steps once with theparent OU selected. If they are not under a parent OU, make sure you complete these steps for eachOU containing users you want to deploy the Chromebook extension to.
To deploy the Chromebook extension:
1. Log in to the Absolute console as an Administrator.
1. On the navigation bar click > Agent Management.
2. Scroll to the Absolute for Chromebooks Extension section.
In the Extension ID column of the table, click the Copy to Clipboard link. The extension ID iscopied to your clipboard.
3. Log in to the Google Admin console using the credentials for the account that you use tomanage your users.
4. Navigate to Users & Browsers:
a) From the Google Admin console home page, click Devices.b) On the navigation bar, expand Chrome.c) On the navigation bar under Chrome, expand Apps & extensions.d) On the navigation bar under Chrome > Apps & extensions, click Users & browsers.
5. On the navigation bar, search for and select the OU contains the users you want to deploy theChromebook extension to.
6. Hover over and click Add Chrome app or extension by ID.
Paste the Extension ID you copied from the Absolute console into the Extension ID field, andclick SAVE.
7. Next to the Absolute for Chromebooks app, select Force Install on the Installation policydrop-down.
8. Click SAVE.
The Chromebook extension is saved to the list of force-installed apps for your device. When anauthorized user logs in to the Chromebook, the extension is deployed to the device.
Chapter 13: Absolute for Chromebooks Absolute User Guide
Absolute 7.x 221

After the extension is deployed to your Chromebook devices, it is activated with its first secureconnection to the Absolute Monitoring Center. Once it is activated, the Chromebook extension versionchanges from 2200 to 25xx in the Agent field and report column. The extension then makes regularlyscheduled connections to the Monitoring Center on a daily basis. During these connections, theextension sends the latest device data to the Monitoring Center and instructions for any pendingsecurity operations, such as Device Freeze, are sent to the device. Data from the Chromebookextension is periodically synchronized into Absolute reports.
If your license includes the Investigations feature, go to "Configuring the Stolen OU" on page 222 tocomplete the final step in the configuration.
If your license doesn't include the Investigations feature, your have successfully deployed theChromebook extension.
Configuring the Stolen OUFor the Absolute Investigations team to track and recover a Chromebook you've reported stolen, youneed to create a "Stolen" OU, associate a Managed guest session with it, and configure DeviceSettings for it.
If you haven't set up a Stolen OU, complete the following tasks:● "Creating the Stolen OU" on page 222● "Configuring the Stolen OU" on page 223
If you have previously set up the Stolen OU with the Kiosk app, change the Stolen OU to use aManaged guest session. To switch to a Managed guest session, you need to complete both thefollowing tasks:
● "Deleting the Kiosk App" on page 222● "Configuring the Stolen OU" on page 223
For more information about the Managed guest session, see "What effect does a Managed guestsession have on a stolen Chromebook?" on page 225.
Creating the Stolen OU
To create the Stolen OU:
1. Log in to the Google Admin console using the credentials for the account that you use tomanage your devices.
2. Under your domain in your Google account, create an OU and name it Stolen. Ensure that youcreate the OU at the root of your domain. The Stolen OU needs to be in place before theAbsolute Investigations team can track and recover a Chromebook if it is stolen.
IMPORTANT You must name the OU Stolen with no variation. If you don't use the exactname, the Investigations team can't track and recover a stolen Chromebook.
For more information about creating OUs, see Google Admin console documentation.
To finish setting up the Stolen OU, see "Configuring the Stolen OU" on page 223.
Deleting the Kiosk AppOnly complete this step if you have previously set up the Stolen OU to use the Kiosk app.
Chapter 13: Absolute for Chromebooks Absolute User Guide
Absolute 7.x 222

To delete the Kiosk app:
1. Log in to the Google Admin console using the credentials for the account that you use tomanage your devices.
2. Navigate to Kiosks:
a) From the Google Admin console home page, click Devices.b) On the navigation bar, expand Chrome.c) On the navigation bar under Chrome, expand Apps & extensions.d) On the navigation bar under Chrome > Apps & extensions, click Kiosks.
3. On the navigation bar, search for and select the Stolen OU.
4. Click the Browser app and click .
5. Click SAVE.
To finish switching to a Managed Guest session, complete "Configuring the Stolen OU" on page 223.
Configuring the Stolen OU
To configure the Stolen OU
1. Log in to the Absolute console as an Administrator.
1. On the navigation bar click > Agent Management.
2. Scroll to the Absolute for Chromebooks Extension section.
In the Extension ID column of the table, click the Copy to Clipboard link. The extension ID iscopied to your clipboard.
3. Log in to the Google Admin console using the credentials for the account that you use tomanage your devices.
4. Navigate to Managed Guest Sessions Settings:
a) From the Google Admin console home page, click Devices.b) On the navigation bar, expand Chrome.c) On the navigation bar under Chrome, expand Settings.d) On the navigation bar under Chrome > Settings, click Managed guest sessions.
5. On the navigation bar, search for and select the Stolen OU and edit its Managed GuestSession Settings as follows:
a) In the General section:i) set the Managed guest session field to Auto-launch managed guest session.ii) enter the name you want your users to see for the Managed guest session in Session
name to display on the login screen. For example, "Guest mode" or "School NameChromebook".
b) In the Security section, set the Incognito mode field to Disallow incognito mode.
6. Click SAVE.
7. In the Apps and extensions section, click apps & extensions page.
Chapter 13: Absolute for Chromebooks Absolute User Guide
Absolute 7.x 223

8. With the MANAGE GUEST SESSIONS tab selected, hover over and click AddChrome app or extension by ID.
Paste the Extension ID you copied from the Absolute console into the Extension ID field, andclick SAVE.
9. Next to the Absolute for Chromebooks app, select Force install from the Installation policydrop-down.
10. Click SAVE.
The Chromebook extension is saved to the list of force-installed apps for your device for theStolen OU.
11. Navigate to Device Settings:
a) From the Google Admin console home page, click Devices.b) On the navigation bar, expand Chrome.c) On the navigation bar under Chrome, expand Settings.d) On the navigation bar under Chrome > Settings, click Device.
12. Edit the Device Settings as follows:
a) In the Enrollment and access section, set the Forced re-enrollment field to Force deviceto automatically re-enroll after wiping.
b) In the Sign-in settings section:i) set the Guest mode field to Disable guest mode.ii) set the Sign-in restriction field to Restrict sign-in to a list of users and enter
*@<YourDomain.com> in the User whitelist field.c) In the Kiosk settings section, set Managed guest session to Auto-launch managed
guest session.d) In the User and device reporting section, set the Device reporting fields to Enable device
state reporting and Enable tracking recent device users.
13. Click SAVE.
14. Navigate to User & Browser Settings:
a) From the Google Admin console home page, click Devices.b) On the navigation bar, expand Chrome.c) On the navigation bar under Chrome, expand Settings.d) On the navigation bar under Settings, click Users & browsers.
15. In the Security section, set the Geolocation field to Allow sites to detect users' location.
16. Click SAVE.
In the future, when you report a Chromebook stolen, the Absolute Investigations Team moves thedevice to the Stolen OU, which forces the device to open in a Managed guest session. Depending onthe polling time period set for your Google account, it may take up to 24 hours for the Chromebook toopen in a Managed guest session. If the device is restarted, it opens in a Managed guest sessionimmediately. Using a Managed guest session helps the Investigations Team track and recover theChromebook.
Chapter 13: Absolute for Chromebooks Absolute User Guide
Absolute 7.x 224

What effect does a Managed guest session have on a stolen Chromebook?After the Managed guest session is running on the Chromebook, device and geolocation information issent to the Absolute Monitoring Center where it is made available to the Absolute Investigations Teamto assist in the device’s recovery.
From a user’s perspective, stolen devices in a Managed guest session have the followingcharacteristics:
● The user sees a message that their activity is being monitored when the device is restarted.● The user is automatically logged in to guest mode when they reach the Chrome OS login
screen.● The user can configure settings local to their session.● The user cannot add new users.
When the device is recovered and the Absolute Investigations team closes the Investigation Report:● The device is moved back to its original OU in your Google account.● The device is no longer run as a Managed guest session.● Full Chrome device functionality is restored.
Managing your Google account in the Absolute consoleThis section provides information on the following topics:
● "Editing Google Account Details" on page 225● "Deleting Google Account Details" on page 226
Editing Google Account DetailsYou can add or remove Chromebooks to your Absolute account by changing the OUs you haveselected in the Absolute console.
To edit your Google account details:
1. Log into the Absolute console as an Administrator.
2. On the navigation bar click > Classic Account Settings.
3. Scroll to the Chromebooks - Google Account area, locate the Google account that you wantto edit and click its Edit link.
4. In the Select Organizational Units dialog, select each OU that contains the Chromebooks youwant add to your Absolute account. To remove Chromebooks from your account, clear eachcheck box next to the applicable organizational units.
5. If you cleared any check boxes, a warning message shows. Click Yes to continue.
WARNING! Clearing the check box of a previously selected OU automatically sets itsChromebooks to Disabled, which frees up device licenses.
6. Click Continue to save your changes and close the dialog.
Absolute begins to update the list of Chromebooks associated with your Absolute account in theAbsolute console. When this process is complete, the Last Sync Time column is populated with thedate and time in the Chromebooks - Google Account section of the Classic Account Settings page.
Chapter 13: Absolute for Chromebooks Absolute User Guide
Absolute 7.x 225

IMPORTANT Adding Chromebook devices to your account is a two step process. If the new OUs arechildren of a parent OU that you have already changed the Device Settings for, you are done. If theyare not, make sure you also update the Device Settings. See "Configuring settings in the Google Adminconsole" on page 219.
Deleting Google Account DetailsIf a Google account was added in error, or the account is not required anymore, you can delete it fromthe Absolute console.
WARNING! Use caution when deleting an existing Google account from Classic Account Settings.This action has the following effect on Chromebooks in the Absolute console:- Device information is no longer synchronized between the Google account and the Absolute console.- If you add new devices to the Google account, the devices are not added to your Absolute account.- The Agent Status of all existing Chromebooks in your Absolute account remains set to Active and thedevices continue to connect to the Absolute Monitoring Center.To disable these devices, see "Removing the Chromebook extension" on page 227.
To delete a Google account:
1. Log into the Absolute console as an Administrator.
2. On the navigation bar click > Classic Account Settings.
3. Scroll to the Chromebooks - Google Account area, locate the Google account that you wantto delete and click its Delete link.
4. On the confirmation message click OK.
Absolute begins to update the list of Chromebooks associated with your Absolute account in theAbsolute console. When this process is complete, the Last Sync Time column is populated with thedate and time in the Chromebooks - Google Account section of the Classic Account Settings page.
Working with Chromebooks in the Absolute consoleThe Chromebook extension collects data from each Chromebook, including operating systeminformation, geolocation information, and details about installed hardware and software. For detailsabout the specific information detected by the extension and made available in the Absolute console,see Absolute Products and Services—Data Points Collected in the online Help.
NOTE The Chromebook extension is unable to collect a device's Asset ID. This data is always synceddirectly from your Google Account to the Absolute console. Asset ID shows in the Asset Number field.You can view this field on a device's Custom Fields page in Device Details. We recommend that youdon't edit the values in this field.
The Chromebook extension enables Chromebook support for the following Absolute reports, features,and functionality:
● Hardware Asset reports, including:○ Monitor Report○ Device Readiness Report
See "Hardware Assets Reports" on page 85.
Chapter 13: Absolute for Chromebooks Absolute User Guide
Absolute 7.x 226

● Software Asset reports, including:○ Software Overview Report○ Software Configuration Change Report○ Software By Device Report
See "Software Assets Reports" on page 94.
● Security reports, including:○ Suspicious Devices Report
See "Security Reports" on page 94.
● Call History and Loss Control reports, including:○ Call History Report○ Device Location Report○ Device Location History Report
See "Call History and Loss Control Reports" on page 113.
● AlertsSee "Alerts" on page 13.
● GeofencesSee "Managing Geofences" on page 199.
● Device FreezeSee Freezing devices in the online Help.
● Investigation ReportsSee Reporting devices stolen in the online Help.
Removing the Chromebook extensionAs the Chromebook extension is a force-installed app that is available to all authorized users in youraccount, users cannot remove it from their device.
There are two ways to remove the Chromebook extension:● "Removing the Chromebook extension from all users in an OU" on page 227● "Removing the Chromebook extension from specific users" on page 228
Removing the Chromebook extension from all users in an OU
To remove the Chromebook extension for all users in a particular OU:
1. Log in to the Google Admin console using the credentials for the account that you use tomanage your users.
2. Navigate to Users & Browsers:
a) From the Google Admin console home page, click Devices.b) On the navigation bar, expand Chrome.c) On the navigation bar under Chrome, expand Apps & extensions.d) On the navigation bar under Chrome > Apps & extensions, click Users & browsers.
Chapter 13: Absolute for Chromebooks Absolute User Guide
Absolute 7.x 227

3. On the navigation bar, search for and select the OU that you want to remove the Chromebookextension from.
4. Click the Absolute for Chromebook app and click .
5. Click SAVE.
The Chromebook extension is removed from the list of force-installed apps for all users in this OU.When an authorized user logs in to the Chromebook, the extension is removed from the device.
Removing the Chromebook extension from specific usersBy default, when an OU is configured for force-installed apps, all authorized users within the OUreceive all apps. To remove the Chromebook extension for a specific user you need to move the userout of this OU.
To help with the removal of the Chromebook extension for specific users, we recommend that you setup at least one OU that does not have the Chromebook extension configured as a force-installed app.You can name the OUs accordingly, such as "No Absolute Extension".
You can then move users between OUs to manage the deployment of the Chromebook extension forindividual users.
To remove the Chromebook extension from one or more authorized users:
1. Log in to the Google Admin console using the credentials for the account that you use tomanage your users.
2. From the Google Admin console home page, click Users.
3. On the navigation bar, search for and select the OU that contains the users you want toupdate.
4. In the Users list, select the check box next to each user.
5. Click More > Change organizational unit.
6. In the dialog that opens, select the applicable OUs (for example, "No Absolute Extension") andclick Continue.
7. On the User move confirmation dialog, click Change.
As the users log in to their Chromebooks, the extension is removed from each device.
Chapter 13: Absolute for Chromebooks Absolute User Guide
Absolute 7.x 228
Glossary
A
Absolute consoleA web-based user interface which enables corporate customers to centrally manage all assetswithin their account.
Absolute for Chromebooks extensionA small account-specific software program that enables a Chromebook to secure a connectionwith the Absolute Monitoring Center through which device authentication and inventory data issent.
Absolute Monitoring CenterThe Monitoring Center where devices call for self-healing.
Absolute PersistenceSee Persistence Technology.
Activation DateAn event when a device contacts the Absolute Monitoring Center for the first time through theInternet to obtain the managed device’s unique Identifier.
Adapter Equipment IDAn Identifier, which is unique to each broadband adapter. For EVDO adapters, the Identifierand/or the Mobile Equipment ID (MEID) may be reported. For UMTS networks, the InternationalMobile Equipment Identifier (IMEI) is reported.
Adapter Last Detected DateWhen information about a network adapter was last collected.
Adapter ManufacturerThe maker of a mobile broadband network adapter.
Adapter ModelThe product type of a mobile broadband network adapter.
Adapter NetworkThe mobile service provider associated with a mobile broadband adapter.
AgentA small software client that resides in the BIOS firmware of a device. It is either embedded at thefactory or manually installed by a user.
Absolute7.x 229

Agent CallA secure connection established between the agent and the Monitoring Center through whichdevice authentication or inventory data is sent.
Agent StatusThe operating condition of an agent. Possible values are Active (indicates that the agent hascalled the Monitoring Center), Inactive (indicates that the agent has not yet called the MonitoringCenter), and Disabled (indicates that the agent is either flagged for removal or removed from thedevice).
Agent VersionThe version number of the agent that contacts the Monitoring Center.
AlertAn alert is a pager or e-mail message that notifies users when specific, user-definable conditionsare met.
Alert EventA record of an alert that was triggered in the Absolute console.
Anti-Malware SoftwareAnti-virus software that detects, blocks, and removes malicious software from a device.
ApplicationThe smallest unit of software installed on a device that is detected by the agent and reported inthe Absolute console.
Application NameThe title of an executable. In practice, many publishers mutually exchange Application Name andProgram Name values. See also Program.
ARIN Who IS InfoInformation related to the registrant or assignee of a Proxy IP Address.
Asset NumberAn alphanumeric identifier for a device, which is entered in the Absolute console by a user.
AssignedEntered and/or edited by a user; for example, Assigned Username.
Assigned E-mail AddressThe e-mail address of the individual responsible for the device.
Assigned UsernameThe username assigned to a device by an Administrator.
Glossary Absolute User Guide
Absolute 7.x 230

AuthenticationA way to establish the credibility of a user. Security operations are authenticated using unique e-mailed security authorization codes. See Authorization.
AuthorizationA permission held by a user. Designated Security Administrators and Security Power Users canperform security operations, such as Data Delete or Device Freeze, by requesting securityauthorization.
Authorization CodeA globally unique identifier that is e-mailed to a Security Administrator in response to a requestmade in the Absolute console. The code is represented as a 32 character hexadecimal characterstring.
Available ViolationsThe number of purchased licenses for an application that are available for installation on devices.A negative value in this column indicates that your organization has exceeded its number of pur-chased licenses.
B
Browser NameThe name of a software application used to navigate the Internet.
Browser Version NumberThe unique name or number assigned to a particular release of a web browser.
C
Call TimeWhen a device contacted the Monitoring Center.
Caller IDA telephone company service describing the origin of an incoming call, including the phone num-ber. See also Public IP Address.
Change StatusIndicates whether a detected difference involves New, Removed, or Changed hardware or soft-ware.
Chrome deviceA personal computer running the Chrome OS operating system. Chrome devices includeChromebooks (laptop computers) and Chromeboxes (desktop computers).
Code Division Multiple Access (CDMA)CDMA is a channel access method used by various radio communication technologies.
Glossary Absolute User Guide
Absolute 7.x 231

Confidence LevelThe estimated accuracy of a Location. Possible values are High and Low.
Cost Center/CodeA unique identifier for a unit for which costs are accumulated or computed.
CPU NameThe known identification of the microprocessor in a device.
CPU SpeedThe rate at which a microprocessor computes.
Current portThe port to which a modem currently installed in a device is connected.
Custom Action FieldAn attribute of a Data Delete or Device Freeze request that a user can create and edit. The fieldcan be set to contain a date, a list option, or text. Values for the fields are maintained by inputfrom users.
Custom Device FieldAn attribute for a device that a user can create and edit. The field can be set to contain a date, alist option, or text. Values for the fields are maintained by input from users.
D
Data DeleteA remote data deletion function that enables an authorized user to delete sensitive data on tar-geted devices in case of theft or loss. The function can also be performed at a device’s end-of-lifeor end-of-lease.
Data Delete PolicyA user-definable file created to enable users to specify files and/or file types to be deleted on tar-geted devices on the Windows platform. The file can also be used to delete registry key entriesand/or files from registry key entries.
Data WipeThe Data Overwrite feature deletes the specified data and overwrites it with random, or garbage,data to make the original data impossible to recover. The overwrite process is called a data wipe.
Date Change DetectedWhen a difference was detected.
DepartmentA user-created attribute for a device that is included in the filter of many reports.
Glossary Absolute User Guide
Absolute 7.x 232

DetectedIdentified by the agent during a call to the Monitoring Center.
Detected Phone NumberThe phone number associated with a mobile broadband adapter, as reported by the device.
DeviceA piece of electronic communication hardware on which the agent can be installed, such as Win-dows computers, Macintosh computers, or mobile handsets.
Device FreezeA function managed in the Absolute console which enables an authorized user to specify thedevices to show a full screen message restricting device users from operating the device.
Device GroupA way to organize managed devices into various groupings based on areas of commonality. Forexample, you can group computers by management levels, security risk assessment (thoselaptops that contain confidential data), geographical locations (such as building, floor, or roomwhere the devices are located), and other criteria.
Device NameThe name given to a device.
Dormant DevicesAdministrators may assign this status to devices that do not call in to the Monitoring Center on aregular basis.
Drive DescriptionIndicates the detected description for this device’s hard drive; for example, on the Full-DiskEncryption Status Report.
Drive LetterThe alphabetical identifier for a physical or logical disk drive or partition.
Drive Serial NumberIndicates the detected serial number; for example, for the full-disk encryption drive detected on adevice.
E
End User Messaging (EUM)A function managed in the Absolute console that enables a user to specify the devices on whichto show a message during the agent call to the Monitoring Center. The content and rules for mes-sages are customizable, and messages can also be used for data input from device users.
Glossary Absolute User Guide
Absolute 7.x 233

Equipment IDThe identification number unique to a smartphone. The equipment ID is typically found on a prin-ted label on the battery. For CDMA smartphones, the Electronic Serial Number (ESN) and/or theMobile Equipment ID (MEID) are reported. For GSM and UMTS smartphones, the InternationalMobile Equipment Identifier (IMEI) is reported.
Event CallingA feature that enables Windows and Mac devices to make an agent call when a specific event,such as a change in installed software, occurs on a device.
Event DetailsA description of an activity related to user administration in the Absolute console.
Executable FileA computer file that contains a program that is ready to be run or carried out.
Export (Data/Group)A function in the Absolute console that enables users to download files, which contain inform-ation on device data or device groups, in multiple formats.
F
FQDNFully Qualified Domain Name (FQDN) of a device, which includes the device name, domainname, and all higher-level domains.
Full-Disk Encryption (FDE)A software or hardware solution that secures, or encrypts, the entire contents of a physical drive.FDE prevents unauthorized access to data storage. The agent detects FDE Hardware (self-encrypting drives) and Software encryption programs that are installed on the hard drives of yourorganization’s tracked devices.
Full Windows Device NameThe Fully Qualified Domain Name (FQDN) of a device, including the device name, domain name,and all higher-level domains.
G
GeofencesA function in the Absolute console that lets users specify boundaries of areas on a map and trackdevices based on Geolocation Tracking data.
Global System for Mobile Communications (GSM)GSM is a standard set developed by the European Telecommunications Standards Institute thatdescribes technologies for second generation digital cellular networks.
Glossary Absolute User Guide
Absolute 7.x 234

GroupSee Device Group.
GUIDGlobally Unique IDentifier.
H
Hard Drive Free SpaceThe amount of storage currently available on a hard disk.
Hard Drive Serial Number (HDSN)The manufacturer’s serial number associated with the hard drive installed on a device. Whendetecting hard drive serial numbers, the agent queries the disk controller first. If that fails, thenthe agent uses Microsoft’s Windows Management Interface (WMI) to get the hard disk serial num-bers.
Hard Drive SizeThe maximum capacity of a hard disk.
Hard Drive Space ThresholdThe minimum amount of storage on a hard disk that needs to be unavailable for a device to showin the results grid.
Hard Drive Total Free SpaceThe amount of storage currently available on all hard disks installed in a device.
Hard Drive Total SizeThe maximum capacity of all hard disks installed in a device.
Hard Drive Total Used SpaceThe amount of storage currently unavailable on all hard disks installed in a device.
Hard Drive Used SpaceThe amount of storage currently unavailable on a hard disk.
Hardware assetA traditional device, such as a laptop or desktop computer, or a mobile device, such as a smart-phone or tablet.
Hardware DescriptionThe type of hardware that changed.
Hardware ProfileThe collection of Identification Points that define a device.
Glossary Absolute User Guide
Absolute 7.x 235
Has Service GuaranteeIndicates whether a payment may be issued if attempts to run a guaranteed service fails.
I
Identification PointsThe inventory items designated to identify and return self-healing devices to the MonitoringCenter. Also referred to as data points.
IdentifierA unique Electronic Serial Number assigned to the agent installed on a device.
IMEIInternational Mobile Equipment Identity. See Equipment ID.
Import (Data/Group)A function in the Absolute console that enables users to upload files in multiple formats, whichcontain information on device data or device groups.
Install SourceThe full directory path to the folder containing the installation files for a program.
Installation DirectoryThe full directory path to the primary folder where a program is installed.
Inventory RecordWhen the agent makes its first activation call, the Monitoring Center creates a record (in a data-base) of the details about this device’s Identification Points, based on the device’s Hardware Pro-file settings, which you configure.
Investigation ReportA report available in the Absolute console that is filled out and sent online by users to notify Abso-lute of a theft or loss of a device.
IP AddressA unique number identifying a computer on the Internet. See also Local IP Address and Public IPAddress. In the Absolute console, enter IP addresses in the format [1-255].[0-255].[0-255].[0-255]. You can use the asterisk (*) wildcard character. For example, to search for all IP addressesin the range 127.10.[0-255].[0-255], type 127.10.*.*
L
Last Agent CallThe date and timestamp when the agent installed on a device most recently contacted the Mon-itoring Center. If available, clicking the Last Call Date or Last Call Time links open the Call Historypage for the device.
Glossary Absolute User Guide
Absolute 7.x 236

Last CallThe date and timestamp when the agent installed on a device most recently contacted the Mon-itoring Center. If available, clicking the Last Call Date or Last Call Time links open the Call Historypage for the device.
Last Call DateThe date and timestamp when the agent installed on a device most recently contacted the Mon-itoring Center. If available, clicking the Last Call Date or Last Call Time links open the Call Historypage for the device.
Last Call TimeThe date and timestamp when the agent installed on a device most recently contacted the Mon-itoring Center. If available, clicking the Last Call Date or Last Call Time links open the Call Historypage for the device.
Last RebootThe date and timestamp when this device was last restarted.
Latest Service PackThe most recent collection of updates, fixes and/or enhancements to a software programdelivered in the form of a single installable package.
Local IP AddressThe IP address assigned to a device on the Local Area Network (LAN) when calling the Mon-itoring Center. See also IP Address and Public IP Address.
Local IP RDNSThe domain name associated with a Local IP Address. See also Proxy IP RDNS.
LocationThe position of a device on the surface of the earth expressed in latitude and longitude.
Location TechnologyA technology, such as GPS or Wi-Fi Positioning, used to determine the location of a device.
Location TimeThe timestamp that indicates when the position of a device was recorded.
M
MAC AddressFor laptops and computing devices with mobile broadband adapters, the Media Access Control(MAC) address is the hardware address that uniquely identifies each node of a network, such asEthernet, or the mobile broadband adapter used to complete a call to the Monitoring Center. Forsmartphones, it is the MAC address detected on the smartphone, most commonly the Wi-Fi MACaddress. Some platforms may also have an Ethernet MAC address.
Glossary Absolute User Guide
Absolute 7.x 237
MakeThe manufacturer of a device or other hardware.
MEIDMobile Equipment Identifier. See Equipment ID.
Mobile Broadband Adapter Tracking (MBAT)This service permits Absolute customers to view a list of mobile broadband adapters and theirattributes including equipment, subscriber, and network information in the Absolute console.
ModelThe product type of a device or other hardware.
Monitor Refresh FrequencyThe scanning rate of a display.
Monitoring CenterA server with which the agent makes a secure connection to send device authentication andinventory data (also called Identification Points). See also Absolute Monitoring Center.
Monitoring Center-initiated Calling (MCIC)A feature that lets customers remotely initiate an agent call using the Absolute console. Mon-itoring Center-initiated calling, under specific circumstances, enables a drastic reduction in thetime required to initiate action on the targeted device.
O
Operating SystemSoftware that controls the running of computer programs and may provide various services.
Organizational unitA Google account term that has relevance for managed Chrome devices. An organizational unitallows services and features to be made available to one or more users through the configurationof policies.
P
Persistence StatusThe status of the Absolute Persistence module on a managed device. Possible values are:BIOS/Firmware Active, BIOS/Firmware Pending, and N/A. A device’s Persistence Status is indic-ated on the Activation Report.
Persistence technologyIncludes BIOS and Firmware persistence. Activated during the agent’s first call to a MonitoringCenter. Checks for the status of the agent and initiates self-healing to restore the agent if it ismissing, tampered with, or damaged.
Glossary Absolute User Guide
Absolute 7.x 238

ProgramAn executable file on a device that is detected by the agent and reported in the Absolute console.See also Application Name.
Proxy IP RDNSResults of performing a Reverse Domain Name System (RDNS) lookup on a Proxy IP Address.
Public IP AddressThe IP address used to communicate with the Internet. For modem calls, caller ID information isreported instead. See also IP Address, Local IP Address, and Caller ID.
PublisherA company or organization selling applications that is detected by the agent and reported in theAbsolute console.
R
RAM SizeThe amount of dynamically accessible memory in a device.
Results gridThe table that is populated underneath the search or filter criteria location on a Absolute consolepage and which is based on the specified filtering criteria. Also called a report table.
RTTReal-Time Technology (RTT) is a feature that lets you track your mobile broadband-enableddevices. Additionally, this feature leverages mobile broadband and SMS (text) messaging toincrease the speed to run security operations on devices in your account.
RTT-IPReal Time Technology over Internet Protocol (RTT-IP) lets you initiate security operations onyour managedWindows and Mac devices without waiting for the next scheduled agent call. RTT-IP can be enabled at the account level or the device level. See also Monitoring Center-initiatedCalling (MCIC).
S
SCCM clientA small software application installed on each Windows device to allow the device to connect tothe SCCM server and be managed remotely. Also see "System Center Configuration Manager(SCCM)".
SCCM RepairA feature that works in conjunction with SCCM Status reporting. If the SCCM client installed on aWindows device is not functioning correctly, SCCM Repair attempts to repair the client. Also see"SCCM Status" and "System Center Configuration Manager (SCCM)".
Glossary Absolute User Guide
Absolute 7.x 239

SCCM StatusThe status of the SCCM client installed on aWindows device. The agent can be configured todetect a device's SCCM Status. Also see "System Center Configuration Manager (SCCM)".
Security AdministratorA user role that exists in those organizations that choose to designate certain Administrators asSecurity Administrators to manage the device and data security of assets. This user role hasmore access rights than Administrators. Security Administrators have the authority to configure,target, and start File Retrieval, Device Freeze, and Data Delete services. Security Administratorsuse the Absolute console to track and manage devices, both within the organization’s local areanetwork and outside of it.
Security Power UserA user role that exists in those organizations that choose to designate certain Power Users asSecurity Power Users to manage the device and data security of assets. This user role has moreaccess rights than Power Users. Security Power Users have the authority to configure, target,and start File Retrieval, Device Freeze, and Data Delete services for devices in their assignedDevice Group. Security Power Users use the Absolute console to track and manage deviceswithin the organization’s local area network.
Self-Encrypting Drive (SED)A type of drive that is capable of FDE and can be detected by the agent, but may not be enabledor may not be supported by Absolute.
Self-Healing Call (SHC)When agent modules are corrupted or tampered with, or when attempts are made to remove theagent from a device, the technology rebuilds (self-heals) itself.
Serial NumberThe serial number of the device or other hardware.
Service PackA collection of updates, fixes and/or enhancements to a software program delivered in the formof a single installable package.
SIEMSecurity Information and Event Management (SIEM) applications collect logged events from mul-tiple software programs and store them in a central repository for consolidated reporting and ana-lysis.You can enable Absolute alert events to be viewed in a SIEM application.
SMSShort Message Service (cellular phone text messaging).
Subscriber IDThe unique number associated with the smartphone network service subscriber. The number isretrieved from the smartphone hardware, the Subscriber Identity Module (SIM) card, or an equi-valent.
Glossary Absolute User Guide
Absolute 7.x 240

Suspicion LevelThe importance level or grade that defines the severity of a suspicious event.
Suspicious eventAn event that triggered one or more alert notifications based on alerts defined for the account.
System BIOS DateWhen the Basic Input/Output System (BIOS) installed in a device was released.
System BIOS VersionThe unique name or number assigned to the Basic Input/Output System (BIOS) of a device.
System Center Configuration Manager (SCCM)Microsoft System Center Configuration Manager (SCCM) is a system management softwareproduct that lets IT administrators manage their Windows devices by performing tasks remotely.
T
Threshold Value (MB)For hard disks, the minimum preferred amount of available storage (expressed in MB) on adevice’s logical drive to show in reports.
U
UsernameA unique name detected by the agent to identify a person who is associated with or using adevice.
V
VersionA number that distinguishes releases of the same software application, sold separately, that isdetected by the agent and reported in the Absolute console. See also Agent Version.
Video Display Color DepthThe number of bits used to represent color on a monitor.
Video Display ResolutionThe number of distinct horizontal and vertical pixels showing on a monitor.
VolumeA single accessible storage area with a single file system that is resident on a single partition of ahard disk.
Volume LabelThe descriptive name assigned to a volume on a hard disk, such as Local Disk or Public.
Glossary Absolute User Guide
Absolute 7.x 241

W
Wi-FiA technology that allows electronic devices to connect to the Internet or communicate with oneanother wirelessly within a particular area over radio waves.
Wi-Fi hotspotA private or public location where Internet access is available via a WLAN (wireless local areanetwork).
Glossary Absolute User Guide
Absolute 7.x 242

Index
AAbsolute for Chromebooks
adding Google account details to the Absoluteconsole 218
Chromebook Extensionabout 217deploying 221
described 217Absolute Secure Drive
turning data collection for your accountoff 52on 52
Absolute Secure Drive Authentication FailuresReport 100
Account Management reports 133Account section, described 51acknowledged end user message 34activating
an end user message 33custom alerts 22encryption alerts manually when you turn Full-
Disk Encryption data collection onagain 52
predefined alerts 22Activation Report 116Active alert state 13adding
applications to theBanned Items list in a software policy 48Required Items list in a software policy 49
devices to aDevice Freeze offline policy 183device group 40device group automatically using the auto-
grouping feature 42multiple devices to a device group by importing
CSV files 43Administrator user role, described 10Agent
callsabout Event Calling 55
installation packages 63unfreezing
a single device on an Agent call 193multiple devices on an Agent call 193
upgrading to latest version 64Agent is Newly Installed predefined alert 14alert events
filtering bydate alert event was triggered 25specific alert event 24suspicion level 25
alertsactivating them 22alert events
filtering bydate alert event was triggered 25specific alert event 24suspicion level 25
creatingcustom
alerts 16deleting custom alerts 24described 13downloading triggered alert events 26editing them 22example of
Geofence Location alert 19security action based alert 19
list of predefined alerts 14managing
alerts 20triggered alert events 24
reactivating a suspended alert 22resetting them 23searching for them 21states
Active 13Suspended 13
suspendingalert scanning 23alerts 23
suspicious activity on devices, described 13triggering an alert, described 13types
custom 13viewing
alerts 21triggered alert events 24
Anti-Malware Report 97API and other sampling technologies 121Asset Summary information 73Assigned Username field
described 82assigning
device groups automatically 41associating devices with device groups,
described 40attempting a forced call 144audience for this guide 10authorizing security personnel using an
e-mailed authorization code 154auto-grouping feature used to add devices to a
device group automatically 42automatic assignment of available Service Guar-
antee Licenses for your accountturning off 51
Absolute 7.x 243

BBanned Items, adding them to the software
policy 48
CCall History and Loss Control reports 113Call History Report 114Calling Profiles Report 135cancelling
Data Delete request fora single device 165multiple devices at the same time 165
Device Freeze request fora single device 174multiple devices at the same time 174
cell tower/network location technology 121cellular technology used to maintain network con-
nectivity 141Change in Serial Number predefined alert 14changing
an e-mail address for security personnel 154the number of records shown in a report 73
choose feature, described 72Chromebook Extension
about 217deploying 221
ChromebooksChromebook extension
about 217deploying 221
Classic Account Settings pageadding Google account details 218editing
automatic assignment of available ServiceGuarantee Licenses 51
off 51described 51RTT-IP settings for your account 54
enabling last file access dates and times 53Event Calling
editing Call Settings 59turning
Absolute Customer Service accessoff 52on 52
Absolute Secure Drive data collectionoff 52on 52
Event Calling for your accountoff 59on 58
Full-Disk Encryption data collectionoff 52on 52
Google MapsWi-Fi Positioningon 53
SCCMRepair on 62SCCM Status reporting on 61
consequences of disabling thepreauthorization 154
Contact list. See Investigation Report Contact Listconventions used in this guide 12copying
a software policy 49creating
customDevice Freeze messages 195
custom action fields 156custom alerts 16end user messages
custom 27URL 29
geofences 202new device groups 36software policy 48
CSV files, importing to add multiple devices to adevice group 43
custom action fields 155creating 156deleting 157editing 156
custom alertsactivating 22creating 16deleting 24described 13editing 22managing 20resetting 23searching for 21suspending 23suspending alert scanning 23viewing 21
custom Device Freeze messages 195deleting 198editing existing Device Freeze messages 197managing 195
custom end user messagesactivating 33creating 27deleting 36described 26editing 30previewing 30resending 35suspending 34viewing
a list of end user messages 27acknowledgements 34unacknowledged end user messages 35
Absolute 7.x 244
Index Absolute User Guide

Index Absolute User Guide
Ddata and device security administration
changing the e-mail address for security per-sonnel 154
described 153disabling your Security Administrator author-
ization 154requesting an e-mailed security authorization
code 154Data Delete
enabling last file access dates and times 53managing custom action fields 156request
cancelling fora single device 165multiple devices at the same time 165
viewing status 158Data Delete Details page 160defining
devices associated to device groupsautomatically 42manually 43
deletingcustom action fields 157custom alerts 24custom Device Freeze messages 198Device Freeze offline policy 185device group 46end user messages 36geofences 204software policy 50
detectingdevices with Full-Disk Encryption products 52devices without Full-Disk Encryption
products 52Device Freeze
described 169editing Device Freeze messages 197forcing a reboot on Windows devices 173managing custom action fields 156minimum system requirements 169offline policy
about 176adding devices to 183creating 177deleting offline policies 185designating a default policy 181editing 180removing devices from 185viewing 179viewing devices 183
requestcancelling for
a single device 174multiple devices at the same time 174
detailed information 189
removing its details and theconsequences 175
states 189tracking the status 186unfreeze passcode for Device Freeze oper-
ation 194viewing the status 189
requesting 170scheduling for future date 170unfreezing
a frozen device using an unfreezepasscode 194
a single device on an Agent call 193multiple devices on an Agent call 193
Device Freeze Summary Report 186device groups
addingdevices to a group 40devices to a group automatically using the
auto-grouping feature 42multiple devices to a device group by
importing CSV files 43Asset Summary information 73assigning devices automatically 41associating a device with a device group 40creating 36defining what devices are assigned to which
device group manually 43deleting
device groups 46described 36editing
information for a device group 39filtering to find a specific device group 38Hardware Details information 76Hardware Summary information 76importing
a CSV file for IP mapping 42an edited CSV file 44
removinga device group from a software policy 50devices associated with a device group 46
viewingdevice groups without a software policy 47devices associated with a device group 45software policies applied to device
groups 47specific device group 38
Device Location History Report 126Device Location Report 122Device Readiness Report 90Device Rebuild predefined alert 14Device Summary page
Asset Summary information 73Call Tracking information 77configuring Event Calling for a device 79described 73Forced Call log 144Hardware Details information 76
Absolute 7.x 245

Hardware Summary information 76SCCM Status history information 78Software Details information 77turning on SCCMRepair 81turning on SCCM Status reporting 80viewing call history 80
devices 80adding
devices to adevice group automatically using the
auto-grouping feature 42single device group 40
multiple devices to a device group byimporting CSV files 43
associating devices with a device group 40data and device security administration,
described 153deleting
device groups 46downloading
data delete log file 167log file for
a single device 167mobile devices 168multiple devices 167
editingdetails for a single device with a mobile
broadband adapter 143details for a specific device 73Identifier’s asset information 73information for a device group 39
filtering to find a specific device group 38finding devices that are ready for retirement 90identifying hardware components that need an
upgrade 90importing a CSV file for IP mapping to a device
group 42locating those that cannot support a particular
software or operating system rollout 90removing devices from
device groups 46setting up dormant devices 82turning
data collection for Absolute Secure Driveoff 52on 52
Event Calling for a deviceoff 79on 79
Event Calling for your accountoff 59on 58
Full-Disk Encryption data collectionoff 52on 52
unfreezing a frozen device using an unfreezepasscode 194
viewinga list of mobile broadband adapters
installed and operational on man-aged devices 92
details for a single device with a mobilebroadband adapter 143
details for a specific device 73log file for
a single device 167mobile devices 168multiple devices 167
managed devices that have Event Callingturned on 60
managed devices with SCCM Status report-ing turned on 62
membership in a device group 45specific device group 38total, used, and available disk space for
each device 89disabling
consequences to 154RTT-IP 151Security Administrator authorization 154
dormant devicesdescribed 82
Download Packages pageAgent section 63
downloadinga CSV or XML file that identifies installed mon-
itor drivers 87a CSV or XML file that identifies installed
printer drivers 86data delete log file 167File List request 213reports, described 84retrieved files 207the Agent 63the log file for
a single device 167mobile devices 168multiple devices 167
triggered alert events 26
Ee-mailed
security authorization codes for security oper-ation 154
security authorization codes for security per-sonnel 154
editingalerts
custom 22predefined 22
asset information for a device 73
Absolute 7.x 246
Index Absolute User Guide

Index Absolute User Guide
assignment of Service Guarantee licensesmanually for a
group of devices 55single device 55
Classic Account Settings 51custom
Device Freeze messages 197end user messages 30
custom action fields 156details for a single device with a mobile broad-
band adapter 143details for a specific device 73device group’s information 39existing geofences 203RTT-IP settings 54saved report filters 83, 140software policy 50URL end user messages 32
enablingSecurity Administrator authorization
again 154-155end user messages, see End User MessagingEnd User Messaging
activating a message 33creating
custommessages 27URL messages 29
deleting end user messages 36described 26editing
custommessages 30URL messages 32
minimum system requirements 26previewing 30resending a message 35suspending a message 34types
custommessages 26URL messages
described 26viewing
a list of end user messages 27end user messages that
were acknowledged 34were not acknowledged 35
ESRI map, when used in the Absoluteconsole 200
Event Callingdescribed 55device changes that trigger a call 56for a device
turn it off 79turn it on 79viewing call history 80
for your accountediting Call Settings 59turn it off 59turn it on 58viewing managed devices that have Event
Calling turned on 60Minimum Event Call Period 57
exportinga software policy to an Excel spreadsheet 50
Extended IP Call Information page, described 114
FFile List 211
downloading a request 213minimum system requirements 211requesting 211requesting one for stolen devices 212tracking the status 213
File Retrievalcancelling request 209changing status 208downloading files 207minimum system requirements 205removing log files 209requesting 205
filteringa report’s results 72alert events by
date alert event was triggered 25specific alert event 24suspicion level 25
to locate specific device groups 38finding
devices that are ready for retirement 90Forced Call log, described 144Forced Call request status 145forcing
a call on devices with mobile broadbandadapters 144
a reboot on Windows devices when the DeviceFreeze request completes 173
freezing devicesDevice Freeze offline policy 177Device Freeze request 170
full-disk encryptiondescribed 102reactivating a suspended alert 22
Full-Disk Encryption Status Reportturning detection of FDE products for your
accountoff 52on 52
GGeofence Editor, described 200Geofence Tracking reports, described 200geofences
creating 202deleting 204editing 203
Absolute 7.x 247

example of a Geofence Location alert 19explained 199Geofence Editor, described 200using the technology 199viewing a list of them 203
geolocationcollecting location information 122limitations of
GPS 122Wi-Fi positioning 122
system requirements 119tracking reports, described 200tracking, described 199types of location technologies, described 121
Global Positioning Systems. See GPS.Google Maps
using in prohibited country 200using navigation tools
in Geofences 200in reports 124
Wi-Fi Positioningdefinition 121enabling 53
Google Synchronization Serviceabout 218enabling 218
GPSdescribed 121limitations 122
Guest User user role, described 11
HHard Disk Space Report 89Hard Drive is Nearly Full predefined alert 15Hardware Details information 76Hardware Summary information 76
Iidentifier, editing asset information 73identifying
devices that do not meet specified minimumrequirements for hardware or operatingsystem 90
hardware components that need anupgrade 90
importinga CSV file for IP mapping 42an edited CSV file for device groups 44
initiating a forced call on devices with mobile broad-band adapters 144
Internet Browsing Configuration Report 95Investigation Report
contact list, managing 66Investigation Report Contact List
about 66
activating Disabled contacts 69adding contacts 67Contact Status
about 66changing status of a contact 69
disabling Active contacts 69editing contact information 67printing the contact list 68viewing the contact list 68
IP georesolution 122
LLast called 20 days ago predefined alert 15Lease Completion Report 129Lease Ending predefined alert 15License Usage Summary Report 134limitations of
GPS technology 122Wi-FI positioning 122
Local IP Address Changed predefined alert 15locating devices
outside your corporate network 114that cannot support a particular software or
operating system rollout 90location technologies
Absolute Wi-Fi Positioning 121API and other sampling technologies 121cell tower/network 121Google MapsWi-Fi Positioning 121GPS 121IP georesolution 122Other Location Technologies 121
log filesdownloading 167for a single device
downloading 167viewing 167
for mobile devicesdownloading 168viewing 168
for multiple devicesdownloading 167viewing 167
MMajor Change predefined alert 15managing
custom alerts 20custom Device Freeze messages 195predefined alerts 20triggered alert events 24
manuallydefining what devices are assigned to which
device groups 43
Absolute 7.x 248
Index Absolute User Guide

Index Absolute User Guide
editing the assignment of Service Guaranteelicenses for a group of devices 55
editing the assignment of Service Guaranteelicenses for a single device 55
Minimum Event Call Period 57minimum system requirements needed for
Device Freeze security operation 169End User Messaging 26File List 211File Retrieval 205RTT 141RTT-IP 146
Missing Anti-Malware Report 97Mobile Broadband Adapter Details page, viewing
for RTT-enabled devices 143Mobile Broadband Adapter Report 92Mobile Device Report 94Mobile Theft Management service
for Chrome devices 217Modem Addition Report 97Modem Changed predefined alert 15monitor drivers, downloading a CSV or XML file
that identifies installed monitor drivers ondevices 87
Monitor Report 87moving
between pages in a report 73My Content 139
described 139My Filters 139My Reports 139
My Filters 139My Reports 139
NNetwork Changed predefined alert 15New Program File Detected predefined alert 16
Ooffline policy. See Device Freezeopening
Data Delete Details page 160Device Summary page 73Reports page 71Software Policy page 47
Operating System Changed predefined alert 16Operating System Updates Report 95OS Product Key Changed predefined alert 16override phone number, setting 144
Ppasscode
used tounfreeze a frozen device 194
policiesDevice Freeze offline policy. See Device
Freeze 176software policy described 47
Power User user role, described 11predefined alerts
activating them 22Agent is Newly Installed 14Change in Serial Number 14described 14Device Name Changed 14Device Rebuild 14editing them 22Hard Drive is Nearly Full 15inability to delete them 14Last called 20 days ago 15Lease Ending 15list of default alerts 14Local IP Address Changed 15Major Change 15managing them 20Modem Changed 15Network Changed 15New Program File Detected 16Operating System Changed 16OS Product Key Changed 16Public IP Address Changed 16resetting them 23searching for 21Self Healing Call 16suspending alert scanning 23suspending them 23Username Changed 16viewing them 21Warranty Ending 16
previewing end user messages 30printer drivers
downloading a CSV or XML file that identifiesinstalled printer drivers on devices 86
Printer Report 86printing
reports 82the current page of a report 83
Public IP Address Changed predefined alerts 16
Rreactivating a suspended alert 22Real-Time Technology. See RTT.Remote File Retrieval 205
Absolute 7.x 249

removingDevice Freeze Request details and the con-
sequences 175device from
Device Freeze offline policy 185device group from a software policy 50devices from
device groups 46Reports
Account ManagementCalling Profiles report 135License Usage Summary report 134Security Audit Logs report 137
Call History and Loss ControlActivation report 116Call History report 114described 113Device Location History report 126Device Location report 122Extended IP Call Information page, locating
devices outside your corporate net-work 114
changing the number of records shown 73downloading 84editing saved reports 83filtering
a report’s results 72finding devices that are ready for retirement 90Hardware Assets
Device Readiness report 90Hard Disk Space report 89Mobile Broadband Adapter report 92Mobile Device report 94Monitor report 87Printer report 86
identifyingdevices that do not meet specified min-
imum requirements for hardware oroperating system 90
hardware components that need anupgrade 90
Lease and Inventory ManagementLease Completion report 129User-entered Data report 131
lease management, described 129locating devices that cannot support a par-
ticular software or operating system rol-lout 90
moving between pages 73MyContent
My Filters 139My Reports 139
printingreports 82the current page of a report 83
saving 83Security
Absolute Secure Drive Authentication Fail-ures report 100
Anti-Malware report 97Internet Browsing Configuration report 95Missing Anti-Malware report 97Modem Addition report 97Operating System Updates report 95SCCM Status History Report 107SCCM Status Report 103Security Posture Report 112Suspicious Devices report 98Unauthorized Software report 96
viewingdetails about mobile devices (Smart
Phones, Tablets) 94entire row in a report record 72list of mobile broadband adapters installed
and operational on manageddevices 92
total, used, and available disk space foreach device 89
Reports page, opening it 71requesting
a Device Freeze 170a File List 211a File Retrieval 205an unfreeze passcode for a Device Freeze
security operation 194e-mailed security authorization code for secur-
ity personnel 154File List on a stolen device 212
Required Items list, adding to the softwarepolicy 49
resending messages to end users 35resetting
custom alerts 23predefined alerts 23
RTTminimum system requirements 141setting an override phone number 144using cellular technology to maintain network
connectivity 141viewing the Forced Call log 144
RTT-IPbenefits of 147described 146disabling 151editing the settings for your account 54enabling
for a specific device 148for all devices in your account 148
minimum system requirements 146overview 146Ping Period
definition 147editing for
a single device 150all devices in your account 149
requesting a full agent call 149viewing status for a device 147viewing status of all devices 150
Absolute 7.x 250
Index Absolute User Guide

Index Absolute User Guide
running a report 71
Ssaving
report filters 140your reports and filter criteria 139
SCCMRepairfeature overview 103History tab for a device 78reports for
SCCM Status History Report 107SCCM Status Report 103
troubleshooting failed repairs 112turning on feature
at the account level 62at the device level 81from the SCCM Status Report 106
viewing repair result details 109SCCM Status
feature overview 102History tab for a device 78reports for
SCCM Status History Report 107SCCM Status Report 103
turning on featureat the account level 61at the device level 80from the SCCM Status Report 106
viewing devices with the feature turned on 62viewing test result details 109
SCCM Status Reports 102scheduled
Device Freeze, requesting for future date 170searching for
custom alerts 21predefined alerts 21
security actionsalerts for 19Security Audit Logs Report 137
Security Administratorsdata and device security administration,
described 153disabling authorization for 154enabling authorization again 154-155managing the Investigation Report Contact
List 66requesting a security authorization code sent
by e-mail 154user role, described 10
Security Audit Logs Report 137security authorization code
described 153requesting one using e-mail 154
Security Posture Report 112Security Power Users
data and device security administration,described 153
requesting a security authorization code sentby e-mail 154
user role, described 11Self Healing Call predefined alert 16Service Guarantee license
described 54editing the assignment manually for a
group of devices 55single device 55
payout eligibility 54settings
for your accountturn it off 59
turningdata collection for devices with Absolute
Secure Driveoff 52on 52
encryption data collection for devices withFull-Disk Encryption
off 52on 52
Signing Officer user role 11smart phones, viewing their details 94software policy
addingapplications to the
Banned Items list 48Required Items list 49
copying 49creating 48deleting 50described 47editing 50exporting to an Excel spreadsheet 50removing a device group 50viewing 47
a software policy 50device groups without a software policy 47
Software Policy page, opening it 47states for Device Freeze requests 189stolen devices
requesting aDevice Freeze 170File List 212File Retrieval 205
Suspended alert state 13suspending
alert scanning 23alerts 23an end user message 34
suspicious activity on devices, described 13Suspicious Devices Report 98system requirements
minimum required forDevice Freeze 169End User Messaging 26File List 211File Retrieval 205
Absolute 7.x 251

RTT 141RTT-IP 146
Ttablets, viewing details about mobile devices 94tracking
Device Freeze request status 186File List status 213
triggered alert eventsmanaging them 24viewing them 24
triggered alerts, downloading them 26triggering an alert 13turning
automatic assignment of available ServiceGuarantee Licenses for your account
off 51data collection for Absolute Secure Drive
off 52on 52
encryption data collection for Full-Disk Encryp-tion products
off 52on 52
Event Calling for your accountoff 59on 58
typographical representations for conventionsused in this guide 12
Uunacknowledged end user message 35Unauthorized Software Report 96unfreezing
a frozen device using an unfreezepasscode 194
a single device on an Agent call 193multiple devices on an Agent call 193
unfreezing a Device Freeze requestgetting an unfreeze passcode 194
upgrading the agent 64URL end user messages
activating them 33creating 29deleting them 36described 26editing 32previewing them 30suspending them 34viewing a list of them 27
user-defined alerts, described 13User-entered Data Report 131User Guide, overview of what’s included 11user roles
Administrators 10
Guest Users 11Power Users 11Security Administrators 10Security Power Users 11Signing Officers 11
Username Changed predefined alert 16using
choose feature 72Data Delete;Data Delete
described 158Device Freeze 169e-mailed authorization codes to authorize
security personnel 154File List 211geofence technology 199Remote File Retrieval 205RTT 141RTT-IP feature 146this guide 11
Vviewing
acknowledged end user message 34alerts
custom 21predefined 21
call history for a device 80detailed information about Device Freeze
requests 189details about mobile devices, including smart
phones and tablets 94details for
a device with a mobile broadbandadapter 143
a specific device 73Device Freeze request 189Device Freeze Request status 189device groups without a software policy 47devices
in a device group 45entire row in a report record 72Forced Call log 144Forced Call request status 145list of
end user messages 27existing geofences 203mobile broadband adapters installed and
operational on manageddevices 92
software policies 47list of managed devices that have Event
Calling turned on 60list of managed devices with SCCM Status
reporting turned on 62log file for
a single device 167mobile devices 168
Absolute 7.x 252
Index Absolute User Guide

Index Absolute User Guide
multiple devices 167Mobile Broadband Adapter Details page 143Reports page 71software policy 50specific device group 38total, used, and available disk space for each
device 89triggered alert events 24unacknowledged end user messages 35
viewing call history for a device 80
WWarranty Ending predefined alert 16Wi-Fi positioning
limitations 122Windows devices, forcing a reboot after Device
Freeze completes 173
Absolute 7.x 253


