Embed Size (px)
Citation preview

CUSTOMIZATION GUIDEDEVELOPER GUIDEAcumatica ERP 2019 R2

| Contents | 2
ContentsCopyright...............................................................................................................10About the Customization Guide.............................................................................11Introduction.......................................................................................................... 12Getting Started......................................................................................................14
Knowledge Pre-Requisites..............................................................................15To Prepare an Environment............................................................................16To Assign the Customizer Role to a User Account............................................. 17
User Access Rights for Customization..........................................................18Exploring the Source Code............................................................................ 19
To Explore the C# Code of a BLC............................................................... 20To Explore the C# Code of a DAC...............................................................21To Explore the ASPX Code of a Page........................................................... 22To Find a Customization of the ASPX Code...................................................23To Find Source Code by a Fragment........................................................... 25
To Develop a Customization Project................................................................ 27To Perform Final Testing of a Customization..................................................... 27To Deploy a Customization Project..................................................................28Asking Questions..........................................................................................29
Acumatica Customization Platform........................................................................30Customization Project................................................................................... 30
Types of Items in a Customization Project................................................... 32Deployment of Customization.....................................................................37Simultaneous Use of Multiple Customizations............................................... 38Customization of a Multitenant Site............................................................ 38Validation of a Customization Project.......................................................... 40
Customization Tools...................................................................................... 42Customization Projects Form .....................................................................43Customization Menu..................................................................................45Element Inspector.................................................................................... 47Customization Project Editor...................................................................... 50Source Code Browser................................................................................84
Customization Framework..............................................................................86Changes in Webpages (ASPX).................................................................... 88Changes in the Application Code (C#).........................................................90Changes in the Database Schema.............................................................123Custom Processes During Publication of a Customization..............................124
Managing Customization Projects....................................................................... 125To Create a New Project..............................................................................126To Select an Existing Project........................................................................ 128

| Contents | 3
To Open a Project.......................................................................................130To Update a Project.................................................................................... 130To Delete a Project..................................................................................... 131To Export a Project..................................................................................... 132To Import a Project.....................................................................................134To Replace the Content of a Project from a Package........................................135To Build a Package Based on Existing Files.....................................................138To Merge Multiple Projects........................................................................... 140To Manipulate Customization Projects from the Code.......................................140
GetPackage() Method.............................................................................. 142PublishPackages() Method........................................................................143UnpublishAllPackages() Method.................................................................144UploadPackage() Method......................................................................... 145
To Detect Whether a Customization Project Is Applied to the Application............ 146To Manage Prefixes in a Customization Project .............................................. 148To Add a Custom Feature Switch.................................................................. 149
Custom Feature Switches.........................................................................151The Features.xml File.............................................................................. 152
Publishing Customization Projects...................................................................... 154To Prepare a Project for Publication...............................................................155To Publish a Single Project...........................................................................155To Publish Multiple Projects..........................................................................156
Performing the Publication Process............................................................156Validating Customization Code..................................................................158
To Publish the Current Project...................................................................... 158To Publish the Current Project with a Cleanup Operation.................................. 159To Publish a Customization for a Multitenant Site............................................161To View a Published Customization............................................................... 162To Unpublish a Customization.......................................................................163
Unpublishing Customization Projects......................................................... 164Managing Items in a Project............................................................................... 166
Customized Screens....................................................................................167To Add a Page Item for an Existing Form................................................... 168To Delete a Page Item from a Project........................................................170To Add a New Custom Form to a Project....................................................170To Delete a Custom Form from a Project................................................... 172To Delete Items from the Project on the Edit Project Items Page................... 173To Add a Condition................................................................................. 174To Add an Action.................................................................................... 175
Customized Data Classes.............................................................................176To Add a DAC Item for an Existing Data Access Class to a Project................. 177

| Contents | 4
To Delete a DAC Item from a Project........................................................ 179To Convert a DAC Item to a Code Item..................................................... 180To Convert a DAC Item to an Extension Library.......................................... 182To Upgrade Technology for Legacy DAC Customization.................................183
Code......................................................................................................... 187To Create a Custom Business Logic Controller............................................ 188To Create a Custom Data Access Class...................................................... 189To Customize an Existing Business Logic Controller..................................... 190To Customize an Existing Data Access Class............................................... 194To Add Custom Code to a Project............................................................. 195To Add a Customization Plug-In to a Project...............................................196To Delete a Code Item From a Project.......................................................198To Move a Code Item to the Extension Library............................................198
Custom Files.............................................................................................. 199To Add a Custom File to a Project.............................................................199To Update a File Item in a Project.............................................................201To Delete a Custom File From a Project..................................................... 203
Generic Inquiries........................................................................................ 203To Add a Generic Inquiry to a Project........................................................204To Delete a Generic Inquiry from a Project.................................................205To Update Generic Inquiry Items in a Project............................................. 206To Navigate to the Generic Inquiry Form .................................................. 206
Custom Reports..........................................................................................208To Add a Custom Report to a Project.........................................................208To Delete a Custom Report from a Project................................................. 210To Navigate a Custom Report in a Project.................................................. 210
Dashboards................................................................................................210To Add a Dashboard to a Project.............................................................. 211To Delete a Dashboard from a Project....................................................... 211To Update Dashboard Items in a Project.................................................... 212To Navigate to the Dashboard Form.......................................................... 212
Site Map....................................................................................................213To Add a Site Map Node to a Project.........................................................213To Delete a Site Map Node from a Project..................................................214To Update a Site Map Node in a Project.....................................................214To Navigate to the Site Map Form ............................................................215
Database Scripts........................................................................................ 215To Add a Custom Table to a Project.......................................................... 216To Update Custom Tables in the Project.....................................................217To Add a Custom Column to an Existing Table............................................ 218To Increase the Size of a Column in an Existing Table..................................218

| Contents | 5
To Add a Custom SQL Script to a Project................................................... 219To Edit a Custom SQL Script.................................................................... 225To Delete an Sql or Table Item From a Project............................................225
System Locales.......................................................................................... 225To Add a System Locale to a Project......................................................... 226To Delete a System Locale from a Project.................................................. 228To Update a Custom System Locale in a Project..........................................229To Navigate to the System Locales Form....................................................229
Import and Export Scenarios........................................................................229To Add an Integration Scenario to a Project............................................... 230To Delete an Integration Scenario from a Project........................................ 232To Update an Integration Scenario in a Project........................................... 233To Navigate to the Import Scenarios Form ................................................ 233
Shared Filters.............................................................................................233To Add a Shared Filter to a Project........................................................... 234To Delete a Shared Filter from a Project.................................................... 236To Update a Shared Filter in a Project....................................................... 237To Navigate to the Filters Form ............................................................... 237
Access Rights............................................................................................. 237To Add Access Rights to a Project............................................................. 238To Delete Access Rights from a Project......................................................240To Update Access Rights in a Project.........................................................241To Navigate to the Access Rights by Screen Form ...................................... 241
Wikis.........................................................................................................241To Add a Custom Wiki to a Project............................................................242To Delete a Custom Wiki from a Project.....................................................244To Update a Custom Wiki in a Project........................................................245To Navigate to the Wiki Form ..................................................................245
Web Service Endpoints................................................................................ 245To Add a Custom Web Service Endpoint to a Project....................................246To Delete a Custom Web Service Endpoint from a Project.............................248To Update a Custom Web Service Endpoint in a Project................................248To Navigate to the Web Service Endpoints Form......................................... 248
Analytical Reports....................................................................................... 249To Add a Custom Analytical Report to a Project.......................................... 249To Delete a Custom Analytical Report from a Project................................... 251To Update a Custom Analytical Report in a Project...................................... 252To Navigate to the Report Definitions Form ............................................... 252
Push Notifications....................................................................................... 252To Add Push Notification Definitions to a Project......................................... 253To Delete Push Notification Definitions from a Project.................................. 254

| Contents | 6
To Update Push Notification Definitions in a Project..................................... 254To Navigate to the Push Notifications Form................................................ 254
Business Events..........................................................................................255To Add Business Events to a Project..........................................................256To Delete Business Events from a Project.................................................. 256To Update Business Events in a Project..................................................... 257To Navigate to the Business Events Form...................................................258
Mobile Application.......................................................................................258To Add a Form To Mobile Site Map............................................................ 259To Update Main Menu of a Mobile App....................................................... 260To Update a Mobile App Screen ............................................................... 261To Remove a Screen of a Mobile App........................................................ 261To Reverse Changes Made to Mobile App................................................... 262
User-Defined Fields.....................................................................................262To Add a User-Defined Field to a Customization Project................................263
Customizing Elements of the User Interface....................................................... 266Custom Form............................................................................................. 269
To Develop a Custom Form...................................................................... 271To Create a Custom Form Template...........................................................272To Delete a Custom Form from a Project................................................... 276
Existing Form............................................................................................. 276To Start a Customization of a Form...........................................................278To Delete a Customization of a Form.........................................................278To Add a Form Container......................................................................... 278To Add a Grid Container.......................................................................... 279To Add a Tab Container........................................................................... 280To Add a Dialog Box............................................................................... 283To Delete a Container..............................................................................284
Form Container (PXFormView)......................................................................284To Open a Container in the Screen Editor.................................................. 286To Set a Container Property..................................................................... 287To Add a Nested Container...................................................................... 287To Add a Box for a Data Field.................................................................. 289To Add a Layout Rule.............................................................................. 291To Add Another Supported Control............................................................ 293To Reorder Child UI Elements...................................................................295To Delete a Child UI Element................................................................... 295
Grid Container (PXGrid)...............................................................................296To Add a Column for a Data Field............................................................. 298To Add a Control to the Form View of a Grid.............................................. 300To Provide Hyperlinks for a Grid Column....................................................301

| Contents | 7
Tab Container (PXTab).................................................................................302Tab Item Container (PXTabItem)...................................................................304Dialog Box (PXSmartPanel).......................................................................... 305
To Open a Smart Panel in the Screen Editor...............................................307Box (Control for a Data Field)...................................................................... 307
To Select a Box in the Screen Editor......................................................... 309To Set a Box Property............................................................................. 310To Change the Type of a Box................................................................... 310
Layout Rule (PXLayoutRule)......................................................................... 312To Select a Layout Rule in the Screen Editor.............................................. 316To Set a Layout Rule Property.................................................................. 317
Panel (PXPanel).......................................................................................... 318Group Box (PXGroupBox)............................................................................ 319
To Open a Group Box in the Screen Editor................................................. 320To Create a Group Box for a Drop-Down Field............................................ 320To Set a Group Box Property....................................................................322
Label (PXLabel).......................................................................................... 322Radio Button (PXRadioButton)...................................................................... 323
To Bind a Radio Button to a Value in the List of a Data Field......................... 324Button (PXButton)...................................................................................... 325
To Use a Button in a Dialog Box............................................................... 326To Use a Button to Invoke a Method......................................................... 328
Java Script (PXJavaScript)........................................................................... 329Toolbars, Action Buttons, and Menus.............................................................329Other Control Types.................................................................................... 330
Customizing Business Logic................................................................................ 331Data Access Class.......................................................................................331
To Start the Customization of a Data Access Class...................................... 332To Add a Custom Data Field.....................................................................334To Create a New DAC..............................................................................336To Create a DAC Extension...................................................................... 338
Data Field..................................................................................................339To Customize a Field on the DAC Level......................................................341To Customize a Field on the Graph Level................................................... 342To Set a Default Value.............................................................................344To Change the Label of a Field................................................................. 345To Make a Field Mandatory...................................................................... 348To Customize the Table of a Selector Field................................................. 349To Add an Event Handler for a Field.......................................................... 351To Provide Multi-Language Support for a Field............................................ 352
Graph........................................................................................................354

| Contents | 8
To Start the Customization of a Graph.......................................................356To Create a Custom Graph.......................................................................360To Add a New Member............................................................................ 361To Add an Action.................................................................................... 362To Add an Event Handler......................................................................... 363To Override an Event Handler...................................................................366To Override a Virtual Method....................................................................368
Data View..................................................................................................371To Override a Data View..........................................................................372To Add a Data View Delegate................................................................... 373To Override a Data View Delegate.............................................................374
Action........................................................................................................375To Start the Customization of an Action.....................................................376To Override an Action Delegate Method..................................................... 378To Rename an Action Button.................................................................... 379To Disable or Enable an Action................................................................. 381To Hide or Show an Action.......................................................................381
Customizing the Database Schema..................................................................... 385To Create a Custom Table............................................................................385To Create a Custom Column in an Existing Table.............................................387To Create an Extension Table....................................................................... 387
Requirements for an Extension Table Schema.............................................388DAC Extension Mapped to an Extension Table.............................................389
To Add a Custom SQL Script to a Customization Project...................................397Integrating the Project Editor with Microsoft Visual Studio................................ 399
To Work with a Code Item........................................................................... 400To Work with Data Access Classes................................................................ 401To Debug the Customization Code................................................................ 401To View and Debug Acumatica Source Code................................................... 402To Synchronize Code Changes with the Customization Project...........................405To Create an Extension Library.....................................................................405Useful Tips.................................................................................................406
Integrating the Project Editor with a Version Control System............................. 408To Save a Project to a Local Folder............................................................... 408To Update the Content of a Project from a Local Folder....................................410To Configure a Connection String..................................................................410To Integrate the Customization Project Editor with Source Control.....................411
Troubleshooting Customization........................................................................... 413To Discover the Method That Has Thrown an Exception....................................413To Write to the Trace Log from the Code....................................................... 416To Log All Exceptions to a File......................................................................419

| Contents | 9
To Debug the Customization Code................................................................ 420To Validate a BQL Statement........................................................................421To Measure the Execution Time of a BQL Statement........................................426To Discover the Cause of Performance Degradation......................................... 429To Force the Platform to Execute Database Scripts..........................................434To Resolve Issues While Upgrading a Customized Website................................434
To Validate the Compatibility of the Published Customization with a New VersionBefore an Upgrade..................................................................................436To Resolve an Issue Discovered During the Validation..................................438To Use the Technical Release Notes to Find the Breaking Changes................. 441To Use an Ignore List for the Validation Errors............................................443
Examples............................................................................................................. 445Examples of User Interface Customization..................................................... 445
Dragging, Moving, and Deleting UI Controls and Grid Columns......................445Adding Input Controls............................................................................. 454Adding Advanced Controls....................................................................... 457Adding Columns to a Grid........................................................................465Modifying Columns in a Selector............................................................... 469
Examples of Functional Customization........................................................... 474Adding Data Fields..................................................................................475Customizing DAC Attributes..................................................................... 485Modifying a BLC Action............................................................................489Modifying a BLC Data View...................................................................... 491Declaring or Altering a BLC Data View Delegate..........................................494Extending BLC Initialization......................................................................497Altering the BLC of a Processing Form.......................................................499Adding or Altering BLC Event Handlers...................................................... 502Altering BLC Virtual Methods.................................................................... 512Customizing the Release Process for CA Documents.................................... 520
Glossary.............................................................................................................. 528

| Copyright | 10
Copyright
© 2019 Acumatica, Inc. ALL RIGHTS RESERVED.
No part of this document may be reproduced, copied, or transmitted without the expressprior consent of Acumatica, Inc.11235 SE 6th Street, Suite 140 Bellevue, WA 98004
Restricted Rights
The product is provided with restricted rights. Use, duplication, or disclosure by the UnitedStates Government is subject to restrictions as set forth in the applicable License andServices Agreement and in subparagraph (c)(1)(ii) of the Rights in Technical Data andComputer Software clause at DFARS 252.227-7013 or subparagraphs (c)(1) and (c)(2) ofthe Commercial Computer Software-Restricted Rights at 48 CFR 52.227-19, as applicable.
Disclaimer
Acumatica, Inc. makes no representations or warranties with respect to the contentsor use of this document, and specifically disclaims any express or implied warranties ofmerchantability or fitness for any particular purpose. Further, Acumatica, Inc. reservesthe right to revise this document and make changes in its content at any time, withoutobligation to notify any person or entity of such revisions or changes.
Trademarks
Acumatica is a registered trademark of Acumatica, Inc. HubSpot is a registered trademark ofHubSpot, Inc. Microsoft Exchange and Microsoft Exchange Server are registered trademarksof Microsoft Corporation. All other product names and services herein are trademarks orservice marks of their respective companies.
Software Version: 2019 R2

| About the Customization Guide | 11
About the Customization GuideThis guide describes the scope of the Acumatica Customization Platform and providesguidelines on how to use the platform capabilities for the customization of Acumatica ERP.
The guide is intended to answer the following questions:
• How to start developing a customization project? (Getting Started)
• How does the Acumatica Customization Platform work? (Acumatica Customization Platform)
• How to create, open, update, delete, publish, unpublish, export, and import acustomization project? (Managing Customization Projects)
• How to create, add, update, and delete each type of item (such as screens, data accessclasses, code, files, and reports) in a customization project? (Managing Items in a Project)
• How to publish a single customization project or multiple project for a site with singletenant or multiple tenants? (Publishing Customization Projects)
• How to create a custom form and customize the look and behavior of an existing form ofAcumatica ERP? (Customizing Elements of the User Interface)
• How to create custom code or extensions for an existing data access class or businesslogic controller? (Customizing Business Logic)
• How to customize an existing table or create a custom table in the database?(Customizing the Database Schema)
• How to use Microsoft Visual Studio to develop the customization code? (Integrating theProject Editor with Microsoft Visual Studio)
• How to integrate with TFS, Git, or another version control system? (Integrating the ProjectEditor with a Version Control System)
• What can I do to solve an issue that occurs while I am developing or applying acustomization? (Troubleshooting Customization)
• Which examples can I use to enhance my understanding of the customization tasks I willperform? (Examples)

| Introduction | 12
IntroductionBy using the tools and capabilities of the Acumatica Customization Platform, you can changethe user interface and business logic of Acumatica ERP, as well as build custom applicationmodules that can be added to the system. The following diagram illustrates the differenttypes of changes that you can make to the system within the scope of the customizationprocess.
Figure: Customization of Acumatica ERP
As a value-added reseller (VAR), you can deliver end-user customization that might be veryspecific to each particular customer. At this level, you might want to add custom reports

| Introduction | 13
and data filters, and configure generic inquiries for users. These changes do not involveprogramming unless you also want to modify the business logic and the user interface ofthe application. For more information on the web-based Generic Inquiry builder and theAcumatica Report Designer, see Managing Generic Inquiries and Acumatica Report Designer Guide.
As an independent software vendor (ISV), you can develop vertical solutions and add-onsto the core functionality of the system. At this level, you might want to modify the businesslogic and the UI of the application, which you can do by using the Acumatica CustomizationPlatform. To develop custom application modules, you can use the API that is provided by theAcumatica Framework.
As an original equipment manufacturer (OEM), you can build your own cloud ERP productsbased on high-level application objects of Acumatica ERP and the underlying AcumaticaFramework technology. This type of customization may involve intensive changes at all levelsof the system: modifications of the business logic and UI, development of custom modules,and report building.

| Getting Started | 14
Getting StartedThis chapter explains how to start developing a customization project and guides you tovarious useful chapters about the developing process.
Before you start developing a customization project, we strongly recommend to takethe T300 training course. There you will learn how to set up and start using AcumaticaCustomization Platform.
To Start Developing a Customization Project:
1. Make sure you have the prerequired knowledge described in Knowledge Pre-Requisites.
2. Review System Requirements for Acumatica ERP 2019 R2 in the Acumatica ERP InstallationGuide.
3. Prepare your operating system according to Preparing for Installing Acumatica ERP in thesame guide.
4. Prepare the environments as described in To Prepare an Environment.
5. In the application instance, assign a Customizer role to those who will work on thecustomization project. See To Assign the Customizer Role to a User Account for details.
6. If you haven't used version control, set up version control as described in Integrating theProject Editor with a Version Control System. If your team already has a customization projectand uses version control:
a. Create an empty customization project with predefined name.
This step is needed because you can load customization project files from versioncontrol only in scope of an existing project.
b. Download the project from version control.
You are ready to develop your customization project.
Implementing CustomizationAs a rule, the process of resolving a customization task includes the following steps:
• Explore the original code of your Acumatica ERP application instance. This step isexecuted in the development environment, which must be the same as the productionenvironment. See Exploring the Source Code for details.
• Develop the customization project. This step is also executed locally in the developmentenvironment, which must include all customizations that are included in the productionenvironment. See To Develop a Customization Project for details.
• Perform final testing. In this step, you test the newly developed customization projectin the staging environment, which can be a local copy of the customized productionenvironment. The staging environment must include a copy of the production database.See To Perform Final Testing of a Customization for details.

| Getting Started | 15
• Deploy the customization project. This step must be executed in the productionenvironment. See To Deploy a Customization Project for details.
The version number of Acumatica ERP used in the development, staging, andproduction environments should be the same. If they are not, before deployingand publishing a project on the production instance, you should update theapplication instances to the same version. If the production application instancehas been updated (or will be updated soon) to a particular version, you shouldupdate the development and staging instances to the target version and repeatall testing steps. Then, if the tests are successful, you should again create thedeployment package to upload it to the production environment.
Also, keep in mind that to carry out the final testing (with the productiondatabase) and deployment stages, you must be registered as an internal user withthe Customizer role assigned.
In this part
• Knowledge Pre-Requisites
• To Prepare an Environment
• To Assign the Customizer Role to a User Account
• Exploring the Source Code
• To Develop a Customization Project
• To Perform Final Testing of a Customization
• To Deploy a Customization Project
• Asking Questions
Knowledge Pre-Requisites
To be able to work on a customization of Acumatica ERP, you should have the followingknowledge of technology used in Acumatica Customization Platform.
Knowledge of technology and programming language used in AcumaticaCustomization Platform
You should have the following knowledge of technology and programming language:
• Proficiency with C# language, including but not limited to the following languagefeatures: classes, OOP, custom attributes, generics, delegates, anonymous methods andlambda expressions.

| Getting Started | 16
• Knowledge of the main concepts of ASP.NET and Web Development: application state,debugging ASP.NET applications using Visual Studio, client and server-side development,Web Forms structure, Web Services.
• Experience with SQL Server: SQL queries (where clause, aggregates, sub-queries),database structure (primary keys, data types, denormalization).
• Experience with IIS: configuration and deployment of ASP.NET websites, configuring andsecuring IIS.
The following courses might be useful to get the required knowledge:
• Programming in C#
• Querying Microsoft SQL Server 2014
• Developing Microsoft SQL Server 2014 Databases
• Visual Studio 2017: Web Development
To Prepare an Environment
As you perform a customization task, you usually need to use three different sites:
• A development environment: Your local environment, on which you program anddebug the customization code.
• A production environment: The target environment of the customer's system thatmust be customized.
• A staging (or pre-production) environment: A copy of the production environment,in which you will test the solution before applying it to the production environment. Thestaging environment can be created on your local system.
All environments are prepared in the same way as described in the following instruction.
To prepare an environment:
1. Install Acumatica ERP.
2. In the Acumatica ERP Configuration Wizard that appears, select Deploy NewApplication Instance to create a local instance of Acumatica ERP for the developmentenvironment.
3. On the Database Configuration page (Step 2 of 8 of the process of deploying a newinstance), create a new database for the development environment.
4. On the Company Setup page (Step 3 of 8), specify the desired settings for the company.
5. On the Instance Configuration page (Step 6 of 8), as the Local Path of the Instance,specify a path outside of the C:\Program Files (x86) and C:\Program Files folders to

| Getting Started | 17
avoid an issue with permission to work in these folders. For example, you could enter C:\AcumaticaSites\MyProject.
The system creates a new Acumatica ERP instance, adds a new company, and loads theselected data. Use the following initial credentials to log in to the new company:
• Login: admin
• Password: setupChange the password when the system prompts you to do so.
6. Log in to Acumatica ERP.
To Assign the Customizer Role to a User Account
Specialists who will work on customization projects should be assigned the Customizer rolein the application instance that is to be customized and tested, as well as in the productionapplication that should be updated with the customization project. With this role assigned,the specialists can use the customization tools and facilities of the Acumatica CustomizationPlatform, and upload and publish customization projects.
A user with the Administrator role has full access rights in the system and can assign theCustomizer role to the needed users by using the Users (SM201010) form.
The default admin user has the Administrator role.
If you have the Administrator role, do the following to assign the Customizer role to a useraccount:
1. Navigate to Configuration > User Security > Manage > Users.
2. In the Login box, select the user account to which the Customizer role should beassigned.
3. Make sure the user account is not a guest account (in the Summary area) and is notassigned to a guest role (on the Roles tab).
4. On the Roles tab, select the check box for the Customizer role, and click Save on theform toolbar.
The screenshot below shows the Johnson user account assigned to the Customizer role.The account is not a guest account and is not assigned to any guest roles.

| Getting Started | 18
Figure: Assigning the Customizer role to a user account
After you save your changes, the user gets full access for customization of the system assoon as the user refreshes a form in the web browser.
User Access Rights for Customization
A user account must be granted the Customizer role to have the appropriate access neededfor customization of Acumatica ERP.
The default admin user account is granted this role. Therefore, if you are a developer whois going to work with a customization project, you can install an application instance ofAcumatica ERP on the local computer and use the admin user account to start doing thecustomization. For testing and deployment of the customization, you should also assign theCustomizer role to the appropriate user accounts on the test instance of the application andon the production instance. On the production instance, only the users who manage thedeployment of customization packages should be granted the Customizer role.

| Getting Started | 19
The users who will be granted the Customizer role must be Acumatica ERP internal users.You cannot assign the Customizer role to a user if either of the following conditions is true(or if both are true):
• The user has a guest account—that is, the user account has the Guest Account checkbox selected on the Users (SM201010) form.
• The user is assigned to a guest role. A guest role has the Guest Role check box selectedon the User Roles (SM201005) form. The default guest roles are Anonymous, Guest, andPortal User.
A user account that is assigned to the Customizer role has access to the following objects ofthe system:
• The Customization Menu and Element Inspector, which give this user the ability toinspect the element properties on every form of Acumatica ERP and to add items to acustomization project.
• The Customization Projects (SM204505) form, which is used to manage and publishmultiple customization projects. (See also Customization Projects Form.)
• The Customization Project Editor, which is used to manage and develop the content of aselected customization project.
Exploring the Source Code
Before you start to customize an Acumatica ERP application instance, you should analyzeyour business requirements to identify the changes in business processes that must be doneand to identify the application objects for the customization. We recommend that you learnabout the structure of the involved webpages by exploring the .aspx pages, the code of thebusiness logic controllers (BLCs), and the data access classes (DACs) that are used withinthe BLCs.
You can use the Source Code (SM204570) form (see also Source Code Browser) to explore theoriginal source code of the application for the following purposes:
• To learn about the structure of the webpages involved in the customization
• To understand which data views are bound with the customized form areas
• To analyze the code that provides the business logic for a form to be customized
• To find and analyze the data views used on a customized webpage
• To understand which data access classes the form being customized is based on
• To learn the attributes of the DAC fields and the relations between DACs
This section contains instructions on how to do the following:
• To Explore the C# Code of a BLC

| Getting Started | 20
• To Explore the C# Code of a DAC
• To Explore the ASPX Code of a Page
• To Find a Customization of the ASPX Code
• To Find Source Code by a Fragment
To Explore the C# Code of a BLC
If you need to customize the business logic for a form of Acumatica ERP, you have to explorethe original source code of the business logic controller (BLC) that provides the businesslogic for the form. The goal of exploring the code is to discover the data views, methods, andevent handlers of the BLC.
To do this, perform the following actions:
1. On a selected form, click Customization > Inspect Element, as item a of thescreenshot below shows, to activate the Element Inspector.
2. Click a control or area of the form to open the Element Properties Dialog Box for the controlor area. See item b on the screenshot.
3. In the dialog box, click Actions > View Business Logic Source (item c).
Figure: Selecting the grid container for the customization

| Getting Started | 21
4. In the Source Code (SM204570) form (see also Source Code Browser), which opens forthe BLC, view the source code in the work area, and use the navigation pane to find amethod or event handler by its name and open it.
Also, you can open the original BLC code in the Source Code browser in the following ways:
• From the Code Editor, by clicking View Source on the page toolbar
• From the Screen Editor, by clicking View Source on the toolbar of the Events tab
To Explore the C# Code of a DAC
If you need to customize the attributes of a data field for an existing control or create a newfield for a custom control on a form, you may need to explore the original source code of theappropriate DAC.
To do this, perform the following actions:
1. On the selected form, click Customization > Inspect Element, as item a of thescreenshot below shows, to activate the Element Inspector.
2. Click a control or area of the form to open the Element Properties Dialog Box for the controlor area. See item b on the screenshot.
3. In the dialog box, click Actions > View Data Class Source (item c).
Figure: Selecting the grid container for the customization

| Getting Started | 22
4. On the Source Code (SM204570) form (see also Source Code Browser), which opens for theDAC, view the data field declarations in the work area.
Also you can open the original DAC code in the Source Code browser in the following ways:
• From the Data Class Editor, by clicking View Source on the page toolbar
• From the Screen Editor, by clicking View Source on the toolbar of the Attributes tab
To Explore the ASPX Code of a Page
If you need to look closely at the data views that provide data for control containers on aform or to see the corresponding webpage structure—that is, the layout of the containersand the types and properties of the controls—you may need to explore the original ASPXcode of the webpage.
To explore this code, perform the following actions:
1. On the selected form, click Customization > Inspect Element, as item a in thescreenshot below shows, to activate the Element Inspector.
2. Click a control or area of the form to open the Element Properties Dialog Box for the controlor area. See item b on the screenshot.
3. In the dialog box, click Actions > View ASPX Source (item c).

| Getting Started | 23
Figure: Selecting the grid container for the customization
4. On the Source Code (SM204570) form (see also Source Code Browser), which opens for theform, view the original ASPX code of the page in the work area.
5. If you need to look closely at the data views that provide data for control containerson the current form, perform a browser search to find the DataMember string. TheDataMember property is used to bind a control container of a form to a data view definedin the business logic controller (BLC) of the form. The property value is the name of thedata view.
Each DataMember property value can correspond to any data view name of theBLC. Any container (for example, PXTab, PXGridLevel, or PXFormView) must bebound to a data view declared within a BLC. Any data view except for the maindata view can be used by an unlimited number of containers. The main data viewmust be bound to a single container.
To Find a Customization of the ASPX Code
If the ASPX code for a form is customized, to explore changes in the code, you use theScreen Editor of the Customization Project Editor, which you access by using the CustomizationProjects (SM204505) form.

| Getting Started | 24
The Source Code browser can display only the original ASPX code of a webpage.
To detect whether a form is currently customized, do the following:
1. Open the form in the browser.
2. Click Tools on the title bar of the form.If the form has been customized, the screen ID has the CST. prefix.
Once you know the form has been customized, to find the customization of the ASPX code ofthe form, perform the following actions:
1. Determine the published customization projects that contain changes for the form asfollows:
a. Navigate to System > Customization > Manage > Customization Projects
b. On the form, view the list of the customization projects (see the followingscreenshot)
Figure: Viewing the list of customization projects
c. In the Screen Names column, for the published customization projects (thosefor which the Published check box is selected), scan the form IDs to identify theprojects that contains changes for this form.
2. To explore a published project that contains changes for this form, perform the followingactions:
a. Click the name of the project to open it in the Customization Project Editor.
b. In the navigation pane of the editor, click Screens to open the Customized Screenspage.
c. On the page (see the screenshot below), click the form ID in the Screen ID columnto open the Screen Editor for the form.

| Getting Started | 25
Figure: Viewing the Customized Screens page of the Customization Project Editor
d. In the Screen Editor, select the View ASPX tab item to view the customized ASPXcode of the node that is currently selected in the Control Tree
e. Explore each node of the tree to find the changes, which are highlighted in yellow, asthe following screenshot shows.
Figure: Viewing the customization of the ASPX code
To Find Source Code by a Fragment
In an instance of Acumatica ERP, a repository with the original C# source code of theapplication is kept in the \App_Data\CodeRepository folder of the website. You can use

| Getting Started | 26
the Source Code (SM204570) form to find the source code within the repository by a codefragment. (For more information, see also Source Code Browser.)
To do this, perform the following actions:
1. Navigate to System > Customization > Explore > Source Code.
2. Click the File in Files tab item.
3. In the Find Text box, enter (by typing or by copying and pasting) a code fragment.
4. Click Find to start the procedure.
The results of the code search are displayed on the form, as the following screenshotshows.
Figure: Viewing the results of the code search in the Source Code browserThe form displays the results in the following elements:
• A list of the locations of the specified code fragment in the repository files
• A text area with the source code of the location selected in the list
5. Explore the use of the code fragment in the original source code by selecting a location inthe list and scrolling the code in the text area.

| Getting Started | 27
To Develop a Customization Project
During the development stage, you develop the customization, which involves implementingyour planned changes by using the framework and tools provided by the AcumaticaCustomization Platform.
We recommend that a separate application instance be used for each developerworking on a single project or group of projects. Multiple developers should not worksimultaneously with the same project or projects. The customization scope should bedivided among the developers on a separate areas so each developer works with aseparate application instance. The created customization projects can be sequentiallyimported into the customer's production environment and applied as if all the dividedtasks had been resolved as a single common one.
Follow this recommended workflow during the development process:
1. In your application instance, create a new customization project or select an existingone.
2. Open the project in the Customization Project Editor.
3. Perform the customization steps, such as:
• Add a UI element. See Customizing Elements of the User Interface for details.
• Extend the business logic. See Customizing Business Logic and Customizing the DatabaseSchema for details.
• Customize the database. See Customizing the Database Schema for details.
After completing each step, validate the changes you have performed.
4. Debug your customization project. See To Debug the Customization Code for details.
5. Publish the project. See Publishing Customization Projects for details.
6. Test the customized application instance.
You develop and maintain customization projects by using the Customization Tools ofAcumatica Customization Platform. The platform provides the mechanisms to develop andpublish customization projects. After the customization project is ready, you prepare thedeployment package to distribute the customization project to the staging or productionenvironment (see Deployment of Customization for details).
To Perform Final Testing of a Customization
After you finished developing your customization, you test it in the staging environment,which can be a local copy of the production environment. The staging environment mustinclude a copy of the production database.

| Getting Started | 28
To apply the customization to the staging environment, you have to do the following:
1. Export the deployment package of the customization project in the developmentenvironment. See To Export a Project for details.
2. Prepare the staging environment in accordance with System Requirements for Acumatica ERP2019 R2.
3. In the staging environment, install a version with the same Acumatica ERP versionnumber that is used in the production environment (see Installing Acumatica ERP fordetails). All further actions must be performed in the staging environment.
4. Copy the deployment package file to the system where the staging environment wasprepared.
5. Start the application instance.
6. Import the project. See To Import a Project for details.
7. Explore the project content. Ensure that the project items contain appropriate data.
8. Publish the project. See Publishing Customization Projects for details.
9. Test the customization.
If you have developed a complex project for an application with multiple customizationprojects published and you can't address some issues that have emerged during this stage,try to perform the original installation with all previous updates, and then upload the savedcontent of the current project to the staging environment.
To Deploy a Customization Project
After you tested your customization project, you deploy it to the production environment.
To apply the customization to the production environment, perform the following actions:
1. Export the deployment package of the customization project in the developmentenvironment. See To Export a Project for details.
2. Copy the deployment package file to the file system where the production environment islocated.
3. Import the project in the production environment, as described in To Import a Project.
4. Publish the project in the production environment to apply the customization. SeePublishing Customization Projects for details.
Related Links
• To Detect Whether a Customization Project Is Applied to the Application

| Getting Started | 29
Asking Questions
Acumatica provides several pages, where you can ask your questions about customizationprocess.
Where To Get Support
• Stack Overflow - Use it to ask all possible question and share your knowledge.
• Git Hub - Check Acumatica Git Hub to get free examples.
• Technical Blog - Google topics and questions that has been answered already.
• Partner Portal - Access portal to get updates and support.
• Your Acumatica support provider.

| Acumatica Customization Platform | 30
Acumatica Customization PlatformTo customize Acumatica ERP, you can use the following parts of the AcumaticaCustomization Platform:
• The web-based Customization Tools to customize the UI and business logic and to gatherthe changes into a distributable package that can be deployed to and applied on a targetsystem
• The Customization Framework to develop customization code that changes the businesslogic of Acumatica ERP
Since an instance of Acumatica ERP consists of the website and the database, you can usethe platform to customize both of these components. The website customization can includecustom DLLs, custom and modified ASPX files, and files with custom C# code that modifiesthe UI and business logic of the product. The database customization can include changes inboth the data and the schema of the database.
This part describes in detail the technologies implemented in the Acumatica CustomizationPlatform.
In This Part
• Customization Project
• Customization Tools
• Customization Framework
Customization Project
When you use the tools provided by the Acumatica Customization Platform, the platformuses a customization project as a container that holds each change you make during thecustomization.
An Acumatica Customization Project is a set of changes to the user interface, configurationdata, and functionality of Acumatica ERP. As the following diagram shows, a customizationproject might include any of the following:
• New custom forms and modifications to the existing forms of Acumatica ERP
• Custom C# code
• Custom database scripts
• Custom or modified reports (Acumatica Report Designer reports, generic inquiries, andanalytical reports)
• Changes in the application configuration (site map changes, new system locales,integration scenarios, shared reusable filters, access rights of roles to forms, changes ofwikis) that are saved in the database for the current tenant

| Acumatica Customization Platform | 31
• Additional files that you need for Acumatica ERP customization
Figure: Content of a customization project
You develop and maintain customization projects by using the tools of the AcumaticaCustomization Platform (see Customization Tools for details). This platform provides themechanisms to develop, upgrade, publish, unpublish (that is, cancel publication), export,and import a customization project. The content of a customization project is stored in thedatabase of the Acumatica ERP instance.
To perform any customization of the UI or to extend the business logic, you have to createa new customization project or modify an existing one. (See To Create a New Project and ToSelect an Existing Project for details.)
Once you have selected a customization project for development, the customizations youperform will be added to this project. The customization project holds each change you makeduring the customization; however before the project is published, the changes exist only inthe project and are not yet applied to the product. To apply the content of a customizationproject to Acumatica ERP, you have to publish the project.
When you need to apply the developed customization to a target environment, you shouldadd all the changes and additional files to the customization project and export the projectas a deployment package—a complete redistributable customization package. Then in thetarget environment, you import the package and publish the project.
You can create as many customization projects as you need and independently develop andmaintain each customization project for a specific customization task.
In This Chapter
• Types of Items in a Customization Project
• Deployment of Customization
• Simultaneous Use of Multiple Customizations

| Acumatica Customization Platform | 32
• Customization of a Multitenant Site
Types of Items in a Customization Project
When you customize an instance of Acumatica ERP by using the Customization Project Editor,the platform keeps all items of a customization project as records in the CustObject table ofthe database. Each record in this table keeps the data of an item, including the XML code ofthe item in a specific field. When you add an item to the customization project, the platformadds the new record to the table, creates the XML code of the item, and stores the codewithin the Content field of the record.
You can view the content of an item of a customization project by using the Item XMLEditor of the Customization Project Editor.
XML Code of the Items
Different item types have XML code that is structured differently. For example, if youcreate the UsrPersonalID bound custom field in the CR.Contact DAC (which is mappedto the SOOrder table) and the control for the field on the Customers (AR303000) form, thecustomization project might contain the following new objects:
• An item with the following XML code to add the column to the DB table.
<Table TableName="Contact"> <Column TableName="Contact" ColumnName="UsrPersonalID" ColumnType="string" AllowNull="True" MaxLength="15" DecimalPrecision="2" DecimalLength="15" IsNewColumn="True" IsUnicode="True" /></Table>
• An item with the following XML code to add the field to the DAC.
<DAC type="PX.Objects.CR.Contact"> <Field FieldName="UsrPersonalID" TypeName="string" MapDbTable="Contact" TextAttributes="#CDATA" StorageName="AddColumn"> <CDATA name="TextAttributes"> <![CDATA[[PXDBString(15)][PXUIField(DisplayName="Personal ID")]]]></CDATA> </Field></DAC>
• An item with the following XML code to add the control to the form.
<Page path="~/pages/ar/ar303000.aspx" ControlId="5" pageSource="...binary content of the page..."> <PXFormView ID="DefContact" ParentId="phG_tab_Items#0_DefContact" TypeFullName="PX.Web.UI.PXFormView"> <Children Key="Template"> <AddItem> <PXTextEdit TypeFullName="PX.Web.UI.PXTextEdit"> <Prop Key="Virtual:ApplyStylesheetSkin" /> <Prop Key="ID" Value="CstPXTextEdit2" />

| Acumatica Customization Platform | 33
<Prop Key="DataField" Value="UsrPersonalID" /> <Prop Key="CommitChanges" Value="True" /> </PXTextEdit> </AddItem> </Children> </PXFormView></Page>
Note that the items in these code blocks differ by type (Table, DAC, and Page) and structure.
Item Types Within a Customization Project
All the possible types of items in a customization project are summarized in the followingtable. The value in the Can Be Unpublished column identifies whether the changesintroduced by the item type are reversed when you unpublish the customization project. Fordetails on which changes are reversed, see Unpublishing Customization Projects.
Item Type(XML Tag, ifdiffers)
Object Description Form forEditing
Can Be Un-published
Page A customform, orchanges toan existingform
• For a custom form, thecontent of the form, andthe path to the .aspx fileof the form (the path isrequired for the systemto detect changes of thefile on the file system inthe development environ-ment and to deploy thefile while publishing theproject)
• For an existing form, thelayout change instructionsand the action change in-structions that have to beapplied by the platform tothe ASPX code of the formduring the project publica-tion
Screen Editor Yes
Automa-tionScreen-Condition
A conditionthat changesthe businesslogic of acustomizedscreen
A data set containing alist of conditions for a cus-tomized screen
Condition Editor Yes
AUScreenAc-tion
An actionthat changesthe businesslogic of a
A data set containing theproperties of an action
Screen Editor Yes

| Acumatica Customization Platform | 34
Item Type(XML Tag, ifdiffers)
Object Description Form forEditing
Can Be Un-published
customizedscreen
AUScreen-Navigation-Action
An actionthat changesthe businesslogic of acustomizedscreen andnavigatesto anotherscreen
A data set containing theproperties of an action
Screen Editor Yes
Automa-tionScreen-Field
A field towhich condi-tions are ap-plied
A data set containing theproperties of a field
Screen Editor Yes
DAC Changes toan existingdata accessclass
The data required to createthe corresponding extensionfor the original data accessclass
Data Class Edi-tor
Yes
Table Changes tothe schemaof an existingdatabase ta-ble
A definition of the customcolumns added to a table forbound custom fields createdin the appropriate DAC
Table Editor No
Code (Graph) Custom C#code
• A custom DAC, which hasthe PX.Data.IBqulTablebase class
• A custom BLC, which hasthe PXGraph<> base class
• An extension for an ex-isting DAC, which has thePXCacheExtension<> baseclass
• An extension for an ex-isting BLC, which has thePXGraphExtension<> baseclass
• A customization plug-in,which has the Customiza-tionPlugin base class
Code Editor Yes

| Acumatica Customization Platform | 35
Item Type(XML Tag, ifdiffers)
Object Description Form forEditing
Can Be Un-published
• Any custom class, whichhas no or any base class
File Custom file The path to a custom fileand the GUID of the file con-tent in the file storage of thedatabase. The path is rel-ative to the website fold-er; new custom forms areadded to the project as cus-tom files.
File Editor Yes
GenericIn-quiryScreen
Custom orcustomizedgeneric in-quiry
A data set of a custom orcustomized generic inquiryform
Generic Inquiry(SM208000)form
No
Report CustomAcumaticaReport De-signer report
A data set of a custom re-port created by using theAcumatica Report Designer
Acumatica Re-port Designer
No
Dashboard Custom orcustomizeddashboard
A data set of a custom orcustomized dashboard
Dashboards(SM208600)form
No
SiteMapNode Custom orcustomizedsite mapnode
A data set of a custom orcustomized site map node(which includes informa-tion about the location of thecustom form or report); youshould create a custom sitemap node for each customform or report included inthe customization project
Site Map(SM200520)form
No
Sql Custom SQLscript
A custom database tabledefinition or custom SQLscript that has to be execut-ed while the customizationproject is published
SQL Script Edi-tor
No
Locale Custom lo-cale
A data set of a custom sys-tem locale, which is a setof parameters that definesthe language and other localpreferences—such as how todisplay numbers, dates, and
System Locales(SM200550)form
No

| Acumatica Customization Platform | 36
Item Type(XML Tag, ifdiffers)
Object Description Form forEditing
Can Be Un-published
times in the user interface—for a group of users
XportSce-nario
Custom inte-gration sce-nario
A data set of a custom ex-port or import scenario usedto perform data migrationbetween a legacy applicationand Acumatica ERP
ImportScenarios(SM206025)form and Ex-port Scenarios(SM207025)form
No
SharedFilter Customshared filter
A data set of a customreusable shared filter creat-ed on a processing or inquiryform
Filters(CS209010)form
No
ScreenWith-Rights
Custom ac-cess rights toa form
A data set of the customaccess rights of roles to aform, down to the control ofform elements, such as but-tons, text boxes, and checkboxes
Access Rightsby Screen(SM201020)form
No
WikiArticle Custom wikimodule
A data set of a custom wikiand all the articles createdwithin this wiki
Wiki(SM202005)form
No
EntityEnd-point
Custom webservice end-point
A data set of a custom webservice endpoint
Web ServiceEndpoints(SM207060)form
No
ReportDefini-tion
Custom ana-lytical report
A data set of a custom ana-lytical report, including thedata of the predefined setsof rows, columns, and units
Report De-finitions(CS206000)form
No
PushNotifica-tion
Push notifica-tion configu-ration
A data set that includes thepush notification destinationand the data query that de-fines for which data changesAcumatica ERP sends notifi-cations
Push No-tifications(SM302000)form
No
BpEvent Businessevent
A data set of a businessevent
BusinessEvents(SM302050)form
No
Mo-bileSiteMap
Mobile appscreen
A script for adding or chang-ing a mobile app screen
Mobile App Edi-tor
Yes

| Acumatica Customization Platform | 37
Item Type(XML Tag, ifdiffers)
Object Description Form forEditing
Can Be Un-published
CSAttribute User-DefinedField
A data set of a user-definedfield with a list of screens onwhich the field is displayed
User-DefinedFields Editor
Yes
Deployment of Customization
Once you have finished a customization project, you can export the project as a deploymentpackage that can be then imported and published as a customization on the end-usersystems, as shown in the following diagram.
Figure: Deployment of customization to target systems
A deployment package is a redistributable .zip file that includes the full content of acustomization project. A deployment package consists of the project.xml file and anycustom files that you have added to the project, such as external assemblies and customASPX pages. You can manually edit the project.xml file in an XML Editor in the file system.However we recommend that you modify the project items in the easiest and most reliableway: by using the Customization Project Editor.
When the project is finished, you can download the deployment package to deploy thecustomization to the target system (see To Export a Project for details). If you have finishedthe project, we recommend that you publish the project and test the customization beforedownloading the deployment package, to ensure that you have no issues. Also, you candownload the package to have a backup copy of the customization project you are workingon.
You can import a deployment package to work with the customization project or to publishthe final customization on the target website (see To Import a Project for details).
In MySQL, the maximum size of one packet that can be transmitted to or from aserver is 4MB by default. If you use MySQL and want to manage a customizationproject with the size that is larger than the default maximum value, you have to

| Acumatica Customization Platform | 38
increase the max_allowed_packet variable in the server. The largest possible packetsize is 1GB.
Simultaneous Use of Multiple Customizations
With the Acumatica Customization Platform, you can simultaneously manage multiplecustomizations by using the Customization Projects (SM204505) form, also described inCustomization Projects Form. You can publish multiple customization projects to an AcumaticaERP instance at once.
When you publish more that one customization project, the platform merges the content ofall projects into a single customization project. If different projects include customization forthe same object, the platform tries to merge the changes by using the following approach:
• If the changes can be merged, the platform merges them. For example, the platform canmerge different properties of the same control in an ASPX page.
• If the changes cannot be merged, as with the same report being in differentcustomization projects, the platform stops the process and displays an error message.
On the Customization Projects form, you can specify an optional number (level) for eachcustomization project, assigning the highest number to the most important change. Thelevel can be used to resolve conflicts that arise while you are publishing customizationprojects if multiple modifications of the same objects of an Acumatica ERP instance aremerged. As a result, the customization from the project with the highest level is added tothe merged project.
Multilevel customizations might be required when you develop an off-the-shelf customizationsolution that is distributed in multiple editions, or applications that extend the functionalityof Acumatica ERP or other software based on Acumatica Framework in multiple markets. Youmay have a customization that contains a solution common to all markets as well as multiplemarket-specific customizations, each of which is deployed along with the base customization.Moreover, you can later apply a high-level project to customize deployed solutions for theend user.
However if you have multiple customizations of the same object and have no marketrequirements to keep multilevel customizations, we recommend that you merge thecustomizations into a single customization project, as described in To Merge Multiple Projects.
Customization of a Multitenant Site
The data of each tenant that uses the same instance of Acumatica ERP is isolated in thedatabase.
Because a customization project is stored in the database, by default, the project databelongs to the tenant in which the project is created or imported. When the project ispublished, the customization applies to both the website files and the database. Becausea customization project can contain different types of items, the platform uses a specificapproach to apply each type of items to the website, database schema, and database data.

| Acumatica Customization Platform | 39
Initially the Page, DAC, Table, SQL, and Code items of a customization project are stored inthe database for a single tenant. However, while the project is being published, the platformcreates certain files for these items in the website folder or changes the database schema, ifrequired. The new files and the changed database schema are available from other tenants.As a result, the listed item types are applied for multiple tenants.
During the publication of the project, for each File item, the platform creates the file in thefile system, so File items are shared for multiple tenants as well.
For example, suppose you have logged in to the MyTenant tenant and have a customizationproject that contains only items of the Page, DAC, Table, Code, and File types. After youhave published the project, the customization is applied to each tenant in the instance ofAcumatica ERP. But the customization project data is still available only in the MyTenanttenant.
However if you publish a customization project that contains items of other types (such asgeneric inquiries and access rights of roles to forms), the customization does not apply tothe website files or to the database schema. This data is stored only in the database, andthe application server uses the data from the database at run time. Because this data istenant-specific, it is available in only the tenant where it was published. Moreover, for alltenants that use the same site, on the Login form and in the About Acumatica box, youcan see that the website is customized, but you won't see any published project on theCustomization Projects (SM204505) form. This form, also described in Customization ProjectsForm, displays the customization projects that have been uploaded to the current tenant;therefore, no projects are displayed if they have been uploaded and published under anothertenant.
You can publish multiple customization projects for multiple tenants at once. On theCustomization Projects form, you can select the customization projects that you need topublish for multiple tenants and use the Publish to Multiple Tenants action to open thePublish to Multiple Tenants dialog box. You then select the required tenants and apply theselected customization projects to the selected tenants. (See To Publish a Customization for aMultitenant Site for details.)
The following table shows the differences in applying a customization to a multitenantwebsite if the customization that has been published from another tenant is shared or notshared for your tenant.
Question Customizationpublished fora multitenantsite from an-other tenant isshared for yourtenant
Customizationpublished fora multitenantsite from an-other tenant isNOT shared foryour tenant
Is the customization applied to the application in-stance (see To Detect Whether a Customization Project IsApplied to the Application for more information) for yourtenant?
Yes Yes

| Acumatica Customization Platform | 40
Question Customizationpublished fora multitenantsite from an-other tenant isshared for yourtenant
Customizationpublished fora multitenantsite from an-other tenant isNOT shared foryour tenant
Do changes in the file system (Page, DAC, and Codeitems) exist for your tenant?
Yes Yes
Do changes of the database schema (Table and SQLitems) exist for your tenant?
Yes Yes
Do custom reports and configuration (such items asReport, SiteMapNode, and SharedFilter) exist for yourtenant?
Yes No
Does the project list on the Customization Projects formcontain the project? (That is, can you access the cus-tomization project data from your tenant?)
No No
Is it necessary to import the customization packageto access the customization project data from yourtenant?
Yes Yes
After the customization package is imported for yourtenant and added to the list on the CustomizationProjects form, is the project displayed in the list as analready published one?
Yes No
Validation of a Customization Project
A customization project must meet various technical requirements to integrate with andoperate within the Acumatica ERP application.
Acumatica ERP Capabilities to Validate and Check Customization ProjectItems
To help to develop a customization project that complies with this technical requirementsand to help to check the project for compliance with this requirements Acumatica ERP andCustomization Project Editor provide the following functionality:
1. Definition of a prefix for the project. All project item names must start with this prefix.You can define this prefix in the Customization Project Editor. For details on defining theproject prefix, see To Manage Prefixes in a Customization Project.
2. Validation of one customization project or multiple customization projects, causing theplatform to check the following criteria:
• The database schema changes included in a customization project are valid

| Acumatica Customization Platform | 41
• The customization project doesn't replace or modify the files distributed as part of thestandard Acumatica ERP application.
• The data types of a custom database column correspond to all data access class(DAC) fields bound to it.
These types of validations should be applied to ISV solutions only.
You can perform this type of validation on the Customization Projects (SM204505)form by using the Validations menu on the form toolbar. In the menu, youselect the Validate Highlighted Project or Validate Multiple Projects menucommand, depending on whether you want to validate one project or multipleprojects correspondingly.
3. Validation of the data consistency in published customization projects, which verifies thecorrespondence between the data types of DAC fields and field states generated by fieldattributes at run time. To perform this validation, you invoke the menu commands on theValidations menu on the form toolbar of the Customization Projects (SM204505) formas follows:
• To verify that the data type of a DAC field matches with the field states generated atrun time, select Validations > DAC Field Types.
• To determine whether there are any PXAttributeFamilyAttribute violations on aDAC field, select Validations > DAC Attributes.
• To verify that DAC fields with lookup boxes defined for a segmented key properlyhandle foreign key segments by means of PXDimensionAttribute, selectValidations > Lookup Definitions.
4. Analysis of custom files included in the customization project.
You can analyze custom files (assemblies) included in the customization project toverify that the customization project doesn't replace or modify files that are distributedas part of the standard Acumatica ERP application. To do this, in the main menu ofthe Customization Project Editor, select Extension Library > Analyze ReferencedAssemblies. A CSV is downloaded with all references made in the project's custom files.
5. Generation of a Workbook with Project Items in Excel format. You can generate thisworkbook, which is in Excel format, in the Customization Project Editor by selecting File> Export Project Items Workbook.
The generated workbook contains a list of solution objects and integration scenariosgrouped by the following types:
• Site map nodes
• Mobile site map nodes
• BLСs and BLC extensions
• DACs and DAC extensions

| Acumatica Customization Platform | 42
• Push notifications
• Import or export scenarios
Customization as Part of an ISV Solution
The validation of a customization project is especially important when a customizationproject is part of an independent software vendor (ISV) solution.
To see technical requirements for a project in the ISV Software Certification Programguidelines, go to Acumatica Partner Portal, open the Partner Program section, and click theAcumatica ISV Solution Certification link in the left pane.
Format of the Validation Results
If any errors or warnings have been detected during project validation, the validation resultshave the following format:
• <CustomizationProjectName>
• <CustomizationRuleName>
• <PathToTheDLL> | <ProjectItemType> | <NameOfTheProjectItem>
List of rules broken by the specified item.
The <PathToTheDLL> field is optional. It appears only if a dll file includedin the project is analyzed.
Customization Tools
Depending on the complexity of the particular customization task, you can employ any thetools implemented in the Acumatica Customization Platform.
For every type of customization, you can use the tools described in the following topics:
• Customization Projects Form
• Customization Menu
• Element Inspector
• Customization Project Editor
• Screen Editor
• ASPX Editor
• Data Class Editor
• Code Editor

| Acumatica Customization Platform | 43
• File Editor
• SQL Script Editor
• XML Editors
• Project XML Editor
• Item XML Editor
• Source Code Browser
Customization Projects Form
The Acumatica Customization Platform stores the data of the customization projects thatwere created or imported in the database of the instance of Acumatica ERP.
You can manage customization projects on the Customization Projects (SM204505) form, whichis shown in the following screenshot.
Figure: Viewing the Customization Projects formOn this form, you can add a new customization project, open a customization project forediting in Customization Project Editor, publish any number of customization projects, cancelthe publication of customization projects, export a customization project as the deploymentpackage, import a customization project from an existing deployment package, and delete acustomization project. (See Managing Customization Projects for instructions.)
Published Customization Page
The Published Customization page of the Customization Projects (SM204505) form showsthe merged XML code of the customization projects that are currently published. On thePublished Customization page, you can:

| Acumatica Customization Platform | 44
• View the code.
• Download the deployment package that contains the code.
The following screenshot shows the merged project, which contains customizationsintroduced by two different projects for the forms with the CR303010 and PO301000identifiers.
Figure: Viewing the merged XML code of the published customization projects
The Published Customization page includes a toolbar and a text area for viewing XML code.The text area displays the XML content of a merged customization project. This area is notused for editing the XML code.
The toolbar buttons of this page are described in the following table.
Button Description
Save to data-base
Is not used.
DownloadPackage
Downloads the Customization.zip file, which includes the full contentof the merged customization project. You can use this file as a joint de-ployment package to work with the customization project or to pub-lish the final customization on the target website. See To Merge MultipleProjects for details.
Upload Pack-age
Is not used.
Choose File Is not used.

| Acumatica Customization Platform | 45
Customization Menu
You can access the Customization menu on an opened Acumatica ERP form if you have theCustomizer role. (For details, see To Assign the Customizer Role to a User Account.)
Click Customization on the form to access the Customization menu associated with theform, as shown in the following screenshot.
Figure:
You can use the following customization-related menu commands.
Command Description
Select Project Opens the Select Customization Project Dialog Box, which you use to selectan existing customization project or to create a new project for all modi-fications that you are going to perform.
Inspect Ele-ment
Launches the Element Inspector, which gives you an option to select a UIcontrol on the current form and opens the Element Properties Dialog Boxfor the selected control. You use the dialog box to inspect and customizethe control.
You can use the keyboard shortcut Ctrl+Alt+Click to inspect ele-ments on pop-up windows and dialog boxes.
If you have selected a customization project, all the modifications thatyou initiate in the inspector will be added to this current project. Oth-erwise, the inspector opens the Select Customization Project dialogbox.

| Acumatica Customization Platform | 46
Command Description
Manage UserDefined Fields
Opens the (CS205020) form, which gives you an opportunity to selectuser-defined fields for the current form from the previously defined listof Managing Attributes and User-Defined Fields. For details on how to adduser-defined user fields see To Add User-Defined Fields to a Form.
Edit Project Opens the Customization Project Editor for the currently selected cus-tomization project.
Manage Cus-tomizations
Opens the Customization Projects (SM204505) form.
Select Customization Project Dialog Box
You use the Select Customization Project dialog box to select an existing customizationproject or to create a new project.
You open the dialog box, shown in the following screenshot, in the following ways:
• From the Customization menu of a form—by selecting the Select Project command
• From the Customization menu of a form—by selecting the Edit Project command ifthere is no currently selected customization project
• From the Element Properties Dialog Box, which you access by clicking the Customizebutton if there is no currently selected customization project
The dialog box contains the following UI controls.
Control Description
Project Name Provides the ability to select an existing customization project. The boxcontains a selector, which you can use to find an existing customizationproject by the name or by a part of the name.
OK Confirms your selection and exits the dialog box.
Cancel Cancels the operation and exits the dialog box.
New Opens the New Project Dialog Box, where you can create a new project.
If you have selected a customization project, all customizations that you initiate will beadded to this current project until you select another project or sign out.

| Acumatica Customization Platform | 47
New Project Dialog Box
You use the New Project dialog box, shown in the following screenshot, to create a newcustomization project.
The dialog box contains the following UI controls.
Control Description
Project Name Provides the ability to enter a name of the customization project.
The customization project name is used as the namespace if youcreate an extension library from the project. The first character ofthe name must be a letter or the underscore symbol.
OK Creates an empty customization project with the specified name andcloses the dialog box.
As soon as you click the OK button, the platform creates a newcustomization project in the database.
Cancel Closes the dialog box.
Element Inspector
You can use the Element Inspector for the following purposes:
• To view the following reference information for any visual element on a form:
• Control type
• Data access class (if applied)
• Data field (if applied)
• Data view (if applied)
• Business logic controller
• Action name (if applied)
• To view the source code of the ASPX page that contains the UI control for the inspectedelement

| Acumatica Customization Platform | 48
• To view the source code of the data access class that provides data for the inspectedelement
• To view the source code of the business logic executed for the inspected element
• To start the customization of the inspected element
For a form, you can activate the Element Inspector from the Customization Menu. If you needto activate the inspector for a pop-up panel, dialog box, or other UI element that opens inmodal mode and makes the Customization menu unavailable for selection, you can pressControl-Alt.
After the inspector is activated, the cursor indicates that you can select a UI elementto inspect. If you select an element, the Element Inspector opens the Element Properties DialogBox.
Element Properties Dialog Box
The Element Inspector opens the Element Properties dialog box, shown below, when youhave selected a UI element to inspect.
In this dialog box, you can perform the following:
• Inspect properties of the UI element selected on the form
• With a single click, launch the Screen Editor for the form to customize the inspectedelement
• Select an action to do any of the following:
• Launch the Code Editor to develop a graph extension for the business logic controller(BLC) bound to the form
• Launch the Data Class Editor for the data access class (DAC) that contains the datafield of the inspected element to customize the DAC
• Open the Source Code Browser to view the following:
• The ASPX code of the inspected page
• The source code of the BLC bound to the form
• The source code of the DAC that contains the data field of the inspected element

| Acumatica Customization Platform | 49
The Element Properties dialog box contains the following controls.
Control Description
Control Type The type of the inspected UI element.
Data Class The name of the DAC to which the field for the inspected element be-longs.
Data Field The string value of the DataField property of the inspected UI element.(It corresponds to the name of the field in the DAC.)
View Name The name of the data view that provides data for the inspected UI ele-ment.
Business Logic The name of the BLC bound to the form.
Action Name The name of the action of the inspected toolbar button.
Customize A button that launches the Customization Project Editor, which opens onthe Screen Editor page for the form that contains the inspected element.
Actions Opens the Actions menu with commands to customize or revise theelement source code using the Customization Project Editor (to cus-tomize) or the Source Code browser (to view).
Cancel Cancels the operation and closes the dialog box.
The Actions Menu
The Actions menu, shown in the screenshot below, contains commands you can invoke tocustomize or revise the code of the following:
• The inspected element
• The current ASPX page on which the element is selected
• The DAC to which the field for the inspected element belongs
• The BLC (graph class) that is bound to the form
The menu contains the following commands.

| Acumatica Customization Platform | 50
Command Description
CustomizeBusiness Logic
Creates a graph extension template for the BLC that is bound to theform, adds the template code to the customization project, and opensthe Customization Project Editor on the Code Editor page, which loads theBLC extension template so you can edit it.
Customize Da-ta Fields
Opens the Customization Project Editor on the Data Class Editor page inthe Edit Attributes section so you can customize the inspected elementattributes.
View ASPXSource
Opens the Source Code Browser on the Screen ASPX tab with the sourcecode of the current form.
View BusinessLogic source
Opens the Source Code browser on the Business Logic tab with thesource code of the BLC that is bound to the form.
View DataClass Source
Opens the Source Code browser on the Data Access tab with thesource code of the DAC to which the field for the inspected element be-longs.
If you have opened the Customization Project Editor or the Source Code browser, youcan access any source code of the website—not only the source code of the inspectedelement and the current form, DAC, and BLC.
Customization Project Editor
You can use the Customization Project Editor (Project Editor) to develop and manage thecontent of a customization project. The editor contains separate pages to add and manageitems of the following types in the currently selected customization project:
• Screen (form)
• Data access class (DAC)
• Code (C#)
• File
• Generic inquiry
• Acumatica Report Designer report
• Site map
• Database script (custom column or script)
• Translation (language locale)
• Integration scenario
• Shared reusable filter

| Acumatica Customization Platform | 51
• Access rights of roles to forms
• Wiki changes
• Analytical report
• Push notification
• Mobile app screen(See Managing Items in a Project for instructions.)
You can launch the Customization Project Editor only if you have selected a customizationproject. You can launch the editor from any form of Acumatica ERP by using the CustomizationMenu or from the Customization Projects (SM204505) form, also described in CustomizationProjects Form.
The Project Editor Webpage
The Project Editor, shown in the following screenshot, looks like a regular webpage thatconsists of the following parts:
• The main menu for working with the customization project
• A navigation pane, which displays the list of pages used to manage the correspondingproject items
• The main area, which displays the list of project items or provides a work area to editthese items
In the navigation pane, a node with capitalized name can be expanded to get direct accessto items of the appropriate type.

| Acumatica Customization Platform | 52
Main Menu of the Project Editor
The main menu contains the following items and commands.
Item Command Description
File Manage Cus-tomizationProjects
Opens the Customization Projects (SM204505) form.
Edit ProjectXML
Opens the Project XML page, which you can use toedit the XML source code of the current customiza-tion project, save it to the database, download theproject package, and upload a deployment package toreplace the project content.
Edit ProjectItems
Opens the Edit Project Items page, which you can useto edit the XML source code of a project item.
Export ProjectPackage
Exports the deployment package of the project—thatis, the ZIP file that contains the project. The file hasthe same name as the exported customization projecthas.
Replace fromPackage
Initiates the import of a previously exported deploy-ment package from a ZIP file. Provides the OpenPackage dialog box with the Choose File button andthe Upload button to replace the current project con-tent.
Publish Publish Cur-rent Project
Initiates the process of publishing the current cus-tomization project. Launches a publication processthat opens the Compilation window to output a logwith information about the process. If both the vali-dation and compilation of the project are successful,the process makes the Publish button available. Thisbutton is used to finalize the publishing and to updatethe website.
MultipleProjects
Opens the Customization Projects in a new window.
Publish withCleanup
Initiates the process of publishing the current cus-tomization project as the Publish Current Projectcommand does, but with the following difference:When the Acumatica Customization Platform publish-es a project that contains a database script, the plat-form executes the script and tries to avoid executingthe script at every publication of the project for op-timization purposes. Therefore, the platform keepsinformation about each script that has been execut-ed at least once and has not since been changed inthe database, and omits the repeated execution ofsuch scripts. If you run the Publish with Cleanup

| Acumatica Customization Platform | 53
Item Command Descriptionoperation, the platform cleans all the informationabout previously executed scripts of the customiza-tion project and executes this scripts once more whilepublishing the project.
Extension Li-brary
Create New Creates a solution for Microsoft Visual Studio in whichyou can develop an extension library for the cus-tomization project. The solution contains the web-site and extension library projects. This action alsodownloads the OpenSolution.bat file. The file con-tains the absolute path to the .sln file in the file sys-tem; you can use this file to open the solution in Visu-al Studio.
By default, the system uses the App_Da-ta\Projects folder of the website as the par-ent folder for the solution project. If the web-site folder is outside of the C:\Program Files(x86) and C:\Program Files folders, such asC:\AcumaticaSites\MySite, we recommendthat you not change it. Otherwise, we recom-mend that you specify a parent folder outsidethese folders to avoid an issue with permissionto access files.
Bind to Exist-ing
Specifies the extension library project in the file sys-tem to which the customization code will be movedif you click Move to Extension Lib on the toolbar ofthe Code Editor.
Open in VisualStudio
Downloads the OpenSolution.bat file, which is usedto open the existing solution in Visual Studio.
Show ActiveExtensions
Starts the verification of extensions for data accessclasses and business logic controllers, and opens theValidate Extensions pop-up window to display thevalidation log. In the log, every error is highlighted inred. We recommend that you verify extensions if youhave upgraded legacy DAC customization.
Source Control Save Project toFolder
Saves the customization project as a set of files toa local folder that is used for integration with sourcecontrol systems. Invoking this action opens theSaves Project to Folder dialog box (see To Save aProject to a Local Folder for instructions) so that youcan select the name and location of the folder inside arepository.
Open Projectfrom Folder
Loads the customization project from the repository.(See To Update the Content of a Project from a Local Folderfor instructions.)

| Acumatica Customization Platform | 54
Built-In Editors in the Project Editor
To help you work with screens, data access classes, code, custom files, and database scriptsin the scope of a customization project, the Project Editor includes the following editors:
• Screen Editor, which is the visual editor for the source code of an .aspx page
• Data Class Editor, which is used to create, develop, manage, and view in XML format thecontent of extensions for data access classes
When the project is published, the Acumatica Customization Platform transformsthe content of extensions for data access classes from XML format to C# code andsaves the code in .cs files in the App_RuntimeCode folder of the website.
• Code Editor, which is used to manage, develop, and view the customization code (C#)added to the project, including extensions for business logic controllers (BLCs) and DACs
• File Editor, which is a text editor used to edit and review the content of text files includedin the customization project
• SQL Script Editor, which is used to add and edit custom SQL scripts in the customizationproject
• Table Editor, which is used to edit custom tables in the customization project
• Mobile App Editor, which is used to add and update mobile app screens in thecustomization project
Other types of items are custom data that can be added to the customization project fromthe database. For these items, the Project Editor provides you the capabilities to add to theproject, delete from the project, and reload from the database. To create or edit these items,you can use dedicated forms of Acumatica ERP. For example, to create or edit a genericinquiry in the database, you can use the Generic Inquiry (SM208000) form.
Also, the Project Editor includes the following editors:
• ASPX Editor, which is used to edit the ASPX code of a page customized by means of theScreen Editor
• XML Editors, which are used to edit and review the XML code of the customization project(Project XML Editor) or a separate item of the project (Item XML Editor)
Screen Editor
The Screen Editor is the visual editor for the source code of an ASPX page and the businesslogic of a screen. You use it to configure ASP.NET containers, such as forms and grids, tospecify the properties of UI controls and grids, as well as to configure conditions and applyconditions to actions and fields.
By using the editor, you can perform customizations of a form as follows:
• By configuring the form's layout in any of the following ways:

| Acumatica Customization Platform | 55
• Add a custom form to Acumatica ERP
• Add a container to a form
• Add a custom field to a data access class (DAC)
• Add a control for a field to a container
• View and modify the properties of a control
• Change the order of controls in a container
• Change the order of actions on a form
• Customize the attributes of a field in a data access class
• View the modifications made to the original declaration of the form
• Immediately preview in the browser the changes made during the customization ofthe layout
• By changing the business logic of the form in any of the following ways:
• Change properties of an action (Visibility and Enabled) or a field (Visibility,Enabled, and Required) dynamically by assigning conditions to the properties
• Add new actions to do any of the following:
• Run a report
• Navigate to an existing record
• Navigate to a form to create a new record
During customization, you can open the Screen Editor in the following ways:
• From the Element Properties Dialog Box, which you access by clicking the Customizebutton on the title bar of the form and selecting Inspect Element
• From the Customized Screens page of the Customization Project Editor, by selecting theScreen ID of the screen (form) you want to customize
• From the navigation pane of the Customization Project Editor, by clicking the neededitem within the Screens folder
The title of each Screen Editor page includes the ID and name (in parentheses) of the formbeing customized. The page also has a toolbar, control tree pane, and tabs, as the followingscreenshot shows.

| Acumatica Customization Platform | 56
Page Toolbar
The page toolbar includes standard and page-specific buttons. The page-specific buttons aredescribed below.
Button Description
Cancel Cancels the latest edit performed in the Screen Editor.
Save Saves to the customization project the difference between the modifiedand original code of the ASPX page, or modifications in the business log-ic of a form.
PreviewChanges
Opens the customized form in a new browser window.
Actions Provides the following actions:
• Edit Aspx: Opens the ASPX Editor with the webpage source code.
• Open Screen: Opens the original form of Acumatica ERP.
• Customize Business Logic: Opens the Code Editor with the extensionclass template of the business logic container (BLC) that is bound tothe form.
• Customize Data Class: Opens the Data Class Editor for customizationof the DAC that contains the field selected in the Control Tree.
Control Tree
The Control Tree displays the hierarchical structure of actions and controls on the webpage.In the tree, you can:
• Select a container, a control, or an action for review or customization.
• Change the order of controls in a container.
• Change the order of actions on a form. The actions are grouped by toolbars on thescreen, such as Standard and Form-Specific. Other available actions are organizedunder the Other group.
• Remove any selected item from the webpage or reset properties of the item to the out-of-the-box state.

| Acumatica Customization Platform | 57
The toolbar of the Control Tree includes the following buttons.
Button Description
Refresh Refreshes the Control Tree.
Add New Action Adds new action to the form.
Remove Removes an item selected in the Control Tree from the form.
Reset Properties Resets all controls and actions to the out-of-the-box state.
To change the order of controls in a container, manually drag controls on the Control Treewithin their containers. You can drag an action in any of the following ways: inside theForm-Specific folder, between the Actions, Inquiries, and Reports folders, and to theForm-Specific folder.
Main Properties Tab
On the Main Properties tab, you can change the main properties of a selected item; theseproperties include Display Name, Visible, and Enabled. For the Enabled, Visible, andRequired properties, you can specify conditions. The Required property is available onlyfor fields.
By default, the values of the Enabled, Visible, and Required properties can be changed toTrue or False. If you have added conditions for the screen, you can select a condition for aproperty. For details on using conditions, see To Add a Condition.
The tab table consists of the following columns.
Column Description
Override A check box that indicates whether the property value was changed.This check box is selected automatically if you change the property.
Property The property name or the name of the property group.
Value The value of the property.
Depending on the type of the selected action, the Main Properties tab also includes a tablewith additional parameters of the action, which you can configure as well.
Layout Properties Tab
On the Layout Properties tab, you can review and modify the layout properties of the formcontrols or actions that are defined on the ASPX page.
The tab contains a toolbar and a table. The tab toolbar includes the Hide AdvancedProperties button ( ) to hide or show advanced properties of the selected control. The tabtable consists of the following columns.

| Acumatica Customization Platform | 58
Column Description
Override A check box that indicates whether the property value was changed.This check box is selected automatically when you change the property.
Property The name of the property or the property group.
Value The value of the property.
Attributes Tab
You use the Attributes tab to review and customize the attributes of the DAC field that isbound to the control currently selected in the Control Tree.
The tab consists of a Summary area with the DAC field information and buttons to customizethe field attributes.
The Summary area contains the following elements.
Element Description
Field Name The name of the field in the DAC. The field name is the name of thepublic virtual property in the public abstract class of the field.
Data Class The name of the DAC to which the field belongs.
Original Attrib-utes
The original attributes of the field in Acumatica ERP.
The Attributes tab provides the following buttons.
Button Description
Customize At-tributes
Opens the Data Class Editor so you can customize the field attributes inthe DAC.
View Source Opens the Source Code Browser on the Data Access tab that displays theDAC source code.
Override OnScreen Level
Opens the Code Editor with the BLC extension class template. Thetemplate includes the field attributes and the template of the DAC-Name_FieldPropertyName_CacheAttached() method, which you canuse to replace the attributes within the BLC.
Events Tab
On the Events tab, you can view and add event handlers for the selected control.
The tab consists of a Summary area, a toolbar, and a table. The Summary area contains thefollowing elements.
Element Description
Data Class The name of the DAC to which the field belongs.

| Acumatica Customization Platform | 59
Element Description
Field Name The name of the field in the DAC.
Business Logic The name of the BLC bound to the form.
The tab toolbar includes the following specific buttons.
Button Description
Add Handler For the selected event, opens the Code Editor with the BLC extensionclass template. The class template includes a code template for theevent handler, so you should implement only the body of the handler.The button provides the following menu commands:
• Keep Base Method: Creates the event handler with two parame-ters, as it is defined in the base BLC. As a result, the event handler isadded to the appropriate event handler collection.
• Override Base Method: Creates the event handler with an additionalparameter to replace the base BLC event handler collection.
View Source Opens the Source Code browser with the source code of the BLC boundto the form.
The table holds information about the event handlers used for the control. It contains thefollowing columns.
Column Description
Event The event name.
Handled inSource
A check box that indicates whether the event handler is implementedwithin Acumatica ERP.
Customized A check box that indicates whether the event handler is customized.This check box is selected automatically when you add the event han-dler.
Add Control Tab
On the Add Control tab, you can add new containers, controls, and layout rules to the form.
To add a control, drag and drop it to the needed position in the Control Tree. After you haveadded the control, you can configure its properties on the Layout Properties tab.
Add Data Fields Tab
You can use the Add Data Fields tab to manage the controls in the form container that iscurrently selected in the Control Tree. On this tab, you can create a control for a DAC fieldand add it to the selected container. You can also create new custom field in a DAC, create acontrol for the field, and add it to the selected container.

| Acumatica Customization Platform | 60
The tab contains the Data View drop-down list, a toolbar, and a table. In the Data Viewdrop-down list, you can select a DAC to view its fields in the table. The list includes allDACName(DataViewName) pairs of the BLC that are bound to the form. The tab toolbarcontains the following buttons.
Button Description
Create Con-trols
Adds the selected fields to the container selected in the Control Tree.
New Field Opens the Create New Field Dialog Box, where you can add a new customfield to the DAC that is referenced in the data view selected in the DataView box.
Once you have created a field or multiple fields, you need to pub-lish the customization project before creating a control for thenew fields.
The table displays the fields that belong to the selected DAC. The table includes the followingcolumns.
Column Description
Included An unlabeled check box that you can use to select a field for which theCreate Controls operation will create a control in the object that is cur-rently selected in the Control Tree.
Used A check box that indicates whether a control for the field exists in theobject that is currently selected in the Control Tree. This check box isselected automatically when you create a control for the field.
Field Name The name and DisplayName (in parentheses) of the field in the DAC.
Control The type of the UI control.
You can use the following filters of DAC fields displayed in the table.
Filter Description
All Fields that are not represented by controls on the form.
Visible Fields that are visible due to the Visibility field attribute in the DAC.
Custom New custom fields of the DAC.
View ASPX Tab
The View ASPX tab displays the ASPX code of the control selected in the Control Tree.
ASPX Editor
You can use the ASPX Editor to edit the ASPX code of a page that has been customized bymeans of the Screen Editor. You can use this editor instead of the Screen Editor if you prefera text editor rather than a visual tool.

| Acumatica Customization Platform | 61
You can launch the ASPX Editor by clicking Actions > Edit Aspx on the toolbar of theScreen Editor.
The ASPX Editor page contains the work area of the editor and a toolbar with only theGenerate Customization Script button, as shown in the following screenshot.
You use the Generate Customization Script button instead of a Save button becausethis action saves to the customization project not the modified ASPX code but the differencebetween the modified code and the original code of the page.
Condition Editor
You use the Condition Editor to construct a condition that can be later specified as a propertyvalue for a control or an action.
You can open the Condition Editor by clicking Conditions under the screen ID in thenavigation pane of the Customization Project Editor. The Condition Editor page contains thefollowing parts: a toolbar with the Cancel and Save buttons, the Conditions area with thelist of the names of the created conditions, and the Condition Details area with the rowsthat make up the condition selected in the Conditions area.
Related Links
• To Add a Condition

| Acumatica Customization Platform | 62
Data Class Editor
You use the Data Class Editor to develop the content of extensions for data access classes(DACs). By using the editor, for example, you can do the following:
• Customize the attributes of the existing fields of a DAC
• Add custom fields to a DAC
• For a selector field, add, delete, and sort the columns of the selector table
• Review the modifications made to an original class
• View the source code of an original data access class
• Navigate to the form on which a field of a class is used
While performing the customization, you can open the editor in the following ways:
• From the Customization Menu > Inspect Element > Element Properties dialogbox, by selecting the Customize Data Fields command on the Actions menu
• From the Customized Data Classes page of the Customization Project Editor, by selectingthe Name field of a DAC
• From the navigation pane of the Customization Project Editor, by clicking an item in theData Access folder
The Data Class Editor page includes the following elements (see the screenshot below):
• The title with the name of the customized class
• A toolbar with standard and page-specific buttons
• A list of the customized fields of the class
• A work area to customize the attributes of the field that is currently selected in the list

| Acumatica Customization Platform | 63
The page toolbar contains the following page-specific buttons.
Button Description
Add Field Provides the following actions:
• Create New Field: Opens the Create New Field Dialog Box, which youcan use to add a new custom field to the DAC.
• Change Attributes of Base Field: Opens the Change Existing Field Di-alog Box, which you can use to add an existing field of the DAC to thecustomization project.
Open Screen For the DAC, opens the primary form of Acumatica ERP.
If there is a primary business logic controller (BLC) for the class,then the primary form is the form bound to this container. Oth-erwise, the primary form is the form bound to the BLC in whichthe class is the main DAC of the primary view. See the AcumaticaFramework training documentation for details.
View Source Opens the Source Code Browser on the Data Access tab, which displaysthe DAC source code.
SelectorColumns
(Available for only the fields that are selectors.) Opens the CustomizeSelector Columns Dialog Box, in which you can modify the columns in theselector table.
Edit Attributes (Unavailable for new custom fields.) Opens the Customize Attributes DialogBox, which you can use to customize the attributes of the selected field.

| Acumatica Customization Platform | 64
You use the list of the currently customized fields of the DAC to select the field that you canreview or change in the work area.
The work area of the page consists of the following:
• The title with the name and type (in parentheses: New Field or Customized ExistingField) of the selected field
• The Customize Attributes text area, where you can edit the attributes of the selectedfield
• The Original Attributes text area, where you can view the original attributes of theselected field
• A drop-down list that is visible for only existing customized fields of the data accessclass, so you can select one of the following ways of applying the changes to the fieldattributes:
• Keep Original: The original attributes remain on the field until you select anotheroption in this box.
• Replace Original: The original attributes are replaced on the field with the customattributes specified in the Customize Attributes text area.
• Append to Original: The custom attributes are added to the end of the list of theoriginal attributes of the data field. If you use this option, make sure you do notduplicate attributes on the field.
The platform gives you advanced possibilities to control the field customization byusing additional attributes in the DAC extension. See Customization of Field Attributes inDAC Extensions of Customization Framework for details.
If you want to change the original attributes in the Customize Attributes text area, beforetyping any text in the area, select the Replace Original option. The original attributes will becopied to the Customize Attributes text area.
Create New Field Dialog Box
You can use the Create New Field dialog box to add a new data field to the customizedDAC.
You can open the dialog box, shown in the following screenshot, in either of the followingways:
• From the Add Data Fields tab of the Screen Editor, by clicking the New Field button
• From the Add Field button of the Data Class Editor, by selecting the Create New Fieldcommand

| Acumatica Customization Platform | 65
The dialog box controls are described below.
Control Description
Field Name The name of the field in the DAC. Because the field is custom, the Usrprefix is added automatically to the name when the box loses focus.
Display Name The name of the field to be displayed on the form. The specified string isinserted into the DisplayName parameter of the PXUIField attribute ofthe field.
Storage Type The storage type for the field, which can be one of the following:
• NonPersistedField: An unbound field of the DAC. The unbound field isadded only to the data access class and is not mapped to the data-base.
• DBTableColumn: An ordinary bound field. The platform adds the data-base column to the base table by altering the base table schema.
• NameValuePair: A "name-value" bound field. The platform stores thefield value in a dedicated table of the database without altering theschema of the base table.
Data Type The data type to be used for a custom fields, which can be one of thefollowing: string, int, bool, decimal, datetime, and guid.
Length (Available if you have selected the string or decimal type.) For the stringtype, the maximum number of symbols in the field value; for the deci-mal type, the precision of the value (the maximum total number of deci-mal digits that will be stored, both to the left of the decimal point and tothe right of it).
Decimal (Available only if you have selected the decimal type.) The scale of thevalue (that is, the number of decimal digits that will be stored to theright of the decimal point).
OK Adds the new field with the specified properties to the data access classand closes the dialog box. The field appears in the list of customizedfields of the class in the Data Class Editor.

| Acumatica Customization Platform | 66
Control Description
Cancel Closes the dialog box.
Change Existing Field Dialog Box
The Change Existing Field dialog box, shown below, is used to add an existing field of thedata access class (DAC) to the list for customization.
You can open the dialog box by clicking the Add Field button of the Data Class Editor andselecting the Change Attributes of Base Field command.
The dialog box controls are described below.
Control Description
Field Name The existing field of the DAC you want to change.
OK Adds the selected field to the list of the customized fields of the data ac-cess class, and closes the dialog box.
Cancel Closes the dialog box.
Customize Selector Columns Dialog Box
The Customize Selector Columns dialog box, shown below, is available for only a selectorfield. In the dialog box, you can add, delete, and sort columns to customize the selectortable. The dialog box contains a toolbar, a table, the OK and Cancel buttons.
You can open the dialog box from the Data Class Editor by clicking the Selector Columnsbutton.

| Acumatica Customization Platform | 67
The dialog box toolbar includes the buttons described below.
Button Description
Refresh Refreshes the list of columns displayed in the table.
Delete Deletes the selected column from the selector.
Add Columns Opens the Add Columns to Selector Dialog Box, which you can use to addcolumns to the table of this dialog box.
Up Moves up the selected field so the column moves left in the selector.
Down Moves down the selected field so the column moves right in the selector.
The table contains information on the selector content and includes the following columns.
Column Description
Column Name The value of the DisplayName parameter of the PXUIField attribute ofthe field.
Data Field The name of the public virtual property of the field in the DAC.
After you click OK in the Customize Selector Columns dialog box, the system appliesthe modifications to the selector table. As a result, the PXCustomizeSelectorColumnsattribute is added to the selector field, and you can view the attribute in the CustomizeAttributes text area of the Data Class Editor. This attribute defines the new set and order ofthe columns in the selector.
The Cancel button closes the dialog box without saving changes to the selector table.
Add Columns to Selector Dialog Box
The Add Columns to Selector dialog box, shown in the following screenshot, is used to addone or multiple columns to the selector table at once. The dialog box contains a table withfilters and the OK and Cancel buttons.
You can open the dialog box from the Customize Selector Columns dialog box by clickingthe Add Columns button.

| Acumatica Customization Platform | 68
The table includes the following columns.
Column Description
Selected A check box you can use to select fields that will be added to the selec-tor.
Column Name The value of the DisplayName parameter of the PXUIField attribute ofthe field.
Data Field The name of the public virtual property of the field in the DAC.
Each tab of the Add Columns to Selector dialog box displays the filtered list of fields. Thetabs are described below.
Filter Description
All All fields.
Selector Fields that are selectors.
Custom New custom fields.
After you click OK in the Add Columns to Selector dialog box, the system applies themodifications. As a result, the selected columns are added to the table of the CustomizeSelector Columns dialog box.
The Cancel button closes the dialog box without saving the changes to the selector table.
Customize Attributes Dialog Box
The Customize Attributes dialog box (shown in the following screenshot) provides theeasiest way to edit attributes of the field selected in the Data Class Editor. The dialog boxcontains an attribute pane, a work area, and the OK and Cancel buttons.
You can open the dialog box from the Data Class Editor by clicking the Edit Attributesbutton.

| Acumatica Customization Platform | 69
The attribute pane includes:
• A toolbar with the Refresh and Delete buttons.
• The list of the field attributes.
In the list, you can select an attribute to be deleted or edited.
You can use the Delete button to delete the selected attribute of the field. After you deletethe attribute and click OK, the [PXRemoveBaseAttribute(typeof(AttrNameAttribute))]attribute is added to the field and you can view the attribute in the Customize Attributestext area of the Data Class Editor.
The work area contains a table that lists the parameters of the attribute selected in the list.The table columns are described below.
Column Description
Property The name of the parameter.
Value The original value of the parameter.
In the table, you can enter any string as the parameter value without type validation. If thevalue of the customized parameter has an incorrect type, it causes a validation error duringthe publication of the project.
After you click OK in the Customize Attributes dialog box, theplatform applies the modifications to the field. As a result, the[PXCustomizeBaseAttribute(typeof(AttrNameAttribute), "ParameterName",NewValue)] attribute is added to the field for each modified parameter. You can view theattribute in the Customize Attributes text area of the Data Class Editor.
You can click the Cancel button to close the dialog box.

| Acumatica Customization Platform | 70
Code Editor
With the Code Editor, you can develop, view, and edit the customization code that has beenadded to the project.
You can open the Code Editor in the following ways:
• From a form of Acumatica ERP by using Customization > Inspect Element to openthe Element Properties dialog box, and then clicking Actions > Customize BusinessLogic
• From the Code page of the Customization Project Editor—by clicking the Object Nameof an existing Code item (see the screenshot below)
• From the navigation pane of the Customization Project Editor, by clicking an item in theCode folder
The Code Editor page includes a toolbar and a text area for editing code, as shown in thefollowing screenshot.

| Acumatica Customization Platform | 71
The toolbar buttons of the Code Editor page are described below.
Button Description
Save Saves the code in the project.
You can use the Control-S combination on the keyboard to savethe code.
Cancel Cancels unsaved changes in the code.
Open Screen Opens the form bound to the business logic controller if you are editingthe customization code of the business logic executed for a form.
View Source Opens the Source Code Browser with the original source code of the busi-ness logic controller (BLC) if you are editing the customization code ofthe business logic executed for a form.
OverrideMethod
Opens the Select Methods to Override Dialog Box, which you can use to se-lect multiple virtual methods of the BLC to override.
New Action Opens the Create Action Dialog Box, which you can use to create a codetemplate for a new action.
Move to Exten-sion Lib
Launches the operation that converts the current Code item into a fileof customization code, adds the file to the extension library project inMicrosoft Visual Studio, and removes the item from the customizationproject. See Move to Extension Lib Action for details.
The customization project must be bound to an existing extensionlibrary project in Visual Studio before you invoke the Move to

| Acumatica Customization Platform | 72
Button DescriptionExtension Lib operation. See Customization Project Editor for de-tails.
Create Action Dialog Box
If the Code item you are viewing by using the Code Editor is a business logic controller (BLC,also referred to as graph) extension, you can create a new action in this BLC. To do this, youcan click the New Action button of the Code Editor to open the Create Action dialog box,shown in the following screenshot.
Figure: Opening the New Action dialog boxTo create an action declaration in the BLC extension, you should specify the name of theaction delegate method in the Action Name box and the name of the action button in theDisplay Name box, as shown in the screenshot above, and then click OK. The system addsto the graph extension a template of the action declaration that includes the following classmembers:
• The declaration of the action delegate method
• The declaration of the button attributes to add the button to the form toolbar with thespecified name
• The template of the action delegate method
The following example shows the template code for an action.
public PXAction<DACName> myActionDelegateMethod;
[PXButton(CommitChanges = true)][PXUIField(DisplayName = "MyActionButtonName")]protected void MyActionDelegateMethod(){ // the body of the action delegate method}

| Acumatica Customization Platform | 73
Select Methods to Override Dialog Box
If the Code item you are viewing in the Code Editor is a business logic controller (BLC)extension, you can override a virtual method of this BLC. To do this, you can use theOverride Method action of the Code Editor, which opens the Select Methods to Overridedialog box, shown in the following screenshot.
Figure: Opening the Select Methods to Override dialog boxTo add a method to the customization, you should select the check box for the method in thetable, as shown in the screenshot, and click Save. The system adds to the graph extension atemplate of an overridden method for each method selected in the table.
The dialog box contains a table that lists the virtual methods of the current BLC and itsparent classes, and the Save and Cancel buttons. You use the table, which contains thefollowing columns, to select the virtual methods that you have to override.
Column Description
Selected A check box that you can use to select the virtual method to be overrid-den in the BLC extension.
Type The identifier of the class type that contains the declaration of the virtu-al method.
Method The signature of the virtual method.
To cancel the operation and close the dialog box, click Cancel.

| Acumatica Customization Platform | 74
Click Save to close the dialog box and launch the process that adds a code template to theBLC extension for each item selected in the table.
When you override a virtual method, the system generates an overridden method templatethat includes the delegate declaration of the base method, the PXOverride attribute, and themethod declaration that invokes the base method delegate.
The following example shows the template code to override the MethodName method.
public delegate returnType MethodNameDelegate(...);[PXOverride]public returnType MethodName(..., MethodNameDelegate baseMethod){ return baseMethod(...);}
Move to Extension Lib Action
You can develop customization code either as Code items in a customization project or assource code included in an extension library project to develop in Microsoft Visual Studio.Some part of a customization may exist in the Code items of a customization project, whileanother part can be included in an extension library that is added to the customizationproject as a dynamic link library (DLL) file.
If you have a Code item in a customization project that you want to move to an extensionlibrary to compile it into a DLL, you can use the Move to Extension Lib action on the pagetoolbar of the Code Editor.
Before you launch the operation, be aware that the customization project is bound to anexisting extension library. (See Customization Project Editor for details.)
After the operation is complete, the Code item that is currently displayed in the work areaof the Code Editor is removed from the customization project, and the file with the samesource code is appended to the extension library that is bound to the customization project.The system assigns a similar name to the file: For example, if the Code item name wasCodeItemName, the name of the created file will be CodeItemName.cs.
For example, suppose you need to move the CustomerMaint Code item to the YogiFonextension library (see the screenshot below).

| Acumatica Customization Platform | 75
Figure: Viewing the content of the Code item before you move it to the extension library
When the operation is complete, the CustomerMaint Code item is removed from thecustomization project, as the screenshot below shows.
Figure: Viewing the Code item list after the operation was performed
In place of the removed item, the CustomerMaint.cs file with the same source code isappended to the bound extension library project, as shown in the screenshot below.

| Acumatica Customization Platform | 76
Figure: Viewing the content of the source code file added to the extension library
The operation of moving code to an extension library is irreversible. If you need to movesource code from an extension library to a Code item of a customization project, use thefollowing approach:
• In Visual Studio (or any text editor), open the file, select the needed source code, andcopy it to the clipboard.
• Create a new Code item in the customization project.
• Delete the code template from the created item.
• Paste the code from the clipboard, and save the Code item to the customization project.
• Delete the source code file from the extension library.
File Editor
You can use the File Editor to view or edit a custom file added to the customization project.
To open a custom file in the editor, on the Custom Files page of the Customization ProjectEditor, click the file name in the list of custom files.
You can use the editor as follows with custom files included in the project:
• To review and edit a text file
• To review the content of a binary DLL file (see the following screenshot)

| Acumatica Customization Platform | 77
Figure: Viewing the content of a custom DLL file in the File Editor
In the editor, you cannot save changes in DLL files.
If you have used the File Editor to modify a custom file in a customization project and havesaved the changes in the database, the changes are not saved in the original file in thefile system. If you then click Detect Modified Files on the toolbar of the Custom Filespage, the platform does not detect a conflict because the file in the database is newer. Theplatform automatically updates the original file in the file system during the publication ofthe customization project.
SQL Script Editor
You use the SQL Script Editor (the Edit SQL Script dialog box) to add and edit a customSQL script. You can open the editor from the Database Scripts page of the CustomizationProject Editor in the following ways:
• To create an SQL script: By clicking Add > Script on the page toolbar
• To edit the script: By doing either of the following:
• Clicking the name of the script in the Object Name column of the table on theDatabase Scripts page

| Acumatica Customization Platform | 78
• Clicking the row of the script in the table on the Database Scripts page and clickingEdit on the page toolbar
Table: Edit SQL Script Dialog Box
The SQL Script Editor has the following elements.Element Description
Script Name The name of the SQL script.
Priority The priority of the script. The priority can have a value that ranges from–100 to 100. By default, the value is 0.
Unlabeled textarea
A text area that you can use to view and edit a custom SQL script.
The SQL Script Editor has the following buttons.
Specify Data-base Engine
Opens the Specify Database Engine dialog box, in which you canspecify the attribute of the script that indicates on which databaseservers the script can be executed (Microsoft SQL Server, MySQL Serv-er, or both).
OK Saves the custom SQL script to the customization project and closes thedialog box.
Cancel Closes the dialog box without saving the changes to the script.
Related Links
• Database Scripts
Table Editor
You use the Table Editor (the Edit Table Columns dialog box) to edit a custom table. Youcan open the editor from the Database Scripts page of the Customization Project Editor inthe following ways:
• By clicking the name of the database table in the Object Name column of the table onthe Database Scripts page
• By selecting the name of the database table in the table on the Database Scripts pageand clicking Edit on the page toolbar
Table: Edit Table Columns Dialog Box
The Table Editor has the following elements.
The table toolbar includes only standard buttons. For the list of standard buttons, see TableToolbar.Element Description
Field Name The name of the field of the database table.
Script Type The type of the database script applied to the table.

| Acumatica Customization Platform | 79
Element Description
Data Type The type of the field of the database table.
The dialog box has the following button.
Done Saves the custom columns of the table to the customization project andcloses the dialog box.
Related Links
• Database Scripts
Mobile App Editor
You can use the Mobile App Editor to add and update mobile app screens to thecustomization project.
You can open the editor on the Mobile Application page of the Customization Project Editor inone of the following ways:
• If you want to add a new screen to the mobile app, click Customize > Add NewScreen.
• If you want to update the main menu of the mobile app, click Customize > UpdateMain Menu.
• If you want to update a screen that is already mapped to the mobile app, clickCustomize > Update Existing Screen.
An example of the editor's appearance is presented on the following screenshot.

| Acumatica Customization Platform | 80
Figure: Editing the main menu of the mobile app
For more details on using the Mobile App Editor, see Working with Mobile Framework.
Related Links
• Mobile Application
XML Editors
In the database, the platform keeps each item of the customization project in XML format.
The platform provides the following tools for experienced users to edit the content of acustomization project in XML format:
• Project XML Editor
• Item XML Editor
Project XML Editor
You can use the Project XML Editor to edit and review the content of a customization projectin XML format.
To open the editor, in the Customization Project Editor, click File > Edit Project XML on themenu (see the following screenshot).

| Acumatica Customization Platform | 81
Figure: Opening the Project XML Editor
The editor page, shown in the screenshot below, contains the following UI elements:
• At the top of the page, the name of the customization project that is opened in the editor
• The page toolbar, which includes the file name of a selected deployment package (or theNo file chosen message) and the following buttons:
• Save to database: To save the XML code of the project to the database
• Download Package: To save the project locally as a deployment package ZIP filethat has the same name as the customization project
• Upload Package: To open the deployment package file whose name is currentlyselected and displayed in the page toolbar
• Choose File: To select a deployment package file
• The work area of the editor

| Acumatica Customization Platform | 82
Figure: Viewing the Project XML Editor page
Item XML Editor
You can use the Item XML Editor to edit and review an item of a customization project.
To open the editor, in the Customization Project Editor, click File > Edit Project Items onthe menu (see the following screenshot).

| Acumatica Customization Platform | 83
Figure: Opening the Item XML Editor
The editor page, shown in the following screenshot, contains the following UI elements:
• The page toolbar, which contains the Save and Cancel buttons
• The list of the items in the customization project
• The work area of the editor

| Acumatica Customization Platform | 84
Figure: Viewing the Item XML Editor page
Source Code Browser
You can explore the source code of the Acumatica ERP application on the Source Code(SM204570) form, which is shown in the following screenshot.

| Acumatica Customization Platform | 85
Figure: Viewing the Source Code form
You can open the browser in the following ways:
• From the Element Properties Dialog Box, by selecting one of the following commands in theActions menu:
• View ASPX Source: To explore the source code of current form
• View Business Logic Source: To explore the source code of the business logiccontroller (BLC) that is bound to the current form
• View Data Class Source: To explore the source code of the data access class (DAC)that contains the data field of the inspected element
• From the Data Class Editor, by clicking View Source on the page toolbar
• From the Code Editor, by clicking View Source on the page toolbar
• From the Screen Editor, by clicking View Source on the toolbar of the Attributes orEvents tab
You can use the Source Code browser for the following purposes:

| Acumatica Customization Platform | 86
• To search for the following types of source code:
• ASPX code, by the screen ID or by the screen title. You can search by any part of anID or of a title.
• C# source code of a BLC or DAC, by the class name. You can also type any part ofthe name and select the name from the list of names that match your search string.
• Any source code, by a text fragment.
• To download a ZIP file with the source code for the website
Customization Framework
The programming framework of the Acumatica Customization Platform, like AcumaticaFramework, is intended for developers experienced in C#.NET. Because the applicationobjects of Acumatica ERP are built on top of Acumatica Framework, the developers needto learn both the programming frameworks to be able to effectively develop qualitycustomizations.
When you have to customize an instance of Acumatica ERP, first you must determine thescope of the customization. For each form that works with data from the database, theinstance of Acumatica ERP must contain at least the following objects (see the diagrambelow):
• An ASPX page: The page must contain, at minimum, the data source control and acontrol container with controls for data fields.
• A business logic controller (BLC, also referred to as graph): The graph must be specifiedin the TypeName property of the data source control of the page. The graph mustcontain at least one data view, which is specified in the PrimaryView property of thedata source control as well as in the DataMember property of the control container. Thegraph instance is created on each round trip and initializes the creation of the dataview instance based on a BQL statement. The data view provides data manipulationsand data flows between the container control, the cache object of the graph, and thecorresponding table of the database. The BQL statement contains a reference to at leastone data access class that is required to map the database table to data records in thecache object.
• A data access class (DAC): On each round trip, the DAC instance is created in the cacheobject when the data view processes any operation with the corresponding data.
• A table in the database: The table is mapped to the data access class that defines thedata record type in the cache object of the graph instance.

| Acumatica Customization Platform | 87
Figure: Objects required for a form that works with data from a database table
By using the Acumatica Customization Platform, you can create or customize each of theobject types listed above.
Customization of ASPX Pages
To change the layout and behavior of an Acumatica ERP form, you must customize thecorresponding ASPX page. However for customizing an ASPX page, the platform uses anapproach that does not require you to change the original ASPX code of the Acumatica ERPform. Instead, the platform can apply the .aspx file with the same name from a specialsubfolder within the website folder, if this file exists. At run time, while the platform isprocessing a request to open a form, the platform first tries to find the needed .aspx fileinside this subfolder to use it instead of the original file. If the file with customized ASPXcode is found, the platform opens the customized form. Otherwise, the original form isopened.
To cancel a customization of a page, you need only to delete the file with the appropriatename from the subfolder.
Customization of Application Classes (BLCs and DACs)
To provide the ability to customize the functionality or business logic of a form, the platformuses the technology based on class extensions. With this technology, to customize a BLC orDAC, the platform does not change the original code of Acumatica ERP. Instead, the platformuses an additional C# file for each class extension.
At run time, the platform automatically detects a class extension during the first initializationof the base (original) class. If an extension is found, the platform replaces the base classwith the merged result of the base class and the extension that was found.

| Acumatica Customization Platform | 88
To cancel a customization of business logic, you need only to delete the file that contains theappropriate class extension.
This approach makes it easy to apply and cancel any customization of business logic inAcumatica ERP.
Customization of the Database Schema
The platform provides the following capabilities that you can use to customize the databaseschema:
• You can create an SQL script to execute while the customization is applied to an instanceof Acumatica ERP.
• You can create a custom bound field to add the corresponding column to a table whilethe customization is applied to an instance of Acumatica ERP.
• You can define the UpdateDatabase() method of a class derived from theCustomizationPlugin class to execute an SQL script or a stored procedure from the C#code after the customization is applied to an instance of Acumatica ERP. (See CustomProcesses During Publication of a Customization for details.)
In This Chapter
• Changes in Webpages (ASPX)
• Changes in the Application Code (C#)
• Changes in the Database Schema
• Custom Processes During Publication of a Customization
Changes in Webpages (ASPX)
To customize the look and behavior of an Acumatica ERP form, you need to change the ASPXcode of the form. Because you need to include all the changes in a customization project,you have to perform the form customization by using the Screen Editor of the CustomizationProject Editor.
To collect all the changes that you make while you customize a form, the Screen Editorcreates a Page item with a name that corresponds to the form ID, and includes the item inthe currently selected customization project. This item contains XML code with instructionsthat have to be applied to the ASPX code of the form during the publication of the project.
For example, the following fragment of a Page item contains the XML code with the<AddItem> tag used to add the UsrSIMCardID field as a column to the Transactions grid.
<PXGridLevel DataMember="Transactions" ParentId="phG_tab_Items#0_grid_Levels#0" TypeFullName="PX.Web.UI.PXGridLevel"> <Children Key="Columns">

| Acumatica Customization Platform | 89
<AddItem> <PXGridColumn TypeFullName="PX.Web.UI.PXGridColumn"> <Prop Key="DataField" Value="UsrSIMCardID" /> <Prop Key="Width" Value="160" /> </PXGridColumn> </AddItem> </Children></PXGridLevel>
In the XML code above, note that the <Prop> tag is used to set the Width property of thecolumn to 160.
With the Screen Editor, you can customize any object in the ASPX code of an AcumaticaERP form and save the resulting changeset to the customization project. To apply thecustomization to the website, you have to publish the project.
For example, at the publication process, the platform transforms the XML code fragmentabove to the following fragment of ASPX code.
<px:PXGridColumn DataField="UsrSIMCardID" Width="160" />
During the publication of the project, the platform applies the XML changeset to theappropriate form to create a customized version of the .aspx file with the same name in thepages_xx subfolder of the CstPublished folder of the website. If the form ID contains theSO prefix, the customized ASPX code is located in the \CstPublished\pages_so folder, asthe following screenshot shows.
Figure: Viewing the files with customized ASPX code in the CstPublished folder
After the project has been published, when Acumatica ERP has to display a form, first it triesto find the .aspx file of the form in the CstPublished folder. If it finds it, Acumatica ERPopens the customized version of the form instead of the original one.
Any customization of Acumatica ERP can be unpublished. If you unpublish a formcustomization, the platform deletes the corresponding file in the CstPublished folder of thewebsite.

| Acumatica Customization Platform | 90
Changes in the Application Code (C#)
In this section, you can find information about the customization of the applicationfunctionality, which is provided by the application business logic (implemented in C# code)of data access classes and business logic controllers.
BLC and DAC Extensions
To give you the ability to customize the functionality or behavior of a form, the AcumaticaCustomization Platform uses technology based on extension models. When you are resolvinga typical customization task, you generally create extensions for original data access classesand business logic controllers.
An extension for a business logic controller (BLC, also referred to as graph) or a dataaccess class (DAC) is a class derived from a generic class defined in the PX.Data assemblyof Acumatica ERP. To declare an extension for a DAC, you derive a class from thePXCacheExtension<T> generic class. To declare an extension of a BLC, you derive a classfrom the PXGraphExtension<T> generic class.
If you have created an extension for a BLC or DAC in a customization project and publishedthe project, the platform applies the extension to the base class at run time. Duringpublication of the project, all the code extensions created for an instance of Acumatica ERPin the project are saved as C# source code files in the App_RuntimeCode folder of theapplication instance (see the diagram below).

| Acumatica Customization Platform | 91
Figure: Use of DAC and BLC extensions for a customization
At run time, during the first initialization of a base class, the Acumatica CustomizationPlatform automatically finds the extension for the class and applies the customization byreplacing the base class with the merged result of the base class and the extension it found.
When you unpublish all customization projects, the platform deletes all the code files fromthe App_RuntimeCode folder. As a result, the platform has no custom code to merge atrun time.
Multilevel Extensions
The Acumatica Customization Platform supports multilevel extensions, which are requiredwhen you develop off-the-shelf software that is distributed in multiple editions. Precompiledextensions provide a measure of protection for your source code and intellectual property.
The figure below illustrates the DAC extension model.

| Acumatica Customization Platform | 92
Figure: DAC extension levels
The figure below illustrates the BLC extension model.
Figure: BLC extension levels
You can use multilevel extensions to develop applications that extend the functionality ofAcumatica ERP or other software based on Acumatica Framework in multiple markets (thatis, specified categories of potential client organizations). You may have a base extension thatcontains the solution common to all markets as well as multiple market-specific extensions.Every market-specific solution is deployed along with the base extension. Moreover, you canlater customize deployed extensions for the end user by using DAC and graph extensions.
When extensions can be deployed separately, the application developer should usemultiple extension levels. Otherwise, we recommend using a single extension level.
The Order in Which Extensions Are Loaded
For each DAC or graph type, the system loads and applies extensions at run time as follows:
1. The system collects extensions for the DAC or graph type.
2. The system sorts the list of extensions in alphabetical order.
3. If there is a subscriber to the PX.Data.PXBuildManager.SortExtentions event, thesystem passes the list of extensions in alphabetical order to this subscriber, which can

| Acumatica Customization Platform | 93
sort extensions in a custom way. A sample implementation of the subscriber is shown inthe following code.
Make sure you use a stable sorting method as the following example does.
using System;using System.Collections.Generic;using System.Linq;using System.Web.Compilation;using Autofac;using PX.Data.DependencyInjection;
namespace MyLib{ public class ServiceRegistration : Module { protected override void Load(ContainerBuilder builder) { builder.ActivateOnApplicationStart<ExtensionSorting>(); } private class ExtensionSorting { private static readonly Dictionary<Type, int> _order = new Dictionary<Type, int> { { typeof(MultiCurrency), 4 }, { typeof(SalesPrice), 3 }, { typeof(Discount), 2 }, { typeof(SalesTax), 1 },
{ typeof(MyGraphExt1), -1 }, { typeof(MyGraphExt2), -2 }, };
public ExtensionSorting() { PXBuildManager.SortExtensions += StableSort; } private static void StableSort(List<Type> list) { if (list?.Count > 1) { var stableSortedList = list.OrderByDescending(item => _order.ContainsKey(item) ? _order[item] : 0).ToList(); list.Clear(); list.AddRange(stableSortedList); } } } }}

| Acumatica Customization Platform | 94
4. The system changes the order of dependent extensions (such as Dac1Ext:PXCacheExtension<Dac1> and Dac1ExtExt: PXCacheExtension<Dac1Ext, Dac1>) sothat the higher-level extensions have higher priorities during the merge operation.
Suppose that the website folder contains five extensions of the Contact DAC that areavailable in the MyLib and ExternalLib namespaces, and the customization project includesan external sorter, which sorts the extensions in a custom way. The following diagramshows how these extensions are sorted. As a result of the sorting in this example, the firstextension that is applied is MyLib.ContactExt. The ExternalLib.ExtExtForContact classhas the highest priority during the merge operation.
Figure: Extension sorting
In This Section
• DAC Extensions
• Graph Extensions
• Run-Time Compilation
• Extension Library
DAC Extensions
This topic explores the ways provided by the Acumatica Customization Platform to definedata access class (DAC) extensions of different levels and shows how different DACextensions can interact.
To declare a DAC extension, you derive a class from PXCacheExtension<T>.
First-Level DAC Extension
The example below shows a declaration of a first-level DAC extension.
class BaseDACExtension : PXCacheExtension<BaseDAC>{ public void SomeMethod() {

| Acumatica Customization Platform | 95
BaseDAC dac = Base; }}
The extension class includes the read-only Base property, which returns an instance of thebase DAC.
Second-Level DAC Extension
The example below shows a declaration of a second-level DAC extension.
class BaseDACExtensionOnExtension : PXCacheExtension<BaseDACExtension, BaseDAC>{ public void SomeMethod() { BaseDAC dac = Base; BaseDACExtension dacExt = Base1; }}
The extension class includes the following:
• The read-only Base property, which returns the instance of the base DAC
• The read-only Base1 property, which returns the instance of the first-level DAC extension
Two Variants of a Higher-Level DAC Extension
A definition of an extension of a higher level has two possible variants. In the first variant,you derive the extension class from the PXCacheExtension generic class with two typeparameters, where the first type parameter is set to an extension of the previous level. Inthe second variant, you derive the extension class from the PXCacheExtension generic classwith the same number of type parameters as the level of the extension of the new class. Inthis case, you set type parameters to extension classes from all lower extension levels, fromthe previous level down to the base class.
First Variant of a Higher-Level DAC Extension
The example below shows the declaration of a third- or higher-level DAC extension thatderives from the PXCacheExtension generic class with two type parameters.
class BaseDACMultiExtensionOnExtension : PXCacheExtension<BaseDACExtensionOnExtension, BaseDAC>{ public void SomeMethod() { BaseDAC dac = Base; BaseDACExtensionOnExtension dacExtOnExt = Base1; }

| Acumatica Customization Platform | 96
}
An extension class defined this way includes the following:
• The read-only Base property, which returns the instance of the base DAC
• The read-only Base1 property, which returns the instance of the DAC extension from theprevious level
Second Variant of a Higher-Level DAC Extension
The example below shows a declaration of a third- or higher-level DAC extension thatderives from the PXCacheExtension generic class with three or more type parameters.
class BaseDACAdvMultiExtensionOnExtension : PXCacheExtension<BaseDACExtensionOnExtension, BaseDACExtension, BaseDAC>{ public void SomeMethod() { BaseDAC dac = Base; BaseDACExtension dacExt = Base1; BaseDACExtensionOnExtension dacExtOnExt = Base2; }}
An extension class defined in this way includes the following:
• The read-only Base property, which returns the instance of the base DAC
• The read-only BaseN properties for all extension levels below the current level, where Nis the sequence number of an extension level
Attributes Hierarchy of a DAC Field
Conceptually, a DAC extension is a substitution of the base DAC. The base DAC is replaced atrun time with the merged result of the base DAC and every extension discovered.
Each extension on another extension completely overrides the DAC field attributes. Theattributes declared on the highest-level extension override all previously declared attributes.
For example, suppose that the attributes of the same DAC field are defined on differentextension levels as follows:
• In the base DAC, as shown below
[PXUIField(DisplayName = "Base Name")] [PXDefault("Default base value")]
• In the first-level DAC extension, as the following code shows
[PXUIField(DisplayName = "Level1 Name", Visible = false)]

| Acumatica Customization Platform | 97
• In the second-level DAC extension, as shown below
[PXUIField(DisplayName = "Level2 Name")][PXDefault("Default 2nd level value")]
If all the extensions are applied, any field of the second-level DAC extension will have thefollowing parameters specified by attributes:
• Display name: Level2 Name
• Visible: true
• Default value: Default 2nd level value
You cannot modify the same member of the base DAC in the DAC extensions of thesame level. You should use DAC extensions of different levels that successively extendone another.
DAC Field Read and Write Operations
The Acumatica Framework can access the value of a DAC field only through an instance ofthe base DAC. The instance of the DAC extension is used to get the field value only when thefield is declared in the extension and is not present in the base DAC.
To assign a value to a field, the application developer should use the instance of the baseDAC. You must use the instance of a DAC extension to assign a field value when the field isdeclared within the extension and is not present in the base DAC.
In This Section
• Access to a Custom Field
• Customization of Field Attributes in DAC Extensions
• Supported DAC Extension Formats
Access to a Custom Field
You can customize a data access class (DAC) in either of the following ways (see thediagram below):
• By altering the attributes of existing fields. You can use an altered field just as you wouldany other existing field.
• By declaring new (custom) fields.

| Acumatica Customization Platform | 98
Figure: Analyzing the content of the merged DAC instance in the cache object
Every custom field is declared within the code of a DAC extension; therefore, at run time,the custom field is accessible only through the DAC extension instance of the cache object.
You can access a custom field:
• From a Method
• From a BQL Statement
• From a Field Attribute
From a Method
You can access the extension instance through the base (original) DAC object by using oneof the following generic methods:
• The GetExtension<T>(object) static generic method of the PXCache<T> generic class
• The GetExtension<T>(object) static generic method declared within the non-genericPXCache class
There are no differences between these generic methods. You can use either one.
For example, you might access an instance of a DAC extension as follows. This example usesthe row instance of the base DAC to retrieve the rowExt DAC extension object.

| Acumatica Customization Platform | 99
DACNameExt rowExt = PXCache<DACName>.GetExtension<DACNameExt>(row);
To access a custom field, use the instance of a DAC extension that contains the field asfollows. The code below illustrates the use of the GetExtension<T>(object) static genericmethod of the PXCache<T> generic class to access an instance of a DAC extension used toaccess a custom field.
var fieldValue = PXCache<DACName>.GetExtension<DACNameExt>(row).UsrFieldName;
You can retrieve a DAC extension object or particular field from it by using the methods ofPXCache, as shown in the code below. This code demonstrates how you can access a field byusing the GetExtension<> method.
//Access to the field through the GetExtension<> method//localCategory gets the value of the usrLocalTaxCategoryID custom field //defined in the InventoryItemExtension DAC extension for the InventoryItem classprotected void InventoryItem_RowUpdating(PXCache sender, PXRowUpdatingEventArgs e){ InventoryItem row = e.NewRow as InventoryItem; InventoryItemExtension rowExt = sender.GetExtension<InventoryItemExtension>(row); string localCategory = rowExt.UsrLocalTaxCategoryID;...
In event handlers, you can also use the GetValue() and GetValueExt() methods to accessthe custom field by its string name, as the code below shows.
//Access to the field through the GetValue() method//localCategory gets the value of the usrLocalTaxCategoryID custom field //defined in a DAC extension for the InventoryItem classprotected void InventoryItem_RowUpdating(PXCache sender, PXRowUpdatingEventArgs e){ InventoryItem row = e.NewRow as InventoryItem; string localCategory = (string)sender.GetValue(row, "usrLocalTaxCategoryID");...
For custom fields defined in DAC extensions, you can also use other methods of PXCacheclasses, such as SetValue() and SetDefaultExt(). For more information, see thePXCache<Table> class in the API Reference Documentation of Acumatica Framework.
You can refer to the custom field by its BQL name in any methods of Acumatica Framework.The example below shows how you can refer to the field in the SetEnabled<T>() methodof the PXUIFieldAttribute that you can use to configure the UI representation of thefield at run time. For more information on available classes and their methods, see the APIReference Documentation of Acumatica Framework.
//The usrLocalTaxCategoryID custom field is defined//in the InventoryItemExtension DAC extension for the InventoryItem class

| Acumatica Customization Platform | 100
protected void InventoryItem_RowSelected(PXCache sender, PXRowSelectedEventArgs e){ InventoryItem row = e.Row as InventoryItem; PXUIFieldAttribute.SetEnabled<InventoryItemExtension.usrLocalTaxCategoryID>(sender, row, true);...
From a BQL Statement
In BQL expressions, you have to refer to the custom field by its BQL name in the extensionclass.
For example, after you have added the UsrSearchKeywords field to theInventoryItemExtension class, which is a DAC extension for the InventoryItem class, thefield is accessible in BQL, as shown in the code below.
//The usrLocalTaxCategoryID custom field is defined//in the InventoryItemExtension DAC extension for the InventoryItem classPXSelect<InventoryItemExtension, Where<InventoryItemExtension.usrLocalTaxCategoryID, IsNotNull>>
From a Field Attribute
In DAC extensions, you have to refer to a custom field by its BQL name.
After you have added the UsrSearchKeywords field to the InventoryItemExtension class,which is a DAC extension for the InventoryItem class, the field is accessible in other DACextensions.
For example, if you need to specify the type of the custom DAC field. For example, inattributes, you can use the typeof operator, as shown in the code below.
//The usrLocalTaxCategoryID custom field is defined//in the InventoryItemExtension DAC extension for the InventoryItem class[PXSelector(typeof(InventoryItemExtension.usrLocalTaxCategoryID))]
Customization of Field Attributes in DAC Extensions
If you have a customization that replaces the original attributes of a field with customattributes, after you upgrade Acumatica ERP to a new version, new functionality maybecame unavailable, as the following diagram shows.

| Acumatica Customization Platform | 101
Figure: Possible result of using the Replace (default) method to customize the attributes of a DACfield
To address this issue, the customization framework provides advanced possibilities for you tocontrol the field customization by using additional attributes in the DAC extension.
When you customize Acumatica ERP, you can specify how the system should apply theoriginal and custom attributes to the field. Thus, you can make the customizations moreflexible and use the collections of original attributes that could be updated betweenAcumatica ERP versions.
To specify the way the system should apply the field attributes in a DAC extension, you canuse the following attributes.
Attribute Description
PXMergeAttributes Specifies how to apply custom attributes tothe existing ones.
PXRemoveBaseAttribute Removes the specified existing attribute.
PXCustomizeBaseAttribute Defines a new value for the specified at-tribute parameter.

| Acumatica Customization Platform | 102
Attribute Description
PXCustomizeSelectorColumns Defines the new set and order of thecolumns in the selector.
Application Order of the Custom Attributes
The customization attributes described above should be declared in the following order:
1. PXCustomizeBaseAttribute
2. PXRemoveBaseAttribute
3. PXMergeAttributes
The PXCustomizeSelectorColumns works independently and can be declared in any placeof the attribute section.
For details on how to customize field attributes for a particular screen, see the OverridingAttributes of a DAC field in the Graph topic.
Supported DAC Extension Formats
You can keep a DAC customization in a customization project in any of the following ways:
• As a DAC item of a customization project in XML format. When you publish theproject, the platform creates the DAC extension source code and saves the code inthe <DACItemName>_extensions.cs file in the App_RuntimeCode folder of thewebsite.
The system creates the file name based on the item name by replacing allsymbols except letters and digits with the _ symbol and adding the _extensionssuffix. For example, the extension code file for the PX.Objects.CR.Contact DACitem has the name PX_Objects_CR_Contact_extensions.cs.
• As a Code item of a customization project that is the C# code of the DAC extensionwrapped in XML format. When you publish the project, the platform saves the code in the<CodeItemName>.cs file in the App_RuntimeCode folder of the website.
• As a .dll file of the extension library in the Bin folder of the website. The library containsthe binary code of the DAC extension. To deploy the extension library to the productionenvironment along with a customization project, you include the extension library in theproject as a File item. See Extension Library for details.
By using the Customization Project Editor, you can:
• Convert a DAC item to a Code item.
The system creates the Code name based on the DAC item name by usingthe last word of the name and adding the Extensions suffix. For example, the

| Acumatica Customization Platform | 103
PX.Objects.CR.Contact DAC item is converted to the ContactExtensions Codeitem.
• Move a Code item to the extension library included in the customization project as a Fileitem.
If you have a customized data access class that is added to the project as a DAC item,then you can click Convert to Extension on the page toolbar of the Customized DataClasses page to convert the class changes into the class extension code used to completethe extension development in either the Code Editor or Microsoft Visual Studio (see thediagram below).
Figure: Converting the code format of a DAC extension in a customization project
For a Code item included in a customization project, if you want to move the code to anextension library to compile it into a .dll file, you can click the Move to Extension Libbutton on the page toolbar of the Code Editor. After the operation is complete, the Codeitem that is currently displayed in the work area of the Code Editor is removed from thecustomization project. The file with the same source code is appended to the extensionlibrary that is bound to the customization project. If the Code item name was CodeItemName,the name of the created file will be CodeItemName.cs.
Graph Extensions
This topic explores the ways provided by the Acumatica Customization Platform to definebusiness logic controller (BLC, also referred as graph) extensions of different levels, andshows how different BLC extensions can interact.
To declare an extension of a BLC, you derive a class from PXGraphExtension<T>.
First-Level BLC Extension
The example below shows a declaration of a first-level BLC extension.
class BaseBLCExtension : PXGraphExtension<BaseBLC>{ public void SomeMethod() { BaseBLC baseBLC = Base;

| Acumatica Customization Platform | 104
}}
The extension class includes the read-only Base property, which returns an instance of thebase BLC.
Second-Level BLC Extension
The example below shows a declaration of a second-level BLC extension.
class BaseBLCExtensionOnExtension : PXGraphExtension<BaseBLCExtension, BaseBLC>{ public void SomeMethod() { BaseBLC baseBLC = Base; BaseBLCExtension ext = Base1; }}
The extension class includes the following:
• The read-only Base property, which returns the instance of the base BLC
• The read-only Base1 property, which returns the instance of the first-level BLC extension
Two Variants of a Higher-Level BLC Extension
A definition of a higher-level BLC extension has two possible variants. In the first variant,you derive the extension class from the PXGraphExtension generic class with two typeparameters, where the first type parameter is set to an extension of the previous level. Inthe second variant, you derive the extension class from the PXGraphExtension generic classwith the same number of type parameters as the level of the extension of the new class. Inthis case, you set type parameters to extension classes from all lower extension levels, fromthe previous level down to the base class.
First Variant of a Higher-Level BLC Extension
The example below shows a declaration of a third- or higher-level BLC extension that isderived from the PXGraphExtension generic class with two type parameters.
class BaseBLCMultiExtensionOnExtension : PXGraphExtension<BaseBLCExtensionOnExtension, BaseBLC>{ public void SomeMethod() { BaseBLC BLC = Base; BaseBLCExtensionOnExtension prevExt = Base1; }}

| Acumatica Customization Platform | 105
An extension class defined in this way includes the following:
• The read-only Base property, which returns the instance of the base BLC
• The read-only Base1 property, which returns the instance of the BLC extension from theprevious level
Second Variant of a Higher-Level BLC Extension
The example below shows a declaration of a third- or higher-level BLC extension that isderived from the PXGraphExtension generic class with three or more type parameters.
class BaseBLCAdvMultiExtensionOnExtension : PXGraphExtension<BaseBLCExtensionOnExtension, BaseBLCExtension, BaseBLC>{ public void SomeMethod() { BaseBLC BLC = Base; BaseBLCExtension ext = Base1; BaseBLCExtensionOnExtension extOnExt = Base2; }}
An extension class defined in this way includes the following:
• The read-only Base property, which returns the instance of the base BLC
• The read-only BaseN properties for all extension levels below the current level, where Nis the sequence number of an extension level
Conceptually, a BLC extension is a substitution of the base BLC. The base BLC is replaced atrun time with the merged result of the base BLC and every extension the platform found.The higher level of a declaration an extension has, the higher priority it obtains in the mergeoperation.
In This Section
• Event Handlers
• Customization of a Data View
• Customization of an Action
• Override of a Method
• Overriding Attributes of a DAC field in the Graph

| Acumatica Customization Platform | 106
Event Handlers
The business logic associated with data modifications is implemented through eventhandlers. Event handlers are methods that are executed when the PXCache objects of aparticular data access class (DAC) raise data manipulation events.
Every business logic controller (BLC, also referred to as graph) instance has a collectionof event handlers for each type of data manipulation event. Every collection is filledautomatically with event subscribers that are declared within the base (original) BLC andthat meet the naming conventions of Acumatica Framework event handlers.
With Acumatica Customization Platform, you can define new event handlers within BLCextensions. You can define an event handler in two possible ways:
• You define the event handler in the same way as it is defined in the base BLC. As aresult, the event handler is added to the appropriate event handler collection. Dependingon the event type, the event handler is added to either the end of the collection or thestart of it. When the event occurs, all event handlers in the collection are executed, fromthe first to the last one.
• You define the event handler with an additional parameter, which represents the delegatefor one of the following:
• The event handler with an additional parameter from the extension of the previouslevel, if such an event handler exists.
• The first item in the collection of event handlers, if no handlers with additionalparameters declared within lower-level extensions exist. The collection contains eventhandlers without the additional parameter from extensions discovered at all levels.
In either case, you can decide whether to invoke the delegate.
The CacheAttached() event handler declared in the highest-level BLCextension is used to replace base DAC field attributes. Attributes attached tothe CacheAttached() event handlers within the base BLC or its extensions areattached to the PXCache object, each time completely replacing the previous ones,from the base BLC to the highest extension discovered.
Event Handler Added to the End of the Collection
The following event handlers are added to the end of the collection:
• FieldUpdated(PXCache sender, PXFieldUpdatedEventArgs e)
• RowSelecting(PXCache sender, PXRowSelectingEventArgs e)
• RowSelected(PXCache sender, PXRowSelectedEventArgs e)
• RowInserted(PXCache sender, PXRowInsertedEventArgs e)
• RowUpdated(PXCache sender, PXRowUpdatedEventArgs e)
• RowDeleted(PXCache sender, PXRowDeletedEventArgs e)

| Acumatica Customization Platform | 107
• RowPersisted(PXCache sender, PXRowPersistedEventArgs e)
The system executes event handlers from the base (original) event handler up to the highestextension level (referred to as the bubbling strategy). The lower the BLC extension's levelof declaration, the earlier the event subscriber is called. The figure below illustrates thisprinciple.
Figure: Event execution with the bubbling strategy
Event Handlers Added to the Beginning of the Collection
The following event handlers are added to the beginning of the collection:
• FieldSelecting(PXCache sender, PXFieldSelectingEventArgs e)
• FieldDefaulting(PXCache sender, PXFieldDefaultingEventArgs e)
• FieldUpdating(PXCache sender, PXFieldUpdatingEventArgs e)
• FieldVerifying(PXCache sender, PXFieldVerifyingEventArgs e)
• RowInserting(PXCache sender, PXRowInsertingEventArgs e)
• RowUpdating(PXCache sender, PXRowUpdatingEventArgs e)
• RowDeleting(PXCache sender, PXRowDeletingEventArgs e)
• RowPersisting(PXCache sender, PXRowPersistingEventArgs e)
• CommandPreparing(PXCache sender, PXCommandPreparingEventArgs e)
• ExceptionHandling(PXCache sender, PXExceptionHandlingEventArgs e)
Event handlers are added by the system to the beginning of the collection by using thetunneling strategy. The system executes event handlers from the highest extension leveldown to the base event handler. The higher the BLC extension's level of declaration, theearlier the event subscriber is called. The figure below illustrates this principle.

| Acumatica Customization Platform | 108
Figure: Event execution with the tunneling strategy
Event Handlers with an Additional Parameter
The event handler with an additional parameter replaces the base BLC event handlercollection. When the event is raised, the system calls the event handler with an additionalparameter of the highest-level BLC extension. The system passes a link to the event handlerwith an additional parameter from the extension of the previous level, if such an eventhandler exists, or to the first item in the event handler collection. You use a delegate as anadditional parameter to encapsulate the appropriate event handler.
The Acumatica Framework provides the following delegates to encapsulate event handlers:
• PXFieldSelecting(PXCache sender, PXFieldSelectingEventArgs e)
• PXFieldDefaulting(PXCache sender, PXFieldDefaultingEventArgs e)
• PXFieldUpdating(PXCache sender, PXFieldUpdatingEventArgs e)
• PXFieldVerifying(PXCache sender, PXFieldVerifyingEventArgs e)
• PXFieldUpdated(PXCache sender, PXFieldUpdatedEventArgs e)
• PXRowSelecting(PXCache sender, PXRowSelectingEventArgs e)
• PXRowSelected(PXCache sender, PXRowSelectedEventArgs e)
• PXRowInserting(PXCache sender, PXRowInsertingEventArgs e)
• PXRowInserted(PXCache sender, PXRowInsertedEventArgs e)
• PXRowUpdating(PXCache sender, PXRowUpdatingEventArgs e)
• PXRowUpdated(PXCache sender, PXRowUpdatedEventArgs e)
• PXRowDeleting(PXCache sender, PXRowDeletingEventArgs e)

| Acumatica Customization Platform | 109
• PXRowDeleted(PXCache sender, PXRowDeletedEventArgs e)
• PXRowPersisting(PXCache sender, PXRowPersistingEventArgs e)
• PXRowPersisted(PXCache sender, PXRowPersistedEventArgs e)
• PXCommandPreparing(PXCache sender, PXCommandPreparingEventArgs e)
• PXExceptionHandling(PXCache sender, PXExceptionHandlingEventArgs e)
For example, for the FieldVerifying event, the event handler with an additionalparameter looks like FieldVerifying(PXCache sender, PXFieldVerifyingEventArgs e,PXFieldVerifying del).
You can execute del() to invoke the event handler to which del points, or you can decidenot to invoke it. When del() points to the base BLC event handler collection, its invocationcauses the execution of the whole collection. All other event handlers in the collection areinvoked sequentially after the first handler is executed.
Suppose that you have declared event handlers as follows.
public class BaseBLC : PXGraph<BaseBLC, DAC>{ protected void DAC_RowUpdated(PXCache cache, PXRowUpdatedEventArgs e) { }
protected void DAC_Field_FieldVerifying(PXCache sender, PXFieldVerifyingEventArgs e) { }}
public class BaseBLCExt : PXGraphExtension<BaseBLC>{ protected void DAC_RowUpdated(PXCache cache, PXRowUpdatedEventArgs e) { }
protected void DAC_Field_FieldVerifying(PXCache sender, PXFieldVerifyingEventArgs e) { }
protected void DAC_RowUpdated(PXCache cache, PXRowUpdatedEventArgs e, PXRowUpdated del) { if (del != null) del(sender, e); }

| Acumatica Customization Platform | 110
protected void DAC_Field_FieldVerifying(PXCache sender, PXFieldVerifyingEventArgs e, PXFieldVerifying del) { if (del != null) del(sender, e); }}
public class BaseBLCExtOnExt : PXGraphExtension<BaseBLCExt, BaseBLC>{ protected void DAC_RowUpdated(PXCache cache, PXRowUpdatedEventArgs e) { }
protected void DAC_Field_FieldVerifying(PXCache sender, PXFieldVerifyingEventArgs e) { }
protected void DAC_RowUpdated(PXCache cache, PXRowUpdatedEventArgs e, PXRowUpdated del) { if (del != null) del(sender, e); }
protected void DAC_Field_FieldVerifying(PXCache sender, PXFieldVerifyingEventArgs e, PXFieldVerifying del) { if (del != null) del(sender, e); }}
In this case, the RowUpdated and FieldVerifying event handlers are invoked in theappropriate sequences, explained below.
The following figure illustrates the order in which the RowUpdated events are invoked.
Figure: The order of the RowUpdated event handler execution

| Acumatica Customization Platform | 111
The following figure illustrates the order in which the FieldVerifying events are invoked.
Figure: The order of the FieldVerifying event handler invocation
Customization of a Data View
The platform provides a way to alter or extend the data views defined in a BLC.
A data view is a PXSelect BQL expression declared in a BLC for accessing andmanipulating data. A data view may contain a delegate, which is an optionalgraph method that executes when the data view is requested. Every data viewis represented by the PXView object and placed in the Views collection of theappropriate BLC. To construct an instance of the PXView class, you use a PXSelectBQL expression and an optional delegate from the highest-level extension discovered.
Suppose that you have declared the Objects data view within the base BLC, as shownbelow.
public class BaseBLC : PXGraph<BaseBLC, DAC>{ public PXSelect<DAC> Objects;}
You can alter a data view within a BLC extension in the following ways:
• By altering the data view within a BLC extension. A data view that is redeclared withina BLC extension replaces the base data view in the Views collection of the BLC instance.Consider the following example of a first-level BLC extension.
public class BaseBLCExt : PXGraphExtension<BaseBLC>{ public PXSelectOrderBy<DAC, OrderBy<Asc<DAC.field>>> Objects;}
The Views collection of a BLC instance contains the PXView object, which uses theObjects data view declared within the first-level extension, instead of the data viewdeclared within the base BLC.

| Acumatica Customization Platform | 112
A data view redeclared within a BLC extension completely replaces the base dataview within the Views collection of a BLC instance, including all attributes attachedto the data view declared within the base BLC. You can either attach the same setof attributes to the data view or completely redeclare the attributes.
• By declaring or altering the data view delegate in a BLC extension. The new delegate isattached to the corresponding data view. Consider the following example of a second-level BLC extension.
public class BaseBLCExtOnExt : PXGraphExtension<BaseBLCExt, BaseBLC>{ protected IEnumerable objects() { return PXSelect<DAC>.Select(Base); }}
The Views collection of a BLC instance contains the PXView object, which uses theObjects data view declared within the first-level extension, with the objects() delegatedeclared within the second-level extension (see the screenshot below).
Figure: The interaction among the levels of a BLC extension
To query a data view declared within the base BLC or a lower-level extension from thedata view delegate, you should redeclare the data view within a BLC extension. You donot need to redeclare a data member when it is not meant to be used from the data viewdelegate. Consider the following example of a second-level BLC extension.
public class BaseBLCExtOnExt : PXGraphExtension<BaseBLCExt, BaseBLC>{

| Acumatica Customization Platform | 113
protected IEnumerable objects() { return Base.Objects.Select(); }}
The new delegate queries the data view declared within the base BLC. Having redeclaredthe data view within the first-level extension, you prevent the data view execution froman infinite loop (see the following screenshot).
Figure: The view of the base BLC from the second-level delegate
If a data view declared within the base BLC contains a delegate, this delegatealso gets invoked when the data view is queried from the new delegate (see thefollowing figure).
Figure: The view with the delegate of the base BLC from the second-level delegate

| Acumatica Customization Platform | 114
Customization of an Action
The platform provides a way to alter or extend an action defined in a business logiccontroller (BLC, also referred as graph).
An action is a BLC member of the PXAction type. An action always has the delegatedefined. Every action is represented by the PXAction object and placed in the Actionscollection of the appropriate BLC. To construct an instance of the PXAction class,you use a BLC member of the PXAction type and a delegate from the highest-levelextension discovered.
Suppose that you have declared the Objects data view and the ValidateObjects actionwithin the base BLC, as shown below.
public class BaseBLC : PXGraph<BaseBLC, DAC>{ public PXSelect<DAC> Objects; public PXAction<DAC> ValidateObjects; [PXButton] [PXUIField(DisplayName = "Validate Objects")] protected virtual void validateObjects() { }}
You can alter actions within BLC extensions in the following ways:
• By overriding action attributes within a BLC extension.
To override action attributes in a BLC extension, you should declare both the BLCmember of the PXAction type and the delegate. You should attach a new set ofattributes to the action delegate. Also, you need to invoke the Press method on thebase BLC action. Having redeclared the member of PXAction<>, you prevent the actiondelegate execution from an infinite loop. Consider the following example of a first-levelBLC extension.
public class BaseBLCExt : PXGraphExtension<BaseBLC>{ public PXAction<DAC> ValidateObjects; [PXButton] [PXUIField(DisplayName = "Validate All Objects")] protected void validateObjects() { Base.ValidateObjects.Press(); }}

| Acumatica Customization Platform | 115
The Actions collection of a BLC instance contains the ValidateObjects action, whichconsists of the PXAction type member and the delegate, both of which were declaredwithin the first-level extension (see the following figure).
When overriding an action delegate within a BLC extension, you completelyredeclare the attributes attached to the action. Every action delegate must havePXButtonAttribute (or the derived attribute) and PXUIFieldAttribute attached.
Figure: The interaction among the first-level and base actions
• By overriding the action delegate within the BLC extension.
The new delegate is used by the appropriate action. Consider the following example of asecond-level BLC extension.
public class BaseBLCExtOnExt : PXGraphExtension<BaseBLCExt, BaseBLC>{ [PXButton] [PXUIField(DisplayName = "Validate Objects")] protected void validateObjects() { }}
The Actions collection of a BLC instance contains the ValidateObjects action, whichconsists of the PXAction<> type member declared within the first-level extension andthe delegate declared within the second-level extension. To use an action declared withinthe base BLC or the lower-level extension from the action delegate, you should redeclarethe action within a BLC extension. You do not need to redeclare an action when it is notmeant to be used from the action delegate.

| Acumatica Customization Platform | 116
Figure: The case when you don't need to redeclare an action
To modify the same member of the base BLC or any BLC extension, you shoulduse extensions of higher levels.
Override of a Method
The platform provides a way to override a method of a BLC.
Suppose that you need to override the Persist method of the BaseBLC class, which isdefined in the code below.
public class BaseBLC : PXGraph<BaseBLC>{ public virtual void Persist() { ... }}
You can override the method within a BLC extension as follows.
public class BaseBLC_Extension : PXGraphExtension<BaseBLC>{ public delegate void PersistDelegate(); [PXOverride] public void Persist(PersistDelegate baseMethod) { ... baseMethod(); ... }}

| Acumatica Customization Platform | 117
The graph extension should include the declaration of the base method delegate, thePXOverride attribute, and the overridden method, which invokes the base method delegate,as the code above shows.
Because the PXOverride attribute on the declaration of the method is included in thegraph extension, it forces the system to override the original method in the graph instance.Otherwise, the overridden method will never be invoked.
Overriding Attributes of a DAC field in the Graph
You can override one attribute or multiple attributes of a DAC field for a particular screenwithout changing the existing behavior of the attribute or attributes for all other screens.
You can do the following to override the attributes of a DAC field:
• Replace the whole set of attributes
• Append an attribute
• Override a single property of an attribute
• Replace one attribute with another
To override attributes, you should declare a CacheAttached event handler in the graph thatcorresponds to the screen for which you want to change the DAC field's behavior. With thedeclared CacheAttached event handler, you use special attributes, depending on what youwant to do with the original attributes, as described in the following sections.
Replacing the Whole Set of Attributes
To override all attributes at once, you should only declare a CacheAttached event handler inthe graph.
Suppose that the original DAC field attributes are declared as shown in the following code.
public class ARInvoice : IBqlTable{ [PXDBDecimal(4)] [PXDefault(TypeCode.Decimal, "0.0")] [PXUIField(DisplayName = "Commission amount")] public virtual Decimal? CommAmt { get; set; }}
To override a DAC field by using the CacheAttached event handler, in the graphcorresponding to the screen whose behavior you want to change, declare the CacheAttachedevent handler for the field. The event handler must be named according to the standardconventions for naming graph events that is described in the Event Handlers topic.
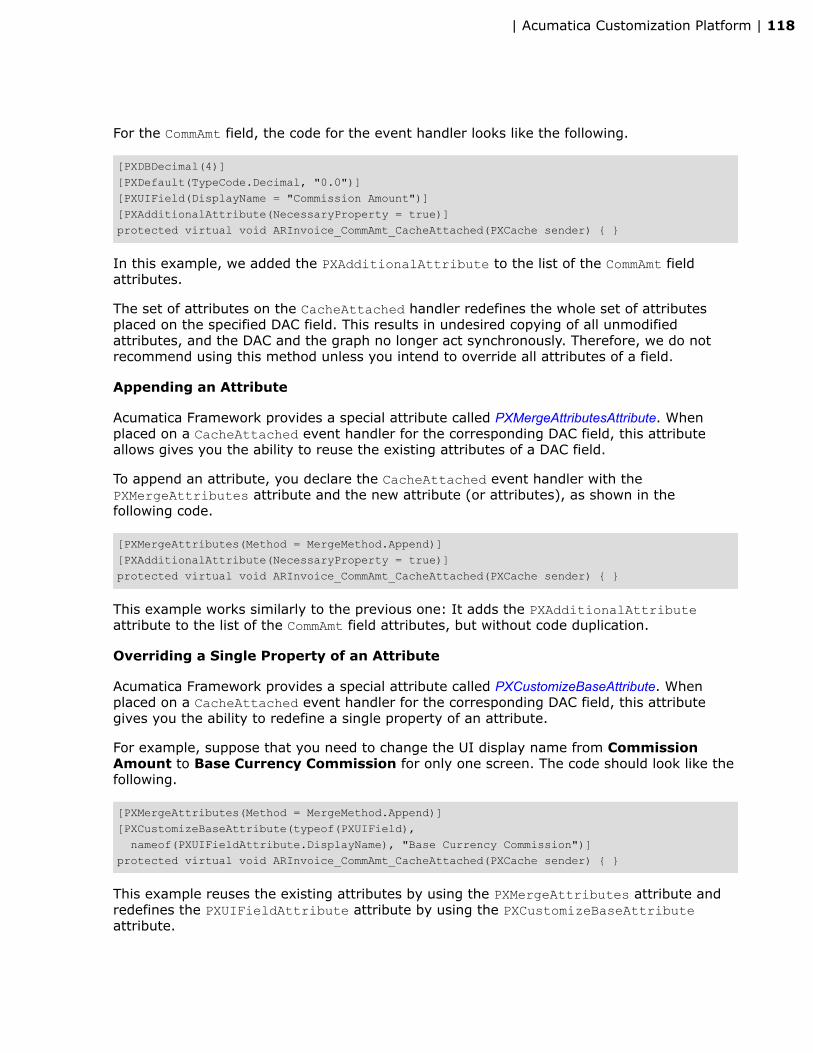
| Acumatica Customization Platform | 118
For the CommAmt field, the code for the event handler looks like the following.
[PXDBDecimal(4)][PXDefault(TypeCode.Decimal, "0.0")][PXUIField(DisplayName = "Commission Amount")][PXAdditionalAttribute(NecessaryProperty = true)]protected virtual void ARInvoice_CommAmt_CacheAttached(PXCache sender) { }
In this example, we added the PXAdditionalAttribute to the list of the CommAmt fieldattributes.
The set of attributes on the CacheAttached handler redefines the whole set of attributesplaced on the specified DAC field. This results in undesired copying of all unmodifiedattributes, and the DAC and the graph no longer act synchronously. Therefore, we do notrecommend using this method unless you intend to override all attributes of a field.
Appending an Attribute
Acumatica Framework provides a special attribute called PXMergeAttributesAttribute. Whenplaced on a CacheAttached event handler for the corresponding DAC field, this attributeallows gives you the ability to reuse the existing attributes of a DAC field.
To append an attribute, you declare the CacheAttached event handler with thePXMergeAttributes attribute and the new attribute (or attributes), as shown in thefollowing code.
[PXMergeAttributes(Method = MergeMethod.Append)][PXAdditionalAttribute(NecessaryProperty = true)]protected virtual void ARInvoice_CommAmt_CacheAttached(PXCache sender) { }
This example works similarly to the previous one: It adds the PXAdditionalAttributeattribute to the list of the CommAmt field attributes, but without code duplication.
Overriding a Single Property of an Attribute
Acumatica Framework provides a special attribute called PXCustomizeBaseAttribute. Whenplaced on a CacheAttached event handler for the corresponding DAC field, this attributegives you the ability to redefine a single property of an attribute.
For example, suppose that you need to change the UI display name from CommissionAmount to Base Currency Commission for only one screen. The code should look like thefollowing.
[PXMergeAttributes(Method = MergeMethod.Append)][PXCustomizeBaseAttribute(typeof(PXUIField), nameof(PXUIFieldAttribute.DisplayName), "Base Currency Commission")]protected virtual void ARInvoice_CommAmt_CacheAttached(PXCache sender) { }
This example reuses the existing attributes by using the PXMergeAttributes attribute andredefines the PXUIFieldAttribute attribute by using the PXCustomizeBaseAttributeattribute.

| Acumatica Customization Platform | 119
Replacing One Attribute with Another
Acumatica Framework provides a special attribute called PXRemoveBaseAttribute. When placedon a CacheAttached event handler for the corresponding DAC field, this attribute gives youthe ability to remove the specified attribute.
For example, suppose that you need to replace PXDefaultAttribute withPXDBDefaultAttribute for only one screen. Further suppose that the original fielddeclaration looks the one shown in the following code.
[Site(DisplayName = "Warehouse ID", DescriptionField = typeof(INSite.descr))][PXDefault(typeof(SOShipment.siteID), PersistingCheck = PXPersistingCheck.Nothing)]public virtual Int32? SiteID { get; set; }
Then replacing PXDefaultAttribute with PXDBDefaultAttribute looks as shown in thefollowing code.
[PXMergeAttributes(Method = MergeMethod.Append)][PXRemoveBaseAttribute(typeof(PXDefaultAttribute))][PXDBDefault(typeof(SOShipment.siteID), PersistingCheck = PXPersistingCheck.Nothing)]protected void SOOrderShipment_SiteID_CacheAttached(PXCache sender) { }
In this example, all existing attributes are reused by the PXMergeAttributes attribute, thePXDefaultAttribute is removed by the PXRemoveBaseAttribute attribute, and the newPXDBDefault attribute is declared.
Run-Time Compilation
If you have created an extension for a business logic controller or a data access class in acustomization project, during the project publication, the Acumatica Customization Platformstores the code of the class extension in a .cs file within the App_RuntimeCode folder ofthe website.
At run time, the platform compiles the code in a separate library that is dynamically mergedwith the original classes. Run-time compilation is used by default for the code of the DACand Code project items. (See Types of Items in a Customization Project for details.)
Publication of a customization updates the files in the App_RuntimeCode folder of thewebsite. Unlike when the Bin folder is updated, update of files in the App_RuntimeCodefolder doesn't cause the application domain to restart. (See Performing the Publication Processfor details.)
Extension Library
An extension library is a Microsoft Visual Studio project that contains customization code andcan be individually developed and tested.

| Acumatica Customization Platform | 120
To move your code from your customization project to an extension library, you should firstcreate an extension library and then move desired Code and DAC items to the extensionlibrary. After that you can develop your extension library in Visual Studio. See the followingtopics for details:
• To Create an Extension Library
• To Convert a DAC Item to an Extension Library
• To Move a Code Item to the Extension Library
If you need to deploy the customization code of an extension library to another system,you have to add the library to a customization project as a File item to include it in acustomization package. See To Add a Custom File to a Project for details.
An extension library .dll file must be located in the Bin folder of the website. At run timeduring the website initialization, all the .dll files of the folder are loaded into the servermemory for use by the Acumatica ERP application. Therefore, all the code extensionsincluded in a library are accessible from the application.
During the first initialization of a base class, the Acumatica Customization Platformautomatically discovers an extension for the class in the memory and applies thecustomization by replacing the base class with the merged result of the base class and thediscovered extension.

| Acumatica Customization Platform | 121
Figure: Actual approach to the use of an extension library for a customization
The use of extension libraries that are precompiled provides a measure of protection for yoursource code and intellectual property.
Extension Library (DLL) Versus Code in a Customization Project
While you are developing source code for a customization task, you can either keep the codein the customization project as DAC and Code items or move the code to an extension libraryand include the library in the project as a File item.
DAC and Code items are saved in the database, and, if the customization project ispublished, in the files located in the App_RuntimeCode folder of the website. AcumaticaCustomization Platform compiles all the code located in this folder at run time.
We recommend that you keep the source code in the customization project only if thecustomization is elementary, such as if the code contains an event handler for a controlon a form. When you work with a code item, it is easy to view the code of the appliedcustomization directly in the Code Editor without Microsoft Visual Studio. However, if you aresolving a complex customization task, it is generally better to develop the solution code in anextension library by using Visual Studio.
You can use Visual Studio to develop a Code item as well as code in an extension library. Butthe IntelliSense feature in Visual Studio is not available for the source code of a Code item if

| Acumatica Customization Platform | 122
the code either uses custom fields or invokes members of class extensions defined in otherCode and DAC items.
You can later customize deployed extensions for the end user by means of code extensions.Therefore, if the customization is compiled to an extension library, more than onecustomization can be applied to a single Acumatica ERP form.
If you have a custom DAC or a DAC extension in one customization and an extensionof this custom DAC or a higher-level DAC extension in another customization, apublication of the second customization will fail if the customizations are publishedin the wrong order. To resolve the issue, convert the DAC extension in the secondcustomization to an extension library. With this approach, no code will be generatedduring publication, and the order of publication is not important. See To Convert a DACItem to an Extension Library for details.
The following table shows the differences in the use of the code in DAC and Code items andin an extension library.
Code in DAC and Codeitems
Code in an Extension Li-brary
Best for: Quick start of a customiza-tion
Development of a customiza-tion project when more thanone developer is involved
Primary storage: Database File system
Location within the websitefolder:
App_RuntimeCode Bin
Intellectual property protec-tion:
No—the source code is openin the deployment package
Yes—the source code is notprovided in the deploymentpackage
Run-time compilation withoutthe application domain beingrestarted:
Yes No
Editor: Code Editor, Visual Studio Visual Studio
IntelliSense feature in VisualStudio:
No Yes
Debugging: Yes Yes
Integration with a versioncontrol system:
Yes Yes
Additional: Can be moved to an exten-sion library when needed
To make a decision about how to work with the code, you should consider the followingquestions:
• How much code will be in the customization project?

| Acumatica Customization Platform | 123
• Is there a need for replicability of the customization?
• How many developers will take part in coding?
• Do you need to open the source code in the production environment?
We recommend that you use an extension library if any of the following conditions is met:
• You intend to have more than five class extensions for business logic controllers.
• The customization will be deployed on more than one system.
• The customization code will be developed by a team that needs to use a version controlsystem.
• You have a reason to protect the intellectual property of the source code of the solution.
Changes in the Database Schema
The Acumatica Customization Platform permits the following changes to the database in thescope of a customization project:
• Creation of custom tables
• Creation of custom columns in existing tables
• Creation of views, indexes, and other database objects
Creation of Custom Tables
We recommend that you create a custom table in the database of your developmentenvironment by using a database administration tool, such as SQL Server ManagementStudio, and then import the table schema from the database to a customization project byusing the Customization Project Editor. The project keeps the schema in XML format. Whilepublishing the customization project, the platform executes a special procedure to create thetable by the schema, while meeting all the requirements of Acumatica ERP.
Creation of Custom Columns in Existing Tables
To create a custom database-bound field, you add a column to the database table anddeclare the field in the extension of the base (original) DAC.
The new column is appended to the original table by altering the table schema. Whenyou create the database-bound field by using the Data Class Editor, the platform generatesthe DAC extension code for the new field and adds to the customization project the XMLdefinition of the new column to be created in the database. To be able to create a UI controlfor the new field to display on a form, you have to publish the project to make the systemcreate the column in the database table and compile the customization code. After thepublication, you can add the control for the new field to the form by using the Screen Editor.

| Acumatica Customization Platform | 124
Creation of Views, Indexes, and Other Database Objects
With the platform, you can add to a customization project an SQL script to be executedduring the publication of the project. However, we recommend that you avoid doing this.
A possible result of a custom SQL script is the loss of the integrity and consistency ofthe application data.
If you do add a custom SQL script, you must adhere to the following requirements for thescript:
• Because Acumatica ERP supports multitenancy, you must create an SQL script thatcorrectly creates a database object that properly specifies and uses the company mask.
• You must correctly specify the attributes for the script so that the script can be executedon the target database servers: MySQL Server, Microsoft SQL Server, or both. For detailsabout attributes, see Using the SQL Script Attributes.
Custom Processes During Publication of a Customization
The platform provides you the ability to execute custom processes within the instance ofAcumatica ERP at the following times during the publication of a customization project:
• After website files are updated but before the website is restarted
• After the customization has been published and the website is restarted
To implement such processes, you can create a class derived from theCustomizationPlugin class, further referred to as the customization plug-in, and overrideone or both of the following methods, which can be invoked at the end of the publicationprocess:
• The OnPublished() method is executed right after website files are updated but beforethe website are restarted. This method is invoked only if run-time compilation is enabled.In a cluster environment, the method is invoked on each cluster node. By using thismethod, you can update any files within the website except the customization code fileslocated in the /Bin folder. For example, you can set up your own UI styles and skins orlog-in images.
• The UpdateDatabase() method is executed after the customization is published andthe website is restarted. In this method, for example, you can already manipulate datain the database by using the business logic implemented in the customization. Forexample, you can develop source code to import data by using a scenario included in thecustomization.
In a customization project, you can include multiple classes derived from theCustomizationPlugin class.
The platform does not provide you the ability to set the order of execution ofcustomization plug-ins in a published customization.
For details about how to create a class derived from the CustomizationPlugin class, see ToAdd a Customization Plug-In to a Project.

| Managing Customization Projects | 125
Managing Customization ProjectsA customization project is a set of changes to the user interface and functionality ofAcumatica ERP. A customization project, described more fully in Customization Project, mightinclude the following:
• New custom forms and modifications to existing forms of Acumatica ERP
• Extensions for the business logic
• Custom reports
• Custom application configuration
• Additional files that you need for the customization
In Acumatica ERP, you manage customization projects by means of the CustomizationProjects (SM204505) form, which is shown in the screenshot below. (See also CustomizationProjects Form for more information.) On this form, you can add a new customization project,open a customization project for editing in the Customization Project Editor, publish anynumber of customization projects, cancel the publication of customization projects, exporta customization project as the deployment package, import a customization project from anexisting deployment package, and delete a customization project.
Figure: Viewing the Customization Projects form
In MySQL, the maximum size of one packet that can be transmitted to or from aserver is 4MB by default. If you use MySQL and want to manage a customizationproject with the size that is larger than the default maximum value, you have toincrease the max_allowed_packet variable in the server. The largest possible packetsize is 1GB.
In This Part
• To Create a New Project
• To Select an Existing Project

| Managing Customization Projects | 126
• To Open a Project
• To Update a Project
• To Delete a Project
• To Export a Project
• To Import a Project
• To Replace the Content of a Project from a Package
• To Merge Multiple Projects
• To Manipulate Customization Projects from the Code
To Create a New Project
Because the Acumatica Customization Platform uses a customization project as a containerfor the customization items, the platform does not permit you to perform any customizationwithout starting a customization project.
You can create a customization project in the following ways:
• On the Customization Projects form
• From the Customization menu
• From the Element InspectorThere are no differences between these ways because the result is the same: a newcustomization project with the specified name is added to the Acumatica ERP instanceas a record in the database. The platform can then use this project as a container ofcustomization items.
Customization project name can contain the following symbols: Latin letters,numbers, dots, underscores, and square brackets, The project name must start with aletter. For example, the name ISVSolution[18.101.0039][18R1_2018.01.25] is valid.The names 18R1_ISV and R1{ISV} are not valid.
Adding a Customization Project on the Customization Projects Form
To add a customization project on the Customization Projects (SM204505) form, perform thefollowing actions:
1. Navigate to System > Customization > Manage > Customization Projects.
2. On the form toolbar, click Add Row (+), as shown in the following screenshot, to add arow to the list of the projects on the form.

| Managing Customization Projects | 127
Figure: Adding a row to the customization project list
3. In the new row, specify a unique name for the project, as the screenshot below shows.
4. Click Save on the form toolbar to save the new project in the database.
Figure: Entering the new project name
Creating a Customization Project from the Customization Menu
To create a customization project from the Customization Menu, perform the following actions:
1. On any form of Acumatica ERP, click Customization > Select Project, as the followingscreenshot shows (item a).
2. In the Select Customization Project Dialog Box, which opens, click New (item b).
3. In the New Project Dialog Box, which opens, enter the name of the new project (item c).
4. In this dialog box, click OK (item d) to create the project in the database and close thedialog box.

| Managing Customization Projects | 128
Figure: Creating a customization project from the Customization menu
Creating a Customization Project from the Element Inspector
Suppose that you have not selected a customization project. In the Element Properties DialogBox, if you have tried to start performing customization by clicking Customize, Actions> Customize Business Logic, or Actions > Customize Data Fields, the inspectoropens the Select Customization Project dialog box to force you to select or create acustomization project.
To create a customization project from this dialog box, perform the following actions:
1. In the dialog box, click New.
2. In the New Project dialog box, which opens, enter the name for the new project (itemc).
3. In this dialog box, click OK to create the project in the database and close the dialogbox.
To Select an Existing Project
Because the Acumatica Customization Platform uses a customization project as a containerfor the customization items, the platform does not permit you to perform any customizationwithout starting a customization project.
You can select an existing customization project in the following ways:
• By selecting it from the Customization menu

| Managing Customization Projects | 129
• By selecting it from the Element Inspector
To Select a Customization Project from the Customization Menu
To create a customization project from the Customization Menu, perform the following actions:
1. On any form of Acumatica ERP, click Customization > Select Project, as the followingscreenshot shows (item a).
2. In the Select Customization Project Dialog Box, which opens, click the Project Nameselector and select a project name (items b and c).
3. In this dialog box, click OK (item d) to select the project and close the dialog box.
Figure: Selecting a customization project from the Customization menu
To Select a Customization Project from the Element Inspector
Suppose that you have not selected a customization project. If in the Element Properties DialogBox, you have tried to perform customization by clicking Customize, Actions > CustomizeBusiness Logic, or Actions > Customize Data Fields, the inspector opens the SelectCustomization Project dialog box to force you to select a customization project.
To select a customization project, in the Select Customization Project dialog box, performthe following actions:
1. In the Project Name selector, select a project name.
2. Click OK to select the project and to close the dialog box.

| Managing Customization Projects | 130
To Open a Project
If you have selected a customization project, you can open the project for editing in theCustomization Project Editor in the following ways:
• On the Customization Projects Form: Click the project name in the table.
• From the Customization Menu: Click Customization > Edit Project.
• From the Element Properties Dialog Box: Click Customize, Actions > CustomizeBusiness Logic, or Actions > Customize Data Fields.
To Update a Project
If you have modified an item of a customization project in the file system by using anintegrated development environment (IDE), such as Microsoft Visual Studio, these changesmay not be reflected in the customization project yet. You have to update the project in thedatabase before the publication or export of the deployment package of the project.
To update a customization project, perform the following actions:
1. Open the project in the Customization Project Editor. (See To Open a Project for details.)
2. In navigation pane of the editor, select Files to open the Custom Files page.
3. On the page toolbar, click Detect Modified Files, as shown in the screenshot below, toreview the files included in the project that could have been modified in the file systembut haven't been updated in the customization project yet.
If at least one conflict is detected, the Modified Files Detected dialog box opens (alsoshown in the following screenshot). The dialog box displays each changed file with thecheck boxes in the Selected and Conflict columns selected. See Detecting the ProjectItems Modified in the File System for details.
4. To update the selected files in the project, on the toolbar of the dialog box, click UpdateCustomization Project, as the following screenshot shows.

| Managing Customization Projects | 131
Figure: Updating files in the project
To Delete a Project
If a customization project is not published, you can delete the project from the instance ofAcumatica ERP by using the Customization Projects (SM204505) form.
To delete a customization project, perform the following actions:
1. Navigate to System > Customization > Manage > Customization Projects.
2. In the project list, select the row of the project that has to be deleted, as shown in thescreenshot below (item a).
3. On the form toolbar, click Delete Row (X), item b in the screenshot, to delete theselected project from the list.
4. On the form toolbar, click Save (item c in the screenshot) to save the changes to thedatabase.

| Managing Customization Projects | 132
Figure: Deleting a customization projectThe platform deletes from the database the project data and the data of the project items.The platform does not delete the files and the objects that were added to the projects fromthe database, such as site map nodes, reports, user access rights, and integration scenarios.
To Export a Project
You can export (download) a customization project when the project is finished to deploy thecustomization to the target system. Also, you can download the package to have a backupcopy of the customization project you are working on.
Before you download the package, we recommend that you make sure you have included allthe needed changes in the customization project. To do this, you take the following actions:
• Make sure that you have added all custom files to the project and uploaded the latestactual version of the files to the project. See To Update a Project for details.
• Make sure that the database schema is updated in the customization project. See ToUpdate Custom Tables in the Project for details.
• Make sure you have added the needed site map nodes to the project. See Site Map fordetails.
• Publish the project and test the customization before downloading the deploymentpackage, to ensure that you have no issues.
To download the deployment package of a customization project, you should export theproject. You can export a customization project in the following ways:
• By using the Customization Projects form
• Through the Customization Project Editor

| Managing Customization Projects | 133
The system creates the deployment package of the project and downloads the zip file ofthe package on your machine. The file has the same name as the customization project. Formore information about a deployment package, see Deployment of Customization.
Exporting a Customization Project by Using the Customization Projectsform
To export a customization project by using the Customization Projects (SM204505) form,perform the following actions:
1. Navigate to System > Customization > Manage > Customization Projects.
2. In the project list of the form, click the row of the customization project to be exported.
The row is highlighted in the table, as the screenshot below shows.
3. Click Export on the form toolbar to export the highlighted project.
Figure: Exporting a customization project
Exporting the Customization Project Opened in the Customization ProjectEditor
To export the customization project that is currently opened in the Customization ProjectEditor, click File > Export Project Package on the editor menu, as shown in the followingscreenshot.

| Managing Customization Projects | 134
Figure: Exporting the current customization project
Also, you can export the customization project from the Project XML Editor of the CustomizationProject Editor by clicking Download Package on the page toolbar, as shown in the followingscreenshot.
Figure: Exporting the current customization project from the Project XML Editor
To Import a Project
You can import a deployment package to work with the customization project or to publishthe final customization on the target website.

| Managing Customization Projects | 135
You can import deployment packages of earlier versions of Acumatica ERP toAcumatica ERP 2019 R2.
To upload the deployment package of a customization project, you should import the projectby using the Customization Projects (SM204505) form. (See Customization Projects Form for moreinformation.)
To do this, perform the following actions:
1. Navigate to System > Customization > Manage > Customization Projects.
2. Click Import on the form toolbar, as the screenshot below shows.
3. In the Open Package dialog box, which opens, click Choose File.
4. In the Open dialog box, which opens, select the deployment package file to be uploaded.
The name of the selected file is displayed in the File path box of the Open Packagedialog box, as shown in the screenshot.
Figure: Importing a customization project
5. In the Open Package dialog box, click Upload.The platform uploads the selected package, create the corresponding customization project,and saves the project in the database. As the result, the new customization project appearsin the list on the Customization Projects form; therefore, you can access the project data andmanage the project.
To Replace the Content of a Project from a Package
You might need to upload a newer version of the customization project that has beenmodified outside the system on which you are working, or upload the project from a backupcopy.

| Managing Customization Projects | 136
You can replace the content of a customization project from a deployment package in thefollowing ways:
• By using the Customization Projects form
• Through the Customization Project Editor
The platform does not verify the content of a deployment package before replacing acustomization project in the database.
Replacing a Customization Project from a File by Using the CustomizationProjects Form
To replace the content of a customization project from a file by using the the CustomizationProjects (SM204505) form (see also Customization Projects Form), perform the followingactions:
1. Navigate to System > Customization > Manage > Customization Projects.
2. In the project list, click the row of the customization project to be updated, as thescreenshot below shows.
3. Click Import > Replace Highlighted Project Content on the form toolbar, as thescreenshot below also shows.
4. In the Open Package dialog box, which opens, click Choose File.
5. In the Open dialog box, which opens, select the deployment package file to be uploaded.
The name of the selected file is displayed in the File path text box of the OpenPackage dialog box, as shown in the screenshot.
Figure: Replacing the content of a customization project
6. In the Open Package dialog box, click Upload.The platform uploads the selected package and replaces in the database the content of theselected project with the content of the deployment package.

| Managing Customization Projects | 137
Replacing the Customization Project Opened in the Customization ProjectEditor from a File
To replace the content of a customization project that is currently opened in the CustomizationProject Editor, perform the following actions:
1. Click File > Replace from Package on the editor menu, as shown in the followingscreenshot.
Figure: Replacing the content of the current customization project
2. In the Open Package dialog box, which opens, click Choose File.
3. In the Open dialog box, which opens, select the deployment package file to be uploaded.
The name of the selected file is displayed in the File path text box of the OpenPackagedialog box.
4. In the Open Package dialog box, click Upload.The platform uploads the selected package and replaces in the database the content of theselected project with the content of the deployment package.
Also, you can replace the content of the customization project by using the Project XML Editorof the Customization Project Editor. To do this, perform the following actions:
1. In the Customization Project Editor, click File > Edit Project XML to open the ProjectXML Editor for the current customization project.
2. On the toolbar of the Project XML Editor, click Choose File.
3. In the Open dialog box, which opens, select the deployment package file to be uploaded.
The name of the selected file is displayed in the text box right of the toolbar buttonsinstead of the No file chosen string (which is shown in the screenshot below).
4. On the editor toolbar, click Upload Package.

| Managing Customization Projects | 138
Figure: Replacing the content of a customization project from the Project XML EditorThe platform uploads the selected package and displays its XML code in the Project XMLEditor.
5. Explore the content of the uploaded package to ensure that this is the needed one.
6. To replace the content of the project that is currently opened in the CustomizationProject Editor with the content of the uploaded package, click Save to Database on thepage toolbar.
By using this approach, you can explore the content of the package before replacing thecontent of the customization project that is currently opened in the Customization ProjectEditor.
To Build a Package Based on Existing Files
You may need to build a customization package that is based on a customization project orthat uses existing files.
To do that, you can use the PX.CommandLine tool provided by Acumatica CustomizationPlatform.
About the PX.CommandLine Tool
The PX.CommandLine tool represents an executable file (PX.CommandLine.exe) located inthe \Bin folder of your customization project.
When you run PX.CommandLine.exe, you supply a set of command-line parameters whereeach parameter must be presented in the following format.
parameter_name "parameter_value"
The PX.CommandLine tool has the following syntax.
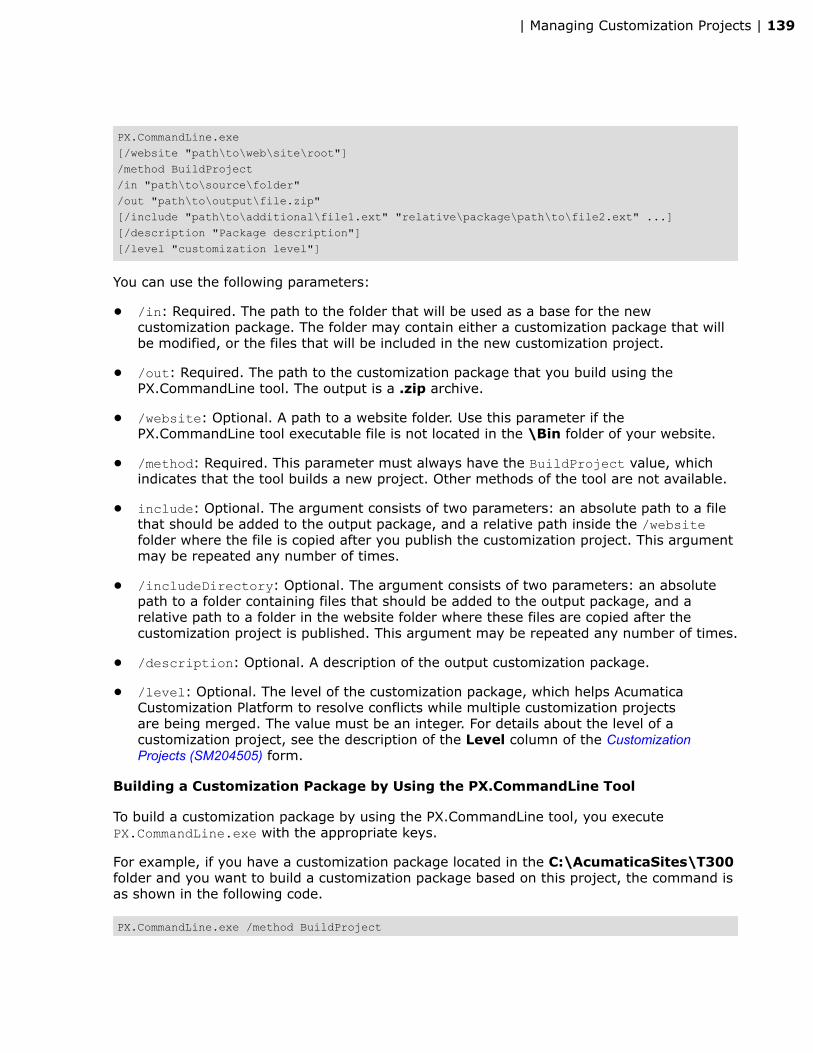
| Managing Customization Projects | 139
PX.CommandLine.exe [/website "path\to\web\site\root"] /method BuildProject /in "path\to\source\folder" /out "path\to\output\file.zip" [/include "path\to\additional\file1.ext" "relative\package\path\to\file2.ext" ...] [/description "Package description"] [/level "customization level"]
You can use the following parameters:
• /in: Required. The path to the folder that will be used as a base for the newcustomization package. The folder may contain either a customization package that willbe modified, or the files that will be included in the new customization project.
• /out: Required. The path to the customization package that you build using thePX.CommandLine tool. The output is a .zip archive.
• /website: Optional. A path to a website folder. Use this parameter if thePX.CommandLine tool executable file is not located in the \Bin folder of your website.
• /method: Required. This parameter must always have the BuildProject value, whichindicates that the tool builds a new project. Other methods of the tool are not available.
• include: Optional. The argument consists of two parameters: an absolute path to a filethat should be added to the output package, and a relative path inside the /websitefolder where the file is copied after you publish the customization project. This argumentmay be repeated any number of times.
• /includeDirectory: Optional. The argument consists of two parameters: an absolutepath to a folder containing files that should be added to the output package, and arelative path to a folder in the website folder where these files are copied after thecustomization project is published. This argument may be repeated any number of times.
• /description: Optional. A description of the output customization package.
• /level: Optional. The level of the customization package, which helps AcumaticaCustomization Platform to resolve conflicts while multiple customization projectsare being merged. The value must be an integer. For details about the level of acustomization project, see the description of the Level column of the CustomizationProjects (SM204505) form.
Building a Customization Package by Using the PX.CommandLine Tool
To build a customization package by using the PX.CommandLine tool, you executePX.CommandLine.exe with the appropriate keys.
For example, if you have a customization package located in the C:\AcumaticaSites\T300folder and you want to build a customization package based on this project, the command isas shown in the following code.
PX.CommandLine.exe /method BuildProject

| Managing Customization Projects | 140
/in "C:\AcumaticaSites\T300" /out "C:\AcumaticaSites\MyNewPackage.zip"
This command builds a customization package and puts the resulting .zip archive in the C:\AcumaticaSites\MyNewPackage folder.
You can also build a new customization package based on a project stored in a sourcecontrol folder. To do that, execute a command that looks similar the one shown in thefollowing code.
PX.CommandLine.exe /website "path_to_Acumatica_website" /method BuildProject /in "path_to_customization_source_control_folder" /out "full_name_of_customization_file.zip"
To Merge Multiple Projects
As a rule, it is better to have multiple customization projects instead of a single one. But ifyou have two or more customization projects that contain changesets with the same items,and if you are sure that each project is valid and that the merged customization applies tothe website properly, we recommend that you merge the projects. You use the CustomizationProjects (SM204505) form as a starting point.
To merge multiple customization projects, perform the following actions:
1. Navigate to System > Customization > Manage > Customization Projects.
2. In the project list, select the check boxes for only the projects to be merged.
3. Click Publish on the form toolbar.
4. Click View Published on the form toolbar to open the Published Customization Page.
5. Click Download Package on the page toolbar to download the Customization.zip file,which includes the full content of the merged customization project.
The Customization.zip file is the deployment package of the merged customization project.You can use the merged project to publish the final customization project on the targetwebsite. You can rename the .zip file to assign the needed name to the customizationproject. To upload the deployment package to a target system, import the .zip file, asdescribed in To Import a Project.
To Manipulate Customization Projects from the Code
You can use the web service API for manipulating customization projects from the code.Methods of the web service API can be used, for example, to deploy customization packagesto local and remote instances of Acumatica ERP.
For manipulating customization projects, the web service API includes the methods, whichare accessible through the SOAP API, described in the following topics:

| Managing Customization Projects | 141
• GetPackage() Method
• PublishPackages() Method
• UnpublishAllPackages() Method
• UploadPackage() Method
A user of an application that invokes any of these methods should be assigned theCustomizer role in the appropriate instance of Acumatica ERP. See To Assign theCustomizer Role to a User Account for details.
The web service used for manipulating customization projects is available under the URL,which is specified in one of the following ways (see the screenshot below):
• http://<Computer Name>/<Website Name>/api/servicegate.asmx, such as http://MyComputer/YogiFon/api/servicegate.asmx
• http://<IP Address>/<Website Name>/api/servicegate.asmx, such ashttp://111.222.3.44/YogiFon/api/servicegate.asmx
Figure: Accessing the web service through the browserTo use the listed methods in the code, you should create a service gate for the specified URLand log in, as shown in the following code fragment.

| Managing Customization Projects | 142
var webserviceurl = "http://localhost/AcumaticaInstance/api/ServiceGate.asmx";var username = "admin";var password = "123";
var client = new ServiceGate.ServiceGate{ Url = webserviceurl, CookieContainer = new CookieContainer(), Timeout = (int) TimeSpan.FromMinutes(5).TotalMilliseconds};
var loginResult = client.Login(username, password);
if (loginResult.Code == ErrorCode.OK){ // Use the methods to manipulate customization projects}
GetPackage() Method
You use the GetPackage() method to get the content of a customization project from thedatabase of an Acumatica ERP instance.
Syntax
public byte[] GetPackage(string packageName)
Parameters
• packageName: The name of the customization project to be loaded from the database.
Return Value
The method returns an array of bytes that corresponds to the content of the deploymentpackage .zip file.
Example
The following code logs in to an Acumatica ERP instance, gets the content of the package1customization project from the database, and returns the content as a byte array. You canthen, for example, save the array to a .zip file to download the deployment package in thefile system.
var webserviceurl = "http://localhost/AcumaticaInstance/api/ServiceGate.asmx";var username = "admin";var password = "123";var packageName = "package1";

| Managing Customization Projects | 143
var client = new ServiceGate.ServiceGate{ Url = webserviceurl, CookieContainer = new CookieContainer(), Timeout = (int) TimeSpan.FromMinutes(5).TotalMilliseconds};
var loginResult = client.Login(username, password);
if (loginResult.Code == ErrorCode.OK){ var packageContents = client.GetPackage(packageName); //do something with the packageContents package content}
Usage Notes
If there are multiple tenants in an instance of Acumatica ERP, this method affects the tenantto which the service is logged in. To log in to a specific tenant, add the tenant name to theuser name using the following format: user@MyTenant.
PublishPackages() Method
You use the PublishPackages() method to publish multiple customization projects thatexist in the database of an Acumatica ERP instance.
Syntax
public void PublishPackages(string[] packageNames, bool mergeWithExistingPackages)
Parameters
• packageNames: An array of names of the customization projects to be published.
• mergeWithExistingPackages: An indicator of whether the specified customizationprojects must be merged with the customization projects that are currently publishedin the same instance of Acumatica ERP. If the value of the parameter is true and thereare published customization projects in the instance, the platform merges the content ofthe projects specified in the method with the content of the currently published projectsand then applies the merged customization to the instance. If the value of the parameteris false, the platform cancels the currently applied customization and publishes only theprojects specified in the method.
Example
The following code logs in to an Acumatica ERP instance and publishes the package1,package2, and package3 customization projects that exist in the database of the instance.
var webserviceurl = "http://localhost/AcumaticaInstance/api/ServiceGate.asmx";var username = "admin";

| Managing Customization Projects | 144
var password = "123";var packageNames = new []{"package1", "package2", "package3"};var mergeWithExistingPackages = true;
var client = new ServiceGate.ServiceGate{ Url = webserviceurl, CookieContainer = new CookieContainer(), Timeout = (int) TimeSpan.FromMinutes(5).TotalMilliseconds};
var loginResult = client.Login(username, password);
if (loginResult.Code == ErrorCode.OK){ client.PublishPackages(packageNames, mergeWithExistingPackages);}
Usage Notes
If there are multiple tenants in an instance of Acumatica ERP, this method affects the tenantto which the service is logged in. To log in to a specific tenant, add the tenant name to theuser name using the following format: user@MyTenant.
UnpublishAllPackages() Method
You use the UnpublishAllPackages() method to cancel customization of an Acumatica ERPinstance.
Syntax
public void UnpublishAllPackages()
Example
The following code logs in to an Acumatica ERP instance and cancels all customizationprojects that is currently applied to the instance.
var webserviceurl = "http://localhost/AcumaticaInstance/api/ServiceGate.asmx";var username = "admin";var password = "123";
var client = new ServiceGate.ServiceGate{ Url = webserviceurl, CookieContainer = new CookieContainer(), Timeout = (int) TimeSpan.FromMinutes(5).TotalMilliseconds};

| Managing Customization Projects | 145
var loginResult = client.Login(username, password);
if (loginResult.Code == ErrorCode.OK){ client.UnpublishAllPackages();}
Usage Notes
The method removes all customization changes from the file system, regardless of thetenants where the customization projects were published.
UploadPackage() Method
You use the UploadPackage() method to import a customization project from the filesystem. The method saves the content of an uploaded deployment package to the databaseof an instance of Acumatica ERP.
Syntax
public void UploadPackage(string packageName, byte[] packageContents, bool replaceIfPackageExists)
Parameters
• packageName: The name of the customization project to be saved in the database.
• packageContents: An array of bytes that contains the content of the deploymentpackage .zip file and will be saved in the database.
• replaceIfPackageExists: An indicator of whether the customization platform mustreplace an existing customization project with the same name in the database. If thevalue of this parameter is true and the database contains a customization project withthe same name, the platform replaces the project with the specified content. If the valueof the parameter is false and the database contains a customization project with thesame name, an exception occurs.
Example
The following code logs in to an Acumatica ERP instance, loads the C:\package1.zip filecontent, and saves or updates the package1 customization project in the database of theinstance.
var webserviceurl = "http://localhost/AcumaticaInstance/api/ServiceGate.asmx";var username = "admin";var password = "123";var packageName = "package1";var packageContents = File.ReadAllBytes("C:\package1.zip");var replaceIfPackageExists = true;

| Managing Customization Projects | 146
var client = new ServiceGate.ServiceGate{ Url = webserviceurl, CookieContainer = new CookieContainer(), Timeout = (int) TimeSpan.FromMinutes(5).TotalMilliseconds};
var loginResult = client.Login(username, password);
if (loginResult.Code == ErrorCode.OK){ client.UploadPackage(packageName, packageContents, replaceIfPackageExists);}
Usage Notes
If there are multiple tenants in an instance of Acumatica ERP, this method affects the tenantto which the service is logged in. To log in to a specific tenant, add the tenant name to theuser name using the following format: user@MyTenant.
To Detect Whether a Customization Project Is Appliedto the Application
You can see whether a customization project is applied to the application on the Welcomescreen, with more detailed information available on the Customization Projects (SM204505)form. To detect whether an Acumatica ERP instance is customized, perform the followingactions:
1. Launch the application in the browser.
2. In the bottom of the Welcome screen, check for the presence of the Customized string.
If the string exists, it is followed by the names of the customization projects that arecurrently published, as shown in the following screenshot.

| Managing Customization Projects | 147
Figure: Viewing the customization projects that are currently published
3. Enter your credentials and click Sign In.
4. Navigate to System > Customization > Manage > Customization Projects.
5. On the form, view the list of the customization projects that are accessible in theapplication for your tenant (see the following screenshot).
Figure: Viewing the list of customization projects

| Managing Customization Projects | 148
If a customization project that you know to be published is absent in the list, theproject may be published for another tenant. See Customization of a Multitenant Sitefor details.
6. In the Published column of the list, notice which customization projects have the checkbox selected. These are the projects that are currently published.
7. Use the Customization Project Editor to explore the content of each published customizationproject. To open a project in the editor, click the name of the project.
You can also view the names of the customization projects that are currently published inthe About Acumatica dialog box, as the following screenshot shows.
Figure: Viewing the list of the customization projects that are currently publishedTo open the dialog box, click Help > About on a form of Acumatica ERP.
To Manage Prefixes in a Customization Project
You can specify a prefix that should be added to any object of the customization project.When validation of the customization project is performed, the platform checks all objects tobe sure they have the added prefix.
To add a prefix for a customization project, do the following:
1. On the main menu of the Customization Project Editor, select File > Validate ProjectPrefix.
The Customization Project Prefix dialog box opens.
2. In the Project Prefix box, add the prefix for the customization project. The prefix is twoto four characters in length and can be made up of any of the 26 Latin letters (A throughZ). Only capital letters are allowed.
3. Click Save.
You can perform validation of the project's items to check for the added prefix. To dothis, in the Customization Project Prefix dialog box, click the Validate Project Itemsbutton. In the Validation Result area, the result of the validation appears.

| Managing Customization Projects | 149
Format of the Validation Result
If errors or warnings have been detected during validation, the validation result has thefollowing format:
• <CustomizationProjectName>
• <CustomizationRuleName>
• <PathToTheDLL> | <ProjectItemType> | <NameOfTheProjectItem>
List of rules broken by the specified item.
To Add a Custom Feature Switch
This section explains how to add a custom feature switch into an ISV solution. For detailsabout custom feature switches, see Custom Feature Switches.
Before You Proceed
Before you start adding a switch for a custom feature, the following prerequisite stepsshould be performed:
• The new custom feature should be developed and integrated into Acumatica ERP.
• You should have Acumatica Developer Network (ADN) Level 2 or Level 3. For details, seethe Acumatica Developer Network website.
• You should contact the Independent Software Vendor (ISV) team or Technical ContractManager to create a Stock Keeping Unit (SKU) and sign a contract.
For the custom feature switch to work properly, make sure you have done the following:
• Defined access rights for all custom forms if the feature switch you are developingrestricts these custom forms partially (that is, it restricts only some caches, actions, orfields on the form, rather than restricting access to the forms as a whole)
• Defined access rights for all standard forms that the custom feature switch restrictscompletely or partially
• Included the defined access rights in your customization project
For details on access rights, see Managing User Access Rights. For details on adding accessrights to a customization project, see Access Rights.
To Add a Custom Feature Switch
To add a custom feature switch, do the following:
1. Customize the Enable/Disable Features (CS101000) form by adding a check box with thename of the custom feature on it. For details, see To Add a Box for a Data Field.

| Managing Customization Projects | 150
2. Add a column to the FeaturesSet DAC by using a cache extension, and add a relatedcolumn to the database. The name of the new column must consist of the Usr prefixand the feature name. For details, see To Add a Custom Data Field. As a result, you get theFeatureSetExt class.
3. Create your Features.xml file with information about your feature, as shown in thefollowing example.
<?xml version="1.0" encoding="utf-8"?><Features Type="FeatureExtTest.FeaturesSetExt" Key="0"> <Feature Name="UsrTestFeature"> <Access ScreenID="CR102000"/> <Access ScreenID="TT999999"/> <Access ScreenID="SM201510" ActionName="installLicense"/> </Feature></Features>
The name of the custom feature in the FeaturesSet table column and theFeatures.xml file must be the same.
4. Add the Features.xml file to your Visual Studio project in the folder with the samename as the namespace that holds the FeaturesSetExt class (which contains thedatabase extension for the FeaturesSet table). That is, the Feautres.xml file and theFeaturesSetExt class must be in the same namespace.
For example, suppose that you have a Visual Studio project and that in the root folderyou have defined the FeaturesSetExt class; then you should add the Features.xmlfiles to the same project folder, as shown in the following screenshot.
Figure: Location of the Features.xml files

| Managing Customization Projects | 151
For details about the Features.xml file structure, see The Features.xml File.
5. Set the Build Action property of the Features.xml file in Visual Studio to EmbeddedResource.
Custom Feature Switches
You can develop a custom feature and integrate it in Acumatica ERP by using acustomization project. After you develop this custom feature, you might want to add aswitch for this feature—that is, a check box that the administrator can select to enable thefeature—on the Enable/Disable Features (CS100000) form. With this feature switch added, theadministrator can enable the feature to make the custom forms associated with the featureavailable or disable the feature to make the custom forms unavailable.
Adding a Custom Feature: Process Overview
After you have developed a custom feature and integrated it in Acumatica ERP, your featureis reviewed by the ISV team, and information about the feature is added to the AcumaticaLicensing Server. After that, you can customize the Enable/Disable Features (CS100000)form, the FeaturesSet table, and the Features.xml file to add information about yourfeature to the project. The process of exchanging information with the Acumatica LicensingServer is shown in the diagram below.
Figure: Adding a custom feature
After you have completed all these steps, when your customer purchases your customfeature, you should notify the ISV team about it (for example, by using your ISV solution'spage on the partner portal).

| Managing Customization Projects | 152
The Features.xml File
Every instance of Acumatica ERP has a Feature.xml file, located in the PX.Data.dll library.This file contains the description of the out-of-the-box features that are available in theinstance and displayed on the Enable/Disable Features (CS100000) form.
Each feature is represented in the Features.xml file by a Feature element with a numberof Access subelements. (For an example, see the following code.)
<Feature Name="Branch"> <Access ScreenID="GL201500" CacheName="PX.Objects.GL.Ledger" FieldName="DefBranchID" /> <Access ScreenID="GL101010" /> <Access FieldClass="BRANCH"/></Feature>
For all custom features you are implementing, you should create a new Features.xml file ofthe same structure that contains information about all new features.
Targets for Rules
By using the Access element, you can set up rules for the following items:
• A specific page, as shown in the following example.
<Access ScreenID="AP506500" />
• All pages whose identifiers start with the provided value; see the following code line.
<Access ScreenID="IN" />
• A specific data field on a page, as shown below.
<Access ScreenID="GL201500" CacheName="PX.Objects.GL.Ledger" FieldName="PostInterCompany" />
• Data fields having a specific field class. (See the following example.)
<Access FieldClass="BRANCH"/>
To apply this rule to a field, you should specify the name of the field class in thePXUIField attribute added to the field definition in the data access class, as follows.
[PXUIField(DisplayName = "Active", FieldClass="BRANCH")]public bool? Active{ get; set;

| Managing Customization Projects | 153
}
• A specific action on a page, as demonstrated in the following code line.
<Access ScreenID="AR303000" ActionName="NewSalesOrder"/>
• A user role, as the following example shows.
<Access Role="Consultant"/>

| Publishing Customization Projects | 154
Publishing Customization ProjectsTo apply a customization project to an instance of Acumatica ERP, you have to publish thecustomization project. You can also publish multiple customization projects at once; seeSimultaneous Use of Multiple Customizations for details.
When you publish a customization project, the system applies the changes in the projectto the website. After the customization project has been published, users see the modifiedAcumatica ERP. The changes apply to the website of Acumatica ERP and therefore affect alltenants in the system (see Customization of a Multitenant Site for details).
The Acumatica Customization Platform provides the following ways to manage thepublication process:
1. You can develop and include in a customization project the custom code that is executedduring the project publication. See Custom Processes During Publication of a Customization fordetails.
2. By using additional attributes in DAC extensions, you can specify how the system shouldapply the original and custom attributes to the field. See Customization of Field Attributes inDAC Extensions for details.
3. By using SQL script attributes, you can control the execution of batches in SQL scripts.See Using the SQL Script Attributes for details.
You can cancel the publication of the project and publish the project again, which youmight do often during the development and testing of the customization. The applicationdomain does not restart every time you publish the customization project because Run-TimeCompilation is enabled for the website by default.
Detailed instructions are provided in the following topics:
• To Publish a Single Project
• To Publish Multiple Projects
• To Prepare a Project for Publication
• To Publish the Current Project
• To Publish the Current Project with a Cleanup Operation
• To Publish a Customization for a Multitenant Site
• Validating Customization Code
• To View a Published Customization
• To Unpublish a Customization

| Publishing Customization Projects | 155
To Prepare a Project for Publication
Before you publish a customization project, we recommend that you make sure you haveincluded all the needed changes in the customization project. To do this, you should take thefollowing actions:
• Make sure that you have added all custom files to the project and uploaded the latestversion of the files to the project.
• Make sure that the database schema is updated in the customization project. Youmay have modified custom tables by using a database management tool, such as SQLManagement Studio. On the page toolbar of the Database Scripts page, click ReloadFrom Database. This action regenerates the database table schema of the customtables.
• Open the Site Map page, make sure that you have added the needed site map nodes tothe project. If you have modified the site map nodes after you have added them to theproject, click Reload From Database to update the customization project.
• Make sure that all other objects (such as generic inquiries, system locales, integrationscenarios, shared reusable filters, access rights, wikis, web service endpoints, analyticalreports, push notifications) are updated in the project. If an object was changed in theapplication instance, open the appropriate page of the Customization Project Editor, andclick Reload From Database on the page toolbar to update the corresponding item inthe project. (See To Update a Project for details.)
To Publish a Single Project
You can publish a single customization project by using the Publish action on theCustomization Projects (SM204505) form.
To to do this, perform the following actions:
1. Navigate to System > Customization > Manage > Customization Projects.
2. In the project list, select the check box (in the unlabeled column) for the neededcustomization project, as the screenshot below shows.
3. Clear any selected check boxes in this column for other customization projects.
All previously published projects that are not selected will be unpublished.
4. Click Publish on the form toolbar to initiate the publication of the selected project.

| Publishing Customization Projects | 156
Figure: Publishing a single customization project
To Publish Multiple Projects
To publish multiple customization projects, you perform the following actions on theCustomization Projects (SM204505) form:
1. Navigate to System > Customization > Manage > Customization Projects.
2. In the project list, select the check boxes (in the unlabeled column) for the customizationprojects you want to publish.
You can save these selections by clicking Save on the form toolbar. The formopens with the selections that are previously saved in the database.
3. Click Publish on the form toolbar to initiate publication of the selected projects.
All previously published projects that are not selected will be unpublished.
The platform merges the selected projects into one project and then publishes the project.For more details, see Performing the Publication Process and Validating Customization Code.
Performing the Publication Process
When you run the publication process, the Acumatica Customization Platform executes theprocess in the following stages:
1. If you publish more than one customization project, the platform merges the projectsinto a single customization project.

| Publishing Customization Projects | 157
2. The platform validates the customization project. (See Validating Customization Code fordetails.)
3. If the validation completes successfully, the platform applies the changes to theapplication instance when you click Publish in the Compilation window.
When the platform merges multiple projects, if different projects include customization forthe same application object, the customization from the project with the highest level (anoptional number assigned to each project) is added to the merged project. See SimultaneousUse of Multiple Customizations for details.
If you manage multiple customization projects and some projects are published, youdo not have to unpublish any projects before other projects are published (leaving thecheck boxes selected for already-published projects in the list). On the CustomizationProjects (SM204505) form, you just need to select any projects you want to publishand click Publish on the toolbar. If you clear the check box for a published project, itwill be unpublished.
After the publication is complete, you can view the content of the merged customizationproject by clicking the View Published button on the form toolbar of the CustomizationProjects form. (See To View a Published Customization for details.)
After the project is ready, the platform validates and compiles the customization codeincluded in the project. If there are any validation errors, the system displays the errormessages in the browser and doesn't compile the code. If the compilation completessuccessfully, you can click Publish in the Compilation window to apply the changescontained in the project items to the website.
During the actual publication, the platform applies the changes to the application anddatabase objects and updates the files in the website folder as follows:
• The custom layout is applied to the forms of Acumatica ERP.
• The .cs files with the DAC extension code for the existing data access classes aregenerated and placed in the file system.
• The .cs files with the BLC extension code for the existing business logic are generatedand placed in the file system.
• The .cs files with the custom code (Code items) are generated and placed in the filesystem.
• The custom files of the project are added to the website folder.
• The custom tables are created in the database, and custom SQL scripts are executed.
• The custom generic inquiries, reports, site map nodes, system locales, integrationscenarios, shared reusable filters, access rights, wikis, web-service endpoints, andanalytical reports are added to the database.

| Publishing Customization Projects | 158
We recommend that you back up the database before you publish customizationprojects, because canceling publication doesn't revert changes made to the database.See To Unpublish a Customization for details.
After the publication is complete, the application domain always restarts if the projectincludes assemblies, which are placed in the /Bin folder of the website. If you have noassemblies in the project, you can enable run-time compilation and publication will not causea restart.
If a published customization project contains classes derived from the CustomizationPluginclass, the platform launches the implemented custom processes after website files wereupdated and after the website was restarted. (See Custom Processes During Publication of aCustomization for details.)
After you have published the customization project, the files with the customization code areupdated in the file system, and you can work with them in MS Visual Studio. The .cs fileswith code are placed in the App_RuntimeCode folder of the website.
Validating Customization Code
While the Acumatica Customization Platform processes publication of a customizationproject, the platform validates the customization code included in the project. This validationof the code provides not only checking for syntax and semantics but also checking of thecompatibility of the code included in the customization project with the original applicationcode.
If you have a customization project that works properly for the current version of AcumaticaERP and have upgraded an application instance to a newer version, the customizationproject might not work properly or might even prevent the website from starting after theupgrade. This could occur because the code of Acumatica ERP is continuously developedto implement new features or enhance existing functionality. Thus, the code of an updatedinstance of Acumatica ERP can become inconsistent with the code in a customization project.For example, if the signature of a method that is overridden in the customization code ischanged in the original code, a run-time error may occur in the graph extension. As anotherexample, modified or deleted database columns and tables might cause the functionality of adata access class extension to fail.
The platform checks the compatibility of the code included in a customization projectwith the original application code every time it publishes the project. If there are anycompatibility errors, the platform displays the warning and error messages in theCompilation window and stops the publication process. See Messages for Validation Errors andTo Resolve an Issue Discovered During the Validation for detailed information about, respectively,the error messages and the ways to fix the validation errors.
To Publish the Current Project
If you create a customization project in the Customization Project Editor, the best way topublish the customization project that is under development is to use the Publish Current

| Publishing Customization Projects | 159
Project menu command provided by the editor. This publication does not influence thepublication of other customization projects that exist in the application instance.
To publish the customization project that is currently open in the Customization ProjectEditor, perform one of the following actions:
• Use the Control+Space combination on the keyboard.
• In the editor menu, select Publish > Publish Current Project.
When you perform one of these actions, the platform initiates the publication of the project.If another customization project is already published, the platform merges the projectsinto a single project, and then compiles and validates the merged project. If the validationsucceeds, the platform applies the merged customization to the application instance.
You can publish the customization project as described above again after you have made anychange to the project.
To Publish the Current Project with a CleanupOperation
If a customization project contains a database script, during the project publication, theplatform executes the script. For optimization purposes, to avoid the execution of databasescripts during every publication of the project, the platform saves information about eachscript that has been executed at least once and has not yet been changed in the database,and omits the repeated execution of such scripts. You can force the platform to clean up allsuch information about previously executed scripts of a customization project and executethe scripts once more while publishing the project. This process is called publishing withcleanup.
When to Publish with a Cleanup Operation
Database scripts can be separated into two categories: those that modify the databaseschema, and those that modify data in database tables. The first kind of scripts are appliedto the whole instance, so they are called database-level scripts. The second kind of scriptsmodify the data of a single tenant for which the scripts are published, so these scripts arecalled tenant-level scripts.
When a customization project that contains database script customization items is publishedfor the first time, a hash for each script is saved to the database. For a tenant-level script,the system also saves the tenant ID for which this script has been published. When thecustomization project is published again, the system compares the hash of each databasescript (and the tenant ID, if the script is tenant-level) in the current project to the hash(and tenant IDs, if applicable) of each database script in the database. If the hashes (fora database-level script) or hashes and tenant IDs (for tenant-level script) are equal, thescript is not applied. The conditions for which different scripts are applied are shown in thefollowing diagram.

| Publishing Customization Projects | 160
Figure: Conditions for which scripts are applied
The system behavior with these scripts has the following outcomes:
• Even minor changes in a database script customization item may lead to the script beingapplied again.
• The same tenant-level script is not applied for the same tenant twice.
• When a customization project is published for another tenant, all tenant-level scripts areapplied.
• A database-level script is never applied again for the same instance.
Publishing with cleanup applies all database scripts again, regardless of whether thesescripts have ever been applied. You should use publishing with cleanup only if any changeswere made outside of the Customization Project Editor to the tables that are affected byyour custom database scripts.
For example, suppose that you have added a database script that creates a new table inthe database. Further suppose that you have published this customization project, and thetable has been added to the database. Then you have removed this table from the database

| Publishing Customization Projects | 161
manually. To apply the script in the customization project and create the table again, publishthe project with the cleanup option.
To Perform Publishing with Cleanup
To perform publishing with cleanup, do the following:
1. Open the customization project in the Customization Project Editor (see To Open a Project fordetails).
2. On the menu of the editor, click Publish > Publish with Cleanup, as shown in thescreenshot below, to clean information about previously executed scripts of the projectand initiate the process of publishing the customization project.
Figure: Publishing a customization project with a cleanup operation
To Publish a Customization for a Multitenant Site
You can publish a customization project for multiple tenants in a multitenant site; seeCustomization of a Multitenant Site for details. You use the Customization Projects (SM204505)form to publish this customization.
To share customization content stored exclusively in the database for multiple tenants,perform the following actions:
1. Navigate to System > Customization > Manage > Customization Projects.
2. In the table, select the check boxes in the rows that correspond to the customizationprojects that you need to publish for multiple tenants.
3. On the toolbar of the form, click Publish > Publish to Multiple Tenants.
4. In the Publish to Multiple Tenants dialog box, which opens, do the following:
a. In the Selected column, select check boxes for the tenants to which you want toapply the selected customization projects.

| Publishing Customization Projects | 162
b. To skip updating the site files, select the Apply Changes Only to Database (SkipWebsite Update) check box.
If you have published all the selected customization projects in the website fora single tenant at least once, you do not need to update website files. You canapply only the database changes.
c. To execute all database scripts of the selected customization projects, select theExecute All Database Scrips (Including Previously Executed) check box.
When the platform publishes a project that contains a database script, itexecutes the script and tries to avoid the execution of the script during everypublication of the project, for optimization purposes. Therefore, the platformkeeps information about each script that is executed at least once and hasnot yet been changed in the database, and omits the repeated execution ofsuch scripts. If you run the publication with the Execute All Database Scrips(Including Previously Executed) check box selected, the platform cleansup such information about previously executed scripts and executes them oncemore while publishing the project.
d. Click OK.
The platform applies the customization content to each tenant selected in the dialog box.As a result, the published customization content is saved in the database for each selectedtenant.
To View a Published Customization
You can view the merged content of multiple customization projects that are currentlypublished by using the Published Customization page of the Customization Projects (SM204505)form.
When you publish multiple projects at once, the platform merges the projects into a singleproject and then applies this project to the application instance. (See To Publish MultipleProjects for details.) To view the content of the merged project, perform the followingactions:
1. Navigate to System > Customization > Manage > Customization Projects.
2. On the form toolbar, click View Published on the toolbar, as the following screenshotshows.

| Publishing Customization Projects | 163
Figure: Opening the Published Customization pageThe Published Customization page opens. The screenshot below shows two simultaneouslypublished customization projects, HideSSN and POstatus. The Published Customization pageshows the result of merging these projects.
Figure: Viewing the merged XML code of published customization projects
To Unpublish a Customization
When there are multiple customization projects published in an instance of Acumatica ERP,you can the following options to unpublish the projects:
• Unpublish all projects
• Unpublish some projects

| Publishing Customization Projects | 164
In both cases, you use the Customization Projects (SM204505) form as a starting point.
To Unpublish All Projects
To remove all customization projects from publication, perform the following actions:
1. Navigate to System > Customization > Manage > Customization Projects.
2. On the form toolbar, click Unpublish All.The platform removes all published customization from the Acumatica ERP instance. SeeUnpublishing Customization Projects for details.
To Unpublish Some Projects
To remove some customization projects from publication, perform the following actions:
1. Navigate to System > Customization > Manage > Customization Projects.
2. In the project list of the form, be sure the check boxes for projects that you want toremain published are selected, and clear the check boxes for the unnecessary projects.
3. On the form toolbar, click Publish.The platform removes all published customization from the Acumatica ERP instance, mergesthe content of the customization projects that are currently selected on the form, andapplies the merged content to the instance.
Unpublishing Customization Projects
When you unpublish all customization projects, the system reverses the changes introducedby the customization as follows:
• The forms of Acumatica ERP return to their original layout.
• The .cs files of the project with customization code are removed from the website folderin the file system.
• The custom files of these projects are removed from the website folder on the filesystem.
Some changes aren't reversed, as described below:
• Database changes remain in the database after the customization is unpublished. Thus,the generic inquiries, reports, changes to the site map, custom tables, custom databaseobjects, and custom data remain in the database. Changes to the site map remain in thenavigation menu of Acumatica ERP. If you need to remove these changes, you must doso manually.
• The .sln file of the integrated Microsoft Visual Studio solution and its projects (ifany) remain in the file system. However the customization code of the unpublishedcustomization project and the external files added to the customization project areremoved from the solution.

| Publishing Customization Projects | 165
For example, if a customization project contains a Report item and a SiteMapNode item forthe report, after you publish and unpublish the project, the report and the site map noderemain in the database and remain available in the application, so you need to remove themmanually.
There is no difference in the unpublishing process for a single-tenant site and a multitenantsite: The platform deletes the same files in the file system and keeps all the changes in thedatabase.

| Managing Items in a Project | 166
Managing Items in a ProjectYou use the Customization Project Editor to manage the items in a customization project. Theeditor includes a page to support each type of item in a customization project. (See Types ofItems in a Customization Project for details.) By using the navigation pane of the editor, shownin the following screenshot, you can open these pages (each of which is described in detail inthe corresponding part of this guide).
Figure: Viewing the navigation pane of the editor
In This Part
• Customized Screens
• Customized Data Classes
• Code
• Custom Files
• Generic Inquiries
• Custom Reports
• Dashboards
• Site Map
| Managing Items in a Project | 167
• Database Scripts
• System Locales
• Import and Export Scenarios
• Shared Filters
• Access Rights
• Wikis
• Web Service Endpoints
• Analytical Reports
• Push Notifications
• Business Events
• Mobile Application
Customized Screens
You use the Customized Screens page of the Customization Project Editor to manage thePage, AUScreenAction, AUScreenNavigationAction, and AutomationScreenField items in thecustomization project. The Page item for an existing form contains the instructions aboutchanges to the layout that have to be applied by the platform to the ASPX code of the formduring publication of the project. For a custom form, the Page item holds the content of theform and the path to the ASPX file of the form. (The path is required so the plarform candetect changes of the file in the file system in the development environment and update thefile while you publish the project.)
Using the Customized Screens page, you can do the following:
• Modify the layour and actions on an existing form. When you start to modify the layoutof an existing form, to store the changes, the platform adds a Page item for the formto the customization project. When you use the Screen Editor to change the form layout,the platform saves each change to this item. The changed logic of the form is saved inthe AUScreenAction, AUScreenNavigationAction, and AutomationScreenField items. SeeTypes of Items in a Customization Project for details about customization project items.
• Create a custom form. To do this, you invoke Add Screen > Create New Screen onthe Customized Screens page to create the workable template for the form, and add thetemplate to the customization project as a Page item, a Code item, a SiteMapNode item,and two File items, as described in To Add a New Custom Form to a Project. You can thendevelop the custom form by using both the Screen Editor and Microsoft Visual Studio.
The Customized Screens page contains the list of the Page items for existing and customforms added to the customization project.

| Managing Items in a Project | 168
On the page, you can perform the operations with the customized screens that are describedin the following topics:
• To Add a Page Item for an Existing Form
• To Delete a Page Item from a Project
• To Add a New Custom Form to a Project
• To Delete a Custom Form from a Project
• To Delete Items from the Project on the Edit Project Items Page
• To Add a Condition
• To Add an Action
To Add a Page Item for an Existing Form
You can add a Page item for an existing form to a customization project by using both theCustomization Menu and the Element Inspector, or you can add the item in the CustomizationProject Editor.
The following sections provide detailed information:
• To Add a Page Item by Using the Element Inspector
• To Add a Page Item on the Customized Screens Page
To Add a Page Item by Using the Element Inspector
To add a Page item for an existing form to a customization project by using the ElementInspector, perform the following actions:
1. Open the form in the browser.
2. On the form title bar, click Customization > Inspect Element to launch the ElementInspector.
3. On the form, select the UI element (or area) to be customized, to open the ElementProperties Dialog Box for the element (or area).
4. In the dialog box, click Customize.
5. If there is no currently selected customization project and the inspector opens the SelectCustomization Project Dialog Box, select an existing customization project or create a newone.
Acumatica Customization Platform creates the Page item for the form, adds the item to thecurrently selected customization project, and opens the form in the Screen Editor.
The platform assigns to the new item a name that corresponds to the form ID.

| Managing Items in a Project | 169
To Add a Page Item on the Customized Screens Page
To add a Page item for an existing form to a customization project by using theCustomization Project Editor, perform the following actions:
1. Open the customization project in the editor. (See To Open a Project for details.)
2. Click Screens in the navigation pane to open the Customized Screens page.
3. On the page toolbar, click Add Screen > Customize Existing Screen.
4. In the Customize Existing Screen dialog box, which opens, double-click the neededform in the tree, which corresponds to the site map of the application.
The following screenshot demonstrates how you can select the Payments and Applicationsform (Finance > Accounts Receivable > Work Area > Enter) in the CustomizeExisting Screen dialog box.
Figure: Selecting the form in the Customize Existing Screen dialog boxAs soon as you add the item, the Screen Editor opens for the form so that you can startchanging the form layout.
To go back to the Customized Screens page of the Customization Project Editor, clickScreens on the navigation pane. You can see that the added form is saved to the list ofproject items.

| Managing Items in a Project | 170
As an alternative to selecting a form in the tree, if you know the screen ID of the form, youcan add the appropriate item directly to the table of the Customized Screens page. To dothis, perform the following actions (shown in the screenshot below):
1. On the page toolbar, click Add Row (+).
2. In the Screen ID column of the new row, type the screen ID of the form.
3. On the page toolbar, click Save to save the item to the project.
The screenshot below shows the screen ID of the Journal Transactions form entered in thetable: GL301000. As soon as you specify the screen ID, press Tab on the keyboard to viewthe name of the form, which appears in the Title column; make you sure you are adding theitem for the needed form.
Figure: Adding the screen ID of an existing form to the table
To modify the layout of a form, open the Screen Editor for the form by clicking the ScreenID of the form in the table or in the navigation pane of the Project Editor.
To Delete a Page Item from a Project
To remove from a customization project a Page Item created for an existing or custom form,perform the following actions:
1. Open the project in the Customization Project Editor. (See To Open a Project for details.)
2. Click Screens in the navigation pane to open the Customized Screens page.
3. In the page table, click the item for the form.
4. On the page toolbar, click Delete Row (X).
5. On the page toolbar, click Save to save the changes to the customization project.
To Add a New Custom Form to a Project
To add a new custom form to a customization project, perform the following actions:
1. Open the customization project in the Customization Project Editor. (See To Open a Projectfor details.)

| Managing Items in a Project | 171
2. Click Screens in the navigation pane to open the Customized Screens page.
3. On the page toolbar, click Add Screen > Create New Screen.
4. In the Create New Screen dialog box, which opens, specify the following parameters tocreate the files for the new form:
• Screen ID: The unique identifier of the new form
• Graph Name: The name of the new class of the business logic code for the form(also called graph)
• Graph Namespace: The namespace to which the new business logic class should beadded
• Page Title: The title of the new form
• Template: The form template that provides the default set of containers on the form
• Site Map Parent: The parent node in the site map to which the new form should beadded
5. In the dialog box, click OK.
Before you start editing the created screen in the Screen Editor, you must publishthe customization project.
For the new form, the system creates the following items and adds them to thecustomization project:
• The .aspx and .aspx.cs files, which appear in the Files list of the project items.
• The .cs file with the business logic code for the form, which appears in the Code list ofproject items.
• The site map node, which appears in the Site Map list of project items.
To give users the ability to navigate to the form in Acumatica ERP, you need tospecify the position of the new form in the UI by using the Menu Editing mode andupdate the SiteMapNode item, as described in To Update a Site Map Node in a Project.For details on the Menu Editing mode, see Menu Editing Mode in the InterfaceGuide.
• The Page item, with a name that corresponds to the new screen ID; this item appears inthe Screens list of project items. This item contains the link to the new page content,which you can later develop by using the Screen Editor.
To obtain the actual files in the file system, publish the customization project after you haveadded the form to the project. After that, the following files are available on the file system:
• The .aspx and .aspx.cs files in the Pages/<First segment of ScreenID>/ folder ofthe website

| Managing Items in a Project | 172
• The .cs file with the business logic code in the App_RuntimeCode folder of the website
You can develop business logic code for the custom form in Microsoft Visual Studio later.
The screenshot below shows the files of the custom form that has been added to thecustomization project (through the Add Screen > Create New Screen command) with thefollowing parameters:
• Screen ID: KW302010
• Graph Name: KeywordsMaint
Figure: Viewing the files of the custom form in Visual Studio solution
To Delete a Custom Form from a Project
To remove a custom form from a customization project, you have to delete all the items thathave been added to the project for the form.
To do this, perform the following actions:
• Delete from the customization project the Page item that was added by the New Screenwizard. (See To Delete a Page Item from a Project for details.)
• Delete from the project the Code item that was added by the New Screen wizard. (SeeTo Delete a Code Item From a Project.)
• Delete from the project the <FormID>.aspx and <FormID>.aspx.cs File items thatwere added by the New Screen wizard. (For more information, see To Delete a Custom FileFrom a Project.)

| Managing Items in a Project | 173
• Delete from the project the SiteMapNode item that was added by the New Screen wizard.(See To Delete a Site Map Node from a Project for details.)
• If you added other items for the custom form, such as items for the mobile site map orcustom files, delete these items.
To delete multiple items from the customization project successively on a single page, youcan use the Edit Project Items page of the Customization Project Editor. (See To Delete Itemsfrom the Project on the Edit Project Items Page for details.)
The system applies the changes to the file system as soon as you publish the customizationproject.
To Delete Items from the Project on the Edit Project ItemsPage
You can delete multiple items from the customization project on the Edit Project Items pageof the Customization Project Editor. To do this, perform the following actions:
1. On the menu of the editor, click File > Edit Project Items.
2. In the table of the Edit Project Items page, which opens, click the item to be deleted, asthe following screenshot shows.
Figure: Using the Edit Project Items page to delete an item from the customization project
3. Press Delete on the keyboard to delete the selected row from the table.

| Managing Items in a Project | 174
4. If you need to delete multiple items from the project, repeat Steps 2–3 for each item.
5. On the page toolbar, click Save to save the change in the project.
To Add a Condition
You can construct a condition and then specify it as a property value for an action or acontrol. This way you can change the business logic of the screen.
Before You Proceed
Conditions can be added to a specific screen. So before adding a condition, you should addthe corresponding screen item to the customization project. See To Add a Page Item for anExisting Form or To Add a New Custom Form to a Project for details.
To Add a Condition
To add a condition, do the following:
1. In the navigation pane of the Customization Project Editor, click Conditions under thescreen node you want to customize. The Conditions page opens.
2. In the Conditions area, enter the name of the condition you are adding in theCondition Name column..
3. In the Condition Details area of the Conditions page, configure the condition by addingrows and specifying field values in each row.
4. Click Save on the page toolbar.
When you save the added condition, it appears in the lists of possible values for theEnabled, Visible, and Required properties of a control or an action.
To Display an Action When a Field Has a Specific Value (Example)
Suppose that you want an action to be displayed only when some elements have specificvalues: On the Sales Orders (SO301000) form, you want the Print Sales Order/Quoteaction to be displayed only when the Description box is not empty and when the Status isOpen. To configure this condition, do the following:
1. Add the Sales Orders screen to the list of customized screens, as described in To Add aPage Item for an Existing Form.
2. In the navigation pane of the Customization Project Editor, click Conditions under theSO301000 node.
The Conditions: SO301000 (Sales Orders) page opens.
3. In the Conditions area of the opened page, specify the condition's name in theCondition Name column: DescriptionNotEmpty.
4. In the Condition Details of the opened page, add two rows with the following values:

| Managing Items in a Project | 175
• Row 1:
• Field Name: OrderDesc
• Condition: Is Not Empty
• Operation: And
• Row 2:
• Field Name: Status
• Condition: Equals
• Value: Open
5. On the page toolbar, click Save.
6. On the navigation pane of the Customization Project Editor, select the SO301000 node.
The Screen Editor: SO301000 (Sales Orders) page opens.
7. In the control tree of the opened page, select DataSource: SOOrderEntry > Toolbar> Form-Specific > Reports > Print Sales Order/Quote.
8. On the Main Properties tab, for the Visible property, select the DescriptionNotEmptyvalue.
9. Save your changes, and publish the customization project.
10.In Acumatica ERP, open a sales order with an Open status on the Sales Orders form.Clear the description of the order, and save the order. Notice that the Reports menu isno longer shown on the toolbar because it contains only one menu command, which doesnot meet the conditions to be shown in this case.
To Add an Action
You can use the Screen Editor to add a new action to do any of the following:
• Run a report
• Navigate to a list of records
• Navigate to a form to create a new record
Before You Proceed
Before adding a action to a screen, you should add the corresponding page item to thecustomization project as described in the previous instructions.
To Add a New Action by Using the Screen Editor
To add a new action using Screen Editor:

| Managing Items in a Project | 176
1. In the navigation pane of the Customization Project Editor, under the Screens node,select the page item you added to the customization project.
2. In the control tree of the page, select the group of actions to which you want to add anaction. You can add an action to the following action groups:
• Form-Specific
• Form-Specific > Actions
• Form-Specific > Inquiries
• Form-Specific > Reports
3. On the control tree area toolbar, click Add New Action.
4. In the New Action dialog box, which opens, specify the action type, name, and screenID. You should specify the screen ID depending on what action type you selected. Thefollowing table summarizes the screen you should specify depending on the action typeyou selected.
5. In the dialog box, click OK.
The created action appears in the control tree. The action properties appear in the tabsto the right of the control tree. You can change the location of the action by dragging it inthe control tree.
6. Configure the action properties, such as Display Name.
On the Main Properties tab, configure the properties specific to the action type, whichare displayed at the bottom of the tab.
7. Save your changes to the customization project.
Related Links
• Action
Customized Data Classes
You use the Customized Data Classes page of the Customization Project Editor to manage DACitems in a customization project.
A DAC item contains data in the XML format used by the platform to create anappropriate extension for the original data access class.
The Customized Data Classes page displays the list of DAC items for existing data accessclasses of Acumatica ERP added to the project.

| Managing Items in a Project | 177
On the page, you can perform several operations with the customized data access classes,as described in the following topics:
• To Add a DAC Item for an Existing Data Access Class to a Project
• To Delete a DAC Item from a Project
• To Convert a DAC Item to a Code Item
• To Upgrade Technology for Legacy DAC Customization
You cannot create a custom data access class on this page. Instead, you have to usethe Code page of the editor. Custom classes are added to the project as Code items.See To Create a Custom Data Access Class for details.
You can use Microsoft Visual Studio to work with a DAC item of a customization projectthat is currently published. During the project publication, the platform creates thePX_Objects_<DACItemName>_extensions.cs file with the item content in theApp_RuntimeCode folder of the website. If you make changes to the code in Visual Studio,you have to update the item in the customization project. See Detecting the Project ItemsModified in the File System for details.
To Add a DAC Item for an Existing Data Access Class to aProject
Before modifying an existing data access class, you have to add a DAC item for the classto the customization project. This item is used to store the data of the class extension inXML format. After the item is created, you can modify the class members by using the DataClass Editor. After the customization project is published, the .cs file for the item is created inthe file system, and you can develop the C# code of the class extension in Microsoft VisualStudio. You can use the Data Class Editor as well as Visual Studio to add custom fields toexisting data access classes.
You can add a DAC item for an existing data access class to a customization project by usingthe Element Inspector, or you can create and add the item on the Customized Data Classespage of the Customization Project Editor.
The following sections provide detailed information:
• To Add a DAC Item by Using the Element Inspector
• To Add a DAC Item on the Customized Data Classes page
To Add a DAC Item by Using the Element Inspector
1. Open the form in the browser.
2. On the form title bar, click Customization > Inspect Element to launch the ElementInspector.

| Managing Items in a Project | 178
3. On the form, select a UI element for a field of the class to be customized to open theElement Properties Dialog Box for the element.
The dialog box displays the name of the data access class that contains the selectedelement in the Data Class box, as shown in the screenshot below.
4. In the dialog box, click Actions > Customize Data Fields.
Figure: Using the Element Properties dialog box to start customization of the class
If there is no currently selected customization project, the inspector opens the SelectCustomization Project Dialog Box to force you to select an existing customization project orto create a new one.
Acumatica Customization Platform creates the DAC item for the class, adds the item to thecurrently selected customization project, and opens the class in the Data Class Editor.
The platform assigns the new item the name of the data access class.
To Add a DAC Item on the Customized Data Classes page
1. Open the customization project in the editor. (See To Open a Project for details.)
2. Click Data Access in the navigation pane to open the Customized Data Classes page.
3. On the page toolbar, click Add New Record (+).
4. In the Select Existing Data Access Class dialog box, which opens, select the class inthe Class Name box.
You can type the class name in the Class Name box or search for the class by a part ofits name, as shown in the screenshot below. As soon as you add the class, the Data ClassEditor opens for it so that you can modify the fields of this class and add custom fields toit.

| Managing Items in a Project | 179
Figure: Adding an existing data access class to the project
5. On the page toolbar, click Save to save the item in the customization project.
As soon as you have modified the attributes of an existing field of the class or added anew field to the class and saved the changes in Data Class Editor, the class is added to thecustomization project and appears in the table of the Customized Data Classes page.
To go back to the Customized Data Classes page of the Customization Project Editor, selectData Access on the navigation pane. You can see that the added item is saved to the list ofproject items.
To Delete a DAC Item from a Project
To remove changes to an existing data access class from a project, perform the followingactions:
1. Open the customization project in the Customization Project Editor. (See To Open a Projectfor details.)
2. Click Data Access in the navigation pane to open the Customized Data Classes page.
3. In the page table, select the item to be deleted.
4. On the page toolbar, click Delete Row.

| Managing Items in a Project | 180
5. On the page toolbar, click Save to save the changes to the customization project.
If you added a bound custom field to an existing data access class, the platform includes theDAC and Table items for this class in the customization project.
The Table item contains a description of custom columns added to a database tablefor bound custom fields created in the appropriate data access class.
After you publish the customization project at least once, the database schema is changed.Changes to the database schema aren't deleted when you delete the DAC and Table itemsand publish the project. You have to remove the changes manually.
You can delete a DAC or Table item (or another item) from the customization project onthe Edit Project Items page of the Customization Project Editor. (See To Delete Items from theProject on the Edit Project Items Page for details.)
To Convert a DAC Item to a Code Item
If you have a customized data access class that is added to the project as a DAC item, thenyou can convert the class changes into the class extension code (a Code item) to completethe extension development in the Code Editor or in Microsoft Visual Studio. (See SupportedDAC Extension Formats for details.)
To do this, perform the following actions:
1. Open the customization project in the Customization Project Editor. (See To Open a Projectfor details.)
2. Click Data Access in the navigation pane to open the Customized Data Classes page.
3. In the page table, select the item to be converted, as the screenshot below shows.
4. On the page toolbar, click Convert to Extension.
This action can be applied for only data access classes customized using thetechnology based on extensions. If you have legacy DAC customization, upgrade

| Managing Items in a Project | 181
it before converting DAC items to class extensions. See To Upgrade Technology forLegacy DAC Customization for details.
Figure: Converting the DAC item to the Code itemThe platform converts the XML content of the selected item to C# code, deletes the DACitem in the customization project, adds the created code to the project as a Code item, andopens it in the Code Editor, as shown in the following screenshot.

| Managing Items in a Project | 182
Figure: Viewing the result of the conversion
This operation is irreversible. After you convert the XML data to C# code, you will not beable to work with the item in the Data Class Editor or convert it back to a DAC item. You willbe able to edit the code in Code Editor and Visual Studio.
The Convert to Extension action also affects all the inherited classes of the specifiedDAC if the classes are customized.
The system obtains the name of the Code item from the DAC name by appending theExtensions suffix to it. After the publication of the customization project, the actualcustomization code of the class is available in the <DACName>Extensions.cs file inthe App_RuntimeCode folder of the website. For example, if you apply the action to theCR.Contact class, as shown in the screenshots above, the operation converts the DACitem to the Code item, automatically giving it the name of ContactExtensions. The actionremoves the CR.Contact DAC item class from the project and adds the ContactExtensionsCode item.
To Convert a DAC Item to an Extension Library
Only Code items can be moved to an extension library. To convert a DAC item to anextension library, you should first convert the DAC item to a Code item.

| Managing Items in a Project | 183
Also, you might need to complete these instructions if you have a custom DAC or a DACextension developed in one customization and a DAC extension of this custom DAC or ahigher-level DAC extension in another customization. To eliminate dependency and to beable to use the DAC extension in your project, you need to convert the DAC extension to anextension library.
To Convert a DAC Extension to an Extension Library
1. Convert the DAC item to a Code item, as described in To Convert a DAC Item to a Code Item.
2. Move the Code item to the extension library, as described in To Move a Code Item to theExtension Library
To Upgrade Technology for Legacy DAC Customization
In Acumatica Customization Platform 4.2 and earlier versions, the customization of dataaccess classes was implemented through the direct Microsoft Intermediate Language(MSIL) injection of custom fields into PX.Objects.dll. This resulted in a complex process ofpublication in which the original library was replaced with the modified version. In AcumaticaCustomization Platform 2019 R2, the customization uses the technology based on classextensions and the DAC extension is compiled into a separate library that is dynamicallymerged with the original DAC by the platform at run time.
If you do not need to change the contents of a customization project, there is no reason toupgrade it. The system will successfully publish the project using the injection of customfields into PX.Objects.dll in the newer version of the system as well. However if you haveto continue the development of the project, we recommend that you upgrade the technologyof DAC customization in the project.
The following sections provide detailed information:
• To Upgrade a Legacy DAC Customization
• To Upgrade a Library with a Legacy DAC Customization
To Upgrade a Legacy DAC Customization
To upgrade the legacy DAC customization to the technology based on class extensions,perform the following actions:
1. Open the customization project in the Customization Project Editor. (See To Open a Projectfor details.)
2. Click Data Access in the navigation pane to open the Customized Data Classes page.
3. On the page toolbar, click Upgrade All, as shown in the following screenshot.

| Managing Items in a Project | 184
Figure: Upgrading legacy customization
This action launches the upgrade wizard, which processes all the project items of the DACand Code types to discover and update the following cases of DAC customization based onthe MSIL injection technology:
• A field of a data access class does not contain the StorageName attribute, which specifiesthe storage type of the field. For more information about the storage types, see CreateNew Field Dialog Box.
In the Acumatica Customization Platform, you must select the way a custom fieldwill be stored in the database when you add the field to a data access class.
• The code contains a direct reference to a custom field of a row.
• The code contains a direct reference to an abstract class of a DAC field.See Using the Upgrade Wizard for details.
After the process is complete, the wizard opens the message box with the list of the itemsthat have been upgraded (see the screenshot below).

| Managing Items in a Project | 185
Figure: Viewing the list of upgraded items
If there is no legacy customization in the project, the wizard opens a message box with therelevant information (see the screenshot below).
Figure: Viewing the message box that indicates no legacy customization in the project
To Upgrade a Library with a Legacy DAC Customization
If you have legacy customization of data access classes as a library (.dll) and have to modifythe customization project, you can add the source code of the library as Code items to thecustomization project and then upgrade it as follows:
1. In the Microsoft Visual Studio project of the library, for each source code file thatcontains a data access class customization, do the following:
a. In Visual Studio (or any text editor), open the file, select All, and copy the sourcecode to the clipboard.

| Managing Items in a Project | 186
b. Create a new Code item in the customization project.
c. Delete the code template from the created item.
d. Paste the clipboard content into the item and save the Code item to thecustomization project.
2. Upgrade the customization project.
3. Test the upgraded customization project to ensure that the project is valid and applies tothe system after publication.
4. If you need to move the source code back to the library, use the clipboard and the copy-paste approach as well.
Using the Upgrade Wizard
While upgrading the DAC items, the wizard does the following:
• Adds the StorageName attribute and sets its value to "ExistingColumn" for an existingfield.
• Adds the StorageName attribute and sets its value to "AddColumn" for a custom field.
• Finds and replaces all references to custom fields in the attributes of other customizedfields, such as a PXSelector, PXParent or PXFormula. For example, the wizard insertsthe typeof(DACNameExt.usrFieldName) reference in the PXSelector declaration insteadof the typeof(DACName.usrFileName) reference.
While upgrading items of the Code type, the wizard processes each item to find references tothe custom fields and replaces the references by using the following approach:
• The wizard updates the references to the abstract class of the DAC field fromDACName.usrFieldName to DACNameExt.usrFieldName, where the DACNameExt is thename of the new extension class.
• The wizard replaces the references to the field Row.UsrFieldName with a reference to thefield through the DAC extension: Row.GetExtension<DACNameExt>().UsrFieldName.
For example, the following code contains the references to the APRegister.usrVoucherNbrclass and doc.UsrVoucherNbr field, which is a field customized based on the MSIL injectiontechnology.
sender.RaiseExceptionHandling<APRegister.usrVoucherNbr>(doc, doc.UsrVoucherNbr, new PXSetPropertyException("..."));
After technological upgrade for the customization of DAC classes in the project, thereferences will look as the following code shows. Now the code refers to the usrVoucherNbrclass of the APRegisterExt extension class that will be generated during publication of theproject.

| Managing Items in a Project | 187
sender.RaiseExceptionHandling<APRegisterExt.usrVoucherNbr>(doc, doc.GetExtension<APRegisterExt>().UsrVoucherNbr, new PXSetPropertyException("..."));
There might be a situation when a legacy customization includes two dataaccess classes with custom fields that have the same names, such asDACName1.usrTheSameFieldName and DACName2.usrTheSameFieldName.When you upgrade the customization, the wizard replaces theRow.usrTheSameFieldName references to each field by using the following pattern:Row.GetExtension<DACName1Ext or DACName2Ext>().usrTheSameFieldName. Theexpression "GetExtension<DACName1Ext or DACName2Ext>" is invalid and causes acompilation error. You are supposed to review these references and insert the correctreference to the needed class, DACName1Ext or DACName2Ext.
Code
You use the Code page of the Customization Project Editor to manage Code items in thecustomization project. On the page, you can perform the following operations with items:
• Add a new Code item of any of the following subtypes to the project:
• New Graph: A new business logic controller that is derived from the PXGraph<> class
• New DAC: A data access class that is derived from the IBqlTable class
• Graph Extension: A graph extension that is derived from the PXGraphExtension<>class
• DAC Extension: A DAC extension that is derived from the PXCacheExtension<> class
• Code File: Custom C# code
• Customization Plug-in: A class that is derived from the CustomizationPlugin class
• Delete a Code item from the project
You can open the Code Editor for a Code item by clicking the object name of the item in thepage table.
You can develop the customization code in the Code Editor. However we recommendthat you develop the code in Microsoft Visual Studio (as described in Integratingthe Project Editor with Microsoft Visual Studio) and use the editor for either minor codecorrection or the insertion of ready portions of code.
To move the code from a Code item to the extension library that is bound to thecustomization project, use the Move to Extension Lib action on the Code Editor toolbar.
For detailed information on working with Code items, see the following topics:
• To Create a Custom Business Logic Controller

| Managing Items in a Project | 188
• To Create a Custom Data Access Class
• To Customize an Existing Business Logic Controller
• To Customize an Existing Data Access Class
• To Add Custom Code to a Project
• To Add a Customization Plug-In to a Project
• To Delete a Code Item From a Project
• To Move a Code Item to the Extension Library
You can use Visual Studio to work with a Code item of a customization project thatis currently published. During the publication of the project, the platform creates the<CodeItemName>.cs file with the item content in the App_RuntimeCode folder of thewebsite. If you make changes to the code in Visual Studio, you have to update the item inthe customization project. See Detecting the Project Items Modified in the File System for details.
To Create a Custom Business Logic Controller
You can add a custom business logic controller to a customization project on the Code pageof the Customization Project Editor.
To do this, perform the following actions:
1. Open the customization project in the editor. (See To Open a Project for details.)
2. Select Code in the navigation pane to open the Code page.
3. Click Add New Record (+) on the page toolbar.
4. In the Create Code File dialog box, which opens, select New Graph in the FileTemplate box, as the screenshot below shows.
5. In the Class Name box, specify the class name of the business logic controller to becreated.
6. Click OK.
Figure: Adding a Code item for a custom graph to the projectThe platform creates the code template of the class derived from the PXGraph<> class, savesthe code as a Code item of the project in the database, and opens the item in the CodeEditor.

| Managing Items in a Project | 189
To Create a Custom Data Access Class
You can add a new data access class (DAC) to a customization project by generating thecode from the definition of a database table.
To create a custom data access class for a custom database table and add the created itemto a customization project, you have to generate the class template on the Code page of theCustomization Project Editor.
To do this, perform the following actions:
1. Create the needed custom table in the database by using a database management tool.
2. Generate the DAC code for the customization project as follows:
a. Open the customization project in the Project Editor.
b. In the navigation pane, click Code to open the Code page.
c. On the page toolbar, click Add New Record (+).
d. In the Create Code File dialog box, which opens, select New DAC in the FileTemplate box.
e. In the Class Name box, specify the class name that corresponds to the name of thetable created in the database.
If you have just created the table, restart Internet Information Services (IIS)or recycle the application pool to make sure that Acumatica ERP is aware ofthe new table, because it caches the database schema once, when the domainstarts.
f. Select the Generate Members from Database check box.
g. Click OK.
The platform does the following:
• Generates the data access class with members that correspond to the tablecolumns. The class is added to the namespace of the customization project.
• Adds the class to the customization project as a Code item.
• Saves the customization project.
• Opens the created item in the Code Editor.
You can use the Code Editor to modify the generated code. After you publish thecustomization project, you can work with the custom data access class in MS VisualStudio.

| Managing Items in a Project | 190
3. In the Code Editor, define the key fields in the DAC. To include a data field in the key,in the type attribute of the field, you have to add the IsKey parameter, as the examplebelow shows.
[PXDBString(15, IsKey=true)]
4. Add the table definition to the customization project by doing the following:
a. In the navigation pane of the Project Editor, click Database Scripts.
b. On the Database Scripts page, which opens, click Add > Custom Table Schema.
c. In the Add Custom Table Schema dialog box, which opens, select the custom tablein the Table box, and click OK.
The platform does the following:
• Adds the XML definition of the table to the customization project as an Sql item
• Saves the customization project
Every time you publish the customization project, the system checks whether a tablewith this SQL definition exists in the database. If the table doesn't exist, the systemcreates the table. If the table exists, the system adjusts the table schema if thereis any difference between the existing table schema and the table schema from thecustomization project (no data is truncated).
To Customize an Existing Business Logic Controller
You can create the class extension for an existing business logic controller (BLC) and add theCode item with the created code to a customization project in several ways, as described inthe following sections:
• To Add a Code Item by Using the Element Inspector
• To Add a Code Item by Using the Layout Editor
• To Add a Code Item on the Code page
If you need to extend the code of a BLC that has no webpage associated (such asARReleaseProcess), follow the instructions described in To Add a Code Item on the Code page.
As soon as you add the Code item for customization of the business logic to the project,the system generates an extension class for it and opens the code in the Code Editor. Youcan work with the extension classes in the Code Editor. After you publish the customizationproject, you can develop the code in MS Visual Studio.
To Add a Code Item by Using the Element Inspector
Typically, you want to modify the business logic that is executed for a certain form ofAcumatica ERP.

| Managing Items in a Project | 191
To add a Code item for customization of the business logic for an existing form to acustomization project by using the Element Inspector, perform the following actions:
1. Open the form in the browser.
2. On the form title bar, click Customization > Inspect Element to launch the ElementInspector.
3. On the form, select any UI element to open the Element Properties Dialog Box for theelement.
The Business Logic box of the dialog box displays the name of the business logiccontroller that provides business logic for the form, as shown in the screenshot below.
4. In the dialog box, click Actions > Customize Business Logic.
Figure: Using the Element Properties dialog box to customize the business logic for the form
5. If there is no currently selected customization project and the inspector opens the SelectCustomization Project Dialog Box, select an existing customization project or to create a newone.
The platform creates the template of the class that is derived from the PXGraphExtension<>class, saves the code as a Code item of the project in the database, and opens the item inthe Code Editor, as shown in the following screenshot.

| Managing Items in a Project | 192
Figure: Viewing the created code template in the Code Editor
To Add a Code Item by Using the Layout Editor
Often, you start a customization of an Acumatica ERP form in the Screen Editor and you laterwant to modify the business logic for this form. To customize the business logic of the form,you can add a Code item to a customization project from the Layout Editor.
To do this, perform the following action:
1. On the toolbar of the Layout Editor, click Actions > Customize Business Logic, as thefollowing screenshot shows.

| Managing Items in a Project | 193
Figure: Starting the customization of the business logic from the Layout Editor
The platform creates the template of the class that is derived from the PXGraphExtension<>class, saves the code as a Code item of the project in the database, and opens the item inthe Code Editor.
To Add a Code Item on the Code page
If you know the name of the business logic controller to be customized, you can create aCode item with the graph extension template on the Code page of the Customization ProjectEditor by using the Create Code File dialog box.
To do this, perform the following actions:
1. Open the customization project in the editor. (See To Open a Project for details.)
2. Click Code in the navigation pane to open the Code page.
3. Click Add New Record (+) on the page toolbar.
4. In the Create Code File dialog box, which opens, select Graph Extension in the FileTemplate box, as the screenshot below shows.
5. In the Base Graph box, select the class name of the business logic controller to becustomized.
6. Click OK.

| Managing Items in a Project | 194
Figure: Adding a Code item with the graph extension to the project
The platform creates the template of the class that is derived from the PXGraphExtension<>class, saves the code as a Code item of the project in the database, and opens the item inthe Code Editor.
To Customize an Existing Data Access Class
If you know the name of the data access class to be customized, you can create a Code itemwith the DAC extension template on the Code page of the Customization Project Editor byusing the Create Code File dialog box.
To do this, perform the following actions:
1. Open the customization project in the editor. (See To Open a Project for details.)
2. Click Code in the navigation pane to open the Code page.
3. Click Add New Record (+) on the page toolbar.
4. In the Create Code File dialog box, which opens, select DAC Extension in the FileTemplate box, as the screenshot below shows.
5. In the Base DAC box, select the name of the data access class to be customized.
6. Click OK.

| Managing Items in a Project | 195
Figure: Adding a Code item with the DAC extension to the project
The platform creates the template of the class that is derived from the PXCacheExtension<>class, saves the code as a Code item of the project in the database, and opens the item inthe Code Editor.
To Add Custom Code to a Project
You can add a .cs file with some custom code to a customization project. To do this, performthe following actions:
1. Open the customization project in the editor. (See To Open a Project for details.)
2. Click Code in the navigation pane to open the Code page.
3. Click Add New Record (+) on the page toolbar.
4. In the Create Code File dialog box, which opens, select Code File in the File Templatebox, as the screenshot below shows.
5. In the Class Name box, specify the name of the new class to be added to the project.
6. Click OK.

| Managing Items in a Project | 196
Figure: Adding a Code item for a custom graph to the project
The platform creates the code template of the new class, saves the code as a Code itemof the project in the database, and opens the item in the Code Editor, as the followingscreenshot shows.
Figure: Viewing the custom code file added to the project
To Add a Customization Plug-In to a Project
As a part of a complex customization, you might need to make changes to the websitebeyond the customization project. For example, you might need to change the websiteconfiguration. In such situations, you can add a customization plug-in to the project with thecode to be executed at the end of the publication process.
To add a customization plug-in, perform the following actions:
1. Open the customization project in the editor. (See To Open a Project for details.)
2. Click Code in the navigation pane to open the Code page.
3. Click Add New Record (+) on the page toolbar.
4. In the Create Code File dialog box, which opens, select Customization Plug-in in theFile Template box, as the screenshot below shows.
5. In the Class Name box, enter the name of the plug-in to be added to the project.

| Managing Items in a Project | 197
6. Click OK.
Figure: Adding a customization plug-in to the project
The system generates the plug-in code by template, as shown below.
using System;using PX.Data;using Customization;
namespace YogiFon{ //The customization plug-in is used to execute custom actions after the customization project has been published public class MyPlugin: CustomizationPlugin { //This method is executed right after website files are updated, but before the website is restarted //The method is invoked on each cluster node in a cluster environment //The method is invoked only if runtime compilation is enabled //Do not access custom code published to bin folder; it may not be loaded yet public override void OnPublished() { this.WriteLog("OnPublished Event"); } //This method is executed after the customization has been published and the website is restarted. public override void UpdateDatabase() { this.WriteLog("UpdateDatabase Event"); } }}
When a customization project that contains a customization plug-in has been published, thecorresponding .cs file is created in the App_RuntimeCode folder of the website.
The Acumatica Customization Platform uses the App_RuntimeCode folder to keepthe CS code of the DAC and Code items of all the published customization projects.By default, at run time, the platform compiles the code of this folder in a separatelibrary and dynamically links the library to the Acumatica ERP application. (SeeRun-Time Compilation for details.) If you set the UseRuntimeCompilation key in the

| Managing Items in a Project | 198
<appSettings> section of the web.config file (located in the website folder) to False,the platform uses the App_Code/Caches folder instead the App_RuntimeCode onefor the customization code. In this case, the OnPublished method of a customizationplug-in cannot be executed. Execution of the UpdateDatabase method does notdepend on the UseRuntimeCompilation key value.
To Delete a Code Item From a Project
To remove a Code item from a project, perform the following actions:
1. Open the customization project in the Customization Project Editor. (See To Open a Projectfor details.)
2. Click Code in the navigation pane to open the Code page.
3. In the page table, click the item to be deleted.
4. On the page toolbar, click Delete Row (X).
5. On the page toolbar, click Save to save the changes to the customization project.
You can delete a Code item from the customization project on the Edit Project Items pageof the Customization Project Editor. (See To Delete Items from the Project on the Edit Project ItemsPage for details.)
If you are working in Microsoft Visual Studio, to update the files in the file system, publishthe customization project. The .cs file of the deleted Code item will be removed from the filesystem.
To Move a Code Item to the Extension Library
You can develop customization code either as Code items in a customization project or assource code included in an extension library project in Microsoft Visual Studio. Some part ofa customization may exist in the Code items of a customization project, while another partcan be in an extension library that is included in the customization project as DLL file. (SeeExtension Library for details.)
To move the code from a Code item to an extension library, perform the following actions:
1. Open the customization project in the Customization Project Editor. (See To Open a Projectfor details.)
2. Click Code in the navigation pane to open the Code page.
3. In the page table, click the name of the item to be moved to open the Code Editor for theitem.
4. On the editor toolbar, click Move to Extension Lib.

| Managing Items in a Project | 199
Before you launch the operation, be sure that the customization project is boundto an existing extension library. (See Customization Project Editor for details.)
For more information about the operation, see Move to Extension Lib Action. Also, see ExtensionLibrary (DLL) Versus Code in a Customization Project for our recommendations about where youshould keep your customization code.
Custom Files
You can add to a customization project any custom file located in the website folder of yourinstance of Acumatica ERP. When you add a file to a project, the Acumatica CustomizationPlatform stores a copy of the file in the database as a File item. A File item contains the pathto the custom file and the GUID of the file content in the file storage of the database. Thepath is relative to the website folder. The platform then includes a copy of the file from thedatabase in the deployment package.
You must include in a customization package any custom files that you need to usewith your instance of Acumatica ERP and publish this package on this instance. Ifyou instead copy the files to the website folder of your instance of Acumatica ERPmanually, the files will be removed while the instance is being updated.
You use the Custom Files page of the Customization Project Editor to manage File items in thecustomization project. The page displays the list of File items included in the project.
When you publish or export the project, the platform compares each file in the project (inthe database) with the original file in the file system and detects the files that have beenmodified in the file system. If a modified file is found, there is a conflict, and the platformgives you the option to update the files in the project or discard the changes (and use thefiles from the database). See Detecting the Project Items Modified in the File System for details.
On the Custom Files page, you can perform the operations with items described in thefollowing topics:
• To Add a Custom File to a Project
• To Update a File Item in a Project
• To Delete a Custom File From a Project
To Add a Custom File to a Project
To add a custom file to a customization project, do the following:
1. In the file system, place the file in an appropriate folder within the website folder.
For example, if you need to add an extension library file, place it in the Bin folder of thewebsite.
2. Open the customization project in the Customization Project Editor. (See To Open a Projectfor details.)

| Managing Items in a Project | 200
3. Click Files in the navigation pane to open the Custom Files page.
4. On the page toolbar, click Add New record (+).
5. In the Add Files dialog box, which opens, find the file in the table and select the checkbox in the Selected column for it, as shown in the following screenshot.
You can select multiple custom files to add them to the project at the same time.
Figure: Adding a custom file to the project
For any files other than the ones placed in the Bin folder, you can click Refreshon the toolbar of the Add Files dialog box to make the system update the list offiles in the table. If you have changed files in the Bin folder of the website, youshould refresh the page in the browser by pressing F5 on the keyboard.
6. In the dialog box, click Save to save each selected file to the customization project as aFile item.
If you modify the file added to a customization project in the file system, you have to updatethe appropriate File item in the project.

| Managing Items in a Project | 201
To Update a File Item in a Project
If you have modified a file of a customization project in the file system and need to usethe modified version of the file in the project, you have to update the copy of the file in thedatabase. To do this, perform the following actions:
1. Open the customization project in the Customization Project Editor. (See To Open a Projectfor details.)
2. Click Files in the navigation pane to open the Custom Files page.
3. On the page toolbar, click Detect Modified Files, as shown in the screenshot below.
4. In the Modified Files Detected dialog box, which opens, ensure that the Conflict checkbox is selected for the file.
Figure: Updating files in the project
5. If multiple files in the project were changed, and you do not want to update some files atthe moment, clear the selection of these files in the Selected column.
6. On the toolbar of the dialog box, click Update Customization Project to update theselected files.

| Managing Items in a Project | 202
If you click Discard All Changes, the Acumatica Customization Platform resolves theconflict by overriding the file in the file system using the file copy in the database.
If you make changes to custom files added to a customization project in the file system, theplatform does not publish or export the project while a file in the file system differs its copyin the database. You have to resolve all such conflicts before publication or export of theproject. See Detecting the Project Items Modified in the File System for details.
Detecting the Project Items Modified in the File System
In the website folder in the file system, the platform tracks changes that you make to thefollowing files:
• Files with the customization code added to the customization project as DAC items
• Files with the customization code added to the project as Code items
• Custom files added to the project
If you make changes to these files in the file system, you have to update them in the projectbefore you publish the project or export the deployment package of the project.
When you run the project publication process or export the project, the AcumaticaCustomization Platform compares each file in the project (in the database) with the originalfile and detects the files modified in the file system. If a modified file is found, there is aconflict, and the platform opens the Modified Files Detected dialog box to give you theoption to update the files in the project or discard the changes and use the files from thedatabase.
If you have used the File Editor of the Customization Project Editor to modify a Fileitem in a customization project and saved the changes in the database, the changesare not saved in the original file in the file system. Then if you click Detect ModifiedFiles on the toolbar of the Files page, the platform does not detect a conflict becausethe file in the database is newer. The platform automatically updates the original fileduring the publication of the customization project.
The Modified Files Detected dialog box lists all custom and customized files in the websitefolder. The Conflict check box means that the file version in the file system differs fromthe file version in the customization project. This could happen, for example, if you havemodified the customization code in a file by using MS Visual Studio and the change is not yetreflected in the customization project. You have to resolve all conflicts in the project beforeyou publish the project or export the deployment package of the project.
In the dialog box, you can invoke the following actions for conflicting files:
• Update Customization Project: Updates the customization project with the file versionfrom the file system.
• Discard All Changes: Keeps the file version that exists in the customization project anddiscard the changes in the file system.
These actions are performed on the selected files—that is, all conflicting files for which youhave selected the check box in the Selected column.

| Managing Items in a Project | 203
You can invoke one action for one individual file and another action for another file. Forexample, you can first select the files that you want to update in the customization projectand click Update Customization Project. Then you can click Discard All Changes tocancel the changes made to all other conflicting files.
Make sure you have updated all appropriate files before removing all remaining conflicts. Ifyou discard changes, after you publish the customization project, the platform updates allselected conflicting files from the database, therefore the files will return to the original statein the file system.
No conflicts will appear in the Modified Files Detected dialog box until a file included in thecustomization project is modified in the file system again.
To Delete a Custom File From a Project
To delete a custom file from a customization project, perform the following actions:
1. Open the customization project in the Customization Project Editor. (See To Open a Projectfor details.)
2. Click Files in the navigation pane to open the Custom Files page.
3. In the page table, click the item to be deleted.
4. On the page toolbar, click Delete Row (X).
5. On the page toolbar, click Save to save the changes to the customization project.The File item is deleted from the project. The file remains in the file system and you can addit back to the project, if needed.
If you either publish the customization project after the File item is deleted orunpublish all customizations of the website, the platform deletes the original file in thefile system.
Generic Inquiries
You use the Generic Inquiries page of the Customization Project Editor to manageGenericInquiryScreen items in the customization project.
A GenericInquiryScreen item contains the data set of a custom or customized genericinquiry form.
The Generic Inquiries page displays the list of the generic inquiries added to thecustomization project.
On the page, you can perform the operations described in the following topics:
• To Add a Generic Inquiry to a Project
• To Delete a Generic Inquiry from a Project

| Managing Items in a Project | 204
• To Update Generic Inquiry Items in a Project
• To Navigate to the Generic Inquiry Form
To Add a Generic Inquiry to a Project
You can add to a customization project a custom or customized generic inquiry—the genericinquiry that is saved in the database for the current tenant. To do this, perform the followingactions:
1. Open the customization project in the Customization Project Editor. (See To Open a Projectfor details.)
2. Click Generic Inquiries in the navigation pane to open the Generic Inquiries page.
3. On the page toolbar, click Add New Record (+), as shown in the screenshot below.
4. In the list of generic inquiries in the Add Generic Inquiries dialog box, which opens,select the check box for each generic inquiry form that you want to include in theproject.
The Add Generic Inquiries dialog box displays all the custom and customizedgeneric inquiries that exist in your instance of Acumatica ERP. You can selectmultiple generic inquiries to add them to the project simultaneously.
5. In the dialog box, click Save to add the selected generic inquiry or inquiries to thecustomization project.
Figure: Adding the generic inquiry to the customization project

| Managing Items in a Project | 205
The system adds to the project the data for each selected generic inquiry, and you can seeeach new GenericInquiryScreen item in the Project Items table of the Item XML Editor, asshown in the following screenshot.
Figure: Viewing the new GenericInquiryScreen item included in the project
The system automatically includes in the customization project information about theworkspace to which the generic inquiry have been added in the UI along with otherinformation about the generic inquiry.
To Delete a Generic Inquiry from a Project
To remove a GenericInquiryScreen item from a project, perform the following actions:
1. Open the customization project in the Customization Project Editor. (See To Open a Projectfor details.)
2. Click Generic Inquiries in the navigation pane to open the Generic Inquiries page.
3. In the page table, click the item to be deleted.
4. On the page toolbar, click Delete Row (X).
5. On the page toolbar, click Save to save the changes to the customization project.

| Managing Items in a Project | 206
If you delete a GenericInquiryScreen item from the project, the generic inquiry remains inthe system unless you delete the inquiry by using the Generic Inquiry (SM208000) form.
If you have added a site map node for a custom inquiry form to the project and removed theinquiry from the project, you should delete the appropriate SiteMapNode item. (See To Deletea Site Map Node from a Project for details.)
To Update Generic Inquiry Items in a Project
If you have used the Generic Inquiry (SM208000) form to change a generic inquiry included inthe customization project, you have to update the appropriate item in the project. To do this,perform the following actions:
1. Open the customization project in the Customization Project Editor. (See To Open a Projectfor details.)
2. Click Generic Inquiries in the navigation pane to open the Generic Inquiries page.
3. On the page toolbar, click Reload From Database.
The platform updates all the GenericInquiryScreen items of the project by using theappropriate data from the database.
To Navigate to the Generic Inquiry Form
When you are working with the Customization Project Editor, you may need to open the GenericInquiry (SM208000) form in the browser. You can use this form, for example, to create anew generic inquiry, to customize an existing one, or to manage existing generic inquiries inAcumatica ERP.
To open the Generic Inquiry form from the Customization Project Editor, perform the followingactions:
1. Select Generic Inquiries in the navigation pane to open the Generic Inquiries page.
2. On the page toolbar, click Manage Inquiries.
As soon as you save a new inquiry on the Generic Inquiry form, you can add the inquiry as aGenericInquiryScreen item to the project.
You can limit the list of tables available for constructing generic inquiries on theGeneric Inquiry form. See Limiting the List of Tables Available for Generic Inquiries for details.
Limiting the List of Tables Available for Generic Inquiries
You can limit the list of database tables available for constructing generic inquiries onthe Generic Inquiry (SM208000) form in the production environment. To do this, in thedevelopment environment, use the following approach:

| Managing Items in a Project | 207
1. Create the GITables.xml configuration file to specify the Allowed and Hiddencollections of masks for the full names of the database tables, as described inGITables.xml File Content.
2. Save the configuration file to the App_Data folder of the website.
3. Add the file to a customization project as a File item. (See To Add a Custom File to a Projectfor details.)
The platform automatically checks whether this file exists in the App_Data folder. If thecustomization project is published in the production environment, the platform applies thefile content when a user selects a table for a generic inquiry on the Generic Inquiry form.
GITables.xml File Content
The configuration file is in XML format and includes the GITables element only. This elementmust include the Allowed section and can also contain the Hidden section. Each section is acollection of Table elements.
The Allowed collection specifies the list of tables that are available for use in genericinquiries constructed on the Generic Inquiry form. If a table isn't included in the Allowedcollection, it doesn't appear in the list for selection on the Table tab of the form. You canalso add the Hidden section to the configuration file. This section specifies the tables youwant to exclude from the list.
If a table is allowed and not hidden (as illustrated by the green area in the figure below), itis included in the list of the tables available for constructing generic inquiries on the GenericInquiry form. Otherwise, the table is not displayed in this list of tables.
Each Table element of the Allowed and Hidden sections contains the FullName attribute,which specifies the table name or the mask for a set of tables.
The attribute value is a string that can contain the following wildcard characters:
• An asterisk (*), which matches any number of characters (or no characters)
• A question mark (?), which matches exactly one character
The example below shows how to exclude the tables by using the PX.Objects.CR.BAccountand PX.*Contact* masks.

| Managing Items in a Project | 208
<?xml version="1.0" encoding="utf-8"?><GITables> <Hidden> <Table FullName="PX.Objects.CR.BAccount" /> <Table FullName="PX.*Contact*" /> </Hidden> <Allowed> <Table FullName="*" /> </Allowed></GITables>
According to the mask with Contact, users will not be able to use any tables that contain theword Contact in the table name in their inquiries (for example, the PX.Objects.CR.Contacttable).
To limit the list of database tables by using only the Allowed collection, you can empty orremove the Hidden section. The following example shows how to include only the tables thatmatched the PX.Objects.IN.* mask.
<?xml version="1.0" encoding="utf-8"?><GITables> <Allowed> <Table FullName="PX.Objects.IN.*" /> </Allowed></GITables>
Custom Reports
You use the Custom Reports page of the Customization Project Editor to manage Report items inthe customization project.
A Report item contains the data set of a custom report created with Acumatica ReportDesigner.
The Custom Reports page displays the list of the custom reports that have been added to thecustomization project.
On the page, you can perform the operations described in the following topics:
• To Add a Custom Report to a Project
• To Delete a Custom Report from a Project
• To Navigate a Custom Report in a Project
To Add a Custom Report to a Project
You can add an Acumatica Report Designer custom report to a customization project. Beforeadding a report to a project, you have to construct the report in Acumatica Report Designer

| Managing Items in a Project | 209
and save the report to the database. (For more information about reports, see AcumaticaReport Designer Guide.
To add a custom report to a project, perform the following actions:
1. Open the customization project in the Customization Project Editor. (See To Open a Projectfor details.)
2. Click Reports in the navigation pane to open the Custom Reports page.
3. On the page toolbar, click Add New Record (+), as shown in the screenshot below.
4. In Name box of the Select Report from Database dialog box, which opens, select thereport that you want to include in the project.
If a custom report is created in Acumatica Report Designer and saved as a file inthe file system, you cannot add the report to a customization project as a Reportitem.
5. In the dialog box, click OK to add the selected report to the customization project.
Figure: Adding a custom report to the project

| Managing Items in a Project | 210
To give users the ability to navigate to the custom report in Acumatica ERP, you haveto add the appropriate site map node to the customization project, as described in ToAdd a Site Map Node to a Project.
To Delete a Custom Report from a Project
To remove a custom report from a project, perform the following actions:
1. Open the customization project in the Customization Project Editor. (See To Open a Projectfor details.)
2. Click Reports in the navigation pane to open the Custom Reports page.
3. In the page table, click the item to be deleted.
4. On the page toolbar, click Delete Row (X).
5. On the page toolbar, click Save to save the changes to the customization project.
If you have added a site map node for the custom report to the project, you also have todelete the appropriate SiteMapNode item. (See To Delete a Site Map Node from a Project fordetails.)
To Navigate a Custom Report in a Project
If you have used Acumatica Report Designer to change a custom report included in thecustomization project, you have to update the appropriate item in the project. To do this,perform the following actions:
1. Open the customization project in the Customization Project Editor. (See To Open a Projectfor details.)
2. Click Reports in the navigation pane to open the Custom Reports page.
3. On the page toolbar, click Reload From Database.
The platform updates all the Report items that are added to the customization project.
Dashboards
You use the Dashboards page of the Customization Project Editor to manage Dashboard items inthe customization project.
A Dashboard item contains the data set of a custom or customized dashboard.
The Dashboards page displays the list of the dashboards that have been added to thecustomization project.
On the page, you can perform the operations described in the following topics:

| Managing Items in a Project | 211
• To Add a Dashboard to a Project
• To Delete a Dashboard from a Project
• To Update Dashboard Items in a Project
• To Navigate to the Dashboard Form
To Add a Dashboard to a Project
You can add to a customization project a custom or customized dashboard—the dashboardthat is saved in the database for the current tenant. To do this, perform the followingactions:
1. Open the customization project in the Customization Project Editor. (See To Open a Projectfor details.)
2. Click Dashboards in the navigation pane to open the Dashboards page.
3. On the page toolbar, click Add New Record (+).
4. In the list of dashboards in the Add Dashboards dialog box, which opens, select thecheck box for each dashboard that you want to include in the project.
The Add Dashboards dialog box displays all the custom and customizeddashboards that exist in your instance of Acumatica ERP. You can select multipledashboards to add them to the project simultaneously.
5. In the dialog box, click Save to add the selected dashboards to the customizationproject.
The system adds to the project the data for each selected dashboard, and you can see eachnew Dashboard item in the Project Items table of the Item XML Editor.
Alongside with Dashboard item, the system adds Generic Inquiry, Site Map, and Wikiitems for inquiries, site map nodes, and wiki pages associated with the dashboard. If aninquiry, a site map node, or a wiki page is already added to the customization project, it isnot duplicated.
The system automatically includes in the customization project information aboutthe workspace to which the dashboard have been added in the UI along with otherinformation about the dashboard.
To Delete a Dashboard from a Project
To remove a Dashboard item from a project, perform the following actions:
1. Open the customization project in the Customization Project Editor. (See To Open a Projectfor details.)
2. Click Dashboards in the navigation pane to open the Dashboards page.

| Managing Items in a Project | 212
3. In the page table, click the item to be deleted.
4. On the page toolbar, click Delete Row (X).
5. On the page toolbar, click Save to save the changes to the customization project.
If you delete a Dashboard item from the project, the dashboard remains in the systemunless you delete the dashboard by using the Dashboards (SM208600) form.
If a site map node or a generic inquiry was added for a custom dashboard to the project(manually or automatically), and you removed the dashboard from the project, you shoulddelete the appropriate Site Map, Generic Inquiry, or Wiki item manually. (See To Delete a SiteMap Node from a Project for details.)
To Update Dashboard Items in a Project
If you have used the Dashboards (SM208600) form to change a dashboard included in thecustomization project or changed its design by modifying the set of widgets, you have toupdate the appropriate item in the project. To do this, perform the following actions:
1. Open the customization project in the Customization Project Editor. (See To Open a Projectfor details.)
2. Click Dashboards in the navigation pane to open the Dashboard page.
3. On the page toolbar, click Reload From Database.
The platform updates all the Dashboard items of the project by using the appropriate datafrom the database.
To Navigate to the Dashboard Form
When you are working with the Customization Project Editor, you may need to open theDashboards (SM208600) form in the browser. You can use this form, for example, to create anew dashboard, to modify settings of an existing one, or to manage existing dashboards inAcumatica ERP.
To open the Dashboards form from the Customization Project Editor, perform the followingactions:
1. Select Dashboards in the navigation pane to open the Dashboards page.
2. On the page toolbar, click Manage Dashboards.
As soon as you save a dashboard on the Dashboards form, you can add the dashboard as aDashboard item to the project.

| Managing Items in a Project | 213
Site Map
You use the Site Map page of the Customization Project Editor to manage SiteMapNode items inthe customization project.
A SiteMapNode item contains the data set of a custom site map node for a customform or report included in the customization project. The item also includesinformation about the location of the form or report in the UI (such as workspace towhich the form or report included).
The Site Map page displays the list of the custom site map nodes that have been added tothe customization project.
On the page, you can perform the operations described in the following topics:
• To Add a Site Map Node to a Project
• To Delete a Site Map Node from a Project
• To Update a Site Map Node in a Project
• To Navigate to the Site Map Form
To Add a Site Map Node to a Project
If, for a custom form or report, you have changed the workspace in the UI and savedthese changes in the database for the current tenant, you can add these changes to acustomization project as a SiteMapNode item. To do this, perform the following actions:
1. Open the customization project in the Customization Project Editor. (See To Open a Projectfor details.)
2. Click Site Map in the navigation pane to open the Site Map page.
3. On the page toolbar, click Add New Record (+), as shown in the screenshot below.
4. In the list of site map nodes in the Add Site Map dialog box, which opens, select thecheck box for each screen that you want to include in the project.
The Add Site Map dialog box displays all the custom site map nodes that havebeen created in the site map of Acumatica ERP and the nodes that have beenmodified in the site map. You can select multiple custom site map nodes to addthem to the project simultaneously.
5. In the dialog box, click Save to add each selected site map node to the customizationproject.

| Managing Items in a Project | 214
Figure: Adding the site map node to the customization project
The system adds to the project the data from the database for each selected site map node.You can view each new SiteMapNode item in the Project Items table of the Item XML Editor.
To Delete a Site Map Node from a Project
To delete a site map node from a customization project, perform the following actions:
1. Open the customization project in the Customization Project Editor. (See To Open a Projectfor details.)
2. Click Site Map in the navigation pane to open the Site Map page.
3. In the page table, click the item to be deleted.
4. On the page toolbar, click Delete Row (X).
5. On the page toolbar, click Save to save the changes to the customization project.
If you delete a SiteMapNode item from the project, the node remains in the site map unlessyou delete the node on the Site Map (SM200520) form.
To Update a Site Map Node in a Project
If you have used the Site Map (SM200520) form or a workspace of the UI of Acumatica ERPto change a site map node included in the customization project, you should update thisnode in the project. To do this, perform the following actions:

| Managing Items in a Project | 215
1. Open the customization project in the Customization Project Editor. (See To Open a Projectfor details.)
2. Select Site Map in the navigation pane to open the Site Map page.
3. On the page toolbar, click Reload From Database.The platform updates all the SiteMapNode items of the project by using the appropriate datafrom the database.
To Navigate to the Site Map Form
You might need to add to Acumatica ERP a site map node for a custom form, inquiry, orreport that you develop for a customization project. To create a custom site map node ormodify an existing node, you use the Site Map (SM200520) form of Acumatica ERP.
To open the Site Map form from the Customization Project Editor, perform the following actions:
1. Click Site Map in the navigation pane to open the Site Map page of the editor.
2. On the page toolbar, click Manage Site Map.
As soon as you save changes to an existing site map node or create a custom node on theSite Map form, you can add the node as a SiteMapNode item to the customization project.
Database Scripts
With the Acumatica Customization Platform, you can use custom SQL scripts for thefollowing changes to the database in the scope of a customization project:
• The creation of custom tables
• The creation of views, indexes, and other database objects
• The insertion of data into tables
• The increasing of the size of a text column of a tableSee Changes in the Database Schema for details.
You use the Database Scripts page of the Customization Project Editor to manage Sql and Tableitems in the customization project.
An Sql item contains a custom database table definition or a custom SQL script thathas to be executed while the customization project is published. A Table item containsa description of the custom columns added to a table for bound custom fields createdin the appropriate data access class.
The Database Scripts page displays the list of the custom SQL scripts and customized tablesthat have been added to the customization project.
When you create a custom table in the database, we recommend that you add the tableschema to the customization project, as described in To Add a Custom Table to a Project. To

| Managing Items in a Project | 216
create other database objects or insert data into the tables, you have to compose thecorresponding SQL script and add the script to the customization project, as described in ToAdd a Custom SQL Script to a Project.
On the Database Scripts page, you can perform various operations, as described in thefollowing topics:
• To Add a Custom Table to a Project
• To Update Custom Tables in the Project
• To Add a Custom Column to an Existing Table
• To Increase the Size of a Column in an Existing Table
• To Add a Custom SQL Script to a Project
• To Edit a Custom SQL Script
• To Delete an Sql or Table Item From a Project
To Add a Custom Table to a Project
You use the Database Scripts page of the Customization Project Editor to add a custom tableto a customization project. You can add a custom table to a project by adding the tableschema or by adding a custom SQL script.
Adding the table schema is the optimal way of adding custom tables to the project. Whenyou publish the customization project, the platform executes each SQL script of the projectto update the database. If an Sql item contains a custom database table definition, toupdate the database with the table schema, the Acumatica Customization Platform checkswhether a table with this name already exists in the database. If the table exists, theplatform generates SQL statements to alter the existing table so that it matches the schema.The platform doesn't drop the existing table, and it keeps any data in it. This helps to deploya newer version of the customization project to a system that is already in use. If the tabledoesn't exist, the platform generates SQL statements to create the table. SQL statementsare generated in the SQL dialect of the database management system. Therefore, if you addcustom tables to the project by adding the table schema, you keep the customization projectindependent from the database management system that hosts the database of AcumaticaERP.
Alternatively, you can add custom tables by adding a custom SQL script that creates thetable in the project, as described in To Add a Custom SQL Script to a Project.
The creation or modification of the System tables is forbidden. A customizationproject containing such changes will not pass validation tests. For details on theSystem tables, see System and Application Tables.
To Add a Custom Table to a Customization Project
1. Create the needed table in the database by using a database administration tool, such asSQL Server Management Studio.

| Managing Items in a Project | 217
You have to use a naming convention that provides unique names for your customtables so that they do not have the names of existing tables of Acumatica ERP.
2. Open the customization project in the Customization Project Editor. (See To Open a Projectfor details.)
3. Click Database Scripts in the navigation pane to open the Database Scripts page.
4. On the page toolbar, click Add > Custom Table Schema.
5. In the Add Custom Table Schema dialog box, which opens, select the custom table inthe Table box and click OK.
Acumatica Customization Platform generates the table schema and adds the schema tothe customization project as an Sql item.
Below is an example of the Sql item that contains the table schema of the custom tableRBProduct.
<Sql TableName="RBProduct" TableSchemaXml="#CDATA"> <CDATA name="TableSchemaXml"><![CDATA[<table name="RBProduct"> <col name="ProductID" type="Int" identity="true" /> <col name="ProductCD" type="NVarChar(15)" /> <col name="ProductName" type="NVarChar(50)" /> <col name="Active" type="Bit" /> <col name="StockUnit" type="NVarChar(20)" /> <col name="UnitPrice" type="Decimal(19,6)" /> <col name="MinAvailQty" type="Decimal(25,6)" /> <col name="TStamp" type="Timestamp" /> <index name="RBProduct_PK" clustered="true" primary="true" unique="true"> <col name="ProductID" /> </index></table>]]></CDATA> </Sql>
To Update Custom Tables in the Project
After you have added a custom table to the project, you might want to continue makingchanges to the table by using a database administration tool, such as SQL ServerManagement Studio. We recommend that you update the table schema in the customizationproject before you export the deployment package of the project or publish the project.
To Update the Schema of Custom Tables in the Project
1. Open the customization project in the Customization Project Editor. (See To Open a Projectfor details.)
2. Click Database Scripts in the navigation pane to open the Database Scripts page.
3. On the page toolbar, click Reload From Database.

| Managing Items in a Project | 218
The platform regenerates the database table schema of all the custom tables added to theproject.
To Add a Custom Column to an Existing Table
You use the Database Scripts page of the Customization Project Editor to add customcolumns of an existing table of Acumatica ERP to a customization project. If you add customfields to a data access class by using the Data Class Editor, you do not need to add the customcolumns to the database table manually; Acumatica Customization Platform adds thesecolumns automatically. You may need to add a column manually if you added a custom fieldto a data access class in code.
We recommend that you not write custom SQL scripts to add changes to the databaseschema. If you add a custom SQL script, you must adhere to platform requirements thatapply to custom SQL scripts, such as the support of multitenancy and the support of SQLdialects of the target database management systems. If you use the approach describedin this topic, during the publication of the customization project, the platform generatesSQL statements to alter the existing table so that this statement conforms to all platformrequirements.
To Add a Custom Column to an Existing Table
1. Open the customization project in the Customization Project Editor. (See To Open a Projectfor details.)
2. Click Database Scripts in the navigation pane to open the Database Scripts page.
3. On the page toolbar, click Add > Custom Column to Table.
4. In the Add Custom Column to Table dialog box, which opens, specify the table towhich the column should be added and the name and type of the new column, and clickOK. Acumatica Customization Platform adds the columns to the customization project asa Table item.
To Increase the Size of a Column in an Existing Table
You use the Database Scripts page of the Customization Project Editor to increase the size ofa text column of an existing table of Acumatica ERP.
If you publish the customization project, the changes remain in the Acumatica ERPdatabase even if you unpublish the project.
To Increase the Size of a Column
1. Open the customization project in the Customization Project Editor. (See To Open a Projectfor details.)
2. In the navigation pane, click Database Scripts to open the Database Scripts page.
3. On the page toolbar, click Add > Column Length Increase.

| Managing Items in a Project | 219
4. In the Column Length Increase dialog box, which opens, specify the following:
a. The table in which the column should be altered (Table).
b. The name of the column that should be altered (Field Name).
Only text fields are available in the list because only their length can bechanged.
The Data Type field displays the current type and size of the specified column.
c. The new length of the text field (New Length).
5. Click OK to save your changes and exit the dialog box.
Acumatica Customization Platform creates a script to alter the column in the applicationdatabase. You can see the change entry on the Database Scripts page with the CustomColumns type.
To Add a Custom SQL Script to a Project
With the platform, you can add to a customization project an SQL script to be executedduring the publication of the project. However, we recommend that you avoid doing this.
A possible result of a custom SQL script is the loss of the integrity and consistency ofthe application data.
If you do add a custom SQL script, you must adhere to the following requirements for thescript:
• Because Acumatica ERP supports multitenancy, you must create an SQL script thatcorrectly creates a database object that properly specifies and uses the company mask.
• You must correctly specify the attributes for the script so that the script can be executedon the target database servers: MySQL Server, Microsoft SQL Server, or both. For detailsabout attributes, see Using the SQL Script Attributes.
To Add a Custom SQL Script to a Customization Project
1. Prepare, debug, and test the SQL script with a database administration tool, such as SQLServer Management Studio. (See Creating a Custom SQL Script for details.)
2. Open the customization project in the Customization Project Editor. (See To Open a Projectfor details.)
3. Click Database Scripts in the navigation pane to open the Database Scripts page.
4. On the page toolbar, click Add > Script.
5. In the Script Name box of the SQL Script Editor, which opens, specify the name of thescript to be used as the object name of the customization item. (The name can containonly English characters and digits.)

| Managing Items in a Project | 220
6. Optional: In the Priority box, specify the priority of the script. By default, the priority is0.
7. For each batch that you want to add, do the following:
a. Click Specify Database Engine, and in the Attribute box, select one of thefollowing options:
• Skip Batch on MySQL Server, which adds the --[mysql: Skip] attribute to theend of the text in the text area of the script editor.
• Skip Batch on Microsoft SQL Server, which adds the --[mssql: Skip] attributeto the end of the text in the text area of the script editor.
• Use Interpreter, which adds the --[VmSql] attribute to the end of the text in thetext area of the script editor.
For more information on the database script attributes, see Using the SQL ScriptAttributes.
b. In the text area of the editor, below the added attribute, enter the SQL script.
8. In the editor, click OK to add the script to the customization project.
If a custom script causes an error, the error message will appear during the publicationprocess when the system executes the custom scripts.
Related Links
• Creating a Custom SQL Script
• Using the SQL Script Attributes
• Writing Custom SQL Scripts for Interpretation
Creating a Custom SQL Script
To create database objects other than custom tables or to insert data into tables, you canadd custom SQL scripts to a customization project. When you publish the project, theAcumatica Customization Platform executes the custom SQL scripts added to the project.
When you publish a customization project that contains a database script, theAcumatica Customization Platform executes the script during the first publication. Theplatform keeps information about each script that has been executed at least onceand has not since been changed in the database, and omits the repeated executionof these scripts for optimization purposes. If you run the Publish with Cleanupoperation, the platform cleans all the information about previously executed scriptsof the customization project, and executes this script once more while publishing theproject. See Customization Project Editor for details.
As you write scripts, keep the following guidelines in mind:

| Managing Items in a Project | 221
• You have to use a naming convention that provides unique names for your customobjects so that they do not have the same as existing database objects do.
• A script can be executed multiple times. Therefore, in the script, you have to checkwhether an object already exists before you create a new one; otherwise, an error willoccur when the script runs on a database that already contains the object.
You can prepare the script directly in the dialect of the target database or prepare the scriptfor on-the-fly interpretation by Microsoft SQL Server or MySQL, depending on the targetdatabase. So you have the following options:
• Insert the SQL script prepared for the target database, which is Microsoft SQLor MySQL: During the publication of the project, the Acumatica Customization Platformexecutes the script as it is. You can use all the functionality of the SQL dialect of thetarget database, but this script causes the customization project to depend on thedatabase management system that hosts the database of Acumatica ERP.
You can use SQL script attributes to skip the script batch execution on a databasemanagement system. See Using the SQL Script Attributes for details.
• Insert the SQL script with support for interpretation for the target database:Prepare the script in the Microsoft SQL Server dialect, and insert the script with the--[VmSql] attribute. During the publication of the project, the system analyzes thescript, generates the corresponding SQL statements in the dialect of the target database,and executes the statements. A customization project that includes only these scriptsremains independent from the database management system that hosts the databaseof Acumatica ERP. However, the interpreter supports a relatively limited set of SQLlanguage elements. See Writing Custom SQL Scripts for Interpretation for details.
In the script for interpretation, you have to place the --[VmSql] attribute before eachbatch of the SQL script to be interpreted.
Using the SQL Script Attributes
You can decorate a batch of an SQL script with various attributes to control the batchexecution.
An SQL batch is a portion of an SQL script located between two GO statements.
Attributes are based on the line preceding the batch in the following format.
--[Attribute(Parameter1 = Value1, Parameter2 = Value2)]
Also, it is possible to specify that an attribute is effective only when the script is executedon a particular platform (MySQL Server or Microsoft SQL Server). To achieve this, add tothe beginning of the attribute name a short database platform name followed by a colon, asfollows.
--[mysql: Attribute(Parameter1 = Value1, Parameter2 = Value2)]

| Managing Items in a Project | 222
--[mssql: Attribute(Parameter1 = Value1, Parameter2 = Value2)]
The currently used platform names are azure, mssql, and mysql.
We recommend that you use the following attributes for batches in SQL scripts.
Attribute Description Para-meters
Examples
Native The script batch will be exe-cuted against the databasewithout any changes or at-tempts to parse and interpretit. You can use SQL clausesthat are specific to the targetplatform.
- --[mssql: Native]
Skip A script batch can be skippedwhen the upgrade is beingexecuted on a specific plat-form.
- --[mysql: Skip]
SmartExecute The whole batch will be exe-cuted once for every tenant.(Inter-tenant visibility mech-anisms (CompanyMask) areused.) You write your code inT-SQL, and it will be passedto the interpreter.
- --[SmartExecute]
VmSql The decorated script batchwill be interpreted as T-SQL,and a corresponding scriptfor the current database en-gine will be generated andexecuted on the database.The number of correctlytranslated clauses is a limit-ed subset of T-SQL.
- --[VmSql]
You can create an SQL script that is executed properly on the MySQL database platform andMicrosoft SQL database platform, as shown in the example below. This script contains twobatches and demonstrates how to use SQL script attributes to control the execution of thebatches.
--[mysql: Skip]--[mssql: Native]IF OBJECT_ID('dbo.View1', 'V') IS NOT NULL DROP VIEW [View1];CREATE VIEW [View1] AS (SELECT TOP 10 * FROM [AccountClass] )GO
--[mysql: Native]--[mssql: Skip]

| Managing Items in a Project | 223
DROP VIEW IF EXISTS `View1`;CREATE VIEW `View1` AS (SELECT * FROM `AccountClass` LIMIT 10 )GO
Writing Custom SQL Scripts for Interpretation
In custom scripts for interpretation, you can use the data types and SQL statements that arelisted below.
Data Types
The following data types of Microsoft SQL Server are supported for interpretation:
• bit
• char, nchar, varchar, and nvarchar
• smallint, int, and bigint
• date, datetime, and datetime2
• uniqueidentifier
• decimal and double
The following data types of MySQL Server are supported for interpretation:
• binary, varbinary, and longblob
• char, varchar, and longtext
• tinyint, smallint, int, and bigint
• timestamp and datetime
• decimal and double
SQL Statements
If you prepare a script for interpretation, you can use the following elements of Transact-SQL:
• CREATE, ALTER, and DROP statements
• SELECT, INSERT, UPDATE, and DELETE statements with WHERE clauses
• Logical operators: NOT, AND, OR, and EXISTS
• Control-of-flow keywords: IF...ELSE and BEGIN...END
• Expressions: CASE, COALESCE, and NULLIF
• String functions: LEN, CONCAT, REPLACE, CHAR, RTRIM, LTRIM, SUBSTRING, UPPER, LOWER,REPLICATE, and DATALENGTH

| Managing Items in a Project | 224
• Arithmetic operators: +, —, *, and /
• Mathematical functions: CEILING, ROUND, and FLOOR
• Date and time functions: GETDATE, DAYADD, DATEPART, and DATALENGTH
• Aggregate functions: ABS, MIN, MAX, SUM, and COUNT
• Conversion functions: CAST and CONVERT
• System functions: ISNULL and NEWID
• System variables: @@ROWCOUNT, @@IDENTITY, and @@FETCH_STATUS
• Cryptographic functions: HASHBYTES with MD5 only
• Local variables
• Cursors
• Scalar subselect
The EXISTS operator can be applied to the sys.tables, sys.column, andsys.indexes objects. The DATALENGTH function can be applied to a string or binaryobject, and the function returns the object length in bytes.
VmSQL Variables
In the script for interpretation, you can use the @@@is_mssql, @@@is_azure, and@@@is_mysql variables. The following table contains the values of these variables forMicrosoft SQL Server, Microsoft Azure SQL Database, and MySQL Server.
SQL Server @@@is_mssql @@@is_azure @@@is_mysql
MS SQL Server 1 0 0
MS Azure SQL Database 1 1 0
MySQL Server 0 0 1
Error Messages
Unsupported data types cause the following error: Cannot figure out DbType forSqlDataTypeOption.
Unsupported elements can cause the following errors:
• Date interval ... not recognized: This indicates that the dates are specified in an unknownformat in the functions that work with datetime formats.
• Unknown algorithm in hashbytes ... not implemented: If you get this error, an unknownalgorithm is specified in the HASHBYTES function. Currently, the interpreter supports MD5only.

| Managing Items in a Project | 225
• Function ... not implemented: This means that the script contains an unknown functionthat cannot be interpreted.
To Edit a Custom SQL Script
You can edit a custom SQL script once it is added to a customization project. To do this,perform the following actions:
1. Open the customization project in the Customization Project Editor. (See To Open a Projectfor details.)
2. Click Database Scripts in the navigation pane to open the Database Scripts page.
3. In the table on the page, click the row of the script to be edited.
4.On the page toolbar, click (Edit) to open the SQL Script Editor for the selected item.
You can click the name of a Script item in the Object Name column of the tableto open the SQL Script Editor for the item.
To Delete an Sql or Table Item From a Project
To delete an Sql or Table item from a customization project, perform the following actions:
1. Open the customization project in the Customization Project Editor. (See To Open a Projectfor details.)
2. Click Database Scripts in the navigation pane to open the Database Scripts page.
3. In the table on the page, click the row of the item to be deleted.
4.On the page toolbar, click (Delete Row).
The item is removed from the customization project. The database objects that have beencreated or altered if you have published the customization project remain in the database.
System Locales
You use the System Locales page of the Customization Project Editor to manage Locale items inthe customization project.
A Locale item contains the data set of a system locale, which is a set of parametersthat defines the language and other local preferences—such as how to displaynumbers, dates, and times in the user interface—for a group of users.
The System Locales page displays the list of the system locales that have been added to thecustomization project.

| Managing Items in a Project | 226
On the page, you can perform various operations, as described in the following topics:
• To Add a System Locale to a Project
• To Delete a System Locale from a Project
• To Update a Custom System Locale in a Project
• To Navigate to the System Locales Form
To Add a System Locale to a Project
You can add a system locale to a customization project. To do this, perform the followingactions:
1. Open the customization project in the Customization Project Editor. (See To Open a Projectfor details.)
2. Click System Locales in the navigation pane to open the System Locales page.
3. On the page toolbar, click Add New Record (+), as shown in the screenshot below.
4. In the list of system locales in the Add Locale dialog box, which opens, select the checkbox for each locale that you want to include in the project.
The Add Locale dialog box displays all the system locales that exist in yourinstance of Acumatica ERP. You can select multiple system locales to add them tothe project simultaneously.
5. In the dialog box, click OK to add each selected locale to the page table.
6. On the page toolbar, click Save to save the changes to the customization project.

| Managing Items in a Project | 227
Figure: Adding the system locale to the customization project
The system adds to the project the data from the database for each selected system locale.You can view each new Locale item in the Project Items table of the Item XML Editor, asshown in the following screenshot.

| Managing Items in a Project | 228
Figure: Viewing the XML code of the Locale item included in the project
To Delete a System Locale from a Project
To remove a Locale item from a project, perform the following actions:
1. Open the customization project in the Customization Project Editor. (See To Open a Projectfor details.)
2. Click System Locales in the navigation pane to open the System Locales page.
3. In the page table, click the item to be deleted.
4. On the page toolbar, click Delete Row (X).
5. On the page toolbar, click Save to save the changes to the customization project.

| Managing Items in a Project | 229
If you delete a Locale item from the project, the system locale remains in the system unlessyou delete the locale by using the System Locales (SM200550) form.
To Update a Custom System Locale in a Project
If you have used the System Locales (SM200550) form to change a system locale included ina customization project, you have to update the appropriate item in the project. To do this,perform the following actions:
1. Open the customization project in the Customization Project Editor. (See To Open a Projectfor details.)
2. Click System Locales in the navigation pane to open the System Locales page.
3. On the page toolbar, click Reload From Database.
The platform updates all the Locale items of the project by using the appropriate data fromthe database.
To Navigate to the System Locales Form
You might need to add a system locale to Acumatica ERP during customization. To managesystem locales in Acumatica ERP, you use the System Locales (SM200550) form.
In the Customization Project Editor, to open the System Locales form, perform the followingactions:
1. Click System Locales in the navigation pane to open the System Locales page of theeditor.
2. On the page toolbar, click Manage Locales.
As soon as you add a system locale to the system on the System Locales form, you can addthe locale as a Locale item to the customization project. For more information about systemlocales, see System Locales in the User Guide.
Import and Export Scenarios
You use the Import and Export Scenarios page of the Customization Project Editor to manageXportScenario items in the customization project.
An XportScenario item contains the data set of a custom export or import scenarioused to perform data migration between a legacy application and Acumatica ERP.
The Import and Export Scenarios page displays the list of the integration scenarios that havebeen added to the customization project.
On the page, you can perform a variety of operations, including the following:
• To Add an Integration Scenario to a Project

| Managing Items in a Project | 230
• To Delete an Integration Scenario from a Project
• To Update an Integration Scenario in a Project
• To Navigate to the Import Scenarios Form
To Add an Integration Scenario to a Project
You can add a custom integration scenario to a customization project. To do this, performthe following actions:
1. Open the customization project in the Customization Project Editor. (See To Open a Projectfor details.)
2. Click Import/Export Scenarios in the navigation pane to open the Import and ExportScenarios page.
3. On the page toolbar, click Add New Record (+), as shown in the screenshot below.
4. In the list of integration scenarios in the Add Import or Export Scenario dialog box,which opens, select the check box for each scenario that you want to include in theproject.
The Add Import or Export Scenario dialog box displays all the customintegration scenarios that exist in your instance of Acumatica ERP. You can selectmultiple integration scenarios to add them to the project simultaneously.
5. In the dialog box, click OK to add each selected integration scenario to the page table.
6. On the page toolbar, click Save to save the changes to the customization project.

| Managing Items in a Project | 231
Figure: Adding an integration scenario to the customization project
The system adds to the project the data from the database for each selected integrationscenario. You can view each new XportScenario item in the Project Items table of the ItemXML Editor, as shown in the following screenshot.

| Managing Items in a Project | 232
Figure: Viewing the XML code of the XportScenario item included in the project
An XportScenario item contains all the data required for the integration scenario. Therefore,the item includes the data of the data provider.
To Delete an Integration Scenario from a Project
To remove an XportScenario item from a project, perform the following actions:
1. Open the customization project in the Customization Project Editor. (See To Open a Projectfor details.)
2. Click Import/Export Scenarios in the navigation pane to open the Import and ExportScenarios page.
3. In the page table, click the item to be deleted.
4. On the page toolbar, click Delete Row (X).
5. On the page toolbar, click Save to save the changes to the customization project.

| Managing Items in a Project | 233
If you delete an XportScenario item from the project, the integration scenario remains in thesystem unless you delete the scenario by using the Import Scenarios (SM206025) form.
To Update an Integration Scenario in a Project
If you have used the Import Scenarios (SM206025) form to change an integration scenarioincluded in a customization project, you have to update the appropriate item in the project.To do this, perform the following actions:
1. Open the customization project in the Customization Project Editor. (See To Open a Projectfor details.)
2. Click Import/Export Scenarios in the navigation pane to open the Import and ExportScenarios page.
3. On the page toolbar, click Reload From Database.
The platform updates all the XportScenario items of the project by using the appropriatedata from the database.
To Navigate to the Import Scenarios Form
You might need to add an import or export scenario to Acumatica ERP during customization.To manage import scenarios in Acumatica ERP, you use the Import Scenarios (SM206025)form.
In the Customization Project Editor, to open this form, perform the following actions:
1. Select Import/Export Scenarios in the navigation pane to open the Import and ExportScenarios page.
2. On the page toolbar, click Manage Scenarios.
To manage export scenarios in Acumatica ERP, you use the Export Scenarios (SM207025)form.
As soon as you add an integration scenario to the system on the Import Scenarios or ExportScenarios form, you can add the scenario as an XportScenario item to the customizationproject. For more information about integration scenarios, see the Preparing Data for Import andExport by Using Scenarios in the Integrations guide.
Shared Filters
Users can create reusable filters, which are available on processing and inquiry forms inAcumatica ERP, to filter the data in the table part of the form; these filters can be reusedanytime after creation. Reusable filters can be shared among all users of the system.
You use the Shared Filters page of the Customization Project Editor to manage SharedFilteritems in the customization project.

| Managing Items in a Project | 234
A SharedFilter item contains the data set of a custom reusable shared filter created ona processing or inquiry form of Acumatica ERP.
The Shared Filters page displays the list of the custom reusable shared filters that have beenadded to the customization project.
On the page, you can perform several operations, as described in the following topics:
• To Add a Shared Filter to a Project
• To Delete a Shared Filter from a Project
• To Update a Shared Filter in a Project
• To Navigate to the Filters Form
To Add a Shared Filter to a Project
You can add a custom reusable shared filter to a customization project. To do this, performthe following actions:
1. Open the customization project in the Customization Project Editor. (See To Open a Projectfor details.)
2. Click Shared Filters in the navigation pane to open the Shared Filters page.
3. On the page toolbar, click Add New Record (+), as shown in the screenshot below.
4. In the list of integration scenarios in the Add Shared Filter dialog box, which opens,select the check box for each filter that you want to include in the project.
The Add Shared Filter dialog box displays all the custom shared filters that existin your instance of Acumatica ERP. You can select multiple shared filters to addthem to the project simultaneously.
5. In the dialog box, click OK to add the selected filter or filters to the page table.
6. On the page toolbar, click Save to save the changes to the customization project.

| Managing Items in a Project | 235
Figure: Adding the shared filter to the customization project
The system adds to the project the data from the database for each selected shared filter.You can view each new SharedFilter item in the Project Items table of the Item XML Editor, asshown in the following screenshot.

| Managing Items in a Project | 236
Figure: Viewing the XML code of the SharedFilter item included in the project
To Delete a Shared Filter from a Project
To remove a SharedFilter item from a project, perform the following actions:
1. Open the customization project in the Customization Project Editor. (See To Open a Projectfor details.)
2. Click Shared Filters in the navigation pane to open the Shared Filters page.
3. In the page table, click the item to be deleted.
4. On the page toolbar, click Delete Row (X).
5. On the page toolbar, click Save to save the changes to the customization project.
If you delete a SharedFilter item from the project, the custom reusable shared filter remainsin the system unless you delete the filter. You can delete the filter by using the Filters

| Managing Items in a Project | 237
(CS209010) form, as described in To Delete a System Filter, or by using the form to which thefilter is applied, as described in To Delete a Filter.
To Update a Shared Filter in a Project
If you have used the Filters (CS209010) form or the form to which the filter is appliedto change a shared filter included in a customization project, you have to update theappropriate item in the project. To do this, perform the following actions:
1. Open the customization project in the Customization Project Editor. (See To Open a Projectfor details.)
2. Click Shared Filters in the navigation pane to open the Shared Filters page.
3. On the page toolbar, click Reload From Database.
The platform updates all the SharedFilter items of the project by using the appropriate datafrom the database.
To Navigate to the Filters Form
You might need to add or change a reusable shared filter in Acumatica ERP during acustomization. To manage shared filters in Acumatica ERP, you use the Filters (CS209010)form.
In the Customization Project Editor, to open this form, perform the following actions:
1. Click Shared Filters in the navigation pane to open the Shared Filters page.
2. On the page toolbar, click Manage Filters.
For more information about reusable filters, see Saving of Filters for Future Use in the InterfaceGuide.
Access Rights
In Acumatica ERP, you can control access to system objects at broad and granular levels,down to the control of form elements, such as buttons, text boxes, and check boxes. Usersare assigned to roles, and you give these roles the appropriate levels of access rights tosystem objects—suites, modules, forms, and form elements.
You use the Access Rights page of the Customization Project Editor to manageScreenWithRights items in the customization project.
A ScreenWithRights item contains the data set of custom access rights of roles to aform, down to the control of form elements.
The Access Rights page displays the list of the custom access rights of roles that have beenadded to the customization project.

| Managing Items in a Project | 238
On the page, you can perform several operations, as described in the following topics:
• To Add Access Rights to a Project
• To Delete Access Rights from a Project
• To Update Access Rights in a Project
• To Navigate to the Access Rights by Screen Form
To Add Access Rights to a Project
When you create or change the access rights by screen, role, or user in an instance ofAcumatica ERP, these changes are saved in the database for the current tenant.
You can add to a customization project the access rights of roles by screen that are saved inthe database for the current tenant. To do this, perform the following actions:
1. Open the customization project in the Customization Project Editor. (See To Open a Projectfor details.)
2. Click Access Rights in the navigation pane to open the Access Rights page.
3. On the page toolbar, click Add New Record (+), as shown in the screenshot below.
4. In the Add Access Rights for Screen dialog box, which opens, in the list of customaccess rights of roles by screen, select the check box for the access rights that you wantto include in the project.
The Add Access Rights for Screen dialog box displays all the custom accessrights of roles that exist in your instance of Acumatica ERP. You can selectmultiple access rights of roles to add them to the project simultaneously.
5. In the dialog box, click OK to add the selected access rights of roles to the page table.
6. On the page toolbar, click Save to save the changes to the customization project.

| Managing Items in a Project | 239
Figure: Adding the access rights to the customization project
The system adds to the project the data from the database for the selected access rights ofroles. You can view each new ScreenWithRights item in the Project Items table of the ItemXML Editor, as shown in the following screenshot.

| Managing Items in a Project | 240
Figure: Viewing the XML code of the ScreenWithRights item included in the project
A ScreenWithRights item contains all the data required for the access rights of roles to thescreen. Therefore, the item includes the data of all the roles applied to the screen.
To Delete Access Rights from a Project
To remove a ScreenWithRights item from a project, perform the following actions:
1. Open the customization project in the Customization Project Editor. (See To Open a Projectfor details.)
2. Click Access Rights in the navigation pane to open the Access Rights page.
3. In the page table, click the item to be deleted.
4. On the page toolbar, click Delete Row (X).
5. On the page toolbar, click Save to save the changes to the customization project.
If you delete a ScreenWithRights item from the project, the customization of the accessrights of roles remain in the system unless you delete the changes of access rights from thedatabase.

| Managing Items in a Project | 241
To Update Access Rights in a Project
If you have used Acumatica ERP forms to change access rights included in a customizationproject, you have to update the appropriate items in the project. To do this, perform thefollowing actions:
1. Open the customization project in the Customization Project Editor. (See To Open a Projectfor details.)
2. Click Access Rights in the navigation pane to open the Access Rights page.
3. On the page toolbar, click Reload From Database.
The platform updates all the ScreenWithRights items of the project by using the appropriatedata from the database.
To Navigate to the Access Rights by Screen Form
You might need to change the access rights of roles in Acumatica ERP during customization.To manage access rights of roles by screen in Acumatica ERP, you use the Access Rights byScreen (SM201020) form.
To open this form from the Customization Project Editor, perform the following actions:
1. Click Access Rights in the navigation pane to open the Access Rights page.
2. On the page toolbar, click Manage Access Rights.
As soon as you change the access rights of roles in Acumatica ERP, the system savesthe changes in the database for your tenant, and you can add the access rights as aScreenWithRights item to the customization project. For more information about the accessrights of roles, see Managing User Access Rights in the System Administration Guide.
Wikis
You use the Wikis page of the Customization Project Editor to manage WikiArticle items in thecustomization project.
A WikiArticle item contains the data set of a custom wiki and all the articles createdwithin this wiki.
The Wikis page displays the list of the custom wikis that have been added to thecustomization project.
On the page, you can perform several operations, as described in the following topics:
• To Add a Custom Wiki to a Project
• To Delete a Custom Wiki from a Project

| Managing Items in a Project | 242
• To Update a Custom Wiki in a Project
• To Navigate to the Wiki Form
To Add a Custom Wiki to a Project
In Acumatica ERP, you can create a new wiki or modify the properties of an existing one.For example, you can change the access rights to wiki folders and edit the list of categoriesavailable for the wiki. Any change to wikis is saved for the appropriate wiki in the databasefor the current tenant.
You can add to a customization project the wiki that are saved in the database for thecurrent tenant. To do this, perform the following actions:
1. Open the customization project in the Customization Project Editor. (See To Open a Projectfor details.)
2. Click Wikis in the navigation pane to open the Wikis page.
3. On the page toolbar, click Add New Record (+), as shown in the screenshot below.
4. In the list of custom wikis in the Add Wiki Page dialog box, which opens, select thecheck box for each wiki that you want to include in the project.
The Add Wiki Page dialog box displays all the custom wikis that exist in yourinstance of Acumatica ERP. You can select multiple wikis to add them to theproject simultaneously.
5. In the dialog box, click OK to add the selected wiki to the page table.
6. On the page toolbar, click Save to save the changes to the customization project.

| Managing Items in a Project | 243
Figure: Adding the custom wiki to the customization project
The system adds to the project each selected wiki. You can view each new WikiArticle item inthe Project Items table of the Item XML Editor, as shown in the following screenshot.

| Managing Items in a Project | 244
Figure: Viewing the XML code of the WikiArticle item included in the project
A WikiArticle item contains all the data required to recreate the corresponding wiki in anyinstance of Acumatica ERP.
To Delete a Custom Wiki from a Project
To remove a WikiArticle item from a project, perform the following actions:
1. Open the customization project in the Customization Project Editor. (See To Open a Projectfor details.)
2. Click Wikis in the navigation pane to open the Wikis page.
3. In the page table, click the item to be deleted.
4. On the page toolbar, click Delete Row (X).
5. On the page toolbar, click Save to save the changes to the customization project.
If you delete a WikiArticle item from the project, the custom wiki remains in the systemunless you delete the wiki by using the Wiki (SM202005) form.

| Managing Items in a Project | 245
To Update a Custom Wiki in a Project
If you have changed a wiki included in a customization project by using Acumatica ERPforms, you have to update the appropriate item in the project. To do this, perform thefollowing actions:
1. Open the customization project in the Customization Project Editor. (See To Open a Projectfor details.)
2. Click Wikis in the navigation pane to open the Wikis page.
3. On the page toolbar, click Reload From Database.
The platform updates all the WikiArticle items of the project by using the appropriate datafrom the database.
To Navigate to the Wiki Form
You might need to add a new wiki or edit an existing one in Acumatica ERP duringcustomization. To manage wikis in Acumatica ERP, you use the Wiki (SM202005) form.
To open this form from the Customization Project Editor, perform the following actions:
1. Click Wikis in the navigation pane to open the Wikis page.
2. On the page toolbar, click Manage Wikis.
As soon as you create or change a wiki in the system, the system saves this wiki inthe database for the current tenant, you can add the wiki as a WikiArticle item to thecustomization project. For more information about wikis, see Managing Wikis in the SystemAdministration Guide.
Web Service Endpoints
Acumatica ERP provides web services for integration with external systems. Through the webservices of Acumatica ERP, external systems can get data records from Acumatica ERP andprocess these records; new or updated records can also be saved to Acumatica ERP. You canconfigure contract-based web service endpoints in an instance of Acumatica ERP and includethe new configuration in a customization project as an EntityEndpoint item.
You use the Web Service Endpoints page of the Customization Project Editor to manageEntityEndpoint items in the customization project.
A EntityEndpoint item contains the data set of a custom contract-based web serviceendpoint.
The Web Service Endpoints page displays the list of the custom contract-based web serviceendpoints that have been added to the customization project.

| Managing Items in a Project | 246
On the page, you can perform several operations, as described in the following topics:
• To Add a Custom Web Service Endpoint to a Project
• To Delete a Custom Web Service Endpoint from a Project
• To Update a Custom Web Service Endpoint in a Project
• To Navigate to the Web Service Endpoints Form
To Add a Custom Web Service Endpoint to a Project
To add a custom contract-based web service endpoint to a customization project, performthe following actions:
1. Open the customization project in the Customization Project Editor. (See To Open a Projectfor details.)
2. Click Web Service Endpoints in the navigation pane to open the Web Service Endpointspage.
3. On the page toolbar, click Add New Record (+), as shown in the screenshot below.
4. In the list of custom contract-based web service endpoints in the Add Entity Endpointdialog box, which opens, select the check box for each endpoint that you want to includein the project.
The Add Entity Endpoint dialog box displays all the custom contract-based webservice endpoints that exist in your instance of Acumatica ERP. You can selectmultiple endpoints to add them to the project simultaneously.
5. In the dialog box, click OK to add each selected endpoint to the page table.
6. On the page toolbar, click Save to save the changes to the customization project.

| Managing Items in a Project | 247
Figure: Adding the custom contract-based web service endpoint to the customization project
The system adds to the project the data from the database for each selected web serviceendpoint . You can view each new EntityEndpoint item in the Project Items table of the ItemXML Editor, as shown in the following screenshot.
Figure: Viewing the XML code of the EntityEndpoint item included in the project

| Managing Items in a Project | 248
To Delete a Custom Web Service Endpoint from a Project
To remove a EntityEndpoint item from a project, perform the following actions:
1. Open the customization project in the Customization Project Editor. (See To Open a Projectfor details.)
2. Click Web Service Endpoints in the navigation pane to open the Web Service Endpointspage.
3. In the page table, click the item to be deleted.
4. On the page toolbar, click Delete Row (X).
5. On the page toolbar, click Save to save the changes to the customization project.
If you delete a EntityEndpoint item from the project, the custom contract-based web serviceendpoint remains in the system unless you delete the endpoint by using the Web ServiceEndpoints (SM207060) form.
To Update a Custom Web Service Endpoint in a Project
If you have used the Web Service Endpoints (SM207060) form to change a custom contract-based web service endpoint included in a customization project, you have to update theappropriate item in the project. To do this, perform the following actions:
1. Open the customization project in the Customization Project Editor. (See To Open a Projectfor details.)
2. Click Web Service Endpoints in the navigation pane to open the Web Service Endpointspage.
3. On the page toolbar, click Reload From Database.
The platform updates all the EntityEndpoint items of the project by using the appropriatedata from the database.
To Navigate to the Web Service Endpoints Form
You might need to configure contract-based web service endpoints in Acumatica ERP duringcustomization. To manage contract-based web service endpoints in Acumatica ERP, you usethe Web Service Endpoints (SM207060) form.
To open this form from the Customization Project Editor, perform the following actions:
1. Click Web Service Endpoints in the navigation pane to open the Web Service Endpointspage of the editor.
2. On the page toolbar, click Manage Endpoints.

| Managing Items in a Project | 249
As soon as you configure a web service endpoint on the Web Service Endpoints form, thesystem saves the endpoint data in the database for the current tenant, and you can add theendpoint as a EntityEndpoint item to the customization project. For more information aboutthe contract-based web services API, see Configuring the Contract-Based REST and SOAP API inthe Integration Development Guide.
Analytical Reports
Analytical reports are used to display the consolidated and summarized data in a viewdefined by the report designer at the report design stage. The analytical reports are usedto provide the summarized and aggregated values in a variety of views: the data in theanalytical report can be displayed in the monthly, yearly, and quarterly views, and the datacan provide information from the point of view of departments, selected account classes,and other dimensions.
In Acumatica ERP, you can modify defined analytical reports, create a new analytical report,and delete existing reports. You can add the analytical reports that have been created ormodified to the customization project as ReportDefinition items.
You use the Analytical Reports page of the Customization Project Editor to manageReportDefinition items in the customization project.
A ReportDefinition item contains the data set of a custom analytical report, includingthe data of a predefined sets of rows, columns, and units.
The Analytical Reports page displays the list of the custom analytical reports that have beenadded to the customization project.
On the page, you can perform a variety of operations, as described in the following topics:
• To Add a Custom Analytical Report to a Project
• To Delete a Custom Analytical Report from a Project
• To Update a Custom Analytical Report in a Project
• To Navigate to the Report Definitions Form
To Add a Custom Analytical Report to a Project
You can add a custom analytical report to a customization project. To do this, perform thefollowing actions:
1. Open the customization project in the Customization Project Editor. (See To Open a Projectfor details.)
2. Click Analytical Reports in the navigation pane to open the Analytical Reports page.
3. On the page toolbar, click Add New Record (+), as shown in the screenshot below.

| Managing Items in a Project | 250
4. In the list of custom analytical reports in the Add Report Definition dialog box, whichopens, select the check box for each report that you want to include in the project.
The Add Report Definition dialog box displays all the custom analytical reportsthat exist in your instance of Acumatica ERP. You can select multiple customanalytical reports to add them to the project simultaneously.
5. In the dialog box, click OK to add each selected analytical report to the page table.
6. On the page toolbar, click Save to save the changes to the customization project.
Figure: Adding the custom analytical report to the customization project
The system adds to the project the data from the database for each selected customanalytical report. You can view each new item in the Project Items table of the Item XMLEditor, as shown in the following screenshot.

| Managing Items in a Project | 251
Figure: Viewing the XML code of the ReportDefinition item included in the project
A ReportDefinition item contains all the data required to recreate the correspondinganalytical report in any instance of Acumatica ERP.
To give users the ability to navigate to the custom analytical report in AcumaticaERP, you have to add the appropriate site map node to the customization project, asdescribed in To Add a Site Map Node to a Project.
To Delete a Custom Analytical Report from a Project
To remove a ReportDefinition item from a project, perform the following actions:
1. Open the customization project in the Customization Project Editor. (See To Open a Projectfor details.)
2. Click Analytical Reports in the navigation pane to open the Analytical Reports page.
3. In the page table, click the item to be deleted.
4. On the page toolbar, click Delete Row (X).
5. On the page toolbar, click Save to save the changes to the customization project.

| Managing Items in a Project | 252
If you delete a ReportDefinition item from the project, the analytical report remains in thesystem unless you delete the report by using the Report Definitions (CS206000) form.
To Update a Custom Analytical Report in a Project
If you have used the Report Definitions (CS206000) form to change an analytical reportincluded in a customization project, you have to update the appropriate item in the project.To do this, perform the following actions:
1. Open the customization project in the Customization Project Editor. (See To Open a Projectfor details.)
2. Click Analytical Reports in the navigation pane to open the Analytical Reports page.
3. On the page toolbar, click Reload From Database.
The platform updates all the ReportDefinition items of the project by using the appropriatedata from the database.
To Navigate to the Report Definitions Form
You might need to add an analytical report to Acumatica ERP during customization. Tomanage analytical reports in Acumatica ERP, you use the Report Definitions (CS206000) form.
To open this form from the Customization Project Editor, perform the following actions:
1. Click Analytical Reports in the navigation pane to open the Analytical Reports page.
2. On the page toolbar, click Manage Report Definitions.
As soon as you add a new analytical report to the system or change an existing analyticalreport on the Report Definitions form, the report is saved in the database for the currenttenant, and you can add the report to the customization project as a ReportDefinition item.For more information about analytical reports, see Managing Analytical Reports in the ReportingTools Guide.
Push Notifications
Push notifications are notifications in JSON format that are sent by Acumatica ERP tonotification destinations when specific data changes occur in Acumatica ERP. Externalapplications can receive the notifications and process them to retrieve the information aboutthe changes.
For more information about push notifications in Acumatica ERP, see Configuring PushNotifications.
You can add the push notification definitions to a customization project as PushNotificationitems. A PushNotification item contains the data set of a push notification definition. A pushnotification definition includes the push notification destination and the data query, whichdefines the data changes for which Acumatica ERP sends notifications.

| Managing Items in a Project | 253
You use the Push Notifications page of the Customization Project Editor to managePushNotification items in the customization project. This page displays the list of the pushnotification definitions that have been added to the customization project.
On the page, you can perform a variety of operations, as described in the following topics:
• To Add Push Notification Definitions to a Project
• To Delete Push Notification Definitions from a Project
• To Update Push Notification Definitions in a Project
• To Navigate to the Push Notifications Form
To Add Push Notification Definitions to a Project
You can add any number of push notification definitions to a customization project asPushNotification items. A PushNotification item contains all the data required to recreate thecorresponding push notification definition in any instance of Acumatica ERP.
To add a push notification definition to the project, perform the following actions:
1. Open the customization project in the Customization Project Editor. (See To Open a Projectfor details.)
2. In the navigation pane, click Push Notifications to open the Push Notifications page.
3. On the page toolbar, click Add New Record (+).
4. In the list of push notification definitions in the Add Push Notifications dialog box,which has opened, select the unlabeled check box in the row of each definition that youwant to include in the project.
The Add Push Notifications dialog box displays all the push notificationdefinitions that are configured in your instance of Acumatica ERP.
5. Click OK to add each selected notification definition to the page table and close thedialog box.
6. On the page toolbar, click Save to save your changes to the customization project.
7. For each data query that defines the data changes for which Acumatica ERP shouldsend notifications in the added push notification definition or definitions, do one of thefollowing:
• If the data query has been defined with a generic inquiry, add the generic inquiry tothe customization project, as described in To Add a Generic Inquiry to a Project.
• If the data query has been defined with a built-in definition, make sure that the built-in definition is available in the customization project: The built-in definition can beadded as either a Code item (if the definition is added directly to the customization

| Managing Items in a Project | 254
project as a class) or a File item (if the definition is added to the customizationproject as a class in a DLL file).
8. Optional: In the Customization Project Editor, click File > Edit Project Items on themenu. In the Project Items table of the Item XML Editor, verify that the system hasadded to the project the data from the database for each selected push notificationdefinition. For details on the Item XML Editor, see Item XML Editor.
To Delete Push Notification Definitions from a Project
To remove a PushNotification item or multiple PushNotification items from a project, performthe following actions:
1. Open the customization project in the Customization Project Editor. (See To Open a Projectfor details.)
2. In the navigation pane, click Push Notifications to open the Push Notifications page.
3. In the page table, click the item to be deleted.
4. On the page toolbar, click Delete Row (X).
5. Repeat the two previous steps for each item to be deleted.
6. On the page toolbar, click Save to save your changes to the customization project.
If you delete a PushNotification item from the project, the push notificationdefinition remains in the system unless it is deleted on the Push Notifications(SM302000) form.
To Update Push Notification Definitions in a Project
If a push notification included in a customization project has been changed (or if multiplepush notification definitions have been changed) on the Push Notifications (SM302000) form,you have to update the appropriate item (or items) in the project. To do this, perform thefollowing actions:
1. Open the customization project in the Customization Project Editor. (See To Open a Projectfor details.)
2. In the navigation pane, click Push Notifications to open the Push Notifications page.
3. On the page toolbar, click Reload From Database.
The platform updates all the PushNotification items of the project with the data in thedatabase.
To Navigate to the Push Notifications Form
You might need to add a push notification definition to Acumatica ERP during customization.To manage push notifications in Acumatica ERP, you use the Push Notifications (SM302000)

| Managing Items in a Project | 255
form. For more information about push notifications, see Configuring Push Notifications in theIntegration Development Guide.
To open this form directly from the Customization Project Editor, perform the following actions:
1. In the navigation pane, click Push Notifications to open the Push Notifications page.
2. On the page toolbar, click Manage Notifications.
This opens the Push Notifications form, where you can select a particular push notificationdefinitions or create a new one.
As soon as you add a new push notification definition to the system or change anexisting push notification definition on the Push Notifications form, the push notificationdefinition is saved in the database for the current tenant. You can add the definitionto the customization project, as described in To Add Push Notification Definitions to aProject. If you have changed a push notification definition that is already included ina customization project, you have to update the appropriate item in the project, asdescribed in To Update Push Notification Definitions in a Project.
Business Events
To configure the system to monitor a business process, on the Business Events (SM302050)form, you define a business event that relates to this business process and that causes thesystem to perform an action or multiple actions in the system. The business event is a datachange or a set of conditions checked for on a schedule. For details on the business events,see Business Events Related to Data Changes and Business Events Monitored on a Schedule.
You can add the business events to a customization project as BpEvent items. A BpEventitem contains the data set of a business event. The item includes the following information:
• The general information about the business event (such as its name and type)
• The trigger conditions of the business event
• The schedule of the business event (if the conditions of the business event are checkedfor on a schedule)
• The generic inquiry parameters (if any parameter values have been specified for thebusiness event)
• The email notification templates (if the business event has email notification templatesas subscribers)
• The link to the GenericInquiryScreen item related to the business event, which thesystem adds to the customization project as a separate item
• The links to the XportScenario items related to the business event, which the systemadds to the customization project as separate items (if the business event has importscenarios as subscribers)

| Managing Items in a Project | 256
You use the Business Events page of the Customization Project Editor to manage BpEvent itemsin the customization project. This page displays the list of the business events that havebeen added to the customization project.
On the page, you can perform a variety of operations, as described in the following topics:
• To Add Business Events to a Project
• To Delete Business Events from a Project
• To Update Business Events in a Project
• To Navigate to the Business Events Form
To Add Business Events to a Project
You can add any number of business events to a customization project as BpEvent items. ABpEvent item contains all the data required to recreate the corresponding business event inany instance of Acumatica ERP.
To add a business event to the project, perform the following actions:
1. Open the customization project in the Customization Project Editor. (See To Open a Projectfor details.)
2. In the navigation pane, click Business Events to open the Business Events page.
3. On the page toolbar, click Add New Record (+).
4. In the list of business events in the Add Business Events dialog box, which hasopened, select the unlabeled check box in the row of each business event that you wantto include in the project.
The Add Business Events dialog box displays all the business events that areconfigured in your instance of Acumatica ERP.
5. Click OK to add each selected business event to the page table and close the dialog box.
6. Optional: In the Customization Project Editor, click File > Edit Project Items on themenu. In the Project Items table of the Item XML Editor, verify that for each selectedbusiness event, the system has added to the project the data of the business eventfrom the database (BpEvent item), the related generic inquiry (GenericInquiryScreenitem), and, if the business scenario has any import scenarios as subscribers, the importscenario (XportScenario item) for each import scenario subscriber. For details on theItem XML Editor, see Item XML Editor.
To Delete Business Events from a Project
To remove a BpEvent item or multiple BpEvent items from a project, perform the followingactions:

| Managing Items in a Project | 257
1. Open the customization project in the Customization Project Editor. (See To Open a Projectfor details.)
2. In the navigation pane, click Business Events to open the Business Events page.
3. In the page table, click the item to be deleted.
4. On the page toolbar, click Delete Row (X).
5. Repeat the two previous steps for each item to be deleted.
6. On the page toolbar, click Save to save your changes to the customization project.
If you delete a BpEvent item from the project, the business event remains in thesystem unless it is deleted on the Business Events (SM302050) form.
7. If you want to remove from the customization project the generic inquiry that theremoved business event used, perform the instructions in To Delete a Generic Inquiry from aProject.
8. If you want to remove from the customization project any of the import scenario scriptsthat the removed business event used, for each import scenario script, perform theinstructions in To Delete an Integration Scenario from a Project.
To Update Business Events in a Project
If a business event included in a customization project has been changed (or if multiplebusiness events have been changed) on the Business Events (SM302050) form, you haveto update the appropriate item (or items) in the project. To do this, perform the followingactions:
1. Open the customization project in the Customization Project Editor. (See To Open a Projectfor details.)
2. In the navigation pane, click Business Events to open the Business Events page.
3. On the page toolbar, click Reload From Database.
The platform updates all the BpEvent items of the project with the data in the database.
If you have changed the generic inquiry used in the business event or the importscenario of the business event, you need to update each changed item separatelyon the corresponding page of the Customization Project Editor, as described in ToUpdate Generic Inquiry Items in a Project and To Update an Integration Scenario in a Project,respectively. If you have changed the notification template of the business event, the

| Managing Items in a Project | 258
system updates the notification template in the customization project automaticallywhen you update the business event.
To Navigate to the Business Events Form
You might need to add a business event to Acumatica ERP during customization. To managebusiness events in Acumatica ERP, you use the Business Events (SM302050) form. For moreinformation about business events, see Monitoring and Managing Events in the User Guide.
To open this form directly from the Customization Project Editor, perform the following actions:
1. In the navigation pane, click Business Events to open the Business Events page.
2. On the page toolbar, click Manage Business Events.
This opens the Business Events form where you can select a particular business event orcreate a new one.
As soon as you add a new business event to the system or change an existingbusiness event on the Business Events form, the business event is saved in thedatabase for the current tenant. You can add the business event to the customizationproject, as described in To Add Business Events to a Project. If you have changed abusiness event that is already included in a customization project, you have to updatethe appropriate item in the project, as described in To Update Business Events in aProject.
Mobile Application
An Acumatica mobile client application uses the Mobile API to access the data of the formsthat are mapped for mobile apps in the instance of Acumatica ERP. The metadata of themobile site map is used to configure the user interface of the mobile client application. Youcan expose any form of Acumatica ERP on your mobile device if the mobile site map includesthe metadata for the form. Accessing and using Acumatica ERP mobile app is provided bythe Acumatica Mobile Framework.
You can customize the Acumatica ERP mobile app by adding new screens to it or updatingexisting screens. You perform customization of the mobile app using the Mobile Applicationpage of the Customization Project Editor.
On the page you can perfrom a variety of operations, as described in the following topics:
• To Add a Form To Mobile Site Map
• To Update Main Menu of a Mobile App
• To Update a Mobile App Screen
• To Remove a Screen of a Mobile App
• To Reverse Changes Made to Mobile App

| Managing Items in a Project | 259
For details on how to customize a mobile app using Acumatica Mobile Framework see in theWorking with Mobile Framework guide.
To Add a Form To Mobile Site Map
Suppose that you need to add to the mobile app a screen that corresponds to an AcumaticaERP form. The form ID is XXX. The desired mobile screen has to contain the Date andDescription fields and the Insert and Delete actions of the original XXX form ofAcumatica ERP.
Figure: Use of MSDL to configure a screen in the mobile app
The diagram shows how the Acumatica Mobile Framework uses the MSDL code to configurethe XXX screen in the mobile app. (See Configuring the Mobile Site Map for details.) You declarethe desired screen, containers, fields, actions and other objects by using Mobile Site MapDefinition Language (MSDL) in the Customization Project Editor. The objects you want tobe displayed on the mobile app screen must be present on the original Acumatica ERP form(See Getting the WSDL Schema).
After you publish your customization project, the screen you have defined using MSDLappears in the mobile app.
To Add a Screen to the Mobile Site Map
1. Get the WSDL schema for the original XXX screen of Acumatica ERP, as described inGetting the WSDL Schema.
2. Open the Customization Project Editor.
3. On the page toolbar of the Mobile Application page, click Customize > Add NewScreen.

| Managing Items in a Project | 260
4. In the Add New Screen dialog box, which opens, enter the form ID of the AcumaticaERP form (and thus of the corresponding screen in the mobile app) that you want to addto the mobile app, and click OK.
The Add: <screen_name> page opens. The row with the add screen and its detailsappears in the list of modified screens on the Mobile Application page of theCustomization Project Editor.
5. Notice that the initial code of the screen includes only one add instruction.
add screen <screen_ID> {# you can add commands here# ObjectAttribute = Value}
(See add for details about the instruction.)
6. Implement the code of the new screen in the Commands area of the Add page. Fordetails, see Screens.
While implementing the code, use the WSDL schema to understand which actions andfields are available for the form you are adding. For details, see Getting the WSDL Schema.
7. Save your changes.
Your commands are applied to the site map. If any errors have occurred, you can seethem in the Errors area of the page. If your changes have been applied successfully, youcan see the updated site map of the main menu in the Result Preview area of the form.
8. On the Update: MENU page, add a shortcut for the new screen in the main menu, asillustrated in the following code.
add item <screen_ID> { visible = True displayName = "screen_title" }
9. Save your changes, and publish the project.
To Update Main Menu of a Mobile App
You can update the main menu of the customized Acumatica mobile app by using theCustomization Project Editor.
To Update the Main Menu of a Mobile App
1. Open the Customization Project Editor.
2. On the page toolbar of the Mobile Application page, click Customize > Update MainMenu.
The Update: MENU page opens. The Update MENU appears in the list of modified screenson the Mobile Application page of the Customization Project Editor.

| Managing Items in a Project | 261
3. In the Result Preview area of the Update: MENU page, explore the original code of themain menu.
4. In the Commands area of the Update: MENU page, implement your code using MobileSite Map Definition Language (MSDL). For details, see Main Menu.
5. Save your changes.
Your commands are applied to the menu. If any errors have occurred, you can see themin the Errors area of the form. If your changes have been applied successfully, you cansee the updated site map of the main menu in the Result Preview area of the form.
6. Publish your customization project.
To Update a Mobile App Screen
You can update an existing screen of a customized mobile app by using the CustomizationProject Editor.
To Update a Screen of a Mobile App
1. Open the Customization Project Editor.
2. On the page toolbar of the Mobile Application page, click Customize > Update ExistingScreen.
3. In the Update Existing Screen dialog box, which appears, specify the ID of the screenyou want to update, and click OK.
The Update: <screen_name> page opens. The new update screen with its detailsappears in the list of modified screens on the Mobile Application page of theCustomization Project Editor.
4. Explore the original code of the screen in the Result Preview area of the Update page.
5. Implement your code using Mobile Site Map Definition Language (MSDL) in theCommands area of the Update page. For details, see Screens.
6. Save your changes.
Your commands are applied to the site map. If any errors have occurred, you can seethem in the Errors area of the page. If your changes have been applied successfully, youcan see the updated site map of the main menu in the Result Preview area of the form.
7. Publish the customization project.
To Remove a Screen of a Mobile App
You can remove a screen of a customized mobile app by using the Customization ProjectEditor.

| Managing Items in a Project | 262
To Remove a Screen of a Mobile App
1. Open the Customization Project Editor.
2. On the page toolbar of the Mobile Application page, click Customize > RemoveExisting Screen.
3. In the Remove Existing Screen dialog box, which appears, specify the ID of the screenyou want to remove, and click OK.
The selected screen is removed. The Remove <screen_name> row appears in the list ofmodified screens on the Mobile Application page of the Customization Project Editor.
To Reverse Changes Made to Mobile App
When you are customizing the mobile site map in the Customization Project Editor, youmight need to go back to the out-of-the-box site map and base functionality. You can returnto the original site map to one tenant or to all tenants without removing the other changesyou have made in the customization project.
To Reverse Changes Made to the Mobile Site Map
1. Open the Customization Project Editor.
2. Click Mobile Application in the navigation pane to open the Mobile Application page.
3. If you want to reverse the changes to the current tenant only, on the page toolbar, clickClear Current Tenant. If you want to reverse the changes to all tenants, on the pagetoolbar, click Clear All Tenants.
The mobile app customization is unpublished from the selected tenants.
To return to your changes, publish your customization project, as described in To Publish theCurrent Project.
User-Defined Fields
The Customization Project Editor includes the User-Defined Fields page, which is shown inthe screenshot below. On this page, you can do the following:
• Update fields properties that have been updated by users in an instance of AcumaticaERP by clicking the Reload From Database action.
• Add a new user-defined field based on existing attributes. For details on definingattributes, see Attributes.
• View detailed information about a user-defined field.
• Modify the list of screens on which the field is displayed.
• Remove an existing user-defined field.

| Managing Items in a Project | 263
You can add a user-defined field either on the applicable form of Acumatica ERP or on theUser-Defined Fields page of the Customization Project Editor. Any user-defined fields you addin the Customization Project Editor are added to the current customization project with allother items; when the project has been completed, it can be exported and imported.
Figure: The User-Defined Fields page
Related Links
• Attributes
To Add a User-Defined Field to a Customization Project
To add a user-defined field to customization project, you can use a field previously definedin Acumatica ERP, or create a field in Customization Project Editor. After that you can includethe field in the current customization project.
To Add a New User-Defined Field
To add a new user-defined field, proceed as follows:
1. On the navigation pane of the Customization Project Editor, click User-Defined Fields toopen the User-Defined Fields page.
2. On the page toolbar, click Add New Record.
3. In the Add User-Defined Fields dialog box, which opens, select an attribute for theuser-defined field you are adding, and click Save.

| Managing Items in a Project | 264
The user-defined field appears in the list on the User-Defined Fields page, and thedialog box is closed. Now you need to specify the IDs of the screens on which the fieldwill appear. By default, the added field appears with all screens where it is used in theinstance.
4. In the row with the user-defined field, click the link in the Attribute ID column.
5. In the Edit Attribute dialog box (see the following screenshot), which opens, select theforms for which you want to save the fields in the customization project.
In this dialog box, you can see only the IDs of the screens for which the user-defined field was added. To add a user-defined field to a screen, on the title bar ofthe screen, select Customization > Manage User-Defined Fields and add thefield.
Figure: The Edit Attribute dialog box

| Managing Items in a Project | 265
6. Click Save to save your changes, close the dialog box, and return to the User-DefinedFields page.
The selected form IDs are listed in the Screen ID column of the user-defined field youedited, as shown in the following screenshot.
Figure: The list of user-defined fields after being edited
7. On the page toolbar, click Save.
Related Links
• To Add User-Defined Fields to a Form

| Customizing Elements of the User Interface | 266
Customizing Elements of the User InterfaceYou can customize the user interface by creating a new form or by changing the content andlayout of a form that already exists in Acumatica ERP.
This part is intended to describe how to use the visual Screen Editor to develop the ASPX codeof a custom form and modify the ASPX code of an existing form.
The following table lists most of the types of ASPX objects supported in the AcumaticaCustomization Platform.
Object Description
PXDataSource A data source control that connects to a graph instance on the Acumat-ica ERP server, retrieves data from the graph instance, and sends datato the graph instance; it also provides the data processing for the con-trol containers that are defined in the ASPX page. In Acumatica ERP, apage must contain a single PXDataSource control.
PXFormView A data-bound UI container control that renders a single record from itsassociated data source.
PXGrid A data-bound UI container control that renders a table with multiplerecords from its associated data source. The object can be displayed inform view mode for a single record and provides paging buttons thatcan be used to navigate between records. To define form view mode,the PXGrid control must include the RowTemplate element, which cancontain controls for the record fields and layout rules for these controls.
PXGridColumn In a PXGrid container, an object that defines the data field and proper-ties of a column in the grid.
RowTemplate In a PXGrid container, an object that defines a record field and layoutfor each control to be rendered in form view mode for the grid.
PXTab A data-bound UI container control that renders tabs defined by childPXTabItem containers.
PXTabItem In a PXTab container, a container control that renders a single recordfrom the data source specified for the parent PXTab container.
PXSmartPanel An UI container control that renders a dialog box.
PXLayoutRule In a container with controls for a single data record, a component thatdefines a layout rule used to organize the controls within a row or col-umn.
PXPanel In a container with controls for a single data record, a container with acaption used to group controls. In a dialog box, it is often used as a con-tainer to display a horizontal row of buttons with right alignment.
PXGroupBox In a container with controls for a single data record, a container with acaption used to group controls. It is designed to be used as a radio but-ton container to render a drop-down field as a set of radio buttons. It

| Customizing Elements of the User Interface | 267
Object Descriptioncontains scripts with logic to support a nested radio button for each val-ue of a drop-down field.
PXRadioButton In a PXGroupBox container, a radio button that is used for a single con-stant value of a drop-down field.
In Acumatica ERP, a radio button can work properly only in a PX-GroupBox container that is used for a drop-down data field.
PXLabel In a container with controls for a single data record, an element to dis-play text.
PXButton In a container with controls for a single data record, an element to dis-play a button control. In a dialog box, it is usually included in a PXPanelcontainer.
PXJavaScript In a container with controls for a single data record, a control to keepJavaScript code.
PXTextEdit In a container with controls for a single data record, a text box to dis-play and edit the value of a string field.
PXNumberEdit In a container with controls for a single data record, a box to displayand edit the value of a decimal or int field.
PXMaskEdit In a container with controls for a single data record, a text box to dis-play and edit the value of a string field that has the format specified inthe data access class.
PXDateTimeEdit In a container with controls for a single data record, a box to displayand select the value of a datetime field.
PXCheckBox In a container with controls for a single data record, a check box to dis-play and select the value of a bool field.
PXDropDown In a container with controls for a single data record, a combo box to dis-play, edit, and select the value of a field with a list attribute, such asPXStringList, PXIntList, or PXDecimalList.
PXSelector In a container with controls for a single data record, a lookup control todisplay, search, and select the value of a field with the PXSelector at-tribute.
PXSegmentMask In a container with controls for a single data record, a lookup controlwith a specified segmented key value that identifies a data record andconsists of one segment or multiple segments, with a list of possible val-ues defined for each segment.
PXTreeSelector In a container with controls for a single data record, a lookup control toselect a value for a field with a PXTreeSelector attribute from a treecontrol.
When you use the Screen Editor to add a UI element to another UI element on a form, youshould understand the rules that are used for nesting objects in ASPX code for Acumatica
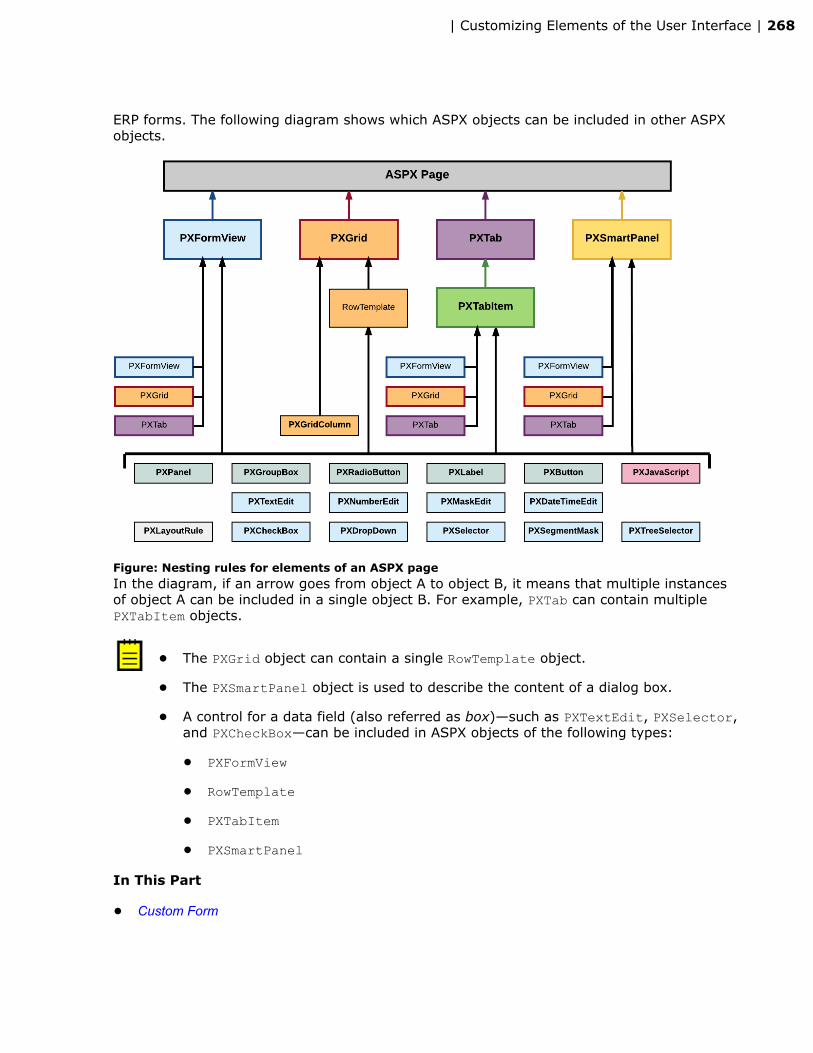
| Customizing Elements of the User Interface | 268
ERP forms. The following diagram shows which ASPX objects can be included in other ASPXobjects.
Figure: Nesting rules for elements of an ASPX pageIn the diagram, if an arrow goes from object A to object B, it means that multiple instancesof object A can be included in a single object B. For example, PXTab can contain multiplePXTabItem objects.
• The PXGrid object can contain a single RowTemplate object.
• The PXSmartPanel object is used to describe the content of a dialog box.
• A control for a data field (also referred as box)—such as PXTextEdit, PXSelector,and PXCheckBox—can be included in ASPX objects of the following types:
• PXFormView
• RowTemplate
• PXTabItem
• PXSmartPanel
In This Part
• Custom Form

| Customizing Elements of the User Interface | 269
• Existing Form
• Form Container (PXFormView)
• Grid Container (PXGrid)
• Tab Container (PXTab)
• Tab Item Container (PXTabItem)
• Dialog Box (PXSmartPanel)
• Box (Control for a Data Field)
• Layout Rule (PXLayoutRule)
• Panel (PXPanel)
• Group Box (PXGroupBox)
• Label (PXLabel)
• Radio Button (PXRadioButton)
• Button (PXButton)
• Java Script (PXJavaScript)
• Toolbars, Action Buttons, and Menus
• Other Control Types
Custom Form
By using the Acumatica Customization Platform, you can develop a custom form fromscratch and add it to a customization project. To create a new form, you have to create thefollowing types of code:
• ASPX page that contains a description of the UI elements of the form
• CS code that provides the business logic for the form
For each form that works with data from the database, the instance of Acumatica ERP mustcontain at least the following objects (see the diagram below):
• An ASPX page: The page must contain at least the data source control and a containerwith controls for data fields.
• A business logic controller (BLC, also referred to as graph): The graph must be specifiedin the TypeName property of the data source control of the page. The graph must containat least one data view, which is specified in the PrimaryView property of the data sourcecontrol and in the DataMember property of the container. The graph instance is createdon each round trip and initializes the creation of the data view instance based on a BQL

| Customizing Elements of the User Interface | 270
statement. The data view provides data manipulation and data flows between the datasource control of the ASPX page, the cache object of the graph, and the correspondingtable of the database. The BQL statement contains a reference to at least one dataaccess class that is required to map the database table to data records in the cacheobject.
• A data access class (DAC): On each round trip, the DAC instance is created in the cacheobject when the data view processes any operation with the corresponding data.
• A table in the database: The table is mapped to the data access class that defines thedata record type in the cache object of the graph instance.
Figure: Objects required for a form that works with data from a database tableFor a custom form to be enabled in an instance of Acumatica ERP, the site map of theinstance must contain information about the form.
You use the Customization Project Editor to perform operations with custom forms, as describedin the following topics:
• To Develop a Custom Form
• To Create a Custom Form Template
• To Delete a Custom Form from a Project
Related Links
• Changes in Webpages (ASPX)
• Customized Screens

| Customizing Elements of the User Interface | 271
To Develop a Custom Form
To create and develop a custom form within a customization project, you can use thefollowing approach:
1. Plan the functionality, content, and user interface of the new form.
2. If the custom form requires data from a new table, create the table in the database byusing a database administration tool, such as SQL Server Management Studio. (See ToAdd a Custom Table to a Project for details.)
3. Create a workable form template by using the New Screen wizard, as described in ToCreate a Custom Form Template.
After you have created a custom form template and published the customizationproject, you can develop the form in the same way as you customize an existing form ofAcumatica ERP. (See Existing Form for details.) Because the code templates are added tothe App_RuntimeCode folder of the Acumatica ERP website, you can develop the codein Microsoft Visual Studio.
4. C#: Create data access classes that contain the data field declarations required for theform controls. (See To Create a Custom Data Access Class for details.)
5. C#: In the graph template, define BQL statements in data views to manage data fieldsdeclared in data access classes. (See To Add a New Member for details.)
6. ASPX: If needed, add nested containers to the main containers of the form template.(See To Add a Nested Container for details.)
7. C#: For each nested container, in the graph template, define the appropriate data views.
8. ASPX: For each added container, specify the name of an appropriate data view in theDataMember property. (See To Set a Container Property for details.)
9. ASPX: If required, for each added container, specify other properties. (See To Set aContainer Property for details.)
10.ASPX: Add controls for data fields to each container. (See To Add a Box for a Data Field fordetails.)
11.ASPX: Specify properties for controls. (See To Set a Box Property for details.)
12.C#: Develop business logic for the form in the graph (See Customizing Business Logic fordetails.)
13.ASPX: If required, add dialog boxes, as described in To Add a Dialog Box.
We recommend that you use the Screen Editor to create the content of an ASPX page andVisual Studio to develop the business logic for a page. (See Integrating the Project Editor withMicrosoft Visual Studio for details.)

| Customizing Elements of the User Interface | 272
To Create a Custom Form Template
To create a workable template for a custom form by using the New Screen wizard andinclude the template in a customization project, perform the following actions:
1. Open the customization project in the Customization Project Editor. (See To Open a Projectfor details.)
2. Select the Screens node in the navigation pane of the editor to open the CustomizedScreens page.
3. On the page toolbar, click Add Screen > Create New Screen, as item a in thescreenshot below shows.
4. In the Create New Screen dialog box, which opens, specify values for input controls asfollows (item b in the screenshot):
a. Screen ID: Enter an ID of a custom form in the XX.**.**.** format, which consistsof the following parts:
1. Two-letter code of the module in Acumatica ERP
You can use a single unique two-letter code for all custom forms in asolution. Please check the Pages folder of the website in the productionenvironment to ensure that the code you want to use is not already used inthe instance of Acumatica ERP.
2. Two-digit code indicating the form type:1. 10: Setup form
2. 20: Maintenance form
3. 30: Data entry form
4. 40: Inquiry form
5. 50: Processing form
6. 60: Report form
3. Two-digit code indicating the form sequential number
4. Two-digit code indicating the subform sequential number
b. Graph Name: Enter a unique name for the new graph.
c. Graph Namespace: By default, the New Screen wizard specifies the customizationproject name as the namespace ID. If you want to change the default ID, enter theID of an existing or a new namespace for the new graph.
d. Page Title: Enter the title to be used as the form title in Acumatica ERP.
e. Template: Select one of the following ASPX page templates for the custom form.

| Customizing Elements of the User Interface | 273
Template Description
Form (For-mView)
A record-editing page with one PXFormView container
Grid (GridView) A record-editing page with one PXGrid container
Tab (TabView) A record-editing page with one PXTab container
FormTab A record-editing page with PXFormView and PXTab containers
FormGrid (For-mDetail)
A master-detail editing page with PXFormView and PXGrid contain-ers
TabGrid (Tab-Detail)
A master-detail page with PXTab and PXGrid containers
f. Site Map Parent: Select a parent site map node to place the form in this location inthe site map of Acumatica ERP.
5. Click OK (item c) to create the new form.
Figure: Using the New Screen wizard to create the new form
The wizard creates the form template and adds the following items to the customizationproject.

| Customizing Elements of the User Interface | 274
Item Description
File Contains the Pages\XX\XX******.aspx file with theASPX code template that has been selected for the newform. The name of the file corresponds to the value thatis entered in the Screen ID box. The file is located in thePages\XX folder of the Acumatica ERP website, whereXX is the two-letter code of the screen ID.
File Contains the Pages\XX\XX******.aspx.cs file withthe C# code for the ASPX page.
Code Contains the code template of the business logic con-troller (BLC, also referred to as graph) for the new form.This item is saved in the database. When you publish theproject, the platform creates a copy of the code in the filewith the same name in the App_RuntimeCode folder ofthe Acumatica ERP website. You can develop the code inMicrosoft Visual Studio.
Page Contains the link to the new page content, which you canlater develop by using the Screen Editor.
SiteMapNode Contains the site map object of the new form.
For example, if you enter in the Create New Screen dialog box the values that aredisplayed in the screenshot above, the wizard creates code templates for both theCUDetailsInq business logic controller and the YF401000 page, which contain all thecomponents required for the form template to work properly (see the following diagram).
Figure: Analyzing the content of the new form template

| Customizing Elements of the User Interface | 275
You can publish the customization project to ensure that it is valid and the custom form canbe opened in the browser. At the moment, the form does not contain a control for a field, asthe following screenshot shows.
Figure: Viewing the new form

| Customizing Elements of the User Interface | 276
To Delete a Custom Form from a Project
To remove a custom form from a customization project, you have to delete all the items thathave been added to the project for the form.
To do this, perform the following actions:
• Delete from the customization project the Page item that was added by the New Screenwizard. (See To Delete a Page Item from a Project for details.)
• Delete from the project the Code item that was added by the New Screen wizard. (SeeTo Delete a Code Item From a Project.)
• Delete from the project the <FormID>.aspx and <FormID>.aspx.cs File items thatwere added by the New Screen wizard. (For more information, see To Delete a Custom FileFrom a Project.)
• Delete from the project the SiteMapNode item that was added by the New Screen wizard.(See To Delete a Site Map Node from a Project for details.)
• If you added other items for the custom form, such as items for the mobile site map orcustom files, delete these items.
To delete multiple items from the customization project successively on a single page, youcan use the Edit Project Items page of the Customization Project Editor. (See To Delete Itemsfrom the Project on the Edit Project Items Page for details.)
The system applies the changes to the file system as soon as you publish the customizationproject.
Existing Form
You can customize the user interface of an existing form of Acumatica ERP by using theScreen Editor. The editor is a visual tool that you can use to perform the following changes inthe ASPX code for a form:
• Add or delete a container.
• Add or delete a button or radio button. (See Button (PXButton) and Radio Button(PXRadioButton) for details.)
• Add or delete a layout rule. (See Layout Rule (PXLayoutRule) for details.)
• Add or delete a Java script. (See Java Script (PXJavaScript) for details.)
• Create or delete a control for a data field. (See Box (Control for a Data Field) for details.)
• Change the properties of an element in the ASPX code. (See To Set a Container Property, ToSet a Box Property and To Set a Layout Rule Property for details.)

| Customizing Elements of the User Interface | 277
In Acumatica ERP, an ASPX page must contain a single PXDataSource control. You canadd the following types of containers immediately to the level of an ASPX page, where thePXDataSource control is defined:
• Form Container (PXFormView)
• Grid Container (PXGrid)
• Tab Container (PXTab)
• Dialog Box (PXSmartPanel)The order of containers in the ASPX page defines the order of appropriate areas withcontrols on the form.
Detailed instructions on the customization of an existing form are provided in the followingtopics:
• To Start a Customization of a Form
• To Delete a Customization of a Form
• To Add a Form Container
• To Add a Tab Container
• To Add a Grid Container
• To Add a Dialog Box
• To Delete a Container
The changeset of a form is stored in the database as a Page item of a customization project.During the publication of the project, the Acumatica Customization Platform applies thechangeset to the form to create a customized version of the .aspx file with the same namein the pages_xx subfolder of the CstPublished folder of the website.
For example, if you customize the Customers (AR303000) form and publish the project, theplatform creates the ar303000.aspx and ar303000.aspx.cs files in the \CstPublished\pages_ar folder. If you delete these files, Acumatica ERP uses the original files from the\Pages\AR folder to display this form. However if you again publish the customizationproject, the platform recreates these files, and Acumatica ERP uses the customized versionof the form.
We recommend that you use the Screen Editor to customize the content of an ASPX page,the Data Class Editor to modify data access classes, and Microsoft Visual Studio to extendthe business logic for a page. (See Integrating the Project Editor with Microsoft Visual Studio fordetails.)
Related Links
• Changes in Webpages (ASPX)
• Customized Screens

| Customizing Elements of the User Interface | 278
To Start a Customization of a Form
To start the customization of a form, you have to open the form in the Screen Editor. To dothis, you commonly perform the following operations:
1. Open the form in the browser.
2. On the form title bar, click Customization > Inspect Element to launch the ElementInspector.
3. On the form, click the UI element (or area) to be customized; this opens the ElementProperties Dialog Box for the element (or area).
4. In the dialog box, click Customize.
5. If there is no currently selected customization project and the inspector opens the SelectCustomization Project Dialog Box, select an existing customization project or create a newone. (See To Select an Existing Project and To Create a New Project for details.)
If the customization project does not contain a changeset for the form, the CustomizationProject Editor adds a Page item for the form to the project, to keep the changeset to the ASPXcode of the form in the database. The form is opened in the Screen Editor, and you can startcustomization of the form.
When you click Save on the editor toolbar, the editor updates the Page item in the database.
To Delete a Customization of a Form
If a customization project contains changes to multiple objects of Acumatica ERP, and youneed to remove customization for only a single form, perform the following operations:
1. Remove from the project the Page item for the form. (See To Delete a Page Item from aProject for details.)
2. Publish the project, as described in To Publish the Current Project.
To Add a Form Container
You can add a new PXFormView container to a form of Acumatica ERP. To do this, performthe following actions:
1. Open the form in the Screen Editor, as described in To Add a Page Item for an Existing Form.
2. In the editor, click the Add Controls tab item.
3. From the Main Containers group, drag the Form container to the required place in theControl Tree, as shown in the following screenshot.

| Customizing Elements of the User Interface | 279
Figure: Adding a form container to a form
The area of a form container is visible on a customized form only if it contains atleast one visible control.
4. In the Control Tree, select the form container that has been added, and specify the itemproperties. as described in To Set a Container Property.
5. Click Save on the toolbar of the Screen Editor to save your changes to the customizationproject.
For more information about PXFormView, see Form Container (PXFormView).
To Add a Grid Container
You can add a new PXGrid container to an existing form of Acumatica ERP. To do this,perform the following actions:
1. Open the form in the Screen Editor, as described in To Add a Page Item for an Existing Form.
2. In the editor, click the Add Controls tab item.
3. From the Main Containers group, drag the Grid container to the required place in theControl Tree, as shown in the following screenshot.

| Customizing Elements of the User Interface | 280
Figure: Adding a grid container to the tab
A grid is visible on a customized form only if it contains at least one column for afield.
4. In the Control Tree, select the grid that has been added, and specify the item properties,as described in To Set a Container Property.
5. Click Save on the toolbar of the Screen Editor to save your changes to the customizationproject.
For more information about PXTab, see Tab Container (PXTab).
To Add a Tab Container
You can add a new PXTab container to an existing form of Acumatica ERP. To do this,perform the following actions:
1. Open the form in the Screen Editor, as described in To Add a Page Item for an Existing Form.
2. In the editor, click the Add Controls tab item.
3. From the Main Containers group, drag the Tab container to the required place in theControl Tree, as shown in the following screenshot.

| Customizing Elements of the User Interface | 281
Figure: Adding a tab container to the tabThe PXTab container cannot exist without nested PXTabItem containers. Therefore, whenyou add a PXTab container, the Screen Editor creates a nested PXTabItem container.
A tab container is visible on a customized form only if there is at least one controlfor a field in a nested PXTabItem container.
4. In the Control Tree, select the tab that has been added, and specify the item properties,as described in To Set a Container Property.
5. Click Save on the toolbar of the Screen Editor to save your changes to the customizationproject.
For more information about PXTab, see Tab Container (PXTab).
To Add a New Tab Item to a Tab
You can add a new PXTabItem container to a tab on an existing form of Acumatica ERP. Todo this, perform the following actions:
1. Open the form in the Screen Editor, as described in To Add a Page Item for an Existing Form.
2. In the editor, click the Add Controls tab item.
3. From the Main Containers group of the tab item, drag the Tab Item container abovethe customized tab, as shown in the following screenshot.

| Customizing Elements of the User Interface | 282
Figure: Adding a tab item to the tabIf the tab contains multiple tab items and you need to add a tab item to a certainposition in the tab, you should expand the tab node in the Control Tree to see theexisting tab items and drag the Tab Item container to the required position, as thefollowing screenshot shows.
Figure: Adding a tab item to a certain position in the tab

| Customizing Elements of the User Interface | 283
A tab item is visible if it contains at least one control for a field.
4. In the Control Tree, select the tab item that has been added, and specify the itemproperties, as described in To Set a Container Property.
5. Click Save on the toolbar of the Screen Editor to save your changes to the customizationproject.
To Add a Dialog Box
You can add a custom dialog box to an Acumatica ERP form. If the dialog box must containcontrols for data fields, you should generally perform the following operations:
• Add a new PXSmartPanel container to the ASPX page, as described in this topic.
• If needed, define a custom data access class with the declaration of the data fields to beused for controls in the dialog box. See To Create a Custom Data Access Class for details.
• If needed, in the extension for the graph that is specified in the TypeName property ofthe PXDataSource control of the ASPX page, add business logic for the dialog box. (SeeTo Customize an Existing Business Logic Controller for details.) For example, in the graphextension, you can do the following:
• Declare a new data view that provides data for the dialog box controls, as describedin To Add a New Member
• Add an action (with a button on the form toolbar) to open the dialog box
• Add other business logic for the dialog box
• If the smart panel container must include a box for a data field, add a data-boundcontainer, such as PXFormView. Then bind the new container to the data view declaredin the graph or graph extension (see Use of the DataMember Property of Containers in theAcumatica Framework Guide for details) whose BQL statement refers to the data accessclass with the field declaration.
• If the smart panel must contain a row of buttons, add a nested PXPanel container withthe SkinID property set to Buttons (see Use of the SkinID Property of Containers in theAcumatica Framework Guide for details), and add the buttons to the nested panel, asdescribed in To Add Another Supported Control.
To add a new PXSmartPanel container to an ASPX page, perform the following actions:
1. Open the form in the Screen Editor, as described in To Add a Page Item for an Existing Form.
2. In the editor, click the Add Controls tab item.
3. From the Main Containers group of the tab item, drag the POPUP PANEL containerinto the Dialogs node in the Control Tree, as shown in the following screenshot.

| Customizing Elements of the User Interface | 284
Figure: Adding a form container to a form
A dialog box can be displayed if it contains at least one visible control.
4. In the Control Tree, select the new container that has been added.
5. Specify the item properties, as described in To Set a Container Property.
6. Click Save on the toolbar of the Screen Editor to save your changes to the customizationproject.
To Delete a Container
You can delete a container from an Acumatica ERP form. To do this, perform the followingactions:
1. Open the form in the Screen Editor, as described in To Add a Page Item for an Existing Form.
2. In the Control Tree of the editor, select the container to be deleted.
3. On the toolbar of the Control Tree, click Delete.
4. Click Save on the toolbar of the Screen Editor to save your changes to the customizationproject.
Form Container (PXFormView)
PXFormView is a data-bound UI container control that renders a single record from itsassociated data source.

| Customizing Elements of the User Interface | 285
An ASPX page can contain PXFormView as a main container. A form container, as the diagrambelow shows, can be also included in the following types of containers:
• PXFormView
• PXTabItem
• PXSmartPanel
Figure: Nesting rules for a PXFormView container in an ASPX page
A form container can include multiple ASPX objects of the following types:
• A data-bound UI container control: PXFormView, PXGrid, and PXTab
• A layout rule: PXLayoutRule
• A box for a data field: PXTextEdit, PXNumberEdit, PXMaskEdit, PXDateTimeEdit,PXCheckBox, PXDropDown, PXSelector, PXSegmentMask, and PXTreeSelector
• Another control: PXPanel, PXGroupBox, PXRadioButton, PXLabel, PXButton, andPXJavaScript
A box for a data field can be added to a form container if the container is bound to a dataview declared within the graph that provides business logic for the ASPX page. If you wantto bind a form container to a data view, you must specify the properties as follows for theappropriate PXFormView object:

| Customizing Elements of the User Interface | 286
• The DataSourceID property value must be equal to the value of the ID property of thePXDataSource control.
• The DataMember property must contain the name of the data view that is declared in thegraph and provides data for the controls of the form container.
To create a new form container in an ASPX page, follow the instructions described in To Add aForm Container.
To delete a form container from an ASPX page, follow the instructions described in To Delete aContainer.
For detailed information on working with the content of a form container, see the followingtopics:
• To Open a Container in the Screen Editor
• To Set a Container Property
• To Add a Nested Container
• To Add a Box for a Data Field
• To Add a Layout Rule
• To Add Another Supported Control
• To Reorder Child UI Elements
• To Delete a Child UI Element
Related Links
• Changes in Webpages (ASPX)
• Customized Screens
To Open a Container in the Screen Editor
You perform the customization of a container by using the Screen Editor. To open a containerof an Acumatica ERP form in the editor, perform the following actions:
1. Open the form in the browser.
2. On the form title bar, click Customization > Inspect Element to launch the ElementInspector.
3. On the form, click the area of the container to be customized, which opens the ElementProperties Dialog Box for the container.
4. In the dialog box, click Customize.

| Customizing Elements of the User Interface | 287
5. If there is no currently selected customization project and the inspector opens the SelectCustomization Project Dialog Box, select an existing customization project or create a newone. (See To Create a New Project and To Select an Existing Project for details.)
If the customization project does not contain a changeset for the form, the CustomizationProject Editor adds to the project a Page item for the form to keep the changeset to the ASPXcode of the form in the database. The container is opened in the Screen Editor, and you canstart the customization of the container.
When you click Save on the editor toolbar, the editor updates the Page item in the database.
To Set a Container Property
To include in a customization project changes to the properties of a container, you have tomodify the properties by using the Screen Editor. To start setting the properties of a container,perform the following actions:
1. Open the container in the Screen Editor, as described in To Open a Container in the ScreenEditor.
2. Ensure that the container node is selected in the Control Tree of the editor. Click thearrow left of the node to expand the node if needed.
3. Click the Main Properties or Layout Properties tab to open the list of properties forthe container.
4. Specify values for the required properties.
5. Click Save to save your changes to the customization project.
For detailed information about the DataMember property, see Use of the DataMember Property ofContainers in the Acumatica Framework Guide.
In Acumatica ERP, for the PXFormView, PXGrid, and PXPanel containers, there arepredefined values for the SkinID property. For details, see Use of the SkinID Property ofContainers in the Acumatica Framework Guide.
If you plan to use a container in the mobile site map, specify the Caption property of thecontainer, as described in Use of the Caption Property of Containers in the Acumatica FrameworkGuide.
To Add a Nested Container
A PXGrid container cannot include a nested container. A PXTab container can include onlyPXTabItem containers. You can add any container as a nested container to a PXFormView,PXTabItem, or PXSmartPanel container, as the following diagram shows.

| Customizing Elements of the User Interface | 288
Figure: Nesting rules for containers on an ASPX page
You can include the PXPanel and PXGroupBox container controls in the PXFormView,RowTemplate, PXTabItem, and PXSmartPanel containers.
To add a nested container to a parent container, perform the following actions:
1. Open the parent container in the Screen Editor, as described in To Open a Container in theScreen Editor.
2. Ensure that the container node is selected in the Control Tree of the editor. Click thearrow left of the node to expand the node if needed.
3. Click the Add Controls tab item (see the screenshot below).
4. From the Main Containers or Other Controls group, drag the required type of thenested container into the parent container in the Control Tree, as shown in the followingscreenshot.

| Customizing Elements of the User Interface | 289
Figure: Adding a nested container to a parent container
A nested container is visible on the customized form only if it contains at least onevisible control.
5. If required, specify properties for the new container, as described in To Set a ContainerProperty.
6. Click Save to save changes in the customization project.
To Add a Box for a Data Field
The Acumatica Customization Platform supports the following types of boxes for data fields:
• PXTextEdit
• PXNumberEdit
• PXMaskEdit
• PXDateTimeEdit
• PXCheckBox
• PXDropDown
• PXSelector
• PXSegmentMask
• PXTreeSelector(See the table in Customizing Elements of the User Interface for field type descriptions.)

| Customizing Elements of the User Interface | 290
You can add a box for a data field without restrictions immediately to a PXFormView orPXTabItem element that has the DataMember property defined. Also, you can add a box for adata field to a PXPanel or PXGroupBox container that has the DataMember property inheritedfrom the parent container.
Also, you can add a box for a data field to a RowTemplate element of a PXGrid container thatis bound to a data view whose BQL statement refers to the data access class that containsthe field declaration.
To add a box for a data field to a container that is bound to a data view, perform thefollowing actions:
1. Open the parent container in the Screen Editor, as described in To Open a Container in theScreen Editor.
2. Ensure that the container node is selected in the Control Tree of the editor. Click thearrow left of the node to expand the node if needed.
3. Click the Add Data Fields tab item (see the screenshot below).
4. If you need to create a control for a data field that is not accessible through the dataview specified for the container in the DataMember property but is accessible throughanother data view of the same graph, and if the Data View box is available, selectthe needed data view in this box. (For details, see Use of Multiple Data Views for Boxes inContainers in the Acumatica Framework Guide.)
On the Add Data Fields tab item of the Screen Editor, if you change thepredefined data view in the Data View box and create a control for a data fieldfrom the field list for the selected data view, the editor concatenates the data viewname with the field name in the DataField property of the created control.
5. On the tab item, click the All, Visible, or Custom filter for the fields provided by thedata view to view the appropriate field list.
You can create a custom field immediately on the Add Data Fields tab item byclicking the New Field action and then using the Create New Field dialog box.
6. Find the required data field in the list, and if the field is not used (the check box inthe Used column is cleared for the field), select the check box for the field in the first(unlabeled) column, as the following screenshot shows.

| Customizing Elements of the User Interface | 291
Figure: Selecting a data field for which a box to be created
You can select multiple data fields to create multiple boxes simultaneously.
7. On the list toolbar, click Create Controls.
The platform creates a box for the selected data field and adds a node for the box to theControl Tree.
8. Click Save to save the changes in the customization project.
You can change the location of a control in a container. See To Reorder Child UI Elements fordetails.
For more information about boxes, see Box (Control for a Data Field).
To Add a Layout Rule
In a container with multiple controls, the PXLayoutRule component is used to provide thefollowing UI customization capabilities:
• Placing controls in multiple rows to uniformly distribute them on the form or tab area of aform
• Placing controls in multiple columns in a row

| Customizing Elements of the User Interface | 292
• Spanning controls across multiple columns in a row
• Merging controls into one row to align them horizontally
• Adjusting the widths of controls and labels in a column
• Hiding the labels of controls
• Grouping controls for users' convenience
The Screen Editor supports the following types of the PXLayoutRule component (with therespective predefined properties noted):
• Row: A layout rule with the StartRow property, which is set to True
• Column: A layout rule with the StartColumn property, which is set to True
• Group: A layout rule with the StartGroup property, which is set to True
• Merge: A layout rule with the Merge property, which is set to True
• Empty Rule: A layout rule without predefined properties
To add a layout rule to a container, perform the following actions:
1. Open the container in the Screen Editor, as described in To Open a Container in the ScreenEditor.
2. Ensure that the container node is selected in the Control Tree of the editor. Click thearrow left of the node to expand the node if needed.
3. Click the Add Controls tab item (see the screenshot below).
4. From the Layout Rules group, drag the required type of the rule to the needed locationin the Control Tree within the container, as shown in the following screenshot.

| Customizing Elements of the User Interface | 293
Figure: Adding a layout rule to a container
A layout rule is visible on the customized form only if it contains at least onevisible control.
5. If required, specify properties for the new layout rule.
In any rule, you can configure any properties that you need. Some propertiesaffect only the next control under the PXLayoutRule component, while otherproperties affect all controls under the rule until the next rule is encountered.Some properties require a corresponding ending rule. See To Set a Layout RuleProperty for details.
6. Click Save to save your changes in the customization project.
If you add a layout rule beneath another layout rule, you can override the properties ofthe PXLayoutRule component, which apply to the underlying controls. See Layout Rule(PXLayoutRule) for more information about using layout rules.
To Add Another Supported Control
You use the Screen Editor to add to a container a control of any of the following types, whichare supported in the Acumatica Customization Platform (listed under Other Controls on theAdd Controls tab item):
• Panel (PXPanel)
• Group Box (PXGroupBox)
• Label (PXLabel)

| Customizing Elements of the User Interface | 294
• Radio Button (PXRadioButton)
• Button (PXButton)
• Java Script (PXJavaScript)
We recommend that you not include a PXRadioButton control in a container that neither isbound to a data view nor inherits the DataMember property from the parent container.
You can nest a control of the listed types in a PXPanel or PXGroupBox container. Howeverthe PXGroupBox control type is especially designed to be used as a radio button containerto render a drop-down field as a set of radio buttons. It contains scripts with the logic tosupport a nested radio button for each value of a drop-down field. So we recommend thatyou use PXGroupBox exclusively to include radio buttons.
To add a control of one of the listed types to a container, perform the following actions:
1. Open the container in the Screen Editor, as described in To Open a Container in the ScreenEditor.
2. Ensure that the container node is selected in the Control Tree of the editor. Click thearrow left of the node to expand the node if needed.
3. Click the Add Controls tab item (see the screenshot below).
4. From the Other Controls group, drag the required control type to the needed location inthe Control Tree within the container, as shown in the following screenshot.
Figure: Adding a layout rule to a container
5. If required, specify properties for the new control.
6. Click Save to save your changes in the customization project.

| Customizing Elements of the User Interface | 295
To Reorder Child UI Elements
You can reorder UI elements in a container manually by dragging them in the Control Treeof the Screen Editor. However before you start to move elements, note the following simplerules:
• You can move a child element anywhere within its parent container control.
• To move an element within a container, you have to drag the element to the requiredplace.
• Any element moved within a container is automatically aligned according to the nearestPXLayoutRule component placed above it. (See Layout Rule (PXLayoutRule) for details.)
To move an element within a container, perform the following actions:
1. Open the container in the Screen Editor, as described in To Open a Container in the ScreenEditor.
2. Ensure that the container node is selected and expanded in the Control Tree of the editor.Click the arrow left of the node to expand the node if needed.
3. In the Control Tree, drag the element to the required position.
The Screen Editor moves the element with all its child elements to the new position inthe container.
4. Click Save to save your changes to the customization project.
To Delete a Child UI Element
You can delete a child UI element from a container. To do this, perform the following actions:
1. Open the container in the Screen Editor, as described in To Open a Container in the ScreenEditor.
2. In the Control Tree of the editor, click the arrow left of the container node to expand thenode.
3. Select the UI element to be deleted.
4. On the toolbar of the Control Tree, click Remove > Remove, as the followingscreenshot shows.

| Customizing Elements of the User Interface | 296
Figure: Deleting an UI element
The platform deletes all child elements of the deleted object.
If you delete a PXLayoutRule component, all the controls under this layout ruleare deleted too.
5. Click Save on the toolbar of the Screen Editor to save your changes to the customizationproject.
Grid Container (PXGrid)
PXGrid is a data-bound UI container control that renders a table with multiple records fromits associated data source. For a single record, the object can be displayed in form viewmode, which provides navigation buttons to move between records. For form view mode tobe defined, PXGrid must include the RowTemplate element, which can contain controls forthe record fields and layout rules for these controls.
An ASPX page can contain PXGrid as a main container that is included immediately in thepage. A grid container, as the diagram below shows, can also be included in the followingtypes of containers:
• PXFormView

| Customizing Elements of the User Interface | 297
• PXTabItem
• PXSmartPanel
Figure: Nesting rules for a PXGrid container in an ASPX page
A grid container can include multiple PXGridColumn objects and a single RowTemplateelement. In the ASPX code, grid columns are included in the Columns element, whereascontrols for the form view of the grid belong to the RowTemplate element, as the followingcode snippet shows.
<px:PXGrid ID="grid" ... DataSourceID="ds" ...> ... <Columns> ... <px:PXGridColumn DataField="Qty" TextAlign="Right" Width="81px" AutoCallBack="True" /> ... </Columns> <RowTemplate> ... <px:PXNumberEdit ID="edQty" runat="server" DataField="Qty" /> ... </RowTemplate> ...

| Customizing Elements of the User Interface | 298
</px:PXGrid>
In this code, you can see descriptions of both a grid column and a box for the same Qty datafield.
To create a new grid in an ASPX page, follow the instructions described in To Add a GridContainer.
To delete a grid from an ASPX page, follow the instructions described in To Delete a Container.
For detailed information on working with the content of a grid container, see the followingtopics in this section:
• To Add a Column for a Data Field
• To Add a Control to the Form View of a Grid
• To Provide Hyperlinks for a Grid ColumnThe following topics may also be useful as you work with a grid container:
• To Open a Container in the Screen Editor
• To Set a Container Property
• To Reorder Child UI Elements
• To Delete a Child UI Element
Related Links
• Changes in Webpages (ASPX)
• Customized Screens
To Add a Column for a Data Field
In a grid, you can create a column for a data field if the grid container is bound to a dataview declared within the graph that provides business logic for the ASPX page. To bind agrid container to a data view, you must specify the properties as follows for the appropriatePXGrid object:
• The DataSourceID property value must be equal to the value of the ID property of thePXDataSource control.
• The DataMember property must contain the name of the data view that is declared in thegraph and provides data for the grid.
To add a column to a grid that is bound to a data view, perform the following actions:
1. Open the grid container in the Screen Editor, as described in To Open a Container in theScreen Editor.
2. In the Control Tree of the editor, ensure that the grid node is selected. Click the arrowleft of the node to expand the node if needed.

| Customizing Elements of the User Interface | 299
3. In the editor, click the Add Data Fields tab item (see the screenshot below).
4. On the tab item, select the All, Visible (as shown below), or Custom filter for the datafields provided by the data view, to open the appropriate field list.
You can create a custom field immediately on the Add Data Fields tab item byusing the Create New Field dialog box.
5. Find the required data field in the list, and if the field is not used (that is, if the check boxin the Used column is cleared for the field), select the check box in the unlabeled firstcolumn for the field.
• You can select multiple data fields to create multiple columns simultaneously.
• In the Field Name column of the list, a data field of a joined data access class(DAC) has a name that consists of the DAC name, two underscore characters,and the field name, such as Product__Active. If you create a grid column forthis field, the new PXGridColumn element refers to the field as shown in thefollowing ASPX code.
<px:PXGridColumn DataField="Product__Active" ... />
6. On the list toolbar, click Create Controls.
The platform creates a column for the selected data field, appends this column to theend of the grid column list, and adds a node for the column to the appropriate position inthe Control Tree.
If you need to locate the new column in a position after some existing column,you can select this existing column before you click Create Controls. Then theeditor inserts new grid columns after the column that is selected in the ControlTree.
At any time, you can change the position of a column in a grid. See To Reorder Child UIElements for details.
7. If needed, specify the following properties of the new column:
• Type—to define a specific type of data in a column (for details, see Use of the TypeProperty of PXGridColumn in the Acumatica Framework Guide)
• CommitChanges—to enable callbacks on the column field (for details, see Use of theCommitChanges Property of Boxes in the Acumatica Framework Guide)
• DisplayMode—to define the mode of displaying a value in the column (for details, seeUse of the DisplayMode Property of PXGridColumn in the Acumatica Framework Guide)
If you need to provide hyperlinks to redirect the user from a column cell toanother Acumatica ERP form, follow the recommendations described in To ProvideHyperlinks for a Grid Column.
8. Click Save to save your changes to the customization project.

| Customizing Elements of the User Interface | 300
To Add a Control to the Form View of a Grid
If the AllowFormEdit property of a grid is set to True, the user can switch the grid to formview mode to display the grid columns as controls on the form. This mode gives you thecapability to edit a single record selected in the grid.
Therefore, to add a box for a data field to the form view of a grid, you have to add the boxto the RowTemplate element in the ASPX code. To do this in the Screen Editor, perform thefollowing actions:
1. Open the grid container in the Screen Editor, as described in To Open a Container in theScreen Editor.
2. In the Control Tree of the editor, click the arrow left of the node to expand the node.
3. Click the arrow left of the Levels node to expand the node, and then expand the nodethat appears, which has the same name as the grid does.
In the Control Tree, the Screen Editor assigns to a grid node theGrid:<DataMember> name, where the <DataMember> is the value of theDataMember property of the grid container. To the node that corresponds to theRowTemplate element of the grid, the editor assigns the same <DataMember>name.
4. If the expanded node contains other expandable nodes, such as Columns nodes, expandthem to see which boxes are currently included in the form view of the grid.
The RowTemplate element can contain layout rules, which are used to arrangecontrols in the form view of the grid. Also, you can use this element to providespecific properties of columns in the grid.
5. If you need to place the new box in a position below some existing box, select the nodeof this box in the Control Tree before you add a new control. (In the screenshot below,the Mailing ID node is currently selected in the tree.)
6. In the editor, click the Add Data Fields tab item.
7. On the tab item, click the All, Visible, or Custom filter for the data fields provided bythe data view to open the appropriate field list.
You can create a custom field immediately on the Add Data Fields tab item byusing the Create New Field dialog box.
8. Find the required data field in the list, and if the field is not used (that is, if the check boxin the Used column is cleared for the field), select the check box for the field in the firstcolumn, as the following screenshot shows.

| Customizing Elements of the User Interface | 301
Figure: Selecting a data field to create a control on the form view of the grid
You can select multiple data fields to create multiple columns simultaneously.
9. On the list toolbar, click Create Controls.
The platform creates a box for the selected data field and adds a node for the box to theappropriate position in the Control Tree. At any time, you can change the position of acolumn in a grid. See To Reorder Child UI Elements for details.
10.If needed, specify properties for the new control.
If you need to provide hyperlinks to redirect the user from a column cell toanother Acumatica ERP form, follow the recommendations described in To ProvideHyperlinks for a Grid Column.
11.Click Save to save your changes to the customization project.
To Provide Hyperlinks for a Grid Column
To provide hyperlinks for an existing column in a grid, perform the following actions:
1. Add the PXSelector attribute for the field used to create the column.

| Customizing Elements of the User Interface | 302
2. For the field, create a selector control in the RowTemplate element of the PXGridLevelcontainer of the ASPX page, as described in To Add a Control to the Form View of a Grid.
3. Set the AllowEdit property of the selector control to True.
A selector control contains the value of the key field of a data record from a particulartable. Therefore, the control can be used to redirect a user to the form designed toedit the data record.
After you have completed these actions:
• The column fields contain hyperlinks to redirect the user to the data entry form for therecords defined by the fields.
• If the form view for the grid is available, the following interface elements appear on theform view:
• The text box created for the field
• The Edit button, which provides the required redirection to the data entry form forthe record defined by the value in the text box
Tab Container (PXTab)
PXTab is a data-bound UI container control that renders tabs defined by child PXTabItemcontainers.
An ASPX page can contain PXTab as a main container. A tab container, as the diagram belowshows, can be also included in the following types of containers:
• PXFormView
• PXTabItem
• PXSmartPanel

| Customizing Elements of the User Interface | 303
Figure: Nesting rules for a PXTab container in an ASPX page
A tab container can include only PXTabItem container controls.
A box for a data field can be added immediately to a child PXTabItem container if theparent PXTab container is bound to a data view declared within the graph that providesbusiness logic for the ASPX page. To bind a tab container to a data view, you must specifythe properties as follows for the appropriate PXTab object:
• The DataSourceID property value must be equal to the value of the ID property of thePXDataSource control.
• The DataMember property must contain the name of the data view that is declared in thegraph and provides data for the controls of a child container that is not a data-bound UIcontainer.
To create a new tab container in an ASPX page, follow the instructions described in To Add aTab Container.
To delete a tab container from an ASPX page, follow the instructions described in To Delete aContainer.
For detailed information about the PXTabItem container control, see Tab Item Container(PXTabItem).

| Customizing Elements of the User Interface | 304
Related Links
• Changes in Webpages (ASPX)
• Customized Screens
Tab Item Container (PXTabItem)
PXTabItem is a container control that can be used to render a single record from the datasource specified for the parent PXTab container.
A tab item container, as the diagram below shows, can be included only in a PXTab container.
Figure: Nesting rules for a PXTabItem container in an ASPX page
A tab item container can include multiple ASPX objects of the following types:
• A data-bound UI container control: PXFormView, PXGrid, and PXTab
• A layout rule: PXLayoutRule
• A box for a data field: PXTextEdit, PXNumberEdit, PXMaskEdit, PXDateTimeEdit,PXCheckBox, PXDropDown, PXSelector, PXSegmentMask, and PXTreeSelector
• Another control: PXPanel, PXGroupBox, PXRadioButton, PXLabel, PXButton, andPXJavaScript

| Customizing Elements of the User Interface | 305
A box for a data field can be added to a tab item container if the parent PXTab container isbound to a data view declared within the graph that provides business logic for the ASPXpage.
To create a new tab item container in a tab container in an ASPX page, follow theinstructions described in To Add a Nested Container.
To delete a tab item container from an ASPX page, follow the instructions described in ToDelete a Child UI Element.
For specific information on working with a tab item container, see the Conditional Hiding of aTab Item topic in this section. You will find additional information in the following topics:
• To Open a Container in the Screen Editor
• To Set a Container Property
• To Add a Nested Container
• To Add a Box for a Data Field
• To Add a Layout Rule
• To Add Another Supported Control
• To Reorder Child UI Elements
• To Delete a Child UI Element
Related Links
• Changes in Webpages (ASPX)
• Customized Screens
Dialog Box (PXSmartPanel)
PXSmartPanel is a UI container control that renders a dialog box.
A PXSmartPanel container does not have the DataMember property; therefore, it cannotcontain a UI element for a data field. To add a box for a data field to a dialog box, in theappropriate PXSmartPanel container, you have to include the data-bound container that cancontain the required data field.
However without binding a data view, you can create, for example, a message box with thecontrols that contain all required data in the ASPX code.
A PXSmartPanel container can include multiple ASPX objects of the following types (see thediagram below):
• A data-bound UI container control: PXFormView, PXGrid, and PXTab

| Customizing Elements of the User Interface | 306
• A layout rule: PXLayoutRule
• Another control: PXPanel, PXGroupBox, PXLabel, PXButton, and PXJavaScript
Figure: Nesting rules for a PXSmartPanel container in an ASPX page
A box for a data field cannot be added immediately to a dialog box because this typeof container cannot be bound to a data view.
To create a new dialog box in a form, follow the instructions described in To Add a Dialog Box.
To delete a dialog box from a form, follow the instructions described in To Delete a Container.
In Acumatica ERP, a dialog box usually contains a container for data fields and a PXPanelcontainer with PXButton elements to get a response from the user. See Panel (PXPanel) andTo Use a Button in a Dialog Box for details.
For detailed information on working with the content of a dialog box, see the To Open aSmart Panel in the Screen Editor topic in this section. You will find additional information in thefollowing topics:
• To Set a Container Property
• To Add a Nested Container
• To Add Another Supported Control

| Customizing Elements of the User Interface | 307
• To Reorder Child UI Elements
• To Delete a Child UI Element
Related Links
• Changes in Webpages (ASPX)
• Customized Screens
To Open a Smart Panel in the Screen Editor
If you need to activate the Element Inspector for a pop-up panel, a dialog box, or anotherUI element that opens in modal mode and makes the Customization Menu unavailable forselection, you can press Control-Alt.
To open a smart panel in the Screen Editor, perform the following actions:
1. Open the form in the browser.
2. On the form, open the needed dialog box by using the appropriate action.
3. On the keyboard, press the Control-Alt combination.
The Element Inspector is activated while you keep the Control-Alt combinationpressed on the keyboard.
4. Click anywhere inside the dialog box to open the Element Properties dialog box.
5. In the dialog box, click Customize.
6. If there is no currently selected customization project and the inspector opens the SelectCustomization Project Dialog Box, select an existing customization project or create a newone (see To Create a New Project and To Select an Existing Project for details).
If the customization project does not contain a changeset for the form, the CustomizationProject Editor adds to the project a Page item for the form to keep your changes in thedatabase. The smart panel element is opened in the Screen Editor, and you can start tocustomize the dialog box.
When you click Save on the editor toolbar, the editor updates the Page item in the database.
Box (Control for a Data Field)
You can use a control for a data field, also referred as a box, to display and edit the value ofthe field on a form.
The Acumatica Customization Platform supports the following types of boxes.

| Customizing Elements of the User Interface | 308
Object Description
PXTextEdit A text box to display and edit the value of a string field.
PXNumberEdit A box to display and edit the value of a decimal or int field.
PXMaskEdit A text box to display and edit the value of a string field that has theformat specified in the data access class.
PXDateTimeEdit A box to display and select the value of a datetime field.
PXCheckBox A check box to display and select the value of a bool field.
PXDropDown A combo box to display, edit, and select the value of a field with a listattribute, such as PXStringList, PXIntList, or PXDecimalList.
PXSelector A lookup control to display, search for, and select the value of a fieldwith the PXSelector attribute.
PXSegmentMask A lookup control with a specified segmented key value that identifies adata record and consists of one segment or multiple segments, wherethe list of possible values is defined for each segment.
PXTreeSelector A lookup control to select a value for a field with a PXTreeSelector at-tribute from a tree control.
A box, as the diagram below shows, can be immediately added to the following types ofcontainers:
• PXFormView
• RowTeplate
• PXTabItem

| Customizing Elements of the User Interface | 309
Figure: Nesting rules for a box bound to a data field
To create a box in a container, follow the instructions described in To Add a Box for a Data Field.
To delete a box from a container, follow the instructions described in To Delete a Child UIElement.
For detailed information on customizing a box, see the following topics:
• To Select a Box in the Screen Editor
• To Set a Box Property
• To Change the Type of a Box
To Select a Box in the Screen Editor
To start the customization of a box, you have to select it in the Screen Editor. To do this,perform the following actions.
1. Open the form that contains the box to be customized so that the box is displayed on thescreen.
2. On the form title bar, click Customization > Inspect Element to launch the ElementInspector.

| Customizing Elements of the User Interface | 310
3. On the form, click the box to open the Element Properties Dialog Box for the box.
4. In the dialog box, click Customize.
5. If there is no currently selected customization project and the inspector opens the SelectCustomization Project Dialog Box, select an existing customization project or create a newone. (See To Select an Existing Project and To Create a New Project for details.)
If the customization project does not contain a changeset for the form, the CustomizationProject Editor adds to the project a Page item for the form, to keep the changeset to ASPXcode of the form in the database. The container of the box is opened in the Screen Editor, andthe box is selected in the Control Tree of the editor. Therefore you can start customization ofthe box.
When you click Save on the editor toolbar, the editor updates the Page item in the database.
To Set a Box Property
To include in a customization project changes to properties of a box, you have to modify theproperties by using the Screen Editor. To start setting the properties of a box, perform thefollowing actions:
1. Select the box in the Screen Editor, as described in To Select a Box in the Screen Editor.
2. Click the Layout Properties tab item to open the list of properties for the box.
3. Specify values for the required properties.
4. Click Save to save your changes to the customization project.
For detailed information about the CommitChanges property, see Use of the CommitChangesProperty of Boxes in the Acumatica Framework Guide.
You can assign a predefined size abbreviation (such as XXS, L or XL) for the LabelsWidthand Size properties of a box. See Predefined Size Values in the Acumatica Framework Guidefor details.
To Change the Type of a Box
For a data field, you can create a control of any type that is supported in Acumatica ERP.However to avoid issues with rendering controls and processing control values, you have tohave an appropriate control for each data field. Therefore, if you have changed the type ofa data field, you should recreate all the controls that exist on Acumatica ERP forms for thisfield.
For example, a text edit box for the MyFieldName PXDBString field can be defined in theASPX code as follows.
<px:PXTextEdit ... DataField="MyFieldName" />

| Customizing Elements of the User Interface | 311
Suppose that you have added the PXStringList attribute for the field in the data accessclass to use the control for the field as a drop-down box. Then you need to redefine thecontrol as follows.
<px:PXDropDown ... DataField="MyFieldName" />
Because this change must be saved in a customization project, you have to use the ScreenEditor to delete the old definition of the box and to add the new one.
To change the type of a box in a container on a form and to include this modification in acustomization project, perform the following actions:
1. Select the box in the Screen Editor, as described in To Select a Box in the Screen Editor.
2. On the toolbar of the Control Tree, click Delete.
3. Click the Add Data Fields tab item (see the screenshot below).
4. If you need to create a control for a data field that is not accessible through the dataview specified for the container in the DataMember property, but is accessible throughanother data view of the same graph, and the Data View box gives you the availabilityto select a data view, select the needed data view in this box. (See Use of Multiple DataViews for Boxes in Containers in the Acumatica Framework Guide for details.)
5. On the tab item, click the All, Visible, or Custom filter for the fields provided by thedata view selected in the Data View box to view the appropriate field list.
6. Find the required data field in the Field Name column of the list and select the checkbox for the field in the unlabeled first column, as the following screenshot shows.

| Customizing Elements of the User Interface | 312
Figure: Selecting a data field for which a box is to be created
For each data field in the list, the Screen Editor presets the most appropriate controltype. However you can select another control type to be created for a field.
The control type must match the field type. Otherwise, the control cannot workproperly with the field data. If you create a control that does not match the datafield, you have to update the data field in the DAC (see To Customize a Field on theDAC Level for details) or in the graph. (See To Customize a Field on the Graph Level fordetails.)
7. If you need to change the type of the control to be created, select the needed type in theControl column of the selected field.
8. On the list toolbar, click Create Controls.
The platform creates a box for the selected data field and adds to the Control Tree anode for the box.
9. Click Save to save your changes to the customization project.
Layout Rule (PXLayoutRule)
The layout of a form is organized into a table of controls, with each control located within acertain column and row. The columns and rows are defined by PXLayoutRule componentsadded to the layout of the form. The properties of the PXLayoutRule component provide theposition of the underlying controls and their size and appearance in the UI.

| Customizing Elements of the User Interface | 313
You can use the PXLayoutRule component to do the following to manage the layout of UIelements within a container:
• Place controls in multiple rows and columns to uniformly distribute them on the form ortab area of a form (see the diagram below)
• Cause controls to span multiple columns
• Merge controls into one row of the column to align them horizontally
• Adjust the widths of controls and labels
• Hide the labels of controls
• Group controls for users' convenience
Figure: Layout rules to arrange controls within a container
A layout rule, as the diagram below shows, can be immediately added to the following typesof containers:
• PXFormView
• RowTeplate
• PXTabItem
• PXSmartPanel

| Customizing Elements of the User Interface | 314
Figure: Nesting rules for a layout rule in an ASPX page
The Acumatica Customization Platform supports the following properties for a PXLayoutRulecomponent.
Property Description
ColumnSpan Specifies the number of columns spanned by a control placed below thetarget PXLayoutRule component. This property applies to a single con-trol that is under the layout rule in the ASPX code. (See Use of the Colum-nSpan Property of PXLayoutRule in the Acumatica Framework Guide for de-tails.)
ColumnWidth Defines the width (in pixels) of a column containing controls. You canset the property to a predefined value (see Predefined Size Values in theAcumatica Framework Guide for details) or to a value in pixels. Thespecified width is applied to the column and is not changed when theLabelsWidth property value is specified for the same PXLayoutRulecomponent and when the Size, Width, or LabelWidth property value isspecified for a control contained within a column. (See Use of the Column-Width, ControlSize, and LabelsWidth Properties of PXLayoutRule in the Acumat-ica Framework Guide for details.)
ControlSize Defines the width for the controls placed within a column. The Con-trolSize property value is assigned from the predefined list of items.(See Predefined Size Values in the Acumatica Framework Guide for de-tails.) The specified size is applied to all controls contained within the

| Customizing Elements of the User Interface | 315
Property Descriptioncolumn if you do not override the size separately for a control by spec-ifying the Size or Width property values. (See Use of the ColumnWidth,ControlSize, and LabelsWidth Properties of PXLayoutRule in the AcumaticaFramework Guide for details.)
GroupCaption Specifies the caption for the group of controls that is started from thecontrol placed under this rule in the ASPX code. Any rule that has theGroupCaption property value set requires a rule with the EndGroupproperty value set to True below the last control of the group in thecode. All controls between the starting and ending group rules are in-cluded in the group. (See Use of the GroupCaption, StartGroup, and EndGroupProperties of PXLayoutRule in the Acumatica Framework Guide for details.)
EndGroup Indicates that the control above the rule in the ASPX code is the lastcontrol in the group that starts from the PXLayoutRule component witha specified GroupCaption property value. (See Use of the GroupCap-tion, StartGroup, and EndGroup Properties of PXLayoutRule in the AcumaticaFramework Guide for details.)
LabelsWidth Defines the width (in pixels) of the control labels placed within a col-umn. You select the LabelsWidth property value from the predefinedlist of items (see Predefined Size Values in the Acumatica FrameworkGuide for details) or by typing the width in pixels. The specified size isapplied to all control labels contained within the column if you do notoverride the size separately for a control by specifying the LabelWidthproperty value. (See Use of the ColumnWidth, ControlSize, and LabelsWidthProperties of PXLayoutRule in the Acumatica Framework Guide for details.)
Merge Is used to merge controls into one row and to horizontally align the con-trols that are placed under this rule in the ASPX code. The first PXLay-outRule component added under this rule in the code stops the merg-ing, and the next control is placed alone beneath the merged controlsas the leftmost control of the current column. To cancel merging for allcontrols that follow, you must add the PXLayoutRule component with-out the adjusted property value. (See Use of the Merge Property of PXLay-outRule in the Acumatica Framework Guide for details.)
StartGroup Starts the group of controls from the control placed under this rule inthe ASPX code. If the GroupCaption property value is not set to True,the group is displayed without a caption. Any rule that has the Start-Group property value set requires a rule with the EndGroup property val-ue set to True below the last control of the group in the code. All con-trols between the starting and ending group rules in the code are includ-ed in the group. (See Use of the GroupCaption, StartGroup, and EndGroupProperties of PXLayoutRule in the Acumatica Framework Guide for details.)
StartRow If set to True, starts a new row for the controls following this rule.(See Use of the StartRow and StartColumn Properties of PXLayoutRule in theAcumatica Framework Guide for details.)
SuppressLabel Hides all control labels within a column. All control labels placed withinthe column are hidden if you do not override them separately for a con-trol by specifying a SuppressLabel property value. (See Use of the Sup-

| Customizing Elements of the User Interface | 316
Property DescriptionpressLabel Property of PXLayoutRule in the Acumatica Framework Guide fordetails.)
By specifying the values of these properties, you can make a variety of changes to theUI. Some properties affect only the next control under the PXLayoutRule componentin the ASPX code. Other properties affect all controls under the rule until the next ruleis encountered in the code. Still other properties require a corresponding ending rule.For instance, the rule with the GroupCaption property value specified requires that acorresponding rule be set with the EndGroup property value. All controls in the code betweenthe GroupCaption and EndGroup rules become part of the group.
To create a layout rule in a container, follow the instructions described in To Add a Layout Rule.
To delete a layout rule from a container, perform the actions described in To Delete a Child UIElement.
For detailed information on working with the content of a grid container, see the followingtopics:
• To Select a Layout Rule in the Screen Editor
• To Set a Layout Rule Property
To Select a Layout Rule in the Screen Editor
To start the customization of a layout rule, you have to select it in the Screen Editor. To dothis, perform the following actions.
1. Open the form that contains the container with the layout rule, so that the container isdisplayed on the screen.
2. On the form title bar, click Customization > Inspect Element to launch the ElementInspector.
3. On the form, click the area of the container to be customized, to open the ElementProperties Dialog Box for the container.
4. In the dialog box, click Customize.
5. If there is no currently selected customization project and the inspector opens the SelectCustomization Project Dialog Box, select an existing customization project or create a newone. (See To Select an Existing Project and To Create a New Project for details.)
If the customization project does not contain a changeset for the form, the CustomizationProject Editor adds to the project a Page item for the form to keep in the database thechangeset to the ASPX code of the form. The container is opened in the Screen Editor andselected in the Control Tree of the editor.
6. If the required layout rule is not displayed in the Control Tree, expand the subnodes ofthe container node to display the rule.

| Customizing Elements of the User Interface | 317
7. In the Control Tree, select the layout rule to start the customization.
When you click Save on the editor toolbar, the editor updates the Page item in the database.
To Set a Layout Rule Property
To include in a customization project changes to properties of a layout rule, you have tomodify the properties by using the Screen Editor. To start setting the properties of a layoutrule, perform the following actions:
1. Select the layout rule in the Screen Editor, as described in To Select a Layout Rule in theScreen Editor.
2. Click the Layout Properties tab item to open the list of layout properties for the rule.(See the following screenshot.)
Figure: Viewing the list of layout rule properties in the Screen Editor
3. Specify values for the required properties.
4. Click Save to save changes in the customization project.
The most important properties of the PXLayoutRule component are described in thefollowing topics of the Acumatica Framework Guide:
• Use of the StartRow and StartColumn Properties of PXLayoutRule

| Customizing Elements of the User Interface | 318
• Use of the ColumnWidth, ControlSize, and LabelsWidth Properties of PXLayoutRule
• Predefined Size Values
• Use of the ColumnSpan Property of PXLayoutRule
• Use of the Merge Property of PXLayoutRule
• Use of the GroupCaption, StartGroup, and EndGroup Properties of PXLayoutRule
• Use of the SuppressLabel Property of PXLayoutRule
Panel (PXPanel)
In a container with controls for a single data record, you can use a PXPanel element asa container with a caption to group controls. However we recommend that you use thePXLayoutRule component for this purpose. (See Layout Rule (PXLayoutRule) for details.)
In Acumatica ERP, a panel is used as a container to display a horizontal row of buttons withright alignment in a dialog box (see Dialog Box (PXSmartPanel) for details), as the followingscreenshot shows.
Figure: Using a panel as a button container in a dialog boxIf you open the dialog box displayed in the screenshot above in the Screen Editor, you cansee that the panel is located below a form container and contains two buttons.

| Customizing Elements of the User Interface | 319
Figure: Viewing the panel content in the Screen Editor
You can add the PXPanel element to a dialog box and buttons to this element, as describedin To Add Another Supported Control and To Use a Button in a Dialog Box. In a panel, to arrangebuttons in a horizontal row with right alignment, you can specify the SkinID property ofthe PXPanel element, as described in Use of the SkinID Property of Containers in the AcumaticaFramework Guide.
Group Box (PXGroupBox)
In a container with controls for a single data record, you can use a PXGroupBox elementas a container with a caption to group controls. However we recommend that you use thePXLayoutRule component for this purpose. (See Layout Rule (PXLayoutRule) for details.)
In Acumatica ERP, the PXGroupBox element is designed to be exclusively used as a radiobutton container to render a drop-down data field as a set of radio buttons. It containsscripts with the logic to support a nested radio button for each value of a drop-down field.
A group box for a drop-down data field can be immediately added to the following types ofcontainers:
• PXFormView
• RowTeplate
• PXTabItem
To add a PXGroupBox element to a container, follow the instructions described in To AddAnother Supported Control.
To delete a group box from a container, follow the instructions described in To Delete a Child UIElement.

| Customizing Elements of the User Interface | 320
For detailed information on customizing a group box, see the following topics:
• To Open a Group Box in the Screen Editor
• To Create a Group Box for a Drop-Down Field
• To Set a Group Box Property
To Open a Group Box in the Screen Editor
To start the customization of a group box on a form, you have to open it in the Screen Editor.To do this, perform the following actions:
1. Open the form to display the appropriate set of radio buttons in the browser.
In Acumatica ERP, a radio button can work properly only in a PXGroupBoxcontainer that is used for a drop-down data field.
2. On the form title bar, click Customization > Inspect Element to launch the ElementInspector.
If you need to activate the Element Inspector for a pop-up panel, a dialog box, oranother UI element that opens in modal mode and makes the Customization Menuunavailable for selection, you can press Control-Alt.
3. On the form, click the area with radio buttons to open the Element Properties dialog boxfor the group box.
4. In the dialog box, click Customize.
5. If there is no currently selected customization project and the inspector opens the SelectCustomization Project Dialog Box, select an existing customization project or create a newone. (See To Create a New Project and To Select an Existing Project for details.)
If the customization project does not contain a changeset for the form, the CustomizationProject Editor adds to the project a Page item for the form, to keep the changeset to the ASPXcode of the form in the database. The group box is opened in the Screen Editor, and you canstart the customization of the box and the nested radio buttons.
When you click Save on the editor toolbar, the editor updates the Page item in the database.
To Create a Group Box for a Drop-Down Field
In Acumatica ERP, the PXDropDown box type is generally used to display on a form a fieldwith a list attribute, such as PXStringList, PXIntList, or PXDecimalList. However ifyou want to display such a field as a set of radio buttons, where one radio button is usedto display and select each single constant value of the field, you can create a PXGroupBoxelement and include PXRadioButton elements in it.
To create a group box for a drop-down data field in a container, perform the followingactions:

| Customizing Elements of the User Interface | 321
1. Open the container in the Screen Editor, as described in To Open a Container in the ScreenEditor.
2. In the container, add a group box, as described in To Add Another Supported Control.
3. For the new group box, specify the DataField property to bind the box to the data field.See To Set a Group Box Property and Use of the DataField Property of PXGroupBox for details.
4. If required, specify the Caption and RenderStyle properties of the group box, as thefollowing screenshot shows.
Figure: Setting the properties of a group box(See Use of the Caption Property of PXGroupBox and Use of the RenderStyle Property ofPXGroupBox in the Acumatica Framework Guide for details.)
5. For each value defined in the field list, do the following:
a. To the group box node of the Control Tree, add a radio button, as described in To AddAnother Supported Control.
b. In the C# code, find the value (usually it is an one-symbol value) in the list.
c. On the Layout Properties tab item, enter this value in the Value property.
6. Click Save to save changes in the customization project.

| Customizing Elements of the User Interface | 322
For example, as the result of the described actions for the StatementType data field with theO and B values defined in the list, you might get the following ASPX code.
<px:PXGroupBox runat="server" ID="CstGroupBox1" DataField="StatementType" Caption="Statement Type" RenderStyle="Fieldset"> <Template> <px:PXRadioButton runat="server" ID="CstRadioButton2" Value="O" /> <px:PXRadioButton runat="server" ID="CstRadioButton3" Value="B" /> </Template></px:PXGroupBox>
To Set a Group Box Property
To include changes to the properties of a group box in a customization project, you have tomodify the properties by using the Screen Editor. To start setting the properties of a groupbox, perform the following actions:
1. Select the group box in the Screen Editor, as described in To Open a Group Box in the ScreenEditor.
2. Click the Layout Properties tab item to open the list of properties for the group box.
3. Specify values for the required properties.
4. Click Save to save your changes to the customization project.
To bind a group box to a data field, you have to specify the DataField property, asdescribed in Use of the DataField Property of PXGroupBox in the Acumatica Framework Guide.
To set a caption for a group box, you use the Caption property. (See Use of the CaptionProperty of PXGroupBox in the Acumatica Framework Guide for details.)
To define the style of the group box on the form, you have to select a value of theRenderStyle property, see Use of the RenderStyle Property of PXGroupBox in the AcumaticaFramework Guide for details.
Label (PXLabel)
In a container with controls for a single data record, you can use a PXLabel element todisplay text. For example, you should use a label to render on a form static text that isstored in the ASPX code.
A PXLabel element can be immediately added to the following types of containers:
• PXFormView
• RowTeplate
• PXTabItem

| Customizing Elements of the User Interface | 323
• PXSmartPanel
You can view the use of the PXLabel elements, for example, in the Aging Settings groupon the Statement Cycles (AR202800) form, shown in the following screenshot.
Figure: Viewing the labels on the Statement Cycles form
The use of a label can be required when a field contains a quantity, but you need to adda unit type for the value. For example, if you need to display a field as Duration [value]Days, where Duration is the value of the DisplayName parameter of the PXUIField attributeof the field, you have to add a PXLabel element that contains the Days string constant. Toarrange the label in the same column as the field, you need to use the Merge layout rule, asdescribed in To Set a Layout Rule Property and Use of the Merge Property of PXLayoutRule.
You can add the PXLabel element to a container, as described in To Add Another SupportedControl.
To delete a label from an ASPX page, follow the instructions described in To Delete a Child UIElement.
Radio Button (PXRadioButton)
In Acumatica ERP, a radio button can work properly only in a PXGroupBox container. (SeeGroup Box (PXGroupBox) for details.) A PXGroupBox element contains scripts to provide the

| Customizing Elements of the User Interface | 324
appropriate logic to use a nested radio button for a single constant value of a bound drop-down data field.
To use a PXRadioButton element on a form, follow the instructions described in To Create aGroup Box for a Drop-Down Field.
To bind a radio button to a value from the list of a drop-down data field, follow theinstructions described in To Bind a Radio Button to a Value in the List of a Data Field.
To Bind a Radio Button to a Value in the List of a Data Field
In the parent group box, to bind a radio button to a value in the list of a drop-down datafield that is bound to this group box, perform the following actions:
1. Open the group box in the Screen Editor, as described in To Open a Group Box in the ScreenEditor.
2. In the Control Tree, select the node of the radio button.
3. Click the Layout Properties tab item to open the list of properties for the radio button.
4. Set the Value property to an appropriate value (usually it is a one-symbol value) of thelist defined in the C# code, as the following screenshot shows.
Figure: Setting the Value property of a radio button
5. Click Save to save your changes to the customization project.

| Customizing Elements of the User Interface | 325
Button (PXButton)
In Acumatica ERP, the PXButton element is used for the following purposes:
• In a dialog box—to display a button that closes the dialog box and returns a predefinedDialogResult value
• In a container with controls for a single data record (including a dialog box) of a form—todisplay a button that invokes a method defined in the graph, which provides the businesslogic for the form
The most common use case of the PXButton element is in a dialog box.
A button, as the diagram below shows, can be immediately added to the following types ofcontainers:
• PXFormView
• RowTeplate
• PXTabItem
• PXSmartPanel
• PXPanel

| Customizing Elements of the User Interface | 326
Figure: Nesting rules for a button in an ASPX page
To create a button in a container, follow the instructions described in To Add Another SupportedControl.
To delete a button from a container, follow the instructions described in To Delete a Child UIElement.
For detailed information about using a button, see the following topics:
• To Use a Button in a Dialog Box
• To Use a Button to Invoke a Method
To Use a Button in a Dialog Box
In a dialog box, you can create buttons of the following types:
• A standard button that invokes no method but closes the dialog box and returns aspecified predefined value, which can be processed by the method that has opened thedialog box

| Customizing Elements of the User Interface | 327
To arrange buttons in a horizontal row with right alignment in a dialog box, werecommend that you use the PXPanel container with the SkinID property set toButtons.
• A button that invokes a method of the graph that provides business logic for the form
To add a standard button to a PXPanel container of a dialog box, perform the followingactions:
1. Add the button to a PXPanel container, as described in To Add Another Supported Control.
2. In the Control Tree of the Screen Editor, select the node of the new button.
3. Click the Layout Properties tab item to open the list of properties for the button.
4. Specify values for the following properties:
a. DialogResult: Specify the value that is returned when the button closes the dialogbox. Set the property to one of the following values defined in the WebDialogResultenumerator.
Value Description
OK The user clicked a button with the DialogResult property set toOK.
Cancel The user clicked a button with the DialogResult property set toCancel.
Abort The user clicked a button with the DialogResult property set toAbort.
Retry The user clicked a button with the DialogResult property set toRetry.
Ignore The user clicked a button with the DialogResult property set toIgnore.
Yes The user clicked a button with the DialogResult property set toYes.
No The user clicked a button with the DialogResult property set toNo.
When the user clicks the added button, the dialog box is closed, and the specifiedvalue is returned to the method that has opened the dialog box.
b. Text: Specify the text to be displayed on the button.
In the Text property of a standard button, you can define any text, regardlessof the value of the DialogResult property.
5. Click Save to save changes in the customization project.

| Customizing Elements of the User Interface | 328
The following ASPX code snippet creates a panel with two standard buttons arranged ahorizontal row with right alignment.
<px:PXPanel ... SkinID="Buttons"> <px:PXButton ... DialogResult="OK" Text="Next" /> <px:PXButton ... DialogResult="Cancel" Text="Return" /></px:PXPanel>
If you need to include in the same dialog box a button that invokes a method of the graph,you can add the button to the same PXPanel container and set the button properties asdescribed in To Use a Button to Invoke a Method.
To Use a Button to Invoke a Method
You can use the PXButton element on a form to invoke a method of the graph that providesbusiness logic for the form.
To include in a container a button that invokes a method of the graph, perform the followingactions:
1. Open the container in the Screen Editor, as described in To Open a Container in the ScreenEditor.
2. Add the button to the container, as described in To Add Another Supported Control.
3. In the Control Tree of the Screen Editor, select the node of the new button.
4. Click the Layout Properties tab item to open the list of properties for the button.
5. Specify values for the following properties:
a. CommandSourceID: Set the property to the value specified in the ID property of thePXDataSource control.
b. CommandName: In the property, specify the name of the method to be invoked whenthe user clicks the button on the form.
The method must be defined in the graph that is specified in the TypeNameproperty of the PXDataSource control.
c. Text: Specify the text to be displayed on the button.
6. Click Save to save your changes to the customization project.
The following ASPX code creates a button that invokes the MethodName method referencedin the PXDataSource control with the ID property set to ds.
<px:PXButton ... CommandName="MethodName" CommandSourceID="ds" Text="ButtonText" />

| Customizing Elements of the User Interface | 329
The MethodName method must be referenced in a PXDSCallbackCommand element of thePXDataSource control as follows.
<px:PXDataSource ID="ds" ... TypeName="PX.Objects.<GraphName>" ...> <CallbackCommands> ... <px:PXDSCallbackCommand Name="MethodName" Visible="False" ... /> ... </CallbackCommands></px:PXDataSource>
You can see all available PXDSCallbackCommand elements in the Control tree. They areadded there automatically.
Java Script (PXJavaScript)
The PXJavaScript element is designed to keep JavaScript code in an ASPX page.
A PXJavaScript control can be immediately added to the following types of containers:
• PXFormView
• RowTeplate
• PXTabItem
• PXSmartPanel
• PXPanel
To create a JavaScript control in a container, follow the instructions described in To AddAnother Supported Control.
To delete a JavaScript control from a container, follow the instructions described in To Delete aChild UI Element.
For a detailed example of using a JavaScript control, see How do I play a sound in response to acustom action or button in Acumatica?.
Toolbars, Action Buttons, and Menus
On an Acumatica ERP form, toolbars, action buttons, and menus are the types of UIelements that are created and processed by the graph that is specified in the TypeNameproperty of the PXDataSource control and provides business logic for the form. Therefore,these UI elements cannot be created or customized by using the Screen Editor. SeeCustomizing Business Logic for details.

| Customizing Elements of the User Interface | 330
The standard page toolbar buttons include data manipulation (Insert, Delete, Save, andCancel), navigation (Next, Previous, First, and Last), and clipboard (Copy and Paste).Every toolbar button corresponds to an action declared in the graph. You can use explicit orimplicit declaration of actions to add standard buttons to the toolbar. To add standard toolbarbuttons to the form and add selector controls, in the graph class declaration, specify themain DAC as the second type parameter of PXGraph, as the following code shows.
public class GraphName : PXGraph<GraphName, MainDACName>{public PXSelect<MainDACName> PrimaryDataViewName;}
To add a custom action to a form toolbar, you use Code Editor to create the action declarationin the graph extension. See To Add an Action for details.
To create a menu on a form toolbar, in the graph or graph extension, you have to declareone action as a menu holder on the toolbar, and then declare all required actions and addthese actions to the menu holder by using the AddMenuAction method of the PXActionclass.
Other Control Types
The Acumatica Customization Platform does not support some control types, such asPXSplitContainer and PXTreeView, that are supported by the Acumatica Framework.However the Acumatica Customization Platform gives you the ability to add a control of anunsupported type to an Acumatica ERP form and save the change to a customization project.
To do this, perform the following actions:
1. Open the form in the Screen Editor, as described in To Start a Customization of a Form.
2. On the editor toolbar, click Actions > Edit ASPX to open the ASPX code of the form inthe ASPX Editor.
3. Modify the code in the editor.
4. Click Generate Customization Script to save to the customization project the changesto the Page item for the form.
After you have added a new control to the customization project, you can select the controlnode in the Control Tree of the Screen Editor and specify the control properties, as describedin To Set a Box Property.

| Customizing Business Logic | 331
Customizing Business LogicBusiness logic is implemented by overloading certain methods invoked by the system in theprocess of manipulating data. For such procedures as inserting a data record or updatinga data record, the cache controllers generate series of events causing invocation of themethods called event handlers. The application is able to interfere in the series of events ondifferent stages. For this purpose, the application implements methods that are executedas event handlers. Business logic can be divided into common logic relevant to differentparts of the application and the logic specific to an application form. The common logic isimplemented through event handler methods defined in attributes, while the screen-specificlogic is implemented as methods in the associated graph.
You use Customization Tools of the Acumatica Customization Platform to customize businesslogic for forms of Acumatica ERP.
The customization of existing business logic is based on the extension technology, which isdescribed in greater detail in DAC Extensions and Graph Extensions.
This part contains detailed instructions on how to customize a data access class, data field,graph, data view and an action of Acumatica ERP and how to include the changeset in acustomization project.
In This Part
• Data Access Class
• Data Field
• Graph
• Data View
• Action
Data Access Class
A data access class (DAC) is used to represent a database table in the code of AcumaticaERP. If a DAC is bound to the database, it must have the same class name as the databasetable. A data access class is inherited from the IBqlTable class and contains data fielddeclarations.
You can use Customization Project Editor to do the following:
• Create a new DAC
• Add a custom field to an existing DAC
• Customize the declaration of a data field of an existing DAC
For detailed information on customizing data access classes, see the following topics:

| Customizing Business Logic | 332
• To Start the Customization of a Data Access Class
• To Add a Custom Data Field
• To Create a New DAC
• To Create a DAC Extension
See Data Field for detailed instructions on the customization of a data field.
To Start the Customization of a Data Access Class
Before you start a DAC customization, we recommend that you check the possibilityto use the appropriate business entity attributes, which can be defined on theAttributes form (CS205000), instead of custom fields. See Usage Entity Attributes Insteadof Custom Fields for details.
You might need to customize an existing data access class in the following cases:
• On a form, you want to create a custom data field to be used for a custom control.
• In Acumatica ERP, you want to change the business logic for a data field in the DAC.
If multiple Acumatica ERP forms contain controls for the same field, changing anattribute of the field in the DAC modifies the behavior of these controls for thefield on all forms.
If you know the name of the data access class to be customized, you can first add a DACitem for the class on the Customized Data Classes page of the Customization Project Editor (seeTo Add a DAC Item for an Existing Data Access Class to a Project for details) and then click the itemto open it in the Data Class Editor.
You usually start the customization of a data access class on a form that contains boxes usedby users to work with data of an appropriate business entity, such as a sales order invoice.
To start the customization of a DAC from a form, perform the following actions:
1. Open the form in the browser.
2. On the form title bar, click Customization > Inspect Element to launch the ElementInspector.
If you need to activate the Element Inspector for a pop-up panel, a dialog box, oranother UI element that opens in modal mode and makes the Customization Menuunavailable for selection, you can press Control-Alt.
3. On the form, click the area with the boxes that are used for the data of the businessentity, to open the Element Properties dialog box for the area.
4. In the Data Class box of the dialog box, view the name of the DAC for the element youclicked. (See the following screenshot.) If you are not sure that this DAC is the neededone, click Cancel and repeat Step 3.

| Customizing Business Logic | 333
5. Click Actions > Customize Data Fields, as the following screenshot shows.
Figure: Using the Element Properties dialog box to start the customization of the class
6. If there is no currently selected customization project and the inspector opens the SelectCustomization Project Dialog Box, select an existing customization project or create a newone (see To Create a New Project and To Select an Existing Project for details).
If the customization project does not contain a DAC item for the data access class, theCustomization Project Editor adds the item to the project to keep the changes in the database.The DAC is opened in the Data Class Editor, and you can start the customization of the class.
When you click Save on the editor toolbar, the editor updates the DAC item in the database.
Usage Entity Attributes Instead of Custom Fields
Under some circumstances, you will find it best to use entity attributes defined on theAttributes form (CS205000; Configuration > Common Settings > Common Settings),while under other circumstances, custom fields will help you better meet the requirements ofyour customization task.
You might use attributes under the following circumstances:
• You don't need a complex layout for attribute fields because they aren't used for manualinput, so you can use the easiest way of creating additional fields.
• You'd prefer an approach that helps you to localize customizations that you make to thesystem to a limited number of spaces, which in turn helps you to avoid having scatteredchanges throughout the system.
The use of custom fields provides more functionality than attributes do. Using attributes ascolumns in a grid can present difficulties. For example, in a grid, you can display columns foreither all attributes or none of them. Also, you cannot rename a column for an attribute in agrid.

| Customizing Business Logic | 334
You might use custom fields under the following circumstances:
• These fields are for manual input and you need a nice-looking layout for them.
• You also have some business logic of validation based on a custom field, so you mightneed the customization code for these fields.
To Add a Custom Data Field
You can add a custom data field to an existing data access class by using the Screen Editor orData Class Editor, as described in the following sections:
• By Using the Data Class Editor
• By Using the Screen Editor
Both of the editors opens the New Field dialog box, which you use to enter the parametersof the new field and to launch the New Field wizard, which includes an XML declaration ofthe new field in the DAC item for the modified data access class. If the DAC item for themodified data access class is absent in the customization project, the wizard creates theappropriate item. Also, the wizard creates a Table item with a description of the customcolumn added to the table for the custom field.
You can select the way a custom field will be stored in the database when you add the fieldto a data access class. You can add a custom field as one of the following:
• Without mapping to the database
• As a new column to the database table by altering the table schema
• As a name-value pair to a dedicated table without altering the table schemaThe detailed information is described in the following sections:
• To Add a Custom Field Without Mapping to the Database
• To Add a Custom Field as a New Column
• To Add a Custom Field as a Name-Value Pair
• To Delete a Custom Field
To be able to create a control for the new field to be displayed on a form, you have topublish the project to make the system create the column in the database table and compilethe customization code. After the publication, you can add the control for the new field to aform by using the Screen Editor. See To Add a Box for a Data Field or To Add a Column for a DataField for details.
By Using the Data Class Editor
You generally use the Data Class Editor to add a custom field to a data access class (DAC)and store the changes in the customization project as a DAC item. To do this, perform thefollowing actions:

| Customizing Business Logic | 335
1. Start customization of the data access class, as described in To Start the Customization of aData Access Class.
2. On the toolbar of the Data Class page, click Add Field > Create New Field.
3. In the New Field dialog box, which opens, specify the custom field parameters that aredescribed in Create New Field Dialog Box.
4. Click OK to save changes in the customization project.
By Using the Screen Editor
If you customize a form by using the Screen Editor, you may need to create a custom datafield to be used to create a new control on the form. By using the editor, you can create anew field in the main DAC of the data view that provides data for the object selected in theControl Tree. To do this, perform the following actions:
1. In the Control Tree of the Screen Editor, select the node of a container to which youintend to add a new control, or a subnode within the container node.
2. Click the Add Data Fields tab item.
3. On the table toolbar of the tab item, click New Field.
4. In the New Field dialog box, which opens, specify the custom field parameters, whichare described in Create New Field Dialog Box.
5. Click OK to save your changes to the customization project.
To Add a Custom Field Without Mapping to the Database
To add a custom field without mapping to the database, perform the following actions:
1. Open Create New Field dialog box for the data access class By Using the Data Class Editoror By Using the Screen Editor.
2. In the dialog box, specify the custom field parameters and select NonPersistedField inStorage Type.
3. Click OK to add the field to the data access class.
The New Field wizard includes an XML declaration of the new field in the DAC item for themodified data access class. The new field declaration contains the data type attribute thatspecifies an unbound field, such as [PXString].
To Add a Custom Field as a New Column
To add a custom field as a new column that will be appended to the original table ofAcumatica ERP, perform the following actions:
1. Open the Create New Field dialog box for the data access class by using the Data ClassEditor or by using the Layout Editor.

| Customizing Business Logic | 336
2. In the dialog box, specify the custom field parameters and select DBTableColumn in theStorage Type box to make the system append the column to the original table in thedatabase.
3. Click OK to add the field to the data access class.The New Field wizard includes an XML declaration of the new field in the DAC item for themodified data access class. If the DAC item for the modified data access class is absent inthe customization project, the wizard creates the appropriate item. Also, the wizard createsa Table item with a description of the custom column to be created in the database table forthe custom field.
To Add a Custom Field as a Name-Value Pair
To add a custom field a name-value pairs stored in a dedicated table of Acumatica ERP,perform the following actions:
1. Open Create New Field dialog box for the data access class By Using the Data Class Editoror By Using the Screen Editor.
2. In the dialog box, specify the custom field parameters and select NameValuePair inStorage Type.
3. Click OK to add the field to the data access class.
The New Field wizard includes an XML declaration of the new field in the DAC item for themodified data access class. If the DAC item for the modified data access class is absentin the customization project, the wizard creates the appropriate item. The wizard doesn'tgenerate any definitions to change the database schema.
To Delete a Custom Field
To delete a custom field or custom attributes on a field from the data access class, open thedata access class in the Data Class Editor and delete the custom field from the field list. Ifyou work in Microsoft Visual Studio, publish the customization project to update the file withthe customized data access class in the file system. After the project has been published, thecustomization will be removed from the data access class.
To Create a New DAC
You can add a new data access class (DAC) to a customization project by generating thecode from the definition of a database table.
To create a custom data access class for a custom database table and add the created itemto a customization project, you have to generate the class template on the Code page of theCustomization Project Editor.
To do this, perform the following actions:
1. Create the needed custom table in the database by using a database management tool.
2. Generate the DAC code for the customization project as follows:

| Customizing Business Logic | 337
a. Open the customization project in the Project Editor.
b. In the navigation pane, click Code to open the Code page.
c. On the page toolbar, click Add New Record (+).
d. In the Create Code File dialog box, which opens, select New DAC in the FileTemplate box.
e. In the Class Name box, specify the class name that corresponds to the name of thetable created in the database.
If you have just created the table, restart Internet Information Services (IIS)or recycle the application pool to make sure that Acumatica ERP is aware ofthe new table, because it caches the database schema once, when the domainstarts.
f. Select the Generate Members from Database check box.
g. Click OK.
The platform does the following:
• Generates the data access class with members that correspond to the tablecolumns. The class is added to the namespace of the customization project.
• Adds the class to the customization project as a Code item.
• Saves the customization project.
• Opens the created item in the Code Editor.
You can use the Code Editor to modify the generated code. After you publish thecustomization project, you can work with the custom data access class in MS VisualStudio.
3. In the Code Editor, define the key fields in the DAC. To include a data field in the key,in the type attribute of the field, you have to add the IsKey parameter, as the examplebelow shows.
[PXDBString(15, IsKey=true)]
4. Add the table definition to the customization project by doing the following:
a. In the navigation pane of the Project Editor, click Database Scripts.
b. On the Database Scripts page, which opens, click Add > Custom Table Schema.
c. In the Add Custom Table Schema dialog box, which opens, select the custom tablein the Table box, and click OK.
The platform does the following:

| Customizing Business Logic | 338
• Adds the XML definition of the table to the customization project as an Sql item
• Saves the customization project
Every time you publish the customization project, the system checks whether a tablewith this SQL definition exists in the database. If the table doesn't exist, the systemcreates the table. If the table exists, the system adjusts the table schema if thereis any difference between the existing table schema and the table schema from thecustomization project (no data is truncated).
To Create a DAC Extension
If you know the name of the data access class to be customized, you can create a Code itemwith the DAC extension template on the Code page of the Customization Project Editor byusing the Create Code File dialog box.
To do this, perform the following actions:
1. Open the customization project in the editor. (See To Open a Project for details.)
2. Click Code in the navigation pane to open the Code page.
3. Click Add New Record (+) on the page toolbar.
4. In the Create Code File dialog box, which opens, select DAC Extension in the FileTemplate box, as the screenshot below shows.
5. In the Base DAC box, select the name of the data access class to be customized.
6. Click OK.

| Customizing Business Logic | 339
Figure: Adding a Code item with the DAC extension to the project
The platform creates the template of the class that is derived from the PXCacheExtension<>class, saves the code as a Code item of the project in the database, and opens the item inthe Code Editor.
Data Field
In a data access class (DAC), a data field declaration consists of the following elements:
• A public abstract class that implements the PX.Data.IBqlField interface. This abstractclass is used as a type to reference the field in the BQL statements specified in the dataviews and attributes added to data field declarations.
• Attributes that provide the common business logic for the field. On a field, you useattributes to define the data field specification, which includes multiple parameters, suchas the data type, default value, and field caption in the UI. The type attribute, such asPXDBString and PXDBDecimal, is the only mandatory attribute of a DAC field.
• A public virtual property of a nullable data type that corresponds to the data type of thisfield. This property keeps the value of the data field. The attributes are added to theproperty and not to the abstract class of the data field declaration.
For a data field, you can customize only field attributes. You do this in one of the followingways:
• In the DAC (on the DAC level)

| Customizing Business Logic | 340
• In a graph (on the graph level)
On the DAC level, you can customize the attributes of a field by adding, deleting, replacing,or modifying an attribute in the DAC extension by using the Data Class Editor.
On the graph level, you can define a new set of attributes for a field and apply changes bymeans of the DACName_FieldPropertyName_CacheAttached() event handler in the graphextension.
The following diagram shows an example that demonstrates how the attributes of a fielddeclared in a data access class can be changed on the DAC and graph levels for two forms.
Figure: Example of the customization of attributes for a data field on the DAC and graph levelsOn the diagram, you can see that the attribute collection for the same data field in the cacheobject can be different for graphs that provide business logic for different forms.
For detailed information on customizing a data field, see the following topics:
• To Customize a Field on the DAC Level
• To Customize a Field on the Graph Level
• To Set a Default Value
• To Change the Label of a Field

| Customizing Business Logic | 341
• To Make a Field Mandatory
• To Customize the Table of a Selector Field
• To Add an Event Handler for a Field
• To Provide Multi-Language Support for a Field
Related Links
•
To Customize a Field on the DAC Level
If an attribute is added to a field declaration within a data access class (DAC), the commonbusiness logic of this attribute is applied to each data record of this type for each graph thatuses this class. Therefore, if multiple Acumatica ERP forms contain controls for the samefield, a change to an attribute of the field in the DAC modifies the behavior of these controlsfor the field on all forms.
You can use the Data Class Editor to customize the attributes of an existing data field in theDAC and to store the changes in the customization project as a DAC item. Because the goalof the customization of a field on the DAC level is to change the behavior or appearance ofcontrols for the field on all forms, you start the customization of a data field from any formthat contains a control for the field.
To customize a data field from a form that contains a control for the field, perform thefollowing actions:
1. Open the form in the browser and make the control visible on the form.
2. On the form title bar, click Customization > Inspect Element to launch the ElementInspector.
If you need to activate the Element Inspector for a pop-up panel, a dialog box, oranother UI element that opens in modal mode and makes the Customization Menuunavailable for selection, you can press Control-Alt.
3. On the form, click the control to open the Element Properties dialog box for the control.
4. In the dialog box, click Actions > Customize Data Fields.
5. If there is no currently selected customization project and the inspector opens the SelectCustomization Project Dialog Box, select an existing customization project or create a newone. (See To Select an Existing Project and To Create a New Project for details.)
If the customization project does not contain a DAC item for the data access class,the Customization Project Editor adds the item to the project to keep the changes in thedatabase. The DAC is opened in the Data Class Editor, and the needed field is added to listof customized fields of the DAC.
6. In the list of customized fields of the DAC, click the name of the field to be customized.

| Customizing Business Logic | 342
Now you can start the customization of the field on the DAC level.
The Data Class editor shows the custom and original attributes of the field in the work area,and you can use the following objects:
• The Customize Attributes text area: Use this area to define the custom attributes ofthe field.
• A drop-down list that is visible for only existing customized fields of the data accessclass: In this list, select one of the following ways of applying the custom attributes tothe field:
• Keep Original: The original attributes remain on the field until you select anotheroption in this box.
• Replace Original: The original attributes of the field are replaced with the customattributes specified in the Customize Attributes text area.
• Append to Original: The custom attributes are added to the end of the list of theoriginal attributes of the data field. If you use this option, make sure you do notduplicate the attributes of the field.
• The Selector Columns toolbar action, which is available for only the fields that areselectors: Use this action to open the Customize Selector Columns dialog box, in which youcan modify the columns in the selector table.
• The Edit Attributes toolbar action, which is unavailable for a custom field: Invoke thisaction to change the values of parameters for the existing original attributes of theselected field.
When you click Save on the editor toolbar, the editor updates the DAC item in the database.
To Start the Customization of a Field from the Screen Editor
If you customize a form by using the Screen Editor, you may need to change the attributes adata field to change the appearance or behavior of an appropriate control on the form. If thecontrol node is selected in the Control Tree, you can open the Data Class editor for the fieldimmediately from the Screen Editor. To do this, perform the following actions:
1. Click the Attributes tab item.
2. On the tab item, click Customize Attributes.If the DAC item for the data access class that contains the field declaration is absent in thecustomization project, the Acumatica Customization Platform creates an appropriate itemand saves it in the database. Then the platform opens the item in the Data Class editor, andyou can customize the attributes of the field.
To Customize a Field on the Graph Level
If an attribute is added to a field declaration within a graph, the common business logicof this attribute is applied to each data record of this type on the graph level for only thisgraph. Therefore, if multiple Acumatica ERP forms contain controls for the same field, a

| Customizing Business Logic | 343
change of an attribute of the field within the graph modifies the behavior of a single controlfor the field on only the form for which the graph provides business logic.
Because the goal of customizing a field on the graph level is to change the behavior orappearance of a specific control for the field on a specific form, you start the customizationof a data field from the form.
To customize a field on the graph level, perform the following actions:
1. Open the form in the browser and make the control visible on the form.
2. On the form title bar, click Customization > Inspect Element to launch the ElementInspector.
If you need to activate the Element Inspector for a pop-up panel, a dialog box, oranother UI element that opens in modal mode and makes the Customization Menuunavailable for selection, you can press Control-Alt.
3. On the form, click the control to open the Element Properties dialog box for the control.
4. In the dialog box, click Actions > Customize.
5. If there is no currently selected customization project and the inspector opens the SelectCustomization Project Dialog Box, select an existing customization project or create a newone. (See To Select an Existing Project or To Create a New Project for details.)
If the customization project does not contain a changeset for the form, the CustomizationProject Editor adds to the project a Page item for the form, to keep the changeset to theASPX code of the form in the database. The container of the control is opened in theScreen Editor, and the control is selected in the Control Tree of the editor.
6. Click the Attributes tab item, which is used to review and customize the attributes ofthe DAC field that is bound to the control currently selected in the Control Tree.
7. Click Override On Screen Level to create in the graph extension thecode template, which includes the original attributes of the field and theDACName_FieldPropertyName_CacheAttached() event handler, which replaces theattributes within the graph.
If the customization project does not contain an extension for the graph, theCustomization Project Editor adds to the project a Code item for the graph extension, tokeep the code in the database. Then the Acumatica Customization Platform opens theCode item in the Code Editor, and you can start the customization of the field on thegraph level.
In the graph extension, you can define the field attributes as you need to. However you canuse one of the following approaches to customize the attributes of a field on the graph level:
• Define a new set of custom attributes to replace the original attributes of the field (as inthe created template).
• Use the PXCustomizeBaseAttribute, PXMergeAttributes, PXRemoveBaseAttribute,and PXCustomizeSelectorColumns attributes to customize the original attributes of afield instead of replacing it with custom ones.

| Customizing Business Logic | 344
We recommend that you use the second approach, which is described in Customization of FieldAttributes in DAC Extensions.
When you click Save on the Code editor toolbar, the editor updates the Code item in thedatabase.
You can develop the customization code in the Code Editor. However we recommendthat you develop the code in Microsoft Visual Studio (as described in Integratingthe Project Editor with Microsoft Visual Studio) and use the editor for either minor codecorrections or the insertion of completed portions of code.
To Set a Default Value
When a user creates a new record of a business entity through a form of Acumatica ERP,you might need to set a default value for a data field. You use the PXDefault attribute fora data field to set a constant as the default value, or you provide a BQL query to obtain avalue from the database or data records from the cache. The default value is assigned to thefield when a data record holding this field is inserted into the cache.
If the default value is taken from a field that can be auto-generated by the database(such as an ID), you should use the PXDBDefault attribute instead of the PXDefaultattribute.
You can set a default value for an original or custom text field on the DAC and graph levels.The following sections provide detailed information:
• To Set a Default Value for an Original Field on the DAC Level
• To Set a Default Value for an Original Field on the Graph Level
• To Set a Default Value for a Custom Field on the DAC Level
To Set a Default Value for an Original Field on the DAC Level
To set a default value for a field used on multiple forms, you should customize the originalattributes of the field in the data access class extension. To do this, perform the followingactions:
1. Open the field in the Data Class Editor, as described in To Customize a Field on the DACLevel.
2. In the Customize Attributes box, select Append to Original.
3. In the edit area below the box, add the PXDefault attribute and define a default valuefor the attribute.
4. Click Save on the editor toolbar to save your changes to the customization project.
To Set a Default Value for an Original Field on the Graph Level
To set a default value for a field used on a single form, you should customize the originalattributes of the field in the graph extension. To do this, perform the following actions:

| Customizing Business Logic | 345
1. Create the code template that includes the original attributes of the field and theDACName_FieldPropertyName_CacheAttached() event handler, which replaces theattributes within the graph, as described in To Customize a Field on the Graph Level.
2. By using the Code editor, replace the original attributes in the template, as shown in thefollowing code snippet.
[PXMergeAttributes(Method = MergeMethod.Append)][PXDefault(false, PersistingCheck = PXPersistingCheck.Nothing)]protected void DACName_FieldPropertyName_CacheAttached(PXCache cache){}
3. Click Save on the editor toolbar to save your changes to the customization project.
To Set a Default Value for a Custom Field on the DAC Level
If you need to set a default value for a custom data field on the DAC level, you add thePXDefault attribute and define a default value for the attribute in the edit area of the DataClass editor, as shown in the following screenshot.
Figure: Setting a default value for a custom field
To Change the Label of a Field
You can change the label for an original data field on the DAC and graph levels. The followingsections provide detailed information:
• To Change the Label of a Field on the DAC Level

| Customizing Business Logic | 346
• To Change the Label of a Field on the Graph Level
To Change the Label of a Field on the DAC Level
To change the label of a control for a field used on multiple forms, you should customize thePXUIField attribute of the field in the data access class extension. To do this, perform thefollowing actions:
1. Open the field in the Data Class Editor, as described in To Customize a Field on the DACLevel.
2. In the Customize Attributes box, select Append to Original.
3. In the editor, click Edit Attributes on the page toolbar.
4. In the Attribute list of the Customize Attributes dialog box, which opens, click thePXUIField attribute to select it.
5. In the parameter list, specify a new label for the DisplayName parameter, as thescreenshot below shows.
6. Click OK to exit the dialog box.
7. Click Save on the editor toolbar to save your changes to the customization project.

| Customizing Business Logic | 347
Figure: Changing the display label of a fieldAs a result, the editor adds the following attribute for the field to the DAC extension.
[PXCustomizeBaseAttribute(typeof(PXUIFieldAttribute), "DisplayName", "NewName")]
To Change the Label of a Field on the Graph Level
To change the label of a field for a single form, you should customize the PXUIFieldattribute of the field in the graph extension. To do this, perform the following actions:
1. Create the code template that includes the original attributes of the field and theDACName_FieldPropertyName_CacheAttached() event handler, which replaces theattributes within the graph, as described in To Customize a Field on the Graph Level.
2. By using the Code editor, replace the original attributes in the template, as shown in thefollowing code snippet.
[PXCustomizeBaseAttribute(typeof(PXUIFieldAttribute), "DisplayName", "NewName")]protected void DACName_FieldPropertyName_CacheAttached(PXCache cache){}
3. Click Save on the editor toolbar to save your changes to the customization project.

| Customizing Business Logic | 348
To Make a Field Mandatory
If a field is mandatory for input, the user has to specify a value for the field before savingthe record that contains the field. To make a field mandatory for input, you use thePXDefault attribute without parameters. A mandatory field is marked by an asterisk (*)on the form to cue the reader that a value must be specified for it. To mark a control fora mandatory field with an asterisk, you set the Required parameter of the PXUIFieldattribute to true.
You can make an original or custom field mandatory and mark a control for the field with anasterisk on the DAC and graph levels. The following sections provide detailed information:
• To Make an Original Field Mandatory on the DAC Level
• To Make a Custom Field Mandatory on the DAC Level
• To Make a Field Mandatory on the Graph Level
To Make an Original Field Mandatory on the DAC Level
To make an original field mandatory and mark the control for the field with an asterisk onmultiple forms with an asterisk, you should customize the original attributes of the field inthe data access class extension. To do this, perform the following actions:
1. Open the field in the Data Class Editor, as described in To Customize a Field on the DACLevel.
2. In the Customize Attributes box, select Append to Original.
3. In the edit area below the box, add the PXDefault attribute without parameters.
4. In the editor, click Edit Attributes on the page toolbar.
5. In the Attribute list of the Customize Attributes dialog box, which opens, click thePXUIField attribute to select it.
6. In the parameter list, set the Required parameter to True.
7. Click OK to exit the dialog box.
The edit area of the editor must contain the following code:
[PXDefault][PXCustomizeBaseAttribute(typeof(PXUIFieldAttribute), "Required", true)]
8. Click Save on the editor toolbar to save your changes to the customization project.
To Make a Custom Field Mandatory on the DAC Level
If you need to set a default value for a custom data field, you add the PXDefault attributewithout parameters and set the Required parameter of the PXUIField attribute to True, asin the following code snippet.

| Customizing Business Logic | 349
[PXDefault][PXUIField(..., Required = true)]
To Make a Field Mandatory on the Graph Level
To make a field mandatory and mark the field with an asterisk for the field control used ona single form, you should customize the field attributes in the graph extension. To do this,perform the following actions:
1. Create the code template that includes the field attributes and theDACName_FieldPropertyName_CacheAttached() event handler, which replaces theattributes within the graph, as described in To Customize a Field on the Graph Level.
2. By using the Code editor, replace the original attributes in the template, as shown in thefollowing code snippet.
[PXDefault][PXCustomizeBaseAttribute(typeof(PXUIFieldAttribute), "Required", true)]protected void DACName_FieldPropertyName_CacheAttached(PXCache cache){}
3. Click Save on the editor toolbar to save your changes to the customization project.
To Customize the Table of a Selector Field
For a selector field, you use the Data Class Editor to add, delete, and sort the columns of theselector table and store the changes in the customization project as a DAC item.
You can customize the table of an original selector field on the data access class (DAC) andgraph levels. The following sections provide detailed information:
• To Customize the Table of an Original Selector Field on the DAC Level
• To Customize the Table of an Original Selector Field on the Graph Level
To Customize the Table of an Original Selector Field on the DAC Level
To customize the table of an original selector field for all controls for the field, you shouldcustomize the PXSelector attribute of the field in the data access class extension. To dothis, perform the following actions:
1. Open the field in the Data Class Editor, as described in To Customize a Field on the DACLevel.
2. In the editor, click Selector Columns on the page toolbar.
3. In the Customize Selector Columns dialog box, which opens, make the requiredchanges.

| Customizing Business Logic | 350
You can use this dialog box to add new columns to the selector table and to reordercolumns in the table. (See Customize Selector Columns Dialog Box for details.)
4. Click OK to add the PXCustomizeSelectorColumns attribute for the field in the edit areaof the Data Class editor based on your changes, as shown in the following screenshot.
Figure: Viewing the PXCustomizeSelectorColumns attribute in the Data Class editor
5. Click Save on the editor toolbar to save your changes to the customization project.
To Customize the Table of an Original Selector Field on the Graph Level
To customize the selector table for the selector control on a single form, you shouldcustomize the PXSelector attribute of the appropriate field in the graph extension. To dothis, perform the following actions:
1. Create the code template that includes the field attributes and theDACName_FieldPropertyName_CacheAttached() event handler that replaces theattributes within the graph, as described in To Customize a Field on the Graph Level.
2. By using the Code editor, replace the original attributes in the template, as shown in thefollowing code snippet.
[PXCustomizeSelectorColumns(<NEW CONTENT OF THE PXSELECTOR ATTRIBUTE>)]protected void DACName_FieldPropertyName_CacheAttached(PXCache cache){}
3. Click Save on the editor toolbar to save your changes to the customization project.

| Customizing Business Logic | 351
To Add an Event Handler for a Field
You can add an event handler for an original or custom field on the graph and DAC levels.The following sections provide detailed information:
• To Add an Event Handler for a Field on the Graph Level
• To Add an Event Handler for a Field on the DAC Level
To Add an Event Handler for a Field on the Graph Level
To add an event handler for a field control used on a single form, perform the followingactions:
1. Open the form in the browser and make the control visible on the form.
2. On the form title bar, click Customization > Inspect Element to launch the ElementInspector.
If you need to activate the Element Inspector for a pop-up panel, a dialog box, oranother UI element that opens in modal mode and makes the Customization Menuunavailable for selection, you can press Control-Alt.
3. On the form, click the control for which you are adding an event handler to open theElement Properties dialog box for the control.
4. In the dialog box, click Actions > Customize.
5. If there is no currently selected customization project and the inspector opens the SelectCustomization Project Dialog Box, select an existing customization project or create a newone. (See To Select an Existing Project or To Create a New Project for details.)
If the customization project does not contain a changeset for the form, the CustomizationProject Editor adds a Page item for the form to the project to keep the changeset to ASPXcode of the form in the database. The container of the control is opened in the ScreenEditor, and the control is selected in the Control Tree of the editor.
6. If you need to provide additional business logic to process a control value immediatelyafter the value is changed, follow the instructions described in To Add an Event Handler.If you need to override the existing business logic for the field, follow the instructionsdescribed in To Override an Event Handler.
To Add an Event Handler for a Field on the DAC Level
Typically, you develop an event handler to provide the business logic for a field on the graphlevel. However if you need to add the same business logic for a field used on multiple forms,you add the event handler on the DAC level as follow:
1. Create a custom attribute, as described in Lesson 8 of the T200 Acumatica FrameworkFundamentals course.
2. Add the needed event handler to the custom attribute.

| Customizing Business Logic | 352
3. Add the custom attribute to the field, as described in To Customize a Field on the DAC Level.
To Provide Multi-Language Support for a Field
Acumatica ERP 5.3 supports locale-specific settings and the translation of the strings usedon the application interface. Starting with Version 6, Acumatica ERP also provides thefunctionality to translate user input to multiple languages and store translations in thedatabase. (See Locales and Languages for details.)
For example, if there are multiple active system locales in an instance of Acumatica ERP,and a text field on a form is declared as a multi-language field, the field control displays thevalue for the current locale. If the database does not contain a value for the current locale,the control displays the value for the default system locale.
To declare a text field as a multi-language one, in the data access class, you should usethe PXDBLocalizableString attribute instead of PXDBString or PXDBText. The PXDBTextattribute has to be replaced with the PXDBLocalizableString one without any lengthspecified.
• Please do not confuse the PXDBLocalizableString attribute withPXDBLocalString. The PXDBLocalString attribute is deprecated and should notbe used in the customization code.
• By default, starting with Acumatica ERP 6, the system supports multilingualuser input for some boxes listed in Boxes that Have Multi-Language Support. Ifthe PXDBString attribute for a box from the list was customized in the earlierversions, after you upgrade to Acumatica ERP 6, the box will not have multi-language support. To resolve the issue, we recommend that you replace thePXDBString attribute with PXDBLocalizableString in the customization code.
You can provide multi-language support for an original or custom text field. The followingsections provide detailed information:
• To Provide Multi-Language Support for an Original Field on the DAC Level
• To Provide Multi-Language Support for an Original Field on the Graph Level
• To Provide Multi-Language Support for a Custom Field
To Provide Multi-Language Support for an Original Field on the DAC Level
To provide multi-language support for a field used on multiple forms, you should customizethe original attributes of the field in the data access class extension. To do this, perform thefollowing actions:
1. Open the field in the Data Class Editor, as described in To Customize a Field on the DACLevel.
2. In the editor, click Edit Attributes on the page toolbar.

| Customizing Business Logic | 353
3. In the Customize Attributes dialog box, which opens, select the PXDBString (orPXDBText) attribute, and click Delete (Х) on the toolbar.
4. Click OK to save your changes and close the dialog box.
5. In the Customize Attributes box of the editor, select Append to Original, as shown inthe screenshot below.
6. In the work area below the box, add the PXDBLocalizableString attribute, which hasthe same parameters as the deleted PXDBString (or PXDBText) attribute.
7. Click Save on the editor toolbar to save your changes to the customization project.
For example, after you perform these actions for the Description field on the Sales Ordersform (SO301000; Distribution > Sales Orders > Work Area > Enter), the CustomizeAttributes area of the Data Class editor contains the following code (as shown in thescreenshot below).
[PXDBLocalizableString(255, IsUnicode = true)][PXRemoveBaseAttribute(typeof(PXDBStringAttribute))]
Figure: Providing multi-language support for the Description field of the Sales Orders form
To Provide Multi-Language Support for an Original Field on the Graph Level
To provide multi-language support for a field used on a single form, you should customizethe original attributes of the field in the graph extension. To do this, perform the followingactions:

| Customizing Business Logic | 354
1. Create the code template, which includes the original attributes of the field and theDACName_FieldPropertyName_CacheAttached() event handler, which replaces theattributes within the graph, as described in To Customize a Field on the Graph Level.
2. By using the Code editor, replace the original attributes in the template, as shown in thefollowing code snippet.
[PXMergeAttributes(Method = MergeMethod.Merge)][PXDBLocalizableString(255, IsUnicode = true)]protected void DACName_FieldPropertyName_CacheAttached(PXCache cache){}
3. Click Save on the editor toolbar to save the changes to the customization project.
To Provide Multi-Language Support for a Custom Field
If you need to create a custom text box with multi-language support, first you create acustom field with the PXDBString attribute. Then in the DAC, you replace this attributename with PXDBLocalizableString.
Graph
A business logic controller (BLC, also referred as graph) is used to provide the business logicfor an Acumatica ERP form. A graph instance is created when a data request occurs anddiscarded after the request is processed.
With Acumatica Framework, the application programmer is restricted from direct databaseaccess and from writing SQL queries. Database specifics are hidden for the applicationbehind data access classes, and the SQL queries are constructed declaratively throughBusiness Query Language (BQL). Through a set of generic classes, the BQL library providesa rich syntax for building the equivalents of SQL queries of any complexity. Unlike SQLstatements, BQL statements operate with data access classes, rather than database tables,and provide compatibility between different database engines. The BQL library supportsMS SQL and MySQL database engines, as well as access to the database through the ODBCprovider.
Each graph contains the Caches collection of cache objects and the Views collection of dataview objects. The framework handles these objects automatically; you don't have to initializeand control them. A PXView data view object contains two main parts:
• The BQL command, which is defined by the type of the data view
• The optional delegate, which constructs the data set that is returned instead of the BQLcommand's execution result
PXView objects, like graphs, are initialized and destructed on each round trip.
The order in which data views are defined in a graph is important, because it definesthe order of saving data to the database. (This order, however doesn't define the

| Customizing Business Logic | 355
order in which data views are executed.) The data view that you specify in thePrimaryView property should always be defined first in the graph.
If a BQL statement of a data view refers to multiple data access classes (DACs), the dataview creates the PXCache object for each DAC to keep appropriate data records, as shown inthe following diagram.
Figure: Example of two data views working with the records of three DACsIf multiple data views contain a reference to the same DAC, for this DAC, the graph cachecontains a single PXCache object that is used by the data views.
On a webpage, you bind each container to a data view that provides data for the container.To bind a container and a data view, you specify the data view name in the DataMemberproperty of the container in the ASPX code. When a webpage requests data, the systeminvokes the ExecuteSelect() method of the graph with the data view name passed as anargument to execute every data view bound to the containers of the webpage. Note thatdata views that aren't bound to a container are not executed by a request from the UI.
When a data record is modified on the page, the framework invokes the ExecuteInsert(),ExecuteUpdate(), or ExecuteDelete() method of the graph, passing the name of thedata view as an argument. The graph gets the data view by its name and invokes thecorresponding method of the data view.
You shouldn't use the ExecuteSelect(), ExecuteInsert(), ExecuteUpdate(), andExecuteDelete() methods for purposes other than debugging.
You use the Customization Tools of the Acumatica Customization Platform to create a customgraph and to create new members and override existing ones in an existing graph.

| Customizing Business Logic | 356
For detailed information on creating a custom graph and customizing an existing graph, seethe following topics:
• To Start the Customization of a Graph
• To Create a Custom Graph
• To Add a New Member
• To Add an Action
• To Add an Event Handler
• To Override an Event Handler
• To Override a Virtual Method
To Start the Customization of a Graph
You can create the class extension for an existing business logic controller (BLC) and add theCode item with the created code to a customization project in several ways, as described inthe following sections:
• To Add a Code Item by Using the Element Inspector
• To Add a Code Item by Using the Layout Editor
• To Add a Code Item on the Code page
If you need to extend the code of a BLC that has no webpage associated (such asARReleaseProcess), follow the instructions described in To Add a Code Item on the Code page.
As soon as you add the Code item for customization of the business logic to the project,the system generates an extension class for it and opens the code in the Code Editor. Youcan work with the extension classes in the Code Editor. After you publish the customizationproject, you can develop the code in MS Visual Studio.
To Add a Code Item by Using the Element Inspector
Typically, you want to modify the business logic that is executed for a certain form ofAcumatica ERP.
To add a Code item for customization of the business logic for an existing form to acustomization project by using the Element Inspector, perform the following actions:
1. Open the form in the browser.
2. On the form title bar, click Customization > Inspect Element to launch the ElementInspector.
3. On the form, select any UI element to open the Element Properties Dialog Box for theelement.

| Customizing Business Logic | 357
The Business Logic box of the dialog box displays the name of the business logiccontroller that provides business logic for the form, as shown in the screenshot below.
4. In the dialog box, click Actions > Customize Business Logic.
Figure: Using the Element Properties dialog box to customize the business logic for the form
5. If there is no currently selected customization project and the inspector opens the SelectCustomization Project Dialog Box, select an existing customization project or to create a newone.
The platform creates the template of the class that is derived from the PXGraphExtension<>class, saves the code as a Code item of the project in the database, and opens the item inthe Code Editor, as shown in the following screenshot.

| Customizing Business Logic | 358
Figure: Viewing the created code template in the Code Editor
To Add a Code Item by Using the Layout Editor
Often, you start a customization of an Acumatica ERP form in the Screen Editor and you laterwant to modify the business logic for this form. To customize the business logic of the form,you can add a Code item to a customization project from the Layout Editor.
To do this, perform the following action:
1. On the toolbar of the Layout Editor, click Actions > Customize Business Logic, as thefollowing screenshot shows.

| Customizing Business Logic | 359
Figure: Starting the customization of the business logic from the Layout Editor
The platform creates the template of the class that is derived from the PXGraphExtension<>class, saves the code as a Code item of the project in the database, and opens the item inthe Code Editor.
To Add a Code Item on the Code page
If you know the name of the business logic controller to be customized, you can create aCode item with the graph extension template on the Code page of the Customization ProjectEditor by using the Create Code File dialog box.
To do this, perform the following actions:
1. Open the customization project in the editor. (See To Open a Project for details.)
2. Click Code in the navigation pane to open the Code page.
3. Click Add New Record (+) on the page toolbar.
4. In the Create Code File dialog box, which opens, select Graph Extension in the FileTemplate box, as the screenshot below shows.
5. In the Base Graph box, select the class name of the business logic controller to becustomized.
6. Click OK.

| Customizing Business Logic | 360
Figure: Adding a Code item with the graph extension to the project
The platform creates the template of the class that is derived from the PXGraphExtension<>class, saves the code as a Code item of the project in the database, and opens the item inthe Code Editor.
To Create a Custom Graph
You can add a custom business logic controller to a customization project on the Code pageof the Customization Project Editor.
To do this, perform the following actions:
1. Open the customization project in the editor. (See To Open a Project for details.)
2. Select Code in the navigation pane to open the Code page.
3. Click Add New Record (+) on the page toolbar.
4. In the Create Code File dialog box, which opens, select New Graph in the FileTemplate box, as the screenshot below shows.
5. In the Class Name box, specify the class name of the business logic controller to becreated.
6. Click OK.

| Customizing Business Logic | 361
Figure: Adding a Code item for a custom graph to the projectThe platform creates the code template of the class derived from the PXGraph<> class, savesthe code as a Code item of the project in the database, and opens the item in the CodeEditor.
To Add a New Member
You can add a new member (such as a variable, data view, or method) to a custom graph orto an extension for a graph in Acumatica ERP.
Initially, the code of a custom graph or an extension for an existing graph is saved in theappropriate Code item of the customization project. If the project has not been published,you can use only the Code Editor to add a new member to the graph code.
After the customization project has been published, the code is also saved in thecorresponding C# file in the App_RuntimeCode folder of the website. (See Changes in theApplication Code (C#) for details.) You can open the file in Microsoft Visual Studio and useVisual Studio to add a new member to the graph code. To do this, perform the followingactions:
1. In Visual Studio, click File > Open > Web Site, and select your Acumatica ERPdevelopment environment.
2. Open the App_RuntimeCode\<CodeItemName>.cs file.
3. In the code, add the needed class member.
4. Save the file.
5. In the Customization Project Editor, select the Files node in the navigation pane.
6. On the Custom Files page, which opens, click Detect Modified Files on the pagetoolbar.
The customization platform compares the content of each file added to thesite with the content of the associated item of the customization project in thedatabase. If a difference is detected, the platform opens the Modified FilesDetected dialog box so you can resolve the detected conflicts. You can eitherupdate the customization project in the database or discard the file changes in thefile system to resolve the conflicts.
7. In the Modified Files Detected dialog box, which opens, ensure that the modified codefile is selected.

| Customizing Business Logic | 362
8. Click Update Customization Project on the dialog box toolbar to update the Code itemthat is saved in the database.
If the graph code is included in an extension library whose binary file is added to thecustomization project as a File item, you can use Visual Studio to add a new member to thegraph code in the library solution. (See Extension Library for details.) If you make changes tothe extension library file in the file system, you have to update the appropriate File item inthe customization project. See To Update a File Item in a Project for details.
To Add an Action
To add a new action to the toolbar of an original form of Acumatica ERP, you have to addto the appropriate graph extension the action declaration, toolbar button declaration, andaction delegate method. (See To Start the Customization of a Graph for details.)
To add a new action to the toolbar of a custom form, you have to add the action code to theappropriate custom graph. (See To Create a Custom Form Template and To Create a Custom Graphfor details.)
You can also add an action in the Screen Editor. For details, see To Add an Action.
You can use the Code Editor to add an action template to the graph extension or customgraph that is saved in a customization project as a Code item and currently opened in theeditor. To do this, perform the following actions:
1. Click the New Action button of the Code Editor to open the Create Action dialog box.
2. In the dialog box, specify the name of the action delegate method in the Action Namebox and the name of the action button in the Display Name box, as shown in thefollowing screenshot.
Figure: Opening the New Action dialog box
3. Click OK to create the action template and add it to the item.

| Customizing Business Logic | 363
The system adds to the code a template of the action declaration that includes the followingclass members:
• The declaration of the action delegate method
• The declaration of the button attributes to add the button to the form toolbar with thespecified name
• The template of the action delegate method
The following example shows the template code for an action.
public PXAction<DACName> myActionDelegateMethod;
[PXButton(CommitChanges = true)][PXUIField(DisplayName = "MyActionButtonName")]protected void MyActionDelegateMethod(){ // the body of the action delegate method}
If the code of a graph extension or custom graph is moved to an extension library whosebinary file is added to the customization project as a File item, you should develop the actioncode from scratch by using Visual Studio. If you make changes to the extension library filein the file system, you have to update the appropriate File item in the customization project.See To Update a File Item in a Project for details.
To Add an Event Handler
If you customize a form, you may need to provide additional business logic for processing acontrol value immediately after the value is changed.
To implement business logic for data changed by the user on an original form, you shouldadd event handlers for data fields (or data records) to the extension of the graph thatprovides business logic for the form.
To process data modification on a custom form, you should add event handlers for data fields(or data records) to the appropriate custom graph.
You can use the Screen Editor to add to the appropriate customization code a workabletemplate of an event handler for a data field (or data record) that can be modified on aform. To do this, perform the following actions:
1. Open the form in the browser and make the control for the field visible on the form.
2. On the form title bar, click Customization > Inspect Element to launch the ElementInspector.

| Customizing Business Logic | 364
If you need to activate the Element Inspector for a pop-up panel, dialog box, oranother UI element that opens in modal mode and makes the Customization Menuunavailable for selection, you can press Control-Alt.
3. On the form, click the control to open the Element Properties dialog box for the control.
4. In the dialog box, click Actions > Customize.
5. If there is no currently selected customization project and the inspector opens the SelectCustomization Project Dialog Box, select an existing customization project or create a newone. (See To Create a New Project and To Select an Existing Project for details.)
If the customization project does not contain a changeset for the form, the CustomizationProject Editor adds to the project a Page item for the form, to keep the changeset to theASPX code of the form in the database. The container of the control is opened in theScreen Editor, and the control is selected in the Control Tree of the editor.
6. Select the node of the control in the Control Tree.
7. Click the Layout Properties tab item to open the list of properties for the control.
8. In the list, set the CommitChange property to True. (For detailed information about theproperty, see Use of the CommitChanges Property of Boxes in the Acumatica FrameworkGuide.)
9. Click Save to save your changes in the customization project.
10.Click the Events tab item to open the list of available event types for the control.
11.In the list, click the type of the event that you want to process for the field to highlightthe type, as shown in the screenshot below.
12.On the list toolbar, click Add Handler > Keep Base Method.

| Customizing Business Logic | 365
Figure: Adding an event handler for a data fieldIf there is no extension for the graph that provides business logic for the form in thecustomization project, the Acumatica Customization Platform creates a template for theextension and saves it as a Code item in the database. Then the platform adds to the graphextension a template for the event handler highlighted in the list and opens the Code item inthe Code Editor, as shown in the following screenshot.
Figure: Viewing the event handler templateIn the template, the event handler has two parameters, as is defined in the base graph. As aresult, the event handler is added to the appropriate event handler collection.
When you publish the customization project, the platform saves the graph extension as a C#source code file in the App_RuntimeCode folder of the website. You can later develop theevent handler in Microsoft Visual Studio. (See Integrating the Project Editor with Microsoft VisualStudio for details.)

| Customizing Business Logic | 366
To Override an Event Handler
If you customize a form, you may need to override the business logic that processes acontrol value immediately after the value is changed.
To implement business logic for data changed by the user on an original form, you shouldadd event handlers for data fields (or data records) to the extension of the graph thatprovides business logic for the form.
To process data modification on a custom form, you should add event handlers for data fields(or data records) to the appropriate custom graph.
You can use the Screen Editor to add to the appropriate customization code a workabletemplate of an event handler that overrides the base event handler for a data field (or datarecord). To do this, perform the following actions:
1. Open the form in the browser and make the control for the field visible on the form.
2. On the form title bar, click Customization > Inspect Element to launch the ElementInspector.
If you need to activate the Element Inspector for a pop-up panel, dialog box, orother UI element that opens in modal mode and makes the Customization Menuunavailable for selection, you can press Control-Alt.
3. On the form, click the control to open the Element Properties dialog box for the control.
4. In the dialog box, click Actions > Customize.
5. If there is no currently selected customization project and the inspector opens the SelectCustomization Project Dialog Box, elect an existing customization project or create a newone. (See To Create a New Project and To Select an Existing Project for details.)
If the customization project does not contain a changeset for the form, the CustomizationProject Editor adds a Page item for the form to the project, to keep the changeset to theASPX code of the form in the database. The container of the control is opened in theScreen Editor, and the control is selected in the Control Tree of the editor.
6. Select the node of the control in the Control Tree.
7. Click the Layout Properties tab item to open the list of properties for the control.
8. In the list, ensure that the CommitChange property is set to True. (For detailedinformation about the property, see Use of the CommitChanges Property of Boxes in theAcumatica Framework Guide.)
9. Click Save to save your changes in the customization project.
10.Click the Events tab item to open the list of available event types for the control.
11.In the list, click the type of the event that you want to process for the field to highlightthe type, as shown in the screenshot below.

| Customizing Business Logic | 367
12.On the list toolbar, click Add Handler > Override Base Method.
Figure: Adding an event handler for a data fieldIf there is no extension for the graph that provides business logic for the form in thecustomization project, the Acumatica Customization Platform creates a template for theextension and saves it as a Code item in the database. Then the platform adds to the graphextension a template for the event handler highlighted in the list and opens the Code item inthe Code Editor, as shown in the following screenshot.
Figure: Viewing the event handler templateIn the template, the event handler has an additional parameter to replace the base eventhandler collection of the graph.
When you publish the customization project, the platform saves the graph extension as a C#source code file in the App_RuntimeCode folder of the website. You can later develop theevent handler in Microsoft Visual Studio. (See Integrating the Project Editor with Microsoft VisualStudio for details.)

| Customizing Business Logic | 368
To Override a Virtual Method
In a graph extension, you can override the virtual methods defined within the base graph. Aswith the event handlers, you have two options:
• You can define the override method with exactly the same signature—that is, thereturn value, the name of the method, and all method parameters—as the overriddenbase virtual method has. As a result, the method is added to the queue of all overridemethods. When the system invokes the base method, all methods in the queue areexecuted sequentially, from the first one to the last one. The lower the level of the graphextension, the earlier the system invokes the override method.
• You can define the override method with an additional parameter, which represents thedelegate for one of the following:
• The override method with an additional parameter from the extension of the previouslevel, if such a method exists
• The base virtual method, if no override methods with additional parameters declaredwithin lower-level extensions exist
In both cases, you should attach the PXOverride attribute to the override method declaredwithin the BLC extension, as described in the following sections below:
• Override Method That Is Added to the Override Method Queue
• Override Method That Replaces the Original Method
Override Method That Is Added to the Override Method Queue
By declaring an override method with exactly the same signature as the overridden basevirtual method has, you extend the base method execution. The base BLC method isreplaced at run time with the queue of methods, which starts with the base BLC method.When the system invokes the base method, all methods in the queue are executedsequentially, from the first one to the last one. The lower the level the BLC extension has,the earlier the system invokes the override method. If the system has invoked the basemethod, you have no option to prevent the override method queue from execution. Toprevent the base method executions, see the Override Method That Replaces the Original Methodsection below.
To add an override method that is added to the override method queue, perform thefollowing actions:
1. Create the graph extension, as described in To Start the Customization of a Graph.
2. In the Code Editor, click View Source to view the code of the base graph in the SourceCode Browser.

| Customizing Business Logic | 369
In an instance of Acumatica ERP, a repository with the original C# source code ofthe application is kept in the \App_Data\CodeRepository folder of the website.
3. In the browser, select and copy the code of the method.
4. In the Code Editor, paste the method code in the graph extension.
5. In the graph extension, insert the PXOverride attribute immediately before the methodsignature.
6. Clear the method body.
7. Develop the code of the method.
8. Click Save in Code Editor to save your changes.
Override Method That Replaces the Original Method
The override method with an additional parameter replaces the base BLC virtual method.When the virtual method is invoked, the system invokes the override method with anadditional parameter of the highest-level BLC extension. The system passes a link to theoverride method with an additional parameter from the extension of the previous level, ifsuch a method exists, or to the base virtual method.
You use a delegate as an additional parameter to encapsulate the method with exactly thesame signature as the base virtual method. If the base virtual method contains a list ofparameters, then you should not use the same list of parameters when you declare theoverride method with an additional parameter. To declare a MyMethod override method withan additional parameter within a BLC extension, you can use the following example.
public class BaseBLCExt : PXGraphExtension<BaseBLC>{ public delegate ReturnType MyMethodDelegate([List of Parameters]); [PXOverride] public ReturnType MyMethod([List of Parameters,] MyMethodDelegate baseMethod) { return baseMethod(adapter); }}
You can decide whether to call the method pointed to by the delegate. By invoking the basemethod, you also start the execution of the override method queue.
To add an override method that replaces the base BLC virtual method, perform the followingactions:
1. Create the graph extension, as described in To Start the Customization of a Graph.
2. In the Code Editor, click Override Method, as shown in the screenshot below.

| Customizing Business Logic | 370
3. In the Selected column of the Select Methods to Override dialog box, which opens,select the method to be overridden.
4. Click Save to add the code template for the override method to the graph extension.
Figure: Selecting a method to be overriddenOnce the override method template has been created (see the following screenshot), youcan implement the needed code within the template.

| Customizing Business Logic | 371
Figure: Viewing the override method template in the Code Editor
When you publish the customization project, the platform saves the graph extension as a C#source code file in the App_RuntimeCode folder of the website. You can later develop theevent handler in Microsoft Visual Studio. (See Integrating the Project Editor with Microsoft VisualStudio for details.)
Data View
In a business logic controller (BLC, also referred to as graph), a data view is a PXView objectthat is used to access and manipulate data. In an ASPX page, to obtain data for controls,each container has to be bound to a data view of the BLC that is bound to the PXDataSourcecontrol of the page.
A data view object contains two main parts:
• The BQL command, which is defined by the type of the data view
• The optional delegate, which constructs the data set that is returned instead of the resultof the execution of the BQL command
In a graph extension, you can include the following member types:

| Customizing Business Logic | 372
• Declaration of a custom data view
• Redefinition for an existing data view
• Declaration of the delegate for an existing data view
• An override method for an existing data view delegate
To declare a custom data view in a graph extension, you can follow the instructionsdescribed in To Add a New Member.
For detailed information on customizing a data view, see the following topics:
• To Override a Data View
• To Add a Data View Delegate
• To Override a Data View Delegate
To Override a Data View
To modify a data view, you have to redefine the data view in the graph extension class. Thedata view redefined within a BLC extension completely replaces the base data view withinthe Views collection of a graph instance, including all attributes attached to the data viewdeclared within the base graph. You can either attach the same set of attributes to the dataview or completely redeclare the attributes. For details, see Graph Extensions. The data viewmust have exactly the same identifier, which is referred to in the appropriate container in theASPX page.
To redefine a data view in the graph extension, perform the following actions:
1. Create the graph extension, as described in To Start the Customization of a Graph, ifrequired.
2. In the Code Editor, click View Source to view the code of the base graph in the SourceCode Browser.
In an instance of Acumatica ERP, a repository with the original C# source code ofthe application is kept in the \App_Data\CodeRepository folder of the website.
3. In the browser, select and copy the data view declaration.
4. In the Code Editor, paste the data view declaration in the graph extension.
5. In the graph extension, redefine the data view declaration as required.
6. Click Save in the Code Editor to save your changes.

| Customizing Business Logic | 373
To Add a Data View Delegate
By default, when a data view object is requested by the UI or you invoke the Select()method on the object, the system executes the query specified in the data view declaration.However you can define a dynamic query, which is an optional graph method (called thedata view delegate) that is executed when the data view is requested. If no dynamic queryis defined in the graph, Acumatica Framework executes the BQL statement from the dataview declaration.
You can use the data view delegate in the following cases:
• If you construct the query dynamically at run time by adding Where<> and Join<>clauses depending on some condition, typically a filter
• If the query retrieves data fields that cannot be calculated declaratively by attributes—forinstance, if you retrieve values aggregated by calculated data fields
• If the result set has data records that aren't retrieved from the database and arecomposed dynamically in code
In a graph extension, to define the delegate for a data view, you should redeclare the dataview and add a method that has the same name as the data view but uses a differentcase of the first letter (for example, if the data view name is MyDataView, the name of thedelegate must be myDataView). The delegate returns an IEnumerable object, as shown inthe code below.
// The delegate for the MyDataView data viewprotected virtual IEnumerable myDataView(){ // The code to be used to construct the query dynamically at run time, execute // the query, and return the list of retrieved records}
When you declare or alter a data view delegate within a graph extension, the newdelegate is attached to the corresponding data view. To query a data view declaredwithin the base graph or lower-level extension from the data view delegate, youshould redeclare the data view within the graph extension. You do not need toredeclare a generic PXSelect<Table> data member in the graph extension when itwill not be used from the data view delegate. For details, see Graph Extensions.
You can add a data view delegate to a custom graph or to an extension for an existinggraph, which is saved in the appropriate Code item of the customization project. See ToCreate a Custom Graph and To Start the Customization of a Graph for details.
If the project has not been published, you can use only the Code Editor to add a new memberto the graph code.
After the customization project has been published, the code is also saved in thecorresponding C# file in the App_RuntimeCode folder of the website. (See Changes inthe Application Code (C#) for details.) You can open the file in Microsoft Visual Studio anduse Visual Studio to add a data view delegate to the graph code. To do this, perform thefollowing actions:

| Customizing Business Logic | 374
1. In Visual Studio, click File > Open > Web Site, and select your Acumatica ERPdevelopment environment.
2. Open the App_RuntimeCode\<CodeItemName>.cs file.
3. In the code, develop the delegate for the data view.
An example of implementation of a data view delegate for a custom graph isdescribed in Step 11.7 of the T300 Acumatica Customization Platform course. SeeDeclaring or Altering a BLC Data View Delegate for an example of a data view delegatefor a graph extension.
4. Debug the code by using Visual Studio, as described in To Debug the Customization Code.
5. Save the file.
6. In the Customization Project Editor, select the Files node in the navigation pane.
7. On the Custom Files page, which opens, click Detect Modified Files on the pagetoolbar.
The customization platform compares the content of each file added to thesite with the content of the associated item of the customization project in thedatabase. If a difference is detected, the platform opens the Modified FilesDetected dialog box so you can resolve the detected conflicts. You can eitherupdate the customization project in the database or discard the file changes in thefile system to resolve the conflicts.
8. In the Modified Files Detected dialog box, which opens, ensure that the modified codefile is selected.
9. Click Update Customization Project on the dialog box toolbar to update the Code itemthat is saved in the database.
To Override a Data View Delegate
You can modify the data view delegate—that is, the method that is invoked when the recordsare retrieved through the data view. To do this, perform the following actions:
1. Create the graph extension, as described in To Start the Customization of a Graph, ifrequired.
2. In the Code Editor, click View Source to view the code of the base graph in the SourceCode Browser.
In an instance of Acumatica ERP, a repository with the original C# source code ofthe application is kept in the \App_Data\CodeRepository folder of the website.
3. In the browser, select and copy the data view declaration and the data view delegate.

| Customizing Business Logic | 375
The override data view delegate must have exactly the same signature—thereturn value, the name of the method, and any method parameters—as the basedata view delegate.
4. In the Code Editor, paste the code in the graph extension.
When you declare or alter a data view delegate within a graph extension, thenew delegate is attached to the corresponding data view. To query a data viewdeclared within the base graph or a lower-level extension from the data viewdelegate, you should redeclare the data view within the graph extension. Youdo not need to redeclare a generic PXSelect<Table> data member in the graphextension when it will not be used from the data view delegate. For details, seeGraph Extensions.
5. In the graph extension, rewrite the data view delegate code as you need to.
6. Click Save in the Code Editor to save your changes.
Action
An action is a graph member of the PXAction type. An action always has the delegatedefined. Every action is represented by the PXAction object and placed in the Actionscollection of the appropriate graph. To construct an instance of the PXAction class, youuse a graph member of the PXAction type and a delegate from the highest-level extensiondiscovered.
To modify the business logic of an action that is defined within a graph, you should overridethe action delegate.
To rename, disable, or hide an action button, you should override the action attributes.
The redefined action delegate must have exactly the same signature—that is, the returnvalue, the name of the method, and any method parameters—as the base action delegatehas. You always have to redefine the action delegate to alter either its delegate or theattributes attached to the action. To use the action declared within the base graphor a lower-level extension from the action delegate, you should redefine the genericPXAction<TNode> data member within the graph extension. You do not need to redefinethe data member when it is not meant to be used from the action delegate. For details, seeGraph Extensions. When you redefine an action delegate, you have to repeat the attributesattached to the action. Every action delegate must have PXButtonAttribute (or the derivedattribute) and PXUIFieldAttribute attached.
For detailed information on customizing an action, see the following topics:
• To Start the Customization of an Action
• To Override an Action Delegate Method
• To Rename an Action Button
• To Disable or Enable an Action

| Customizing Business Logic | 376
• To Hide or Show an Action
Related Links
• Customization of an Action
• Action Attributes
• PXButtonAttribute Class
• PXUIFieldAttribute Class
• To Add an Action
To Start the Customization of an Action
If you need to customize an action represented by a button on a form, perform the followingactions:
1. To find the declaration of the action, do the following:
a. Open the form in the browser, and make the button visible on the form (if it isn'twhen the form is brought up).
b. On the form title bar, click Customization > Inspect Element to launch the ElementInspector.
c. On the form, click the button to open the Element Properties dialog box for the button.
If the action command is a part of an action menu, open the menu to displaythe command and use the keyboard shortcut Ctrl+Alt+Click to inspect theaction item in the menu, as shown in the following screenshot.

| Customizing Business Logic | 377
Figure: Displaying the action name in the Element Properties dialog box
d. In the dialog box, click Actions > View Business Logic Source to open the sourcecode of the graph whose name is displayed in the Business Logic box of the ElementProperties dialog box.
In an instance of Acumatica ERP, the repository with the original C# sourcecode of the application is kept in the \App_Data\CodeRepository folder ofthe website.
e. In the Methods list of the Source Code browser, which opens for the graph, search forand click the action name to display the action delegate method in the work area ofthe browser, as the following screenshot shows.

| Customizing Business Logic | 378
Figure: Viewing the action delegate method in the Source Code browser
f. If the search fails, try to find the action declaration in the base class of the graph.
If the button has an unique name, you can also find the action declaration in theSource Code Browser, as described in To Find Source Code by a Fragment, by usingthe button name as a code fragment.
2. Explore the action declaration in the source code of the original graph.
3. Select and copy the action declaration.
4. Create an extension for the graph, as described in To Start the Customization of a Graph, ifneeded.
5. In the graph extension, paste the action declaration and develop the needed code tochange the behavior and appearance of the action.
To Override an Action Delegate Method
With the technology based on extension models, an action from base graph is alwayscompletely replaced by the identically named action declared within a graph extension.
To override an action delegate method in a graph extension, you should declare both thegraph member of the PXAction type and the delegate. You should attach a new set of

| Customizing Business Logic | 379
attributes to the action delegate declared within the graph extension. Also, you need toinvoke the Press() method on the base graph action. Because you have redeclared themember of PXAction, you have prevented the action delegate execution from infinite loops.
If you have a customization that replaces an original action declaration statically, afteryou upgrade Acumatica ERP to a new version, new functionality of the action maybecame unavailable.
Do the following to override an action delegate method:
1. Explore the original action declaration and copy the declaration to the graph extension,as described in To Start the Customization of an Action.
We recommend that you not remove or change any attributes of the action.
2. In the action declaration, replace the action delegate with the following code template.
public virtual IEnumerable myAction(PXAdapter adapter){ return Base.MyAction.Press(adapter);;}#endregion
3. In the code template, replace myAction and MyAction with the appropriate names.
4. In the template, redefine the action delegate arguments and return type based on thesignature of the base action delegate.
5. Implement the needed code in the override action delegate.
6. Click Save in the Code Editor to save your changes.
To Rename an Action Button
To rename an action button, you should redefine the DisplayName parameter of thePXUIField attribute for the button.
You can change attributes of an action button in one of the following ways:
• Dynamically at run time, in the Initialize() method of the graph extension
• Statically, by overriding the action attributes in the graph extension
To Rename an Action Button Dynamically at Run Time
1. Explore the original action declaration, as described in To Start the Customization of an Actionbut without copying the declaration to the graph extension.
2. In the graph extension, add the following code.
#region Extended initialization

| Customizing Business Logic | 380
public override void Initialize(){ base.Initialize(); Base.MyAction.SetCaption("NEW NAME");}#endregion
3. In the added code, replace MyAction with the action name and specify the neededbutton name.
4. Click Save in Code Editor to save the changes.
To Rename an Action Button Statically
To override action attributes in a graph extension statically, you should declare both thegraph member of the PXAction type and the delegate. You should attach a new set ofattributes to the action delegate, declared within the graph extension. Also, you need toinvoke the Press() method on the base graph action. Because you have redeclared themember of PXAction, you have prevented the action delegate execution from infinite loops.
If you have a customization that replaces an original action declaration statically, afteryou upgrade Acumatica ERP to a new version, the new functionality of the action maybecame unavailable.
To rename an action button statically, perform the following actions:
1. Explore the original action declaration, and copy the declaration to the graph extension,as described in To Start the Customization of an Action.
2. In the action declaration, specify the required name for the action button in thePXUIField attribute, as the following code snippet shows.
...[PXUIField(DisplayName = "NEW NAME", ...)]...
We recommend that you not remove or change other attributes of the action.
3. Replace the action delegate with the following code template.
public virtual IEnumerable myAction(PXAdapter adapter){ return Base.MyAction.Press(adapter);;}#endregion
4. In the code template, replace myAction and MyAction with the appropriate names.
5. In the template, redefine the action delegate arguments and return type based on thesignature of the base action delegate.

| Customizing Business Logic | 381
6. Click Save in the Code Editor to save your changes.
To Disable or Enable an Action
To disable or enable an action button, you can redefine the Enabled parameter of thePXUIField attribute for the button. However we recommend that you change the attributedynamically at run time in the Initialize() method of the graph extension.
If you have a customization that replaces an original action declaration statically, afteryou upgrade Acumatica ERP to a new version, any new functionality of the action maybecame unavailable.
To disable or enable an action button, do the following:
1. Explore the original action declaration, as described in To Start the Customization of an Actionbut without copying the declaration to the graph extension.
2. In the graph extension, add the following code.
#region Extended initialization
public override void Initialize(){ base.Initialize(); Base.MyAction.SetEnabled(false);}#endregion
To enable the action button, use true instead of false for the SetEnabled methodcall.
3. In the added code, replace MyAction with the action name.
4. Click Save in the Code Editor to save your changes.
To Hide or Show an Action
To hide or show an action button, you should redefine the Visible parameter of thePXUIField attribute for the button.
You can change attributes of an action button by using one of the following approaches:
• Dynamically at run time, in the Initialize() method of the graph extension
• Statically, by overriding the action attributes in the graph extension
• Statically, by changing visibility of the button in the ASPX code

| Customizing Business Logic | 382
To Hide or Show an Action Button at Run Time
1. Explore the original action declaration, as described in To Start the Customization of an Actionbut without copying the declaration to the graph extension.
2. In the graph extension, add the following code.
#region Extended initialization
public override void Initialize(){ base.Initialize(); Base.MyAction.SetVisible(false);}#endregion
To show the action button, use true instead of false for the SetVisible methodcall.
3. In the added code, replace MyAction with the action name.
4. Click Save in the Code Editor to save your changes.
To Hide or Show an Action Button Statically
To override action attributes in a graph extension statically, you should declare both thegraph member of the PXAction type and the delegate. You should attach a new set ofattributes to the action delegate declared within the graph extension. Also, you need toinvoke the Press() method on the base graph action. Because you have redeclared themember of PXAction, you prevent the action delegate execution from infinite loops.
If you have a customization that replaces an original action declaration statically, afteryou upgrade Acumatica ERP to a new version, any new functionality of the action maybecame unavailable.
To hide or show the action button, perform the following actions:
1. Explore the original action declaration and copy the declaration to the graph extension,as described in To Start the Customization of an Action.
2. In the action declaration, set the Visible parameter of the PXUIField attribute to false,as the following code snippet shows.
To show the action button, set the Visible parameter to true.
...[PXUIField(…, Visible = false)]...

| Customizing Business Logic | 383
We recommend that you not remove or change other attributes of the action.
3. Replace the action delegate with the following code template.
public virtual IEnumerable myAction(PXAdapter adapter){ return Base.MyAction.Press(adapter);}
4. In the code template, replace myAction and MyAction with the appropriate names.
5. In the template, redefine the action delegate arguments and return type based on thesignature of the base action delegate.
6. Click Save in the Code Editor to save your changes.
To Hide or Show an Action Button in the ASPX Code
If a callback command for the button is declared in the PXDataSource control, you can hidethe button by customizing the ASPX code. To do this, perform the following actions:
1. Open the form in the browser and make the button visible on the form.
2. On the form title bar, click Customization > Inspect Element to launch the ElementInspector.
3. On the form, click the button to open the Element Properties dialog box for the button.
If the button is a part of an action menu, inspect the menu button instead of thebutton.
4. In the dialog box, click Customize.
5. If there is no currently selected customization project and the inspector opens the SelectCustomization Project Dialog Box, select an existing customization project or create a newone.
If there is no a Page item for the form in the customization project, the AcumaticaCustomization Platform creates such item, adds the item to the project, and opens theform in the Screen Editor.
6. In the Control Tree of the editor, click the arrow left of the PXDataSource node to expandit.
7. Select the PXDSCallbackCommand element with the button name.
8. Click the Layout Properties tab item to open the list of properties for the callback.
9. Set the Visible property of the element to False to hide the button.

| Customizing Business Logic | 384
To show the button, set Visible property to True.
10.Click Save to save your changes to the customization project.

| Customizing the Database Schema | 385
Customizing the Database SchemaYou can use the platform to customize the database of an Acumatica ERP instance. Thedatabase customization can include changes in both the data and the schema of thedatabase.
To change the database schema, you can add to a customization project the followingscripts:
• A script to create a custom table
• A script to create a custom column in an existing table
• A script to create an extension table for an existing table
• A custom script
When you publish a customization project with a database script, which changes thedatabase schema, the script is executed. Changes to the database schema aren't deletedwhen you unpublish the project or delete the script and publish the project once more. Youhave to remove the changes to the database schema manually.
For detailed information on creating custom database scripts and adding the scripts to acustomization project, see the following topics:
• To Create a Custom Table
• To Create a Custom Column in an Existing Table
• To Create an Extension Table
• To Add a Custom SQL Script to a Customization Project
Related Links
• Changes in the Database Schema
• SQL Script Editor
• Creating a Custom SQL Script
• Using the SQL Script Attributes
• Writing Custom SQL Scripts for Interpretation
To Create a Custom Table
You use the Database Scripts page of the Customization Project Editor to add a custom tableto a customization project. You can add a custom table to a project by adding the tableschema or by adding a custom SQL script.

| Customizing the Database Schema | 386
Adding the table schema is the optimal way of adding custom tables to the project. Whenyou publish the customization project, the platform executes each SQL script of the projectto update the database. If an Sql item contains a custom database table definition, toupdate the database with the table schema, the Acumatica Customization Platform checkswhether a table with this name already exists in the database. If the table exists, theplatform generates SQL statements to alter the existing table so that it matches the schema.The platform doesn't drop the existing table, and it keeps any data in it. This helps to deploya newer version of the customization project to a system that is already in use. If the tabledoesn't exist, the platform generates SQL statements to create the table. SQL statementsare generated in the SQL dialect of the database management system. Therefore, if you addcustom tables to the project by adding the table schema, you keep the customization projectindependent from the database management system that hosts the database of AcumaticaERP.
Alternatively, you can add custom tables by adding a custom SQL script that creates thetable in the project, as described in To Add a Custom SQL Script to a Project.
The creation or modification of the System tables is forbidden. A customizationproject containing such changes will not pass validation tests. For details on theSystem tables, see System and Application Tables.
To Add a Custom Table to a Customization Project
1. Create the needed table in the database by using a database administration tool, such asSQL Server Management Studio.
You have to use a naming convention that provides unique names for your customtables so that they do not have the names of existing tables of Acumatica ERP.
2. Open the customization project in the Customization Project Editor. (See To Open a Projectfor details.)
3. Click Database Scripts in the navigation pane to open the Database Scripts page.
4. On the page toolbar, click Add > Custom Table Schema.
5. In the Add Custom Table Schema dialog box, which opens, select the custom table inthe Table box and click OK.
Acumatica Customization Platform generates the table schema and adds the schema tothe customization project as an Sql item.
Below is an example of the Sql item that contains the table schema of the custom tableRBProduct.
<Sql TableName="RBProduct" TableSchemaXml="#CDATA"> <CDATA name="TableSchemaXml"><
| Customizing the Database Schema | 387
<col name="UnitPrice" type="Decimal(19,6)" /> <col name="MinAvailQty" type="Decimal(25,6)" /> <col name="TStamp" type="Timestamp" /> <index name="RBProduct_PK" clustered="true" primary="true" unique="true"> <col name="ProductID" /> </index></table>]]></CDATA> </Sql>
To Create a Custom Column in an Existing Table
Because you can need a new column in an existing database table only for a bound datafield, the Acumatica Customization Platform automatically creates a custom column whenyou create a custom bound data field by using the New Field wizard.
To add a custom field as a new column that will be appended to the original table ofAcumatica ERP, perform the following actions:
1. Open the Create New Field dialog box for the data access class by using the Data ClassEditor or by using the Layout Editor.
2. In the dialog box, specify the custom field parameters and select DBTableColumn in theStorage Type box to make the system append the column to the original table in thedatabase.
3. Click OK to add the field to the data access class.The New Field wizard includes an XML declaration of the new field in the DAC item for themodified data access class. If the DAC item for the modified data access class is absent inthe customization project, the wizard creates the appropriate item. Also, the wizard createsa Table item with a description of the custom column to be created in the database table forthe custom field.
After you publish the customization project at least once, the database schema is changed.Changes to the database schema aren't deleted when you unpublish the project or deletethe DAC and Table items and publish the project once more. You have to remove thechanges manually.
To Create an Extension Table
The Acumatica Customization Platform provides the following options to create a customcolumn in a table of the database:
• Add the column to the original table
• Create a separate table that is an extension of the original table, and add the column tothe extension table
In some cases, you may need to store new field values in a separate table or use this tableindependently from the original database table. You can use the Acumatica CustomizationPlatform to create a separate extension database table. This table must include all main

| Customizing the Database Schema | 388
key fields from the original database table and your new fields. You should create a DACextension that holds the new fields and is mapped to the extension table. The platform willautomatically synchronize the extension table with the original database table by expandingevery create, retrieve, update, and delete operation on the base (original) DAC to eachdiscovered DAC extension that is mapped to an extension table.
To declare a DAC extension that is mapped to an extension table, perform the followingactions:
1. Create an extension table in the database according to the requirements described inRequirements for an Extension Table Schema.
2. Declare a DAC extension mapped to the created table, as described in DAC ExtensionMapped to an Extension Table.
By using the PXTable attribute, you specify that the DAC extension is mapped to theextension table with the same name.
Requirements for an Extension Table Schema
You should ensure that the following requirements are met when you create an extensiontable:
• The extension table should have the same set of main key columns as the originaldatabase table has.
• The extension table must include the following columns if they are declared within theoriginal database table:
• [CompanyID][int] NOT NULL
• [DeletedDatabaseRecord][bit] NOT NULL
• For an extension table that can be used separately, you should also declare the followingaudit columns:
• [tstamp][timestamp] NULL
• [CreatedByID][uniqueidentifier] NOT NULL
• [CreatedByScreenID][char] ( 8 ) NOT NULL
• [CreatedDateTime][datetime] NOT NULL
• [LastModifiedByID][uniqueidentifier] NOT NULL
• [LastModifiedByScreenID][char] ( 8 ) NOT NULL
• [LastModifiedDateTime][datetime] NOT NULL
The example below shows the declaration of the InventoryItemTableExtension extensiontable. Notice that this table will not be used independently from the original database table.

| Customizing the Database Schema | 389
CREATE TABLE [dbo].[InventoryItemTableExtension]( [CompanyID] [int] NOT NULL, [InventoryID] [int] NOT NULL, [DeletedDatabaseRecord] [bit] NOT NULL, [ExtTableDescr] [nvarchar](256) NULL CONSTRAINT [InventoryItemTableExtension_PK] PRIMARY KEY CLUSTERED ( [CompanyID] ASC, [InventoryID] ASC ) WITH (PAD_INDEX = OFF, STATISTICS_NORECOMPUTE = OFF, IGNORE_DUP_KEY = OFF, ALLOW_ROW_LOCKS = ON, ALLOW_PAGE_LOCKS = ON) ON [PRIMARY]) ON [PRIMARY]ALTER TABLE [dbo].[InventoryItemTableExtension] ADD DEFAULT ((0)) FOR [DeletedDatabaseRecord]GO
DAC Extension Mapped to an Extension Table
You can define a DAC extension mapped to an extension table by using either the defaultInner Join way or the optional Left Outer Join way. To specify which way is used, you need toset the value for the IsOptional parameter of the PXTable attribute. By default, the systemsets this parameter value to false. You need to specify the IsOptional parameter value onlyif you need to set its value to true.
[PXTable(IsOptional = value)]public class TableExtension : PXCacheExtension<BaseDAC>{ ... }
If the DAC contains surrogate and natural keys, then the PXTable attribute attached tothe DAC extension should reference the surrogate key as well as other database key fields(but not the natural key). If the DAC doesn't have surrogate and natural keys, no keyfields should be specified in the PXTable attribute. See the following code example of thedeclaration of the PXTable attribute with key references.
[PXTable(typeof(BaseDAC.surrogateKey), typeof(BaseDAC.otherDBKeyField), IsOptional = value)]public class TableExtension : PXCacheExtension<BaseDAC>{ ... }

| Customizing the Database Schema | 390
The natural key is a user-friendly value that is not used as a key in the database.The surrogate key, which is the internal value corresponding to the natural key, is notshown to the user and is assigned by the system. When you use a natural key, theDAC field that serves as a surrogate key is bound to the database key column, but isnot marked as key within its attributes.
In the sample code shown below, the Location database table contains both the surrogateLocationID key and the natural LocationCD key. The Location database table main keycontains the BAccountID and LocationID columns. Because LocationCD is a natural key, weneed to specify the corresponding surrogate key, LocationID, as well as the other databasekey field, BAccountID, in the PXTable attribute.
[PXTable(typeof(Location.locationID), typeof(Location.bAccountID))]public class LocationTableExtension : PXCacheExtension<Location>{ ... }
The Left Outer Join Way
The following example shows the declaration of a DAC extension mapped to an extensiontable with the Left Outer Join way. Notice that the IsOptional parameter of the PXTableattribute is set to true.
[PXTable(IsOptional = true)]class LeftJoinTableExtension : PXCacheExtension<BaseDAC>{}
The Left Outer Join way covers the common steps required to add an extension tables to acustomization project. For details on populating an extension table with records, see SQLScript Editor.
The Left Outer Join way:
• Can be used when the original and extension database tables are not necessarilysynchronized.
• Causes an extension table record to be created when the appropriate original tablerecord is created or updated.
• Never excludes an original database table record from the result set.
• Calculates the default field values if no extension table record is found.
• Can be used as a standalone DAC.
The following example shows the declaration of the InventoryItemTableExtension DACextension mapped to the extension table with the Left Outer Join way.

| Customizing the Database Schema | 391
[PXTable(typeof(InventoryItem.inventoryID), IsOptional = true)]public class InventoryItemTableExtension : PXCacheExtension<InventoryItem>{ #region ExtTableDescr public abstract class extTableDescr : PX.Data.IBqlField { } [PXDBString(255)] [PXDefault("Additional description")] [PXUIField(DisplayName = "Ext_Table Description")] public string ExtTableDescr { get; set; } #endregion}
Suppose that you have added the corresponding Ext_Table Description control tothe header area of the Stock Items (IN202500) form. If you open the form, by clickingnavigation buttons on the form toolbar, you can ensure that all the stock items are visible,while the Ext_Table Description control has the default Additional description value set, asthe screenshot below illustrates.
Figure: Exploring the behavior of the customized Stock Items form
If you update a data record (by changing the value of any control, including Ext_TableDescription), a new database record is added to the extension table, as the following twoscreenshots illustrate.

| Customizing the Database Schema | 392
Figure: Entering and saving the description in the new control
Figure: Analyzing the record added to the new database table
When you use the Left Outer Join way, data records within the original and extensiontables are not necessarily synchronized (as the figure below illustrates); data recordsynchronization works as follows:
• If an appropriate data record does not exist within an extension table when the systemqueries the original table, the system automatically generates and assigns default values

| Customizing the Database Schema | 393
to every field of the DAC extension that is mapped to the extension table; otherwise,DAC extension field values are read from the database.
• When a new record is inserted into the original table, the system automatically inserts anew record into the extension table.
• If a data record does not exist within an extension table when the system updates theoriginal table, the system automatically inserts a data record into the extension table.Otherwise, if there are no modified fields of the DAC extension that is mapped to theextension table, the system does not update the extension table data record.
• When the system deletes the data record in the original table, it automatically deletesthe appropriate data record from the extension table, if such a record exists.
To use an extension table independently from the original database table, you shoulddeclare a data view by using a DAC extension that is mapped to an extension table asthe main DAC, as shown below.
public class BaseBLCExt : PXGraphExtension<BaseBLC>{ public PXSelect<TableExtension> Objects;}

| Customizing the Database Schema | 394
In the example of the data view declaration above, extension table data records haveno reference to the original database table records. You can work with these datarecords just as you would work with any other DAC instance.
Figure: Exploring data record synchronization when the Left Outer Join way is used
The Inner Join Way
The Inner Join is the default way.
The following example shows the declaration of a DAC extension mapped to an extensiontable with the default Inner Join way.
[PXTable]class InnerJoinTableExtension : PXCacheExtension<BaseDAC>{}
The Inner Join way:
• Can be used only when the original table and extension table are always synchronized.

| Customizing the Database Schema | 395
• Causes an extension table record to be automatically created only when the appropriateoriginal database table record is created.
• Requires the main key column values to be copied from the original table to eachextension table.
• Excludes an original database table record from the result set when no correspondingextension table record is found.
• Can be used as a standalone DAC.
The sample code below shows the declaration of the InventoryItemTableExtension DACextension, which is mapped to the extension table by using the default Inner Join way.
[PXTable(typeof(InventoryItem.inventoryID))] public class InventoryItemTableExtension : PXCacheExtension<InventoryItem>{ #region ExtTableDescr public abstract class extTableDescr : PX.Data.IBqlField { } [PXDBString(255)] [PXDefault("Additional description")] [PXUIField(DisplayName = "Ext_Table Description")] public string ExtTableDescr { get; set; } #endregion}
If you again open the Stock Items (IN202500) form, by clicking navigation buttons on theform toolbar of the Stock Items form, you will see that only one stock item is visible, and ithas the modified Ext_Table Description.
To have access to the other database table records, you need to populate the extension tablewith the appropriate records. You can do this by using the following script.
INSERT INTO [dbo].[InventoryItemTableExtension]SELECT CompanyID, InventoryID, 0, N'Additional description'FROM [dbo].[InventoryItem]WHERE NOT EXISTS( SELECT * FROM [dbo].[InventoryItemTableExtension] AS t WHERE t.CompanyID = [dbo].[InventoryItem].CompanyID AND t.InventoryID = [dbo].[InventoryItem].InventoryID)GO

| Customizing the Database Schema | 396
After you copy data records from the InventoryItem database table to theInventoryItemTableExtension user extension table, you will notice that all stock items arevisible again.
When you use the Inner Join way, the data records within the base and extended tablesmust always be synchronized (see the screenshot below). With this way, data recordsynchronization works as follows:
• If an appropriate data record does not exist within an extension table when the systemqueries the original table, the system excludes the original table record from the resultset.
• When a new record is inserted into the original table, the system automatically inserts anew record into the extension table.
• When the system updates the data record in the original table, it does not update theextension table if there are no modified fields of the DAC extension that is mapped to theextension table.
• When it deletes the original table data record, the system automatically deletes theappropriate data record from the extension table, if such a record exists.

| Customizing the Database Schema | 397
To use the extension table independently from the original database table, you shoulddeclare a data view by using a DAC extension, which is mapped to an extension table,as the main DAC (for details, see the The Left Outer Join Way section).
Figure: Exploring data record synchronization when you use the Inner Join way
To Add a Custom SQL Script to a Customization Project
With the platform, you can add to a customization project an SQL script to be executedduring the publication of the project. However, we recommend that you avoid doing this.
A possible result of a custom SQL script is the loss of the integrity and consistency ofthe application data.
If you do add a custom SQL script, you must adhere to the following requirements for thescript:
• Because Acumatica ERP supports multitenancy, you must create an SQL script thatcorrectly creates a database object that properly specifies and uses the company mask.
• You must correctly specify the attributes for the script so that the script can be executedon the target database servers: MySQL Server, Microsoft SQL Server, or both. For detailsabout attributes, see Using the SQL Script Attributes.

| Customizing the Database Schema | 398
To Add a Custom SQL Script to a Customization Project
1. Prepare, debug, and test the SQL script with a database administration tool, such as SQLServer Management Studio. (See Creating a Custom SQL Script for details.)
2. Open the customization project in the Customization Project Editor. (See To Open a Projectfor details.)
3. Click Database Scripts in the navigation pane to open the Database Scripts page.
4. On the page toolbar, click Add > Script.
5. In the Script Name box of the SQL Script Editor, which opens, specify the name of thescript to be used as the object name of the customization item. (The name can containonly English characters and digits.)
6. Optional: In the Priority box, specify the priority of the script. By default, the priority is0.
7. For each batch that you want to add, do the following:
a. Click Specify Database Engine, and in the Attribute box, select one of thefollowing options:
• Skip Batch on MySQL Server, which adds the --[mysql: Skip] attribute to theend of the text in the text area of the script editor.
• Skip Batch on Microsoft SQL Server, which adds the --[mssql: Skip] attributeto the end of the text in the text area of the script editor.
• Use Interpreter, which adds the --[VmSql] attribute to the end of the text in thetext area of the script editor.
For more information on the database script attributes, see Using the SQL ScriptAttributes.
b. In the text area of the editor, below the added attribute, enter the SQL script.
8. In the editor, click OK to add the script to the customization project.
If a custom script causes an error, the error message will appear during the publicationprocess when the system executes the custom scripts.
Related Links
• Creating a Custom SQL Script
• Using the SQL Script Attributes
• Writing Custom SQL Scripts for Interpretation

| Integrating the Project Editor with Microsoft Visual Studio | 399
Integrating the Project Editor with MicrosoftVisual Studio
You do not need to install MS Visual Studio to customize the Acumatica ERP UI or to developa simple changes of business logic, because the platform includes the Customization Tools,which are designed for these purposes and available in your web browser. However you canuse Visual Studio to develop the customization code.
If you plan to use Visual Studio on the server that hosts the website of Acumatica ERP 2019R2, the environment where you install and use Acumatica Framework or Acumatica ERPshould meet particular requirements, which are described in System Requirements for AcumaticaFramework 2019 R2.
To use Visual Studio while customizing Acumatica ERP, you can select one of the followingapproaches:
• Create an Extension Library, develop the customization code in Visual Studio, compilethe DLL binary file within the Bin folder of the website, and add this custom file to thecustomization project
• Develop and debug the customization code of a customization project on the fly by usingVisual Studio
This part of the guide describes the second approach, because the first one is obvious anddoes not require any integration between the Customization Project Editor and Visual Studio.
To use the second approach, you should perform the following steps each time you want touse Visual Studio to develop and debug the customization code on the fly:
1. In Data Class Editor, create extensions for existing data access classes if required, asdescribed in To Create a DAC Extension.
2. In Code Editor, for business logic controllers, create new classes or class extensions thatcontain required code templates, as described in To Create a Custom Graph and To Start theCustomization of a Graph.
3. Publish the customization project to obtain the corresponding C# files within theApp_RuntimeCode website folder. (See Performing the Publication Process for details.).\
4. By using Visual Studio, develop, modify, and debug the customization code in these fileson the fly. (See To Debug the Customization Code for details.)
5. In the Customization Project Editor, update the code in the customization project, asdescribed in To Synchronize Code Changes with the Customization Project.
In This Chapter
• To Work with a Code Item
• To Work with Data Access Classes

| Integrating the Project Editor with Microsoft Visual Studio | 400
• To Debug the Customization Code
• To Synchronize Code Changes with the Customization Project
• To Create an Extension Library
• Useful Tips
To Work with a Code Item
The Code Editor does not provide facilities you can use in Microsoft Visual Studio to developand debug any source code in customization projects. To start working with a Code item inVisual Studio, perform the following instructions:
1. Publish the customization project, as described in Publishing Customization Projects.
After you have published the customization project, the <CodeItemName>.cs file withthe item code is placed in the App_RuntimeCode folder of the website.
2. Launch Visual Studio.
3. To open the <CodeItemName>.cs file in Visual Studio, on the main menu, click File >Open > File, and select the file in the Open File dialog box, which opens.
If you need to debug the customization code, you have to open the websiteinstead of the file. See To Debug the Customization Code for details.
4. After you have finished editing the source code of the item, click Save to save yourchanges in the file.
Because the App_RuntimeCode folder contains the customization code that ispublished, the changes in the file are immediately applied to the application instance.
5. Open or refresh the form that uses the code, to make sure that the business logic hasbeen changed for the form.
If an error exists in the changed file, the website might be corrupted. You canrecover the website, for example, in one of the following ways:
• Debug the code
• Undo the changes
• Publish the customization project again to update the files in theApp_RuntimeCode folder
• Delete the file from the App_RuntimeCode folder
6. To update the Code item in the customization project, follow the instructions described inTo Synchronize Code Changes with the Customization Project.

| Integrating the Project Editor with Microsoft Visual Studio | 401
To Work with Data Access Classes
You can use Microsoft Visual Studio to work with a data access class (DAC) that has beenadded to a customization project.
A customization project can contain code for a DAC in the following item types (see SupportedDAC Extension Formats for details):
• As a DAC item with XML data for an existing DAC
• As a Code item with the code of an existing DAC extension
• As a Code item with the code of a custom DAC
• In a File item that keeps a .dll file of the extension library that contains the binary codeof a DAC extension or custom DAC
Once a customization project is published, you can use Visual Studio to develop, modify,and debug the customization code of a Code item on the fly. However, you cannot use thisapproach for a DAC item.
If you need to work in Visual Studio with the code of the DAC whose changeset is added to acustomization project as a DAC item in XML format, perform the following actions:
1. Follow the instructions described in To Convert a DAC Item to a Code Item to convert the itemto the Code item.
2. Follow the instructions described in To Work with a Code Item to change the code of theDAC extension.
To Debug the Customization Code
The Code Editor does not provide facilities you can use to debug a code item of acustomization project. We recommend that you use Microsoft Visual Studio to develop anddebug any source code in customization projects. To start debugging an existing Code itemin Visual Studio, perform the following instructions:
1. Publish the customization project, as described in Publishing Customization Projects.
2. In the file system, open in a text editor the web.config file located in the website folder.
3. In <system.web> tag of the file, locate the <compilation> element.
4. Set to true the debug attribute of the element, as follows.
<compilation debug="true" ...>

| Integrating the Project Editor with Microsoft Visual Studio | 402
See Debug Mode in ASP.NET Applications for details.
5. In a browser, launch your instance of Acumatica ERP to have a running process in thesystem.
6. Launch Visual Studio.
7. To open the website of your instance of Acumatica ERP in Visual Studio, on the mainmenu, click File > Open > Web Site, and select the website folder in the Open WebSite dialog box, which opens.
8. In the Solution Explorer of Visual Studio, expand the App_RuntimeCode website folder,and double-click the file of the Code item to open it.
9. In the item source code, which opens, set a breakpoint on the line of the code where youneed to stop the process for debugging.
10.On the main menu, click Debug > Attach to Process, and in the Attach to Processdialog box, which opens, select the w3wp.exe process in the list of AvailableProcesses.
In the dialog box, ensure that the Show processes from all users check boxis selected. If the check box is cleared, the list will not display the w3wp.exeprocess record.
11.In the browser, open the form of Acumatica ERP whose business logic code you want todebug.
12.In the browser, run an operation that invokes the fragment of the code that contains thebreakpoint.
The process will be stopped at the breakpoint, and you can debug the code in Visual Studio.
To View and Debug Acumatica Source Code
Acumatica has open source code and you can easily view it with the Source Code browser.For details, see Source Code Browser.
However, in some cases, for example, when you need to find a method to override, it ishelpful to debug Acumatica ERP source code with breakpoints and see which breakpoint ishit in which scenario. To be able to debug Acumatica ERP code, you should configure yourextension library in Visual Studio.
Before You Proceed
You can view and debug Acumatica source code inside an extension library. Before you startconfiguring your extension library in Visual Studio, create it. For details, see To Create anExtension Library.

| Integrating the Project Editor with Microsoft Visual Studio | 403
To Configure the Extension Library
1. Check whether the Acumatica debugger tools are installed and remember their location.
The Acumatica debugger tools are PDB files located in the Bin folder of the AcumaticaERP site folder.
The PDB files are copied to the Acumatica ERP/Files/Bin during the installationprocess if the Install Debugger Tools option is selected. If you haven't selected thisoption during installation, you should remove Acumatica ERP and install it again withthe Install Debugger Tools option selected. For details, see To Install the Acumatica ERPTools.
Every time when you install or upgrade any Acumatica instance, the Acumatica ERPConfiguration Wizard copies data from the Acumatica ERP/Files/Bin folder to replaceinstance files. These files are not copied to any instance automatically. But to be able todebug Acumatica, you must have them in every instance that you need to debug.
So to distribute these PDB files, you can do one of the following:
• Install a new instance
• Upgrade an existing one
• Copy files manually from Acumatica ERP/Files/Bin
DLL and PDB files should be from the same version of Acumatica
2. Configure the web.config file of the instance by doing the following:
a. In the file system, open in the text editor the web.config file that is located in theroot folder of the your instance.
b. In the <system.web> tag of the file, locate the <compilation> element.
c. Set the debug attribute of the element to True, as shown in the following code.
<system.web> <compilation debug="True" ...>
d. Save your changes.
Be careful with this option on production environment, as debug configuration cansignificantly slow down Acumatica ERP performance.
3. Configure the extension library by doing the following:
a. In Visual Studio, open the extension library.
b. In the main menu, select Tools > Options.

| Integrating the Project Editor with Microsoft Visual Studio | 404
c. In the Debugging > General section, clear the Enable Just My Code check box.
d. In the Debugging > Symbols section, in the Symbols file (.pdb) locations list,add the path to the location of the PDB files which you discovered in instruction 1 ofthe step. For example,
C:\Program Files\Acumatica ERP\Files\Bin
e. Click OK.
To Browse and Debug the Source Code
After you have configured the extension library, you can view and debug source code ofAcumatica ERP. Do the following:
1. Learn the full name of the graph in which the method you want to debug is located. It isshown in the Graph Name box of the Source Code Browser. For details, see To Explorethe C# Code of a BLC.
For example, suppose you want to debug the Release action of the Payments andApplications (AR302000) form. The full graph name is PX.Objects.AR.ARPaymentEntry.
2. Open Acumatica source code files. All files are located in the <Site_folder>/App_Data/CodeRepository folder.
3. Navigate to the file with the code of the graph.
For the Release action of the Payments and Applications form, the graph is located inPX.Objects/AR/ARPaymentEntry.cs.
4. Add a breakpoint inside the method you want to debug.
5. Attach the Visual Studio debugger to a running process.
To do that, on the main menu, click Debug > Attach to Process, and in the Attach toProcess dialog box, which opens, select the w3wp.exe process in the list of AvailableProcesses.
In the dialog box, ensure that the Show processes from all users check boxis selected. If the check box is cleared, the list will not display the w3wp.exeprocess record.
6. In Acumatica ERP, open a form on which the method being debugged is called andperform actions to hit the added breakpoint.
Other Tips on Debugging Acumatica Code
Besides action methods like the ARPaymentEntry.Release method, you can debug eventhandlers implemented for attributes (located in the PX.Data namespace) and {Get; Set;}methods of DAC properties.
For debugging Acumatica code, you can also use the following Visual Studio features:

| Integrating the Project Editor with Microsoft Visual Studio | 405
• The Immediate Window where you can debug and evaluate expressions, executestatements, and print variable values. For details, see Immediate window.
• The Locals Window where you can see and edit variable values. For details, see Inspectvariables in the Autos and Locals windows.
• The Call Stack window to view the method calls that are currently on the stack. Fordetails, see View the call stack and use the Call Stack window in the debugger.
To Synchronize Code Changes with the CustomizationProject
When you create a Code item in a customization project, Acumatica Customization Platformperforms the following actions:
• Saves the item content in the database as a Code item
• Adds the item ID to the customization project
When you publish the project, the platform creates the <CodeItemName>.cs file in theApp_RuntimeCode website folder of the current instance of Acumatica ERP.
If you use the Code Editor to modify a Code item and click Save on the page toolbar, theplatform saves the changes only in the database. To update files in the App_RuntimeCodefolder, you have to publish the project again.
If you have modified the item code in Microsoft Visual Studio, you have to synchronize thechanges with the item in the database. To do that, do the following:
• Follow the instructions described in To Update a File Item in a Project to update files in thecustomization project.
For more information about the synchronization mechanism provided by the AcumaticaCustomization Platform, see Detecting the Project Items Modified in the File System.
To Create an Extension Library
To develop customization code in an extension library, you should first create this extensionlibrary. This topic describes how to create the extension library using the CustomizationProject Editor.
To Create an Extension Library
1. On the main menu of the Customization Project Editor, click Extension Library >Create New.
The Create Extension Library dialog box opens.

| Integrating the Project Editor with Microsoft Visual Studio | 406
2. Specify the location and name name of the Visual Studio project that will contain theextension library.
3. Click OK to close the dialog box and start the process of creating the library.
During the process, Acumatica Customization Platform creates the following files in thefolder specified in the dialog box.
The platform also creates the OpenSolution.bat batch file, which is a copy of theSolution.bat file created in the solution project folder. Depending on the settings of yourbrowser, the OpenSolution.bat file is saved either in the Downloads folder or in anotherlocation.
Useful Tips
Here are some tips and tools that you can use to simplify your development process.
Organize team development
If several developers are working on the customization project, it is important to organize acontinuous team development. Here are several essential points for it:
• Organize a centralized source control, where all developers can push the work they'vedone. To integrate the changes into source control, you can use automation scripts.
• All developers should have a local version of Visual Studio, project's database andrepository. This ensures independent development and debugging at all times.
• Every developer should have Acumatica ERP instance in the same directory and with thesame name. This helps to maintain the same references of the extension library (DLL) tothe project's /bin folder.
• All changes to the customization project and Acumatica ERP related development shouldbe stored in the source control. Code should be stored as a part of Visual Studio project.UI, database, and data changes should be included into a customization project and alsostored in source control.
• Developers may work on different features in separate branches and merge their work tothe main branch only when the changes are completed and tested.
• You can do parts of continuous integration manually on your local machine andautomatically on the build server from centralized repository.
Use Acuminator
You can simplify customization development in Visual Studio by using Acuminator - a staticcode analysis and colorizer tool. Acuminator provides diagnostics and code fixes for commondeveloper challenges related to Acumatica Framework. Also, Acuminator can colorize andformat BQL statements, and can collapse attributes and parts of BQL queries.

| Integrating the Project Editor with Microsoft Visual Studio | 407
To use Acuminator in Visual Studio:
1. Download Acuminator from the Visual Studio Marketplace.
You get a Visual Studio extension installer (VSIX file).
2. Install Acuminator by launching the downloaded VSIX file.
Acuminator is ready for use. To check it, open your customization project in Visual Studio.BQL statements and DAC code Acumatica Framework should be highlighted.

| Integrating the Project Editor with a Version Control System | 408
Integrating the Project Editor with a VersionControl System
If a customization task is large or complex or it is implemented by a group of developers,you might need to use a version control system for the customization project. The platformsupports the integration of the Customization Project Editor with a version control system.
The Customization Project Editor includes the Source Control menu, which contains thefollowing commands to integrate the editor with a version control system:
• Save Project to Folder: Saves the customization project as a set of files to a localfolder that is used for integration with a source control system. When you invoke thisaction, the system opens the Saves Project to Folder dialog box so that you can selectthe name and location of the folder inside a repository.
• Open Project from Folder: Loads the customization project from the repository.
• Set Up Source Control: Opens the Source Control Setup dialog box, which youcan use to specify a configuration string for connection to a version control system, ifrequired.
For detailed information on integrating the editor with a version control system, see thefollowing topics:
• To Save a Project to a Local Folder
• To Update the Content of a Project from a Local Folder
• To Configure a Connection String
• To Integrate the Customization Project Editor with Source Control
To Save a Project to a Local Folder
You can save a customization project as set of files to a local folder that can be used forintegration with a source control system. To do this, perform the following actions:
1. Open the project in the Customization Project Editor.
2. On the editor menu, click Source Control > Saves Project to Folder.
3. In the Saves Project to Folder dialog box, which opens, do the following:
a. In the Parent Folder selector, select the parent folder.
b. In the Project Name box, specify the name of the new folder to be used as theproject storage.
4. Click OK.

| Integrating the Project Editor with a Version Control System | 409
Within the selected parent folder, the platform creates the folder with the project name thatyou have specified. This folder includes at least the _project subfolder that contains an XMLfile for each item of the project, as the following screenshot shows.
Figure: Viewing the content of the .project folder
If the customization project contains custom files, the platform keeps the paths to thesefiles. Therefore, the project folder includes the corresponding folders for these custom files,as shown in the following screenshot.

| Integrating the Project Editor with a Version Control System | 410
Figure: Viewing the folders inside the project folder
To Update the Content of a Project from a Local Folder
If you have saved a customization project to a local folder by invoking the Source Control> Saves Project to Folder command of the Customization Project Editor, you can update thecontent of the project that is currently opened in the editor with the data from the folder.
To do this, perform the following actions:
1. On the editor menu, click Source Control > Open Project from Folder.
2. In the Containing Folder box of the Open Project from Folder dialog box, whichopens, select the local folder that contains the files of the needed customization project.
If the folder is empty, the content of the project in the database is cleared.
3. Click OK.
To Configure a Connection String
To use a self-made or third-party plug-in to integrate with a version control system, you canspecify the configuration string required to connect the Customization Project Editor with theversion control system through the plug-in. To do this, perform the following actions:
1. Open the customization project in the Customization Project Editor.
2. On the editor menu, click Source Control > Set Up Source Control.

| Integrating the Project Editor with a Version Control System | 411
3. In Config box of the Source Control Setup dialog box, which opens, specify the plug-into be used and the data required by the plug-in to connect to the version control system.
4. Click OK.
The editor tries to connect with the version control system by using the specifiedconfiguration string. If the connection fails, the editor displays an error message with theissue description, as the following screenshot shows.
Figure: Viewing the box with a connection error message
To Integrate the Customization Project Editor withSource Control
To start tracking changes in a customization project by using source control, perform thefollowing actions:
1. Configure Visual Studio to use source control.
2. In Visual Studio, do the following:
a. Open your customization project, and add it to the source control.
b. Sync your project with the latest server version.
Before starting the project development, you have to do the following each time:
1. Get the latest version of the customization project from the server.
2. Load the project from the local storage, as described in To Update the Content of a Projectfrom a Local Folder.
After the project has been modified, you have to do the following:
1. Update the project in the local storage, as described in To Save a Project to a Local Folder.
2. Check in the changes to the server.

| Integrating the Project Editor with a Version Control System | 412
Related Links
• Use Team Foundation Version Control

| Troubleshooting Customization | 413
Troubleshooting CustomizationThis part is intended to describe how to solve issues that occur while you are developing orapplying a customization. It will be under ongoing development to cover all the approachesand ways required to solve each typical issue that is result of an error in customization or amisunderstanding of the platform features.
In This Part
• To Discover the Method That Has Thrown an Exception
• To Write to the Trace Log from the Code
• To Log All Exceptions to a File
• To Debug the Customization Code
• To Validate a BQL Statement
• To Measure the Execution Time of a BQL Statement
• To Discover the Cause of Performance Degradation
• To Force the Platform to Execute Database Scripts
• To Resolve Issues While Upgrading a Customized Website
Related Links
• Troubleshooting Acumatica ERP
To Discover the Method That Has Thrown an Exception
If an exception has occurred at run time and a message box with an error or a warninghas been displayed on the form, you can easily discover the method that has thrown theexception. To do this, perform the following actions:
1. Read the message, and close the message box.
2. On a form of Acumatica ERP, click Help > Trace, as shown in the following screenshot.

| Troubleshooting Customization | 414
Figure: Opening the Acumatica Trace page
3. On the Acumatica Trace page, which opens to display the trace log, find the appropriateerror message, and click the arrow left of the Details label for the message to show thedetailed information on the error.
In the list of the method calls that were on the stack at the moment of the error, theupper method is the one that threw the exception.
By default, the trace log is stored on the Acumatica ERP server for the currentuser session. If the user opens two Acumatica ERP forms simultaneously in twotabs or windows of a browser, the Acumatica ERP server creates a subsession foreach opened form and stores the trace logs separately for each subsession. Aftera session or subsession of the user is completed (due to the user logging off orbeing timed out), the server clears the appropriate log.
To save the trace logs of all subsessions of all users in a single file on the server,a user with the Administrator role has to change the web.config file of theAcumatica ERP instance to configure the appropriate trace provider. See the Tracesection of Using Logs for details.
For example, if you open the Customers (AR303000) form of an Acumatica ERP instance inwhich the YogiFon customization project is published (see the T300 Acumatica CustomizationPlatform training course for details) and click Verify Credit Record on the form toolbar, thesystem shows an error message, as the following screenshot shows.

| Troubleshooting Customization | 415
Figure: Viewing a message box with an error
On the Acumatica Trace page, as the following screenshot shows, you can find the errormessage. After you expand the error details, you can see that the exception has beenthrown by the CustomerMaint_Extension.VerifyCreditRecord() method.

| Troubleshooting Customization | 416
Figure: Viewing the needed method in the list of method calls
To Write to the Trace Log from the Code
When you are developing and troubleshooting the customization code, you may need toknow what happens during code execution (for example, an action being called or an eventbeing raised). You can write information to the trace log directly from your code by usingone of the following static methods of the PXTrace static class:
• public static void WriteError(string message)
• public static void WriteError(Exception e)
• public static void WriteWarning(string message)
• public static void WriteWarning(Exception e)
• public static void WriteInformation(string message)
• public static void WriteInformation(Exception e)
• public static void WriteVerbose(string message)
For reference information on the PXTrace class methods, see the API Reference.
To manage writing information to the trace log, you can use the following methods of thePXTrace static class:

| Troubleshooting Customization | 417
• public static Serilog.ILogger WithStack()
By default, the stack trace is not collected so that the project does not impair systemperformance. To turn on the collection of the stack trace, call the WithStack method, asthe following code example shows. Note that in the presented code, the stack trace iscollected only if the appropriate logging level has been set up.
PXTrace.WithStack().Information(“some info”);
• public static Serilog.ILogger WithSourceLocation()
To use the WithStack and WithSourceLocation methods, you must include theextenal Serilog library. We recommend using the Serilog library located in the Binfolder of Acumatica ERP.
The WithStack and WithSourceLocation methods can be chained with Serilog.ILoggermethods.
Adding the Method to the Customization Code
If you want to avoid changes in the customization project, you can add this method to thecustomization code that has already been applied to the application instance. To do this,perform the following actions:
1. Make sure that the customization project that contains the code you are debugginghas been published. If the project is unpublished, publish it, as described in PublishingCustomization Projects.
2. Launch Microsoft Visual Studio.
3. In Visual Studio, open the file with the code that is currently saved in theApp_RuntimeCode website folder.
4. Add a call of one of the methods listed above to the appropriate code sample.
5. Save your changes to the file.
6. In the browser, open or refresh the form that you are troubleshooting.
7. On the form, perform the sequence of actions that invokes the changed code.
8. Click Help > Trace to open the Acumatica Trace page.
9. On the page, explore the trace log to make sure that the changed code sample has beenexecuted.
When you publish or export the project, the Acumatica Customization Platformcompares the code in the App_RuntimeCode website folder with the appropriatecode in the database and discovers the files that have been changed in the filesystem. If a modified file is found, there is a conflict, and the platform opens theModified Files Detected dialog box, in which you can direct the system to update

| Troubleshooting Customization | 418
the files in the project or discard the changes. See Detecting the Project Items Modified inthe File System for details.
Adding the WriteInformation() Method
As an example of using the static methods of the PXTrace static class, suppose that youopen in Visual Studio the SOOrderEntry.cs file of the YogiFon customization project,which is published (see the T300 Acumatica Customization Platform training course for details).You then add the PXTrace.WriteInformation("SOOrder_CustomerID_FieldUpdated")method call to the SOOrder_CustomerID_FieldUpdated() event handler of theSOOrderEntry_Extension class, as shown in the following screenshot. In this example, thespecified text string is written to the trace log every time the CustomerID field is updated onthe Sales Orders (SO301000) form.
Figure: Adding the WriteInformation method call to the code
If you were to refresh the form in the browser, change the customer ID in the Customerbox, and click Help > Trace to open the Acumatica Trace page, the trace log would containa record with the text specified in the WriteInformation method call, as the followingscreenshot shows.

| Troubleshooting Customization | 419
Figure: Viewing the information record in the trace log
By default, the trace log is stored on the Acumatica ERP server for the current usersession. If the user opens two Acumatica ERP forms simultaneously in two tabsor windows of a browser, the Acumatica ERP server creates a subsession for eachopened form and stores the trace logs separately for each subsession. After a sessionor subsession of the user is completed (due to the user logging off or being timedout), the server clears the appropriate log.
To save the trace logs of all subsessions of all users in a single file on the server, auser with the Administrator role has to change the web.config file of the AcumaticaERP instance to configure the appropriate trace provider. See the Trace section ofUsing Logs for details.
Specifying the Logging Level
Events that you log in code have different logging levels. You can specify a logging level inweb.config so that only events up to that level will be logged. You set up the logging levelby using the following settings in the web.config file:
• system.web/pxtrace/@minimumLevel
• system.web/pxtrace/add/@minimumLevel
• appSettings/add[@key="serilog:minimum-level"]/@valueThe logging levels are presented in the table below. By default, the Verbose level isspecified.
To Log All Exceptions to a File
Acumatica ERP provides a mechanism you can use for catching and logging all exceptionsin the system. (See the First-Chance Exception Log section of Using Logs for details.) If you

| Troubleshooting Customization | 420
have been assigned the Administrator role, you can activate this mechanism and specify thename of the log file. To do this, perform the following actions:
1. In the file system, open in a text editor the web.config file located in the website folder.
2. Within the <appSettings> tag of the file, turn on theEnableFirstChanceExceptionsLogging key, as follows.
<add key="EnableFirstChanceExceptionsLogging" value="True" />
3. If you need to change the log file name, which is firstchanceexceptions.log by default,you can specify the needed name in the FirstChanceExceptionsLogFileName key, asfollows.
<add key="FirstChanceExceptionsLogFileName" value="MyLog.log" />
By default, the first-chance exception log file is saved in the App_Data folder ofthe website.
You can open the log file in a text editor to view the content of the first-change exceptionlog, as the following screenshot shows.
Figure: Viewing the first-chance exception log
To Debug the Customization Code
The Code Editor does not provide facilities you can use to debug a code item of acustomization project. We recommend that you use Microsoft Visual Studio to develop and

| Troubleshooting Customization | 421
debug any source code in customization projects. To start debugging an existing Code itemin Visual Studio, perform the following instructions:
1. Publish the customization project, as described in Publishing Customization Projects.
2. In the file system, open in a text editor the web.config file located in the website folder.
3. In <system.web> tag of the file, locate the <compilation> element.
4. Set to true the debug attribute of the element, as follows.
<compilation debug="true" ...>
See Debug Mode in ASP.NET Applications for details.
5. In a browser, launch your instance of Acumatica ERP to have a running process in thesystem.
6. Launch Visual Studio.
7. To open the website of your instance of Acumatica ERP in Visual Studio, on the mainmenu, click File > Open > Web Site, and select the website folder in the Open WebSite dialog box, which opens.
8. In the Solution Explorer of Visual Studio, expand the App_RuntimeCode website folder,and double-click the file of the Code item to open it.
9. In the item source code, which opens, set a breakpoint on the line of the code where youneed to stop the process for debugging.
10.On the main menu, click Debug > Attach to Process, and in the Attach to Processdialog box, which opens, select the w3wp.exe process in the list of AvailableProcesses.
In the dialog box, ensure that the Show processes from all users check boxis selected. If the check box is cleared, the list will not display the w3wp.exeprocess record.
11.In the browser, open the form of Acumatica ERP whose business logic code you want todebug.
12.In the browser, run an operation that invokes the fragment of the code that contains thebreakpoint.
The process will be stopped at the breakpoint, and you can debug the code in Visual Studio.
To Validate a BQL Statement
Suppose that you have a BQL statement in the customization code that does not workproperly or you want to make sure that a BQL statement is correctly converted into an SQLquery. To validate the BQL statement, you can use the Request Profiler.

| Troubleshooting Customization | 422
To do this, perform the following actions:
1. Open the Request Profiler form (SM205070) in the browser.
2. In the Profiler Options section, select the Log SQL Requests check box, whichindicates that the SQL request data should be stored in the database.
3. On the form toolbar, click Start, as shown in the following screenshot.
Figure: Launching the SQL Profiler
4. In the browser, open the form that uses the customization code with the BQL statement.
5. On this form, perform the action that executes the BQL statement.
6. Open the Request Profiler form (SM205070).
7. On the form toolbar, click Refresh Results to refresh the log table.
8. In the Command Name column of the log table, find the URL request that is related tothe needed BQL statement.
9. Select the needed URL request, as shown in the screenshot below.
10.On the table toolbar, click SQL to open the SQL Profiler pop-up panel.

| Troubleshooting Customization | 423
Figure: Opening the SQL Profiler pop-up panel for the selected URL request
11.On the panel, in the list of SQL requests for the currently selected URL request, find andclick the SQL request that corresponds to the BQL statement.
12.On the panel toolbar, click Switch Between Grid and Form ( ), as shown in thefollowing screenshot, to view the SQL statement of the selected request.

| Troubleshooting Customization | 424
Figure: Switching the panel to display the content of the selected SQL request
Because you know the name of the table that you use in the BQL statement, werecommend that you specify the name as a filter in the Tables column of the SQLprofiler table, as the following screenshot shows.
Figure: Setting a filter for the SQL request list

| Troubleshooting Customization | 425
If the BQL statement contains a parameter, you can also use the parameter tofilter the list.
If a filter is specified for a column of the table of the SQL Profiler pop-up panel,the filter icon is displayed in the column caption, as shown in the followingscreenshot.
Figure: Viewing the filter icon on the panelA filter is applied to the list for every URL request until you clear the filter.
13.In the SQL area of the panel, shown in the following screenshot, view the SQL statementto validate the BQL statement used in the customization code.
Figure: Viewing the SQL statement
14.On the form toolbar of the Request Profiler form (SM205070), click Stop to stop theRequest Profiler.
We recommend that you activate the Log SQL mode for only a limited periodbecause it can degrade system performance.
15.On the form toolbar, click Clear Log to delete the SQL request data from the database.

| Troubleshooting Customization | 426
To Measure the Execution Time of a BQL Statement
Suppose that in the customization code you have a BQL statement that can affect systemperformance. To measure the execution time of the BQL statement, you can use the RequestProfiler.
To do this, perform the following actions:
1. Open the Request Profiler form (SM205070) in the browser.
2. In the Profiler Options area of the form, select the Log SQL Requests check box, thatindicates that the SQL request data should be stored in the database.
3. On the form toolbar, click Start, as shown in the following screenshot.
Figure: Launching the SQL Profiler
4. In the browser, open the form that uses the customization code with the BQL statement.
5. On the form, perform the action that executes the BQL statement.
6. Open the Request Profiler form (SM205070).
7. On the form toolbar, click Refresh Results to refresh the log table.
8. In the Command Name column of the log table, find the URL request that is related tothe needed BQL statement.
9. Click the needed URL request, as shown in the screenshot below.
10.On table toolbar, click SQL to open the SQL Profiler pop-up panel.

| Troubleshooting Customization | 427
Figure: Opening the SQL Profiler pop-up panel for the selected URL request
11.On the panel, in the table, specify filters for one or both of the Tables and Parameterscolumns to shorten the list, as follows:
a. Click the column caption to open a simple filter for the column, as the followingscreenshot shows.
b. Enter the name of the needed table (for the Tables column) or parameter (for theParameters column) that is used in the BQL statement you are referring to.
c. Click OK to save the filter.

| Troubleshooting Customization | 428
Figure: Setting a filter for the SQL request list
If a filter is specified for a column of the table of the SQL Profiler pop-up panel,the filter icon is displayed in the column caption, as shown in the followingscreenshot.
Figure: Viewing the filter icon on the panelThe filter is applied to the list for every URL request until you clear the filter.
12.In the filtered list of SQL requests for the currently selected URL request, find the SQLrequest that corresponds to the BQL statement.

| Troubleshooting Customization | 429
Figure: Viewing the duration of the selected SQL request
The execution time of the SQL request is displayed in the TimeMs column.
13.On the form toolbar of the Request Profiler form (SM205070), click Stop to stop theRequest Profiler.
We recommend that you activate the Log SQL mode for only a limited periodbecause it can degrade system performance.
14.On the form toolbar, click Clear Log to delete the SQL request data from the database.
To Discover the Cause of Performance Degradation
Suppose that after publishing a customization project, you notice that the AcumaticaERP performance on a customized form is degraded. To check whether the content of thecustomization project is the cause of the performance degradation and to find the codefragment that affects system performance, you can use the Request Profiler.
The following sections provide detailed information:
• To Check Whether a Customization Project Affects System Performance
• To Find the Code Fragment That Is Affecting System Performance
To Check Whether a Customization Project Affects System Performance
To check whether a customization project degrades the Acumatica ERP performance, performthe following actions:
1. Unpublish all customization projects, as described in To Unpublish a Customization.
2. Open the Request Profiler form (SM205070) in the browser.
3. In the Profiler Options section, select the Log SQL Requests check box, whichindicates that the SQL request data should be stored in the database.
4. On the form toolbar, click Start, as shown in the following screenshot.

| Troubleshooting Customization | 430
Figure: Launching the SQL Profiler
5. In the browser, open the form that you suspect has experienced performance issuessince the customization project was published.
6. Reload the page by using the browser toolbar button.
7. On the form, sequentially perform multiple actions available on the form toolbar, such asRefresh or Save. Be sure to execute each action that is customized on the form.
8. On the form toolbar of the Request Profiler form (SM205070), click Refresh Results torefresh the log table.
9.On the table toolbar, click Export to Excel ( ) to save the log data to a Microsoft Excelfile.
10.Publish the customization project, as described in To Publish a Single Project.
11.Return to the Request Profiler form, and on the form toolbar, click Clear Log to clear thetable.
12.In the browser, open the form that you use for the performance test.
13.Perform the same sequence of actions that you did in Step 6 and Step 7.
14.Return to the Request Profiler form, and on the form toolbar, click Refresh Results torefresh the log table.
15.On the table toolbar, click Export to Excel ( ) to save the log data to a Microsoft Excelfile.
16.In Microsoft Excel, open the Microsoft Excel files you have saved to compare the durationvalues for the same actions.

| Troubleshooting Customization | 431
Customization of the business logic for a form can degrade the system performance,however the duration of an action can increase by no more than 10 percent. If theduration of an action on the customized form is more than 10 percent longer than theduration of the same action before customization, then the customization code must bereworked. To do this, follow the instructions described in To Find the Code Fragment That IsAffecting System Performance.
17.On the form toolbar of the Request Profiler form (SM205070), click Stop to stop theRequest Profiler.
We recommend that you activate the Log SQL mode for only a limited periodbecause it can degrade system performance.
18.On the form toolbar, click Clear Log to delete the SQL request data from the database.
To Find the Code Fragment That Is Affecting System Performance
If you have confirmed that the system performance is degraded on a customized form, youcan use the Request Profiler to discover the code fragment that is causing the performancedegradation. To do this, perform the following actions:
1. Open the Request Profiler form (SM205070) in the browser.
2. In the Profiler Options section, select the Log SQL Requests check box, whichindicates that the SQL request data should be stored in the database.
3. Select the Log SQL Requests Stack Trace check box, which indicates that the SQLrequest stack trace data should be stored in the database.
4. On the form toolbar, click Start.
5. In the browser, open the customized form that you have confirmed as experiencingperformance degradation.
6. On the form, sequentially perform the actions that you identified as executing too slowly.
7. On the form toolbar of the Request Profiler form (SM205070), click Refresh Results torefresh the log table.
8. In the log table, rearrange the log records in descending order to find the URL requestswith the highest values in each of the columns described below.
Column Description
Server Time,ms
The aggregate duration of the URL request execution on the server(in milliseconds).
SQL Time, ms The aggregate duration of execution of all the SQL requests in theURL request (in milliseconds).
Server CPU,ms
The aggregate duration of CPU usage during the URL request (in mil-liseconds).

| Troubleshooting Customization | 432
Column Description
SQL Count The count of the SQL requests to the database in the URL request.This count is the difference between the total number of the SQL re-quests in the URL request and the number of requests to the cache.
9. Select a record that has an unusually large value in any column listed in the previousstep, and then click SQL on table toolbar, as shown in the following screenshot, to openthe SQL Profiler pop-up panel.
Figure: Opening the SQL Profiler pop-up panel for the selected URL request
10.In the panel, use the standard table navigation buttons to explore the list of SQLrequests, which are initially ordered by start time (see the following screenshot).

| Troubleshooting Customization | 433
Figure: Viewing navigation buttons on the SQL Profiler pop-up panel
11.If needed, in the SQL profiler table, rearrange records by the value in the TimeMscolumn in descending order to find the SQL requests with the longest duration.
12.To view the SQL statement and the stack trace for an SQL request, select the request
in the table and then click Switch Between Grid and Form ( ), as shown in thefollowing screenshot.
Figure: Switching the panel to display the SQL statement and the stack trace of the selectedSQL request
13.In the stack trace, find the method that is causing the performance degradation.
14.Launch Microsoft Visual Studio.

| Troubleshooting Customization | 434
15.In Visual Studio, open the file with the method; the file is currently saved in theApp_RuntimeCode website folder.
16.Analyze the method body to find the code snippet that is causing the issue.
17.On the form toolbar of the Request Profiler form (SM205070), click Stop to stop theRequest Profiler.
We recommend that you activate the Log SQL mode for only a limited periodbecause it can degrade system performance.
18.On the form toolbar, click Clear Log to delete the SQL request data from the database.
To Force the Platform to Execute Database Scripts
You can discover that the database scripts that are included in a customization project havenot been executed by the Acumatica Customization Platform when you publish the project.This issue arises when you have first published the project and then changed the scripts.
When you publish the project, the platform executes all the scripts included in the project.For optimization purposes, to avoid the execution of database scripts during everypublication of the project, the platform saves information about each script that has beenexecuted at least once and has not yet been changed in the database, and omits therepeated execution of such scripts.
To force the platform to clean up all such information about previously executed scripts of acustomization project and execute the scripts again while publishing the project, follow theinstructions described in To Publish the Current Project with a Cleanup Operation.
To Resolve Issues While Upgrading a CustomizedWebsite
If you have a customization project that works properly for the current version of AcumaticaERP and you need to upgrade an application instance to a newer version, the customizationproject might not work properly or might even prevent the website from starting afterthe upgrade. This happens because the code of Acumatica ERP is continuously developedto implement new features or enhance existing functionality, so the code of an updatedinstance of Acumatica ERP can become inconsistent with the code in a customization project.For example, if the signature of a method that is overridden in the customization code ischanged in the original code, a run-time error may occur in the graph extension. As anotherexample, modified or deleted database columns and tables might cause the functionality of adata access class extension to fail.
Validation Process
To prevent these issues between the customization and the current version of AcumaticaERP, before you upgrade a customized instance of Acumatica ERP to a new version, theAcumatica Customization Platform validates the compatibility of the code included in

| Troubleshooting Customization | 435
all currently published customization projects with the application code of the updateversion. This validation process executes the following checks in the code of the publishedcustomization to detect the breaking changes in the code of Acumatica ERP:
• In graph extensions:
• Checking the signature for each method that is overridden by using the PXOverrideattribute.
• Checking the existence of each base graph.
• In data access class extensions, if a field attribute is overridden:
• Checking the field existence.
• Checking that the field type is not changed. (If the customization code uses the fieldvalue as decimal and the field type is changed, for example, from PXDBDecimal toPXDBString that is currently binding this field to a database column of the stringtype, an exception will occur on a request to the database.)
• In binary DLL files:
• Checking all the referenced methods, properties, fields, return types, and signatures.
In some specific cases, a binary file can be updated automatically with a newsignature. For example, in a referenced graph, the process updates the BQLstatement that is changed for a data view. If a changed signature is detectedand cannot be fixed automatically, an error is reported, and the validationfails.
This validation protects a customized website from an update that contains breaking changesand might make the website unworkable.
Upgrade of a Customized Website
You can upgrade an instance of Acumatica ERP in one of the following ways:
• On the Application Maintenance page of the Acumatica ERP Configuration Wizard. (SeeUpdating Acumatica ERP by Using the Configuration Wizard for details.)
• On the Apply Updates form (SM203510; System > Management > Process). (SeeUpdating Acumatica ERP by Using the Web Interface for details.)
You must include in a customization package any custom files that you need to usewith your instance of Acumatica ERP and publish this package on this instance. Ifyou instead copy the files to the website folder of your instance of Acumatica ERPmanually, the files will be removed while the instance is being updated.
When you start upgrading a customized instance of Acumatica ERP to a newer version, theplatform launches the validation process, to check the published customization compatibilitywith the new version code to detect breaking changes. If the validation fails, the platformcancels the upgrade process and shows an appropriate error message. (See Messages forValidation Errors for details.)

| Troubleshooting Customization | 436
To upgrade a customized instance of Acumatica ERP, follow the instructions presented in thefollowing topics:
• To Validate the Compatibility of the Published Customization with a New Version Before an Upgrade
• To Resolve an Issue Discovered During the Validation
• To Use the Technical Release Notes to Find the Breaking Changes
• To Use an Ignore List for the Validation Errors
To Validate the Compatibility of the PublishedCustomization with a New Version Before an Upgrade
You can validate the compatibility of the currently published customization with an updatedversion before you start the upgrade process.
To do this, perform the following actions:
1. Navigate to the Apply Updates form (SM203510; System > Management > Process).
2. On the Updates tab of the form, in the table of available updates, click the productversion to which you want to upgrade your Acumatica ERP instance, as shown in thescreenshot below.
3. On the table toolbar, click Download Package.
When the download is complete, the Ready to Install check box is automaticallyselected.
4. In the table toolbar, click Validate Customization to start the process of validating thecompatibility of the currently published customization code with the code of the selectedproduct version.

| Troubleshooting Customization | 437
Figure: Validating the product versionIf the validation succeeds, you know that you can upgrade your Acumatica ERP instance tothe selected version without an issue occurring.
If the validation fails, the Validation Failed window opens to display the list of the executedchecks and discovered errors, as the following screenshot shows.
Figure: Viewing an error message in the Validation Failed window

| Troubleshooting Customization | 438
To resolve any discovered issues, we recommend that you use the approach described in ToResolve an Issue Discovered During the Validation.
To Resolve an Issue Discovered During the Validation
If you need to upgrade an Acumatica ERP instance in the production environment, if thevalidation of the compatibility of the code included in all currently published customizationprojects with the code of the new product version fails, do the following:
• If the customization was developed by a third-party, please contact their supportdepartment directly.
• If you are a developer of this customization:
a. Learn what the error message means. (See Messages for Validation Errors for details.)
b. Find the customization code fragment related to the error, and try to resolve theissue you have discovered yourself by using the error description.
c. Check the technical release notes for the selected product version to ensure that thereason of the error is a change in the product code, and find the recommendation tosolve the issue. (See To Use the Technical Release Notes to Find the Breaking Changes fordetails.)
d. In your development environment:
1. Install the needed version of Acumatica ERP and deploy the new applicationinstance. (See Installing Acumatica ERP Locally for details.)
2. Import all customization projects. (See To Import a Project for details.)
3. Validate and fix the customization code in each project.
If you are unable to resolve an issue yourself, please contact Acumaticasupport. You can create a support case for the issue on the Support page ofthe Acumatica Partner Portal.
If you are sure that a discovered error is not really an error, you can force thevalidation process to ignore the error. See To Use an Ignore List for the ValidationErrors for details.
e. In the production environment:
1. Unpublish all customization projects. (See To Unpublish a Customization for details.)
2. Upgrade the Acumatica ERP instance. (See Updating Acumatica ERP by Using the WebInterface for details.)
3. Update the customization projects. (See To Replace the Content of a Project from aPackage for details.)
4. Publish the fixed customization projects. (See Publishing Customization Projects fordetails.)

| Troubleshooting Customization | 439
The validation that detects breaking changes is by default turned on in an instanceof Acumatica ERP. If you need to temporarily omit this validation, you can turn offthe CheckCustomizationCompatibility key by including the following string in the<appSettings> section of the web.config file located in the website folder:
<add key="CheckCustomizationCompatibility" value="False" />
We do not recommend that you turn off the validation permanently.
Messages for Validation Errors
This topic, which is intended to be used by developers, describes the messages thatmay occur during the validation of the customization code compatibility with the code ofAcumatica ERP.
Failed to resolve method reference
This error occurs if the validation process finds in a custom DLL a reference to a method thatis absent with the same signature in the code of Acumatica ERP.
The following example of the error message informs you thatthe AM.Objects.dll file contains a reference to the System.VoidPX.Data.PXLineNbrAttribute::.ctor(System.Type) method, which has not been declaredor has another signature in the PX.Data assembly.
AM.Objects.dllFailed to resolve method reference:System.Void PX.Data.PXLineNbrAttribute::.ctor(System.Type)declared inPX.Data, Version=1.0.0.0, Culture=neutral, PublicKeyToken=3b136cac2f602b8e
Because the customization code is consistent with the previous version of Acumatica ERP,this error occurs because the method overridden in the customization code has beenremoved or its signature has been changed in the update. To ensure that this change isimplemented in the code of the new version of Acumatica ERP, see the technical releasenotes for this version, as described in To Use the Technical Release Notes to Find the BreakingChanges.
To fix the error, in the code of the specified extension library, you should refer to anappropriate method declared in the assembly.
Failed to resolve type reference
This error occurs if the validation process finds in a custom DLL a reference to a type whosedeclaration is absent in the code of Acumatica ERP.
The following example of the error message informs you that the FETempFix.dll filecontains the reference to the PX.Data.PXGraphWithActionsBase`2 type that is not declaredin the PX.Data assembly.

| Troubleshooting Customization | 440
FETempFix.dllFailed to resolve type reference:PX.Data.PXGraphWithActionsBase`2declared inPX.Data, Version=1.0.0.0, Culture=neutral, PublicKeyToken=3b136cac2f602b8e
To fix the error, in the code of the specified extension library, you have to refer to anappropriate type declared in the assembly.
Could not resolve
This error occurs if the validation process finds a reference to a custom DLL that cannot befound.
The following example of the error message informs you that the FullRegen.dll file containsthe ADODB reference, which cannot be resolved.
FullRegen.dllCould not resolve:ADODB, Version=7.0.3300.0, Culture=neutral, PublicKeyToken=b03f5f7f11d50a3a
To fix the error, in the code of the specified extension library, you have to refer to a DLL filelocated in the Bin folder of the website.
Declaring Type missing
This error occurs if the validation process finds, in the customization code located in theApp_RuntimeCode folder of the website, a reference to a type whose declaration is absentin the code of Acumatica ERP.
The following example of the error message informs you that thePX.Objects.EP.CRBaseActivityMaint`1<PX.Objects.CR.CRTaskMaint> class contains areference to the BaseBAccount type, which is undeclared.
Declaring Type missing:BaseBAccountfromPX.Objects.EP.CRBaseActivityMaint`1<PX.Objects.CR.CRTaskMaint>
To fix the error, in the corresponding Code or DAC item of the customization project, youhave to refer to the appropriate type.
Referenced Field missing
This error occurs if the validation process finds, in the customization code located in theApp_RuntimeCode folder of the website, a reference to a field that is undeclared in thedata access class (DAC).
The following example of the error message informs you that the PX.Objects.CS.CSAnswersdata access class does not contain the _EntityID field.

| Troubleshooting Customization | 441
Referenced Field missing:_EntityIDfromPX.Objects.CS.CSAnswers
To fix the error, in the corresponding Code or DAC item of the customization project, youhave to refer to the appropriate field.
Base property is missing or IBqlField is not defined
This error can occur if the validation process finds a data access class extension thatcontains a reference of a field with both of the following implementation features:
• The field name does not contain the Usr prefix.
• The DAC extension does not contain the IBqlField declaration.For such cases, the validation determines that the DAC extension overrides a field existingin the code of Acumatica ERP. If this field cannot be found in the code of Acumatica ERP, thevalidation reports about the error.
The following example of the error message informs you that the Age field is referencedin the CQHRIS.ContactExtension extension of the CQHRIS.Contact data access class;however the code of Acumatica ERP does not contain the field declaration.
Base property is missing or IBqlField is not defined:Agein extensionCQHRIS.ContactExtension
If the field is custom, to fix the error, you have to add the IBqlField declaration in the DACextension. If the code refers to a field that was removed from the code of Acumatica ERP,you should alter the DAC extension to make it consistent with the base class.
To Use the Technical Release Notes to Find the BreakingChanges
If you need to know all the changes that have been performed in some version of AcumaticaERP and may affect reports, customizations, and integration built in a prior version, see thelist of changes in the Technical Release Notes document for the new version.
The Technical Release Notes documents contain the following lists of breaking changes:
• Removed screens
• Removed tables
• Removed fields
• Modified field types
• Removed data access classes

| Troubleshooting Customization | 442
• Removed graphs
• Removed constants
• Other removed classes
• Modified interfaces and abstract classes
• Other breaking changes
• Other breaking fields
To download a Technical Release Notes document for the needed version of Acumatica ERP,perform the following actions:
1. In the browser, open Acumatica Partner Portal.
2. In the Product Links list of the webpage, click Download Acumatica.
3. In the Links list at right side of the webpage, which opens, click Release Notes.
4. On the Release Notes webpage, which opens, select the tab for the needed version ofAcumatica ERP, and then click the link for the Technical Release Notes document for thisversion, as the following screenshot shows.
Figure: Downloading the Technical Release Notes on the Partner Portal
After you have downloaded the document, you can use it to search for the object that isspecified in the error message that occurred during the validation process.

| Troubleshooting Customization | 443
The Technical Release Notes document contains information about the changes in theselected version of Acumatica ERP. If you upgrade an instance of Acumatica ERP, forexample, from Version 5.2 to Version 6.0, you should explore the technical releasenotes for Versions 5.3 and 6.0.
If the object is found, and the document contains information about how to fix the issue, usethe information. Otherwise, on the Support page of the portal, click New Support Case tocreate a support case for the issue.
To Use an Ignore List for the Validation Errors
If validation of the compatibility of the published customization with the new version fails,the platform cancels the upgrade process and shows an appropriate error message. Howeverfor some cases when you are sure that a discovered error is not really an error, you canforce the validation process to ignore the error, so you can continue the process of upgradingof the customized instance of Acumatica ERP. Also, you may need to ignore, for example, anerror in a third-party DLL file.
To force the validation process to ignore an error, perform the following actions:
1. In the App_Data folder of the website, create a .txt file whose namehas the CstValidationIgnore prefix, such as CstValidationIgnore.txt orCstValidationIgnore_ProjectName.txt.
You can create multiple CstValidationIgnore*.txt files with ignore lists for aninstance of Acumatica ERP.
2. In the tool used for the upgrade, which may be the Acumatica ERP Configuration Wizardor the Apply Updates form (SM203510; System > Management > Process), select theerror message and copy it to the clipboard.
3. In the file, paste the error message from the clipboard.
You can add multiple error messages to each of multiple files with ignore lists.
4. Save the file.
5. Determine which the customization project has the code that provokes the errormessage.
6. Add the file with the ignore list to the project (see To Add a Custom File to a Projectfor details) so it will ignore the error when you publish the project in the productionenvironment.
While it validates a customization project before the project publication, theAcumatica Customization Platform ignores all the errors that are specified in the

| Troubleshooting Customization | 444
CstValidationIgnore*.txt files with the CstValidationIgnore prefix in the filename if these files are located in the App_Data folder of the website.
As a result, if you publish the customization project or upgrade an Acumatica ERP instancewhere the project is published, the validation process omits the error that is specified in thefile.

| Examples | 445
ExamplesThis part of the guide is intended to describe examples of how you can customize the userinterface and business logic of Acumatica ERP forms.
In This Part
• Examples of User Interface Customization
• Examples of Functional Customization
Examples of User Interface Customization
UI customization includes changing the look and behavior of forms, tweaking form design,and manually editing the .aspx code. UI customization is always related to the .aspxcode of the corresponding forms and represents aspx changesets that are added to theexisting .aspx code.
For customization to the layout of existing forms, you can use the Screen Editor that you openfrom the Customization Project Editor.
For the layout design of new forms, you should use the Screen Editor that you open fromMicrosoft Visual Studio.
The next topics describe the rules for user interface customization and give examples oftypical UI customization tasks:
• Dragging, Moving, and Deleting UI Controls and Grid Columns
• Adding Input Controls
• Adding Advanced Controls
• Adding Columns to a Grid
• Modifying Columns in a Selector
•
Dragging, Moving, and Deleting UI Controls and GridColumns
This topic describes in detail how to change the placement of UI controls by dragging themand how to use the facilities of the Screen Editor to delete or move UI controls and gridcolumns.
Dragging and Dropping UI Controls
Before you start to manually move UI controls by dragging them in the Control Tree of theScreen Editor, note the following simple rules:
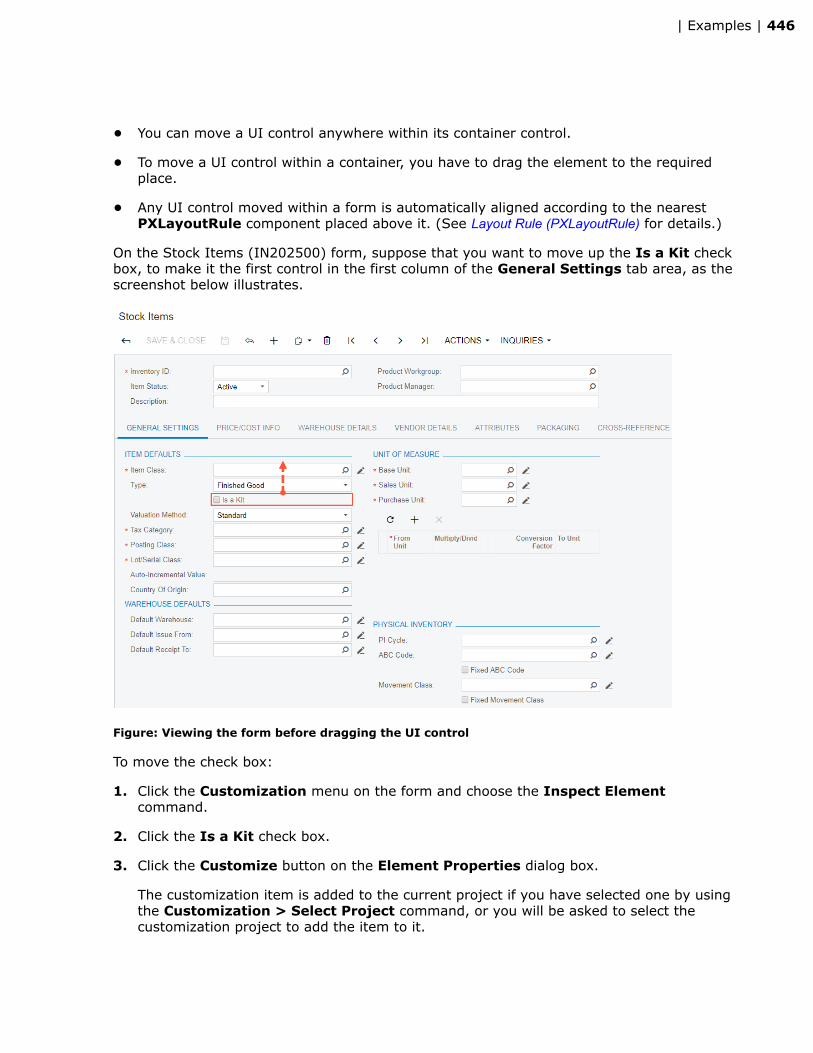
| Examples | 446
• You can move a UI control anywhere within its container control.
• To move a UI control within a container, you have to drag the element to the requiredplace.
• Any UI control moved within a form is automatically aligned according to the nearestPXLayoutRule component placed above it. (See Layout Rule (PXLayoutRule) for details.)
On the Stock Items (IN202500) form, suppose that you want to move up the Is a Kit checkbox, to make it the first control in the first column of the General Settings tab area, as thescreenshot below illustrates.
Figure: Viewing the form before dragging the UI control
To move the check box:
1. Click the Customization menu on the form and choose the Inspect Elementcommand.
2. Click the Is a Kit check box.
3. Click the Customize button on the Element Properties dialog box.
The customization item is added to the current project if you have selected one by usingthe Customization > Select Project command, or you will be asked to select thecustomization project to add the item to it.

| Examples | 447
4. In the Control Tree of the Screen Editor, drag the Is a Kit check box to the positionabove the Item Class control.
5. Save the changes to the customization project, and publish the customization project.
Figure: Moving the UI control to the required position
The check box appears at the new position (see the following screenshot).

| Examples | 448
Figure: Noticing the new placement of the check box
Moving and Deleting UI Controls and Grid Columns
You use the Screen Editor to implement advanced customization of a form—for instance,if you need to shift a column within a grid, to delete a UI control or table column from aform area, or to change the position of a UI control on a form while having the capability tochange its original container.
After changing containers, you should perform functional changes concerning thecode of appropriate main data access classes (DACs) or data views of businesslogic controllers (BLCs, also referred to as graphs). For details, see Customizing DACAttributes.
Suppose that you have to customize the General Settings and Warehouse Details tabs ofthe Stock Items (IN202500) form as follows:
1. Delete the Auto-Incremental Value input control. (See the first screenshot below.)
2. Move down the Tax Category control so that it is placed under the Lot/Serial Classcontrol, as the first screenshot also illustrates.

| Examples | 449
The Lot/Serial Class field is visible if the Lot and Serial Tracking feature isenabled on the Enable/Disable Features (CS100000) form.
3. Move to the left the Status column of the details table so that it is placed at the right ofthe Default column, as shown in the second screenshot below
Figure: Viewing the General Settings tab before changes
Figure: Viewing the details table of the Warehouse Details tab before changes

| Examples | 450
To open the Screen Editor, open the Stock Items (IN202500) form, click the Customizationmenu, choose the Inspect Element command, select the Auto-Incremental Valuecontrol on the form, and click the Customize button on the Element Properties dialogbox.
The Control Tree of the editor displays content of the General Settings tab item, to whichthe Auto-Incremental Value control belongs. This control is currently selected andhighlighted in bold.
To view all controls and containers of the customized form on the tree, click the filterbutton of the tree toolbar.
To delete the selected control, click the Delete button of the tree toolbar.
Figure: Removing the selected UI control
Now you should move down the Tax Category UI control, to place it under the Lot/SerialClass control. Select the Tax Category UI control on the tree, drag it and drop to therequired position, as the screenshot below illustrates.

| Examples | 451
Figure: Moving the control on the Control Tree
Thus, to change the placement of a UI control, you select it on the Control Tree of theScreen Editor, drag it and drop to place this control appropriately in relation to other UIcontrols.
Click Save on the toolbar of the Screen Editor to save changes to the current customizationproject.
To begin moving the Status column, you can:
• Open the Stock Items (IN202500) form and use the Element Inspector for the Statuscolumn on the form
• Open the Screen Editor for the form and find the column in the Control Tree
Drag and drop the Status control to the required position in the tree, as the screenshotbelow illustrates.

| Examples | 452
Figure: Moving the grid column to the left
Thus, to change the placement of a grid column, you find the column in the Control Tree ofthe Screen Editor and drag it to the desired position.
Click Save on the toolbar of the Screen Editor to save changes to the current customizationproject.
After you publish the project, you will see the modified General Settings tab on the StockItems (IN202500) form, as the following screenshot illustrates.

| Examples | 453
Figure: Viewing the modified General Settings tab of the form
If you open the Warehouse Details tab of this form, you will see that the column of thedetails table has been moved to the left, as shown in the screenshot below.
Figure: Viewing the moved column on the Warehouse Details tab
If you need to analyze the added content (changeset) of the customization project, open theproject in the Project Editor, choose the Edit Project Items command on the File menuitem and select the Object Name field of the customized object (see the screenshot below).

| Examples | 454
Figure: Analyzing the added content of the customization project
Adding Input Controls
If you need to add a control onto a form, you use the Screen Editor.
The screenshot below illustrates the original Journal Transactions (GL301000) form. Supposethat you want to add a text field (for instance, the CreatedByID selector of the GL BatchDAC) below the Auto Reversing check box.
Figure: Viewing the original form

| Examples | 455
To open the Screen Editor, open the Journal Transactions (GL301000) form, click theCustomization menu, choose the Inspect Element command, select the Auto Reversingcontrol, and click the Customize button on the Element Properties dialog box.
The editor is opened with the Auto Reversing control selected and highlighted in bold in thetree of controls.
To create a control below the selected item in the tree:
1. Click on the Add Data Field tab.
2. Select the CreatedByID field in the list on the tab.
3. Click the Create Controls button on the tab toolbar.
Figure: Creating a control below the selected one in the tree of controls
Adjust the placement of a UI control so that it is after the [Layout Rule] node by dragging itto the needed place.
Click Save on the toolbar of the Screen Editor to save changes to the current customizationproject.
After publishing the customization project, you will see the added field on the JournalTransactions form, as the screenshot below illustrates.

| Examples | 456
Figure: Viewing the customized form
To view the fragment of the .aspx code that represents the customization result, openthe form in the Screen Editor and select the View ASPX tab. The customized fragment ishighlighted in yellow, as the screenshot below illustrates.
Figure: Analyzing the changeset of the .aspx code
To view the changes to the layout of the form introduced by the new control, open theproject in the Project Editor, choose the Edit Project Items command on the File menuitem and select the Object Name field of the customized object (see the screenshot below).You can see the new Page item that contains the .aspx code changeset.

| Examples | 457
Figure: Analyzing the added content of the customization project
As a rule, if you add a new data field, you need to perform some additional actionsrelated to the functional customization. For an example of the creation of a new datafield, see Adding Data Fields.
Adding Advanced Controls
Suppose that you need to customize the Stock Items (IN202500) form and you have dividedthe customization task into the following steps:
• Adding a new tab item onto the form.
• Adding a panel onto the tab item.
• Adding an UI control onto the new panel.
This step is needed to make the added tab and its content visible at run time;otherwise, empty container controls aren't displayed.
The original Stock Items (IN202500) form is shown on the screenshot below.

| Examples | 458
Figure: Viewing the Stock Items form before changes
Adding a New Tab Item
Suppose that you need to add the Relative Positioning Layout tab item to the StockItems (IN202500) form and set its position as the leftmost one.
To do this, perform the following actions:
1. On the Stock Items (IN202500) form, click the Customization menu, choose InspectElement, select the tab control, and click Customize on the Element Propertiesdialog box.
2. In the Screen Editor that appears, click the Tab: ItemSettings node in the Control Tree toview all items of the tab.
3. Open the Add Controls tab of the Screen Editor.
4. Drag and drop the Tab Item (PXTabItem) container above the General Settings node inthe tree, as shown in the screenshot below.

| Examples | 459
Figure: Adding a tab item to the left position on the tab area of the Stock Items form
5. Select the TabItem node that has been added.
6. Select the Layout Properties tab of the Screen Editor.
7. Select the Text property and enter Relative Positioning Layout to specify the nameof the new tab.
8. Click Save on the toolbar of the Screen Editor to save changes to the currentcustomization project.
Thus, to add a new tab item to a tab, you have to expand the tab node in the Control Treeof the Screen Editor, select the Add Controls tab in the editor, drag and drop the Tab Itemcontainer to place this control appropriately in relation to other items in the tab.
A container is visible on the form if the container contains a visible field control. So at themoment you cannot view the Relative Positioning Layout tab item on the Stock Items(IN202500) form even after the customization project is published or on the form previewthat can be opened by clicking Preview Changes in the Screen Editor.
Adding a Panel onto the PXTabItem Container Control
Now you have to add a panel (PXPanel control) onto the created PXTabItem control (that is,onto the new tab item), which is empty at the moment.
Complete the following steps:
1. Open the Add Controls tab of the Screen Editor.
2. On the opened tab item, find and drag the Panel (PXPanel) control.

| Examples | 460
3. Drop it into the Relative Positioning Layout tab item in the tree of controls, as shown inthe screenshot below.
Figure: Adding a panel onto the created PXTabItem container control
4. Select the Panel: CstPanel1 node that has been added.
5. Select the Layout Properties tab of the Screen Editor.
6. Select the Caption property and enter Audit to specify the name of the new panel.
7. Click Save on the toolbar of the Screen Editor to save changes to the currentcustomization project.
Thus, to add a new control to a container, you have to open the Screen Editor, find thecontainer in the Control Tree, select the Add Controls tab in the editor, find the requiredtype of the control, and drag and drop the needed control onto the container. Then you canspecify the properties of the created control.
Adding a UI Control onto the PXPanel Control
The panel is still not visible on the tab because it doesn't contain any visible controls. Add acontrol to the panel, as described below:
1. Select the Panel: Audit node in the tree of controls.
2. Open the Add Data Fields tab of the Screen Editor.
3. Select the CreatedByID field in the list that at the moment displays the visible fields ofthe Inventory Item data access class.

| Examples | 461
4. Click Create Controls on the tab toolbar (see the screenshot below).
Figure: Adding a UI control to the PXPanel container control
5. Click the Panel: Audit node to expand and view the created control in the tree ofcontrols.
6. Open the Add Controls tab of the Screen Editor.
7. Drag the Empty Rule (PXLayoutRule) control and drop it above the Created By controlin the tree, as shown in the screenshot below.

| Examples | 462
Figure: Adding the PXLayoutRule onto the panel
8. In the Control Tree, select the Layout Rule node that has been added.
9. Select the Layout Properties tab of the Screen Editor.
10.Type SM as the ControlSize property value and S as the LabelWidth property value.
11.Set the StartRow property to True, as shown in the screenshot below.

| Examples | 463
Figure: Setting property values for the added PXLayoutRule object
12.Click Save on the toolbar of the Screen Editor to save changes to the customizationproject.
After you save your changes, the Layout Rule transforms into a Control Tree node insidethe Panel:Audit node according to specified properties. In this case, you see the CreatedBy node is now inside the Row node which has the Layout Rule's properties.
Thus, to apply a layout rule to controls, you have to place the layout rule above the controls.Then you can specify the properties of the created layout rule.
To view the changes, click Preview Page on the toolbar or publish the project and reviewthe changes on the Stock Items (IN202500) form after the customization has been applied.
The control is displayed on the panel on the Relative Positioning Layout tab (see thescreenshot below) that has been added in Adding a New Tab Item.

| Examples | 464
Figure: Viewing the added UI control at run time
To view the fragment of the .aspx code that represents the customization result, openthe form in the Screen Editor and select the View ASPX tab. The customized fragment ishighlighted in yellow, as the screenshot below illustrates.
Figure: Viewing the changes to the layout of the form
If you need to analyze the added content (changeset) of the customization project, in theCustomization Project Editor, choose the Edit Project Items command on the File menuitem and select the Object Name field of the customized object (see the screenshot below).The Page item represents the changes to the .aspx code.

| Examples | 465
Figure: Analyzing the added content of the customization project
Adding Columns to a Grid
Suppose that you need to add a column to the details table (grid) of the Journal Transactions(GL301000) form shown in the screenshot below.

| Examples | 466
Figure: Viewing the original form
For instance, suppose that you need to add the column for the CreateDateTime data field tothe position after the Ref. Number column.
To do this, perform the following actions:
1. On the Journal Transactions (GL301000) form, click the Customization menu, chooseInspect Element, select the Ref. Number column header, and click Customize on theElement Properties dialog box.
2. In the Screen Editor, open the Add Data Fields tab.
3. Apply the All filter to the list of the fields.
4. Select the CreateDateTime field in the list, as shown in the screenshot below.
5. Click Create Controls in the tab toolbar.

| Examples | 467
New columns are added to the grid in the position after the item selected in theControl Tree of the Screen Editor. If you need to change the placement of a UIcontrol, select the control on the tree, drag and drop it to the needed place.
Figure: Adding the column to the grid
6. Click Save on the toolbar of the Screen Editor to save changes to the currentcustomization project.
Thus, to add new columns to a grid, you have to open the grid node on the Control Tree ofthe Screen, select the Add Data Fields tab in the editor, select needed fields in the list onthe tab, click Create Controls, and then drag and drop new columns to desired positionsinside the grid. You can add a column for any field that belongs to any data access class(DAC) of any data view of the business logic controller bound to the form. To select a DAC toview its fields in the list, use the Data View drop-down list on the Add Data Fields tab.
To view the changes on the form, click Preview Page on the toolbar or publish theproject and review the changes on the Journal Transactions (GL301000) form after thecustomization has been applied.

| Examples | 468
Figure: Viewing the customized form
To view the fragment of the .aspx code that represents the customization result, openthe form in the Screen Editor and select the View ASPX tab. The customized fragment ishighlighted in yellow, as the screenshot below illustrates.
Figure: Analyzing the changeset of the .aspx code
To analyze the changes to the layout of the form introduced by the new column, in theCustomization Project Editor, choose the Edit Project Items command on the File menuitem and select the Object Name field of the customized object (see the screenshot below).You can see the new Page item that contains the .aspx code changeset.

| Examples | 469
Figure: Analyzing the added content of the customization project
Modifying Columns in a Selector
If you add columns to a selector, you give the user the capability to see more informationabout each item in the lookup window, so the user can select the appropriate data record.
The screenshot below illustrates the original view of the Batch Number lookup window(also referred to as selector). The Batch Number is a control on the form of the JournalTransactions (GL301000) form. The lookup window of this control includes eight columns, asshown in the screenshot below.
Figure: Viewing the current structure and content of the lookup window

| Examples | 470
Suppose the UI customization task for the Batch Number selector includes the followingsteps (see the screenshot above):
1. Deleting an existing column, such as the Ledger column.
2. Adding a column for the Created By field to the place after the Currency column.
3. Changing the order of the selector columns, so the Status column moves to the positionbetween the Credit Total and Currency columns.
To do this, perform the following actions:
1. On the Journal Transactions (GL301000) form, click the Customization menu, chooseInspect Element, select the Batch Number control, click Actions on the ElementProperties dialog box and select the Customize Data Fields command.
The Data Class Editor appears with only the BatchNbr field in the list of the customizedfields of the class. The field is already selected in the field; therefore the work area of theeditor holds information about the field.
The selected field type is selector, so the Selector Columns button is enabled inthe editor toolbar.
2. Сlick Selector Columns to open the Customize Selector Column dialog box, asshown in the screenshot below.
3. In the table of the Customize Selector Column dialog box, select the row with theLedger column.
4. Click Delete Row to delete the selected Ledger column from the selector.

| Examples | 471
Figure: Deleting the selected column from the selector
5. Click Add Columns on the toolbar of the Customize Selector Column dialog box toopen the Add Columns to Selector dialog box.
6. In the Add Columns to Selector dialog box, select the All tab to view all fields of thecustomized data access class (DAC) in the table.
7. In the table, select the row with the Created By column name.
8. Click OK to add the selected field to the table of the Customize Selector Columndialog box.

| Examples | 472
Figure: Adding the column for the field to the table of the Customize Selector Column Dialog
New columns are added to the position after the last existing column of theselector.
The Created By column is created in the table of the Customize Selector Columndialog box at the rightmost position. Therefore, you do not need to move this columninside the selector. But you still have to move the Status column to position between theCredit Total and Currency columns.
9. Select the row with the Status column.
10.Click Down twice to move the selected row to the required position, as shown in thescreenshot below.
11.Click OK on the Customize Selector Column dialog box to apply the changes to theselector.
12.Click Save on the toolbar of the Data Class Editor to save the changes to the currentcustomization project.
After you click OK in the Customize Selector Columns dialog box, the system applies themodifications to the selector table. As a result, the PXCustomizeSelectorColumns attributeis added to the selector field and you can view the attribute in the Customize Attributestext area of the Data Class Editor (see the screenshot below). This attribute defines the newset and order of the columns in the selector.

| Examples | 473
Figure: Viewing the changes in the Customize Attributes text area
After publishing the project, open the Journal Transactions (GL301000) form, click theMagnifier icon of the Batch Number control, and view the lookup window. Notice theabsence of the deleted column, the position of the moved Status column, and the presenceof the Created By column, as shown in the screenshot below.
Figure: Viewing the modified structure and content of the lookup window

| Examples | 474
If you need to analyze the added content (changeset) of the customization project, openthe project in the Project Editor, choose the Edit Project Items command on the Filemenu item, and select the Object Name field of the customized object (see the screenshotbelow). The DAC object represents the changes to the data access class code.
Figure: Analyzing the added content of the customization project
Examples of Functional Customization
Functional customization means modifications of the data structure and original applicationbusiness logic. These modifications are related either to the code of the appropriate dataaccess classes (DACs) or business logic controllers (BLCs, also referred to as graphs).
The Acumatica Customization Platform provides the tools and the framework that is basedon class extensions and provides the following key features:
• You can deploy multiple projects that extend DACs or BLCs.
• Extensions are precompiled, which provides a measure of protection for your source codeand intellectual property.
• The framework provides an advanced level of control over the business logic and amultilevel extension model.
• The platform implements an auto-discovery mechanism, which makes the deploymentand upgrade processes straightforward.
The topics of this section describe the rules and methods of functional customization andgive examples of customization projects that resolve typical functional customization tasks:
• Adding Data Fields

| Examples | 475
• Customizing DAC Attributes
• Modifying a BLC Action
• Modifying a BLC Data View
• Declaring or Altering a BLC Data View Delegate
• Extending BLC Initialization
• Altering the BLC of a Processing Form
• Adding or Altering BLC Event Handlers
• Altering BLC Virtual Methods
Adding Data Fields
You can add to a form a UI control based on a new data field. To do this, you can use thefollowing ways:
• Use the Data Class Editor to create the data field and use the Screen Editor to add thecontrol onto the required area of a form.
• Define the data field in code, add the Table customization item for adding the column tothe database table if the field is bound, and use the Screen Editor to add the control ontothe required area of a form.
These approaches are described in greater detail below.
• Adding a Data Field From the Data Class Editor
• Adding a Data Field From Code
Adding a Data Field From the Data Class Editor
Suppose that you have to add an input UI text box for a bound data field to the Stock Items(IN202500) form. To do this, you have to (see the diagram below):
• Add a data field to the code of the appropriate DAC (the functional customization step)
• Add a column to the database table (a customization change to the database structurethat is a part of functional customization)
You have to add a database column only for bound data fields. Bound data fieldmeans the field values are saved in the database. If you define an unbound field,skip this step.
• Add a control for the field onto the form area (the UI customization step)

| Examples | 476
Figure: Adding a bound field to a webpage
Suppose you have to add the new Search Keywords text box to the Stock Items form tothe location shown on the screenshot.

| Examples | 477
Figure: The customization task of adding the new field to the form
To add this text box, do the following:
1. Add the field to the appropriate DAC as follows:
a. Open the data access class that provides fields for the form area on the StockItems form in Data Class Editor. To do this, open the Stock Items form, selectCustomization > Inspect Element on the form title bar, and click the form area ofthe Stock Items form.
The following information of the control and the data access class should appear inthe Element Properties dialog box:
• Control Type: Form View
• Data Class: InventoryItem
• Business Logic: InventoryItemMaint
InventoryItem is the data access class that provides the data fields for UI controlson the form. Therefore, you have to add the new data field to the extension of thisclass.
b. In the Element Properties dialog box, select Actions > Customize Data Fields toopen the Data Class Editor for the InventoryItem class.
If you haven't selected the current project yet, you will be asked to selectthe customization project to which the customization of the data accessclass will be added. You can select the current project to automatically addall customizations that you initiate from the Element Inspector by using theCustomization > Select Project menu to the project. For more information,see Select Customization Project Dialog Box.
c. In the Data Class Editor, select Add Field > Create New Field on the toolbar.
d. In the Create New Field dialog box, specify the following parameters for the newfield:
• Field Name: SearchKeywords
• DisplayName: Search Keywords

| Examples | 478
• Storage Type: DBTableColumn
• Data Type: string
• Length: 255
As soon as you move the focus out of the Field Name box, the system adds the Usrprefix to the field name (see the screenshot below), which provides the distinctionbetween the base fields and new custom fields that you add to the class. Keep theprefix in the field name and click OK to add the data field to the class.
If you select the DBTableColumn storage type, the system automatically addsschema for the new database column to the customization project. For moreinformation on parameters that you specify for new fields, see Create New FieldDialog Box.
Figure: Adding the new data field to the class
To the customization project, the system adds the new field as the extension tothe InventoryItem data access class, and adds the Table item for adding thecorresponding column to the database table.
e. Click Save on the toolbar of the Data Class Editor to save the changes to the project.After you save the added field, you can see the added project item in the DatabaseScripts page of the Customization Project Editor.

| Examples | 479
2. Publish the customization project. You need to do it at this point to be able to add the UIcontrol for the new field because when the project is published the system compiles thecustomization code and updates the database schema with the new column. For moreinformation, see Publishing Customization Projects.
3. Add the control to the form. Do it as follows:
a. Add the Stock Items form to the customization project. To do this, you can use theElement Inspector or select Screens on the navigation pane of the CustomizationProject Editor, and add the Stock Items form to the list by selecting Add Screen >Customize Existing Screen on the toolbar.
b. Open the form in the Screen Editor. In the Control Tree, expand the Form: Itemcontainer and select and expand the first column within the container to set up theposition to which the new control will be added.
c. Select the Add Data Fields tab of Screen Editor.
d. Leave the Data View box empty. (The box specifies the data access class by whichthe fields are filtered in the table below.)
e. Select the Custom filter on the tab and select the check box for theUsrSearchKeywords field in the table, as the following screenshot shows.
Figure: Adding the control for the data field
f. Click Create Controls on the toolbar of the tab. The control for the SearchKeywords field will be added to the tree.
Now you have to adjust the position and size of the control on the form. Drag and dropthe Search Keywords control at the end of the column after the Description controland click Save to save the changes to the project.
4. Adjust the size of the control. To do that you have to place an instance of thePXLayoutRule component right above the control and configure it as follows:
a. Select the Add Controls tab of Screen Editor and drag and drop an Empty Rulecomponent to the position above the Search Keywords control in the tree, as thescreenshot below shows.

| Examples | 480
Figure: Adding an Empty Rule component to the tree to adjust the size of the control
b. Select the [Layout Rule] node that appears in the Control Tree and switch to theLayout Properties tab of Screen Editor.
c. On the Layout Properties tab, set the ColumnSpan property to 2, which specifiesthe span of the control on two columns of the layout on the form. Click Save to savethe changes to the project. After you save these changes, the [Layout Rule] node isrenamed to [Column Span] according to the property the rule is changing.
The controls are organized in two columns on the form. For more informationabout positioning controls, see Layout Rule (PXLayoutRule).
The customization to the layout of the form is ready.
While working with Screen Editor, you can click Preview Page to view how thechanges will affect the layout of the form.
Publish the project again to view the changes applied to the Stock Items (IN202500) form.After you publish the project, verify that the customized Stock Items form looks as neededaccording to the customization task. The customization items for form layout, data accessclass, and database schema have been added to the project. The new Search Keywordstext box will appear on the Stock Items form on every system where you publish thecustomization project.
The DAC extension code that has been generated for the new field is given below. Thesystem has generated a DAC extension class for InventoryItem and added the data fielddefinition to the class. For more information about extension classes, see DAC Extensions.
public class PX_Objects_IN_InventoryItem_Extension_AddColumn: PXCacheExtension<PX.Objects.IN.InventoryItem>{ #region UsrSearchKeywords public abstract class usrSearchKeywords : IBqlField{}

| Examples | 481
[PXDBString(255)] [PXUIField(DisplayName="Search Keywords")] public virtual string UsrSearchKeywords { get; set; } #endregion}
You can open the customization code in MS Visual Studio and work with the code there. Formore information, see Integrating the Project Editor with Microsoft Visual Studio.
Adding a Data Field From Code
If you work with the customization code in MS Visual Studio, you can define a new data fieldin DAC extension code and then create the control on the form.
Suppose that you have to add an input UI text box for a bound data field to the Stock Items(IN202500) form. To do this, you have to:
• Add a data field to the code of the appropriate DAC (the functional customization step)
• Add a column to the database table (a customization change to the database structurethat is a part of functional customization)
You have to add a database column only for bound data fields. Bound data fieldmeans the field values are saved in the database. If you define an unbound field,skip this step.
• Add an input UI text box onto the form area of the form (the UI customization step)
Suppose you have to add the new Local Tax Category selector to the Stock Items form, asthe screenshot below shows.

| Examples | 482
Figure: The customization task of adding the new field to the form
If you want to work with the DAC extension code in the integrated MS Visual Studiosolution without use of Data Class Editor, you can develop the code in a .cs file addedto the customization project as a custom Code item or in a .cs file in a separate add-onproject in the solution. We recommend that you use either Data Class Editor or develop theentire customization code in an add-on project in MS Visual Studio, but do not mix up theapproaches. For more information, see Integrating the Project Editor with Microsoft Visual Studio.
To add the UI control for the bound data field created from code, perform the followingactions:
1. In MS Visual Studio, define the custom usrLocalTaxCategoryID data field in the DACextension class, as listed below.
using PX.Data;using PX.Objects.IN;using PX.Objects.TX;
namespace PX.Objects.IN{ public class InventoryItemExtension: PXCacheExtension<InventoryItem>

| Examples | 483
{ #region UsrLocalTaxCategoryID public abstract class usrLocalTaxCategoryID : PX.Data.IBqlField { } [PXDBString(10, IsUnicode = true)] [PXUIField(DisplayName = "Local Tax Category")] [PXSelector(typeof(TaxCategory.taxCategoryID), DescriptionField = typeof(TaxCategory.descr))] public string UsrLocalTaxCategoryID { get; set; } #endregion }}
In this example, the .cs file with the DAC extension code is added to thecustomization project as a custom Code item. When you develop extensions incustom Code items, define the extension classes in the namespace of the originalclass. For more information about adding custom Code items to the project, seeCode.
2. Update the customization project with the new customization code. To do this, openthe customization project that corresponds to the MS Visual Studio solution in theCustomization Project Editor, select the Files list of project items and click DetectModified Files.
If you build an assembly with the DAC extension code, update the assembly filein the customization project. For more information, see To Update a File Item in aProject.
In the Modified Files Detected dialog box, select the conflicting file of the custom Codeitem and click Update Customization Project to update the code in the project.
3. Add the database schema for the custom field to the project as follows:
a. On the Database Scripts page of the Customization Project Editor, click Add >Custom Column to Table. In the Add Custom Column to Table dialog box whichopens, fill in the following values and click OK:
• Table Name: InventoryItem
• Field Name: LocalTaxCategoryID (without the Usr prefix)
• Field Type: string
• Length: 10

| Examples | 484
Figure: Adding the database schema for a custom DAC field created from code
We recommend that you add the database schema for the a custom column,as shown above, and do not alter the original schema of the table by a customSQL script.
b. Publish the customization project to make the system add the column to thedatabase and compile the customization code. To do this, select Publish > PublishCurrent Project on the menu of Customization Project Editor.
4. Add the UI control for the custom field to the Stock Items form. To do this, open theform in Screen Editor.
You can add an existing form to the customization project by using the ElementInspector or directly from Project Editor. See Customized Screens for details.
a. Select the Tax Category control in the Control Tree to add the new control below it.
b. On the Add Data Fields tab, select the check box for the Local Tax Categoryselector in the table and click Create Controls to add the control to the tree (see thescreenshot below).

| Examples | 485
Figure: Adding the control for the data field
c. Click Save on the toolbar to save the layout changes.
d. Preview the customized form by clicking Preview Page on the toolbar or publish thecustomization project to view the changes applied to the Stock Items form.
5. Verify that the customized Stock Items form looks as needed according to thecustomization task (see above). The customization items for the form layout, customcode (or external assembly file), and database schema have been added to thecustomization project. The new Local Tax Category text box will appear on the StockItems form on every system where you publish the customization project.
Customizing DAC Attributes
To modify or extend the behavior that is defined within a data access class (DAC), youshould append or override the field attributes declared within the DAC.
Suppose that you have a customization task to modify the Invoices (SO303000) form, andthat this task consists of the following requirements:
1. The Customer Order data field on the form area (see the screenshot below) must havethe None value when the user has not specified the reference number of the customer.
2. The values of the Discount Percent column must be limited to a range of -30 to 25percent instead of the original range of -100 to 100 percent.

| Examples | 486
Figure: Viewing the original form
To begin implementing the first requirement, inspect the properties of the Customer OrderUI control. To do this, on the Customization menu, select Inspect Element and click thebox or label of the control on the form. The system should retrieve the following informationof the control that will display in the Element Properties dialog box:
• Control Type: Text Edit. The type of the UI control.
• Data Class: ARInvoice. The data access class that contains the inspected field.
• Data Field: InvoiceNbr. The field that is represented by the Customer Order control onthe form.
• Business Logic: SOInvoiceEntry. The business logic controller (BLC, also referred to asgraph) that provides the logic executed on the Invoices form.
To modify attributes of the DAC field, select Actions > Customize Data Fields in theElement Properties dialog box. In the Select Customization Project dialog box, specifythe project to which you want to add the customization item for the data field and click OK.
Data Class Editor opens for customization of the InvoiceNbr field of the ARInvoice dataaccess class.
Suppose that you decided to append an attribute to the DAC field to specify the default valuefor the field. Do it as follows:
1. in the Customize Attributes box select Append to Original.
2. In the text area, type [PXDefault("None")].
3. Save your changes in the Data Class Editor.

| Examples | 487
Acumatica Framework 2019 R2 provides advanced possibilities to control thefield customization by using additional attributes in the DAC extension. See theCustomization of Field Attributes in DAC Extensions for details.
Figure: Appending an attribute to the DAC field
The system adds the customized data access class to the Data Access list of project items.For more information, see Customized Data Classes.
To view the changes applied to the Invoices form, publish the customization project andadd a new document on the Invoices form. When you add a new document, the system willinsert the None default value into the Customer Order box as you have specified with thePXDefault attribute.
To implement the second requirement of the task, inspect the Discount Percent columnon the Document Details tab of the Invoices form. To do this, on the Customizationmenu, select Inspect Element and click the area of the Discount Percent column header.The system should retrieve the following information of the control that will display in theElement Properties dialog box:
• Control Type: Grid Column. The type of the UI control.
• Data Class: ARTran. The data access class that contains the inspected field.
• Data Field: DiscPct. The field that is represented by the Discount Percent column inthe table.
• Business Logic: SOInvoiceEntry. The business logic controller (BLC, also referred to asgraph) that provides the logic executed on the Invoices form.
To modify attributes of the DAC field, select Actions > Customize Data Fields in theElement Properties dialog box. In the Select Customization Project dialog box, specifythe project to which you want to add the customization item for the data field and click OK.
Data Class Editor opens for customization of the DiscPct field of the ARTran data accessclass.
The PXDBDecimal attribute specifies the range of valid values for the field. According to thecustomization task, you have to modify the minimum and maximum values specified in the

| Examples | 488
attribute. To do this, you have to replace the original attributes with the custom ones asfollows:
1. In the Customize Attributes box, select Replace Original. The original attributes will becopied to the text area where you enter custom attributes.
2. For the PXDBDecimal attribute, change the minimum and maximum values, as listedbelow.
[PXDBDecimal(6, MinValue = -30, MaxValue = 25)][PXUIField(DisplayName = "Discount Percent")][PXDefault(TypeCode.Decimal, "0.0")]
3. Click Save in Data Class Editor to save the changes.
If you replace attributes, you have to repeat all attributes that you want to remain onthe data field.
Figure: Replacing attributes on the data field
The system adds the customized data access class to the Data Access list of project items.For more information, see Customized Data Classes.
To test the result of the customization, publish the customization project, open the Invoicesform, insert a new document, and add a record to the details table, as shown in thescreenshot below. If you try to specify a value in the Discount column greater than 25percent or less than -30 percent, the system will automatically correct the value to themaximum 25 or minimum -30, respectively.

| Examples | 489
Modifying a BLC Action
To modify the behavior of an action that is defined within a business logic controller (BLC,also referred to as graph), you should override an action delegate.
Suppose that you need to rename the Release button to Extended Release on theReceipts (IN301000) form, which is shown in the following screenshot.
Figure: Viewing the original Receipts form
To do this, you have to find the business logic controller for the form and modify the displayname of the action that corresponds to the Release button as follows:
1. Find the business logic controller for the form, on the Customization menu, selectInspect Element and click the button caption on the form. The system should retrievethe following information of the button, which appears in the Element Properties dialogbox:
• Control Type: DS Callback Command. The type of the UI control.
• Business Logic: INReceiptEntry. The business logic controller that contains the codeof the action that is represented by the Release button.
Thus, to rename the button, you have to change the DisplayName parameter of thePXUIField attribute for the Release action in the BLC extension for the INReceiptEntryclass.
2. Modify the attributes of the action, by doing the following:
a. Select Actions > Customize Business Logic in the Element Properties dialog box

| Examples | 490
b. In the Select Customization Project dialog, specify the project to which you wantto add the customization item for the business logic controller of the form and clickOK.
The Code Editor opens for customization of the business logic code of the form (seethe screenshot below). The system generates the BLC extension class in which youcan develop the customization code. (See Graph Extensions for details.)
Figure: The BLC extension class generated for customization of the business logic codeexecuted for the Receipts form
c. Modify the DisplayName parameter of the PXUIField attribute for the Releaseaction by redefining the action in the BLC extension class, to which the attributes areattached. Insert the code listed below into the INReceiptEntry_Extension class, asshown in the screenshot below. In the DisplayName parameter, you specify the newname for the button, "Extended Release".
#region Customized Actions public PXAction<INRegister> release; [PXUIField(DisplayName = "Extended Release", MapEnableRights = PXCacheRights.Update, MapViewRights = PXCacheRights.Update)] [PXProcessButton] protected IEnumerable Release(PXAdapter adapter) { return Base.release.Press(adapter); }#endregion

| Examples | 491
The redefined action delegate must have exactly the same signature—that is, thereturn value, the name of the method, and any method parameters—as the base actiondelegate has. You always have to redefine the action delegate to alter either its delegateor the attributes attached to the action. To use the action declared within the base BLCor a lower-level extension from the action delegate, you should redefine the genericPXAction<TNode> data member within the BLC extension, as shown in the code above.You do not need to redefine the data member when it is not meant to be used from theaction delegate. For details, see Graph Extensions. When you redefine an action delegate,you have to repeat the attributes attached to the action. Every action delegate musthave PXButtonAttribute (or the derived attribute) and PXUIFieldAttribute attached.
3. Click Save in Code Editor to save the changes.
The system adds the customization to the business logic code to the Code list of projectitems. See Code for details.
To view the result of the customization, publish the customization project and open theReceipts form. Verify that the button caption has changed to Extended Release. Click thisbutton for a document with the Balanced status and verify that the release procedure worksexactly as it worked before publication of the current customization project.
Modifying a BLC Data View
A data view is a PXSelect BQL expression declared in a business logic controller (BLC,also referred to as graph) for accessing and manipulating data. A data view may contain adelegate that is used to extend data access. To modify the data view, you have to alter theappropriate PXSelect BQL expression.
Suppose that you need to filter the rows on the Vendor Details tab of the Stock Items(IN202500) form. Open the original Stock Items form and create an item that has multiplevendor records on the Vendor Details tab, one or more of which has a Lot Size columnvalue that equals 0.00, as the screenshot below illustrates.
Your task is to modify the selection of records for the Vendor Details tab so that onlythe records that have a non-zero Lot Size value are retrieved to the tab. To resolve thiscustomization task, you have to redeclare the data view that provides the data displayed onthe tab.

| Examples | 492
Figure: Viewing the original Stock Items form
The data for the Vendor Details tab is provided by the VendorItems data view that isdefined in the InventoryItemMaint class—that is, the business logic controller for the StockItems form. To resolve the customization task, you have to redefine the VendorItems dataview in the BLC extension for the business logic controller of the form as follows:
1. Select the business logic controller for customization, on the Customization menu,select Inspect Element and click the Vendor Details tab. The system should retrievethe following information that appears in the Element Properties dialog box:
• Business Logic: InventoryItemMaint. The business logic controller that provides thelogic for the Stock Items form.
2. Select Actions > Customize Business Logic in the Element Properties dialog box.
3. In the Select Customization Project dialog box, specify the project to which you wantto add the customization item for the business logic controller of the form and click OK.
The Code Editor opens for customization of the business logic code of the form (seethe screenshot below). The system generates the BLC extension class in which you candevelop the customization code. (See Graph Extensions for details.)

| Examples | 493
Figure: The BLC extension class generated for customization of the business logic codeexecuted for the Stock Items form
4. In the BLC extension class for InventoryItemMaint, redefine the VendorItems dataview, as listed below.
public POVendorInventorySelect<POVendorInventory, LeftJoin<InventoryItem, On<InventoryItem.inventoryID, Equal<POVendorInventory.inventoryID>>, LeftJoin<Vendor, On<Vendor.bAccountID, Equal<POVendorInventory.vendorID>>, LeftJoin<Location, On<Location.bAccountID, Equal<POVendorInventory.vendorID>, And<Location.locationID, Equal<POVendorInventory.vendorLocationID>>>>>>, Where<POVendorInventory.inventoryID, Equal<Current<InventoryItem.inventoryID>>, And<POVendorInventory.lotSize, Greater<decimal0>>>, InventoryItem> VendorItems;
To modify a data view, you have to redefine the data view in the BLC extension class.The data view redefined within a BLC extension completely replaces the base data viewwithin the Views collection of a BLC instance, including all attributes attached to the dataview declared within the base BLC. You can either attach the same set of attributes tothe data view or completely redeclare the attributes. For details, see Graph Extensions.

| Examples | 494
The data view must have exactly the same identifier, VendorItems, which is referred inthe UI control.
5. Click Save in Code Editor to save the changes.
The system adds the customization to the business logic code to the Code list of projectitems. See Code for details.
To view the result of the customization, publish the customization project and open theStock Items form. Verify that the records are filtered on the Vendor Details tab as requiredaccording to the customization task (only the records with non-zero Lot Size are retrieved).
Declaring or Altering a BLC Data View Delegate
You can modify the data view delegate—that is, the method that is invoked when the recordsare retrieved through the data view.
For this example, you have to enable the Warehouses feature in the system to viewthe Warehouse Details tab on the Stock Items (IN202500) form.
For the Stock Items form, suppose that you have to make the system display the defaultwarehouse in the Default Receipt To column for those records for which this column isempty. Your customization task specifies that the default warehouse for such records is theDefault Receipt To warehouse of the default record selected on the Warehouse Detailstab.
Open the Stock Items form and select the Warehouse Details tab to view the original tab,which is shown in the screenshot below.
Figure: Viewing the original Stock Items form
To resolve this task, you have to modify the logic that retrieves the records to theWarehouse Details tab—that is, the modify the delegate of the data view that providesdata for the tab. The data view that provides data for the tab is itemsiterecords that is

| Examples | 495
defined in the business logic controller of the form. The business logic controller of the formis the InventoryItemMaint class. Do the following:
1. Select the business logic controller for customization, on the Customization menu,select Inspect Element and click the Warehouse Details tab. The system shouldretrieve the following information that appears in the Element Properties dialog box:
• Business Logic: InventoryItemMaint. The business logic controller that provides thelogic for the Stock Items form.
2. Select Actions > Customize Business Logic in the Element Properties dialog box.
3. In the Select Customization Project dialog box, specify the project to which you wantto add the customization item for the business logic controller of the form and click OK.
The Code Editor opens for customization of the business logic code of the form (seethe screenshot below). The system generates the BLC extension class in which you candevelop the customization code. (See Graph Extensions for details.)
Figure: The BLC extension class generated for customization of the business logic codeexecuted for the Stock Items form
To resolve the customization task, you have to redefine the itemsiterecords data viewand implement the needed logic in the itemSiteRecords() data view delegate.

| Examples | 496
4. Add the code that is listed below to the BLC extension class for InventoryItemMaint
#region Customized Data Views public PXSelectJoin<INItemSite, InnerJoin<INSite, On<INSite.siteID, Equal<INItemSite.siteID>>, LeftJoin<INSiteStatusSummary, On<INSiteStatusSummary.inventoryID, Equal<INItemSite.inventoryID>, And<INSiteStatusSummary.siteID, Equal<INItemSite.siteID>>>>>> itemsiterecords;
protected IEnumerable itemSiteRecords() { int? dfltReceiptLocationID = null; foreach (var res in Base.itemsiterecords.Select()) { INItemSite site = (INItemSite)res; if (site.DfltReceiptLocationID != null && site.IsDefault == true) dfltReceiptLocationID = site.DfltReceiptLocationID; else if (site.DfltReceiptLocationID == null && dfltReceiptLocationID != null) site.DfltReceiptLocationID = dfltReceiptLocationID; yield return res; } }#endregion
When you declare or alter a data view delegate within a BLC extension, the newdelegate is attached to the corresponding data view. To query a data view declaredwithin the base BLC or lower-level extension from the data view delegate, you shouldredeclare the data view within the BLC extension. You do not need to redeclare a genericPXSelect<Table> data member when it will not be used from the data view delegate.For details, see Graph Extensions.
The redeclared data view delegate must have exactly the same signature—the returnvalue, the name of the method, and any method parameters— as the base data viewdelegate.
5. Click Save in Code Editor to save the changes.
The system adds the customization to the business logic code to the Code list of projectitems. See Code for details.
To view the result of the customization, publish the customization project and open theStock Items form. Verify that the default warehouse is displayed for all records as neededaccording to the customization task. The default warehouse is taken from the DefaultReceipt To warehouse of the record selected as Default in the table.

| Examples | 497
Extending BLC Initialization
During the initialization of a business logic controller (BLC, also referred to as graph), youcan retrieve additional preferences, change field settings, or configure the processing form.You can extend the BLC initialization by implementing the needed logic in a BLC extension.To extend the initialization process, you have to override the Initialize() method of thePXGraphExtension<T> class and do not use the constructor of the BLC extension classfor that. During the BLC initialization, the system calls the Initialize() methods of allextension levels, from the lowest to the highest. See Graph Extensions for details.
In this example, you will create an extension of the InventoryItemMaintExtensionBLC, which overrides the Initialize() method to change the display name of theInventoryItem data access class (DAC) field from Inventory ID to Inventory Item ID duringthe initialization of the base (original) BLC instance.
If you open the Stock Items (IN202500) form, you can see its original view with theInventory ID control (see the following screenshot) that corresponds to the InventoryItemDAC field.
Figure: Viewing the original Stock Items form
To complete the example, do the following:
1. Select the business logic controller for customization, on the Customization menu,select Inspect Element and click the Inventory ID label. The system should retrievethe following information that appears in the Element Properties dialog box:
• Business Logic: InventoryItemMaint. The business logic controller that provides thelogic for the Stock Items form.
2. Select Actions > Customize Business Logic in the Element Properties dialog box.
3. In the Select Customization Project dialog box, specify the project to which you wantto add the customization item for the business logic controller of the form and click OK.
The Code Editor opens for customization of the business logic code of the form (seethe screenshot below). The system generates the BLC extension class in which you candevelop the customization code. (See Graph Extensions for details.)

| Examples | 498
Figure: The BLC extension class generated for customization of the business logic codeexecuted for the Stock Items form
4. Override the Initialize() method; in the method, set the display name of theInventoryItem data access class (DAC) field to Inventory Item ID. (For demonstrativepurposes, the code also retrieves the INSetup data record and shows how you canimplement the logic depending on values of the record.)
Do not define constructors of BLC extension classes; always use theInitialize() method to implement the needed initialization logic.
Add the code that is listed below to the BLC extension class for InventoryItemMaint.
#region Extended initializationpublic override void Initialize(){ PXUIFieldAttribute.SetDisplayName<InventoryItem.inventoryCD>( Base.Item.Cache, "Inventory Item ID"); //retrieval of the setup record that stores preferences of the Inventory module INSetup setup = Base.insetup.Current;

| Examples | 499
if (setup.UpdateGL != true) { // Do some actions here }}#endregion
In this method, you change the display name of the InventoryCD field of theInventoryItem DAC. You do this by calling the SetDisplayName() static method ofPXUIFieldAttribute. Also, you obtain the INSetup DAC instance by using the Currentproperty of the INSetup data view. In your customization tasks, you may need toperform some actions that depend on field values of this setup DAC instance.
You do not need to explicitly invoke the Initialize() method on the previous extensionlevels; these methods are called automatically. Invoking base.Initialize() makes nosense, because the base variable points to the base class, which is PXGraphExtension(not the base graph). The PXGraphExtension class defines Initialize() as an emptymethod.
5. Click Save in Code Editor to save the changes.
The system adds the customization to the business logic code to the Code list of projectitems. See Code for details.
To view the result of the customization, publish the customization project and open theStock Items form. Verify that the label has changed to Inventory Item ID.
Altering the BLC of a Processing Form
For most processing forms of Acumatica ERP, the processing method, the button captionsthat are displayed on the toolbar of the form are set up during the BLC initialization(business logic controller, also referred to as graph)—that is, in the constructor of the BLCthat provides the logic for the processing form, or in the RowSelected event handler of themain view data access class (DAC). To modify the logic that is executed during the BLCinitialization, you have to create a BLC extension class and implement the needed logic inthe Initialize() method overridden in the extension class; do not use the constructor forthat.
For example, to disable the Release All button and modify the functionality of the Releasebutton of the Release IN Documents (IN501000) form, you create an extension on theINDocumentRelease BLC and override the Initialize() method as follows:
1. Open the Release IN Documents form to see its original view (see the screenshot below).Notice that the Release and Release All buttons are both available for clicking.

| Examples | 500
Figure: Analyzing the original Release IN Documents form
2. Select the business logic controller for customization, on the Customization menu,by clicking Inspect Element and selecting any element on the form, for example, theRelease button. The system should retrieve the following information that appears inthe Element Properties dialog box:
• Business Logic: INDocumentRelease. The business logic controller that provides thelogic for the Release IN Documents form.
3. Select Actions > Customize Business Logic in the Element Inspector. In the SelectCustomization Project dialog box, specify the project to which you want to add thecustomization item for the business logic controller of the form and click OK.
The Code Editor opens for customization of the business logic code of the form (seethe screenshot below). The system generates the BLC extension class in which you candevelop the customization code. (See Graph Extensions for details.)

| Examples | 501
Figure: The BLC extension class generated for customization of the business logic codeexecuted for the Release IN Documents form
4. Override the Initialize() method. In the method, disable the Release All button onthe toolbar of the form, set the processing method, and set the method for asking theconfirmation from the user before running the process.
Do not define constructors of BLC extension classes; always use theInitialize() method to implement the needed initialization logic.
To the BLC extension class for INDocumentRelease, add the code that is listed below.
#region Extended initializationpublic override void Initialize(){ // Disable the Process All button Base.INDocumentList.SetProcessAllEnabled(false);

| Examples | 502
//If set by the SetParametersDelegate, the method is executed before the processing is run //and provides conditional processing depending on the confirmation from the user //If the method returns true, the system executes the processing method //that is set by SetProcessDelegate Base.INDocumentList.SetParametersDelegate(delegate(List<INRegister> documents) { return Base.INDocumentList.Ask("IN Document Release", "Are you sure?", MessageButtons.YesNo) == WebDialogResult.Yes; }); Base.INDocumentList.SetProcessDelegate(delegate(INRegister doc) { INDocumentRelease.ReleaseDoc(new List<INRegister>() { doc }, true); });}#endregion
For another example of extending the BLC initialization, see Extending BLC Initialization.
5. Click Save in Code Editor to save the changes.
The system adds the customization to the business logic code to the Code list of projectitems. See Code for details.
To view the result of the customization, publish the customization project and open theRelease IN Documents form. Notice that the Release All button has become unavailable.Select a few check boxes for documents to be released and click Release. The dialog boxappears with the question that you have added in the BLC code. Click Yes to release thedocuments or No to cancel the operation and exit the dialog box.
Adding or Altering BLC Event Handlers
The following examples of customization tasks demonstrate how you can implement customhandlers for events in extension classes to business logic controllers (BLCs, also referred toas graphs).
• Implementing a Handler That is Appended to the Collection of Base Handlers
• Implementing a Handler That Replaces the Collection of Base Handlers
• Adding an Event Handler From the Screen Editor
Implementing a Handler That is Appended to the Collection of BaseHandlers
When you define an event handler in the BLC extension class with the same declaration, asit is defined in the base (original) BLC, this handler is added to the appropriate event handlercollection. Depending on the event type, the event handler is appended to either the end ofthe collection or the start of it. When the event occurs, all event handlers in the collectionare executed, from the first one to the last one. For details, see Event Handlers.

| Examples | 503
Suppose that you need to add validation of Local Tax Category on the GeneralSettings tab of the Stock Items (IN202500) form. Local Tax Category that is shownin the screenshot below is a custom field that has been added to the form, as describedin the example of Adding Data Fields. Local Tax Category is linked to the customUsrLocalTaxCategoryID data field defined in the DAC extension for the InventoryItem dataaccess class.
Your task is to check whether the selected Local Tax Category is the same as the selectedTax Category of the item and add a warning message that appears for the Local TaxCategory box if they are the same.
Figure: The control for the custom field on the Stock Items form
To resolve the task, you implement validation of fields on the RowUpdating event handlerthat you will add to the BLC extension for the Stock Items form. In this variant ofimplementation, the validation will occur when the user attempts to save the InventoryItemrecord. In the handler, you compare the TaxCategoryID and UsrLocalTaxCategoryID fieldsand return an error message that displays for the Local Tax Category box if the values areequal. Do the following:
1. Select the business logic controller for customization by clicking Customization >Inspect Element and clicking the Warehouse Details tab on the Stock Items form.

| Examples | 504
The system should retrieve the following information that appears in the ElementProperties dialog box:
• Business Logic: InventoryItemMaint. The business logic controller that provides thelogic for the Stock Items form.
Select Actions > Customize Business Logic in the Element Properties dialogbox. In the Select Customization Project dialog box, specify the project to whichyou want to add the customization item for the business logic controller of the formand click OK.
The Code Editor opens for customization of the business logic code of the form (seethe screenshot below). The system generates the BLC extension class in which youcan develop the customization code. (See Graph Extensions for details.)
Figure: The BLC extension class generated for customization of the business logic codeexecuted for the Stock Items form
2. Add the following code to the BLC extension class for InventoryItemMaint:
#region Event Handlersprotected void InventoryItem_RowUpdating(PXCache sender, PXRowUpdatingEventArgs e){ InventoryItem row = e.NewRow as InventoryItem; InventoryItemExt rowExt = sender.GetExtension<InventoryItemExt>(row);

| Examples | 505
if (row.TaxCategoryID != null && rowExt.UsrLocalTaxCategoryID != null && row.TaxCategoryID == rowExt.UsrLocalTaxCategoryID) { sender.RaiseExceptionHandling<InventoryItemExt.usrLocalTaxCategoryID>( row, rowExt.UsrLocalTaxCategoryID, new PXSetPropertyException("Tax category and local tax category should differ", PXErrorLevel.Warning)); }}#endregion
The event handler checks whether the TaxCategoryID and UsrLocalTaxCategoryID fieldvalues are not null and do not equal each other. If these conditions are not satisfied, thehandler issues the warning that will be shown on the Local Tax Category box in the UI,which corresponds to the UsrLocalTaxCategoryID field.
The field is accessed by its string name by using the GetValue() method on thecache. There is a number of ways how you can access customization objects fromcode. See Access to a Custom Field for details.
3. Click Save in the Code Editor to save the changes.
The system adds the customization to the business logic code to the Code list of projectitems. See Code Editor for details.
To view the result of the customization, publish the customization project and open theStock Items form. To test the validation, select an item on the form, set the Local TaxCategory the same as the Tax Category of the item and click Save. The warning messageappears for the Local Tax Category box, as it was required by the task. To view thewarning message, point the mouse to the warning icon, as shown on the screenshot below.

| Examples | 506
Figure: The warning message appears on saving attempt
Implementing a Handler That Replaces the Collection of Base Handlers
In a BLC extension, you can define an event handler so that the handler replaces the baseBLC event handler collection. To do this, you declare the event handler with an additionalparameter, as described below. When the event is raised, the system calls the event handlerwith an additional parameter of the highest-level BLC extension. The system passes the

| Examples | 507
link to the event handler with an additional parameter from the extension of the previouslevel, if such an event handler exists, or to the first item in the event handler collection (alsodescribed in Event Handlers). In the event handler that replaces the collection of handlers ofthe base BLC, you can invoke the collection of base handlers as well as implement the logicto be executed before and after the base collection.
Suppose that you need to resolve the same customization task, as described above—thatis, you have to add validation of Local Tax Category on the General Settings tab of theStock Items form. To resolve the task, you implement validation in the RowUpdating eventhandler that you define in the BLC extension for the InventoryItemMaint class.
If you define the event handler, as listed below, the handler will replace the collection ofhandlers of the base BLC. The code of the replacing handler that is given below introducesthe same behavior of the Stock Items form as the code of the event handler that is added tothe collection, as described above in Adding a Handler to the Collection of Base Handlers. In thehandler below, you invoke the base handlers first and then validate the TaxCategoryID andUsrLocalTaxCategoryID fields and return an error message that displays for the Local TaxCategory box if the validation fails.
#region Event Handlersprotected void InventoryItem_RowUpdating( PXCache cache, PXRowUpdatingEventArgs e, PXRowUpdating InvokeBaseHandler){ //execute the collection of base handlers if(InvokeBaseHandler != null) InvokeBaseHandler(cache, e); //add the validation of Local Tax Category InventoryItem row = e.NewRow as InventoryItem; InventoryItemExt rowExt = cache.GetExtension<InventoryItemExt>(row); if (row.TaxCategoryID != null && rowExt.UsrLocalTaxCategoryID != null && row.TaxCategoryID == rowExt.UsrLocalTaxCategoryID) { cache.RaiseExceptionHandling<InventoryItemExt.usrLocalTaxCategoryID>( row, rowExt.UsrLocalTaxCategoryID, new PXSetPropertyException("Tax category and local tax category should differ", PXErrorLevel.Warning)); }} #endregion
Notice the three parameters within the event handler declaration. When the eventis raised, the system calls the event handler, passing a link to the first item in thebase BLC event handler collection. You execute InvokeBaseHandler() to invoke thecollection of event handlers defined in the base BLC. Depending on a customizationtask, you can skip the execution of base handlers or implement the needed logicbefore the base handlers are invoked.
Adding an Event Handler From the Screen Editor
To add a custom handler for a row or field event to the customization project, you can usethe Screen Editor, as described below.

| Examples | 508
For this example, you have to enable the Lot and Serial Tracking feature in thesystem to view the Lot/Serial Class box on the General Settings tab of the StockItems form.
Suppose that on the Stock Items form you need to replace the warning message thatappears on the Lot/Serial Class box for an incompatible class selected in the box (see thescreenshot below) with an error message.
Figure: The original warning message on the Stock Items form
To resolve the task, you have to modify the logic of validation of the DAC field thatcorresponds to the Lot/Serial Class box. You have to implement a custom handler for theFieldVerifying event on the DAC field. Do the following:
1. Find the DAC field and add the event handler to the customization project for it, open theform in Screen Editor. To do this, on the Customization menu, select Inspect Element

| Examples | 509
and click the label or the box area of the Lot/Serial Class control. The system shouldretrieve the following information that appears in the Element Properties dialog box:
• Control Type: Selector. The type of the inspected UI control.
• Data Class: InventoryItem. The data access class that contains the fieldcorresponding to the inspected control.
• Data Field: LotSerClassID. The data field that is linked to the inspected control.
• Business Logic: InventoryItemMaint. The business logic controller that provides thelogic for the Stock Items form.
2. Click Customize in the Element Inspector. In the Select Customization Project dialogbox, specify the project to which you want to add the customization item for the businesslogic controller of the form and click OK.
Screen Editor opens for the form already navigated to the inspected control, as thescreenshot below shows.
Figure: Screen Editor opened for the inspected element
3. Add the FieldVerifying event handler for data field underlying the Lot/Serial Classcontrol. To do this, first select the Events tab and find the FieldVerifying event inthe grid. The selected check box in the Handled in Source column means that the

| Examples | 510
FieldVerifying event is already handled for the LotSerClassID field in the originalbusiness logic controller, InventoryItemMaint class.
The Events tab displays the events depending on the control selected in the tree.The tab shows the field events f you select a control that is linked to a data field(that is, has the DataField property specified) and the row events of the parentcontainer that is linked to a data view (that is, has the DataMember propertyspecified). If you select a container that is not linked to a data view or data field,the tab shows no events.
Add a custom handler for the LotSerClassID field to the customization project byclicking the FieldVerifying event in the table and then clicking Add Handler on thetoolbar (see the screenshot below).
Figure: Adding an event handler to the customization project
The system generates the definition of the event handler, adds the definition to the BLCextension class for the form, and opens the Code Editor with the generated code asshown below. The system generates handlers with three input parameters; a handlerwith such definition replaces the collection of event handlers implemented in the originalBLC, which is described in Implementing a Handler That Replaces the Collection of BaseHandlers. You can modify the generated code as needed.
protected void InventoryItem_LotSerClassID_FieldVerifying( PXCache cache, PXFieldVerifyingEventArgs e, PXFieldVerifying InvokeBaseHandler){ if(InvokeBaseHandler != null) InvokeBaseHandler(cache, e);

| Examples | 511
var row = (InventoryItem)e.Row; }
4. Modify the generated code, as listed below, and click Save in Code Editor to save thechanges to the customization project. In the code, you catch the exception that could bethrown from the original handlers and create another exception with the error messageinstead of the original one.
protected void InventoryItem_LotSerClassID_FieldVerifying( PXCache cache, PXFieldVerifyingEventArgs e, PXFieldVerifying InvokeBaseHandler){ try { if(InvokeBaseHandler != null) InvokeBaseHandler(cache, e); } catch (PXSetPropertyException ex) { cache.RaiseExceptionHandling<InventoryItem.lotSerClassID>( e.Row, e.NewValue, new PXSetPropertyException( ex.MessageNoPrefix, PXErrorLevel.Error)); } }
5. Publish your customization project.
To view the result of the customization, publish the customization project and open theStock Items form. To test the validation, select an incompatible class in the Lot/SerialClass box, as shown in the screenshot below. The error message appears for the boxinstead of a warning message.

| Examples | 512
Figure: The error message that appears on selecting an incompatible class
Altering BLC Virtual Methods
In a BLC extension, you can override virtual methods defined within a business logiccontroller (BLC, also referred to as graph). As with the event handlers, you have twooptions:
• You can define the override method with exactly the same signature—that is, the returnvalue, the name of the method, and all method parameters—as the overridden basevirtual method. As a result, the method is added to the queue of all override methods.When the system invokes the base method, all methods in the queue are executed

| Examples | 513
sequentially, from the first to the last one. The lower the level the BLC extension has, theearlier the system invokes the override method.
• You can define the override method with an additional parameter, which represents thedelegate for one of the following:
• The override method with an additional parameter from the extension of the previouslevel, if such a method exists.
• The base virtual method, if no override methods with additional parameters declaredwithin lower-level extensions exist.
In both cases, you should attach the PXOverrideAttribute to the override method declaredwithin the BLC extension. See the topics below for details.
• Override Method That is Added to the Override Method Queue
• Override Method That Replaces the Original Method
Override Method That is Added to the Override Method Queue
By declaring an override method with exactly the same signature as the overridden basevirtual method, you extend the base method execution. The base BLC method is replaced atrun time with the queue of methods that starts with the base BLC method. When the systeminvokes the base method, all methods in the queue are executed sequentially, from the firstto the last one. The lower the level the BLC extension has, the earlier the system invokes theoverride method. If the system has invoked the base method, you have no option to preventthe override method queue from execution. To prevent the base method executions, seeOverride Method That Replaces the Original Method below.
Suppose that you need to modify the behavior of the Journal Transactions (GL301000) form.
Open Journal Transactions and explore its original behavior. Start by adding a new journaltransaction, selecting an account, and setting the Debit Amount to 2000.00. Then add onemore journal transaction and select a different account, and notice that the Credit Amountis set by default to 2000.00 to balance the batch, as the following screenshot illustrates.

| Examples | 514
Figure: The Credit Amount by default is set to balance the batch
Suppose that you need this form to work differently, so that if the user first inserts a debitentry, by default each Credit Amount value equals 0.00, to make the user add the requiredvalues manually. If the user first inserts a credit entry, a Debit Amount value should alsoequal 0.00 by default, so that the user must add the needed values. You can implement thisbehavior in the PopulateSubDescr method that you have to override in a BLC extension forthe JournalEntry class.
To select the business logic controller for customization, on the Customization menu,select Inspect Element and click any element on the form, for example, the form area. Thesystem should retrieve the following information that appears in the Element Propertiesdialog box:
• Business Logic: JournalEntry. The business logic controller that provides the logic forthe Journal Transactions form.
Select Actions > Customize Business Logic in the Element Inspector. In the SelectCustomization Project dialog box, specify the project to which you want to add thecustomization item for the business logic controller of the form and click OK.
The Code Editor opens for customization of the business logic code of the form (see thescreenshot below). The system generates the BLC extension class in which you can developthe customization code. (See Graph Extensions for details.)

| Examples | 515
Figure: The BLC extension class generated for customization of the business logic code executedfor the Journal Transactions form
To the BLC extension class for JournalEntry, add the code that is listed below.
[PXOverride]public void PopulateSubDescr(PXCache sender, GLTran row, bool externalCall){ decimal difference = (Base.BatchModule.Current.CuryCreditTotal ?? decimal.Zero) - (Base.BatchModule.Current.CuryDebitTotal ?? decimal.Zero); if (difference != 0) { if (row.CuryCreditAmt == Math.Abs(difference)) { row.CuryCreditAmt = 0; } else if (row.CuryDebitAmt == Math.Abs(difference)) { row.CuryDebitAmt = 0; } }}

| Examples | 516
In the code, you override the PopulateSubDescr method of the original BLC by adding thenew method to the queue of override methods to be executed. The system invokes the basemethod first, and then executes the override method. The override method resets the valueof the Credit Amount or the Debit Amount to 0.00.
Click Save in Code Editor to save the changes.
Figure: The override method implemented in the BLC extension class
To view the result of the customization, publish the customization project and open theJournal Transactions (GL301000) form.
Test the modified behavior of Journal Transactions. Add a new journal transaction, selectan account, and set the Debit Amount to 2000.00. Then add one more journal transactionand select a different account, and notice that the Credit Amount is set by default to 0.00.You must manually specify the amount for every journal entry to make the batch balanced.Otherwise, you will not be able to save the batch with the Balanced status, and you will seethe appropriate error message on the Debit Total box.

| Examples | 517
You should also test the case when the user first adds a transaction with a CreditAmount: Then the Debit Amount must equal 0.00 by default.
Figure: Viewing the result of the customization
Override Method That Replaces the Original Method
The override method with an additional parameter replaces the base BLC virtual method.When the virtual method is invoked, the system invokes the override method with anadditional parameter of the highest-level BLC extension. The system passes a link to theoverride method with an additional parameter from the extension of the previous level, ifsuch a method exists, or to the base virtual method.
You use a delegate as an additional parameter to encapsulate the method with exactly thesame signature as the base virtual method. If the base virtual method contains a paramsparameter, then you should not use the params keyword when you declare the overridemethod with an addition parameter. For example, to declare an ExecuteInsert overridemethod with an additional parameter within a BLC extension, you can use the followingcode.
public class BaseBLCExt : PXGraphExtension<BaseBLC>{ [PXOverride] public int ExecuteInsert(string viewName, IDictionary values, object[] parameters, Func<int, string, IDictionary, object[]> del) { if (del != null) { del(viewName, values, parameters) } }}

| Examples | 518
You can decide whether to call the method pointed to by the delegate. By invoking the basemethod, you also start the override method queue execution.
Suppose that you need to modify the logic of generating batches on release of AccountsReceivable documents.
For example, open the Invoices and Memos (AR301000) form and explore its originalbehavior. Create and save an invoice, clear the Hold check box, click the Release button,and notice that a new GL batch has been generated by the system while the system releasesthe invoice. You can see the batch number on the Financial Details tab of the Invoices andMemos form, as the following screenshot shows.
Figure: The batch has been generated during release of the Accounts Receivable invoice
Suppose that you need to prevent generation of batches during release of AccountsReceivable documents. You can implement the new behavior in the Persist method that youhave to override in a BLC extension for the JournalEntry class. In the override method, youneed to handle execution of the Persist method of the original BLC. Therefore, you have toimplement the override method with an additional parameter, as described below.
To the BLC extension class for JournalEntry, add the code that is listed below. For example,you can add the override method to the JournalEntry_Extension BLC extension classgenerated by the system, as described above in Override Method That is Added to the OverrideMethod Queue.

| Examples | 519
[PXOverride]public void Persist(Action del){ if (Base.BatchModule.Current != null && Base.BatchModule.Cache.GetStatus(Base.BatchModule.Current) == PXEntryStatus.Inserted && Base.BatchModule.Current.Module == "AR") return; if (del != null) del();}
The code modifies the logic so that the system will not invoke the base virtual method ifthe batch is being generated from the Accounts Receivable module; otherwise, the systemexecutes the base business logic.
To view the result of the customization, publish the customization project and open theInvoices and Memos form.
To test the modified behavior of the Invoices and Memos form, add and save a new invoice,clear the Hold check box, and click the Release button. Notice that no new GL batch isgenerated by the system while it releases the invoice. Open the Financial Details tab. Nobatch number is displayed, as the following screenshot illustrates.

| Examples | 520
Figure: No batch has been generated by the system for the Accounts Receivable Invoice
Customizing the Release Process for CA Documents
You can use customize the release process for several forms in the following ways:
• By overriding the Insert***Transaction methods. This way you will be able to managethe process of inserting a line to the General Ledger.
• By subscribing to the RowPersisting and RowPersisted events. This way you will beable to access the following caches of the CAReleaseProcess class:
public PXSelect<CAAdj> CAAdjastments;public PXSelect<CATransfer> CAtransfers;public PXSelect<CATaxTran> TaxTrans;public PXSelect<CAExpense> TransferExpenses;public PXSelect<SVATConversionHist> SVATConversionHist;public PXSelect<CADailySummary> DailySummary;
Such customization is available for actions which include the ReleaseDocProc<TCADocument>method cal. These action are the following:
• The Release action on the Release Cash Transactions (CA502000) form

| Examples | 521
• The Release action on the Transactions (CA304000) form
• The Release action on the Funds Transfers (CA301000) form
• The Process action on the Process Bank Transactions (CA306000) form
• The Release action on the Journal Vouchers (GL304000) form
• The Release action on the Bank Deposits (CA305000) form
Overriding the Insert***Transaction methods
The following methods are available for customization:
•public virtual GLTran InsertDocumentTransaction(JournalEntry, GLTran, GLTranInsertionContext)
The method inserts the content of the form header.
•public virtual GLTran InsertSplitTransaction(JournalEntry, GLTran, GLTranInsertionContext)
The method inserts the lines of the Document Details tab of the form.
•public virtual GLTran InsertRoundingTransaction(JournalEntry, GLTran, GLTranInsertionContext)
The method processes the rounding of the document lines sum and document total.
•public virtual GLTran InsertDepositChargeTransaction(JournalEntry, GLTran, GLTranInsertionContext)
The method is available only for the Bank Deposits form and inserts the lines of theCharges tab of the form.
The GLTranInsertionContext context parameter of the methods contains the contextof the release process. That means the kind of record being released is the field of theGLTranInsertionContext class instance, which is not null. The context parameter isassigned the corresponding value by the system. The class members are presented below.
public class GLTranInsertionContext{ public virtual CAAdj CAAdjRecord { get; set; } public virtual CASplit CASplitRecord { get; set; } public virtual CATaxTran CATaxTranRecord { get; set; }
public virtual CATransfer CATransferRecord { get; set; }

| Examples | 522
public virtual CAExpense CAExpenseRecord { get; set; }
public virtual CADeposit CADepositRecord { get; set; } public virtual CADepositDetail CADepositDetailRecord { get; set; } public virtual CADepositCharge CADepositChargeRecord { get; set; }
public virtual CATran CATranRecord { get; set; }}
Customizing the Release of a Transaction (an Example)
Suppose you have a custom field on the Transactions form, and you need to display it on theseparate column in the lines of the Journal Transaction form. Then you need to complete thefollowing steps:
1. Add a custom field to the Transactions form. See example in the Adding Input Controlstopic.
For example, add the CreatedDateTime field of the Transactions data view. Thecustomized screen in the Screen Editor is shown on the screenshot below.
Figure: The customized Transactions screen
2. Add a custom column to the grid on the Journal Transactions form. See example in theAdding Columns to a Grid topic.
For example, add the corresponding CreatedOn field to the form grid. The correspondingData Access is shown on the screenshot below.

| Examples | 523
Figure: The GLTran DAC extension
3. Customize the business logic of the Transactions form by overriding theInsertDocumentTransaction method as follows:
a. Before you start overriding the InsertDocumentTransaction, you should understandwhich field of the GLTranInsertionContext class is changed depending on whichform is used. You are overriding the Release action on the Transactions form, so openElement Inspector for this form's header and see which Data Class and View Nameit has. Their names correspond to types and fields of the GLTranInsertionContextclass.
So, for the Transactions form, you need the CAAdj DAC as shown on the followingscreenshot.

| Examples | 524
Figure: The Element Properties dialog box of the Transactions form
b. In the Code Editor of the Customization Project Editor, select Add New Record.
c. In the Create Code File dialog box that opens, specify the following values and clickOK.
• File Template: Graph Extension
• Class Name: CAReleaseProcess
The Code Editor: CAReleaseProcess page opens.
d. On the Code Editor: CAReleaseProcess page, select Override Method.
e. On the Select Methods to Override panel, select the InsertDocumentTransactionmethod, and click Save.
The code for overriding the InsertDocumentTransaction method is generated asfollows.
public delegate GLTran InsertDocumentTransactionDelegate( JournalEntry je, GLTran tran, CAReleaseProcess.GLTranInsertionContext context);[PXOverride]public GLTran InsertDocumentTransaction( JournalEntry je, GLTran tran, CAReleaseProcess.GLTranInsertionContext context, InsertDocumentTransactionDelegate baseMethod){ return baseMethod(je,tran,context);

| Examples | 525
}
f. In the method's body, insert the following code where you detect whether the currentcontext (a record of the CAAdj type that was found in paragraph a) is not empty.
if (context.CATranRecord!= null){ var adj = PXSelect<CAAdj, Where<CAAdj.tranID, Equal<Required<CAAdj.tranID>>>>.Select(Base, context.CATranRecord.TranID); if(adj!=null) { // some code }}
Now you can work with the record's fields inside the if statement.
g. As the original task requires, assign the custom field (CreatedDateTime) to thereleased transaction's custom field (UsrCreatedOn) as shown in the code below.
GLTranExt tranExt = Base.Caches[typeof(GLTran)].GetExtension<GLTranExt>(tran);tranExt.UsrCreatedOn = context.CATranRecord.CreatedDateTime;
The complete code of the CAReleaseProcess_Extension class should look as follows.
public class CAReleaseProcess_Extension : PXGraphExtension<CAReleaseProcess>{ #region Event Handlers public delegate GLTran InsertDocumentTransactionDelegate( JournalEntry je, GLTran tran, CAReleaseProcess.GLTranInsertionContext context); [PXOverride] public GLTran InsertDocumentTransaction( JournalEntry je, GLTran tran, CAReleaseProcess.GLTranInsertionContext context, InsertDocumentTransactionDelegate baseMethod) { if (context.CATranRecord!= null) { var adj = PXSelect<CAAdj, Where<CAAdj.tranID, Equal<Required<CAAdj.tranID>>>>.Select(Base, context.CATranRecord.TranID); if(adj!=null) { GLTranExt tranExt = Base.Caches[typeof(GLTran)].GetExtension<GLTranExt>(tran); tranExt.UsrCreatedOn = context.CATranRecord.CreatedDateTime; } } return baseMethod(je,tran,context); } #endregion

| Examples | 526
}
4. Publish the customization project.
To test the implemented customization, do the following:
1. Open the Transactions form. Note the Created On field in the form's header. Create atransaction and release it. The released transaction is shown on the screenshot below.
Figure: The released transacrion on the customized Transactions form
2. In the Financial Details tab, click the generated batch number.
3. The Journal Transactions form opens. Note the Created On column in the form's grid.Only the first line corresponding to the transaction's header has the Created On columnvalue filled.

| Examples | 527
Figure: The customized Journal Transactions form
You can use the same approach to customize the process of releasing AP and ARdocuments.

| Glossary | 528
GlossaryAcumatica mobile application: The native mobile client applications Acumatica providesfrom App Store and Google Play for iOS and Android devices respectively.
Administrator role: A user account role assigned to specialists involved with systemadministration. This role can assign the Customizer role to the needed users by using theUsers (SM201010) form.
Attributes of a business entity in Acumatica ERP: Data records that contain specificinformation defined for a particular class, which is a grouping of entities—such as leads,opportunities, customers, cases, projects, and stock and non-stock items—that have similarproperties.
BLC: See Business logic controller.
Bound data field: A field for which the value is stored in the database.
Business logic controller (BLC, also referred to as graph): A class that provides businesslogic for a form of Acumatica ERP.
Code Editor: A tool of the Customization Project Editor that is designed to edit and managethe customization code added to the customization project. For more information, see CodeEditor.
Customization project: A set of changes and additional files that modifies Acumatica ERPor an Acumatica Framework-based application.
Customization task: A set of custom requirements to be implemented in Acumatica ERP.
Customization Project Editor (Project Editor): A tool of Acumatica ERP that is designedto manage a customization project. For more information, see Customization Project Editor.
Customizer role: A user account role assigned to the specialists that can use thecustomization tools and facilities of the Acumatica Customization Platform, and upload andpublish customization projects.
DAC: See data access class.
Data access class (DAC): A class that contains field declarations and provides an abstractinterface used for mapping C# objects to the database schema.
Data Class editor: A tool of the Project Editor that is designed to customize data accessclasses. For more information, see Data Class Editor.
Deployment package: A redistributable .zip file that includes the full content of acustomization project. The deployment package consists of the project.xml file and thecustom files that you could have added to the project, such as external assemblies.
Development environment: Your local environment in which you solve a customizationtask.

| Glossary | 529
Extension class: A class that contains the customization code for an original (base) classof Acumatica ERP. At run time, during the first initialization of a base class, the systemautomatically discovers an extension for the class and applies the customization by replacingthe base class with the merged result of the base class and the discovered extension.
Extension class for a business logic controller: A class that contains the customizationcode for an original business logic controller of Acumatica ERP. An extension class for abusiness logic controller is derived from the PXGraphExtension<T> generic class.
Extension class for a data access class: A class that contains the customization code foran original data access class of Acumatica ERP. An extension class for a data access class isderived from the PXCacheExtension<T> generic class.
Extension library: A Microsoft Visual Studio project that is individually developed andtested, and added to the customization project as a DLL.
Generic inquiry: An inquiry to the database to get the information you want to view.
Import scenario: A scenario that is a sequence of actions to perform data migration from alegacy application to an instance of Acumatica ERP.
Integration scenario: An import or export scenario that is a sequence of actions to beexecuted for a data record to perform data migration between a legacy application andAcumatica ERP.
Screen Editor: The visual editor for the source code of an .aspx page. You can use it toconfigure ASP.NET containers, such as forms and grids, as well as to set the properties of UIcontrols. For more information, see Screen Editor.
Main data access class: A data access class that is the first type parameter in a data viewdeclaration.
New Screen wizard: The utility of the Project Editor that is designed to immediately createa workable template for a custom form.
Production environment: The environment that must be customized for the end users.
Publication of a customization project: The process of applying the content of theproject to the current instance of Acumatica ERP.
Source Code browser: A tool of the Project Editor that is designed to explore the originalsource code of Acumatica ERP.
Staging (or testing) environment: The production environment copy in which you willtest the solution before applying it to the production environment.
Unbound data field: A field that is added only to the data access class and is not mappedto the database.


