Embed Size (px)
Citation preview
CorelDRAW Tutorials
CorelDRAW Graphics Suite X3 Advances to the Next Level By Steve Bain
A peek under the hood of the CorelDRAW Graphics Suite X3 hints at a change in the wind at Corel. Two years of development and more rigorous testing have brought to the suite better reliability and performance along with the many new tools, effects, and advancements. But it's the quality woven into the very fabric of the suite that really caught my eye. Maybe, it's the subtle sophistication that
comes with maturity. Take a look at what's new, and you'll see what I mean.
CorelDRAW X3's New and Improved Tools CorelDRAW X3 boasts a myriad of new and improved Toolbox components. The new innovations
include an ingenious new Smart Fill tool, a new bitmap-cropping tool, an overhauled star-drawing tool, and significant improvements to the Shape Tool.
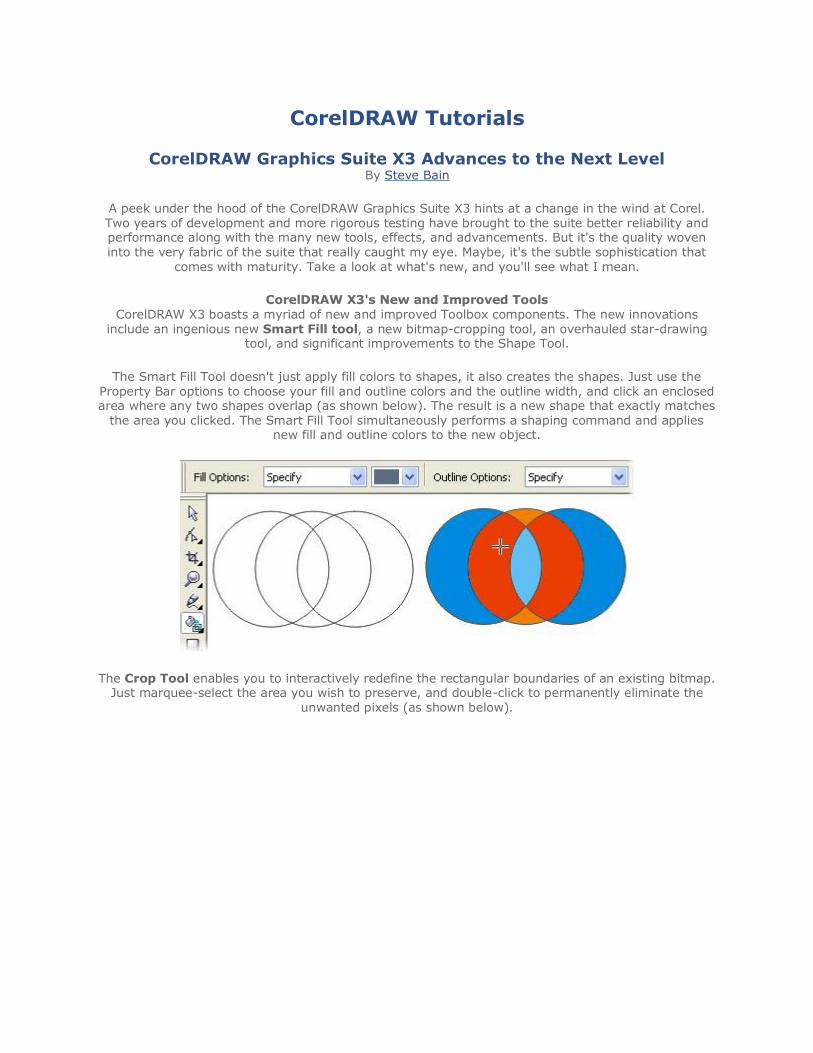
The Smart Fill Tool doesn't just apply fill colors to shapes, it also creates the shapes. Just use the Property Bar options to choose your fill and outline colors and the outline width, and click an enclosed area where any two shapes overlap (as shown below). The result is a new shape that exactly matches
the area you clicked. The Smart Fill Tool simultaneously performs a shaping command and applies new fill and outline colors to the new object.
The Crop Tool enables you to interactively redefine the rectangular boundaries of an existing bitmap. Just marquee-select the area you wish to preserve, and double-click to permanently eliminate the
unwanted pixels (as shown below).
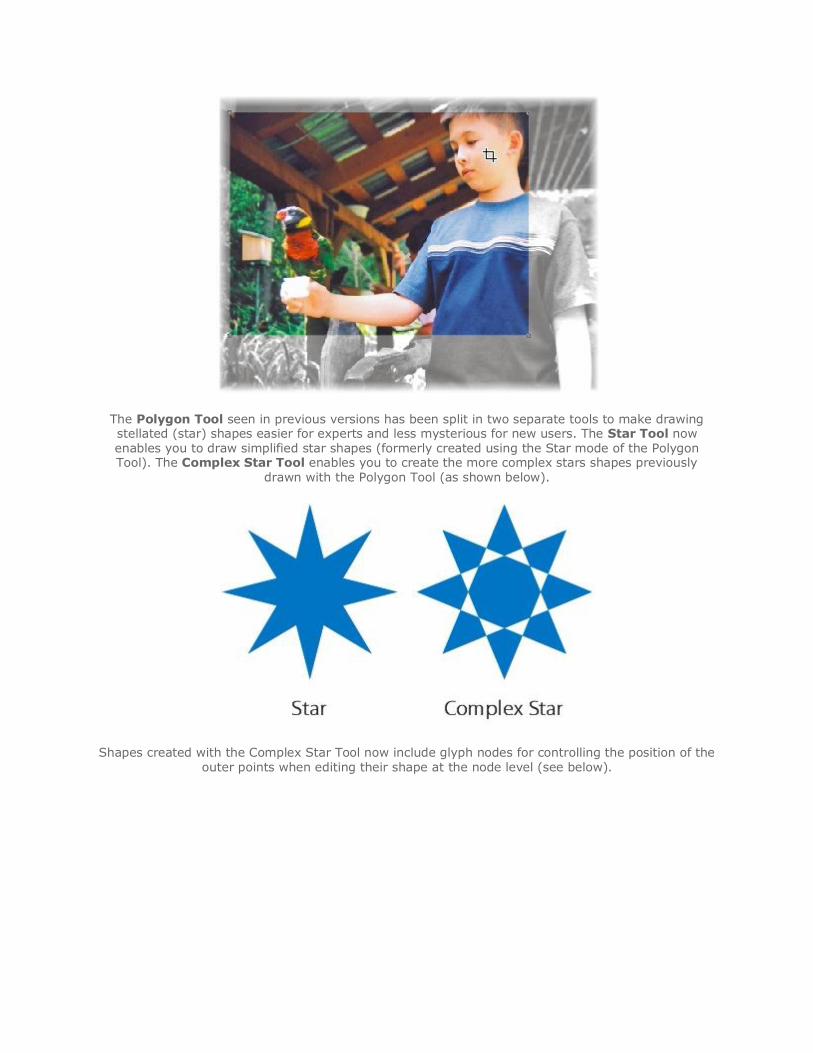
The Polygon Tool seen in previous versions has been split in two separate tools to make drawing stellated (star) shapes easier for experts and less mysterious for new users. The Star Tool now enables you to draw simplified star shapes (formerly created using the Star mode of the Polygon Tool). The Complex Star Tool enables you to create the more complex stars shapes previously
drawn with the Polygon Tool (as shown below).
Shapes created with the Complex Star Tool now include glyph nodes for controlling the position of the outer points when editing their shape at the node level (see below).
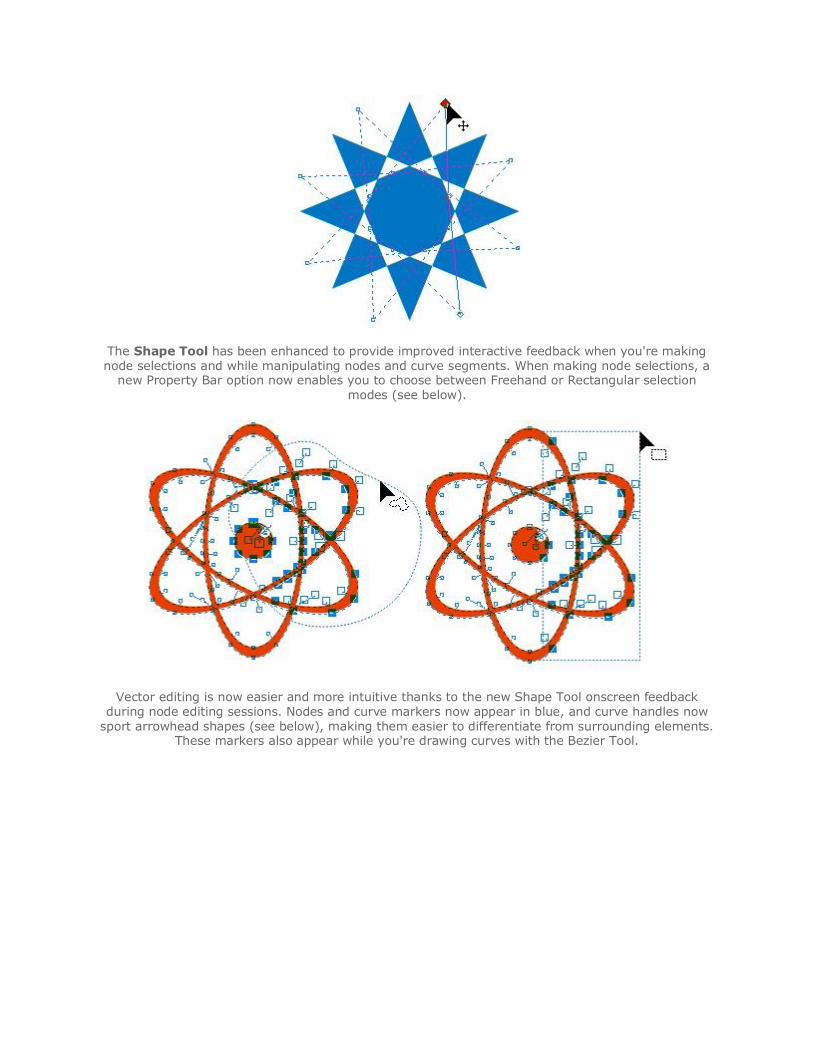
The Shape Tool has been enhanced to provide improved interactive feedback when you're making node selections and while manipulating nodes and curve segments. When making node selections, a
new Property Bar option now enables you to choose between Freehand or Rectangular selection modes (see below).
Vector editing is now easier and more intuitive thanks to the new Shape Tool onscreen feedback during node editing sessions. Nodes and curve markers now appear in blue, and curve handles now
sport arrowhead shapes (see below), making them easier to differentiate from surrounding elements. These markers also appear while you're drawing curves with the Bezier Tool.
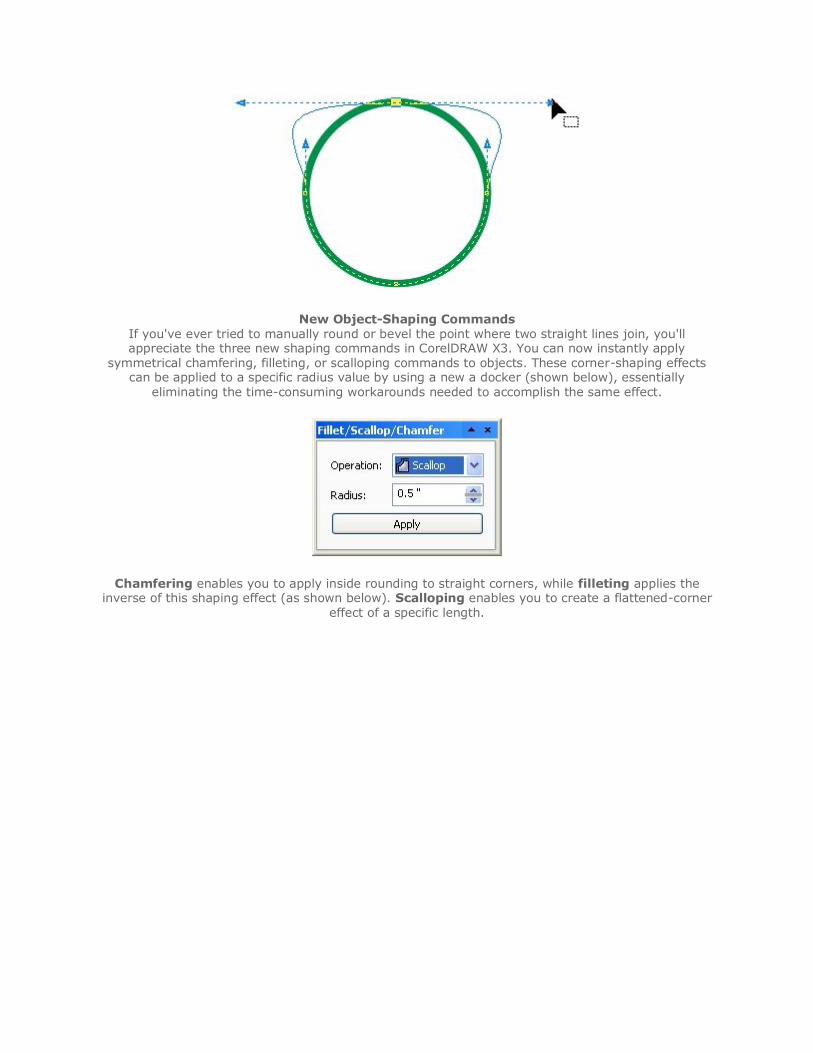
New Object-Shaping Commands If you've ever tried to manually round or bevel the point where two straight lines join, you'll appreciate the three new shaping commands in CorelDRAW X3. You can now instantly apply
symmetrical chamfering, filleting, or scalloping commands to objects. These corner-shaping effects can be applied to a specific radius value by using a new a docker (shown below), essentially
eliminating the time-consuming workarounds needed to accomplish the same effect.
Chamfering enables you to apply inside rounding to straight corners, while filleting applies the inverse of this shaping effect (as shown below). Scalloping enables you to create a flattened-corner
effect of a specific length.
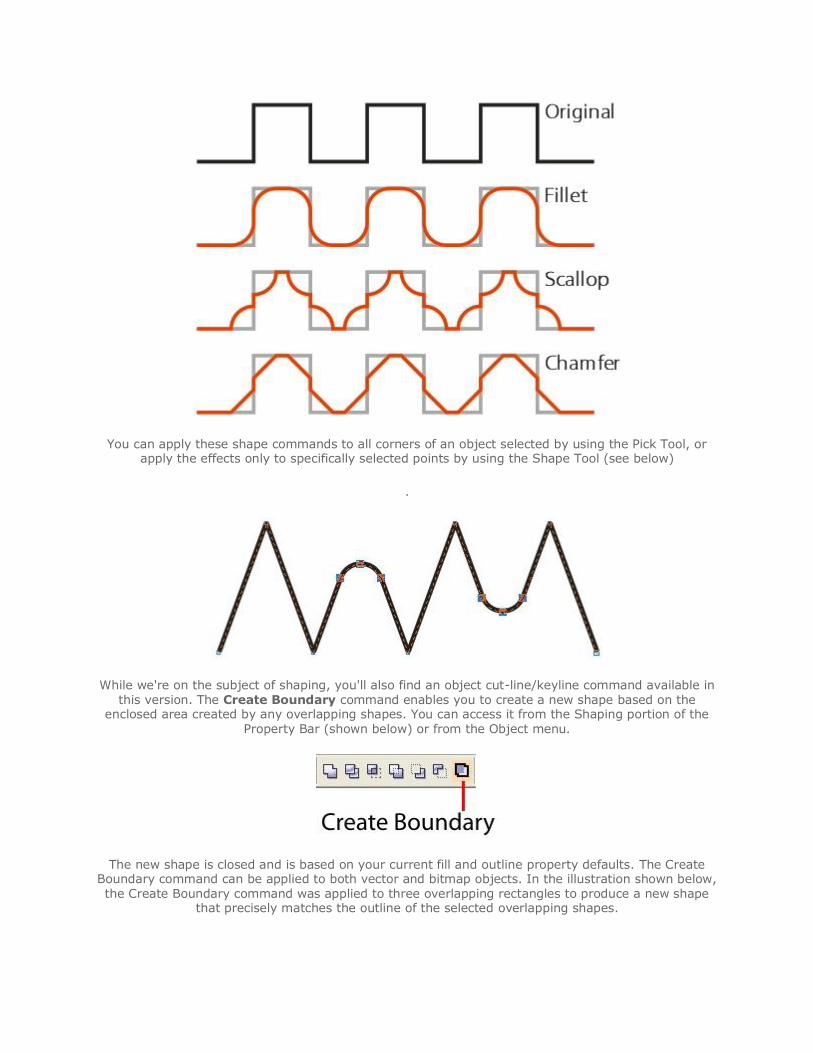
You can apply these shape commands to all corners of an object selected by using the Pick Tool, or apply the effects only to specifically selected points by using the Shape Tool (see below)
.
While we're on the subject of shaping, you'll also find an object cut-line/keyline command available in this version. The Create Boundary command enables you to create a new shape based on the
enclosed area created by any overlapping shapes. You can access it from the Shaping portion of the Property Bar (shown below) or from the Object menu.
The new shape is closed and is based on your current fill and outline property defaults. The Create Boundary command can be applied to both vector and bitmap objects. In the illustration shown below, the Create Boundary command was applied to three overlapping rectangles to produce a new shape
that precisely matches the outline of the selected overlapping shapes.
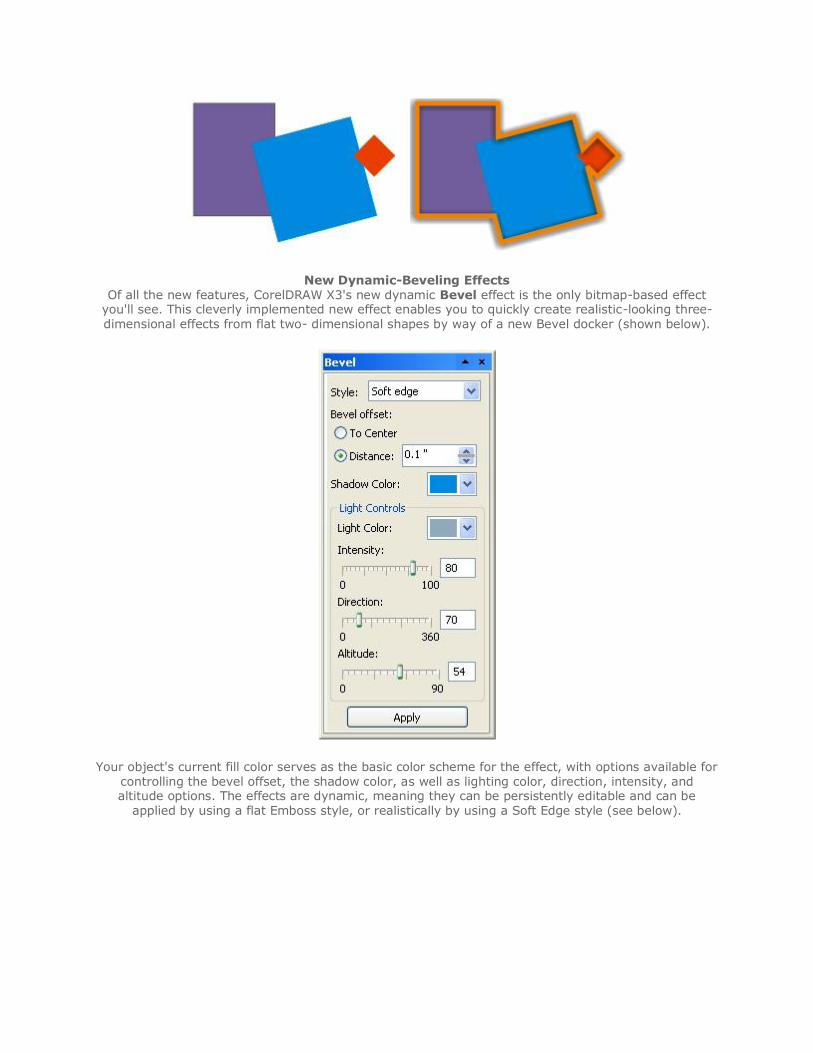
New Dynamic-Beveling Effects Of all the new features, CorelDRAW X3's new dynamic Bevel effect is the only bitmap-based effect
you'll see. This cleverly implemented new effect enables you to quickly create realistic-looking three- dimensional effects from flat two- dimensional shapes by way of a new Bevel docker (shown below).
Your object's current fill color serves as the basic color scheme for the effect, with options available for controlling the bevel offset, the shadow color, as well as lighting color, direction, intensity, and altitude options. The effects are dynamic, meaning they can be persistently editable and can be
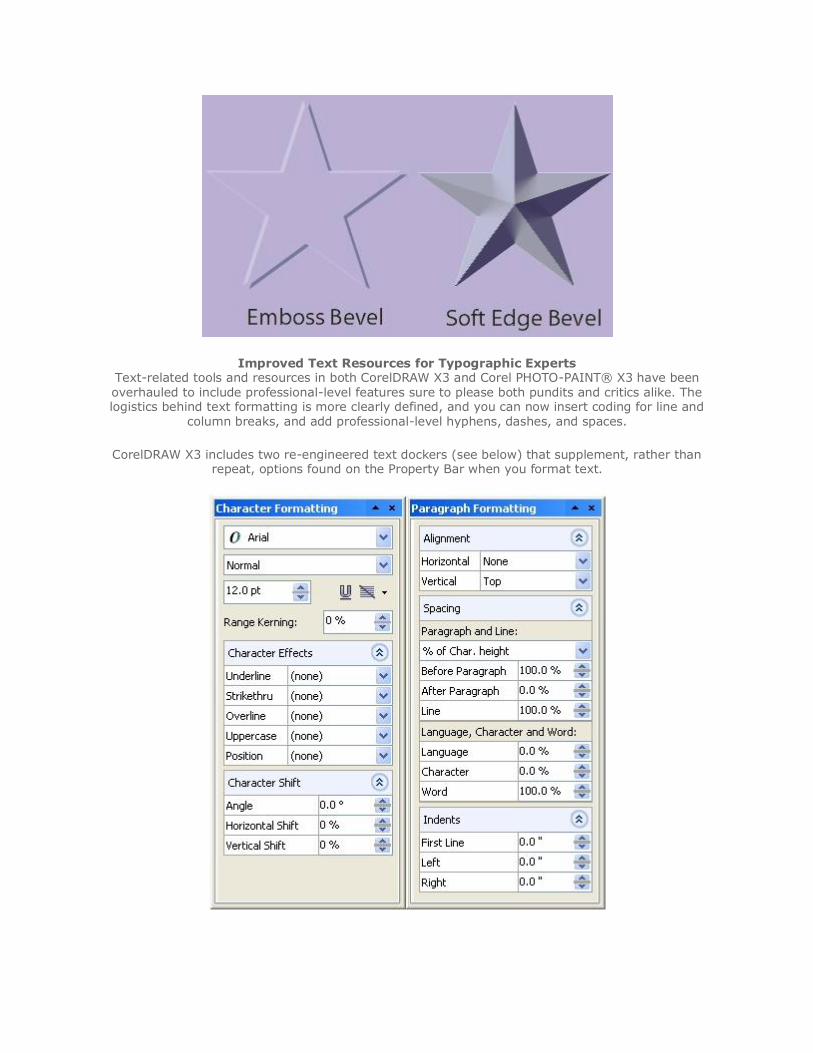
applied by using a flat Emboss style, or realistically by using a Soft Edge style (see below).
Improved Text Resources for Typographic Experts Text-related tools and resources in both CorelDRAW X3 and Corel PHOTO-PAINT® X3 have been overhauled to include professional-level features sure to please both pundits and critics alike. The logistics behind text formatting is more clearly defined, and you can now insert coding for line and
column breaks, and add professional-level hyphens, dashes, and spaces.
CorelDRAW X3 includes two re-engineered text dockers (see below) that supplement, rather than repeat, options found on the Property Bar when you format text.
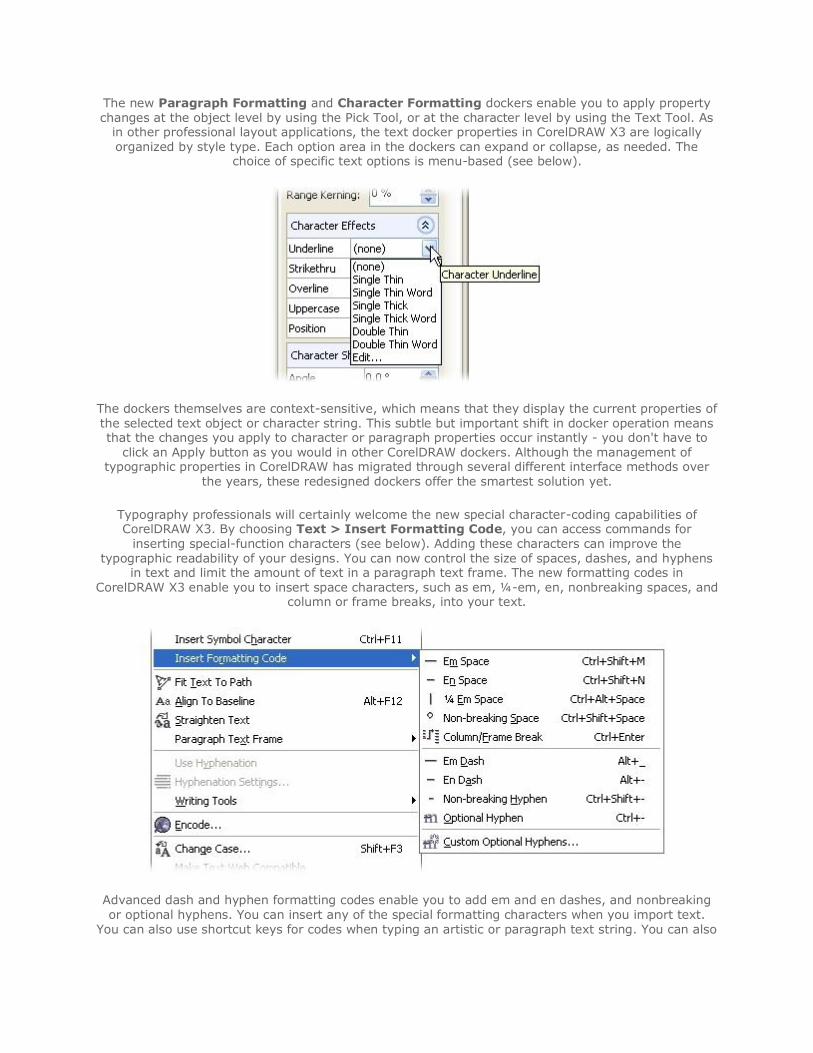
The new Paragraph Formatting and Character Formatting dockers enable you to apply property changes at the object level by using the Pick Tool, or at the character level by using the Text Tool. As
in other professional layout applications, the text docker properties in CorelDRAW X3 are logically organized by style type. Each option area in the dockers can expand or collapse, as needed. The
choice of specific text options is menu-based (see below).
The dockers themselves are context-sensitive, which means that they display the current properties of the selected text object or character string. This subtle but important shift in docker operation means that the changes you apply to character or paragraph properties occur instantly - you don't have to
click an Apply button as you would in other CorelDRAW dockers. Although the management of typographic properties in CorelDRAW has migrated through several different interface methods over
the years, these redesigned dockers offer the smartest solution yet.
Typography professionals will certainly welcome the new special character-coding capabilities of CorelDRAW X3. By choosing Text > Insert Formatting Code, you can access commands for
inserting special-function characters (see below). Adding these characters can improve the typographic readability of your designs. You can now control the size of spaces, dashes, and hyphens
in text and limit the amount of text in a paragraph text frame. The new formatting codes in CorelDRAW X3 enable you to insert space characters, such as em, ¼-em, en, nonbreaking spaces, and
column or frame breaks, into your text.
Advanced dash and hyphen formatting codes enable you to add em and en dashes, and nonbreaking or optional hyphens. You can insert any of the special formatting characters when you import text.
You can also use shortcut keys for codes when typing an artistic or paragraph text string. You can also
create your own lists of hyphenation exceptions by using the Custom Option Hyphens dialog (see below). Hyphenation can now be toggled on or off for specific text objects using command menus.
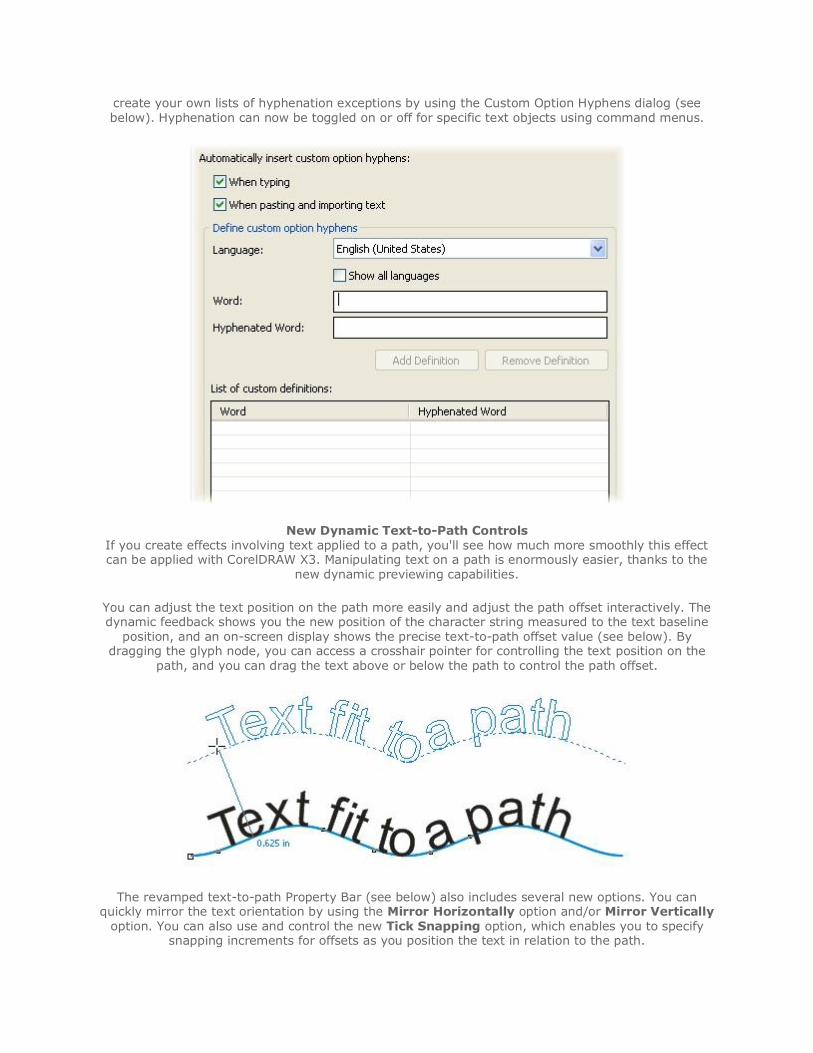
New Dynamic Text-to-Path Controls If you create effects involving text applied to a path, you'll see how much more smoothly this effect can be applied with CorelDRAW X3. Manipulating text on a path is enormously easier, thanks to the
new dynamic previewing capabilities.
You can adjust the text position on the path more easily and adjust the path offset interactively. The dynamic feedback shows you the new position of the character string measured to the text baseline
position, and an on-screen display shows the precise text-to-path offset value (see below). By dragging the glyph node, you can access a crosshair pointer for controlling the text position on the
path, and you can drag the text above or below the path to control the path offset.
The revamped text-to-path Property Bar (see below) also includes several new options. You can quickly mirror the text orientation by using the Mirror Horizontally option and/or Mirror Vertically
option. You can also use and control the new Tick Snapping option, which enables you to specify snapping increments for offsets as you position the text in relation to the path.
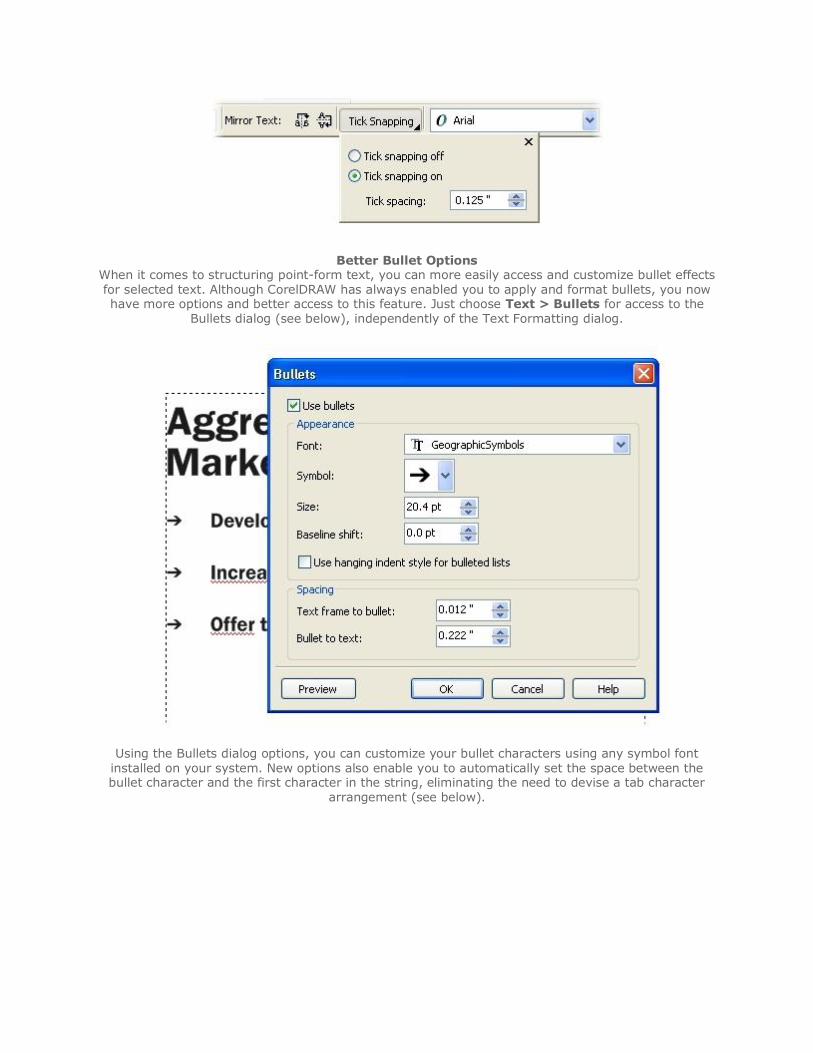
Better Bullet Options When it comes to structuring point-form text, you can more easily access and customize bullet effects for selected text. Although CorelDRAW has always enabled you to apply and format bullets, you now have more options and better access to this feature. Just choose Text > Bullets for access to the
Bullets dialog (see below), independently of the Text Formatting dialog.
Using the Bullets dialog options, you can customize your bullet characters using any symbol font installed on your system. New options also enable you to automatically set the space between the bullet character and the first character in the string, eliminating the need to devise a tab character
arrangement (see below).
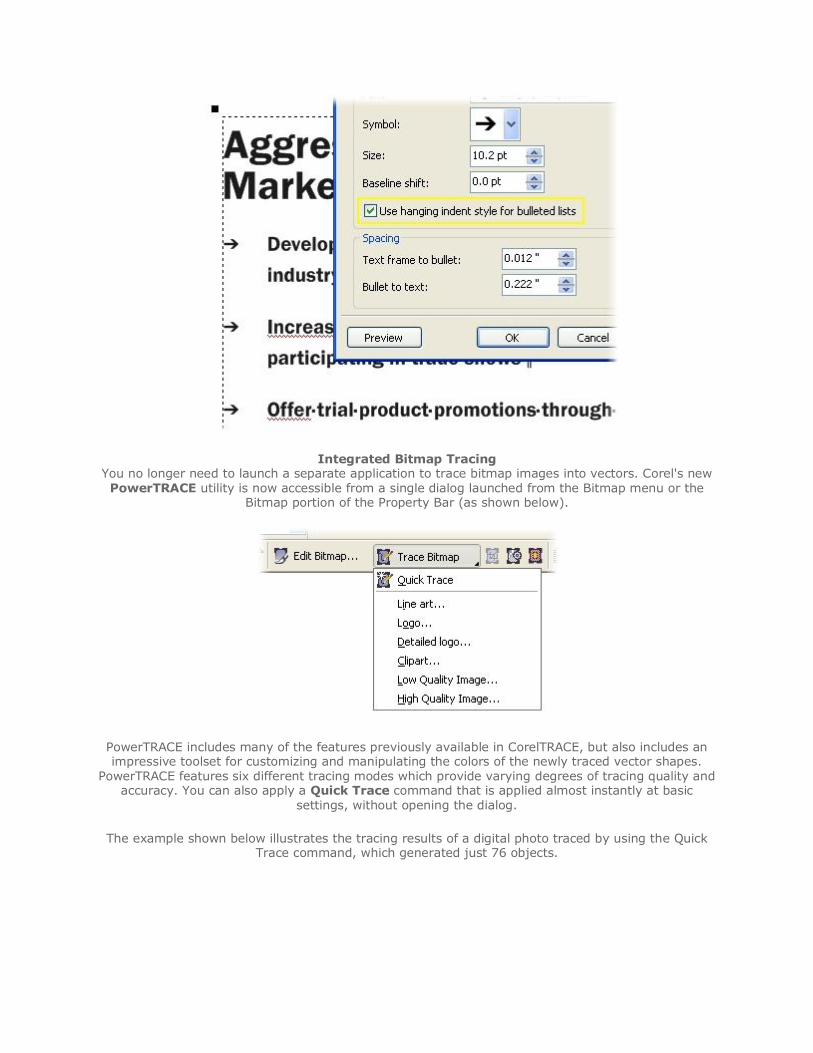
Integrated Bitmap Tracing You no longer need to launch a separate application to trace bitmap images into vectors. Corel's new
PowerTRACE utility is now accessible from a single dialog launched from the Bitmap menu or the Bitmap portion of the Property Bar (as shown below).
PowerTRACE includes many of the features previously available in CorelTRACE, but also includes an impressive toolset for customizing and manipulating the colors of the newly traced vector shapes.
PowerTRACE features six different tracing modes which provide varying degrees of tracing quality and accuracy. You can also apply a Quick Trace command that is applied almost instantly at basic
settings, without opening the dialog.
The example shown below illustrates the tracing results of a digital photo traced by using the Quick Trace command, which generated just 76 objects.
Advanced Color Support < transparency with objects or effects vector behind layered to applied are they if even preserved colors spot means also support improved The transparency. and fills, mesh
blends, shadows, drop as such tools interactive bitmap dynamic include now can You PHOTO-PAINT. Corel CorelDRAW supported fully palettes color Fixed>
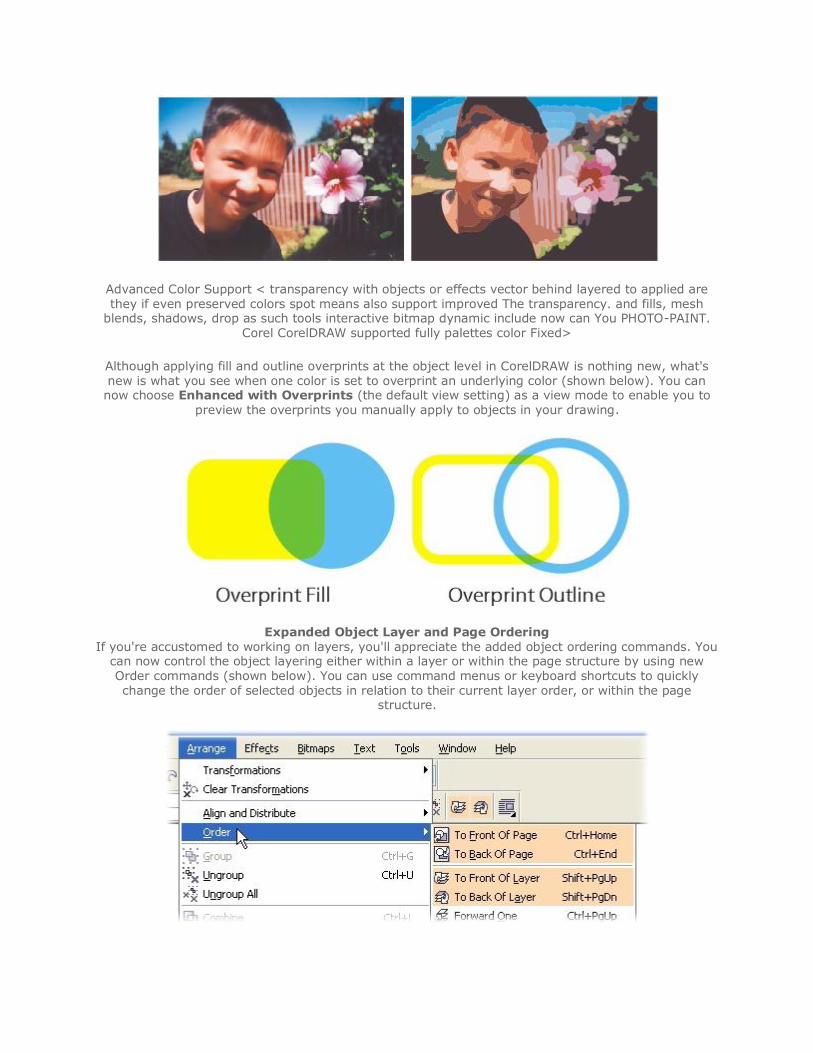
Although applying fill and outline overprints at the object level in CorelDRAW is nothing new, what's new is what you see when one color is set to overprint an underlying color (shown below). You can now choose Enhanced with Overprints (the default view setting) as a view mode to enable you to
preview the overprints you manually apply to objects in your drawing.
Expanded Object Layer and Page Ordering If you're accustomed to working on layers, you'll appreciate the added object ordering commands. You
can now control the object layering either within a layer or within the page structure by using new Order commands (shown below). You can use command menus or keyboard shortcuts to quickly change the order of selected objects in relation to their current layer order, or within the page
structure.
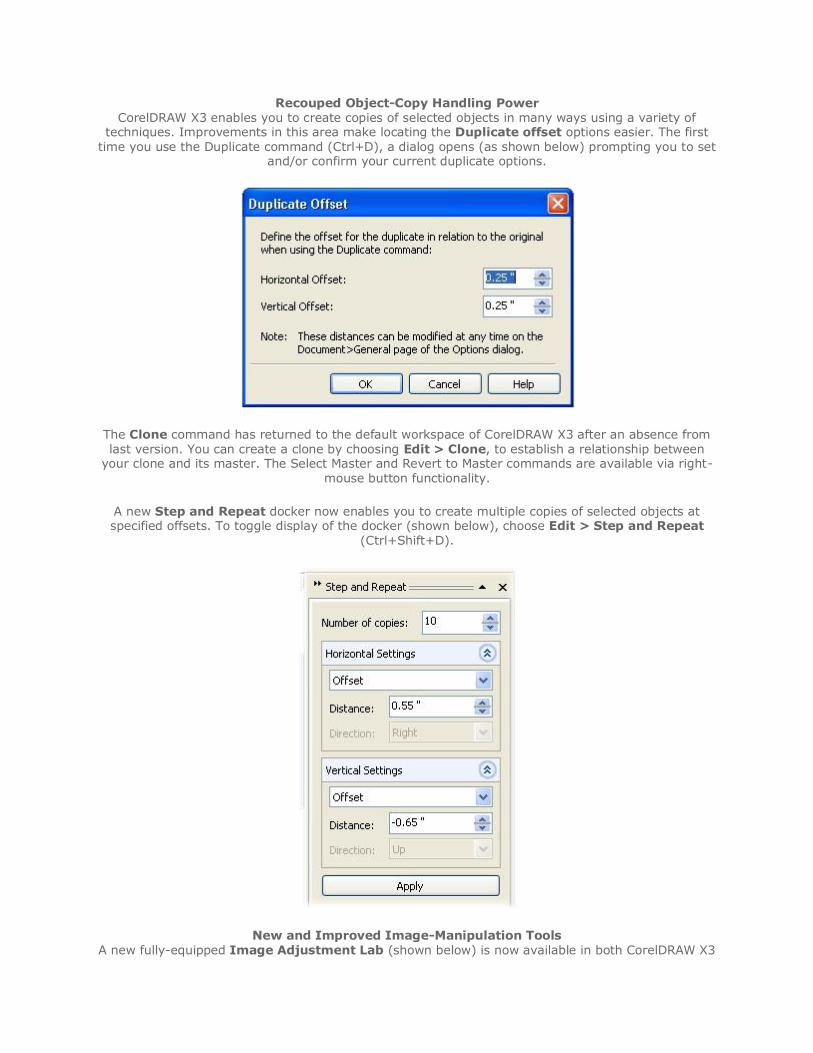
Recouped Object-Copy Handling Power CorelDRAW X3 enables you to create copies of selected objects in many ways using a variety of
techniques. Improvements in this area make locating the Duplicate offset options easier. The first time you use the Duplicate command (Ctrl+D), a dialog opens (as shown below) prompting you to set
and/or confirm your current duplicate options.
The Clone command has returned to the default workspace of CorelDRAW X3 after an absence from last version. You can create a clone by choosing Edit > Clone, to establish a relationship between
your clone and its master. The Select Master and Revert to Master commands are available via right- mouse button functionality.
A new Step and Repeat docker now enables you to create multiple copies of selected objects at specified offsets. To toggle display of the docker (shown below), choose Edit > Step and Repeat
(Ctrl+Shift+D).
New and Improved Image-Manipulation Tools A new fully-equipped Image Adjustment Lab (shown below) is now available in both CorelDRAW X3
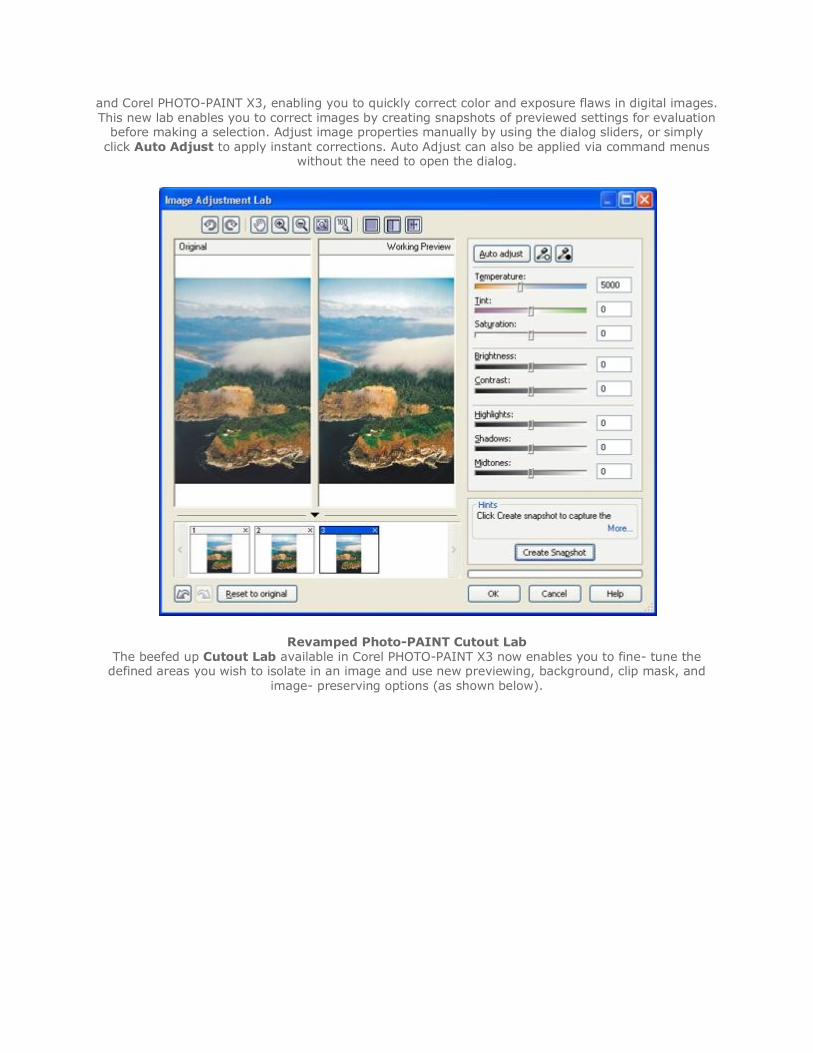
and Corel PHOTO-PAINT X3, enabling you to quickly correct color and exposure flaws in digital images. This new lab enables you to correct images by creating snapshots of previewed settings for evaluation
before making a selection. Adjust image properties manually by using the dialog sliders, or simply click Auto Adjust to apply instant corrections. Auto Adjust can also be applied via command menus
without the need to open the dialog.
Revamped Photo-PAINT Cutout Lab The beefed up Cutout Lab available in Corel PHOTO-PAINT X3 now enables you to fine- tune the
defined areas you wish to isolate in an image and use new previewing, background, clip mask, and image- preserving options (as shown below).
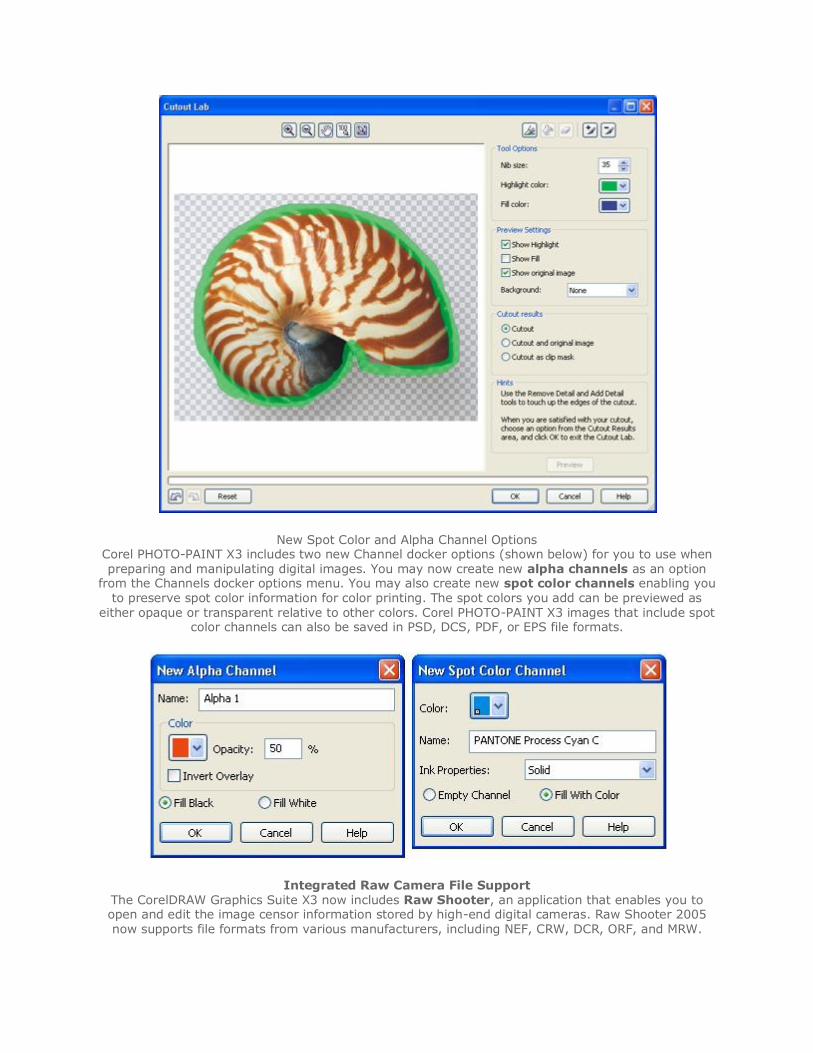
New Spot Color and Alpha Channel Options Corel PHOTO-PAINT X3 includes two new Channel docker options (shown below) for you to use when preparing and manipulating digital images. You may now create new alpha channels as an option
from the Channels docker options menu. You may also create new spot color channels enabling you to preserve spot color information for color printing. The spot colors you add can be previewed as
either opaque or transparent relative to other colors. Corel PHOTO-PAINT X3 images that include spot color channels can also be saved in PSD, DCS, PDF, or EPS file formats.
Integrated Raw Camera File Support The CorelDRAW Graphics Suite X3 now includes Raw Shooter, an application that enables you to open and edit the image censor information stored by high-end digital cameras. Raw Shooter 2005 now supports file formats from various manufacturers, including NEF, CRW, DCR, ORF, and MRW.
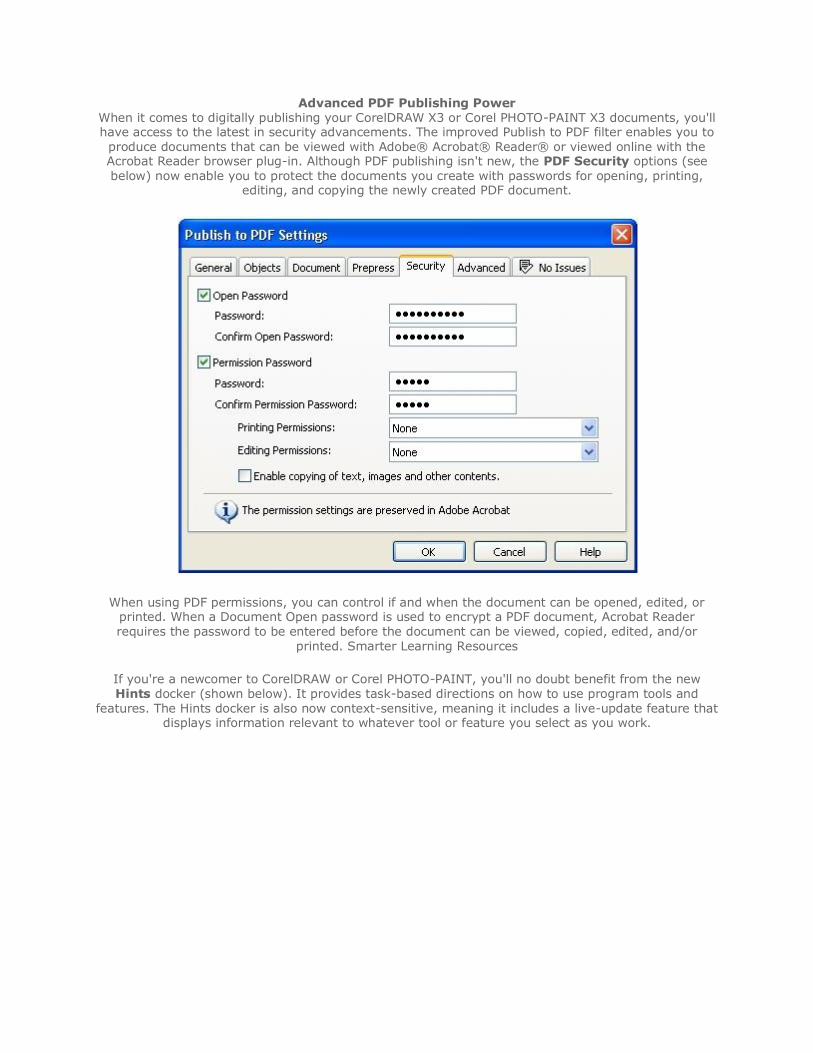
Advanced PDF Publishing Power When it comes to digitally publishing your CorelDRAW X3 or Corel PHOTO-PAINT X3 documents, you'll have access to the latest in security advancements. The improved Publish to PDF filter enables you to
produce documents that can be viewed with Adobe® Acrobat® Reader® or viewed online with the Acrobat Reader browser plug-in. Although PDF publishing isn't new, the PDF Security options (see below) now enable you to protect the documents you create with passwords for opening, printing,
editing, and copying the newly created PDF document.
When using PDF permissions, you can control if and when the document can be opened, edited, or printed. When a Document Open password is used to encrypt a PDF document, Acrobat Reader requires the password to be entered before the document can be viewed, copied, edited, and/or
printed. Smarter Learning Resources
If you're a newcomer to CorelDRAW or Corel PHOTO-PAINT, you'll no doubt benefit from the new Hints docker (shown below). It provides task-based directions on how to use program tools and
features. The Hints docker is also now context-sensitive, meaning it includes a live-update feature that displays information relevant to whatever tool or feature you select as you work.
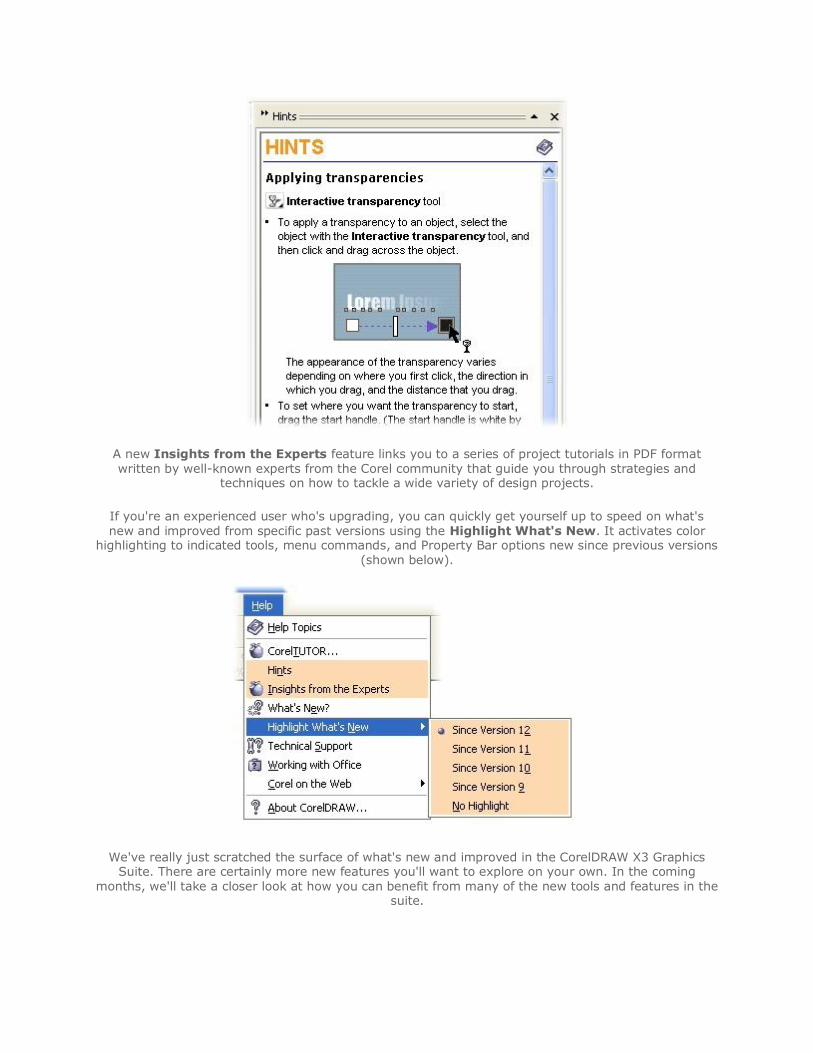
A new Insights from the Experts feature links you to a series of project tutorials in PDF format written by well-known experts from the Corel community that guide you through strategies and
techniques on how to tackle a wide variety of design projects.
If you're an experienced user who's upgrading, you can quickly get yourself up to speed on what's new and improved from specific past versions using the Highlight What's New. It activates color
highlighting to indicated tools, menu commands, and Property Bar options new since previous versions (shown below).
We've really just scratched the surface of what's new and improved in the CorelDRAW X3 Graphics Suite. There are certainly more new features you'll want to explore on your own. In the coming
months, we'll take a closer look at how you can benefit from many of the new tools and features in the suite.

CorelDRAW Graphics Suite Tutorials
CorelDRAW® Graphics Suite X3 Packs an Easy-To-Use Graphics Punch
By Steve Bain
Corel's flagship graphics suite has certainly developed a loyal worldwide following over the years. Reasons for this loyalty include the ease with which users can create sophisticated graphics and the
suite's friendly interface and easy-to-use effects. Even newcomers to the suite find how fast and simple it is to create complex designs and perform fancy graphics tricks.
CorelDRAW® Graphics Suite X3 delivers even more on this theme with a more intuitive interface and innovative learning resources. Let's take a look at several new features that really shine - including a
new context-sensitive docker, a new feature called Insights from the Experts, and some key enhancements made to the main vector-handling capabilities in CorelDRAW.
Tips from Your Own Personal Trainer If you're new to either CorelDRAW or Corel PHOTO-PAINT®, the new Hints docker may quickly
become your best friend. It works like a personal training coach, providing step-based instructions on how to use the program. It displays real-time tips, techniques, and step-by-step directions for
whatever tool or interactive effect you happen to be using at the moment.
For example, in CorelDRAW X3, when you click a complex star with the Shape Tool, the Hints docker immediately provides the steps needed to perform mirror editing on the shape (see below).
You can also use the Hints docker to learn how to use complex tools and effects in Corel PHOTO-PAINT X3. For example, when you select the Clone Tool while editing an image, the Hints docker instantly
displays quick tutorial information on how to perform detailed photo-retouching operations by cloning from one area of an image onto another (see below).
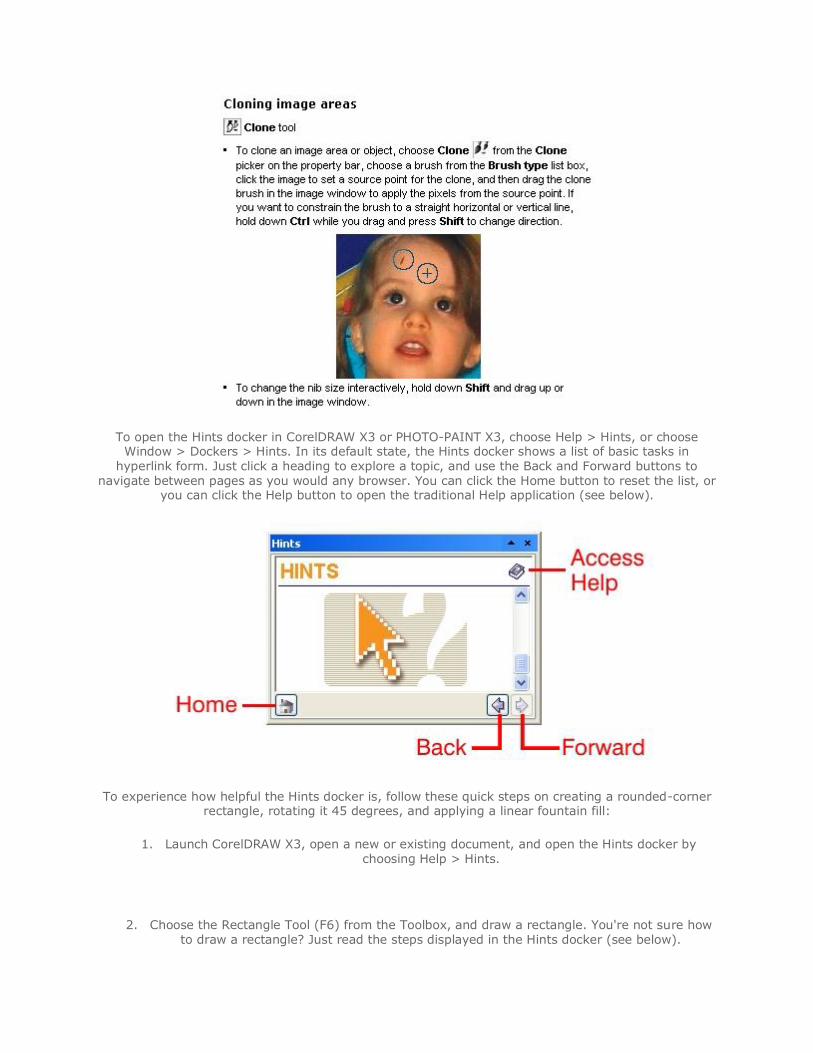
To open the Hints docker in CorelDRAW X3 or PHOTO-PAINT X3, choose Help > Hints, or choose Window > Dockers > Hints. In its default state, the Hints docker shows a list of basic tasks in
hyperlink form. Just click a heading to explore a topic, and use the Back and Forward buttons to navigate between pages as you would any browser. You can click the Home button to reset the list, or
you can click the Help button to open the traditional Help application (see below).
To experience how helpful the Hints docker is, follow these quick steps on creating a rounded-corner rectangle, rotating it 45 degrees, and applying a linear fountain fill:
1. Launch CorelDRAW X3, open a new or existing document, and open the Hints docker by choosing Help > Hints.
2. Choose the Rectangle Tool (F6) from the Toolbox, and draw a rectangle. You're not sure how to draw a rectangle? Just read the steps displayed in the Hints docker (see below).

3. With the rectangle still selected, choose the Shape Tool (F10) from the Toolbox and round the corners interactively. If this procedure is new to you, use the Hints docker, which provides
steps on how to round the rectangle corners (see below).
4. With the rectangle corners rounded, choose the Pick Tool (press Spacebar), and click the selected shape to display the interactive rotation and skewing handles. Rotate the rectangle
45 degrees, using the steps provided in the Hints docker (see below).
5. Apply a fountain fill to the rectangle by using the Interactive Fill Tool. If you've never used this particular tool before, just follow the instructions in the Hints docker to create and customize
your fountain fill colors.
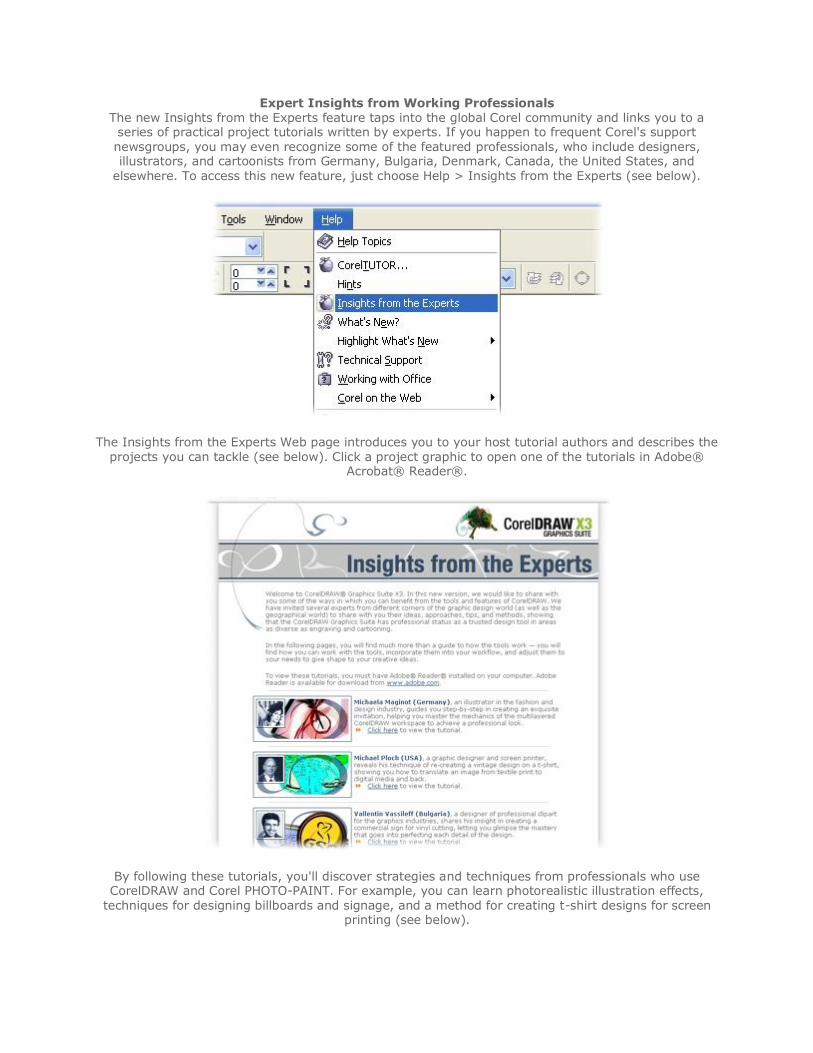
Expert Insights from Working Professionals The new Insights from the Experts feature taps into the global Corel community and links you to a series of practical project tutorials written by experts. If you happen to frequent Corel's support newsgroups, you may even recognize some of the featured professionals, who include designers, illustrators, and cartoonists from Germany, Bulgaria, Denmark, Canada, the United States, and
elsewhere. To access this new feature, just choose Help > Insights from the Experts (see below).
The Insights from the Experts Web page introduces you to your host tutorial authors and describes the projects you can tackle (see below). Click a project graphic to open one of the tutorials in Adobe®
Acrobat® Reader®.
By following these tutorials, you'll discover strategies and techniques from professionals who use CorelDRAW and Corel PHOTO-PAINT. For example, you can learn photorealistic illustration effects,
techniques for designing billboards and signage, and a method for creating t-shirt designs for screen printing (see below).

A Friendlier Face to Work With Several improvements in CorelDRAW X3 make core competencies easier to use. If you're an
experienced user upgrading to this version, the new Highlight What's New option lets you quickly ramp up to what's new and different. You can even customize the feature by choosing to highlight
differences from specific past versions of either CorelDRAW X3 or Corel PHOTO-PAINT X3, as far back as version 9 (see below). The feature works independently of workspace preferences, which makes it
truly convenient.
The color highlighting appears on Toolbox tools, Property Bar options, and menu commands (see below), so that you can quickly reap the benefits of recent changes virtually anywhere in the suite.
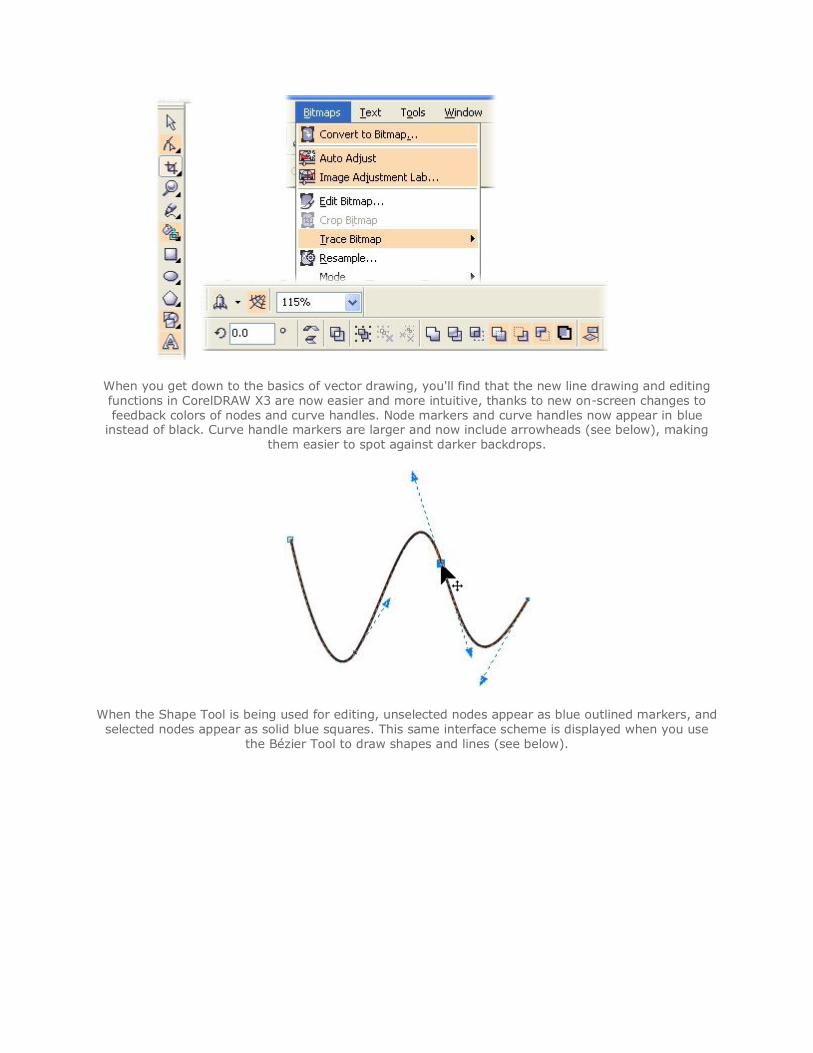
When you get down to the basics of vector drawing, you'll find that the new line drawing and editing functions in CorelDRAW X3 are now easier and more intuitive, thanks to new on-screen changes to feedback colors of nodes and curve handles. Node markers and curve handles now appear in blue
instead of black. Curve handle markers are larger and now include arrowheads (see below), making them easier to spot against darker backdrops.
When the Shape Tool is being used for editing, unselected nodes appear as blue outlined markers, and selected nodes appear as solid blue squares. This same interface scheme is displayed when you use
the Bézier Tool to draw shapes and lines (see below).
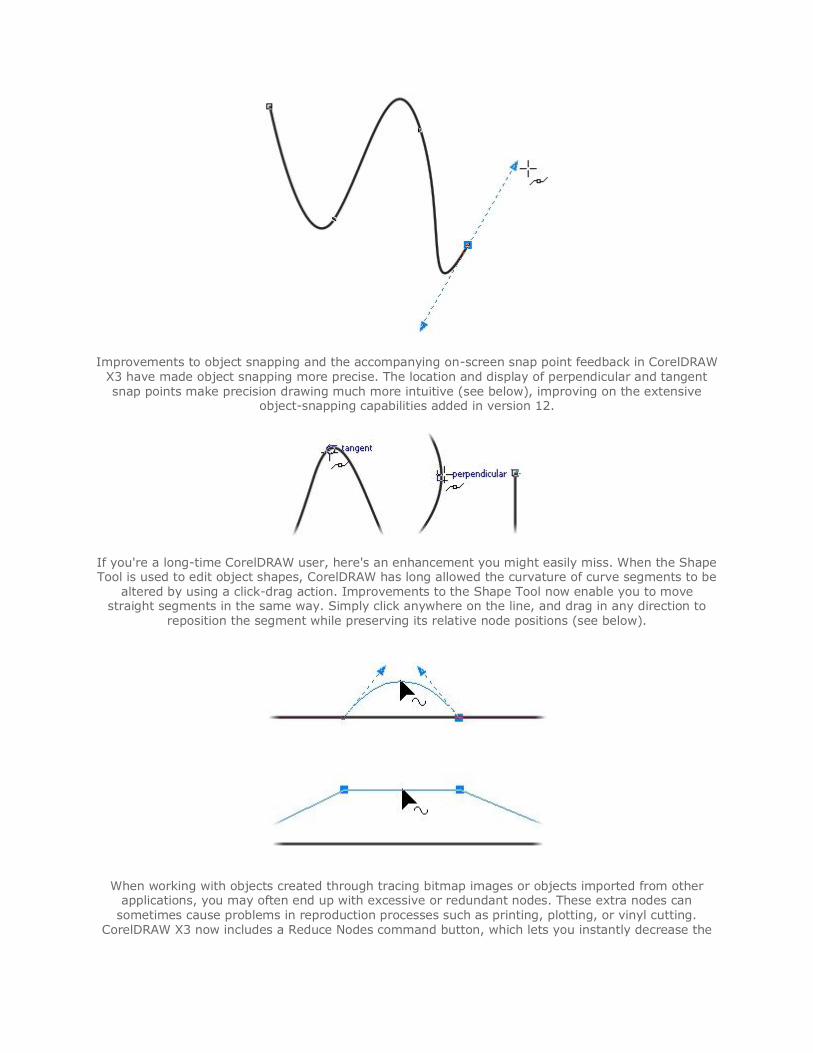
Improvements to object snapping and the accompanying on-screen snap point feedback in CorelDRAW X3 have made object snapping more precise. The location and display of perpendicular and tangent snap points make precision drawing much more intuitive (see below), improving on the extensive
object-snapping capabilities added in version 12.
If you're a long-time CorelDRAW user, here's an enhancement you might easily miss. When the Shape Tool is used to edit object shapes, CorelDRAW has long allowed the curvature of curve segments to be
altered by using a click-drag action. Improvements to the Shape Tool now enable you to move straight segments in the same way. Simply click anywhere on the line, and drag in any direction to
reposition the segment while preserving its relative node positions (see below).
When working with objects created through tracing bitmap images or objects imported from other applications, you may often end up with excessive or redundant nodes. These extra nodes can
sometimes cause problems in reproduction processes such as printing, plotting, or vinyl cutting. CorelDRAW X3 now includes a Reduce Nodes command button, which lets you instantly decrease the
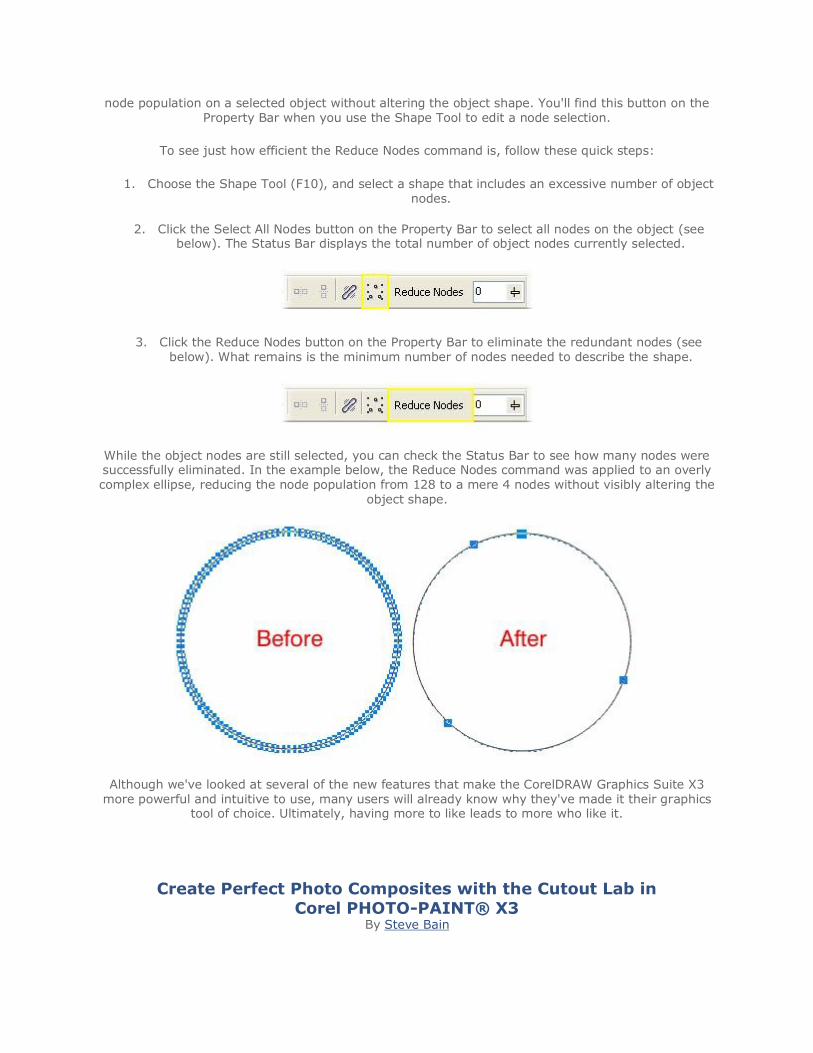
node population on a selected object without altering the object shape. You'll find this button on the Property Bar when you use the Shape Tool to edit a node selection.
To see just how efficient the Reduce Nodes command is, follow these quick steps:
1. Choose the Shape Tool (F10), and select a shape that includes an excessive number of object nodes.
2. Click the Select All Nodes button on the Property Bar to select all nodes on the object (see below). The Status Bar displays the total number of object nodes currently selected.
3. Click the Reduce Nodes button on the Property Bar to eliminate the redundant nodes (see below). What remains is the minimum number of nodes needed to describe the shape.
While the object nodes are still selected, you can check the Status Bar to see how many nodes were successfully eliminated. In the example below, the Reduce Nodes command was applied to an overly complex ellipse, reducing the node population from 128 to a mere 4 nodes without visibly altering the
object shape.
Although we've looked at several of the new features that make the CorelDRAW Graphics Suite X3 more powerful and intuitive to use, many users will already know why they've made it their graphics
tool of choice. Ultimately, having more to like leads to more who like it.
Create Perfect Photo Composites with the Cutout Lab in
Corel PHOTO-PAINT® X3
By Steve Bain
The Cutout Lab in Corel PHOTO-PAINT® enables you to extract or copy photo elements from any digital image with precision and relative ease. Much more than just a quick selection tool, the Cutout Lab accurately detects almost any shape and preserves the fine details of an image. It automatically
applies transparent edge-feathering, and it enables you to decide whether your cutout will be an object without a background, an object on top of the original image, or a clip mask attached to the
original image.
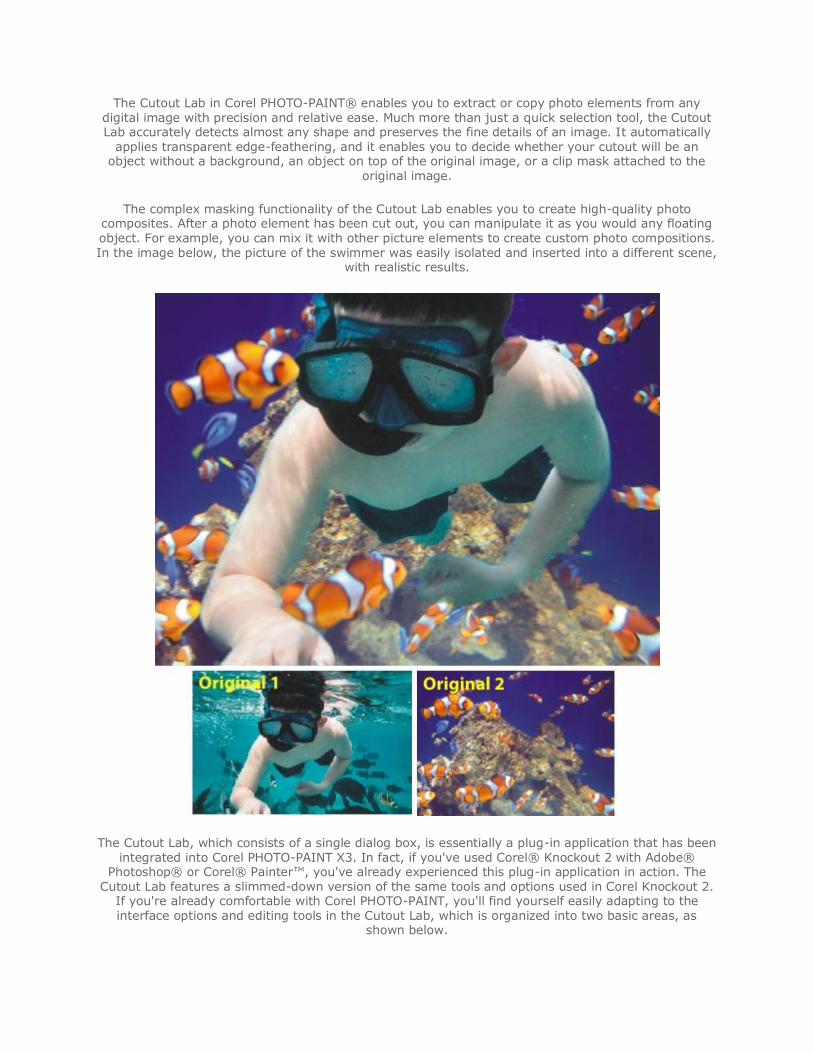
The complex masking functionality of the Cutout Lab enables you to create high-quality photo composites. After a photo element has been cut out, you can manipulate it as you would any floating object. For example, you can mix it with other picture elements to create custom photo compositions. In the image below, the picture of the swimmer was easily isolated and inserted into a different scene,
with realistic results.
The Cutout Lab, which consists of a single dialog box, is essentially a plug-in application that has been integrated into Corel PHOTO-PAINT X3. In fact, if you've used Corel® Knockout 2 with Adobe®
Photoshop® or Corel® Painter™, you've already experienced this plug-in application in action. The Cutout Lab features a slimmed-down version of the same tools and options used in Corel Knockout 2.
If you're already comfortable with Corel PHOTO-PAINT, you'll find yourself easily adapting to the interface options and editing tools in the Cutout Lab, which is organized into two basic areas, as
shown below.
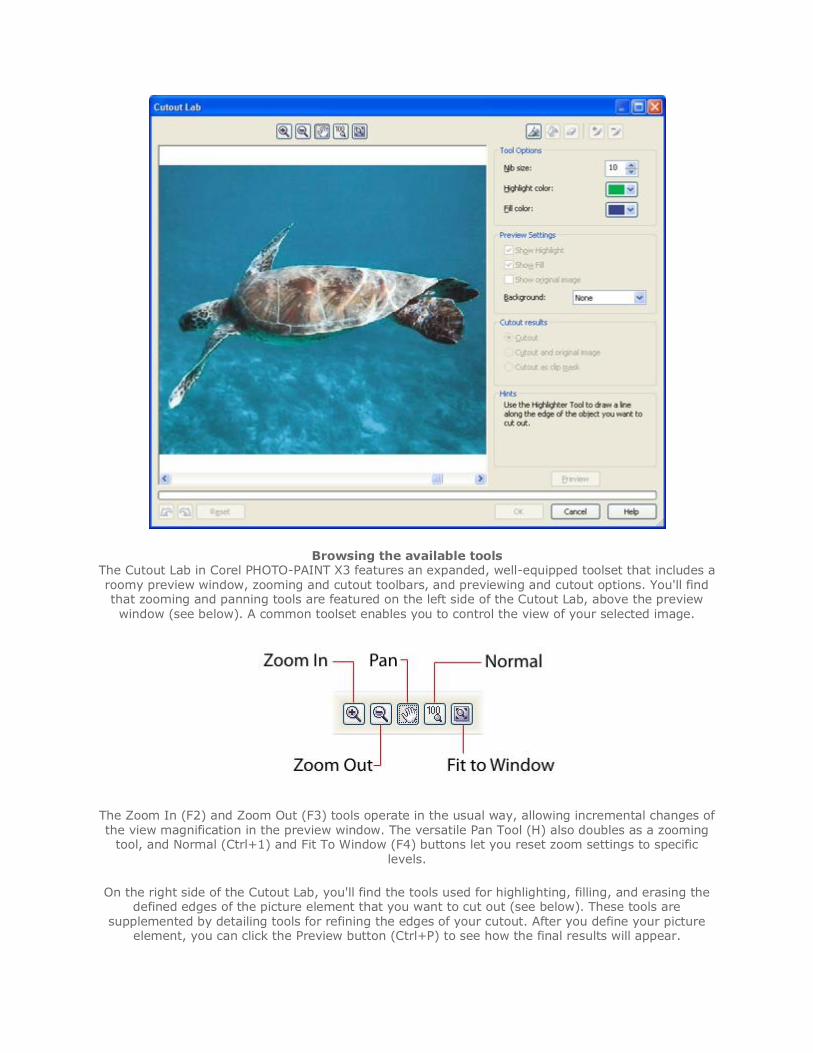
Browsing the available tools The Cutout Lab in Corel PHOTO-PAINT X3 features an expanded, well-equipped toolset that includes a roomy preview window, zooming and cutout toolbars, and previewing and cutout options. You'll find that zooming and panning tools are featured on the left side of the Cutout Lab, above the preview window (see below). A common toolset enables you to control the view of your selected image.
The Zoom In (F2) and Zoom Out (F3) tools operate in the usual way, allowing incremental changes of the view magnification in the preview window. The versatile Pan Tool (H) also doubles as a zooming
tool, and Normal (Ctrl+1) and Fit To Window (F4) buttons let you reset zoom settings to specific levels.
On the right side of the Cutout Lab, you'll find the tools used for highlighting, filling, and erasing the defined edges of the picture element that you want to cut out (see below). These tools are
supplemented by detailing tools for refining the edges of your cutout. After you define your picture element, you can click the Preview button (Ctrl+P) to see how the final results will appear.
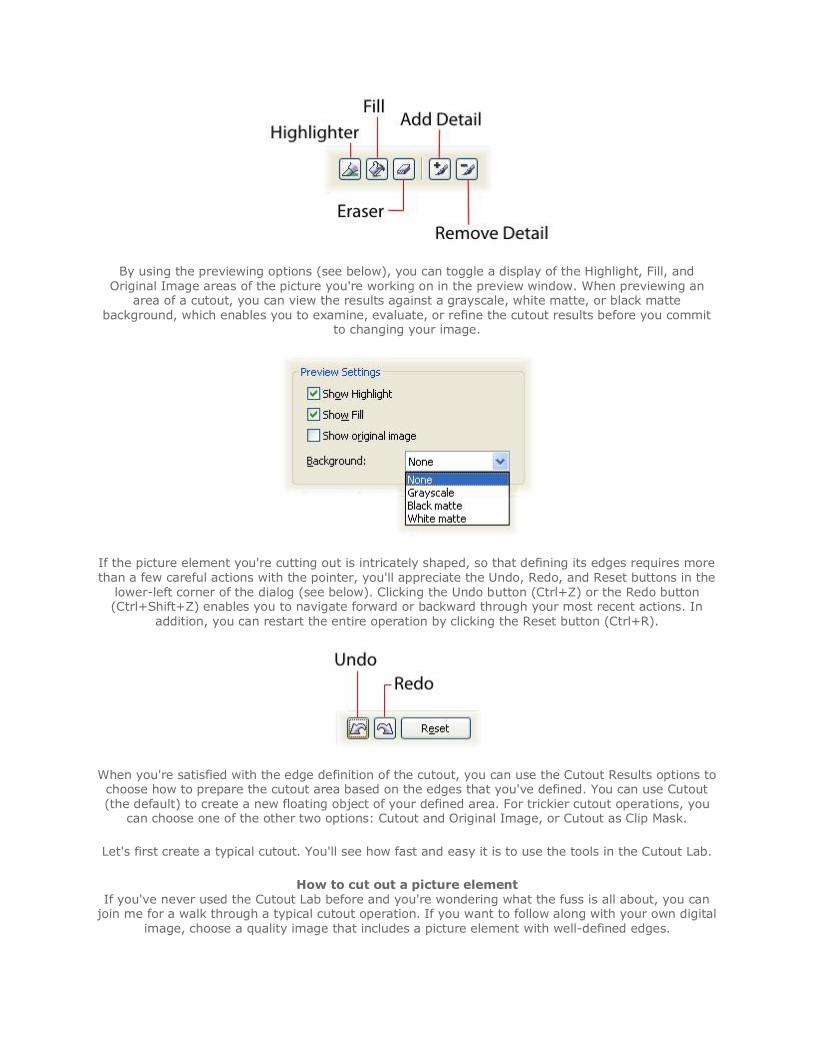
By using the previewing options (see below), you can toggle a display of the Highlight, Fill, and Original Image areas of the picture you're working on in the preview window. When previewing an
area of a cutout, you can view the results against a grayscale, white matte, or black matte background, which enables you to examine, evaluate, or refine the cutout results before you commit
to changing your image.
If the picture element you're cutting out is intricately shaped, so that defining its edges requires more than a few careful actions with the pointer, you'll appreciate the Undo, Redo, and Reset buttons in the
lower-left corner of the dialog (see below). Clicking the Undo button (Ctrl+Z) or the Redo button (Ctrl+Shift+Z) enables you to navigate forward or backward through your most recent actions. In
addition, you can restart the entire operation by clicking the Reset button (Ctrl+R).
When you're satisfied with the edge definition of the cutout, you can use the Cutout Results options to choose how to prepare the cutout area based on the edges that you've defined. You can use Cutout (the default) to create a new floating object of your defined area. For trickier cutout operations, you
can choose one of the other two options: Cutout and Original Image, or Cutout as Clip Mask.
Let's first create a typical cutout. You'll see how fast and easy it is to use the tools in the Cutout Lab.
How to cut out a picture element If you've never used the Cutout Lab before and you're wondering what the fuss is all about, you can
join me for a walk through a typical cutout operation. If you want to follow along with your own digital image, choose a quality image that includes a picture element with well-defined edges.
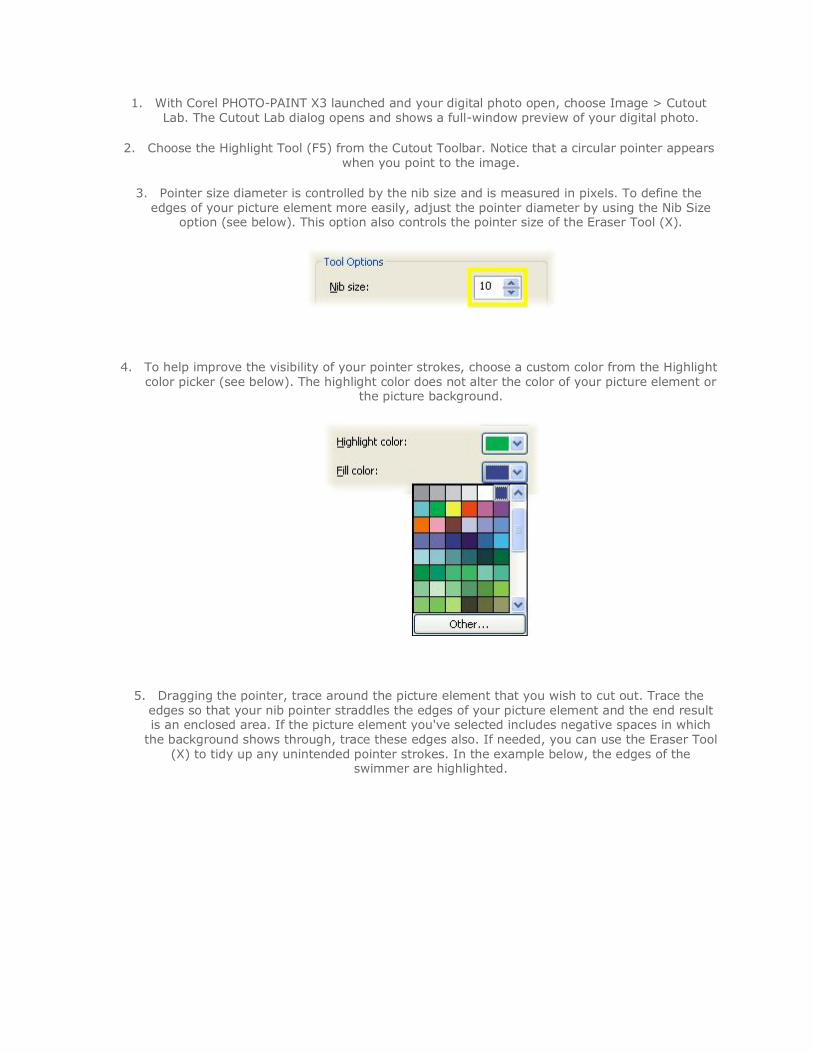
1. With Corel PHOTO-PAINT X3 launched and your digital photo open, choose Image > Cutout Lab. The Cutout Lab dialog opens and shows a full-window preview of your digital photo.
2. Choose the Highlight Tool (F5) from the Cutout Toolbar. Notice that a circular pointer appears when you point to the image.
3. Pointer size diameter is controlled by the nib size and is measured in pixels. To define the edges of your picture element more easily, adjust the pointer diameter by using the Nib Size
option (see below). This option also controls the pointer size of the Eraser Tool (X).
4. To help improve the visibility of your pointer strokes, choose a custom color from the Highlight color picker (see below). The highlight color does not alter the color of your picture element or
the picture background.
5. Dragging the pointer, trace around the picture element that you wish to cut out. Trace the edges so that your nib pointer straddles the edges of your picture element and the end result is an enclosed area. If the picture element you've selected includes negative spaces in which
the background shows through, trace these edges also. If needed, you can use the Eraser Tool (X) to tidy up any unintended pointer strokes. In the example below, the edges of the
swimmer are highlighted.
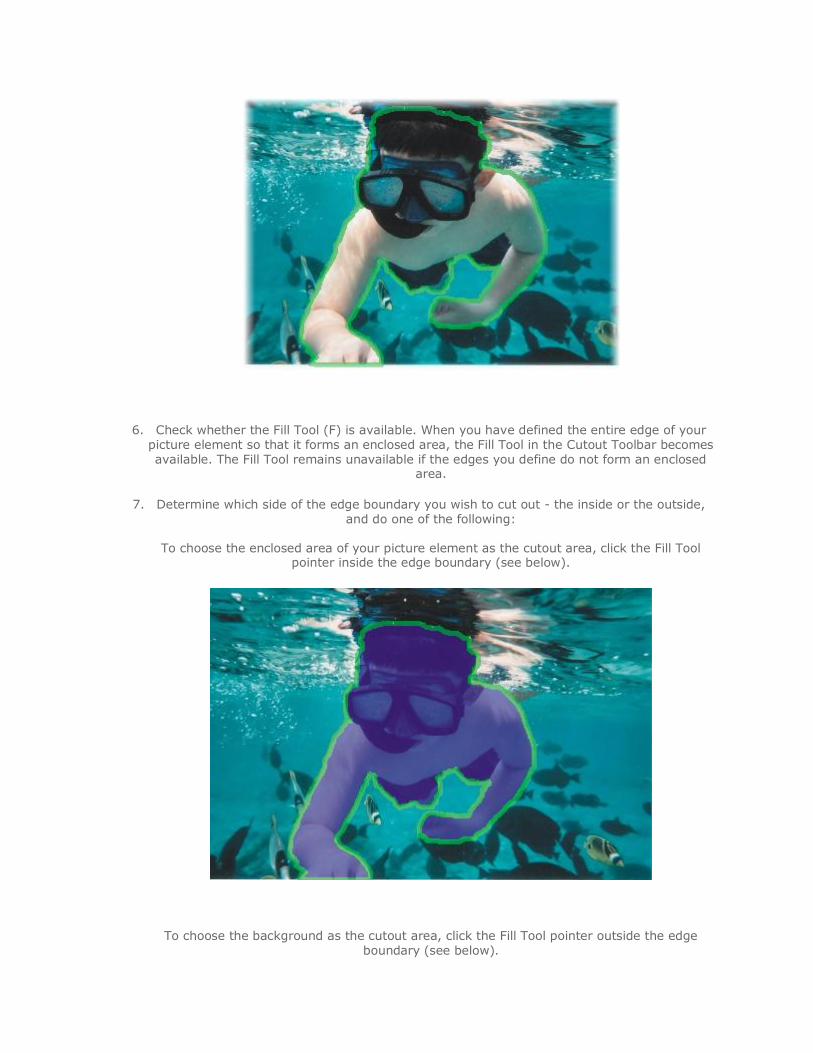
6. Check whether the Fill Tool (F) is available. When you have defined the entire edge of your picture element so that it forms an enclosed area, the Fill Tool in the Cutout Toolbar becomes available. The Fill Tool remains unavailable if the edges you define do not form an enclosed
area.
7. Determine which side of the edge boundary you wish to cut out - the inside or the outside, and do one of the following:
To choose the enclosed area of your picture element as the cutout area, click the Fill Tool
pointer inside the edge boundary (see below).
To choose the background as the cutout area, click the Fill Tool pointer outside the edge boundary (see below).
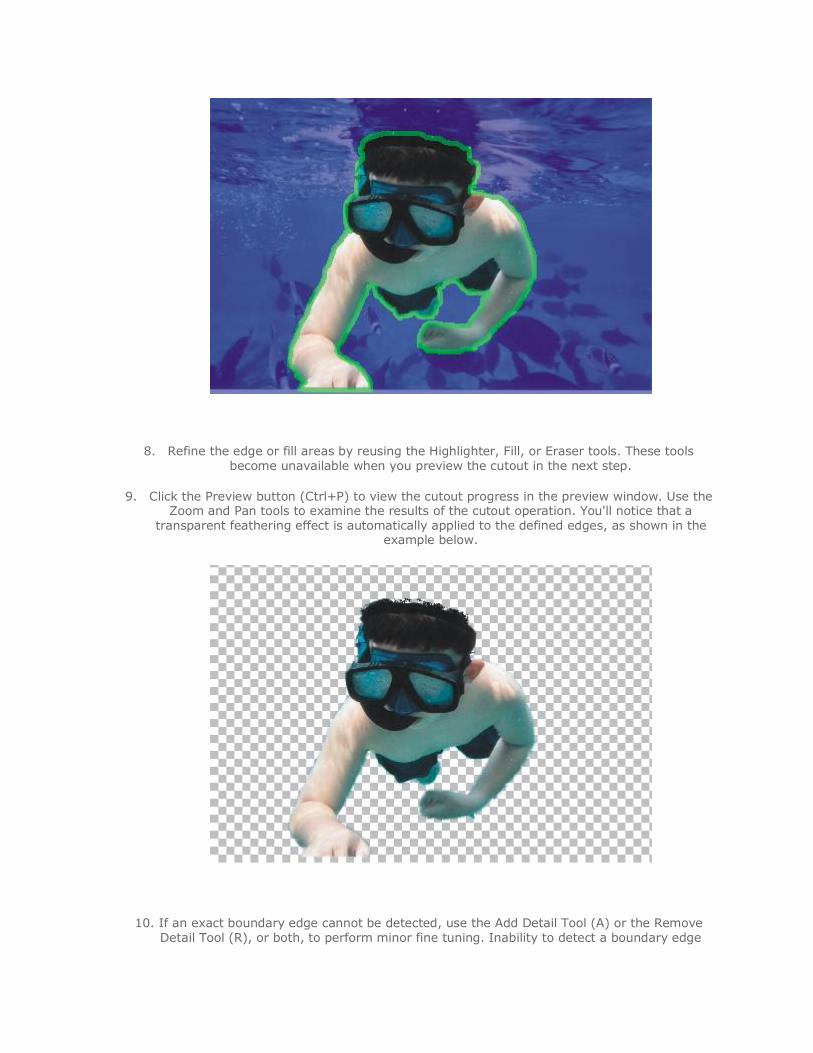
8. Refine the edge or fill areas by reusing the Highlighter, Fill, or Eraser tools. These tools become unavailable when you preview the cutout in the next step.
9. Click the Preview button (Ctrl+P) to view the cutout progress in the preview window. Use the Zoom and Pan tools to examine the results of the cutout operation. You'll notice that a
transparent feathering effect is automatically applied to the defined edges, as shown in the example below.
10. If an exact boundary edge cannot be detected, use the Add Detail Tool (A) or the Remove Detail Tool (R), or both, to perform minor fine tuning. Inability to detect a boundary edge
happens rarely, especially when the defined edges are significantly out of focus, are intensely white, or have very low color-intensity values. Both the Add Detail Tool and the Remove Detail
Tool apply transparent feathering in a typical brush-tool fashion.
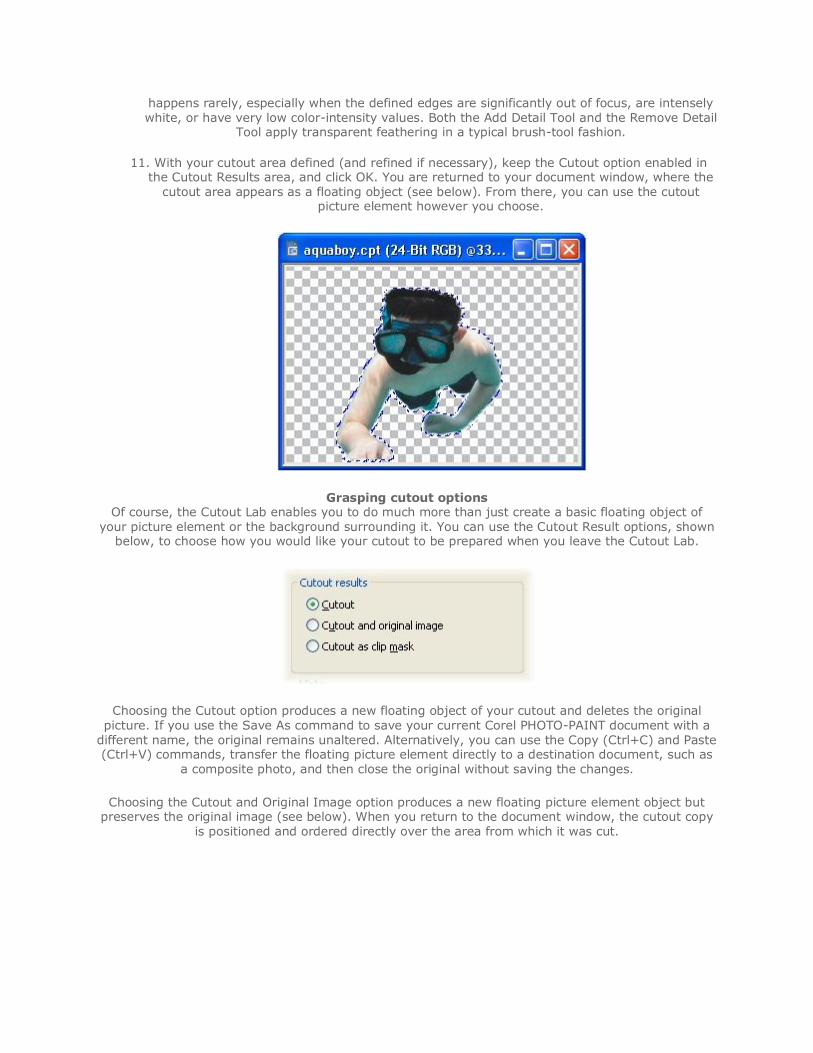
11. With your cutout area defined (and refined if necessary), keep the Cutout option enabled in the Cutout Results area, and click OK. You are returned to your document window, where the
cutout area appears as a floating object (see below). From there, you can use the cutout picture element however you choose.
Grasping cutout options Of course, the Cutout Lab enables you to do much more than just create a basic floating object of
your picture element or the background surrounding it. You can use the Cutout Result options, shown below, to choose how you would like your cutout to be prepared when you leave the Cutout Lab.
Choosing the Cutout option produces a new floating object of your cutout and deletes the original picture. If you use the Save As command to save your current Corel PHOTO-PAINT document with a
different name, the original remains unaltered. Alternatively, you can use the Copy (Ctrl+C) and Paste (Ctrl+V) commands, transfer the floating picture element directly to a destination document, such as
a composite photo, and then close the original without saving the changes.
Choosing the Cutout and Original Image option produces a new floating picture element object but preserves the original image (see below). When you return to the document window, the cutout copy
is positioned and ordered directly over the area from which it was cut.

If you choose the third option, Cutout as Clip Mask, a new object is created with a clip mask over the hidden area. This option preserves the originally masked area, enabling you to create other complex effects by manipulating or deleting the clip mask. Corel PHOTO-PAINT X3 enables you to alter clip mask properties by using the Object docker or by right-clicking the mask to access commands in a
context menu.
In Corel PHOTO-PAINT X3, you can produce floating picture elements just as you could in version 12, but with the new tools and options in the Cutout Lab, you have much more control and creative
freedom for isolating intricate picture elements and preserving details. You no longer need to struggle through a gamut of selection tools, feathering effects, and transparency options. The Cutout Lab saves
you valuable editing time and produces much better results.

Create Beautiful Bevels with CorelDRAW® X3
By Steve Bain
Applying bevels to graphics with earlier versions of CorelDRAW® was certainly not simple and easy, and the results were arguably less than impressive. However, all that has changed with the
introduction of the new bevel effect in CorelDRAW X3. You can now add a third dimension (see below) and customize your bevels with depth, color, and lighting options. This new feature is a welcome
addition to the effects available in CorelDRAW.
Besides being completely customizable, the bevels you can create are dynamically linked to the source object they're applied to, so you can always adjust and edit your bevel creations. CorelDRAW X3 also
enables you to specify full CMYK or spot colors, which makes this effect extremely versatile.
Fast and Easy Bevels
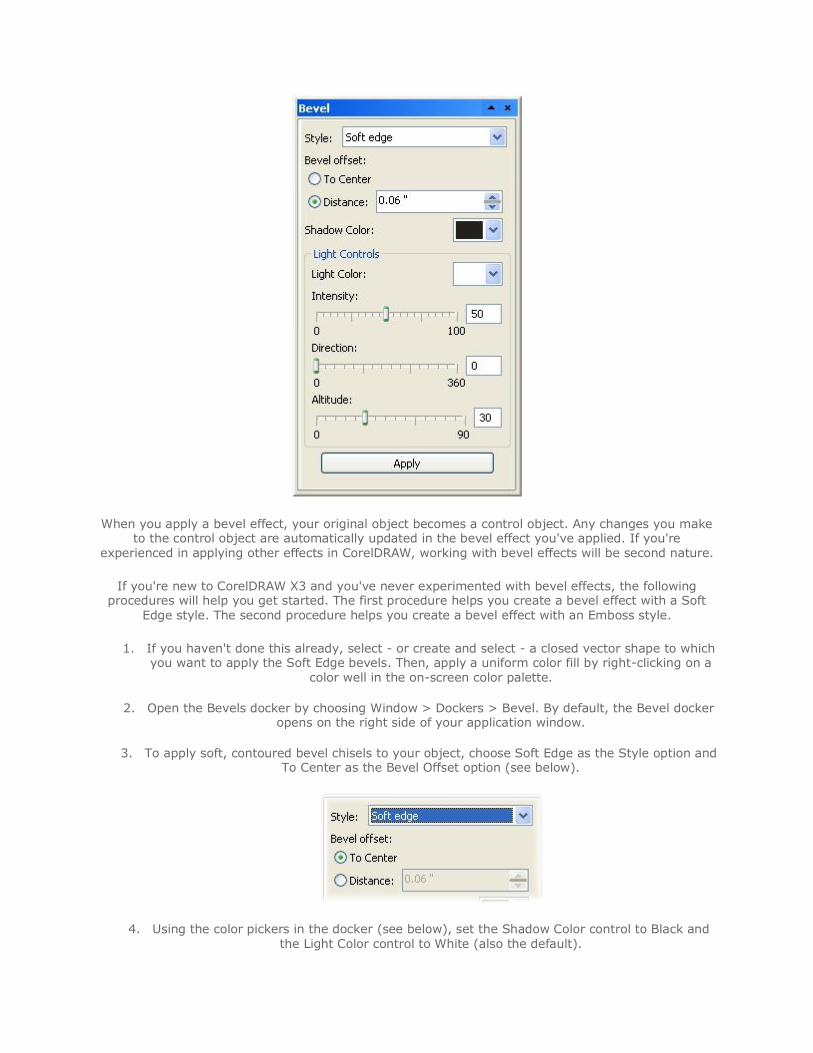
All of the controls you need to apply a bevel effect are found in the Bevel docker. You can apply your bevels to virtually any closed vector shape, provided you haven't already applied other complex
effects to it. Closed vector shapes include artistic text, native shapes (such as rectangles, ellipses, and polygons), and any other shapes you can imagine.
Options in the Bevel docker are organized into Style, Bevel Offset, Shadow Color, and Light controls, with the last group of controls providing the most flexibility (see below). After your options are set,
you can apply or update the bevels by clicking the Apply button.
When you apply a bevel effect, your original object becomes a control object. Any changes you make to the control object are automatically updated in the bevel effect you've applied. If you're
experienced in applying other effects in CorelDRAW, working with bevel effects will be second nature.
If you're new to CorelDRAW X3 and you've never experimented with bevel effects, the following procedures will help you get started. The first procedure helps you create a bevel effect with a Soft
Edge style. The second procedure helps you create a bevel effect with an Emboss style.
1. If you haven't done this already, select - or create and select - a closed vector shape to which you want to apply the Soft Edge bevels. Then, apply a uniform color fill by right-clicking on a
color well in the on-screen color palette.
2. Open the Bevels docker by choosing Window > Dockers > Bevel. By default, the Bevel docker opens on the right side of your application window.
3. To apply soft, contoured bevel chisels to your object, choose Soft Edge as the Style option and To Center as the Bevel Offset option (see below).
4. Using the color pickers in the docker (see below), set the Shadow Color control to Black and the Light Color control to White (also the default).
If you wish, adjust the sliders for the other available lighting controls.
5. Click the Apply button. The bevels are immediately applied to the selected object, according to the options you specified.
While Soft Edge bevel effects can be applied quickly to virtually any existing shape and look great in virtually any arrangement of shapes, the same isn't true for Emboss style bevels. A successful Emboss
bevel requires a bit more time to set up. Follow these steps, and you'll see what I mean.
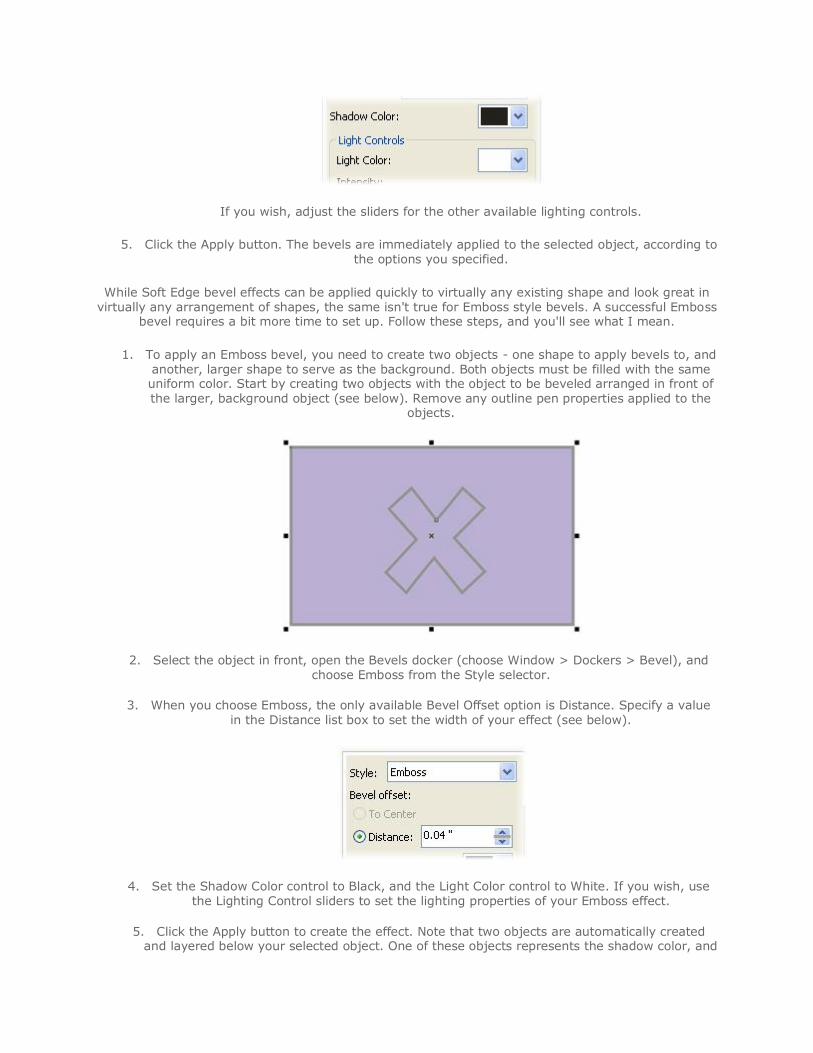
1. To apply an Emboss bevel, you need to create two objects - one shape to apply bevels to, and another, larger shape to serve as the background. Both objects must be filled with the same uniform color. Start by creating two objects with the object to be beveled arranged in front of the larger, background object (see below). Remove any outline pen properties applied to the
objects.
2. Select the object in front, open the Bevels docker (choose Window > Dockers > Bevel), and choose Emboss from the Style selector.
3. When you choose Emboss, the only available Bevel Offset option is Distance. Specify a value in the Distance list box to set the width of your effect (see below).
4. Set the Shadow Color control to Black, and the Light Color control to White. If you wish, use the Lighting Control sliders to set the lighting properties of your Emboss effect.
5. Click the Apply button to create the effect. Note that two objects are automatically created and layered below your selected object. One of these objects represents the shadow color, and
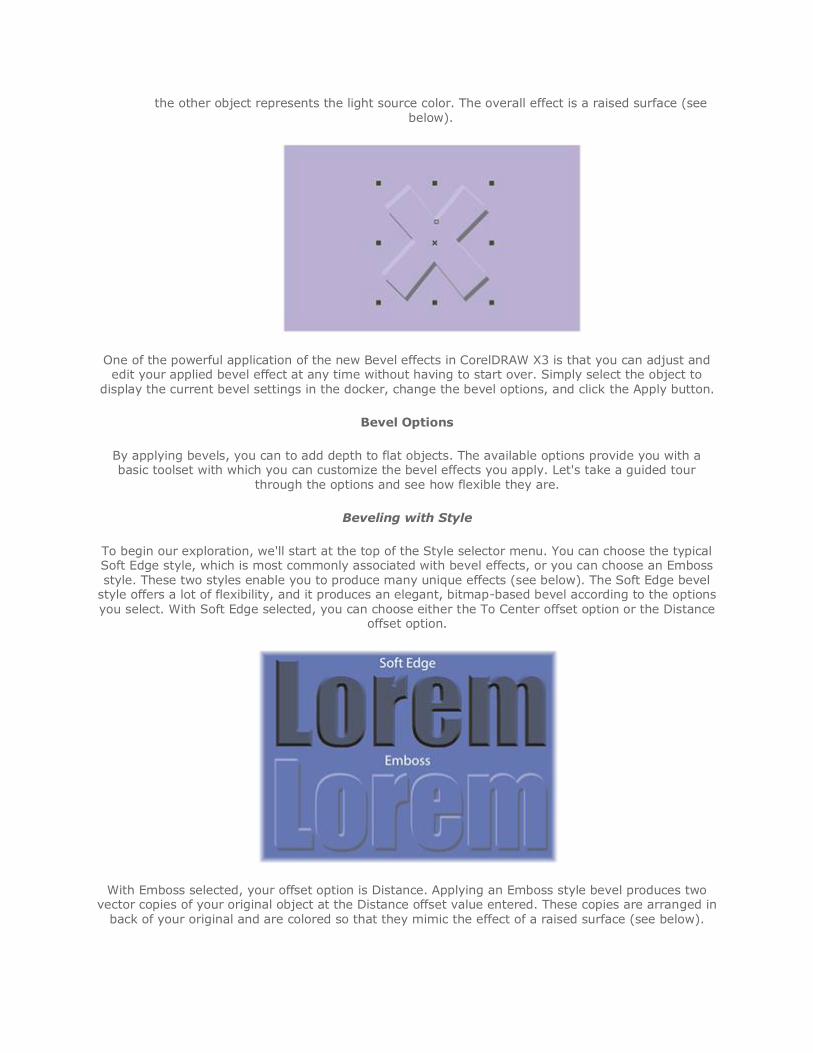
the other object represents the light source color. The overall effect is a raised surface (see below).
One of the powerful application of the new Bevel effects in CorelDRAW X3 is that you can adjust and edit your applied bevel effect at any time without having to start over. Simply select the object to
display the current bevel settings in the docker, change the bevel options, and click the Apply button.
Bevel Options
By applying bevels, you can to add depth to flat objects. The available options provide you with a basic toolset with which you can customize the bevel effects you apply. Let's take a guided tour
through the options and see how flexible they are.
Beveling with Style
To begin our exploration, we'll start at the top of the Style selector menu. You can choose the typical Soft Edge style, which is most commonly associated with bevel effects, or you can choose an Emboss style. These two styles enable you to produce many unique effects (see below). The Soft Edge bevel
style offers a lot of flexibility, and it produces an elegant, bitmap-based bevel according to the options you select. With Soft Edge selected, you can choose either the To Center offset option or the Distance
offset option.
With Emboss selected, your offset option is Distance. Applying an Emboss style bevel produces two vector copies of your original object at the Distance offset value entered. These copies are arranged in
back of your original and are colored so that they mimic the effect of a raised surface (see below).
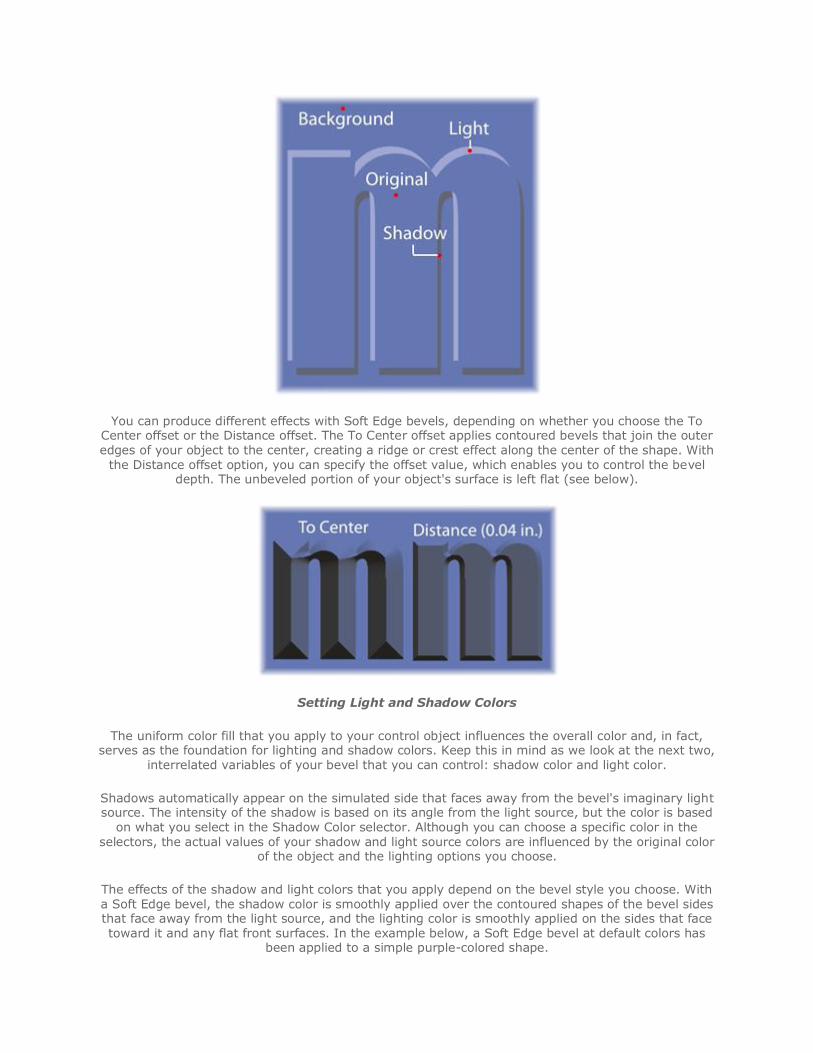
You can produce different effects with Soft Edge bevels, depending on whether you choose the To Center offset or the Distance offset. The To Center offset applies contoured bevels that join the outer edges of your object to the center, creating a ridge or crest effect along the center of the shape. With
the Distance offset option, you can specify the offset value, which enables you to control the bevel depth. The unbeveled portion of your object's surface is left flat (see below).
Setting Light and Shadow Colors
The uniform color fill that you apply to your control object influences the overall color and, in fact, serves as the foundation for lighting and shadow colors. Keep this in mind as we look at the next two,
interrelated variables of your bevel that you can control: shadow color and light color.
Shadows automatically appear on the simulated side that faces away from the bevel's imaginary light source. The intensity of the shadow is based on its angle from the light source, but the color is based
on what you select in the Shadow Color selector. Although you can choose a specific color in the selectors, the actual values of your shadow and light source colors are influenced by the original color
of the object and the lighting options you choose.
The effects of the shadow and light colors that you apply depend on the bevel style you choose. With a Soft Edge bevel, the shadow color is smoothly applied over the contoured shapes of the bevel sides that face away from the light source, and the lighting color is smoothly applied on the sides that face toward it and any flat front surfaces. In the example below, a Soft Edge bevel at default colors has
been applied to a simple purple-colored shape.
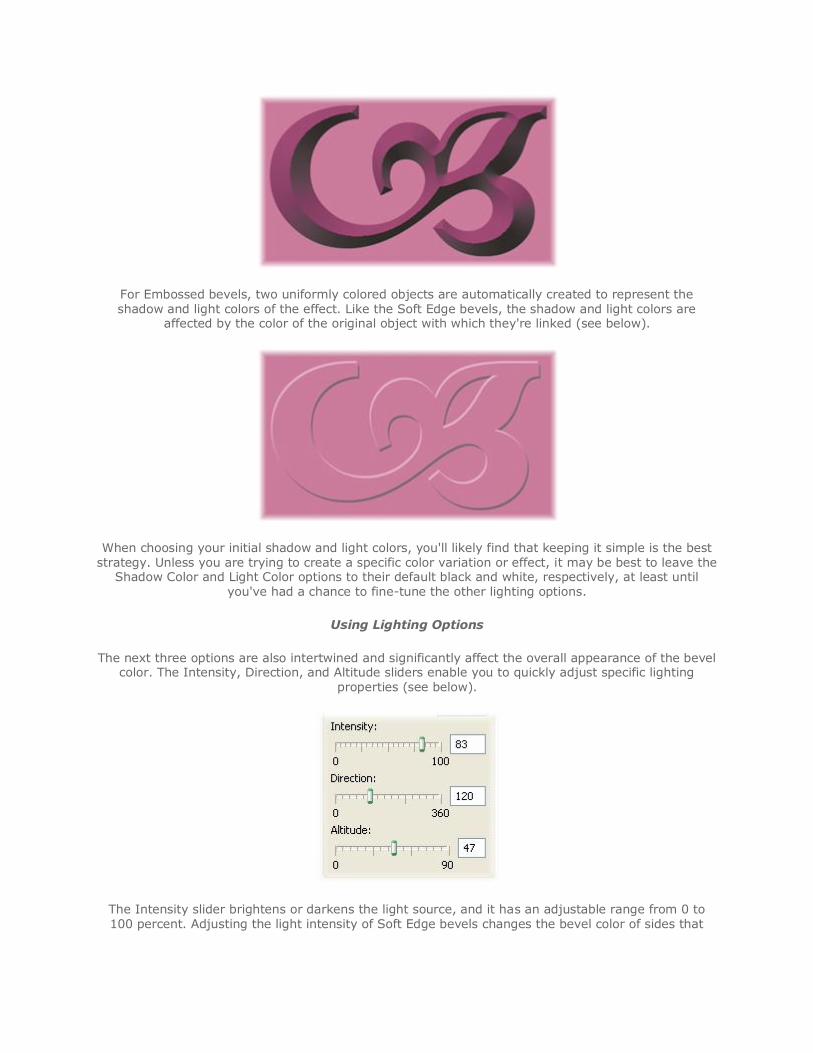
For Embossed bevels, two uniformly colored objects are automatically created to represent the shadow and light colors of the effect. Like the Soft Edge bevels, the shadow and light colors are
affected by the color of the original object with which they're linked (see below).
When choosing your initial shadow and light colors, you'll likely find that keeping it simple is the best strategy. Unless you are trying to create a specific color variation or effect, it may be best to leave the
Shadow Color and Light Color options to their default black and white, respectively, at least until you've had a chance to fine-tune the other lighting options.
Using Lighting Options
The next three options are also intertwined and significantly affect the overall appearance of the bevel color. The Intensity, Direction, and Altitude sliders enable you to quickly adjust specific lighting
properties (see below).
The Intensity slider brightens or darkens the light source, and it has an adjustable range from 0 to 100 percent. Adjusting the light intensity of Soft Edge bevels changes the bevel color of sides that
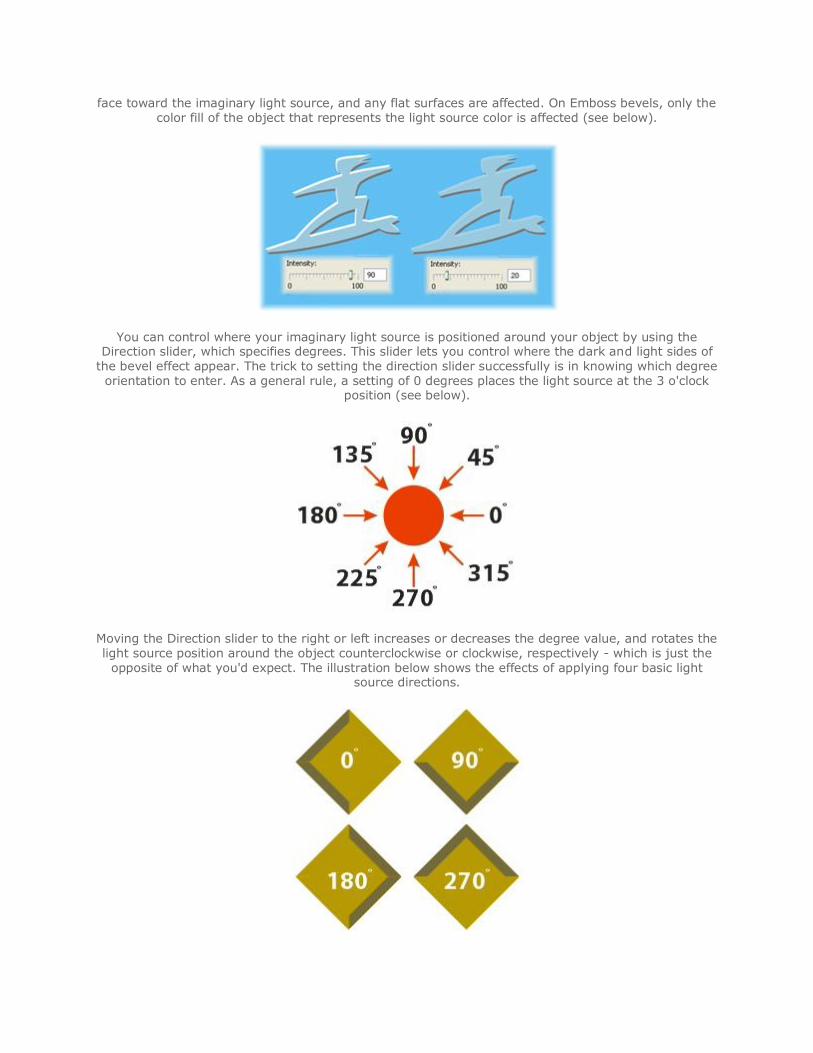
face toward the imaginary light source, and any flat surfaces are affected. On Emboss bevels, only the color fill of the object that represents the light source color is affected (see below).
You can control where your imaginary light source is positioned around your object by using the Direction slider, which specifies degrees. This slider lets you control where the dark and light sides of
the bevel effect appear. The trick to setting the direction slider successfully is in knowing which degree orientation to enter. As a general rule, a setting of 0 degrees places the light source at the 3 o'clock
position (see below).
Moving the Direction slider to the right or left increases or decreases the degree value, and rotates the light source position around the object counterclockwise or clockwise, respectively - which is just the
opposite of what you'd expect. The illustration below shows the effects of applying four basic light source directions.
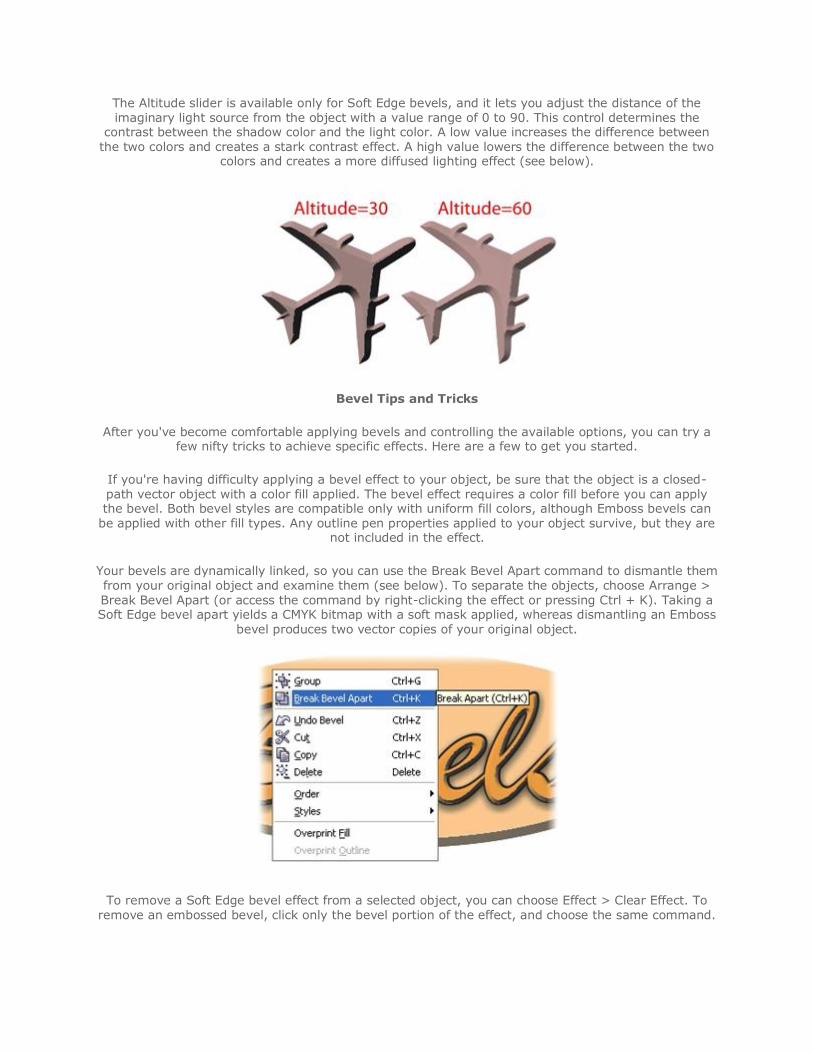
The Altitude slider is available only for Soft Edge bevels, and it lets you adjust the distance of the imaginary light source from the object with a value range of 0 to 90. This control determines the
contrast between the shadow color and the light color. A low value increases the difference between the two colors and creates a stark contrast effect. A high value lowers the difference between the two
colors and creates a more diffused lighting effect (see below).
Bevel Tips and Tricks
After you've become comfortable applying bevels and controlling the available options, you can try a few nifty tricks to achieve specific effects. Here are a few to get you started.
If you're having difficulty applying a bevel effect to your object, be sure that the object is a closed-path vector object with a color fill applied. The bevel effect requires a color fill before you can apply the bevel. Both bevel styles are compatible only with uniform fill colors, although Emboss bevels can
be applied with other fill types. Any outline pen properties applied to your object survive, but they are not included in the effect.
Your bevels are dynamically linked, so you can use the Break Bevel Apart command to dismantle them from your original object and examine them (see below). To separate the objects, choose Arrange > Break Bevel Apart (or access the command by right-clicking the effect or pressing Ctrl + K). Taking a Soft Edge bevel apart yields a CMYK bitmap with a soft mask applied, whereas dismantling an Emboss
bevel produces two vector copies of your original object.
To remove a Soft Edge bevel effect from a selected object, you can choose Effect > Clear Effect. To remove an embossed bevel, click only the bevel portion of the effect, and choose the same command.
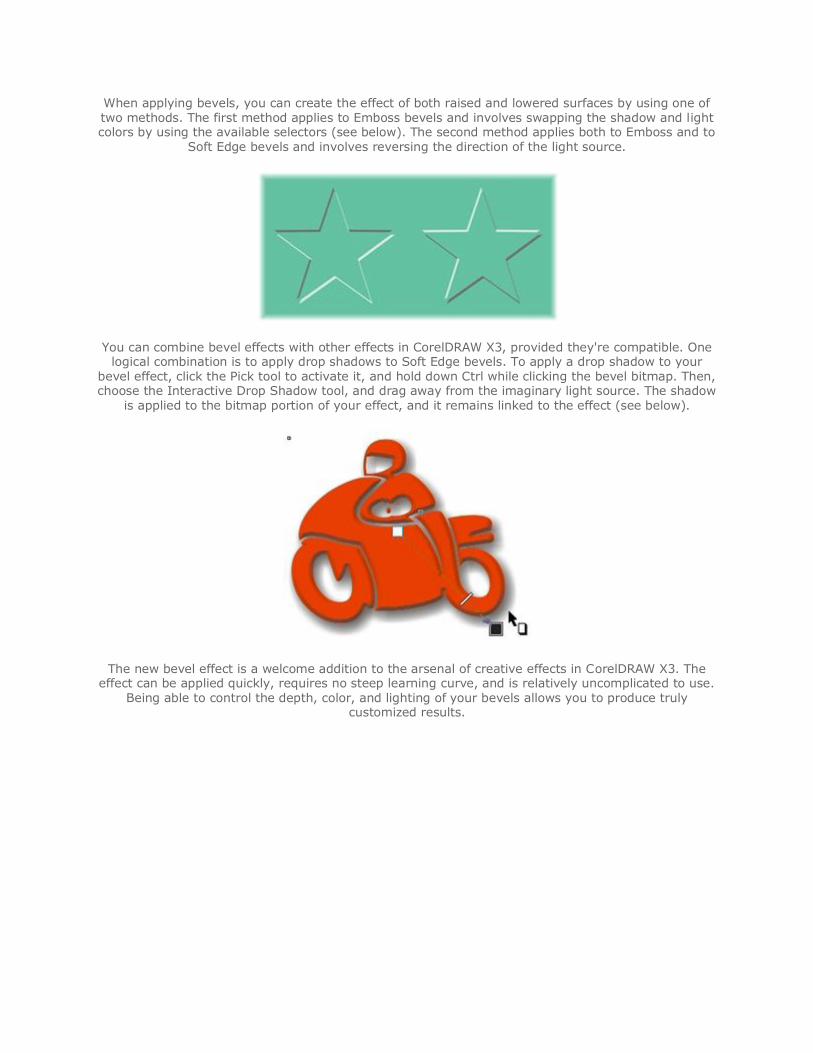
When applying bevels, you can create the effect of both raised and lowered surfaces by using one of two methods. The first method applies to Emboss bevels and involves swapping the shadow and light colors by using the available selectors (see below). The second method applies both to Emboss and to
Soft Edge bevels and involves reversing the direction of the light source.
You can combine bevel effects with other effects in CorelDRAW X3, provided they're compatible. One logical combination is to apply drop shadows to Soft Edge bevels. To apply a drop shadow to your
bevel effect, click the Pick tool to activate it, and hold down Ctrl while clicking the bevel bitmap. Then, choose the Interactive Drop Shadow tool, and drag away from the imaginary light source. The shadow
is applied to the bitmap portion of your effect, and it remains linked to the effect (see below).
The new bevel effect is a welcome addition to the arsenal of creative effects in CorelDRAW X3. The effect can be applied quickly, requires no steep learning curve, and is relatively uncomplicated to use.
Being able to control the depth, color, and lighting of your bevels allows you to produce truly customized results.


