Embed Size (px)
Citation preview
Control panelsBatch building cars • •
downloadStandard edition - Portrait
Sandhouse
Click here for the landscape version
indexcontents
indexcontentsMRH-Apr 2014
Front Cover: An Espee GS-1 rolls through Deschutes Junction. Join us as Charlie Comstock's Bear Creek and South Jackson celebrates its 10th anniversary.
ISSN 2152-7423
Editorial Staff Joe D. Fugate, Publisher and EditorDon Hanley, Assistant Editor
Production Patty Fugate, pasteup and layout Joe Brugger, copy editing Mike Dodd, copy editing
Technical Assistants Jeff Shultz Jimmy Simmons
Advertising Les Halmos, Account Manager Daniel Nava, Advertising Assistant Jean-François Delisle, Marketing Assistant
Columnists Richard Bale, News and events Jeff Shultz, News and events Les Halmos, Modular railroading Ken Patterson, Reporter at large Bruce Petrarca, DCC
Special Correspondents Joe Brugger, Questions & answers Charlie Comstock, Contributing editor
Published for the glory of God. What’s this?
Cover and MRH masthead
Issue password: Apr2014
Issue 50
indexcontents
MRH Sponsors - 1MRH Sponsors - 1indexcontents
MRH-Apr 2014
MRH Sponsors - 2MRH Sponsors - 2
Looking for something?
Check our Hobby Marketplace!Take me there
Want your logo on this page?
Click to find out how....
90,000+ unique device views per
month... Tell me more
indexcontents
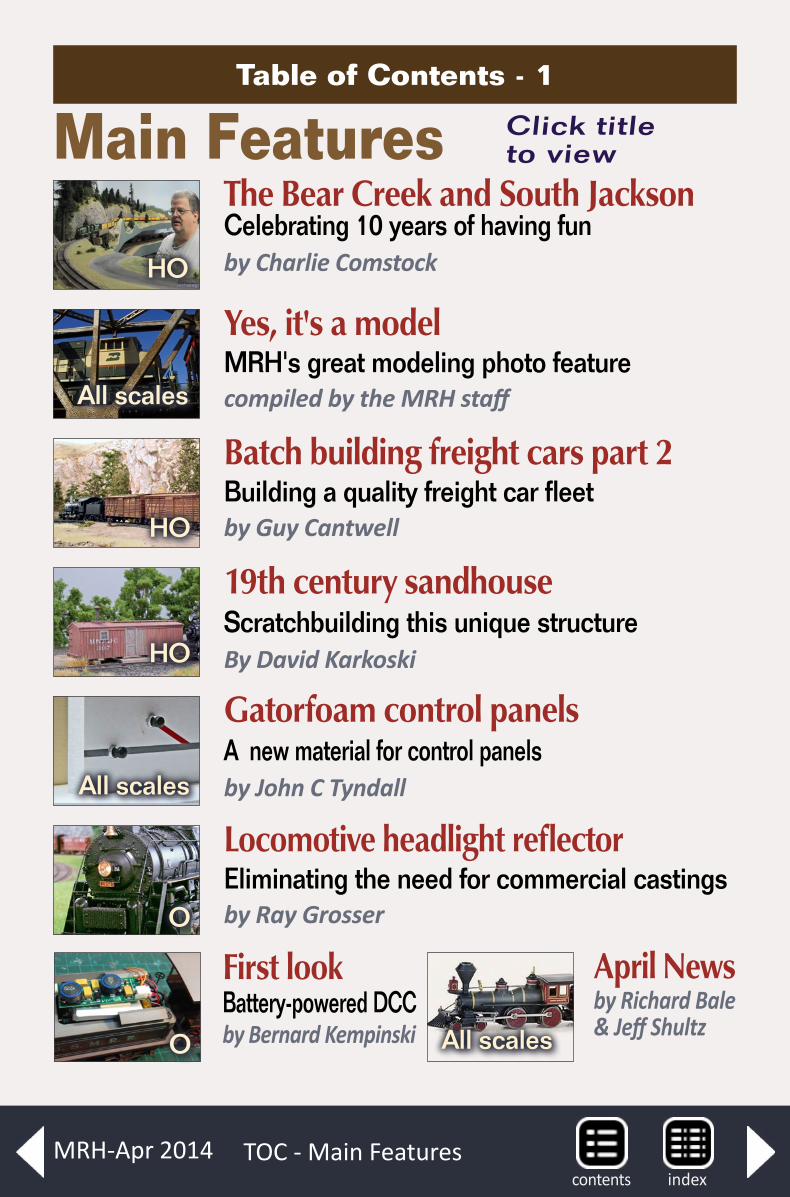
Main FeaturesTable of Contents - 1
April News by Richard Bale& Jeff ShultzAll scales
TOC - Main Features
Click title to view
Locomotive headlight reflectorEliminating the need for commercial castingsby Ray GrosserO
19th century sandhouseScratchbuilding this unique structureBy David KarkoskiHO
The Bear Creek and South Jackson Celebrating 10 years of having funby Charlie ComstockHO
Batch building freight cars part 2Building a quality freight car fleetby Guy CantwellHO
Gatorfoam control panelsA new material for control panelsby John C TyndallAll scales
First lookBattery-powered DCCby Bernard KempinskiO
Yes, it's a modelMRH's great modeling photo featurecompiled by the MRH staffAll scales
indexcontentsMRH-Apr 2014
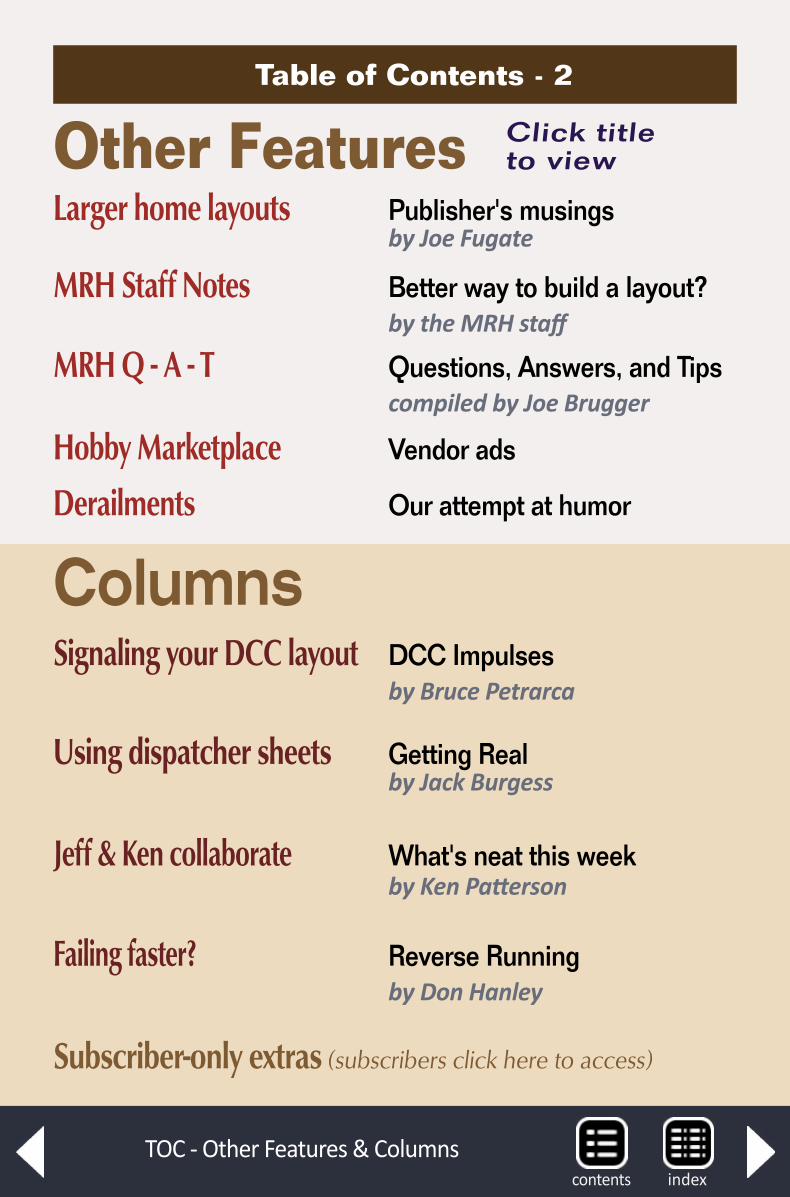
Other FeaturesTable of Contents - 2
Larger home layouts Publisher's musings by Joe Fugate
MRH Staff Notes Better way to build a layout? by the MRH staff
MRH Q - A - T Questions, Answers, and Tips compiled by Joe Brugger
Hobby Marketplace Vendor ads
Derailments Our attempt at humor
TOC - Other Features & Columns
Click title to view
Using dispatcher sheets Getting Real by Jack Burgess
Signaling your DCC layout DCC Impulses by Bruce Petrarca
Failing faster? Reverse Running by Don Hanley
Subscriber-only extras (subscribers click here to access)
Columns
Jeff & Ken collaborate What's neat this week by Ken Patterson
indexcontents
indexcontentsMRH-Apr 2014
indexcontents
indexcontentsMRH-Apr 2014
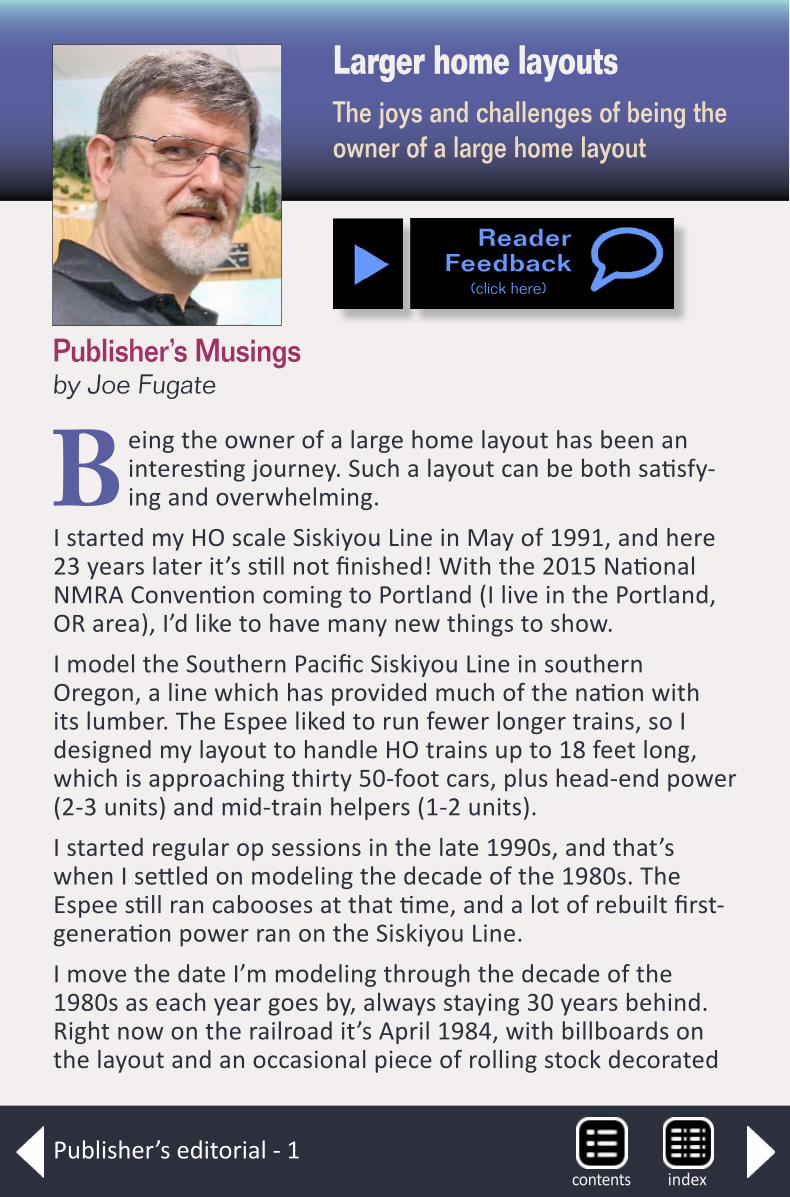
Publisher’s Musingsby Joe Fugate
ReaderFeedback
(click here)
Larger home layoutsThe joys and challenges of being the owner of a large home layout
B eing the owner of a large home layout has been an interesting journey. Such a layout can be both satisfy-ing and overwhelming.
I started my HO scale Siskiyou Line in May of 1991, and here 23 years later it’s still not finished! With the 2015 National NMRA Convention coming to Portland (I live in the Portland, OR area), I’d like to have many new things to show.I model the Southern Pacific Siskiyou Line in southern Oregon, a line which has provided much of the nation with its lumber. The Espee liked to run fewer longer trains, so I designed my layout to handle HO trains up to 18 feet long, which is approaching thirty 50-foot cars, plus head-end power (2-3 units) and mid-train helpers (1-2 units).I started regular op sessions in the late 1990s, and that’s when I settled on modeling the decade of the 1980s. The Espee still ran cabooses at that time, and a lot of rebuilt first-generation power ran on the Siskiyou Line.I move the date I’m modeling through the decade of the 1980s as each year goes by, always staying 30 years behind. Right now on the railroad it’s April 1984, with billboards on the layout and an occasional piece of rolling stock decorated
Publisher’s editorial - 1indexcontents
indexcontentsMRH-Apr 2014
for the 1984 LA Olympics. There’s also the 1984 elections to help establish the layout’s timeframe.I will keep marching through the decade, reaching 1986 in 2016 and having the first SPSF Kodachrome power show up on the line. Then, in late 1987 (2017), the first black and orange DRGW power shows up.Once we reach 2020, I’ll go back to 1980 again. That way, I stay perpetually in the 1980s.As I look around my 1100 square foot layout, it’s easy to get overwhelmed. I can see projects that need doing everywhere I look. Sometimes, I wonder what I have got myself into.When I started the layout back in the 90s, I quickly realized the scope of this layout meant I’d have to lean heavily on Allen McClelland’s “good enough” philosophy. For example, I would have to be okay with a moderate level of detail on the locos – with 60+ locos on the roster, that’s a lot of detailing time if I super-detailed them all.
indexcontents

Same with rolling stock. I determined to use generally out-of-the-box equipment (at the time, Athearn and Roundhouse, now Accurail) to build up the needed fleet of 600 cars, and just fill in here and there with a few special kitbashed or scratchbuilt cars.
I started out handlaying my turnouts in place, but with 120 turnouts, I quickly found that was taking too long, so I went to commercial turnouts to speed things up.
Some of the commercial turnouts don’t perform real well, so I’m now using jig-built turnouts with Central Valley ties to replace the worst offenders.
The commercial jig-built turnout option didn’t exist when I was at the height of the track-laying period on my layout, so I didn’t have that choice. Were I starting over today, I’d go commercial jig-built all the way. For more on my jig-built turn-out methods, see the September 2011 MRH: (mrhmag.com/magazine/mrh-2011-09-sep/jig_built_turnouts).
My layout is currently about 30% scenicked, and other than bridges, there are few structures on the layout. We hope to change that between now and August 2015 when the NMRA National comes to town.
My wife, Patty, bless her heart, has made getting more struc-tures on the layout something of a crusade and she’s always on the lookout for new structures. She’s definitely a keeper!
But this does bring up an important point for those of you that do not yet have a layout. My advice is to get busy build-ing structures as well as detailing locos and rolling stock, and do that now.
Once you have space for a layout, you will be very happy you built ahead on the things that go on the layout. Getting the layout physical plant built once you have space will consume
Publisher’s editorial - 3indexcontents
MRH-Apr 2014
indexcontents indexcontents
ReaderFeedback
(click here)
most of your time, and you’ll just be much further ahead if you already have some finished stuff to put on the layout.For another large home layout owner’s view, check out this issue’s cover story by Charlie Comstock on his Bear Creek & South Jackson. That layout project is now 10 years along, so Charlie reflects on his journey of building a larger home layout over the last decade.I’d also like to encourage others of you who are building a larger home layout to post your thoughts to the comment thread of this editorial. It’s helpful to inject some reality into the plans of those still pining for a large layout space, and to help them see what they may be signing up for!
indexcontentsMRH-Apr 2014
indexcontents
Get your feet wet with modules ...
A s we look at today’s state of the art ways to build a home layout, we think there are better ways. Taking a fill-the-room-with-benchwork approach may not be
the best way to do a layout, whether the layout is to be large or small.
We’d like to suggest a different approach – build the layout in modules or sections. Let’s describe how we see this working.
Start with a town, important industry or scenic focal point like a key bridge and then build a single section that’s say one or two feet (5 - 10 cm) wide and four to six feet (1.2 - 2.4 meters) long.
Build this layout section/module at the workbench in comfort, which will allow you to do your best work. When it comes time to do wiring or install turnout controls, just turn the module over for an easy install.
Finish this one section to a good level of completion, exercis-ing all the needed hobby skills: benchwork, roadbed, trackwork, wiring, scenery, and structures. Get a starter DCC system that’s expandable (NCE’s Powercab or a Digitrax Zephyr come to mind) and learn some DCC.
MRH staff notes - 1
Notes from the
MRH StaffBuild a home layout as modules, volunteers for Cleveland and Kansas City conventions, and more ...
ReaderFeedback
(click here)
indexcontentsMRH-Apr 2014
The five top-rated articles in the March 2014 issue of MRH are:
� 4.7 DCC Impulses: Myths of DCC � 4.7 Getting Real: Modeling a bulk oil dealer � 4.6 First Look: Micro-Mark MicroLux paint � 4.4 Batch-building freight cars 101, part 1 � 4.4 Pennsylvania and Western RR
� Issue overall: 4.7
Please rate the articles! Click the reader feedback button on each article and select the star rating you think each article deserves. Thank you!
Mar 2014 MRHRatings
indexcontents indexcontents
MRH staff notes - 2
Now take this module into the layout room and add some “flat-top staging” to each end. Flat-top staging can be nothing more than a 1x12 with a 5-6 track staging yard on it. Put one of these on each end of your module and you can now run trains through this module. If the module is a town or industry, you can also try some switching.
With not a lot of investment of time and money, you now have an operational layout that looks finished!
If that’s too small for you, then build another module section to add to the first, and again build it to a reasonable level of com-pletion at the workbench. Once that’s done, take it to the layout room and add it in to your layout-that’s-a-building.
Voila! Instant layout expansion, and it too looks finished.
Using this approach, you can build to any size or you can stop wherever you want – and all along the way you have an opera-tional layout that looks complete.
We see many benefits to this approach for doing a layout, and we believe it is the way to do a model railroad in the 21st century.
We like that this approach can put an end to huge layouts that never reach any satisfying level of completion. You’re much less likely to overcommit, and it’s also a route to quick gratification, which is a popular concept in today’s microwave world.
It also makes it easier to replace the older original sections where you made all your mistakes. As your skills improve, just build a new section to replace that old original one you built.
We think this approach to building a layout has so much going for it that we’d like to see it catch on. There should be fewer ply-wood pacifics as a result!
indexcontentsMRH-Apr 2014
Volunteers for Cleveland and Kansas CityEvery year, we like to look for what we call “a local yokel” to help us with the logistics side of attending these major national con-ventions. As a benefit, we pay your registration to the conven-tion and you get to hang with the MRH staff and be something of an insider for the event.
If you live in the Cleveland, Ohio area, then we’re looking for a volunteer to help us with the NMRA National Convention coming to Cleveland this July.
As a volunteer, we’re looking for you to help us with train show booth setup, and we’ll ask you to run errands for us like running to the local office supply store for some extra tape or whatever. We also depend on the local yokel to help us find the best eating establishments and the like.
When talking to hobby vendors, please
remember to mention
MRH.
indexcontents indexcontents
We’ll also appreciate it if you can help ferry staff to and from the airport. You’ll get an advanced look at the train show, we will pay your registration to the convention, plus you’ll get an offical MRH golf shirt. How cool is that?
Click this link if you’d like to discuss possibly being our local yokel for Cleveland this July!
We’re also looking for a local volunteer who lives in the Kansas City area and would like to help us out with the National Narrow Gauge Convention in early September.
Click this link to explore being our local yokel for Kansas City in September.
Model Railroad Hobbyist on Wikipedia?We noticed recently the railroading publication section of Wikipedia lists all the major hobby publications, but there’s no entry for Model Railroad Hobbyist. See:
en.wikipedia.org/wiki/List_of_railroad-related_periodicals#United_States
Since Wikipedia content is user-generated, we’d like some of our readers who know how to post entries on Wikipedia to help get an MRH entry on Wikipedia. If MRH staff were to post something (we tried), it gets deleted because of self-interest conflicts.
We think the railroad-related periodicals section isn’t complete unless it lists MRH as well, since we’ve now got more subscribers and more readers than Railroad Model Craftsman, and we have a model railroad video channel with TrainMasters TV (which RMC does not have).
If you can help, please respond using the feedback button on this column.
MRH staff notes - 3indexcontents
MRH-Apr 2014

Subscribing to MRHEven though MRH is free, did you know you can subscribe to MRH and get many benefits?
All you need to do is click this link to subscribe. Subscribing simply means you give us your email so we can send you regular reminders for downloading the magazine, and to also provide you with updates on the hobby announce-ments and the latest cool reader tips and inspiring projects being posted on the MRH website. Never fear, we do not give out your email to anyone else. We only use your email to contact you with weekly updates on MRH and hobby happenings.
(If you are already a subscriber and are logged in, then click-ing the subscribe link above will just take you to your user
April 2014Bonus Extras! Available to subscribers!DVD and HD quality versions of videos, plus:
� Bear Creek & South Jackson extra goodies
� Coupon code good for 20% off on TrainMasters TV 1-year or 2-year subscription
Click here to access
indexcontents
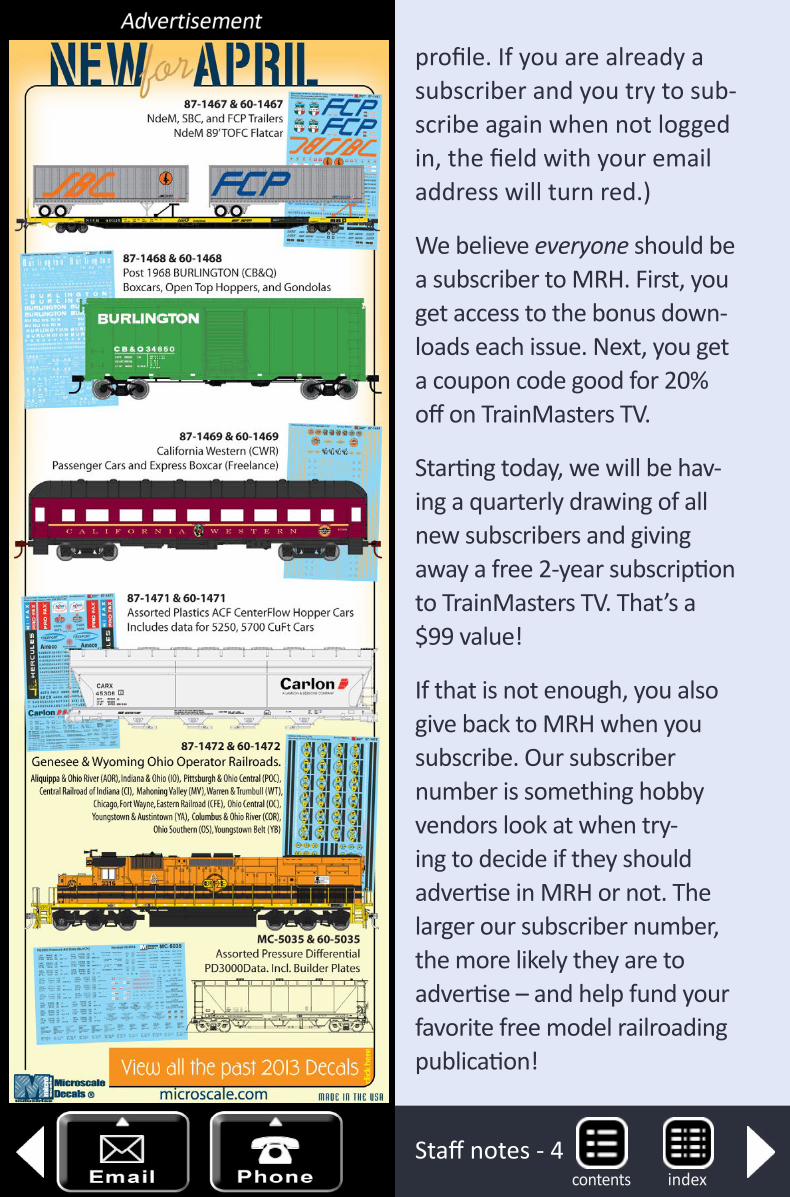
profile. If you are already a subscriber and you try to sub-scribe again when not logged in, the field with your email address will turn red.)
We believe everyone should be a subscriber to MRH. First, you get access to the bonus down-loads each issue. Next, you get a coupon code good for 20% off on TrainMasters TV.
Starting today, we will be hav-ing a quarterly drawing of all new subscribers and giving away a free 2-year subscription to TrainMasters TV. That’s a $99 value!
If that is not enough, you also give back to MRH when you subscribe. Our subscriber number is something hobby vendors look at when try-ing to decide if they should advertise in MRH or not. The larger our subscriber number, the more likely they are to advertise – and help fund your favorite free model railroading publication!
Staff notes - 4indexcontents
Accessing the MRH podcastIn the last month, there’s been some discussion on the MRH website about how to best access the MRH podcast.
If you don’t know what a podcast is, it’s basically an Internet radio program, and you can listen to it with a computer or just about any devive that can connect to the Internet.
To find the MRH podcast, just go to:
mrhmag.com/podcast/episodes
This podcast episode list not only has podcast mp3’s you can download and play, it also has issues of the magazine on it as PDFs. If you use a podcast manager like iTunes, you can have it autodownload the MRH magazine PDFs for you as well.
For mobile devices, you can use a podcast manager app to get some extra value out of our podcast feed. Here’s some recom-mended apps:
� Android: Pocketcast ($4), AntennaPod (free) � Apple iPad/iPhone: Podcasts (free), Downcast ($4) � Mac: iTunes(free), Instacast ($20) � Windows: iTunes(free), Zune (free)
TrainMasters TV comments ...
We tend to lurk on the various forums and railroad-related Facebook pages, watching for interesting discussions on model railroad topics, and for unvarnished feedback on MRH and TrainMasters TV.
Recently, we found these TrainMasters TV comments on the Model Rail Radio Facebook page:
indexcontents
George S. says ...If anyone is on the fence about subscribing to TrainMasters TV, just do it. I’ve been a subscriber since the beginning and it has consistently delivered high value. This latest batch of videos has been particularly interesting.
And besides, where else can you see Lionel Strang in living color?
Michael D. says ...Right on the mark. Never disappointed. I just want MORE!!!!!
Don V. says ...What all does TrainMasters TV offer? I’m a charter member of MR Video Plus and have become very disappointed. Each release is almost identical in stories and they are also dupli-cated in Model Railroader Mag newsletter on line. I’m ready to drop subscription.
indexcontentsMRH-Apr 2014
Andy D. says ...
Don, I’ve not seen any MR Video Plus, but I can tell you that TrainMasters TV is top notch. Every episode is different, entertaining and informative. I look forward to every section. The bonus footage is worth the price of admission alone.
Michael D. says ...
I left MR over 5 years ago and have not looked back so I can’t speak about them. But TrainMasters TV is not about what is in Model Railroad Hobbyist. The shows are great shows about modeling (most are) and some are about just railroading. It is just plain good TV.
Joe S. says ...
I just joined and have watched 3 videos, and worth every penny.
indexcontents indexcontents
MRH staff notes - 6
Tom B. says ...I have been happy with TrainMasters TV and MR Video Plus.
Don V. says ...Tom, I just signed up for TrainMasters TV. No comparison to MR Video Plus. This is so much better with so much more info. Thanks to all who recommended it.
James C. says ...I love Model Railroader, but wow, Joe and his MRH gang are way beyond them when it comes to the video series. I’m subscribing to both for now. I really look forward to Joe’s. There are probably fewer videos, but they’re more in depth.
You get the feeling Joe gives you everything he has. He’ll ask questions until there are no more to ask, rather than sticking to a short format. He’s utilizing the new technology – free of the limits of, say, cramming five stories onto a VHS tape. (Not that MR has a VHS tape restriction, but it feels that way). Joe just gives you all he can – that’s how it feels to me.
James R. says ...Heck if nothing else try it for one month and see if you like it. For the price of a rental or two at the redbox you can get a month of great hints, tips, full programs on modeling and even prototype trains and meets. Great Stuff!!
If you’d like to read this feedback from the actual Facebook page, click here.
We have to say thanks to these guys for such kind words about what we’re trying to do here. We never want to rest
... On to next page of text
indexcontentsMRH-Apr 2014
indexcontents indexcontents
on our laurels, however, so please know we appreciate criti-cal feedback as well.
All along, we’ve felt the way to do model railroad video pro-gramming is different than how MR Video Plus is approaching things. TrainMasters TV is our vision of how to make model railroad video programming into something that’s network TV level and “respectable” to the general public as well as mod-elers by using network quality production values.
It’s nice to hear we’re on the right track ... pun intended!
This issueBeginning with this month’s cover story, we celebrate the 10th anniversary of Charlie Comstock’s Bear Creek & South Jackson.
Last month in Part 1, Guy Cantwell gave an overview of the batch-building process. This month, he takes us through the process details. Need a sandhouse for your engine facility? David Karkoski scratchbuilds a unique form of this structure.
Looking for an easier way to build control panels? Give Gatorfoam® a try: John Tyndall shows how to use this new and durable product for control panels. Looking for the right steam loco headlight casting? MMR Ray Grosser shows us how to build a headlight reflector.
In our First Look, Bernie Kempinski demonstrates an option for wireless battery powered DCC by looking at the Stanton System.
... On to next page of text
back to previous page of text ...
MRH staff notes - 7indexcontents
MRH-Apr 2014
Remember You can click on the Email or Phone buttons (with a smartphone) to contact a sponsoring advertiser!
Also tell them “Thanks for sponsoring MRH!”
indexcontents
We also have our usual col-umns this month. Bruce leads off with the ever popular DCC Impulses on signaling your DCC layout. In Getting Real, Jack Burgess explains how dispatcher sheets were used on the prototype and how a railroad is run using TT/TO (timetable/train order).
Ken Patterson shows us more of Jeff Meyer’s wonderful work. Publisher Joe Fugate has this month’s editorial on large home layouts while Assistant Editor Don Hanley proposes “Failing Faster” in this month’s Reverse Running – no fooling!
Finally we end the month’s issue with the April prod-uct news, events, and our Derailments humor/bizarre facts column.
Have a great read this month and keep the trains on the tracks!
ReaderFeedback (click here)
back to previous page of text ...
Staff notes - 8indexcontents
MRH-Apr 2014
indexcontents
ReaderFeedback (click here)
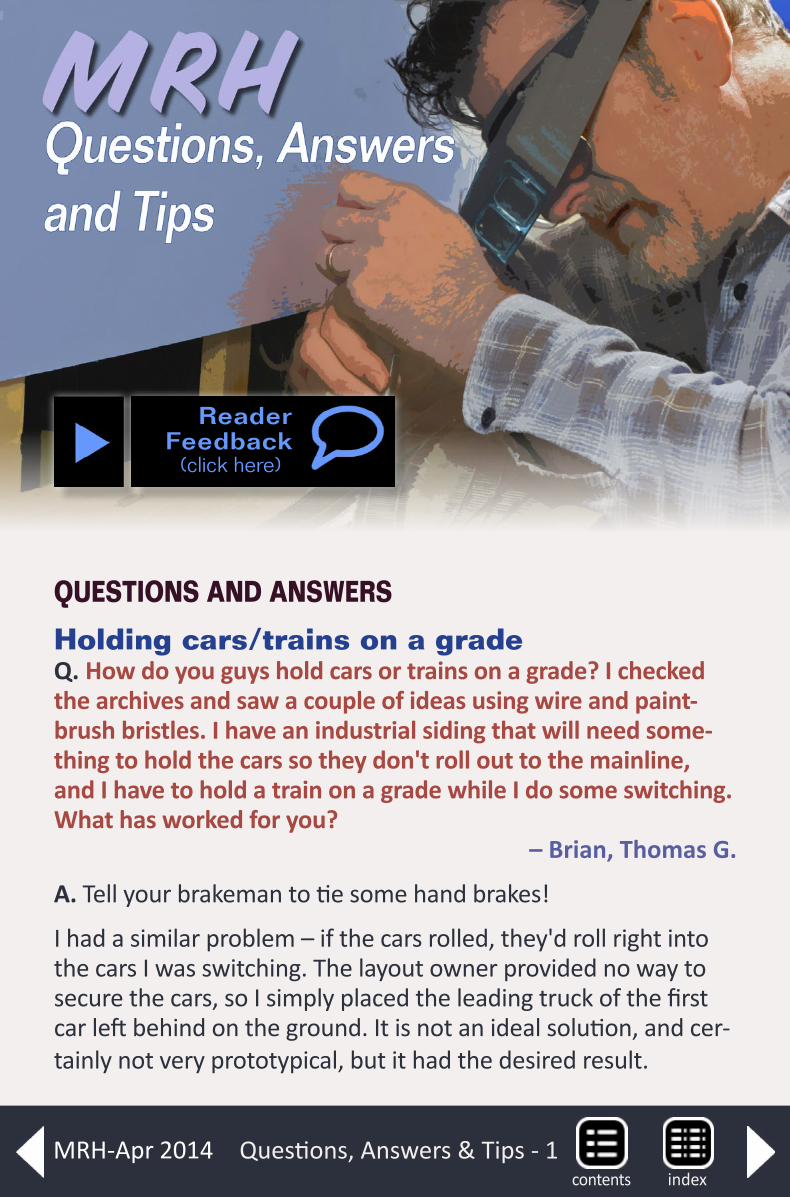
QUESTIONS AND ANSWERS
Holding cars/trains on a grade Q. How do you guys hold cars or trains on a grade? I checked the archives and saw a couple of ideas using wire and paint-brush bristles. I have an industrial siding that will need some-thing to hold the cars so they don't roll out to the mainline, and I have to hold a train on a grade while I do some switching. What has worked for you? – Brian, Thomas G.
A. Tell your brakeman to tie some hand brakes!
I had a similar problem – if the cars rolled, they'd roll right into the cars I was switching. The layout owner provided no way to secure the cars, so I simply placed the leading truck of the first car left behind on the ground. It is not an ideal solution, and cer-tainly not very prototypical, but it had the desired result.
Questions, Answers & Tips - 1indexcontents
MRH-Apr 2014

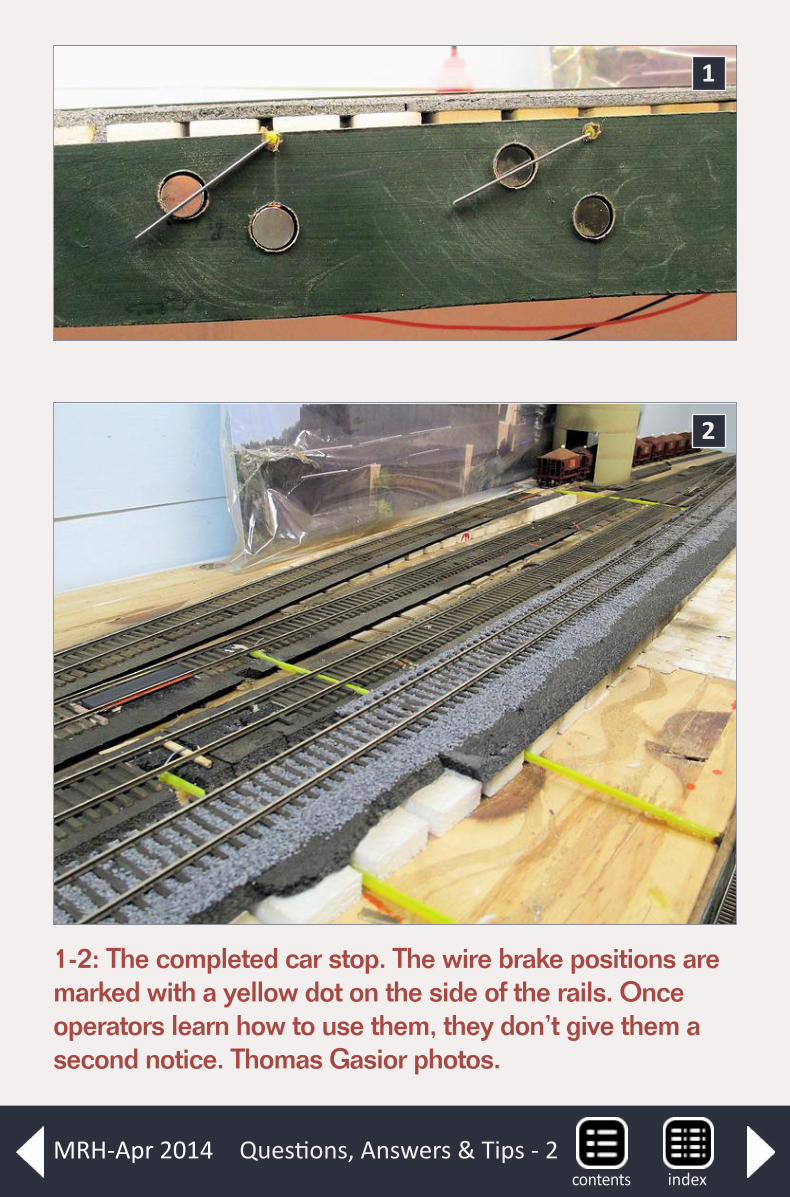
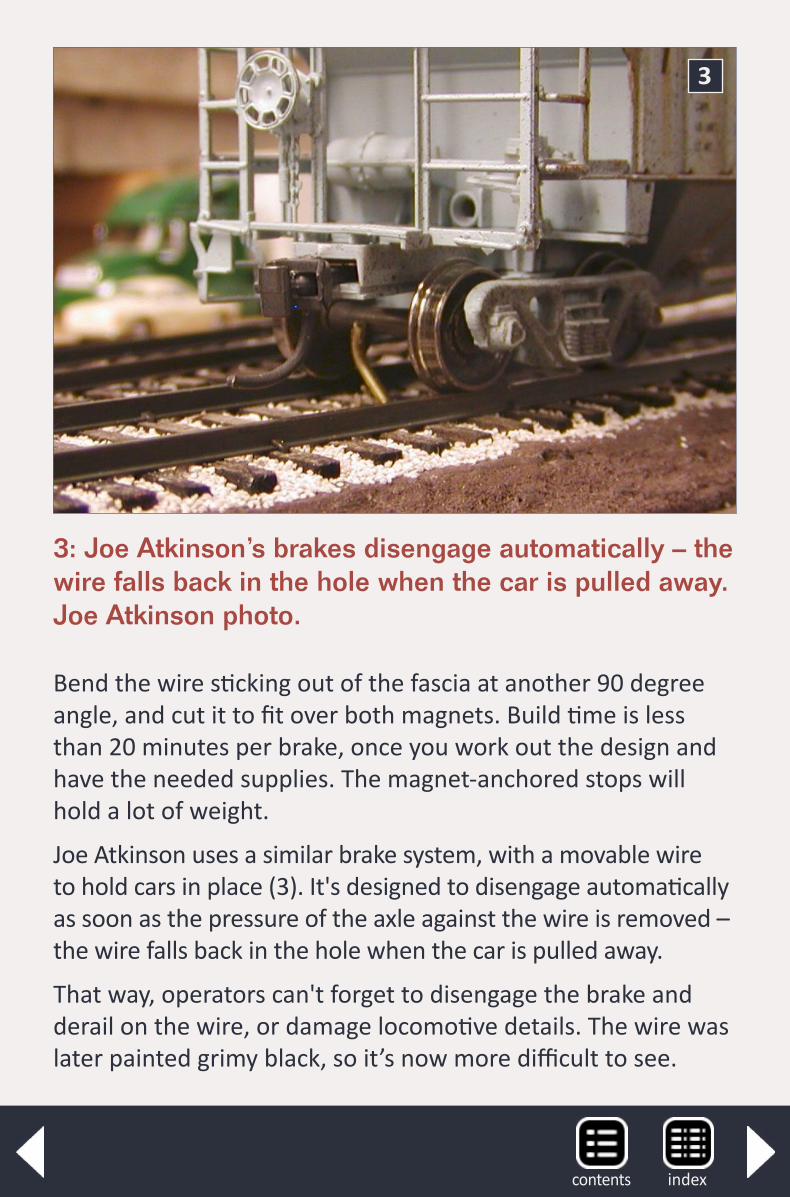
Some people place coupler springs or other small springs on one end of their freight car axles, between the wheel face and the truck frame, to act as a brake. This adds rolling resistance, so if you move a lot of long trains, it might not be a very good option. It does add enough resistance when installed on one or two axles in each car to prevent undesired movement though.At a local model railroad club we have several "blue flags" for industries. They are pins with a blue plastic handle. Those are pinned into the middle of the track when cars are left at indus-tries, particularly at industries where cars would roll to foul the main if left without being secured. – James OgdenBuilding a retractable wire stop can keep cars from rolling away. Thomas Gasior uses hollow plastic pull rods left over from Fast Tracks Bullfrog ground throws, and piano wire from the local hobby store. He drilled holes for the pull rods, then drilled holes for super magnet locks to be embedded in the fascia.Push the piano wire through the hollow pipe, bend the end on the track at a 90-degree angle, and cut it to size to just contact a freight car axle. Mount the stop off-center between the rails, to keep the wire out of couplers (1-2, next page).
indexcontents
Questions, Answers & Tips - 2
1
2
1-2: The completed car stop. The wire brake positions are marked with a yellow dot on the side of the rails. Once operators learn how to use them, they don’t give them a second notice. Thomas Gasior photos.
indexcontentsMRH-Apr 2014
Bend the wire sticking out of the fascia at another 90 degree angle, and cut it to fit over both magnets. Build time is less than 20 minutes per brake, once you work out the design and have the needed supplies. The magnet-anchored stops will hold a lot of weight.
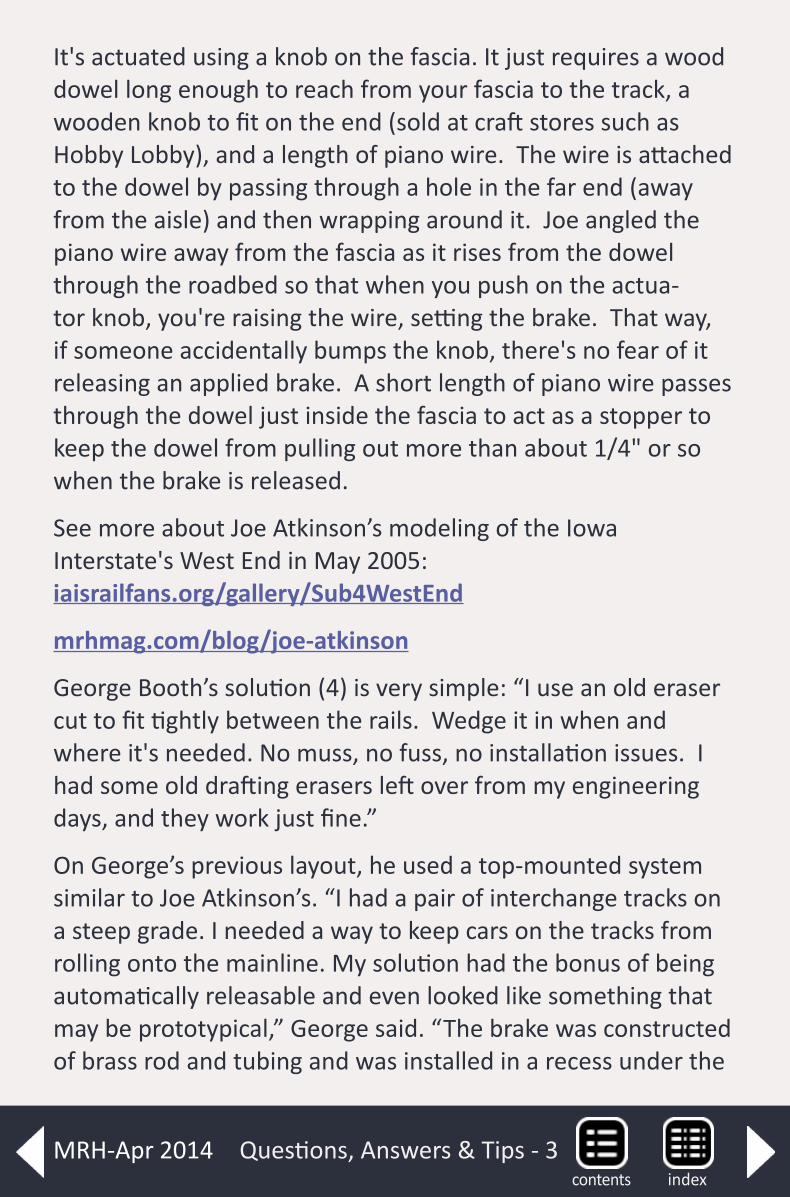
Joe Atkinson uses a similar brake system, with a movable wire to hold cars in place (3). It's designed to disengage automatically as soon as the pressure of the axle against the wire is removed – the wire falls back in the hole when the car is pulled away.
That way, operators can't forget to disengage the brake and derail on the wire, or damage locomotive details. The wire was later painted grimy black, so it’s now more difficult to see.
3
3: Joe Atkinson’s brakes disengage automatically – the wire falls back in the hole when the car is pulled away. Joe Atkinson photo.
indexcontents
Questions, Answers & Tips - 3
It's actuated using a knob on the fascia. It just requires a wood dowel long enough to reach from your fascia to the track, a wooden knob to fit on the end (sold at craft stores such as Hobby Lobby), and a length of piano wire. The wire is attached to the dowel by passing through a hole in the far end (away from the aisle) and then wrapping around it. Joe angled the piano wire away from the fascia as it rises from the dowel through the roadbed so that when you push on the actua-tor knob, you're raising the wire, setting the brake. That way, if someone accidentally bumps the knob, there's no fear of it releasing an applied brake. A short length of piano wire passes through the dowel just inside the fascia to act as a stopper to keep the dowel from pulling out more than about 1/4" or so when the brake is released.
See more about Joe Atkinson’s modeling of the Iowa Interstate's West End in May 2005: iaisrailfans.org/gallery/Sub4WestEnd
mrhmag.com/blog/joe-atkinson
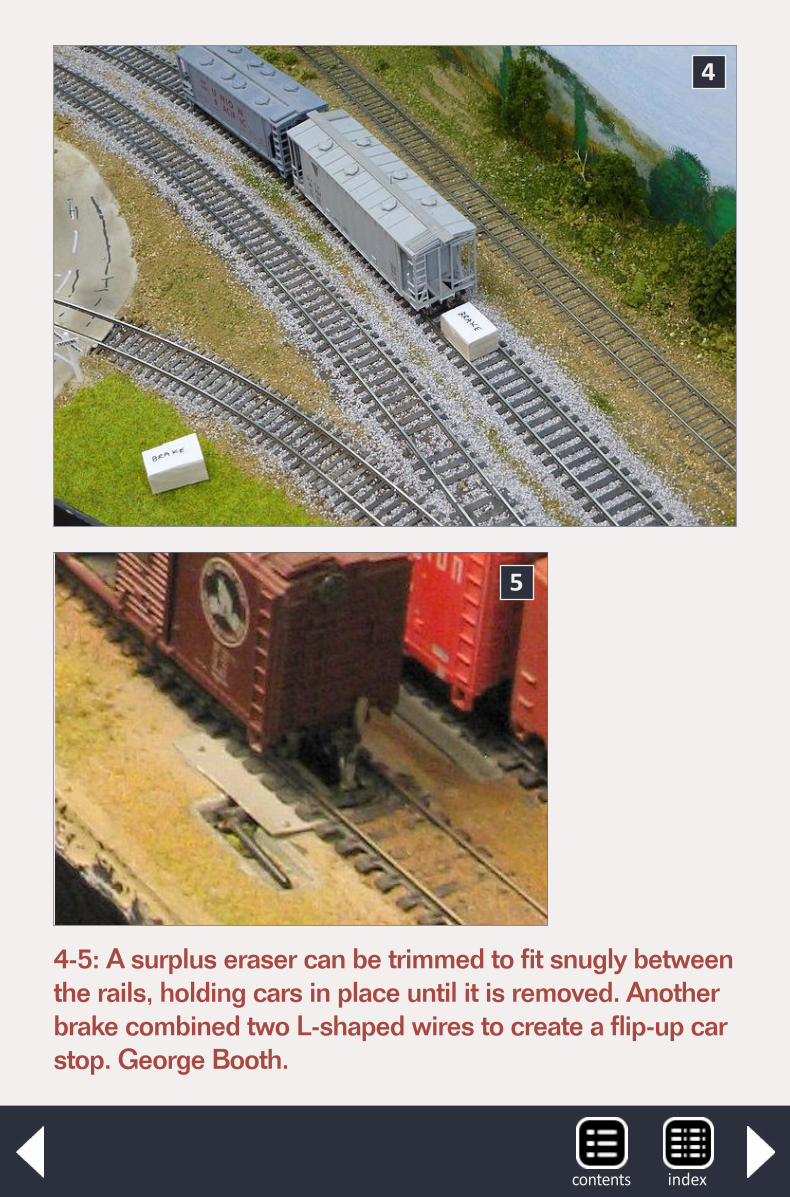
George Booth’s solution (4) is very simple: “I use an old eraser cut to fit tightly between the rails. Wedge it in when and where it's needed. No muss, no fuss, no installation issues. I had some old drafting erasers left over from my engineering days, and they work just fine.”
On George’s previous layout, he used a top-mounted system similar to Joe Atkinson’s. “I had a pair of interchange tracks on a steep grade. I needed a way to keep cars on the tracks from rolling onto the mainline. My solution had the bonus of being automatically releasable and even looked like something that may be prototypical,” George said. “The brake was constructed of brass rod and tubing and was installed in a recess under the
indexcontentsMRH-Apr 2014
4
4-5: A surplus eraser can be trimmed to fit snugly between the rails, holding cars in place until it is removed. Another brake combined two L-shaped wires to create a flip-up car stop. George Booth.
5
indexcontents
track. An L-shaped piece of rod had a second piece of rod sol-dered to it at a 90 degree angle.”
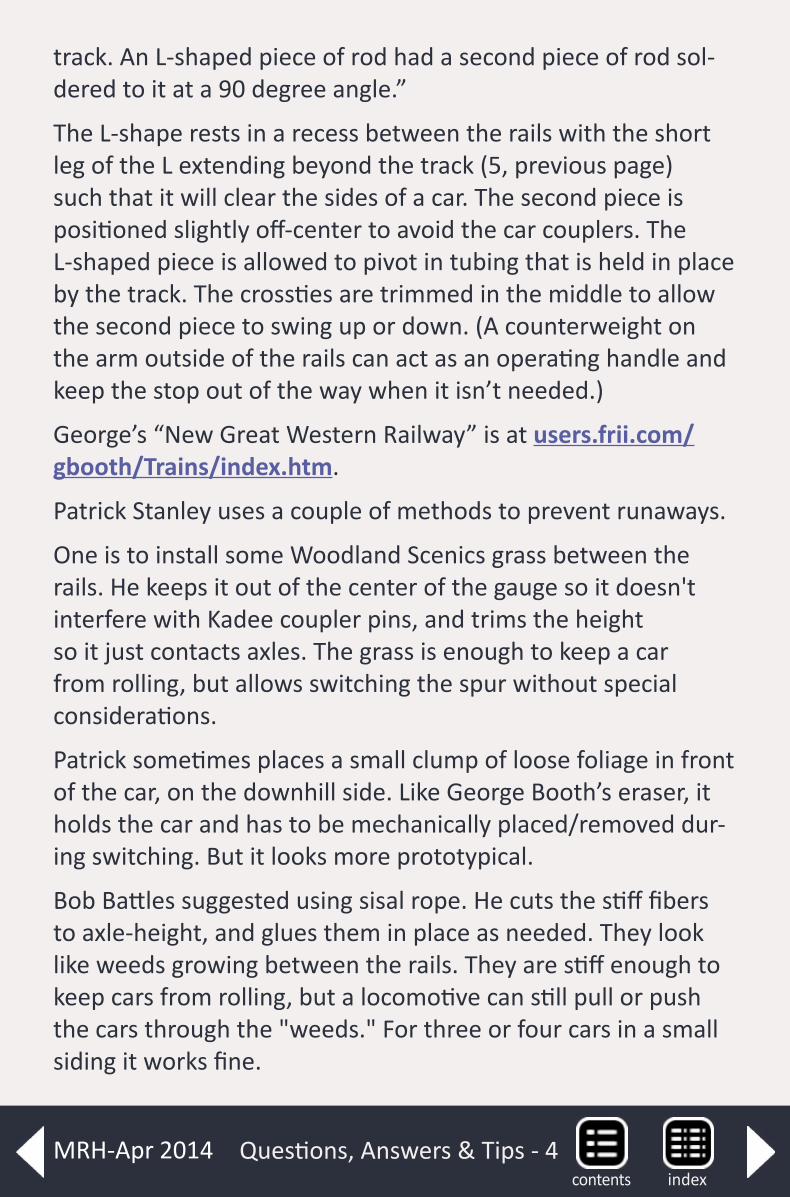
The L-shape rests in a recess between the rails with the short leg of the L extending beyond the track (5, previous page) such that it will clear the sides of a car. The second piece is positioned slightly off-center to avoid the car couplers. The L-shaped piece is allowed to pivot in tubing that is held in place by the track. The crossties are trimmed in the middle to allow the second piece to swing up or down. (A counterweight on the arm outside of the rails can act as an operating handle and keep the stop out of the way when it isn’t needed.)
George’s “New Great Western Railway” is at users.frii.com/gbooth/Trains/index.htm.
Patrick Stanley uses a couple of methods to prevent runaways.
One is to install some Woodland Scenics grass between the rails. He keeps it out of the center of the gauge so it doesn't interfere with Kadee coupler pins, and trims the height so it just contacts axles. The grass is enough to keep a car from rolling, but allows switching the spur without special considerations.
Patrick sometimes places a small clump of loose foliage in front of the car, on the downhill side. Like George Booth’s eraser, it holds the car and has to be mechanically placed/removed dur-ing switching. But it looks more prototypical.
Bob Battles suggested using sisal rope. He cuts the stiff fibers to axle-height, and glues them in place as needed. They look like weeds growing between the rails. They are stiff enough to keep cars from rolling, but a locomotive can still pull or push the cars through the "weeds." For three or four cars in a small siding it works fine.
Questions, Answers & Tips - 4indexcontents
MRH-Apr 2014
Richard Morrison suggests holding a motor tool roughly paral-lel with the rails and making a slight dip that's the same radius as a car's wheels (a smooth notch) in each. The notch should be just big enough so that the first wheel of a car or cars on the siding will rest there and won't roll past it unless it’s pulled by a loco.
“Greenville” had a steep grade where he needed to set out cars. “I drilled a hole beside the rail big enough to fit the wooden part of a cotton-tipped applicator. I positioned the hole in front of a signal cabinet so I could find it. When I stop the train, I put the dowel in the hole and back the train slowly so the car on the uphill side of the grade rests against it. That also bunches the slack so I can uncouple. When the locomotive returns and cou-ples to the train, I pull ahead slightly to make sure it coupled and remove the dowel. It works great and is hardly noticeable.”
For many more ideas about holding cars on grades: mrhmag.com/node/10339.mrhmag.com/node/16879.
ACI label placement
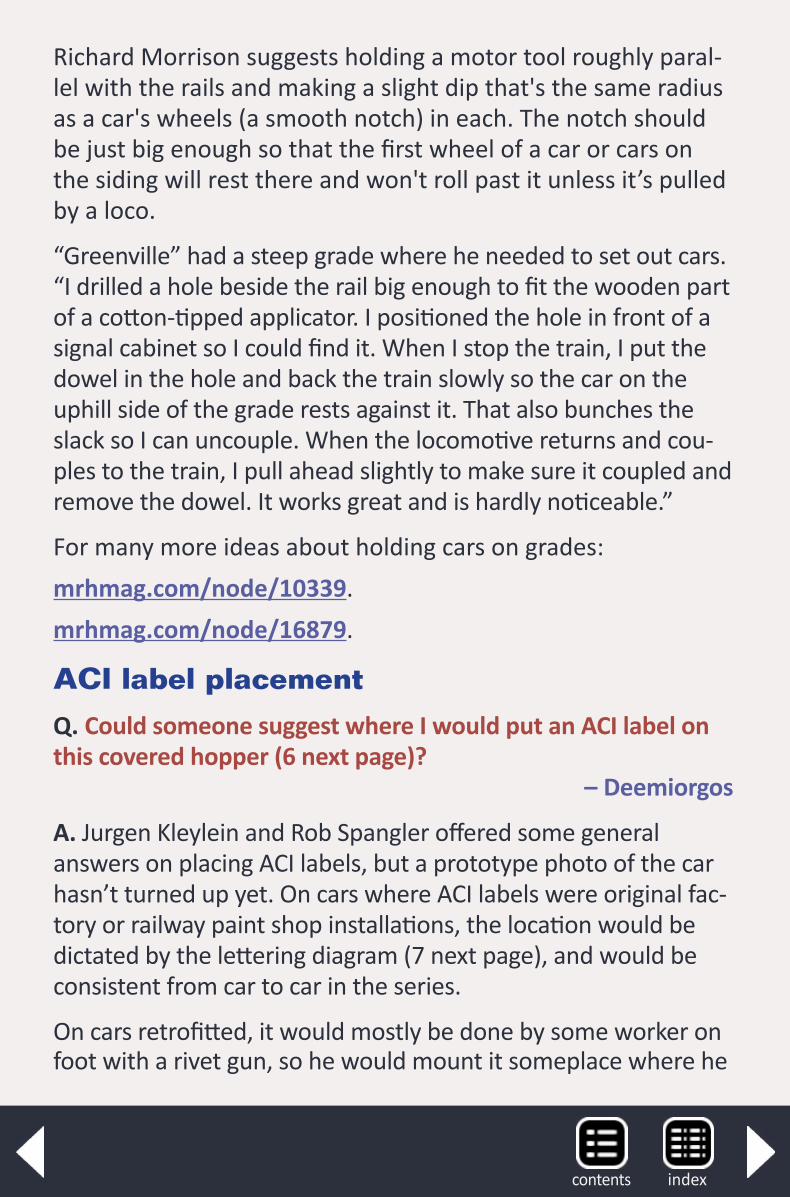
Q. Could someone suggest where I would put an ACI label on this covered hopper (6 next page)? – Deemiorgos
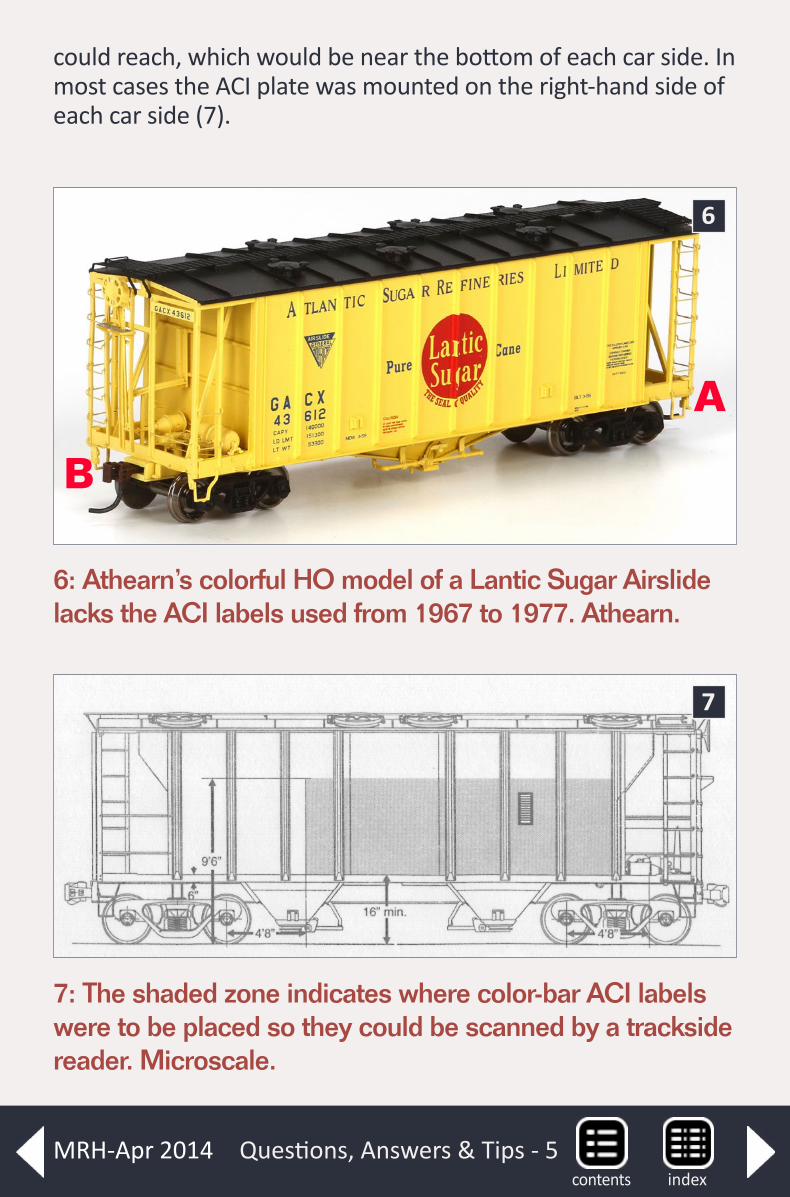
A. Jurgen Kleylein and Rob Spangler offered some general answers on placing ACI labels, but a prototype photo of the car hasn’t turned up yet. On cars where ACI labels were original fac-tory or railway paint shop installations, the location would be dictated by the lettering diagram (7 next page), and would be consistent from car to car in the series.
On cars retrofitted, it would mostly be done by some worker on foot with a rivet gun, so he would mount it someplace where he
indexcontents
Questions, Answers & Tips - 5
could reach, which would be near the bottom of each car side. In most cases the ACI plate was mounted on the right-hand side of each car side (7).
6
7
7: The shaded zone indicates where color-bar ACI labels were to be placed so they could be scanned by a trackside reader. Microscale.
6: Athearn’s colorful HO model of a Lantic Sugar Airslide lacks the ACI labels used from 1967 to 1977. Athearn.
A
B
indexcontentsMRH-Apr 2014
Some railroads also mounted them to the left of the doors on boxcars and refrigerator cars so the label wouldn’t be obscured by an open door. Mounting on the left side was also common on hoppers and flatcars. The ACI system was in operation only from 1967 to 1977, but the labels could be seen much later.
ACI labels: mrhmag.com/node/16913.
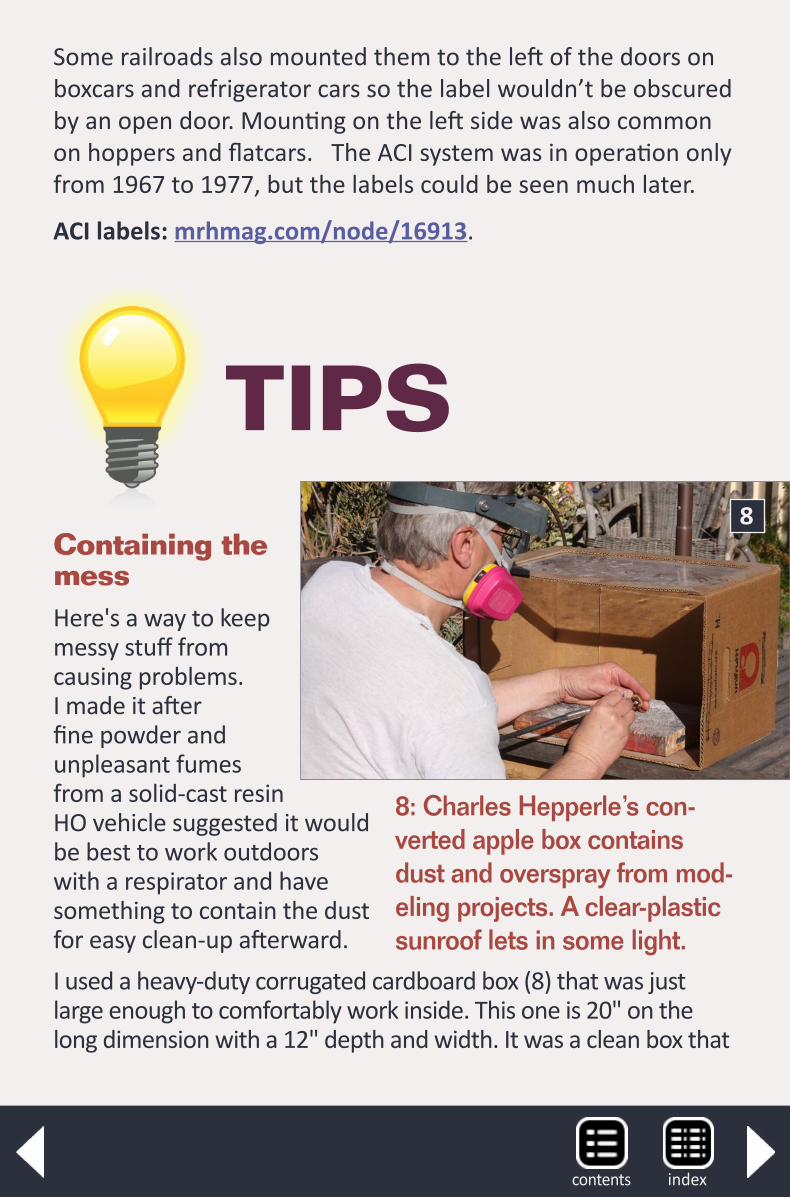
Containing the mess Here's a way to keep messy stuff from causing problems. I made it after fine powder and unpleasant fumes from a solid-cast resin HO vehicle suggested it would be best to work outdoors with a respirator and have something to contain the dust for easy clean-up afterward.I used a heavy-duty corrugated cardboard box (8) that was just large enough to comfortably work inside. This one is 20" on the long dimension with a 12" depth and width. It was a clean box that
TIPS8
8: Charles Hepperle’s con-verted apple box contains dust and overspray from mod-eling projects. A clear-plastic sunroof lets in some light.
indexcontents
apples had been shipped in. To allow more light in, I cut an opening in the top and attached a piece of scrap clear acrylic sheet with a hot-melt glue gun. It works really well. A second use for the box is to contain overspray when doing small, and I mean small, airbrush jobs with water-based paint. After swabbing it out with a damp rag to get rid of dust, you can do a little spraying – say weathering one pair of trucks – without having to use a formal paint spray booth.
– Charles Hepperle
GET $25 PER TIPWe pay $25 USD for each tip we publish. Send your modeling tips to Model Railroad
Hobbyist and we’ll get payment to you upon acceptance.
Just think, for only a few minutes effort, you could fund your next piece of rolling stock – or even pay for an entire train if you send in several tips and we publish them!
If you include any photos with your tip, we pay a bonus of $10 per photo we use with the tip.
Questions, Answers & Tips - 6
ReaderFeedback (click here)
indexcontentsMRH-Apr 2014
indexcontents

indexcontentsMRH-Apr 2014
indexcontents
indexcontentsMRH-Apr 2014
Signaling your DCC pikeDCC tips, tricks, and techniques
A t the mention of signals, it seems that everyone has a different idea in their mind. Some folks think of traffic lights; others think grade crossing gates or wig-wags.
Yet others think of signaling the track on their layout.
As for track signals, thoughts range from simple units with no lights to full computer control and technically correct signals. Adding life to your layout can fall somewhere in between. This column is designed to introduce you to some of the arenas available to you. There are a lot of ways to skin this cat. Here are some suggestions for future investigation.
Full signaling of a layout revolves around whether or not a block is occupied and, perhaps, the positions of several turnouts.
Model railroaders like to signal the position of turnouts. This can help operations and give some awe-factor for guests. Very few prototype railroads actually signal turnout position.
DCC Impulses columnby Bruce PetrarcaPhotos and illustrations by author
Bring your layout to life ...
ReaderFeedback
(click here)
DCC Impulses Column - 1indexcontents
DCC Impulses Column - 2
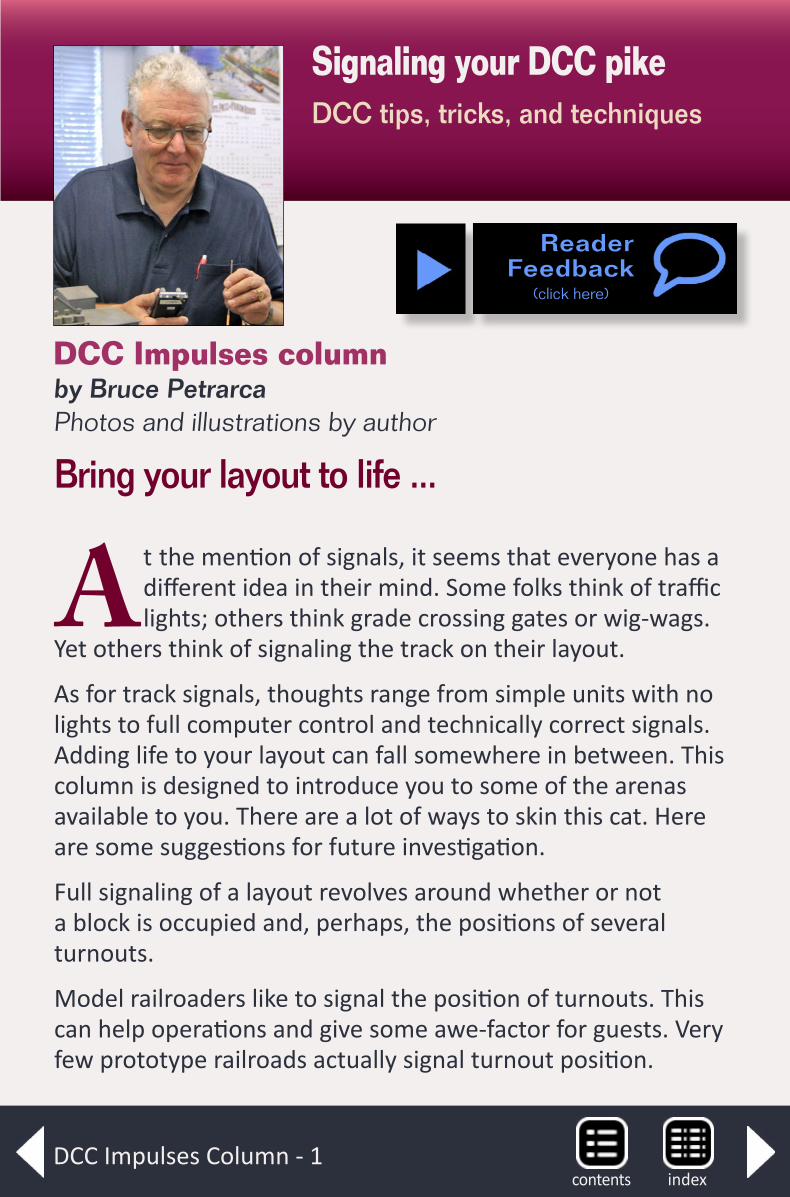
1: Bachmann nonoperating HO signal. Eye candy on our club layout. pcmrc.org.
1
Static structuresRegardless of your control system, if all you want is some eye -candy for the trackside, consider a simple non- operating display, like the Bachmann unit shown in figure 1. These guys run about $10 for a package of four and they help set the stage. These signals provide a quick bit of scenery if this style of signal is approximately correct for the railroad and era you are modeling.The downside to these signals is that there is no life in them. They just sit there. In figure 1, the foreground signal is the basic one from Bachmann. In the background is the same sig-
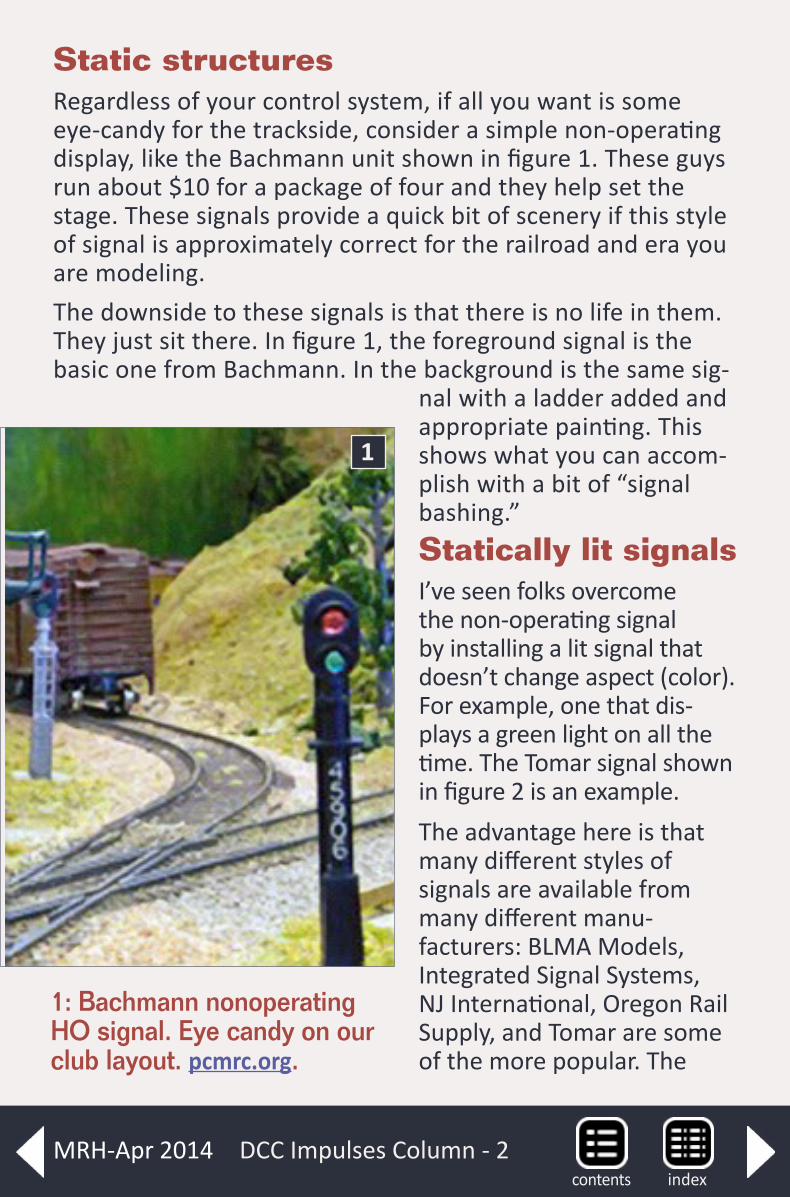
nal with a ladder added and appropriate painting. This shows what you can accom-plish with a bit of “signal bashing.”Statically lit signalsI’ve seen folks overcome the non -operating signal by installing a lit signal that doesn’t change aspect (color). For example, one that dis-plays a green light on all the time. The Tomar signal shown in figure 2 is an example. The advantage here is that many different styles of signals are available from many different manu-facturers: BLMA Models, Integrated Signal Systems, NJ International, Oregon Rail Supply, and Tomar are some of the more popular. The
indexcontentsMRH-Apr 2014
one to fit your pike and era is probably available. If one of the many production units available doesn’t fit your desires, then some of the same folks are willing to cus-tom build signals for you.Non-modelers will tend to be impressed with a lighted signal. Rail enthusiasts will notice that the signal is always green. Some folks may find it disconcerting for the signal to remain green when there is a train in the block. But this is a quick and easy way to get some pizazz on the layout. Some folks will argue that setting the signal perma-nently red would be better. Installing the correct signal and wiring it constantly show one color, and getting power from the DCC rails, is a quick way to get something on the layout and can be a stepping stone to more correctly activated signals. Which way is my turnout?Displaying turnout status (closed or thrown) is one way that signals can help the model train operator. It is nice to stand several yards (meters) away and see clearly which direction the turnout is set. Tortoise controlled-turnouts Whether DC or DCC controls the trains, if one is using Tortoise switch motors or other similar products, the contacts in the motor can be used to activate two colors of signal.
2: Tomar H-857 is permanent green light, but the fact that it never changes will bother some folks. pcmrc.org.
2
indexcontents
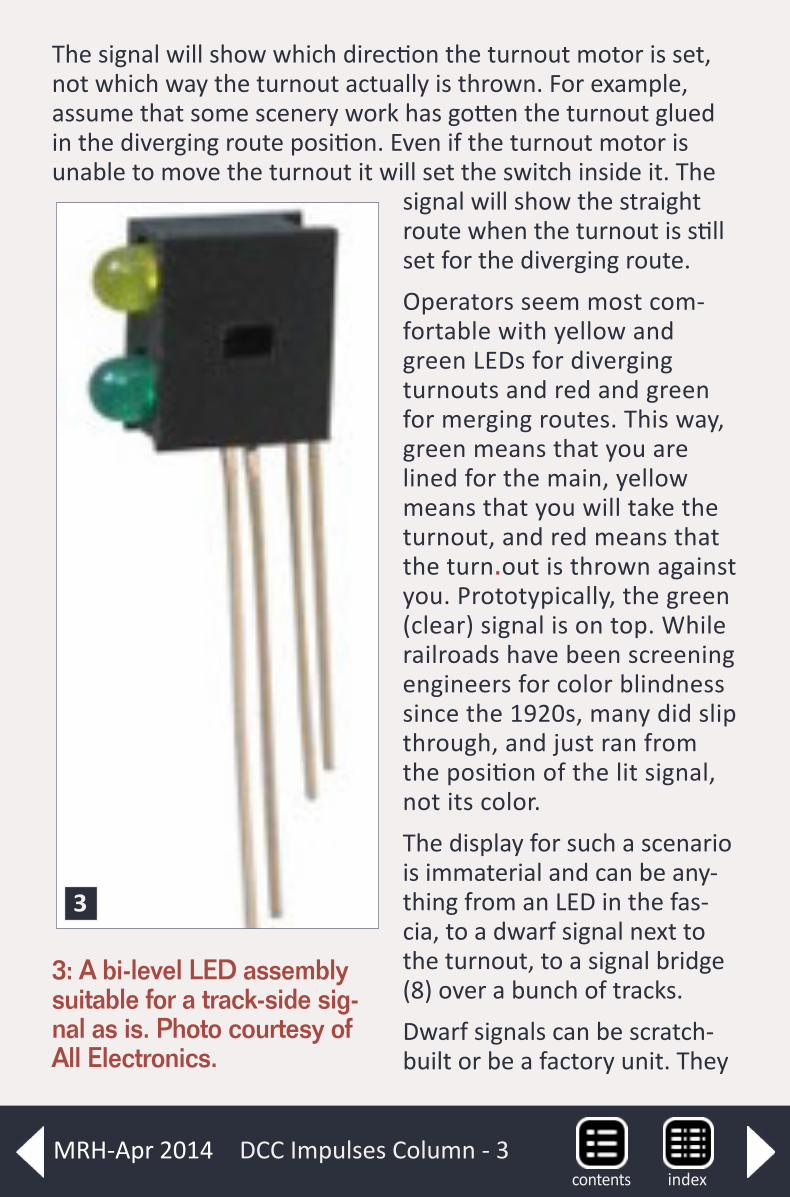
The signal will show which direction the turnout motor is set, not which way the turnout actually is thrown. For example, assume that some scenery work has gotten the turnout glued in the diverging route position. Even if the turnout motor is unable to move the turnout it will set the switch inside it. The
signal will show the straight route when the turnout is still set for the diverging route. Operators seem most com-fortable with yellow and green LEDs for diverging turnouts and red and green for merging routes. This way, green means that you are lined for the main, yellow means that you will take the turnout, and red means that the turn.out is thrown against you. Prototypically, the green (clear) signal is on top. While railroads have been screening engineers for color blindness since the 1920s, many did slip through, and just ran from the position of the lit signal, not its color. The display for such a scenario is immaterial and can be any-thing from an LED in the fas-cia, to a dwarf signal next to the turnout, to a signal bridge (8) over a bunch of tracks. Dwarf signals can be scratch-built or be a factory unit. They
DCC Impulses Column - 3
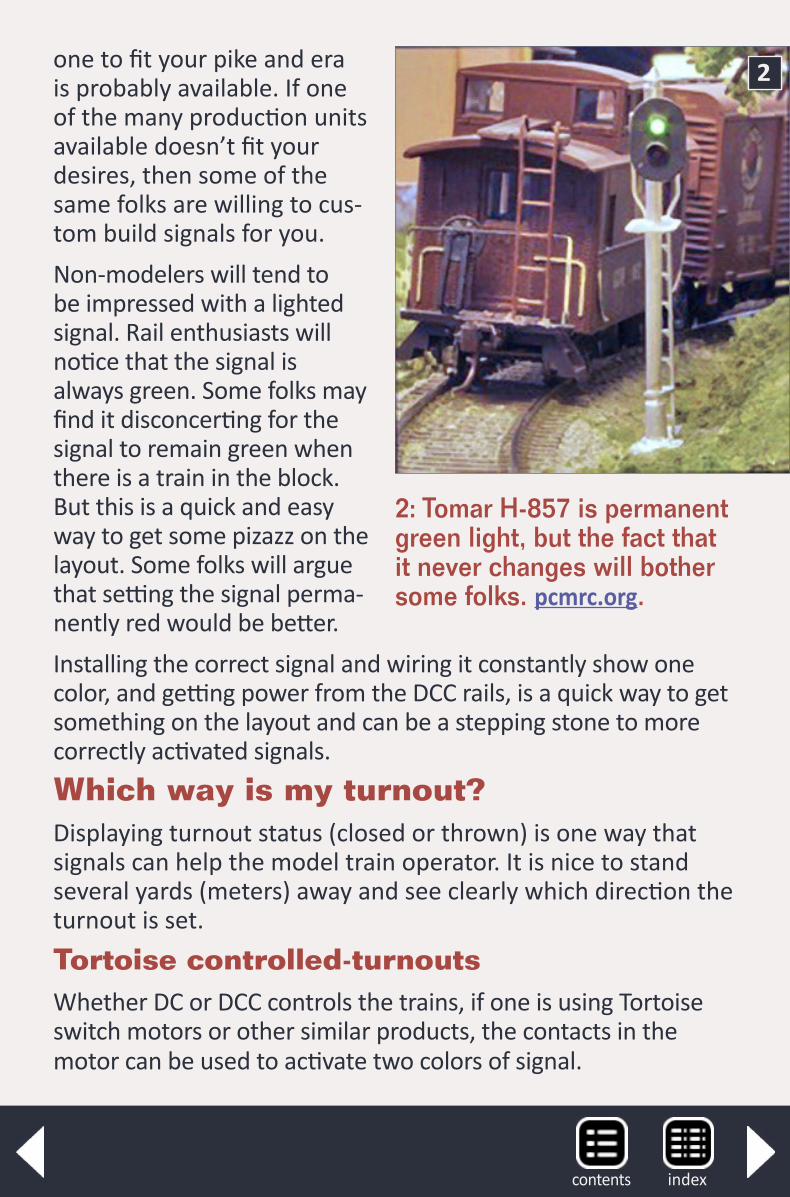
3: A bi-level LED assembly suitable for a track-side sig-nal as is. Photo courtesy of All Electronics.
3
indexcontentsMRH-Apr 2014
may be as simple as an LED or two in a plastic housing, like the inexpensive LED-212 from All Electronics, as in (3). Many of the plastic LED holders can have the LEDs removed, so adjusting what color is where is not a big deal. Many companies make dwarf signals, in (4, next page). These are available for about $10. If you choose to make your own, see model- railroad- infoguy.com/dwarf-signal.html for ideas.Live frogs and DCCHow about an arrangement where the turnout will tell you which way it is actually set? You can do it if you use DCC and live frog turnouts, such as the Peco Electrofrog. The signal is built out of two LEDs and a resistor. This scheme will work with just about any style LED you have available: two LEDs or a single bi- color LED with three leads, either common cathode or common anode. The LED pack-age shown in (3) would work nicely. If you are using two LEDs,
indexcontents
connect the same side together, either the anodes or cathodes. You may wish to review my web site for infor-mation on LED lights. mrdccu.com/cur-riculum/Lighting/LED. There
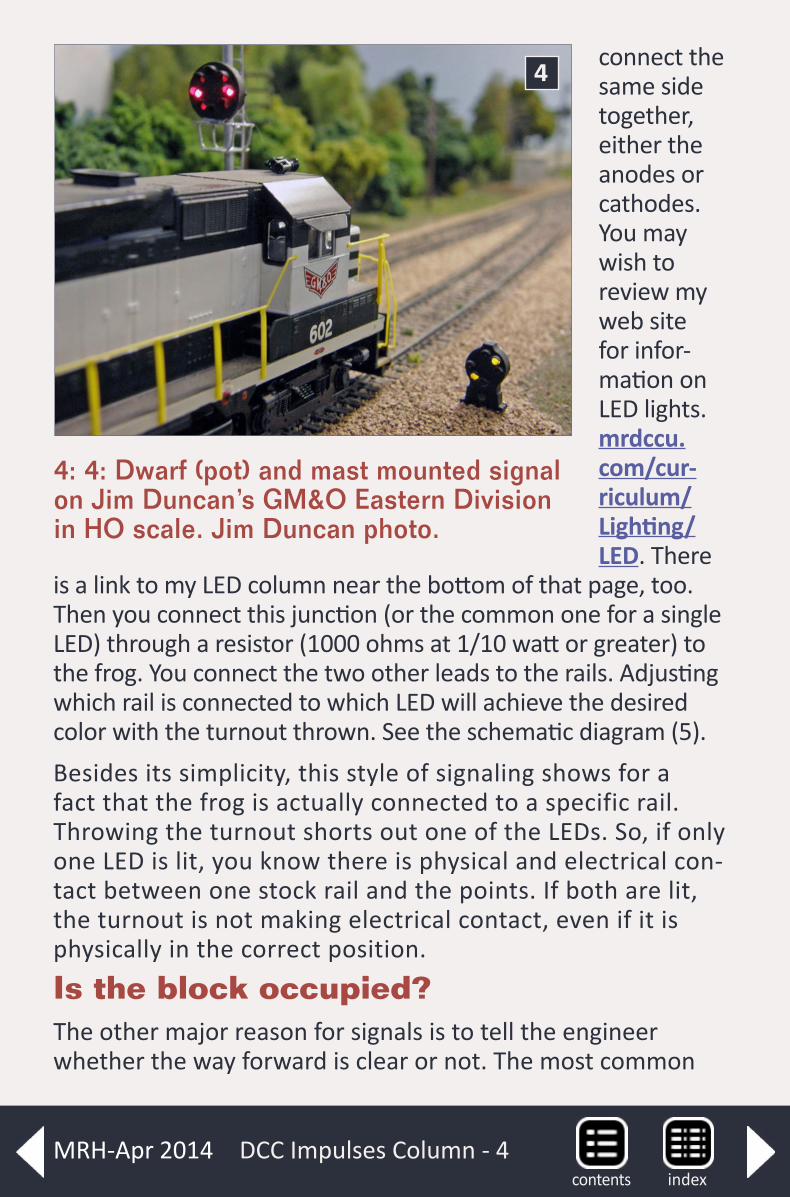
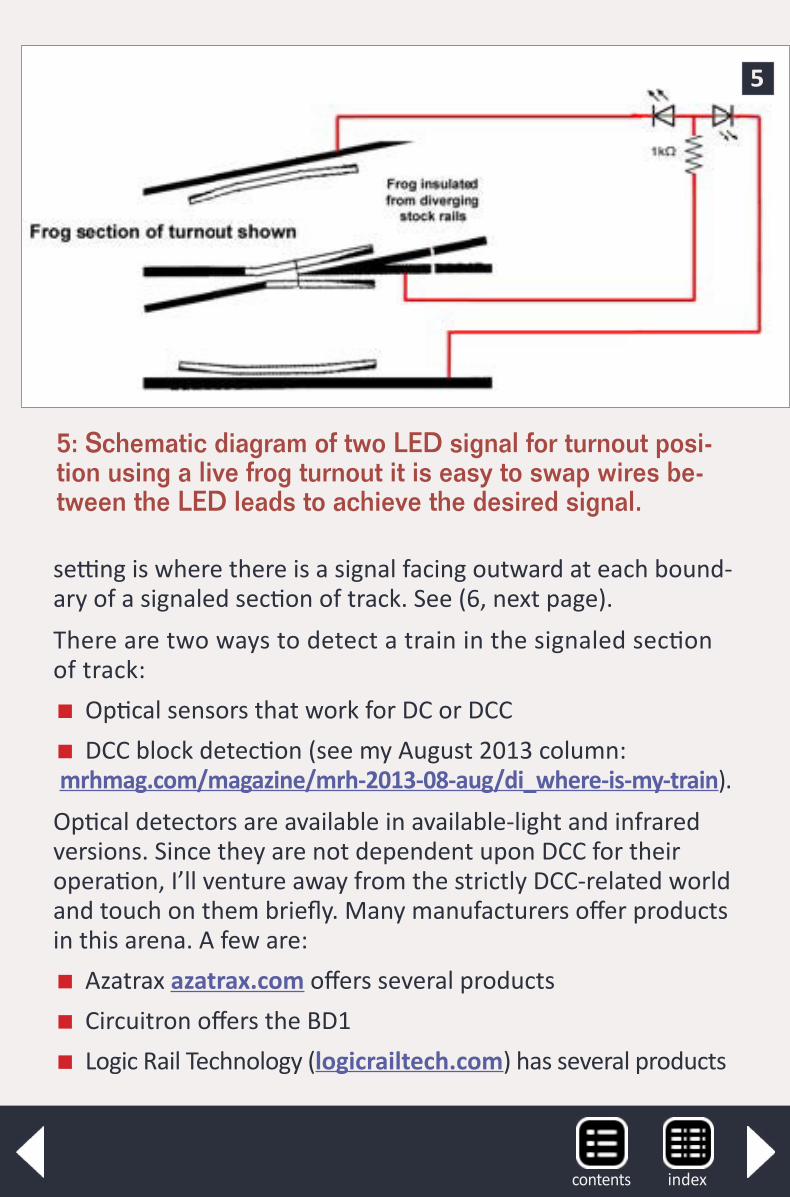
is a link to my LED column near the bottom of that page, too. Then you connect this junction (or the common one for a single LED) through a resistor (1000 ohms at 1/10 watt or greater) to the frog. You connect the two other leads to the rails. Adjusting which rail is connected to which LED will achieve the desired color with the turnout thrown. See the schematic diagram (5). Besides its simplicity, this style of signaling shows for a fact that the frog is actually connected to a specific rail. Throwing the turnout shorts out one of the LEDs. So, if only one LED is lit, you know there is physical and electrical con-tact between one stock rail and the points. If both are lit, the turnout is not making electrical contact, even if it is physically in the correct position. Is the block occupied?The other major reason for signals is to tell the engineer whether the way forward is clear or not. The most common
DCC Impulses Column - 4
4: 4: Dwarf (pot) and mast mounted signal on Jim Duncan’s GM&O Eastern Division in HO scale. Jim Duncan photo.
4
indexcontentsMRH-Apr 2014
setting is where there is a signal facing outward at each bound-ary of a signaled section of track. See (6, next page). There are two ways to detect a train in the signaled section of track:
� Optical sensors that work for DC or DCC � DCC block detection (see my August 2013 column:
mrhmag.com/magazine/mrh-2013-08-aug/di_where-is-my-train).Optical detectors are available in available-light and infrared versions. Since they are not dependent upon DCC for their operation, I’ll venture away from the strictly DCC-related world and touch on them briefly. Many manufacturers offer products in this arena. A few are:
� Azatrax azatrax.com offers several products � Circuitron offers the BD1 � Logic Rail Technology (logicrailtech.com) has several products
5: Schematic diagram of two LED signal for turnout posi-tion using a live frog turnout it is easy to swap wires be-tween the LED leads to achieve the desired signal.
5
indexcontents
Electronic hobbyists can find schematics and kits to build their own.
Detecting the entire block becomes an issue with optical sen-sors. They can easily tell that there is a train above them, but not elsewhere in the block. To report an entire block occupied requires some fooling around.
One method is time. Once the train uncovers the optical sensor, a timer starts and some seconds later, the block is deemed clear and the signal logic proceeds normally. If the train stops just after it uncovers the detector, the situation pictured in figure 2 can occur: a green (or yellow) signal with a train just past it.
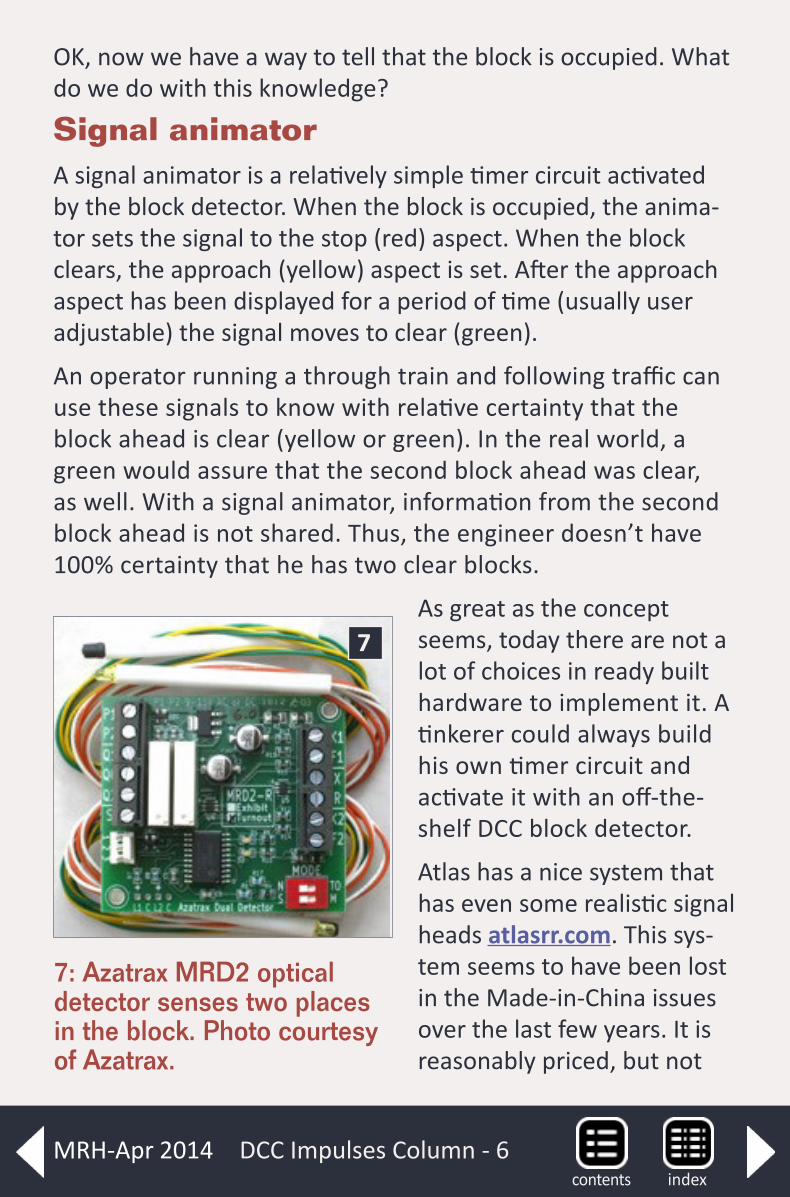
Increased accuracy requires increased complexity. Two (or more) sensors along with sophisticated electronics will more accurately report the block occupied. The Azatrax MRD2 (7, next page) is an example of this type of board.
indexcontentsMRH-Apr 2014
DCC Impulses Column - 5
With that short introduction into the world of optical detec-tion, it will be easy to understand why DCC block detection is an elegant solution. DCC block detection reports whenever cur-rent is being consumed inside the isolated block. That current can be powering a decoder-equipped locomotive, whether it is moving or not, or lighted cars (passenger or caboose), or cars with resistor wheelsets. For more details, see my August 2013 column, referenced above.
So DCC block detection, coupled with resistor wheelsets and lighted cars, will very accurately tell you that the block is occu-pied until the very last car exits the block. There is one hitch. You need to make sure there are no ongoing current loads on the detected bus, like: stationary decoders, lit buildings, panel displays, etc.
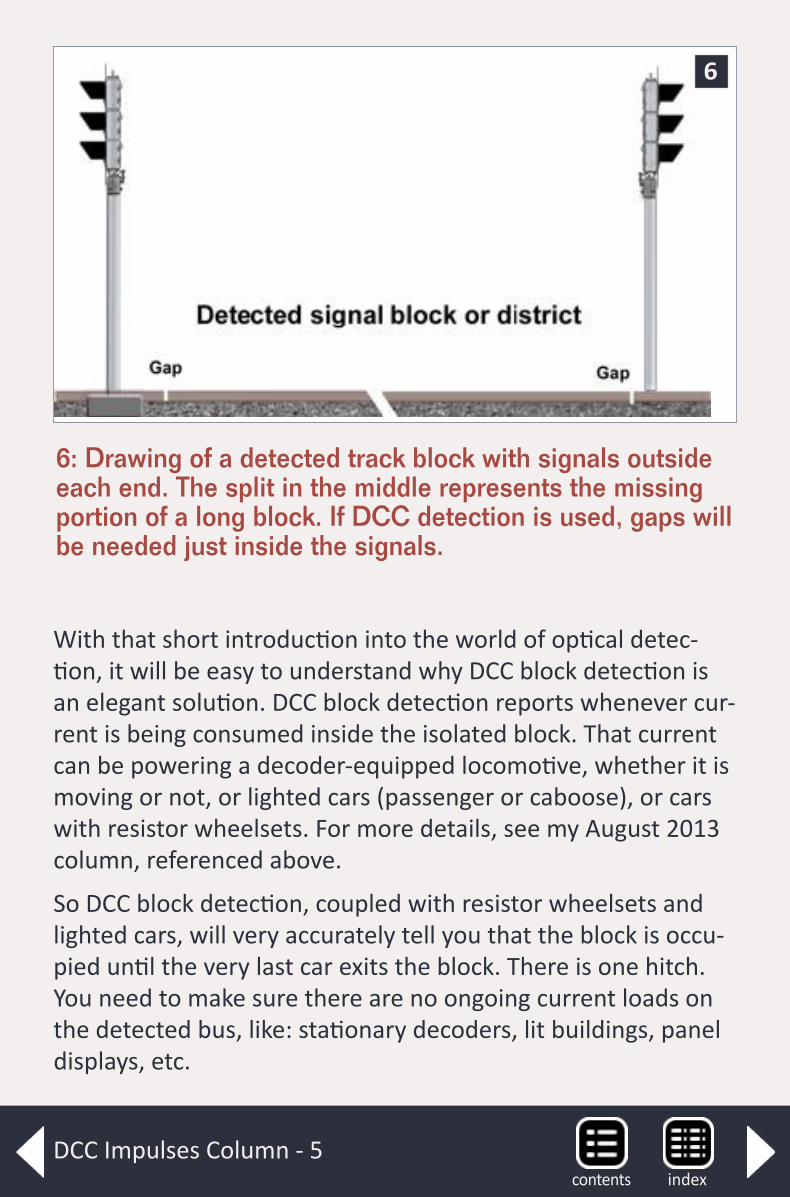
6: Drawing of a detected track block with signals outside each end. The split in the middle represents the missing portion of a long block. If DCC detection is used, gaps will be needed just inside the signals.
6
indexcontents
DCC Impulses Column - 6
OK, now we have a way to tell that the block is occupied. What do we do with this knowledge?
Signal animator A signal animator is a relatively simple timer circuit activated by the block detector. When the block is occupied, the anima-tor sets the signal to the stop (red) aspect. When the block clears, the approach (yellow) aspect is set. After the approach aspect has been displayed for a period of time (usually user adjustable) the signal moves to clear (green).
An operator running a through train and following traffic can use these signals to know with relative certainty that the block ahead is clear (yellow or green). In the real world, a green would assure that the second block ahead was clear, as well. With a signal animator, information from the second block ahead is not shared. Thus, the engineer doesn’t have 100% certainty that he has two clear blocks.
As great as the concept seems, today there are not a lot of choices in ready built hardware to implement it. A tinkerer could always build his own timer circuit and activate it with an off-the-shelf DCC block detector.
Atlas has a nice system that has even some realistic signal heads atlasrr.com. This sys-tem seems to have been lost in the Made-in-China issues over the last few years. It is reasonably priced, but not
7: Azatrax MRD2 optical detector senses two places in the block. Photo courtesy of Azatrax.
7
indexcontentsMRH-Apr 2014
currently available. Stores, swap meets, and eBay might yield some old stock. Hopefully, it will soon be available again.
NCE promised a system called ( SIG 12 ) many years ago. As I understand it, the signal animator portion of the SIG 12 worked just fine. However, the folks at NCE wanted to include the sophistication of an easy- to-install system that would sig-nal that second block ahead, too. Thus, a clear signal (green) would guarantee that the next two blocks were clear. Getting all this to work under a lot of conditions hasn’t yet happened and the unit remains on the shelf.
Signaling the entire pike
Sophisticated signaling systems take into account more than just occupied blocks. Turnout position comes into play, too. Consider a scenario where the main track in the next block is occupied. A signal animator would give a stop (red) signal. However, if you have a scheduled meet and your partner is already in the block on the main, you both will see stop signals
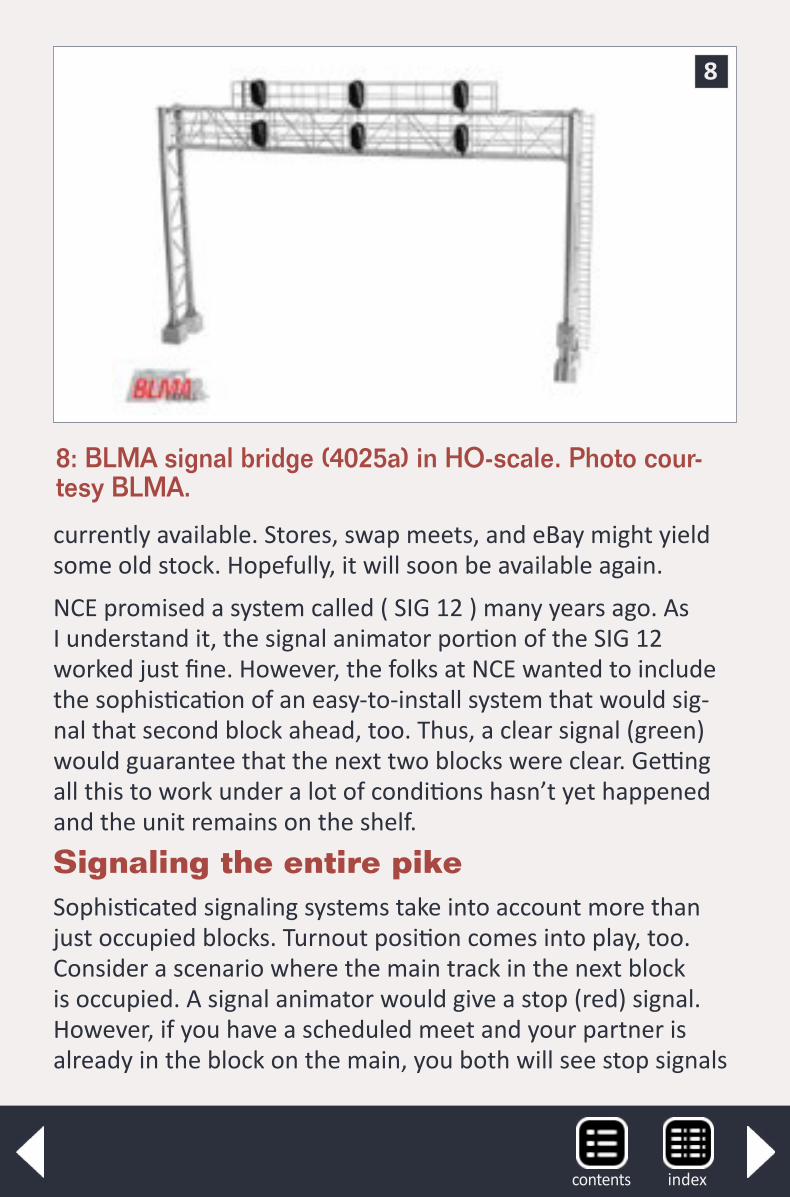
8: BLMA signal bridge (4025a) in HO-scale. Photo cour-tesy BLMA.
8
indexcontents
at the boundary. What you really need is a caution or approach signal, if the passing siding is free and the turnout is set to allow you to move into the siding.
Here is where a lot of data crunching and system planning comes into play. This usually means a computer and software and block detectors and signal control modules and feedback from the turnout controllers and lots of wire and...
Whew! It can be daunting. This level of discussion could be its own eBook. I’m going to just mention a couple of things that are out there. Be ready to devote a lot of time other resources to take a system from the signal animation level to the signal automation level.
Personally, I don’t see the return on investment. But many folks do. But then I only model railroads with dark territory (no signals).
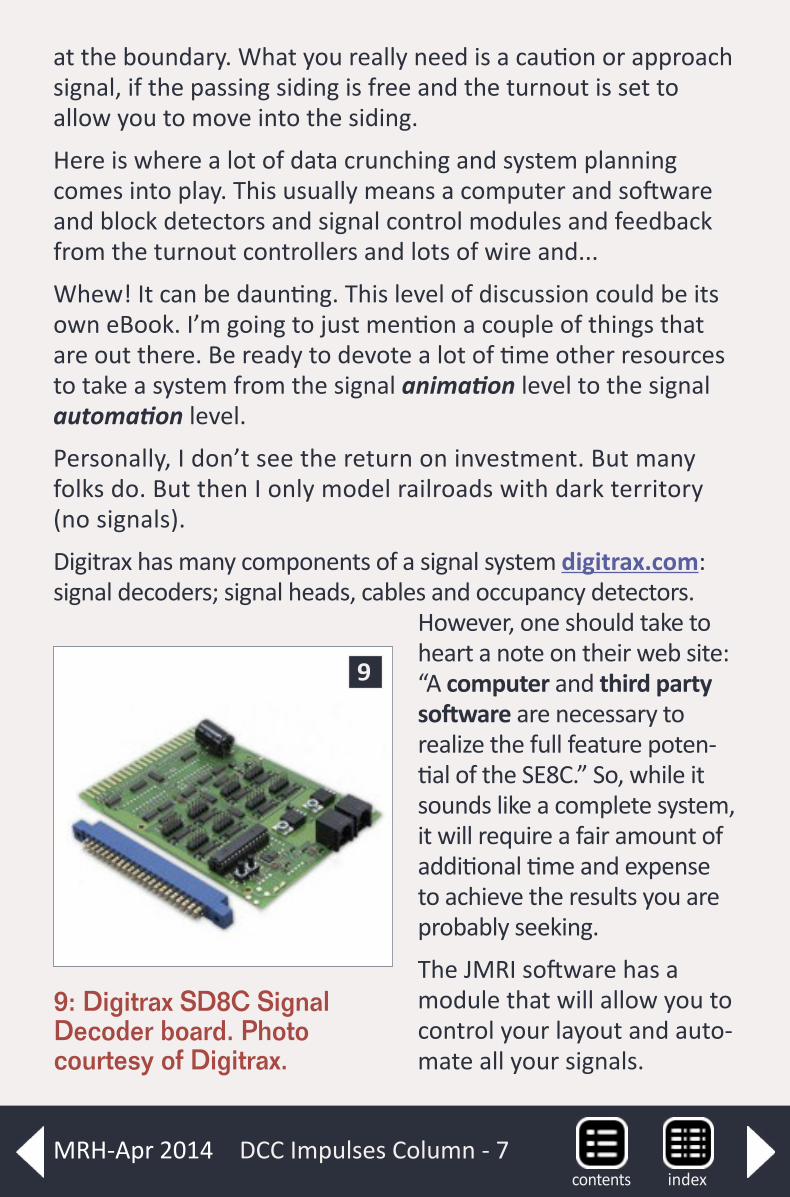
Digitrax has many components of a signal system digitrax.com: signal decoders; signal heads, cables and occupancy detectors.
However, one should take to heart a note on their web site: “A computer and third party software are necessary to realize the full feature poten-tial of the SE8C.” So, while it sounds like a complete system, it will require a fair amount of additional time and expense to achieve the results you are probably seeking.
The JMRI software has a module that will allow you to control your layout and auto-mate all your signals.
9: Digitrax SD8C Signal Decoder board. Photo courtesy of Digitrax.
9
DCC Impulses Column - 7indexcontents
MRH-Apr 2014
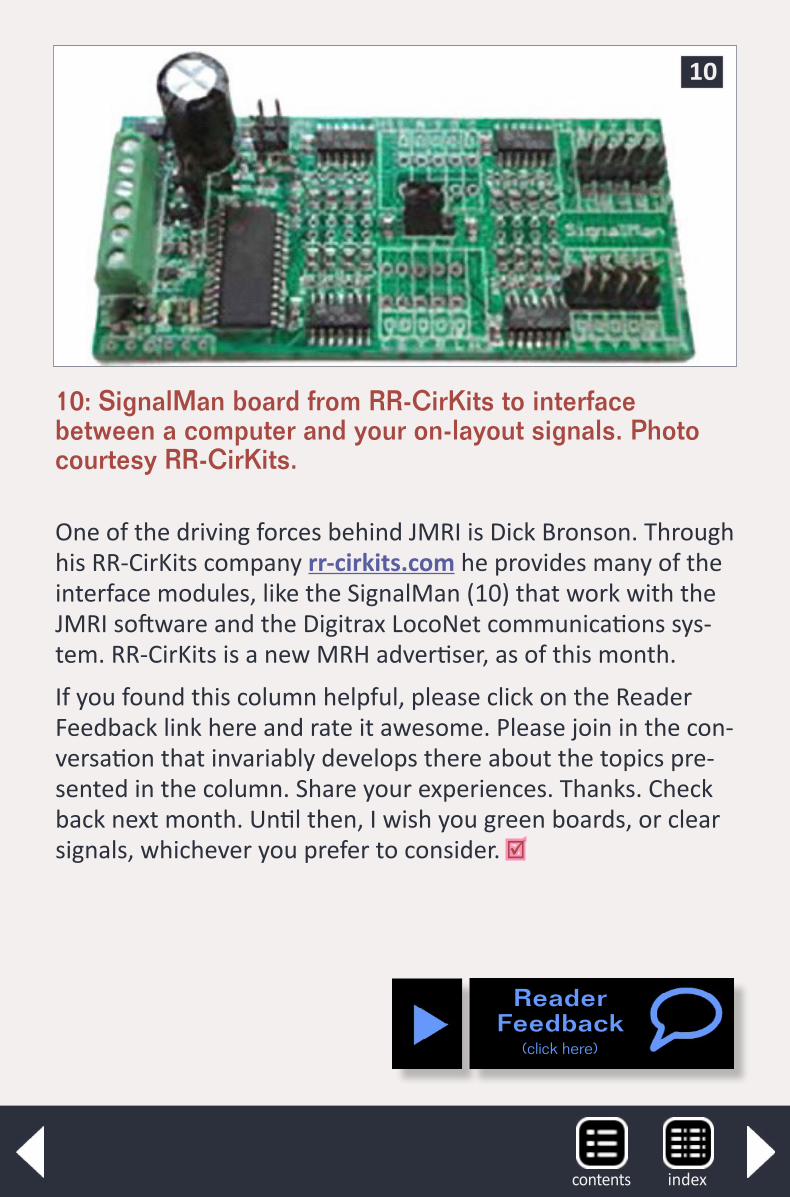
10: SignalMan board from RR-CirKits to interface between a computer and your on-layout signals. Photo courtesy RR-CirKits.
10
One of the driving forces behind JMRI is Dick Bronson. Through his RR- CirKits company rr-cirkits.com he provides many of the interface modules, like the SignalMan (10) that work with the JMRI software and the Digitrax LocoNet communications sys-tem. RR-CirKits is a new MRH advertiser, as of this month.
If you found this column helpful, please click on the Reader Feedback link here and rate it awesome. Please join in the con-versation that invariably develops there about the topics pre-sented in the column. Share your experiences. Thanks. Check back next month. Until then, I wish you green boards, or clear signals, whichever you prefer to consider.
ReaderFeedback
(click here)
indexcontents
indexcontentsMRH-Apr 2014
From Mr. DCC’s workbench
DCC compatibility between systemsI see and get a lot of questions about DCC compatibility, so let’s spend a bit of time talking about it. First, there are NMRA standards that are based upon Bernd Lenz’ basic patents. I’m going to talk about DCC components that conform to NMRA standards. If they don’t conform, all bets are off. Many compo-nents conform but are not certified. A list of tested and certi-fied components is available on the NMRA web site nmra.org/standards. But just because a component is not listed doesn’t mean that it doesn’t conform. It may not have been tested.
Okay, let’s start with a basic question: “I’ve been using system X and I am converting to system Y, will I have to reprogram all my locomotives?” The answer is, “Probably not.”
One case revolves around the situation I discussed in my February column: mrhmag.com/magazine/mrh-2014-02-feb/di_unraveling-dcc-addresses.
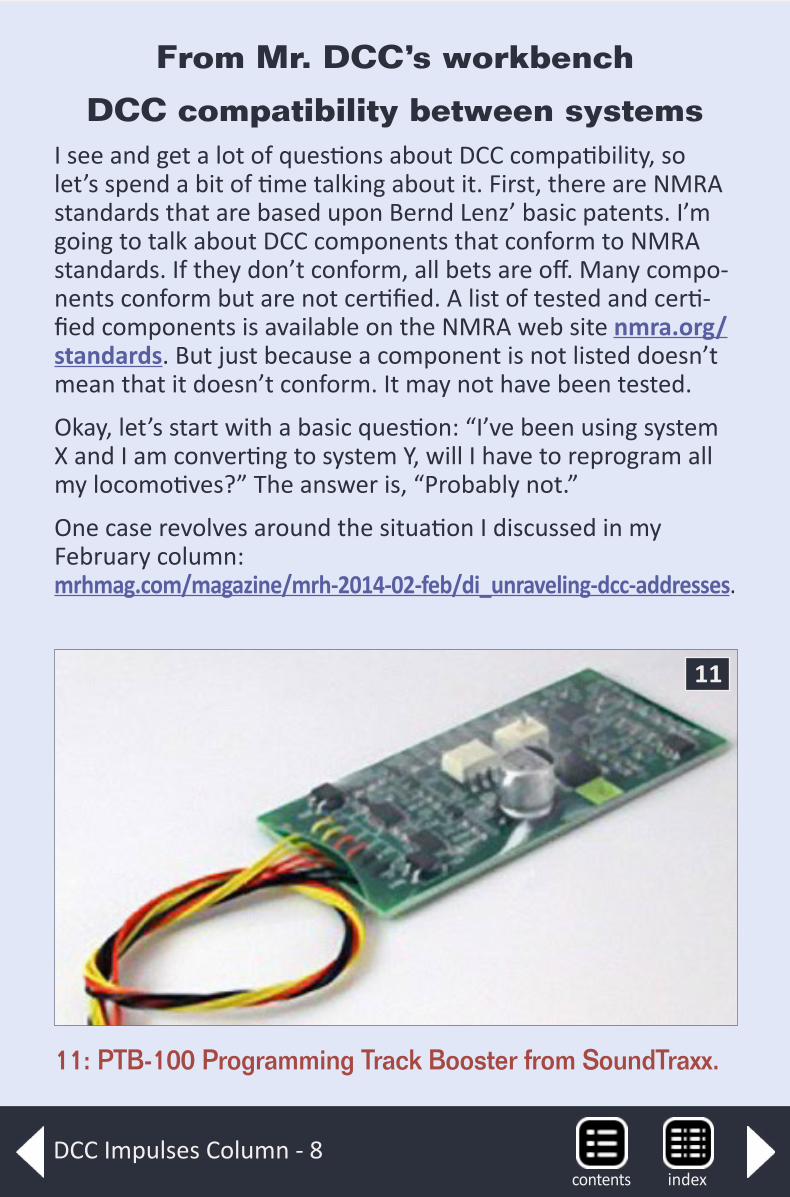
11: PTB-100 Programming Track Booster from SoundTraxx.
11
DCC Impulses Column - 8indexcontents
DCC Impulses Column - 9
Systems vary widely in how they handle addresses between 100 and 127. If all your locos fall in this range, you may have to change all their addresses. However, I don’t think folks are con-cerned with this when they ask the question.
What I believe they are asking really is, “I’ve spent a lot of time working on my locos and getting the sound volume and sounds and momentum, etc., just right. Will I have to change those set-tings?” And the answer is no. There are some decoders which don’t meet the NMRA specs on some things like momentum. However, they will react the same regardless of the system issuing the commands.
Another area that bugs folks frequently revolves around pro-gramming sound decoders or other decoders with large energy storage capacitors on board. It frequently goes like this: “I have a DCC system (like the NCE PowerHouse Pro) that has a NMRA warrant (issued in 2005). I cannot read my SoundTraxx Tsunami equipped locomotive with it. Why?” The capacitors in a lot of modern decoders exceed the specifications on the original pro-gramming track outputs. Many of the current generation DCC systems were designed before the NMRA issued enhanced Recommended Practices (upgraded to Standards in 2012). The latest designs will read all decoders. Systems that were designed prior to about 2005 will probably need a programming track booster mrhmag.com/mrdccu-ptb to read these new decoders.
The keystone of DCC is the fact that it is a standardized system, supported by many manufacturers.
So, if one manufacturer goes away (as with Wangrow), there are others to step in and fill the void.
ReaderFeedback
(click here)
indexcontentsMRH-Apr 2014
indexcontents
indexcontentsMRH-Apr 2014
indexcontents
indexcontentsMRH-Apr 2014
Dispatcher sheetsModeling real railroads and what they do
There appears to be a growing interest in TT/TO (time-table/train order) operations by layout operators. I discussed some ways to adapt prototype TT/TO opera-
tions to model layouts in my July 2013 Getting Real column (mrhmag.com/magazine/mrh-2013-07-jul/gr_prototype-ops-for-modelers). Among other items, that article discussed the importance of employee timetables as a source of prototype information which can form the basis of realistic layout operat-ing sessions.
Please keep in mind that my knowledge of operations under TT/TO is limited to how my prototype, the Yosemite Valley Railroad, was operated based on paperwork from the railroad and discussions with more knowledgeable individuals. The YV was a 77-mile-long short line which ran from connections with the SP and ATSF in Merced to El Portal, at the western bound-ary of Yosemite National Park (1). While the YV was a short line
Getting Real columnby Jack Burgess
Dispatchers' records give an insight into daily operations ...
Getting Real Column - 1
ReaderFeedback
(click here)
... On to next page of text
indexcontents
1
Getting Real Column - 2
2
indexcontentsMRH-Apr 2014
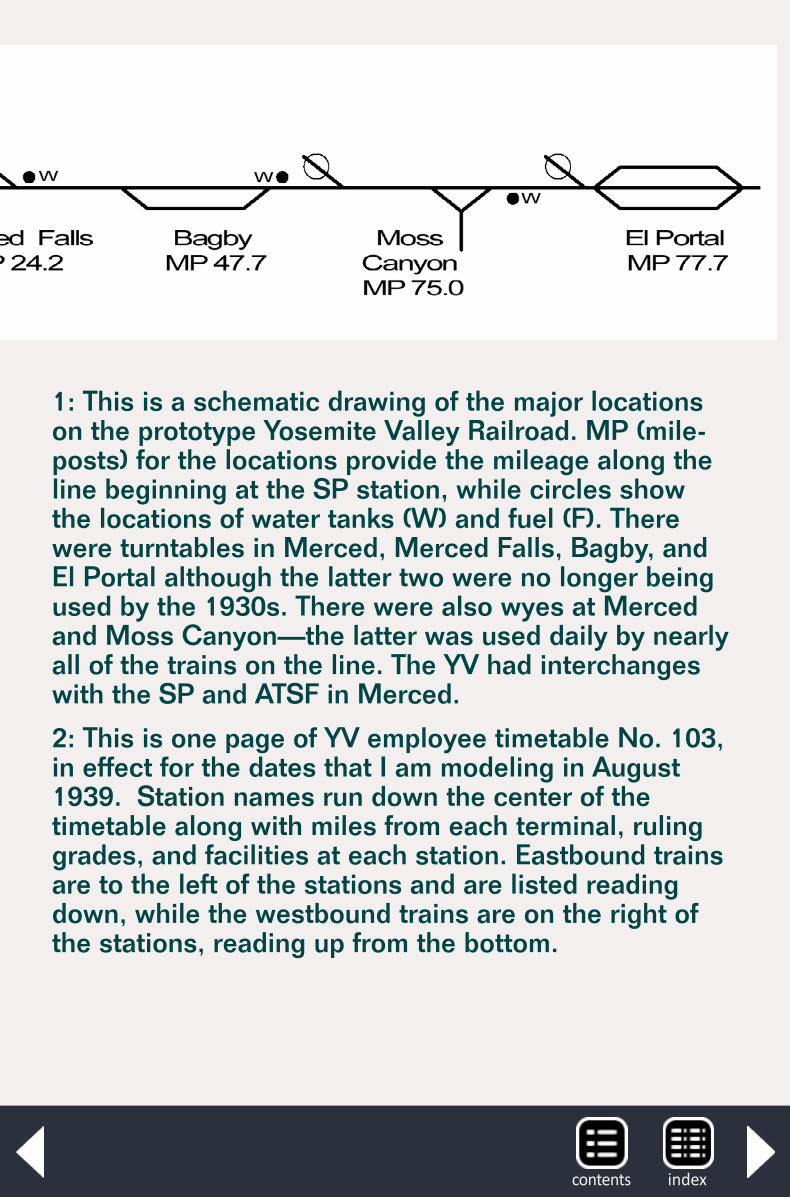
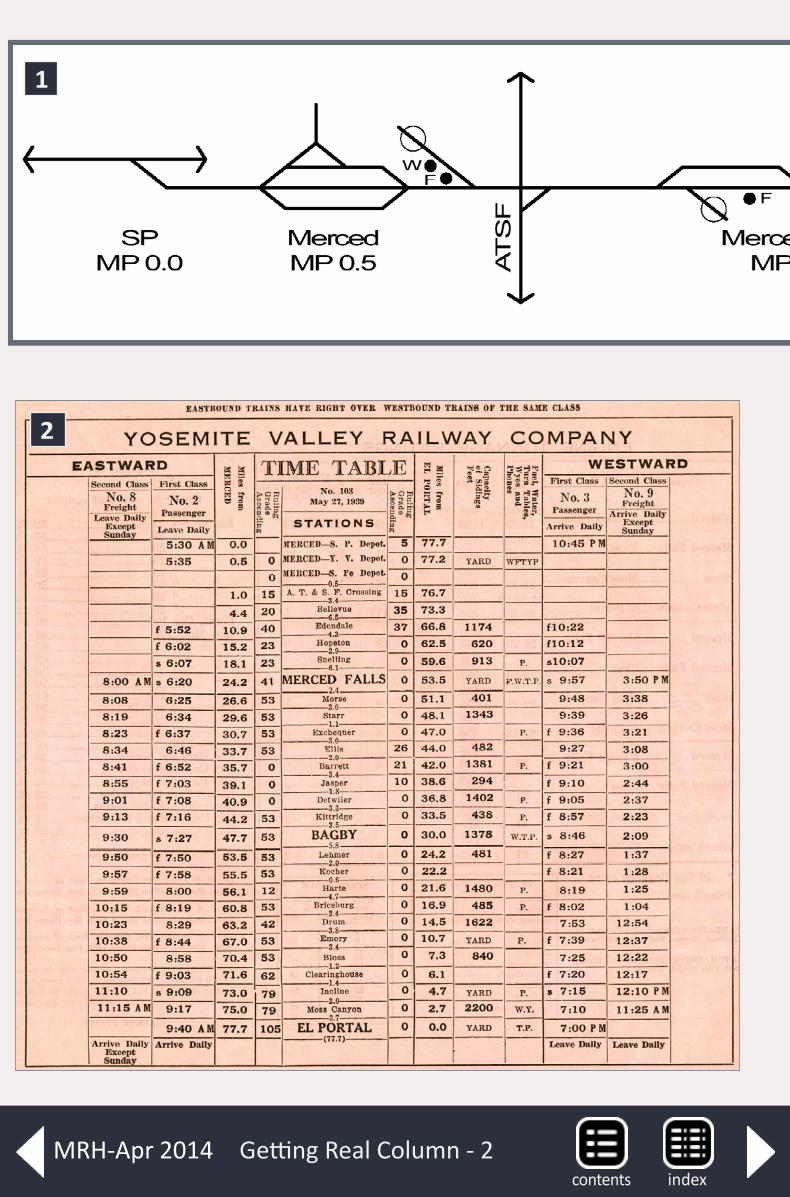
1: This is a schematic drawing of the major locations on the prototype Yosemite Valley Railroad. MP (mile-posts) for the locations provide the mileage along the line beginning at the SP station, while circles show the locations of water tanks (W) and fuel (F). There were turntables in Merced, Merced Falls, Bagby, and El Portal although the latter two were no longer being used by the 1930s. There were also wyes at Merced and Moss Canyon—the latter was used daily by nearly all of the trains on the line. The YV had interchanges with the SP and ATSF in Merced.
2: This is one page of YV employee timetable No. 103, in effect for the dates that I am modeling in August 1939. Station names run down the center of the timetable along with miles from each terminal, ruling grades, and facilities at each station. Eastbound trains are to the left of the stations and are listed reading down, while the westbound trains are on the right of the stations, reading up from the bottom.
indexcontents
with a mix of freight, they also ran Pullman passenger cars dur-ing the summer months. Hence, it makes a good candidate for better understanding some of the nuances of using TT/TO with-out being overwhelmed.
Employee timetables (2) can be thought of as the “plan” for the days covered by that timetable. The YV timetable lists the arrival and departure time for each train listed as well as times for meets where needed. The “plan” assumes that every train will arrive and depart on time throughout the 24-hour day cov-ered by the timetable. However, there will inevitably be days where there are delays, needs for double-headers, and other problems. The YV also operated locals six days a week which ran as extras—these trains were not listed on the timetable but ran under the authority of train orders issued by the dis-patcher. In order to run a railroad as efficiently as possible, dis-patchers might also issue train orders to send a late-running timetable train into a siding to let another, faster moving train to pass.
Train sheetsIn order to keep track of where each train is along the line, the dispatchers used printed train sheets. On the YV, these sheets were officially labeled as “Dispatcher’s Record of Movement of Trains” and were 17″ high by 22″ wide. The basic form of the YV sheets was similar to employee timetables with sta-tions and distances listed down the center of the sheet. Just like the timetables, eastbound trains were recorded on the left side reading down, while westbound trains were recorded on the right side reading up. The dispatcher generally worked out from the center so that the earliest trains of the day were clos-est to the center of the sheet.
Getting Real Column - 3
back to previous page of text ...
indexcontentsMRH-Apr 2014
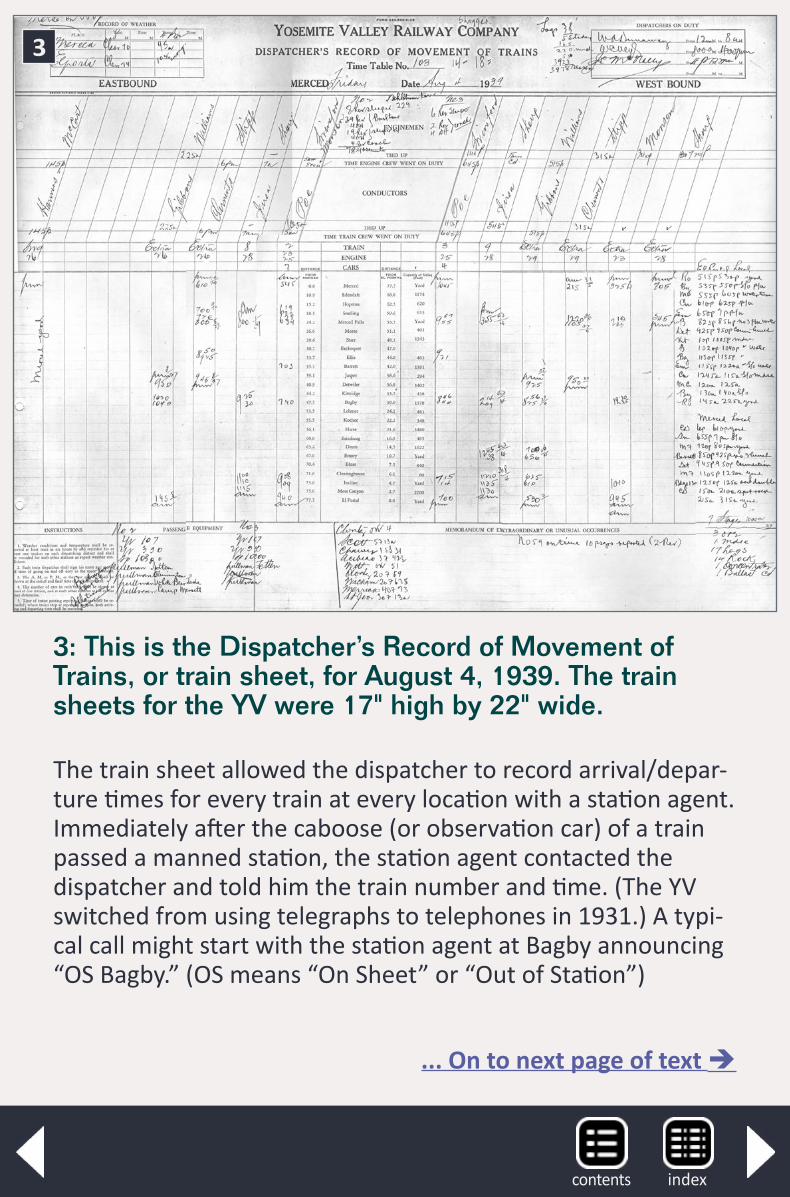
The train sheet allowed the dispatcher to record arrival/depar-ture times for every train at every location with a station agent. Immediately after the caboose (or observation car) of a train passed a manned station, the station agent contacted the dispatcher and told him the train number and time. (The YV switched from using telegraphs to telephones in 1931.) A typi-cal call might start with the station agent at Bagby announcing “OS Bagby.” (OS means “On Sheet” or “Out of Station”)
3: This is the Dispatcher’s Record of Movement of Trains, or train sheet, for August 4, 1939. The train sheets for the YV were 17" high by 22" wide.
3
... On to next page of text
indexcontents
Getting Real Column - 4
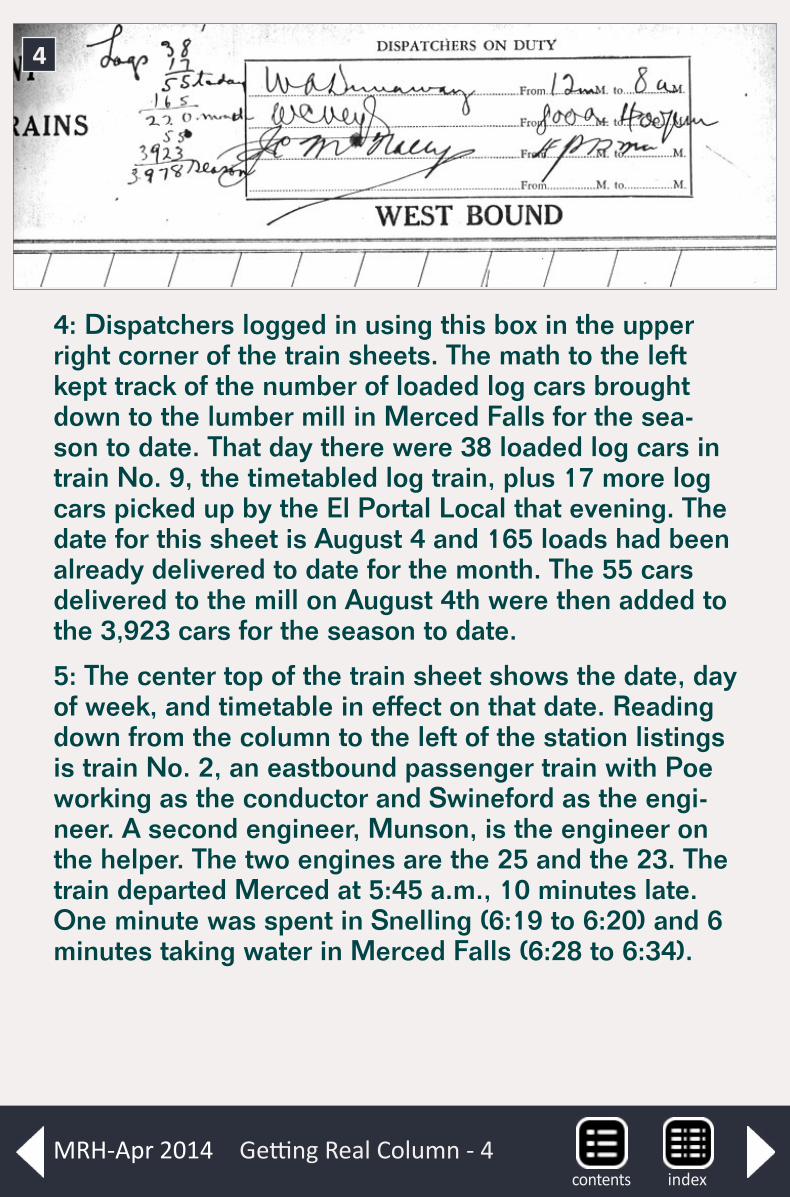
4: Dispatchers logged in using this box in the upper right corner of the train sheets. The math to the left kept track of the number of loaded log cars brought down to the lumber mill in Merced Falls for the sea-son to date. That day there were 38 loaded log cars in train No. 9, the timetabled log train, plus 17 more log cars picked up by the El Portal Local that evening. The date for this sheet is August 4 and 165 loads had been already delivered to date for the month. The 55 cars delivered to the mill on August 4th were then added to the 3,923 cars for the season to date.
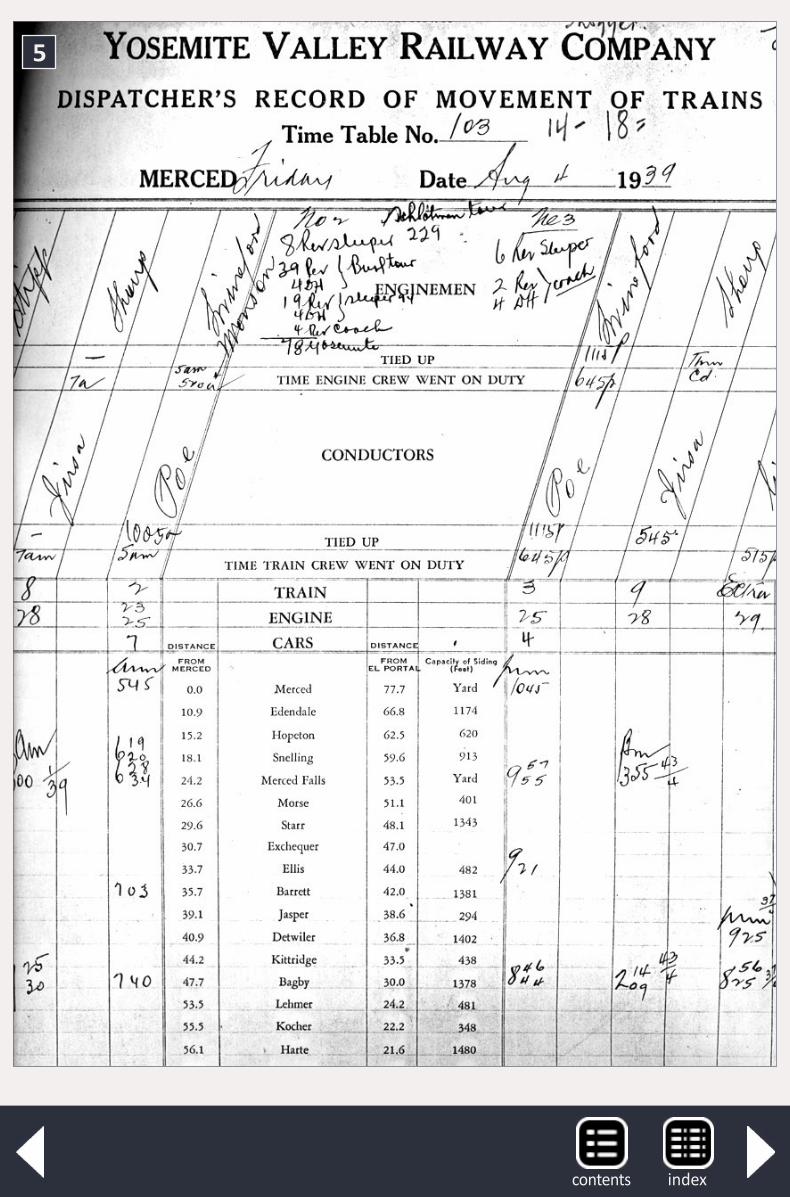
5: The center top of the train sheet shows the date, day of week, and timetable in effect on that date. Reading down from the column to the left of the station listings is train No. 2, an eastbound passenger train with Poe working as the conductor and Swineford as the engi-neer. A second engineer, Munson, is the engineer on the helper. The two engines are the 25 and the 23. The train departed Merced at 5:45 a.m., 10 minutes late. One minute was spent in Snelling (6:19 to 6:20) and 6 minutes taking water in Merced Falls (6:28 to 6:34).
4
indexcontentsMRH-Apr 2014
5
indexcontents
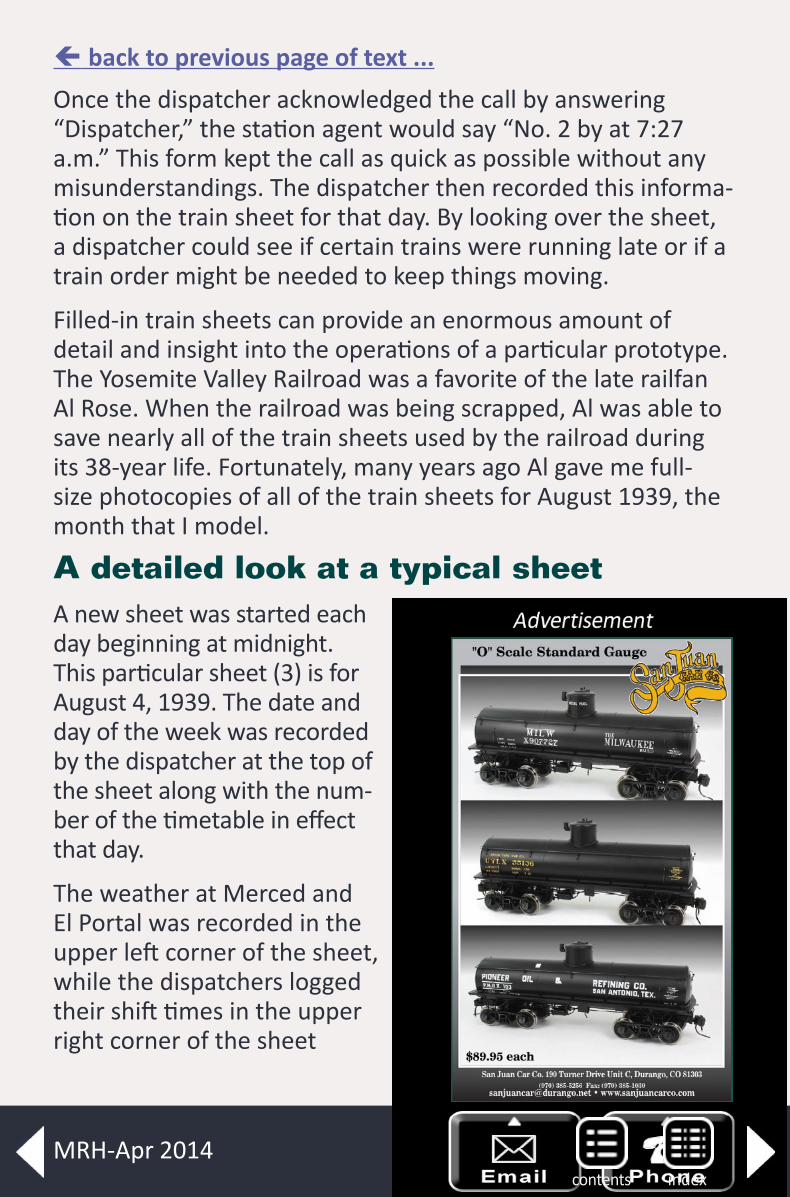
Once the dispatcher acknowledged the call by answering “Dispatcher,” the station agent would say “No. 2 by at 7:27 a.m.” This form kept the call as quick as possible without any misunderstandings. The dispatcher then recorded this informa-tion on the train sheet for that day. By looking over the sheet, a dispatcher could see if certain trains were running late or if a train order might be needed to keep things moving.
Filled-in train sheets can provide an enormous amount of detail and insight into the operations of a particular prototype. The Yosemite Valley Railroad was a favorite of the late railfan Al Rose. When the railroad was being scrapped, Al was able to save nearly all of the train sheets used by the railroad during its 38-year life. Fortunately, many years ago Al gave me full-size photocopies of all of the train sheets for August 1939, the month that I model.
A detailed look at a typical sheetA new sheet was started each day beginning at midnight. This particular sheet (3) is for August 4, 1939. The date and day of the week was recorded by the dispatcher at the top of the sheet along with the num-ber of the timetable in effect that day.
The weather at Merced and El Portal was recorded in the upper left corner of the sheet, while the dispatchers logged their shift times in the upper right corner of the sheet
back to previous page of text ...
indexcontentsMRH-Apr 2014
(4). In addition to passenger/Pullman service, the YV also ran log trains, starting in the spring when the snow melted in the mountains, until fall when the logging operations shut down for the winter. The number of log cars moved that day and for the month and season was recorded next to the “Dispatchers on Duty” box.
The center portion of the train sheet (5) lists the stations and the distance from Merced and El Portal (the two ends of the line), along with siding capacities in feet at each station. Keep in mind that there wasn’t a physical station at each “station” listed in the timetables or on the train sheets. Most of the places listed were only sidings or spurs. Space is provided to enter the names of the conductor and engineer for each train, and times that the engine crew and train crew went on duty and tied up.
Train No. 2, the eastbound passenger train, was the first train recorded on this particular day (5). As an eastbound train,
departure and arrival times for this train are recorded to the left of the station names reading down, just like the employee timetables. There are places to record the train number, engine number, and number of cars in the passen-ger trains. As shown, there were seven cars in this pas-senger train that day. This number of cars required a second engine, or double-header, with a 2-6-0 (the 26) and a 4-4-0 helper (the 23). Train No. 2 departed Merced at 5:45 (“am” is
indexcontents
Getting Real Column - 6
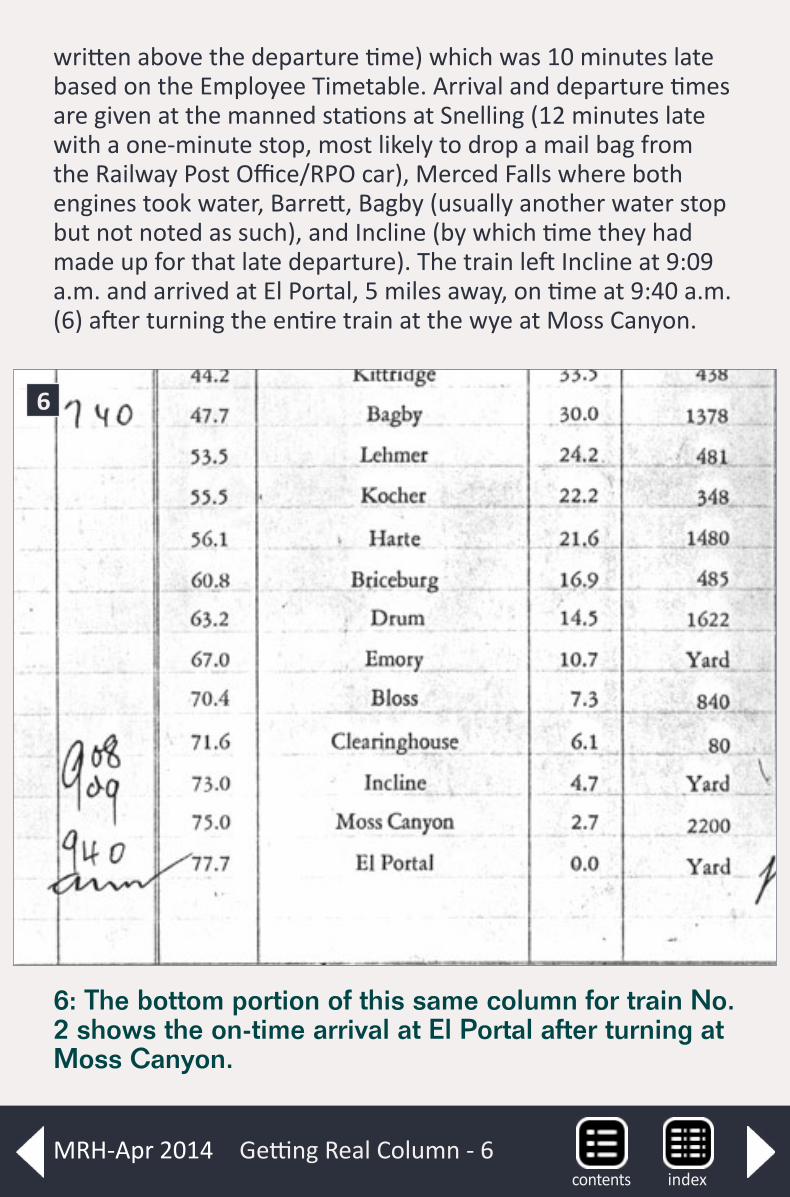
written above the departure time) which was 10 minutes late based on the Employee Timetable. Arrival and departure times are given at the manned stations at Snelling (12 minutes late with a one-minute stop, most likely to drop a mail bag from the Railway Post Office/RPO car), Merced Falls where both engines took water, Barrett, Bagby (usually another water stop but not noted as such), and Incline (by which time they had made up for that late departure). The train left Incline at 9:09 a.m. and arrived at El Portal, 5 miles away, on time at 9:40 a.m. (6) after turning the entire train at the wye at Moss Canyon.
6: The bottom portion of this same column for train No. 2 shows the on-time arrival at El Portal after turning at Moss Canyon.
6
indexcontentsMRH-Apr 2014

Backing with the observation car first into the stub-ended yard and train shed at El Portal put the passengers closer to the buses which would take them into Yosemite National Park 15 miles further east. This move also allowed at least some of the Pullmans and the leased diner to be parked in the shade during the day (7).
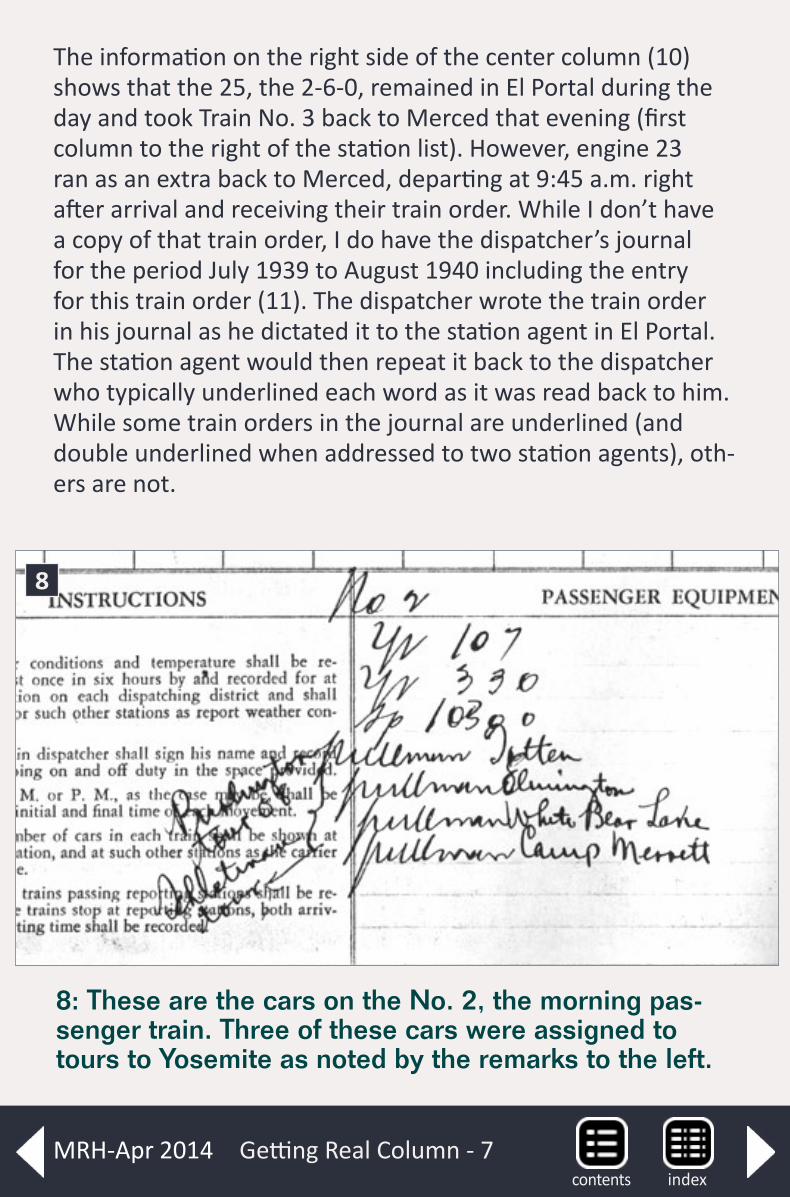
A listing of the cars in the eastbound Train No. 2 is at the bot-tom of the train sheet (8). Train No. 2 that day consisted of YV RPO 107; YV observation car 330; and leased SP diner 10300 plus the Pullmans Totten, Elmington, White Bear Lake, and Camp Merritt for a total of seven cars. Another note (9) shows that the cars on the westbound Train No. 3 were the 107, 330, diner, and the Totten.
7: YV observation car 330 is only partially under the train shed at El Portal while a Pullman and the leased diner are shaded from the summer sun. This train will depart at 7:00 p.m. that evening as train No. 3.
7
indexcontents
Getting Real Column - 7
The information on the right side of the center column (10) shows that the 25, the 2-6-0, remained in El Portal during the day and took Train No. 3 back to Merced that evening (first column to the right of the station list). However, engine 23 ran as an extra back to Merced, departing at 9:45 a.m. right after arrival and receiving their train order. While I don’t have a copy of that train order, I do have the dispatcher’s journal for the period July 1939 to August 1940 including the entry for this train order (11). The dispatcher wrote the train order in his journal as he dictated it to the station agent in El Portal. The station agent would then repeat it back to the dispatcher who typically underlined each word as it was read back to him. While some train orders in the journal are underlined (and double underlined when addressed to two station agents), oth-ers are not.
8: These are the cars on the No. 2, the morning pas-senger train. Three of these cars were assigned to tours to Yosemite as noted by the remarks to the left.
8
indexcontentsMRH-Apr 2014
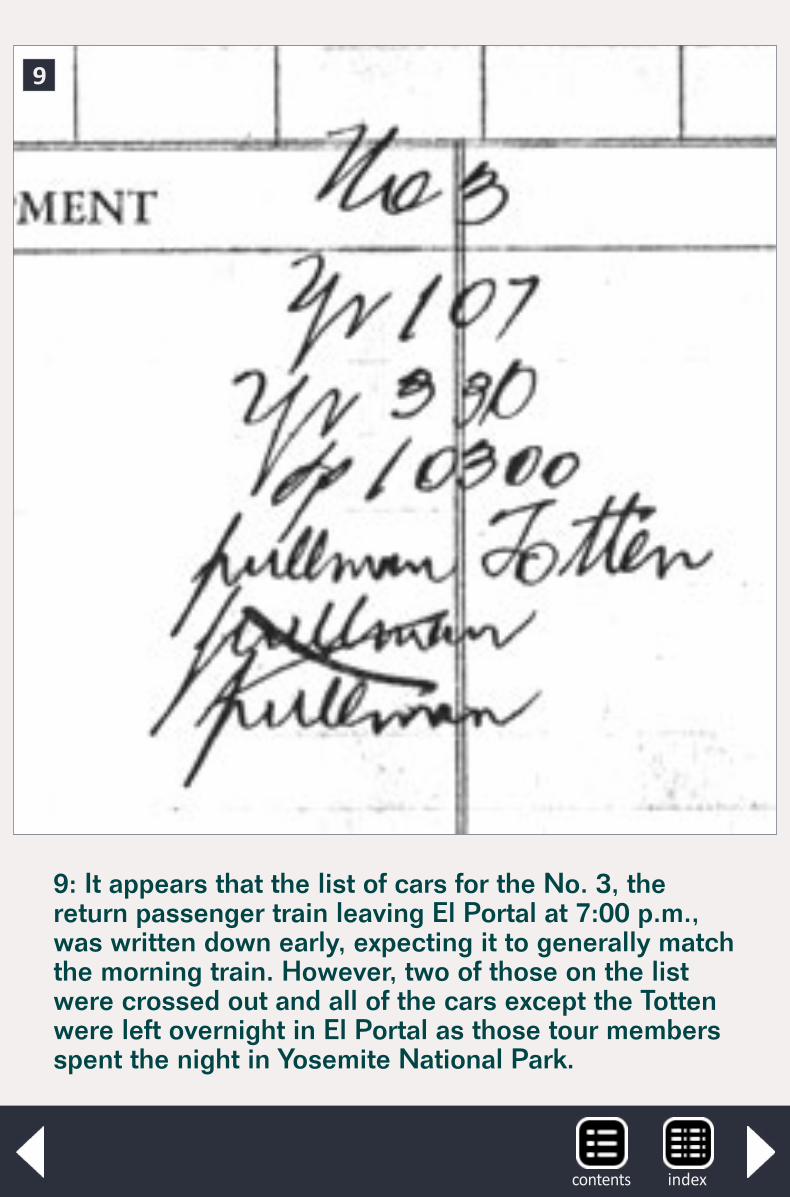
9: It appears that the list of cars for the No. 3, the return passenger train leaving El Portal at 7:00 p.m., was written down early, expecting it to generally match the morning train. However, two of those on the list were crossed out and all of the cars except the Totten were left overnight in El Portal as those tour members spent the night in Yosemite National Park.
9
indexcontents
Getting Real Column - 8
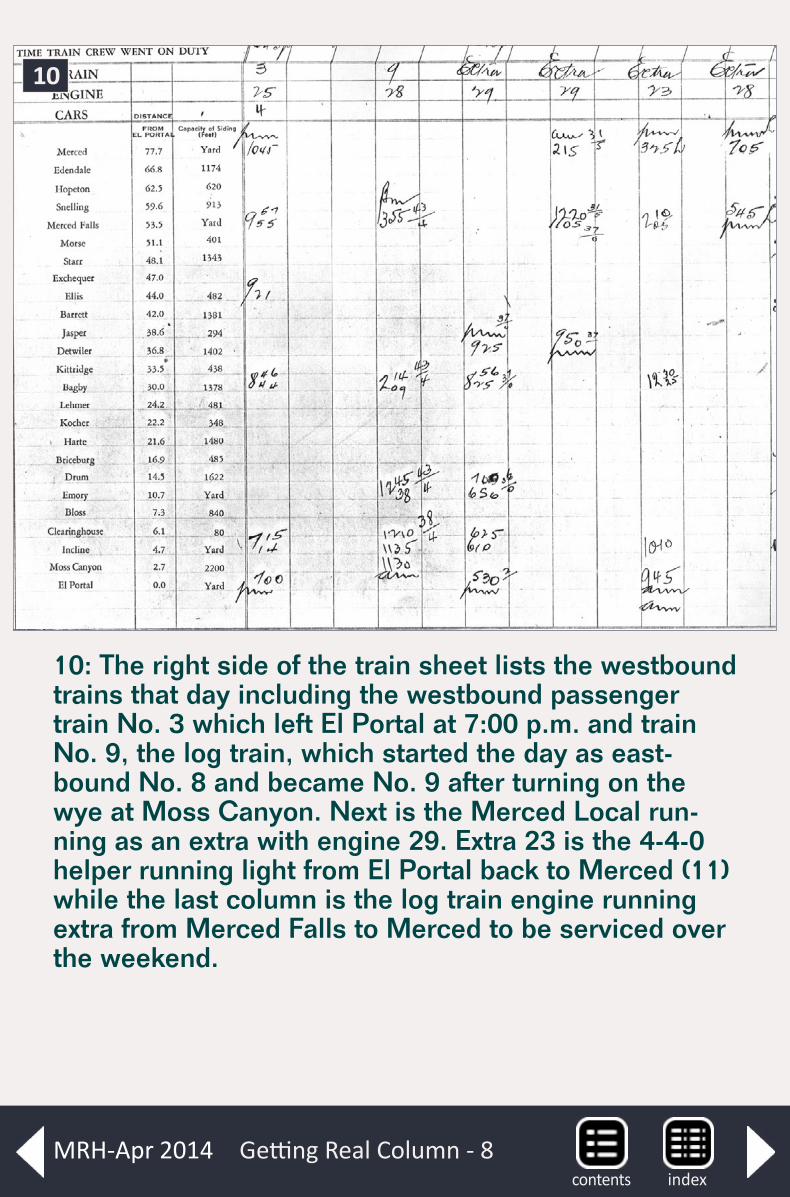
10: The right side of the train sheet lists the westbound trains that day including the westbound passenger train No. 3 which left El Portal at 7:00 p.m. and train No. 9, the log train, which started the day as east-bound No. 8 and became No. 9 after turning on the wye at Moss Canyon. Next is the Merced Local run-ning as an extra with engine 29. Extra 23 is the 4-4-0 helper running light from El Portal back to Merced (11) while the last column is the log train engine running extra from Merced Falls to Merced to be serviced over the weekend.
10
indexcontentsMRH-Apr 2014
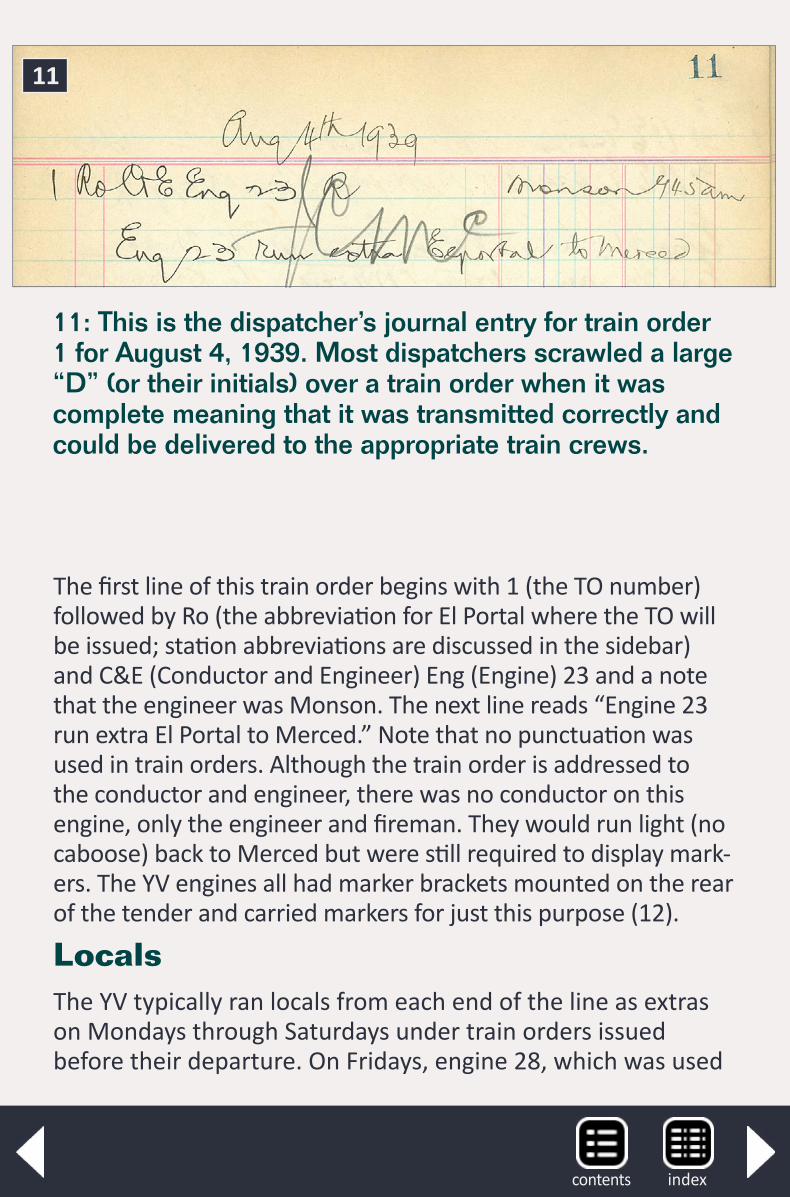
11: This is the dispatcher’s journal entry for train order 1 for August 4, 1939. Most dispatchers scrawled a large “D” (or their initials) over a train order when it was complete meaning that it was transmitted correctly and could be delivered to the appropriate train crews.
11
The first line of this train order begins with 1 (the TO number) followed by Ro (the abbreviation for El Portal where the TO will be issued; station abbreviations are discussed in the sidebar) and C&E (Conductor and Engineer) Eng (Engine) 23 and a note that the engineer was Monson. The next line reads “Engine 23 run extra El Portal to Merced.” Note that no punctuation was used in train orders. Although the train order is addressed to the conductor and engineer, there was no conductor on this engine, only the engineer and fireman. They would run light (no caboose) back to Merced but were still required to display mark-ers. The YV engines all had marker brackets mounted on the rear of the tender and carried markers for just this purpose (12).
LocalsThe YV typically ran locals from each end of the line as extras on Mondays through Saturdays under train orders issued before their departure. On Fridays, engine 28, which was used
indexcontents
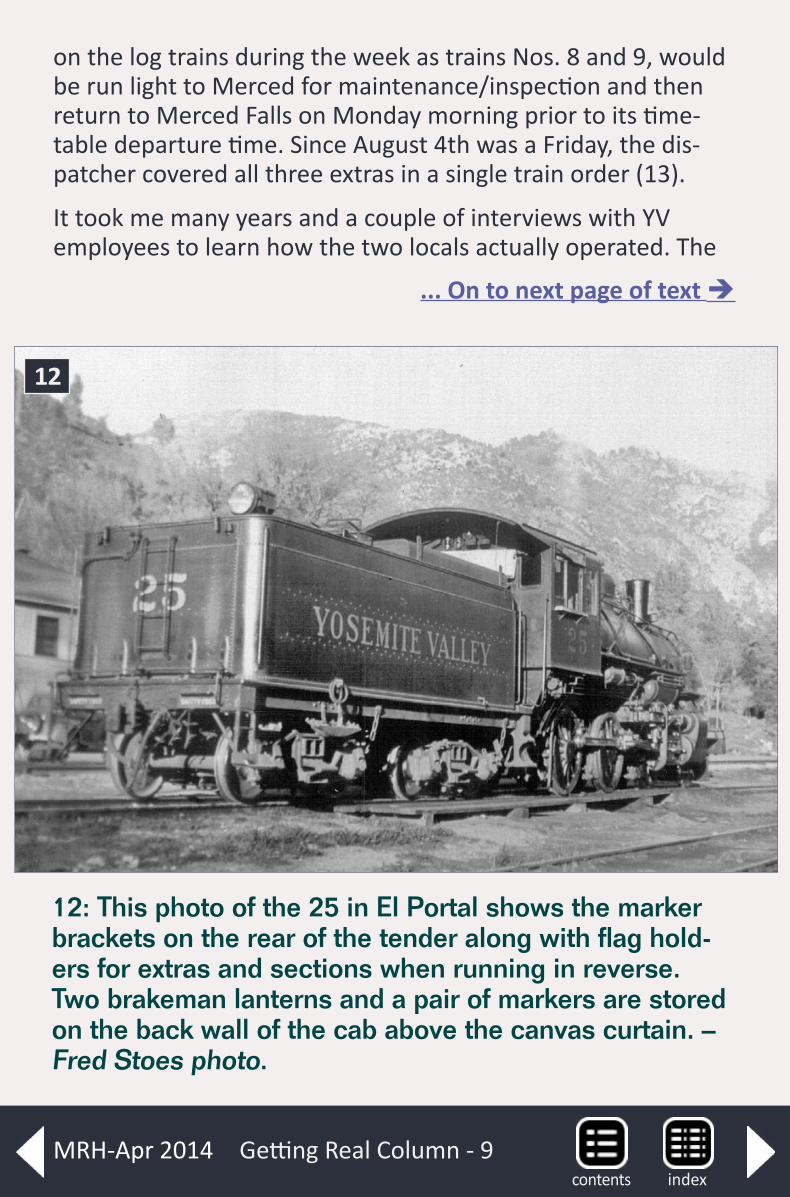
12: This photo of the 25 in El Portal shows the marker brackets on the rear of the tender along with flag hold-ers for extras and sections when running in reverse. Two brakeman lanterns and a pair of markers are stored on the back wall of the cab above the canvas curtain. – Fred Stoes photo.
12
on the log trains during the week as trains Nos. 8 and 9, would be run light to Merced for maintenance/inspection and then return to Merced Falls on Monday morning prior to its time-table departure time. Since August 4th was a Friday, the dis-patcher covered all three extras in a single train order (13).
It took me many years and a couple of interviews with YV employees to learn how the two locals actually operated. The
... On to next page of text
Getting Real Column - 9indexcontents
MRH-Apr 2014
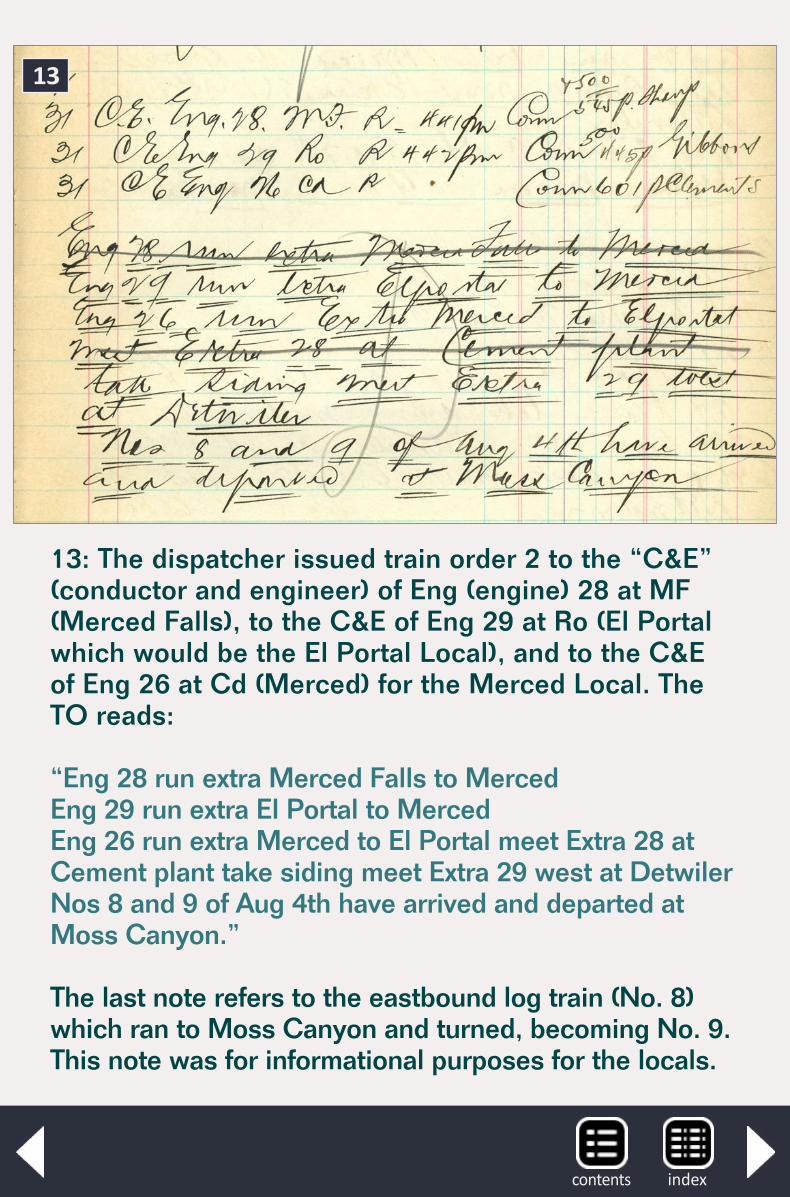
13: The dispatcher issued train order 2 to the “C&E” (conductor and engineer) of Eng (engine) 28 at MF (Merced Falls), to the C&E of Eng 29 at Ro (El Portal which would be the El Portal Local), and to the C&E of Eng 26 at Cd (Merced) for the Merced Local. The TO reads:
“Eng 28 run extra Merced Falls to Merced Eng 29 run extra El Portal to Merced Eng 26 run extra Merced to El Portal meet Extra 28 at Cement plant take siding meet Extra 29 west at Detwiler Nos 8 and 9 of Aug 4th have arrived and departed at Moss Canyon.”
The last note refers to the eastbound log train (No. 8) which ran to Moss Canyon and turned, becoming No. 9. This note was for informational purposes for the locals.
13
indexcontents
14
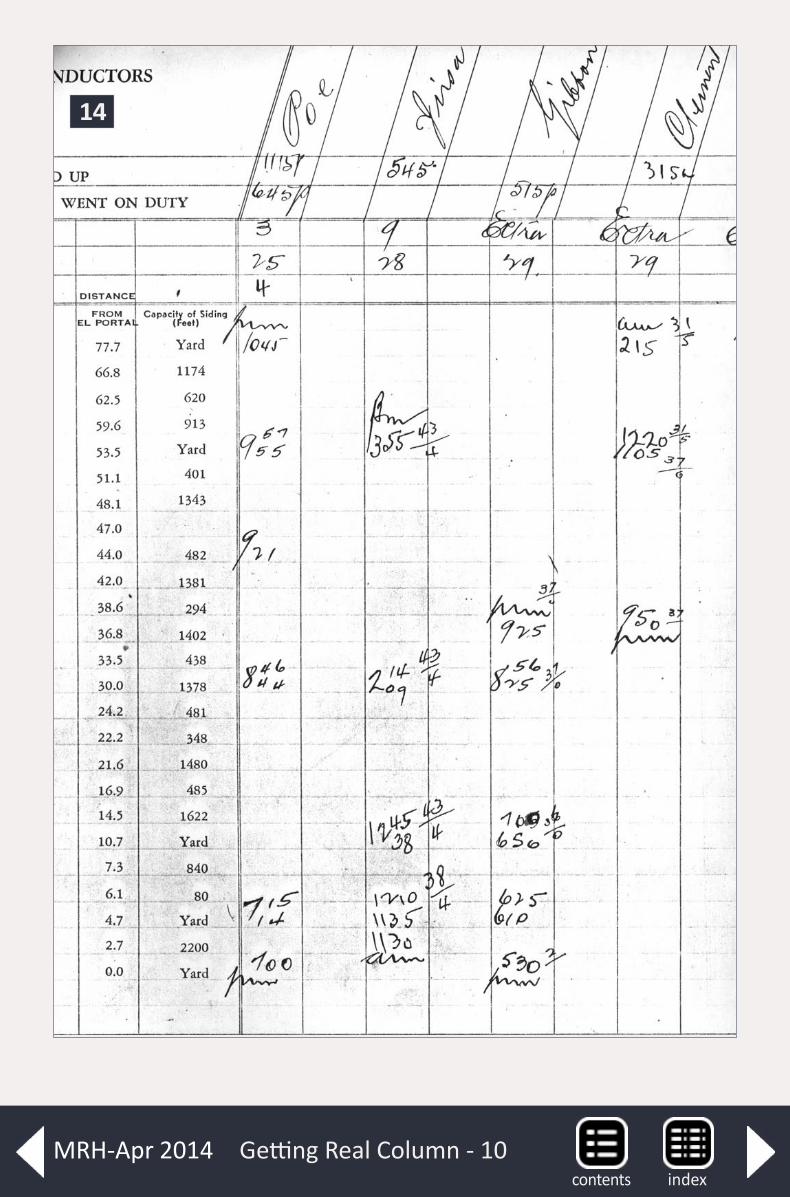
Getting Real Column - 10indexcontents
MRH-Apr 2014
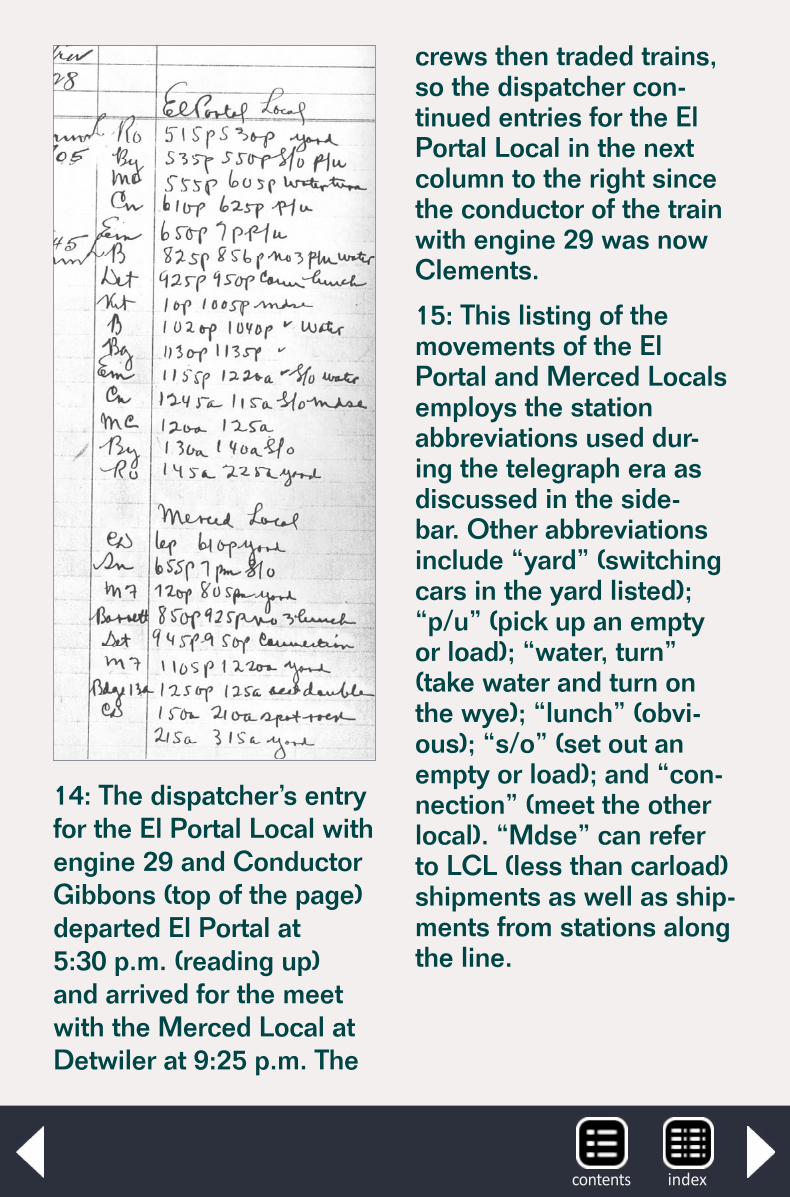
14: The dispatcher’s entry for the El Portal Local with engine 29 and Conductor Gibbons (top of the page) departed El Portal at 5:30 p.m. (reading up) and arrived for the meet with the Merced Local at Detwiler at 9:25 p.m. The
crews then traded trains, so the dispatcher con-tinued entries for the El Portal Local in the next column to the right since the conductor of the train with engine 29 was now Clements.
15: This listing of the movements of the El Portal and Merced Locals employs the station abbreviations used dur-ing the telegraph era as discussed in the side-bar. Other abbreviations include “yard” (switching cars in the yard listed); “p/u” (pick up an empty or load); “water, turn” (take water and turn on the wye); “lunch” (obvi-ous); “s/o” (set out an empty or load); and “con-nection” (meet the other local). “Mdse” can refer to LCL (less than carload) shipments as well as ship-ments from stations along the line.
indexcontents
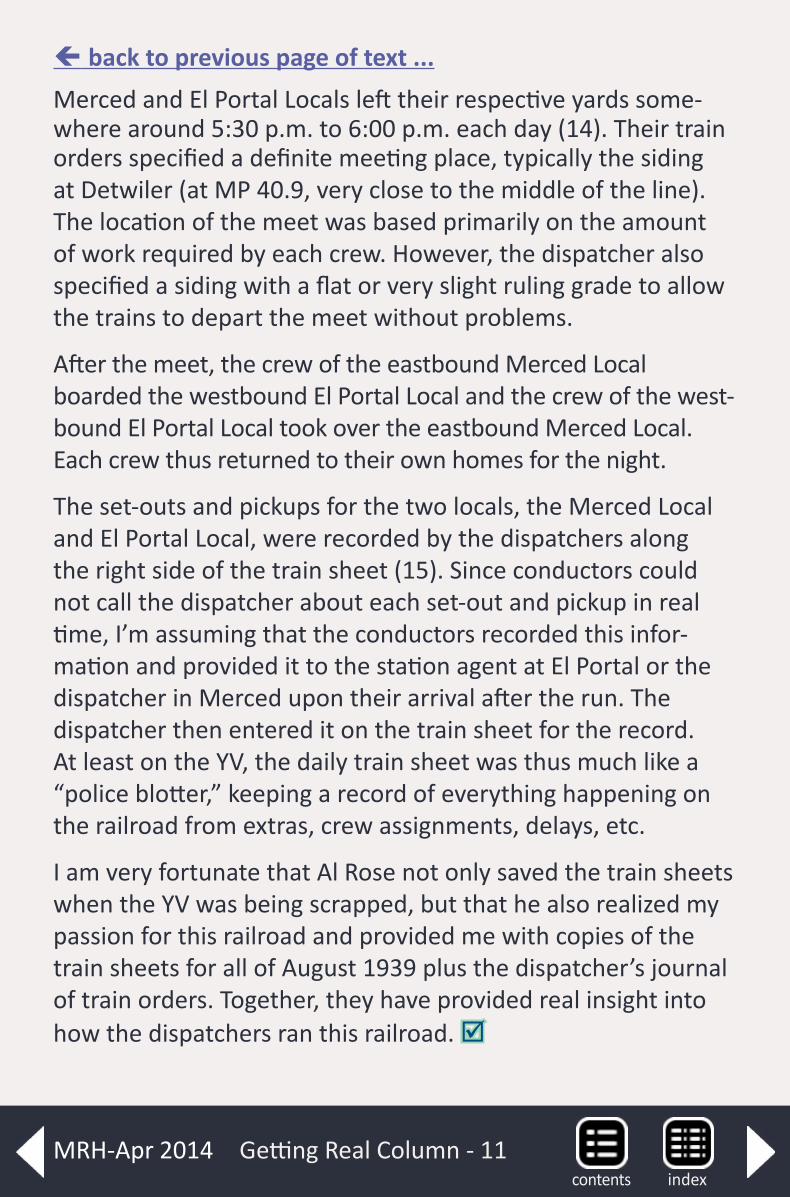
Merced and El Portal Locals left their respective yards some-where around 5:30 p.m. to 6:00 p.m. each day (14). Their train orders specified a definite meeting place, typically the siding at Detwiler (at MP 40.9, very close to the middle of the line). The location of the meet was based primarily on the amount of work required by each crew. However, the dispatcher also specified a siding with a flat or very slight ruling grade to allow the trains to depart the meet without problems.
After the meet, the crew of the eastbound Merced Local boarded the westbound El Portal Local and the crew of the west-bound El Portal Local took over the eastbound Merced Local. Each crew thus returned to their own homes for the night.
The set-outs and pickups for the two locals, the Merced Local and El Portal Local, were recorded by the dispatchers along the right side of the train sheet (15). Since conductors could not call the dispatcher about each set-out and pickup in real time, I’m assuming that the conductors recorded this infor-mation and provided it to the station agent at El Portal or the dispatcher in Merced upon their arrival after the run. The dispatcher then entered it on the train sheet for the record. At least on the YV, the daily train sheet was thus much like a “police blotter,” keeping a record of everything happening on the railroad from extras, crew assignments, delays, etc.
I am very fortunate that Al Rose not only saved the train sheets when the YV was being scrapped, but that he also realized my passion for this railroad and provided me with copies of the train sheets for all of August 1939 plus the dispatcher’s journal of train orders. Together, they have provided real insight into how the dispatchers ran this railroad.
back to previous page of text ...
Getting Real Column - 11indexcontents
MRH-Apr 2014
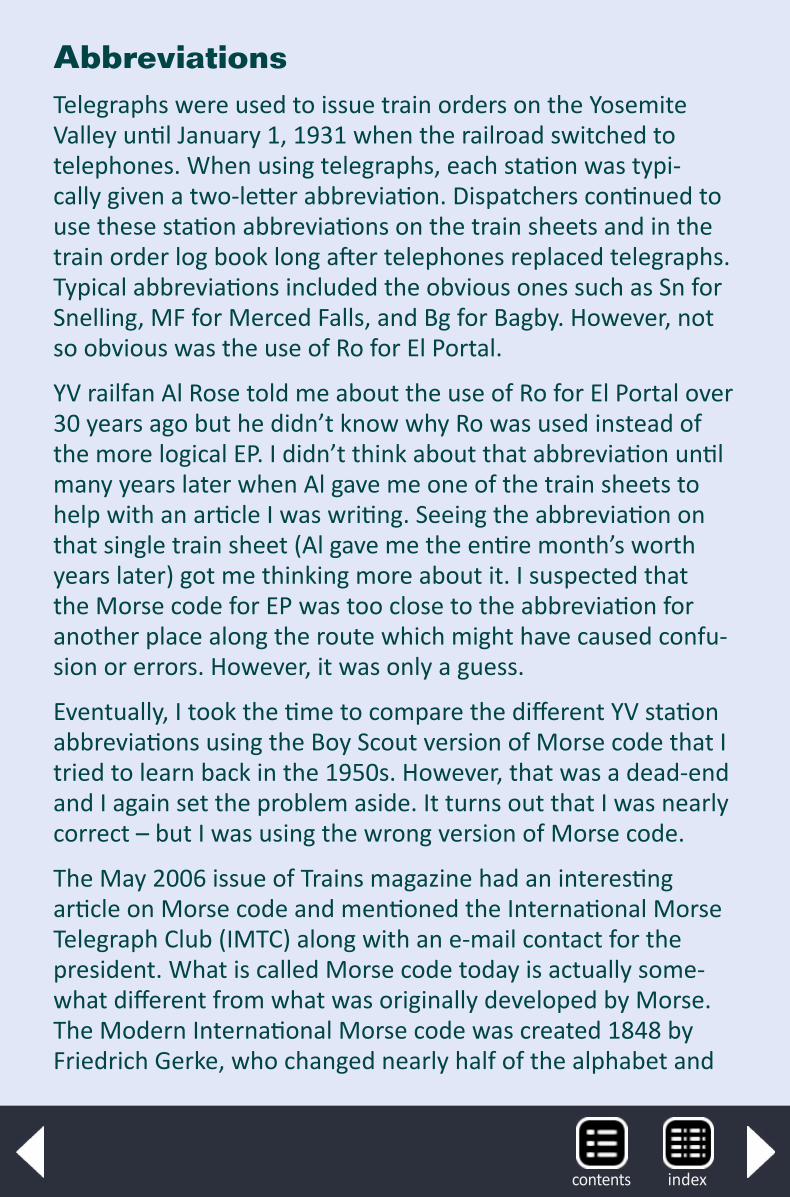
Abbreviations Telegraphs were used to issue train orders on the Yosemite Valley until January 1, 1931 when the railroad switched to telephones. When using telegraphs, each station was typi-cally given a two-letter abbreviation. Dispatchers continued to use these station abbreviations on the train sheets and in the train order log book long after telephones replaced telegraphs. Typical abbreviations included the obvious ones such as Sn for Snelling, MF for Merced Falls, and Bg for Bagby. However, not so obvious was the use of Ro for El Portal.
YV railfan Al Rose told me about the use of Ro for El Portal over 30 years ago but he didn’t know why Ro was used instead of the more logical EP. I didn’t think about that abbreviation until many years later when Al gave me one of the train sheets to help with an article I was writing. Seeing the abbreviation on that single train sheet (Al gave me the entire month’s worth years later) got me thinking more about it. I suspected that the Morse code for EP was too close to the abbreviation for another place along the route which might have caused confu-sion or errors. However, it was only a guess.
Eventually, I took the time to compare the different YV station abbreviations using the Boy Scout version of Morse code that I tried to learn back in the 1950s. However, that was a dead-end and I again set the problem aside. It turns out that I was nearly correct – but I was using the wrong version of Morse code.
The May 2006 issue of Trains magazine had an interesting article on Morse code and mentioned the International Morse Telegraph Club (IMTC) along with an e-mail contact for the president. What is called Morse code today is actually some-what different from what was originally developed by Morse. The Modern International Morse code was created 1848 by Friedrich Gerke, who changed nearly half of the alphabet and
indexcontents
all of the numerals. The Gerke version of Morse code was even-tually standardized in 1865. It was this version of Morse code that was being used by the YV dispatcher and station agents.
From correspondence with the IMTC president and another member/operator I learned that, with International Morse Code, “EP” would have been one dot (for the E) followed by five dots (for the P). Transmitting five dots and then one dot in Morse code could have been misinterpreted as the number “6”, which is six dots.
These IMTC members told me that the assignment of Morse office station calls (normally just one or two letters since numer-als were not often used) was normally made by some abbrevia-tion or combination of letters that were in the station’s name. Usually these letters would give a clue to the station name.
According to these members, two of the letters in the words “El Portal” such as “Or” could have been used to avoid using “EP”. They felt that someone just picked Or and simply reversed it, resulting in “Ro”. I think that “Or” might have been confused with the word “or” but maybe someone just thought “Ro” sounded better.
YV dispatchers also used some three letter station names such as “Det” for Detwiler, an often-used meeting siding for the locals. The IMTC members were of the opinion that no one ever used three letter station names. However, these sidings were not actual station locations and the dispatchers just used the most logical abbreviations for them on train sheets and in their train order journals.
ReaderFeedback
(click here)
Abbreviations Continued ...
Getting Real Column - 12indexcontents
MRH-Apr 2014

indexcontents
indexcontentsMRH-Apr 2014

indexcontents
House Ad
indexcontentsMRH-Apr 2014
Jeff and Ken collaboratePhotos and video of superb models
What’s neat column - 1
What’s neat this week columnby Ken Patterson
ReaderFeedback
(click here)
1
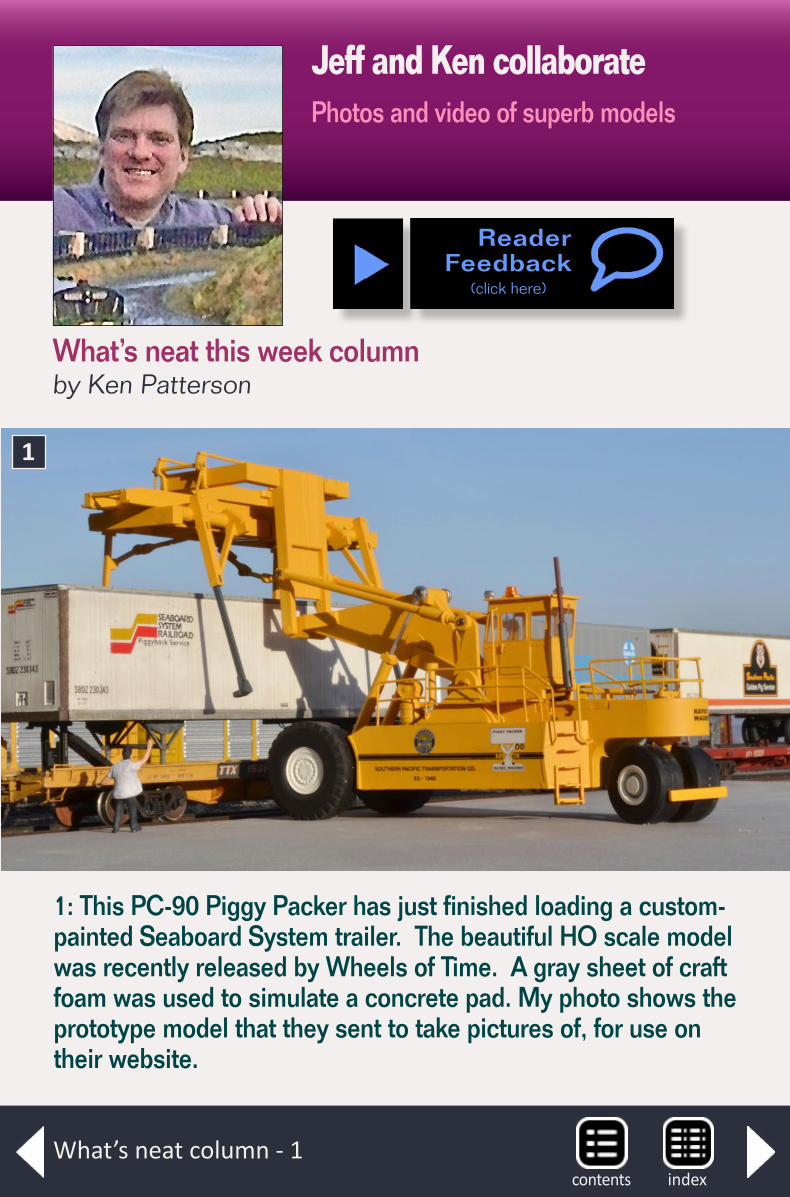
1: This PC-90 Piggy Packer has just finished loading a custom-painted Seaboard System trailer. The beautiful HO scale model was recently released by Wheels of Time. A gray sheet of craft foam was used to simulate a concrete pad. My photo shows the prototype model that they sent to take pictures of, for use on their website.
indexcontents

It’s spring, and this month we celebrate the hints of spring. The snow and deep freeze winter is over and the flowers are in bloom. Throw in some garden railroading and that is
the opening scene for this month’s videos.
As I mentioned to Scotty Mason the other day, my column is all about the video, not just the still text and photos here. Yes, there’s still an article, but that is old hat. Moving video is where the new modeling tricks are, along with showing modeled spe-cial effects that you simply cannot display with a still article and text alone.
This month’s video features the photography efforts of Jeff Meyer. Jeff has been coming around each month for two years shooting photos for theweatheringshop.com.
Playback problems? Click to try a different version.
... On to next page of text
What’s neat column - 2indexcontents
MRH-Apr 2014
indexcontents
What’s neat column - 3
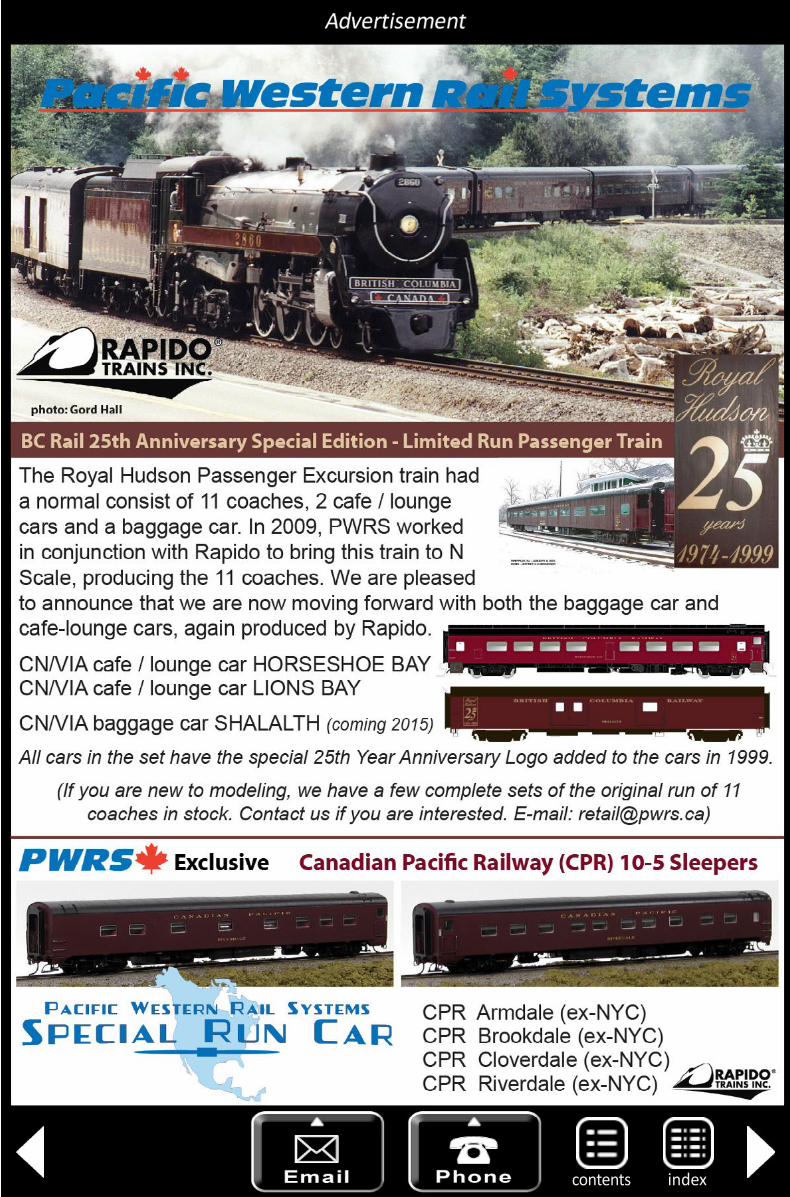
3: A Red Caboose coil car is re-detailed with new brake rig-ging, grab irons, pin lifters, air hoses and Sergent couplers. The hoods are heavily faded using an airbrush and white oil paints. The rest of the weathering is done by hand with oil paints and powders, to closely match prototype photos.
3
The thing about Jeff is he will try any diorama in any weather conditions to shoot his stills!
There are also a few Athearn shoots, with their latest offer-ings on full sunny display. I have included four of those finished photos here.
Jeff Meyer wrote the captions for his photos, so in his own words I give you Jeff describing this month’s still photos.
Please use the feedback button to let me know how you like these columns. If I don’t hear from you, I can only assume you don’t find these columns inspiring, so please comment!
back to previous page of text ...
indexcontentsMRH-Apr 2014
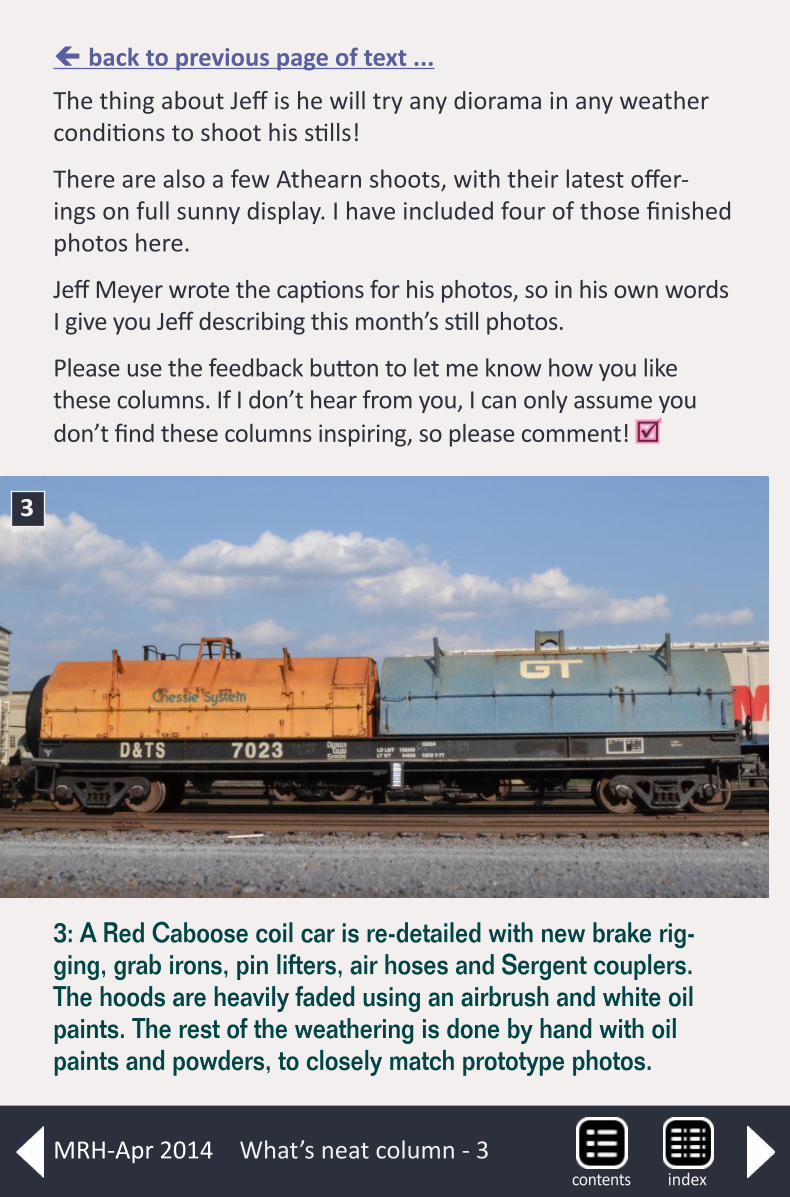
4: Jeff modified an Athearn 40’ exterior post trailer to become this Campbell 66 Express model. The decals for this trailer are from Weathering Solutions. Some light weathering com-pletes this eye-catching piece.
4
ReaderFeedback
(click here)
indexcontents
What’s neat column - 4
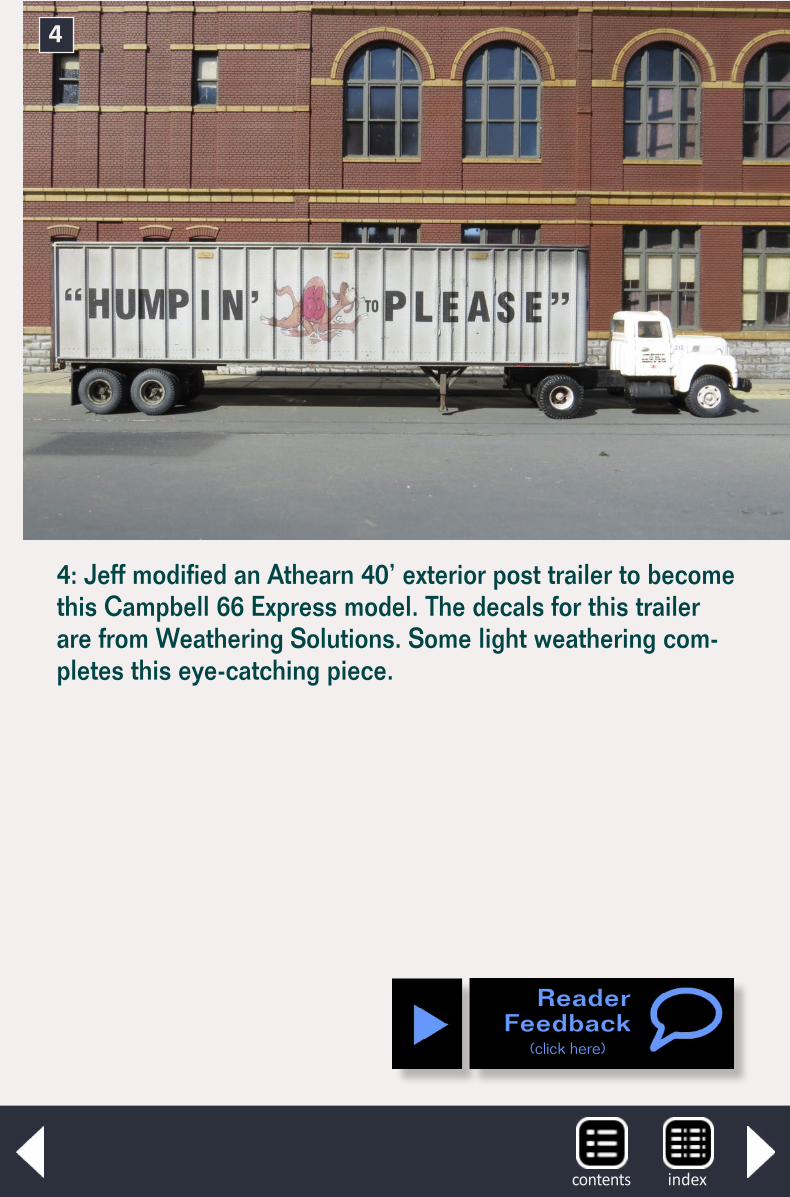
5: Ken Patterson talks about the remaining photos, for Athearn and Bachmann ads. Samples of Athearn’s Southern Pacific SDP45 units showed up while we were shooting something on Jeff’s yard module. With the UPS guy standing there, we opened the boxes and made some test shots of the models just moments after their arrival. Jeff’s diorama looks so good folks thought we superimposed real track under the models. Yeah, Jeff’s track looks that good. The first shots ended up running in the ad. Watch the video, as this whole episode takes place live as you are there on the bluff with us for the shoot.
5
indexcontentsMRH-Apr 2014
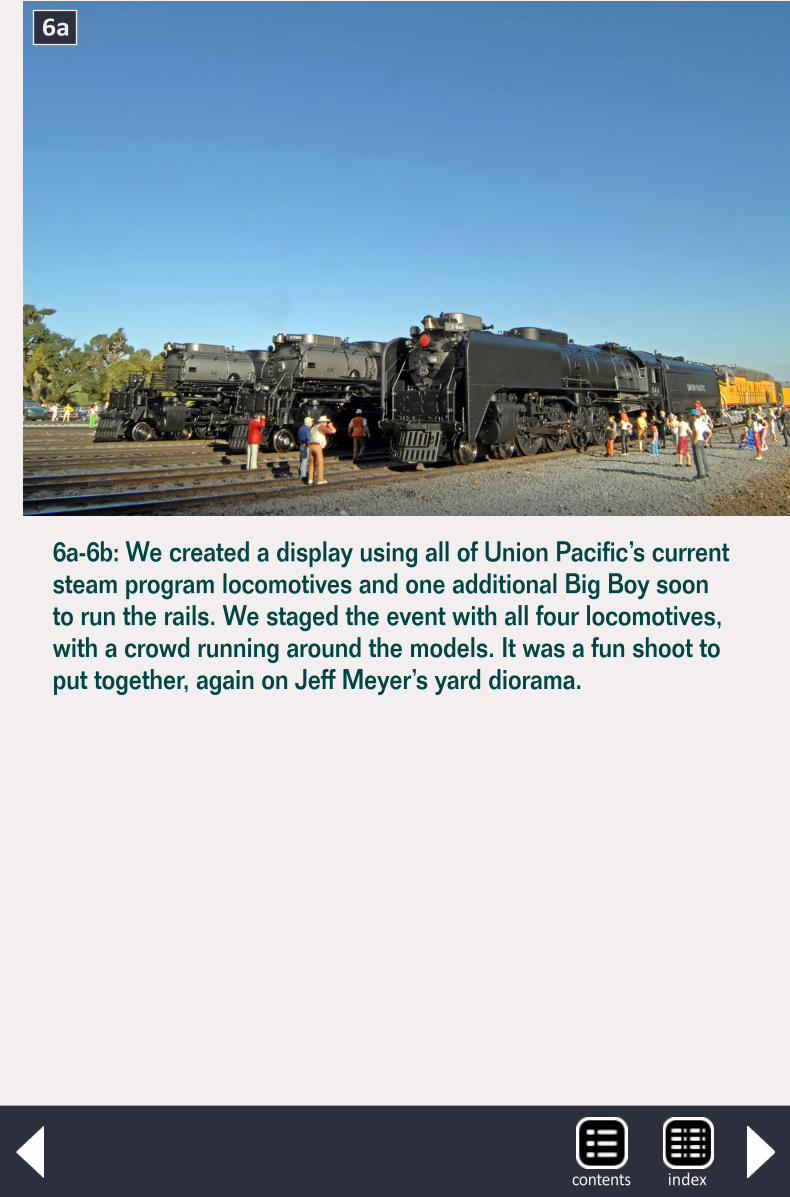
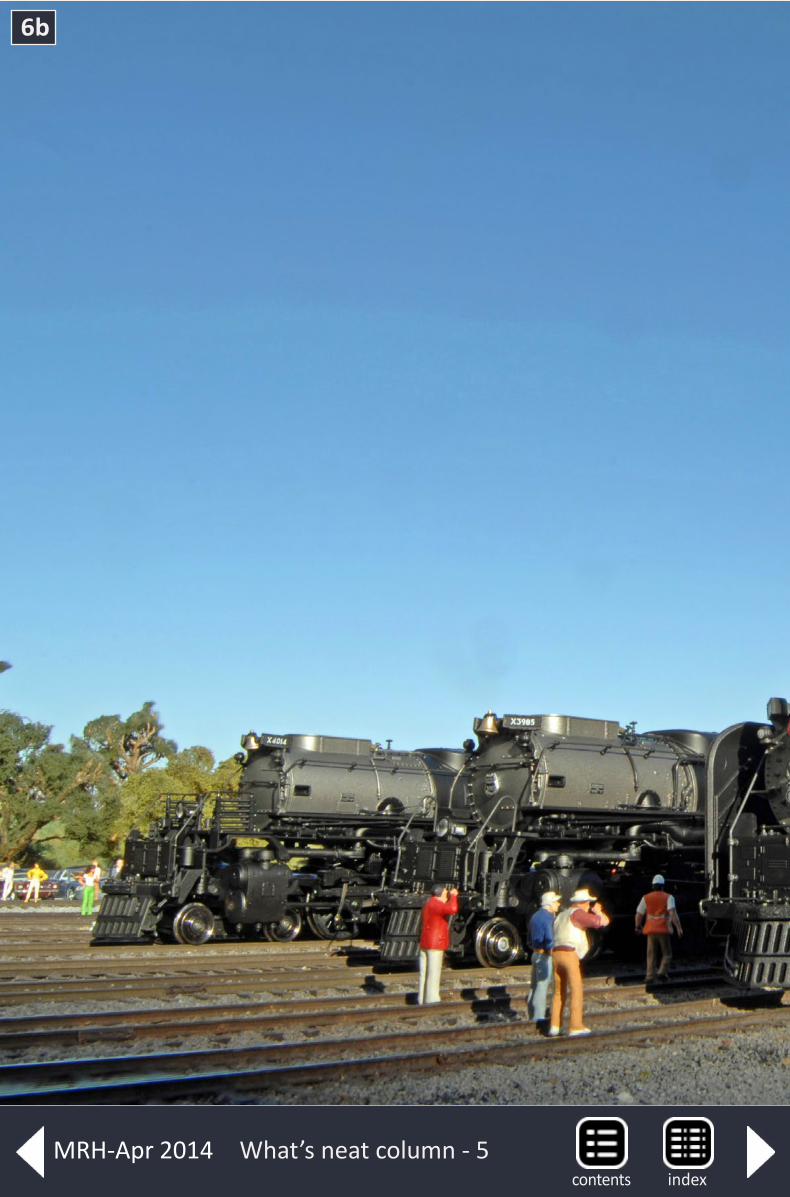
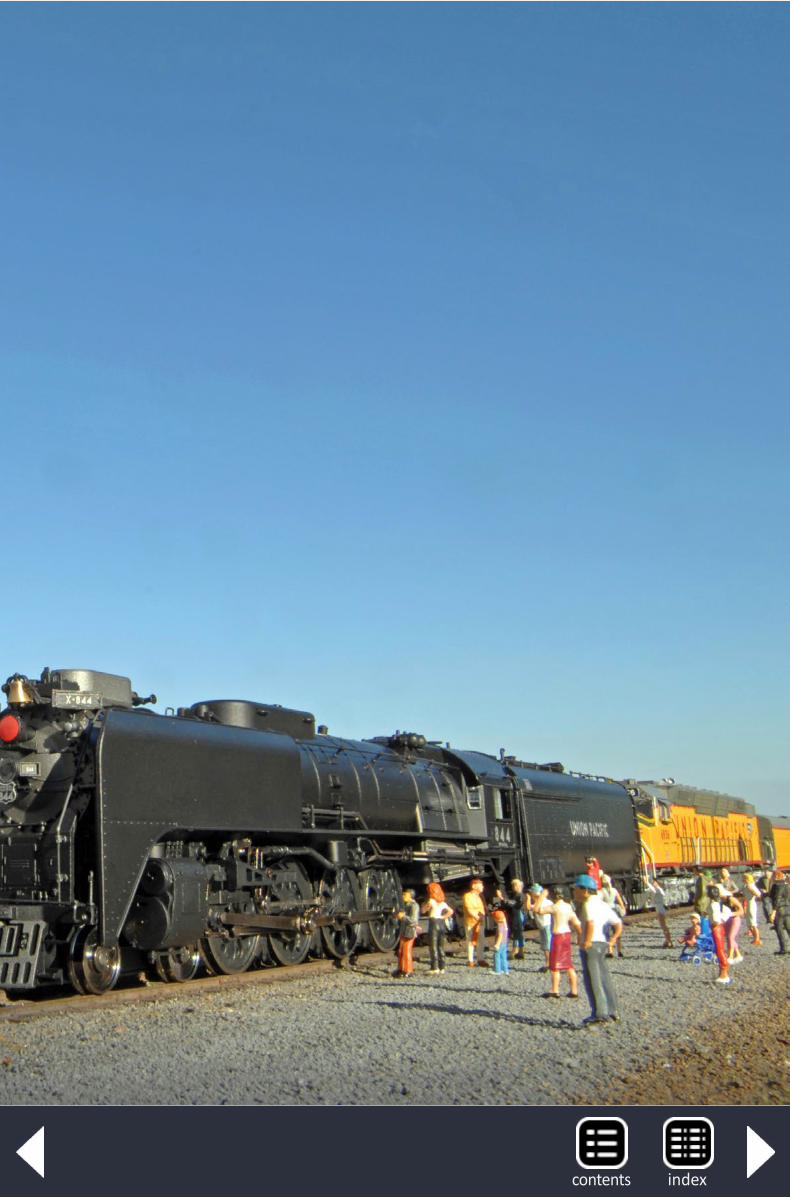
6a-6b: We created a display using all of Union Pacific’s current steam program locomotives and one additional Big Boy soon to run the rails. We staged the event with all four locomotives, with a crowd running around the models. It was a fun shoot to put together, again on Jeff Meyer’s yard diorama.
6a
indexcontents
What’s neat column - 5
6b
indexcontentsMRH-Apr 2014
indexcontents
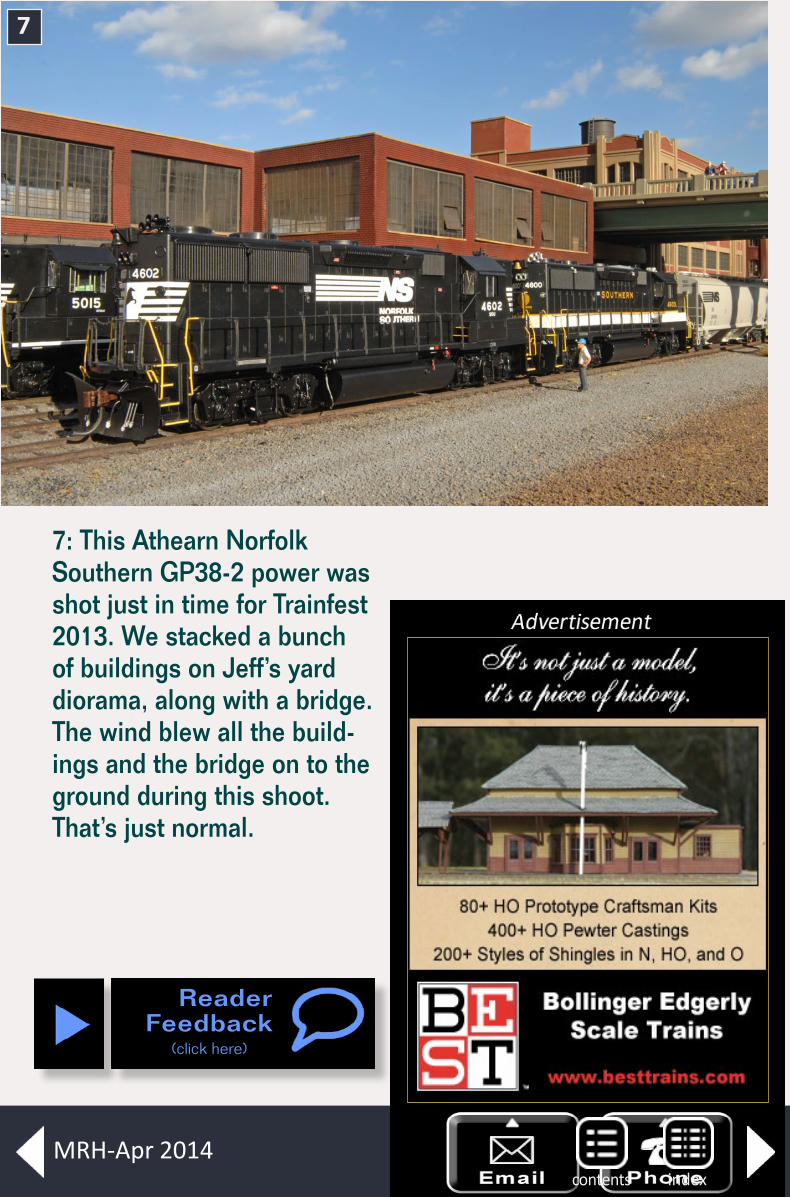
7: This Athearn Norfolk Southern GP38-2 power was shot just in time for Trainfest 2013. We stacked a bunch of buildings on Jeff’s yard diorama, along with a bridge. The wind blew all the build-ings and the bridge on to the ground during this shoot. That’s just normal.
7
ReaderFeedback
(click here)
indexcontentsMRH-Apr 2014
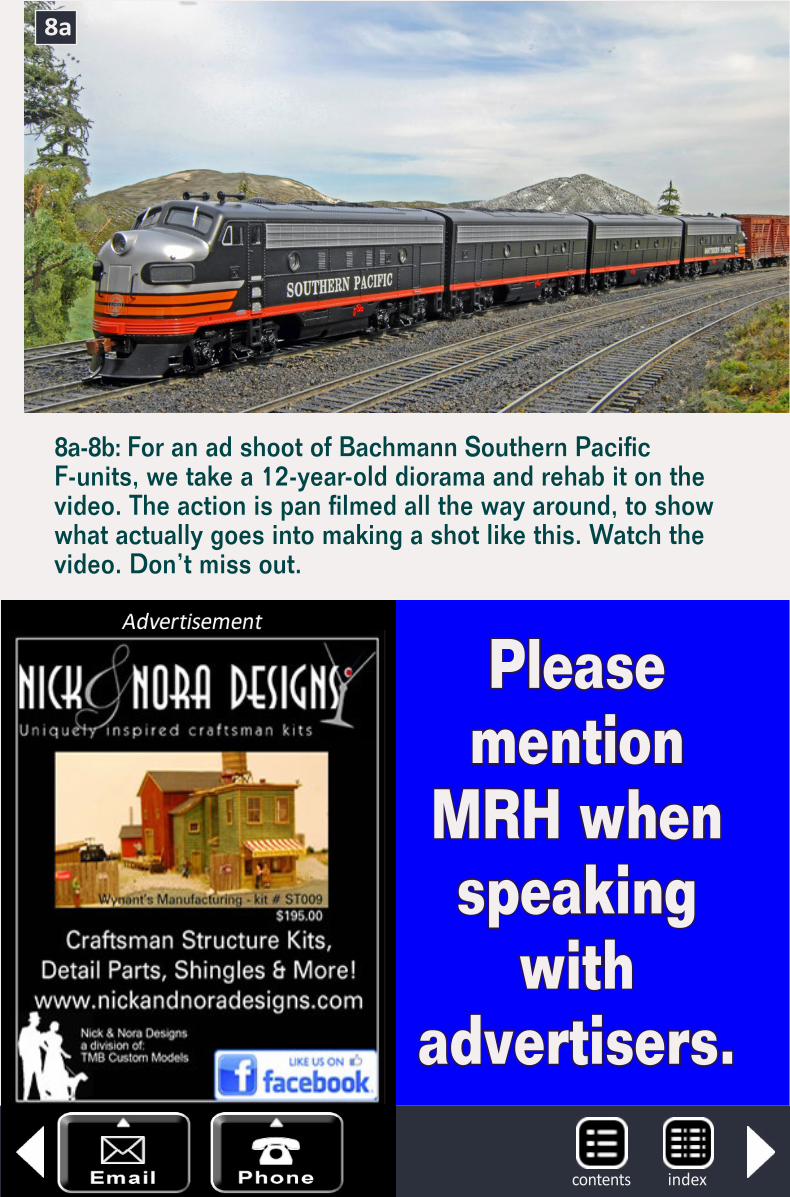
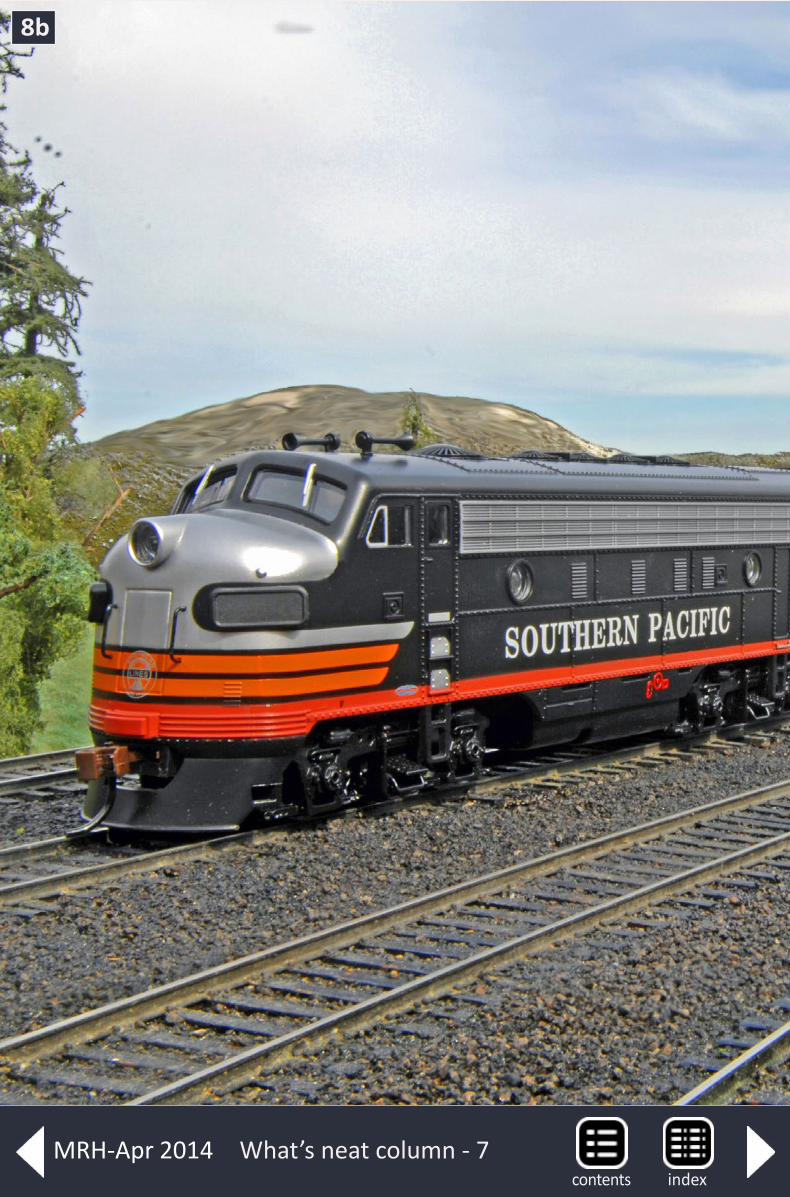
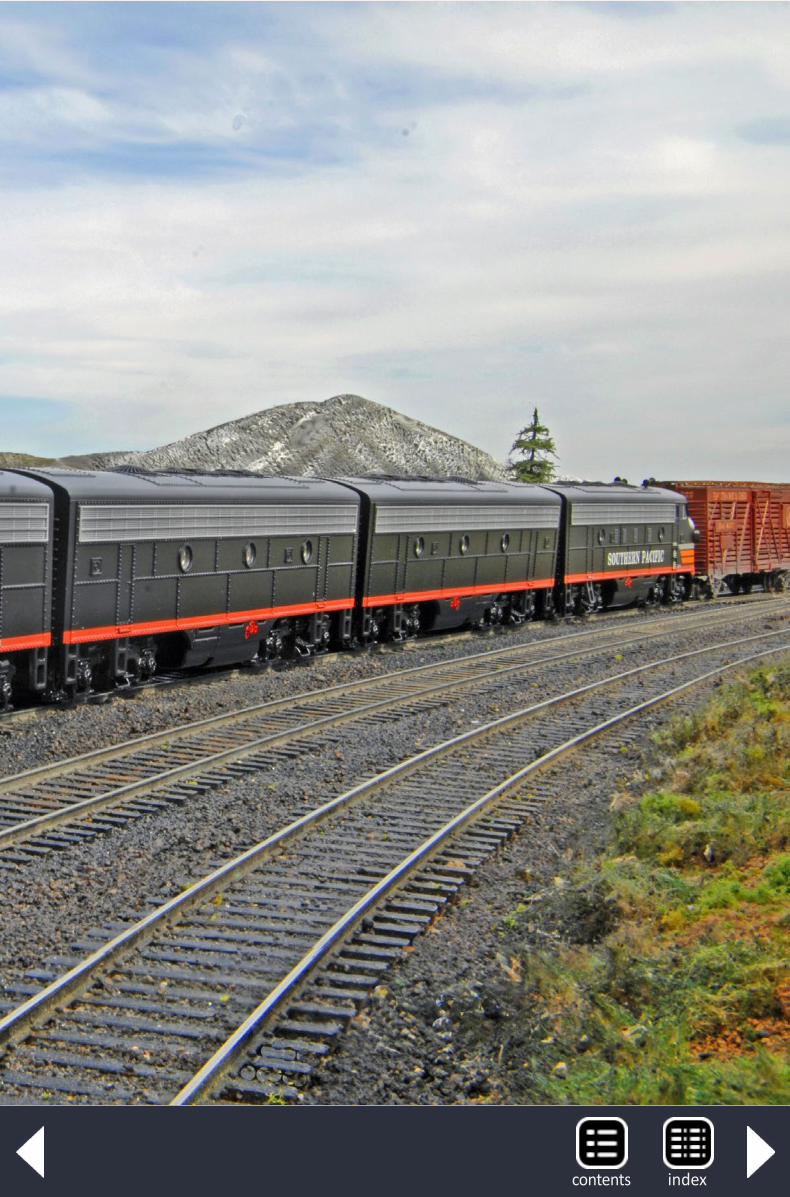
8a-8b: For an ad shoot of Bachmann Southern Pacific F-units, we take a 12-year-old diorama and rehab it on the video. The action is pan filmed all the way around, to show what actually goes into making a shot like this. Watch the video. Don’t miss out.
8a
Please mention
MRH when speaking
with advertisers.
indexcontents
8b
What’s neat column - 7indexcontents
MRH-Apr 2014
indexcontents
indexcontentsMRH-Apr 2014
indexcontents
MRH Hobby Marketplace - 1
MRH Hobby Marketplace - 1
Hobby Marketplace
ads are economical and
effective. Click HERE to learn more.
indexcontentsMRH-Apr 2014

contentsMRH Hobby Marketplace - 2
MRH Hobby Marketplace - 2
Get your large text ad here in this space!
Ordinary text ads are limited to 100 characters, but if you’d like to do a double-text-ad, we’ll give you 375 characters. (This ad here had right
at 364 characters.)
If you have more you’d like to say, then a double-text-ad is a superb, very affordable way to say it. Place your double-text-ad with us today
and start getting the word out to our audience of over 110,000 unique device views per month!
RULERS-of-the-WORLDScale Rulers $4 each
Over 150 scales!Metric or Imperial
www.rulers-of-the-world.com
Railroads Done Right! click HERE to learn more
Rail Design Services
indexcontents
MRH Hobby Marketplace - 3
MRH Hobby Marketplace - 3
Can’t remember which cars you’ve bought? Yard Boss
Model Train Inventory Software from DCC by Design
Under $15 Download free trial now
www.dccbydesign.com
indexcontentsMRH-Apr 2014

MRH Hobby Marketplace - 4
MRH Hobby Marketplace - 4
Your ad could be in this space for just $55 a month.Click to learn more ...
indexcontents
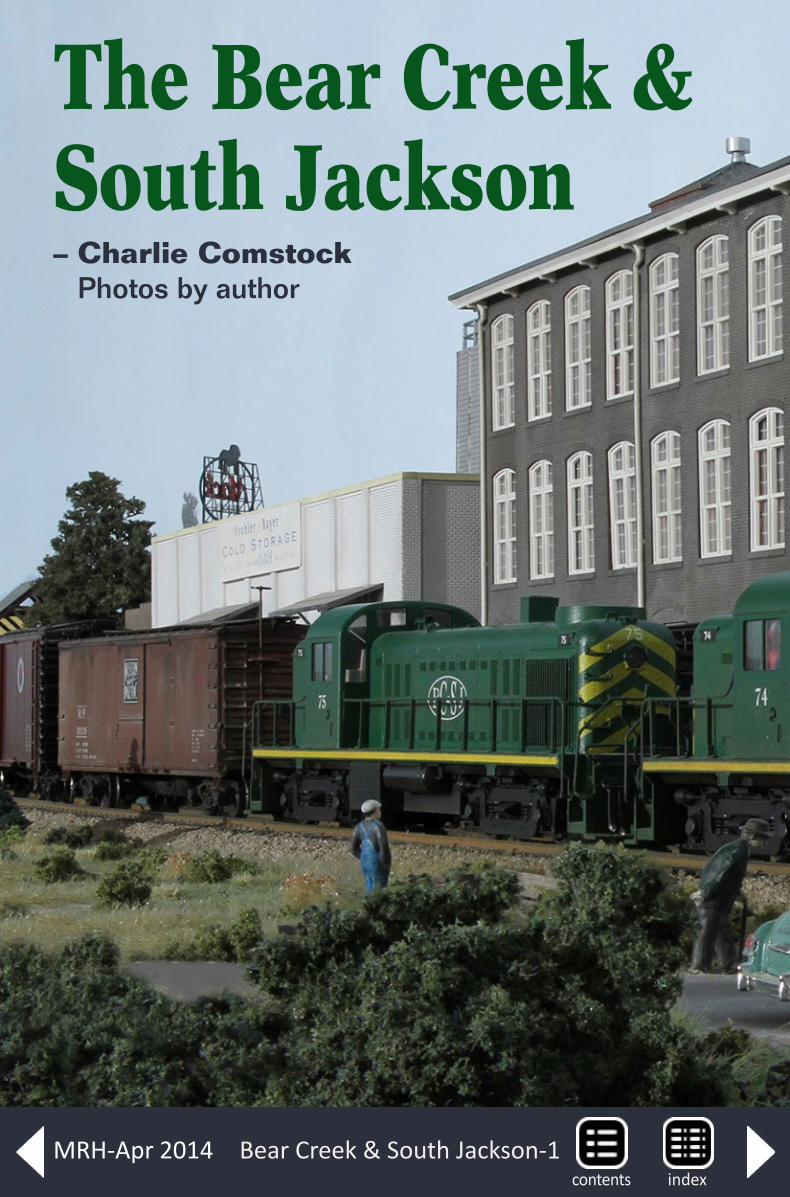
The Bear Creek & South Jackson– Charlie Comstock Photos by author
Bear Creek & South Jackson-1indexcontents
MRH-Apr 2014
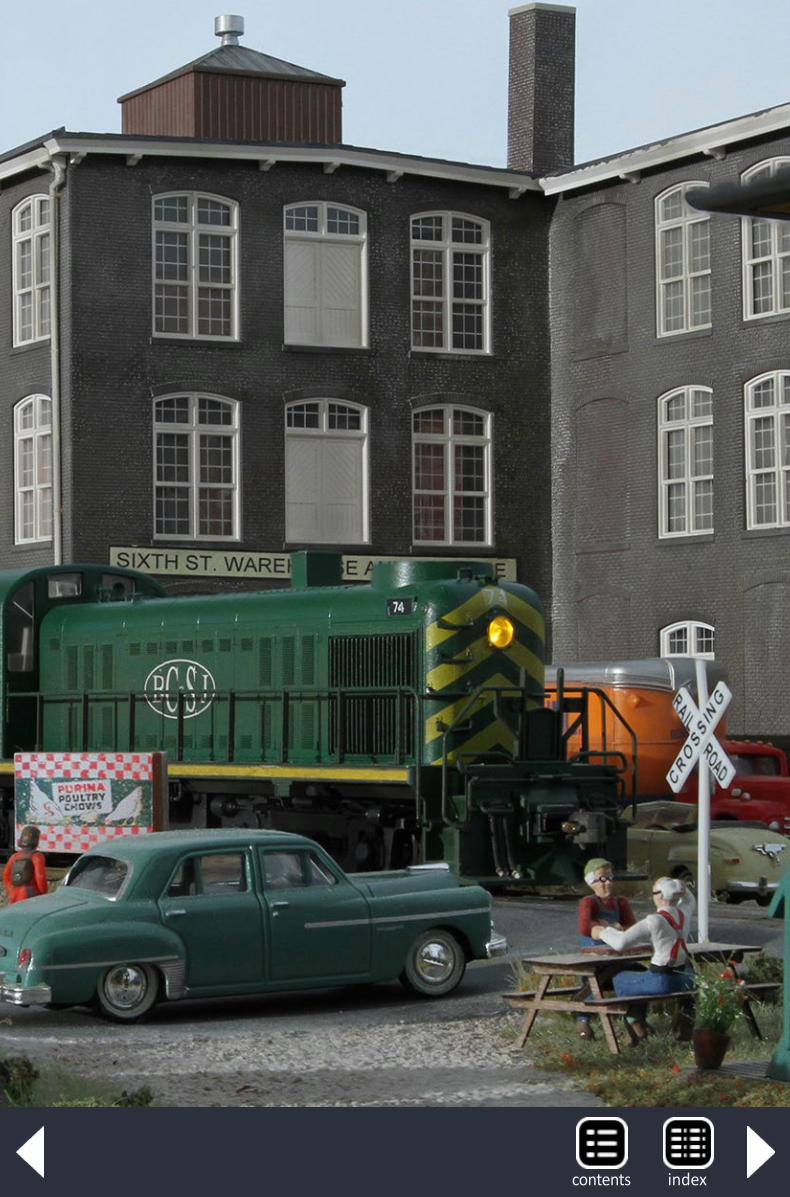
indexcontents

Bear Creek & South Jackson-2
I’m heading downstairs to the train room again. It’s been 10 years since January 2004 when construction started and though I’ve made lots of progress, tasks needing my
attention lurk everywhere. Sometimes I wonder: If I knew how much work and time an 1100 square-foot layout could soak up, would I have gone with a smaller one? Maybe, but the lure of a large layout is strong.
Deadlines help progress. I took an ops break in December (for political reasons) and that gave me two months before
ReaderFeedback
(click here)
1: A Southern Pacific AC-4 crosses the Upper Bear Creek bridge in 2011.
1
10 years and it ain’t done yet ...
Lead photo: A pair of BC&SJ RS-2s pass the 6th Street warehouse in Mill Bend early in the morning. Mill Bend was saved from the previous Bear Creek and is usually a busy place.
indexcontentsMRH-Apr 2014
the next op session. I used the time to remove the temporary Salem staging yard at the west end of the layout, extend the two-mile mainline to three miles (with two more yet to come), add the Siskiyou branch line, and start the main yard at Bear Creek – a massive amount of work to accomplish. I made it, though I was just finishing when the crew began arriving to run trains. That deadline was tight!
The next major deadline is bigger. The NMRA 2015 National Convention nmra2015portland.org is coming to Portland in August 2015.
What is the BC&SJ?What is the BC&SJ and why do I spend so much time in what my wife calls the train dungeon? Let me describe what I’m building.
The BC&SJ is a proto-lanced (more lance than proto!) HO model of a class 1 railroad. It features a 5-mile, single track mainline. Three branch lines add operational complex-ity and two yards (only one built so far) make up and break down trains. Lots of staging represents the rest of the North American rail network. It’s a mountain railroad set in the Oregon Cascades and the Willamette Valley in 1952 (I expect to be making Douglas firs for the rest of my life). A pair of long steep grades often force heavy trains to use helpers. Trains are a mixture of bridge traffic and cars from local industries. The Great Northern and SP have trackage rights. Some Spokane, Portland & Seattle motive power is also present.
The layout is dark. There are no signals other than train order semaphores. The BC&SJ hosts regular op sessions which I (try to) run using prototypical principles. In the past, TWC (track warrants) controlled train movement, but recently I’ve started using TT&TO (time table/train order) control and a 1952 SP rulebook. 4x fast clocks let everyone know what time it is.
indexcontents
Bear Creek & South Jackson-3
Although it’s now 10 years old, benchwork and track still aren’t complete, but the end is in sight. I’m hoping to finish the benchwork and trackwork and resume scenery construction before 2014 ends. Tempus fugit – the pressure of a national convention often induces great progress.
I built the layout in stages, adding temporary staging areas so I could start op sessions early on. Having trains running is a great way to boost enthusiasm.
My scenery is a series of small vignettes (mrhmag.com/mrh2009-Q4/up_the_creek). The eye pauses on each of these, making the layout seem bigger. They also make great scenes for photography.
My hobby rootsAs long as I can remember I’ve liked building things. I started with Playskool blocks when I was a wee ‘un, then progressed to Lincoln Logs, Erector Sets, Legos, and plastic model kits. Mix that with nearby railroads – I was nearly run over on the Boston & Albany near Holden, MA when I was three, and later had the Long Island Railroad behind my backyard. Add in a dad who built me a small HO layout when I was six and it was only a matter of time.
The impetus into serious model trains came from a visit to the East Bay Society of Model Engineers in Emeryville, CA in ‘68. A week later I was reading my first issue of Model Railroader and there was no turning back (although my modeling genes were sometimes dormant).
I guess you could say that my current Bear Creek & South Jackson is the logical conclusion, though some would argue whether an 1100 square-foot model railroad is logical!
indexcontentsMRH-Apr 2014

I try not to take myself too seriously; after all, no matter how prototypically we model or operate, we’re still playing with trains!
My major interests in the hobby are:
�Layout design – due to my engineering background.
�Operation – running it prototypically. I try to avoid the boring parts, such as sitting in a siding for eight hours. I like the in-teractions between trains and train crews.
�Construction – I already mentioned a fetish for building things!
2
2: First generation Alco road switchers run through morning fog, rolling westward out of Mill Bend.
indexcontents
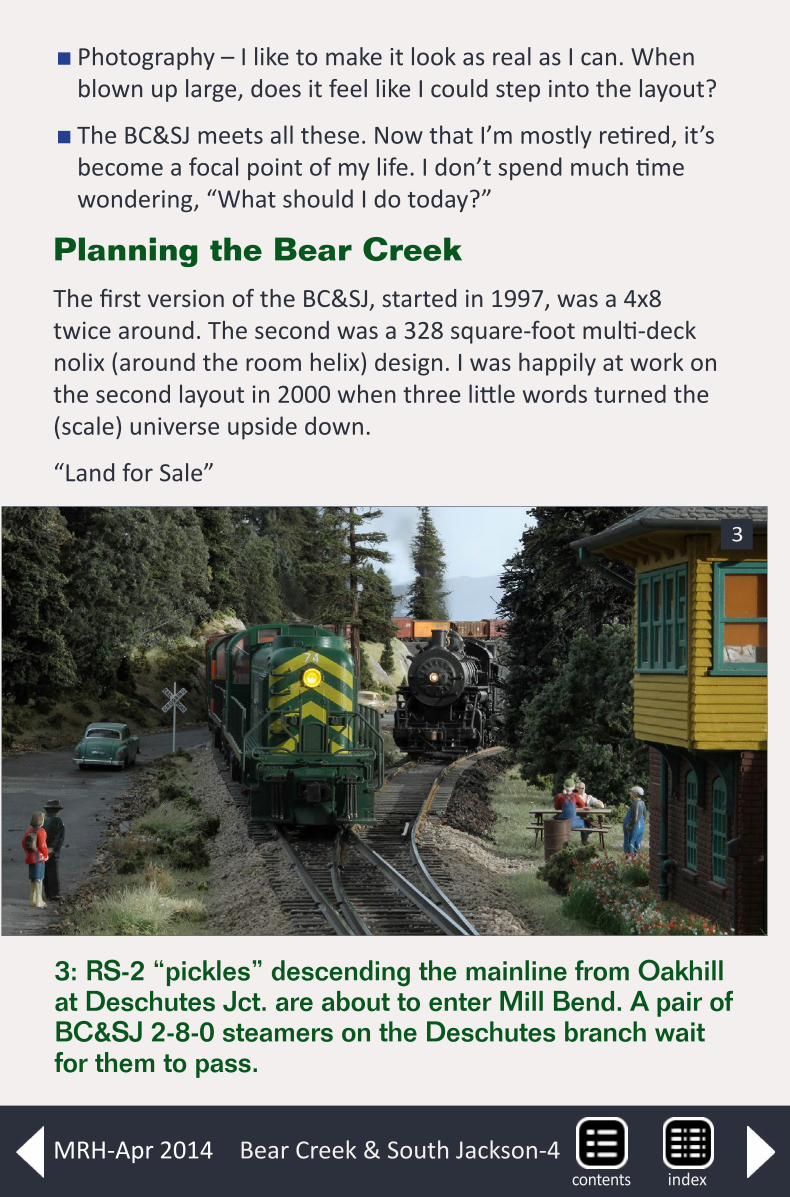
Bear Creek & South Jackson-4
�Photography – I like to make it look as real as I can. When blown up large, does it feel like I could step into the layout?
�The BC&SJ meets all these. Now that I’m mostly retired, it’s become a focal point of my life. I don’t spend much time wondering, “What should I do today?”
Planning the Bear CreekThe first version of the BC&SJ, started in 1997, was a 4x8 twice around. The second was a 328 square-foot multi-deck nolix (around the room helix) design. I was happily at work on the second layout in 2000 when three little words turned the (scale) universe upside down.
“Land for Sale”
3: RS-2 “pickles” descending the mainline from Oakhill at Deschutes Jct. are about to enter Mill Bend. A pair of BC&SJ 2-8-0 steamers on the Deschutes branch wait for them to pass.
3
indexcontentsMRH-Apr 2014
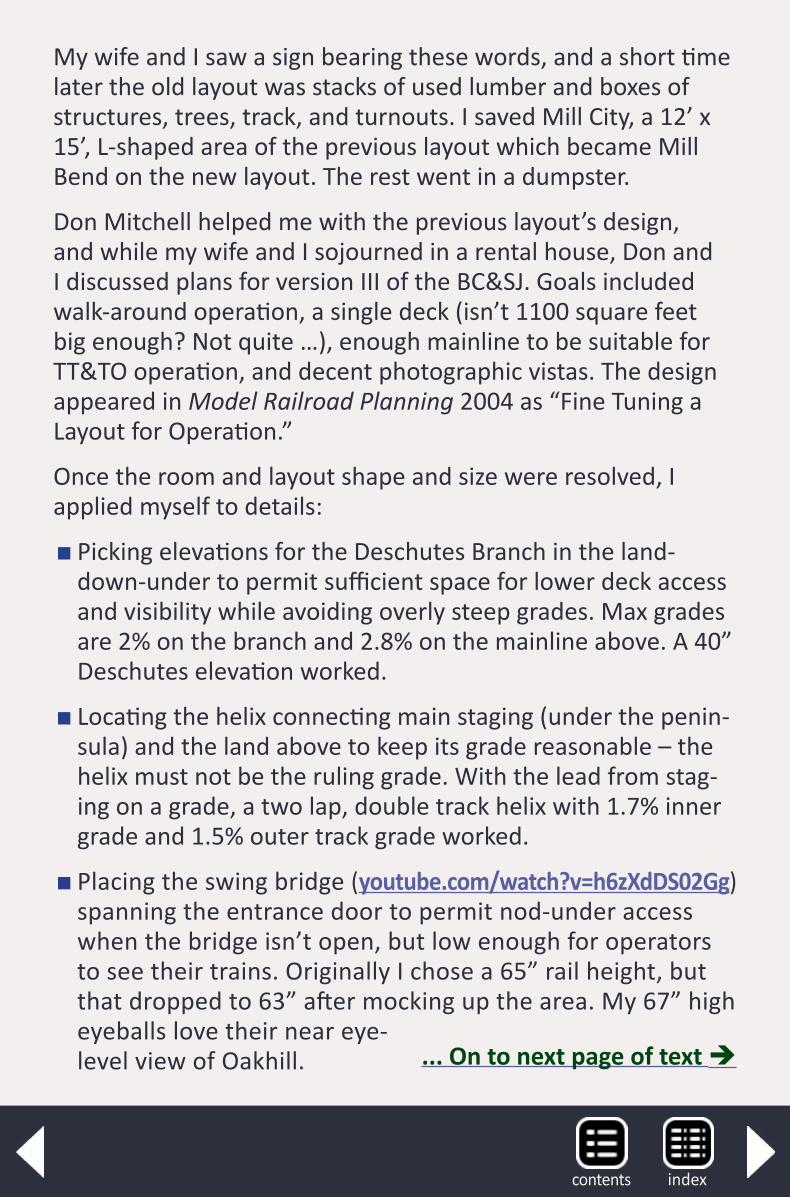
My wife and I saw a sign bearing these words, and a short time later the old layout was stacks of used lumber and boxes of structures, trees, track, and turnouts. I saved Mill City, a 12’ x 15’, L-shaped area of the previous layout which became Mill Bend on the new layout. The rest went in a dumpster.
Don Mitchell helped me with the previous layout’s design, and while my wife and I sojourned in a rental house, Don and I discussed plans for version III of the BC&SJ. Goals included walk-around operation, a single deck (isn’t 1100 square feet big enough? Not quite …), enough mainline to be suitable for TT&TO operation, and decent photographic vistas. The design appeared in Model Railroad Planning 2004 as “Fine Tuning a Layout for Operation.”
Once the room and layout shape and size were resolved, I applied myself to details:
�Picking elevations for the Deschutes Branch in the land-down-under to permit sufficient space for lower deck access and visibility while avoiding overly steep grades. Max grades are 2% on the branch and 2.8% on the mainline above. A 40” Deschutes elevation worked.
�Locating the helix connecting main staging (under the penin-sula) and the land above to keep its grade reasonable – the helix must not be the ruling grade. With the lead from stag-ing on a grade, a two lap, double track helix with 1.7% inner grade and 1.5% outer track grade worked.
�Placing the swing bridge (youtube.com/watch?v=h6zXdDS02Gg) spanning the entrance door to permit nod-under access when the bridge isn’t open, but low enough for operators to see their trains. Originally I chose a 65” rail height, but that dropped to 63” after mocking up the area. My 67” high eyeballs love their near eye-level view of Oakhill. ... On to next page of text
indexcontents
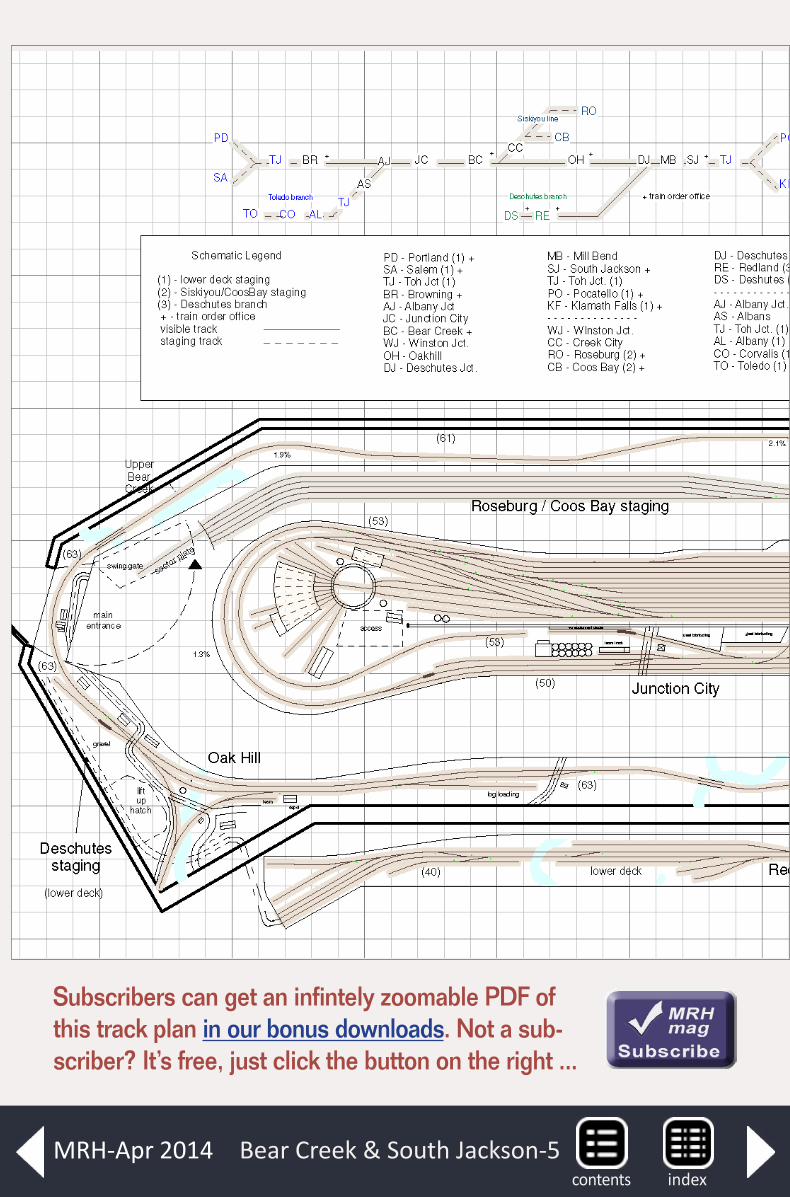
Bear Creek & South Jackson-5
Subscribers can get an infintely zoomable PDF of this track plan in our bonus downloads. Not a sub-scriber? It’s free, just click the button on the right ...
indexcontentsMRH-Apr 2014
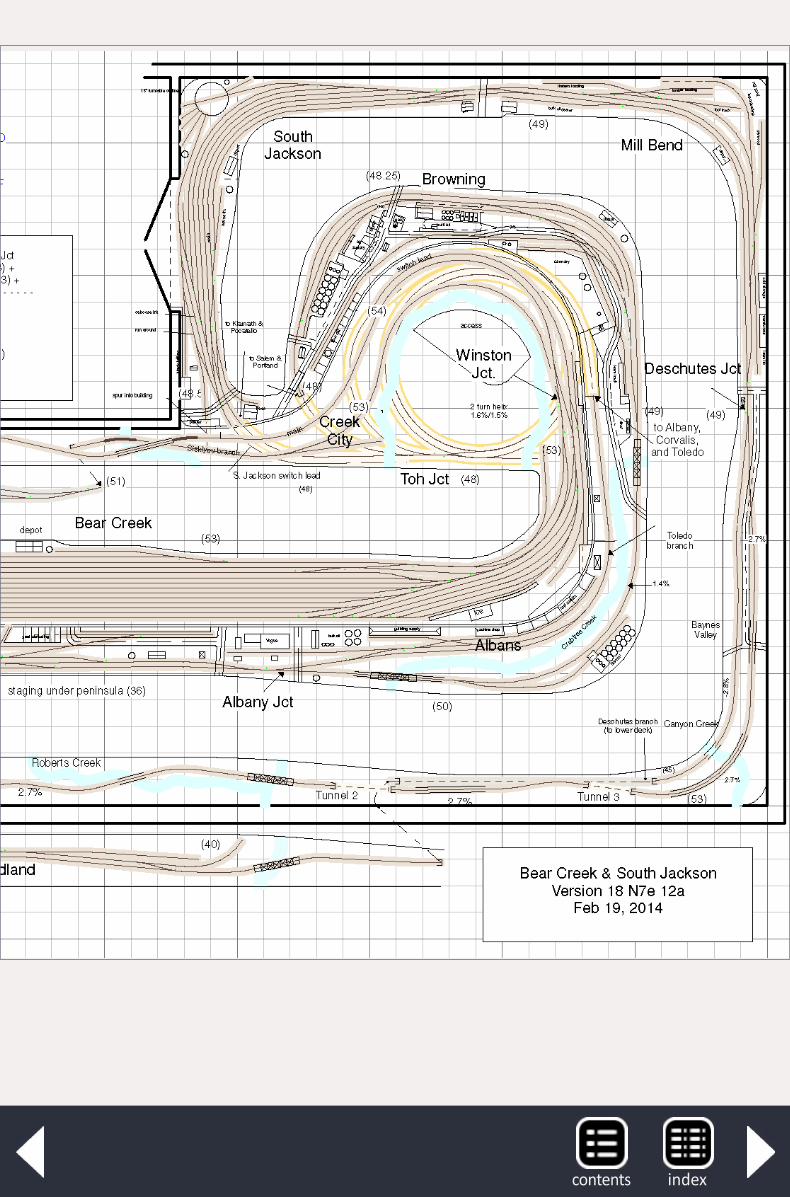
indexcontents
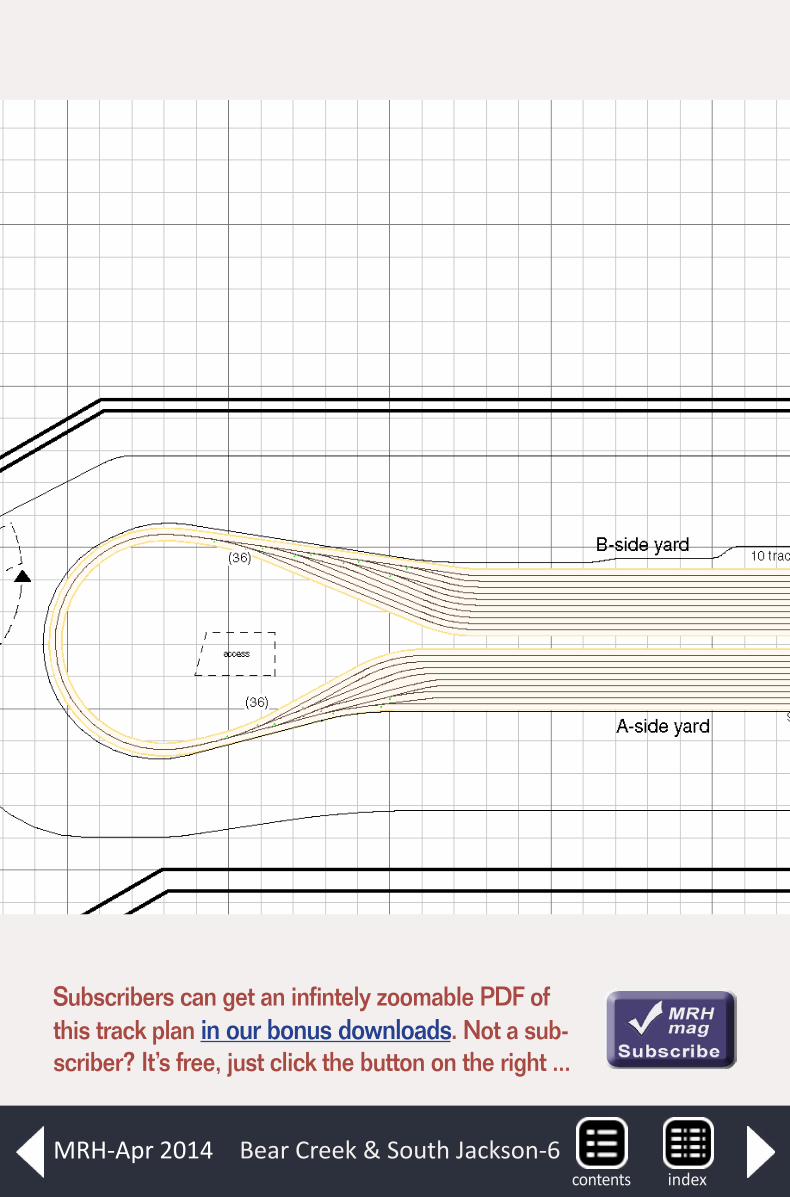
Bear Creek & South Jackson-6
Subscribers can get an infintely zoomable PDF of this track plan in our bonus downloads. Not a sub-scriber? It’s free, just click the button on the right ...
indexcontentsMRH-Apr 2014
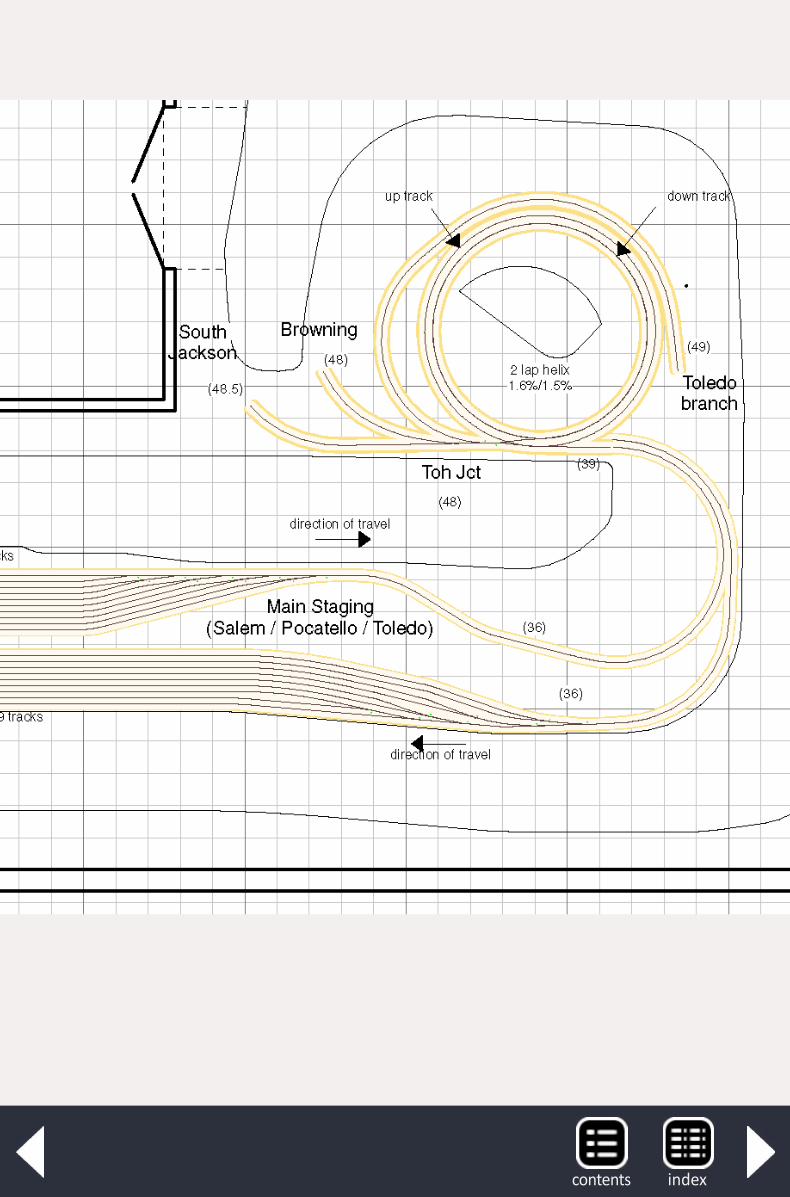
indexcontents
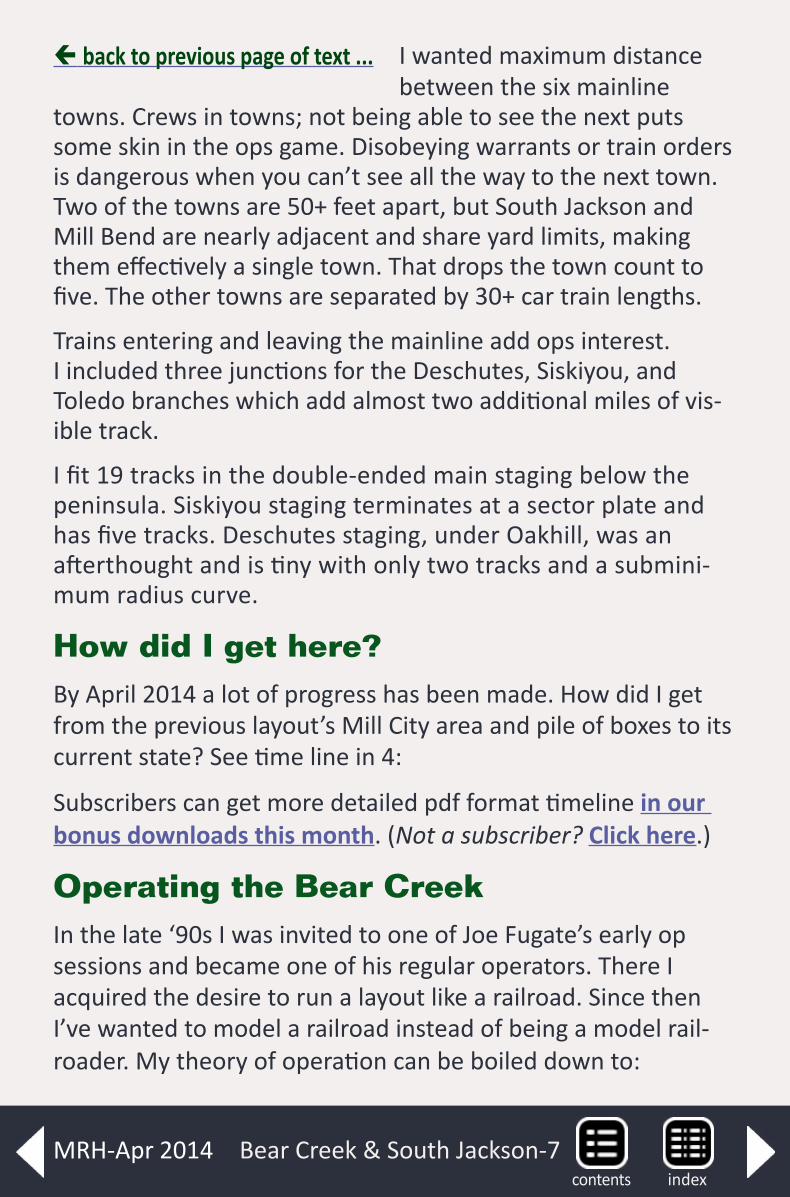
Bear Creek & South Jackson-7
I wanted maximum distance between the six mainline
towns. Crews in towns; not being able to see the next puts some skin in the ops game. Disobeying warrants or train orders is dangerous when you can’t see all the way to the next town. Two of the towns are 50+ feet apart, but South Jackson and Mill Bend are nearly adjacent and share yard limits, making them effectively a single town. That drops the town count to five. The other towns are separated by 30+ car train lengths.
Trains entering and leaving the mainline add ops interest. I included three junctions for the Deschutes, Siskiyou, and Toledo branches which add almost two additional miles of vis-ible track.
I fit 19 tracks in the double-ended main staging below the peninsula. Siskiyou staging terminates at a sector plate and has five tracks. Deschutes staging, under Oakhill, was an afterthought and is tiny with only two tracks and a submini-mum radius curve.
How did I get here?By April 2014 a lot of progress has been made. How did I get from the previous layout’s Mill City area and pile of boxes to its current state? See time line in 4:
Subscribers can get more detailed pdf format timeline in our bonus downloads this month. (Not a subscriber? Click here.)
Operating the Bear Creek In the late ‘90s I was invited to one of Joe Fugate’s early op sessions and became one of his regular operators. There I acquired the desire to run a layout like a railroad. Since then I’ve wanted to model a railroad instead of being a model rail-roader. My theory of operation can be boiled down to:
back to previous page of text ...
indexcontentsMRH-Apr 2014
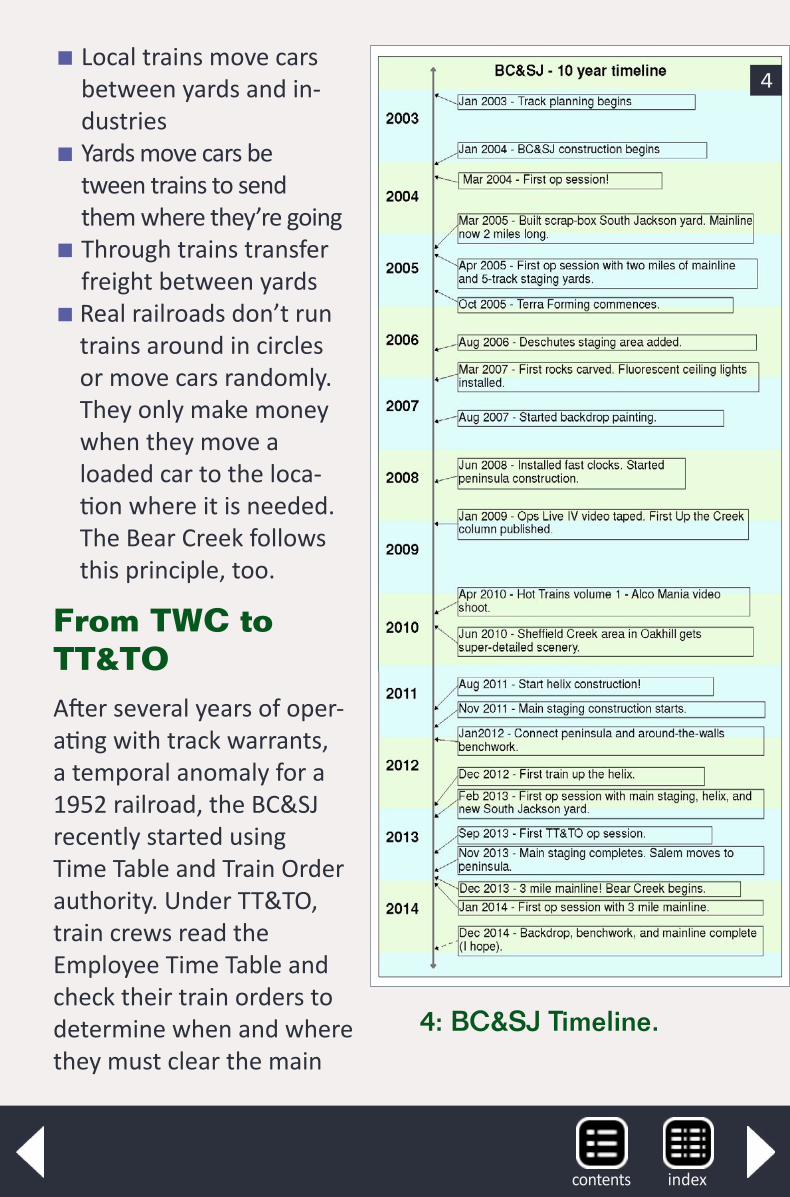
4: BC&SJ Timeline.
� Local trains move cars between yards and in- dustries
� Yards move cars be tween trains to send them where they’re going
� Through trains transfer freight between yards
�Real railroads don’t run trains around in circles or move cars randomly. They only make money when they move a loaded car to the loca- tion where it is needed. The Bear Creek follows this principle, too.
From TWC to TT&TOAfter several years of oper-ating with track warrants, a temporal anomaly for a 1952 railroad, the BC&SJ recently started using Time Table and Train Order authority. Under TT&TO, train crews read the Employee Time Table and check their train orders to determine when and where they must clear the main
4
indexcontents
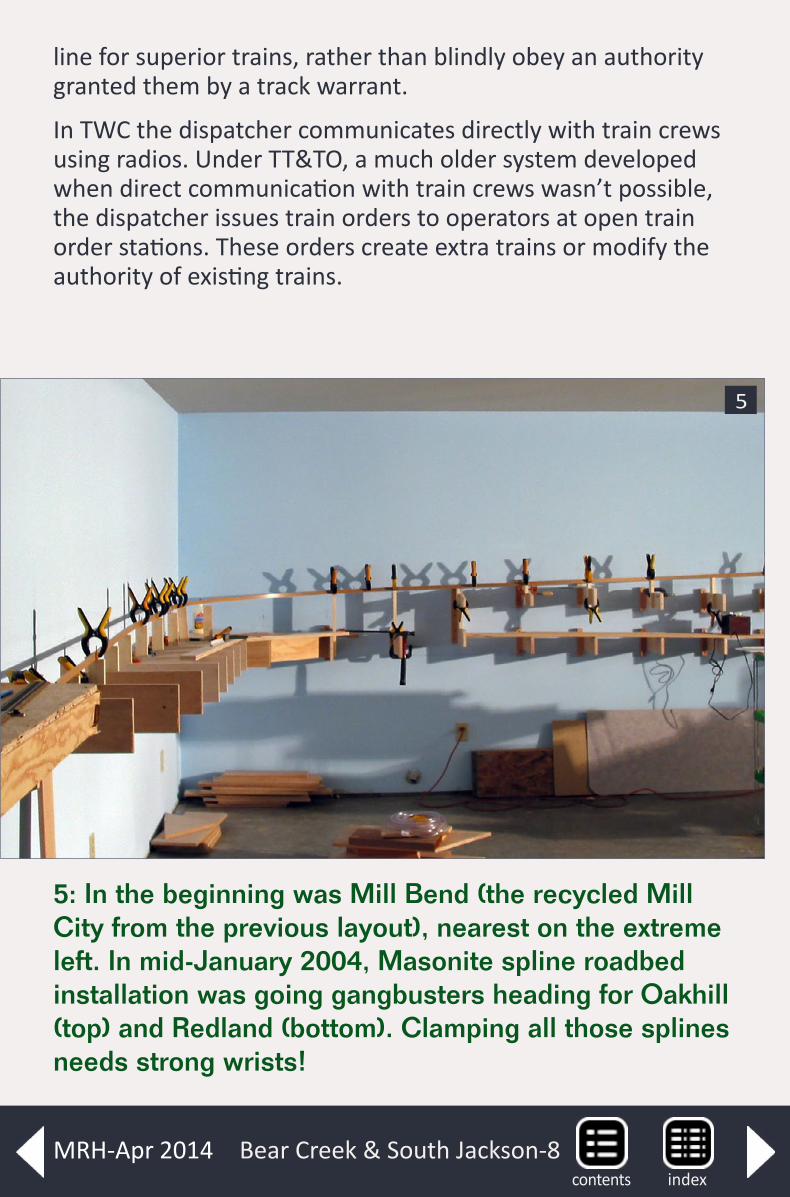
Bear Creek & South Jackson-8
line for superior trains, rather than blindly obey an authority granted them by a track warrant.
In TWC the dispatcher communicates directly with train crews using radios. Under TT&TO, a much older system developed when direct communication with train crews wasn’t possible, the dispatcher issues train orders to operators at open train order stations. These orders create extra trains or modify the authority of existing trains.
5: In the beginning was Mill Bend (the recycled Mill City from the previous layout), nearest on the extreme left. In mid-January 2004, Masonite spline roadbed installation was going gangbusters heading for Oakhill (top) and Redland (bottom). Clamping all those splines needs strong wrists!
5
indexcontentsMRH-Apr 2014
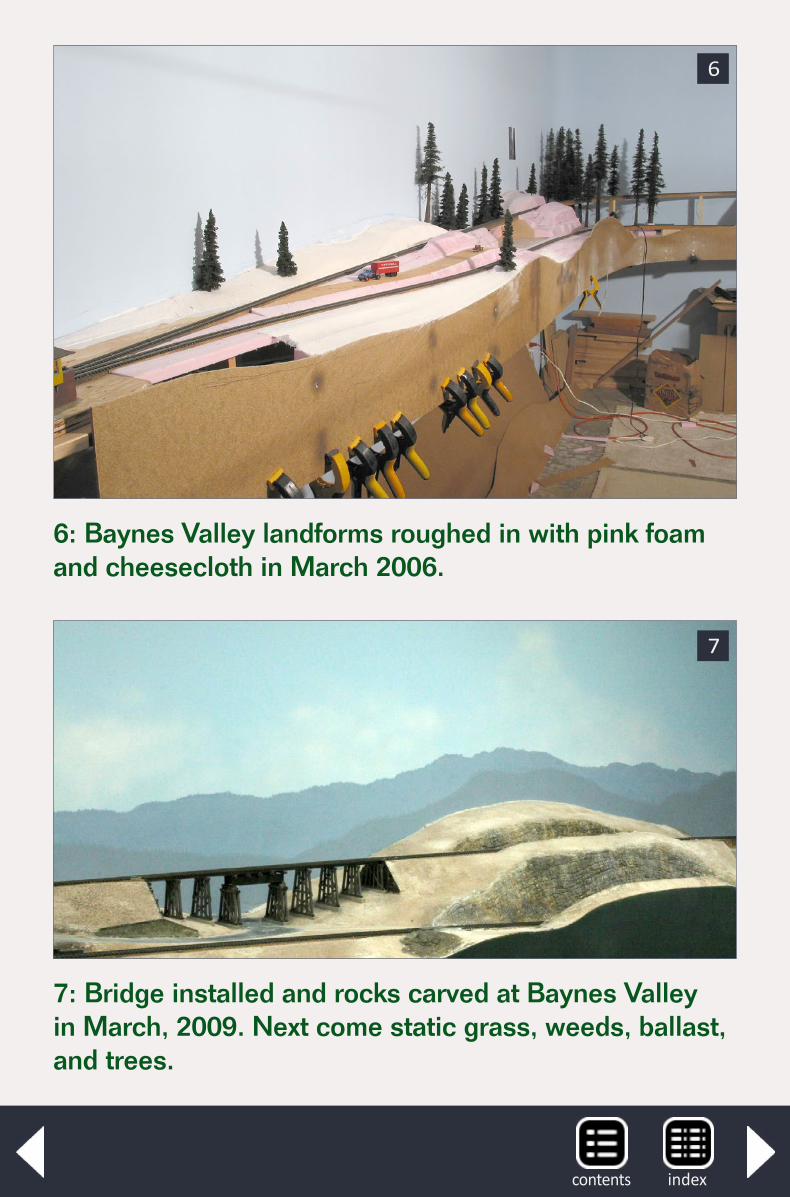
6: Baynes Valley landforms roughed in with pink foam and cheesecloth in March 2006.
6
7: Bridge installed and rocks carved at Baynes Valley in March, 2009. Next come static grass, weeds, ballast, and trees.
7
indexcontents
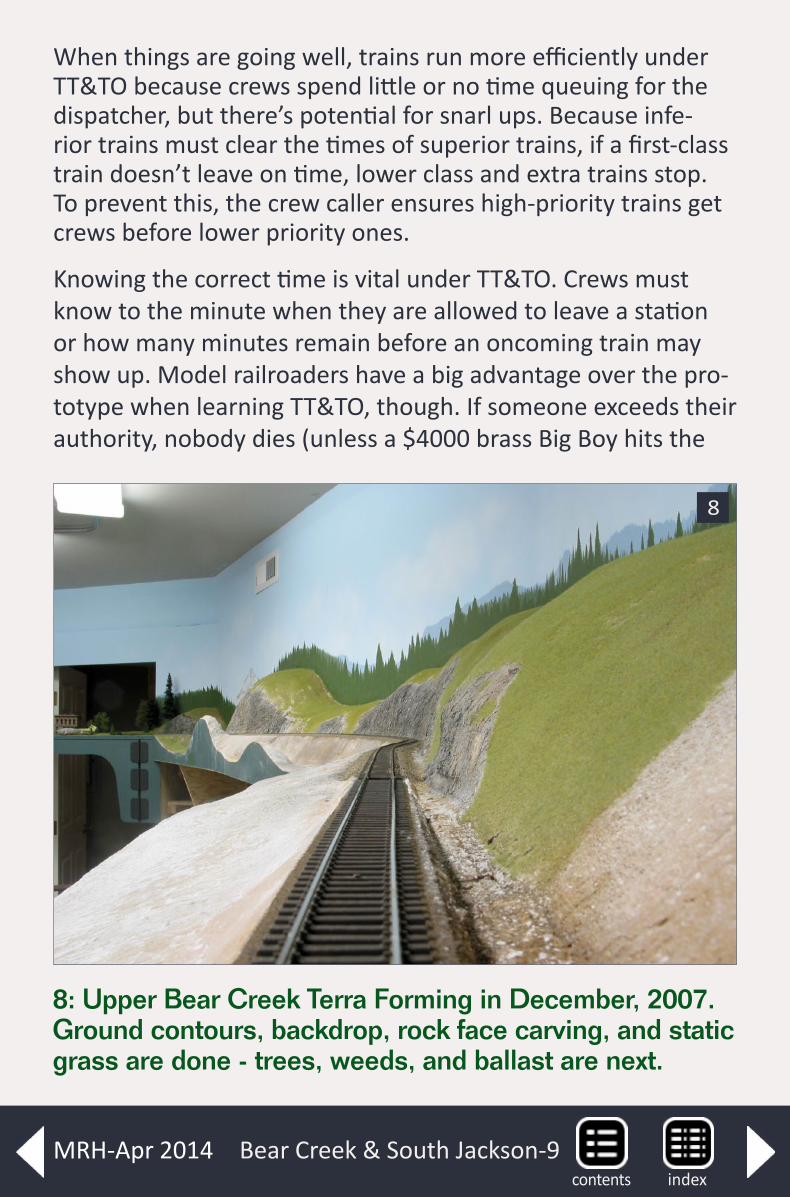
Bear Creek & South Jackson-9
When things are going well, trains run more efficiently under TT&TO because crews spend little or no time queuing for the dispatcher, but there’s potential for snarl ups. Because infe-rior trains must clear the times of superior trains, if a first-class train doesn’t leave on time, lower class and extra trains stop. To prevent this, the crew caller ensures high-priority trains get crews before lower priority ones.
Knowing the correct time is vital under TT&TO. Crews must know to the minute when they are allowed to leave a station or how many minutes remain before an oncoming train may show up. Model railroaders have a big advantage over the pro-totype when learning TT&TO, though. If someone exceeds their authority, nobody dies (unless a $4000 brass Big Boy hits the
8: Upper Bear Creek Terra Forming in December, 2007. Ground contours, backdrop, rock face carving, and static grass are done - trees, weeds, and ballast are next.
8
indexcontentsMRH-Apr 2014
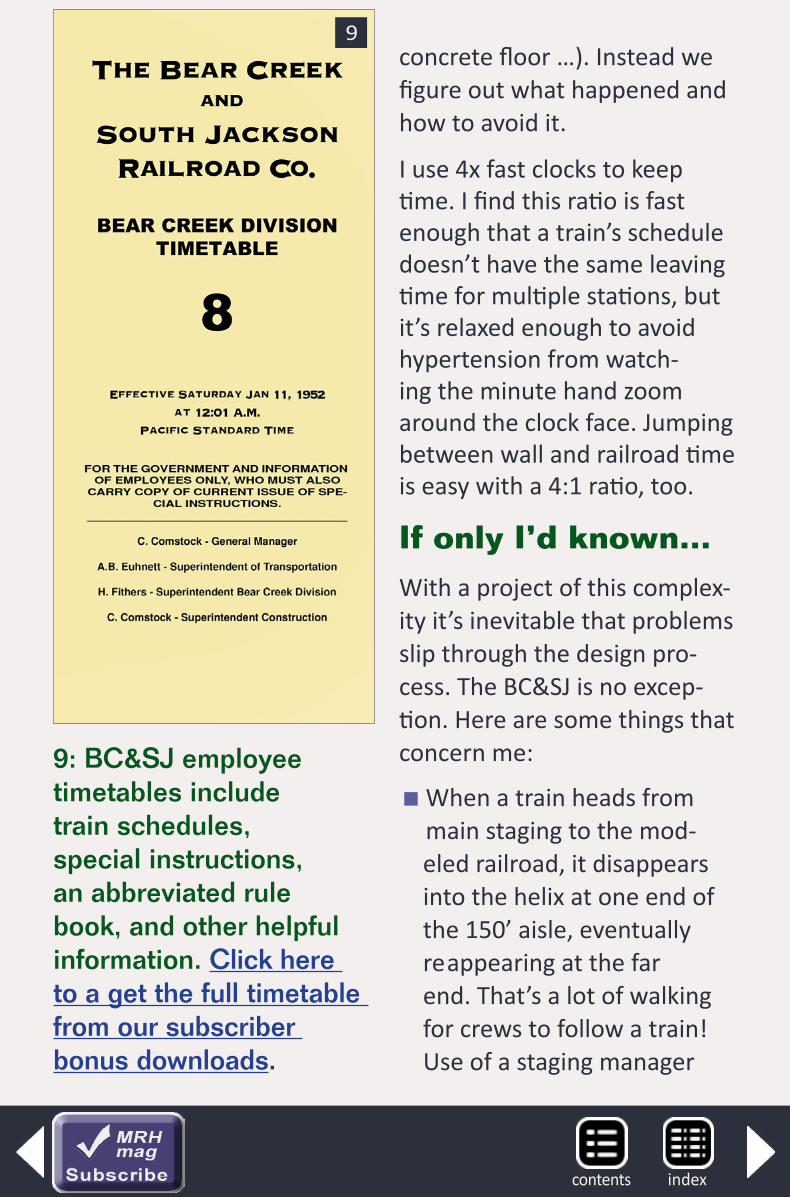
concrete floor …). Instead we figure out what happened and how to avoid it.
I use 4x fast clocks to keep time. I find this ratio is fast enough that a train’s schedule doesn’t have the same leaving time for multiple stations, but it’s relaxed enough to avoid hypertension from watch-ing the minute hand zoom around the clock face. Jumping between wall and railroad time is easy with a 4:1 ratio, too.
If only I’d known…With a project of this complex-ity it’s inevitable that problems slip through the design pro-cess. The BC&SJ is no excep-tion. Here are some things that concern me:
�When a train heads from main staging to the mod- eled railroad, it disappears into the helix at one end of the 150’ aisle, eventually re appearing at the far end. That’s a lot of walking for crews to follow a train! Use of a staging manager
9: BC&SJ employee timetables include train schedules, special instructions, an abbreviated rule book, and other helpful information. Click here to a get the full timetable from our subscriber bonus downloads.
9
indexcontents
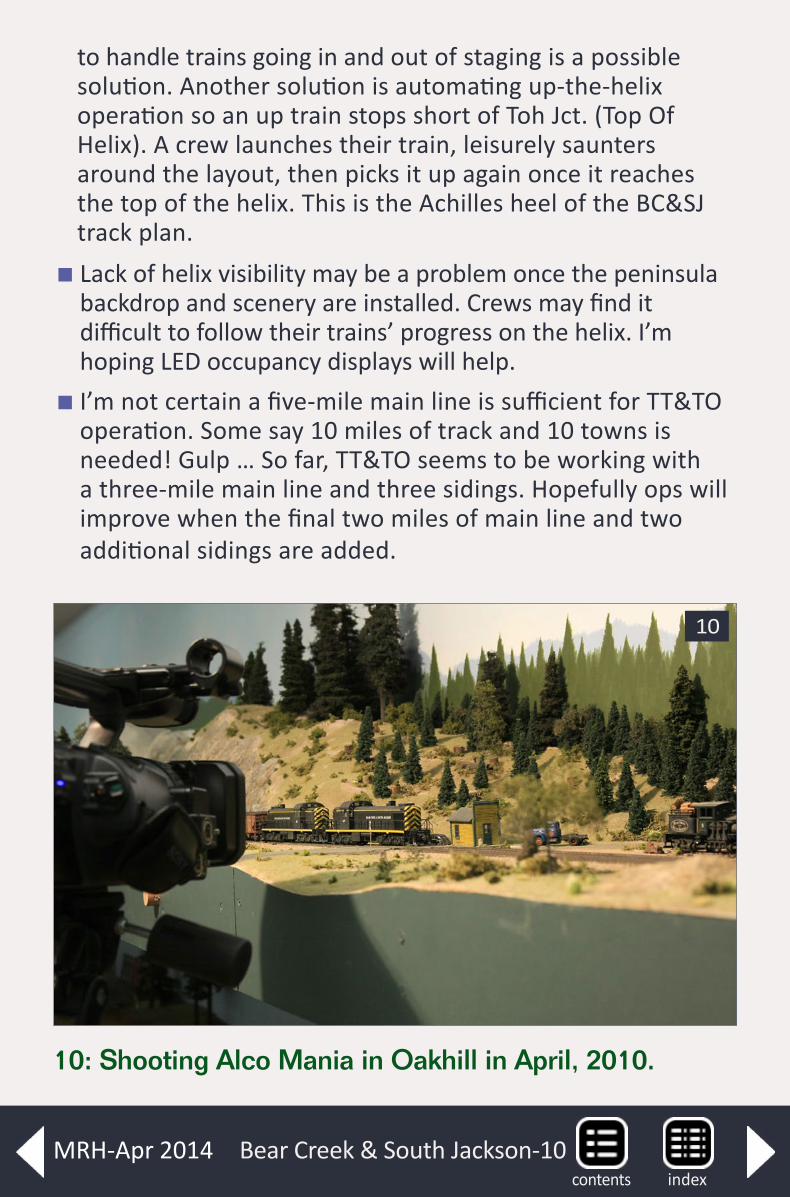
to handle trains going in and out of staging is a possible solution. Another solution is automating up-the-helix operation so an up train stops short of Toh Jct. (Top Of Helix). A crew launches their train, leisurely saunters around the layout, then picks it up again once it reaches the top of the helix. This is the Achilles heel of the BC&SJ track plan.
�Lack of helix visibility may be a problem once the peninsula backdrop and scenery are installed. Crews may find it difficult to follow their trains’ progress on the helix. I’m hoping LED occupancy displays will help.
� I’m not certain a five-mile main line is sufficient for TT&TO operation. Some say 10 miles of track and 10 towns is needed! Gulp … So far, TT&TO seems to be working with a three-mile main line and three sidings. Hopefully ops will improve when the final two miles of main line and two additional sidings are added.
10: Shooting Alco Mania in Oakhill in April, 2010.
10
Bear Creek & South Jackson-10indexcontents
MRH-Apr 2014
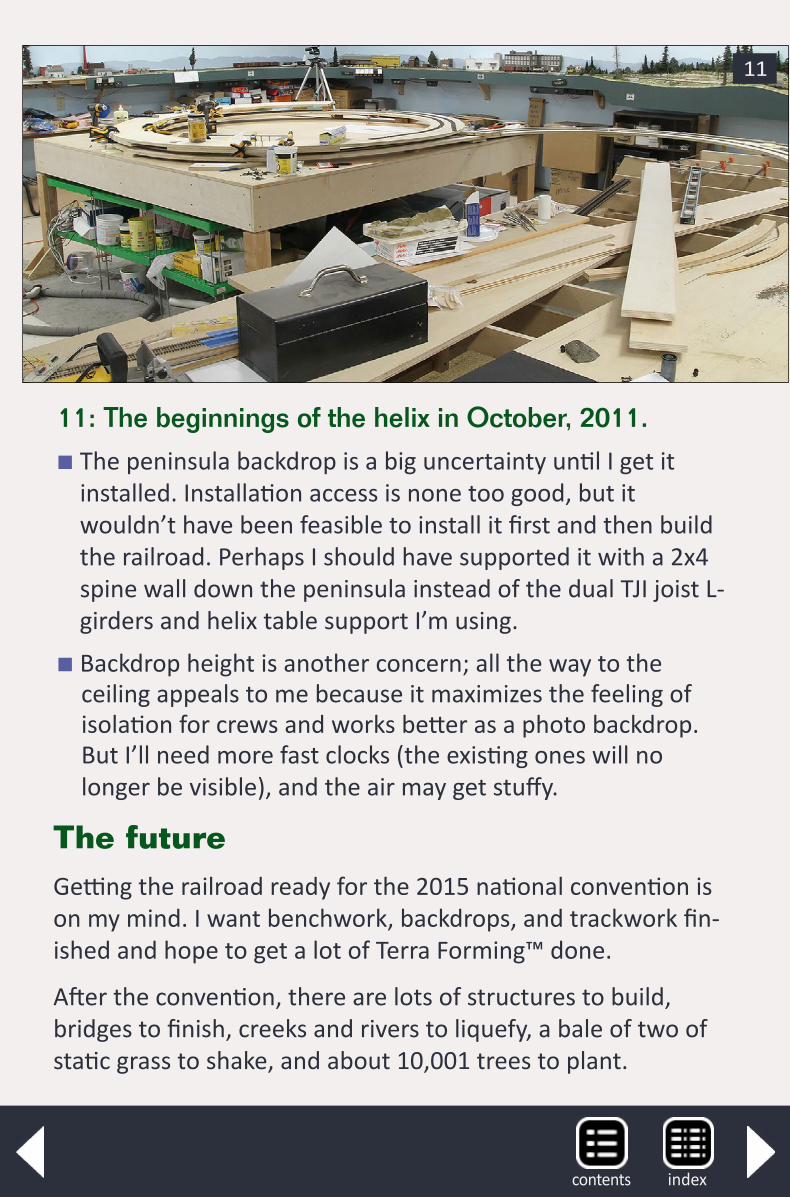
11: The beginnings of the helix in October, 2011.
�The peninsula backdrop is a big uncertainty until I get it installed. Installation access is none too good, but it wouldn’t have been feasible to install it first and then build the railroad. Perhaps I should have supported it with a 2x4 spine wall down the peninsula instead of the dual TJI joist L- girders and helix table support I’m using.
�Backdrop height is another concern; all the way to the ceiling appeals to me because it maximizes the feeling of isolation for crews and works better as a photo backdrop. But I’ll need more fast clocks (the existing ones will no longer be visible), and the air may get stuffy.
The future Getting the railroad ready for the 2015 national convention is on my mind. I want benchwork, backdrops, and trackwork fin-ished and hope to get a lot of Terra Forming™ done.
After the convention, there are lots of structures to build, bridges to finish, creeks and rivers to liquefy, a bale of two of static grass to shake, and about 10,001 trees to plant.
11
indexcontents
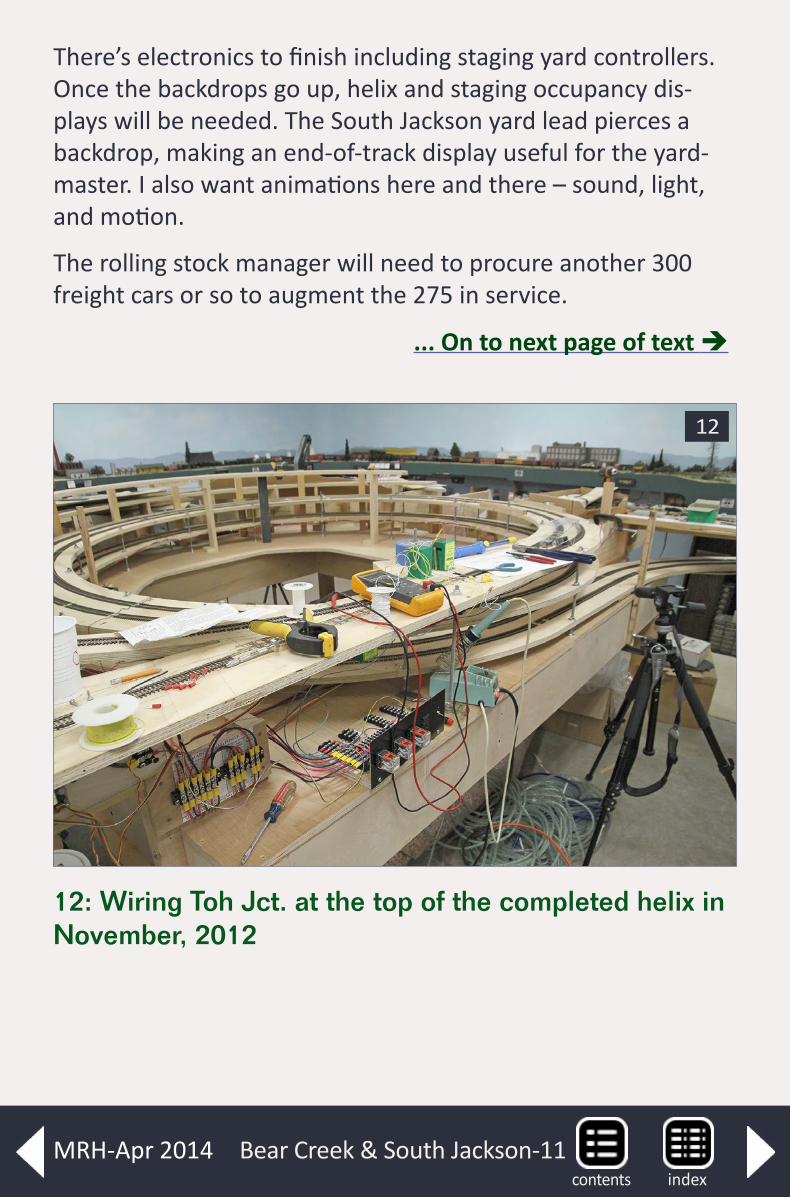
12: Wiring Toh Jct. at the top of the completed helix in November, 2012
... On to next page of text
There’s electronics to finish including staging yard controllers. Once the backdrops go up, helix and staging occupancy dis-plays will be needed. The South Jackson yard lead pierces a backdrop, making an end-of-track display useful for the yard-master. I also want animations here and there – sound, light, and motion.
The rolling stock manager will need to procure another 300 freight cars or so to augment the 275 in service.
12
Bear Creek & South Jackson-11indexcontents
MRH-Apr 2014
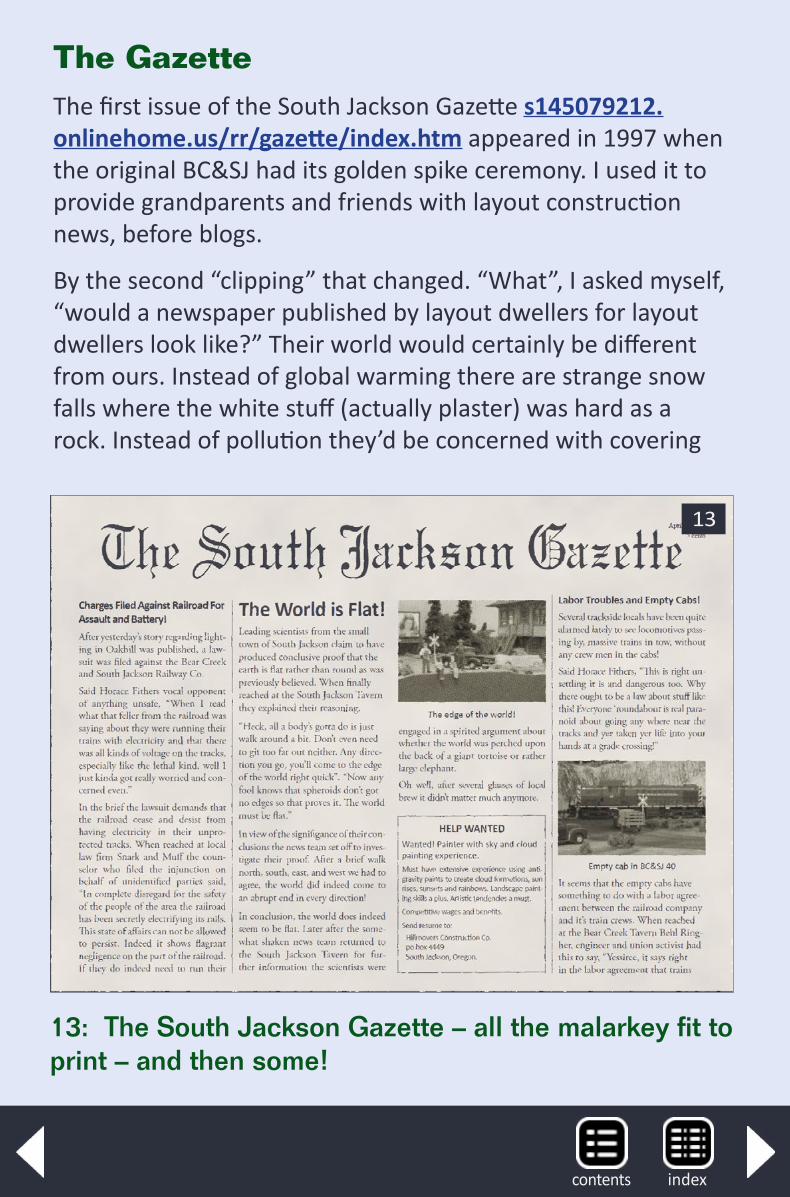
The GazetteThe first issue of the South Jackson Gazette s145079212.onlinehome.us/rr/gazette/index.htm appeared in 1997 when the original BC&SJ had its golden spike ceremony. I used it to provide grandparents and friends with layout construction news, before blogs.
By the second “clipping” that changed. “What”, I asked myself, “would a newspaper published by layout dwellers for layout dwellers look like?” Their world would certainly be different from ours. Instead of global warming there are strange snow falls where the white stuff (actually plaster) was hard as a rock. Instead of pollution they’d be concerned with covering
13: The South Jackson Gazette – all the malarkey fit to print – and then some!
13
indexcontents
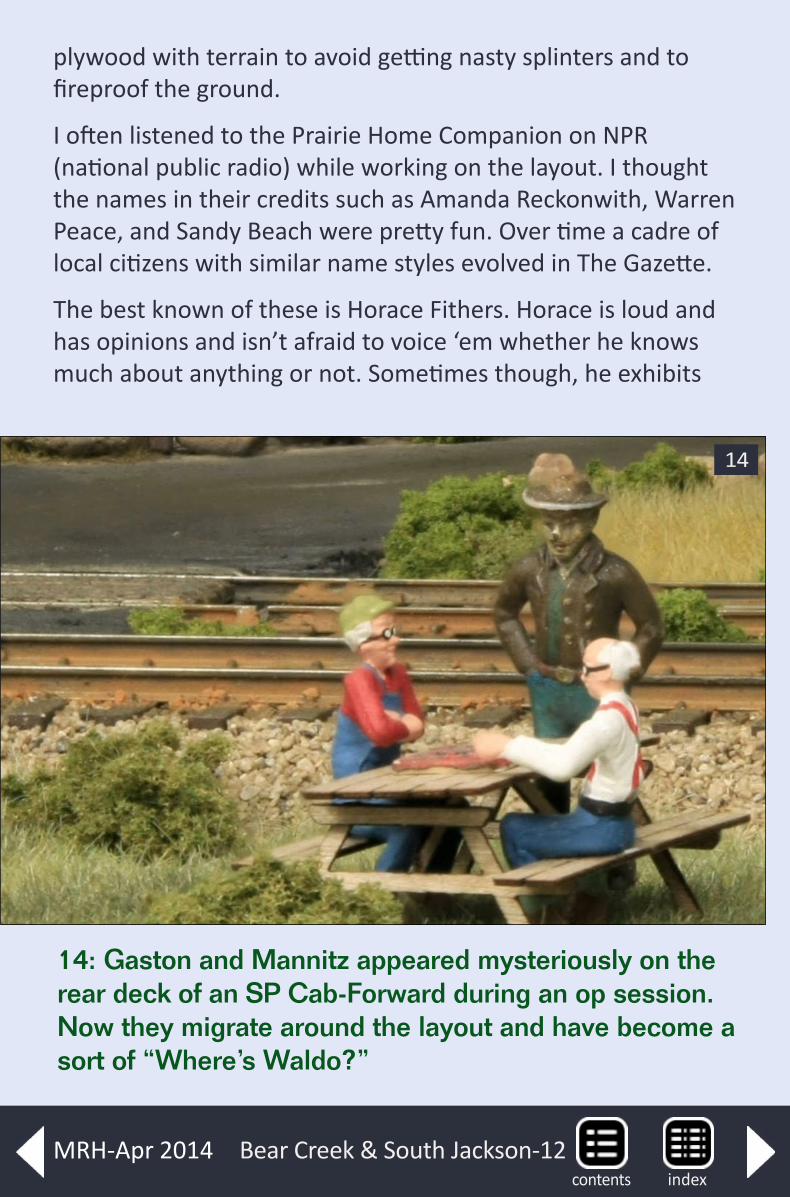
plywood with terrain to avoid getting nasty splinters and to fireproof the ground.
I often listened to the Prairie Home Companion on NPR (national public radio) while working on the layout. I thought the names in their credits such as Amanda Reckonwith, Warren Peace, and Sandy Beach were pretty fun. Over time a cadre of local citizens with similar name styles evolved in The Gazette.
The best known of these is Horace Fithers. Horace is loud and has opinions and isn’t afraid to voice ‘em whether he knows much about anything or not. Sometimes though, he exhibits
14: Gaston and Mannitz appeared mysteriously on the rear deck of an SP Cab-Forward during an op session. Now they migrate around the layout and have become a sort of “Where’s Waldo?”
14
Bear Creek & South Jackson-12indexcontents
MRH-Apr 2014
remarkable insight and he’s fiercely loyal to the railroad. Some people claim Horace is my alter ego.
Gaston Aridelyte, chef at the local greasy spoon, blames flying saucers and Martians when anything goes wrong.
Others include fire marshal S.T. Behr, railroad engineers Abe Euhnett and Behl Ringher, local skinflint retailer Xavier Muney, and electrician Mannitz Daark. Mannitz and Gaston play check-ers whenever they get a chance.
Hillmover’s Construction, developers of the Terra Forming™ technology used to transform bare plywood to lush surround-ings, is mentioned in many Gazette articles.
indexcontents
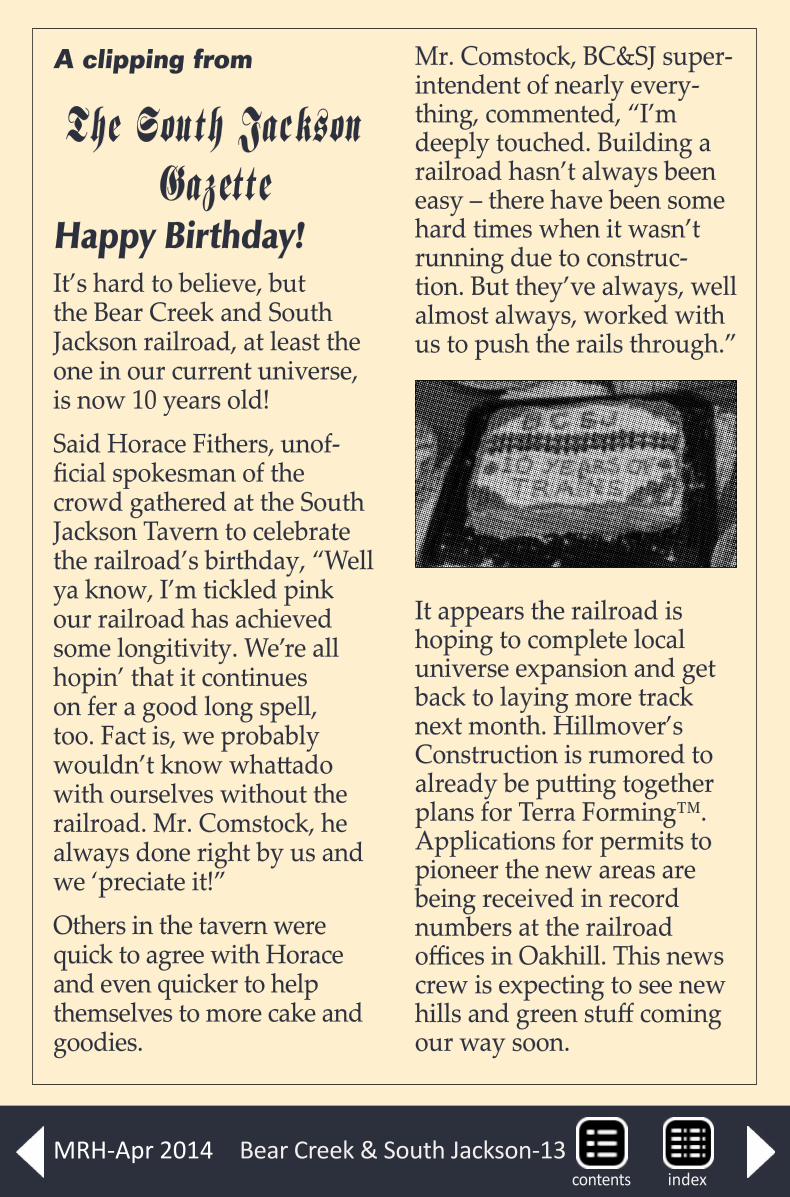
A clipping from
The South Jackson Gazette
Happy Birthday!It’s hard to believe, but the Bear Creek and South Jackson railroad, at least the one in our current universe, is now 10 years old!Said Horace Fithers, unof-ficial spokesman of the crowd gathered at the South Jackson Tavern to celebrate the railroad’s birthday, “Well ya know, I’m tickled pink our railroad has achieved some longitivity. We’re all hopin’ that it continues on fer a good long spell, too. Fact is, we probably wouldn’t know whattado with ourselves without the railroad. Mr. Comstock, he always done right by us and we ‘preciate it!”Others in the tavern were quick to agree with Horace and even quicker to help themselves to more cake and goodies.
Mr. Comstock, BC&SJ super-intendent of nearly every-thing, commented, “I’m deeply touched. Building a railroad hasn’t always been easy – there have been some hard times when it wasn’t running due to construc-tion. But they’ve always, well almost always, worked with us to push the rails through.”
It appears the railroad is hoping to complete local universe expansion and get back to laying more track next month. Hillmover’s Construction is rumored to already be putting together plans for Terra Forming™. Applications for permits to pioneer the new areas are being received in record numbers at the railroad offices in Oakhill. This news crew is expecting to see new hills and green stuff coming our way soon.
Bear Creek & South Jackson-13indexcontents
MRH-Apr 2014
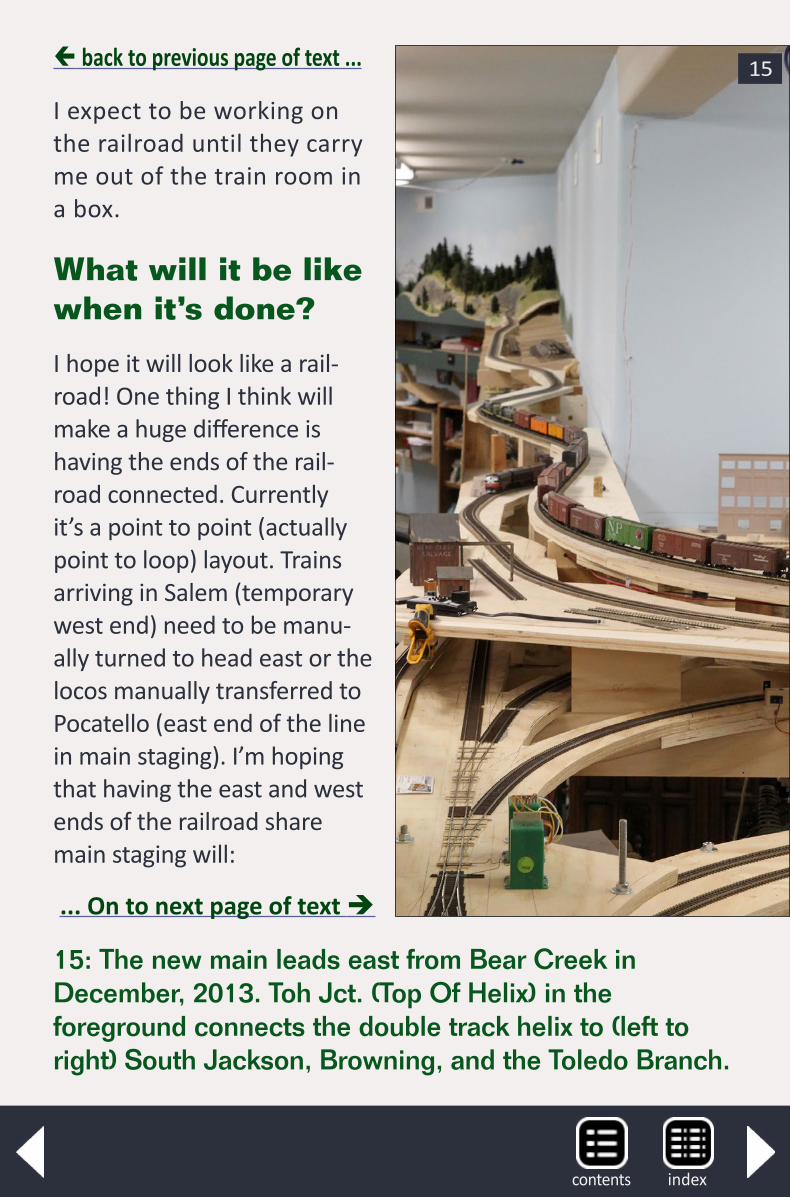
15: The new main leads east from Bear Creek in December, 2013. Toh Jct. (Top Of Helix) in the foreground connects the double track helix to (left to right) South Jackson, Browning, and the Toledo Branch.
I expect to be working on the railroad until they carry me out of the train room in a box.
What will it be like when it’s done?
I hope it will look like a rail-road! One thing I think will make a huge difference is having the ends of the rail-road connected. Currently it’s a point to point (actually point to loop) layout. Trains arriving in Salem (temporary west end) need to be manu-ally turned to head east or the locos manually transferred to Pocatello (east end of the line in main staging). I’m hoping that having the east and west ends of the railroad share main staging will:
15 back to previous page of text ...
... On to next page of text
indexcontents
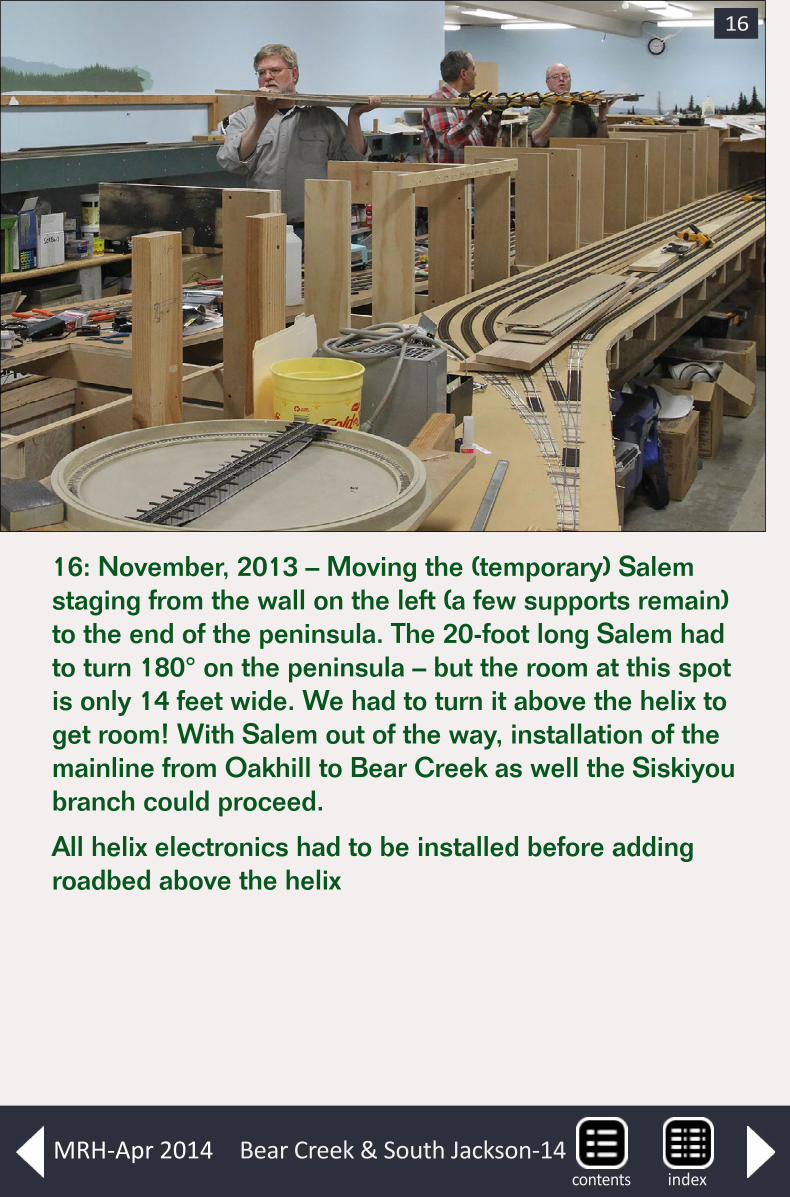
16: November, 2013 – Moving the (temporary) Salem staging from the wall on the left (a few supports remain) to the end of the peninsula. The 20-foot long Salem had to turn 180° on the peninsula – but the room at this spot is only 14 feet wide. We had to turn it above the helix to get room! With Salem out of the way, installation of the mainline from Oakhill to Bear Creek as well the Siskiyou branch could proceed.
All helix electronics had to be installed before adding roadbed above the helix
16
Bear Creek & South Jackson-14indexcontents
MRH-Apr 2014
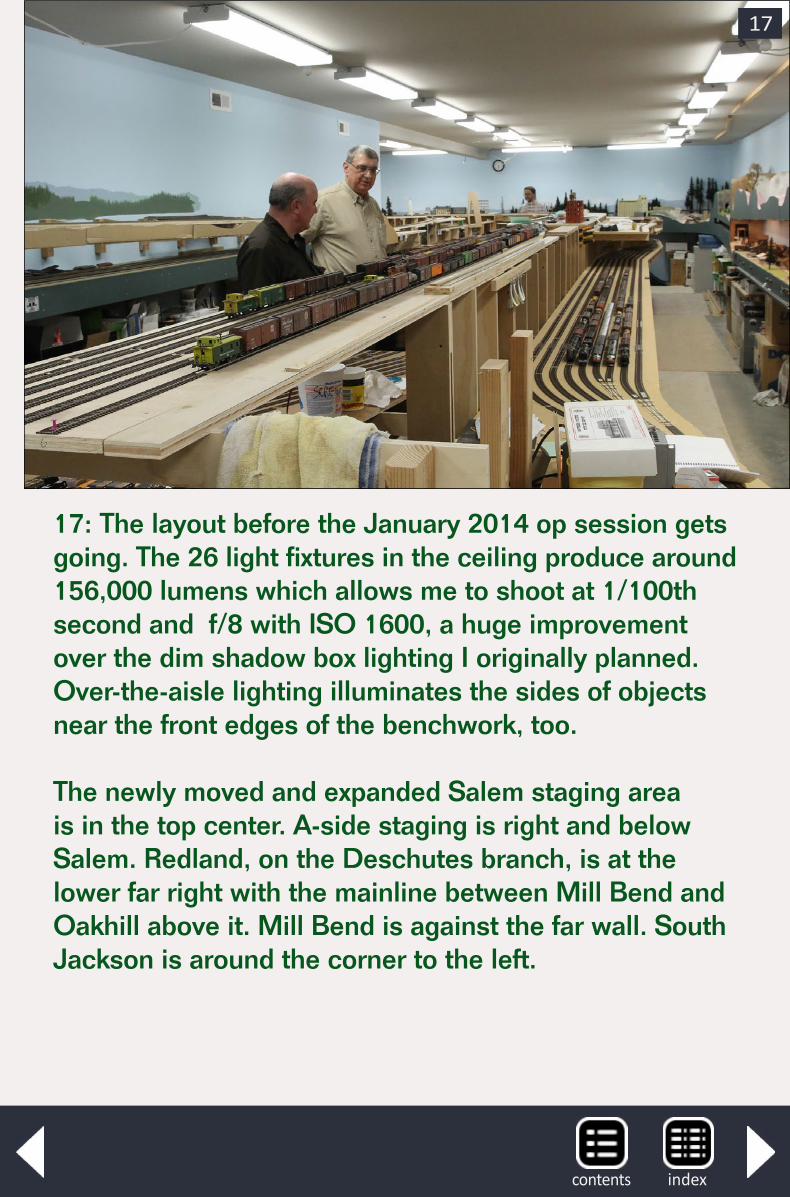
17: The layout before the January 2014 op session gets going. The 26 light fixtures in the ceiling produce around 156,000 lumens which allows me to shoot at 1/100th second and f/8 with ISO 1600, a huge improvement over the dim shadow box lighting I originally planned. Over-the-aisle lighting illuminates the sides of objects near the front edges of the benchwork, too.
The newly moved and expanded Salem staging area is in the top center. A-side staging is right and below Salem. Redland, on the Deschutes branch, is at the lower far right with the mainline between Mill Bend and Oakhill above it. Mill Bend is against the far wall. South Jackson is around the corner to the left.
17
indexcontents
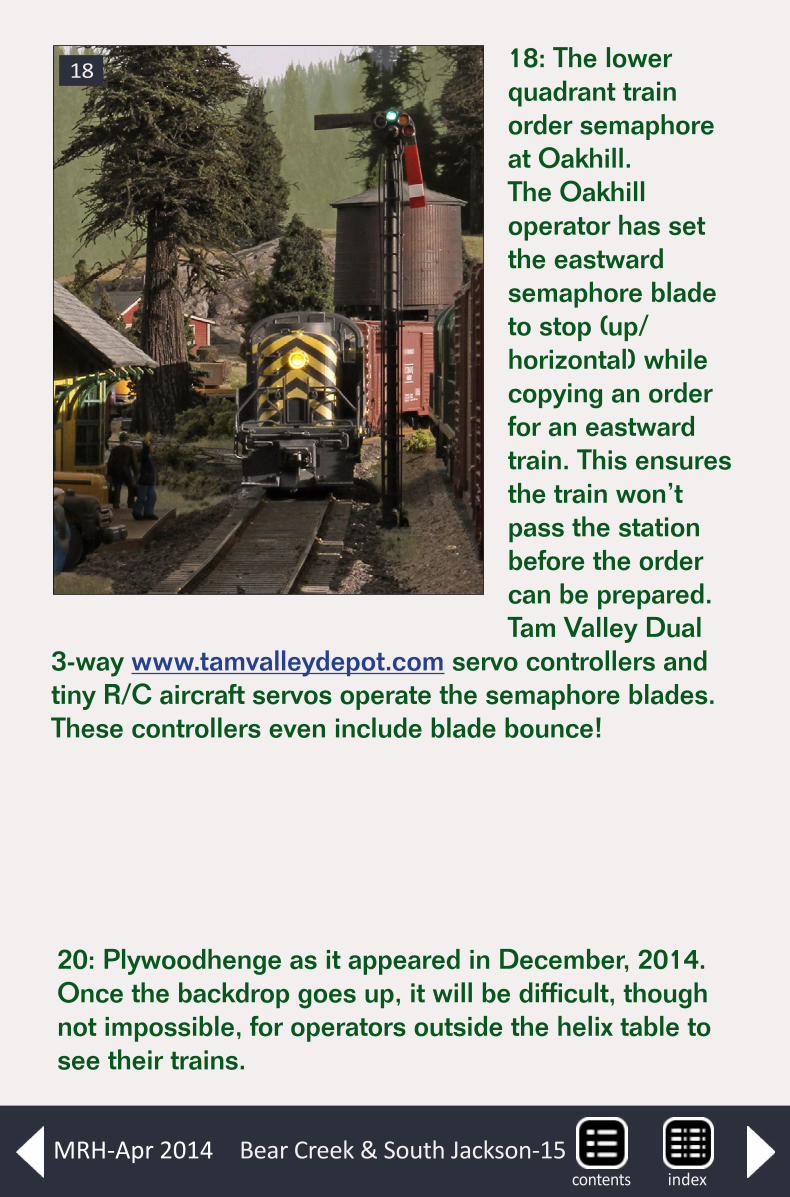
18: The lower quadrant train order semaphore at Oakhill. The Oakhill operator has set the eastward semaphore blade to stop (up/ horizontal) while copying an order for an eastward train. This ensures the train won’t pass the station before the order can be prepared.Tam Valley Dual
3-way www.tamvalleydepot.com servo controllers and tiny R/C aircraft servos operate the semaphore blades. These controllers even include blade bounce!
18
20: Plywoodhenge as it appeared in December, 2014. Once the backdrop goes up, it will be difficult, though not impossible, for operators outside the helix table to see their trains.
Bear Creek & South Jackson-15indexcontents
MRH-Apr 2014
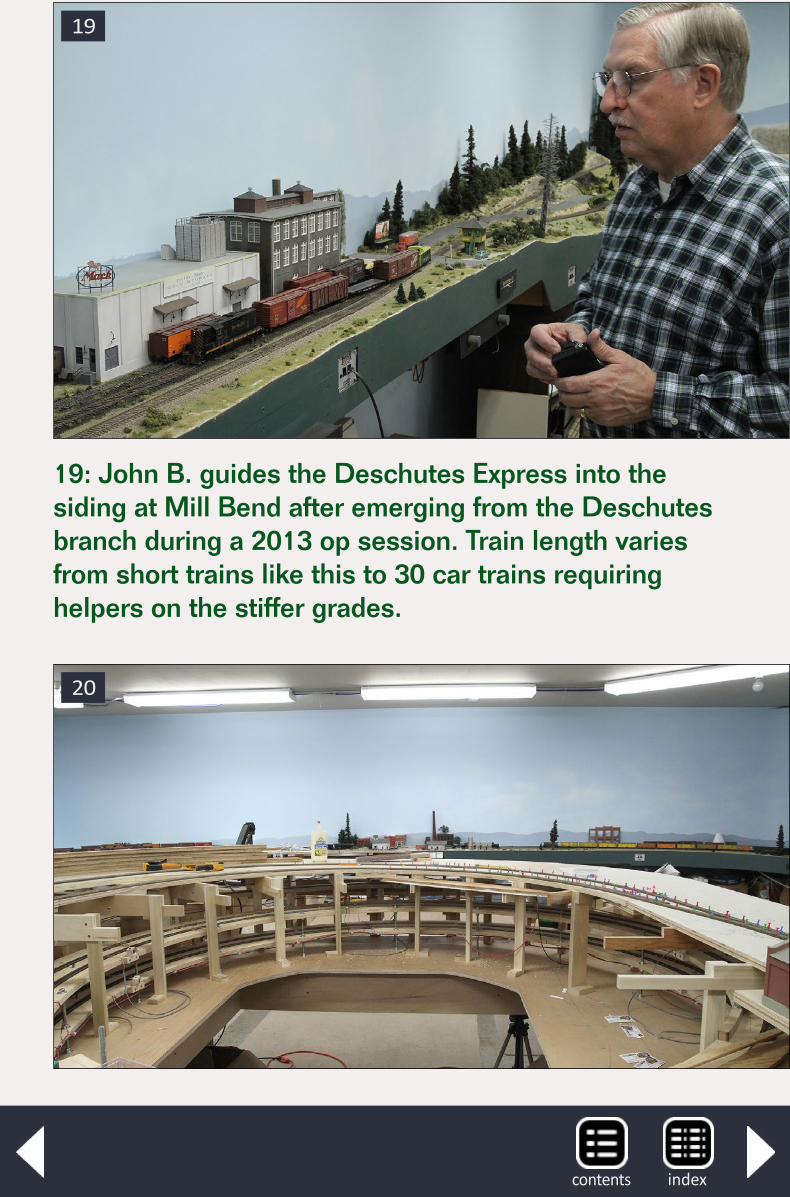
19: John B. guides the Deschutes Express into the siding at Mill Bend after emerging from the Deschutes branch during a 2013 op session. Train length varies from short trains like this to 30 car trains requiring helpers on the stiffer grades.
19
20
indexcontents
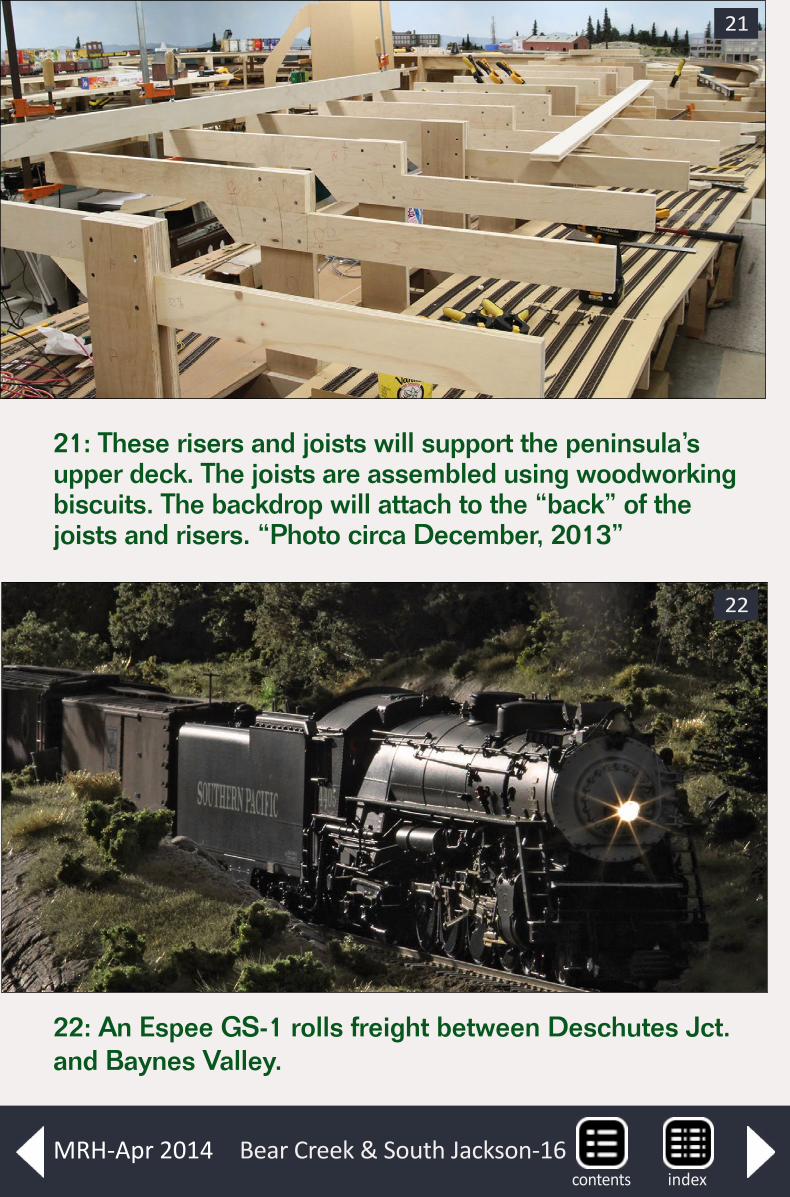
21: These risers and joists will support the peninsula’s upper deck. The joists are assembled using woodworking biscuits. The backdrop will attach to the “back” of the joists and risers. “Photo circa December, 2013”
22: An Espee GS-1 rolls freight between Deschutes Jct. and Baynes Valley.
22
21
Bear Creek & South Jackson-16indexcontents
MRH-Apr 2014
Charlie Comstock started his love affair with trains at age three by nearly getting run over on the B&A in 1955.
His serious modeling started in 1968 but went dormant from ’71 to ’95 after a shelf layout collapsed, dumping brass locos onto a concrete floor. He returned to model railroading in the mid ‘90s by purchasing a few HO structure kits for his kid’s Brio trains and soon
started building a small switching layout.
Over the past five years, Charlie has been involved with MRH where he writes the “Up the Creek” column. He is currently the superintendent of the 2nd Division of the Pacific Northwest Region of the NMRA. He also has a personal website bcsjrr.com.
indexcontents
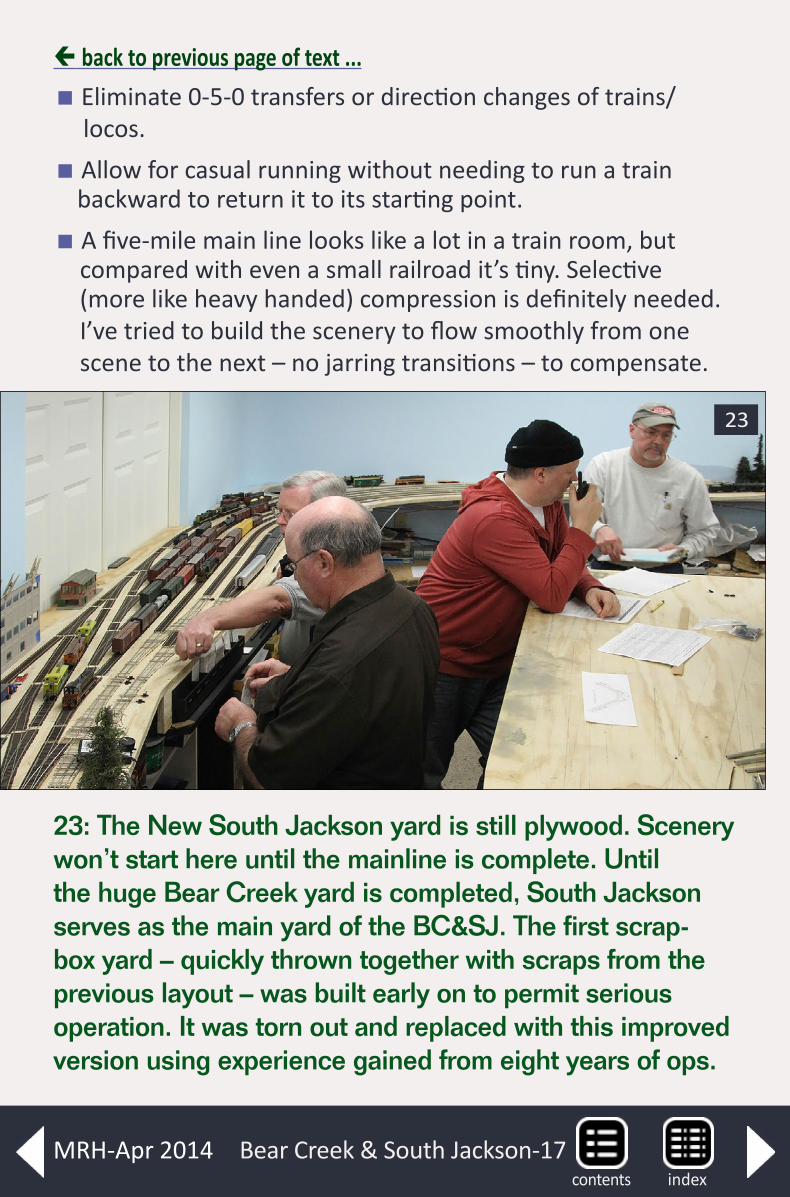
� Eliminate 0-5-0 transfers or direction changes of trains/ locos.
�Allow for casual running without needing to run a train backward to return it to its starting point.
�A five-mile main line looks like a lot in a train room, but compared with even a small railroad it’s tiny. Selective (more like heavy handed) compression is definitely needed. I’ve tried to build the scenery to flow smoothly from one scene to the next – no jarring transitions – to compensate.
23: The New South Jackson yard is still plywood. Scenery won’t start here until the mainline is complete. Until the huge Bear Creek yard is completed, South Jackson serves as the main yard of the BC&SJ. The first scrap-box yard – quickly thrown together with scraps from the previous layout – was built early on to permit serious operation. It was torn out and replaced with this improved version using experience gained from eight years of ops.
23
Bear Creek & South Jackson-17
back to previous page of text ...
indexcontentsMRH-Apr 2014
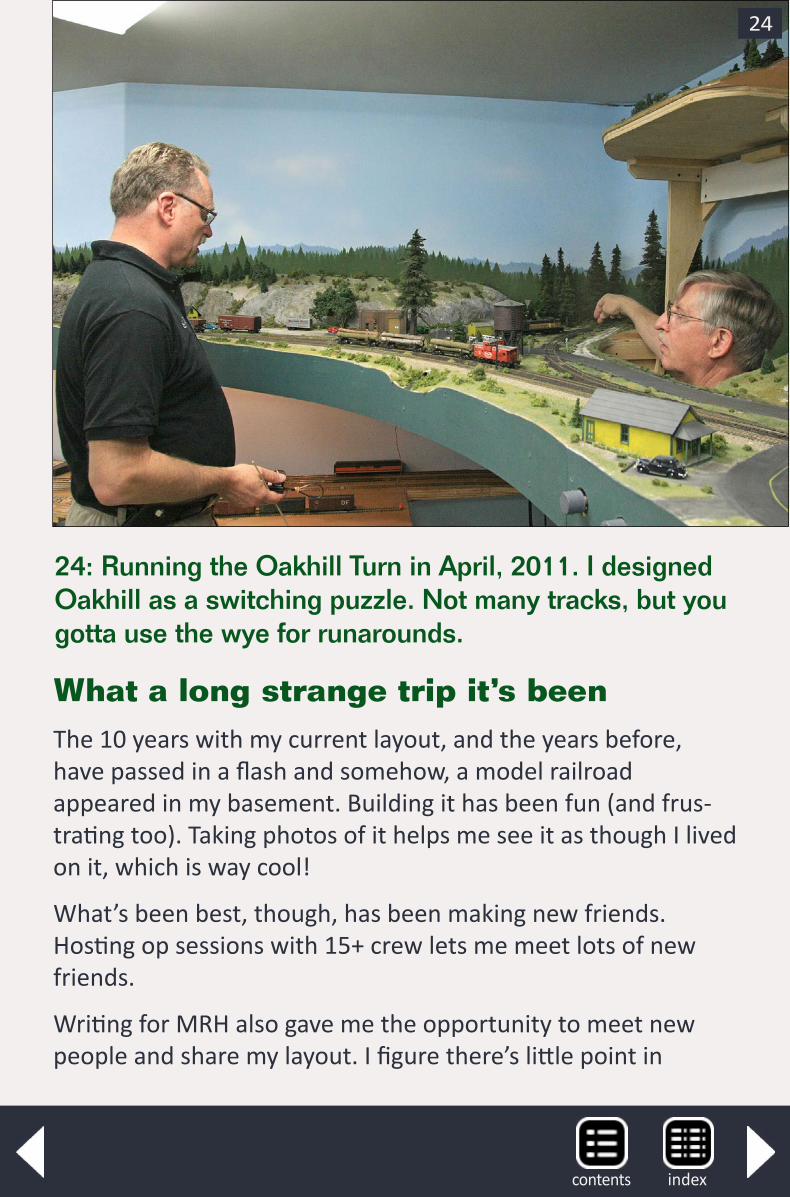
24: Running the Oakhill Turn in April, 2011. I designed Oakhill as a switching puzzle. Not many tracks, but you gotta use the wye for runarounds.
What a long strange trip it’s beenThe 10 years with my current layout, and the years before, have passed in a flash and somehow, a model railroad appeared in my basement. Building it has been fun (and frus-trating too). Taking photos of it helps me see it as though I lived on it, which is way cool!
What’s been best, though, has been making new friends. Hosting op sessions with 15+ crew lets me meet lots of new friends.
Writing for MRH also gave me the opportunity to meet new people and share my layout. I figure there’s little point in
24
indexcontents
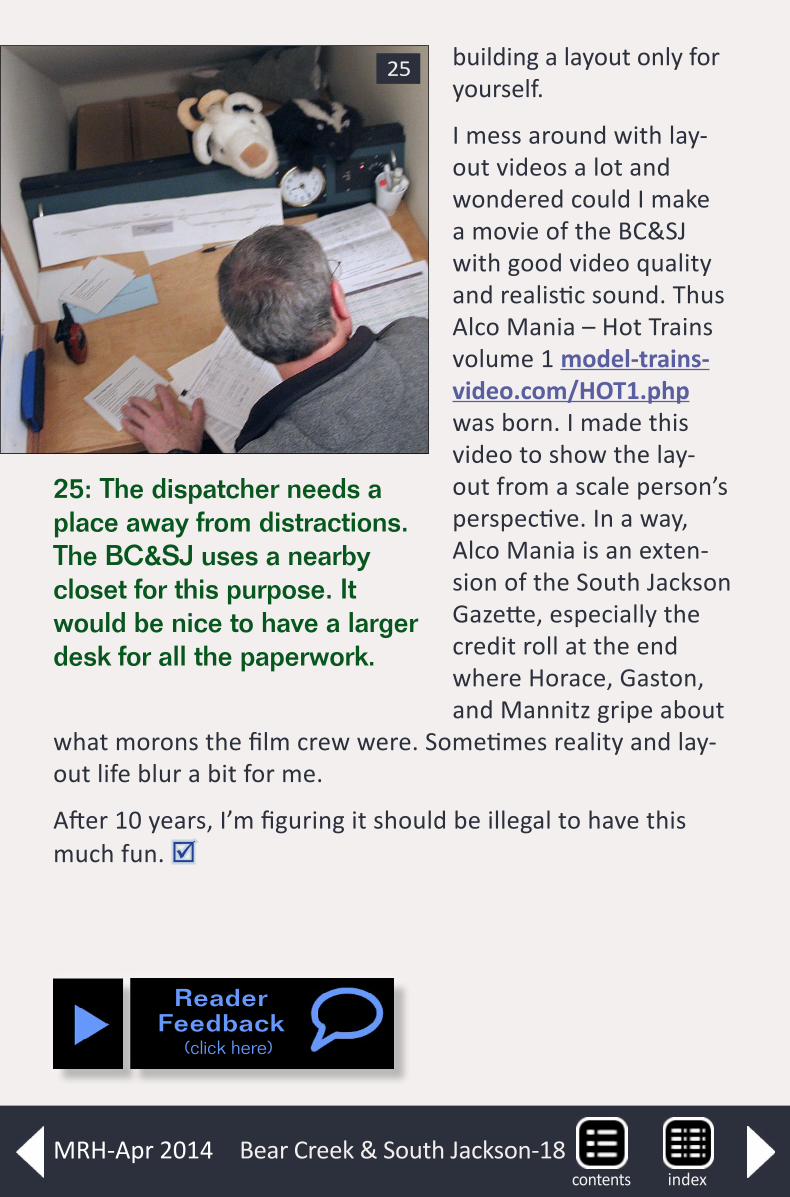
25: The dispatcher needs a place away from distractions. The BC&SJ uses a nearby closet for this purpose. It would be nice to have a larger desk for all the paperwork.
25 building a layout only for yourself.
I mess around with lay-out videos a lot and wondered could I make a movie of the BC&SJ with good video quality and realistic sound. Thus Alco Mania – Hot Trains volume 1 model-trains-video.com/HOT1.php was born. I made this video to show the lay-out from a scale person’s perspective. In a way, Alco Mania is an exten-sion of the South Jackson Gazette, especially the credit roll at the end where Horace, Gaston, and Mannitz gripe about
what morons the film crew were. Sometimes reality and lay-out life blur a bit for me.
After 10 years, I’m figuring it should be illegal to have this much fun.
Bear Creek & South Jackson-18
ReaderFeedback
(click here)
indexcontentsMRH-Apr 2014
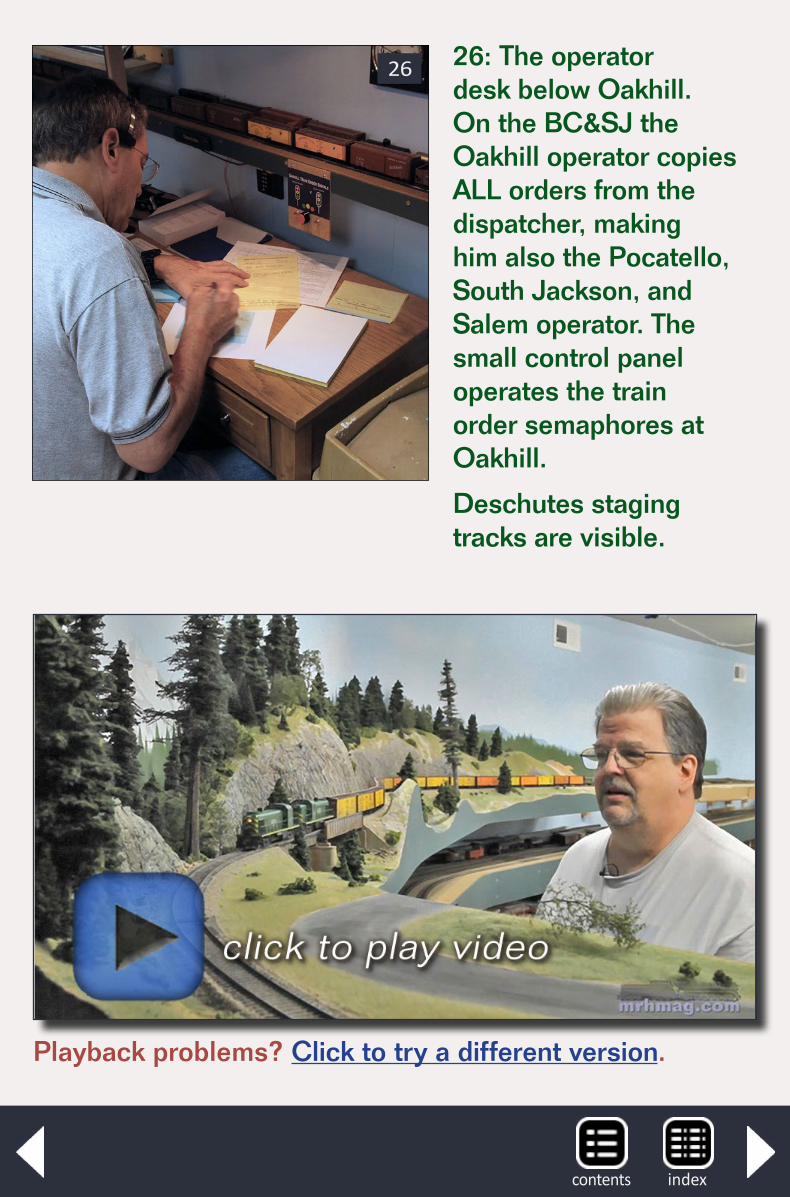
26: The operator desk below Oakhill. On the BC&SJ the Oakhill operator copies ALL orders from the dispatcher, making him also the Pocatello, South Jackson, and Salem operator. The small control panel operates the train order semaphores at Oakhill.
Deschutes staging tracks are visible.
26
Playback problems? Click to try a different version.
indexcontents
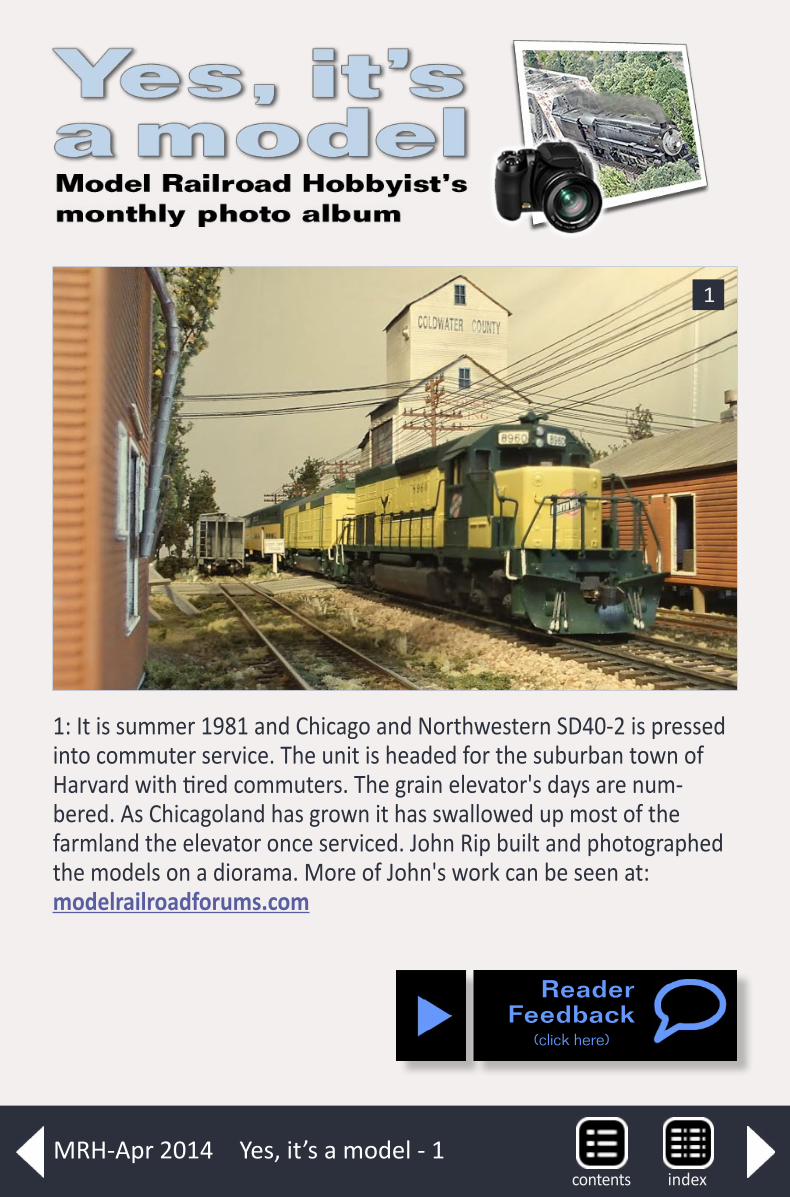
ReaderFeedback
(click here)
Yes, it’s a model - 1
1: It is summer 1981 and Chicago and Northwestern SD40-2 is pressed into commuter service. The unit is headed for the suburban town of Harvard with tired commuters. The grain elevator's days are num-bered. As Chicagoland has grown it has swallowed up most of the farmland the elevator once serviced. John Rip built and photographed the models on a diorama. More of John's work can be seen at: modelrailroadforums.com
1
indexcontentsMRH-Apr 2014
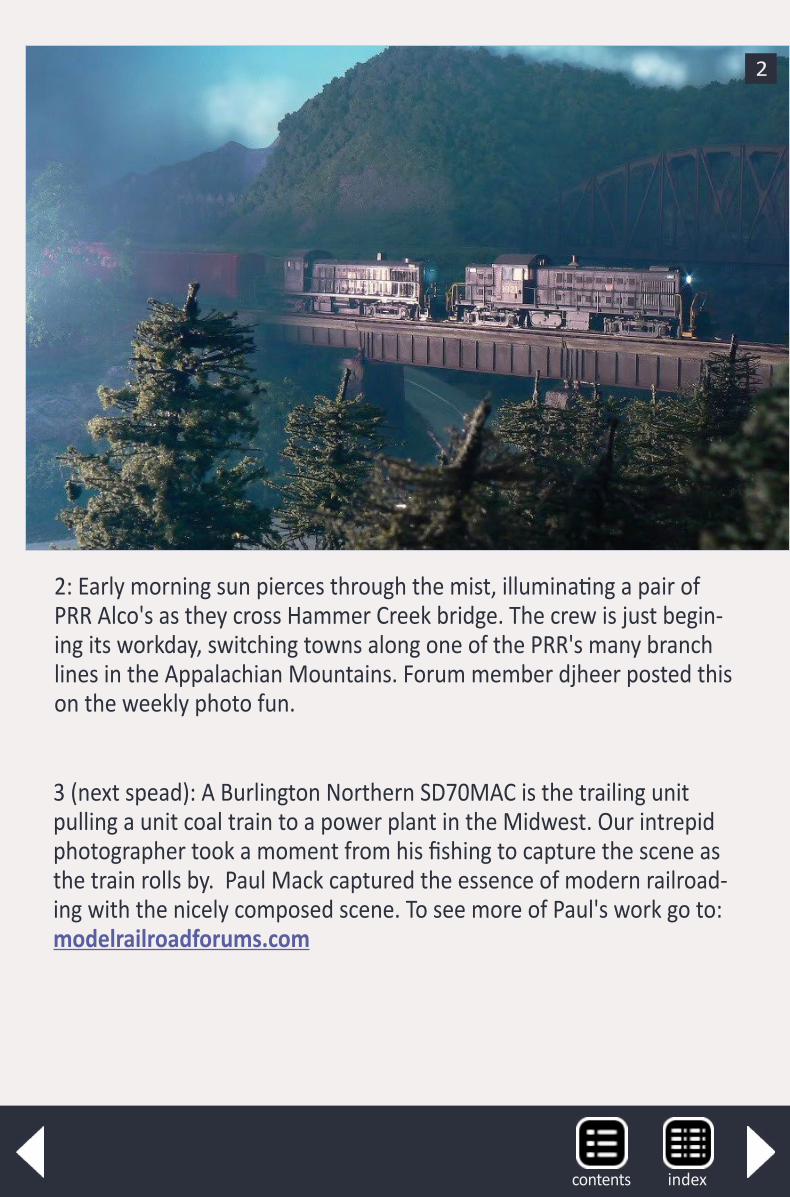
3 (next spead): A Burlington Northern SD70MAC is the trailing unit pulling a unit coal train to a power plant in the Midwest. Our intrepid photographer took a moment from his fishing to capture the scene as the train rolls by. Paul Mack captured the essence of modern railroad-ing with the nicely composed scene. To see more of Paul's work go to: modelrailroadforums.com
2
2: Early morning sun pierces through the mist, illuminating a pair of PRR Alco's as they cross Hammer Creek bridge. The crew is just begin-ing its workday, switching towns along one of the PRR's many branch lines in the Appalachian Mountains. Forum member djheer posted this on the weekly photo fun.
indexcontents
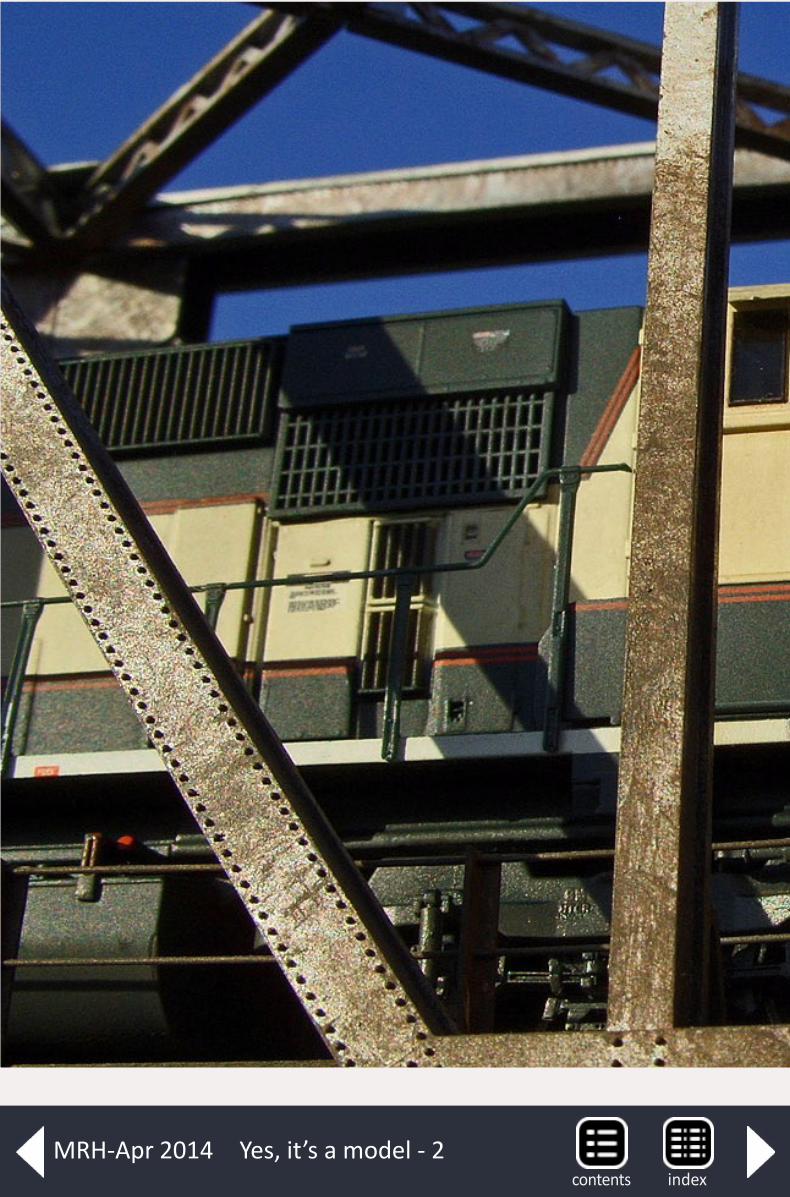
Yes, it’s a model - 2indexcontents
MRH-Apr 2014
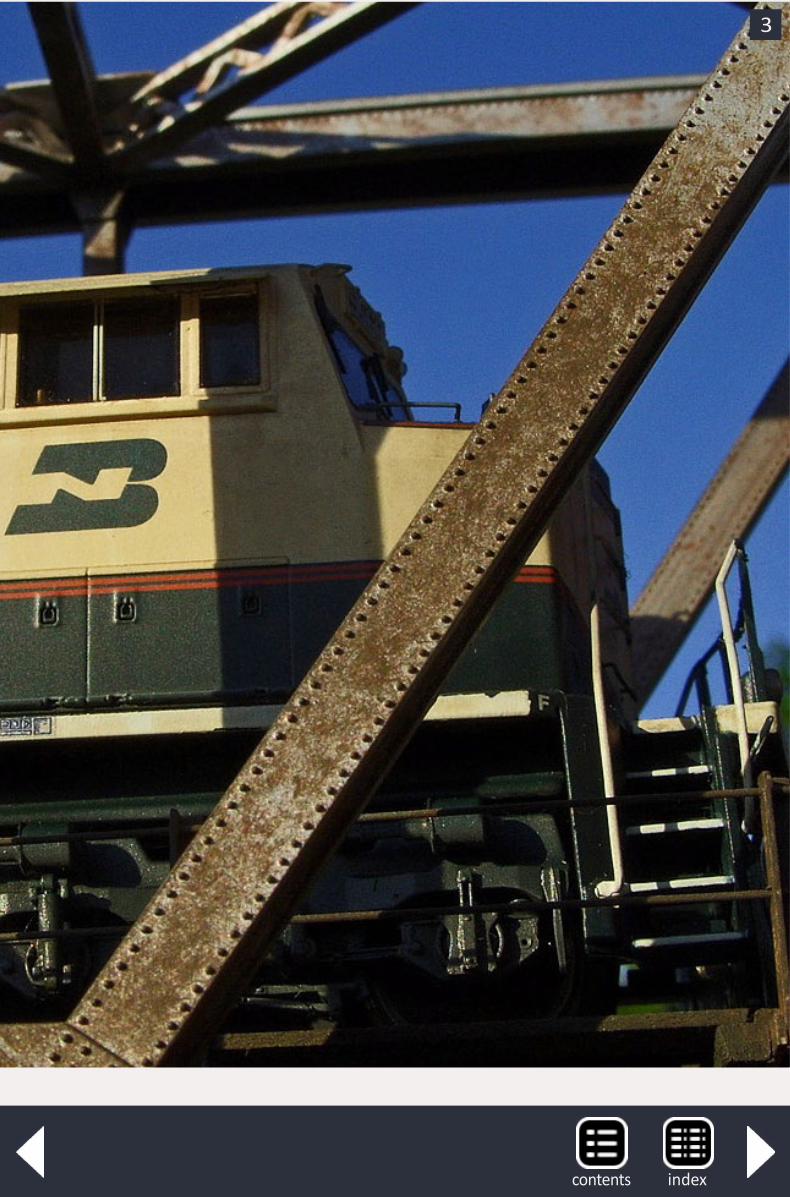
3
indexcontents
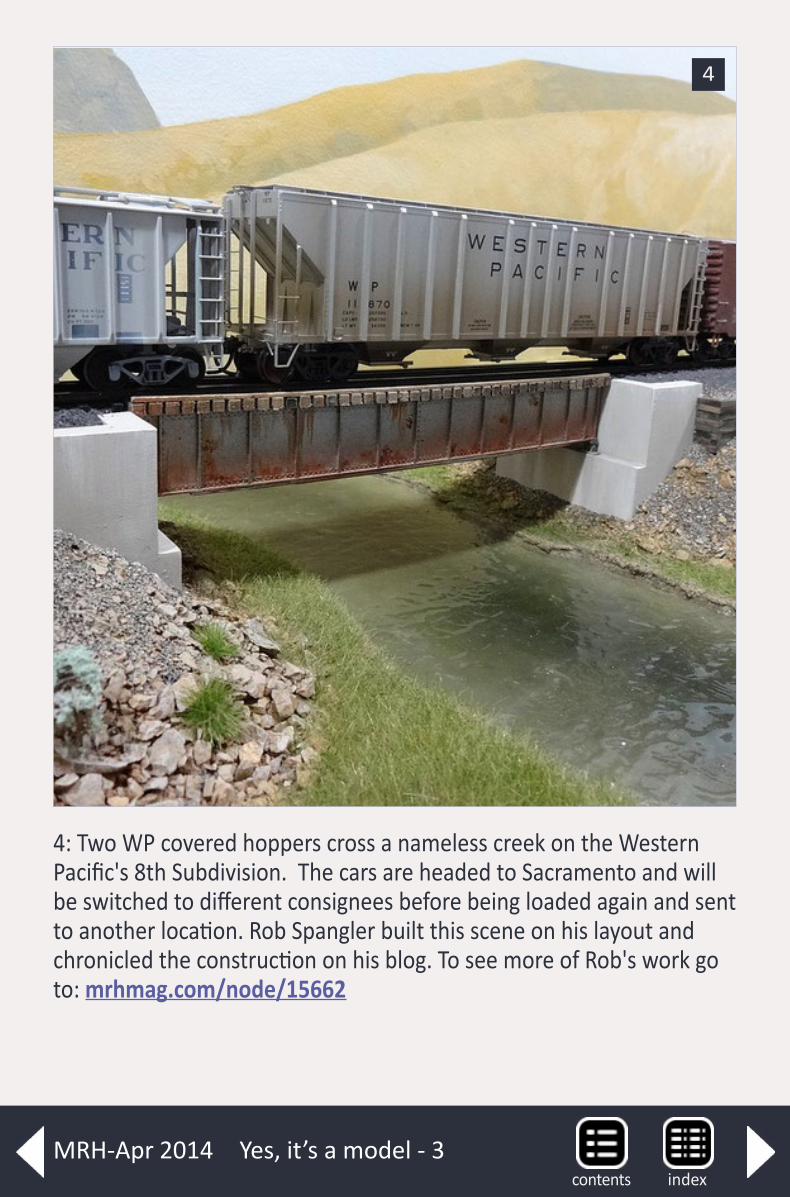
Yes, it’s a model - 3
4: Two WP covered hoppers cross a nameless creek on the Western Pacific's 8th Subdivision. The cars are headed to Sacramento and will be switched to different consignees before being loaded again and sent to another location. Rob Spangler built this scene on his layout and chronicled the construction on his blog. To see more of Rob's work go to: mrhmag.com/node/15662
4
indexcontentsMRH-Apr 2014

5: A Cornhill & Atherton 4-4-0 locomotive sits on the turntable wait-ing for the crew to line it up with an engine house. In the distance the fireman is walking into the shop foreman's office to learn which stall is ready for the locomotive.
Rob Clark took the photo and frequently posts his layout's progress in the MRH forum. He has created the look and feel of a small railroad that operates at a relaxed pace. To see more of Rob's work go to: mrhmag.com/node/16553
5
indexcontents
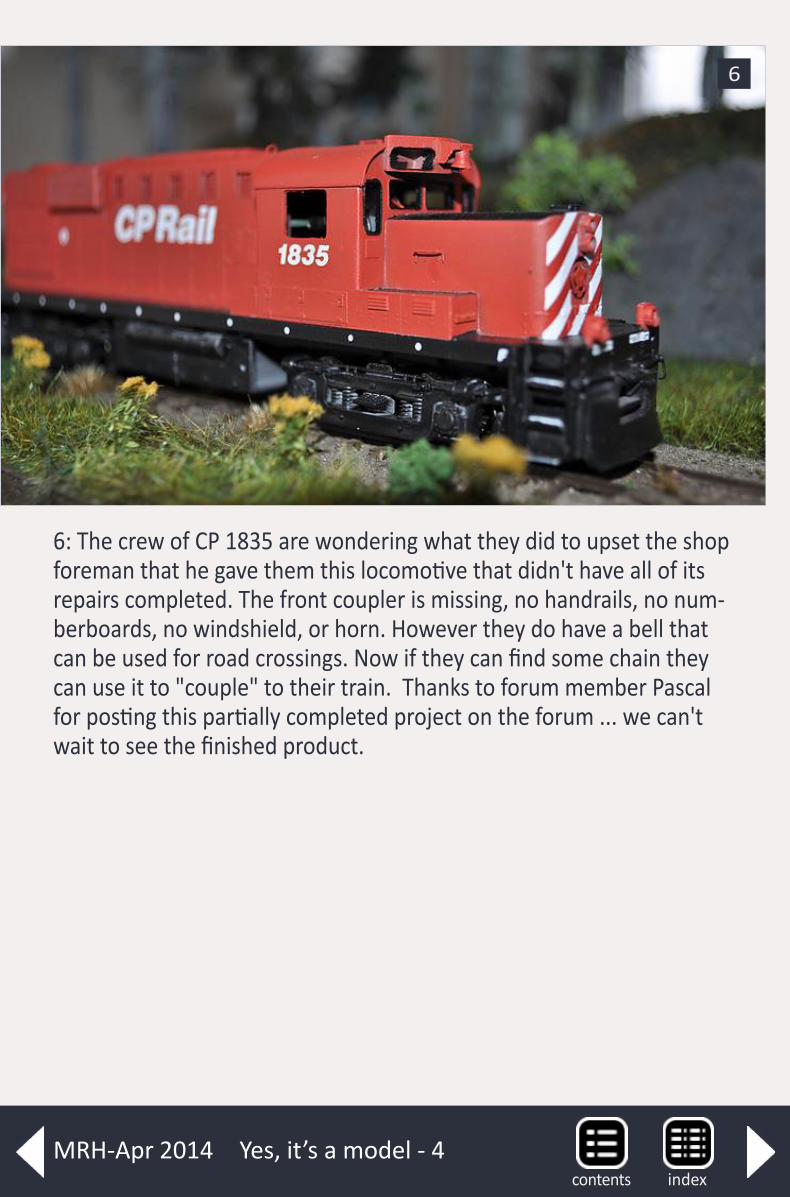
Yes, it’s a model - 4
6: The crew of CP 1835 are wondering what they did to upset the shop foreman that he gave them this locomotive that didn't have all of its repairs completed. The front coupler is missing, no handrails, no num-berboards, no windshield, or horn. However they do have a bell that can be used for road crossings. Now if they can find some chain they can use it to "couple" to their train. Thanks to forum member Pascal for posting this partially completed project on the forum ... we can't wait to see the finished product.
6
indexcontentsMRH-Apr 2014

Our Yes, it’s a model monthly photo feature presents some of the most inspiring modeling and photos from the MRH website and other locations. If you’d like to get your modeling in our photo fea-ture, just start posting your photos on the MRH website, especially in the Weekend Photo Fun thread created each weekend.
Many of the photos posted show HO modeling, but we encourage modelers in other scales to post on the MRH website as well. We don’t want this to just be an HO photo feature!
For info on how to post photos to our website, see this help how-to. You need to be an MRH subscriber to post photos to our web-site, and becoming a subscriber is free, just fill out this form here.
ReaderFeedback
(click here)
Get your photo here!
indexcontents
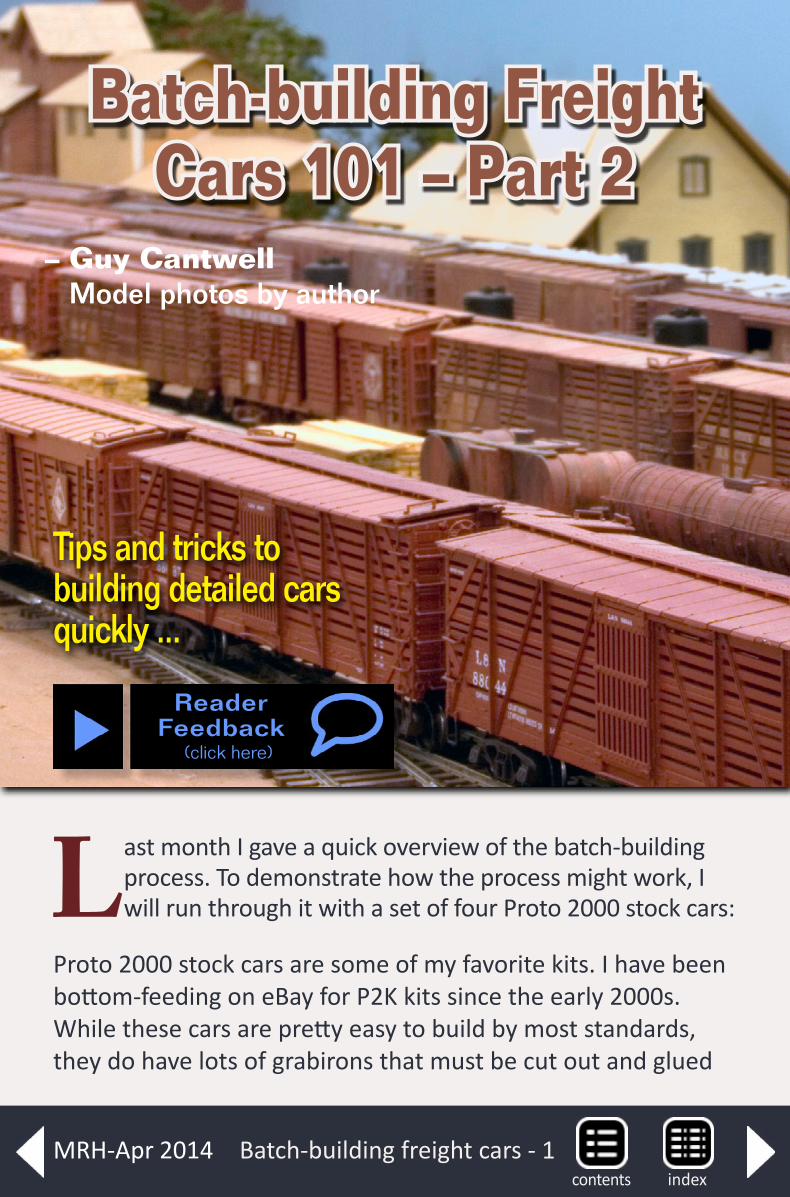
Batch-building Freight Cars 101 – Part 2
– Guy Cantwell Model photos by author
Batch-building freight cars - 1
Tips and tricks to building detailed cars quickly ...
ReaderFeedback
(click here)
Last month I gave a quick overview of the batch-building process. To demonstrate how the process might work, I will run through it with a set of four Proto 2000 stock cars:
Proto 2000 stock cars are some of my favorite kits. I have been bottom-feeding on eBay for P2K kits since the early 2000s. While these cars are pretty easy to build by most standards, they do have lots of grabirons that must be cut out and glued
indexcontentsMRH-Apr 2014
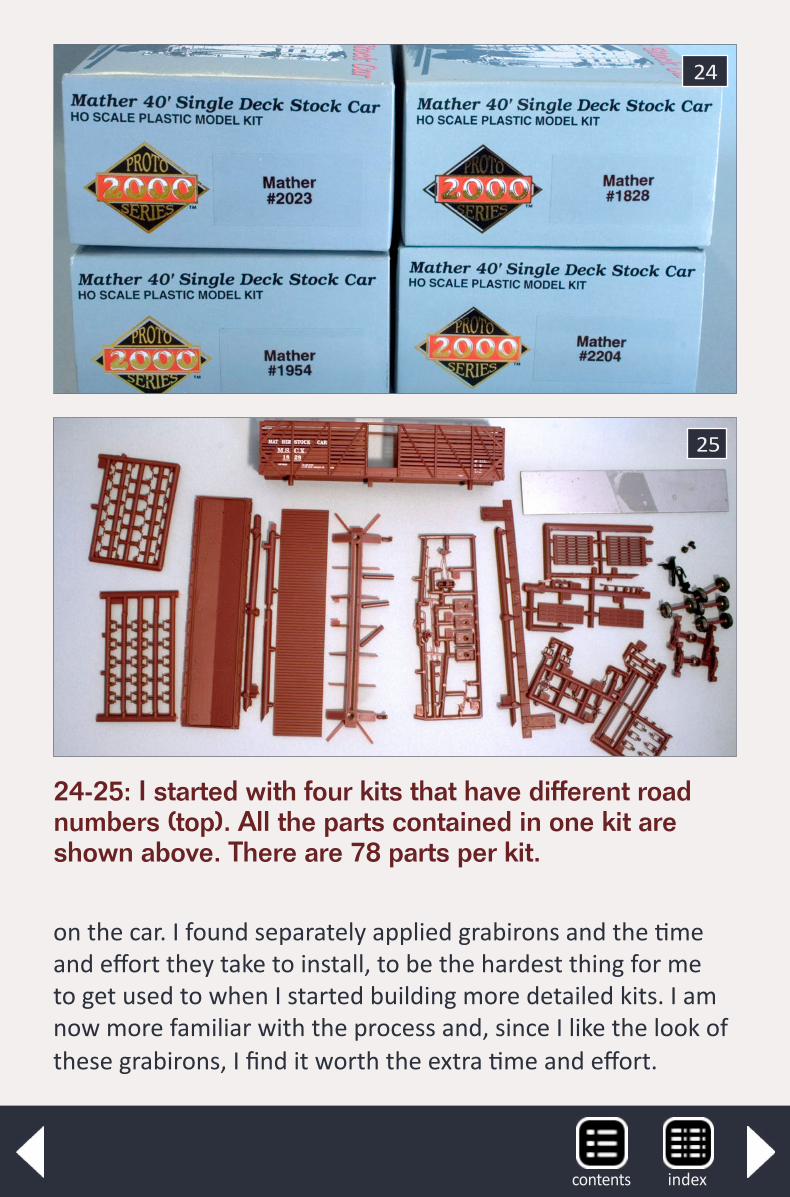
24-25: I started with four kits that have different road numbers (top). All the parts contained in one kit are shown above. There are 78 parts per kit.
on the car. I found separately applied grabirons and the time and effort they take to install, to be the hardest thing for me to get used to when I started building more detailed kits. I am now more familiar with the process and, since I like the look of these grabirons, I find it worth the extra time and effort.
24
25
indexcontents
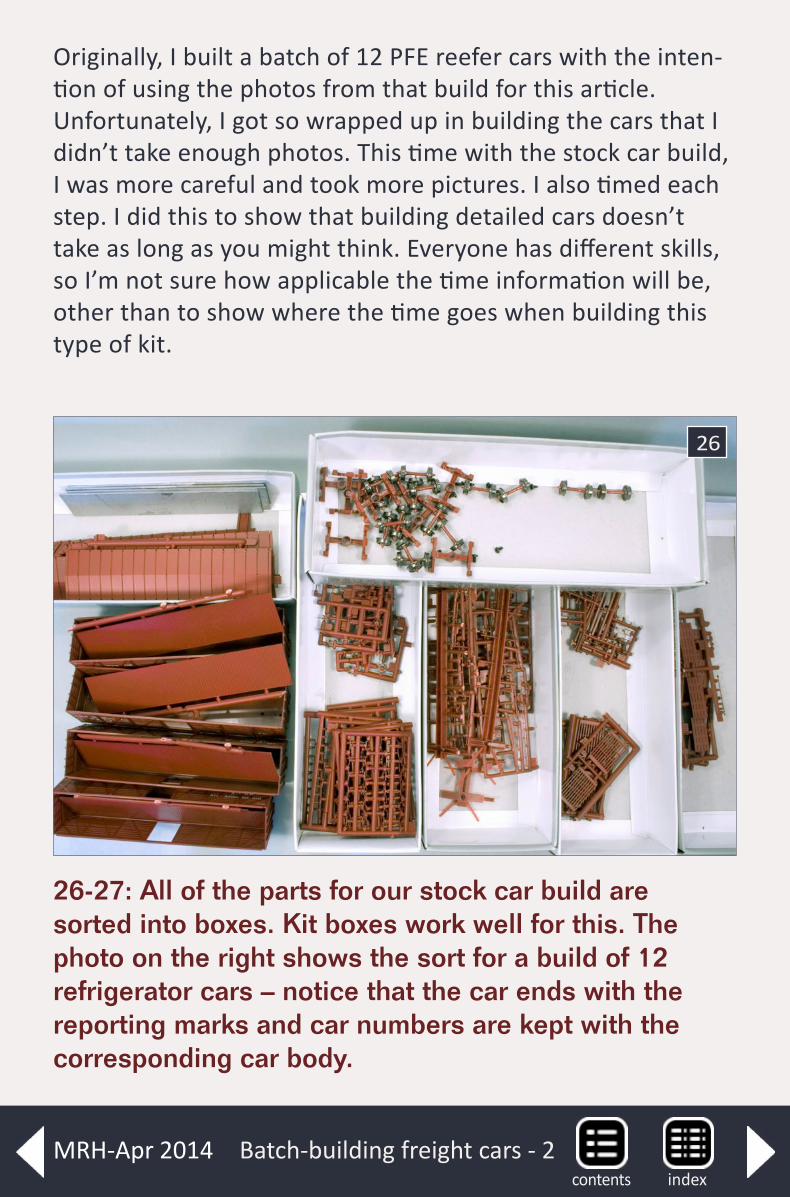
Batch-building freight cars - 2
26-27: All of the parts for our stock car build are sorted into boxes. Kit boxes work well for this. The photo on the right shows the sort for a build of 12 refrigerator cars – notice that the car ends with the reporting marks and car numbers are kept with the corresponding car body.
Originally, I built a batch of 12 PFE reefer cars with the inten-tion of using the photos from that build for this article. Unfortunately, I got so wrapped up in building the cars that I didn’t take enough photos. This time with the stock car build, I was more careful and took more pictures. I also timed each step. I did this to show that building detailed cars doesn’t take as long as you might think. Everyone has different skills, so I’m not sure how applicable the time information will be, other than to show where the time goes when building this type of kit.
26
indexcontentsMRH-Apr 2014
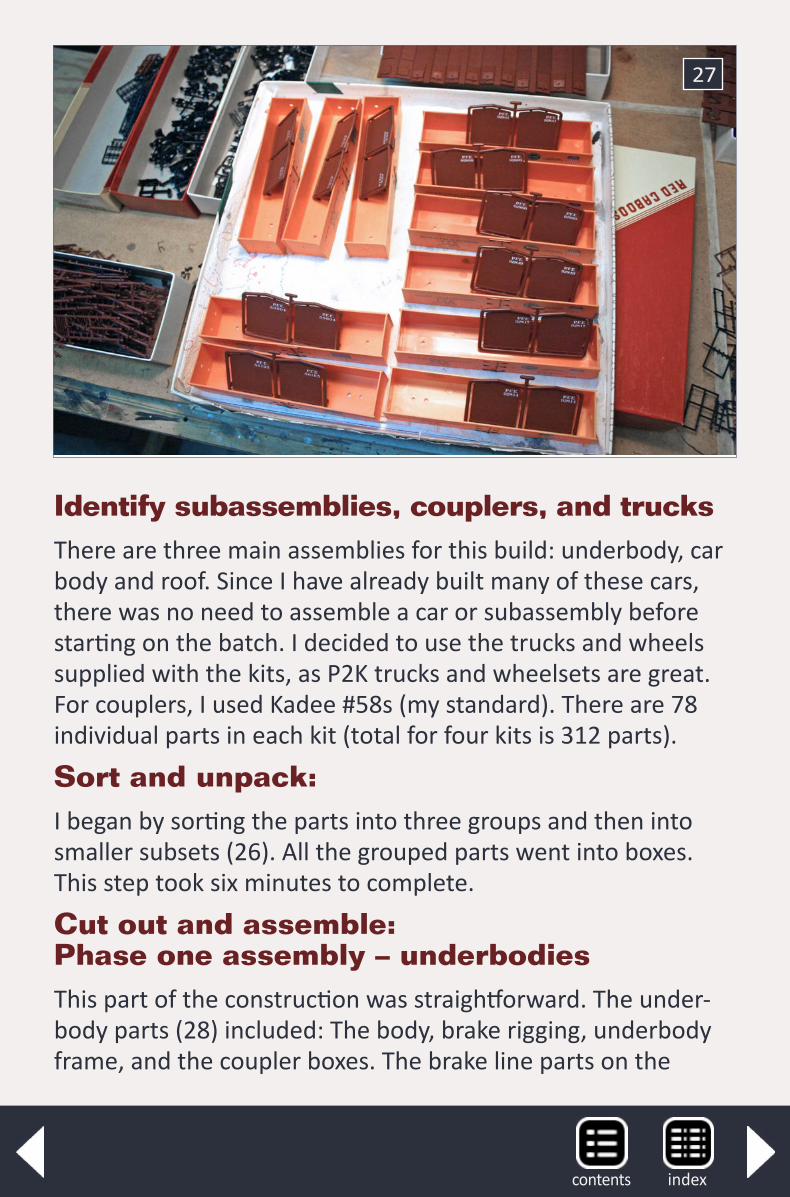
Identify subassemblies, couplers, and trucks There are three main assemblies for this build: underbody, car body and roof. Since I have already built many of these cars, there was no need to assemble a car or subassembly before starting on the batch. I decided to use the trucks and wheels supplied with the kits, as P2K trucks and wheelsets are great. For couplers, I used Kadee #58s (my standard). There are 78 individual parts in each kit (total for four kits is 312 parts).
Sort and unpack: I began by sorting the parts into three groups and then into smaller subsets (26). All the grouped parts went into boxes. This step took six minutes to complete.
Cut out and assemble: Phase one assembly – underbodiesThis part of the construction was straightforward. The under-body parts (28) included: The body, brake rigging, underbody frame, and the coupler boxes. The brake line parts on the
27
indexcontents
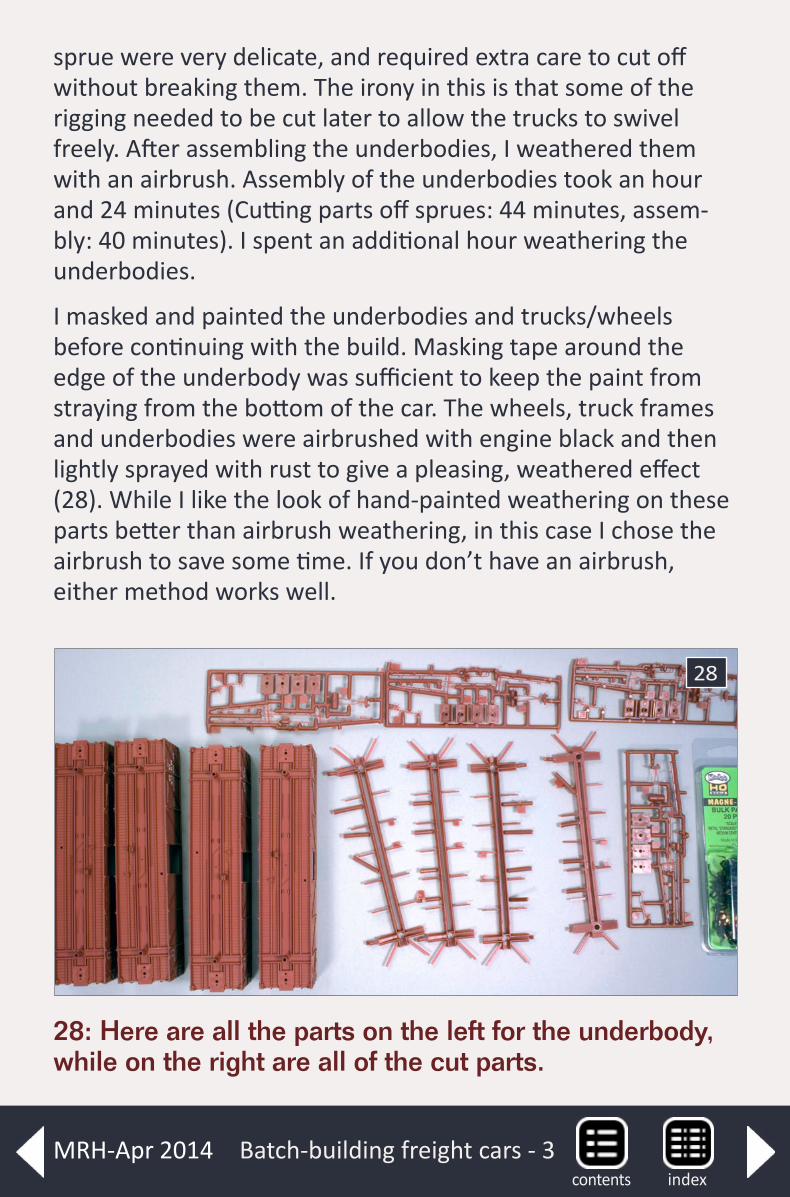
Batch-building freight cars - 3
28: Here are all the parts on the left for the underbody, while on the right are all of the cut parts.
28
sprue were very delicate, and required extra care to cut off without breaking them. The irony in this is that some of the rigging needed to be cut later to allow the trucks to swivel freely. After assembling the underbodies, I weathered them with an airbrush. Assembly of the underbodies took an hour and 24 minutes (Cutting parts off sprues: 44 minutes, assem-bly: 40 minutes). I spent an additional hour weathering the underbodies.
I masked and painted the underbodies and trucks/wheels before continuing with the build. Masking tape around the edge of the underbody was sufficient to keep the paint from straying from the bottom of the car. The wheels, truck frames and underbodies were airbrushed with engine black and then lightly sprayed with rust to give a pleasing, weathered effect (28). While I like the look of hand-painted weathering on these parts better than airbrush weathering, in this case I chose the airbrush to save some time. If you don’t have an airbrush, either method works well.
indexcontentsMRH-Apr 2014
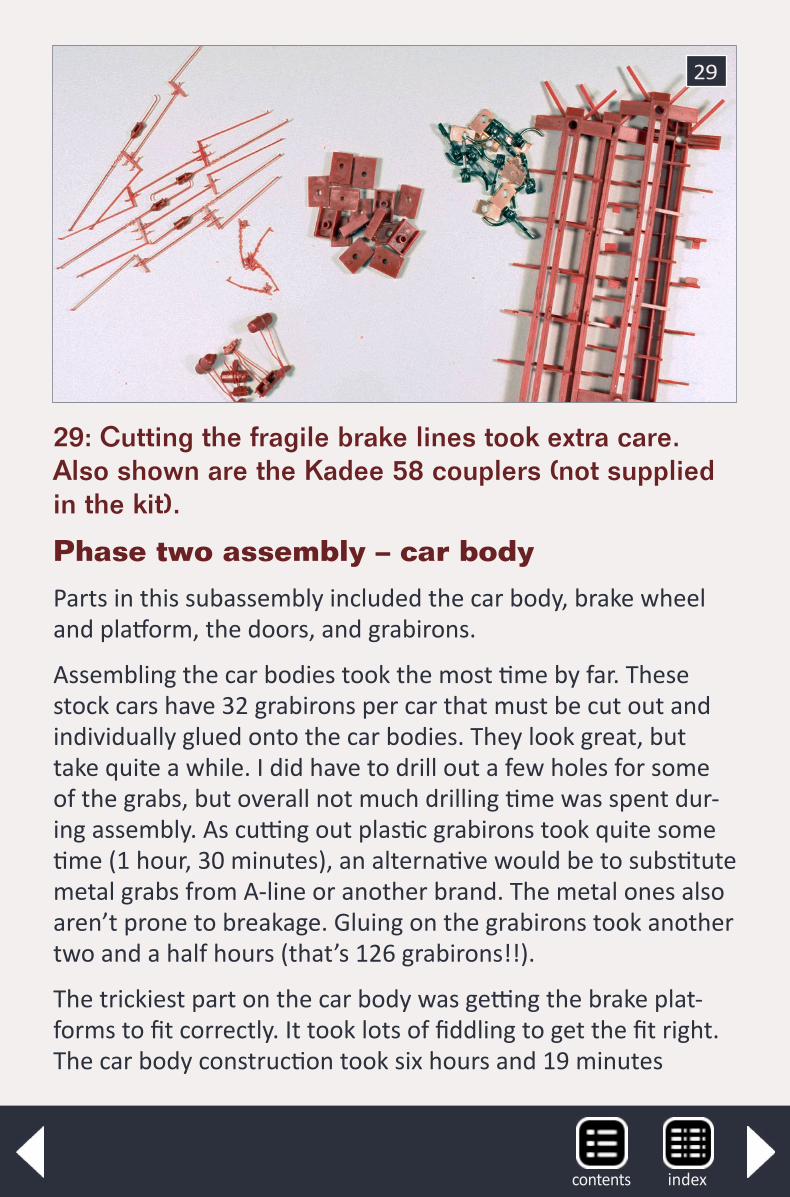
29: Cutting the fragile brake lines took extra care. Also shown are the Kadee 58 couplers (not supplied in the kit).
29
Phase two assembly – car body
Parts in this subassembly included the car body, brake wheel and platform, the doors, and grabirons.
Assembling the car bodies took the most time by far. These stock cars have 32 grabirons per car that must be cut out and individually glued onto the car bodies. They look great, but take quite a while. I did have to drill out a few holes for some of the grabs, but overall not much drilling time was spent dur-ing assembly. As cutting out plastic grabirons took quite some time (1 hour, 30 minutes), an alternative would be to substitute metal grabs from A-line or another brand. The metal ones also aren’t prone to breakage. Gluing on the grabirons took another two and a half hours (that’s 126 grabirons!!).
The trickiest part on the car body was getting the brake plat-forms to fit correctly. It took lots of fiddling to get the fit right. The car body construction took six hours and 19 minutes
indexcontents
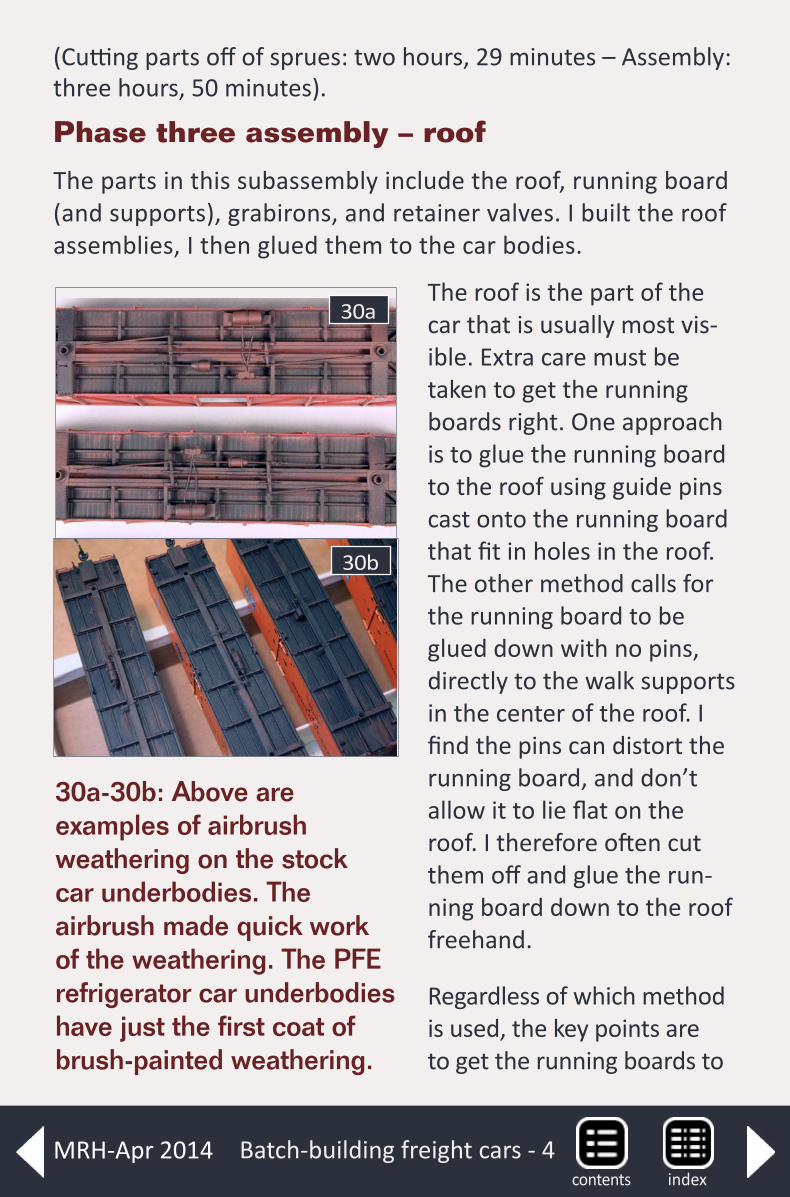
(Cutting parts off of sprues: two hours, 29 minutes – Assembly: three hours, 50 minutes).
Phase three assembly – roof
The parts in this subassembly include the roof, running board (and supports), grabirons, and retainer valves. I built the roof assemblies, I then glued them to the car bodies.
The roof is the part of the car that is usually most vis-ible. Extra care must be taken to get the running boards right. One approach is to glue the running board to the roof using guide pins cast onto the running board that fit in holes in the roof. The other method calls for the running board to be glued down with no pins, directly to the walk supports in the center of the roof. I find the pins can distort the running board, and don’t allow it to lie flat on the roof. I therefore often cut them off and glue the run-ning board down to the roof freehand.
Regardless of which method is used, the key points are to get the running boards to
Batch-building freight cars - 4
30a
30a-30b: Above are examples of airbrush weathering on the stock car underbodies. The airbrush made quick work of the weathering. The PFE refrigerator car underbodies have just the first coat of brush-painted weathering.
30b
indexcontentsMRH-Apr 2014
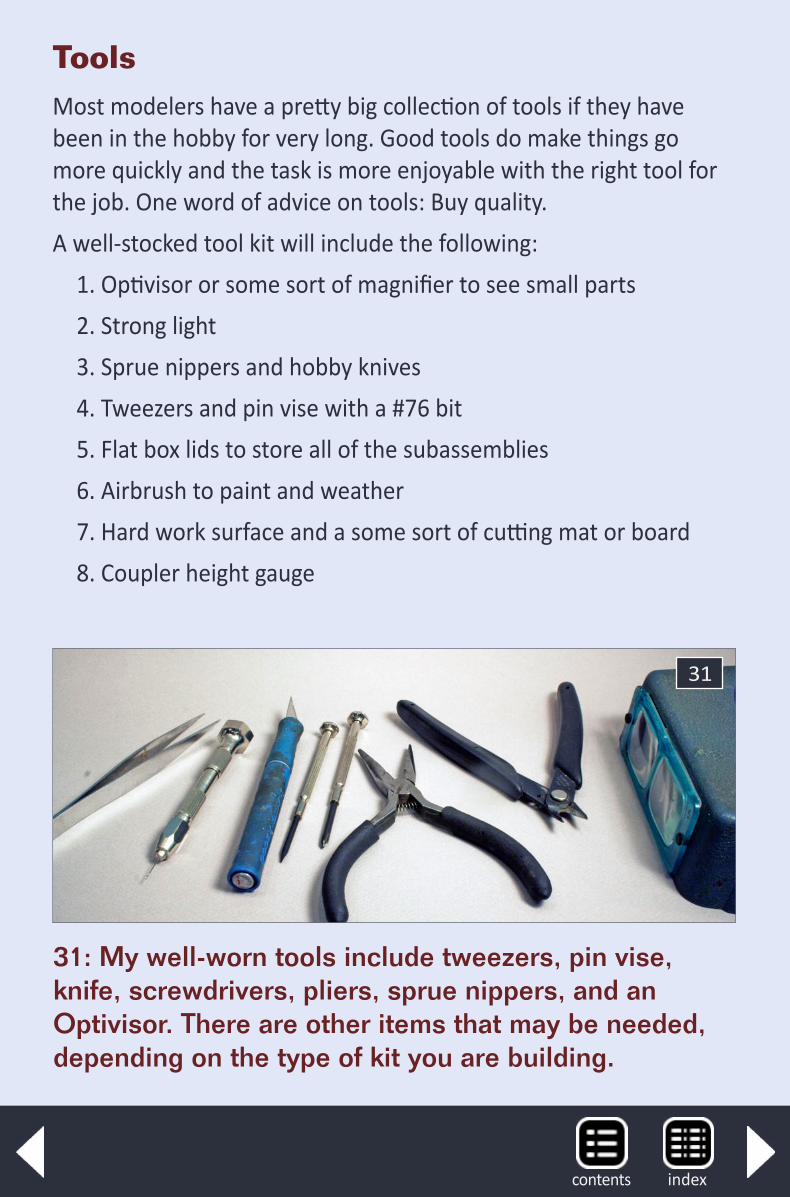
31: My well-worn tools include tweezers, pin vise, knife, screwdrivers, pliers, sprue nippers, and an Optivisor. There are other items that may be needed, depending on the type of kit you are building.
ToolsMost modelers have a pretty big collection of tools if they have been in the hobby for very long. Good tools do make things go more quickly and the task is more enjoyable with the right tool for the job. One word of advice on tools: Buy quality.A well-stocked tool kit will include the following:
1. Optivisor or some sort of magnifier to see small parts2. Strong light3. Sprue nippers and hobby knives4. Tweezers and pin vise with a #76 bit5. Flat box lids to store all of the subassemblies6. Airbrush to paint and weather7. Hard work surface and a some sort of cutting mat or board8. Coupler height gauge
31
indexcontents
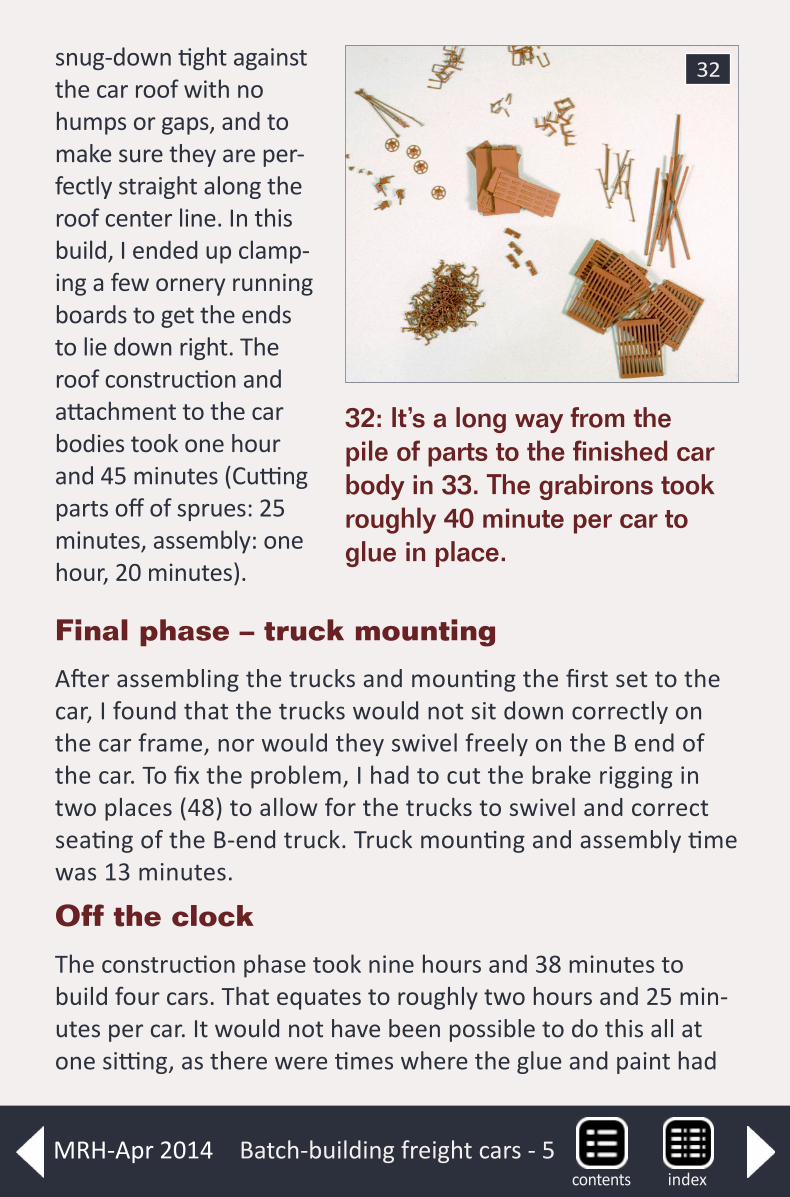
Batch-building freight cars - 5
snug-down tight against the car roof with no humps or gaps, and to make sure they are per-fectly straight along the roof center line. In this build, I ended up clamp-ing a few ornery running boards to get the ends to lie down right. The roof construction and attachment to the car bodies took one hour and 45 minutes (Cutting parts off of sprues: 25 minutes, assembly: one hour, 20 minutes).
Final phase – truck mounting
After assembling the trucks and mounting the first set to the car, I found that the trucks would not sit down correctly on the car frame, nor would they swivel freely on the B end of the car. To fix the problem, I had to cut the brake rigging in two places (48) to allow for the trucks to swivel and correct seating of the B-end truck. Truck mounting and assembly time was 13 minutes.
Off the clock
The construction phase took nine hours and 38 minutes to build four cars. That equates to roughly two hours and 25 min-utes per car. It would not have been possible to do this all at one sitting, as there were times where the glue and paint had
32: It’s a long way from the pile of parts to the finished car body in 33. The grabirons took roughly 40 minute per car to glue in place.
32
indexcontentsMRH-Apr 2014
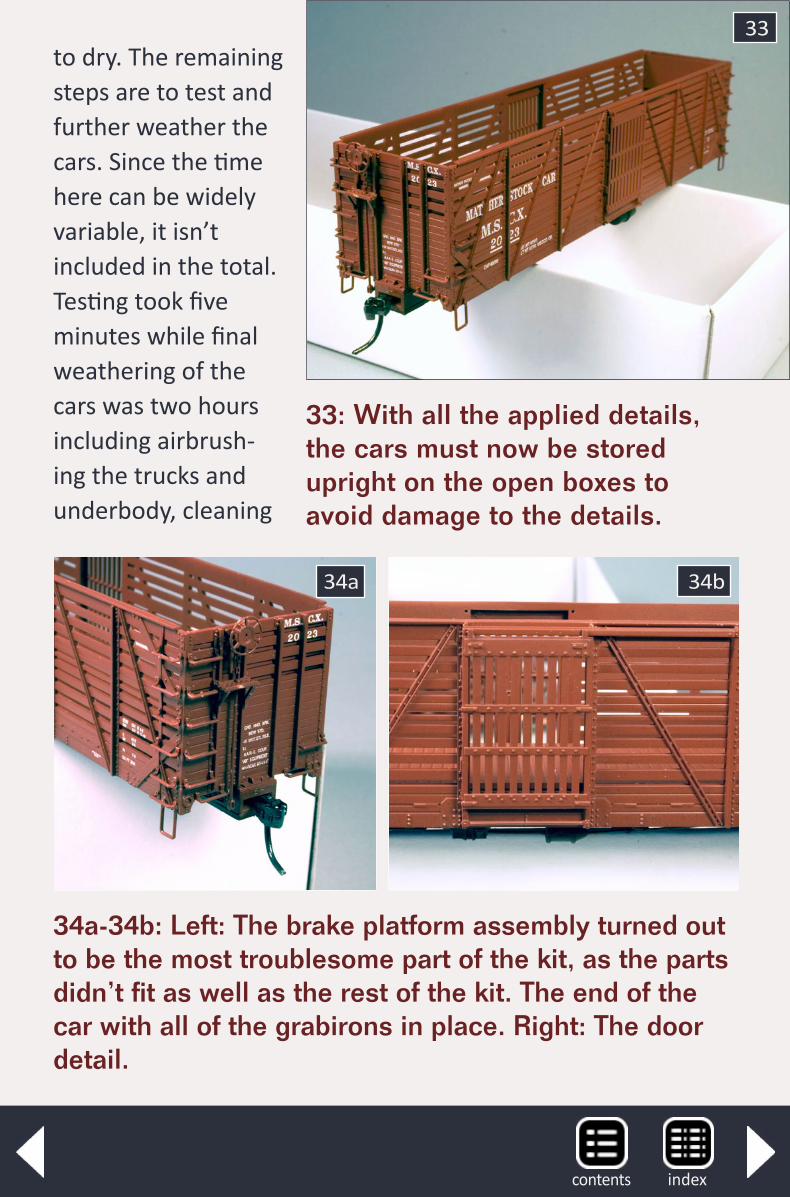
to dry. The remaining steps are to test and further weather the cars. Since the time here can be widely variable, it isn’t included in the total. Testing took five minutes while final weathering of the cars was two hours including airbrush-ing the trucks and underbody, cleaning
33: With all the applied details, the cars must now be stored upright on the open boxes to avoid damage to the details.
33
34a-34b: Left: The brake platform assembly turned out to be the most troublesome part of the kit, as the parts didn’t fit as well as the rest of the kit. The end of the car with all of the grabirons in place. Right: The door detail.
34a 34b
indexcontents
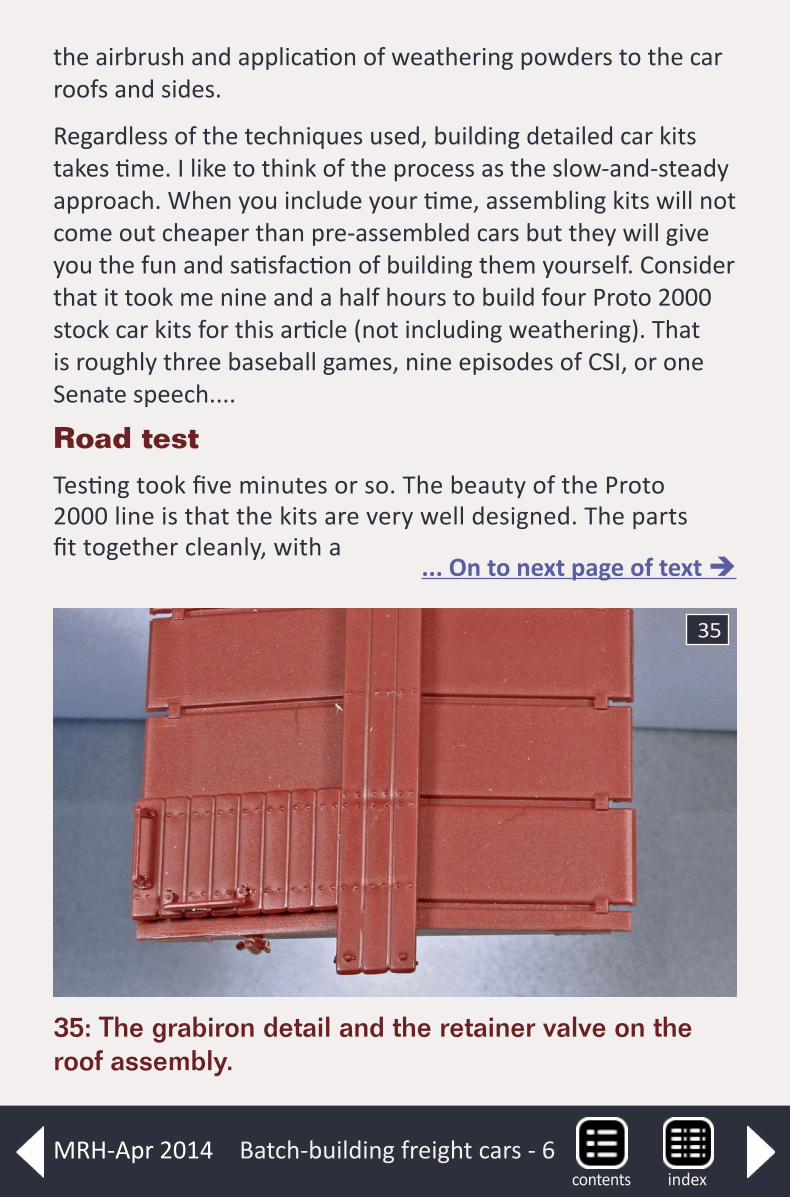
Batch-building freight cars - 6
the airbrush and application of weathering powders to the car roofs and sides.
Regardless of the techniques used, building detailed car kits takes time. I like to think of the process as the slow-and-steady approach. When you include your time, assembling kits will not come out cheaper than pre-assembled cars but they will give you the fun and satisfaction of building them yourself. Consider that it took me nine and a half hours to build four Proto 2000 stock car kits for this article (not including weathering). That is roughly three baseball games, nine episodes of CSI, or one Senate speech....
Road test
Testing took five minutes or so. The beauty of the Proto 2000 line is that the kits are very well designed. The parts fit together cleanly, with a
... On to next page of text
35: The grabiron detail and the retainer valve on the roof assembly.
35
indexcontentsMRH-Apr 2014
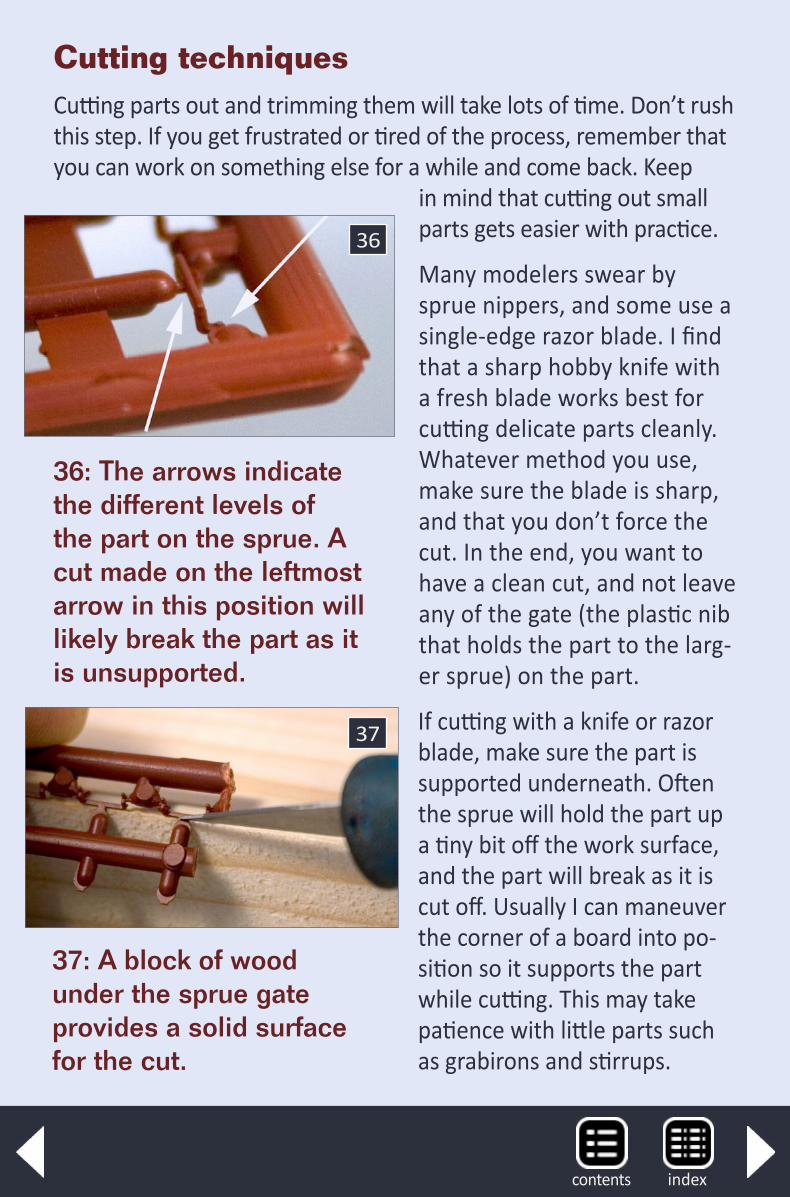
Cutting techniquesCutting parts out and trimming them will take lots of time. Don’t rush this step. If you get frustrated or tired of the process, remember that you can work on something else for a while and come back. Keep
in mind that cutting out small parts gets easier with practice.
Many modelers swear by sprue nippers, and some use a single-edge razor blade. I find that a sharp hobby knife with a fresh blade works best for cutting delicate parts cleanly. Whatever method you use, make sure the blade is sharp, and that you don’t force the cut. In the end, you want to have a clean cut, and not leave any of the gate (the plastic nib that holds the part to the larg-er sprue) on the part.
If cutting with a knife or razor blade, make sure the part is supported underneath. Often the sprue will hold the part up a tiny bit off the work surface, and the part will break as it is cut off. Usually I can maneuver the corner of a board into po-sition so it supports the part while cutting. This may take patience with little parts such as grabirons and stirrups.
36: The arrows indicate the different levels of the part on the sprue. A cut made on the leftmost arrow in this position will likely break the part as it is unsupported.
36
37: A block of wood under the sprue gate provides a solid surface for the cut.
37
indexcontents
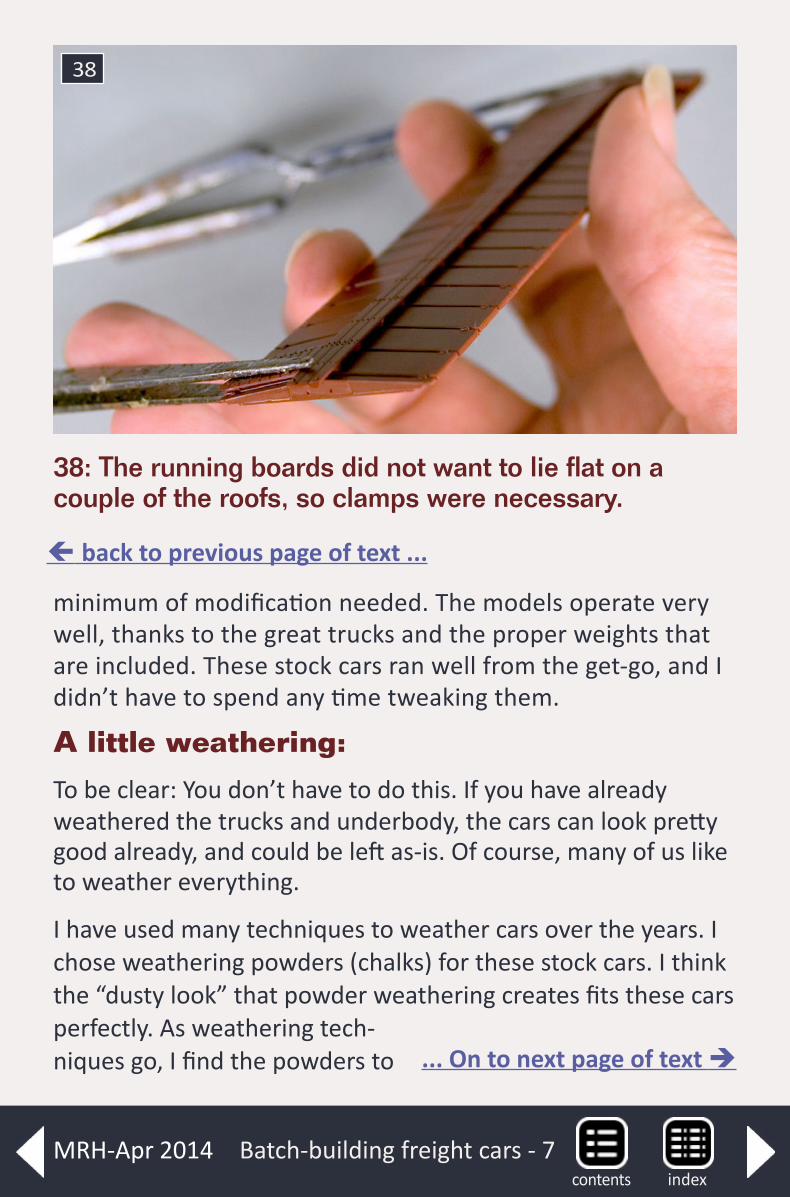
minimum of modification needed. The models operate very well, thanks to the great trucks and the proper weights that are included. These stock cars ran well from the get-go, and I didn’t have to spend any time tweaking them.
A little weathering:
To be clear: You don’t have to do this. If you have already weathered the trucks and underbody, the cars can look pretty good already, and could be left as-is. Of course, many of us like to weather everything.
I have used many techniques to weather cars over the years. I chose weathering powders (chalks) for these stock cars. I think the “dusty look” that powder weathering creates fits these cars perfectly. As weathering tech-niques go, I find the powders to
38: The running boards did not want to lie flat on a couple of the roofs, so clamps were necessary.
38
Batch-building freight cars - 7
back to previous page of text ...
... On to next page of text
indexcontentsMRH-Apr 2014
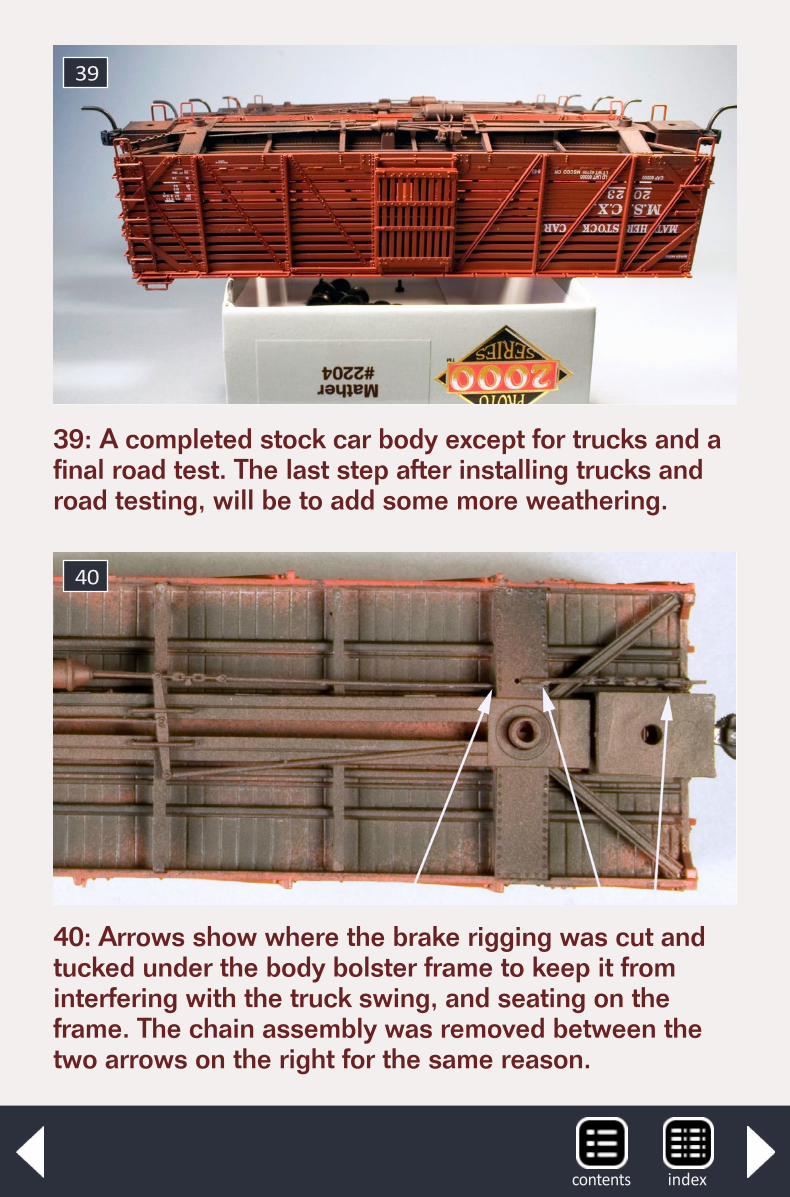
39
39: A completed stock car body except for trucks and a final road test. The last step after installing trucks and road testing, will be to add some more weathering.
40
40: Arrows show where the brake rigging was cut and tucked under the body bolster frame to keep it from interfering with the truck swing, and seating on the frame. The chain assembly was removed between the two arrows on the right for the same reason.
indexcontents
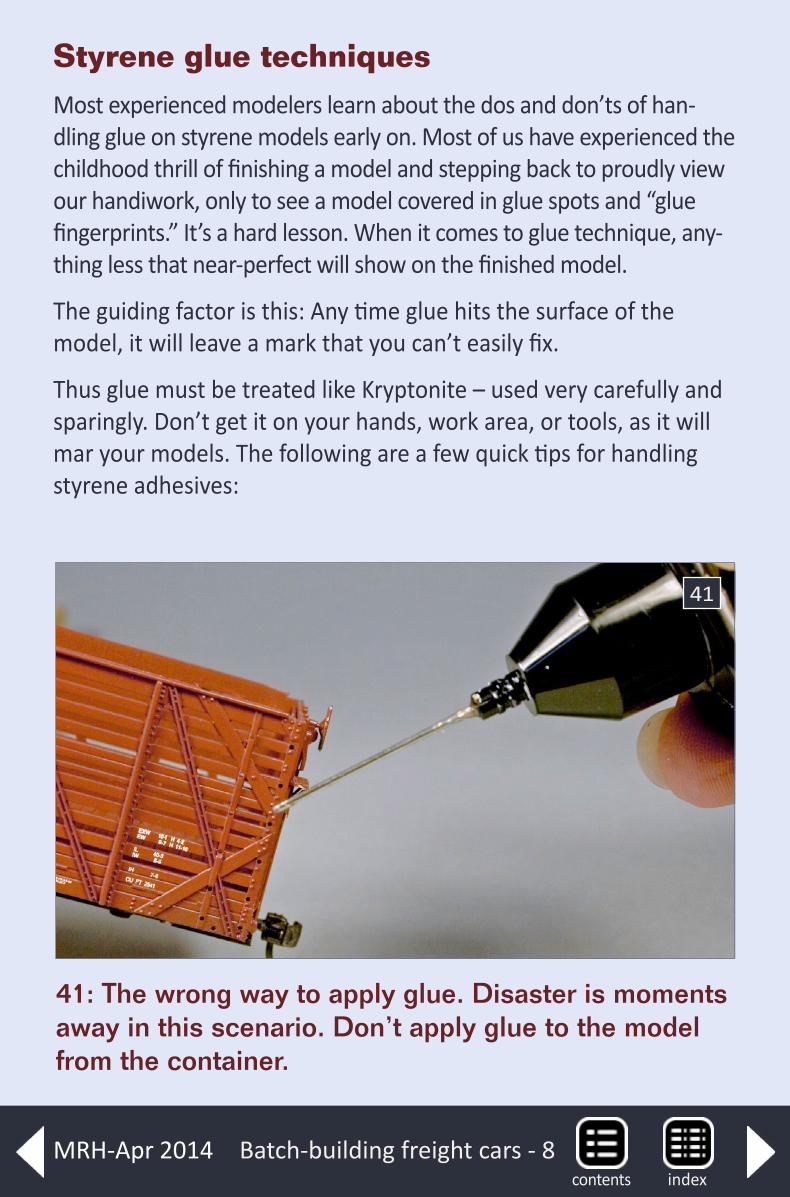
Batch-building freight cars - 8
41: The wrong way to apply glue. Disaster is moments away in this scenario. Don’t apply glue to the model from the container.
41
Styrene glue techniquesMost experienced modelers learn about the dos and don’ts of han-dling glue on styrene models early on. Most of us have experienced the childhood thrill of finishing a model and stepping back to proudly view our handiwork, only to see a model covered in glue spots and “glue fingerprints.” It’s a hard lesson. When it comes to glue technique, any-thing less that near-perfect will show on the finished model.
The guiding factor is this: Any time glue hits the surface of the model, it will leave a mark that you can’t easily fix.
Thus glue must be treated like Kryptonite – used very carefully and sparingly. Don’t get it on your hands, work area, or tools, as it will mar your models. The following are a few quick tips for handling styrene adhesives:
indexcontentsMRH-Apr 2014
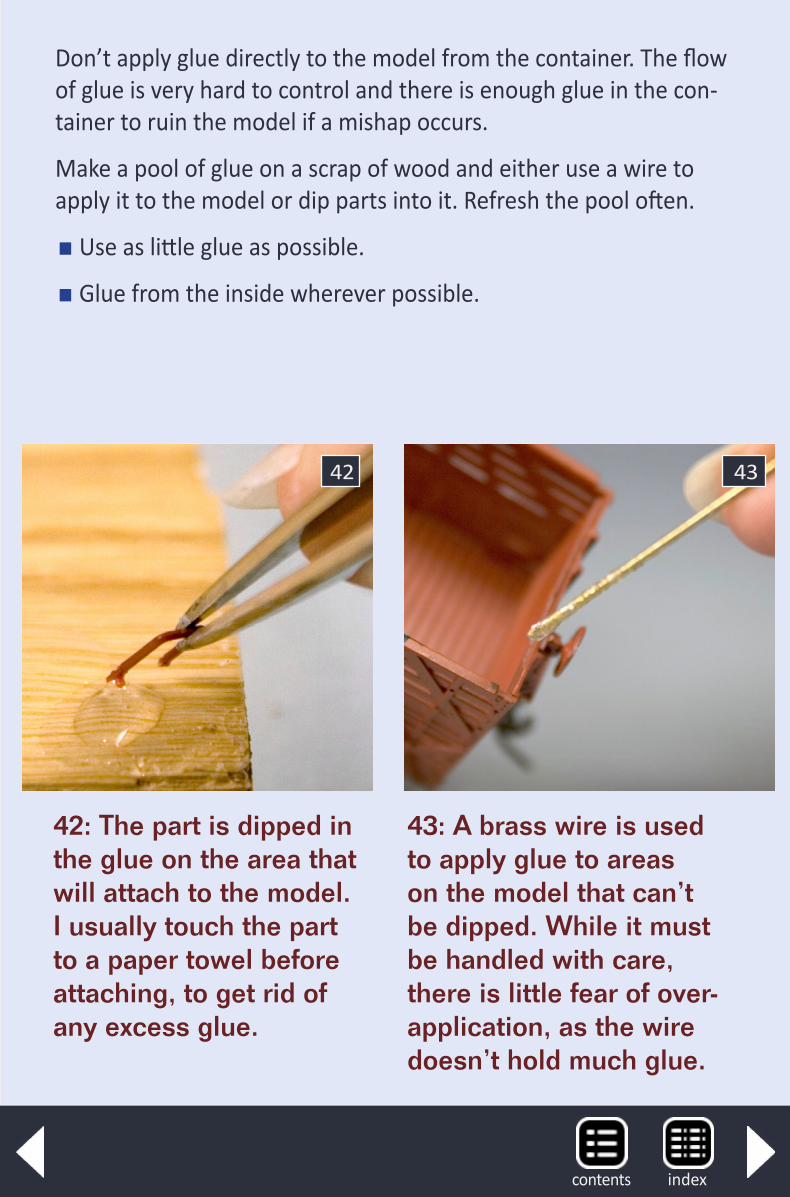
42 43
Don’t apply glue directly to the model from the container. The flow of glue is very hard to control and there is enough glue in the con-tainer to ruin the model if a mishap occurs.
Make a pool of glue on a scrap of wood and either use a wire to apply it to the model or dip parts into it. Refresh the pool often.
�Use as little glue as possible.
�Glue from the inside wherever possible.
42: The part is dipped in the glue on the area that will attach to the model. I usually touch the part to a paper towel before attaching, to get rid of any excess glue.
43: A brass wire is used to apply glue to areas on the model that can’t be dipped. While it must be handled with care, there is little fear of over-application, as the wire doesn’t hold much glue.
indexcontents
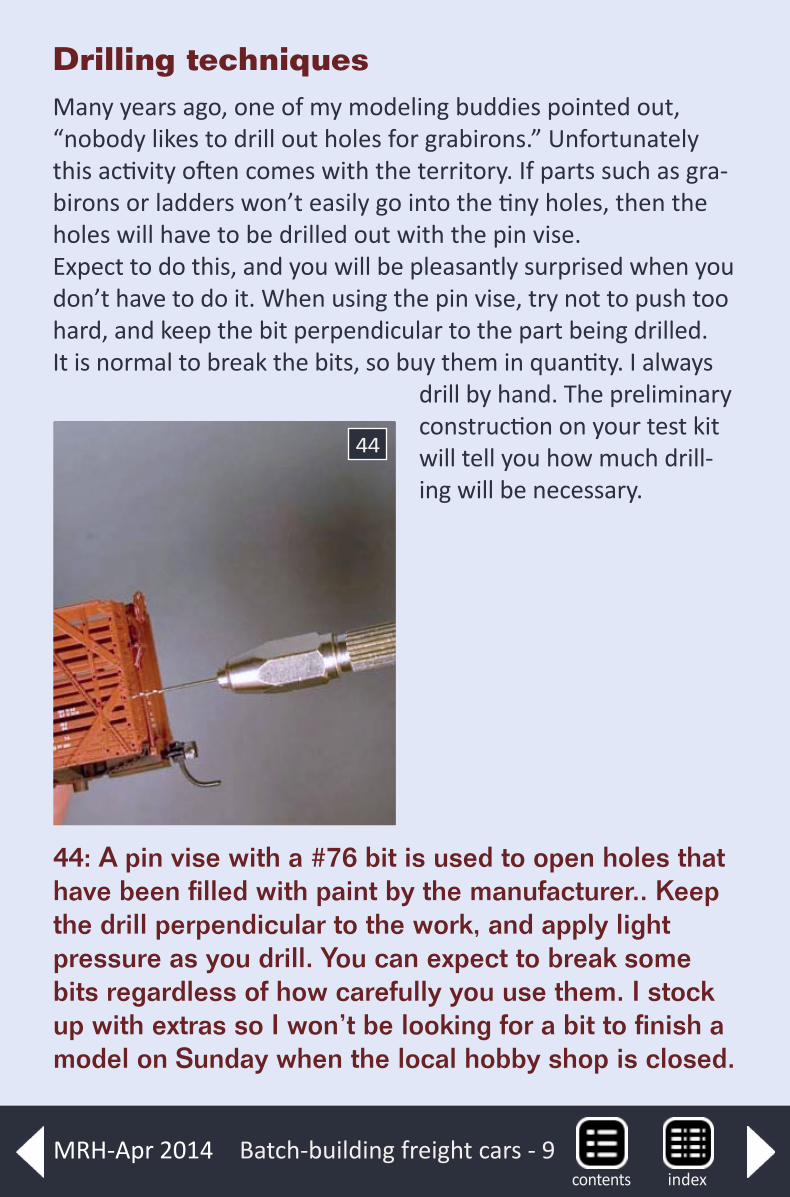
Batch-building freight cars - 9
44: A pin vise with a #76 bit is used to open holes that have been filled with paint by the manufacturer.. Keep the drill perpendicular to the work, and apply light pressure as you drill. You can expect to break some bits regardless of how carefully you use them. I stock up with extras so I won’t be looking for a bit to finish a model on Sunday when the local hobby shop is closed.
Drilling techniquesMany years ago, one of my modeling buddies pointed out, “nobody likes to drill out holes for grabirons.” Unfortunately this activity often comes with the territory. If parts such as gra-birons or ladders won’t easily go into the tiny holes, then the holes will have to be drilled out with the pin vise. Expect to do this, and you will be pleasantly surprised when you don’t have to do it. When using the pin vise, try not to push too hard, and keep the bit perpendicular to the part being drilled. It is normal to break the bits, so buy them in quantity. I always
drill by hand. The preliminary construction on your test kit will tell you how much drill-ing will be necessary.
44
indexcontentsMRH-Apr 2014
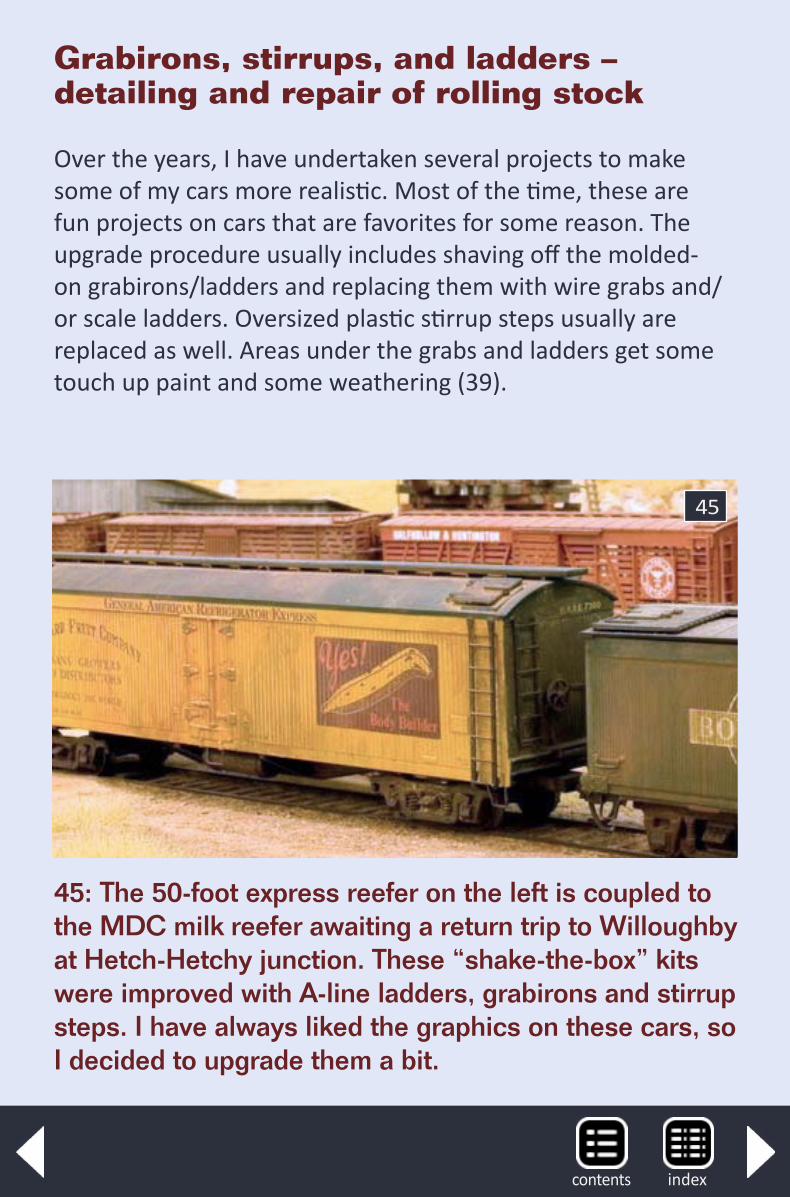
45
45: The 50-foot express reefer on the left is coupled to the MDC milk reefer awaiting a return trip to Willoughby at Hetch-Hetchy junction. These “shake-the-box” kits were improved with A-line ladders, grabirons and stirrup steps. I have always liked the graphics on these cars, so I decided to upgrade them a bit.
Grabirons, stirrups, and ladders – detailing and repair of rolling stock
Over the years, I have undertaken several projects to make some of my cars more realistic. Most of the time, these are fun projects on cars that are favorites for some reason. The upgrade procedure usually includes shaving off the molded-on grabirons/ladders and replacing them with wire grabs and/ or scale ladders. Oversized plastic stirrup steps usually are replaced as well. Areas under the grabs and ladders get some touch up paint and some weathering (39).
indexcontents
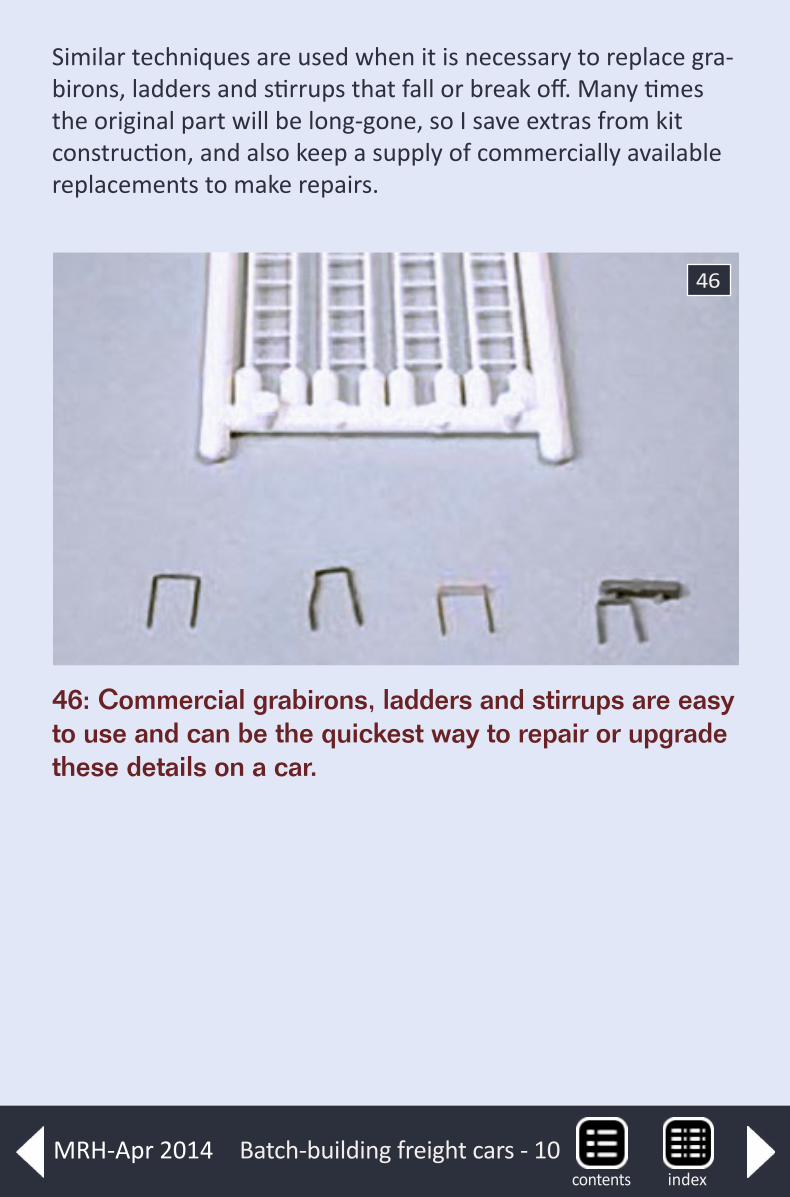
Batch-building freight cars - 10
Similar techniques are used when it is necessary to replace gra-birons, ladders and stirrups that fall or break off. Many times the original part will be long-gone, so I save extras from kit construction, and also keep a supply of commercially available replacements to make repairs.
46: Commercial grabirons, ladders and stirrups are easy to use and can be the quickest way to repair or upgrade these details on a car.
46
indexcontentsMRH-Apr 2014
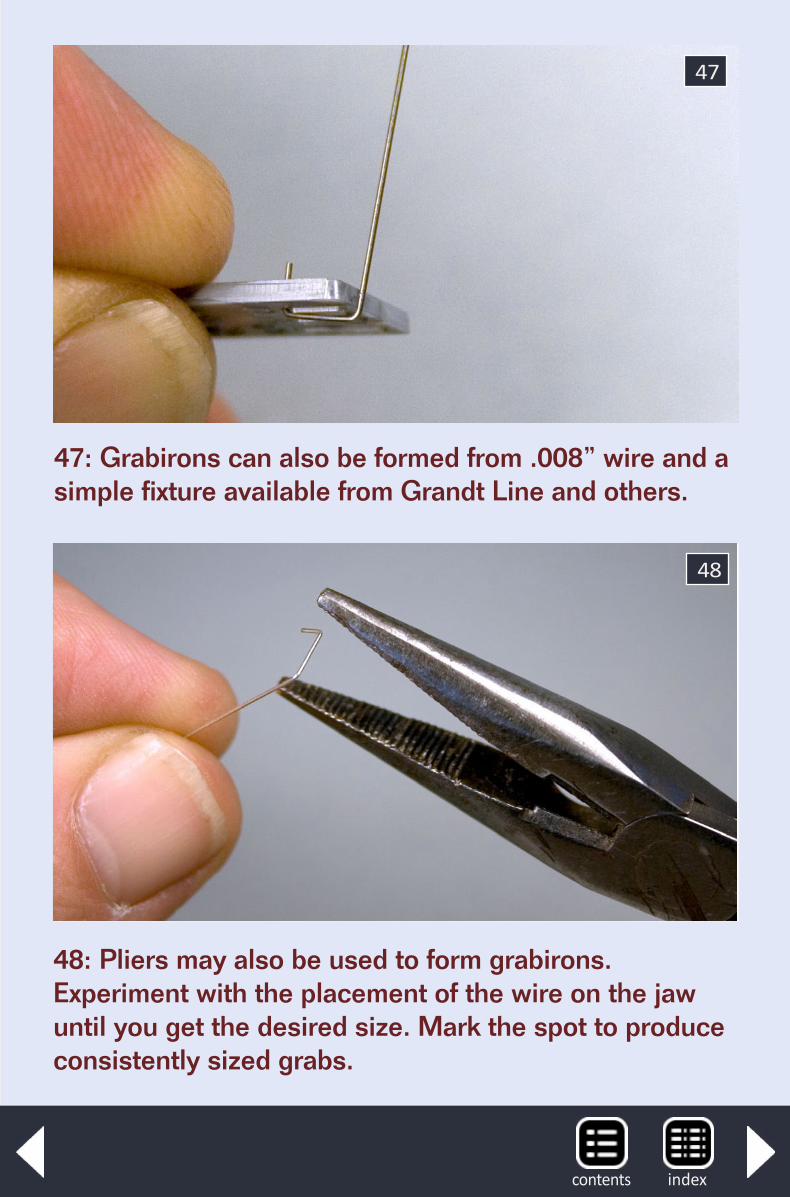
47: Grabirons can also be formed from .008” wire and a simple fixture available from Grandt Line and others.
47
48: Pliers may also be used to form grabirons. Experiment with the placement of the wire on the jaw until you get the desired size. Mark the spot to produce consistently sized grabs.
48
indexcontents
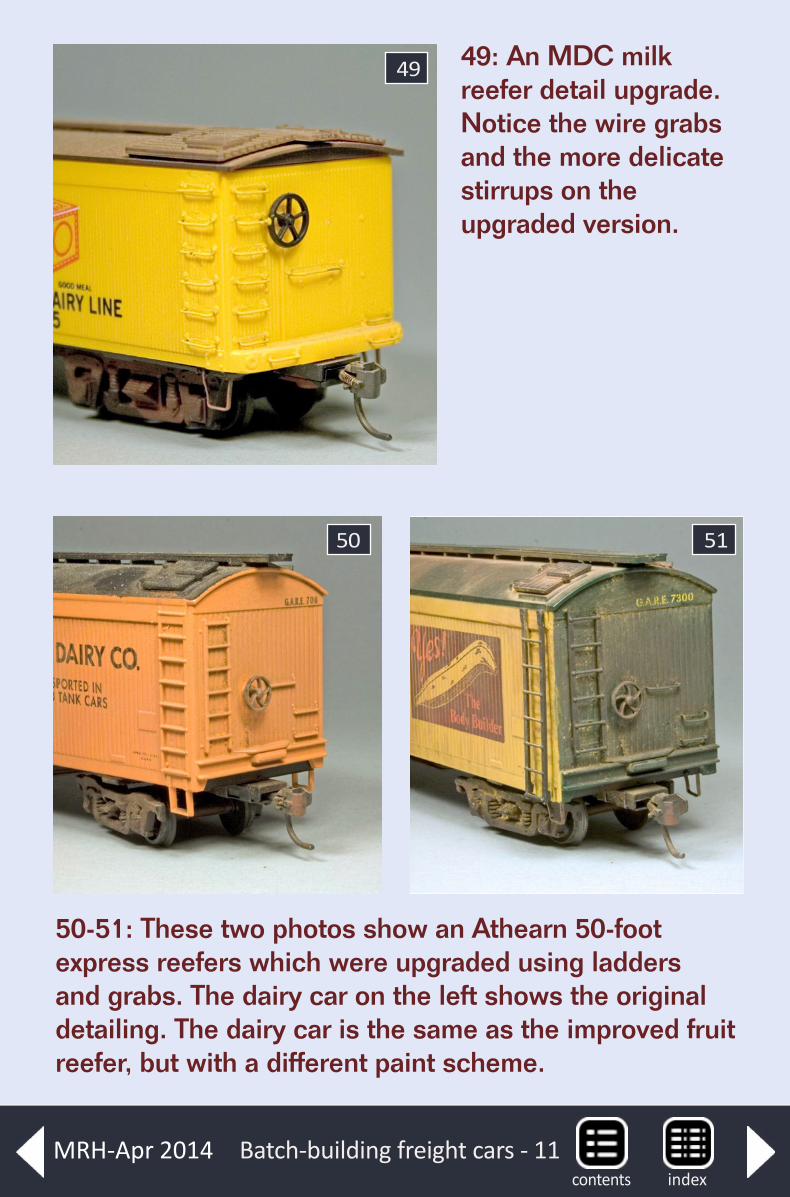
Batch-building freight cars - 11
49: An MDC milk reefer detail upgrade. Notice the wire grabs and the more delicate stirrups on the upgraded version.
49
50-51: These two photos show an Athearn 50-foot express reefers which were upgraded using ladders and grabs. The dairy car on the left shows the original detailing. The dairy car is the same as the improved fruit reefer, but with a different paint scheme.
5150
indexcontentsMRH-Apr 2014
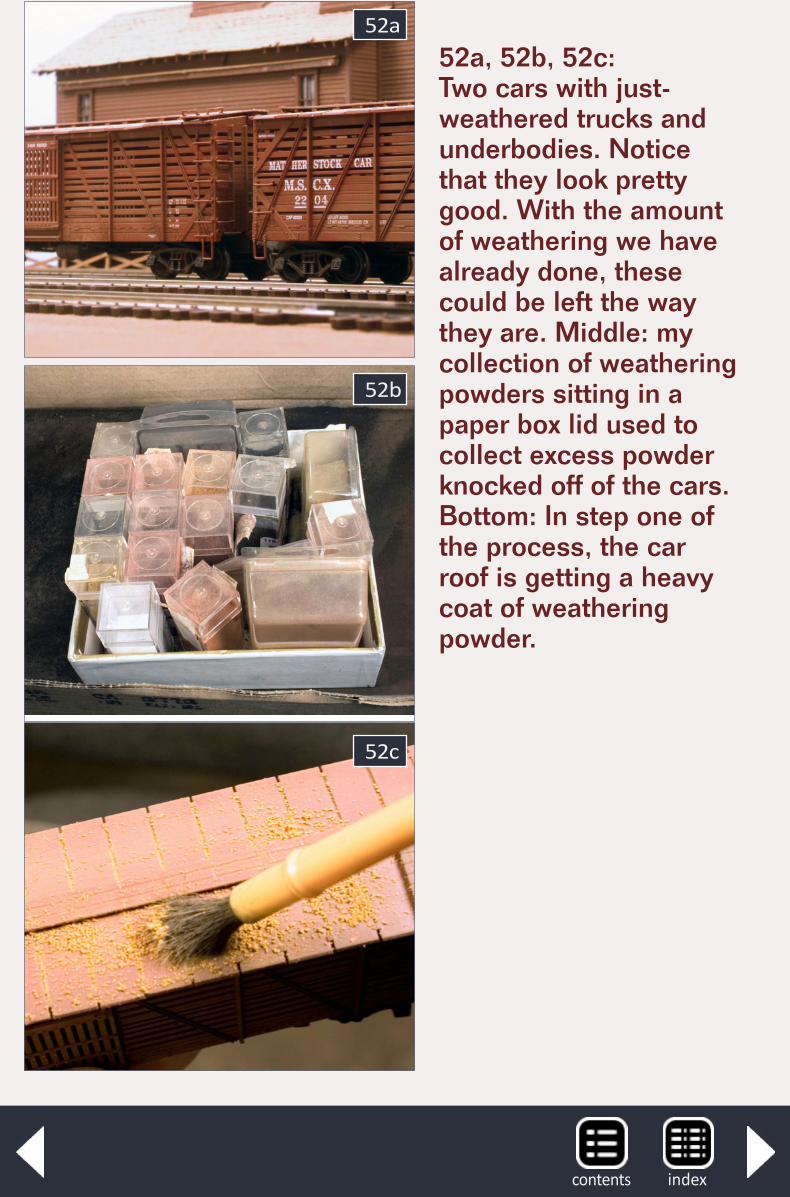
52c
52b
52a52a, 52b, 52c: Two cars with just- weathered trucks and underbodies. Notice that they look pretty good. With the amount of weathering we have already done, these could be left the way they are. Middle: my collection of weathering powders sitting in a paper box lid used to collect excess powder knocked off of the cars. Bottom: In step one of the process, the car roof is getting a heavy coat of weathering powder.
indexcontents

Batch-building freight cars - 12
53c
53b
53a53a, 53b, 53c: Top: In step two of the process, the car bottom edge is getting a heavy coat of darker powder. Middle: In the next step, a light color powder is applied to the upper car body. Bottom: For the final step, the car is scrubbed with a stiff, clean brush to remove the excess powder. Care must be taken to apply firm pressure, while being careful not to break delicate details.
indexcontentsMRH-Apr 2014
back to previous page of text ...A little weathering
To be clear, you don’t have to do this step. If you have already weathered the trucks and underbody, the cars can look pretty good already, and could be left as-is. Of course, many of us like to weather everything, so on to the next step.
I have used many techniques to weather cars over the years. I chose weathering powders (chalks) for these stock cars. I think the “dusty look” that powder weathering creates fits these cars perfectly. As weathering techniques go, I find the powders to be very forgiving and easy to work with. I recommend a pow-der that has some adhesive in it (I used chalks from Bragdon Enterprises bragdon.com, but there are others that work well). One good thing about weathering powder is that you can always wash it off with water if you don’t like the results.
There are a couple of things to keep in mind when using pow-der/chalk. First, apply it very thick, but as evenly as possible. You also need to work the powder into the surface of the model right up to the details and raised edges. Don’t let notice-able areas of non-weathered paint (“weathering shadows”) develop around raised details. After a generous application of the material, use a stiff brush to knock off as much of the excess from the car as possible. Expect that most of the pow-der will come off. When I weather cars with powder, I use a cardboard box lid to catch the excess material. The powders mix together in the lid usually making a dark brown color. I save this mixture and use it for weathering the inside of gondo-las or hoppers.
I usually start with the roof and then apply darker colors to bot-tom edge of the car body, and then another color to the upper
indexcontents
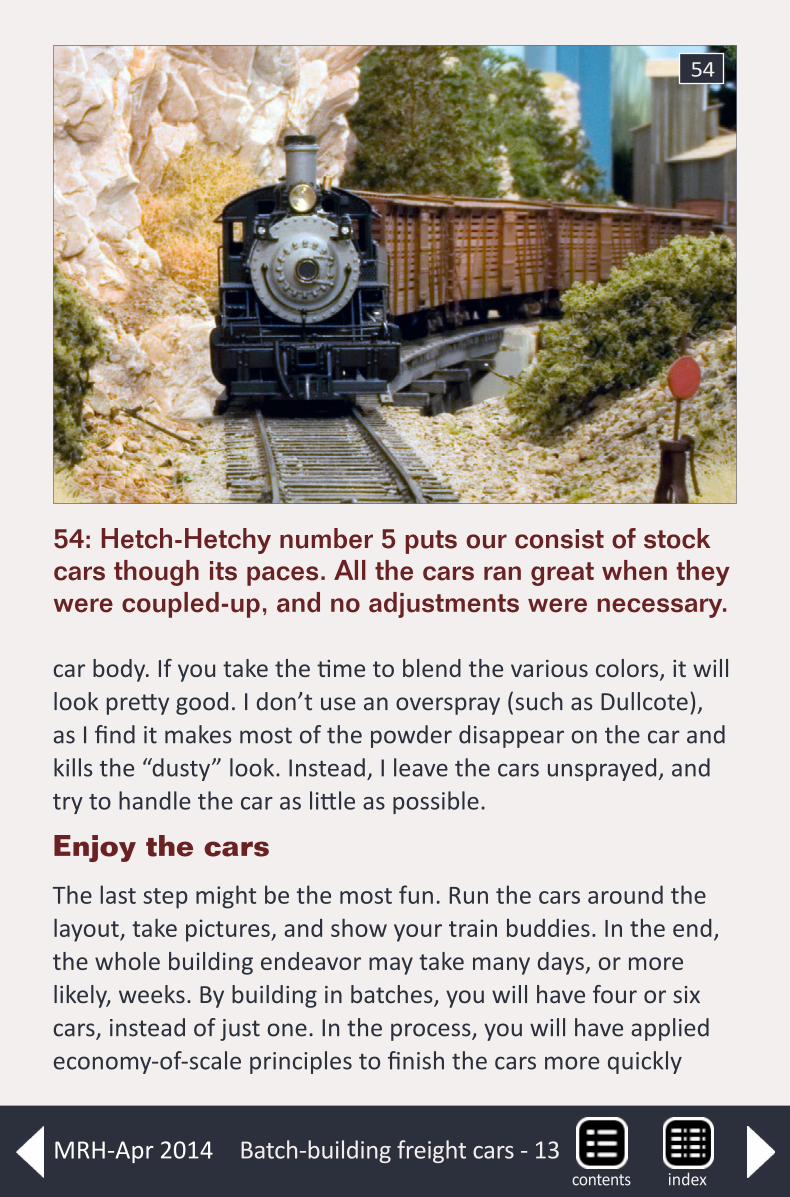
Batch-building freight cars - 13
car body. If you take the time to blend the various colors, it will look pretty good. I don’t use an overspray (such as Dullcote), as I find it makes most of the powder disappear on the car and kills the “dusty” look. Instead, I leave the cars unsprayed, and try to handle the car as little as possible.
Enjoy the cars
The last step might be the most fun. Run the cars around the layout, take pictures, and show your train buddies. In the end, the whole building endeavor may take many days, or more likely, weeks. By building in batches, you will have four or six cars, instead of just one. In the process, you will have applied economy-of-scale principles to finish the cars more quickly
54
54: Hetch-Hetchy number 5 puts our consist of stock cars though its paces. All the cars ran great when they were coupled-up, and no adjustments were necessary.
indexcontentsMRH-Apr 2014
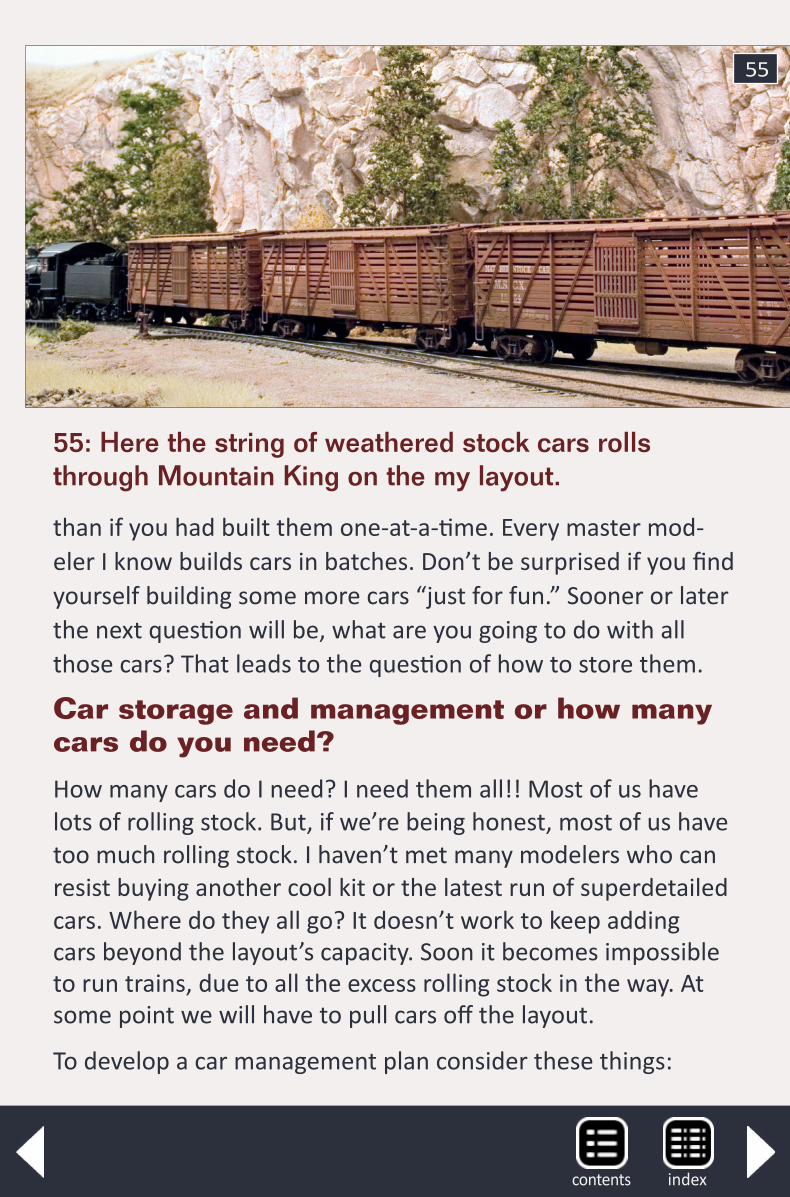
than if you had built them one-at-a-time. Every master mod-eler I know builds cars in batches. Don’t be surprised if you find yourself building some more cars “just for fun.” Sooner or later the next question will be, what are you going to do with all those cars? That leads to the question of how to store them.
Car storage and management or how many cars do you need?
How many cars do I need? I need them all!! Most of us have lots of rolling stock. But, if we’re being honest, most of us have too much rolling stock. I haven’t met many modelers who can resist buying another cool kit or the latest run of superdetailed cars. Where do they all go? It doesn’t work to keep adding cars beyond the layout’s capacity. Soon it becomes impossible to run trains, due to all the excess rolling stock in the way. At some point we will have to pull cars off the layout.
To develop a car management plan consider these things:
55: Here the string of weathered stock cars rolls through Mountain King on the my layout.
55
indexcontents
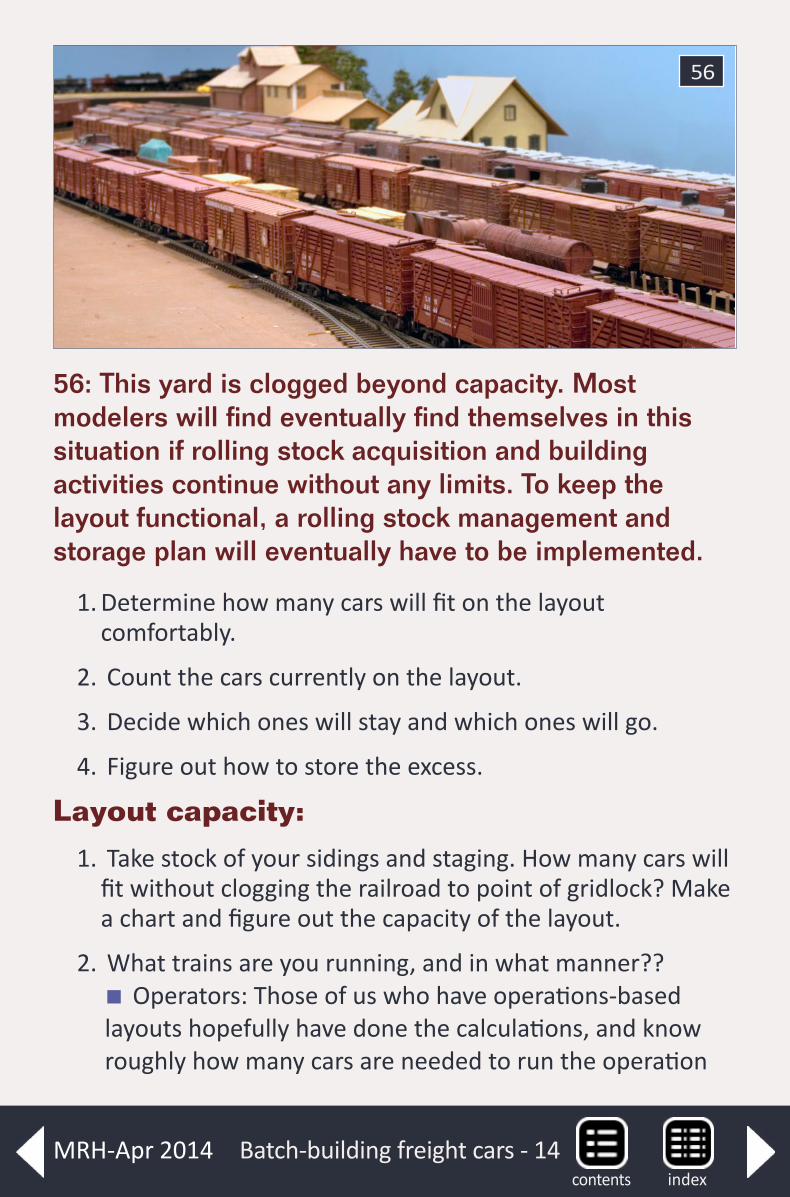
Batch-building freight cars - 14
56: This yard is clogged beyond capacity. Most modelers will find eventually find themselves in this situation if rolling stock acquisition and building activities continue without any limits. To keep the layout functional, a rolling stock management and storage plan will eventually have to be implemented.
56
1. Determine how many cars will fit on the layout comfortably.
2. Count the cars currently on the layout.
3. Decide which ones will stay and which ones will go.
4. Figure out how to store the excess.
Layout capacity:
1. Take stock of your sidings and staging. How many cars will fit without clogging the railroad to point of gridlock? Make a chart and figure out the capacity of the layout.
2. What trains are you running, and in what manner?? � Operators: Those of us who have operations-based
layouts hopefully have done the calculations, and know roughly how many cars are needed to run the operation
indexcontentsMRH-Apr 2014
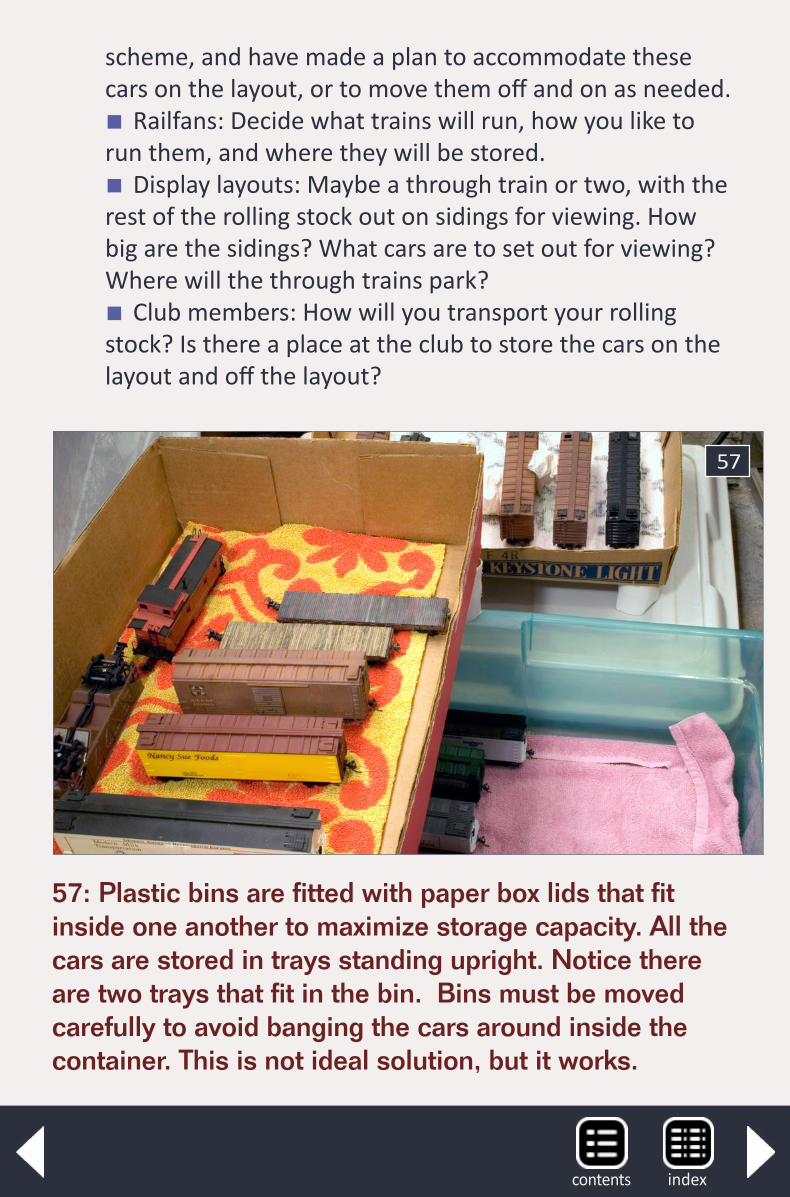
scheme, and have made a plan to accommodate these cars on the layout, or to move them off and on as needed.
� Railfans: Decide what trains will run, how you like to run them, and where they will be stored.
� Display layouts: Maybe a through train or two, with the rest of the rolling stock out on sidings for viewing. How big are the sidings? What cars are to set out for viewing? Where will the through trains park?
� Club members: How will you transport your rolling stock? Is there a place at the club to store the cars on the layout and off the layout?
57: Plastic bins are fitted with paper box lids that fit inside one another to maximize storage capacity. All the cars are stored in trays standing upright. Notice there are two trays that fit in the bin. Bins must be moved carefully to avoid banging the cars around inside the container. This is not ideal solution, but it works.
57
indexcontents
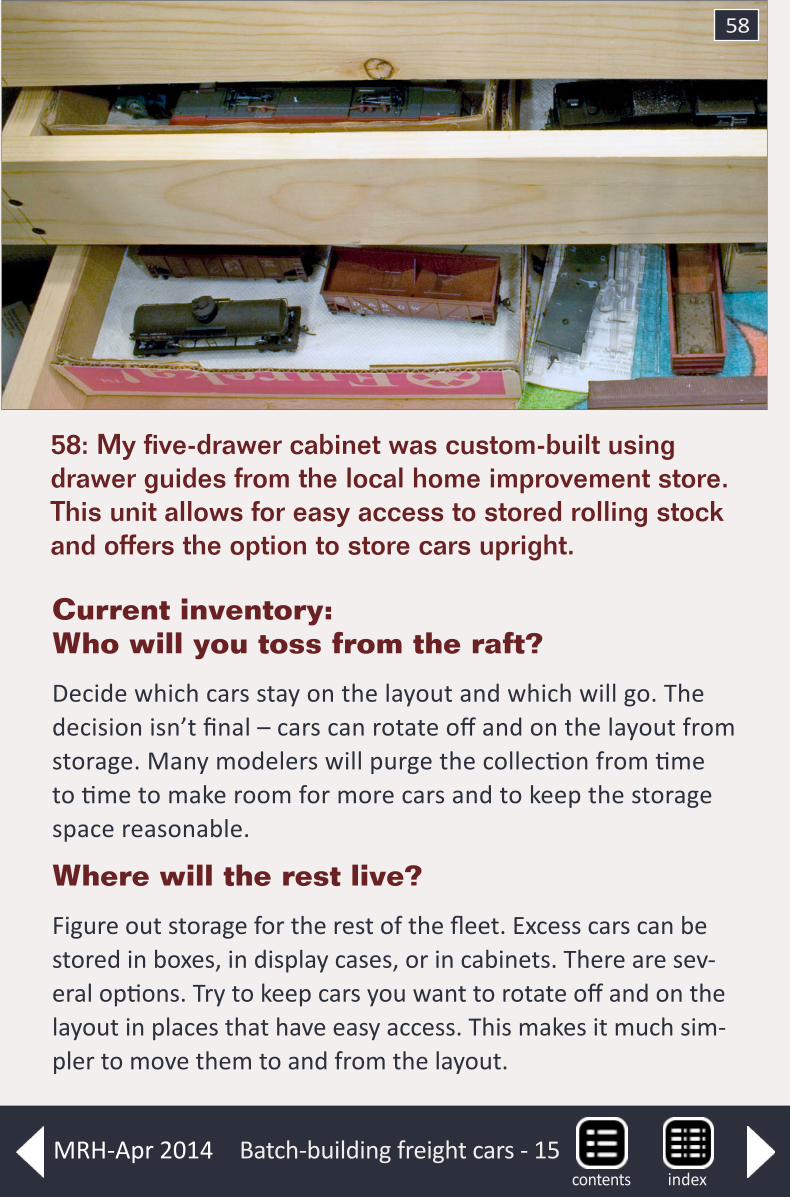
Batch-building freight cars - 15
58: My five-drawer cabinet was custom-built using drawer guides from the local home improvement store. This unit allows for easy access to stored rolling stock and offers the option to store cars upright.
58
Current inventory: Who will you toss from the raft?
Decide which cars stay on the layout and which will go. The decision isn’t final – cars can rotate off and on the layout from storage. Many modelers will purge the collection from time to time to make room for more cars and to keep the storage space reasonable.
Where will the rest live?
Figure out storage for the rest of the fleet. Excess cars can be stored in boxes, in display cases, or in cabinets. There are sev-eral options. Try to keep cars you want to rotate off and on the layout in places that have easy access. This makes it much sim-pler to move them to and from the layout.
indexcontentsMRH-Apr 2014

Storage options on the layout
Staging and Sidings: Cars can be semi-permanently stored in hidden staging or on the sidings out in the open. The num-ber of cars is limited to the capacity of these locations. Rolling stock can be stored as part of staged trains. Operations-based layouts can utilize unused staging (if it exists) for car storage. This option is best because it generally doesn’t require the cars to handled by the 0-5-0 switcher (i.e. your hand).
Staging cassettes: This storage option is gaining popularity. A cassette is a detachable object (usually a wood tray) with stor-age tracks on it that is stored off the layout in a rack. The cas-sette is attached to the layout to move trains on and off the railroad. The disadvantage here is that a plan must be devel-oped to prevent trains from hitting the floor as the cassette is moved. There are many options in this category; check the hobby press for recent articles.
Off the layout
Storage boxes: Storage boxes (54) are a common way to handle cars that are not needed on the layout. Make sure the cars are stored standing upright to minimize damage to the details. The disadvantage here is that we get into the “out-of-sight, out-of- mind” situation where you may not remember what you have stored away. Many modelers I know have this issue (including myself at times). The up-side is the rediscovery of cool cars that were forgotten.
Display cases: Display cases are an excellent choice if you have the space and motivation. I know of one modeler who loved to build cars and filled his basement train room with display cases and shelves. He had several hundred cars on display all the time.
indexcontents
Batch-building freight cars - 16
Cabinets: I finally built a cabinet (55) with flat drawers to store my rolling stock. I like the ease of accessibility and the ability to store the cars upright. Commercial cabinets that work well for car storage are known as “flat file” cabinets. They feature large, shallow drawers that are used to store artwork. I found them out of my budget, so I built my own using drawer guides from the local home improvement store.
Guy Cantwell has been involved in the local music scene in the San Francisco Bay Area for the last 25 years as an educator, per-former, arranger and composer. He also maintains a private teaching studio, providing guitar instruction in a variety of styles from classical to jazz and rock. He and his wife Nancy live in the Santa Cruz area.
Guy’s layout was featured in the June 2011 MRH and was one
of many layouts open for the 2011 NMRA National Convention in Sacra-mento, California.
ReaderFeedback
(click here)
indexcontentsMRH-Apr 2014
indexcontents
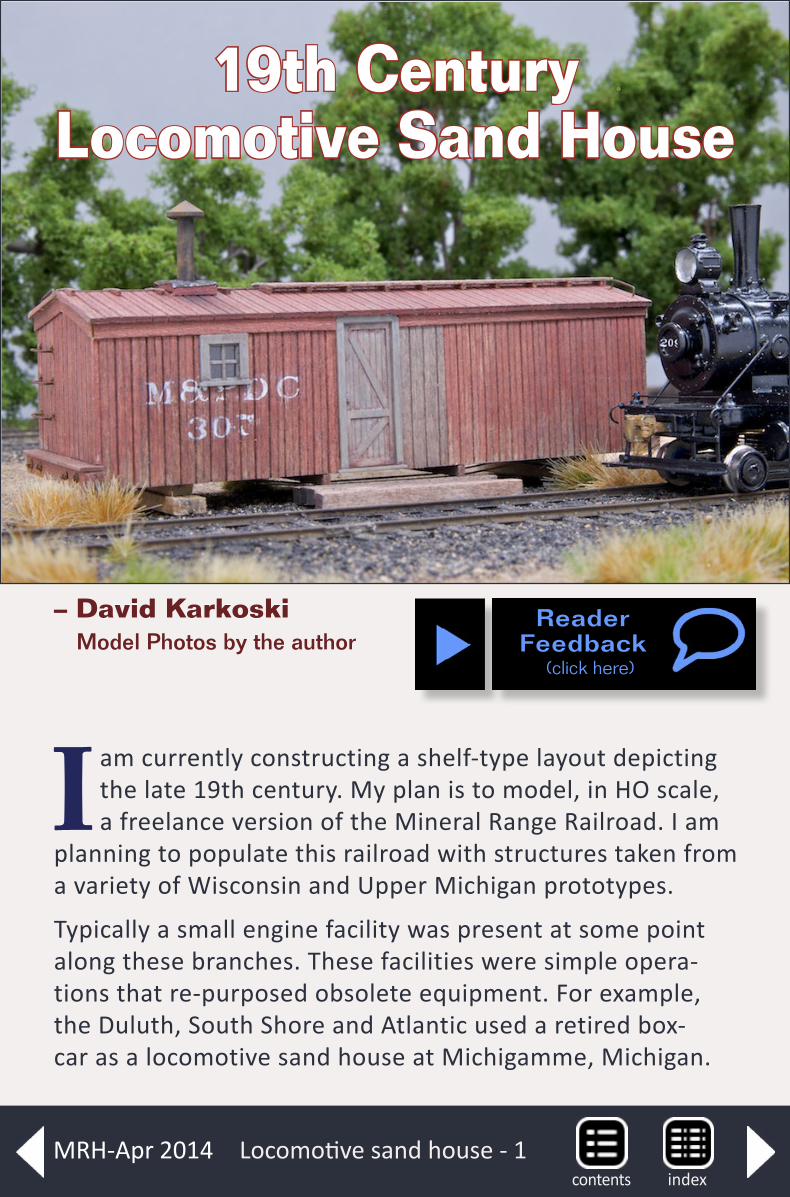
Locomotive sand house - 1
ReaderFeedback
(click here)
19th Century Locomotive Sand House
– David Karkoski Model Photos by the author
I am currently constructing a shelf-type layout depicting the late 19th century. My plan is to model, in HO scale, a freelance version of the Mineral Range Railroad. I am
planning to populate this railroad with structures taken from a variety of Wisconsin and Upper Michigan prototypes.
Typically a small engine facility was present at some point along these branches. These facilities were simple opera-tions that re-purposed obsolete equipment. For example, the Duluth, South Shore and Atlantic used a retired box-car as a locomotive sand house at Michigamme, Michigan.
indexcontentsMRH-Apr 2014
Raw sand was stored and dried in this building prior to be-ing loaded into the locomotive sand box. This seemed like a good structure for my facility.
I needed a plan for a boxcar that would be considered an obsolete car in the 1890s. I searched Google Books and lo-cated a copy of the 1888 "Car Builders Cyclopedia of Ameri-can Practice." Figure 27 is an elevation drawing of a 28' box-car described as an “old style” car and is the source for the dimensions used in constructing this model.
books.google.com/books?id=Jv7VAAAAMAAJ&printsec=frontcover&dq=Car+builders+cyclopedia+of+american+practice&hl=en&sa=X&ei=icGRUdvdDsfjqAGEsIHIDA&ved=0CDUQ6AEwAQ
During the writing of this article it was announced that Pol-lyScale paint would no longer be produced. You may need to find an appropriate substitute if you do not have the Light Freight Car Red I used.
indexcontents
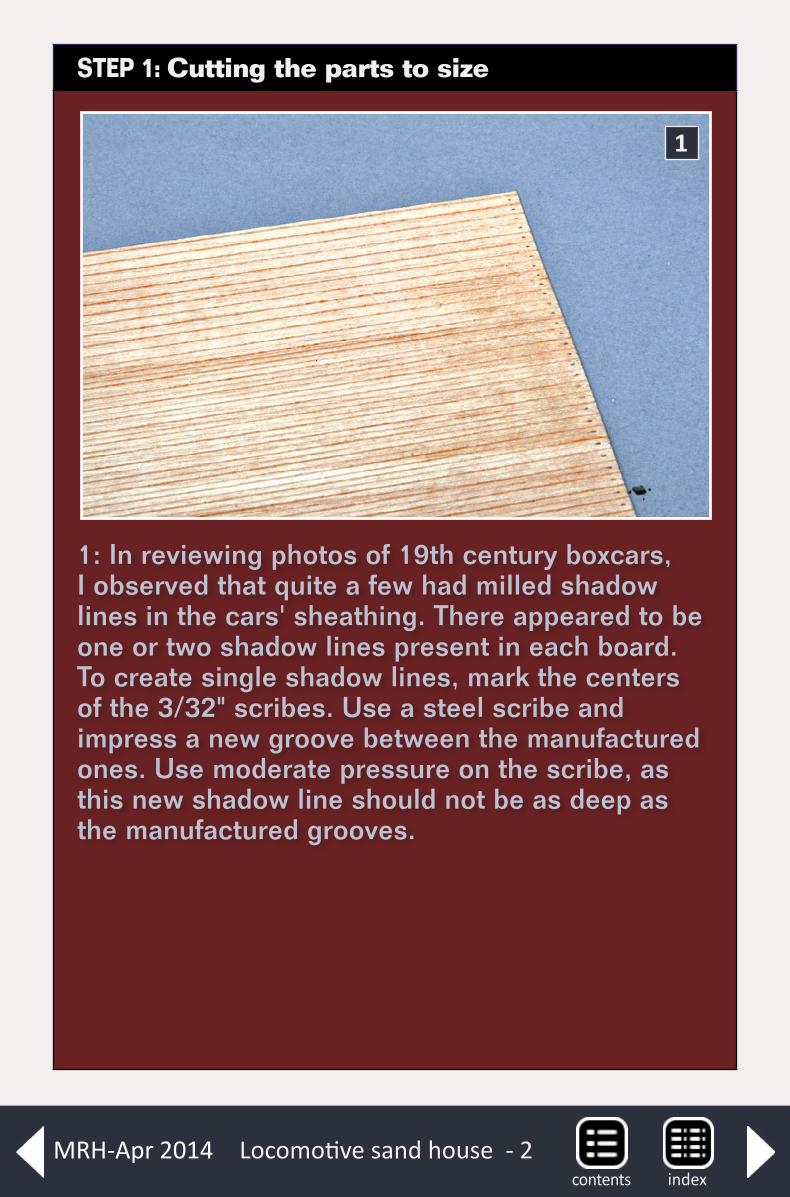
Locomotive sand house - 2
STEP 1: Cutting the parts to size
1: In reviewing photos of 19th century boxcars, I observed that quite a few had milled shadow lines in the cars' sheathing. There appeared to be one or two shadow lines present in each board. To create single shadow lines, mark the centers of the 3/32" scribes. Use a steel scribe and impress a new groove between the manufactured ones. Use moderate pressure on the scribe, as this new shadow line should not be as deep as the manufactured grooves.
1
indexcontentsMRH-Apr 2014
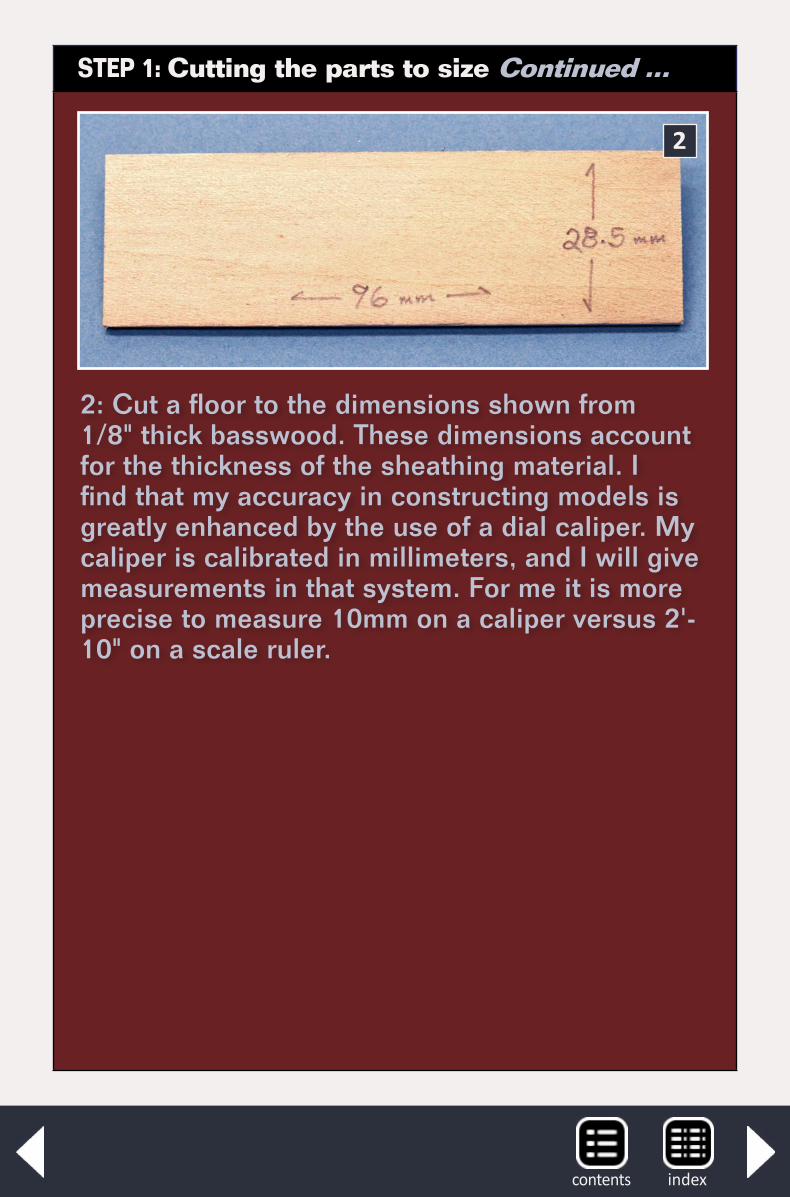
2: Cut a floor to the dimensions shown from 1/8" thick basswood. These dimensions account for the thickness of the sheathing material. I find that my accuracy in constructing models is greatly enhanced by the use of a dial caliper. My caliper is calibrated in millimeters, and I will give measurements in that system. For me it is more precise to measure 10mm on a caliper versus 2'-10" on a scale ruler.
STEP 1: Cutting the parts to size Continued ...
2
indexcontents
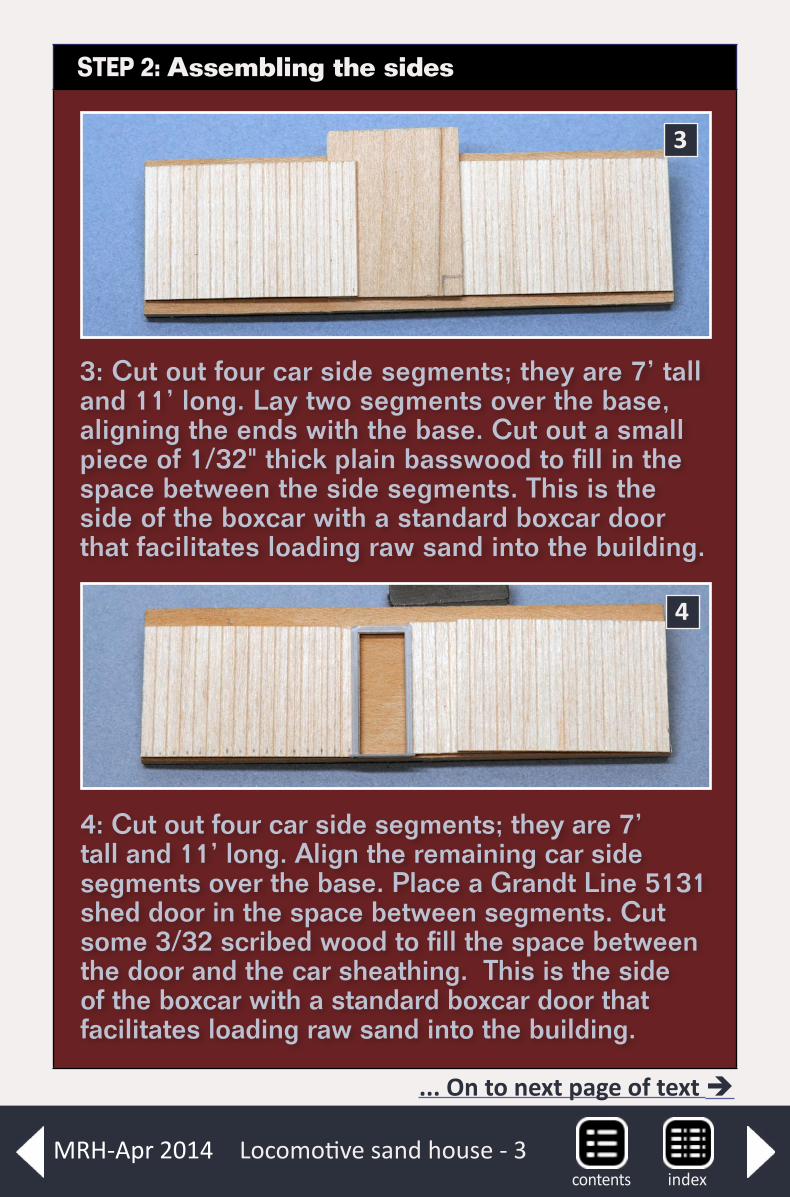
Locomotive sand house - 3
STEP 2: Assembling the sides
3: Cut out four car side segments; they are 7’ tall and 11’ long. Lay two segments over the base, aligning the ends with the base. Cut out a small piece of 1/32" thick plain basswood to fill in the space between the side segments. This is the side of the boxcar with a standard boxcar door that facilitates loading raw sand into the building.
3
4: Cut out four car side segments; they are 7’ tall and 11’ long. Align the remaining car side segments over the base. Place a Grandt Line 5131 shed door in the space between segments. Cut some 3/32 scribed wood to fill the space between the door and the car sheathing. This is the side of the boxcar with a standard boxcar door that facilitates loading raw sand into the building.
4
... On to next page of text
indexcontentsMRH-Apr 2014

Converting from mm to scale inches
HO scale is 3.5mm = 12" Dividing 12" by 87 = .01379" = 3.5mm
If a measurement of 34" is required in mm, use the following equation
3.5mm/12" x 34" = x in this case x =9.91 mm or 10 mm
If you know the value in mm but need inches the formula is as follows:
10mm = (3.5mm/12")x10mm = .29167x34.28" = x
Constants for other scalesO scale use 6.35mmS scale use 4.7625mmHO scale use 3.5mmN scale use 1.905m
indexcontents
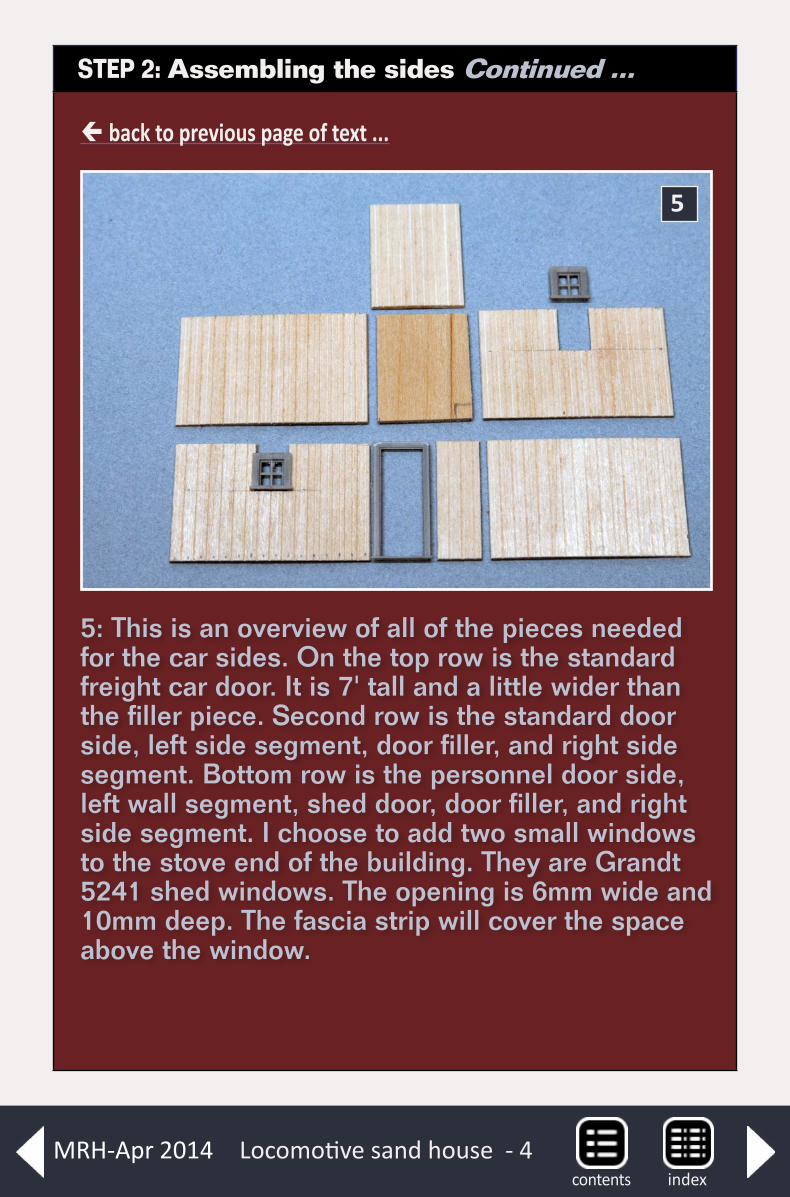
Locomotive sand house - 4
5: This is an overview of all of the pieces needed for the car sides. On the top row is the standard freight car door. It is 7' tall and a little wider than the filler piece. Second row is the standard door side, left side segment, door filler, and right side segment. Bottom row is the personnel door side, left wall segment, shed door, door filler, and right side segment. I choose to add two small windows to the stove end of the building. They are Grandt 5241 shed windows. The opening is 6mm wide and 10mm deep. The fascia strip will cover the space above the window.
STEP 2: Assembling the sides Continued ...
5
back to previous page of text ...
indexcontentsMRH-Apr 2014
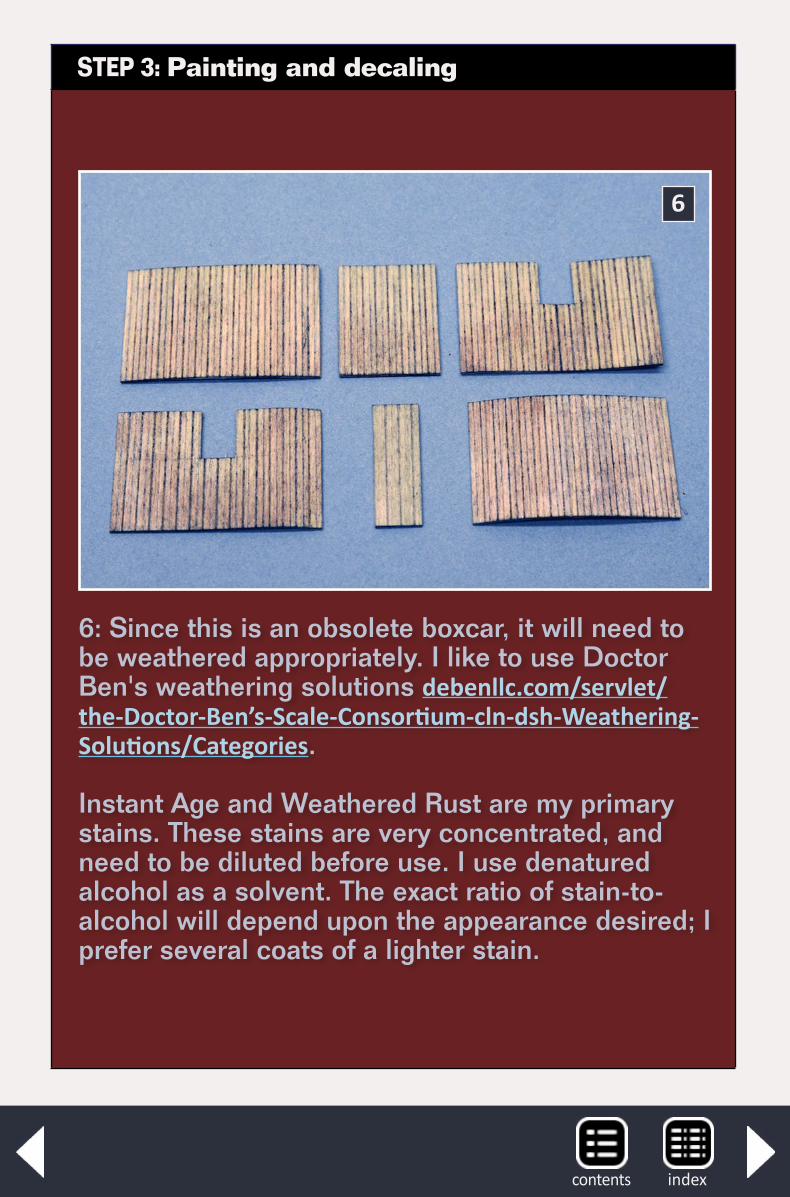
7: You don't need to use the same color of roofing stock throughout the roof area. Here I have mixed in an odd color pieces to create the appearance of a roof that is well worn, and has been patched.
I use white glue to fasten the strips to the sub roof. A word of caution: the glue does seem to ruin the construction paper finish, so work carefully. Another option is to use the student glue sticks. They are quick and neat.
STEP 3: Painting and decaling
6: Since this is an obsolete boxcar, it will need to be weathered appropriately. I like to use Doctor Ben's weathering solutions debenllc.com/servlet/the-Doctor-Ben’s-Scale-Consortium-cln-dsh-Weathering-Solutions/Categories.
Instant Age and Weathered Rust are my primary stains. These stains are very concentrated, and need to be diluted before use. I use denatured alcohol as a solvent. The exact ratio of stain-to-alcohol will depend upon the appearance desired; I prefer several coats of a lighter stain.
6
indexcontents
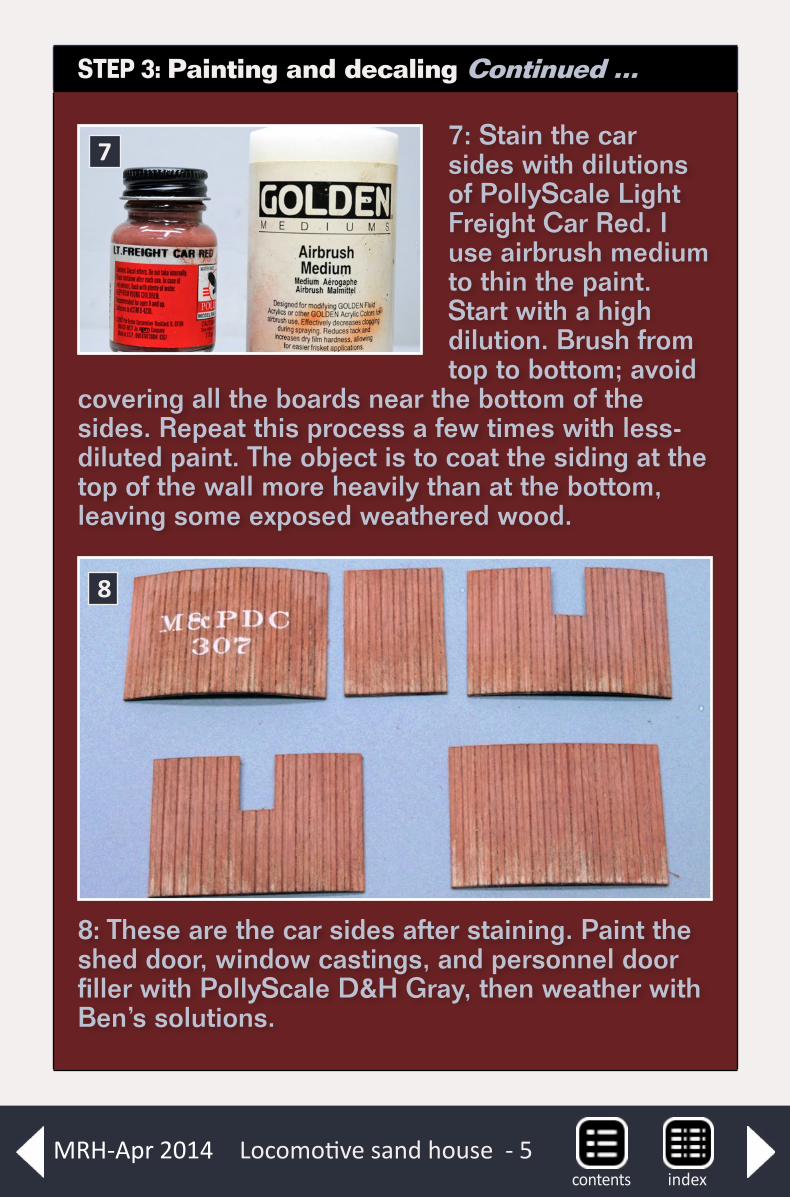
Locomotive sand house - 5
7: Stain the car sides with dilutions of PollyScale Light Freight Car Red. I use airbrush medium to thin the paint. Start with a high dilution. Brush from top to bottom; avoid
covering all the boards near the bottom of the sides. Repeat this process a few times with less-diluted paint. The object is to coat the siding at the top of the wall more heavily than at the bottom, leaving some exposed weathered wood.
STEP 3: Painting and decaling Continued ...
7
8: These are the car sides after staining. Paint the shed door, window castings, and personnel door filler with PollyScale D&H Gray, then weather with Ben’s solutions.
8
indexcontentsMRH-Apr 2014
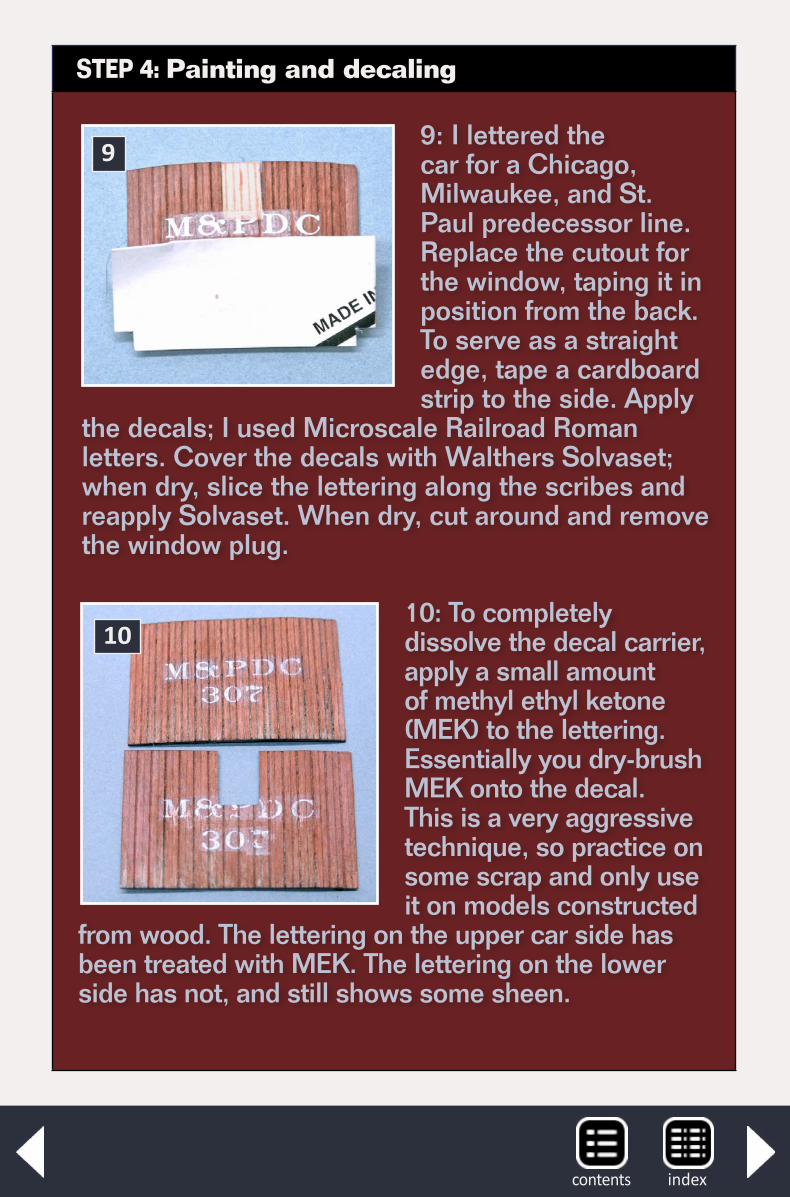
10: To completely dissolve the decal carrier, apply a small amount of methyl ethyl ketone (MEK) to the lettering. Essentially you dry-brush MEK onto the decal. This is a very aggressive technique, so practice on some scrap and only use it on models constructed
from wood. The lettering on the upper car side has been treated with MEK. The lettering on the lower side has not, and still shows some sheen.
STEP 4: Painting and decaling
9: I lettered the car for a Chicago, Milwaukee, and St. Paul predecessor line. Replace the cutout for the window, taping it in position from the back. To serve as a straight edge, tape a cardboard strip to the side. Apply
the decals; I used Microscale Railroad Roman letters. Cover the decals with Walthers Solvaset; when dry, slice the lettering along the scribes and reapply Solvaset. When dry, cut around and remove the window plug.
10
9
indexcontents
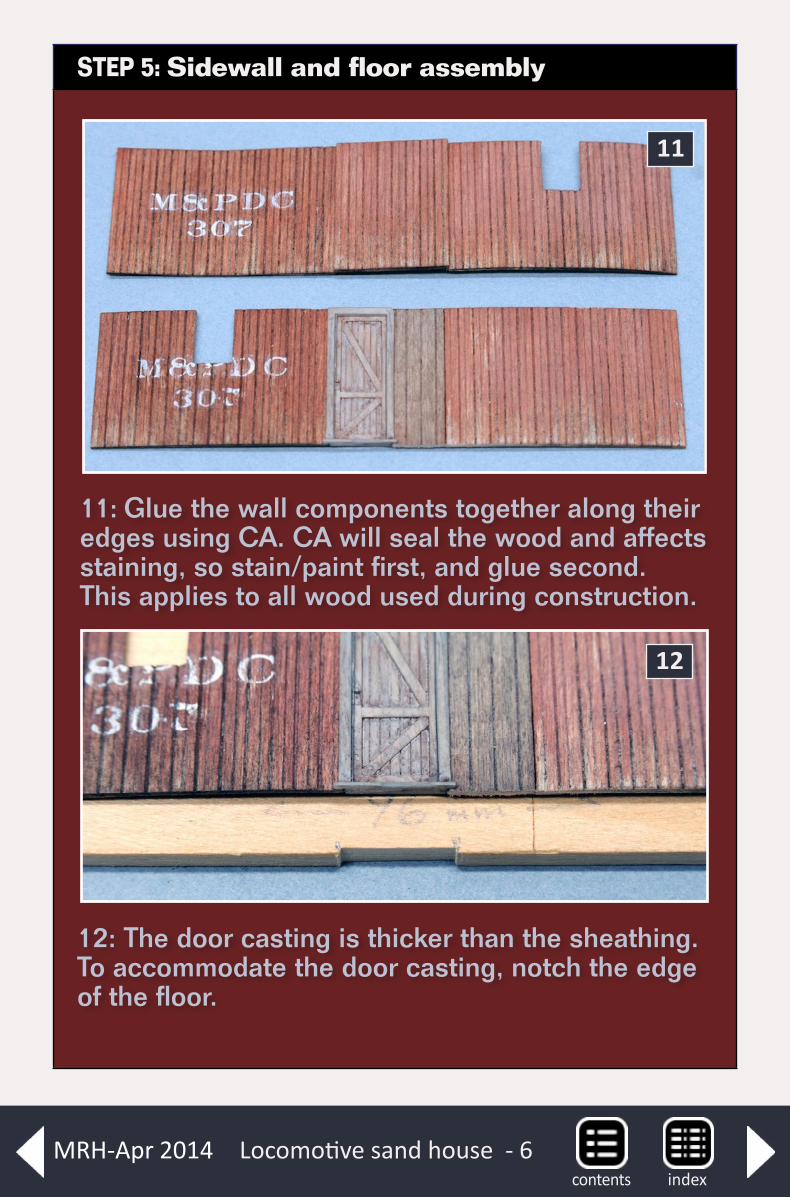
11: Glue the wall components together along their edges using CA. CA will seal the wood and affects staining, so stain/paint first, and glue second. This applies to all wood used during construction.
STEP 5: Sidewall and floor assembly
11
12
Locomotive sand house - 6
12: The door casting is thicker than the sheathing. To accommodate the door casting, notch the edge of the floor.
indexcontentsMRH-Apr 2014
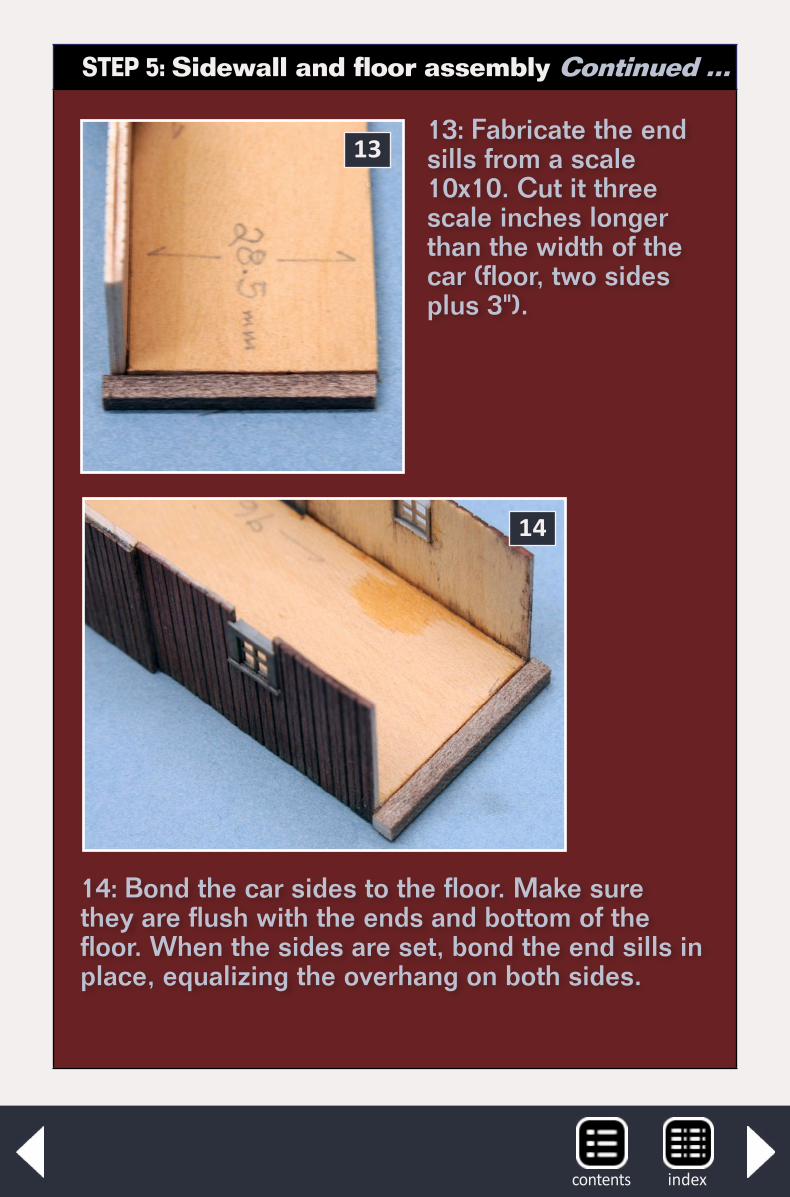
13: Fabricate the end sills from a scale 10x10. Cut it three scale inches longer than the width of the car (floor, two sides plus 3").
13
14: Bond the car sides to the floor. Make sure they are flush with the ends and bottom of the floor. When the sides are set, bond the end sills in place, equalizing the overhang on both sides.
14
STEP 5: Sidewall and floor assembly Continued ...
indexcontents
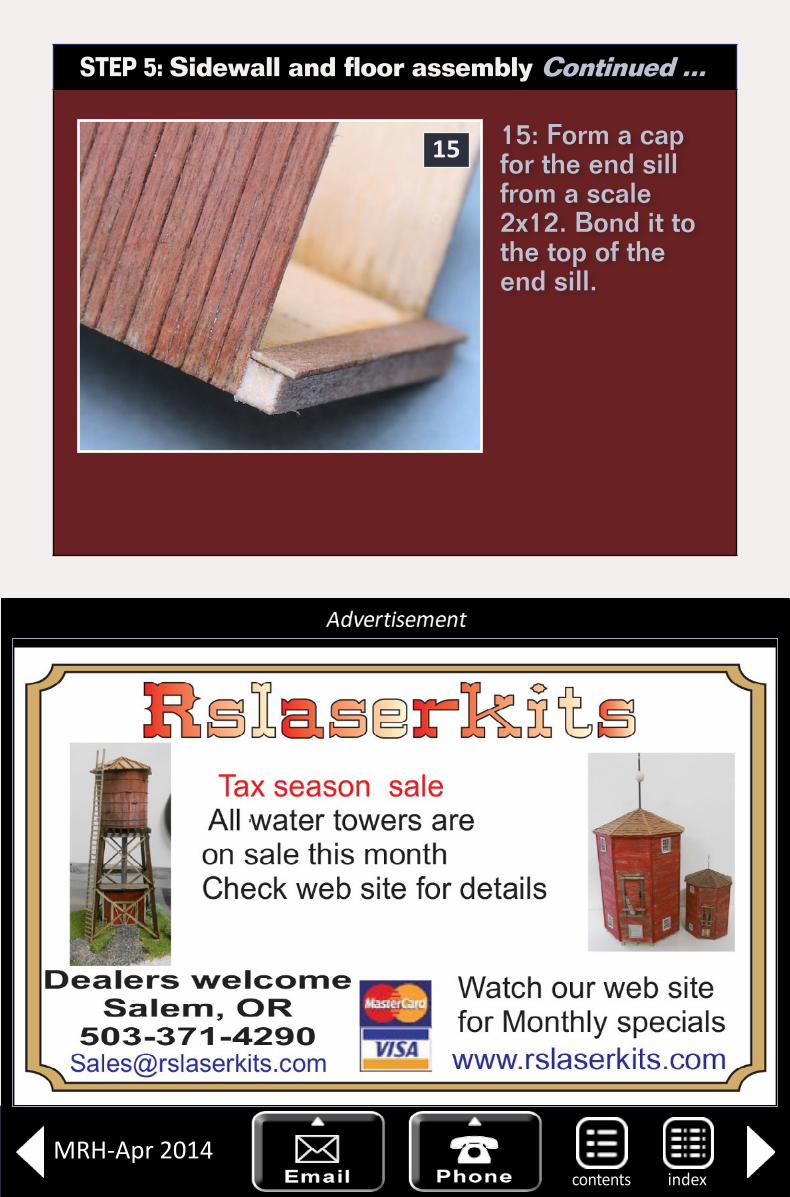
15 15: Form a cap for the end sill from a scale 2x12. Bond it to the top of the end sill.
STEP 5: Sidewall and floor assembly Continued ...
19th Century locomotive sand house - 7indexcontents
MRH-Apr 2014
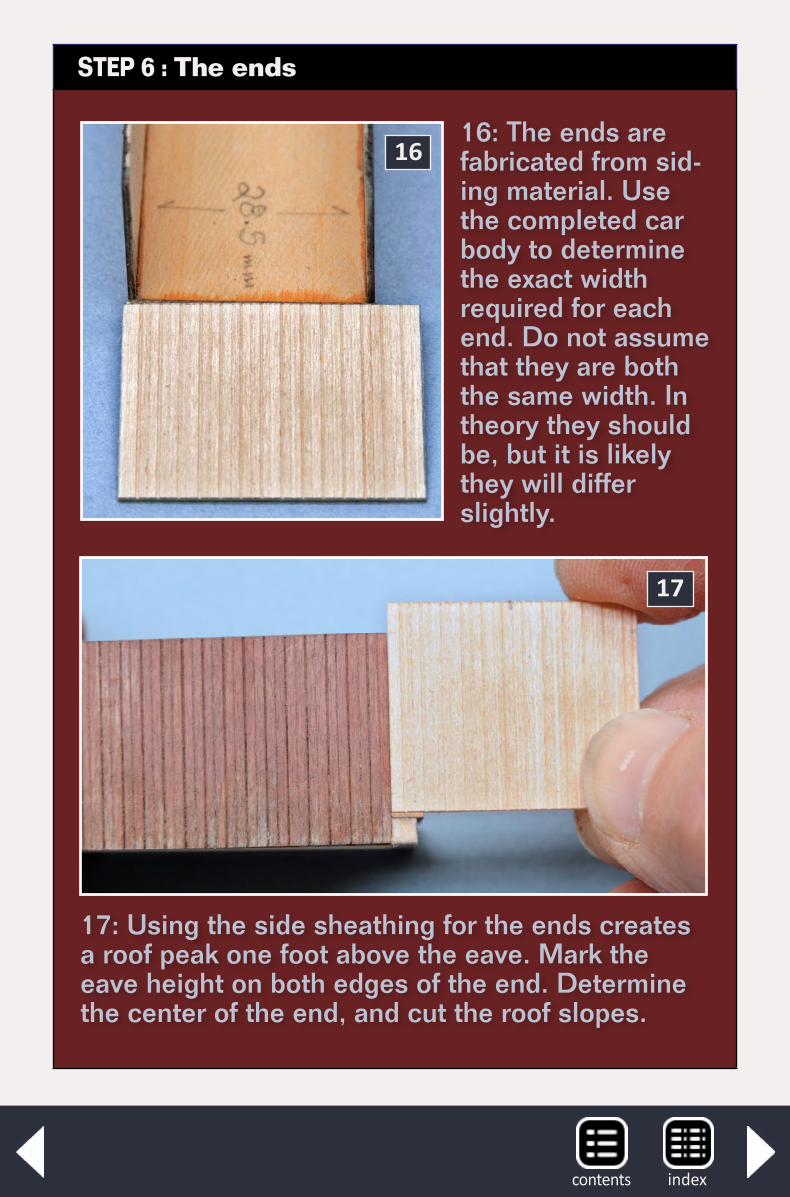
1616: The ends are fabricated from sid-ing material. Use the completed car body to determine the exact width required for each end. Do not assume that they are both the same width. In theory they should be, but it is likely they will differ slightly.
17
17: Using the side sheathing for the ends creates a roof peak one foot above the eave. Mark the eave height on both edges of the end. Determine the center of the end, and cut the roof slopes.
STEP 6 : The ends
indexcontents
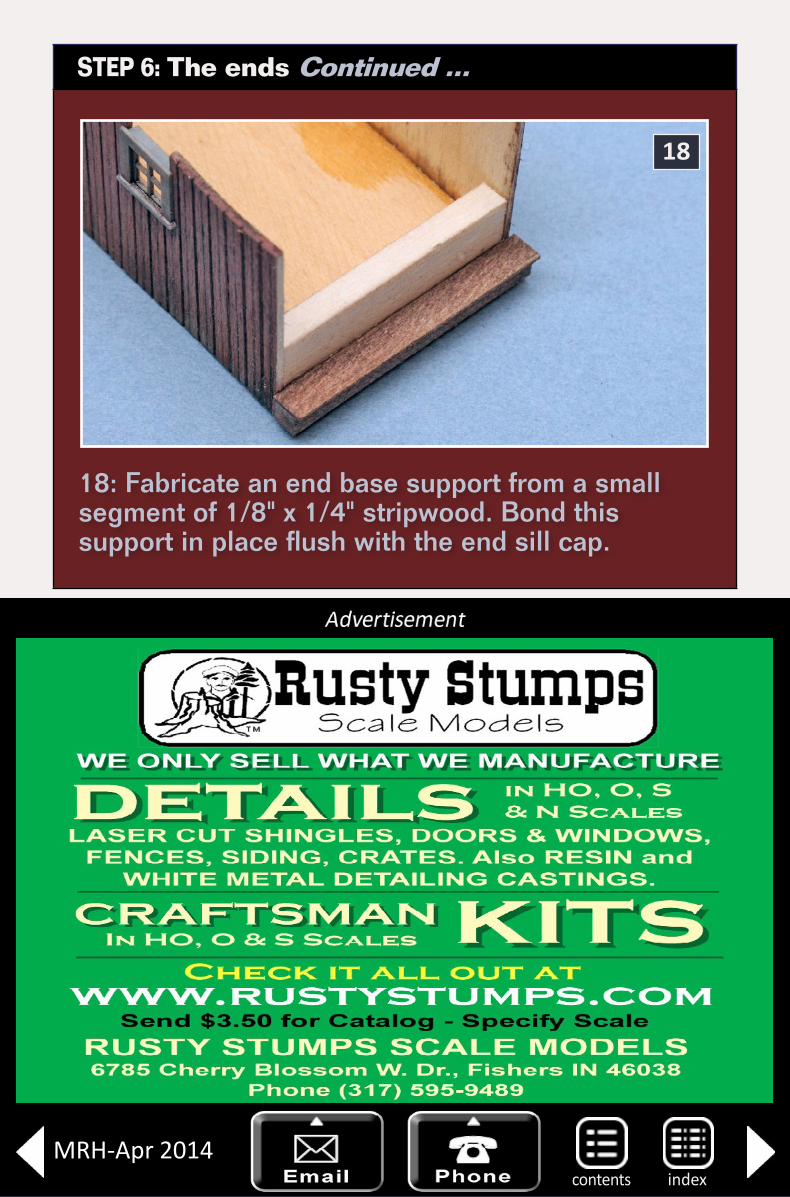
STEP 6: The ends Continued ...
18
18: Fabricate an end base support from a small segment of 1/8" x 1/4" stripwood. Bond this support in place flush with the end sill cap.
indexcontentsMRH-Apr 2014
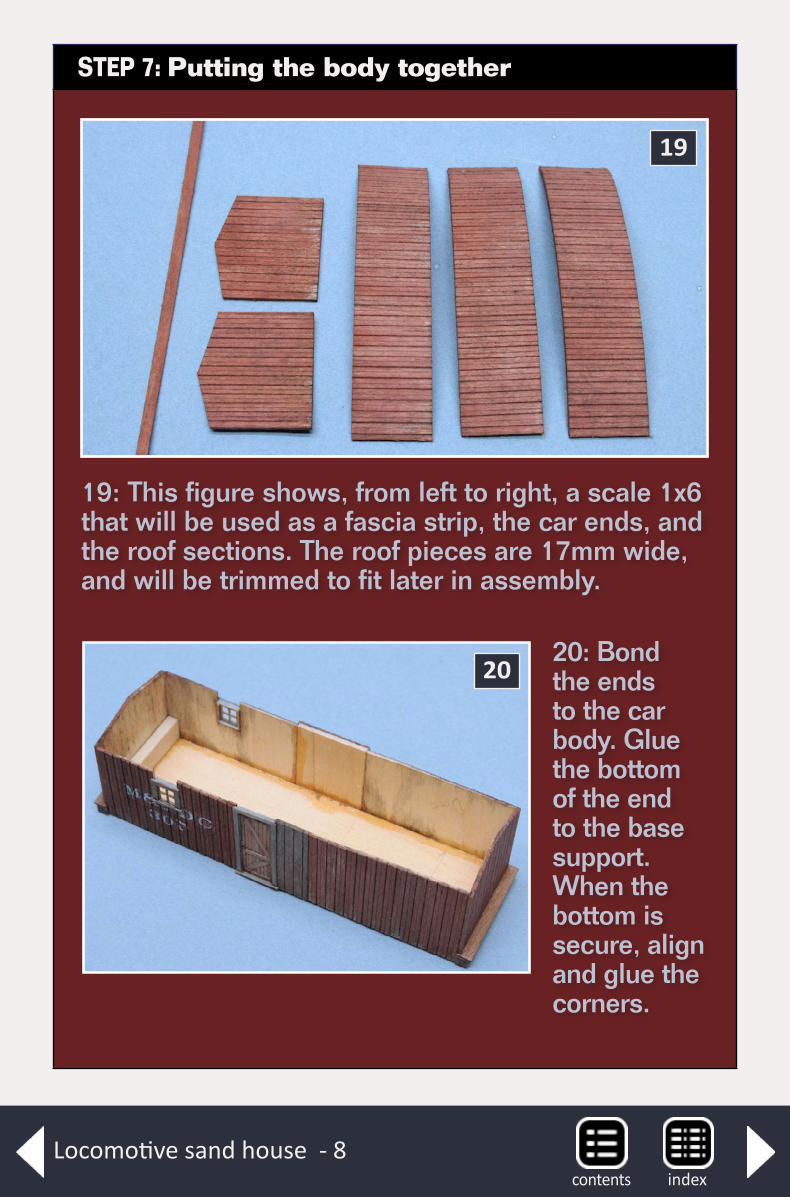
STEP 7: Putting the body together
19
19: This figure shows, from left to right, a scale 1x6 that will be used as a fascia strip, the car ends, and the roof sections. The roof pieces are 17mm wide, and will be trimmed to fit later in assembly.
2020: Bond the ends to the car body. Glue the bottom of the end to the base support. When the bottom is secure, align and glue the corners.
Locomotive sand house - 8indexcontents
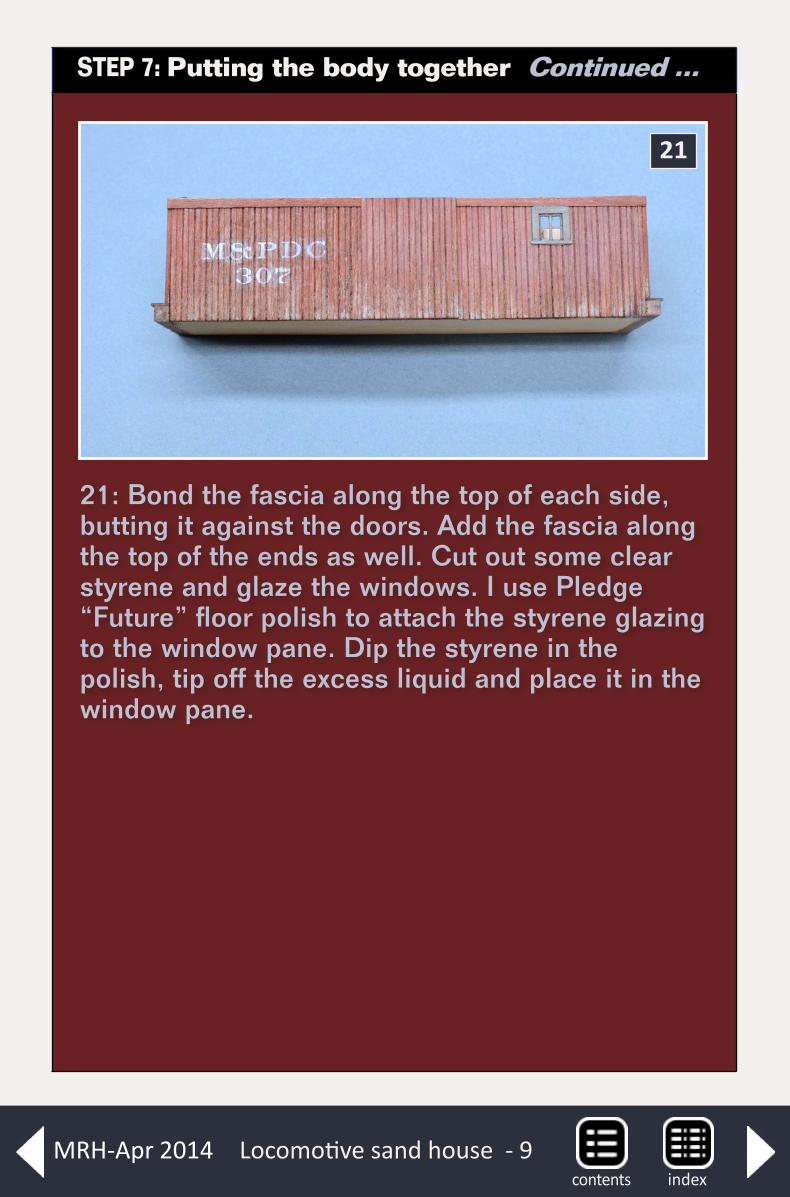
STEP 7: Putting the body together Continued ...
21
21: Bond the fascia along the top of each side, butting it against the doors. Add the fascia along the top of the ends as well. Cut out some clear styrene and glaze the windows. I use Pledge “Future” floor polish to attach the styrene glazing to the window pane. Dip the styrene in the polish, tip off the excess liquid and place it in the window pane.
Locomotive sand house - 9indexcontents
MRH-Apr 2014
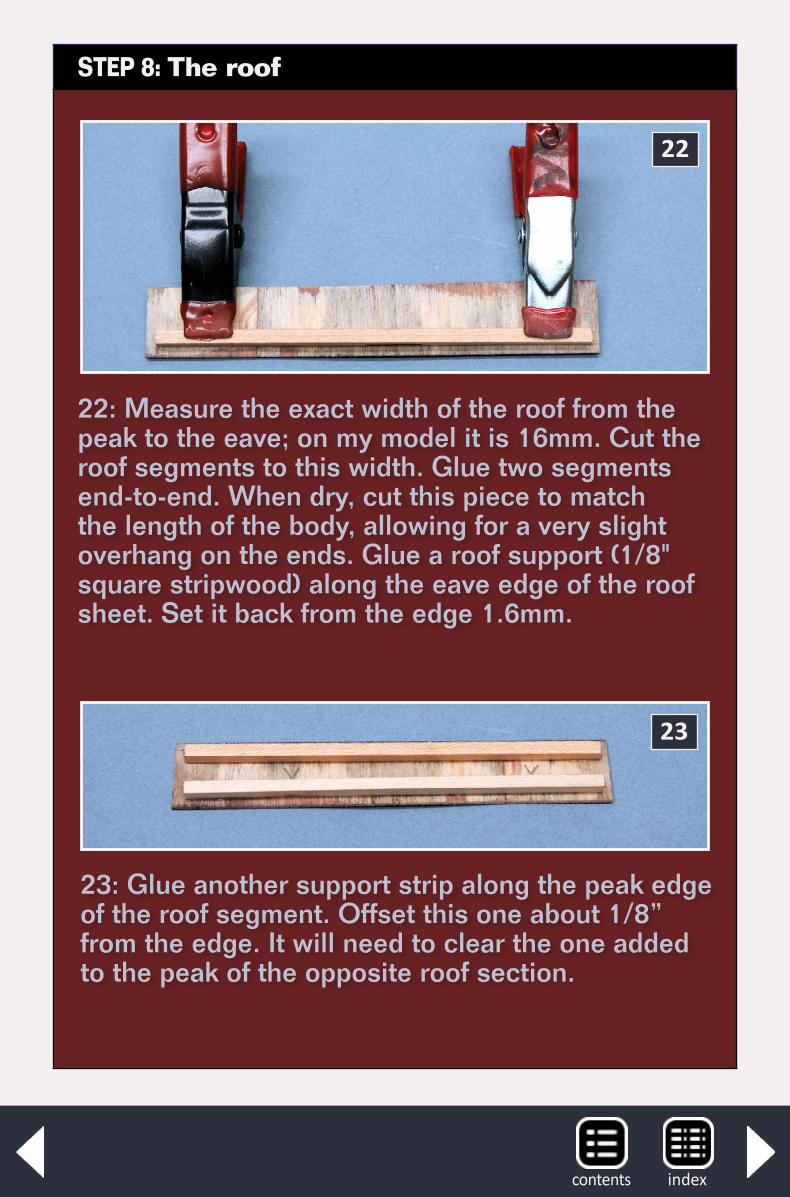
STEP 8: The roof
22
22: Measure the exact width of the roof from the peak to the eave; on my model it is 16mm. Cut the roof segments to this width. Glue two segments end-to-end. When dry, cut this piece to match the length of the body, allowing for a very slight overhang on the ends. Glue a roof support (1/8" square stripwood) along the eave edge of the roof sheet. Set it back from the edge 1.6mm.
23: Glue another support strip along the peak edge of the roof segment. Offset this one about 1/8” from the edge. It will need to clear the one added to the peak of the opposite roof section.
23
indexcontents
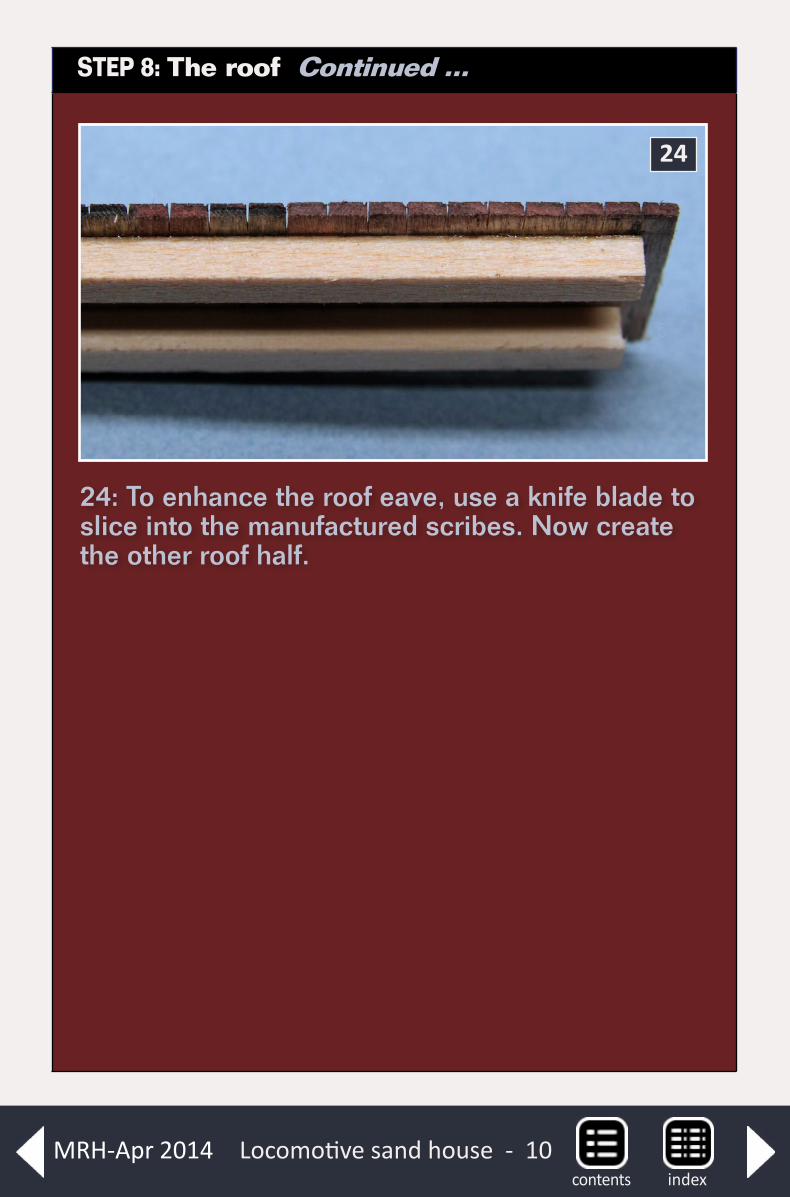
STEP 8: The roof Continued ...
24
24: To enhance the roof eave, use a knife blade to slice into the manufactured scribes. Now create the other roof half.
Locomotive sand house - 10indexcontents
MRH-Apr 2014
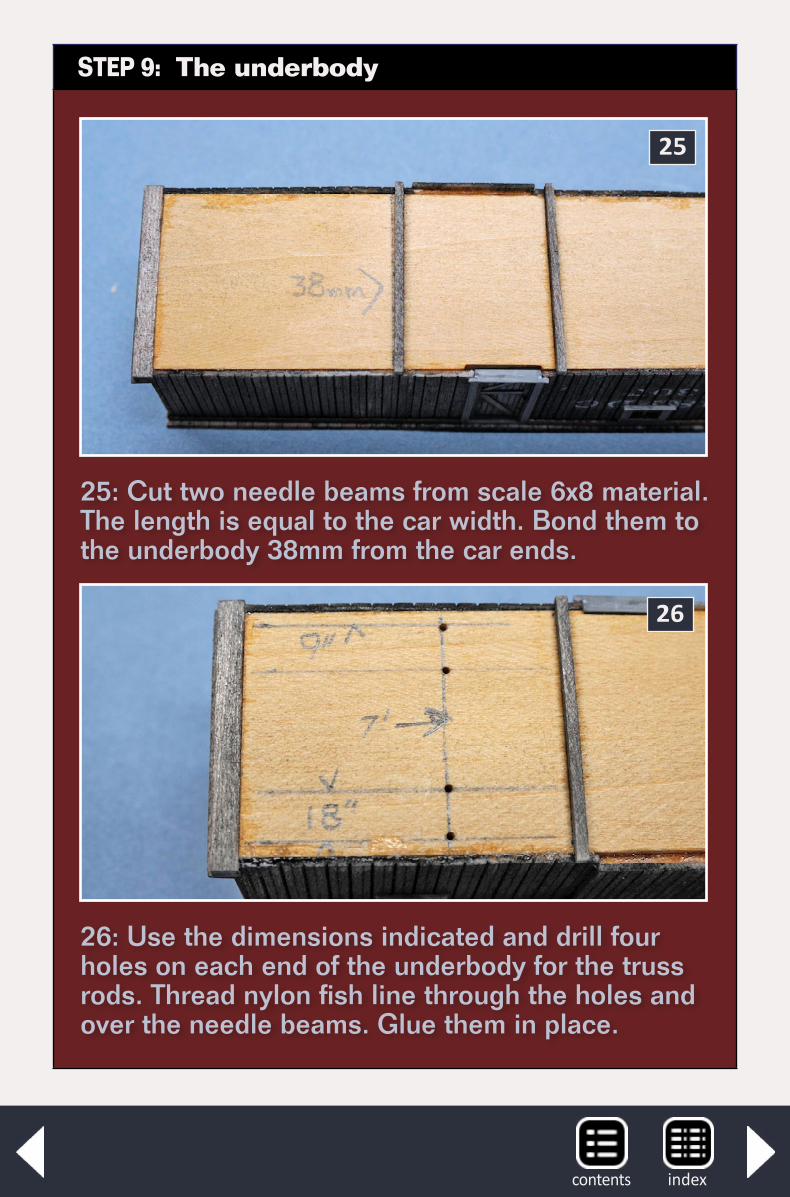
STEP 9: The underbody
25
25: Cut two needle beams from scale 6x8 material. The length is equal to the car width. Bond them to the underbody 38mm from the car ends.
26: Use the dimensions indicated and drill four holes on each end of the underbody for the truss rods. Thread nylon fish line through the holes and over the needle beams. Glue them in place.
26
indexcontents
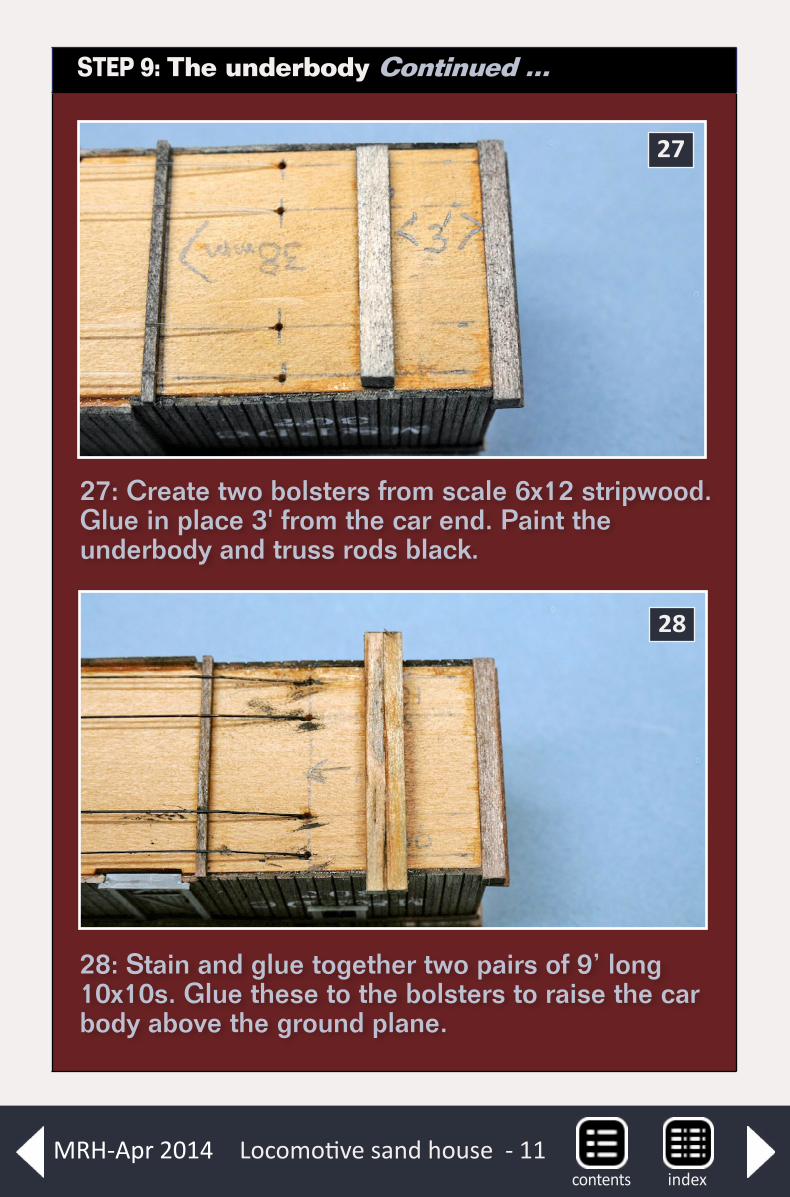
STEP 9: The underbody Continued ...
27
27: Create two bolsters from scale 6x12 stripwood. Glue in place 3' from the car end. Paint the underbody and truss rods black.
28: Stain and glue together two pairs of 9’ long 10x10s. Glue these to the bolsters to raise the car body above the ground plane.
28
Locomotive sand house - 11indexcontents
MRH-Apr 2014
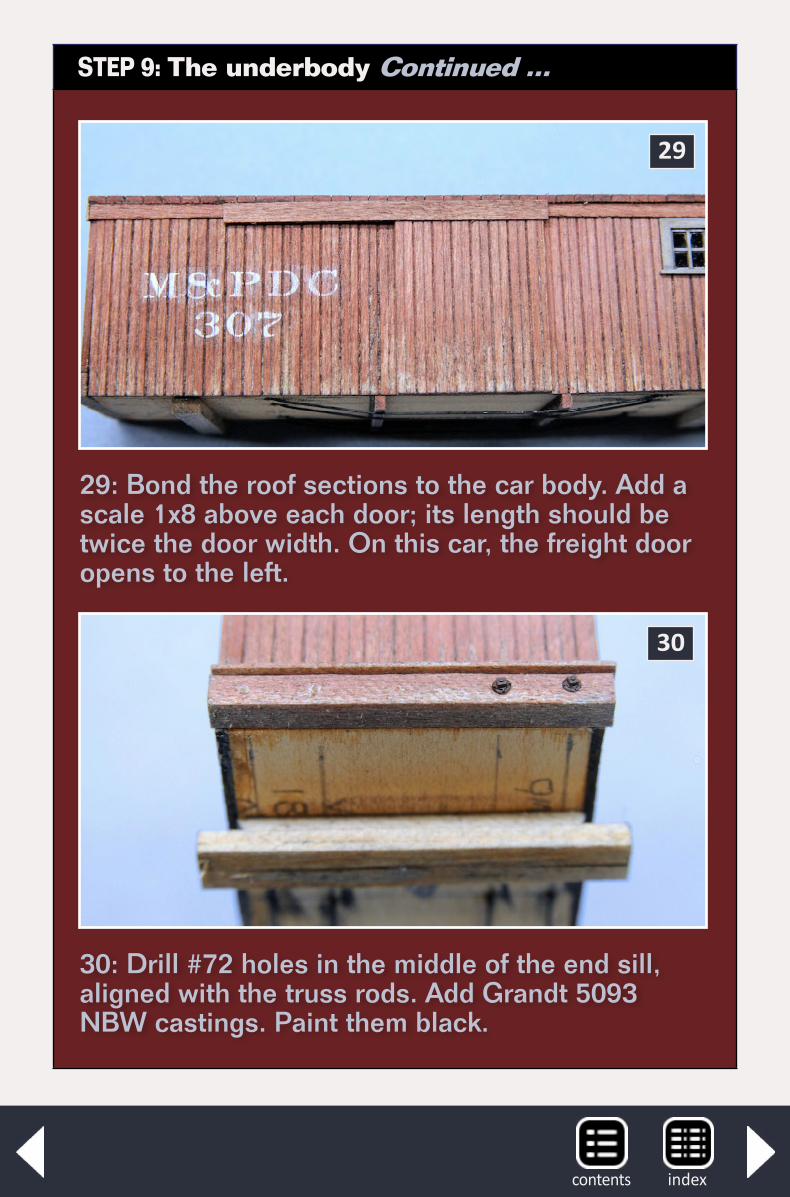
STEP 9: The underbody Continued ...
29
29: Bond the roof sections to the car body. Add a scale 1x8 above each door; its length should be twice the door width. On this car, the freight door opens to the left.
30: Drill #72 holes in the middle of the end sill, aligned with the truss rods. Add Grandt 5093 NBW castings. Paint them black.
30
indexcontents
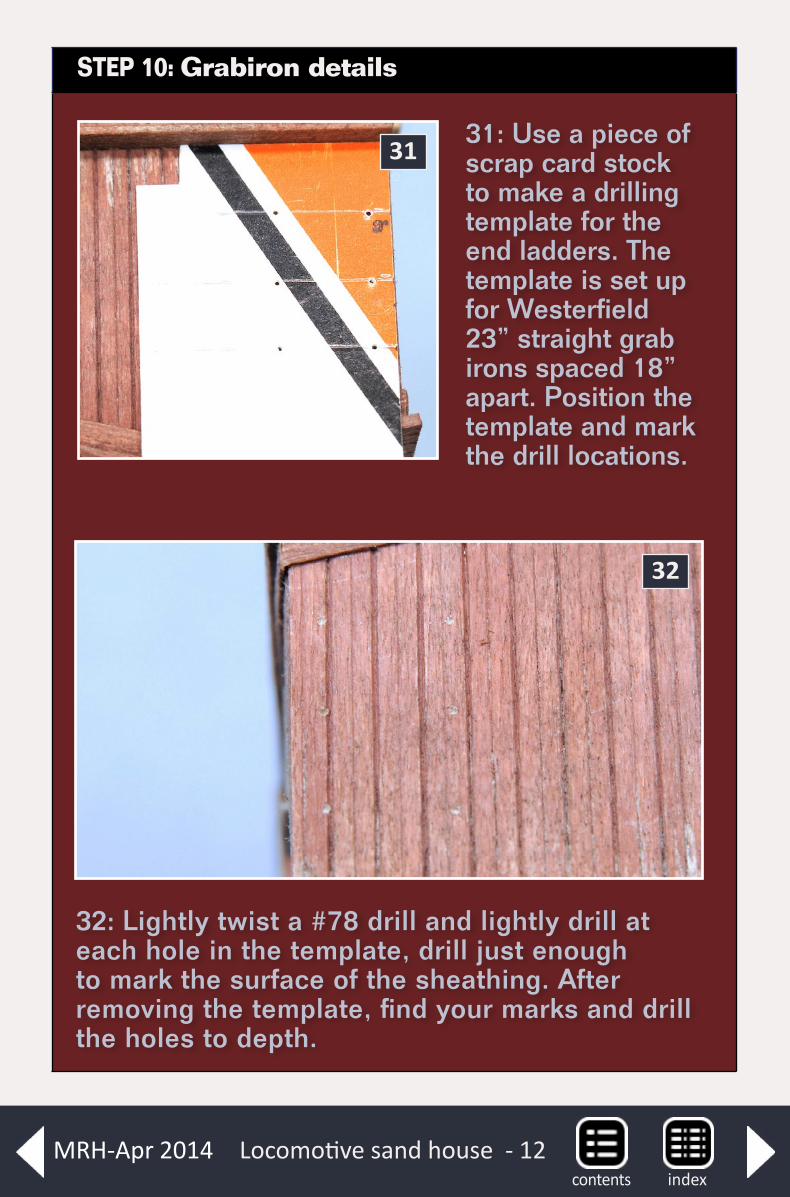
STEP 10: Grabiron details
31: Use a piece of scrap card stock to make a drilling template for the end ladders. The template is set up for Westerfield 23” straight grab irons spaced 18” apart. Position the template and mark the drill locations.
31
32: Lightly twist a #78 drill and lightly drill at each hole in the template, drill just enough to mark the surface of the sheathing. After removing the template, find your marks and drill the holes to depth.
32
Locomotive sand house - 12indexcontents
MRH-Apr 2014
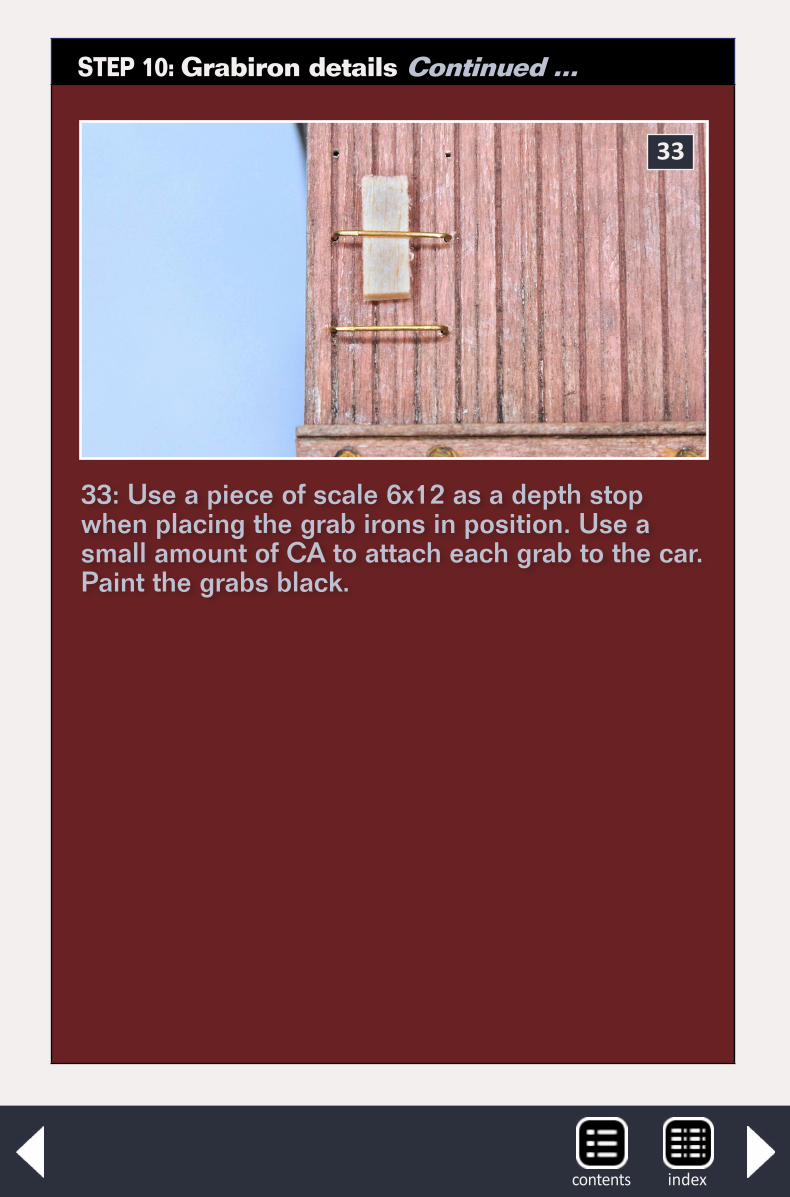
STEP 10: Grabiron details Continued ...
33: Use a piece of scale 6x12 as a depth stop when placing the grab irons in position. Use a small amount of CA to attach each grab to the car. Paint the grabs black.
33
indexcontents
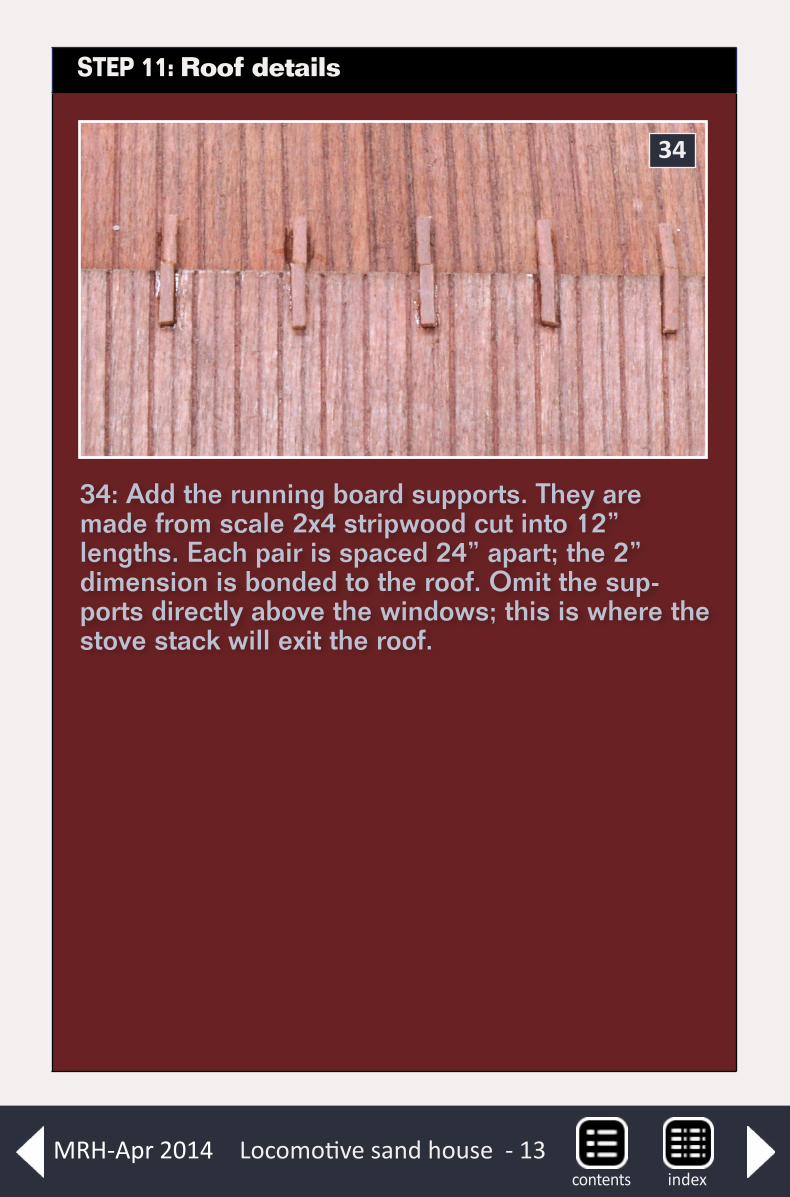
STEP 11: Roof details
34: Add the running board supports. They are made from scale 2x4 stripwood cut into 12” lengths. Each pair is spaced 24” apart; the 2” dimension is bonded to the roof. Omit the sup-ports directly above the windows; this is where the stove stack will exit the roof.
34
Locomotive sand house - 13indexcontents
MRH-Apr 2014
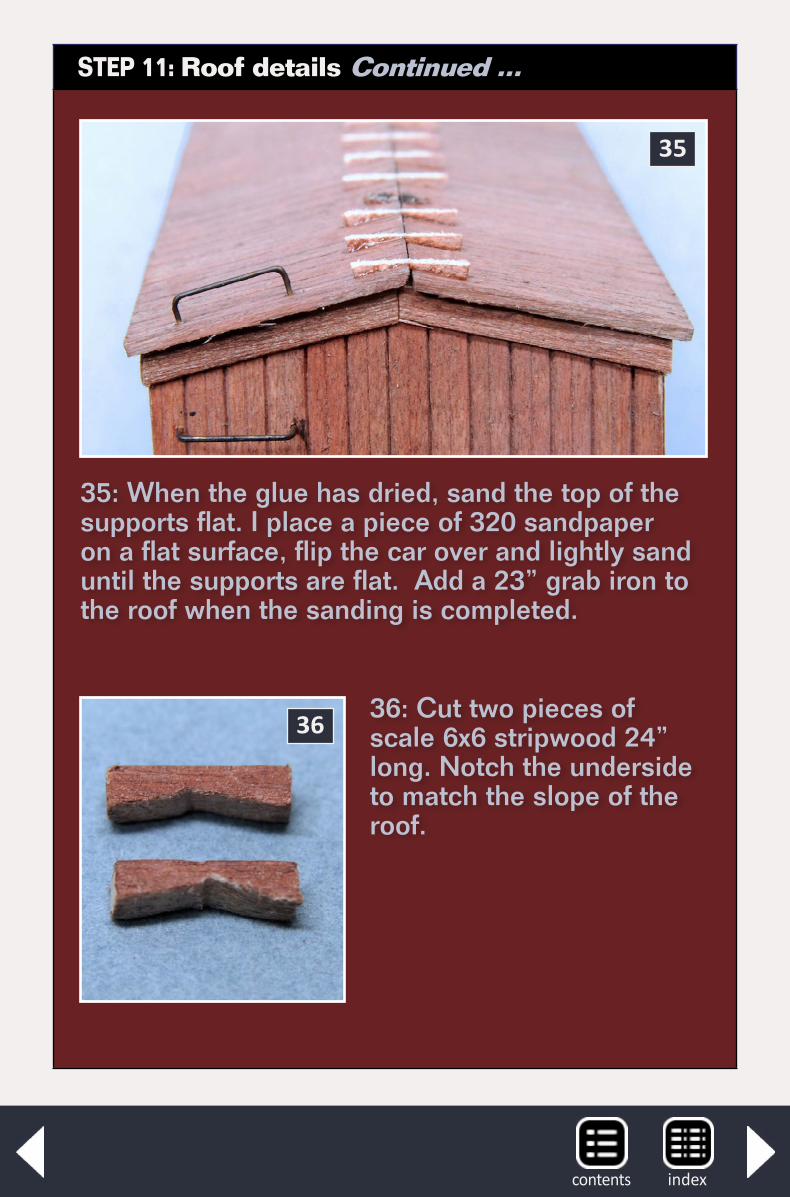
STEP 11: Roof details Continued ...
35: When the glue has dried, sand the top of the supports flat. I place a piece of 320 sandpaper on a flat surface, flip the car over and lightly sand until the supports are flat. Add a 23” grab iron to the roof when the sanding is completed.
35
36: Cut two pieces of scale 6x6 stripwood 24” long. Notch the underside to match the slope of the roof.
36
indexcontents
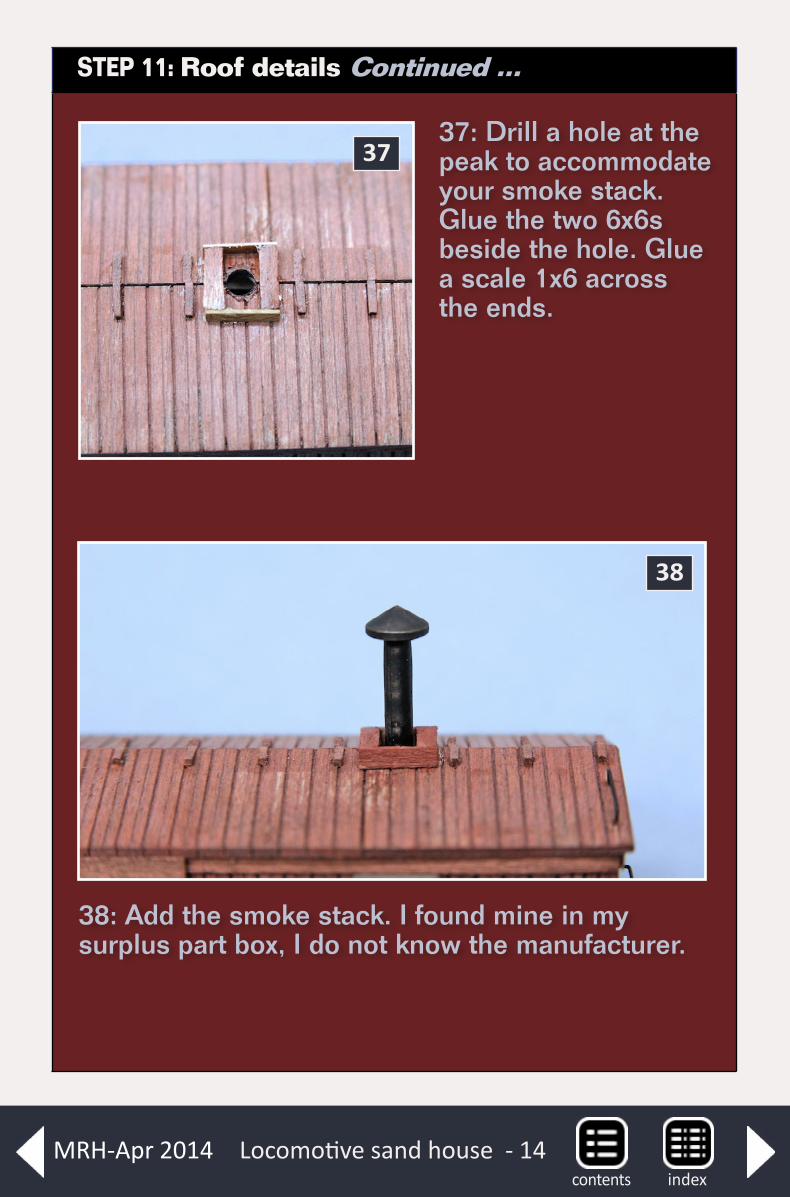
STEP 11: Roof details Continued ...
37: Drill a hole at the peak to accommodate your smoke stack. Glue the two 6x6s beside the hole. Glue a scale 1x6 across the ends.
37
38: Add the smoke stack. I found mine in my surplus part box, I do not know the manufacturer.
38
Locomotive sand house - 14indexcontents
MRH-Apr 2014
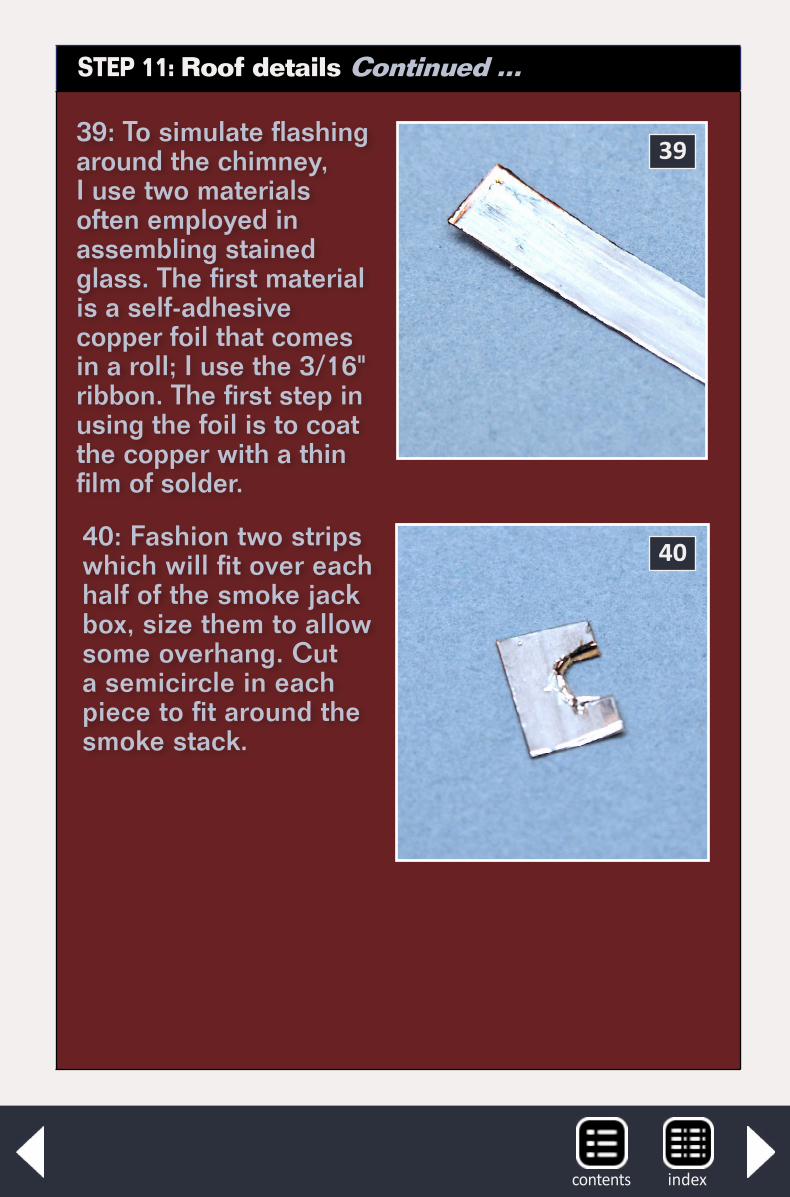
STEP 11: Roof details Continued ...
39: To simulate flashing around the chimney, I use two materials often employed in assembling stained glass. The first material is a self-adhesive copper foil that comes in a roll; I use the 3/16" ribbon. The first step in using the foil is to coat the copper with a thin film of solder.
39
4040: Fashion two strips which will fit over each half of the smoke jack box, size them to allow some overhang. Cut a semicircle in each piece to fit around the smoke stack.
indexcontents
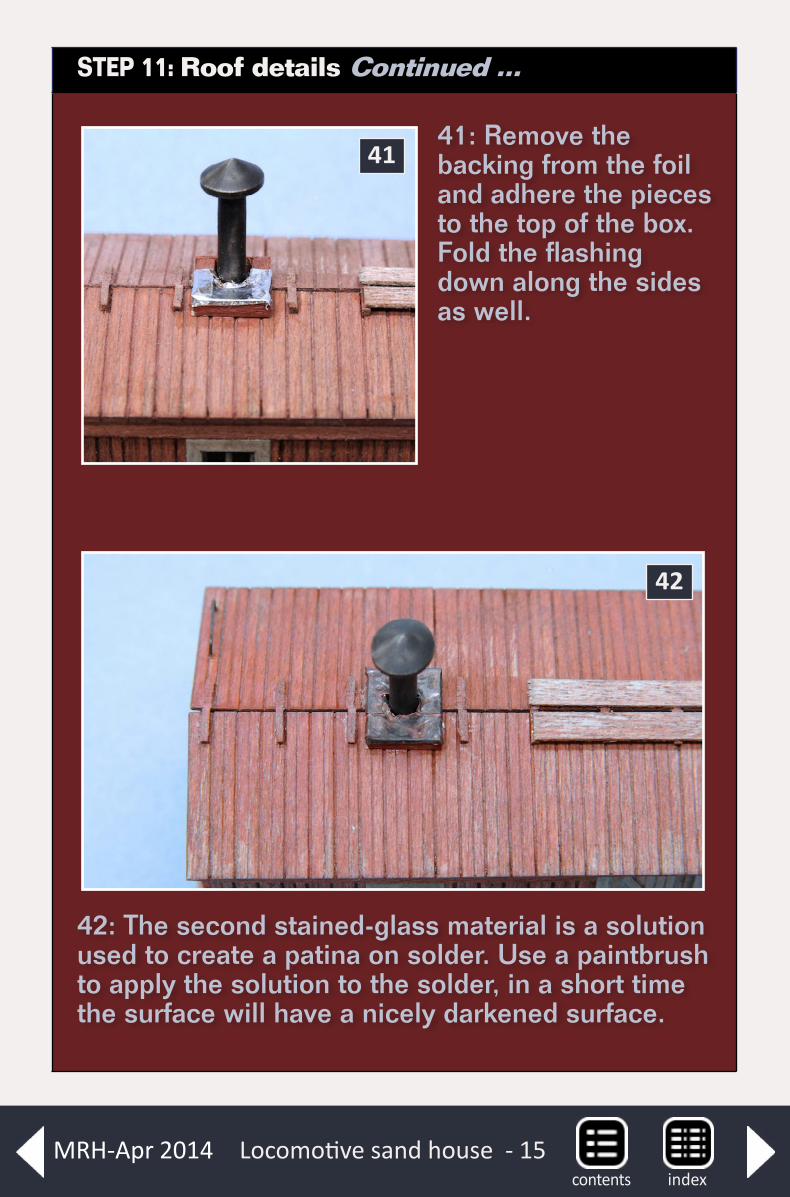
STEP 11: Roof details Continued ...
41: Remove the backing from the foil and adhere the pieces to the top of the box. Fold the flashing down along the sides as well.
41
42: The second stained-glass material is a solution used to create a patina on solder. Use a paintbrush to apply the solution to the solder, in a short time the surface will have a nicely darkened surface.
42
Locomotive sand house - 15indexcontents
MRH-Apr 2014
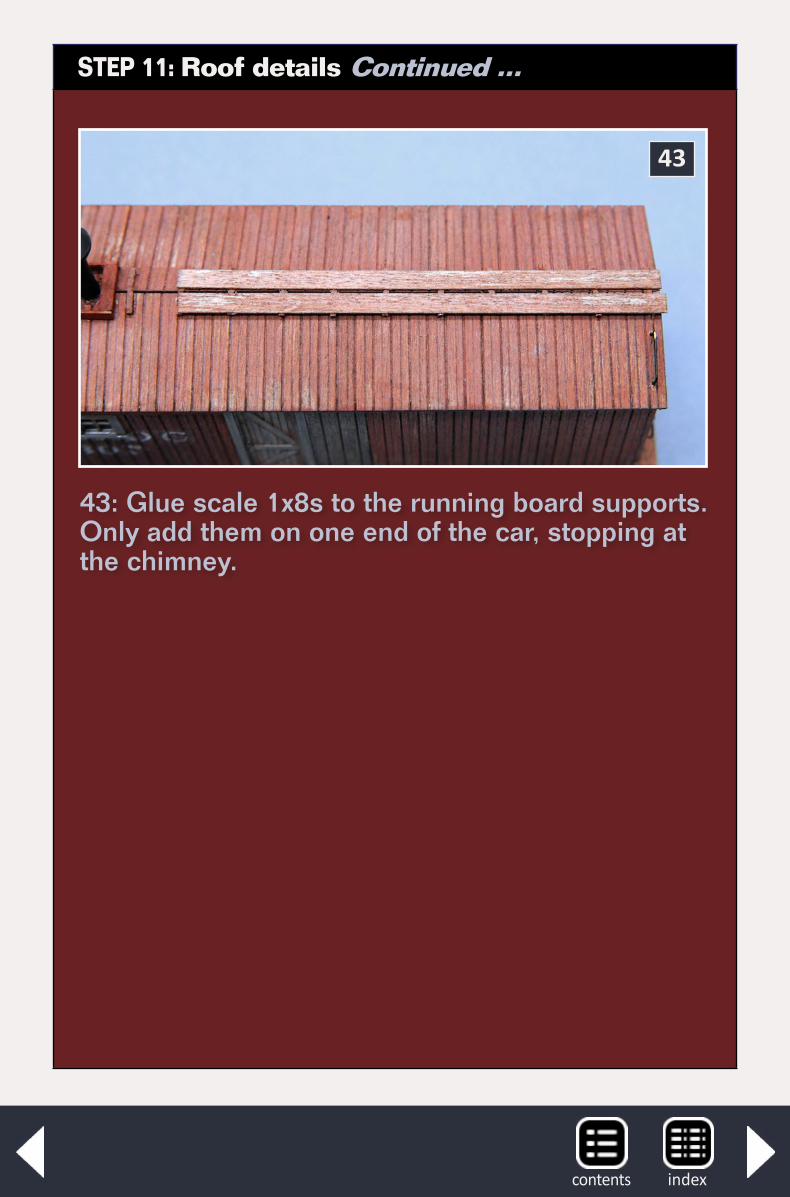
STEP 11: Roof details Continued ...
43: Glue scale 1x8s to the running board supports. Only add them on one end of the car, stopping at the chimney.
43
indexcontents

STEP 12: Finished model Continued ...
Apply bolt detail to each hand grab above the spot where they penetrate the siding. Drill #78 holes and insert Grandt 5045 NBW castings. Dry brush a little Light Freight Car Red on
the grabs and NBW. Follow-up with a wash of Weathered Rust and Realistic Rust.
44
45: Personnel door side.
45
Locomotive sand house - 16indexcontents
MRH-Apr 2014
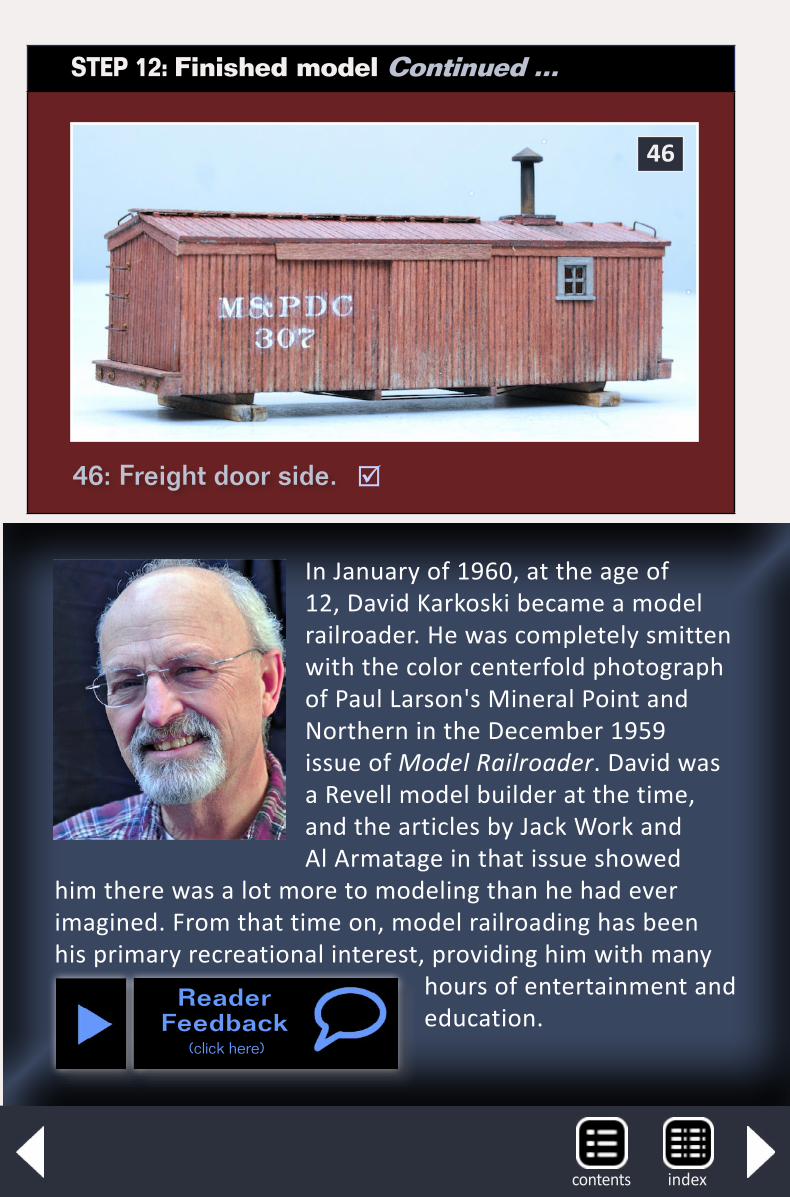
STEP 12: Finished model Continued ...
46
In January of 1960, at the age of 12, David Karkoski became a model railroader. He was completely smitten with the color centerfold photograph of Paul Larson's Mineral Point and Northern in the December 1959 issue of Model Railroader. David was a Revell model builder at the time, and the articles by Jack Work and Al Armatage in that issue showed
him there was a lot more to modeling than he had ever imagined. From that time on, model railroading has been his primary recreational interest, providing him with many
hours of entertainment and education.
46: Freight door side.
ReaderFeedback
(click here)
indexcontents
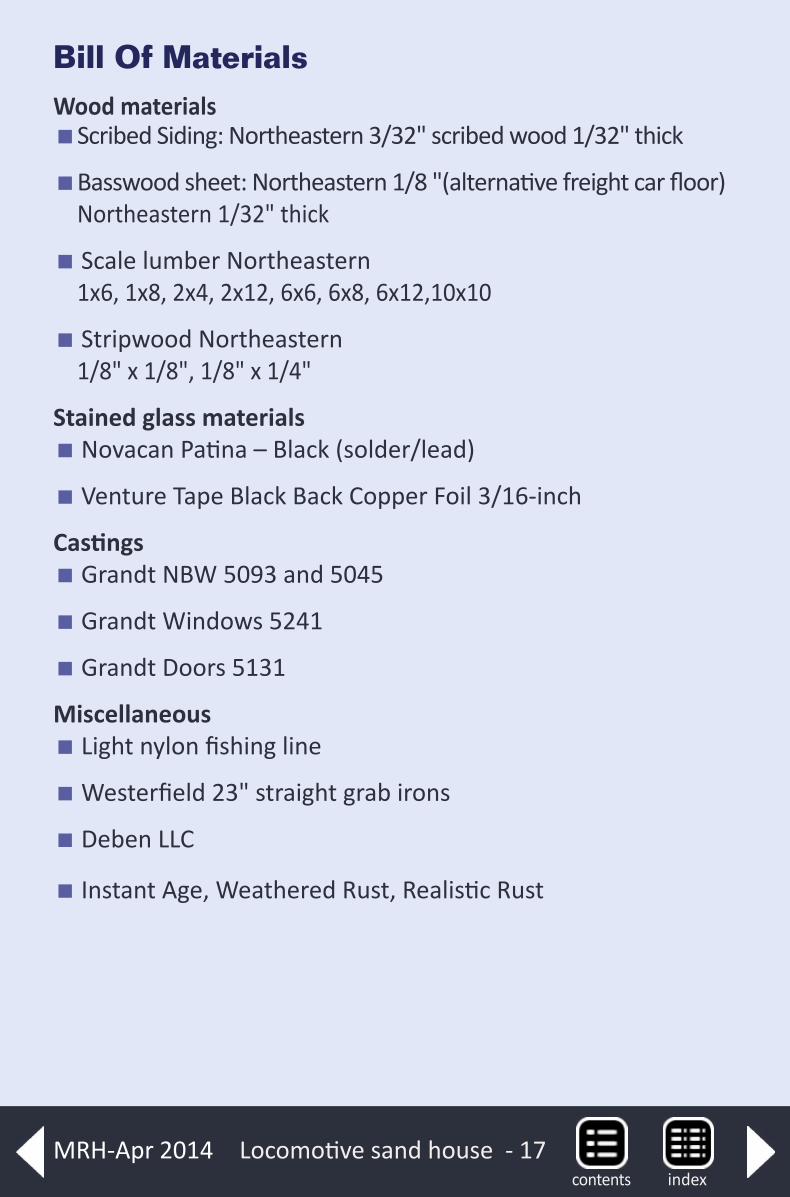
Locomotive sand house - 17
Bill Of MaterialsWood materials
�Scribed Siding: Northeastern 3/32" scribed wood 1/32" thick
�Basswood sheet: Northeastern 1/8 "(alternative freight car floor) Northeastern 1/32" thick
� Scale lumber Northeastern 1x6, 1x8, 2x4, 2x12, 6x6, 6x8, 6x12,10x10
� Stripwood Northeastern 1/8" x 1/8", 1/8" x 1/4"
Stained glass materials �Novacan Patina – Black (solder/lead)
�Venture Tape Black Back Copper Foil 3/16-inch
Castings �Grandt NBW 5093 and 5045
�Grandt Windows 5241
�Grandt Doors 5131
Miscellaneous � Light nylon fishing line
�Westerfield 23" straight grab irons
�Deben LLC
� Instant Age, Weathered Rust, Realistic Rust
indexcontentsMRH-Apr 2014
indexcontents
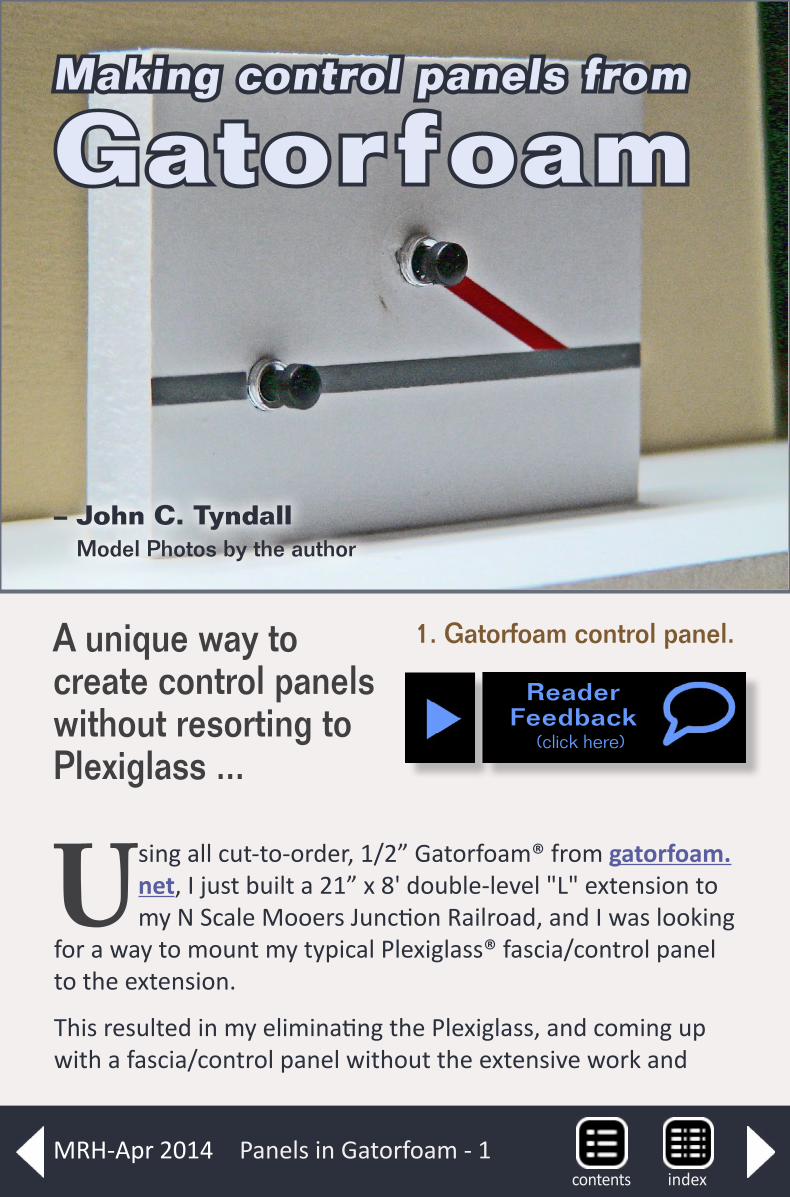
Panels in Gatorfoam - 1
Using all cut-to-order, 1/2” Gatorfoam® from gatorfoam.net, I just built a 21” x 8' double-level "L" extension to my N Scale Mooers Junction Railroad, and I was looking
for a way to mount my typical Plexiglass® fascia/control panel to the extension.
This resulted in my eliminating the Plexiglass, and coming up with a fascia/control panel without the extensive work and
A unique way to create control panels without resorting to Plexiglass ...
ReaderFeedback
(click here)
Making control panels from Gatorfoam
– John C. Tyndall Model Photos by the author
1. Gatorfoam control panel.
indexcontentsMRH-Apr 2014
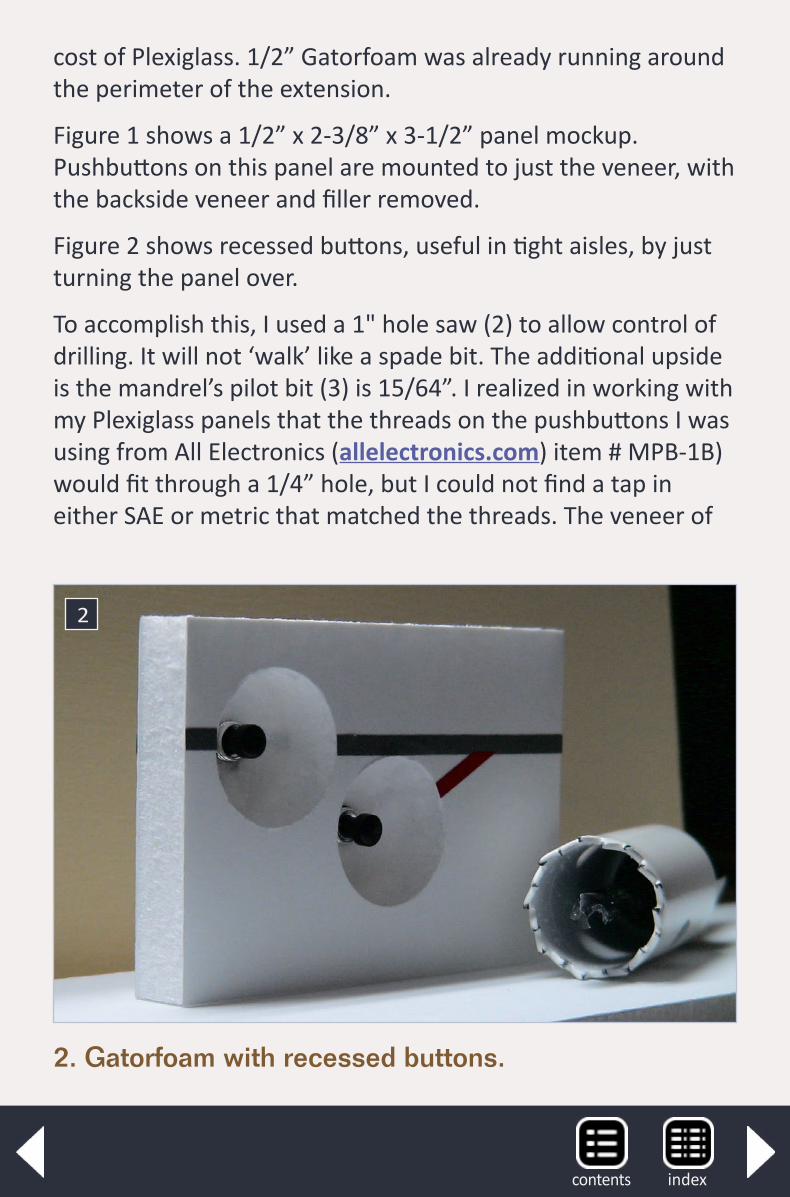
cost of Plexiglass. 1/2” Gatorfoam was already running around the perimeter of the extension.
Figure 1 shows a 1/2” x 2-3/8” x 3-1/2” panel mockup. Pushbuttons on this panel are mounted to just the veneer, with the backside veneer and filler removed.
Figure 2 shows recessed buttons, useful in tight aisles, by just turning the panel over.
To accomplish this, I used a 1" hole saw (2) to allow control of drilling. It will not ‘walk’ like a spade bit. The additional upside is the mandrel’s pilot bit (3) is 15/64”. I realized in working with my Plexiglass panels that the threads on the pushbuttons I was using from All Electronics (allelectronics.com) item # MPB-1B) would fit through a 1/4” hole, but I could not find a tap in either SAE or metric that matched the threads. The veneer of
2
2. Gatorfoam with recessed buttons.
indexcontents
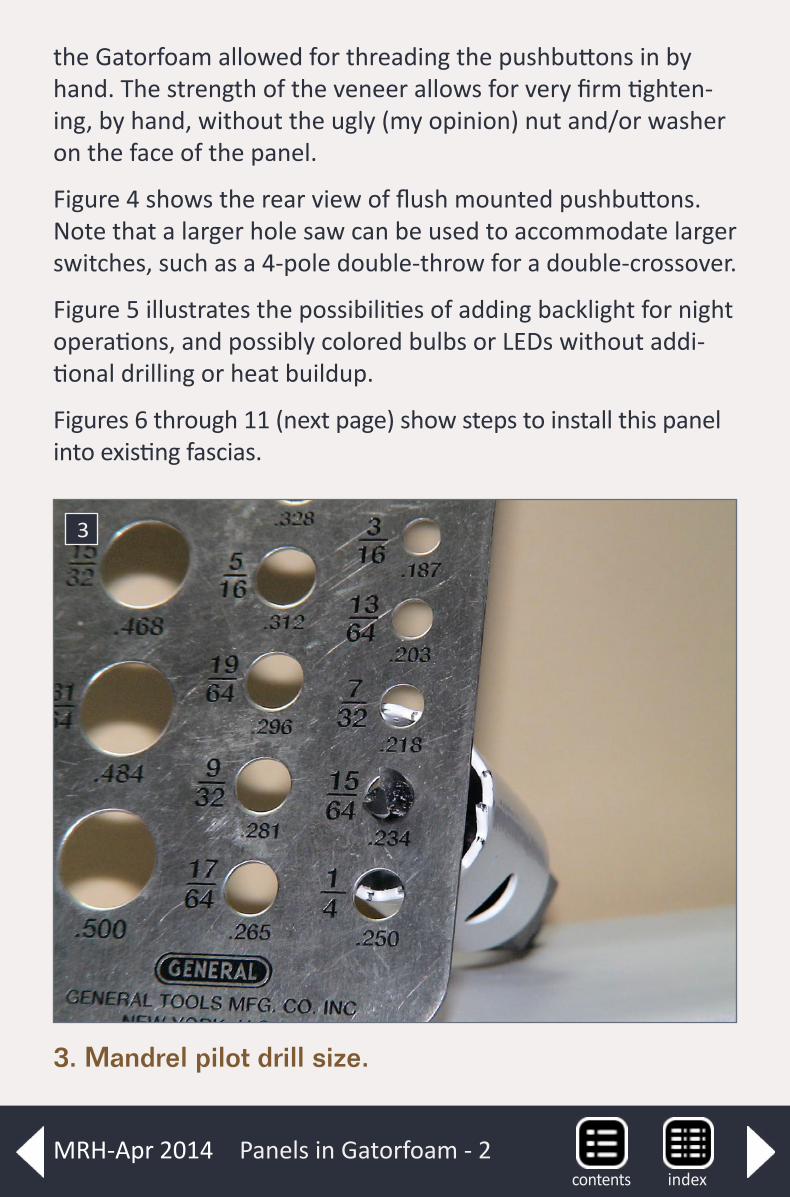
the Gatorfoam allowed for threading the pushbuttons in by hand. The strength of the veneer allows for very firm tighten-ing, by hand, without the ugly (my opinion) nut and/or washer on the face of the panel.
Figure 4 shows the rear view of flush mounted pushbuttons. Note that a larger hole saw can be used to accommodate larger switches, such as a 4-pole double-throw for a double-crossover.
Figure 5 illustrates the possibilities of adding backlight for night operations, and possibly colored bulbs or LEDs without addi-tional drilling or heat buildup.
Figures 6 through 11 (next page) show steps to install this panel into existing fascias.
3
3. Mandrel pilot drill size.
Panels in Gatorfoam - 2indexcontents
MRH-Apr 2014
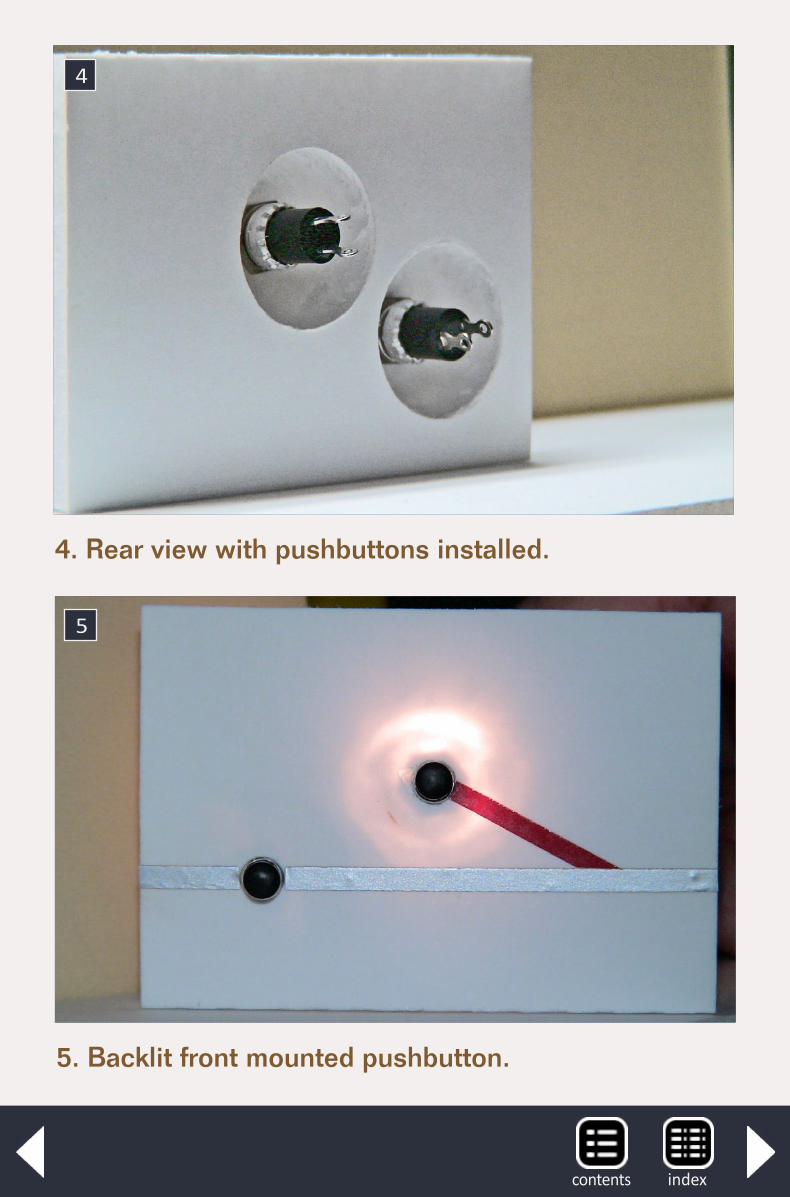
4
4. Rear view with pushbuttons installed.
5
5. Backlit front mounted pushbutton.
indexcontents
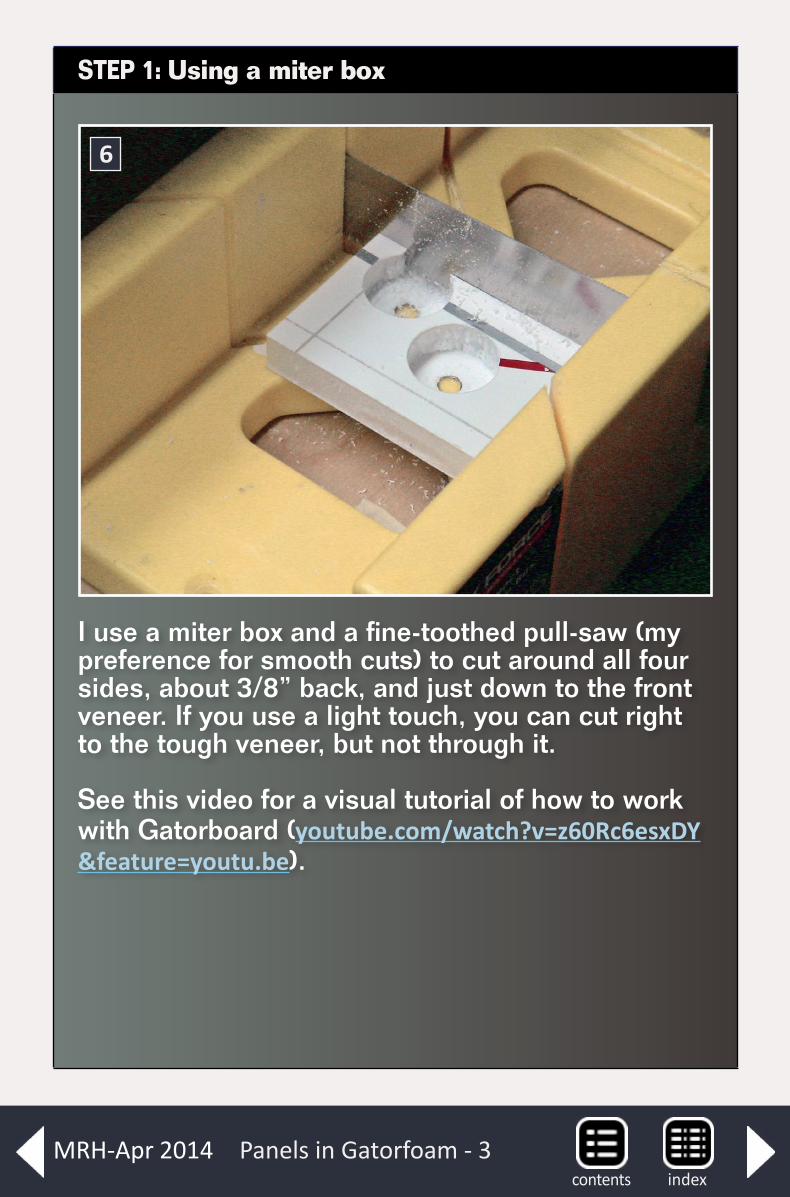
Panels in Gatorfoam - 3
STEP 1: Using a miter box
I use a miter box and a fine-toothed pull-saw (my preference for smooth cuts) to cut around all four sides, about 3/8” back, and just down to the front veneer. If you use a light touch, you can cut right to the tough veneer, but not through it.
See this video for a visual tutorial of how to work with Gatorboard (youtube.com/watch?v=z60Rc6esxDY&feature=youtu.be).
6
indexcontentsMRH-Apr 2014
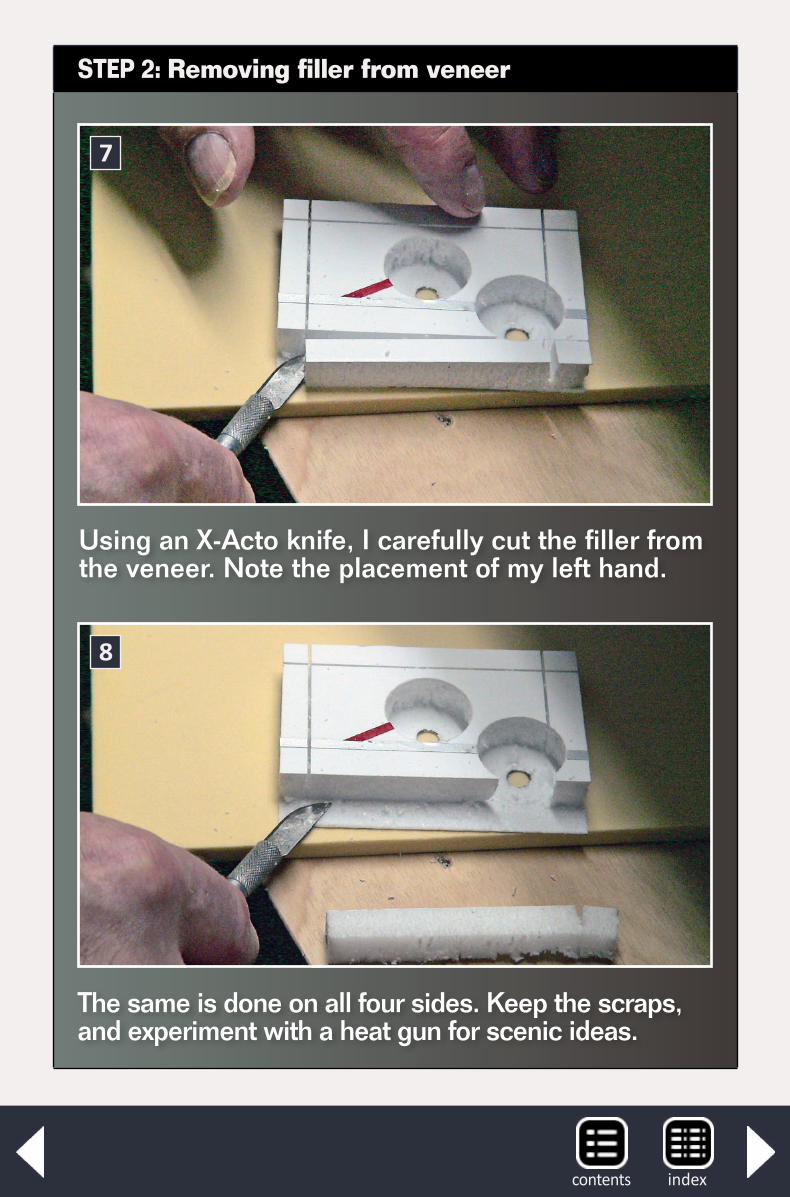
STEP 2: Removing filler from veneer
Using an X-Acto knife, I carefully cut the filler from the veneer. Note the placement of my left hand.
7
The same is done on all four sides. Keep the scraps, and experiment with a heat gun for scenic ideas.
8
indexcontents
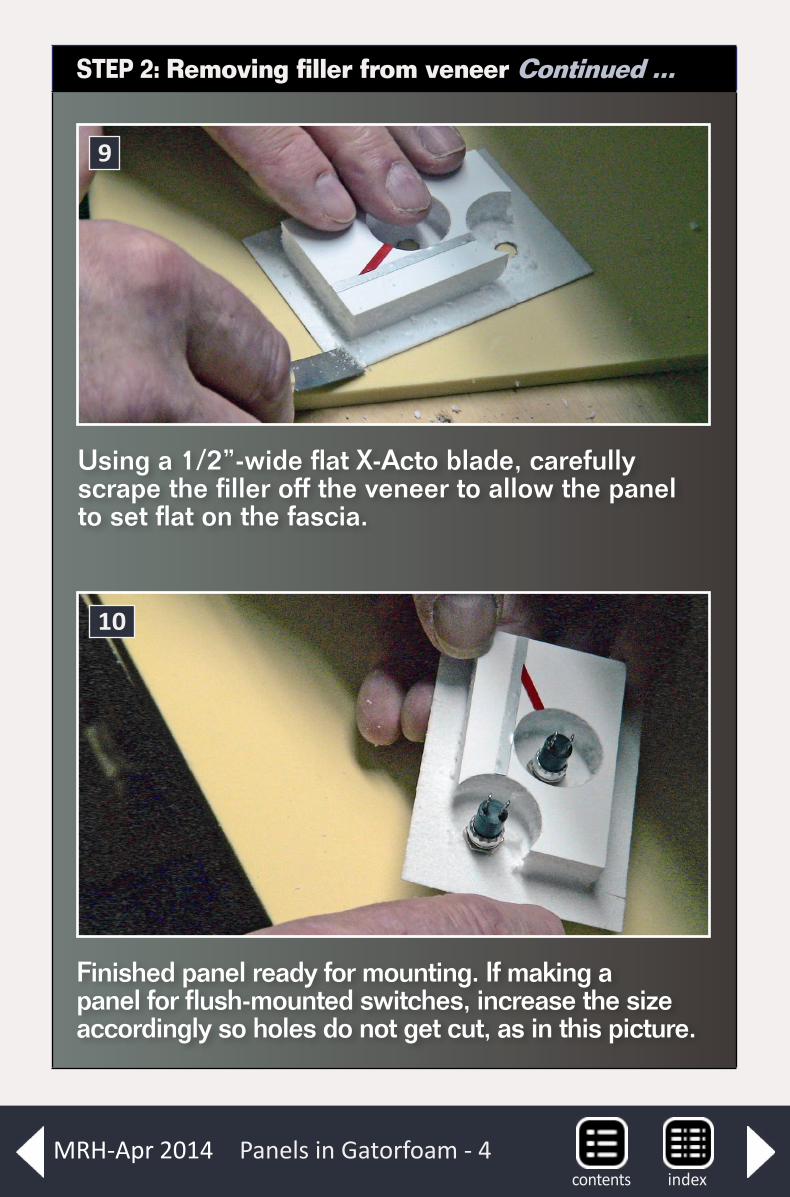
Panels in Gatorfoam - 4
STEP 2: Removing filler from veneer Continued ...
Using a 1/2”-wide flat X-Acto blade, carefully scrape the filler off the veneer to allow the panel to set flat on the fascia.
9
Finished panel ready for mounting. If making a panel for flush-mounted switches, increase the size accordingly so holes do not get cut, as in this picture.
10
indexcontentsMRH-Apr 2014
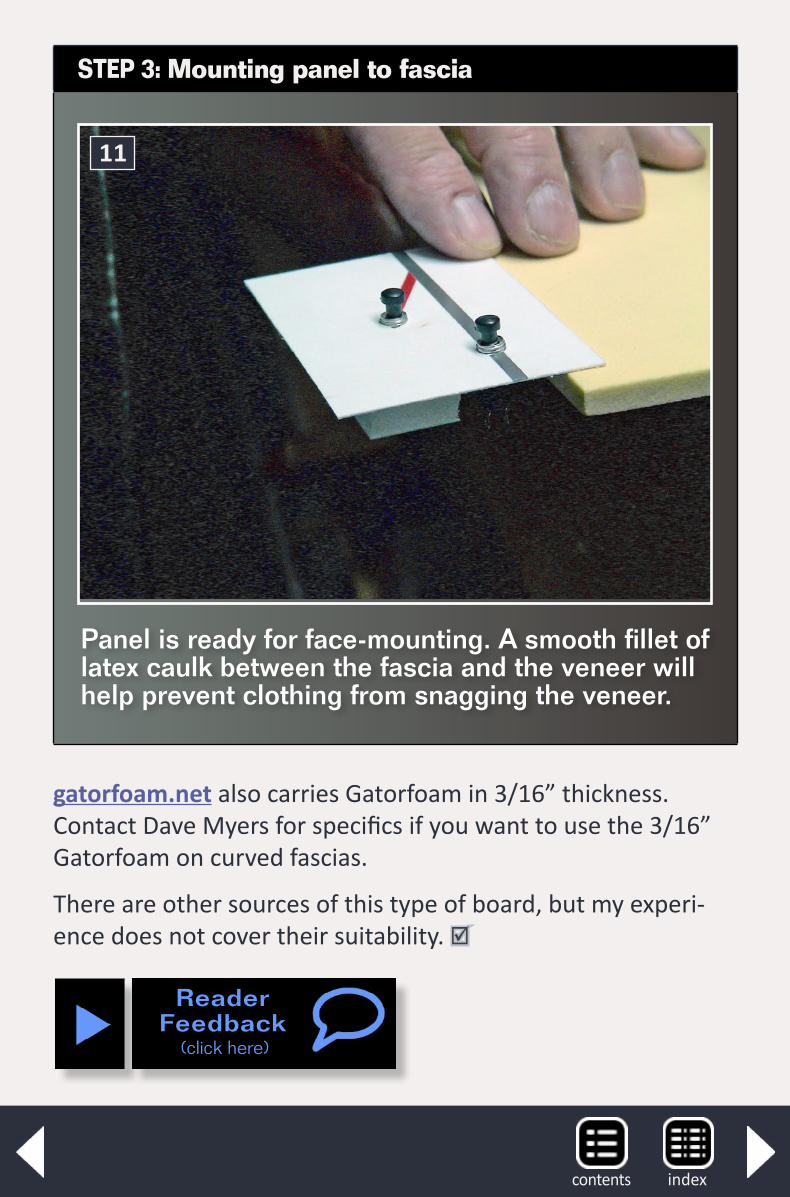
STEP 3: Mounting panel to fascia
Panel is ready for face-mounting. A smooth fillet of latex caulk between the fascia and the veneer will help prevent clothing from snagging the veneer.
11
gatorfoam.net also carries Gatorfoam in 3/16” thickness. Contact Dave Myers for specifics if you want to use the 3/16” Gatorfoam on curved fascias.
There are other sources of this type of board, but my experi-ence does not cover their suitability.
ReaderFeedback
(click here)
indexcontents
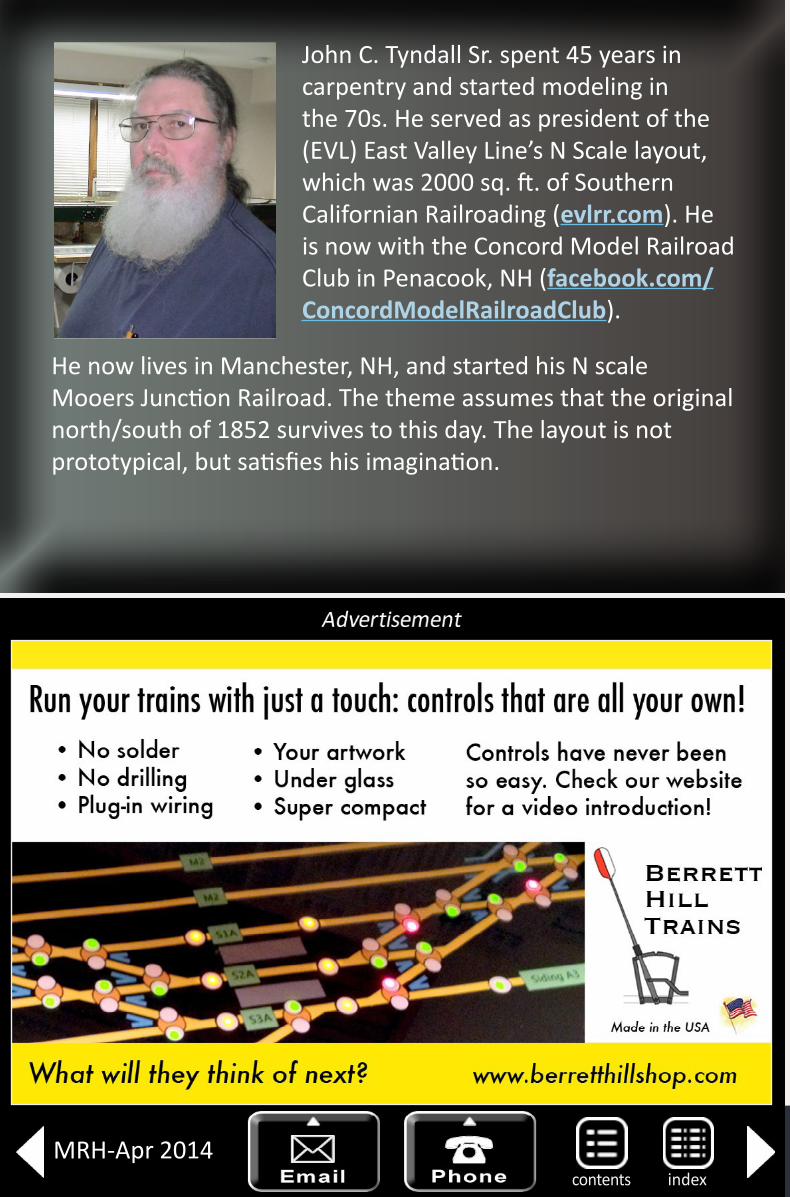
John C. Tyndall Sr. spent 45 years in carpentry and started modeling in the 70s. He served as president of the (EVL) East Valley Line’s N Scale layout, which was 2000 sq. ft. of Southern Californian Railroading (evlrr.com). He is now with the Concord Model Railroad Club in Penacook, NH (facebook.com/ConcordModelRailroadClub).
He now lives in Manchester, NH, and started his N scale Mooers Junction Railroad. The theme assumes that the original north/south of 1852 survives to this day. The layout is not prototypical, but satisfies his imagination.
indexcontentsMRH-Apr 2014
indexcontents

Headlight reflector - 1
Iwas having trouble find-ing a suitable headlight reflector for a brass loco-
motive I was detailing and painting for a customer, so I decided to try to make some.
Simple materials and techniques eliminate the need for a commercial part ...
ReaderFeedback
(click here)
Headlight reflector for O scale locomotives
– Ray Grosser MMR 362 Model Photos by the author
1. Ray Grosser built a convincing headlight reflector for a client's custom-painted O scale steam engine.
indexcontentsMRH-Apr 2014
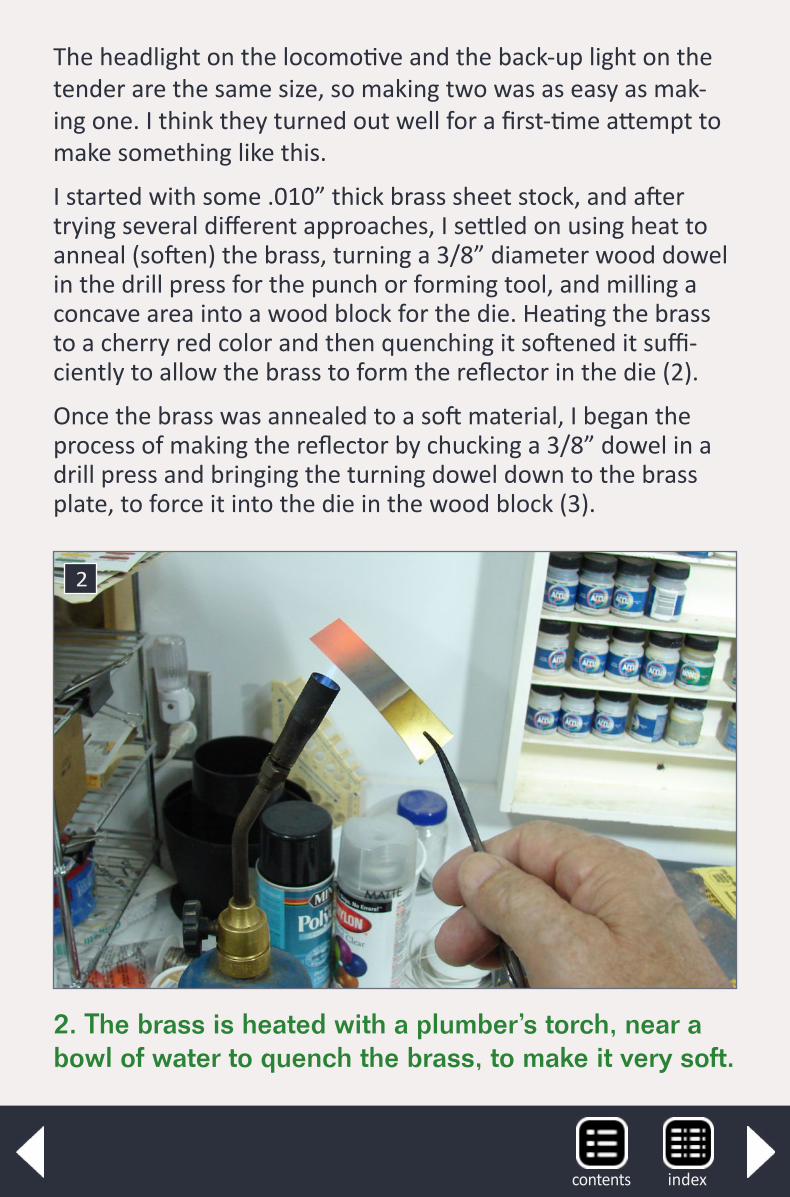
The headlight on the locomotive and the back-up light on the tender are the same size, so making two was as easy as mak-ing one. I think they turned out well for a first-time attempt to make something like this.
I started with some .010” thick brass sheet stock, and after trying several different approaches, I settled on using heat to anneal (soften) the brass, turning a 3/8” diameter wood dowel in the drill press for the punch or forming tool, and milling a concave area into a wood block for the die. Heating the brass to a cherry red color and then quenching it softened it suffi-ciently to allow the brass to form the reflector in the die (2).
Once the brass was annealed to a soft material, I began the process of making the reflector by chucking a 3/8” dowel in a drill press and bringing the turning dowel down to the brass plate, to force it into the die in the wood block (3).
2
2. The brass is heated with a plumber’s torch, near a bowl of water to quench the brass, to make it very soft.
indexcontents
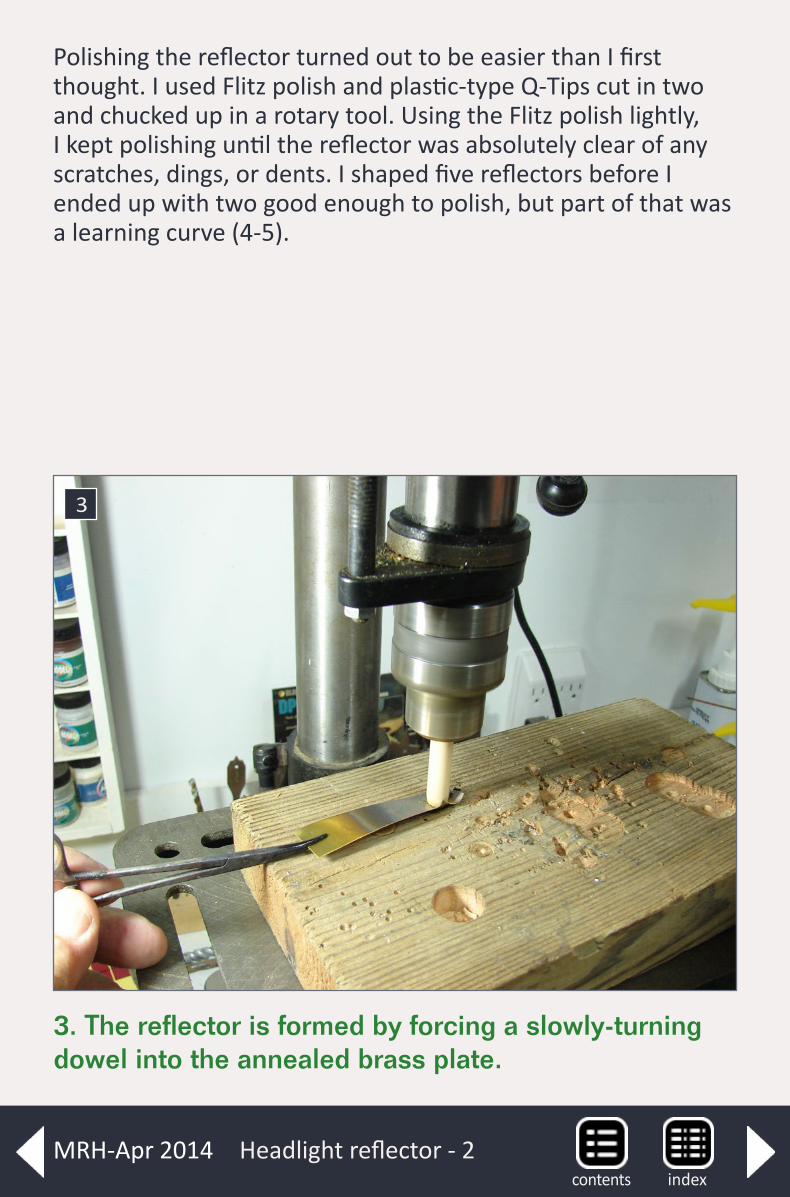
Polishing the reflector turned out to be easier than I first thought. I used Flitz polish and plastic-type Q-Tips cut in two and chucked up in a rotary tool. Using the Flitz polish lightly, I kept polishing until the reflector was absolutely clear of any scratches, dings, or dents. I shaped five reflectors before I ended up with two good enough to polish, but part of that was a learning curve (4-5).
Headlight reflector - 2
3
3. The reflector is formed by forcing a slowly-turning dowel into the annealed brass plate.
indexcontentsMRH-Apr 2014
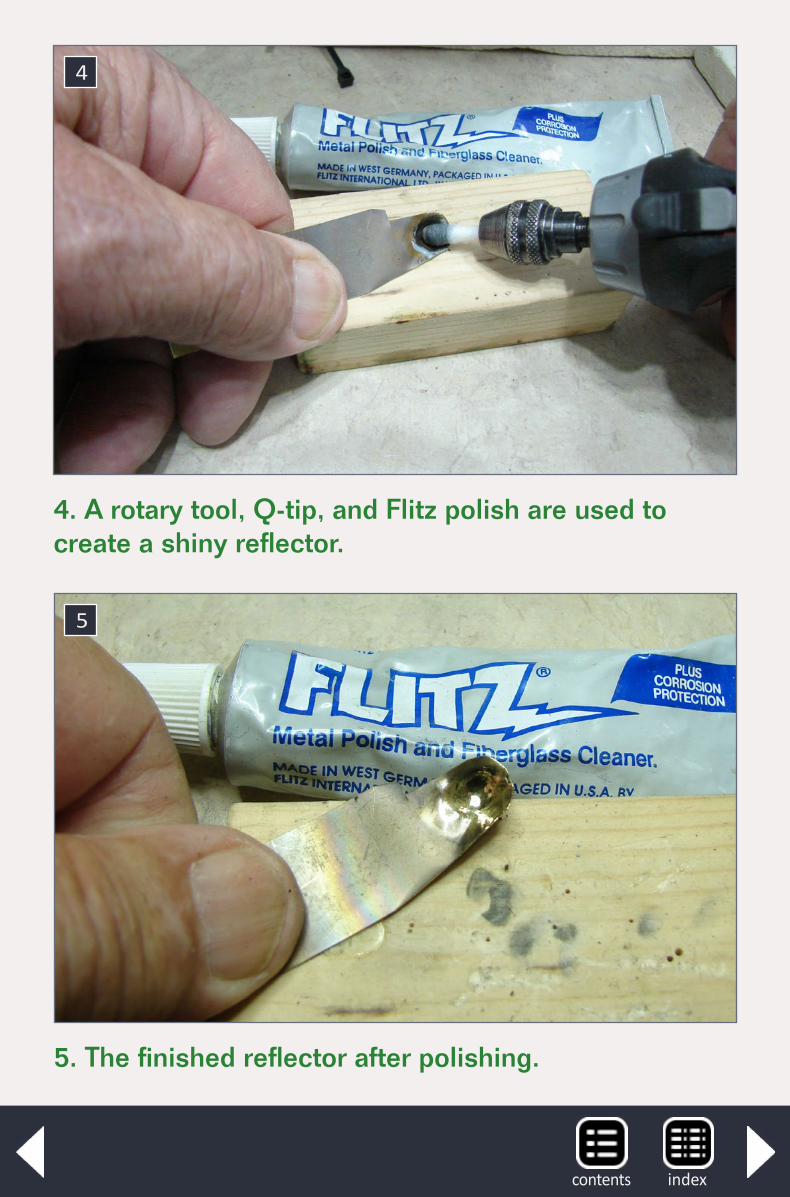
4
4. A rotary tool, Q-tip, and Flitz polish are used to create a shiny reflector.
5
5. The finished reflector after polishing.
indexcontents
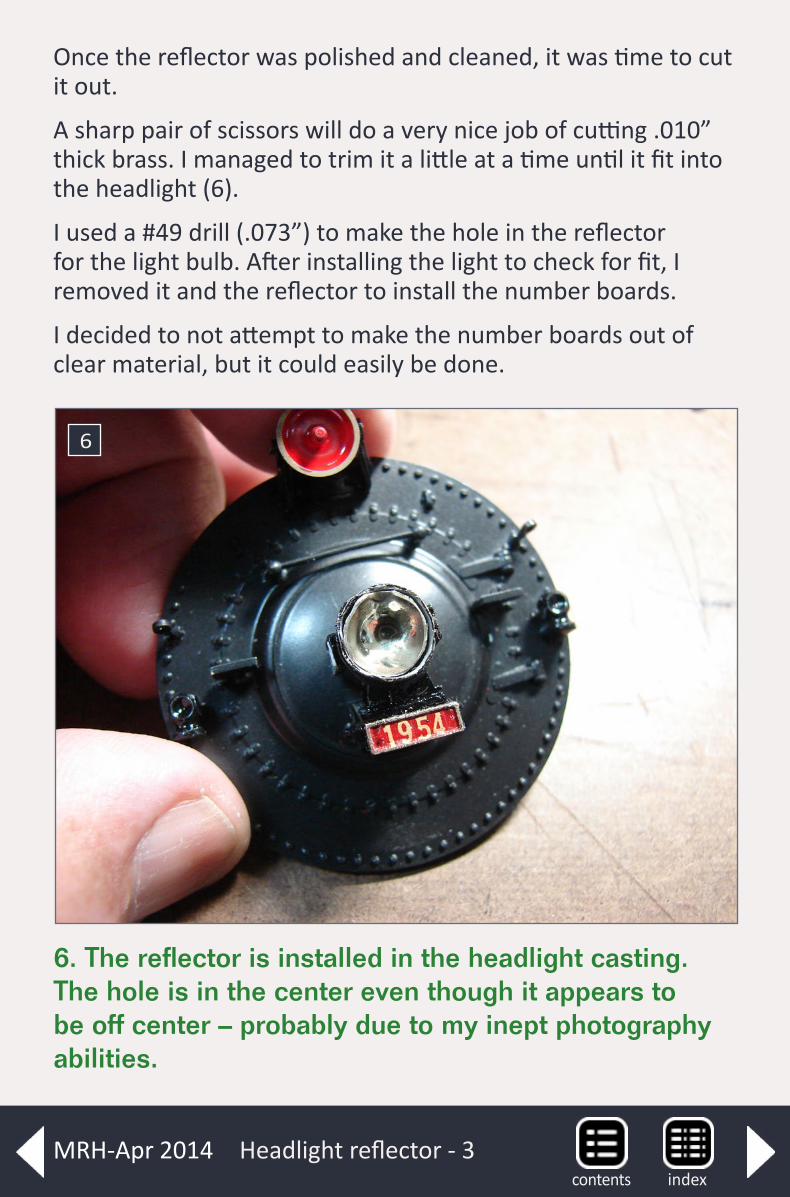
Once the reflector was polished and cleaned, it was time to cut it out.
A sharp pair of scissors will do a very nice job of cutting .010” thick brass. I managed to trim it a little at a time until it fit into the headlight (6).
I used a #49 drill (.073”) to make the hole in the reflector for the light bulb. After installing the light to check for fit, I removed it and the reflector to install the number boards.
I decided to not attempt to make the number boards out of clear material, but it could easily be done.
Headlight reflector - 3
6
6. The reflector is installed in the headlight casting. The hole is in the center even though it appears to be off center – probably due to my inept photography abilities.
indexcontentsMRH-Apr 2014
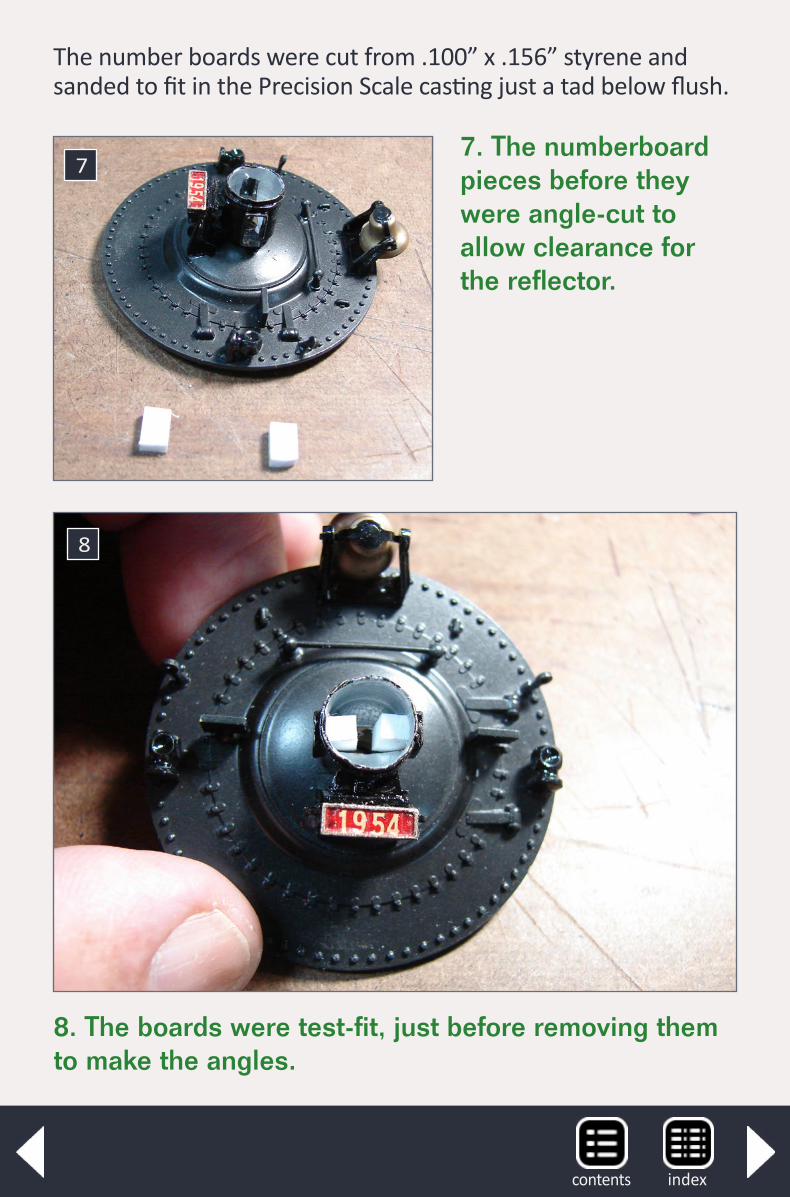
The number boards were cut from .100” x .156” styrene and sanded to fit in the Precision Scale casting just a tad below flush.
77. The numberboard pieces before they were angle-cut to allow clearance for the reflector.
8
8. The boards were test-fit, just before removing them to make the angles.
indexcontents
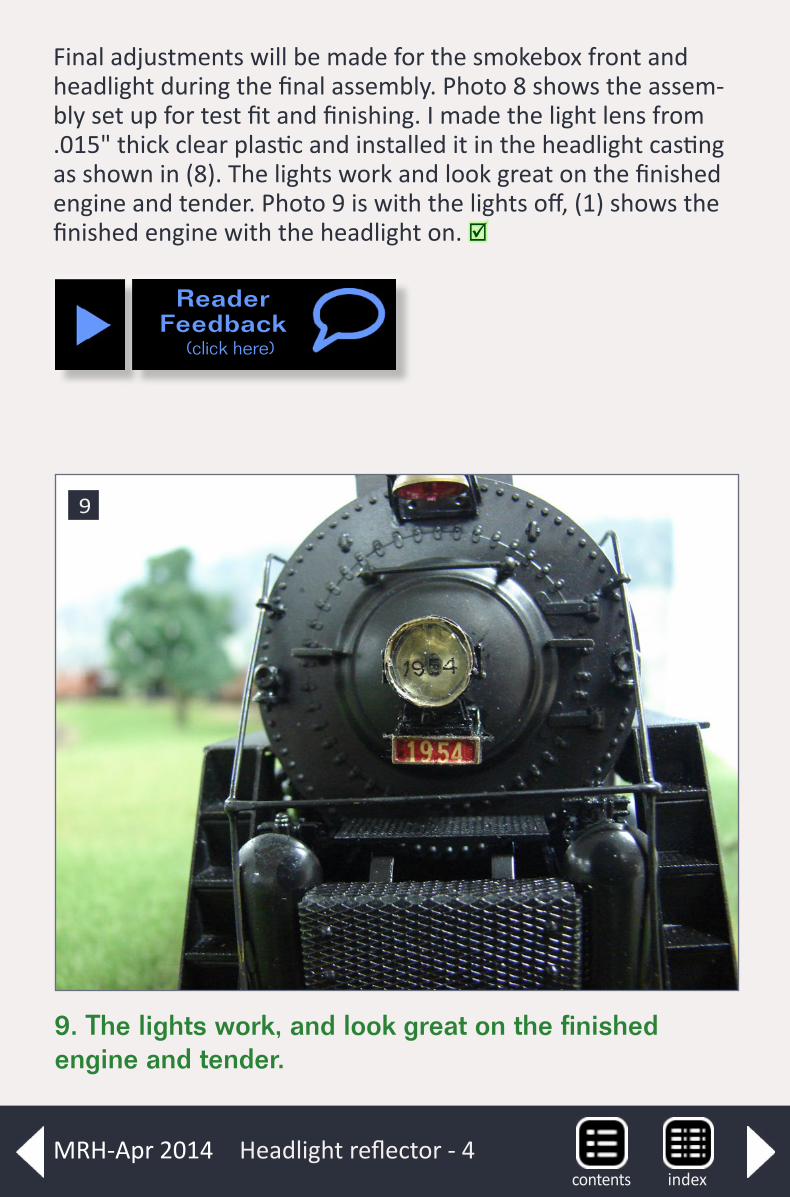
Final adjustments will be made for the smokebox front and headlight during the final assembly. Photo 8 shows the assem-bly set up for test fit and finishing. I made the light lens from .015" thick clear plastic and installed it in the headlight casting as shown in (8). The lights work and look great on the finished engine and tender. Photo 9 is with the lights off, (1) shows the finished engine with the headlight on.
Headlight reflector - 4
9
9. The lights work, and look great on the finished engine and tender.
ReaderFeedback
(click here)
indexcontentsMRH-Apr 2014
Ray Grosser MMR 362 has been modeling since his first train, a clockwork engine in 1948. Ray is a former paratrooper who served with the 11th Special Forces Group for 6-1/2 years – model railroading is much easier on the old bones than parachutes. He and his wife Renee are modeling a fictional Soo Line branch line in O scale, and they now also have a 1/6 scale riding railroad in the yard. That story for another time.
indexcontents
indexcontentsMRH-Apr 2014
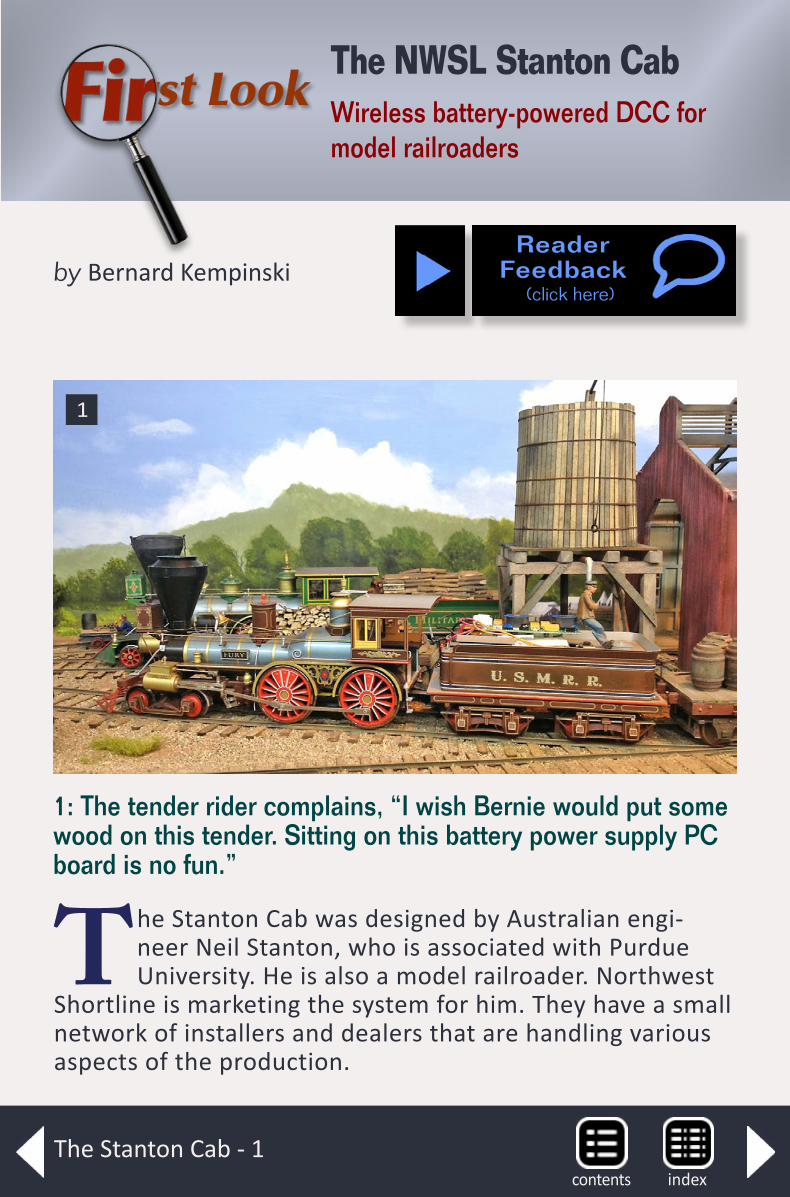
The Stanton Cab - 1
1: The tender rider complains, “I wish Bernie would put some wood on this tender. Sitting on this battery power supply PC board is no fun.”
The Stanton Cab was designed by Australian engi-neer Neil Stanton, who is associated with Purdue University. He is also a model railroader. Northwest
Shortline is marketing the system for him. They have a small network of installers and dealers that are handling various aspects of the production.
ReaderFeedback
(click here) by Bernard Kempinski
The NWSL Stanton Cab
Wireless battery-powered DCC for model railroaders
1
indexcontents
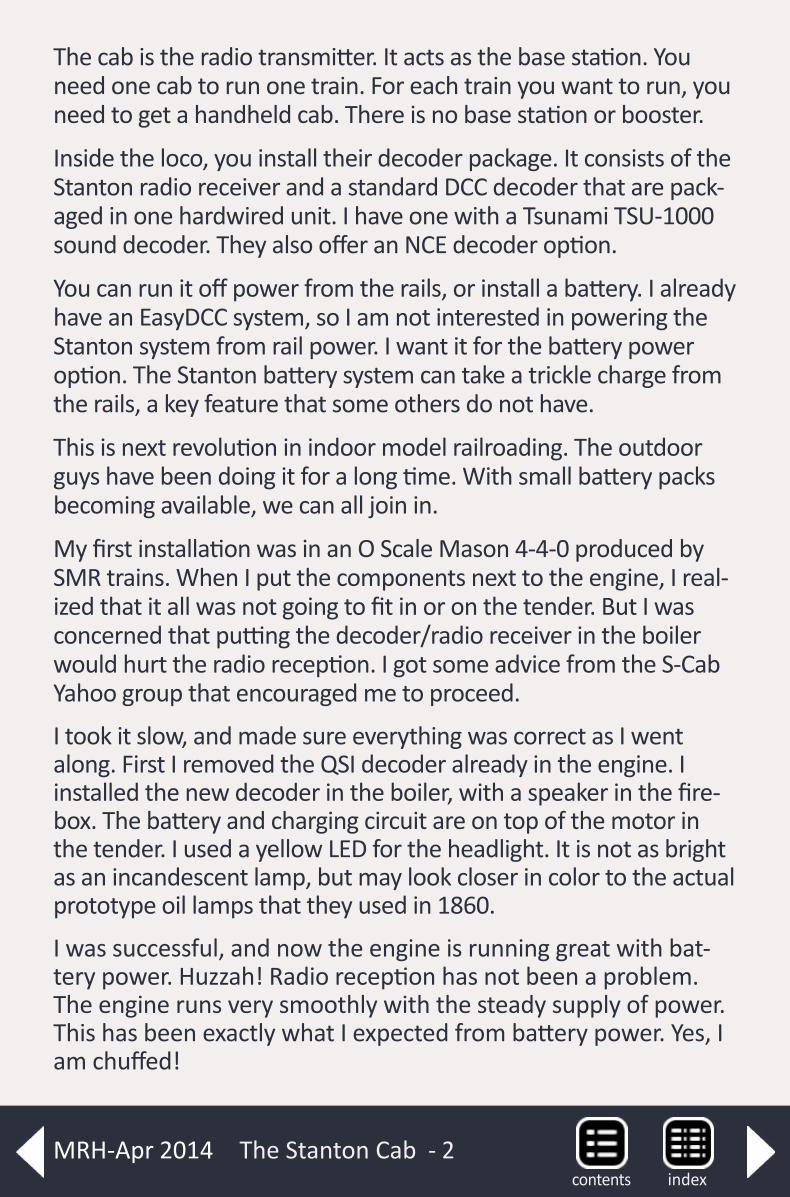
The Stanton Cab - 2
The cab is the radio transmitter. It acts as the base station. You need one cab to run one train. For each train you want to run, you need to get a handheld cab. There is no base station or booster.
Inside the loco, you install their decoder package. It consists of the Stanton radio receiver and a standard DCC decoder that are pack-aged in one hardwired unit. I have one with a Tsunami TSU-1000 sound decoder. They also offer an NCE decoder option.
You can run it off power from the rails, or install a battery. I already have an EasyDCC system, so I am not interested in powering the Stanton system from rail power. I want it for the battery power option. The Stanton battery system can take a trickle charge from the rails, a key feature that some others do not have.
This is next revolution in indoor model railroading. The outdoor guys have been doing it for a long time. With small battery packs becoming available, we can all join in.
My first installation was in an O Scale Mason 4-4-0 produced by SMR trains. When I put the components next to the engine, I real-ized that it all was not going to fit in or on the tender. But I was concerned that putting the decoder/radio receiver in the boiler would hurt the radio reception. I got some advice from the S-Cab Yahoo group that encouraged me to proceed.
I took it slow, and made sure everything was correct as I went along. First I removed the QSI decoder already in the engine. I installed the new decoder in the boiler, with a speaker in the fire-box. The battery and charging circuit are on top of the motor in the tender. I used a yellow LED for the headlight. It is not as bright as an incandescent lamp, but may look closer in color to the actual prototype oil lamps that they used in 1860.
I was successful, and now the engine is running great with bat-tery power. Huzzah! Radio reception has not been a problem. The engine runs very smoothly with the steady supply of power. This has been exactly what I expected from battery power. Yes, I am chuffed!
indexcontentsMRH-Apr 2014
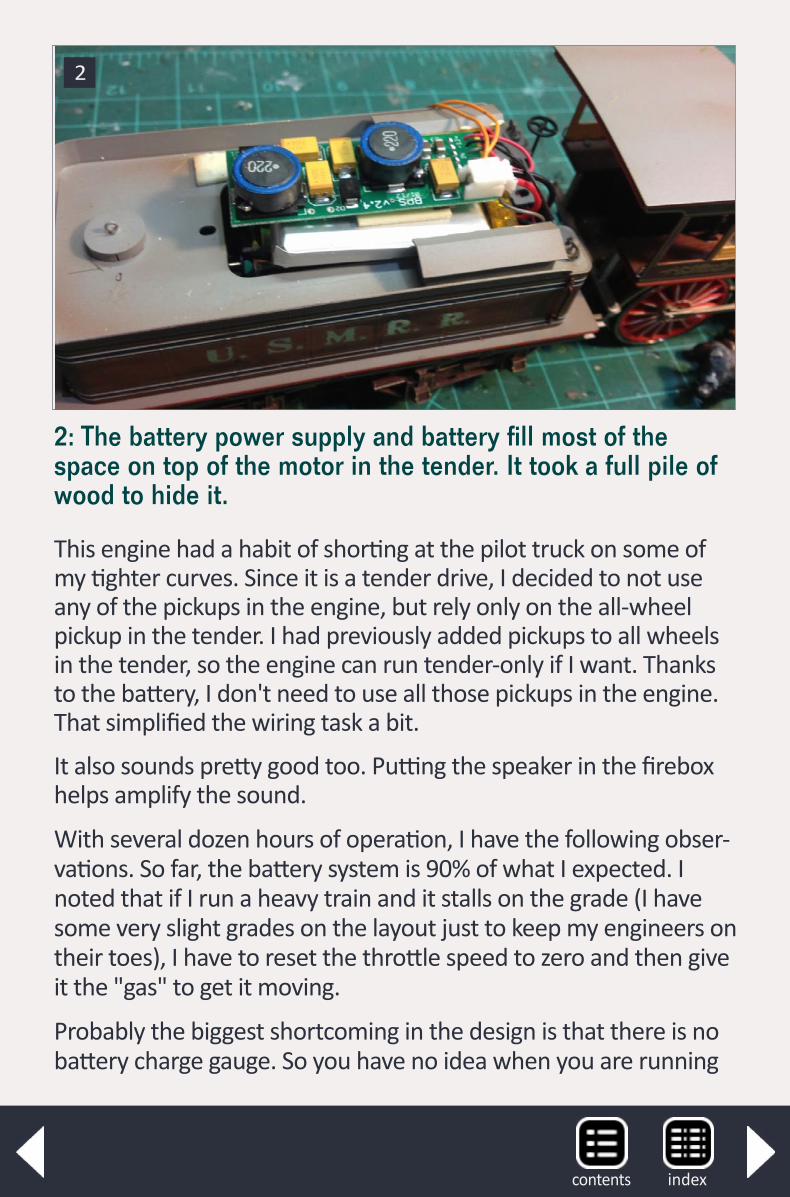
This engine had a habit of shorting at the pilot truck on some of my tighter curves. Since it is a tender drive, I decided to not use any of the pickups in the engine, but rely only on the all-wheel pickup in the tender. I had previously added pickups to all wheels in the tender, so the engine can run tender-only if I want. Thanks to the battery, I don't need to use all those pickups in the engine. That simplified the wiring task a bit.
It also sounds pretty good too. Putting the speaker in the firebox helps amplify the sound.
With several dozen hours of operation, I have the following obser-vations. So far, the battery system is 90% of what I expected. I noted that if I run a heavy train and it stalls on the grade (I have some very slight grades on the layout just to keep my engineers on their toes), I have to reset the throttle speed to zero and then give it the "gas" to get it moving.
Probably the biggest shortcoming in the design is that there is no battery charge gauge. So you have no idea when you are running
2
2: The battery power supply and battery fill most of the space on top of the motor in the tender. It took a full pile of wood to hide it.
indexcontents

The Stanton Cab - 3
low on stored battery power. When it stops, you know you are out of power. The loco won't run with the DCC power through the rails if the battery is dead.
On the Mason, the battery and power supply circuit fill up the front half of the tender top, so the loco has to have a very full load of wood to hide it. In SMR's new locos, there should be room inside the tender to hide the whole setup, as the new locos have boiler drives.
The Stanton system is intentionally designed to be simple. So the CV programming options using the Stanton cab are limited. It can do some of the basic CVs such as 1, 2, 3, 4, 5, 6, 29, and 65. It took a little experimentation and an email to the Neil Stanton, the system designer, but I was able to program the loco so it starts smoothly and has momentum on start and stop. Bottom line is that the loco is 99% of where I would want it in terms of opera-tion. The only complaint is that the minimum speed is about 1-2 MPH faster than I would like.
I also ordered a CVP Airwire T5000 throttle, based on the recom-mendation of George Sebastian-Coleman, another Stanton cab user. With that throttle, which is compatible with the Stanton sys-tem, I am able to program all CVs on the battery loco. I wanted to disable the headlight dynamo and air pumps, as my engines have oil lamps and no air brakes. It worked great.
I reprogrammed the speed curves on the S-Cab-equipped Whiton with a Tsunami decoder. Using the T5000 to do the programming was fairly simple. The problem was more difficult than expected due to some inconsistencies in the user docu-mentation between the S-Cab and the Soundtraxx decoders. Several emails to both manufacturers yielded the answers I needed. I must say, both have excellent customer service. I was able to program Whiton so that it not only starts smoothly, but has up to throttle 10 setting for switching speeds. This involved reprogramming the following CVs, for you DCC gurus.
indexcontentsMRH-Apr 2014
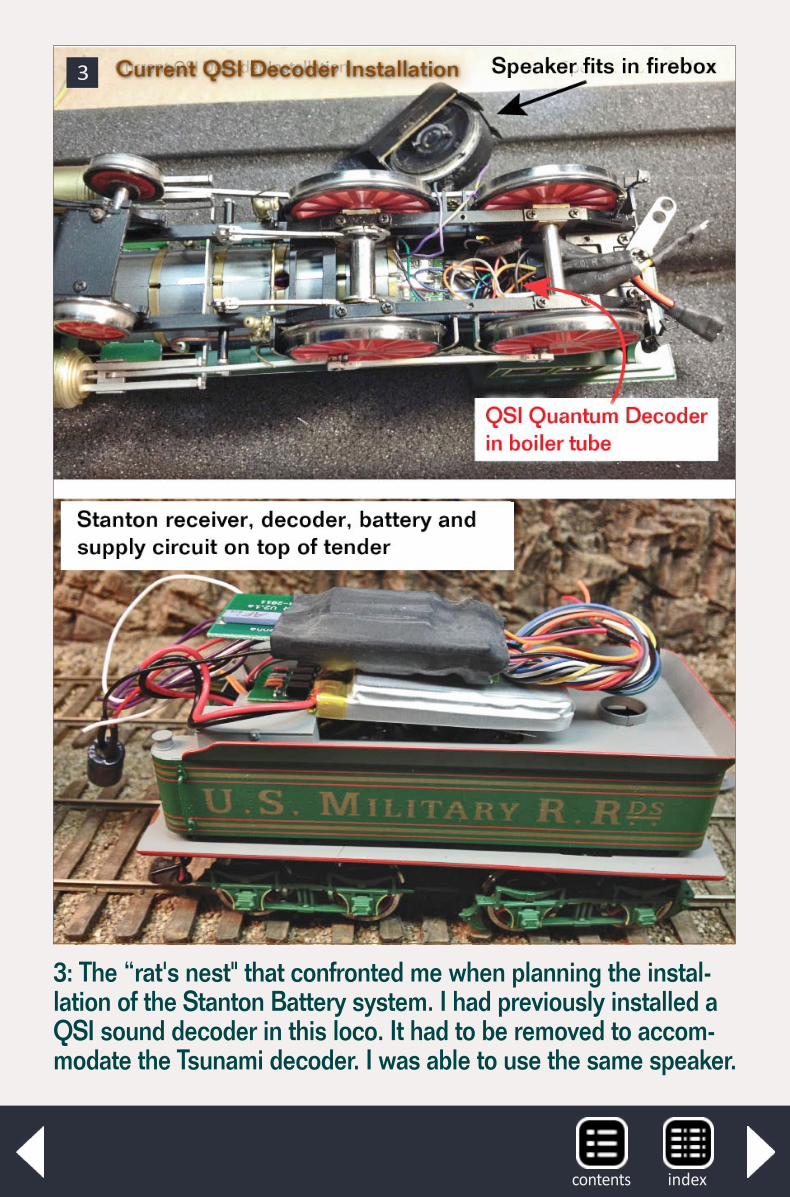
3
3: The “rat's nest" that confronted me when planning the instal-lation of the Stanton Battery system. I had previously installed a QSI sound decoder in this loco. It had to be removed to accom-modate the Tsunami decoder. I was able to use the same speaker.
indexcontents
The Stanton Cab - 4
1. CV29 = 18 Allowed speed tables but no analog control. I noted that if analog control was enabled, the loco tried to respond to the charging track as an engine command.
2. CV25 = 16 Speed Table Select Register allows a user- defined speed table.
3. CV66 = 30 Forward Trim multiplies all forward voltage by about 25%.
4. CV95 = 30 Backward trim multiplies all backward voltage by about 25%.
5. CV116 = 30 Engine chuff rate.
6. CV3 = 20 Forward Acceleration.
7. CV4 = 15 Backward Deceleration.
This all sounds complicated, but the Soundtraxx manual is pretty good and the T5000 it is easy to program the CVs. Finding the correct values was just a matter of trial-and-error. I made a paper table with notes of each trial so I knew what the variables were. There is no way to read the decoder val-ues over the radio, so I found keeping track of the adjust-ments was helpful.
It hasn’t all been a bed of roses. The second battery loco I con-verted has had troubles. I ended up sending it to the Stanton installers for debugging. They said it checked out. However, recently it stopped taking a charge. It may be a bad battery, but I haven’t had time to swap it.
Overall I am very satisfied with the system. It may not be the system for everyone, but it suits my needs quite well.
Link to video on YouTube ...
youtube/K7yEwrlBurY
ReaderFeedback
(click here)
indexcontentsMRH-Apr 2014
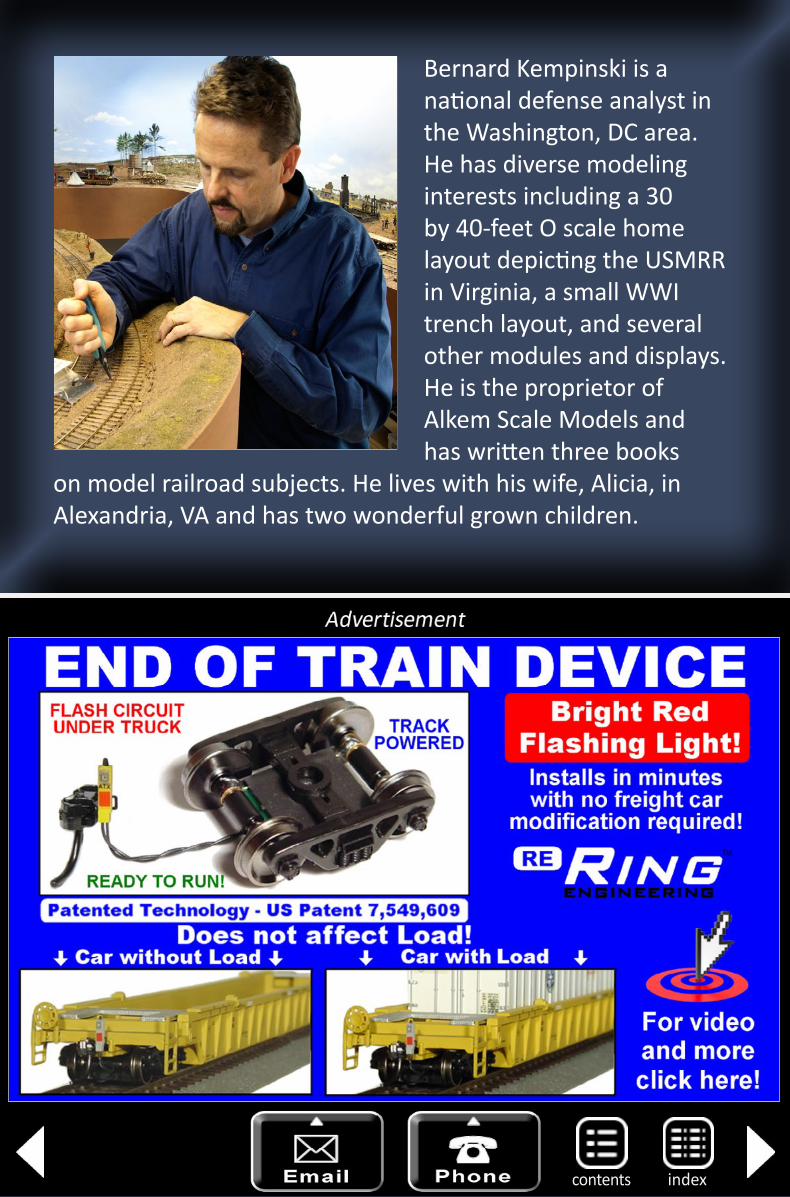
Bernard Kempinski is a national defense analyst in the Washington, DC area. He has diverse modeling interests including a 30 by 40-feet O scale home layout depicting the USMRR in Virginia, a small WWI trench layout, and several other modules and displays. He is the proprietor of Alkem Scale Models and has written three books
on model railroad subjects. He lives with his wife, Alicia, in Alexandria, VA and has two wonderful grown children.
indexcontents
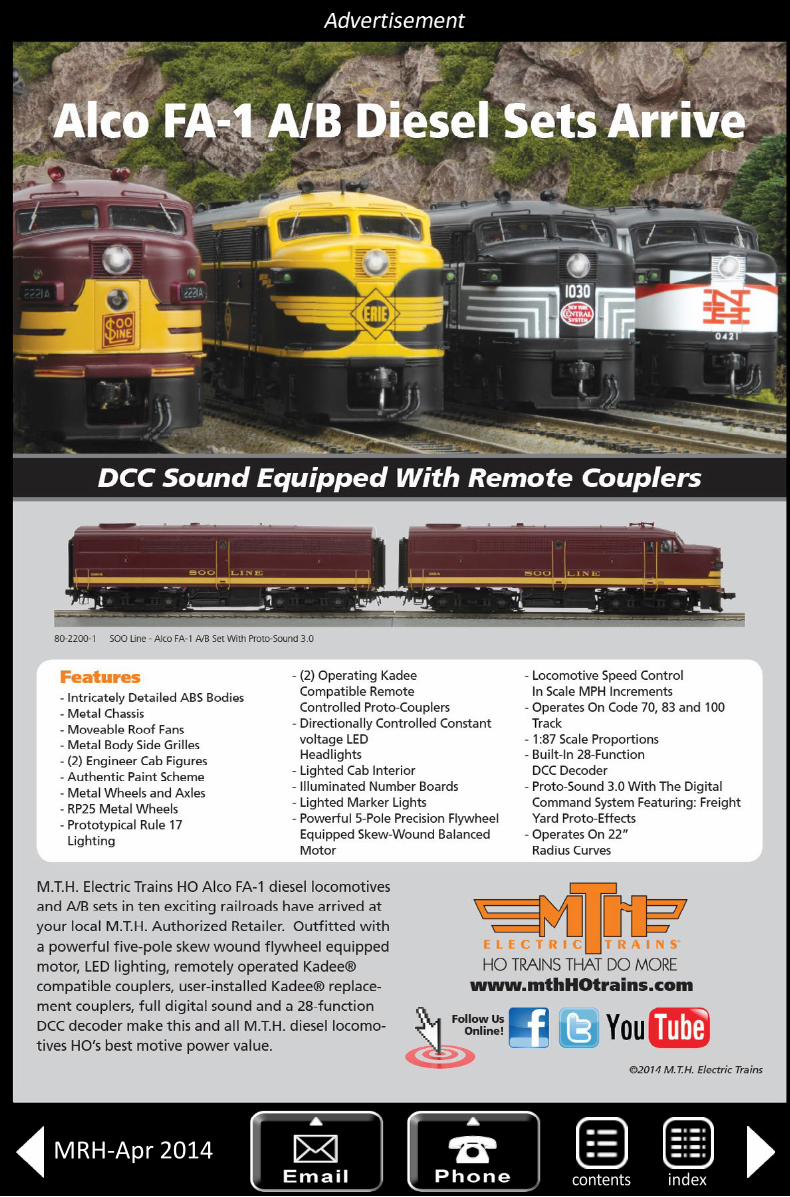
indexcontentsMRH-Apr 2014
News column - 1
April 2014: The latest model railroad products, news & eventsby Richard Bale and Jeff Shultz
Vollmer calls it quitsVollmer GmbH & Co. KG, has announced that it is going out of business. Based in Stuttgart, Germany, the 68-year old firm is best-known to North American hobbyists for its line of injection molded structures, bridges, vehicles, people, and scenic acces-sories of mostly European design. The company produced model railroad items in G, HO, TT, N, and Z scale. The firm was estab-lished in 1946 by Wolfram Vollmer, whose first major success was an HO overhead catenary system he patented in 1948. The company currently produces more than 1000 items for model railroad hobbyists …
NEW PRODUCTS FOR ALL SCALES
Morning Sun (morningsunbooks.com) has announced three new publications, including “Great Northern Through Passenger Service” by Geoffrey H. Doughty. This book examines
ReaderFeedback
(click here)
indexcontents
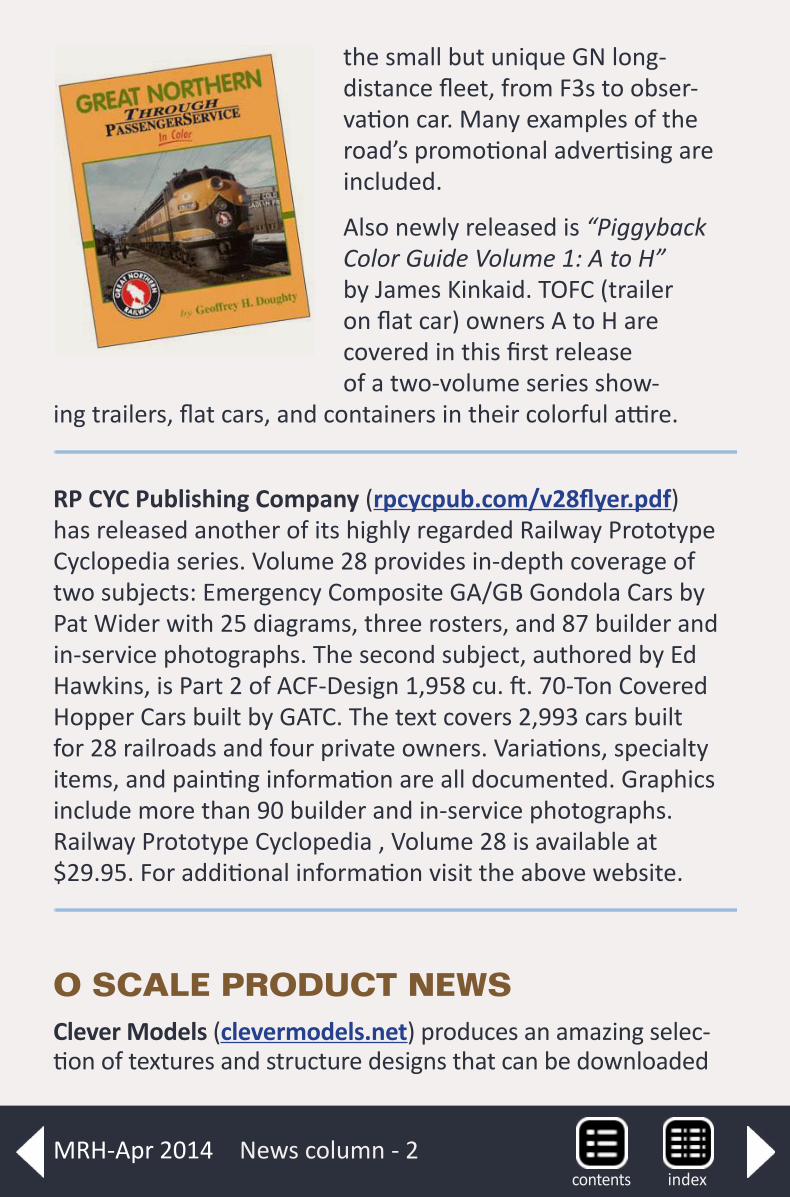
the small but unique GN long-distance fleet, from F3s to obser-vation car. Many examples of the road’s promotional advertising are included.
Also newly released is “Piggyback Color Guide Volume 1: A to H” by James Kinkaid. TOFC (trailer on flat car) owners A to H are covered in this first release of a two-volume series show-
ing trailers, flat cars, and containers in their colorful attire.
RP CYC Publishing Company (rpcycpub.com/v28flyer.pdf) has released another of its highly regarded Railway Prototype Cyclopedia series. Volume 28 provides in-depth coverage of two subjects: Emergency Composite GA/GB Gondola Cars by Pat Wider with 25 diagrams, three rosters, and 87 builder and in-service photographs. The second subject, authored by Ed Hawkins, is Part 2 of ACF-Design 1,958 cu. ft. 70-Ton Covered Hopper Cars built by GATC. The text covers 2,993 cars built for 28 railroads and four private owners. Variations, specialty items, and painting information are all documented. Graphics include more than 90 builder and in-service photographs. Railway Prototype Cyclopedia , Volume 28 is available at $29.95. For additional information visit the above website.
O SCALE PRODUCT NEWSClever Models (clevermodels.net) produces an amazing selec-tion of textures and structure designs that can be downloaded
News column - 2indexcontents
MRH-Apr 2014
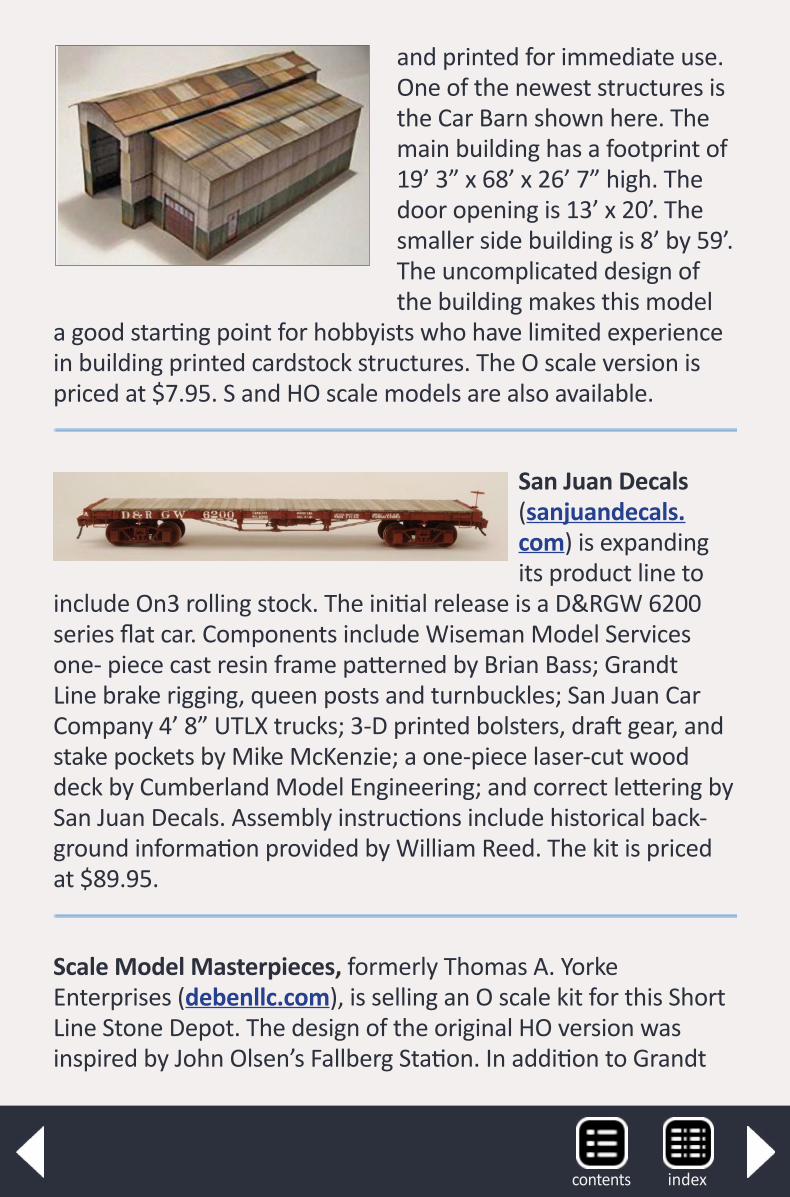
and printed for immediate use. One of the newest structures is the Car Barn shown here. The main building has a footprint of 19’ 3” x 68’ x 26’ 7” high. The door opening is 13’ x 20’. The smaller side building is 8’ by 59’. The uncomplicated design of the building makes this model
a good starting point for hobbyists who have limited experience in building printed cardstock structures. The O scale version is priced at $7.95. S and HO scale models are also available.
San Juan Decals (sanjuandecals.com) is expanding its product line to
include On3 rolling stock. The initial release is a D&RGW 6200 series flat car. Components include Wiseman Model Services one- piece cast resin frame patterned by Brian Bass; Grandt Line brake rigging, queen posts and turnbuckles; San Juan Car Company 4’ 8” UTLX trucks; 3-D printed bolsters, draft gear, and stake pockets by Mike McKenzie; a one-piece laser-cut wood deck by Cumberland Model Engineering; and correct lettering by San Juan Decals. Assembly instructions include historical back-ground information provided by William Reed. The kit is priced at $89.95.
Scale Model Masterpieces, formerly Thomas A. Yorke Enterprises (debenllc.com), is selling an O scale kit for this Short Line Stone Depot. The design of the original HO version was inspired by John Olsen’s Fallberg Station. In addition to Grandt
indexcontents
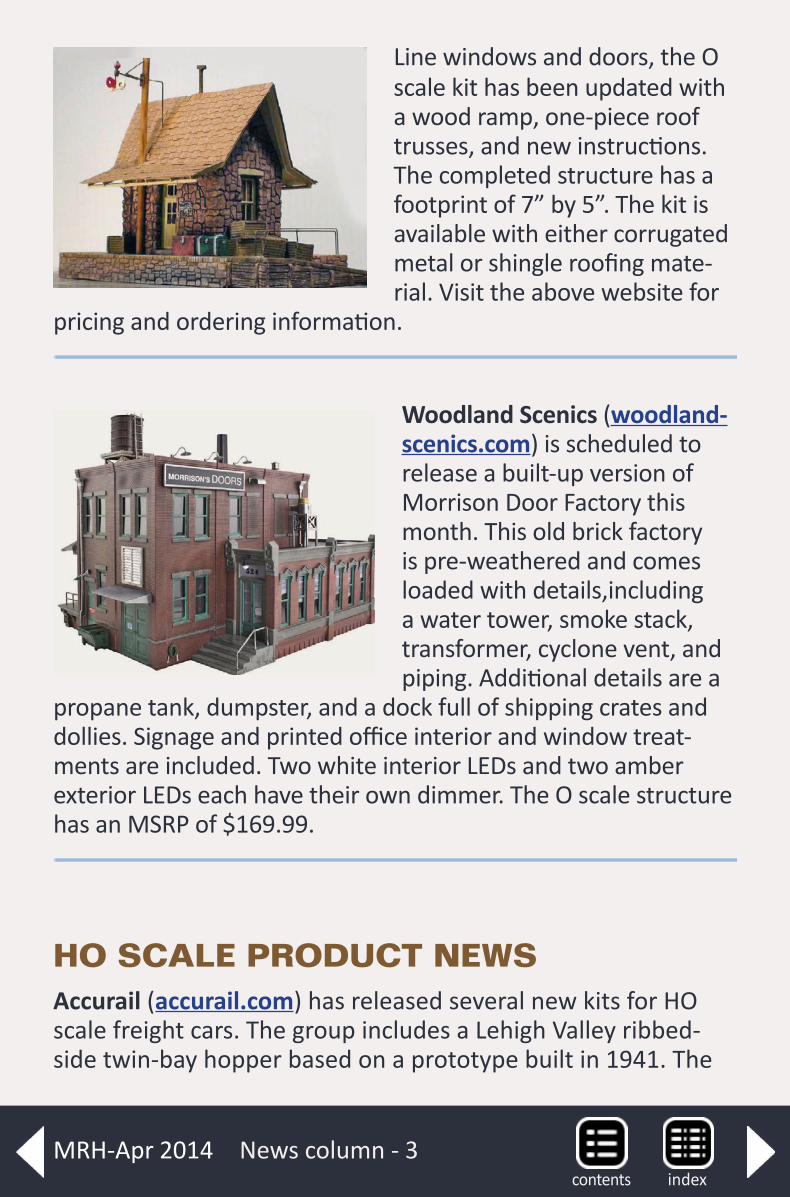
Line windows and doors, the O scale kit has been updated with a wood ramp, one-piece roof trusses, and new instructions. The completed structure has a footprint of 7” by 5”. The kit is available with either corrugated metal or shingle roofing mate-rial. Visit the above website for
pricing and ordering information.
Woodland Scenics (woodland-scenics.com) is scheduled to release a built-up version of Morrison Door Factory this month. This old brick factory is pre-weathered and comes loaded with details,including a water tower, smoke stack, transformer, cyclone vent, and piping. Additional details are a
propane tank, dumpster, and a dock full of shipping crates and dollies. Signage and printed office interior and window treat-ments are included. Two white interior LEDs and two amber exterior LEDs each have their own dimmer. The O scale structure has an MSRP of $169.99.
HO SCALE PRODUCT NEWSAccurail (accurail.com) has released several new kits for HO scale freight cars. The group includes a Lehigh Valley ribbed-side twin-bay hopper based on a prototype built in 1941. The
News column - 3indexcontents
MRH-Apr 2014
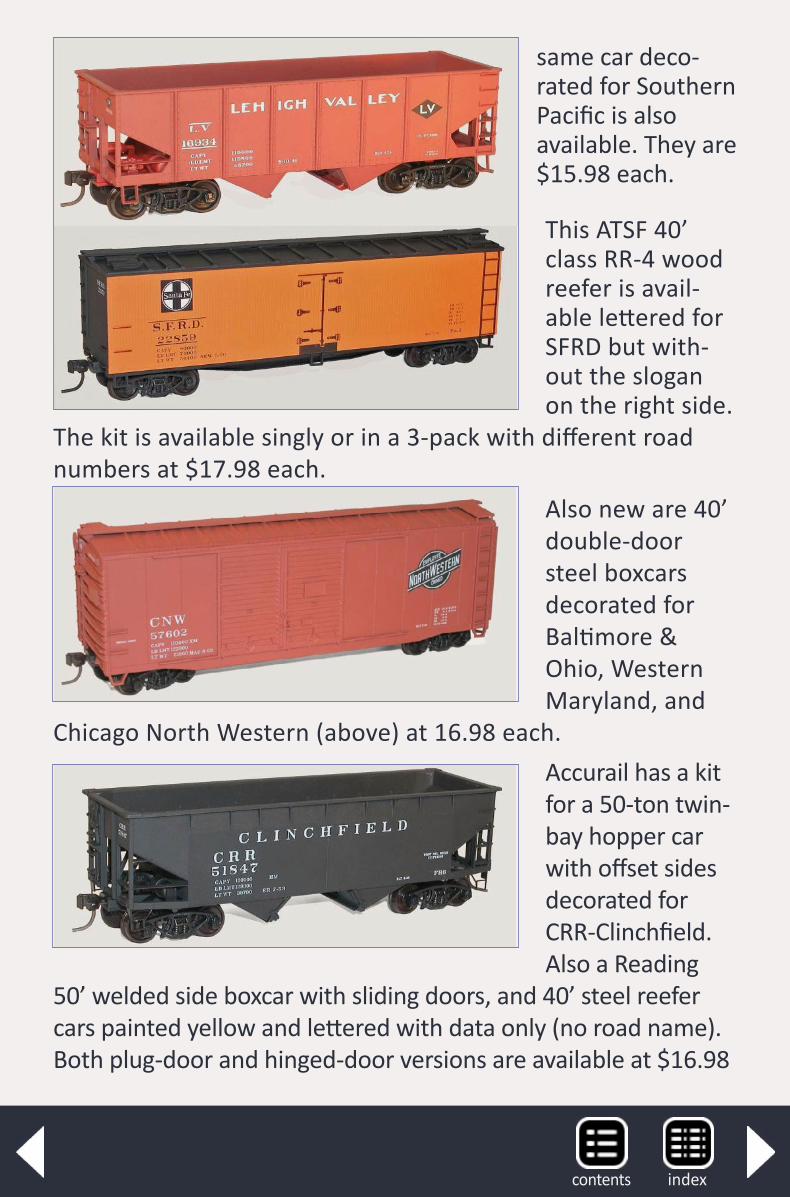
same car deco-rated for Southern Pacific is also available. They are $15.98 each.
This ATSF 40’ class RR-4 wood reefer is avail-able lettered for SFRD but with-out the slogan on the right side.
The kit is available singly or in a 3-pack with different road numbers at $17.98 each.
Also new are 40’ double-door steel boxcars decorated for Baltimore & Ohio, Western Maryland, and
Chicago North Western (above) at 16.98 each.Accurail has a kit for a 50-ton twin-bay hopper car with offset sides decorated for CRR-Clinchfield. Also a Reading
50’ welded side boxcar with sliding doors, and 40’ steel reefer cars painted yellow and lettered with data only (no road name). Both plug-door and hinged-door versions are available at $16.98
indexcontents
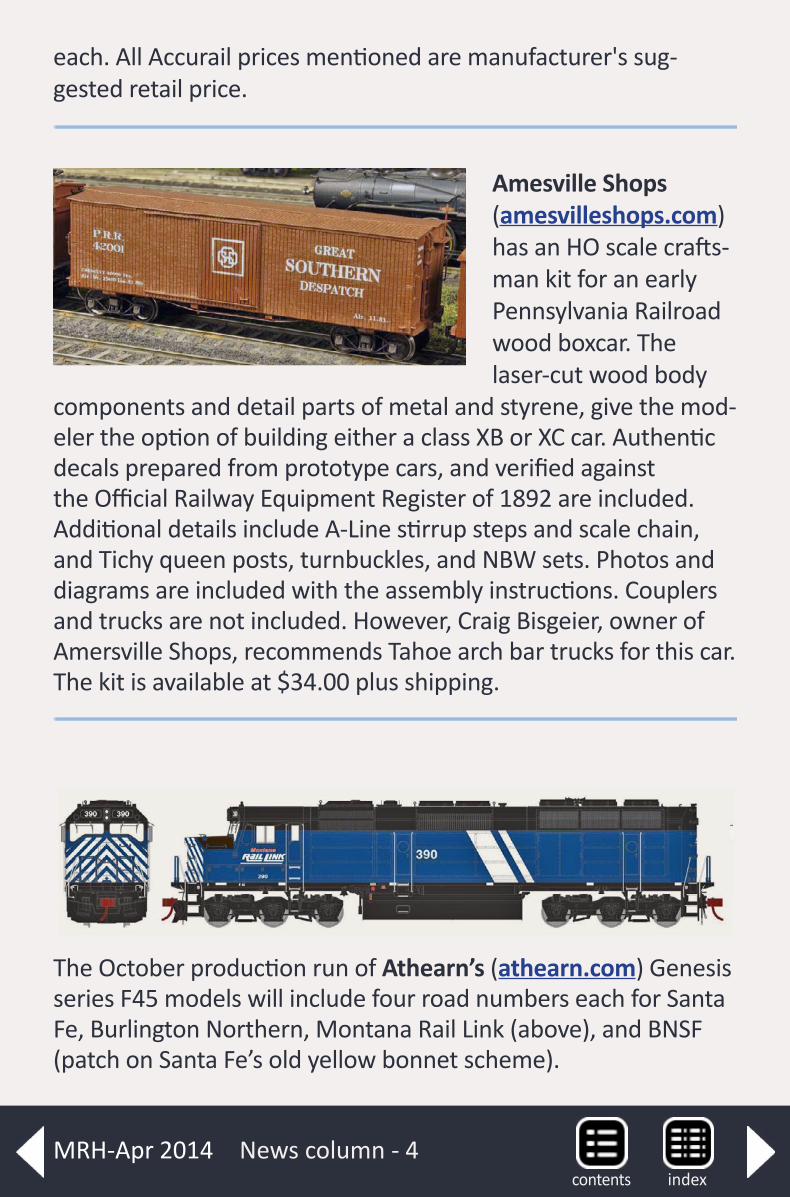
each. All Accurail prices mentioned are manufacturer's sug-gested retail price.
Amesville Shops (amesvilleshops.com) has an HO scale crafts-man kit for an early Pennsylvania Railroad wood boxcar. The laser-cut wood body
components and detail parts of metal and styrene, give the mod-eler the option of building either a class XB or XC car. Authentic decals prepared from prototype cars, and verified against the Official Railway Equipment Register of 1892 are included. Additional details include A-Line stirrup steps and scale chain, and Tichy queen posts, turnbuckles, and NBW sets. Photos and diagrams are included with the assembly instructions. Couplers and trucks are not included. However, Craig Bisgeier, owner of Amersville Shops, recommends Tahoe arch bar trucks for this car. The kit is available at $34.00 plus shipping.
The October production run of Athearn’s (athearn.com) Genesis series F45 models will include four road numbers each for Santa Fe, Burlington Northern, Montana Rail Link (above), and BNSF (patch on Santa Fe’s old yellow bonnet scheme).
News column - 4indexcontents
MRH-Apr 2014
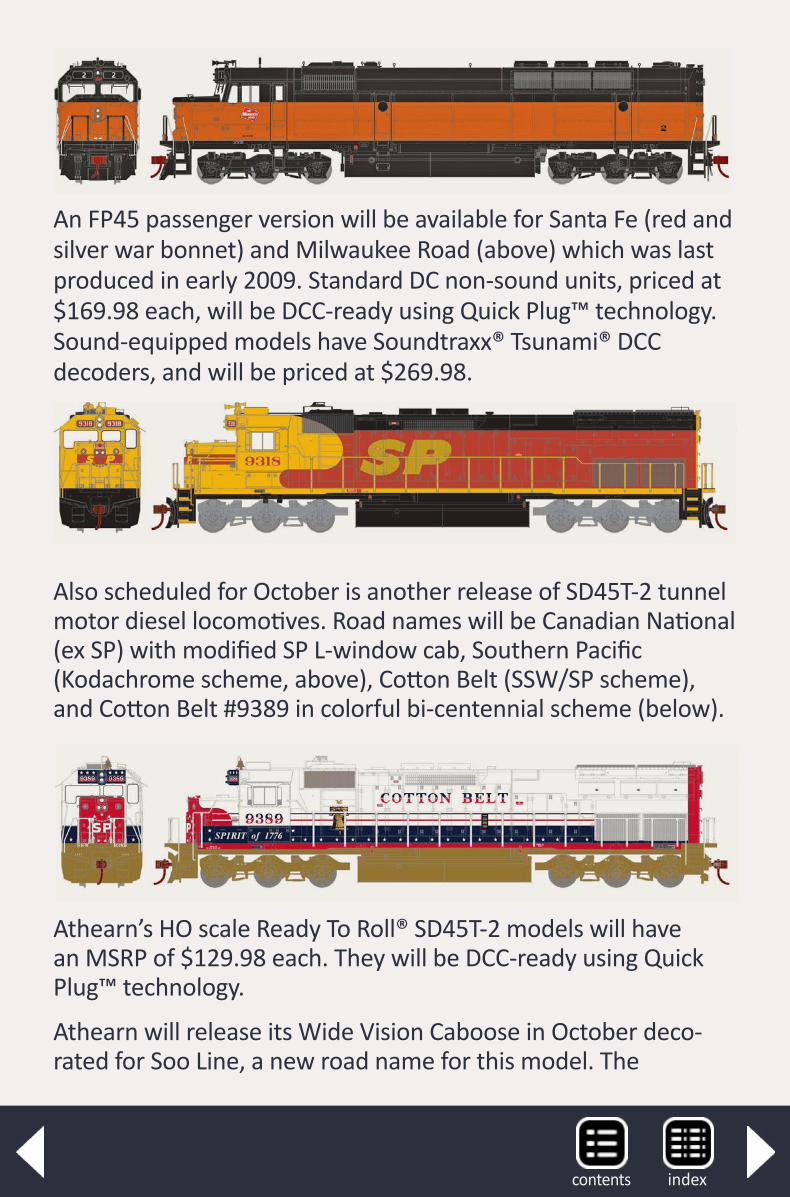
An FP45 passenger version will be available for Santa Fe (red and silver war bonnet) and Milwaukee Road (above) which was last produced in early 2009. Standard DC non-sound units, priced at $169.98 each, will be DCC-ready using Quick Plug™ technology. Sound-equipped models have Soundtraxx® Tsunami® DCC decoders, and will be priced at $269.98.
Also scheduled for October is another release of SD45T-2 tunnel motor diesel locomotives. Road names will be Canadian National (ex SP) with modified SP L-window cab, Southern Pacific (Kodachrome scheme, above), Cotton Belt (SSW/SP scheme), and Cotton Belt #9389 in colorful bi-centennial scheme (below).
Athearn’s HO scale Ready To Roll® SD45T-2 models will have an MSRP of $129.98 each. They will be DCC-ready using Quick Plug™ technology.
Athearn will release its Wide Vision Caboose in October deco-rated for Soo Line, a new road name for this model. The
indexcontents
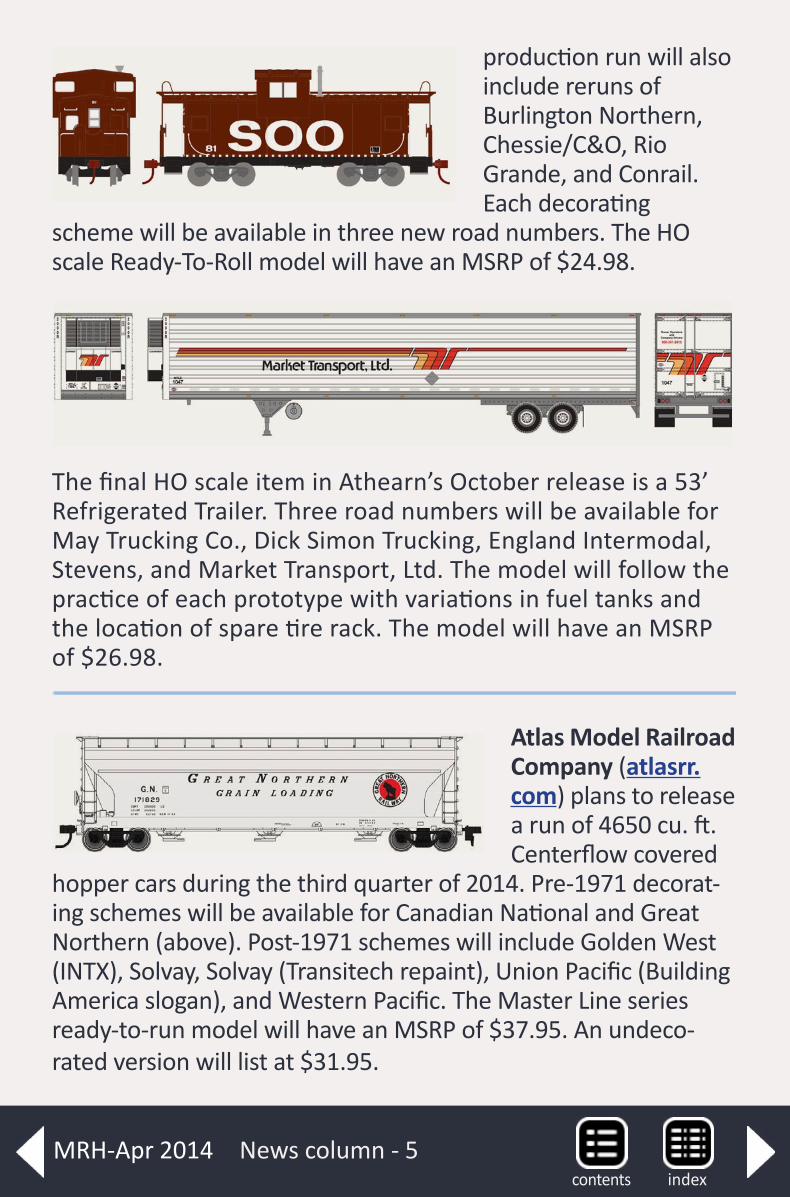
production run will also include reruns of Burlington Northern, Chessie/C&O, Rio Grande, and Conrail. Each decorating
scheme will be available in three new road numbers. The HO scale Ready-To-Roll model will have an MSRP of $24.98.
The final HO scale item in Athearn’s October release is a 53’ Refrigerated Trailer. Three road numbers will be available for May Trucking Co., Dick Simon Trucking, England Intermodal, Stevens, and Market Transport, Ltd. The model will follow the practice of each prototype with variations in fuel tanks and the location of spare tire rack. The model will have an MSRP of $26.98.
Atlas Model Railroad Company (atlasrr.com) plans to release a run of 4650 cu. ft. Centerflow covered
hopper cars during the third quarter of 2014. Pre-1971 decorat-ing schemes will be available for Canadian National and Great Northern (above). Post-1971 schemes will include Golden West (INTX), Solvay, Solvay (Transitech repaint), Union Pacific (Building America slogan), and Western Pacific. The Master Line series ready-to-run model will have an MSRP of $37.95. An undeco-rated version will list at $31.95.
News column - 5indexcontents
MRH-Apr 2014
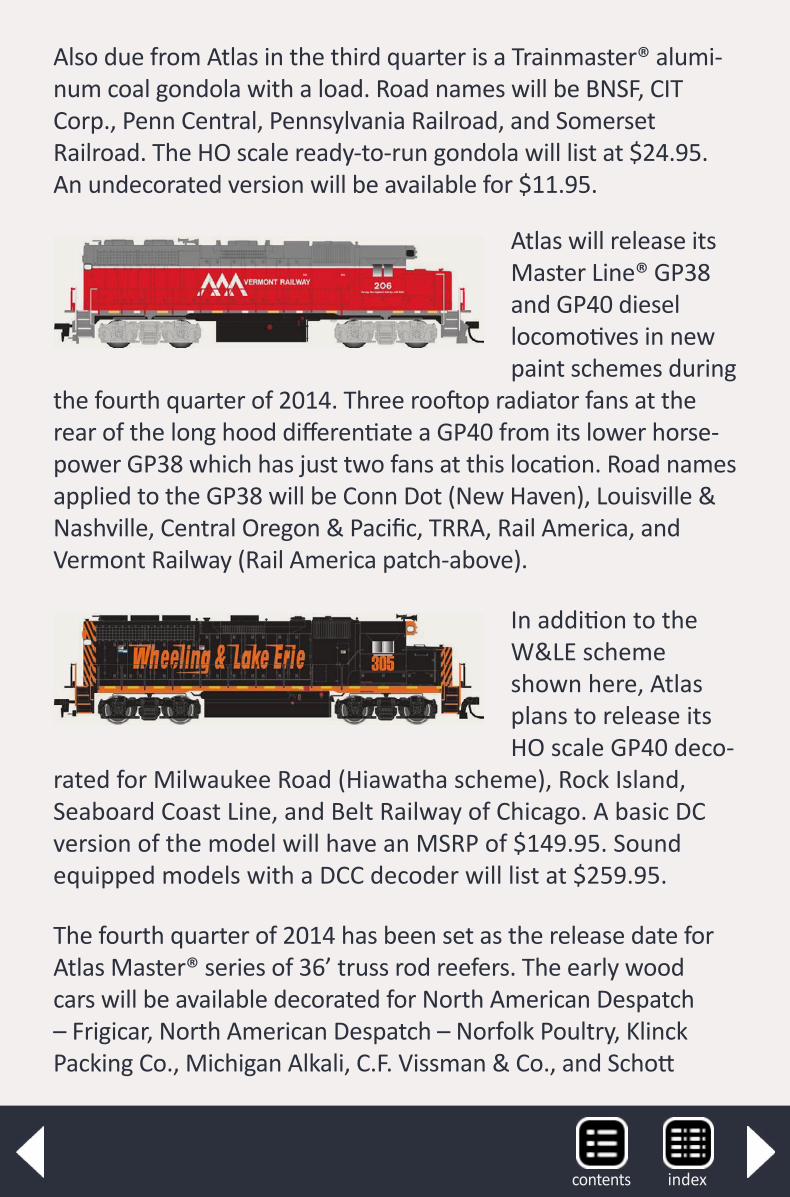
Also due from Atlas in the third quarter is a Trainmaster® alumi-num coal gondola with a load. Road names will be BNSF, CIT Corp., Penn Central, Pennsylvania Railroad, and Somerset Railroad. The HO scale ready-to-run gondola will list at $24.95. An undecorated version will be available for $11.95.
Atlas will release its Master Line® GP38 and GP40 diesel locomotives in new paint schemes during
the fourth quarter of 2014. Three rooftop radiator fans at the rear of the long hood differentiate a GP40 from its lower horse-power GP38 which has just two fans at this location. Road names applied to the GP38 will be Conn Dot (New Haven), Louisville & Nashville, Central Oregon & Pacific, TRRA, Rail America, and Vermont Railway (Rail America patch-above).
In addition to the W&LE scheme shown here, Atlas plans to release its HO scale GP40 deco-
rated for Milwaukee Road (Hiawatha scheme), Rock Island, Seaboard Coast Line, and Belt Railway of Chicago. A basic DC version of the model will have an MSRP of $149.95. Sound equipped models with a DCC decoder will list at $259.95.
The fourth quarter of 2014 has been set as the release date for Atlas Master® series of 36’ truss rod reefers. The early wood cars will be available decorated for North American Despatch – Frigicar, North American Despatch – Norfolk Poultry, Klinck Packing Co., Michigan Alkali, C.F. Vissman & Co., and Schott
indexcontents
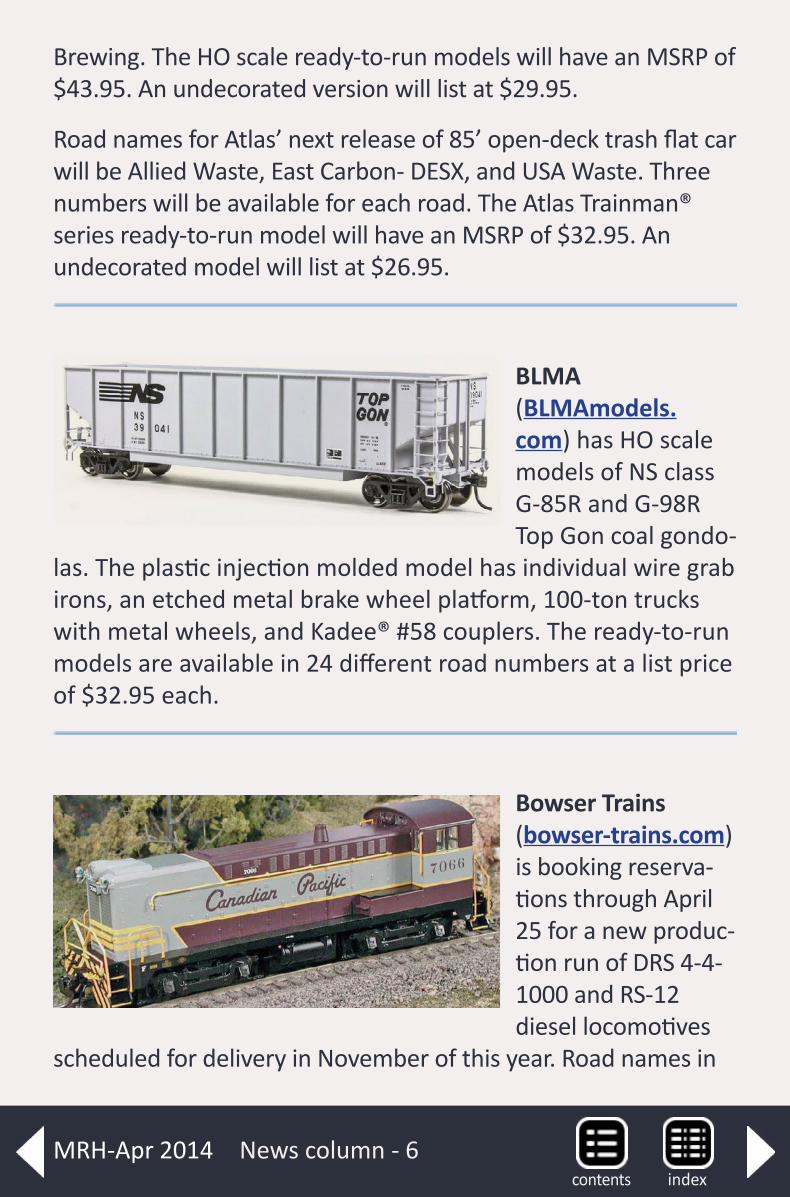
Brewing. The HO scale ready-to-run models will have an MSRP of $43.95. An undecorated version will list at $29.95.
Road names for Atlas’ next release of 85’ open-deck trash flat car will be Allied Waste, East Carbon- DESX, and USA Waste. Three numbers will be available for each road. The Atlas Trainman® series ready-to-run model will have an MSRP of $32.95. An undecorated model will list at $26.95.
BLMA (BLMAmodels.com) has HO scale models of NS class G-85R and G-98R Top Gon coal gondo-
las. The plastic injection molded model has individual wire grab irons, an etched metal brake wheel platform, 100-ton trucks with metal wheels, and Kadee® #58 couplers. The ready-to-run models are available in 24 different road numbers at a list price of $32.95 each.
Bowser Trains (bowser-trains.com) is booking reserva-tions through April 25 for a new produc-tion run of DRS 4-4-1000 and RS-12 diesel locomotives
scheduled for delivery in November of this year. Road names in
News column - 6indexcontents
MRH-Apr 2014
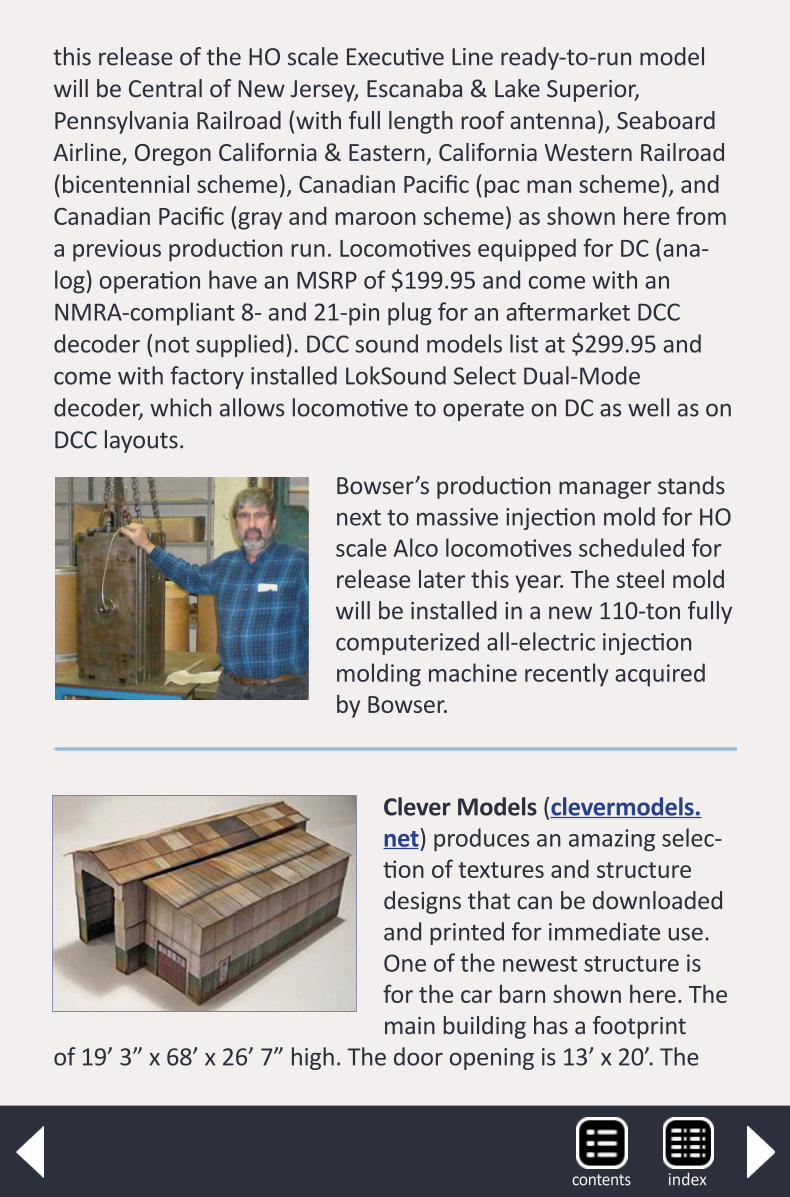
this release of the HO scale Executive Line ready-to-run model will be Central of New Jersey, Escanaba & Lake Superior, Pennsylvania Railroad (with full length roof antenna), Seaboard Airline, Oregon California & Eastern, California Western Railroad (bicentennial scheme), Canadian Pacific (pac man scheme), and Canadian Pacific (gray and maroon scheme) as shown here from a previous production run. Locomotives equipped for DC (ana-log) operation have an MSRP of $199.95 and come with an NMRA-compliant 8- and 21-pin plug for an aftermarket DCC decoder (not supplied). DCC sound models list at $299.95 and come with factory installed LokSound Select Dual-Mode decoder, which allows locomotive to operate on DC as well as on DCC layouts.
Bowser’s production manager stands next to massive injection mold for HO scale Alco locomotives scheduled for release later this year. The steel mold will be installed in a new 110-ton fully computerized all-electric injection molding machine recently acquired by Bowser.
Clever Models (clevermodels.net) produces an amazing selec-tion of textures and structure designs that can be downloaded and printed for immediate use. One of the newest structure is for the car barn shown here. The main building has a footprint
of 19’ 3” x 68’ x 26’ 7” high. The door opening is 13’ x 20’. The
indexcontents
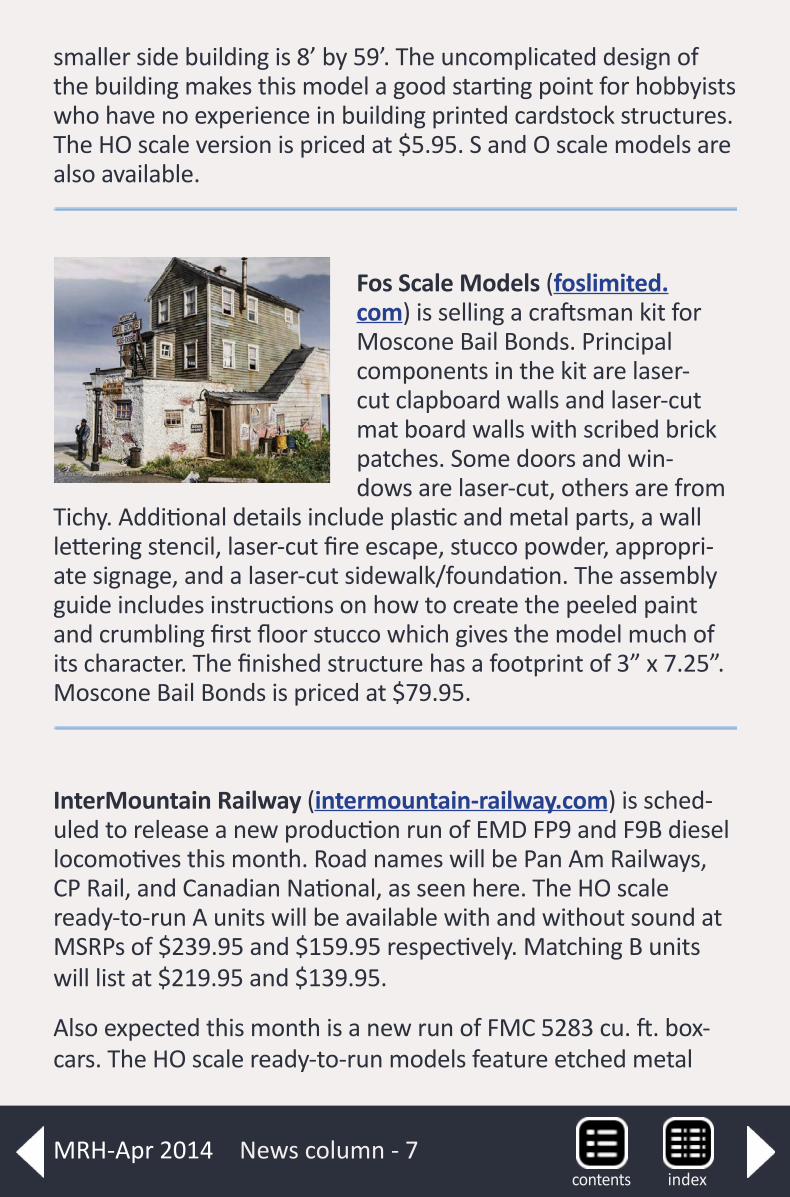
smaller side building is 8’ by 59’. The uncomplicated design of the building makes this model a good starting point for hobbyists who have no experience in building printed cardstock structures. The HO scale version is priced at $5.95. S and O scale models are also available.
Fos Scale Models (foslimited.com) is selling a craftsman kit for Moscone Bail Bonds. Principal components in the kit are laser-cut clapboard walls and laser-cut mat board walls with scribed brick patches. Some doors and win-dows are laser-cut, others are from
Tichy. Additional details include plastic and metal parts, a wall lettering stencil, laser-cut fire escape, stucco powder, appropri-ate signage, and a laser-cut sidewalk/foundation. The assembly guide includes instructions on how to create the peeled paint and crumbling first floor stucco which gives the model much of its character. The finished structure has a footprint of 3” x 7.25”. Moscone Bail Bonds is priced at $79.95.
InterMountain Railway (intermountain-railway.com) is sched-uled to release a new production run of EMD FP9 and F9B diesel locomotives this month. Road names will be Pan Am Railways, CP Rail, and Canadian National, as seen here. The HO scale ready-to-run A units will be available with and without sound at MSRPs of $239.95 and $159.95 respectively. Matching B units will list at $219.95 and $139.95.
Also expected this month is a new run of FMC 5283 cu. ft. box-cars. The HO scale ready-to-run models feature etched metal
News column - 7indexcontents
MRH-Apr 2014
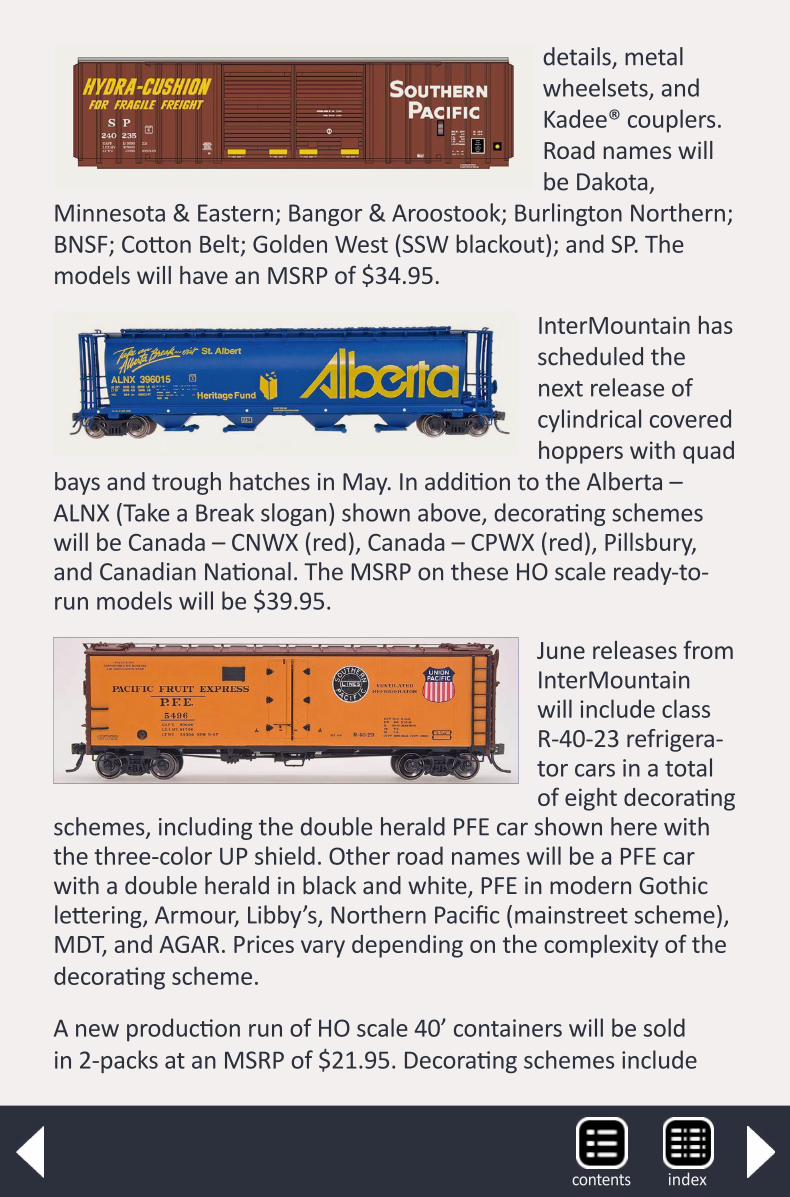
details, metal wheelsets, and Kadee® couplers. Road names will be Dakota,
Minnesota & Eastern; Bangor & Aroostook; Burlington Northern; BNSF; Cotton Belt; Golden West (SSW blackout); and SP. The models will have an MSRP of $34.95.
InterMountain has scheduled the next release of cylindrical covered hoppers with quad
bays and trough hatches in May. In addition to the Alberta – ALNX (Take a Break slogan) shown above, decorating schemes will be Canada – CNWX (red), Canada – CPWX (red), Pillsbury, and Canadian National. The MSRP on these HO scale ready-to-run models will be $39.95.
June releases from InterMountain will include class R-40-23 refrigera-tor cars in a total of eight decorating
schemes, including the double herald PFE car shown here with the three-color UP shield. Other road names will be a PFE car with a double herald in black and white, PFE in modern Gothic lettering, Armour, Libby’s, Northern Pacific (mainstreet scheme), MDT, and AGAR. Prices vary depending on the complexity of the decorating scheme.
A new production run of HO scale 40’ containers will be sold in 2-packs at an MSRP of $21.95. Decorating schemes include
indexcontents
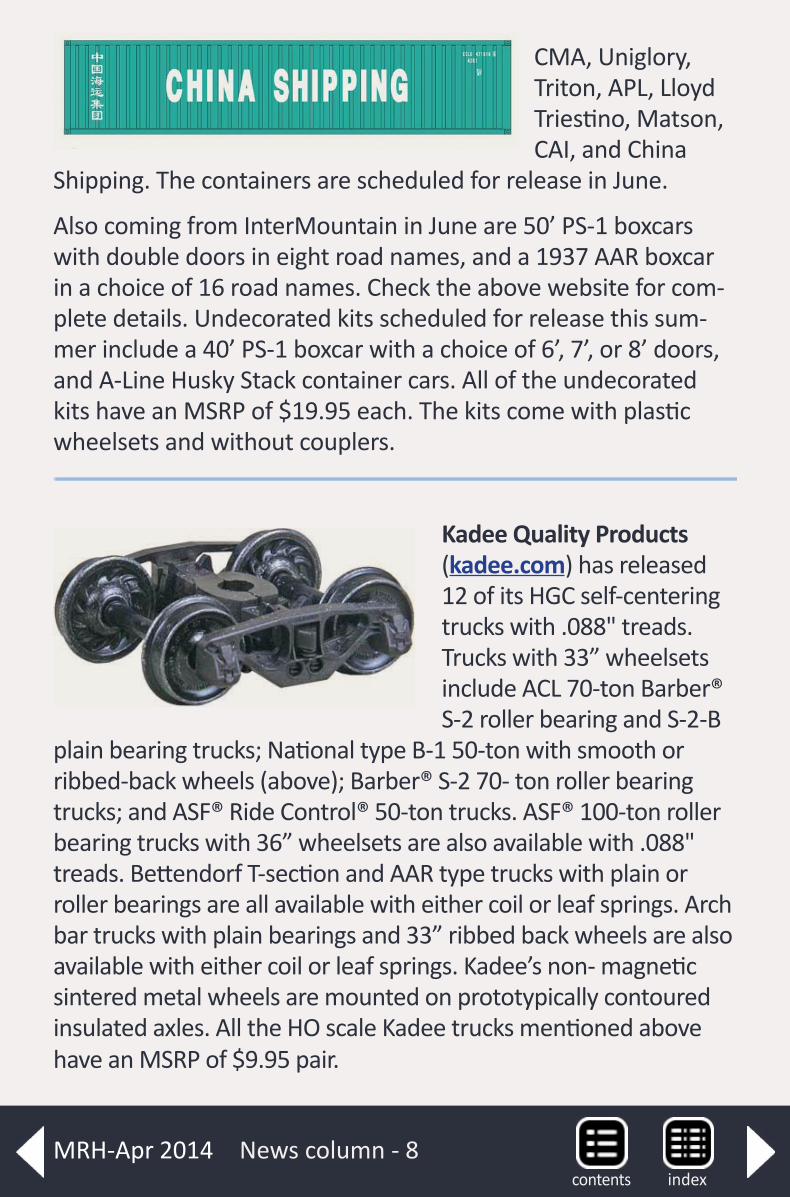
News column - 8
CMA, Uniglory, Triton, APL, Lloyd Triestino, Matson, CAI, and China
Shipping. The containers are scheduled for release in June.
Also coming from InterMountain in June are 50’ PS-1 boxcars with double doors in eight road names, and a 1937 AAR boxcar in a choice of 16 road names. Check the above website for com-plete details. Undecorated kits scheduled for release this sum-mer include a 40’ PS-1 boxcar with a choice of 6’, 7’, or 8’ doors, and A-Line Husky Stack container cars. All of the undecorated kits have an MSRP of $19.95 each. The kits come with plastic wheelsets and without couplers.
Kadee Quality Products (kadee.com) has released 12 of its HGC self-centering trucks with .088" treads. Trucks with 33” wheelsets include ACL 70-ton Barber® S-2 roller bearing and S-2-B
plain bearing trucks; National type B-1 50-ton with smooth or ribbed-back wheels (above); Barber® S-2 70- ton roller bearing trucks; and ASF® Ride Control® 50-ton trucks. ASF® 100-ton roller bearing trucks with 36” wheelsets are also available with .088" treads. Bettendorf T-section and AAR type trucks with plain or roller bearings are all available with either coil or leaf springs. Arch bar trucks with plain bearings and 33” ribbed back wheels are also available with either coil or leaf springs. Kadee’s non- magnetic sintered metal wheels are mounted on prototypically contoured insulated axles. All the HO scale Kadee trucks mentioned above have an MSRP of $9.95 pair.
indexcontentsMRH-Apr 2014
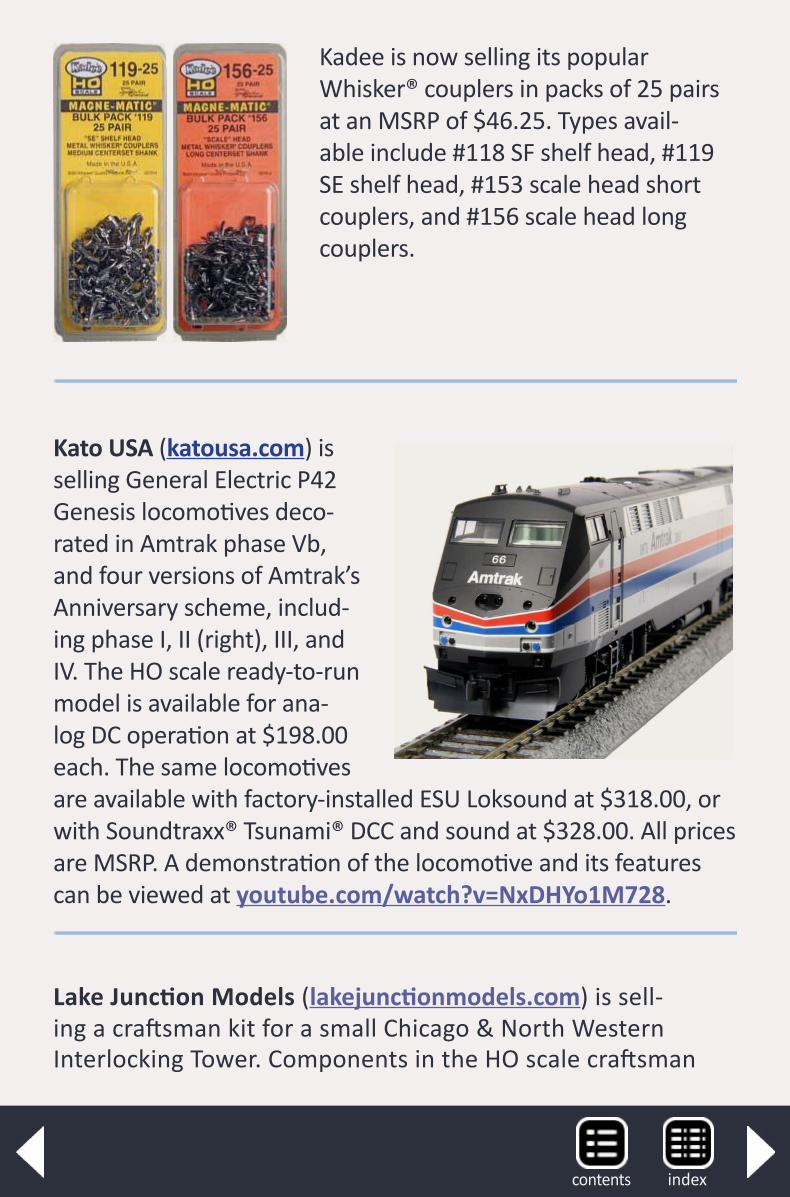
Kadee is now selling its popular Whisker® couplers in packs of 25 pairs at an MSRP of $46.25. Types avail-able include #118 SF shelf head, #119 SE shelf head, #153 scale head short couplers, and #156 scale head long couplers.
Kato USA (katousa.com) is selling General Electric P42 Genesis locomotives deco-rated in Amtrak phase Vb, and four versions of Amtrak’s Anniversary scheme, includ-ing phase I, II (right), III, and IV. The HO scale ready-to-run model is available for ana-log DC operation at $198.00 each. The same locomotives are available with factory-installed ESU Loksound at $318.00, or with Soundtraxx® Tsunami® DCC and sound at $328.00. All prices are MSRP. A demonstration of the locomotive and its features can be viewed at youtube.com/watch?v=NxDHYo1M728.
Lake Junction Models (lakejunctionmodels.com) is sell-ing a craftsman kit for a small Chicago & North Western Interlocking Tower. Components in the HO scale craftsman
indexcontents
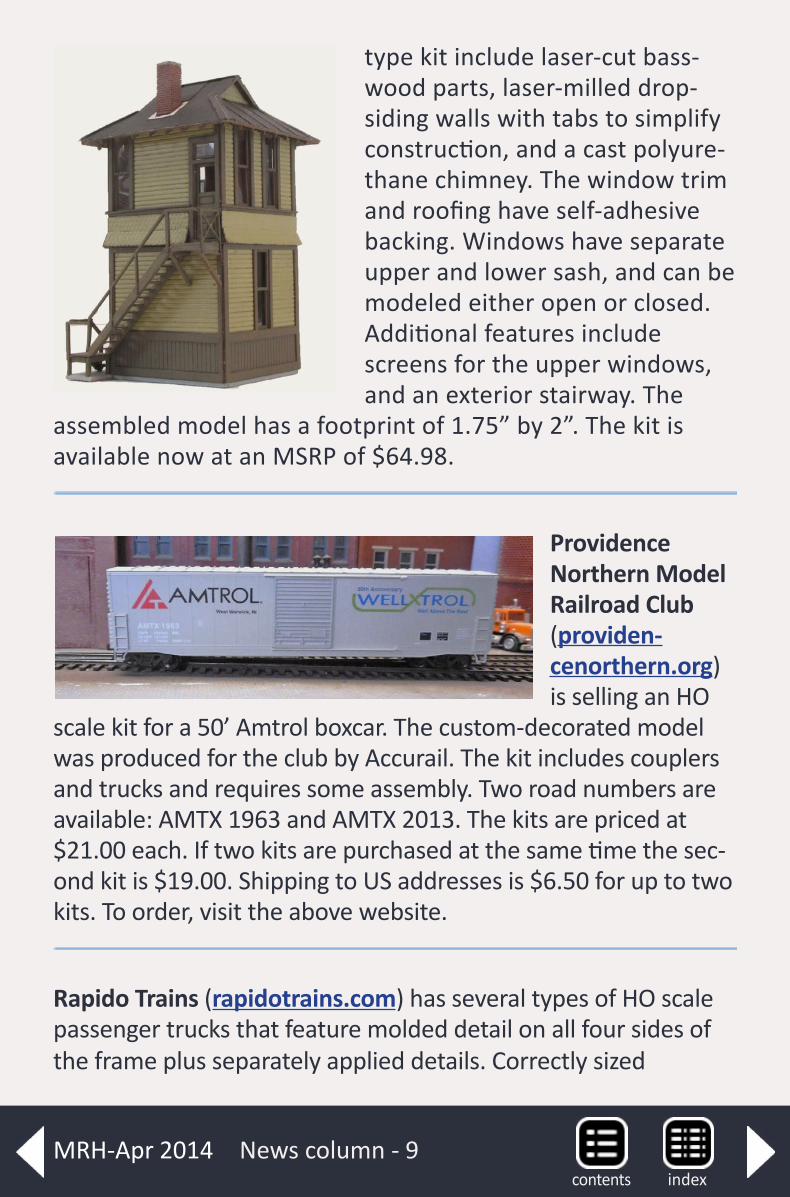
News column - 9
type kit include laser-cut bass-wood parts, laser-milled drop-siding walls with tabs to simplify construction, and a cast polyure-thane chimney. The window trim and roofing have self-adhesive backing. Windows have separate upper and lower sash, and can be modeled either open or closed. Additional features include screens for the upper windows, and an exterior stairway. The
assembled model has a footprint of 1.75” by 2”. The kit is available now at an MSRP of $64.98.
Providence Northern Model Railroad Club (providen-cenorthern.org) is selling an HO
scale kit for a 50’ Amtrol boxcar. The custom-decorated model was produced for the club by Accurail. The kit includes couplers and trucks and requires some assembly. Two road numbers are available: AMTX 1963 and AMTX 2013. The kits are priced at $21.00 each. If two kits are purchased at the same time the sec-ond kit is $19.00. Shipping to US addresses is $6.50 for up to two kits. To order, visit the above website.
Rapido Trains (rapidotrains.com) has several types of HO scale passenger trucks that feature molded detail on all four sides of the frame plus separately applied details. Correctly sized
indexcontentsMRH-Apr 2014
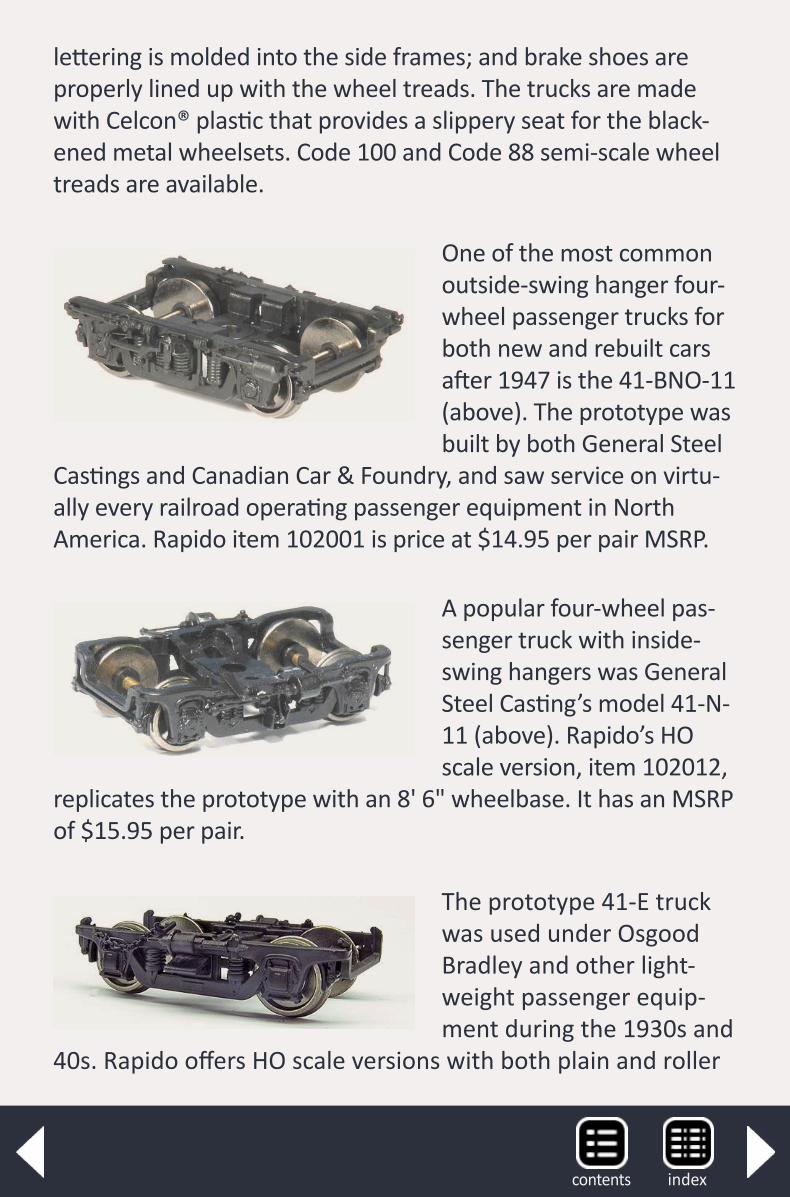
lettering is molded into the side frames; and brake shoes are properly lined up with the wheel treads. The trucks are made with Celcon® plastic that provides a slippery seat for the black-ened metal wheelsets. Code 100 and Code 88 semi-scale wheel treads are available.
One of the most common outside-swing hanger four-wheel passenger trucks for both new and rebuilt cars after 1947 is the 41-BNO-11 (above). The prototype was built by both General Steel
Castings and Canadian Car & Foundry, and saw service on virtu-ally every railroad operating passenger equipment in North America. Rapido item 102001 is price at $14.95 per pair MSRP.
A popular four-wheel pas-senger truck with inside-swing hangers was General Steel Casting’s model 41-N-11 (above). Rapido’s HO scale version, item 102012,
replicates the prototype with an 8' 6" wheelbase. It has an MSRP of $15.95 per pair.
The prototype 41-E truck was used under Osgood Bradley and other light-weight passenger equip-ment during the 1930s and
40s. Rapido offers HO scale versions with both plain and roller
indexcontents
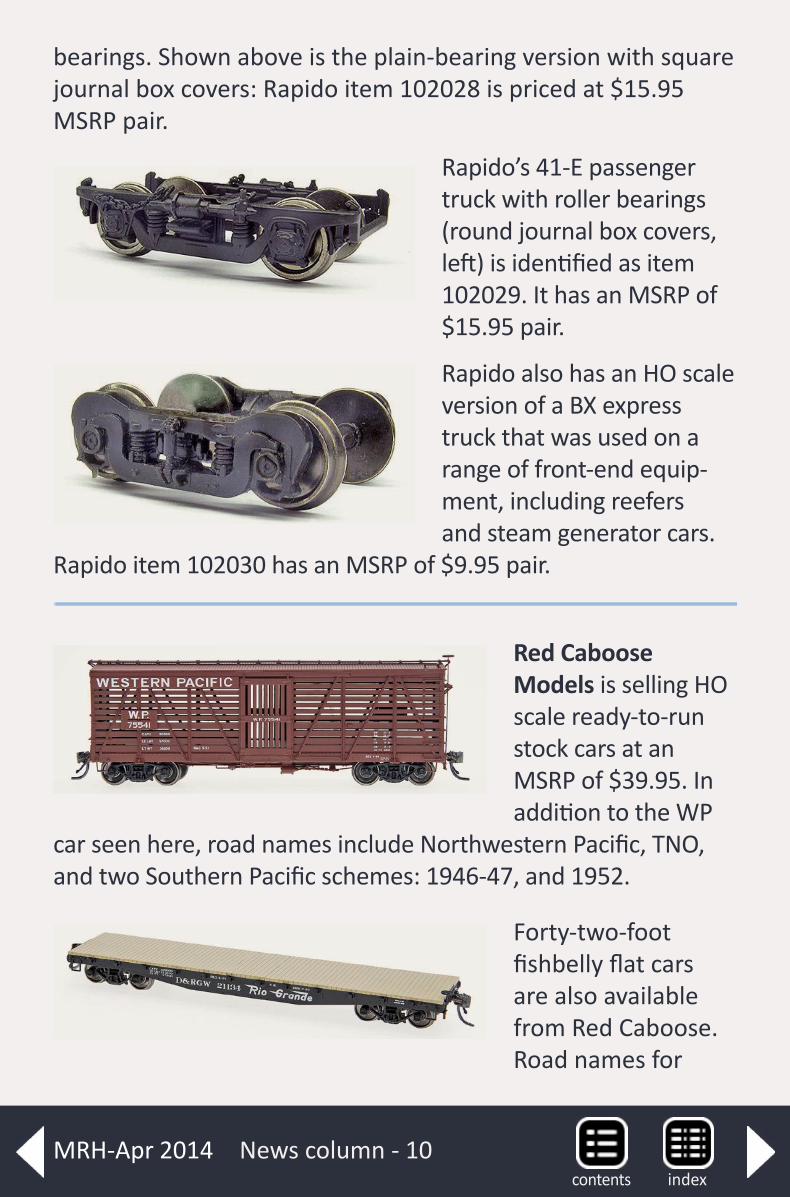
bearings. Shown above is the plain-bearing version with square journal box covers: Rapido item 102028 is priced at $15.95 MSRP pair.
Rapido’s 41-E passenger truck with roller bearings (round journal box covers, left) is identified as item 102029. It has an MSRP of $15.95 pair.
Rapido also has an HO scale version of a BX express truck that was used on a range of front-end equip-ment, including reefers and steam generator cars.
Rapido item 102030 has an MSRP of $9.95 pair.
Red Caboose Models is selling HO scale ready-to-run stock cars at an MSRP of $39.95. In addition to the WP
car seen here, road names include Northwestern Pacific, TNO, and two Southern Pacific schemes: 1946-47, and 1952.
Forty-two-foot fishbelly flat cars are also available from Red Caboose. Road names for
News column - 10indexcontents
MRH-Apr 2014
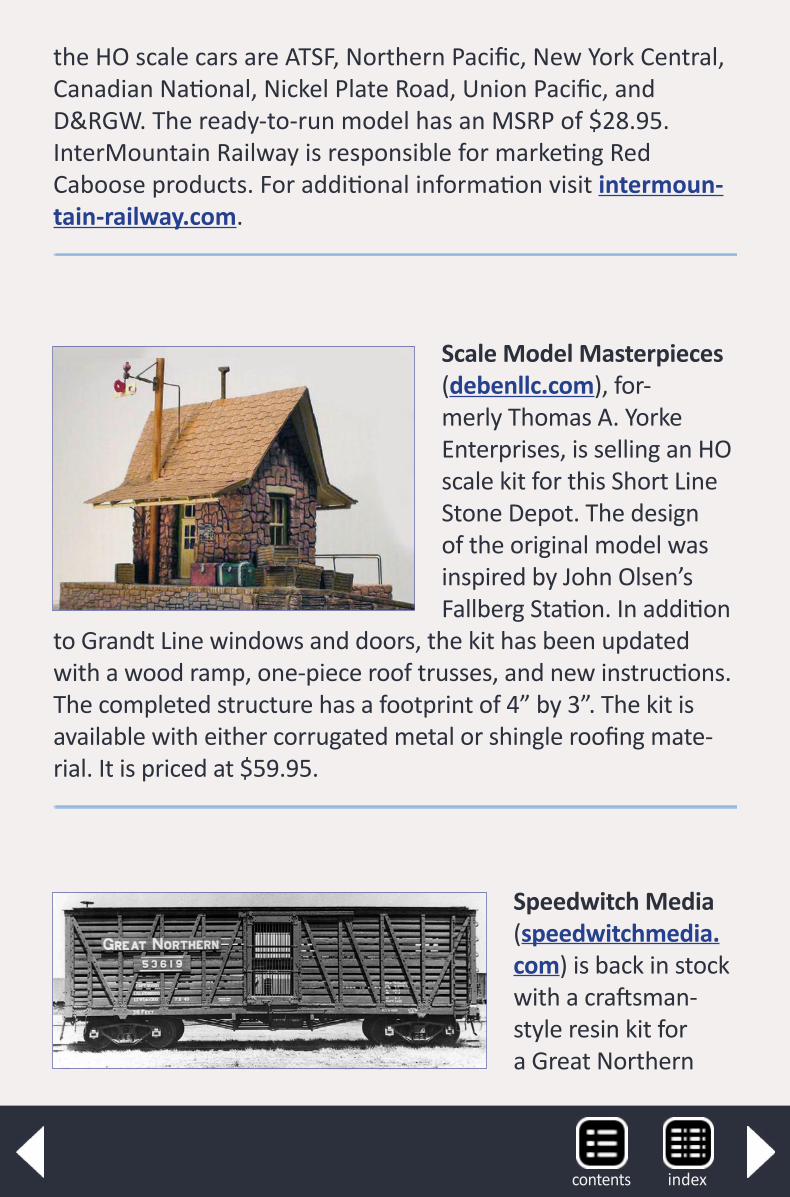
the HO scale cars are ATSF, Northern Pacific, New York Central, Canadian National, Nickel Plate Road, Union Pacific, and D&RGW. The ready-to-run model has an MSRP of $28.95. InterMountain Railway is responsible for marketing Red Caboose products. For additional information visit intermoun-tain-railway.com.
Scale Model Masterpieces (debenllc.com), for-merly Thomas A. Yorke Enterprises, is selling an HO scale kit for this Short Line Stone Depot. The design of the original model was inspired by John Olsen’s Fallberg Station. In addition
to Grandt Line windows and doors, the kit has been updated with a wood ramp, one-piece roof trusses, and new instructions. The completed structure has a footprint of 4” by 3”. The kit is available with either corrugated metal or shingle roofing mate-rial. It is priced at $59.95.
Speedwitch Media (speedwitchmedia.com) is back in stock with a craftsman-style resin kit for a Great Northern
indexcontents
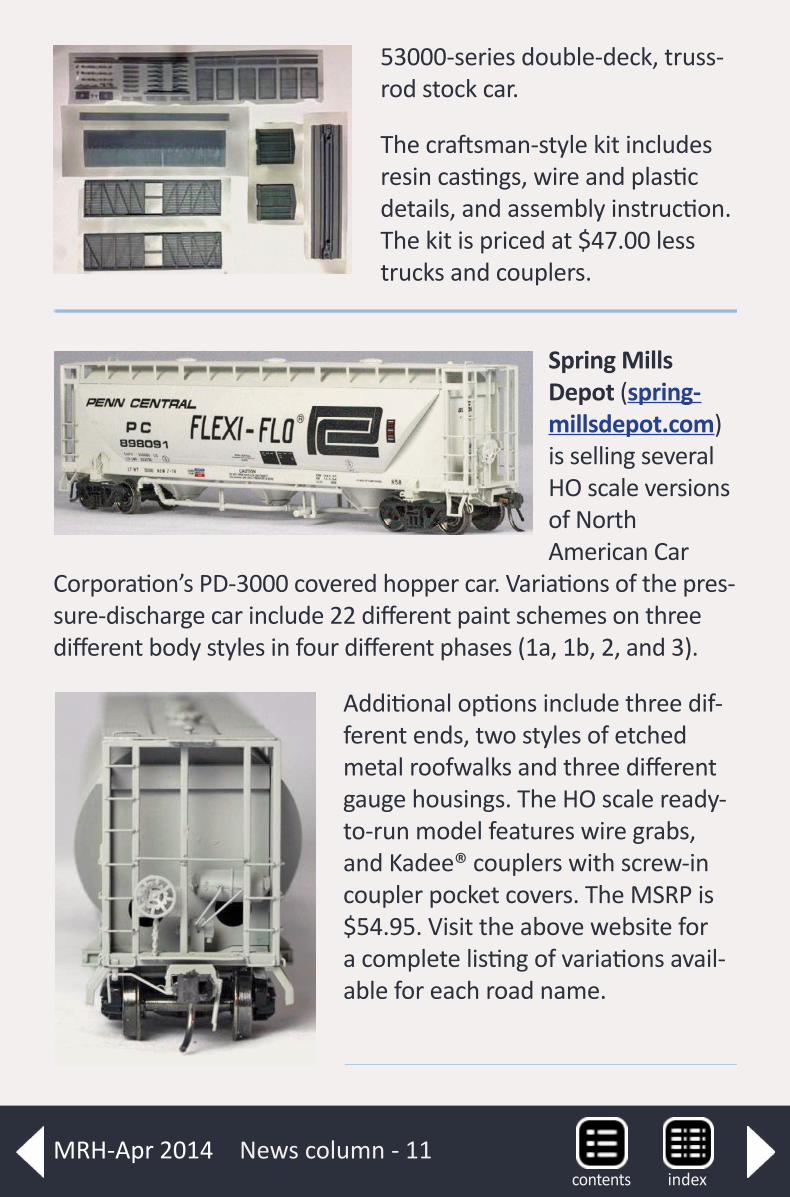
53000-series double-deck, truss-rod stock car.
The craftsman-style kit includes resin castings, wire and plastic details, and assembly instruction. The kit is priced at $47.00 less trucks and couplers.
Spring Mills Depot (spring-millsdepot.com) is selling several HO scale versions of North American Car
Corporation’s PD-3000 covered hopper car. Variations of the pres-sure-discharge car include 22 different paint schemes on three different body styles in four different phases (1a, 1b, 2, and 3).
Additional options include three dif-ferent ends, two styles of etched metal roofwalks and three different gauge housings. The HO scale ready-to-run model features wire grabs, and Kadee® couplers with screw-in coupler pocket covers. The MSRP is $54.95. Visit the above website for a complete listing of variations avail-able for each road name.
News column - 11indexcontents
MRH-Apr 2014
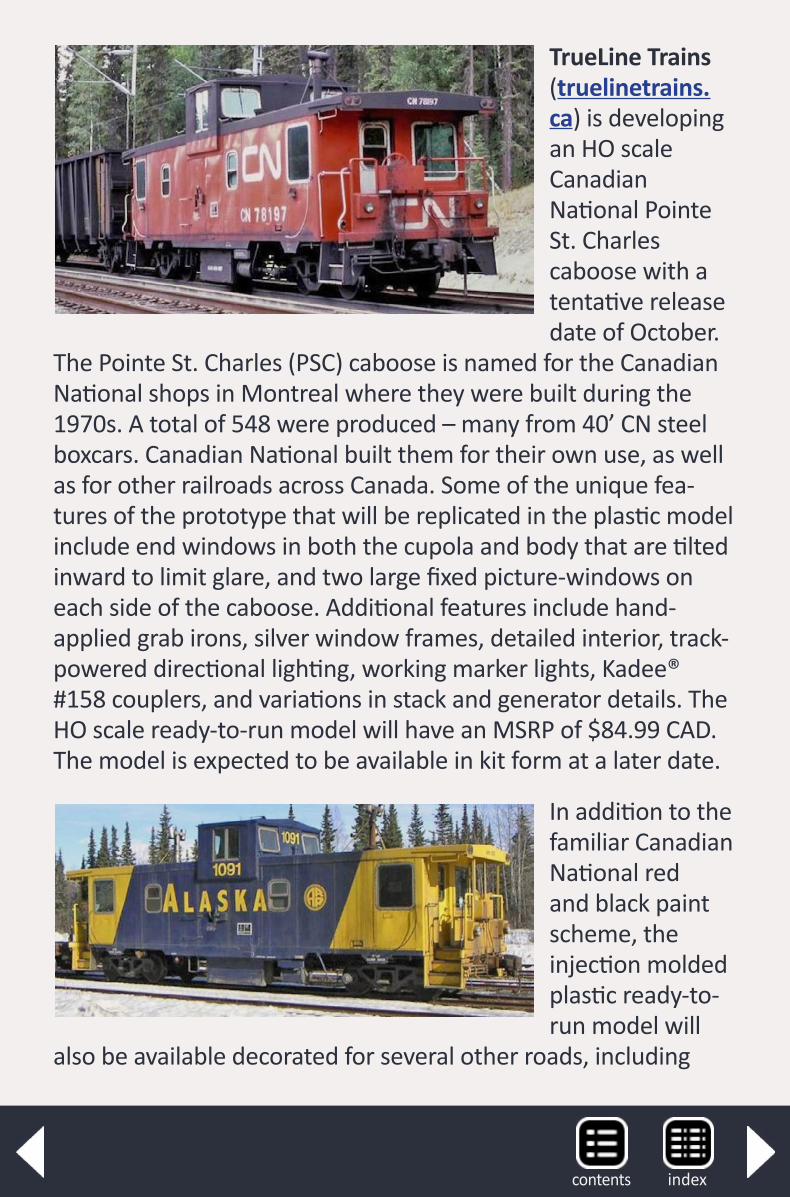
TrueLine Trains (truelinetrains.ca) is developing an HO scale Canadian National Pointe St. Charles caboose with a tentative release date of October.
The Pointe St. Charles (PSC) caboose is named for the Canadian National shops in Montreal where they were built during the 1970s. A total of 548 were produced – many from 40’ CN steel boxcars. Canadian National built them for their own use, as well as for other railroads across Canada. Some of the unique fea-tures of the prototype that will be replicated in the plastic model include end windows in both the cupola and body that are tilted inward to limit glare, and two large fixed picture-windows on each side of the caboose. Additional features include hand-applied grab irons, silver window frames, detailed interior, track-powered directional lighting, working marker lights, Kadee® #158 couplers, and variations in stack and generator details. The HO scale ready-to-run model will have an MSRP of $84.99 CAD. The model is expected to be available in kit form at a later date.
In addition to the familiar Canadian National red and black paint scheme, the injection molded plastic ready-to-run model will
also be available decorated for several other roads, including
indexcontents
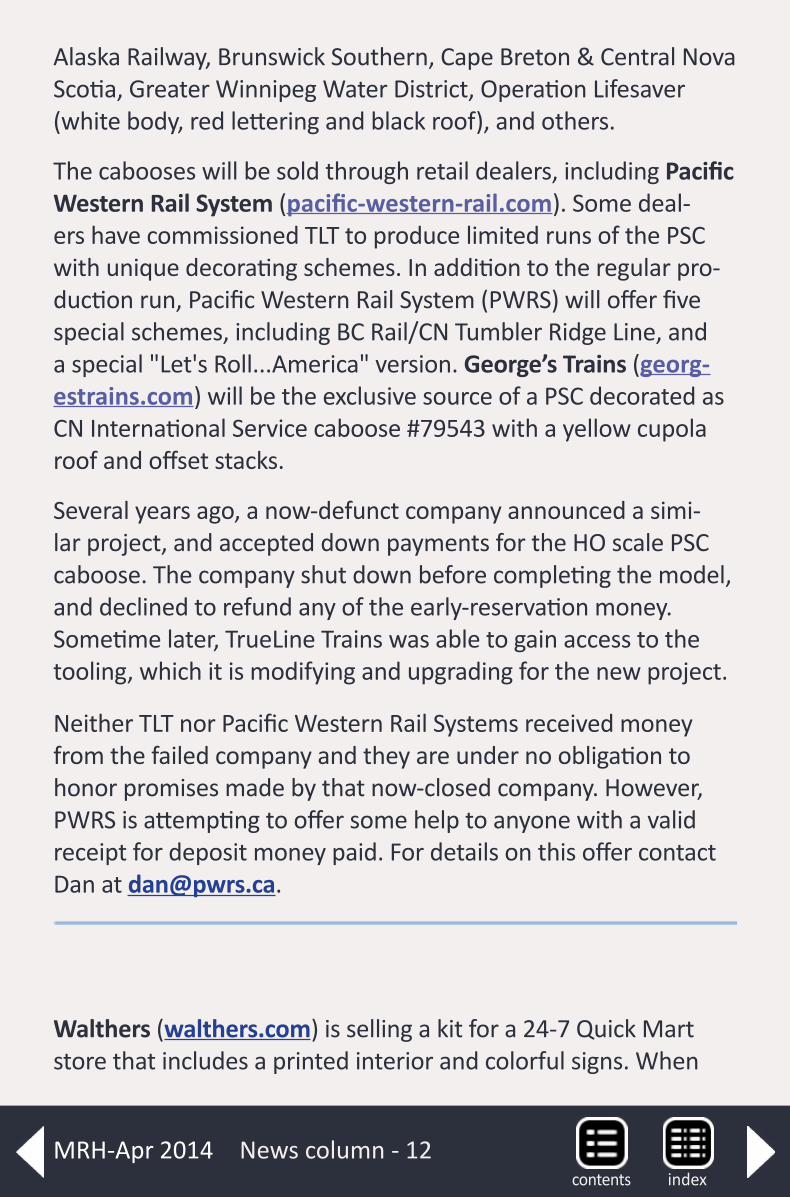
Alaska Railway, Brunswick Southern, Cape Breton & Central Nova Scotia, Greater Winnipeg Water District, Operation Lifesaver (white body, red lettering and black roof), and others.
The cabooses will be sold through retail dealers, including Pacific Western Rail System (pacific-western-rail.com). Some deal-ers have commissioned TLT to produce limited runs of the PSC with unique decorating schemes. In addition to the regular pro-duction run, Pacific Western Rail System (PWRS) will offer five special schemes, including BC Rail/CN Tumbler Ridge Line, and a special "Let's Roll...America" version. George’s Trains (georg-estrains.com) will be the exclusive source of a PSC decorated as CN International Service caboose #79543 with a yellow cupola roof and offset stacks.
Several years ago, a now-defunct company announced a simi-lar project, and accepted down payments for the HO scale PSC caboose. The company shut down before completing the model, and declined to refund any of the early-reservation money. Sometime later, TrueLine Trains was able to gain access to the tooling, which it is modifying and upgrading for the new project.
Neither TLT nor Pacific Western Rail Systems received money from the failed company and they are under no obligation to honor promises made by that now-closed company. However, PWRS is attempting to offer some help to anyone with a valid receipt for deposit money paid. For details on this offer contact Dan at [email protected].
Walthers (walthers.com) is selling a kit for a 24-7 Quick Mart store that includes a printed interior and colorful signs. When
News column - 12indexcontents
MRH-Apr 2014
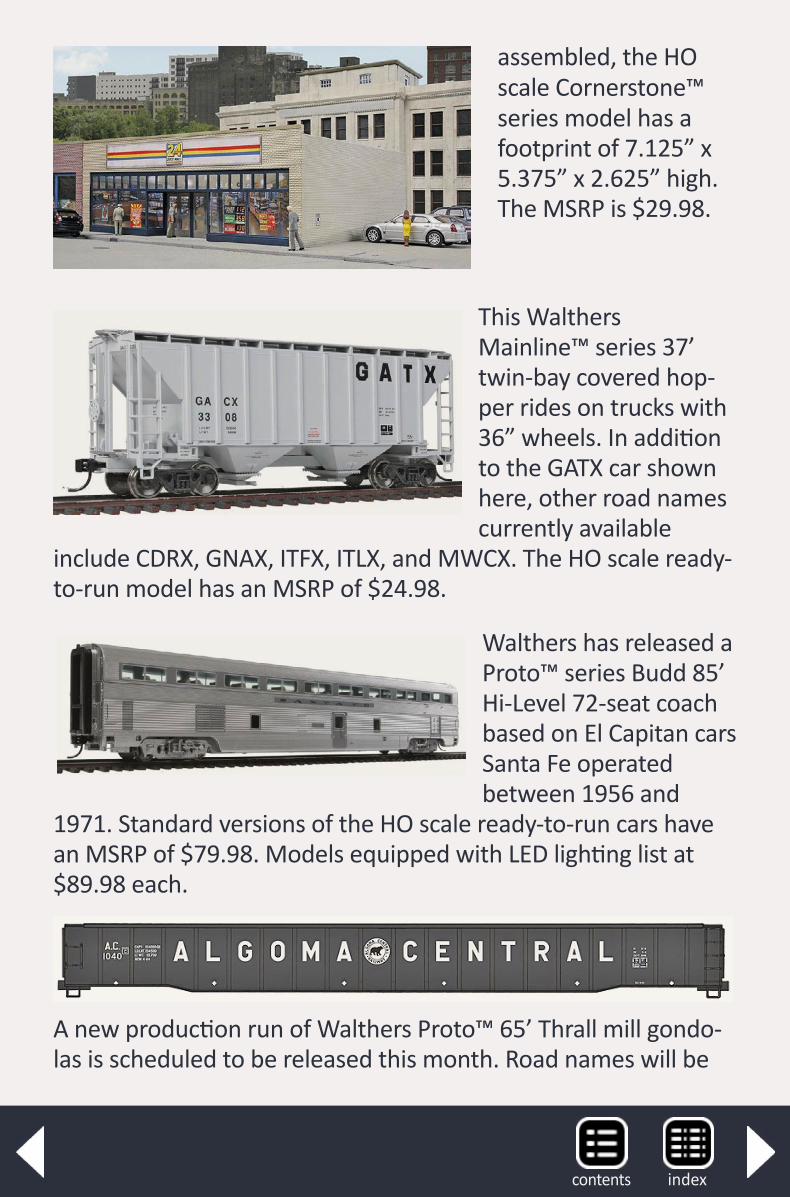
assembled, the HO scale Cornerstone™ series model has a footprint of 7.125” x 5.375” x 2.625” high. The MSRP is $29.98.
This Walthers Mainline™ series 37’ twin-bay covered hop-per rides on trucks with 36” wheels. In addition to the GATX car shown here, other road names currently available
include CDRX, GNAX, ITFX, ITLX, and MWCX. The HO scale ready-to-run model has an MSRP of $24.98.
Walthers has released a Proto™ series Budd 85’ Hi-Level 72-seat coach based on El Capitan cars Santa Fe operated between 1956 and
1971. Standard versions of the HO scale ready-to-run cars have an MSRP of $79.98. Models equipped with LED lighting list at $89.98 each.
A new production run of Walthers Proto™ 65’ Thrall mill gondo-las is scheduled to be released this month. Road names will be
indexcontents
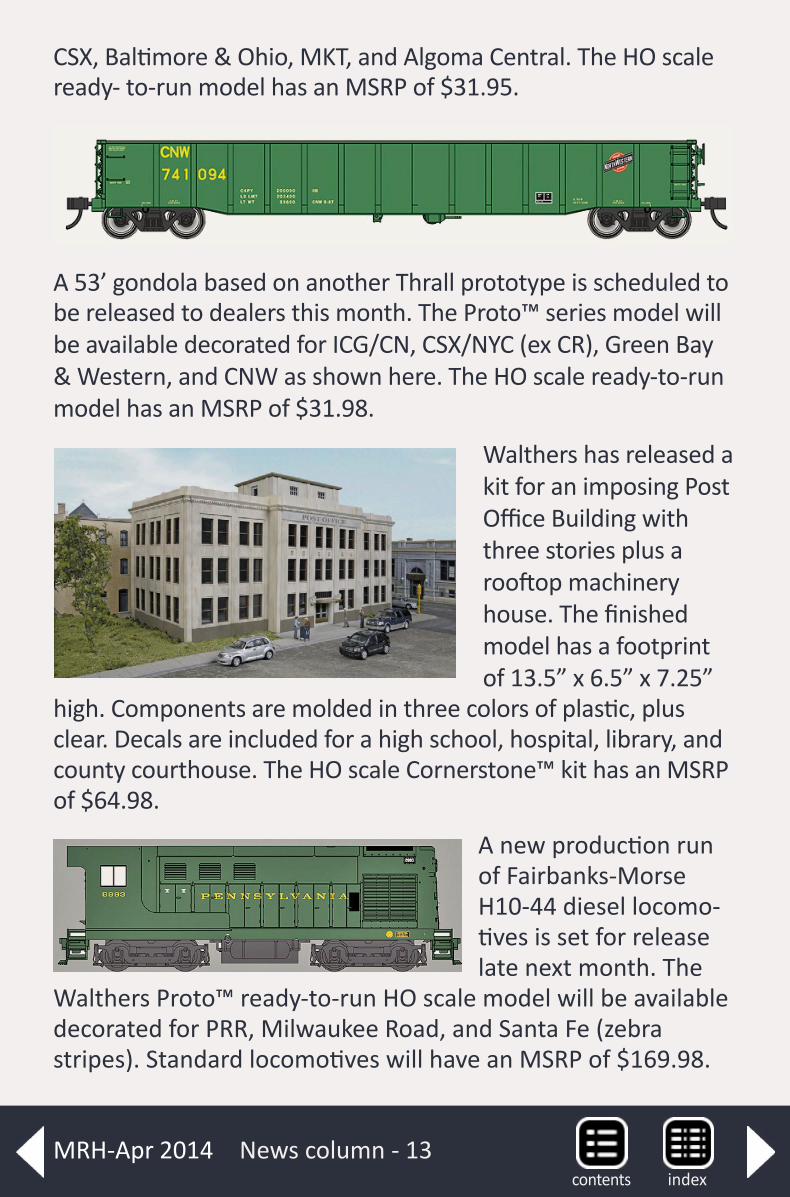
CSX, Baltimore & Ohio, MKT, and Algoma Central. The HO scale ready- to-run model has an MSRP of $31.95.
A 53’ gondola based on another Thrall prototype is scheduled to be released to dealers this month. The Proto™ series model will be available decorated for ICG/CN, CSX/NYC (ex CR), Green Bay & Western, and CNW as shown here. The HO scale ready-to-run model has an MSRP of $31.98.
Walthers has released a kit for an imposing Post Office Building with three stories plus a rooftop machinery house. The finished model has a footprint of 13.5” x 6.5” x 7.25”
high. Components are molded in three colors of plastic, plus clear. Decals are included for a high school, hospital, library, and county courthouse. The HO scale Cornerstone™ kit has an MSRP of $64.98.
A new production run of Fairbanks-Morse H10-44 diesel locomo-tives is set for release late next month. The
Walthers Proto™ ready-to-run HO scale model will be available decorated for PRR, Milwaukee Road, and Santa Fe (zebra stripes). Standard locomotives will have an MSRP of $169.98.
News column - 13indexcontents
MRH-Apr 2014
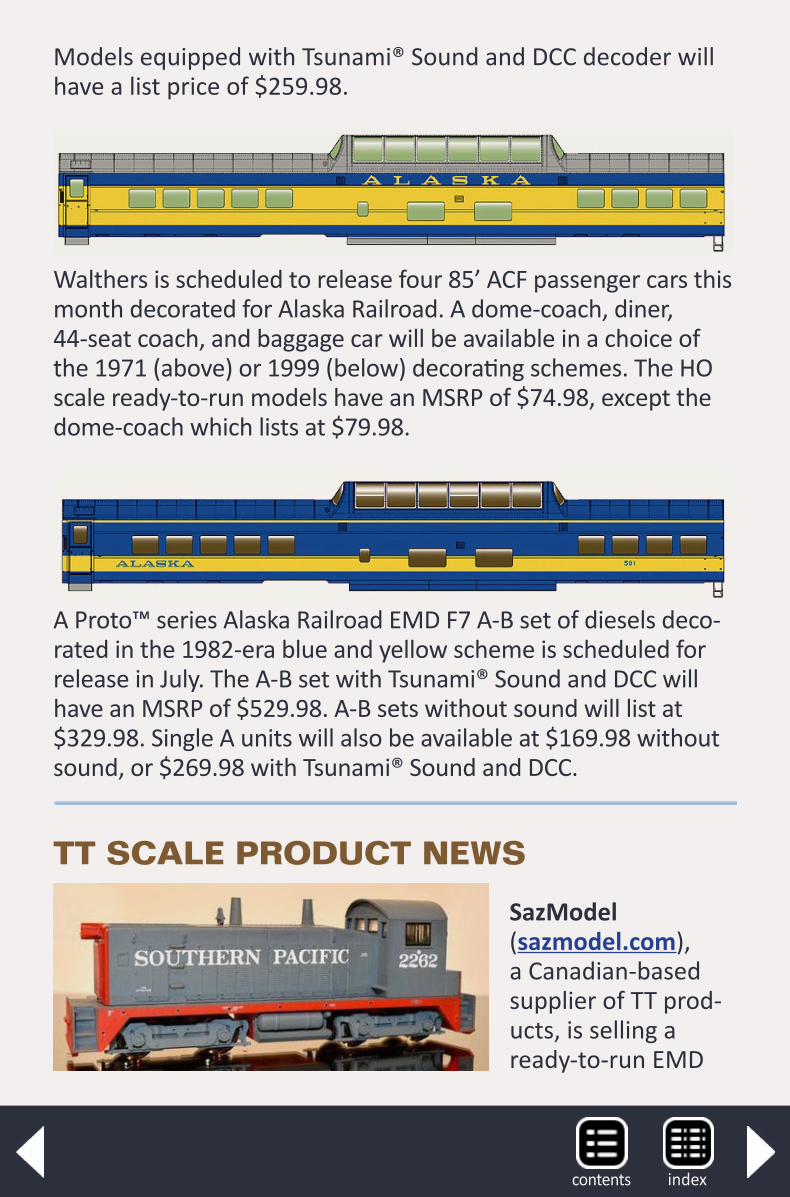
Models equipped with Tsunami® Sound and DCC decoder will have a list price of $259.98.
Walthers is scheduled to release four 85’ ACF passenger cars this month decorated for Alaska Railroad. A dome-coach, diner, 44-seat coach, and baggage car will be available in a choice of the 1971 (above) or 1999 (below) decorating schemes. The HO scale ready-to-run models have an MSRP of $74.98, except the dome-coach which lists at $79.98.
A Proto™ series Alaska Railroad EMD F7 A-B set of diesels deco-rated in the 1982-era blue and yellow scheme is scheduled for release in July. The A-B set with Tsunami® Sound and DCC will have an MSRP of $529.98. A-B sets without sound will list at $329.98. Single A units will also be available at $169.98 without sound, or $269.98 with Tsunami® Sound and DCC.
TT SCALE PRODUCT NEWS
SazModel (sazmodel.com), a Canadian-based supplier of TT prod-ucts, is selling a ready-to-run EMD
indexcontents
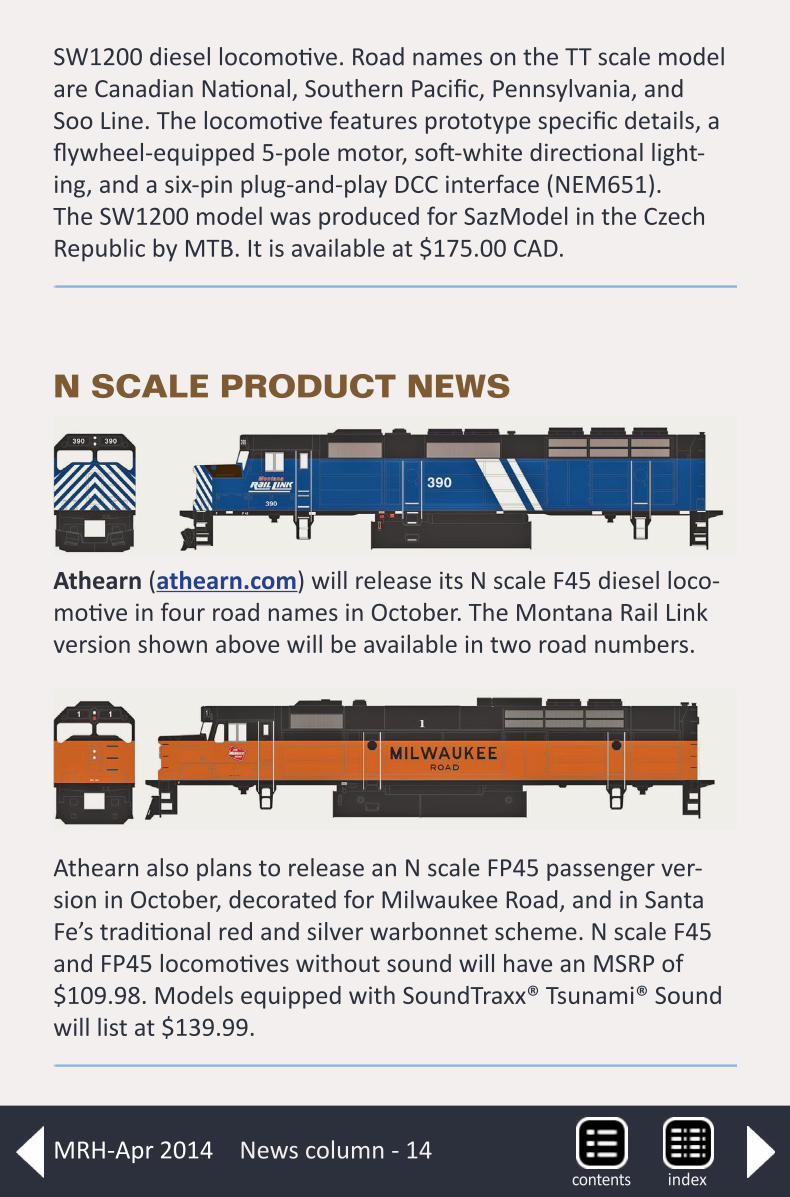
SW1200 diesel locomotive. Road names on the TT scale model are Canadian National, Southern Pacific, Pennsylvania, and Soo Line. The locomotive features prototype specific details, a flywheel-equipped 5-pole motor, soft-white directional light-ing, and a six-pin plug-and-play DCC interface (NEM651). The SW1200 model was produced for SazModel in the Czech Republic by MTB. It is available at $175.00 CAD.
N SCALE PRODUCT NEWS
Athearn (athearn.com) will release its N scale F45 diesel loco-motive in four road names in October. The Montana Rail Link version shown above will be available in two road numbers.
Athearn also plans to release an N scale FP45 passenger ver-sion in October, decorated for Milwaukee Road, and in Santa Fe’s traditional red and silver warbonnet scheme. N scale F45 and FP45 locomotives without sound will have an MSRP of $109.98. Models equipped with SoundTraxx® Tsunami® Sound will list at $139.99.
News column - 14indexcontents
MRH-Apr 2014
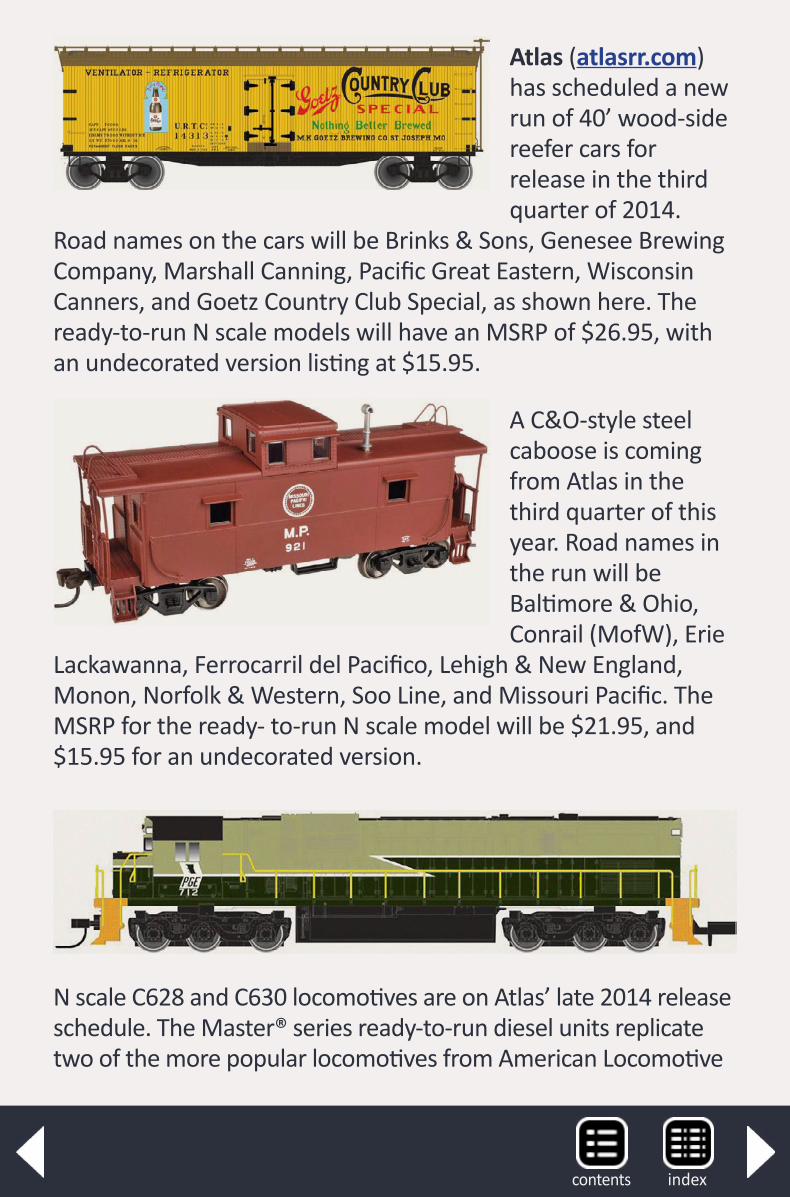
Atlas (atlasrr.com) has scheduled a new run of 40’ wood-side reefer cars for release in the third quarter of 2014.
Road names on the cars will be Brinks & Sons, Genesee Brewing Company, Marshall Canning, Pacific Great Eastern, Wisconsin Canners, and Goetz Country Club Special, as shown here. The ready-to-run N scale models will have an MSRP of $26.95, with an undecorated version listing at $15.95.
A C&O-style steel caboose is coming from Atlas in the third quarter of this year. Road names in the run will be Baltimore & Ohio, Conrail (MofW), Erie
Lackawanna, Ferrocarril del Pacifico, Lehigh & New England, Monon, Norfolk & Western, Soo Line, and Missouri Pacific. The MSRP for the ready- to-run N scale model will be $21.95, and $15.95 for an undecorated version.
N scale C628 and C630 locomotives are on Atlas’ late 2014 release schedule. The Master® series ready-to-run diesel units replicate two of the more popular locomotives from American Locomotive
indexcontents
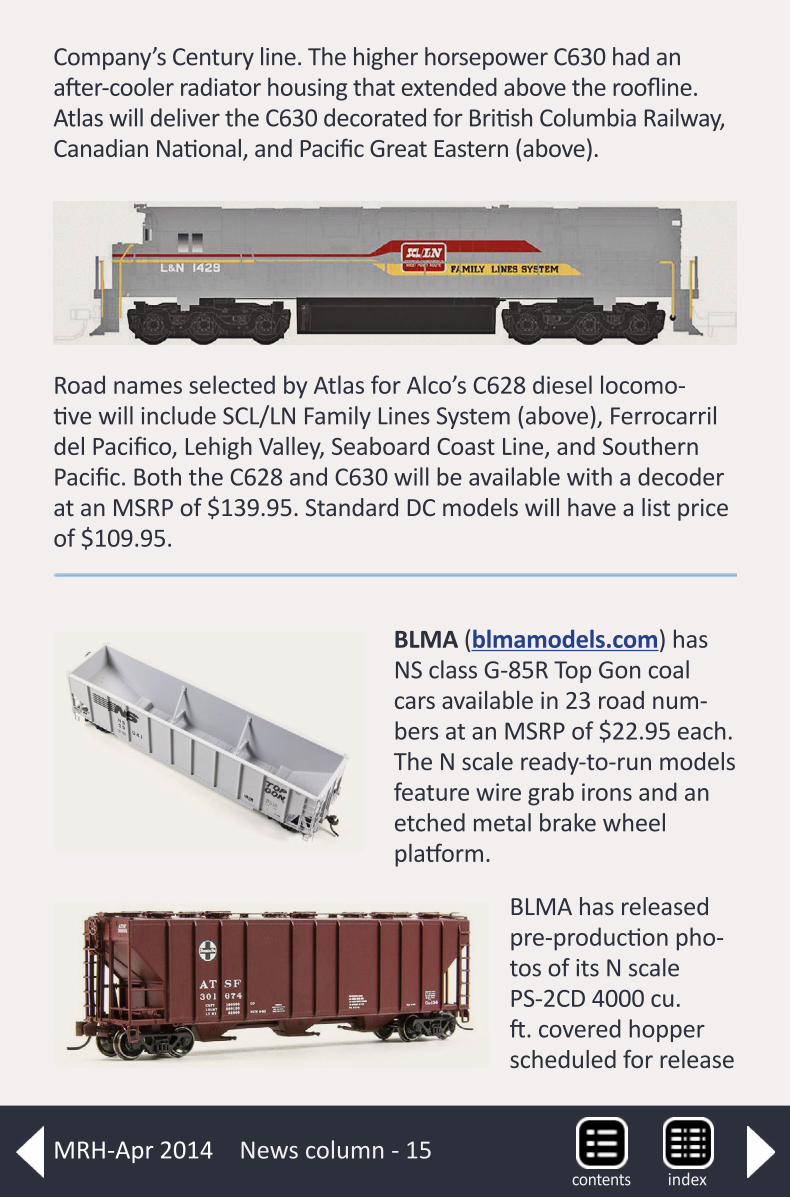
Company’s Century line. The higher horsepower C630 had an after-cooler radiator housing that extended above the roofline. Atlas will deliver the C630 decorated for British Columbia Railway, Canadian National, and Pacific Great Eastern (above).
Road names selected by Atlas for Alco’s C628 diesel locomo-tive will include SCL/LN Family Lines System (above), Ferrocarril del Pacifico, Lehigh Valley, Seaboard Coast Line, and Southern Pacific. Both the C628 and C630 will be available with a decoder at an MSRP of $139.95. Standard DC models will have a list price of $109.95.
BLMA (blmamodels.com) has NS class G-85R Top Gon coal cars available in 23 road num-bers at an MSRP of $22.95 each. The N scale ready-to-run models feature wire grab irons and an etched metal brake wheel platform.
BLMA has released pre-production pho-tos of its N scale PS-2CD 4000 cu. ft. covered hopper scheduled for release
News column - 15indexcontents
MRH-Apr 2014
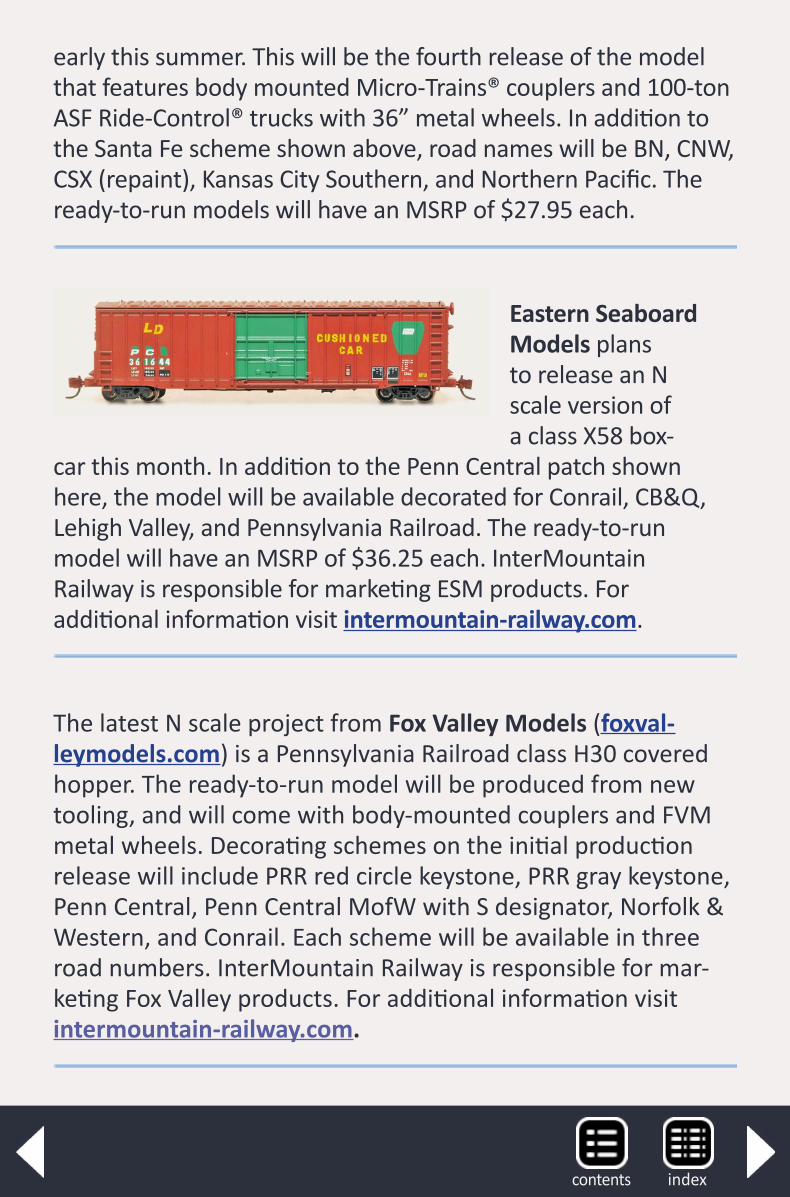
early this summer. This will be the fourth release of the model that features body mounted Micro-Trains® couplers and 100-ton ASF Ride-Control® trucks with 36” metal wheels. In addition to the Santa Fe scheme shown above, road names will be BN, CNW, CSX (repaint), Kansas City Southern, and Northern Pacific. The ready-to-run models will have an MSRP of $27.95 each.
Eastern Seaboard Models plans to release an N scale version of a class X58 box-
car this month. In addition to the Penn Central patch shown here, the model will be available decorated for Conrail, CB&Q, Lehigh Valley, and Pennsylvania Railroad. The ready-to-run model will have an MSRP of $36.25 each. InterMountain Railway is responsible for marketing ESM products. For additional information visit intermountain-railway.com.
The latest N scale project from Fox Valley Models (foxval-leymodels.com) is a Pennsylvania Railroad class H30 covered hopper. The ready-to-run model will be produced from new tooling, and will come with body-mounted couplers and FVM metal wheels. Decorating schemes on the initial production release will include PRR red circle keystone, PRR gray keystone, Penn Central, Penn Central MofW with S designator, Norfolk & Western, and Conrail. Each scheme will be available in three road numbers. InterMountain Railway is responsible for mar-keting Fox Valley products. For additional information visit intermountain-railway.com.
indexcontents
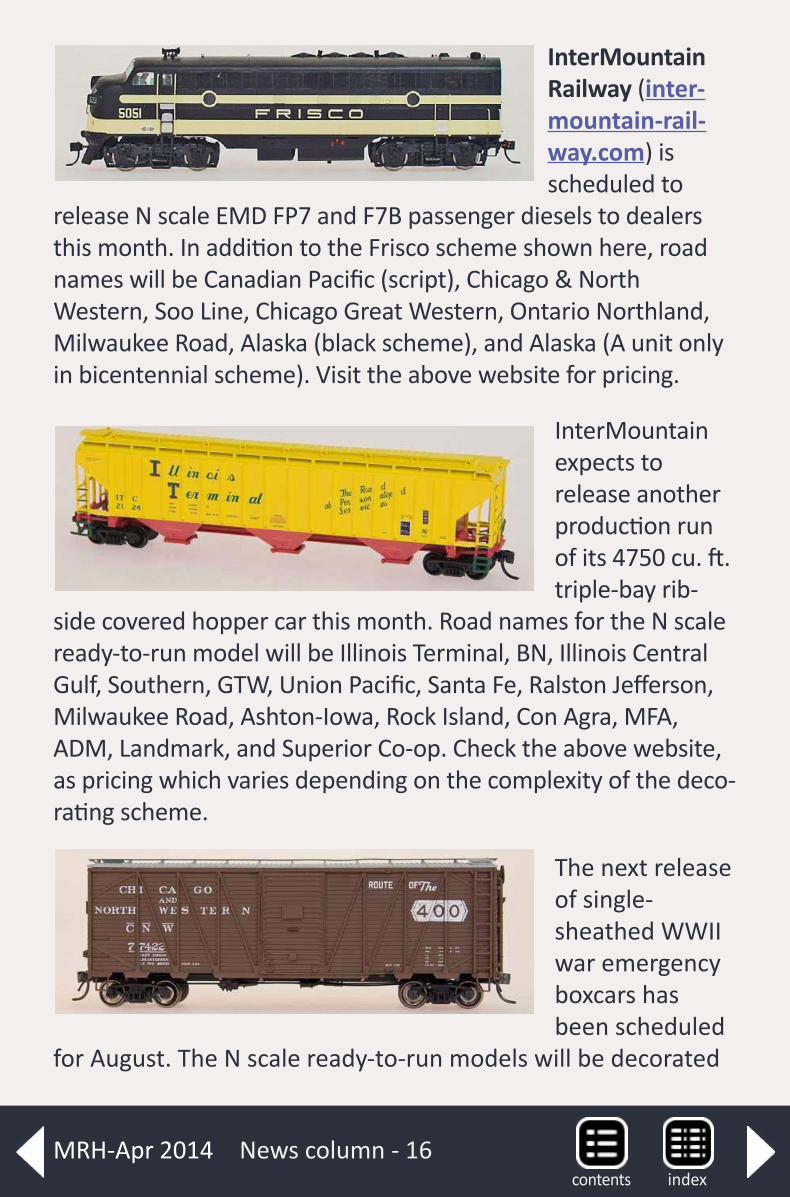
InterMountain Railway (inter-mountain-rail-way.com) is scheduled to
release N scale EMD FP7 and F7B passenger diesels to dealers this month. In addition to the Frisco scheme shown here, road names will be Canadian Pacific (script), Chicago & North Western, Soo Line, Chicago Great Western, Ontario Northland, Milwaukee Road, Alaska (black scheme), and Alaska (A unit only in bicentennial scheme). Visit the above website for pricing.
InterMountain expects to release another production run of its 4750 cu. ft. triple-bay rib-
side covered hopper car this month. Road names for the N scale ready-to-run model will be Illinois Terminal, BN, Illinois Central Gulf, Southern, GTW, Union Pacific, Santa Fe, Ralston Jefferson, Milwaukee Road, Ashton-Iowa, Rock Island, Con Agra, MFA, ADM, Landmark, and Superior Co-op. Check the above website, as pricing which varies depending on the complexity of the deco-rating scheme.
The next release of single-sheathed WWII war emergency boxcars has been scheduled
for August. The N scale ready-to-run models will be decorated
News column - 16indexcontents
MRH-Apr 2014
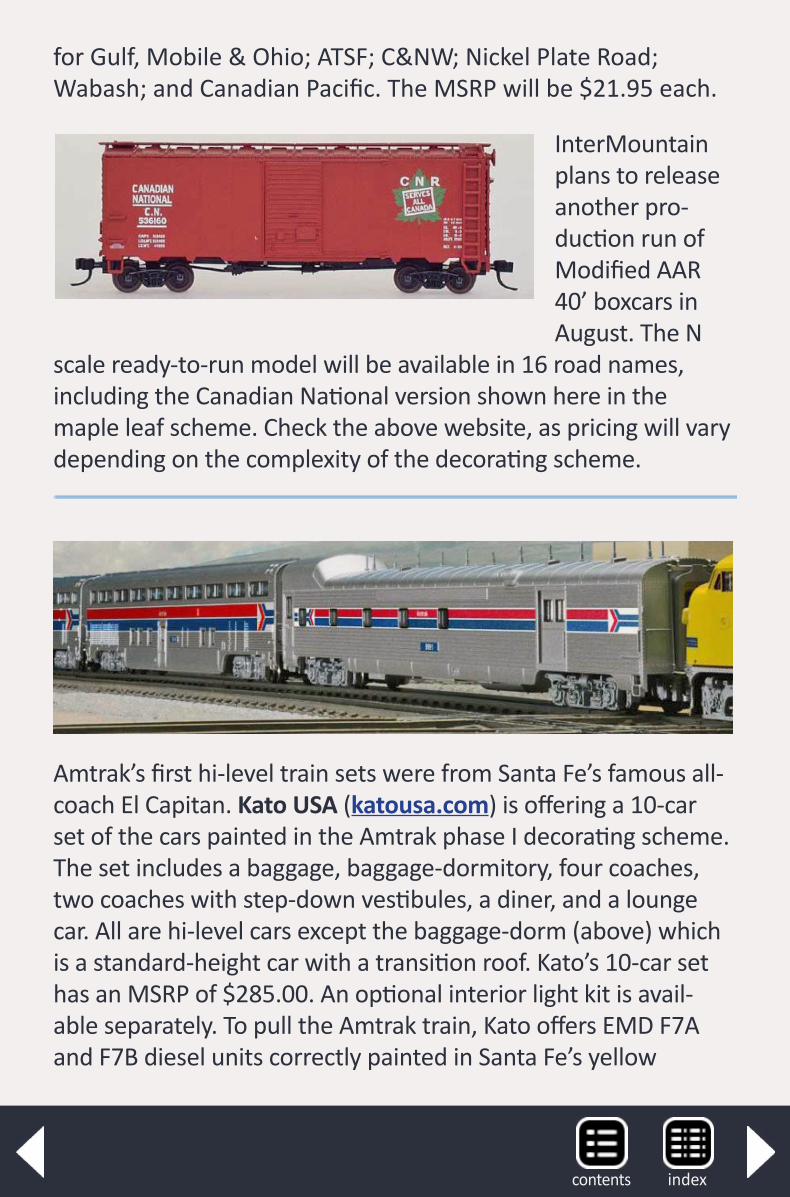
for Gulf, Mobile & Ohio; ATSF; C&NW; Nickel Plate Road; Wabash; and Canadian Pacific. The MSRP will be $21.95 each.
InterMountain plans to release another pro-duction run of Modified AAR 40’ boxcars in August. The N
scale ready-to-run model will be available in 16 road names, including the Canadian National version shown here in the maple leaf scheme. Check the above website, as pricing will vary depending on the complexity of the decorating scheme.
Amtrak’s first hi-level train sets were from Santa Fe’s famous all-coach El Capitan. Kato USA (katousa.com) is offering a 10-car set of the cars painted in the Amtrak phase I decorating scheme. The set includes a baggage, baggage-dormitory, four coaches, two coaches with step-down vestibules, a diner, and a lounge car. All are hi-level cars except the baggage-dorm (above) which is a standard-height car with a transition roof. Kato’s 10-car set has an MSRP of $285.00. An optional interior light kit is avail-able separately. To pull the Amtrak train, Kato offers EMD F7A and F7B diesel units correctly painted in Santa Fe’s yellow
indexcontents
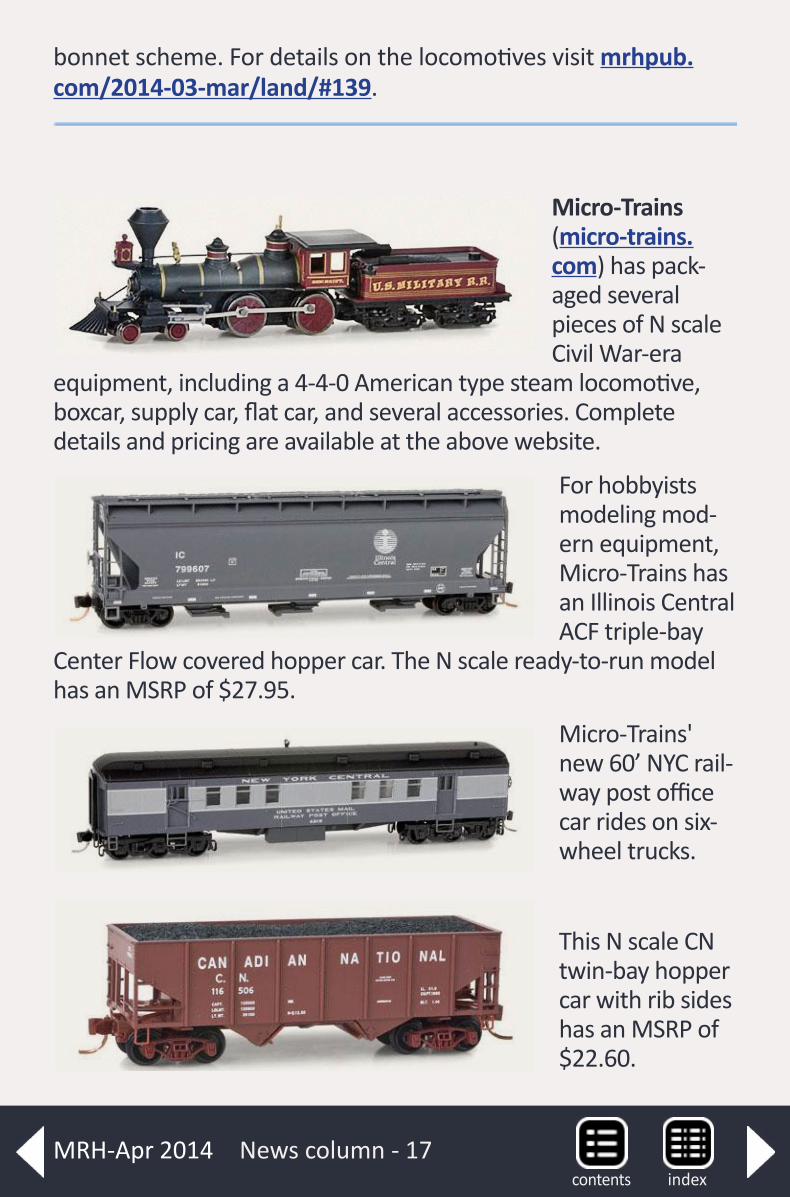
bonnet scheme. For details on the locomotives visit mrhpub.com/2014-03-mar/land/#139.
Micro-Trains (micro-trains.com) has pack-aged several pieces of N scale Civil War-era
equipment, including a 4-4-0 American type steam locomotive, boxcar, supply car, flat car, and several accessories. Complete details and pricing are available at the above website.
For hobbyists modeling mod-ern equipment, Micro-Trains has an Illinois Central ACF triple-bay
Center Flow covered hopper car. The N scale ready-to-run model has an MSRP of $27.95.
Micro-Trains' new 60’ NYC rail-way post office car rides on six-wheel trucks.
This N scale CN twin-bay hopper car with rib sides has an MSRP of $22.60.
News column - 17indexcontents
MRH-Apr 2014
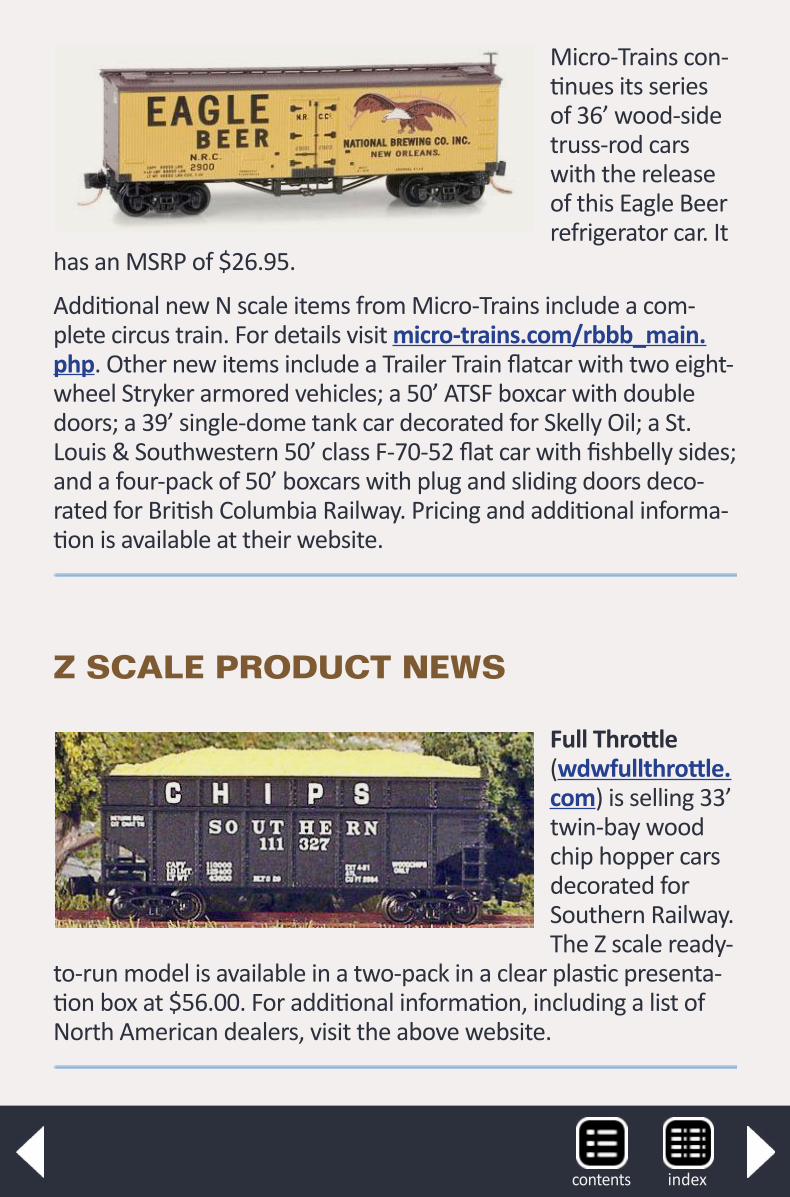
Micro-Trains con-tinues its series of 36’ wood-side truss-rod cars with the release of this Eagle Beer refrigerator car. It
has an MSRP of $26.95.
Additional new N scale items from Micro-Trains include a com-plete circus train. For details visit micro-trains.com/rbbb_main.php. Other new items include a Trailer Train flatcar with two eight- wheel Stryker armored vehicles; a 50’ ATSF boxcar with double doors; a 39’ single-dome tank car decorated for Skelly Oil; a St. Louis & Southwestern 50’ class F-70-52 flat car with fishbelly sides; and a four-pack of 50’ boxcars with plug and sliding doors deco-rated for British Columbia Railway. Pricing and additional informa-tion is available at their website.
Z SCALE PRODUCT NEWS
Full Throttle (wdwfullthrottle.com) is selling 33’ twin-bay wood chip hopper cars decorated for Southern Railway. The Z scale ready-
to-run model is available in a two-pack in a clear plastic presenta-tion box at $56.00. For additional information, including a list of North American dealers, visit the above website.
indexcontents

NEW DECALS, SIGNS AND FINISHING PRODUCTS
Deluxe Innovations (deluxeinnovations.com) has decals for truck cabs to match some of the company’s N scale trailers. The decals are designed for Kato Volvo tractors but can be readily adapted for other brands of trucks. Produced for DI by Microscale, each set has enough material for decorating at least four units. Carrier names currently available are Swift, J.B.Hunt, Arnold Transportation, and Ryder Truck Leasing. Visit the above website for pricing and ordering instructions.
Microscale Industries (microscale.com) has released several new HO and N scale wet decal lettering systems, including sets for Eastern shortline per-diem boxcars (Golden Triangle GTRA, Valdosta Southern VSO, Erie Western ERES, Corinth & Counce CCR, and Bath & Hammondsport BH – above left) and
News column - 18indexcontents
MRH-Apr 2014
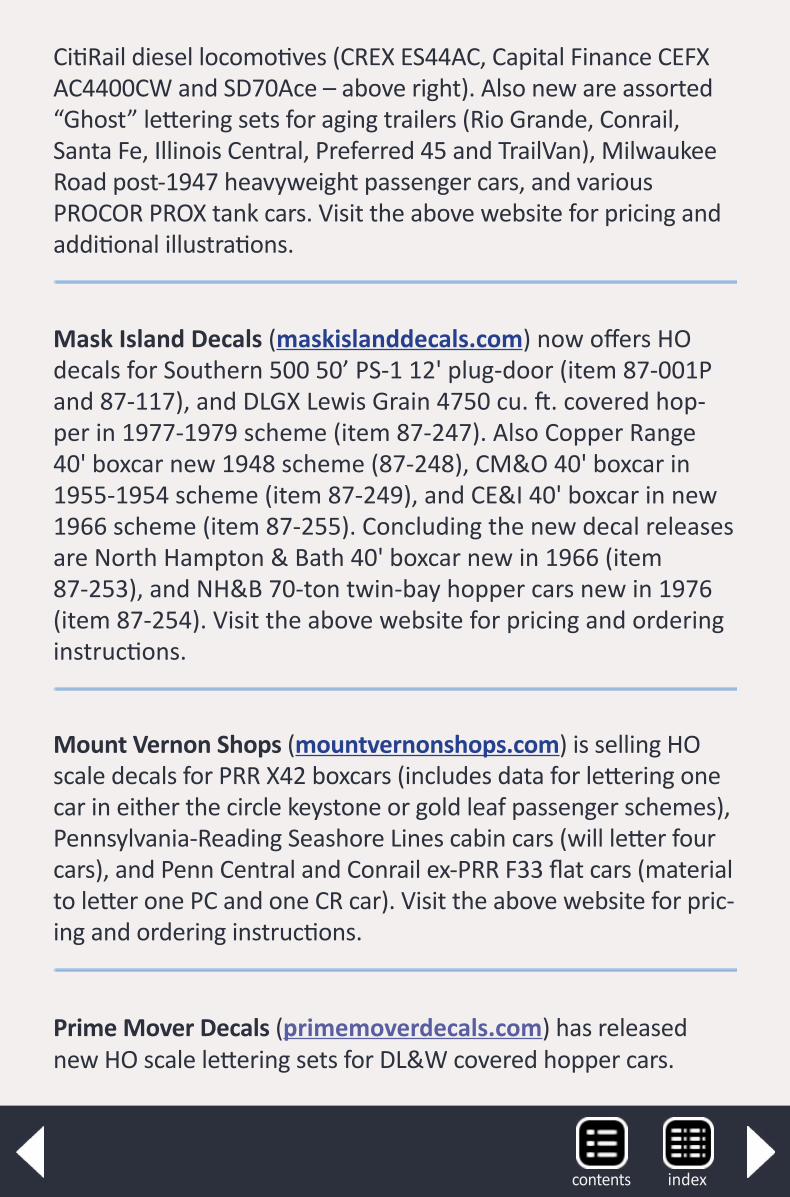
CitiRail diesel locomotives (CREX ES44AC, Capital Finance CEFX AC4400CW and SD70Ace – above right). Also new are assorted “Ghost” lettering sets for aging trailers (Rio Grande, Conrail, Santa Fe, Illinois Central, Preferred 45 and TrailVan), Milwaukee Road post-1947 heavyweight passenger cars, and various PROCOR PROX tank cars. Visit the above website for pricing and additional illustrations.
Mask Island Decals (maskislanddecals.com) now offers HO decals for Southern 500 50’ PS-1 12' plug-door (item 87-001P and 87-117), and DLGX Lewis Grain 4750 cu. ft. covered hop-per in 1977-1979 scheme (item 87-247). Also Copper Range 40' boxcar new 1948 scheme (87-248), CM&O 40' boxcar in 1955-1954 scheme (item 87-249), and CE&I 40' boxcar in new 1966 scheme (item 87-255). Concluding the new decal releases are North Hampton & Bath 40' boxcar new in 1966 (item 87-253), and NH&B 70-ton twin-bay hopper cars new in 1976 (item 87-254). Visit the above website for pricing and ordering instructions.
Mount Vernon Shops (mountvernonshops.com) is selling HO scale decals for PRR X42 boxcars (includes data for lettering one car in either the circle keystone or gold leaf passenger schemes), Pennsylvania-Reading Seashore Lines cabin cars (will letter four cars), and Penn Central and Conrail ex-PRR F33 flat cars (material to letter one PC and one CR car). Visit the above website for pric-ing and ordering instructions.
Prime Mover Decals (primemoverdecals.com) has released new HO scale lettering sets for DL&W covered hopper cars.
indexcontents
Item PMD-053 has white lettering for black or red cars, and item PMD-053-X has black lettering for gray cars. Visit the above web-site for pricing and ordering instructions.
News column - 19
ReaderFeedback
(click here)
DISCLAIMER .....The opinions expressed in this column are those of the writer and do not necessarily reflect the opinion of Model Railroad Hobbyist or its sponsors. Every effort is made to provide our readers with accurate and responsible news and information, however, neither Model Railroad Hobbyist or the writer of this column can be held responsible for any inaccuracies or typo-graphical errors that may inadvertently appear in this column.
Send us your product announcementsIf you are a hobby manufacturer with a product announce-
ment, just click here and submit your announcement to us. Our web site and free magazine reach continues to grow, so get on board with this new media train that’s hard to stop!
indexcontentsMRH-Apr 2014
indexcontents
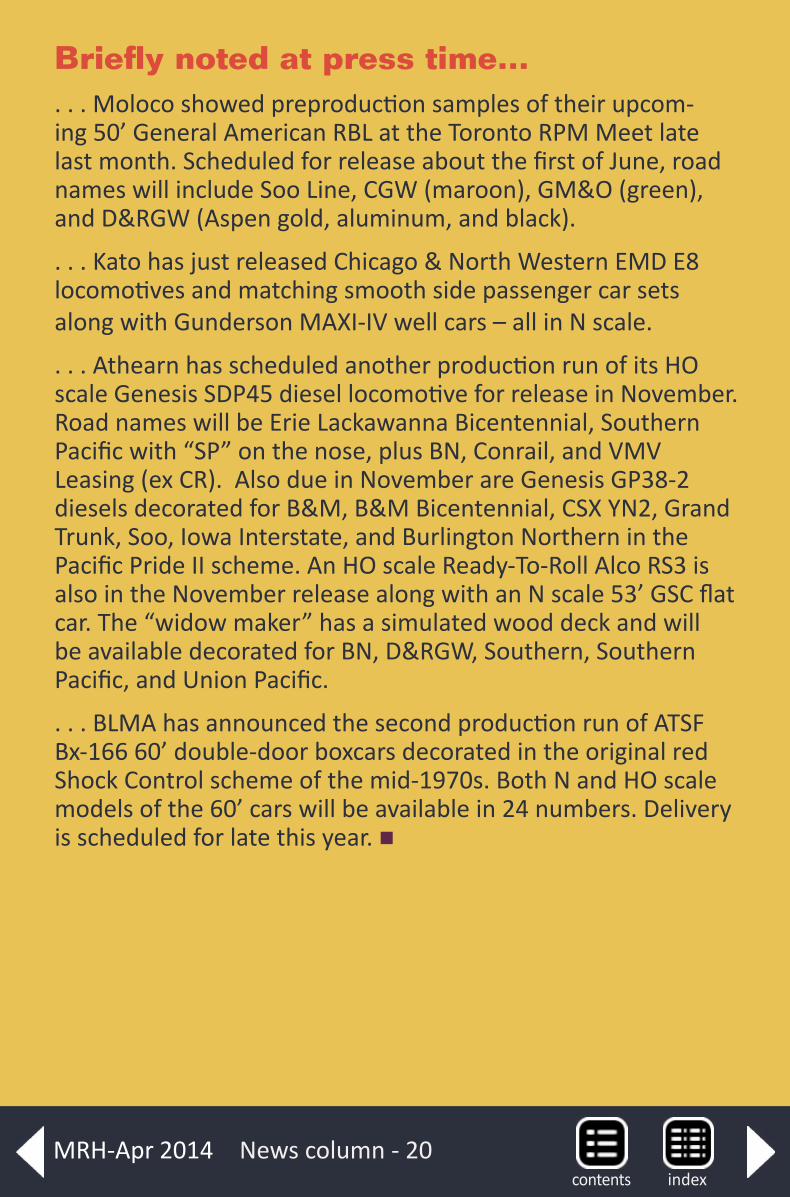
Briefly noted at press time.... . . Moloco showed preproduction samples of their upcom-ing 50’ General American RBL at the Toronto RPM Meet late last month. Scheduled for release about the first of June, road names will include Soo Line, CGW (maroon), GM&O (green), and D&RGW (Aspen gold, aluminum, and black).
. . . Kato has just released Chicago & North Western EMD E8 locomotives and matching smooth side passenger car sets along with Gunderson MAXI-IV well cars – all in N scale.
. . . Athearn has scheduled another production run of its HO scale Genesis SDP45 diesel locomotive for release in November. Road names will be Erie Lackawanna Bicentennial, Southern Pacific with “SP” on the nose, plus BN, Conrail, and VMV Leasing (ex CR). Also due in November are Genesis GP38-2 diesels decorated for B&M, B&M Bicentennial, CSX YN2, Grand Trunk, Soo, Iowa Interstate, and Burlington Northern in the Pacific Pride II scheme. An HO scale Ready-To-Roll Alco RS3 is also in the November release along with an N scale 53’ GSC flat car. The “widow maker” has a simulated wood deck and will be available decorated for BN, D&RGW, Southern, Southern Pacific, and Union Pacific.
. . . BLMA has announced the second production run of ATSF Bx-166 60’ double-door boxcars decorated in the original red Shock Control scheme of the mid-1970s. Both N and HO scale models of the 60’ cars will be available in 24 numbers. Delivery is scheduled for late this year.
News column - 20indexcontents
MRH-Apr 2014
indexcontents
Selected Events
April 2014CANADA, ONTARIO, OTTAWA, April 26-27, Ottawa Train Expo sponsored by Bytown Railway Society. At Ernst & Young Centre, 4899 Uplands Drive. Info at ottawatrainexpo.com.
ARKANSAS, PINE BLUFF, April 5, 19th Annual Railroadiana Show, at Arkansas Railroad Museum, 1700 Port Road. Info at arkansasrailroadmuseum.org.
CALIFORNIA, SAN LUIS OBISPO, April 30-May 4, NMRA Pacific Coast Region Convention, at Sands Inn & Suites, 1930 Monterey Street. Info at pcrnmra.org/conv2014.
FLORIDA, LARGO, April 5-6, Train Show and Open House spon-sored by Suncoast Model Railroad Club, MINNREG Hall, 6340 126th Avenue North. Info at suncoastmrrc.com.
INDIANA, MARTINSVILLE, April 5, Train Show & Swap Meet, sponsored by NMRA Central Indiana Division, at the Martinsville National Guard Armory, 1900 Hospital Drive. Info at cid.railfan.net.
INDIANA, NOBLESVILLE, April 26, 7th Annual Hoosier On30 Meet, at Noblesville Township Community Center, 372 S. Eighth Street.
MASSACHUSETS, HYANNIS, April 26, The Cape Cod Train Show, with dealer tables, operating layouts and models in all scales, at Barnstaple High School Field House, 744 West Main Street. Info at ccmrrcam.com.
NEBRASKA, NORTH PLATTE, April 12-13, 20th Annual Railroad Show, sponsored by NMRA Nebraska West – Central Division, at D&N Event Center, 501 East Walker Road.
News column - 21indexcontents
MRH-Apr 2014
NEW HAMPSHIRE, HOOKSETT, April 27, 19th Annual Hooksett Model Train Show, with vendor tables, operating layouts, clin-ics, and more. Sponsored by Hooksett Lions Club, at Cawley Middle School, 97 Whitehall Road. Info from James Sullivan 603-315 0084.
NEW HAMPSHIRE, NORTH SUTTON, April 13, Annual Model Railroad Show, at Kearsarge Regional Middle School. Info from Eugene Vigneault at [email protected].
NEW YORK, GARDINER, April 11-12, Mid Hudson On30 Meet featuring vendors, models, operating layouts, and On30 cama-raderie, at Bishop Moore Hall, 2212 Route 44/55 at Route 208. Suggested accommodations at Days Inn (near Stewart Airport) in Newburgh. Those arriving Thursday gather for dinner at the Gold Fox Restaurant at Route 208 & 44/55. Info from Allen Littlefield at [email protected].
OHIO, MARION, April 24-26, Central Ohio RPM Meet, at the Marion Union Station, 532 West Center St., featuring the usual RPM activities plus plenty of train watching as both CSX and NS mainlines run adjacent to the restored depot. Info at face-book.com/groups/438383252883060 or contact Denis Blake at [email protected].
PENNSYLVANIA, MONACA, April 13, Beaver County Spring Model Train Show, at Center Stage, 1495 Old Brodhead Road. Info at bcmrr.railfan.net or contact Walt Steiner at 724-843-3783.
May 2014
AUSTRALIA, NSW, ALBURY, May 24-25, Annual Train Show sponsored by Murray Railway Modellers, at Mirambeena Community Centre, 19 Martha Mews, Lavington. Info at mur-rayrailwaymodellers.com.
indexcontents
CANADA, ONTARIO, NIAGARA-ON-THE-LAKE, May 2-4, NMRA Niagara Frontier Region Convention, “The Grapevine Express”, at Niagara College, 137 Taylor Road. Lodging on campus or at local hotels. Info from Mike Pearson at 905-385-9500 or: grapevineexpress.ca.
NEW ZEALAND, DUNEDIN, May 10-11, Dunedin Model Train Show at Forbury Park, 146 Victoria Road. Info at [email protected].
ARIZONA, TUCSON, May 30-31, Gadsden Pacific Toy Train Operating Museum, at Tucson Expo Center, 3750 E Irvington Road. Info at gpdToyTrainMuseum.com.
CONNECTICUT, COLLINSVILLE, May 30-31, New England/Northeast Prototype Modelers Meet. Info at neprototype-meet.com.
NORTH CAROLINA, SPENCER, May 29-June 1, Streamliners at Spencer, a gathering of prototype locomotives from the 1930s through the 1950s at the North Carolina Transportation Museum including an Atlantic Coast Line E3 and the Southern Railway’s E8 and FP7. Details at nctrans.org/Events/Streamliners-at-Spencer-(1).aspx.
OHIO, HILLIARD (Columbus area), May 17-18, 6th Ohio N-scale Train Show with 50 dealers, new and used items, ten club n-scale layouts, at Franklin County Fairgrounds, 4100 Columbia St. Info at [email protected].
VIRGINIA, FISHERVILLE, May 4, 2014, 28th Annual Shenandoah Valley Model Train Show, with model trains sales, club layout, railroad memorabilia and more. Sponsored by the Augusta County Model Railroad Museum at Expoland, 277 Expo Road. Free parking. Info from Dave Colton at [email protected].
News column - 22indexcontents
MRH-Apr 2014
Future (by location)
CANADA, QUEBEC, LAVAL, October 4-5, 2014, The North Shore Train Show, at Complexe Multi-Sports, 995 rue Bois-de-Boulogne. Info at salondutrainrivenord.org.
CALIFORNIA, SAN JOSE, June 14, 2014, Open House at Silicon Valley Lines featuring a 600 foot long mainline double-deck HO scale layout, at 148 E. Virginia Street (basement). Info at sili-convalleylines.com.
CALIFORNIA, VISTA, June 7, 2014, 2nd Annual Open House & Swap Meet sponsored by Short Track Railroad Club, at the Antique Gas & Steam Engine Museum, 2040 North Santa Fe Avenue. Info at shorttrackrr.org. For table reservations contact Milt Perkins at [email protected].
FLORIDA, PALM BAY, December 21, 2014, HO Scale Module Display sponsored by Palm Bay Model Railroad Club, at Franklin T. Degroodt Memorial Library, 6475 Minton Road.
FLORIDA, THE VILLAGES, August 16-17, 2014, Summer Model Train Show and Sale with operating layouts and over 100 ven-dor tables, at Savannah Regional Recreation Center, 1545 Buena Vista Blvd. Sponsored by The Villages Railroad Historical Society. Info from Alan Goldberg 352-205-4322, or email: [email protected].
GEORGIA, KENNESAW, September 19-20, 2014, Atlanta Railroad Prototype Modelers Meet, jointly sponsored by the Southern Railway Historical Association, Atlantic Coast Line & Seaboard Airline Railroads Historical Society, Central of Georgia Railway Historical Society, and Nashville Chattanooga & St Louis Preservation Society. Event at the Southern Museum of Civil War and Locomotive History, 2829 Cherokee Street. Info at srha.net or contact Frank Greene at [email protected].
indexcontents
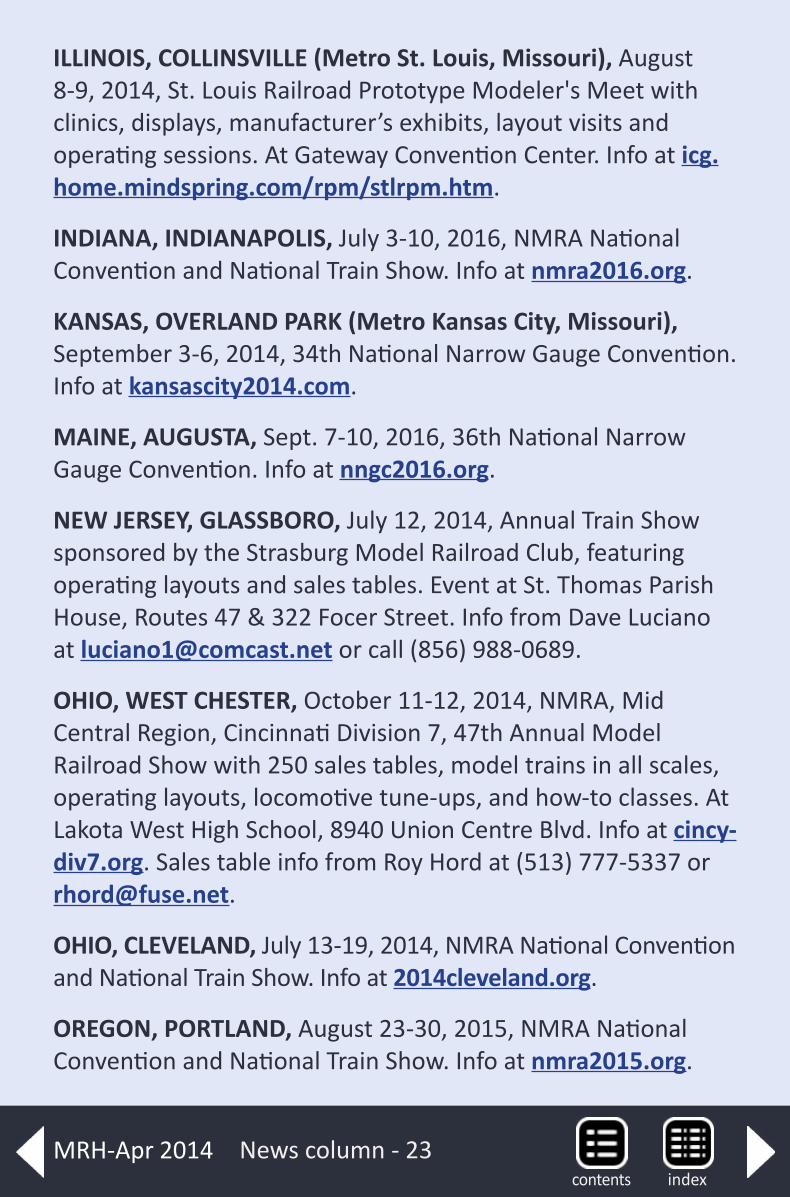
ILLINOIS, COLLINSVILLE (Metro St. Louis, Missouri), August 8-9, 2014, St. Louis Railroad Prototype Modeler's Meet with clinics, displays, manufacturer’s exhibits, layout visits and operating sessions. At Gateway Convention Center. Info at icg.home.mindspring.com/rpm/stlrpm.htm.
INDIANA, INDIANAPOLIS, July 3-10, 2016, NMRA National Convention and National Train Show. Info at nmra2016.org.
KANSAS, OVERLAND PARK (Metro Kansas City, Missouri), September 3-6, 2014, 34th National Narrow Gauge Convention. Info at kansascity2014.com.
MAINE, AUGUSTA, Sept. 7-10, 2016, 36th National Narrow Gauge Convention. Info at nngc2016.org.
NEW JERSEY, GLASSBORO, July 12, 2014, Annual Train Show sponsored by the Strasburg Model Railroad Club, featuring operating layouts and sales tables. Event at St. Thomas Parish House, Routes 47 & 322 Focer Street. Info from Dave Luciano at [email protected] or call (856) 988-0689.
OHIO, WEST CHESTER, October 11-12, 2014, NMRA, Mid Central Region, Cincinnati Division 7, 47th Annual Model Railroad Show with 250 sales tables, model trains in all scales, operating layouts, locomotive tune-ups, and how-to classes. At Lakota West High School, 8940 Union Centre Blvd. Info at cincy-div7.org. Sales table info from Roy Hord at (513) 777-5337 or [email protected].
OHIO, CLEVELAND, July 13-19, 2014, NMRA National Convention and National Train Show. Info at 2014cleveland.org.
OREGON, PORTLAND, August 23-30, 2015, NMRA National Convention and National Train Show. Info at nmra2015.org.
News column - 23indexcontents
MRH-Apr 2014
PENNSYLVANIA, PHILADEPHIA, May 15-17, 2015, Biennial Meet of the East Penn Traction Club, at Pennsylvania Convention Center. Info at eastpenn.org/2015_meet_announcement.htm.
TEXAS, HOUSTON, September 2-5, 2015, 35th National Narrow Gauge Convention. Info at nngc-2015.com.
UTAH, SALT LAKE CITY, June 19-22, 2014, NMRA Rocky Mountain Region Golden Spike Limited Convention, hosted by the Northern Utah Division. With clinics, layout tours, and prototype tours including Golden Spike National Monument at nearby Promontory. Info at gsl2014.org.
VIRGINIA, CHANTILLY, August 7-10, 2014, Capitol Limited N Scale East Convention, co-sponsored by Northern Virginia NTRAK and Greenberg Train and Toy Shows, at Dulles Expo Center. Additional information available at [email protected].
VIRGINIA, FREDERICKBURG, September 12-13, 2014, Mid-Atlantic Railroad Prototype Modelers Meet, with model dis-plays, clinics, and RPM camaraderie. Wingate by Wyndham Hotel, 20 Sanford Drive. Info at marpm.org.
ReaderFeedback
(click here)
indexcontents
Clickable advertiser indexAccu-LitesArcher Fine TransfersBachmannBachrusBackdrop JunctionBerrett Hill TrainsBLMABollinger Edgerly Scale TrainsBowserClever ModelsCoffman GraphicsCoastmans Scenic ProductsCredit Valley RailwayDCC by DesignDigitrax (2 page spread)ExactRailESU LokSoundFast Tracks (2 page spread)Fifer Hobby SupplyFox Valley ModelsGLX Scale ModelsGreat DecalsIowa Scaled EngineeringIwata-MedeaJelsma GraphicsLitchfield StationLogic Rail TechnologiesMicroscaleMinimalist Model RailroadModel Rectifier CorpMotrak ModelsMr. Detail PartsMRH Store (1)MRH Store (2)M.T.H.Mullet River (O scale)
Nano-OilNational Narrow Gauge Conv.NCE (2 page spread)Nick & Nora DesignsNorth American Railcar (1)North American Railcar (2)Ottawa Train ShowRail Design ServicesRailMaster HobbiesRailroad ExplorerRapido (2 page spread)Ring Engineering (1)Ring Engineering (2)RR-CirKitsRSlaserKits, Inc.Rulers-of-the-WorldRusty StumpsSan Juan Car Co.Streamlined BackshopScenic ExpressScotty Mason ShowSoundtraxx/BlackstoneSouthern DigitalTAM Valley DepotTrainMasters (1)TrainMasters (2)Traintek LLCTrue Line TrainsTrue Scene ModelingWesterfield ModelsYankee DabblerYarmouth Model Works
Advertiser index indexcontents
MRH-Apr 2014
Clickable topic indexDCC Impulses – Signaling Your DCC PikeEditorial – Publisher’s MusingsEditorial – Reverse runningFirst Look – NWSL Stanton CabGetting Real – Dispatcher SheetsLayout – The Bear Creek & South JacksonLocomotive – Headlight Reflector for O Scale LocosNews – April NewsletterNews – April EventsQ and A – MRH Questions, Answers, and TipsRolling Stock – Batch-building Freight Cars – Part 2Structures – 19th Century Locomotive Sand HouseYes It's a Model – Monthly Photo AlbumWhat’s Neat – Jeff and Ken collaborateWiring– Control Panels from Gaterfoam———————————————————————————Other – Bonus ExtrasOther – CoverOther – Derailments Other – Hobby MarketplaceOther – MRH SponsorsOther – Staff NotesOther – Table of Contents
Topic index indexcontents
Reverse Running commentary
Winston Churchill said “He who fails to plan is planning to
fail”. I think it is fair to say that when you begin building your layout or a model, you don't want to fail.
You want success and quick success is even better. In fact, much of our limited hobby time is spent planning and building with the goal of avoiding failure.
In all human endeavors, especially if you are building some-thing new, some failure is inevitable. How about adopting the idea of failing faster, wasting fewer resources in the learning process, and getting to what will work quicker?
This can be seen as taking the chainsaw layout concept a step further (mrhmag.com/mrh2009-01/reverse_running) down to individual modeling projects.
For example, have you ever considered building a test model just to see what doesn't work? No, I don't mean build a fully detailed model to the nth degree, but rather a so-called “mini-mally viable” model, sort of a chainsaw model, if you will.
Entrepreneurs often have an idea for a product or service that they believe others will want. They spend time developing their idea and finally put it out on the market.
ReaderFeedback
(click here)
Reverse Running: Stepping outside the box with a contrary viewby Don Hanley
Failing faster?
indexcontentsMRH-Apr 2014
Usually what happens is the response is not as enthusiastic as they had hoped for because some things aren’t quite right.
So what do the smart ones do? The successful ones "pivot", that is, they keep what was good and change what isn’t work-ing and try again. Ultimately, they become successful while still maintaining some essence of their original idea.
Think of a basketball player and his pivot foot. A basketball player must keep one foot in the same position (the pivot foot), but he can turn 360o from that position. Do the same thing: work from your core goals within the hobby (your pivot foot) but examine different ways of achieving those goals.
At the same time, don't totally abandon your plan. Maybe it's a narrow gauge mining line, maybe it's Cajon Pass. Have faith in your core passion, giving your ideas and techniques time to develop.
Build with the goal of learning what doesn't work, and keep notes: all of us seem to suffer at times from CRS (can’t remem-ber stuff).
The notes don't need to be detailed, but enough to keep you on track. As you work through this whole process, you may dis-cover a new material, or a new methodology.
If that happens, then you have an idea that will be beneficial to other readers because of your pivoting, gving you the basis for an article to share with the MRH family.
The advantage of taking this approach to doing the hobby is the risk is generally quite low, but the benefits are likely quite high. For hobby pursuits, there’s few major financial conse-quences for failure like there are for a new business startup.
Are you willing to take the challenge? Will you go ahead and launch out, go ahead and learn by doing, knowing there’s going to be some failure along the way?
indexcontents

Derailments
Derailmentshumor and bizarre facts (allegedly)
If you’re the first to submit a bit of good humor or bizarre facts and we use it, it’s worth $25!
How not to move a derailed locomotive. Watch as a train derailment cleanup in Brazil goes from bad to worse.
ReaderFeedback
(click here)
indexcontentsMRH-Apr 2014
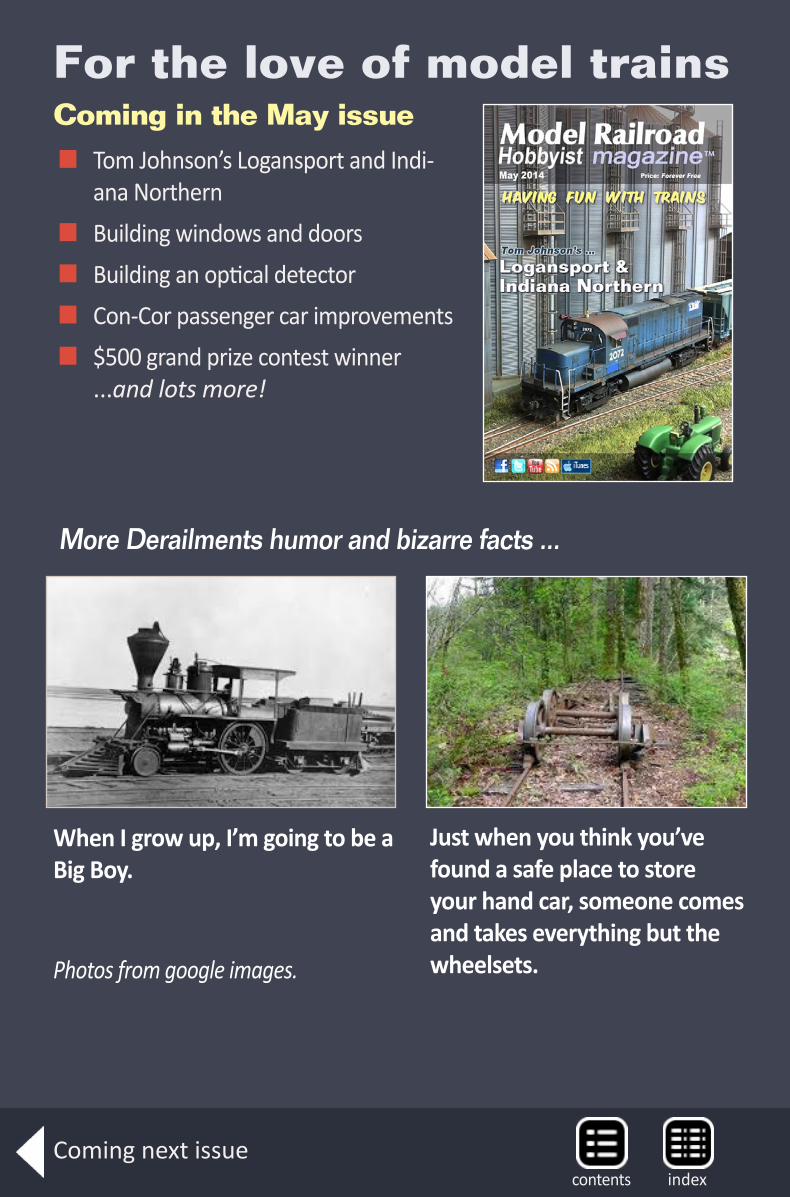
Coming next issue
For the love of model trainsComing in the May issue
� Tom Johnson’s Logansport and Indi-ana Northern
� Building windows and doors � Building an optical detector � Con-Cor passenger car improvements � $500 grand prize contest winner ...and lots more!
More Derailments humor and bizarre facts ...
When I grow up, I’m going to be a Big Boy.
Just when you think you’ve found a safe place to store your hand car, someone comes and takes everything but the wheelsets.Photos from google images.
indexcontents


