Embed Size (px)
Citation preview

Configuring the Kintana Dashboard
Version 5.0.0Publication Number: DashboardConfig-0603A
Kintana, Inc. and all its licensors retain all ownership rights to the software programs and related documentation offered by Kintana. Use of Kintana’s software is governed by the license agreement accompanying such Kintana software. The Kintana software code is a confidential trade secret of Kintana and you may not attempt to decipher or decompile Kintana software or knowingly allow others to do so. Information necessary to achieve the interoperability of the Kintana software with other programs may be obtained from Kintana upon request. The Kintana software and its documentation may not be sublicensed and may not be transferred without the prior written consent of Kintana.
Your right to copy Kintana software and this documentation is limited by copyright law. Making unauthorized copies, adaptations, or compilation works (except for archival purposes or as an essential step in the utilization of the program in conjunction with certain equipment) is prohibited and constitutes a punishable violation of the law.
THIS DOCUMENTATION IS PROVIDED “AS IS” WITHOUT WARRANTY OF ANY KIND. IN NO EVENT SHALL KINTANA BE LIABLE FOR ANY LOSS OF PROFITS, LOSS OF BUSINESS, LOSS OF USE OR DATA, INTERRUPTION OF BUSINESS, OR FOR INDIRECT, SPECIAL, INCIDENTAL, OR CONSEQUENTIAL DAMAGES OF ANY KIND, ARISING FROM ANY ERROR IN THIS DOCUMENTATION.
Kintana may revise this documentation from time to time without notice.
Copyright © 1997, 1998, 1999, 2000, 2001, 2002, 2003 Kintana, Incorporated. All rights reserved.
Kintana, Kintana Deliver, Kintana Create, Kintana Drive, Kintana Dashboard, Kintana Accelerator, Kintana Demand Management (DM), Kintana Portfolio Management (PFM), Kintana Program Management Office (PMO), Kintana Enterprise Change Management (ECM), Object*Migrator, GL*Migrator and the Kintana logo are trademarks of Kintana, Incorporated. All other products or brand names mentioned in this document are the property of their respective owners.
Kintana Version 5.0.0
© Kintana, Incorporated 1997 - 2003All rights reserved. Printed in USA
Kintana, Inc.1314 Chesapeake Terrace, Sunnyvale, California 94089
Telephone: (408) 543-4400Fax: (408) 752-8460
http://www.kintana.com
ContentsConfiguring the Kintana Dashboard
Chapter 1Introduction .................................................................................................................. 1
About This Document...........................................................................................................1Who Should Read This Guide ..........................................................................................2How to Use This Guide ....................................................................................................2
Additional Resources ...........................................................................................................3Kintana Documentation..............................................................................................3
Kintana Business Application Guides....................................................................4User Guides ........................................................................................................4Kintana Application Reference Guides..................................................................4Kintana Instance Administration Guides ...............................................................5External System Integration Guides: .....................................................................5Kintana Solution Guides ......................................................................................5Kintana Accelerator Guides .................................................................................6
Kintana Services ........................................................................................................6Kintana Education .....................................................................................................6Kintana Support ........................................................................................................6
Chapter 2Key Concepts................................................................................................................ 9
Default Dashboard ..............................................................................................................9
System Portlets Versus Custom Portlets ...............................................................................10
Building a Portlet...............................................................................................................10Filter Fields ...................................................................................................................11
Users Who Should Build Portlets ........................................................................................12
Portlet Security and Licensing.............................................................................................12
Retrieving Data from External Sources................................................................................13
Chapter 3Portlets ....................................................................................................................... 15
Building Portlets ................................................................................................................15Before Building a Portlet.................................................................................................16Creating a Portlet ..........................................................................................................16
Creating the New Portlet ..........................................................................................17
Kintana 1
Building the Query ..................................................................................................18Defining the Portlet’s Displayed Columns ...................................................................23Defining Filter Fields ................................................................................................25Laying Out Filter Fields.............................................................................................26
Modifying the Width of a Filter Field ...................................................................26Moving a Filter Field ..........................................................................................27Switching the Positions of Filter Fields ..................................................................27
Portlet Security ........................................................................................................28Portlet URL ..............................................................................................................29Setting Ownership for Portlets...................................................................................30Requiring First-Time Personalization..........................................................................31Verifying the New Portlet .........................................................................................32
Enabling Portlet Use ..........................................................................................................32Enabling a Portlet ..........................................................................................................33Defining Portlet Categories.............................................................................................33Setting Portlet Access .....................................................................................................36
Portlet Maintenance...........................................................................................................36Editing a Portlet.............................................................................................................37
Editing Portlet Layout ...............................................................................................37Propagating Change to Existing Portlets ....................................................................38
Deleting a Custom Portlet ...............................................................................................38Portlet Detail Report.......................................................................................................39Portlet Migrator.............................................................................................................40
Chapter 4Default Dashboard...................................................................................................... 41
Portlet Organization ..........................................................................................................41
Configuring the Default Dashboard Page............................................................................42Viewing the Default Dashboard Page..............................................................................45Adding Multiple Pages to the Default Dashboard .............................................................45
Appendix ASystem Portlets ........................................................................................................... 47
Appendix BExample: Creating a Portlet......................................................................................... 59
Before Building a Portlet .....................................................................................................59
Visualizing the Portlet Query ..............................................................................................60
Building the Portlet Query...................................................................................................61
Kintana2
Configuring the Kintana Dashboard
Chapter
Introduction
Intended for large and complex environments, Kintana Dashboard™ provides 360° visibility and control over technology-based initiatives and IT operational tasks. Configurable, role-based visual displays called “portlets” provide relevant summary information and highlight exception conditions in Kintana-managed initiatives. Users can then drill down to any desired level of detail.
Kintana Dashboard is beneficial to all participants throughout the Technology Chain. For example, developers can use Kintana Dashboard to view all of their own action items, and end-users can consult their own Dashboards to see the status of all the Requests they have submitted.
This document provides instructions for configuring custom portlets and setting a Default Dashboard for all Kintana users.
This chapter discusses the following topics:
• About This Document
• Additional Resources
About This DocumentThis section provides an overview of this document, who should read this document and what types of information are included. The following lists the main topics found in this section:
• Who Should Read This Guide
Knowledge of SQL is required for users who want to create or configure a custom portlet.
Introduction 1
Configuring the Kintana Dashboard
• How to Use This Guide
Who Should Read This GuideThis document provides details concerning the definition and creation of custom Kintana portlets, as well as configuring a Default Dashboard.
This business application guide is used primarily by:
• Business users who configure and maintain portlets in Kintana
• Technical users who configure and maintain portlets in Kintana
How to Use This GuideThis document provides background information and details for defining custom portlets and a Default Dashboard in Kintana. Navigate to one of the following chapter topics or use the Index to find information related to key words.
• Introduction:Provides an overview of this document.
• Key Concepts:Describes the key concepts of the Kintana Dashboard and portlets, including: the Dashboard page, portlets, the menu and navigation, personalization and Dashboard templates.
• Portlets:Describes how to build portlets, edit portlets, delete portlets and add portlets to the Kintana Dashboard. The Portlets chapter also provides information concerning the PORTLET DETAIL REPORT and the portlet migrator.
• Default Dashboard:Provides step-by-step instructions on how to create a Default Dashboard page.
Users must have a Power license to access the screens and windows described in this document. Users must also belong to a Security Group with the correct access grants.
This document does not provide information relevant to Personalizing a portlet. Personalizing a portlet refers to customizing a specific portlet to display only specific information. Each portlet can be edited (or personalized) to display only the information relevant to a specific Project, Task, Package, or Request.
2 Introduction
Configuring the Kintana Dashboard
• System Portlets:Lists all of the available system portlets.
• Example: Creating a PortletProvides step-by-step instructions on how to build an example portlet.
Additional ResourcesKintana provides the following additional resources to help you successfully implement, configure, maintain and fully utilize your Kintana installation:
• Kintana Documentation
• Kintana Services
• Kintana Education
• Kintana Support
Kintana DocumentationKintana product documentation is linked from the Kintana Library page. This page is accessed by:
• Selecting HELP > KINTANA LIBRARY from the Kintana Workbench menu.
• Selecting HELP > CONTENTS AND INDEX from the menu bar on the HTML interface. You can then click the KINTANA LIBRARY link to load the full list of product documents.
Kintana organizes their documents into a number of user-based categories. The following section defines the document categories and lists the documents currently available in each category.
• Kintana Business Application Guides
• User Guides
• Kintana Application Reference Guides
• Kintana Instance Administration Guides
• External System Integration Guides:
• Kintana Solution Guides
• Kintana Accelerator Guides
Introduction 3
Configuring the Kintana Dashboard
Kintana Business Application Guides
Provides instructions for modeling your business processes in Kintana. These documents contain process overviews, implementation instructions, and detailed examples.
• Configuring a Request Resolution System (Create)
• Configuring a Deployment and Distribution System (Deliver)
• Configuring a Release Management System
• Configuring the Kintana Dashboard
• Managing Your Resources with Kintana
• Kintana Reports
User Guides
Provides end-user instructions for using the Kintana products. These documents contain comprehensive processing instructions.
• Processing Packages (Deliver) User Guide
• Processing Requests (Create) User Guide
• Processing Projects (Drive) User Guide
• Navigating the Kintana Workbench:Provides an overview of using the Kintana Workbench
• Navigating Kintana:Provides an overview of using the Kintana (HTML) interface
Kintana Application Reference Guides
Provides detailed reference information on other screen groups in the Kintana Workbench. Also provides overviews of Kintana’s command usage and security model.
• Reference: Using Commands in Kintana
4 Introduction
Configuring the Kintana Dashboard
• Reference: Kintana Security Model
• Workbench Reference: Deliver
• Workbench Reference: Configuration
• Workbench Reference: Create
• Workbench Reference: Dashboard
• Workbench Reference: Sys Admin
• Workbench Reference: Drive
• Workbench Reference: Environments
Kintana Instance Administration Guides
Provides instructions for administrating the Kintana instances at your site. These documents include information on user licensing and archiving your Kintana configuration data.
• Kintana Migration
• Kintana Licensing and Security Model
External System Integration Guides:
Provides information on how to use Kintana’s open interface (API) to access data in other systems. Also discusses Kintana’s Reporting meta-layer which can be used by third party reporting tools to access and report on Kintana data.
• Kintana Open Interface
Kintana Solution Guides
Provides information on how to configure and use functionality associated with the Kintana Solutions. Each Kintana Solution provides a User Guide for instructions on end-use and a Configuration Guide for instructions on installing and configuring the Solution.
Introduction 5
Configuring the Kintana Dashboard
Kintana Accelerator Guides
Provides information on how to configure and use the functionality associated with each Kintana Accelerator. Kintana Accelerator documents are only provided to customers who have purchased a site-license for that Accelerator.
Kintana ServicesKintana is a strategic partner to its clients, assisting them in all aspects of implementing a Kintana technology chain - from pilot project to full implementation, education, project turnover, and ongoing support. Our Total Services Model tailors solution and service delivery to specific customer needs, while drawing on our own knowledgebank and best practices repository. Learn more about Kintana Services from our Web site:
http://www.kintana.com/services/services.shtml
Kintana EducationKintana has created a complete product training curriculum to help you achieve optimal results from your Kintana applications. Learn more about our Education offering from our Web site:
http://www.kintana.com/services/education/index.shtml
Kintana SupportKintana provides web-based interactive support for all products in the Kintana product suite via Contori.
http://www.contori.com
Kintana provides documentation updates in the Download Center section of the Kintana Web site (http://www.kintana.com/support/download/download_center.htm).
A username and password is required to access the Download Center. These were given to your Kintana administrator at the time of product purchase. Contact your administrator for information on Kintana documentation or software updates.
6 Introduction

Configuring the Kintana Dashboard
Login to Contori to enter and track your support issue through our quick and easy resolution system. To log in to Contori you will need a valid email address at your company and a password that will be set by you when you register at Contori.
Introduction 7

Configuring the Kintana Dashboard
8 Introduction
Configuring the Kintana Dashboard
Chapter
Key Concepts
This chapter details key concepts and definitions to help the user understand and configure the Kintana Dashboard and the Kintana portlets. The following lists these key concepts found in this document:
• Default Dashboard
• System Portlets Versus Custom Portlets
• Building a Portlet
• Users Who Should Build Portlets
• Portlet Security and Licensing
• Retrieving Data from External Sources
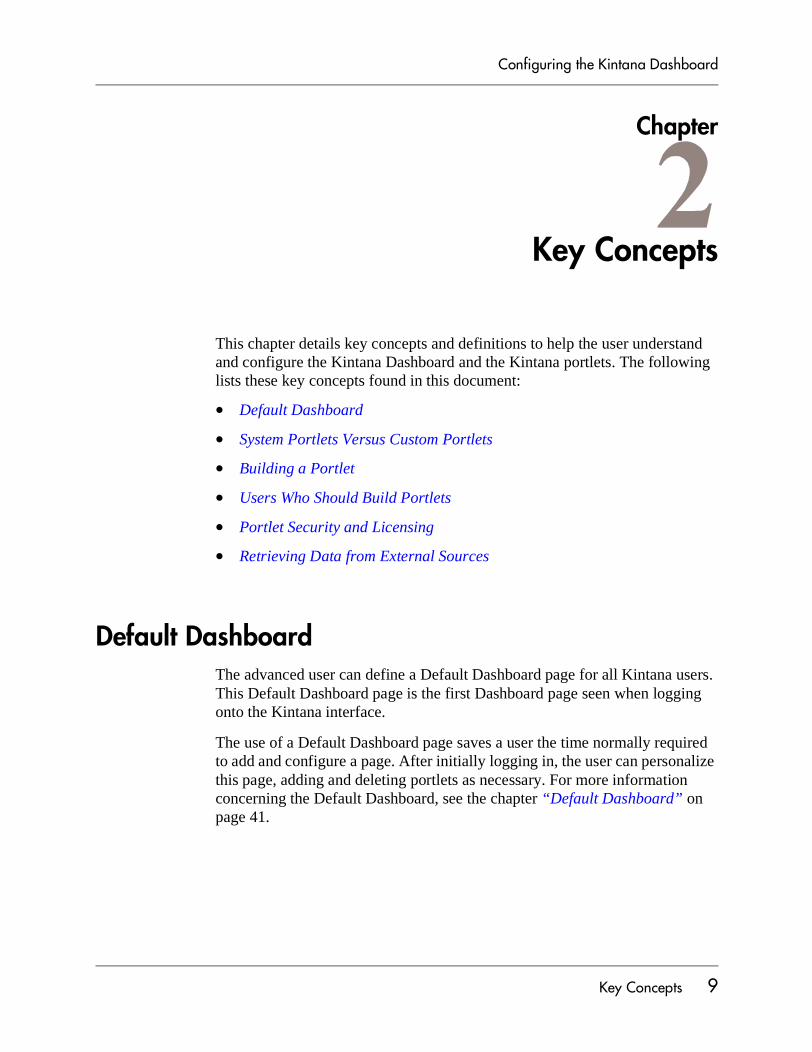
Default Dashboard The advanced user can define a Default Dashboard page for all Kintana users. This Default Dashboard page is the first Dashboard page seen when logging onto the Kintana interface.
The use of a Default Dashboard page saves a user the time normally required to add and configure a page. After initially logging in, the user can personalize this page, adding and deleting portlets as necessary. For more information concerning the Default Dashboard, see the chapter “Default Dashboard” on page 41.
Key Concepts 9
Configuring the Kintana Dashboard
Figure 2-1 Typical Kintana Dashboard and Dashboard Page
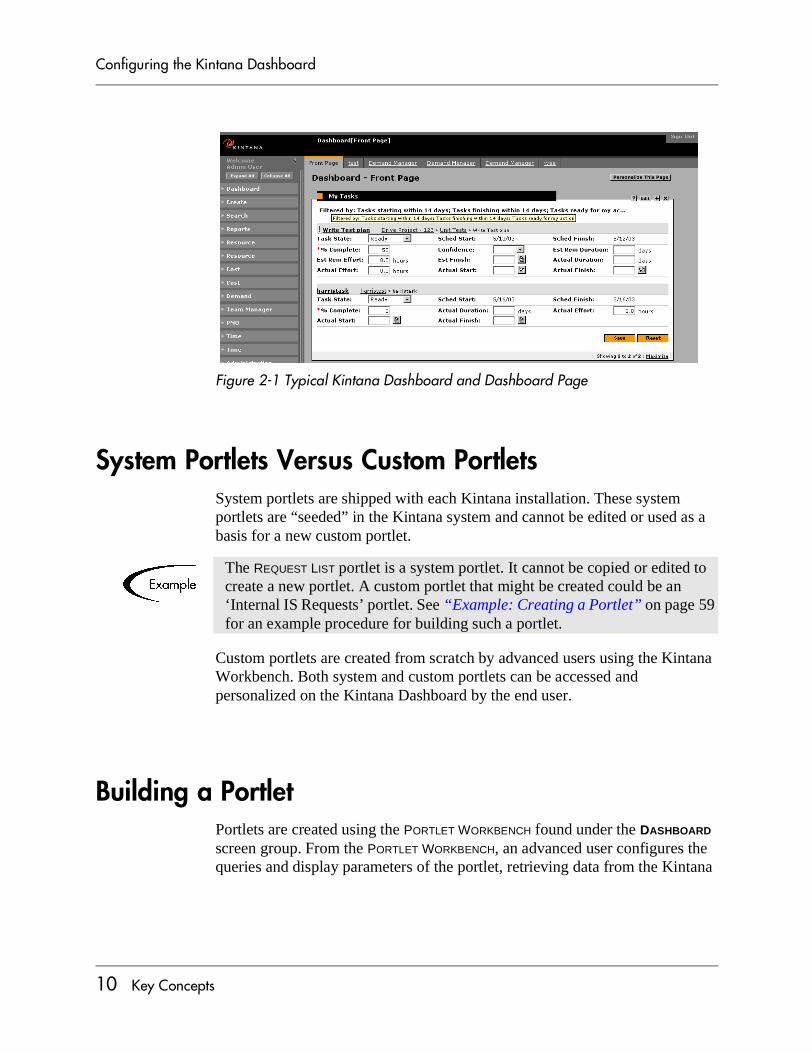
System Portlets Versus Custom PortletsSystem portlets are shipped with each Kintana installation. These system portlets are “seeded” in the Kintana system and cannot be edited or used as a basis for a new custom portlet.
Custom portlets are created from scratch by advanced users using the Kintana Workbench. Both system and custom portlets can be accessed and personalized on the Kintana Dashboard by the end user.
Building a Portlet Portlets are created using the PORTLET WORKBENCH found under the DASHBOARD screen group. From the PORTLET WORKBENCH, an advanced user configures the queries and display parameters of the portlet, retrieving data from the Kintana
The REQUEST LIST portlet is a system portlet. It cannot be copied or edited to create a new portlet. A custom portlet that might be created could be an ‘Internal IS Requests’ portlet. See “Example: Creating a Portlet” on page 59 for an example procedure for building such a portlet.
10 Key Concepts
Configuring the Kintana Dashboard
system through SQL queries. Figure 2-2 illustrates the DASHBOARD screen group.
Figure 2-2 Dashboard Screen Group
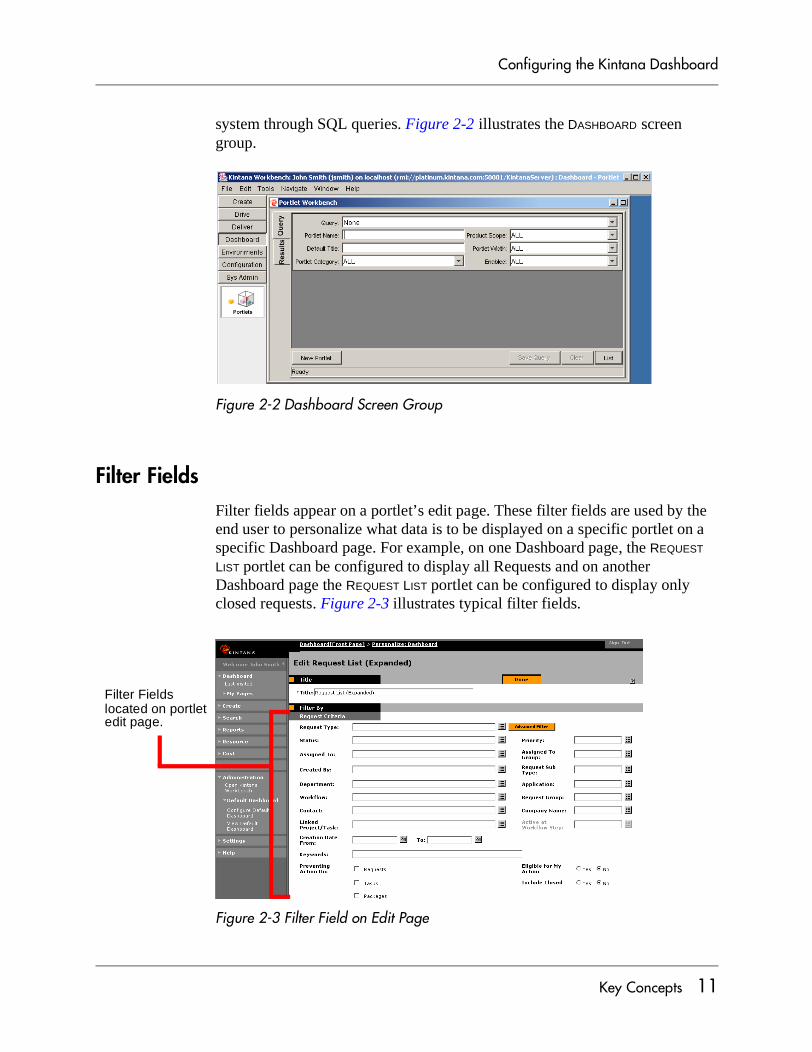
Filter FieldsFilter fields appear on a portlet’s edit page. These filter fields are used by the end user to personalize what data is to be displayed on a specific portlet on a specific Dashboard page. For example, on one Dashboard page, the REQUEST LIST portlet can be configured to display all Requests and on another Dashboard page the REQUEST LIST portlet can be configured to display only closed requests. Figure 2-3 illustrates typical filter fields.
Figure 2-3 Filter Field on Edit Page
Filter Fields
edit page.located on portlet
Key Concepts 11
Configuring the Kintana Dashboard
When constructing a custom Portlet, the advanced user must define the filter fields that will appear on the custom portlet’s edit page. Filter fields are defined from the PORTLET window in the Kintana Workbench. The FILTER FIELDS tab is shown in Figure 2-4.
Figure 2-4 Filter Fields Tab
Users Who Should Build PortletsBuilding custom portlets involves creating SQL queries accessing information from the Kintana database. Therefore, Kintana recommends that only advanced users with SQL and Oracle database experience build or configure portlets.
Portlet Security and LicensingA Kintana user can only access portlets that are associated with the Kintana products licensed at that site and those Kintana products have been licensed for
12 Key Concepts
Configuring the Kintana Dashboard
the user’s use. In addition, the advanced user can restrict portlet access through the use of security groups and user access restrictions.
Security groups and user access restrictions are configured by using the USER ACCESS tab on the PORTLET window in the Kintana Workbench. A user who is not a member of a Security Group specified in the USER ACCESS tab will not see the portlet in their list of available portlets. See “Portlet Security” on page 28 for more information. See Figure 2-5 for an illustration of the USER ACCESS tab of the PORTLET window.
Figure 2-5 Portlet Window - User Access
Retrieving Data from External SourcesPortlets can display data from any external database accessible from the Kintana system. This can be done using the SELECT/FROM tab of the QUERY DEFINITION window. Include database links to external sources’ tables and/or views in the FROM clause, following standard SQL formats.
Key Concepts 13

Configuring the Kintana Dashboard
14 Key Concepts
Configuring the Kintana Dashboard
Chapter
Portlets
The Kintana interface provides visibility into real-time data from the Kintana system while work is in progress. This data is presented through portlets. Portlets are visual displays that act as windows into different aspects of Kintana data. While portlets are customizable by end-users, they can be create by an advanced user to display any desired data. This chapter discusses how custom portlets can be created to meet the business needs of an organization.
The following sections discuss portlet creation, configuration and maintenance in more detail:
• “Building Portlets” on page 15
• “Enabling Portlet Use” on page 32
• “Portlet Maintenance” on page 36
Building PortletsThe following sections discuss the process of creating and configuring portlets:
• “Before Building a Portlet” on page 16
• “Creating a Portlet” on page 16
Knowledge of SQL is required for users who want to create or configure portlets. For a detailed example procedure for building a portlet, see “Example: Creating a Portlet” on page 59.
Portlets 15
Configuring the Kintana Dashboard
Before Building a PortletBefore building a portlet, the user needs to know what information to display and how to display the information. The following list provides some guidelines to help determine what information is required and how best to display the information:
• What type of information needs to be captured in this portlet? For this example, we would like to display the Request Number, Request Type, Description, Created By User, Assigned User, Priority, Progress (which is a custom field on the Request type), and Current Condition (which is an item of Request User Data).
• What additional requirements are there? Are any visual indicators needed (hyperlinks, Tooltips)? For example, should the Request Numbers be hyperlinked, so users can click on the links to go to Request Detail pages directly. Since the Progress field in this example (a custom field) has a percentage as data, we would like to display the column as progress bars for better visual representation. For Created By Users and Assigned Users, we would like to see more information as Tooltips when the user mouses over the usernames. In this case, the Tooltips should include the user’s full name and email address. The field Current Condition (the Request User Data) has values of Red, Yellow or Green, so we would like to display them as colorful icons.
• What are the database columns for the information to display, and from which tables? This information bears most directly on the SQL query that will serve as the portlet’s “back end,” retrieving and displaying data. What is the criteria necessary to link the database tables.
• What possible filter fields would end users find most helpful?
• Is a JSP page being built for the portlet? Only very advanced Kintana users with extensive knowledge of JSP should create their own JSP pages for portlets.
Creating a PortletThis section provides an overview of creating a portlet. See the referenced sections for detailed procedures. The user can also proceed directly to the desired procedure using the following list. To create a new portlet:
• Use the Kintana Workbench to open a new portlet window. See “Creating the New Portlet” on page 17 for more detailed information.
16 Portlets
Configuring the Kintana Dashboard
• Build the portlet SQL query. Use the QUERY DEFINITION window to build the SQL query that the portlet will use to retrieve and display data. See “Building the Query” on page 18 for more detailed information.
• Define the columns that are displayed in the portlet. Use the COLUMN DEFINITION window to modify the column’s internal logic and appearance. See “Defining the Portlet’s Displayed Columns” on page 23 for more detailed information. Repeat this step to create multiple portlet columns.
• Define the filter fields for the portlet’s edit page. Use the FILTER FIELD DEFINITION window to configure the filter field’s internal logic. See “Defining Filter Fields” on page 25 for more detailed information. Repeat this step to create additional portlet filter fields.
• Configure the filter field layout. See “Laying Out Filter Fields” on page 26 for more detailed information.
• Specify the Security Groups and users who can use the portlet. See “Portlet Security” on page 28 for more detailed information.
• (Optional) If desired, define the location of the portlet’s JSP pages. See “Portlet URL” on page 29 for more detailed information.
• (Optional) If desired, specify the Ownership Groups and users who can copy, edit, or delete the portlet. See “Setting Ownership for Portlets” on page 30 for more detailed information.
• (Optional) It might be advantageous to require all Kintana users to personalize a portlet the first time they see it on their Dashboard. See “Requiring First-Time Personalization” on page 31 for more detailed information.
• Verify the portlet. Make sure the query’s tokens and column interactions are correct. See “Verifying the New Portlet” on page 32 for more detailed information.
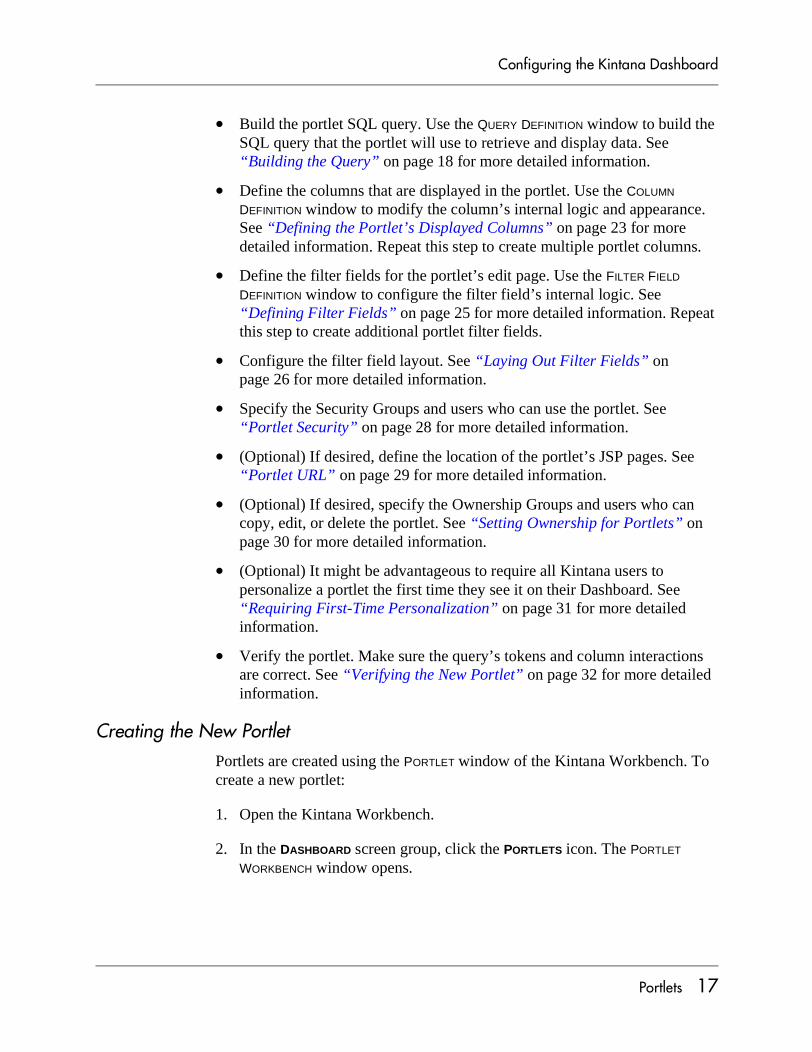
Creating the New PortletPortlets are created using the PORTLET window of the Kintana Workbench. To create a new portlet:
1. Open the Kintana Workbench.
2. In the DASHBOARD screen group, click the PORTLETS icon. The PORTLET WORKBENCH window opens.
Portlets 17
Configuring the Kintana Dashboard
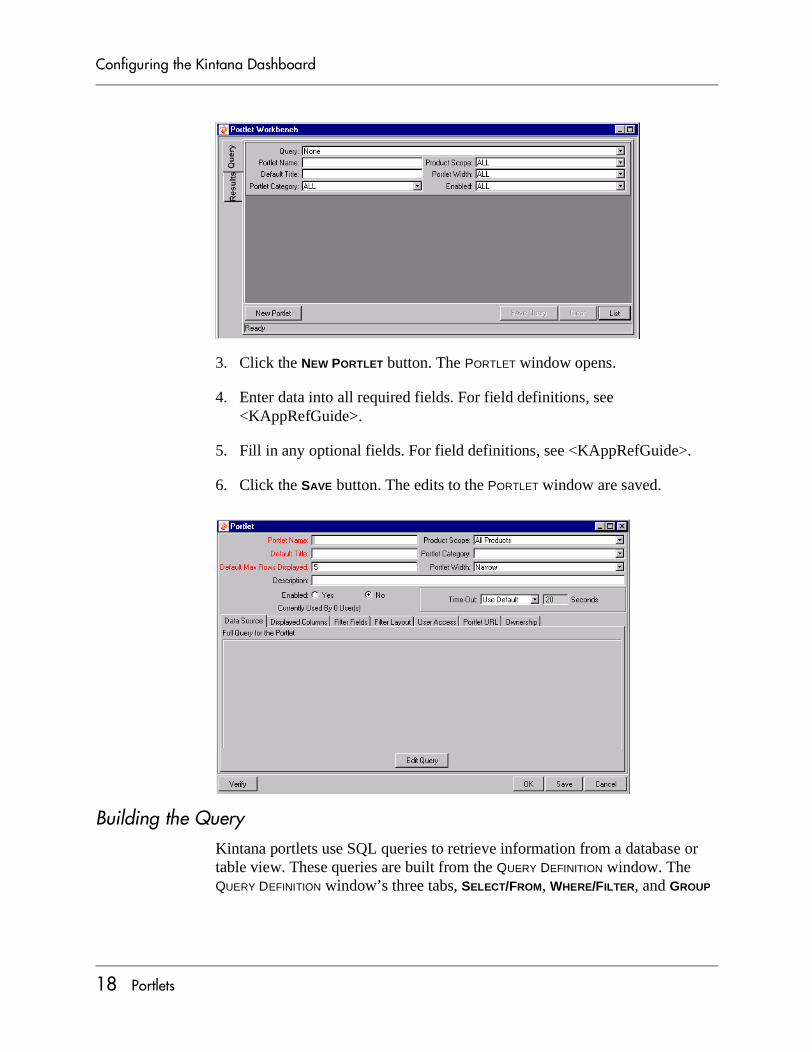
3. Click the NEW PORTLET button. The PORTLET window opens.
4. Enter data into all required fields. For field definitions, see <KAppRefGuide>.
5. Fill in any optional fields. For field definitions, see <KAppRefGuide>.
6. Click the SAVE button. The edits to the PORTLET window are saved.
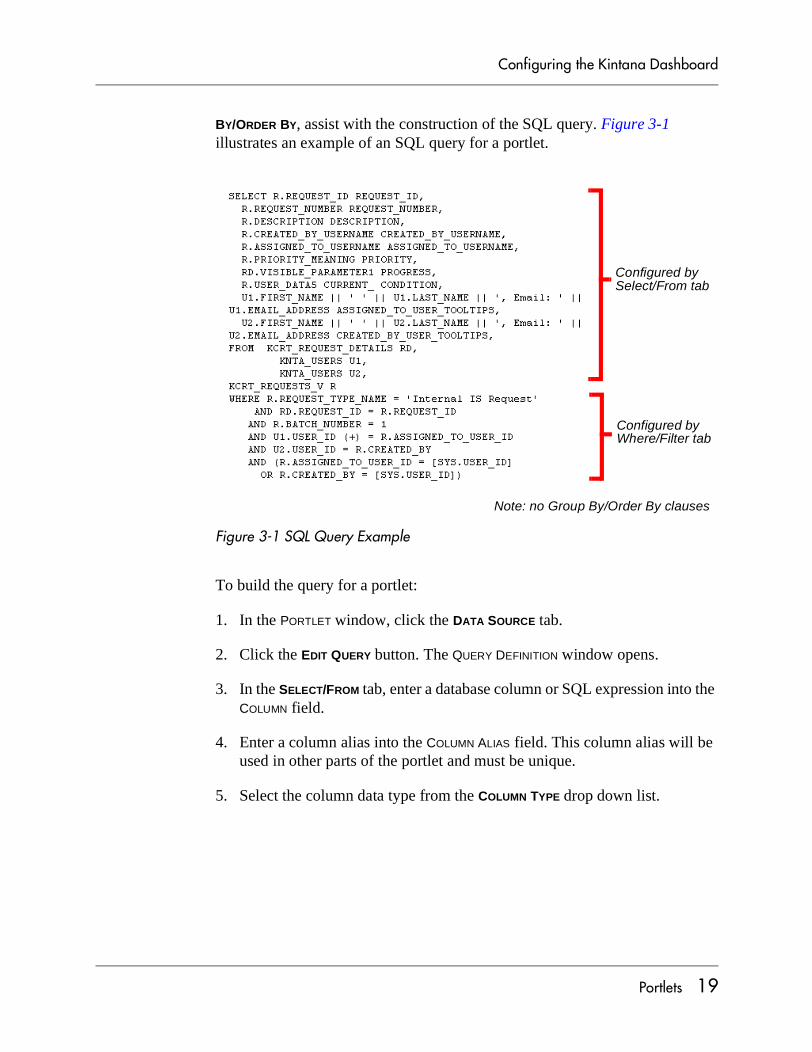
Building the QueryKintana portlets use SQL queries to retrieve information from a database or table view. These queries are built from the QUERY DEFINITION window. The QUERY DEFINITION window’s three tabs, SELECT/FROM, WHERE/FILTER, and GROUP
18 Portlets
Configuring the Kintana Dashboard
BY/ORDER BY, assist with the construction of the SQL query. Figure 3-1 illustrates an example of an SQL query for a portlet.
Figure 3-1 SQL Query Example
To build the query for a portlet:
1. In the PORTLET window, click the DATA SOURCE tab.
2. Click the EDIT QUERY button. The QUERY DEFINITION window opens.
3. In the SELECT/FROM tab, enter a database column or SQL expression into the COLUMN field.
4. Enter a column alias into the COLUMN ALIAS field. This column alias will be used in other parts of the portlet and must be unique.
5. Select the column data type from the COLUMN TYPE drop down list.
Configured bySelect/From tab
Configured byWhere/Filter tab
Note: no Group By/Order By clauses
Portlets 19
Configuring the Kintana Dashboard
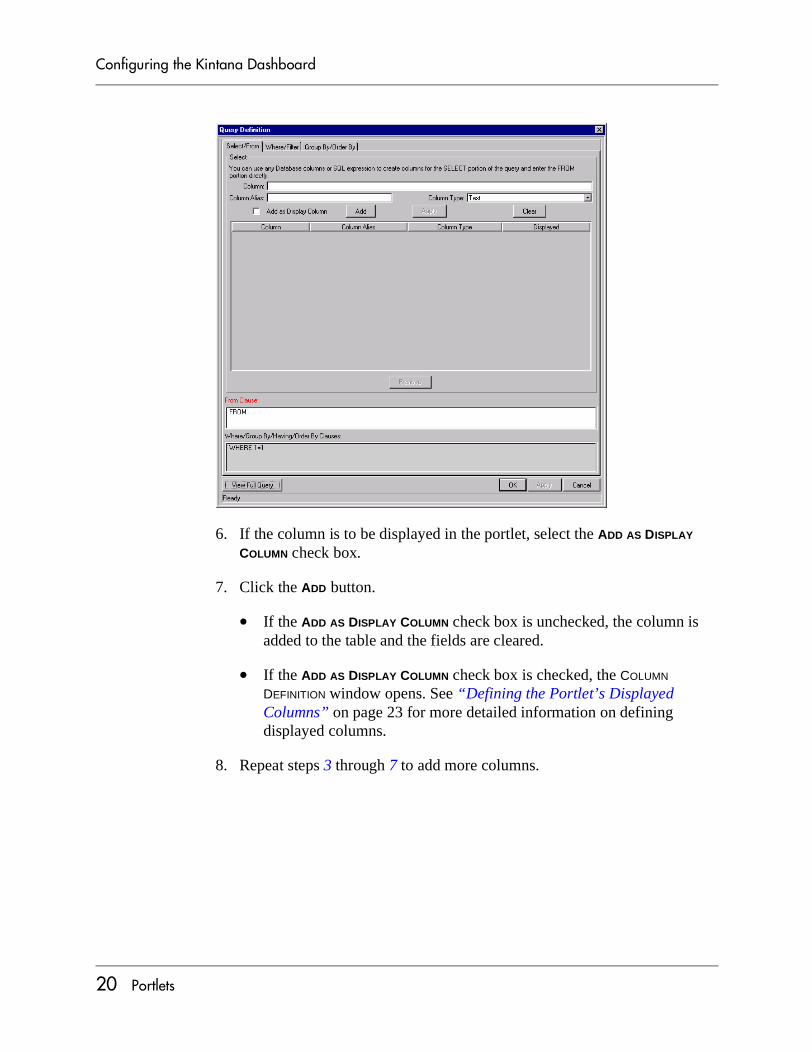
6. If the column is to be displayed in the portlet, select the ADD AS DISPLAY COLUMN check box.
7. Click the ADD button.
• If the ADD AS DISPLAY COLUMN check box is unchecked, the column is added to the table and the fields are cleared.
• If the ADD AS DISPLAY COLUMN check box is checked, the COLUMN DEFINITION window opens. See “Defining the Portlet’s Displayed Columns” on page 23 for more detailed information on defining displayed columns.
8. Repeat steps 3 through 7 to add more columns.
20 Portlets
Configuring the Kintana Dashboard
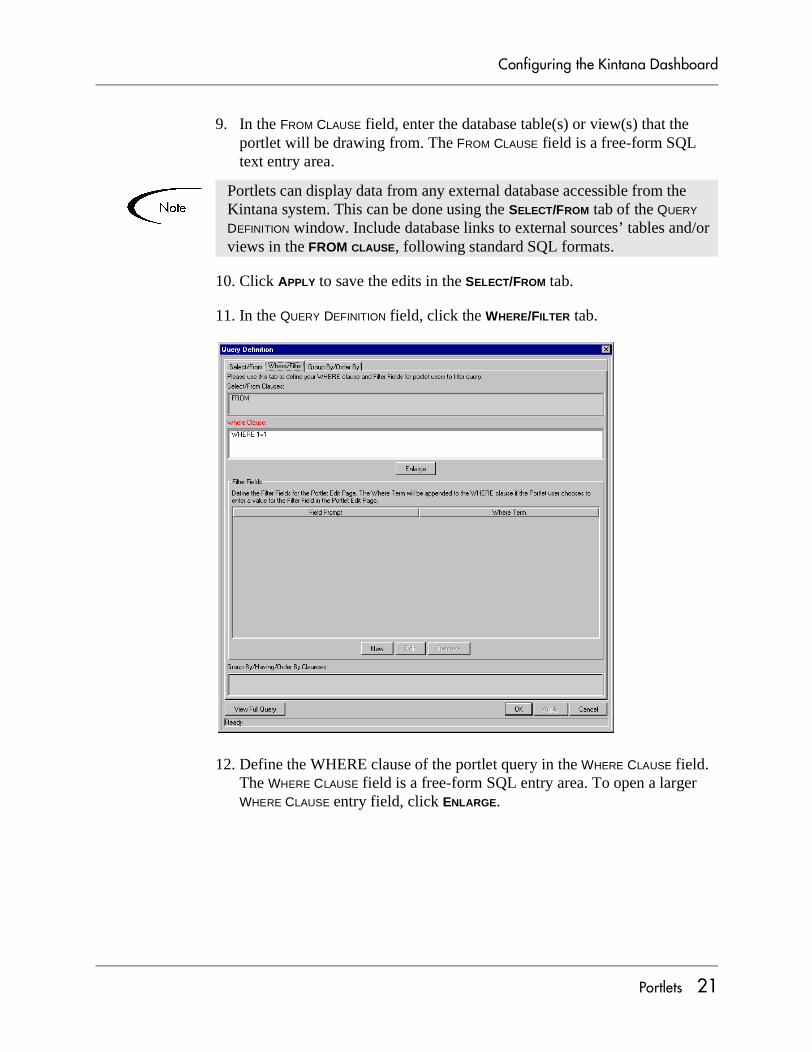
9. In the FROM CLAUSE field, enter the database table(s) or view(s) that the portlet will be drawing from. The FROM CLAUSE field is a free-form SQL text entry area.
10. Click APPLY to save the edits in the SELECT/FROM tab.
11. In the QUERY DEFINITION field, click the WHERE/FILTER tab.
12. Define the WHERE clause of the portlet query in the WHERE CLAUSE field. The WHERE CLAUSE field is a free-form SQL entry area. To open a larger WHERE CLAUSE entry field, click ENLARGE.
Portlets can display data from any external database accessible from the Kintana system. This can be done using the SELECT/FROM tab of the QUERY DEFINITION window. Include database links to external sources’ tables and/or views in the FROM CLAUSE, following standard SQL formats.
Portlets 21
Configuring the Kintana Dashboard
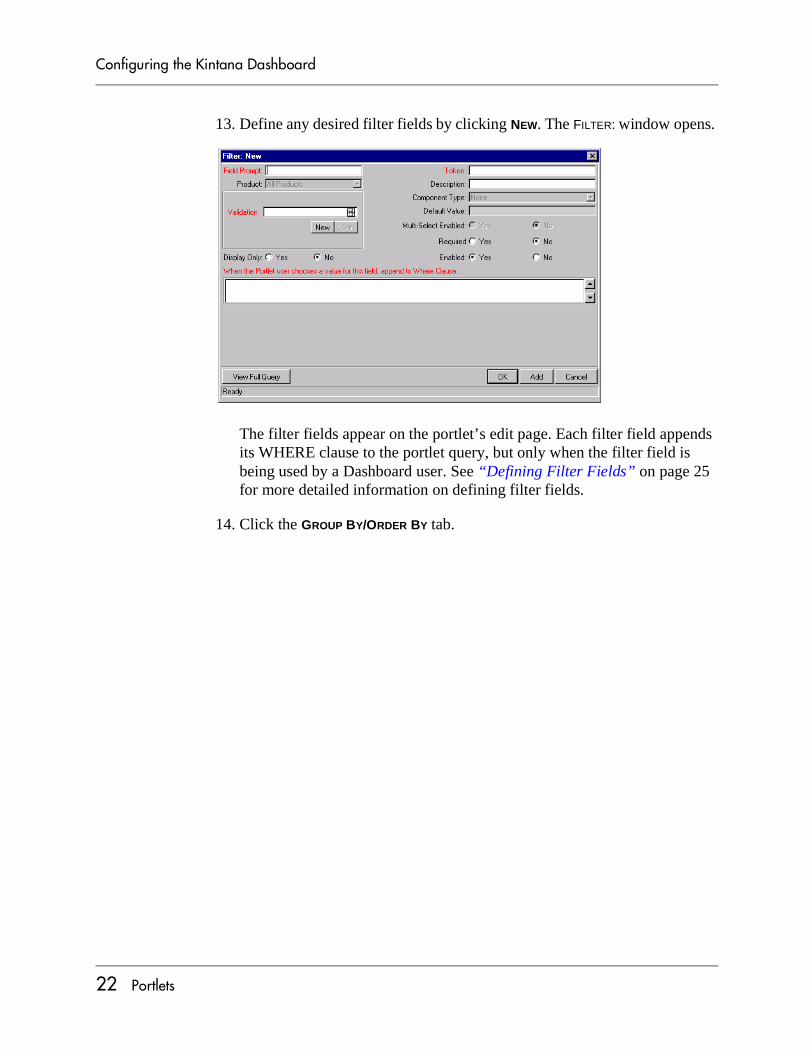
13. Define any desired filter fields by clicking NEW. The FILTER: window opens.
The filter fields appear on the portlet’s edit page. Each filter field appends its WHERE clause to the portlet query, but only when the filter field is being used by a Dashboard user. See “Defining Filter Fields” on page 25 for more detailed information on defining filter fields.
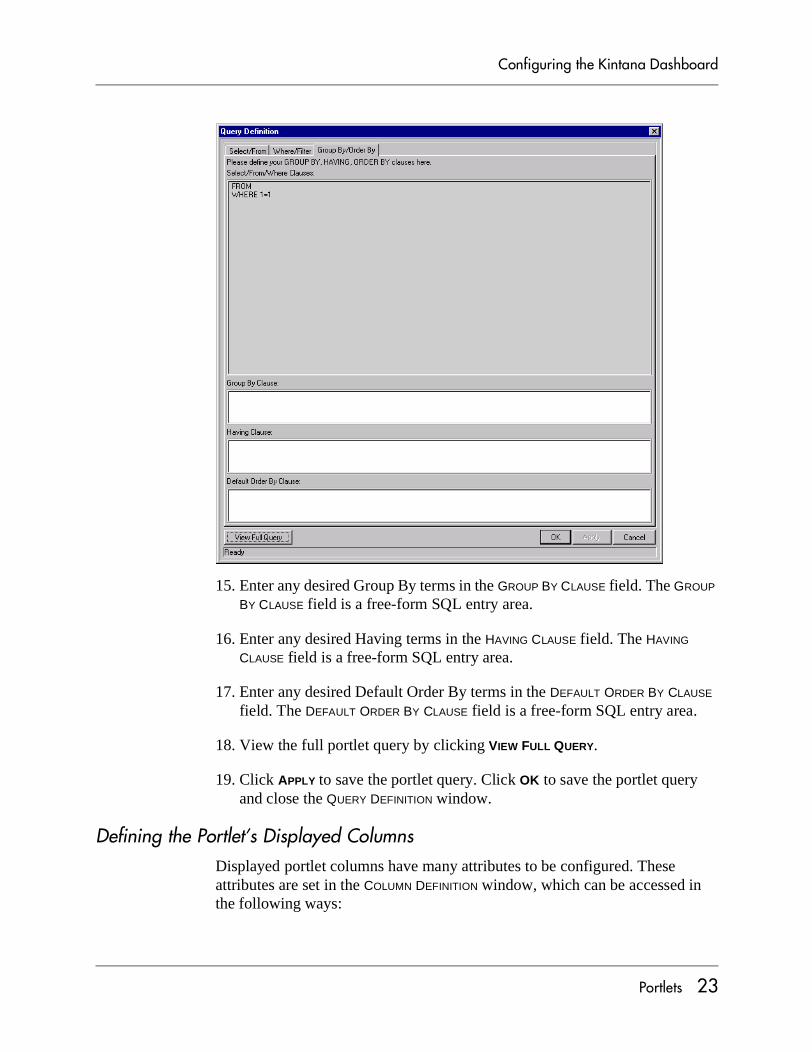
14. Click the GROUP BY/ORDER BY tab.
22 Portlets
Configuring the Kintana Dashboard
15. Enter any desired Group By terms in the GROUP BY CLAUSE field. The GROUP BY CLAUSE field is a free-form SQL entry area.
16. Enter any desired Having terms in the HAVING CLAUSE field. The HAVING CLAUSE field is a free-form SQL entry area.
17. Enter any desired Default Order By terms in the DEFAULT ORDER BY CLAUSE field. The DEFAULT ORDER BY CLAUSE field is a free-form SQL entry area.
18. View the full portlet query by clicking VIEW FULL QUERY.
19. Click APPLY to save the portlet query. Click OK to save the portlet query and close the QUERY DEFINITION window.
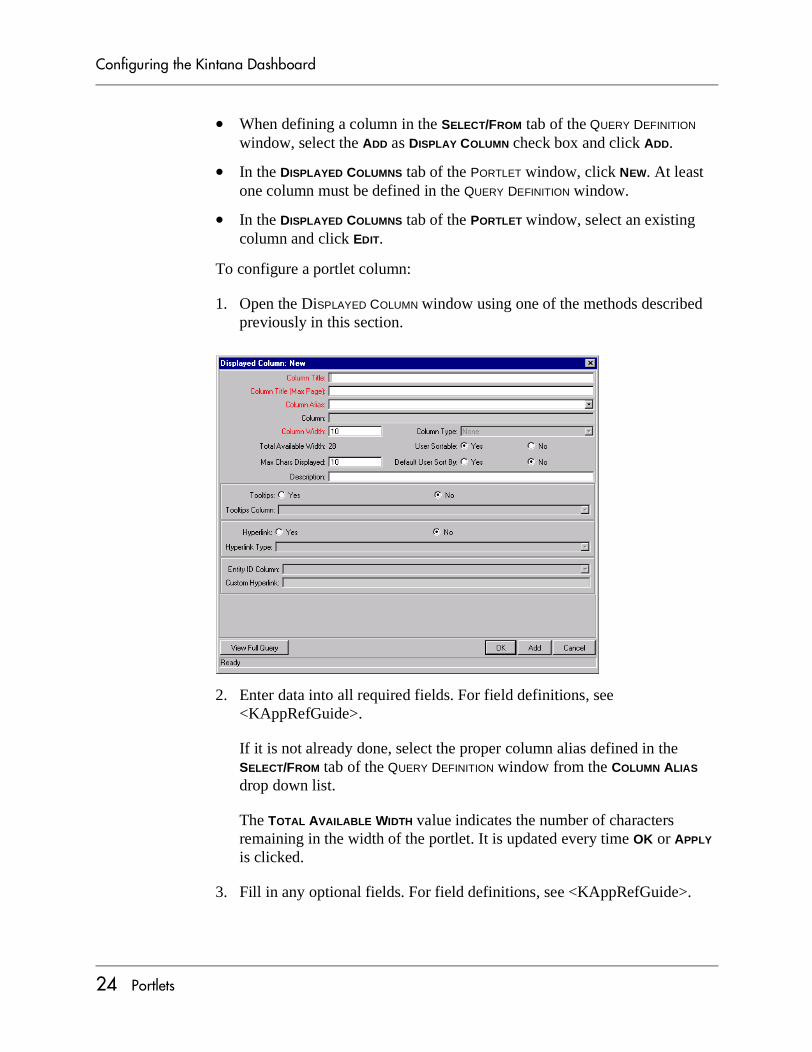
Defining the Portlet’s Displayed ColumnsDisplayed portlet columns have many attributes to be configured. These attributes are set in the COLUMN DEFINITION window, which can be accessed in the following ways:
Portlets 23
Configuring the Kintana Dashboard
• When defining a column in the SELECT/FROM tab of the QUERY DEFINITION window, select the ADD as DISPLAY COLUMN check box and click ADD.
• In the DISPLAYED COLUMNS tab of the PORTLET window, click NEW. At least one column must be defined in the QUERY DEFINITION window.
• In the DISPLAYED COLUMNS tab of the PORTLET window, select an existing column and click EDIT.
To configure a portlet column:
1. Open the DiSPLAYED COLUMN window using one of the methods described previously in this section.
2. Enter data into all required fields. For field definitions, see <KAppRefGuide>.
If it is not already done, select the proper column alias defined in the SELECT/FROM tab of the QUERY DEFINITION window from the COLUMN ALIAS drop down list.
The TOTAL AVAILABLE WIDTH value indicates the number of characters remaining in the width of the portlet. It is updated every time OK or APPLY is clicked.
3. Fill in any optional fields. For field definitions, see <KAppRefGuide>.
24 Portlets
Configuring the Kintana Dashboard
While any column can be USER SORTABLE, only one column can be set to DEFAULT USER SORT BY.
4. Decide whether the column will have TOOLTIPS enabled. If YES, select the column (defined in the SELECT/FROM tab of the QUERY DEFINITION window) that will supply the TOOLTIPS in the TOOLTIPS drop down list.
5. Decide whether the column data will be hyperlinked. If YES, select the type of hyperlink and entity ID column from the HYPERLINK TYPE and ENTITY ID COLUMN drop down lists.
6. Click OK to save the column configuration and close the COLUMN DEFINITION window.
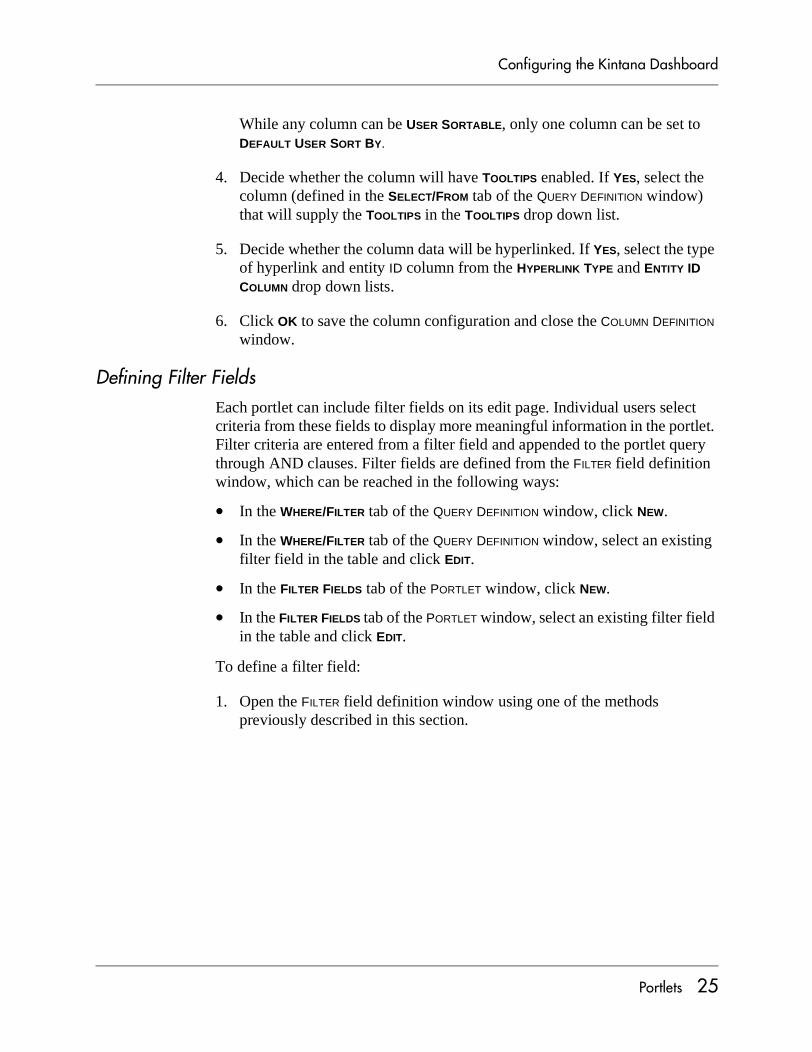
Defining Filter FieldsEach portlet can include filter fields on its edit page. Individual users select criteria from these fields to display more meaningful information in the portlet. Filter criteria are entered from a filter field and appended to the portlet query through AND clauses. Filter fields are defined from the FILTER field definition window, which can be reached in the following ways:
• In the WHERE/FILTER tab of the QUERY DEFINITION window, click NEW.
• In the WHERE/FILTER tab of the QUERY DEFINITION window, select an existing filter field in the table and click EDIT.
• In the FILTER FIELDS tab of the PORTLET window, click NEW.
• In the FILTER FIELDS tab of the PORTLET window, select an existing filter field in the table and click EDIT.
To define a filter field:
1. Open the FILTER field definition window using one of the methods previously described in this section.
Portlets 25
Configuring the Kintana Dashboard
2. Fill in all required fields. For field definitions, see <KAppRefGuide>.
The WHEN THE PORTLET USER CHOOSES A VALUE FOR THIS FIELD, APPEND TO WHERE CLAUSE FIELD is a free-form SQL entry area. Each filter field will append its term to the portlet query, but only when the filter field is being used by a Dashboard user.
3. Fill in any optional fields. For field definitions, see <KAppRefGuide>.
4. Click OK to save the filter field configuration and close the FILTER FIELD DEFINITION window. Click ADD to save the filter field.
Laying Out Filter FieldsThe graphical presentation of the filter fields on the portlet’s edit page is configured on the PORTLET window in the FILTER LAYOUT tab. Modifying the layout of the filter fields can consist of the following activities:
• Modifying the Width of a Filter Field
• Moving a Filter Field
• Switching the Positions of Filter Fields
Modifying the Width of a Filter Field
To change the column width of a field:
1. Open the PORTLET window.
2. Click the FILTER LAYOUT tab.
26 Portlets
Configuring the Kintana Dashboard
3. Select the field.
4. From the FIELD WIDTH drop down list, select 1 (for narrow portlets) or 2 (for wide portlets).
5. Click SAVE to save the portlet and continue to modify the filter field layout. Click OK to save the portlet and close the PORTLET window.
Moving a Filter Field
To move a field or a set of fields:
1. Open the PORTLET window.
2. Click the FILTER LAYOUT tab.
3. Select the field(s). To select more than one field, press the SHIFT key while selecting the last field in a set. Selection is either singular or a sequential group. Only a group of adjacent fields can be selected.
4. Move the fields to the desired location in the layout builder, either by clicking the arrow buttons or using the corresponding keyboard arrow keys.
5. Click SAVE to save the portlet and continue to modify the filter field layout. Click OK to save the portlet and close the PORTLET window.
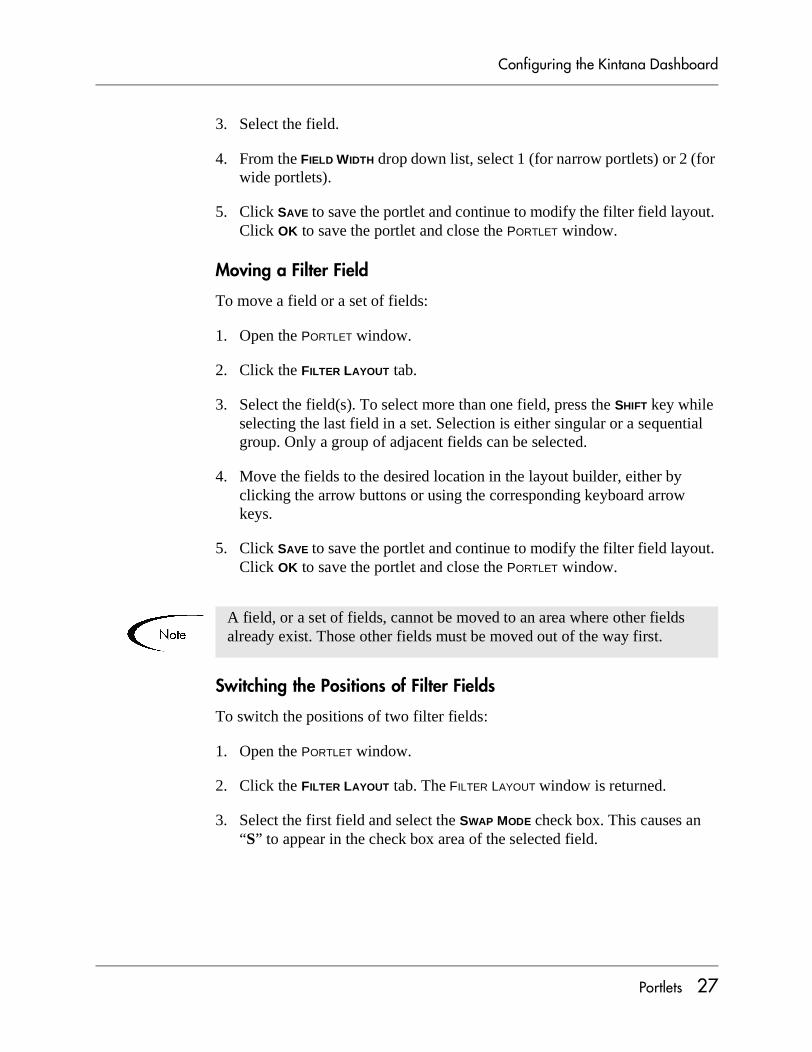
Switching the Positions of Filter Fields
To switch the positions of two filter fields:
1. Open the PORTLET window.
2. Click the FILTER LAYOUT tab. The FILTER LAYOUT window is returned.
3. Select the first field and select the SWAP MODE check box. This causes an “S” to appear in the check box area of the selected field.
A field, or a set of fields, cannot be moved to an area where other fields already exist. Those other fields must be moved out of the way first.
Portlets 27
Configuring the Kintana Dashboard
4. Once the “S” appears, double-click on the field to be swapped. This causes the two fields to change positions.
After the swap is completed, swap mode is automatically turned off. To swap the next selection of fields, repeat the above procedure.
5. Click SAVE to save the portlet and continue to modify the filter field layout. Click OK to save the portlet and close the PORTLET window. Click CANCEL to close the PORTLET window without saving changes.
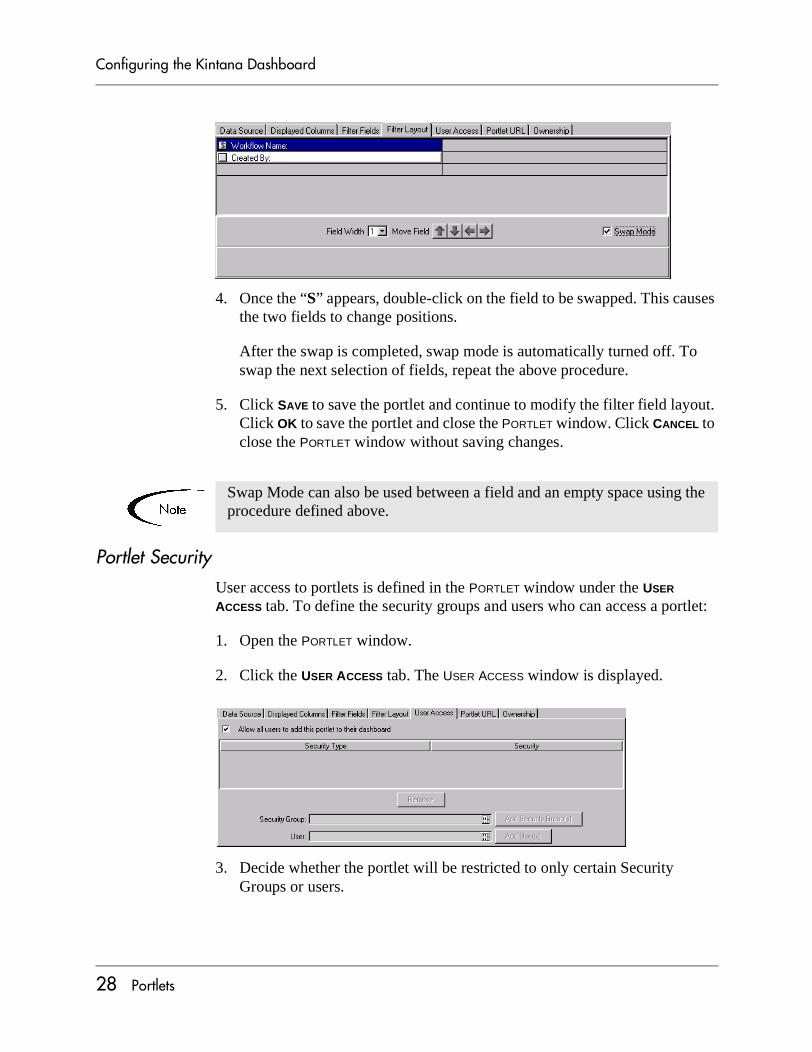
Portlet SecurityUser access to portlets is defined in the PORTLET window under the USER ACCESS tab. To define the security groups and users who can access a portlet:
1. Open the PORTLET window.
2. Click the USER ACCESS tab. The USER ACCESS window is displayed.
3. Decide whether the portlet will be restricted to only certain Security Groups or users.
Swap Mode can also be used between a field and an empty space using the procedure defined above.
28 Portlets
Configuring the Kintana Dashboard
• If no restriction is necessary, leave the ‘ALLOW ALL USERS TO ADD THIS PORTLET TO THEIR DASHBOARD’ box checked. No further configuration is needed.
• If only certain Security Groups or users should use the portlet, de-select the ‘ALLOW ALL USERS TO ADD THIS PORTLET TO THEIR DASHBOARD’ box. The SECURITY GROUP and USER multi-select auto-complete lists are enabled.
i. Specify which Security Groups can use this portlet. Select SECURITY GROUP field. Click the ADD SECURITY GROUP(S) button.
ii. Specify which users can use this portlet. Select the user from the USER field. Click the ADD USER(S) button.
4. Click OK to save the security configuration and close the PORTLET window. Click SAVE to save the security configuration and continue to modify the portlet.
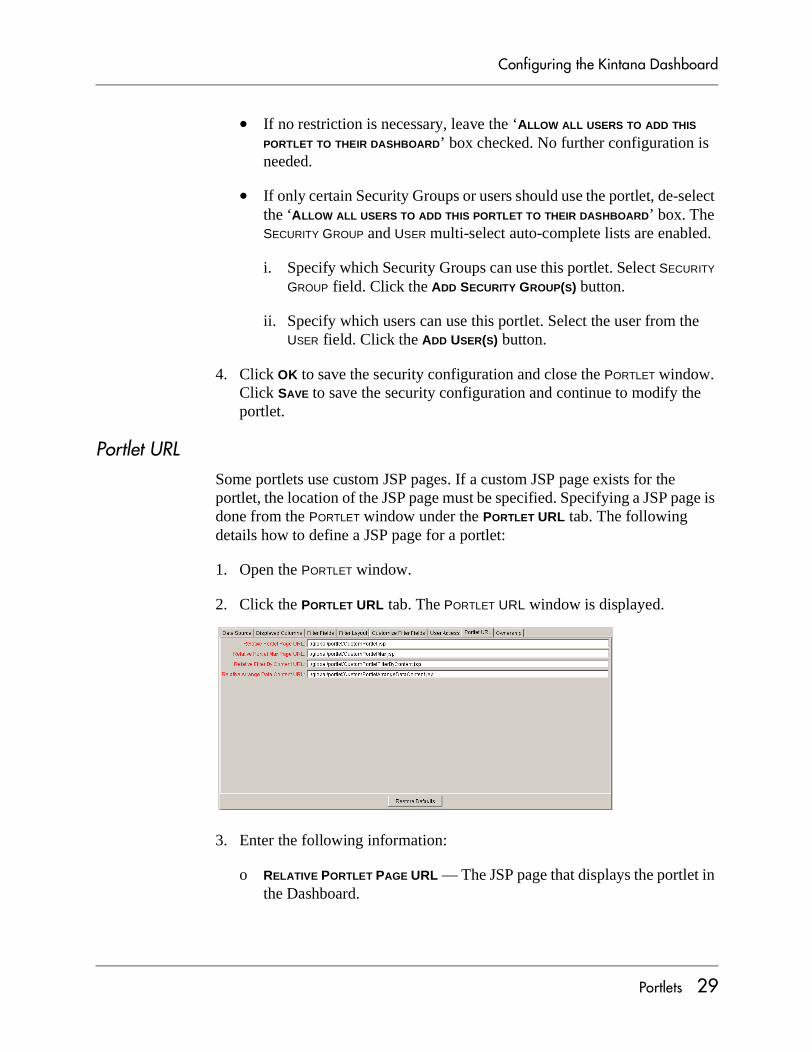
Portlet URLSome portlets use custom JSP pages. If a custom JSP page exists for the portlet, the location of the JSP page must be specified. Specifying a JSP page is done from the PORTLET window under the PORTLET URL tab. The following details how to define a JSP page for a portlet:
1. Open the PORTLET window.
2. Click the PORTLET URL tab. The PORTLET URL window is displayed.
3. Enter the following information:
o RELATIVE PORTLET PAGE URL — The JSP page that displays the portlet in the Dashboard.
Portlets 29
Configuring the Kintana Dashboard
o RELATIVE PORTLET MAX PAGE URL — The JSP page that displays the portlet in its own Maximized page.
o RELATIVE FILTER BY CONTENT URL — The JSP page that displays the Filter By section of the portlet’s Edit page.
o RELATIVE ARRANGE DATA CONTENT URL — The JSP page that displays the Arrange section of the portlet’s Edit page.
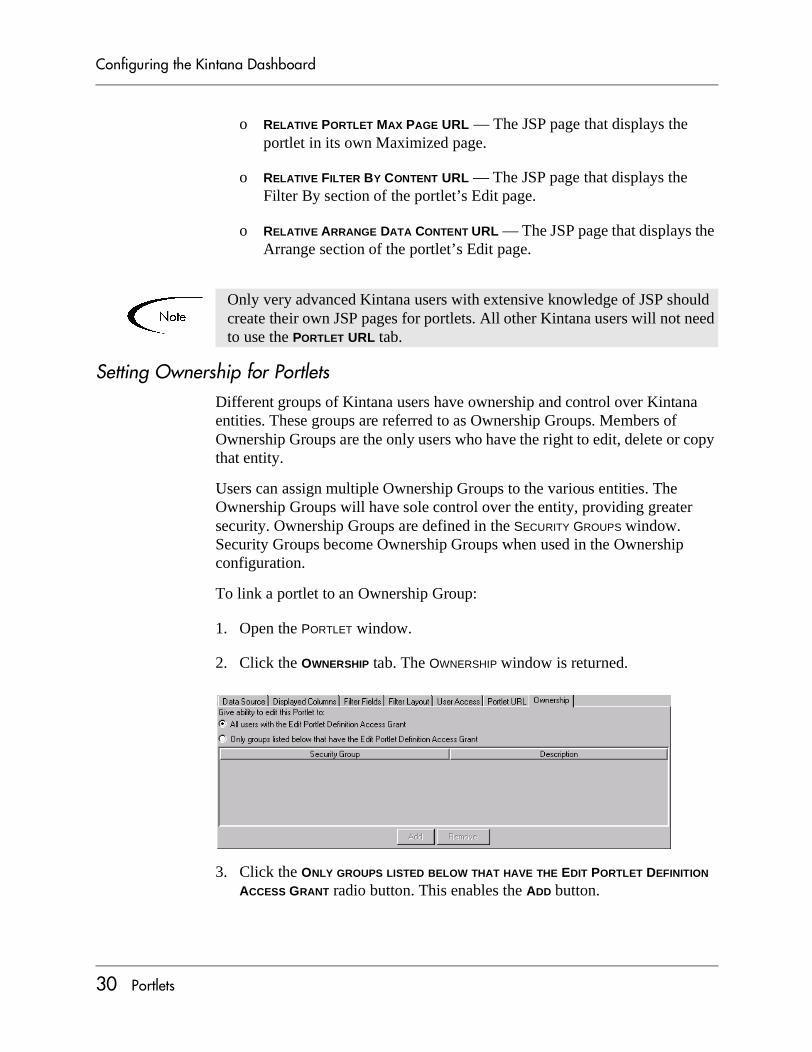
Setting Ownership for PortletsDifferent groups of Kintana users have ownership and control over Kintana entities. These groups are referred to as Ownership Groups. Members of Ownership Groups are the only users who have the right to edit, delete or copy that entity.
Users can assign multiple Ownership Groups to the various entities. The Ownership Groups will have sole control over the entity, providing greater security. Ownership Groups are defined in the SECURITY GROUPS window. Security Groups become Ownership Groups when used in the Ownership configuration.
To link a portlet to an Ownership Group:
1. Open the PORTLET window.
2. Click the OWNERSHIP tab. The OWNERSHIP window is returned.
3. Click the ONLY GROUPS LISTED BELOW THAT HAVE THE EDIT PORTLET DEFINITION ACCESS GRANT radio button. This enables the ADD button.
Only very advanced Kintana users with extensive knowledge of JSP should create their own JSP pages for portlets. All other Kintana users will not need to use the PORTLET URL tab.
30 Portlets
Configuring the Kintana Dashboard
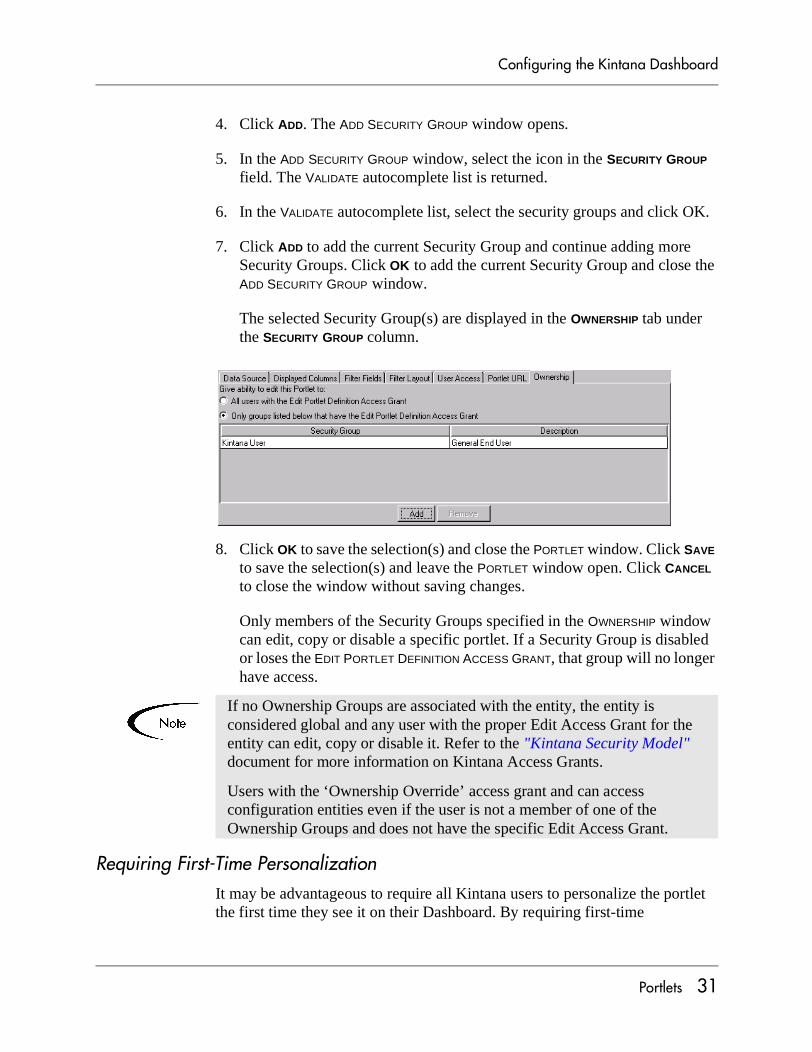
4. Click ADD. The ADD SECURITY GROUP window opens.
5. In the ADD SECURITY GROUP window, select the icon in the SECURITY GROUP field. The VALIDATE autocomplete list is returned.
6. In the VALIDATE autocomplete list, select the security groups and click OK.
7. Click ADD to add the current Security Group and continue adding more Security Groups. Click OK to add the current Security Group and close the ADD SECURITY GROUP window.
The selected Security Group(s) are displayed in the OWNERSHIP tab under the SECURITY GROUP column.
8. Click OK to save the selection(s) and close the PORTLET window. Click SAVE to save the selection(s) and leave the PORTLET window open. Click CANCEL to close the window without saving changes.
Only members of the Security Groups specified in the OWNERSHIP window can edit, copy or disable a specific portlet. If a Security Group is disabled or loses the EDIT PORTLET DEFINITION ACCESS GRANT, that group will no longer have access.
Requiring First-Time PersonalizationIt may be advantageous to require all Kintana users to personalize the portlet the first time they see it on their Dashboard. By requiring first-time
If no Ownership Groups are associated with the entity, the entity is considered global and any user with the proper Edit Access Grant for the entity can edit, copy or disable it. Refer to the "Kintana Security Model" document for more information on Kintana Access Grants.
Users with the ‘Ownership Override’ access grant and can access configuration entities even if the user is not a member of one of the Ownership Groups and does not have the specific Edit Access Grant.
Portlets 31
Configuring the Kintana Dashboard
personalization of a portlet, the user will see the message: PLEASE EDIT THE DEFAULT SEARCH CRITERIA FOR THIS PORTLET when adding the portlet to a Dashboard. To require users to personalize the portlet before using it:
1. Open the PORTLET WORKBENCH.
2. Locate and open the portlet to edit.
3. Click the FILTER FIELDS tab.
4. Set the ‘REQUIRE FIRST TIME PERSONALIZATION BY USER’ radio button to YES.
5. Click SAVE to save the personalization setting and continue to modify the portlet. Click OK to save the personalization setting and close the PORTLET window.
Verifying the New PortletOnce the new portlet is complete, verify the portlet to make sure the query’s tokens and column interactions in the DATA SOURCE tab are correct. Verification of a portlet is performed from the PORTLET WORKBENCH window. To verify a portlet:
1. Locate and open the portlet to verify using the PORTLET WORKBENCH.
2. Click VERIFY to verify the query’s tokens and column interaction in the DATA SOURCE tab. Once the portlet’s query tokens and column interactions are verified, the portlet is ready to be added to the Kintana Dashboard. See “Enabling Portlet Use” on page 32 for more information.
Enabling Portlet UseOnce a custom portlet is built and verified, the portlet must be enabled before it can be accessed through the Kintana Dashboard. In addition, a custom portlet might require a new portlet category definition and changes to the portlet’s access permissions. The following lists the considerations and steps required to add a portlet to the Dashboard:
Only members of designated Ownership Groups with the EDIT PORTLET DEFINITION ACCESS GRANT can change the personalization setting. See “Setting Ownership for Portlets” on page 30 for more information about Ownership.
32 Portlets
Configuring the Kintana Dashboard
• “Enabling a Portlet” on page 33
• “Defining Portlet Categories” on page 33
• “Setting Portlet Access” on page 36
Enabling a PortletOnce a portlet’s definition is complete, it must be enabled for use by Dashboard users. Enabling a portlet is done in the PORTLET window. To enable a portlet for use:
1. In the Kintana Workbench, open the PORTLET window.
2. In the portlet general information region, set the ENABLED radio button to YES.
3. Click SAVE to save and continue to modify the portlet. Click OK to save and close the PORTLET window.
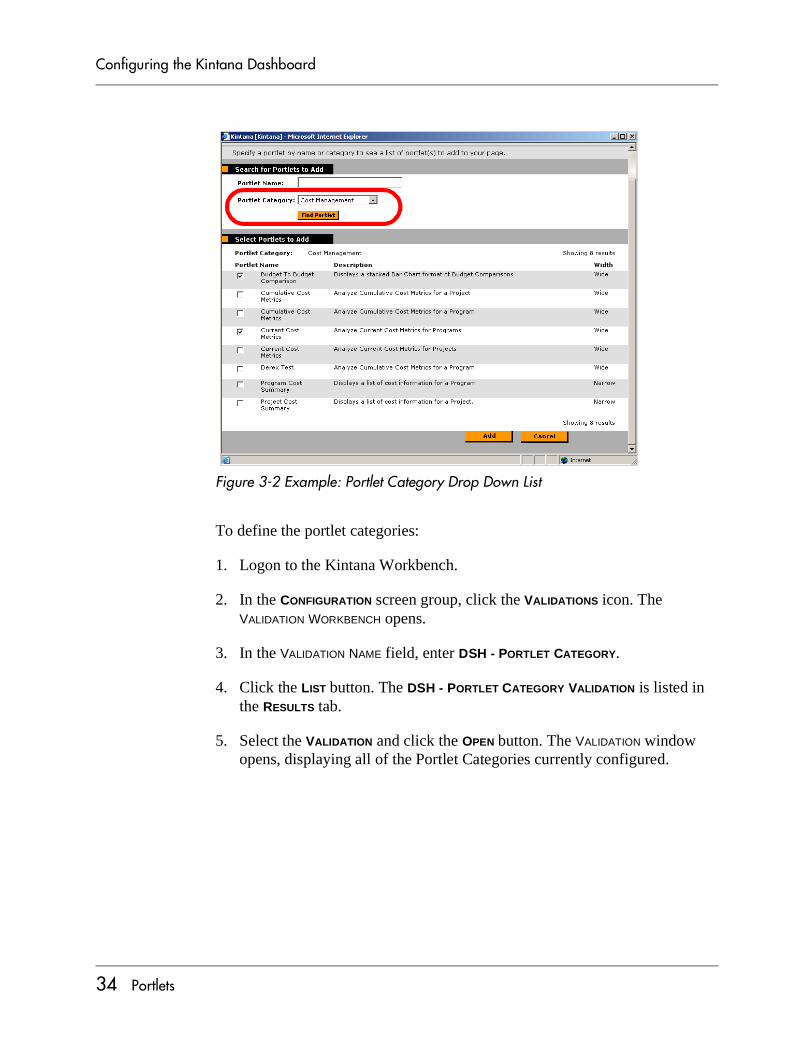
Defining Portlet CategoriesA user can define the categories into which portlets are placed. These categories appear on the ADD A PORTLET page (see Figure 3-2). Selecting a portlet category limits the options displayed in the ADD A PORTLET drop down list. This functionality helps end users select the types of portlets that are most closely related to their business activities.
Portlets 33
Configuring the Kintana Dashboard
Figure 3-2 Example: Portlet Category Drop Down List
To define the portlet categories:
1. Logon to the Kintana Workbench.
2. In the CONFIGURATION screen group, click the VALIDATIONS icon. The VALIDATION WORKBENCH opens.
3. In the VALIDATION NAME field, enter DSH - PORTLET CATEGORY.
4. Click the LIST button. The DSH - PORTLET CATEGORY VALIDATION is listed in the RESULTS tab.
5. Select the VALIDATION and click the OPEN button. The VALIDATION window opens, displaying all of the Portlet Categories currently configured.
34 Portlets
Configuring the Kintana Dashboard
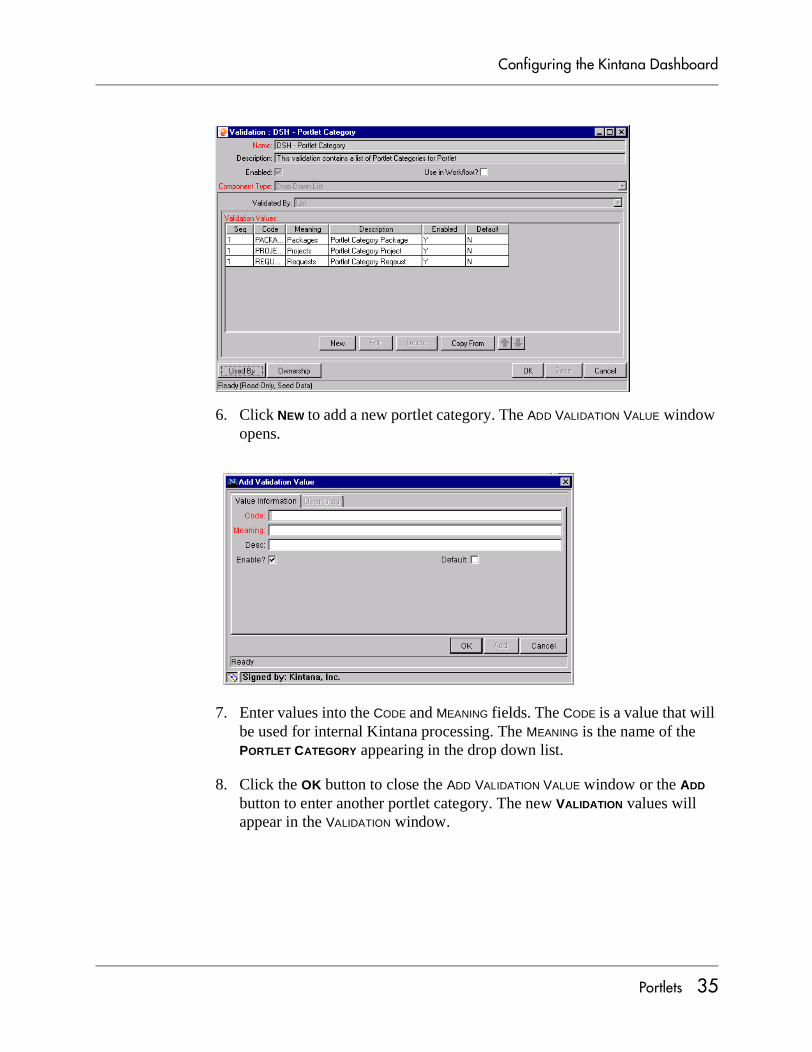
6. Click NEW to add a new portlet category. The ADD VALIDATION VALUE window opens.
7. Enter values into the CODE and MEANING fields. The CODE is a value that will be used for internal Kintana processing. The MEANING is the name of the PORTLET CATEGORY appearing in the drop down list.
8. Click the OK button to close the ADD VALIDATION VALUE window or the ADD button to enter another portlet category. The new VALIDATION values will appear in the VALIDATION window.
Portlets 35
Configuring the Kintana Dashboard
Setting Portlet AccessIt may be advantageous to control which users can access certain portlets, depending on their business role in the organization. Access to portlets can be configured so that only certain users or Security Groups can use them. See “Portlet Security” on page 28 for more detailed information on setting up portlet user access or the "Kintana Security Model" document.
Portlet MaintenanceThis section details how to edit and delete portlets, generate administration reports concerning portlets, and migrating portlets from one Kintana instance to another.
• “Editing a Portlet” on page 37
There may be company, financial, and/or project data that a company director may have access to that would be inappropriate for a developer to see.
If the global permission option was selected in the OWNERSHIP tab, all users with the EDIT PORTLET DEFINITION ACCESS GRANT can configure portlet security. If the global permission option was not selected, only members of designated Ownership Groups with the EDIT PORTLET DEFINITION ACCESS GRANT can configure portlet security. See “Setting Ownership for Portlets” on page 30 for more information about Ownership.
36 Portlets
Configuring the Kintana Dashboard
• “Deleting a Custom Portlet” on page 38
• “Portlet Detail Report” on page 39
• “Portlet Migrator” on page 40
Editing a PortletCustom portlets can be edited using the same processes by which they were created. The following sections contain more detailed information about editing existing portlets:
• “Editing Portlet Layout” on page 37
• “Propagating Change to Existing Portlets” on page 38
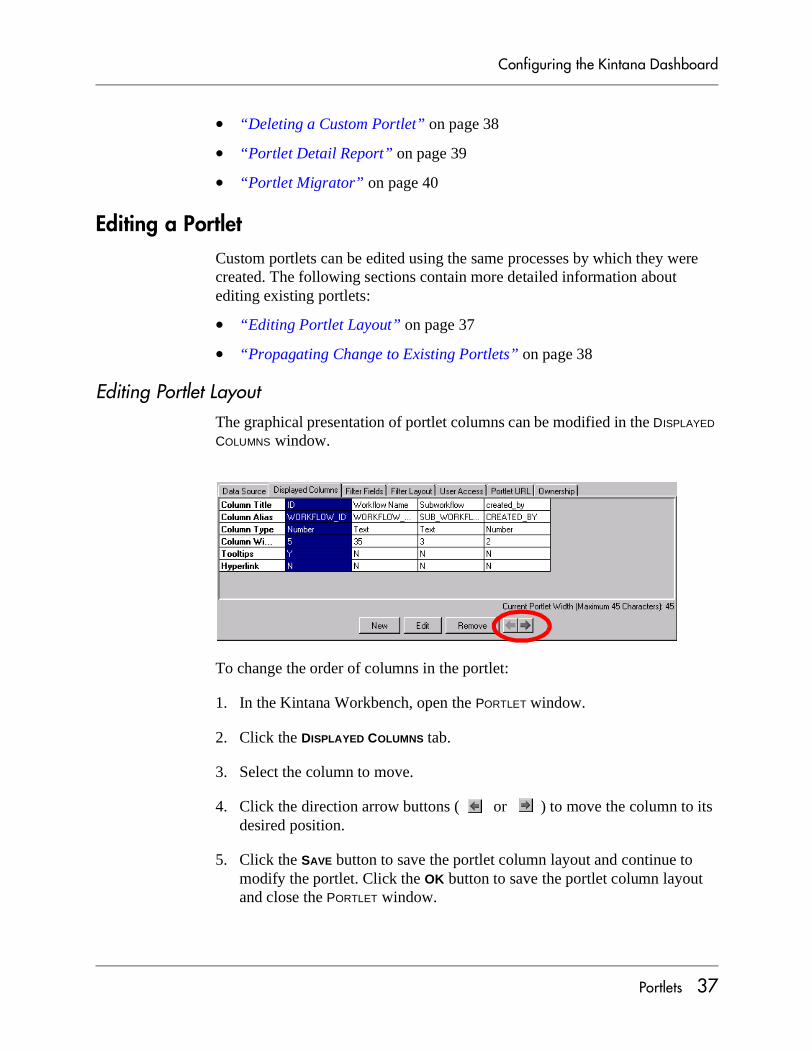
Editing Portlet LayoutThe graphical presentation of portlet columns can be modified in the DISPLAYED COLUMNS window.
To change the order of columns in the portlet:
1. In the Kintana Workbench, open the PORTLET window.
2. Click the DISPLAYED COLUMNS tab.
3. Select the column to move.
4. Click the direction arrow buttons ( or ) to move the column to its desired position.
5. Click the SAVE button to save the portlet column layout and continue to modify the portlet. Click the OK button to save the portlet column layout and close the PORTLET window.
Portlets 37
Configuring the Kintana Dashboard
Propagating Change to Existing PortletsChanges to any aspect of a portlet take effect immediately upon save. Portlets that are not enabled cannot be placed on the Dashboard, so users remain unaffected. Portlets that are in use will exhibit the changes once the user refreshes the page the portlet is contained in.
Deleting a Custom PortletTo delete a portlet:
1. Open the Kintana Workbench.
2. In the DASHBOARD screen group, click the PORTLETS icon. The PORTLET WORKBENCH opens.
3. Enter search criteria to locate the portlet in the QUERY tab.
4. Click the LIST button. The RESULTS tab displays the portlets matching the search.
5. Select the portlet to be removed and click the DELETE button.
Only members of designated Ownership Groups with the EDIT PORTLET DEFINITION ACCESS GRANT can edit the portlet column layout. See “Setting Ownership for Portlets” on page 30 for more information about Ownership.
If a portlet’s definition is altered such that a user no longer has access to that portlet, it will be deleted from the user’s Dashboard. If the portlet’s definition is altered again to re-include the user, the portlet will have to be added and personalized by the user from scratch.
Portlets that are currently being used by Kintana users cannot be deleted. Users must remove the portlet from their Dashboards to allow it to be deleted from the system.
If the global permission option was selected in the OWNERSHIP tab, all users with the EDIT PORTLET DEFINITION ACCESS GRANT can delete the portlet. If the global permission option was not selected, only members of designated Ownership Groups with the EDIT PORTLET DEFINITION ACCESS GRANT can delete the portlet. See “Setting Ownership for Portlets” on page 30 for more information about Ownership.
38 Portlets
Configuring the Kintana Dashboard
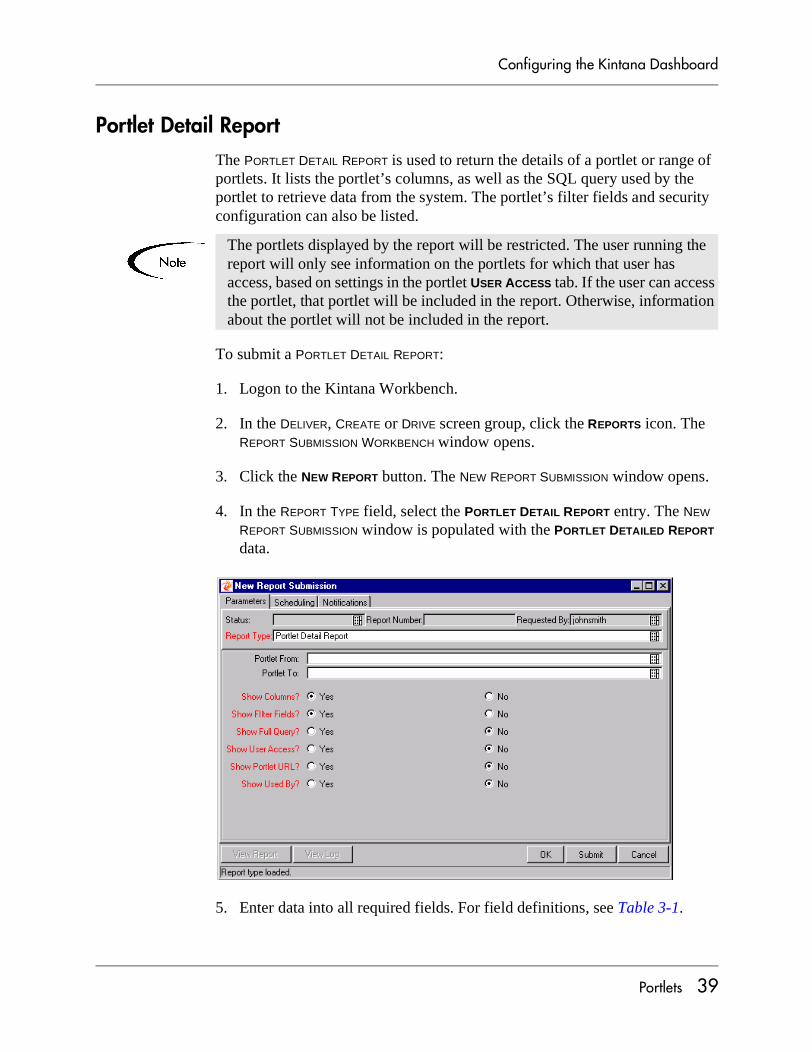
Portlet Detail ReportThe PORTLET DETAIL REPORT is used to return the details of a portlet or range of portlets. It lists the portlet’s columns, as well as the SQL query used by the portlet to retrieve data from the system. The portlet’s filter fields and security configuration can also be listed.
To submit a PORTLET DETAIL REPORT:
1. Logon to the Kintana Workbench.
2. In the DELIVER, CREATE or DRIVE screen group, click the REPORTS icon. The REPORT SUBMISSION WORKBENCH window opens.
3. Click the NEW REPORT button. The NEW REPORT SUBMISSION window opens.
4. In the REPORT TYPE field, select the PORTLET DETAIL REPORT entry. The NEW REPORT SUBMISSION window is populated with the PORTLET DETAILED REPORT data.
5. Enter data into all required fields. For field definitions, see Table 3-1.
The portlets displayed by the report will be restricted. The user running the report will only see information on the portlets for which that user has access, based on settings in the portlet USER ACCESS tab. If the user can access the portlet, that portlet will be included in the report. Otherwise, information about the portlet will not be included in the report.
Portlets 39
Configuring the Kintana Dashboard
6. Fill in any optional fields. For field definitions, see Table 3-1.
7. Click the SUBMIT button. The PORTLET DETAIL REPORT is started. In the STATUS: field, the status will be RUNNING.
8. When the STATUS: field is COMPLETED, the PORTLET DETAIL REPORT is complete.
9. Click the VIEW REPORT button. The PORTLET DETAIL REPORT is displayed.
Table 3-1. Parameters - Portlet Detail Report
Portlet MigratorKintana Migrators are used to move Kintana configuration data such as Validations, Workflows, and Request Types between instances (installations) of Kintana. These Migrators are provided as Kintana Deliver Object Types. For more information on Migrators, see the "Kintana Migrators" document.
Field / Button Description
Portlet From Only select portlets that are alphabetically equal to or greater than the value in this field.
Portlet To Only select portlets that are alphabetically equal to or less than the value in this field.
Show Columns Determines whether to show portlet column information.
Show Filter Fields Determines whether to show portlet filter field information.
Show Full Query Determines whether to show the full portlet query.
Show User Access Determines whether to show portlet Security.
Show Portlet URL Determines whether to show portlet URLs.
Show Used By Determines whether to show which users are using this portlet.
40 Portlets
Configuring the Kintana Dashboard
Chapter
Default Dashboard
Users with the EDIT DEFAULT USER HOMEPAGE access grant can configure a Default Dashboard page that all Kintana users will see when they log in for the first time. This saves time and allows first-time users to more quickly and easily integrate the Kintana Dashboard into their business processes. The Default Dashboard page is configured using the Kintana Dashboard interface. The following sections contain more detailed information on working with the Default Dashboard page:
• Portlet Organization
• Configuring the Default Dashboard Page
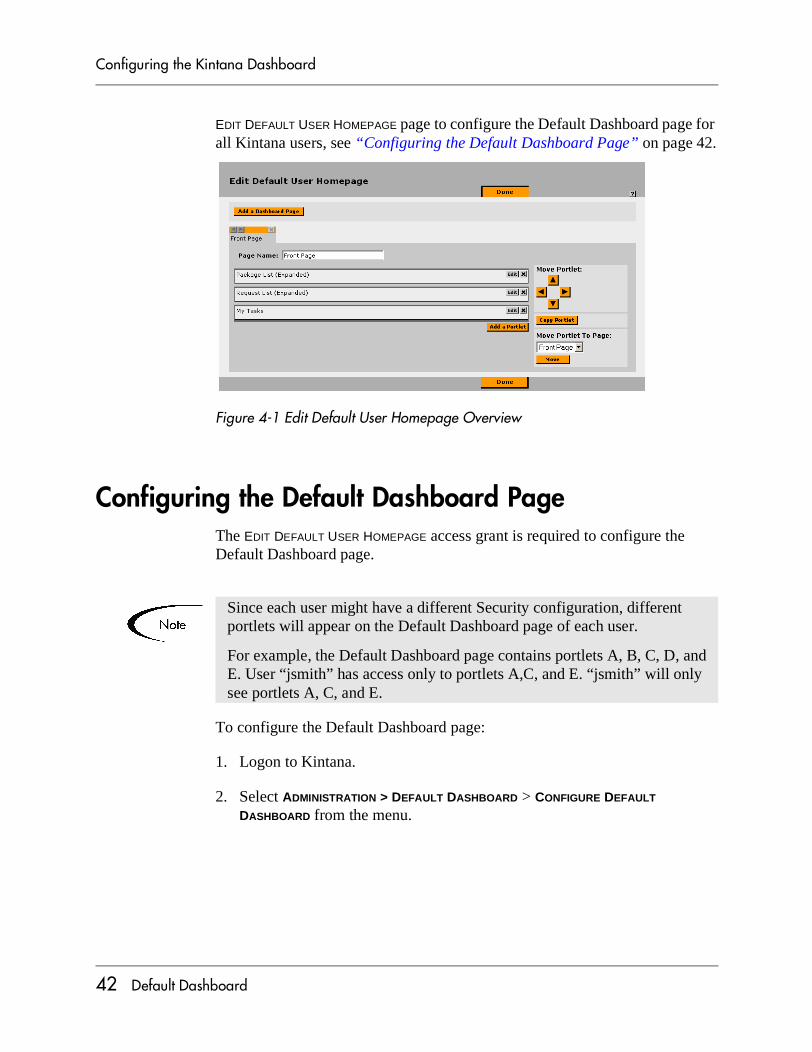
Portlet OrganizationThe EDIT DEFAULT USER HOMEPAGE page is used to add, move or remove portlets from the Default Dashboard page. This page is also used to arrange the portlets’ locations on their pages. Figure 4-1 provides a graphical overview of the EDIT DEFAULT USER HOMEPAGE page. For detailed instructions on using the
Default Dashboard 41
Configuring the Kintana Dashboard
EDIT DEFAULT USER HOMEPAGE page to configure the Default Dashboard page for all Kintana users, see “Configuring the Default Dashboard Page” on page 42.
Figure 4-1 Edit Default User Homepage Overview
Configuring the Default Dashboard PageThe EDIT DEFAULT USER HOMEPAGE access grant is required to configure the Default Dashboard page.
To configure the Default Dashboard page:
1. Logon to Kintana.
2. Select ADMINISTRATION > DEFAULT DASHBOARD > CONFIGURE DEFAULT DASHBOARD from the menu.
Since each user might have a different Security configuration, different portlets will appear on the Default Dashboard page of each user.
For example, the Default Dashboard page contains portlets A, B, C, D, and E. User “jsmith” has access only to portlets A,C, and E. “jsmith” will only see portlets A, C, and E.
42 Default Dashboard
Configuring the Kintana Dashboard
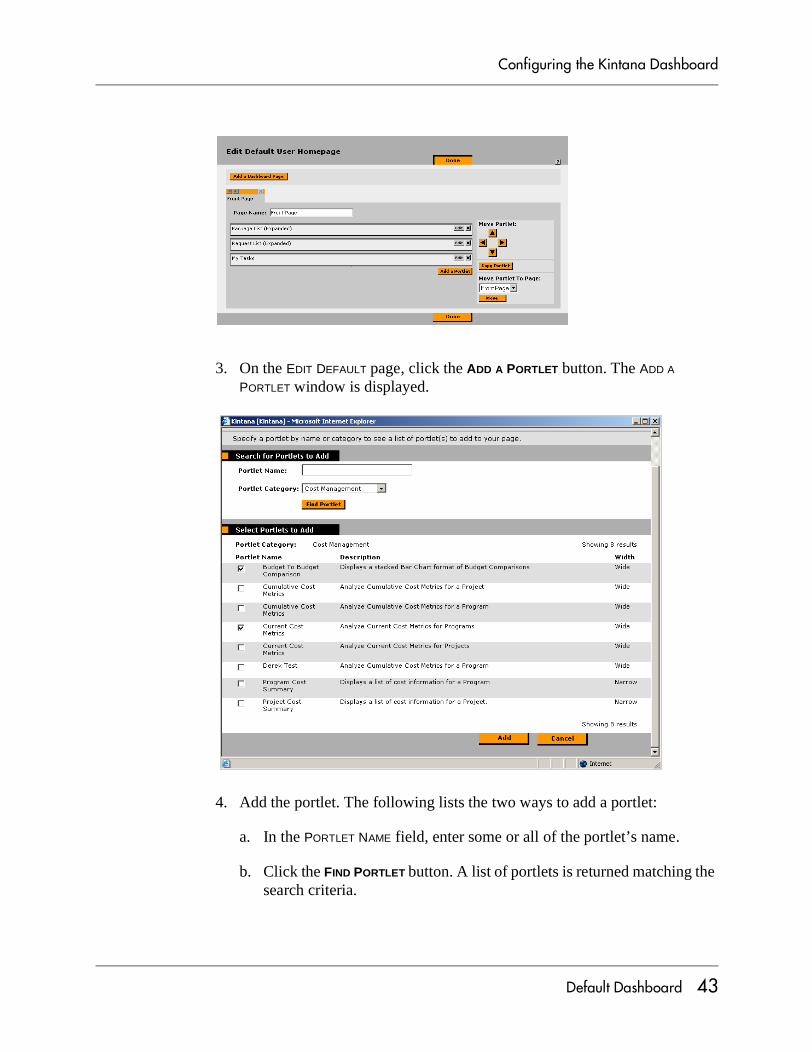
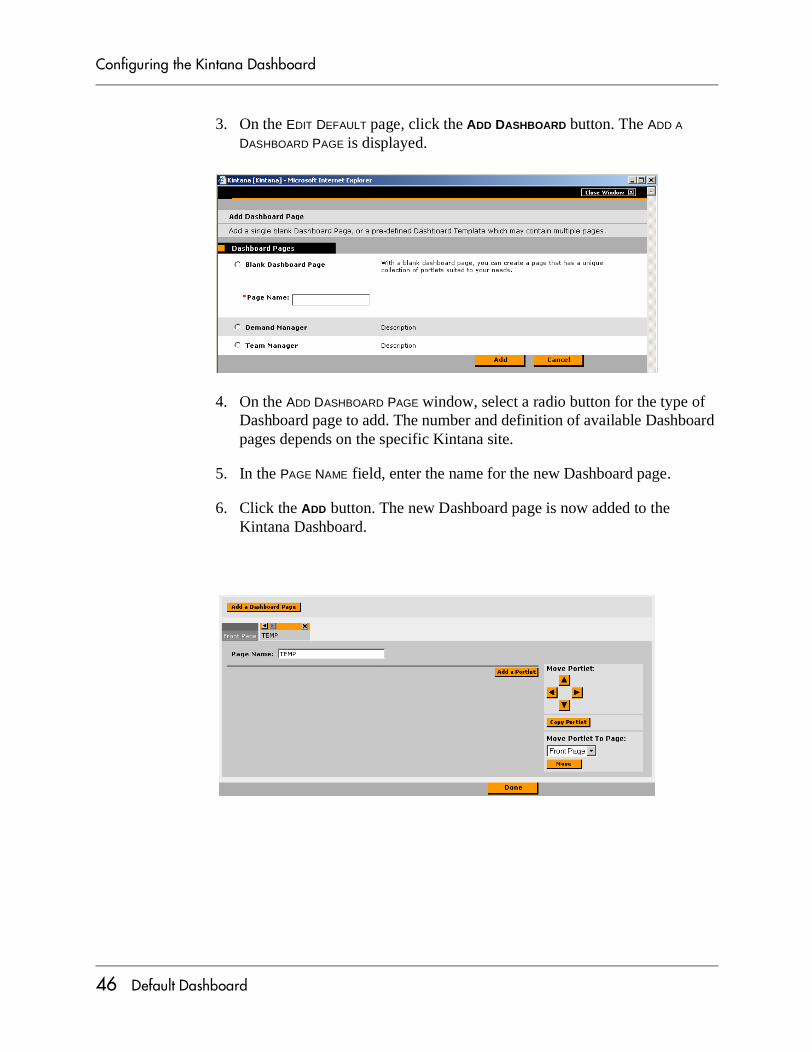
3. On the EDIT DEFAULT page, click the ADD A PORTLET button. The ADD A PORTLET window is displayed.
4. Add the portlet. The following lists the two ways to add a portlet:
a. In the PORTLET NAME field, enter some or all of the portlet’s name.
b. Click the FIND PORTLET button. A list of portlets is returned matching the search criteria.
Default Dashboard 43
Configuring the Kintana Dashboard
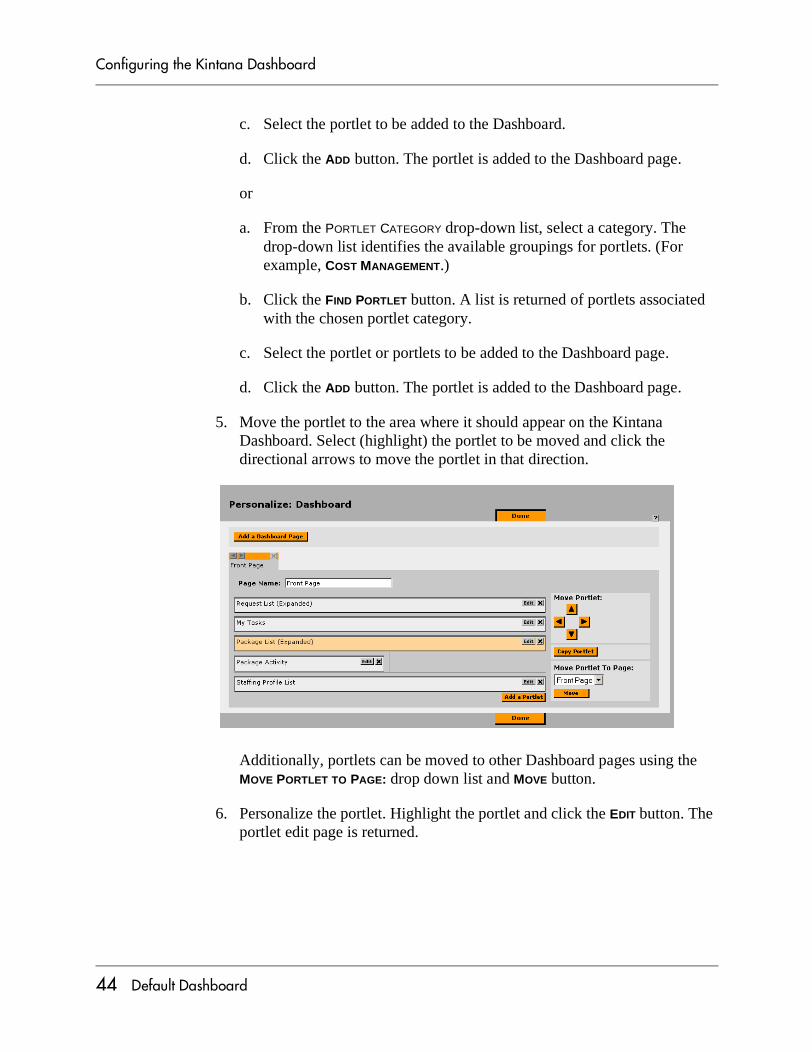
c. Select the portlet to be added to the Dashboard.
d. Click the ADD button. The portlet is added to the Dashboard page.
or
a. From the PORTLET CATEGORY drop-down list, select a category. The drop-down list identifies the available groupings for portlets. (For example, COST MANAGEMENT.)
b. Click the FIND PORTLET button. A list is returned of portlets associated with the chosen portlet category.
c. Select the portlet or portlets to be added to the Dashboard page.
d. Click the ADD button. The portlet is added to the Dashboard page.
5. Move the portlet to the area where it should appear on the Kintana Dashboard. Select (highlight) the portlet to be moved and click the directional arrows to move the portlet in that direction.
Additionally, portlets can be moved to other Dashboard pages using the MOVE PORTLET TO PAGE: drop down list and MOVE button.
6. Personalize the portlet. Highlight the portlet and click the EDIT button. The portlet edit page is returned.
44 Default Dashboard
Configuring the Kintana Dashboard
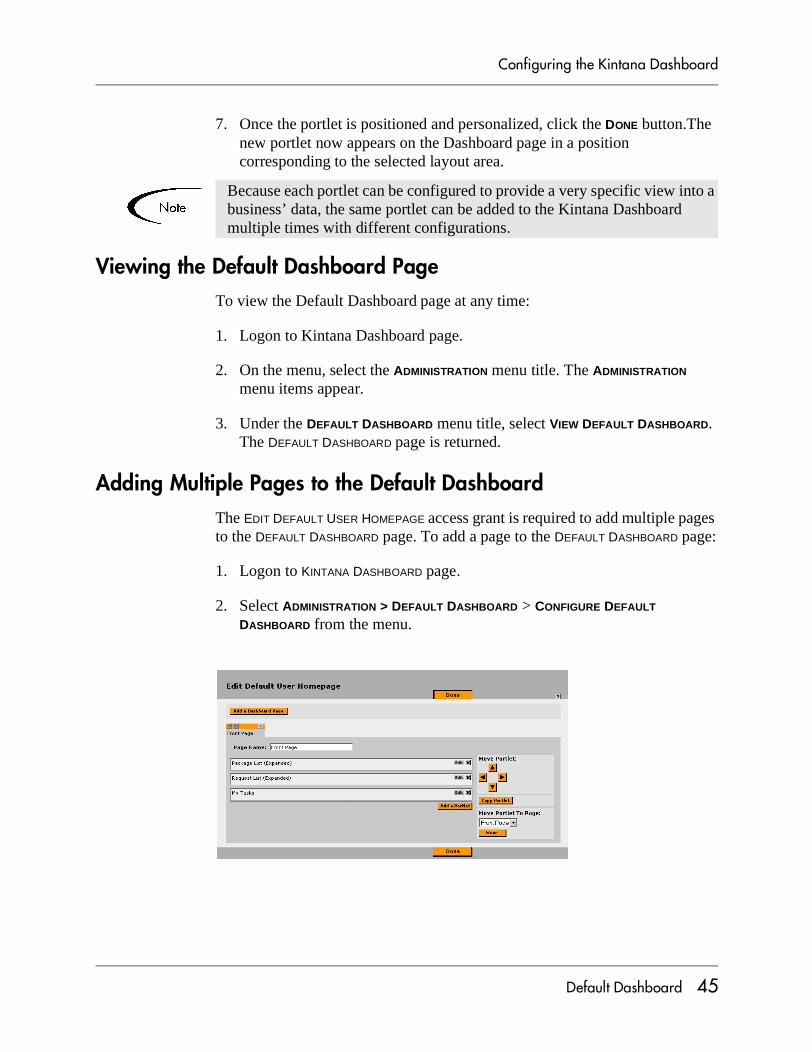
7. Once the portlet is positioned and personalized, click the DONE button.The new portlet now appears on the Dashboard page in a position corresponding to the selected layout area.
Viewing the Default Dashboard PageTo view the Default Dashboard page at any time:
1. Logon to Kintana Dashboard page.
2. On the menu, select the ADMINISTRATION menu title. The ADMINISTRATION menu items appear.
3. Under the DEFAULT DASHBOARD menu title, select VIEW DEFAULT DASHBOARD. The DEFAULT DASHBOARD page is returned.
Adding Multiple Pages to the Default Dashboard The EDIT DEFAULT USER HOMEPAGE access grant is required to add multiple pages to the DEFAULT DASHBOARD page. To add a page to the DEFAULT DASHBOARD page:
1. Logon to KINTANA DASHBOARD page.
2. Select ADMINISTRATION > DEFAULT DASHBOARD > CONFIGURE DEFAULT DASHBOARD from the menu.
Because each portlet can be configured to provide a very specific view into a business’ data, the same portlet can be added to the Kintana Dashboard multiple times with different configurations.
Default Dashboard 45
Configuring the Kintana Dashboard
3. On the EDIT DEFAULT page, click the ADD DASHBOARD button. The ADD A DASHBOARD PAGE is displayed.
4. On the ADD DASHBOARD PAGE window, select a radio button for the type of Dashboard page to add. The number and definition of available Dashboard pages depends on the specific Kintana site.
5. In the PAGE NAME field, enter the name for the new Dashboard page.
6. Click the ADD button. The new Dashboard page is now added to the Kintana Dashboard.
46 Default Dashboard
Configuring the Kintana Dashboard
Appendix
System Portlets
System portlets are configurable, role-based visual displays providing relevant summary information of the user’s business data. Each user can select which portlets they want to display on their Dashboard page. Users can then personalize those portlets to display only information relevant to their specific Cost, Demand, Package, Program, Project, Request, Resource or Time. The following lists the categories of system portlets:
• Cost Management portlets are listed and described in Table
• Demand Manager portlets are listed and described in Table A-1
• Package portlets are listed and described in Table A-2
• Program portlets are listed and described in Table A-3.
• Project portlets are listed and described in Table A-4
• Project Overview portlets are listed and described in Table A-5
• Request portlets are listed and described in Table A-6
• Resource Management portlets are listed and described in Table A-7
• Time Management portlets are listed and described in Table A-8
Not all users can view and access all portlets. Portlet access depends on:
• The appropriate Kintana licenses.
• The appropriate portlet access (Security Group setting).
47
Configuring the Kintana Dashboard
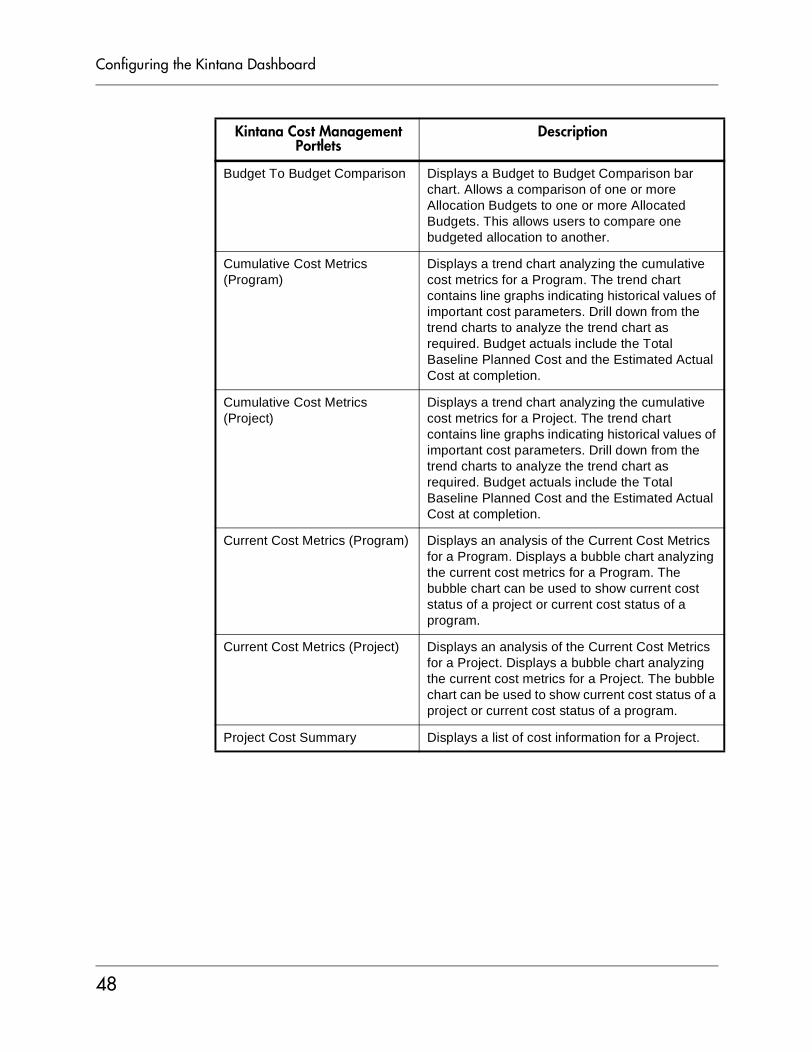
Kintana Cost Management Portlets
Description
Budget To Budget Comparison Displays a Budget to Budget Comparison bar chart. Allows a comparison of one or more Allocation Budgets to one or more Allocated Budgets. This allows users to compare one budgeted allocation to another.
Cumulative Cost Metrics (Program)
Displays a trend chart analyzing the cumulative cost metrics for a Program. The trend chart contains line graphs indicating historical values of important cost parameters. Drill down from the trend charts to analyze the trend chart as required. Budget actuals include the Total Baseline Planned Cost and the Estimated Actual Cost at completion.
Cumulative Cost Metrics (Project)
Displays a trend chart analyzing the cumulative cost metrics for a Project. The trend chart contains line graphs indicating historical values of important cost parameters. Drill down from the trend charts to analyze the trend chart as required. Budget actuals include the Total Baseline Planned Cost and the Estimated Actual Cost at completion.
Current Cost Metrics (Program) Displays an analysis of the Current Cost Metrics for a Program. Displays a bubble chart analyzing the current cost metrics for a Program. The bubble chart can be used to show current cost status of a project or current cost status of a program.
Current Cost Metrics (Project) Displays an analysis of the Current Cost Metrics for a Project. Displays a bubble chart analyzing the current cost metrics for a Project. The bubble chart can be used to show current cost status of a project or current cost status of a program.
Project Cost Summary Displays a list of cost information for a Project.
48
Configuring the Kintana Dashboard
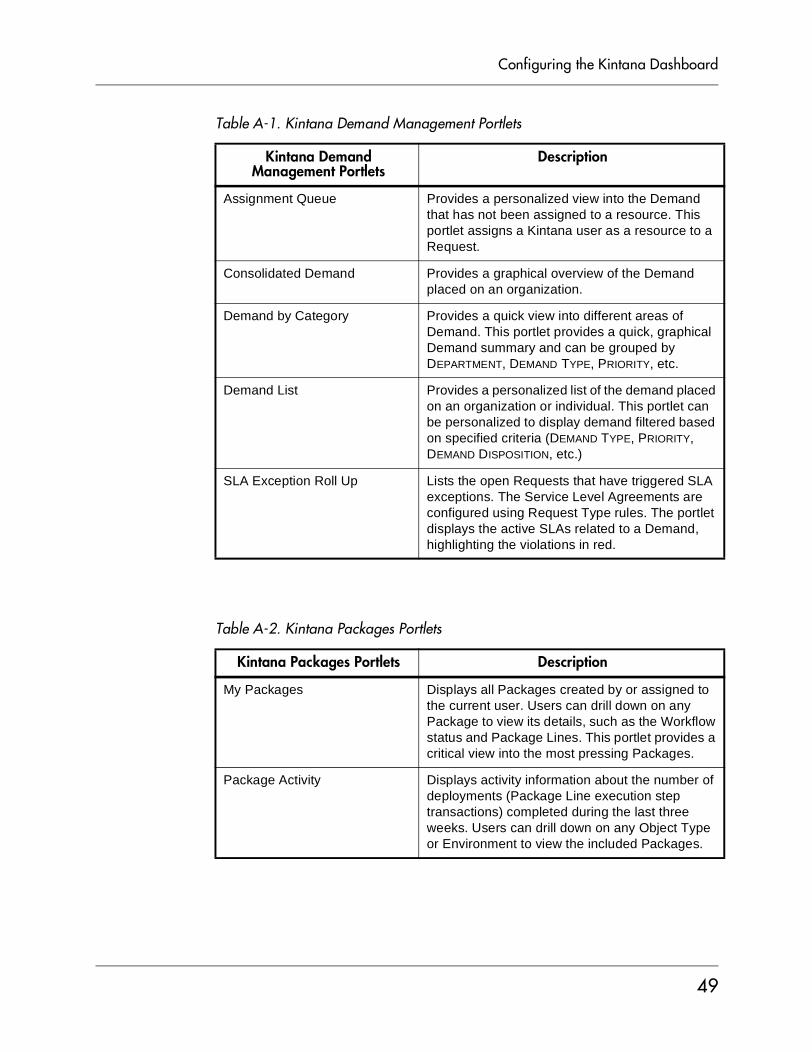
Table A-1. Kintana Demand Management Portlets
Table A-2. Kintana Packages Portlets
Kintana Demand Management Portlets
Description
Assignment Queue Provides a personalized view into the Demand that has not been assigned to a resource. This portlet assigns a Kintana user as a resource to a Request.
Consolidated Demand Provides a graphical overview of the Demand placed on an organization.
Demand by Category Provides a quick view into different areas of Demand. This portlet provides a quick, graphical Demand summary and can be grouped by DEPARTMENT, DEMAND TYPE, PRIORITY, etc.
Demand List Provides a personalized list of the demand placed on an organization or individual. This portlet can be personalized to display demand filtered based on specified criteria (DEMAND TYPE, PRIORITY, DEMAND DISPOSITION, etc.)
SLA Exception Roll Up Lists the open Requests that have triggered SLA exceptions. The Service Level Agreements are configured using Request Type rules. The portlet displays the active SLAs related to a Demand, highlighting the violations in red.
Kintana Packages Portlets Description
My Packages Displays all Packages created by or assigned to the current user. Users can drill down on any Package to view its details, such as the Workflow status and Package Lines. This portlet provides a critical view into the most pressing Packages.
Package Activity Displays activity information about the number of deployments (Package Line execution step transactions) completed during the last three weeks. Users can drill down on any Object Type or Environment to view the included Packages.
49
Configuring the Kintana Dashboard
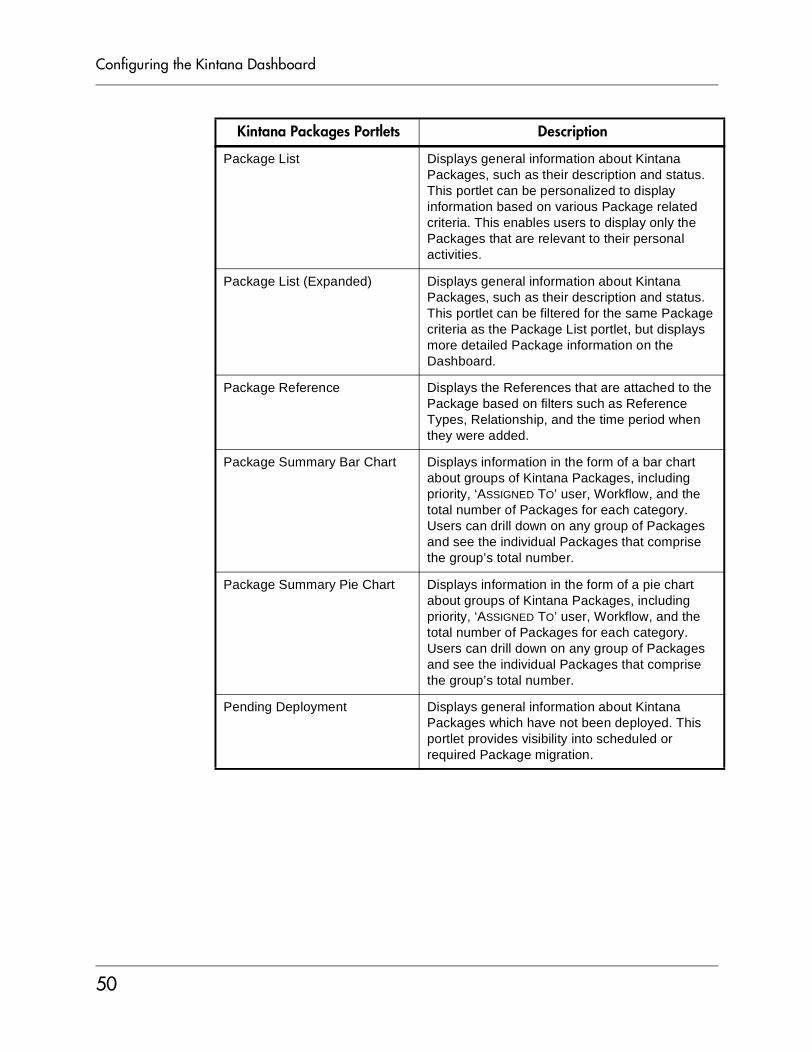
Package List Displays general information about Kintana Packages, such as their description and status. This portlet can be personalized to display information based on various Package related criteria. This enables users to display only the Packages that are relevant to their personal activities.
Package List (Expanded) Displays general information about Kintana Packages, such as their description and status. This portlet can be filtered for the same Package criteria as the Package List portlet, but displays more detailed Package information on the Dashboard.
Package Reference Displays the References that are attached to the Package based on filters such as Reference Types, Relationship, and the time period when they were added.
Package Summary Bar Chart Displays information in the form of a bar chart about groups of Kintana Packages, including priority, ‘ASSIGNED TO’ user, Workflow, and the total number of Packages for each category. Users can drill down on any group of Packages and see the individual Packages that comprise the group’s total number.
Package Summary Pie Chart Displays information in the form of a pie chart about groups of Kintana Packages, including priority, ‘ASSIGNED TO’ user, Workflow, and the total number of Packages for each category. Users can drill down on any group of Packages and see the individual Packages that comprise the group’s total number.
Pending Deployment Displays general information about Kintana Packages which have not been deployed. This portlet provides visibility into scheduled or required Package migration.
Kintana Packages Portlets Description
50
Configuring the Kintana Dashboard
Table A-3. Kintana Program Portlets
Kintana Program Portlets Description
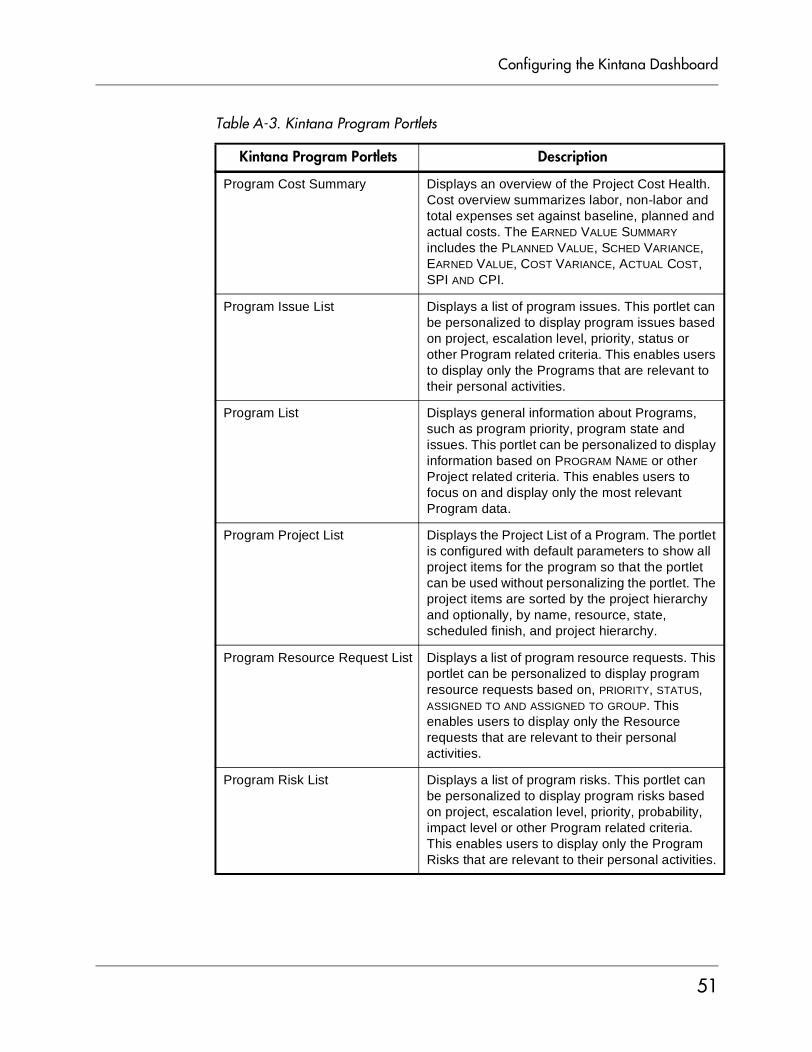
Program Cost Summary Displays an overview of the Project Cost Health. Cost overview summarizes labor, non-labor and total expenses set against baseline, planned and actual costs. The EARNED VALUE SUMMARY includes the PLANNED VALUE, SCHED VARIANCE, EARNED VALUE, COST VARIANCE, ACTUAL COST, SPI AND CPI.
Program Issue List Displays a list of program issues. This portlet can be personalized to display program issues based on project, escalation level, priority, status or other Program related criteria. This enables users to display only the Programs that are relevant to their personal activities.
Program List Displays general information about Programs, such as program priority, program state and issues. This portlet can be personalized to display information based on PROGRAM NAME or other Project related criteria. This enables users to focus on and display only the most relevant Program data.
Program Project List Displays the Project List of a Program. The portlet is configured with default parameters to show all project items for the program so that the portlet can be used without personalizing the portlet. The project items are sorted by the project hierarchy and optionally, by name, resource, state, scheduled finish, and project hierarchy.
Program Resource Request List Displays a list of program resource requests. This portlet can be personalized to display program resource requests based on, PRIORITY, STATUS, ASSIGNED TO AND ASSIGNED TO GROUP. This enables users to display only the Resource requests that are relevant to their personal activities.
Program Risk List Displays a list of program risks. This portlet can be personalized to display program risks based on project, escalation level, priority, probability, impact level or other Program related criteria. This enables users to display only the Program Risks that are relevant to their personal activities.
51
Configuring the Kintana Dashboard
Table A-4. Kintana Projects Portlets
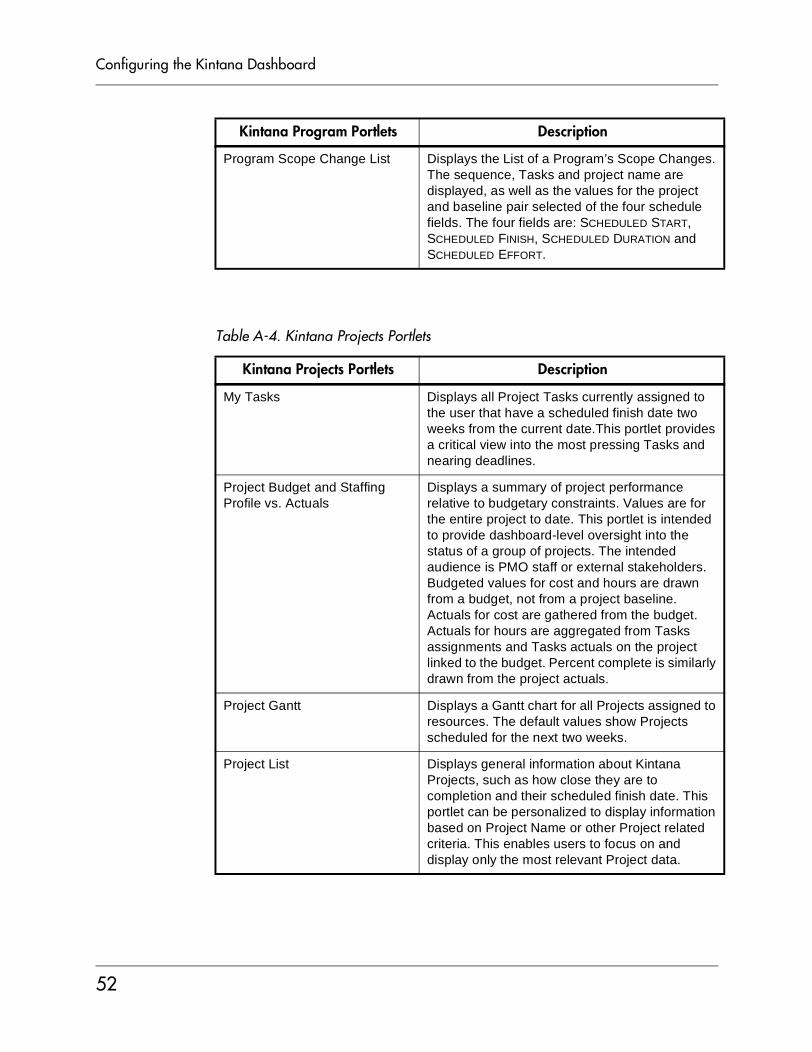
Program Scope Change List Displays the List of a Program’s Scope Changes. The sequence, Tasks and project name are displayed, as well as the values for the project and baseline pair selected of the four schedule fields. The four fields are: SCHEDULED START, SCHEDULED FINISH, SCHEDULED DURATION and SCHEDULED EFFORT.
Kintana Projects Portlets Description
My Tasks Displays all Project Tasks currently assigned to the user that have a scheduled finish date two weeks from the current date.This portlet provides a critical view into the most pressing Tasks and nearing deadlines.
Project Budget and Staffing Profile vs. Actuals
Displays a summary of project performance relative to budgetary constraints. Values are for the entire project to date. This portlet is intended to provide dashboard-level oversight into the status of a group of projects. The intended audience is PMO staff or external stakeholders. Budgeted values for cost and hours are drawn from a budget, not from a project baseline. Actuals for cost are gathered from the budget. Actuals for hours are aggregated from Tasks assignments and Tasks actuals on the project linked to the budget. Percent complete is similarly drawn from the project actuals.
Project Gantt Displays a Gantt chart for all Projects assigned to resources. The default values show Projects scheduled for the next two weeks.
Project List Displays general information about Kintana Projects, such as how close they are to completion and their scheduled finish date. This portlet can be personalized to display information based on Project Name or other Project related criteria. This enables users to focus on and display only the most relevant Project data.
Kintana Program Portlets Description
52

Configuring the Kintana Dashboard
Table A-5. Kintana Project Overview Portlets
Project List (Expanded) Displays general information about Kintana Projects, such as how close they are to completion and their scheduled start and finish date. This portlet can be filtered for the same Project criteria as the PROJECT LIST portlet, but displays more detailed information on the Dashboard.
Project Summary Pie Chart Displays a pie chart that rolls up a group of projects and displays them grouped by their summary condition. Users have the option to either select a set of specific projects and subprojects, or filter by DEPARTMENT and/or PROJECT MANAGER fields.
Resource Gantt Displays a Gantt chart for all work items assigned to resources. Work items are differentiated by color, with Tasks remaining the same color as in the project Gantt chart and requests being a different color. The default values show Tasks and requests scheduled for the next two weeks. The work items are labeled by having the resource displayed to the right of the work item. This is necessary if there are multiple resources or a resource group specified.
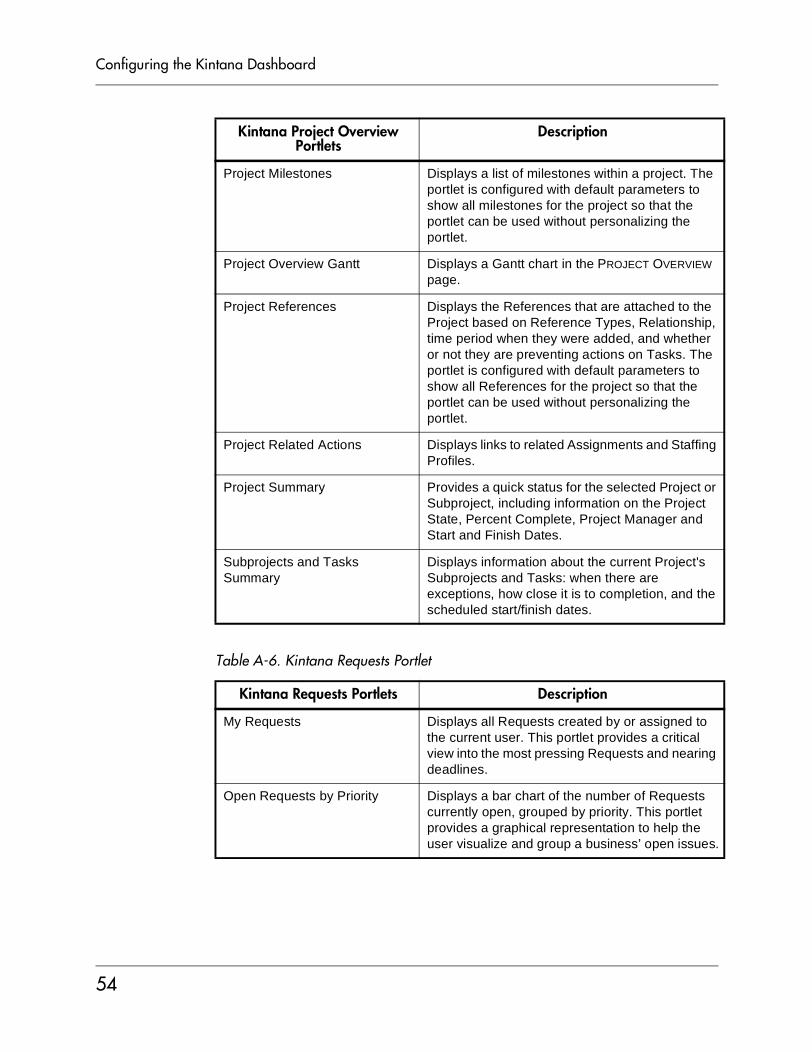
Kintana Project Overview Portlets
Description
Project Cost Summary Displays a list of cost information for a Project if the Project has Cost Management setting enabled. This portlet information is restricted if the user do not have the appropriate cost security.
Project Exception Detail Displays information about the current Project's exceptions, stating the Violation, Tasks State, Start and Finish Dates, and the assigned Resource.
Project Exception Summary Displays relevant exception information about the Project. Exception rules are configured by the Project Manager using the Kintana Drive Workbench. The portlet is configured with default parameters to show all exceptions for the project so that the portlet can be used without personalizing the portlet.
Kintana Projects Portlets Description
53
Configuring the Kintana Dashboard
Table A-6. Kintana Requests Portlet
Project Milestones Displays a list of milestones within a project. The portlet is configured with default parameters to show all milestones for the project so that the portlet can be used without personalizing the portlet.
Project Overview Gantt Displays a Gantt chart in the PROJECT OVERVIEW page.
Project References Displays the References that are attached to the Project based on Reference Types, Relationship, time period when they were added, and whether or not they are preventing actions on Tasks. The portlet is configured with default parameters to show all References for the project so that the portlet can be used without personalizing the portlet.
Project Related Actions Displays links to related Assignments and Staffing Profiles.
Project Summary Provides a quick status for the selected Project or Subproject, including information on the Project State, Percent Complete, Project Manager and Start and Finish Dates.
Subprojects and Tasks Summary
Displays information about the current Project's Subprojects and Tasks: when there are exceptions, how close it is to completion, and the scheduled start/finish dates.
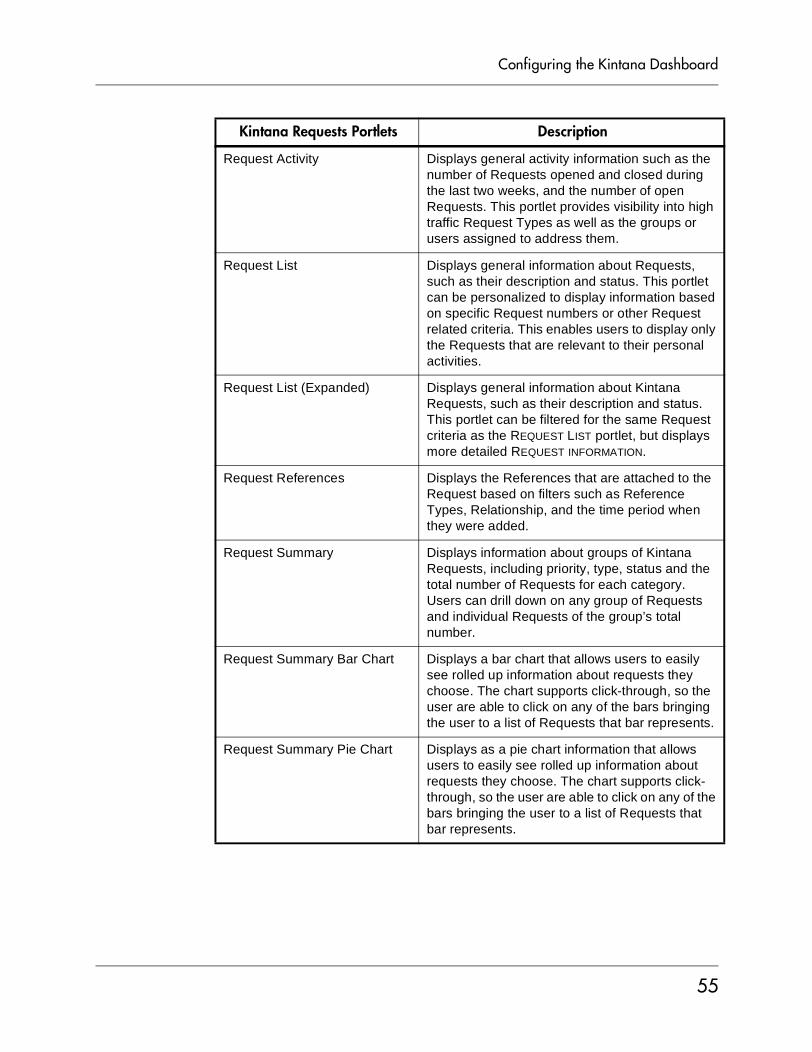
Kintana Requests Portlets Description
My Requests Displays all Requests created by or assigned to the current user. This portlet provides a critical view into the most pressing Requests and nearing deadlines.
Open Requests by Priority Displays a bar chart of the number of Requests currently open, grouped by priority. This portlet provides a graphical representation to help the user visualize and group a business’ open issues.
Kintana Project Overview Portlets
Description
54
Configuring the Kintana Dashboard
Request Activity Displays general activity information such as the number of Requests opened and closed during the last two weeks, and the number of open Requests. This portlet provides visibility into high traffic Request Types as well as the groups or users assigned to address them.
Request List Displays general information about Requests, such as their description and status. This portlet can be personalized to display information based on specific Request numbers or other Request related criteria. This enables users to display only the Requests that are relevant to their personal activities.
Request List (Expanded) Displays general information about Kintana Requests, such as their description and status. This portlet can be filtered for the same Request criteria as the REQUEST LIST portlet, but displays more detailed REQUEST INFORMATION.
Request References Displays the References that are attached to the Request based on filters such as Reference Types, Relationship, and the time period when they were added.
Request Summary Displays information about groups of Kintana Requests, including priority, type, status and the total number of Requests for each category. Users can drill down on any group of Requests and individual Requests of the group’s total number.
Request Summary Bar Chart Displays a bar chart that allows users to easily see rolled up information about requests they choose. The chart supports click-through, so the user are able to click on any of the bars bringing the user to a list of Requests that bar represents.
Request Summary Pie Chart Displays as a pie chart information that allows users to easily see rolled up information about requests they choose. The chart supports click-through, so the user are able to click on any of the bars bringing the user to a list of Requests that bar represents.
Kintana Requests Portlets Description
55
Configuring the Kintana Dashboard
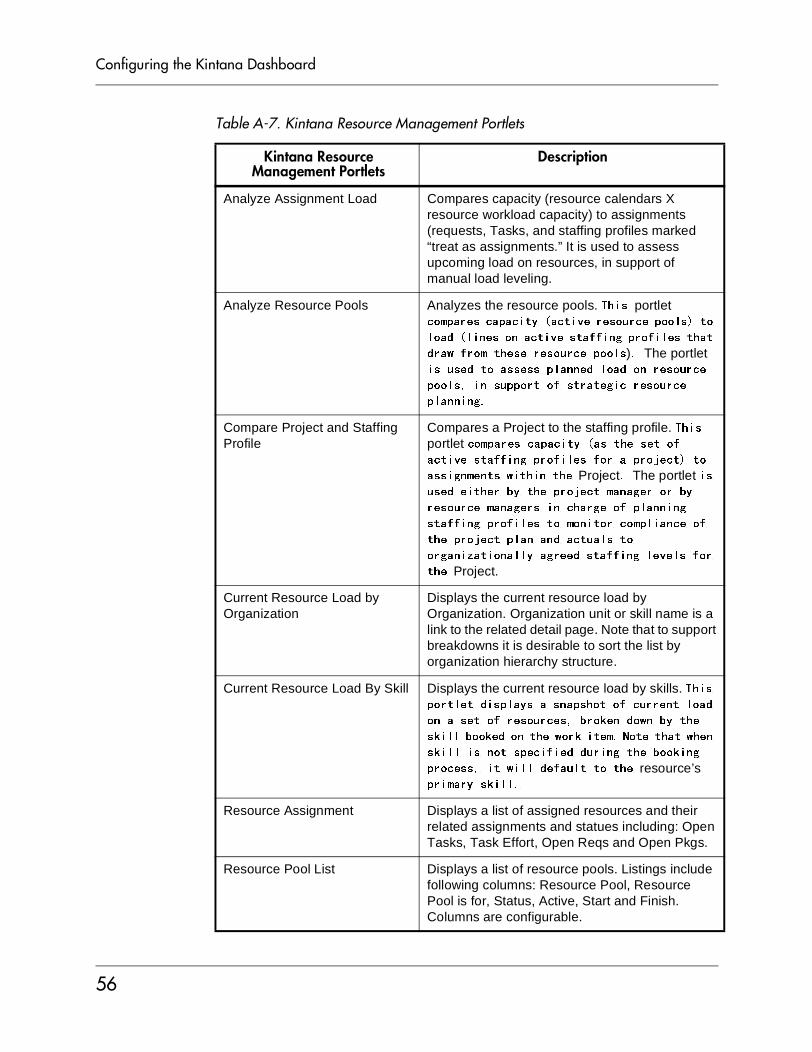
Table A-7. Kintana Resource Management Portlets
Kintana Resource Management Portlets
Description
Analyze Assignment Load Compares capacity (resource calendars X resource workload capacity) to assignments (requests, Tasks, and staffing profiles marked “treat as assignments.” It is used to assess upcoming load on resources, in support of manual load leveling.
Analyze Resource Pools Analyzes the resource pools. �����portlet ���������� ���� ������������������� ��
��������������� ����� �������������� � �
��������� ������������������)��The portlet �������� ������������������������������
������������� ����� � ��������������
��������
Compare Project and Staffing Profile
Compares a Project to the staffing profile. �����portlet ���������� ����� ����� ����� ����� ������������������������ �� ��
�������� ���� ���� ���Project��The portlet ���������� ������� �������� �������������
�����������������������������������
� �������������� ������ ���������������
�������� �������� ���� ��
������ �������������� �����������������
���Project.
Current Resource Load by Organization
Displays the current resource load by Organization. Organization unit or skill name is a link to the related detail page. Note that to support breakdowns it is desirable to sort the list by organization hierarchy structure.
Current Resource Load By Skill Displays the current resource load by skills. ������� �� �������������� ���������� �����
������ ������������������������������ ���
���������������� ��������� ��� �� �� � ����������������� ����������������� �����������
��������� ����������� � �� ���resource’s �������������
Resource Assignment Displays a list of assigned resources and their related assignments and statues including: Open Tasks, Task Effort, Open Reqs and Open Pkgs.
Resource Pool List Displays a list of resource pools. Listings include following columns: Resource Pool, Resource Pool is for, Status, Active, Start and Finish. Columns are configurable.
56
Configuring the Kintana Dashboard
Table A-8. Kintana Time Management Portlets
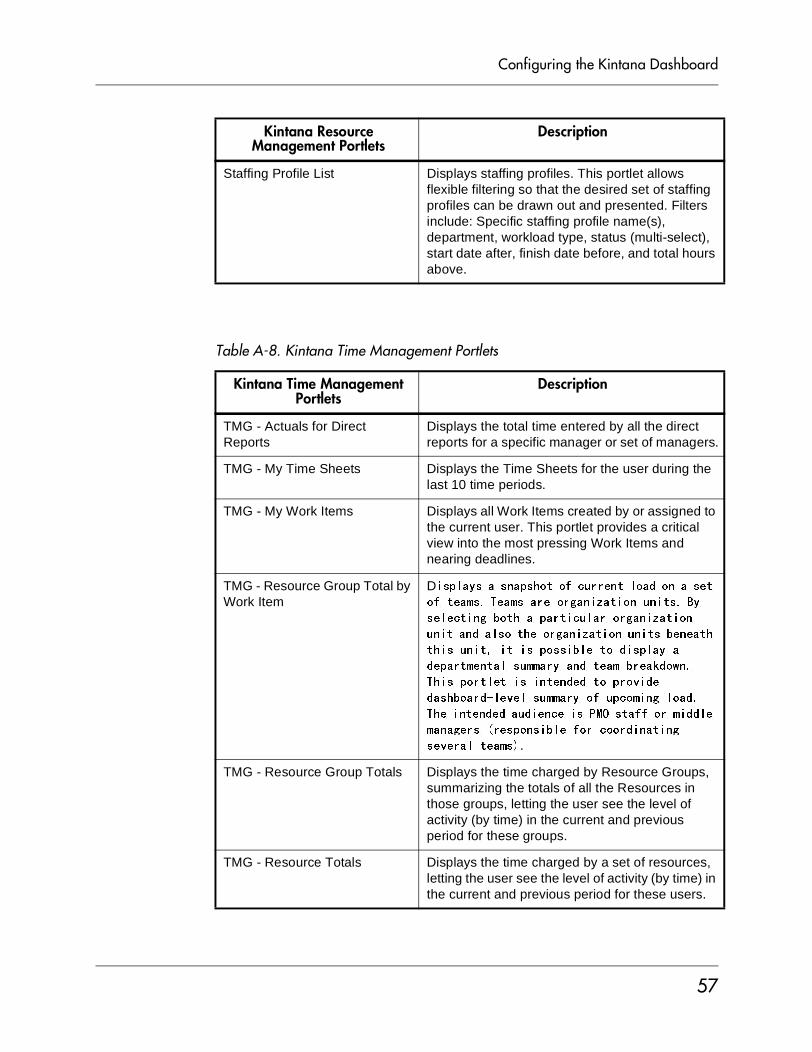
Staffing Profile List Displays staffing profiles. This portlet allows flexible filtering so that the desired set of staffing profiles can be drawn out and presented. Filters include: Specific staffing profile name(s), department, workload type, status (multi-select), start date after, finish date before, and total hours above.
Kintana Time Management Portlets
Description
TMG - Actuals for Direct Reports
Displays the total time entered by all the direct reports for a specific manager or set of managers.
TMG - My Time Sheets Displays the Time Sheets for the user during the last 10 time periods.
TMG - My Work Items Displays all Work Items created by or assigned to the current user. This portlet provides a critical view into the most pressing Work Items and nearing deadlines.
TMG - Resource Group Total by Work Item
D������������ ���������� ����������� �
��� ���� �������������� ������� �� ������� ������ ���� ������������ ����
��� �������� ��������� ������� ������ ��
������� ��� ������������ ���������
��� ��� ������������ �������������
������� �� ������ ������ ���������
�������!���������������������������� ������ �����������������"#$�� �������������
������������������������������ ����
������� ����.
TMG - Resource Group Totals Displays the time charged by Resource Groups, summarizing the totals of all the Resources in those groups, letting the user see the level of activity (by time) in the current and previous period for these groups.
TMG - Resource Totals Displays the time charged by a set of resources, letting the user see the level of activity (by time) in the current and previous period for these users.
Kintana Resource Management Portlets
Description
57
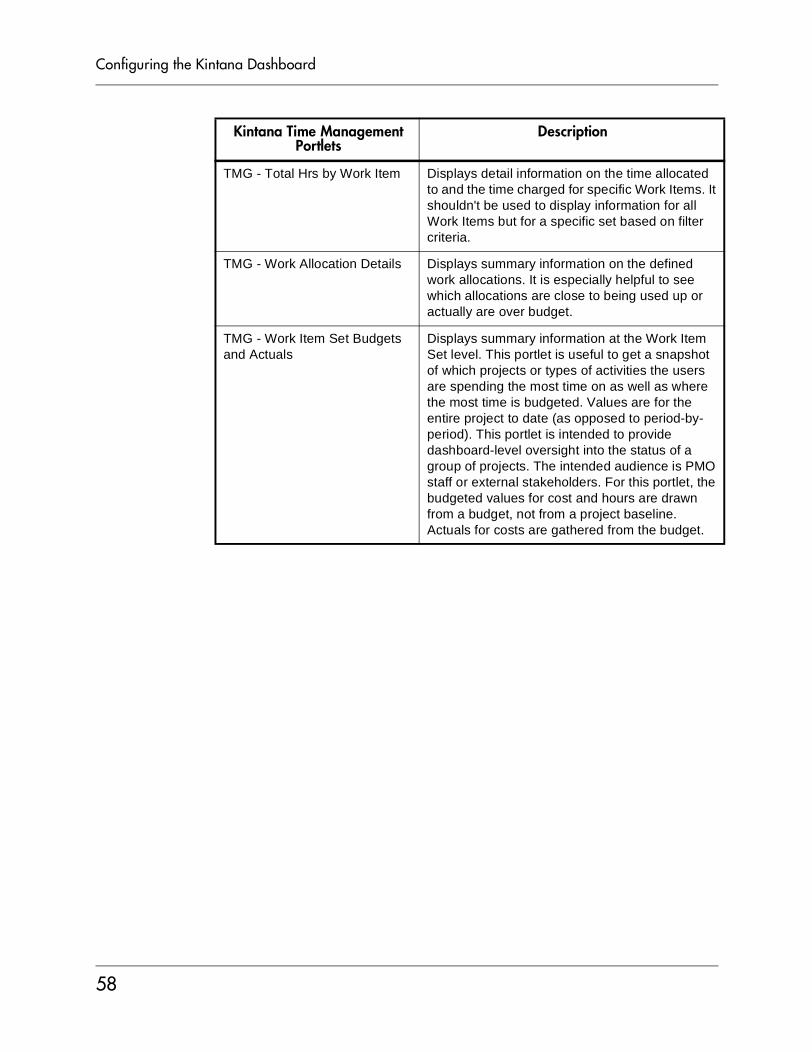
Configuring the Kintana Dashboard
TMG - Total Hrs by Work Item Displays detail information on the time allocated to and the time charged for specific Work Items. It shouldn't be used to display information for all Work Items but for a specific set based on filter criteria.
TMG - Work Allocation Details Displays summary information on the defined work allocations. It is especially helpful to see which allocations are close to being used up or actually are over budget.
TMG - Work Item Set Budgets and Actuals
Displays summary information at the Work Item Set level. This portlet is useful to get a snapshot of which projects or types of activities the users are spending the most time on as well as where the most time is budgeted. Values are for the entire project to date (as opposed to period-by-period). This portlet is intended to provide dashboard-level oversight into the status of a group of projects. The intended audience is PMO staff or external stakeholders. For this portlet, the budgeted values for cost and hours are drawn from a budget, not from a project baseline. Actuals for costs are gathered from the budget.
Kintana Time Management Portlets
Description
58
Configuring the Kintana Dashboard
Appendix
Example: Creating a Portlet
The following example demonstrates how to create a REQUEST LIST portlet. This example portlet shows all of the ‘Internal IS Request’ type requests assigned to or created by the current portlet user. The main topics in this appendix are:
• “Before Building a Portlet” on page 59
• “Visualizing the Portlet Query” on page 60
• “Building the Portlet Query” on page 61
Before Building a PortletBefore building a portlet, the user needs to know what information to display and how to display the information. The following list provides some guidelines to help determine what information is required and how best to display the information:
• What type of information needs to be captured in this portlet? For this example, we would like to display the Request Number, Request Type, Description, Created By User, Assigned User, Priority, Progress (which is a custom field on the Request type), and Current Condition (which is an item of Request User Data).
• What additional requirements are there? Are any visual indicators needed (hyperlinks, Tooltips)? For example, should the Request Numbers be hyperlinked, so users can click on the links to go to Request Detail pages directly. Since the Progress field in this example (a custom field) has a percentage as data, we would like to display the column as progress bars for better visual representation. For Created By Users and Assigned Users, we would like to see more information as Tooltips when the user mouses over the usernames. In this case, the Tooltips should include the user’s full
59
Configuring the Kintana Dashboard
name and email address. The field Current Condition (the Request User Data) has values of Red, Yellow or Green, so we would like to display them as colorful icons.
• What are the database columns for the information to display, and from which tables? This information bears most directly on the SQL query that will serve as the portlet’s “back end,” retrieving and displaying data. What is the criteria necessary to link the database tables.
• What possible filter fields would end users find most helpful?
• Is a JSP page being built for the portlet? Only very advanced Kintana users with extensive knowledge of JSP should create their own JSP pages for portlets.
Visualizing the Portlet QueryThis example portlet takes information using the following SQL query:
SELECT R.REQUEST_ID REQUEST_ID, R.REQUEST_NUMBER REQUEST_NUMBER, R.DESCRIPTION DESCRIPTION, R.CREATED_BY_USERNAME CREATED_BY_USERNAME, R.ASSIGNED_TO_USERNAME ASSIGNED_TO_USERNAME, R.PRIORITY_MEANING PRIORITY, RD.VISIBLE_PARAMETER1 PROGRESS, R.USER_DATA5 CURRENT_ CONDITION, U1.FIRST_NAME || ' ' || U1.LAST_NAME || ', Email: ' ||
U1.EMAIL_ADDRESS ASSIGNED_TO_USER_TOOLTIPS, U2.FIRST_NAME || ' ' || U2.LAST_NAME || ', Email: ' ||
U2.EMAIL_ADDRESS CREATED_BY_USER_TOOLTIPS,FROM KCRT_REQUEST_DETAILS RD,KNTA_USERS U1,KNTA_USERS U2,KCRT_REQUESTS_V RWHERE R.REQUEST_TYPE_NAME = 'Internal IS Request' AND RD.REQUEST_ID = R.REQUEST_ID AND R.BATCH_NUMBER = 1 AND U1.USER_ID (+) = R.ASSIGNED_TO_USER_ID AND U2.USER_ID = R.CREATED_BY AND (R.ASSIGNED_TO_USER_ID = [SYS.USER_ID] OR R.CREATED_BY = [SYS.USER_ID])
60
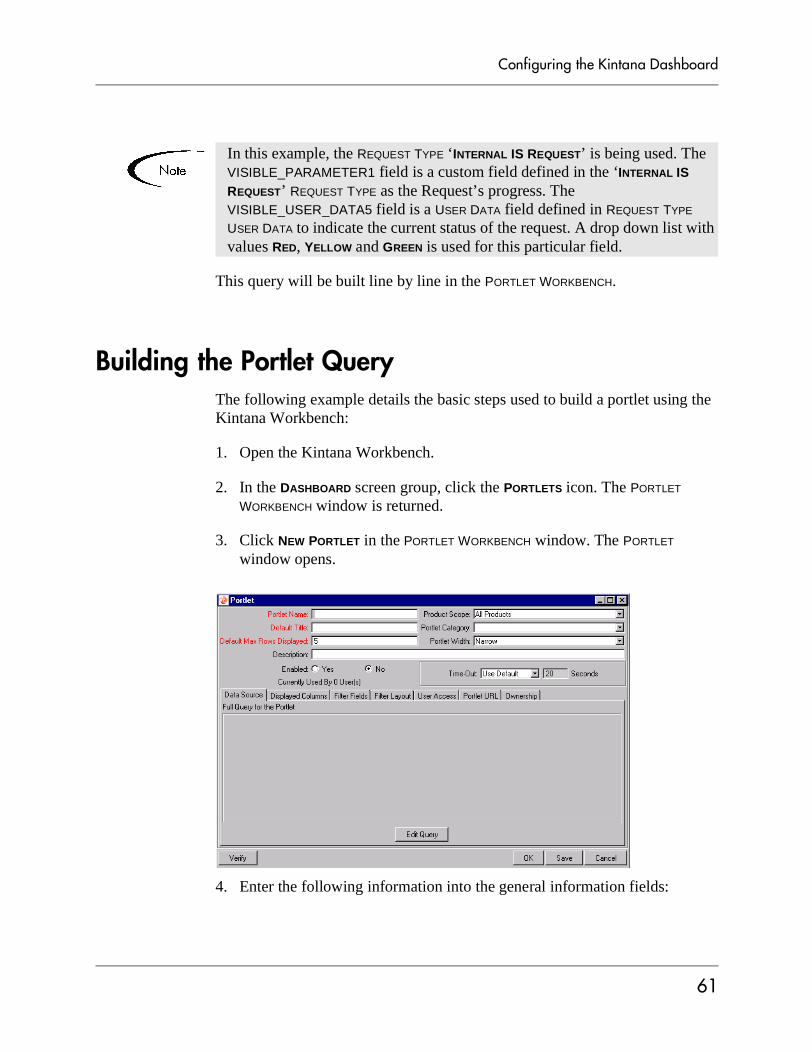
Configuring the Kintana Dashboard
This query will be built line by line in the PORTLET WORKBENCH.
Building the Portlet QueryThe following example details the basic steps used to build a portlet using the Kintana Workbench:
1. Open the Kintana Workbench.
2. In the DASHBOARD screen group, click the PORTLETS icon. The PORTLET WORKBENCH window is returned.
3. Click NEW PORTLET in the PORTLET WORKBENCH window. The PORTLET window opens.
4. Enter the following information into the general information fields:
In this example, the REQUEST TYPE ‘INTERNAL IS REQUEST’ is being used. The VISIBLE_PARAMETER1 field is a custom field defined in the ‘INTERNAL IS REQUEST’ REQUEST TYPE as the Request’s progress. The VISIBLE_USER_DATA5 field is a USER DATA field defined in REQUEST TYPE USER DATA to indicate the current status of the request. A drop down list with values RED, YELLOW and GREEN is used for this particular field.
61
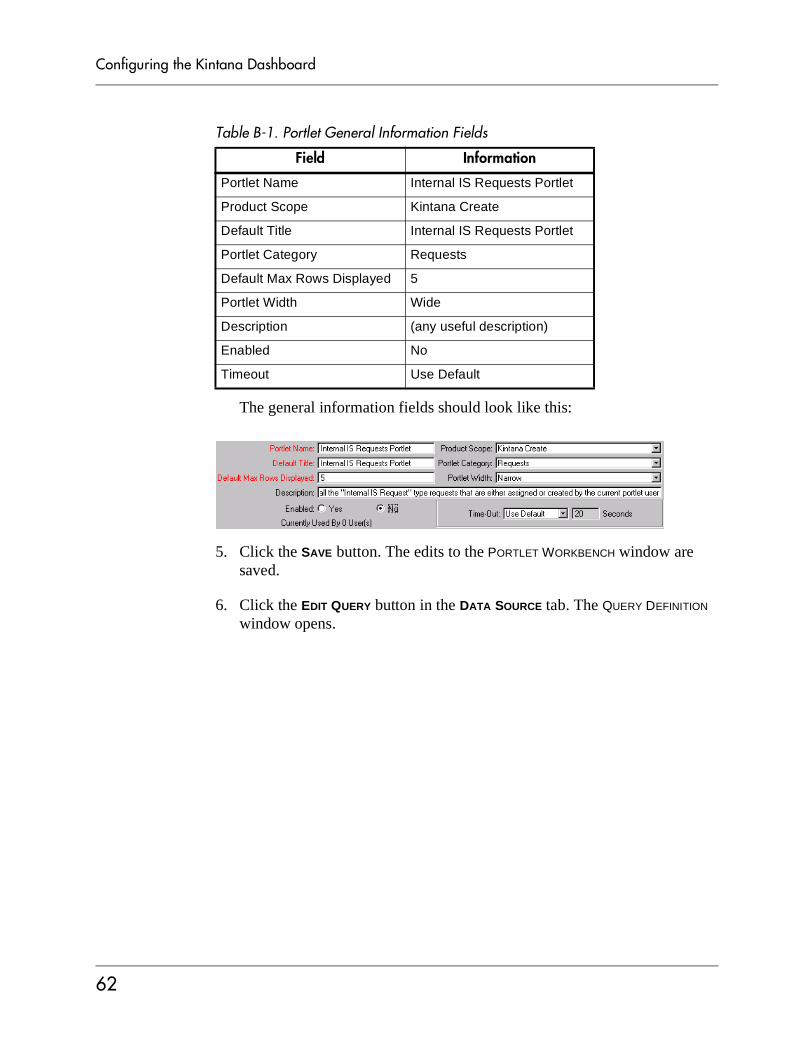
Configuring the Kintana Dashboard
The general information fields should look like this:
5. Click the SAVE button. The edits to the PORTLET WORKBENCH window are saved.
6. Click the EDIT QUERY button in the DATA SOURCE tab. The QUERY DEFINITION window opens.
Table B-1. Portlet General Information Fields
Field Information
Portlet Name Internal IS Requests Portlet
Product Scope Kintana Create
Default Title Internal IS Requests Portlet
Portlet Category Requests
Default Max Rows Displayed 5
Portlet Width Wide
Description (any useful description)
Enabled No
Timeout Use Default
62
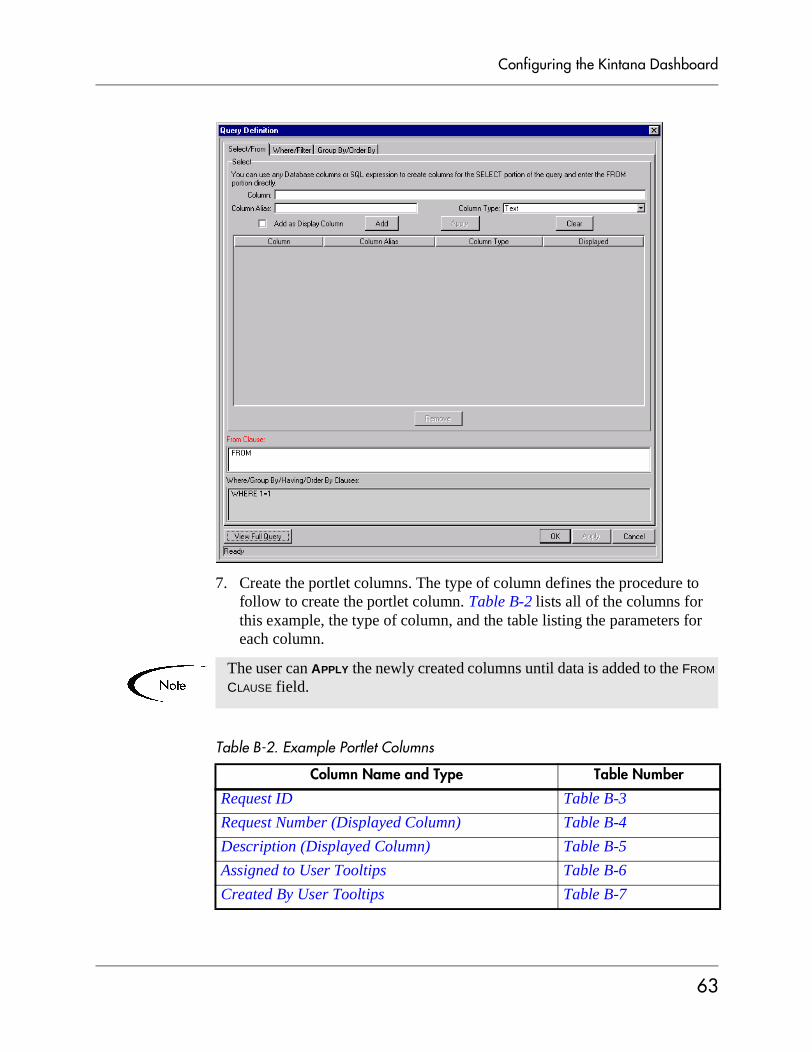
Configuring the Kintana Dashboard
7. Create the portlet columns. The type of column defines the procedure to follow to create the portlet column. Table B-2 lists all of the columns for this example, the type of column, and the table listing the parameters for each column.
Table B-2. Example Portlet Columns
The user can APPLY the newly created columns until data is added to the FROM CLAUSE field.
Column Name and Type Table Number
Request ID Table B-3
Request Number (Displayed Column) Table B-4
Description (Displayed Column) Table B-5
Assigned to User Tooltips Table B-6
Created By User Tooltips Table B-7
63
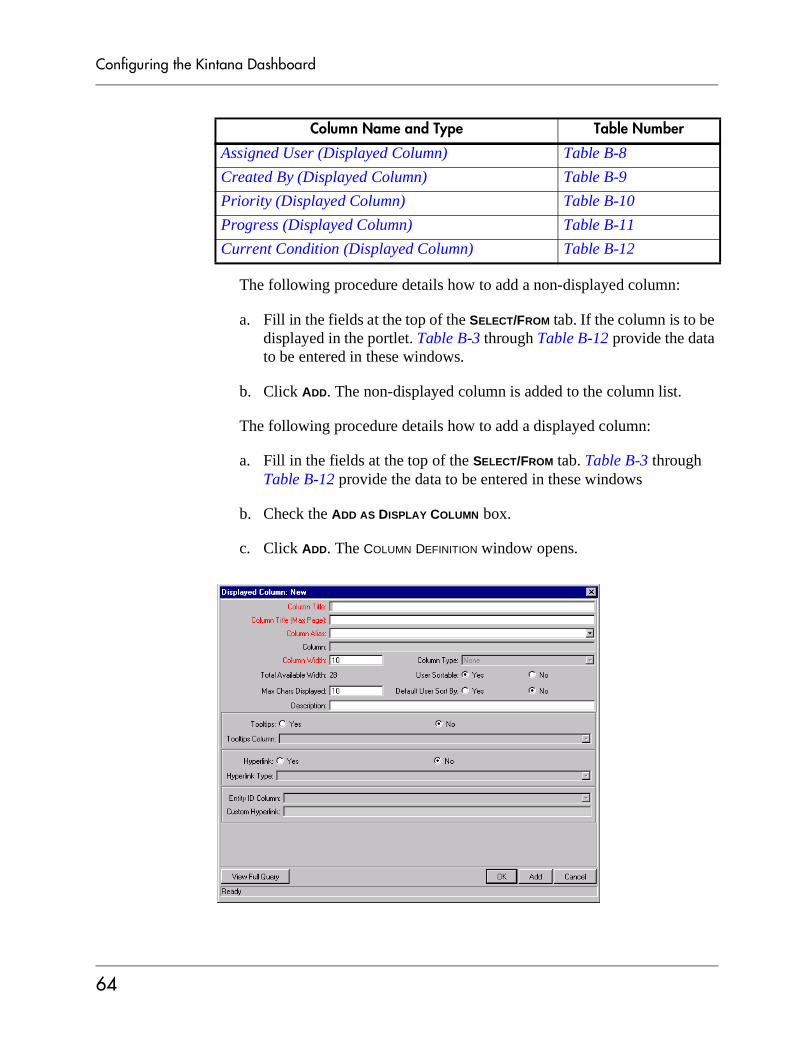
Configuring the Kintana Dashboard
The following procedure details how to add a non-displayed column:
a. Fill in the fields at the top of the SELECT/FROM tab. If the column is to be displayed in the portlet. Table B-3 through Table B-12 provide the data to be entered in these windows.
b. Click ADD. The non-displayed column is added to the column list.
The following procedure details how to add a displayed column:
a. Fill in the fields at the top of the SELECT/FROM tab. Table B-3 through Table B-12 provide the data to be entered in these windows
b. Check the ADD AS DISPLAY COLUMN box.
c. Click ADD. The COLUMN DEFINITION window opens.
Assigned User (Displayed Column) Table B-8
Created By (Displayed Column) Table B-9
Priority (Displayed Column) Table B-10
Progress (Displayed Column) Table B-11
Current Condition (Displayed Column) Table B-12
Column Name and Type Table Number
64
Configuring the Kintana Dashboard
d. Fill in the appropriate fields. Table B-3 through Table B-12 provide the data to be entered in these windows.
e. Click OK. The displayed column is added to the column list.
Make sure to create the columns in the order that they appear in this document. Some column definitions are dependent on others preceding them.
Table B-3. Request ID
Field Information
Select/From Tab
Column R.REQUEST_ID
Column Alias REQUEST_ID (this should be filled in automatically once the ‘Column’ field is filled and exited)
Column Type Text
Add as Display Column Unchecked
Table B-4. Request Number (Displayed Column)
Field Information
Select/From Tab
Column R.REQUEST_NUMBER
Column Alias REQUEST_NUMBER (this should be filled in automatically once the ‘Column’ field is filled and exited)
Column Type Text
Add as Display Column Checked
Column Definition Window
Column Title Req #
Column Title (Max Page) Request No
Max Chars Displayed 10
Column Width 10
User Sortable Yes
Default User Sort By No
Description (any useful description)
Tooltips No
Hyperlink Yes
65
Configuring the Kintana Dashboard
Hyperlink Type Request Detail Page
Entity ID Column REQUEST_ID
Table B-5. Description (Displayed Column)
Field Information
Select/From Tab
Column R.DESCRIPTION
Select/From Tab
Column Alias DESCRIPTION (this should be filled in automatically once the ‘Column’ field is filled and exited)
Column Type Text
Add as Display Column Checked
Column Definition Window
Column Title Description
Column Title (Max Page) Description
Max Chars Displayed 12
Column Width 12
User Sortable Yes
Default User Sort By No
Description (any useful description)
Tooltips No
Hyperlink No
Table B-6. Assigned to User Tooltips
Field Information
Select/From Tab
Column U1.FIRST_NAME || ' ' || U1.LAST_NAME || ', Email: ' || U1.EMAIL_ADDRESS
Column Alias ASSIGNED_TO_USER_TOOLTIPS
Column Type Text
Add as Display Column Unchecked
Table B-4. Request Number (Displayed Column)
Field Information
66
Configuring the Kintana Dashboard
Table B-7. Created By User Tooltips
Field Information
Select/From Tab
Column U2.FIRST_NAME || ' ' || U2.LAST_NAME || ', Email: ' || U2.EMAIL_ADDRESS
Column Alias CREATED_BY_USER_TOOLTIPS
Column Type Text
Add as Display Column Unchecked
Table B-8. Assigned User (Displayed Column)
Field Information
Select/From Tab
Column R.ASSIGNED_TO_USERNAME
Column Alias ASSIGNED_TO_USERNAME (this should be filled in automatically once the ‘Column’ field is filled and exited)
Column Type Text
Add as Display Column Checked
Column Definition Window
Column Title Assigned User
Column Title (Max Page) Assigned User
Max Chars Displayed 13
Column Width 13
User Sortable Yes
Default User Sort By No
Description (any useful description)
67
Configuring the Kintana Dashboard
Tooltips Yes
Tooltips Column ASSIGNED_TO_USER_TOOLTIPS
Hyperlink No
Table B-9. Created By (Displayed Column)
Field Information
Select/From Tab
Column R.CREATED_BY_USERNAME
Column Alias CREATED_BY_USERNAME (this should be filled in automatically once the ‘Column’ field is filled and exited)
Column Type Text
Add as Display Column Checked
Column Definition Window
Column Title Created By
Column Title (Max Page) Created By
Max Chars Displayed 10
Column Width 10
User Sortable Yes
Default User Sort By No
Description (any useful description)
Tooltips Yes
Tooltips Column CREATED_BY_USER_TOOLTIPS
Hyperlink No
Table B-10. Priority (Displayed Column)
Field Information
Select/From Tab
Column R.PRIORITY_MEANING
Column Alias PRIORITY (this should be filled in automatically once the ‘Column’ field is filled and exited)
Column Type Text
Table B-8. Assigned User (Displayed Column)
Field Information
68
Configuring the Kintana Dashboard
Add as Display Column Checked
Column Definition Window
Column Title Priority
Column Title (Max Page) Priority
Max Chars Displayed 8
Column Width 8
User Sortable Yes
Default User Sort By No
Description (any useful description)
Tooltips No
Hyperlink No
Table B-11. Progress (Displayed Column)
Field Information
Select/From Tab
Column RD.VISIBLE_PARAMETER1
Column Alias PROGRESS (this should be filled in automatically once the ‘Column’ field is filled and exited)
Column Type Percentage Bar
Add as Display Column Checked
Column Definition Window
Column Title Progress
Column Title (Max Page) Progress
User Sortable Yes
Default User Sort By No
Description (any useful description)
Tooltips No
Hyperlink No
Table B-10. Priority (Displayed Column)
Field Information
69
Configuring the Kintana Dashboard
8. Enter the FROM clause in the FROM CLAUSE field:
FROM KCRT_REQUEST_DETAILS RD, KNTA_USERS U1, KNTA_USERS U2,KCRT_REQUESTS_V R
9. Click APPLY to save the data entered.
10. It is now time to enter the WHERE clause. Click the WHERE/FILTER tab in the QUERY DEFINITION window. Enter the WHERE clause in the WHERE CLAUSE field:
WHERE R.REQUEST_TYPE_NAME = 'Internal IS Request' AND RD.REQUEST_ID = R.REQUEST_ID AND R.BATCH_NUMBER = 1 AND U1.USER_ID (+) = R.ASSIGNED_TO_USER_ID AND U2.USER_ID = R.CREATED_BY AND (R.ASSIGNED_TO_USER_ID = [SYS.USER_ID] OR R.CREATED_BY = [SYS.USER_ID])
If desired, click ENLARGE to open a larger SQL entry area to work in.
Table B-12. Current Condition (Displayed Column)
Field Information
Select/From Tab
Column R.USER_DATA5
Column Alias CURRENT_CONDITION
Column Type Summary Condition/Exception
Add as Display Column Checked
Column Definition Window
Column Title Summary Condition/Exception
Column Title (Max Page) Summary Condition/Exception
User Sortable Yes
Default User Sort By No
Description (any useful description)
Tooltips No
Hyperlink No
70
Configuring the Kintana Dashboard
11. Click APPLY when finished to save changes without closing the enlarged window or OK to save changes and close the enlarged window.
12. Click OK to save the data entered. The PORTLET window is displayed.
13. Click SAVE to save the portlet.
14. From the PORTLET window, click the EDIT QUERY button. The QUERY DEFINITION window is returned.
15. Click the WHERE/FILTER tab. The WHERE/FILTER window is returned.
16. Click NEW. The FILTER FIELD DEFINITION window opens.
17. Create the filter fields. See Table B-13 for a list of the filter fields and their associated input tables.
Table B-13. Filter Fields
Filter Field Table
Request Status Filter Field Table B-14
‘Created From’ Date Filter Field Table B-15
71
Configuring the Kintana Dashboard
To create a filter field:
a. Fill in the appropriate fields using the data in the following tables and click ADD. The filter field is saved and all fields in the FILTER FIELD DEFINITION window are cleared.
b. Repeat until the last filter field. When the information for the last filter field has been entered, click OK. The filter field is saved and the FILTER FIELD DEFINITION window closes, returning to the WHERE/FILTER tab of the QUERY DEFINITION window.
‘Created To’ Date Filter Field Table B-16
Current Condition Filter Field Table B-17
Priority Filter Field Table B-18
Table B-14. Request Status Filter Field
Field Information
Field Prompt Request Status
Token P_REQ_STATUS
Description (any useful description)
Validation CRT - Request Type Status - All
Multi-Select Enabled Yes
Required No
Display Only No
Enabled Yes
When the Portlet user chooses a value for this field, append to Where Clause
AND R.STATUS_ID IN([P.P_REQ_STATUS])
Table B-15. ‘Created From’ Date Filter Field
Field Information
Field Prompt Created From
Token P_CREATED_FROM
Description (any useful description)
Filter Field Table
72
Configuring the Kintana Dashboard
Validation Date
Required No
Display Only No
Enabled Yes
When the Portlet user chooses a value for this field, append to Where Clause
AND R.CREATION_DATE >= TO_DATE(‘[P.P_CREATED_FROM]’, ‘YYYY-MM-DDHH24:MI:SS’)
Table B-16. ‘Created To’ Date Filter Field
Field Information
Field Prompt To
Token P_CREATED_TO
Description (any useful description)
Validation Date
Required No
Display Only No
Enabled Yes
When the Portlet user chooses a value for this field, append to Where Clause
AND TO_DATE(R.CREATION_DATE || '00:00:00', 'YYYY-MM-DD HH24:MI:SS') <= TO_DATE([P.P_CREATED_TO], 'YYYY-MM-DDHH24:MI:SS')
Table B-17. Current Condition Filter Field
Field Information
Field Prompt Current Condition
Token P_CONDITION
Description (any useful description)
Validation DRV - Summary Condition
Multi-Select Enabled Yes
Required No
Display Only No
Enabled Yes
Table B-15. ‘Created From’ Date Filter Field
Field Information
73
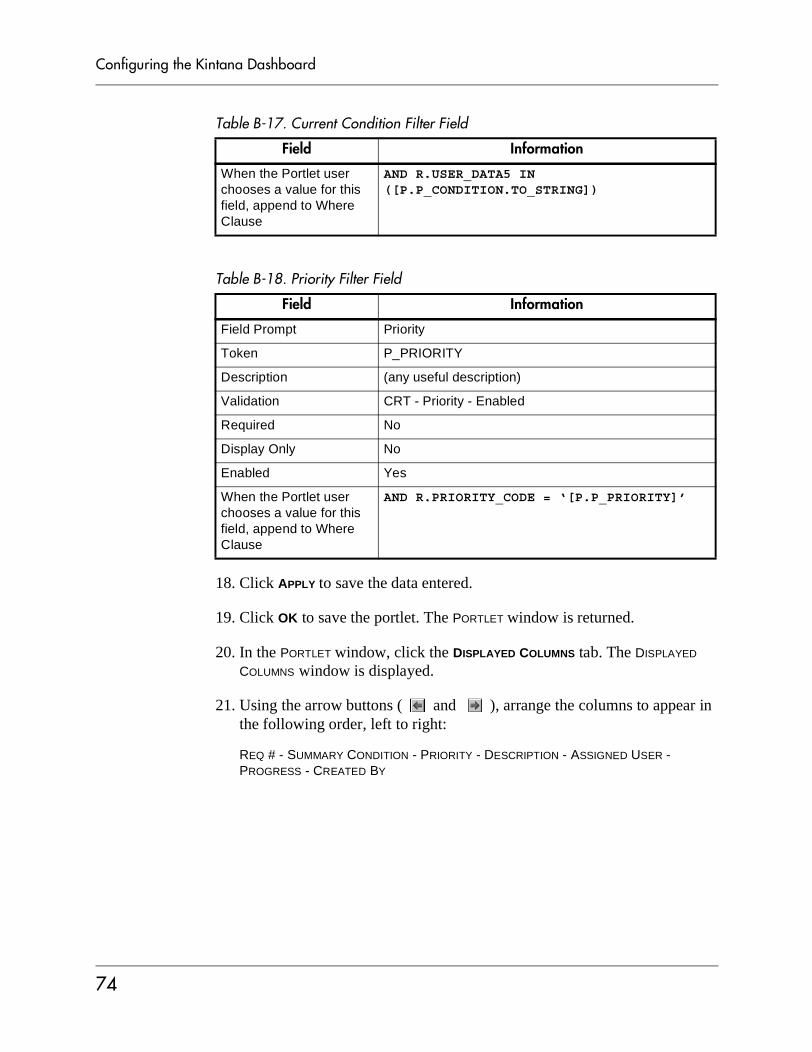
Configuring the Kintana Dashboard
18. Click APPLY to save the data entered.
19. Click OK to save the portlet. The PORTLET window is returned.
20. In the PORTLET window, click the DISPLAYED COLUMNS tab. The DISPLAYED COLUMNS window is displayed.
21. Using the arrow buttons ( and ), arrange the columns to appear in the following order, left to right:
REQ # - SUMMARY CONDITION - PRIORITY - DESCRIPTION - ASSIGNED USER - PROGRESS - CREATED BY
When the Portlet user chooses a value for this field, append to Where Clause
AND R.USER_DATA5 IN ([P.P_CONDITION.TO_STRING])
Table B-18. Priority Filter Field
Field Information
Field Prompt Priority
Token P_PRIORITY
Description (any useful description)
Validation CRT - Priority - Enabled
Required No
Display Only No
Enabled Yes
When the Portlet user chooses a value for this field, append to Where Clause
AND R.PRIORITY_CODE = ‘[P.P_PRIORITY]’
Table B-17. Current Condition Filter Field
Field Information
74
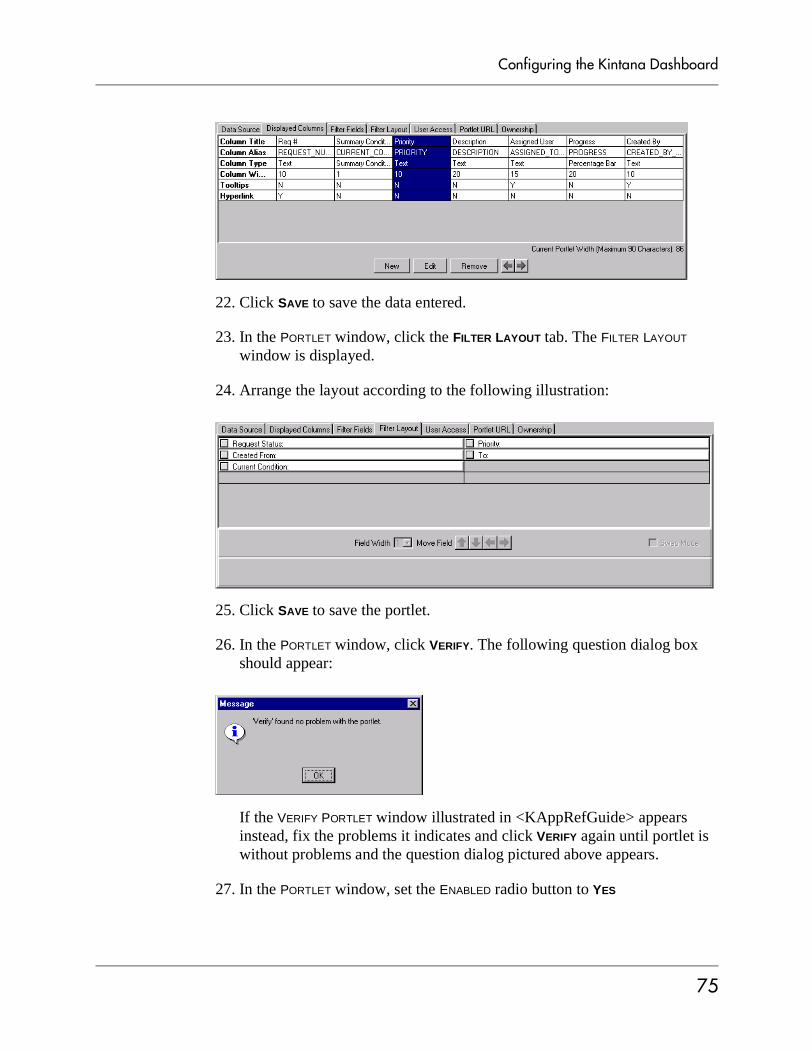
Configuring the Kintana Dashboard
22. Click SAVE to save the data entered.
23. In the PORTLET window, click the FILTER LAYOUT tab. The FILTER LAYOUT window is displayed.
24. Arrange the layout according to the following illustration:
25. Click SAVE to save the portlet.
26. In the PORTLET window, click VERIFY. The following question dialog box should appear:
If the VERIFY PORTLET window illustrated in <KAppRefGuide> appears instead, fix the problems it indicates and click VERIFY again until portlet is without problems and the question dialog pictured above appears.
27. In the PORTLET window, set the ENABLED radio button to YES
75

Configuring the Kintana Dashboard
28. Click SAVE to enable the portlet without closing the PORTLET window. Click OK to save changes and close the PORTLET window.
29. Open the Kintana Dashboard.
30. Add the INTERNAL IS REQUESTS portlet to the Dashboard using the PERSONALIZE page. The portlet should appear where it was placed. The following represents what the portlet should look like:
The custom portlet has been successfully created.
76
Index
Index
AAbout this document 1Access settings for portlets 36Add a Portlet drop down list
33Add Security Group(s) button
29Add User(s) button 29Add Validation Value win-
dow 35Adding portlets to the Dash-
board 32Additional Resources
Kintana documentation 3Kintana education 6Kintana services 6Kintana support 6
Advanced ConfigurationGuides 3
BButtons
Add Security Group(s) 29Add User(s) 29Edit Query 19New Report 39
CCategories for portlets 33Changing portlets 38
Column Alias field 19Column Definition window
20, 23Configuring the default dash-
board 42Cost Management portlets 48Creating a portlet 16Custom Portlets 10
DDashboard
adding portlets 32configuring the default
dashboard 42Dashboard Configuration
introduction 1Data Source tab 32Data sources 21Default Dashboard 9, 41
adding multiple pages 45viewing 45
Default Order By Clause field23
Definingcategories for portlets 33filter fields 25portlets displayed col-
umns 23Deleting a portlet 38Demand Management portlet
49Detailed portlet reports 39
Displayed Columns tab 24, 37Document
about this document 1how to user this document
2who should read 2
Documentation 3
EEdit Query button 19Editing a portlet 37Enabling a portlet 33
FFields
Column Alias 19Default Order By Clause
23From Clause 21Group By Clause 23Having Clause 23Query Definition 21Report Type 39Where Clause 21
Filter fieldlaying out the fields 26modifying the width 26moving 27switching positions 27
Filter Fields 11Filter Fields tab 32
Kintana I-77
Index
Filter Layout tab 26, 27, 28Filter window 22, 25, 26First-time personalizing 31From Clause field 21
GGroup By Clause field 23Group By/Order By tab 18, 22
HHaving Clause field 23How to use this document 2
JJSP pages 29
KKey concepts 9
LLaying out portlet filter fields
26
MMaintaining portlets 36Migrating portlets 40Modifying the width of a filter
field 26Moving a filter field 27
NNew Report button 39New Report Submission win-
dow 39
OOrganizing portlets 41Ownership of a portlet 30Ownership tab 30Ownership window 30
PPackages portlets 49Portlet
building 10example 59
Portlet Detail report 40Portlet Migrator 40Portlet Security and Licensing
12Portlet URL tab 29Portlet URL window 29Portlet window 24Portlets
adding to the Dashboard32
before building a portlet16, 59
building 15Cost Management 48creating 16defining categories 33defining displayed col-
umns 23defining filter fields 25deleting 38
Demand Management 49detailed report 39editing 37enabling 33laying out filter fields 26maintaining 36migration 40organization 41Packages 49Program 51Project Overview 53Projects 52propagating changes 38Requests 54requiring first-time per-
sonalizing 31Resource Management 56security 28setting access 36setting ownership 30System 47Time Management 57using external data sourc-
es 21validation 34verifying 32visualizing a query 60
Program portlets 51Project Overview
portlets 53Projects portlets 52Propagating changes to port-
lets 38
QQuery Definition field 21Query Definition window 19,
24
Kintana I-78
Index
RRelative Arrange Data Con-
tent URL 30Relative Filter By Content
URL 30Relative Portlet Max Page
URL 30Relative Portlet Page URL 29Report Type field 39Requests portlets 54Requiring first-time portlet
personalizing 31Resource Management port-
lets 56
SSecurity for portlets 28Security Group column 31Select/From tab 18, 19Setting access for portlets 36Setting ownership of a portlet
30SQL queries 18Switching filter field posi-
tions 27System Portlets 10, 47
TTabs
Data Source 32Displayed Columns 24, 37Filter Fields 32Filter Layout 26, 27, 28Group By/Order By 18, 22Ownership 30Portlet URL 29
Select/From 18, 19User Access 28Where/Filter 18, 21
Time Management portlets 57Total Available Width 24
UURL
Relative Arrange DataContent 30
Relative Filter By Content30
Relative Portlet Max Page30
Relative Portlet Page 29User Access tab 28User Access window 28Using external data sources
21
VValidation window 34, 35Verifying a new portlet 32Visualizing a portlet query 60
WWhere Clause field 21Where/Filter tab 18, 21Who should read this docu-
ment 2Windows
Add Validation Value 35Column Definition 20, 23Filter 22, 25, 26New Report Submission
39Ownership 30Portlet 24Portlet URL 29Query Definition 19, 24User Access 28Validation 34, 35
Kintana I-79

Index
Kintana I-80


