Embed Size (px)
Citation preview

Chain Saw Safety Manual
STIH)
SM_MS_01_U_G4.book Seite 0 Donnerstag, 1. Juli 2004 10:32 10
1
EnglishBA
_SE_
135_
001_
01_0
3.fm
Pr
inte
d on
chl
orin
e-fre
e pa
per.
Prin
ting
inks
con
tain
veg
etab
le o
ils; p
aper
can
be
recy
cled
.©
AN
DR
EAS
STIH
L AG
& C
o. K
G, 2
004
Cont
Safety WorkinMaintenMain P
utting insaw
in the chine"
e
to n
r to the lar saw
r if you is
Chain Saw Safety Manual
0457
184
012
1. M
5. L
4. R
ei. P
rinte
d in
Ger
man
y
STIHl
manuals of specific machines.
You should therefore always refeinstruction manual of your particumodel.
Please contact your STIHL dealehave any queries after reading thmanual.
ents
Precautions and g Techniques ......................... 2ance Chart ......................... 16
arts of the Saw .................... 18
This manual contains the safety precautions and recommended ctechniques outlined in STIHL chainstruction manuals.
Please note, that the illustrationschapter on "Main Parts of the Mashow the MS 210.
Other chainsaw models may havdifferent parts and controls.
This manual contains referencesvarious chapters in the instructio
2
English
Manual
observegeneraaxe or
referenprecaueven fa
Alwaysstandar
If you hmodel bHave yto operspecialoperati
Minors chainsaanimalsarea wh
or eather .
r
y other
hine. insaw
emely
hine.
, chain re aw
ly ns in dealer. t parts
hine.
TIHL , chain
nts are ur
SafetWork
Chain Saw Safety
Because a chainsaw is a high-speed wood-cutting tool with sharp cutters, some special safety precautions must be
d in addition to those that lly apply when working with an hand saw.
It is important that you read and understand the instruction manual before using your chainsaw for the first time and keep it in a safe place for future
ce. Non-observance of the safety tions may result in serious or tal injury.
observe local safety regulations, ds and ordinances.
ave never used this chainsaw efore:
our STIHL dealer show you how ate your chainsaw or attend a course of training in chainsaw on.
should never be allowed to use a w. Children, bystanders and should not be allowed in the ere a chainsaw is in use.
When the machine is not in use (work break), shut it off so that it does not endanger others and secure it against unauthorized use.
The chainsaw user is responsible for accidents or risks involving third parties or their property.
Do not lend or rent your chainsaw without the instruction manual. Be sure that anyone using your saw understands the information contained in this manual.
You must be rested, healthy and in good physical condition to operate a power tool.
Persons with pacemakers only:The ignition system of your unit produces an electromagnetic field of a very low intensity. This field may interfere with some pacemakers. To reduce the risk of serious or fatal injury, persons with pacemaker should consult their physician and the pacemaker manufacturer before operating this tool.
Do not operate this power tool while under the influence of any substance (drugs, alcohol) which might impair vision, dexterity or judgment.
To reduce the risk of accidentsinjury, put off the work in poor wconditions (rain, snow, ice, wind)
Use your saw for cutting wood owooden objects only.
Do not use your chainsaw for anpurpose since this may result in accidents or damage to the macNever attempt to modify your chain any way since this can be extrdangerous and may also result inaccidents or damage to the mac
Only use tools, guide bars, chainssprockets and accessories that aexplicitly approved for this chainsmodel by STIHL or are technicalidentical. If you have any questiothis respect, consult a specialist Use only high quality replacemensince there is otherwise a risk ofaccidents or damage to the mac
STIHL recommends the use of Soriginal tools, guide bars, chainssprockets and accessories. The characteristics of these componespecifically designed to match yochainsaw model and meet your performance requirements.
y Precautions and ing Techniques
3Chain S
English
ClothiWear pequipm
Do not scarvesrestrict with theconfinecap, ha
face shear plu
ble naked not
not
.
still hot h fire.
ow any elease
tilated l, wipe
s on ly.
aw Safety Manual
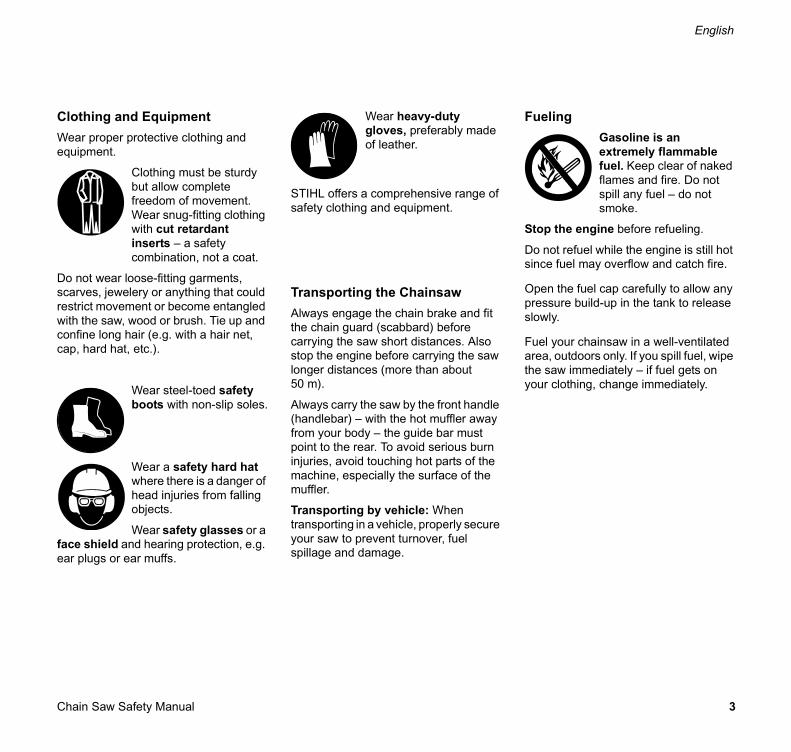
ng and Equipmentroper protective clothing and ent.
Clothing must be sturdy but allow complete freedom of movement. Wear snug-fitting clothing with cut retardant inserts – a safety combination, not a coat.
wear loose-fitting garments, , jewelery or anything that could movement or become entangled saw, wood or brush. Tie up and long hair (e.g. with a hair net, rd hat, etc.).
Wear steel-toed safety boots with non-slip soles.
Wear a safety hard hat where there is a danger of head injuries from falling objects.
Wear safety glasses or a ield and hearing protection, e.g.
gs or ear muffs.
Wear heavy-duty gloves, preferably made of leather.
STIHL offers a comprehensive range of safety clothing and equipment.
Transporting the ChainsawAlways engage the chain brake and fit the chain guard (scabbard) before carrying the saw short distances. Also stop the engine before carrying the saw longer distances (more than about 50 m).
Always carry the saw by the front handle (handlebar) – with the hot muffler away from your body – the guide bar must point to the rear. To avoid serious burn injuries, avoid touching hot parts of the machine, especially the surface of the muffler.
Transporting by vehicle: When transporting in a vehicle, properly secure your saw to prevent turnover, fuel spillage and damage.
Fueling Gasoline is an extremely flammafuel. Keep clear offlames and fire. Dospill any fuel – do smoke.
Stop the engine before refueling
Do not refuel while the engine is since fuel may overflow and catc
Open the fuel cap carefully to allpressure build-up in the tank to rslowly.
Fuel your chainsaw in a well-venarea, outdoors only. If you spill fuethe saw immediately – if fuel getyour clothing, change immediate
4
English
Manual
Differendifferen
This recausingoff and
from
aw. Do unning r saw
nd th the
ual.
en the
Chain Saw Safety
t models may be equipped with t fuel caps.
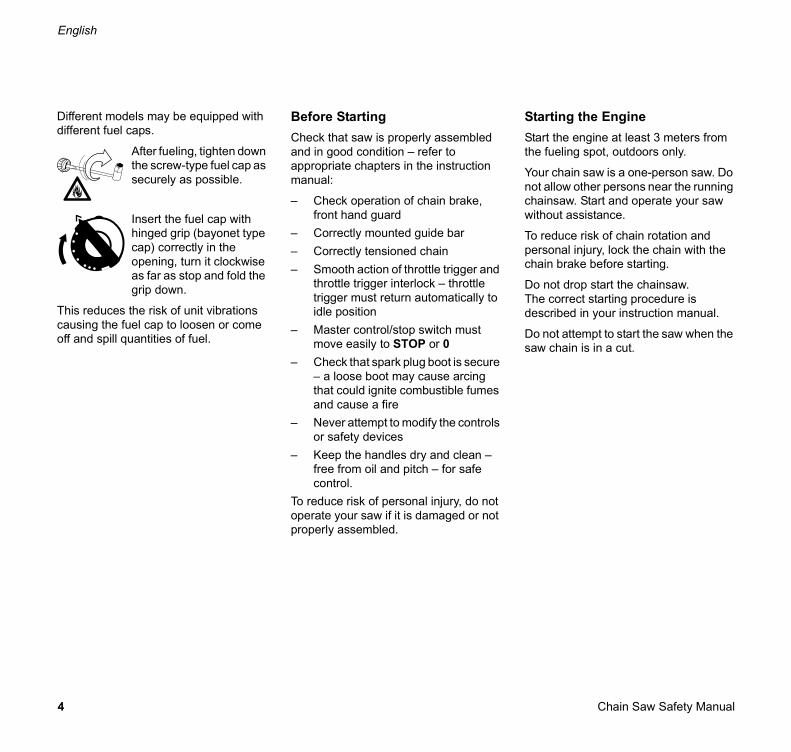
After fueling, tighten down the screw-type fuel cap as securely as possible.
Insert the fuel cap with hinged grip (bayonet type cap) correctly in the opening, turn it clockwise as far as stop and fold the grip down.
duces the risk of unit vibrations the fuel cap to loosen or come
spill quantities of fuel.
Before StartingCheck that saw is properly assembled and in good condition – refer to appropriate chapters in the instruction manual:
– Check operation of chain brake, front hand guard
– Correctly mounted guide bar– Correctly tensioned chain– Smooth action of throttle trigger and
throttle trigger interlock – throttle trigger must return automatically to idle position
– Master control/stop switch must move easily to STOP or 0
– Check that spark plug boot is secure – a loose boot may cause arcing that could ignite combustible fumes and cause a fire
– Never attempt to modify the controls or safety devices
– Keep the handles dry and clean – free from oil and pitch – for safe control.
To reduce risk of personal injury, do not operate your saw if it is damaged or not properly assembled.
Starting the EngineStart the engine at least 3 metersthe fueling spot, outdoors only.
Your chain saw is a one-person snot allow other persons near the rchainsaw. Start and operate youwithout assistance.
To reduce risk of chain rotation apersonal injury, lock the chain wichain brake before starting.
Do not drop start the chainsaw.The correct starting procedure isdescribed in your instruction man
Do not attempt to start the saw whsaw chain is in a cut.
5Chain S
English
DuringIn the ean emeimmediControl
Never aunatten
When tNote thfor a shthrottle
Take sp– dampground
Avoid sor in dit
Ensurefooting.
Do not distancneeded
Be partwearingyour abalarms,
To redubreak inexhaus
oke your fuel system.
as not fall), ndition see
nd
e ed. In d by
tate ssary, chain d by
aw Safety Manual
Operationvent of impending danger or in rgency, switch off the engine ately by moving the Master / stop switch to $ or d.
llow the chainsaw to run ded.
he engine is running:at the chain continues to rotate ort period after you let go of the trigger – flywheel effect.
ecial care in slippery conditions , snow, ice, on slopes, uneven and freshly debarked logs.
tumbling on stumps, roots, rocks ches.
you always have a firm and safe
work alone – keep within calling e of others in case help is .
icularly alert and cautious when hearing protection because ility to hear warnings (shouts, etc.) is restricted.
ce the risk of accidents, take a good time to avoid tiredness or
tion.
To reduce risk of fire, keep hot exhaust gases and hot muffler away from easily combustible materials (e.g. wood chips, bark, dry grass, fuel).Mufflers with a catalytic converter can become particularly hot.
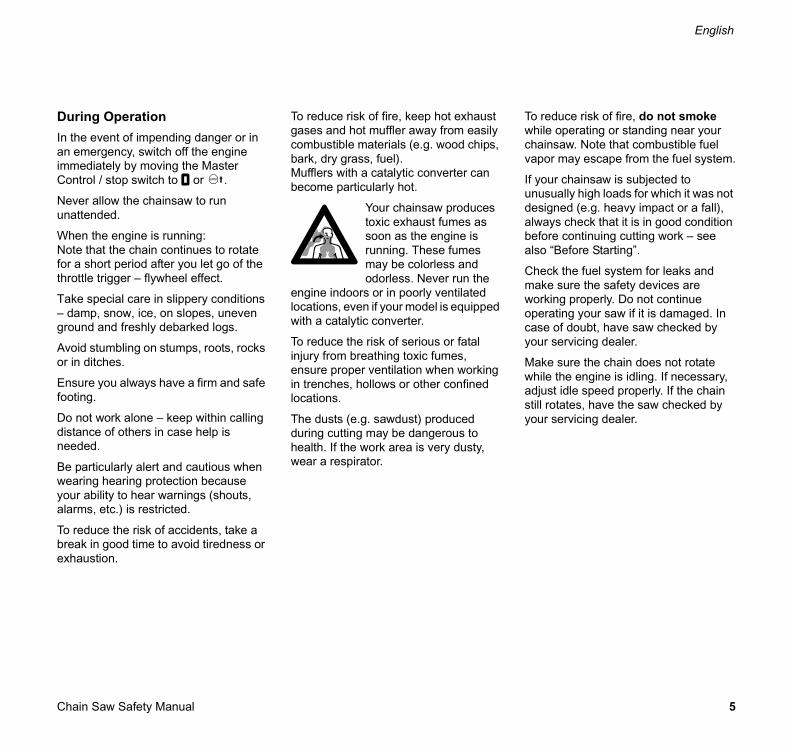
Your chainsaw produces toxic exhaust fumes as soon as the engine is running. These fumes may be colorless and odorless. Never run the
engine indoors or in poorly ventilated locations, even if your model is equipped with a catalytic converter.
To reduce the risk of serious or fatal injury from breathing toxic fumes, ensure proper ventilation when working in trenches, hollows or other confined locations.
The dusts (e.g. sawdust) produced during cutting may be dangerous to health. If the work area is very dusty, wear a respirator.
To reduce risk of fire, do not smwhile operating or standing nearchainsaw. Note that combustiblevapor may escape from the fuel
If your chainsaw is subjected to unusually high loads for which it wdesigned (e.g. heavy impact or aalways check that it is in good cobefore continuing cutting work – also “Before Starting”.
Check the fuel system for leaks amake sure the safety devices areworking properly. Do not continuoperating your saw if it is damagcase of doubt, have saw checkeyour servicing dealer.
Make sure the chain does not rowhile the engine is idling. If neceadjust idle speed properly. If the still rotates, have the saw checkeyour servicing dealer.
6
English
Manual
ReactThe mooccur dpushba
Dange
Kickbacsuddenuncontr
:
h both grip.
e guide
., tough ain.
nce.
ight.e-
f you tting
or the cut .
ed ting
d a
Chain Saw Safety
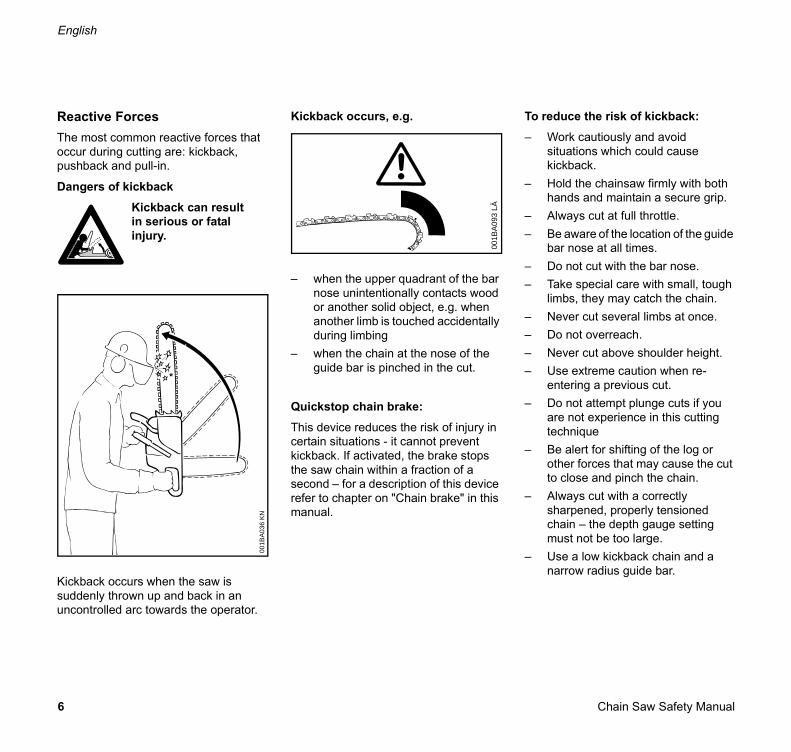
ive Forcesst common reactive forces that uring cutting are: kickback, ck and pull-in.
rs of kickbackKickback can result in serious or fatal injury.
k occurs when the saw is ly thrown up and back in an olled arc towards the operator.
Kickback occurs, e.g.
– when the upper quadrant of the bar nose unintentionally contacts wood or another solid object, e.g. when another limb is touched accidentally during limbing
– when the chain at the nose of the guide bar is pinched in the cut.
Quickstop chain brake:This device reduces the risk of injury in certain situations - it cannot prevent kickback. If activated, the brake stops the saw chain within a fraction of a second – for a description of this device refer to chapter on "Chain brake" in this manual.
To reduce the risk of kickback– Work cautiously and avoid
situations which could causekickback.
– Hold the chainsaw firmly withands and maintain a secure
– Always cut at full throttle.– Be aware of the location of th
bar nose at all times.– Do not cut with the bar nose– Take special care with small
limbs, they may catch the ch– Never cut several limbs at o– Do not overreach.– Never cut above shoulder he– Use extreme caution when r
entering a previous cut.– Do not attempt plunge cuts i
are not experience in this cutechnique
– Be alert for shifting of the logother forces that may cause to close and pinch the chain
– Always cut with a correctly sharpened, properly tensionchain – the depth gauge setmust not be too large.
– Use a low kickback chain annarrow radius guide bar.
001B
A03
6 K
N
001B
A09
3 LÄ
7Chain S
English
A = Pu
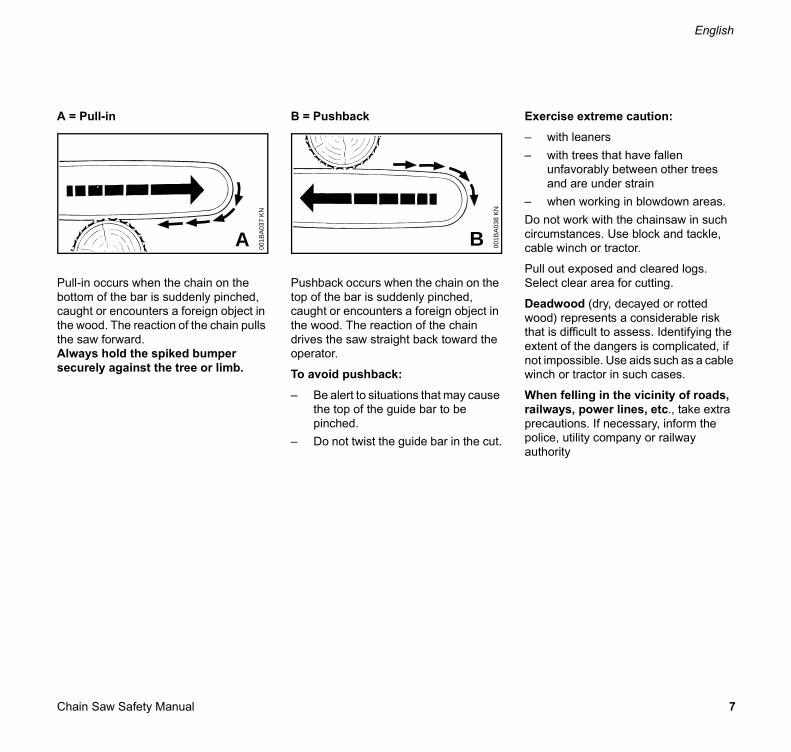
Pull-in bottomcaught the woothe sawAlwayssecure
rees
reas. such ckle,
s.
ed risk ing the ted, if
a cable
oads, extra
the
aw Safety Manual
ll-in
occurs when the chain on the of the bar is suddenly pinched, or encounters a foreign object in d. The reaction of the chain pulls forward. hold the spiked bumper ly against the tree or limb.
B = Pushback
Pushback occurs when the chain on the top of the bar is suddenly pinched, caught or encounters a foreign object in the wood. The reaction of the chain drives the saw straight back toward the operator.
To avoid pushback: – Be alert to situations that may cause
the top of the guide bar to be pinched.
– Do not twist the guide bar in the cut.
Exercise extreme caution:– with leaners– with trees that have fallen
unfavorably between other tand are under strain
– when working in blowdown aDo not work with the chainsaw incircumstances. Use block and tacable winch or tractor.
Pull out exposed and cleared logSelect clear area for cutting.
Deadwood (dry, decayed or rottwood) represents a considerablethat is difficult to assess. Identifyextent of the dangers is complicanot impossible. Use aids such as winch or tractor in such cases.
When felling in the vicinity of rrailways, power lines, etc., takeprecautions. If necessary, informpolice, utility company or railwayauthority
001B
A03
7 K
N
A 001B
A03
8 K
N
B
8
English
Manual
Holdin
Alwayshands even if safe coaroundhandle.
CuttinDo not startingspeed cthrottle
Work cconditiogood –others
Use thechain, gmust m
side of .
ecure
heightone
001B
A03
3 K
N
Chain Saw Safety
g and Controlling the Saw
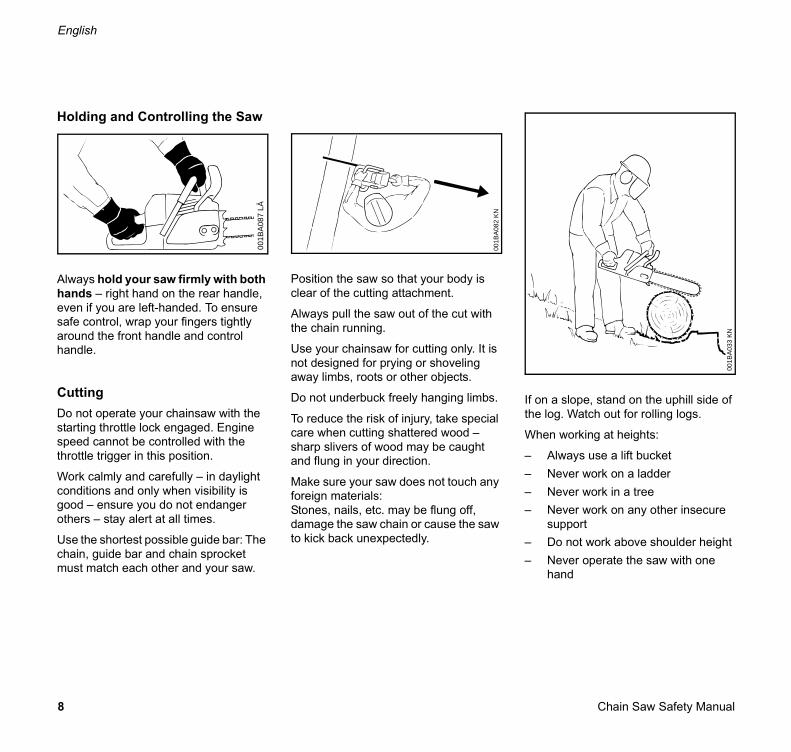
hold your saw firmly with both – right hand on the rear handle, you are left-handed. To ensure ntrol, wrap your fingers tightly the front handle and control
goperate your chainsaw with the throttle lock engaged. Engine annot be controlled with the
trigger in this position.
almly and carefully – in daylight ns and only when visibility is
ensure you do not endanger – stay alert at all times.
shortest possible guide bar: The uide bar and chain sprocket atch each other and your saw.
Position the saw so that your body is clear of the cutting attachment.
Always pull the saw out of the cut with the chain running.
Use your chainsaw for cutting only. It is not designed for prying or shoveling away limbs, roots or other objects.
Do not underbuck freely hanging limbs.
To reduce the risk of injury, take special care when cutting shattered wood – sharp slivers of wood may be caught and flung in your direction.
Make sure your saw does not touch any foreign materials: Stones, nails, etc. may be flung off, damage the saw chain or cause the saw to kick back unexpectedly.
If on a slope, stand on the uphill the log. Watch out for rolling logs
When working at heights:
– Always use a lift bucket – Never work on a ladder– Never work in a tree– Never work on any other ins
support– Do not work above shoulder– Never operate the saw with
hand
001B
A08
7 LÄ
001B
A08
2 K
N
9Chain S
English
Begin cand enthe woo
Never wbecausand offspikedtree orNote wthe sawkerf. Yothe sawof contr
u want
ing
ucture,
d – do
ecial n case r rotted
aw Safety Manual
utting with the saw at full throttle gage the spiked bumper firmly in d, and then continue cutting.
ork without the spiked bumper e the saw may pull you forwards balance. Always hold the bumper securely against the limb.hen reaching the end of a cut that is no longer supported in the u have to take the full weight of since it might otherwise go out ol.
Felling and LimbingTo reduce the risk of accidents and injury, do not attempt felling or limbing unless you have been trained in the necessary techniques.
Observe all country-specific regulations on felling techniques.
Check that there are no other persons in the felling area – other than helpers.
Make sure no-one is endangered by falling tree – the noise of your engine may drown any warning calls.
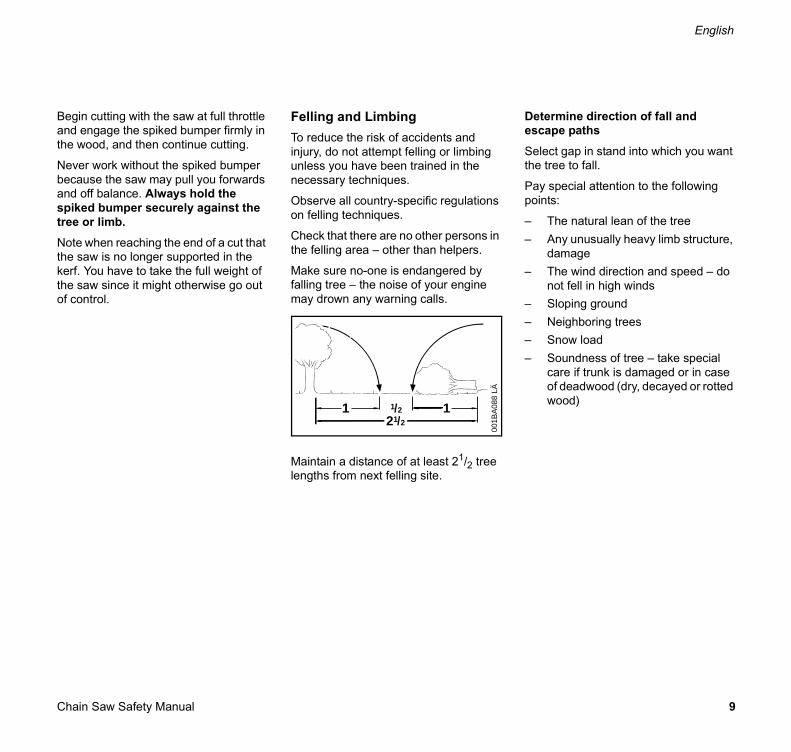
Maintain a distance of at least 21/2 tree lengths from next felling site.
Determine direction of fall andescape pathsSelect gap in stand into which yothe tree to fall.
Pay special attention to the followpoints:
– The natural lean of the tree– Any unusually heavy limb str
damage– The wind direction and spee
not fell in high winds– Sloping ground– Neighboring trees– Snow load– Soundness of tree – take sp
care if trunk is damaged or iof deadwood (dry, decayed owood)
001B
A08
8 LÄ
2 /1 2
1 1/1 2
10
English
Manual
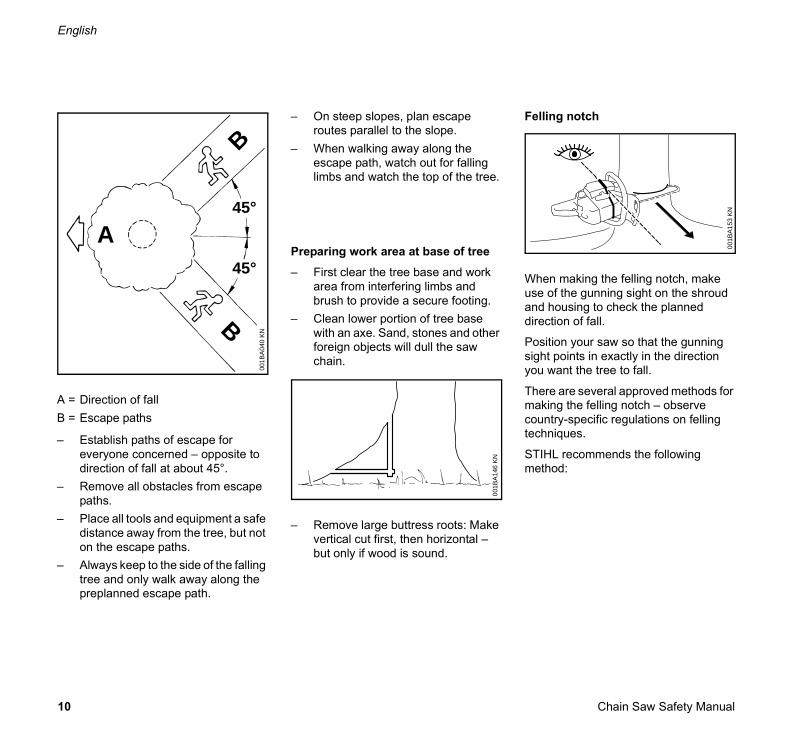
A = DirB = Es
– Esevedire
– Repat
– Pladison
– Alwtrepre
ake hroud d
ning tion
ods for e lling
001B
A15
3 K
N
Chain Saw Safety
ection of fallcape paths
tablish paths of escape for ryone concerned – opposite to ction of fall at about 45°.
move all obstacles from escape hs.ce all tools and equipment a safe tance away from the tree, but not the escape paths.ays keep to the side of the falling
e and only walk away along the planned escape path.
– On steep slopes, plan escape routes parallel to the slope.
– When walking away along the escape path, watch out for falling limbs and watch the top of the tree.
Preparing work area at base of tree– First clear the tree base and work
area from interfering limbs and brush to provide a secure footing.
– Clean lower portion of tree base with an axe. Sand, stones and other foreign objects will dull the saw chain.
– Remove large buttress roots: Make vertical cut first, then horizontal – but only if wood is sound.
Felling notch
When making the felling notch, muse of the gunning sight on the sand housing to check the plannedirection of fall.
Position your saw so that the gunsight points in exactly in the direcyou want the tree to fall.
There are several approved methmaking the felling notch – observcountry-specific regulations on fetechniques.
STIHL recommends the followingmethod:
B
001B
A04
0 K
N
A45°
45°
B
001B
A14
6 K
N
11Chain S
English
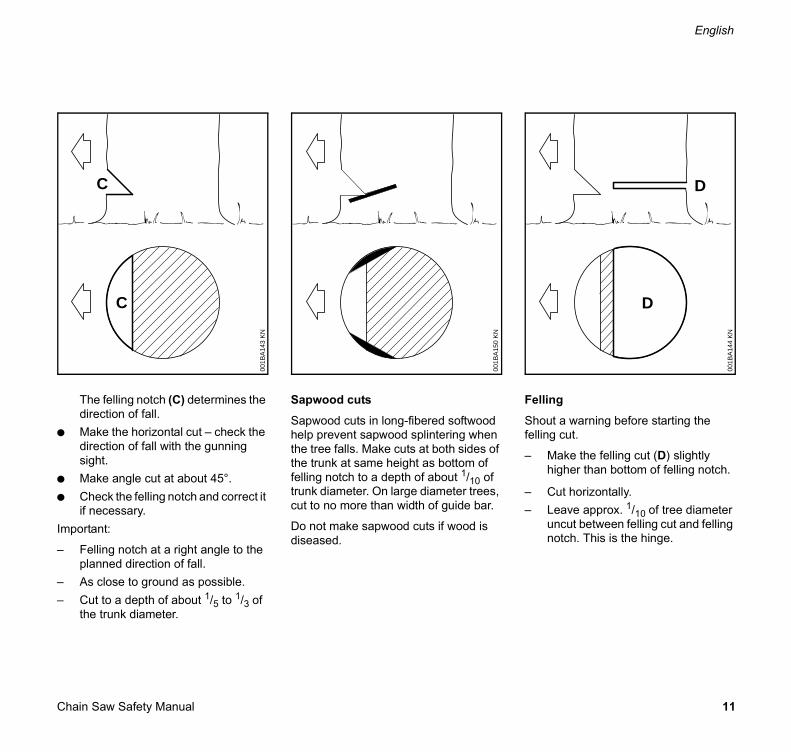
Thdire
: Madiresig
: Ma: Ch
if nImporta
– Fepla
– As– Cu
the
he
tly notch.
ameter felling
001B
A14
4 K
N
D
aw Safety Manual
e felling notch (C) determines the ction of fall.
ke the horizontal cut – check the ction of fall with the gunning
ht.ke angle cut at about 45°.eck the felling notch and correct it ecessary.nt:
lling notch at a right angle to the nned direction of fall. close to ground as possible.t to a depth of about 1/5 to 1/3 of trunk diameter.
Sapwood cutsSapwood cuts in long-fibered softwood help prevent sapwood splintering when the tree falls. Make cuts at both sides of the trunk at same height as bottom of felling notch to a depth of about 1/10 of trunk diameter. On large diameter trees, cut to no more than width of guide bar.
Do not make sapwood cuts if wood is diseased.
FellingShout a warning before starting tfelling cut.
– Make the felling cut (D) slighhigher than bottom of felling
– Cut horizontally.– Leave approx. 1/10 of tree di
uncut between felling cut andnotch. This is the hinge.
001B
A14
3 K
N
C
C
001B
A15
0 K
N
D
12
English
Manual
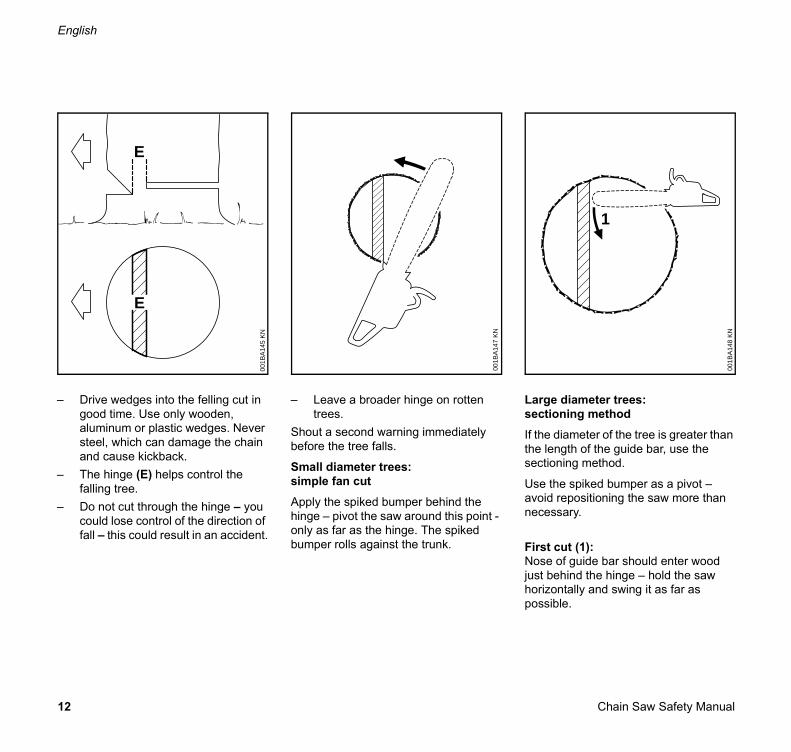
– Drigooalusteand
– Thfall
– Docoufall
er than he
t – than
ood aw
s
001B
A14
8 K
N
Chain Saw Safety
ve wedges into the felling cut in d time. Use only wooden,
minum or plastic wedges. Never el, which can damage the chain cause kickback.
e hinge (E) helps control the ing tree. not cut through the hinge – you ld lose control of the direction of
– this could result in an accident.
– Leave a broader hinge on rotten trees.
Shout a second warning immediately before the tree falls.
Small diameter trees:simple fan cutApply the spiked bumper behind the hinge – pivot the saw around this point - only as far as the hinge. The spiked bumper rolls against the trunk.
Large diameter trees: sectioning methodIf the diameter of the tree is greatthe length of the guide bar, use tsectioning method.
Use the spiked bumper as a pivoavoid repositioning the saw morenecessary.
First cut (1):Nose of guide bar should enter wjust behind the hinge – hold the shorizontally and swing it as far apossible.
001B
A14
5 K
N
E
E
001B
A14
7 K
N
1
13Chain S
English
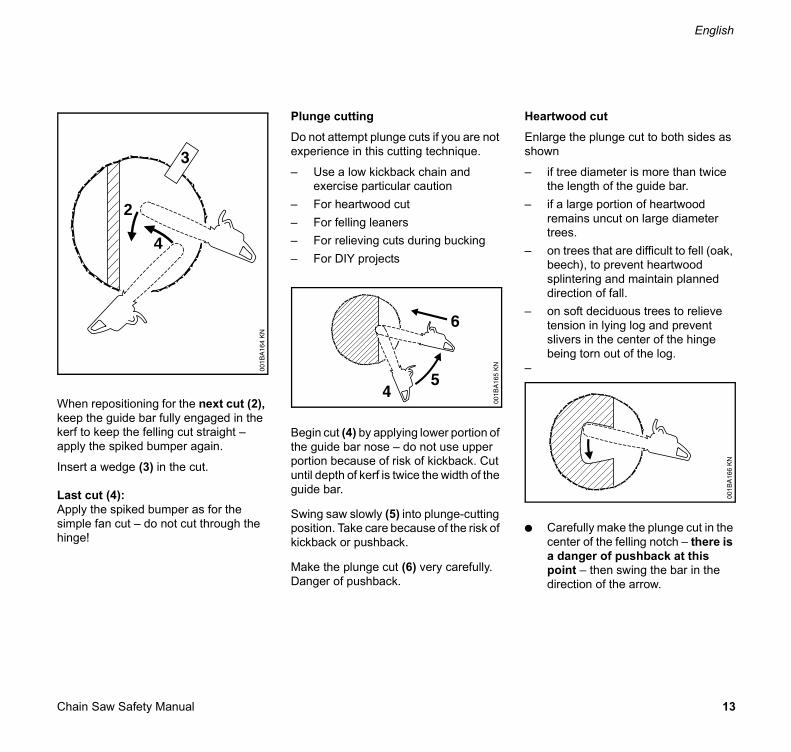
When rkeep thkerf to apply th
Insert a
Last cuApply tsimple hinge!
des as
twice
d eter
ll (oak, d ned
lieve ent nge
t in the here is is the
aw Safety Manual
epositioning for the next cut (2), e guide bar fully engaged in the keep the felling cut straight – e spiked bumper again.
wedge (3) in the cut.
t (4): he spiked bumper as for the fan cut – do not cut through the
Plunge cuttingDo not attempt plunge cuts if you are not experience in this cutting technique.
– Use a low kickback chain and exercise particular caution
– For heartwood cut– For felling leaners– For relieving cuts during bucking– For DIY projects
Begin cut (4) by applying lower portion of the guide bar nose – do not use upper portion because of risk of kickback. Cut until depth of kerf is twice the width of the guide bar.
Swing saw slowly (5) into plunge-cutting position. Take care because of the risk of kickback or pushback.
Make the plunge cut (6) very carefully. Danger of pushback.
Heartwood cutEnlarge the plunge cut to both sishown
– if tree diameter is more thanthe length of the guide bar.
– if a large portion of heartwooremains uncut on large diamtrees.
– on trees that are difficult to febeech), to prevent heartwoosplintering and maintain plandirection of fall.
– on soft deciduous trees to retension in lying log and prevslivers in the center of the hibeing torn out of the log.
–
: Carefully make the plunge cucenter of the felling notch – ta danger of pushback at thpoint – then swing the bar indirection of the arrow.
4
2
14
English
Manual
Limbin– Us– Wo
wh– Do– Wa
ten– Ne
at o
When c– Us
saw– Ne
foo– Ne
the
sult in lems in
be ause it
by:
rm
by:
ffer oms: g).
inders
ld heir bove
advice.
Chain Saw Safety
ge a low kickback chain.rk with the saw supported erever possible. not work with the bar nose.tch for limbs which are under sion. ver attempt to cut several limbs nce.
utting small logse a sturdy and stable support –
horse.ver hold the log with your leg or t.ver allow another person to hold log or help in any other way.
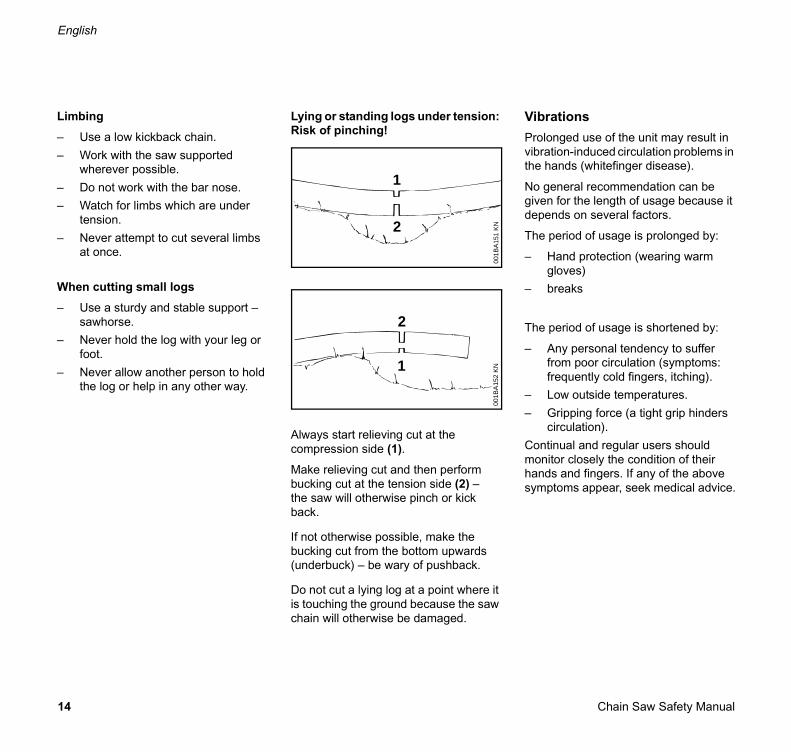
Lying or standing logs under tension: Risk of pinching!
Always start relieving cut at the compression side (1).Make relieving cut and then perform bucking cut at the tension side (2) – the saw will otherwise pinch or kick back.
If not otherwise possible, make the bucking cut from the bottom upwards (underbuck) – be wary of pushback.
Do not cut a lying log at a point where it is touching the ground because the saw chain will otherwise be damaged.
VibrationsProlonged use of the unit may revibration-induced circulation probthe hands (whitefinger disease).
No general recommendation cangiven for the length of usage becdepends on several factors.
The period of usage is prolonged
– Hand protection (wearing wagloves)
– breaks
The period of usage is shortened
– Any personal tendency to sufrom poor circulation (symptfrequently cold fingers, itchin
– Low outside temperatures.– Gripping force (a tight grip h
circulation).Continual and regular users shoumonitor closely the condition of thands and fingers. If any of the asymptoms appear, seek medical
1
001B
A15
1 K
N2
1
001B
A15
2 K
N
2
15Chain S
English
MainteServiceattempnot desHave aspecial
STIHL servicinexclusiservicinregulartraininginformachange
Use onsince thaccidenyou havconsult
STIHL originalcharactspecificchainsaperform
To reduunintenrotationand disbefore maintenExceptadjustm
n.n.
ns aw
at all ned,
ar and
roperly ly. Take oid void
p using brake
er. Do oblem n
aw Safety Manual
nance and Repairs the machine regularly. Do not
t any maintenance or repair work cribed in the instruction manual. ll other work performed by a ist dealer.
recommends that you have g and repair work carried out
vely by an authorized STIHL g dealer. STIHL dealers are ly given the opportunity to attend courses and receive technical tion bulletins on engineering s.
ly high quality replacement parts ere is otherwise a risk of ts or damage to the machine. If e any questions in this respect,
a specialist dealer.
recommends you use only STlHL replacement parts. The eristics of these parts are ally designed to match your w model and meet your ance requirements.
ce the risk of injury from tional engine startup and chain , always shut off the engine connect the spark plug boot
performing any repairs, ance or cleaning work. –
ion: Carburetor and idle speed ents.
To reduce the risk of fire, do not service or store your machine near open flames.
Check the fuel filler cap for leaks at regular intervals.
Use only a spark plug of the type approved by STIHL and make sure it is in good condition – see "Specifications".
Inspect ignition lead (insulation in good condition, secure connection).
Do not turn the engine over on the starter with the spark plug boot or spark plug removed unless the slide control / stop switch is on STOP or 0 since there is otherwise a risk of fire from uncontained sparking.
Check condition of the muffler at regular intervals to reduce the risk of fires and damage to hearing. Do not operate your machine if the muffler is damaged or missing.
Do not touch a hot muffler since burn injury will result.
Vibration behavior is influenced by the condition of the AV elements – check the AV elements at regular intervals.
Check the chain catcher –and replace it if damaged.
Shut off the engine– before checking chain tensio– before retensioning the chai– before replacing the chain.– before rectifying problems.
Observe sharpening instructiofor safe and correct handling of schain and guide bar.Keep the chain in good conditiontimes. It must be properly sharpetensioned and well lubricated.
Always change the chain, guide bsprocket in good time.
Check condition of clutch drum periodically.
Store fuel and chain lubricant in plabelled, safety-type canisters oncare when handling gasoline. Avdirect contact with the skin and ainhaling fuel vapour.
To reduce the risk of injury, stoyour saw immediately if the chaindoes not function properly.Take your saw to your local dealnot use the chainsaw until the prhas been rectified (see chapter o"Chain Brake").

16
English
Manual
1) STIbe d
2) see
Main
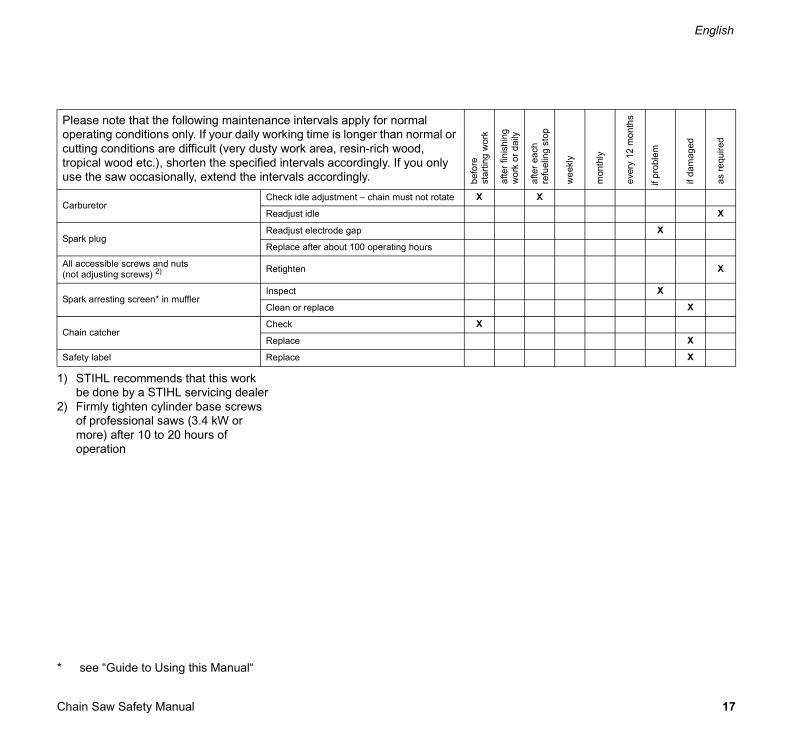
Pleaseoperatcuttingtropicause th if
dam
aged
as re
quire
d
Comple
ThrottleControl
Chain bX
Pickup b
X
Fuel tan
Chain o
Chain lu
Saw cha
X
Guide bX
X
Chain s
Air filterX
AV elem
Cooling
Cylinde
Chain Saw Safety
HL recommends that this work one by a STIHL servicing dealer
"Chain brake"
tenance Chart
note that the following maintenance intervals apply for normal ing conditions only. If your daily working time is longer than normal or conditions are difficult (very dusty work area, resin-rich wood, l wood etc.), shorten the specified intervals accordingly. If you only
e saw occasionally, extend the intervals accordingly. befo
re
star
ting
wor
k
afte
r fin
ishi
ngw
ork
or d
aily
afte
r eac
hre
fuel
ing
stop
wee
kly
mon
thly
ever
y 12
mon
ths
if pr
oble
m
te machineVisual inspection (condition, leaks) X X
Clean X
trigger, trigger interlock, Master Check operation X X
rakeCheck operation X X
Have checked by servicing dealer1)2)
ody/filter in fuel tank
Check X
Clean, replace filter element X X
Replace pickup body X X
k Clean X
il tank Clean X
brication Check X
in
Inspect, also check sharpness X X
Check chain tension X X
Sharpen
ar
Check (wear, damage) X
Clean and turn over
Deburr X
Replace X
procket Check X
Clean X
Replace X
ents (rubber buffers, springs)Inspect X X
Have replaced by servicing dealer1) X
inlets Clean X
r fins Clean X X
17Chain S
English
1) STIbe d
2) Firmof pmorope
* see
Pleaseoperatcuttingtropicause th as
requ
ired
CarbureX
Spark p
All acce(not adj X
Spark a
Chain c
Safety l
aw Safety Manual
HL recommends that this work one by a STIHL servicing dealerly tighten cylinder base screws
rofessional saws (3.4 kW or e) after 10 to 20 hours of ration
“Guide to Using this Manual“
note that the following maintenance intervals apply for normal ing conditions only. If your daily working time is longer than normal or conditions are difficult (very dusty work area, resin-rich wood, l wood etc.), shorten the specified intervals accordingly. If you only
e saw occasionally, extend the intervals accordingly. befo
re
star
ting
wor
k
afte
r fin
ishi
ngw
ork
or d
aily
afte
r eac
hre
fuel
ing
stop
wee
kly
mon
thly
ever
y 12
mon
ths
if pr
oble
m
if da
mag
ed
torCheck idle adjustment – chain must not rotate X X
Readjust idle
lugReadjust electrode gap X
Replace after about 100 operating hours
ssible screws and nuts usting screws) 2) Retighten
rresting screen* in mufflerInspect X
Clean or replace X
atcherCheck X
Replace X
abel Replace X
18
English
Manual
nual"
Main
Chain Saw Safety
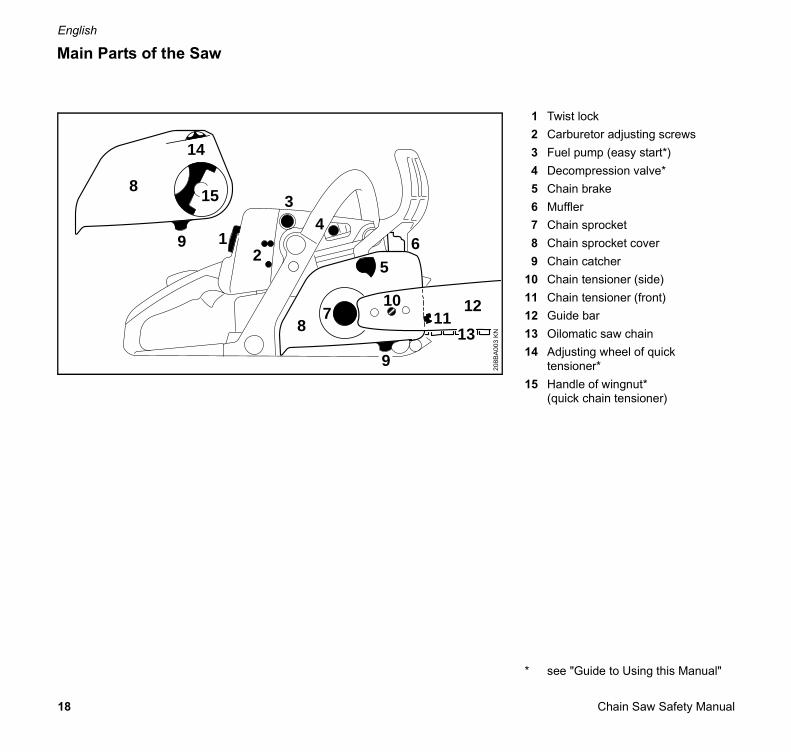
1 Twist lock 2 Carburetor adjusting screws 3 Fuel pump (easy start*) 4 Decompression valve* 5 Chain brake 6 Muffler 7 Chain sprocket 8 Chain sprocket cover 9 Chain catcher 10 Chain tensioner (side)11 Chain tensioner (front)12 Guide bar13 Oilomatic saw chain14 Adjusting wheel of quick
tensioner*15 Handle of wingnut*
(quick chain tensioner)
* see "Guide to Using this Ma
Parts of the Saw
208B
A00
3 K
N
9
3
14
56
78
9
1011
13
12
8
14
15
2
19Chain S
English
#
aw Safety Manual
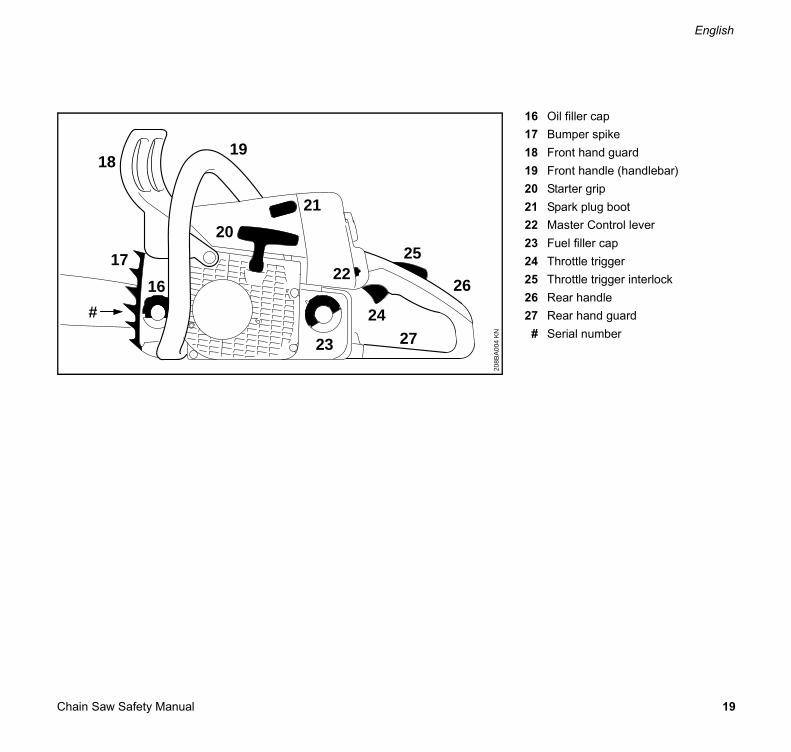
16 Oil filler cap17 Bumper spike18 Front hand guard 19 Front handle (handlebar)20 Starter grip21 Spark plug boot22 Master Control lever23 Fuel filler cap24 Throttle trigger25 Throttle trigger interlock26 Rear handle27 Rear hand guard # Serial number
26
27
208B
A00
4 K
N
17
16
1819
21
20
23
2225
24

20
English
Manual
Chain Saw Safety
0457 184 0121
englisch / English
SM_MS_01_U_G4.book Seite 1 Donnerstag, 1. Juli 2004 10:32 10


