Embed Size (px)
Citation preview
4Camera Raw Settings
102Chapter 4 – Contents
Camera Raw SettingsThis chapter discusses in detail each of the settings available for every camera raw format that is supported in DaVinci Resolve. These settings are available in the Camera Raw panel of the Project Settings, via a contextual menu command in the Media Pool that exposes a floating window, or in the Camera Raw palette of the Color page.
This chapter covers the following topics:
Camera Raw Decoding Explained 103
Using ARRI ALEXA files 105
Master Settings 105
Project Settings 106
Use Camera Metadata 106
Using RED files 107
Master RED Settings 107
Master 108
Project Settings 108
Decoder Settings 111
Use Camera Metadata 111
Using Sony Raw Files 112
Master Settings 112
Project Settings 112
Use Camera Metadata 114
Using CinemaDNG files 114
Master Settings 115
Project Settings 115
Use Camera Metadata 117
Using Phantom Cine Files 117
Master Settings 117
Project Settings 118
103Chapter 4 – Camera Raw Settings
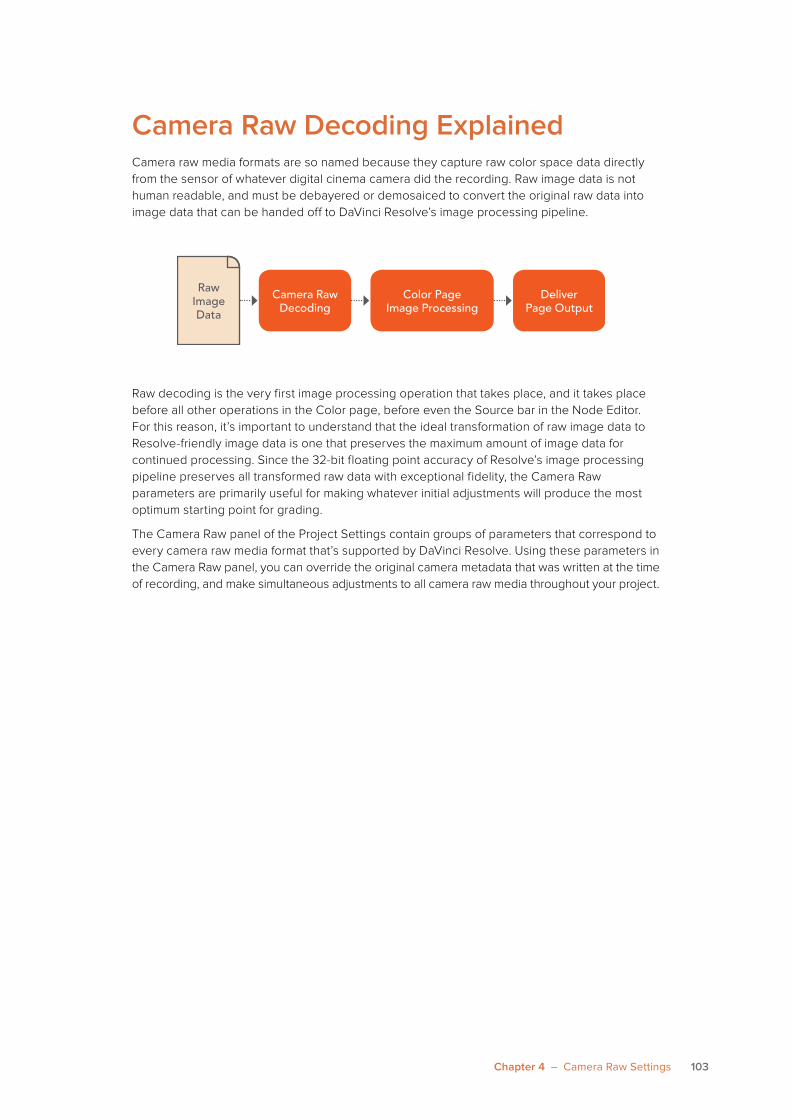
Camera Raw Decoding Explained Camera raw media formats are so named because they capture raw color space data directly from the sensor of whatever digital cinema camera did the recording. Raw image data is not human readable, and must be debayered or demosaiced to convert the original raw data into image data that can be handed off to DaVinci Resolve’s image processing pipeline.
Raw decoding is the very first image processing operation that takes place, and it takes place before all other operations in the Color page, before even the Source bar in the Node Editor. For this reason, it’s important to understand that the ideal transformation of raw image data to Resolve-friendly image data is one that preserves the maximum amount of image data for continued processing. Since the 32-bit floating point accuracy of Resolve’s image processing pipeline preserves all transformed raw data with exceptional fidelity, the Camera Raw parameters are primarily useful for making whatever initial adjustments will produce the most optimum starting point for grading.
The Camera Raw panel of the Project Settings contain groups of parameters that correspond to every camera raw media format that’s supported by DaVinci Resolve. Using these parameters in the Camera Raw panel, you can override the original camera metadata that was written at the time of recording, and make simultaneous adjustments to all camera raw media throughout your project.
Color Page Image Processing
Camera Raw Decoding
Deliver Page Output
Raw Image Data
104Chapter 4 – Camera Raw Settings
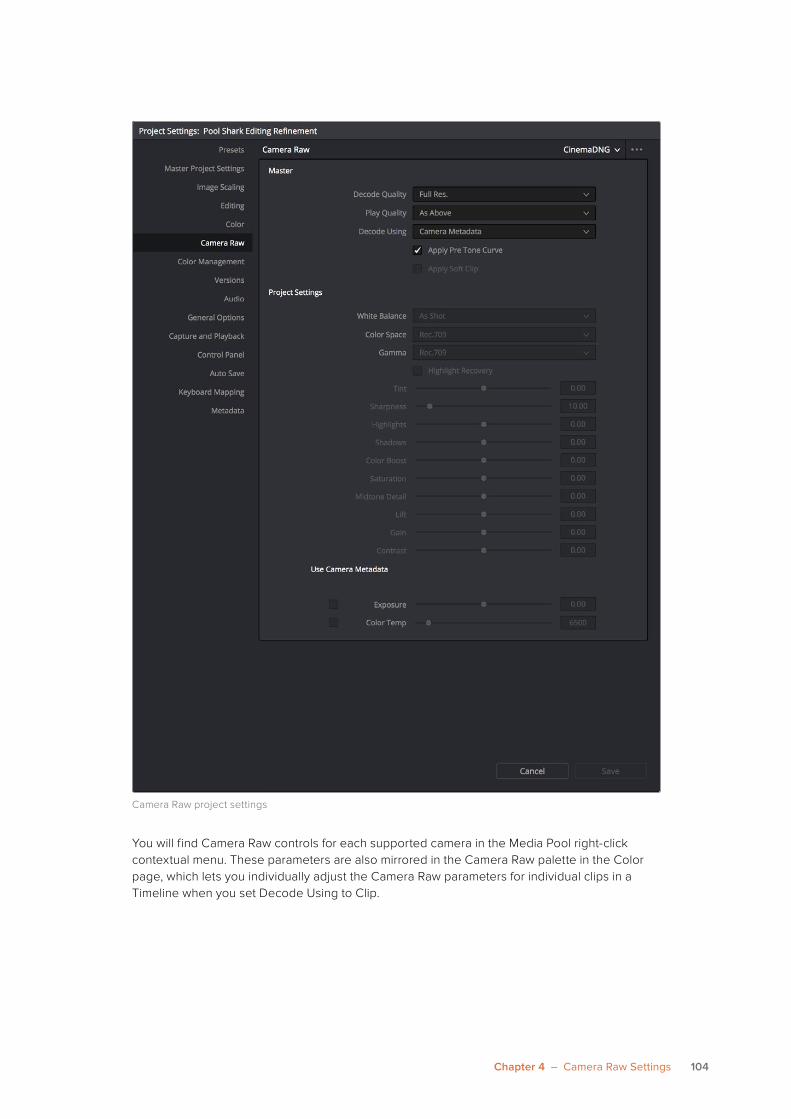
Camera Raw project settings
You will find Camera Raw controls for each supported camera in the Media Pool right-click contextual menu. These parameters are also mirrored in the Camera Raw palette in the Color page, which lets you individually adjust the Camera Raw parameters for individual clips in a Timeline when you set Decode Using to Clip.
105Chapter 4 – Camera Raw Settings
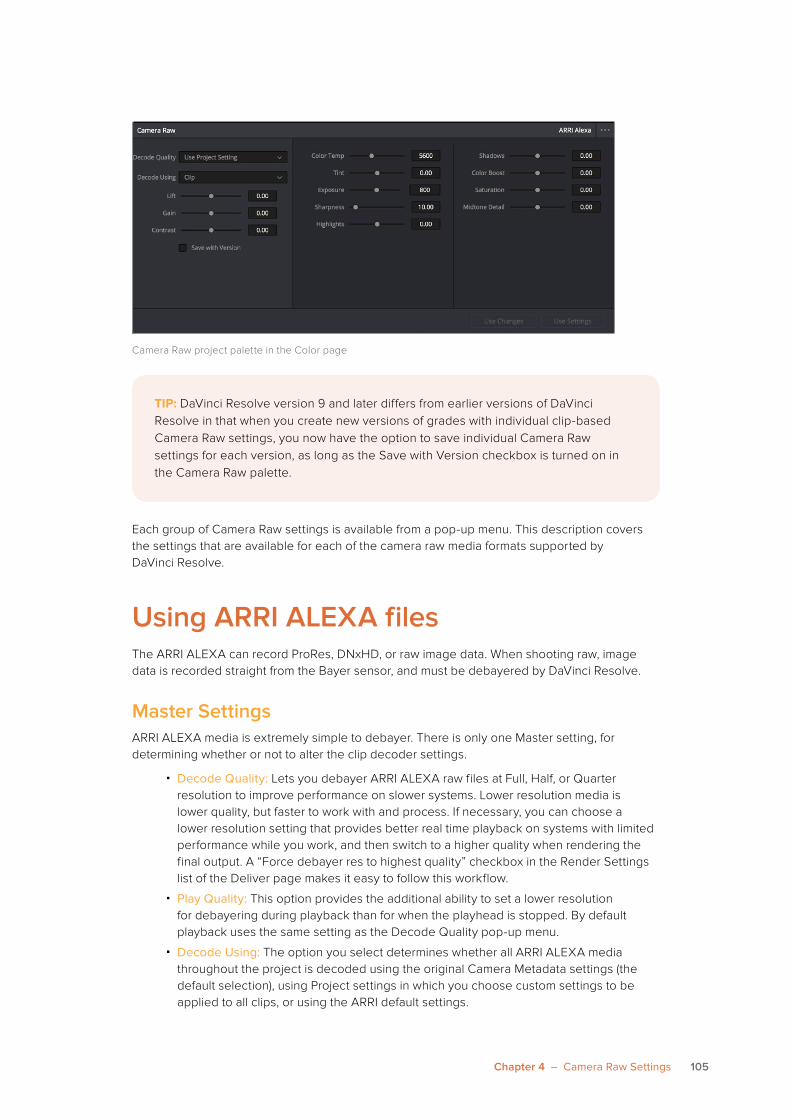
Camera Raw project palette in the Color page
Each group of Camera Raw settings is available from a pop-up menu. This description covers the settings that are available for each of the camera raw media formats supported by DaVinci Resolve.
Using ARRI ALEXA filesThe ARRI ALEXA can record ProRes, DNxHD, or raw image data. When shooting raw, image data is recorded straight from the Bayer sensor, and must be debayered by DaVinci Resolve.
Master SettingsARRI ALEXA media is extremely simple to debayer. There is only one Master setting, for determining whether or not to alter the clip decoder settings.
� Decode Quality: Lets you debayer ARRI ALEXA raw files at Full, Half, or Quarter resolution to improve performance on slower systems. Lower resolution media is lower quality, but faster to work with and process. If necessary, you can choose a lower resolution setting that provides better real time playback on systems with limited performance while you work, and then switch to a higher quality when rendering the final output. A “Force debayer res to highest quality” checkbox in the Render Settings list of the Deliver page makes it easy to follow this workflow.
� Play Quality: This option provides the additional ability to set a lower resolution for debayering during playback than for when the playhead is stopped. By default playback uses the same setting as the Decode Quality pop-up menu.
� Decode Using: The option you select determines whether all ARRI ALEXA media throughout the project is decoded using the original Camera Metadata settings (the default selection), using Project settings in which you choose custom settings to be applied to all clips, or using the ARRI default settings.
TIP: DaVinci Resolve version 9 and later differs from earlier versions of DaVinci Resolve in that when you create new versions of grades with individual clip-based Camera Raw settings, you now have the option to save individual Camera Raw settings for each version, as long as the Save with Version checkbox is turned on in the Camera Raw palette.
106Chapter 4 – Camera Raw Settings
Project SettingsThe following decoder settings let you adjust the color and exposure of ALEXA clips.
� Lift: Adjusts the black point of the media, raising it or lowering it while scaling all midtone values between it and the white point. Regardless of how you adjust this control, all image data is preserved and can be retrieved in subsequent adjustments. The range is –100 to +100.
� Gain: Adjusts the white point of the media, raising or lowing it while scaling all midtone values between it and the black point. Regardless of how you adjust this control, all image data is preserved and can be retrieved in subsequent adjustments. 0 is unity. The range is –100 to +100.
� Contrast: Raising contrast reduces shadows and raises highlights, while leaving midtones at 50 percent unaffected. Regardless of how you adjust this control, all image data is preserved and can be retrieved in subsequent adjustments. 0 is unity. The range is –100 to +100.
� Tint: Adjusts color balance to push the image between magenta and green; useful for balancing images with a green or magenta color cast, such as fluorescent or sodium vapor bulbs. 0 is unity. The range is –150 to +150.
� Sharpness: A debayer-specific sharpness filter applied to provide the appearance of enhanced image detail. 0 is unity, and 10 is the default. The range is 0 to 100.
� Highlights: Makes it easy to selectively retrieve blown-out highlight detail in high-dynamic-range media by lowering this parameter, and achieves a smooth blend between the retrieved highlights and the unadjusted mid tones for a naturalistic result. 0 is unity. The range is –100 (minimum) through +100 (maximum).
� Shadows: Lets you selectively lighten or darken shadow detail. Raising this value retrieves shadow detail recorded below 0 percent, while leaving the midtones alone. 0 is unity. The range is –100 (minimum) through +100 (very high).
� Color Boost: Lets you naturalistically raise the saturation of regions of low saturation, sometimes referred to as a vibrance operation. Can be used also to lower the saturation of regions of low saturation. 0 is unity. The range is –100 (minimum) through +100 (very high).
� Saturation: Adjusts the color intensity of the image. 0 is unity. The range is –100 (minimum) through +100 (very high).
� Midtone Detail: When this parameter is raised, the contrast of regions of the image with high edge detail is raised to increase the perception of image sharpness, sometimes referred to as definition. When this parameter is lowered to a negative value, regions of the image with low amounts of detail are softened while areas of high detail are left alone. 0 is unity. The range is –100 (minimum) through +100 (very high).
Use Camera MetadataThe most elemental camera metadata settings for exposure and color that are available.
� Color Temp: Adjusts color balance to alter the “warmth” of the image. Adjustable in Kelvin. Lower values correct for “warmer” lighting, while higher values correct for “cool” lighting. +2000 is unity. The range is +2000 to +11,000.
� Exposure: Increases or lowers image lightness in units relative to ASA values. If your intended exposure adjustment lifts image data above the maximum white level, don’t worry; all image data is preserved and can be retrieved in subsequent adjustments. 160 is unity. The range is +160 to +3200.
107Chapter 4 – Camera Raw Settings
Using RED files
Master RED SettingsThe Master RED settings are the most important, handling decode quality and the control governing whether the original camera metadata is used, or if you’re overriding the camera metadata project-wide with custom settings.
These settings also contain the pop-up menus that let you choose the color space and gamma curve used to transform the raw image data into image data for processing in Resolve when debayering R3D clips. Which Color Space and Gamma Curve settings you use are solely a matter of preference; there is no absolute requirement to use one or the other for any given type of workflow. You’re simply looking for settings that provide the best starting point for the media you have, given the type of grading you’re looking to do.
For example, in many cases combining the REDcolor3 Color Space setting and REDlog Film gamma curve will offer a starting point that retains the most image detail with the greatest latitude for adjustment. On the other hand, if you’re working in a hurry, for example to generate dailies for offline editing, using one of the REDcolor Color Space settings with one of the REDgamma settings can offer an image that’s more immediately pleasing and that requires fewer adjustments to achieve an acceptable result. These are not recommendations, they’re only examples. As always, the ideal settings for your project depend heavily on the quality of the source media, so you should experiment with media from your own projects to find the most suitable results to your eye.
ARRI Media and Log-C
ALEXA media is usually recorded using Log-C gamma and color processing, which is very similar to the Cineon Log gamma curve, developed by Kodak to produce flat-contrast, wide-gamut image data that preserves image detail with a wide latitude for adjustment. There is no ALEXA raw parameter to adjust this, so for Rec. 709 monitoring and deliverables you need to “normalize” Log-C clips in one of two ways.
You can create your own adjustment to normalize Log-C clips as part of the grading process, using the parameters of the Color page. This approach gives you the most flexibility, as you’ll be making custom settings that maximize the image data that’s available in every scene.
Alternately, you can use a LUT to normalize Log-C clips to obtain a fast starting point for additional grading. Used in this way, LUTs can be applied either as an output LUT, if the entire Timeline is nothing but ALEXA raw media, or as a LUT that’s applied to an individual node of a grade, if you’re mixing ALEXA raw media with other formats.
This provides a fast and easy solution to linearizing ALEXA media that can be useful for creating dailies for offline editing. However, one LUT may not be suitable for all clips. If you’re applying individual LUTs to each clip, you can create multiple LUTs, each with differing contrast settings, in order to gain the speed benefits of using LUTs, while taking into account the individual differences among clips.
ARRI has a LUT generator available online that you can use to create custom LUTs for use with a variety of color correction applications at: www.arri.com/camera/digital_cameras/tools/lut_generator.html
108Chapter 4 – Camera Raw Settings
MasterThese top settings determine the image quality that you’re choosing to extract from the R3D source media. The tradeoff is that higher quality media at higher resolution will be more processor-intensive to debayer, depending on your workstation’s capabilities.
� Decode Quality: Determines the image quality of the decoded R3D data that’s handed off to the Resolve image processing pipeline. The Decode Quality you select has a direct impact on real time performance. Decoding performance depends entirely on the hardware capabilities of your system. DaVinci Resolve decodes R3D files using multi-core CPU processing, but can also decode 4K at Premium quality if you’ve installed a RED ROCKET card. 5K R3D media requires two RED ROCKET cards or, subject to release, a single RED ROCKET-X for the same performance. 6K R3D media requires a RED ROCKET-X card.
If necessary, you can choose a lower quality setting that provides better real time playback on systems with limited performance while you work, and then switch to a higher quality when rendering the final output. A “Force debayer res to highest quality” checkbox in the Render Settings list of the Deliver page makes it easy to follow this workflow.
� Play Quality: This option provides the additional ability to set a lower resolution for debayering during playback than for when the playhead is stopped. By default playback uses the same setting as the Decode Quality pop-up menu.
� Bit Depth: Resolve can decode R3D files with 8-, 10-, or 16-bit image data for processing. Choosing 16-bit for maximum quality may impact playback performance on some hardware.
� Timecode: The timecode recorded for R3D media depends on the camera setting in use when it was shot. There are three choices:
� Camera: This setting automatically selects between Absolute and Edge depending on what was chosen as the default timecode mode on the camera. This setting needs to be selected before you add R3D media to the Media Pool. If you’re browsing R3D media when you change this setting, you should refresh the folder in the Media Storage of the Media Pool before adding media to the Media Pool.
� Absolute: The default. Records “time of day” timecode. If an external timecode source was connected and the camera was put into Jam Sync mode, the external timecode would have been recorded instead.
� Edge: The first recorded clip for each magazine starts at 01:00:00:00, and the timecode of each subsequent clip is recorded sequentially and continuously.
� Decode Using: The option you select determines whether all R3D media throughout the project is decoded using the original Camera Metadata settings (the default selection), using Project settings in which you choose custom settings to be applied to all clips, or using the RED default settings.
Project SettingsThese settings control the fundamental methods used to debayer R3D media. The selections you make to these settings determine the basic color and contrast that you’re choosing to extract from the camera raw image data.
� Color Science: The two options are Original, which was the color science used by early builds of the REDone camera, and Version 2, which is the current version of color science used by the entire RED camera line. Unless you need to match the look of older projects using the older color science, the newest color science is generally preferable.
109Chapter 4 – Camera Raw Settings
� Color Space: Because RED cameras record R3D data which uses a raw color space, debayering the native R3D data requires choosing a color space to convert the raw signal into. Bear in mind that the color space you choose is merely a starting point for further correction. There is no requirement that you choose one or the other color space for any given workflow. You should choose the color space that provides the most pleasing starting point for your particular project.
� CameraRGB: Outputs the original, unmodified sensor data. Not a recommended setting.
� Rec. 709: Decodes into the standard color space specified by the Rec. 709 standard for high definition video. While you may find this option useful, it is not required for programs being output to video.
� Rec. 2020: Decodes into the standard color space specified by the Rec. 2020 standard for high definition video, UHD video, and beyond. While you may find this option useful, it is not required for programs being output to video.
� REDspace: Fits the raw R3D image data into a color space that’s larger than that of Rec. 709. Appropriate for digital cinema mastering and film output. REDspace was the predecessor to the REDcolor setting.
� REDcolor: A color space that’s similar to the Rec. 709 option, but modified to balance accuracy with pleasing color rendition, emphasizing accurate skin tones.
� sRGB: Decodes into the standard color space defined by the sRGB standard, typically used for computer display.
� Adobe1998: Decodes into Adobe’s unique version of the sRGB standard.
� REDcolor2: Similar, but less saturated than, REDcolor.
� REDcolor3: Similar saturation to REDcolor, but with additional modifications to improve the color rendition of skin tone. Introduced as the optimum color space for Epic cameras, but also appropriate for previous generations of RED cameras.
� REDcolor4: A further optimized version of REDcolor3 that is especially recommended for underwater footage.
� DragonColor: A color space optimized for cameras with the RED Dragon sensor, although this color space can be used for previous generations of RED cameras as well.
� DragonColor2: A further optimized version of DragonColor that is especially recommended for underwater footage.
� Gamma Curve: There are several options available for choosing a gamma profile to be used when debayering the raw R3D data:
� Linear: No gamma adjustment is made, this is a linear-to-light representation of data from the RED camera’s sensor.
� Rec. 709: A gamma curve typical for Rec. 709 display. Does not provide an abundance of latitude for grading.
� REDspace: Similar to Rec. 709, but slightly altered to be more appealing, primarily through higher contrast and lighter midtones. The predecessor to the REDgamma curve.
� REDlog: A logarithmic gamma setting that maps the original 12-bit R3D image data to a 10-bit curve. The blacks and midtones occupying the lowest 8 bits of the video signal maintain the same precision as in the original 12-bit data, while the highlights that occupy the highest 4 bits are compressed. While reducing the precision of highlight detail, the tradeoff is that there’s an abundance of precision throughout the rest of the signal. This is a good setting for maintaining maximum latitude.
� PDlog 685: A logarithmic gamma setting that maps the native 12-bit RED image data into the linear portion of a Cineon or film transfer curve.
110Chapter 4 – Camera Raw Settings
� PDlog 985: A logarithmic gamma setting with different mappings.
� Custom PDlog: A logarithmic gamma setting that exposes user adjustable Black Point, White Point, and Gamma PDlog parameters so you can customize your own log gamma curve.
� REDgamma: An improved gamma curve designed to be perceptually appealing on displays calibrated for Rec. 709, with an improved soft roll-off in the highlights to maintain highlight detail while grading.
� sRGB: Similar gamma setting to that employed by Rec. 709.
� HDR ST.2084: The standardized gamma curve for high-dynamic-range (HDR) video. Also referred to as the PQ curve.
� BT.1886: The standardized gamma curve for standard-dynamic-range HD and UHD display. Does not provide an abundance of latitude for grading.
� Log3G12: A wide dynamic range log space developed by RED to support HDR monitoring and grading.
� REDlog Film: An improved logarithmic gamma setting that’s designed to remap the original 12-bit R3D data to the standard Cineon gamma curve. This setting produces flat-contrast image data that preserves image detail with a wide latitude for adjustment, and is compatible with log workflows, including those intended for film output.
� REDgamma2: Similar to REDgamma, with higher contrast.
� REDgamma3: The most recent iteration of the REDgamma curve. Based on a log starting point, but with a pleasing “ready to view” contrast curve applied, designed to be a visually pleasing starting point that maintains excellent dynamic range. REDgamma3 is also designed to work with REDcolor3.
� REDgamma4: The latest iteration of the REDgamma curve, designed to give a good in-camera look without the need for grading, while retaining great dynamic range and highlight handling. REDgamma4 is suitable for all RED cameras.
� Blend Type: Works to control how RED HDRX media is used. When using either Simple or Magic Motion to blend HDRX exposures, there’s no need to use the second output in the Node Editor. You can choose from three options:
� None: Only the regular exposure is used.
� Simple: Blends the two HDRX exposures to achieve a pleasing middle ground.
� Magic Motion: Uses a proprietary algorithm to combine the dual exposures to combine overexposed and well-exposed regions of the picture in a more targeted fashion, while blending the sharpness of the regularly exposed source with the motion blur of the underexposed source.
� Blend Bias: Lets you adjust how much of the regular exposure and how much of the underexposure are combined.
� Apply Metadata Curves: If the R3D media files were preprocessed in REDCINE X Pro, and saved with color curve metadata, you can use this setting to either use or discard that metadata.
� D.E.B (Dragon Enhanced Blacks): A checkbox that enables the elimination of red noise in RED cameras using the Dragon sensor.
� Embedded Audio: Enables embedded audio in R3D media.
111Chapter 4 – Camera Raw Settings
Decoder SettingsThis second group of settings contains additional controls for finessing the debayering of RED raw image data. Many of the settings in this group are color correction adjustments, some of which resemble analogous controls in the Color page. However, the FLUT and DRX controls manage the exposure of the debayered media being fed to the Resolve image processing pipeline, and so can be used to retrieve image detail from R3D source media in cases where the default settings are clipping or crushing detail in the highlights or shadows that would be unavailable to DaVinci Resolve as a result.
� De-noise: Applies image-wide noise reduction. There are seven settings available, from mild to maximum, that you can use to balance noise reduction against any possible image degradation.
� OLPF Compensation: OLPF compensation applies a low pass filter to reduce color moiré. There are four options: Off (the default), Low, Medium, and High.
� Image Detail: Controls the demosaicing algorithm that’s used for the software decoding of R3D media. You can choose a level of sensor detail extraction: Low, Medium, and High (recommended). If you’re using a RED ROCKET card, this setting is ignored as there is a fixed algorithm that’s used.
� FLUT: A gain operation that lets you boost or attenuate the ISO in smaller increments. 0 is unity. The range is -8 to +8.
� Contrast: Raising contrast reduces shadows and raises highlights, while leaving midtones at 50 percent unaffected. The image is compressed rather then clipped at the limits of 100 and 0 percent. 0 is unity. The range is –1 to +1.
� Saturation: Adjusts the color intensity of the image. 1 is unity. The range is 0 (minimum) through 5.0 (very high).
� Tint: Color balance correction for images with a green or magenta color cast, such as fluorescent or sodium vapor bulbs. This parameter is designed specifically to adjust RED linear light image data to make the most photometrically accurate correction. 0 is unity. The range is -100 to +100.
� DRX: A Dynamic Range control (X) that lets you recover highlights while taking into account Color Temperature (degrees Kelvin) and Tint. 0 is unity, and 1.0 is the maximum value.
� Shadow: Provides control over the toe (low range) of the FLUT adjustment. 0 is unity. The range is -2 to +2.
� Brightness: Adjusts image lightness. Image data is compressed rather then clipped at 100 and 0 percent. 0 is unity. The range is –10 to +10.
Use Camera MetadataThe most elemental camera metadata settings for exposure and color that are available.
� ISO: A gain operation that keeps the black point at 0 while raising or lowering the white point of the image, linearly scaling everything in between. Raising the ISO results only in boosted highlights being more compressed, no clipping will occur. 320 is unity. The range is 50–6400.
� Exposure: Increases or lowers image lightness in units relative to ƒ-stops. Using exposure to boost the image beyond 100 or to lower it below 0 will clip, not compress, the image data that’s passed along to the Resolve image processing pipeline. 0 is unity. The range is –7 to +7.
� Color Temp: Designed to alter the “warmth” of the image while keeping white elements of the scene looking neutral. Adjustable in degrees Kelvin. Lower values correct for “warmer” lighting, while higher values correct for “cool” lighting. This parameter is designed specifically to adjust RED linear light image data to make the most photometrically accurate correction. 5600 is unity. The range is 1700 to 10,000.
112Chapter 4 – Camera Raw Settings
Using Sony Raw FilesSony makes several digital cinema cameras, such as the F65 and F55, that record wide latitude, high-gamut media either using Sony’s 12-bit SR codec, or as 16-bit raw media files. Since Sony’s cameras do not use a traditional Bayer pattern, special debayering is necessary when working with F65 raw media, and the image data is demosaiced using the following raw controls and parameters.
Master SettingsThese parameters let you choose the decode quality, white balance, color space, and gamma that Sony raw clips will be transformed to use when debayered.
� Decode Quality: Determines the image quality of the decoded Sony raw data that’s handed off to the Resolve image processing pipeline regardless of the Play Quality setting. The Decode Resolution you select has a direct impact on real time performance, and decoding performance depends entirely on the hardware capabilities of your system.
� If necessary, you can choose a lower resolution setting that provides better real time playback on systems with limited performance while you work, and then switch to a higher quality when rendering the final output. A “Force debayer res to highest quality” checkbox in the Render Settings list of the Deliver page makes it easy to follow this workflow.
� Play Quality: This option provides the additional ability to set a lower resolution for debayering during playback than for when the playhead is stopped. By default playback uses the same setting as the Decode Quality pop-up menu.
� Decode Using: The option you select determines whether all F65 media throughout the project is decoded using the original Camera Metadata settings (the default selection), using Project settings in which you choose custom settings to be applied to all clips, or using the Sony default settings.
Project SettingsThese settings control the fundamental methods used to debayer Sony raw media. The selections you make to these settings determine the basic color and contrast that you’re choosing to extract from the camera raw image data.
� White Balance: Designed to very subtly alter the “warmth” of the image. Adjustable in degrees Kelvin. Lower values correct for “warmer” lighting, while higher values correct for “cool” lighting. +5500 is unity. The range is +3200 to +5500.
� Color Space: Two color spaces are adjustable, depending on your intended workflow:
� Rec. 709: Decodes into the standard color space specified by the Rec. 709 standard for high definition video.
� P3 D60: Decodes RGB-encoded image data with a D60 white point, intended for monitoring with a P3-compatible display.
� SGamut: Decodes into Sony’s wider S-gamut color space, designed to provide the widest range of image data for adjustment.
� SGamut3: The gamut is identical to SGamut, but color reproduction is more accurate, according to Sony’s “Technical Summary for S-Gamut3Cine/S-Log3 and S-Gamut3/S-Log3” whitepaper.
113Chapter 4 – Camera Raw Settings
� SGamut3.Cine: According to Sony’s “Technical Summary for S-Gamut3Cine/S-Log3 and S-Gamut3/S-Log3” whitepaper, S-Gamut3.Cine is designed to provide a more traditionally log-encoded workflow with color reproduction that is slightly wider than the P3 gamut.
� P3: Decodes to a RGB-encoded image data with a D61 white point, intended for use when outputting media for DCI mastering.
� Gamma: Five gamma settings are available, depending on what starting point you want to use for further grading.
� Gamma 2.4: A simple power-function gamma setting commonly used for broadcast.
� Gamma 2.6: A simple power-function gamma setting commonly used for digital cinema projection.
� Rec. 709: A gamma curve typical for Rec. 709 display.
� SLog: Not designed for viewing, Sony’s SLog gammas are designed to provide a wide latitude for grading; 14-stops according to Sony. 18% gray is at 38%.
� SLog2: This version has a half stop offset from SLog to allow for a higher dynamic range. 18% gray is at 32%.
� SLog3: An “easier to grade” version of SLog. 18% gray is at 40%. According to Sony’s “Technical Summary for S-Gamut3Cine/S-Log3 and S-Gamut3/S-Log3,” SLog3 is designed to provide a more traditionally log-encoded workflow, with a gamma curve that is similar, but not identical, to Cineon workflows.
� Linear: A simple linear gamma setting.
� Lift: Adjusts the black point of the media, raising it or lowering it while scaling all midtone values between it and the white point. Regardless of how you adjust this control, all image data is preserved and can be retrieved in subsequent adjustments. The range is –100 to +100.
� Gain: Adjusts the white point of the media, raising or lowing it while scaling all midtone values between it and the black point. Regardless of how you adjust this control, all image data is preserved and can be retrieved in subsequent adjustments. 0 is unity. The range is –100 to +100.
� Contrast: Raising contrast reduces shadows and raises highlights, while leaving midtones at 50 percent unaffected. Regardless of how you adjust this control, all image data is preserved and can be retrieved in subsequent adjustments. 0 is unity. The range is –100 to +100.
� Tint: Color balance correction for images with a green or magenta color cast, such as fluorescent or sodium vapor bulbs. 0 is unity. The range is –150 to +150.
� Sharpness: A debayer-specific sharpness filter applied to provide the appearance of enhanced image detail. 20 is unity. The range is 0 to 100.
� Highlights: Makes it easy to selectively retrieve blown-out highlight detail in high-dynamic-range media by lowering this parameter, and achieves a smooth blend between the retrieved highlights and the unadjusted mid tones for a naturalistic result. 0 is unity. The range is –100 (minimum) through +100 (maximum).
� Shadows: Lets you selectively lighten or darken shadow detail. Raising this value retrieves shadow detail recorded below 0 percent, while leaving the midtones alone. 0 is unity. The range is –100 (minimum) through +100 (very high).
� Color Boost: Lets you naturalistically raise the saturation of regions of low saturation, sometimes referred to as a vibrance operation. Can be used also to lower the saturation of regions of low saturation. 0 is unity. The range is –100 (minimum) through +100 (very high).
114Chapter 4 – Camera Raw Settings
� Saturation: Adjusts the color intensity of the image. 0 is unity. The range is –100 (minimum) through +100 (very high).
� Midtone Detail: When this parameter is raised, the contrast of regions of the image with high edge detail is raised to increase the perception of image sharpness, sometimes referred to as definition. When this parameter is lowered to a negative value, regions of the image with low amounts of detail are softened while areas of high-detail are left alone. 0 is unity. The range is –100 (minimum) through +100 (very high).
Use Camera MetadataThe most elemental camera metadata settings for exposure and color that are available.
� Exposure: Increases or lowers image lightness in units relative to ASA values. If your intended exposure adjustment lifts image data above the maximum white level, don’t worry; all image data is preserved and can be retrieved in subsequent adjustments. +800 is unity. The range is +1 to +65,535.
� Color Temp: Designed to alter the “warmth” of the image. Adjustable in degrees Kelvin. Lower values correct for “warmer” lighting, while higher values correct for “cool” lighting. +6500 is unity. The range is +2000 to +50,000.
Using CinemaDNG filesCinemaDNG is an open format capable of high-resolution raw image data with a wide dynamic range, and is one of the formats recorded by the Blackmagic Cinema Camera when you shoot in raw mode. CinemaDNG images are decoded with full dynamic range when the Highlight Recovery checkbox is selected.
DaVinci Resolve version 11.2.1 introduced improved debayering for raw CinemaDNG media acquired using any of the Blackmagic Design cameras. The “Apply Pre Tone Curve” setting controls whether you’re using the older debayering method (when turned on), or the newer, visually improved debayering method (when turned off).
Sony Media and SLog
Sony’s proprietary SLog gamma setting, which produces flat-contrast, wide-gamut image data that preserves image detail with a wide latitude for adjustment, is also available on some other Sony cameras. Similarly to working with clips using the ARRI ALEXA’s Log-C gamma, you need to normalize SLog clips by either making a manual adjustment to color and contrast, or by applying a LUT, using the same techniques discussed previously.
When applying a LUT, there are two methods that Sony recommends. A 1D LUT can be used to transform SLog clips into the standard Cineon (or Log-C) curve if your ultimate goal is to output Log media for film printing. If you’re planning to output to a normalized format, you can use a dedicated LUT to make this transformation.
For more information, search the web for Sony’s document “SLog: A new LUT for digital production mastering and interchange applications.”
115Chapter 4 – Camera Raw Settings
Master SettingsThese parameters let you choose the decode quality, white balance, color space, and gamma that raw CinemaDNG clips will be transformed to use when debayered.
� Decode Quality: Lets you debayer CinemaDNG raw files at Full, Half, or Quarter resolution to improve performance on slower systems. Lower resolution media is lower quality, but faster to work with and process. If necessary, you can choose a lower resolution setting that provides better real time playback on systems with limited performance while you work, and then switch to a higher quality when rendering the final output. A “Force debayer res to highest quality” checkbox in the Render Settings list of the Deliver page makes it easy to follow this workflow.
� Play Quality: This option provides the additional ability to set a lower resolution for debayering during playback than for when the playhead is stopped. By default playback uses the same setting as the Decode Quality pop-up menu.
� Decode Using: The option you select determines whether all CinemaDNG media throughout the project is decoded using the original Camera Metadata settings (the default selection), using Project settings in which you choose custom settings to be applied to all clips, or using the CinemaDNG default settings.
� Apply Pre Tone Curve: When this checkbox is turned off (the default for new projects created in Resolve 11.2.1 or later), DaVinci Resolve debayers CinemaDNG raw media using an improved method that delivers better-looking results, specifically for media acquired using any of the Blackmagic Design cameras. When this checkbox is turned on (the default for projects created in earlier versions of Resolve), the older debayering method is reenabled for backward compatibility. However, turning Pre Tone Curve on may also provide better results for CinemaDNG raw files coming from other sources. If you’re importing .dng media from cameras other than those from Blackmagic Design, you should try both settings to see which type of debayering you prefer.
� Apply Soft Clip: This checkbox is only available when Apply Pre Tone Curve is turned off. When turned on, high dynamic range parts of the signal (super-white highlights) are brought back into the picture as visible image detail you can adjust, similar to using the Highlights control to retrieve these otherwise clipped parts of the signal.
Project SettingsCinemaDNG has a variety of settings that can be adjusted to alter the image quality of the debayered result. The Color Temp and Tint parameters are only available if the White Balance pop-up menu is set to Custom.
� White Balance: The first seven options offer White Balance presets, which automatically adjust the Color Temp and Tint parameters. These options include Daylight, Cloudy, Shade, Tungsten, Fluorescent, and Flash. An eighth option, Custom, makes the Color Temp and Tint parameters user-adjustable.
� Color Space: Two color spaces are adjustable, depending on your intended workflow:
� Rec. 709: Decodes into the standard color space specified by the Rec. 709 standard for high definition video.
� P3 D60: Decodes into the standard P3 color space specified by the DCI standard for digital cinema projection.
� BMD Film: Decodes into a log-encoded color space that remaps the raw data into an approximation of the Log-C standard. Choosing BMD Film also forces the Gamma setting to BMD Film. This setting produces flat-contrast image data that preserves image detail with a wide latitude for adjustment, which is suitable as a starting point for linear output, and is also compatible with log workflows intended for film output.
116Chapter 4 – Camera Raw Settings
� Gamma: Five gamma settings are available, depending on what starting point you want to use for further grading.
� 2.4: A simple power-function gamma setting commonly used for broadcast.
� 2.6: A simple power-function gamma setting commonly used for digital cinema projection.
� Rec. 709: A gamma of 2.35, with a linear segment near black, approximating the EBU recommended gamma for broadcast.
� sRGB: A gamma of 2.2, with a linear segment near black, intended for reproduction on computer displays alongside the sRGB color space.
� Linear: A simple linear gamma setting.
� BMD Film: A log-encoded gamma setting that approximates Log-C encoding, the main difference being that more data is encoded in the darkest portion of the BMD Film signal.
� BMD Film 4K: A log-encoded gamma setting that approximates Log-C encoding, but that’s optimized for the BMD 4K and URSA cameras.
� BMD Film 4.6K: A log-encoded gamma setting that approximates Log-C encoding, but that’s optimized for BMD cameras using the 4.6K sensor.
� ISO: A gain operation that keeps the black point at 0 while raising or lowering the white point of the image, linearly scaling everything in between. Raising the ISO can push image values above maximum white, but these values are not permanently clipped and are retrievable using the Highlights parameter, or using later adjustments. 800 is unity. This control can be set to 200, 400, and 800.
� Highlight Recovery: A checkbox that lets you include additional highlight sensor data that’s usually clipped by the standard decoding matrix. In cases where you have extremely clipped highlights, you may obtain additional image detail this way, although it may have unusual color artifacts. This checkbox is only available when Apply Pre Tone Curve is turned on.
� Tint: Color balance correction for images with a green or magenta color cast, such as fluorescent or sodium vapor bulbs. 0 is unity. The range is –150 to +150.
� Sharpness: A debayer-specific sharpness filter applied to provide the appearance of enhanced image detail. 20 is unity. The range is 0 to 100.
� Highlights: Makes it easy to selectively retrieve blown-out highlight detail in high-dynamic-range media by lowering this parameter, and achieves a smooth blend between the retrieved highlights and the unadjusted midtones for a naturalistic result. 0 is unity. The range is –100 (minimum) through +100 (maximum).
� Shadows: Lets you selectively lighten or darken shadow detail. Raising this value retrieves shadow detail recorded below 0 percent, while leaving the midtones alone. 0 is unity. The range is –100 (minimum) through +100 (very high).
� Color Boost: Lets you naturalistically raise the saturation of regions of low saturation, sometimes referred to as a vibrance operation. Can be used also to lower the saturation of regions of low saturation. 0 is unity. The range is –100 (minimum) through +100 (very high).
� Saturation: Adjusts the color intensity of the image. 0 is unity. The range is –100 (minimum) through +100 (very high).
� Midtone Detail: When this parameter is raised, the contrast of regions of the image with high edge detail is raised to increase the perception of image sharpness, sometimes referred to as definition. When this parameter is lowered to a negative value, regions of the image with low amounts of detail are softened while areas of high-detail are left alone. 0 is unity. The range is –100 (minimum) through +100 (very high).
117Chapter 4 – Camera Raw Settings
� Lift: Adjusts the black point of the media, raising it or lowering it while scaling all midtone values between it and the white point. Regardless of how you adjust this control, all image data is preserved and can be retrieved in subsequent adjustments. The range is –100 to +100.
� Gain: Adjusts the white point of the media, raising or lowing it while scaling all midtone values between it and the black point. Regardless of how you adjust this control, all image data is preserved and can be retrieved in subsequent adjustments. 0 is unity. The range is –100 to +100.
� Contrast: Raising contrast reduces shadows and raises highlights, while leaving midtones at 50 percent unaffected. Regardless of how you adjust this control, all image data is preserved and can be retrieved in subsequent adjustments. 0 is unity. The range is –100 to +100.
Use Camera MetadataThe most elemental camera metadata settings for exposure and color that are available.
� Exposure: Increases or lowers image lightness in units relative to ƒ-stops. If your intended exposure adjustment lifts image data above the maximum white level, don’t worry; all image data is preserved and can be retrieved in subsequent adjustments. 0 is unity. The range is –4 to +4.
� Color Temp: Designed to alter the “warmth” of the image. Adjustable in degrees Kelvin. Lower values correct for “warmer” lighting, while higher values correct for “cool” lighting. +6500 is unity. The range is +2000 to +50,000.
Using Phantom Cine FilesThe Phantom line of high-speed digital cinema cameras record wide latitude, high-gamut media using the Cine Raw format.
Master SettingsThese parameters let you choose the decode quality, white balance, color space, and gamma that raw Phantom Cine clips will be transformed to use when debayered.
� Decode Using: The option you select determines whether all Phantom Cine media throughout the project is decoded using the original Camera Metadata settings (the default selection), using Project settings in which you choose custom settings to be applied to all clips, or using the Cine default settings.
CinemaDNG Files and BMD Film
Blackmagic Design’s logarithmically-encoded BMD Film gamma setting, which produces flat-contrast, wide-gamut image data that preserves image detail with a wide latitude for adjustment, is a modified version of the standard Log-C curve. However, the modifications are designed to emphasize the strengths of the sensors used by the Blackmagic Design cameras. Similarly to working with clips using the ARRI ALEXA’s Log-C gamma or Sony’s proprietary S-Log or S-Log2 formats, you need to normalize clips using BMD Film by either making a manual adjustment to color and contrast, or by applying a LUT, using the same techniques discussed previously.
118Chapter 4 – Camera Raw Settings
� Timecode: There are four types of timecode that Phantom Cine files can be set to use:
� Set to zero: Camera timecode is ignored, instead using a simple frame count with the first frame considered 0.
� Time of day (Local): Time of day timecode recording.
� Time of day (GMT): Time of day timecode recording based on Greenwich Mean Time.
� SMPTE: Standard SMPTE timecode.
Project SettingsThe following settings for exposure, color, and sharpness are available.
� Gamma: Three options are available for setting the gamma of the debayered output:
� Rec. 709
� Log 1
� Log 2
� Lift: Adjusts the black point of the media, raising it or lowering it while scaling all midtone values between it and the white point. Regardless of how you adjust this control, all image data is preserved and can be retrieved in subsequent adjustments. The range is –100 to +100.
� Gain: Adjusts the white point of the media, raising or lowing it while scaling all midtone values between it and the black point. Regardless of how you adjust this control, all image data is preserved and can be retrieved in subsequent adjustments. 0 is unity. The range is –100 to +100.
� Contrast: Raising contrast reduces shadows and raises highlights, while leaving midtones at 50 percent unaffected. Regardless of how you adjust this control, all image data is preserved and can be retrieved in subsequent adjustments. 0 is unity. The range is –100 to +100.
� Sharpness: A debayer-specific sharpness filter applied to provide the appearance of enhanced image detail. 20 is unity. The range is 0 to 100.
� Highlights: Makes it easy to selectively retrieve blown-out highlight detail in high-dynamic-range media by lowering this parameter, and achieves a smooth blend between the retrieved highlights and the unadjusted mid tones for a naturalistic result. 0 is unity. The range is –100 (minimum) through +100 (maximum).
� Shadows: Lets you selectively lighten or darken shadow detail. Raising this value retrieves shadow detail recorded below 0 percent, while leaving the midtones alone. 0 is unity. The range is –100 (minimum) through +100 (very high).
� Color Boost: Lets you naturalistically raise the saturation of regions of low saturation, sometimes referred to as a vibrance operation. Can be used also to lower the saturation of regions of low saturation. 0 is unity. The range is –100 (minimum) through +100 (very high).
� Saturation: Adjusts the color intensity of the image. 0 is unity. The range is –100 (minimum) through +100 (very high).
� Midtone Detail: When this parameter is raised, the contrast of regions of the image with high edge detail is raised to increase the perception of image sharpness, sometimes referred to as definition. When this parameter is lowered to a negative value, regions of the image with low amounts of detail are softened while areas of high detail are left alone. 0 is unity. The range is –100 (minimum) through +100 (very high).


![ExpLogTrigReview [213 marks] - GitHub Pages](https://img.dokumen.tips/doc/110x75/632067f1117b4414ec0b02fb/explogtrigreview-213-marks-github-pages.jpg)


