Embed Size (px)
Citation preview
.
AVR-S700WINTEGRATED NETWORK AV RECEIVER
Owner’s Manual
Contents Connections Playback Settings Tips Appendix
1Front panel Display Rear panel Remote Index
Accessories 7Inserting the batteries 8Operating range of the remote control unit 8
Features 9High quality sound 9High performance 9Easy operation 12
Part names and functions 13Front panel 13Display 16Rear panel 18Remote control unit 21
ConnectionsConnecting speakers 25
Speaker installation 25Speaker connection 28Speaker configuration and Amp Assign settings 31
Connecting a TV 36Connection 1 : TV equipped with an HDMI connector andcompatible with the ARC (Audio Return Channel) 37Connection 2 : TV equipped with an HDMI connector andincompatible with the ARC (Audio Return Channel) 38Connection 3 : TV equipped without an HDMI connector 39
Connecting a playback device 40Connecting a DVD player or Blu-ray Disc player 41Connecting a set-top box (Satellite tuner/cable TV) 42Connecting a video camcorder or game console 43
Connecting an iPod or USB memory device to the USB port 44Connecting an FM/AM antenna 46Connecting to a home network (LAN) 48
Wired LAN 48Wireless LAN 49
Connecting the power cord 50
PlaybackBasic operation 52
Turning the power on 52Selecting the input source 52Adjusting the volume 53Turning off the sound temporarily (Muting) 53Playback a DVD player/Blu-ray Disc player 53
Contents Connections Playback Settings Tips AppendixContents
2Front panel Display Rear panel Remote Index
Playing an iPod 54Listening to music on an iPod 55iPod Browse Mode settings 56Performing repeat playback 58Performing random playback 58
Playing a USB memory device 59Playing files stored on USB memory devices 60
Listening to music on a Bluetooth device 62Pairing with a Bluetooth device 63Playing a Bluetooth device 64Pairing with the Pairing Mode 66
Listening to FM/AM broadcasts 67Listening to FM/AM broadcasts 68Tuning in by entering the frequency (Direct Tune) 69Changing the tune mode (Tune Mode) 70Tuning in to stations and presetting them automatically (AutoPreset) 70Presetting the current broadcast station (Preset Memory) 71Listening to preset stations 71Specify a name for the preset broadcast station (Preset Name) 72Skipping preset broadcast stations (Preset Skip) 73Cancelling Preset Skip 74
Listening to Internet Radio 75Listening to Internet Radio 76Playing the last played Internet Radio station 77Using vTuner to add Internet Radio stations to favorites 78
Playing back files stored on a PC and NAS 79Applying media sharing settings 80Playing back files stored on a PC and NAS 81
Viewing photographs on the Flickr site 83Viewing photographs shared by particular users 84Viewing all photographs on Flickr 86
Listening to Pandora® 87Listening to Pandora® 88Creating a new station 90Listening to an existing station 91Listening to created radio stations at random 91Giving feedback and managing stations 92Sign Out 93
Listening to SiriusXM Internet Radio 94Listening to SiriusXM Internet Radio 95Sign Out 96
Contents Connections Playback Settings Tips Appendix
3Front panel Display Rear panel Remote Index
AirPlay function 97Playing songs from your iPhone, iPod touch or iPad 98Playing iTunes music with this unit 98Selecting multiple speakers (devices) 99Perform iTunes playback operations with the remote control unitof this unit 99
Spotify Connect function 100Playing Spotify music with this unit 100
Convenience functions 101Performing repeat playback 102Performing random playback 102Registering to Favorites 103Playing back content added to the “Save to Favorite” 103Deleting content added to favorites 104Searching content with keywords (Text Search) 104Playing back music and a favorite picture at the same time(Slideshow) 105Setting the Slideshow Interval 106Adjusting the volume of each channel to match the input source(Ch Level Adjust) 107Adjusting the tone (Tone Control) 108Displaying your desired video during audio playback (VideoSelect) 109Playing the same music in all zones (All Zone Stereo) 110
Selecting a sound mode 111Selecting a sound mode 112Direct playback 113Auto surround playback 113
HDMI control function 122Setting procedure 122
Sleep timer function 123Using the sleep timer 124
Quick select plus function 125Calling up the settings 126Changing the settings 127
Playback in ZONE2 (Separate room) 128Connecting ZONE2 128Playback in ZONE2 129
Contents Connections Playback Settings Tips Appendix
4Front panel Display Rear panel Remote Index
SettingsMenu map 131
Menu operations 134Inputting characters 135
Using the keyboard screen 136Audio 137
Dialog Level 137Subwoofer Level 137Surr.Parameter 138Restorer 142Audio Delay 143Volume 143Audyssey 144Manual EQ 146
Video 148HDMI Setup 148On Screen Disp. 151TV Format 152
Inputs 153Input Assign 153Source Rename 155Hide Sources 155Source Level 155Input Select 156
Speakers 157Audyssey® Setup 157
Procedure for speaker settings (Audyssey® Setup) 159Error messages 165Retrieving Audyssey® Setup settings 166
Manual Setup 167Amp Assign 167Speaker Config. 168Distances 170Levels 171Crossovers 172Bass 173
Contents Connections Playback Settings Tips Appendix
5Front panel Display Rear panel Remote Index
Network 174Information 174Connection 174Wi-Fi Setup 175Settings 177IP Control 178Friendly Name 179Diagnostics 179
General 180Language 180ECO 180ZONE2 Setup 182Zone Rename 183Quick Sel.Names 183Front Display 183Information 184Usage Data 185Firmware 186Setup Lock 188
TipsTips 190Troubleshooting 192
Resetting factory settings 208
AppendixAbout HDMI 209Playing back a USB memory devices 212Playing back a Bluetooth device 213Playing back a file saved on a PC or NAS 214Playing back Internet Radio 215Personal memory plus function 215Last function memory 215Sound modes and channel output 216Sound modes and surround parameters 217Types of input signals, and corresponding sound modes 220Explanation of terms 223Trademark information 233Specifications 235Index 240License 243
Contents Connections Playback Settings Tips Appendix
6Front panel Display Rear panel Remote Index
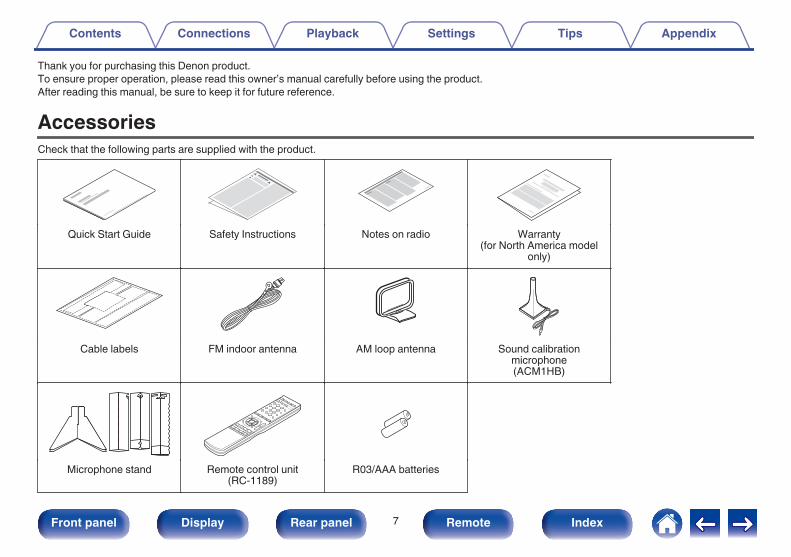
Thank you for purchasing this Denon product.To ensure proper operation, please read this owner’s manual carefully before using the product.After reading this manual, be sure to keep it for future reference.
AccessoriesCheck that the following parts are supplied with the product.
.
.
.
.
Quick Start Guide Safety Instructions Notes on radio Warranty(for North America model
only)
.
.
.
.
Cable labels FM indoor antenna AM loop antenna Sound calibrationmicrophone(ACM1HB)
. .
.
Microphone stand Remote control unit(RC-1189)
R03/AAA batteries
Contents Connections Playback Settings Tips Appendix
7Front panel Display Rear panel Remote Index
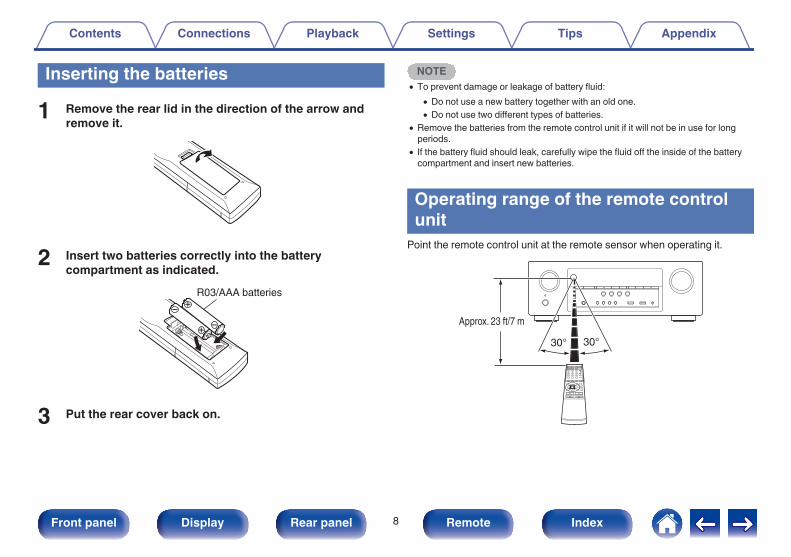
Inserting the batteries
1 Remove the rear lid in the direction of the arrow andremove it.
.
2 Insert two batteries correctly into the batterycompartment as indicated.
.
R03/AAA batteries
3 Put the rear cover back on.
NOTE0 To prevent damage or leakage of battery fluid:
0 Do not use a new battery together with an old one.0 Do not use two different types of batteries.
0 Remove the batteries from the remote control unit if it will not be in use for longperiods.
0 If the battery fluid should leak, carefully wipe the fluid off the inside of the batterycompartment and insert new batteries.
Operating range of the remote controlunit
Point the remote control unit at the remote sensor when operating it.
.
Approx. 23 ft/7 m30° 30°
Contents Connections Playback Settings Tips Appendix
8Front panel Display Rear panel Remote Index
FeaturesHigh quality sound0 With discrete circuit technology, the power amplifier provides
identical quality for all 7-channels (110 Watts x 7-channels)For optimum realism and stunning dynamic range, the power amplifiersection features discrete power devices (not integrated circuitry).By using high current, high power discrete power devices, the amplifieris able to easily drive high quality speakers.
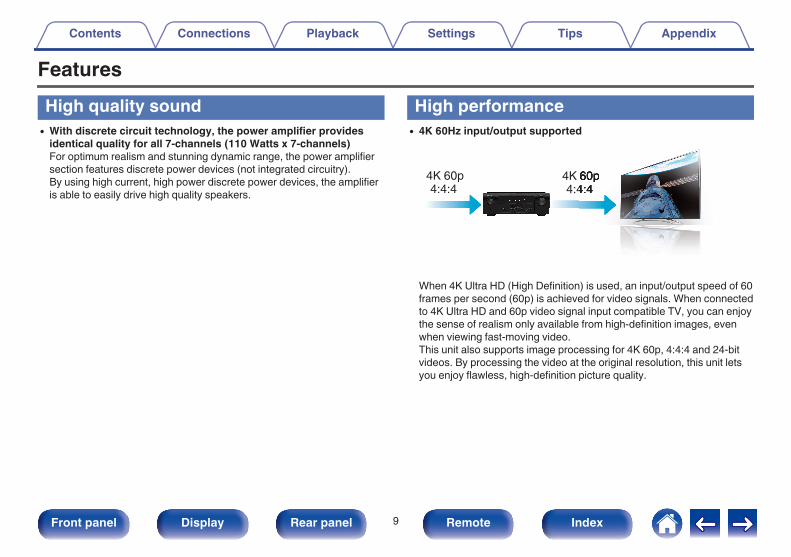
High performance0 4K 60Hz input/output supported
.
4K 60p4:4:4
4K 60p4:4:4
When 4K Ultra HD (High Definition) is used, an input/output speed of 60frames per second (60p) is achieved for video signals. When connectedto 4K Ultra HD and 60p video signal input compatible TV, you can enjoythe sense of realism only available from high-definition images, evenwhen viewing fast-moving video.This unit also supports image processing for 4K 60p, 4:4:4 and 24-bitvideos. By processing the video at the original resolution, this unit letsyou enjoy flawless, high-definition picture quality.
Contents Connections Playback Settings Tips Appendix
9Front panel Display Rear panel Remote Index
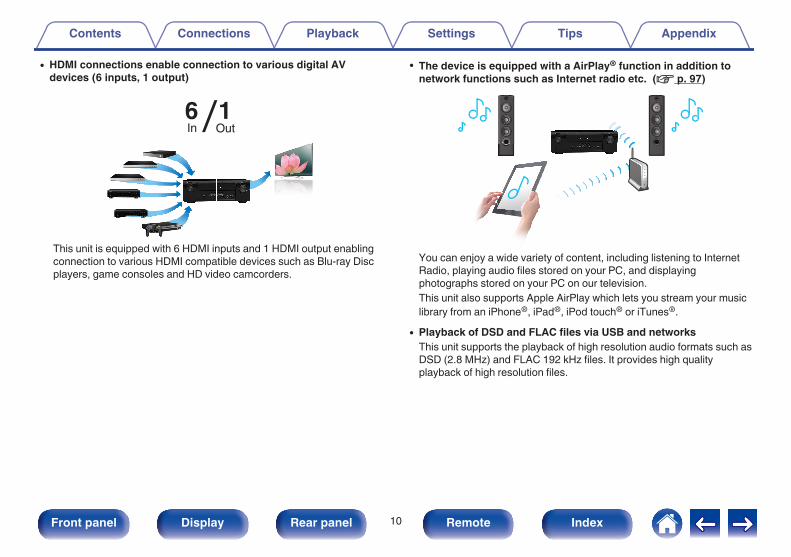
0 HDMI connections enable connection to various digital AVdevices (6 inputs, 1 output)
.
6 1/In Out
This unit is equipped with 6 HDMI inputs and 1 HDMI output enablingconnection to various HDMI compatible devices such as Blu-ray Discplayers, game consoles and HD video camcorders.
0 The device is equipped with a AirPlay® function in addition tonetwork functions such as Internet radio etc. (v p. 97)
.
You can enjoy a wide variety of content, including listening to InternetRadio, playing audio files stored on your PC, and displayingphotographs stored on your PC on our television.This unit also supports Apple AirPlay which lets you stream your musiclibrary from an iPhone®, iPad®, iPod touch® or iTunes®.
0 Playback of DSD and FLAC files via USB and networksThis unit supports the playback of high resolution audio formats such asDSD (2.8 MHz) and FLAC 192 kHz files. It provides high qualityplayback of high resolution files.
Contents Connections Playback Settings Tips Appendix
10Front panel Display Rear panel Remote Index
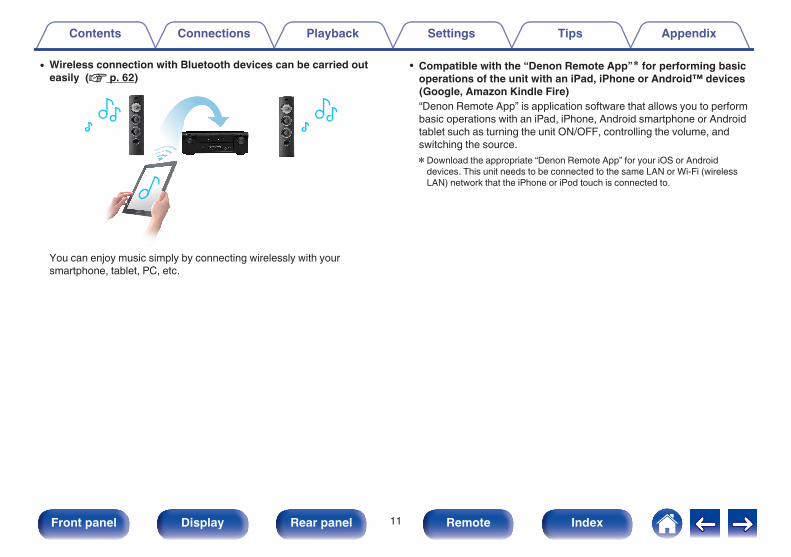
0 Wireless connection with Bluetooth devices can be carried outeasily (v p. 62)
.
You can enjoy music simply by connecting wirelessly with yoursmartphone, tablet, PC, etc.
0 Compatible with the “Denon Remote App”z for performing basicoperations of the unit with an iPad, iPhone or Android™ devices(Google, Amazon Kindle Fire)“Denon Remote App” is application software that allows you to performbasic operations with an iPad, iPhone, Android smartphone or Androidtablet such as turning the unit ON/OFF, controlling the volume, andswitching the source.zDownload the appropriate “Denon Remote App” for your iOS or Android
devices. This unit needs to be connected to the same LAN or Wi-Fi (wirelessLAN) network that the iPhone or iPod touch is connected to.
Contents Connections Playback Settings Tips Appendix
11Front panel Display Rear panel Remote Index
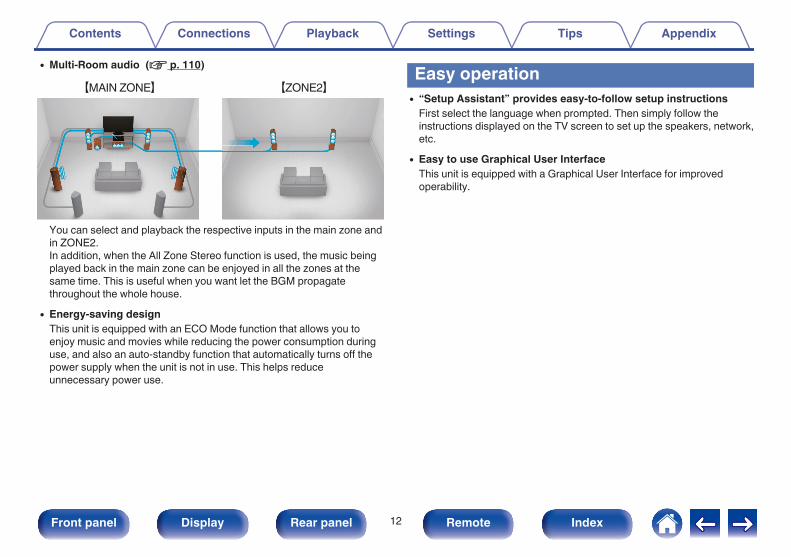
0 Multi-Room audio (v p. 110)
.
GMAIN ZONEH GZONE2H
You can select and playback the respective inputs in the main zone andin ZONE2.In addition, when the All Zone Stereo function is used, the music beingplayed back in the main zone can be enjoyed in all the zones at thesame time. This is useful when you want let the BGM propagatethroughout the whole house.
0 Energy-saving designThis unit is equipped with an ECO Mode function that allows you toenjoy music and movies while reducing the power consumption duringuse, and also an auto-standby function that automatically turns off thepower supply when the unit is not in use. This helps reduceunnecessary power use.
Easy operation0 “Setup Assistant” provides easy-to-follow setup instructions
First select the language when prompted. Then simply follow theinstructions displayed on the TV screen to set up the speakers, network,etc.
0 Easy to use Graphical User InterfaceThis unit is equipped with a Graphical User Interface for improvedoperability.
Contents Connections Playback Settings Tips Appendix
12Front panel Display Rear panel Remote Index
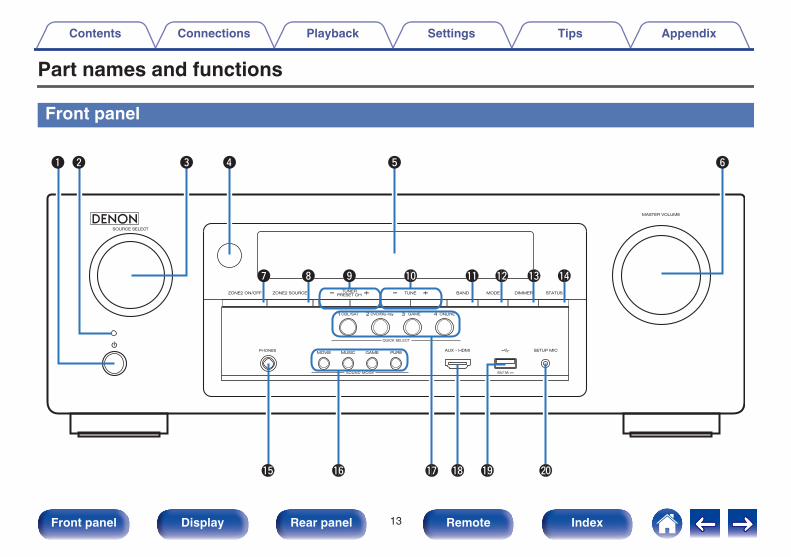
Part names and functionsFront panel
.
MASTER VOLUME
SOURCE SELECT
BAND MODE DIMMER STATUSTUNEZONE2 ON/OFF ZONE2 SOURCE TUNERPRESET CH
CBL/SAT 3 4 ONLINE1 GAME2 DVD/Blu-ray
QUICK SELECT
SETUP MICAUX - HDMI
5V/1A
PHONES MOVIE MUSIC GAME PURE
SOUND MODE
Q0ou i Q1 Q2 Q3 Q4
W0Q8Q7Q6 Q9Q5
trewq y
Contents Connections Playback Settings Tips Appendix
13Front panel Display Rear panel Remote Index
.
MASTER VOLUME
SOURCE SELECT
BAND MODE DIMMER STATUSTUNEZONE 2 ON/OFF ZONE 2 SOURCE TUNERPRESET CH
CBL/SAT 3 4 ONLINE1 GAME2 DVD/Blu-ray
QUICK SELECT
SETUP MICAUX - HDMI
5V/1A
PHONES MOVIE MUSIC GAME PURE
SOUND MODE
tqw e r y
u io Q0
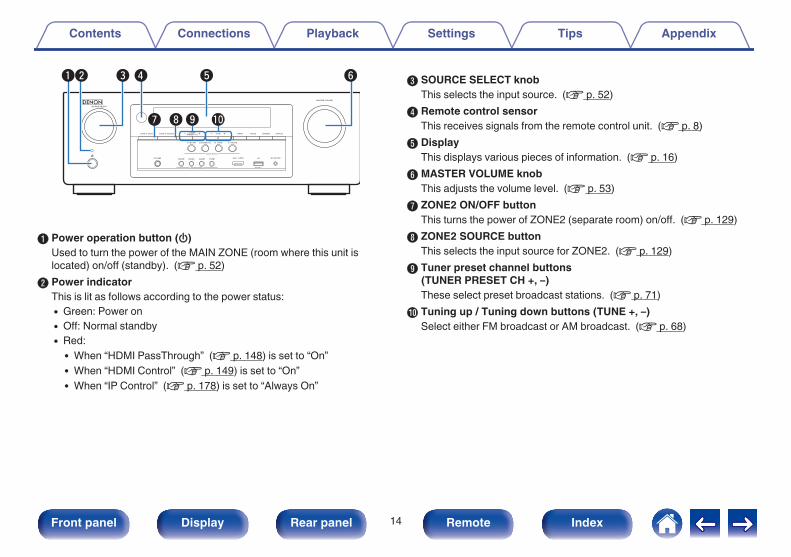
A Power operation button (X)Used to turn the power of the MAIN ZONE (room where this unit islocated) on/off (standby). (v p. 52)
B Power indicatorThis is lit as follows according to the power status:0 Green: Power on0 Off: Normal standby0 Red:0 When “HDMI PassThrough” (v p. 148) is set to “On”0 When “HDMI Control” (v p. 149) is set to “On”0 When “IP Control” (v p. 178) is set to “Always On”
C SOURCE SELECT knobThis selects the input source. (v p. 52)
D Remote control sensorThis receives signals from the remote control unit. (v p. 8)
E DisplayThis displays various pieces of information. (v p. 16)
F MASTER VOLUME knobThis adjusts the volume level. (v p. 53)
G ZONE2 ON/OFF buttonThis turns the power of ZONE2 (separate room) on/off. (v p. 129)
H ZONE2 SOURCE buttonThis selects the input source for ZONE2. (v p. 129)
I Tuner preset channel buttons(TUNER PRESET CH +, –)These select preset broadcast stations. (v p. 71)
J Tuning up / Tuning down buttons (TUNE +, –)Select either FM broadcast or AM broadcast. (v p. 68)
Contents Connections Playback Settings Tips Appendix
14Front panel Display Rear panel Remote Index
.
MASTER VOLUME
SOURCE SELECT
BAND MODE DIMMER STATUSTUNEZONE 2 ON/OFF ZONE 2 SOURCE TUNERPRESET CH
CBL/SAT 3 4 ONLINE1 GAME2 DVD/Blu-ray
QUICK SELECT
SETUP MICAUX - HDMI
5V/1A
PHONES MOVIE MUSIC GAME PURE
SOUND MODE
W0Q8Q7Q6 Q9Q5
Q1Q2Q3Q4
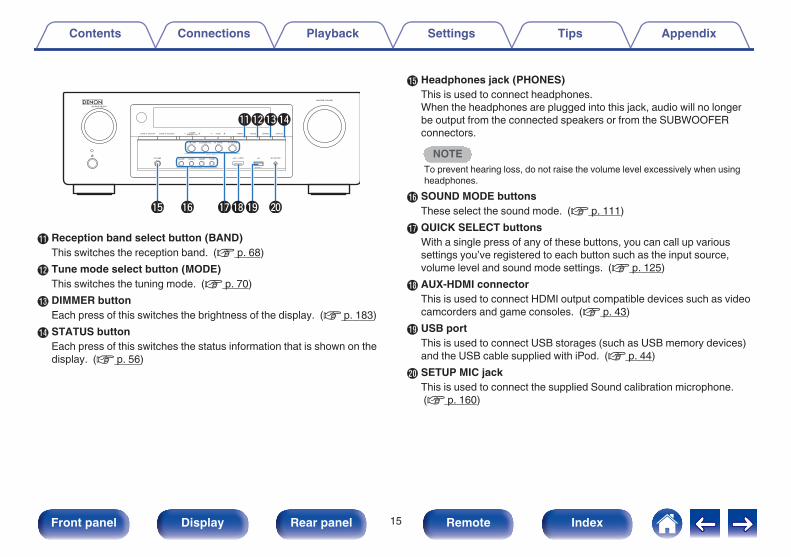
K Reception band select button (BAND)This switches the reception band. (v p. 68)
L Tune mode select button (MODE)This switches the tuning mode. (v p. 70)
M DIMMER buttonEach press of this switches the brightness of the display. (v p. 183)
N STATUS buttonEach press of this switches the status information that is shown on thedisplay. (v p. 56)
O Headphones jack (PHONES)This is used to connect headphones.When the headphones are plugged into this jack, audio will no longerbe output from the connected speakers or from the SUBWOOFERconnectors.
NOTETo prevent hearing loss, do not raise the volume level excessively when usingheadphones.
P SOUND MODE buttonsThese select the sound mode. (v p. 111)
Q QUICK SELECT buttonsWith a single press of any of these buttons, you can call up varioussettings you’ve registered to each button such as the input source,volume level and sound mode settings. (v p. 125)
R AUX-HDMI connectorThis is used to connect HDMI output compatible devices such as videocamcorders and game consoles. (v p. 43)
S USB portThis is used to connect USB storages (such as USB memory devices)and the USB cable supplied with iPod. (v p. 44)
T SETUP MIC jackThis is used to connect the supplied Sound calibration microphone. (v p. 160)
Contents Connections Playback Settings Tips Appendix
15Front panel Display Rear panel Remote Index
Display
.
i ouytq w e r
Q0 Q1 Q2
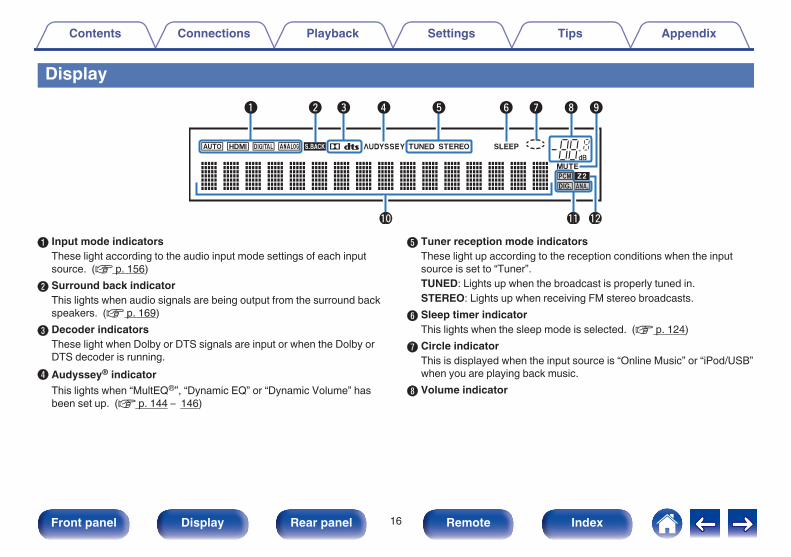
A Input mode indicatorsThese light according to the audio input mode settings of each inputsource. (v p. 156)
B Surround back indicatorThis lights when audio signals are being output from the surround backspeakers. (v p. 169)
C Decoder indicatorsThese light when Dolby or DTS signals are input or when the Dolby orDTS decoder is running.
D Audyssey® indicatorThis lights when “MultEQ®”, “Dynamic EQ” or “Dynamic Volume” hasbeen set up. (v p. 144 – 146)
E Tuner reception mode indicatorsThese light up according to the reception conditions when the inputsource is set to “Tuner”.TUNED: Lights up when the broadcast is properly tuned in.STEREO: Lights up when receiving FM stereo broadcasts.
F Sleep timer indicatorThis lights when the sleep mode is selected. (v p. 124)
G Circle indicatorThis is displayed when the input source is “Online Music” or “iPod/USB”when you are playing back music.
H Volume indicator
Contents Connections Playback Settings Tips Appendix
16Front panel Display Rear panel Remote Index

.
o
Q1Q0 Q2
I MUTE indicatorThis blinks while the sound is muted. (v p. 53)
J Information displayThe input source name, sound mode, setting values and otherinformation are displayed here.
K Input signal indicatorsThe respective indicator will light corresponding to the input signal. (v p. 156)
L ZONE2 indicatorThis lights up when ZONE2 (separate room) power is turned on. (v p. 129)
Contents Connections Playback Settings Tips Appendix
17Front panel Display Rear panel Remote Index

Rear panel
.
IMPEDANCE : 4 16SPEAKERSASSIGNABLE
ANTENNA
1 CBL/SAT 4 Blu-ray 5 GAMEMEDIAPLAYER3 DVD/
Blu-ray2 (4K)(4K)
HDMI (ASSIGNABLE)INNETWORK
CLASS 2 WIRING
PRE OUT
1
2
SUBWOOFER CBL/SAT MEDIAPLAYERTV AUDIO
1 2
COAXIAL OPTICAL
INDIGITAL AUDIO(ASSIGNABLE)
75
FMAM
FRONT FRONT CENTER SURROUND SURROUND BACK SURROUND BACKSURROUND
MONITORARC
HDMI OUT
1 CBL/SAT
MEDIAPLAYER2
VIDEO OUT
MONITOR
VIDEO IN(ASSIGNABLE)AUDIO
(ASSIGNABLE)IN
MEDIAPLAYER
1 2CBL/SAT
yt u i qq rew
o Q0
Contents Connections Playback Settings Tips Appendix
18Front panel Display Rear panel Remote Index
.
IMPEDANCE : 4 16SPEAKERSASSIGNABLE
ANTENNA
1 CBL/SAT 4 Blu-ray 5 GAMEMEDIAPLAYER3 DVD/
Blu-ray2 (4K)(4K)
HDMI (ASSIGNABLE)INNETWORK
CLASS 2 WIRING
PRE OUT
1
2
SUBWOOFER CBL/SAT MEDIAPLAYERTV AUDIO
1 2
COAXIAL OPTICAL
INDIGITAL AUDIO(ASSIGNABLE)
75
FMAM
FRONT FRONT CENTER SURROUND SURROUND BACK SURROUND BACKSURROUND
MONITORARC
HDMI OUT
1 CBL/SAT
MEDIAPLAYER2
VIDEO OUT
MONITOR
VIDEO IN(ASSIGNABLE)AUDIO
(ASSIGNABLE)IN
MEDIAPLAYER
1 2CBL/SAT
yt u iqq rew
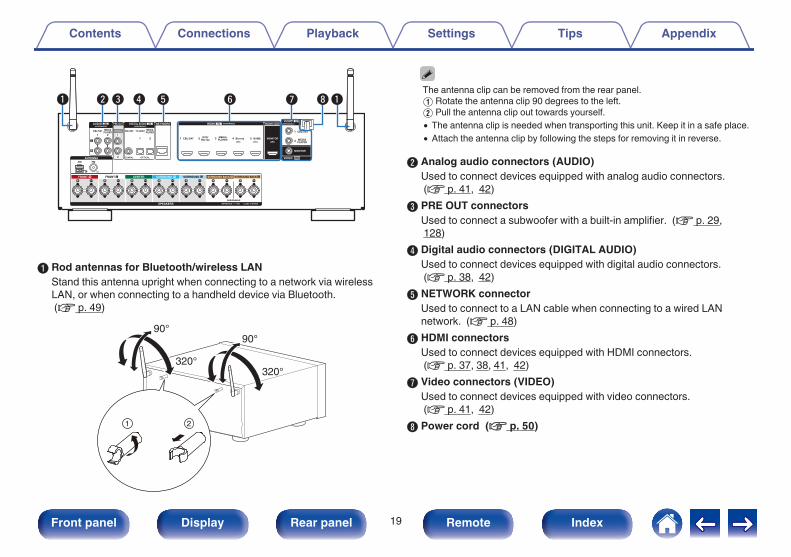
A Rod antennas for Bluetooth/wireless LANStand this antenna upright when connecting to a network via wirelessLAN, or when connecting to a handheld device via Bluetooth. (v p. 49)
.
90°
320°320°
90°
The antenna clip can be removed from the rear panel.A Rotate the antenna clip 90 degrees to the left.B Pull the antenna clip out towards yourself.0 The antenna clip is needed when transporting this unit. Keep it in a safe place.0 Attach the antenna clip by following the steps for removing it in reverse.
B Analog audio connectors (AUDIO)Used to connect devices equipped with analog audio connectors. (v p. 41, 42)
C PRE OUT connectorsUsed to connect a subwoofer with a built-in amplifier. (v p. 29, 128)
D Digital audio connectors (DIGITAL AUDIO)Used to connect devices equipped with digital audio connectors. (v p. 38, 42)
E NETWORK connectorUsed to connect to a LAN cable when connecting to a wired LANnetwork. (v p. 48)
F HDMI connectorsUsed to connect devices equipped with HDMI connectors. (v p. 37, 38, 41, 42)
G Video connectors (VIDEO)Used to connect devices equipped with video connectors. (v p. 41, 42)
H Power cord (v p. 50)
Contents Connections Playback Settings Tips Appendix
19Front panel Display Rear panel Remote Index
.
IMPEDANCE : 4 16SPEAKERSASSIGNABLE
ANTENNA
1 CBL/SAT 4 Blu-ray 5 GAMEMEDIAPLAYER3 DVD/
Blu-ray2 (4K)(4K)
HDMI (ASSIGNABLE)INNETWORK
CLASS 2 WIRING
PRE OUT
1
2
SUBWOOFER CBL/SAT MEDIAPLAYERTV AUDIO
1 2
COAXIAL OPTICAL
INDIGITAL AUDIO(ASSIGNABLE)
75
FMAM
FRONT FRONT CENTER SURROUND SURROUND BACK SURROUND BACKSURROUND
MONITORARC
HDMI OUT
1 CBL/SAT
MEDIAPLAYER2
VIDEO OUT
MONITOR
VIDEO IN(ASSIGNABLE)AUDIO
(ASSIGNABLE)IN
MEDIAPLAYER
1 2CBL/SAT
o Q0
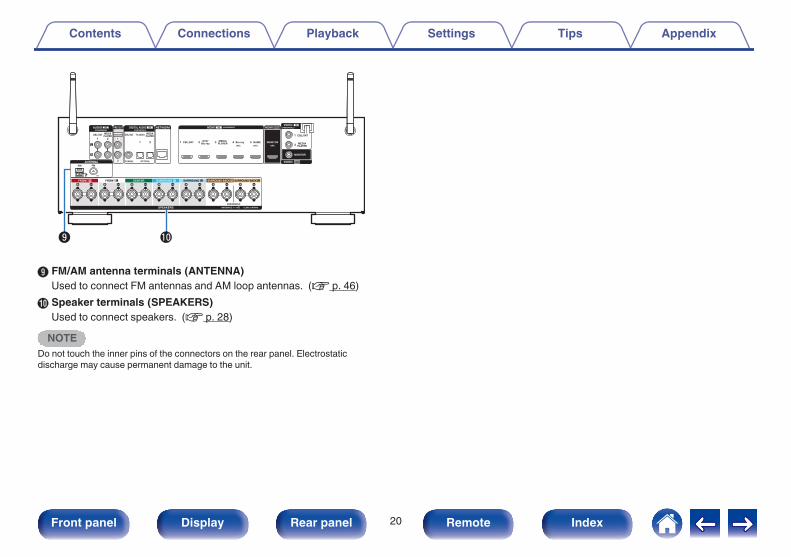
I FM/AM antenna terminals (ANTENNA)Used to connect FM antennas and AM loop antennas. (v p. 46)
J Speaker terminals (SPEAKERS)Used to connect speakers. (v p. 28)
NOTEDo not touch the inner pins of the connectors on the rear panel. Electrostaticdischarge may cause permanent damage to the unit.
Contents Connections Playback Settings Tips Appendix
20Front panel Display Rear panel Remote Index
Remote control unit
.
ENTENTER
SOUOUND ND MOMODE
POPOWER
VOLULUME
CHAHANNNNEL
MUTEMUTE
QUICK K SESELECT
PAGAGE
VOVOLULUME
BlBlu-r-rayCBL/SATBL/SAT
GAGAME
DVD/VD/Blu-raBlu-ray
AUX MEDEDIAPLAYPLAYER
TV A AUDIDIO
BluluetooetoothINTEINTERNETRNET
RADIADIO
TUNUNERiPiPod/od/USB
PUREMOVIE GAMEMUSIC
TUNUNE TUTUNE
1 2 3 4
ECO
ONLINONLINEMUSIC
ZOZONE 2
SOUOURCRCE SLELEEP
INFNFO OPOPTIOION
BACK SETSETUP
q
r
t
y
uio
w
e
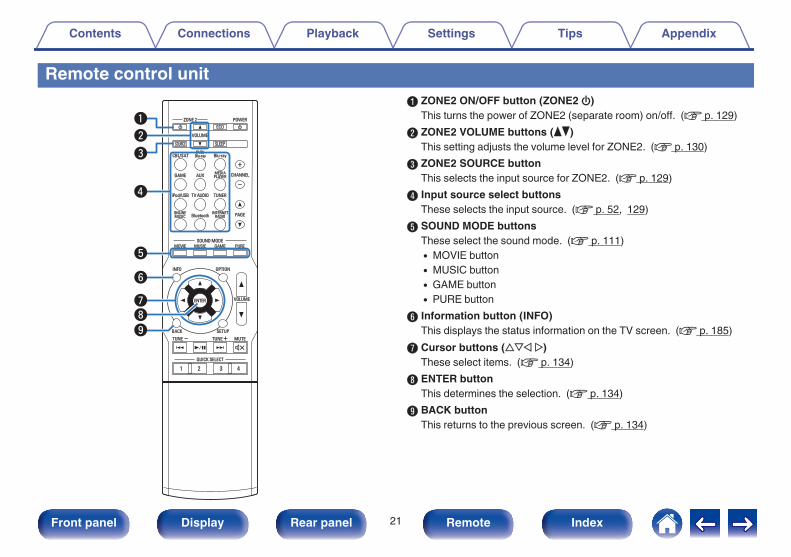
A ZONE2 ON/OFF button (ZONE2 X)This turns the power of ZONE2 (separate room) on/off. (v p. 129)
B ZONE2 VOLUME buttons (df)This setting adjusts the volume level for ZONE2. (v p. 130)
C ZONE2 SOURCE buttonThis selects the input source for ZONE2. (v p. 129)
D Input source select buttonsThese selects the input source. (v p. 52, 129)
E SOUND MODE buttonsThese select the sound mode. (v p. 111)0 MOVIE button0 MUSIC button0 GAME button0 PURE button
F Information button (INFO)This displays the status information on the TV screen. (v p. 185)
G Cursor buttons (uio p)These select items. (v p. 134)
H ENTER buttonThis determines the selection. (v p. 134)
I BACK buttonThis returns to the previous screen. (v p. 134)
Contents Connections Playback Settings Tips Appendix
21Front panel Display Rear panel Remote Index
.
ENTENTER
SOUOUND ND MOMODE
POPOWER
VOLULUME
CHAHANNNNEL
MUTEMUTE
QUICK K SESELECT
PAGAGE
VOVOLULUME
BlBlu-r-rayCBL/SATBL/SAT
GAGAME
DVD/VD/Blu-raBlu-ray
AUX MEDEDIAPLAYPLAYER
TV A AUDIDIO
BluluetooetoothINTEINTERNETRNET
RADIADIO
TUNUNERiPiPod/od/USB
PUREMOVIE GAMEMUSIC
TUNUNE TUTUNE
1 2 3 4
ECO
ONLINONLINEMUSIC
ZOZONE 2
SOUOURCRCE SLELEEP
INFNFO OPOPTIOION
BACK SETSETUP
Q3Q2
Q7
Q6
Q4
Q5
Q1
Q0
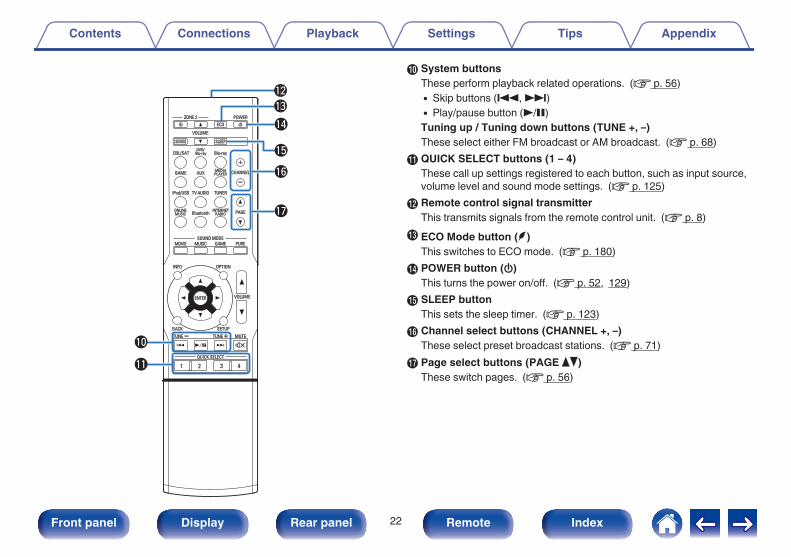
J System buttonsThese perform playback related operations. (v p. 56)0 Skip buttons (8, 9)0 Play/pause button (1/3)Tuning up / Tuning down buttons (TUNE +, –)These select either FM broadcast or AM broadcast. (v p. 68)
K QUICK SELECT buttons (1 – 4)These call up settings registered to each button, such as input source,volume level and sound mode settings. (v p. 125)
L Remote control signal transmitterThis transmits signals from the remote control unit. (v p. 8)
M ECO Mode button (G)This switches to ECO mode. (v p. 180)
N POWER button (X)This turns the power on/off. (v p. 52, 129)
O SLEEP buttonThis sets the sleep timer. (v p. 123)
P Channel select buttons (CHANNEL +, –)These select preset broadcast stations. (v p. 71)
Q Page select buttons (PAGE df)These switch pages. (v p. 56)
Contents Connections Playback Settings Tips Appendix
22Front panel Display Rear panel Remote Index
.
ENTENTER
SOUOUND ND MOMODE
POPOWER
VOLULUME
CHAHANNNNEL
MUTEMUTE
QUICK K SESELECT
PAGAGE
VOVOLULUME
BlBlu-r-rayCBL/SATBL/SAT
GAGAME
DVD/VD/Blu-raBlu-ray
AUX MEDEDIAPLAYPLAYER
TV A AUDIDIO
BluluetooetoothINTEINTERNETRNET
RADIADIO
TUNUNERiPiPod/od/USB
PUREMOVIE GAMEMUSIC
TUNUNE TUTUNE
1 2 3 4
ECO
ONLINONLINEMUSIC
ZOZONE 2
SOUOURCRCE SLELEEP
INFNFO OPOPTIOION
BACK SETSETUP
Q9
W1
Q8
W0
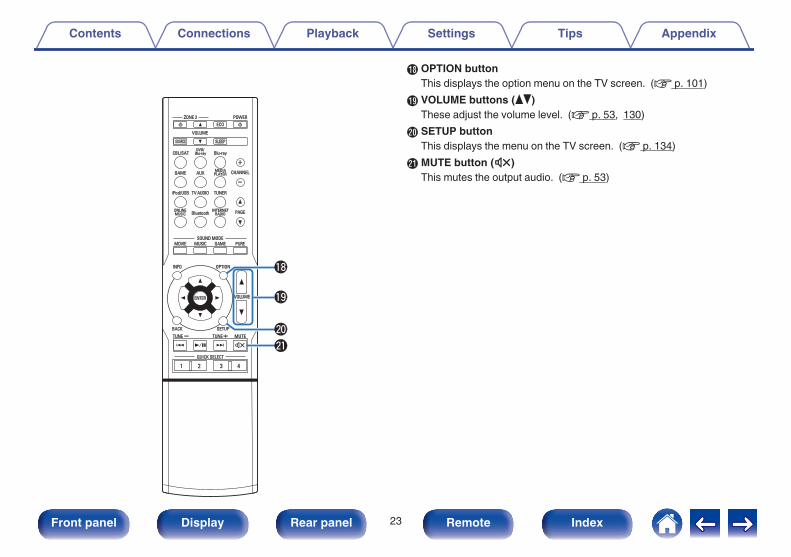
R OPTION buttonThis displays the option menu on the TV screen. (v p. 101)
S VOLUME buttons (df)These adjust the volume level. (v p. 53, 130)
T SETUP buttonThis displays the menu on the TV screen. (v p. 134)
U MUTE button (:)This mutes the output audio. (v p. 53)
Contents Connections Playback Settings Tips Appendix
23Front panel Display Rear panel Remote Index

o ContentsConnecting speakers 25Connecting a TV 36Connecting a playback device 40Connecting an iPod or USB memory device to the USB port 44Connecting an FM/AM antenna 46Connecting to a home network (LAN) 48Connecting the power cord 50
NOTE0 Do not plug in the power cord until all connections have been completed.
However, when the “Setup Assistant” is running, follow the instructions in the“Setup Assistant” (page 8 in the separate “Quick Start Guide”) screen for makingconnections. (During “Setup Assistant” operation, the input/output connectors donot conduct current.)
0 Do not bundle power cords together with connection cables. Doing so can result innoise.
o Cables used for connectionsProvide necessary cables according to the devices you want toconnect.
Speaker cable.
Subwoofer cable.
HDMI cable.
Video cable.
Coaxial digital cable.
Optical cable.
Audio cable.
R
L
R
L
LAN cable.
Contents Connections Playback Settings Tips AppendixConnections
24Front panel Display Rear panel Remote Index
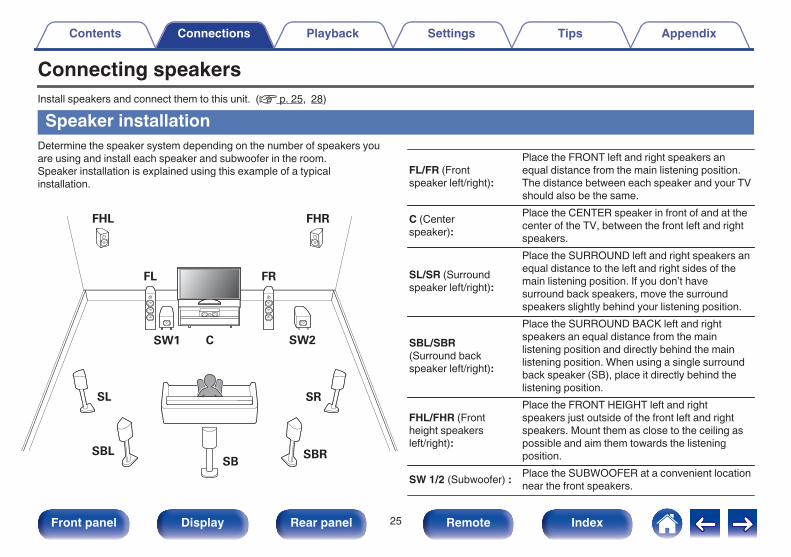
Connecting speakersInstall speakers and connect them to this unit. (v p. 25, 28)
Speaker installationDetermine the speaker system depending on the number of speakers youare using and install each speaker and subwoofer in the room.Speaker installation is explained using this example of a typicalinstallation.
.
FHL
FL
SW1 C
SL
SBL
FHR
FR
SR
SBRSB
SW2
FL/FR (Frontspeaker left/right):
Place the FRONT left and right speakers anequal distance from the main listening position.The distance between each speaker and your TVshould also be the same.
C (Centerspeaker):
Place the CENTER speaker in front of and at thecenter of the TV, between the front left and rightspeakers.
SL/SR (Surroundspeaker left/right):
Place the SURROUND left and right speakers anequal distance to the left and right sides of themain listening position. If you don’t havesurround back speakers, move the surroundspeakers slightly behind your listening position.
SBL/SBR(Surround backspeaker left/right):
Place the SURROUND BACK left and rightspeakers an equal distance from the mainlistening position and directly behind the mainlistening position. When using a single surroundback speaker (SB), place it directly behind thelistening position.
FHL/FHR (Frontheight speakersleft/right):
Place the FRONT HEIGHT left and rightspeakers just outside of the front left and rightspeakers. Mount them as close to the ceiling aspossible and aim them towards the listeningposition.
SW 1/2 (Subwoofer) : Place the SUBWOOFER at a convenient locationnear the front speakers.
Contents Connections Playback Settings Tips Appendix
25Front panel Display Rear panel Remote Index
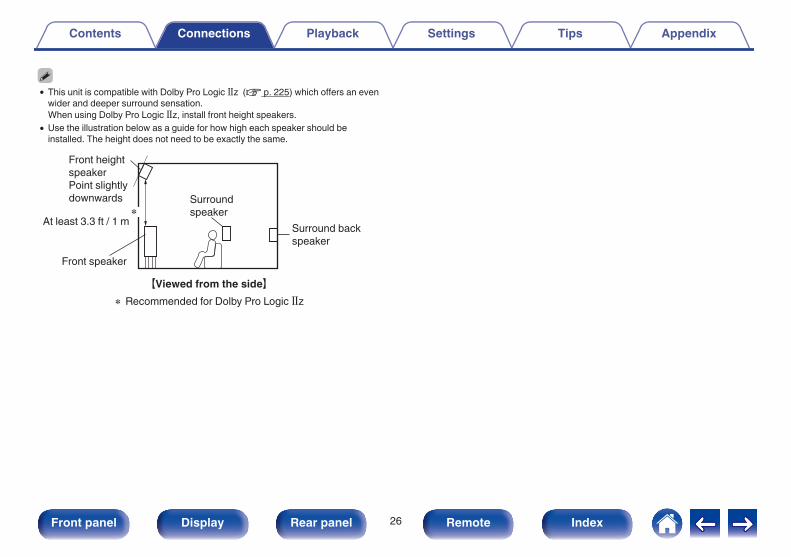
0 This unit is compatible with Dolby Pro Logic gz (v p. 225) which offers an evenwider and deeper surround sensation.When using Dolby Pro Logic gz, install front height speakers.
0 Use the illustration below as a guide for how high each speaker should beinstalled. The height does not need to be exactly the same.
.
z
Surround back speaker
At least 3.3 ft / 1 m
Front height speakerPoint slightly downwards Surround
speaker
Front speakerGViewed from the sideH
z Recommended for Dolby Pro Logic gz
Contents Connections Playback Settings Tips Appendix
26Front panel Display Rear panel Remote Index

o When 7.1-channel speakers are installed usingsurround back speakers
.
z1
z2z3
FL
SW C
SL
SBL
FR
SR
SBRListening position
z1:22° - 30° z2:90° - 110° z3:135° - 150°
When using a single surround back speaker, place it directly behind the listeningposition.
o When 7.1-channel speakers are installed usingfront height speakers
.
z1
z2
z3
FHL FHR
FL
SW C
SL
FR
SR
z1:22° - 30° z2:22° - 45° z3:90° - 110°
o When 5.1-channel speakers are installed
.
z1
z2
FL
SW C
SL
FR
SR
z1:22° - 30° z2:120°
Contents Connections Playback Settings Tips Appendix
27Front panel Display Rear panel Remote Index
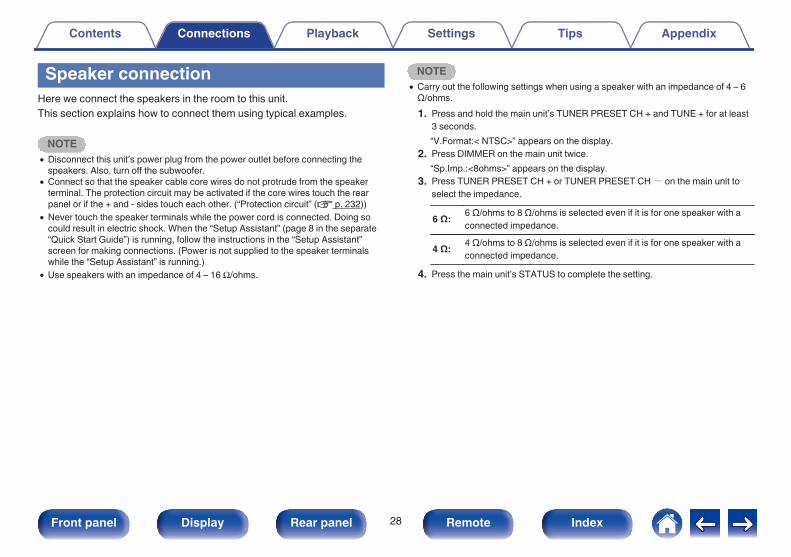
Speaker connectionHere we connect the speakers in the room to this unit.This section explains how to connect them using typical examples.
NOTE0 Disconnect this unit’s power plug from the power outlet before connecting the
speakers. Also, turn off the subwoofer.0 Connect so that the speaker cable core wires do not protrude from the speaker
terminal. The protection circuit may be activated if the core wires touch the rearpanel or if the + and - sides touch each other. (“Protection circuit” (v p. 232))
0 Never touch the speaker terminals while the power cord is connected. Doing socould result in electric shock. When the “Setup Assistant” (page 8 in the separate“Quick Start Guide”) is running, follow the instructions in the “Setup Assistant”screen for making connections. (Power is not supplied to the speaker terminalswhile the “Setup Assistant” is running.)
0 Use speakers with an impedance of 4 – 16 Ω/ohms.
NOTE0 Carry out the following settings when using a speaker with an impedance of 4 – 6
Ω/ohms.1. Press and hold the main unit’s TUNER PRESET CH + and TUNE + for at least
3 seconds.“V.Format:< NTSC>” appears on the display.
2. Press DIMMER on the main unit twice.“Sp.Imp.:<8ohms>” appears on the display.
3. Press TUNER PRESET CH + or TUNER PRESET CH - on the main unit toselect the impedance.
6 Ω: 6 Ω/ohms to 8 Ω/ohms is selected even if it is for one speaker with aconnected impedance.
4 Ω: 4 Ω/ohms to 8 Ω/ohms is selected even if it is for one speaker with aconnected impedance.
4. Press the main unit’s STATUS to complete the setting.
Contents Connections Playback Settings Tips Appendix
28Front panel Display Rear panel Remote Index
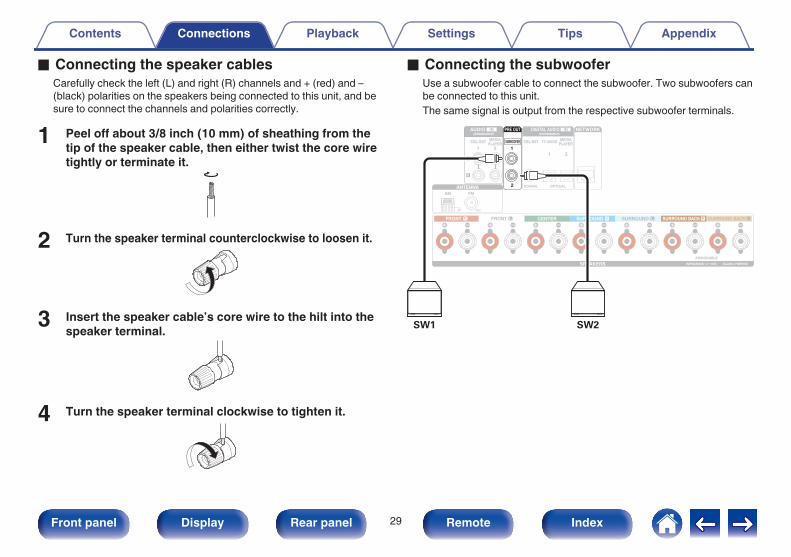
o Connecting the speaker cablesCarefully check the left (L) and right (R) channels and + (red) and –(black) polarities on the speakers being connected to this unit, and besure to connect the channels and polarities correctly.
1 Peel off about 3/8 inch (10 mm) of sheathing from thetip of the speaker cable, then either twist the core wiretightly or terminate it.
.
2 Turn the speaker terminal counterclockwise to loosen it.
.
3 Insert the speaker cable’s core wire to the hilt into thespeaker terminal.
.
4 Turn the speaker terminal clockwise to tighten it.
.
o Connecting the subwooferUse a subwoofer cable to connect the subwoofer. Two subwoofers canbe connected to this unit.The same signal is output from the respective subwoofer terminals.
.
ANTENNA
NETWORK
CBL/SAT MEDIAPLAYERTV AUDIO
1 2
COAXIAL OPTICAL
INDIGITAL AUDIO(ASSIGNABLE)
75
FMAM
AUDIO(ASSIGNABLE)
IN
MEDIAPLAYER
1 2CBL/SAT
IMPEDANCE : 4 16SPEAKERSASSIGNABLE
CLASS 2 WIRING
SURROUNDFRONT FRONT CENTER SURROUND SURROUND BACK SURROUND BACK
PRE OUT
1
2
SUBWOOFER
SW1 SW2
Contents Connections Playback Settings Tips Appendix
29Front panel Display Rear panel Remote Index
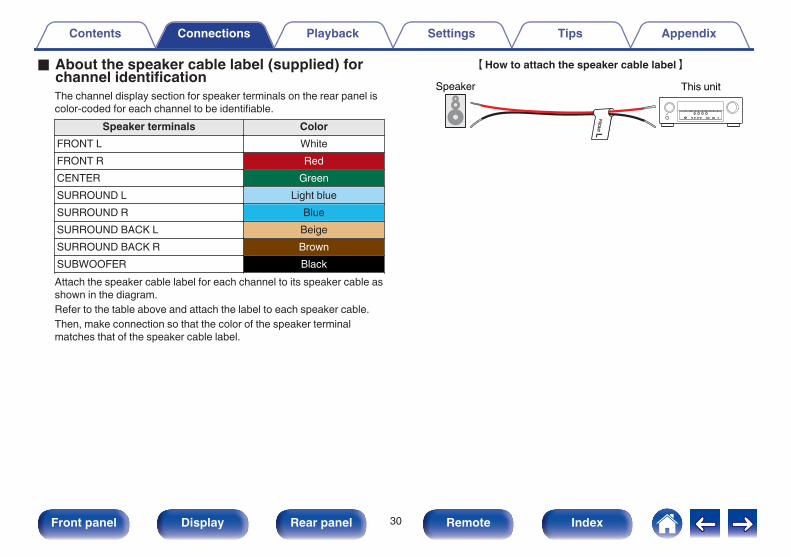
o About the speaker cable label (supplied) forchannel identificationThe channel display section for speaker terminals on the rear panel iscolor-coded for each channel to be identifiable.
Speaker terminals ColorFRONT L WhiteFRONT R RedCENTER GreenSURROUND L Light blueSURROUND R BlueSURROUND BACK L BeigeSURROUND BACK R BrownSUBWOOFER BlackAttach the speaker cable label for each channel to its speaker cable asshown in the diagram.Refer to the table above and attach the label to each speaker cable.Then, make connection so that the color of the speaker terminalmatches that of the speaker cable label.
G How to attach the speaker cable label H
.
Speaker This unit
Contents Connections Playback Settings Tips Appendix
30Front panel Display Rear panel Remote Index
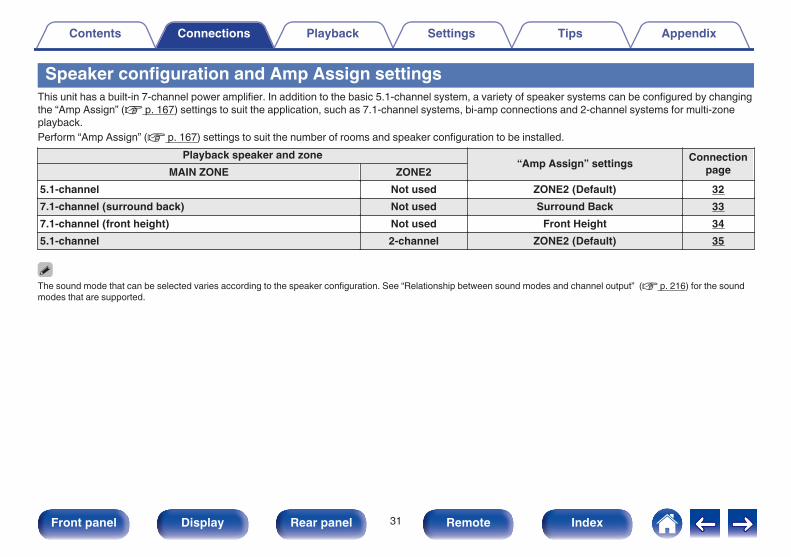
Speaker configuration and Amp Assign settingsThis unit has a built-in 7-channel power amplifier. In addition to the basic 5.1-channel system, a variety of speaker systems can be configured by changingthe “Amp Assign” (v p. 167) settings to suit the application, such as 7.1-channel systems, bi-amp connections and 2-channel systems for multi-zoneplayback.Perform “Amp Assign” (v p. 167) settings to suit the number of rooms and speaker configuration to be installed.
Playback speaker and zone “Amp Assign” settings ConnectionpageMAIN ZONE ZONE2
5.1-channel Not used ZONE2 (Default) 327.1-channel (surround back) Not used Surround Back 337.1-channel (front height) Not used Front Height 345.1-channel 2-channel ZONE2 (Default) 35
The sound mode that can be selected varies according to the speaker configuration. See “Relationship between sound modes and channel output” (v p. 216) for the soundmodes that are supported.
Contents Connections Playback Settings Tips Appendix
31Front panel Display Rear panel Remote Index
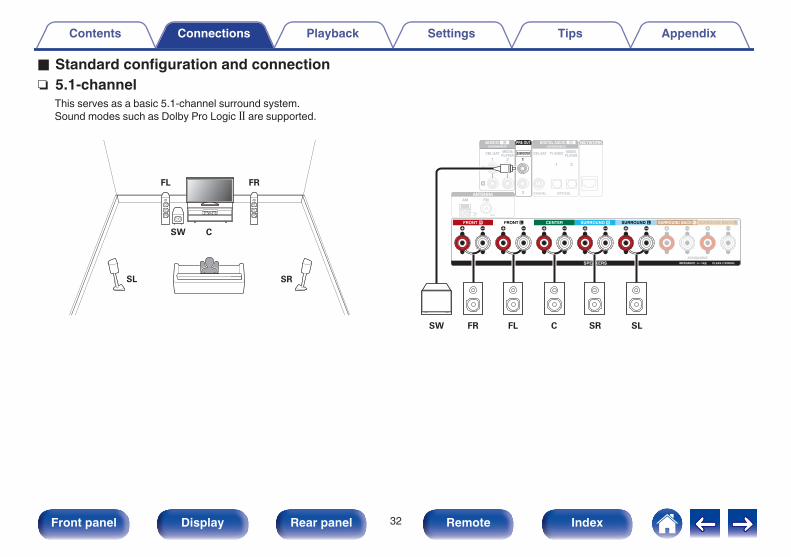
o Standard configuration and connectionn 5.1-channel
This serves as a basic 5.1-channel surround system.Sound modes such as Dolby Pro Logic g are supported.
.
FL
SW C
SL
FR
SR
.
ANTENNA
NETWORK
CBL/SAT MEDIAPLAYERTV AUDIO
1 2
COAXIAL OPTICAL
INDIGITAL AUDIO(ASSIGNABLE)
75
FMAM
AUDIO(ASSIGNABLE)
IN
MEDIAPLAYER
1 2CBL/SAT
IMPEDANCE : 4 16SPEAKERS CLASS 2 WIRING
FRONT FRONT CENTER SURROUND SURROUND
PRE OUT
1SUBWOOFER
2
ASSIGNABLE
SURROUND BACK SURROUND BACK
C SR SLSW FLFR
Contents Connections Playback Settings Tips Appendix
32Front panel Display Rear panel Remote Index
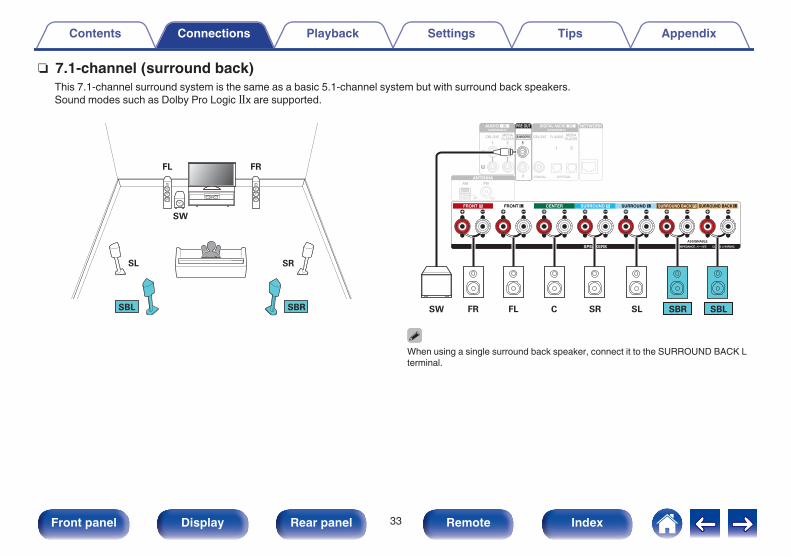
n 7.1-channel (surround back)This 7.1-channel surround system is the same as a basic 5.1-channel system but with surround back speakers.Sound modes such as Dolby Pro Logic gx are supported.
.
FL
SW
SL
FR
SR
SBRSBL.
ANTENNA
NETWORK
CBL/SAT MEDIAPLAYERTV AUDIO
1 2
COAXIAL OPTICAL
INDIGITAL AUDIO(ASSIGNABLE)
75
FMAM
AUDIO(ASSIGNABLE)
IN
MEDIAPLAYER
1 2CBL/SAT
IMPEDANCE : 4 16SPEAKERSASSIGNABLE
CLASS 2 WIRING
FRONT FRONT CENTER SURROUND SURROUND BACK SURROUND BACKSURROUND
PRE OUT
1SUBWOOFER
2
FLFR C SR SLSW SBR SBL
When using a single surround back speaker, connect it to the SURROUND BACK Lterminal.
Contents Connections Playback Settings Tips Appendix
33Front panel Display Rear panel Remote Index
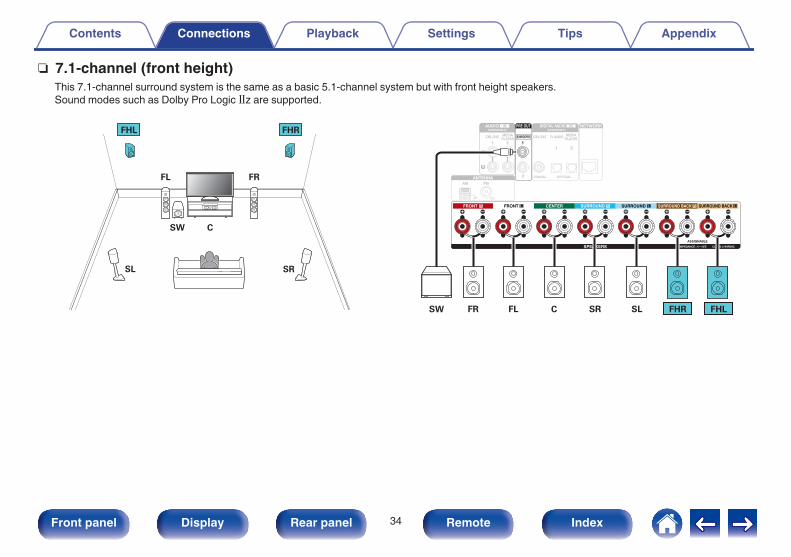
n 7.1-channel (front height)This 7.1-channel surround system is the same as a basic 5.1-channel system but with front height speakers.Sound modes such as Dolby Pro Logic gz are supported.
.
FL
SW C
SL
FHR
FR
SR
FHL
.
ANTENNA
NETWORK
CBL/SAT MEDIAPLAYERTV AUDIO
1 2
COAXIAL OPTICAL
INDIGITAL AUDIO(ASSIGNABLE)
75
FMAM
AUDIO(ASSIGNABLE)
IN
MEDIAPLAYER
1 2CBL/SAT
IMPEDANCE : 4 16SPEAKERSASSIGNABLE
CLASS 2 WIRING
FRONT FRONT CENTER SURROUND SURROUND BACK SURROUND BACKSURROUND
PRE OUT
1SUBWOOFER
2
FLFR C SR SLSW FHR FHL
Contents Connections Playback Settings Tips Appendix
34Front panel Display Rear panel Remote Index
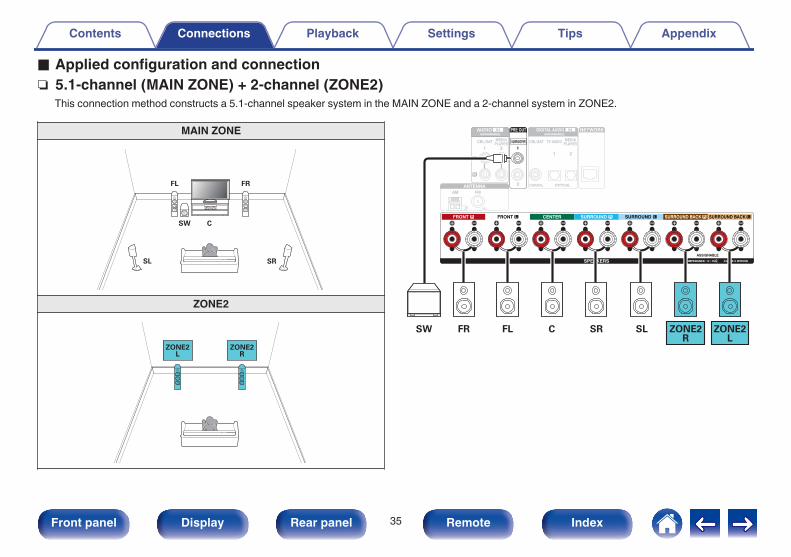
o Applied configuration and connectionn 5.1-channel (MAIN ZONE) + 2-channel (ZONE2)
This connection method constructs a 5.1-channel speaker system in the MAIN ZONE and a 2-channel system in ZONE2.
MAIN ZONE
.
FL
SW C
SL
FR
SR
ZONE2
.
ZONE2L
ZONE2R
.
ANTENNA
NETWORK
CBL/SAT MEDIAPLAYERTV AUDIO
1 2
COAXIAL OPTICAL
INDIGITAL AUDIO(ASSIGNABLE)
75
FMAM
AUDIO(ASSIGNABLE)
IN
MEDIAPLAYER
1 2CBL/SAT
IMPEDANCE : 4 16SPEAKERSASSIGNABLE
CLASS 2 WIRING
FRONT FRONT CENTER SURROUND SURROUND BACK SURROUND BACKSURROUND
PRE OUT
1SUBWOOFER
2
FLFR C SR SLSW ZONE2R
ZONE2L
Contents Connections Playback Settings Tips Appendix
35Front panel Display Rear panel Remote Index
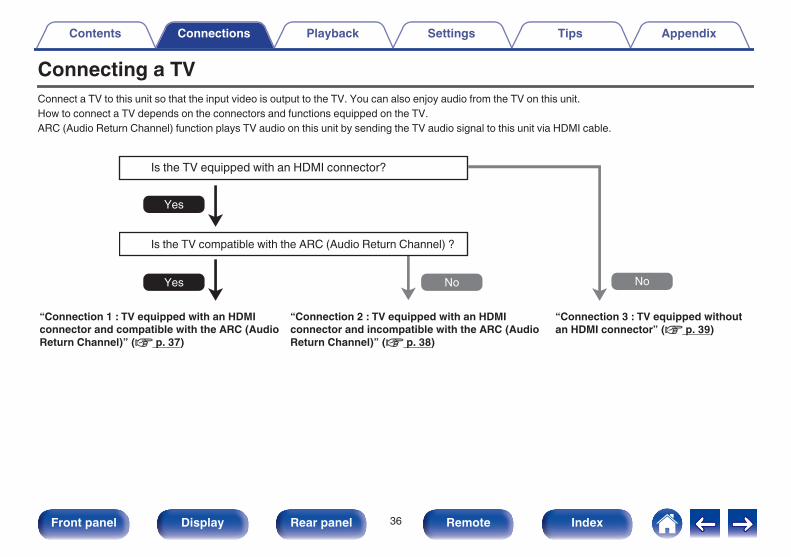
Connecting a TVConnect a TV to this unit so that the input video is output to the TV. You can also enjoy audio from the TV on this unit.How to connect a TV depends on the connectors and functions equipped on the TV.ARC (Audio Return Channel) function plays TV audio on this unit by sending the TV audio signal to this unit via HDMI cable.
.
Is the TV equipped with an HDMI connector?
Is the TV compatible with the ARC (Audio Return Channel) ?
Yes
Yes No No
“Connection 1 : TV equipped with an HDMIconnector and compatible with the ARC (AudioReturn Channel)” (v p. 37)
“Connection 2 : TV equipped with an HDMIconnector and incompatible with the ARC (AudioReturn Channel)” (v p. 38)
“Connection 3 : TV equipped withoutan HDMI connector” (v p. 39)
Contents Connections Playback Settings Tips Appendix
36Front panel Display Rear panel Remote Index
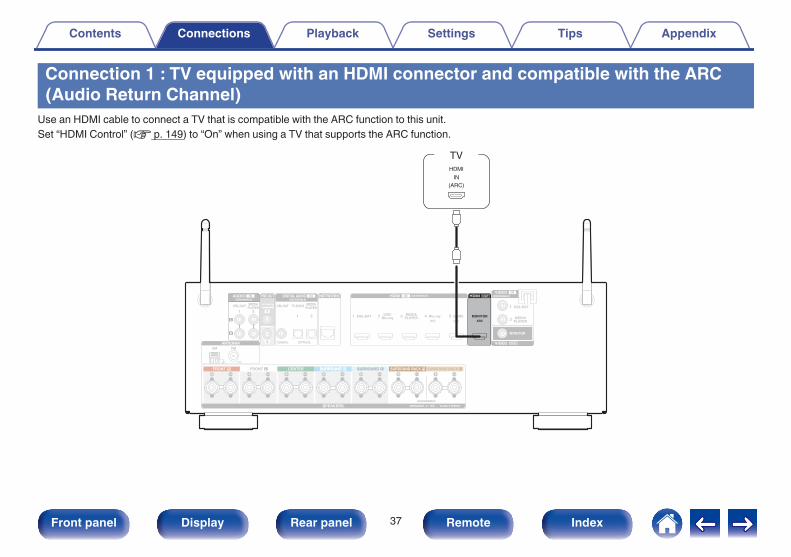
Connection 1 : TV equipped with an HDMI connector and compatible with the ARC(Audio Return Channel)
Use an HDMI cable to connect a TV that is compatible with the ARC function to this unit.Set “HDMI Control” (v p. 149) to “On” when using a TV that supports the ARC function.
.
ANTENNA
1 CBL/SAT 4 Blu-ray 5 GAMEMEDIAPLAYER3 DVD/
Blu-ray2 (4K)(4K)
HDMI (ASSIGNABLE)INNETWORKPRE OUT
1
2
SUBWOOFER CBL/SAT MEDIAPLAYERTV AUDIO
1 2
COAXIAL OPTICAL
INDIGITAL AUDIO(ASSIGNABLE)
75
FMAM
1 CBL/SAT
MEDIAPLAYER2
VIDEO OUT
MONITOR
VIDEO IN(ASSIGNABLE)AUDIO
(ASSIGNABLE)IN
MEDIAPLAYER
1 2CBL/SAT
IMPEDANCE : 4 16SPEAKERSASSIGNABLE
CLASS 2 WIRING
FRONT FRONT CENTER SURROUNDSURROUND SURROUND BACK SURROUND BACK
MONITORARC
HDMI OUT
SURROUNDSURROUND
(ARC)IN
HDMI
TV
Contents Connections Playback Settings Tips Appendix
37Front panel Display Rear panel Remote Index
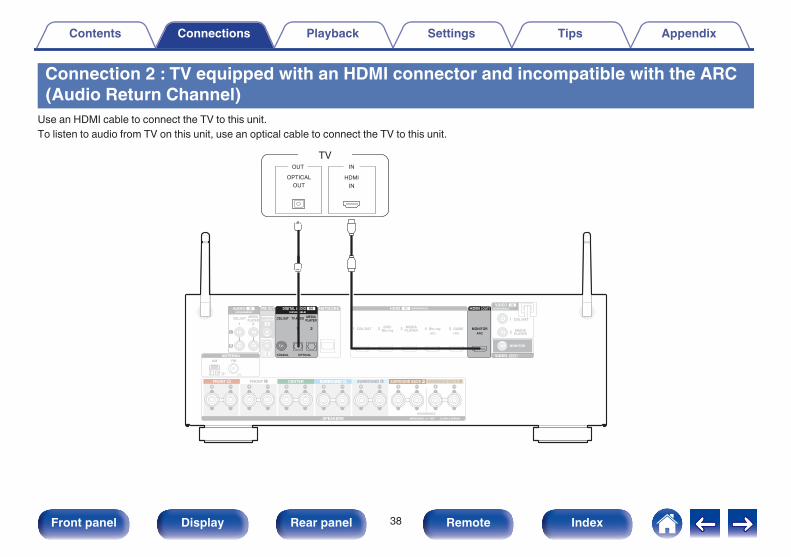
Connection 2 : TV equipped with an HDMI connector and incompatible with the ARC(Audio Return Channel)
Use an HDMI cable to connect the TV to this unit.To listen to audio from TV on this unit, use an optical cable to connect the TV to this unit.
.
ANTENNA
1 CBL/SAT 4 Blu-ray 5 GAMEMEDIAPLAYER3 DVD/
Blu-ray2 (4K)(4K)
HDMI (ASSIGNABLE)INNETWORKPRE OUT
1
2
SUBWOOFER
75
FMAM
1 CBL/SAT
MEDIAPLAYER2
VIDEO OUT
MONITOR
VIDEO IN(ASSIGNABLE)AUDIO
(ASSIGNABLE)IN
MEDIAPLAYER
1 2CBL/SAT
IMPEDANCE : 4 16SPEAKERSASSIGNABLE
CLASS 2 WIRING
FRONT FRONT CENTER SURROUNDSURROUND SURROUND BACK SURROUND BACKSURROUNDSURROUND
MONITORARC
HDMI OUT
CBL/SAT MEDIAPLAYERTV AUDIO
1 2
COAXIAL OPTICAL
INDIGITAL AUDIO(ASSIGNABLE)
OUTOPTICAL
OUT IN
IN
HDMI
TV
Contents Connections Playback Settings Tips Appendix
38Front panel Display Rear panel Remote Index
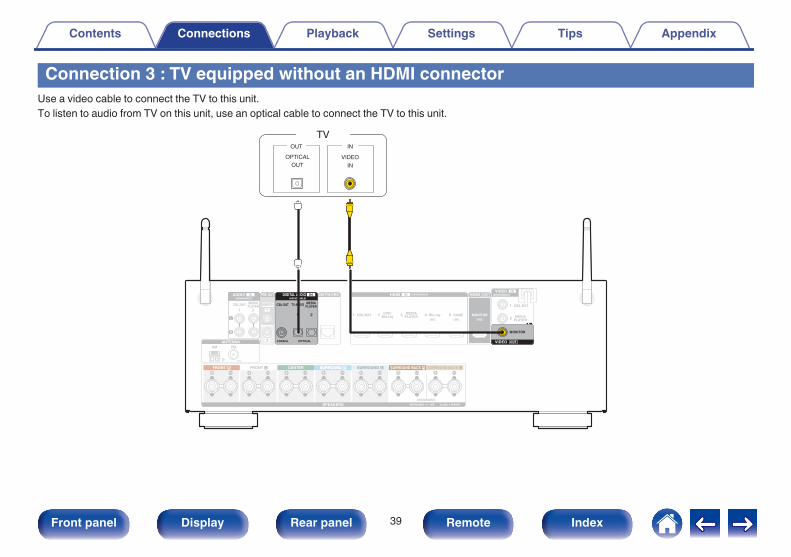
Connection 3 : TV equipped without an HDMI connectorUse a video cable to connect the TV to this unit.To listen to audio from TV on this unit, use an optical cable to connect the TV to this unit.
.
MONITORARC
HDMI OUT
ANTENNA
1 CBL/SAT 4 Blu-ray 5 GAMEMEDIAPLAYER3 DVD/
Blu-ray2 (4K)(4K)
HDMI (ASSIGNABLE)INNETWORKPRE OUT
1
2
SUBWOOFER
75
FMAM
1 CBL/SAT
MEDIAPLAYER2
VIDEO IN(ASSIGNABLE)AUDIO
(ASSIGNABLE)IN
MEDIAPLAYER
1 2CBL/SAT
IMPEDANCE : 4 16SPEAKERSASSIGNABLE
CLASS 2 WIRING
FRONT FRONT CENTER SURROUNDSURROUND SURROUND BACK SURROUND BACKSURROUNDSURROUND
CBL/SAT MEDIAPLAYERTV AUDIO
1 2
COAXIAL OPTICAL
INDIGITAL AUDIO(ASSIGNABLE)
VIDEO OUT
MONITOR
OUTOPTICAL
OUT IN
IN
VIDEO
TV
Contents Connections Playback Settings Tips Appendix
39Front panel Display Rear panel Remote Index
Connecting a playback deviceThis unit is equipped with two types of video input connectors (HDMI and composite video) and two types of audio input connectors (digital audio, audio).Select input connectors on this unit according to the connectors equipped on the device you want to connect.If the device connected to this unit is equipped with an HDMI connector, it is recommended to use HDMI connections.In the HDMI connection, audio and video signals can be transmitted through a single HDMI cable.
0 “Connecting a DVD player or Blu-ray Disc player” (v p. 41)0 “Connecting a set-top box (Satellite tuner/cable TV)” (v p. 42)0 “Connecting a video camcorder or game console” (v p. 43)
0 Connect devices to this unit as indicated by the input sources printed on the audio/video input connectors of this unit.0 The source that is assigned to the HDMI IN, DIGITAL AUDIO IN, VIDEO IN and AUDIO IN connectors can be changed. See “Input Assign” (v p. 153) on how to change the
input source assigned to the input connectors.0 To play back audio signals that are input to this unit on a TV connected via HDMI, set in the menu “HDMI Audio Out” (v p. 148) to “TV”.
Contents Connections Playback Settings Tips Appendix
40Front panel Display Rear panel Remote Index
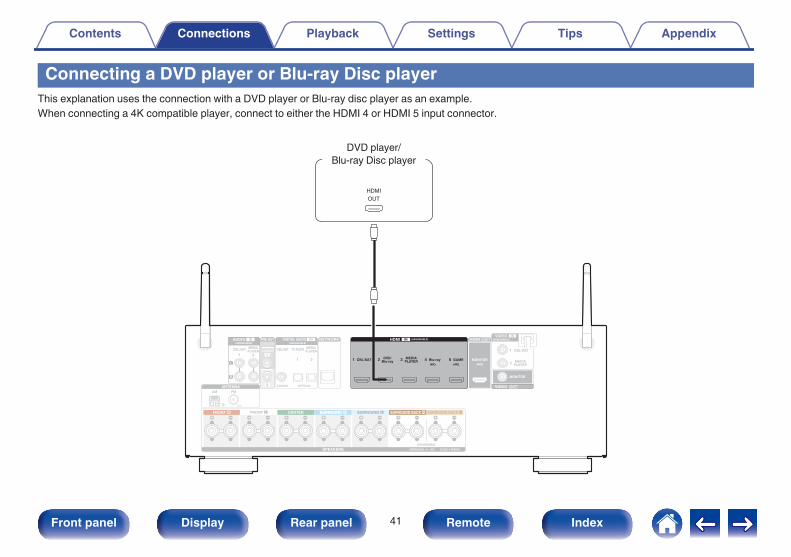
Connecting a DVD player or Blu-ray Disc playerThis explanation uses the connection with a DVD player or Blu-ray disc player as an example.When connecting a 4K compatible player, connect to either the HDMI 4 or HDMI 5 input connector.
.
ANTENNA
NETWORKPRE OUT
1
2
SUBWOOFER CBL/SAT MEDIAPLAYERTV AUDIO
1 2
COAXIAL OPTICAL
INDIGITAL AUDIO(ASSIGNABLE)
75
FMAM
MONITORARC
HDMI OUT
1 CBL/SAT
MEDIAPLAYER2
VIDEO OUT
MONITOR
VIDEO IN(ASSIGNABLE)AUDIO
(ASSIGNABLE)IN
MEDIAPLAYER
1 2CBL/SAT
IMPEDANCE : 4 16SPEAKERSASSIGNABLE
CLASS 2 WIRING
FRONT FRONT CENTER SURROUNDSURROUND SURROUND BACK SURROUND BACKSURROUNDSURROUND
1 CBL/SAT 4 Blu-ray 5 GAMEMEDIAPLAYER3 DVD/
Blu-ray2 (4K)(4K)
HDMI (ASSIGNABLE)IN
OUTHDMI
DVD player/Blu-ray Disc player
Contents Connections Playback Settings Tips Appendix
41Front panel Display Rear panel Remote Index
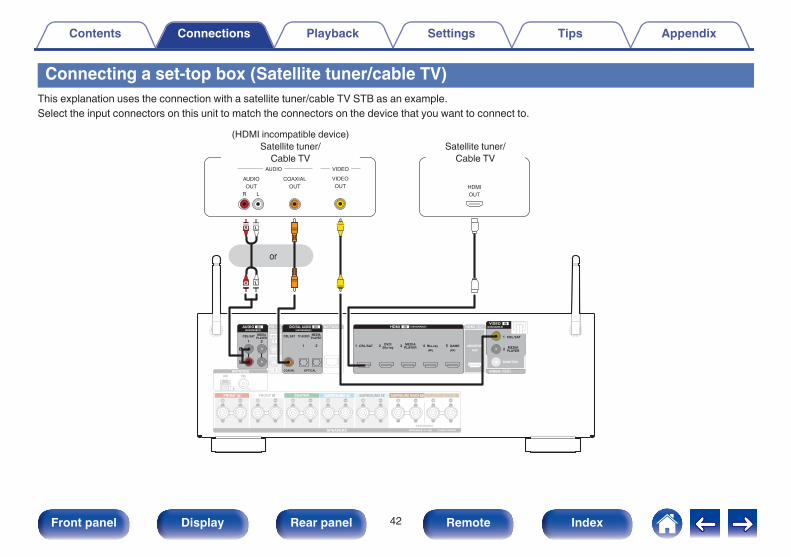
Connecting a set-top box (Satellite tuner/cable TV)This explanation uses the connection with a satellite tuner/cable TV STB as an example.Select the input connectors on this unit to match the connectors on the device that you want to connect to.
.
ANTENNA
NETWORKPRE OUT
1
2
SUBWOOFER
75
FMAM
MONITORARC
HDMI OUT
VIDEO OUT
MONITOR
1 CBL/SAT
MEDIAPLAYER2
VIDEO IN(ASSIGNABLE)
IMPEDANCE : 4 16SPEAKERSASSIGNABLE
CLASS 2 WIRING
FRONT FRONT CENTER SURROUNDSURROUND SURROUND BACK SURROUND BACKSURROUNDSURROUND
1 CBL/SAT 4 Blu-ray 5 GAMEMEDIAPLAYER3 DVD/
Blu-ray2 (4K)(4K)
HDMI (ASSIGNABLE)INAUDIO(ASSIGNABLE)
IN
MEDIAPLAYER
1 2CBL/SAT CBL/SAT MEDIA
PLAYERTV AUDIO
1 2
COAXIAL OPTICAL
INDIGITAL AUDIO(ASSIGNABLE)
R L
R L
OUTHDMIOUT
COAXIAL
AUDIO
AUDIO
R LOUT OUT
VIDEO
VIDEO
(HDMI incompatible device)Satellite tuner/
Cable TVSatellite tuner/
Cable TV
or
Contents Connections Playback Settings Tips Appendix
42Front panel Display Rear panel Remote Index
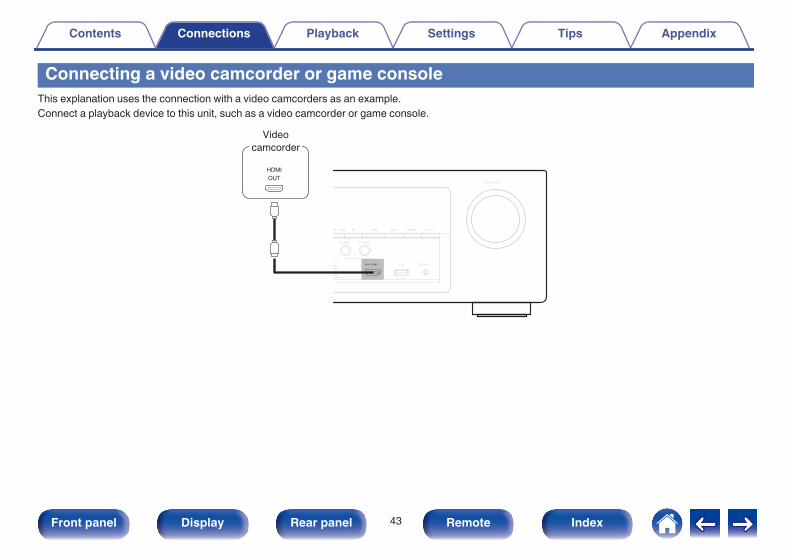
Connecting a video camcorder or game consoleThis explanation uses the connection with a video camcorders as an example.Connect a playback device to this unit, such as a video camcorder or game console.
.
MASTER VOLUM E
BAND MODE DIMMER STATUSTUNE
3 4 ONLINEGAME
SELECT
SETUP MICAUX - HDMI
5V / 1A
URE
OUTHDMI
Video camcorder
Contents Connections Playback Settings Tips Appendix
43Front panel Display Rear panel Remote Index
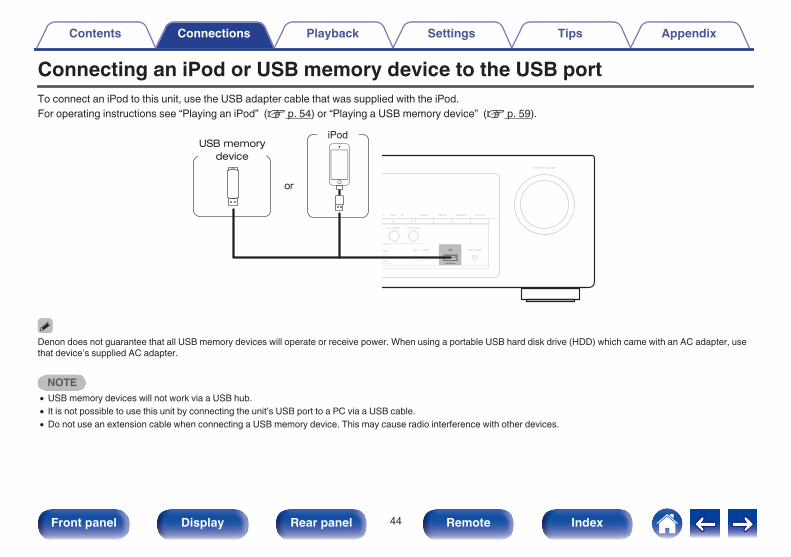
Connecting an iPod or USB memory device to the USB portTo connect an iPod to this unit, use the USB adapter cable that was supplied with the iPod.For operating instructions see “Playing an iPod” (v p. 54) or “Playing a USB memory device” (v p. 59).
.
MASTER VOLUME
BAND MODE DIMMER STATUSTUNE
3 4 ONLINEGAMEy
K SELECT
SETUP MICAUX - HDMI
5V/1A
PURE
USB memory device
iPod
or
Denon does not guarantee that all USB memory devices will operate or receive power. When using a portable USB hard disk drive (HDD) which came with an AC adapter, usethat device’s supplied AC adapter.
NOTE0 USB memory devices will not work via a USB hub.0 It is not possible to use this unit by connecting the unit’s USB port to a PC via a USB cable.0 Do not use an extension cable when connecting a USB memory device. This may cause radio interference with other devices.
Contents Connections Playback Settings Tips Appendix
44Front panel Display Rear panel Remote Index
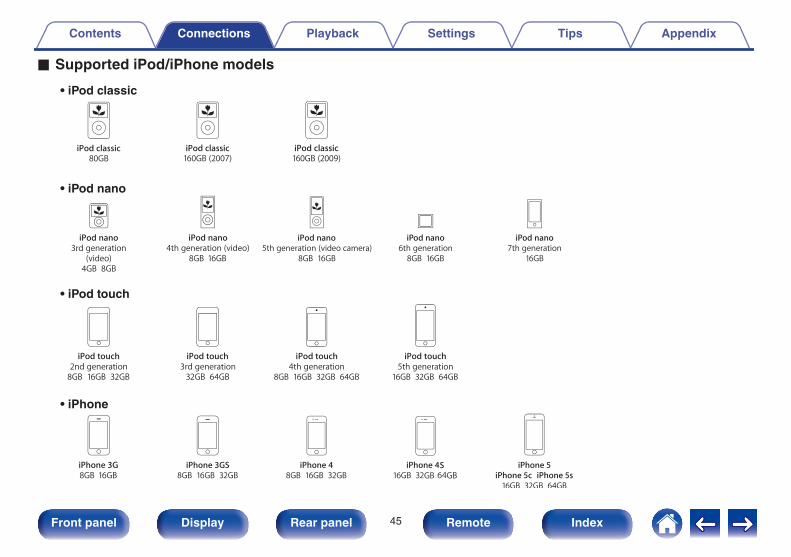
o Supported iPod/iPhone models
.
• iPod classic
• iPod nano
• iPod touch
• iPhone
Contents Connections Playback Settings Tips Appendix
45Front panel Display Rear panel Remote Index
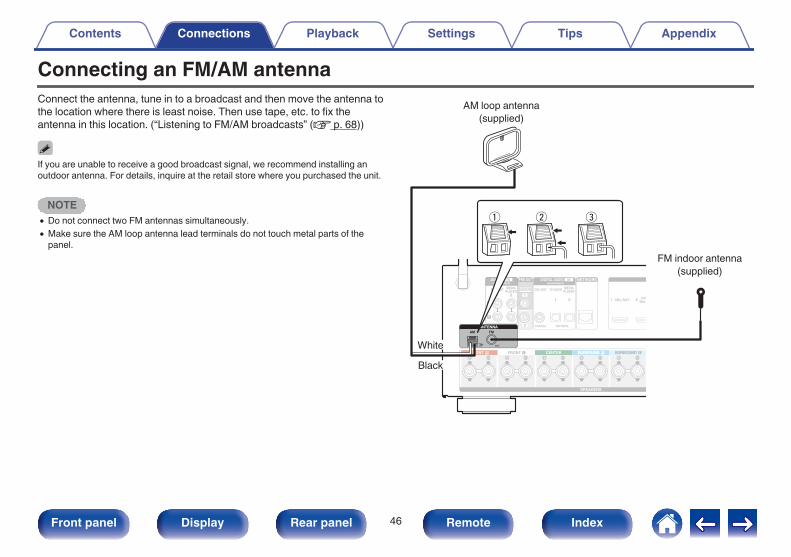
Connecting an FM/AM antennaConnect the antenna, tune in to a broadcast and then move the antenna tothe location where there is least noise. Then use tape, etc. to fix theantenna in this location. (“Listening to FM/AM broadcasts” (v p. 68))
If you are unable to receive a good broadcast signal, we recommend installing anoutdoor antenna. For details, inquire at the retail store where you purchased the unit.
NOTE0 Do not connect two FM antennas simultaneously.0 Make sure the AM loop antenna lead terminals do not touch metal parts of the
panel.
.
1 CBL/SAT DVDBlu-r2
NETWORKPRE OUT
1
2
SUBWOOFER CBL/SAT MEDIAPLAYERTV AUDIO
1 2
COAXIAL OPTICAL
INDIGITAL AUDIO(ASSIGNABLE)
AUDIO(ASSIGNABLE)
IN
MEDIAPLAYER
1 2CBL/SAT
SPEAKERS
FRONT FRONT CENTER SURROUNDSURROUND SURROUNDSURROUND
ANTENNA
75
FMAM
wq e
AM loop antenna (supplied)
FM indoor antenna (supplied)
BlackWhite
Contents Connections Playback Settings Tips Appendix
46Front panel Display Rear panel Remote Index
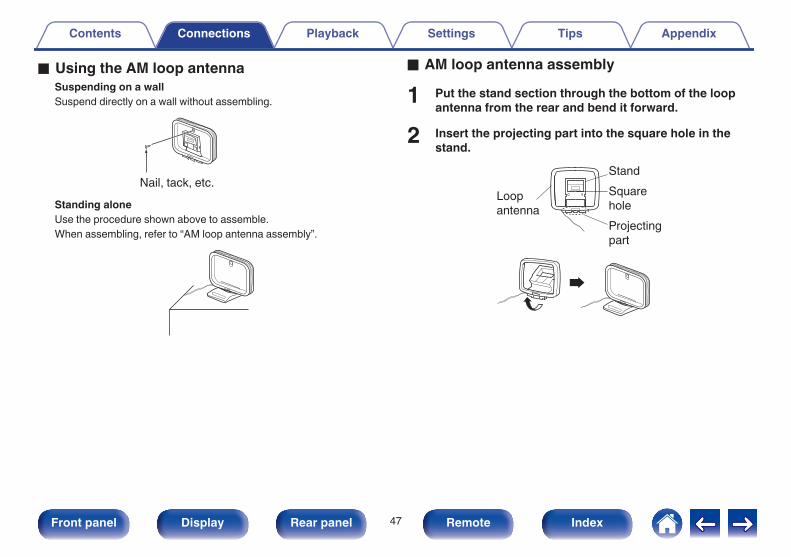
o Using the AM loop antennaSuspending on a wallSuspend directly on a wall without assembling.
.
Nail, tack, etc.Standing aloneUse the procedure shown above to assemble.When assembling, refer to “AM loop antenna assembly”.
.
o AM loop antenna assembly
1 Put the stand section through the bottom of the loopantenna from the rear and bend it forward.
2 Insert the projecting part into the square hole in thestand.
.
StandSquare holeLoop
antennaProjecting part
Contents Connections Playback Settings Tips Appendix
47Front panel Display Rear panel Remote Index
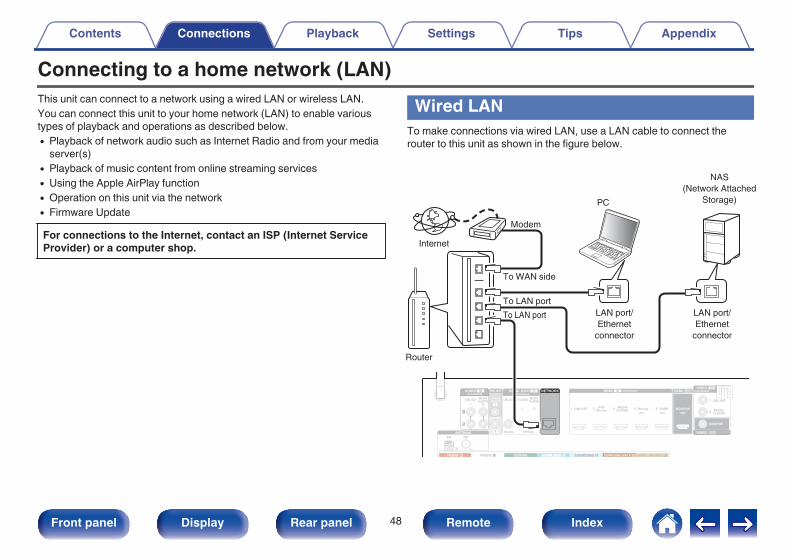
Connecting to a home network (LAN)This unit can connect to a network using a wired LAN or wireless LAN.You can connect this unit to your home network (LAN) to enable varioustypes of playback and operations as described below.0 Playback of network audio such as Internet Radio and from your media
server(s)0 Playback of music content from online streaming services0 Using the Apple AirPlay function0 Operation on this unit via the network0 Firmware UpdateFor connections to the Internet, contact an ISP (Internet ServiceProvider) or a computer shop.
Wired LANTo make connections via wired LAN, use a LAN cable to connect therouter to this unit as shown in the figure below.
.
ANTENNA
1 CBL/SAT 4 Blu-ray 5 GAMEMEDIAPLAYER3 DVD/
Blu-ray2 (4K)(4K)
HDMI (ASSIGNABLE)INPRE OUT
1
2
SUBWOOFER CBL/SAT MEDIAPLAYERTV AUDIO
1 2
COAXIAL OPTICAL
INDIGITAL AUDIO(ASSIGNABLE)
75
FMAM
MONITORARC
HDMI OUT
1 CBL/SAT
MEDIAPLAYER2
VIDEO OUT
MONITOR
VIDEO IN(ASSIGNABLE)AUDIO
(ASSIGNABLE)IN
MEDIAPLAYER
1 2CBL/SAT
FRONT FRONT CENTER SURROUNDSURROUND SURROUND BACK SURROUND BACKSURROUNDSURROUND
NETWORK
To LAN portTo LAN port
To WAN side
Router
ModemInternet
PC
LAN port/ Ethernet
connector
LAN port/ Ethernet
connector
NAS(Network Attached
Storage)
Contents Connections Playback Settings Tips Appendix
48Front panel Display Rear panel Remote Index
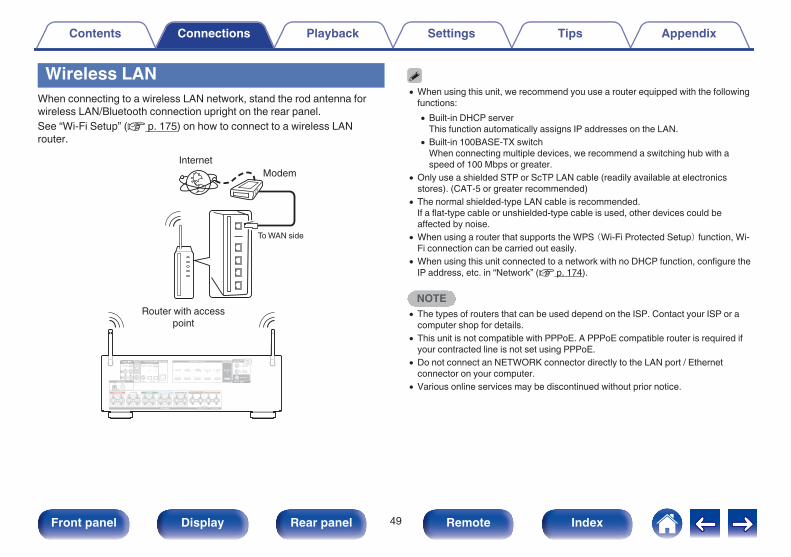
Wireless LANWhen connecting to a wireless LAN network, stand the rod antenna forwireless LAN/Bluetooth connection upright on the rear panel.See “Wi-Fi Setup” (v p. 175) on how to connect to a wireless LANrouter.
.
InternetModem
To WAN side
Router with access point
ANTENNA
1 CBL/SAT 4 Blu-ray 5 GAMEMEDIAPLAYER3 DVD/
Blu-ray2 (4K)(4K)
HDMI (ASSIGNABLE)INPRE OUT
1
2
SUBWOOFER CBL/SAT MEDIAPLAYERTV AUDIO
1 2
COAXIAL OPTICAL
INDIGITAL AUDIO(ASSIGNABLE)
75
FMAM
MONITORARC
HDMI OUT
1 CBL/SAT
MEDIAPLAYER2
VIDEO OUT
MONITOR
VIDEO IN(ASSIGNABLE)AUDIO
(ASSIGNABLE)IN
MEDIAPLAYER
1 2CBL/SAT
IMPEDANCE : 4 16SPEAKERSASSIGNABLE
CLASS 2 WIRING
FRONT FRONT CENTER SURROUNDSURROUND SURROUND BACK SURROUND BACKSURROUNDSURROUND
NETWORK
0 When using this unit, we recommend you use a router equipped with the followingfunctions:0 Built-in DHCP server
This function automatically assigns IP addresses on the LAN.0 Built-in 100BASE-TX switch
When connecting multiple devices, we recommend a switching hub with aspeed of 100 Mbps or greater.
0 Only use a shielded STP or ScTP LAN cable (readily available at electronicsstores). (CAT-5 or greater recommended)
0 The normal shielded-type LAN cable is recommended.If a flat-type cable or unshielded-type cable is used, other devices could beaffected by noise.
0 When using a router that supports the WPS (Wi-Fi Protected Setup) function, Wi-Fi connection can be carried out easily.
0 When using this unit connected to a network with no DHCP function, configure theIP address, etc. in “Network” (v p. 174).
NOTE0 The types of routers that can be used depend on the ISP. Contact your ISP or a
computer shop for details.0 This unit is not compatible with PPPoE. A PPPoE compatible router is required if
your contracted line is not set using PPPoE.0 Do not connect an NETWORK connector directly to the LAN port / Ethernet
connector on your computer.0 Various online services may be discontinued without prior notice.
Contents Connections Playback Settings Tips Appendix
49Front panel Display Rear panel Remote Index
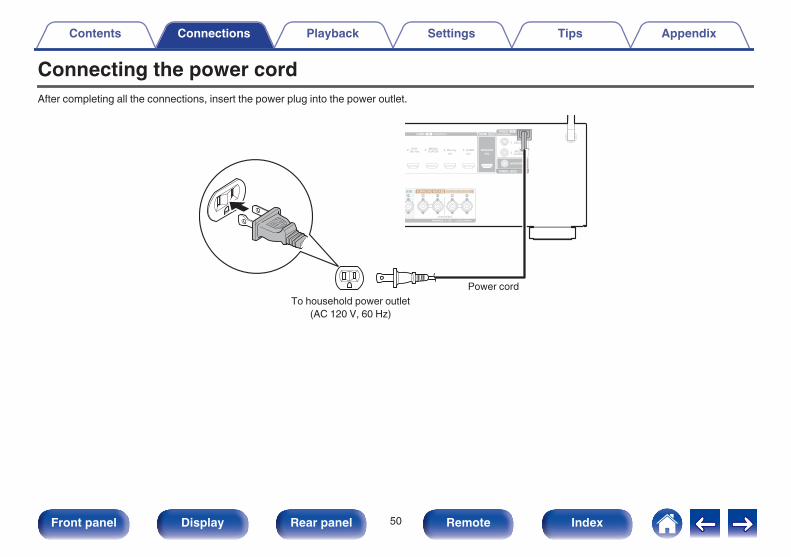
Connecting the power cordAfter completing all the connections, insert the power plug into the power outlet.
.
4 Blu-ray 5 GAMEMEDIAPLAYER3 DVD/
Blu-ray2 (4K)(4K)
HDMI (ASSIGNABLE)IN
MONITORARC
HDMI OUT
1 CBL/SAT
MEDIAPLAYER2
VIDEO OUT
MONITOR
VIDEO IN(ASSIGNABLE)
IMPEDANCE : 4 16
ASSIGNABLE
CLASS 2 WIRING
SURROUND BACK SURROUND BACKDD
Power cordTo household power outlet
(AC 120 V, 60 Hz)
Contents Connections Playback Settings Tips Appendix
50Front panel Display Rear panel Remote Index
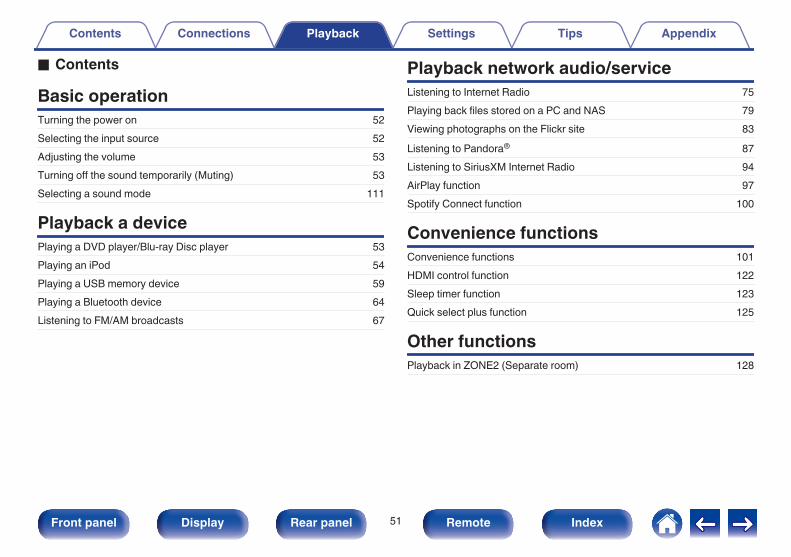
o ContentsBasic operationTurning the power on 52Selecting the input source 52Adjusting the volume 53Turning off the sound temporarily (Muting) 53Selecting a sound mode 111
Playback a devicePlaying a DVD player/Blu-ray Disc player 53Playing an iPod 54Playing a USB memory device 59Playing a Bluetooth device 64Listening to FM/AM broadcasts 67
Playback network audio/serviceListening to Internet Radio 75Playing back files stored on a PC and NAS 79Viewing photographs on the Flickr site 83Listening to Pandora® 87Listening to SiriusXM Internet Radio 94AirPlay function 97Spotify Connect function 100
Convenience functionsConvenience functions 101HDMI control function 122Sleep timer function 123Quick select plus function 125
Other functionsPlayback in ZONE2 (Separate room) 128
Contents Connections Playback Settings Tips AppendixPlayback
51Front panel Display Rear panel Remote Index
Basic operation
.
ENTENTER
SOUOUND ND MOMODE
VOLULUME
CHAHANNNNEL
QUICK K SESELECT
PAGAGE
PUREMOVIE GAMEMUSIC
TUNUNE TUTUNE
1 2 3 4
ECOZOZONE 2
SOUOURCRCE SLELEEP
INFNFO OPOPTIOION
BACK SETSETUP
BlBlu-r-rayCBL/SATBL/SAT
GAGAME
DVD/VD/Blu-raBlu-ray
AUX MEDEDIAPLAYPLAYER
TV A AUDIDIO
BluluetooetoothINTEINTERNETRNET
RADIADIO
TUNUNERiPiPod/od/USB
ONLINONLINEMUSIC
POPOWER
VOVOLULUME
MUTEMUTE
POWER
MUTE
VOLUME
X
df
:
Input source select
buttons
Turning the power on
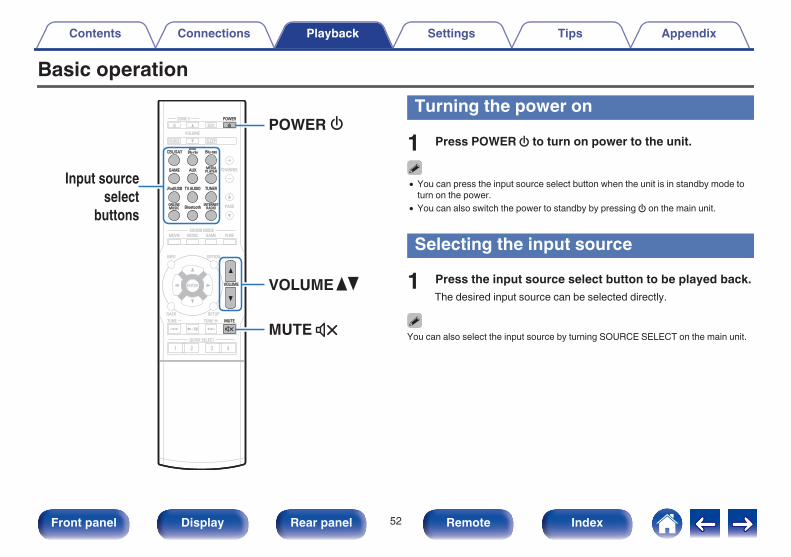
1 Press POWER X to turn on power to the unit.
0 You can press the input source select button when the unit is in standby mode toturn on the power.
0 You can also switch the power to standby by pressing X on the main unit.
Selecting the input source
1 Press the input source select button to be played back.The desired input source can be selected directly.
You can also select the input source by turning SOURCE SELECT on the main unit.
Contents Connections Playback Settings Tips Appendix
52Front panel Display Rear panel Remote Index
Adjusting the volume
1 Use VOLUME df to adjust the volume.
0 The variable range differs according to the input signal and channel level setting.0 You can also adjust the master volume by turning MASTER VOLUME on the main
unit.
Turning off the sound temporarily(Muting)
1 Press MUTE :.0 MUTE indicator on the display flashes.0 : appears on the TV screen.
0 The sound is reduced to the level set at “Mute Level” (v p. 143) in the menu.0 To cancel mute, either adjust the sound volume or press MUTE : again.
Playback a DVD player/Blu-ray Discplayer
The following describes the procedure for playing DVD player/Blu-ray Discplayer.
1 Prepare for playback.A Turn on the power of the TV, subwoofer and player.B Change the TV input to the input of this unit.
2 Press POWER X to turn on power to the unit.
3 Press DVD/Blu-ray (4K not supported) or Blu-ray (4Ksupported) to switch the input source of the player tobe played back.
4 Play the DVD player or Blu-ray Disc player.
o Surround playback (v p. 111)
Contents Connections Playback Settings Tips Appendix
53Front panel Display Rear panel Remote Index

Playing an iPod
.
SOUOUND ND MOMODE
POPOWER
VOLULUME
CHAHANNNNEL
MUTEMUTE
QUICK K SESELECT
VOVOLULUME
BlBlu-r-rayCBL/SATBL/SAT
GAGAME
DVD/VD/Blu-raBlu-ray
AUX MEDEDIAPLAYPLAYER
TV A AUDIDIO
BluluetooetoothINTEINTERNETRNET
RADIADIO
TUNUNER
PUREMOVIE GAMEMUSIC
TUNUNE TUTUNE
ECO
ONLINONLINEMUSIC
ZOZONE 2
SOUOURCRCE SLELEEP
INFNFO
BACK SETSETUP
PAGAGE
iPiPod/od/USB
ENTENTER
OPOPTIOION
BACK
1 2 3 4
uio pENTER
OPTION
iPod/USB
BACK
PAGE df
1/38 9
0 You can use the USB cable provided with the iPod to connect the iPodwith the unit’s USB port and enjoy music stored on the iPod.
0 For information on the iPod models that can be played back with thisunit, see “Supported iPod/iPhone models” (v p. 45).
0 See “AirPlay function” (v p. 97) on how to play a music file saved onan iPhone, iPod touch, iPad or iTunes on this unit via the network.
Contents Connections Playback Settings Tips Appendix
54Front panel Display Rear panel Remote Index
Listening to music on an iPod
1 Connect the iPod to the USB port. (v p. 44)
2 Press iPod/USB to switch the input source to “iPod/USB”.“Browse from iPod” is displayed on the display of this unit.0 Nothing is displayed on the TV screen.
3 Operate iPod itself while seeing the iPod screen to playback music.
0 “iPod Browse Mode” has two modes, “From iPod” and “On-Screen”. The defaultsetting is “From iPod” that operate the iPod itself while looking at the iPod screen.
0 To change to “On-Screen”, where you perform operations while having the iPodinformation displayed on the TV screen, see “iPod Browse Mode settings” (v p. 56).
NOTE0 Depending on the type of iPod and the software version, some functions may not
operate.0 Note that Denon will accept no responsibility whatsoever for any problems arising
with the data on an iPod when using this unit in conjunction with the iPod.
o Operations accessible through the optionmenuThis can be operated when the “iPod Browse Mode” (v p. 56) isset to “From iPod”.0 “iPod Browse Mode settings” (v p. 56)0 “Adjusting the volume of each channel to match the input source (Ch
Level Adjust)” (v p. 107)0 “Adjusting the tone (Tone Control)” (v p. 108)0 “Displaying your desired video during audio playback (Video
Select)” (v p. 109)0 “Playing the same music in all zones (All Zone Stereo)” (v p. 110)
Contents Connections Playback Settings Tips Appendix
55Front panel Display Rear panel Remote Index
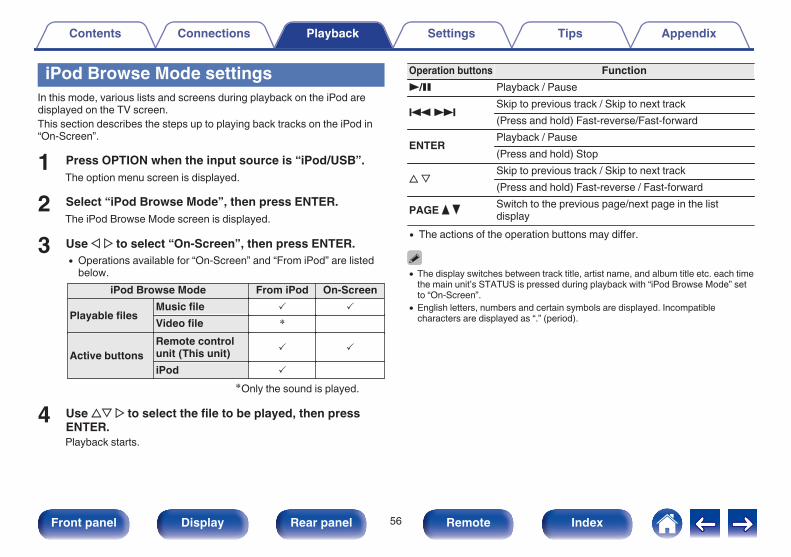
iPod Browse Mode settingsIn this mode, various lists and screens during playback on the iPod aredisplayed on the TV screen.This section describes the steps up to playing back tracks on the iPod in“On-Screen”.
1 Press OPTION when the input source is “iPod/USB”.The option menu screen is displayed.
2 Select “iPod Browse Mode”, then press ENTER.The iPod Browse Mode screen is displayed.
3 Use o p to select “On-Screen”, then press ENTER.0 Operations available for “On-Screen” and “From iPod” are listed
below.iPod Browse Mode From iPod On-Screen
Playable files Music file P P
Video file z
Active buttonsRemote controlunit (This unit) P P
iPod P
zOnly the sound is played.
4 Use ui p to select the file to be played, then pressENTER.Playback starts.
Operation buttons Function1/3 Playback / Pause
8 9 Skip to previous track / Skip to next track(Press and hold) Fast-reverse/Fast-forward
ENTER Playback / Pause(Press and hold) Stop
u i Skip to previous track / Skip to next track(Press and hold) Fast-reverse / Fast-forward
PAGE d f Switch to the previous page/next page in the listdisplay
0 The actions of the operation buttons may differ.
0 The display switches between track title, artist name, and album title etc. each timethe main unit’s STATUS is pressed during playback with “iPod Browse Mode” setto “On-Screen”.
0 English letters, numbers and certain symbols are displayed. Incompatiblecharacters are displayed as “.” (period).
Contents Connections Playback Settings Tips Appendix
56Front panel Display Rear panel Remote Index
o Operations accessible through the optionmenu
This can be operated when the “iPod Browse Mode” is set to “On-Screen”. (v p. 56)0 “iPod Browse Mode settings” (v p. 56)0 “Performing repeat playback” (v p. 58)0 “Performing random playback” (v p. 58)0 “Adjusting the volume of each channel to match the input source (Ch
Level Adjust)” (v p. 107)0 “Adjusting the tone (Tone Control)” (v p. 108)0 “Displaying your desired video during audio playback (Video
Select)” (v p. 109)0 “Playing the same music in all zones (All Zone Stereo)” (v p. 110)
Contents Connections Playback Settings Tips Appendix
57Front panel Display Rear panel Remote Index
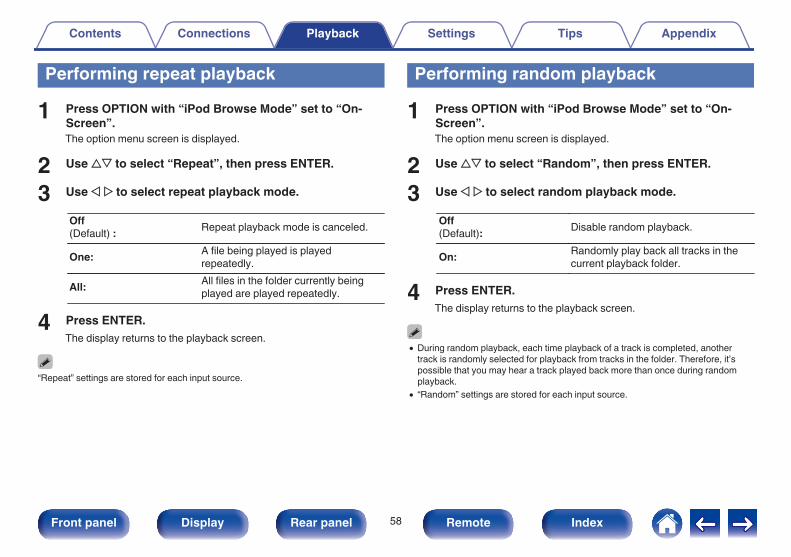
Performing repeat playback
1 Press OPTION with “iPod Browse Mode” set to “On-Screen”.The option menu screen is displayed.
2 Use ui to select “Repeat”, then press ENTER.
3 Use o p to select repeat playback mode.
Off(Default) : Repeat playback mode is canceled.
One: A file being played is playedrepeatedly.
All: All files in the folder currently beingplayed are played repeatedly.
4 Press ENTER.The display returns to the playback screen.
“Repeat” settings are stored for each input source.
Performing random playback
1 Press OPTION with “iPod Browse Mode” set to “On-Screen”.The option menu screen is displayed.
2 Use ui to select “Random”, then press ENTER.
3 Use o p to select random playback mode.
Off(Default): Disable random playback.
On: Randomly play back all tracks in thecurrent playback folder.
4 Press ENTER.The display returns to the playback screen.
0 During random playback, each time playback of a track is completed, anothertrack is randomly selected for playback from tracks in the folder. Therefore, it’spossible that you may hear a track played back more than once during randomplayback.
0 “Random” settings are stored for each input source.
Contents Connections Playback Settings Tips Appendix
58Front panel Display Rear panel Remote Index
Playing a USB memory device
.
SOUOUND ND MOMODE
POPOWER
VOLULUME
CHAHANNNNEL
MUTEMUTE
QUICK K SESELECT
VOVOLULUME
BlBlu-r-rayCBL/SATBL/SAT
GAGAME
DVD/VD/Blu-raBlu-ray
AUX MEDEDIAPLAYPLAYER
TV A AUDIDIO
BluluetooetoothINTEINTERNETRNET
RADIADIO
TUNUNER
PUREMOVIE GAMEMUSIC
TUNUNE TUTUNE
ECO
ONLINONLINEMUSIC
ZOZONE 2
SOUOURCRCE SLELEEP
INFNFO
BACK SETSETUP
PAGAGE
iPiPod/od/USB
ENTENTER
OPOPTIOION
BACK
1 2 3 4
ui pENTER
OPTION
iPod/USB
BACK
PAGE df
1/38 9
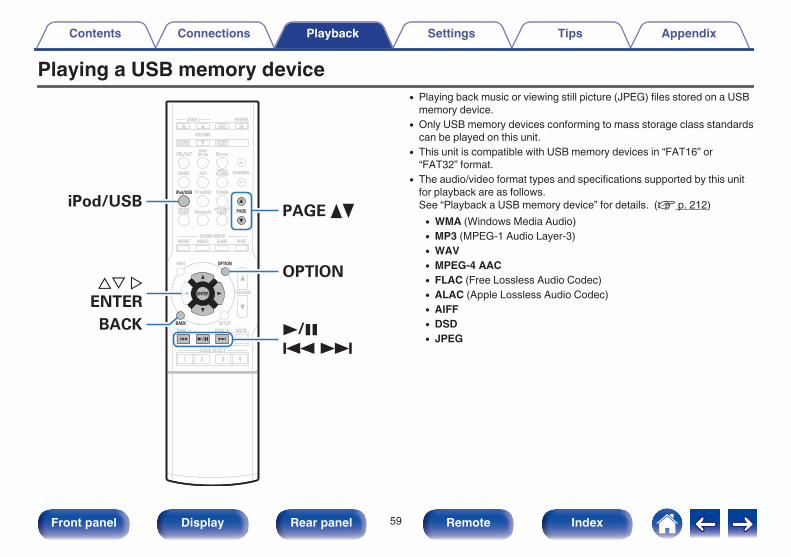
0 Playing back music or viewing still picture (JPEG) files stored on a USBmemory device.
0 Only USB memory devices conforming to mass storage class standardscan be played on this unit.
0 This unit is compatible with USB memory devices in “FAT16” or“FAT32” format.
0 The audio/video format types and specifications supported by this unitfor playback are as follows.See “Playback a USB memory device” for details. (v p. 212)0 WMA (Windows Media Audio)0 MP3 (MPEG-1 Audio Layer-3)0 WAV0 MPEG-4 AAC0 FLAC (Free Lossless Audio Codec)0 ALAC (Apple Lossless Audio Codec)0 AIFF0 DSD0 JPEG
Contents Connections Playback Settings Tips Appendix
59Front panel Display Rear panel Remote Index
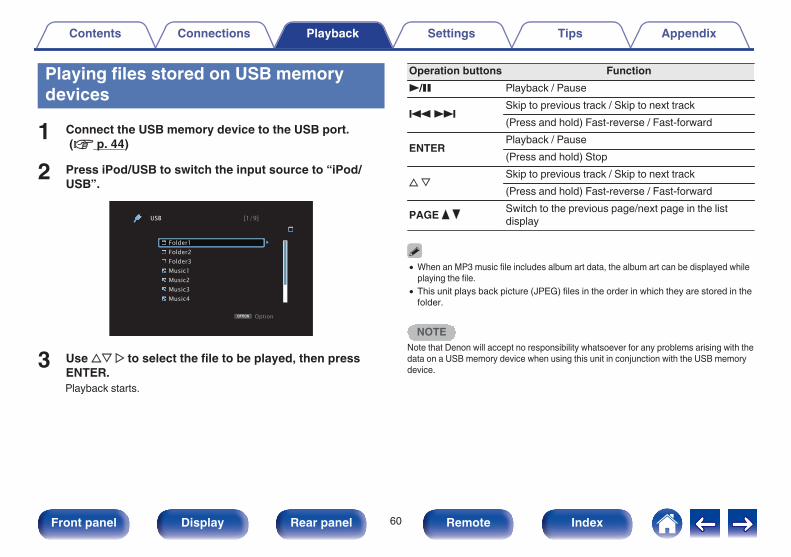
Playing files stored on USB memorydevices
1 Connect the USB memory device to the USB port. (v p. 44)
2 Press iPod/USB to switch the input source to “iPod/USB”.
.
Folder1Folder2Folder3Music1Music2Music3Music4
OPTIONOPTION
USB [1/9]
Option
3 Use ui p to select the file to be played, then pressENTER.Playback starts.
Operation buttons Function1/3 Playback / Pause
8 9 Skip to previous track / Skip to next track(Press and hold) Fast-reverse / Fast-forward
ENTER Playback / Pause(Press and hold) Stop
u i Skip to previous track / Skip to next track(Press and hold) Fast-reverse / Fast-forward
PAGE d f Switch to the previous page/next page in the listdisplay
0 When an MP3 music file includes album art data, the album art can be displayed whileplaying the file.
0 This unit plays back picture (JPEG) files in the order in which they are stored in thefolder.
NOTENote that Denon will accept no responsibility whatsoever for any problems arising with thedata on a USB memory device when using this unit in conjunction with the USB memorydevice.
Contents Connections Playback Settings Tips Appendix
60Front panel Display Rear panel Remote Index
o Operations accessible through the optionmenu0 “Performing repeat playback” (v p. 102)0 “Performing random playback” (v p. 102)0 “Searching content with keywords (Text Search)” (v p. 104)0 “Playing back music and a favorite picture at the same time
(Slideshow)” (v p. 105)0 “Setting the Slideshow Interval” (v p. 106)0 “Adjusting the volume of each channel to match the input source (Ch
Level Adjust)” (v p. 107)0 “Adjusting the tone (Tone Control)” (v p. 108)0 “Displaying your desired video during audio playback (Video
Select)” (v p. 109)0 “Playing the same music in all zones (All Zone Stereo)” (v p. 110)
Contents Connections Playback Settings Tips Appendix
61Front panel Display Rear panel Remote Index
Listening to music on a Bluetooth device
.
SOUOUND ND MOMODE
POPOWER
VOLULUME
CHAHANNNNEL
MUTEMUTE
QUICK K SESELECT
PAGAGE
VOVOLULUME
BlBlu-r-rayCBL/SATBL/SAT
GAGAME
DVD/VD/Blu-raBlu-ray
AUX MEDEDIAPLAYPLAYER
TV A AUDIDIO
INTEINTERNETRNETRADIADIO
TUNUNERiPiPod/od/USB
PUREMOVIE GAMEMUSIC
TUNUNE TUTUNE
1 2 3 4
ECO
ONLINONLINEMUSIC
ZOZONE 2
SOUOURCRCE SLELEEP
Bluluetooetooth
ENTENTER
INFNFO OPOPTIOION
BACK SETSETUP
1/38 9
ui
ENTER OPTION
Bluetooth
BACK
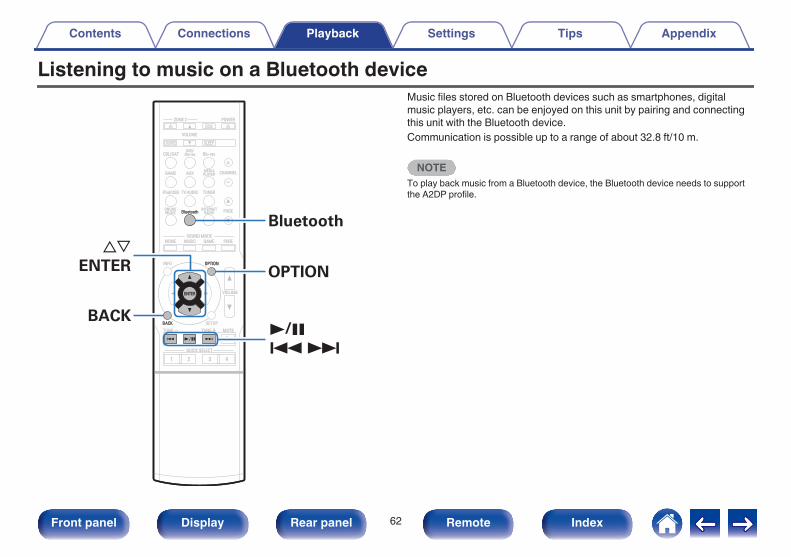
Music files stored on Bluetooth devices such as smartphones, digitalmusic players, etc. can be enjoyed on this unit by pairing and connectingthis unit with the Bluetooth device.Communication is possible up to a range of about 32.8 ft/10 m.
NOTETo play back music from a Bluetooth device, the Bluetooth device needs to supportthe A2DP profile.
Contents Connections Playback Settings Tips Appendix
62Front panel Display Rear panel Remote Index

Pairing with a Bluetooth deviceIn order to enjoy music from a Bluetooth device on this unit, the Bluetoothdevice must first be paired with this unit.Once the Bluetooth device has been paired, it does not need to be pairedagain.
1 Press Bluetooth to switch the input source to“Bluetooth”.
.
OPTIONOPTION
Bluetooth
MusicDevice
Now Playing
ArtistAlbum
Option
When using for the first time, the unit will go into the pairing modeautomatically and “Pairing...” will appear on the display of the unit.
2 Select this unit when its name appears in the list ofdevices displayed on the screen of the Bluetoothdevice.At the end of the pairing, the device name appears on the display ofthis unit.0 Connect to the Bluetooth device while “Pairing” is being displayed
on the display of the unit.Perform the connection with the Bluetooth device close to the unit(about 3.3 ft/1 m).
0 When connecting a second Bluetooth device, press and hold Bluetooth forapproximately 3 seconds or select “Pairing Mode” from the options menu to pairthe device. (v p. 66)
0 This unit can be paired with a maximum of 8 Bluetooth devices. When a 9thBluetooth device is paired, it will be registered in place of the oldest registereddevice.
0 When a number appears on the display of this unit, check that it is the samenumber as that shown on the screen of the Bluetooth device and then select “Pair”for both the Bluetooth device and the unit.
0 Enter “0000” when the password is requested on the screen of the Bluetoothdevice.
Contents Connections Playback Settings Tips Appendix
63Front panel Display Rear panel Remote Index
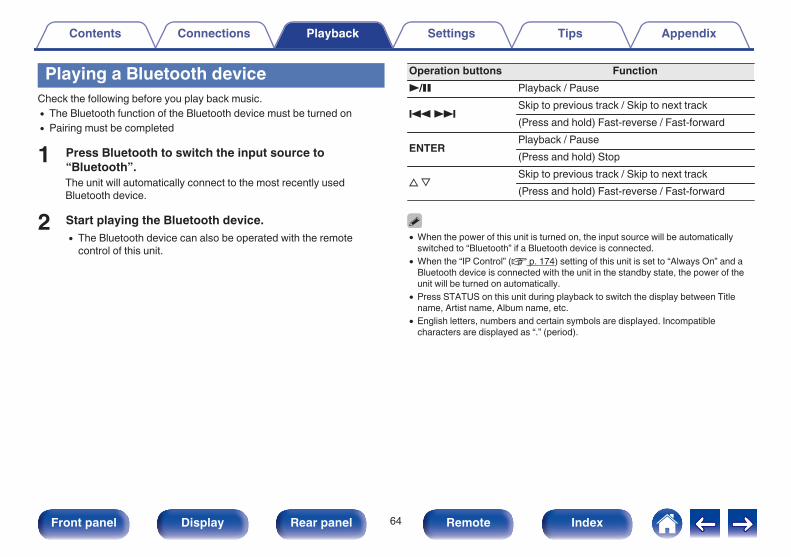
Playing a Bluetooth deviceCheck the following before you play back music.0 The Bluetooth function of the Bluetooth device must be turned on0 Pairing must be completed
1 Press Bluetooth to switch the input source to“Bluetooth”.The unit will automatically connect to the most recently usedBluetooth device.
2 Start playing the Bluetooth device.0 The Bluetooth device can also be operated with the remote
control of this unit.
Operation buttons Function1/3 Playback / Pause
8 9 Skip to previous track / Skip to next track(Press and hold) Fast-reverse / Fast-forward
ENTER Playback / Pause(Press and hold) Stop
u i Skip to previous track / Skip to next track(Press and hold) Fast-reverse / Fast-forward
0 When the power of this unit is turned on, the input source will be automaticallyswitched to “Bluetooth” if a Bluetooth device is connected.
0 When the “IP Control” (v p. 174) setting of this unit is set to “Always On” and aBluetooth device is connected with the unit in the standby state, the power of theunit will be turned on automatically.
0 Press STATUS on this unit during playback to switch the display between Titlename, Artist name, Album name, etc.
0 English letters, numbers and certain symbols are displayed. Incompatiblecharacters are displayed as “.” (period).
Contents Connections Playback Settings Tips Appendix
64Front panel Display Rear panel Remote Index
NOTE0 To operate the Bluetooth device with the remote control of this unit, the Bluetooth
device needs to support the AVRCP profile.0 The remote control of this unit is not guaranteed to work with all Bluetooth devices.0 Depending on the type of Bluetooth device, this unit outputs audio that is coupled
to the volume setting on the Bluetooth device.
o Operations accessible through the optionmenu0 “Performing repeat playback” (v p. 102)0 “Performing random playback” (v p. 102)0 “Pairing with the Pairing Mode” (v p. 66)0 “Adjusting the volume of each channel to match the input source (Ch
Level Adjust)” (v p. 107)0 “Adjusting the tone (Tone Control)” (v p. 108)0 “Displaying your desired video during audio playback (Video
Select)” (v p. 109)0 “Playing the same music in all zones (All Zone Stereo)” (v p. 110)
Contents Connections Playback Settings Tips Appendix
65Front panel Display Rear panel Remote Index
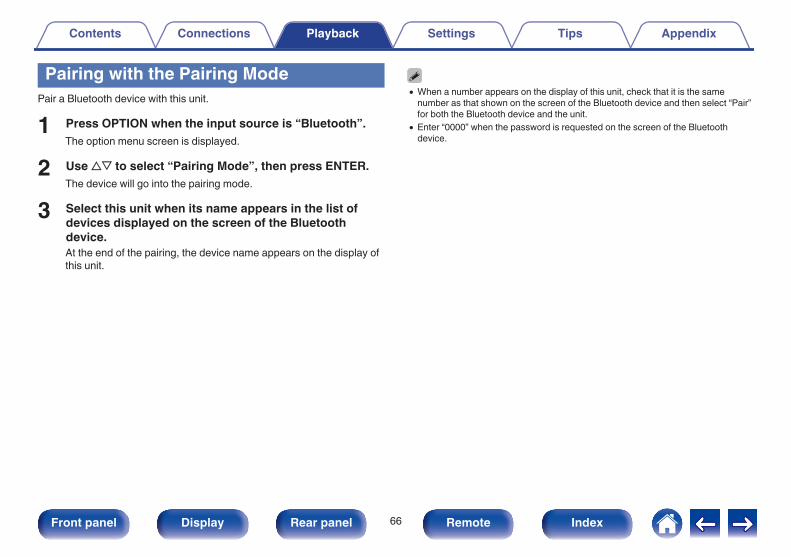
Pairing with the Pairing ModePair a Bluetooth device with this unit.
1 Press OPTION when the input source is “Bluetooth”.The option menu screen is displayed.
2 Use ui to select “Pairing Mode”, then press ENTER.The device will go into the pairing mode.
3 Select this unit when its name appears in the list ofdevices displayed on the screen of the Bluetoothdevice.At the end of the pairing, the device name appears on the display ofthis unit.
0 When a number appears on the display of this unit, check that it is the samenumber as that shown on the screen of the Bluetooth device and then select “Pair”for both the Bluetooth device and the unit.
0 Enter “0000” when the password is requested on the screen of the Bluetoothdevice.
Contents Connections Playback Settings Tips Appendix
66Front panel Display Rear panel Remote Index
Listening to FM/AM broadcasts
.
SOUOUND ND MOMODE
POPOWER
VOLULUME
MUTEMUTE
QUICK K SESELECT
PAGAGE
VOVOLULUME
BlBlu-r-rayCBL/SATBL/SAT
GAGAME
DVD/VD/Blu-raBlu-ray
AUX MEDEDIAPLAYPLAYER
TV A AUDIDIO
BluluetooetoothINTEINTERNETRNET
RADIADIO
iPiPod/od/USB
PUREMOVIE GAMEMUSIC
1 2 3 4
ECO
ONLINONLINEMUSIC
ZOZONE 2
SOUOURCRCE SLELEEP
TUNUNER
ENTENTER
INFNFO OPOPTIOION
BACK SETSETUP
TUNUNE TUTUNE
CHAHANNNNEL
uio pENTER
OPTION
TUNER
BACKTUNE +, –
CHANNEL +, –
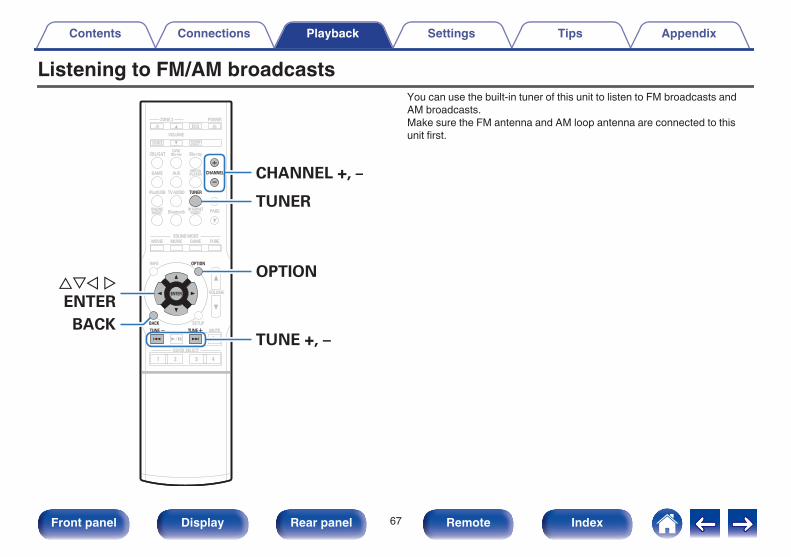
You can use the built-in tuner of this unit to listen to FM broadcasts andAM broadcasts.Make sure the FM antenna and AM loop antenna are connected to thisunit first.
Contents Connections Playback Settings Tips Appendix
67Front panel Display Rear panel Remote Index
Listening to FM/AM broadcasts
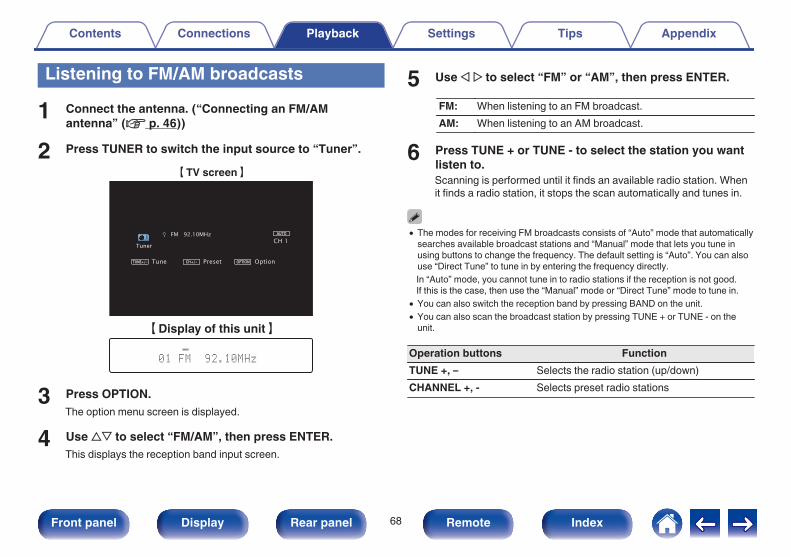
1 Connect the antenna. (“Connecting an FM/AMantenna” (v p. 46))
2 Press TUNER to switch the input source to “Tuner”.G TV screen H
.
TUNE+/-TUNE+/- OPTIONOPTION
AUTOAUTO
CHCH+/-+/-
TunerCH 1
FM 92.10MHz
Tune Preset Option
.
01 FM 92.10MHz
G Display of this unit H
3 Press OPTION.The option menu screen is displayed.
4 Use ui to select “FM/AM”, then press ENTER.This displays the reception band input screen.
5 Use o p to select “FM” or “AM”, then press ENTER.
FM: When listening to an FM broadcast.AM: When listening to an AM broadcast.
6 Press TUNE + or TUNE - to select the station you wantlisten to.Scanning is performed until it finds an available radio station. Whenit finds a radio station, it stops the scan automatically and tunes in.
0 The modes for receiving FM broadcasts consists of “Auto” mode that automaticallysearches available broadcast stations and “Manual” mode that lets you tune inusing buttons to change the frequency. The default setting is “Auto”. You can alsouse “Direct Tune” to tune in by entering the frequency directly.In “Auto” mode, you cannot tune in to radio stations if the reception is not good.If this is the case, then use the “Manual” mode or “Direct Tune” mode to tune in.
0 You can also switch the reception band by pressing BAND on the unit.0 You can also scan the broadcast station by pressing TUNE + or TUNE - on the
unit.
Operation buttons FunctionTUNE +, – Selects the radio station (up/down)CHANNEL +, - Selects preset radio stations
Contents Connections Playback Settings Tips Appendix
68Front panel Display Rear panel Remote Index
o Operations accessible through the optionmenu0 “Tuning in by entering the frequency (Direct Tune)” (v p. 69)0 “Changing the tune mode (Tune Mode)” (v p. 70)0 “Tuning in to stations and presetting them automatically (Auto
Preset)” (v p. 70)0 “Presetting the current broadcast station (Preset
Memory)” (v p. 71)0 “Specify a name for the preset broadcast station (Preset
Name)” (v p. 72)0 “Skipping preset broadcast stations (Preset Skip)” (v p. 73)0 “Adjusting the volume of each channel to match the input source (Ch
Level Adjust)” (v p. 107)0 “Adjusting the tone (Tone Control)” (v p. 108)0 “Displaying your desired video during audio playback (Video
Select)” (v p. 109)0 “Playing the same music in all zones (All Zone Stereo)” (v p. 110)
Tuning in by entering the frequency(Direct Tune)
You can enter the receiving frequency directly to tune in.
1 Press OPTION when the input source is “Tuner”.The option menu screen is displayed.
2 Use ui to select “Direct Tune”, then press ENTER.The screen that lets you enter the frequency is displayed.
3 Use ui to select the number, then press p.0 If o is pressed, the immediately preceding input is cancelled.
4 Repeat step 3 and enter the frequency of the radiostation you want to hear.
5 When setting is completed, press ENTER.The preset frequency is tuned in.
Contents Connections Playback Settings Tips Appendix
69Front panel Display Rear panel Remote Index
Changing the tune mode (Tune Mode)You can change the mode for tuning into FM and AM broadcasts. If youcannot tune in automatically with “Auto” mode, change the mode to“Manual” and tune in manually.
1 Press OPTION when the input source is “Tuner”.The option menu screen is displayed.
2 Use ui to select “Tune Mode”, then press ENTER.
3 Use o p to select the tune mode, then press ENTER.
Auto: Automatically search for and tune to a receivable radiostation.
Manual: Manually change the frequency one step at a time eachtime the button is pressed.
You can also select the tuning mode by pressing MODE on the main unit.
Tuning in to stations and presettingthem automatically (Auto Preset)
A maximum of 56 radio stations can be automatically preset.
1 Press OPTION when the input source is “Tuner”.The option menu screen is displayed.
2 Use ui to select “Auto Preset”, then press ENTER.
3 Press ENTER.The unit starts to tune in to radio stations automatically and presetthem.0 When presetting is completed, “Completed” is displayed for about
5 seconds and the option menu screen turns off.
The preset memory is overwritten.
Contents Connections Playback Settings Tips Appendix
70Front panel Display Rear panel Remote Index
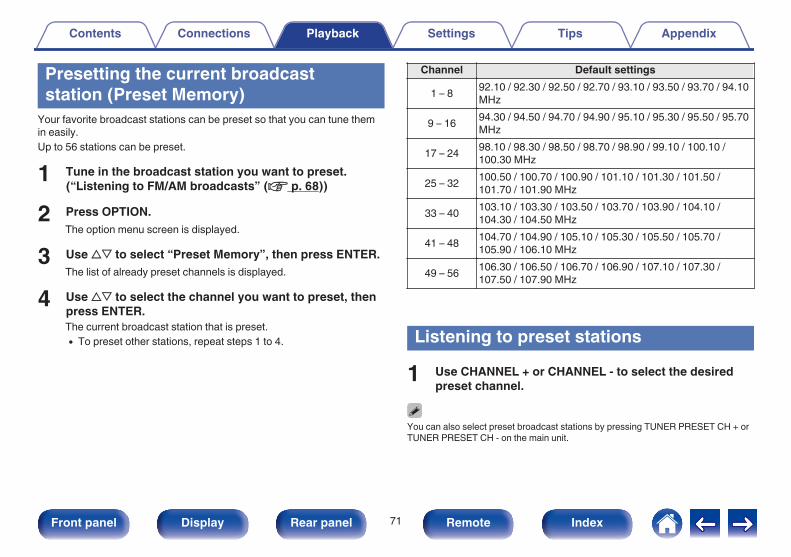
Presetting the current broadcaststation (Preset Memory)
Your favorite broadcast stations can be preset so that you can tune themin easily.Up to 56 stations can be preset.
1 Tune in the broadcast station you want to preset.(“Listening to FM/AM broadcasts” (v p. 68))
2 Press OPTION.The option menu screen is displayed.
3 Use ui to select “Preset Memory”, then press ENTER.The list of already preset channels is displayed.
4 Use ui to select the channel you want to preset, thenpress ENTER.The current broadcast station that is preset.0 To preset other stations, repeat steps 1 to 4.
Channel Default settings1 – 8 92.10 / 92.30 / 92.50 / 92.70 / 93.10 / 93.50 / 93.70 / 94.10
MHz9 – 16 94.30 / 94.50 / 94.70 / 94.90 / 95.10 / 95.30 / 95.50 / 95.70
MHz17 – 24 98.10 / 98.30 / 98.50 / 98.70 / 98.90 / 99.10 / 100.10 /
100.30 MHz25 – 32 100.50 / 100.70 / 100.90 / 101.10 / 101.30 / 101.50 /
101.70 / 101.90 MHz33 – 40 103.10 / 103.30 / 103.50 / 103.70 / 103.90 / 104.10 /
104.30 / 104.50 MHz41 – 48 104.70 / 104.90 / 105.10 / 105.30 / 105.50 / 105.70 /
105.90 / 106.10 MHz49 – 56 106.30 / 106.50 / 106.70 / 106.90 / 107.10 / 107.30 /
107.50 / 107.90 MHz
Listening to preset stations
1 Use CHANNEL + or CHANNEL - to select the desiredpreset channel.
You can also select preset broadcast stations by pressing TUNER PRESET CH + orTUNER PRESET CH - on the main unit.
Contents Connections Playback Settings Tips Appendix
71Front panel Display Rear panel Remote Index
Specify a name for the presetbroadcast station (Preset Name)
You can set the name to the preset broadcast station or change it.Up to eight characters can be input.
1 Press OPTION when the input source is “Tuner”.The option menu screen is displayed.
2 Use ui to select “Preset Name”, then press ENTER.The Preset Name screen is displayed.
3 Use o p to select the group of the broadcast stationyou want to name.
4 Use ui to select the broadcast station you want toname, then press ENTER.
5 Use ui to select a name label, then press ENTER.The screen that lets you edit the Preset Name is displayed.0 If you select “Set Defaults”, then the unit returns to displaying the
frequency.
6 Enter the characters, then press “OK”.0 For character input, see “Using the keyboard
screen” (v p. 136).
7 Press OPTION to return to the previous screen.
Contents Connections Playback Settings Tips Appendix
72Front panel Display Rear panel Remote Index
Skipping preset broadcast stations(Preset Skip)
Perform auto preset memory to save all the broadcasting stations that canbe received in the memory. Selecting a broadcast station becomes easierby skipping unnecessary memories.
1 Press OPTION when the input source is “Tuner”.The option menu screen is displayed.
2 Use ui to select “Preset Skip”, then press ENTER.The Preset Skip screen is displayed.
3 n To set the stations you want to skip by groupsA Use o p to select the group of broadcast stations you want to
skip.B Press u to select “Set No.z – z to Skip”, then press ENTER.
Skip all the broadcast stations that are included in theselected group “z-z”.(z is the selected group number.)
n To set the stations you want to skip bystationsA Use o p to select the group of broadcast stations you want
to skip.B Use ui to select the broadcast station you want to skip.C Use o p to select “Skip”.
The station you selected is not displayed.
4 Press OPTION to return to the previous screen.
Contents Connections Playback Settings Tips Appendix
73Front panel Display Rear panel Remote Index
Cancelling Preset Skip
1 While the Preset Skip screen is displayed, use o p toselect a group containing a broadcast station to cancelthe skip for.
2 Use ui to select a broadcast station to cancel the skipfor.
3 Use o p to select “On”.The skip is cancelled.
NOTEPreset skip cannot be cancelled for groups.
Contents Connections Playback Settings Tips Appendix
74Front panel Display Rear panel Remote Index
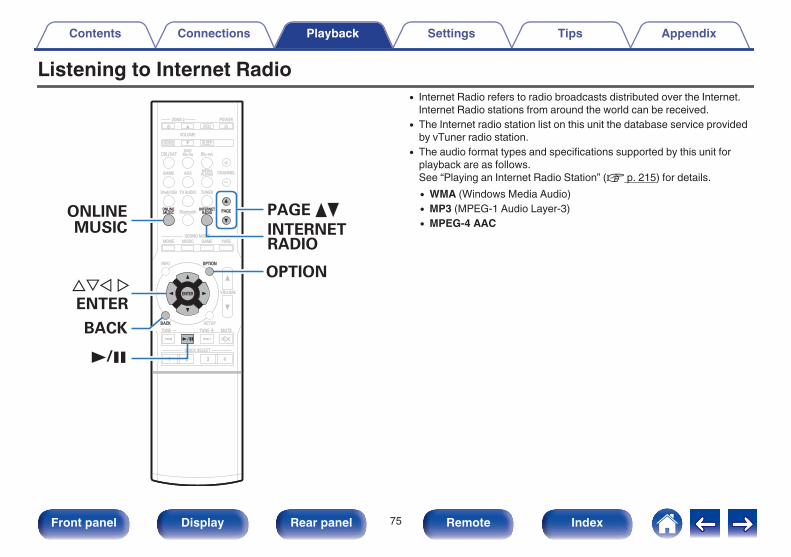
Listening to Internet Radio
.
ENTENTER
OPOPTIOION
BACK
SOUOUND ND MOMODE
POPOWER
VOLULUME
CHAHANNNNEL
MUTEMUTE
QUICK K SESELECT
VOVOLULUME
BlBlu-r-rayCBL/SATBL/SAT
GAGAME
DVD/VD/Blu-raBlu-ray
AUX MEDEDIAPLAYPLAYER
TV A AUDIDIO
Bluluetooetooth
TUNUNERiPiPod/od/USB
PUREMOVIE GAMEMUSIC
TUNUNE TUTUNE
1 2 3 4
ECOZOZONE 2
SOUOURCRCE SLELEEP
INFNFO
SETSETUP
INTEINTERNETRNETRADIADIO PAGAGEONLINONLINE
MUSIC
1/3
uio pENTER
OPTION
INTERNET PAGE df
BACK
ONLINEMUSIC
RADIO
0 Internet Radio refers to radio broadcasts distributed over the Internet.Internet Radio stations from around the world can be received.
0 The Internet radio station list on this unit the database service providedby vTuner radio station.
0 The audio format types and specifications supported by this unit forplayback are as follows.See “Playing an Internet Radio Station” (v p. 215) for details.0 WMA (Windows Media Audio)0 MP3 (MPEG-1 Audio Layer-3)0 MPEG-4 AAC
Contents Connections Playback Settings Tips Appendix
75Front panel Display Rear panel Remote Index
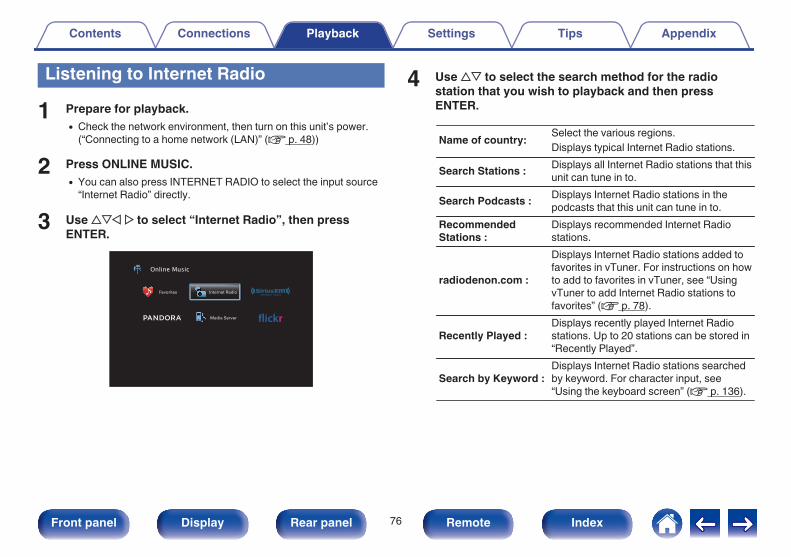
Listening to Internet Radio
1 Prepare for playback.0 Check the network environment, then turn on this unit’s power.
(“Connecting to a home network (LAN)” (v p. 48))
2 Press ONLINE MUSIC.0 You can also press INTERNET RADIO to select the input source
“Internet Radio” directly.
3 Use uio p to select “Internet Radio”, then pressENTER.
.
Favorites Internet Radio
Media Server
Online Music
4 Use ui to select the search method for the radiostation that you wish to playback and then pressENTER.
Name of country: Select the various regions.Displays typical Internet Radio stations.
Search Stations : Displays all Internet Radio stations that thisunit can tune in to.
Search Podcasts : Displays Internet Radio stations in thepodcasts that this unit can tune in to.
RecommendedStations :
Displays recommended Internet Radiostations.
radiodenon.com :
Displays Internet Radio stations added tofavorites in vTuner. For instructions on howto add to favorites in vTuner, see “UsingvTuner to add Internet Radio stations tofavorites” (v p. 78).
Recently Played :Displays recently played Internet Radiostations. Up to 20 stations can be stored in“Recently Played”.
Search by Keyword :Displays Internet Radio stations searchedby keyword. For character input, see“Using the keyboard screen” (v p. 136).
Contents Connections Playback Settings Tips Appendix
76Front panel Display Rear panel Remote Index
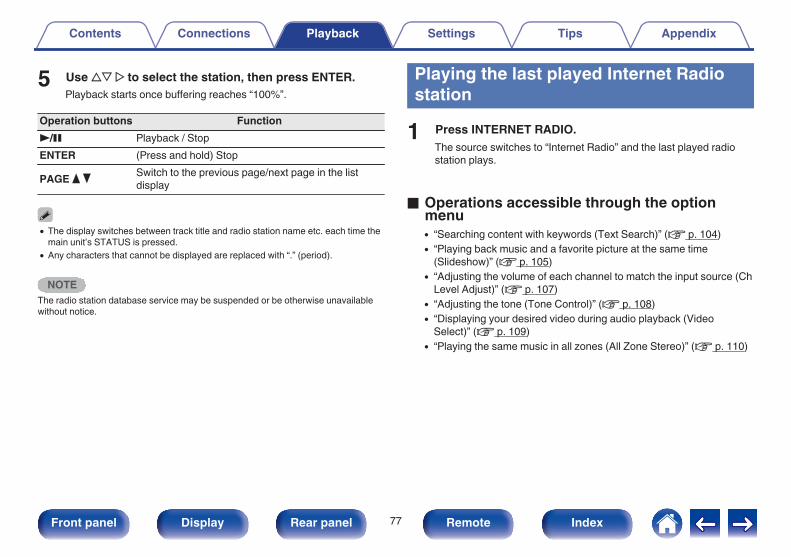
5 Use ui p to select the station, then press ENTER.Playback starts once buffering reaches “100%”.
Operation buttons Function1/3 Playback / StopENTER (Press and hold) Stop
PAGE d f Switch to the previous page/next page in the listdisplay
0 The display switches between track title and radio station name etc. each time themain unit’s STATUS is pressed.
0 Any characters that cannot be displayed are replaced with “.” (period).
NOTEThe radio station database service may be suspended or be otherwise unavailablewithout notice.
Playing the last played Internet Radiostation
1 Press INTERNET RADIO.The source switches to “Internet Radio” and the last played radiostation plays.
o Operations accessible through the optionmenu0 “Searching content with keywords (Text Search)” (v p. 104)0 “Playing back music and a favorite picture at the same time
(Slideshow)” (v p. 105)0 “Adjusting the volume of each channel to match the input source (Ch
Level Adjust)” (v p. 107)0 “Adjusting the tone (Tone Control)” (v p. 108)0 “Displaying your desired video during audio playback (Video
Select)” (v p. 109)0 “Playing the same music in all zones (All Zone Stereo)” (v p. 110)
Contents Connections Playback Settings Tips Appendix
77Front panel Display Rear panel Remote Index
Using vTuner to add Internet Radiostations to favorites
There are many Internet Radio stations in the world, and this unit can tuneinto these stations. But finding the radio station you want to hear may bedifficult, because there are too many stations. If this is the case, thenplease use vTuner, an Internet Radio station search website specificallydesigned for this unit. You can use your PC to search Internet Radiostations and add them as your favorites. This unit can play radio stationsadded to vTuner.
1 Check the MAC address of this unit.(“Information” (v p. 174))0 The MAC address is necessary when you create an account for
vTuner.
2 Use your PC to access the vTuner website (http://www.radiodenon.com).
3 Enter the MAC address of this unit, then click “Go”.
4 Enter your E-mail address and a password of yourchoice.
5 Select the search criteria (genre, region, language,etc.) of your choice.0 You can also enter a keyword to search for a station you want to
hear.
6 Select the radio station of your choice from the list, andthen click the Add to Favorites icon.
7 Enter the name of the favorite group, then click “Go”.A new favorite group that includes the selected radio station iscreated.0 Internet Radio stations added to favorites in vTuner can be played
from “radiodenon.com” (v p. 76) with this unit.
You can also add a radio station that is not in the vTuner list.
Contents Connections Playback Settings Tips Appendix
78Front panel Display Rear panel Remote Index
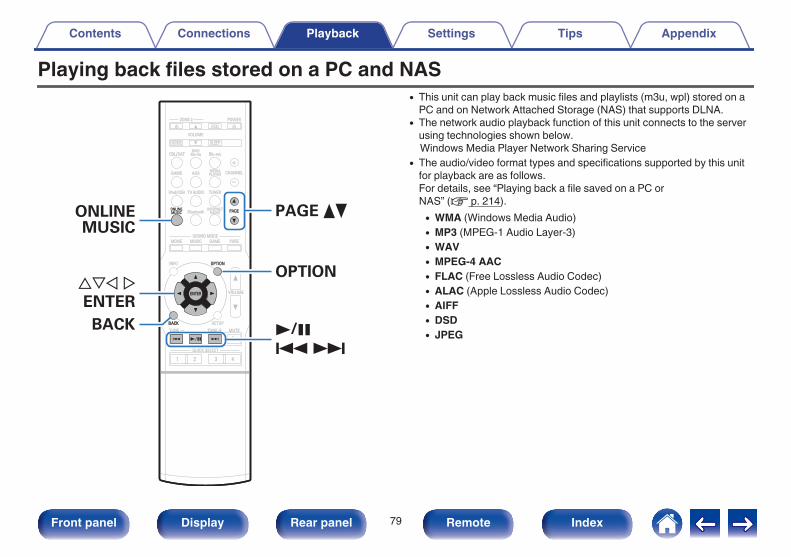
Playing back files stored on a PC and NAS
.
SOUOUND ND MOMODE
POPOWER
VOLULUME
CHAHANNNNEL
MUTEMUTE
QUICK K SESELECT
VOVOLULUME
BlBlu-r-rayCBL/SATBL/SAT
GAGAME
DVD/VD/Blu-raBlu-ray
AUX MEDEDIAPLAYPLAYER
TV A AUDIDIO
BluluetooetoothINTEINTERNETRNET
RADIADIO
TUNUNER
PUREMOVIE GAMEMUSIC
TUNUNE TUTUNE
ECOZOZONE 2
SOUOURCRCE SLELEEP
INFNFO
BACK SETSETUP
PAGAGE
ENTENTER
OPOPTIOION
BACK
1 2 3 4
iPiPod/od/USB
ONLINONLINEMUSIC
uio pENTER
OPTION
BACK
PAGE df
1/38 9
ONLINEMUSIC
0 This unit can play back music files and playlists (m3u, wpl) stored on aPC and on Network Attached Storage (NAS) that supports DLNA.
0 The network audio playback function of this unit connects to the serverusing technologies shown below.Windows Media Player Network Sharing Service
0 The audio/video format types and specifications supported by this unitfor playback are as follows.For details, see “Playing back a file saved on a PC orNAS” (v p. 214).0 WMA (Windows Media Audio)0 MP3 (MPEG-1 Audio Layer-3)0 WAV0 MPEG-4 AAC0 FLAC (Free Lossless Audio Codec)0 ALAC (Apple Lossless Audio Codec)0 AIFF0 DSD0 JPEG
Contents Connections Playback Settings Tips Appendix
79Front panel Display Rear panel Remote Index

Applying media sharing settingsHere, we apply the settings to share music files stored on a PC and NAS on the network.If you are using a Media Server, be sure to apply this setting first..o When using Windows Media Player 12
(Windows 7 / Windows 8)
1 Start up Windows Media Player 12 on the PC.
2 Select “More streaming options...” in the “Stream”.
3 Select “Allowed” in the “Denon AVR-S700W” dropdownlist.
4 Select “Allowed” in the drop-down list for “Mediaprograms on this PC and remote connections...”.
5 Follow the screen instructions to end the setting.
o When using Windows Media Player 11
1 Start up Windows Media Player 11 on the PC.
2 Select “Media Sharing” in the “Library”.
3 Click the “Share my media” check box, select “DenonAVR-S700W”, and then click “Allow”.
4 As you did in step 3, select the icon of the device (otherPCs and mobile devices) you want to use as a mediacontroller, and then click “Allow”.
5 Click “OK” to finish.
o Sharing media stored in NASChange settings on the NAS to allow this unit and other devices (PCsand mobile devices) used as media controllers to access the NAS. Fordetails, see the owner’s manual that came with the NAS.
Contents Connections Playback Settings Tips Appendix
80Front panel Display Rear panel Remote Index
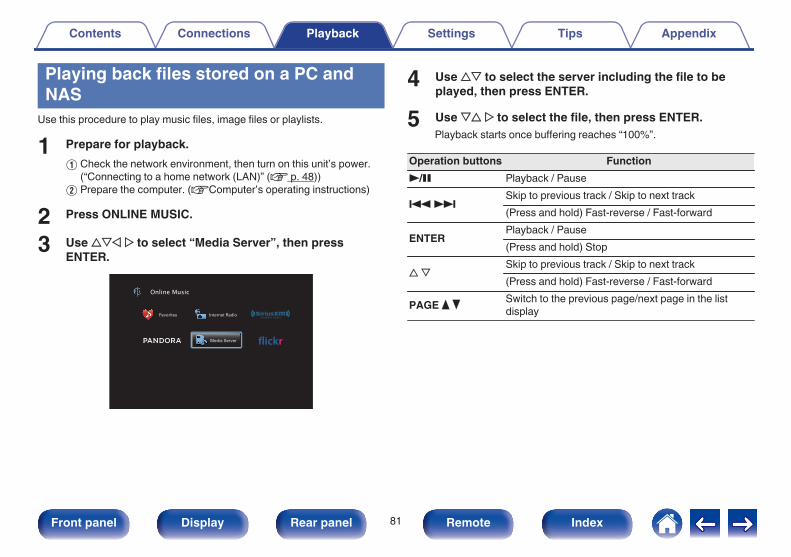
Playing back files stored on a PC andNAS
Use this procedure to play music files, image files or playlists.
1 Prepare for playback.A Check the network environment, then turn on this unit’s power.
(“Connecting to a home network (LAN)” (v p. 48))B Prepare the computer. (vComputer’s operating instructions)
2 Press ONLINE MUSIC.
3 Use uio p to select “Media Server”, then pressENTER.
.
Favorites Internet Radio
Online Music
Media Server
4 Use ui to select the server including the file to beplayed, then press ENTER.
5 Use iu p to select the file, then press ENTER.Playback starts once buffering reaches “100%”.
Operation buttons Function1/3 Playback / Pause
8 9 Skip to previous track / Skip to next track(Press and hold) Fast-reverse / Fast-forward
ENTER Playback / Pause(Press and hold) Stop
u i Skip to previous track / Skip to next track(Press and hold) Fast-reverse / Fast-forward
PAGE d f Switch to the previous page/next page in the listdisplay
Contents Connections Playback Settings Tips Appendix
81Front panel Display Rear panel Remote Index
0 The display switches between track title, artist name, and album title each time themain unit’s STATUS is pressed.
0 When a WMA (Windows Media Audio), MP3 or MPEG-4 AAC file includes albumart data, the album art can be displayed while the music files are playing.
0 If you use Ver.11 or later of Windows Media Player, the album art for WMA filescan be displayed.
0 WMA Lossless files can be played when using a server supporting transcoding,such as Windows Media Player (Ver.11 or later).
0 This unit plays back picture (JPEG) files in the order in which they are stored in thefolder.
NOTE0 When playing back music files with your PC or NAS connected through wireless
LAN, audio may be interrupted depending on your wireless LAN environment. Inthis case, connect using a wired LAN.
0 Depending on the size of the still picture (JPEG) file, some time may be requiredfor the file to be displayed.
0 The order in which the tracks/files are displayed depends on the serverspecifications. If the tracks/files are not displayed in alphabetical order due to theserver specifications, searching by the first letter may not work properly.
o Operations accessible through the optionmenu0 “Performing repeat playback” (v p. 102)0 “Performing random playback” (v p. 102)0 “Searching content with keywords (Text Search)” (v p. 104)0 “Playing back music and a favorite picture at the same time
(Slideshow)” (v p. 105)0 “Setting the Slideshow Interval” (v p. 106)0 “Adjusting the volume of each channel to match the input source (Ch
Level Adjust)” (v p. 107)0 “Adjusting the tone (Tone Control)” (v p. 108)0 “Displaying your desired video during audio playback (Video
Select)” (v p. 109)0 “Playing the same music in all zones (All Zone Stereo)” (v p. 110)
Contents Connections Playback Settings Tips Appendix
82Front panel Display Rear panel Remote Index
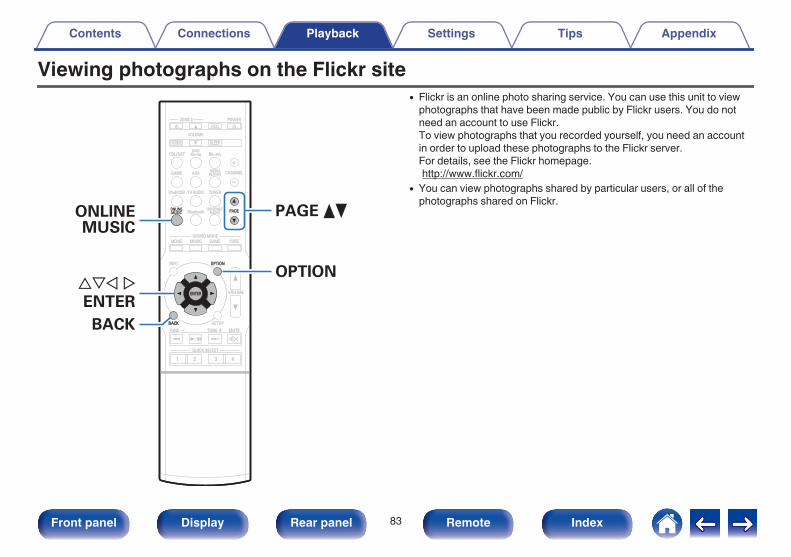
Viewing photographs on the Flickr site
.
SOUOUND ND MOMODE
POPOWER
VOLULUME
CHAHANNNNEL
MUTEMUTE
QUICK K SESELECT
VOVOLULUME
BlBlu-r-rayCBL/SATBL/SAT
GAGAME
DVD/VD/Blu-raBlu-ray
AUX MEDEDIAPLAYPLAYER
TV A AUDIDIO
BluluetooetoothINTEINTERNETRNET
RADIADIO
TUNUNER
PUREMOVIE GAMEMUSIC
TUNUNE TUTUNE
ECOZOZONE 2
SOUOURCRCE SLELEEP
INFNFO
BACK SETSETUP
PAGAGE
ENTENTER
OPOPTIOION
BACK
1 2 3 4
iPiPod/od/USB
ONLINONLINEMUSIC
uio pENTER
OPTION
BACK
PAGE dfONLINEMUSIC
0 Flickr is an online photo sharing service. You can use this unit to viewphotographs that have been made public by Flickr users. You do notneed an account to use Flickr.To view photographs that you recorded yourself, you need an accountin order to upload these photographs to the Flickr server.For details, see the Flickr homepage.http://www.flickr.com/
0 You can view photographs shared by particular users, or all of thephotographs shared on Flickr.
Contents Connections Playback Settings Tips Appendix
83Front panel Display Rear panel Remote Index
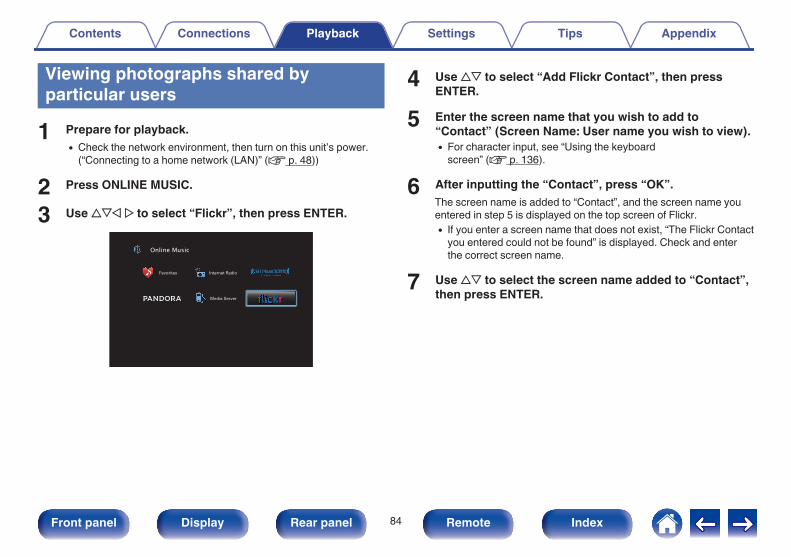
Viewing photographs shared byparticular users
1 Prepare for playback.0 Check the network environment, then turn on this unit’s power.
(“Connecting to a home network (LAN)” (v p. 48))
2 Press ONLINE MUSIC.
3 Use uio p to select “Flickr”, then press ENTER.
.
Favorites Internet Radio
Media Server
Online Music
4 Use ui to select “Add Flickr Contact”, then pressENTER.
5 Enter the screen name that you wish to add to“Contact” (Screen Name: User name you wish to view).0 For character input, see “Using the keyboard
screen” (v p. 136).
6 After inputting the “Contact”, press “OK”.The screen name is added to “Contact”, and the screen name youentered in step 5 is displayed on the top screen of Flickr.0 If you enter a screen name that does not exist, “The Flickr Contact
you entered could not be found” is displayed. Check and enterthe correct screen name.
7 Use ui to select the screen name added to “Contact”,then press ENTER.
Contents Connections Playback Settings Tips Appendix
84Front panel Display Rear panel Remote Index
8 Use ui to select the folder, then press ENTER.
Favorites : Displays the favorite photographs of thespecified user.
Photostream : Displays a list of shared photographs.PhotoSets : Displays the folder (photograph album) list.Contacts : Displays the screen name used by the
specified user in Contacts.Remove thisContact : Deletes a user from Flickr Contact.Add this Contact : Adds a user from Flickr Contact.
9 Use ui p to select the photograph, then press ENTER.The selected photograph is displayed.
Operation buttons Function
ENTER Playback(Press and hold) Stop
u i Display previous photograph / Display nextphotograph
PAGE d f Switch to the previous page/next page in the listdisplay
Contents Connections Playback Settings Tips Appendix
85Front panel Display Rear panel Remote Index
Viewing all photographs on Flickr
1 Use ui to select “All Content”, then press ENTER.
2 Use ui to select the folder, and then press ENTER.
Interestingness :Displays photographs that are popular from thenumber of user comments or number of timesthey are added as favorites.
Recent : Displays the most recently added photographs.Search by text : Search for photographs by keyword.
3 Use ui p to select the photograph, then press ENTER.The selected photograph is displayed.
NOTEDepending on the file format, some photographs may not be viewable.
o Operations accessible through the optionmenu0 “Setting the Slideshow Interval” (v p. 106)0 “Displaying your desired video during audio playback (Video
Select)” (v p. 109)0 “Playing the same music in all zones (All Zone Stereo)” (v p. 110)
Contents Connections Playback Settings Tips Appendix
86Front panel Display Rear panel Remote Index
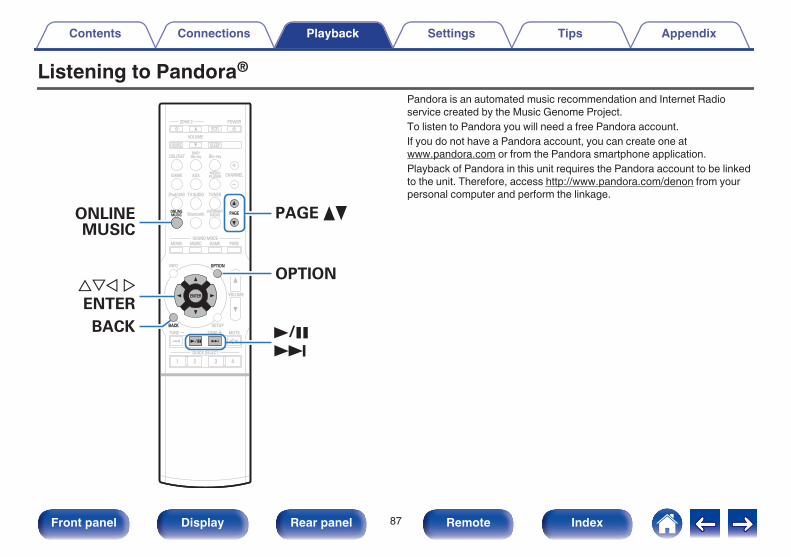
Listening to Pandora®
.
SOUOUND ND MOMODE
POPOWER
VOLULUME
CHAHANNNNEL
MUTEMUTE
QUICK K SESELECT
VOVOLULUME
BlBlu-r-rayCBL/SATBL/SAT
GAGAME
DVD/VD/Blu-raBlu-ray
AUX MEDEDIAPLAYPLAYER
TV A AUDIDIO
BluluetooetoothINTEINTERNETRNET
RADIADIO
TUNUNER
PUREMOVIE GAMEMUSIC
TUNUNE TUTUNE
ECOZOZONE 2
SOUOURCRCE SLELEEP
INFNFO
BACK SETSETUP
PAGAGE
ENTENTER
OPOPTIOION
BACK
1 2 3 4
iPiPod/od/USB
ONLINONLINEMUSIC
1/39
uio pENTER
OPTION
BACK
PAGE dfONLINEMUSIC
Pandora is an automated music recommendation and Internet Radioservice created by the Music Genome Project.To listen to Pandora you will need a free Pandora account.If you do not have a Pandora account, you can create one atwww.pandora.com or from the Pandora smartphone application.Playback of Pandora in this unit requires the Pandora account to be linkedto the unit. Therefore, access http://www.pandora.com/denon from yourpersonal computer and perform the linkage.
Contents Connections Playback Settings Tips Appendix
87Front panel Display Rear panel Remote Index
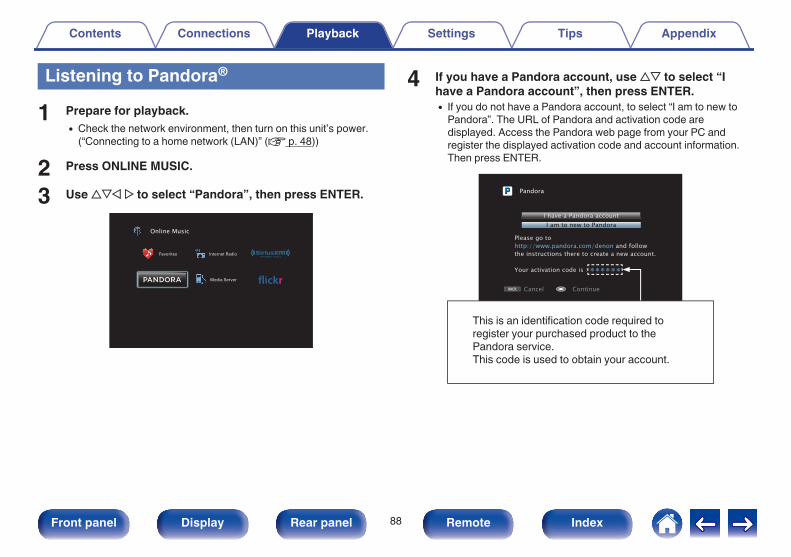
Listening to Pandora®
1 Prepare for playback.0 Check the network environment, then turn on this unit’s power.
(“Connecting to a home network (LAN)” (v p. 48))
2 Press ONLINE MUSIC.
3 Use uio p to select “Pandora”, then press ENTER.
.
Online Music
Favorites Internet Radio
Media Server
4 If you have a Pandora account, use ui to select “Ihave a Pandora account”, then press ENTER.0 If you do not have a Pandora account, to select “I am to new to
Pandora”. The URL of Pandora and activation code aredisplayed. Access the Pandora web page from your PC andregister the displayed activation code and account information.Then press ENTER.
.
BACKBACK
Pandora
I have a Pandora account
Please go tohttp://www.pandora.com/denon and follow the instructions there to create a new account.
Your activation code is : zzzzzz
I am to new to Pandora
Cancel Continue
This is an identification code required to register your purchased product to the Pandora service.This code is used to obtain your account.
Contents Connections Playback Settings Tips Appendix
88Front panel Display Rear panel Remote Index
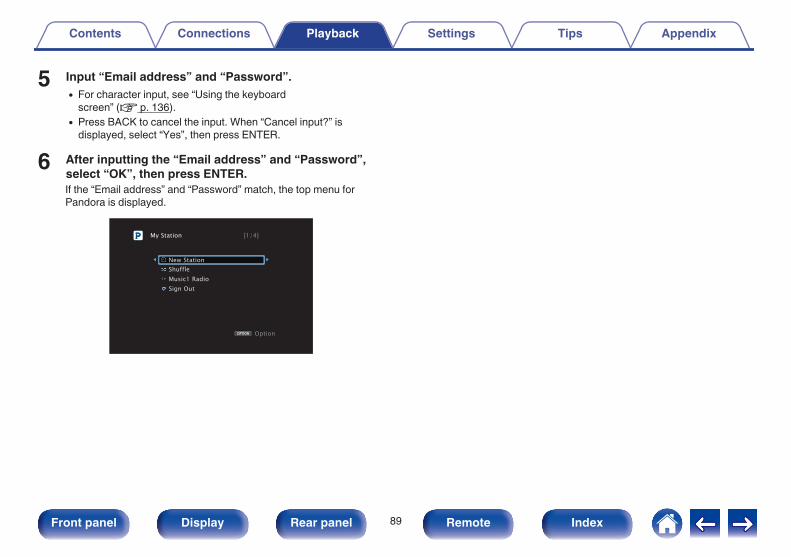
5 Input “Email address” and “Password”.0 For character input, see “Using the keyboard
screen” (v p. 136).0 Press BACK to cancel the input. When “Cancel input?” is
displayed, select “Yes”, then press ENTER.
6 After inputting the “Email address” and “Password”,select “OK”, then press ENTER.If the “Email address” and “Password” match, the top menu forPandora is displayed.
.
OPTIONOPTION
My Station [1/4]
Option
New StationShuffleMusic1 RadioSign Out
Contents Connections Playback Settings Tips Appendix
89Front panel Display Rear panel Remote Index

Creating a new stationYou can create up to 100 radio stations.
1 Use ui to select “New Station”, then press ENTER.
2 Input a track or artist name, then press “OK”.0 For character input, see “Using the keyboard
screen” (v p. 136).
3 Use ui to select “Search by Artist” or “Search byTrack”, then press ENTER.You can search and display a list by track or artist.
4 Use ui, select a file from the list, press ENTER.New station is created.
Your new station will play music with similar qualities to the artist or track youentered.
Operation buttons Function1/3 Playback / Pause9 Skip to next track
ENTER Playback / Pause(Press and hold) Stop
i Skip to next track
PAGE d f Switch to the previous page/next page in the listdisplay
Contents Connections Playback Settings Tips Appendix
90Front panel Display Rear panel Remote Index
Listening to an existing station
1 Use ui and select the radio station that you want tolisten to, then press ENTER.
You can skip up to 6 tracks that are being played back within 1 hour.
Listening to created radio stations atrandom
1 Use ui to select “Shuffle”, then press ENTER.Created radio stations are selected at random, and tracks arestreamed.
Contents Connections Playback Settings Tips Appendix
91Front panel Display Rear panel Remote Index
Giving feedback and managingstations
You can personalize your stations by providing feedback.
1 Press p while a track is playing.The Pandora menu screen is displayed.
I like this track :Press when you like the track that is beingplayed.Playback a favorite track.Display the E (Thumbs up) icon.
I don’t like thistrack :
Press when you don’t like the track that isbeing played.Delete that track from the radio station.Display the D (Thumbs down) icon.
Why is this trackplaying? :
Displays the reason why Pandora selectedthis track.
Create station : Creates a station for the track or artist beingplayed.
Bookmark thistrack :
Bookmarks the artist currently being played.You can check on a computer or iPhone etc.For details, see the Pandora web page.
I’m tired of thistrack :
Press when you don’t like the track that is beingplayed.The track will not be played for 1 month.
Delete thisstation :
Press when you want to delete the station thatis being played.
Contents Connections Playback Settings Tips Appendix
92Front panel Display Rear panel Remote Index
Sign OutDisassociate this unit from your Pandora account.
1 Use ui to select “Sign Out”, then press ENTER.
2 When the popup menu appears, use o p to select“Yes”, then press ENTER.
o Operations accessible through the optionmenu0 “Adjusting the volume of each channel to match the input source (Ch
Level Adjust)” (v p. 107)0 “Adjusting the tone (Tone Control)” (v p. 108)0 “Displaying your desired video during audio playback (Video
Select)” (v p. 109)0 “Playing the same music in all zones (All Zone Stereo)” (v p. 110)
Contents Connections Playback Settings Tips Appendix
93Front panel Display Rear panel Remote Index

Listening to SiriusXM Internet Radio
.
SOUOUND ND MOMODE
POPOWER
VOLULUME
CHAHANNNNEL
MUTEMUTE
QUICK K SESELECT
VOVOLULUME
BlBlu-r-rayCBL/SATBL/SAT
GAGAME
DVD/VD/Blu-raBlu-ray
AUX MEDEDIAPLAYPLAYER
TV A AUDIDIO
BluluetooetoothINTEINTERNETRNET
RADIADIO
TUNUNER
PUREMOVIE GAMEMUSIC
TUNUNE TUTUNE
ECOZOZONE 2
SOUOURCRCE SLELEEP
INFNFO
BACK SETSETUP
PAGAGE
ENTENTER
OPOPTIOION
BACK
1 2 3 4
iPiPod/od/USB
ONLINONLINEMUSIC
1/3
uio pENTER
OPTION
BACK
PAGE dfONLINEMUSIC
You can access SiriusXM to enjoy access to a wide range of uniquecontent.An All Access package lets you listen to SiriusXM on your computer,smartphone, tablet or Lynx Portable.For details, see the SiriusXM homepage.http://www.siriusxm.com
Contents Connections Playback Settings Tips Appendix
94Front panel Display Rear panel Remote Index
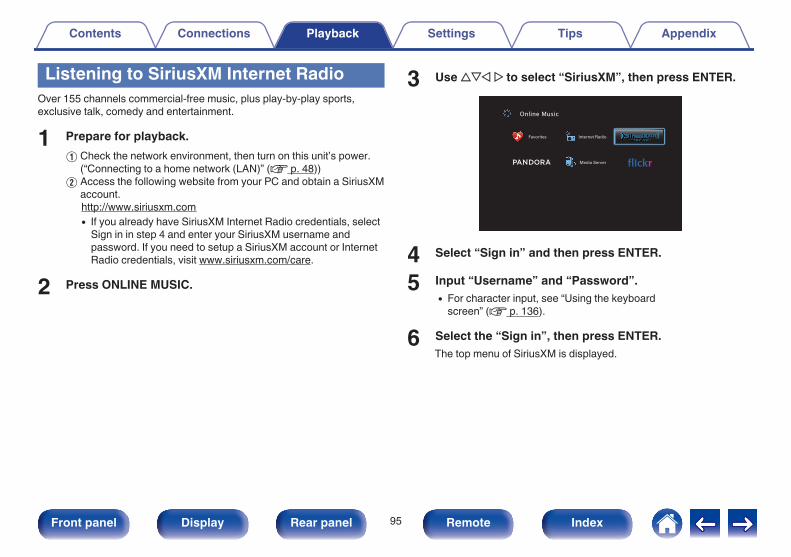
Listening to SiriusXM Internet RadioOver 155 channels commercial-free music, plus play-by-play sports,exclusive talk, comedy and entertainment.
1 Prepare for playback.A Check the network environment, then turn on this unit’s power.
(“Connecting to a home network (LAN)” (v p. 48))B Access the following website from your PC and obtain a SiriusXM
account.http://www.siriusxm.com0 If you already have SiriusXM Internet Radio credentials, select
Sign in in step 4 and enter your SiriusXM username andpassword. If you need to setup a SiriusXM account or InternetRadio credentials, visit www.siriusxm.com/care.
2 Press ONLINE MUSIC.
3 Use uio p to select “SiriusXM”, then press ENTER.
.
Online Music
Favorites Internet Radio
Media Server
4 Select “Sign in” and then press ENTER.
5 Input “Username” and “Password”.0 For character input, see “Using the keyboard
screen” (v p. 136).
6 Select the “Sign in”, then press ENTER.The top menu of SiriusXM is displayed.
Contents Connections Playback Settings Tips Appendix
95Front panel Display Rear panel Remote Index
7 Use ui to select the genre, then press ENTER.
8 Use ui to select the file, then press ENTER.The selected file is displayed.
Operation buttons Function1/3 Playback / Stop
ENTER Playback(Press and hold) Stop
PAGE d f Switch to the previous page/next page in the listdisplay
Sign OutDisassociate this unit from your SiriusXM account.
1 Use ui to select “Sign Out”, then press ENTER.
2 When the popup menu appears, use o p to select“Yes”, then press ENTER.
o Operations accessible through the optionmenu0 “Adjusting the volume of each channel to match the input source (Ch
Level Adjust)” (v p. 107)0 “Adjusting the tone (Tone Control)” (v p. 108)0 “Displaying your desired video during audio playback (Video
Select)” (v p. 109)0 “Playing the same music in all zones (All Zone Stereo)” (v p. 110)
Contents Connections Playback Settings Tips Appendix
96Front panel Display Rear panel Remote Index
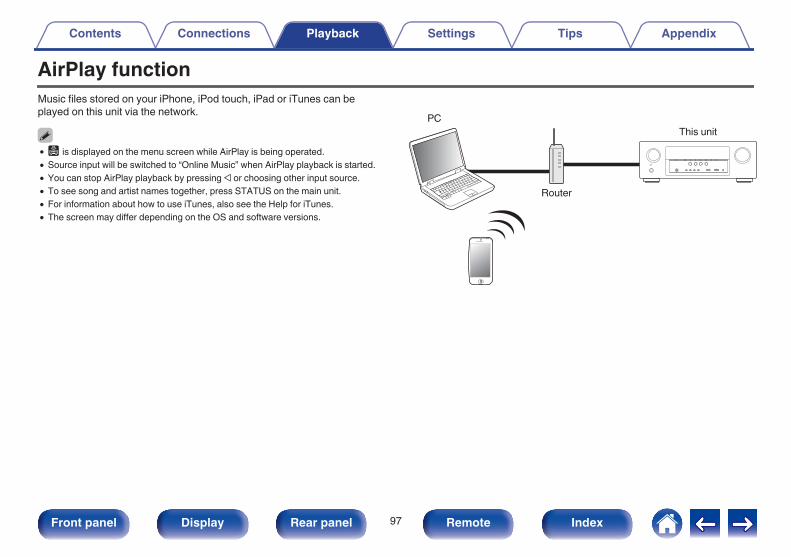
AirPlay functionMusic files stored on your iPhone, iPod touch, iPad or iTunes can beplayed on this unit via the network.
0 + is displayed on the menu screen while AirPlay is being operated.0 Source input will be switched to “Online Music” when AirPlay playback is started.0 You can stop AirPlay playback by pressing o or choosing other input source.0 To see song and artist names together, press STATUS on the main unit.0 For information about how to use iTunes, also see the Help for iTunes.0 The screen may differ depending on the OS and software versions.
.
PC
Router
This unit
Contents Connections Playback Settings Tips Appendix
97Front panel Display Rear panel Remote Index
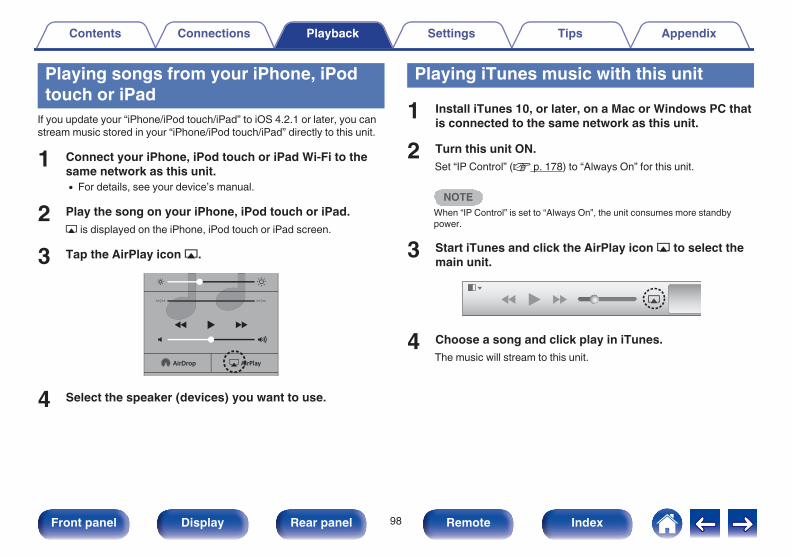
Playing songs from your iPhone, iPodtouch or iPad
If you update your “iPhone/iPod touch/iPad” to iOS 4.2.1 or later, you canstream music stored in your “iPhone/iPod touch/iPad” directly to this unit.
1 Connect your iPhone, iPod touch or iPad Wi-Fi to thesame network as this unit.0 For details, see your device’s manual.
2 Play the song on your iPhone, iPod touch or iPad.' is displayed on the iPhone, iPod touch or iPad screen.
3 Tap the AirPlay icon '.
.
AirPlayAirPlayAirDropAirDrop
4 Select the speaker (devices) you want to use.
Playing iTunes music with this unit
1 Install iTunes 10, or later, on a Mac or Windows PC thatis connected to the same network as this unit.
2 Turn this unit ON.Set “IP Control” (v p. 178) to “Always On” for this unit.
NOTEWhen “IP Control” is set to “Always On”, the unit consumes more standbypower.
3 Start iTunes and click the AirPlay icon ' to select themain unit.
.
4 Choose a song and click play in iTunes.The music will stream to this unit.
Contents Connections Playback Settings Tips Appendix
98Front panel Display Rear panel Remote Index
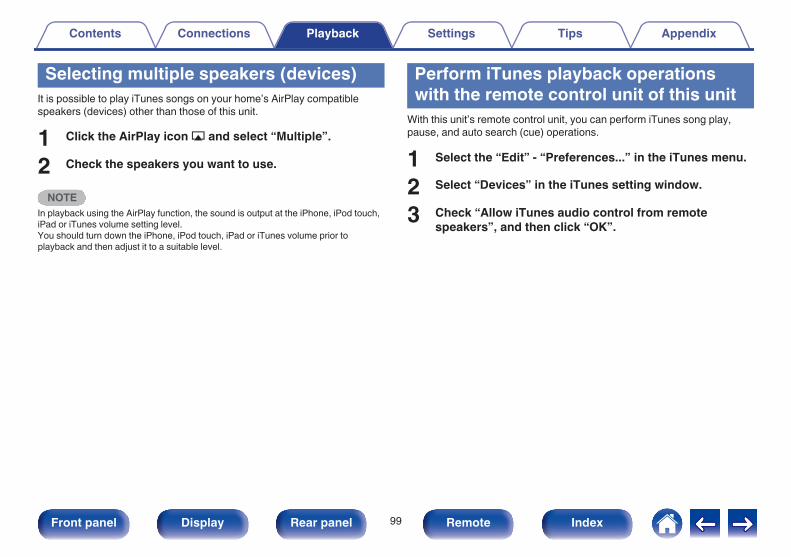
Selecting multiple speakers (devices)It is possible to play iTunes songs on your home’s AirPlay compatiblespeakers (devices) other than those of this unit.
1 Click the AirPlay icon ' and select “Multiple”.
2 Check the speakers you want to use.
NOTEIn playback using the AirPlay function, the sound is output at the iPhone, iPod touch,iPad or iTunes volume setting level.You should turn down the iPhone, iPod touch, iPad or iTunes volume prior toplayback and then adjust it to a suitable level.
Perform iTunes playback operationswith the remote control unit of this unit
With this unit’s remote control unit, you can perform iTunes song play,pause, and auto search (cue) operations.
1 Select the “Edit” - “Preferences...” in the iTunes menu.
2 Select “Devices” in the iTunes setting window.
3 Check “Allow iTunes audio control from remotespeakers”, and then click “OK”.
Contents Connections Playback Settings Tips Appendix
99Front panel Display Rear panel Remote Index
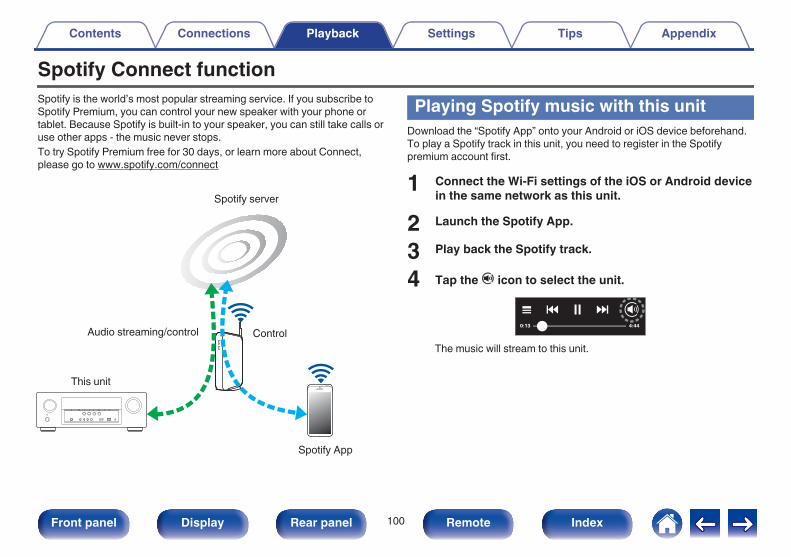
Spotify Connect functionSpotify is the world’s most popular streaming service. If you subscribe toSpotify Premium, you can control your new speaker with your phone ortablet. Because Spotify is built-in to your speaker, you can still take calls oruse other apps - the music never stops.To try Spotify Premium free for 30 days, or learn more about Connect,please go to www.spotify.com/connect
.
Spotify server
This unit
Audio streaming/control Control
Spotify App
Playing Spotify music with this unitDownload the “Spotify App” onto your Android or iOS device beforehand.To play a Spotify track in this unit, you need to register in the Spotifypremium account first.
1 Connect the Wi-Fi settings of the iOS or Android devicein the same network as this unit.
2 Launch the Spotify App.
3 Play back the Spotify track.
4 Tap the F icon to select the unit.
.
4:440:13
The music will stream to this unit.
Contents Connections Playback Settings Tips Appendix
100Front panel Display Rear panel Remote Index
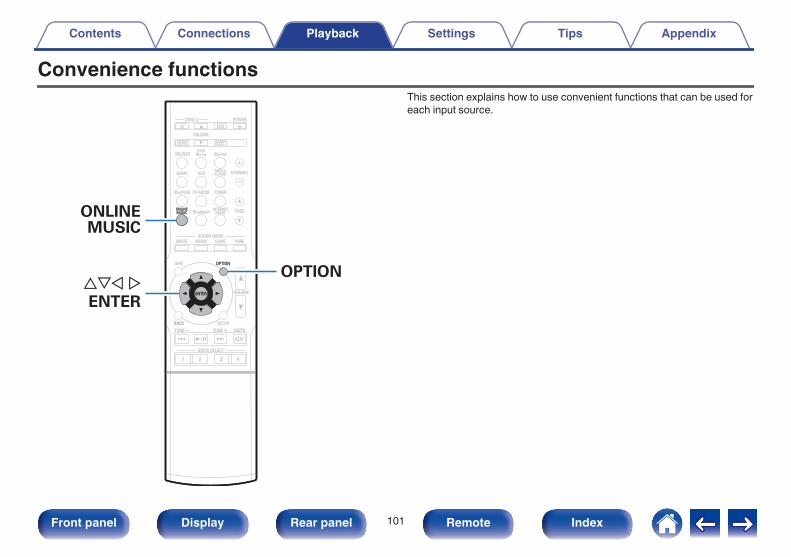
Convenience functions
.
SOUOUND ND MOMODE
POPOWER
VOLULUME
CHAHANNNNEL
MUTEMUTE
QUICK K SESELECT
VOVOLULUME
BlBlu-r-rayCBL/SATBL/SAT
GAGAME
DVD/VD/Blu-raBlu-ray
AUX MEDEDIAPLAYPLAYER
TV A AUDIDIO
BluluetooetoothINTEINTERNETRNET
RADIADIO
TUNUNER
PUREMOVIE GAMEMUSIC
TUNUNE TUTUNE
ECOZOZONE 2
SOUOURCRCE SLELEEP
INFNFO
BACK SETSETUP
ENTENTER
OPOPTIOION
BACK
1 2 3 4
iPiPod/od/USB
ONLINONLINEMUSIC PAGAGE
uio pENTER
OPTION
ONLINEMUSIC
This section explains how to use convenient functions that can be used foreach input source.
Contents Connections Playback Settings Tips Appendix
101Front panel Display Rear panel Remote Index

Performing repeat playbackn Supported input sources :
USB / Media Server / Bluetooth
1 While content is playing, press OPTION.The option menu screen is displayed.
2 Use ui to select “Repeat”, then press ENTER.
3 Use o p to select repeat playback mode.
Off(Default): Repeat playback mode is canceled.
One: A file being played is playedrepeatedly.
All: All files in the folder currently beingplayed are played repeatedly.
4 Press ENTER.The display returns to the playback screen.
0 This cannot be set up if the Bluetooth device does not support the repeat settingunder the AVRCP profile.
0 “Repeat” settings are stored for each input source.
Performing random playbackn Supported input sources :
USB / Media Server / Bluetooth
1 While content is playing, press OPTION.The option menu screen is displayed.
2 Use ui to select “Random”, then press ENTER.
3 Use o p to select random playback mode.
Off(Default): Disable random playback.
On: Randomly play back all tracks in thecurrent playback folder.
4 Press ENTER.The display returns to the playback screen.
0 During random playback, each time playback of a track is completed, anothertrack is randomly selected for playback from tracks in the folder. Therefore, it’spossible that you may hear a track played back more than once during randomplayback.
0 This cannot be set up if the Bluetooth device does not support the random settingunder the AVRCP profile.
0 “Random” settings are stored for each input source.
Contents Connections Playback Settings Tips Appendix
102Front panel Display Rear panel Remote Index

Registering to FavoritesYou can register a total of 100 favorites.n Supported input sources : Internet Radio /
Media Server / Pandora / SiriusXM
1 While content is playing, press OPTION.The option menu screen is displayed.
2 Use ui to select “Save to Favorite”, then pressENTER.“Favorite added” is displayed, and the current content is added tofavorites.0 The display returns to the playback screen when the procedure is
completed.
Playing back content added to the“Save to Favorite”
1 Press ONLINE MUSIC.
2 Use uio p to select “Favorites”, then press ENTER.
.
Internet Radio
Media Server
Online Music
Favorites
3 Use ui to select the content you want to play, thenpress ENTER.Playback starts.
Contents Connections Playback Settings Tips Appendix
103Front panel Display Rear panel Remote Index
Deleting content added to favorites
1 Press ONLINE MUSIC.
2 Use uio p to select “Favorites”, then press ENTER.
3 Use ui to select the content you want to delete fromfavorites, then press OPTION.The option menu screen is displayed.
4 Use ui to select “Remove from Fav.”, then pressENTER.“Favorite removed” is displayed, and the selected content is deletedfrom favorites.0 The screen returns to the previous screen when the delete
process is complete.
Searching content with keywords (TextSearch)
n Supported input sources :USB / Internet Radio / Media Server
1 While the content is playing, press OPTION.The option menu screen is displayed.
2 Use ui to select “Text Search”, then press ENTER.The keyboard input screen is displayed.
3 Enter the first character of the Internet Radio station orfile you want to search for, and then press “OK”.0 For character input, see “Using the keyboard
screen” (v p. 136).
4 Use ui to select the content you want to play, thenpress ENTER.Playback starts.
“Text Search” searches for Internet Radio stations or files that start with the enteredfirst character from the displayed list.
NOTEText Search may not work for some lists.
Contents Connections Playback Settings Tips Appendix
104Front panel Display Rear panel Remote Index
Playing back music and a favorite picture at the same time (Slideshow)n Supported input sources : USB
1 Play back a still picture.0 Playing back still pictures stored on USB memory devices.
(v p. 60)
2 Play back a music file. (v p. 60)
3 Press OPTION.The option menu screen is displayed.
4 Use ui to select “Slideshow”, then press ENTER.The option menu disappears, and the picture you were viewing isshown on the screen.
n Supported input sources :Internet Radio / Media Server
1 Play back a still picture.0 Play back still pictures stored on Media Server. (v p. 79)0 Play back still pictures stored on Flickr. (v p. 83)
2 Play back a music file of Media Server or Internet Radiostation. (v p. 75, 79)
3 Press OPTION.The option menu screen is displayed.
4 Use ui to select “Slideshow”, then press ENTER.The option menu disappears, and the picture you were viewing isshown on the screen.
Contents Connections Playback Settings Tips Appendix
105Front panel Display Rear panel Remote Index
Setting the Slideshow IntervalSet the playback interval when playing back a slideshow of still picture(JPEG) files stored on a USB memory device or media server, or on theFlickr website.n Supported input sources :
USB / Media Server / Flickr
1 While the list is displayed, press OPTION.The option menu screen is displayed.
2 Use ui to select “Slideshow Time”, then press ENTER.
3 Use o p to set the display time.
Off: The slide show is not played back.5s - 60s(Default: 5s):
Set the time for displaying a single picture whenplaying back images in the slide show.
4 Press ENTER.
The “Slideshow Time” settings are reflected for all input sources.
Contents Connections Playback Settings Tips Appendix
106Front panel Display Rear panel Remote Index
Adjusting the volume of each channelto match the input source (Ch LevelAdjust)
The volume of each channel can be changed while listening to music. Youcan set this for each input source.
1 Press OPTION.The option menu screen is displayed.
2 Use ui to select “Ch Level Adjust”, then press ENTER.The channel level adjust screen is displayed.
3 Use ui to select the channel that you wish to adjust.
4 Use o p to adjust the volume, then press ENTER.
–12.0 dB – +12.0 dB (Default : 0 dB)
0 Select “Reset” and press ENTER if you want to restore the adjustment values ofthe various channels to “0 dB” (default).
0 Headphone volume can be adjusted when a headphone is connected.0 “Ch Level Adjust” settings are stored for each input source.0 You can only set this for speakers that output audio. In addition, you cannot set
this when in the menu “HDMI Audio Out” (v p. 148) is set to “TV”.
Contents Connections Playback Settings Tips Appendix
107Front panel Display Rear panel Remote Index

Adjusting the tone (Tone Control)Adjusts the tonal quality of the sound.
1 Press OPTION.The option menu screen is displayed.
2 Use ui to select “Tone Control”, then press ENTER.The tone control screen is displayed.
3 Use o p to set the tone control function to on/off.
On: Allow tone adjustment (bass, treble).Off(Default): Playback without tone adjustment.
4 Select “On” in step 3 and press i to select the soundrange to be adjusted.Bass: Adjust bass.Treble: Adjust treble.
5 Use o p to adjust the tone, then press ENTER.
-6 dB – +6 dB (Default : 0 dB)
0 “Tone Control” settings are stored for each input source.0 This cannot be set when the sound mode is set to “Direct”.0 This item cannot be set when “Dynamic EQ” (v p. 145) is set to “On”.0 You cannot set this when no audio signal is input or in the menu “HDMI Audio
Out” (v p. 148) is set to “TV”.
Contents Connections Playback Settings Tips Appendix
108Front panel Display Rear panel Remote Index

Displaying your desired video duringaudio playback (Video Select)
This unit can display video from a different source on TV during audioplayback. You can set this for each input source.n Supported input sources:
iPod/USB / Tuner / Online Music / Bluetooth
1 Press OPTION during audio playback.The option menu screen is displayed.
2 Use ui to select “Video Select”, then press ENTER.
3 Use o p to select the Video Select mode.
Off(Default): Disable Video Select mode.On: Enable Video Select mode.
4 If you selected “On” in step 3, press i and select“Source”.
5 Use o p to select the input source for video you wantto play back, then press ENTER.
“Video Select” settings are stored for each input source.
Contents Connections Playback Settings Tips Appendix
109Front panel Display Rear panel Remote Index
Playing the same music in all zones (AllZone Stereo)
You can play back the music being played back in MAIN ZONEsimultaneously in ZONE2 (another room).It is useful when you want to enjoy the same music at the same time inmultiple rooms during home party or when you want to play back the sameBGM in the entire house.
1 Press OPTION.The option menu screen is displayed.
2 Use ui to select “All Zone Stereo”, then press ENTER.
3 Select “Start”, then press ENTER.The input source for ZONE2 is switched to the same input source asfor MAIN ZONE, and playback starts in the “All Zone Stereo” mode.
o Stopping the All Zone Stereo mode
1 During playback in All Zone Stereo mode, pressOPTION.The option menu screen is displayed.
2 Use ui to select “All Zone Stereo”, then press ENTER.
3 Select “Stop”, then press ENTER.
0 The “All Zone Stereo” mode is canceled even when the power supply of the MAINZONE is turned off.
0 In the “All Zone Stereo” mode, only the “Multi Ch Stereo” and “Stereo” soundmodes can be selected.
0 When “HDMI Audio Out” (v p. 148) is set to “TV”, the All Zone Stereo mode isnot available.
Contents Connections Playback Settings Tips Appendix
110Front panel Display Rear panel Remote Index
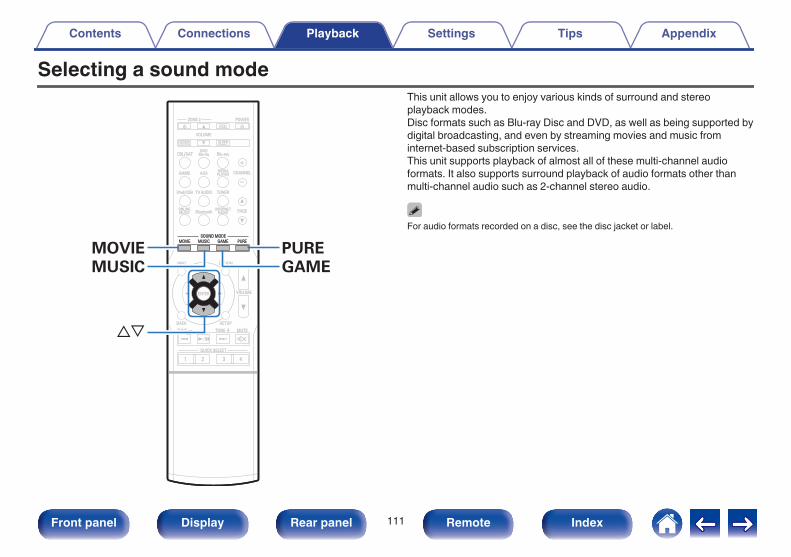
Selecting a sound mode
.
Bluluetooetooth
POPOWER
VOLULUME
CHAHANNNNEL
MUTEMUTE
PAGAGE
VOVOLULUME
BlBlu-r-rayCBL/SATBL/SAT
GAGAME
DVD/VD/Blu-raBlu-ray
AUX MEDEDIAPLAYPLAYER
TV A AUDIDIO
INTEINTERNETRNETRADIADIO
TUNUNERiPiPod/od/USB
TUNUNE TUTUNE
ECO
ONLINONLINEMUSIC
ZOZONE 2
SOUOURCRCE SLELEEP
ENTENTER
INFNFO OPOPTIOION
BACK SETSETUP
Bluluetooetooth
QUICK K SESELECT
1 2 3 4
SOUOUND ND MOMODEPUREMOVIE GAMEMUSIC
ui
PUREMOVIEMUSIC GAME
This unit allows you to enjoy various kinds of surround and stereoplayback modes.Disc formats such as Blu-ray Disc and DVD, as well as being supported bydigital broadcasting, and even by streaming movies and music frominternet-based subscription services.This unit supports playback of almost all of these multi-channel audioformats. It also supports surround playback of audio formats other thanmulti-channel audio such as 2-channel stereo audio.
For audio formats recorded on a disc, see the disc jacket or label.
Contents Connections Playback Settings Tips Appendix
111Front panel Display Rear panel Remote Index
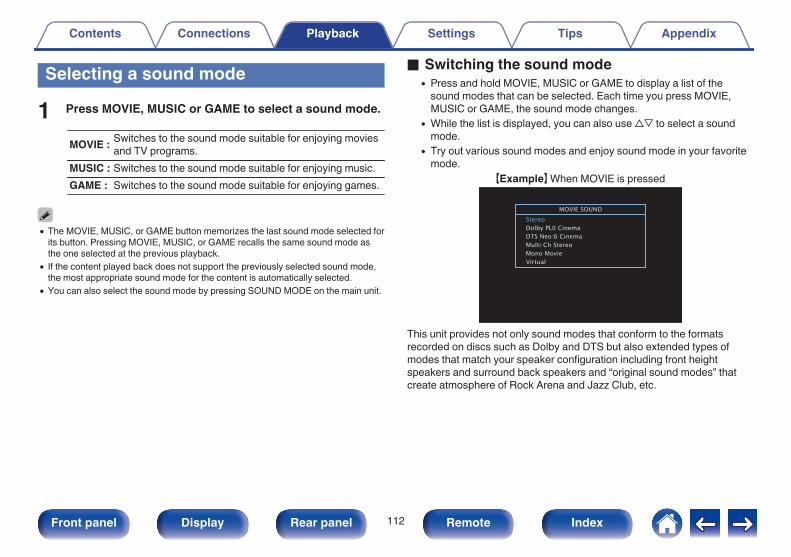
Selecting a sound mode
1 Press MOVIE, MUSIC or GAME to select a sound mode.
MOVIE : Switches to the sound mode suitable for enjoying moviesand TV programs.
MUSIC : Switches to the sound mode suitable for enjoying music.GAME : Switches to the sound mode suitable for enjoying games.
0 The MOVIE, MUSIC, or GAME button memorizes the last sound mode selected forits button. Pressing MOVIE, MUSIC, or GAME recalls the same sound mode asthe one selected at the previous playback.
0 If the content played back does not support the previously selected sound mode,the most appropriate sound mode for the content is automatically selected.
0 You can also select the sound mode by pressing SOUND MODE on the main unit.
o Switching the sound mode0 Press and hold MOVIE, MUSIC or GAME to display a list of the
sound modes that can be selected. Each time you press MOVIE,MUSIC or GAME, the sound mode changes.
0 While the list is displayed, you can also use ui to select a soundmode.
0 Try out various sound modes and enjoy sound mode in your favoritemode.
GExampleH When MOVIE is pressed
.
StereoMOVIE SOUND
Dolby PLII CinemaDTS Neo:6 CinemaMulti Ch StereoMono MovieVirtual
This unit provides not only sound modes that conform to the formatsrecorded on discs such as Dolby and DTS but also extended types ofmodes that match your speaker configuration including front heightspeakers and surround back speakers and “original sound modes” thatcreate atmosphere of Rock Arena and Jazz Club, etc.
Contents Connections Playback Settings Tips Appendix
112Front panel Display Rear panel Remote Index
Direct playbackSound recorded in source is played as is.
1 Press PURE to select “Direct”.Direct playback begins.
In Direct sound mode, the following items cannot be adjusted.0 Tone Control (v p. 108)0 Restorer (v p. 142)0 MultEQ® (v p. 144)0 Dynamic EQ (v p. 145)0 Dynamic Volume (v p. 146)
Auto surround playbackThis mode detects the type of input digital signal, and automaticallyselects the corresponding mode for playback.Perform stereo playback when the input signal is PCM. When the inputsignal is Dolby Digital or DTS, the music is played back according to therespective channel number.
1 Press PURE to select “Auto”.Auto surround playback begins.
Contents Connections Playback Settings Tips Appendix
113Front panel Display Rear panel Remote Index
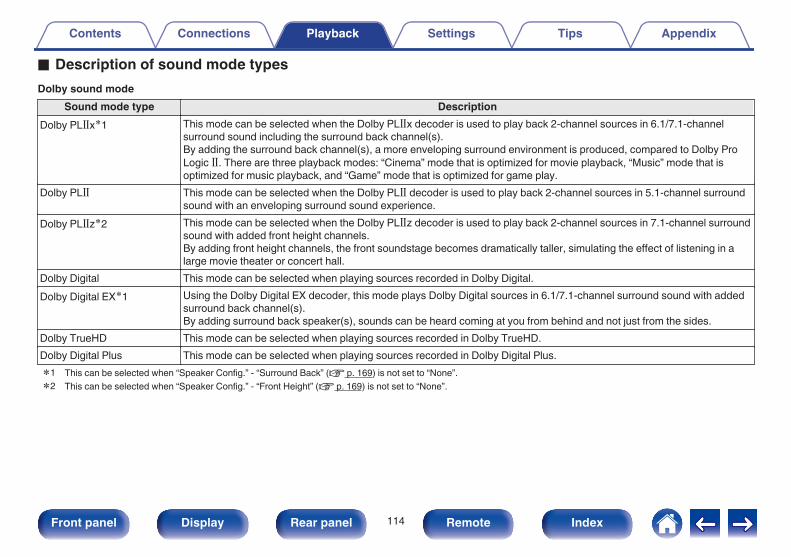
o Description of sound mode typesDolby sound mode
Sound mode type DescriptionDolby PLgxz1 This mode can be selected when the Dolby PLgx decoder is used to play back 2-channel sources in 6.1/7.1-channel
surround sound including the surround back channel(s).By adding the surround back channel(s), a more enveloping surround environment is produced, compared to Dolby ProLogic g. There are three playback modes: “Cinema” mode that is optimized for movie playback, “Music” mode that isoptimized for music playback, and “Game” mode that is optimized for game play.
Dolby PLg This mode can be selected when the Dolby PLg decoder is used to play back 2-channel sources in 5.1-channel surroundsound with an enveloping surround sound experience.
Dolby PLgzz2 This mode can be selected when the Dolby PLgz decoder is used to play back 2-channel sources in 7.1-channel surroundsound with added front height channels.By adding front height channels, the front soundstage becomes dramatically taller, simulating the effect of listening in alarge movie theater or concert hall.
Dolby Digital This mode can be selected when playing sources recorded in Dolby Digital.Dolby Digital EXz1 Using the Dolby Digital EX decoder, this mode plays Dolby Digital sources in 6.1/7.1-channel surround sound with added
surround back channel(s).By adding surround back speaker(s), sounds can be heard coming at you from behind and not just from the sides.
Dolby TrueHD This mode can be selected when playing sources recorded in Dolby TrueHD.Dolby Digital Plus This mode can be selected when playing sources recorded in Dolby Digital Plus.z1 This can be selected when “Speaker Config.” - “Surround Back” (v p. 169) is not set to “None”.z2 This can be selected when “Speaker Config.” - “Front Height” (v p. 169) is not set to “None”.
Contents Connections Playback Settings Tips Appendix
114Front panel Display Rear panel Remote Index
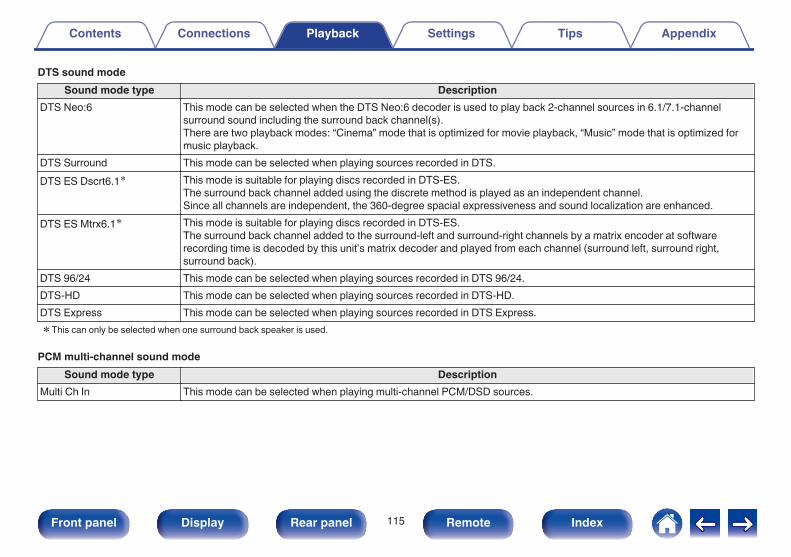
DTS sound modeSound mode type Description
DTS Neo:6 This mode can be selected when the DTS Neo:6 decoder is used to play back 2-channel sources in 6.1/7.1-channelsurround sound including the surround back channel(s).There are two playback modes: “Cinema” mode that is optimized for movie playback, “Music” mode that is optimized formusic playback.
DTS Surround This mode can be selected when playing sources recorded in DTS.DTS ES Dscrt6.1z This mode is suitable for playing discs recorded in DTS-ES.
The surround back channel added using the discrete method is played as an independent channel.Since all channels are independent, the 360-degree spacial expressiveness and sound localization are enhanced.
DTS ES Mtrx6.1z This mode is suitable for playing discs recorded in DTS-ES.The surround back channel added to the surround-left and surround-right channels by a matrix encoder at softwarerecording time is decoded by this unit’s matrix decoder and played from each channel (surround left, surround right,surround back).
DTS 96/24 This mode can be selected when playing sources recorded in DTS 96/24.DTS-HD This mode can be selected when playing sources recorded in DTS-HD.DTS Express This mode can be selected when playing sources recorded in DTS Express.zThis can only be selected when one surround back speaker is used.
PCM multi-channel sound modeSound mode type Description
Multi Ch In This mode can be selected when playing multi-channel PCM/DSD sources.
Contents Connections Playback Settings Tips Appendix
115Front panel Display Rear panel Remote Index
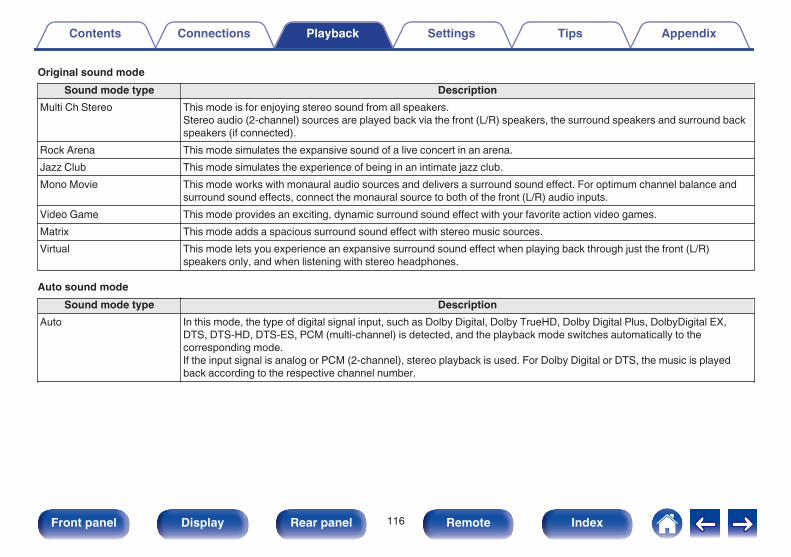
Original sound modeSound mode type Description
Multi Ch Stereo This mode is for enjoying stereo sound from all speakers.Stereo audio (2-channel) sources are played back via the front (L/R) speakers, the surround speakers and surround backspeakers (if connected).
Rock Arena This mode simulates the expansive sound of a live concert in an arena.Jazz Club This mode simulates the experience of being in an intimate jazz club.Mono Movie This mode works with monaural audio sources and delivers a surround sound effect. For optimum channel balance and
surround sound effects, connect the monaural source to both of the front (L/R) audio inputs.Video Game This mode provides an exciting, dynamic surround sound effect with your favorite action video games.Matrix This mode adds a spacious surround sound effect with stereo music sources.Virtual This mode lets you experience an expansive surround sound effect when playing back through just the front (L/R)
speakers only, and when listening with stereo headphones.
Auto sound modeSound mode type Description
Auto In this mode, the type of digital signal input, such as Dolby Digital, Dolby TrueHD, Dolby Digital Plus, DolbyDigital EX,DTS, DTS-HD, DTS-ES, PCM (multi-channel) is detected, and the playback mode switches automatically to thecorresponding mode.If the input signal is analog or PCM (2-channel), stereo playback is used. For Dolby Digital or DTS, the music is playedback according to the respective channel number.
Contents Connections Playback Settings Tips Appendix
116Front panel Display Rear panel Remote Index
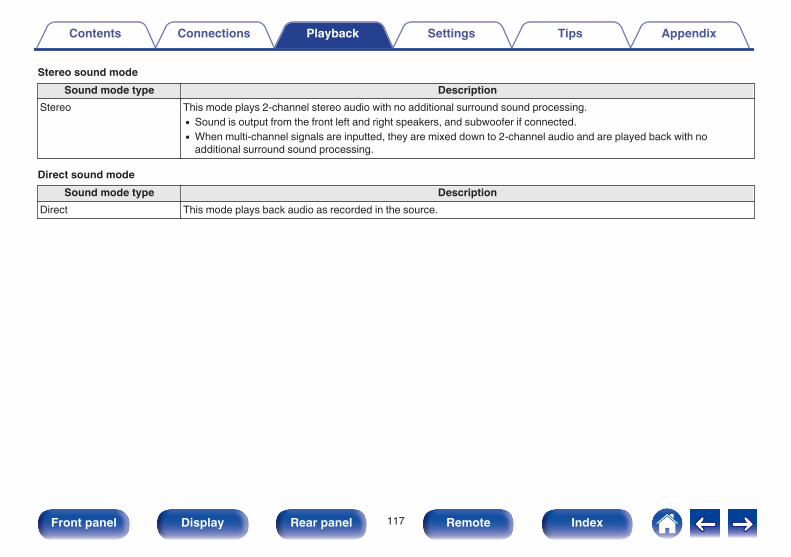
Stereo sound modeSound mode type Description
Stereo This mode plays 2-channel stereo audio with no additional surround sound processing.0 Sound is output from the front left and right speakers, and subwoofer if connected.0 When multi-channel signals are inputted, they are mixed down to 2-channel audio and are played back with no
additional surround sound processing.
Direct sound modeSound mode type Description
Direct This mode plays back audio as recorded in the source.
Contents Connections Playback Settings Tips Appendix
117Front panel Display Rear panel Remote Index
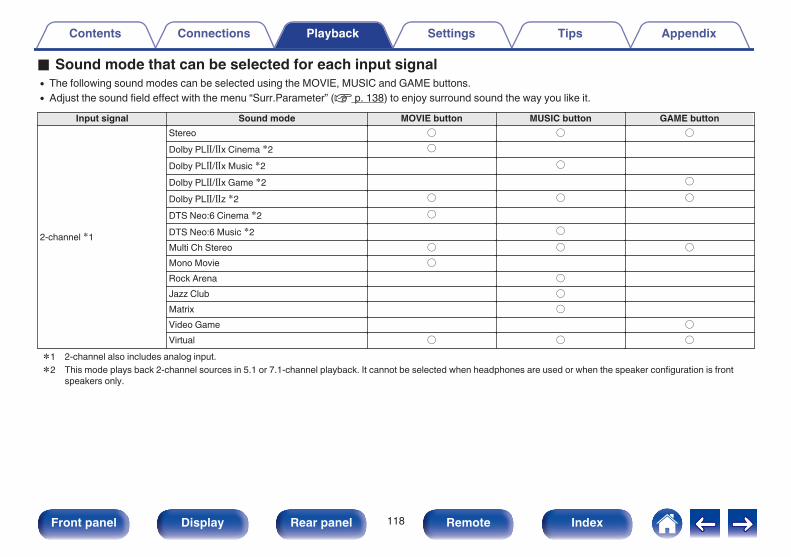
o Sound mode that can be selected for each input signal0 The following sound modes can be selected using the MOVIE, MUSIC and GAME buttons.0 Adjust the sound field effect with the menu “Surr.Parameter” (v p. 138) to enjoy surround sound the way you like it.
Input signal Sound mode MOVIE button MUSIC button GAME button
2-channel z1
Stereo S S S
Dolby PLg/gx Cinema z2 S
Dolby PLg/gx Music z2 S
Dolby PLg/gx Game z2 S
Dolby PLg/gz z2 S S S
DTS Neo:6 Cinema z2 S
DTS Neo:6 Music z2 S
Multi Ch Stereo S S S
Mono Movie S
Rock Arena S
Jazz Club S
Matrix S
Video Game S
Virtual S S S
z1 2-channel also includes analog input.z2 This mode plays back 2-channel sources in 5.1 or 7.1-channel playback. It cannot be selected when headphones are used or when the speaker configuration is front
speakers only.
Contents Connections Playback Settings Tips Appendix
118Front panel Display Rear panel Remote Index
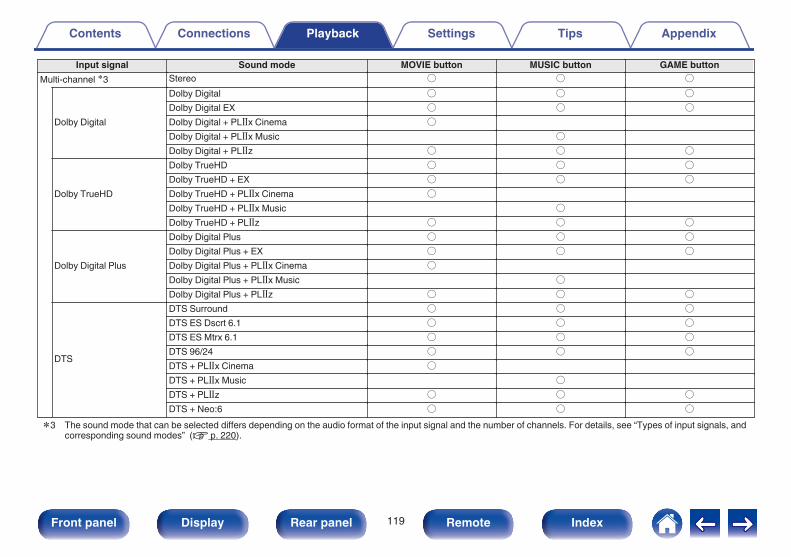
Input signal Sound mode MOVIE button MUSIC button GAME buttonMulti-channel z3 Stereo S S S
Dolby Digital
Dolby Digital S S SDolby Digital EX S S SDolby Digital + PLgx Cinema SDolby Digital + PLgx Music SDolby Digital + PLgz S S S
Dolby TrueHD
Dolby TrueHD S S SDolby TrueHD + EX S S SDolby TrueHD + PLgx Cinema SDolby TrueHD + PLgx Music SDolby TrueHD + PLgz S S S
Dolby Digital Plus
Dolby Digital Plus S S SDolby Digital Plus + EX S S SDolby Digital Plus + PLgx Cinema SDolby Digital Plus + PLgx Music SDolby Digital Plus + PLgz S S S
DTS
DTS Surround S S SDTS ES Dscrt 6.1 S S SDTS ES Mtrx 6.1 S S SDTS 96/24 S S SDTS + PLgx Cinema SDTS + PLgx Music SDTS + PLgz S S SDTS + Neo:6 S S S
z3 The sound mode that can be selected differs depending on the audio format of the input signal and the number of channels. For details, see “Types of input signals, andcorresponding sound modes” (v p. 220).
Contents Connections Playback Settings Tips Appendix
119Front panel Display Rear panel Remote Index
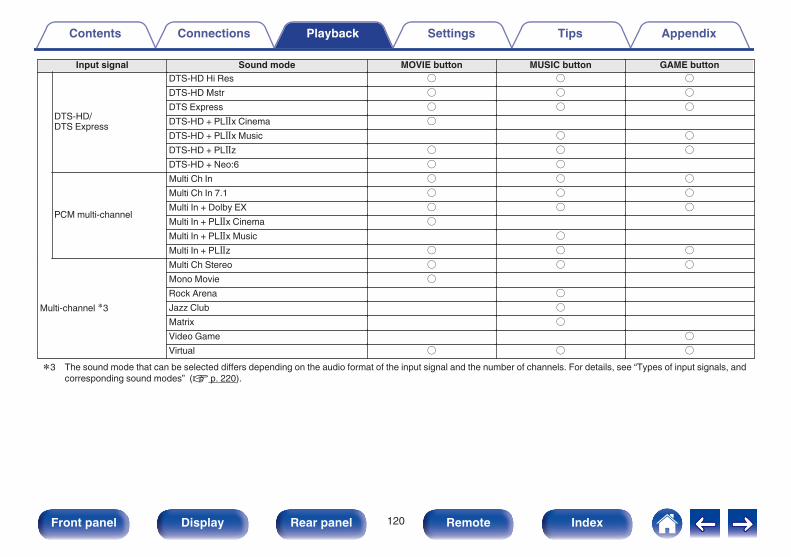
Input signal Sound mode MOVIE button MUSIC button GAME button
DTS-HD/DTS Express
DTS-HD Hi Res S S SDTS-HD Mstr S S SDTS Express S S SDTS-HD + PLgx Cinema SDTS-HD + PLgx Music S SDTS-HD + PLgz S S SDTS-HD + Neo:6 S S
PCM multi-channel
Multi Ch In S S SMulti Ch In 7.1 S S SMulti In + Dolby EX S S SMulti In + PLgx Cinema SMulti In + PLgx Music SMulti In + PLgz S S S
Multi-channel z3
Multi Ch Stereo S S SMono Movie SRock Arena SJazz Club SMatrix SVideo Game SVirtual S S S
z3 The sound mode that can be selected differs depending on the audio format of the input signal and the number of channels. For details, see “Types of input signals, andcorresponding sound modes” (v p. 220).
Contents Connections Playback Settings Tips Appendix
120Front panel Display Rear panel Remote Index
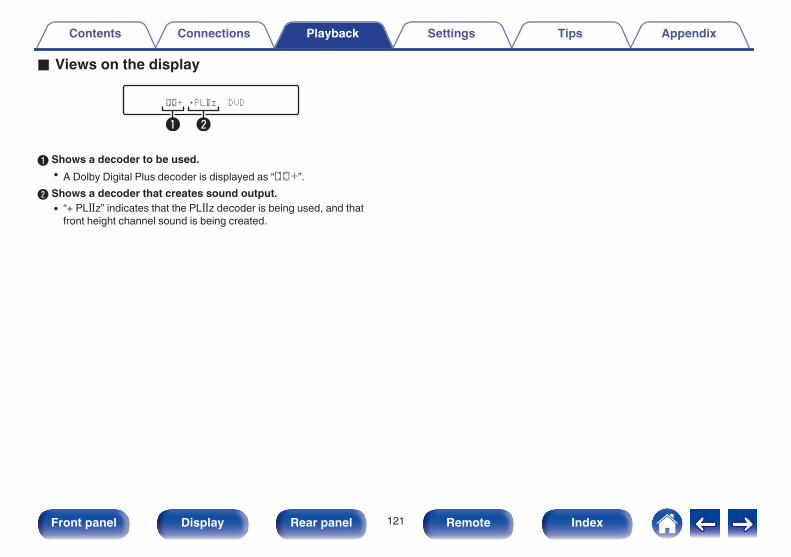
o Views on the display
.
+ PL z DVD
q w
A Shows a decoder to be used.0 A Dolby Digital Plus decoder is displayed as “H”.
B Shows a decoder that creates sound output.0 “+ PLgz” indicates that the PLgz decoder is being used, and that
front height channel sound is being created.
Contents Connections Playback Settings Tips Appendix
121Front panel Display Rear panel Remote Index
HDMI control functionA recent addition to the HDMI standard is CEC (Consumer Electronics Control), which allows control signals from one device to communicate withanother device via the HDMI cable connection.
Setting procedure
1 Enable the HDMI control function of this unit.Set “HDMI Control” (v p. 149) to “On”.
2 Turn the power on for all the devices connected byHDMI cable.
3 Set the HDMI control function for all devices connectedby HDMI cable.0 Please consult the operating instructions for the connected
devices to check the settings.0 Carry out steps 2 and 3 should any of the devices be unplugged.
4 Switch the television input to the HDMI input connectedto this unit.
5 Switch the input source of this unit to check that videofrom the player connected by HDMI is played backcorrectly.
6 When you turn the TV’s power to standby, check thatthe power of this unit also goes to standby.
NOTESome functions may not operate depending on the connected TV or player. Checkthe owner’s manual of each device for details beforehand.
Contents Connections Playback Settings Tips Appendix
122Front panel Display Rear panel Remote Index
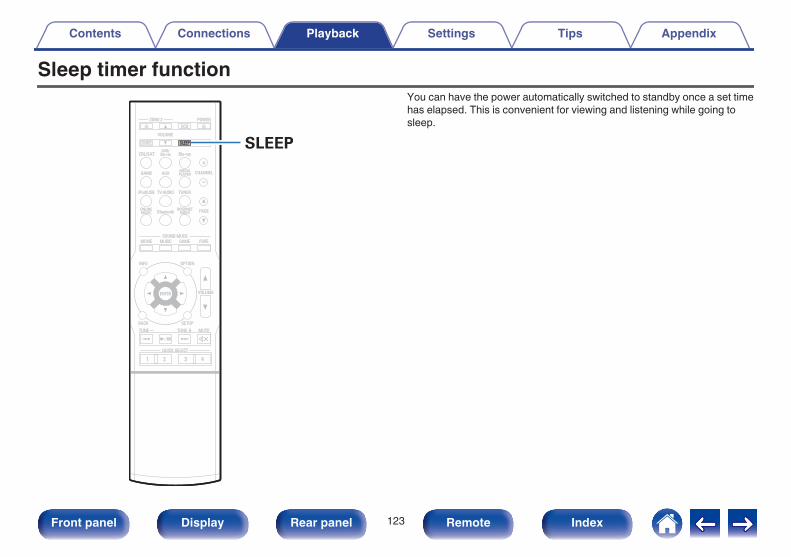
Sleep timer function
.
ENTENTER
SOUOUND ND MOMODE
POPOWER
VOLULUME
CHAHANNNNEL
MUTEMUTE
QUICK K SESELECT
PAGAGE
VOVOLULUME
BlBlu-r-rayCBL/SATBL/SAT
GAGAME
DVD/VD/Blu-raBlu-ray
AUX MEDEDIAPLAYPLAYER
TV A AUDIDIO
BluluetooetoothINTEINTERNETRNET
RADIADIO
TUNUNERiPiPod/od/USB
PUREMOVIE GAMEMUSIC
TUNUNE TUTUNE
1 2 3 4
ECO
ONLINONLINEMUSIC
SOUOURCRCE
INFNFO OPOPTIOION
BACK SETSETUP
ZOZONE 2
SLELEEP SLEEP
You can have the power automatically switched to standby once a set timehas elapsed. This is convenient for viewing and listening while going tosleep.
Contents Connections Playback Settings Tips Appendix
123Front panel Display Rear panel Remote Index
Using the sleep timer
1 Press SLEEP and display the time you want to set.0 The SLEEP indicator lights up on the display and the sleep timer
starts.0 You can set the sleep timer in the range from 10 to 120 minutes in
steps of 10 minutes.
o Checking the remaining timePress SLEEP when the sleep timer is in operation.The remaining time appears on the display.
o To cancel the sleep timerPress SLEEP to select “Off”.The SLEEP indicator on the display turns off.
The sleep timer setting is canceled when the unit switches to standby mode.
NOTEThe sleep timer function cannot turn off the power of devices connected to this unit.To turn off the power of those connected devices, set up sleep timers on theconnected devices themselves.
Contents Connections Playback Settings Tips Appendix
124Front panel Display Rear panel Remote Index
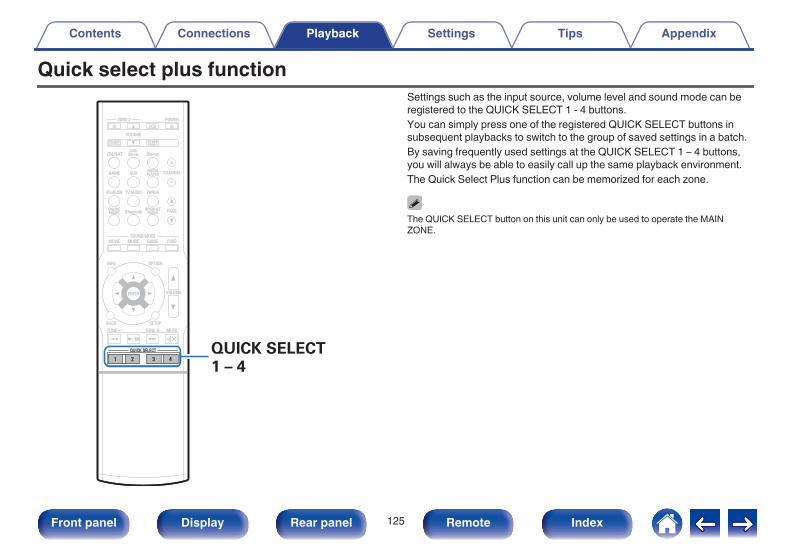
Quick select plus function
.
Bluluetooetooth
SOUOUND ND MOMODE
POPOWER
VOLULUME
CHAHANNNNEL
MUTEMUTE
PAGAGE
VOVOLULUME
BlBlu-r-rayCBL/SATBL/SAT
GAGAME
DVD/VD/Blu-raBlu-ray
AUX MEDEDIAPLAYPLAYER
TV A AUDIDIO
INTEINTERNETRNETRADIADIO
TUNUNERiPiPod/od/USB
PUREMOVIE GAMEMUSIC
TUNUNE TUTUNE
ECO
ONLINONLINEMUSIC
ZOZONE 2
SOUOURCRCE SLELEEP
Bluluetooetooth
QUICK K SESELECT QUICK SELECT1 – 4
1 2 3 4
ENTENTER
INFNFO OPOPTIOION
BACK SETSETUP
Settings such as the input source, volume level and sound mode can beregistered to the QUICK SELECT 1 - 4 buttons.You can simply press one of the registered QUICK SELECT buttons insubsequent playbacks to switch to the group of saved settings in a batch.By saving frequently used settings at the QUICK SELECT 1 – 4 buttons,you will always be able to easily call up the same playback environment.The Quick Select Plus function can be memorized for each zone.
The QUICK SELECT button on this unit can only be used to operate the MAINZONE.
Contents Connections Playback Settings Tips Appendix
125Front panel Display Rear panel Remote Index
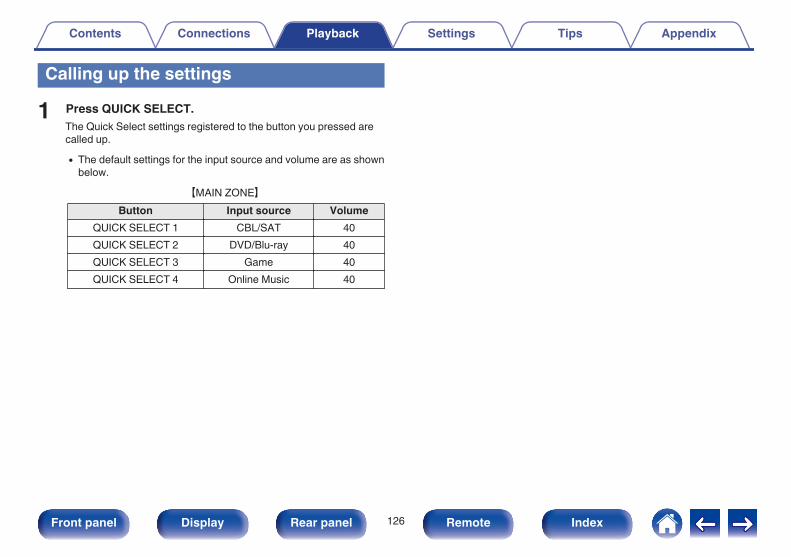
Calling up the settings
1 Press QUICK SELECT.The Quick Select settings registered to the button you pressed arecalled up.0 The default settings for the input source and volume are as shown
below.GMAIN ZONEH
Button Input source VolumeQUICK SELECT 1 CBL/SAT 40QUICK SELECT 2 DVD/Blu-ray 40QUICK SELECT 3 Game 40QUICK SELECT 4 Online Music 40
Contents Connections Playback Settings Tips Appendix
126Front panel Display Rear panel Remote Index
Changing the settings
1 Set the items below to the settings you want toregister.The following settings from A to H can be memorized for MAINZONE, and settings A and B can be memorized for ZONE2.A Input source (v p. 52)B Volume (v p. 53)C Sound mode (v p. 111)D Audyssey (Audyssey MultEQ®, Audyssey Dynamic EQ®,
Audyssey Dynamic Volume®) (v p. 144 - 146)E “Restorer” (v p. 142)F “Adjusting the volume of each channel to match the input source
(Ch Level Adjust)” (v p. 107)G “Displaying your desired video during audio playback (Video
Select)” (v p. 109)
Press and hold QUICK SELECT while a radio station is being received or atrack is being played back with any of the following sources, the current radiostation or track is memorized.0 Tuner / Internet Radio / Media Server / Pandora / SiriusXM / Favorites /
iPod/USB
2 Press and hold the desired QUICK SELECT until“Quickz Memory” appears on the display.The current settings will be memorized.z is displayed the number for the QUICK SELECT button youpressed.
o Changing the Quick Select NameThe MAIN ZONE Quick Select name displayed on the TV screen ordisplay of this unit can be changed to a different name.For the name change method, see “Quick Sel.Names” (v p. 183).
Contents Connections Playback Settings Tips Appendix
127Front panel Display Rear panel Remote Index
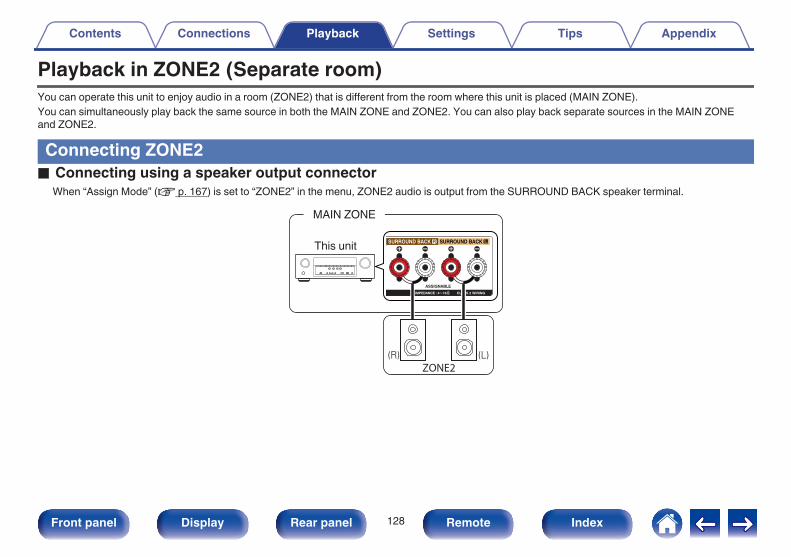
Playback in ZONE2 (Separate room)You can operate this unit to enjoy audio in a room (ZONE2) that is different from the room where this unit is placed (MAIN ZONE).You can simultaneously play back the same source in both the MAIN ZONE and ZONE2. You can also play back separate sources in the MAIN ZONEand ZONE2.
Connecting ZONE2o Connecting using a speaker output connector
When “Assign Mode” (v p. 167) is set to “ZONE2” in the menu, ZONE2 audio is output from the SURROUND BACK speaker terminal.
.
IMPEDANCE : 4 16
ASSIGNABLE
CLASS 2 WIRING
SURROUND BACK SURROUND BACKThis unit
MAIN ZONE
(R) (L)ZONE2
Contents Connections Playback Settings Tips Appendix
128Front panel Display Rear panel Remote Index
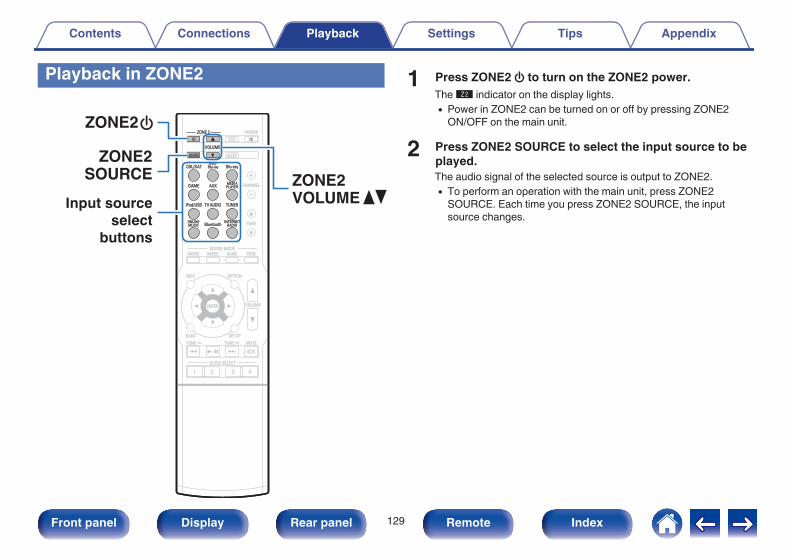
Playback in ZONE2.
ENTENTER
SOUOUND ND MOMODE
VOLULUME
CHAHANNNNEL
QUICK K SESELECT
PAGAGE
PUREMOVIE GAMEMUSIC
TUNUNE TUTUNE
1 2 3 4
ECOZOZONE 2
SOUOURCRCE SLELEEP
INFNFO OPOPTIOION
BACK SETSETUP
BlBlu-r-rayCBL/SATBL/SAT
GAGAME
DVD/VD/Blu-raBlu-ray
AUX MEDEDIAPLAYPLAYER
TV A AUDIDIO
BluluetooetoothINTEINTERNETRNET
RADIADIO
TUNUNERiPiPod/od/USB
ONLINONLINEMUSIC
POPOWER
VOVOLULUME
MUTEMUTE
ZONE2
ZONE2VOLUME
ZONE2SOURCE
df
X
Input source select
buttons
1 Press ZONE2 X to turn on the ZONE2 power.The ( indicator on the display lights.0 Power in ZONE2 can be turned on or off by pressing ZONE2
ON/OFF on the main unit.
2 Press ZONE2 SOURCE to select the input source to beplayed.The audio signal of the selected source is output to ZONE2.0 To perform an operation with the main unit, press ZONE2
SOURCE. Each time you press ZONE2 SOURCE, the inputsource changes.
Contents Connections Playback Settings Tips Appendix
129Front panel Display Rear panel Remote Index
o Adjusting the volumeUse ZONE2 VOLUME df to adjust the volume.0 At time of purchase, “Volume Limit” is set to “70 (–10 dB)”.
(v p. 182)
Turn MASTER VOLUME after pressing ZONE2 SOURCE on the main unit toadjust the sound volume.
Contents Connections Playback Settings Tips Appendix
130Front panel Display Rear panel Remote Index
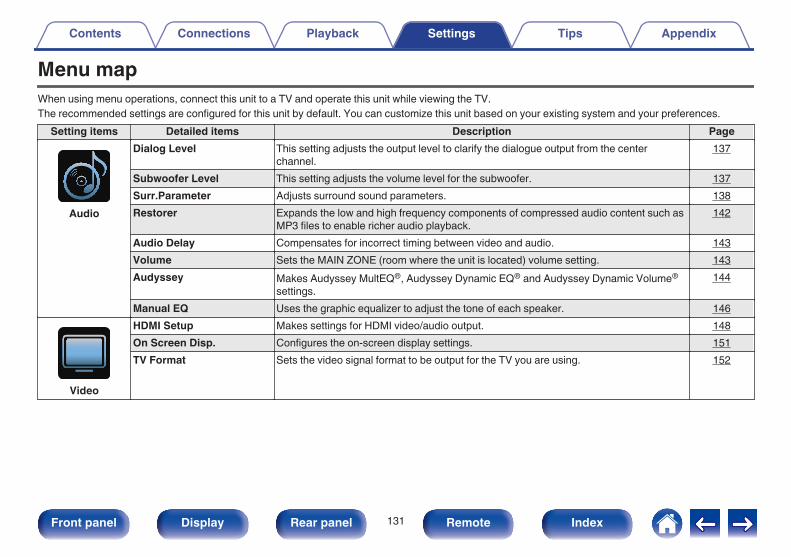
Menu mapWhen using menu operations, connect this unit to a TV and operate this unit while viewing the TV.The recommended settings are configured for this unit by default. You can customize this unit based on your existing system and your preferences.
Setting items Detailed items Description Page
.
Audio
Dialog Level This setting adjusts the output level to clarify the dialogue output from the centerchannel.
137
Subwoofer Level This setting adjusts the volume level for the subwoofer. 137Surr.Parameter Adjusts surround sound parameters. 138Restorer Expands the low and high frequency components of compressed audio content such as
MP3 files to enable richer audio playback.142
Audio Delay Compensates for incorrect timing between video and audio. 143Volume Sets the MAIN ZONE (room where the unit is located) volume setting. 143Audyssey Makes Audyssey MultEQ®, Audyssey Dynamic EQ® and Audyssey Dynamic Volume®
settings.144
Manual EQ Uses the graphic equalizer to adjust the tone of each speaker. 146
.Video
HDMI Setup Makes settings for HDMI video/audio output. 148On Screen Disp. Configures the on-screen display settings. 151TV Format Sets the video signal format to be output for the TV you are using. 152
Contents Connections Playback Settings Tips AppendixSettings
131Front panel Display Rear panel Remote Index
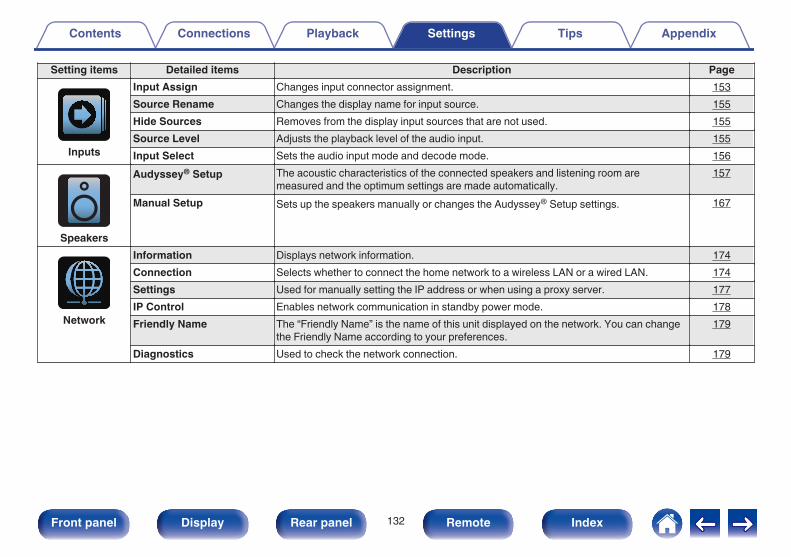
Setting items Detailed items Description Page
.
Inputs
Input Assign Changes input connector assignment. 153Source Rename Changes the display name for input source. 155Hide Sources Removes from the display input sources that are not used. 155Source Level Adjusts the playback level of the audio input. 155Input Select Sets the audio input mode and decode mode. 156
.Speakers
Audyssey® Setup The acoustic characteristics of the connected speakers and listening room aremeasured and the optimum settings are made automatically.
157
Manual Setup Sets up the speakers manually or changes the Audyssey® Setup settings. 167
.Network
Information Displays network information. 174Connection Selects whether to connect the home network to a wireless LAN or a wired LAN. 174Settings Used for manually setting the IP address or when using a proxy server. 177IP Control Enables network communication in standby power mode. 178Friendly Name The “Friendly Name” is the name of this unit displayed on the network. You can change
the Friendly Name according to your preferences.179
Diagnostics Used to check the network connection. 179
Contents Connections Playback Settings Tips Appendix
132Front panel Display Rear panel Remote Index
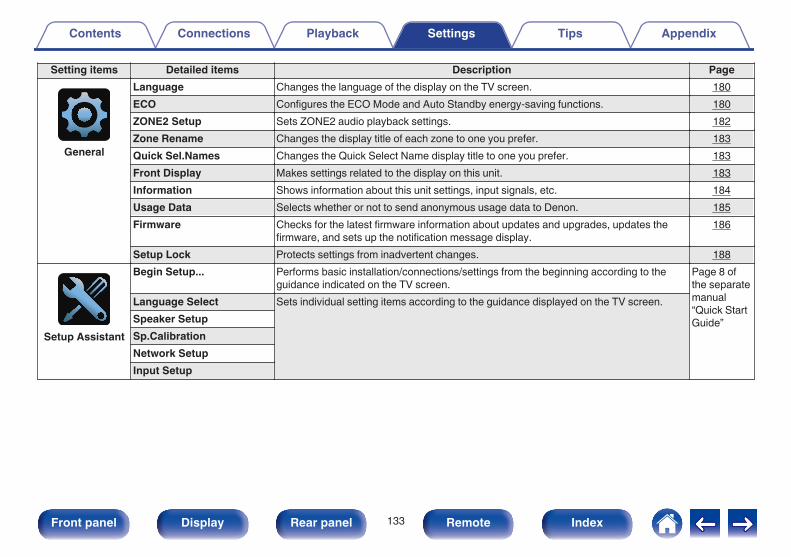
Setting items Detailed items Description Page
.
General
Language Changes the language of the display on the TV screen. 180ECO Configures the ECO Mode and Auto Standby energy-saving functions. 180ZONE2 Setup Sets ZONE2 audio playback settings. 182Zone Rename Changes the display title of each zone to one you prefer. 183Quick Sel.Names Changes the Quick Select Name display title to one you prefer. 183Front Display Makes settings related to the display on this unit. 183Information Shows information about this unit settings, input signals, etc. 184Usage Data Selects whether or not to send anonymous usage data to Denon. 185Firmware Checks for the latest firmware information about updates and upgrades, updates the
firmware, and sets up the notification message display.186
Setup Lock Protects settings from inadvertent changes. 188
.Setup Assistant
Begin Setup... Performs basic installation/connections/settings from the beginning according to theguidance indicated on the TV screen.
Page 8 ofthe separatemanual“Quick StartGuide”
Language Select Sets individual setting items according to the guidance displayed on the TV screen.Speaker SetupSp.CalibrationNetwork SetupInput Setup
Contents Connections Playback Settings Tips Appendix
133Front panel Display Rear panel Remote Index
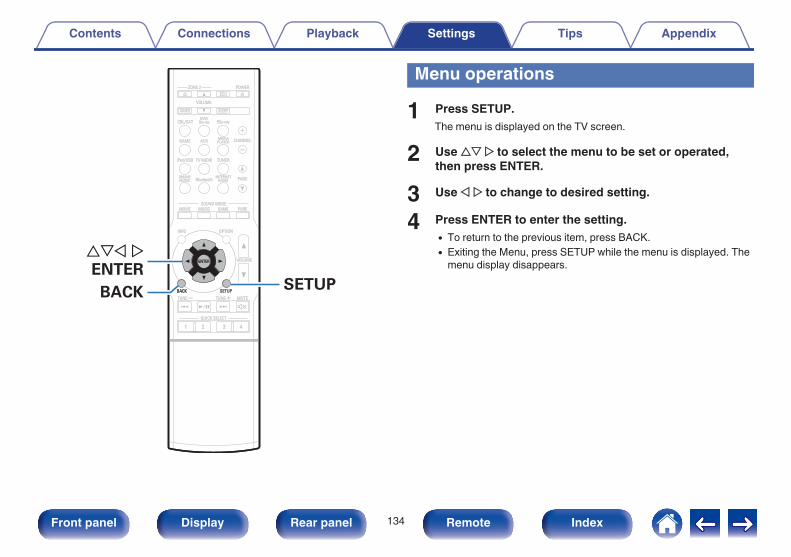
.
SOUOUND ND MOMODE
POPOWER
VOLULUME
CHAHANNNNEL
MUTEMUTE
QUICK K SESELECT
VOVOLULUME
BlBlu-r-rayCBL/SATBL/SAT
GAGAME
DVD/VD/Blu-raBlu-ray
AUX MEDEDIAPLAYPLAYER
TV A AUDIDIO
BluluetooetoothINTEINTERNETRNET
RADIADIO
TUNUNER
PUREMOVIE GAMEMUSIC
TUNUNE TUTUNE
ECOZOZONE 2
SOUOURCRCE SLELEEP
INFNFO
BACK SETSETUP
ENTENTER
OPOPTIOION
BACK
1 2 3 4
iPiPod/od/USB
PAGAGEONLINONLINEMUSIC
uio pENTER
SETUPBACK
Menu operations
1 Press SETUP.The menu is displayed on the TV screen.
2 Use ui p to select the menu to be set or operated,then press ENTER.
3 Use o p to change to desired setting.
4 Press ENTER to enter the setting.0 To return to the previous item, press BACK.0 Exiting the Menu, press SETUP while the menu is displayed. The
menu display disappears.
Contents Connections Playback Settings Tips Appendix
134Front panel Display Rear panel Remote Index

Inputting charactersOn this unit, you can change the name displayed on the following screens to the names that you prefer.0 Preset Name (v p. 72)0 Text Search (v p. 104)0 Source Rename (v p. 155)0 Friendly Name (v p. 179)0 Zone Rename (v p. 183)0 Quick Sel.Names (v p. 183)0 Character input for the network functions
Contents Connections Playback Settings Tips Appendix
135Front panel Display Rear panel Remote Index

Using the keyboard screen
1 Display the screen for inputting characters.GExampleH Source Rename screen
.
Source Rename
CBL/SAT
AN0$
BO1%
CP2&
DQ3‘
ER4(
FS5)
GT6z
HU7+
IV8,
JW9;
KX!<
LY“=
MZ#>
a/Aa/A CancelCancel OKOKSpaceSpace
InsertInsertClearClear DeleteDelete
CBL/SAT
2 Use uio p to select , or ..
3 Press ENTER to move the cursor to the character thatyou wish to change.0 Each time ENTER is pressed, the cursor moves by one
character.
4 Select a character to be input with uio p then pressENTER.
5 Repeat steps 2 - 4 to change the name.
6 Use uio p to select “OK”, then press ENTER.
Contents Connections Playback Settings Tips Appendix
136Front panel Display Rear panel Remote Index
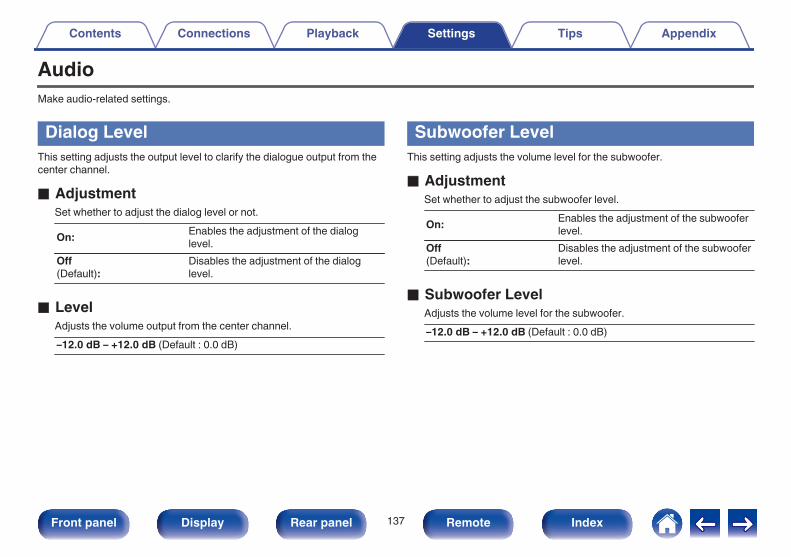
AudioMake audio-related settings.
Dialog LevelThis setting adjusts the output level to clarify the dialogue output from thecenter channel.
o AdjustmentSet whether to adjust the dialog level or not.
On: Enables the adjustment of the dialoglevel.
Off(Default):
Disables the adjustment of the dialoglevel.
o LevelAdjusts the volume output from the center channel.–12.0 dB – +12.0 dB (Default : 0.0 dB)
Subwoofer LevelThis setting adjusts the volume level for the subwoofer.
o AdjustmentSet whether to adjust the subwoofer level.
On: Enables the adjustment of the subwooferlevel.
Off(Default):
Disables the adjustment of the subwooferlevel.
o Subwoofer LevelAdjusts the volume level for the subwoofer.–12.0 dB – +12.0 dB (Default : 0.0 dB)
Contents Connections Playback Settings Tips Appendix
137Front panel Display Rear panel Remote Index
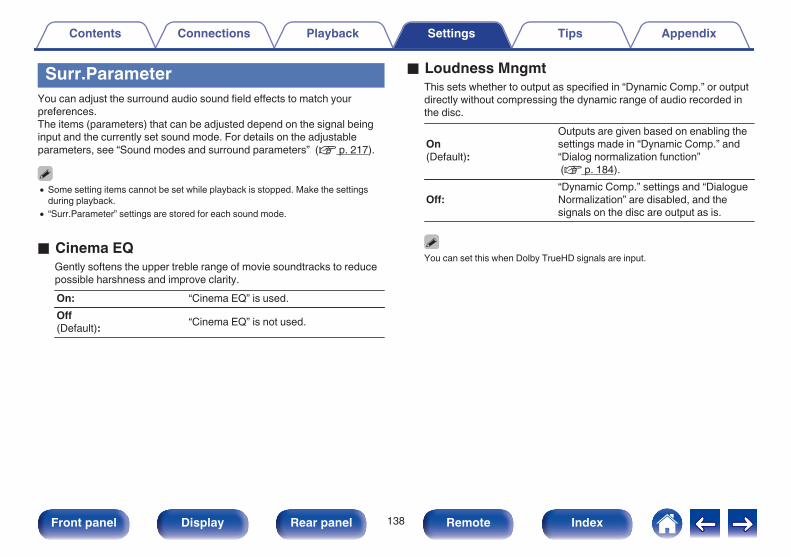
Surr.ParameterYou can adjust the surround audio sound field effects to match yourpreferences.The items (parameters) that can be adjusted depend on the signal beinginput and the currently set sound mode. For details on the adjustableparameters, see “Sound modes and surround parameters” (v p. 217).
0 Some setting items cannot be set while playback is stopped. Make the settingsduring playback.
0 “Surr.Parameter” settings are stored for each sound mode.
o Cinema EQGently softens the upper treble range of movie soundtracks to reducepossible harshness and improve clarity.On: “Cinema EQ” is used.Off(Default): “Cinema EQ” is not used.
o Loudness MngmtThis sets whether to output as specified in “Dynamic Comp.” or outputdirectly without compressing the dynamic range of audio recorded inthe disc.
On(Default):
Outputs are given based on enabling thesettings made in “Dynamic Comp.” and“Dialog normalization function” (v p. 184).
Off:“Dynamic Comp.” settings and “DialogueNormalization” are disabled, and thesignals on the disc are output as is.
You can set this when Dolby TrueHD signals are input.
Contents Connections Playback Settings Tips Appendix
138Front panel Display Rear panel Remote Index
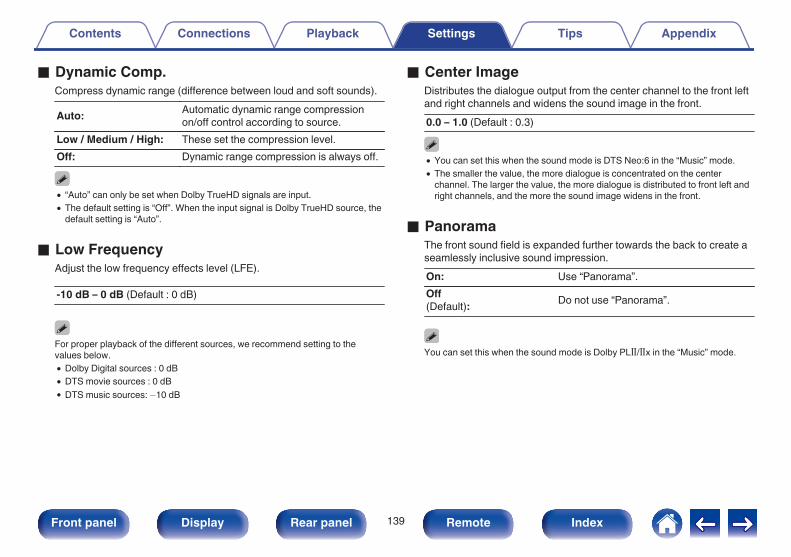
o Dynamic Comp.Compress dynamic range (difference between loud and soft sounds).
Auto: Automatic dynamic range compressionon/off control according to source.
Low / Medium / High: These set the compression level.Off: Dynamic range compression is always off.
0 “Auto” can only be set when Dolby TrueHD signals are input.0 The default setting is “Off”. When the input signal is Dolby TrueHD source, the
default setting is “Auto”.
o Low FrequencyAdjust the low frequency effects level (LFE).
-10 dB – 0 dB (Default : 0 dB)
For proper playback of the different sources, we recommend setting to thevalues below.0 Dolby Digital sources : 0 dB0 DTS movie sources : 0 dB0 DTS music sources: ]10 dB
o Center ImageDistributes the dialogue output from the center channel to the front leftand right channels and widens the sound image in the front.0.0 – 1.0 (Default : 0.3)
0 You can set this when the sound mode is DTS Neo:6 in the “Music” mode.0 The smaller the value, the more dialogue is concentrated on the center
channel. The larger the value, the more dialogue is distributed to front left andright channels, and the more the sound image widens in the front.
o PanoramaThe front sound field is expanded further towards the back to create aseamlessly inclusive sound impression.On: Use “Panorama”.Off(Default): Do not use “Panorama”.
You can set this when the sound mode is Dolby PLg/gx in the “Music” mode.
Contents Connections Playback Settings Tips Appendix
139Front panel Display Rear panel Remote Index
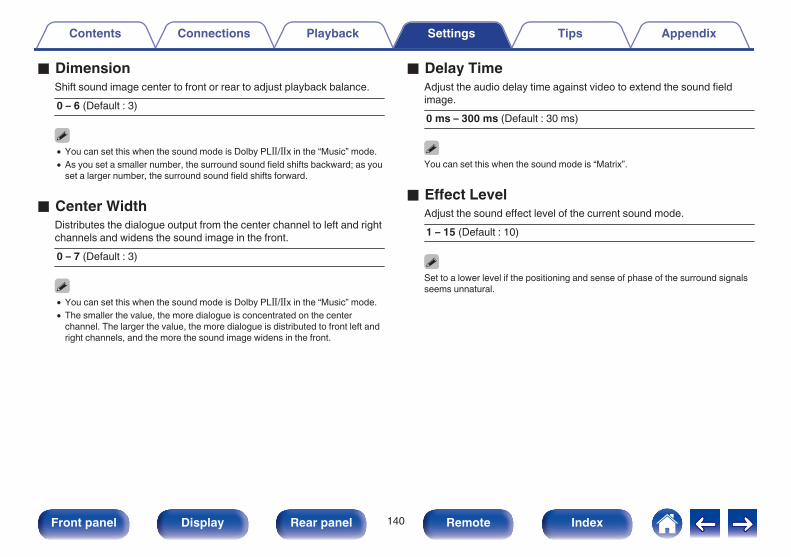
o DimensionShift sound image center to front or rear to adjust playback balance.0 – 6 (Default : 3)
0 You can set this when the sound mode is Dolby PLg/gx in the “Music” mode.0 As you set a smaller number, the surround sound field shifts backward; as you
set a larger number, the surround sound field shifts forward.
o Center WidthDistributes the dialogue output from the center channel to left and rightchannels and widens the sound image in the front.0 – 7 (Default : 3)
0 You can set this when the sound mode is Dolby PLg/gx in the “Music” mode.0 The smaller the value, the more dialogue is concentrated on the center
channel. The larger the value, the more dialogue is distributed to front left andright channels, and the more the sound image widens in the front.
o Delay TimeAdjust the audio delay time against video to extend the sound fieldimage.0 ms – 300 ms (Default : 30 ms)
You can set this when the sound mode is “Matrix”.
o Effect LevelAdjust the sound effect level of the current sound mode.1 – 15 (Default : 10)
Set to a lower level if the positioning and sense of phase of the surround signalsseems unnatural.
Contents Connections Playback Settings Tips Appendix
140Front panel Display Rear panel Remote Index
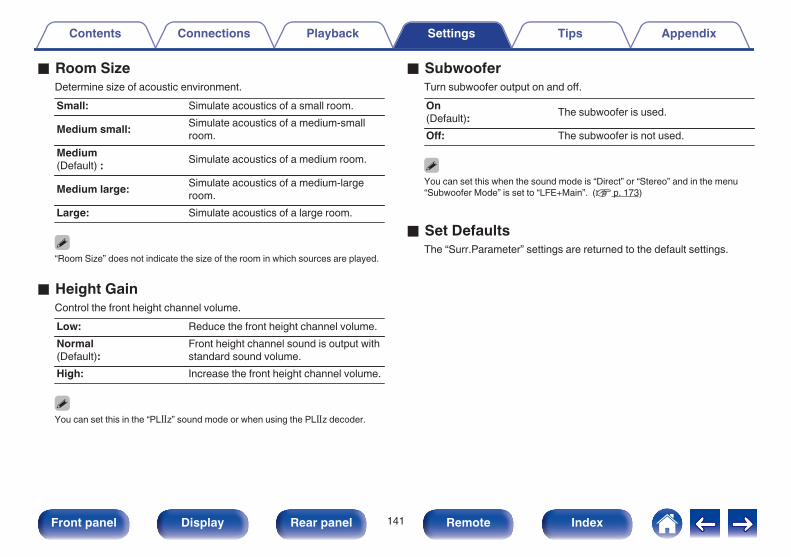
o Room SizeDetermine size of acoustic environment.Small: Simulate acoustics of a small room.Medium small: Simulate acoustics of a medium-small
room.Medium(Default) : Simulate acoustics of a medium room.
Medium large: Simulate acoustics of a medium-largeroom.
Large: Simulate acoustics of a large room.
“Room Size” does not indicate the size of the room in which sources are played.
o Height GainControl the front height channel volume.Low: Reduce the front height channel volume.Normal(Default):
Front height channel sound is output withstandard sound volume.
High: Increase the front height channel volume.
You can set this in the “PLgz” sound mode or when using the PLgz decoder.
o SubwooferTurn subwoofer output on and off.On(Default): The subwoofer is used.Off: The subwoofer is not used.
You can set this when the sound mode is “Direct” or “Stereo” and in the menu“Subwoofer Mode” is set to “LFE+Main”. (v p. 173)
o Set DefaultsThe “Surr.Parameter” settings are returned to the default settings.
Contents Connections Playback Settings Tips Appendix
141Front panel Display Rear panel Remote Index
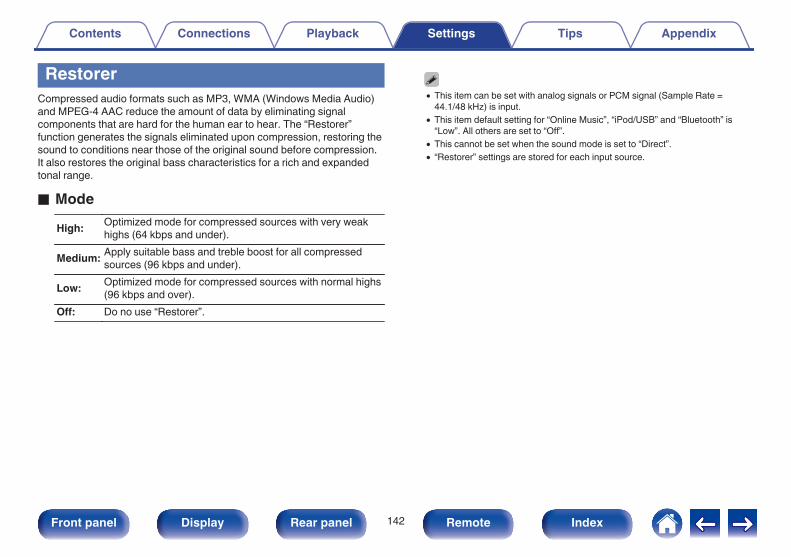
RestorerCompressed audio formats such as MP3, WMA (Windows Media Audio)and MPEG-4 AAC reduce the amount of data by eliminating signalcomponents that are hard for the human ear to hear. The “Restorer”function generates the signals eliminated upon compression, restoring thesound to conditions near those of the original sound before compression.It also restores the original bass characteristics for a rich and expandedtonal range.
o ModeHigh: Optimized mode for compressed sources with very weak
highs (64 kbps and under).Medium: Apply suitable bass and treble boost for all compressed
sources (96 kbps and under).Low: Optimized mode for compressed sources with normal highs
(96 kbps and over).Off: Do no use “Restorer”.
0 This item can be set with analog signals or PCM signal (Sample Rate =44.1/48 kHz) is input.
0 This item default setting for “Online Music”, “iPod/USB” and “Bluetooth” is“Low”. All others are set to “Off”.
0 This cannot be set when the sound mode is set to “Direct”.0 “Restorer” settings are stored for each input source.
Contents Connections Playback Settings Tips Appendix
142Front panel Display Rear panel Remote Index
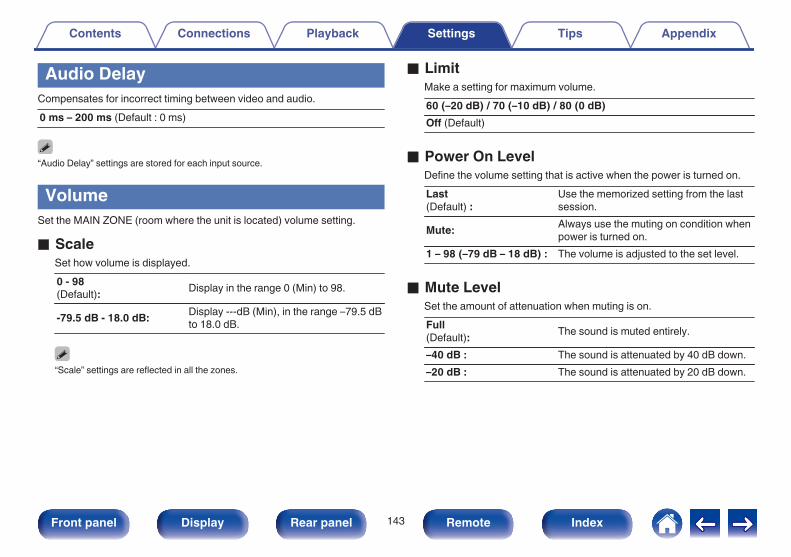
Audio DelayCompensates for incorrect timing between video and audio.0 ms – 200 ms (Default : 0 ms)
“Audio Delay” settings are stored for each input source.
VolumeSet the MAIN ZONE (room where the unit is located) volume setting.
o ScaleSet how volume is displayed.0 - 98(Default): Display in the range 0 (Min) to 98.
-79.5 dB - 18.0 dB: Display ---dB (Min), in the range –79.5 dBto 18.0 dB.
“Scale” settings are reflected in all the zones.
o LimitMake a setting for maximum volume.60 (–20 dB) / 70 (–10 dB) / 80 (0 dB)Off (Default)
o Power On LevelDefine the volume setting that is active when the power is turned on.Last(Default) :
Use the memorized setting from the lastsession.
Mute: Always use the muting on condition whenpower is turned on.
1 – 98 (–79 dB – 18 dB) : The volume is adjusted to the set level.
o Mute LevelSet the amount of attenuation when muting is on.Full(Default): The sound is muted entirely.–40 dB : The sound is attenuated by 40 dB down.–20 dB : The sound is attenuated by 20 dB down.
Contents Connections Playback Settings Tips Appendix
143Front panel Display Rear panel Remote Index
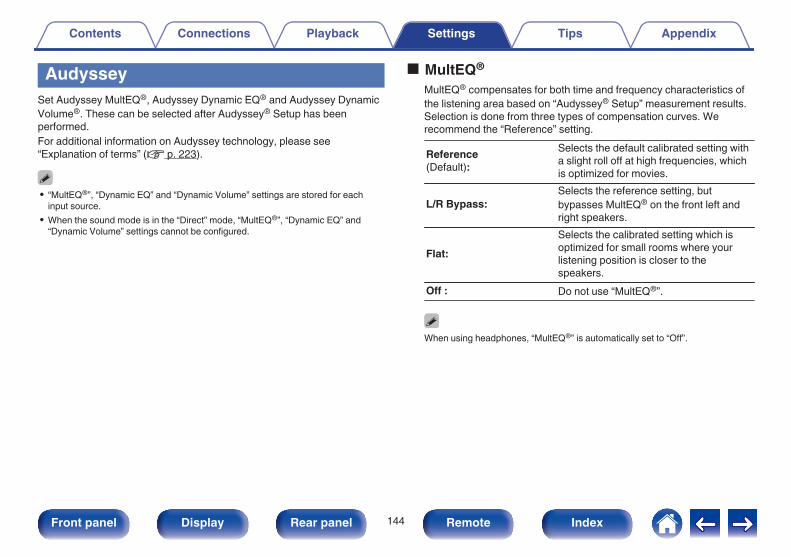
AudysseySet Audyssey MultEQ®, Audyssey Dynamic EQ® and Audyssey DynamicVolume®. These can be selected after Audyssey® Setup has beenperformed.For additional information on Audyssey technology, please see“Explanation of terms” (v p. 223).
0 “MultEQ®”, “Dynamic EQ” and “Dynamic Volume” settings are stored for eachinput source.
0 When the sound mode is in the “Direct” mode, “MultEQ®”, “Dynamic EQ” and“Dynamic Volume” settings cannot be configured.
o MultEQ®
MultEQ® compensates for both time and frequency characteristics ofthe listening area based on “Audyssey® Setup” measurement results.Selection is done from three types of compensation curves. Werecommend the “Reference” setting.
Reference(Default):
Selects the default calibrated setting witha slight roll off at high frequencies, whichis optimized for movies.
L/R Bypass:Selects the reference setting, butbypasses MultEQ® on the front left andright speakers.
Flat:Selects the calibrated setting which isoptimized for small rooms where yourlistening position is closer to thespeakers.
Off : Do not use “MultEQ®”.
When using headphones, “MultEQ®” is automatically set to “Off”.
Contents Connections Playback Settings Tips Appendix
144Front panel Display Rear panel Remote Index
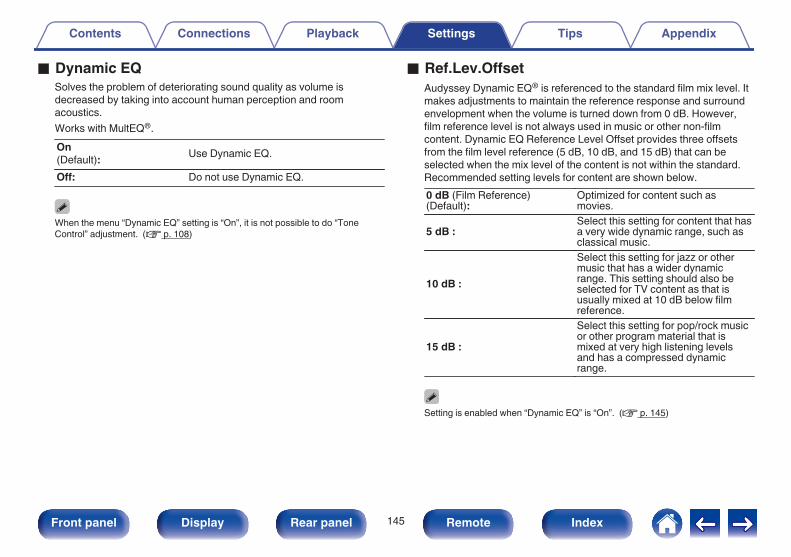
o Dynamic EQSolves the problem of deteriorating sound quality as volume isdecreased by taking into account human perception and roomacoustics.Works with MultEQ®.On(Default): Use Dynamic EQ.Off: Do not use Dynamic EQ.
When the menu “Dynamic EQ” setting is “On”, it is not possible to do “ToneControl” adjustment. (v p. 108)
o Ref.Lev.OffsetAudyssey Dynamic EQ® is referenced to the standard film mix level. Itmakes adjustments to maintain the reference response and surroundenvelopment when the volume is turned down from 0 dB. However,film reference level is not always used in music or other non-filmcontent. Dynamic EQ Reference Level Offset provides three offsetsfrom the film level reference (5 dB, 10 dB, and 15 dB) that can beselected when the mix level of the content is not within the standard.Recommended setting levels for content are shown below.0 dB (Film Reference)(Default):
Optimized for content such asmovies.
5 dB :Select this setting for content that hasa very wide dynamic range, such asclassical music.
10 dB :
Select this setting for jazz or othermusic that has a wider dynamicrange. This setting should also beselected for TV content as that isusually mixed at 10 dB below filmreference.
15 dB :Select this setting for pop/rock musicor other program material that ismixed at very high listening levelsand has a compressed dynamicrange.
Setting is enabled when “Dynamic EQ” is “On”. (v p. 145)
Contents Connections Playback Settings Tips Appendix
145Front panel Display Rear panel Remote Index
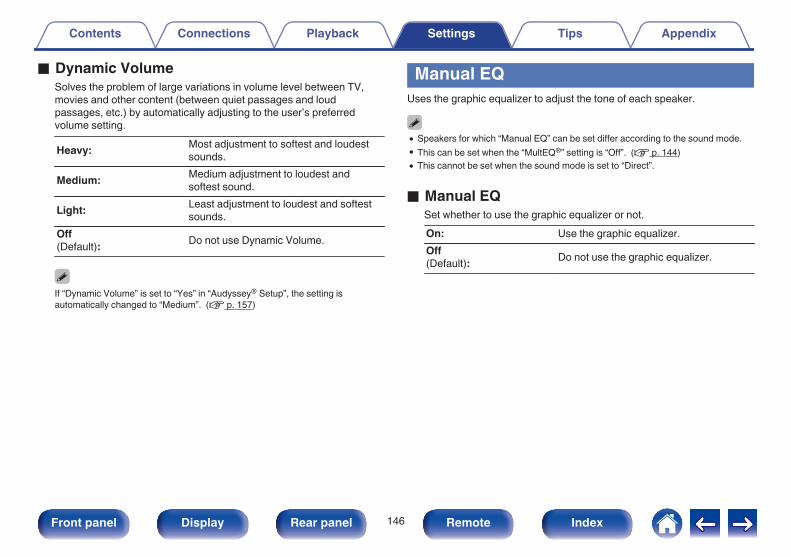
o Dynamic VolumeSolves the problem of large variations in volume level between TV,movies and other content (between quiet passages and loudpassages, etc.) by automatically adjusting to the user’s preferredvolume setting.
Heavy: Most adjustment to softest and loudestsounds.
Medium: Medium adjustment to loudest andsoftest sound.
Light: Least adjustment to loudest and softestsounds.
Off(Default): Do not use Dynamic Volume.
If “Dynamic Volume” is set to “Yes” in “Audyssey® Setup”, the setting isautomatically changed to “Medium”. (v p. 157)
Manual EQUses the graphic equalizer to adjust the tone of each speaker.
0 Speakers for which “Manual EQ” can be set differ according to the sound mode.0 This can be set when the “MultEQ®” setting is “Off”. (v p. 144)0 This cannot be set when the sound mode is set to “Direct”.
o Manual EQSet whether to use the graphic equalizer or not.On: Use the graphic equalizer.Off(Default): Do not use the graphic equalizer.
Contents Connections Playback Settings Tips Appendix
146Front panel Display Rear panel Remote Index
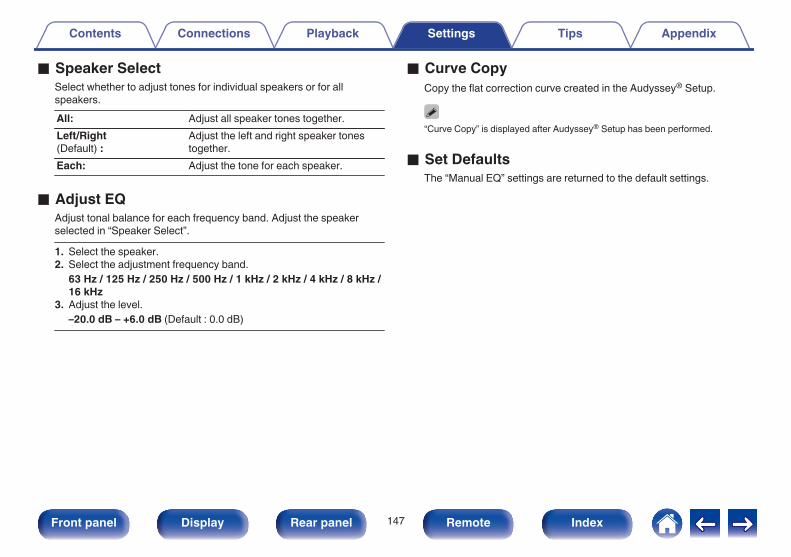
o Speaker SelectSelect whether to adjust tones for individual speakers or for allspeakers.All: Adjust all speaker tones together.Left/Right(Default) :
Adjust the left and right speaker tonestogether.
Each: Adjust the tone for each speaker.
o Adjust EQAdjust tonal balance for each frequency band. Adjust the speakerselected in “Speaker Select”.1. Select the speaker.2. Select the adjustment frequency band.
63 Hz / 125 Hz / 250 Hz / 500 Hz / 1 kHz / 2 kHz / 4 kHz / 8 kHz /16 kHz
3. Adjust the level.–20.0 dB – +6.0 dB (Default : 0.0 dB)
o Curve CopyCopy the flat correction curve created in the Audyssey® Setup.
“Curve Copy” is displayed after Audyssey® Setup has been performed.
o Set DefaultsThe “Manual EQ” settings are returned to the default settings.
Contents Connections Playback Settings Tips Appendix
147Front panel Display Rear panel Remote Index
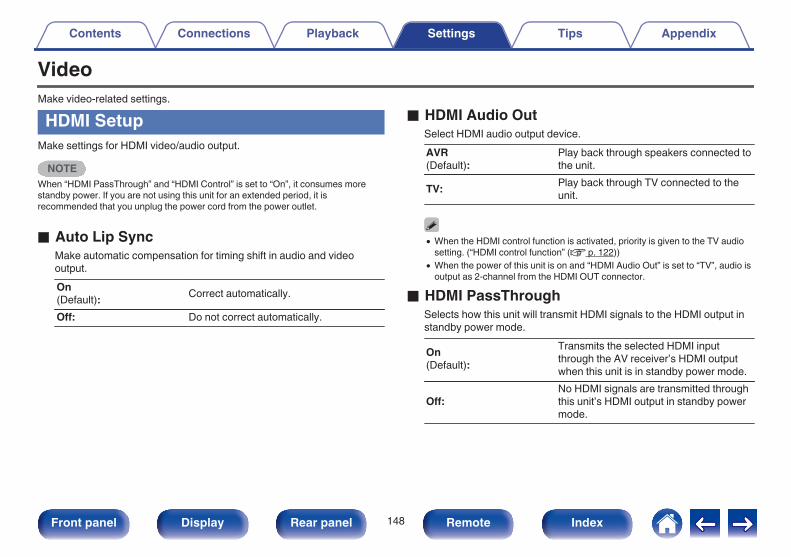
VideoMake video-related settings.
HDMI SetupMake settings for HDMI video/audio output.
NOTEWhen “HDMI PassThrough” and “HDMI Control” is set to “On”, it consumes morestandby power. If you are not using this unit for an extended period, it isrecommended that you unplug the power cord from the power outlet.
o Auto Lip SyncMake automatic compensation for timing shift in audio and videooutput.On(Default): Correct automatically.Off: Do not correct automatically.
o HDMI Audio OutSelect HDMI audio output device.AVR(Default):
Play back through speakers connected tothe unit.
TV: Play back through TV connected to theunit.
0 When the HDMI control function is activated, priority is given to the TV audiosetting. (“HDMI control function” (v p. 122))
0 When the power of this unit is on and “HDMI Audio Out” is set to “TV”, audio isoutput as 2-channel from the HDMI OUT connector.
o HDMI PassThroughSelects how this unit will transmit HDMI signals to the HDMI output instandby power mode.
On(Default):
Transmits the selected HDMI inputthrough the AV receiver’s HDMI outputwhen this unit is in standby power mode.
Off:No HDMI signals are transmitted throughthis unit’s HDMI output in standby powermode.
Contents Connections Playback Settings Tips Appendix
148Front panel Display Rear panel Remote Index
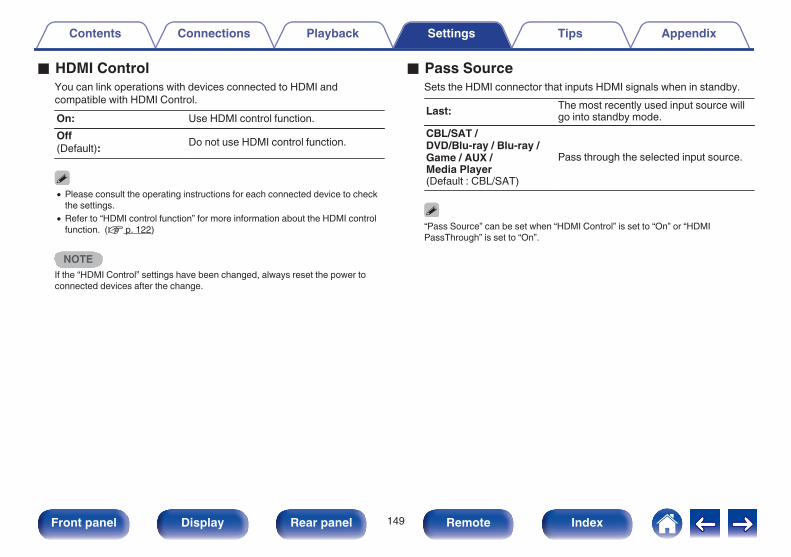
o HDMI ControlYou can link operations with devices connected to HDMI andcompatible with HDMI Control.On: Use HDMI control function.Off(Default): Do not use HDMI control function.
0 Please consult the operating instructions for each connected device to checkthe settings.
0 Refer to “HDMI control function” for more information about the HDMI controlfunction. (v p. 122)
NOTEIf the “HDMI Control” settings have been changed, always reset the power toconnected devices after the change.
o Pass SourceSets the HDMI connector that inputs HDMI signals when in standby.
Last: The most recently used input source willgo into standby mode.
CBL/SAT /DVD/Blu-ray / Blu-ray /Game / AUX /Media Player(Default : CBL/SAT)
Pass through the selected input source.
“Pass Source” can be set when “HDMI Control” is set to “On” or “HDMIPassThrough” is set to “On”.
Contents Connections Playback Settings Tips Appendix
149Front panel Display Rear panel Remote Index
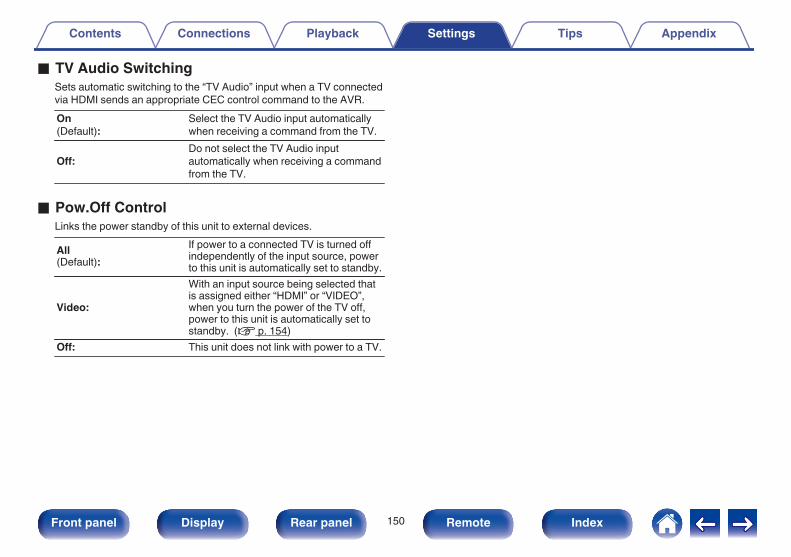
o TV Audio SwitchingSets automatic switching to the “TV Audio” input when a TV connectedvia HDMI sends an appropriate CEC control command to the AVR.On(Default):
Select the TV Audio input automaticallywhen receiving a command from the TV.
Off:Do not select the TV Audio inputautomatically when receiving a commandfrom the TV.
o Pow.Off ControlLinks the power standby of this unit to external devices.
All(Default):
If power to a connected TV is turned offindependently of the input source, powerto this unit is automatically set to standby.
Video:With an input source being selected thatis assigned either “HDMI” or “VIDEO”,when you turn the power of the TV off,power to this unit is automatically set tostandby. (v p. 154)
Off: This unit does not link with power to a TV.
Contents Connections Playback Settings Tips Appendix
150Front panel Display Rear panel Remote Index
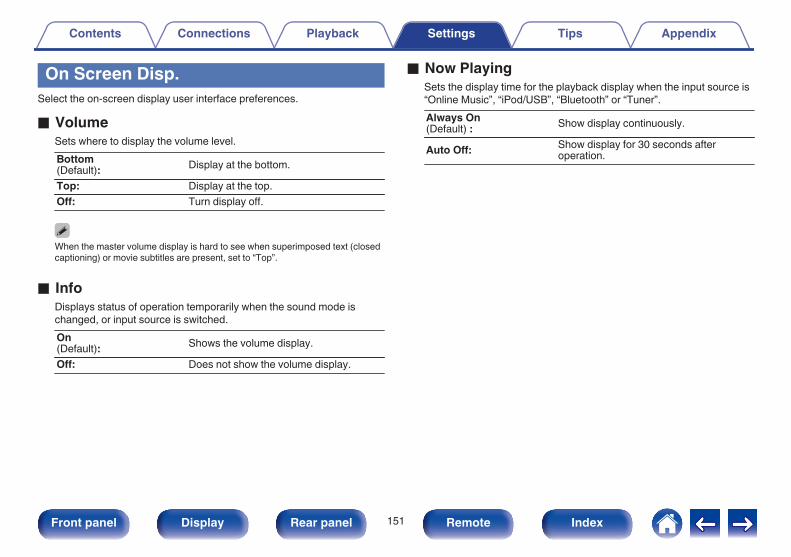
On Screen Disp.Select the on-screen display user interface preferences.
o VolumeSets where to display the volume level.Bottom(Default): Display at the bottom.Top: Display at the top.Off: Turn display off.
When the master volume display is hard to see when superimposed text (closedcaptioning) or movie subtitles are present, set to “Top”.
o InfoDisplays status of operation temporarily when the sound mode ischanged, or input source is switched.On(Default): Shows the volume display.Off: Does not show the volume display.
o Now PlayingSets the display time for the playback display when the input source is“Online Music”, “iPod/USB”, “Bluetooth” or “Tuner”.Always On(Default) : Show display continuously.
Auto Off: Show display for 30 seconds afteroperation.
Contents Connections Playback Settings Tips Appendix
151Front panel Display Rear panel Remote Index
TV FormatSet the video signal format to be output for the TV you are using.
o FormatNTSC(Default): Select NTSC output.PAL: Select PAL output.
“Format” can also be set by the following procedure. However, the menu screenis not displayed. Following the display content to make the setting.1. Press and hold the main unit’s TUNER PRESET CH + and TUNE + for at least
3 seconds.“V.Format:<NTSC>” appears on the display.
2. Use the main unit’s TUNER PRESET CH + or TUNER PRESET CH - and setthe video signal format.
3. Press the main unit’s STATUS to complete the setting.
NOTEWhen a format other than the video format of the connected TV is set, the picturewill not be displayed properly.
Contents Connections Playback Settings Tips Appendix
152Front panel Display Rear panel Remote Index
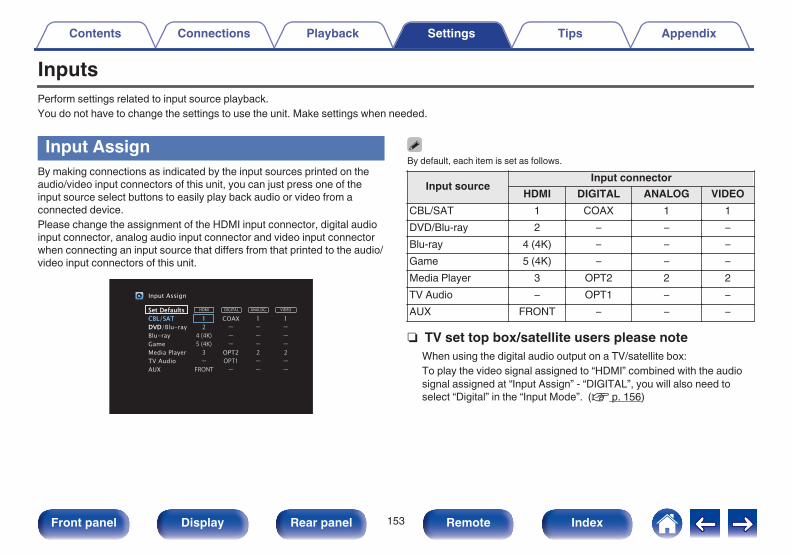
InputsPerform settings related to input source playback.You do not have to change the settings to use the unit. Make settings when needed.
Input AssignBy making connections as indicated by the input sources printed on theaudio/video input connectors of this unit, you can just press one of theinput source select buttons to easily play back audio or video from aconnected device.Please change the assignment of the HDMI input connector, digital audioinput connector, analog audio input connector and video input connectorwhen connecting an input source that differs from that printed to the audio/video input connectors of this unit.
.
DIGITAL ANALOGHDMI VIDEOSet Defaults
Input Assign
CBL/SATDVDBlu-rayGame
Set DefaultsCBL/SATDVD/Blu-ray
Media PlayerTV AudioAUX
12
4 (4K)5 (4K)3-
FRONT
COAX---
OPT2OPT1-
1---2--
1---2--
By default, each item is set as follows.
Input source Input connectorHDMI DIGITAL ANALOG VIDEO
CBL/SAT 1 COAX 1 1DVD/Blu-ray 2 – – –Blu-ray 4 (4K) – – –Game 5 (4K) – – –Media Player 3 OPT2 2 2TV Audio – OPT1 – –AUX FRONT – – –
n TV set top box/satellite users please noteWhen using the digital audio output on a TV/satellite box:To play the video signal assigned to “HDMI” combined with the audiosignal assigned at “Input Assign” - “DIGITAL”, you will also need toselect “Digital” in the “Input Mode”. (v p. 156)
Contents Connections Playback Settings Tips Appendix
153Front panel Display Rear panel Remote Index
o HDMISet this to change the HDMI input connectors assigned to the inputsources.1 / 2 / 3 / 4(4K) /5(4K) / FRONT:
Assign an HDMI input connector to the selectedinput source.
– : Do not assign an HDMI input connector to theselected input source.
0 When “HDMI Control” is set to “On” in the menu, “HDMI” cannot be assignedto “TV Audio”. (v p. 149)
0 When the input source assigned with HDMI 4 (4K) or HDMI 5 (4K) is beingselected, the information on the changes in volume or sound mode will not bedisplayed.
o DIGITALSet this to change the digital audio input connectors assigned to theinput sources.COAX (Coaxial) /OPT1 (Optical) / OPT2:
Assign a digital audio input connector to theselected input source.
– : Do not assign a digital audio input connectorto the selected input source.
o ANALOGSet this to change the analog audio input connectors assigned to theinput sources.1 / 2 : Assign a analog audio input connector to the selected input
source.– : Do not assign a analog audio input connector to the selected
input source.
o VIDEOSet this to change the composite video input connectors assigned tothe input sources.1 / 2: Assign the video input connector to the selected input source.– : Do not assign a video input connector to the selected input
source.
o Set DefaultsThe “Input Assign” settings are returned to the default settings.
Contents Connections Playback Settings Tips Appendix
154Front panel Display Rear panel Remote Index
Source RenameChange the display name for input source.This is convenient when the name of your device and the input sourcename of this unit are different. You can change the name to suit yourneeds. When the renaming is completed, the name is displayed on thisunit’s display and on the menu screen.CBL/SAT / DVD/Blu-ray /Blu-ray / Game / AUX /Media Player / TV Audio:
Change the display name for input source.
Set Defaults: The Source Rename settings are returned tothe default settings.
Up to 12 characters can be input. For character input, see “Using the keyboardscreen” (v p. 136).
Hide SourcesRemove from the display input sources that are not used.Show(Default) : Use this source.Hide: Do not use this source.
Source LevelThis function corrects the playback level of the selected input source’saudio input.Make this setting if there are differences in the input volume levelsbetween the different sources.-12 dB – +12 dB (Default : 0 dB)
“Source Level” settings are stored for each input source.
Contents Connections Playback Settings Tips Appendix
155Front panel Display Rear panel Remote Index
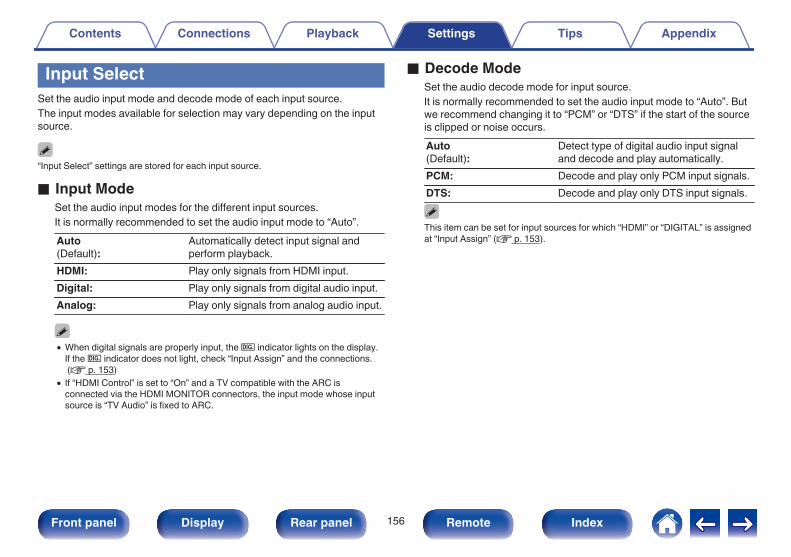
Input SelectSet the audio input mode and decode mode of each input source.The input modes available for selection may vary depending on the inputsource.
“Input Select” settings are stored for each input source.
o Input ModeSet the audio input modes for the different input sources.It is normally recommended to set the audio input mode to “Auto”.Auto(Default):
Automatically detect input signal andperform playback.
HDMI: Play only signals from HDMI input.Digital: Play only signals from digital audio input.Analog: Play only signals from analog audio input.
0 When digital signals are properly input, the ~ indicator lights on the display.If the ~ indicator does not light, check “Input Assign” and the connections. (v p. 153)
0 If “HDMI Control” is set to “On” and a TV compatible with the ARC isconnected via the HDMI MONITOR connectors, the input mode whose inputsource is “TV Audio” is fixed to ARC.
o Decode ModeSet the audio decode mode for input source.It is normally recommended to set the audio input mode to “Auto”. Butwe recommend changing it to “PCM” or “DTS” if the start of the sourceis clipped or noise occurs.Auto(Default):
Detect type of digital audio input signaland decode and play automatically.
PCM: Decode and play only PCM input signals.DTS: Decode and play only DTS input signals.
This item can be set for input sources for which “HDMI” or “DIGITAL” is assignedat “Input Assign” (v p. 153).
Contents Connections Playback Settings Tips Appendix
156Front panel Display Rear panel Remote Index
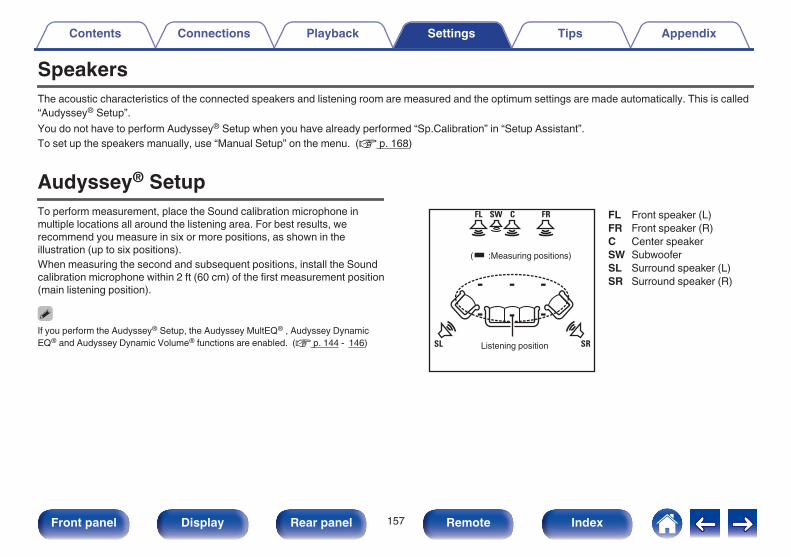
SpeakersThe acoustic characteristics of the connected speakers and listening room are measured and the optimum settings are made automatically. This is called“Audyssey® Setup”.You do not have to perform Audyssey® Setup when you have already performed “Sp.Calibration” in “Setup Assistant”.To set up the speakers manually, use “Manual Setup” on the menu. (v p. 168)
Audyssey® SetupTo perform measurement, place the Sound calibration microphone inmultiple locations all around the listening area. For best results, werecommend you measure in six or more positions, as shown in theillustration (up to six positions).When measuring the second and subsequent positions, install the Soundcalibration microphone within 2 ft (60 cm) of the first measurement position(main listening position).
If you perform the Audyssey® Setup, the Audyssey MultEQ® , Audyssey DynamicEQ® and Audyssey Dynamic Volume® functions are enabled. (v p. 144 - 146)
.
FL SW C FR
SRSL
( :Measuring positions)
Listening position
Front speaker (L)Front speaker (R)Center speakerSubwooferSurround speaker (L)Surround speaker (R)
FLFRCSWSLSR
Contents Connections Playback Settings Tips Appendix
157Front panel Display Rear panel Remote Index
o About the main listening positionThe main listening position is the position where listeners wouldnormally sit or where one would normally sit alone within the listeningenvironment. Before starting Audyssey® Setup, place the Soundcalibration microphone in the main listening position.Audyssey MultEQ® uses the measurements from this position tocalculate speaker distance, level, polarity, and the optimum crossovervalue for the subwoofer.
NOTE0 Make the room as quiet as possible. Background noise can disrupt the room
measurements. Close windows and turn off the power on electronic devices(radios, air conditioners, fluorescent lights, etc.). The measurements could beaffected by the sounds emitted by such devices.
0 During the measurement process, place cell phones outside the listening room.Cell phone signals could disrupt the measurements.
0 Do not stand between the speakers and Sound calibration microphone or allowobstacles in the path while the measurements are being made. Also, install theSound calibration microphone at least 20 inches (50 cm) away from the wall.Failure to do so will result in inaccurate readings.
0 During the measurement process, audible test tones will come from the speakersand subwoofer(s), but this is part of normal operation. If there is background noisein the room, these test signals will increase in volume.
0 Operating VOLUME d f on the remote control unit or MASTER VOLUME on themain unit during the measurements will cancel the measurements.
0 Measurement cannot be performed when headphones are connected. Unplug theheadphones before performing Audyssey® Setup.
Contents Connections Playback Settings Tips Appendix
158Front panel Display Rear panel Remote Index
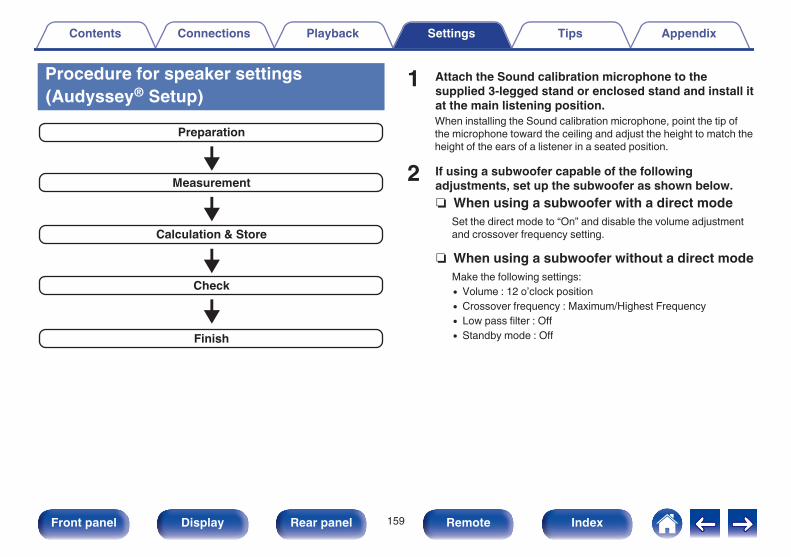
Procedure for speaker settings(Audyssey® Setup)
.
Finish
Check
Calculation & Store
Measurement
Preparation
1 Attach the Sound calibration microphone to thesupplied 3-legged stand or enclosed stand and install itat the main listening position.When installing the Sound calibration microphone, point the tip ofthe microphone toward the ceiling and adjust the height to match theheight of the ears of a listener in a seated position.
2 If using a subwoofer capable of the followingadjustments, set up the subwoofer as shown below.n When using a subwoofer with a direct mode
Set the direct mode to “On” and disable the volume adjustmentand crossover frequency setting.
n When using a subwoofer without a direct modeMake the following settings:0 Volume : 12 o’clock position0 Crossover frequency : Maximum/Highest Frequency0 Low pass filter : Off0 Standby mode : Off
Contents Connections Playback Settings Tips Appendix
159Front panel Display Rear panel Remote Index
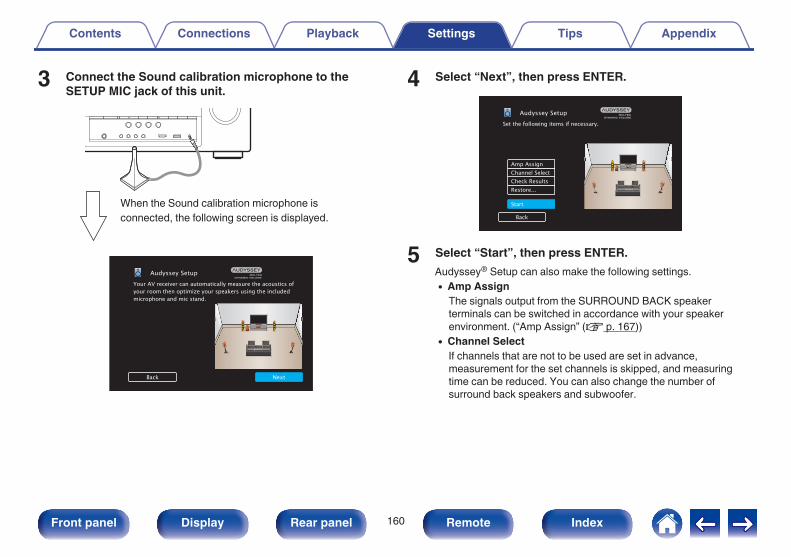
3 Connect the Sound calibration microphone to theSETUP MIC jack of this unit.
.
When the Sound calibration microphone is connected, the following screen is displayed.
.
Audyssey SetupYour AV receiver can automatically measure the acoustics ofyour room then optimize your speakers using the includedmicrophone and mic stand.
NextBack
4 Select “Next”, then press ENTER.
.
Audyssey SetupSet the following items if necessary.
Start
Back
Restore...Check ResultsChannel SelectAmp Assign
5 Select “Start”, then press ENTER.Audyssey® Setup can also make the following settings.0 Amp Assign
The signals output from the SURROUND BACK speakerterminals can be switched in accordance with your speakerenvironment. (“Amp Assign” (v p. 167))
0 Channel SelectIf channels that are not to be used are set in advance,measurement for the set channels is skipped, and measuringtime can be reduced. You can also change the number ofsurround back speakers and subwoofer.
Contents Connections Playback Settings Tips Appendix
160Front panel Display Rear panel Remote Index
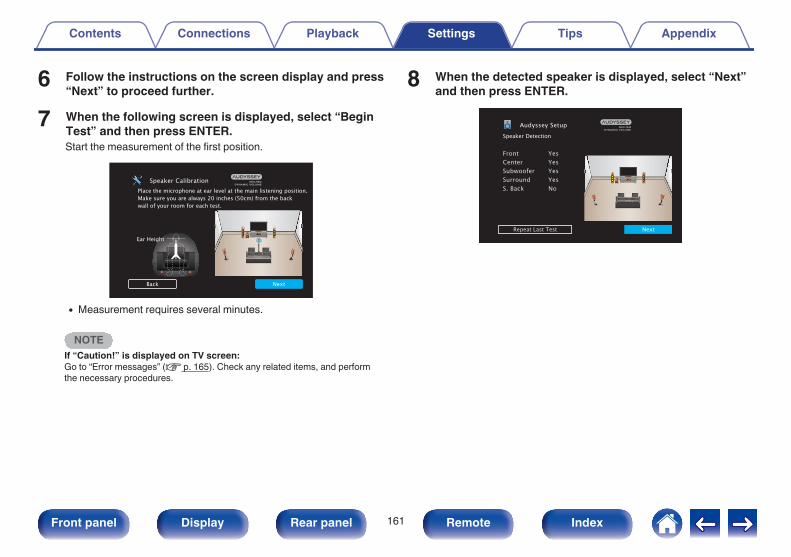
6 Follow the instructions on the screen display and press“Next” to proceed further.
7 When the following screen is displayed, select “BeginTest” and then press ENTER.Start the measurement of the first position.
.
Place the microphone at ear level at the main listening position.Make sure you are always 20 inches (50cm) from the backwall of your room for each test.
Ear Height
Speaker Calibration
NextBack
0 Measurement requires several minutes.
NOTEIf “Caution!” is displayed on TV screen:Go to “Error messages” (v p. 165). Check any related items, and performthe necessary procedures.
8 When the detected speaker is displayed, select “Next”and then press ENTER.
.
Audyssey SetupSpeaker Detection
NextRepeat Last Test
FrontCenterSubwooferSurroundS. Back
YesYesYesYesNo
Contents Connections Playback Settings Tips Appendix
161Front panel Display Rear panel Remote Index
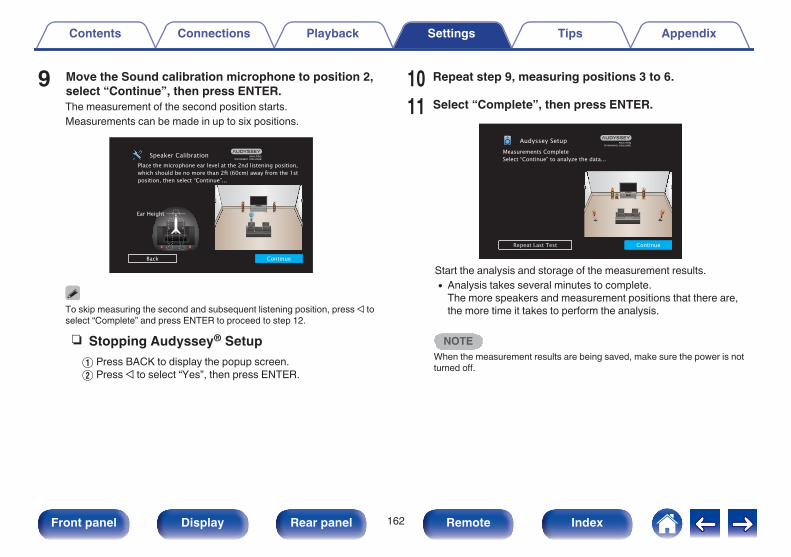
9 Move the Sound calibration microphone to position 2,select “Continue”, then press ENTER.The measurement of the second position starts.Measurements can be made in up to six positions.
.
Place the microphone ear level at the 2nd listening position,which should be no more than 2ft (60cm) away from the 1st position, then select “Continue”...
Ear Height
Speaker Calibration
ContinueBack
To skip measuring the second and subsequent listening position, press o toselect “Complete” and press ENTER to proceed to step 12.n Stopping Audyssey® SetupA Press BACK to display the popup screen.B Press o to select “Yes”, then press ENTER.
10 Repeat step 9, measuring positions 3 to 6.
11 Select “Complete”, then press ENTER.
.
Audyssey Setup
ContinueRepeat Last Test
Measurements CompleteSelect “Continue” to analyze the data...
Start the analysis and storage of the measurement results.0 Analysis takes several minutes to complete.
The more speakers and measurement positions that there are,the more time it takes to perform the analysis.
NOTEWhen the measurement results are being saved, make sure the power is notturned off.
Contents Connections Playback Settings Tips Appendix
162Front panel Display Rear panel Remote Index
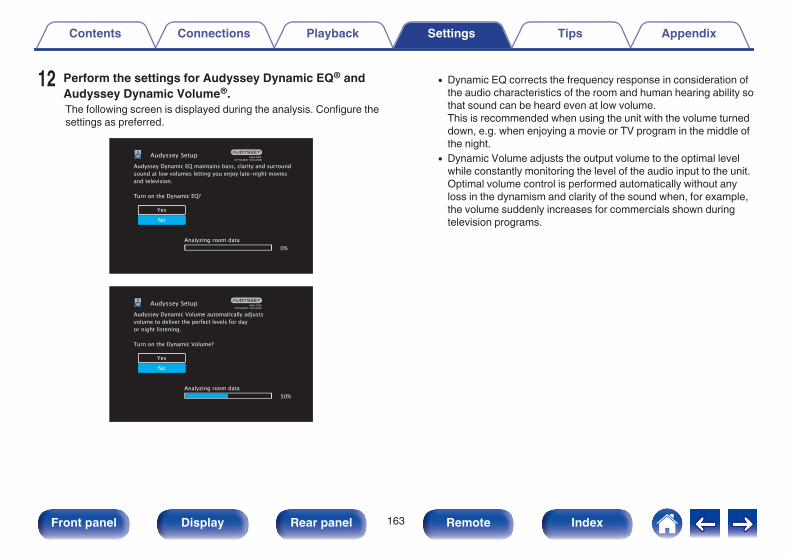
12 Perform the settings for Audyssey Dynamic EQ® andAudyssey Dynamic Volume®.The following screen is displayed during the analysis. Configure thesettings as preferred.
.
Audyssey Setup
No
Yes
Analyzing room data0%
Audyssey Dynamic EQ maintains bass, clarity and surround sound at low volumes letting you enjoy late-night moviesand television.
Turn on the Dynamic EQ?
.
Audyssey Setup
No
Yes
Analyzing room data50%
Audyssey Dynamic Volume automatically adjusts volume to deliver the perfect levels for dayor night listening.
Turn on the Dynamic Volume?
0 Dynamic EQ corrects the frequency response in consideration ofthe audio characteristics of the room and human hearing ability sothat sound can be heard even at low volume.This is recommended when using the unit with the volume turneddown, e.g. when enjoying a movie or TV program in the middle ofthe night.
0 Dynamic Volume adjusts the output volume to the optimal levelwhile constantly monitoring the level of the audio input to the unit.Optimal volume control is performed automatically without anyloss in the dynamism and clarity of the sound when, for example,the volume suddenly increases for commercials shown duringtelevision programs.
Contents Connections Playback Settings Tips Appendix
163Front panel Display Rear panel Remote Index
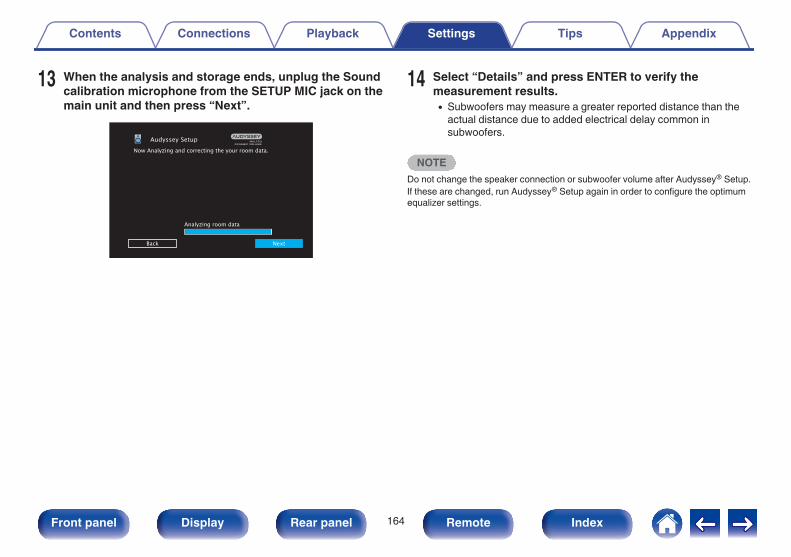
13 When the analysis and storage ends, unplug the Soundcalibration microphone from the SETUP MIC jack on themain unit and then press “Next”.
.
Audyssey Setup
Analyzing room data
Back Next
Now Analyzing and correcting the your room data.
14 Select “Details” and press ENTER to verify themeasurement results.0 Subwoofers may measure a greater reported distance than the
actual distance due to added electrical delay common insubwoofers.
NOTEDo not change the speaker connection or subwoofer volume after Audyssey® Setup.If these are changed, run Audyssey® Setup again in order to configure the optimumequalizer settings.
Contents Connections Playback Settings Tips Appendix
164Front panel Display Rear panel Remote Index
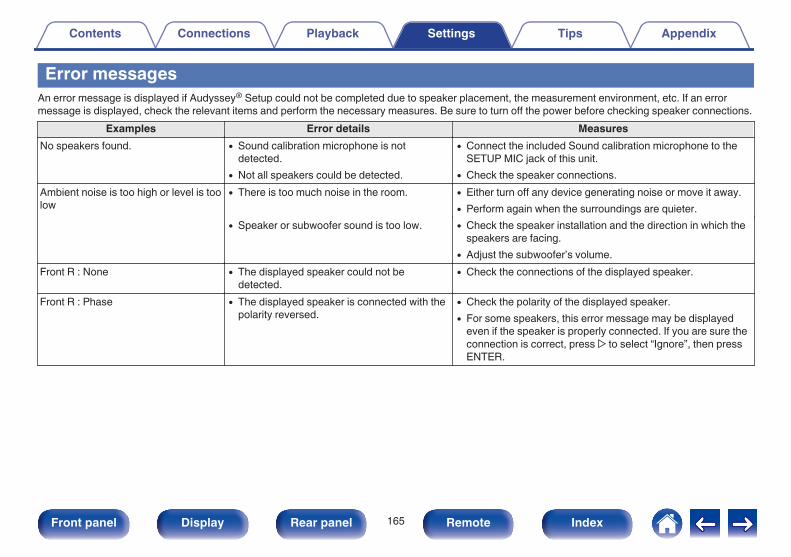
Error messagesAn error message is displayed if Audyssey® Setup could not be completed due to speaker placement, the measurement environment, etc. If an errormessage is displayed, check the relevant items and perform the necessary measures. Be sure to turn off the power before checking speaker connections.
Examples Error details MeasuresNo speakers found. 0 Sound calibration microphone is not
detected.0 Connect the included Sound calibration microphone to the
SETUP MIC jack of this unit.0 Not all speakers could be detected. 0 Check the speaker connections.
Ambient noise is too high or level is toolow
0 There is too much noise in the room. 0 Either turn off any device generating noise or move it away.0 Perform again when the surroundings are quieter.
0 Speaker or subwoofer sound is too low. 0 Check the speaker installation and the direction in which thespeakers are facing.
0 Adjust the subwoofer’s volume.Front R : None 0 The displayed speaker could not be
detected.0 Check the connections of the displayed speaker.
Front R : Phase 0 The displayed speaker is connected with thepolarity reversed.
0 Check the polarity of the displayed speaker.0 For some speakers, this error message may be displayed
even if the speaker is properly connected. If you are sure theconnection is correct, press p to select “Ignore”, then pressENTER.
Contents Connections Playback Settings Tips Appendix
165Front panel Display Rear panel Remote Index
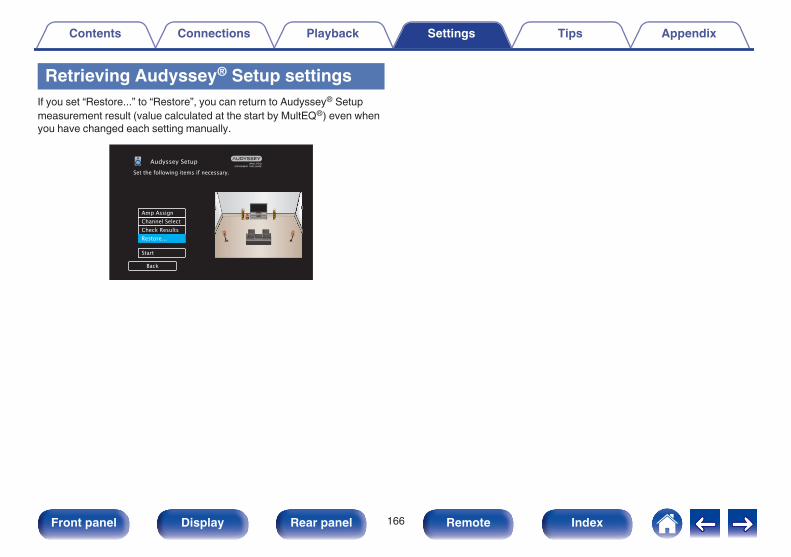
Retrieving Audyssey® Setup settingsIf you set “Restore...” to “Restore”, you can return to Audyssey® Setupmeasurement result (value calculated at the start by MultEQ®) even whenyou have changed each setting manually.
.
Audyssey SetupSet the following items if necessary.
Start
Back
Check ResultsChannel SelectAmp Assign
Restore...
Contents Connections Playback Settings Tips Appendix
166Front panel Display Rear panel Remote Index
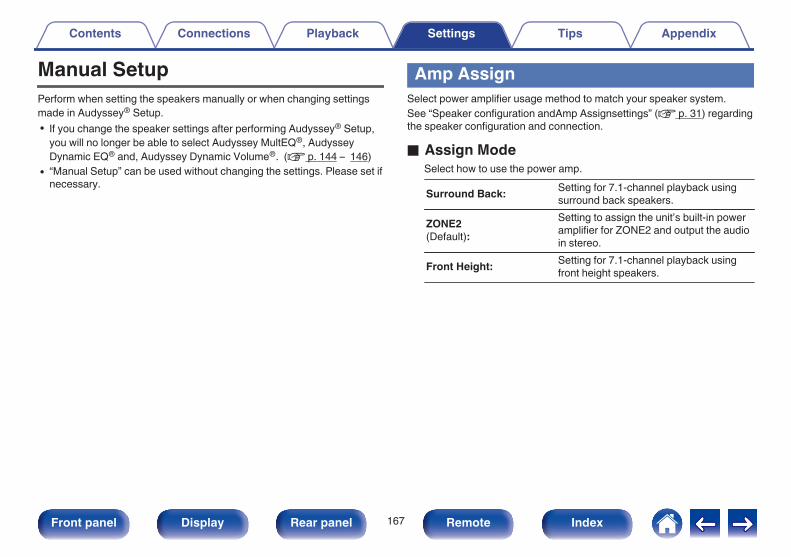
Manual SetupPerform when setting the speakers manually or when changing settingsmade in Audyssey® Setup.0 If you change the speaker settings after performing Audyssey® Setup,
you will no longer be able to select Audyssey MultEQ®, AudysseyDynamic EQ® and, Audyssey Dynamic Volume®. (v p. 144 – 146)
0 “Manual Setup” can be used without changing the settings. Please set ifnecessary.
Amp AssignSelect power amplifier usage method to match your speaker system.See “Speaker configuration andAmp Assignsettings” (v p. 31) regardingthe speaker configuration and connection.
o Assign ModeSelect how to use the power amp.
Surround Back: Setting for 7.1-channel playback usingsurround back speakers.
ZONE2(Default):
Setting to assign the unit’s built-in poweramplifier for ZONE2 and output the audioin stereo.
Front Height: Setting for 7.1-channel playback usingfront height speakers.
Contents Connections Playback Settings Tips Appendix
167Front panel Display Rear panel Remote Index
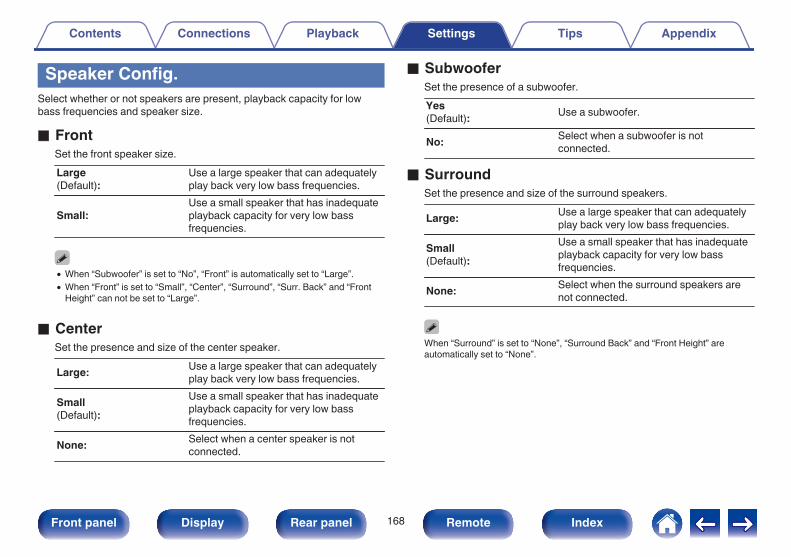
Speaker Config.Select whether or not speakers are present, playback capacity for lowbass frequencies and speaker size.
o FrontSet the front speaker size.Large(Default):
Use a large speaker that can adequatelyplay back very low bass frequencies.
Small:Use a small speaker that has inadequateplayback capacity for very low bassfrequencies.
0 When “Subwoofer” is set to “No”, “Front” is automatically set to “Large”.0 When “Front” is set to “Small”, “Center”, “Surround”, “Surr. Back” and “Front
Height” can not be set to “Large”.
o CenterSet the presence and size of the center speaker.
Large: Use a large speaker that can adequatelyplay back very low bass frequencies.
Small(Default):
Use a small speaker that has inadequateplayback capacity for very low bassfrequencies.
None: Select when a center speaker is notconnected.
o SubwooferSet the presence of a subwoofer.Yes(Default): Use a subwoofer.
No: Select when a subwoofer is notconnected.
o SurroundSet the presence and size of the surround speakers.
Large: Use a large speaker that can adequatelyplay back very low bass frequencies.
Small(Default):
Use a small speaker that has inadequateplayback capacity for very low bassfrequencies.
None: Select when the surround speakers arenot connected.
When “Surround” is set to “None”, “Surround Back” and “Front Height” areautomatically set to “None”.
Contents Connections Playback Settings Tips Appendix
168Front panel Display Rear panel Remote Index
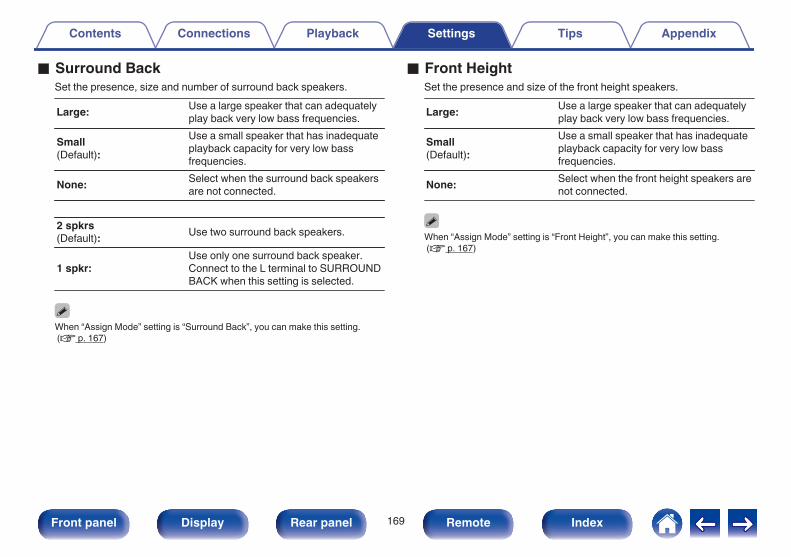
o Surround BackSet the presence, size and number of surround back speakers.
Large: Use a large speaker that can adequatelyplay back very low bass frequencies.
Small(Default):
Use a small speaker that has inadequateplayback capacity for very low bassfrequencies.
None: Select when the surround back speakersare not connected.
2 spkrs(Default): Use two surround back speakers.
1 spkr:Use only one surround back speaker.Connect to the L terminal to SURROUNDBACK when this setting is selected.
When “Assign Mode” setting is “Surround Back”, you can make this setting. (v p. 167)
o Front HeightSet the presence and size of the front height speakers.
Large: Use a large speaker that can adequatelyplay back very low bass frequencies.
Small(Default):
Use a small speaker that has inadequateplayback capacity for very low bassfrequencies.
None: Select when the front height speakers arenot connected.
When “Assign Mode” setting is “Front Height”, you can make this setting. (v p. 167)
Contents Connections Playback Settings Tips Appendix
169Front panel Display Rear panel Remote Index
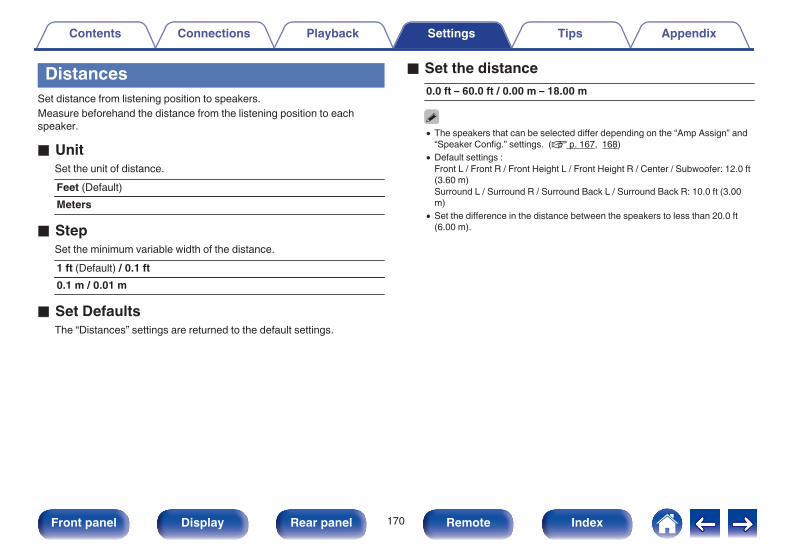
DistancesSet distance from listening position to speakers.Measure beforehand the distance from the listening position to eachspeaker.
o UnitSet the unit of distance.Feet (Default)Meters
o StepSet the minimum variable width of the distance.1 ft (Default) / 0.1 ft0.1 m / 0.01 m
o Set DefaultsThe “Distances” settings are returned to the default settings.
o Set the distance0.0 ft – 60.0 ft / 0.00 m – 18.00 m
0 The speakers that can be selected differ depending on the “Amp Assign” and“Speaker Config.” settings. (v p. 167, 168)
0 Default settings :Front L / Front R / Front Height L / Front Height R / Center / Subwoofer: 12.0 ft(3.60 m)Surround L / Surround R / Surround Back L / Surround Back R: 10.0 ft (3.00m)
0 Set the difference in the distance between the speakers to less than 20.0 ft(6.00 m).
Contents Connections Playback Settings Tips Appendix
170Front panel Display Rear panel Remote Index
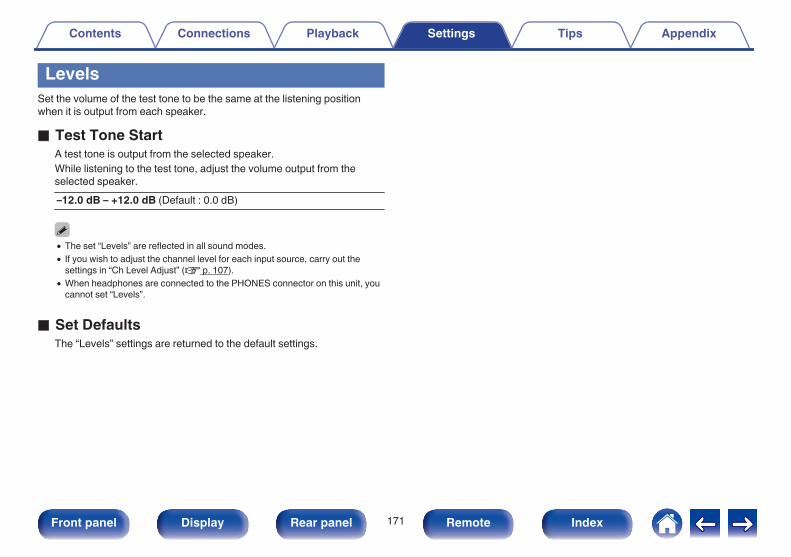
LevelsSet the volume of the test tone to be the same at the listening positionwhen it is output from each speaker.
o Test Tone StartA test tone is output from the selected speaker.While listening to the test tone, adjust the volume output from theselected speaker.–12.0 dB – +12.0 dB (Default : 0.0 dB)
0 The set “Levels” are reflected in all sound modes.0 If you wish to adjust the channel level for each input source, carry out the
settings in “Ch Level Adjust” (v p. 107).0 When headphones are connected to the PHONES connector on this unit, you
cannot set “Levels”.
o Set DefaultsThe “Levels” settings are returned to the default settings.
Contents Connections Playback Settings Tips Appendix
171Front panel Display Rear panel Remote Index
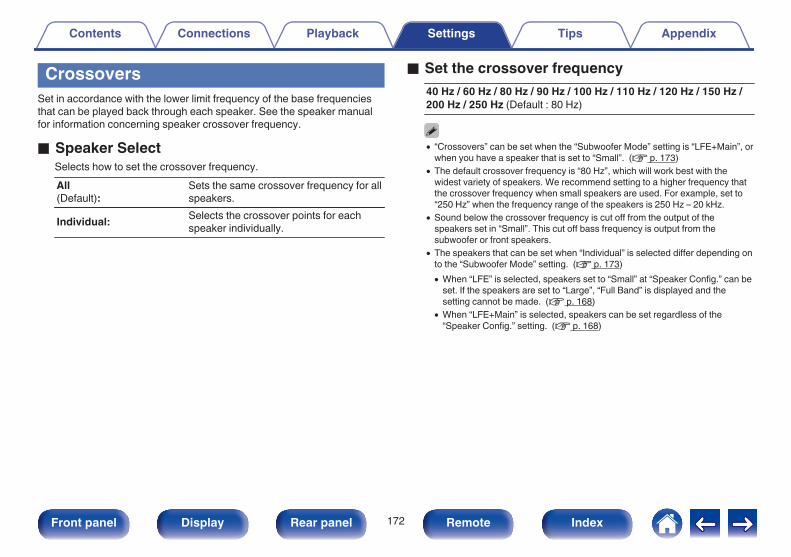
CrossoversSet in accordance with the lower limit frequency of the base frequenciesthat can be played back through each speaker. See the speaker manualfor information concerning speaker crossover frequency.
o Speaker SelectSelects how to set the crossover frequency.All(Default):
Sets the same crossover frequency for allspeakers.
Individual: Selects the crossover points for eachspeaker individually.
o Set the crossover frequency40 Hz / 60 Hz / 80 Hz / 90 Hz / 100 Hz / 110 Hz / 120 Hz / 150 Hz /200 Hz / 250 Hz (Default : 80 Hz)
0 “Crossovers” can be set when the “Subwoofer Mode” setting is “LFE+Main”, orwhen you have a speaker that is set to “Small”. (v p. 173)
0 The default crossover frequency is “80 Hz”, which will work best with thewidest variety of speakers. We recommend setting to a higher frequency thatthe crossover frequency when small speakers are used. For example, set to“250 Hz” when the frequency range of the speakers is 250 Hz – 20 kHz.
0 Sound below the crossover frequency is cut off from the output of thespeakers set in “Small”. This cut off bass frequency is output from thesubwoofer or front speakers.
0 The speakers that can be set when “Individual” is selected differ depending onto the “Subwoofer Mode” setting. (v p. 173)0 When “LFE” is selected, speakers set to “Small” at “Speaker Config.” can be
set. If the speakers are set to “Large”, “Full Band” is displayed and thesetting cannot be made. (v p. 168)
0 When “LFE+Main” is selected, speakers can be set regardless of the“Speaker Config.” setting. (v p. 168)
Contents Connections Playback Settings Tips Appendix
172Front panel Display Rear panel Remote Index
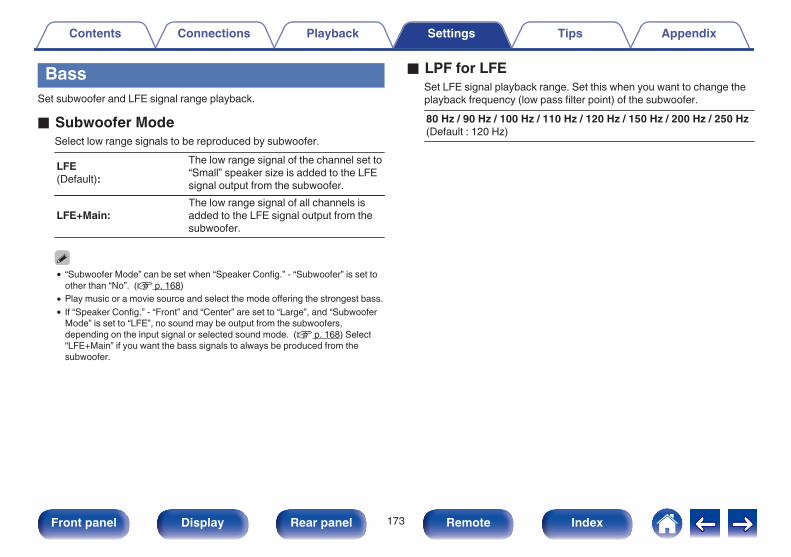
BassSet subwoofer and LFE signal range playback.
o Subwoofer ModeSelect low range signals to be reproduced by subwoofer.
LFE(Default):
The low range signal of the channel set to“Small” speaker size is added to the LFEsignal output from the subwoofer.
LFE+Main:The low range signal of all channels isadded to the LFE signal output from thesubwoofer.
0 “Subwoofer Mode” can be set when “Speaker Config.” - “Subwoofer” is set toother than “No”. (v p. 168)
0 Play music or a movie source and select the mode offering the strongest bass.0 If “Speaker Config.” - “Front” and “Center” are set to “Large”, and “Subwoofer
Mode” is set to “LFE”, no sound may be output from the subwoofers,depending on the input signal or selected sound mode. (v p. 168) Select“LFE+Main” if you want the bass signals to always be produced from thesubwoofer.
o LPF for LFESet LFE signal playback range. Set this when you want to change theplayback frequency (low pass filter point) of the subwoofer.80 Hz / 90 Hz / 100 Hz / 110 Hz / 120 Hz / 150 Hz / 200 Hz / 250 Hz(Default : 120 Hz)
Contents Connections Playback Settings Tips Appendix
173Front panel Display Rear panel Remote Index
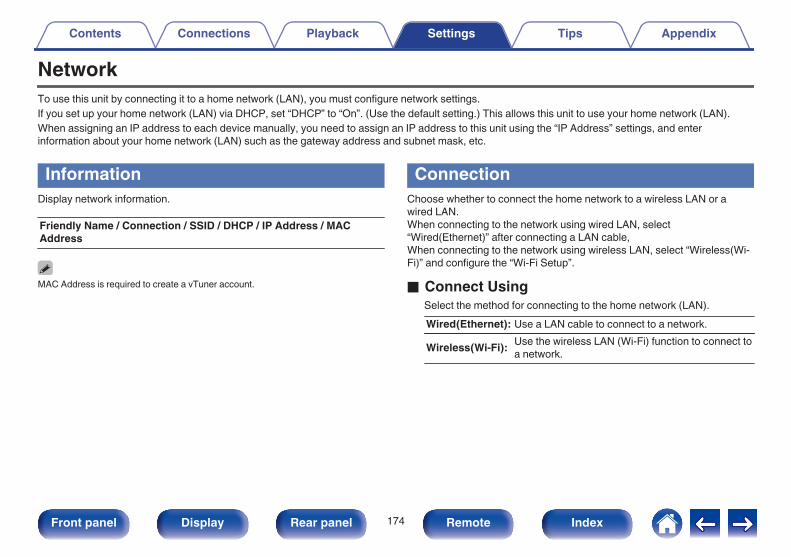
NetworkTo use this unit by connecting it to a home network (LAN), you must configure network settings.If you set up your home network (LAN) via DHCP, set “DHCP” to “On”. (Use the default setting.) This allows this unit to use your home network (LAN).When assigning an IP address to each device manually, you need to assign an IP address to this unit using the “IP Address” settings, and enterinformation about your home network (LAN) such as the gateway address and subnet mask, etc.
InformationDisplay network information.
Friendly Name / Connection / SSID / DHCP / IP Address / MACAddress
MAC Address is required to create a vTuner account.
ConnectionChoose whether to connect the home network to a wireless LAN or awired LAN.When connecting to the network using wired LAN, select“Wired(Ethernet)” after connecting a LAN cable,When connecting to the network using wireless LAN, select “Wireless(Wi-Fi)” and configure the “Wi-Fi Setup”.
o Connect UsingSelect the method for connecting to the home network (LAN).Wired(Ethernet): Use a LAN cable to connect to a network.Wireless(Wi-Fi): Use the wireless LAN (Wi-Fi) function to connect to
a network.
Contents Connections Playback Settings Tips Appendix
174Front panel Display Rear panel Remote Index
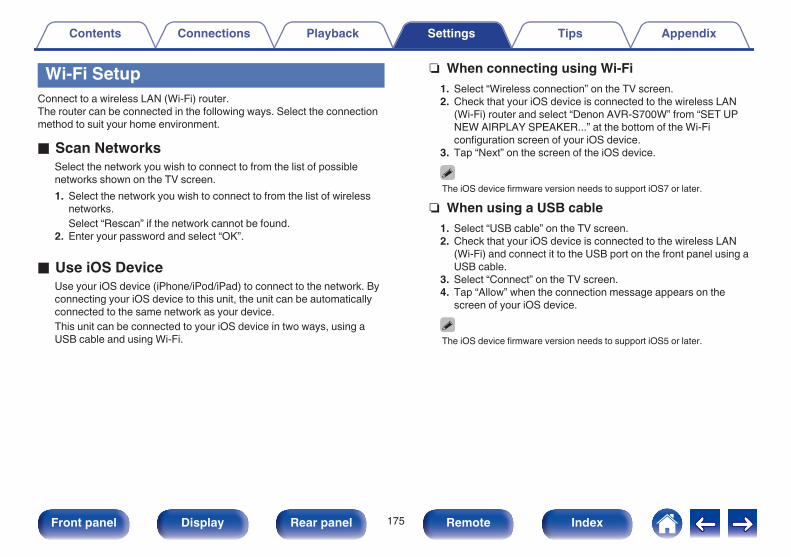
Wi-Fi SetupConnect to a wireless LAN (Wi-Fi) router.The router can be connected in the following ways. Select the connectionmethod to suit your home environment.
o Scan NetworksSelect the network you wish to connect to from the list of possiblenetworks shown on the TV screen.1. Select the network you wish to connect to from the list of wireless
networks.Select “Rescan” if the network cannot be found.
2. Enter your password and select “OK”.
o Use iOS DeviceUse your iOS device (iPhone/iPod/iPad) to connect to the network. Byconnecting your iOS device to this unit, the unit can be automaticallyconnected to the same network as your device.This unit can be connected to your iOS device in two ways, using aUSB cable and using Wi-Fi.
n When connecting using Wi-Fi1. Select “Wireless connection” on the TV screen.2. Check that your iOS device is connected to the wireless LAN
(Wi-Fi) router and select “Denon AVR-S700W” from “SET UPNEW AIRPLAY SPEAKER...” at the bottom of the Wi-Ficonfiguration screen of your iOS device.
3. Tap “Next” on the screen of the iOS device.
The iOS device firmware version needs to support iOS7 or later.n When using a USB cable
1. Select “USB cable” on the TV screen.2. Check that your iOS device is connected to the wireless LAN
(Wi-Fi) and connect it to the USB port on the front panel using aUSB cable.
3. Select “Connect” on the TV screen.4. Tap “Allow” when the connection message appears on the
screen of your iOS device.
The iOS device firmware version needs to support iOS5 or later.
Contents Connections Playback Settings Tips Appendix
175Front panel Display Rear panel Remote Index

o WPS RouterUse a WPS-compatible router to connect.There are two ways to connect, using the push button method or thePIN code method. Select the connection method to match your router.
n When connecting using the push button method1. Select “Push Button” on the TV screen.2. Switch to the WPS mode by pressing the WPS button of the
router you wish to connect to.0 The time for pressing the button varies depending on the
router.3. Select “Connect” on the TV screen within 2 minutes.
n When connecting using the PIN code method1. Select “PIN” on the TV screen.2. Select the network you wish to connect to from the list of
wireless networks.This displays the PIN code of the unit on the TV screen.
3. Register the PIN code of the unit in the router.
o ManualEnter the name (SSID) and password of the network you wish toconnect to.1. Set the following items.
SSID: Input the name of the wireless network (SSID).Security: Select the encryption method according to the
encryption setting of the access point you are using.Password: Input the password.
Default Key:Select the Default Key.When connecting to a “WEP” encrypted network,“Default Key” menu is displayed.
2. Select “Connect” at the end of the setting.
The wireless LAN (Wi-Fi) settings of this unit can also be configured from a PC ortablet that supports wireless LAN connection.When using a device that has a firmware version of iOS7 or later, “When connectingusing Wi-Fi” (v p. 175) in “Use iOS Device”.1. Press and hold the TUNE + and TUNE - buttons on the main unit for at least 3
seconds when the power of the unit is on.2. Connect the wireless LAN of the PC or tablet used to “Denon AVR-S700W” when
the message “Connect your Wi-Fi device to Wi-Fi network called “Denon AVR-S700W”” appears in the display.
3. Start up the browser and enter “192.168.1.16” in the URL.4. Use the browser to enter the settings, select “Connect” and then exit the settings.
Contents Connections Playback Settings Tips Appendix
176Front panel Display Rear panel Remote Index
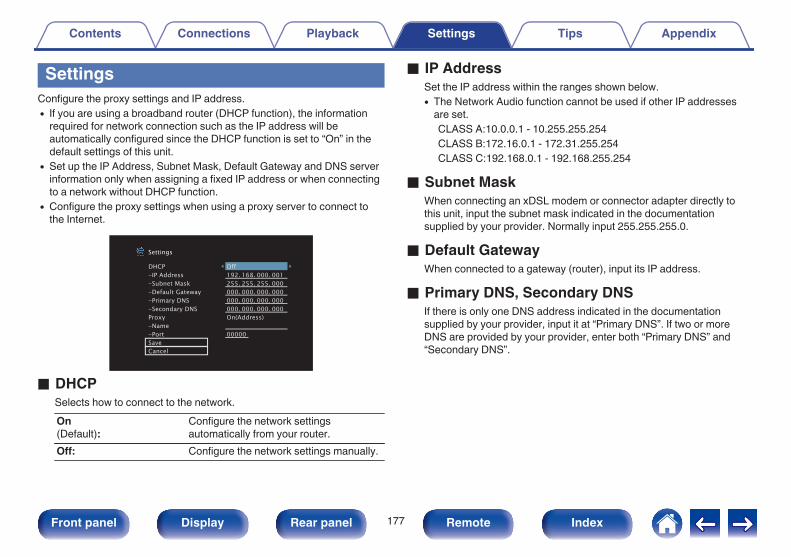
SettingsConfigure the proxy settings and IP address.0 If you are using a broadband router (DHCP function), the information
required for network connection such as the IP address will beautomatically configured since the DHCP function is set to “On” in thedefault settings of this unit.
0 Set up the IP Address, Subnet Mask, Default Gateway and DNS serverinformation only when assigning a fixed IP address or when connectingto a network without DHCP function.
0 Configure the proxy settings when using a proxy server to connect tothe Internet.
.
DHCP
Settings
-IP Address-Subnet Mask-Default Gateway-Primary DNS-Secondary DNS
Off192. 168. 000. 001255. 255. 255. 000000. 000. 000. 000000. 000. 000. 000000. 000. 000. 000
Proxy-Name-Port
On(Address)
00000SaveCancel
o DHCPSelects how to connect to the network.On(Default):
Configure the network settingsautomatically from your router.
Off: Configure the network settings manually.
o IP AddressSet the IP address within the ranges shown below.0 The Network Audio function cannot be used if other IP addresses
are set.CLASS A:10.0.0.1 - 10.255.255.254CLASS B:172.16.0.1 - 172.31.255.254CLASS C:192.168.0.1 - 192.168.255.254
o Subnet MaskWhen connecting an xDSL modem or connector adapter directly tothis unit, input the subnet mask indicated in the documentationsupplied by your provider. Normally input 255.255.255.0.
o Default GatewayWhen connected to a gateway (router), input its IP address.
o Primary DNS, Secondary DNSIf there is only one DNS address indicated in the documentationsupplied by your provider, input it at “Primary DNS”. If two or moreDNS are provided by your provider, enter both “Primary DNS” and“Secondary DNS”.
Contents Connections Playback Settings Tips Appendix
177Front panel Display Rear panel Remote Index
o ProxyMake this setting when connecting to the Internet via a proxy server.Make the proxy settings only when you connect to the Internet via aproxy server that is on your internal network or provided by yourprovider, etc.On(Address): Select when inputting by address.On(Name): Select when inputting by domain name.Off(Default): Disables the proxy server.
o PortEnter port number.
0 If you cannot connect to the Internet, recheck the connections and settings. (v p. 48)
0 If you do not understand about Internet connection, contact your ISP (InternetService Provider) or the store from which you purchased your computer.
IP ControlEnables network communication in standby power mode.Off In Standby: Suspend network function during standby.Always On(Default) :
Network is on during standby. Main unitoperable with a network compatiblecontroller.
When using Denon Remote App use with the “IP Control” setting set to “Always On”.
NOTEWhen “IP Control” is set to “Always On”, it consumes more standby power.
Contents Connections Playback Settings Tips Appendix
178Front panel Display Rear panel Remote Index
Friendly NameThe Friendly Name is the name of this unit displayed on the network. Youcan change the Friendly Name according to your preferences.
o NameSelects Friendly Name from the list.When you select “Other”, you can change the Friendly Nameaccording to your preferences.Home Theater / Living Room / Family Room / Guest Room /Kitchen / Dining Room / Master Bedroom / Bedroom / Den /Office / Other
0 Up to 63 characters can be input.For character input, see “Using the keyboard screen” (v p. 136).
0 The default Friendly Name on first use is “Denon AVR-S700W”.
o Set DefaultsRestores Friendly Name, which you had changed, to the defaultsetting.
DiagnosticsUsed to check the network connection.
o Physical ConnectionChecks the physical LAN port connection.OKError: The LAN cable is not connected. Check the connection.
When connected using a wireless LAN, “Connection Wireless(Wi-Fi)” will bedisplayed.
o Router AccessChecks the connection from this unit to the router.OKError: Failed to communicate with the router. Check the router
settings.
o Internet AccessChecks whether this unit has access to the Internet (WAN).OKError: Failed to connect to the Internet. Check the Internet connection
environment or router settings.
Contents Connections Playback Settings Tips Appendix
179Front panel Display Rear panel Remote Index
GeneralMake various other settings.
LanguageSet the language for display the menu on the TV screen.English / Français / Español (Default : English)
“Language” can also be set up by the following operation. However, the menu screenis not displayed. Watch the display while configuring the settings.1. Press and hold the main unit’s TUNER PRESET CH + and TUNE + for at least 3
seconds.“V.Format:< NTSC>” appears on the display.
2. Press the main unit’s DIMMER.“Lang.:<ENGLISH >” appears on the display.
3. Use the main unit’s TUNER PRESET CH + or TUNER PRESET CH - and set thelanguage.
4. Press the main unit’s STATUS to complete the setting.
ECOConfigure the settings of the ECO Mode and auto standby mode.
o ECO ModeThis can reduce the power consumption when the power of the unit ison.On: Reduce the power consumption.Auto: The power consumption is automatically
reduced to match the volume.Off(Default): Do not reduce the power consumption.
0 When you want to output audio at a high volume level, it is recommended toset “ECO Mode” to “Off”.
0 Eco mode can also be switched by pressing ECO on the remote control unit.
Contents Connections Playback Settings Tips Appendix
180Front panel Display Rear panel Remote Index
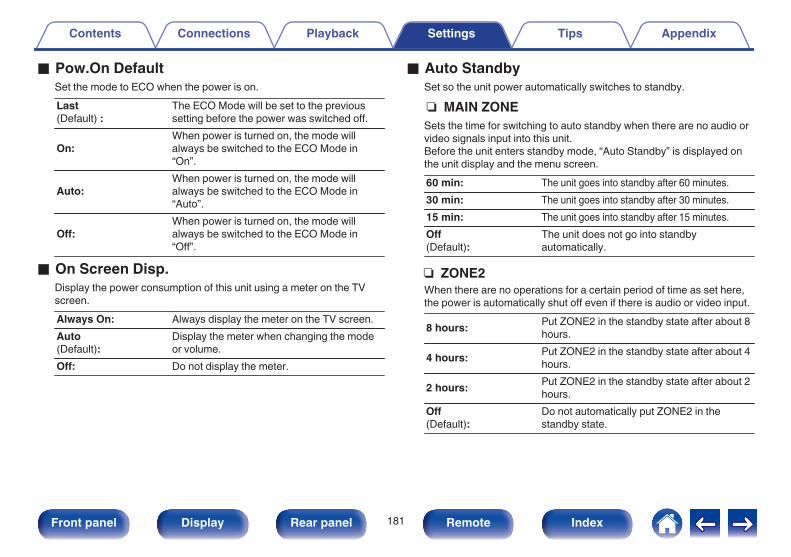
o Pow.On DefaultSet the mode to ECO when the power is on.Last(Default) :
The ECO Mode will be set to the previoussetting before the power was switched off.
On:When power is turned on, the mode willalways be switched to the ECO Mode in“On”.
Auto:When power is turned on, the mode willalways be switched to the ECO Mode in“Auto”.
Off:When power is turned on, the mode willalways be switched to the ECO Mode in“Off”.
o On Screen Disp.Display the power consumption of this unit using a meter on the TVscreen.Always On: Always display the meter on the TV screen.Auto(Default):
Display the meter when changing the modeor volume.
Off: Do not display the meter.
o Auto StandbySet so the unit power automatically switches to standby.n MAIN ZONESets the time for switching to auto standby when there are no audio orvideo signals input into this unit.Before the unit enters standby mode, “Auto Standby” is displayed onthe unit display and the menu screen.60 min: The unit goes into standby after 60 minutes.30 min: The unit goes into standby after 30 minutes.15 min: The unit goes into standby after 15 minutes.Off(Default):
The unit does not go into standbyautomatically.
n ZONE2When there are no operations for a certain period of time as set here,the power is automatically shut off even if there is audio or video input.
8 hours: Put ZONE2 in the standby state after about 8hours.
4 hours: Put ZONE2 in the standby state after about 4hours.
2 hours: Put ZONE2 in the standby state after about 2hours.
Off(Default):
Do not automatically put ZONE2 in thestandby state.
Contents Connections Playback Settings Tips Appendix
181Front panel Display Rear panel Remote Index

ZONE2 SetupConfigure the settings for audio playback on ZONE2.
Values set for “Volume Limit” and “Pow.On Volume” are displayed according to thesetting specified for the volume “Scale” (v p. 143).
o Volume LevelSet the volume output level.Variable(Default) : Volume can be adjusted.
1 – 98(–79.5 dB – 18.0 dB):
Volume is fixed at the desired level. Thevolume cannot be adjusting using the remotecontrol unit.
o Volume LimitMake a setting for maximum volume.60 (-20 dB) / 70 (-10 dB) / 80 (0 dB)(Default : 70 (-10 dB))Off: Do not set a maximum volume.
This can be set when “Volume Level” is set to “Variable”. (v p. 182)
o Pow.On VolumeDefine the volume setting that is active when the power is turned on.Last(Default) :
Use the memorized setting from the lastsession.
Mute: Always use the muting on condition.1 – 98(–79.5 dB – 18.0 dB): The volume is adjusted to the set level.
This can be set when “Volume Level” is set to “Variable”. (v p. 182)
Contents Connections Playback Settings Tips Appendix
182Front panel Display Rear panel Remote Index
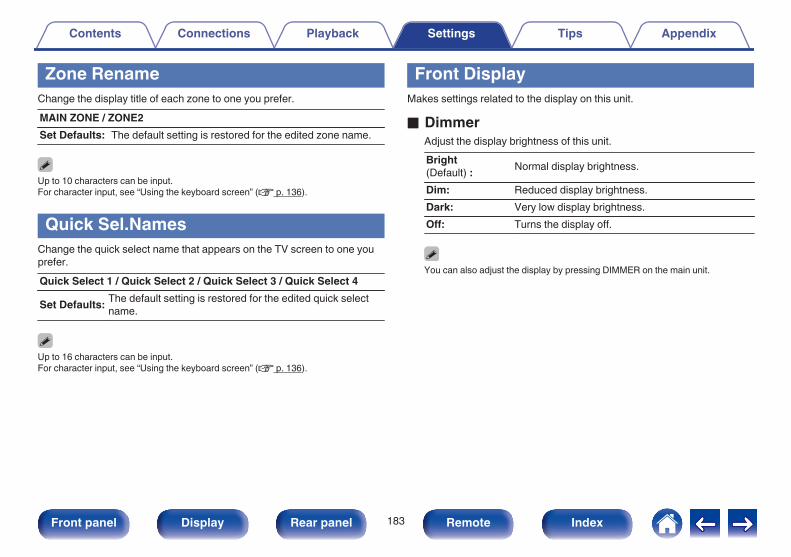
Zone RenameChange the display title of each zone to one you prefer.MAIN ZONE / ZONE2Set Defaults: The default setting is restored for the edited zone name.
Up to 10 characters can be input.For character input, see “Using the keyboard screen” (v p. 136).
Quick Sel.NamesChange the quick select name that appears on the TV screen to one youprefer.Quick Select 1 / Quick Select 2 / Quick Select 3 / Quick Select 4Set Defaults: The default setting is restored for the edited quick select
name.
Up to 16 characters can be input.For character input, see “Using the keyboard screen” (v p. 136).
Front DisplayMakes settings related to the display on this unit.
o DimmerAdjust the display brightness of this unit.Bright(Default) : Normal display brightness.Dim: Reduced display brightness.Dark: Very low display brightness.Off: Turns the display off.
You can also adjust the display by pressing DIMMER on the main unit.
Contents Connections Playback Settings Tips Appendix
183Front panel Display Rear panel Remote Index

InformationShow information about this unit settings, input signals, etc.
o AudioShow the audio information for MAIN ZONE.Sound Mode: The currently set sound mode.Input Signal: The input signal type.Format: The number of input signal channels (presence of
front, surround, LFE).Sample Rate: The input signal’s sampling frequency.Offset: The dialogue normalization correction value.
Flag:This is displayed when inputting signals including asurround back channel. “MATRIX” is displayed withDolby Digital EX and DTS-ES Matrix signals,“DISCRETE” with DTS-ES Discrete signals.
o VideoShow the HDMI input/output signals and HDMI monitor information forMAIN ZONE.HDMI SignalResolution / Color Space / Pixel DepthHDMI MonitorInterface / Resolutions
o ZONEShow information about current settings.
MAIN ZONE:This item shows information aboutsettings for MAIN ZONE. The informationdisplayed differs according to the inputsource.
ZONE2: This item shows information aboutsettings for ZONE2.
o FirmwareVersion: Displays information for the current firmware.
Contents Connections Playback Settings Tips Appendix
184Front panel Display Rear panel Remote Index
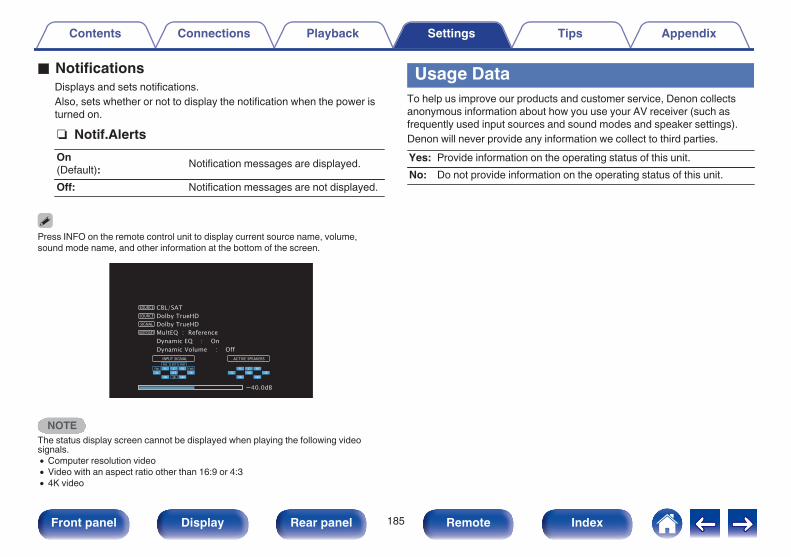
o NotificationsDisplays and sets notifications.Also, sets whether or not to display the notification when the power isturned on.n Notif.AlertsOn(Default): Notification messages are displayed.Off: Notification messages are not displayed.
Press INFO on the remote control unit to display current source name, volume,sound mode name, and other information at the bottom of the screen.
.
EXT FHRFHL
SB SBRSBL
C FR FWRFLFWLLFE SRSL
SBRSBL
C FRFLSW SRSL
INPUT SIGNAL ACTIVE SPEAKERS
AUDYSSEY
SIGNAL
SOURCE
SOURCE
Dynamic EQ : OnMultEQ : ReferenceDolby TrueHDDolby TrueHDCBL/SAT
Dynamic Volume : Off
-40.0dB
NOTEThe status display screen cannot be displayed when playing the following videosignals.0 Computer resolution video0 Video with an aspect ratio other than 16:9 or 4:30 4K video
Usage DataTo help us improve our products and customer service, Denon collectsanonymous information about how you use your AV receiver (such asfrequently used input sources and sound modes and speaker settings).Denon will never provide any information we collect to third parties.Yes: Provide information on the operating status of this unit.No: Do not provide information on the operating status of this unit.
Contents Connections Playback Settings Tips Appendix
185Front panel Display Rear panel Remote Index
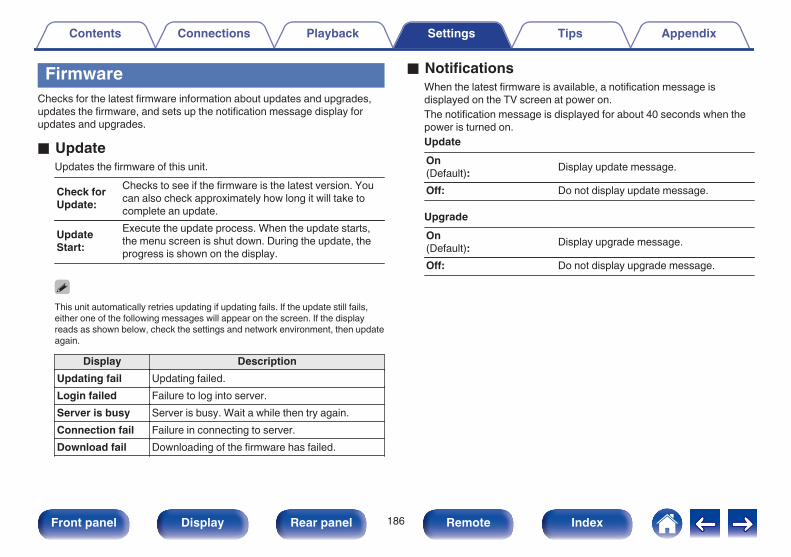
FirmwareChecks for the latest firmware information about updates and upgrades,updates the firmware, and sets up the notification message display forupdates and upgrades.
o UpdateUpdates the firmware of this unit.
Check forUpdate:
Checks to see if the firmware is the latest version. Youcan also check approximately how long it will take tocomplete an update.
UpdateStart:
Execute the update process. When the update starts,the menu screen is shut down. During the update, theprogress is shown on the display.
This unit automatically retries updating if updating fails. If the update still fails,either one of the following messages will appear on the screen. If the displayreads as shown below, check the settings and network environment, then updateagain.
Display DescriptionUpdating fail Updating failed.Login failed Failure to log into server.Server is busy Server is busy. Wait a while then try again.Connection fail Failure in connecting to server.Download fail Downloading of the firmware has failed.
o NotificationsWhen the latest firmware is available, a notification message isdisplayed on the TV screen at power on.The notification message is displayed for about 40 seconds when thepower is turned on.UpdateOn(Default): Display update message.Off: Do not display update message.
UpgradeOn(Default): Display upgrade message.Off: Do not display upgrade message.
Contents Connections Playback Settings Tips Appendix
186Front panel Display Rear panel Remote Index
o Add New FeatureDisplay new features that can be downloaded to this unit and performan upgrade.UpgradePackage: Display the items to be upgraded.UpgradeStatus:
Display a list of the additional functions provided bythe upgrade.
Upgrade Start:Execute the upgrade process.When the upgrade starts, the menu screen is shutdown. During the upgrade, the amount of upgradetime which has elapsed is displayed.
0 See the Denon website for details about upgrades.0 When the procedure is complete, “Registered” is displayed in this menu and
upgrades can be carried out. If the procedure has not been carried out, “-------”is displayed.The ID number shown on this screen is needed when carrying out theprocedure.The ID number can also be displayed by pressing and holding the main unit’sZONE2 SOURCE and TUNE + for at least 3 seconds.
0 If the upgrade is not successful, an error message identical to those in“Firmware” - “Update” will appear on the display. Check the settings andnetwork environment and then perform the upgrade again.
Notes concerning use of “Update” and “Add New Feature”0 In order to use these functions, you must have the correct system
requirements and settings for an Internet connection. (v p. 48)0 Do not turn off the power until updating or upgrading is completed.0 Approximately 1 hour is required for the updating/upgrading procedure
to be completed.0 Once updating/upgrade starts, normal operations on this unit cannot
be performed until updating/upgrading is completed. Furthermore,there may be cases where backup data is reset for the parameters,etc., set on this unit.
0 If the update or upgrade fails, press and hold the X on the main unit formore than 5 seconds, or remove and re-insert the power cord. “UpdateRetry” appears on the display and update restarts from the point atwhich update failed. If the error continues despite this, check thenetwork environment.
Information regarding the “Update” function and “Add New Feature” will beannounced on the Denon web site each time related plans are defined.
Contents Connections Playback Settings Tips Appendix
187Front panel Display Rear panel Remote Index
Setup LockProtect settings from inadvertent changes.
o LockOn: Turn protection on.Off(Default): Turn protection off.
When cancelling the setting, set “Lock” to “Off”.
NOTEWhen “Lock” is set to “On”, no setting items are displayed except for “SetupLock”.
Contents Connections Playback Settings Tips Appendix
188Front panel Display Rear panel Remote Index
o ContentsTipsI want the volume not to become too loud by mistake 190I want to keep the volume at the same level when I turn the power on 190I want to have the subwoofer always output audio 190I want to make human voices in the movies clearer 190I want to keep bass and clarity during playback at a lower volumelevel 190I want to automatically adjust the volume level difference in contentsuch as TV and movies 190I want to set the optimized listening environment after changing theconfiguration/position of the speakers or changing a speaker to a newone 191I want to combine a desired video with the current music 191I want to play back photos from Flickr at the same time while listeningto the Internet radio 191I want to delete unused input sources 191I want to enjoy the same music in all zones at the home party, etc. 191
TroubleshootingPower does not turn on / Power is turned off 193Operations cannot be performed through the remote control unit 194Display on this unit shows nothing 194No sound comes out 195Desired sound does not come out 196Sound is interrupted or noise occurs 198No video is shown on the TV 199The menu screen is not displayed on the TV 200iPod cannot be played back 201USB memory devices cannot be played back 202File names on the iPod/USB memory device are not displayedproperly 203Bluetooth cannot be played back 203The Internet radio cannot be played back 204Music files on PC or NAS cannot be played back 205Various online services cannot be played 205The HDMI control function does not work 206When it is not possible to connect to a wireless LAN network 207
Contents Connections Playback Settings Tips AppendixTips
189Front panel Display Rear panel Remote Index
TipsI want the volume not to become too loud by mistake0 Set the volume upper limit for “Volume Limit” in the menu beforehand. This prevents children or others from increasing the volume too much by mistake.
You can set this for each zone. (v p. 143, 182)I want to keep the volume at the same level when I turn the power on0 By default, the volume setting when power was previously set to standby on this unit is applied at next power on with no change. To use a fixed volume
level, set the volume level at power on for “Pow.On Volume” in the menu. You can set this for each zone. (v p. 143, 182)I want to have the subwoofer always output audio0 Depending on the input signals and sound mode, the subwoofer may not output audio. When “Subwoofer Mode” in the menu is set to “LFE+Main”, you
can have the subwoofer always output audio. (v p. 173)I want to make human voices in the movies clearer0 Use “Dialog Level” in the menu to adjust the level. (v p. 137)I want to keep bass and clarity during playback at a lower volume level0 Set “Dynamic EQ” in the menu to “On”. This setting corrects the frequency characteristics to allow you to enjoy clear sound without the bass being lost
even during playback at a lower volume level. (v p. 145)I want to automatically adjust the volume level difference in content such as TV and movies0 Set “Dynamic Volume” in the menu. Volume level changes (between quiet scenes and loud scenes) in TV shows or movies are automatically adjusted
to your desired level. (v p. 146)
Contents Connections Playback Settings Tips Appendix
190Front panel Display Rear panel Remote Index
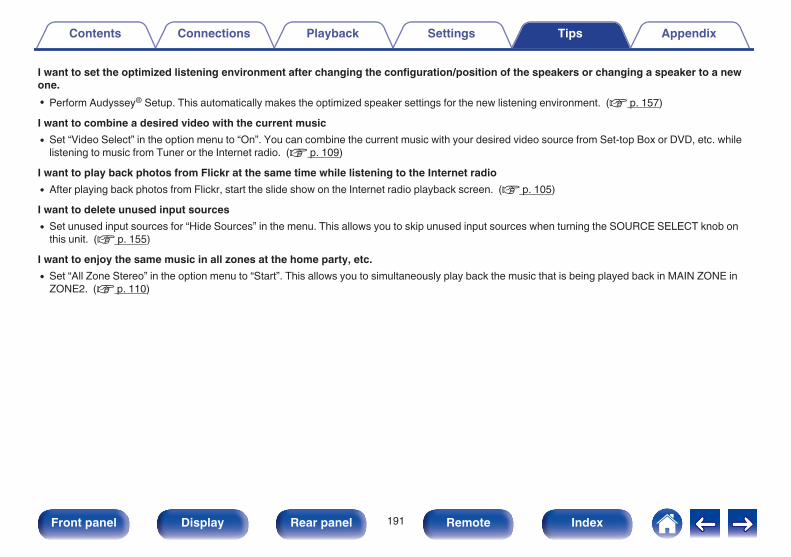
I want to set the optimized listening environment after changing the configuration/position of the speakers or changing a speaker to a newone.0 Perform Audyssey® Setup. This automatically makes the optimized speaker settings for the new listening environment. (v p. 157)I want to combine a desired video with the current music0 Set “Video Select” in the option menu to “On”. You can combine the current music with your desired video source from Set-top Box or DVD, etc. while
listening to music from Tuner or the Internet radio. (v p. 109)I want to play back photos from Flickr at the same time while listening to the Internet radio0 After playing back photos from Flickr, start the slide show on the Internet radio playback screen. (v p. 105)I want to delete unused input sources0 Set unused input sources for “Hide Sources” in the menu. This allows you to skip unused input sources when turning the SOURCE SELECT knob on
this unit. (v p. 155)I want to enjoy the same music in all zones at the home party, etc.0 Set “All Zone Stereo” in the option menu to “Start”. This allows you to simultaneously play back the music that is being played back in MAIN ZONE in
ZONE2. (v p. 110)
Contents Connections Playback Settings Tips Appendix
191Front panel Display Rear panel Remote Index

TroubleshootingIf a problem should arise, first check the following:1. Are the connections correct?2. Is the set being operated as described in the owner’s manual?3. Are the other devices operating properly?If this unit does not operate properly, check the corresponding symptoms in this section.If the symptoms do not match any of those described here, consult your dealer as it could be due to a fault in this unit. In this case, disconnect the powerimmediately and contact the store where you purchased this unit.
Contents Connections Playback Settings Tips Appendix
192Front panel Display Rear panel Remote Index
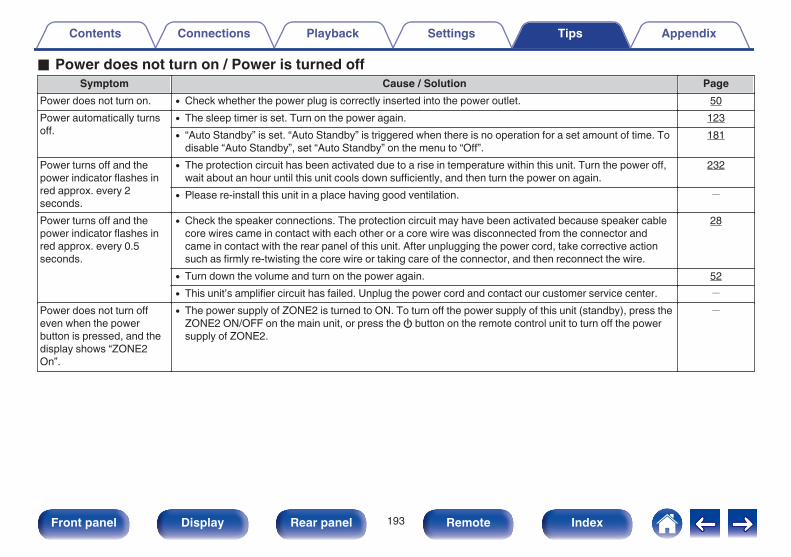
o Power does not turn on / Power is turned offSymptom Cause / Solution Page
Power does not turn on. 0 Check whether the power plug is correctly inserted into the power outlet. 50Power automatically turnsoff.
0 The sleep timer is set. Turn on the power again. 1230 “Auto Standby” is set. “Auto Standby” is triggered when there is no operation for a set amount of time. To
disable “Auto Standby”, set “Auto Standby” on the menu to “Off”.181
Power turns off and thepower indicator flashes inred approx. every 2seconds.
0 The protection circuit has been activated due to a rise in temperature within this unit. Turn the power off,wait about an hour until this unit cools down sufficiently, and then turn the power on again.
232
0 Please re-install this unit in a place having good ventilation. -
Power turns off and thepower indicator flashes inred approx. every 0.5seconds.
0 Check the speaker connections. The protection circuit may have been activated because speaker cablecore wires came in contact with each other or a core wire was disconnected from the connector andcame in contact with the rear panel of this unit. After unplugging the power cord, take corrective actionsuch as firmly re-twisting the core wire or taking care of the connector, and then reconnect the wire.
28
0 Turn down the volume and turn on the power again. 520 This unit’s amplifier circuit has failed. Unplug the power cord and contact our customer service center. -
Power does not turn offeven when the powerbutton is pressed, and thedisplay shows “ZONE2On”.
0 The power supply of ZONE2 is turned to ON. To turn off the power supply of this unit (standby), press theZONE2 ON/OFF on the main unit, or press the X button on the remote control unit to turn off the powersupply of ZONE2.
-
Contents Connections Playback Settings Tips Appendix
193Front panel Display Rear panel Remote Index
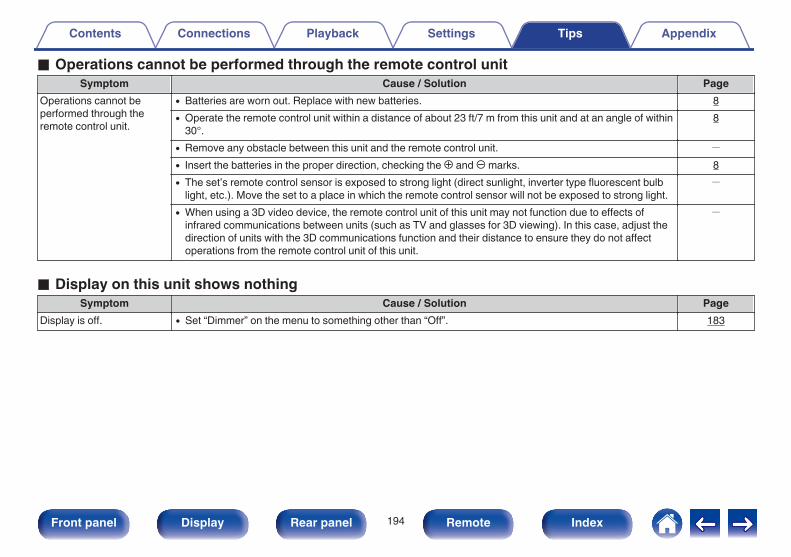
o Operations cannot be performed through the remote control unitSymptom Cause / Solution Page
Operations cannot beperformed through theremote control unit.
0 Batteries are worn out. Replace with new batteries. 80 Operate the remote control unit within a distance of about 23 ft/7 m from this unit and at an angle of within
30°.8
0 Remove any obstacle between this unit and the remote control unit. -
0 Insert the batteries in the proper direction, checking the q and w marks. 80 The set’s remote control sensor is exposed to strong light (direct sunlight, inverter type fluorescent bulb
light, etc.). Move the set to a place in which the remote control sensor will not be exposed to strong light.-
0 When using a 3D video device, the remote control unit of this unit may not function due to effects ofinfrared communications between units (such as TV and glasses for 3D viewing). In this case, adjust thedirection of units with the 3D communications function and their distance to ensure they do not affectoperations from the remote control unit of this unit.
-
o Display on this unit shows nothingSymptom Cause / Solution Page
Display is off. 0 Set “Dimmer” on the menu to something other than “Off”. 183
Contents Connections Playback Settings Tips Appendix
194Front panel Display Rear panel Remote Index
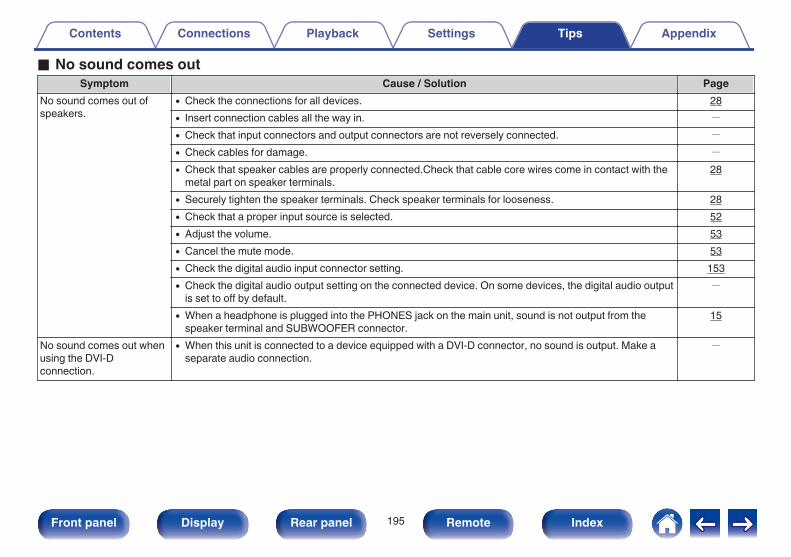
o No sound comes outSymptom Cause / Solution Page
No sound comes out ofspeakers.
0 Check the connections for all devices. 280 Insert connection cables all the way in. -
0 Check that input connectors and output connectors are not reversely connected. -
0 Check cables for damage. -
0 Check that speaker cables are properly connected.Check that cable core wires come in contact with themetal part on speaker terminals.
28
0 Securely tighten the speaker terminals. Check speaker terminals for looseness. 280 Check that a proper input source is selected. 520 Adjust the volume. 530 Cancel the mute mode. 530 Check the digital audio input connector setting. 1530 Check the digital audio output setting on the connected device. On some devices, the digital audio output
is set to off by default.-
0 When a headphone is plugged into the PHONES jack on the main unit, sound is not output from thespeaker terminal and SUBWOOFER connector.
15
No sound comes out whenusing the DVI-Dconnection.
0 When this unit is connected to a device equipped with a DVI-D connector, no sound is output. Make aseparate audio connection.
-
Contents Connections Playback Settings Tips Appendix
195Front panel Display Rear panel Remote Index
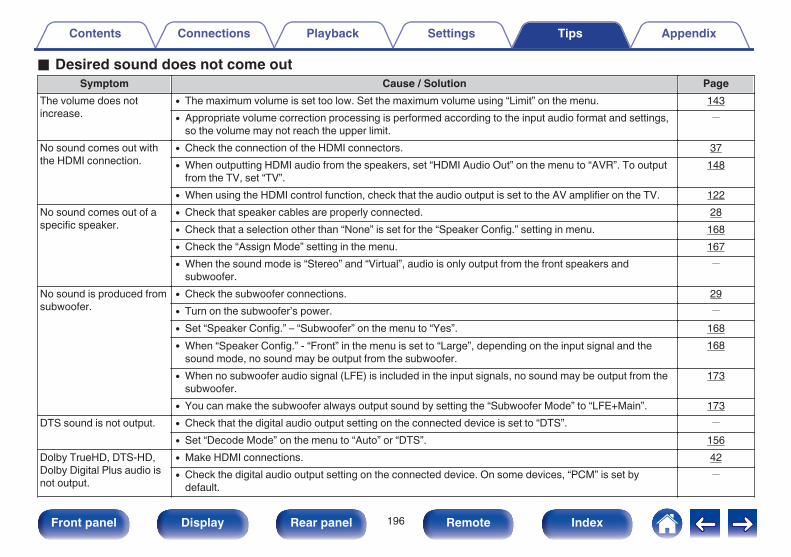
o Desired sound does not come outSymptom Cause / Solution Page
The volume does notincrease.
0 The maximum volume is set too low. Set the maximum volume using “Limit” on the menu. 1430 Appropriate volume correction processing is performed according to the input audio format and settings,
so the volume may not reach the upper limit.-
No sound comes out withthe HDMI connection.
0 Check the connection of the HDMI connectors. 370 When outputting HDMI audio from the speakers, set “HDMI Audio Out” on the menu to “AVR”. To output
from the TV, set “TV”.148
0 When using the HDMI control function, check that the audio output is set to the AV amplifier on the TV. 122No sound comes out of aspecific speaker.
0 Check that speaker cables are properly connected. 280 Check that a selection other than “None” is set for the “Speaker Config.” setting in menu. 1680 Check the “Assign Mode” setting in the menu. 1670 When the sound mode is “Stereo” and “Virtual”, audio is only output from the front speakers and
subwoofer.-
No sound is produced fromsubwoofer.
0 Check the subwoofer connections. 290 Turn on the subwoofer’s power. -
0 Set “Speaker Config.” – “Subwoofer” on the menu to “Yes”. 1680 When “Speaker Config.” - “Front” in the menu is set to “Large”, depending on the input signal and the
sound mode, no sound may be output from the subwoofer.168
0 When no subwoofer audio signal (LFE) is included in the input signals, no sound may be output from thesubwoofer.
173
0 You can make the subwoofer always output sound by setting the “Subwoofer Mode” to “LFE+Main”. 173DTS sound is not output. 0 Check that the digital audio output setting on the connected device is set to “DTS”. -
0 Set “Decode Mode” on the menu to “Auto” or “DTS”. 156Dolby TrueHD, DTS-HD,Dolby Digital Plus audio isnot output.
0 Make HDMI connections. 420 Check the digital audio output setting on the connected device. On some devices, “PCM” is set by
default.-
Contents Connections Playback Settings Tips Appendix
196Front panel Display Rear panel Remote Index
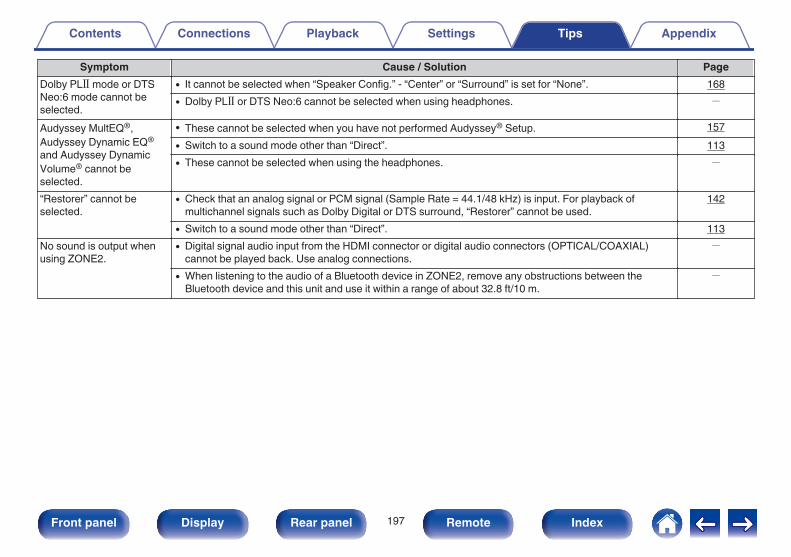
Symptom Cause / Solution PageDolby PLg mode or DTSNeo:6 mode cannot beselected.
0 It cannot be selected when “Speaker Config.” - “Center” or “Surround” is set for “None”. 1680 Dolby PLg or DTS Neo:6 cannot be selected when using headphones. -
Audyssey MultEQ®,Audyssey Dynamic EQ®and Audyssey DynamicVolume® cannot beselected.
0 These cannot be selected when you have not performed Audyssey® Setup. 1570 Switch to a sound mode other than “Direct”. 1130 These cannot be selected when using the headphones. -
“Restorer” cannot beselected.
0 Check that an analog signal or PCM signal (Sample Rate = 44.1/48 kHz) is input. For playback ofmultichannel signals such as Dolby Digital or DTS surround, “Restorer” cannot be used.
142
0 Switch to a sound mode other than “Direct”. 113No sound is output whenusing ZONE2.
0 Digital signal audio input from the HDMI connector or digital audio connectors (OPTICAL/COAXIAL)cannot be played back. Use analog connections.
-
0 When listening to the audio of a Bluetooth device in ZONE2, remove any obstructions between theBluetooth device and this unit and use it within a range of about 32.8 ft/10 m.
-
Contents Connections Playback Settings Tips Appendix
197Front panel Display Rear panel Remote Index
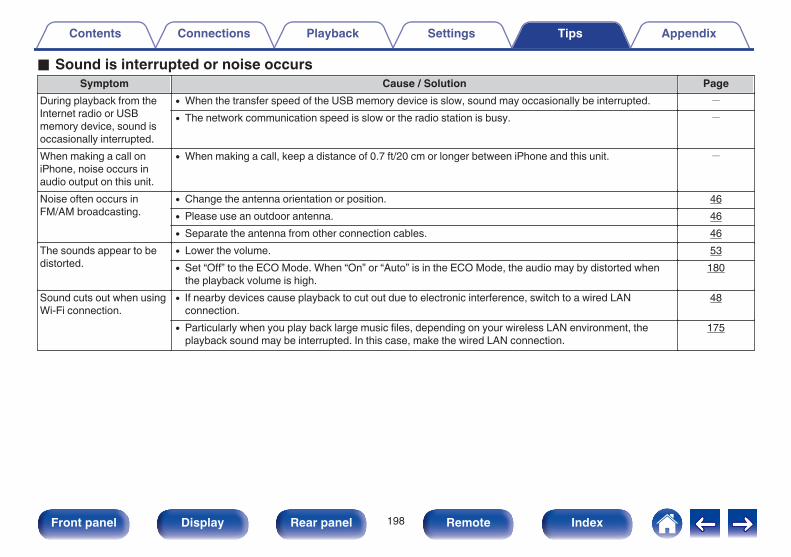
o Sound is interrupted or noise occursSymptom Cause / Solution Page
During playback from theInternet radio or USBmemory device, sound isoccasionally interrupted.
0 When the transfer speed of the USB memory device is slow, sound may occasionally be interrupted. -
0 The network communication speed is slow or the radio station is busy. -
When making a call oniPhone, noise occurs inaudio output on this unit.
0 When making a call, keep a distance of 0.7 ft/20 cm or longer between iPhone and this unit. -
Noise often occurs inFM/AM broadcasting.
0 Change the antenna orientation or position. 460 Please use an outdoor antenna. 460 Separate the antenna from other connection cables. 46
The sounds appear to bedistorted.
0 Lower the volume. 530 Set “Off” to the ECO Mode. When “On” or “Auto” is in the ECO Mode, the audio may by distorted when
the playback volume is high.180
Sound cuts out when usingWi-Fi connection.
0 If nearby devices cause playback to cut out due to electronic interference, switch to a wired LANconnection.
48
0 Particularly when you play back large music files, depending on your wireless LAN environment, theplayback sound may be interrupted. In this case, make the wired LAN connection.
175
Contents Connections Playback Settings Tips Appendix
198Front panel Display Rear panel Remote Index
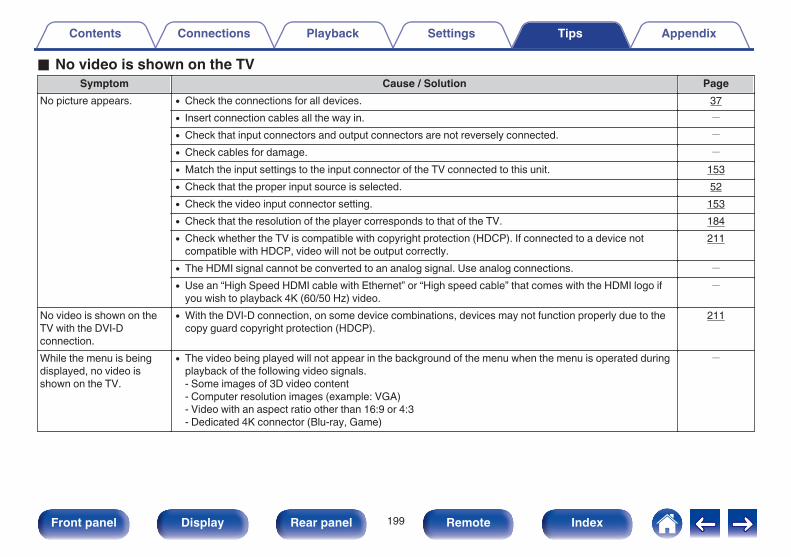
o No video is shown on the TVSymptom Cause / Solution Page
No picture appears. 0 Check the connections for all devices. 370 Insert connection cables all the way in. -
0 Check that input connectors and output connectors are not reversely connected. -
0 Check cables for damage. -
0 Match the input settings to the input connector of the TV connected to this unit. 1530 Check that the proper input source is selected. 520 Check the video input connector setting. 1530 Check that the resolution of the player corresponds to that of the TV. 1840 Check whether the TV is compatible with copyright protection (HDCP). If connected to a device not
compatible with HDCP, video will not be output correctly.211
0 The HDMI signal cannot be converted to an analog signal. Use analog connections. -
0 Use an “High Speed HDMI cable with Ethernet” or “High speed cable” that comes with the HDMI logo ifyou wish to playback 4K (60/50 Hz) video.
-
No video is shown on theTV with the DVI-Dconnection.
0 With the DVI-D connection, on some device combinations, devices may not function properly due to thecopy guard copyright protection (HDCP).
211
While the menu is beingdisplayed, no video isshown on the TV.
0 The video being played will not appear in the background of the menu when the menu is operated duringplayback of the following video signals.- Some images of 3D video content- Computer resolution images (example: VGA)- Video with an aspect ratio other than 16:9 or 4:3- Dedicated 4K connector (Blu-ray, Game)
-
Contents Connections Playback Settings Tips Appendix
199Front panel Display Rear panel Remote Index
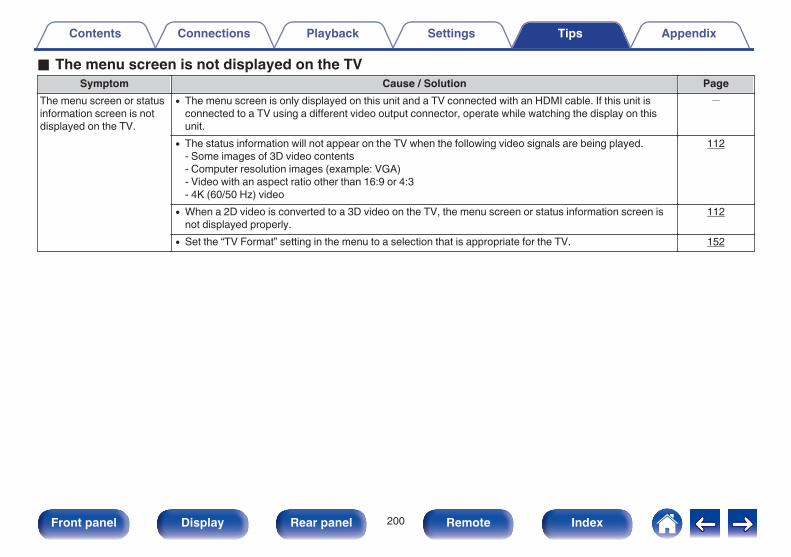
o The menu screen is not displayed on the TVSymptom Cause / Solution Page
The menu screen or statusinformation screen is notdisplayed on the TV.
0 The menu screen is only displayed on this unit and a TV connected with an HDMI cable. If this unit isconnected to a TV using a different video output connector, operate while watching the display on thisunit.
-
0 The status information will not appear on the TV when the following video signals are being played.- Some images of 3D video contents- Computer resolution images (example: VGA)- Video with an aspect ratio other than 16:9 or 4:3- 4K (60/50 Hz) video
112
0 When a 2D video is converted to a 3D video on the TV, the menu screen or status information screen isnot displayed properly.
112
0 Set the “TV Format” setting in the menu to a selection that is appropriate for the TV. 152
Contents Connections Playback Settings Tips Appendix
200Front panel Display Rear panel Remote Index
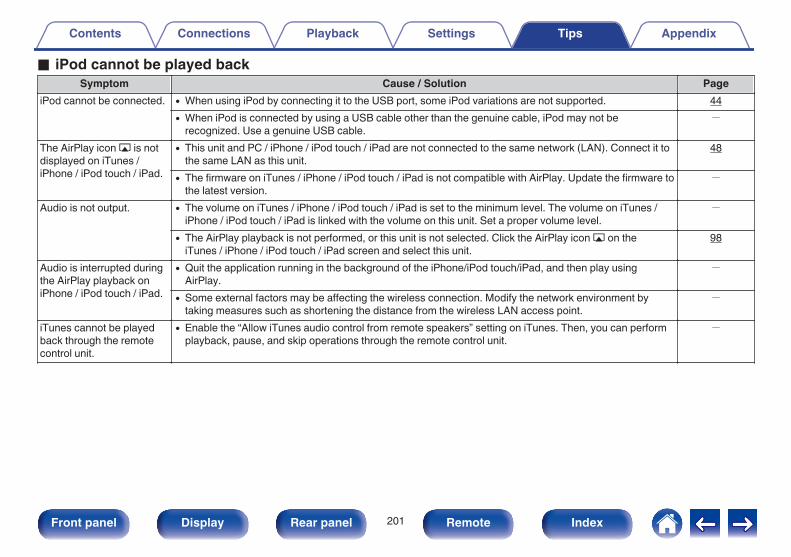
o iPod cannot be played backSymptom Cause / Solution Page
iPod cannot be connected. 0 When using iPod by connecting it to the USB port, some iPod variations are not supported. 440 When iPod is connected by using a USB cable other than the genuine cable, iPod may not be
recognized. Use a genuine USB cable.-
The AirPlay icon ' is notdisplayed on iTunes /iPhone / iPod touch / iPad.
0 This unit and PC / iPhone / iPod touch / iPad are not connected to the same network (LAN). Connect it tothe same LAN as this unit.
48
0 The firmware on iTunes / iPhone / iPod touch / iPad is not compatible with AirPlay. Update the firmware tothe latest version.
-
Audio is not output. 0 The volume on iTunes / iPhone / iPod touch / iPad is set to the minimum level. The volume on iTunes /iPhone / iPod touch / iPad is linked with the volume on this unit. Set a proper volume level.
-
0 The AirPlay playback is not performed, or this unit is not selected. Click the AirPlay icon ' on theiTunes / iPhone / iPod touch / iPad screen and select this unit.
98
Audio is interrupted duringthe AirPlay playback oniPhone / iPod touch / iPad.
0 Quit the application running in the background of the iPhone/iPod touch/iPad, and then play usingAirPlay.
-
0 Some external factors may be affecting the wireless connection. Modify the network environment bytaking measures such as shortening the distance from the wireless LAN access point.
-
iTunes cannot be playedback through the remotecontrol unit.
0 Enable the “Allow iTunes audio control from remote speakers” setting on iTunes. Then, you can performplayback, pause, and skip operations through the remote control unit.
-
Contents Connections Playback Settings Tips Appendix
201Front panel Display Rear panel Remote Index
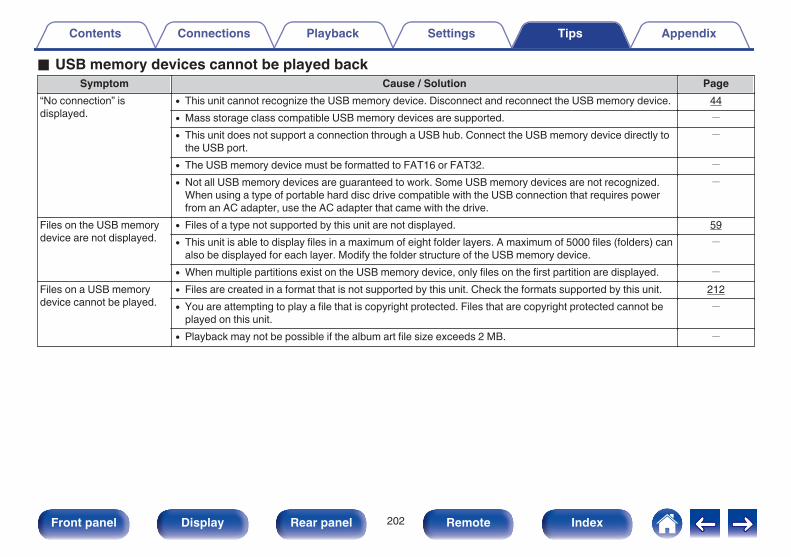
o USB memory devices cannot be played backSymptom Cause / Solution Page
“No connection” isdisplayed.
0 This unit cannot recognize the USB memory device. Disconnect and reconnect the USB memory device. 440 Mass storage class compatible USB memory devices are supported. -
0 This unit does not support a connection through a USB hub. Connect the USB memory device directly tothe USB port.
-
0 The USB memory device must be formatted to FAT16 or FAT32. -
0 Not all USB memory devices are guaranteed to work. Some USB memory devices are not recognized.When using a type of portable hard disc drive compatible with the USB connection that requires powerfrom an AC adapter, use the AC adapter that came with the drive.
-
Files on the USB memorydevice are not displayed.
0 Files of a type not supported by this unit are not displayed. 590 This unit is able to display files in a maximum of eight folder layers. A maximum of 5000 files (folders) can
also be displayed for each layer. Modify the folder structure of the USB memory device.-
0 When multiple partitions exist on the USB memory device, only files on the first partition are displayed. -
Files on a USB memorydevice cannot be played.
0 Files are created in a format that is not supported by this unit. Check the formats supported by this unit. 2120 You are attempting to play a file that is copyright protected. Files that are copyright protected cannot be
played on this unit.-
0 Playback may not be possible if the album art file size exceeds 2 MB. -
Contents Connections Playback Settings Tips Appendix
202Front panel Display Rear panel Remote Index
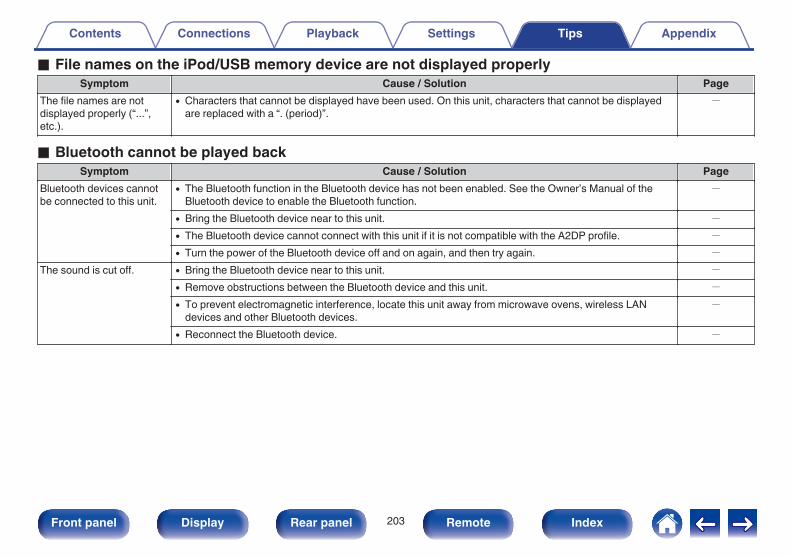
o File names on the iPod/USB memory device are not displayed properlySymptom Cause / Solution Page
The file names are notdisplayed properly (“...”,etc.).
0 Characters that cannot be displayed have been used. On this unit, characters that cannot be displayedare replaced with a “. (period)”.
-
o Bluetooth cannot be played backSymptom Cause / Solution Page
Bluetooth devices cannotbe connected to this unit.
0 The Bluetooth function in the Bluetooth device has not been enabled. See the Owner’s Manual of theBluetooth device to enable the Bluetooth function.
-
0 Bring the Bluetooth device near to this unit. -
0 The Bluetooth device cannot connect with this unit if it is not compatible with the A2DP profile. -
0 Turn the power of the Bluetooth device off and on again, and then try again. -
The sound is cut off. 0 Bring the Bluetooth device near to this unit. -
0 Remove obstructions between the Bluetooth device and this unit. -
0 To prevent electromagnetic interference, locate this unit away from microwave ovens, wireless LANdevices and other Bluetooth devices.
-
0 Reconnect the Bluetooth device. -
Contents Connections Playback Settings Tips Appendix
203Front panel Display Rear panel Remote Index
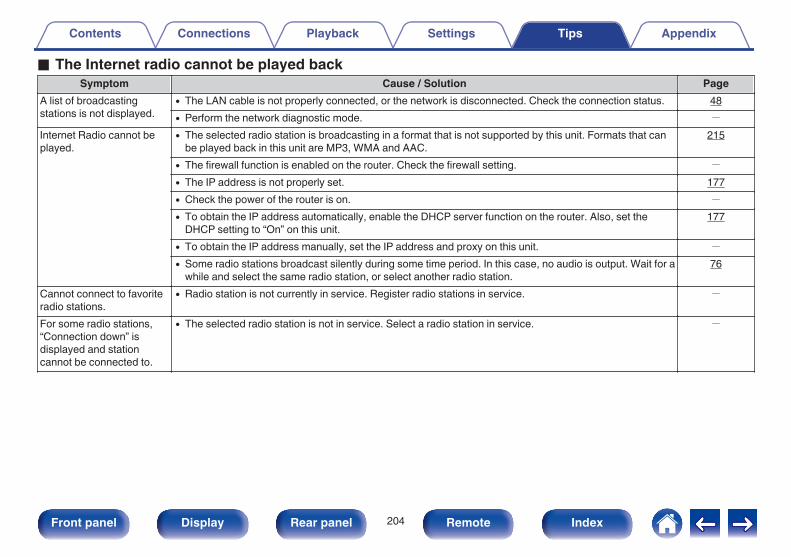
o The Internet radio cannot be played backSymptom Cause / Solution Page
A list of broadcastingstations is not displayed.
0 The LAN cable is not properly connected, or the network is disconnected. Check the connection status. 480 Perform the network diagnostic mode. -
Internet Radio cannot beplayed.
0 The selected radio station is broadcasting in a format that is not supported by this unit. Formats that canbe played back in this unit are MP3, WMA and AAC.
215
0 The firewall function is enabled on the router. Check the firewall setting. -
0 The IP address is not properly set. 1770 Check the power of the router is on. -
0 To obtain the IP address automatically, enable the DHCP server function on the router. Also, set theDHCP setting to “On” on this unit.
177
0 To obtain the IP address manually, set the IP address and proxy on this unit. -
0 Some radio stations broadcast silently during some time period. In this case, no audio is output. Wait for awhile and select the same radio station, or select another radio station.
76
Cannot connect to favoriteradio stations.
0 Radio station is not currently in service. Register radio stations in service. -
For some radio stations,“Connection down” isdisplayed and stationcannot be connected to.
0 The selected radio station is not in service. Select a radio station in service. -
Contents Connections Playback Settings Tips Appendix
204Front panel Display Rear panel Remote Index
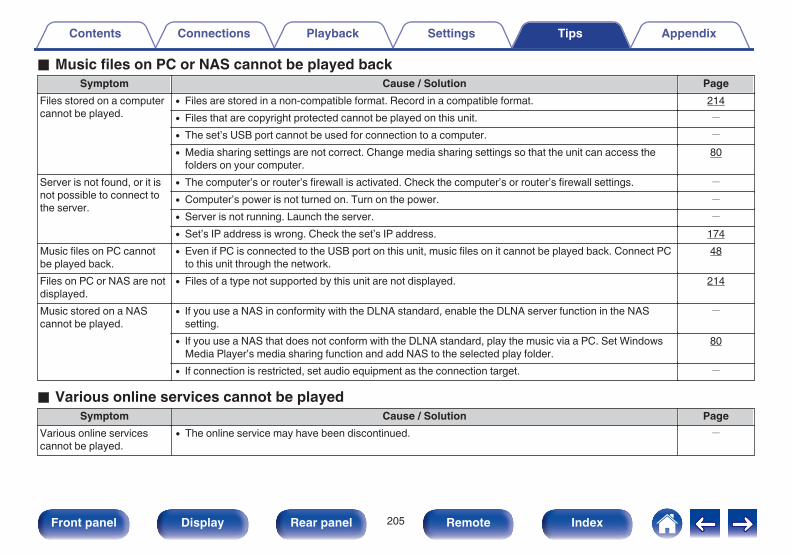
o Music files on PC or NAS cannot be played backSymptom Cause / Solution Page
Files stored on a computercannot be played.
0 Files are stored in a non-compatible format. Record in a compatible format. 2140 Files that are copyright protected cannot be played on this unit. -
0 The set’s USB port cannot be used for connection to a computer. -
0 Media sharing settings are not correct. Change media sharing settings so that the unit can access thefolders on your computer.
80
Server is not found, or it isnot possible to connect tothe server.
0 The computer’s or router’s firewall is activated. Check the computer’s or router’s firewall settings. -
0 Computer’s power is not turned on. Turn on the power. -
0 Server is not running. Launch the server. -
0 Set’s IP address is wrong. Check the set’s IP address. 174Music files on PC cannotbe played back.
0 Even if PC is connected to the USB port on this unit, music files on it cannot be played back. Connect PCto this unit through the network.
48
Files on PC or NAS are notdisplayed.
0 Files of a type not supported by this unit are not displayed. 214
Music stored on a NAScannot be played.
0 If you use a NAS in conformity with the DLNA standard, enable the DLNA server function in the NASsetting.
-
0 If you use a NAS that does not conform with the DLNA standard, play the music via a PC. Set WindowsMedia Player’s media sharing function and add NAS to the selected play folder.
80
0 If connection is restricted, set audio equipment as the connection target. -
o Various online services cannot be playedSymptom Cause / Solution Page
Various online servicescannot be played.
0 The online service may have been discontinued. -
Contents Connections Playback Settings Tips Appendix
205Front panel Display Rear panel Remote Index
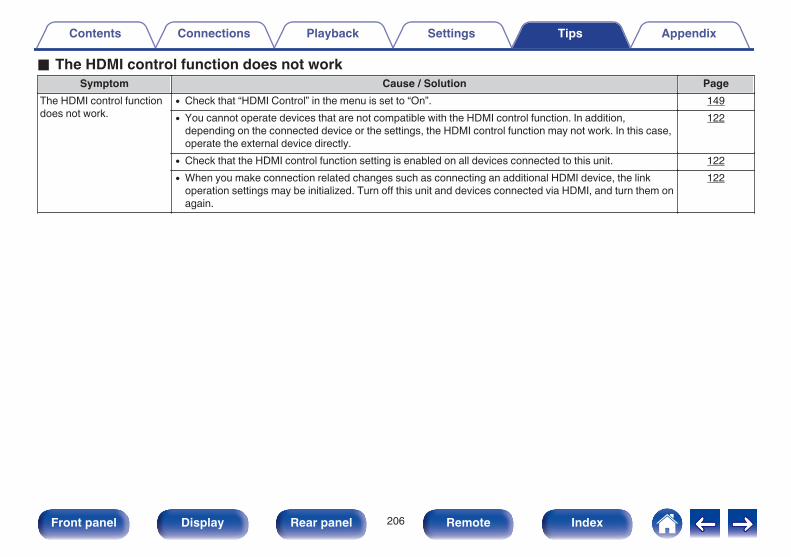
o The HDMI control function does not workSymptom Cause / Solution Page
The HDMI control functiondoes not work.
0 Check that “HDMI Control” in the menu is set to “On”. 1490 You cannot operate devices that are not compatible with the HDMI control function. In addition,
depending on the connected device or the settings, the HDMI control function may not work. In this case,operate the external device directly.
122
0 Check that the HDMI control function setting is enabled on all devices connected to this unit. 1220 When you make connection related changes such as connecting an additional HDMI device, the link
operation settings may be initialized. Turn off this unit and devices connected via HDMI, and turn them onagain.
122
Contents Connections Playback Settings Tips Appendix
206Front panel Display Rear panel Remote Index
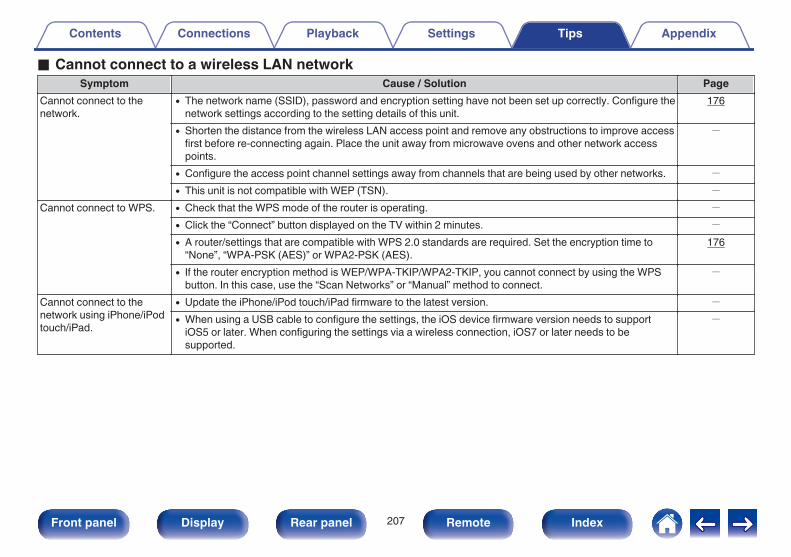
o Cannot connect to a wireless LAN networkSymptom Cause / Solution Page
Cannot connect to thenetwork.
0 The network name (SSID), password and encryption setting have not been set up correctly. Configure thenetwork settings according to the setting details of this unit.
176
0 Shorten the distance from the wireless LAN access point and remove any obstructions to improve accessfirst before re-connecting again. Place the unit away from microwave ovens and other network accesspoints.
-
0 Configure the access point channel settings away from channels that are being used by other networks. -
0 This unit is not compatible with WEP (TSN). -
Cannot connect to WPS. 0 Check that the WPS mode of the router is operating. -
0 Click the “Connect” button displayed on the TV within 2 minutes. -
0 A router/settings that are compatible with WPS 2.0 standards are required. Set the encryption time to“None”, “WPA-PSK (AES)” or WPA2-PSK (AES).
176
0 If the router encryption method is WEP/WPA-TKIP/WPA2-TKIP, you cannot connect by using the WPSbutton. In this case, use the “Scan Networks” or “Manual” method to connect.
-
Cannot connect to thenetwork using iPhone/iPodtouch/iPad.
0 Update the iPhone/iPod touch/iPad firmware to the latest version. -
0 When using a USB cable to configure the settings, the iOS device firmware version needs to supportiOS5 or later. When configuring the settings via a wireless connection, iOS7 or later needs to besupported.
-
Contents Connections Playback Settings Tips Appendix
207Front panel Display Rear panel Remote Index
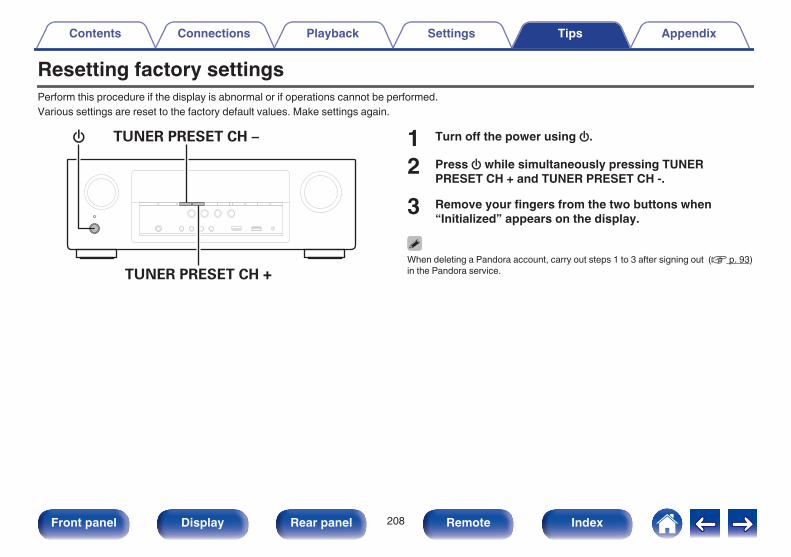
Resetting factory settingsPerform this procedure if the display is abnormal or if operations cannot be performed.Various settings are reset to the factory default values. Make settings again.
.
X
TUNER PRESET CH +
TUNER PRESET CH – 1 Turn off the power using X.
2 Press X while simultaneously pressing TUNERPRESET CH + and TUNER PRESET CH -.
3 Remove your fingers from the two buttons when“Initialized” appears on the display.
When deleting a Pandora account, carry out steps 1 to 3 after signing out (v p. 93)in the Pandora service.
Contents Connections Playback Settings Tips Appendix
208Front panel Display Rear panel Remote Index
About HDMIHDMI is an abbreviation of High-Definition Multimedia Interface, which isan AV digital interface that can be connected to a TV or amplifier.With the HDMI connection, high definition video and high quality audioformats adopted by Blu-ray Disc players (Dolby Digital Plus, DolbyTrueHD, DTS-HD, DTS-HD Master Audio) can be transmitted, which is notpossible with the analog video transmission.Furthermore, in the HDMI connection, audio and video signals can betransmitted through a single HDMI cable, while in conventionalconnections it is necessary to provide audio and video cables separatelyfor connection between devices. This allows you to simplify the wiringconfiguration that tends to be quite complex in a home theater system.This unit supports the following HDMI functions.0 Deep Color
An imaging technology supported by HDMI. Unlike RGB or YCbCr,which uses 8 bits (256 shades) per color, it can use 10 bits (1024shades), 12 bits (4096 shades), or 16 bits (65536 shades) to producecolors in higher definition.Both devices linked via HDMI must support Deep Color.
0 “x.v.Color”This function lets HDTVs display colors more accurately. It enablesdisplay with natural, vivid colors.“x.v.Color” is trademark of Sony Corporation.
0 3DThis unit supports input and output of 3D (3 dimensional) video signalsof HDMI. To play back 3D video, you need a TV and player thatprovide support for the HDMI 3D function and a pair of 3D glasses.
0 4KThis unit supports input and output of 4K (3840 x 2160 pixels) videosignals of HDMI.
0 Content TypeIt automatically makes settings suitable for the video output type(content information).
0 Adobe RGB color, Adobe YCC601 colorThe color space defined by Adobe Systems Inc. Because it is a widercolor space than RGB, it can produce more vivid and natural images.
0 sYCC601 colorEach of these color spaces defines a palette of available colors that islarger than the traditional RGB color model.
Contents Connections Playback Settings Tips AppendixAppendix
209Front panel Display Rear panel Remote Index
0 Auto Lip SyncThis function can automatically correct delay between the audio andvideo.Use a TV that is compatible with the Auto Lip Sync function.
0 HDMI Pass ThroughEven when the power to this unit is set to standby, signals input fromthe HDMI input connector are output to a TV or other device that isconnected to the HDMI output connector.
0 HDMI ControlIf you connect the unit and an HDMI control function compatible TV orplayer with an HDMI cable and then enable the HDMI control functionsetting on each device, the devices will be able to control each other.0 Power off link
This unit power off can be linked to the TV power off step.0 Audio output destination switching
From the TV, you can switch whether to output audio from the TV orthe AV amplifier.
0 Volume adjustmentYou can adjust this unit’s volume in the TV volume adjustmentoperation.
0 Input source switchingYou can switch this unit input sources through linkage to TV inputswitching.When playing the player, this unit input source switches to thesource for that player.
0 ARC (Audio Return Channel)This function transmits audio signals from the TV to this unit throughthe HDMI cable and plays back the audio from the TV on this unitbased on the HDMI control function.If a TV without the ARC function is connected via HDMI connections,video signals of the playback device connected to this unit aretransmitted to the TV, but this unit can not play back the audio from theTV. If you want to enjoy surround audio for TV program, a separateaudio cable connection is required.In contrast, if a TV with the ARC function is connected via HDMIconnections, no audio cable connection is required. Audio signals fromthe TV can be input to this unit through the HDMI cable between thisunit and the TV. This function allows you to enjoy surround playbackon this unit for the TV.
Contents Connections Playback Settings Tips Appendix
210Front panel Display Rear panel Remote Index
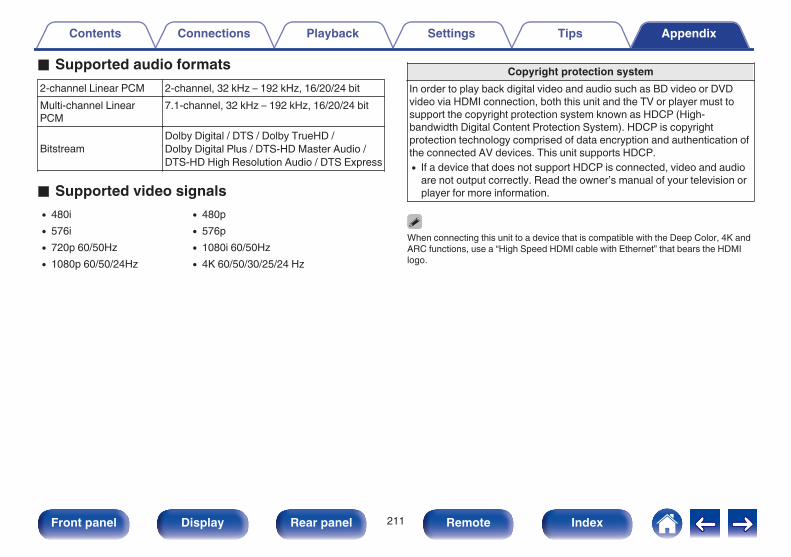
o Supported audio formats2-channel Linear PCM 2-channel, 32 kHz – 192 kHz, 16/20/24 bitMulti-channel LinearPCM
7.1-channel, 32 kHz – 192 kHz, 16/20/24 bit
BitstreamDolby Digital / DTS / Dolby TrueHD /Dolby Digital Plus / DTS-HD Master Audio /DTS-HD High Resolution Audio / DTS Express
o Supported video signals0 480i 0 480p0 576i 0 576p0 720p 60/50Hz 0 1080i 60/50Hz0 1080p 60/50/24Hz 0 4K 60/50/30/25/24 Hz
Copyright protection systemIn order to play back digital video and audio such as BD video or DVDvideo via HDMI connection, both this unit and the TV or player must tosupport the copyright protection system known as HDCP (High-bandwidth Digital Content Protection System). HDCP is copyrightprotection technology comprised of data encryption and authentication ofthe connected AV devices. This unit supports HDCP.0 If a device that does not support HDCP is connected, video and audio
are not output correctly. Read the owner’s manual of your television orplayer for more information.
When connecting this unit to a device that is compatible with the Deep Color, 4K andARC functions, use a “High Speed HDMI cable with Ethernet” that bears the HDMIlogo.
Contents Connections Playback Settings Tips Appendix
211Front panel Display Rear panel Remote Index
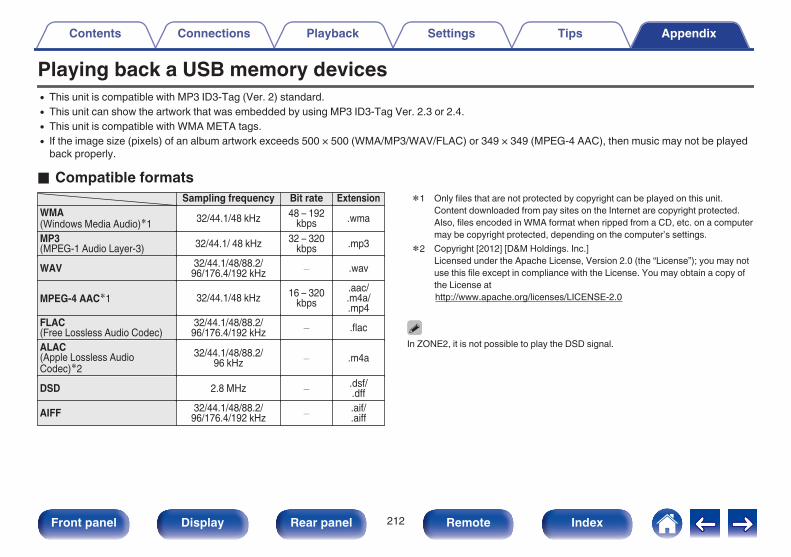
Playing back a USB memory devices0 This unit is compatible with MP3 ID3-Tag (Ver. 2) standard.0 This unit can show the artwork that was embedded by using MP3 ID3-Tag Ver. 2.3 or 2.4.0 This unit is compatible with WMA META tags.0 If the image size (pixels) of an album artwork exceeds 500 × 500 (WMA/MP3/WAV/FLAC) or 349 × 349 (MPEG-4 AAC), then music may not be played
back properly.
o Compatible formatsSampling frequency Bit rate Extension
WMA(Windows Media Audio)z1 32/44.1/48 kHz 48 – 192
kbps .wmaMP3(MPEG-1 Audio Layer-3) 32/44.1/ 48 kHz 32 – 320
kbps .mp3
WAV 32/44.1/48/88.2/96/176.4/192 kHz ] .wav
MPEG-4 AACz1 32/44.1/48 kHz 16 – 320kbps
.aac/.m4a/.mp4
FLAC(Free Lossless Audio Codec)
32/44.1/48/88.2/96/176.4/192 kHz ] .flac
ALAC(Apple Lossless AudioCodec)z2
32/44.1/48/88.2/96 kHz ] .m4a
DSD 2.8 MHz ].dsf/.dff
AIFF 32/44.1/48/88.2/96/176.4/192 kHz ]
.aif/
.aiff
z1 Only files that are not protected by copyright can be played on this unit.Content downloaded from pay sites on the Internet are copyright protected.Also, files encoded in WMA format when ripped from a CD, etc. on a computermay be copyright protected, depending on the computer’s settings.
z2 Copyright [2012] [D&M Holdings. Inc.]Licensed under the Apache License, Version 2.0 (the “License”); you may notuse this file except in compliance with the License. You may obtain a copy ofthe License athttp://www.apache.org/licenses/LICENSE-2.0
In ZONE2, it is not possible to play the DSD signal.
Contents Connections Playback Settings Tips Appendix
212Front panel Display Rear panel Remote Index
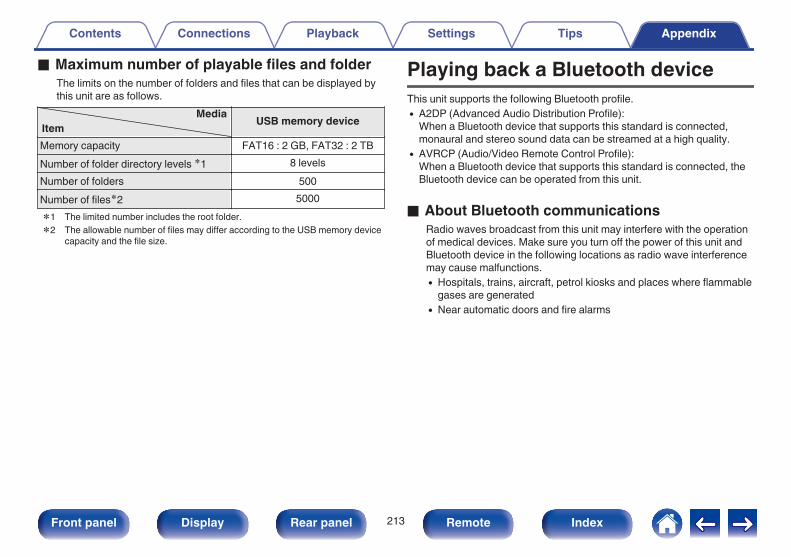
o Maximum number of playable files and folderThe limits on the number of folders and files that can be displayed bythis unit are as follows.
MediaItem USB memory device
Memory capacity FAT16 : 2 GB, FAT32 : 2 TBNumber of folder directory levels z1 8 levelsNumber of folders 500Number of filesz2 5000z1 The limited number includes the root folder.z2 The allowable number of files may differ according to the USB memory device
capacity and the file size.
Playing back a Bluetooth deviceThis unit supports the following Bluetooth profile.0 A2DP (Advanced Audio Distribution Profile):
When a Bluetooth device that supports this standard is connected,monaural and stereo sound data can be streamed at a high quality.
0 AVRCP (Audio/Video Remote Control Profile):When a Bluetooth device that supports this standard is connected, theBluetooth device can be operated from this unit.
o About Bluetooth communicationsRadio waves broadcast from this unit may interfere with the operationof medical devices. Make sure you turn off the power of this unit andBluetooth device in the following locations as radio wave interferencemay cause malfunctions.0 Hospitals, trains, aircraft, petrol kiosks and places where flammable
gases are generated0 Near automatic doors and fire alarms
Contents Connections Playback Settings Tips Appendix
213Front panel Display Rear panel Remote Index
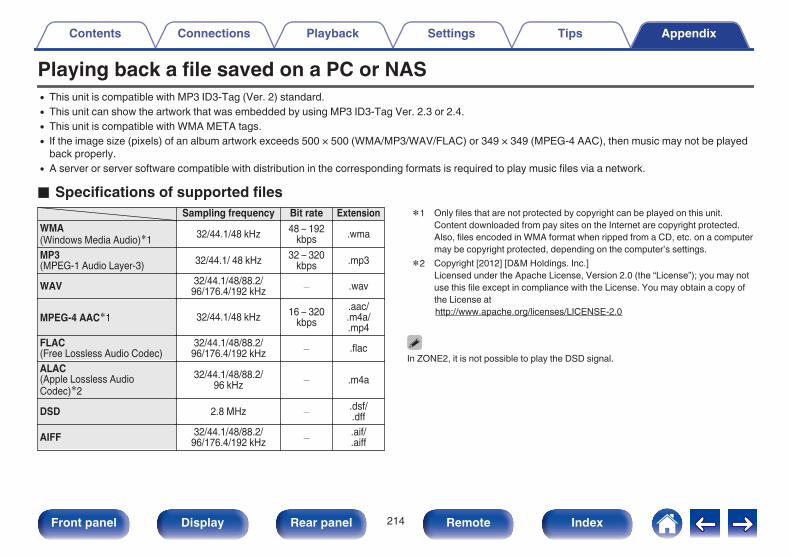
Playing back a file saved on a PC or NAS0 This unit is compatible with MP3 ID3-Tag (Ver. 2) standard.0 This unit can show the artwork that was embedded by using MP3 ID3-Tag Ver. 2.3 or 2.4.0 This unit is compatible with WMA META tags.0 If the image size (pixels) of an album artwork exceeds 500 × 500 (WMA/MP3/WAV/FLAC) or 349 × 349 (MPEG-4 AAC), then music may not be played
back properly.0 A server or server software compatible with distribution in the corresponding formats is required to play music files via a network.
o Specifications of supported filesSampling frequency Bit rate Extension
WMA(Windows Media Audio)z1 32/44.1/48 kHz 48 – 192
kbps .wmaMP3(MPEG-1 Audio Layer-3) 32/44.1/ 48 kHz 32 – 320
kbps .mp3
WAV 32/44.1/48/88.2/96/176.4/192 kHz ] .wav
MPEG-4 AACz1 32/44.1/48 kHz 16 – 320kbps
.aac/.m4a/.mp4
FLAC(Free Lossless Audio Codec)
32/44.1/48/88.2/96/176.4/192 kHz ] .flac
ALAC(Apple Lossless AudioCodec)z2
32/44.1/48/88.2/96 kHz ] .m4a
DSD 2.8 MHz ].dsf/.dff
AIFF 32/44.1/48/88.2/96/176.4/192 kHz ]
.aif/
.aiff
z1 Only files that are not protected by copyright can be played on this unit.Content downloaded from pay sites on the Internet are copyright protected.Also, files encoded in WMA format when ripped from a CD, etc. on a computermay be copyright protected, depending on the computer’s settings.
z2 Copyright [2012] [D&M Holdings. Inc.]Licensed under the Apache License, Version 2.0 (the “License”); you may notuse this file except in compliance with the License. You may obtain a copy ofthe License athttp://www.apache.org/licenses/LICENSE-2.0
In ZONE2, it is not possible to play the DSD signal.
Contents Connections Playback Settings Tips Appendix
214Front panel Display Rear panel Remote Index
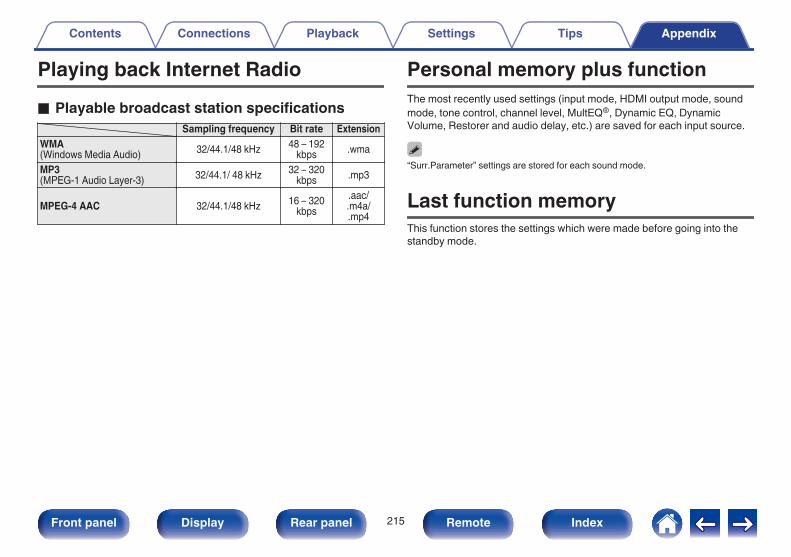
Playing back Internet Radioo Playable broadcast station specifications
Sampling frequency Bit rate ExtensionWMA(Windows Media Audio) 32/44.1/48 kHz 48 – 192
kbps .wmaMP3(MPEG-1 Audio Layer-3) 32/44.1/ 48 kHz 32 – 320
kbps .mp3
MPEG-4 AAC 32/44.1/48 kHz 16 – 320kbps
.aac/.m4a/.mp4
Personal memory plus functionThe most recently used settings (input mode, HDMI output mode, soundmode, tone control, channel level, MultEQ®, Dynamic EQ, DynamicVolume, Restorer and audio delay, etc.) are saved for each input source.
“Surr.Parameter” settings are stored for each sound mode.
Last function memoryThis function stores the settings which were made before going into thestandby mode.
Contents Connections Playback Settings Tips Appendix
215Front panel Display Rear panel Remote Index
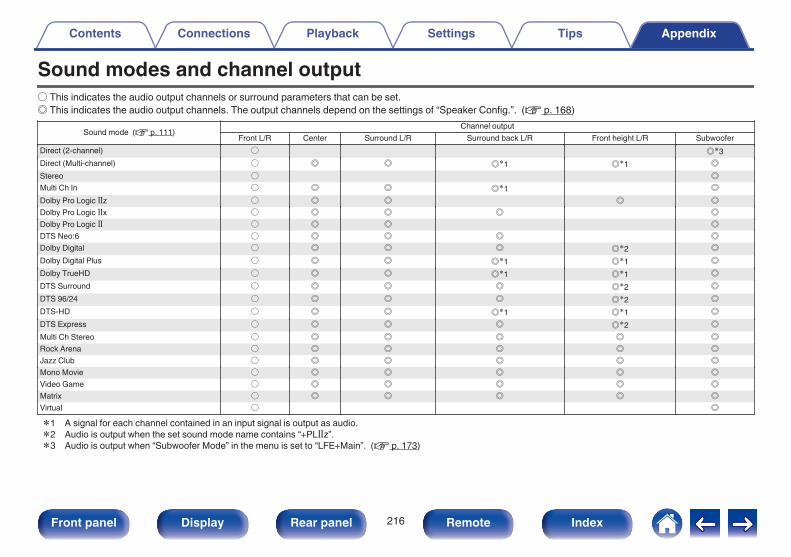
Sound modes and channel outputS This indicates the audio output channels or surround parameters that can be set.D This indicates the audio output channels. The output channels depend on the settings of “Speaker Config.”. (v p. 168)
Sound mode (v p. 111) Channel outputFront L/R Center Surround L/R Surround back L/R Front height L/R Subwoofer
Direct (2-channel) S Dz3Direct (Multi-channel) S D D Dz1 Dz1 DStereo S DMulti Ch In S D D Dz1 DDolby Pro Logic gz S D D D DDolby Pro Logic gx S D D D DDolby Pro Logic g S D D DDTS Neo:6 S D D D DDolby Digital S D D D Dz2 DDolby Digital Plus S D D Dz1 Dz1 DDolby TrueHD S D D Dz1 Dz1 DDTS Surround S D D D Dz2 DDTS 96/24 S D D D Dz2 DDTS-HD S D D Dz1 Dz1 DDTS Express S D D D Dz2 DMulti Ch Stereo S D D D D DRock Arena S D D D D DJazz Club S D D D D DMono Movie S D D D D DVideo Game S D D D D DMatrix S D D D D DVirtual S D
z1 A signal for each channel contained in an input signal is output as audio.z2 Audio is output when the set sound mode name contains “+PLgz”.z3 Audio is output when “Subwoofer Mode” in the menu is set to “LFE+Main”. (v p. 173)
Contents Connections Playback Settings Tips Appendix
216Front panel Display Rear panel Remote Index
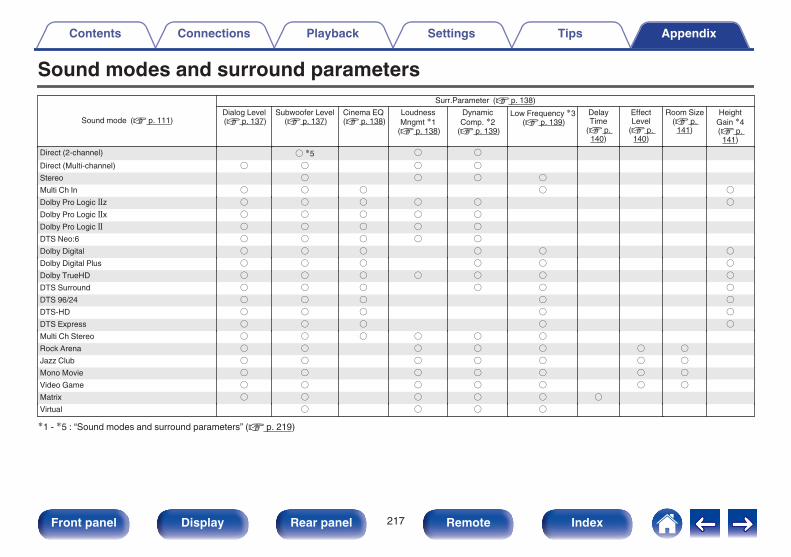
Sound modes and surround parameters
Sound mode (v p. 111)
Surr.Parameter (v p. 138)Dialog Level (v p. 137)
Subwoofer Level (v p. 137)
Cinema EQ (v p. 138)
LoudnessMngmt z1
(v p. 138)
DynamicComp. z2
(v p. 139)Low Frequency z3
(v p. 139)DelayTime
(v p. 140)
EffectLevel
(v p. 140)
Room Size (v p.
141)Height
Gain z4 (v p.
141)Direct (2-channel) S z5 S SDirect (Multi-channel) S S S SStereo S S S SMulti Ch In S S S S SDolby Pro Logic gz S S S S S SDolby Pro Logic gx S S S S SDolby Pro Logic g S S S S SDTS Neo:6 S S S S SDolby Digital S S S S S SDolby Digital Plus S S S S S SDolby TrueHD S S S S S S SDTS Surround S S S S S SDTS 96/24 S S S S SDTS-HD S S S S SDTS Express S S S S SMulti Ch Stereo S S S S S SRock Arena S S S S S S SJazz Club S S S S S S SMono Movie S S S S S S SVideo Game S S S S S S SMatrix S S S S S SVirtual S S S S
z1 - z5 : “Sound modes and surround parameters” (v p. 219)
Contents Connections Playback Settings Tips Appendix
217Front panel Display Rear panel Remote Index
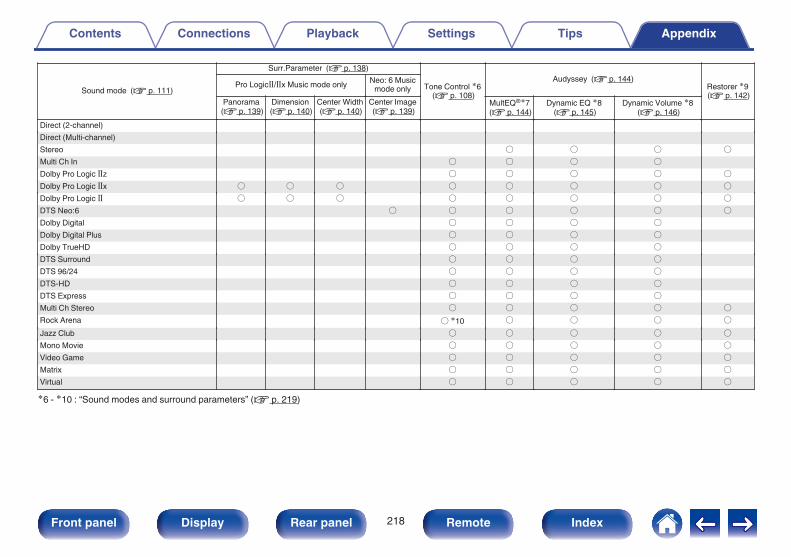
Sound mode (v p. 111)
Surr.Parameter (v p. 138)
Tone Control z6 (v p. 108)
Audyssey (v p. 144)Restorer z9 (v p. 142)
Pro Logicg/gx Music mode only Neo: 6 Musicmode only
Panorama (v p. 139)
Dimension (v p. 140)
Center Width (v p. 140)
Center Image (v p. 139)
MultEQ®z7 (v p. 144)
Dynamic EQ z8 (v p. 145)
Dynamic Volume z8 (v p. 146)
Direct (2-channel)Direct (Multi-channel)Stereo S S S SMulti Ch In S S S SDolby Pro Logic gz S S S S SDolby Pro Logic gx S S S S S S S SDolby Pro Logic g S S S S S S S SDTS Neo:6 S S S S S SDolby Digital S S S SDolby Digital Plus S S S SDolby TrueHD S S S SDTS Surround S S S SDTS 96/24 S S S SDTS-HD S S S SDTS Express S S S SMulti Ch Stereo S S S S SRock Arena S z10 S S S SJazz Club S S S S SMono Movie S S S S SVideo Game S S S S SMatrix S S S S SVirtual S S S S S
z6 - z10 : “Sound modes and surround parameters” (v p. 219)
Contents Connections Playback Settings Tips Appendix
218Front panel Display Rear panel Remote Index
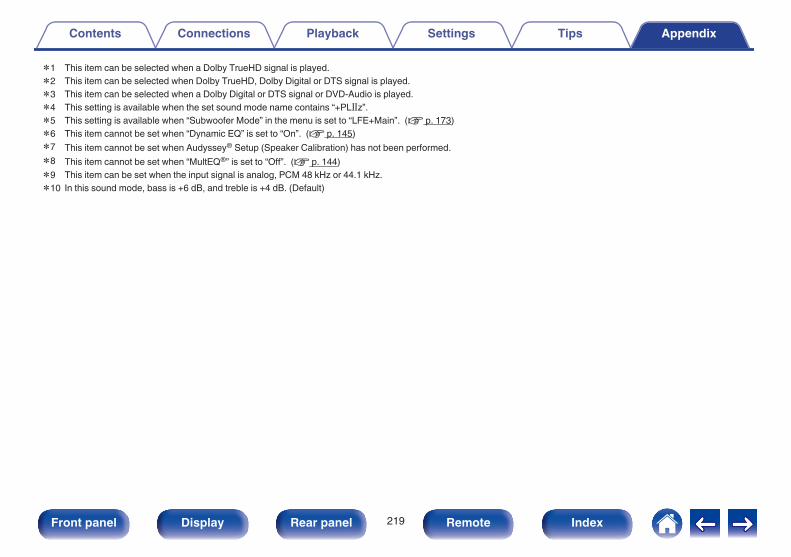
z1 This item can be selected when a Dolby TrueHD signal is played.z2 This item can be selected when Dolby TrueHD, Dolby Digital or DTS signal is played.z3 This item can be selected when a Dolby Digital or DTS signal or DVD-Audio is played.z4 This setting is available when the set sound mode name contains “+PLgz”.z5 This setting is available when “Subwoofer Mode” in the menu is set to “LFE+Main”. (v p. 173)z6 This item cannot be set when “Dynamic EQ” is set to “On”. (v p. 145)z7 This item cannot be set when Audyssey® Setup (Speaker Calibration) has not been performed.z8 This item cannot be set when “MultEQ®” is set to “Off”. (v p. 144)z9 This item can be set when the input signal is analog, PCM 48 kHz or 44.1 kHz.z10 In this sound mode, bass is +6 dB, and treble is +4 dB. (Default)
Contents Connections Playback Settings Tips Appendix
219Front panel Display Rear panel Remote Index
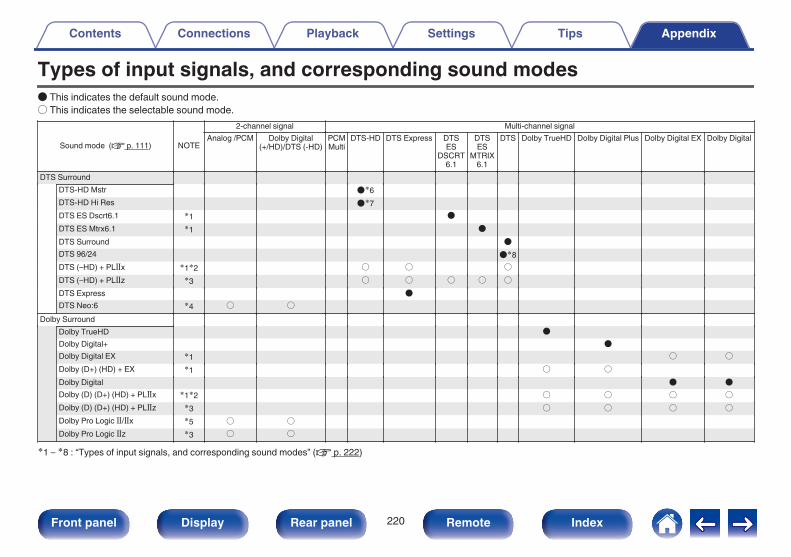
Types of input signals, and corresponding sound modesF This indicates the default sound mode.S This indicates the selectable sound mode.
Sound mode (v p. 111) NOTE
2-channel signal Multi-channel signalAnalog /PCM Dolby Digital
(+/HD)/DTS (-HD)PCMMulti
DTS-HD DTS Express DTSES
DSCRT6.1
DTSES
MTRIX6.1
DTS Dolby TrueHD Dolby Digital Plus Dolby Digital EX Dolby Digital
DTS Surround DTS-HD Mstr Fz6
DTS-HD Hi Res Fz7DTS ES Dscrt6.1 z1 FDTS ES Mtrx6.1 z1 FDTS Surround FDTS 96/24 Fz8DTS (–HD) + PLgx z1z2 S S S
DTS (–HD) + PLgz z3 S S S S SDTS Express FDTS Neo:6 z4 S S
Dolby Surround Dolby TrueHD F
Dolby Digital+ FDolby Digital EX z1 S SDolby (D+) (HD) + EX z1 S SDolby Digital F FDolby (D) (D+) (HD) + PLgx z1z2 S S S SDolby (D) (D+) (HD) + PLgz z3 S S S SDolby Pro Logic g/gx z5 S SDolby Pro Logic gz z3 S S
z1 – z8 : “Types of input signals, and corresponding sound modes” (v p. 222)
Contents Connections Playback Settings Tips Appendix
220Front panel Display Rear panel Remote Index
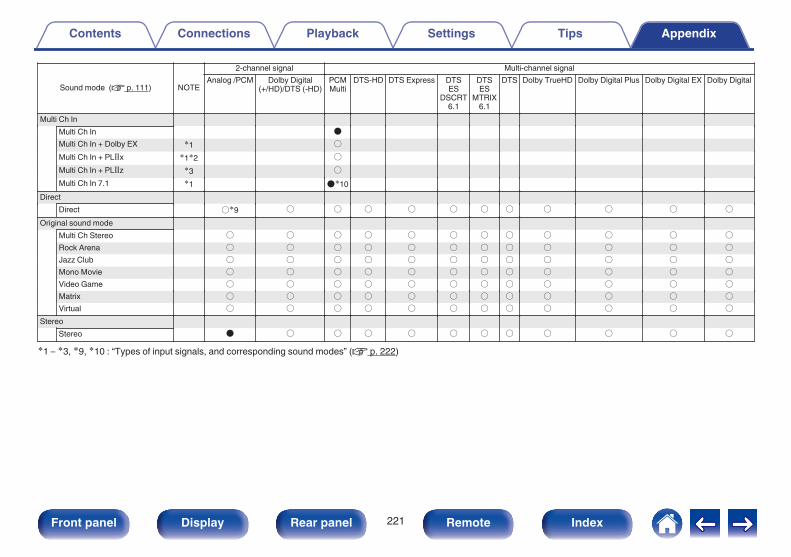
Sound mode (v p. 111) NOTE
2-channel signal Multi-channel signalAnalog /PCM Dolby Digital
(+/HD)/DTS (-HD)PCMMulti
DTS-HD DTS Express DTSES
DSCRT6.1
DTSES
MTRIX6.1
DTS Dolby TrueHD Dolby Digital Plus Dolby Digital EX Dolby Digital
Multi Ch In Multi Ch In F
Multi Ch In + Dolby EX z1 S
Multi Ch In + PLgx z1z2 S
Multi Ch In + PLgz z3 SMulti Ch In 7.1 z1 Fz10
Direct Direct Sz9 S S S S S S S S S S S
Original sound mode Multi Ch Stereo S S S S S S S S S S S S
Rock Arena S S S S S S S S S S S SJazz Club S S S S S S S S S S S SMono Movie S S S S S S S S S S S SVideo Game S S S S S S S S S S S SMatrix S S S S S S S S S S S SVirtual S S S S S S S S S S S S
Stereo Stereo F S S S S S S S S S S S
z1 – z3, z9, z10 : “Types of input signals, and corresponding sound modes” (v p. 222)
Contents Connections Playback Settings Tips Appendix
221Front panel Display Rear panel Remote Index
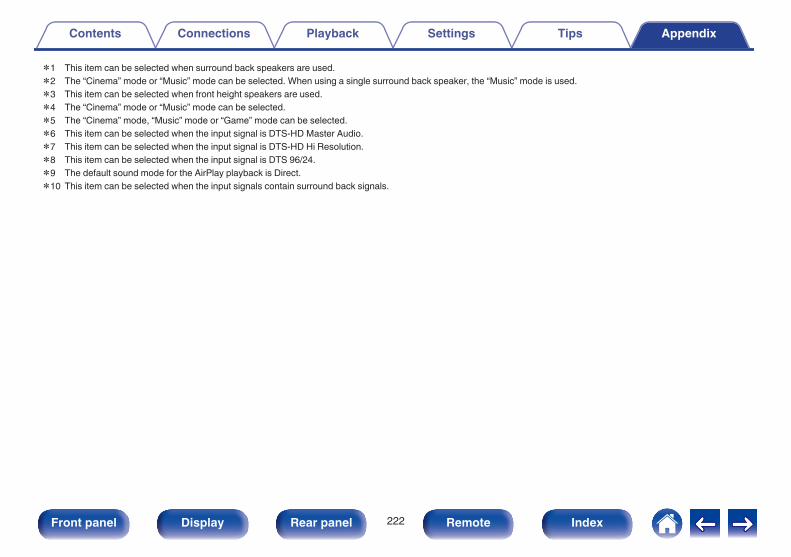
z1 This item can be selected when surround back speakers are used.z2 The “Cinema” mode or “Music” mode can be selected. When using a single surround back speaker, the “Music” mode is used.z3 This item can be selected when front height speakers are used.z4 The “Cinema” mode or “Music” mode can be selected.z5 The “Cinema” mode, “Music” mode or “Game” mode can be selected.z6 This item can be selected when the input signal is DTS-HD Master Audio.z7 This item can be selected when the input signal is DTS-HD Hi Resolution.z8 This item can be selected when the input signal is DTS 96/24.z9 The default sound mode for the AirPlay playback is Direct.z10 This item can be selected when the input signals contain surround back signals.
Contents Connections Playback Settings Tips Appendix
222Front panel Display Rear panel Remote Index
Explanation of termso AudysseyAudyssey Dynamic EQ®
Dynamic EQ solves the problem of deteriorating sound quality as volumeis decreased by taking into account human perception and roomacoustics.Audyssey Dynamic EQ® works in tandem with Audyssey MultEQ® toprovide well-balanced sound for every listener at any volume level.Audyssey Dynamic Volume®
Dynamic Volume solves the problem of large variations in volume levelbetween television programs, commercials, and between the soft and loudpassages of movies. Audyssey Dynamic EQ® is integrated into DynamicVolume so that as the playback volume is adjusted automatically, theperceived bass response, tonal balance, surround impression, and dialogclarity remain the same.
Audyssey MultEQ®
Audyssey MultEQ® is a room equalization solution that calibrates anyaudio system so that it can achieve optimum performance for everylistener in a large listening area. Based on several room measurements,MultEQ® calculates an equalization solution that corrects for both time andfrequency response problems in the listening area and also performs afully automated surround system setup.
o DolbyDolby DigitalDolby Digital is a multi-channel digital signal format developed by DolbyLaboratories.A total of 5.1-channels are played: 3 front channels (“FL”, “FR” and “C”), 2surround channels (“SL” and “SR”) and the “LFE” channel for lowfrequency effects.Because of this, there is no crosstalk between channels and a realisticsound field with a “three-dimensional” feeling (sense of distance,movement and positioning) is achieved. This delivers a thrilling surroundsound experience in the home.
Contents Connections Playback Settings Tips Appendix
223Front panel Display Rear panel Remote Index
Dolby Digital PlusDolby Digital Plus is an improved Dolby Digital signal format that iscompatible with up to 7.1-channels of discrete digital sound and alsoimproves sound quality thanks to extra data bit rate performance. It isupwardly compatible with conventional Dolby Digital, so it offers greaterflexibility in response to the source signal and the conditions of theplayback device.Dolby Digital EXDolby Digital EX is a 6.1-channel surround format from Dolby Laboratoriesthat allows users to enjoy in their homes the “Dolby Digital Surround EX”audio format jointly developed by Dolby Laboratories and Lucasfilm.The 6.1-channels of sound, including surround back channel, provideimproved sound positioning and expansion of the surround sound field.
Dolby Pro Logic g
Dolby Pro Logic g is a matrix decoding technology developed by DolbyLaboratories.Regular music such as that on CDs is encoded into 5-channels to achievean excellent surround effect.The surround channel signals are converted into stereo and full bandsignals (with a frequency response of 20 Hz to 20 kHz or greater) to createa “three-dimensional” sound image offering a rich sense of presence for allstereo sources.Dolby Pro Logic gxDolby Pro Logic gx is a further improved version of the Dolby Pro Logic gmatrix decoding technology. Audio signals recorded in 2-channels aredecoded to achieve a natural sound with up to 7.1-channels. There arethree modes: “Music” suited for playing music, “Cinema” suited for playingmovies, and “Game” which is optimized for playing games.
Contents Connections Playback Settings Tips Appendix
224Front panel Display Rear panel Remote Index
Dolby Pro Logic gzDolby Pro Logic gz introduces a new dimension to Home Entertainmentthrough the addition of a pair of front height channels. This supportsvarious sources such as 2-channel sources and 7.1/5.1 multi-channelsources.By adding height speakers to the upper left and right locations in the frontof the listening environment, you can enjoy more spatial spread feel anddepth feel when you play back movies/music/games.Dolby Pro Logic gz, with front height channels is also an ideal alternativefor households that cannot support the placement of back surroundspeakers of a typical 7.1-channel system but may have bookshelf spaceavailable to support the addition of height speakers.Dolby TrueHDDolby TrueHD is a high definition audio technology developed by DolbyLaboratories, using lossless coding technology to faithfully reproduce thesound of the studio master.This format provides the facility to support up to 8 audio channels with asampling frequency of 96 kHz/24 bit resolution and up to 6 audio channelswith a sampling frequency of 192 kHz/24 bit resolution.
o DTSDTSThis is an abbreviation of Digital Theater System, which is a digital audiosystem developed by DTS. DTS delivers a powerful and dynamicsurround sound experience, and is found in the world’s finest movietheaters and screening rooms.DTS 96/24DTS 96/24 is a digital audio format enabling high sound quality playback in5.1-channels with a sampling frequency of 96 kHz and 24 bit quantizationon DVD-Video.DTS Digital SurroundDTS™ Digital Surround is the standard digital surround format of DTS,Inc., compatible with a sampling frequency of 44.1 or 48 kHz and up to5.1-channels of digital discrete surround sound.
Contents Connections Playback Settings Tips Appendix
225Front panel Display Rear panel Remote Index
DTS-ES™ Discrete 6.1DTS-ES™ Discrete 6.1 is a 6.1-channel discrete digital audio formatadding a surround back (SB) channel to the DTS digital surround sound.Decoding of conventional 5.1-channel audio signals is also possibleaccording to the decoder.DTS-ES™ Matrix 6.1DTS-ES™ Matrix 6.1 is a 6.1-channel audio format that inserts a surroundback (SB) channel to the DTS digital surround sound through matrixencoding. Decoding of conventional 5.1-channel audio signals is alsopossible according to the decoder.DTS ExpressDTS Express is an audio format supporting low bit rates (max. 5.1-channels, 24 to 256 kbps).DTS-HDThis audio technology provides higher sound quality and enhancedfunctionality than the conventional DTS and is adopted as an optionalaudio for Blu-ray Disc.This technology supports multi-channel, high data transfer speed, highsampling frequency, and lossless audio playback. Maximum 7.1-channelsare supported in Blu-ray Disc.
DTS-HD High Resolution AudioDTS-HD High Resolution Audio is an improved version of the conventionalDTS, DTS-ES and DTS 96/24 signals formats, compatible with samplingfrequencies of 96 or 48 kHz and up to 7.1-channels of discrete digitalsound. High data bit rate performance provides high quality sound. Thisformat is fully compatible with conventional products, includingconventional DTS digital surround 5.1-channel data.DTS-HD Master AudioDTS-HD Master Audio is a lossless audio format created by DigitalTheater System (DTS). This format provides the facility to support up to 8audio channels with a sampling frequency of 96 kHz/24 bit resolution andup to 6 audio channels with a sampling frequency of 192 kHz/24 bitresolution. It is fully compatible with conventional products, includingconventional DTS digital surround 5.1-channel data.DTS Neo:6™ SurroundDTS Neo:6™ is a matrix decoding technology for achieving 6.1-channelsurround playback with 2-channel sources. It includes “DTS Neo:6Cinema” suite for playing movies and “DTS Neo:6 Music” suited forplaying music.
Contents Connections Playback Settings Tips Appendix
226Front panel Display Rear panel Remote Index
o AudioALAC (Apple Lossless Audio Codec)This is a codec for lossless audio compression method developed byApple Inc. This codec can be played back on iTunes, iPod or iPhone. Datacompressed to approximately 60 – 70 % can be decompressed to exactlythe same original data.FLAC (Free Lossless Audio Codec)FLAC stands for Free lossless Audio Codec, and is a lossless free audiofile format. Lossless means that the audio is compressed without any lossin quality.The FLAC license is as shown below.Copyright (C) 2000, 2001, 2002, 2003, 2004, 2005, 2006, 2007, 2008,2009 Josh CoalsonRedistribution and use in source and binary forms, with or withoutmodification, are permitted provided that the following conditions are met:0 Redistributions of source code must retain the above copyright notice,
this list of conditions and the following disclaimer.0 Redistributions in binary form must reproduce the above copyright
notice, this list of conditions and the following disclaimer in thedocumentation and/or other materials provided with the distribution.
0 Neither the name of the Xiph.org Foundation nor the names of itscontributors may be used to endorse or promote products derived fromthis software without specific prior written permission.
THIS SOFTWARE IS PROVIDED BY THE COPYRIGHT HOLDERS ANDCONTRIBUTORS “AS IS” AND ANY EXPRESS OR IMPLIEDWARRANTIES, INCLUDING, BUT NOT LIMITED TO, THE IMPLIEDWARRANTIES OF MERCHANTABILITY AND FITNESS FOR APARTICULAR PURPOSE ARE DISCLAIMED. IN NO EVENT SHALL THEFOUNDATION OR CONTRIBUTORS BE LIABLE FOR ANY DIRECT,INDIRECT, INCIDENTAL, SPECIAL, EXEMPLARY, ORCONSEQUENTIAL DAMAGES (INCLUDING, BUT NOT LIMITED TO,PROCUREMENT OF SUBSTITUTE GOODS OR SERVICES; LOSS OFUSE, DATA, OR PROFITS; OR BUSINESS INTERRUPTION) HOWEVERCAUSED AND ON ANY THEORY OF LIABILITY, WHETHER INCONTRACT, STRICT LIABILITY, OR TORT (INCLUDING NEGLIGENCEOR OTHERWISE) ARISING IN ANY WAY OUT OF THE USE OF THISSOFTWARE, EVEN IF ADVISED OF THE POSSIBILITY OF SUCHDAMAGE.LFEThis is an abbreviation of Low Frequency Effect, which is an outputchannel that emphasizes low frequency effect sound. Surround audio isintensified by outputting 20 Hz to 120 Hz deep bass to the systemsubwoofer(s).MP3 (MPEG Audio Layer-3)This is an internationally standardized audio data compression scheme,using the “MPEG-1” video compression standard. It compresses the datavolume to about one eleventh its original size while maintaining soundquality equivalent to a music CD.
Contents Connections Playback Settings Tips Appendix
227Front panel Display Rear panel Remote Index
MPEG (Moving Picture Experts Group), MPEG-2, MPEG-4These are the names for digital compression format standards used forthe encoding of video and audio. Video standards include “MPEG-1Video”, “MPEG-2 Video”, “MPEG-4 Visual”, “MPEG-4 AVC”. Audiostandards include “MPEG-1 Audio”, “MPEG-2 Audio”, “MPEG-4 AAC”.WMA (Windows Media Audio)This is audio compression technology developed by MicrosoftCorporation.WMA data can be encoded using Windows Media® Player.To encode WMA files, only use applications authorized by MicrosoftCorporation. If you use an unauthorized application, the file may not workproperly.
Sampling frequencySampling involves taking a reading of a sound wave (analog signal) atregular intervals and expressing the height of the wave at each reading indigitized format (producing a digital signal).The number of readings taken in one second is called the “samplingfrequency”. The larger the value, the closer the reproduced sound is to theoriginal.Speaker impedanceThis is an AC resistance value, indicated in Ω (Ohms).Greater power can be obtained when this value is smaller.Dialog normalization functionThis function operates automatically during playback of Dolby Digital,Dolby Digital Plus, Dolby TrueHD, DTS or DTS-HD sources.It automatically corrects the standard signal level for individual programsources.Dynamic rangeThe difference between the maximum undistorted sound level and theminimum discernible level above the noise emitted by the device.DownmixThis function converts the number of channels of surround audio to alower number of channels and plays back according to the system’sconfiguration.
Contents Connections Playback Settings Tips Appendix
228Front panel Display Rear panel Remote Index
o VideoISFISF (Imaging Science Foundation) is an organization that certifies videotechnicians who are then qualified to carry out calibration and adjustmentto match the installation conditions. It also sets quality standards for theoptimization of device video performance.Progressive (sequential scanning)This is a scanning system of the video signal that displays 1 frame of videoas one image. Compared to the interlace system, this system providesimages with less flickering and jagged edges.
o NetworkAES (Advanced Encryption Standard)This is a next generation standard encryption method replacing the currentDES and 3DES, and because of its high security it is expected to beapplied widely to wireless LANs in the future. It uses the “Rijndael”algorithm developed by two Belgian cryptographers to divide the data intoblocks of fixed lengths and encrypt each block. It supports data lengths of128, 192 and 256 bits and key lengths of 128, 192 and 256 bits as well,offering extremely high encryption security.AirPlayAirPlay sends (plays) contents recorded in iTunes or on an iPhone/iPodtouch/iPad to a compatible device via the network.DLNADLNA and DLNA CERTIFIED are trademarks and/or service marks ofDigital Living Network Alliance. Some contents may not be compatiblewith other DLNA CERTIFIED® products.
Contents Connections Playback Settings Tips Appendix
229Front panel Display Rear panel Remote Index
TKIP (Temporal Key Integrity Protocol)This is a network key used for WPA. The encryption algorithm is RC4, thesame as for WEP, but the security level is increased by changing thenetwork key used for encryption for each packet.vTunerThis is a free online content server for Internet Radio.For inquiries about this service, visit the vTuner site below.vTuner website:http://www.radiodenon.comThis product is protected by certain intellectual property rights of NothingElse Matters Software and BridgeCo. Use or distribution of suchtechnology outside of this product is prohibited without a license fromNothing Else Matters Software and BridgeCo or an authorized subsidiary.WEP Key (network key)This is key information used for encrypting data when conducting datatransfer. On this unit, the same WEP key is used for data encryption anddecryption, so the same WEP key must be set on both devices in order forcommunications to be established between them.
Wi-Fi®Wi-Fi Certification assures tested and proven interoperability by the Wi-FiAlliance, a group certifying interoperability among wireless LAN devices.WPA (Wi-Fi Protected Access)This is a security standard established by the Wi-Fi Alliance. In addition tothe conventional SSID (network name) and WEP key (network key), it alsouses a user identification function and encrypting protocol for strongersecurity.WPA2 (Wi-Fi Protected Access 2)This is a new version of the WPA established by the Wi-Fi Alliance,compatible with more secure AES encryption.WPA-PSK/WPA2-PSK (Pre-shared Key)This is a simple authentication system for mutual authentication when apreset character string matches on the wireless LAN access point andclient.WPS (Wi-Fi Protected Setup)This is a standard drawn up by the Wi-Fi Alliance to ease the task ofsetting up wireless LAN connections and configuring security. There aretwo methods: push-button and PIN (Personal Identification Number) code.
Contents Connections Playback Settings Tips Appendix
230Front panel Display Rear panel Remote Index
Network Names (SSID: Security Set Identifier)When forming wireless LAN networks, groups are formed to preventinterference, data theft, etc. These groups are based on “SSID (networknames)”. For enhanced security, a WEP key is set so that communicationis unavailable unless both the “SSID” and the WEP key match. This issuitable for temporarily constructing a simplified network.ModemDevice that connects to your broadband internet provider, and is veryoften supplied with the service. A type that is integrated with a router isalso often available.
o Media playeriTunesiTunes is the name of the multimedia player provided by Apple Inc.iTunes is the name of the multimedia player provided by Apple Inc. Itenables management and playback of multimedia contents includingmusic and movies. iTunes supports many main file formats including AAC,WAV, and MP3.Windows Media PlayerThis is a media player distributed free of charge by Microsoft Corporation.It can play playlists created with Ver.11 or later of Windows Media Player,as well as WMA, WAV, and other files.
Contents Connections Playback Settings Tips Appendix
231Front panel Display Rear panel Remote Index
o OthersApp StoreApp Store is a site that sells application software for such devices as theiPhone or iPod Touch, and is operated by Apple Inc.HDCPWhen transmitting digital signals between devices, this copyrightprotection technology encrypts the signals to prevent content from beingcopied without authorization.ZONE2This unit can operate in a room other than the room where this unit isplaced (MAIN ZONE) (ZONE2 playback). The room for ZONE2 playbackis called ZONE2.MAIN ZONEThe room where this unit is placed is called the MAIN ZONE.
PairingPairing (registration) is an operation that is required in order to connect aBluetooth device to this unit using Bluetooth. When paired, the devicesauthenticate each other and can connect without mistaken connectionsoccurring.When using Bluetooth connection for the first time, you need to pair thisunit and the Bluetooth device to be connected.This unit can store pairing information for a maximum of 8 devices.Protection circuitThis is a function to prevent damage to devices within the power supplywhen an abnormality such as an overload, excess voltage occurs or overtemperature for any reason.If a malfunction occurs in this unit, the power indicator blinks red and theunit switches to standby mode.
Contents Connections Playback Settings Tips Appendix
232Front panel Display Rear panel Remote Index
Trademark information
.
“Made for iPod” and “Made for iPhone” mean that an electronic accessoryhas been designed to connect specifically to iPod, or iPhone,respectively, and has been certified by the developer to meet Appleperformance standards.Apple is not responsible for the operation of this device or its compliancewith safety and regulatory standards. Please note that the use of thisaccessory with iPod, or iPhone, may affect wireless performance.AirPlay, the AirPlay logo, iPad, iPhone, iPod, iPod classic, iPod nano,iPod shuffle and iPod touch are trademarks of Apple Inc., registered inthe U.S. and other countries.0 Individual users are permitted to use iPhone, iPod, iPod classic, iPod
nano, iPod shuffle, and iPod touch for private copy and playback ofnon-copyrighted contents and contents whose copy and playback ispermitted by law. Copyright infringement is prohibited by law.
.Manufactured under license from Audyssey Laboratories™. U.S. andforeign patents pending. Audyssey MultEQ®, Audyssey Dynamic EQ®
and Audyssey Dynamic Volume® are registered trademarks of AudysseyLaboratories.
.
The Bluetooth® word mark and logos are registered trademarks ownedby Bluetooth SIG, Inc. and any use of such marks by D&M Holdings inc.is under license. Other trademarks and trade names are those of theirrespective owners.
.
Manufactured under license from Dolby Laboratories.
Contents Connections Playback Settings Tips Appendix
233Front panel Display Rear panel Remote Index

.
Manufactured under a license from U.S. Patent No’s:5,956,674; 5,974,380; 6,226,616; 6,487,535; 7,212,872; 7,333,929;7,392,195; 7,272,567 & other U.S. and worldwide patents issued &pending. DTS-HD, the Symbol, & DTS-HD and the Symbol together areregistered trademarks & DTS-HD Master Audio is a trademark of DTS,Inc. Product includes software. ©DTS, Inc. All Rights Reserved.
.
The terms HDMI and HDMI High-Definition Multimedia Interface, and theHDMI Logo are trademarks or registered trademarks of HDMI LicensingLLC in the United States and other countries.
.The Wi-Fi CERTIFIED logo is a registered trademark of the Wi-FiAlliance.Wi-Fi Certification provides assurance that the device has passed theinteroperability test conducted by the Wi-Fi Alliance, a group that certifiesinteroperability among wireless LAN devices.
Contents Connections Playback Settings Tips Appendix
234Front panel Display Rear panel Remote Index
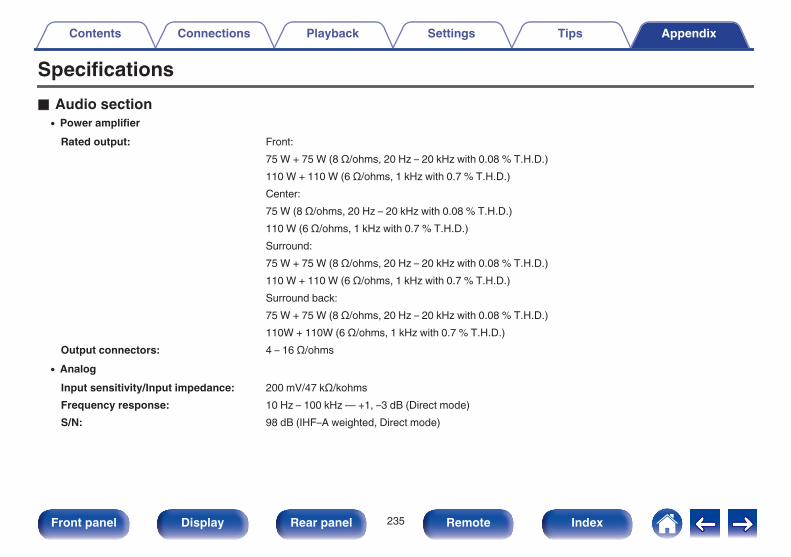
Specificationso Audio section0 Power amplifier
Rated output: Front:75 W + 75 W (8 Ω/ohms, 20 Hz – 20 kHz with 0.08 % T.H.D.)110 W + 110 W (6 Ω/ohms, 1 kHz with 0.7 % T.H.D.)Center:75 W (8 Ω/ohms, 20 Hz – 20 kHz with 0.08 % T.H.D.)110 W (6 Ω/ohms, 1 kHz with 0.7 % T.H.D.)Surround:75 W + 75 W (8 Ω/ohms, 20 Hz – 20 kHz with 0.08 % T.H.D.)110 W + 110 W (6 Ω/ohms, 1 kHz with 0.7 % T.H.D.)Surround back:75 W + 75 W (8 Ω/ohms, 20 Hz – 20 kHz with 0.08 % T.H.D.)110W + 110W (6 Ω/ohms, 1 kHz with 0.7 % T.H.D.)
Output connectors: 4 – 16 Ω/ohms0 Analog
Input sensitivity/Input impedance: 200 mV/47 kΩ/kohmsFrequency response: 10 Hz – 100 kHz — +1, –3 dB (Direct mode)S/N: 98 dB (IHF–A weighted, Direct mode)
Contents Connections Playback Settings Tips Appendix
235Front panel Display Rear panel Remote Index

o Video section0 Standard video connectors
Input/output level and impedance: 1 Vp-p, 75 Ω/ohmsFrequency response: 5 Hz – 10 MHz — 0, –3 dB
o Tuner section [FM] [AM] (Note: μV at 75 Ω/ohms, 0 dBf = 1 x 10 –15 W)
Reception frequency range: 87.5 MHz – 107.9 MHz 520 kHz – 1710 kHzEffective sensitivity: 1.2 μV (12.8 dBf) 18 μV50 dB sensitivity: MONO ― 2.8 μV (20.2 dBf)S/N ratio: MONO ― 70 dB (IHF–A weighted, Direct mode)
STEREO ― 67 dB (IHF–A weighted, Direct mode)Distortion: MONO ― 0.7 % (1 kHz)
STEREO ― 1.0 % (1 kHz)
Contents Connections Playback Settings Tips Appendix
236Front panel Display Rear panel Remote Index
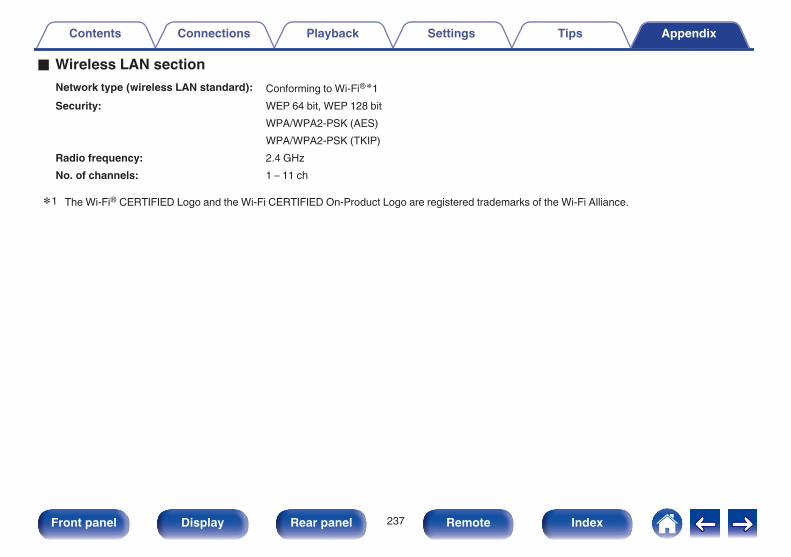
o Wireless LAN sectionNetwork type (wireless LAN standard): Conforming to Wi-Fi®z1Security: WEP 64 bit, WEP 128 bit
WPA/WPA2-PSK (AES)WPA/WPA2-PSK (TKIP)
Radio frequency: 2.4 GHzNo. of channels: 1 – 11 ch
z1 The Wi-Fi® CERTIFIED Logo and the Wi-Fi CERTIFIED On-Product Logo are registered trademarks of the Wi-Fi Alliance.
Contents Connections Playback Settings Tips Appendix
237Front panel Display Rear panel Remote Index
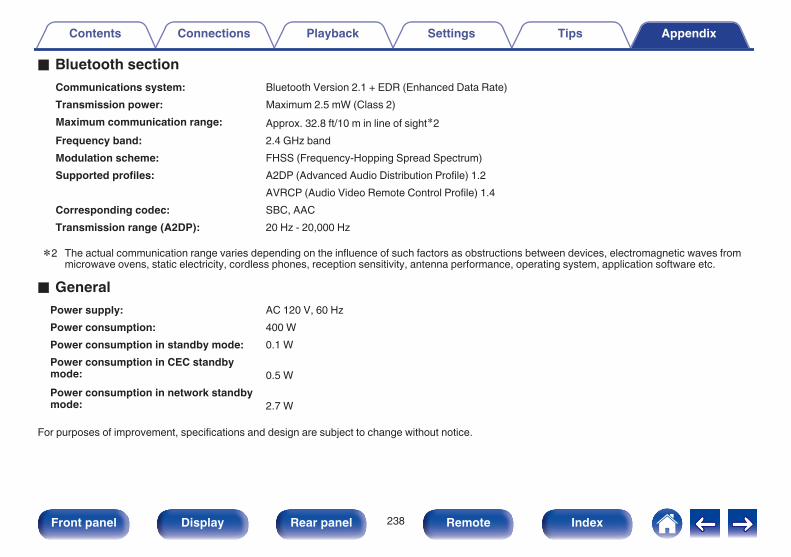
o Bluetooth sectionCommunications system: Bluetooth Version 2.1 + EDR (Enhanced Data Rate)Transmission power: Maximum 2.5 mW (Class 2)Maximum communication range: Approx. 32.8 ft/10 m in line of sightz2Frequency band: 2.4 GHz bandModulation scheme: FHSS (Frequency-Hopping Spread Spectrum)Supported profiles: A2DP (Advanced Audio Distribution Profile) 1.2
AVRCP (Audio Video Remote Control Profile) 1.4Corresponding codec: SBC, AACTransmission range (A2DP): 20 Hz - 20,000 Hz
z2 The actual communication range varies depending on the influence of such factors as obstructions between devices, electromagnetic waves frommicrowave ovens, static electricity, cordless phones, reception sensitivity, antenna performance, operating system, application software etc.
o GeneralPower supply: AC 120 V, 60 HzPower consumption: 400 WPower consumption in standby mode: 0.1 WPower consumption in CEC standbymode: 0.5 WPower consumption in network standbymode: 2.7 W
For purposes of improvement, specifications and design are subject to change without notice.
Contents Connections Playback Settings Tips Appendix
238Front panel Display Rear panel Remote Index
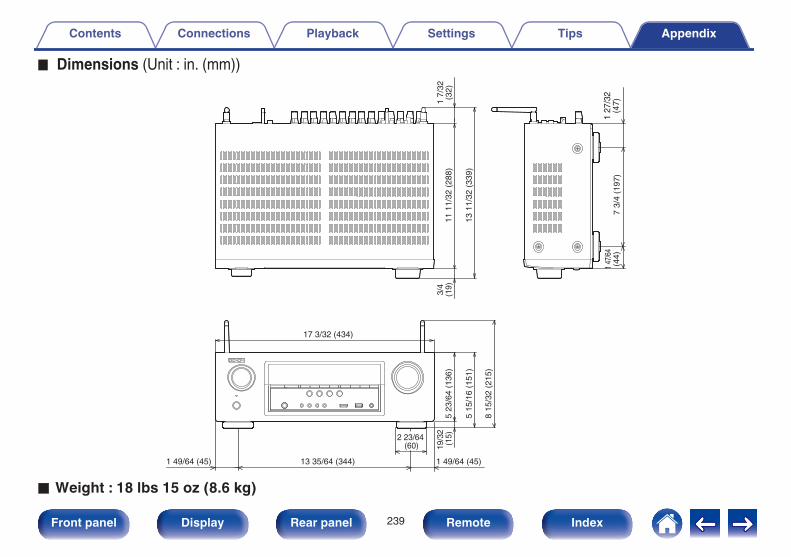
o Dimensions (Unit : in. (mm))
.
17 3/32 (434)
19/3
2 (1
5)5
23/6
4 (1
36)
5 15
/16
(151
)
8 15
/32
(215
)
13 35/64 (344)
2 23/64 (60)
1 49/64 (45) 1 49/64 (45)
11 1
1/32
(28
8)
13 1
1/32
(33
9)
3/4
(19)
1 7/
32(3
2)
7 3/
4 (1
97)
1 47
/64
(44)
1 27
/32
(47)
o Weight : 18 lbs 15 oz (8.6 kg)
Contents Connections Playback Settings Tips Appendix
239Front panel Display Rear panel Remote Index

Indexv Numerics
3D ................................................................ 2094K ................................................................ 2095.1-channel .............................................. 27, 327.1-channel ........................................ 27, 33, 34
v AAccessories ..................................................... 7Add New Feature ......................................... 187Adjusting the volume ...................................... 53Adjusting volume of each channel ................ 107AirPlay ............................................................ 97All Zone Stereo ............................................ 110All Zone Stereo ............................................ 110Audio formats ....................... 211, 212, 214, 215Audio settings ....................................... 131, 137Audyssey Dynamic EQ® ............................. 223Audyssey Dynamic Volume® ...................... 223Audyssey MultEQ® ..................................... 223Audyssey settings ................................ 144, 159Audyssey® Setup ........................................ 157Auto Standby ............................................... 181
v CCables ............................................................ 24Connecting a Blu-ray Disc player ................... 41Connecting a cable TV ................................... 42Connecting a DVD player ............................... 41Connecting a game console ........................... 43Connecting a satellite tuner ............................ 42Connecting a set-top box ............................... 42Connecting a TV ................................. 37, 38, 39Connecting a video camera ........................... 43Connecting an iPod ........................................ 44Connecting an USB memory device .............. 44Connecting FM/AM antenna .......................... 46Connecting a power cord ............................... 50Connecting wired LAN ........................... 48, 174Connecting wireless LAN ....................... 49, 175Connecting ZONE2 ................................ 35, 128
v DDirect sound mode ....................................... 117Display ........................................................... 16DLNA ........................................................... 229Dolby sound mode ............................... 114, 223DTS sound mode ................................. 115, 225
v EECO Mode ................................................... 180Error messages (Audyssey® Setup) ............ 165Explanation of terms/technology .......... 209, 223
v FFirmware Update .......................................... 186Front height speaker ................................ 27, 34Front panel ..................................................... 13
v GGeneral settings ................................... 133, 180
v HHDCP ........................................................... 211HDMI Control ....................................... 122, 149
Contents Connections Playback Settings Tips Appendix
240Front panel Display Rear panel Remote Index
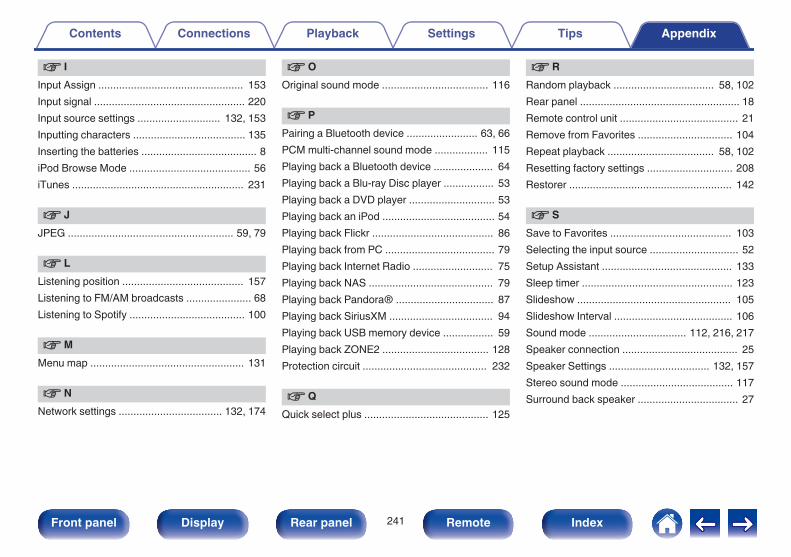
v IInput Assign ................................................. 153Input signal ................................................... 220Input source settings ............................ 132, 153Inputting characters ...................................... 135Inserting the batteries ....................................... 8iPod Browse Mode ......................................... 56iTunes .......................................................... 231
v JJPEG ........................................................ 59, 79
v LListening position ......................................... 157Listening to FM/AM broadcasts ...................... 68Listening to Spotify ....................................... 100
v MMenu map .................................................... 131
v NNetwork settings ................................... 132, 174
v OOriginal sound mode .................................... 116
v PPairing a Bluetooth device ........................ 63, 66PCM multi-channel sound mode .................. 115Playing back a Bluetooth device .................... 64Playing back a Blu-ray Disc player ................. 53Playing back a DVD player ............................. 53Playing back an iPod ...................................... 54Playing back Flickr ......................................... 86Playing back from PC ..................................... 79Playing back Internet Radio ........................... 75Playing back NAS .......................................... 79Playing back Pandora® ................................. 87Playing back SiriusXM ................................... 94Playing back USB memory device ................. 59Playing back ZONE2 .................................... 128Protection circuit .......................................... 232
v QQuick select plus .......................................... 125
v RRandom playback .................................. 58, 102Rear panel ...................................................... 18Remote control unit ........................................ 21Remove from Favorites ................................ 104Repeat playback .................................... 58, 102Resetting factory settings ............................. 208Restorer ....................................................... 142
v SSave to Favorites ......................................... 103Selecting the input source .............................. 52Setup Assistant ............................................ 133Sleep timer ................................................... 123Slideshow .................................................... 105Slideshow Interval ........................................ 106Sound mode ................................. 112, 216, 217Speaker connection ....................................... 25Speaker Settings .................................. 132, 157Stereo sound mode ...................................... 117Surround back speaker .................................. 27
Contents Connections Playback Settings Tips Appendix
241Front panel Display Rear panel Remote Index
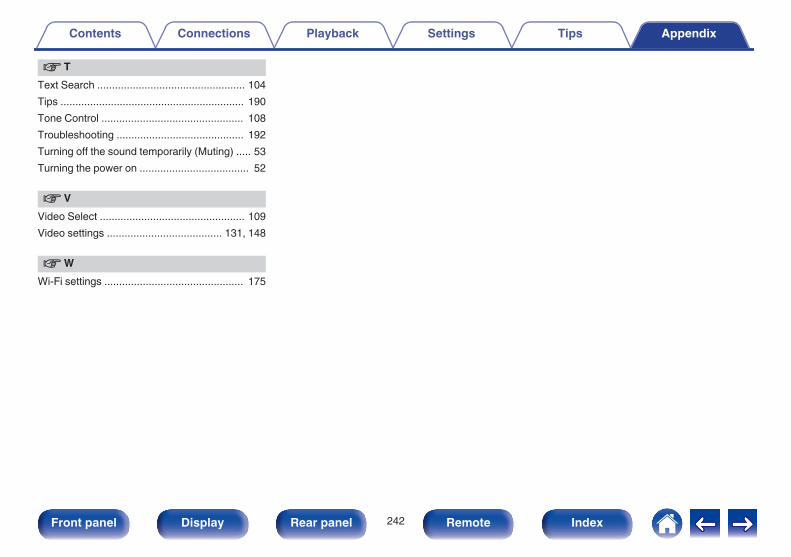
v TText Search .................................................. 104Tips .............................................................. 190Tone Control ................................................ 108Troubleshooting ........................................... 192Turning off the sound temporarily (Muting) ..... 53Turning the power on ..................................... 52
v VVideo Select ................................................. 109Video settings ....................................... 131, 148
v WWi-Fi settings ............................................... 175
Contents Connections Playback Settings Tips Appendix
242Front panel Display Rear panel Remote Index
LicenseThis section describes software license used for this unit.To maintain the correct content, the original (English) is used.oBoosthttp://www.boost.org/Boost Software License – Version 1.0 – August 17th, 2003Permission is hereby granted, free of charge, to any person or organization obtaininga copy of the software and accompanying documentation covered by this license(the “Software”) to use, reproduce, display, distribute, execute, and transmit theSoftware, and to prepare derivative works of the Software, and to permit third-partiesto whom the Software is furnished to do so, all subject to the following:The copyright notices in the Software and this entire statement, including the abovelicense grant, this restriction and the following disclaimer, must be included in allcopies of the Software, in whole or in part, and all derivative works of the Software,unless such copies or derivative works are solely in the form of machine-executableobject code generated by a source language processor.THE SOFTWARE IS PROVIDED “AS IS”, WITHOUT WARRANTY OF ANY KIND,EXPRESS OR IMPLIED, INCLUDING BUT NOT LIMITED TO THE WARRANTIESOF MERCHANTABILITY, FITNESS FOR A PARTICULAR PURPOSE, TITLE ANDNON-INFRINGEMENT. IN NO EVENT SHALL THE COPYRIGHT HOLDERS ORANYONE DISTRIBUTING THE SOFTWARE BE LIABLE FOR ANY DAMAGES OROTHER LIABILITY, WHETHER IN CONTRACT, TORT OR OTHERWISE, ARISINGFROM, OUT OF OR IN CONNECTION WITH THE SOFTWARE OR THE USE OROTHER DEALINGS IN THE SOFTWARE.
o Expathttp://www.jclark.com/xml/expat.htmlExpat License. Copyright (c) 1998, 1999, 2000 Thai Open Source Software CenterLtd
Permission is hereby granted, free of charge, to any person obtaining a copy of thissoftware and associated documentation files (the “Software”), to deal in the Softwarewithout restriction, including without limitation the rights to use, copy, modify, merge,publish, distribute, sublicense, and/or sell copies of the Software, and to permitpersons to whom the Software is furnished to do so, subject to the followingconditions:The above copyright notice and this permission notice shall be included in all copiesor substantial portions of the Software.THE SOFTWARE IS PROVIDED “AS IS”, WITHOUT WARRANTY OF ANY KIND,EXPRESS OR IMPLIED, INCLUDING BUT NOT LIMITED TO THE WARRANTIESOF MERCHANTABILITY, FITNESS FOR A PARTICULAR PURPOSE ANDNONINFRINGEMENT. IN NO EVENT SHALL THE AUTHORS OR COPYRIGHTHOLDERS BE LIABLE FOR ANY CLAIM, DAMAGES OR OTHER LIABILITY,WHETHER IN AN ACTION OF CONTRACT, TORT OR OTHERWISE, ARISINGFROM, OUT OF OR IN CONNECTION WITH THE SOFTWARE OR THE USE OROTHER DEALINGS IN THE SOFTWARE.
o FastDelegatehttp://www.codeproject.com/KB/cpp/FastDelegate.aspxTHE WORK (AS DEFINED BELOW) IS PROVIDED UNDER THE TERMS OF THISCODE PROJECT OPEN LICENSE (“LICENSE”). THE WORK IS PROTECTED BYCOPYRIGHT AND/OR OTHER APPLICABLE LAW. ANY USE OF THE WORKOTHER THAN AS AUTHORIZED UNDER THIS LICENSE OR COPYRIGHT LAW ISPROHIBITED.BY EXERCISING ANY RIGHTS TO THE WORK PROVIDED HEREIN, YOUACCEPT AND AGREE TO BE BOUND BY THE TERMS OF THIS LICENSE. THEAUTHOR GRANTS YOU THE RIGHTS CONTAINED HEREIN IN CONSIDERATIONOF YOUR ACCEPTANCE OF SUCH TERMS AND CONDITIONS. IF YOU DO NOTAGREE TO ACCEPT AND BE BOUND BY THE TERMS OF THIS LICENSE, YOUCANNOT MAKE ANY USE OF THE WORK.
Contents Connections Playback Settings Tips Appendix
243Front panel Display Rear panel Remote Index
Definitions. “Articles” means, collectively, all articles written by Author whichdescribes how the Source Code and Executable Files for the Work may be used by auser.“Author” means the individual or entity that offers the Work under the terms of thisLicense.“Derivative Work” means a work based upon the Work or upon the Work and otherpre-existing works.“Executable Files” refer to the executables, binary files, configuration and anyrequired data files included in the Work.“Publisher” means the provider of the website, magazine, CD-ROM, DVD or othermedium from or by which the Work is obtained by You.“Source Code” refers to the collection of source code and configuration files used tocreate the Executable Files.“Standard Version” refers to such a Work if it has not been modified, or has beenmodified in accordance with the consent of the Author, such consent being in the fulldiscretion of the Author.“Work” refers to the collection of files distributed by the Publisher, including theSource Code, Executable Files, binaries, data files, documentation, whitepapers andthe Articles.“You” is you, an individual or entity wishing to use the Work and exercise your rightsunder this License.Fair Use/Fair Use Rights. Nothing in this License is intended to reduce, limit, orrestrict any rights arising from fair use, fair dealing, first sale or other limitations on theexclusive rights of the copyright owner under copyright law or other applicable laws.License Grant. Subject to the terms and conditions of this License, the Author herebygrants You a worldwide, royalty-free, non-exclusive, perpetual (for the duration of theapplicable copyright) license to exercise the rights in the Work as stated below: Youmay use the standard version of the Source Code or Executable Files in Your ownapplications.You may apply bug fixes, portability fixes and other modifications obtained from thePublic Domain or from the Author. A Work modified in such a way shall still beconsidered the standard version and will be subject to this License.
You may otherwise modify Your copy of this Work (excluding the Articles) in any wayto create a Derivative Work, provided that You insert a prominent notice in eachchanged file stating how, when and where You changed that file.You may distribute the standard version of the Executable Files and Source Code orDerivative Work in aggregate with other (possibly commercial) programs as part of alarger (possibly commercial) software distribution.The Articles discussing the Work published in any form by the author may not bedistributed or republished without the Author’s consent. The author retains copyrightto any such Articles. You may use the Executable Files and Source Code pursuant tothis License but you may not repost or republish or otherwise distribute or makeavailable the Articles, without the prior written consent of the Author.Any subroutines or modules supplied by You and linked into the Source Code orExecutable Files this Work shall not be considered part of this Work and will not besubject to the terms of this License.Patent License. Subject to the terms and conditions of this License, each Authorhereby grants to You a perpetual, worldwide, non-exclusive, no-charge, royalty-free,irrevocable (except as stated in this section) patent license to make, have made, use,import, and otherwise transfer the Work.Restrictions. The license granted in Section 3 above is expressly made subject toand limited by the following restrictions: You agree not to remove any of the originalcopyright, patent, trademark, and attribution notices and associated disclaimers thatmay appear in the Source Code or Executable Files.You agree not to advertise or in any way imply that this Work is a product of Yourown.The name of the Author may not be used to endorse or promote products derivedfrom the Work without the prior written consent of the Author.You agree not to sell, lease, or rent any part of the Work. This does not restrict youfrom including the Work or any part of the Work inside a larger software distributionthat itself is being sold. The Work by itself, though, cannot be sold, leased or rented.
Contents Connections Playback Settings Tips Appendix
244Front panel Display Rear panel Remote Index
You may distribute the Executable Files and Source Code only under the terms ofthis License, and You must include a copy of, or the Uniform Resource Identifier for,this License with every copy of the Executable Files or Source Code You distributeand ensure that anyone receiving such Executable Files and Source Code agreesthat the terms of this License apply to such Executable Files and/or Source Code.You may not offer or impose any terms on the Work that alter or restrict the terms ofthis License or the recipients’ exercise of the rights granted hereunder. You may notsublicense the Work. You must keep intact all notices that refer to this License and tothe disclaimer of warranties. You may not distribute the Executable Files or SourceCode with any technological measures that control access or use of the Work in amanner inconsistent with the terms of this License.You agree not to use the Work for illegal, immoral or improper purposes, or on pagescontaining illegal, immoral or improper material. The Work is subject to applicableexport laws. You agree to comply with all such laws and regulations that may apply tothe Work after Your receipt of the Work.Representations, Warranties and Disclaimer. THIS WORK IS PROVIDED “AS IS”,“WHERE IS” AND “AS AVAILABLE”, WITHOUT ANY EXPRESS OR IMPLIEDWARRANTIES OR CONDITIONS OR GUARANTEES. YOU, THE USER, ASSUMEALL RISK IN ITS USE, INCLUDING COPYRIGHT INFRINGEMENT, PATENTINFRINGEMENT, SUITABILITY, ETC. AUTHOR EXPRESSLY DISCLAIMS ALLEXPRESS, IMPLIED OR STATUTORY WARRANTIES OR CONDITIONS,INCLUDING WITHOUT LIMITATION, WARRANTIES OR CONDITIONS OFMERCHANTABILITY, MERCHANTABLE QUALITY OR FITNESS FOR APARTICULAR PURPOSE, OR ANY WARRANTY OF TITLE OR NON-INFRINGEMENT, OR THAT THE WORK (OR ANY PORTION THEREOF) ISCORRECT, USEFUL, BUG-FREE OR FREE OF VIRUSES. YOU MUST PASS THISDISCLAIMER ON WHENEVER YOU DISTRIBUTE THE WORK OR DERIVATIVEWORKS.Indemnity. You agree to defend, indemnify and hold harmless the Author and thePublisher from and against any claims, suits, losses, damages, liabilities, costs, andexpenses (including reasonable legal or attorneys’ fees) resulting from or relating toany use of the Work by You.Limitation on Liability. EXCEPT TO THE EXTENT REQUIRED BY APPLICABLELAW, IN NO EVENT WILL THE AUTHOR OR THE PUBLISHER BE LIABLE TO YOUON ANY LEGAL THEORY FOR ANY SPECIAL, INCIDENTAL, CONSEQUENTIAL,PUNITIVE OR EXEMPLARY DAMAGES ARISING OUT OF THIS LICENSE OR THEUSE OF THE WORK OR OTHERWISE, EVEN IF THE AUTHOR OR THEPUBLISHER HAS BEEN ADVISED OF THE POSSIBILITY OF SUCH DAMAGES.Termination.
This License and the rights granted hereunder will terminate automatically upon anybreach by You of any term of this License. Individuals or entities who have receivedDerivative Works from You under this License, however, will not have their licensesterminated provided such individuals or entities remain in full compliance with thoselicenses. Sections 1, 2, 6, 7, 8, 9, 10 and 11 will survive any termination of thisLicense.If You bring a copyright, trademark, patent or any other infringement claim againstany contributor over infringements You claim are made by the Work, your Licensefrom such contributor to the Work ends automatically.Subject to the above terms and conditions, this License is perpetual (for the durationof the applicable copyright in the Work). Notwithstanding the above, the Authorreserves the right to release the Work under different license terms or to stopdistributing the Work at any time; provided, however that any such election will notserve to withdraw this License (or any other license that has been, or is required tobe, granted under the terms of this License), and this License will continue in fullforce and effect unless terminated as stated above.Publisher. The parties hereby confirm that the Publisher shall not, under anycircumstances, be responsible for and shall not have any liability in respect of thesubject matter of this License. The Publisher makes no warranty whatsoever inconnection with the Work and shall not be liable to You or any party on any legaltheory for any damages whatsoever, including without limitation any general, special,incidental or consequential damages arising in connection to this license. ThePublisher reserves the right to cease making the Work available to You at any timewithout noticeMiscellaneousThis License shall be governed by the laws of the location of the head office of theAuthor or if the Author is an individual, the laws of location of the principal place ofresidence of the Author.If any provision of this License is invalid or unenforceable under applicable law, itshall not affect the validity or enforceability of the remainder of the terms of thisLicense, and without further action by the parties to this License, such provision shallbe reformed to the minimum extent necessary to make such provision valid andenforceable.
Contents Connections Playback Settings Tips Appendix
245Front panel Display Rear panel Remote Index
No term or provision of this License shall be deemed waived and no breachconsented to unless such waiver or consent shall be in writing and signed by theparty to be charged with such waiver or consent.This License constitutes the entire agreement between the parties with respect to theWork licensed herein. There are no understandings, agreements or representationswith respect to the Work not specified herein. The Author shall not be bound by anyadditional provisions that may appear in any communication from You. This Licensemay not be modified without the mutual written agreement of the Author and You
o libogghttp://www.xiph.org/ogg/Copyright (c) 2002, Xiph.org FoundationRedistribution and use in source and binary forms, with or without modification, arepermitted provided that the following conditions are met:0 Redistributions of source code must retain the above copyright notice, this list of
conditions and the following disclaimer.0 Redistributions in binary form must reproduce the above copyright notice, this list
of conditions and the following disclaimer in the documentation and/or othermaterials provided with the distribution.
0 Neither the name of the Xiph.org Foundation nor the names of its contributors maybe used to endorse or promote products derived from this software withoutspecific prior written permission.
THIS SOFTWARE IS PROVIDED BY THE COPYRIGHT HOLDERS ANDCONTRIBUTORS “AS IS” AND ANY EXPRESS OR IMPLIED WARRANTIES,INCLUDING, BUT NOT LIMITED TO, THE IMPLIED WARRANTIES OFMERCHANTABILITY AND FITNESS FOR A PARTICULAR PURPOSE AREDISCLAIMED. IN NO EVENT SHALL THE FOUNDATION OR CONTRIBUTORS BELIABLE FOR ANY DIRECT, INDIRECT, INCIDENTAL, SPECIAL, EXEMPLARY, ORCONSEQUENTIAL DAMAGES (INCLUDING, BUT NOT LIMITED TO,PROCUREMENT OF SUBSTITUTE GOODS OR SERVICES; LOSS OF USE, DATA,OR PROFITS; OR BUSINESS INTERRUPTION) HOWEVER CAUSED AND ONANY THEORY OF LIABILITY, WHETHER IN CONTRACT, STRICT LIABILITY, ORTORT (INCLUDING NEGLIGENCE OR OTHERWISE) ARISING IN ANY WAY OUTOF THE USE OF THIS SOFTWARE, EVEN IF ADVISED OF THE POSSIBILITY OFSUCH DAMAGE.
o libvorbishttp://www.xiph.org/vorbis/Copyright (c) 2002-2004 Xiph.org FoundationRedistribution and use in source and binary forms, with or without modification, arepermitted provided that the following conditions are met:0 Redistributions of source code must retain the above copyright notice, this list of
conditions and the following disclaimer.0 Redistributions in binary form must reproduce the above copyright notice, this list
of conditions and the following disclaimer in the documentation and/or othermaterials provided with the distribution.
0 Neither the name of the Xiph.org Foundation nor the names of its contributors maybe used to endorse or promote products derived from this software withoutspecific prior written permission.
THIS SOFTWARE IS PROVIDED BY THE COPYRIGHT HOLDERS ANDCONTRIBUTORS “AS IS” AND ANY EXPRESS OR IMPLIED WARRANTIES,INCLUDING, BUT NOT LIMITED TO, THE IMPLIED WARRANTIES OFMERCHANTABILITY AND FITNESS FOR A PARTICULAR PURPOSE AREDISCLAIMED. IN NO EVENT SHALL THE FOUNDATION OR CONTRIBUTORS BELIABLE FOR ANY DIRECT, INDIRECT, INCIDENTAL, SPECIAL, EXEMPLARY, ORCONSEQUENTIAL DAMAGES (INCLUDING, BUT NOT LIMITED TO,PROCUREMENT OF SUBSTITUTE GOODS OR SERVICES; LOSS OF USE, DATA,OR PROFITS; OR BUSINESS INTERRUPTION) HOWEVER CAUSED AND ONANY THEORY OF LIABILITY, WHETHER IN CONTRACT, STRICT LIABILITY, ORTORT (INCLUDING NEGLIGENCE OR OTHERWISE) ARISING IN ANY WAY OUTOF THE USE OF THIS SOFTWARE, EVEN IF ADVISED OF THE POSSIBILITY OFSUCH DAMAGE.
o Tremolohttp://wss.co.uk/pinknoise/tremoloCopyright (C) 2002 – 2009 Xiph.org Foundation Changes Copyright (C) 2009 – 2010Robin Watts for Pinknoise Productions LtdRedistribution and use in source and binary forms, with or without modification, arepermitted provided that the following conditions are met:
Contents Connections Playback Settings Tips Appendix
246Front panel Display Rear panel Remote Index
0 Redistributions of source code must retain the above copyright notice, this list ofconditions and the following disclaimer.
0 Redistributions in binary form must reproduce the above copyright notice, this listof conditions and the following disclaimer in the documentation and/or othermaterials provided with the distribution.
0 Neither the name of the Xiph.org Foundation nor the names of its contributors maybe used to endorse or promote products derived from this software withoutspecific prior written permission.
THIS SOFTWARE IS PROVIDED BY THE COPYRIGHT HOLDERS ANDCONTRIBUTORS “AS IS” AND ANY EXPRESS OR IMPLIED WARRANTIES,INCLUDING, BUT NOT LIMITED TO, THE IMPLIED WARRANTIES OFMERCHANTABILITY AND FITNESS FOR A PARTICULAR PURPOSE AREDISCLAIMED. IN NO EVENT SHALL THE FOUNDATION OR CONTRIBUTORS BELIABLE FOR ANY DIRECT, INDIRECT, INCIDENTAL, SPECIAL, EXEMPLARY, ORCONSEQUENTIAL DAMAGES (INCLUDING, BUT NOT LIMITED TO,PROCUREMENT OF SUBSTITUTE GOODS OR SERVICES; LOSS OF USE, DATA,OR PROFITS; OR BUSINESS INTERRUPTION) HOWEVER CAUSED AND ONANY THEORY OF LIABILITY, WHETHER IN CONTRACT, STRICT LIABILITY, ORTORT (INCLUDING NEGLIGENCE OR OTHERWISE) ARISING IN ANY WAY OUTOF THE USE OF THIS SOFTWARE, EVEN IF ADVISED OF THE POSSIBILITY OFSUCH DAMAGE.
o Tremorhttp://wiki.xiph.org/index.php/TremorCopyright (c) 2002, Xiph.org FoundationRedistribution and use in source and binary forms, with or without modification, arepermitted provided that the following conditions are met:0 Redistributions of source code must retain the above copyright notice, this list of
conditions and the following disclaimer.0 Redistributions in binary form must reproduce the above copyright notice, this list
of conditions and the following disclaimer in the documentation and/or othermaterials provided with the distribution.
0 Neither the name of the Xiph.org Foundation nor the names of its contributors maybe used to endorse or promote products derived from this software withoutspecific prior written permission.
THIS SOFTWARE IS PROVIDED BY THE COPYRIGHT HOLDERS ANDCONTRIBUTORS “AS IS” AND ANY EXPRESS OR IMPLIED WARRANTIES,INCLUDING, BUT NOT LIMITED TO, THE IMPLIED WARRANTIES OFMERCHANTABILITY AND FITNESS FOR A PARTICULAR PURPOSE AREDISCLAIMED. IN NO EVENT SHALL THE FOUNDATION OR CONTRIBUTORS BELIABLE FOR ANY DIRECT, INDIRECT, INCIDENTAL, SPECIAL, EXEMPLARY, ORCONSEQUENTIAL DAMAGES (INCLUDING, BUT NOT LIMITED TO,PROCUREMENT OF SUBSTITUTE GOODS OR SERVICES; LOSS OF USE, DATA,OR PROFITS; OR BUSINESS INTERRUPTION) HOWEVER CAUSED AND ONANY THEORY OF LIABILITY, WHETHER IN CONTRACT, STRICT LIABILITY, ORTORT (INCLUDING NEGLIGENCE OR OTHERWISE) ARISING IN ANY WAY OUTOF THE USE OF THIS SOFTWARE, EVEN IF ADVISED OF THE POSSIBILITY OFSUCH DAMAGE.
oMersenne Twisterhttp://www.math.sci.hiroshima-u.ac.jp/~m-mat/MT/MT2002/CODES/mt19937ar.cCopyright (C) 1997 – 2002, Makoto Matsumoto and Takuji Nishimura,All rights reserved.Redistribution and use in source and binary forms, with or without modification, arepermitted provided that the following conditions are met:Redistributions of source code must retain the above copyright notice, this list ofconditions and the following disclaimer.Redistributions in binary form must reproduce the above copyright notice, this list ofconditions and the following disclaimer in the documentation and/or other materialsprovided with the distribution.The names of its contributors may not be used to endorse or promote productsderived from this software without specific prior written permission.
Contents Connections Playback Settings Tips Appendix
247Front panel Display Rear panel Remote Index
THIS SOFTWARE IS PROVIDED BY THE COPYRIGHT HOLDERS ANDCONTRIBUTORS “AS IS” AND ANY EXPRESS OR IMPLIED WARRANTIES,INCLUDING, BUT NOT LIMITED TO, THE IMPLIED WARRANTIES OFMERCHANTABILITY AND FITNESS FOR A PARTICULAR PURPOSE AREDISCLAIMED. IN NO EVENT SHALL THE COPYRIGHT OWNER ORCONTRIBUTORS BE LIABLE FOR ANY DIRECT, INDIRECT, INCIDENTAL,SPECIAL, EXEMPLARY, OR CONSEQUENTIAL DAMAGES (INCLUDING, BUTNOT LIMITED TO, PROCUREMENT OF SUBSTITUTE GOODS OR SERVICES;LOSS OF USE, DATA, OR PROFITS; OR BUSINESS INTERRUPTION) HOWEVERCAUSED AND ON ANY THEORY OF LIABILITY, WHETHER IN CONTRACT,STRICT LIABILITY, OR TORT (INCLUDING NEGLIGENCE OR OTHERWISE)ARISING IN ANY WAY OUT OF THE USE OF THIS SOFTWARE, EVEN IFADVISED OF THE POSSIBILITY OF SUCH DAMAGE.
o zlibhttp://www.zlib.net/zlib.h -- interface of the “zlib” general purpose compression library version 1.2.3, July18th, 2005Copyright (C) 1995 – 2004 Jean-loup Gailly and Mark AdlerThis software is provided “as-is”, without any express or implied warranty. In no eventwill the authors be held liable for any damages arising from the use of this software.Permission is granted to anyone to use this software for any purpose, includingcommercial applications, and to alter it and redistribute it freely, subject to thefollowing restrictions:The origin of this software must not be misrepresented; you must not claim that youwrote the original software. If you use this software in a product, an acknowledgmentin the product documentation would be appreciated but is not required.Altered source versions must be plainly marked as such, and must not bemisrepresented as being the original software.This notice may not be removed or altered from any source distribution.Jean-loup Gailly [email protected], Mark Adler [email protected]
o cURLhttp://curl.haxx.seCOPYRIGHT AND PERMISSION NOTICECopyright (c) 1996 – 2011, Daniel Stenberg, <[email protected]>.All rights reserved.Permission to use, copy, modify, and distribute this software for any purpose with orwithout fee is hereby granted, provided that the above copyright notice and thispermission notice appear in all copies.THE SOFTWARE IS PROVIDED “AS IS”, WITHOUT WARRANTY OF ANY KIND,EXPRESS OR IMPLIED, INCLUDING BUT NOT LIMITED TO THE WARRANTIESOF MERCHANTABILITY, FITNESS FOR A PARTICULAR PURPOSE ANDNONINFRINGEMENT OF THIRD PARTY RIGHTS. IN NO EVENT SHALL THEAUTHORS OR COPYRIGHT HOLDERS BE LIABLE FOR ANY CLAIM, DAMAGESOR OTHER LIABILITY, WHETHER IN AN ACTION OF CONTRACT, TORT OROTHERWISE, ARISING FROM, OUT OF OR IN CONNECTION WITH THESOFTWARE OR THE USE OR OTHER DEALINGS IN THE SOFTWARE.Except as contained in this notice, the name of a copyright holder shall not be used inadvertising or otherwise to promote the sale, use or other dealings in this Softwarewithout prior written authorization of the copyright holder.
o c-areshttp://c-ares.haxx.seCopyright 1998 by the Massachusetts Institute of Technology.Permission to use, copy, modify, and distribute this software and its documentationfor any purpose and without fee is hereby granted, provided that the above copyrightnotice appear in all copies and that both that copyright notice and this permissionnotice appear in supporting documentation, and that the name of M.I.T. not be usedin advertising or publicity pertaining to distribution of the software without specific,written prior permission. M.I.T. makes no representations about the suitability of thissoftware for any purpose. It is provided “as is” without express or implied warranty.
Contents Connections Playback Settings Tips Appendix
248Front panel Display Rear panel Remote Index
o License information for the software used inthe unitAbout GPL (GNU-General Public License), LGPL (GNU LesserGeneral Public License) LicenseThis product uses GPL/LGPL software and software made by othercompanies.After you purchase this product, you may procure, modify or distributethe source code of the GPL/LGPL software that is used in the product.Denon provides the source code based on the GPL and LPGLlicenses at the actual cost upon your request to our customer servicecenter.However, note that we make no guarantees concerning the sourcecode.Please also understand that we do not offer support for the contents ofthe source code.
Contents Connections Playback Settings Tips Appendix
249Front panel Display Rear panel Remote Index

.
www.denon.com D&M Holdings Inc.3520 10349 00AD
250


![[LinksVIP.Net] HD SD CODEVISION AVR](https://img.dokumen.tips/doc/110x75/6358f525c2cb8a15fc065b1b/linksvipnet-hd-sd-codevision-avr.jpg)