Embed Size (px)
Citation preview
Architectural Submission Template for Archicad 25
Duke Ellington School of the Arts Architect: cox graae + spack architects | LBA Joint Venture
Photo © Chris Ambridge
Copyright © Building and Construction Authority, 2021. All rights reserved.
Architectural Native BIM Submission Template for Archicad 25
2
Publishing, reproduction, paraphrasing or translation without express prior written permission is strictly prohibited.
Trademarks
Archicad® is a registered trademark of GRAPHISOFT. All other trademarks are the properties of their respective holders.
Credits
Courtesy of GRAPHISOFT
--- Links last accessed: October 15, 2021 ---
If you have any comments, suggestions, or clarifications, please contact:
GRAPHISOFT Singapore 152 Beach Road
#10-05 Gateway East Singapore 189721
Building and Construction Authority 52 Jurong Gateway Road, #11-01
Singapore 608550
Copyright © Building and Construction Authority, 2021. All rights reserved.
Architectural Native BIM Submission Template for Archicad 25
3
Table of Contents INTRODUCTION ............................................................................................................................ 5 GETTING STARTED ....................................................................................................................... 6 THE ARCHICAD NAVIGATOR ........................................................................................................ 9 STOREYS, PROJECT LOCATION AND REFERENCE LEVELS ....................................................... 12 SITE AND CONTEXT FROM EXTERNAL CONTENT ..................................................................... 16
DWG .............................................................................................................................................................................. 16 Surveyors' Data File ................................................................................................................................................. 19 Point Clouds ............................................................................................................................................................... 20
BIM SUBMISSION TOOLS AND INTERFACE ............................................................................... 22 View Map Overview ................................................................................................................................................ 22 Quick Options ............................................................................................................................................................ 23 Favorites ...................................................................................................................................................................... 24 Find & Select Criteria Sets ..................................................................................................................................... 26
PREPARING THE FILE FOR SUBMISSION ................................................................................... 27 3D Plan Views ............................................................................................................................................................ 27 Creating/Modifying 3D Plan Views - 3D Cutting Planes ........................................................................... 28 Creating/Modifying 3D Plan Views - Filter and Cut Elements in 3D ..................................................... 29
ACCESSIBILITY & VENTILATION ................................................................................................ 31 Accessibility Routes ................................................................................................................................................. 31 Accessible Doors ...................................................................................................................................................... 33 Clearance Boxes ........................................................................................................................................................ 34 Zone Accessibility .................................................................................................................................................... 36 Modes of Ventilation .............................................................................................................................................. 39 Lifts ................................................................................................................................................................................ 40 Toilets and Toilet Compartments ...................................................................................................................... 43 Accessibility Objects ............................................................................................................................................... 46
SCHEDULES ................................................................................................................................. 47 Accessible (Audience) Seating ............................................................................................................................ 47 Hearing Enhancement Systems ......................................................................................................................... 49 Parking Lots ................................................................................................................................................................ 51 Accessible/Elderly Friendly Rooms (Hospitality Projects Only) .............................................................. 53 All Rooms .................................................................................................................................................................... 55 Stairs .............................................................................................................................................................................. 56 Shelters ........................................................................................................................................................................ 57
AREA TABULATION .................................................................................................................... 60 GFA ................................................................................................................................................................................ 60 STRATA ......................................................................................................................................................................... 62 SGFA .............................................................................................................................................................................. 63
COVER PAGE ............................................................................................................................... 64 A&A WORKS (RENOVATION) ..................................................................................................... 66 COLLISION DETECTION (OPTIONAL) ......................................................................................... 68 MERGING THE TEMPLATE INTO AN EXISTING COMPANY TEMPLATE .................................... 69
Favorites ...................................................................................................................................................................... 69 Attributes .................................................................................................................................................................... 70 Project Info ................................................................................................................................................................. 72
Copyright © Building and Construction Authority, 2021. All rights reserved.
Architectural Native BIM Submission Template for Archicad 25
4
Views, Layouts and Master Layouts .................................................................................................................. 73 Publisher Sets ............................................................................................................................................................ 75 Renovation Filters .................................................................................................................................................... 77 Model View Options ............................................................................................................................................... 78 Graphic Override Combinations ........................................................................................................................ 79
SUBMISSION REQUIREMENTS ................................................................................................... 80 Final Check ................................................................................................................................................................. 81 File Formats ................................................................................................................................................................ 81
ACKNOWLEDGEMENT ................................................................................................................ 82
Copyright © Building and Construction Authority, 2021. All rights reserved.
Architectural Native BIM Submission Template for Archicad 25
5
INTRODUCTION The objective of this document is to assist qualified persons (QPs) in developing BIM models to meet the new requirements of the Building Information Model (BIM) submission (Native BIM Submission). The document describes the features of the Architectural Native BIM Submission Template for Archicad 25 and provides a step-by-step guide to apply them in projects. The template creates a basic structure to assist the QPs in preparing the BIM models for regulatory approval according to the Architectural BIM e-Submission Guideline. It is by no means an exhaustive template and QPs are allowed/required to edit/change it accordingly to suit their needs. For any additional requirements that require customizations to a certain extent, QPs are also advised to make reference to the training materials distributed or to consult the respective software vendor for any enquiries on the application. If there are contradictions between this submission guideline and vendor’s instructions, BCA BIM team shall be contacted for clarification. Please note that any BIM Submission Guidelines and templates shall be collected from the BCA BIM team. This material is to serve as a reference for GRAPHISOFT Archicad 25 users only.
Find the BIM e-Submission Templates and Guidelines at the CORENET website here: https://www.corenet.gov.sg/general/building-information-modeling-(bim)-e-submission.aspx
Find the Archicad Libraries for each template on the GRAPHISOFT SG website here:
(requires GRAPHISOFT ID and SSA license to log in) https://graphisoft.com/sg/ssa/downloads
Copyright © Building and Construction Authority, 2021. All rights reserved.
Architectural Native BIM Submission Template for Archicad 25
6
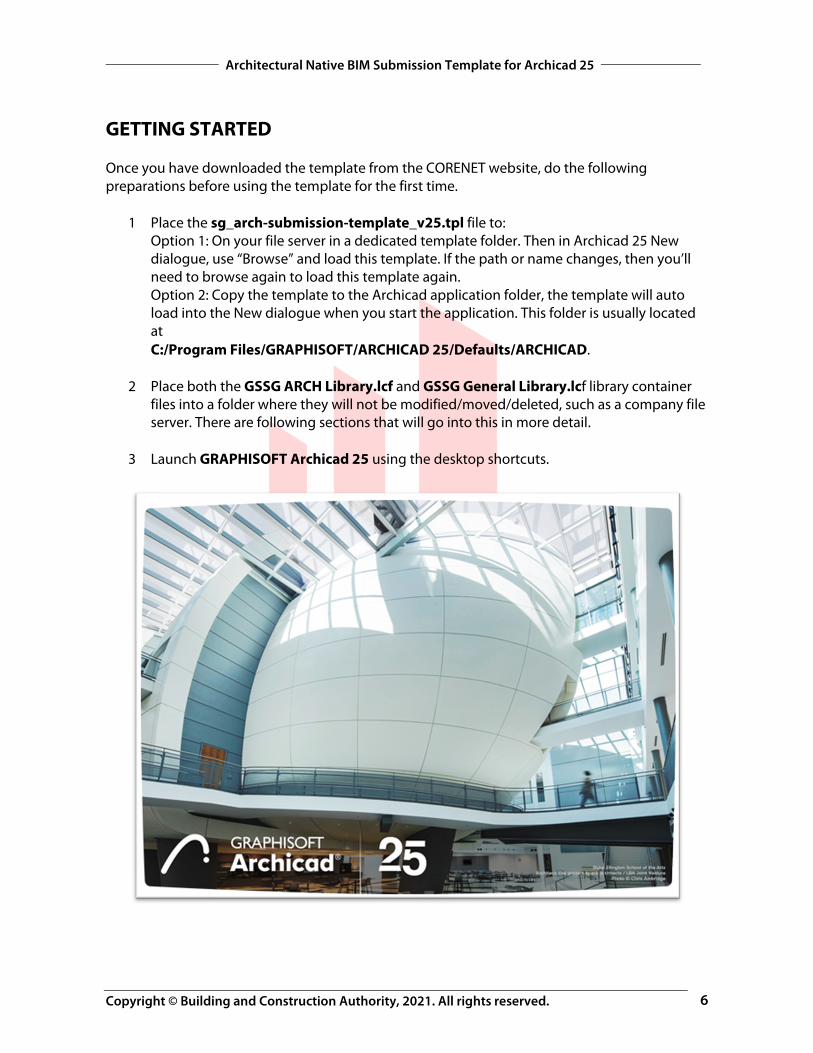
GETTING STARTED Once you have downloaded the template from the CORENET website, do the following preparations before using the template for the first time.
1 Place the sg_arch-submission-template_v25.tpl file to: Option 1: On your file server in a dedicated template folder. Then in Archicad 25 New dialogue, use “Browse” and load this template. If the path or name changes, then you’ll need to browse again to load this template again. Option 2: Copy the template to the Archicad application folder, the template will auto load into the New dialogue when you start the application. This folder is usually located at C:/Program Files/GRAPHISOFT/ARCHICAD 25/Defaults/ARCHICAD.
2 Place both the GSSG ARCH Library.lcf and GSSG General Library.lcf library container files into a folder where they will not be modified/moved/deleted, such as a company file server. There are following sections that will go into this in more detail.
3 Launch GRAPHISOFT Archicad 25 using the desktop shortcuts.
Copyright © Building and Construction Authority, 2021. All rights reserved.
Architectural Native BIM Submission Template for Archicad 25
7
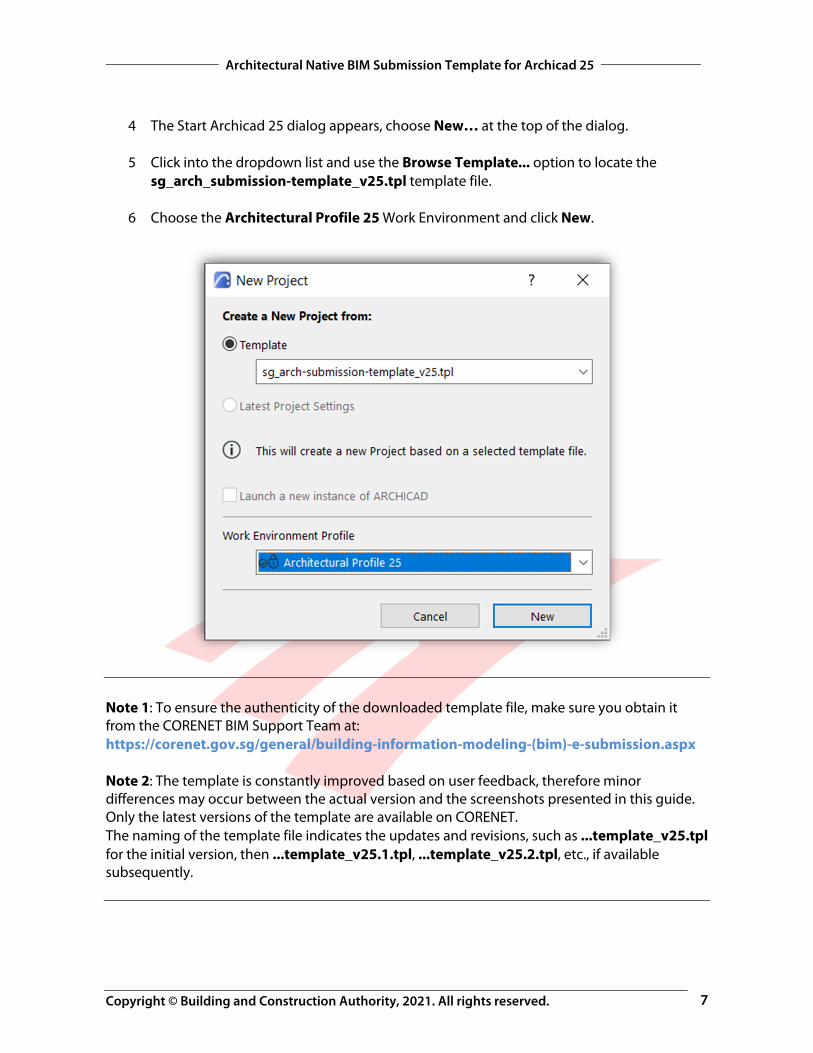
4 The Start Archicad 25 dialog appears, choose New… at the top of the dialog.
5 Click into the dropdown list and use the Browse Template... option to locate the sg_arch_submission-template_v25.tpl template file.
6 Choose the Architectural Profile 25 Work Environment and click New.
Note 1: To ensure the authenticity of the downloaded template file, make sure you obtain it from the CORENET BIM Support Team at: https://corenet.gov.sg/general/building-information-modeling-(bim)-e-submission.aspx Note 2: The template is constantly improved based on user feedback, therefore minor differences may occur between the actual version and the screenshots presented in this guide. Only the latest versions of the template are available on CORENET. The naming of the template file indicates the updates and revisions, such as ...template_v25.tpl for the initial version, then ...template_v25.1.tpl, ...template_v25.2.tpl, etc., if available subsequently.
Copyright © Building and Construction Authority, 2021. All rights reserved.
Architectural Native BIM Submission Template for Archicad 25
8
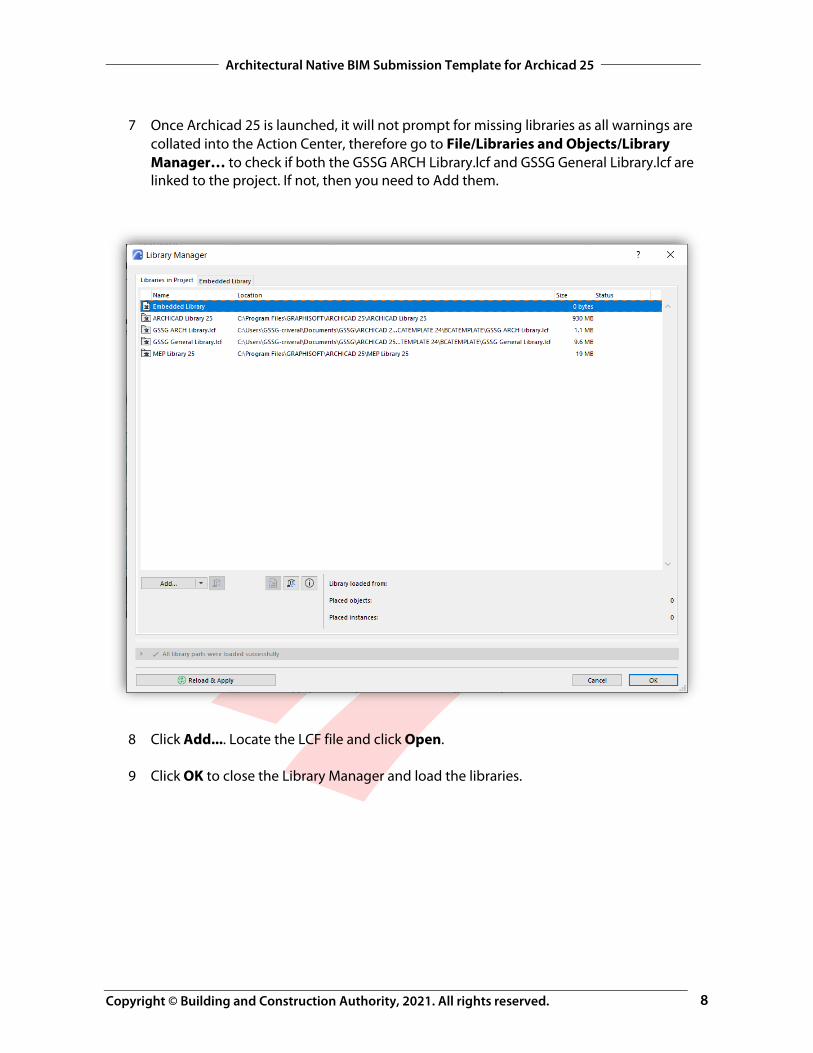
7 Once Archicad 25 is launched, it will not prompt for missing libraries as all warnings are collated into the Action Center, therefore go to File/Libraries and Objects/Library Manager… to check if both the GSSG ARCH Library.lcf and GSSG General Library.lcf are linked to the project. If not, then you need to Add them.
8 Click Add.... Locate the LCF file and click Open.
9 Click OK to close the Library Manager and load the libraries.
Copyright © Building and Construction Authority, 2021. All rights reserved.
Architectural Native BIM Submission Template for Archicad 25
9
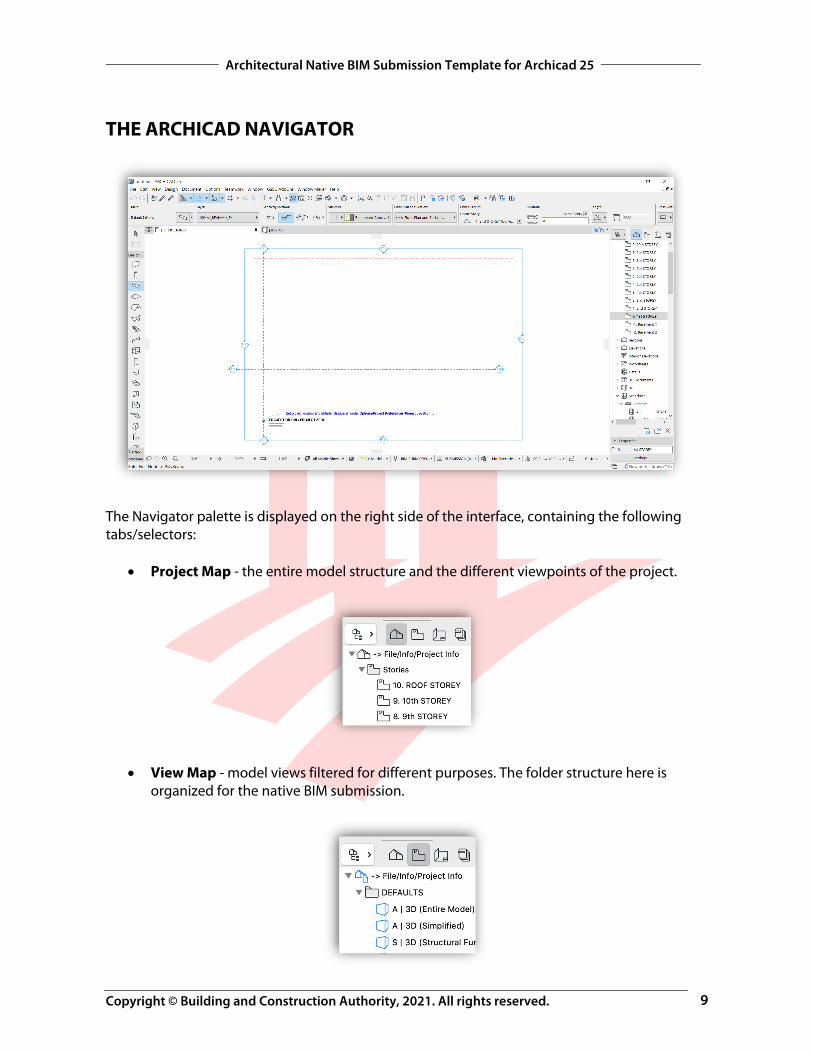
THE ARCHICAD NAVIGATOR
The Navigator palette is displayed on the right side of the interface, containing the following tabs/selectors:
Project Map - the entire model structure and the different viewpoints of the project.
View Map - model views filtered for different purposes. The folder structure here is organized for the native BIM submission.
Copyright © Building and Construction Authority, 2021. All rights reserved.
Architectural Native BIM Submission Template for Archicad 25
10
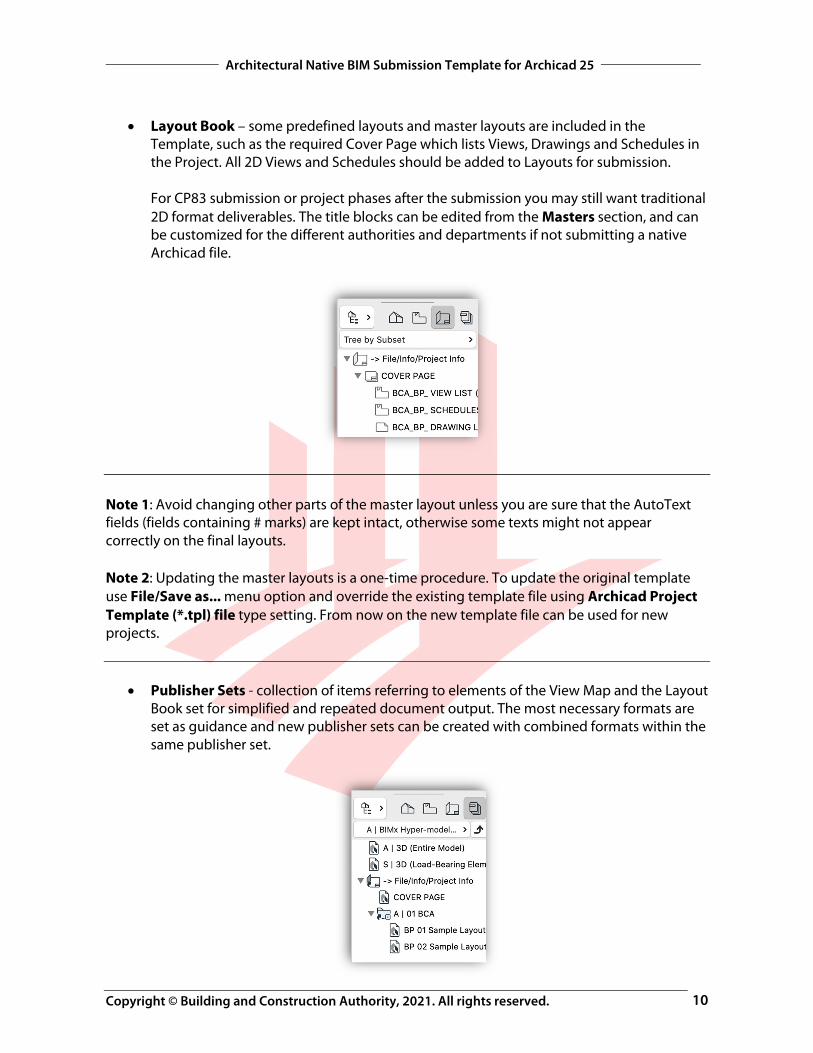
Layout Book – some predefined layouts and master layouts are included in the Template, such as the required Cover Page which lists Views, Drawings and Schedules in the Project. All 2D Views and Schedules should be added to Layouts for submission. For CP83 submission or project phases after the submission you may still want traditional 2D format deliverables. The title blocks can be edited from the Masters section, and can be customized for the different authorities and departments if not submitting a native Archicad file.
Note 1: Avoid changing other parts of the master layout unless you are sure that the AutoText fields (fields containing # marks) are kept intact, otherwise some texts might not appear correctly on the final layouts. Note 2: Updating the master layouts is a one-time procedure. To update the original template use File/Save as... menu option and override the existing template file using Archicad Project Template (*.tpl) file type setting. From now on the new template file can be used for new projects.
Publisher Sets - collection of items referring to elements of the View Map and the Layout Book set for simplified and repeated document output. The most necessary formats are set as guidance and new publisher sets can be created with combined formats within the same publisher set.

Copyright © Building and Construction Authority, 2021. All rights reserved.
Architectural Native BIM Submission Template for Archicad 25
11
The BIM submission template serves as a basic platform to help you in preparing your model for regulatory approval. Submitting native files is not mandatory and you are free to submit your projects in the traditional way and edit the template according to your needs as long as the final results presented to the authorities meet the requirements specified in the Code of Practice for BIM Submission documents. Note: Traditional submission formats are still accepted, but not supported or recommended by BCA, nor GRAPHISOFT Singapore as the creator of this template, from July 2016 onwards.
Copyright © Building and Construction Authority, 2021. All rights reserved.
Architectural Native BIM Submission Template for Archicad 25
12
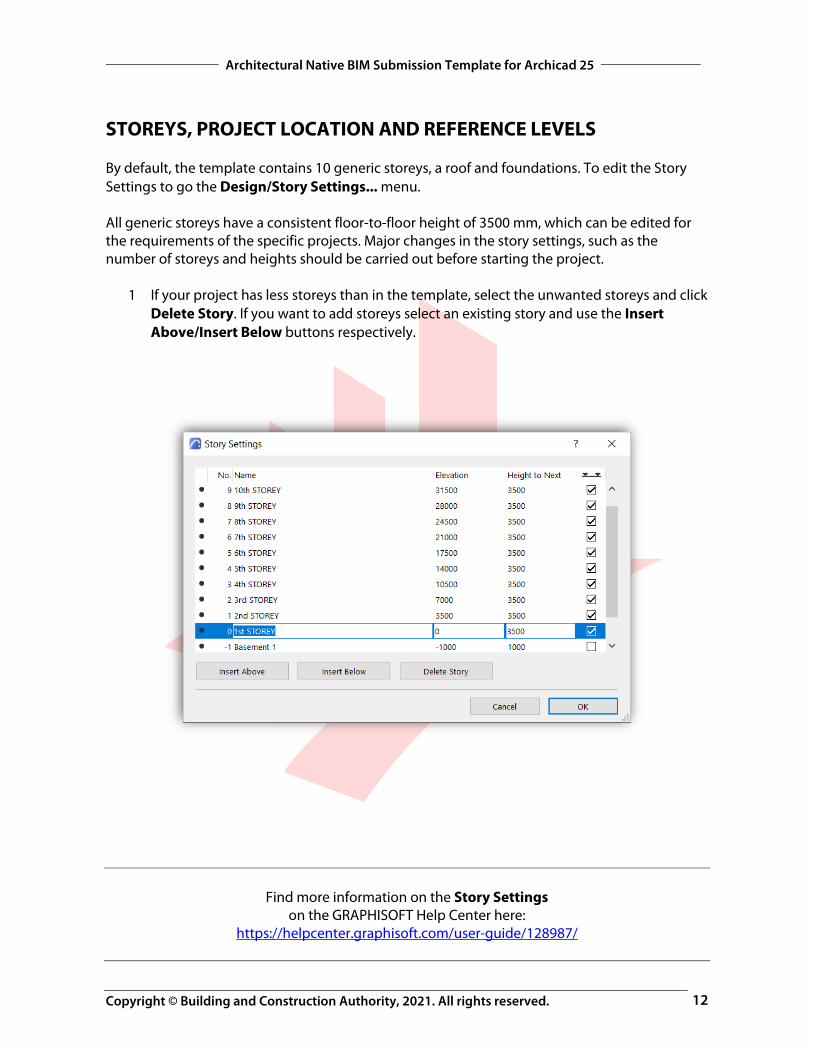
STOREYS, PROJECT LOCATION AND REFERENCE LEVELS By default, the template contains 10 generic storeys, a roof and foundations. To edit the Story Settings to go the Design/Story Settings... menu. All generic storeys have a consistent floor-to-floor height of 3500 mm, which can be edited for the requirements of the specific projects. Major changes in the story settings, such as the number of storeys and heights should be carried out before starting the project.
1 If your project has less storeys than in the template, select the unwanted storeys and click Delete Story. If you want to add storeys select an existing story and use the Insert Above/Insert Below buttons respectively.
Find more information on the Story Settings on the GRAPHISOFT Help Center here:
https://helpcenter.graphisoft.com/user-guide/128987/
Copyright © Building and Construction Authority, 2021. All rights reserved.
Architectural Native BIM Submission Template for Archicad 25
13
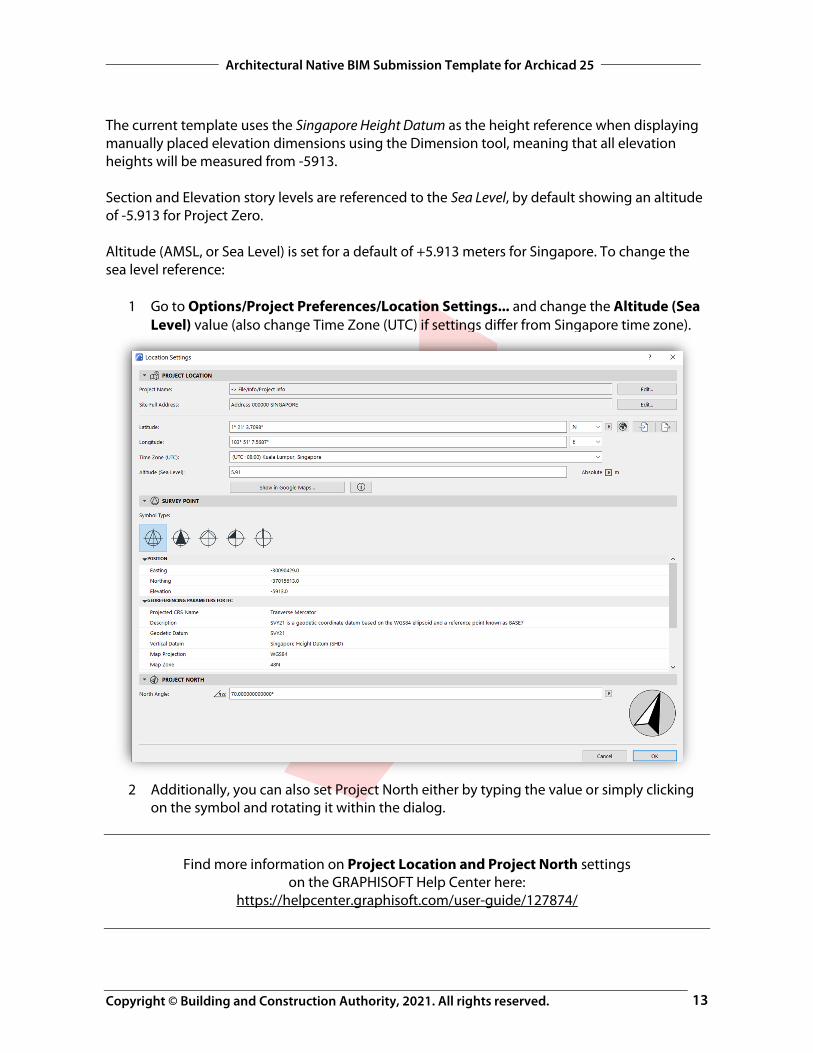
The current template uses the Singapore Height Datum as the height reference when displaying manually placed elevation dimensions using the Dimension tool, meaning that all elevation heights will be measured from -5913. Section and Elevation story levels are referenced to the Sea Level, by default showing an altitude of -5.913 for Project Zero. Altitude (AMSL, or Sea Level) is set for a default of +5.913 meters for Singapore. To change the sea level reference:
1 Go to Options/Project Preferences/Location Settings... and change the Altitude (Sea Level) value (also change Time Zone (UTC) if settings differ from Singapore time zone).
2 Additionally, you can also set Project North either by typing the value or simply clicking
on the symbol and rotating it within the dialog.
Find more information on Project Location and Project North settings
on the GRAPHISOFT Help Center here: https://helpcenter.graphisoft.com/user-guide/127874/
Copyright © Building and Construction Authority, 2021. All rights reserved.
Architectural Native BIM Submission Template for Archicad 25
14
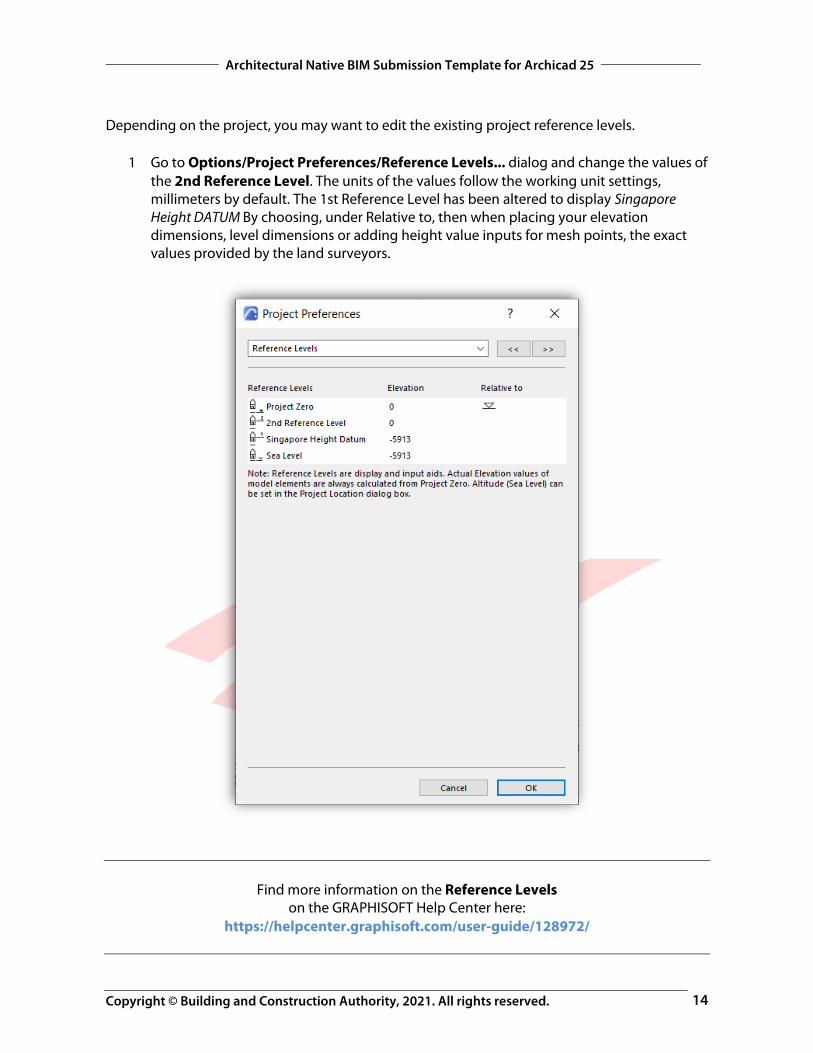
Depending on the project, you may want to edit the existing project reference levels.
1 Go to Options/Project Preferences/Reference Levels... dialog and change the values of the 2nd Reference Level. The units of the values follow the working unit settings, millimeters by default. The 1st Reference Level has been altered to display Singapore Height DATUM By choosing, under Relative to, then when placing your elevation dimensions, level dimensions or adding height value inputs for mesh points, the exact values provided by the land surveyors.
Find more information on the Reference Levels on the GRAPHISOFT Help Center here:
https://helpcenter.graphisoft.com/user-guide/128972/
Copyright © Building and Construction Authority, 2021. All rights reserved.
Architectural Native BIM Submission Template for Archicad 25
15
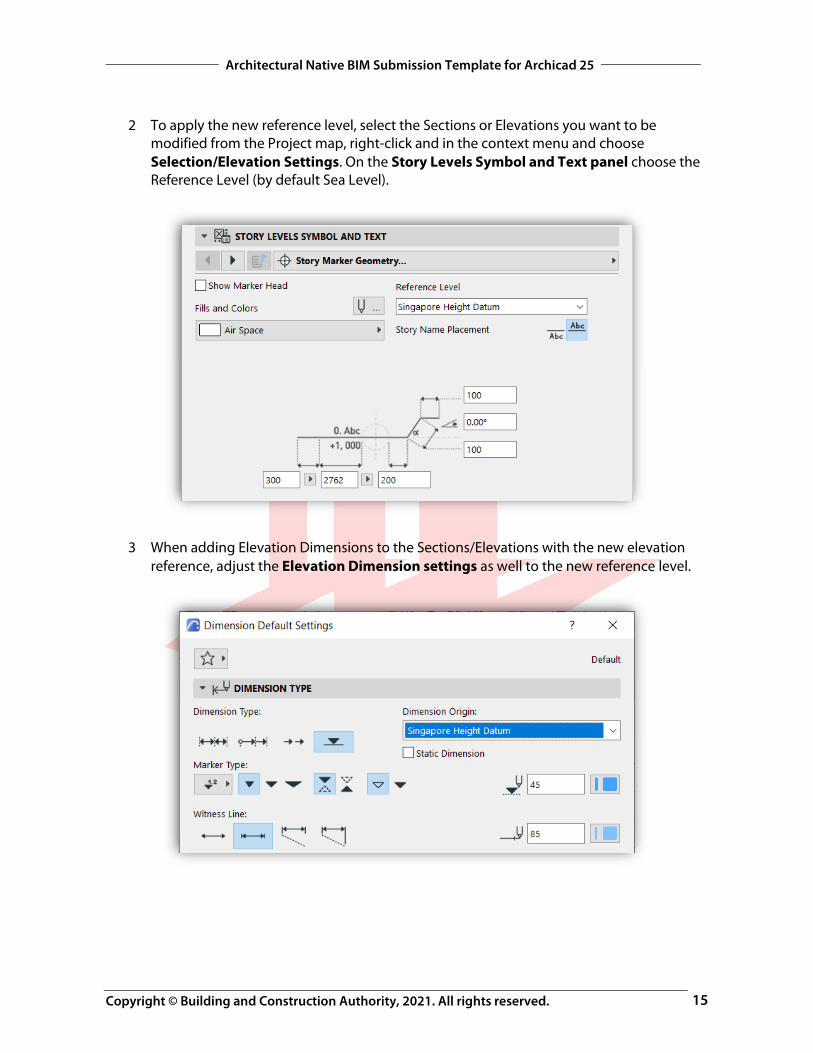
2 To apply the new reference level, select the Sections or Elevations you want to be modified from the Project map, right-click and in the context menu and choose Selection/Elevation Settings. On the Story Levels Symbol and Text panel choose the Reference Level (by default Sea Level).
3 When adding Elevation Dimensions to the Sections/Elevations with the new elevation reference, adjust the Elevation Dimension settings as well to the new reference level.
Copyright © Building and Construction Authority, 2021. All rights reserved.
Architectural Native BIM Submission Template for Archicad 25
16
SITE AND CONTEXT FROM EXTERNAL CONTENT Context to the site can be imported and created from many different formats, such as 2D DWGs, tabulated text files (XYZ coordinates) or Point Clouds.
DWG There are two main methods to link DWG files into Archicad. For both methods, it is advised to create a new Independent Worksheet, and use the Trace and Reference functionality to view the DWG from the Worksheet on the relevant floor plan.
1 Place Drawing - Use the Drawing Tool, to add into a Worksheet. Make sure to set the Drawing Units when prompted and check any linked images/SHX (fonts) files. Once placed, within the Drawing Tool, the DWG Embedded Layers can be turned on/off as needed. The Drawing can be exploded and the 2D content embedded by using right-click, Explode into Current View.
2 Attach Xref – From the File/External Content/Attach Xref dialog. Set to Drawing’s
own origin, check the Translator being used before attaching, and any linked images/SHX (fonts) files when prompted. Place the DWG in the correct location and choose which Layers you wish to import. These imported Layers will be available in the projects Layer Settings, separated after all other Layers. If the Xref will be deleted from the Project, these separated Layers will also be removed as well.
To accommodate the extents of the DWG and site boundary, Section and Elevation markers may need to be adjusted on the floor plan. To create the 3D terrain from the 2D DWG:
1 Use the Mesh Tool from the Toolbox, to trace the boundaries of the terrain.
2 To trace the continuous ridge lines, select the Mesh in the plan, and activating the Mesh Tool in the Toolbox.
3 Activate the Magic Wand, by holding the SPACEBAR and click on the ridges of the DWG
reference.
Copyright © Building and Construction Authority, 2021. All rights reserved.
Architectural Native BIM Submission Template for Archicad 25
17
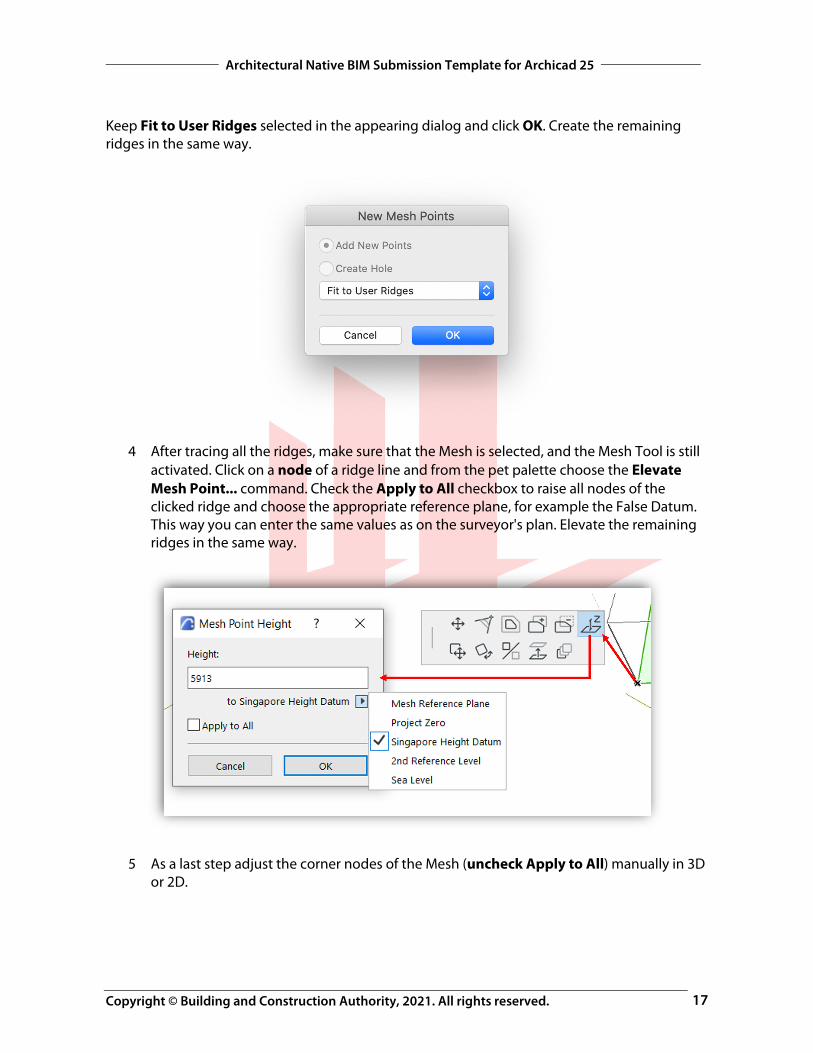
Keep Fit to User Ridges selected in the appearing dialog and click OK. Create the remaining ridges in the same way.
4 After tracing all the ridges, make sure that the Mesh is selected, and the Mesh Tool is still activated. Click on a node of a ridge line and from the pet palette choose the Elevate Mesh Point... command. Check the Apply to All checkbox to raise all nodes of the clicked ridge and choose the appropriate reference plane, for example the False Datum. This way you can enter the same values as on the surveyor's plan. Elevate the remaining ridges in the same way.
5 As a last step adjust the corner nodes of the Mesh (uncheck Apply to All) manually in 3D or 2D.
Copyright © Building and Construction Authority, 2021. All rights reserved.
Architectural Native BIM Submission Template for Archicad 25
18
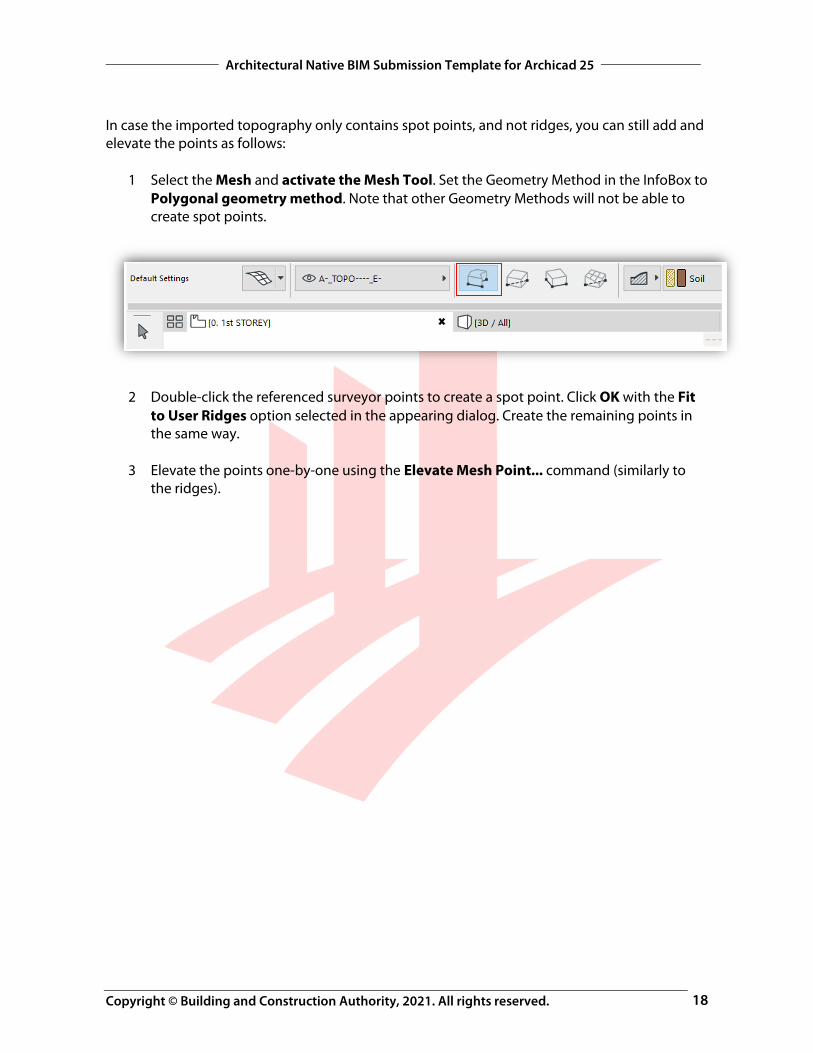
In case the imported topography only contains spot points, and not ridges, you can still add and elevate the points as follows:
1 Select the Mesh and activate the Mesh Tool. Set the Geometry Method in the InfoBox to Polygonal geometry method. Note that other Geometry Methods will not be able to create spot points.
2 Double-click the referenced surveyor points to create a spot point. Click OK with the Fit to User Ridges option selected in the appearing dialog. Create the remaining points in the same way.
3 Elevate the points one-by-one using the Elevate Mesh Point... command (similarly to
the ridges).
Copyright © Building and Construction Authority, 2021. All rights reserved.
Architectural Native BIM Submission Template for Archicad 25
19
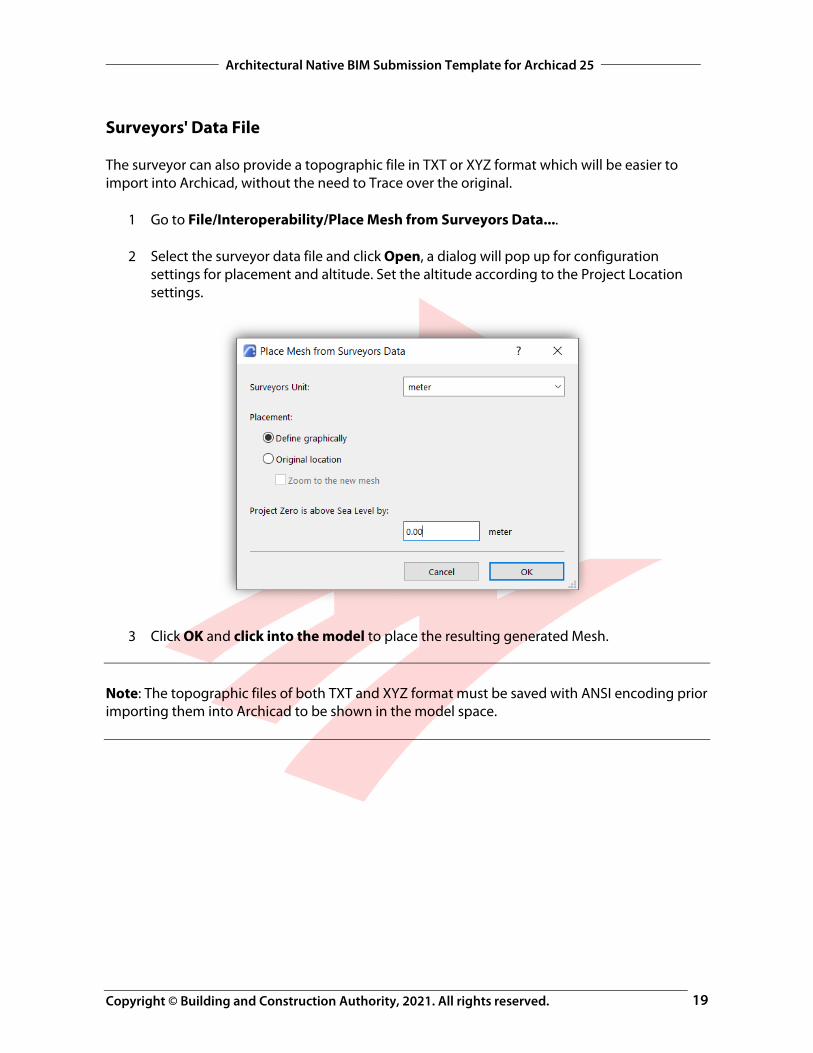
Surveyors' Data File The surveyor can also provide a topographic file in TXT or XYZ format which will be easier to import into Archicad, without the need to Trace over the original.
1 Go to File/Interoperability/Place Mesh from Surveyors Data....
2 Select the surveyor data file and click Open, a dialog will pop up for configuration settings for placement and altitude. Set the altitude according to the Project Location settings.
3 Click OK and click into the model to place the resulting generated Mesh.
Note: The topographic files of both TXT and XYZ format must be saved with ANSI encoding prior importing them into Archicad to be shown in the model space.
Copyright © Building and Construction Authority, 2021. All rights reserved.
Architectural Native BIM Submission Template for Archicad 25
20
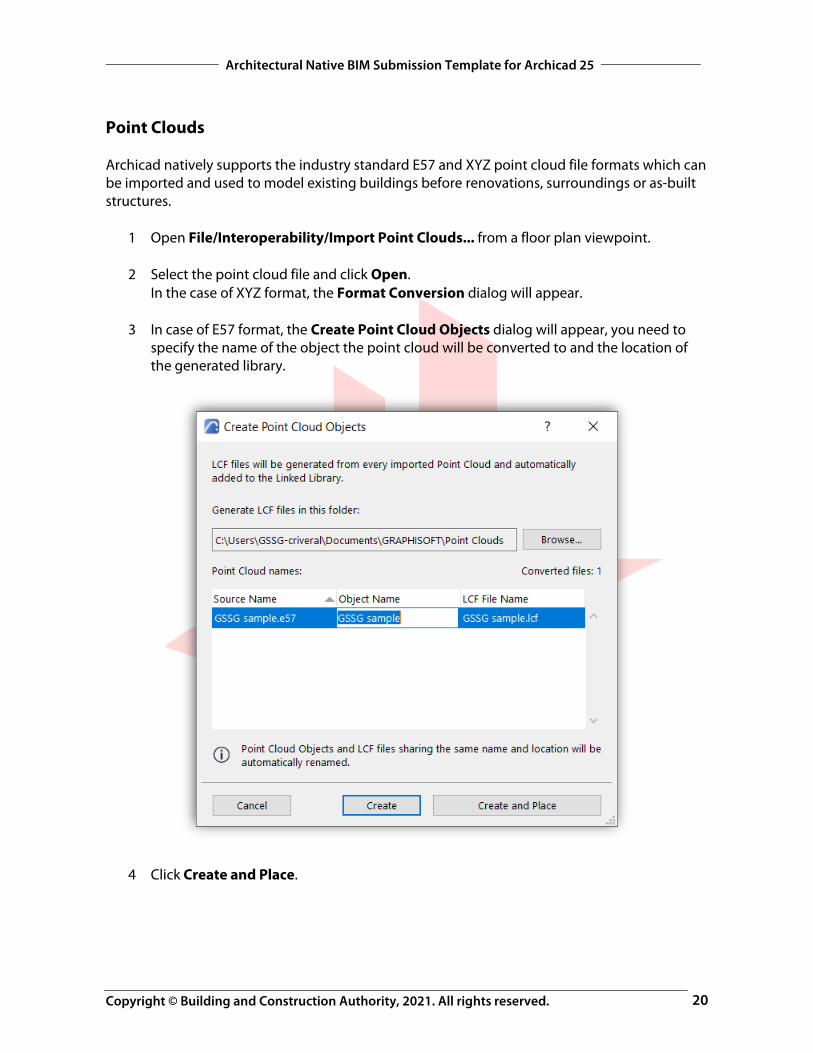
Point Clouds Archicad natively supports the industry standard E57 and XYZ point cloud file formats which can be imported and used to model existing buildings before renovations, surroundings or as-built structures.
1 Open File/Interoperability/Import Point Clouds... from a floor plan viewpoint.
2 Select the point cloud file and click Open. In the case of XYZ format, the Format Conversion dialog will appear.
3 In case of E57 format, the Create Point Cloud Objects dialog will appear, you need to
specify the name of the object the point cloud will be converted to and the location of the generated library.
4 Click Create and Place.
Copyright © Building and Construction Authority, 2021. All rights reserved.
Architectural Native BIM Submission Template for Archicad 25
21
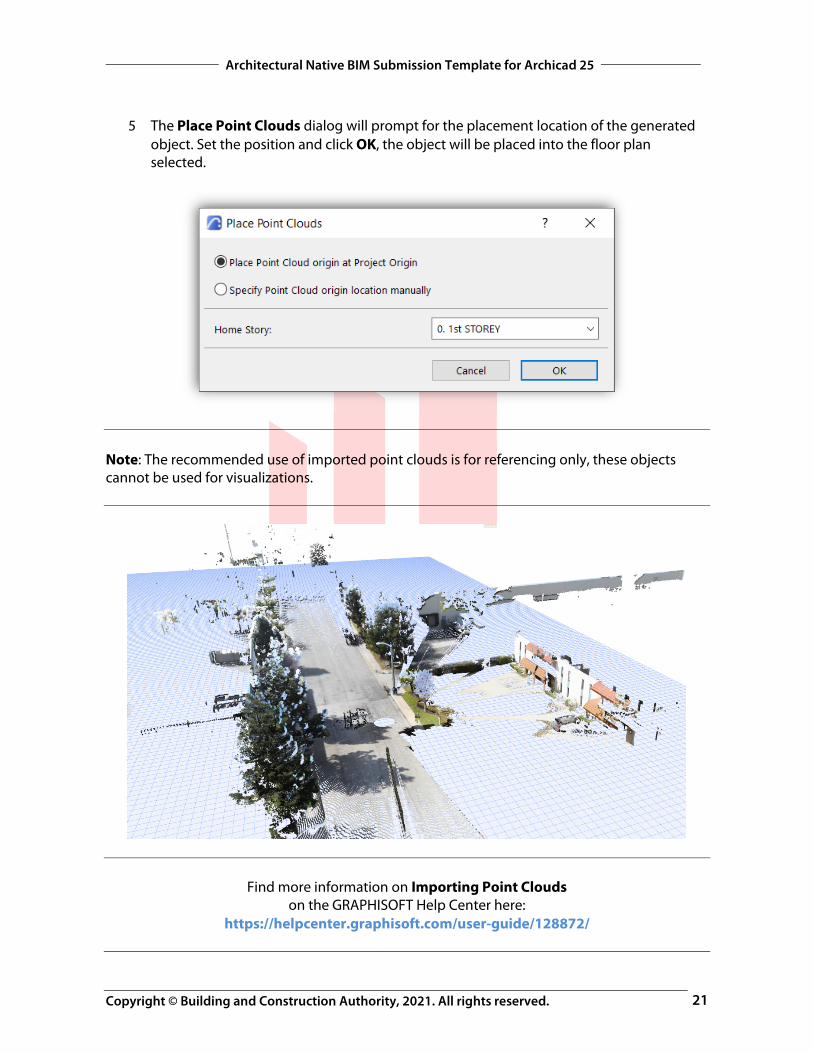
5 The Place Point Clouds dialog will prompt for the placement location of the generated object. Set the position and click OK, the object will be placed into the floor plan selected.
Note: The recommended use of imported point clouds is for referencing only, these objects cannot be used for visualizations.
Find more information on Importing Point Clouds on the GRAPHISOFT Help Center here:
https://helpcenter.graphisoft.com/user-guide/128872/
Copyright © Building and Construction Authority, 2021. All rights reserved.
Architectural Native BIM Submission Template for Archicad 25
22
BIM SUBMISSION TOOLS AND INTERFACE
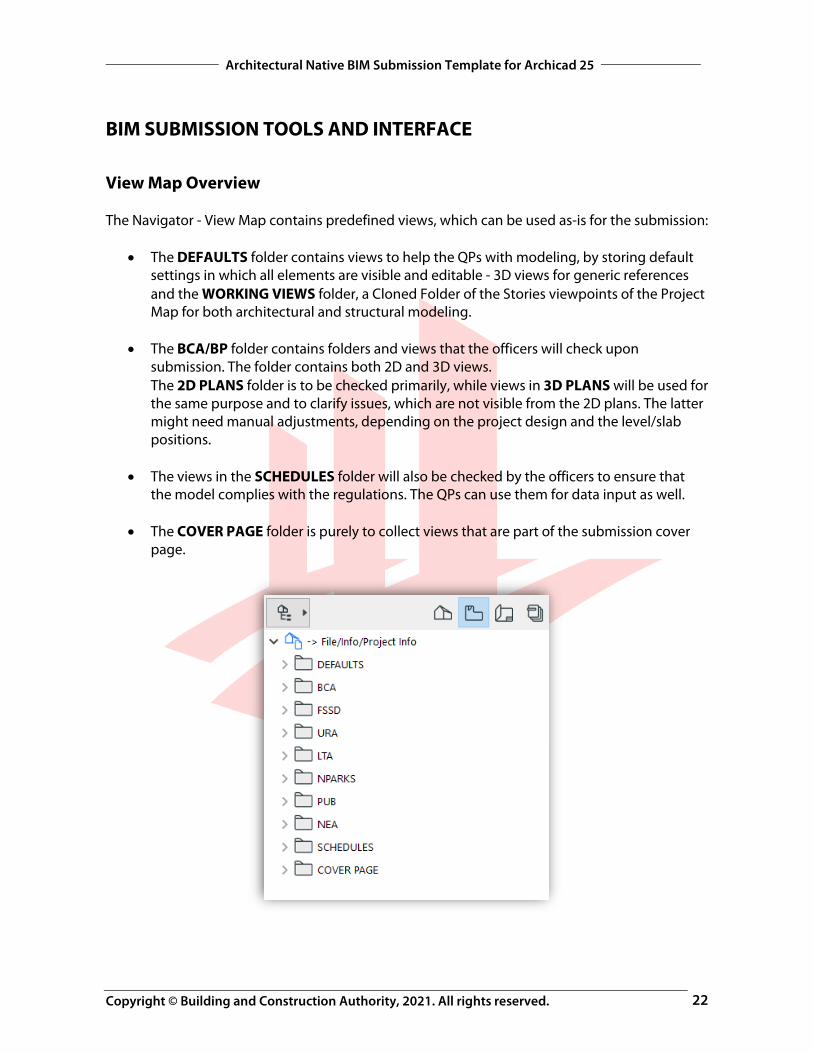
View Map Overview The Navigator - View Map contains predefined views, which can be used as-is for the submission:
The DEFAULTS folder contains views to help the QPs with modeling, by storing default settings in which all elements are visible and editable - 3D views for generic references and the WORKING VIEWS folder, a Cloned Folder of the Stories viewpoints of the Project Map for both architectural and structural modeling.
The BCA/BP folder contains folders and views that the officers will check upon
submission. The folder contains both 2D and 3D views. The 2D PLANS folder is to be checked primarily, while views in 3D PLANS will be used for the same purpose and to clarify issues, which are not visible from the 2D plans. The latter might need manual adjustments, depending on the project design and the level/slab positions.
The views in the SCHEDULES folder will also be checked by the officers to ensure that
the model complies with the regulations. The QPs can use them for data input as well.
The COVER PAGE folder is purely to collect views that are part of the submission cover page.
Copyright © Building and Construction Authority, 2021. All rights reserved.
Architectural Native BIM Submission Template for Archicad 25
23
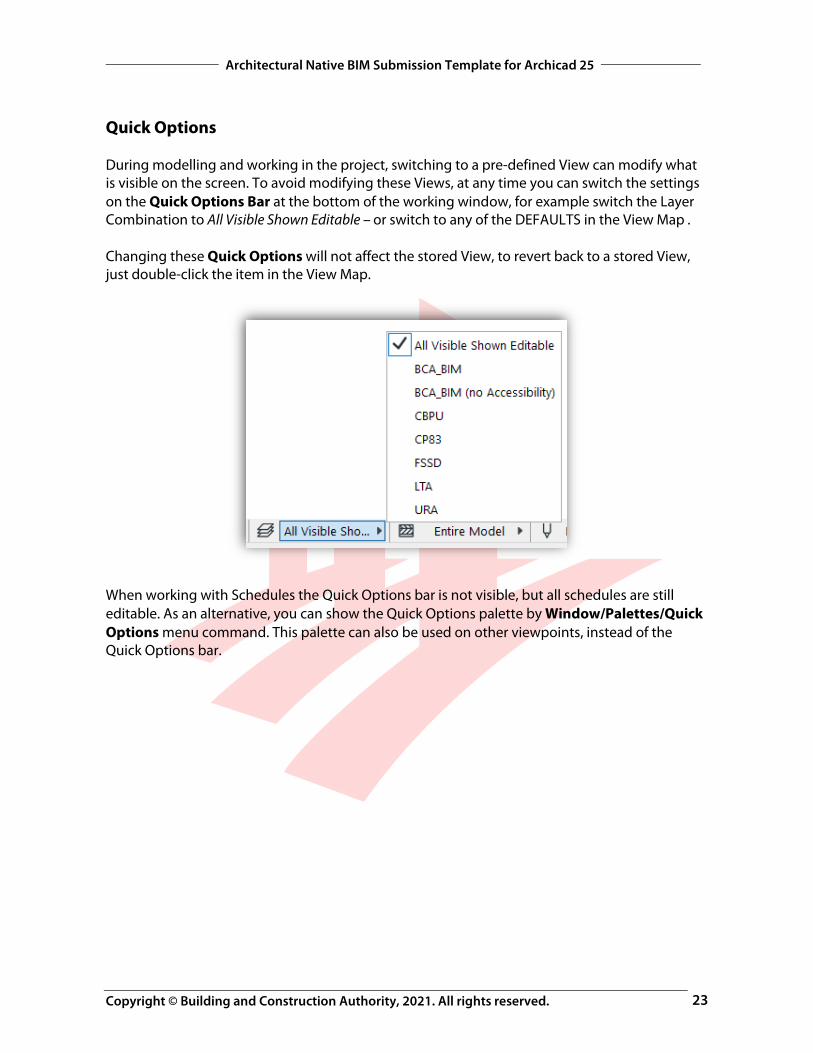
Quick Options During modelling and working in the project, switching to a pre-defined View can modify what is visible on the screen. To avoid modifying these Views, at any time you can switch the settings on the Quick Options Bar at the bottom of the working window, for example switch the Layer Combination to All Visible Shown Editable – or switch to any of the DEFAULTS in the View Map . Changing these Quick Options will not affect the stored View, to revert back to a stored View, just double-click the item in the View Map.
When working with Schedules the Quick Options bar is not visible, but all schedules are still editable. As an alternative, you can show the Quick Options palette by Window/Palettes/Quick Options menu command. This palette can also be used on other viewpoints, instead of the Quick Options bar.

Copyright © Building and Construction Authority, 2021. All rights reserved.
Architectural Native BIM Submission Template for Archicad 25
24
Favorites The template contains many predefined favorites for the QPs' convenience. These can be easily accessed by hovering on a Tool in the Toolbox and clicking on the appearing arrow. Alternatively, in the InfoBox, in the Main panel, click the arrow next to the Tool Settings button.
Free-floating items in the root folder are generic Favorites.
The BIM SUBMISSION folder contains the Favorites needed specifically for submission.
Defaults contain Favorites from the standard Archicad template and the defaults for each element. These can be deleted if need be.
STRUCTURAL ELEMENTS are used in case structural elements will be used when working together with the structural teams in an integrated model workflow.
Copyright © Building and Construction Authority, 2021. All rights reserved.
Architectural Native BIM Submission Template for Archicad 25
25
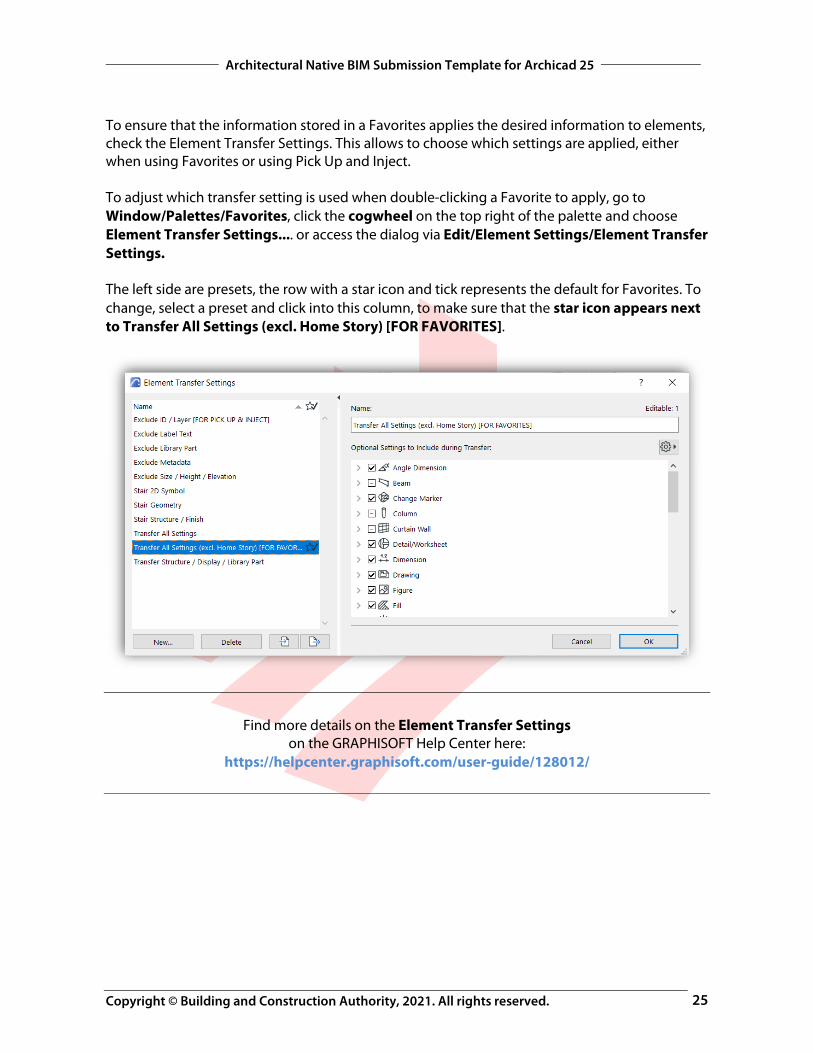
To ensure that the information stored in a Favorites applies the desired information to elements, check the Element Transfer Settings. This allows to choose which settings are applied, either when using Favorites or using Pick Up and Inject. To adjust which transfer setting is used when double-clicking a Favorite to apply, go to Window/Palettes/Favorites, click the cogwheel on the top right of the palette and choose Element Transfer Settings.... or access the dialog via Edit/Element Settings/Element Transfer Settings. The left side are presets, the row with a star icon and tick represents the default for Favorites. To change, select a preset and click into this column, to make sure that the star icon appears next to Transfer All Settings (excl. Home Story) [FOR FAVORITES].
Find more details on the Element Transfer Settings on the GRAPHISOFT Help Center here:
https://helpcenter.graphisoft.com/user-guide/128012/
Copyright © Building and Construction Authority, 2021. All rights reserved.
Architectural Native BIM Submission Template for Archicad 25
26
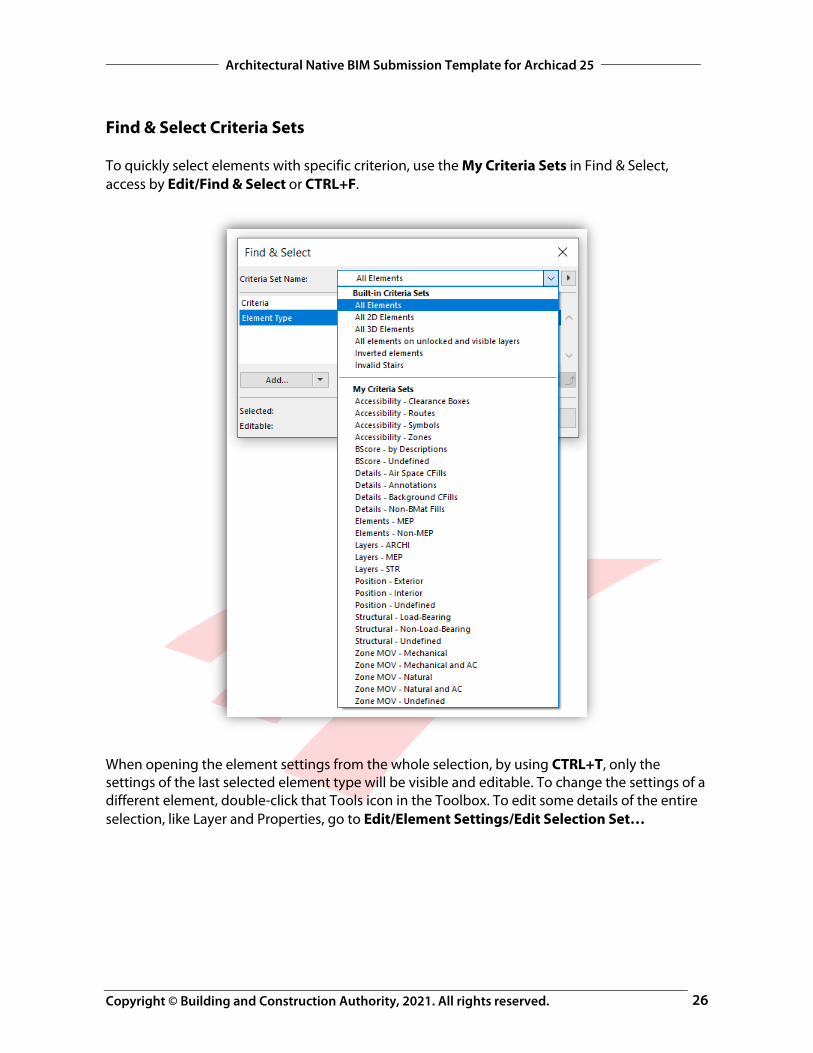
Find & Select Criteria Sets To quickly select elements with specific criterion, use the My Criteria Sets in Find & Select, access by Edit/Find & Select or CTRL+F.
When opening the element settings from the whole selection, by using CTRL+T, only the settings of the last selected element type will be visible and editable. To change the settings of a different element, double-click that Tools icon in the Toolbox. To edit some details of the entire selection, like Layer and Properties, go to Edit/Element Settings/Edit Selection Set…
Copyright © Building and Construction Authority, 2021. All rights reserved.
Architectural Native BIM Submission Template for Archicad 25
27
PREPARING THE FILE FOR SUBMISSION
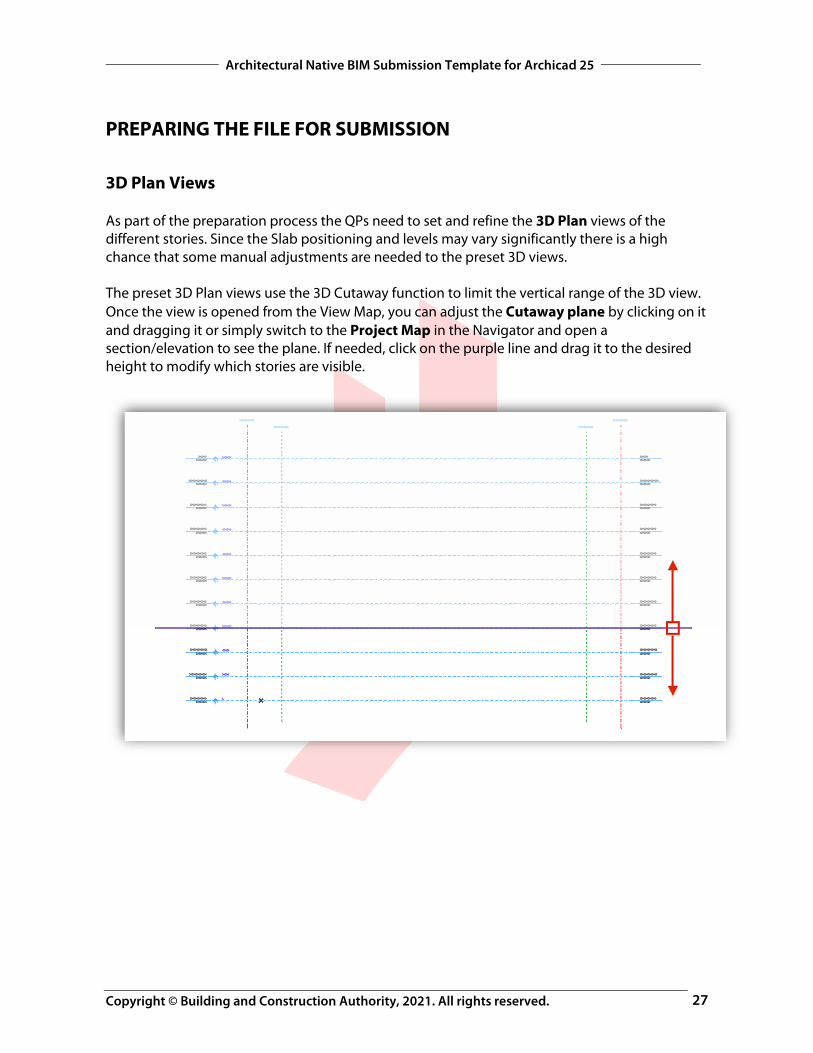
3D Plan Views As part of the preparation process the QPs need to set and refine the 3D Plan views of the different stories. Since the Slab positioning and levels may vary significantly there is a high chance that some manual adjustments are needed to the preset 3D views. The preset 3D Plan views use the 3D Cutaway function to limit the vertical range of the 3D view. Once the view is opened from the View Map, you can adjust the Cutaway plane by clicking on it and dragging it or simply switch to the Project Map in the Navigator and open a section/elevation to see the plane. If needed, click on the purple line and drag it to the desired height to modify which stories are visible.
Copyright © Building and Construction Authority, 2021. All rights reserved.
Architectural Native BIM Submission Template for Archicad 25
28
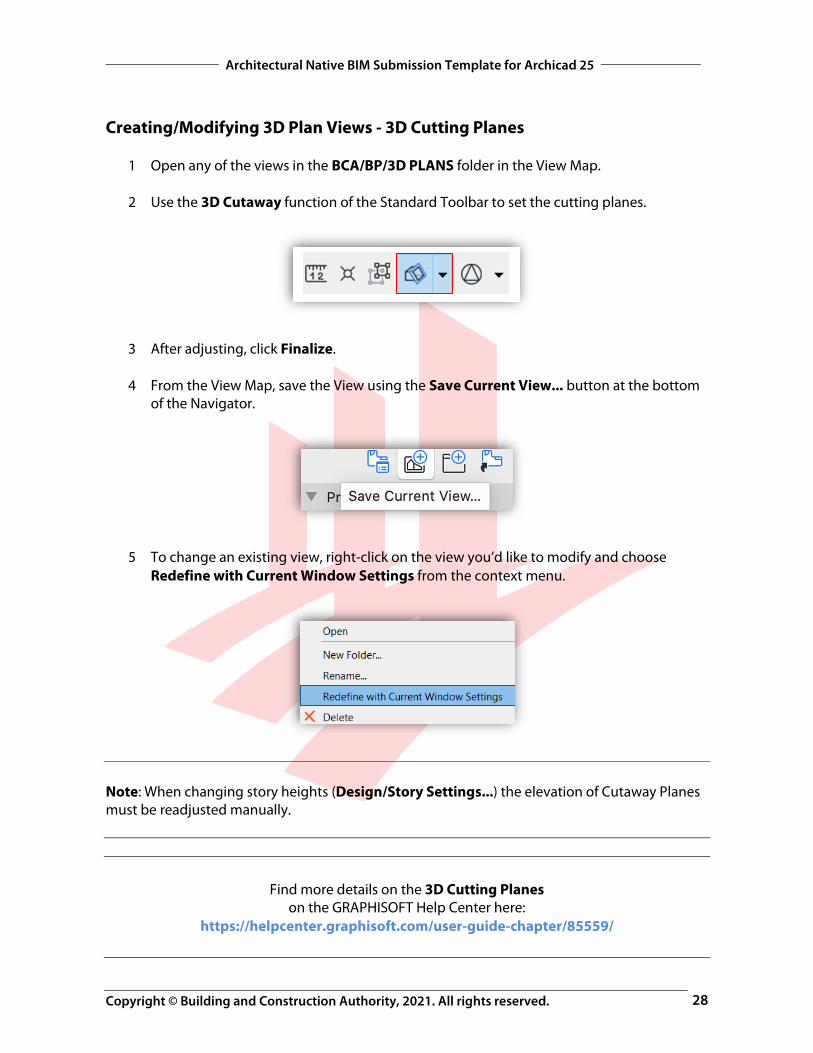
Creating/Modifying 3D Plan Views - 3D Cutting Planes
1 Open any of the views in the BCA/BP/3D PLANS folder in the View Map.
2 Use the 3D Cutaway function of the Standard Toolbar to set the cutting planes.
3 After adjusting, click Finalize.
4 From the View Map, save the View using the Save Current View... button at the bottom of the Navigator.
5 To change an existing view, right-click on the view you’d like to modify and choose Redefine with Current Window Settings from the context menu.
Note: When changing story heights (Design/Story Settings...) the elevation of Cutaway Planes must be readjusted manually.
Find more details on the 3D Cutting Planes on the GRAPHISOFT Help Center here:
https://helpcenter.graphisoft.com/user-guide-chapter/85559/
Copyright © Building and Construction Authority, 2021. All rights reserved.
Architectural Native BIM Submission Template for Archicad 25
29
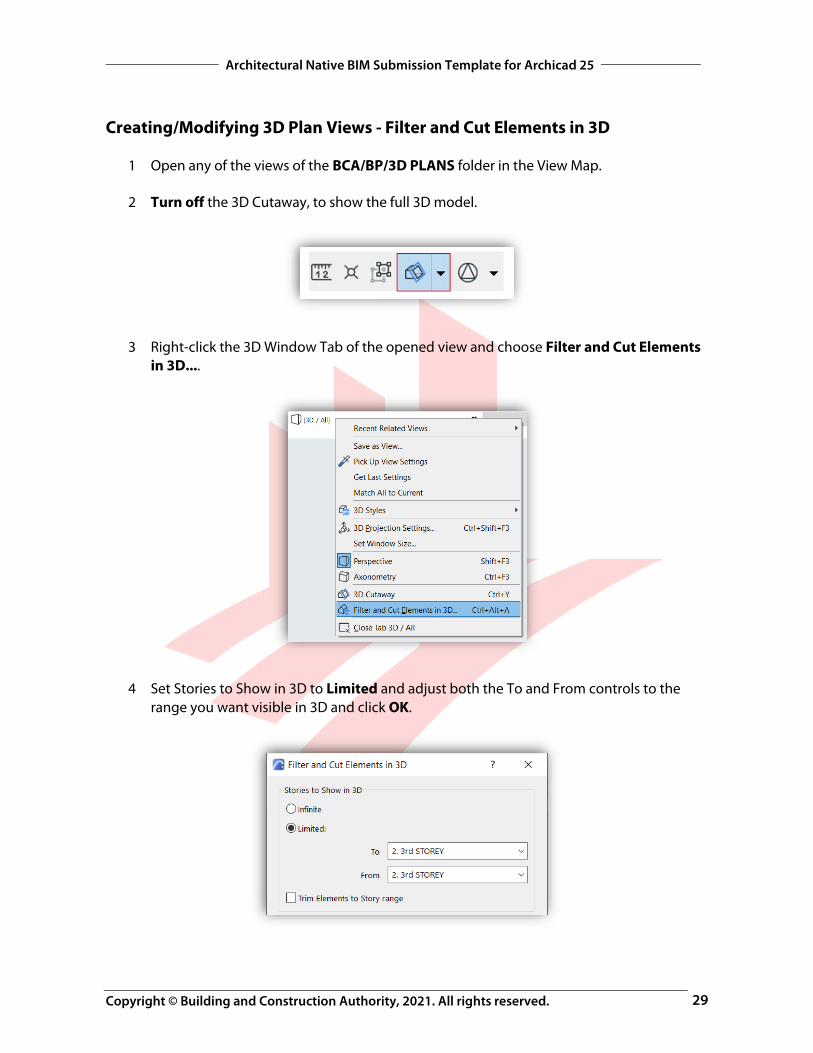
Creating/Modifying 3D Plan Views - Filter and Cut Elements in 3D
1 Open any of the views of the BCA/BP/3D PLANS folder in the View Map.
2 Turn off the 3D Cutaway, to show the full 3D model.
3 Right-click the 3D Window Tab of the opened view and choose Filter and Cut Elements in 3D....
4 Set Stories to Show in 3D to Limited and adjust both the To and From controls to the range you want visible in 3D and click OK.
Copyright © Building and Construction Authority, 2021. All rights reserved.
Architectural Native BIM Submission Template for Archicad 25
30
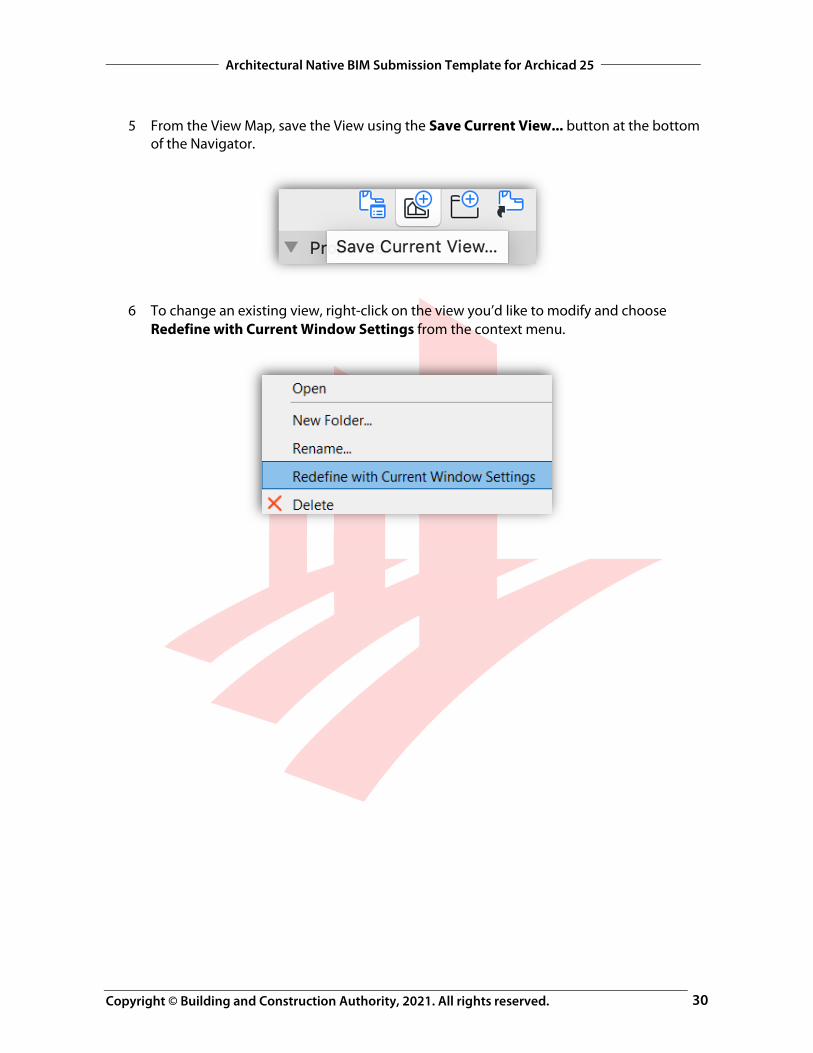
5 From the View Map, save the View using the Save Current View... button at the bottom of the Navigator.
6 To change an existing view, right-click on the view you’d like to modify and choose Redefine with Current Window Settings from the context menu.
Copyright © Building and Construction Authority, 2021. All rights reserved.
Architectural Native BIM Submission Template for Archicad 25
31
ACCESSIBILITY & VENTILATION Accessibility and Modes of Ventilation has to be marked by adding accessibility routes, clearance boxes, accessibility objects (symbols) and by setting the properties of zones regarding both. This part summarizes ventilation and accessibility in general, the use of the accessibility related objects will be introduced in later parts of this document.
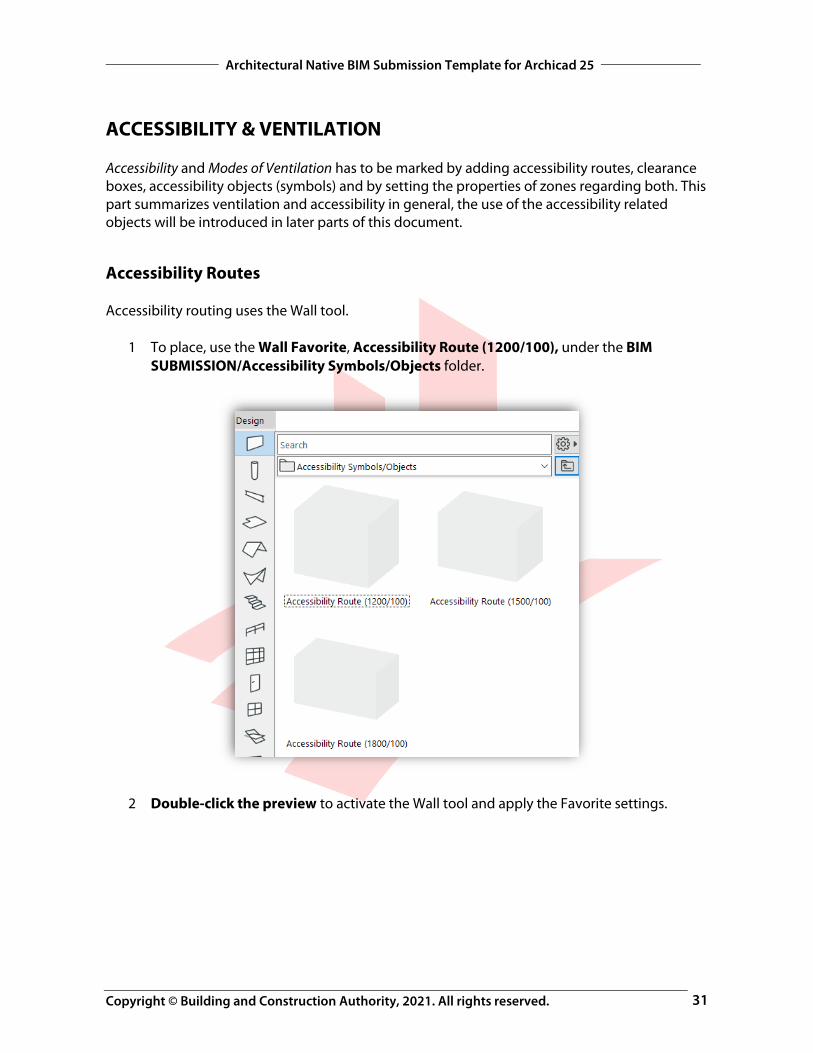
Accessibility Routes Accessibility routing uses the Wall tool.
1 To place, use the Wall Favorite, Accessibility Route (1200/100), under the BIM SUBMISSION/Accessibility Symbols/Objects folder.
2 Double-click the preview to activate the Wall tool and apply the Favorite settings.
Copyright © Building and Construction Authority, 2021. All rights reserved.
Architectural Native BIM Submission Template for Archicad 25
32
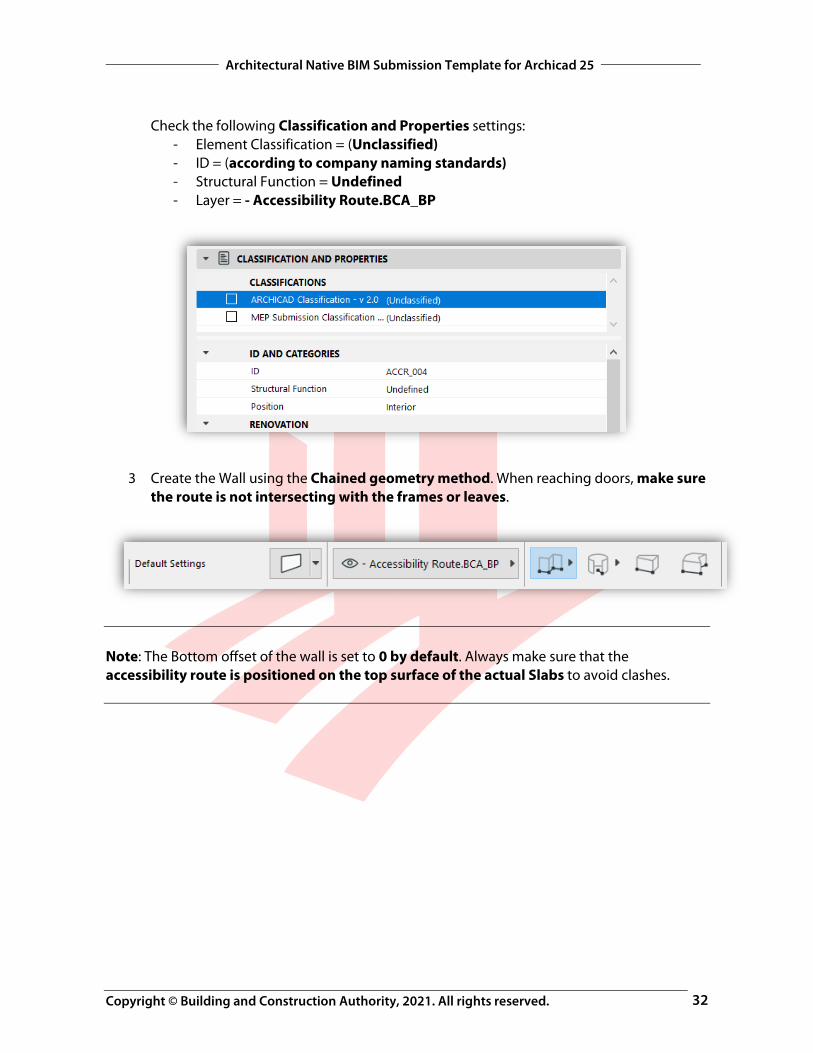
Check the following Classification and Properties settings: - Element Classification = (Unclassified) - ID = (according to company naming standards) - Structural Function = Undefined - Layer = - Accessibility Route.BCA_BP
3 Create the Wall using the Chained geometry method. When reaching doors, make sure the route is not intersecting with the frames or leaves.
Note: The Bottom offset of the wall is set to 0 by default. Always make sure that the accessibility route is positioned on the top surface of the actual Slabs to avoid clashes.
Copyright © Building and Construction Authority, 2021. All rights reserved.
Architectural Native BIM Submission Template for Archicad 25
33
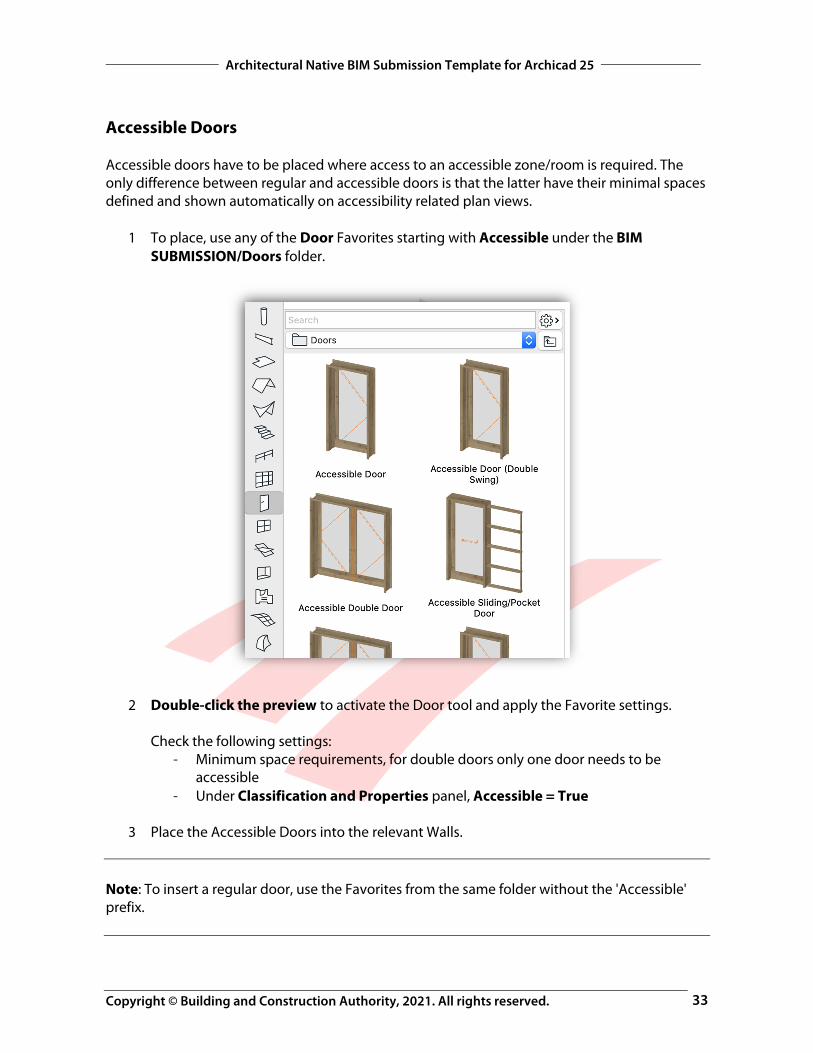
Accessible Doors Accessible doors have to be placed where access to an accessible zone/room is required. The only difference between regular and accessible doors is that the latter have their minimal spaces defined and shown automatically on accessibility related plan views.
1 To place, use any of the Door Favorites starting with Accessible under the BIM SUBMISSION/Doors folder.
2 Double-click the preview to activate the Door tool and apply the Favorite settings. Check the following settings:
- Minimum space requirements, for double doors only one door needs to be accessible
- Under Classification and Properties panel, Accessible = True
3 Place the Accessible Doors into the relevant Walls. Note: To insert a regular door, use the Favorites from the same folder without the 'Accessible' prefix.
Copyright © Building and Construction Authority, 2021. All rights reserved.
Architectural Native BIM Submission Template for Archicad 25
34
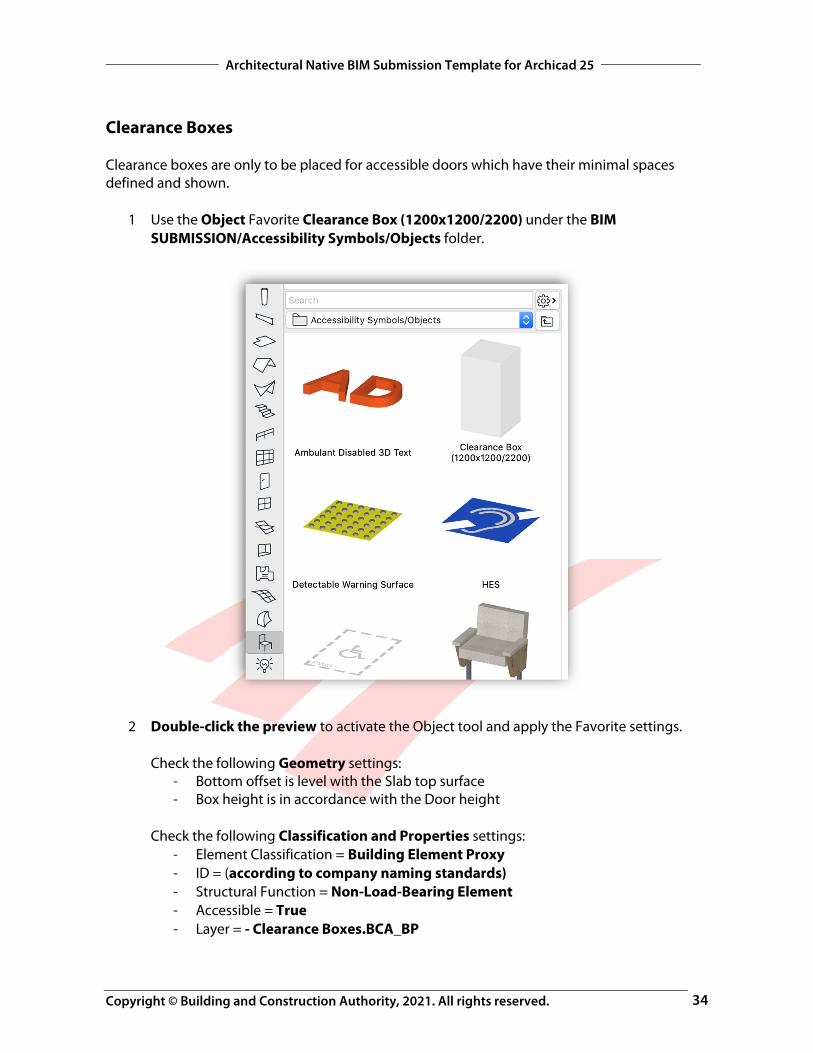
Clearance Boxes Clearance boxes are only to be placed for accessible doors which have their minimal spaces defined and shown.
1 Use the Object Favorite Clearance Box (1200x1200/2200) under the BIM SUBMISSION/Accessibility Symbols/Objects folder.
2 Double-click the preview to activate the Object tool and apply the Favorite settings. Check the following Geometry settings:
- Bottom offset is level with the Slab top surface - Box height is in accordance with the Door height
Check the following Classification and Properties settings:
- Element Classification = Building Element Proxy - ID = (according to company naming standards) - Structural Function = Non-Load-Bearing Element - Accessible = True - Layer = - Clearance Boxes.BCA_BP
Copyright © Building and Construction Authority, 2021. All rights reserved.
Architectural Native BIM Submission Template for Archicad 25
35
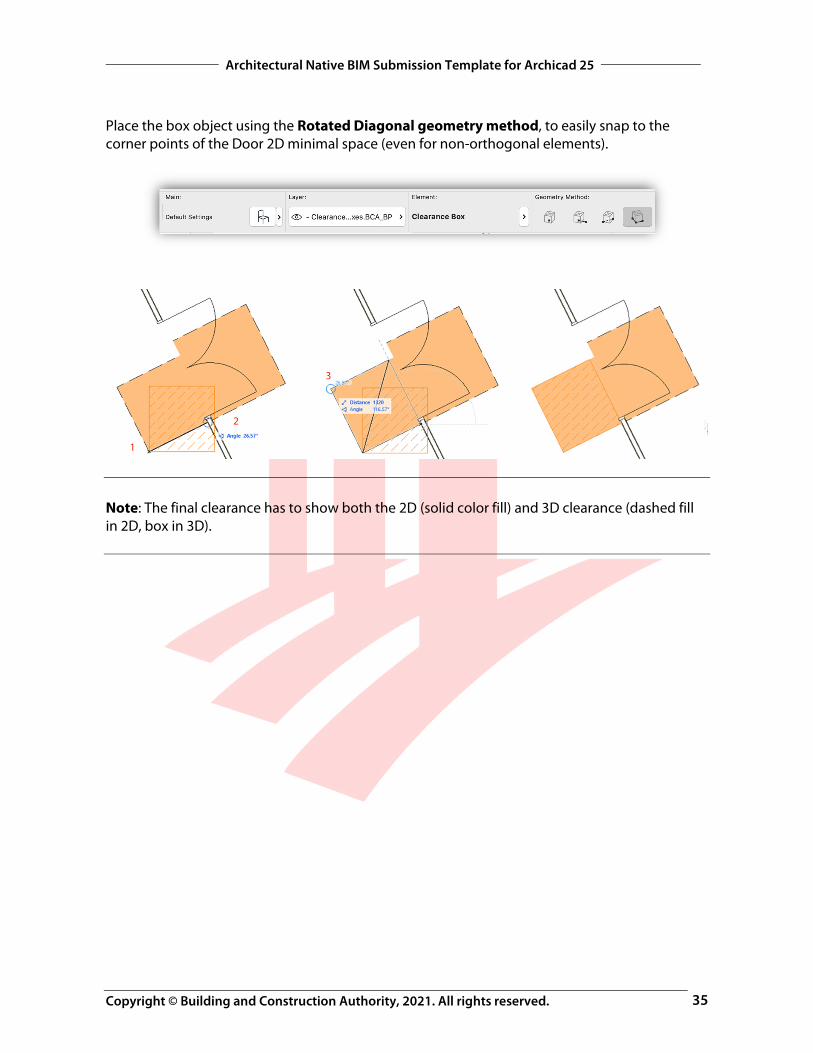
Place the box object using the Rotated Diagonal geometry method, to easily snap to the corner points of the Door 2D minimal space (even for non-orthogonal elements).
Note: The final clearance has to show both the 2D (solid color fill) and 3D clearance (dashed fill in 2D, box in 3D).
Copyright © Building and Construction Authority, 2021. All rights reserved.
Architectural Native BIM Submission Template for Archicad 25
36
Zone Accessibility Accessibility of Zones needs to be set if the accessibility route goes through the zone or is reaching it via an accessible opening.
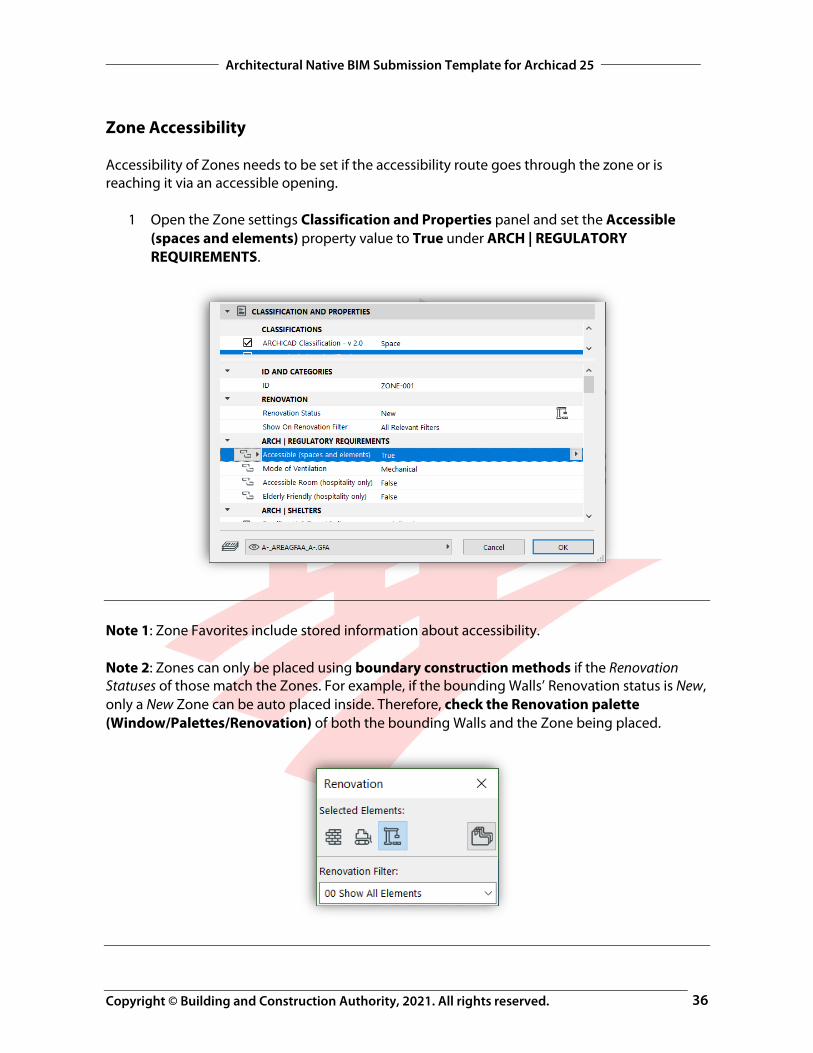
1 Open the Zone settings Classification and Properties panel and set the Accessible (spaces and elements) property value to True under ARCH | REGULATORY REQUIREMENTS.
Note 1: Zone Favorites include stored information about accessibility. Note 2: Zones can only be placed using boundary construction methods if the Renovation Statuses of those match the Zones. For example, if the bounding Walls’ Renovation status is New, only a New Zone can be auto placed inside. Therefore, check the Renovation palette (Window/Palettes/Renovation) of both the bounding Walls and the Zone being placed.
Copyright © Building and Construction Authority, 2021. All rights reserved.
Architectural Native BIM Submission Template for Archicad 25
37
As an alternative data input method, you can also use Schedules once the Zones are placed but their accessibility has not been defined yet.
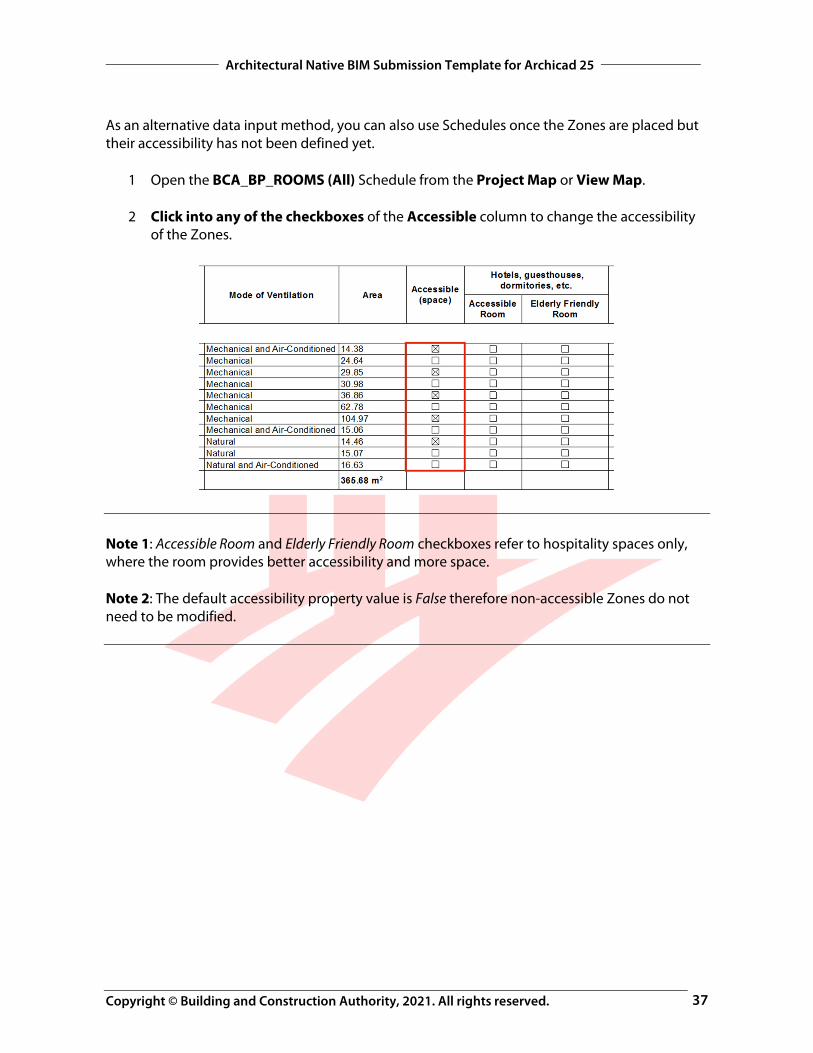
1 Open the BCA_BP_ROOMS (All) Schedule from the Project Map or View Map.
2 Click into any of the checkboxes of the Accessible column to change the accessibility of the Zones.
Note 1: Accessible Room and Elderly Friendly Room checkboxes refer to hospitality spaces only, where the room provides better accessibility and more space. Note 2: The default accessibility property value is False therefore non-accessible Zones do not need to be modified.
Copyright © Building and Construction Authority, 2021. All rights reserved.
Architectural Native BIM Submission Template for Archicad 25
38
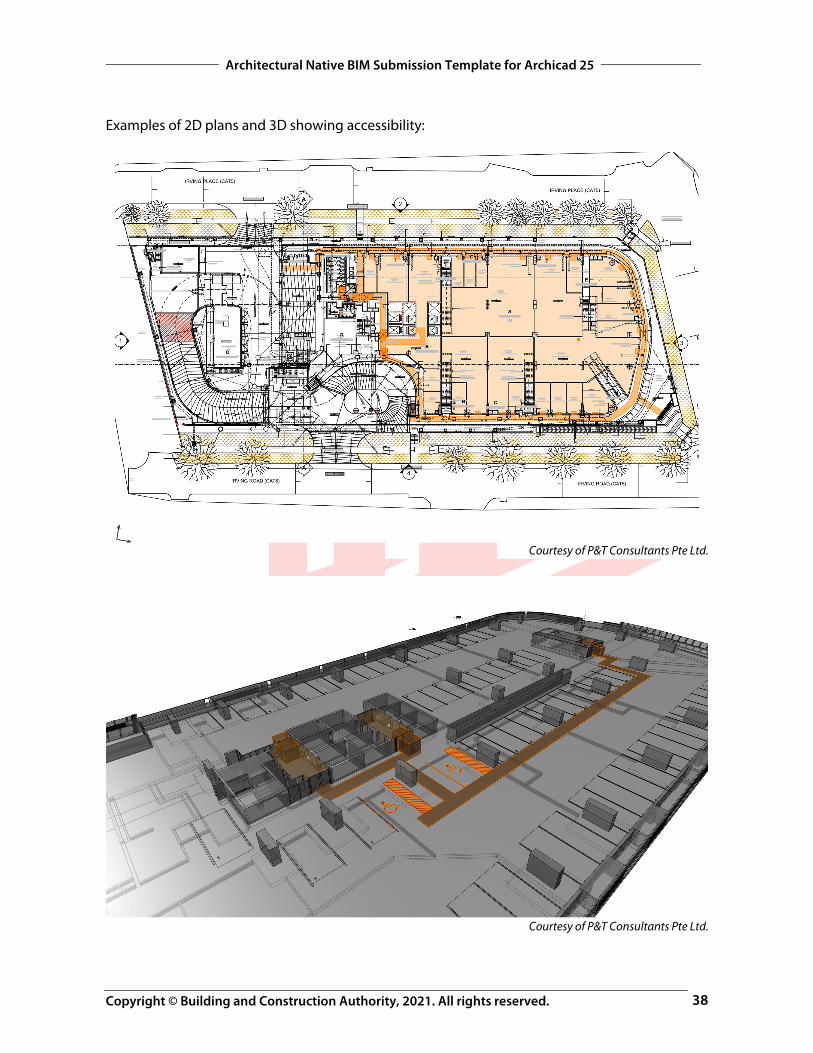
Examples of 2D plans and 3D showing accessibility:
Courtesy of P&T Consultants Pte Ltd.
Courtesy of P&T Consultants Pte Ltd.
Copyright © Building and Construction Authority, 2021. All rights reserved.
Architectural Native BIM Submission Template for Archicad 25
39
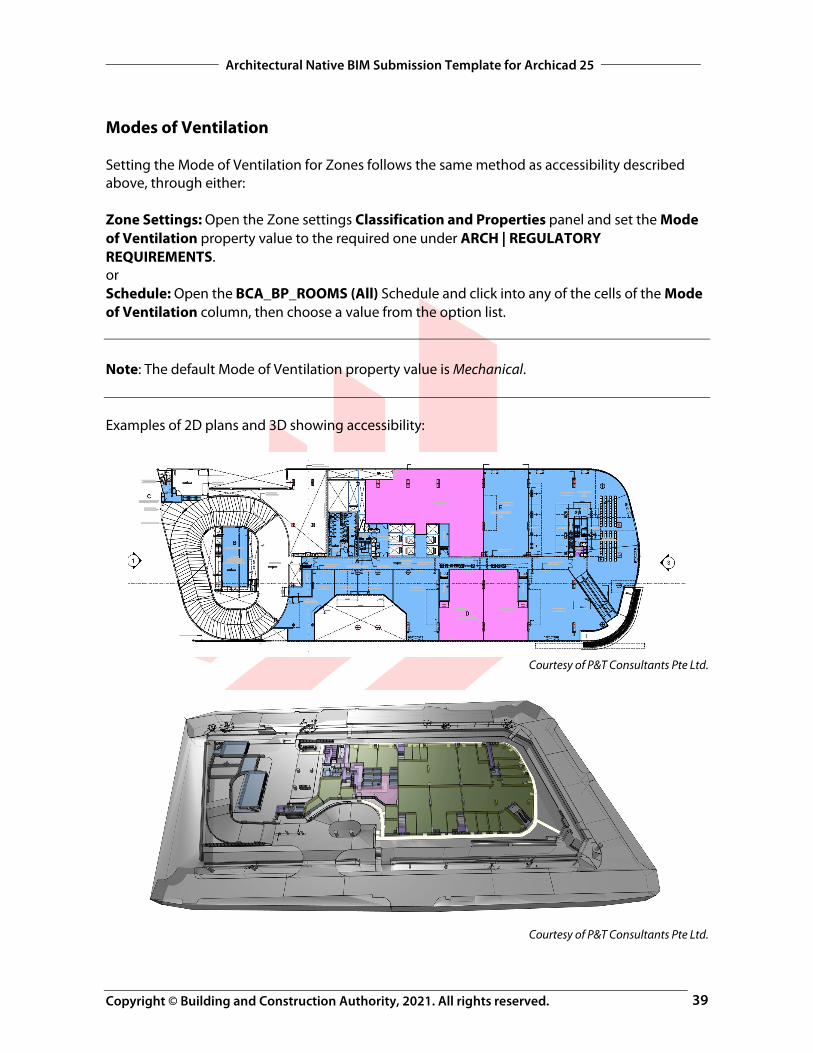
Modes of Ventilation Setting the Mode of Ventilation for Zones follows the same method as accessibility described above, through either: Zone Settings: Open the Zone settings Classification and Properties panel and set the Mode of Ventilation property value to the required one under ARCH | REGULATORY REQUIREMENTS. or Schedule: Open the BCA_BP_ROOMS (All) Schedule and click into any of the cells of the Mode of Ventilation column, then choose a value from the option list. Note: The default Mode of Ventilation property value is Mechanical. Examples of 2D plans and 3D showing accessibility:
Courtesy of P&T Consultants Pte Ltd.
Courtesy of P&T Consultants Pte Ltd.
Copyright © Building and Construction Authority, 2021. All rights reserved.
Architectural Native BIM Submission Template for Archicad 25
40
Lifts Accessible lifts have to be set according to the accessibility code and will be highlighted on plans. For actual requirements please refer to the relevant codes.
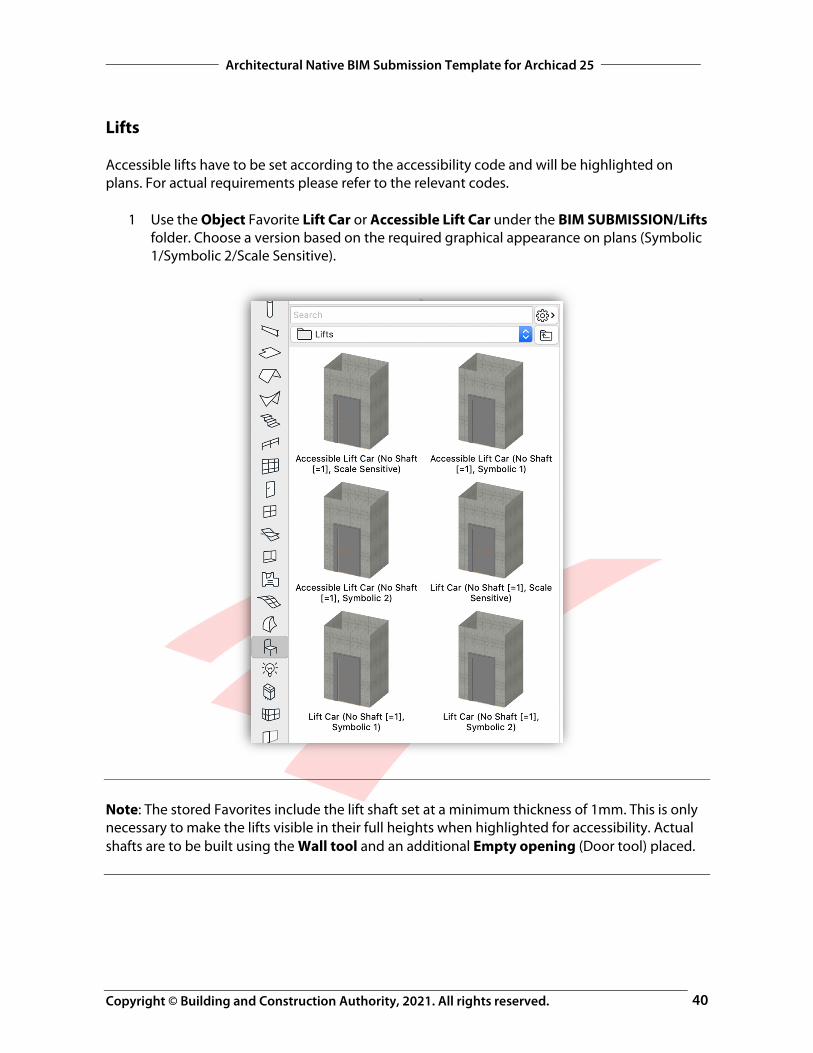
1 Use the Object Favorite Lift Car or Accessible Lift Car under the BIM SUBMISSION/Lifts folder. Choose a version based on the required graphical appearance on plans (Symbolic 1/Symbolic 2/Scale Sensitive).
Note: The stored Favorites include the lift shaft set at a minimum thickness of 1mm. This is only necessary to make the lifts visible in their full heights when highlighted for accessibility. Actual shafts are to be built using the Wall tool and an additional Empty opening (Door tool) placed.
Copyright © Building and Construction Authority, 2021. All rights reserved.
Architectural Native BIM Submission Template for Archicad 25
41
2 Double-click the preview to activate the Object tool and apply the Favorite settings.
Check the following Classification and Properties settings:
- Element Classification = Elevator - ID = (according to company naming standards) - Structural Function = Non-Load-Bearing Element - Accessible = False or True (as needed) - Layer = A-_LIFT---_E-
3 Place the necessary lifts.
Add the 2D symbol for accessibility to mark the elevators on plans as well.
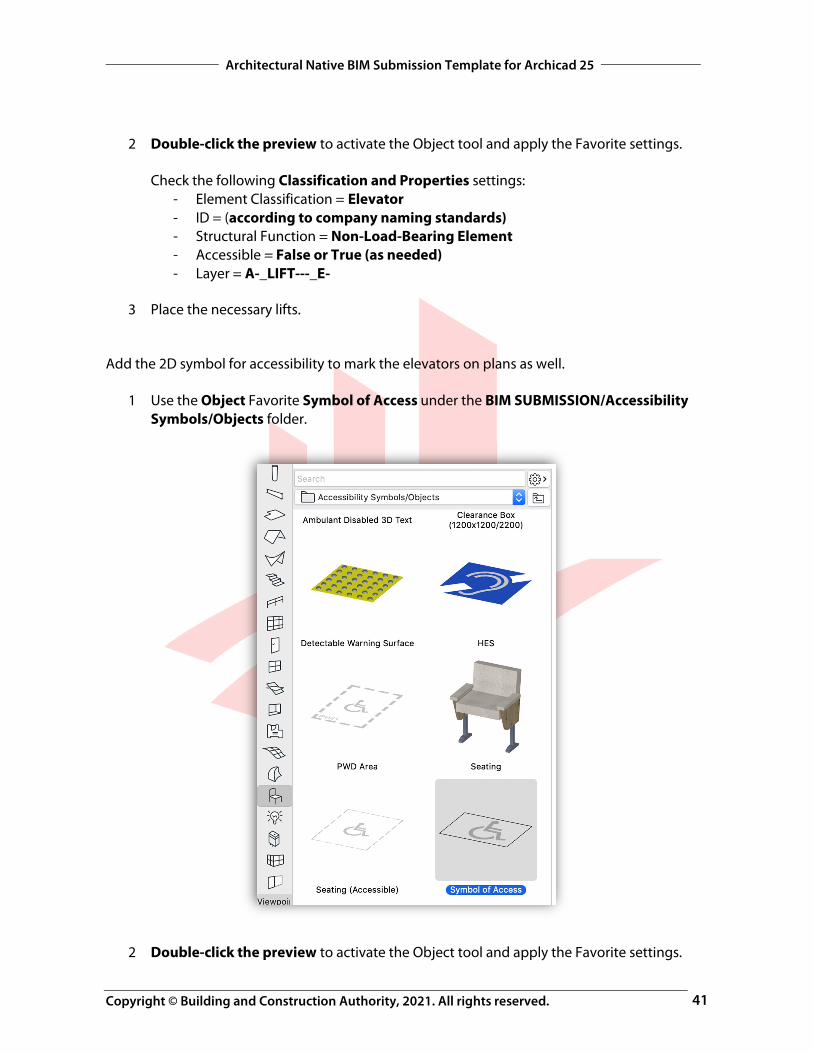
1 Use the Object Favorite Symbol of Access under the BIM SUBMISSION/Accessibility Symbols/Objects folder.
2 Double-click the preview to activate the Object tool and apply the Favorite settings.
Copyright © Building and Construction Authority, 2021. All rights reserved.
Architectural Native BIM Submission Template for Archicad 25
42
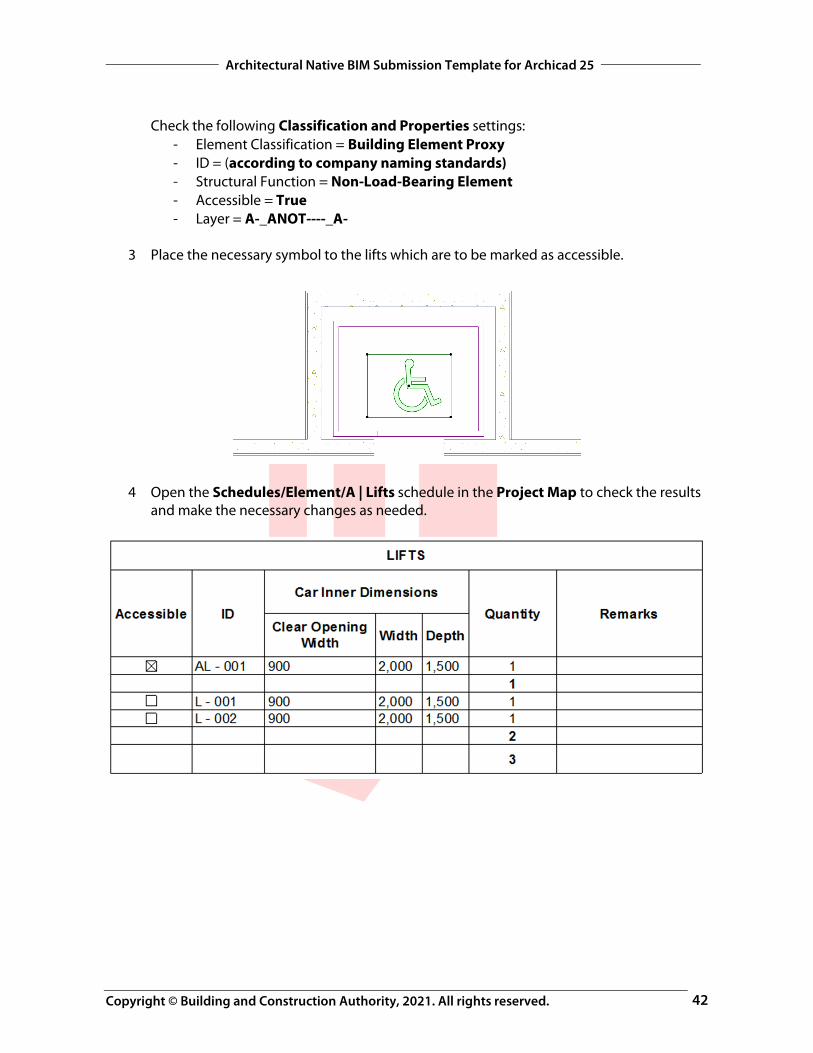
Check the following Classification and Properties settings: - Element Classification = Building Element Proxy - ID = (according to company naming standards) - Structural Function = Non-Load-Bearing Element - Accessible = True - Layer = A-_ANOT----_A-
3 Place the necessary symbol to the lifts which are to be marked as accessible.
4 Open the Schedules/Element/A | Lifts schedule in the Project Map to check the results and make the necessary changes as needed.
Copyright © Building and Construction Authority, 2021. All rights reserved.
Architectural Native BIM Submission Template for Archicad 25
43
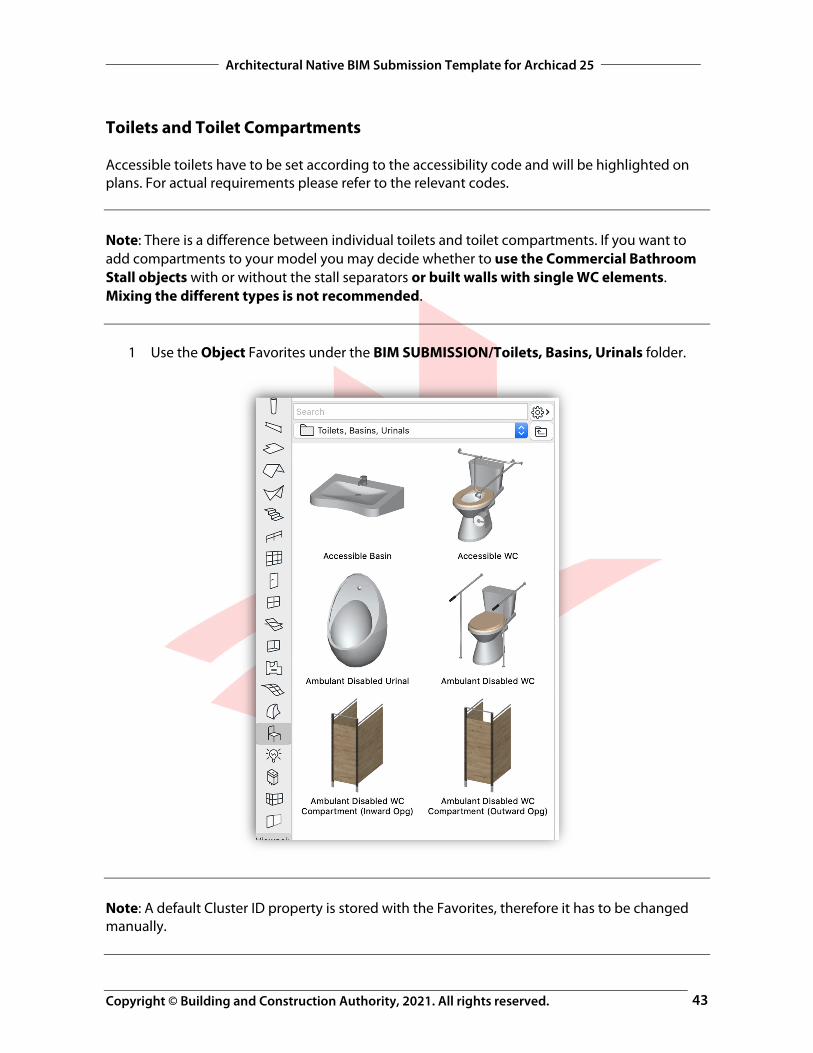
Toilets and Toilet Compartments Accessible toilets have to be set according to the accessibility code and will be highlighted on plans. For actual requirements please refer to the relevant codes. Note: There is a difference between individual toilets and toilet compartments. If you want to add compartments to your model you may decide whether to use the Commercial Bathroom Stall objects with or without the stall separators or built walls with single WC elements. Mixing the different types is not recommended.
1 Use the Object Favorites under the BIM SUBMISSION/Toilets, Basins, Urinals folder.
Note: A default Cluster ID property is stored with the Favorites, therefore it has to be changed manually.
Copyright © Building and Construction Authority, 2021. All rights reserved.
Architectural Native BIM Submission Template for Archicad 25
44
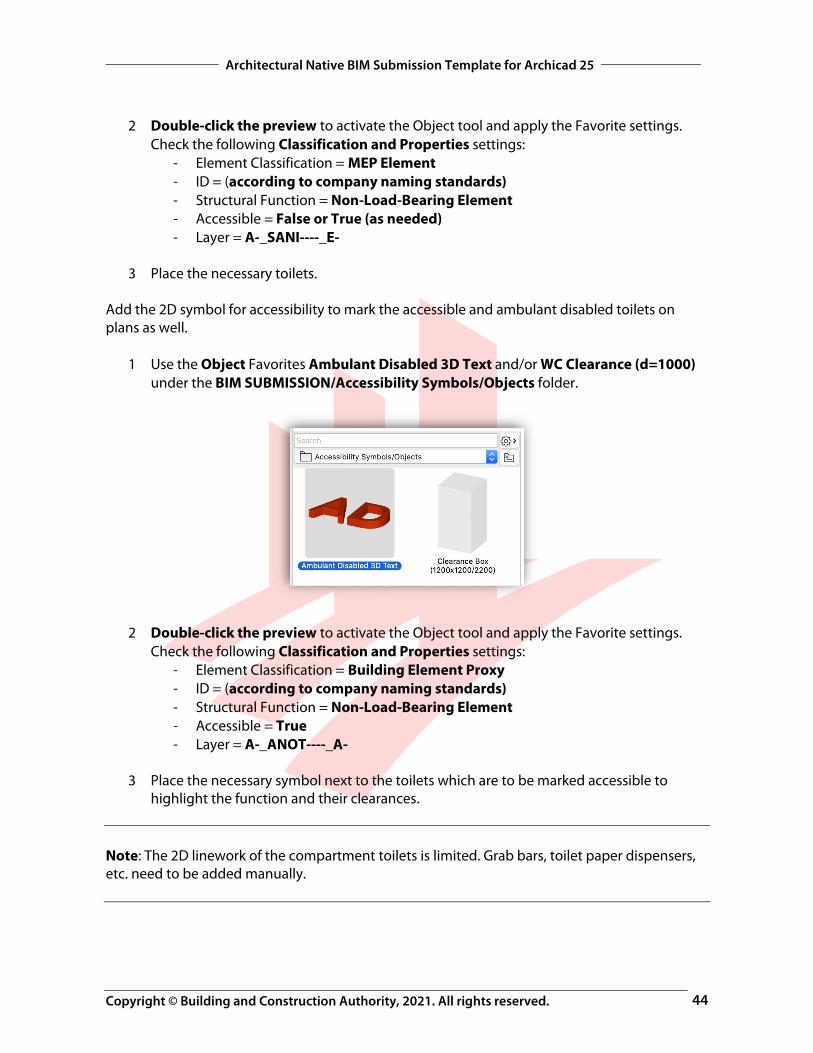
2 Double-click the preview to activate the Object tool and apply the Favorite settings. Check the following Classification and Properties settings:
- Element Classification = MEP Element - ID = (according to company naming standards) - Structural Function = Non-Load-Bearing Element - Accessible = False or True (as needed) - Layer = A-_SANI----_E-
3 Place the necessary toilets.
Add the 2D symbol for accessibility to mark the accessible and ambulant disabled toilets on plans as well.
1 Use the Object Favorites Ambulant Disabled 3D Text and/or WC Clearance (d=1000) under the BIM SUBMISSION/Accessibility Symbols/Objects folder.
2 Double-click the preview to activate the Object tool and apply the Favorite settings. Check the following Classification and Properties settings:
- Element Classification = Building Element Proxy - ID = (according to company naming standards) - Structural Function = Non-Load-Bearing Element - Accessible = True - Layer = A-_ANOT----_A-
3 Place the necessary symbol next to the toilets which are to be marked accessible to
highlight the function and their clearances. Note: The 2D linework of the compartment toilets is limited. Grab bars, toilet paper dispensers, etc. need to be added manually.
Copyright © Building and Construction Authority, 2021. All rights reserved.
Architectural Native BIM Submission Template for Archicad 25
45
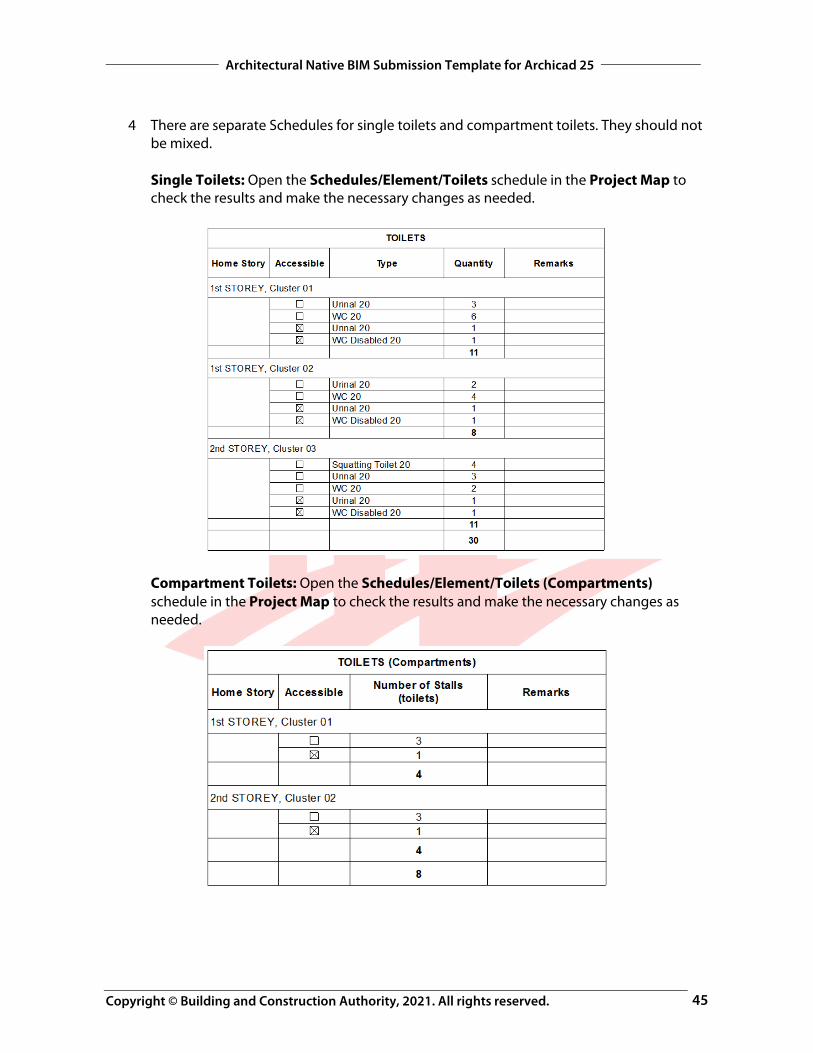
4 There are separate Schedules for single toilets and compartment toilets. They should not be mixed. Single Toilets: Open the Schedules/Element/Toilets schedule in the Project Map to check the results and make the necessary changes as needed.
Compartment Toilets: Open the Schedules/Element/Toilets (Compartments) schedule in the Project Map to check the results and make the necessary changes as needed.
Copyright © Building and Construction Authority, 2021. All rights reserved.
Architectural Native BIM Submission Template for Archicad 25
46
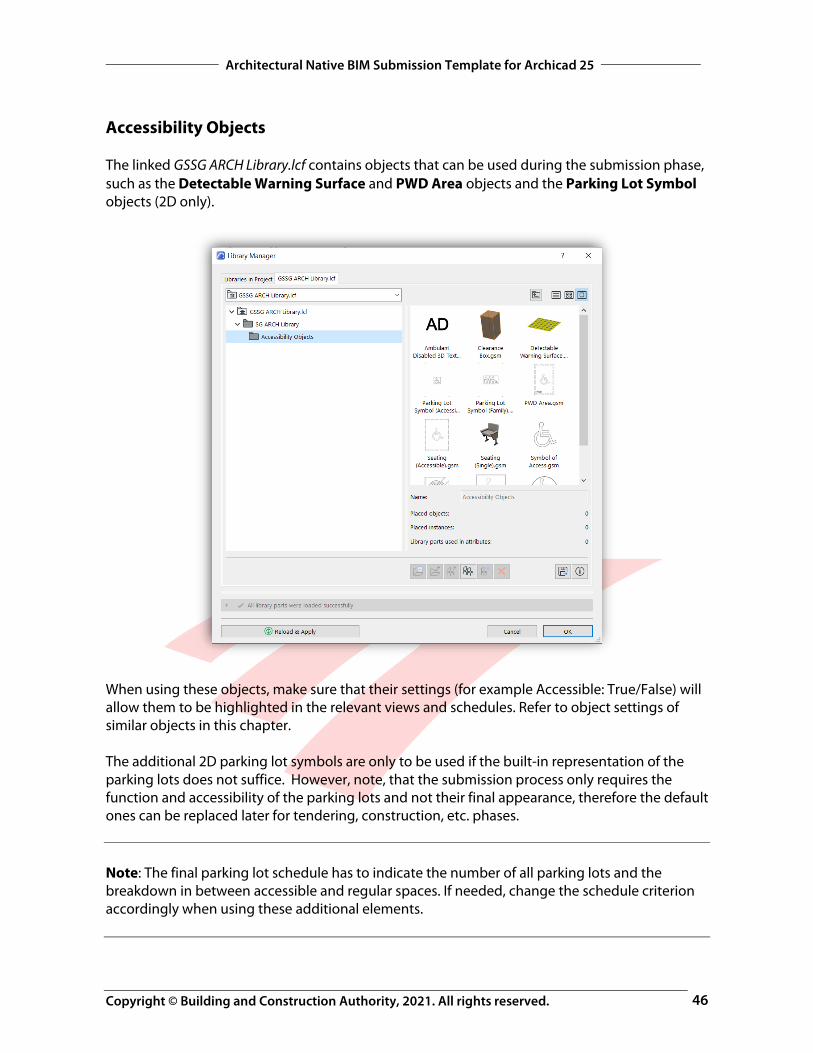
Accessibility Objects The linked GSSG ARCH Library.lcf contains objects that can be used during the submission phase, such as the Detectable Warning Surface and PWD Area objects and the Parking Lot Symbol objects (2D only).
When using these objects, make sure that their settings (for example Accessible: True/False) will allow them to be highlighted in the relevant views and schedules. Refer to object settings of similar objects in this chapter. The additional 2D parking lot symbols are only to be used if the built-in representation of the parking lots does not suffice. However, note, that the submission process only requires the function and accessibility of the parking lots and not their final appearance, therefore the default ones can be replaced later for tendering, construction, etc. phases. Note: The final parking lot schedule has to indicate the number of all parking lots and the breakdown in between accessible and regular spaces. If needed, change the schedule criterion accordingly when using these additional elements.
Copyright © Building and Construction Authority, 2021. All rights reserved.
Architectural Native BIM Submission Template for Archicad 25
47
SCHEDULES The officers will use the Schedules to perform manual code-checking to see whether the model is built according to the regulations and will comment as necessary. The following sections will introduce the template schedules and present the necessary settings for the related elements. To access, go to the SCHEDULES folder in the View Map.
Accessible (Audience) Seating This schedule lists the total number of auditorium-type seating and the number of accessible seating and sorts them based on accessibility per stories/rooms. For actual requirements please refer to the relevant codes. Note: The schedule does not list the Audience Seating 25 object in the Archicad Library 25.
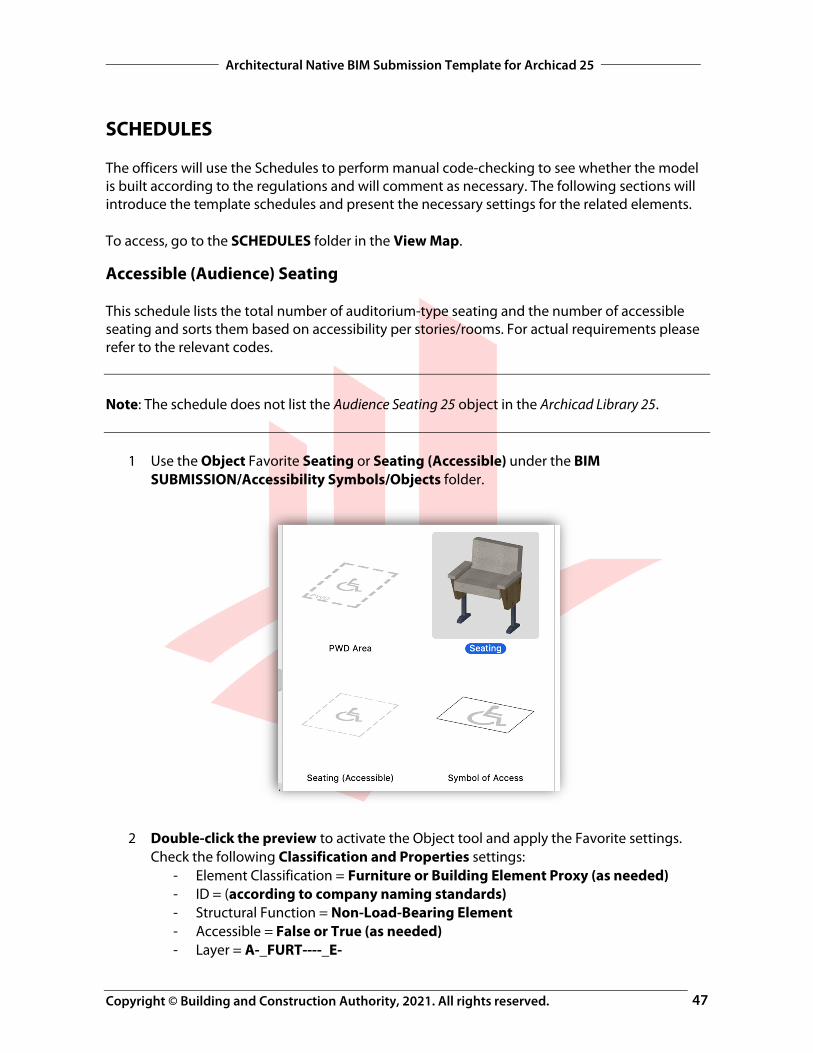
1 Use the Object Favorite Seating or Seating (Accessible) under the BIM SUBMISSION/Accessibility Symbols/Objects folder.
2 Double-click the preview to activate the Object tool and apply the Favorite settings. Check the following Classification and Properties settings:
- Element Classification = Furniture or Building Element Proxy (as needed) - ID = (according to company naming standards) - Structural Function = Non-Load-Bearing Element - Accessible = False or True (as needed) - Layer = A-_FURT----_E-
Copyright © Building and Construction Authority, 2021. All rights reserved.
Architectural Native BIM Submission Template for Archicad 25
48
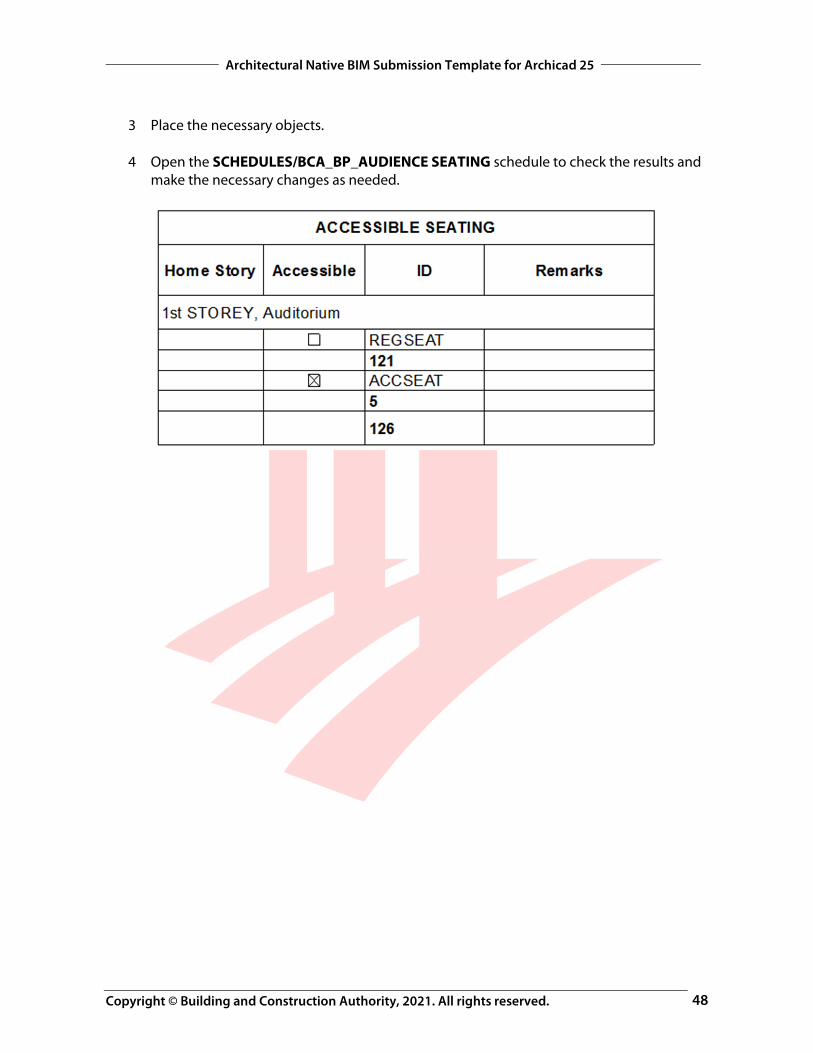
3 Place the necessary objects.
4 Open the SCHEDULES/BCA_BP_AUDIENCE SEATING schedule to check the results and make the necessary changes as needed.
Copyright © Building and Construction Authority, 2021. All rights reserved.
Architectural Native BIM Submission Template for Archicad 25
49
Hearing Enhancement Systems This schedule lists the number of Hearing Enhancement Systems (HES) symbols per rooms. For actual requirements please refer to the relevant codes.
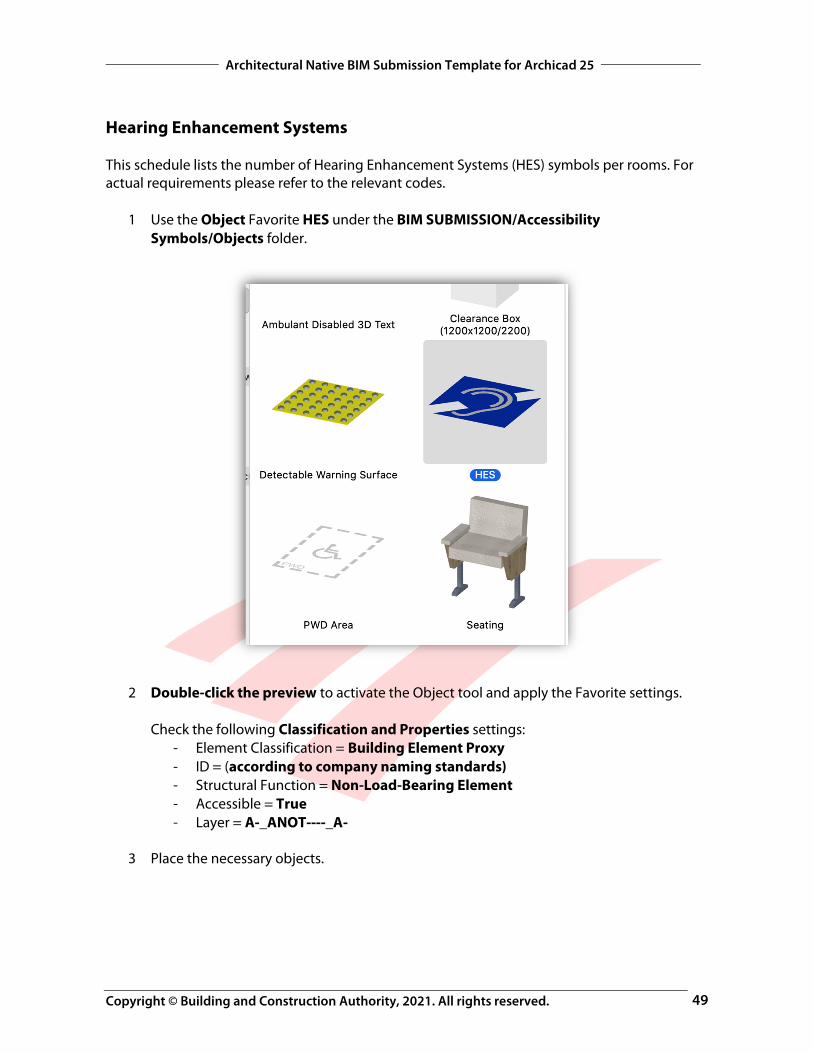
1 Use the Object Favorite HES under the BIM SUBMISSION/Accessibility Symbols/Objects folder.
2 Double-click the preview to activate the Object tool and apply the Favorite settings. Check the following Classification and Properties settings:
- Element Classification = Building Element Proxy - ID = (according to company naming standards) - Structural Function = Non-Load-Bearing Element - Accessible = True - Layer = A-_ANOT----_A-
3 Place the necessary objects.
Copyright © Building and Construction Authority, 2021. All rights reserved.
Architectural Native BIM Submission Template for Archicad 25
50
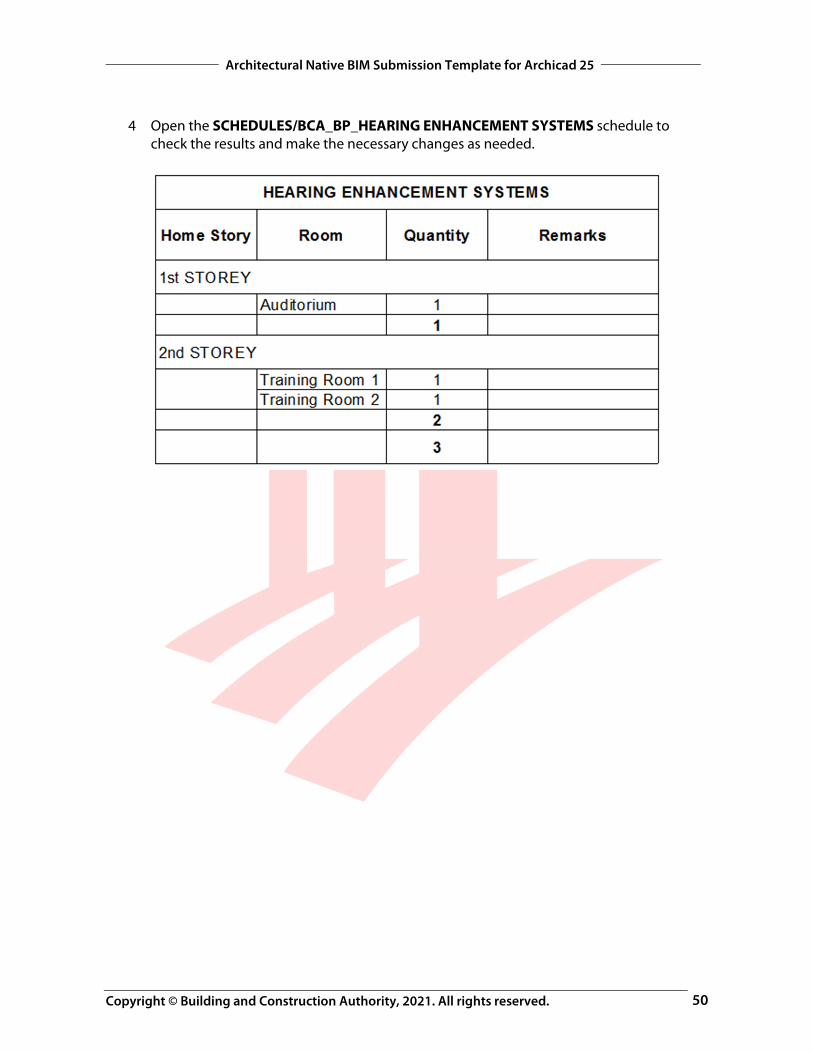
4 Open the SCHEDULES/BCA_BP_HEARING ENHANCEMENT SYSTEMS schedule to check the results and make the necessary changes as needed.
Copyright © Building and Construction Authority, 2021. All rights reserved.
Architectural Native BIM Submission Template for Archicad 25
51
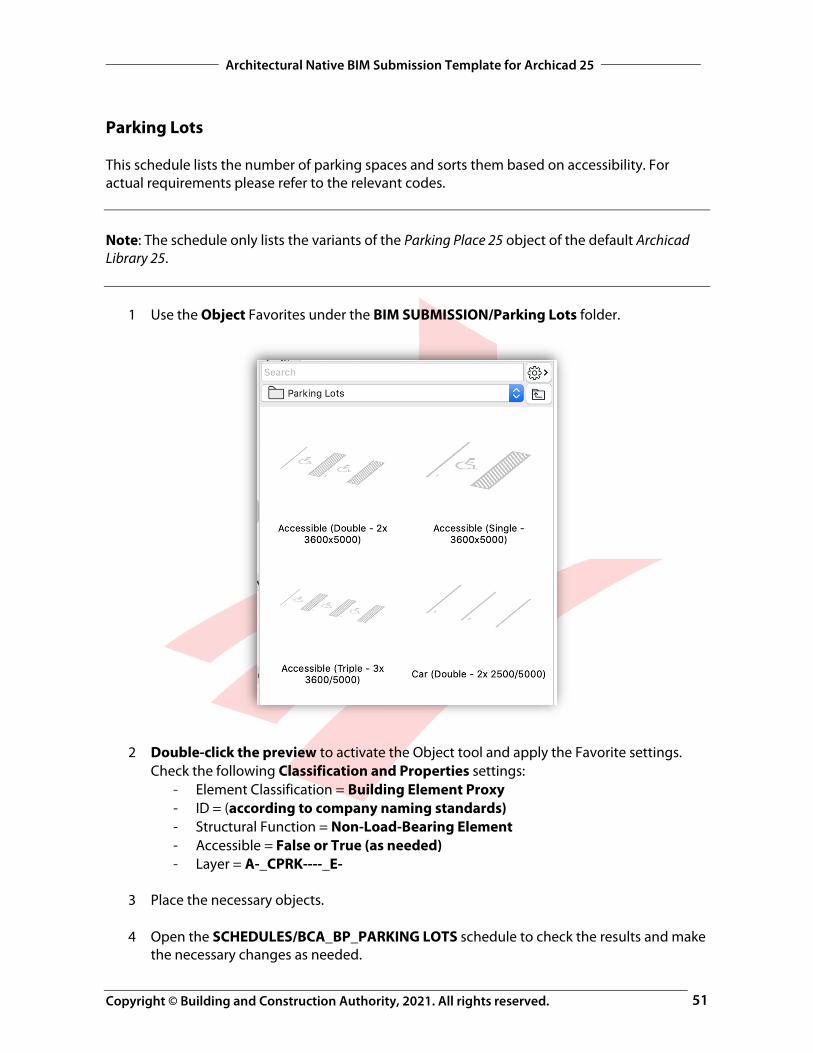
Parking Lots This schedule lists the number of parking spaces and sorts them based on accessibility. For actual requirements please refer to the relevant codes. Note: The schedule only lists the variants of the Parking Place 25 object of the default Archicad Library 25.
1 Use the Object Favorites under the BIM SUBMISSION/Parking Lots folder.
2 Double-click the preview to activate the Object tool and apply the Favorite settings. Check the following Classification and Properties settings:
- Element Classification = Building Element Proxy - ID = (according to company naming standards) - Structural Function = Non-Load-Bearing Element - Accessible = False or True (as needed) - Layer = A-_CPRK----_E-
3 Place the necessary objects.
4 Open the SCHEDULES/BCA_BP_PARKING LOTS schedule to check the results and make
the necessary changes as needed.

Copyright © Building and Construction Authority, 2021. All rights reserved.
Architectural Native BIM Submission Template for Archicad 25
52
5 Add remarks to the Accessible/Family Car Park Spaces to confirm that the required total width is provided.
Copyright © Building and Construction Authority, 2021. All rights reserved.
Architectural Native BIM Submission Template for Archicad 25
53
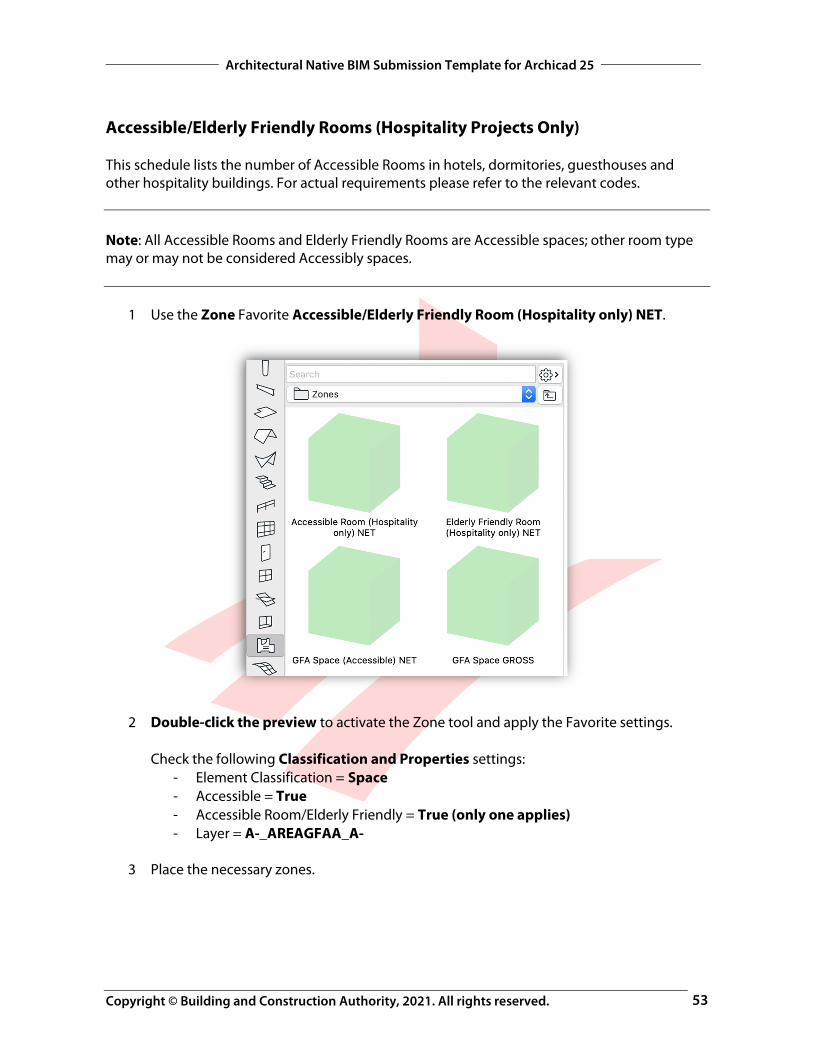
Accessible/Elderly Friendly Rooms (Hospitality Projects Only) This schedule lists the number of Accessible Rooms in hotels, dormitories, guesthouses and other hospitality buildings. For actual requirements please refer to the relevant codes. Note: All Accessible Rooms and Elderly Friendly Rooms are Accessible spaces; other room type may or may not be considered Accessibly spaces.
1 Use the Zone Favorite Accessible/Elderly Friendly Room (Hospitality only) NET.
2 Double-click the preview to activate the Zone tool and apply the Favorite settings. Check the following Classification and Properties settings:
- Element Classification = Space - Accessible = True - Accessible Room/Elderly Friendly = True (only one applies) - Layer = A-_AREAGFAA_A-
3 Place the necessary zones.
Copyright © Building and Construction Authority, 2021. All rights reserved.
Architectural Native BIM Submission Template for Archicad 25
54
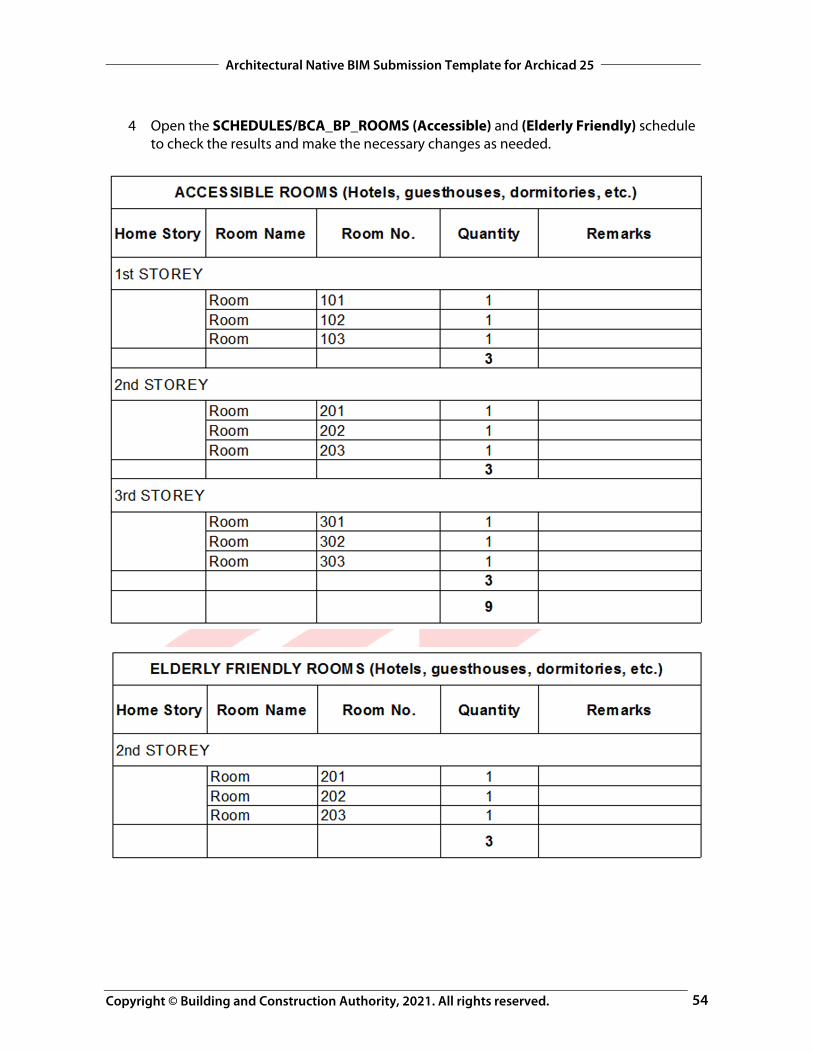
4 Open the SCHEDULES/BCA_BP_ROOMS (Accessible) and (Elderly Friendly) schedule to check the results and make the necessary changes as needed.
Copyright © Building and Construction Authority, 2021. All rights reserved.
Architectural Native BIM Submission Template for Archicad 25
55
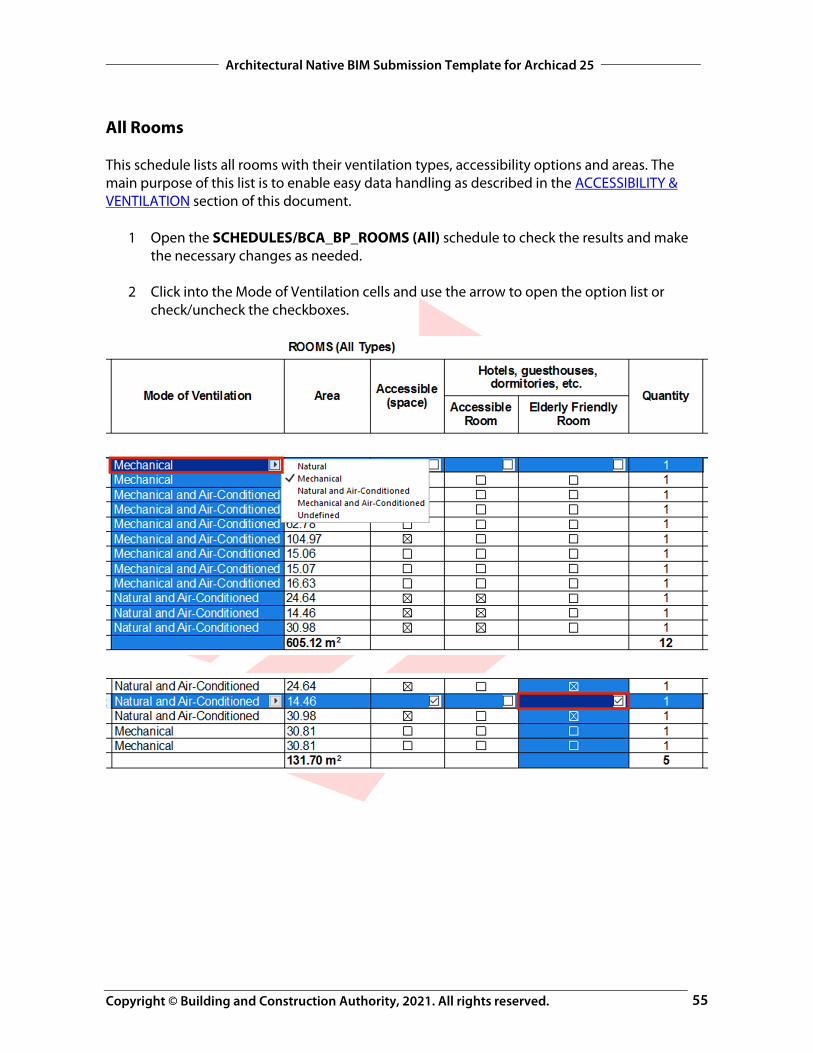
All Rooms This schedule lists all rooms with their ventilation types, accessibility options and areas. The main purpose of this list is to enable easy data handling as described in the ACCESSIBILITY & VENTILATION section of this document.
1 Open the SCHEDULES/BCA_BP_ROOMS (All) schedule to check the results and make the necessary changes as needed.
2 Click into the Mode of Ventilation cells and use the arrow to open the option list or
check/uncheck the checkboxes.
Copyright © Building and Construction Authority, 2021. All rights reserved.
Architectural Native BIM Submission Template for Archicad 25
56
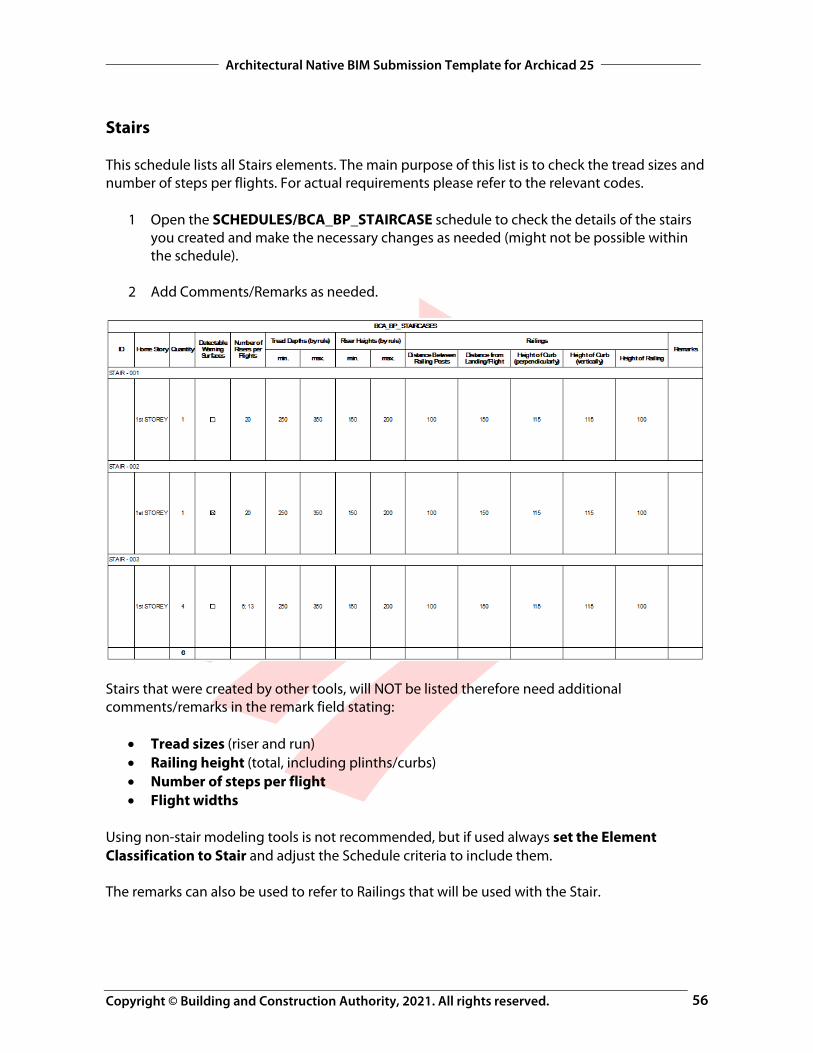
Stairs This schedule lists all Stairs elements. The main purpose of this list is to check the tread sizes and number of steps per flights. For actual requirements please refer to the relevant codes.
1 Open the SCHEDULES/BCA_BP_STAIRCASE schedule to check the details of the stairs you created and make the necessary changes as needed (might not be possible within the schedule).
2 Add Comments/Remarks as needed.
Stairs that were created by other tools, will NOT be listed therefore need additional comments/remarks in the remark field stating:
Tread sizes (riser and run) Railing height (total, including plinths/curbs) Number of steps per flight Flight widths
Using non-stair modeling tools is not recommended, but if used always set the Element Classification to Stair and adjust the Schedule criteria to include them. The remarks can also be used to refer to Railings that will be used with the Stair.
Copyright © Building and Construction Authority, 2021. All rights reserved.
Architectural Native BIM Submission Template for Archicad 25
57
Shelters These schedules list all household and staircase shelters. Shelters use the Zone tool for the area calculation as ordinary spaces, the setbacks are represented by Morphs. The list needs manual filling of properties of the above-mentioned elements as follows. Note: The shelter setbacks are using one common layer that is only shown on the FSSD layer combination. Any additional layers that might be needed for shelter (setbacks) must be incorporated into the FSSD layer combination.
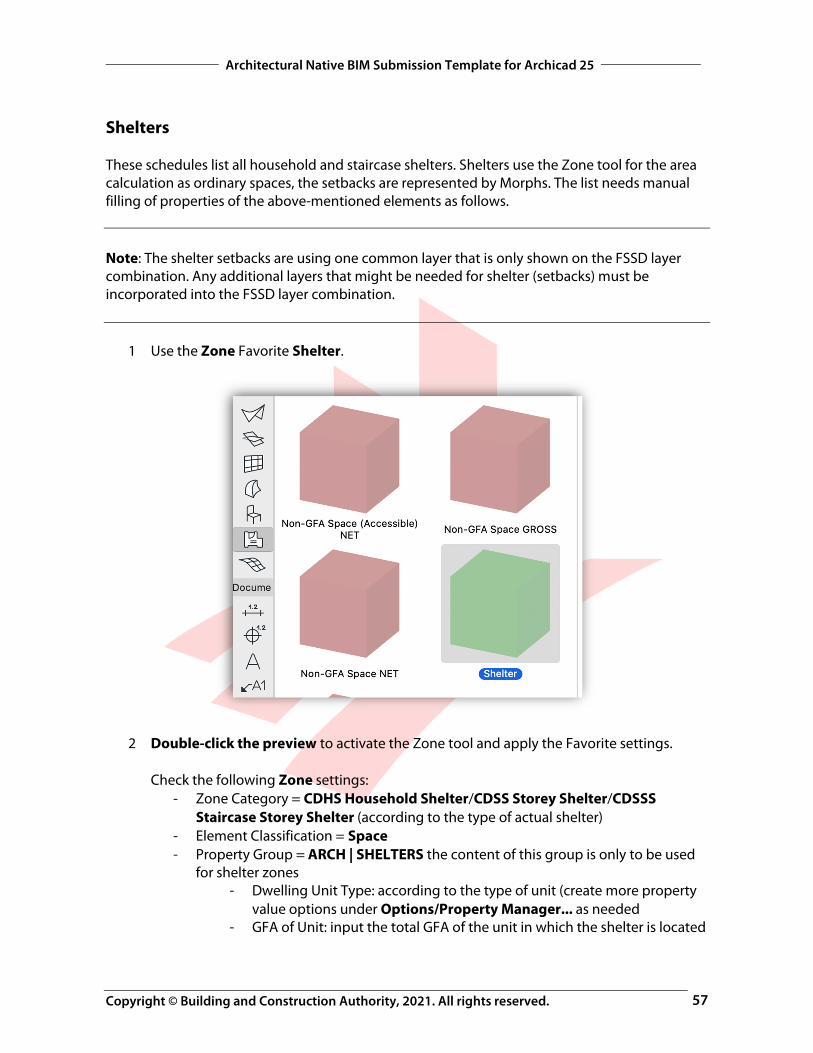
1 Use the Zone Favorite Shelter.
2 Double-click the preview to activate the Zone tool and apply the Favorite settings. Check the following Zone settings:
- Zone Category = CDHS Household Shelter/CDSS Storey Shelter/CDSSS Staircase Storey Shelter (according to the type of actual shelter)
- Element Classification = Space - Property Group = ARCH | SHELTERS the content of this group is only to be used
for shelter zones - Dwelling Unit Type: according to the type of unit (create more property
value options under Options/Property Manager... as needed - GFA of Unit: input the total GFA of the unit in which the shelter is located
Copyright © Building and Construction Authority, 2021. All rights reserved.
Architectural Native BIM Submission Template for Archicad 25
58
- Shelter Type (not for Staircase Storey Shelter): HA/HB/SA/SB according to the position of the shelter, this value can be set in the schedules as well
- No. of Square Units: expression-based calculation, according to the code of practice
- Required Internal Area: expression-based calculation, according to the code of practice
- Required Internal Volume: expression-based calculation, according to the code of practice
- Layer = according to the GFA/NonGFA type of actual shelter
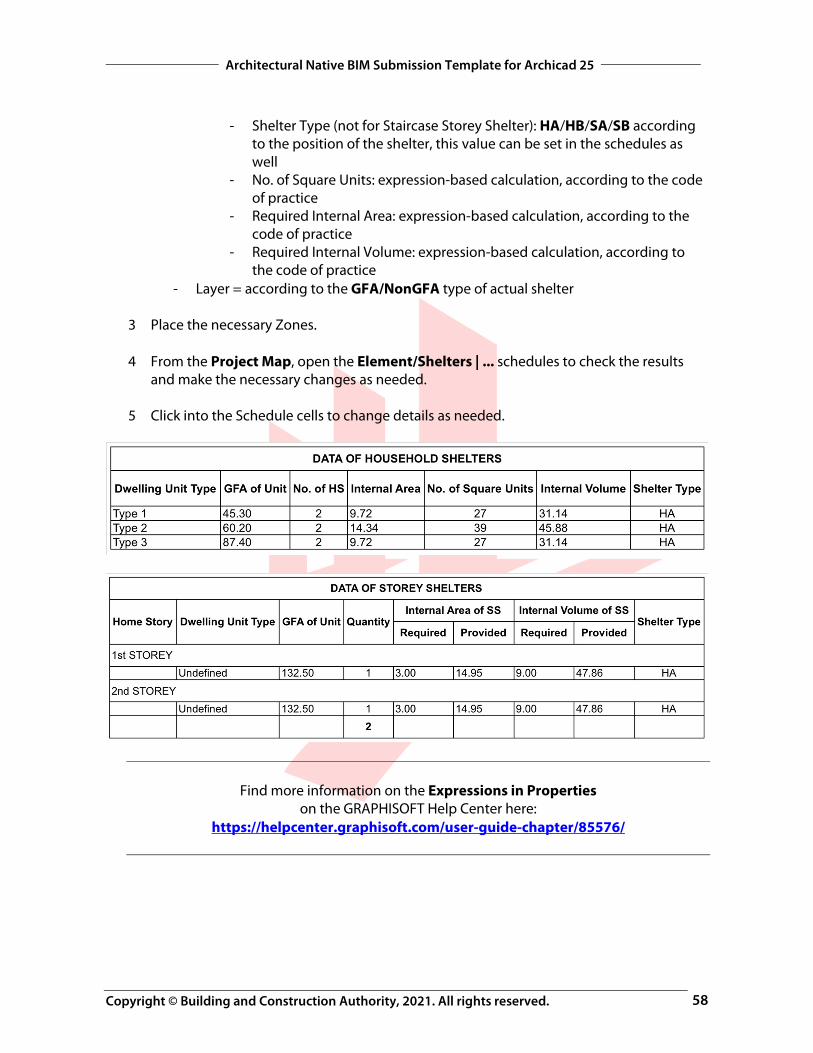
3 Place the necessary Zones.
4 From the Project Map, open the Element/Shelters | ... schedules to check the results and make the necessary changes as needed.
5 Click into the Schedule cells to change details as needed.
Find more information on the Expressions in Properties on the GRAPHISOFT Help Center here:
https://helpcenter.graphisoft.com/user-guide-chapter/85576/
Copyright © Building and Construction Authority, 2021. All rights reserved.
Architectural Native BIM Submission Template for Archicad 25
59
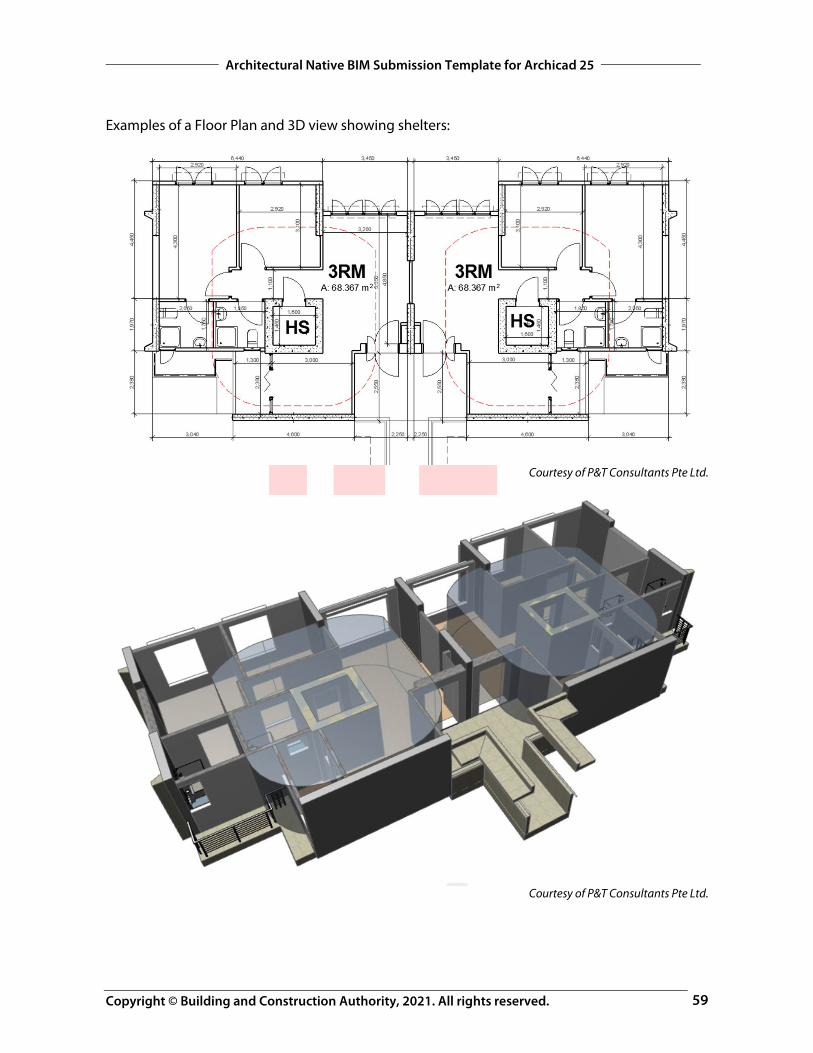
Examples of a Floor Plan and 3D view showing shelters:
Courtesy of P&T Consultants Pte Ltd.
Courtesy of P&T Consultants Pte Ltd.
Copyright © Building and Construction Authority, 2021. All rights reserved.
Architectural Native BIM Submission Template for Archicad 25
60
AREA TABULATION
GFA Schedule URA_LV_ SUM OF GROSS FLOOR AREA (GFA) (New) can be viewed under the SCHEDULES folder of the View Map.
1 Open a Floor Plan viewpoint from the Navigator.
2 Activate the Zone tool and open its settings and choose the appropriate Favorite (any of the GFA Spaces/Non-GFA Spaces).
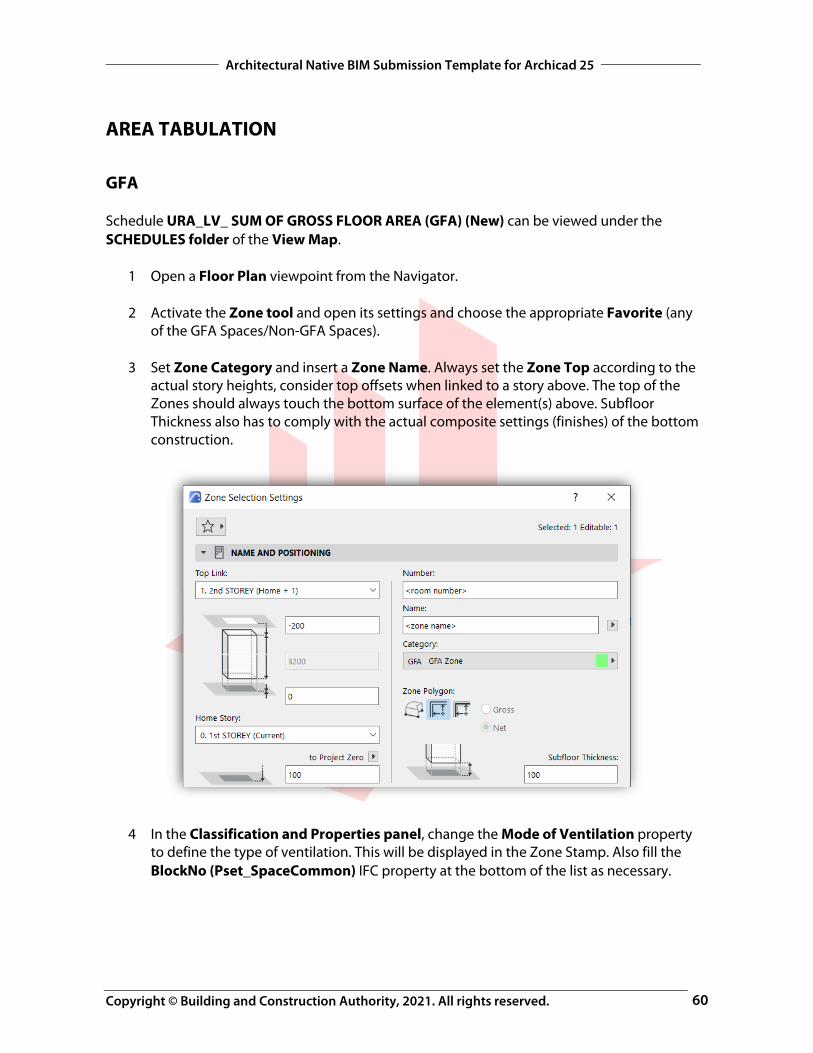
3 Set Zone Category and insert a Zone Name. Always set the Zone Top according to the actual story heights, consider top offsets when linked to a story above. The top of the Zones should always touch the bottom surface of the element(s) above. Subfloor Thickness also has to comply with the actual composite settings (finishes) of the bottom construction.
4 In the Classification and Properties panel, change the Mode of Ventilation property to define the type of ventilation. This will be displayed in the Zone Stamp. Also fill the BlockNo (Pset_SpaceCommon) IFC property at the bottom of the list as necessary.
Copyright © Building and Construction Authority, 2021. All rights reserved.
Architectural Native BIM Submission Template for Archicad 25
61
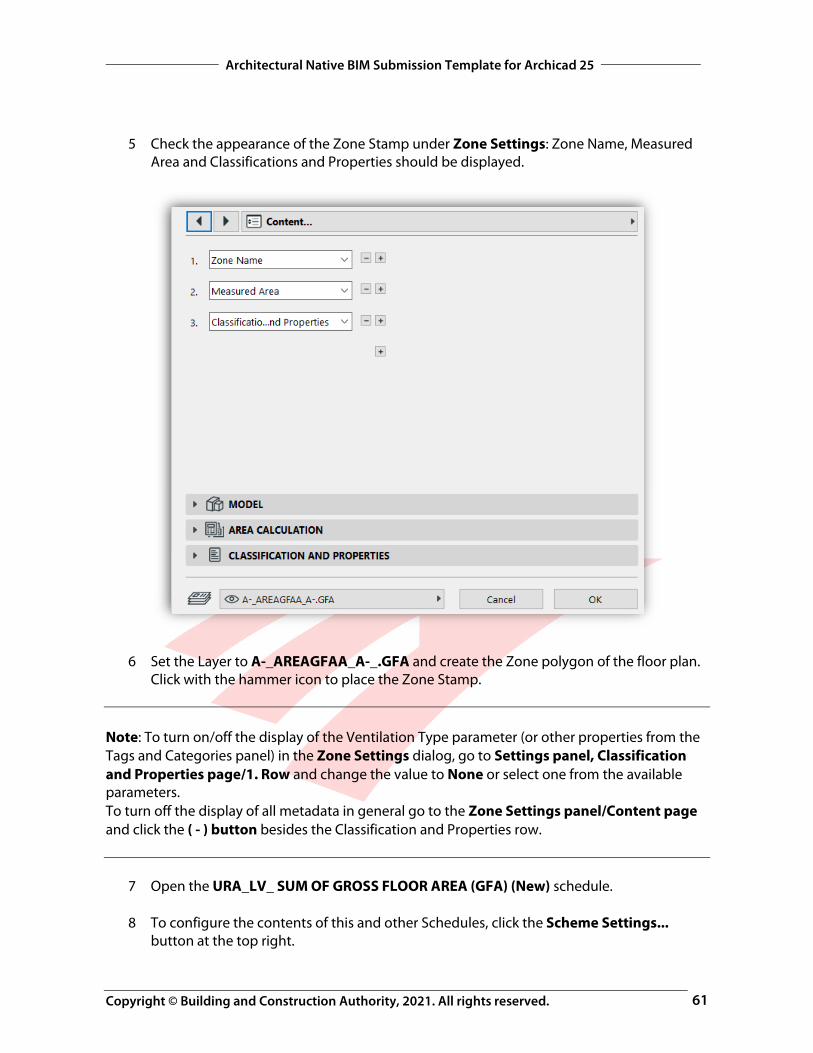
5 Check the appearance of the Zone Stamp under Zone Settings: Zone Name, Measured
Area and Classifications and Properties should be displayed.
6 Set the Layer to A-_AREAGFAA_A-_.GFA and create the Zone polygon of the floor plan. Click with the hammer icon to place the Zone Stamp.
Note: To turn on/off the display of the Ventilation Type parameter (or other properties from the Tags and Categories panel) in the Zone Settings dialog, go to Settings panel, Classification and Properties page/1. Row and change the value to None or select one from the available parameters. To turn off the display of all metadata in general go to the Zone Settings panel/Content page and click the ( - ) button besides the Classification and Properties row.
7 Open the URA_LV_ SUM OF GROSS FLOOR AREA (GFA) (New) schedule.
8 To configure the contents of this and other Schedules, click the Scheme Settings... button at the top right.
Copyright © Building and Construction Authority, 2021. All rights reserved.
Architectural Native BIM Submission Template for Archicad 25
62
STRATA Schedule URA-_LV_ STRATA can be viewed under the SCHEDULES folder of the View Map.
1 Open a Floor Plan viewpoint from the Navigator.
2 Activate the Zone tool and open its settings and choose the Favorite UNIT.
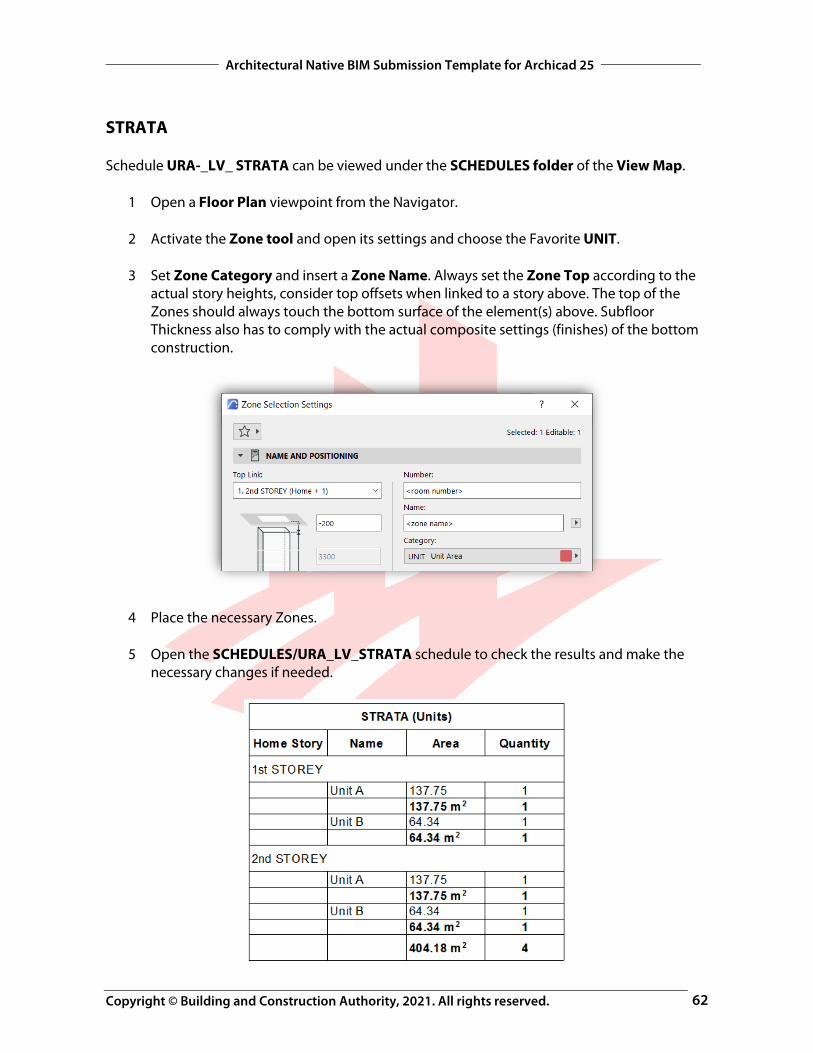
3 Set Zone Category and insert a Zone Name. Always set the Zone Top according to the actual story heights, consider top offsets when linked to a story above. The top of the Zones should always touch the bottom surface of the element(s) above. Subfloor Thickness also has to comply with the actual composite settings (finishes) of the bottom construction.
4 Place the necessary Zones.
5 Open the SCHEDULES/URA_LV_STRATA schedule to check the results and make the necessary changes if needed.

Copyright © Building and Construction Authority, 2021. All rights reserved.
Architectural Native BIM Submission Template for Archicad 25
63
SGFA These Schedules are found in the SCHEDULES folders of the View Map.
BCA_LV_ STATISTICAL GROSS FLOOR AREA (SGFA) 2 BCA_LV_ STATISTICAL GROSS FLOOR AREA (SGFA) GENERAL BCA_LV_ STATISTICAL GROSS FLOOR AREA (SGFA) SPECIFIED BCA_LV_SUM OF AREAS NOT INCL IN GFA COMPUTATION
To generate the SGFA table for areas NOT calculated as GFA automatically:
1 Activate the Zone tool and open its settings and choose the appropriate Zone Category and insert a Zone Name.
2 Set the building type of the Zone under Classification and Properties/ARCH |
SGFA/Building Type (SGFA), the other Properties in this group are expression-based.
3 Set the Layer to A-_AREAGFAD_A-.NonGFA if the Zone is a Non-GFA Zone and create
the Zone polygon on the floor plan.
4 Open the respective schedules under the SCHEDULES folder of the View Map. Note: Always check the Scheme Settings of each schedule before using and make sure you understand its Criterion and Fields.
5 To view the final SGFA plans, open views from the BCA/BP/2D PLANS/SGFA PLANS folder in the View Map.
Copyright © Building and Construction Authority, 2021. All rights reserved.
Architectural Native BIM Submission Template for Archicad 25
64
COVER PAGE Though the Native BIM Submission is mainly based on views, Layouts are still required for submission. The Layout Book contains a COVER PAGE (which contains all the required project information), and some Sample layouts if needed.
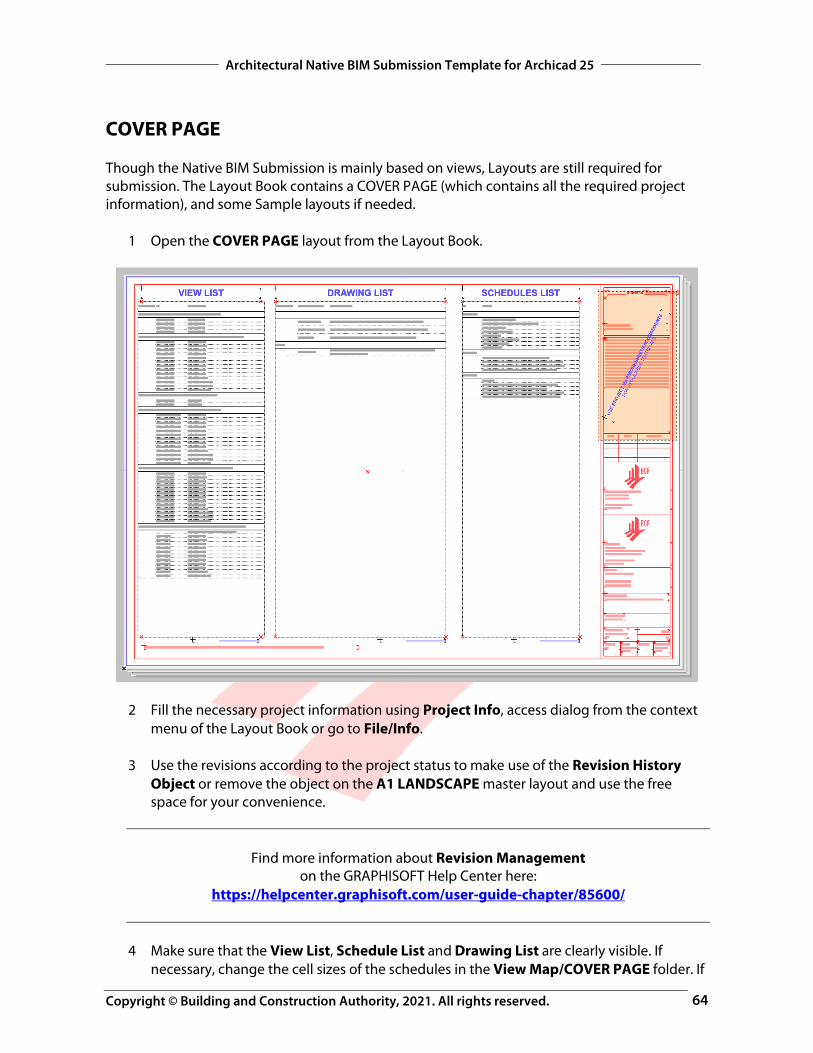
1 Open the COVER PAGE layout from the Layout Book.
2 Fill the necessary project information using Project Info, access dialog from the context menu of the Layout Book or go to File/Info.
3 Use the revisions according to the project status to make use of the Revision History
Object or remove the object on the A1 LANDSCAPE master layout and use the free space for your convenience.
Find more information about Revision Management on the GRAPHISOFT Help Center here:
https://helpcenter.graphisoft.com/user-guide-chapter/85600/
4 Make sure that the View List, Schedule List and Drawing List are clearly visible. If
necessary, change the cell sizes of the schedules in the View Map/COVER PAGE folder. If
Copyright © Building and Construction Authority, 2021. All rights reserved.
Architectural Native BIM Submission Template for Archicad 25
65
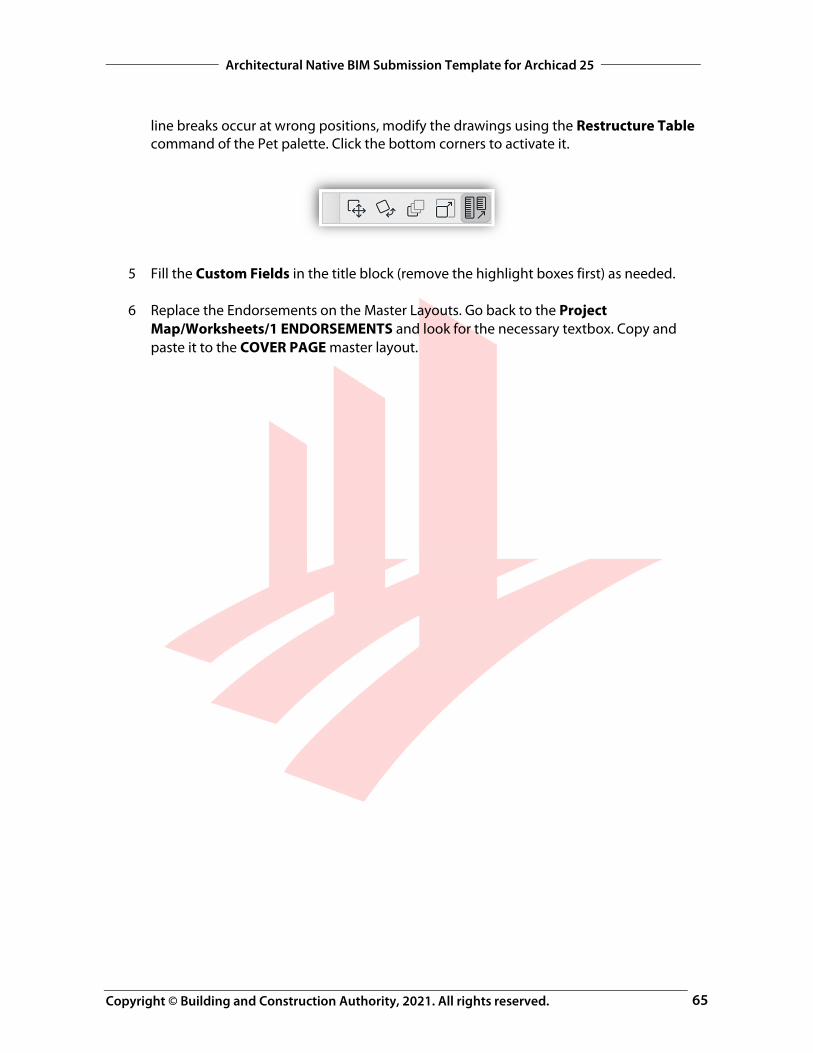
line breaks occur at wrong positions, modify the drawings using the Restructure Table command of the Pet palette. Click the bottom corners to activate it.
5 Fill the Custom Fields in the title block (remove the highlight boxes first) as needed.
6 Replace the Endorsements on the Master Layouts. Go back to the Project Map/Worksheets/1 ENDORSEMENTS and look for the necessary textbox. Copy and paste it to the COVER PAGE master layout.

Copyright © Building and Construction Authority, 2021. All rights reserved.
Architectural Native BIM Submission Template for Archicad 25
66
A&A WORKS (RENOVATION) By default, all elements are defined as New. Renovation Filter colors are based on the CP83 color coding. Use the Renovation palette (find in menu Window/Palettes/Renovation) to change the default renovation status of elements or change the current renovation status of specific elements, which are selected.
To change all Renovation Statuses of all elements (for example change all New elements to Existing after finishing a phase) use the Document/Renovation/Reset Renovation Status... dialog.
Find more information about the Renovation feature on the GRAPHISOFT Help Center here:
https://helpcenter.graphisoft.com/user-guide-chapter/85569/
Copyright © Building and Construction Authority, 2021. All rights reserved.
Architectural Native BIM Submission Template for Archicad 25
67
For additional Renovation filtering options:
1 Go to Document/Renovation/Renovation Filter Options....
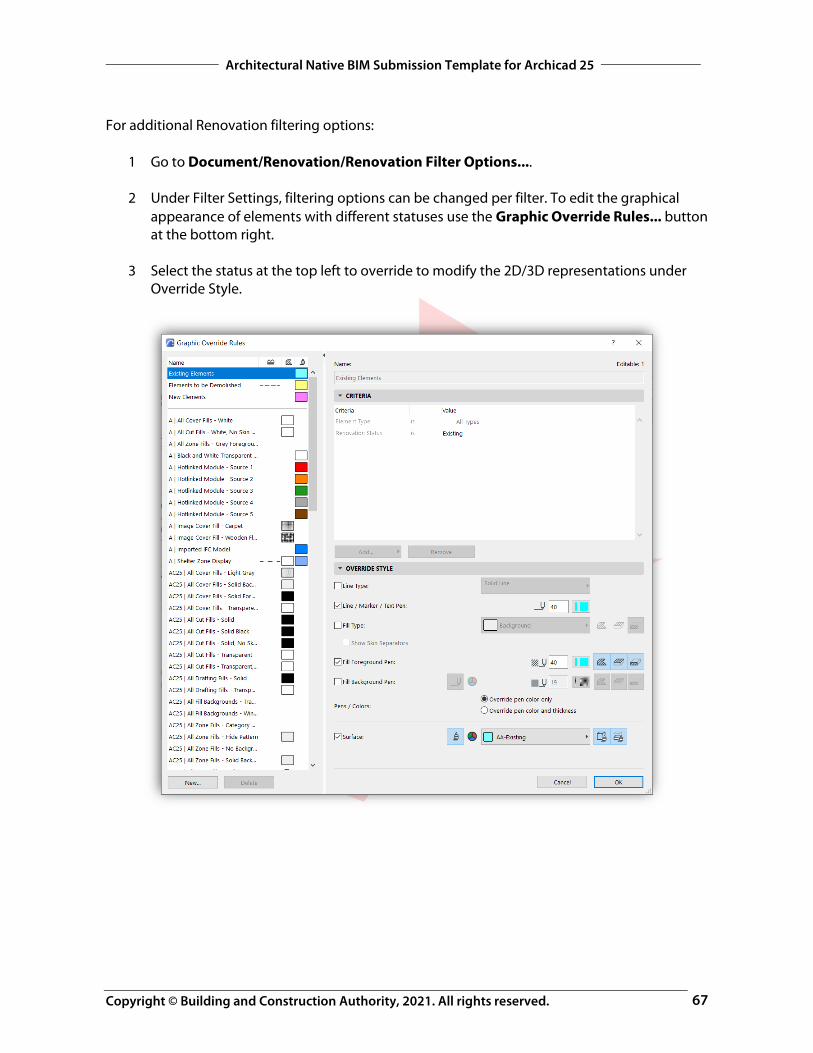
2 Under Filter Settings, filtering options can be changed per filter. To edit the graphical appearance of elements with different statuses use the Graphic Override Rules... button at the bottom right.
3 Select the status at the top left to override to modify the 2D/3D representations under Override Style.
Copyright © Building and Construction Authority, 2021. All rights reserved.
Architectural Native BIM Submission Template for Archicad 25
68
COLLISION DETECTION (OPTIONAL) Collision detection is optional and can be carried out in between accessibility elements and regular building elements to ensure access and clearances. This is completely voluntarily and will not be checked by the officers, however it can increase the quality of the BIM project.
1 Launch the Design/Model Check/Collision Detection... dialog.
2 Define the two groups you wish to check for collisions between. Pre-set Find & Select
Criteria Sets can be used for this purpose. Then click Check.
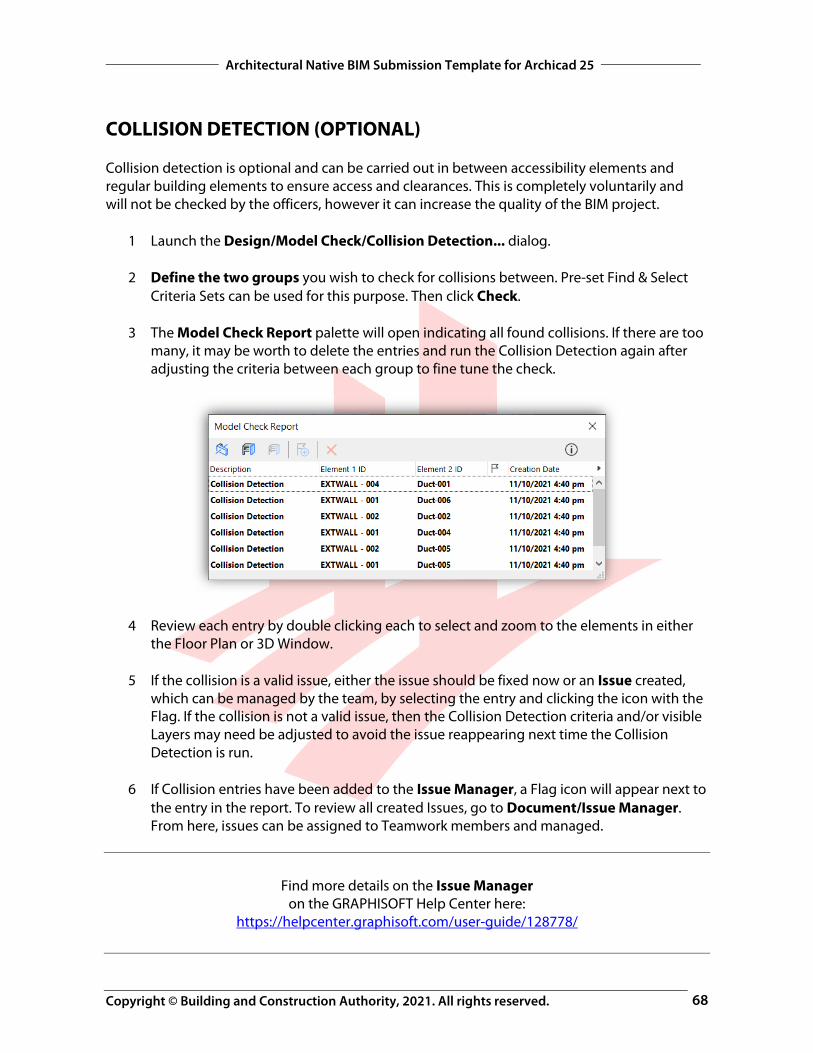
3 The Model Check Report palette will open indicating all found collisions. If there are too many, it may be worth to delete the entries and run the Collision Detection again after adjusting the criteria between each group to fine tune the check.
4 Review each entry by double clicking each to select and zoom to the elements in either
the Floor Plan or 3D Window.
5 If the collision is a valid issue, either the issue should be fixed now or an Issue created, which can be managed by the team, by selecting the entry and clicking the icon with the Flag. If the collision is not a valid issue, then the Collision Detection criteria and/or visible Layers may need be adjusted to avoid the issue reappearing next time the Collision Detection is run.
6 If Collision entries have been added to the Issue Manager, a Flag icon will appear next to the entry in the report. To review all created Issues, go to Document/Issue Manager. From here, issues can be assigned to Teamwork members and managed.
Find more details on the Issue Manager on the GRAPHISOFT Help Center here:
https://helpcenter.graphisoft.com/user-guide/128778/
Copyright © Building and Construction Authority, 2021. All rights reserved.
Architectural Native BIM Submission Template for Archicad 25
69
MERGING THE TEMPLATE INTO AN EXISTING COMPANY TEMPLATE The current version of the template contains most of the default settings that are shipped with the Archicad INT (International) version and the additional customizations to comply with the Native BIM Submission requirements. These template settings can be migrated into your existing company templates as follows.
Favorites The template contains many pre-defined favorites. To migrate and transfer these:
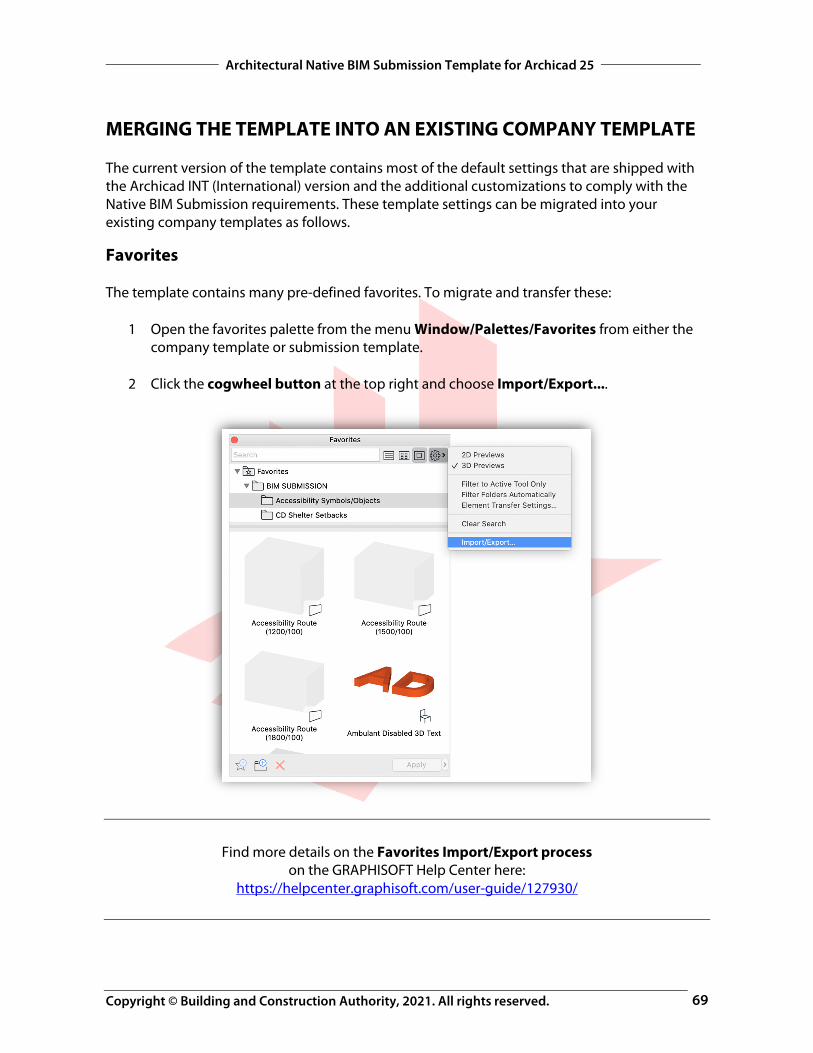
1 Open the favorites palette from the menu Window/Palettes/Favorites from either the company template or submission template.
2 Click the cogwheel button at the top right and choose Import/Export....
Find more details on the Favorites Import/Export process on the GRAPHISOFT Help Center here:
https://helpcenter.graphisoft.com/user-guide/127930/
Copyright © Building and Construction Authority, 2021. All rights reserved.
Architectural Native BIM Submission Template for Archicad 25
70
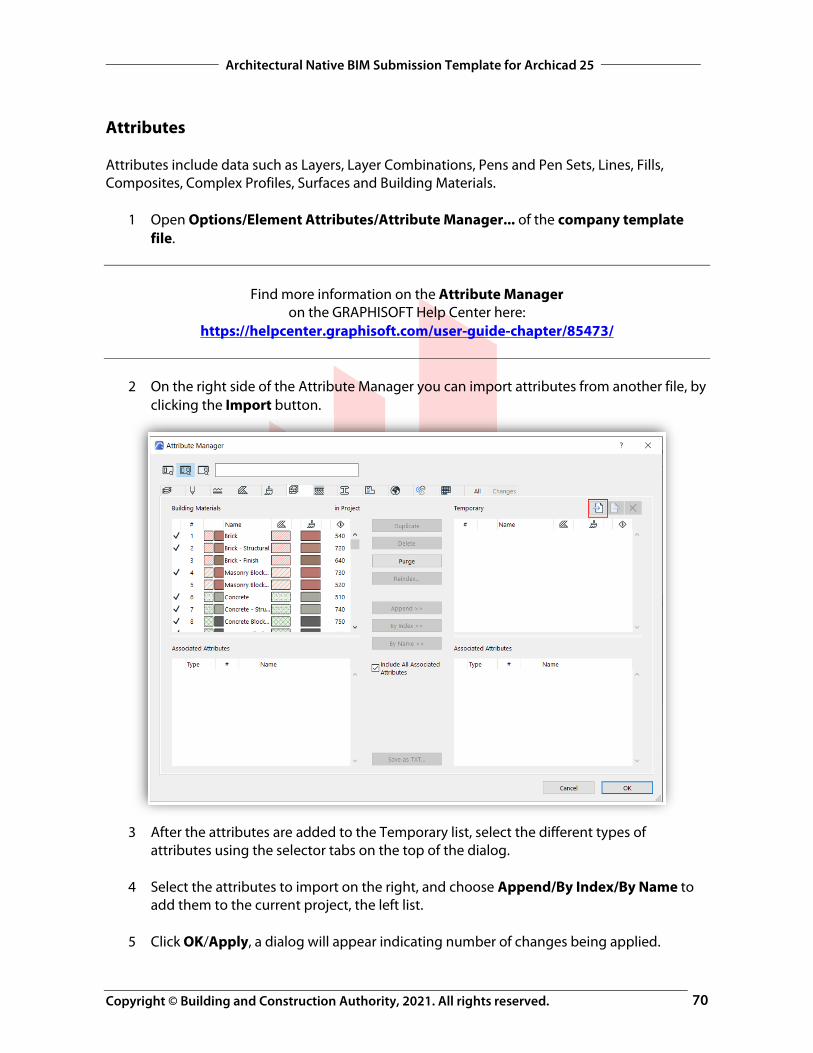
Attributes Attributes include data such as Layers, Layer Combinations, Pens and Pen Sets, Lines, Fills, Composites, Complex Profiles, Surfaces and Building Materials.
1 Open Options/Element Attributes/Attribute Manager... of the company template file.
Find more information on the Attribute Manager on the GRAPHISOFT Help Center here:
https://helpcenter.graphisoft.com/user-guide-chapter/85473/
2 On the right side of the Attribute Manager you can import attributes from another file, by
clicking the Import button.
3 After the attributes are added to the Temporary list, select the different types of
attributes using the selector tabs on the top of the dialog.
4 Select the attributes to import on the right, and choose Append/By Index/By Name to add them to the current project, the left list.
5 Click OK/Apply, a dialog will appear indicating number of changes being applied.
Copyright © Building and Construction Authority, 2021. All rights reserved.
Architectural Native BIM Submission Template for Archicad 25
71
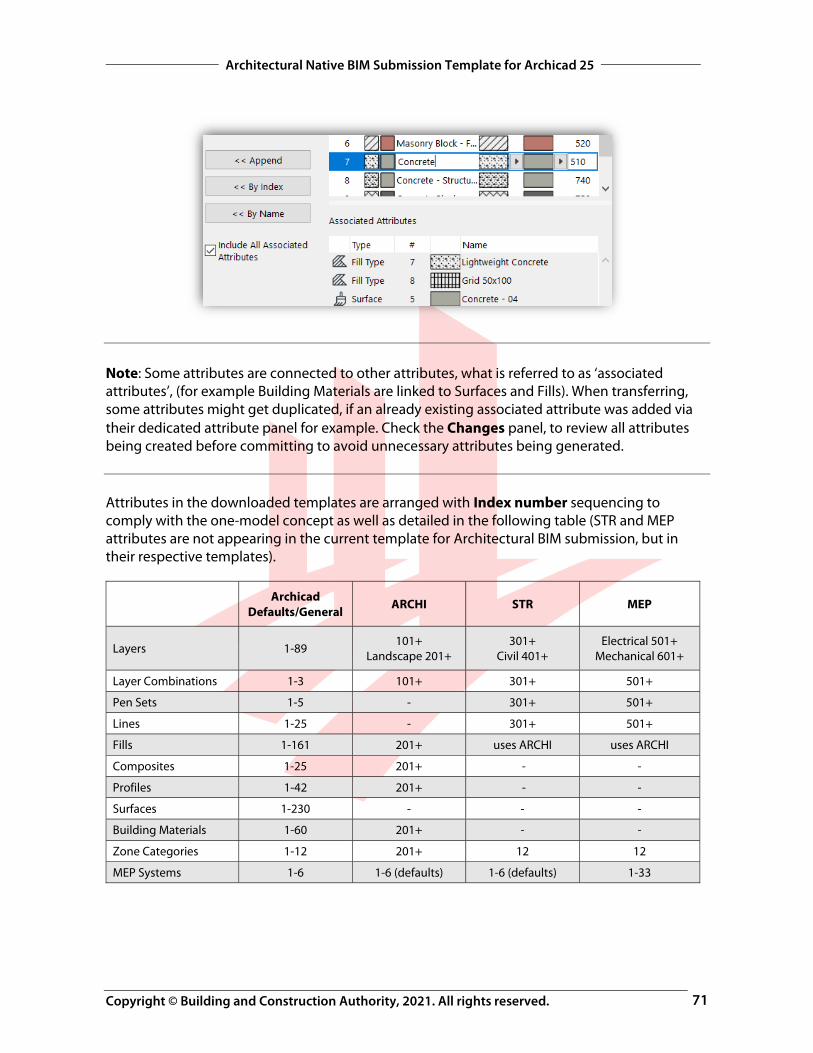
Note: Some attributes are connected to other attributes, what is referred to as ‘associated attributes’, (for example Building Materials are linked to Surfaces and Fills). When transferring, some attributes might get duplicated, if an already existing associated attribute was added via their dedicated attribute panel for example. Check the Changes panel, to review all attributes being created before committing to avoid unnecessary attributes being generated. Attributes in the downloaded templates are arranged with Index number sequencing to comply with the one-model concept as well as detailed in the following table (STR and MEP attributes are not appearing in the current template for Architectural BIM submission, but in their respective templates).
Archicad Defaults/General ARCHI STR MEP
Layers 1-89 101+
Landscape 201+ 301+
Civil 401+ Electrical 501+
Mechanical 601+
Layer Combinations 1-3 101+ 301+ 501+
Pen Sets 1-5 - 301+ 501+
Lines 1-25 - 301+ 501+
Fills 1-161 201+ uses ARCHI uses ARCHI
Composites 1-25 201+ - -
Profiles 1-42 201+ - -
Surfaces 1-230 - - -
Building Materials 1-60 201+ - -
Zone Categories 1-12 201+ 12 12
MEP Systems 1-6 1-6 (defaults) 1-6 (defaults) 1-33
Copyright © Building and Construction Authority, 2021. All rights reserved.
Architectural Native BIM Submission Template for Archicad 25
72
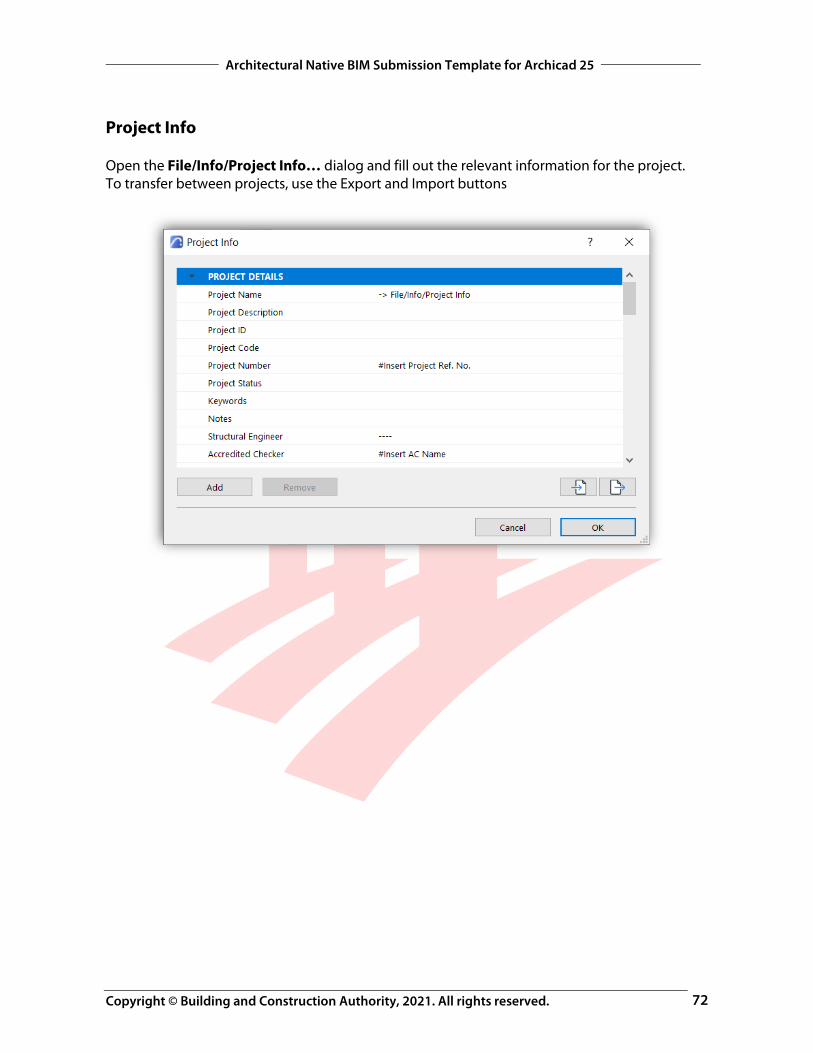
Project Info Open the File/Info/Project Info… dialog and fill out the relevant information for the project. To transfer between projects, use the Export and Import buttons
Copyright © Building and Construction Authority, 2021. All rights reserved.
Architectural Native BIM Submission Template for Archicad 25
73
Views, Layouts and Master Layouts Views, Layouts (and Layout Subsets) and Master Layouts cannot be exported directly. However, by using the Organizer, and both project files open, you can show the contents of the second Project on the left, and use Drag/Drop to the current project on the right. Copied Drawings and Views will be linked from the second Project - which is a good method for splitting a project between Model and Documentation. Doing the same for Masters, will copy the Master content from one file to the other. Alternatively, and maybe simpler, copy the contents of a Master Layouts from one file, and paste to the other file.
Find more information on Accessing Views/Layouts from another Archicad on the GRAPHISOFT Help Center here:
https://helpcenter.graphisoft.com/user-guide/127947/
Copyright © Building and Construction Authority, 2021. All rights reserved.
Architectural Native BIM Submission Template for Archicad 25
74
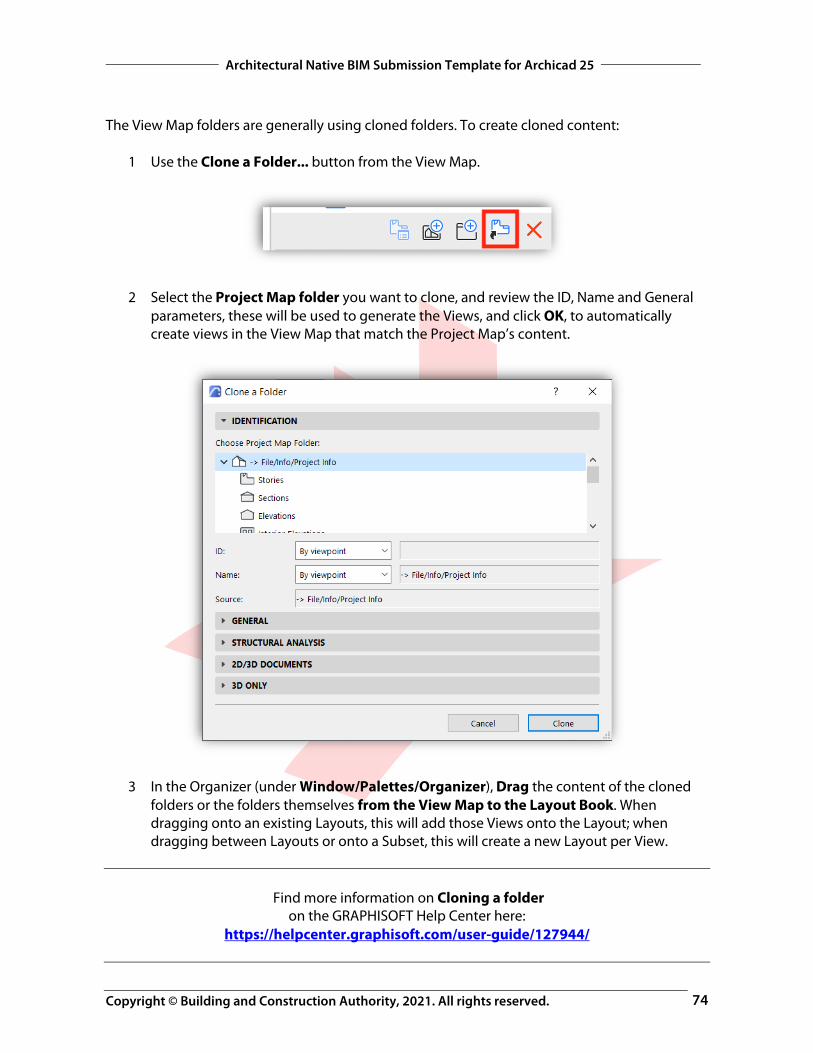
The View Map folders are generally using cloned folders. To create cloned content:
1 Use the Clone a Folder... button from the View Map.
2 Select the Project Map folder you want to clone, and review the ID, Name and General parameters, these will be used to generate the Views, and click OK, to automatically create views in the View Map that match the Project Map’s content.
3 In the Organizer (under Window/Palettes/Organizer), Drag the content of the cloned folders or the folders themselves from the View Map to the Layout Book. When dragging onto an existing Layouts, this will add those Views onto the Layout; when dragging between Layouts or onto a Subset, this will create a new Layout per View.
Find more information on Cloning a folder on the GRAPHISOFT Help Center here:
https://helpcenter.graphisoft.com/user-guide/127944/
Copyright © Building and Construction Authority, 2021. All rights reserved.
Architectural Native BIM Submission Template for Archicad 25
75
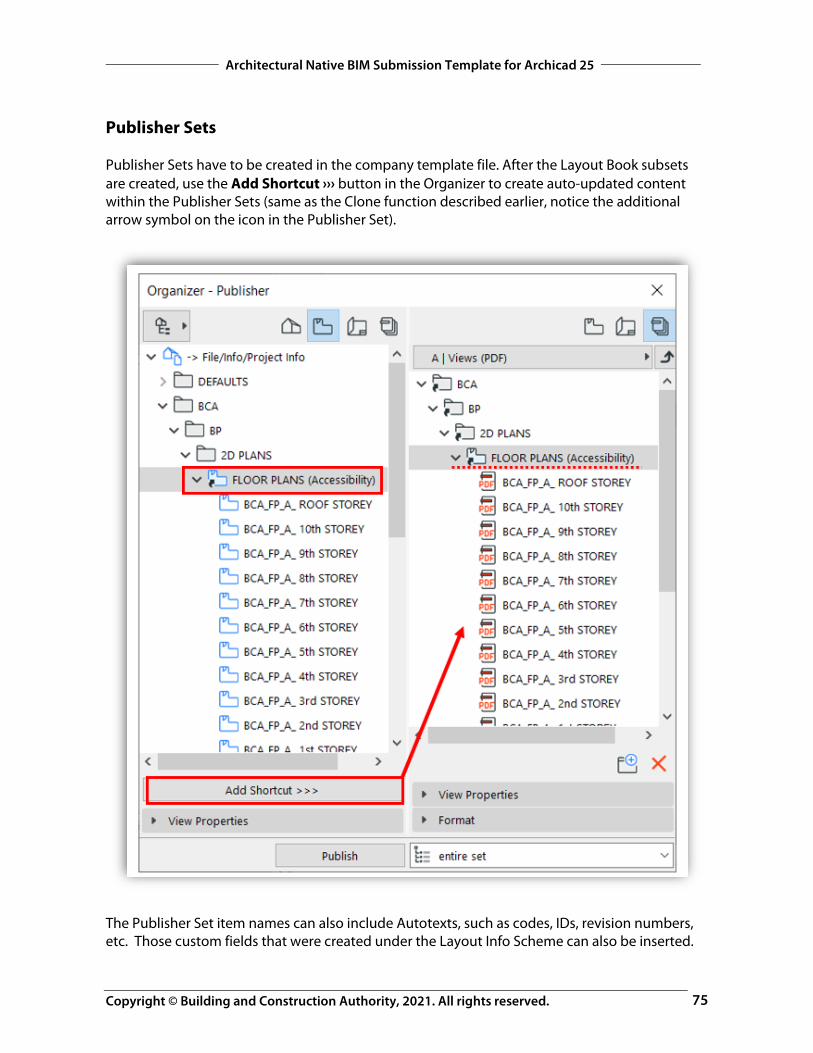
Publisher Sets Publisher Sets have to be created in the company template file. After the Layout Book subsets are created, use the Add Shortcut ››› button in the Organizer to create auto-updated content within the Publisher Sets (same as the Clone function described earlier, notice the additional arrow symbol on the icon in the Publisher Set).
The Publisher Set item names can also include Autotexts, such as codes, IDs, revision numbers, etc. Those custom fields that were created under the Layout Info Scheme can also be inserted.
Copyright © Building and Construction Authority, 2021. All rights reserved.
Architectural Native BIM Submission Template for Archicad 25
76
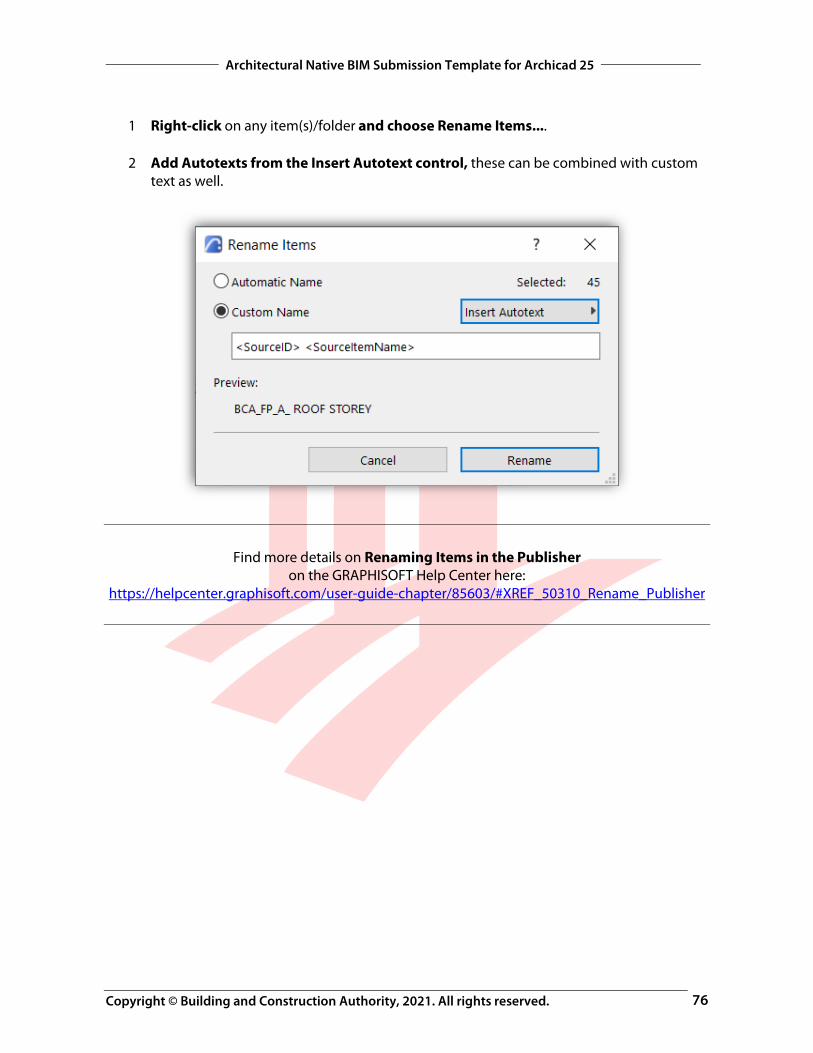
1 Right-click on any item(s)/folder and choose Rename Items.... 2 Add Autotexts from the Insert Autotext control, these can be combined with custom
text as well.
Find more details on Renaming Items in the Publisher on the GRAPHISOFT Help Center here:
https://helpcenter.graphisoft.com/user-guide-chapter/85603/#XREF_50310_Rename_Publisher
Copyright © Building and Construction Authority, 2021. All rights reserved.
Architectural Native BIM Submission Template for Archicad 25
77
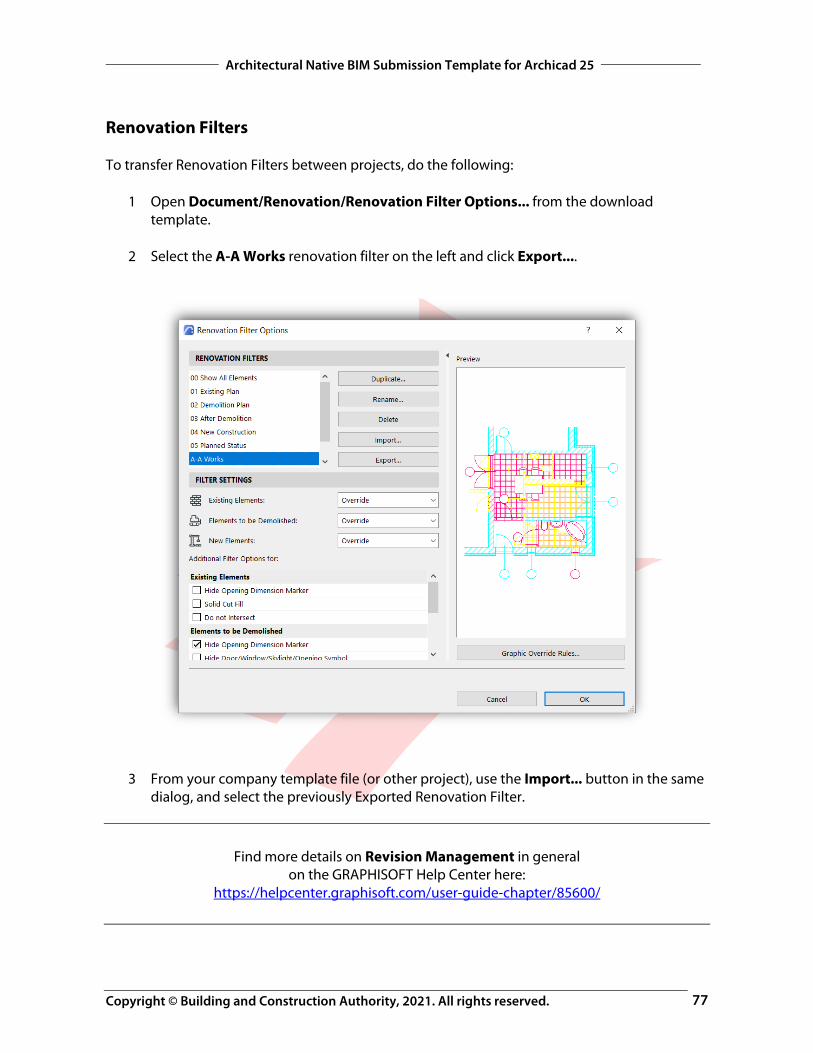
Renovation Filters To transfer Renovation Filters between projects, do the following:
1 Open Document/Renovation/Renovation Filter Options... from the download template.
2 Select the A-A Works renovation filter on the left and click Export....
3 From your company template file (or other project), use the Import... button in the same dialog, and select the previously Exported Renovation Filter.
Find more details on Revision Management in general on the GRAPHISOFT Help Center here:
https://helpcenter.graphisoft.com/user-guide-chapter/85600/
Copyright © Building and Construction Authority, 2021. All rights reserved.
Architectural Native BIM Submission Template for Archicad 25
78
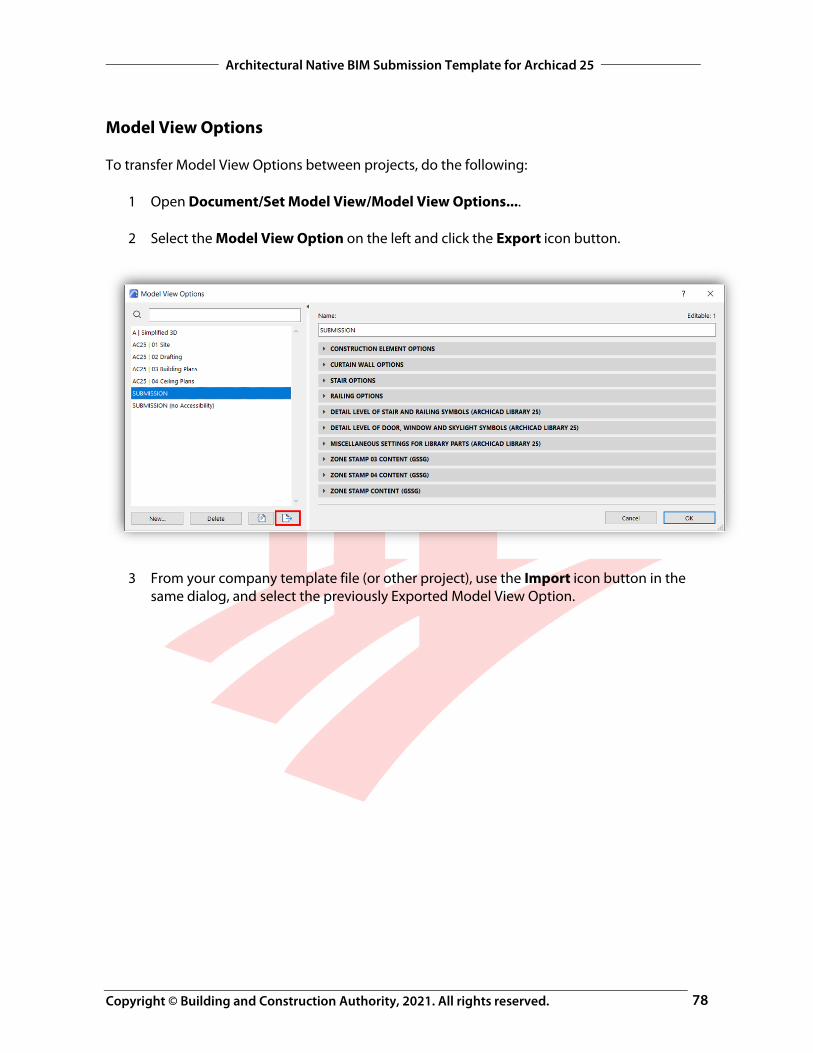
Model View Options To transfer Model View Options between projects, do the following:
1 Open Document/Set Model View/Model View Options....
2 Select the Model View Option on the left and click the Export icon button.
3 From your company template file (or other project), use the Import icon button in the same dialog, and select the previously Exported Model View Option.

Copyright © Building and Construction Authority, 2021. All rights reserved.
Architectural Native BIM Submission Template for Archicad 25
79
Graphic Override Combinations
1 Open Document/Graphic Overrides/Graphic Override Combinations....
2 Select the Graphic Override Combination on the left and click the Export icon button.
3 From your company template file (or other project), use the Import icon button in the same dialog, and select the previously Exported Graphic Override Combination.
Note: Graphic Override Rules cannot be exported/imported individually but will transfer with the Combination.
Find more information about Graphic Overrides on the GRAPHISOFT Help Center here:
https://helpcenter.graphisoft.com/user-guide-chapter/85573/

Copyright © Building and Construction Authority, 2021. All rights reserved.
Architectural Native BIM Submission Template for Archicad 25
80
SUBMISSION REQUIREMENTS Saving the files requires a specific naming format to define the following.
1 Make sure that the COVER PAGE layout is opened and moved to the beginning of the Tab Bar, followed by the Floor Plan of the project (which must be open to keep the file open in Archicad). This COVER PAGE has to be the first one that officers see when they open the file. All other tabs are to be closed.
2 Use File/Save as... menu command and save you file in one of the different formats.
BIM native file format and software version in a single file:
Archicad .PLA, version 25, indicated in the file name, for example:
ABCDEF_A1_BLK01_A_A25_123456.pla Note: PLA files include all library elements used in a project and make the file management easier for the submission, therefore it is highly recommended to use this format. File naming conventions – as per the BCA General Requirements, indicating maximum number of characters per part:
Before submitting the file make sure all necessary views are set correctly and show the relevant information.
Project ID (6) _
Aut
hor (
2)
_ Model Part
(6) _ Submission
Version (1)
_ Software Version
(3) _
User Defined (6)
A B C D E F _ A 1 _ B L K 0 0 1 _ A _ A 2 5 _ 1 2 3 4 5 6
Copyright © Building and Construction Authority, 2021. All rights reserved.
Architectural Native BIM Submission Template for Archicad 25
81
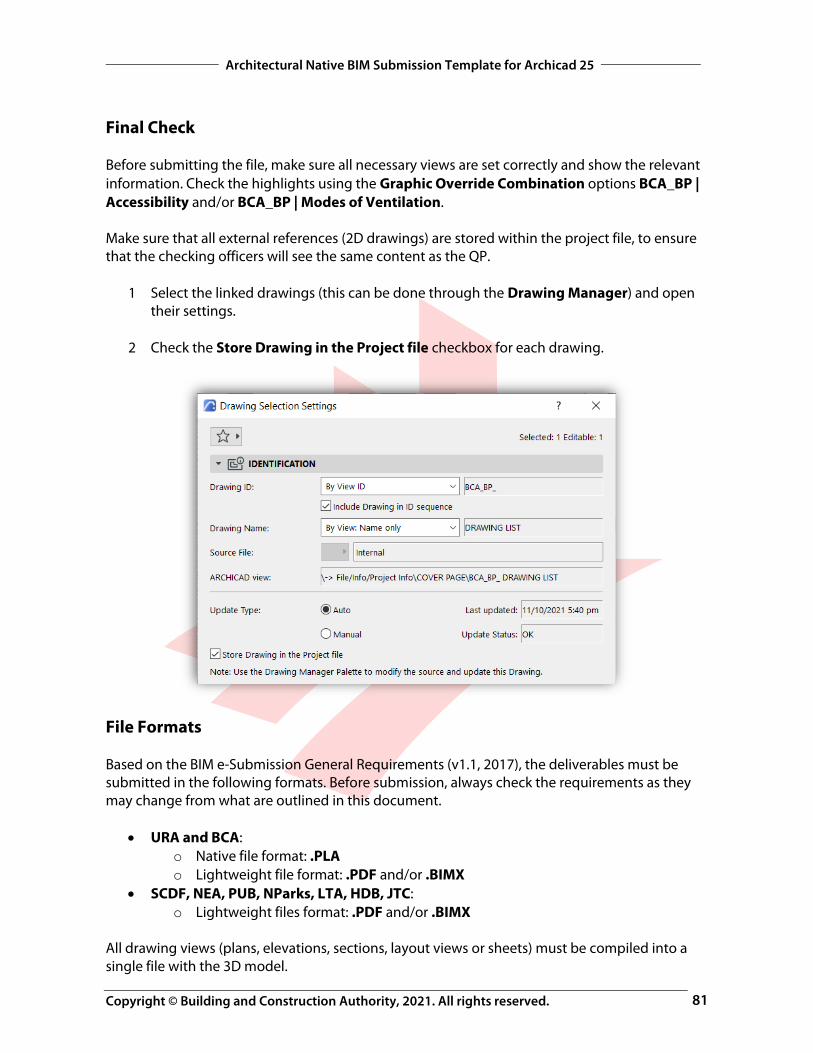
Final Check Before submitting the file, make sure all necessary views are set correctly and show the relevant information. Check the highlights using the Graphic Override Combination options BCA_BP | Accessibility and/or BCA_BP | Modes of Ventilation. Make sure that all external references (2D drawings) are stored within the project file, to ensure that the checking officers will see the same content as the QP.
1 Select the linked drawings (this can be done through the Drawing Manager) and open their settings.
2 Check the Store Drawing in the Project file checkbox for each drawing.
File Formats Based on the BIM e-Submission General Requirements (v1.1, 2017), the deliverables must be submitted in the following formats. Before submission, always check the requirements as they may change from what are outlined in this document.
URA and BCA: o Native file format: .PLA o Lightweight file format: .PDF and/or .BIMX
SCDF, NEA, PUB, NParks, LTA, HDB, JTC: o Lightweight files format: .PDF and/or .BIMX
All drawing views (plans, elevations, sections, layout views or sheets) must be compiled into a single file with the 3D model.
Copyright © Building and Construction Authority, 2021. All rights reserved.
Architectural Native BIM Submission Template for Archicad 25
82
ACKNOWLEDGEMENT Revision of the current template and guide done by GRAPHISOFT Singapore, with the help and input from our user Catherine Loke of Lander Loke Architects. For any queries please contact: GRAPHISOFT Singapore 152 Beach Road #10-05 Gateway East Singapore 189722 [email protected]