Embed Size (px)
Citation preview
0
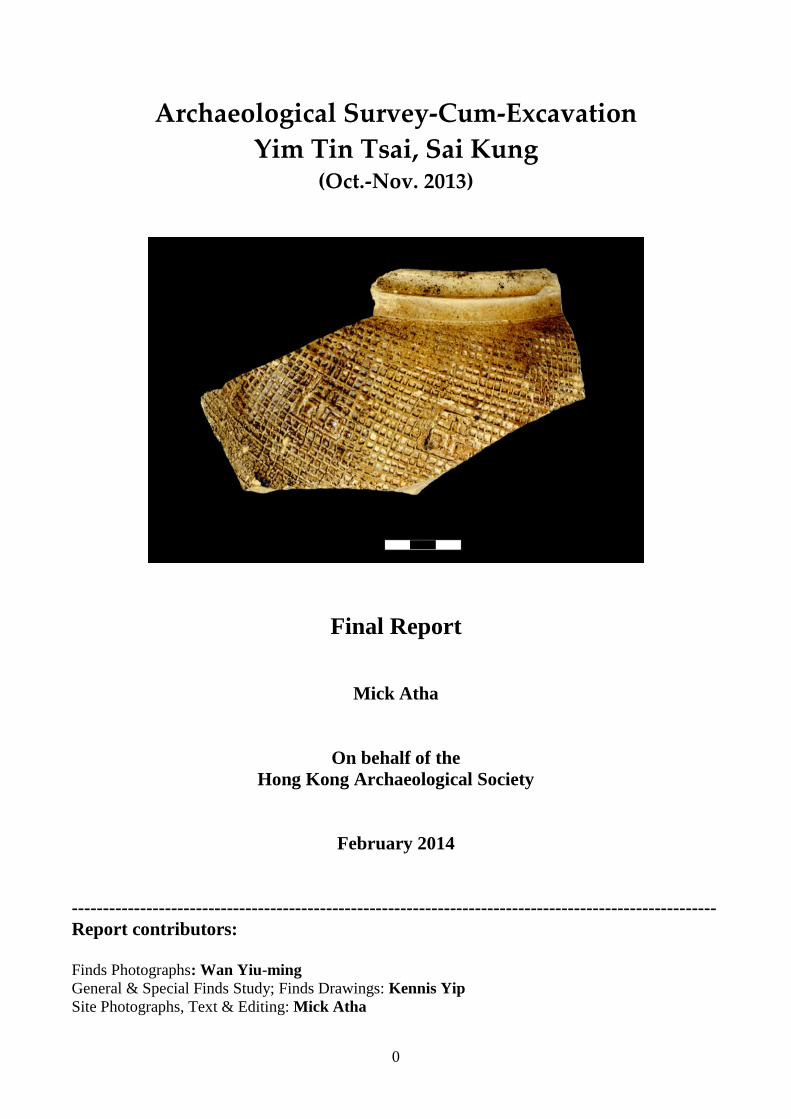
Archaeological Survey-Cum-Excavation
Yim Tin Tsai, Sai Kung (Oct.-Nov. 2013)
Final Report
Mick Atha
On behalf of the
Hong Kong Archaeological Society
February 2014
--------------------------------------------------------------------------------------------------------
Report contributors:
Finds Photographs: Wan Yiu-ming
General & Special Finds Study; Finds Drawings: Kennis Yip
Site Photographs, Text & Editing: Mick Atha
1
CONTENTS Page
Acknowledgements 6
Abbreviations & Usage 8
Non-Technical Summary 9
PART 1: PROJECT OVERVIEW
1. Introduction 9
2. Background 10
2.1 Geology, Topography, Drainage & Land Use 10
2.2 History 11
2.2.1 The Village and Salt-Field 11
2.2.2 Catholic Chapels 11
2.3 Existing Archaeological Information 12
2.3.1 The Archaeological Map of Hong Kong (HKAS 1972) 12
2.3.2 First Territory Wide Survey (1983-85) 12
2.3.3 Second Territory Wide Survey (1997-98) 12
2.4 Discussion 13
3. Objectives 13
4. Methodology 13
4.1 Introduction 13
4.2 Survey Methodology 13
4.2.1 Baseline & Testing Transects 14
4.2.2 Field Scan 14
4.2.3 Auger Tests 14
4.2.4 Terrace Face Cuttings 15
4.2.5 Test Pits 15
4.3 On-Site Excavation, Recording & Sampling 15
4.3.1 Excavation 15
4.3.2 Recording 15
4.3.3 Sampling 16
4.4 Post-Excavation Processing & Analysis 16
4.4.1 Processing, Analysis & Assessment 16
4.5 Presentation and Discussion of Results 16
4.5.1 Sequence of discussions 16
4.5.2 Deposit descriptions 16
4.5.3 Finds categorisation & dating 16
4.5.4 Reporting 17
PART 2: SURVEY IMPLEMENTATION & RESULTS
5. Four Stage Survey 17
5.1 Introduction 17
5.2 Field Scan 17
5.3 Auger Tests 17
5.3.1 Introduction 17
5.3.2 Table 1: Auger Test Sequence of Deposits 18
5.3.3 Discussion 27
5.4 Terrace Face Cuttings 27
5.4.1 Introduction 27
5.4.2 Terrace Face TF1 27
5.4.3 Terrace Face TF2 27
5.4.4 Terrace Face TF3 27
5.4.5 Terrace Face TF4 28
5.4.6 Terrace Face TF5 28
5.4.7 Terrace Face TF6 28

2
5.4.8 Discussion 28
5.5 Test Pits 28
5.5.1 Test Pit T2 29
5.5.2 Test Pit T3 29
5.5.3 Test Pit T4 30
5.5.4 Test Pit T5 30
5.5.5 Test Pit T6 31
PART 3: Old Chapel Investigation
6. Old Chapel Investigation 32
6.1 Introduction 32
6.2 North Wall [107a], Dividing Wall [106] & Eastern Gable End [107b] 33
6.2.1 Introduction 33
6.2.2 North Wall [107a] & Dividing Wall [106] 33
6.2.3 East Gable Wall [107b] 33
6.3 South & West Walls [105a & 105b] 34
6.4 Internal Floors, Doorway and Staircase Base 35
6.4.1 Post-Abandonment Deposits over Internal Floor 112=117 35
6.4.2 Eastern Room Doorway Threshold [109] & Green Brick Surround [110] 35
6.4.3 Masonry Base for Wooden Stairs to Upper Floor over Eastern Room 36
6.5 Loose Granite Slabs 36
7. Discussion 37
7.1 Survey Results 37
7.1.1 Qing-20th
-Century Agriculture 37
7.1.2 Clay Levelling Deposit 37
7.1.3 Han Cultural Layer 37
7.1.4 Prehistoric Stone Knapping Debitage? 37
7.2 Old Chapel 37
7.2.1 General Layout and Sequence of Development 37
7.2.2 Evidence for Secular and Religious Use? 38
PART 4: SPECIAL FINDS CATALOGUE
8. Ceramics 38
81 Introduction 38
8.2 Fabric types 39
8.3 Ceramics catalogue 39
9. Decorative Building Materials & Ceramic Building Materials 42
9.1 Introduction 42
9.2 CBM & DBM Catalogue 43
PART 5 CONCLUSIONS & RECOMMENDATIONS
10. Conclusions 44
11. Recommendations 45
PART 6: REFERENCES
12. References 46
PART 7: SUPPORTING ILLUSTRATIONS
13. Figures 47
14. Plates 73
PART 8: SUPPORTING DATA
15. Harris Matrix (Old Chapel – Trench T1) 104

3
16. Coordinates and Levels
16.1 Table 2: AH1-AH40 Coordinates and Levels 105
16.2 Table 3: Old Chapel Excavation T1 Coordinates and Levels 106
16.3 Table 4: Test Pits T2-T6 Coordinates and Levels 107
16.4 Table 4a: Context Register 108
17. Finds Tables 108
17.1 Introduction 108
17.2 Table 5: Key to finds codes used 109
17.3 Table 6: General Finds 110
17.4 Table 7: Special Finds 119
APPENDICES
Appendix 1: Supporting Documents 124
Appendix 2: Comments and Responses 130
List Figures
Figure 1 Location of Yim Tin Tsai in Inner Port Shelter
Figure 2 Yim Tin Tsai showing YTTSAI, Old Chapel & two previous auger tests
Figure 3 Project study area boundary & details of testing locations
Figure 4 Yim Tin Tsai geological map
Figure 5 Crown Block Lease Map of 1905
Figure 6 Detail of auger testing areas around test pit T5
Figure 7 Stratified random survey of north-west block of terraced fields
Figure 8 Schematic view of terraced hillside to illustrate choice of testing locations
Figure 9 Test Pit T2 sections
Figure 10 Test Pit T3 sections
Figure 11 Test Pit T4 sections
Figure12 Test Pit T5 sections
Figure 13 T5 Co.503 Han pottery rubbings
Figure 14 T5 Co.503 Han stoneware bowls and basins
Figure 15 T5 Co.503 Han stoneware seal-stamp-over-net jar (SF06)
Figure 16 T5 Co.503 Han stoneware jar bases
Figure 17 T5 Co.503 SF03 Han foot-ring base
Figure 18 Test Pit T6 sections
Figure 19 Schematic layout of Old Chapel ruin & adjacent village houses VH1 & VH2
Figure 20 Old Chapel T1 overall survey plan of excavated remains
Figure 20a Old Chapel T1 spot height locations
Figure 20b Old Chapel T1 plan showing key coordinates within survey areas
Figure 21 South facing elevation on north wall 107 & dividing wall 106
Figure 22 West facing elevation on dividing wall 106
Figure 23 South facing elevation wall 106, brick door surround 110 & threshold 109
Figure 24 West facing elevation on Old Chapel east gable wall 107b & VH1 wall 108
Figure 25 Wall 105b north facing elevation
Figure 26 South facing elevation on Old Chapel post-abandonment deposits
Figure 27 Trench T1 Co.103 Plaster mouldings
Figure 28 Schematic cross-section through VH1 window 114
List of Plates
Plate 1 The old chapel and priest’s lodgings – view looking east
Plate 2 Former rice paddies (foreground) with salt-field in background – view looking SE
Plate 3 1924 aerial photograph
Plate 4 1963 aerial photograph
Plate 5 Google Earth satellite image of Yim Tin Tsai
4
Plate 6 Enlarged view of eastern part of Yim Tin Tsai village in 1963 aerial photo showing Old
Chapel building
Plate 7 10cm auger with both extension bars added (totalling over 4m long)
Plate 8 Basic set up of 10cm auger without extensions
Plate 9 A fairly typical sequence of topsoil, interface layer, and decayed rock subsoil;
Plate 10 MA students recording soil colour using a Munsell Colour Chart.
Plate 11 North-east facing section of cut back terrace face TF1 (c.3m SW of AH26) – with surviving
traces of stone revetment
Plate 12 West facing section of cut back terrace face TF2 (c.4.5m west of AH24)
Plate 13 South-west facing section of cut back terrace face TF3 (c.10m SW of AH21)
Plate 14 North-east facing section of cut back terrace face TF4 (c.4.5m NE of AH6)
Plate 15 West facing section on cut back terrace face TF5 (c.3.5m east of AH19) – with surviving trace
of stone revetment
Plate 16 West facing section on cut back terrace face TF6 (c.10.5m south of AH05) – green brick and
orange tile both in topsoil at base of terrace
Plate 17 North facing section of T2
Plate 18 West facing section and post-excavation overview of T2
Plate 19 Gaming counter from Co.201, T2
Plate 20 Metal objects from Co.201, T2
Plate 21 Village ware, blue & white glass/ceramic object, and provincial porcelain from Co.201, T2
Plate 22 Tile fragments from Co.201, T2
Plate 23 North facing section of T3
Plate 24 West facing section and post-excavation overview of T3
Plate 25 Two small flakes of stone comprised one of probable rhyolite while the other was a sub-
rectangular flint, Co.301, T3
Plate 26 Handle of a teaspoon from Co.302, T3
Plate 27 South-east facing section of T4
Plate 28 South-west facing section of T4
Plate 29 Tile fragments, village ware and provincial porcelain from Co.401, T4
Plate 30 North facing section of T5
Plate 31 South facing section of T5
Plate 32 West facing section of T5
Plate 33 East facing section of T5
Plate 34 Refitted fragments of a possible whetstone from Co.502, T5
Plate 35 Net-impressed Han stoneware body sherds from Co.502, T5
Plate 36 SF01, bold cord-impressed coarse ware body sherd from Co.503, T5
Plate 37 SF02, fine red fabric pottery with impressed rectangular ‘degenerate’ net
Plate 37a SF04, stoneware rim from Co.503, T5
Plate 37b SF05, stoneware rim from Co.503, T5
Plate 38 SF06, a large Han rim-and-shoulder sherd with hooked rim, seal stamp-over-net design
and kiln glost, Co.503, T5
Plate 39 SF07, stoneware rim with horizontal lug from Co.503, T5
Plate 39a SF08, stoneware rim from Co.503, T5
Plate 40 SF09, stone ware rim from Co.503, T5
Plate 41 SF10, stoneware bodysherd with seal stamp-over-net decoration from Co.503, T5
Plate 41a SF11, stoneware base from Co.503, T5
Plate 41b SF12, stoneware base from Co.503, T5
Plate 41c SF13, stoneware base from Co.503, T5
Plate 41d SF14, stoneware base from Co.503, T5
Plate 41e SF15, 3 joiners, stoneware base from Co.503, T5
Plate 42 SF03, probable jar base with unusual high and sharply potted foot- ring
Plate 43 East facing section of T6
Plate 44 South facing section of T6
Plate 45 Iron objects from Co.601, T6
Plate 46 West facing section of the North Wall (Co.107a)

5
Plate 47 South facing elevation of north wall 107a with dividing wall 106 in foreground
Plate 48 West facing elevation of dividing wall 106 with floor 112 in foreground
Plate 49 South facing elevation on wall 106 & door lining 110, granite threshold slab 109 in
foreground
Plate 50 West facing elevation of Old Chapel east gable wall [107] to left of vertical scale and VH1
west gable wall to right
Plate 51 View of VH1 west gable wall 108 (east facing elevation) showing window 114 and triangular
block of masonry [115]
Plate 52 Excavated remains of Old Chapel west wall 105a (right foreground) and south wall 105b
(background)
Plate 53 Old Chapel main doorway foundation 105c
Plate 54 Old Chapel north facing elevation on wall 105b, VH2 in background
Plate 55 Old Chapel post-abandonment sequence [104; 118; 120] over floor 112
Plate 56 Brick and roof-tile fragments from T1 C.104
Plate 57 SF30 green brick with coarse plaster moulding.
Plate 58 SF30 green brick with coarse plaster moulding.
Plate 59 Plaster mouldings from T1, Co.103: Type ‘A’ (SF16)
Plate 60 Plaster mouldings from T1, Co.103: Type ‘B’ (SF17)
Plate 61 Plaster mouldings from T1, Co.103: Type ‘C’ (SF18-20)
Plate 62 Plaster mouldings from T1, Co.103: Type ‘D’ (SF21-27)
Plate 63 Plaster mouldings from T1, Co.103: Type ‘E’ (SF28)
Plate 64 Plaster mouldings from T1, Co.103: Stoneware lid
Plate 65 View of chapel showing floor surface 112 laid against eastern dividing wall 106, doorway
109 to right with floor 117 beyond, staircase base 111 (left foreground) & western dividing
wall 122
Plate 66 South facing section in central room of Old Chapel showing post-abandonment deposits [104;
118; 120] over floor 112 & levelled bedrock 121. Staircase base 111 visible centre left with
western dividing wall 122 on its left-hand side
Plate 67 Step staircase base in renovated village house in Yim Tin Tsai village
Plate 68 Large plain lintel slab (from main door?)
Plate 69 Large slotted threshold slab (from main door?)
Plate 70 Pair of door pivot slabs (from main door?)
Plate 71 Window lintel with sockets for five iron bars
Plate 72 Slotted doorway threshold—size very similar to one from eastern room [109]—this one from
a doorway between western and central rooms?
Plate 73 Plaster moulding above VH1 window 114—combining curving Type ‘D’ moulding above
Type ‘C’ edge moulding
List of Tables
Table 1 Auger Test Results
Table 2 Auger Tests AH1-AH40 Coordinates and Levels
Table 3 Old Chapel Excavation (Trench T1) Coordinates and Levels
Table 4 Test Pits T2-T6 Coordinates and Levels
Table4a Context Register
Table 5 Key to finds codes used
Table 6 General Finds
Table 7 Special Finds

6
Acknowledgements
This project was commissioned by the Hong Kong Archaeological Society and funded by a
subvention provided by the Government of the Hong Kong SAR. The authors wish to acknowledge
the Society and SAR Government’s ongoing support for research into the region’s archaeological
heritage and Hong Kong’s rich human past.
We are extremely grateful to the many Society members (and Committee Members) and present and
former CUHK Anthropology students, who offered their voluntary support – the project could not
have occurred or been the success it was without their enthusiastic involvement. They are, in
alphabetical order: Sonia Chan, Chen Liuyan, Paul Cheung, Li Guo, Paul Harrison, Reint Heizinga,
Yurizi Hernandez, Jiang Lingzi, Prashanthi and Hari Korapaty, Jack Kwok, John Lau, Mike Leung,
Sam Lo, Imogen Mitchell, Ng Wing-keung, Shi Hanxiao, Patrick So, Rao Yichen, Andy Stevenson,
Maria Sze, Wan Yui-ming, Kelly Wong, Sophia Wong and Wu Zhe. The following people also
helped with different aspects of post-excavation processing and recording: Prashanthi Korapaty,
Imogen Mitchell and Wan Yui-ming.
Mick Atha (MA) would like, in particular, to thank his well-organised, knowledgeable, professional
and patient site supervisor Kennis Yip, for her enormous contribution on site, in post-excavation, and
in the production of this report. MA also wishes to highlight Wan Yiu-Ming’s significant
contribution on site and as finds photographer during the post-excavation stage of the project. MA
also acknowledges the support of the Society’s Chairman Steven Ng and Committee Members for
commissioning him as project director, and especially Honorary Treasurer Jimmy Lai who dealt
efficiently with all financial aspects of the project.
Specialist support was provided by the following people: Geomatic Surveyors Ltd. carried out
topographic surveying during the project and Professor Peter Lam kindly advised on the provenance
and dating of ceramic finds.
Mick Atha and Kennis Yip sincerely acknowledge the kind logistical support and warmth of the Yim
Tin Tsai villagers, in particular the Village Representative Mr Colin Chan and Secretary of the
Village Rural Committee Mr Nicholas Chan, and our two valuable local site assistants Liu Wai Kit
and Leung Kei Sing.
Finally, thanks are due to the 37 undergraduate students and their Teaching Assistant Rao Yichen –
who visited site as part of the writer’s Understanding Archaeology course in the Department of
Anthropology, CUHK.
7
鳴謝
是次研究項目是受香港考古學會委託 ,並由香港特別行政區政府所資助。作者希望特此鳴謝
學會和特區政府在對於香港地區的考古與深厚的人類歷史之研究方面所作出的長期支持。
我們尤其感謝學會眾多的新、舊會員(及委員), 及中文大學人類學系的學生和舊生, 不論新或
舊 ,如無他們的義務幫助和踴躍支持, 此次項目將無法如此順利完成。參與此次活動的會員
(依姓氏排序) 包括:陳盈康、陳柳燕、張金華、Li Guo、Paul Harrison、Reint Heizinga、
Yurizi Hernandez、 江泠子、Prashanthi Korapaty、Hari Korapaty、郭世孝、劉浩駿、梁遠威、
羅佩華、Imogen Mitchell、吳永強、Shi Hanxiao、蘇清沐、Rao Yichen、Andy Stevenson、史
銀鳳、尹耀銘、黃蔚潔、王頌瑩和吴喆。而有份參與發掘後整理工作的會員包括: Prashanthi
Korapaty、Imogen Mitchell和尹耀銘。
范旼澔 (Mick Atha) 希望在此特別嗚謝處事條理分明、耐心肯幹且專業的發掘主管: 葉可詩。
感謝她在發掘期間及發掘後資料整理和報告中所提供的協助。范亦希望特別感謝尹耀銘在發
掘其間所作出的重要幫助,並在發掘後整理工作階段負責文物攝影工作。最後,范感謝學會
主席吳偉鴻及各位委員委託他負責是次發掘研究,尤其感謝司庫黎國樑高效率地處理一切與
此項目有關的財政事宜。
提供專業協助的人士包括:負責地形測量工作的 Geomatic Surveyors Ltd.;與林業強教授有關
陶瓷出處及年代的指教。
范旼澔 (Mick Atha) 和葉可詩希望在此由衷感謝鹽田梓村村民的熱情和友善協助,尤其是陳忠
賢村長及委員會秘書陳子良, 以及我們兩位不可多得的本地民工廖惠杰和梁淇星。
8
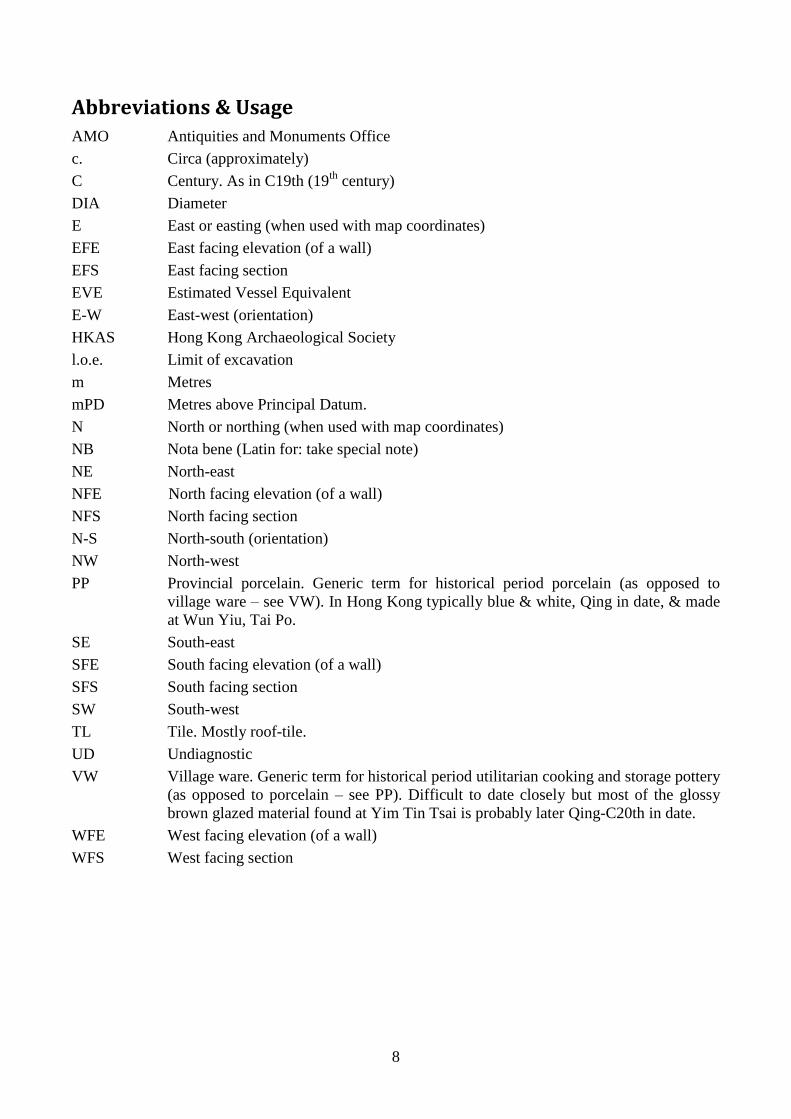
Abbreviations & Usage
AMO Antiquities and Monuments Office
c. Circa (approximately)
C Century. As in C19th (19th
century)
DIA Diameter
E East or easting (when used with map coordinates)
EFE East facing elevation (of a wall)
EFS East facing section
EVE Estimated Vessel Equivalent
E-W East-west (orientation)
HKAS Hong Kong Archaeological Society
l.o.e. Limit of excavation
m Metres
mPD Metres above Principal Datum.
N North or northing (when used with map coordinates)
NB Nota bene (Latin for: take special note)
NE North-east
NFE North facing elevation (of a wall)
NFS North facing section
N-S North-south (orientation)
NW North-west
PP Provincial porcelain. Generic term for historical period porcelain (as opposed to
village ware – see VW). In Hong Kong typically blue & white, Qing in date, & made
at Wun Yiu, Tai Po.
SE South-east
SFE South facing elevation (of a wall)
SFS South facing section
SW South-west
TL Tile. Mostly roof-tile.
UD Undiagnostic
VW Village ware. Generic term for historical period utilitarian cooking and storage pottery
(as opposed to porcelain – see PP). Difficult to date closely but most of the glossy
brown glazed material found at Yim Tin Tsai is probably later Qing-C20th in date.
WFE West facing elevation (of a wall)
WFS West facing section
9
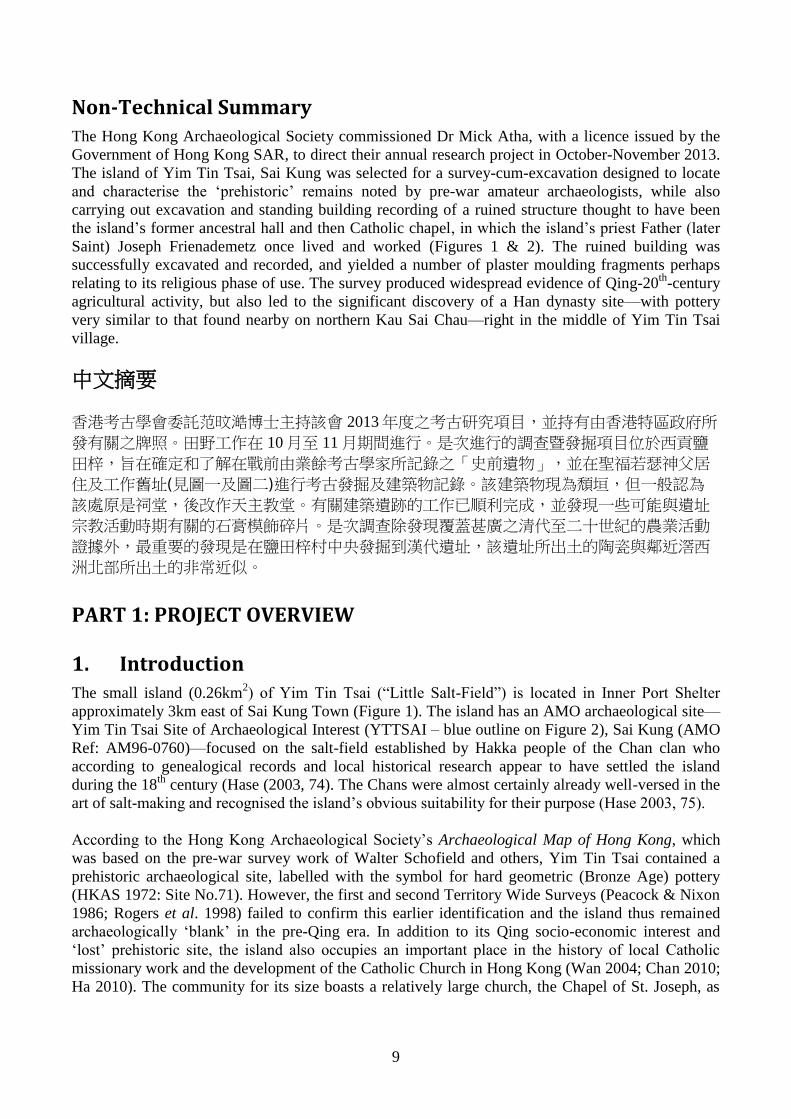
Non-Technical Summary
The Hong Kong Archaeological Society commissioned Dr Mick Atha, with a licence issued by the
Government of Hong Kong SAR, to direct their annual research project in October-November 2013.
The island of Yim Tin Tsai, Sai Kung was selected for a survey-cum-excavation designed to locate
and characterise the ‘prehistoric’ remains noted by pre-war amateur archaeologists, while also
carrying out excavation and standing building recording of a ruined structure thought to have been
the island’s former ancestral hall and then Catholic chapel, in which the island’s priest Father (later
Saint) Joseph Frienademetz once lived and worked (Figures 1 & 2). The ruined building was
successfully excavated and recorded, and yielded a number of plaster moulding fragments perhaps
relating to its religious phase of use. The survey produced widespread evidence of Qing-20th
-century
agricultural activity, but also led to the significant discovery of a Han dynasty site—with pottery
very similar to that found nearby on northern Kau Sai Chau—right in the middle of Yim Tin Tsai
village.
中文摘要
香港考古學會委託范旼澔博士主持該會 2013年度之考古研究項目,並持有由香港特區政府所
發有關之牌照。田野工作在 10月至 11月期間進行。是次進行的調查暨發掘項目位於西貢鹽
田梓,旨在確定和了解在戰前由業餘考古學家所記錄之「史前遺物」,並在聖福若瑟神父居
住及工作舊址(見圖一及圖二)進行考古發掘及建築物記錄。該建築物現為頹垣,但一般認為
該處原是祠堂,後改作天主教堂。有關建築遺跡的工作已順利完成,並發現一些可能與遺址
宗教活動時期有關的石膏模飾碎片。是次調查除發現覆蓋甚廣之清代至二十世紀的農業活動
證據外,最重要的發現是在鹽田梓村中央發掘到漢代遺址,該遺址所出土的陶瓷與鄰近滘西
洲北部所出土的非常近似。
PART 1: PROJECT OVERVIEW
1. Introduction
The small island (0.26km2) of Yim Tin Tsai (“Little Salt-Field”) is located in Inner Port Shelter
approximately 3km east of Sai Kung Town (Figure 1). The island has an AMO archaeological site—
Yim Tin Tsai Site of Archaeological Interest (YTTSAI – blue outline on Figure 2), Sai Kung (AMO
Ref: AM96-0760)—focused on the salt-field established by Hakka people of the Chan clan who
according to genealogical records and local historical research appear to have settled the island
during the 18th
century (Hase (2003, 74). The Chans were almost certainly already well-versed in the
art of salt-making and recognised the island’s obvious suitability for their purpose (Hase 2003, 75).
According to the Hong Kong Archaeological Society’s Archaeological Map of Hong Kong, which
was based on the pre-war survey work of Walter Schofield and others, Yim Tin Tsai contained a
prehistoric archaeological site, labelled with the symbol for hard geometric (Bronze Age) pottery
(HKAS 1972: Site No.71). However, the first and second Territory Wide Surveys (Peacock & Nixon
1986; Rogers et al. 1998) failed to confirm this earlier identification and the island thus remained
archaeologically ‘blank’ in the pre-Qing era. In addition to its Qing socio-economic interest and
‘lost’ prehistoric site, the island also occupies an important place in the history of local Catholic
missionary work and the development of the Catholic Church in Hong Kong (Wan 2004; Chan 2010;
Ha 2010). The community for its size boasts a relatively large church, the Chapel of St. Joseph, as
10
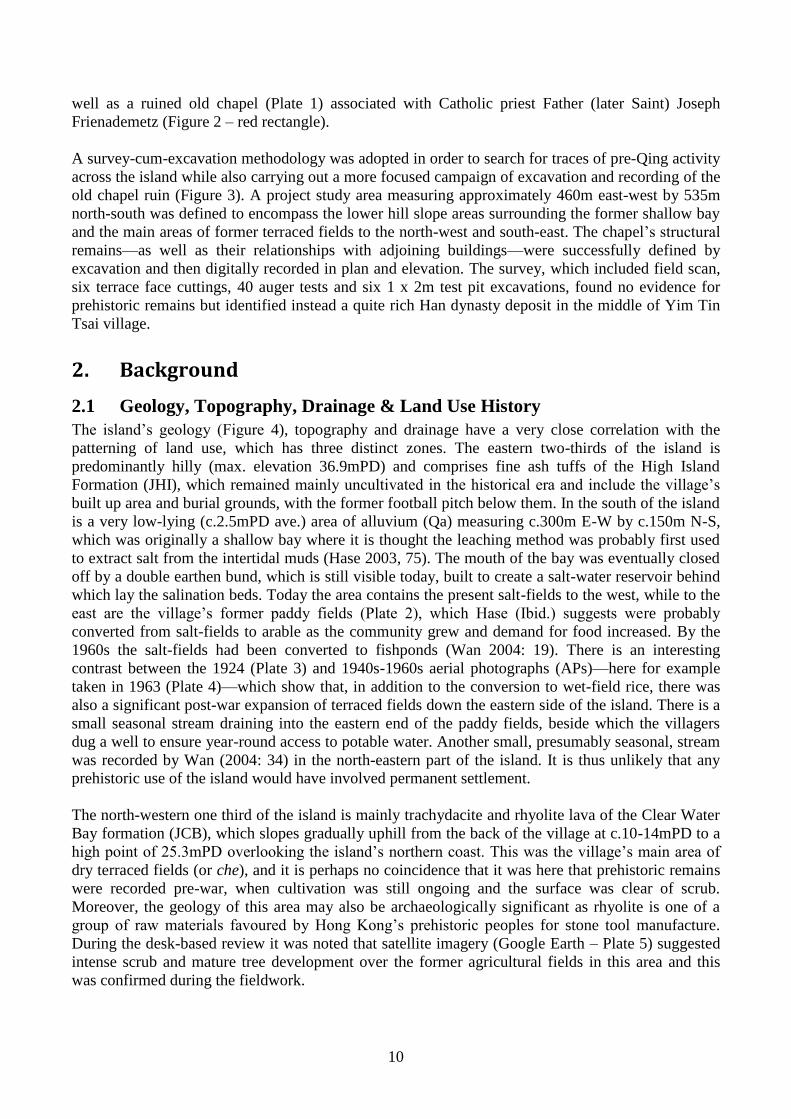
well as a ruined old chapel (Plate 1) associated with Catholic priest Father (later Saint) Joseph
Frienademetz (Figure 2 – red rectangle).
A survey-cum-excavation methodology was adopted in order to search for traces of pre-Qing activity
across the island while also carrying out a more focused campaign of excavation and recording of the
old chapel ruin (Figure 3). A project study area measuring approximately 460m east-west by 535m
north-south was defined to encompass the lower hill slope areas surrounding the former shallow bay
and the main areas of former terraced fields to the north-west and south-east. The chapel’s structural
remains—as well as their relationships with adjoining buildings—were successfully defined by
excavation and then digitally recorded in plan and elevation. The survey, which included field scan,
six terrace face cuttings, 40 auger tests and six 1 x 2m test pit excavations, found no evidence for
prehistoric remains but identified instead a quite rich Han dynasty deposit in the middle of Yim Tin
Tsai village.
2. Background
2.1 Geology, Topography, Drainage & Land Use History
The island’s geology (Figure 4), topography and drainage have a very close correlation with the
patterning of land use, which has three distinct zones. The eastern two-thirds of the island is
predominantly hilly (max. elevation 36.9mPD) and comprises fine ash tuffs of the High Island
Formation (JHI), which remained mainly uncultivated in the historical era and include the village’s
built up area and burial grounds, with the former football pitch below them. In the south of the island
is a very low-lying (c.2.5mPD ave.) area of alluvium (Qa) measuring c.300m E-W by c.150m N-S,
which was originally a shallow bay where it is thought the leaching method was probably first used
to extract salt from the intertidal muds (Hase 2003, 75). The mouth of the bay was eventually closed
off by a double earthen bund, which is still visible today, built to create a salt-water reservoir behind
which lay the salination beds. Today the area contains the present salt-fields to the west, while to the
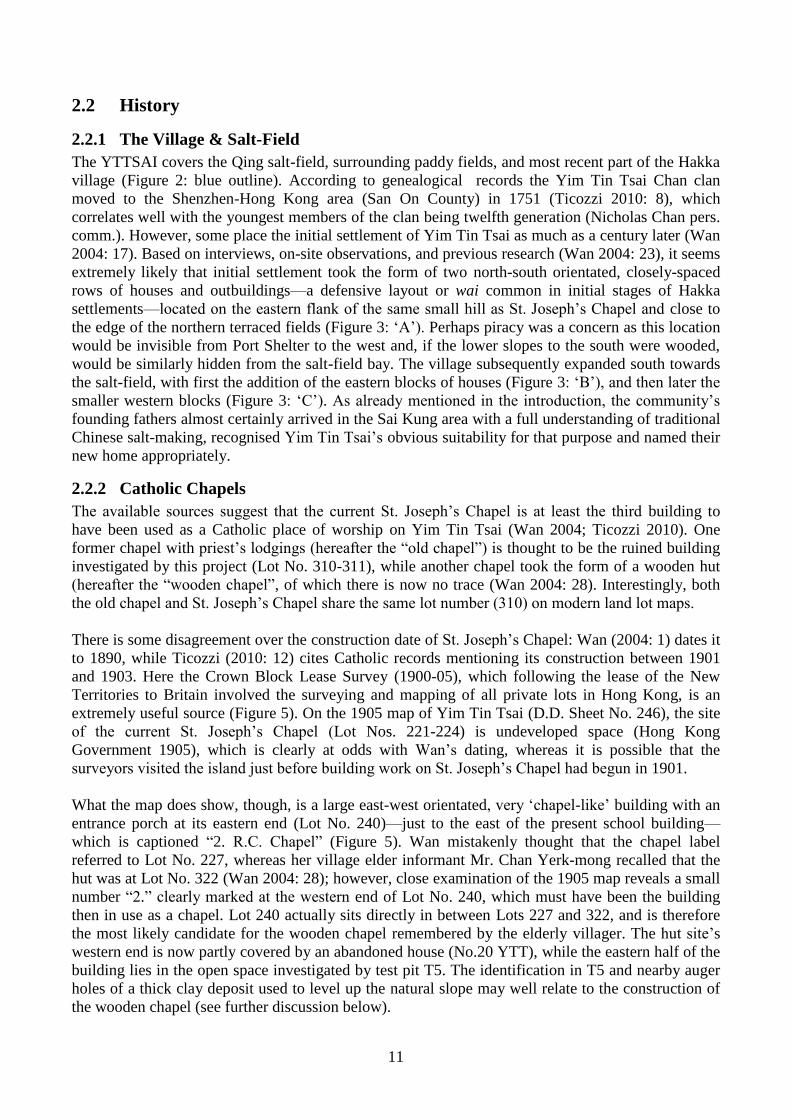
east are the village’s former paddy fields (Plate 2), which Hase (Ibid.) suggests were probably
converted from salt-fields to arable as the community grew and demand for food increased. By the
1960s the salt-fields had been converted to fishponds (Wan 2004: 19). There is an interesting
contrast between the 1924 (Plate 3) and 1940s-1960s aerial photographs (APs)—here for example
taken in 1963 (Plate 4)—which show that, in addition to the conversion to wet-field rice, there was
also a significant post-war expansion of terraced fields down the eastern side of the island. There is a
small seasonal stream draining into the eastern end of the paddy fields, beside which the villagers
dug a well to ensure year-round access to potable water. Another small, presumably seasonal, stream
was recorded by Wan (2004: 34) in the north-eastern part of the island. It is thus unlikely that any
prehistoric use of the island would have involved permanent settlement.
The north-western one third of the island is mainly trachydacite and rhyolite lava of the Clear Water
Bay formation (JCB), which slopes gradually uphill from the back of the village at c.10-14mPD to a
high point of 25.3mPD overlooking the island’s northern coast. This was the village’s main area of
dry terraced fields (or che), and it is perhaps no coincidence that it was here that prehistoric remains
were recorded pre-war, when cultivation was still ongoing and the surface was clear of scrub.
Moreover, the geology of this area may also be archaeologically significant as rhyolite is one of a
group of raw materials favoured by Hong Kong’s prehistoric peoples for stone tool manufacture.
During the desk-based review it was noted that satellite imagery (Google Earth – Plate 5) suggested
intense scrub and mature tree development over the former agricultural fields in this area and this
was confirmed during the fieldwork.
11
2.2 History
2.2.1 The Village & Salt-Field
The YTTSAI covers the Qing salt-field, surrounding paddy fields, and most recent part of the Hakka
village (Figure 2: blue outline). According to genealogical records the Yim Tin Tsai Chan clan
moved to the Shenzhen-Hong Kong area (San On County) in 1751 (Ticozzi 2010: 8), which
correlates well with the youngest members of the clan being twelfth generation (Nicholas Chan pers.
comm.). However, some place the initial settlement of Yim Tin Tsai as much as a century later (Wan
2004: 17). Based on interviews, on-site observations, and previous research (Wan 2004: 23), it seems
extremely likely that initial settlement took the form of two north-south orientated, closely-spaced
rows of houses and outbuildings—a defensive layout or wai common in initial stages of Hakka
settlements—located on the eastern flank of the same small hill as St. Joseph’s Chapel and close to
the edge of the northern terraced fields (Figure 3: ‘A’). Perhaps piracy was a concern as this location
would be invisible from Port Shelter to the west and, if the lower slopes to the south were wooded,
would be similarly hidden from the salt-field bay. The village subsequently expanded south towards
the salt-field, with first the addition of the eastern blocks of houses (Figure 3: ‘B’), and then later the
smaller western blocks (Figure 3: ‘C’). As already mentioned in the introduction, the community’s
founding fathers almost certainly arrived in the Sai Kung area with a full understanding of traditional
Chinese salt-making, recognised Yim Tin Tsai’s obvious suitability for that purpose and named their
new home appropriately.
2.2.2 Catholic Chapels
The available sources suggest that the current St. Joseph’s Chapel is at least the third building to
have been used as a Catholic place of worship on Yim Tin Tsai (Wan 2004; Ticozzi 2010). One
former chapel with priest’s lodgings (hereafter the “old chapel”) is thought to be the ruined building
investigated by this project (Lot No. 310-311), while another chapel took the form of a wooden hut
(hereafter the “wooden chapel”, of which there is now no trace (Wan 2004: 28). Interestingly, both
the old chapel and St. Joseph’s Chapel share the same lot number (310) on modern land lot maps.
There is some disagreement over the construction date of St. Joseph’s Chapel: Wan (2004: 1) dates it
to 1890, while Ticozzi (2010: 12) cites Catholic records mentioning its construction between 1901
and 1903. Here the Crown Block Lease Survey (1900-05), which following the lease of the New
Territories to Britain involved the surveying and mapping of all private lots in Hong Kong, is an
extremely useful source (Figure 5). On the 1905 map of Yim Tin Tsai (D.D. Sheet No. 246), the site
of the current St. Joseph’s Chapel (Lot Nos. 221-224) is undeveloped space (Hong Kong
Government 1905), which is clearly at odds with Wan’s dating, whereas it is possible that the
surveyors visited the island just before building work on St. Joseph’s Chapel had begun in 1901.
What the map does show, though, is a large east-west orientated, very ‘chapel-like’ building with an
entrance porch at its eastern end (Lot No. 240)—just to the east of the present school building—
which is captioned “2. R.C. Chapel” (Figure 5). Wan mistakenly thought that the chapel label
referred to Lot No. 227, whereas her village elder informant Mr. Chan Yerk-mong recalled that the
hut was at Lot No. 322 (Wan 2004: 28); however, close examination of the 1905 map reveals a small
number “2.” clearly marked at the western end of Lot No. 240, which must have been the building
then in use as a chapel. Lot 240 actually sits directly in between Lots 227 and 322, and is therefore
the most likely candidate for the wooden chapel remembered by the elderly villager. The hut site’s
western end is now partly covered by an abandoned house (No.20 YTT), while the eastern half of the
building lies in the open space investigated by test pit T5. The identification in T5 and nearby auger
holes of a thick clay deposit used to level up the natural slope may well relate to the construction of
the wooden chapel (see further discussion below).
12
Somewhat strangely, the 1905 map records nothing behind Lot Nos. 280-283 in the position of the
old chapel (Lots 310-311), and the last sequential lot number allocated on the map is 307, while lots
319 and 320 are written in a different hand and were seemingly later additions to the map. Is this
simply an omission by the cartographer and the old chapel was in fact allocated Lot No. 310 during
the survey? Whatever the case, when St. Joseph’s Chapel was completed in 1903 some confusion
clearly occurred at the Lands Office and both it and the old chapel were allocated Lot No. 310.
Today the former ancestral hall, donated as a Catholic place of worship by the villagers at some time
before 1867 (Ticozzi 2010: 12), survives as a rectangular ruined building with long axis orientated
east-west (Plate 1). At the eastern end of the building is a small room with cock-loft above that is
thought to have served as the priest’s lodgings. When the building eventually became too small for
the growing congregation it is said to have reverted to domestic use as a family home. The building
appears to be intact in the rather blurred 1924 aerial photograph, and was certainly so in the much
clearer, lower altitude, image taken in 1963 (Plate 6). When first visited by the writer, the structure
was partially filled with material collapsed from the walls and roof, some of which had already been
removed by the villagers.
In terms of heritage value, the ruin is a rare example of a Hakka village ancestral hall converted for
use as a Catholic chapel and priest’s lodgings. The structure therefore has significant socio-historical
and archaeological interest and was deemed worthy of archaeological investigation prior to its
consolidation and use as a place of pilgrimage associated with its 19th-century priest Joseph
Frienademetz who was canonised by the Catholic Church in 2003.
2.3 Existing Archaeological Information
2.3.1 The Archaeological Map of Hong Kong (HKAS 1972)
As mentioned above, the Archaeological Map of Hong Kong (HKAS 1972), which included the
Society’s own findings and those of pre-war pioneers such as Schofield, had a site numbered “71” on
the area of che to the north of the village that bore the symbol for prehistoric remains. No detailed
information survives regarding the nature of the material discoveries that led to the creation of the
site or the precise location of any find spots.
2.3.2 First Territory Wide Survey (1983-85)
The site was labelled “Yim Tin Tsai (N)” by Peacock and Nixon (1986: 211) and designated “Block
No. 08, Site No. 12” in their survey. It is unclear, however, how fully that northern area was
reinvestigated during either of the two Territory Wide Surveys, the first of which reported that “all
accessible parts of the island” had been field scanned but the only finds were a few “sherds of
[undated] unglazed stoneware from the south eastern end of the island” (ibid.). Today dense jungle
renders access to the northern site difficult, although by no means impossible. Almost thirty years
ago the site would have been much more open, but it is unclear how thoroughly it was checked. The
1st Territory Wide Survey thus concluded that the island was of unknown archaeological significance
(ibid: 212).
2.3.3 Second Territory Wide Survey (1997-98)
The site was revisited during the 2nd
Territory Wide Survey during which a programme of “non-
linear walking” investigated the eastern side of the island and the area surrounding “the pond” (salt-
field) (Rogers et al. 1998: 106-7). In addition, two auger holes were conducted on lower hillsides to
the south of the salt-field as indicated in Figure 2 (yellow stars). The auger holes revealed a simple
sequence comprising thin organically-enhanced topsoil (19-33cm thick) over a deep sequence of
clay-rich decayed volcanic rock (ibid: 107).
13
2.4 Discussion
As will be evident from the foregoing presentation of background information, the 2013 Yim Tin
Tsai fieldwork methodology needed to address two quite distinct types of research. On the one hand,
there was very little information available regarding the island’s pre-Qing (‘prehistoric’)
archaeological resource and there was therefore a clear requirement for some form of survey to
provide the necessary enhancement of baseline data. While in the case of the chapel ruin a more
detailed programme of excavation and recording would be required to define, characterise and
interpret the structure and its environs. A series of contrasting research objectives was therefore
needed, and it is to those that we now turn.
3. Objectives
The project was designed to address the following six main research objectives:
To enhance understanding of the general sequence of deposits across the island;
To identify and characterise any cultural deposits within such sequences;
More specifically, to identify and characterise any pre-Qing activity on the island;
To maximise information retrieval through the use of dry sieving of any cultural deposits
encountered;
To define and characterise the ruin of the old chapel and priest’s lodgings in terms of its
structure, associated post-abandonment deposits, and materials contained therein;
To produce an accurate surveyed, drawn & photographic record of the chapel remains.
The successful implementation of those six objectives demanded an approach that married large-
scale landscape coverage at relatively low resolution with high-resolution, detailed excavation and
recording: a survey-cum-excavation methodology was therefore required and is discussed next.
4. Methodology
4.1 Introduction
This section of the report provides an overview of the methodologies used to address the project
objectives set out above. It begins by explaining the rationale behind and characteristics of the
survey-cum-excavation methodology adopted (4.2), moves on to give an overview of the methods
used in on-site recording and sampling (4.3), then discusses the approach to post-excavation
processing and analysis (4.4), and ends by discussing the presentation and discussion of results (4.5).
4.2 Survey Methodology
As discussed above, the generally very disappointing results of previous fieldwork with respect to the
supposed prehistoric interest clearly suggested that some form of survey would be necessary in order
to generate improved information regarding the pre-Qing archaeological potential of the island.
While the south and east of the island was accessible from concrete paths, the main area of former
terraced agricultural fields to the north-west had no such paths, was densely overgrown with trees,
bamboo stands and thorny undergrowth, and was thus only accessible with significant jungle
clearance. Given the density of vegetation on the island and the need to clear huge areas for a grid-
based survey, the use of geophysics in this instance was not deemed practicable.
Instead, for the large north-western area of terraced fields a four-stage survey methodology was
devised and implemented as follows (Figure 3):
14
Stage 1: Conduct field scan of baseline, testing transects & testing locations;
Stage 2: Drill 25 auger tests in selected locations (AH1-6, 8, 10-27);
Stage 3: Cut back six agricultural terrace faces (TF1-6), inspect and photograph;
Stage 4: Excavate & record three 2x1m test pits (T2, T3 & T4);
In contrast, for the southern half of the survey area, which was well-served with concrete pathways, a
more traditional three-stage methodology was used and testing locations were chosen based upon a
combination of topography and landscape setting (e.g. gently sloping ground on lower hillside
overlooking former bay) (Figure 3).
Stage 1: Field scan of testing location & environs;
Stage 2: Drill 15 (8+7)* auger tests in selected locations (AH7, 9, 28-33 plus AH34-40);
Stage 3: Excavate & record two 2x1m test pits (T5 & T6);
* The discovery a Han cultural layer in test pit T5 required the drilling of seven additional auger tests
(AH34-40) in an attempt to define the fuller extent of the deposit (Figure 6).
4.2.1 Baseline & Testing Transects
In the large north-western survey block it took five days to cut a 2m wide by 250m long corridor
within which the dog-legged baseline was laid out by line-of-sight, triangulation and compass
bearings (Figure 7). Random numbers were then used to determine 16 points along the baseline
where auger testing would then take place. Some such locations were used for auger tests along the
baseline itself, but ten were used as the marker for testing transects laid out at right-angles to the
baseline. The positioning of auger tests along such transects was then determined by a combination
of the topography and the desire to have as good an overall coverage of the area as was possible
within the time and resources available. As mentioned above, testing locations in the southern half of
the island were selected based on the topography and landscape and attempted to provide a good
overall coverage of the area.
The survey thus included some degree of selectivity fixed by the baseline and position of auger tests
along transects, but the transect positions themselves involved a degree of randomisation. The survey
can thus in some respects be said to have employed a stratified random sampling strategy (Renfrew
& Bahn 2012: 77).
4.2.2 Field Scan
Field scan activity was constrained by the narrow corridors cleared for auger testing and the localised
areas cut back around test pits. Surface artefacts were collected in the environs of each testing
location and then bagged and labelled with the relevant auger hole or test pit number.
4.2.3 Auger Tests
Auger testing was conducted using the Society’s new 10cm diameter ‘Dutch auger’, which also had
two extensions, and a borrowed 12cm diameter ‘Dutch auger’, which allowed two teams to work in
parallel. Auger tests were positioned within the ‘downslope half’ of individual agricultural terraces in
order to provide the best chance of recording the full sequence of deposits including original subsoil
and more recent topsoil (see Figure 8 for explanation). Initial auger tests confirmed that decayed rock
was typically encountered within the first metre or less of depth. It was therefore decided that the
majority of tests would proceed only to sterile deposits with decayed rock; however, in the interest of
understanding more about the sterile decayed rock sequence, four tests located in the north-western
survey area were drilled—with some difficulty—to the end of the fully extended 10cm auger (at
around 4m below surface).

15
4.2.4 Terrace Face Cuttings
Six well-preserved and relatively substantial terrace face cuttings (TF1-TF6 inclusive) were
identified across the north-western survey area—terraces in the southern half of the island being
small and poorly defined—and these were cut back, trowel cleaned and photographed. Any finds
recovered were labelled with the relevant terrace face number.
4.2.5 Test Pits
All five test pits excavated measured 1 x 2m in size and were excavated to a maximum depth of
around 1m. Four of the test pits (T2-T4 & T6) were positioned in areas where surface finds and/or
the findings or auger testing suggested further investigation was necessary. In the case of T5, though,
the rather ambiguous result from AH28, where there seemed to be a deep fill deposit, encouraged the
positioning of a test pit somewhat further uphill in one of the few other flat open spaces in the middle
of the Hakka village, which was not under concrete.
4.3 On-Site Excavation, Recording & Sampling
4.3.1 Excavation
All excavation on site was done by hand, although work in the five small test pits (T2-T6 inclusive)
was by necessity—given the hard clay-rich character of subsoils in particular—done using pick,
spade and shovel backed up by trowel cleaning. The richness of the Han deposit in T5, though,
required a greater reliance on trowel excavation, while all work in the Old Chapel (T1) was carefully
conducted using trowels and other small tools. The approach used in the trench T1 consisted of a
long L-shaped trench used to define the extent and nature of the Chapel’s robbed out south and west
wall foundations, in combination with open-area excavation over the surviving areas of floor in the
central area and eastern room.
4.3.2 Recording
Recording was carried out in line with AMO guidelines (see Appendix 1) and internationally
accepted standards of archaeological practice. The basic unit of analysis used on site was the context
– each of which was allocated a unique number prefixed with the trench or test pit number (e.g. 101,
201, 301 & 401). Although no features were identified during the excavations, the standings walls of
the Old Chapel in some cases incorporated a number of structural elements and these were allocated
separate context numbers and are discussed in the main body of the report under the different wall
elevations. A context register for the six excavation areas (T1-T6 inclusive) can be found in Table 4a
in Section 16.4.
General finds were bagged by context number, while special finds were also allocated a unique
number (SF01-31: see finds tabulation in Section 17.4).
All on-site photography was done using digital SLRs and photographs were allocated unique
numbers, which were then also cross-referenced to the camera-generated image numbering sequence.
For the five test pits, plans and sections were hand-drawn on waterproof drawing film and each view
was allocated a unique combination of drawing number and sheet number. All auger test locations
and test pit top and bottom coordinates and levels were digitally recorded by the professional survey
team. In the Old Chapel, detailed plans and elevations were hand drawn and recorded as above,
whereas the main digital plan and wall elevations were recorded by the professional survey team—
under archaeological guidance—using a total station theodolite (TST) with a reflector (prism) for the
plans and a reflectorless TST methodology for the elevations.
16
4.3.3 Sampling
In additional to hand collection of finds during trowelling and excavation, where possible cultural
layers were dry sieved 100% using 0.5cm mesh. If a cultural deposit was too hard and clayey to be
effectively sieved—for example layers 502 and 503 at T5—spoil was then carefully checked through
using a trowel. Any finds recovered through dry sieving were bagged against the relevant context
number and marked “dry sieving”.
4.4 Post-Excavation Processing & Analysis
4.4.1 Processing, Analysis & Assessment
The excavation yielded an assemblage dominated by pottery, tile and brick, with much smaller
components of plaster moulding, glass and corroded iron. All the non-metal finds were washed and
marked with the help of Society volunteers. All finds were then identified and categorised, counted,
weighed, tabulated (see Section 17) and finally photographed.
4.5 Presentation and Discussion of Results
4.5.1 Sequence of discussions
The presentation of results begins in Part 2 with discussions of the four stage survey results as
follows: first field scan (5.2), then the findings of the auger testing (5.3), next terrace face cuttings
(5.4) and, finally, test pit excavations (5.5). Then in Part 3 we move on to discuss the Old Chapel
investigation beginning with the remains of the north, east and eastern dividing walls (6.2), followed
by the south and west walls (6.3), then the internal floors, doorway and staircase base (6.4), and
finally rounding off with an overview and interpretation of the original position and function of the
10 loose granite slabs present on site (6.5). Thereafter in Part 4 we offer an overarching discussion of
the findings of the survey (7.1) and the Old Chapel investigation (7.2) in their local and regional
context.
The test pit and Old Chapel excavation results are presented as follows: first the stratigraphic units
are discussed in the reverse chronological order of their deposition (i.e. from the most
recent/uppermost excavated stratum to the oldest/lowest—contexts, when first mentioned, are shown
in square brackets in bold type for clarity). The Old Chapel stratigraphic sequence is graphically
depicted in a Harris Matrix in Section 15).
4.5.2 Deposit descriptions
Alphanumeric codes and deposit colour descriptions are taken from the Munsell system of soil
colour charts (Munsell 2009). Cultural layers in the test pits can be assumed to extend horizontally
beyond the limit of excavation (l.o.e.) in all directions unless stated otherwise. In terms of
compaction, the vast majority of deposits encountered outside the Old Chapel were either the firm to
hard clay-rich, sterile decayed volcanic rock sequence or loose topsoil deposits developed from such
material. Deposit thicknesses used are maximum values, but where variation in thickness has
archaeological significance, for example, in terms of sloping deposits or where localised spreads
diminish in thickness towards their outer edges, further elaboration will be provided. Furthermore, if
layers extend vertically beyond the l.o.e., this will also be clearly indicated in the text. Any absolute
heights or levels mentioned are expressed in metres above Hong Kong Principal Datum (mPD).
4.5.3 Finds categorisation & dating
All finds were categorised in terms of their material, the object type and, if possible, their date (see
finds key in Table 5 (17.2). The main finds category used in dating the site was pottery. When finds
assemblages are listed and discussed, any material not ascribed to a date or specific period can be
17
assumed to be undiagnostic for date (UD), but probably Qing-20th
century in origin. All pottery,
whether diagnostic for date or not, was allocated to one of four fabric categories (see Section 8.2 for
details) and, where possible, was identified to period, region and even sometimes to particular kilns.
A fuller discussion of the main identifiable types is provided in the Special Finds Catalogue in
Section 8.3.
4.5.4 Reporting
This text has been prepared in accordance with the relevant AMO guidelines (see Appendix 1) and,
in addition to this present report, a further version will be included in the next volume of the Journal
of the Hong Kong Archaeological Society.
PART 2: SURVEY IMPLEMENTATION & RESULTS
5. Four Stage Survey
5.1 Introduction
We begin by discussing the results of the field scan (5.2), next the auger testing (5.3), then terrace
face cuttings (5.4), and finally the test pits (5.5). The following discussion of the four stage survey
results should be read in conjunction with Figures 3, 6, 7 and 8. Supporting survey and finds data are
tabulated in Sections 16 and 17.
5.2 Field Scan
The sheer length of the baseline and testing transects, added to the very densely overgrown nature of
most testing areas, meant that clearance of vegetation down to the topsoil surface was only achieved
in the environs of each auger test or test pit. The field scan results are therefore presented as ‘surface
finds’ in the auger test results tabulation (Section 5.3.2) and in the discussion of finds against each of
the five test pits T2-T6 (Sections 5.5.1-5.5.5 inclusive).
5.3 Auger Tests
5.3.1 Introduction
As is typical of Hong Kong and other places, although the geological map suggests that Yim Tin
Tsai has two blocks of different solid geology to the north-west and south-east, the auger testing
revealed a far more diverse pattern of localised decayed rock sequences. Most auger tests were
drilled until subsoil with decayed rock was encountered; however, in four cases both of the extension
bars were attached in order to test the fuller extent of the decayed rock sequence at auger holes AH13,
19, 23 and 27. Given the rather repetitive nature of auger test data, it made sense to first present the
results in Table 1 as shown below (5.3.2) and then offer a brief discussion of the overall findings
(5.3.3). Plates 7 and 8 respectively show examples of testing using the fully extended 10cm auger
and the basic setup without extensions. Plate 9 shows a fairly typical Yim Tin Tsai soil sequence
moving from topsoil in the foreground of the photograph, through an interface layer, to the decayed
rock subsoil in the background. Plate 10 shows a pair of CUHK Masters student volunteers checking
soil colour using the Munsell Colour Chart (Munsell 2009).
18
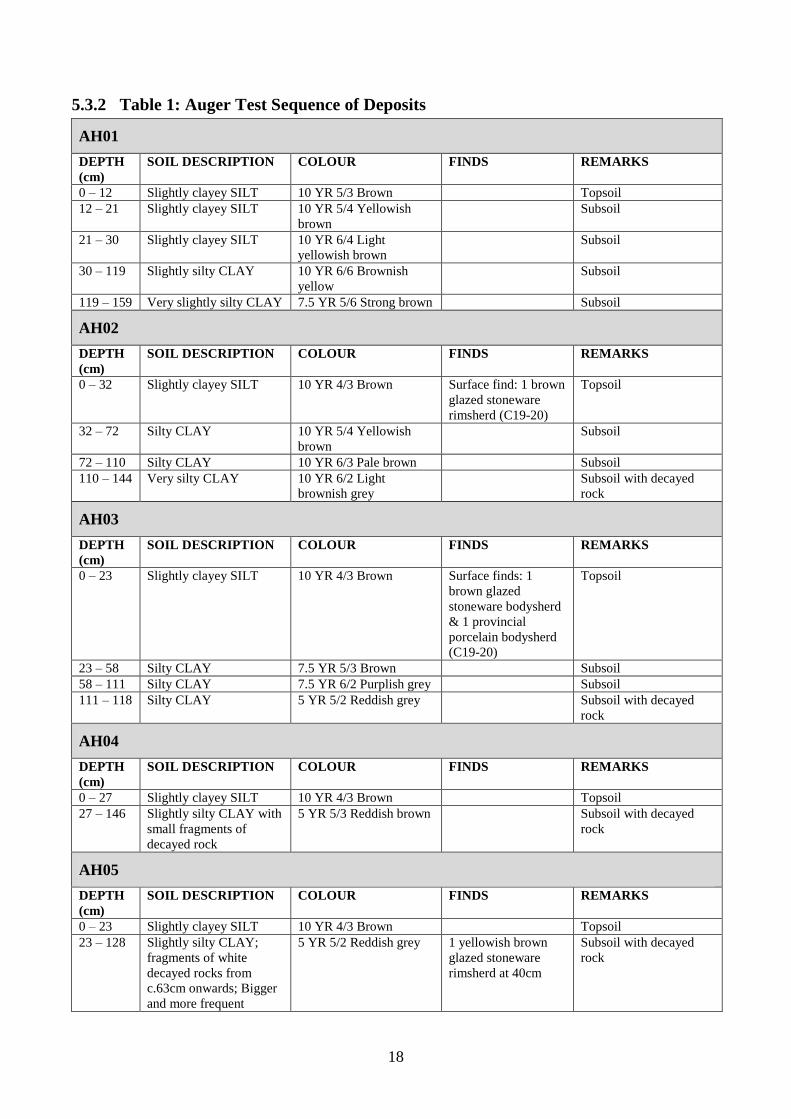
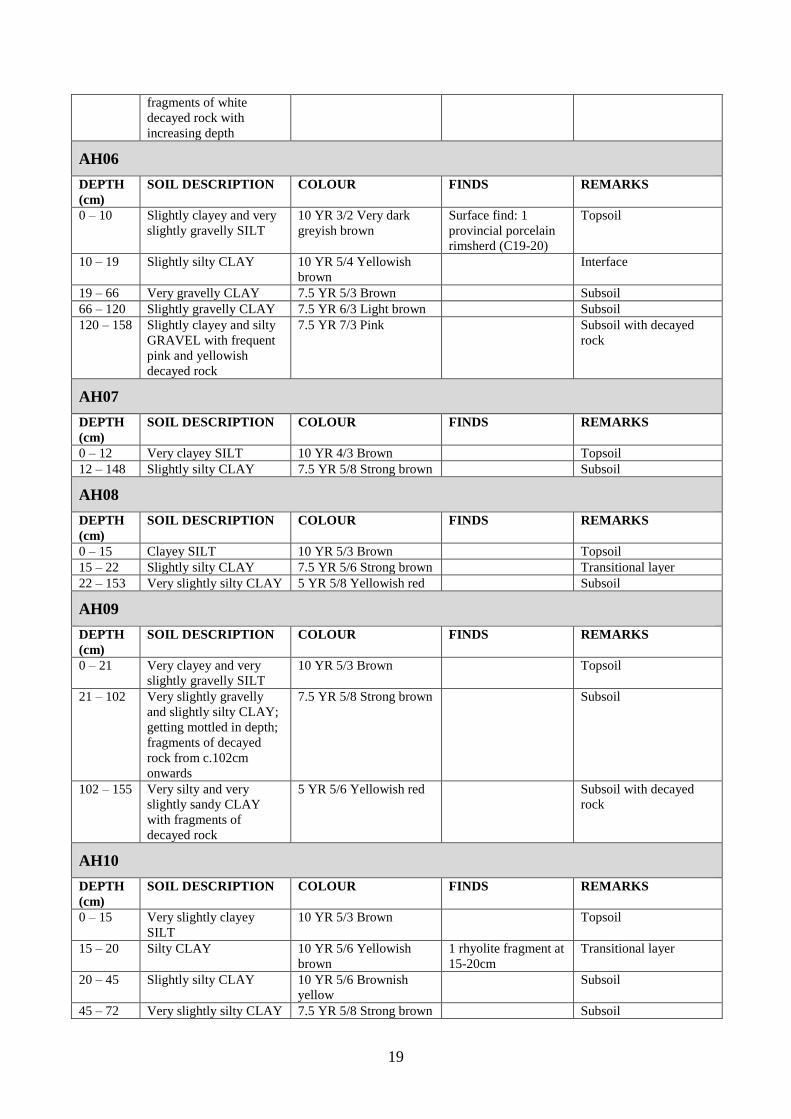
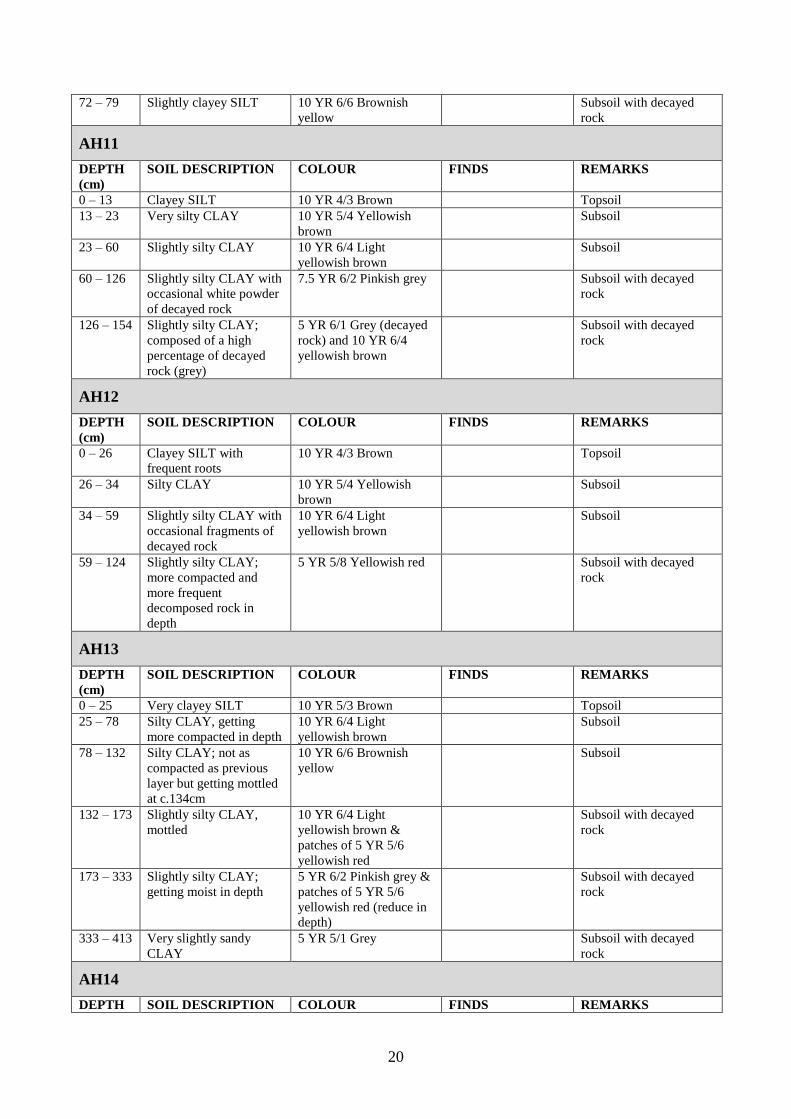
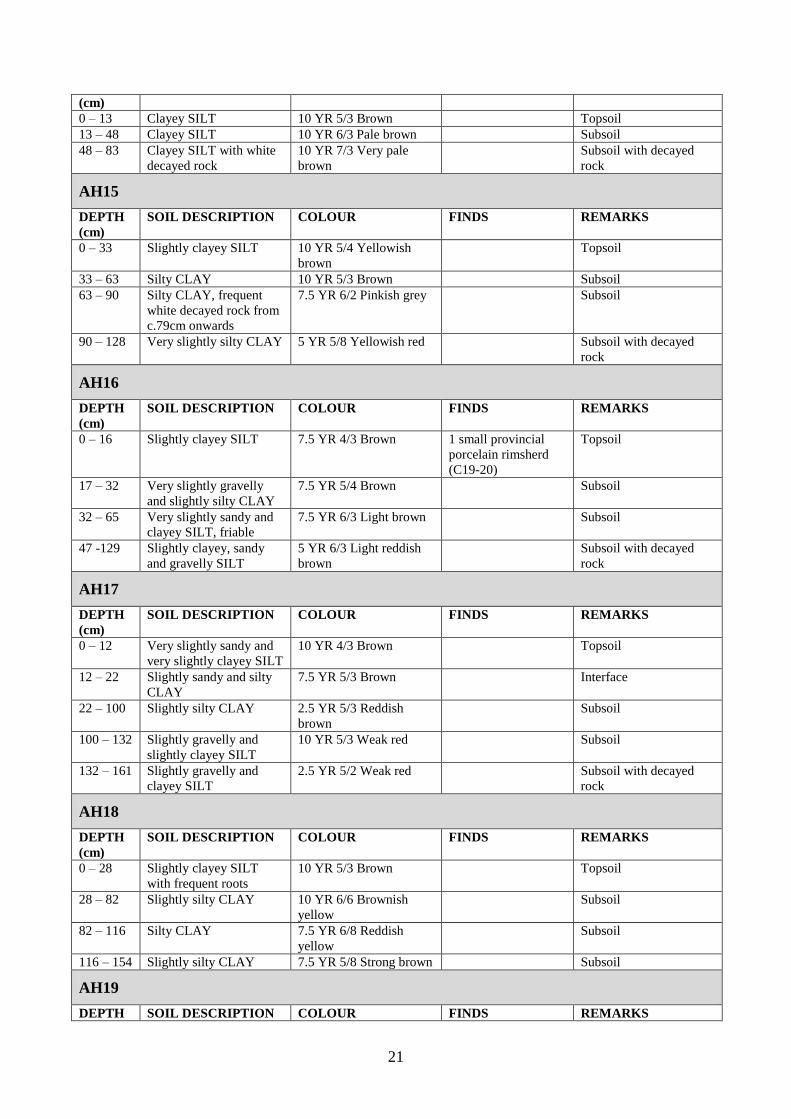
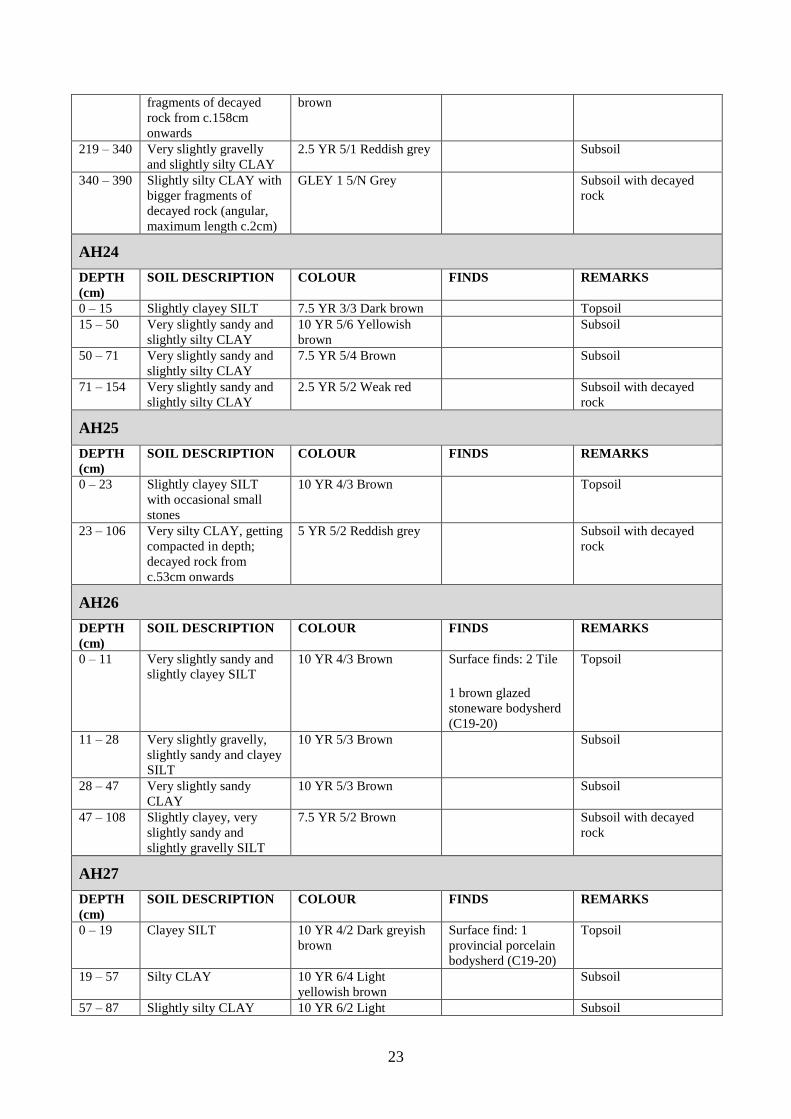
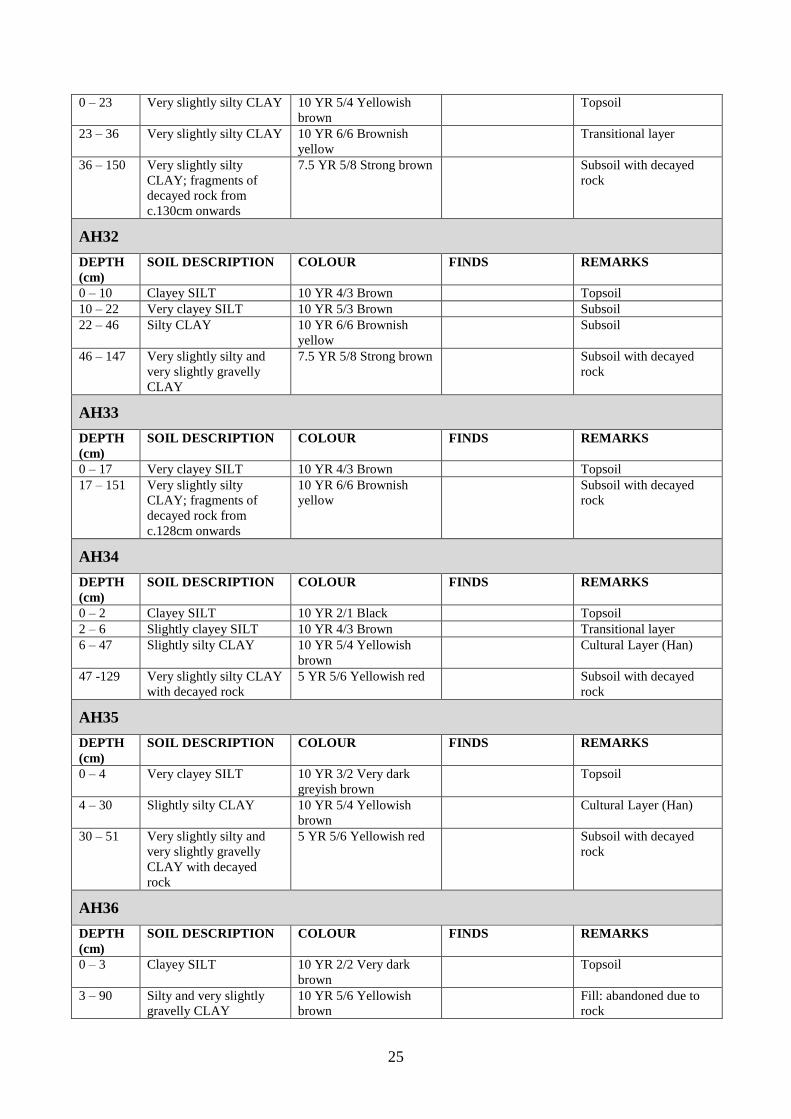
5.3.2 Table 1: Auger Test Sequence of Deposits
AH01
DEPTH
(cm)
SOIL DESCRIPTION COLOUR FINDS REMARKS
0 – 12 Slightly clayey SILT 10 YR 5/3 Brown Topsoil
12 – 21 Slightly clayey SILT 10 YR 5/4 Yellowish
brown
Subsoil
21 – 30 Slightly clayey SILT 10 YR 6/4 Light
yellowish brown
Subsoil
30 – 119 Slightly silty CLAY 10 YR 6/6 Brownish
yellow
Subsoil
119 – 159 Very slightly silty CLAY 7.5 YR 5/6 Strong brown Subsoil
AH02
DEPTH
(cm)
SOIL DESCRIPTION COLOUR FINDS REMARKS
0 – 32 Slightly clayey SILT 10 YR 4/3 Brown Surface find: 1 brown
glazed stoneware
rimsherd (C19-20)
Topsoil
32 – 72 Silty CLAY 10 YR 5/4 Yellowish
brown
Subsoil
72 – 110 Silty CLAY 10 YR 6/3 Pale brown Subsoil
110 – 144 Very silty CLAY 10 YR 6/2 Light
brownish grey
Subsoil with decayed
rock
AH03
DEPTH
(cm)
SOIL DESCRIPTION COLOUR FINDS REMARKS
0 – 23 Slightly clayey SILT 10 YR 4/3 Brown Surface finds: 1
brown glazed
stoneware bodysherd
& 1 provincial
porcelain bodysherd
(C19-20)
Topsoil
23 – 58 Silty CLAY 7.5 YR 5/3 Brown Subsoil
58 – 111 Silty CLAY 7.5 YR 6/2 Purplish grey Subsoil
111 – 118 Silty CLAY 5 YR 5/2 Reddish grey Subsoil with decayed
rock
AH04
DEPTH
(cm)
SOIL DESCRIPTION COLOUR FINDS REMARKS
0 – 27 Slightly clayey SILT 10 YR 4/3 Brown Topsoil
27 – 146 Slightly silty CLAY with
small fragments of
decayed rock
5 YR 5/3 Reddish brown Subsoil with decayed
rock
AH05
DEPTH
(cm)
SOIL DESCRIPTION COLOUR FINDS REMARKS
0 – 23 Slightly clayey SILT 10 YR 4/3 Brown Topsoil
23 – 128 Slightly silty CLAY;
fragments of white
decayed rocks from
c.63cm onwards; Bigger
and more frequent
5 YR 5/2 Reddish grey 1 yellowish brown
glazed stoneware
rimsherd at 40cm
Subsoil with decayed
rock
19
fragments of white
decayed rock with
increasing depth
AH06
DEPTH
(cm)
SOIL DESCRIPTION COLOUR FINDS REMARKS
0 – 10 Slightly clayey and very
slightly gravelly SILT
10 YR 3/2 Very dark
greyish brown
Surface find: 1
provincial porcelain
rimsherd (C19-20)
Topsoil
10 – 19 Slightly silty CLAY 10 YR 5/4 Yellowish
brown
Interface
19 – 66 Very gravelly CLAY 7.5 YR 5/3 Brown Subsoil
66 – 120 Slightly gravelly CLAY 7.5 YR 6/3 Light brown Subsoil
120 – 158 Slightly clayey and silty
GRAVEL with frequent
pink and yellowish
decayed rock
7.5 YR 7/3 Pink Subsoil with decayed
rock
AH07
DEPTH
(cm)
SOIL DESCRIPTION COLOUR FINDS REMARKS
0 – 12 Very clayey SILT 10 YR 4/3 Brown Topsoil
12 – 148 Slightly silty CLAY 7.5 YR 5/8 Strong brown Subsoil
AH08
DEPTH
(cm)
SOIL DESCRIPTION COLOUR FINDS REMARKS
0 – 15 Clayey SILT 10 YR 5/3 Brown Topsoil
15 – 22 Slightly silty CLAY 7.5 YR 5/6 Strong brown Transitional layer
22 – 153 Very slightly silty CLAY 5 YR 5/8 Yellowish red Subsoil
AH09
DEPTH
(cm)
SOIL DESCRIPTION COLOUR FINDS REMARKS
0 – 21 Very clayey and very
slightly gravelly SILT
10 YR 5/3 Brown Topsoil
21 – 102 Very slightly gravelly
and slightly silty CLAY;
getting mottled in depth;
fragments of decayed
rock from c.102cm
onwards
7.5 YR 5/8 Strong brown Subsoil
102 – 155 Very silty and very
slightly sandy CLAY
with fragments of
decayed rock
5 YR 5/6 Yellowish red Subsoil with decayed
rock
AH10
DEPTH
(cm)
SOIL DESCRIPTION COLOUR FINDS REMARKS
0 – 15 Very slightly clayey
SILT
10 YR 5/3 Brown Topsoil
15 – 20 Silty CLAY 10 YR 5/6 Yellowish
brown
1 rhyolite fragment at
15-20cm
Transitional layer
20 – 45 Slightly silty CLAY 10 YR 5/6 Brownish
yellow
Subsoil
45 – 72 Very slightly silty CLAY 7.5 YR 5/8 Strong brown Subsoil
20
72 – 79 Slightly clayey SILT 10 YR 6/6 Brownish
yellow
Subsoil with decayed
rock
AH11
DEPTH
(cm)
SOIL DESCRIPTION COLOUR FINDS REMARKS
0 – 13 Clayey SILT 10 YR 4/3 Brown Topsoil
13 – 23 Very silty CLAY 10 YR 5/4 Yellowish
brown
Subsoil
23 – 60 Slightly silty CLAY 10 YR 6/4 Light
yellowish brown
Subsoil
60 – 126 Slightly silty CLAY with
occasional white powder
of decayed rock
7.5 YR 6/2 Pinkish grey Subsoil with decayed
rock
126 – 154 Slightly silty CLAY;
composed of a high
percentage of decayed
rock (grey)
5 YR 6/1 Grey (decayed
rock) and 10 YR 6/4
yellowish brown
Subsoil with decayed
rock
AH12
DEPTH
(cm)
SOIL DESCRIPTION COLOUR FINDS REMARKS
0 – 26 Clayey SILT with
frequent roots
10 YR 4/3 Brown Topsoil
26 – 34 Silty CLAY 10 YR 5/4 Yellowish
brown
Subsoil
34 – 59 Slightly silty CLAY with
occasional fragments of
decayed rock
10 YR 6/4 Light
yellowish brown
Subsoil
59 – 124 Slightly silty CLAY;
more compacted and
more frequent
decomposed rock in
depth
5 YR 5/8 Yellowish red Subsoil with decayed
rock
AH13
DEPTH
(cm)
SOIL DESCRIPTION COLOUR FINDS REMARKS
0 – 25 Very clayey SILT 10 YR 5/3 Brown Topsoil
25 – 78 Silty CLAY, getting
more compacted in depth
10 YR 6/4 Light
yellowish brown
Subsoil
78 – 132 Silty CLAY; not as
compacted as previous
layer but getting mottled
at c.134cm
10 YR 6/6 Brownish
yellow
Subsoil
132 – 173 Slightly silty CLAY,
mottled
10 YR 6/4 Light
yellowish brown &
patches of 5 YR 5/6
yellowish red
Subsoil with decayed
rock
173 – 333 Slightly silty CLAY;
getting moist in depth
5 YR 6/2 Pinkish grey &
patches of 5 YR 5/6
yellowish red (reduce in
depth)
Subsoil with decayed
rock
333 – 413 Very slightly sandy
CLAY
5 YR 5/1 Grey Subsoil with decayed
rock
AH14
DEPTH SOIL DESCRIPTION COLOUR FINDS REMARKS
21
(cm)
0 – 13 Clayey SILT 10 YR 5/3 Brown Topsoil
13 – 48 Clayey SILT 10 YR 6/3 Pale brown Subsoil
48 – 83 Clayey SILT with white
decayed rock
10 YR 7/3 Very pale
brown
Subsoil with decayed
rock
AH15
DEPTH
(cm)
SOIL DESCRIPTION COLOUR FINDS REMARKS
0 – 33 Slightly clayey SILT 10 YR 5/4 Yellowish
brown
Topsoil
33 – 63 Silty CLAY 10 YR 5/3 Brown Subsoil
63 – 90 Silty CLAY, frequent
white decayed rock from
c.79cm onwards
7.5 YR 6/2 Pinkish grey Subsoil
90 – 128 Very slightly silty CLAY 5 YR 5/8 Yellowish red Subsoil with decayed
rock
AH16
DEPTH
(cm)
SOIL DESCRIPTION COLOUR FINDS REMARKS
0 – 16 Slightly clayey SILT 7.5 YR 4/3 Brown 1 small provincial
porcelain rimsherd
(C19-20)
Topsoil
17 – 32 Very slightly gravelly
and slightly silty CLAY
7.5 YR 5/4 Brown Subsoil
32 – 65 Very slightly sandy and
clayey SILT, friable
7.5 YR 6/3 Light brown Subsoil
47 -129 Slightly clayey, sandy
and gravelly SILT
5 YR 6/3 Light reddish
brown
Subsoil with decayed
rock
AH17
DEPTH
(cm)
SOIL DESCRIPTION COLOUR FINDS REMARKS
0 – 12 Very slightly sandy and
very slightly clayey SILT
10 YR 4/3 Brown Topsoil
12 – 22 Slightly sandy and silty
CLAY
7.5 YR 5/3 Brown Interface
22 – 100 Slightly silty CLAY 2.5 YR 5/3 Reddish
brown
Subsoil
100 – 132 Slightly gravelly and
slightly clayey SILT
10 YR 5/3 Weak red Subsoil
132 – 161 Slightly gravelly and
clayey SILT
2.5 YR 5/2 Weak red Subsoil with decayed
rock
AH18
DEPTH
(cm)
SOIL DESCRIPTION COLOUR FINDS REMARKS
0 – 28 Slightly clayey SILT
with frequent roots
10 YR 5/3 Brown Topsoil
28 – 82 Slightly silty CLAY 10 YR 6/6 Brownish
yellow
Subsoil
82 – 116 Silty CLAY 7.5 YR 6/8 Reddish
yellow
Subsoil
116 – 154 Slightly silty CLAY 7.5 YR 5/8 Strong brown Subsoil
AH19
DEPTH SOIL DESCRIPTION COLOUR FINDS REMARKS

22
(cm)
0 – 9 Clayey SILT 10 YR 4/3 Brown Topsoil
9 – 47 Slightly gravelly SILT
with decayed rock
10 YR 5/4 Yellowish
brown
Subsoil
47 – 57 A band of slightly silty
and very slightly gravelly
CLAY
5 YR 5/3 Reddish brown Subsoil
57 – 392 Slightly gravelly SILT
with decayed rock
5 YR 5/3 Reddish brown Subsoil with decayed
rock
AH20
DEPTH
(cm)
SOIL DESCRIPTION COLOUR FINDS REMARKS
0 – 44 Slightly clayey SILT
with frequent roots
10 YR 5/3 Brown Topsoil
44 – 144 Very slightly silty
CLAY; fragments of
white decayed rock from
c.50cm onwards and
increase in depth
5 YR 5/3 Reddish brown Subsoil with decayed
rock
AH21
DEPTH
(cm)
SOIL DESCRIPTION COLOUR FINDS REMARKS
0 – 27 Very slightly sandy and
very slightly clayey SILT
10 YR 5/3 Brown Topsoil
27 – 35 Slightly silty CLAY 10 YR 5/4 Yellowish
brown
Subsoil
35 – 90 Very slightly silty CLAY
with flecks of white
decayed rock from
c.90cm onwards
7.5 YR 5/6 Strong brown Subsoil
90 – 160 Very slightly silty and
slightly gravelly CLAY
7.5 YR 6/2 Pinkish grey Subsoil with decayed
rock
AH22
DEPTH
(cm)
SOIL DESCRIPTION COLOUR FINDS REMARKS
0 – 27 Slightly clayey SILT 10 YR 5/3 Brown Topsoil
27 – 58 Very slightly clayey
CLAY with occasional
root skin fragments
10 YR 5/6 Yellowish
brown
Subsoil
58 – 146 Very slightly silty
CLAY; fragments of
decayed rock from
c.123cm onwards and
more frequent in depth
7.5 YR 5/8 Strong brown Subsoil with decayed
rock
AH23
DEPTH
(cm)
SOIL DESCRIPTION COLOUR FINDS REMARKS
0 – 20 Clayey SILT 10 YR 4/3 Brown Topsoil
20 – 28 Slightly clayey SILT 10 YR 5/4 Yellowish
brown
Subsoil
28 – 94 Very slightly silty CLAY 7.5 YR 5/6 Strong brown
(getting more reddish in
depth)
Subsoil
94 – 219 Very silty CLAY; 10 YR 5/4 Yellowish Subsoil
23
fragments of decayed
rock from c.158cm
onwards
brown
219 – 340 Very slightly gravelly
and slightly silty CLAY
2.5 YR 5/1 Reddish grey Subsoil
340 – 390 Slightly silty CLAY with
bigger fragments of
decayed rock (angular,
maximum length c.2cm)
GLEY 1 5/N Grey Subsoil with decayed
rock
AH24
DEPTH
(cm)
SOIL DESCRIPTION COLOUR FINDS REMARKS
0 – 15 Slightly clayey SILT 7.5 YR 3/3 Dark brown Topsoil
15 – 50 Very slightly sandy and
slightly silty CLAY
10 YR 5/6 Yellowish
brown
Subsoil
50 – 71 Very slightly sandy and
slightly silty CLAY
7.5 YR 5/4 Brown Subsoil
71 – 154 Very slightly sandy and
slightly silty CLAY
2.5 YR 5/2 Weak red Subsoil with decayed
rock
AH25
DEPTH
(cm)
SOIL DESCRIPTION COLOUR FINDS REMARKS
0 – 23 Slightly clayey SILT
with occasional small
stones
10 YR 4/3 Brown Topsoil
23 – 106 Very silty CLAY, getting
compacted in depth;
decayed rock from
c.53cm onwards
5 YR 5/2 Reddish grey Subsoil with decayed
rock
AH26
DEPTH
(cm)
SOIL DESCRIPTION COLOUR FINDS REMARKS
0 – 11 Very slightly sandy and
slightly clayey SILT
10 YR 4/3 Brown Surface finds: 2 Tile
1 brown glazed
stoneware bodysherd
(C19-20)
Topsoil
11 – 28 Very slightly gravelly,
slightly sandy and clayey
SILT
10 YR 5/3 Brown Subsoil
28 – 47 Very slightly sandy
CLAY
10 YR 5/3 Brown Subsoil
47 – 108 Slightly clayey, very
slightly sandy and
slightly gravelly SILT
7.5 YR 5/2 Brown Subsoil with decayed
rock
AH27
DEPTH
(cm)
SOIL DESCRIPTION COLOUR FINDS REMARKS
0 – 19 Clayey SILT 10 YR 4/2 Dark greyish
brown
Surface find: 1
provincial porcelain
bodysherd (C19-20)
Topsoil
19 – 57 Silty CLAY 10 YR 6/4 Light
yellowish brown
Subsoil
57 – 87 Slightly silty CLAY 10 YR 6/2 Light Subsoil

24
brownish grey
87 – 158 Very slightly sandy and
slightly silty CLAY
7.5 YR 6/1 Grey Subsoil
158 – 413 Very slightly sandy and
slightly silty CLAY with
patches of pure white
CLAY (7.5 YR 8/1
white) increase in depth;
iron pan from c.274cm
onwards; getting more
clayey and moist in
depth
7.5 YR 6/1 Grey Subsoil with decayed
rock
AH28
DEPTH
(cm)
SOIL DESCRIPTION COLOUR FINDS REMARKS
0 – 24 Silty CLAY with some
shells and frequent
stones
10 YR 5/8 Yellowish
brown
Surface find: 1
modern glass marble
2 small worn red
brick fragments at
22cm
Fill
24 – 128 Silty CLAY with
decayed rock and shells
(e.g. Strombus luhuanus,
Hemifusus tuba (Gmelin)
& other edible
gastropods)
7.5 YR 5/6 Strong brown Fill
128 – 152 Slightly silty CLAY with
occasional shells
10 YR 5/6 Yellowish
brown
Subsoil with decayed
rock
AH29
DEPTH
(cm)
SOIL DESCRIPTION COLOUR FINDS REMARKS
0 – 32 Very clayey and slightly
gravelly SILT with
stones
10 YR 4/3 Brown Occasional tile
fragments
Topsoil
32 – 67 Slightly silty and very
slightly gravelly CLAY
with decayed rock
10 YR 5/6 Yellowish
brown
Subsoil (natural)
67 – 98 Very clayey and slightly
gravelly SILT with
decayed rock
10 YR 6/6 Brownish
yellow
Subsoil with decayed
rock
AH30
DEPTH
(cm)
SOIL DESCRIPTION COLOUR FINDS REMARKS
0 – 25 Slightly silty CLAY with
frequent roots
10 YR 6/3 Pale brown Topsoil
25 – 84 Slightly silty CLAY 10 YR 6/4 Light
yellowish brown
Subsoil
84 – 153 Silty CLAY; fragments
of decayed rock from
c.140cm onwards
10 YR 7/4 Very pale
brown
Subsoil with decayed
rock
AH31
DEPTH
(cm)
SOIL DESCRIPTION COLOUR FINDS REMARKS
25
0 – 23 Very slightly silty CLAY 10 YR 5/4 Yellowish
brown
Topsoil
23 – 36 Very slightly silty CLAY 10 YR 6/6 Brownish
yellow
Transitional layer
36 – 150 Very slightly silty
CLAY; fragments of
decayed rock from
c.130cm onwards
7.5 YR 5/8 Strong brown Subsoil with decayed
rock
AH32
DEPTH
(cm)
SOIL DESCRIPTION COLOUR FINDS REMARKS
0 – 10 Clayey SILT 10 YR 4/3 Brown Topsoil
10 – 22 Very clayey SILT 10 YR 5/3 Brown Subsoil
22 – 46 Silty CLAY 10 YR 6/6 Brownish
yellow
Subsoil
46 – 147 Very slightly silty and
very slightly gravelly
CLAY
7.5 YR 5/8 Strong brown Subsoil with decayed
rock
AH33
DEPTH
(cm)
SOIL DESCRIPTION COLOUR FINDS REMARKS
0 – 17 Very clayey SILT 10 YR 4/3 Brown Topsoil
17 – 151 Very slightly silty
CLAY; fragments of
decayed rock from
c.128cm onwards
10 YR 6/6 Brownish
yellow
Subsoil with decayed
rock
AH34
DEPTH
(cm)
SOIL DESCRIPTION COLOUR FINDS REMARKS
0 – 2 Clayey SILT 10 YR 2/1 Black Topsoil
2 – 6 Slightly clayey SILT 10 YR 4/3 Brown Transitional layer
6 – 47 Slightly silty CLAY 10 YR 5/4 Yellowish
brown
Cultural Layer (Han)
47 -129 Very slightly silty CLAY
with decayed rock
5 YR 5/6 Yellowish red Subsoil with decayed
rock
AH35
DEPTH
(cm)
SOIL DESCRIPTION COLOUR FINDS REMARKS
0 – 4 Very clayey SILT 10 YR 3/2 Very dark
greyish brown
Topsoil
4 – 30 Slightly silty CLAY 10 YR 5/4 Yellowish
brown
Cultural Layer (Han)
30 – 51 Very slightly silty and
very slightly gravelly
CLAY with decayed
rock
5 YR 5/6 Yellowish red Subsoil with decayed
rock
AH36
DEPTH
(cm)
SOIL DESCRIPTION COLOUR FINDS REMARKS
0 – 3 Clayey SILT 10 YR 2/2 Very dark
brown
Topsoil
3 – 90 Silty and very slightly
gravelly CLAY
10 YR 5/6 Yellowish
brown
Fill: abandoned due to
rock
26
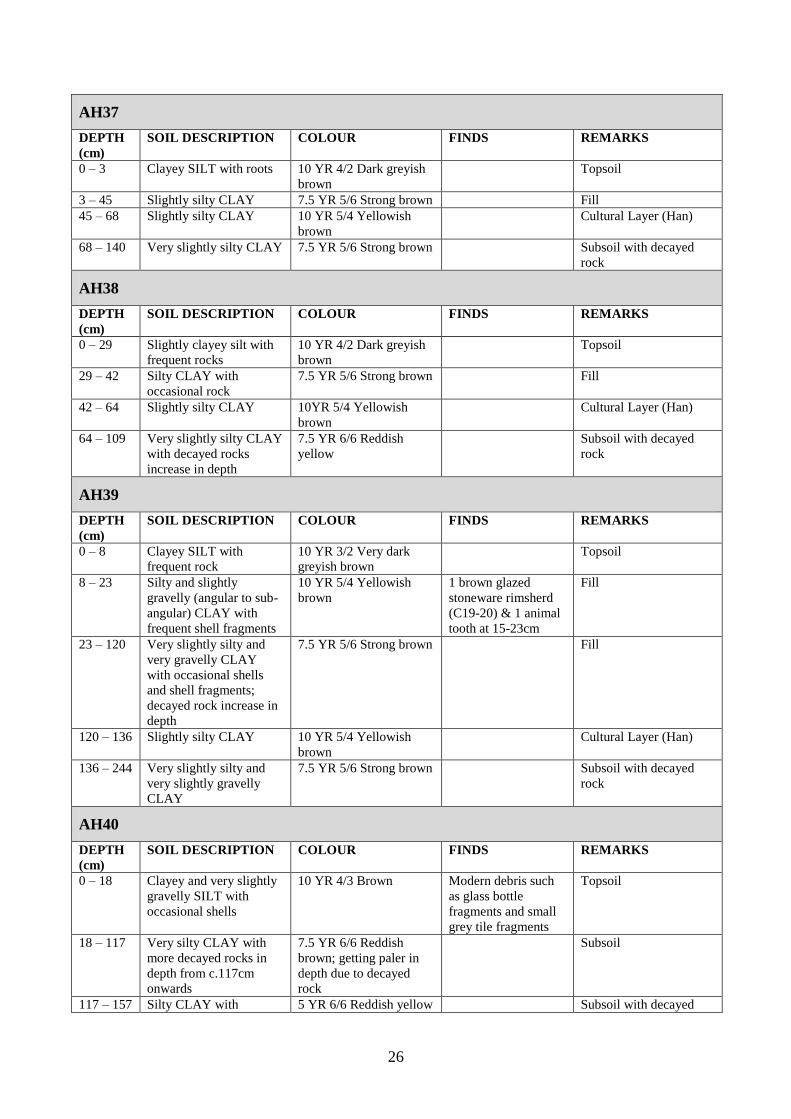
AH37
DEPTH
(cm)
SOIL DESCRIPTION COLOUR FINDS REMARKS
0 – 3 Clayey SILT with roots 10 YR 4/2 Dark greyish
brown
Topsoil
3 – 45 Slightly silty CLAY 7.5 YR 5/6 Strong brown Fill
45 – 68 Slightly silty CLAY 10 YR 5/4 Yellowish
brown
Cultural Layer (Han)
68 – 140 Very slightly silty CLAY 7.5 YR 5/6 Strong brown Subsoil with decayed
rock
AH38
DEPTH
(cm)
SOIL DESCRIPTION COLOUR FINDS REMARKS
0 – 29 Slightly clayey silt with
frequent rocks
10 YR 4/2 Dark greyish
brown
Topsoil
29 – 42 Silty CLAY with
occasional rock
7.5 YR 5/6 Strong brown Fill
42 – 64 Slightly silty CLAY 10YR 5/4 Yellowish
brown
Cultural Layer (Han)
64 – 109 Very slightly silty CLAY
with decayed rocks
increase in depth
7.5 YR 6/6 Reddish
yellow
Subsoil with decayed
rock
AH39
DEPTH
(cm)
SOIL DESCRIPTION COLOUR FINDS REMARKS
0 – 8 Clayey SILT with
frequent rock
10 YR 3/2 Very dark
greyish brown
Topsoil
8 – 23 Silty and slightly
gravelly (angular to sub-
angular) CLAY with
frequent shell fragments
10 YR 5/4 Yellowish
brown
1 brown glazed
stoneware rimsherd
(C19-20) & 1 animal
tooth at 15-23cm
Fill
23 – 120 Very slightly silty and
very gravelly CLAY
with occasional shells
and shell fragments;
decayed rock increase in
depth
7.5 YR 5/6 Strong brown Fill
120 – 136 Slightly silty CLAY 10 YR 5/4 Yellowish
brown
Cultural Layer (Han)
136 – 244 Very slightly silty and
very slightly gravelly
CLAY
7.5 YR 5/6 Strong brown Subsoil with decayed
rock
AH40
DEPTH
(cm)
SOIL DESCRIPTION COLOUR FINDS REMARKS
0 – 18 Clayey and very slightly
gravelly SILT with
occasional shells
10 YR 4/3 Brown Modern debris such
as glass bottle
fragments and small
grey tile fragments
Topsoil
18 – 117 Very silty CLAY with
more decayed rocks in
depth from c.117cm
onwards
7.5 YR 6/6 Reddish
brown; getting paler in
depth due to decayed
rock
Subsoil
117 – 157 Silty CLAY with 5 YR 6/6 Reddish yellow Subsoil with decayed
27
decayed rock rock
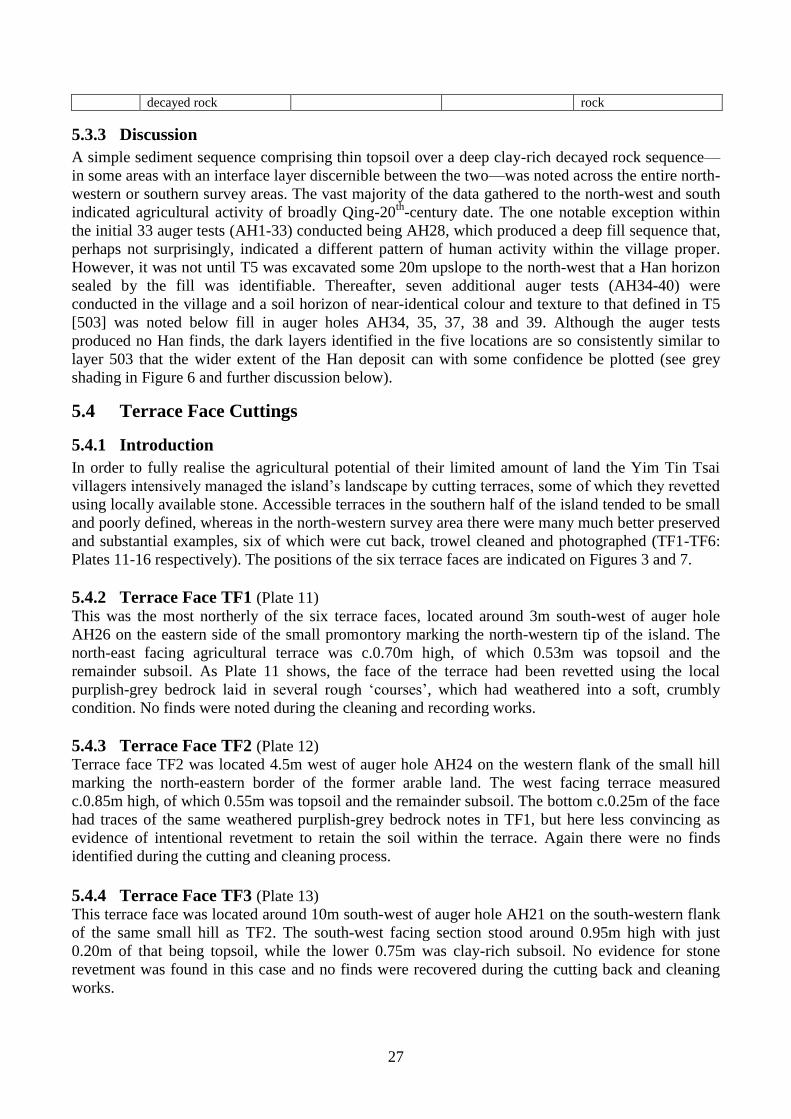
5.3.3 Discussion
A simple sediment sequence comprising thin topsoil over a deep clay-rich decayed rock sequence—
in some areas with an interface layer discernible between the two—was noted across the entire north-
western or southern survey areas. The vast majority of the data gathered to the north-west and south
indicated agricultural activity of broadly Qing-20th
-century date. The one notable exception within
the initial 33 auger tests (AH1-33) conducted being AH28, which produced a deep fill sequence that,
perhaps not surprisingly, indicated a different pattern of human activity within the village proper.
However, it was not until T5 was excavated some 20m upslope to the north-west that a Han horizon
sealed by the fill was identifiable. Thereafter, seven additional auger tests (AH34-40) were
conducted in the village and a soil horizon of near-identical colour and texture to that defined in T5
[503] was noted below fill in auger holes AH34, 35, 37, 38 and 39. Although the auger tests
produced no Han finds, the dark layers identified in the five locations are so consistently similar to
layer 503 that the wider extent of the Han deposit can with some confidence be plotted (see grey
shading in Figure 6 and further discussion below).
5.4 Terrace Face Cuttings
5.4.1 Introduction
In order to fully realise the agricultural potential of their limited amount of land the Yim Tin Tsai
villagers intensively managed the island’s landscape by cutting terraces, some of which they revetted
using locally available stone. Accessible terraces in the southern half of the island tended to be small
and poorly defined, whereas in the north-western survey area there were many much better preserved
and substantial examples, six of which were cut back, trowel cleaned and photographed (TF1-TF6:
Plates 11-16 respectively). The positions of the six terrace faces are indicated on Figures 3 and 7.
5.4.2 Terrace Face TF1 (Plate 11) This was the most northerly of the six terrace faces, located around 3m south-west of auger hole
AH26 on the eastern side of the small promontory marking the north-western tip of the island. The
north-east facing agricultural terrace was c.0.70m high, of which 0.53m was topsoil and the
remainder subsoil. As Plate 11 shows, the face of the terrace had been revetted using the local
purplish-grey bedrock laid in several rough ‘courses’, which had weathered into a soft, crumbly
condition. No finds were noted during the cleaning and recording works.
5.4.3 Terrace Face TF2 (Plate 12)
Terrace face TF2 was located 4.5m west of auger hole AH24 on the western flank of the small hill
marking the north-eastern border of the former arable land. The west facing terrace measured
c.0.85m high, of which 0.55m was topsoil and the remainder subsoil. The bottom c.0.25m of the face
had traces of the same weathered purplish-grey bedrock notes in TF1, but here less convincing as
evidence of intentional revetment to retain the soil within the terrace. Again there were no finds
identified during the cutting and cleaning process.
5.4.4 Terrace Face TF3 (Plate 13)
This terrace face was located around 10m south-west of auger hole AH21 on the south-western flank
of the same small hill as TF2. The south-west facing section stood around 0.95m high with just
0.20m of that being topsoil, while the lower 0.75m was clay-rich subsoil. No evidence for stone
revetment was found in this case and no finds were recovered during the cutting back and cleaning
works.
28
5.4.5 Terrace Face TF4 (Plate 14)
East-north-east facing TF4 was located 4.5m north-east of auger hole AH6 on the eastern flank of the
ridge forming the highest ground traversed by the baseline. The terrace had a maximum height of
1.25m—0.95m at the cut face—of which just 0.15m was topsoil, around 0.20m interface layer, and
the remainder subsoil with decayed rock. Towards the north-western end of the cleaned-up face was
a localised patch of dark topsoil extending around 0.25m deep by a similar amount wide, which is
probably an agricultural feature of some sort—perhaps a planting pit. Two fragments of roof-tile and
a Qing-20th
-century brown glazed stoneware base were found during the cleaning works.
5.4.6 Terrace Face TF5 (Plate 15)
The best preserved length of terrace face examined during the project was located some 3.5m east of
auger hole AH19, on the penultimate terrace before the steep drop-off down to the island’s west
coast. The west facing terrace was just c.0.75m high with approximately 0.15m of topsoil overlying
the decayed rock subsoil. The northern and southern ends of the cleaned-up terrace face revealed
quite well-preserved revetment wall made from the heavily weathered pinkish-coloured native rock
noted in many of the north-western testing locations. There were no finds recovered in this instance.
5.4.7 Terrace Face TF6 (Plate 16)
The final terrace face investigated was located 10.5m south of AH5 at the western edge of the same
ridge of high ground as TF4. Interestingly, the cut-back length of west facing terrace appeared to
show that the plateau had expanded to the north but was cut away to the west. Thus in the sequence
visible in section on Plate 16 we can see to the right a horizontal division between the 0.33m thick
topsoil and 0.57m thick decayed rock subsoil, but to the left-hand side that line slopes down at 45
degrees so that the topsoil extends to the base of the terrace face. The green brick and orange tile
visible at the base of the terrace face are therefore actually in the topsoil. It is hard to say whether the
topsoil was intentionally ‘tipped’ off the plateau edge to extend its area, or gradually accumulated
due to agricultural activity and erosion. Three further finds from the topsoil comprised a Qing-20th
-
century brown glazed stoneware rimsherd from a shallow bowl, a pink roof-tile fragment and a large
flake of rhyolite with no obvious signs of working.
5.4.8 Discussion The experience of clearing the jungle and then daily walking in and out of the che (terraced land) to
work for a few short weeks gave some opportunity for reflection on the enormous investment of time
and effort made by multiple generations of Yim Tin Tsai villagers in order to create and maintain a
productive agricultural landscape on less than perfect land. As Figures 3 and 7 show, the six terrace
faces studied in detail are but short lengths of much larger features, which articulate with others to
create a fully utilised landscape. It is unclear why some terraces were stone-revetted while others
apparently were not. Did it relate to the villagers’ knowledge of wet season patterns of run-off and
associated erosion risk, was it related to the localised geology or crops grown in certain fields, or was
it simply a matter of preference for different families? Further research should provide an answer.
5.5 Test Pits
In an ideal situation one would hope to be able to position test pits based on the patterning of
archaeological discoveries made during earlier testing. The generally poor results of the field scan,
auger tests and terrace cuttings at Yim Tin Tsai therefore made the process of test pit positioning
rather difficult. The placement of three of the test pits was aimed to test different topographic zones
within the north-western survey area (T2-T4), but was also guided by the patterning of field scan-
auger findings: the large flake of rhyolite in TF6 (T2), another chip of rhyolite in AH10 (T3), and
particularly large numbers of surface finds around AH27 (T4). The fourth test pit was located in the
centre of the village (T5) just upslope from an unusually deep fill sequence in AH28, while the fifth
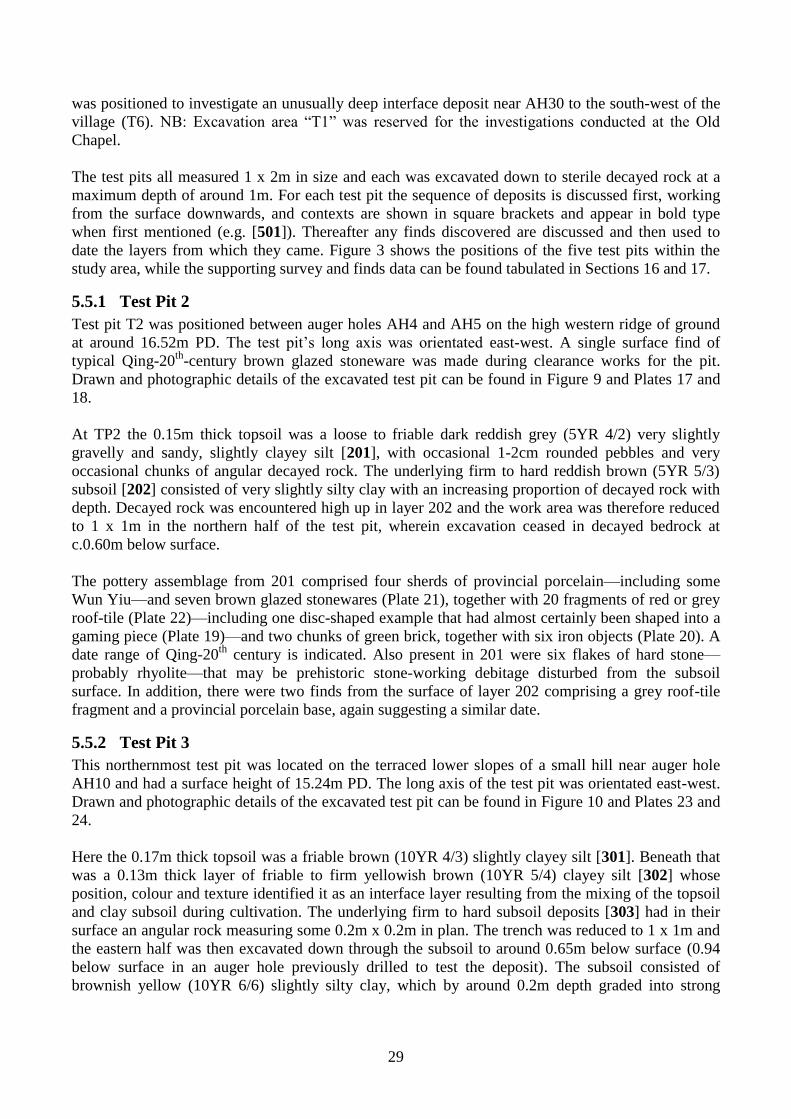
29
was positioned to investigate an unusually deep interface deposit near AH30 to the south-west of the
village (T6). NB: Excavation area “T1” was reserved for the investigations conducted at the Old
Chapel.
The test pits all measured 1 x 2m in size and each was excavated down to sterile decayed rock at a
maximum depth of around 1m. For each test pit the sequence of deposits is discussed first, working
from the surface downwards, and contexts are shown in square brackets and appear in bold type
when first mentioned (e.g. [501]). Thereafter any finds discovered are discussed and then used to
date the layers from which they came. Figure 3 shows the positions of the five test pits within the
study area, while the supporting survey and finds data can be found tabulated in Sections 16 and 17.
5.5.1 Test Pit 2
Test pit T2 was positioned between auger holes AH4 and AH5 on the high western ridge of ground
at around 16.52m PD. The test pit’s long axis was orientated east-west. A single surface find of
typical Qing-20th
-century brown glazed stoneware was made during clearance works for the pit.
Drawn and photographic details of the excavated test pit can be found in Figure 9 and Plates 17 and
18.
At TP2 the 0.15m thick topsoil was a loose to friable dark reddish grey (5YR 4/2) very slightly
gravelly and sandy, slightly clayey silt [201], with occasional 1-2cm rounded pebbles and very
occasional chunks of angular decayed rock. The underlying firm to hard reddish brown (5YR 5/3)
subsoil [202] consisted of very slightly silty clay with an increasing proportion of decayed rock with
depth. Decayed rock was encountered high up in layer 202 and the work area was therefore reduced
to 1 x 1m in the northern half of the test pit, wherein excavation ceased in decayed bedrock at
c.0.60m below surface.
The pottery assemblage from 201 comprised four sherds of provincial porcelain—including some
Wun Yiu—and seven brown glazed stonewares (Plate 21), together with 20 fragments of red or grey
roof-tile (Plate 22)—including one disc-shaped example that had almost certainly been shaped into a
gaming piece (Plate 19)—and two chunks of green brick, together with six iron objects (Plate 20). A
date range of Qing-20th
century is indicated. Also present in 201 were six flakes of hard stone—
probably rhyolite—that may be prehistoric stone-working debitage disturbed from the subsoil
surface. In addition, there were two finds from the surface of layer 202 comprising a grey roof-tile
fragment and a provincial porcelain base, again suggesting a similar date.
5.5.2 Test Pit 3
This northernmost test pit was located on the terraced lower slopes of a small hill near auger hole
AH10 and had a surface height of 15.24m PD. The long axis of the test pit was orientated east-west.
Drawn and photographic details of the excavated test pit can be found in Figure 10 and Plates 23 and
24.
Here the 0.17m thick topsoil was a friable brown (10YR 4/3) slightly clayey silt [301]. Beneath that
was a 0.13m thick layer of friable to firm yellowish brown (10YR 5/4) clayey silt [302] whose
position, colour and texture identified it as an interface layer resulting from the mixing of the topsoil
and clay subsoil during cultivation. The underlying firm to hard subsoil deposits [303] had in their
surface an angular rock measuring some 0.2m x 0.2m in plan. The trench was reduced to 1 x 1m and
the eastern half was then excavated down through the subsoil to around 0.65m below surface (0.94
below surface in an auger hole previously drilled to test the deposit). The subsoil consisted of
brownish yellow (10YR 6/6) slightly silty clay, which by around 0.2m depth graded into strong
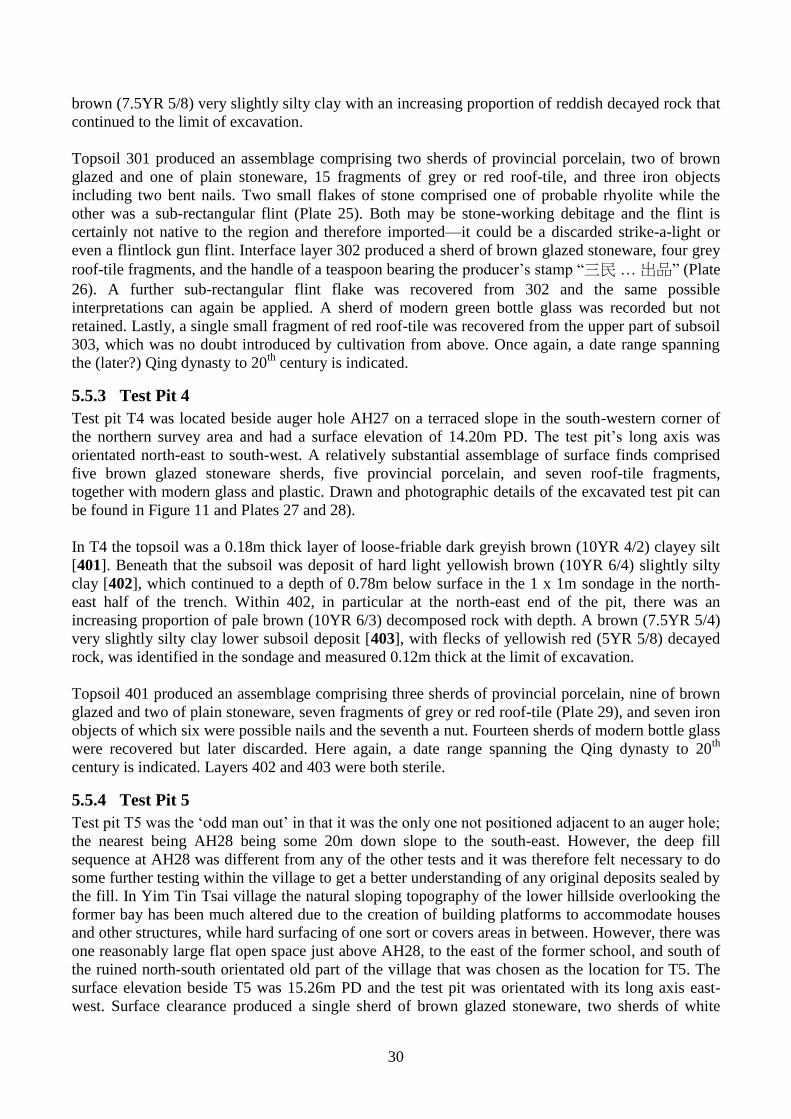
30
brown (7.5YR 5/8) very slightly silty clay with an increasing proportion of reddish decayed rock that
continued to the limit of excavation.
Topsoil 301 produced an assemblage comprising two sherds of provincial porcelain, two of brown
glazed and one of plain stoneware, 15 fragments of grey or red roof-tile, and three iron objects
including two bent nails. Two small flakes of stone comprised one of probable rhyolite while the
other was a sub-rectangular flint (Plate 25). Both may be stone-working debitage and the flint is
certainly not native to the region and therefore imported—it could be a discarded strike-a-light or
even a flintlock gun flint. Interface layer 302 produced a sherd of brown glazed stoneware, four grey
roof-tile fragments, and the handle of a teaspoon bearing the producer’s stamp “三民 … 出品” (Plate
26). A further sub-rectangular flint flake was recovered from 302 and the same possible
interpretations can again be applied. A sherd of modern green bottle glass was recorded but not
retained. Lastly, a single small fragment of red roof-tile was recovered from the upper part of subsoil
303, which was no doubt introduced by cultivation from above. Once again, a date range spanning
the (later?) Qing dynasty to 20th
century is indicated.
5.5.3 Test Pit 4
Test pit T4 was located beside auger hole AH27 on a terraced slope in the south-western corner of
the northern survey area and had a surface elevation of 14.20m PD. The test pit’s long axis was
orientated north-east to south-west. A relatively substantial assemblage of surface finds comprised
five brown glazed stoneware sherds, five provincial porcelain, and seven roof-tile fragments,
together with modern glass and plastic. Drawn and photographic details of the excavated test pit can
be found in Figure 11 and Plates 27 and 28).
In T4 the topsoil was a 0.18m thick layer of loose-friable dark greyish brown (10YR 4/2) clayey silt
[401]. Beneath that the subsoil was deposit of hard light yellowish brown (10YR 6/4) slightly silty
clay [402], which continued to a depth of 0.78m below surface in the 1 x 1m sondage in the north-
east half of the trench. Within 402, in particular at the north-east end of the pit, there was an
increasing proportion of pale brown (10YR 6/3) decomposed rock with depth. A brown (7.5YR 5/4)
very slightly silty clay lower subsoil deposit [403], with flecks of yellowish red (5YR 5/8) decayed
rock, was identified in the sondage and measured 0.12m thick at the limit of excavation.
Topsoil 401 produced an assemblage comprising three sherds of provincial porcelain, nine of brown
glazed and two of plain stoneware, seven fragments of grey or red roof-tile (Plate 29), and seven iron
objects of which six were possible nails and the seventh a nut. Fourteen sherds of modern bottle glass
were recovered but later discarded. Here again, a date range spanning the Qing dynasty to 20th
century is indicated. Layers 402 and 403 were both sterile.
5.5.4 Test Pit 5
Test pit T5 was the ‘odd man out’ in that it was the only one not positioned adjacent to an auger hole;
the nearest being AH28 being some 20m down slope to the south-east. However, the deep fill
sequence at AH28 was different from any of the other tests and it was therefore felt necessary to do
some further testing within the village to get a better understanding of any original deposits sealed by
the fill. In Yim Tin Tsai village the natural sloping topography of the lower hillside overlooking the
former bay has been much altered due to the creation of building platforms to accommodate houses
and other structures, while hard surfacing of one sort or covers areas in between. However, there was
one reasonably large flat open space just above AH28, to the east of the former school, and south of
the ruined north-south orientated old part of the village that was chosen as the location for T5. The
surface elevation beside T5 was 15.26m PD and the test pit was orientated with its long axis east-
west. Surface clearance produced a single sherd of brown glazed stoneware, two sherds of white

31
porcelain and 14 roof-tile fragments. Drawn and photographic details of the excavated test pit can be
found in Figure 12 and Plates 30-33 inclusive).
The thin surface deposit was a loose-friable very dark greyish brown (10YR 3/2) slightly sandy, very
clayey silt with occasional small angular stones [501]—evidently the result of natural leaf-litter
decay rather than agriculture. Beneath the topsoil was a mixed layer of firm textured fill comprising
roughly equal proportions of brown (10YR 4/3) very slightly sandy clay and yellowish brown (10YR
5/6) clay [502] with frequent rubble, which tapered out to the north-west and thickened appreciably
down towards the south-east corner of the pit, where it measured 0.40m thick. The fill sealed a
c.0.25m thick undulating layer of hard brown (10YR 5/3) very slightly sandy, silty clay [503] with
very occasional angular stones up to 0.15 x 0.15 x 0.20m in size, which sloped downhill from north-
west to south-east and probably records the original topography in the area. Under layer 503 was the
natural subsoil sequence that was recorded as a 0.21m thick (at l.o.e.) deposit of yellowish brown
(10YR 5/6) very slightly gravelly, slightly silty clay with frequent chips of yellowish red (5YR 5/6)
decayed rock—giving way to larger chunks of crumbly rock deeper down to the east [504].
Fill 502 produced a mixed finds assemblage comprising the following items: a fragment of roof-tile
and one of green brick, five sherds of brown glazed stoneware and one of provincial porcelain (Qing-
20th
-century), three refitting fragments of a possible whetstone (Plate 34), and two refitting net-
impressed Han stoneware bodysherds (Plate 35). The most exciting discovery during the survey was
the 77 sherds of Han pottery recovered from layer 503 comprising: a cord-impressed coarseware
bodysherd (SF01 – Figure 13a & Plate 36); 24 sherds of fine red fabric pottery including 18 with
impressed rectangular ‘degenerate’ net (SF02 - Figure 13b & Plate 37); six stoneware rimsherds
(SF04-09 – Plates 37a-40 & Figure 14) including a large rim-and-shoulder sherd with hooked rim,
seal stamp-over-net design and brown ‘glaze’ (SF06 – Figures 13d & 15; Plate 38)—actually “kiln
glost” caused accidentally by dripping fuel-ash during kiln firing (Medley 1989: 40-41; P. Lam pers.
comm.)—and one with a horizontal lug (SF07 – Figure 14 & Plate 39); 37 stoneware bodysherds
including two with impressed small net, another with lug scars, and a second sherd with seal stamp-
over-net decoration (SF10 – Figure 13c & Plate 41); and lastly 9 stoneware base sherds (SF11-15:
Plates 41a-e & Figure 16) and an unusual example of a probable jar base with high and sharply
potted foot-ring (SF03 – Figure 17 & Plate 42). In addition, there were two small undiagnostic iron
objects, half a bivalve shell and a small fragment of red roof-tile (probably intrusive). Layer 504 was
sterile.
Fuller details of the above Han special finds can be found in Section 9 of the Special Finds
Catalogue, which identifies comparanda for many of the Yim Tin Tsai finds, in particular from the
nearby site on Kau Sai Chau. Discussion and interpretation of layers 502 and 503 is reserved for the
overall discussion of test pit results in Sections 8.2.1, 8.2.2 and 8.2.3.
5.5.5 Test Pit 6
Test pit T6 was located just above auger hole AH30 on the gently terraced upper slope of a small
hillock to the west of the salt-field. The test pit was orientated with its long axis north-south and it
had a surface elevation of 15.17m PD. There were no surface finds surrounding T6. Drawn and
photographic details of the excavated test pit can be found in Figure 18 and Plates 43 and 44.
The topsoil was a 0.15m thick layer of loose-friable brown (10YR 5/3) very slightly sandy, slightly
silty clay with occasional angular stones up to 5cm square [601]. Beneath that was a 20cm thick
interface layer of firm pale brown (10YR 6/3) very slightly sandy, slightly silty clay [602], whose
undulating lower boundary suggested the former presence of ridge-and-furrow cultivation. The
average depth of such furrows was around 7cm, but the deepest was over 15cm deep (see Figure and

32
Plate of east facing section). Once the decayed rock subsoil was encountered the excavation was
reduced to a 1 x1m sondage in the northern half of the test pit. The subsoil was recorded as a 0.33m
thick (at l.o.e.) deposit of hard pale brown (2.5YR 7/4) very slightly sandy clay with occasional
nodules of iron-rich decayed rock and very occasional small flecks of charcoal [603].
Topsoil 601 produced 18 iron objects comprising 11 nails and seven plate fragments (Plate 45), four
roof-tile fragments, and 13 sherds of modern bottle glass, which were counted and discarded. Layers
602 and 603 were both sterile. Based on the bottle glass a date somewhere in the 20th
century seems
most likely for the cultivation activity evidenced in T6.
PART 3: OLD CHAPEL INVESTIGATION
6. Old Chapel Investigation
6.1 Introduction
During the fieldwork the Old Chapel was already in the process of being consolidated as a ruin ahead
of its planned use as a place of Catholic pilgrimage relating to Saint Joseph Frienademetz, who as the
community’s priest resided and led services in the building during the late 19th
century. The
archaeological works were therefore designed to investigate, characterise and record the building
prior to the completion of such revitalisation works. A schematic plan of the Old Chapel and nearby
village houses VH1 onto which the Old Chapel was added (to the east) and VH2 (to the south) can be
found in Figure 19 and the Harris Matrix can be found in Section 15.
Some rubble clearance works had previously been completed by the villagers, during which the
central area of the floor and several large rough-dressed granite slabs had been removed (see
discussion in 6.4 below). The original floor surface therefore only survived in the north-east corner
of the main room and in the southern one third of the area of the small eastern room—the northern
two thirds having been recently sealed by concrete. Oral testimony from villagers and photographic
evidence from before the earlier clearance works both indicated that the main doorway into the Old
Chapel, which by that time had been converted to domestic use, was formerly in the centre of the
east-west orientated south wall. Within living memory, access was gained through the back door of
village house VH2, immediately south of the Old Chapel, but that back door was later partially
blocked and converted to a window once the Old Chapel had become a ruin, which must have
occurred post-1963 (when aerial photographic evidence shows it was then still roofed).
Investigations at the Old Chapel site were focused on the excavation and digital recording of the
following: the standing remains of the north [107a] and east walls [107b] with integral load-bearing
dividing wall [106], the standing remains and much-reduced foundations of the building’s west
[105a] and south walls [105b], post-abandonment spread [104], secondary [118] and primary
building collapse [120] over surviving (and accessible) areas of the original rammed clay floor in the
north-east corner of the central room [112] and southern end of the eastern room [117], the doorway
[109 & 110] between the central and eastern rooms, and masonry staircase base [111] leading to the
cockloft above the eastern room. The work also involved the analysis of the building’s internal
stratigraphic sequence and its relationships with the two nearby village houses (VH1 to the east and
VH2 to the south). Each context number will be shown in bold type where it is first described in
detail (i.e. [101]), but then in normal type elsewhere.
We begin by discussing the Old Chapel’s standing remains comprising the north and east [107a & b]
walls together with the eastern (N-S orientated) load-bearing dividing wall [106] (6.2), followed by
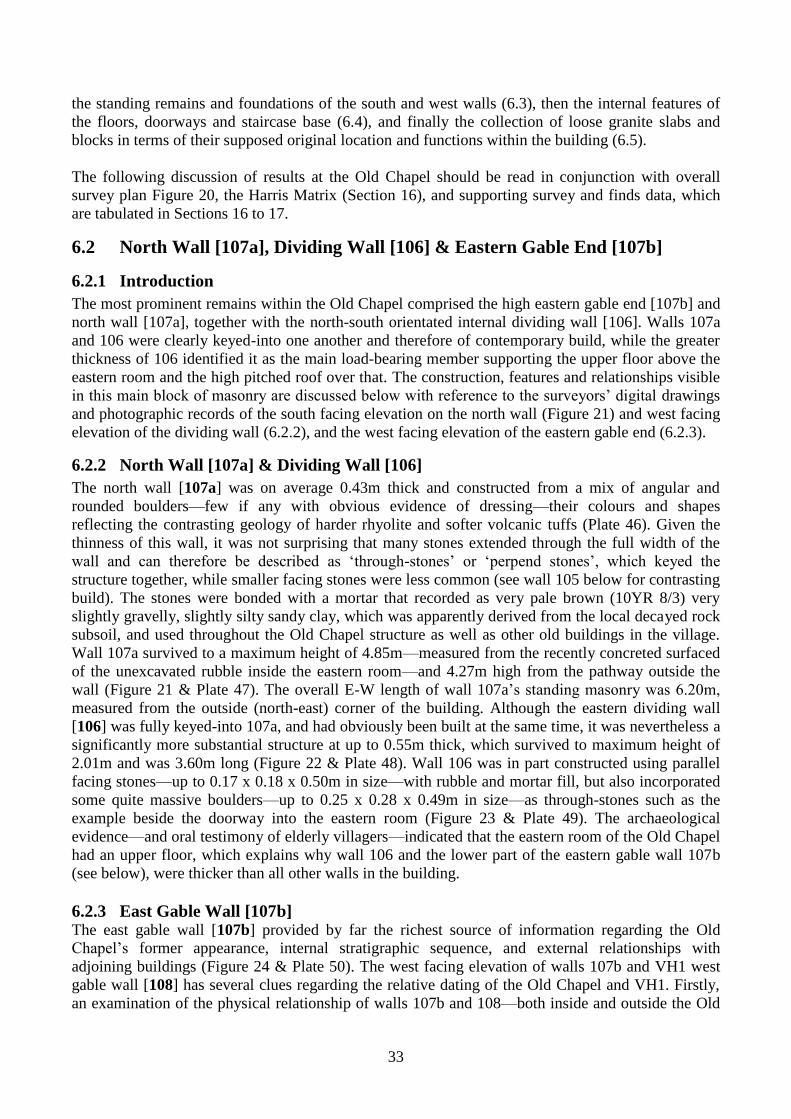
33
the standing remains and foundations of the south and west walls (6.3), then the internal features of
the floors, doorways and staircase base (6.4), and finally the collection of loose granite slabs and
blocks in terms of their supposed original location and functions within the building (6.5).
The following discussion of results at the Old Chapel should be read in conjunction with overall
survey plan Figure 20, the Harris Matrix (Section 16), and supporting survey and finds data, which
are tabulated in Sections 16 to 17.
6.2 North Wall [107a], Dividing Wall [106] & Eastern Gable End [107b]
6.2.1 Introduction
The most prominent remains within the Old Chapel comprised the high eastern gable end [107b] and
north wall [107a], together with the north-south orientated internal dividing wall [106]. Walls 107a
and 106 were clearly keyed-into one another and therefore of contemporary build, while the greater
thickness of 106 identified it as the main load-bearing member supporting the upper floor above the
eastern room and the high pitched roof over that. The construction, features and relationships visible
in this main block of masonry are discussed below with reference to the surveyors’ digital drawings
and photographic records of the south facing elevation on the north wall (Figure 21) and west facing
elevation of the dividing wall (6.2.2), and the west facing elevation of the eastern gable end (6.2.3).
6.2.2 North Wall [107a] & Dividing Wall [106]
The north wall [107a] was on average 0.43m thick and constructed from a mix of angular and
rounded boulders—few if any with obvious evidence of dressing—their colours and shapes
reflecting the contrasting geology of harder rhyolite and softer volcanic tuffs (Plate 46). Given the
thinness of this wall, it was not surprising that many stones extended through the full width of the
wall and can therefore be described as ‘through-stones’ or ‘perpend stones’, which keyed the
structure together, while smaller facing stones were less common (see wall 105 below for contrasting
build). The stones were bonded with a mortar that recorded as very pale brown (10YR 8/3) very
slightly gravelly, slightly silty sandy clay, which was apparently derived from the local decayed rock
subsoil, and used throughout the Old Chapel structure as well as other old buildings in the village.
Wall 107a survived to a maximum height of 4.85m—measured from the recently concreted surfaced
of the unexcavated rubble inside the eastern room—and 4.27m high from the pathway outside the
wall (Figure 21 & Plate 47). The overall E-W length of wall 107a’s standing masonry was 6.20m,
measured from the outside (north-east) corner of the building. Although the eastern dividing wall
[106] was fully keyed-into 107a, and had obviously been built at the same time, it was nevertheless a
significantly more substantial structure at up to 0.55m thick, which survived to maximum height of
2.01m and was 3.60m long (Figure 22 & Plate 48). Wall 106 was in part constructed using parallel
facing stones—up to 0.17 x 0.18 x 0.50m in size—with rubble and mortar fill, but also incorporated
some quite massive boulders—up to 0.25 x 0.28 x 0.49m in size—as through-stones such as the
example beside the doorway into the eastern room (Figure 23 & Plate 49). The archaeological
evidence—and oral testimony of elderly villagers—indicated that the eastern room of the Old Chapel
had an upper floor, which explains why wall 106 and the lower part of the eastern gable wall 107b
(see below), were thicker than all other walls in the building.
6.2.3 East Gable Wall [107b] The east gable wall [107b] provided by far the richest source of information regarding the Old
Chapel’s former appearance, internal stratigraphic sequence, and external relationships with
adjoining buildings (Figure 24 & Plate 50). The west facing elevation of walls 107b and VH1 west
gable wall [108] has several clues regarding the relative dating of the Old Chapel and VH1. Firstly,
an examination of the physical relationship of walls 107b and 108—both inside and outside the Old
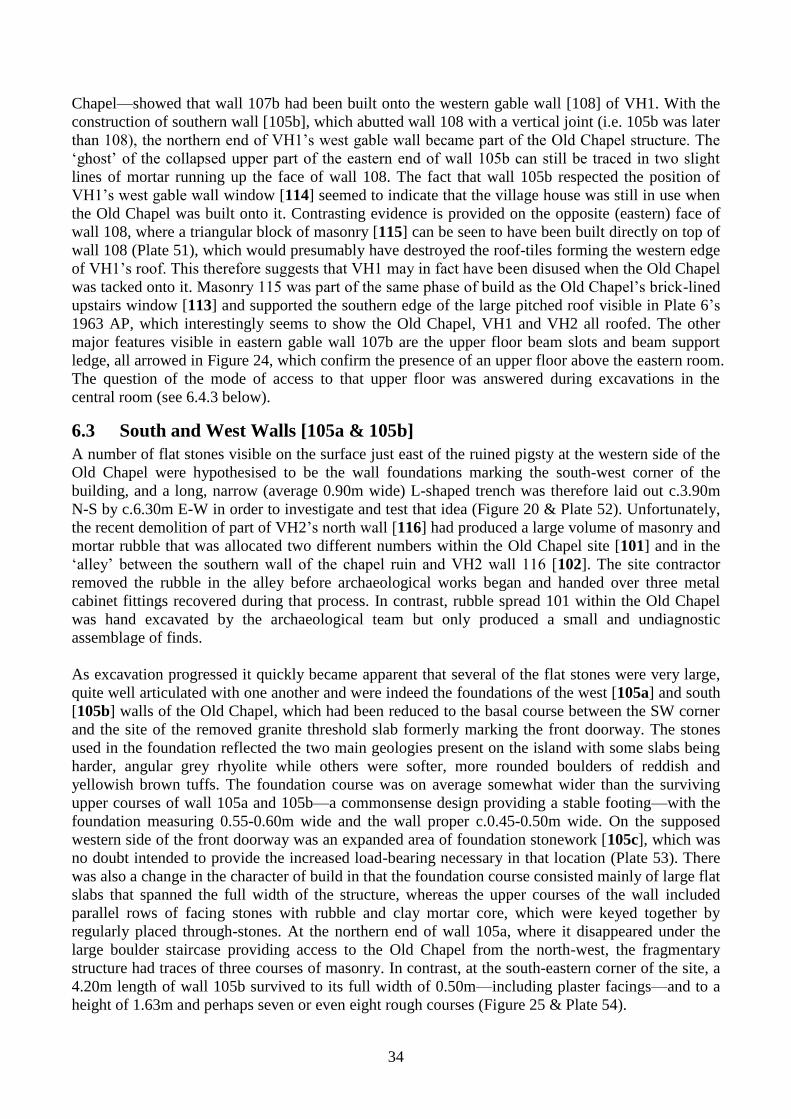
34
Chapel—showed that wall 107b had been built onto the western gable wall [108] of VH1. With the
construction of southern wall [105b], which abutted wall 108 with a vertical joint (i.e. 105b was later
than 108), the northern end of VH1’s west gable wall became part of the Old Chapel structure. The
‘ghost’ of the collapsed upper part of the eastern end of wall 105b can still be traced in two slight
lines of mortar running up the face of wall 108. The fact that wall 105b respected the position of
VH1’s west gable wall window [114] seemed to indicate that the village house was still in use when
the Old Chapel was built onto it. Contrasting evidence is provided on the opposite (eastern) face of
wall 108, where a triangular block of masonry [115] can be seen to have been built directly on top of
wall 108 (Plate 51), which would presumably have destroyed the roof-tiles forming the western edge
of VH1’s roof. This therefore suggests that VH1 may in fact have been disused when the Old Chapel
was tacked onto it. Masonry 115 was part of the same phase of build as the Old Chapel’s brick-lined
upstairs window [113] and supported the southern edge of the large pitched roof visible in Plate 6’s
1963 AP, which interestingly seems to show the Old Chapel, VH1 and VH2 all roofed. The other
major features visible in eastern gable wall 107b are the upper floor beam slots and beam support
ledge, all arrowed in Figure 24, which confirm the presence of an upper floor above the eastern room.
The question of the mode of access to that upper floor was answered during excavations in the
central room (see 6.4.3 below).
6.3 South and West Walls [105a & 105b]
A number of flat stones visible on the surface just east of the ruined pigsty at the western side of the
Old Chapel were hypothesised to be the wall foundations marking the south-west corner of the
building, and a long, narrow (average 0.90m wide) L-shaped trench was therefore laid out c.3.90m
N-S by c.6.30m E-W in order to investigate and test that idea (Figure 20 & Plate 52). Unfortunately,
the recent demolition of part of VH2’s north wall [116] had produced a large volume of masonry and
mortar rubble that was allocated two different numbers within the Old Chapel site [101] and in the
‘alley’ between the southern wall of the chapel ruin and VH2 wall 116 [102]. The site contractor
removed the rubble in the alley before archaeological works began and handed over three metal
cabinet fittings recovered during that process. In contrast, rubble spread 101 within the Old Chapel
was hand excavated by the archaeological team but only produced a small and undiagnostic
assemblage of finds.
As excavation progressed it quickly became apparent that several of the flat stones were very large,
quite well articulated with one another and were indeed the foundations of the west [105a] and south
[105b] walls of the Old Chapel, which had been reduced to the basal course between the SW corner
and the site of the removed granite threshold slab formerly marking the front doorway. The stones
used in the foundation reflected the two main geologies present on the island with some slabs being
harder, angular grey rhyolite while others were softer, more rounded boulders of reddish and
yellowish brown tuffs. The foundation course was on average somewhat wider than the surviving
upper courses of wall 105a and 105b—a commonsense design providing a stable footing—with the
foundation measuring 0.55-0.60m wide and the wall proper c.0.45-0.50m wide. On the supposed
western side of the front doorway was an expanded area of foundation stonework [105c], which was
no doubt intended to provide the increased load-bearing necessary in that location (Plate 53). There
was also a change in the character of build in that the foundation course consisted mainly of large flat
slabs that spanned the full width of the structure, whereas the upper courses of the wall included
parallel rows of facing stones with rubble and clay mortar core, which were keyed together by
regularly placed through-stones. At the northern end of wall 105a, where it disappeared under the
large boulder staircase providing access to the Old Chapel from the north-west, the fragmentary
structure had traces of three courses of masonry. In contrast, at the south-eastern corner of the site, a
4.20m length of wall 105b survived to its full width of 0.50m—including plaster facings—and to a
height of 1.63m and perhaps seven or even eight rough courses (Figure 25 & Plate 54).
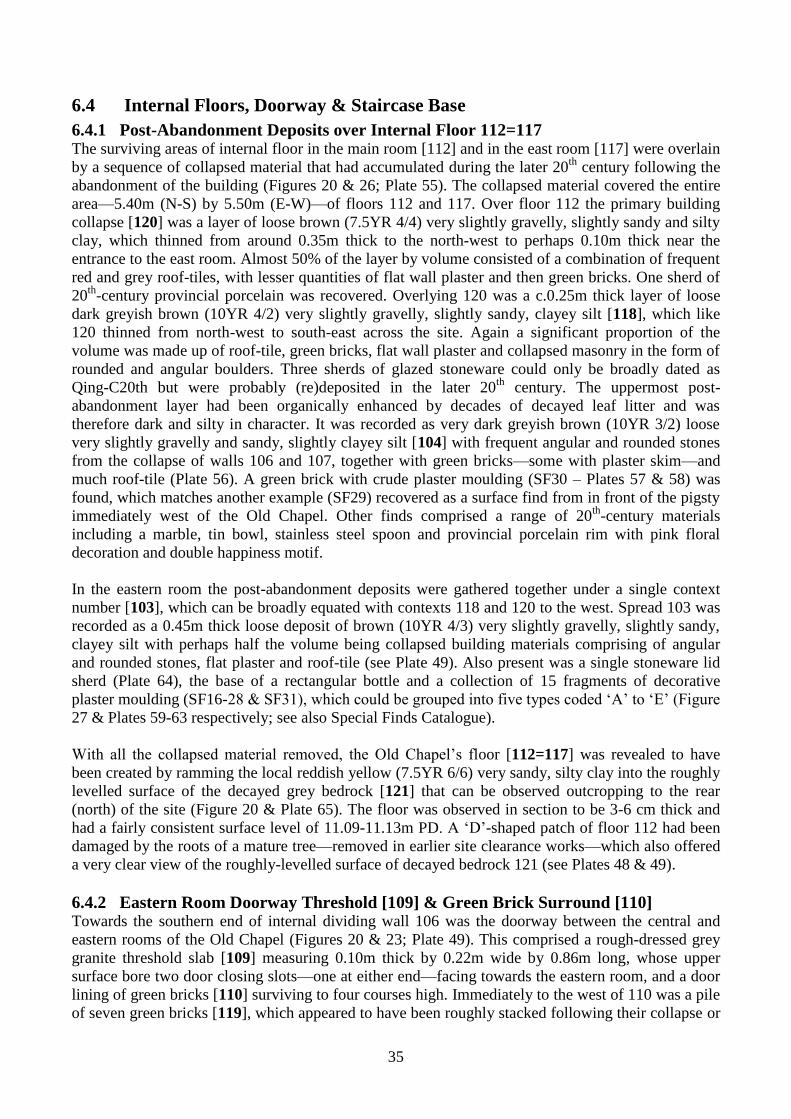
35
6.4 Internal Floors, Doorway & Staircase Base
6.4.1 Post-Abandonment Deposits over Internal Floor 112=117 The surviving areas of internal floor in the main room [112] and in the east room [117] were overlain
by a sequence of collapsed material that had accumulated during the later 20th
century following the
abandonment of the building (Figures 20 & 26; Plate 55). The collapsed material covered the entire
area—5.40m (N-S) by 5.50m (E-W)—of floors 112 and 117. Over floor 112 the primary building
collapse [120] was a layer of loose brown (7.5YR 4/4) very slightly gravelly, slightly sandy and silty
clay, which thinned from around 0.35m thick to the north-west to perhaps 0.10m thick near the
entrance to the east room. Almost 50% of the layer by volume consisted of a combination of frequent
red and grey roof-tiles, with lesser quantities of flat wall plaster and then green bricks. One sherd of
20th
-century provincial porcelain was recovered. Overlying 120 was a c.0.25m thick layer of loose
dark greyish brown (10YR 4/2) very slightly gravelly, slightly sandy, clayey silt [118], which like
120 thinned from north-west to south-east across the site. Again a significant proportion of the
volume was made up of roof-tile, green bricks, flat wall plaster and collapsed masonry in the form of
rounded and angular boulders. Three sherds of glazed stoneware could only be broadly dated as
Qing-C20th but were probably (re)deposited in the later 20th
century. The uppermost post-
abandonment layer had been organically enhanced by decades of decayed leaf litter and was
therefore dark and silty in character. It was recorded as very dark greyish brown (10YR 3/2) loose
very slightly gravelly and sandy, slightly clayey silt [104] with frequent angular and rounded stones
from the collapse of walls 106 and 107, together with green bricks—some with plaster skim—and
much roof-tile (Plate 56). A green brick with crude plaster moulding (SF30 – Plates 57 & 58) was
found, which matches another example (SF29) recovered as a surface find from in front of the pigsty
immediately west of the Old Chapel. Other finds comprised a range of 20th
-century materials
including a marble, tin bowl, stainless steel spoon and provincial porcelain rim with pink floral
decoration and double happiness motif.
In the eastern room the post-abandonment deposits were gathered together under a single context
number [103], which can be broadly equated with contexts 118 and 120 to the west. Spread 103 was
recorded as a 0.45m thick loose deposit of brown (10YR 4/3) very slightly gravelly, slightly sandy,
clayey silt with perhaps half the volume being collapsed building materials comprising of angular
and rounded stones, flat plaster and roof-tile (see Plate 49). Also present was a single stoneware lid
sherd (Plate 64), the base of a rectangular bottle and a collection of 15 fragments of decorative
plaster moulding (SF16-28 & SF31), which could be grouped into five types coded ‘A’ to ‘E’ (Figure
27 & Plates 59-63 respectively; see also Special Finds Catalogue).
With all the collapsed material removed, the Old Chapel’s floor [112=117] was revealed to have
been created by ramming the local reddish yellow (7.5YR 6/6) very sandy, silty clay into the roughly
levelled surface of the decayed grey bedrock [121] that can be observed outcropping to the rear
(north) of the site (Figure 20 & Plate 65). The floor was observed in section to be 3-6 cm thick and
had a fairly consistent surface level of 11.09-11.13m PD. A ‘D’-shaped patch of floor 112 had been
damaged by the roots of a mature tree—removed in earlier site clearance works—which also offered
a very clear view of the roughly-levelled surface of decayed bedrock 121 (see Plates 48 & 49).
6.4.2 Eastern Room Doorway Threshold [109] & Green Brick Surround [110] Towards the southern end of internal dividing wall 106 was the doorway between the central and
eastern rooms of the Old Chapel (Figures 20 & 23; Plate 49). This comprised a rough-dressed grey
granite threshold slab [109] measuring 0.10m thick by 0.22m wide by 0.86m long, whose upper
surface bore two door closing slots—one at either end—facing towards the eastern room, and a door
lining of green bricks [110] surviving to four courses high. Immediately to the west of 110 was a pile
of seven green bricks [119], which appeared to have been roughly stacked following their collapse or
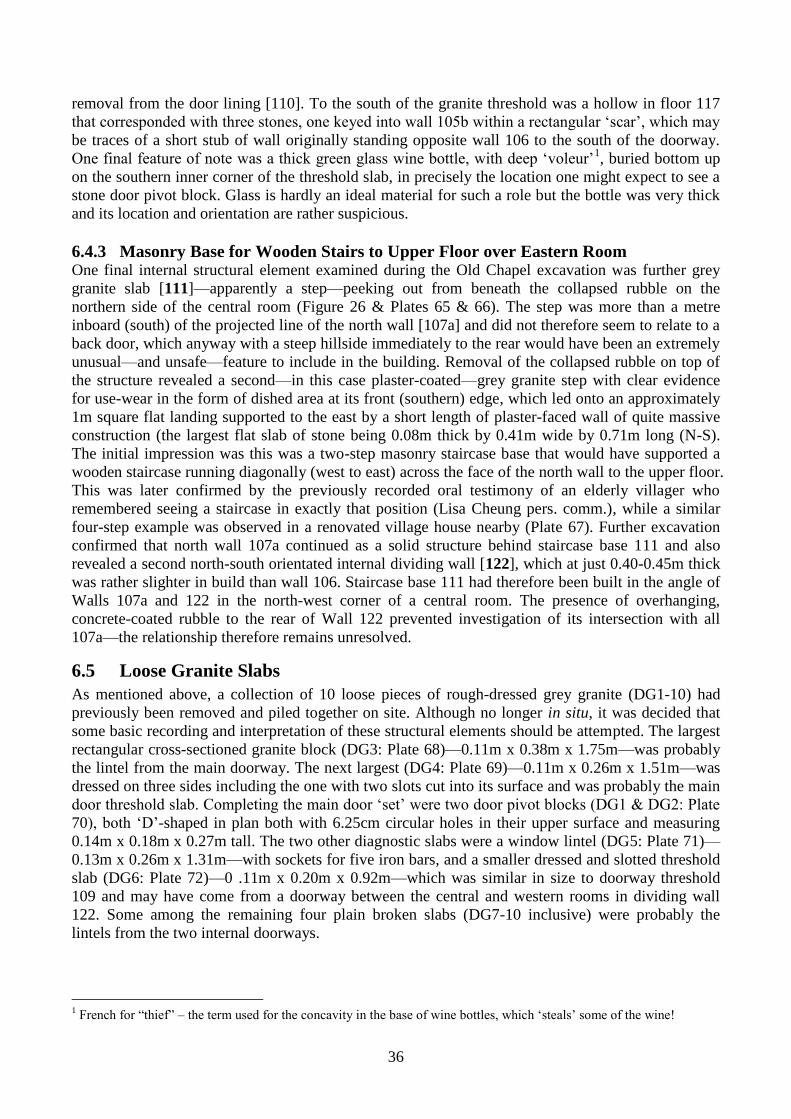
36
removal from the door lining [110]. To the south of the granite threshold was a hollow in floor 117
that corresponded with three stones, one keyed into wall 105b within a rectangular ‘scar’, which may
be traces of a short stub of wall originally standing opposite wall 106 to the south of the doorway.
One final feature of note was a thick green glass wine bottle, with deep ‘voleur’1, buried bottom up
on the southern inner corner of the threshold slab, in precisely the location one might expect to see a
stone door pivot block. Glass is hardly an ideal material for such a role but the bottle was very thick
and its location and orientation are rather suspicious.
6.4.3 Masonry Base for Wooden Stairs to Upper Floor over Eastern Room One final internal structural element examined during the Old Chapel excavation was further grey
granite slab [111]—apparently a step—peeking out from beneath the collapsed rubble on the
northern side of the central room (Figure 26 & Plates 65 & 66). The step was more than a metre
inboard (south) of the projected line of the north wall [107a] and did not therefore seem to relate to a
back door, which anyway with a steep hillside immediately to the rear would have been an extremely
unusual—and unsafe—feature to include in the building. Removal of the collapsed rubble on top of
the structure revealed a second—in this case plaster-coated—grey granite step with clear evidence
for use-wear in the form of dished area at its front (southern) edge, which led onto an approximately
1m square flat landing supported to the east by a short length of plaster-faced wall of quite massive
construction (the largest flat slab of stone being 0.08m thick by 0.41m wide by 0.71m long (N-S).
The initial impression was this was a two-step masonry staircase base that would have supported a
wooden staircase running diagonally (west to east) across the face of the north wall to the upper floor.
This was later confirmed by the previously recorded oral testimony of an elderly villager who
remembered seeing a staircase in exactly that position (Lisa Cheung pers. comm.), while a similar
four-step example was observed in a renovated village house nearby (Plate 67). Further excavation
confirmed that north wall 107a continued as a solid structure behind staircase base 111 and also
revealed a second north-south orientated internal dividing wall [122], which at just 0.40-0.45m thick
was rather slighter in build than wall 106. Staircase base 111 had therefore been built in the angle of
Walls 107a and 122 in the north-west corner of a central room. The presence of overhanging,
concrete-coated rubble to the rear of Wall 122 prevented investigation of its intersection with all
107a—the relationship therefore remains unresolved.
6.5 Loose Granite Slabs
As mentioned above, a collection of 10 loose pieces of rough-dressed grey granite (DG1-10) had
previously been removed and piled together on site. Although no longer in situ, it was decided that
some basic recording and interpretation of these structural elements should be attempted. The largest
rectangular cross-sectioned granite block (DG3: Plate 68)—0.11m x 0.38m x 1.75m—was probably
the lintel from the main doorway. The next largest (DG4: Plate 69)—0.11m x 0.26m x 1.51m—was
dressed on three sides including the one with two slots cut into its surface and was probably the main
door threshold slab. Completing the main door ‘set’ were two door pivot blocks (DG1 & DG2: Plate
70), both ‘D’-shaped in plan both with 6.25cm circular holes in their upper surface and measuring
0.14m x 0.18m x 0.27m tall. The two other diagnostic slabs were a window lintel (DG5: Plate 71)—
0.13m x 0.26m x 1.31m—with sockets for five iron bars, and a smaller dressed and slotted threshold
slab (DG6: Plate 72)—0 .11m x 0.20m x 0.92m—which was similar in size to doorway threshold
109 and may have come from a doorway between the central and western rooms in dividing wall
122. Some among the remaining four plain broken slabs (DG7-10 inclusive) were probably the
lintels from the two internal doorways.
1 French for “thief” – the term used for the concavity in the base of wine bottles, which ‘steals’ some of the wine!
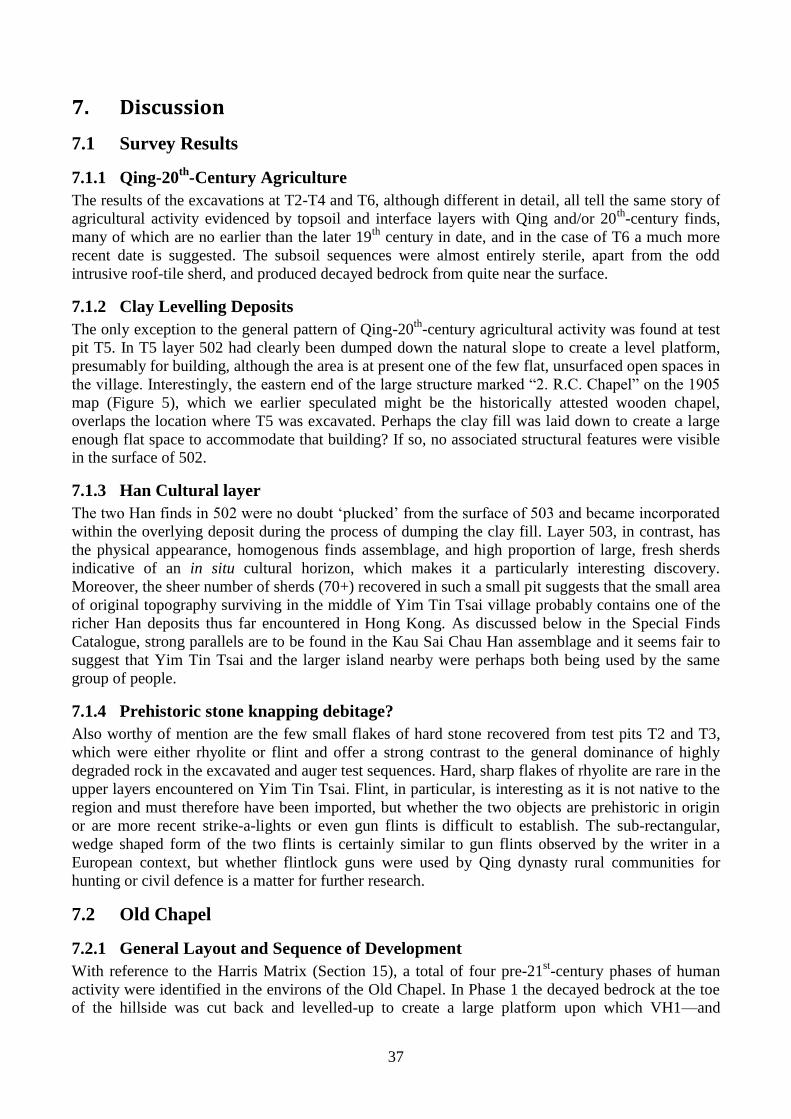
37
7. Discussion
7.1 Survey Results
7.1.1 Qing-20th
-Century Agriculture
The results of the excavations at T2-T4 and T6, although different in detail, all tell the same story of
agricultural activity evidenced by topsoil and interface layers with Qing and/or 20th
-century finds,
many of which are no earlier than the later 19th
century in date, and in the case of T6 a much more
recent date is suggested. The subsoil sequences were almost entirely sterile, apart from the odd
intrusive roof-tile sherd, and produced decayed bedrock from quite near the surface.
7.1.2 Clay Levelling Deposits
The only exception to the general pattern of Qing-20th
-century agricultural activity was found at test
pit T5. In T5 layer 502 had clearly been dumped down the natural slope to create a level platform,
presumably for building, although the area is at present one of the few flat, unsurfaced open spaces in
the village. Interestingly, the eastern end of the large structure marked “2. R.C. Chapel” on the 1905
map (Figure 5), which we earlier speculated might be the historically attested wooden chapel,
overlaps the location where T5 was excavated. Perhaps the clay fill was laid down to create a large
enough flat space to accommodate that building? If so, no associated structural features were visible
in the surface of 502.
7.1.3 Han Cultural layer
The two Han finds in 502 were no doubt ‘plucked’ from the surface of 503 and became incorporated
within the overlying deposit during the process of dumping the clay fill. Layer 503, in contrast, has
the physical appearance, homogenous finds assemblage, and high proportion of large, fresh sherds
indicative of an in situ cultural horizon, which makes it a particularly interesting discovery.
Moreover, the sheer number of sherds (70+) recovered in such a small pit suggests that the small area
of original topography surviving in the middle of Yim Tin Tsai village probably contains one of the
richer Han deposits thus far encountered in Hong Kong. As discussed below in the Special Finds
Catalogue, strong parallels are to be found in the Kau Sai Chau Han assemblage and it seems fair to
suggest that Yim Tin Tsai and the larger island nearby were perhaps both being used by the same
group of people.
7.1.4 Prehistoric stone knapping debitage?
Also worthy of mention are the few small flakes of hard stone recovered from test pits T2 and T3,
which were either rhyolite or flint and offer a strong contrast to the general dominance of highly
degraded rock in the excavated and auger test sequences. Hard, sharp flakes of rhyolite are rare in the
upper layers encountered on Yim Tin Tsai. Flint, in particular, is interesting as it is not native to the
region and must therefore have been imported, but whether the two objects are prehistoric in origin
or are more recent strike-a-lights or even gun flints is difficult to establish. The sub-rectangular,
wedge shaped form of the two flints is certainly similar to gun flints observed by the writer in a
European context, but whether flintlock guns were used by Qing dynasty rural communities for
hunting or civil defence is a matter for further research.
7.2 Old Chapel
7.2.1 General Layout and Sequence of Development
With reference to the Harris Matrix (Section 15), a total of four pre-21st-century phases of human
activity were identified in the environs of the Old Chapel. In Phase 1 the decayed bedrock at the toe
of the hillside was cut back and levelled-up to create a large platform upon which VH1—and
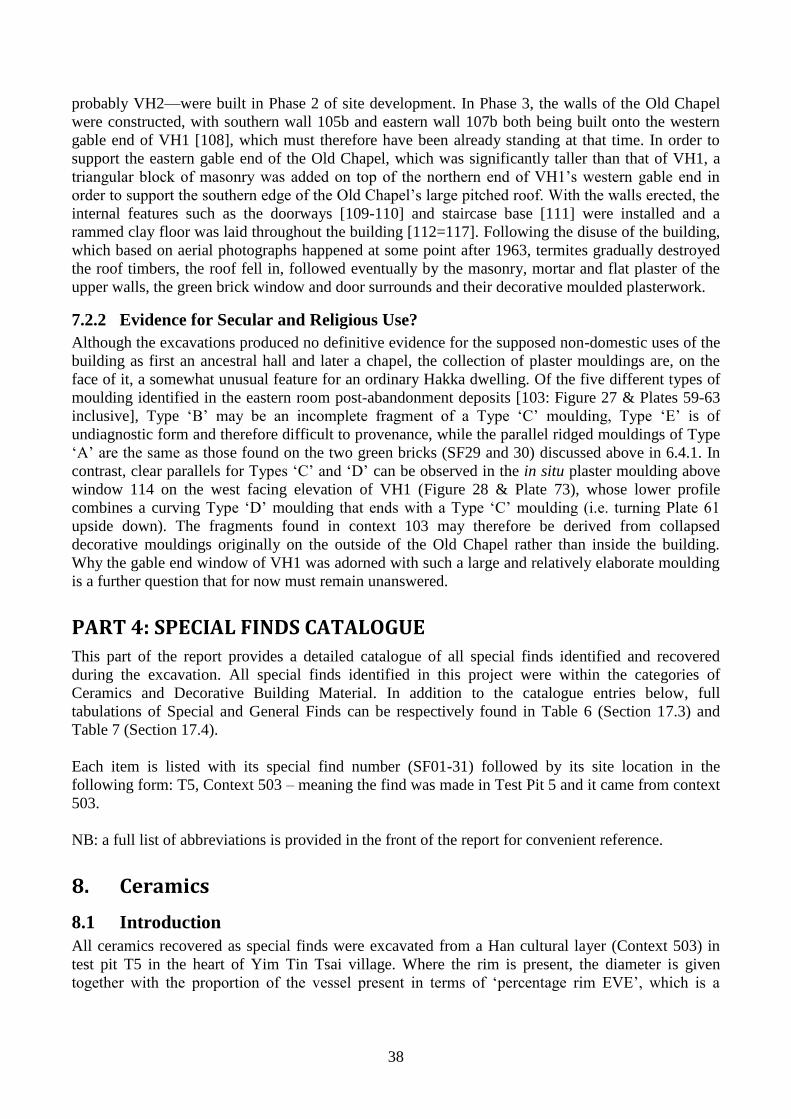
38
probably VH2—were built in Phase 2 of site development. In Phase 3, the walls of the Old Chapel
were constructed, with southern wall 105b and eastern wall 107b both being built onto the western
gable end of VH1 [108], which must therefore have been already standing at that time. In order to
support the eastern gable end of the Old Chapel, which was significantly taller than that of VH1, a
triangular block of masonry was added on top of the northern end of VH1’s western gable end in
order to support the southern edge of the Old Chapel’s large pitched roof. With the walls erected, the
internal features such as the doorways [109-110] and staircase base [111] were installed and a
rammed clay floor was laid throughout the building [112=117]. Following the disuse of the building,
which based on aerial photographs happened at some point after 1963, termites gradually destroyed
the roof timbers, the roof fell in, followed eventually by the masonry, mortar and flat plaster of the
upper walls, the green brick window and door surrounds and their decorative moulded plasterwork.
7.2.2 Evidence for Secular and Religious Use?
Although the excavations produced no definitive evidence for the supposed non-domestic uses of the
building as first an ancestral hall and later a chapel, the collection of plaster mouldings are, on the
face of it, a somewhat unusual feature for an ordinary Hakka dwelling. Of the five different types of
moulding identified in the eastern room post-abandonment deposits [103: Figure 27 & Plates 59-63
inclusive], Type ‘B’ may be an incomplete fragment of a Type ‘C’ moulding, Type ‘E’ is of
undiagnostic form and therefore difficult to provenance, while the parallel ridged mouldings of Type
‘A’ are the same as those found on the two green bricks (SF29 and 30) discussed above in 6.4.1. In
contrast, clear parallels for Types ‘C’ and ‘D’ can be observed in the in situ plaster moulding above
window 114 on the west facing elevation of VH1 (Figure 28 & Plate 73), whose lower profile
combines a curving Type ‘D’ moulding that ends with a Type ‘C’ moulding (i.e. turning Plate 61
upside down). The fragments found in context 103 may therefore be derived from collapsed
decorative mouldings originally on the outside of the Old Chapel rather than inside the building.
Why the gable end window of VH1 was adorned with such a large and relatively elaborate moulding
is a further question that for now must remain unanswered.
PART 4: SPECIAL FINDS CATALOGUE
This part of the report provides a detailed catalogue of all special finds identified and recovered
during the excavation. All special finds identified in this project were within the categories of
Ceramics and Decorative Building Material. In addition to the catalogue entries below, full
tabulations of Special and General Finds can be respectively found in Table 6 (Section 17.3) and
Table 7 (Section 17.4).
Each item is listed with its special find number (SF01-31) followed by its site location in the
following form: T5, Context 503 – meaning the find was made in Test Pit 5 and it came from context
503.
NB: a full list of abbreviations is provided in the front of the report for convenient reference.
8. Ceramics
8.1 Introduction
All ceramics recovered as special finds were excavated from a Han cultural layer (Context 503) in
test pit T5 in the heart of Yim Tin Tsai village. Where the rim is present, the diameter is given
together with the proportion of the vessel present in terms of ‘percentage rim EVE’, which is a
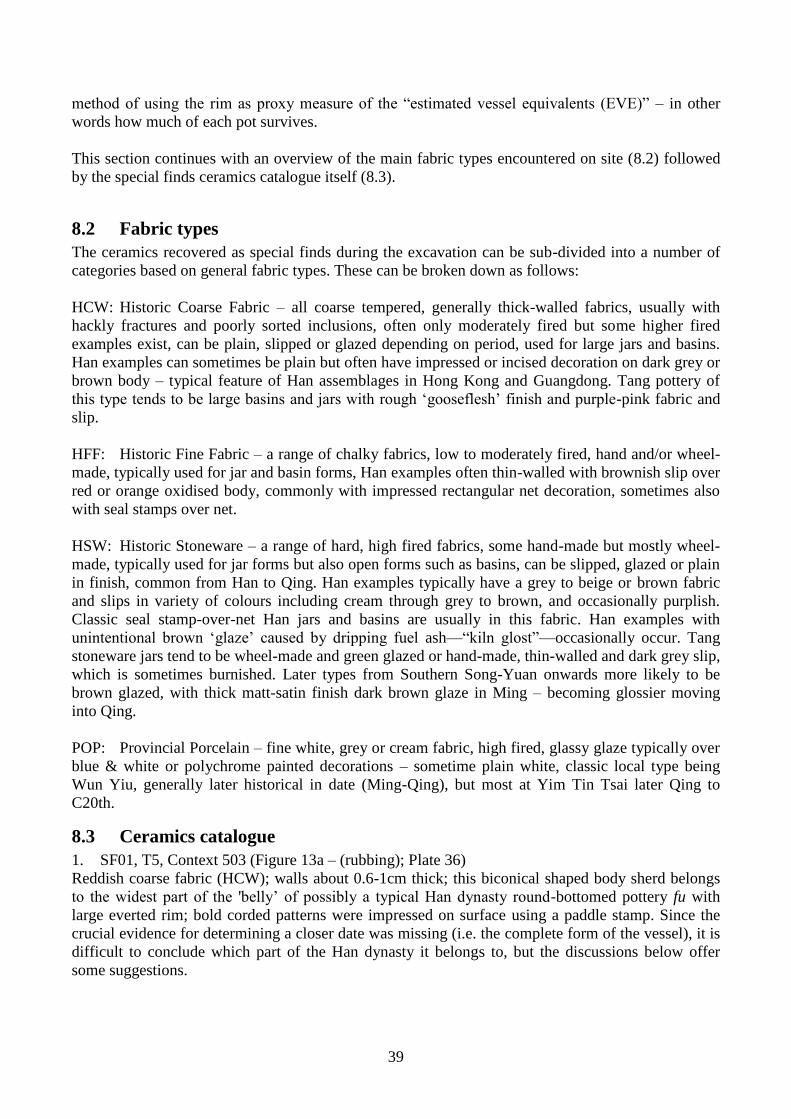
39
method of using the rim as proxy measure of the “estimated vessel equivalents (EVE)” – in other
words how much of each pot survives.
This section continues with an overview of the main fabric types encountered on site (8.2) followed
by the special finds ceramics catalogue itself (8.3).
8.2 Fabric types
The ceramics recovered as special finds during the excavation can be sub-divided into a number of
categories based on general fabric types. These can be broken down as follows:
HCW: Historic Coarse Fabric – all coarse tempered, generally thick-walled fabrics, usually with
hackly fractures and poorly sorted inclusions, often only moderately fired but some higher fired
examples exist, can be plain, slipped or glazed depending on period, used for large jars and basins.
Han examples can sometimes be plain but often have impressed or incised decoration on dark grey or
brown body – typical feature of Han assemblages in Hong Kong and Guangdong. Tang pottery of
this type tends to be large basins and jars with rough ‘gooseflesh’ finish and purple-pink fabric and
slip.
HFF: Historic Fine Fabric – a range of chalky fabrics, low to moderately fired, hand and/or wheel-
made, typically used for jar and basin forms, Han examples often thin-walled with brownish slip over
red or orange oxidised body, commonly with impressed rectangular net decoration, sometimes also
with seal stamps over net.
HSW: Historic Stoneware – a range of hard, high fired fabrics, some hand-made but mostly wheel-
made, typically used for jar forms but also open forms such as basins, can be slipped, glazed or plain
in finish, common from Han to Qing. Han examples typically have a grey to beige or brown fabric
and slips in variety of colours including cream through grey to brown, and occasionally purplish.
Classic seal stamp-over-net Han jars and basins are usually in this fabric. Han examples with
unintentional brown ‘glaze’ caused by dripping fuel ash—“kiln glost”—occasionally occur. Tang
stoneware jars tend to be wheel-made and green glazed or hand-made, thin-walled and dark grey slip,
which is sometimes burnished. Later types from Southern Song-Yuan onwards more likely to be
brown glazed, with thick matt-satin finish dark brown glaze in Ming – becoming glossier moving
into Qing.
POP: Provincial Porcelain – fine white, grey or cream fabric, high fired, glassy glaze typically over
blue & white or polychrome painted decorations – sometime plain white, classic local type being
Wun Yiu, generally later historical in date (Ming-Qing), but most at Yim Tin Tsai later Qing to
C20th.
8.3 Ceramics catalogue
1. SF01, T5, Context 503 (Figure 13a – (rubbing); Plate 36)
Reddish coarse fabric (HCW); walls about 0.6-1cm thick; this biconical shaped body sherd belongs
to the widest part of the 'belly’ of possibly a typical Han dynasty round-bottomed pottery fu with
large everted rim; bold corded patterns were impressed on surface using a paddle stamp. Since the
crucial evidence for determining a closer date was missing (i.e. the complete form of the vessel), it is
difficult to conclude which part of the Han dynasty it belongs to, but the discussions below offer
some suggestions.
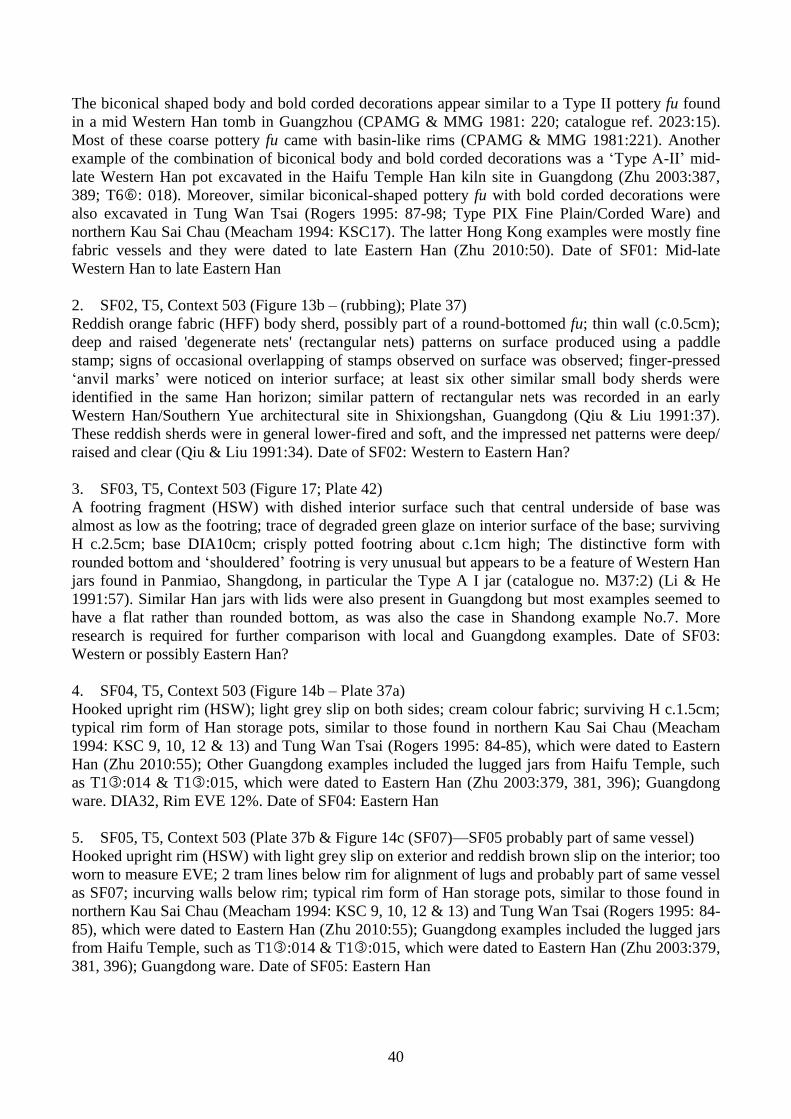
40
The biconical shaped body and bold corded decorations appear similar to a Type II pottery fu found
in a mid Western Han tomb in Guangzhou (CPAMG & MMG 1981: 220; catalogue ref. 2023:15).
Most of these coarse pottery fu came with basin-like rims (CPAMG & MMG 1981:221). Another
example of the combination of biconical body and bold corded decorations was a ‘Type A-II’ mid-
late Western Han pot excavated in the Haifu Temple Han kiln site in Guangdong (Zhu 2003:387,
389; T6: 018). Moreover, similar biconical-shaped pottery fu with bold corded decorations were
also excavated in Tung Wan Tsai (Rogers 1995: 87-98; Type PIX Fine Plain/Corded Ware) and
northern Kau Sai Chau (Meacham 1994: KSC17). The latter Hong Kong examples were mostly fine
fabric vessels and they were dated to late Eastern Han (Zhu 2010:50). Date of SF01: Mid-late
Western Han to late Eastern Han
2. SF02, T5, Context 503 (Figure 13b – (rubbing); Plate 37)
Reddish orange fabric (HFF) body sherd, possibly part of a round-bottomed fu; thin wall (c.0.5cm);
deep and raised 'degenerate nets' (rectangular nets) patterns on surface produced using a paddle
stamp; signs of occasional overlapping of stamps observed on surface was observed; finger-pressed
‘anvil marks’ were noticed on interior surface; at least six other similar small body sherds were
identified in the same Han horizon; similar pattern of rectangular nets was recorded in an early
Western Han/Southern Yue architectural site in Shixiongshan, Guangdong (Qiu & Liu 1991:37).
These reddish sherds were in general lower-fired and soft, and the impressed net patterns were deep/
raised and clear (Qiu & Liu 1991:34). Date of SF02: Western to Eastern Han?
3. SF03, T5, Context 503 (Figure 17; Plate 42)
A footring fragment (HSW) with dished interior surface such that central underside of base was
almost as low as the footring; trace of degraded green glaze on interior surface of the base; surviving
H c.2.5cm; base DIA10cm; crisply potted footring about c.1cm high; The distinctive form with
rounded bottom and ‘shouldered’ footring is very unusual but appears to be a feature of Western Han
jars found in Panmiao, Shangdong, in particular the Type A I jar (catalogue no. M37:2) (Li & He
1991:57). Similar Han jars with lids were also present in Guangdong but most examples seemed to
have a flat rather than rounded bottom, as was also the case in Shandong example No.7. More
research is required for further comparison with local and Guangdong examples. Date of SF03:
Western or possibly Eastern Han?
4. SF04, T5, Context 503 (Figure 14b – Plate 37a)
Hooked upright rim (HSW); light grey slip on both sides; cream colour fabric; surviving H c.1.5cm;
typical rim form of Han storage pots, similar to those found in northern Kau Sai Chau (Meacham
1994: KSC 9, 10, 12 & 13) and Tung Wan Tsai (Rogers 1995: 84-85), which were dated to Eastern
Han (Zhu 2010:55); Other Guangdong examples included the lugged jars from Haifu Temple, such
as T1:014 & T1:015, which were dated to Eastern Han (Zhu 2003:379, 381, 396); Guangdong
ware. DIA32, Rim EVE 12%. Date of SF04: Eastern Han
5. SF05, T5, Context 503 (Plate 37b & Figure 14c (SF07)—SF05 probably part of same vessel)
Hooked upright rim (HSW) with light grey slip on exterior and reddish brown slip on the interior; too
worn to measure EVE; 2 tram lines below rim for alignment of lugs and probably part of same vessel
as SF07; incurving walls below rim; typical rim form of Han storage pots, similar to those found in
northern Kau Sai Chau (Meacham 1994: KSC 9, 10, 12 & 13) and Tung Wan Tsai (Rogers 1995: 84-
85), which were dated to Eastern Han (Zhu 2010:55); Guangdong examples included the lugged jars
from Haifu Temple, such as T1:014 & T1:015, which were dated to Eastern Han (Zhu 2003:379,
381, 396); Guangdong ware. Date of SF05: Eastern Han

41
6. SF06, T5, Context 503 (Figure 13d (rubbing) & Figure 15; Plate 38)
Hooked rim (HSW); 2 square/sub-square seal-stamps (comprised of triangles and squares, about
1.5cm x 1.4cm) located c.3cm below rim; over small raised net patterns; uneven yellowish brown
'glaze' on exterior surface below rim: actually unintentionally formed by kiln glost dripping from the
kiln roof (Medley 1989:40-41); thick walls (c.1-1.1cm thick); firing-spur marks on top of rim; wheel-
finished marks on interior with impressed thumb ‘anvil marks’; light brown fabric with occasional
small black inclusions; typical rim form of Han storage pots, similar to those found in northern Kau
Sai Chau (Meacham 1994: KSC 9, 10, 12 & 13) and Tung Wan Tsai (Rogers 1995: 84-85), which
were dated to Eastern Han (Zhu 2010:55); Guangdong examples included the Eastern Han Type ‘C’
urn (Y1:001) from Haifu Temple (Zhu 2003:379, 396); in terms of the seal stamp pattern, again, it is
very similar to those recorded in Tung Wan Tsai (Rogers 1995: 96) and northern Kau Sai Chau
(Meacham 1994: KSC 13); it also shared a great similarity to a late Eastern Han example found in a
Guangzhou tomb (CPAMG & MMG 1981:396); Guangdong ware.
DIA18, Rim EVE14%; Date of SF06: late Eastern Han
7. SF07, T5, Context 503 (Figure 14c; Plate 39)
Flat-topped expanded rim fragment possibly of a double-lugged small basin; with one surviving
small horizontal lug (surviving L c.3.2cm; W2.5) located immediately below rim; incurving walls
below lug; reddish brown slipped interior; walls about 0.7cm thick; base missing; surviving H
c.4.2cm; The overall form resembles the Type ‘E’ double-lugged basin (T2:024) found in Haifu
Temple, which was dated to late Eastern Han (Zhu 2003:381-2, 396). Although the lugs seemed
different, the forms overall were very similar. Date of SF07: late Eastern Han.
8. SF08, T5, Context 503 (Figure 14d; Plate 39a)
Incurving upright rim (HSW); round lip; feint glaze on interior; possibly grey slip on exterior; light
grey fabric with some small black inclusions; thin wall (c.0.5-0.7cm thick); surviving H c.3cm;
similar to Eastern Han shallow bowls found in the Haifu Temple Han kiln site, such as Type ‘I’
(T64:026), Type ‘II’ (T4(3):040) and Type ‘III’ (T1(3):042) (Zhu 2003: 383-384). According to Zhu
(2003: 396), this type of shallow bowl was absent from Guangzhou Han tombs, but was recorded in
Western/Eastern Han tombs or deposits excavated in other parts of Guangdong and Guangxi.
DIA22, Rim EVE4%; Date of SF08: Western to Eastern Han.
9. SF09, T5, Context 503 (Figure 14a; Plate 40)
Incurving upright rim (HSW); round lip; too small to measure; possibly grey slipped surface; light
grey fabric with some small black inclusions; thin wall (c.0.4-0.5cm thick); surviving H c.5.5cm;
similar to Eastern Han shallow bowls found in the Haifu Temple Han kiln site, such as Type ‘I’
(T64:026), Type ‘II’ (T4(3):040) and Type ‘III’ (T1(3):042) (Zhu 2003:383-384). According to Zhu
(2003: 396), this type of shallow bowl was absent from Guangzhou Han tombs, but was recorded in
Western/Eastern Han tombs or deposits excavated in other parts of Guangdong and Guangxi. Date of
SF09: Western to Eastern Han.
10. SF10, T5, Context 503 (Figure 13c (rubbing); Plate 41)
One unglazed body sherd (HSW) with a seal-stamp over small net decoration of a hard storage pot;
walls about 0.9-1.2cm thick; cream colour fabric; the seal stamp comprised of squares and triangles,
about 1cm x 1cm; the patterns were similar to one found in Tung Wan Tsai (Fig.5.13, second row
middle; Rogers et.al.1995: 86), which was dated to late Eastern Han (Zhu 2010:55). Date of SF10:
late Eastern Han.
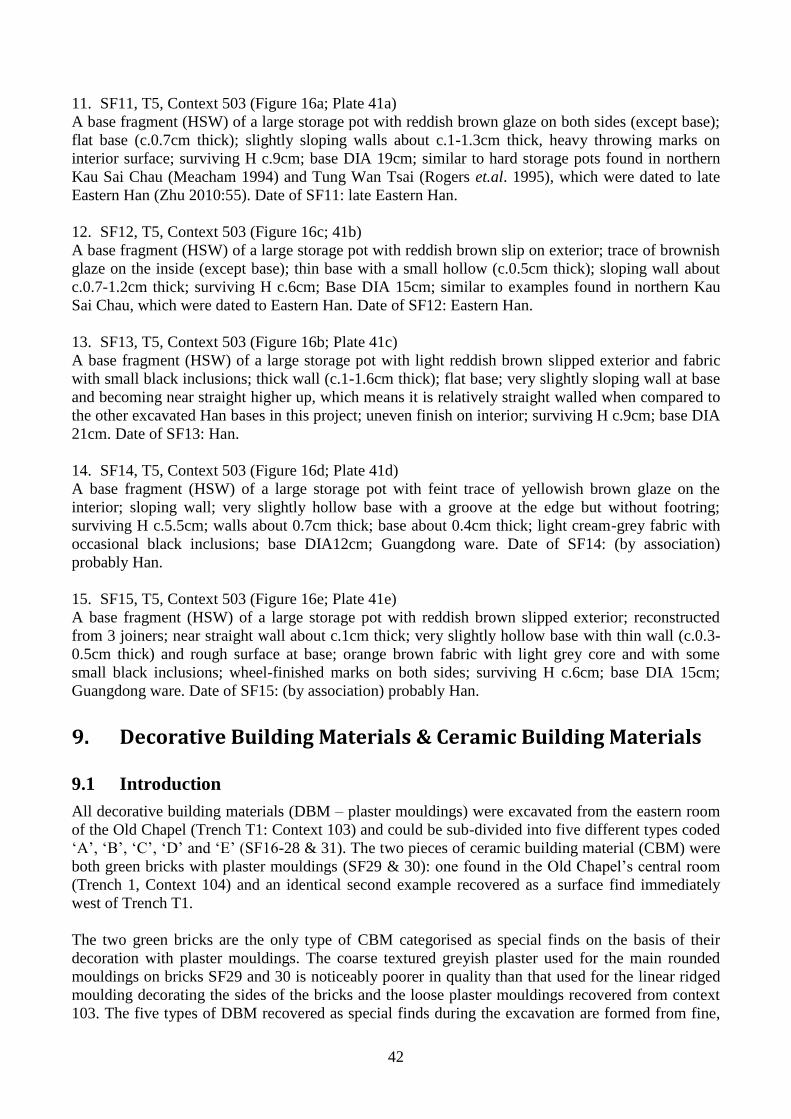
42
11. SF11, T5, Context 503 (Figure 16a; Plate 41a)
A base fragment (HSW) of a large storage pot with reddish brown glaze on both sides (except base);
flat base (c.0.7cm thick); slightly sloping walls about c.1-1.3cm thick, heavy throwing marks on
interior surface; surviving H c.9cm; base DIA 19cm; similar to hard storage pots found in northern
Kau Sai Chau (Meacham 1994) and Tung Wan Tsai (Rogers et.al. 1995), which were dated to late
Eastern Han (Zhu 2010:55). Date of SF11: late Eastern Han.
12. SF12, T5, Context 503 (Figure 16c; 41b)
A base fragment (HSW) of a large storage pot with reddish brown slip on exterior; trace of brownish
glaze on the inside (except base); thin base with a small hollow (c.0.5cm thick); sloping wall about
c.0.7-1.2cm thick; surviving H c.6cm; Base DIA 15cm; similar to examples found in northern Kau
Sai Chau, which were dated to Eastern Han. Date of SF12: Eastern Han.
13. SF13, T5, Context 503 (Figure 16b; Plate 41c)
A base fragment (HSW) of a large storage pot with light reddish brown slipped exterior and fabric
with small black inclusions; thick wall (c.1-1.6cm thick); flat base; very slightly sloping wall at base
and becoming near straight higher up, which means it is relatively straight walled when compared to
the other excavated Han bases in this project; uneven finish on interior; surviving H c.9cm; base DIA
21cm. Date of SF13: Han.
14. SF14, T5, Context 503 (Figure 16d; Plate 41d)
A base fragment (HSW) of a large storage pot with feint trace of yellowish brown glaze on the
interior; sloping wall; very slightly hollow base with a groove at the edge but without footring;
surviving H c.5.5cm; walls about 0.7cm thick; base about 0.4cm thick; light cream-grey fabric with
occasional black inclusions; base DIA12cm; Guangdong ware. Date of SF14: (by association)
probably Han.
15. SF15, T5, Context 503 (Figure 16e; Plate 41e)
A base fragment (HSW) of a large storage pot with reddish brown slipped exterior; reconstructed
from 3 joiners; near straight wall about c.1cm thick; very slightly hollow base with thin wall (c.0.3-
0.5cm thick) and rough surface at base; orange brown fabric with light grey core and with some
small black inclusions; wheel-finished marks on both sides; surviving H c.6cm; base DIA 15cm;
Guangdong ware. Date of SF15: (by association) probably Han.
9. Decorative Building Materials & Ceramic Building Materials
9.1 Introduction
All decorative building materials (DBM – plaster mouldings) were excavated from the eastern room
of the Old Chapel (Trench T1: Context 103) and could be sub-divided into five different types coded
‘A’, ‘B’, ‘C’, ‘D’ and ‘E’ (SF16-28 & 31). The two pieces of ceramic building material (CBM) were
both green bricks with plaster mouldings (SF29 & 30): one found in the Old Chapel’s central room
(Trench 1, Context 104) and an identical second example recovered as a surface find immediately
west of Trench T1.
The two green bricks are the only type of CBM categorised as special finds on the basis of their
decoration with plaster mouldings. The coarse textured greyish plaster used for the main rounded
mouldings on bricks SF29 and 30 is noticeably poorer in quality than that used for the linear ridged
moulding decorating the sides of the bricks and the loose plaster mouldings recovered from context
103. The five types of DBM recovered as special finds during the excavation are formed from fine,
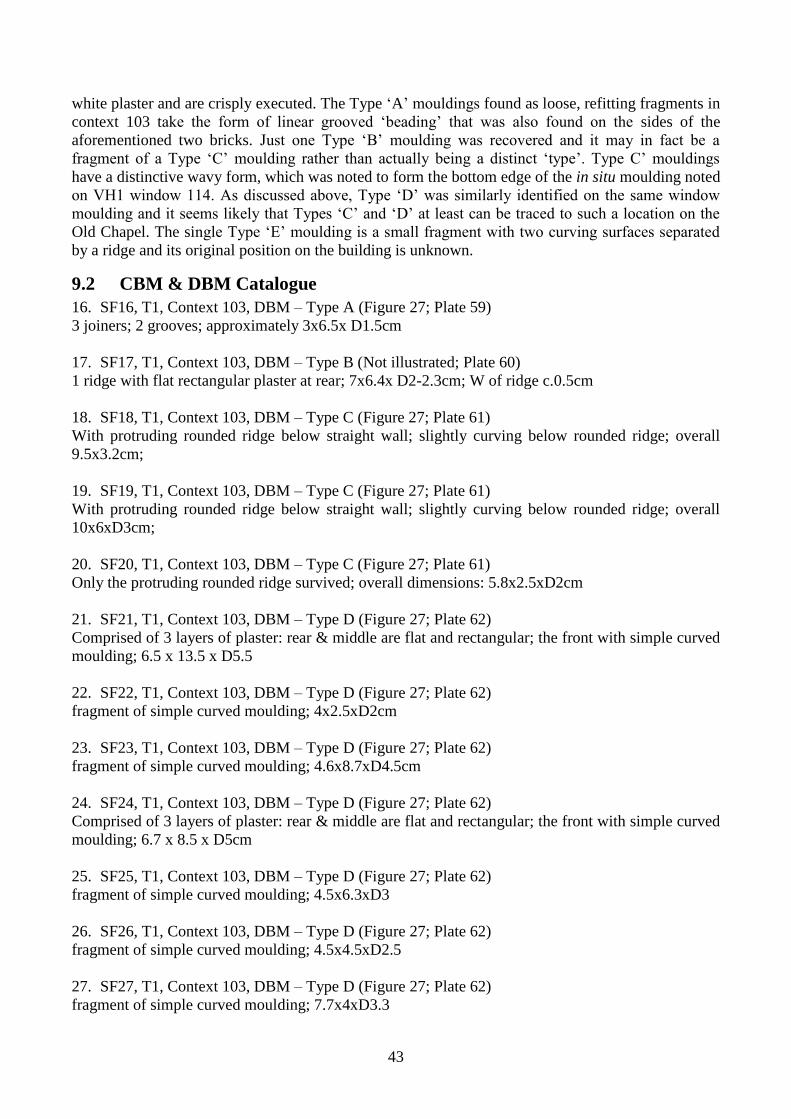
43
white plaster and are crisply executed. The Type ‘A’ mouldings found as loose, refitting fragments in
context 103 take the form of linear grooved ‘beading’ that was also found on the sides of the
aforementioned two bricks. Just one Type ‘B’ moulding was recovered and it may in fact be a
fragment of a Type ‘C’ moulding rather than actually being a distinct ‘type’. Type C’ mouldings
have a distinctive wavy form, which was noted to form the bottom edge of the in situ moulding noted
on VH1 window 114. As discussed above, Type ‘D’ was similarly identified on the same window
moulding and it seems likely that Types ‘C’ and ‘D’ at least can be traced to such a location on the
Old Chapel. The single Type ‘E’ moulding is a small fragment with two curving surfaces separated
by a ridge and its original position on the building is unknown.
9.2 CBM & DBM Catalogue
16. SF16, T1, Context 103, DBM – Type A (Figure 27; Plate 59)
3 joiners; 2 grooves; approximately 3x6.5x D1.5cm
17. SF17, T1, Context 103, DBM – Type B (Not illustrated; Plate 60)
1 ridge with flat rectangular plaster at rear; 7x6.4x D2-2.3cm; W of ridge c.0.5cm
18. SF18, T1, Context 103, DBM – Type C (Figure 27; Plate 61)
With protruding rounded ridge below straight wall; slightly curving below rounded ridge; overall
9.5x3.2cm;
19. SF19, T1, Context 103, DBM – Type C (Figure 27; Plate 61)
With protruding rounded ridge below straight wall; slightly curving below rounded ridge; overall
10x6xD3cm;
20. SF20, T1, Context 103, DBM – Type C (Figure 27; Plate 61)
Only the protruding rounded ridge survived; overall dimensions: 5.8x2.5xD2cm
21. SF21, T1, Context 103, DBM – Type D (Figure 27; Plate 62)
Comprised of 3 layers of plaster: rear & middle are flat and rectangular; the front with simple curved
moulding; 6.5 x 13.5 x D5.5
22. SF22, T1, Context 103, DBM – Type D (Figure 27; Plate 62)
fragment of simple curved moulding; 4x2.5xD2cm
23. SF23, T1, Context 103, DBM – Type D (Figure 27; Plate 62)
fragment of simple curved moulding; 4.6x8.7xD4.5cm
24. SF24, T1, Context 103, DBM – Type D (Figure 27; Plate 62)
Comprised of 3 layers of plaster: rear & middle are flat and rectangular; the front with simple curved
moulding; 6.7 x 8.5 x D5cm
25. SF25, T1, Context 103, DBM – Type D (Figure 27; Plate 62)
fragment of simple curved moulding; 4.5x6.3xD3
26. SF26, T1, Context 103, DBM – Type D (Figure 27; Plate 62)
fragment of simple curved moulding; 4.5x4.5xD2.5
27. SF27, T1, Context 103, DBM – Type D (Figure 27; Plate 62)
fragment of simple curved moulding; 7.7x4xD3.3
44
28. SF28, T1, Context 103, DBM – Type E (Figure 27; Plate 63)
Irregular shaped fragment; front with small ridge and blackish colour; rear surface uneven; surviving
thickness 0.7-1.5cm; L5.2xW3.8
29. SF29, T1, Surface Find, CBM – Brick (Plates 57 & 58 )
Intact rectangular green brick wrapped with a layer of simple plaster mouldings at one end & simple
grooved elongated plaster mouldings on both surfaces; collected on surface on site; dimensions of
green brick: 27x11.5xD6.5; dimensions of elongated plaster moulding (front): 24.5x9xD7cm; (rear):
26.5x3x7cm;
30. SF30, T1, Context 104, CBM – Brick (Plates 57 & 58)
Fragment of rectangular green brick wrapped with a layer of simple plaster mouldings at one end &
simple grooved elongated plaster mouldings on one side; dimensions of green brick: 26x11xD6;
irregular patch of plaster survived with MAX L16, W11, D6.5
31. SF31, T1, Context 103, DBM – Type D (Figure 27; Plate 62)
fragment of simple curved moulding; blackish at rear; 4x2.3xD3cm
PART 5: CONCLUSIONS & RECOMMENDATIONS
10. Conclusions
10.1 Introduction
The project set out to address a number of research objectives and these have in large part been
successfully achieved and are discussed below.
10.2 Enhance Understanding of General Sequence of Deposits at Yim Tin Tsai
The survey has provided an enhanced understanding of the island’s archaeology, confirming the
character and Qing-20th
-century date of agricultural activity, which was built upon widespread
terracing and management of the landscape. Within Yim Tin Tsai village, there was evidence for
large-scale terracing and levelling activity, some of which may relate to the construction of an early
wooden chapel in the environs of test pit T5.
10.3 Identify & Characterise Any Cultural Deposits (Especially Pre-Qing)
The supposed prehistoric interest on Yim Tin Tsai, which was recorded on the HKAS map of Hong
Kong archaeology, seems now more likely to have been the result of the misidentification of Han
geometric stoneware as Bronze Age material. The Han deposit in the heart of Yim Tin Tsai village
seems particularly rich and could prove to be a very productive site if further investigation were ever
required. However, there are by necessity still many untested gaps in the record and the few chips of
stone recovered may hint at prehistoric activity, but at the moment this seems unlikely.
10.4 Maximise Information Retrieval Through Dry Sieving
All cultural layers were dry sieved and the value of such an approach was confirmed by the
significant proportion of the overall finds assemblage that resulted from such activity.
45
10.5 Define & Characterise the Old Chapel Ruin & Priest’s Lodgings
The excavations at the Old Chapel provided a much fuller understanding of the character, layout and
stratigraphic relationships within the building. Moreover, the visual analysis and digital surveying
also confirmed the building’s position with the local sequence of build in that part of the village. The
clear indications of a second storey above the eastern room—supported by load-bearing dividing
wall 106—were further confirmed by the discovery of a second dividing wall and two-step staircase
base, which suggested a wooden staircase running diagonally across the face of the rear wall [107a].
Overall, the building is relatively large and solidly built when compared to other old structures in the
village. However, no definitive evidence for the building’s use as either an ancestral hall or chapel
was found, although the collection of mouldings from the excavation are an interesting discovery in
that they find parallel in the quite grand moulding above VH1 window 114.
10.6 Create an Accurate Surveyed, Drawn & Photographic Record of the Ruin
The manual and digital recording conducted in the Old Chapel provides an accurate and meaningful
record of the building itself and its relationships with nearby structures.
11. Recommendations
11.1 Further analysis of the 2013 Han material
Our initial study of the Han material from test pit T5, as set out in the Special Finds Catalogue, has
identified many parallels with sites in Hong Kong—most notably Kau Sai Chau and Tung Wan
Tsai—but has also found comparanda in excavations from Guangzhou, elsewhere in Guangdong, and
even further afield. The foot-ringed jar base (SF03) is a particularly intriguing find with no local
parallels. Further study of the Yim Tin Tsai Han material is therefore recommended.
11.2 Suggested directions for future field research at Yim Tin Tsai
11.2.1 Survey
In general the survey produced an unsurprising result reflecting the Qing-20th
century agricultural
activities of the Yim Tin Tsai villagers. However, the survey left many areas untested and should
significant development occur on the island it would be prudent, given the Han discoveries and
possibility of prehistoric activity, to carry out some form of additional archaeological evaluation. It
might also be worth revisiting the south-east corner of the island to search for more traces of the
plain “unglazed stoneware” sherds that had “certain unusual features, but are otherwise undated”
(Peacock & Nixon 1986: 211). On reflection, based on our findings of plain stoneware sherds within
the Han deposit at T5, we wonder whether these sherds might in fact be more evidence of Han
activity.
11.2.2 Excavation
The Han cultural deposit discovered in the middle of Yim Tin Tsai village in test pit T5 is clearly
worthy of further investigation. The pottery recovered, in particular the harder fabrics, was mostly in
the form of large, fresh sherds, which do not seem to have been disturbed since their date of
deposition. Indeed the quantity and range of materials recovered from T5 is surprising from just a
0.25m deep cultural layer in 2m x 1m test pit and, should the opportunity arise, further exploration of
the rich Han deposit would doubtless further enhance our understanding of this period in Hong
Kong. Interestingly, that same small test pit also identified a thick clay levelling deposit that, based
on map evidence, seems to coincide with the location of another Roman Catholic chapel, which in
this case is maybe the wooden chapel remembered in that general location by elderly informants.
46
Any further testing around T5 could also, therefore, test for the presence of any structural features
relating to such a building cut into the surface of the clay fill.
By way of a final word, the low south-facing hillside overlooking Yim Tin Tsai’s shallow bay, which
was so attractive for the Hakka people who settled the island, was clearly also attractive two
millennia earlier to the local Han period population who stayed long enough, or visited frequently
enough, to leave such a significant and fascinating trace of their presence.
PART 6: REFERENCES
12. References
AMO 1998. 2nd
Territory Wide Survey of Hong Kong: North Lantau Survey. Unpublished fieldwork
report.
Geotechnical Engineering Office 1994. 1:20,000 Scale HGM20 Series Map of Solid and Superficial
Geology, Sheet 9: Tung Chung. Hong Kong: Hong Kong SAR Government.
Gretagmacbeth. 2000. Munsell Soil Colour Charts. Gretagmacbeth: New Windsor, NY.
Harris, E.C 1979. Principles of archaeological stratigraphy. London: Academic Press.
Lands Department 2011a. 1:1000 Map Series HP1C, Sheet 9-DE-2D. Hong Kong: Hong Kong SAR
Government
Lands Department 2011b. 1:1000 Map Lot Index Plan, Sheets 9-SE-2C, 2D, 7A & 7B. Hong Kong:
Hong Kong SAR Government
李季、何德亮 (國家文物局考古領隊培訓班):<山東濟寧郊區潘廟漢代墓地>, 《文物》,
1991年第 12期, 頁 37, 48-65。
Meacham, W. 2009. The archaeology of Hong Kong. Hong Kong: Hong Kong University Press.
Medley, M. 1989. The Chinese potter. 3rd
Edition. Oxford: Phaidon.
Peacock, B. & Nixon, T. (1986) Report on the Hong Kong archaeological survey, Volume III, Part 2,
Summary Site Data Sheets. Unpublished Government Report.
Qiu, L.C. & Liu, J.A. (Guangdong Provincial Institute of Cultural Relics & Archaeology,
Guangdong Provincial Museum, and Museum of the County of Wuhua) 1991. Site of Han
Architectures at Shixiongshan in Wuhua, Guangdong, in Wenwu 1991(11), p.27-37.
Rogers, P.R. et.al. 1995. Tung Wan Tsai: a Bronze Age and Han Period Coastal Site. Antiquities &
Monuments Office Occasional Paper No.3. Hong Kong: Government of Hong Kong.
The CPAM of Guangzhou & The Municipal Museum of Guangzhou 1981. Excavations of the Han
Tombs at Guangzhou. Beijing: Cultural Relics Publishing House.
Zhu, H.R.(Guangzhou Municipal Institute of Cultural Relics and Archaeology) 2003. Excavations on
the Han Period Kiln Site at the Haifu Temple, Guangdong, in Kaogu Xuebao 2003(3), p.373-400.
朱海仁:<香港漢代考古發現與研究>,《西漢南越國考古與漢文化》,白雲翔、馮永驅等編
,2010年, 頁 43-62 (北京: 科學出版社,2010年)。
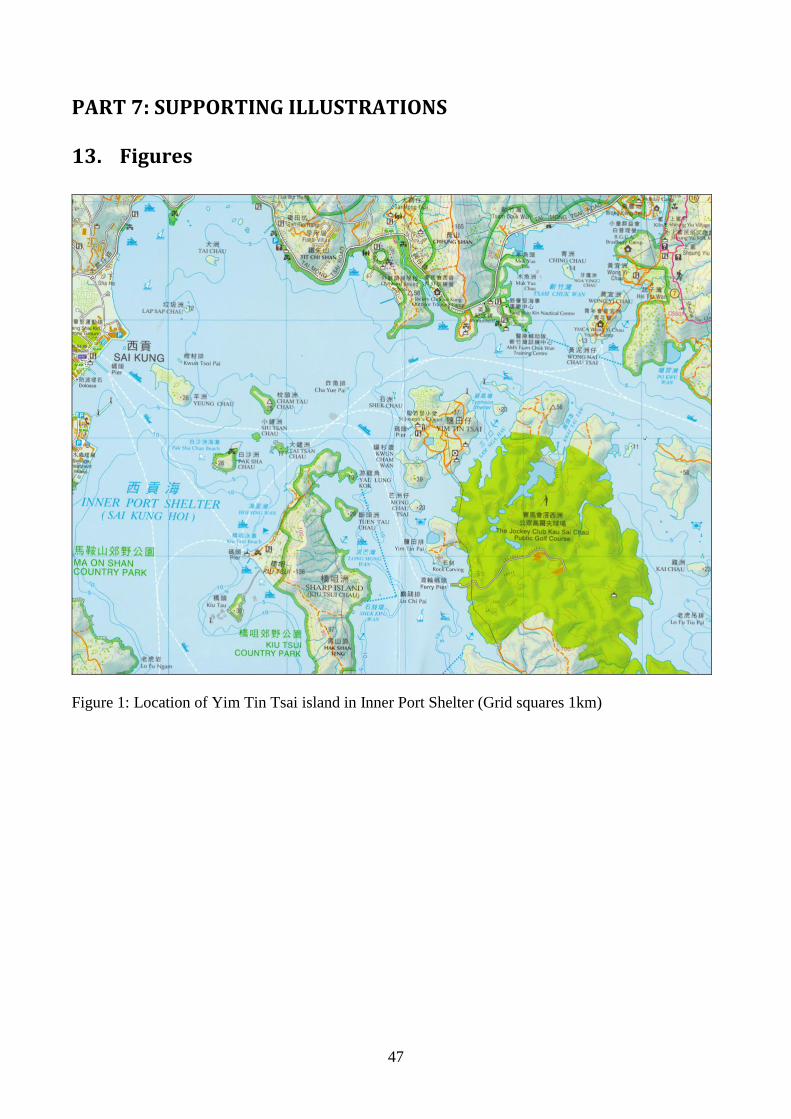
47
PART 7: SUPPORTING ILLUSTRATIONS
13. Figures
Figure 1: Location of Yim Tin Tsai island in Inner Port Shelter (Grid squares 1km)
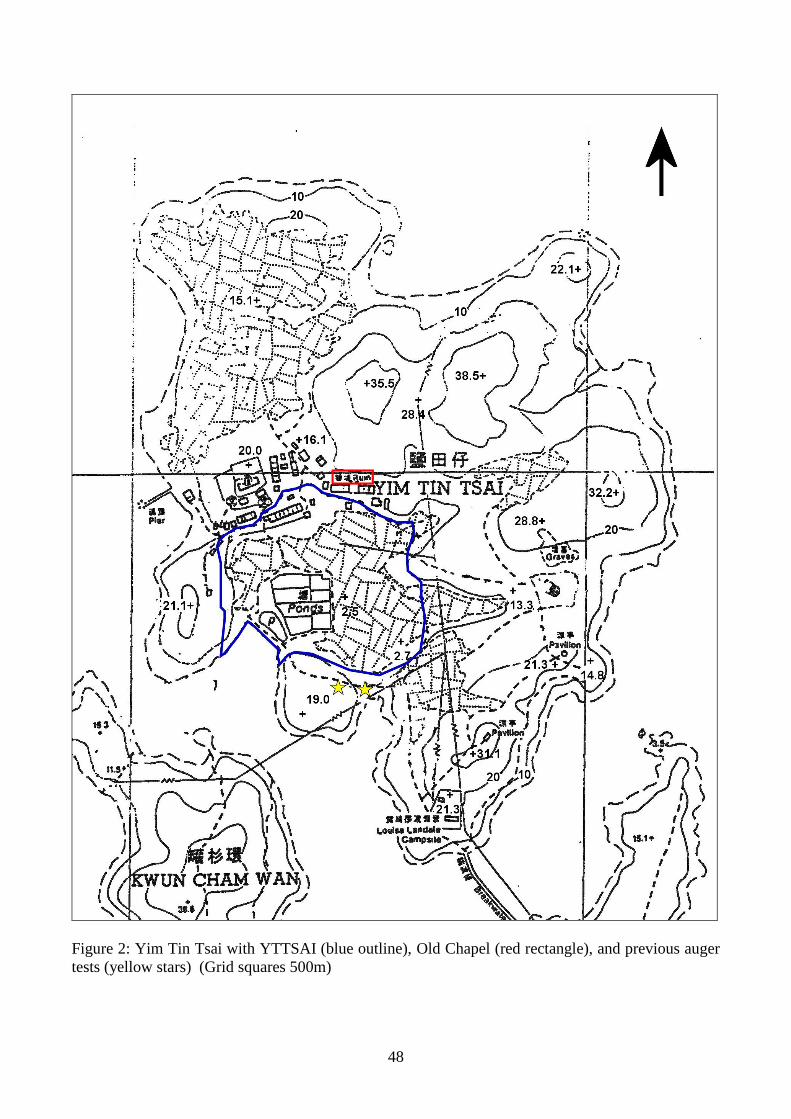
48
Figure 2: Yim Tin Tsai with YTTSAI (blue outline), Old Chapel (red rectangle), and previous auger
tests (yellow stars) (Grid squares 500m)
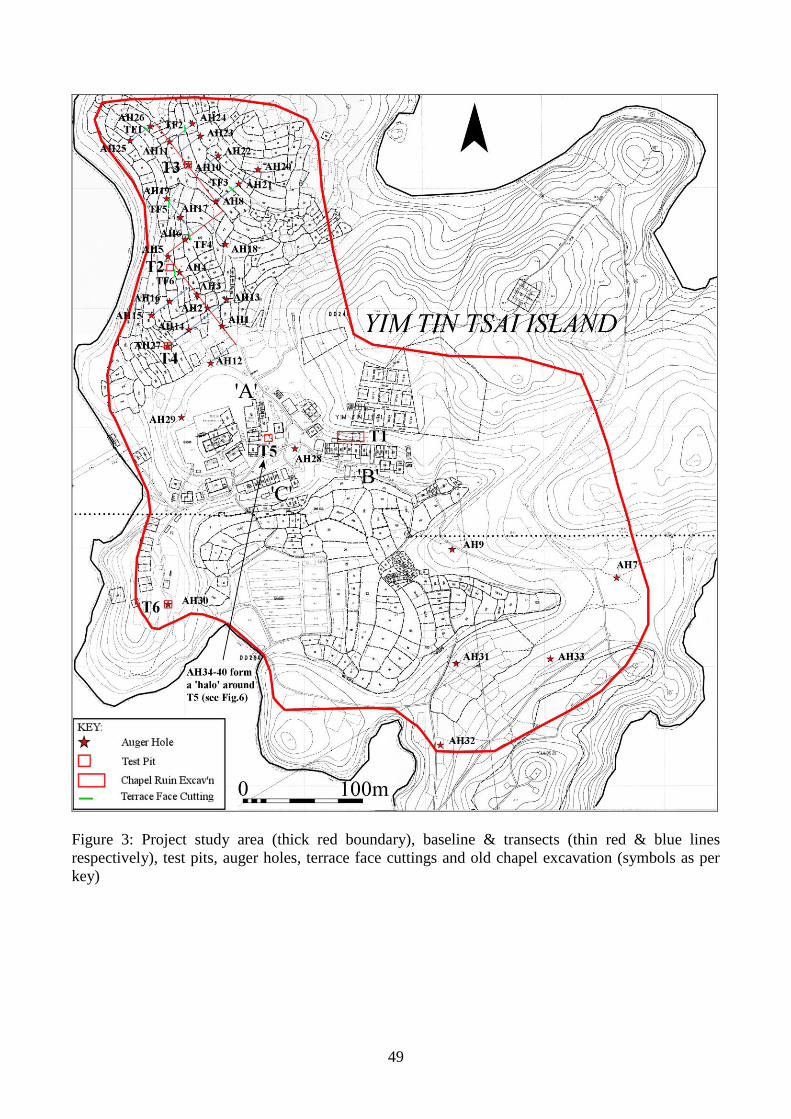
49
Figure 3: Project study area (thick red boundary), baseline & transects (thin red & blue lines
respectively), test pits, auger holes, terrace face cuttings and old chapel excavation (symbols as per
key)
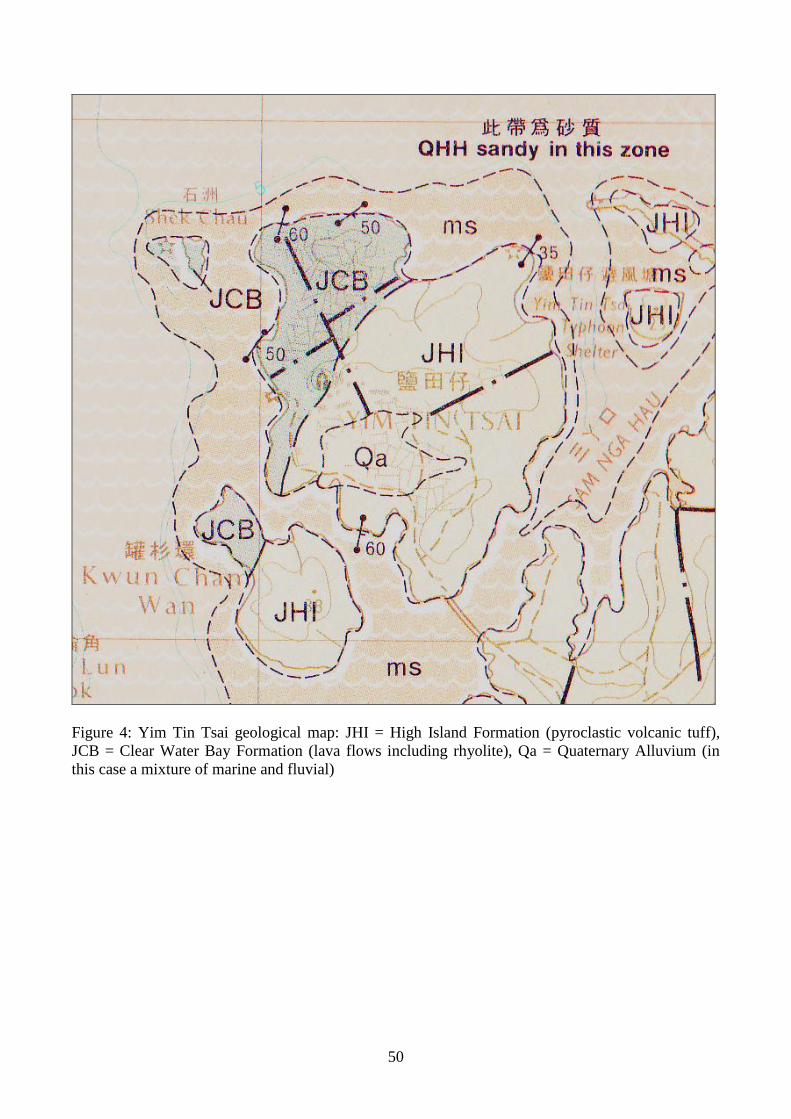
50
Figure 4: Yim Tin Tsai geological map: JHI = High Island Formation (pyroclastic volcanic tuff),
JCB = Clear Water Bay Formation (lava flows including rhyolite), Qa = Quaternary Alluvium (in
this case a mixture of marine and fluvial)
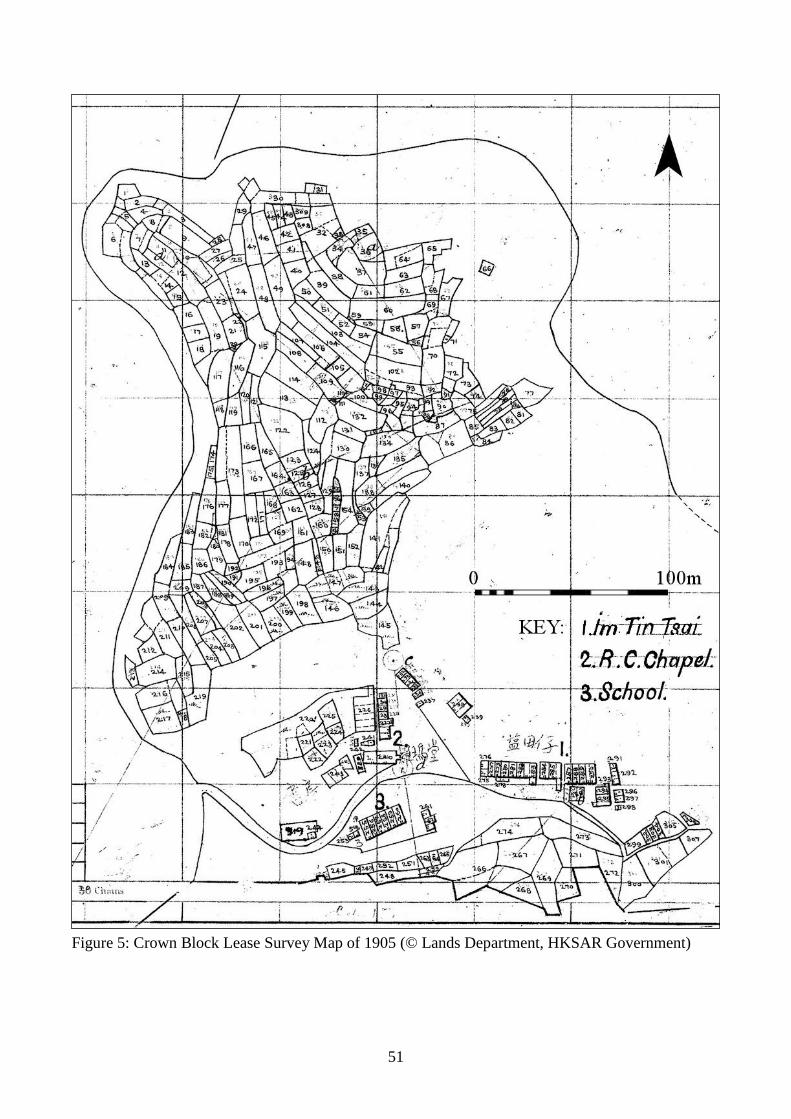
51
Figure 5: Crown Block Lease Survey Map of 1905 (© Lands Department, HKSAR Government)

52
Figure 6: Detail of auger testing around test pit T5 in the centre of Yim Tin Tsai village (auger holes
AH28, AH34-40 inclusive) – general extent of Han deposit indicated by grey shading
(Scale: grid squares 50m)
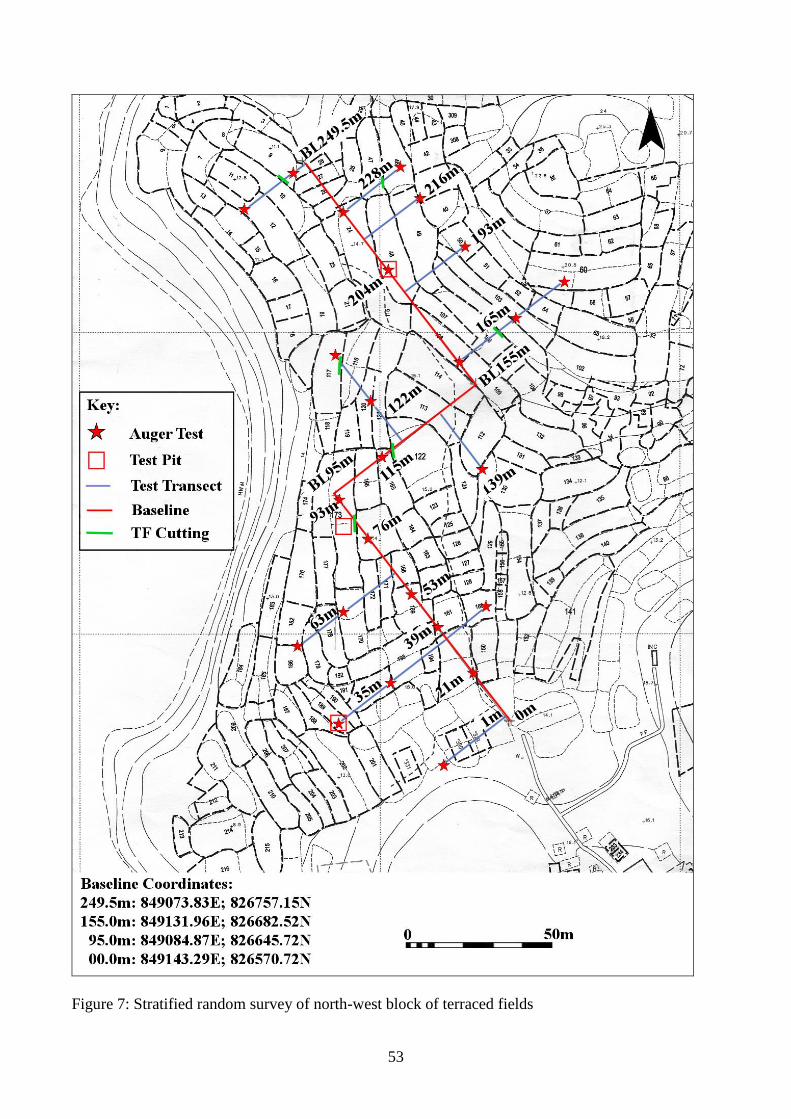
53
Figure 7: Stratified random survey of north-west block of terraced fields
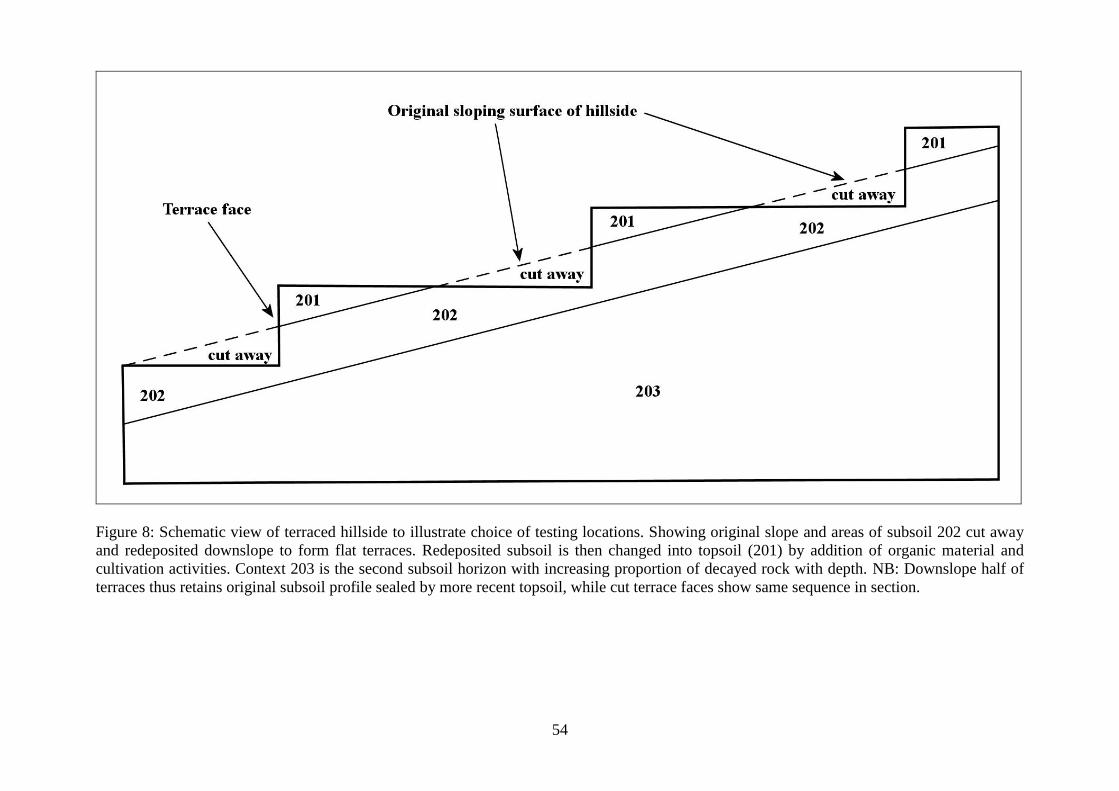
54
Figure 8: Schematic view of terraced hillside to illustrate choice of testing locations. Showing original slope and areas of subsoil 202 cut away
and redeposited downslope to form flat terraces. Redeposited subsoil is then changed into topsoil (201) by addition of organic material and
cultivation activities. Context 203 is the second subsoil horizon with increasing proportion of decayed rock with depth. NB: Downslope half of
terraces thus retains original subsoil profile sealed by more recent topsoil, while cut terrace faces show same sequence in section.
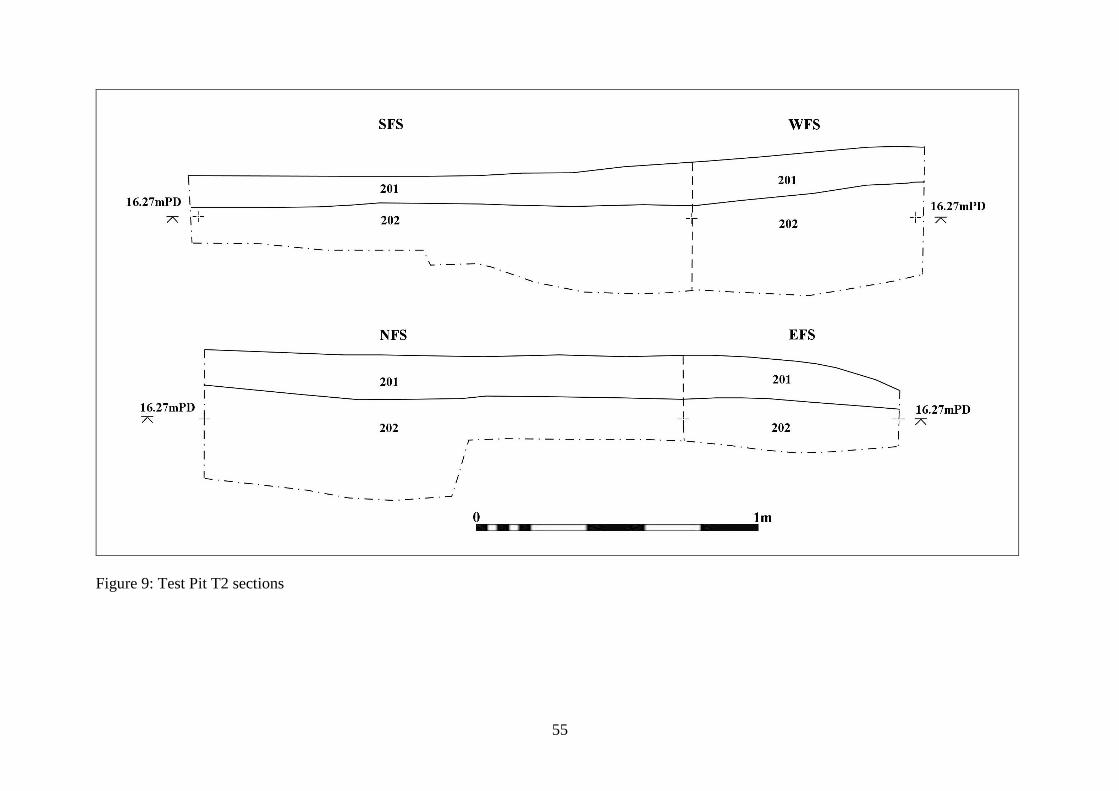
55
Figure 9: Test Pit T2 sections
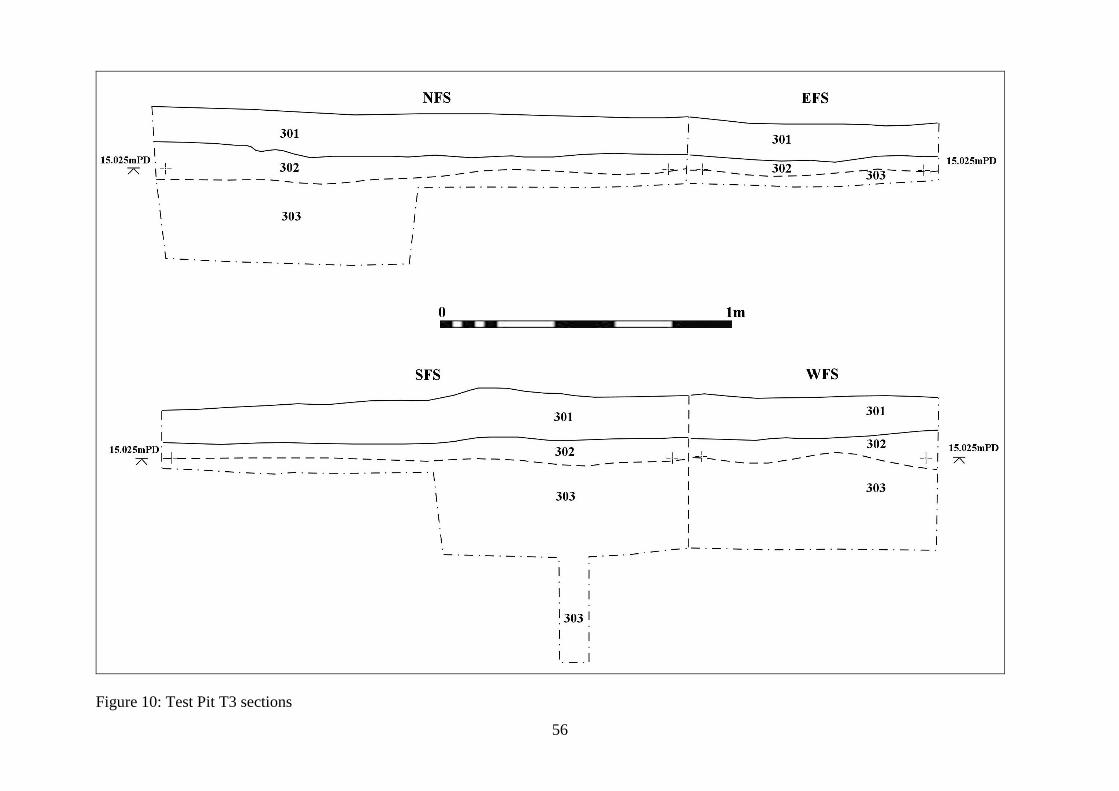
56
Figure 10: Test Pit T3 sections
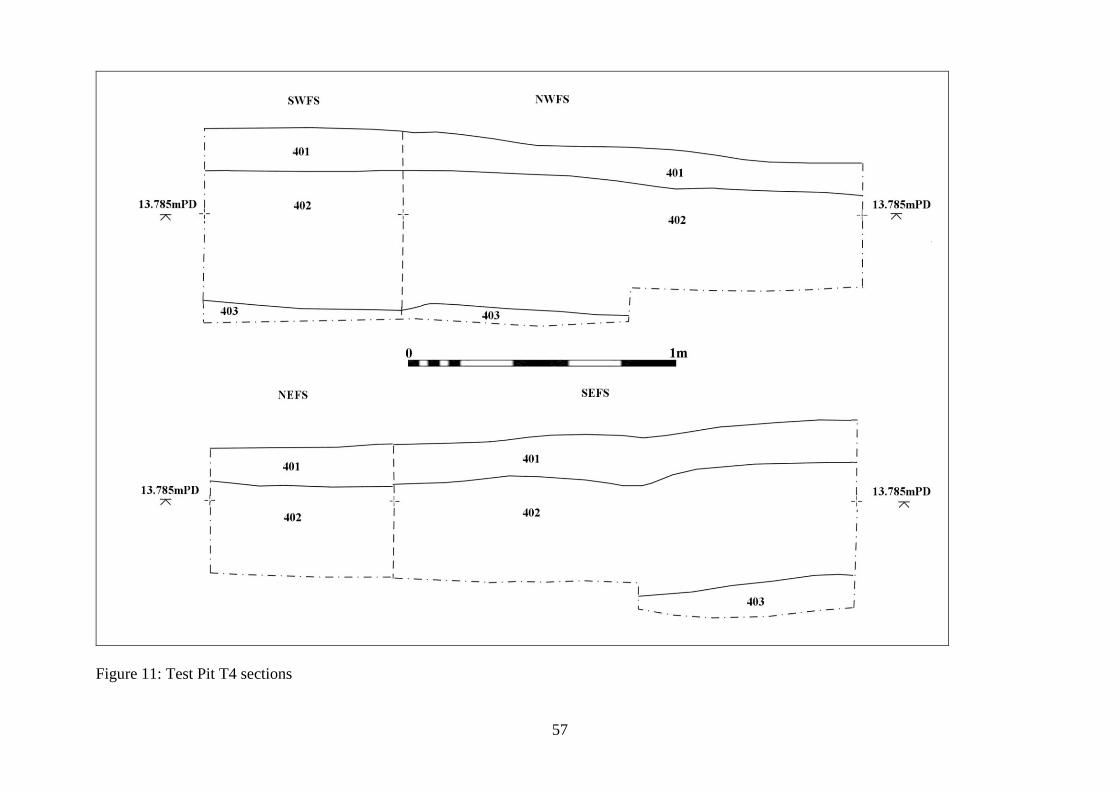
57
Figure 11: Test Pit T4 sections
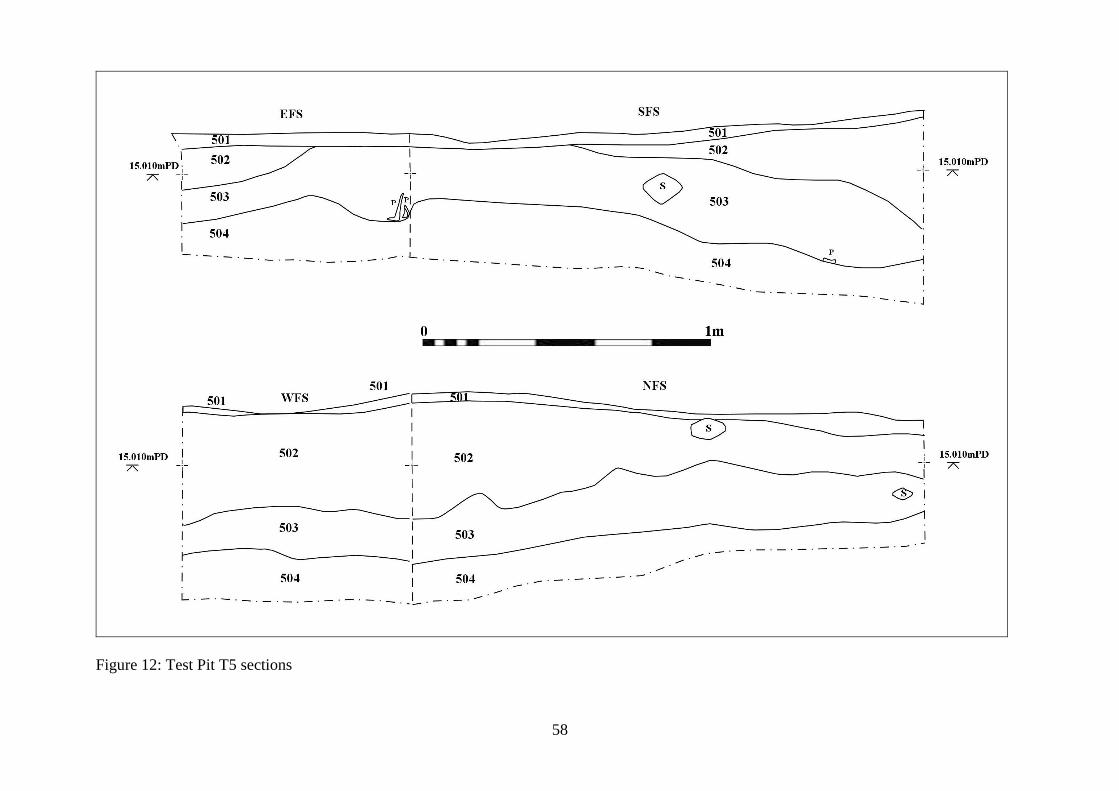
58
Figure 12: Test Pit T5 sections
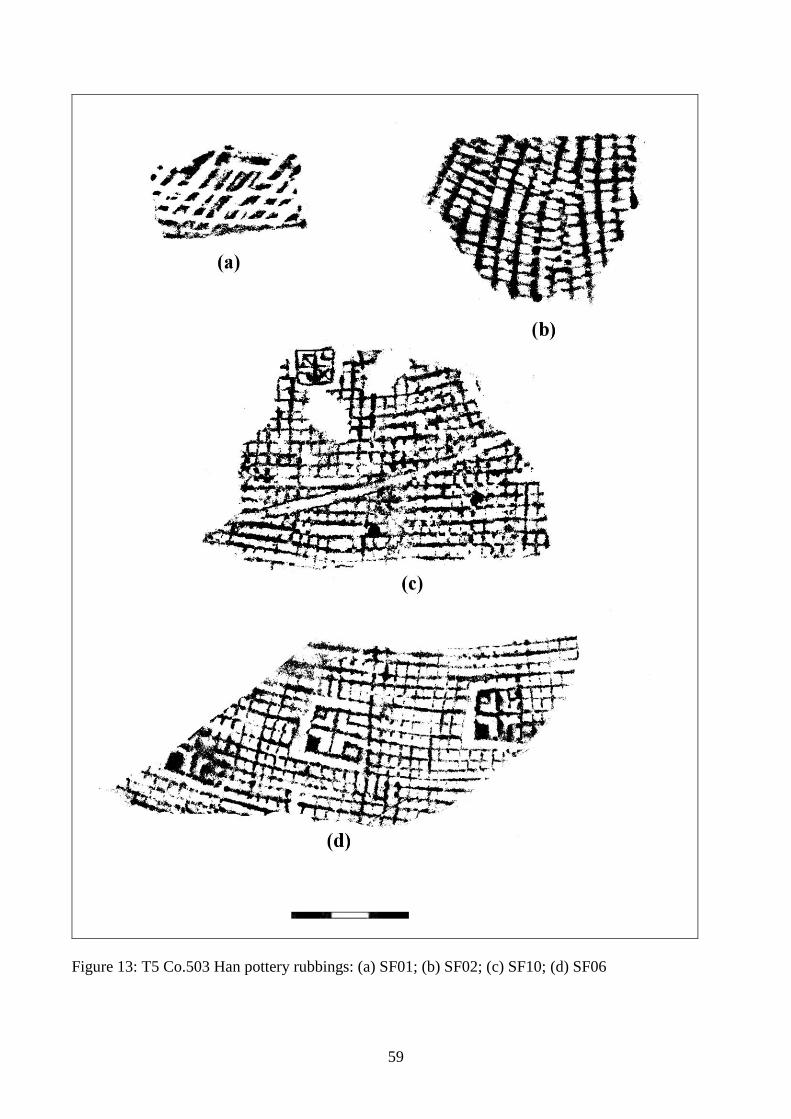
59
Figure 13: T5 Co.503 Han pottery rubbings: (a) SF01; (b) SF02; (c) SF10; (d) SF06
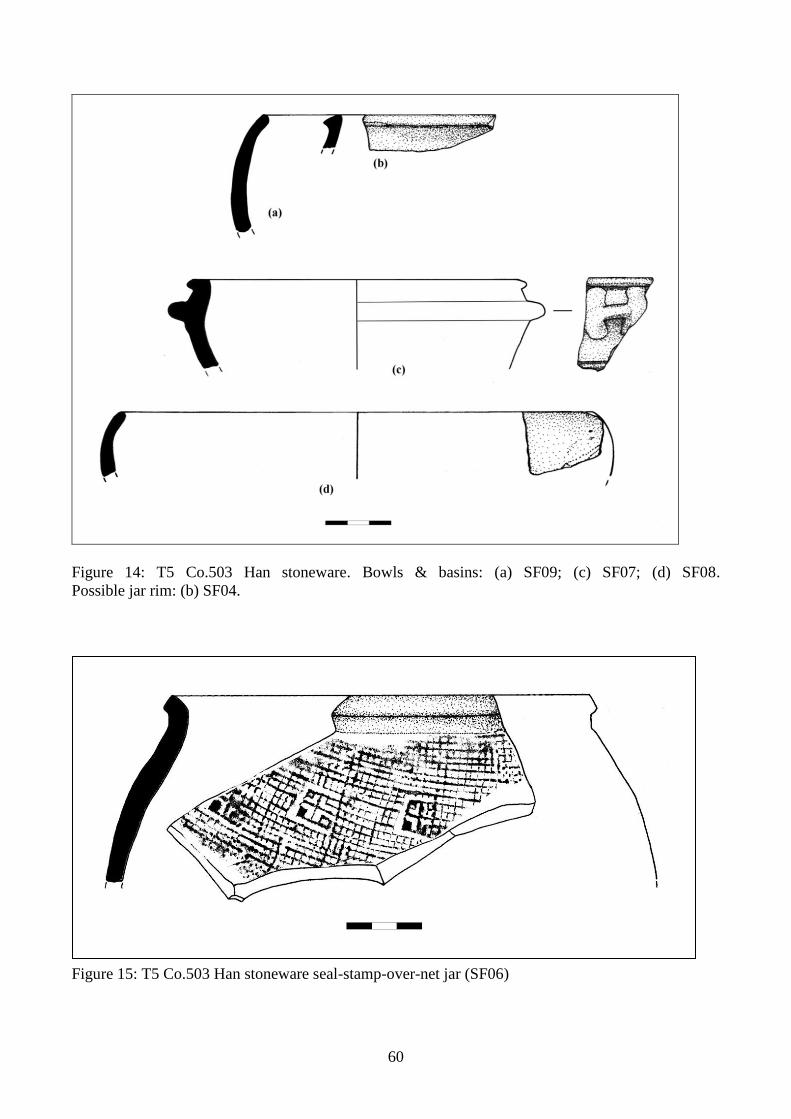
60
Figure 14: T5 Co.503 Han stoneware. Bowls & basins: (a) SF09; (c) SF07; (d) SF08.
Possible jar rim: (b) SF04.
Figure 15: T5 Co.503 Han stoneware seal-stamp-over-net jar (SF06)
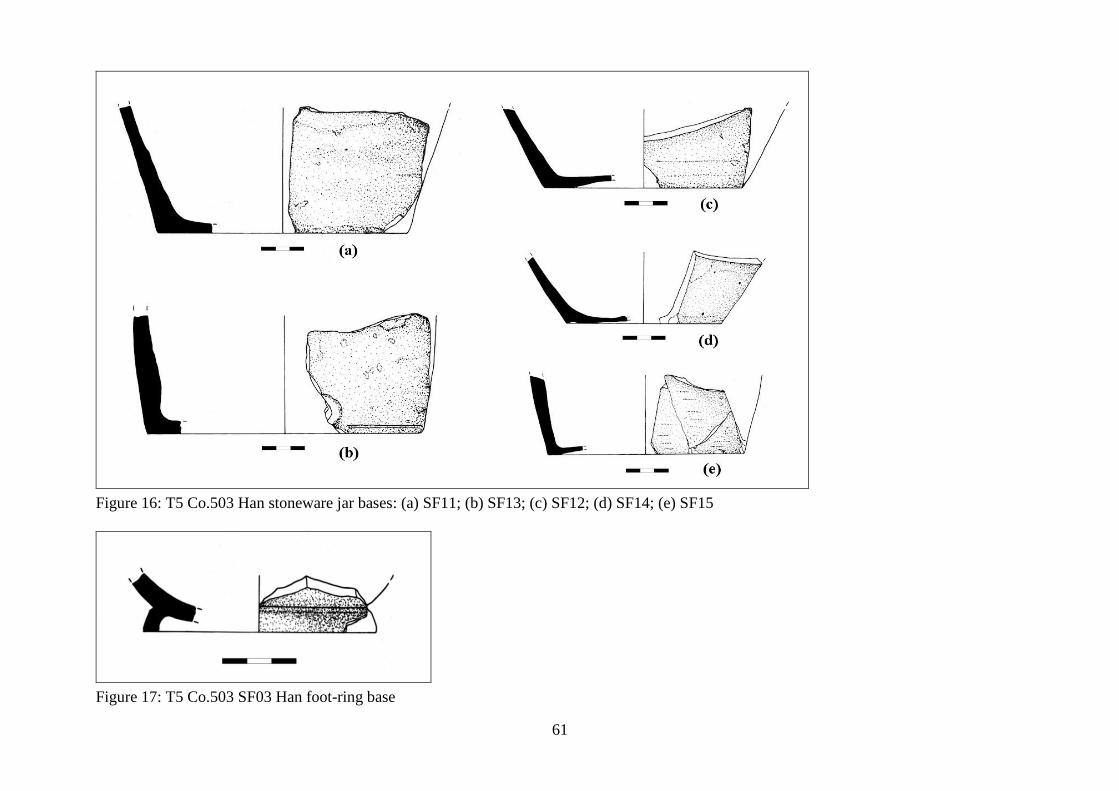
61
Figure 16: T5 Co.503 Han stoneware jar bases: (a) SF11; (b) SF13; (c) SF12; (d) SF14; (e) SF15
Figure 17: T5 Co.503 SF03 Han foot-ring base
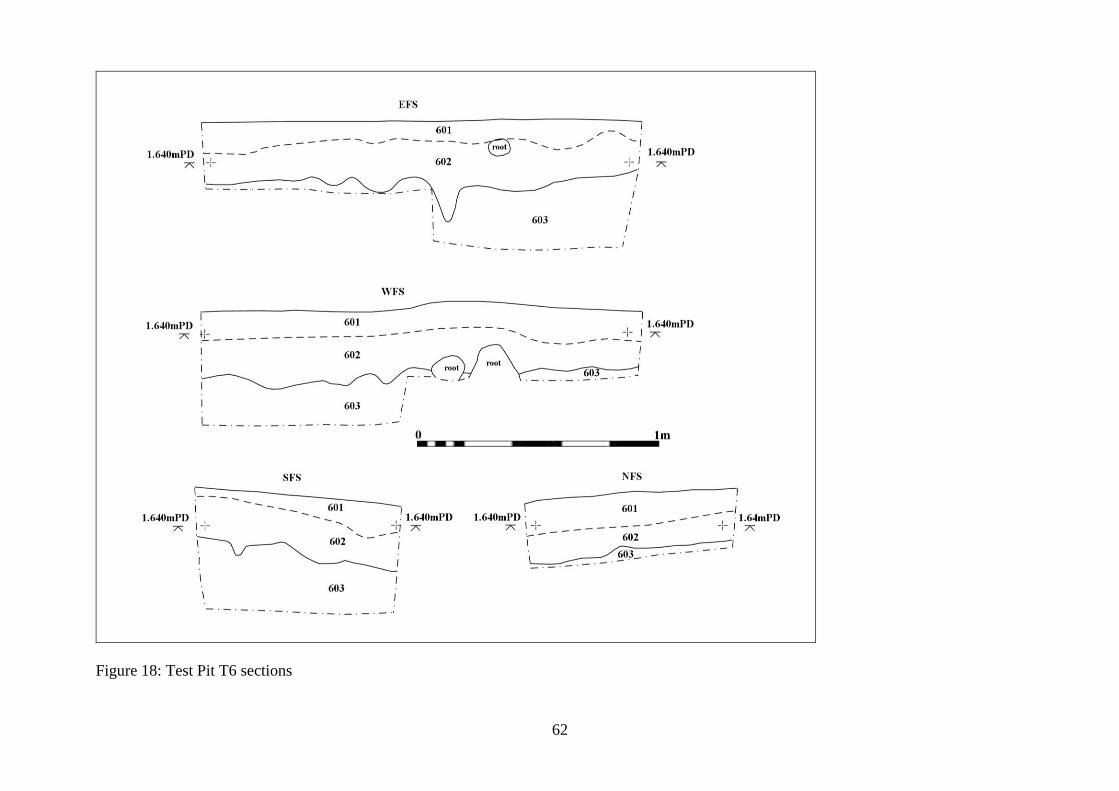
62
Figure 18: Test Pit T6 sections
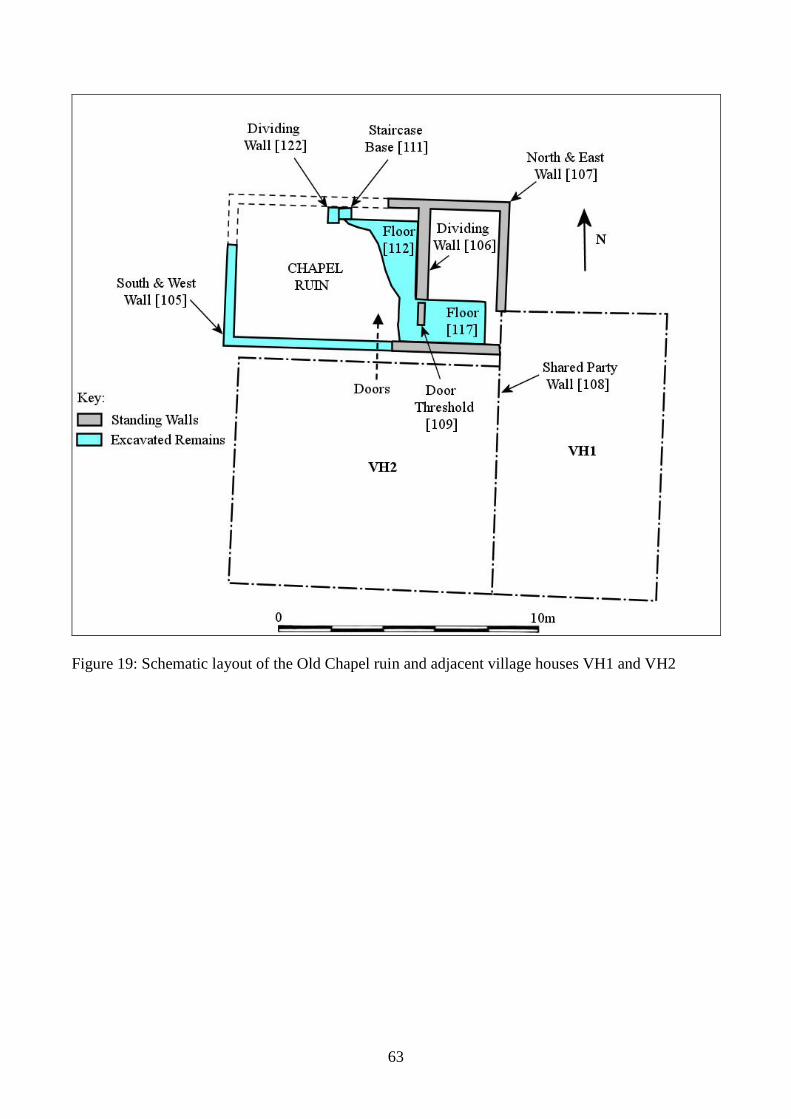
63
Figure 19: Schematic layout of the Old Chapel ruin and adjacent village houses VH1 and VH2
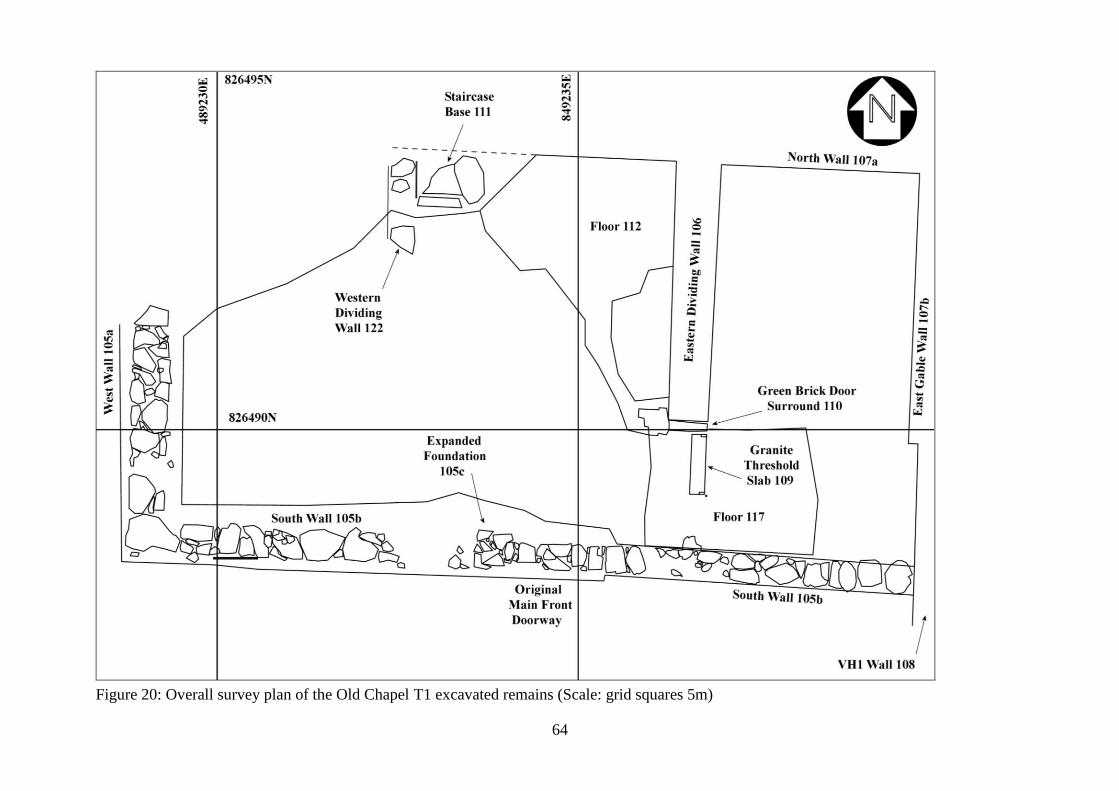
64
Figure 20: Overall survey plan of the Old Chapel T1 excavated remains (Scale: grid squares 5m)
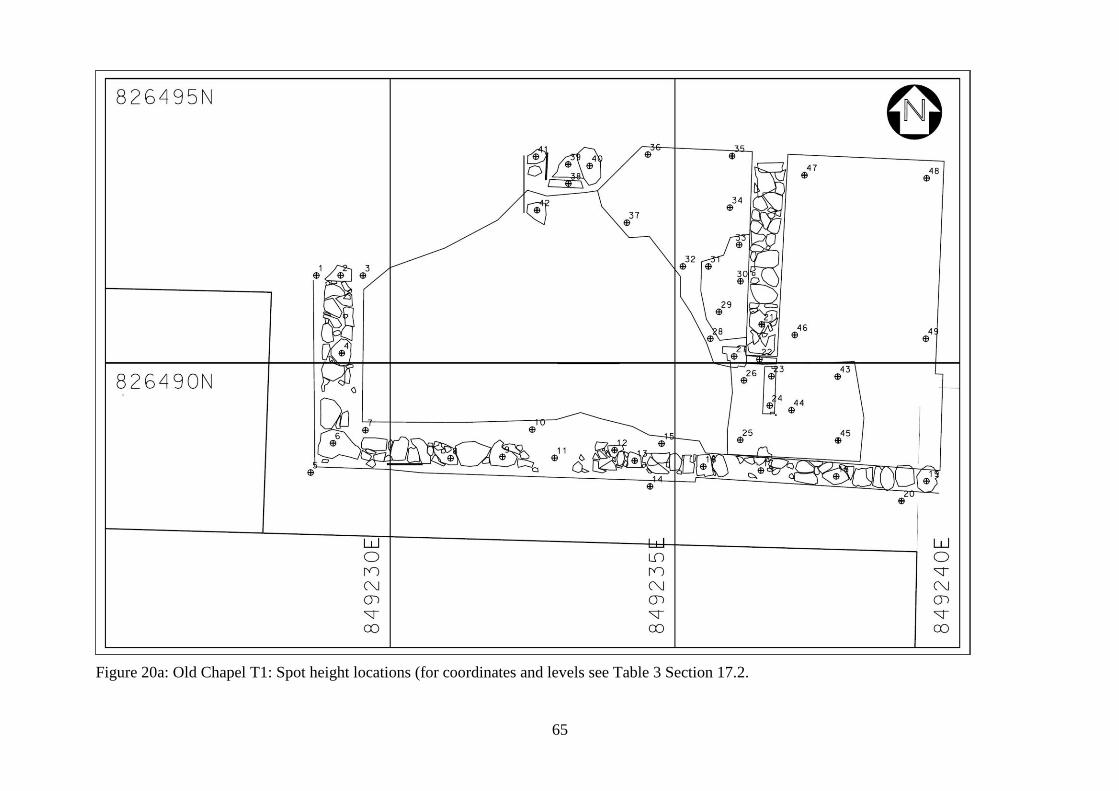
65
Figure 20a: Old Chapel T1: Spot height locations (for coordinates and levels see Table 3 Section 17.2.
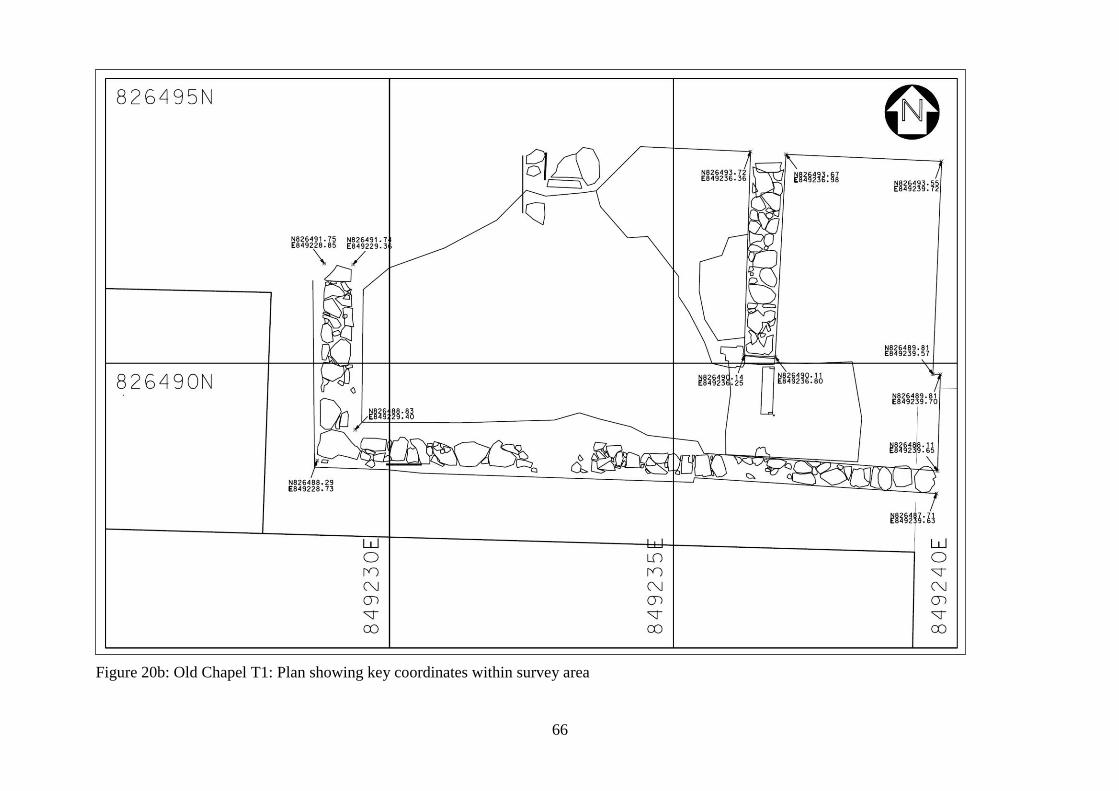
66
Figure 20b: Old Chapel T1: Plan showing key coordinates within survey area
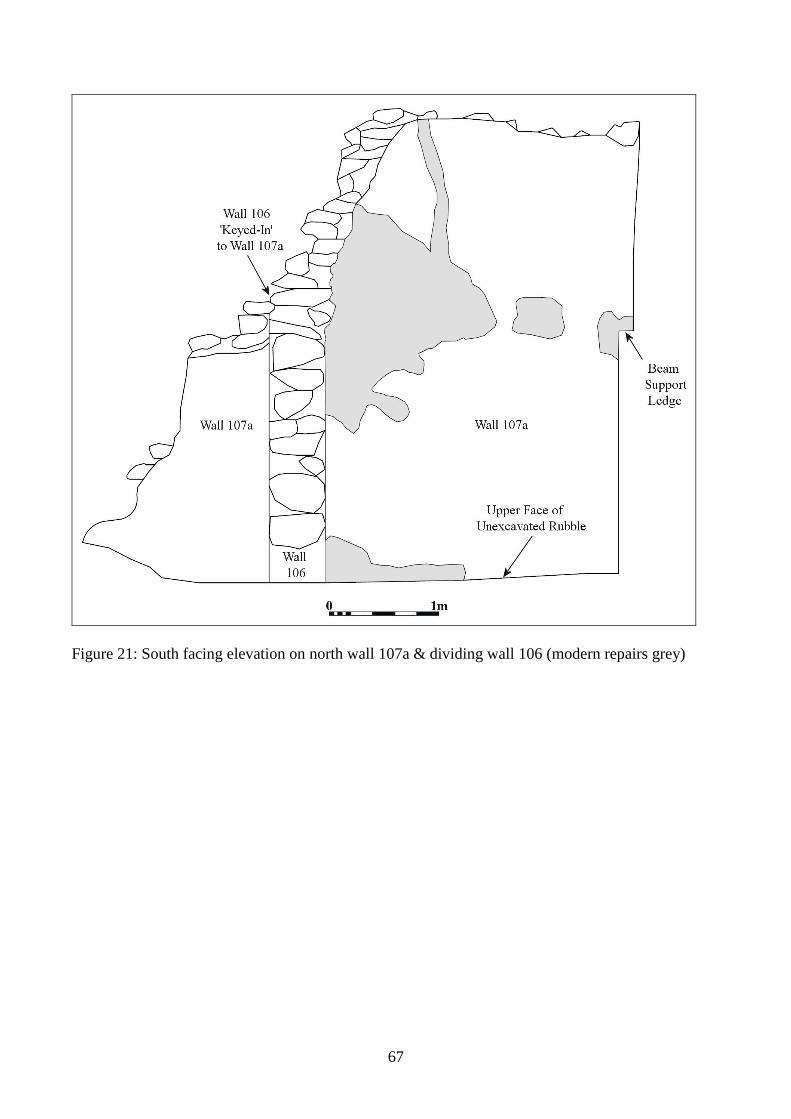
67
Figure 21: South facing elevation on north wall 107a & dividing wall 106 (modern repairs grey)

68
Figure 22: West facing elevation on dividing wall 106 (modern repairs grey)
Figure 23: South facing elevation of wall 106, brick door surround 110 and granite threshold 109
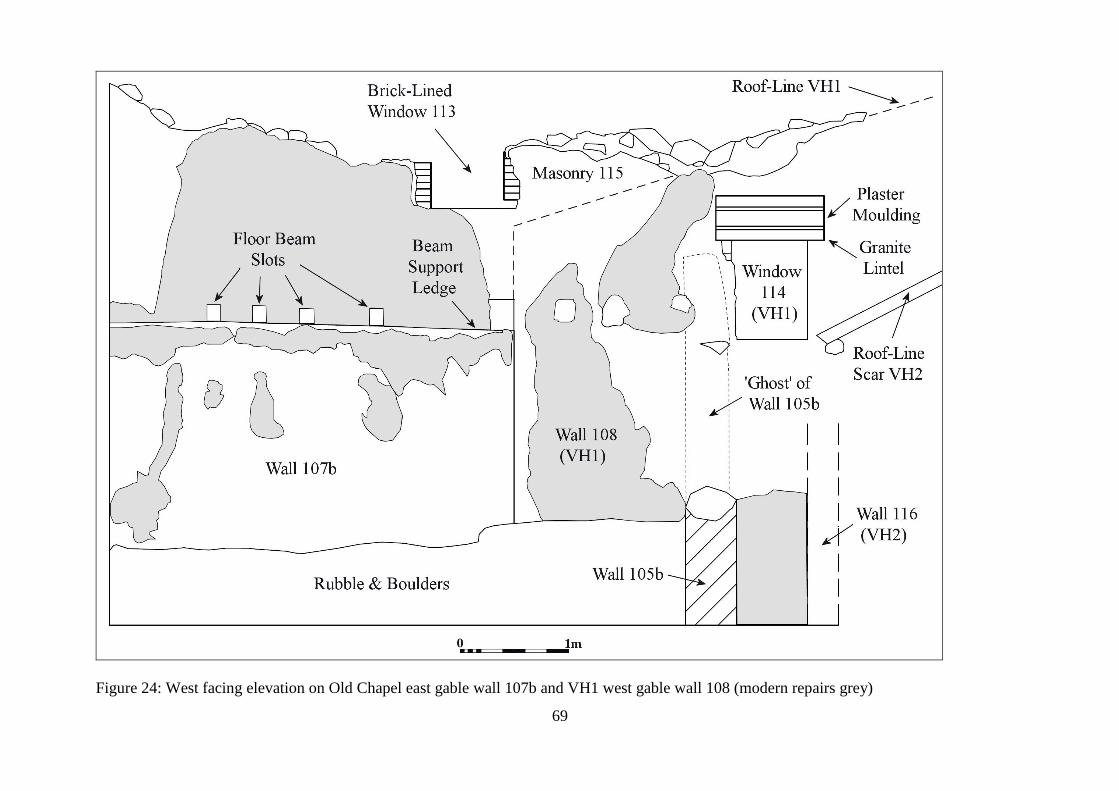
69
Figure 24: West facing elevation on Old Chapel east gable wall 107b and VH1 west gable wall 108 (modern repairs grey)
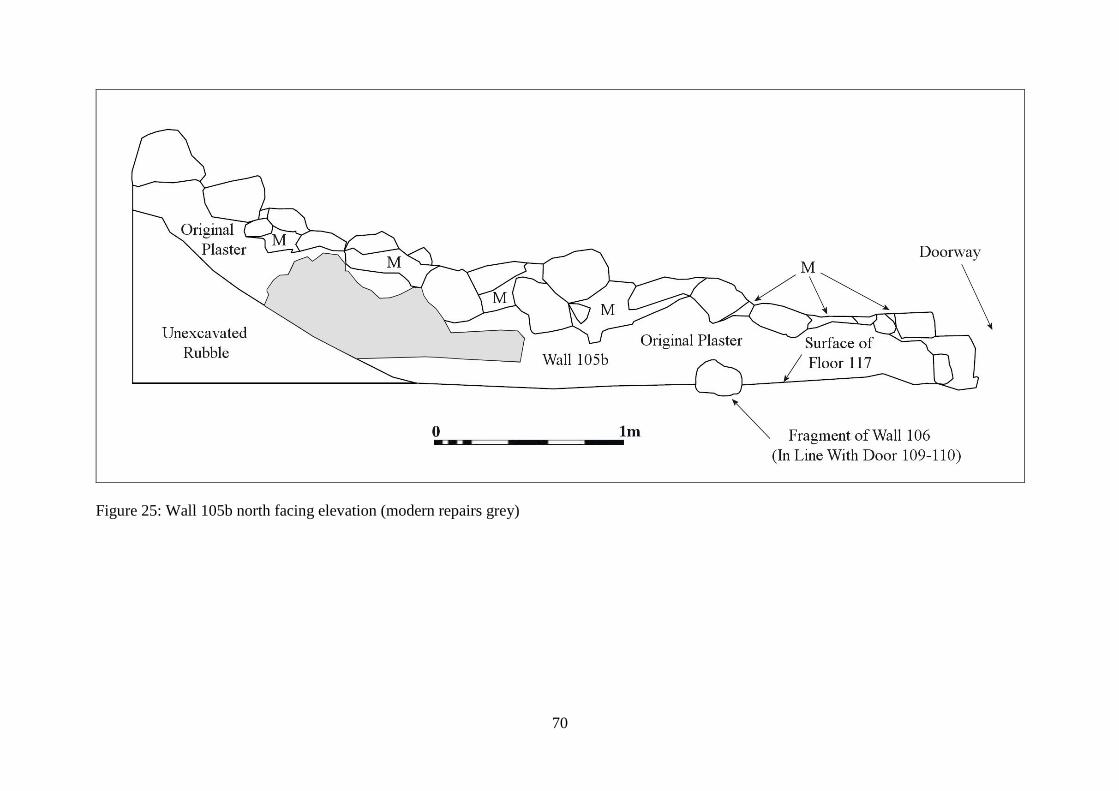
70
Figure 25: Wall 105b north facing elevation (modern repairs grey)
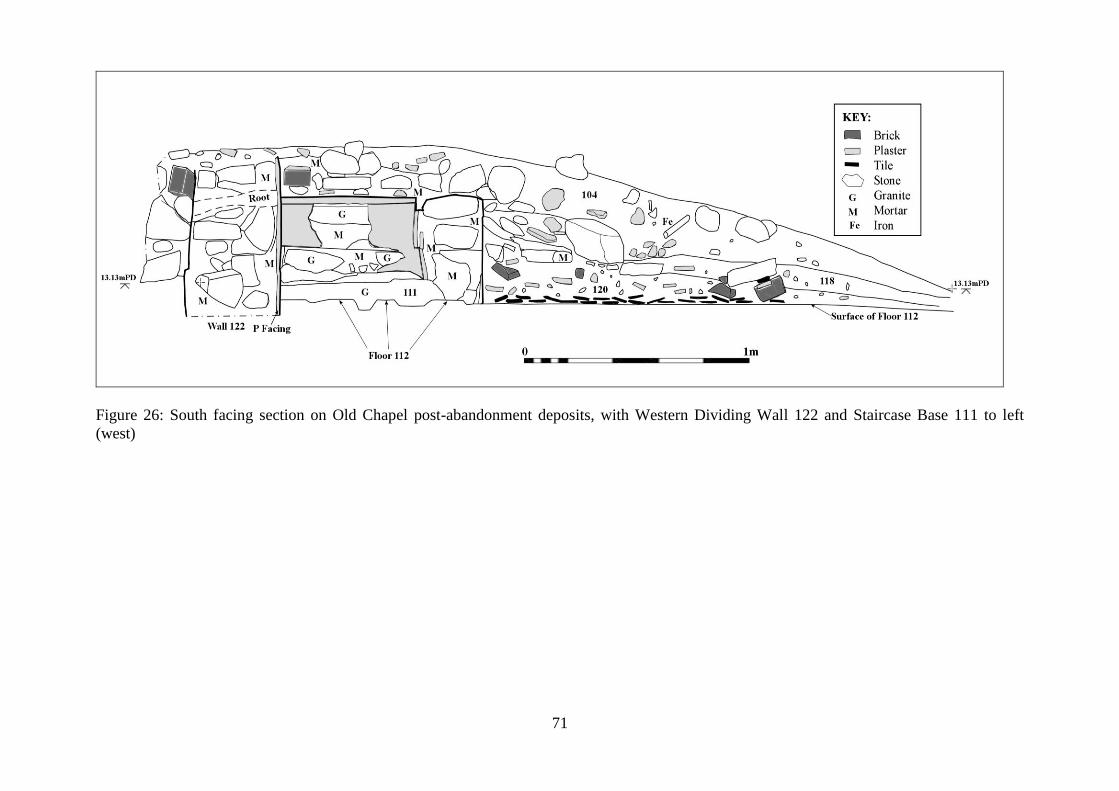
71
Figure 26: South facing section on Old Chapel post-abandonment deposits, with Western Dividing Wall 122 and Staircase Base 111 to left
(west)
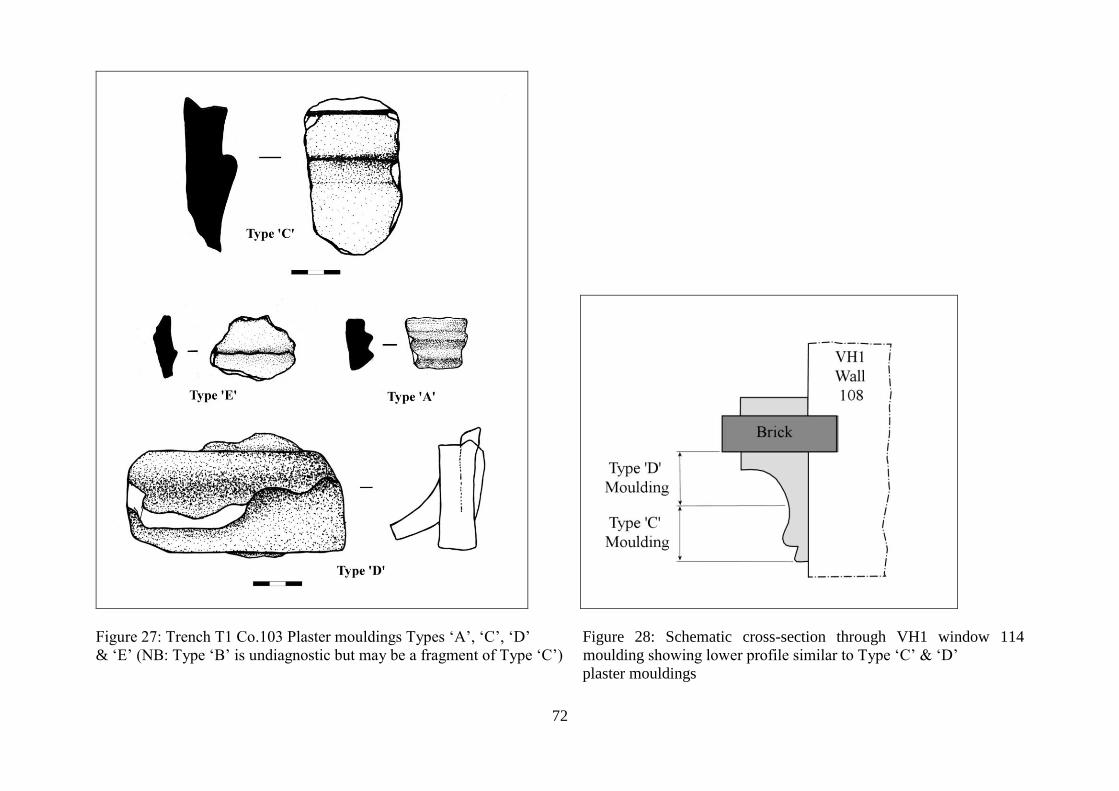
72
Figure 27: Trench T1 Co.103 Plaster mouldings Types ‘A’, ‘C’, ‘D’ Figure 28: Schematic cross-section through VH1 window 114
& ‘E’ (NB: Type ‘B’ is undiagnostic but may be a fragment of Type ‘C’) moulding showing lower profile similar to Type ‘C’ & ‘D’
plaster mouldings
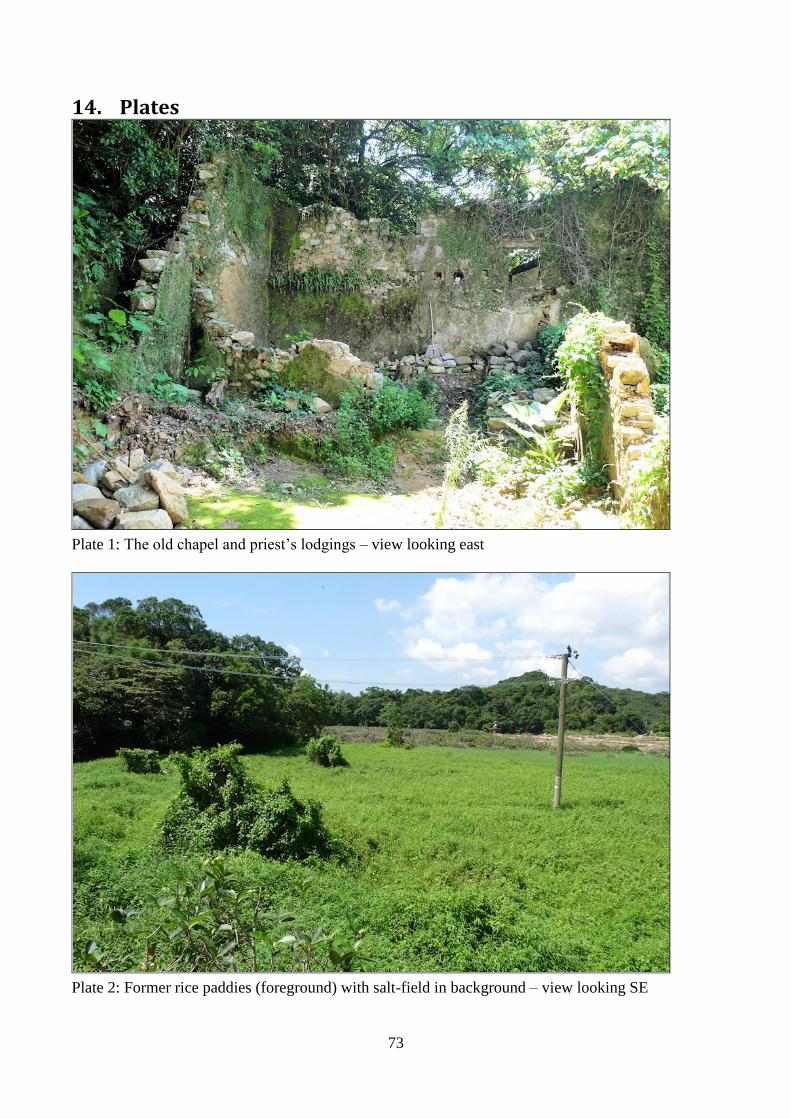
73
14. Plates
Plate 1: The old chapel and priest’s lodgings – view looking east
Plate 2: Former rice paddies (foreground) with salt-field in background – view looking SE
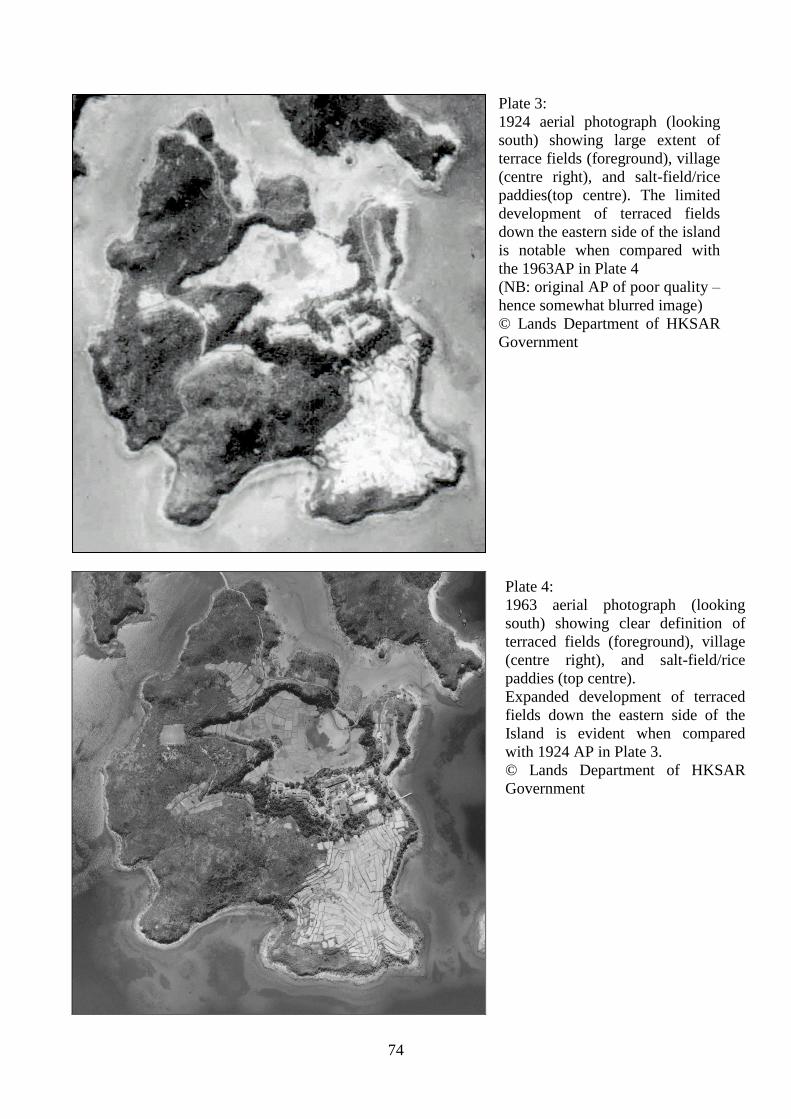
74
Plate 3:
1924 aerial photograph (looking
south) showing large extent of
terrace fields (foreground), village
(centre right), and salt-field/rice
paddies(top centre). The limited
development of terraced fields
down the eastern side of the island
is notable when compared with
the 1963AP in Plate 4
(NB: original AP of poor quality –
hence somewhat blurred image)
© Lands Department of HKSAR
Government
Plate 4:
1963 aerial photograph (looking
south) showing clear definition of
terraced fields (foreground), village
(centre right), and salt-field/rice
paddies (top centre).
Expanded development of terraced
fields down the eastern side of the
Island is evident when compared
with 1924 AP in Plate 3.
© Lands Department of HKSAR
Government
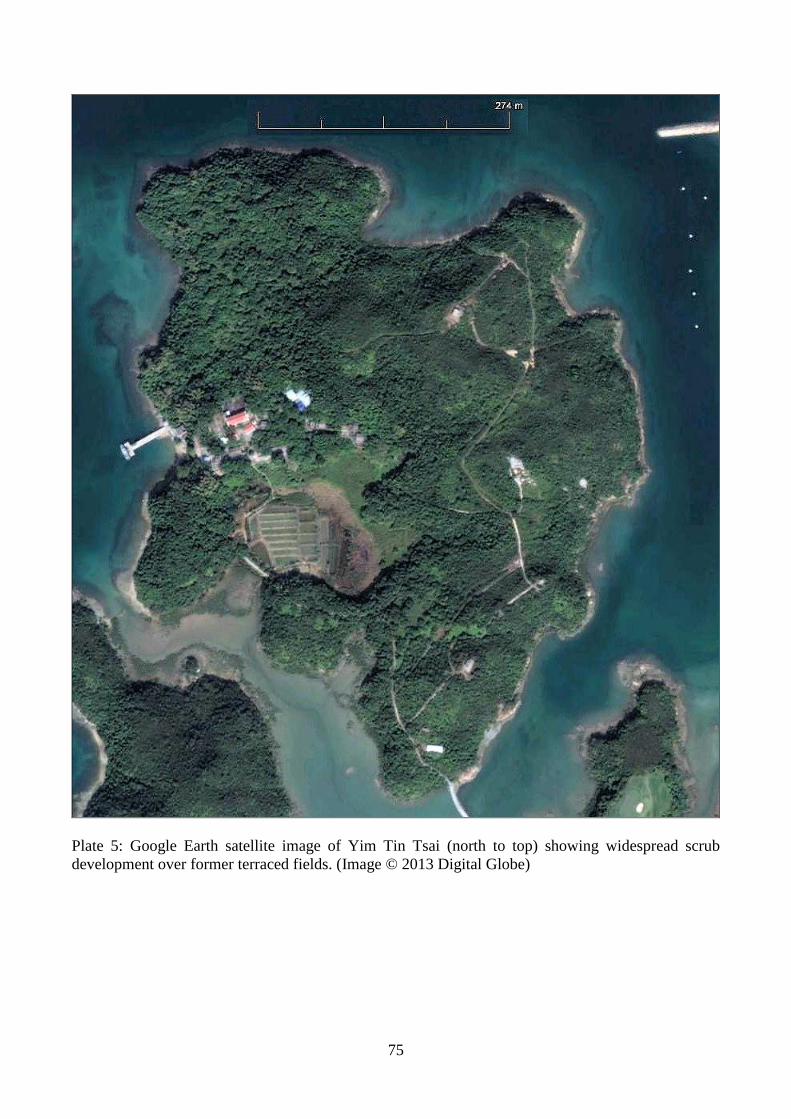
75
Plate 5: Google Earth satellite image of Yim Tin Tsai (north to top) showing widespread scrub
development over former terraced fields. (Image © 2013 Digital Globe)
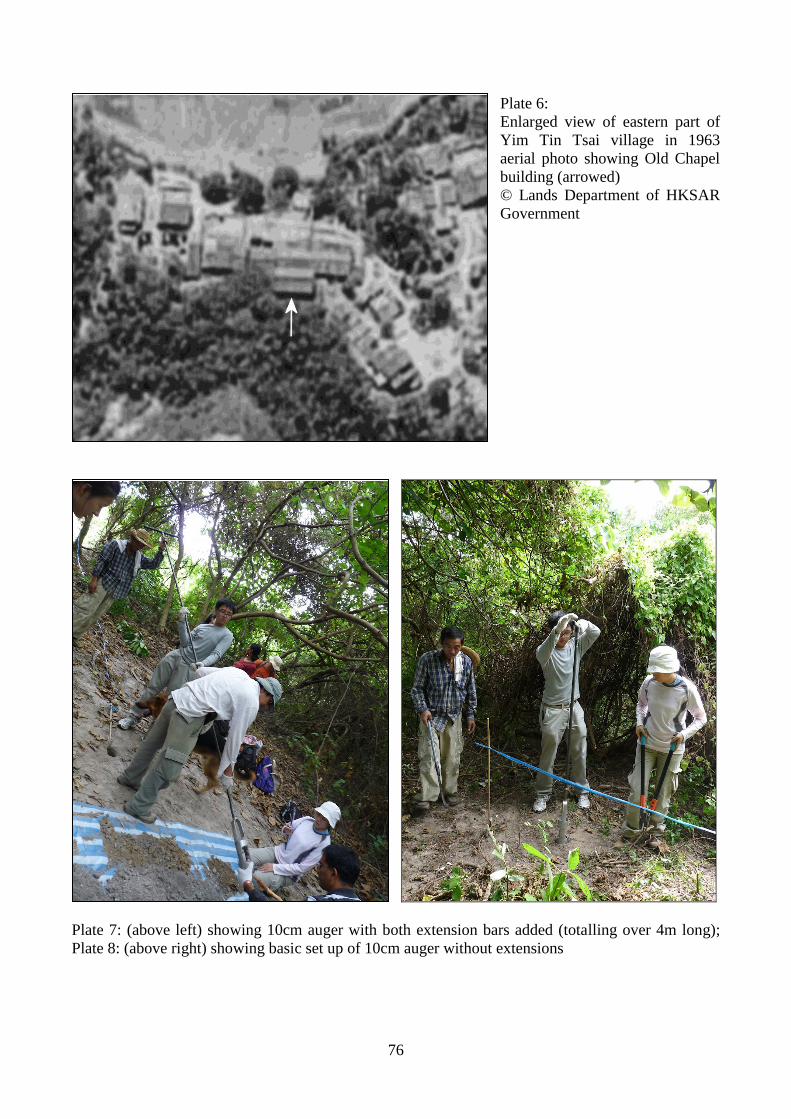
76
Plate 6:
Enlarged view of eastern part of
Yim Tin Tsai village in 1963
aerial photo showing Old Chapel
building (arrowed)
© Lands Department of HKSAR
Government
Plate 7: (above left) showing 10cm auger with both extension bars added (totalling over 4m long);
Plate 8: (above right) showing basic set up of 10cm auger without extensions
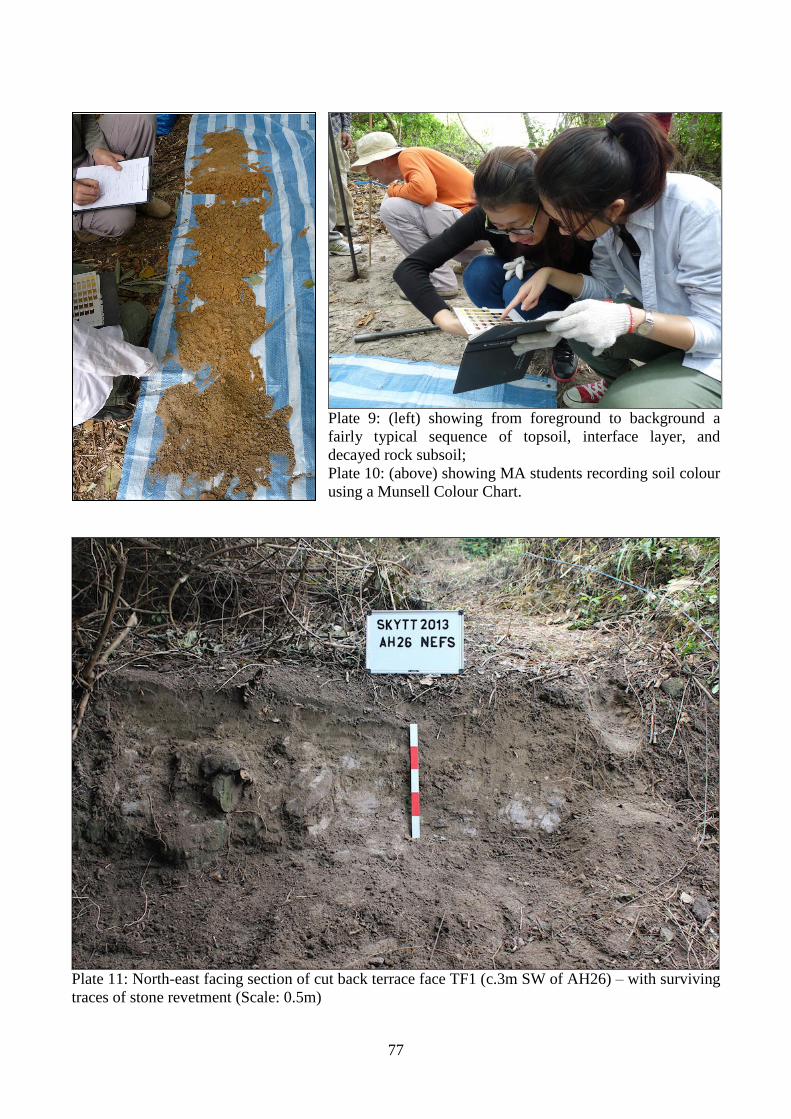
77
Plate 9: (left) showing from foreground to background a
fairly typical sequence of topsoil, interface layer, and
decayed rock subsoil;
Plate 10: (above) showing MA students recording soil colour
using a Munsell Colour Chart.
Plate 11: North-east facing section of cut back terrace face TF1 (c.3m SW of AH26) – with surviving
traces of stone revetment (Scale: 0.5m)

78
Plate 12: West facing section of cut back terrace face TF2 (c.4.5m west of AH24) (Scale: 0.5m)
Plate 13: South-west facing section of cut back terrace face TF3 (c.10m SW of AH21) (Scale: 0.5m)
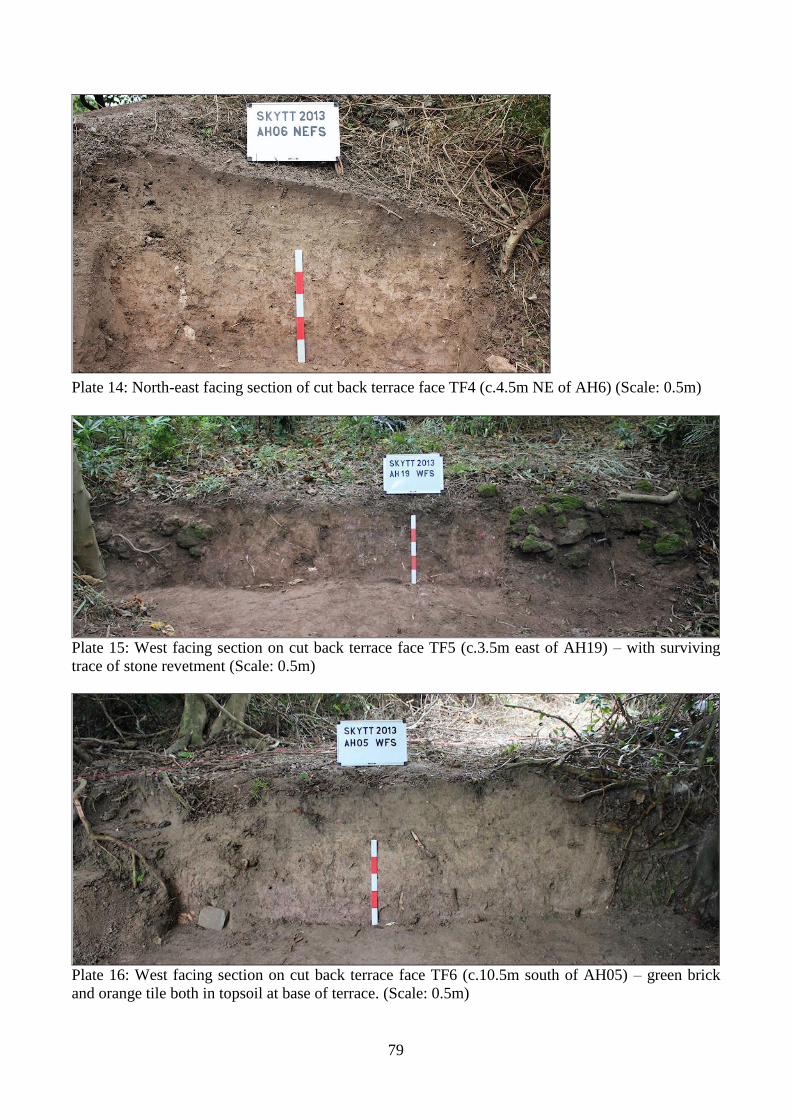
79
Plate 14: North-east facing section of cut back terrace face TF4 (c.4.5m NE of AH6) (Scale: 0.5m)
Plate 15: West facing section on cut back terrace face TF5 (c.3.5m east of AH19) – with surviving
trace of stone revetment (Scale: 0.5m)
Plate 16: West facing section on cut back terrace face TF6 (c.10.5m south of AH05) – green brick
and orange tile both in topsoil at base of terrace. (Scale: 0.5m)

80
Plate 17: North facing section of T2. (Scales: 2m and 0.5m)
Plate 19 (above): Gaming counter from
Co.201, T2. (Scale in cm)*
*NB: Scales in all finds photographs
are in cm.
Plate 18 (left): West facing section and
post-excavation overview of T2.
(Scales: 2m, 0.5m and 0.3m)
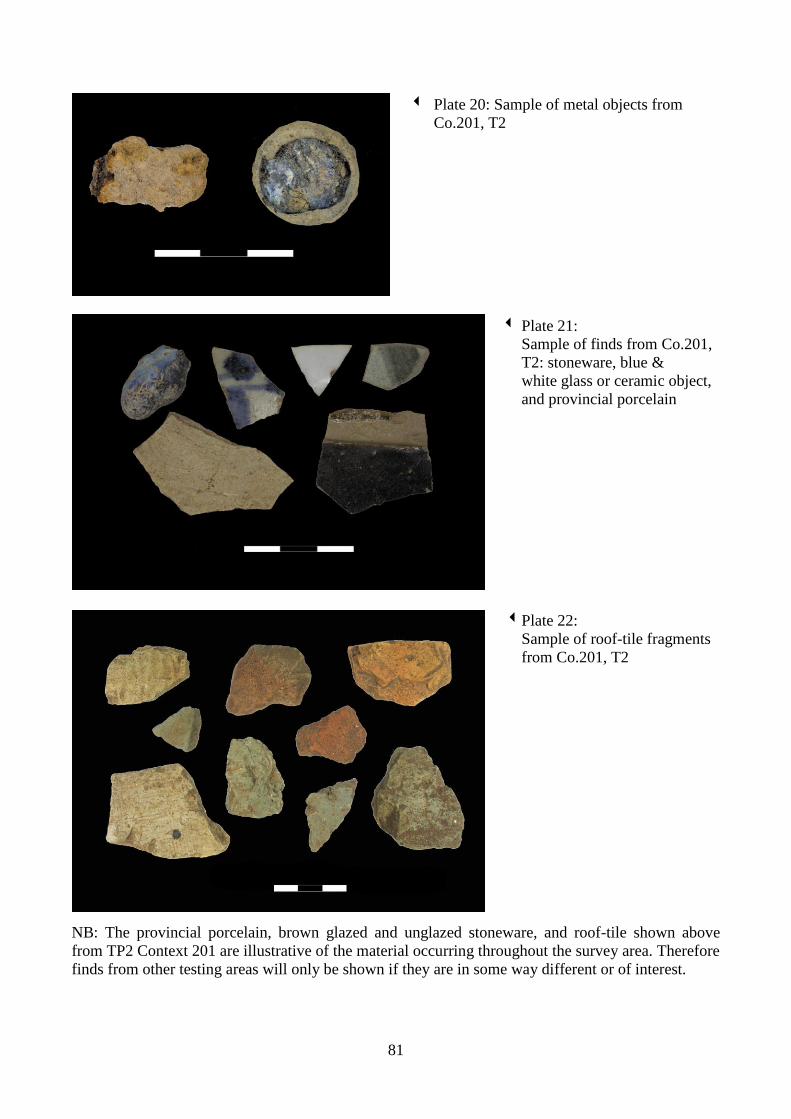
81
Plate 20: Sample of metal objects from
Co.201, T2
Plate 21:
Sample of finds from Co.201,
T2: stoneware, blue &
white glass or ceramic object,
and provincial porcelain
Plate 22:
Sample of roof-tile fragments
from Co.201, T2
NB: The provincial porcelain, brown glazed and unglazed stoneware, and roof-tile shown above
from TP2 Context 201 are illustrative of the material occurring throughout the survey area. Therefore
finds from other testing areas will only be shown if they are in some way different or of interest.
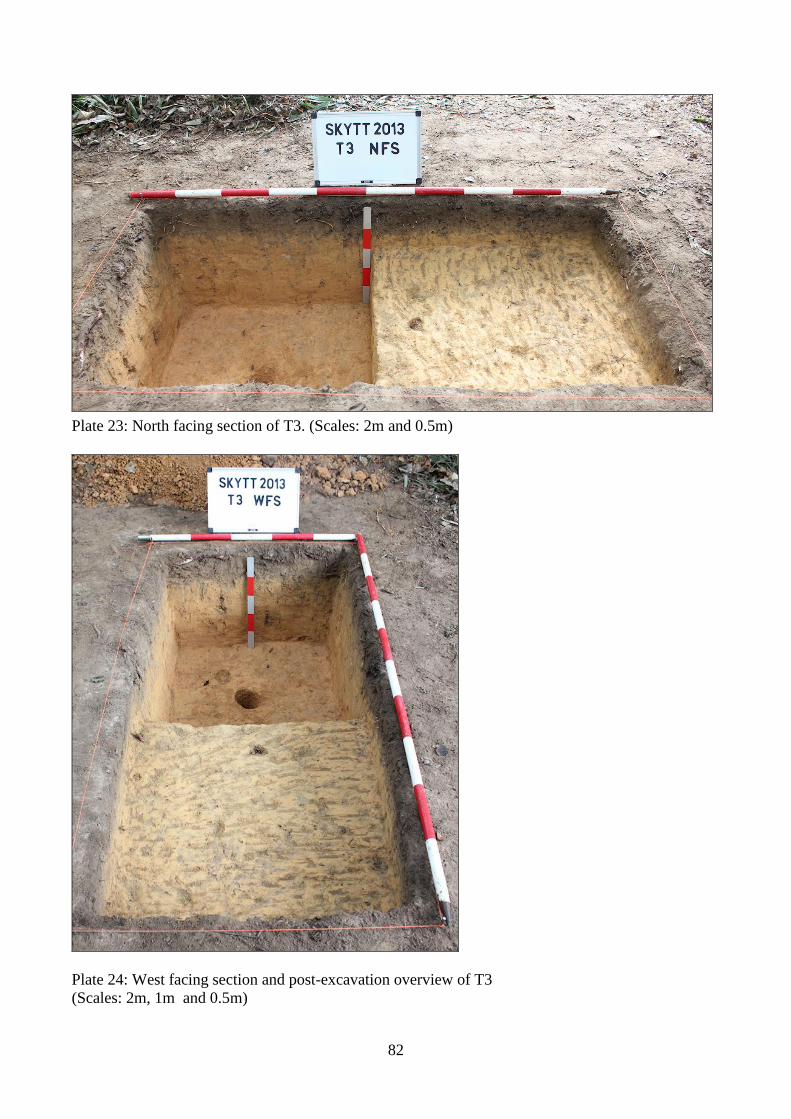
82
Plate 23: North facing section of T3. (Scales: 2m and 0.5m)
Plate 24: West facing section and post-excavation overview of T3
(Scales: 2m, 1m and 0.5m)
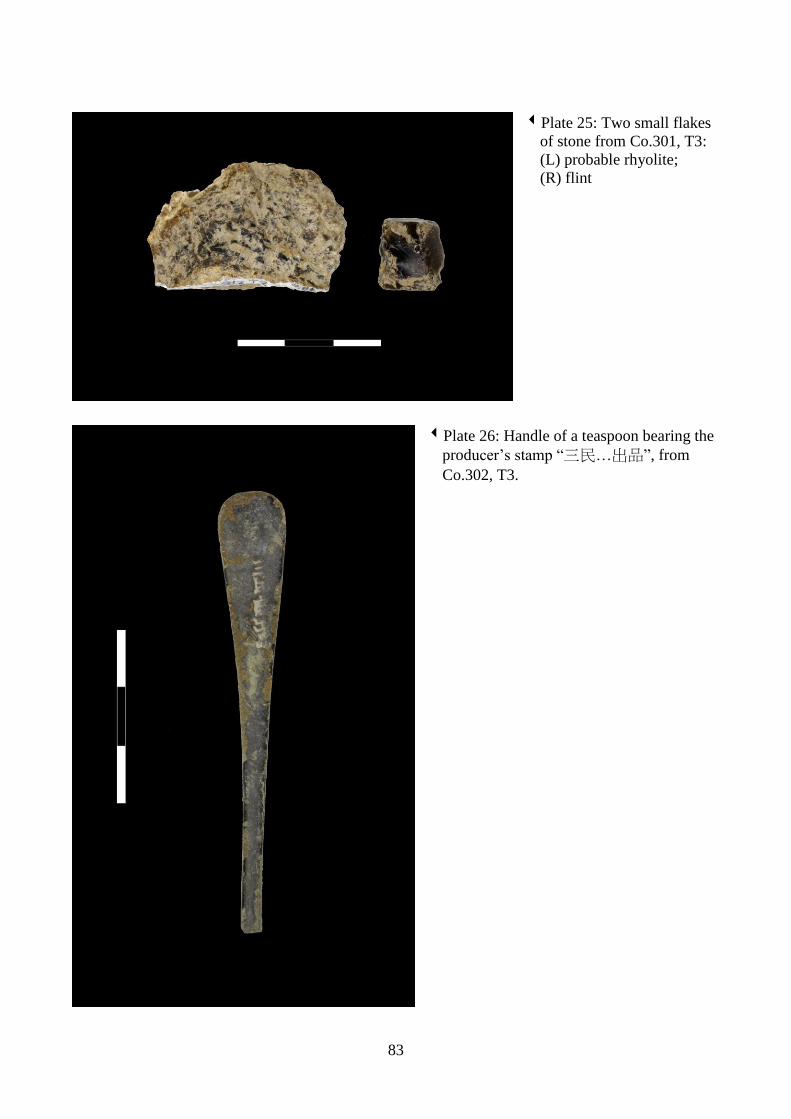
83
Plate 25: Two small flakes
of stone from Co.301, T3:
(L) probable rhyolite;
(R) flint
Plate 26: Handle of a teaspoon bearing the
producer’s stamp “三民…出品”, from
Co.302, T3.
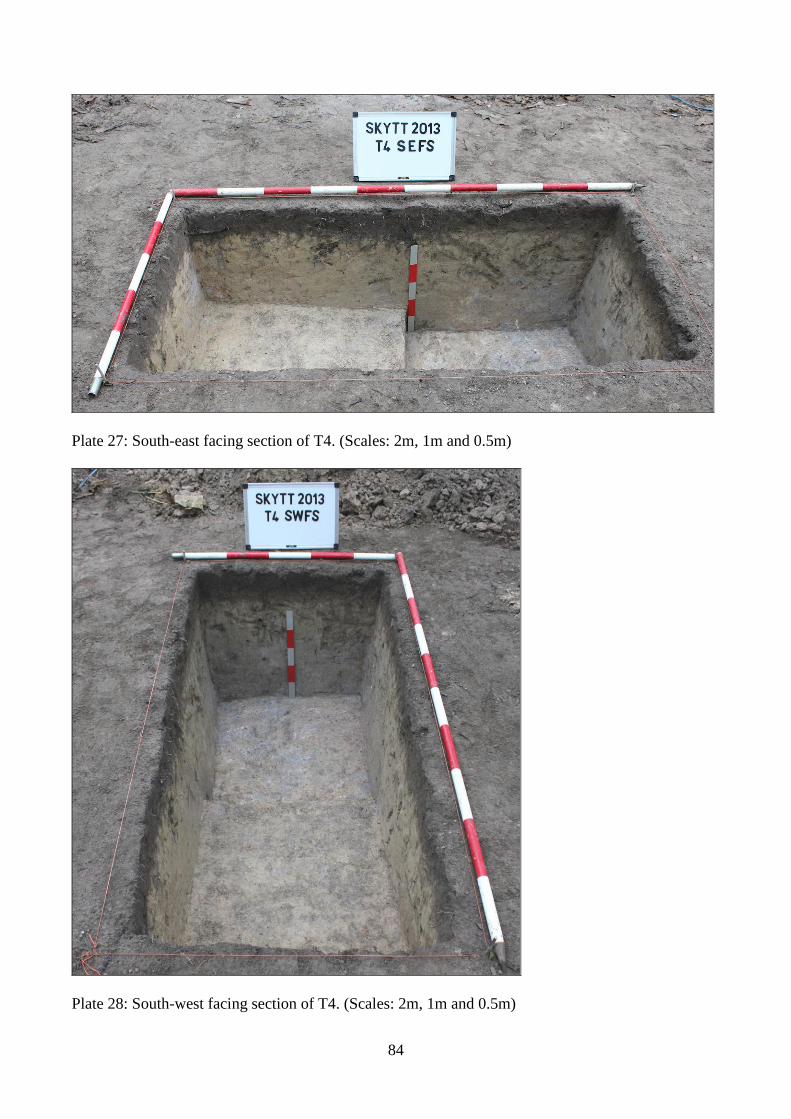
84
Plate 27: South-east facing section of T4. (Scales: 2m, 1m and 0.5m)
Plate 28: South-west facing section of T4. (Scales: 2m, 1m and 0.5m)
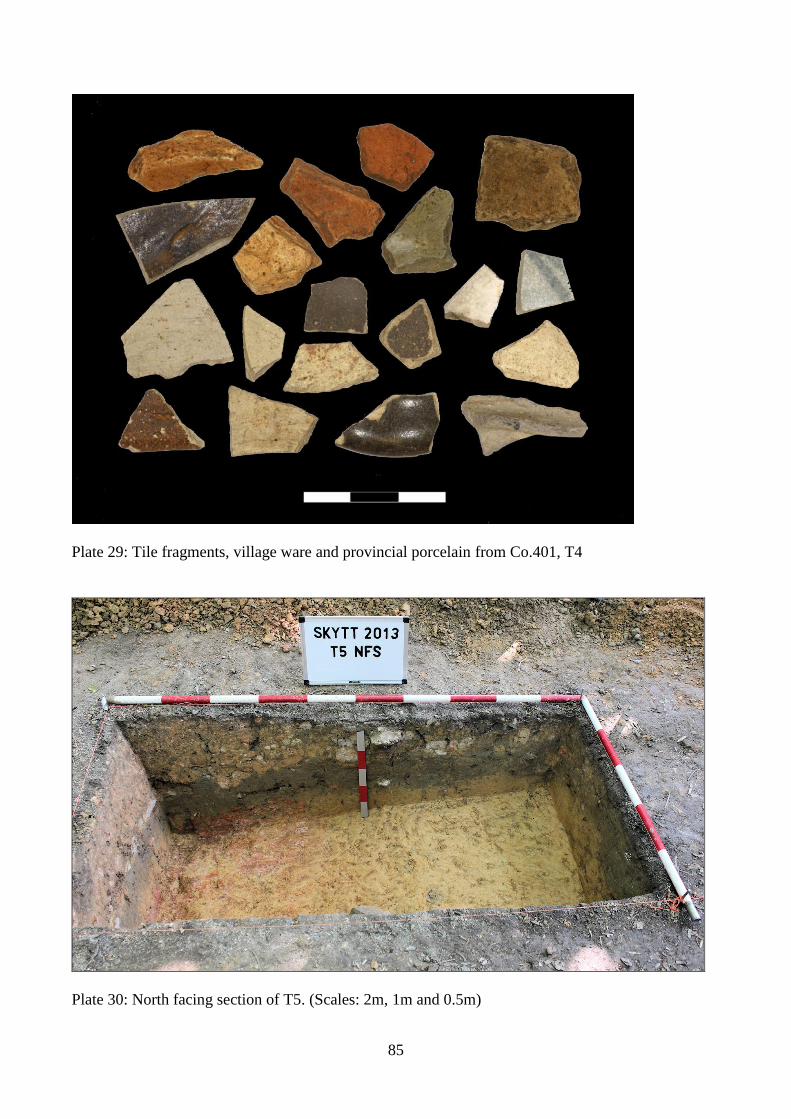
85
Plate 29: Tile fragments, village ware and provincial porcelain from Co.401, T4
Plate 30: North facing section of T5. (Scales: 2m, 1m and 0.5m)
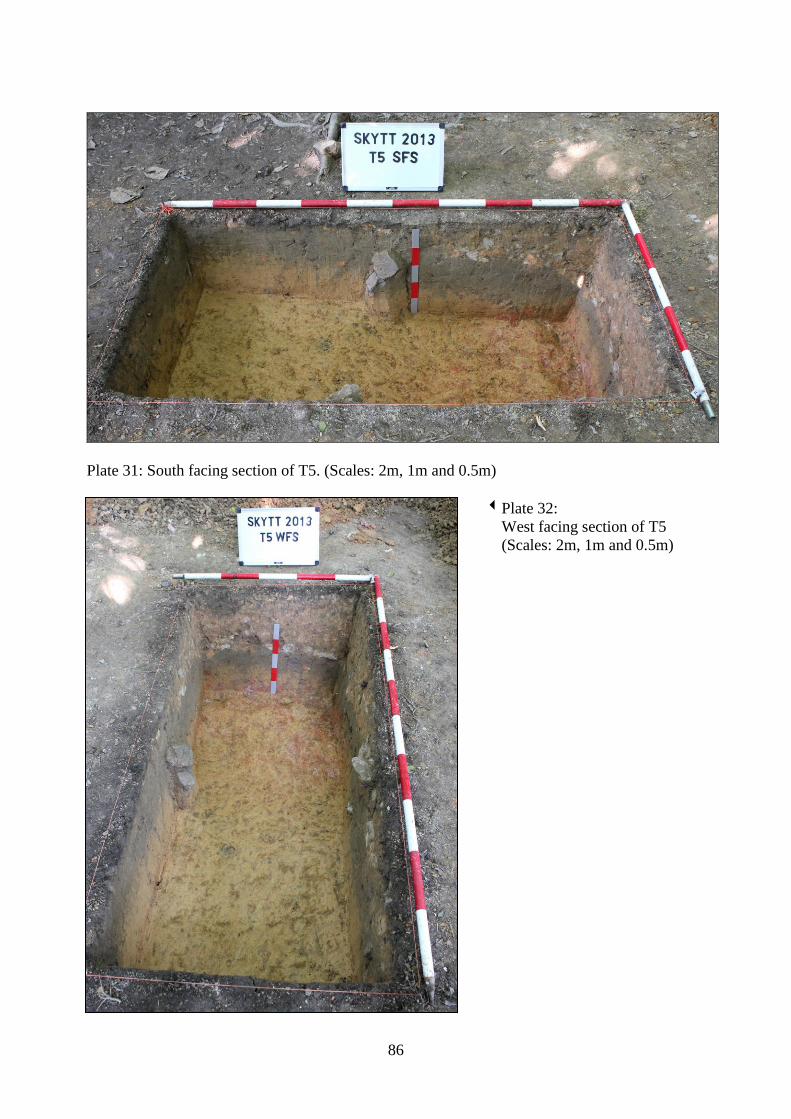
86
Plate 31: South facing section of T5. (Scales: 2m, 1m and 0.5m)
Plate 32:
West facing section of T5
(Scales: 2m, 1m and 0.5m)
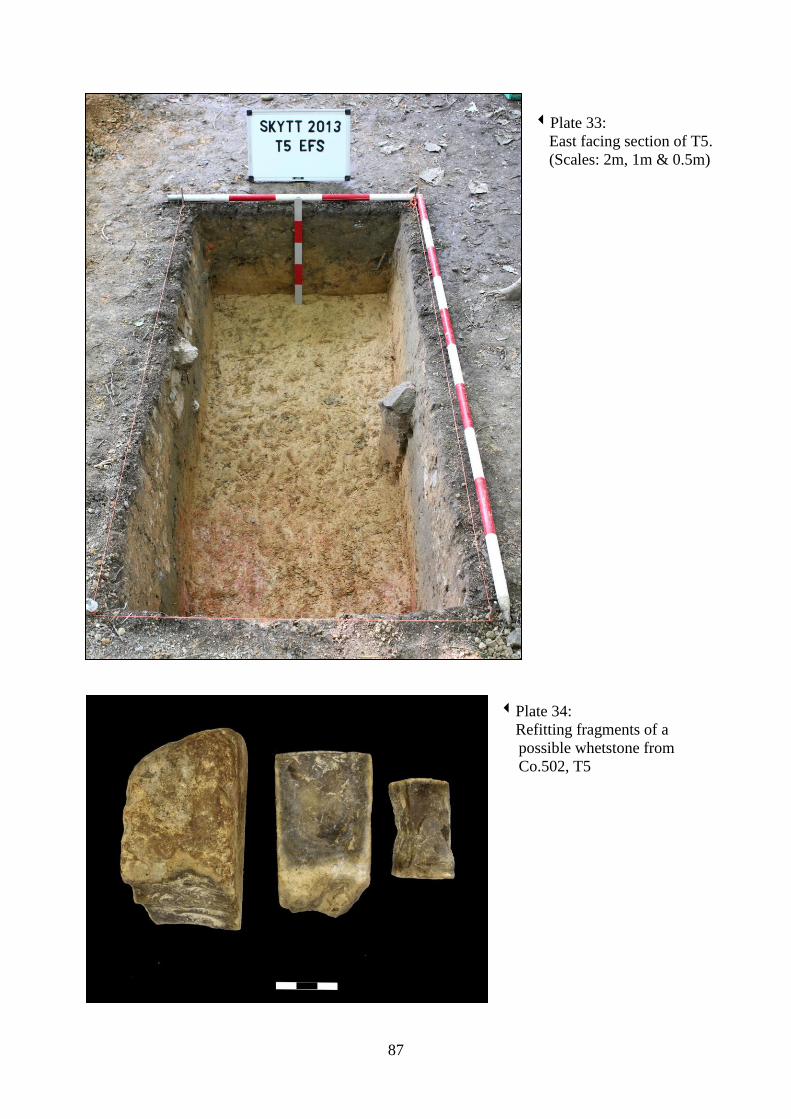
87
Plate 33:
East facing section of T5.
(Scales: 2m, 1m & 0.5m)
Plate 34:
Refitting fragments of a
possible whetstone from
Co.502, T5

88
(above left) Plate 35: Net-impressed Han stoneware body sherds from Co.502, T5;
(above right) Plate 36: SF01, bold cord-impressed coarseware body sherd from Co.503, T5
(left) Plate 37:
SF02, fine red fabric pottery with impressed
rectangular ‘degenerate’ net
(above left) Plate 37a: SF04, stoneware rim from Co.503, T5;
(above right): Plate 37b: SF05, stoneware rim from Co.503, T5;
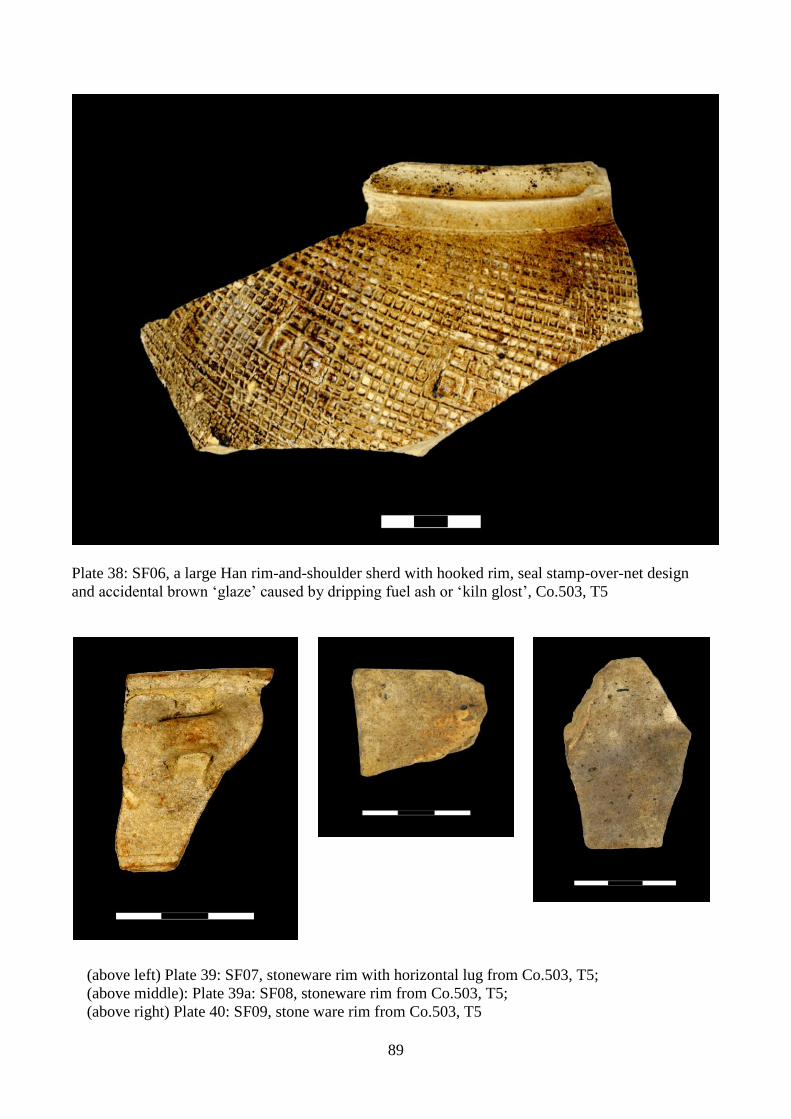
89
Plate 38: SF06, a large Han rim-and-shoulder sherd with hooked rim, seal stamp-over-net design
and accidental brown ‘glaze’ caused by dripping fuel ash or ‘kiln glost’, Co.503, T5
(above left) Plate 39: SF07, stoneware rim with horizontal lug from Co.503, T5;
(above middle): Plate 39a: SF08, stoneware rim from Co.503, T5;
(above right) Plate 40: SF09, stone ware rim from Co.503, T5
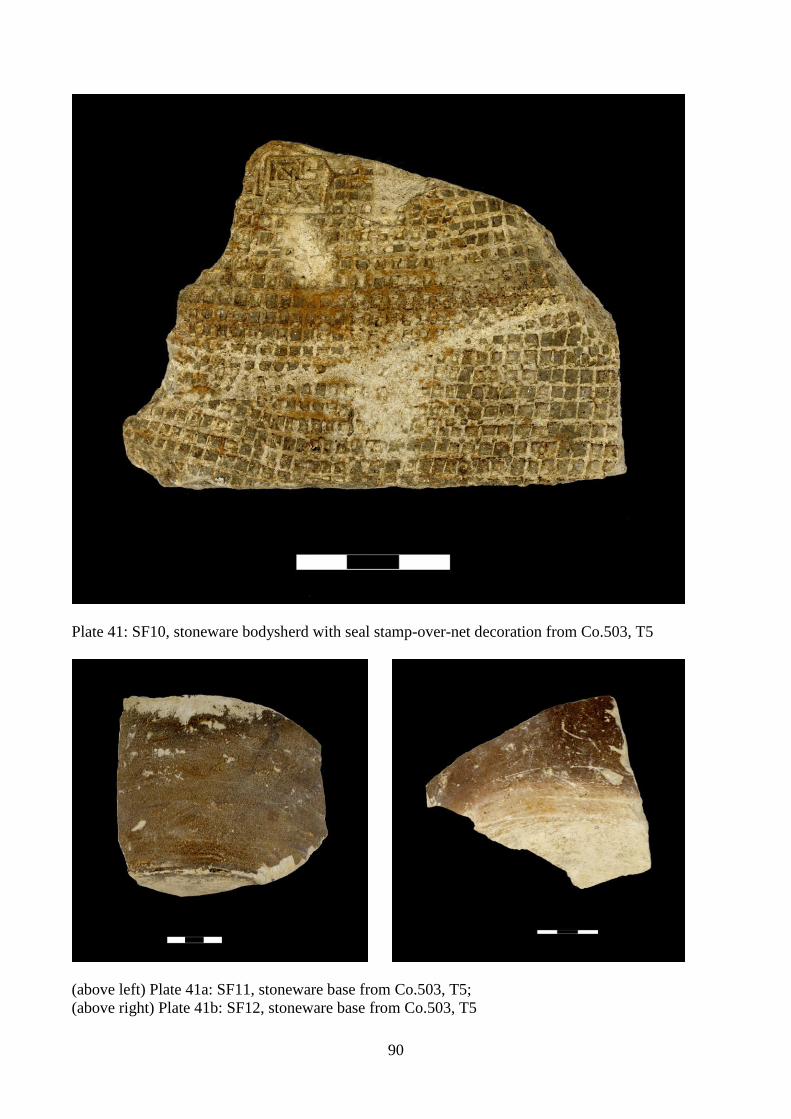
90
Plate 41: SF10, stoneware bodysherd with seal stamp-over-net decoration from Co.503, T5
(above left) Plate 41a: SF11, stoneware base from Co.503, T5;
(above right) Plate 41b: SF12, stoneware base from Co.503, T5
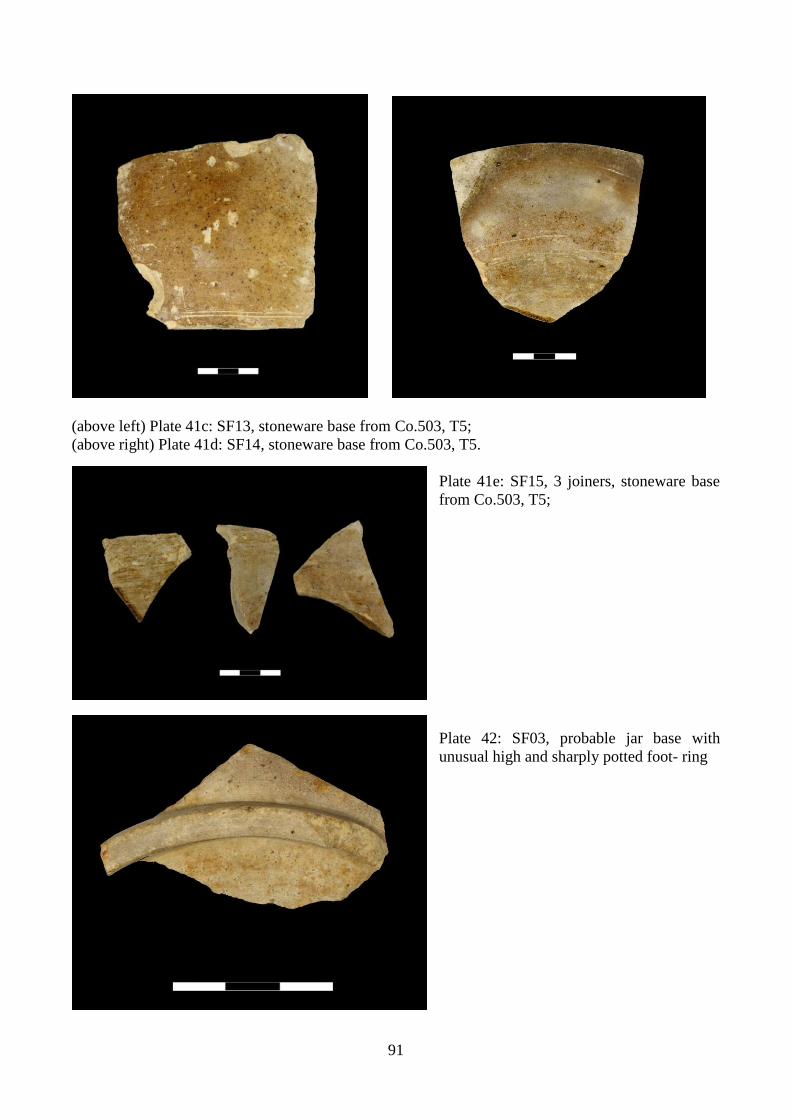
91
(above left) Plate 41c: SF13, stoneware base from Co.503, T5;
(above right) Plate 41d: SF14, stoneware base from Co.503, T5.
Plate 41e: SF15, 3 joiners, stoneware base
from Co.503, T5;
Plate 42: SF03, probable jar base with
unusual high and sharply potted foot- ring

92
Plate 43: East facing section of T6. (Scales: 2m, 1m and 0.3m)
Plate 44:
South facing section of T6
(Scales: 2m, 1m and 0.5m)
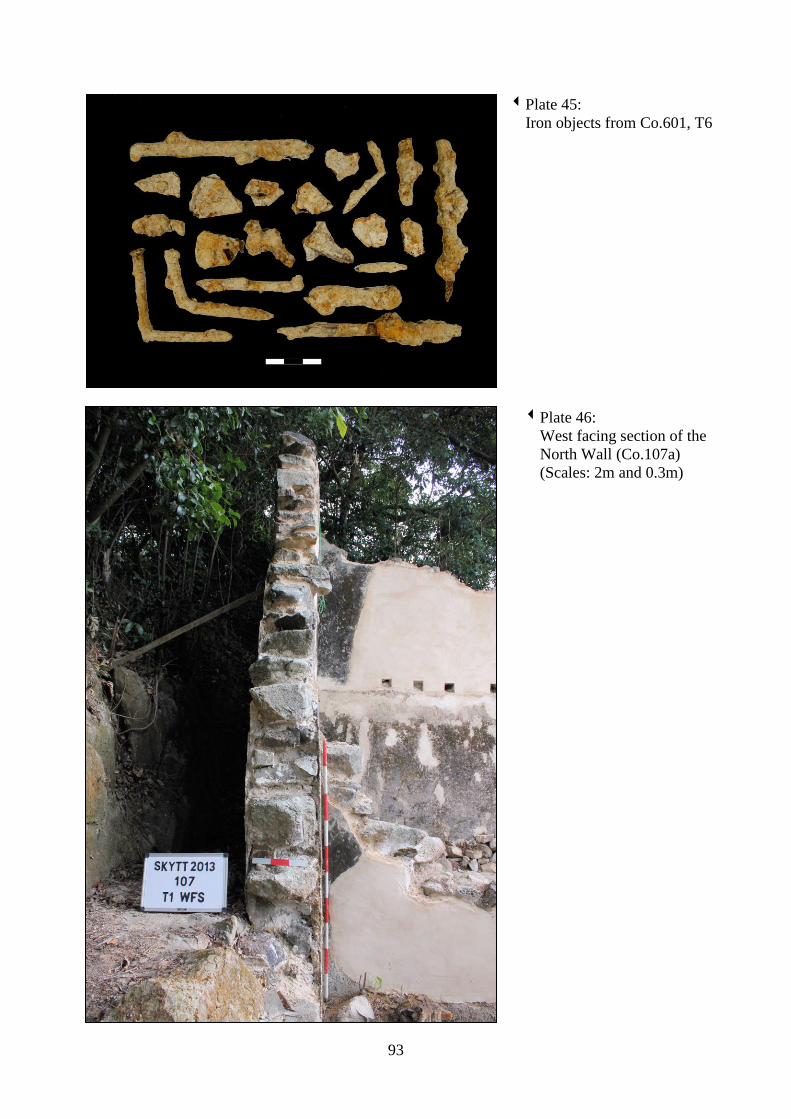
93
Plate 45:
Iron objects from Co.601, T6
Plate 46:
West facing section of the
North Wall (Co.107a)
(Scales: 2m and 0.3m)

94
Plate 47: South facing elevation of north wall 107a with dividing wall 106 in foreground.
(Scales: 2m and 1m)
Plate 48: West facing elevation of dividing wall 106 with floor 112 in foreground. Levelled bedrock
121 clearly visible to right of storyboard where floor 112 damaged by tree roots. (Scales: both 2m)
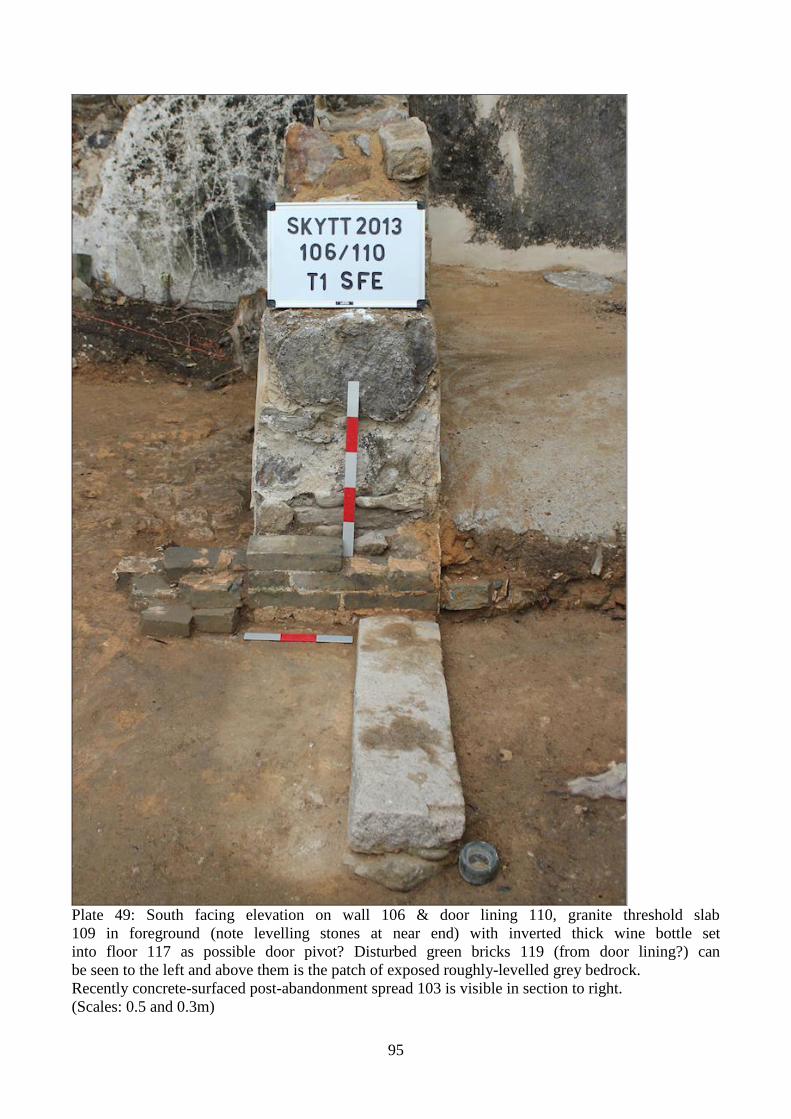
95
Plate 49: South facing elevation on wall 106 & door lining 110, granite threshold slab
109 in foreground (note levelling stones at near end) with inverted thick wine bottle set
into floor 117 as possible door pivot? Disturbed green bricks 119 (from door lining?) can
be seen to the left and above them is the patch of exposed roughly-levelled grey bedrock.
Recently concrete-surfaced post-abandonment spread 103 is visible in section to right.
(Scales: 0.5 and 0.3m)
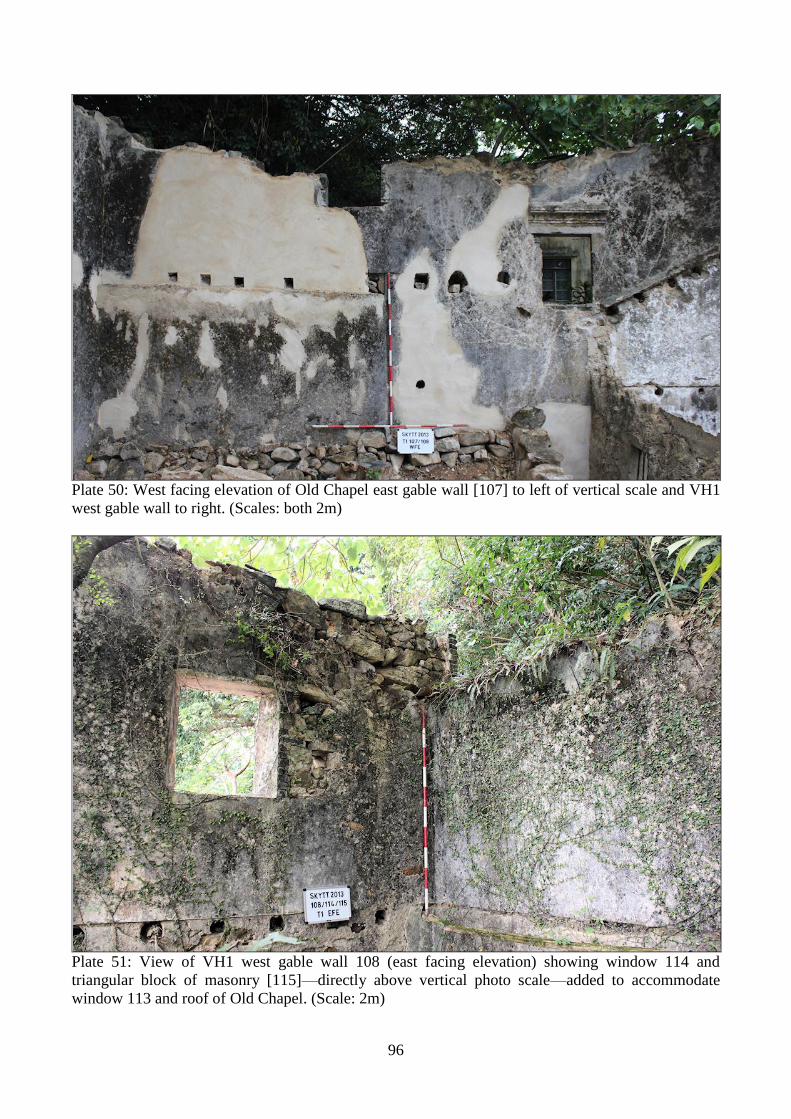
96
Plate 50: West facing elevation of Old Chapel east gable wall [107] to left of vertical scale and VH1
west gable wall to right. (Scales: both 2m)
Plate 51: View of VH1 west gable wall 108 (east facing elevation) showing window 114 and
triangular block of masonry [115]—directly above vertical photo scale—added to accommodate
window 113 and roof of Old Chapel. (Scale: 2m)
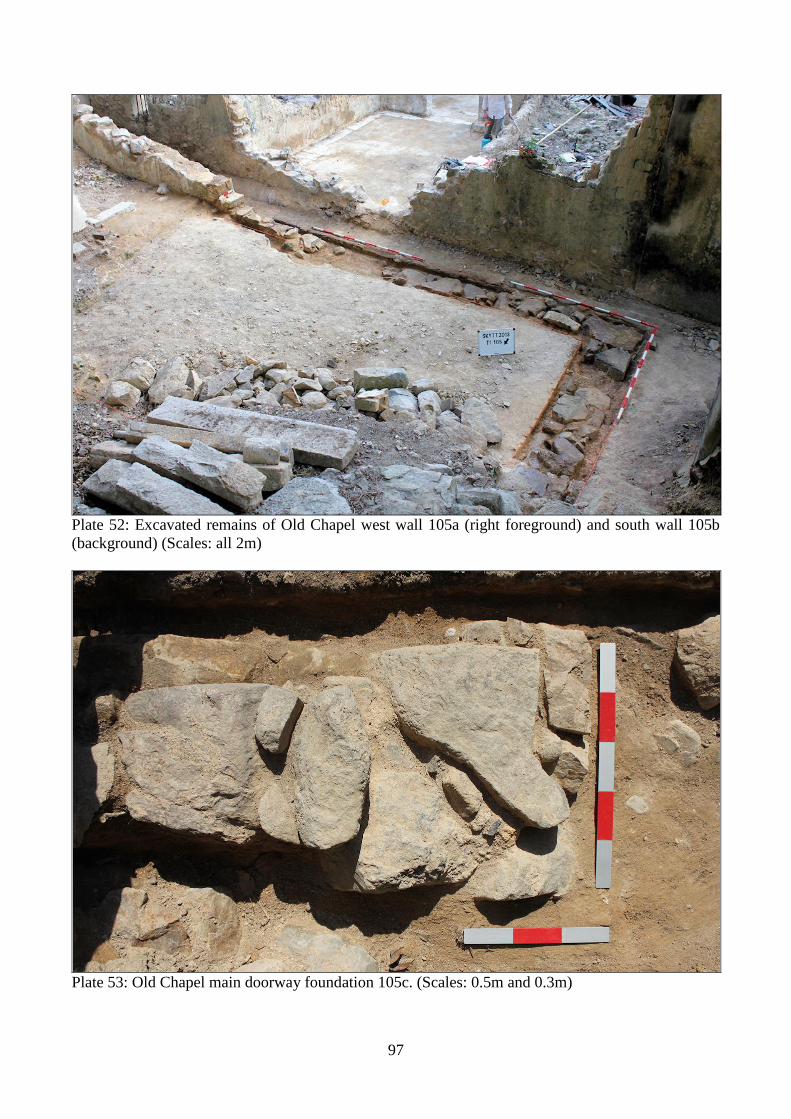
97
Plate 52: Excavated remains of Old Chapel west wall 105a (right foreground) and south wall 105b
(background) (Scales: all 2m)
Plate 53: Old Chapel main doorway foundation 105c. (Scales: 0.5m and 0.3m)
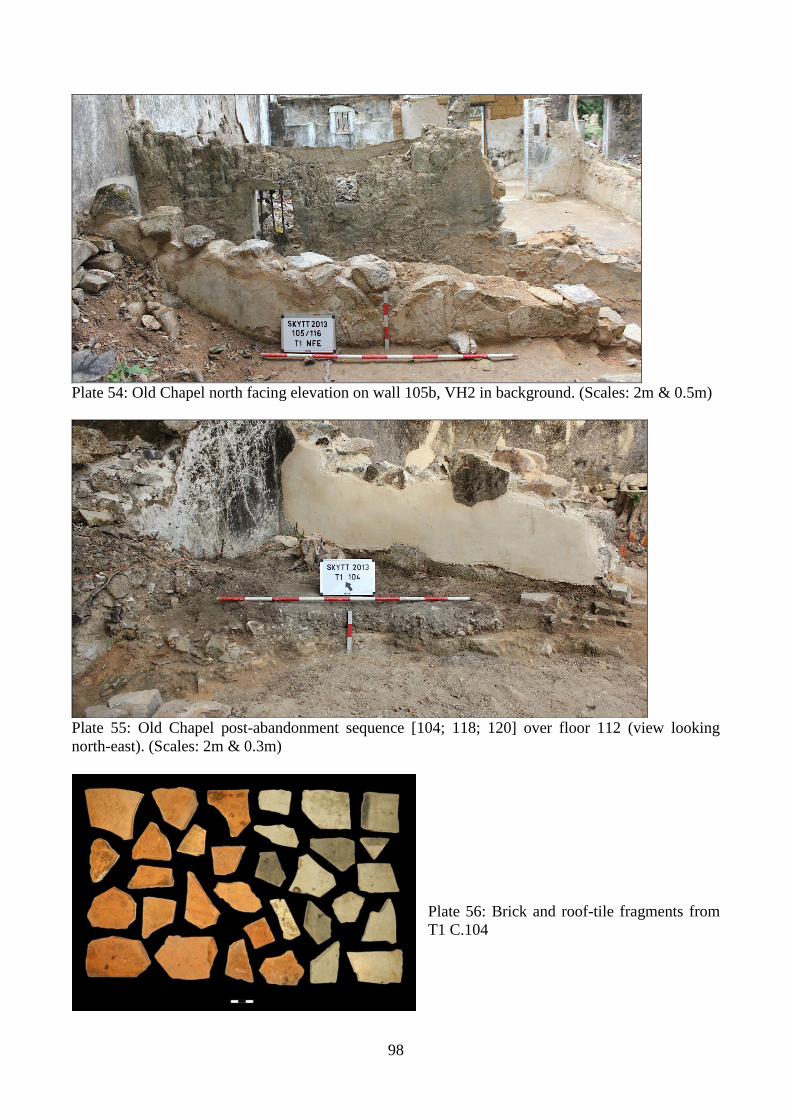
98
Plate 54: Old Chapel north facing elevation on wall 105b, VH2 in background. (Scales: 2m & 0.5m)
Plate 55: Old Chapel post-abandonment sequence [104; 118; 120] over floor 112 (view looking
north-east). (Scales: 2m & 0.3m)
Plate 56: Brick and roof-tile fragments from
T1 C.104
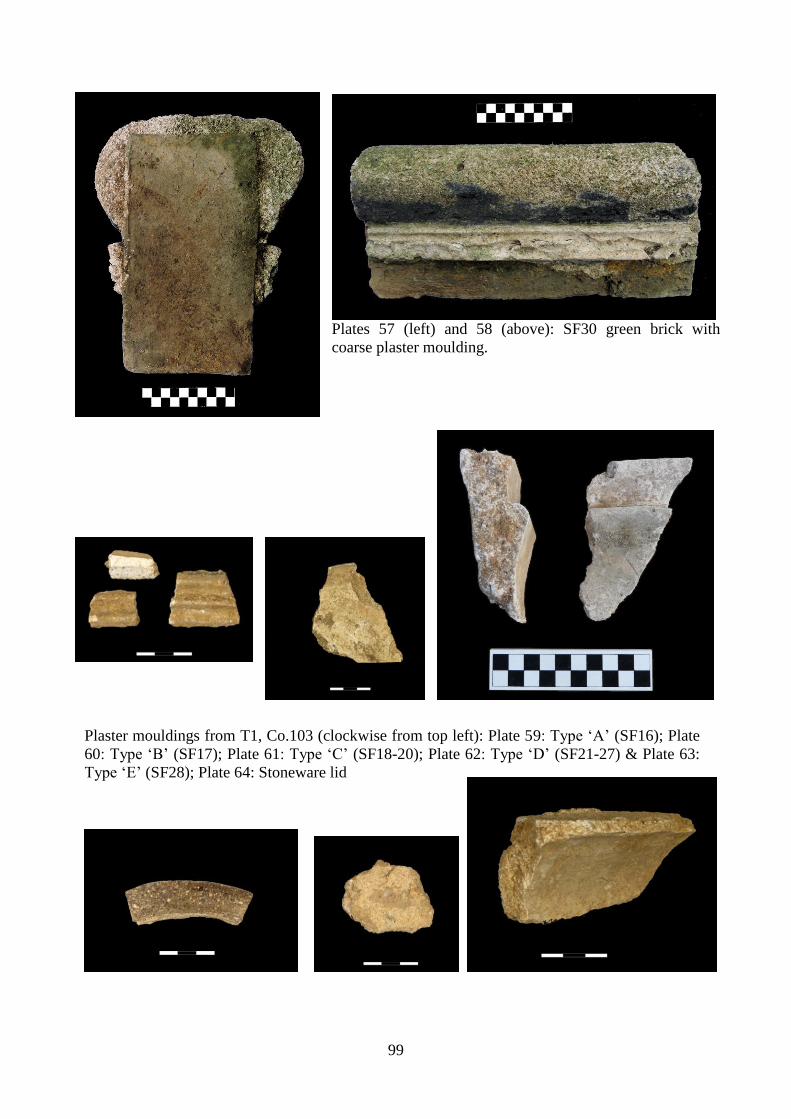
99
Plates 57 (left) and 58 (above): SF30 green brick with
coarse plaster moulding.
Plaster mouldings from T1, Co.103 (clockwise from top left): Plate 59: Type ‘A’ (SF16); Plate
60: Type ‘B’ (SF17); Plate 61: Type ‘C’ (SF18-20); Plate 62: Type ‘D’ (SF21-27) & Plate 63:
Type ‘E’ (SF28); Plate 64: Stoneware lid
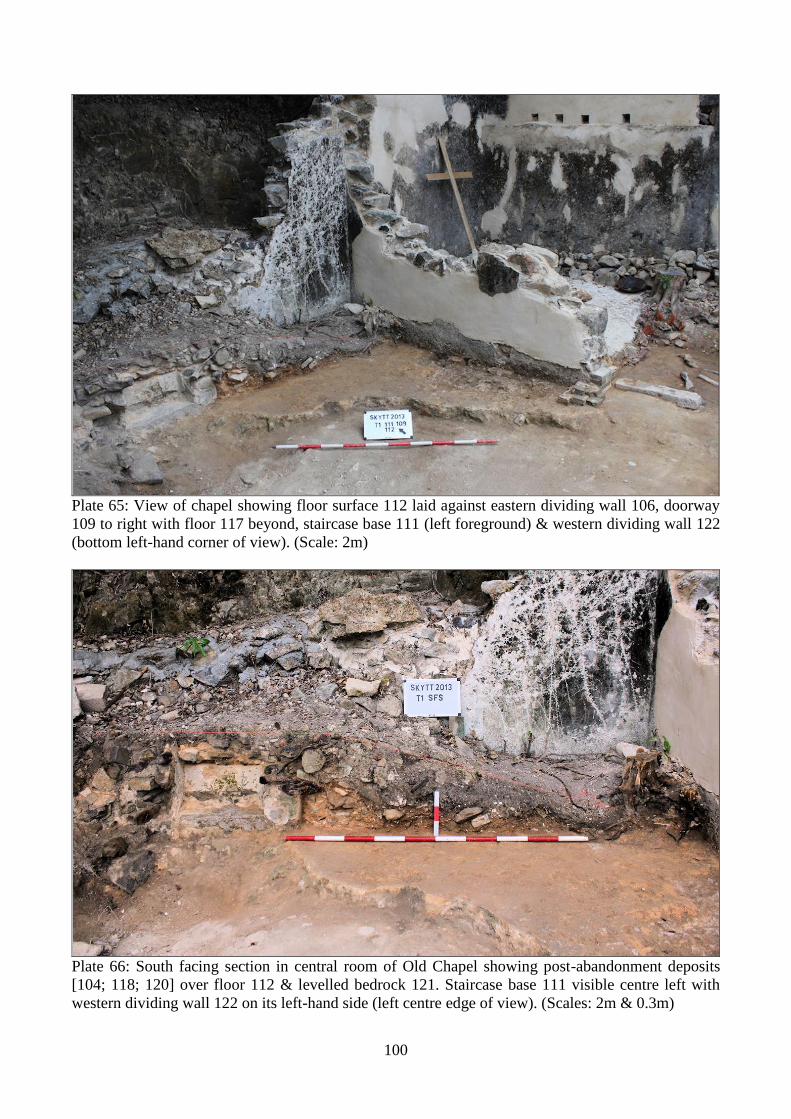
100
Plate 65: View of chapel showing floor surface 112 laid against eastern dividing wall 106, doorway
109 to right with floor 117 beyond, staircase base 111 (left foreground) & western dividing wall 122
(bottom left-hand corner of view). (Scale: 2m)
Plate 66: South facing section in central room of Old Chapel showing post-abandonment deposits
[104; 118; 120] over floor 112 & levelled bedrock 121. Staircase base 111 visible centre left with
western dividing wall 122 on its left-hand side (left centre edge of view). (Scales: 2m & 0.3m)
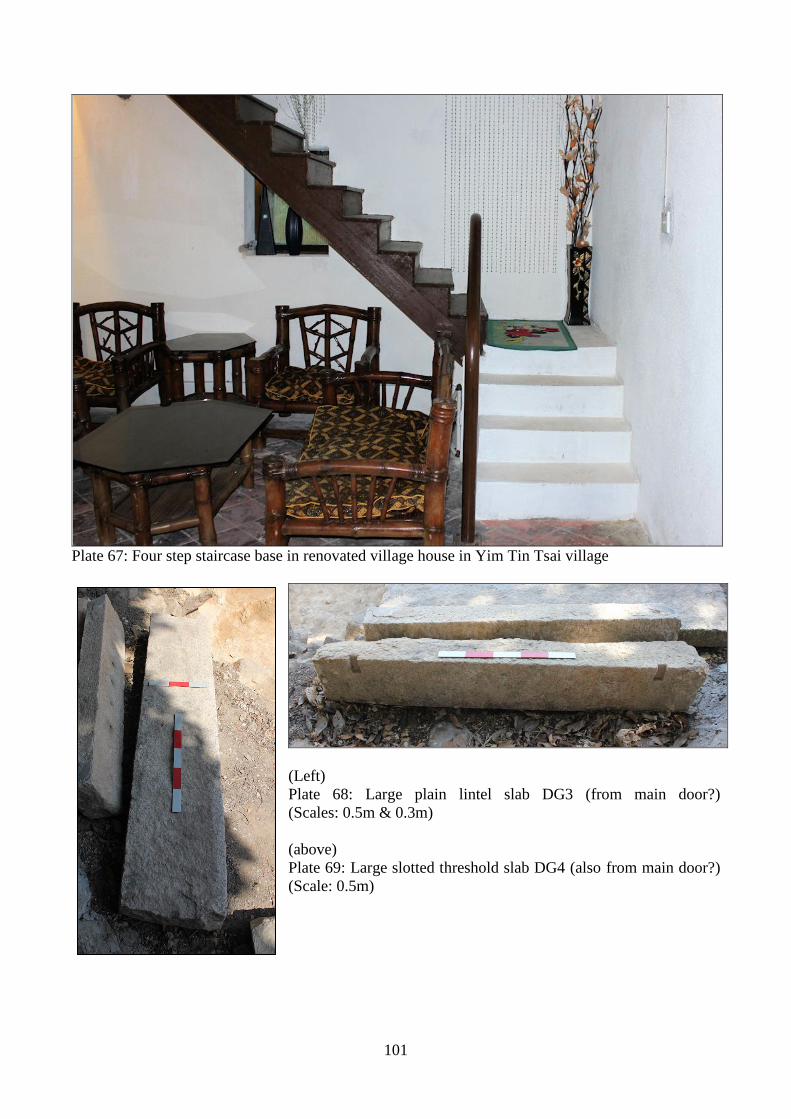
101
Plate 67: Four step staircase base in renovated village house in Yim Tin Tsai village
(Left)
Plate 68: Large plain lintel slab DG3 (from main door?)
(Scales: 0.5m & 0.3m)
(above)
Plate 69: Large slotted threshold slab DG4 (also from main door?)
(Scale: 0.5m)
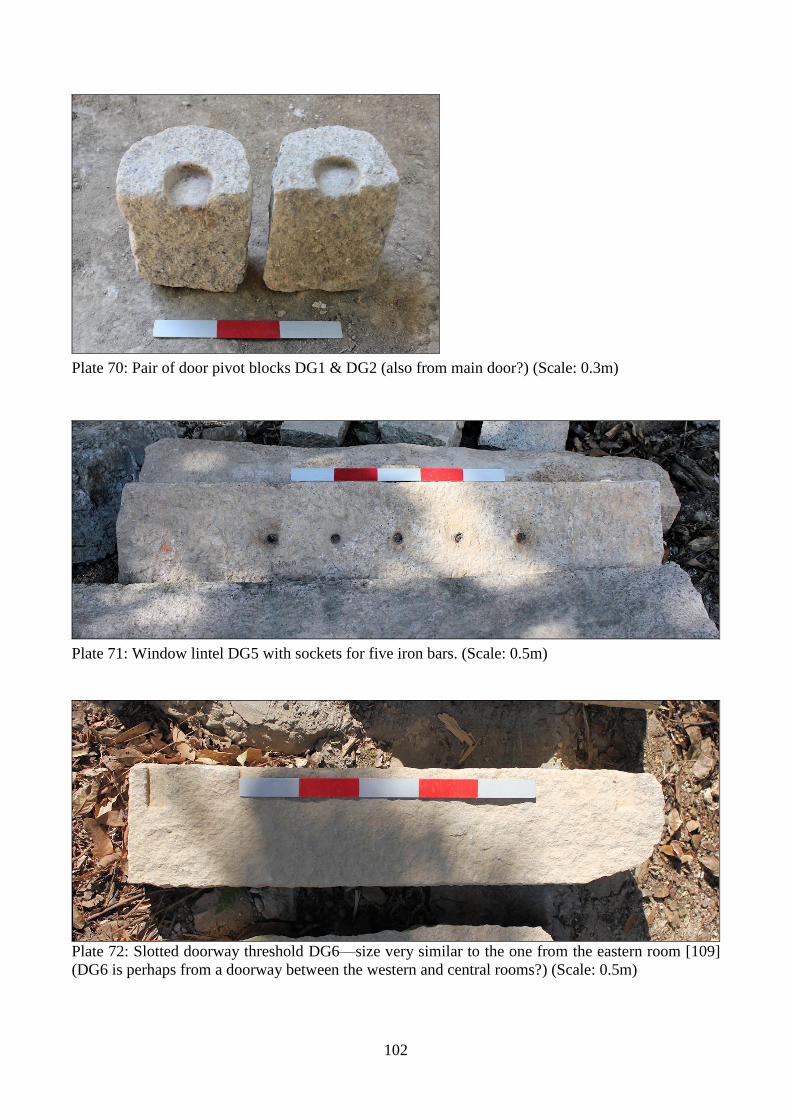
102
Plate 70: Pair of door pivot blocks DG1 & DG2 (also from main door?) (Scale: 0.3m)
Plate 71: Window lintel DG5 with sockets for five iron bars. (Scale: 0.5m)
Plate 72: Slotted doorway threshold DG6—size very similar to the one from the eastern room [109]
(DG6 is perhaps from a doorway between the western and central rooms?) (Scale: 0.5m)
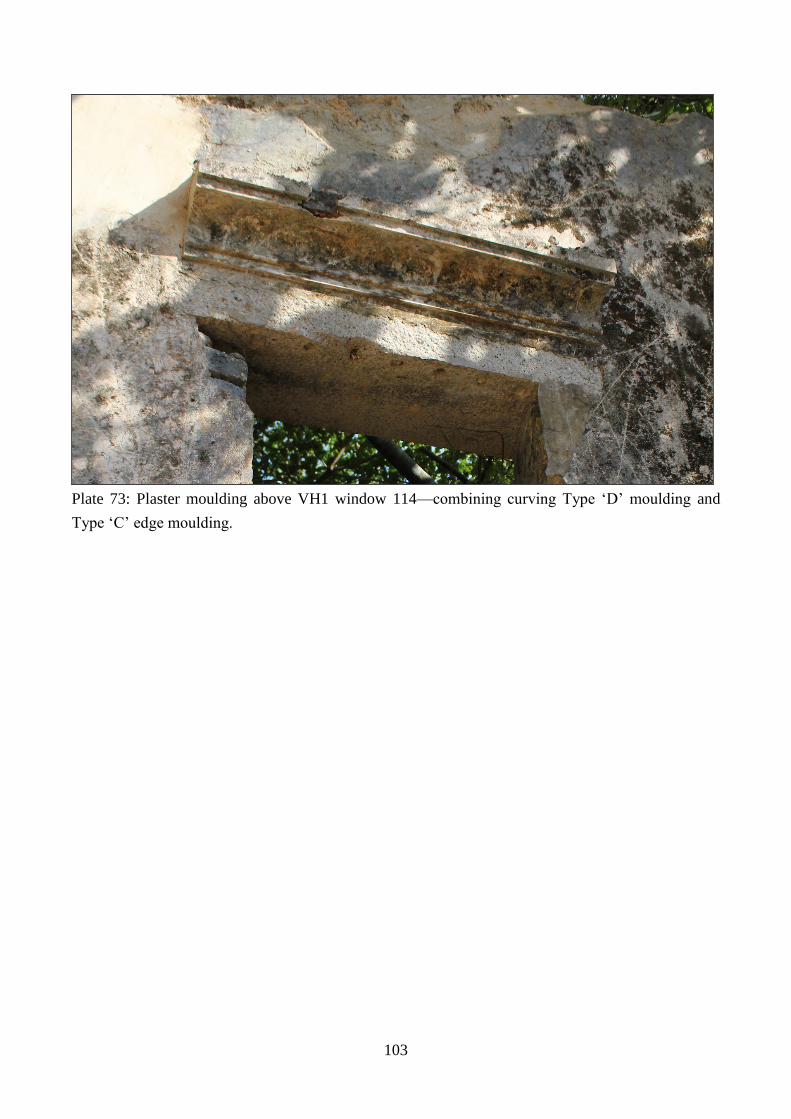
103
Plate 73: Plaster moulding above VH1 window 114—combining curving Type ‘D’ moulding and
Type ‘C’ edge moulding.
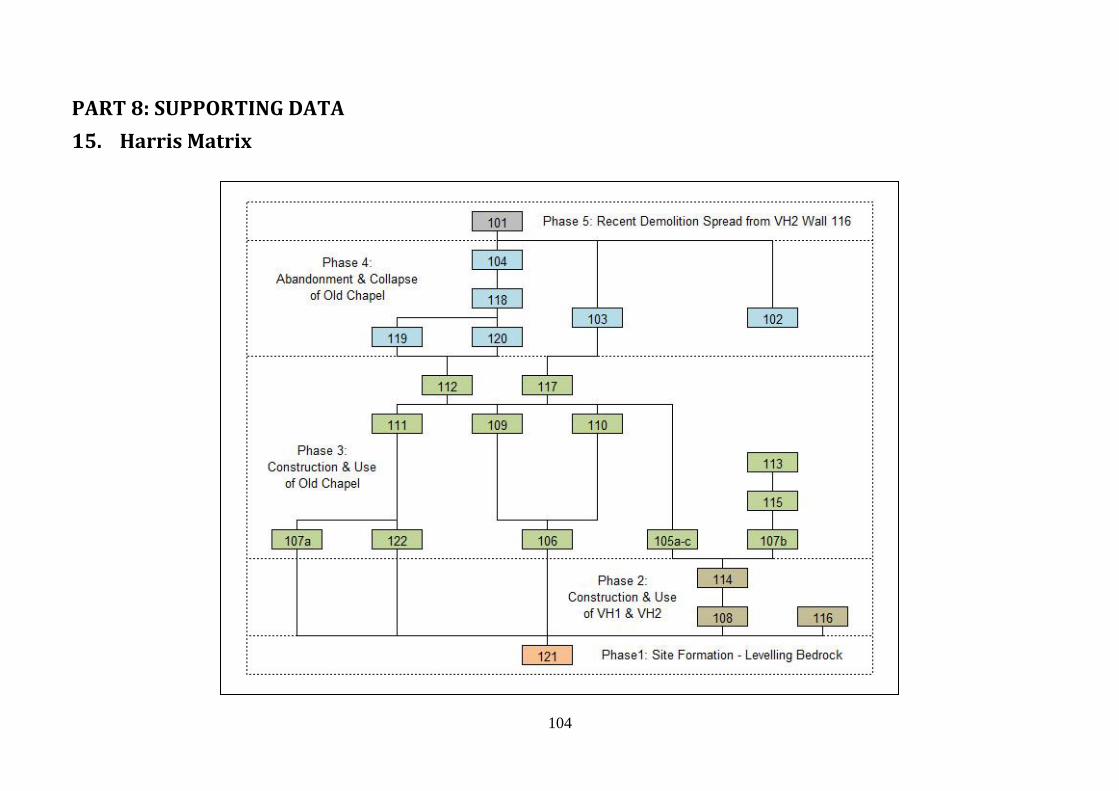
104
PART 8: SUPPORTING DATA
15. Harris Matrix
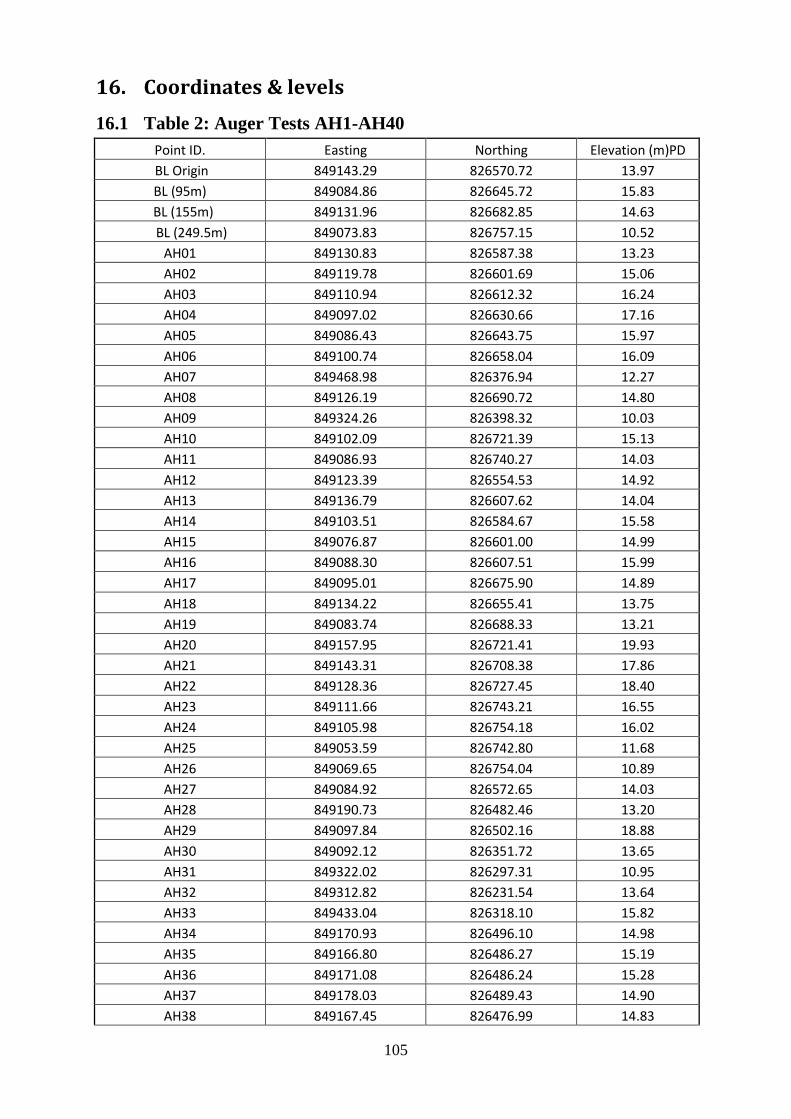
105
16. Coordinates & levels
16.1 Table 2: Auger Tests AH1-AH40
Point ID. Easting Northing Elevation (m)PD
BL Origin 849143.29 826570.72 13.97
BL (95m) 849084.86 826645.72 15.83
BL (155m) 849131.96 826682.85 14.63
BL (249.5m) 849073.83 826757.15 10.52
AH01 849130.83 826587.38 13.23
AH02 849119.78 826601.69 15.06
AH03 849110.94 826612.32 16.24
AH04 849097.02 826630.66 17.16
AH05 849086.43 826643.75 15.97
AH06 849100.74 826658.04 16.09
AH07 849468.98 826376.94 12.27
AH08 849126.19 826690.72 14.80
AH09 849324.26 826398.32 10.03
AH10 849102.09 826721.39 15.13
AH11 849086.93 826740.27 14.03
AH12 849123.39 826554.53 14.92
AH13 849136.79 826607.62 14.04
AH14 849103.51 826584.67 15.58
AH15 849076.87 826601.00 14.99
AH16 849088.30 826607.51 15.99
AH17 849095.01 826675.90 14.89
AH18 849134.22 826655.41 13.75
AH19 849083.74 826688.33 13.21
AH20 849157.95 826721.41 19.93
AH21 849143.31 826708.38 17.86
AH22 849128.36 826727.45 18.40
AH23 849111.66 826743.21 16.55
AH24 849105.98 826754.18 16.02
AH25 849053.59 826742.80 11.68
AH26 849069.65 826754.04 10.89
AH27 849084.92 826572.65 14.03
AH28 849190.73 826482.46 13.20
AH29 849097.84 826502.16 18.88
AH30 849092.12 826351.72 13.65
AH31 849322.02 826297.31 10.95
AH32 849312.82 826231.54 13.64
AH33 849433.04 826318.10 15.82
AH34 849170.93 826496.10 14.98
AH35 849166.80 826486.27 15.19
AH36 849171.08 826486.24 15.28
AH37 849178.03 826489.43 14.90
AH38 849167.45 826476.99 14.83
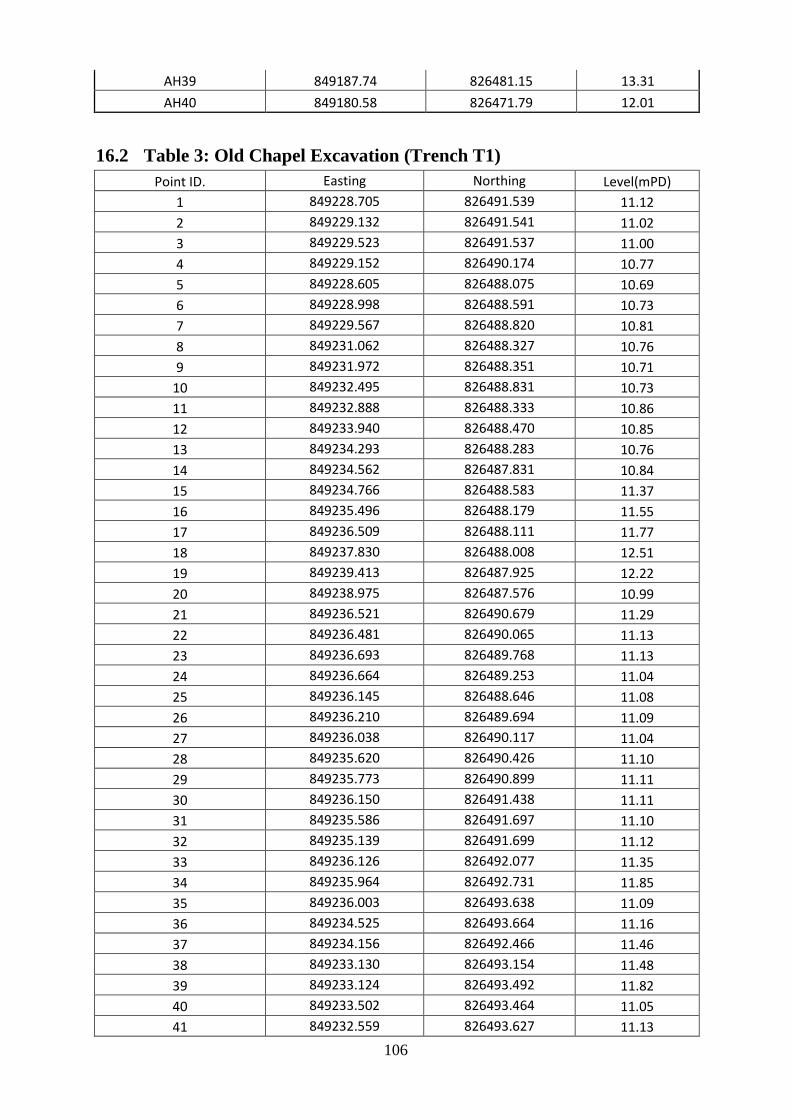
106
AH39 849187.74 826481.15 13.31
AH40 849180.58 826471.79 12.01
16.2 Table 3: Old Chapel Excavation (Trench T1)
Point ID. Easting Northing Level(mPD)
1 849228.705 826491.539 11.12
2 849229.132 826491.541 11.02
3 849229.523 826491.537 11.00
4 849229.152 826490.174 10.77
5 849228.605 826488.075 10.69
6 849228.998 826488.591 10.73
7 849229.567 826488.820 10.81
8 849231.062 826488.327 10.76
9 849231.972 826488.351 10.71
10 849232.495 826488.831 10.73
11 849232.888 826488.333 10.86
12 849233.940 826488.470 10.85
13 849234.293 826488.283 10.76
14 849234.562 826487.831 10.84
15 849234.766 826488.583 11.37
16 849235.496 826488.179 11.55
17 849236.509 826488.111 11.77
18 849237.830 826488.008 12.51
19 849239.413 826487.925 12.22
20 849238.975 826487.576 10.99
21 849236.521 826490.679 11.29
22 849236.481 826490.065 11.13
23 849236.693 826489.768 11.13
24 849236.664 826489.253 11.04
25 849236.145 826488.646 11.08
26 849236.210 826489.694 11.09
27 849236.038 826490.117 11.04
28 849235.620 826490.426 11.10
29 849235.773 826490.899 11.11
30 849236.150 826491.438 11.11
31 849235.586 826491.697 11.10
32 849235.139 826491.699 11.12
33 849236.126 826492.077 11.35
34 849235.964 826492.731 11.85
35 849236.003 826493.638 11.09
36 849234.525 826493.664 11.16
37 849234.156 826492.466 11.46
38 849233.130 826493.154 11.48
39 849233.124 826493.492 11.82
40 849233.502 826493.464 11.05
41 849232.559 826493.627 11.13
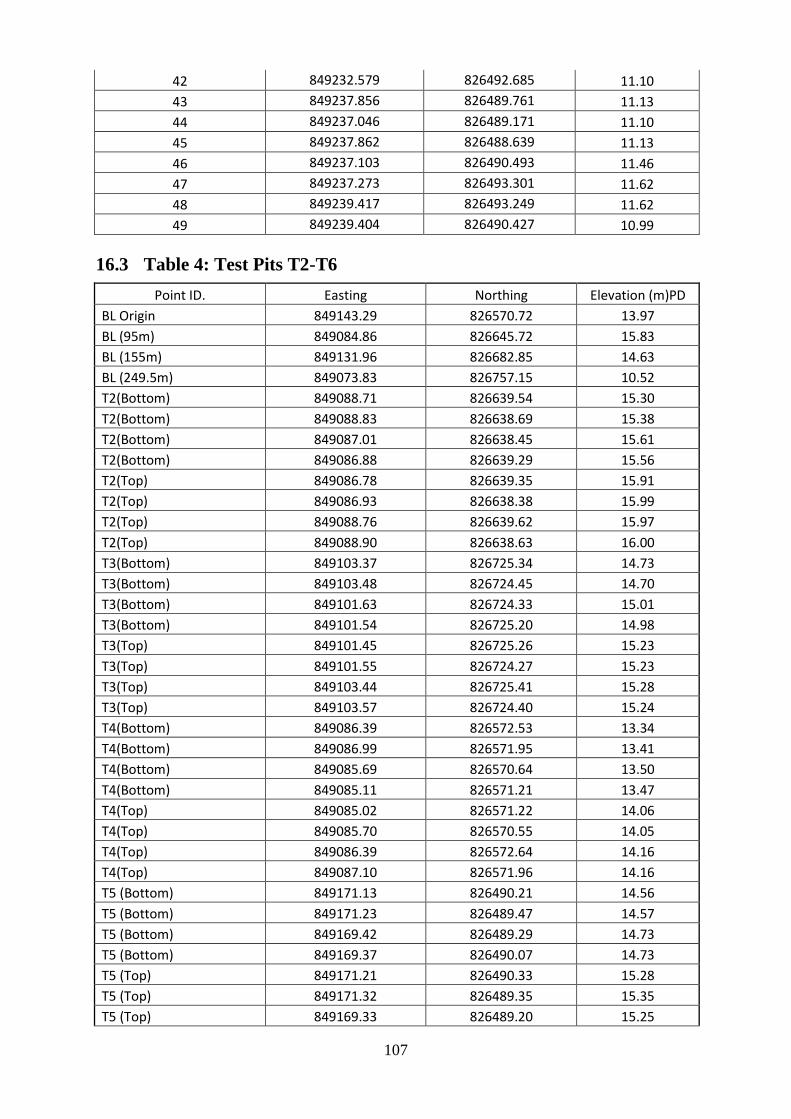
107
42 849232.579 826492.685 11.10
43 849237.856 826489.761 11.13
44 849237.046 826489.171 11.10
45 849237.862 826488.639 11.13
46 849237.103 826490.493 11.46
47 849237.273 826493.301 11.62
48 849239.417 826493.249 11.62
49 849239.404 826490.427 10.99
16.3 Table 4: Test Pits T2-T6
Point ID. Easting Northing Elevation (m)PD
BL Origin 849143.29 826570.72 13.97
BL (95m) 849084.86 826645.72 15.83
BL (155m) 849131.96 826682.85 14.63
BL (249.5m) 849073.83 826757.15 10.52
T2(Bottom) 849088.71 826639.54 15.30
T2(Bottom) 849088.83 826638.69 15.38
T2(Bottom) 849087.01 826638.45 15.61
T2(Bottom) 849086.88 826639.29 15.56
T2(Top) 849086.78 826639.35 15.91
T2(Top) 849086.93 826638.38 15.99
T2(Top) 849088.76 826639.62 15.97
T2(Top) 849088.90 826638.63 16.00
T3(Bottom) 849103.37 826725.34 14.73
T3(Bottom) 849103.48 826724.45 14.70
T3(Bottom) 849101.63 826724.33 15.01
T3(Bottom) 849101.54 826725.20 14.98
T3(Top) 849101.45 826725.26 15.23
T3(Top) 849101.55 826724.27 15.23
T3(Top) 849103.44 826725.41 15.28
T3(Top) 849103.57 826724.40 15.24
T4(Bottom) 849086.39 826572.53 13.34
T4(Bottom) 849086.99 826571.95 13.41
T4(Bottom) 849085.69 826570.64 13.50
T4(Bottom) 849085.11 826571.21 13.47
T4(Top) 849085.02 826571.22 14.06
T4(Top) 849085.70 826570.55 14.05
T4(Top) 849086.39 826572.64 14.16
T4(Top) 849087.10 826571.96 14.16
T5 (Bottom) 849171.13 826490.21 14.56
T5 (Bottom) 849171.23 826489.47 14.57
T5 (Bottom) 849169.42 826489.29 14.73
T5 (Bottom) 849169.37 826490.07 14.73
T5 (Top) 849171.21 826490.33 15.28
T5 (Top) 849171.32 826489.35 15.35
T5 (Top) 849169.33 826489.20 15.25
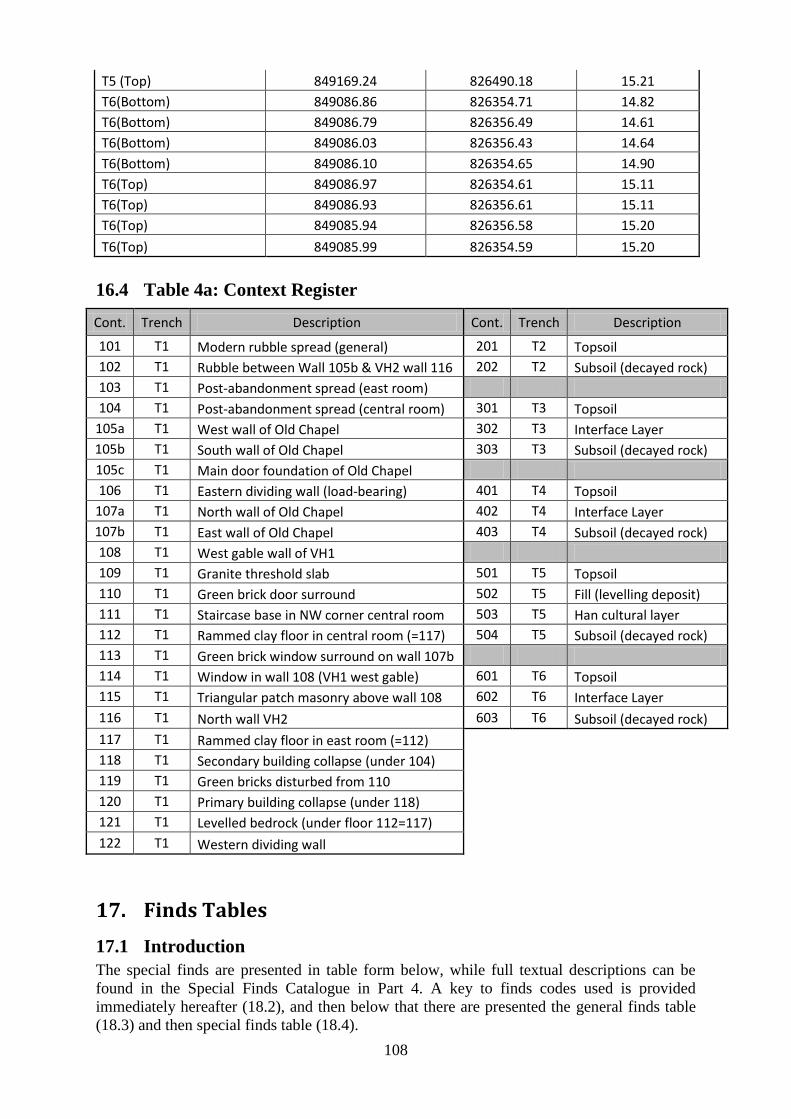
108
T5 (Top) 849169.24 826490.18 15.21
T6(Bottom) 849086.86 826354.71 14.82
T6(Bottom) 849086.79 826356.49 14.61
T6(Bottom) 849086.03 826356.43 14.64
T6(Bottom) 849086.10 826354.65 14.90
T6(Top) 849086.97 826354.61 15.11
T6(Top) 849086.93 826356.61 15.11
T6(Top) 849085.94 826356.58 15.20
T6(Top) 849085.99 826354.59 15.20
16.4 Table 4a: Context Register
Cont. Trench Description Cont. Trench Description
101 T1 Modern rubble spread (general) 201 T2 Topsoil
102 T1 Rubble between Wall 105b & VH2 wall 116 202 T2 Subsoil (decayed rock)
103 T1 Post-abandonment spread (east room)
104 T1 Post-abandonment spread (central room) 301 T3 Topsoil
105a T1 West wall of Old Chapel 302 T3 Interface Layer
105b T1 South wall of Old Chapel 303 T3 Subsoil (decayed rock)
105c T1 Main door foundation of Old Chapel
106 T1 Eastern dividing wall (load-bearing) 401 T4 Topsoil
107a T1 North wall of Old Chapel 402 T4 Interface Layer
107b T1 East wall of Old Chapel 403 T4 Subsoil (decayed rock)
108 T1 West gable wall of VH1
109 T1 Granite threshold slab 501 T5 Topsoil
110 T1 Green brick door surround 502 T5 Fill (levelling deposit)
111 T1 Staircase base in NW corner central room 503 T5 Han cultural layer
112 T1 Rammed clay floor in central room (=117) 504 T5 Subsoil (decayed rock)
113 T1 Green brick window surround on wall 107b
114 T1 Window in wall 108 (VH1 west gable) 601 T6 Topsoil
115 T1 Triangular patch masonry above wall 108 602 T6 Interface Layer
116 T1 North wall VH2 603 T6 Subsoil (decayed rock)
117 T1 Rammed clay floor in east room (=112) 118 T1 Secondary building collapse (under 104) 119 T1 Green bricks disturbed from 110 120 T1 Primary building collapse (under 118) 121 T1 Levelled bedrock (under floor 112=117) 122 T1 Western dividing wall
17. Finds Tables
17.1 Introduction
The special finds are presented in table form below, while full textual descriptions can be
found in the Special Finds Catalogue in Part 4. A key to finds codes used is provided
immediately hereafter (18.2), and then below that there are presented the general finds table
(18.3) and then special finds table (18.4).
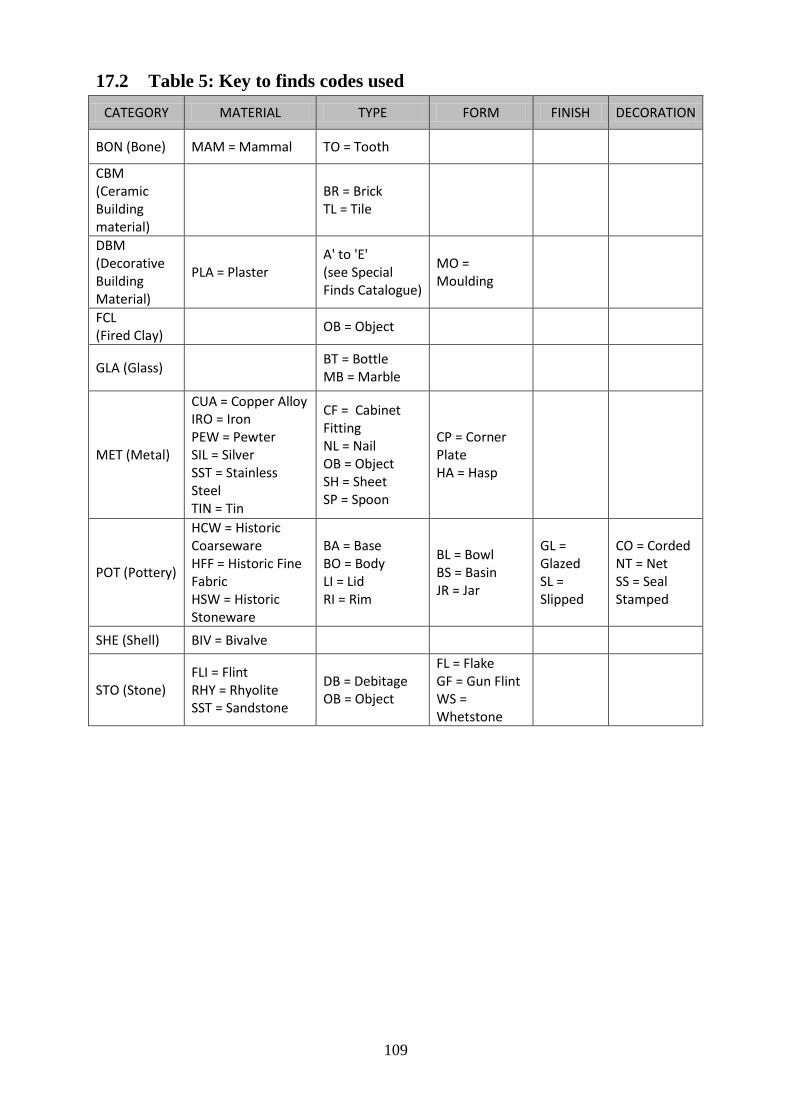
109
17.2 Table 5: Key to finds codes used
CATEGORY MATERIAL TYPE FORM FINISH DECORATION
BON (Bone) MAM = Mammal TO = Tooth
CBM (Ceramic Building material)
BR = Brick TL = Tile
DBM (Decorative Building Material)
PLA = Plaster A' to 'E' (see Special Finds Catalogue)
MO = Moulding
FCL (Fired Clay)
OB = Object
GLA (Glass) BT = Bottle MB = Marble
MET (Metal)
CUA = Copper Alloy IRO = Iron PEW = Pewter SIL = Silver SST = Stainless Steel TIN = Tin
CF = Cabinet Fitting NL = Nail OB = Object SH = Sheet SP = Spoon
CP = Corner Plate HA = Hasp
POT (Pottery)
HCW = Historic Coarseware HFF = Historic Fine Fabric HSW = Historic Stoneware
BA = Base BO = Body LI = Lid RI = Rim
BL = Bowl BS = Basin JR = Jar
GL = Glazed SL = Slipped
CO = Corded NT = Net SS = Seal Stamped
SHE (Shell) BIV = Bivalve
STO (Stone) FLI = Flint RHY = Rhyolite SST = Sandstone
DB = Debitage OB = Object
FL = Flake GF = Gun Flint WS = Whetstone
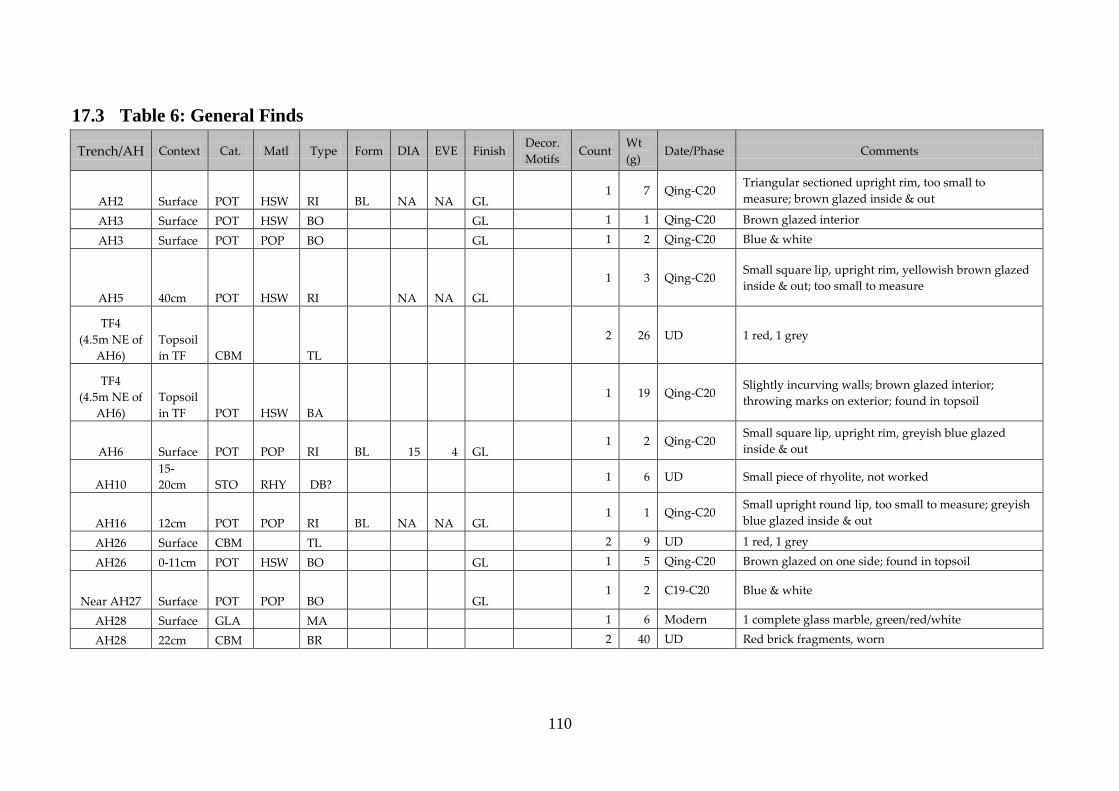
110
17.3 Table 6: General Finds
Trench/AH Context Cat. Matl Type Form DIA EVE Finish Decor.
Motifs Count
Wt
(g) Date/Phase Comments
AH2 Surface POT HSW RI BL NA NA GL 1 7 Qing-C20
Triangular sectioned upright rim, too small to
measure; brown glazed inside & out
AH3 Surface POT HSW BO GL 1 1 Qing-C20 Brown glazed interior
AH3 Surface POT POP BO GL 1 2 Qing-C20 Blue & white
AH5 40cm POT HSW RI NA NA GL
1 3 Qing-C20 Small square lip, upright rim, yellowish brown glazed
inside & out; too small to measure
TF4
(4.5m NE of
AH6)
Topsoil
in TF CBM TL
2 26 UD 1 red, 1 grey
TF4
(4.5m NE of
AH6)
Topsoil
in TF POT HSW BA
1 19 Qing-C20 Slightly incurving walls; brown glazed interior;
throwing marks on exterior; found in topsoil
AH6 Surface POT POP RI BL 15 4 GL 1 2 Qing-C20
Small square lip, upright rim, greyish blue glazed
inside & out
AH10
15-
20cm STO RHY DB? 1 6 UD Small piece of rhyolite, not worked
AH16 12cm POT POP RI BL NA NA GL 1 1 Qing-C20
Small upright round lip, too small to measure; greyish
blue glazed inside & out
AH26 Surface CBM TL 2 9 UD 1 red, 1 grey
AH26 0-11cm POT HSW BO GL 1 5 Qing-C20 Brown glazed on one side; found in topsoil
Near AH27 Surface POT POP BO GL 1 2 C19-C20 Blue & white
AH28 Surface GLA MA 1 6 Modern 1 complete glass marble, green/red/white
AH28 22cm CBM BR 2 40 UD Red brick fragments, worn

111
TF6
(10.5m S of
AH5)
Topsoil
below
TF CBM TL
1 8 UD Pink
TF6
(10.5m S of
AH5)
Topsoil
below
TF POT HSW RI BL GL
1 7 Qing-C20 Broken rim fragment of a shallow bowl; brown glazed
inside & out
AH39
c.15-
23cm POT HSW RI BL GL 1 2 Qing-C20
Broken rim fragment of a shallow bowl; brown glazed
inside & out
AH39
c.15-
23cm BON MAM TO 1 1 UD Suid molar - probably domesticated pig
TF6
Topsoil
in face STO RHY DB? 1 214 UD Large triangular chunk (natural?)
Trench/AH Context Cat. Matl Type Form DIA EVE Finish Decor.
Motifs Count
Wt
(g) Date/Phase Comments
T1 101 MET IRO OB 1 107 UD Bar; L19cm, W1-1.5cm, rusty
T1 101 GLA MB 1 8 Modern Red
T1 101 CBM TL 4 50 UD Grey
T1 101 POT HSW BO GL 1 61 UD Light grey fabric; patches of light grey glaze on interior
T1 102 MET
TIN
or
CUA CF CP
2 54 C19-C20? Corner plate of cabinet with floral decorations;
Furniture (cabinet) fittings found by contractor
T1 102 MET
TIN
or
CUA CF HP
1 72 C19-C20? Hasp with 'cloud' & bird decorations; Furniture
(cabinet) fittings found by contractor
Trench/AH Context Cat. Matl Type Form DIA EVE Finish Decor.
Motifs Count
Wt
(g) Date/Phase Comments
T1 103 GLA BT 1 32 C19-C20?
Bottom part of a glass bottle; rectangular shaped; '4 & 2
at the base of bottle'
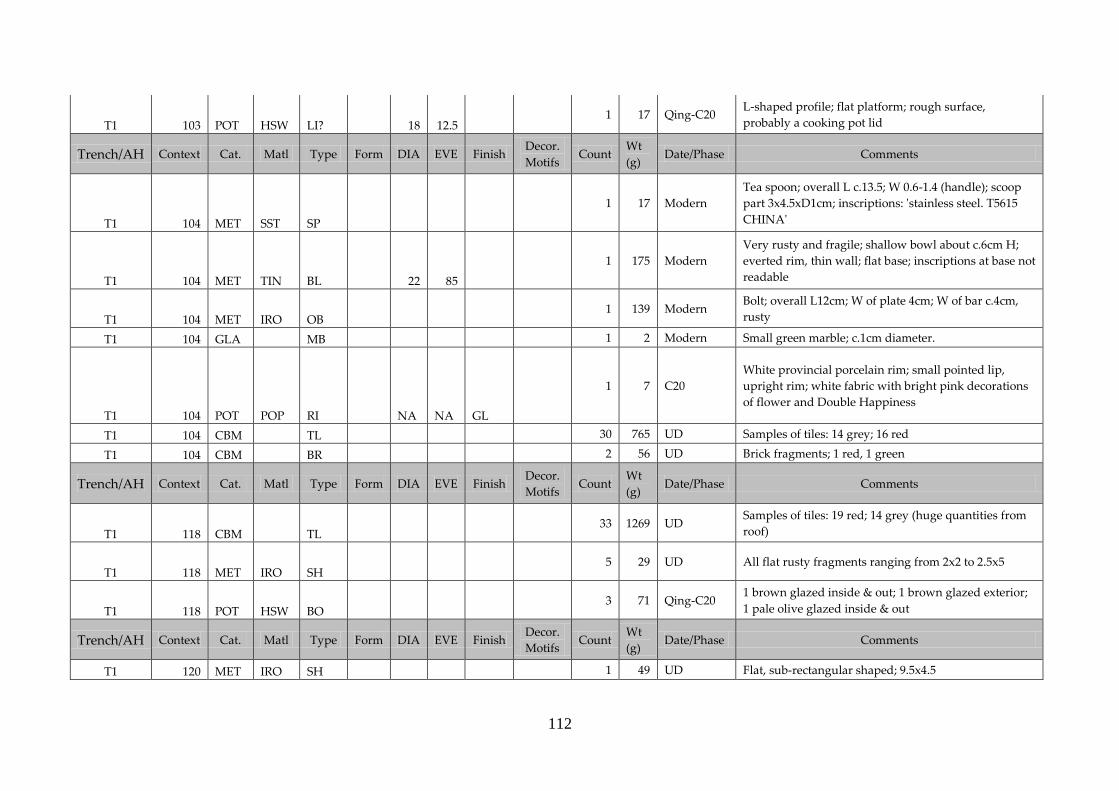
112
T1 103 POT HSW LI? 18 12.5 1 17 Qing-C20
L-shaped profile; flat platform; rough surface,
probably a cooking pot lid
Trench/AH Context Cat. Matl Type Form DIA EVE Finish Decor.
Motifs Count
Wt
(g) Date/Phase Comments
T1 104 MET SST SP
1 17 Modern
Tea spoon; overall L c.13.5; W 0.6-1.4 (handle); scoop
part 3x4.5xD1cm; inscriptions: 'stainless steel. T5615
CHINA'
T1 104 MET TIN BL 22 85
1 175 Modern
Very rusty and fragile; shallow bowl about c.6cm H;
everted rim, thin wall; flat base; inscriptions at base not
readable
T1 104 MET IRO OB 1 139 Modern
Bolt; overall L12cm; W of plate 4cm; W of bar c.4cm,
rusty
T1 104 GLA MB 1 2 Modern Small green marble; c.1cm diameter.
T1 104 POT POP RI NA NA GL
1 7 C20
White provincial porcelain rim; small pointed lip,
upright rim; white fabric with bright pink decorations
of flower and Double Happiness
T1 104 CBM TL 30 765 UD Samples of tiles: 14 grey; 16 red
T1 104 CBM BR 2 56 UD Brick fragments; 1 red, 1 green
Trench/AH Context Cat. Matl Type Form DIA EVE Finish Decor.
Motifs Count
Wt
(g) Date/Phase Comments
T1 118 CBM TL 33 1269 UD
Samples of tiles: 19 red; 14 grey (huge quantities from
roof)
T1 118 MET IRO SH 5 29 UD All flat rusty fragments ranging from 2x2 to 2.5x5
T1 118 POT HSW BO 3 71 Qing-C20
1 brown glazed inside & out; 1 brown glazed exterior;
1 pale olive glazed inside & out
Trench/AH Context Cat. Matl Type Form DIA EVE Finish Decor.
Motifs Count
Wt
(g) Date/Phase Comments
T1 120 MET IRO SH 1 49 UD Flat, sub-rectangular shaped; 9.5x4.5
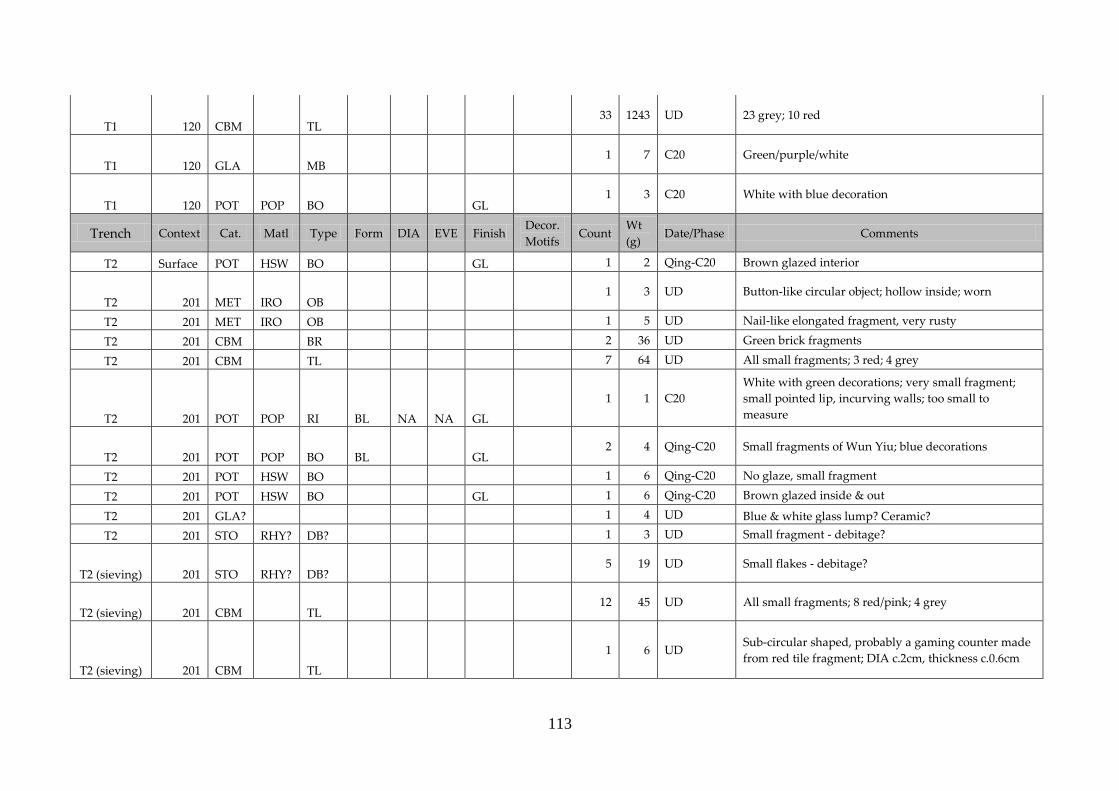
113
T1 120 CBM TL 33 1243 UD 23 grey; 10 red
T1 120 GLA MB 1 7 C20 Green/purple/white
T1 120 POT POP BO GL 1 3 C20 White with blue decoration
Trench Context Cat. Matl Type Form DIA EVE Finish Decor.
Motifs Count
Wt
(g) Date/Phase Comments
T2 Surface POT HSW BO GL 1 2 Qing-C20 Brown glazed interior
T2 201 MET IRO OB 1 3 UD Button-like circular object; hollow inside; worn
T2 201 MET IRO OB 1 5 UD Nail-like elongated fragment, very rusty
T2 201 CBM BR 2 36 UD Green brick fragments
T2 201 CBM TL 7 64 UD All small fragments; 3 red; 4 grey
T2 201 POT POP RI BL NA NA GL
1 1 C20
White with green decorations; very small fragment;
small pointed lip, incurving walls; too small to
measure
T2 201 POT POP BO BL GL 2 4 Qing-C20 Small fragments of Wun Yiu; blue decorations
T2 201 POT HSW BO 1 6 Qing-C20 No glaze, small fragment
T2 201 POT HSW BO GL 1 6 Qing-C20 Brown glazed inside & out
T2 201 GLA? 1 4 UD Blue & white glass lump? Ceramic?
T2 201 STO RHY? DB? 1 3 UD Small fragment - debitage?
T2 (sieving) 201 STO RHY? DB? 5 19 UD Small flakes - debitage?
T2 (sieving) 201 CBM TL 12 45 UD All small fragments; 8 red/pink; 4 grey
T2 (sieving) 201 CBM TL
1 6 UD Sub-circular shaped, probably a gaming counter made
from red tile fragment; DIA c.2cm, thickness c.0.6cm

114
T2 (sieving) 201 POT HFF BO SL
1 7.5 UD Very worn fragment; trace of degraded brown slip on
one side; orange fabric with large quartz inclusions
T2 (sieving) 201 POT HSW BO GL 3 3 Qing-C20 Small fragments; brown glazed on interior
T2 (sieving) 201 POT POP BA GL 1 8 Qing-C20
Blue & white; glazed on both sides; too worn to
measure
T2 (sieving) 201 MET IRO NL 3 14 UD All rusty, 2 with flat top
T2 (sieving) 201 MET IRO OB 1 3 UD Rusty, shaft-like object
Trench Context Cat. Matl Type Form DIA EVE Finish Decor.
Motifs Count
Wt
(g) Date/Phase Comments
T2 202 CBM TL 1 6 UD Grey tile; found in top of 202
T2 202 POT POP BA GL 1 5 Qing-C20 Blue & white; found in top of 202
Trench Context Cat. Matl Type Form DIA EVE Finish Decor.
Motifs Count
Wt
(g) Date/Phase Comments
T3 (sieving) 301 POT HSW RI BL NA NA GL 1 6 Qing-C20
Triangular-sectioned rim with brown glaze on both
sides; too small to measure
T3 (sieving) 301 POT HSW BO GL 1 2 Qing-C20 Very degraded brown glaze on the interior
T3 (sieving) 301 POT HSW BO 1 1 Qing-C20 No glaze, small fragment
T3 (sieving) 301 POT POP RI BL 17 4.5 GL 1 2 Qing-C20 Blue & white, green-fired; small round lip, upright rim
T3 (sieving) 301 POT POP RI BL NA NA GL 1 1 Qing-C20
Small bead rim, upright; blue & white, too small to
measure
T3 (sieving) 301 CBM TL 15 70 UD All small fragments; 9 red; 6 grey
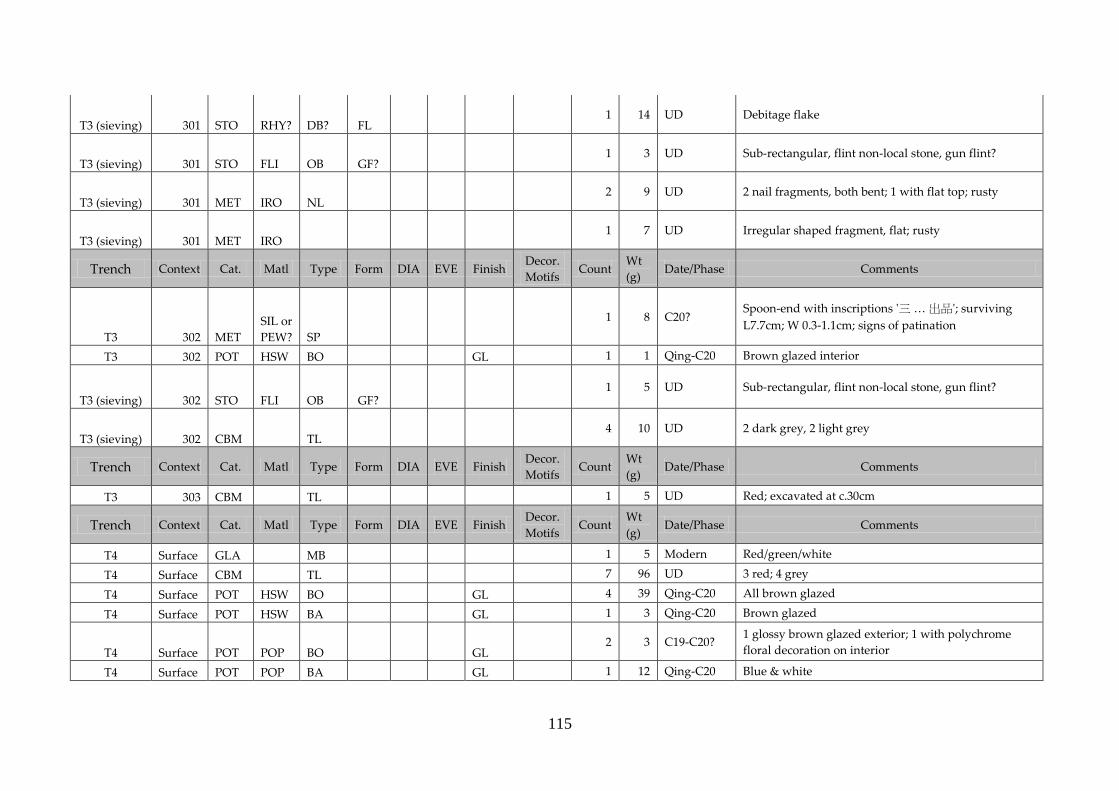
115
T3 (sieving) 301 STO RHY? DB? FL 1 14 UD Debitage flake
T3 (sieving) 301 STO FLI OB GF? 1 3 UD Sub-rectangular, flint non-local stone, gun flint?
T3 (sieving) 301 MET IRO NL 2 9 UD 2 nail fragments, both bent; 1 with flat top; rusty
T3 (sieving) 301 MET IRO 1 7 UD Irregular shaped fragment, flat; rusty
Trench Context Cat. Matl Type Form DIA EVE Finish Decor.
Motifs Count
Wt
(g) Date/Phase Comments
T3 302 MET
SIL or
PEW? SP
1 8 C20? Spoon-end with inscriptions '三 … 出品'; surviving
L7.7cm; W 0.3-1.1cm; signs of patination
T3 302 POT HSW BO GL 1 1 Qing-C20 Brown glazed interior
T3 (sieving) 302 STO FLI OB GF? 1 5 UD Sub-rectangular, flint non-local stone, gun flint?
T3 (sieving) 302 CBM TL 4 10 UD 2 dark grey, 2 light grey
Trench Context Cat. Matl Type Form DIA EVE Finish Decor.
Motifs Count
Wt
(g) Date/Phase Comments
T3 303 CBM TL 1 5 UD Red; excavated at c.30cm
Trench Context Cat. Matl Type Form DIA EVE Finish Decor.
Motifs Count
Wt
(g) Date/Phase Comments
T4 Surface GLA MB 1 5 Modern Red/green/white
T4 Surface CBM TL 7 96 UD 3 red; 4 grey
T4 Surface POT HSW BO GL 4 39 Qing-C20 All brown glazed
T4 Surface POT HSW BA GL 1 3 Qing-C20 Brown glazed
T4 Surface POT POP BO GL 2 3 C19-C20?
1 glossy brown glazed exterior; 1 with polychrome
floral decoration on interior
T4 Surface POT POP BA GL 1 12 Qing-C20 Blue & white
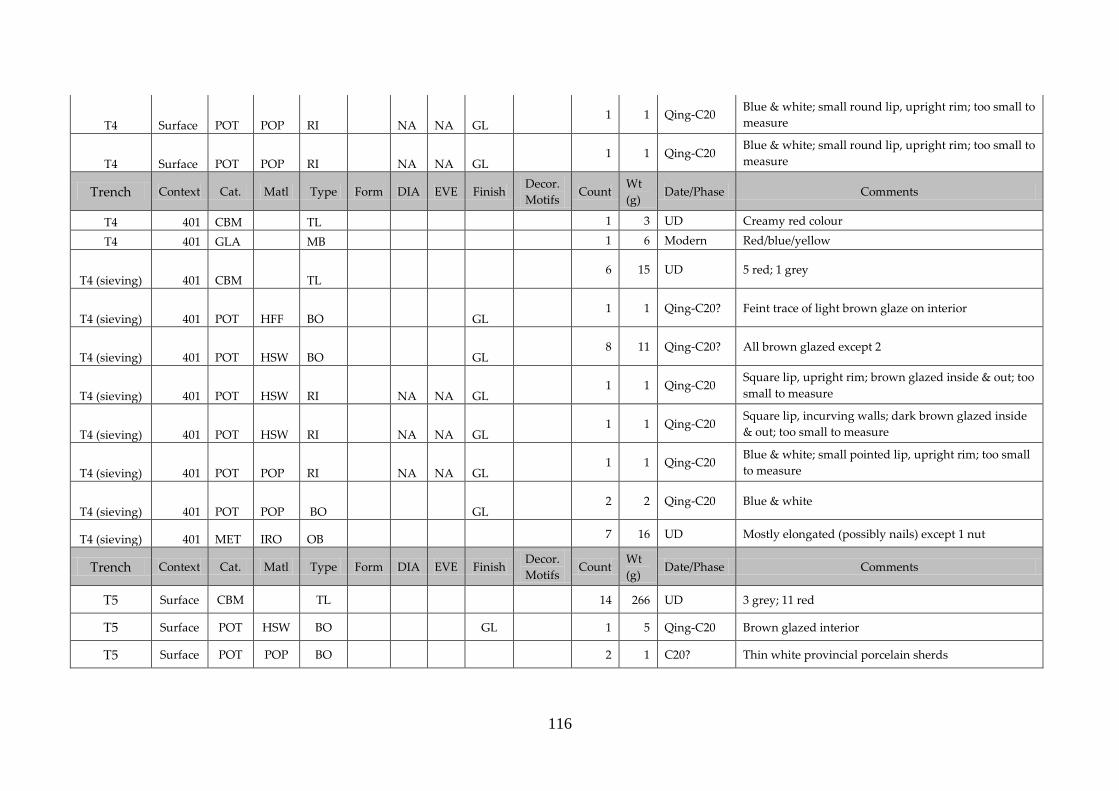
116
T4 Surface POT POP RI NA NA GL 1 1 Qing-C20
Blue & white; small round lip, upright rim; too small to
measure
T4 Surface POT POP RI NA NA GL 1 1 Qing-C20
Blue & white; small round lip, upright rim; too small to
measure
Trench Context Cat. Matl Type Form DIA EVE Finish Decor.
Motifs Count
Wt
(g) Date/Phase Comments
T4 401 CBM TL
1 3 UD Creamy red colour
T4 401 GLA MB
1 6 Modern Red/blue/yellow
T4 (sieving) 401 CBM TL
6 15 UD 5 red; 1 grey
T4 (sieving) 401 POT HFF BO GL 1 1 Qing-C20? Feint trace of light brown glaze on interior
T4 (sieving) 401 POT HSW BO GL 8 11 Qing-C20? All brown glazed except 2
T4 (sieving) 401 POT HSW RI NA NA GL 1 1 Qing-C20
Square lip, upright rim; brown glazed inside & out; too
small to measure
T4 (sieving) 401 POT HSW RI NA NA GL 1 1 Qing-C20
Square lip, incurving walls; dark brown glazed inside
& out; too small to measure
T4 (sieving) 401 POT POP RI NA NA GL 1 1 Qing-C20
Blue & white; small pointed lip, upright rim; too small
to measure
T4 (sieving) 401 POT POP BO GL 2 2 Qing-C20 Blue & white
T4 (sieving) 401 MET IRO OB 7 16 UD Mostly elongated (possibly nails) except 1 nut
Trench Context Cat. Matl Type Form DIA EVE Finish Decor.
Motifs Count
Wt
(g) Date/Phase Comments
T5 Surface CBM TL 14 266 UD 3 grey; 11 red
T5 Surface POT HSW BO GL 1 5 Qing-C20 Brown glazed interior
T5 Surface POT POP BO 2 1 C20? Thin white provincial porcelain sherds
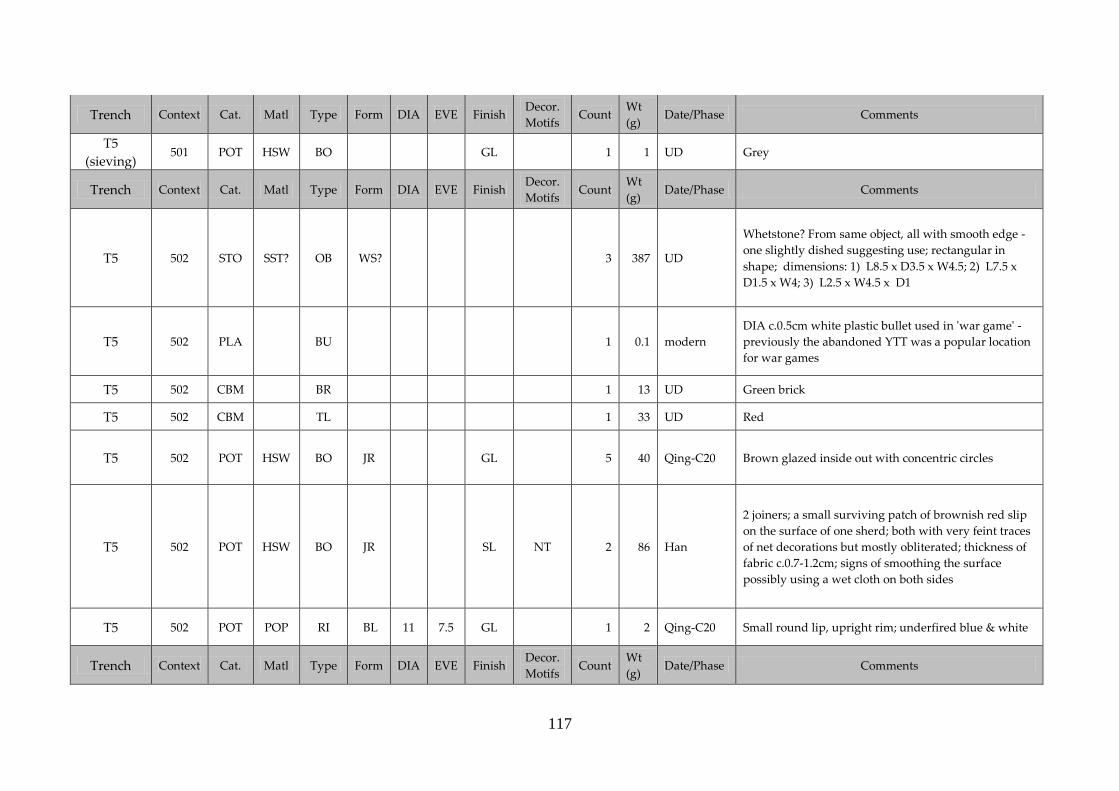
117
Trench Context Cat. Matl Type Form DIA EVE Finish Decor.
Motifs Count
Wt
(g) Date/Phase Comments
T5
(sieving) 501 POT HSW BO GL 1 1 UD Grey
Trench Context Cat. Matl Type Form DIA EVE Finish Decor.
Motifs Count
Wt
(g) Date/Phase Comments
T5 502 STO SST? OB WS? 3 387 UD
Whetstone? From same object, all with smooth edge -
one slightly dished suggesting use; rectangular in
shape; dimensions: 1) L8.5 x D3.5 x W4.5; 2) L7.5 x
D1.5 x W4; 3) L2.5 x W4.5 x D1
T5 502 PLA BU 1 0.1 modern
DIA c.0.5cm white plastic bullet used in 'war game' -
previously the abandoned YTT was a popular location
for war games
T5 502 CBM BR 1 13 UD Green brick
T5 502 CBM TL 1 33 UD Red
T5 502 POT HSW BO JR GL 5 40 Qing-C20 Brown glazed inside out with concentric circles
T5 502 POT HSW BO JR SL NT 2 86 Han
2 joiners; a small surviving patch of brownish red slip
on the surface of one sherd; both with very feint traces
of net decorations but mostly obliterated; thickness of
fabric c.0.7-1.2cm; signs of smoothing the surface
possibly using a wet cloth on both sides
T5 502 POT POP RI BL 11 7.5 GL 1 2 Qing-C20 Small round lip, upright rim; underfired blue & white
Trench Context Cat. Matl Type Form DIA EVE Finish Decor.
Motifs Count
Wt
(g) Date/Phase Comments
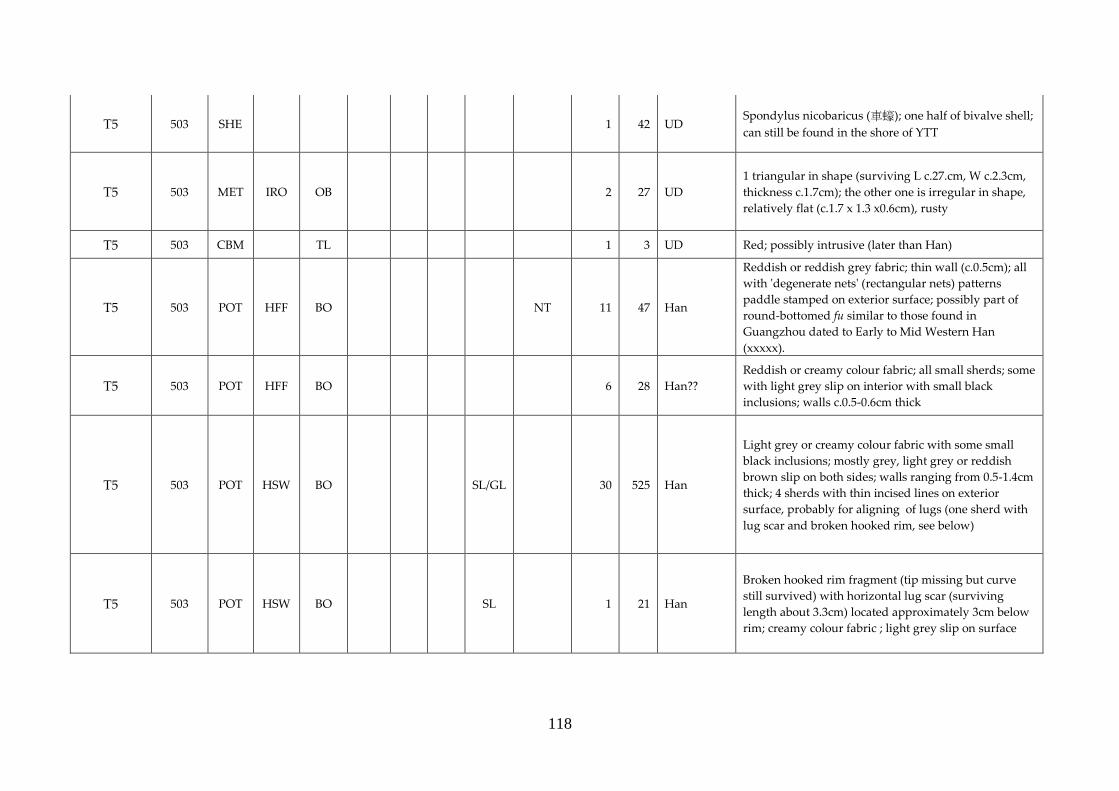
118
T5 503 SHE 1 42 UD Spondylus nicobaricus (車蠔); one half of bivalve shell;
can still be found in the shore of YTT
T5 503 MET IRO OB 2 27 UD
1 triangular in shape (surviving L c.27.cm, W c.2.3cm,
thickness c.1.7cm); the other one is irregular in shape,
relatively flat (c.1.7 x 1.3 x0.6cm), rusty
T5 503 CBM TL 1 3 UD Red; possibly intrusive (later than Han)
T5 503 POT HFF BO NT 11 47 Han
Reddish or reddish grey fabric; thin wall (c.0.5cm); all
with 'degenerate nets' (rectangular nets) patterns
paddle stamped on exterior surface; possibly part of
round-bottomed fu similar to those found in
Guangzhou dated to Early to Mid Western Han
(xxxxx).
T5 503 POT HFF BO 6 28 Han??
Reddish or creamy colour fabric; all small sherds; some
with light grey slip on interior with small black
inclusions; walls c.0.5-0.6cm thick
T5 503 POT HSW BO SL/GL 30 525 Han
Light grey or creamy colour fabric with some small
black inclusions; mostly grey, light grey or reddish
brown slip on both sides; walls ranging from 0.5-1.4cm
thick; 4 sherds with thin incised lines on exterior
surface, probably for aligning of lugs (one sherd with
lug scar and broken hooked rim, see below)
T5 503 POT HSW BO SL 1 21 Han
Broken hooked rim fragment (tip missing but curve
still survived) with horizontal lug scar (surviving
length about 3.3cm) located approximately 3cm below
rim; creamy colour fabric ; light grey slip on surface
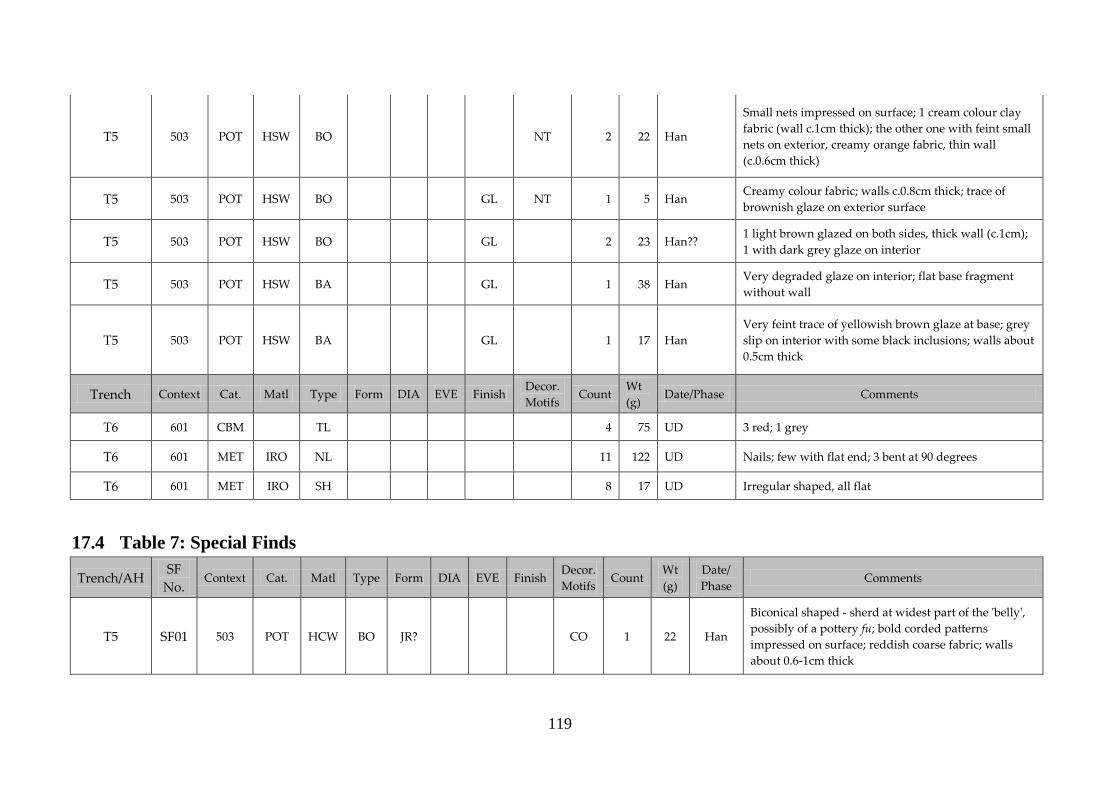
119
T5 503 POT HSW BO NT 2 22 Han
Small nets impressed on surface; 1 cream colour clay
fabric (wall c.1cm thick); the other one with feint small
nets on exterior, creamy orange fabric, thin wall
(c.0.6cm thick)
T5 503 POT HSW BO GL NT 1 5 Han Creamy colour fabric; walls c.0.8cm thick; trace of
brownish glaze on exterior surface
T5 503 POT HSW BO GL 2 23 Han?? 1 light brown glazed on both sides, thick wall (c.1cm);
1 with dark grey glaze on interior
T5 503 POT HSW BA GL 1 38 Han Very degraded glaze on interior; flat base fragment
without wall
T5 503 POT HSW BA GL 1 17 Han
Very feint trace of yellowish brown glaze at base; grey
slip on interior with some black inclusions; walls about
0.5cm thick
Trench Context Cat. Matl Type Form DIA EVE Finish Decor.
Motifs Count
Wt
(g) Date/Phase Comments
T6 601 CBM TL 4 75 UD 3 red; 1 grey
T6 601 MET IRO NL 11 122 UD Nails; few with flat end; 3 bent at 90 degrees
T6 601 MET IRO SH 8 17 UD Irregular shaped, all flat
17.4 Table 7: Special Finds
Trench/AH SF
No. Context Cat. Matl Type Form DIA EVE Finish
Decor.
Motifs Count
Wt
(g)
Date/
Phase Comments
T5 SF01 503 POT HCW BO JR? CO 1 22 Han
Biconical shaped - sherd at widest part of the 'belly',
possibly of a pottery fu; bold corded patterns
impressed on surface; reddish coarse fabric; walls
about 0.6-1cm thick
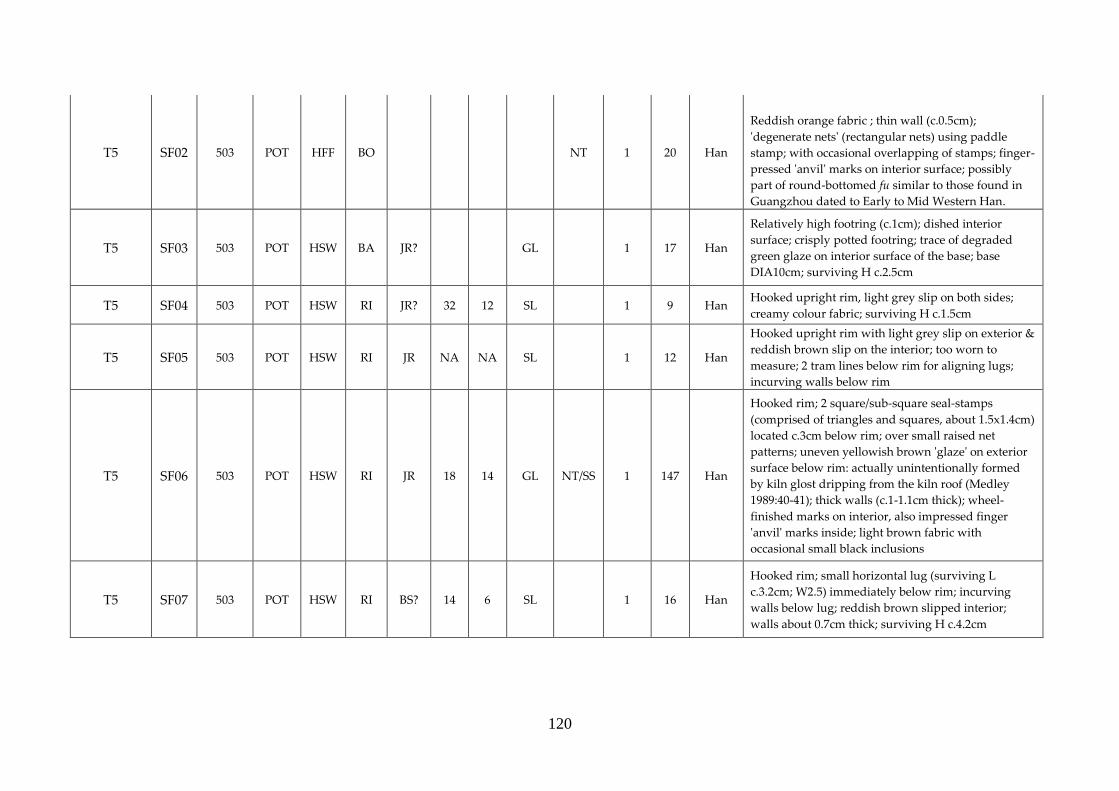
120
T5 SF02 503 POT HFF BO NT 1 20 Han
Reddish orange fabric ; thin wall (c.0.5cm);
'degenerate nets' (rectangular nets) using paddle
stamp; with occasional overlapping of stamps; finger-
pressed 'anvil' marks on interior surface; possibly
part of round-bottomed fu similar to those found in
Guangzhou dated to Early to Mid Western Han.
T5 SF03 503 POT HSW BA JR? GL 1 17 Han
Relatively high footring (c.1cm); dished interior
surface; crisply potted footring; trace of degraded
green glaze on interior surface of the base; base
DIA10cm; surviving H c.2.5cm
T5 SF04 503 POT HSW RI JR? 32 12 SL 1 9 Han Hooked upright rim, light grey slip on both sides;
creamy colour fabric; surviving H c.1.5cm
T5 SF05 503 POT HSW RI JR NA NA SL 1 12 Han
Hooked upright rim with light grey slip on exterior &
reddish brown slip on the interior; too worn to
measure; 2 tram lines below rim for aligning lugs;
incurving walls below rim
T5 SF06 503 POT HSW RI JR 18 14 GL NT/SS 1 147 Han
Hooked rim; 2 square/sub-square seal-stamps
(comprised of triangles and squares, about 1.5x1.4cm)
located c.3cm below rim; over small raised net
patterns; uneven yellowish brown 'glaze' on exterior
surface below rim: actually unintentionally formed
by kiln glost dripping from the kiln roof (Medley
1989:40-41); thick walls (c.1-1.1cm thick); wheel-
finished marks on interior, also impressed finger
'anvil' marks inside; light brown fabric with
occasional small black inclusions
T5 SF07 503 POT HSW RI BS? 14 6 SL 1 16 Han
Hooked rim; small horizontal lug (surviving L
c.3.2cm; W2.5) immediately below rim; incurving
walls below lug; reddish brown slipped interior;
walls about 0.7cm thick; surviving H c.4.2cm
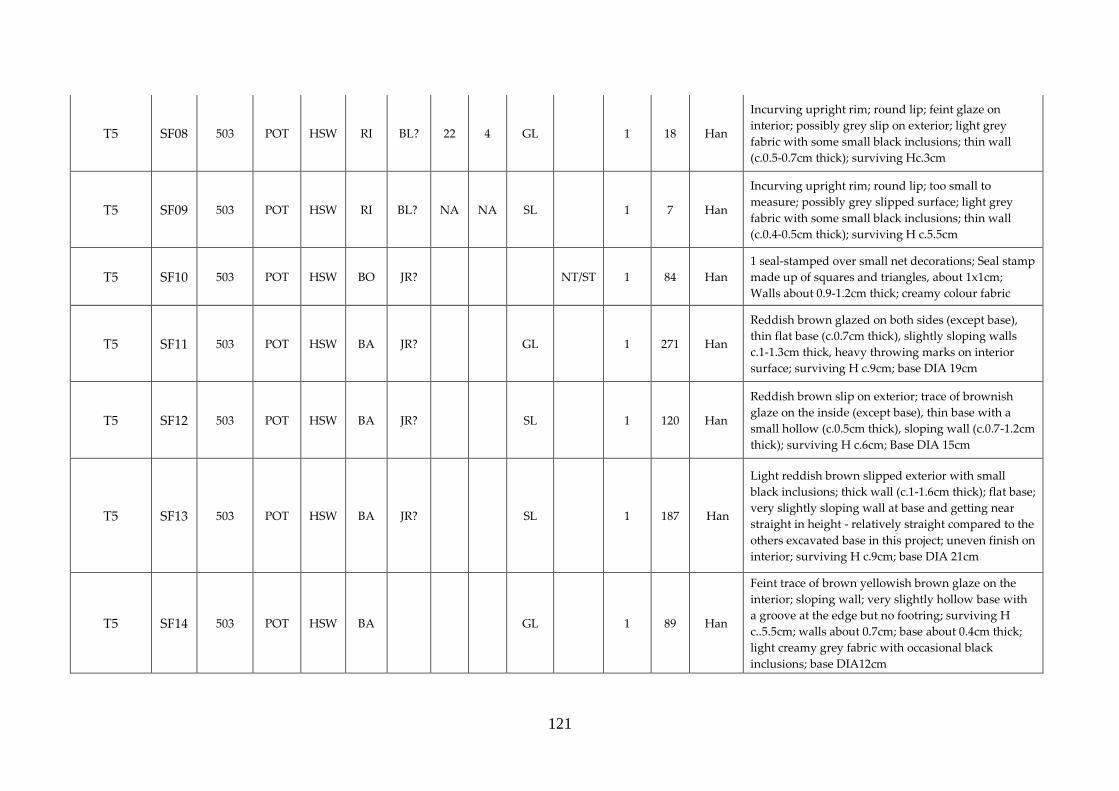
121
T5 SF08 503 POT HSW RI BL? 22 4 GL 1 18 Han
Incurving upright rim; round lip; feint glaze on
interior; possibly grey slip on exterior; light grey
fabric with some small black inclusions; thin wall
(c.0.5-0.7cm thick); surviving Hc.3cm
T5 SF09 503 POT HSW RI BL? NA NA SL 1 7 Han
Incurving upright rim; round lip; too small to
measure; possibly grey slipped surface; light grey
fabric with some small black inclusions; thin wall
(c.0.4-0.5cm thick); surviving H c.5.5cm
T5 SF10 503 POT HSW BO JR? NT/ST 1 84 Han
1 seal-stamped over small net decorations; Seal stamp
made up of squares and triangles, about 1x1cm;
Walls about 0.9-1.2cm thick; creamy colour fabric
T5 SF11 503 POT HSW BA JR? GL 1 271 Han
Reddish brown glazed on both sides (except base),
thin flat base (c.0.7cm thick), slightly sloping walls
c.1-1.3cm thick, heavy throwing marks on interior
surface; surviving H c.9cm; base DIA 19cm
T5 SF12 503 POT HSW BA JR? SL 1 120 Han
Reddish brown slip on exterior; trace of brownish
glaze on the inside (except base), thin base with a
small hollow (c.0.5cm thick), sloping wall (c.0.7-1.2cm
thick); surviving H c.6cm; Base DIA 15cm
T5 SF13 503 POT HSW BA JR? SL 1 187 Han
Light reddish brown slipped exterior with small
black inclusions; thick wall (c.1-1.6cm thick); flat base;
very slightly sloping wall at base and getting near
straight in height - relatively straight compared to the
others excavated base in this project; uneven finish on
interior; surviving H c.9cm; base DIA 21cm
T5 SF14 503 POT HSW BA GL 1 89 Han
Feint trace of brown yellowish brown glaze on the
interior; sloping wall; very slightly hollow base with
a groove at the edge but no footring; surviving H
c..5.5cm; walls about 0.7cm; base about 0.4cm thick;
light creamy grey fabric with occasional black
inclusions; base DIA12cm
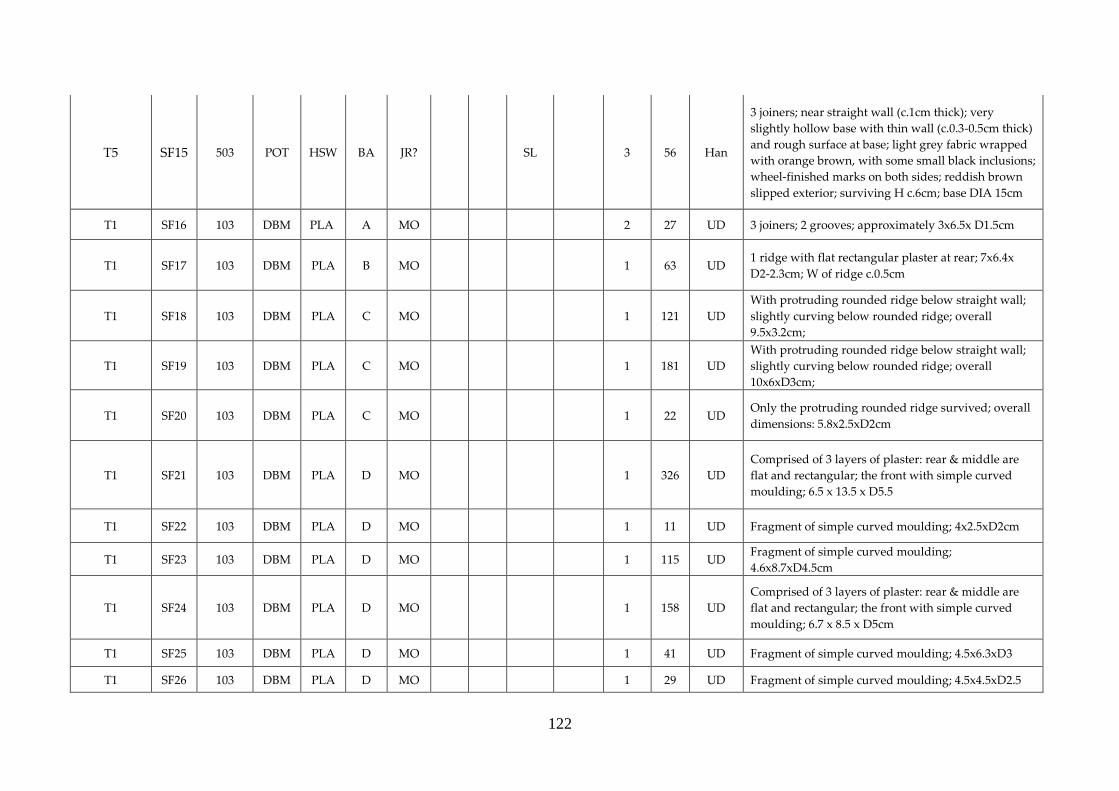
122
T5 SF15 503 POT HSW BA JR? SL 3 56 Han
3 joiners; near straight wall (c.1cm thick); very
slightly hollow base with thin wall (c.0.3-0.5cm thick)
and rough surface at base; light grey fabric wrapped
with orange brown, with some small black inclusions;
wheel-finished marks on both sides; reddish brown
slipped exterior; surviving H c.6cm; base DIA 15cm
T1 SF16 103 DBM PLA A MO
2 27 UD 3 joiners; 2 grooves; approximately 3x6.5x D1.5cm
T1 SF17 103 DBM PLA B MO
1 63 UD 1 ridge with flat rectangular plaster at rear; 7x6.4x
D2-2.3cm; W of ridge c.0.5cm
T1 SF18 103 DBM PLA C MO
1 121 UD
With protruding rounded ridge below straight wall;
slightly curving below rounded ridge; overall
9.5x3.2cm;
T1 SF19 103 DBM PLA C MO
1 181 UD
With protruding rounded ridge below straight wall;
slightly curving below rounded ridge; overall
10x6xD3cm;
T1 SF20 103 DBM PLA C MO
1 22 UD Only the protruding rounded ridge survived; overall
dimensions: 5.8x2.5xD2cm
T1 SF21 103 DBM PLA D MO
1 326 UD
Comprised of 3 layers of plaster: rear & middle are
flat and rectangular; the front with simple curved
moulding; 6.5 x 13.5 x D5.5
T1 SF22 103 DBM PLA D MO
1 11 UD Fragment of simple curved moulding; 4x2.5xD2cm
T1 SF23 103 DBM PLA D MO
1 115 UD Fragment of simple curved moulding;
4.6x8.7xD4.5cm
T1 SF24 103 DBM PLA D MO
1 158 UD
Comprised of 3 layers of plaster: rear & middle are
flat and rectangular; the front with simple curved
moulding; 6.7 x 8.5 x D5cm
T1 SF25 103 DBM PLA D MO 1 41 UD Fragment of simple curved moulding; 4.5x6.3xD3
T1 SF26 103 DBM PLA D MO 1 29 UD Fragment of simple curved moulding; 4.5x4.5xD2.5
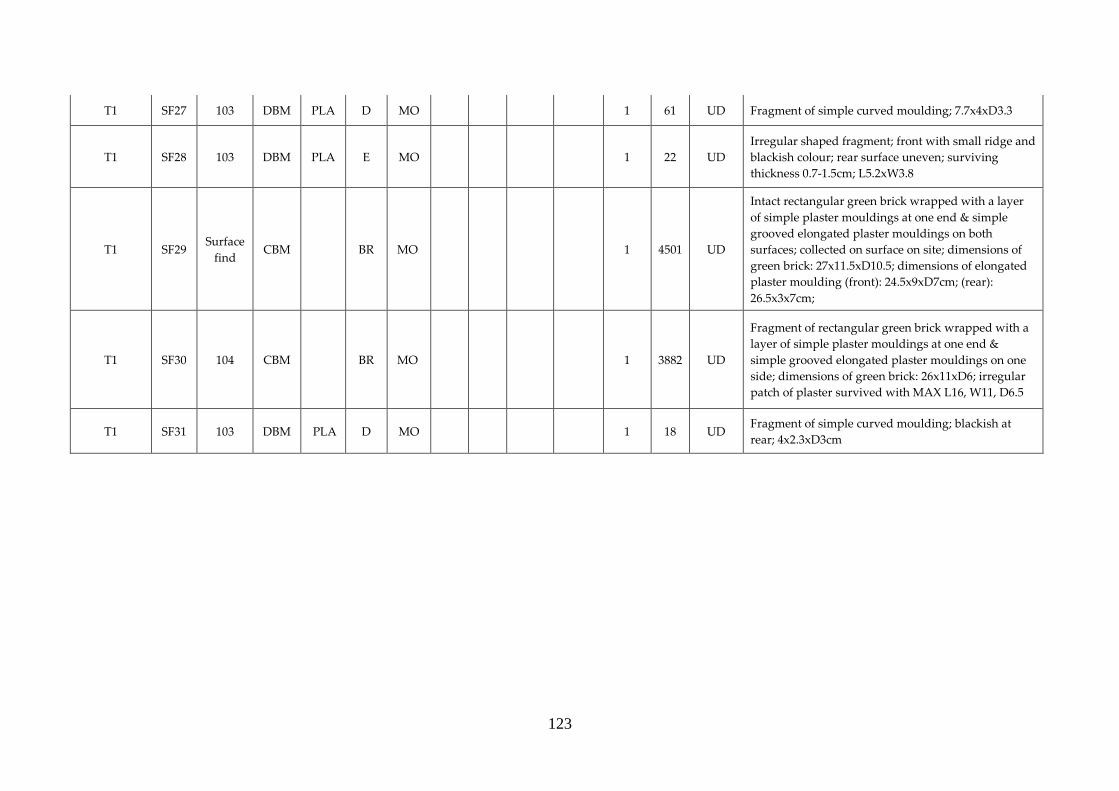
123
T1 SF27 103 DBM PLA D MO
1 61 UD Fragment of simple curved moulding; 7.7x4xD3.3
T1 SF28 103 DBM PLA E MO
1 22 UD
Irregular shaped fragment; front with small ridge and
blackish colour; rear surface uneven; surviving
thickness 0.7-1.5cm; L5.2xW3.8
T1 SF29 Surface
find CBM BR MO
1 4501 UD
Intact rectangular green brick wrapped with a layer
of simple plaster mouldings at one end & simple
grooved elongated plaster mouldings on both
surfaces; collected on surface on site; dimensions of
green brick: 27x11.5xD10.5; dimensions of elongated
plaster moulding (front): 24.5x9xD7cm; (rear):
26.5x3x7cm;
T1 SF30 104 CBM BR MO
1 3882 UD
Fragment of rectangular green brick wrapped with a
layer of simple plaster mouldings at one end &
simple grooved elongated plaster mouldings on one
side; dimensions of green brick: 26x11xD6; irregular
patch of plaster survived with MAX L16, W11, D6.5
T1 SF31 103 DBM PLA D MO
1 18 UD Fragment of simple curved moulding; blackish at
rear; 4x2.3xD3cm