Embed Size (px)
Citation preview

9TH Edition
A l t i t u d e · C l i m b i n g · E n d u r a n c e
ACE™ Training for Cyclists
Arnie Baker, MD
Table of Contents ACE™ Training for Cyclists .................. 2 Arnie Baker, MD .................................... 2 Table of Contents ................................... 3 Reader Comments .................................. 4 Also by Arnie Baker, MD ...................... 5 Arnie Baker, MD .................................... 5 Publication Notices ................................. 6 Acknowledgments .................................. 7 Forward .................................................. 8 10 ACE-Ride Commandments .............. 9 Part 1: Training Basics ........................ 10 Riding Recipe ....................................... 10 Fitness Elements ................................... 11 Non-Fitness Elements .......................... 17 The Training Curve ............................. 18 Training Principles .............................. 19 Training Triangles ............................... 20 Training Hints ...................................... 22 Bicycle Workout Variables ................. 23 Aerobic Training .................................. 25 Interval Training .................................. 27 Isolated Leg Training .......................... 28 Heart-Rate-Based Training ................. 30 Power-Based Training ......................... 35 Part 2: Climbing ................................... 39 Climbing—Introduction ...................... 39
Percent Grade ....................................... 40 Keep a Climbing Log ............................ 41 Climbing Volume .................................. 42 Climbing Intensity ................................ 43 Stationary Trainer Climbing ............... 44 Climbing & Descending Tips ............... 45 Six Climbing Positions ......................... 49 Climbing Workouts .............................. 53 Dealing With High Altitude ................. 58 Part 3: Mind Matters ........................... 63 Pacing .................................................... 63 Focus & Breathing ................................ 69 Motivation ............................................. 73 Part 4: Endurance Sport Nutrition ..... 77 Consume More ...................................... 77 Nutrition Losses .................................... 78 Examples of Meals and Foods ............. 80 Maltodextrin Nutrition ........................ 83 Event Nutrition Summary ................... 84 Part 5: Equipment ................................ 85 Part 6: Medical Problems .................... 88 Saddle Soreness ..................................... 88 Bicycle Seat Discomfort ....................... 93 Genital Numbness ................................. 93 Neck Pain ............................................... 94 Low Back Pain ...................................... 96 Ulnar Neuropathy ................................. 98
Knees ..................................................... 99 Achilles Tendonitis & Bursitis .......... 101 Forefoot Problems .............................. 103 Muscle Cramps ................................... 105 Eye Problems ...................................... 107 Part 7: Training Schedules ................ 108 Suggested Training: Overview .......... 108 Your Weekly Training Schedule ...... 109 Death Ride Training Schedule .......... 111 18-Week ACE™ Program ................. 112 Tapering for Events ........................... 113 Final Words: Clipped From: Rider Prep, deathride.com ........................... 115 Appendix A: Training Log ................ 116 Appendix B: Gears and Gear-Inches 118 Appendix C: Rear Derailleur Capacities ............................................ 119 Appendix D: Markleeville ACE™ Secrets ................................................. 120 Appendix E: Death Ride Deadlines .. 122 The “Just-Made-It” Schedule ........... 122 Appendix F: Famous Climbs ............ 124 Appendix G: Training Glossary ....... 125 Appendix H: ABC Publications ........ 127 Enjoyed this Book? ............................ 127

ACE: Altitude Climbing Endurance Training for Cyclists Arnie Baker, MD 4
Reader Comments “After 16 years of “serious” riding, 4 Near Death Experience Training camps, and 12 years of Death Ride volunteering/organizing I finally earned my first 5 pass pin. Thanks Arnie, your coaching and a little training worked; amazingly enough!” Jackie Johnson Alta Alpina Cycling Club Death Ride Sponsorship Coordinator “Dear Dr. Baker, I finished the Death Ride a couple of weeks ago and I have to thank you. I read your "ACE" book at least 10 times; the last time being on the plane on the way out to the ride. You are a good writer and an excellent teacher/coach. I loved doing this ride and am disgustingly proud for having finished it. The money I paid for your book was a very cheap price for the wisdom contained in its pages.” Terry Vance
Training for the Everest Challenge (EC) race (www.everestchallenge.com)... I … found (your ACE Book) it to be … the single most useful piece of training information that I have ever read. What made the book so useful was that it was written in a manner that both 'novice' and 'expert' alike would benefit from. Julien Nordstrand [[email protected]] “Dear Dr. Baker, I just finished the Death Ride (5 passes) and want to thank you for the help you provided in your ACE training book. I used your book a lot both during training and also in the strategy for the event itself. It was a marvelous help in all respects. I'm 51 and this is the hardest single day event I've done. But I was well prepared enough so that I enjoyed most of the ride, was relaxed, and had a good time. Once again, thanks.” Steve Lombardi
ACE: Altitude Climbing Endurance Training for Cyclists Arnie Baker, MD 5
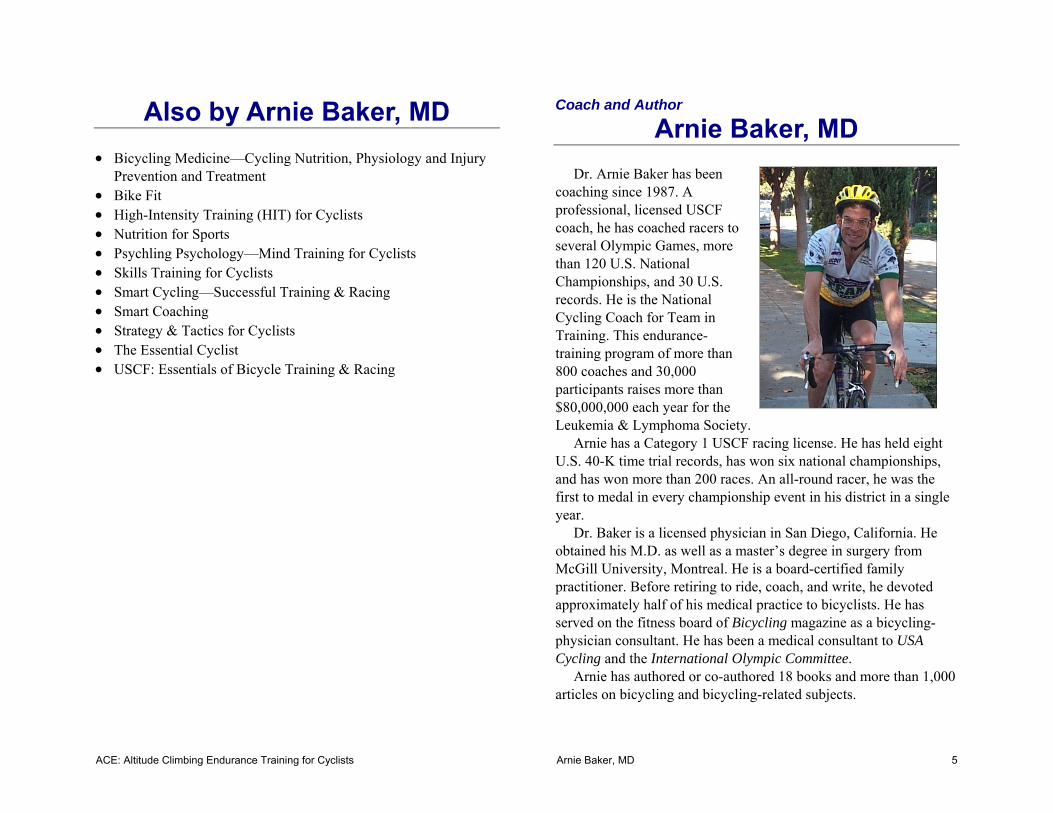
Also by Arnie Baker, MD • Bicycling Medicine—Cycling Nutrition, Physiology and Injury
Prevention and Treatment • Bike Fit • High-Intensity Training (HIT) for Cyclists • Nutrition for Sports • Psychling Psychology—Mind Training for Cyclists • Skills Training for Cyclists • Smart Cycling—Successful Training & Racing • Smart Coaching • Strategy & Tactics for Cyclists • The Essential Cyclist • USCF: Essentials of Bicycle Training & Racing
Coach and Author
Arnie Baker, MD
Dr. Arnie Baker has been coaching since 1987. A professional, licensed USCF coach, he has coached racers to several Olympic Games, more than 120 U.S. National Championships, and 30 U.S. records. He is the National Cycling Coach for Team in Training. This endurance-training program of more than 800 coaches and 30,000 participants raises more than $80,000,000 each year for the Leukemia & Lymphoma Society.
Arnie has a Category 1 USCF racing license. He has held eight U.S. 40-K time trial records, has won six national championships, and has won more than 200 races. An all-round racer, he was the first to medal in every championship event in his district in a single year.
Dr. Baker is a licensed physician in San Diego, California. He obtained his M.D. as well as a master’s degree in surgery from McGill University, Montreal. He is a board-certified family practitioner. Before retiring to ride, coach, and write, he devoted approximately half of his medical practice to bicyclists. He has served on the fitness board of Bicycling magazine as a bicycling-physician consultant. He has been a medical consultant to USA Cycling and the International Olympic Committee.
Arnie has authored or co-authored 18 books and more than 1,000 articles on bicycling and bicycling-related subjects.
ACE: Altitude Climbing Endurance Training for Cyclists Arnie Baker, MD 6
Publication Notices
Copyright The materials available in Arnie Baker Cycling and/or Argo Publishing products (collectively subsequently referred to as Arnie Baker Cycling), both in print and online, are the property of Arnie Baker and are protected under United States and international copyright and other laws and conventions. Arnie Baker Cycling grants to you, the customer, a nontransferable, nonexclusive right and revocable license to use this material according to the terms and conditions set forth in this Agreement. Except as expressly granted by this Agreement, you acquire no right, title, or license to the contents of Arnie Baker Cycling products or its website. Some material is derived from previously published works of Arnie Baker, or includes material previously written and published for or derived from works of the United States Cycling Federation or commercial/trade books. The information contained herein is for the personal use of a single reader, and may not be incorporated into any commercial programs, other books, databases or any other kind of software without the written consent of the author. Making copies of Arnie Baker Cycling publications, or any portion, for any purposes other than your own is a violation of United States copyright laws. The occasional use of trademarked names is for editorial purposes only. There is no intention to infringe upon trademarks. No endorsement or denigration of any product is implied. Copyright © 1988-2007, by Arnie Baker. Arnie Baker Cycling. http://arniebakercycling.com/ Argo Publishing. 1820 Washington Place, San Diego, CA 92103 Limitations of Use All rights reserved. The contents of Arnie Baker Cycling publications may be accessed, viewed, or otherwise used only by a registered customer. Customers are permitted to view, browse, download, and/or print for their own personal purposes only. These uses are restricted to noncommercial purposes; all copyright and any other notices must be maintained on all copies. Materials may have electronic expiration dates. Use of materials beyond their expiration date is prohibited. Using “work-arounds” or programs to defeat electronically set expiration dates is prohibited.
Except as provided by law or by this agreement, the contents of Arnie Baker Cycling publications or its website may not be further stored, reproduced, distributed, transmitted, modified, adapted, performed, displayed (including adaptations/displays such as by “framing”), published, printed, or sold in whole or in part without prior written permission from Arnie Baker Cycling. Arnie Baker Cycling publications may not be duplicated in any way without the expressed written consent of the author, except in the form of brief excerpts or quotations for the purposes of review. Sharing an ABC password with a non-customer or otherwise making the contents of Arnie Baker Cycling publications available to third parties is strictly prohibited. Unauthorized use may subject the user to applicable civil or criminal penalties. Changes in Terms and Conditions Arnie Baker Cycling reserves the right at its discretion to change, modify, add or remove the Terms and Conditions of this Agreement at any time and post the changes on its website. Continued use of the website following the posting and such notification of any change to these Terms and Conditions will constitute acceptance by you of the Terms and Conditions as modified. Arnie Baker Cycling reserves the right to change, modify, suspend, or discontinue any or all parts of the website or the material available at any time and reserves the right to restrict access to parts or all without notice or liability. Disclaimer The author makes no warranty of any kind, expressed or implied, with regard to the information contained in Arnie Baker Cycling publications or its website. Arnie Baker Cycling does not guarantee the accuracy, completeness, currentness, noninfringement, merchantability, or fitness for a particular purpose of information available from its publications or website. The author shall not be liable in the event of incidental or consequential damages in connection with, or arising out of, the furnishing, performance, or use of information, associated instructions, programs, and/or claims of results or productivity gains. Generalizations or applicability of information contained in this book may not apply to any specific individual. The contents of Arnie Baker Cycling publications or its website should not be substituted for the advice of a personal physician. All readers are cautioned to obtain medical consultation in the event of any medical problems. All readers are cautioned to consider obtaining medical consultation before entering into any athletic training program.
ACE: Altitude Climbing Endurance Training for Cyclists Arnie Baker, MD 7
Arnie Baker Cycling will not be liable for any loss or injury caused by information obtained through its publications or its website. In no event will Arnie Baker Cycling be liable for any decision made or action taken in reliance on such information. Arnie Baker Cycling will not be liable for any damages arising out of any legal claim in any way connected with the information provided in its publications or on its website. Disclosure Dr. Baker receives or has received sponsorship or products from: Adams Avenue Bicycles, Bell Sports, Bike USA, Bill Holland Bicycles, Boone Technologies, Cannondale, Chris King, CompuTrainer, Continental, CycleOps, LeMond Fitness, Lew Composites, Mavic USA, Pantour, Polar Electro Oy, PowerFoods, PowerTap (Tune, Saris), PR Bar, Ralph Ray Engineering, Scott USA, Specialized, Speedplay, Tailwings, Trek Bicycle Superstores San Diego, VeloMax, Vision Tech, XLM, Xtrem, and Zipp. Dr. Baker has been a paid consultant for: Colorado Altitude Training, Kirkwood Mountain Resort, PacTour, The International Olympic Committee, The Leukemia & Lymphoma Society, and The United States Cycling Federation. Cataloging in Publication Data Baker, Arnie, 1953- Altitude Climbing Endurance/ by Arnie Baker. —9th ed. 1. Bicycling 2. Sports Training 3. Fitness I. Title 2008 ISBN 0-9640601-6-7 Softcover 10 9
Acknowledgments I thank Jackie Johnson, past ride director of the Markleeville
Death Ride, for valuable suggestions and comments. I thank Kirkwood Mountain Resort for whom I have conducted a
number of Near-Death Experience training camps. I thank the many members of the Alta Alpina Cycling Club as well as Perry Crutchfield, Ginger Coombs, Bobby Carter, David and Haze Thompson, and John Seher who have helped mentor and coach at these camps.
I thank the Leukemia and Lymphoma Society’s Northern California Team in Training Chapter; all of whom combined to first formally interest me in specific altitude-climbing-endurance training.
I thank Barbara Baker and Perry Crutchfield for proofing and other valuable suggestions.
I thank Gero McGuffin, who not only has helped with proofing and criticism, but with whom I have climbed more than 10,000,000 feet during the past 20 years.
ACE: Altitude Climbing Endurance Training for Cyclists Arnie Baker, MD 8
Forward
This is a book about altitude-climbing-endurance training for cyclists. It concerns training for “hilly centuries+”—one-day events over 100 miles with more than 10,000 feet of climbing.
ACE events require a specialized approach. In addition to general bicycle training and knowledge, ACE riders need to be specialists in climbing, descending, and endurance.
Motivation, focus, breathing techniques, and pacing are especially important.
Knowledge about the altitude’s effects on the body is crucial. Part 1 is an introduction to the essential elements of successful
riding. Although the primary focus of this book is training, this introduction places training within an overall framework. The essentials of bicycle training are reviewed, and heart-rate and power-based training are discussed in some detail.
Part 2 is all about climbing. Here you will find information from the basics—what percent grade means—to the finer details about bicycle climbing positions. It is about technique as well as specific training to get you up hills faster. Descending is also covered. There is also a section on dealing with high altitude.
Part 3 is about the mental aspects of riding. It includes sections on pacing, focus and breathing, and motivation. Many of us who are motivated to participate in this type of bicycle riding have moments of doubt. By understanding a little bit about how our minds work, we can stay focused and motivated.
Part 4 covers endurance sport nutrition. All-day riding requires attention to diet. The principles, as well as specific dietary suggestions for training and the event are found here.
Part 5 is about equipment selection and care. Part 6 is all about the common bicycling-related medical
problems that crop up in endurance riding. Suggestions for prevention and treatment are outlined.
Part 7 gives suggested training schedules. Although training must be individualized, you will probably find the suggested programs helpful.
Finally specific target training goals and schedules are provided. Beginners are cautioned to approach “all-out” or sustained
efforts gradually, and riders over the age of 40 or those with known medical conditions are advised to consult a physician before embarking on an exercise program.
Riding 100 or more miles in one day, climbing more than 10,000 feet in that day is not for everyone. If it is for you, this book will make the going easier and faster.
ACE: Altitude Climbing Endurance Training for Cyclists Arnie Baker, MD 9
10 ACE-Ride Commandments
1. Train properly. In the six weeks before the event, ride three or more individual days of at least 60% of target-event climbing. During this six-week period, three of the weeks should include climbing that totals at least 125% of target-event-day climbing. At times during your training, work on climbing rate with interval work.
2. Clarify your motivation and goals before you arrive—so that when you finish four passes you can answer the question: “Do I really need to climb that fifth pass?”
3. Have your bike working perfectly two weeks before the event. Do not make last minute changes.
4. Emphasize carbohydrates three days before the event. On long training and event days, eat > 1,000 calories for breakfast and average > 300 calories per hour while riding.
5. Add salt and eat salty foods the day before and during the event. 6. While riding, drink one to three waterbottles per hour depending
upon the heat. 7. Pace yourself. Keep heart rate < 75% of maximum. If you do
not use a heart rate monitor, this means you should be able to talk easily in sentences.
8. Keep average climbing cadence > 70 rpm. Have gearing to keep cadence above 50 rpm on 10% grades.
9. On event day, climb > 1,600 to 2,000+ feet per hour depending upon the distance, climbing, and cut-offs.
10. Think safety in your equipment and riding style.
ACE: Altitude Climbing Endurance Training for Cyclists Arnie Baker, MD 10
Part 1: Training Basics Fitness derives from genetic, serendipitous, and planned events. In other words, you are given it, you are lucky, or you work for
it. Some of us seem almost born to be fit, and respond quickly to
training. Others are slower to adapt. The most important strategy in becoming an Olympic athlete might be to choose one’s parents wisely; it is just not practical.
Most athletes start out as “fun” enthusiasts. Fitness is achieved, often by chance. Many athletes who do well do so because their training is sound, even if there is no overall purpose, program, or plan. Although demands may be made on the separate elements of fitness, they are not teasing out these fitness elements; they are not optimizing their genetic potential.
Finally, fitness results from planned activities. Coaches, sport scientists, nutritionists, body workers, and others combine to design, develop, and implement training programs to improve or maximize genetic potential.
This part is about some of those planned activities. In other words, how and what you can do to get fitter, and how
best to use the fitness you have!
Riding Recipe Many riders simplistically think that all you need is to be strong.
There is a lot more to it. The following information places training in perspective. This book addresses the first three fitness elements of the riding recipe in detail.
Riding Requirements
The major elements of successful riding and racing can be dissected. Consider each ingredient. Train each one—the right amount at the right time. Put the ingredients together. You will go a long way toward optimizing your potential.
Some of these elements are: • Fitness, including
o Aerobic fitness o Muscle-strength fitness o Endurance fitness o Metabolic fitness o Anaerobic fitness o Power o Neuromuscular (leg-speed) fitness o Neurohormonal fitness
• Body composition • Diet and ergogenics • Physical health • Bicycle specs and maintenance • Position on the bicycle • Bike handling • Strategy and tactics, including energy conservation • Mental attitude, sport psychology • Rest-recovery-sleep
ACE: Altitude Climbing Endurance Training for Cyclists Arnie Baker, MD 11
Fitness Elements Fitness means different things to different people. Some aspects
of fitness are very specific to specific sports. Weight lifters think of fitness differently than curlers or chess players.
It is valuable to know about the elements of cycling fitness, because knowing what elements are important helps us decide how to train.
Although some aspects of fitness do have genetic limits, most athletes are limited by their training rather than by their heredity.
The elements of bicycling fitness follow. The performance of most non-racer cycling enthusiasts—century
riders, all-day riders, randonneurs, tourists—depends chiefly on the first three.
Racer success may be limited by any of the major eight fitness elements outlined below.
Types of Cycling Fitness
Many elements of cycling fitness belong to more than one type of fitness and so it is sometimes hard to tease out the fitness elements, or understand them clearly. (Consider, as an analogy, various systems on your bicycle: The cogs on your back wheel belong to the drive-train system as well as to the wheel system.)
Aerobic Fitness
The ability to use oxygen for energy production. This is important for performance in any event longer than 30 seconds. The heart, lungs, blood vessels, and muscles are all involved in the aerobic chain.
The amount of blood the heart can pump is a product of how much blood the heart pumps with each beat and how many times the heart beats per minute. Most of the change in aerobic fitness is due to the amount of blood the heart pumps with each beat.
The lungs are usually not the limiting factor in aerobic fitness. They are very efficient in transferring oxygen from small airways to the blood. Although not the limiting factor, the athlete’s perception of aerobic limitation is usually perceived to be in the lungs.
Lung power can be a limiting factor in the presence of disease (for example, asthma), at altitude, or at high levels of exertion in trained athletes.
The muscles are important in the aerobic chain. Fit riders extract more oxygen from the blood as it courses through the muscles than less fit riders.
Aerobic fitness can be measured by a VO2 max test. This test measures the volume (V) of oxygen (O2) the body can use, in liters of oxygen per minute. Power demand is ramped up in 10 to 50 watt increments, depending upon the protocol used. Oxygen use is measured from a formula whose terms include the total volume of air breathed and the amount of oxygen in inspired and expired air. This test is fair at predicting flatland time-trialing ability.
VO2 max is often scaled to the rider’s mass, or weight, in which case it measures the volume of oxygen used per minute per kilogram. Scaled to weight, the test is a good predictor of long, steady hill-climbing ability.
VO2 can be estimated from the power achieved in ramped tests. Arnie’s formula is VO2 = 12 x watts/kilogram + 3.3.
Simple field measures cost nothing and are as good or better at predicting performance. For example, after testing hundreds of athletes, I have found that timing ascent up our local 1.3 mile Torrey Pines climb, with 440 feet of climbing, predicts VO2 as follows: 360 / time in minutes = VO2. A 6-minute climb equates to a VO2 max of 60 milliliters per kilogram per minute.
Although considered a measure of aerobic function, not muscular function, a VO2 max test really does involve muscle mass too. Without adequate muscle mass, there is insufficient oxygen demand, and values will be low.
ACE: Altitude Climbing Endurance Training for Cyclists Arnie Baker, MD 12
More important as a predictor of performance is how much oxygen the body can use at submaximum levels, say at time-trial pace, or at other thresholds.
General aerobic fitness is trained at moderate exertion levels that correspond to roughly 65% to 85% of an individual’s maximum heart rate.
High-level aerobic fitness is trained at exertion levels that correspond to roughly 80% to 85% of an individual’s maximum heart rate. Athletes can train at such levels for up to about 120 minutes per week. Training time beyond this amount is limited by high-energy fuel—the ability to incorporate carbohydrate into muscle.
Read more about aerobic training on page 25.
Muscle-Strength Fitness All the aerobic capacity in the world will not get you anywhere if
you do not have the right muscles to use that energy. What muscles do is contract, or shorten, when stimulated to do
so by the nerves that supply them. They contract because of filaments of actin and myosin that form chemical/mechanical cross-bridges and move relative to one another.
The importance of sport-specific muscle strength is well known. For example, elite runners who try bicycle riding are often not very fast; same with bicyclists who try running. Sport-specific slow-twitch muscle strength is trained during specific sport training. Although weight-room work may help, more sport-specific exercises such as hill running for runners and isolated leg training or big-gear riding for cyclists is often better.
Broadly speaking, there are two types of muscle fibers: Fast-twitch and slow-twitch.
Short, high-power efforts are associated with fast-twitch fibers. For a given power output, the slower the cadence the higher the percentage of fast-twitch fibers recruited.
In a strict sport science sense, muscle strength refers to 1-rep maximum strength—the amount of weight that a muscle can lift, push, or pull one time. One-rep muscle strength is a function of fast-twitch muscle fibers. It is easy to measure 1-rep muscle strength in the gym, although the machines that isolate different muscle groups are not always cycling specific.
In cycling, muscle strength over a period of time, or power, is crucial. To contract repeatedly, muscles need energy. The energy may come from metabolic reactions with or without oxygen.
Reactions without oxygen (or anaerobic energy production) are characteristic of many fast-twitch muscle fibers, called glycolytic fibers. Reactions with oxygen are characteristic of slow-twitch muscle fibers. A subtype of fast-twitch muscle fibers may also use oxygen. Those fibers, which characteristically use oxygen to produce energy, are called oxidative fibers.
Although in pure track sprinting fast-twitch strength is crucial, in most cycling events slow-twitch strength is more important—but slow-twitch strength is very difficult to measure, in part because when slow-twitch fibers reach their limit, fast-twitch ones take over.
One lab test that comes closer to measuring what is important for most road cyclists (for most of us) is muscle fatigability. One way it is measured is by seeing how many repetitions can be performed at 70% of 1-rep maximum, or at a percentage of body weight.
Tests show that elite aerobic endurance athletes are generally not world-class when it comes to strength testing in the lab. Again, these measurements of primarily fast-twitch muscle strength are not relevant to the type of strength that aerobic-endurance athletes need—slow-twitch muscle strength.
Cycling muscles are trained by cycling—by just riding along. You are specifically strength training your cycling muscles when you feel them working.

ACE: Altitude Climbing Endurance Training for Cyclists Arnie Baker, MD 13
Big-gear riding and climbing provide aerobic-muscle-specific work. Sprint work provides anaerobic muscle-specific work.
For the most cycling muscle-specific work, I separate out the muscle element of cycling fitness with isolated leg testing and training. In my experience, the power that one can generate with one leg riding at 60 rpm for three minutes is an excellent measure of cycling muscle fitness.
Read more about muscle-strength fitness training under Isolated Leg Training on page 28.
Endurance
This is the ability to last. Endurance is required to get to the finish of an event.
Endurance can mean different things. Most sport science discussions about endurance concern events lasting one to three hours. Ultra riders may think of endurance as what Tour de France or Race Across America (RAAM) riders possess. However, track coaches think of pursuiters, as opposed to sprinters, as endurance riders. On the track, the ability to last 4 minutes is endurance.
Although many equate endurance with aerobic fitness, and although there is some overlap, they are not the same. It is possible to be able to perform a 40K time trial in 50 minutes, showing elite level aerobic ability and a VO2 max over 80 mL / kg / min., yet fall apart in races over 100 miles.
Endurance for events up to a few hours in duration can be predicted by the tests for aerobic fitness described above.
Endurance in the sense of stage racing or ultra-distance events is not measured in the lab. It requires field evaluation.
For example, the best measure of your endurance for the Tour of the California Alps (a 129-mile ride with 16,000 feet of climbing) is simply how well you adapt to long hilly training rides.
Metabolic Fitness This aspect of fitness comprises many factors. Here are some
well-known elements in metabolic fitness: Mitochondrial energy production. Mitochondria are the energy
factories of the cells. They produce energy through biochemical reactions involving oxygen (for example, the Kreb’s citric acid cycle). The number and function of mitochondria can be improved with training.
Energy can also be produced without oxygen (anaerobically). Chemical reactions that involve stored adenosine triphosphate (ATP) and creatine phosphate (CP) are important in producing energy anaerobically.
When work is accomplished without oxygen, lactic acid is produced. Lactic acid clearance involves the ability of the body to buffer (or temporarily neutralize) lactic acid as well as the ability of the body to metabolize (or burn) lactic acid. This involves many chemical substances and reactions in the muscles and in the blood (myoglobin, bicarbonate, and hemoglobin, to name only a few). As with the fitness elements listed above, training helps.
Some indication of metabolic function can be gained through lab studies including chemical analyses and muscle biopsies. For example, lactic acid levels in muscle or blood lactate levels can be measured with standard workloads or at threshold. Mitochondrial density can be determined in muscle biopsies. These tests are not as good as those discussed above in predicting human performance.
Anaerobic Fitness
The ability to produce work without oxygen is vital in many forms of bicycle racing. This is a combined metabolic (anaerobic) and muscle-strength (glycolytic) fitness.
Anaerobic fitness is necessary whenever attacks occur, when the pace gets super high, when the period for maximum effort is short.
ACE: Altitude Climbing Endurance Training for Cyclists Arnie Baker, MD 14
In fact, this is what mass start group racing is usually all about—riders do not usually get left behind until fitter riders push the pace and force them to exceed their aerobic and anaerobic limits.
The amount of work that can be performed over short periods (less than 30 seconds) can be measured in the lab or in the field. Peak power in the lab can be measured by computerized cycling ergometers in standardized Wingate tests. In the field, one can measure, for example, 200-meter sprint times.
This type of fitness is not particularly important for century rides or all-day touring. Although some anaerobic training may improve your aerobic fitness, you should rarely, if ever, be anaerobic during any part of such events.
Power
For most cyclists, power is the most important lab predictor of cycling performance. After all, it is power that gets you down the road. It is a more important predictor than VO2 max.
Anaerobic Power For track sprinters, maximum power in 3- to 30-second tests
provides an excellent predictor of track sprinting fitness. The shorter the test, the more pure muscle strength is measured. When the test approaches 30 seconds, combined muscle fitness (glycolytic) and anaerobic metabolic fitness is measured. Again, anaerobic fitness has little importance for century riding or most-of-a-day events.
Aerobic Power For most other riders, power at time-trial threshold is key to
performance. Alternatively, maximum power on a ramped test lasting about 15 minutes. This is really a test of combined muscle-fitness (oxidative) and aerobic fitness. (There is a close correlation between power and oxygen uptake. Where they diverge, power is more important.)
Neuromuscular Fitness Leg speed is a neuromuscular fitness. It is a skill. It is not
strength; it is not related to aerobic or anaerobic function. The ability to respond to changes in tempo, especially in criteriums, requires the ability to move those legs quickly. Successful sprinters have excellent leg speed.
Can you hold 140 or more rpm for several minutes on a stationary trainer with low resistance? Can you spin over 200 rpm for short bursts? If so, you have good to excellent leg speed.
Although important in some specific bicycling disciplines, leg speed is of little importance to bicycle touring or most all-day riding—except that at moderate to high power levels cadences closer to 90 rpm are less fatiguing than those closer to 60 rpm.
Neuromuscular fitness is important not only for leg speed, but for cycling economy.
Imagine your right leg rotating though a clock circle. Most of your right leg power comes from pushing down or forward, between about one and five o’clock. You want to stop your nerve cells from activating your right leg push down/forward muscles before you get to the six o’clock position and return your leg back up to twelve o’clock.
Although much has been written about a smooth pedal stroke and pulling up after pushing down, studies show that even professional cyclists do not do this. What is important, and what economical cyclists do, is to not push down on the returning (right) leg while the other (left) leg is in its power phase pushing down or forward. Or, at least, not pushing down too hard.
Isolated leg exercises at low power (in easy gears) at about 80 rpm are an excellent for improving neuromuscular fitness.
Neurohormonal Fitness
This type of fitness is poorly understood, but important. It includes some of the following areas: Pain perception and the neurohormonal response and tolerance of training volume and
ACE: Altitude Climbing Endurance Training for Cyclists Arnie Baker, MD 15
intensity. How brain cells talk with one another, and how the body’s hormones respond and adapt to stress.
Bicycle training not only changes neurochemistry, it may change the physical structure of the brain itself. “Extensive practice in… athletes… changes their brains as well as their bodies.”1
Neurohormonal fitness is required to respond and adapt to training without overtraining.
Testing for neurohormonal fitness is in its infancy. We are just beginning to understand the physiological underpinnings of neurohormonal factors.
Other Types of Fitness
Above are some of the major aspects of fitness. The list is not complete.
Gastrointestinal fitness can be crucial in endurance events. The ability to drink and eat and to digest nutrients is frequently a limiter to performance in long events. Like other fitness elements, gastrointestinal fitness can be trained.
Much of what we know has to do with what we can measure. What is hard to measure we may ignore. For example, we rarely consider the lubrication of joints and muscle viscosity, which may be important factors in economy (the ability to produce more with less).
Immunologic fitness—the resistance to disease—may also be important for cyclists.
Recovery is an important aspect of fitness, which involves not only some of the systems described above, but also nutrition and rest.
1 Bill Hendrick, Cox News Service, July 5, 2005.
Fitness Summary Cycling fitness is more than just big muscles or big lungs. Often, as stated above, it has nothing to do with either of those
two factors. By understanding cycling fitness, we will understand how to
train to improve our performance.
ACE: Altitude Climbing Endurance Training for Cyclists Arnie Baker, MD 16
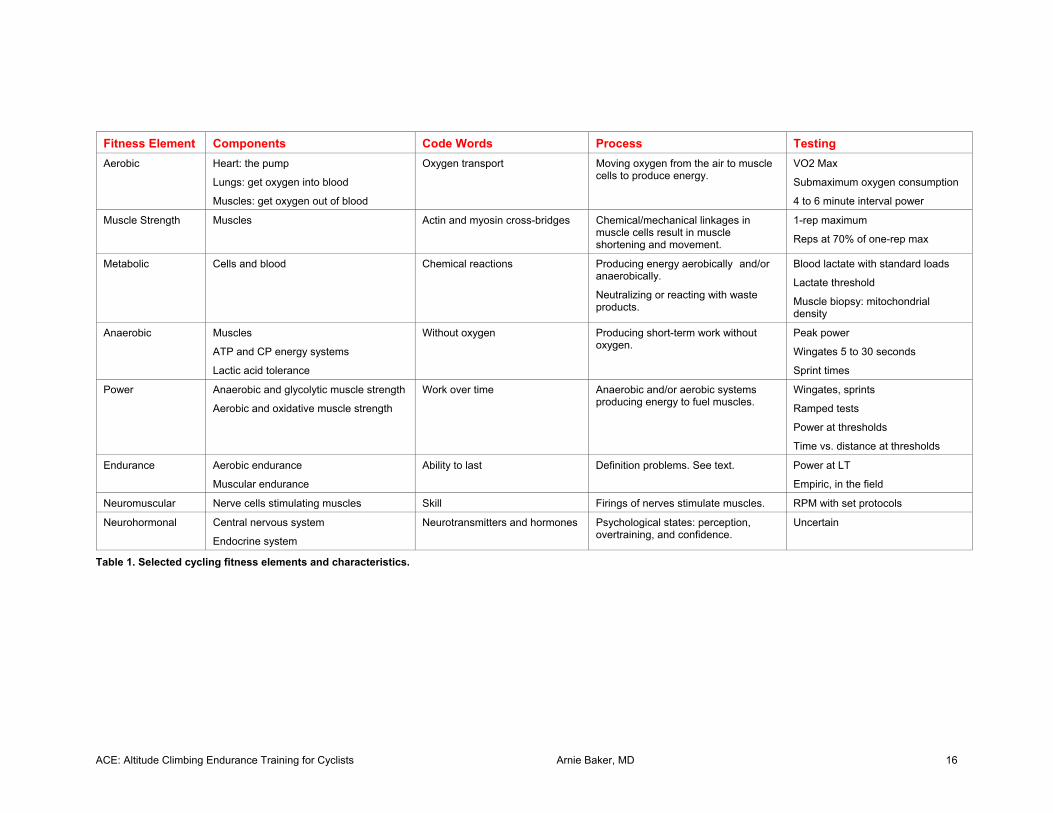
Fitness Element Components Code Words Process Testing Aerobic Heart: the pump
Lungs: get oxygen into blood
Muscles: get oxygen out of blood
Oxygen transport Moving oxygen from the air to muscle cells to produce energy.
VO2 Max
Submaximum oxygen consumption
4 to 6 minute interval power
Muscle Strength Muscles Actin and myosin cross-bridges Chemical/mechanical linkages in muscle cells result in muscle shortening and movement.
1-rep maximum
Reps at 70% of one-rep max
Metabolic Cells and blood Chemical reactions Producing energy aerobically and/or anaerobically.
Neutralizing or reacting with waste products.
Blood lactate with standard loads
Lactate threshold
Muscle biopsy: mitochondrial density
Anaerobic Muscles
ATP and CP energy systems
Lactic acid tolerance
Without oxygen Producing short-term work without oxygen.
Peak power
Wingates 5 to 30 seconds
Sprint times
Power Anaerobic and glycolytic muscle strength
Aerobic and oxidative muscle strength
Work over time Anaerobic and/or aerobic systems producing energy to fuel muscles.
Wingates, sprints
Ramped tests
Power at thresholds
Time vs. distance at thresholds
Endurance Aerobic endurance
Muscular endurance
Ability to last Definition problems. See text. Power at LT
Empiric, in the field
Neuromuscular Nerve cells stimulating muscles Skill Firings of nerves stimulate muscles. RPM with set protocols
Neurohormonal Central nervous system
Endocrine system
Neurotransmitters and hormones Psychological states: perception, overtraining, and confidence.
Uncertain
Table 1. Selected cycling fitness elements and characteristics.
ACE: Altitude Climbing Endurance Training for Cyclists Arnie Baker, MD 17
Non-Fitness Elements
Body Composition Excess fat is useless for an athlete. Being lean is important for
climbing. Males have the best combination of bicycling performance and
general health at body fat levels around 10%, women at about 15%. Body fat levels up to 5% higher are still healthy levels, but performance may suffer.
Men and women whose body fat levels drop below 5% and 10% respectively may perform even better—but general health may suffer. Excessive leanness may reduce the body’s natural immunity. Athletes at such low levels are subject to a number of other health concerns including osteoporosis and eating disorders.
Every excess pound slows you about 20 seconds for every hour of climbing. If you are 20 pounds overweight, a century may take an extra half hour to complete.
Diet and Ergogenics
Know how to use your diet to help you, not hurt you. What to eat, when to eat. Occasionally specific supplements or medicines can help.
For events longer than one hour, fluids and calories improve performance and reduce sense of effort.
Physical Health
You need to keep injury-free and in good physical health. For example, for many riders backache is a problem on repeated
long climbs. Some will adapt easily with a progressive climbing program. For most, back strengthening exercises are also part of our program.
Right Bike Some bikes are specifically designed for certain types of riding
and races. There are bikes better suited for road riding and others better suited for triathlon, mountain biking, or touring.
The bicycle becomes an extension of your body. Use it efficiently by optimizing your bicycle position and riding style.
You need easy gears. Late in the ride, they may not seem easy. At a minimum, most riders are advised to have a 39-tooth chainring and a 27-tooth rear cog for most centuries. A triple front chainring, compact cranks, or mountain bike cogs and derailleur are preferred for epic all-day rides such as The Tour of the California Alps—Markleeville Death Ride. Read more about Small Gears on page 85.
Lightweight equipment can help on climbs. Lightweight road racing bikes can be five pounds lighter than standard racing bicycles. As with body weight, each pound of non-rotating weight lost will save about 20 seconds for every hour of climbing. Rotating weight (wheel and pedals) saves twice as much time per pound as fat on your body or bike frame.
Aero wheels and tires with less rolling resistance can really help on flat rides. Note, however, that (1) sometimes weight is increased in an aerodynamic design, and that (2) aero wheels are often unstable when descending, especially with crosswinds.
Bicycle maintenance improves reliability and reduces mechanical friction. A clean bike is a happy bike.
Bike Handling
You need to know how to make your bicycle go exactly where you want it to go. This is important in descending, where crosswinds affect bike handling. Safe, controlled descending is a must. Be especially alert near the end of the ride when fatigue reduces your judgment and skill.
Bike handling skills are developed not only during regular riding and racing, but also by practice during specific skill and technique training sessions.
ACE: Altitude Climbing Endurance Training for Cyclists Arnie Baker, MD 18
Ride Smart Use your physical talent correctly. Use your energy at the right
time with a ride plan and the parts that make up the overall plan—strategy and tactics.
Most importantly, pace your effort. Do not work too hard too early.
Most riders waste a lot of their precious energy. Efficient drafting and slip-sliding on climbs save energy when riding with groups. Avoid wasting energy with side-to-side and up-and-down motions that do not propel you and your bike forward. Make every effort count.
Sport Psychology
The mental aspects can provide the crucial difference. Motivation, confidence, the setting of realistic and attainable goals, mental rehearsal, and visualization, control of arousal and anxiety can all help you perform to potential. Attending to, understanding, and working through the psychological conflicts we all experience help resolve these frequent barriers to success.
Rest Right
It is not just training that makes us fitter; it is the recovery from training that is crucial. It is not enough to know how to ride hard. You must know how to rest and recover. How to ride easy as well as hard. How to recover to allow a peak for major competitions. How to assure proper sleep despite the logistics of organizing the rest of life, travel and other obstacles.
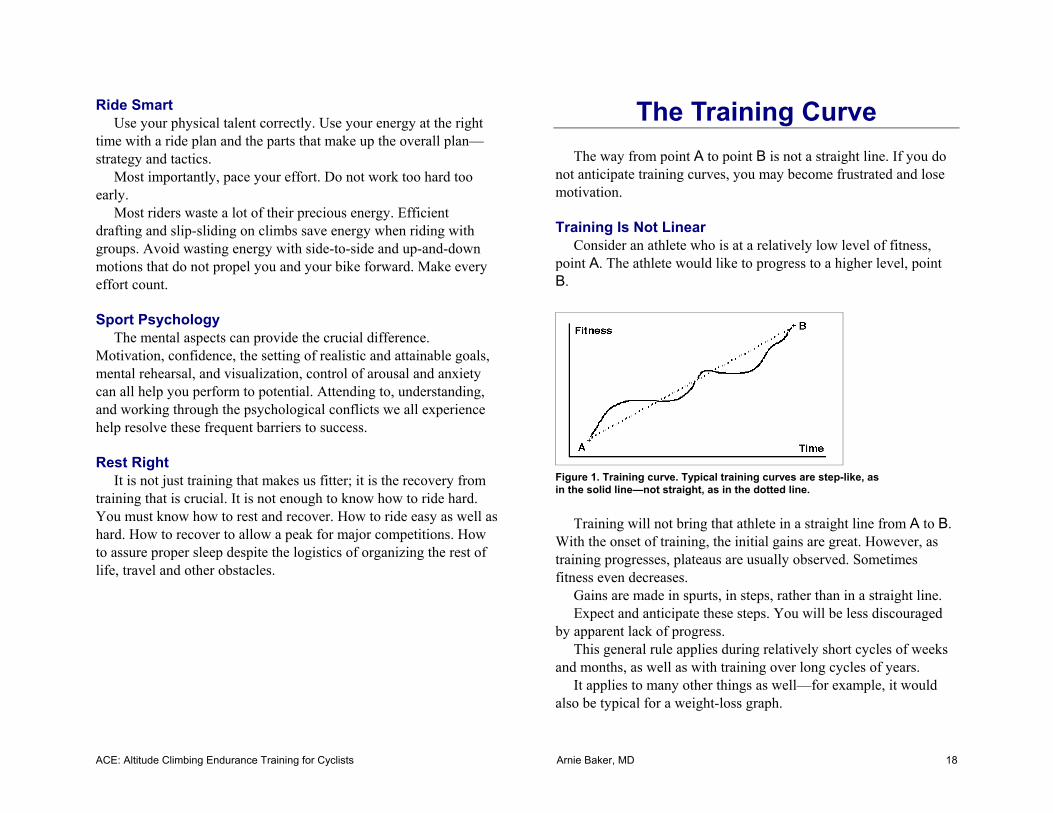
The Training Curve The way from point A to point B is not a straight line. If you do
not anticipate training curves, you may become frustrated and lose motivation.
Training Is Not Linear
Consider an athlete who is at a relatively low level of fitness, point A. The athlete would like to progress to a higher level, point B.
Figure 1. Training curve. Typical training curves are step-like, as in the solid line—not straight, as in the dotted line.
Training will not bring that athlete in a straight line from A to B.
With the onset of training, the initial gains are great. However, as training progresses, plateaus are usually observed. Sometimes fitness even decreases.
Gains are made in spurts, in steps, rather than in a straight line. Expect and anticipate these steps. You will be less discouraged
by apparent lack of progress. This general rule applies during relatively short cycles of weeks
and months, as well as with training over long cycles of years. It applies to many other things as well—for example, it would
also be typical for a weight-loss graph.
ACE: Altitude Climbing Endurance Training for Cyclists Arnie Baker, MD 19
Training Principles
Follow Your Own Program
Some of us are relatively new to riding and some of us have been racing for years. Get hints and advice from others, but remember your training program is not the same as everyone else’s.
Build Up
You are at a certain place now. You may know where you want to be. Get there gradually, building up your miles and speed to reach your goals. Do not expect to get there in one big step.
Challenge Yourself
We get stronger by challenging the body. As our body adapts to training, we can continue to improve by taking on new challenges.
Be Organized
Have a program. Organize your schedule to allow you to stick to your program. Think ahead. Keep lists. It is tough to ride home from the office if you have forgotten your bicycling shoes. It is tough to ride Wednesday evening if you have forgotten to clear the decks and you have to take your child to softball practice.
Do the Same Stuff, Do Different Stuff
By repeating the same or similar workouts you will learn how hard you can go and how and when to work harder. However, changing your workouts every month or so keeps you mentally fresh and trains different aspects of fitness.
Be Flexible It rains. You get sick. Adversity strikes. Do not brood or get
uptight about it. Modify your program, if needed, and get on with your training. Track Your Progress
Keep a record or log of how you are doing. Review it every week or two. It will let you know if you are on track and whether your program is working or needs adjustment.
Keep it Fun
Do not be a slave to your training. Keep a perspective of your overall goals. If your schedule calls for intervals but you are sick of them, do something else.
Take it Easy
It is tempting to be caught up in any program. Your program is important. However, keep it in perspective and make sure you allow proper time to recover. Avoid overtraining.
Undertraining makes it difficult to get to the finish line. Over-training can make it impossible to get to the start line.
If you think you need recovery, you do. If you are sure you need a day of recovery, you need two!
Reward Yourself
Consider other rewards along the way. Completed the first six weeks of your training on track? Maybe reward yourself with a new pair of cycling shoes. Or a dinner on the town to thank someone for putting up with you!
ACE: Altitude Climbing Endurance Training for Cyclists Arnie Baker, MD 20
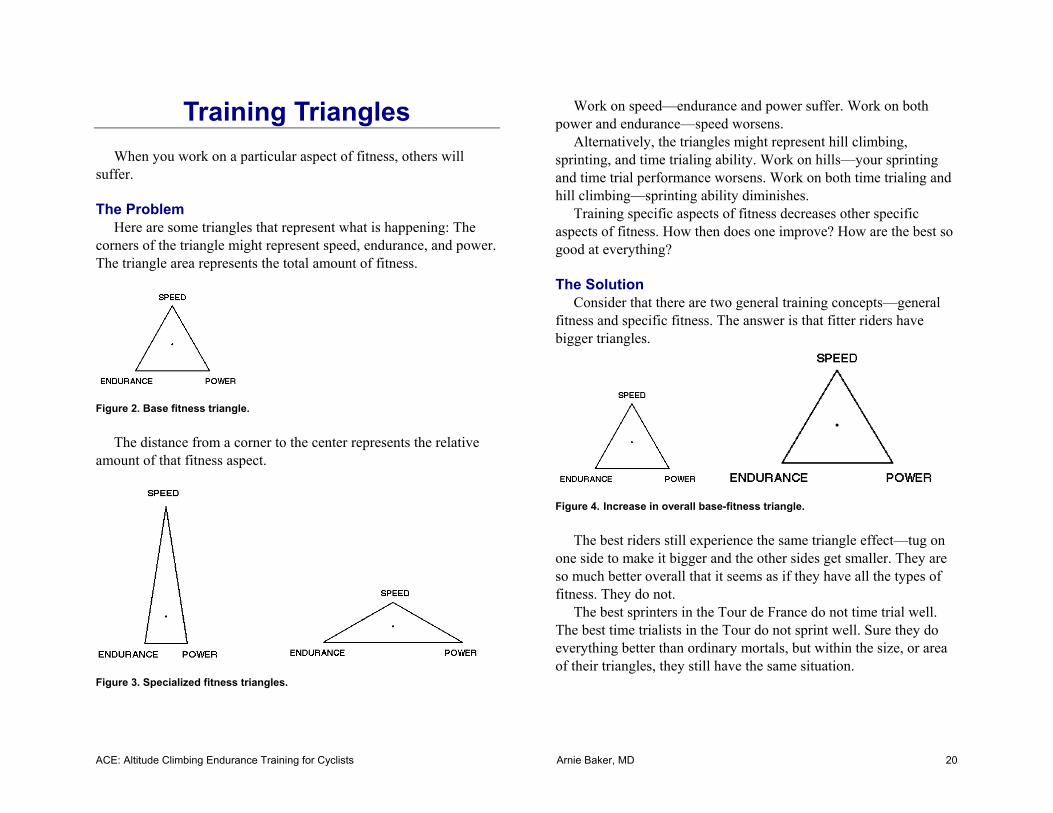
Training Triangles When you work on a particular aspect of fitness, others will
suffer.
The Problem Here are some triangles that represent what is happening: The
corners of the triangle might represent speed, endurance, and power. The triangle area represents the total amount of fitness.
Figure 2. Base fitness triangle.
The distance from a corner to the center represents the relative
amount of that fitness aspect.
Figure 3. Specialized fitness triangles.
Work on speed—endurance and power suffer. Work on both power and endurance—speed worsens.
Alternatively, the triangles might represent hill climbing, sprinting, and time trialing ability. Work on hills—your sprinting and time trial performance worsens. Work on both time trialing and hill climbing—sprinting ability diminishes.
Training specific aspects of fitness decreases other specific aspects of fitness. How then does one improve? How are the best so good at everything?
The Solution
Consider that there are two general training concepts—general fitness and specific fitness. The answer is that fitter riders have bigger triangles.
Figure 4. Increase in overall base-fitness triangle.
The best riders still experience the same triangle effect—tug on
one side to make it bigger and the other sides get smaller. They are so much better overall that it seems as if they have all the types of fitness. They do not.
The best sprinters in the Tour de France do not time trial well. The best time trialists in the Tour do not sprint well. Sure they do everything better than ordinary mortals, but within the size, or area of their triangles, they still have the same situation.
ACE: Altitude Climbing Endurance Training for Cyclists Arnie Baker, MD 21
Overall fitness improves with increases in quality and quantity of work the athlete performs. Many racers, as they go up through the category ranks, increase the amount of time they spend riding as well as the quality of riding through intervals, anaerobic threshold training and racing.
By the end of your program, after concentrating on climbing and riding long distances, you may not be so snappy on the flats. Alternatively, you may find that your overall fitness may have improved so much that you are better at everything.
ACE: Altitude Climbing Endurance Training for Cyclists Arnie Baker, MD 22
Training Hints The only way to get finished is to get started. As an introduction to training, the following is a list of general
hints to keep in mind during the course of your training regimen, whether you are a beginning or seasoned cyclist, or are training indoors or out. Come back to this list for a quick reference occasionally as a way of initiating a review of your overall program. The tips will help keep you on the right track.
• Get a plan, set goals, and figure out what you need to get there. • Keep a training log. • Use an altimeter to track feet climbed. • Periodize your week, training differently during different
sessions. • Learn to work harder on hard days, easier on recovery days. Plan
for recovery. • Work on different aspects of fitness in different workouts. • Climb, climb, and climb. Learn to love climbing. • Work on aerobics, endurance, and strength. • Work on strength with heavy gears and one-legged riding. • Pull and push with the same-side hand and leg when climbing. • Establish a breathing rhythm when working hard, especially
when climbing. • Ride with riders both stronger and weaker than you are.
• Play intensity games with friends. • Improve your riding technique and skills though practice and
from coaches. • Ride with relaxed, bent arms and with your knees in. • Train in different riding positions. • Use a heart rate monitor. • Wear a helmet and gloves. Keep your equipment safe and in
good working order. • Check your position on the bicycle, especially your seat height. • Rely on food, not pills or supplements, for your nutrition. • Maintain hydration; drink before you are thirsty. • Keep carbohydrate solution in your water bottle. • Optimize your weight. • Redirect the stresses of your life. • Have patience in your program. • Do not try new equipment or foods for the first time on event
day. • When your group is warming up, or cooling down, ride in a
smaller gear than just about everyone else to learn to spin better. • Learn to work hard on a stationary bicycle trainer. Get together
and form a class if that is what it takes. • Practice skills such as pacelines, regularly. • Watch good riders and how they flow without doing any more
work than necessary. Try to learn from them.
ACE: Altitude Climbing Endurance Training for Cyclists Arnie Baker, MD 23
Bicycle Workout Variables By understanding the variables of bicycling workouts, you will
understand how workout programs function to achieve different ends and be better able to design your own.
Workout Variables
The components of a bicycle workout can be broken down into six basic variables: • Volume • Intensity • Cadence • Position • Pedal-Stroke Emphasis • Environment
These variables can be adjusted depending on the different goals you wish to achieve. Volume and intensity are standard workout variables that apply to almost any sport. Many riders and coaches neglect to consider that cadence, position, pedal-stroke emphasis, and environment distinguish bicycling workouts and help train different aspects of fitness.
Volume
Volume is the total amount of work performed. In other words, it is the distance or the amount of time you spend training in a given week, month, etc.
When work is performed in intervals, the length of each interval is called the duration of the interval.
Increasing volume up to about 200 miles or 15 hours per week helps improve aerobic and endurance fitness. Additional volume primarily improves endurance.
Training for long road rides requires time in the saddle to toughen the buttock tissues and adapt to riding position. Long rides, even those of minimal intensity, help train these needs.
Intensity—Introduction
Intensity is the load or speed of work performed. Perceived exertion, heart-rate monitoring, and the less commonly
available power monitoring all have roles to play in assessing work intensity.
Perceived exertion is related to many factors including breathing rate and depth, and muscle tension, burning, and heaviness.
Heart-rate monitors help measure intensity, but they, too, are imperfect. If you work on leg speed, for example, and spin flat-out as fast as you can in an easy gear for 5 minutes, your heart rate may be very high, but your power output may be only moderate.
On the other hand, if you sprint in a moderately hard gear for 20 seconds flat-out as hard as you can, your power output may be maximum, but your heart rate may not have time to “catch up” to a maximum effort.
Power measurement—traditionally available on laboratory ergometers—is also available on new-generation portable “consumer” electronic stationary trainers. Force measuring devices can also be installed at the bottom bracket, pedals, or rear wheel axle.
As glycogen energy stores are exhausted, perceived exertion is relatively high compared with heart rate, blood lactate, or power levels.
Cadence
Leg speed is another component of workouts. Consider a rider told to work at a heart-rate intensity of 150 beats
per minute for 15 minutes.
ACE: Altitude Climbing Endurance Training for Cyclists Arnie Baker, MD 24
Those with a limited view of cycling fitness might think that defining intensity and duration determines the workout. It does not.
Riding at 50 rpm in a big gear at a heart rate of 150 beats per minute (bpm) trains muscular strength. Riding at 150 rpm at 150 bpm trains leg speed, a neuromuscular fitness. The workouts are quite different and give different physical results.
Some fit riders can pedal very fast—but in an easy gear, they are not necessarily working hard or going very fast.
Position
We know that the leg muscles used in cycling are different from the leg muscles used in running. That is one reason why a good runner might be a poor cyclist.
Within cycling, the muscles used in climbing are different from those muscles used in flat riding. A position component is therefore part of the workout prescription.
Climbing volume and climbing intensity are important factors in climbing fitness.
You can climb standing or seated; on the handlebar tops, on the brake hoods, or in the handlebar drops. There are important reasons to be versatile and to train in all these positions.
For steady climbing, riding with the hands on the handlebar tops is often the best way to climb. That is because the legs have more power when the hip angle is open, and aerodynamics is of minimal importance when climbing.
Pedal-Stroke Emphasis
Athletes may appear to the casual observer to be performing similar work—this is not always the case.
Consider two athletes climbing for 5 minutes at 75% of maximum heart rate, at 50 rpm, on the tops of the handlebars. The athlete who concentrates on pulling up will be performing different work than the athlete who concentrates on pushing forward or who pedals smoothly.
Training by emphasizing different parts of the pedal stroke—working specific muscle groups—defines yet another workout variable.
Environment
Workouts performed at altitude are different from workouts at sea level.
Workouts in the heat, humidity, cold, rain, or snow are different from workouts in temperate weather.
Workouts that require mental vigilance—because they are performed on roadways with potholes or cars, or workouts performed on mountain bike trails—are different from workouts performed on stationary trainers where all one’s mental energy can be focused on the bike.
Workouts performed on flat terrain are different from those where the grade is uphill or changing.
The same workout may present a different stress to the body depending upon recovery state. Sprints at the beginning of a workout are different from sprints after 5 hours of riding, though the duration and intensity may objectively be the same.
The same workout done individually may be perceived differently when performed in a group setting. Though the workload may be the same, as yet ill-defined neurohormonal factors make the environment of the workout different.
ACE: Altitude Climbing Endurance Training for Cyclists Arnie Baker, MD 25
Aerobic Training Aerobic capacity and aerobic endurance are important cycling
fitnesses.
Aerobic Capacity Aerobic capacity is the ability to work using oxygen in
combination with fats and carbohydrates as fuel sources to produce energy.
At low-aerobic levels, fat is the primary fuel source. At high-aerobic levels, glycogen—stored carbohydrate in muscle—predominates as a fuel source.
Aerobic Endurance
Aerobic endurance is the ability of the body to perform aerobic work over long periods. This is important in sustained efforts—in time trialing or in long hill climbing.
To improve aerobic endurance one must improve the quantity or quality of components of this system.
Aerobic endurance involves oxygen transport from the air we breathe to the chemical factories of the body that burn fats and carbohydrates in combination with oxygen for fuel.
This fitness system includes the heart, lungs, circulation, cell transport systems, and the cells’ chemical factories—the energy-producing mitochondria.
Aerobic Training Principles
Aerobic training requires the rhythmic action of large muscle groups, as in cycling or running. Vigorous video game play using only smaller hand muscles can never place enough demands on the body to be aerobic.
Aerobic training begins at about 66% of an individual’s maximum heart rate.
An increasing workload is required to stimulate aerobic training as an individual becomes fitter. Consequently, aerobic training should be progressive:
Since the body is constantly adapting, the intensity of workouts must be increased until an individual’s genetic aerobic potential is reached.
For the very fit, training at rates higher than 93% of maximum heart rate will cause anaerobic systems to kick in, allowing fewer aerobic repeats. For the less fit, anaerobic systems may take over at heart rates as low as 80% of maximum.
Besides reaching your aerobic capacity, you can train to increase the length of time over which you can work at or near this level.
Aerobic fitness may begin to be lost in as little as one to two weeks; training regularity is important. Accumulate thirty minutes of aerobic training twice a week for maintenance.
Intensity, Duration, Frequency
As stated above, aerobic training begins at about 66% of an individual’s maximum heart rate.
To maximally train the aerobic system, riders need high-level aerobic work—loads that result in 80% to 90% of maximum heart rate.
Once you have built a base of a thousand miles or more over a few months, you can aim to train at this intensity two or more times per week. Aim for a cumulative total of about two hours per week.
Endurance may be improved by training at lower intensity levels, but maximal oxygen uptake may not increase.
Spending more time training at high-aerobic levels may be productive during some training phases. During these phases, riders may train at high-aerobic levels up to six hours per week.
There is a limit as to how much time riders can spend at high-aerobic levels because there is a limit to high-aerobic energy
ACE: Altitude Climbing Endurance Training for Cyclists Arnie Baker, MD 26
sources. Intramuscular glycogen is a limiter. There is also a neurohormonal limiter. High volumes of high-
aerobic work should not be performed routinely because of overtraining risk.
Racers need training at 86% to 92% of maximum heart rate to reach the limits of their aerobic potential. Training near this level overlaps with anaerobic training at times; this is threshold training. When training at such very-high aerobic levels, reduce the overall volume of aerobic work.
Aerobic fitness may begin to be lost in as little as one to two weeks; training regularity is important. Accumulate thirty minutes of aerobic training twice a week for maintenance.
High-level aerobic training is not required for everyone. Riders are commonly able to complete a hilly century successfully without maximizing their aerobic training.
Value of Interval Training
As elsewhere noted, unless intervals are performed at a cadence, heart rate, power, or torque level above that of continuous work, interval work is unlikely to be of more benefit than continuous work.
One may exercise longer at the limits of high-aerobic metabolism by performing intervals rather than by continuous training. There is evidence that interval training is helpful in high-level aerobic training
Length of the Aerobic Interval
High-level aerobic intervals should be long enough to reach maximum oxygen uptake in most of the intervals, and short enough to minimize fatigue.
Because experimental results are inconclusive regarding the benefits of short (15–30 seconds) and long (up to 5 minutes) intervals for aerobic training, a variety of training intervals is recommended.
My favorite interval length is 3 to 5 minutes. This is because it is relatively easy to perform such intervals effectively.
In order to be effective, the majority of 3- to 5-minute intervals must be performed at workloads above 30-minute time trial pace.
Although not effective in increasing maximum aerobic capacity, intervals performed below 30-minute time trial pace may: • Help adaptation to high-intensity work • Build a bigger base/increase overall training volume • Increase general aerobic or muscular endurance • Assist in rehabilitation • Provide variety, reduce boredom • Provide workout structure, or • Improve neuromuscular technique or skill.
To train aerobically, intervals shorter than three minutes require similarly short recoveries—otherwise aerobic demands may be low or work may be performed anaerobically.
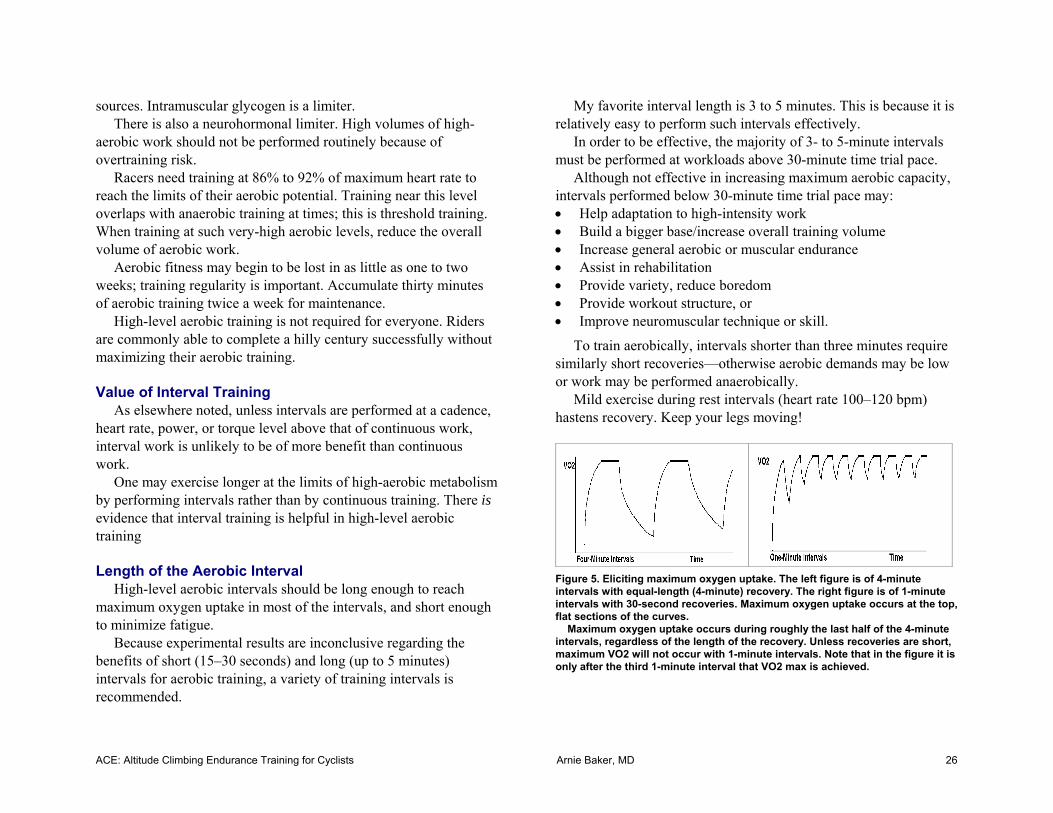
Mild exercise during rest intervals (heart rate 100–120 bpm) hastens recovery. Keep your legs moving!
Figure 5. Eliciting maximum oxygen uptake. The left figure is of 4-minute intervals with equal-length (4-minute) recovery. The right figure is of 1-minute intervals with 30-second recoveries. Maximum oxygen uptake occurs at the top, flat sections of the curves. Maximum oxygen uptake occurs during roughly the last half of the 4-minute intervals, regardless of the length of the recovery. Unless recoveries are short, maximum VO2 will not occur with 1-minute intervals. Note that in the figure it is only after the third 1-minute interval that VO2 max is achieved.
ACE: Altitude Climbing Endurance Training for Cyclists Arnie Baker, MD 27
Interval Training The following is a rudimentary introduction to cycling intervals.
For more information, see my companion book High-Intensity Training for Cyclists, referenced on page 127.
What Are Intervals?
Cyclists often use the word interval to specifically denote training at intensities below those found in sprints and above those in a 10-mile time trial. Exercise physiologists include sprints in their definition of intervals. Colloquially, cyclists do not.
Exercise physiologists use the word interval to denote any work period. Therefore, intervals can be aerobic if done below threshold intensity or anaerobic if performed above this level.
It is not that one definition is right or wrong; it is just cycling jargon vs. science jargon. As a coach and scientist, I will use the second meaning.
Interval Training Works
The benefits of hard-effort interval training include improved acceleration, high-speed endurance, and the ability to respond to a changing pace. Interval training is a relative shortcut to improving speed and strength. Intervals have been proven to help anaerobic power and capacity.
Intervals may also be of lower intensity. For example, you may spend time working on riding in the drops of the handlebars or standing while climbing. These types of intervals will also be important in our program.
Intervals can be performed on stationary trainer, velodrome, flat terrain, and hills.
Examples of Intervals Assume you can ride a time trial at 20 miles an hour for 10 miles.
Interval work might consist of 5 to 10 hard 1-mile efforts at 22+ mph.
Another technique is decreasing intervals. For example, you might ride as hard as you can maintain for 2 minutes, and then ride each successive interval for 10 fewer seconds, down to 30 to 60 seconds.
Another type of interval is the hill interval. Distances of 0.5 to 1.5 miles up a steady grade might be used. You might ride as fast as possible up a 1-mile climb, coast down to recover, and then repeat another 5 times.
Heart-Rate Monitor?
A heart-rate monitor can be very helpful in assuring that you are making a hard effort during intervals. Many inexperienced riders benefit from the feedback that heart-rate monitors provide. Many experienced racers like to confirm their intensity. Most coaches swear by their value.
Remember, for short intervals, or intervals not preceded by a good warm-up or high aerobic level of work, heart rate might not “catch up” to effort.
U.S. multiple time-trial record holder Jane Gagne has another point of view. She does not see the need for heart-rate monitoring: “Basically you ride as hard as you can to complete the interval—it doesn’t matter what your heart rate is.”
ACE: Altitude Climbing Endurance Training for Cyclists Arnie Baker, MD 28
Isolated Leg Training What if I told you there was a simple method of bicycle training
that would improve almost all aspects of fitness. A method that would help strength, spin, leg speed, anaerobic power, focus, and breathing. A method so powerful that in training hundreds of athletes, I have never met one who did not benefit and see improvement within a few training sessions?
You would want to try this method, I hope. It is called isolated leg training, ILT, or one-leg riding.
What You Do
Unclip from one of your pedals. Ride with one leg. If riding on the road, dangle your inactive leg to one side, or find a safe place to rest your heel on your chainstay or seatstay, away from your spokes.
On a stationary trainer, you can rest your inactive foot on the back of your trainer, on a side support (a box or a stool), in the drop of your handlebar, or in your waterbottle cage. Work up to three-minute intervals. Work up to four repetitions.
Work On Strength
In my experience, high-load 50 to 60 rpm ILT is the best method of improving cycling-specific strength.
However, do not use high loads to start. Take several sessions to adapt to this exercise.
It is easiest to perform this work on a stationary trainer or on a hill (up to about 6% grade).
Choose a moderately-hard gear, one that you can only pedal between 50 and 60 rpm.
Since you are working only one leg, your heart rate response will probably not be high. You will be working on your muscles,
not on your cardiovascular system—isolating the muscle component of fitness.
With moderate loads, you can focus on difference parts of your stroke. Sometimes focus on pushing down. Sometimes focus on pushing forward. Sometimes focus on pulling up. Sometimes focus on pulling through, or pulling around.
After adapting to moderate loads, choose a harder gear. Pedaling smoothly does not necessarily result in the highest
average torque or power. Pedaling smoothly also means that you are not working your most powerful muscles to their potential. A harder gear will specifically strengthen your quads and glutes—the most important cycling propulsive muscles you have.
You may be able to perform high-power ILTs with so much force that you can push yourself up off the saddle. It helps to stabilize and anchor yourself with your arms. Pulling with your arms may allow you to work harder. If you are performing a left leg ILT, pull more with your left arm. Elite athletes may perform ILTs with such high torque that they may require two hands on same side of the handlebar to keep in the saddle.
Road racers and mountain bikers work with their hands on the tops. Time trialists, criterium riders, and track specialists work more with their hands in the drops.
When performed in an easy or moderate gear at 70 to 90 rpm, this exercise tends to work the hip flexors (pulling up muscles) more.
Work On Spin and Leg Speed
Why do riders bounce at high rpm? It is because they do not send a neurologic signal to their muscles to stop pushing down at the bottom of the pedal stroke fast enough. A leg that is still pushing down at the bottom of the stroke while the pedal is already coming up forces the rider off the seat.
ACE: Altitude Climbing Endurance Training for Cyclists Arnie Baker, MD 29
Bouncing here is not a question of too high a saddle, leg strength, aerobic or anaerobic fitness. It is a question of neuromuscular coordination. It is a skill.
This skill comes from neuromuscular practice. Choose an easy gear. If you have a heart-rate monitor, choose a
gear that allows you to ride at less than 65% of maximum heart rate. If you have a power meter, choose a gear that allows you to ride at less than 50 watts.
Ride with one leg at a cadence between 80 to 90 rpm. Pedal stroke will improve. Leg speed will improve—even for two-legged cadences at more
than twice this rate.
Pacing, Focus, and Breathing ILTs are excellent exercises to help improve pacing. It is easy to
mistakenly work too hard initially and not be able to maintain cadence for the prescribed duration.
Athletes operating near their time trial threshold in steady, hard efforts often perform better by focusing on their own efforts, listening to their bodies’ rhythms.
Intense, narrow, internal, and associated focus improves performance for almost all athletes.
Isolated leg training is an ideal exercise in which to start counting strokes or practice rhythmic breathing.
Then extend the coordination of counting, breathing, or other rhythmic action to time trialing or climbing with both legs.
Give ILT a Try
One-leg riding helps every type of cyclist—from mountain biker to sprint specialist to RAAM rider.
Start with two or three repetitions of one minute, and build up to three or four repetitions of three minutes over six to ten training sessions.
Perform ILT training once or twice a week. You can mix 50 to 60 rpm high-load and 80 to 90 rpm low-load
work in the same session. After just six training sessions, I am confident that you will
notice a benefit. If you want to continue training with one leg, give ILT a rest for
a week or two, and then build up to another peak over 3 to 4 weeks. Now give ILT a rest. Remember, it is not during training, but
during the recovery from training that we improve fitness. Allow a month or two before entering another 6-week ILT phase. Four ILT phases a year are probably best for maximizing gains
and minimizing boredom or staleness.
ACE: Altitude Climbing Endurance Training for Cyclists Arnie Baker, MD 30
Heart-Rate-Based Training Heart-rate monitors allow you to observe your heart rate while
working out. This helps training, providing immediate feedback about aerobic exercise intensity.
Why Use a Heart-Rate Monitor?
As with all measures of intensity outlined above: • Use a heart-rate monitor to help design your training and racing
programs. • Use a heart-rate monitor to help ensure that you work according
to plan. A monitor helps make sure that you work hard enough when you want to work hard. It also helps make sure that you do not work too hard on easy days.
• Use a monitor to help analyze how you feel and what happens to your body in training and in racing. Monitors do not necessarily change your training, but may help allow you to understand what is going on.
• Use a monitor to help motivation. The feedback provided is engaging for many riders.
Maximum Heart Rate Determining maximum heart rate is the first step in developing a
heart-rate training program.
Why Care About Maximum Heart Rate? For most riders, heart-rate zones for aerobic, threshold and
anaerobic work are determined from maximum heart rate. Some coaches and athletes attempt to determine maximum heart
rate a few times a year to set training intensities.
Maximum Heart Rate Defined Maximum heart rate is the highest heart rate you can achieve. For most riders, maximum heart rate is the highest accurate
number seen on their monitor during the last year. Electromagnetic transmitters are a common source of false readings.
Individualize Your Numbers 220 minus your age, and other similar formulae are useless. The
statistical average for the population is wholly unsuitable for the individual. It is like saying the average person is 5’9” tall, so all bikes should be made 55 cm.
Maximum Heart Rate Changes Maximum heart rate is not a static or fixed number. The unfit may not be able to achieve their genetic potential
because of a lack of muscular strength or energy to work hard. Their maximum heart rate will increase as they become fitter.
Once fitness exists, maximum heart rate does not change much, but it does change. Elite athletes often have a lower maximum heart rate during their competitive seasons.
Maximum heart rate is sport- and climate-specific. Maximum heart rate is higher when vertical than when horizontal, and higher when more muscle mass is engaged. Therefore, maximum heart rate running is higher than maximum heart rate cycling, which in turn is higher than maximum heart rate swimming.
Finding Your Maximum Heart Rate To obtain a maximum heart rate value, you need to be:
1. Rested. 2. Well warmed-up. 3. Motivated to make a maximum effort.
Why rested? Rest provides for recovery from previous exertion. With muscle fatigue/soreness or a lack of glycogen, it is not possible to produce a maximum effort.

ACE: Altitude Climbing Endurance Training for Cyclists Arnie Baker, MD 31
Why a warm-up? Maximum heart rate depends upon maximum cardiovascular demand. If you are not well warmed-up, there is less blood flowing to your working muscles (the pre-capillary sphincters are not all open)—maximum effort cannot elicit maximum response.
Why motivated? Many people only see their max in a race or a test in which they are motivated. It is often difficult for riders to test their max when by themselves.
There are a number of different ways to find your maximum heart rate. Here is one way:
Warm up for at least 5 to 10 minutes. After working at a moderate pace for three minutes, increase your effort by about 10% every minute.
Cyclists on an ergometer can increase power output by about 10% each minute.
Figure 6. Ramped maximum heart-rate recording.
Cyclists riding on a velodrome or open road: Since power
requirements rise between the square and the cube of speed, a 10%
increase in power each minute does not mean a 10% increase in speed. Increase cadence by 3 – 5 revolutions per minute, or increase your gearing by one gear of difficulty every couple of minutes.
When you get to the point that it is extremely difficult to continue at pace, sprint as hard as you can for 30 seconds. Watch your heart monitor. This value should be close to your maximum.
Resting Heart Rate
Resting heart rate provides a tool for monitoring fitness and recovery.
Morning Resting Heart Rate Determine resting heart rate by counting or monitoring your
heart rate while not engaging in physical activity. This is usually measured first thing in the morning while lying still in bed.
Conventional wisdom states that resting heart rate is a measure of fitness and recovery. As you get fitter, your resting heart rate falls. When you are not recovered, your resting heart rate rises.
Use resting heart rate as tool in evaluation, but do not be spooked by high values: Some riders have their best performances on days that their resting heart rates are high.
Factors Affecting Resting Heart Rate Dehydration, fever or other illness, drugs, stress, or the
environment might raise resting heart rate. For many riders the discomfort of a full bladder, the physical
activity of getting up to urinate, or the jarring of an alarm clock will raise heart rate. Resting quietly in bed for several minutes after returning from urinating or turning the alarm clock off will give a more accurate reading.
The value measured while lying flat on the back is often slightly lower than that measured while lying on the side.
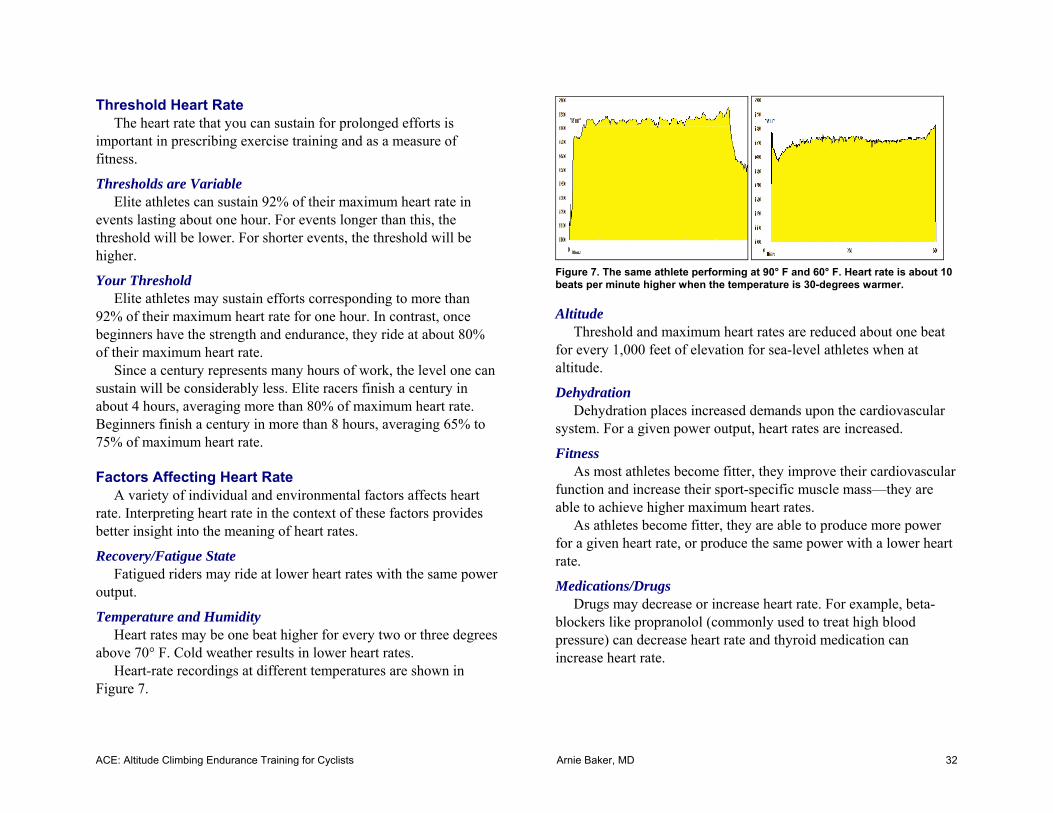
ACE: Altitude Climbing Endurance Training for Cyclists Arnie Baker, MD 32
Threshold Heart Rate The heart rate that you can sustain for prolonged efforts is
important in prescribing exercise training and as a measure of fitness.
Thresholds are Variable Elite athletes can sustain 92% of their maximum heart rate in
events lasting about one hour. For events longer than this, the threshold will be lower. For shorter events, the threshold will be higher.
Your Threshold Elite athletes may sustain efforts corresponding to more than
92% of their maximum heart rate for one hour. In contrast, once beginners have the strength and endurance, they ride at about 80% of their maximum heart rate.
Since a century represents many hours of work, the level one can sustain will be considerably less. Elite racers finish a century in about 4 hours, averaging more than 80% of maximum heart rate. Beginners finish a century in more than 8 hours, averaging 65% to 75% of maximum heart rate.
Factors Affecting Heart Rate
A variety of individual and environmental factors affects heart rate. Interpreting heart rate in the context of these factors provides better insight into the meaning of heart rates.
Recovery/Fatigue State Fatigued riders may ride at lower heart rates with the same power
output.
Temperature and Humidity Heart rates may be one beat higher for every two or three degrees
above 70° F. Cold weather results in lower heart rates. Heart-rate recordings at different temperatures are shown in
Figure 7.
Figure 7. The same athlete performing at 90° F and 60° F. Heart rate is about 10 beats per minute higher when the temperature is 30-degrees warmer.
Altitude Threshold and maximum heart rates are reduced about one beat
for every 1,000 feet of elevation for sea-level athletes when at altitude.
Dehydration Dehydration places increased demands upon the cardiovascular
system. For a given power output, heart rates are increased.
Fitness As most athletes become fitter, they improve their cardiovascular
function and increase their sport-specific muscle mass—they are able to achieve higher maximum heart rates.
As athletes become fitter, they are able to produce more power for a given heart rate, or produce the same power with a lower heart rate.
Medications/Drugs Drugs may decrease or increase heart rate. For example, beta-
blockers like propranolol (commonly used to treat high blood pressure) can decrease heart rate and thyroid medication can increase heart rate.
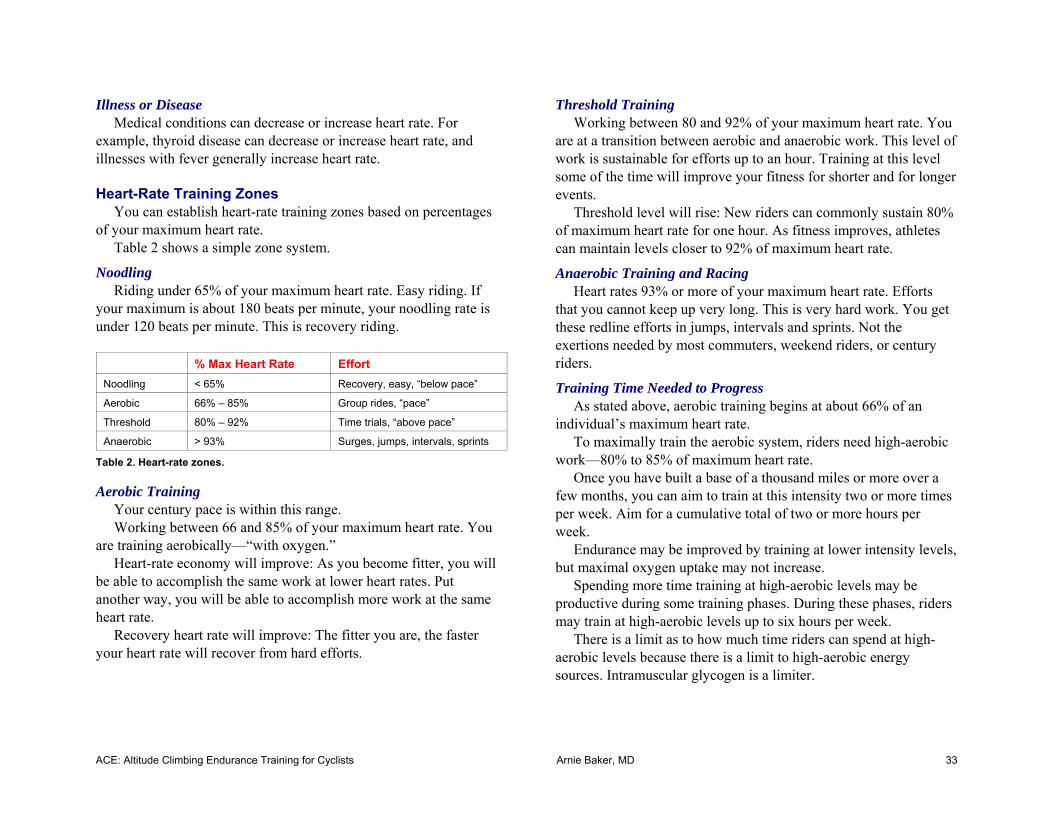
ACE: Altitude Climbing Endurance Training for Cyclists Arnie Baker, MD 33
Illness or Disease Medical conditions can decrease or increase heart rate. For
example, thyroid disease can decrease or increase heart rate, and illnesses with fever generally increase heart rate.
Heart-Rate Training Zones
You can establish heart-rate training zones based on percentages of your maximum heart rate.
Table 2 shows a simple zone system.
Noodling Riding under 65% of your maximum heart rate. Easy riding. If
your maximum is about 180 beats per minute, your noodling rate is under 120 beats per minute. This is recovery riding.
% Max Heart Rate Effort Noodling < 65% Recovery, easy, “below pace”
Aerobic 66% – 85% Group rides, “pace”
Threshold 80% – 92% Time trials, “above pace”
Anaerobic > 93% Surges, jumps, intervals, sprints
Table 2. Heart-rate zones.
Aerobic Training Your century pace is within this range. Working between 66 and 85% of your maximum heart rate. You
are training aerobically—“with oxygen.” Heart-rate economy will improve: As you become fitter, you will
be able to accomplish the same work at lower heart rates. Put another way, you will be able to accomplish more work at the same heart rate.
Recovery heart rate will improve: The fitter you are, the faster your heart rate will recover from hard efforts.
Threshold Training Working between 80 and 92% of your maximum heart rate. You
are at a transition between aerobic and anaerobic work. This level of work is sustainable for efforts up to an hour. Training at this level some of the time will improve your fitness for shorter and for longer events.
Threshold level will rise: New riders can commonly sustain 80% of maximum heart rate for one hour. As fitness improves, athletes can maintain levels closer to 92% of maximum heart rate.
Anaerobic Training and Racing Heart rates 93% or more of your maximum heart rate. Efforts
that you cannot keep up very long. This is very hard work. You get these redline efforts in jumps, intervals and sprints. Not the exertions needed by most commuters, weekend riders, or century riders.
Training Time Needed to Progress As stated above, aerobic training begins at about 66% of an
individual’s maximum heart rate. To maximally train the aerobic system, riders need high-aerobic
work—80% to 85% of maximum heart rate. Once you have built a base of a thousand miles or more over a
few months, you can aim to train at this intensity two or more times per week. Aim for a cumulative total of two or more hours per week.
Endurance may be improved by training at lower intensity levels, but maximal oxygen uptake may not increase.
Spending more time training at high-aerobic levels may be productive during some training phases. During these phases, riders may train at high-aerobic levels up to six hours per week.
There is a limit as to how much time riders can spend at high-aerobic levels because there is a limit to high-aerobic energy sources. Intramuscular glycogen is a limiter.
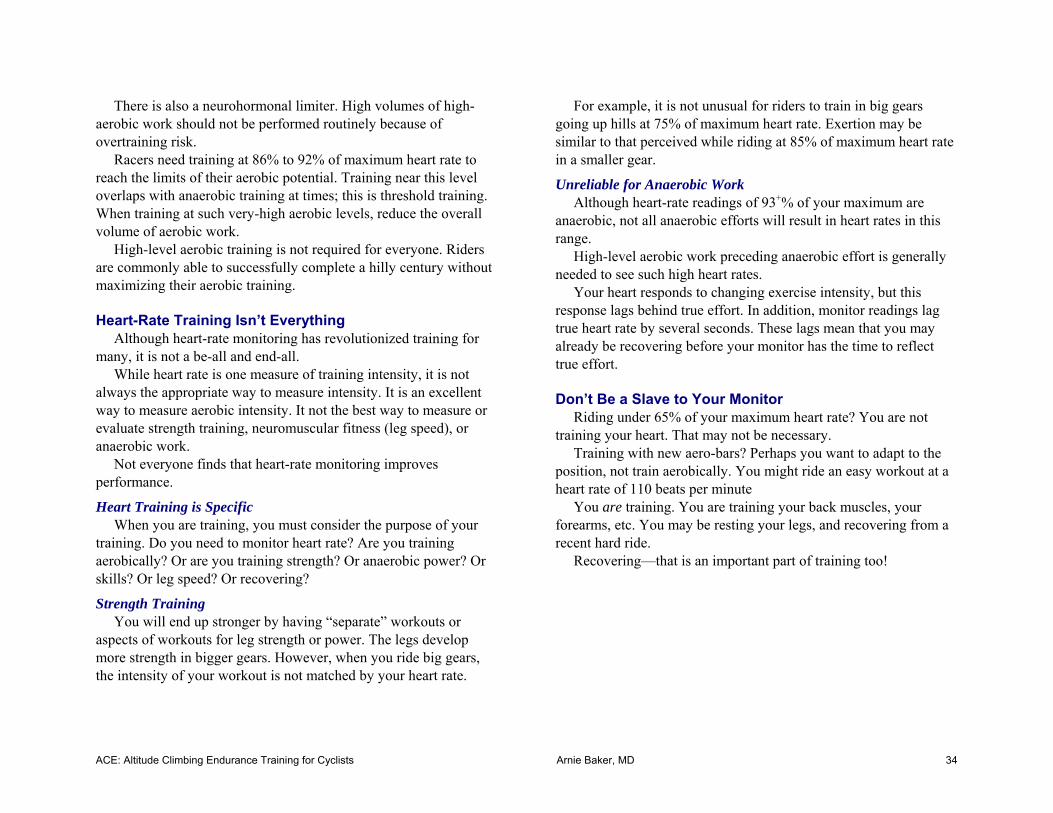
ACE: Altitude Climbing Endurance Training for Cyclists Arnie Baker, MD 34
There is also a neurohormonal limiter. High volumes of high-aerobic work should not be performed routinely because of overtraining risk.
Racers need training at 86% to 92% of maximum heart rate to reach the limits of their aerobic potential. Training near this level overlaps with anaerobic training at times; this is threshold training. When training at such very-high aerobic levels, reduce the overall volume of aerobic work.
High-level aerobic training is not required for everyone. Riders are commonly able to successfully complete a hilly century without maximizing their aerobic training.
Heart-Rate Training Isn’t Everything
Although heart-rate monitoring has revolutionized training for many, it is not a be-all and end-all.
While heart rate is one measure of training intensity, it is not always the appropriate way to measure intensity. It is an excellent way to measure aerobic intensity. It not the best way to measure or evaluate strength training, neuromuscular fitness (leg speed), or anaerobic work.
Not everyone finds that heart-rate monitoring improves performance.
Heart Training is Specific When you are training, you must consider the purpose of your
training. Do you need to monitor heart rate? Are you training aerobically? Or are you training strength? Or anaerobic power? Or skills? Or leg speed? Or recovering?
Strength Training You will end up stronger by having “separate” workouts or
aspects of workouts for leg strength or power. The legs develop more strength in bigger gears. However, when you ride big gears, the intensity of your workout is not matched by your heart rate.
For example, it is not unusual for riders to train in big gears going up hills at 75% of maximum heart rate. Exertion may be similar to that perceived while riding at 85% of maximum heart rate in a smaller gear.
Unreliable for Anaerobic Work Although heart-rate readings of 93+% of your maximum are
anaerobic, not all anaerobic efforts will result in heart rates in this range.
High-level aerobic work preceding anaerobic effort is generally needed to see such high heart rates.
Your heart responds to changing exercise intensity, but this response lags behind true effort. In addition, monitor readings lag true heart rate by several seconds. These lags mean that you may already be recovering before your monitor has the time to reflect true effort.
Don’t Be a Slave to Your Monitor
Riding under 65% of your maximum heart rate? You are not training your heart. That may not be necessary.
Training with new aero-bars? Perhaps you want to adapt to the position, not train aerobically. You might ride an easy workout at a heart rate of 110 beats per minute
You are training. You are training your back muscles, your forearms, etc. You may be resting your legs, and recovering from a recent hard ride.
Recovering—that is an important part of training too!
ACE: Altitude Climbing Endurance Training for Cyclists Arnie Baker, MD 35
Power-Based Training The basics of power-based training follow. Find more
information in High-Intensity Training for Cyclists, referenced on page 127.
Power is the rate of work. Power monitors provide the best
measure of muscular work. Power on a bicycle is measured in watts. Power over time, or work, is measured in kilojoules. Power is a measure of workout intensity. Its key features are:
• Absolute, objective measure • Race predictor • Not affected by confounding variables.
Unlike speed, for example, it is unaffected by environmental conditions such as wind or elevation change.
• Immediate • Effort sensitive
Power-Monitoring Benefits • Quantify and document current and past fitness • Compare fitness to others • Quantify and document fitness changes that have occurred with
training, overtraining, overuse injury, or traumatic injury • Quantify total work, total work during intervals or stratify work
performed at various intensities • Quantify the demands of events • Quantify and compare work performed with confounding
variables—such as varying grades, wind conditions, temperatures, and group vs. solo riding
• Provide training intensity targets • Encourage athletes to ride harder, or easier
• Provide training guidelines in rehabilitation • Predict performance in training and events • Show the decrease in ability with exposure to altitude—and the
improvement that comes with acclimation • Show the decrease in ability with exposure to heat, humidity, or
cold—and the improvement that comes with acclimation • Demonstrate changes in power with hydration status or fatigue • Suggest a check for medical causes of decreased power • Demonstrate the aerodynamic savings of equipment • Demonstrate the aerodynamic savings of position • Demonstrate improved power with changes in position • Demonstrate the value of drafting, especially to “slow learners” • Give a measure of calories burned • Provide immediate and reviewable feedback about pacing • Provide athletes with biofeedback and quicker appreciation of
perceived exertion • Show that performance (power) may be fine even though
feeling tired or otherwise “slow” • Help motivation • Help confidence
Training Load and Event Predictor
Power measurement is the gold-standard measure of absolute workload.
Power is what gets you down the road. (Wind resistance, rolling resistance, and gravity hold you back. Formulae exist for predicting performance based on power.)
Hill climbing ability correlates well to aerobic power output divided by weight. Time trialing ability correlates well to aerobic power divided by frontal area or drag. Sprinting ability correlates well to anaerobic power.
While other measures of intensity, such as perceived exertion or heart rate, can provide relative measures of individual workload intensity, they do not predict performance.
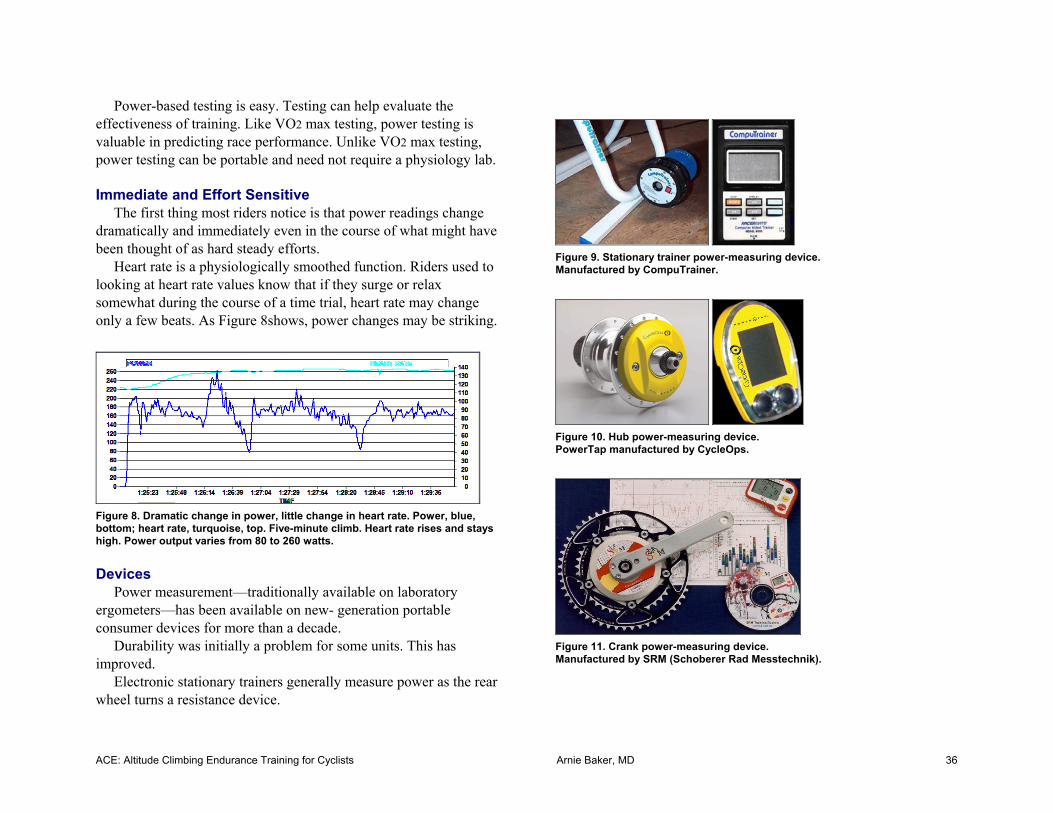
ACE: Altitude Climbing Endurance Training for Cyclists Arnie Baker, MD 36
Power-based testing is easy. Testing can help evaluate the effectiveness of training. Like VO2 max testing, power testing is valuable in predicting race performance. Unlike VO2 max testing, power testing can be portable and need not require a physiology lab.
Immediate and Effort Sensitive
The first thing most riders notice is that power readings change dramatically and immediately even in the course of what might have been thought of as hard steady efforts.
Heart rate is a physiologically smoothed function. Riders used to looking at heart rate values know that if they surge or relax somewhat during the course of a time trial, heart rate may change only a few beats. As Figure 8shows, power changes may be striking.
Figure 8. Dramatic change in power, little change in heart rate. Power, blue, bottom; heart rate, turquoise, top. Five-minute climb. Heart rate rises and stays high. Power output varies from 80 to 260 watts.
Devices
Power measurement—traditionally available on laboratory ergometers—has been available on new- generation portable consumer devices for more than a decade.
Durability was initially a problem for some units. This has improved.
Electronic stationary trainers generally measure power as the rear wheel turns a resistance device.
Figure 9. Stationary trainer power-measuring device. Manufactured by CompuTrainer.
Figure 10. Hub power-measuring device. PowerTap manufactured by CycleOps.
Figure 11. Crank power-measuring device. Manufactured by SRM (Schoberer Rad Messtechnik).
ACE: Altitude Climbing Endurance Training for Cyclists Arnie Baker, MD 37
Force-measuring devices that can be installed at the pedals, crank, bottom bracket, chain, or rear wheel axle are available.
These allow riders to measure power on the road, trail, or track. Some devices may add up to half a pound in weight and so
fractionally worsen uphill performance. Some devices that purport to measure power output do not—they
impute it from speed, gradient, and rider weight. Such units are useful in that they provide a measure of relative workload intensity under identical conditions—for example, climbing a steady grade with no wind.
Total Work
Training hours and mileage are commonly used as measures of training volume. Total work may be a better measure of training stress.
Power is the rate of performing work. Many devices can compute the work accomplished over a period of time. This is commonly reported in kilojoules.
A joule is one watt of power for one second. There are 3,600 seconds in an hour. One kilojoule equals 1,000 joules. Therefore, averaging 100 watts of power for one hour yields 360 kilojoules of work.
Calories Used Rule of Thumb—Close Enough
Since a kilojoule equals 0.24 calories,2 and since the body is about 24% efficient in converting energy to muscular work, kilojoules of work provide a good estimate of calories burned.
That is to say if your total ride work is 1,200 kilojoules, you have also burned about 1,200 calories in producing that work.
2 Technically one kilojoule equals 0.24 kilocalories. A scientific kilocalorie is popularly referred to as a calorie.
More Precise For most riders, the body is closer to 22% efficient, about 10%
less than the 24% quoted above. If your total ride work is 1,200 kilojoules, you have burned about 10% more calories, or about 1,320 calories.
Three Ways to Use Power
Riders and coaches use power meters in three general ways: 1. During a workout 2. Download and analysis of a single workout 3. Analysis of multiple downloads
Power During Efforts
This is what most riders and coaches initially examine. What power can be sustained during a climb, time trial, or other
interval? What happens during racing? What kinds of efforts are required?
Are those efforts simulated in training? Determination is made crudely while riding, or more precisely
with computer software of downloads.
Watts Per Kilogram Just as absolute heart rate is of limited importance for most riders
(percentage of maximum heart rate is a more useful statistic), absolute power output is less relevant than power per unit of mass, that is, watts per kilogram. (Metric units are used more frequently for this statistic, although some use watts per pound. A kilogram equals 2.2 pounds.)
A 90-kilogram (200-pound) rider will generate roughly twice the power of a 45-kilogram (100-pound) rider to ascend at the same speed. Watts/kilogram (pounds) will be roughly the same.
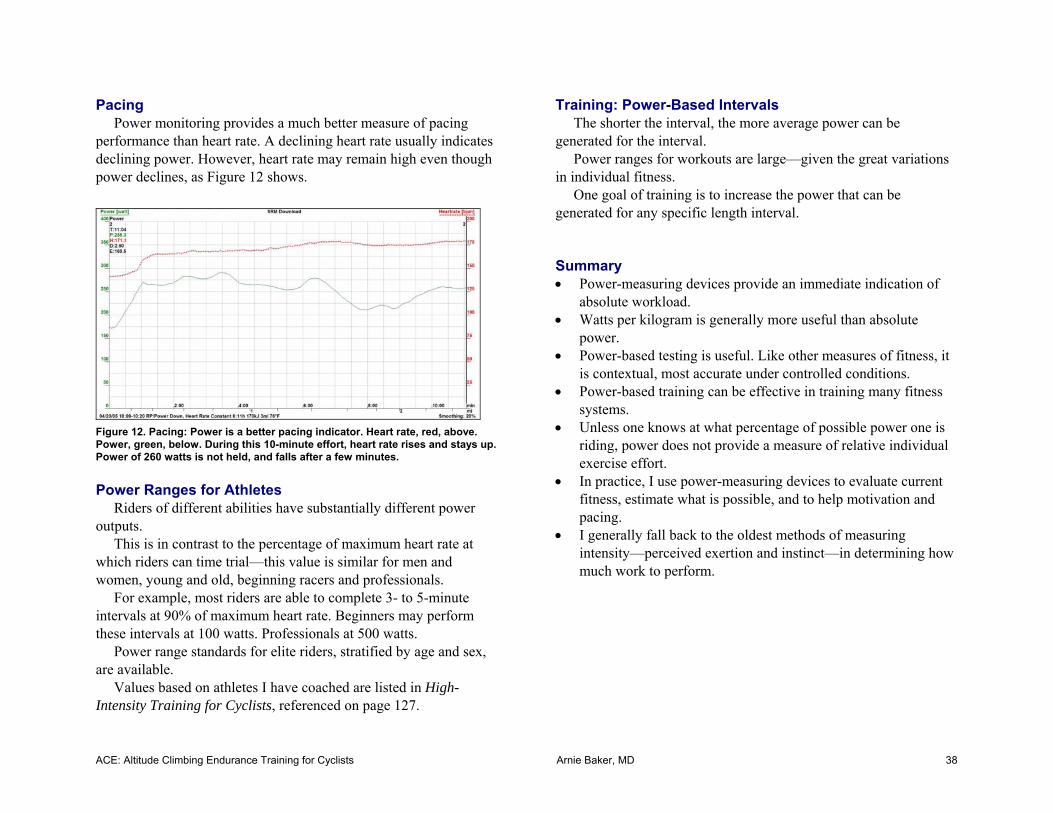
ACE: Altitude Climbing Endurance Training for Cyclists Arnie Baker, MD 38
Pacing Power monitoring provides a much better measure of pacing
performance than heart rate. A declining heart rate usually indicates declining power. However, heart rate may remain high even though power declines, as Figure 12 shows.
Figure 12. Pacing: Power is a better pacing indicator. Heart rate, red, above. Power, green, below. During this 10-minute effort, heart rate rises and stays up. Power of 260 watts is not held, and falls after a few minutes.
Power Ranges for Athletes
Riders of different abilities have substantially different power outputs.
This is in contrast to the percentage of maximum heart rate at which riders can time trial—this value is similar for men and women, young and old, beginning racers and professionals.
For example, most riders are able to complete 3- to 5-minute intervals at 90% of maximum heart rate. Beginners may perform these intervals at 100 watts. Professionals at 500 watts.
Power range standards for elite riders, stratified by age and sex, are available.
Values based on athletes I have coached are listed in High-Intensity Training for Cyclists, referenced on page 127.
Training: Power-Based Intervals The shorter the interval, the more average power can be
generated for the interval. Power ranges for workouts are large—given the great variations
in individual fitness. One goal of training is to increase the power that can be
generated for any specific length interval.
Summary • Power-measuring devices provide an immediate indication of
absolute workload. • Watts per kilogram is generally more useful than absolute
power. • Power-based testing is useful. Like other measures of fitness, it
is contextual, most accurate under controlled conditions. • Power-based training can be effective in training many fitness
systems. • Unless one knows at what percentage of possible power one is
riding, power does not provide a measure of relative individual exercise effort.
• In practice, I use power-measuring devices to evaluate current fitness, estimate what is possible, and to help motivation and pacing.
• I generally fall back to the oldest methods of measuring intensity—perceived exertion and instinct—in determining how much work to perform.

ACE: Altitude Climbing Endurance Training for Cyclists Arnie Baker, MD 39
Part 2: Climbing
Figure 13. Monitor Pass. Tour of the California Alps—Markleeville Death Ride.
Climbing—Introduction Climb, climb, and climb.
Learn to Love Hills ACE rides are epics. Rides with names like Death Ride, Triple
Bypass, Heartbreak, or Challenge are usually so named because of the amount of climbing in the ride.
For elite athletes, the work of every 1,000 feet of climbing is like an extra 5 miles on flat terrain. For recreational riders, 1,000 feet of climbing is more like an extra 10 miles.
In effort and time, the 129-mile, 16,000-foot The Death Ride is close to a relatively flat double century—200 miles.
One of the most important determinants to your success will be your hill climbing fitness. Plain old endurance climbing is more important than intervals, weight training, stretching, everything else. The way to improve this fitness is to climb, climb, and climb.
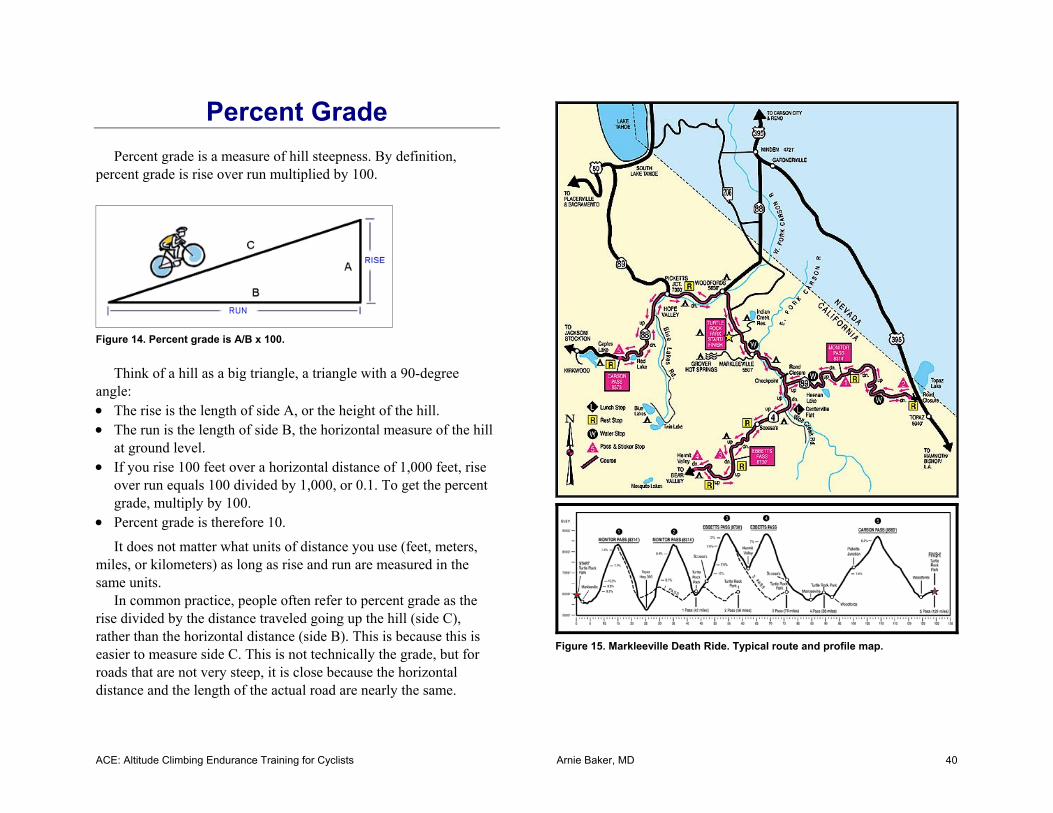
ACE: Altitude Climbing Endurance Training for Cyclists Arnie Baker, MD 40
Percent Grade Percent grade is a measure of hill steepness. By definition,
percent grade is rise over run multiplied by 100.
Figure 14. Percent grade is A/B x 100.
Think of a hill as a big triangle, a triangle with a 90-degree
angle: • The rise is the length of side A, or the height of the hill. • The run is the length of side B, the horizontal measure of the hill
at ground level. • If you rise 100 feet over a horizontal distance of 1,000 feet, rise
over run equals 100 divided by 1,000, or 0.1. To get the percent grade, multiply by 100.
• Percent grade is therefore 10.
It does not matter what units of distance you use (feet, meters, miles, or kilometers) as long as rise and run are measured in the same units.
In common practice, people often refer to percent grade as the rise divided by the distance traveled going up the hill (side C), rather than the horizontal distance (side B). This is because this is easier to measure side C. This is not technically the grade, but for roads that are not very steep, it is close because the horizontal distance and the length of the actual road are nearly the same.
Figure 15. Markleeville Death Ride. Typical route and profile map.

ACE: Altitude Climbing Endurance Training for Cyclists Arnie Baker, MD 41
For example, if you ride exactly 10,000 feet (about 2 miles) up a steady grade, and your altimeter shows that you have climbed exactly 1,000 feet, you might figure the hill has a grade of 10%. Technically, it is 9.95%.
How Much Climbing is 16,000 Feet in 129 Miles?
Let us use The Tour of the California Alps—Markleeville Death Ride as an example. It is 129 miles. It has 16,000 vertical feet of climbing.
Let us do some math. To climb 16,000 feet in 129 miles, you will average about 125 feet per mile. Since what goes up must come down, the overall climbing average per mile for a ride doubles: When you are not descending, you will average 250 feet of climbing per mile. That is a 5% grade.
Some of the time the climbs will be a lot steeper—perhaps 12% to 15%. Some of the time, you may actually ride on level ground—but not much—less than 25 miles.
On balance, you will spend most of your day climbing. If the ride takes you 12 to 13 hours, about 8 of those hours will be spent climbing.
Keep a Climbing Log Want to be a better climber? Almost any coach will suggest
keeping a training log to keep track of volume—how much riding you do, and intensity—how hard you ride. However, very few people keep track of their climbing. You have to do this.
Just as no method is perfect in tracking overall volume—there is endless debate about logging miles or hours, there is no perfect method of keeping track of climbing. The important thing is to have some method.
Feet Climbed
This is the easiest, simplest, and most effective way to track climbing volume.
Questions arise: Do you keep track only of major climbs, or every little highway overpass? How do you measure climbing: Do you need a computer or can you just guess?
Get an Altitude Computer—an Altimeter
There is no other way. You know you have traveled 60 miles because your bike odometer computer says so. Sure, you can guess, or look at a map. However, if you are hoping to see elevation markers on the roadside at the bottom and top of each climb, hope again. You need an altitude computer.
Barometric-derived accumulated totals are more accurate than GPS totals.3 Depending upon the terrain, GPS-derived values may be as more than 100% higher than barometric measurements.
GPS units that also use barometric pressure, such as the Garmin 305, are much more accurate than those using GPS alone.
GPS units may be downloadable and interface with topological- 3 Barometric units may read high or low due to improper calibration or change in weather. However, accumulated totals reasonably assess accrued barometric changes. GPS altitude may be as accurate as 15 feet at any given time. However, over the course of a ride, altitude up-and-down errors build up to overestimate total climbing.
ACE: Altitude Climbing Endurance Training for Cyclists Arnie Baker, MD 42
or satellite-based programs. Again, topologically determined elevation gains are overestimates.
Climbing Hours
For those without an altitude computer, tracking how long you climb is another approach.
Perhaps the easiest way is to use a bike computer or handlebar mounted watch that can measure elapsed time. Simply turn the time on when you start climbing, off when you stop.
This presents logistical difficulties except for sustained climbs.
Climbing Volume Though it will take a while to build up, I recommend that you
build up weekly climbing volume to a minimum of 125% of event climbing volume during three of your training weeks. If you love to climb and have the time and fitness, once or twice aim for over 25,000 feet per week.
Aim to climb at least 60% of event climbing volume several times. If your event has 16,000 feet of climbing, you must climb 10,000 feet in training in one day on at least several occasions.
For reference (not to make you feel bad), the best climbers in the world may occasionally climb 60,000 feet in a week. Many pros regularly climb 30,000 to 40,000 feet per week. National-level women and masters may climb 20,000 feet per week. For those living in Florida, only a thousand feet of climbing per week might be possible, even seeking out all available highway overpasses. Moreover, a few local criterium racers I know get woozy just looking at a hill.
Stationary training with the front of the bicycle/trainer elevated can help train climbing muscles. Give yourself credit for half your maximum hourly road-climbing rate for every hour that you are on the trainer. For example: Climb at 3,000 feet per hour on the road? Give yourself credit for 1,500 feet per hour on a front-elevated bicycle/trainer. (Read more about climbing on stationary trainers starting on pages 44 and 53.)
Mountain biking? To equate to road, double feet climbed on single track. Add 50% for fire roads. For example: Climb 1,000 feet of single track. Give yourself credit for 2,000 road feet. Climb 1,000 feet on fire roads? Give yourself credit for 1,500 road feet.
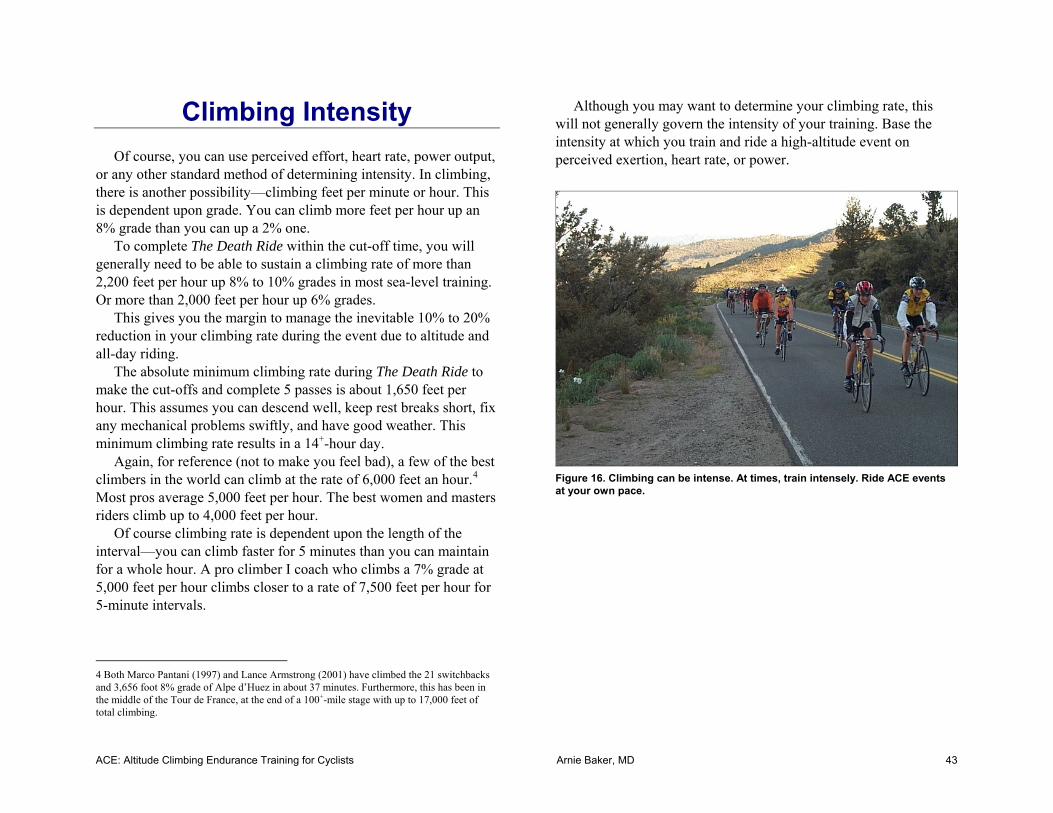
ACE: Altitude Climbing Endurance Training for Cyclists Arnie Baker, MD 43
Climbing Intensity Of course, you can use perceived effort, heart rate, power output,
or any other standard method of determining intensity. In climbing, there is another possibility—climbing feet per minute or hour. This is dependent upon grade. You can climb more feet per hour up an 8% grade than you can up a 2% one.
To complete The Death Ride within the cut-off time, you will generally need to be able to sustain a climbing rate of more than 2,200 feet per hour up 8% to 10% grades in most sea-level training. Or more than 2,000 feet per hour up 6% grades.
This gives you the margin to manage the inevitable 10% to 20% reduction in your climbing rate during the event due to altitude and all-day riding.
The absolute minimum climbing rate during The Death Ride to make the cut-offs and complete 5 passes is about 1,650 feet per hour. This assumes you can descend well, keep rest breaks short, fix any mechanical problems swiftly, and have good weather. This minimum climbing rate results in a 14+-hour day.
Again, for reference (not to make you feel bad), a few of the best climbers in the world can climb at the rate of 6,000 feet an hour.4 Most pros average 5,000 feet per hour. The best women and masters riders climb up to 4,000 feet per hour.
Of course climbing rate is dependent upon the length of the interval—you can climb faster for 5 minutes than you can maintain for a whole hour. A pro climber I coach who climbs a 7% grade at 5,000 feet per hour climbs closer to a rate of 7,500 feet per hour for 5-minute intervals.
4 Both Marco Pantani (1997) and Lance Armstrong (2001) have climbed the 21 switchbacks and 3,656 foot 8% grade of Alpe d’Huez in about 37 minutes. Furthermore, this has been in the middle of the Tour de France, at the end of a 100+-mile stage with up to 17,000 feet of total climbing.
Although you may want to determine your climbing rate, this will not generally govern the intensity of your training. Base the intensity at which you train and ride a high-altitude event on perceived exertion, heart rate, or power.
Figure 16. Climbing can be intense. At times, train intensely. Ride ACE events at your own pace.
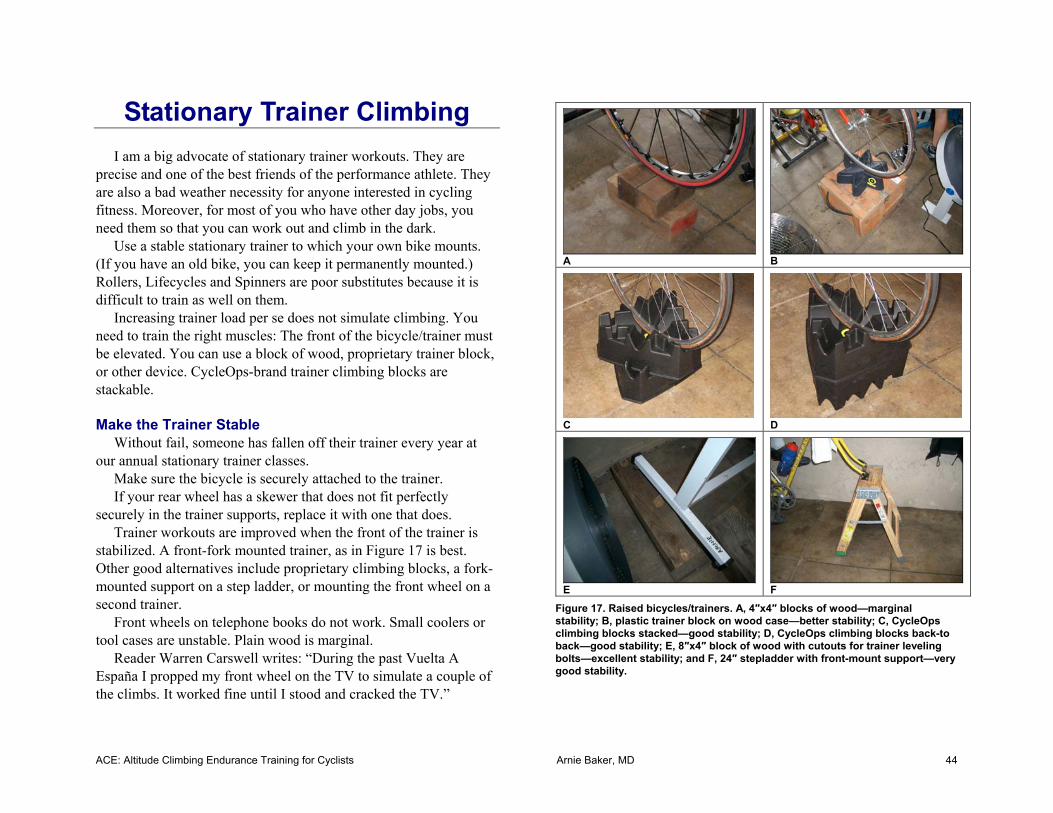
ACE: Altitude Climbing Endurance Training for Cyclists Arnie Baker, MD 44
Stationary Trainer Climbing I am a big advocate of stationary trainer workouts. They are
precise and one of the best friends of the performance athlete. They are also a bad weather necessity for anyone interested in cycling fitness. Moreover, for most of you who have other day jobs, you need them so that you can work out and climb in the dark.
Use a stable stationary trainer to which your own bike mounts. (If you have an old bike, you can keep it permanently mounted.) Rollers, Lifecycles and Spinners are poor substitutes because it is difficult to train as well on them.
Increasing trainer load per se does not simulate climbing. You need to train the right muscles: The front of the bicycle/trainer must be elevated. You can use a block of wood, proprietary trainer block, or other device. CycleOps-brand trainer climbing blocks are stackable.
Make the Trainer Stable
Without fail, someone has fallen off their trainer every year at our annual stationary trainer classes.
Make sure the bicycle is securely attached to the trainer. If your rear wheel has a skewer that does not fit perfectly
securely in the trainer supports, replace it with one that does. Trainer workouts are improved when the front of the trainer is
stabilized. A front-fork mounted trainer, as in Figure 17 is best. Other good alternatives include proprietary climbing blocks, a fork-mounted support on a step ladder, or mounting the front wheel on a second trainer.
Front wheels on telephone books do not work. Small coolers or tool cases are unstable. Plain wood is marginal.
Reader Warren Carswell writes: “During the past Vuelta A España I propped my front wheel on the TV to simulate a couple of the climbs. It worked fine until I stood and cracked the TV.”
A
B
C
D
E
F
Figure 17. Raised bicycles/trainers. A, 4″x4″ blocks of wood—marginal stability; B, plastic trainer block on wood case—better stability; C, CycleOps climbing blocks stacked—good stability; D, CycleOps climbing blocks back-to back—good stability; E, 8″x4″ block of wood with cutouts for trainer leveling bolts—excellent stability; and F, 24″ stepladder with front-mount support—very good stability.
ACE: Altitude Climbing Endurance Training for Cyclists Arnie Baker, MD 45
As you gain experience, you can raise the front of the bicycle/trainer up to 8 inches. Since the trainer raises the back of the bicycle up to 2 inches, this amounts to a net front elevation of about 6 inches. Raising the bicycle/trainer more than this amount risks an accident, wheelieing backward.
How Much Climbing?
Since percent grade equals rise over run, if the front of your bicycle/trainer is 6 inches higher than the rear, and the bike’s wheel base is 40 inches, you have a roughly 15% grade.
My rule of thumb for climbing workouts: Each hour on the stationary trainer in climbing position is equivalent to one-half the maximum road climbing feet one can climb in an hour. Another way to say the same thing: On a sustained climb, can you climb 3,000 feet per hour? If so, give yourself credit for 1,500 feet of climbing for each hour you spend on the trainer.
More Info
Use fans for cooling and plan ahead with waterbottles. For more information about stationary training, see the workouts
on page 53 and High-Intensity Training for Cyclists, referenced on page 127.
Climbing & Descending Tips Hills present a special challenge. When you ride on the level,
you can ease up and rest, and still go forward. However, hills are different. You have to keep putting out a good level of energy just to avoid falling over!
There is something else to consider. Descending. For some, descending, especially with corners or crosswinds, is very scary. Fortunately descending skills and techniques can be learned. These can make going down hills safe and a blast.
Climbing Train on the Hills
It is obvious, of course. Riding the hills makes you better on the hills. It astonishes how many riders are disappointed at their slow progress on hills—and when I ask them whether they train on hills, they say: “No.”
Steady hill riding, interval hill riding, big-gear hill riding, and hill sprints. Incorporate them into your program and you will certainly climb better.
Climbing logs—made possible with an altimeter—help many riders record and plan their hill climbing work.
If you do not have easy access to hills for training, a stationary trainer with the front elevated about 6 inches will train climbing muscles.
Train Your Mind If you look at each hill as an opportunity to improve your
climbing, you will. If you see each hill as an obstacle to where you are going, it will be.
Sometimes keeping focused on the top of the hill helps draw you up to the top. At other times mentally dividing the hill into more
ACE: Altitude Climbing Endurance Training for Cyclists Arnie Baker, MD 46
manageable segments works better. Be flexible in your approach, and use both techniques to help you.
Get the Right Gears, Shift Early Balance the work of your muscles and aerobic system. New riders frequently use their muscles until they cannot push
any more. When their legs bog down, they shift to an easier gear—if they have one. However, by then it may be too late. The muscles may be exhausted and unable to continue, even in a “bail-out” or super-easy gear.
It is a much better strategy to shift early to easier gears. Save your legs. If you find that you are going well, you can always shift to a harder gear later.
This is the strategy used by many top professional racers. On a hard, steady climb, the top pros shift to harder gears, not easier ones half way up the climb.
Many riders do not have “easy” enough gears to allow them to climb comfortably. There is no shame in having easy gears. The first few races I entered I had a 26-cog on my rear wheel. My competition had 21s. They did make comments about my “easy gears.” However, when I won every one of my first few races, they did not laugh at me anymore—they asked where they could buy a similar set-up.
Think of it another way. If a top pro rider can climb twice as fast as you can, and uses a 21-cog, maybe you should have a 42-cog!
There is no shame and there is a lot of sense in having a triple chainring set-up. With a triple, you have more gear options. Some professional riders use triples in the hills. Many bikes are sold with triples. Alternatively, you can convert your double-ringed bike.
Read the information about Small Gears on page 85.
Be Conservative, Go Easy If hills intimidate you, or are your weak link, take it easy. Go 5-
10% easier than you think you need to. Conserve. You can always pick it up later.
If you are a great hill climber, the opposite strategy may hold. You obtain an overall better time by working a little harder on hills.
Get the Proper Body Position Sure, bent over in the drops is the efficient way to fly along on
level ground. However, hills are different. There is much less aerodynamic resistance.
You get the most power sitting up as high as you can. Open up the hips.
Place your hands on the tops of the handlebars—that is where they generally belong.
Most riders do better by pushing back on the saddle and pushing forward with the legs, rather than down.
The sitting-up high, hands on the tops position is generally the most comfortable and economical climbing position.
Some other positions can be used effectively as training exercises. The six most common climbing positions are discussed more fully on page 49.
Sit or Stand? Everyone has his or her individual preference. Most of us do better sitting on long climbs. Everyone needs a change in position from time to time, and
standing helps work different muscle groups and gives a partial rest to some leg and back muscles.
Standing can also allow you to maintain or give a little more power, without shifting, on short, steeper pitches.
A minority of riders, especially light riders, climbs better standing.
Establish a Breathing Rhythm Get a rhythm. Concentrate on each stroke. Coordinate your
breathing with your legs. At moderate intensity, perhaps take a breath every two revolutions of your legs. At harder intensities, perhaps take a breath every one and one-half revolutions of your legs. You will go faster!
ACE: Altitude Climbing Endurance Training for Cyclists Arnie Baker, MD 47
Read more about Focus and Breathing on page 69.
Relax Do not get tied up in knots on the climb. Relax you arms. Relax
your shoulders. Relax your back. Use your legs.
Working Really Hard? At hard intensity, fit riders can push down on their pedals with
forces greater than body weight, and lift themselves off their saddles.
At high intensity levels, stabilize your body by pulling up on the handlebar. Pull with the same-side arm as the pushing leg.
Weight An extra pound on your body or bike frame is worth about 20
seconds for every hour of climbing. Rotating wheel weight is about double.
20 pounds overweight? That hour-long mountain climb will take you about 7 minutes longer.
Do not sacrifice equipment weight for reliability.
Descending Be Safe and Be In Control
Do not scare yourself. Start with gentle descents and gentle corners. Learn proper techniques. Always feel comfortable and in control—let faster descenders go by you. With practice, you will improve.
If you have a friend who is a skilled descender, ask him to slow down a little and let you follow his line at a safe distance.
As you ride faster, rider further from the pavement’s edge. Scan for pavement hazards in front of you at the same time as you look farther down the road.
Keep both hands on the handlebars. Keep your hands in the drops, with a firm, yet relaxed grip. Do not concentrate on the road
beneath you or stare at the corner you are approaching. Rather, look where you are going, look around the corner to where you will be.
If you need to brake suddenly, shift your weight rearward. Apply more front brake than rear.
Initially your hands and wrists may tire on long, winding descents. You may need to stop and rest after a mile or two. If you do not adapt with time, hand and wrist strengthening exercises may help.
When on a straight descent, gripping the top tube between your legs can help stabilize the bicycle, allow more relaxation of your upper body, and help prevent front-end shimmy. When cornering, allowing your inside thigh to stabilize your bike’s top tube against your body can be helpful.
Anticipate While scanning for road hazards, trust the big picture. Look
ahead. Look beyond the corner. Look where you will be going. Anticipate at what speed you want to ride the corner. If you are
concerned about maximizing your speed through corners, remember that exit speed is more important than entrance speed. If you will need to reduce speed, break before corners, not in corners. However, if you have misjudged the corner, breaking late is better than going off the road.
Balance Rules In addition to looking ahead, as described above, apply standard
balance principles: 1. Keep your eyes level with the horizon by pointing your chin
where you are going. 2. Shift a little rearward on the bicycle. 3. When not cornering, keep cranks and feet level. 4. Lead with your dominant leg. 5. Relax.
ACE: Altitude Climbing Endurance Training for Cyclists Arnie Baker, MD 48
Cornering Technique If traffic safety and rules of the road allow, ride from the outside
of the lane or road to the inside apex of the corner, then to the outside of the lane or road on exiting the corner. This effectively straightens out the corner.
By raising or lowering your chest, you can modulate your speed. A dropped chest results in greater speed, and a lower center of gravity.
Put your outside leg down. Straighten out your outside leg. Put weight on your outside leg.
Although some riders point their inside knee into the corner, most find that stabilizing the inside knee against the top tube improves balance.
Important advanced techniques for corners: Put weight on your inside hand. As the bike balances between your outside leg and inside hand, lean the bike more than your body, slightly unweight your rear end, and move slightly back on the saddle. More weight on the inside hand and greater bicycle lean allows you to turn more sharply; less weight on the inside hand and less bicycle lean allows you to increase the radius of your turn—even while in the corner itself.
As your skill allows, you will often find that the fastest descents are achieved by sprinting out of corners and tucking into an aerodynamic crouch, not by steadily pedaling in a big gear.
Crosswinds Slow down and get down. The less your body is acting like a
sail, the less you will be blown around. Lower your center of gravity. Put more weight on your pedals. Ride with the hands in the drops and a low chest. Since this position improves aerodynamics, use your brakes to slow down, if necessary.
As traffic safety and rules of the road allow, allow some margin for the wind to blow you to the edge of the road.
Relaxed riding, with relaxed yet firm arms and grip, and mildly allowing the bike to “go with the flow” is usually safer than tensing up and trying to (over)correct for every gust of wind.
Extend your leg on the lee side. Weighting the lee leg, leaning the bicycle into the wind, with weight on the windward hand, allows relatively safe compensation for wind gusts.
Look ahead. Anticipate gusts when direction or protection from hills or other geographical features changes.
With crosswinds from the left, anticipate that passing or oncoming vehicles, especially trucks, will result in gusts.
Equipment Wheels can make big differences in descending comfort and
safety. Deep-dish rims catch crosswinds and can make safe descending
more difficult, occasionally impossible. Lightly-spoked wheels may be less laterally stable during
cornering. Dual-tread and other tire compounds can improve cornering
force and slip-out angle. Although narrow tires are often chosen because they are lighter and have better aerodynamic profiles, keep in mind that wider tires reduce rolling resistance and improve cornering.
Summary
With training and practice, you will climb and descend more comfortably, with greater skill and safety.
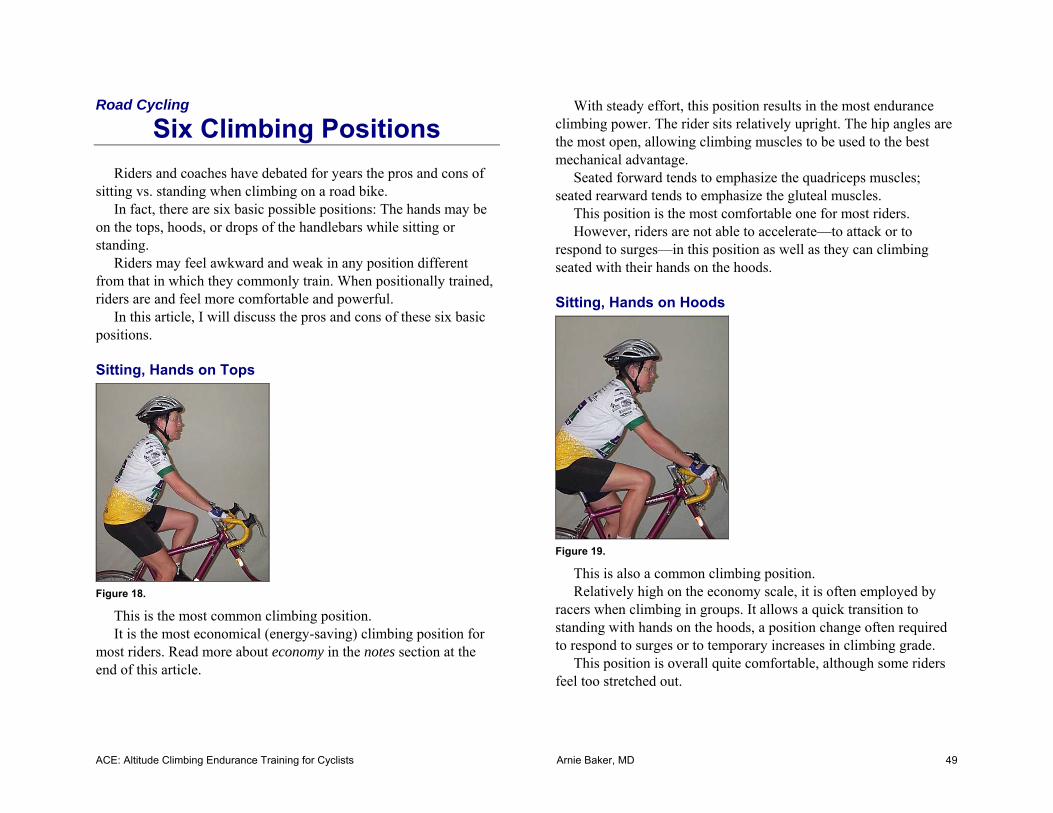
ACE: Altitude Climbing Endurance Training for Cyclists Arnie Baker, MD 49
Road Cycling
Six Climbing Positions Riders and coaches have debated for years the pros and cons of
sitting vs. standing when climbing on a road bike. In fact, there are six basic possible positions: The hands may be
on the tops, hoods, or drops of the handlebars while sitting or standing.
Riders may feel awkward and weak in any position different from that in which they commonly train. When positionally trained, riders are and feel more comfortable and powerful.
In this article, I will discuss the pros and cons of these six basic positions.
Sitting, Hands on Tops
Figure 18.
This is the most common climbing position. It is the most economical (energy-saving) climbing position for
most riders. Read more about economy in the notes section at the end of this article.
With steady effort, this position results in the most endurance climbing power. The rider sits relatively upright. The hip angles are the most open, allowing climbing muscles to be used to the best mechanical advantage.
Seated forward tends to emphasize the quadriceps muscles; seated rearward tends to emphasize the gluteal muscles.
This position is the most comfortable one for most riders. However, riders are not able to accelerate—to attack or to
respond to surges—in this position as well as they can climbing seated with their hands on the hoods.
Sitting, Hands on Hoods
Figure 19.
This is also a common climbing position. Relatively high on the economy scale, it is often employed by
racers when climbing in groups. It allows a quick transition to standing with hands on the hoods, a position change often required to respond to surges or to temporary increases in climbing grade.
This position is overall quite comfortable, although some riders feel too stretched out.
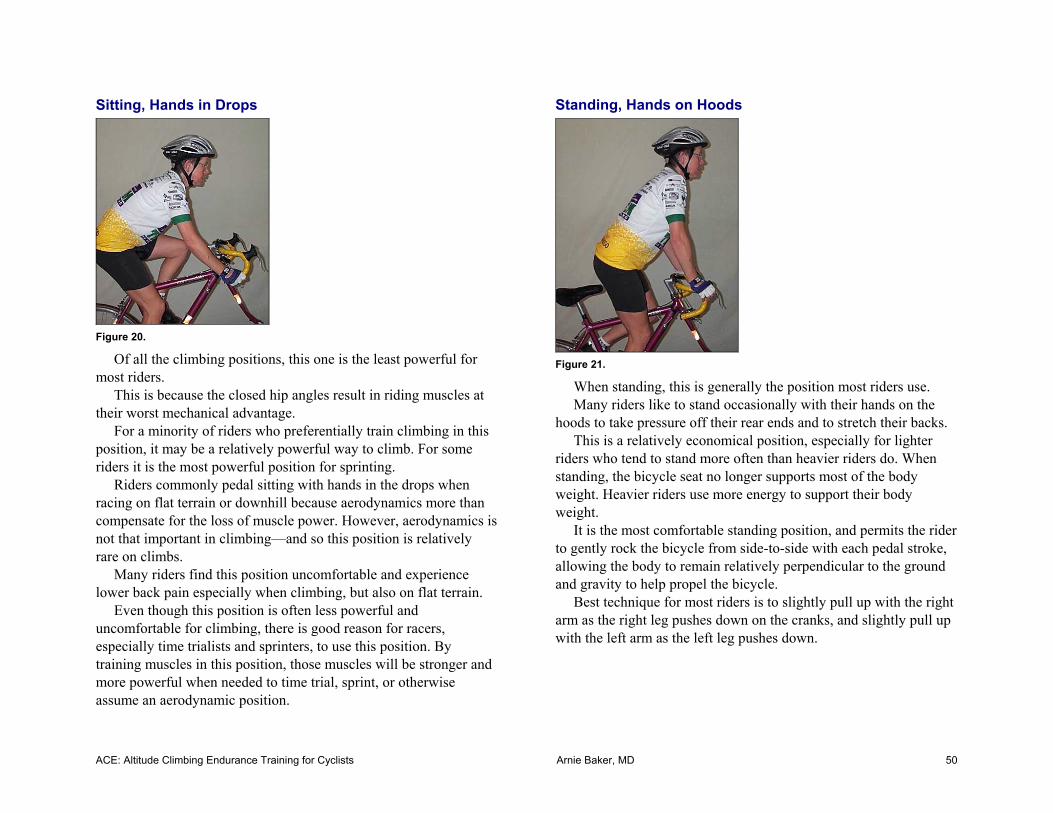
ACE: Altitude Climbing Endurance Training for Cyclists Arnie Baker, MD 50
Sitting, Hands in Drops
Figure 20.
Of all the climbing positions, this one is the least powerful for most riders.
This is because the closed hip angles result in riding muscles at their worst mechanical advantage.
For a minority of riders who preferentially train climbing in this position, it may be a relatively powerful way to climb. For some riders it is the most powerful position for sprinting.
Riders commonly pedal sitting with hands in the drops when racing on flat terrain or downhill because aerodynamics more than compensate for the loss of muscle power. However, aerodynamics is not that important in climbing—and so this position is relatively rare on climbs.
Many riders find this position uncomfortable and experience lower back pain especially when climbing, but also on flat terrain.
Even though this position is often less powerful and uncomfortable for climbing, there is good reason for racers, especially time trialists and sprinters, to use this position. By training muscles in this position, those muscles will be stronger and more powerful when needed to time trial, sprint, or otherwise assume an aerodynamic position.
Standing, Hands on Hoods
Figure 21.
When standing, this is generally the position most riders use. Many riders like to stand occasionally with their hands on the
hoods to take pressure off their rear ends and to stretch their backs. This is a relatively economical position, especially for lighter
riders who tend to stand more often than heavier riders do. When standing, the bicycle seat no longer supports most of the body weight. Heavier riders use more energy to support their body weight.
It is the most comfortable standing position, and permits the rider to gently rock the bicycle from side-to-side with each pedal stroke, allowing the body to remain relatively perpendicular to the ground and gravity to help propel the bicycle.
Best technique for most riders is to slightly pull up with the right arm as the right leg pushes down on the cranks, and slightly pull up with the left arm as the left leg pushes down.
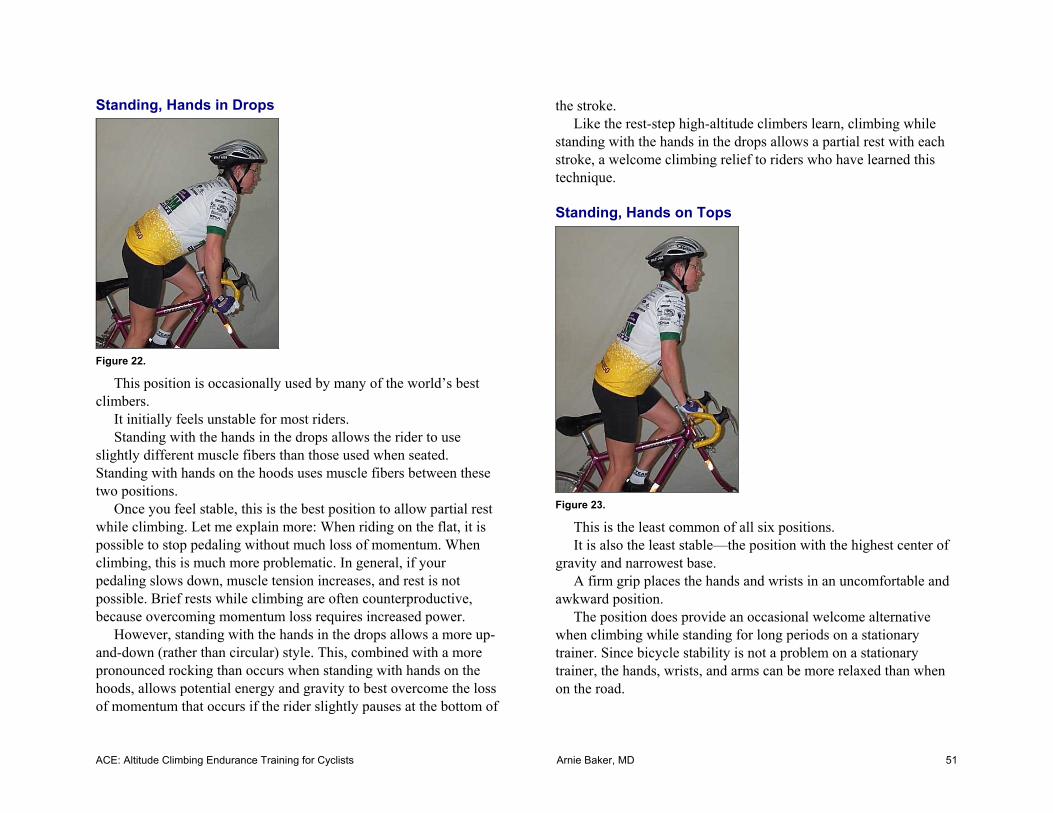
ACE: Altitude Climbing Endurance Training for Cyclists Arnie Baker, MD 51
Standing, Hands in Drops
Figure 22.
This position is occasionally used by many of the world’s best climbers.
It initially feels unstable for most riders. Standing with the hands in the drops allows the rider to use
slightly different muscle fibers than those used when seated. Standing with hands on the hoods uses muscle fibers between these two positions.
Once you feel stable, this is the best position to allow partial rest while climbing. Let me explain more: When riding on the flat, it is possible to stop pedaling without much loss of momentum. When climbing, this is much more problematic. In general, if your pedaling slows down, muscle tension increases, and rest is not possible. Brief rests while climbing are often counterproductive, because overcoming momentum loss requires increased power.
However, standing with the hands in the drops allows a more up-and-down (rather than circular) style. This, combined with a more pronounced rocking than occurs when standing with hands on the hoods, allows potential energy and gravity to best overcome the loss of momentum that occurs if the rider slightly pauses at the bottom of
the stroke. Like the rest-step high-altitude climbers learn, climbing while
standing with the hands in the drops allows a partial rest with each stroke, a welcome climbing relief to riders who have learned this technique.
Standing, Hands on Tops
Figure 23.
This is the least common of all six positions. It is also the least stable—the position with the highest center of
gravity and narrowest base. A firm grip places the hands and wrists in an uncomfortable and
awkward position. The position does provide an occasional welcome alternative
when climbing while standing for long periods on a stationary trainer. Since bicycle stability is not a problem on a stationary trainer, the hands, wrists, and arms can be more relaxed than when on the road.
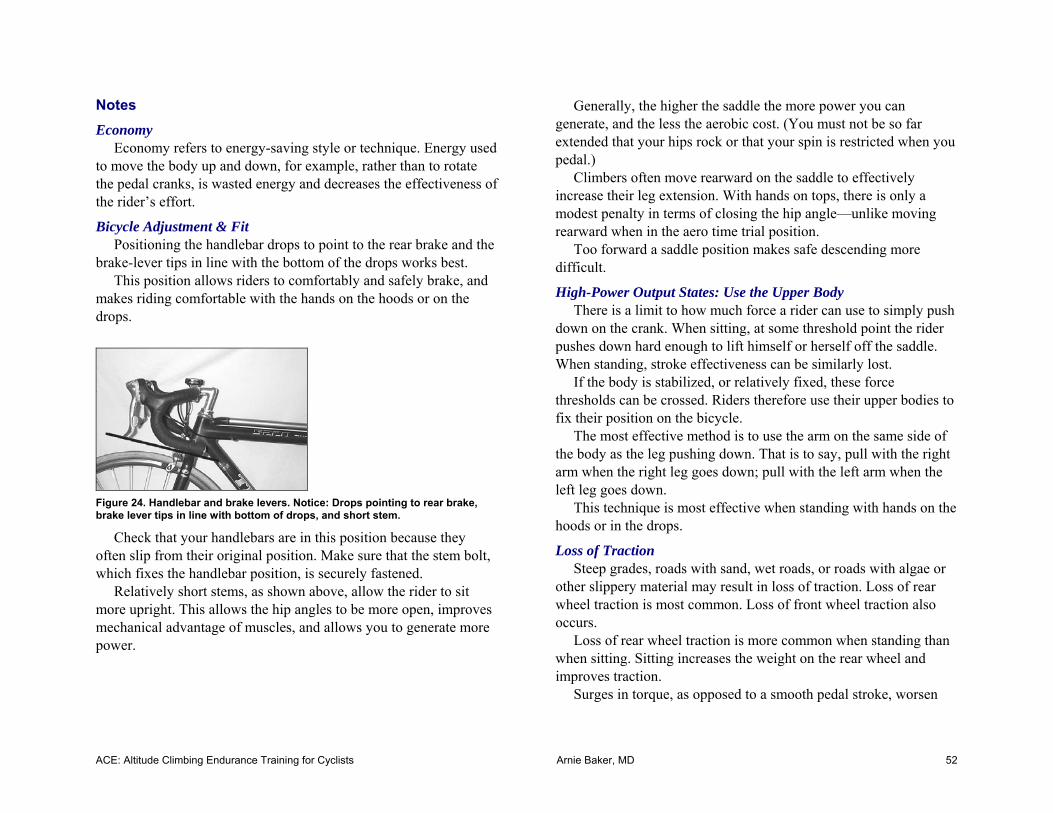
ACE: Altitude Climbing Endurance Training for Cyclists Arnie Baker, MD 52
Notes Economy
Economy refers to energy-saving style or technique. Energy used to move the body up and down, for example, rather than to rotate the pedal cranks, is wasted energy and decreases the effectiveness of the rider’s effort.
Bicycle Adjustment & Fit Positioning the handlebar drops to point to the rear brake and the
brake-lever tips in line with the bottom of the drops works best. This position allows riders to comfortably and safely brake, and
makes riding comfortable with the hands on the hoods or on the drops.
Figure 24. Handlebar and brake levers. Notice: Drops pointing to rear brake, brake lever tips in line with bottom of drops, and short stem.
Check that your handlebars are in this position because they often slip from their original position. Make sure that the stem bolt, which fixes the handlebar position, is securely fastened.
Relatively short stems, as shown above, allow the rider to sit more upright. This allows the hip angles to be more open, improves mechanical advantage of muscles, and allows you to generate more power.
Generally, the higher the saddle the more power you can generate, and the less the aerobic cost. (You must not be so far extended that your hips rock or that your spin is restricted when you pedal.)
Climbers often move rearward on the saddle to effectively increase their leg extension. With hands on tops, there is only a modest penalty in terms of closing the hip angle—unlike moving rearward when in the aero time trial position.
Too forward a saddle position makes safe descending more difficult.
High-Power Output States: Use the Upper Body There is a limit to how much force a rider can use to simply push
down on the crank. When sitting, at some threshold point the rider pushes down hard enough to lift himself or herself off the saddle. When standing, stroke effectiveness can be similarly lost.
If the body is stabilized, or relatively fixed, these force thresholds can be crossed. Riders therefore use their upper bodies to fix their position on the bicycle.
The most effective method is to use the arm on the same side of the body as the leg pushing down. That is to say, pull with the right arm when the right leg goes down; pull with the left arm when the left leg goes down.
This technique is most effective when standing with hands on the hoods or in the drops.
Loss of Traction Steep grades, roads with sand, wet roads, or roads with algae or
other slippery material may result in loss of traction. Loss of rear wheel traction is most common. Loss of front wheel traction also occurs.
Loss of rear wheel traction is more common when standing than when sitting. Sitting increases the weight on the rear wheel and improves traction.
Surges in torque, as opposed to a smooth pedal stroke, worsen
ACE: Altitude Climbing Endurance Training for Cyclists Arnie Baker, MD 53
traction. Pulling on the handlebars, as described above in high-power output states, worsens traction.
If rear-wheel traction is poor, pushing forward slightly on the handlebars when pushing down on the pedals can help.
Final Words
See the climbing position summary table below. There are six basic climbing positions. Climbing while standing with hands on the tops is best reserved
for occasional use on a stationary trainer. The other five positions each have distinctive benefits on the road. By training in these different positions, riders can become better climbers, better all-round riders, and enjoy climbing more.
CLIMBING POSITION SUMMARY
Position Economy Comfort Ease in Stability
Notes (Energy-saving) Acceleration
Sit, Tops Most economical
Sit, Hoods Allows transition to stand
Sit, Drops Trains flat-land power
Stand, Tops Unstable except on trainer
Stand, Hoods Best overall stand position
Stand, Drops Allows dynamic rest
Scale: Most Least
Table 3. Climbing position summary.
With a Stationary Trainer Emphasis
Climbing Workouts If you do not have a workout plan when training on a stationary
trainer you are wasting your time. It is too boring otherwise. Stationary trainer workouts are precise and time-efficient. If you
have a half hour in the morning to ride before getting dressed for work, you are probably just not going to get a meaningful climbing workout in on the road. If you are like most folks I know, it takes longer to get out of city traffic and find a good hill. With a trainer, you can easily perform a worthwhile half hour of climbing.
Here are some climbing workouts for the stationary trainer that combine many of the principles discussed above. You can easily adapt these workouts to the road by finding a climb of suitable length and grade.
Here is a typical two-hour program that will introduce you to climbing.
Two-Hour Stationary Trainer Workout Overview
~ Duration Exercise Gear RPM Intervals 12 minutes Warm-up 39/23 to 120
14 minutes Climbing ILT 53/17 50-60 3 & 4-minute reps
15 minutes Climbing 53/13 50-60
24 minutes Climbing 53/13 50–60 3 x 3-min up/down reps 3 x 1-min up/down reps
8 minutes Climbing ILT 53/16 50-60 4 minute rep
10 minutes Cool-down 39/21 100+
Table 4. Sample 2-hour stationary trainer workout.
ACE: Altitude Climbing Endurance Training for Cyclists Arnie Baker, MD 54
Front-Elevate As stated above on page 44, resistance or load does not stimulate
climbing. Position does. Whenever you are on a trainer, elevate the front of your bicycle trainer.
This not only simulates climbing, it makes it easier for your crotch to tolerate long trainer workouts.
Stability is important. See Make the Trainer Stable on page 44 and Figure 17.
Warm-up Spin-up The first 10–15 minutes of every workout are spent warming up.
Choose the easiest, or almost easiest gear, available, with very little resistance on the trainer. Start at about 60 rpm—pedaling a cadence of one stroke every second. Build up 5 rpm every minute until you are spinning about 120 rpm. If you are new to spinning, it may take some time to be able to spin this quickly.
Isolated Leg Training One of the best ways to work on leg strength is one leg at a time.
By pedaling with just one leg—isolating that leg—you can focus on pulling up, on evenly applying force to the pedals around the stroke, and on building tremendous push-down forces. The key is to focus on the leg, not the cardiovascular system—which is precisely what ILT does.
An easy gear will force you to concentrate on smoothness and the pull up motion of your leg. A hard gear specifically strengthens your quads and gluts—the most important cycling propulsive muscles you have.
It is hard to be precise about the gear, because everybody’s trainer is different. Choose a gear that allows you to pedal with a cadence of about 50 rpm with a heart rate of about 140 or 70% to 75% of you maximum heart rate.
Steady Hill Climbing Keep the front of your trainer elevated. Choose a hard gear with significant trainer resistance. Stand up
and pedal 50 to 60 rpm steadily for 15 minutes. It may take a while to build up to this. It is helpful to concentrate,
focus, or visualize rather than just wait for the 15 minutes to finish. For example, concentrate on breathing out every stroke-and-one
half. Or concentrate on pushing down for 10 strokes with your left leg, then on pushing down for 10 strokes with your right. Or concentrate on breathing every stroke-and-one half, and count to ten, 10 times.
Or concentrate on pulling up with your left hand when you push down with your left leg. After about a minute, focus on your right side and concentrate on pulling up with your right hand when you push down with your right leg.
There are lots of different counting and visualization games you can play. It is not critical which games you choose, but games like this will make the time pass more easily and help the workout.
Up/Down Hill Climbing Keep the front of your trainer elevated. Pedal easily with both legs for about five minutes. Stand for 3 minutes; then sit for 3 minutes. Do not change to an
easier gear. It may take a minute to get your cadence back up. Repeat this up and down standing and sitting two more times.
Then stand for one minute, sit for one, stand for one, sit for one, stand for one, sit for one.
That will be a total of 24 minutes of climbing simulation. When you get to the one-minute up one-minute down part, try to
pick up the pace progressively, so that when you are finished you are working all-out.
ILT Pedal easily for 5 minutes. Repeat a 4-minute ILT set in as hard a gear as you can push to
finish the 4 minutes.
Cool-Down Almost as important as the warm-up is a proper cool-down. With
ACE: Altitude Climbing Endurance Training for Cyclists Arnie Baker, MD 55
minimal trainer resistance, spin up to 100–120 rpm, hold it for 5 minutes, and gradually spin down.
Remember the racehorse adage: By the time it gets back to the barn after a hard workout, a racehorse should be breathing normally and not sweating.
Climbing Workout Variations
The workout above is a possible two-hour stationary trainer workout.
Many different climbing workouts are possible. All climbing exercises are performed with the front of the trainer elevated 4 to 8 inches. Some elements of workouts are common to all workouts; for example, a warm-up and cool-down. Since many riders neglect standing when climbing on the road, most trainer workouts incorporate more standing than seated climbing. Steady-state climbing adds climbing endurance to almost any hill climb workout.
Here are some suggestions for items to add to make up a climbing trainer workout depending upon what aspect of climbing fitness you wish to work on, and time available.
Endurance Climb—Stand Works standing climbing muscular endurance.
• Stand 20 to 30 minutes. • Hard gear. • Rpm 50 to 55. • Heart rate 75% to 80% of maximum at the end of the endurance
climb.
Endurance Climb—Stand and Sit Works standing and sitting climbing muscular endurance.
• Stand 20 to 30 minutes. • Hard gear. • Rpm 50 to 55. • Alternate standing and sitting every 5 minutes. • Heart rate 75% to 80% of maximum at the end of the climb.
Progressive RPM Climb Works climbing muscular endurance, cardiovascular system.
• This is a good way to perform some hard work even when you are a little tired. It is usually pretty easy to “get into it.”
• Hard gear. • Start with a cadence of 50 to 55 rpm. • Alternate standing and sitting. Start with 3 to 7 minutes.
Decrease duration of effort by one minute every time you stand again. Increase cadence 1 rpm every time you change position. Sprint the last 30 seconds. If you start with 4 minutes, the duration of the exercises is 20 minutes. If you start with 7 minutes, the duration of the exercise is 56 minutes. An example starting from 5 minutes is shown in Table 5.
It will take a while to develop the climbing endurance. Start with just 3 minute standing. Build up to a 7 minute-standing start after a year or two.
For example, if you begin with 5 minutes of standing and sitting, and start at 54 rpm, the details will be:
When you get to the 2-minute efforts, you heart rate should be 85% or more of maximum HR. You should end at over 92% of maximum HR.
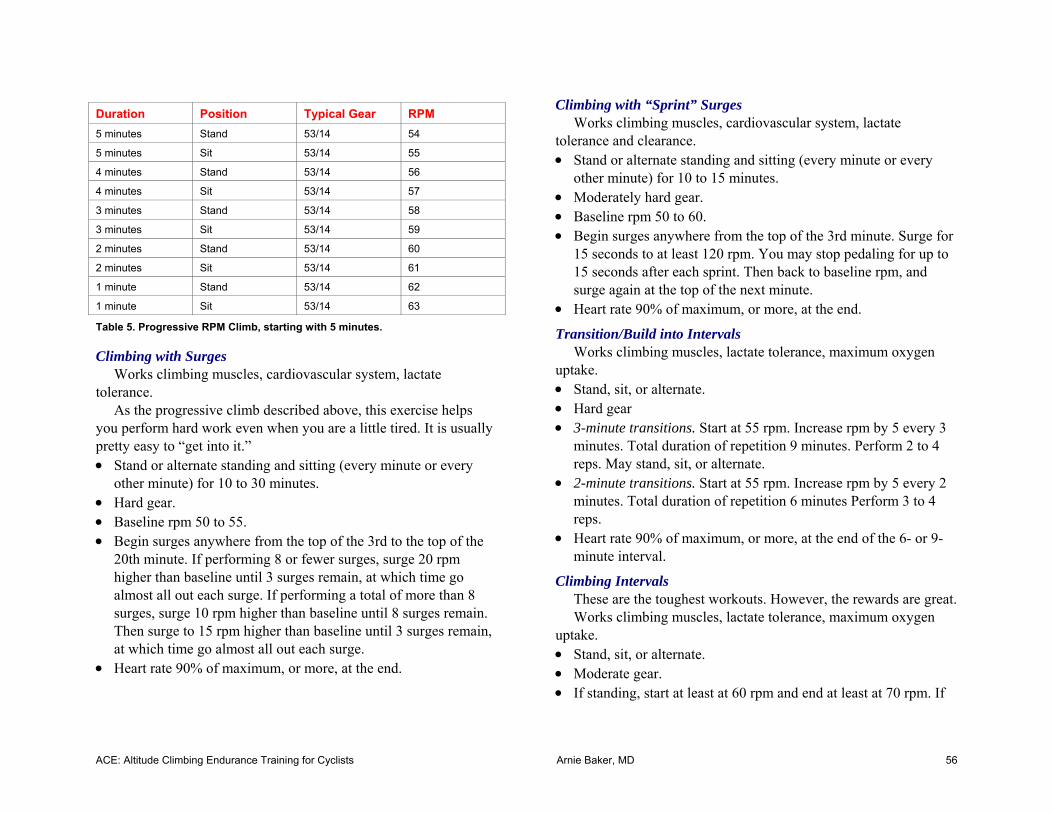
ACE: Altitude Climbing Endurance Training for Cyclists Arnie Baker, MD 56
Duration Position Typical Gear RPM 5 minutes Stand 53/14 54
5 minutes Sit 53/14 55
4 minutes Stand 53/14 56
4 minutes Sit 53/14 57
3 minutes Stand 53/14 58
3 minutes Sit 53/14 59
2 minutes Stand 53/14 60
2 minutes Sit 53/14 61
1 minute Stand 53/14 62
1 minute Sit 53/14 63
Table 5. Progressive RPM Climb, starting with 5 minutes.
Climbing with Surges Works climbing muscles, cardiovascular system, lactate
tolerance. As the progressive climb described above, this exercise helps
you perform hard work even when you are a little tired. It is usually pretty easy to “get into it.” • Stand or alternate standing and sitting (every minute or every
other minute) for 10 to 30 minutes. • Hard gear. • Baseline rpm 50 to 55. • Begin surges anywhere from the top of the 3rd to the top of the
20th minute. If performing 8 or fewer surges, surge 20 rpm higher than baseline until 3 surges remain, at which time go almost all out each surge. If performing a total of more than 8 surges, surge 10 rpm higher than baseline until 8 surges remain. Then surge to 15 rpm higher than baseline until 3 surges remain, at which time go almost all out each surge.
• Heart rate 90% of maximum, or more, at the end.
Climbing with “Sprint” Surges Works climbing muscles, cardiovascular system, lactate
tolerance and clearance. • Stand or alternate standing and sitting (every minute or every
other minute) for 10 to 15 minutes. • Moderately hard gear. • Baseline rpm 50 to 60. • Begin surges anywhere from the top of the 3rd minute. Surge for
15 seconds to at least 120 rpm. You may stop pedaling for up to 15 seconds after each sprint. Then back to baseline rpm, and surge again at the top of the next minute.
• Heart rate 90% of maximum, or more, at the end.
Transition/Build into Intervals Works climbing muscles, lactate tolerance, maximum oxygen
uptake. • Stand, sit, or alternate. • Hard gear • 3-minute transitions. Start at 55 rpm. Increase rpm by 5 every 3
minutes. Total duration of repetition 9 minutes. Perform 2 to 4 reps. May stand, sit, or alternate.
• 2-minute transitions. Start at 55 rpm. Increase rpm by 5 every 2 minutes. Total duration of repetition 6 minutes Perform 3 to 4 reps.
• Heart rate 90% of maximum, or more, at the end of the 6- or 9-minute interval.
Climbing Intervals These are the toughest workouts. However, the rewards are great. Works climbing muscles, lactate tolerance, maximum oxygen
uptake. • Stand, sit, or alternate. • Moderate gear. • If standing, start at least at 60 rpm and end at least at 70 rpm. If

ACE: Altitude Climbing Endurance Training for Cyclists Arnie Baker, MD 57
seated, start at least at 75 rpm and end at least at 85 rpm. • 3- to 4-minute intervals. Standing or seated. Heart rate 90% of
maximum, or more, at the end of the interval. • Pyramid intervals. 1-2-3-4-4-3-2-1–minute intervals (a total of 8
intervals). Rest intervals of 2-3-4-4-4-4-3 minutes. For the 3rd to the last interval, heart rate 90% of maximum, or more, at the end of the interval.
Climbing Sprints These are tough workouts. Again, the rewards are great.
• Works climbing muscles, lactate tolerance. • Stand, sit, or alternate. • Hard gear. • Pedal slowly, perhaps at only 30 rpm. • Sprint as hard as you can, to 140 or more rpm, for 15 to 30
seconds. Rest 2 to 5 minutes. Repeat up to 8 times. • The effort is too short for heart rate to accurately reflect your
work intensity, so do not look to your monitor to gauge training effectiveness.
Climbing ILTs Works climbing muscles. High rpm ILT preferentially works hip
flexors and neuromuscular system. • Sit. Unclip one leg from your pedal, as described above in the
detailed 2-hour climbing workout. • Hard gear. 50 to 60 rpm. 3 to 4 minutes each leg. Works
“pushing muscles.” • Easiest gear. 80 to 85 rpm. 3 to 4 minutes each leg. Works
“pulling muscles.” These are good when you want to add workout time, but your push climbing muscles are tired.
• Heart rate is not usually relevant—the muscles, not the cardiovascular system, are being trained.
Summary A big part of enjoying climbing is mastering the fitnesses
required. A wide variety of climbing workouts, and lots of them, will ensure your climbing success.
ACE: Altitude Climbing Endurance Training for Cyclists Arnie Baker, MD 58
Dealing With High Altitude Traveling to over 4,000 feet and planning athletic activity?
Moderate or high altitudes will affect your performance. Traveling to over 8,000 feet? Mountain sickness may be a
problem.
Altitude—What We’re Talking About From the athletes’ point of view, it means less oxygen. As one
ascends, there is less barometric pressure and as a result, less oxygen is absorbed into the blood.
At sea level, the average barometric pressure is 760 millimeters of mercury. At 10,000 feet, the barometer reads 510. The percentage of oxygen in the air, about 21%, does not change—but the density of air, and hence oxygen, does. At 10,000 feet, only two-thirds of sea-level oxygen is present.
Altitude Side Effects Mountain Sickness
Many who travel rapidly to high altitude experience side effects. Most people adapt to high altitude more quickly when they have traveled to high altitude frequently in the past.
The side effects, however, are not predictable. Some individuals may have problems on some occasions and not on others. Problems do occur in proportion to the change in altitude. Those living at sea level have more problems when traveling to 8,000 feet than those living at 3,000 feet. Changes in altitude less than 4,000 feet do not present much difficulty.
Those who travel to 8,000 feet and above may experience headache, drowsiness, mental fatigue, dizziness, nausea, vomiting, insomnia, dimness of vision (especially color vision), and euphoria. Judgment and memory are ordinarily normal to 9,000 feet. At 11,000 feet, reaction times, handwriting, and psychological test
scores may be 20% below normal. Pulmonary edema, convulsions, and coma can occur above 23,000 feet.
Dryness, Dehydration The air at altitude is usually very dry. Extra fluids may be lost
because of increased breathing. Since fluid losses are greater, it is easy to get dehydrated. Skin chaps easily. Be sure to drink plenty of fluids. Use moisturizer.
Sunburn Sun intensity at high altitude is higher. Protect your skin and lips
with sunscreen, and reapply as needed.
Headache Headache may be related to mountain sickness, described above,
or to the increase in brightness that occurs at high altitude. Most sunglasses filter most, if not all, ultraviolet rays. Wear sunglasses.
Decreased Performance Reduced aerobic capacity results in reduced power output for
athletes. Anticipate reduced aerobic performance and pace to help optimize results.
Reduced Appetite High altitude often suppresses appetite. If planning to participate
in an endurance aerobic event, it is important to maintain good carbohydrate (glycogen) energy stores. Ensure adequate caloric intake.
Acclimation
The body adapts to altitude—a process called acclimation. Short-term acclimation is usually complete by two weeks. Many
athletes have a bad day between the second and fifth days at high altitude.
If one ascends beyond 6,000 feet at the rate of less than 1,000 feet per day, side effects can often be avoided.
ACE: Altitude Climbing Endurance Training for Cyclists Arnie Baker, MD 59
The medication acetazolamide (Diamox) may help prevent or treat mountain sickness. This medicine is a diuretic and affects acid-base balance. It may worsen athletic performance.
Other illnesses, such as colds or flu, may make mountain sickness symptoms worse.
Some heart and lung problems are worse at altitude. Check with your doctor if you are concerned.
Diet The following dietary suggestions reduce mountain sickness and
help acclimation: • Increase fluid intake • Add a little more salt to your diet than usual. This helps
hydration • Avoid alcohol—it worsens mountain sickness • Frequent small meals, rather than few large ones, may be helpful • Emphasize carbohydrates
Other Methods of Managing Mountain Sickness • Descend • Supplemental oxygen • Medications
Warning!
Consider expert care if you experience the following: • Symptoms worsen rather than improve • Hacking cough • Trouble waking • Confusion • Hallucinations • Visual problems
Timing Your Arrival at Altitude Altitude acclimation is helpful for athletes who wish to train or
race at altitude. If you are traveling to an important event and have the time,
arrive three weeks early. You can train at an easy pace for the first few days, be over the worst altitude effects by one week, train hard the second, and taper slightly the third.
As stated above, riders often have a bad day between the second and fifth days at altitude. As this bad day is unpredictable, there can be no blanket arrival-at-altitude advice statement for everyone.
Most riders find that every day spent at altitude before an event is helpful; others have set altitude records by arriving only hours before competing.
Some events take place over a range of altitudes. If you have not had the time to acclimate, it may be better to rest and sleep at lower elevations.
A Primer on Altitude Physiology Resting Heart Rate Changes at Altitude
During travel to altitude, there is a rise in resting heart rate for a week or two, although there may be a short small dip in the middle of the first week. A fall in resting heart rate back to baseline is a measure of acclimation.
Threshold and Maximum Heart Rates Threshold and maximum heart rate are reduced about 1 beat for
every 1,000 feet of elevation for athletes who have trained at sea level. For a given submaximal power output, heart rate is higher.
You cannot maintain the same power output at altitude as you can at sea level. So plan to pace yourself and go slower at altitude.
VO2 Maximum at Altitude At 5,000 feet, VO2 max, or the body’s maximum ability to use
oxygen, is reduced by about 5%. At 6,500 feet, it is reduced by about 8%.
ACE: Altitude Climbing Endurance Training for Cyclists Arnie Baker, MD 60
At Monitor Pass, California, the reduction is about 12%. At nearby Ebbetts, about 15%. Thinking about training in Colorado at Pike’s Peak or competing at Mt. Evans? There will be a reduction of about 25% in your VO2 max.
The reduced amount of oxygen means that less work can be performed. Cycling time trial records are often accomplished at altitude because the reduced ability to work is more than compensated for by reduced air resistance. Athletes in sports with less aerodynamic benefit, such as running, do worse in aerobic events at altitude.
Even when adapted, you cannot sustain the same levels of aerobic work as you can at sea level. For a given workload, your heart rate may be higher. Since you cannot work as hard at altitude, your threshold working heart rate may be lower. For a given speed on the level, your heart rate may be lower.
Acid-Base Balance at Altitude At altitude, the acid-base balance in the body changes. This
occurs because carbon dioxide levels in the blood fall as a result of faster breathing. This changes the blood pH toward alkaline and then results in loss of bicarbonate from the kidneys.
Due to the loss of bicarbonate, the body is less able to buffer lactic acid. However, other mechanisms more than compensate and result, in fact, in decreased lactate levels as described below.
Acclimation—How the Body Adjusts
Adaptations to altitude are long-term and short-term. Long-term adaptations and physiologic changes of altitude living can take months or years. The body adapts to altitude in several ways. Here is how:
Increased Breathing After first ascending, breathing may increase as much as 65%.
This initial effect is limited. Increased breathing blows off carbon dioxide and increases blood pH, which, in turn, inhibits breathing.
This inhibition fades with time, but later, rates may increase again, up to 500% of normal.
Increased Diffusing Capacity of the Lungs The lungs exchange gases, taking in oxygen and giving up
carbon dioxide. The normal volume of gases exchanged, per minute, increases at altitude.
This may be due to either (1) increased pulmonary capillary volume caused by expanded capillaries and increased surface area, or (2) increased lung volume.
Increased Hemoglobin in the Blood Hemoglobin, the blood protein that carries oxygen, may increase
from 15 to 22 grams per 100 milliliter of blood. The hematocrit, the percentage of red blood cells in the blood, may increase from 40–45 to 60–65. This degree of change occurs only in some people at extremely high altitudes. How much extra hemoglobin is made depends on how high one ascends and how long one is exposed to reduced oxygen levels. Generally, increases are more modest. Hemoglobin/hematocrit usually increases about 4% for every 1,000 meters (3,000 feet) of elevation above sea level. The volume of blood is reported to increase in some studies, to decrease in others.
The net effect is this: Studies show that the total circulating hemoglobin may increase, in extreme circumstances, from 50% to 90%. Increases in the 10% to 20% range are more common in athletes who live or train at altitude.
The increase results from the naturally produced hormone erythropoietin (EPO). Studies show that EPO levels begin to rise significantly in two hours, and evidence suggests that exposure to an elevation of 8,000 feet for six hours daily will raise hemoglobin levels approximately 10% after two to three weeks. Further increases may occur with more prolonged exposure to higher altitudes.
ACE: Altitude Climbing Endurance Training for Cyclists Arnie Baker, MD 61
Increased Vascularity of Tissues The body responds to reduced oxygen by making more blood
vessels. Studies have shown that the smallest blood vessels, capillaries, become more concentrated in muscle. This adaptation may take months to years.
Increased Ability of Cells to Use Oxygen Myoglobin, the muscle protein that transports oxygen, increases
about 15%. There are increased mitochondria—the energy factories of cells. Some studies have shown an increase in 2, 3 DPG, a chemical that helps release oxygen to the tissues. Oxidative enzymes are increased.
Decreased Lactate Levels with Exertion Studies show that exposure to high altitude results in decreased
lactate levels for a given workload. This could be due to increased levels of myoglobin and hemoglobin, both of which buffer acids, or an increase in certain enzymatic pathways. Altitude exposure decreases bicarbonate—this works against improved buffering.
Ethics and Synthetic EPO
Erythropoietin (EPO) is a hormone released by the kidney that stimulates the bone marrow to make red blood cells. This hormone has been produced synthetically since the early 1990s. There is good reason to believe that this substance can help human performance. However, artificially increasing the numbers of red blood cells may result in thick blood that clots. This has been reported to be responsible for athletes’ deaths.
Altitude has a similar effect but may produce some protection that guards against this, and the body has regulatory mechanisms governing the quantities of EPO produced. Athletes may take synthetically produced EPO in quantities higher than those produced in response to altitude.
One hears about EPO causing death in athletes; one does not hear about this problem in residents of Mammoth, California; Park City, Utah; or other high-altitude cities.
There is another problem: EPO is a banned substance.
Altitude Exposure Can Help Sea-Level Performance Increased hemoglobin results in increased aerobic capacity. This
improves the aerobic fitness of the athlete. The increased vascularity of tissues and the increased ability of the cells to use oxygen could also help athletes, but these effects take months to develop.
The improved performance of runners following high altitude exposure, especially when coupled with brief visits to lower altitudes for high-intensity work, is documented in many scientific studies.
The mechanical aspect of cycling—gears—results in considerations unique to that sport. Cycling balances aerobic and muscular fitness. Faster cadences at a given power output require more aerobic metabolism than slower cadences. Slower cadences at a given power output require more muscle fiber recruitment.
The increased aerobic capacity present after altitude exposure of several weeks means that the balance of gear selection allows a shift to higher rpm. This improves the response to the changing accelerations that characterize cycling events.
Altitude Exposure Can Hurt Sea-Level Performance
The ability to perform high-level work is reduced at high altitude and may lead to detraining: a loss of muscle mass, a loss of anaerobic power, and a loss of threshold ability. As stated above, altitude may decrease the body’s ability to buffer lactic acid because of the loss of bicarbonate. Mountain sickness may lessen the athlete’s ability to train.
Many elite athlete teams travel to high-altitude camps. Although such camps can be good for training, living in close quarters increases contagious illnesses such as the common cold and stomach
ACE: Altitude Climbing Endurance Training for Cyclists Arnie Baker, MD 62
flu. Many athletes are plagued by boredom or homesickness. Coupled with the stress of traveling and performing, high-altitude camps are not good for all athletes.
Summary • Acclimation to high altitude is helpful for high-altitude
performance • Repeated short exposures, or arriving several weeks before
events, can help • Timing optimal arrival at high altitude up to two weeks before an
event is often guesswork • Use sunscreen, and reapply as needed • Use moisturizer • Wear sunglasses • Anticipate reduced aerobic performance and pace to help
optimize results • Increase fluid intake • Add a little more salt to your diet than usual • Avoid alcohol • Ensure adequate caloric intake • Emphasize carbohydrates • Frequent small meals, rather than few large ones, may be helpful • When warning signs of more than mild mountain sickness
develop, get expert medical care and o Descend o Use supplemental oxygen o Use medications
ACE: Altitude Climbing Endurance Training for Cyclists Arnie Baker, MD 63
Part 3: Mind Matters
Pacing Pacing requires self-knowledge and self-control. Pacing may be required when what will limit your performance
later does not limit you now. Pacing means going more slowly at the beginning so that you
can go faster at the end. Pacing also means going more slowly at the beginning so that you can reach the end.
Years ago, runners used to run the mile by starting out almost as fast as they could go. They invariably pooped out at the end. Roger Bannister broke the four-minute barrier for the mile back in the 1950’s by planning to run each quarter mile in just under one minute. That planning allowed him to become one of the most famous athletes of all time.
Why Pace? Because You’ll Finish Faster
Figuring out at what pace you should ride is crucial to great performance in events where the aim is to cover a set distance in the shortest time. This is an essential strategy in track and road time trial events. It is also very important in cross-country mountain biking. In mass-start cycling events where drafting and tactics play important roles, pacing is a less important component of racing success—but even here, it often makes or breaks a race.
Pacing commonly improves finishing times in such events by 1% to 3%. Very fast starts may worsen finishing times even more.
At many levels of competition, there are often very small differences between winning and losing. At the highest levels—the Olympic Games or World Championships—the margin between the
glory of a top-three medal and anonymity is often less than 1%. The difference between going out too hard and pacing yourself
well can cost 10 seconds in a 3–K track event, a minute in 10-mile road time trial, and several minutes in a pro cross-country mountain bike race. In mass start events, a lack of pacing can drop a rider who otherwise might win!
Because You’ll Finish! In all-day century and ultra-distance events, pacing can play an
even greater role. Finishing such events may not even be possible for some participants without pacing!
Sooner or Later We All Slow Down
Whether you plan on pacing or not, sooner or later, we all slow down. The question is, is it planned? What strategy provides the best chance of finishing? What strategy provides the best finishing time? In a group, or mass start event, what strategy gives the best place finish?
Why Pacing Works
Pacing works because you ration resources that will be needed later, now. Common resources are fuel (usually glycogen), fluids, and heat regulation.
A simplistic explanation of the pacing principle may be the following: • Go out too slowly and you never have the time to catch up. • Go out too fast and you run out of energy. • Go out too fast and your lactic acid levels zoom up too quickly.
It is easier to tolerate high lactic acid levels for short periods rather than longer ones. If high lactic acid levels must be endured, it is easier to tolerate them at the end rather than at the beginning of a race.
Psychologically, the natural tendency of many athletes is to get excited at big competitions and go out too hard. By consciously
ACE: Altitude Climbing Endurance Training for Cyclists Arnie Baker, MD 64
backing off just a little this risk is reduced. Build to a crescendo rather than start with a bang and fizzle.
There are other benefits to pacing. For example, in a longer event, starting out more slowly will allow you to drink and eat more easily, and so have more energy for the end of the ride.
Why We Slow Down
There are a number of physiological reasons why we slow down: The main reason is that we run out of fuel energy. Dehydration, overheating, and muscle and neurohormonal fatigue can also contribute.
Dehydration Consider dehydration in ultra-endurance cyclists as an example
why pacing is required: Suppose an athlete can work reasonably well until 3%
dehydrated. Suppose at 6% dehydration health is threatened. Suppose an athlete weighs 140 pounds. Suppose it is a hot and humid day. Suppose working hard, an athlete loses 2.5 quarts (5 pounds) of fluids per hour. Suppose working moderately an athlete loses 1 quart per hour. Suppose the maximum rate of fluid intake is 1.5 quarts per hour. After two hours of hard work, the athlete will be performance impaired. After four hours, general health will be threatened.
The only options are to slow down early (pace) or stop when fatigued or exhausted. Pacing results in a higher overall speed.
Fuel Energy Efforts up to about 10 seconds can be performed “all-out.”
Pacing allows efforts of all other lengths to apportion higher-energy producing fuels over longer periods. Pacing results in overall total work and better overall times.
Fuel energy exists in several forms: Anaerobic energy fuel sources include ATP, which supplies
energy for just a few seconds, and CP—creatine phosphate, which
helps supply energy for up to 30 seconds. Aerobic energy fuel sources include carbohydrates and fats. Glycogen, a form of carbohydrate stored in muscle, allows
prolonged work at relatively high energy levels, associated with high heart rates. We are able to store a maximum of only about 2,000 calories of glycogen. After that stored glycogen runs out, we are basically burning stored fat.
That may sound great to those trying to lose weight, but it means that you cannot ride hard and that you generally feel terrible. Regardless of how hard you ride, you will burn about the same amount of fat. At higher intensities, you burn carbohydrates as well.
Running out of glycogen means we operate at less than 60% of maximum heart rate. That is what happens to ultra-distance cyclists after their first 24 hours of competition.
A 25-mile time trial, performed at 92+% of maximum heart rate, may exhaust almost all of our glycogen. A two-hour mountain bike race certainly will. It is simply not possible to continue at a pace of 90% of maximum heart rate for more than about two hours—one runs out of glycogen.
Glycogen is also stored in the liver. Liver glycogen helps keep the blood sugar level up, which can help spare the glycogen in the muscles. When the muscle glycogen is gone, blood sugar can be converted to useful energy, but not as efficiently.
By maintaining blood sugar with the ingestion of fuels—sugary drinks or carbohydrate solids—we can spare our stored glycogen and ride strongly longer. Consuming calories while riding will allow you to ride comfortably for many more hours than is otherwise possible.
Temperature Regulation On hot and humid days, athletes may need to reduce workload in
order to keep from overheating. Overheating not only reduces power output, it can risk heat
cramps, heat exhaustion, and heat stroke. Overweight athletes are more subject to overheating.
ACE: Altitude Climbing Endurance Training for Cyclists Arnie Baker, MD 65
Athletes occasionally pace up long climbs in order to keep their clothes dry and so prevent wind-chill from contributing to hypothermia on subsequent descents.
Neuromuscular (Skill) Control Racing all-out to the top of a climb is frequently a poor tactic for
mountain bike racers. Exhaustion at the top of climbs contributes to loss of neuromuscular control and overbraking on descents—resulting in slower overall times.
Heart Rate on Long Rides
Consider a racer with a maximum heart rate of 200 beats per minute, who performs the following events by himself, without the benefit of slipstreaming or drafting a group of riders.
25-mile time trial: It takes 60 minutes. The athlete can maintain 25 miles an hour, with a heart rate of 185 beats-per-minute or about 92% of his maximum.
100 miles: It takes 4.5 hours. The athlete can maintain 22 miles an hour. The heart rate is 160 bpm, or about 80% of maximum.
200 miles: It takes 10 hours. The athlete can maintain 20 miles an hour. The heart rate is 140 or about 70% of maximum.
2500 miles: It takes eight days. The athlete can maintain 13 miles an hour. The heart rate is 120 or about 60% of max.
As a beginning racer, your times will be slower, but your percentage of maximum heart rate will be similar.
Pacing Exceptions Drafting
Cycling is different from running in the sense that drafting, or riding in another’s slipstream, is much more important. Since you can use more than 20% less energy riding behind another rider, or group of riders, a fast-paced group provides enormous benefit in overall time.
It is possible to draft within a group at a heart rate 30 or more
beats per minute below what would be required to ride alone at the same speed. Therefore, it might be worth it to exert yourself a little bit more than your pacing strategy allows to reap the enormous benefits of group travel.
It might be worth working harder than planned over the top of that hill, to be able to stay with the group down the hill and along the flats
Other Strategies and Tactics Sprints or finishing kicks, hill-climbing ability, and other tactical
considerations often affect race strategy in mass start events as much as pacing.
Prove the Value of Pacing
It is easy to prove the importance of pacing, on your own, with a simple test:
Perform the test on a stationary trainer, in a hard gear, riding with one leg, using a cadence computer.
Let us assume that you find the perfect gear for which 55 rpm is the most rpm you can maintain at a steady cadence for 4 minutes. After several weeks, try this experiment: Ride a cadence of 53 for the first 2 minutes, and then try to ride 57 rpm for the last 2 minutes. At your next workout session, try riding at a cadence of 57 for the first 2 minutes, and 53 for the last 2 minutes.
Which way was harder? The vast majority of riders find the slow-start strategy much easier.
Events to 15 Minutes: 51/49 Principle
In its most basic, simplistic form, pacing usually means even effort throughout the event.
Reports from many coaches and studies confirm that in events of up to 15 minutes, going at about 98% race pace the first half and 102% race pace the second half is the best strategy. That is, the first half takes about 51% of elapsed time, the second half 49%.
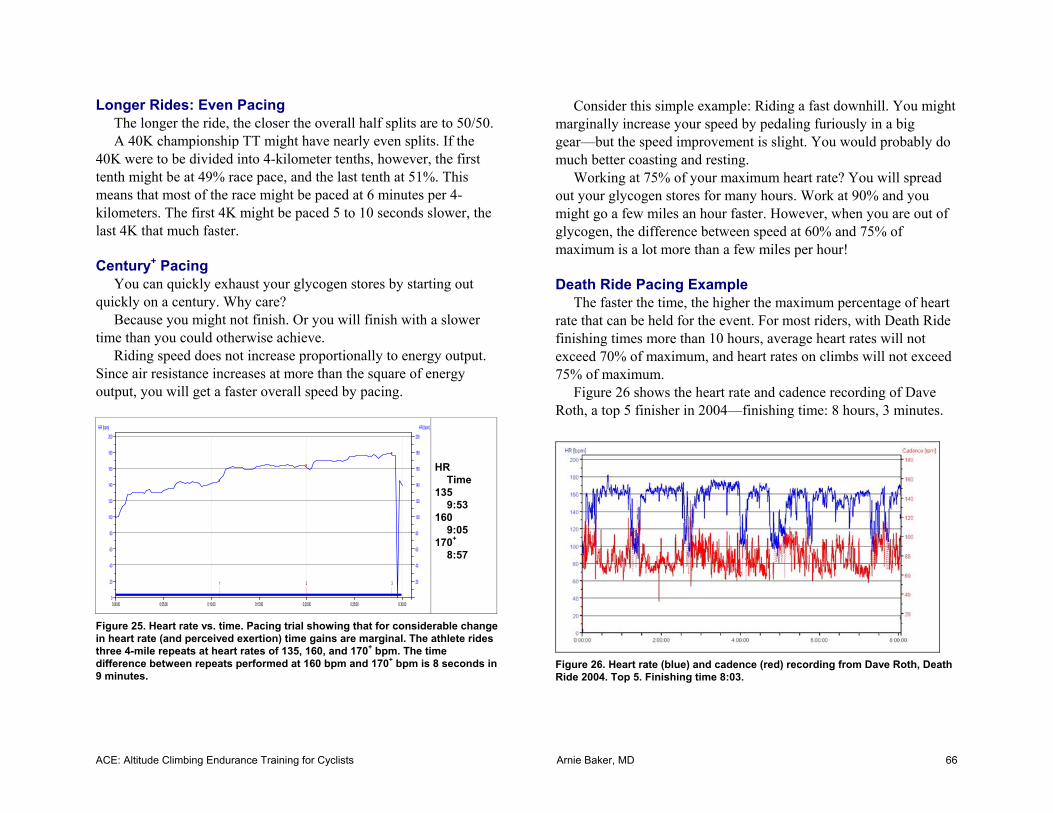
ACE: Altitude Climbing Endurance Training for Cyclists Arnie Baker, MD 66
Longer Rides: Even Pacing The longer the ride, the closer the overall half splits are to 50/50. A 40K championship TT might have nearly even splits. If the
40K were to be divided into 4-kilometer tenths, however, the first tenth might be at 49% race pace, and the last tenth at 51%. This means that most of the race might be paced at 6 minutes per 4-kilometers. The first 4K might be paced 5 to 10 seconds slower, the last 4K that much faster.
Century+ Pacing
You can quickly exhaust your glycogen stores by starting out quickly on a century. Why care?
Because you might not finish. Or you will finish with a slower time than you could otherwise achieve.
Riding speed does not increase proportionally to energy output. Since air resistance increases at more than the square of energy output, you will get a faster overall speed by pacing.
200 200
180 180
160 160
140 140
120 120
100 100
80 80
60 60
40 40
20 20
00:00:00 0:05:00 0:10:00 0:15:00 0:20:00 0:25:00 0:30:00
HR [bpm] HR [bpm]
Time
1 2 3
HR Time 135 9:53 160 9:05 170+
8:57
Figure 25. Heart rate vs. time. Pacing trial showing that for considerable change in heart rate (and perceived exertion) time gains are marginal. The athlete rides three 4-mile repeats at heart rates of 135, 160, and 170+ bpm. The time difference between repeats performed at 160 bpm and 170+ bpm is 8 seconds in 9 minutes.
Consider this simple example: Riding a fast downhill. You might marginally increase your speed by pedaling furiously in a big gear—but the speed improvement is slight. You would probably do much better coasting and resting.
Working at 75% of your maximum heart rate? You will spread out your glycogen stores for many hours. Work at 90% and you might go a few miles an hour faster. However, when you are out of glycogen, the difference between speed at 60% and 75% of maximum is a lot more than a few miles per hour!
Death Ride Pacing Example
The faster the time, the higher the maximum percentage of heart rate that can be held for the event. For most riders, with Death Ride finishing times more than 10 hours, average heart rates will not exceed 70% of maximum, and heart rates on climbs will not exceed 75% of maximum.
Figure 26 shows the heart rate and cadence recording of Dave Roth, a top 5 finisher in 2004—finishing time: 8 hours, 3 minutes.
Figure 26. Heart rate (blue) and cadence (red) recording from Dave Roth, Death Ride 2004. Top 5. Finishing time 8:03.
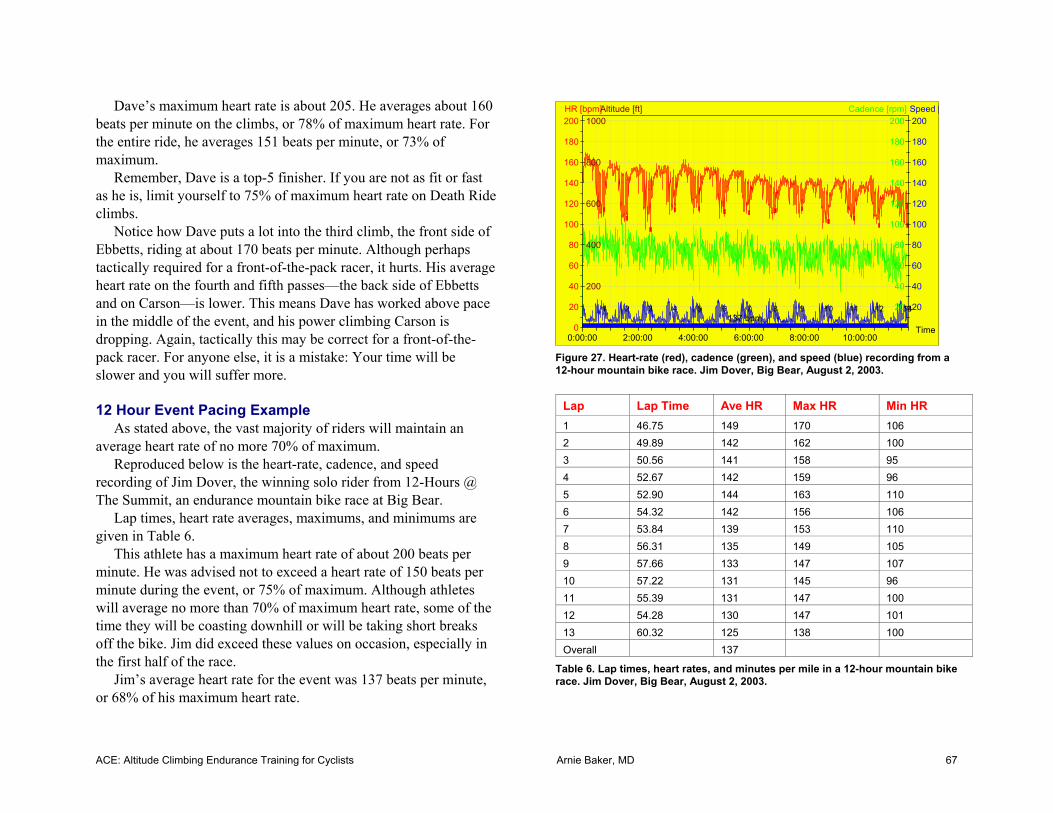
ACE: Altitude Climbing Endurance Training for Cyclists Arnie Baker, MD 67
Dave’s maximum heart rate is about 205. He averages about 160 beats per minute on the climbs, or 78% of maximum heart rate. For the entire ride, he averages 151 beats per minute, or 73% of maximum.
Remember, Dave is a top-5 finisher. If you are not as fit or fast as he is, limit yourself to 75% of maximum heart rate on Death Ride climbs.
Notice how Dave puts a lot into the third climb, the front side of Ebbetts, riding at about 170 beats per minute. Although perhaps tactically required for a front-of-the-pack racer, it hurts. His average heart rate on the fourth and fifth passes—the back side of Ebbetts and on Carson—is lower. This means Dave has worked above pace in the middle of the event, and his power climbing Carson is dropping. Again, tactically this may be correct for a front-of-the-pack racer. For anyone else, it is a mistake: Your time will be slower and you will suffer more.
12 Hour Event Pacing Example
As stated above, the vast majority of riders will maintain an average heart rate of no more 70% of maximum.
Reproduced below is the heart-rate, cadence, and speed recording of Jim Dover, the winning solo rider from 12-Hours @ The Summit, an endurance mountain bike race at Big Bear.
Lap times, heart rate averages, maximums, and minimums are given in Table 6.
This athlete has a maximum heart rate of about 200 beats per minute. He was advised not to exceed a heart rate of 150 beats per minute during the event, or 75% of maximum. Although athletes will average no more than 70% of maximum heart rate, some of the time they will be coasting downhill or will be taking short breaks off the bike. Jim did exceed these values on occasion, especially in the first half of the race.
Jim’s average heart rate for the event was 137 beats per minute, or 68% of his maximum heart rate.
Figure 27. Heart-rate (red), cadence (green), and speed (blue) recording from a 12-hour mountain bike race. Jim Dover, Big Bear, August 2, 2003.
Lap Lap Time Ave HR Max HR Min HR 1 46.75 149 170 106 2 49.89 142 162 100 3 50.56 141 158 95 4 52.67 142 159 96 5 52.90 144 163 110 6 54.32 142 156 106 7 53.84 139 153 110 8 56.31 135 149 105 9 57.66 133 147 107 10 57.22 131 145 96 11 55.39 131 147 100 12 54.28 130 147 101 13 60.32 125 138 100 Overall 137
Table 6. Lap times, heart rates, and minutes per mile in a 12-hour mountain bike race. Jim Dover, Big Bear, August 2, 2003.
200
180
160
140
120
100
80
60
40
20
00:00:00 2:00:00 4:00:00 6:00:00 8:00:00 10:00:00
HR [bpm]
Time
Speed [Cadence [rpm]Altitude [ft]
1 2 3 4 5 6 7 8 9 10 11 12 1314137 bpm
20
40
60
80
100
120
140
160
180
200
20
40
60
80
100
120
140
160
180
200
200
400
600
800
1000

ACE: Altitude Climbing Endurance Training for Cyclists Arnie Baker, MD 68
Although Jim won the event, he might have done a little better by going just a little easier for the first few laps. His early lap times would have been a little slower; his late lap times perhaps much better.
If Jim is one of the world’s best at this, doesn’t it make sense that you too should keep your heart rate below 75% of maximum heart rate?
Pacing Not Everything
Pacing is a very important strategy. In time trials and mountain bike racing, it is crucial. Several of the pro mountain bikers I coach have had their best races after learning patience and pacing. Even in mass start events, it can be very valuable.
On the other hand, it is not everything. At a recent road race in Arizona, I and three other teammates in four separate races broke away solo from our respective fields with 10 to 90 miles left. Our fields could have caught us had they been organized. Mass start racing is much more than pacing: It is feints, it is who has the best sprint, it is who wants not to work thinking someone else will, it is who wants to help someone, and it is who can’t stand a rival being off the front.
Sometimes, “No guts, no glory.” Three out of the four of us stayed away and won our races.
What You Need to Pace • Self-knowledge. You need to know your limits. Based on past
performance, you need to know how hard you can go. • Self-control. You must not let others dictate your pace. • Correct equipment. For example, you need the right gears. If you
have a straight block 12-21 cogset and want to climb a 10% grade at 70 rpm and at less than 75% of maximum heart rate, you may need easier gears. You may need a heart-rate monitor.
• Warm-up. The shorter and more intense the event, the more important it is to warm up. For more information, read the ABC
handout Warm-Ups. In many events, to achieve target pace your overall effort level will be too low if you do not warm-up properly.
• Nutrition. Food and fluids will help you maintain target pace.
The Bottom Line Learning to pace is a hard lesson for many riders to learn. It is so
very tempting to take off from the start at too fast a pace—there is all the excitement and enthusiasm, and you certainly do not want to look like the slowest person there!
However, if you start at a reasonable pace, at the halfway point or later you will be passing many people who thought they left you in the dust at the beginning.
ACE: Altitude Climbing Endurance Training for Cyclists Arnie Baker, MD 69
Focus & Breathing Focus has intensity, width, direction, and relevance. Athletes can learn to intensify, narrow, internalize, and associate
their focus and thereby improve their performance. Learning focused, coordinated breathing is one of the best tools
to achieve this gain.
Focus Focus, or attention, may be strong or weak, external or internal;
narrow or wide; associated or dissociated. External focus is attention directed outside the body. Internal
focus is attention directed inward. Narrow focus is restricted; wide focus, like peripheral vision,
takes in a large field of view. Beginners frequently dissociate—separate what they are thinking
about from what they are doing. For example, beginners may think about favorite restaurants while racing.
Elite athletes associate. They invariably try to keep from dissociating.
The harder the effort, the more important it is to be able to keep a strong, narrow, internal, associated focus.
Studies show that elite time trialists do precisely this: they keep a strong, narrow, internal, and associated focus—they concentrate within—not on the flowers on the hillside, upcoming television shows, or the conflict in the Middle East.
Although studies show that elite athletes are more focused than beginners are, it is something elite athletes learn. If beginners learn focus techniques, they benefit as well.
Shifting Focus
In many events, it is important to be able to shift focus. For example in a road race, it is important to have a wide, external focus
in order to see competitors up the road or falling behind, and then have a narrow, internal focus in order to work harder to make the break or leave others further behind.
Riding recreationally along the roadway, it is important to shift focus: To narrowly pay attention to potholes just a few feet ahead as well as to widely notice, for example, the flow of traffic, stop signs, pedestrians, opening car doors, animals, and other riders.
Riders who disassociate while riding, thinking about their jobs or family arguments may be more likely to have accidents.
The ability to shift and hold focus is a critical element that separates champion athletes from beginners.
Although as efforts increase in intensity elite athletes increase the intensity of their focus, shift their focus inward, and associate—they also maintain flexibility in width and direction.
For example, in track pursuit (an effort of several minutes’ duration), in addition to focusing on their effort, athletes must have an external focus on their line—they must make sure that they don’t drift upward on the track, traveling farther.
Rhythmic Effort
Got rhythm? Watch video footage and listen to commentary of time trialists or climbers narrated by the well-known voice of cycling, Phil Liggett, and you will hear about riders “getting into a good rhythm” or “not in their rhythm.”
Steady-state hard effort demands a good rhythm. Such a rhythm is part of all aerobic endurance sports such as swimming, running, rowing, marching.
Humming or singing a song is one way to keep rhythm—hence soldiers’ marching songs. Counting pedal strokes is another.
Music
Music is used in many aerobics and spin classes—and this may be its best use.
Many riders use music during their stationary trainer workouts.

ACE: Altitude Climbing Endurance Training for Cyclists Arnie Baker, MD 70
Music is most suitable for moderately-high level, rhythmic, aerobic work. It helps athletes increase arousal and focus on their work.
Sophisticated set-ups allow music to be played at variable rates—allowing instructors to coordinate the music’s beat with the exercise rhythm.
However, music may not always coordinate with the best cadence for any given rider, and is generally not suitable for the highest intensity work that requires an internal focus.
Listening to music while riding on the road or trail is not safe. Racers also need to train without music so that they can learn self-monitoring and pacing for racing.
Focus & Breathing
Focus on effort and the self-monitoring of effort are characteristics of elite athletes.
Breathing is one of the cardinal self-monitoring focus tools. Of course, you breathe whether you think about it or not: from as
little as 10 times per minute at rest to more than 60 times per minute at maximal effort.
Breathing technique is important in hard, steady efforts. It is not important when you are noodling—riding slowly. It may not be applicable when you are constantly changing efforts, as in criteriums or when you are making a maximum effort, as in sprinting.
Breathing technique is also important when you want to keep to a pace, even if it is not at a high threshold. By breathing regularly, your pace will stay steady as well.
Focused breathing is also well known to help when you face a crisis—whether related to pace, a cramp, or a crash. It helps get you back on track. After all, think how many women in labor have been helped with the focused breathing techniques of Lamaze.
Focus & Breathing Helps Beginners Although champion athletes have been the most closely studied,
focus is just as important for beginners. It is very helpful for all riders when climbing long steady hills.
Almost all of riders will benefit from learning to breath and count even if it only helps them get to the top of the next hill before they know it.
Why Focused Breathing Works
Focusing on breathing helps us draw on our reserves and get closer to reaching our potential.
Consider an analogy: If you can normally perform about 20 push-ups, performing 10 is a piece of cake, and you do not need to focus on technique. However, if you are trying to do 21, it is a different story. You need focus. You need to count. You do not want outside distraction, people talking to you. If you focus, if you count each push-up, you can get closer to the limit of your potential.
Studies of elite athletes show that they focus on how their bodies are working, that they develop a sense of pace, and that they constantly seek to test their pace and efforts.
Beginners tend to focus more on the outside environment and factors not within their control. Focusing on breathing is a key to self-monitoring of effort and developing the ability to work to your maximum potential.
How Often Should You Breathe?
To some extent, you do not have much choice. It is not that one can say you should breathe this many times a minute and just do it. For any given effort, there will be a limited range of what is comfortable.
You can vary the frequency of your breathing by modifying the depth of your breathing.
ACE: Altitude Climbing Endurance Training for Cyclists Arnie Baker, MD 71
Notice your breathing and co-ordinate it with the pedal stroke of your legs. This is the key to unlocking a good rhythm.
For many riders, working at about 75% of maximum heart rate, breathing frequency will be about 30 times per minute. For many riders, working at 85+% of maximum heart rate (near VO2 max), breathing frequency will be about 60 times per minute.
Cadence, or number of pedal strokes per minute, will vary with the type of riding.
Timing your breaths with pedal strokes will therefore vary depending upon how hard you are working and the type of riding you are performing.
For many riders, climbing at a cadence of 60 rpm, breath timing will be once every two pedal strokes at 75% of maximum heart rate, once every pedal stroke and a half at 80% of maximum heart rate, and once every stroke at 85+% of maximum heart rate.
For many riders, at maximal road time-trial pace, breath timing will be once every stroke and a half. Since cadence will be about 85 rpm, this will translate into a breathing rate of about 55 times per minute at 90% of maximum heart rate.
Concentrate on Breathing Out
When you concentrate on breathing, concentrate on breathing out—exhaling, rather than breathing in—inhaling.
Use Your Mouth
At high-aerobic intensity, the nasal passages restrict airflow. Nasal dilators have not been shown to be effective.
Consider Purse Breathing
Slightly narrowing your lips when breathing may improve air exchange for some riders, yet not overly restrict airflow.
In many riders, the breathing passages may partially collapse or constrict.
The positive pressure exerted through the breathing passages
may help keep them from collapsing and improve air exchange.
Learn to Belly Breathe Breathing with your diaphragm and expanding your abdomen
may increase lung capacity, improve relaxation, and use less energy. It also uses different muscles than the standard chest breathing,
and so may be helpful to help prevent you from tiring from prolonged respiratory muscle work.
Learn to belly breathe lying flat on your back with a book on your abdomen. As you breathe in, the book should rise.
Alternate Stroke Emphasis
If you are breathing once every pedal stroke and a half, you will naturally alternate emphasis on the left and right leg.
If you breathe once every stroke, your emphasis may be on one leg. Consider breathing once every stroke on your left leg for 10 strokes, then once every stroke on your right for 10 strokes, then your left, and so on.
By varying your emphasis, you make the exercise more interesting. Shifting your focus reduces boredom. It also prevents fatigue or stress on one side vs. the other.
Change Your Breathing
It is not as if you should always have the same rhythm. Consider the analogy of music. It may have a basic rhythm or beat. However, this need not stay constant for the whole composition. Sometimes it shifts to another rhythm, or a third, only to return to the original later.
It is the same thing with riding. Suppose you are climbing, breathing every stroke and a half. As you get near the summit, you can change your rhythm to every stroke as you pick up the pace to surge over the top.
ACE: Altitude Climbing Endurance Training for Cyclists Arnie Baker, MD 72
Hyperventilation Caution: Overbreathing can be a problem. Anxiety can cause
hyperventilation; in some athletes, the reverse is true: overbreathing can increase anxiety.
The Work of Breathing
Focused, coordinated breathing does something else: It reduces the work of breathing.
At maximal work levels, the muscles of breathing can use up to 20% of the energy and oxygen you are producing and need. Energy you save by improving breathing economy can be used by your legs to get you down the road.
Exercises for Focused Breathing
Let us face it, not all of us were born with rhythm. Perfecting breathing technique takes practice.
Efforts on a stationary trainer can be precisely controlled. Stationary trainer workouts can provide an excellent place to start learning breathing techniques.
For example: 1. During a steady 75% to 80% of maximum heart rate effort at 90
rpm, focus on exhaling every two pedal strokes. 2. Pick up the pace about 10% and concentrate on breathing every
stroke for about 15 seconds. 3. Back off to steady-state 75% to 80% of maximum heart rate
effort again. Focus on exhaling every two pedal strokes again, this time counting strokes of the alternate leg.
4. Work at about 85% of maximum heart rate effort at 90 rpm and focus on an every-stroke-and-a-half rhythm. Breathe once every second.
The Arnie Waltz Those of you with musical talent may have instantly understood
the breathing-every-pedal-stroke-and-a-half concept—that results in alternate stroke emphasis and a breathing rate of about 55 times per minute when time trialing.
Think of it perhaps as a waltz—you know, the ONE-two-three, ONE-two-three, ONE-two-three, ONE-two-three rhythm.
Each time you pedal, with the left or the right leg, count. Each time you have a count of ONE, breathe out.
It is easy—now you are doing the Arnie Waltz!
Picking Up the Pace Want to go a little faster? Try focusing on your breathing, getting
a rhythm. Then slightly increase your breathing rate. Let your cadence increase with your higher breathing rate. Watch your speed computer. You will go faster!
Summary
Athletes can learn to intensify, narrow, internalize, and associate their focus and thereby improve their performance.
Like fitness training, breath training requires practice. With practice, breathing techniques will become second nature,
automatically improving focus, training, and race performance.

ACE: Altitude Climbing Endurance Training for Cyclists Arnie Baker, MD 73
Motivation Although riders may wish it were different, you do not buy
motivation at the store and take a pill of it in the morning. By understanding what makes you tick and why you are doing
what you are doing, you may improve your performance. George Mallory, when asked why he wanted to climb Mt.
Everest, replied: “Because it’s there.” If you can do a little better than that, you may be able to persevere when, for example, on the fourth pass of The Tour of the California Alps—Markleeville Death Ride you wonder why you should bother trying to do the fifth.
What We’re Talking About
Motivation is something that causes a person to act. It is the ability to focus on a goal and work toward that goal, regardless of physical ability. It is willpower.
Motivation has two important elements: direction and intensity. Direction is the choice of goal. Intensity is how energized the individual is toward that goal. Intensity, which is related to psychic energy, is influenced by emotion.
Motivations’ Origins
Motivations have distant or recent origins. Some adult motivations derive from early childhood
experiences— for example, trying to please or live up to a parent’s expectation or wanting to be fit to prove a childhood tease or bully wrong.
Other motivations derive from current events—for example, the sickness of a loved one, divorce, inheritance, or a new baby.
Though it is not always necessary, it can be helpful, to understand the origins of one’s motivations. It is usually important for athletes, especially competitive athletes, to have a clear picture of their goals.
Intrinsic and Extrinsic Motivation Motivation of an individual may come from within (intrinsic) or
from without (extrinsic). People who are intrinsically motivated have an inner striving to
be successful, to master their task, to reach their goal. Athletes who are intrinsically motivated participate because they love the sport, or, perhaps, because other goals are facilitated in so doing. Intrinsic rewards—such as feelings of accomplishment, mastery, or self-confidence—tend to be self-perpetuating and powerful.
Extrinsic motivation comes from other people through positive and negative reinforcement. Positive reinforcers increase the likelihood or frequency of positive behaviors; negative reinforcers decrease the likelihood of negative behaviors.
Positive reinforcers—the carrots—include praise, trophies, recognition, and money.
Negative reinforcers—the sticks—include ridicule, embarrassment, and punishment.
Most athletes are motivated by a combination of intrinsic and extrinsic rewards. The proportions may vary greatly.
Extrinsic rewards that are excessive or manipulating, and those that are not contingent upon accomplishment, tend to lose effectiveness. Extrinsic rewards can also increase or decrease intrinsic motivation. With time, many extrinsic rewards lose their value: Enough prizes, trophies, or money will eventually fail to motivate. When earned for accomplished behavior, extrinsic rewards can be extremely motivating. Extrinsic rewards that transform into intrinsic rewards tend to sustain motivation.
One of my favorite stories about excessive extrinsic rewards concerns a child, Jack Miller, who comes home from school with a “Child of the Week” award. His mother appears very proud and asks Jack why he appears nonplussed. Jack says, “Aw mom, this week it was the turn for the ‘M’s in the alphabet.”
ACE: Altitude Climbing Endurance Training for Cyclists Arnie Baker, MD 74
Motivation Theories Hierarchy of Needs
On the most basic of levels, we need to satisfy our hunger, thirst, sleep and sex drives. After that, we look to our safety and security needs.
Once our basic needs are satisfied, we seek to satisfy our social needs for belonging, love, self-esteem, self-worth, and self-respect. We also have needs for play, excitement, and avoiding boredom.
Older athletes may be motivated by the perceived retention of youth and health that exercise may impart.
Optimal Challenge/Frustration An optimal challenge or frustration results in the greatest
motivation. Too much challenge or frustration (a task too difficult) reduces motivation. Too little challenge or frustration (a task too easy) also reduces motivation.
Control We have relatively little control over our genetic ability or talent,
the demands of a given race, and luck. We have relatively more control over our own effort and preparation.
Many athletes correctly attribute their success to effort and preparation; they often incorrectly attribute their failure to factors over which they have little control.
Why We Ride
Our motivation to ride may come from reinforcers, needs, or challenges.
Most of us ride for one or more of the following reasons: • “Fun,” which involves stimulation, excitement, challenge, and
creativity. • Health and fitness. • Social affiliation with others, belonging to and being accepted by
a group. Altruism. • Self-worth, confirmed by demonstrating competency.
These reasons all satisfy social needs. For some professional riders, it is more a question of economics: earning a living.
Fun Stimulation must not be too much or too little. The skill
difficulty must match ability. There must be challenge and some success. Realistic goals are needed. Control of the scheduling of activities and events, and not always having “to perform,” keeps things fun.
Health and Fitness Bicycle riding helps many improve and maintain their health and
fitness. Bicycling injuries are common. If you ride only for health and
fitness, crashes may soon cause you to leave the sport.
Social Affiliation An appropriate group is necessary. You need to be able to
identify with your team and be accepted by teammates. Your local club may help you feel part of a team.
Self-Worth Self-worth, self-esteem, confidence, and achievement are closely
tied. Goals appropriate to ability levels help maintain motivation. Competency, mastery, and success will be important.
Suppose you are a 32-year-old racer, beginning bicycle racing after a successful running career ended by injury. You are used to placing in 10K races.
However, bike racing is different. Different muscles are used, different skills are required, and different tactics are employed. You may have difficulty with self-worth if you start out racing against the Category 1, 2 Masters. Start racing senior Cat 4, 5, or Masters 3, 4, 5. Your feelings of self-worth are less likely to be affronted. As you become accomplished at your level, advance.
An epic like The Tour of the California Alps—Markleeville Death Ride can provide a great sense of achievement for almost
ACE: Altitude Climbing Endurance Training for Cyclists Arnie Baker, MD 75
everyone. Whether you do one pass or five, most of us deservedly feel like winners just for showing up.
Motivation Personalities
Coaches notice sport-personality types. Most of us are a composite of types; many of us change with time or coaching.
Success-Driven Like a toddler that learns to walk to be like adults, or a child who
wants to learn to ride a bicycle because her friends can, some competitors are motivated by other successful athletes.
Fear-of-Failure-Driven These athletes perform as a response to negative feedback. They
want to prevent a negative result from happening again. They are concerned about validating their personal worth. Some athletes who find success become motivated by fear of failure and worry about not winning again.
Fear-of-Success-Driven Top-level athletes sometimes want to avoid the responsibility of
celebrity status.
Perfectionist This personality type may be psychologically related to fear of
failure and concern about personal worth. Unrealistic expectations can be a problem with these athletes. They sometimes break down or burnout when things do not go exactly their way. Perfectionists find it hard to deal with setbacks.
Underachiever These athletes do not reach their potential and can be frustrating
for coaches.
Effective-Learner These athletes are aware of what works. They work with the
truth to get better. Their egos are out of the way. They typically ask: “What can I do to achieve the next step?” They understand the need
to work and that time and setbacks are common, necessary roadblocks to be negotiated in order to achieve their goals. These are true students of sport, and most coaches love these athletes.
Problem Situations
What reduced motivation? How can you increase motivation?
Anticipate Many athletes do not consider motivation issues until they have
them. Anticipate that problems with motivation are common. Consider
any situations in the past when motivation issues arose and how you dealt with them then and over time.
Most importantly, plan, keep your goals in mind, and remember your past successes.
Getting Going Century riders often become stuck when they see the final goal
of riding 100 miles. Chunk it. Break down final goals into smaller bites. “A trip of a thousand miles begins with a single step.” Make it easy to take the first step: take baby-steps.
Racers often feel or think: “What am I doing here?” Remember, this has happened before. Remember, events went okay before.
Discomfort We often deal with uncomfortable situations, whether physical
(for example, a saddle sore), or psychological (for example, asking others for sponsorship).
We do better when we discuss our discomforts with coaches or teammates. Others, who have been there before, can share tips or perhaps they know a simple solution.
For example, in the case of a saddle sore, a change in saddle or position, or an effective healing balm.
Setbacks Whether, for example, an overuse injury or family emergency,
motion toward a goal is sometimes slowed or comes to a standstill.
ACE: Altitude Climbing Endurance Training for Cyclists Arnie Baker, MD 76
This loss of momentum can easily derail an individual. The solution is to start again, perhaps with baby steps—no
matter how small, and go through the motions of training again.
Poor Performance The learning curve is upward, but leveling off or reduced
performance often occurs. Anticipating plateaus or reduced performance helps prevent athletes from becoming frustrated.
Not Into a Workout Sometimes one does not feel like training even though one is not
injured, and one is properly recovered to do the job. Allow yourself to warm-up slowly. Try to do one-third of efforts
well, and see how things go. Alternatively, do a couple of submaximal efforts. Arousal may
increase. Then you may be motivated to work hard.
Performance Anxiety This often occurs when an athlete is finally face-to-face with a
race or target event. Recalling past training success, bargaining to just start, or
completing perhaps one-third of an event—to look at a smaller piece of the pie—often makes it easier to finish the whole thing.
Staying Motivating During an Event Keeping focused and motivated midway through an event is a
common difficulty. Fatigue, hunger, and pain all reduce motivation. Sometimes riders search for and seize upon small excuses in
order to drop out: Out of food, out of water, saddle sores, or need to urinate = a reason to stop.
Racers sometimes openly wish for a flat tire so they can DNF gracefully.
Racers who feel their chances are poor during the finish of a race may lose motivation to try for a placing.
Since losing confidence decreases motivation, realistic confidence-building work before events helps. Clarifying goals before the event begins is crucial.
Recalling similar past feelings and one’s reactions at the time, breaking down the remaining distance into smaller chunks, and striving for incremental improvement are all strategies that help riders.
Deriving motivation from teammates can help. Sometimes you may realize during an event that it is not your day, but that you may be able to help your teammates do well.
Focus on breathing, pedal stroke, and the controllable sometimes helps.
Visualizing what you want to do, not what is hurting or holding you back may be helpful.
Summary: Get & Stay Motivated • Understand your reinforcers and needs—why you ride, why you
race. • Set realistic, specific goals. • Expect to be over-frustrated at first, or limit task difficulty. • Get coaching or advice as a way to find the most efficient, direct,
and intense reinforcers. • Set up appropriate reinforcers. • Work on the most controllable factors—preparation and effort. • Get confident. • Achieve your goals.
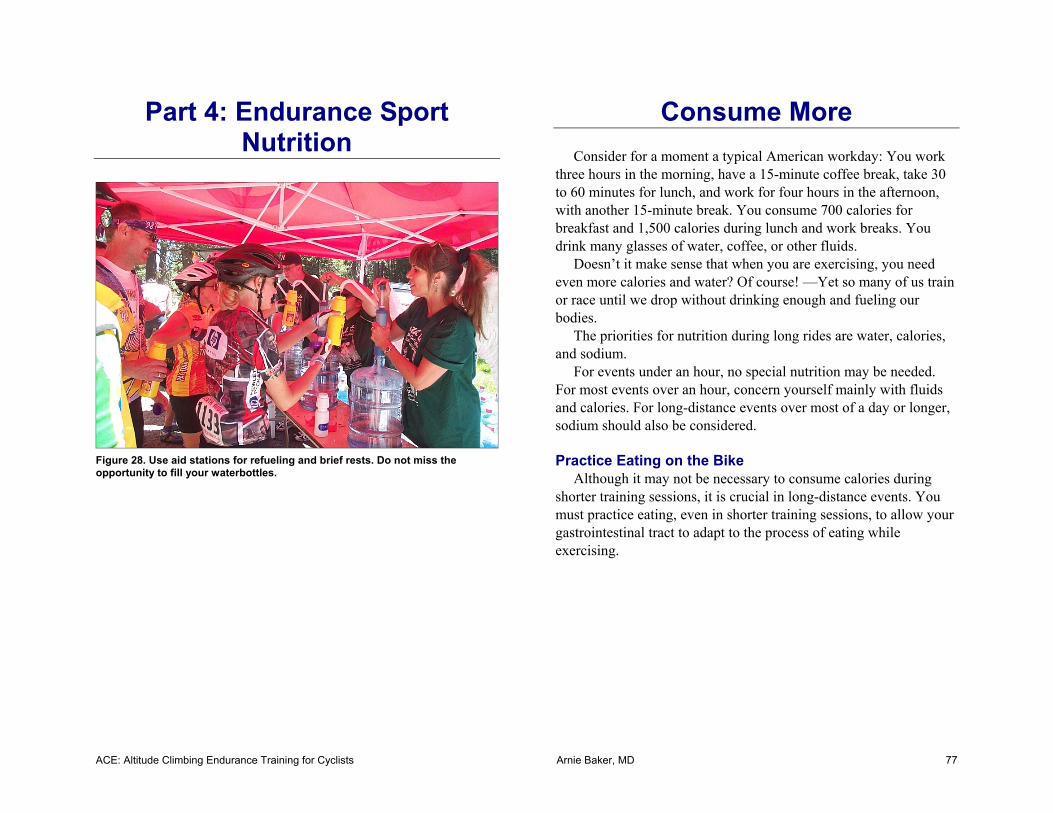
ACE: Altitude Climbing Endurance Training for Cyclists Arnie Baker, MD 77
Part 4: Endurance Sport Nutrition
Figure 28. Use aid stations for refueling and brief rests. Do not miss the opportunity to fill your waterbottles.
Consume More Consider for a moment a typical American workday: You work
three hours in the morning, have a 15-minute coffee break, take 30 to 60 minutes for lunch, and work for four hours in the afternoon, with another 15-minute break. You consume 700 calories for breakfast and 1,500 calories during lunch and work breaks. You drink many glasses of water, coffee, or other fluids.
Doesn’t it make sense that when you are exercising, you need even more calories and water? Of course! —Yet so many of us train or race until we drop without drinking enough and fueling our bodies.
The priorities for nutrition during long rides are water, calories, and sodium.
For events under an hour, no special nutrition may be needed. For most events over an hour, concern yourself mainly with fluids and calories. For long-distance events over most of a day or longer, sodium should also be considered.
Practice Eating on the Bike
Although it may not be necessary to consume calories during shorter training sessions, it is crucial in long-distance events. You must practice eating, even in shorter training sessions, to allow your gastrointestinal tract to adapt to the process of eating while exercising.
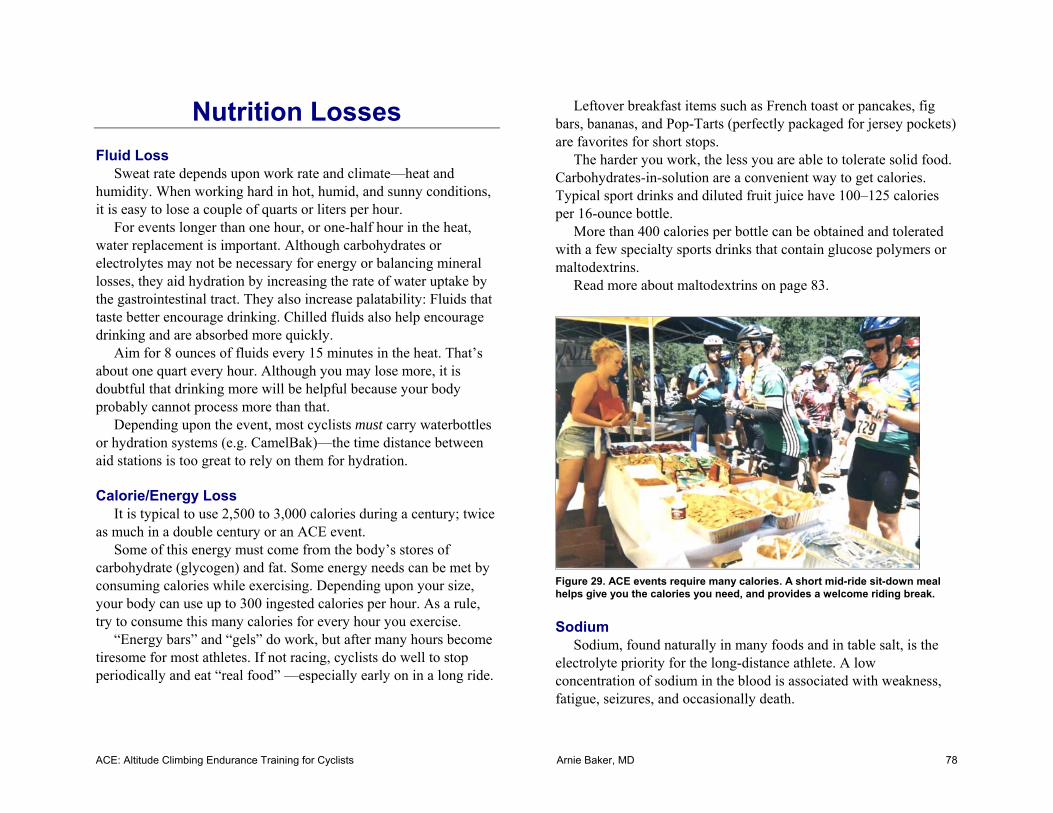
ACE: Altitude Climbing Endurance Training for Cyclists Arnie Baker, MD 78
Nutrition Losses
Fluid Loss Sweat rate depends upon work rate and climate—heat and
humidity. When working hard in hot, humid, and sunny conditions, it is easy to lose a couple of quarts or liters per hour.
For events longer than one hour, or one-half hour in the heat, water replacement is important. Although carbohydrates or electrolytes may not be necessary for energy or balancing mineral losses, they aid hydration by increasing the rate of water uptake by the gastrointestinal tract. They also increase palatability: Fluids that taste better encourage drinking. Chilled fluids also help encourage drinking and are absorbed more quickly.
Aim for 8 ounces of fluids every 15 minutes in the heat. That’s about one quart every hour. Although you may lose more, it is doubtful that drinking more will be helpful because your body probably cannot process more than that.
Depending upon the event, most cyclists must carry waterbottles or hydration systems (e.g. CamelBak)—the time distance between aid stations is too great to rely on them for hydration.
Calorie/Energy Loss
It is typical to use 2,500 to 3,000 calories during a century; twice as much in a double century or an ACE event.
Some of this energy must come from the body’s stores of carbohydrate (glycogen) and fat. Some energy needs can be met by consuming calories while exercising. Depending upon your size, your body can use up to 300 ingested calories per hour. As a rule, try to consume this many calories for every hour you exercise.
“Energy bars” and “gels” do work, but after many hours become tiresome for most athletes. If not racing, cyclists do well to stop periodically and eat “real food” —especially early on in a long ride.
Leftover breakfast items such as French toast or pancakes, fig bars, bananas, and Pop-Tarts (perfectly packaged for jersey pockets) are favorites for short stops.
The harder you work, the less you are able to tolerate solid food. Carbohydrates-in-solution are a convenient way to get calories. Typical sport drinks and diluted fruit juice have 100–125 calories per 16-ounce bottle.
More than 400 calories per bottle can be obtained and tolerated with a few specialty sports drinks that contain glucose polymers or maltodextrins.
Read more about maltodextrins on page 83.
Figure 29. ACE events require many calories. A short mid-ride sit-down meal helps give you the calories you need, and provides a welcome riding break.
Sodium
Sodium, found naturally in many foods and in table salt, is the electrolyte priority for the long-distance athlete. A low concentration of sodium in the blood is associated with weakness, fatigue, seizures, and occasionally death.

ACE: Altitude Climbing Endurance Training for Cyclists Arnie Baker, MD 79
The average American ingests two to five grams of sodium a day. An overall general diet high in sodium is associated with high blood pressure in an important minority of the population who are “salt-sensitive.” Restaurant foods tend to be high in sodium. Many athletes consciously watch their sodium intake and keep it low. This is not necessarily a good strategy for most endurance athletes.
The body loses about one gram of sodium per quart of sweat. After a gallon of such loss, the average total daily intake of sodium may be inadequate to meet demands, and the blood sodium may drop.
In temperate weather conditions, this may take 4 or 5 hours. In high heat and humidity conditions, sodium depletion can occur in just a couple of hours.
In many athletes, low sodium problems first occur in “target” long-distance events—because these events may last 50% longer than the longest previous training session.
Many athletes who are sodium depleted are also dehydrated. However, those with low blood sodium are often relatively less dehydrated than their competitors who have blood levels closer to normal.
The reason is that all athletes tend to rehydrate, or partially rehydrate, with fluids that have a lower sodium concentration than intestinal fluids and blood. Those who drink the most tend to dilute sodium the most and have lower blood concentrations. For long-distance athletes, it is reasonable to plan on an intake of up to a maximum of one gram (1,000 milligrams) of sodium per liter of fluid loss. This is about one-half teaspoon of salt.
The best way to get extra sodium is by eating salty foods. The night before longer rides, add some salt to your pasta meal or have high sodium foods such as pizza, pretzels, or soup. Tomato juice and V-8® are high-sodium fluids. Low-fat pretzels and saltines are often a good choice for athletes at rest stops. Even foods like cookies or bread, which you may not think of as “salty foods,” have more sodium than most sports drinks. The sodium content of
selected products is listed in the table on page 82. Salt tablets do not appropriately stimulate thirst and are not
generally recommended. There is another reason for consuming some salt. It helps the
body rehydrate.
Protein, Vitamins, Minerals and Other Electrolytes, Although protein, vitamins, minerals and other electrolytes in
addition to sodium are required during the course of a day, these nutrients have relatively little , if any role, during exercise.
For a detailed discussion about protein, as well as every vitamin and mineral, see Nutrition for Sports, listed in Appendix H on page 127.
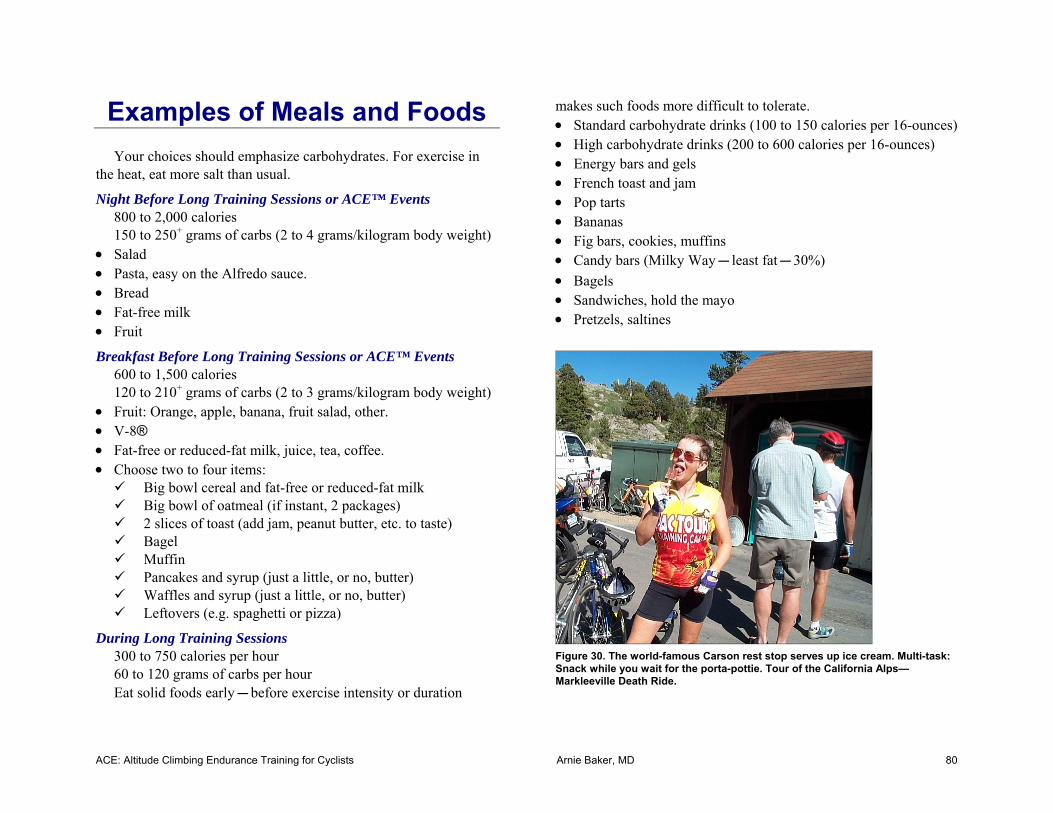
ACE: Altitude Climbing Endurance Training for Cyclists Arnie Baker, MD 80
Examples of Meals and Foods Your choices should emphasize carbohydrates. For exercise in
the heat, eat more salt than usual.
Night Before Long Training Sessions or ACE™ Events 800 to 2,000 calories 150 to 250+ grams of carbs (2 to 4 grams/kilogram body weight)
• Salad • Pasta, easy on the Alfredo sauce. • Bread • Fat-free milk • Fruit
Breakfast Before Long Training Sessions or ACE™ Events 600 to 1,500 calories 120 to 210+ grams of carbs (2 to 3 grams/kilogram body weight)
• Fruit: Orange, apple, banana, fruit salad, other. • V-8® • Fat-free or reduced-fat milk, juice, tea, coffee. • Choose two to four items:
Big bowl cereal and fat-free or reduced-fat milk Big bowl of oatmeal (if instant, 2 packages) 2 slices of toast (add jam, peanut butter, etc. to taste) Bagel Muffin Pancakes and syrup (just a little, or no, butter) Waffles and syrup (just a little, or no, butter) Leftovers (e.g. spaghetti or pizza)
During Long Training Sessions 300 to 750 calories per hour 60 to 120 grams of carbs per hour Eat solid foods early—before exercise intensity or duration
makes such foods more difficult to tolerate. • Standard carbohydrate drinks (100 to 150 calories per 16-ounces) • High carbohydrate drinks (200 to 600 calories per 16-ounces) • Energy bars and gels • French toast and jam • Pop tarts • Bananas • Fig bars, cookies, muffins • Candy bars (Milky Way—least fat—30%) • Bagels • Sandwiches, hold the mayo • Pretzels, saltines
Figure 30. The world-famous Carson rest stop serves up ice cream. Multi-task: Snack while you wait for the porta-pottie. Tour of the California Alps—Markleeville Death Ride.
ACE: Altitude Climbing Endurance Training for Cyclists Arnie Baker, MD 81
After Long Training Sessions If training the next day: 300 to 750 calories per hour for 2 hours. 60 to 120 grams of carbs per hour Minimum 500 calories over 2 hours.
• Carbohydrate or recovery drinks • V-8® • Sandwiches, hold the mayo • Pretzels, low-fat chips • French toast and jam • Energy bars and gels • Bananas • Fig bars • Bagels
During ACE™ Events 300 to 750 calories per hour 60 to 120 grams of carbs per hour Eat solid foods early—before exercise intensity or duration
makes such foods more difficult to tolerate. Many events, such as The Tour of the California Alps—
Markleeville Death Ride, provide excellent aid stations and a sit-down lunch. If a sit-down lunch is provided, unless you are a top racer, sit down!
Soups (salty), baked potatoes, sandwiches, pasta, yogurt, and well-ripened fruits are all excellent choices. Though fats can slow digestion, the calories and salt present in chips, Fritos, and other snacks often makes them appropriate choices.
At other events, support is limited, and you will rely on the same items you carry on self-supported long training sessions. • Standard carb drinks (100 to 150 calories per 16-ounces) • High carb drinks (200 to 600 calories per 16-ounces) • Energy bars and gels • French toast and jam
• Pop tarts • Bananas • Fig bars, cookies, muffins • Candy bars (Milky Way—least fat—30%) • Bagels • Sandwiches, hold the mayo • Pretzels, saltines
Convenience Store Ideas • Prepared whole-wheat turkey or chicken sandwiches
Don’t add the mayo on the side • “Wraps” • Low-fat muffins • Yogurt • Ice milk or frozen yogurt • Fresh fruit • Pretzels • Fat free or reduced fat corn chips or potato chips • Bagels, raisin bread • Apple pies (higher in fat than perhaps ideal, but taste great!)
Fast-Food Ideas • Pancakes • English muffins • Chicken sandwiches, hold most of the sauce • Salads, easy on the dressings • Baked potatoes • Tostados • Burritos • Pizza, chose lower fat toppings • Burger, (whopper) hold the mayo. About 400 calories, 30% fat.
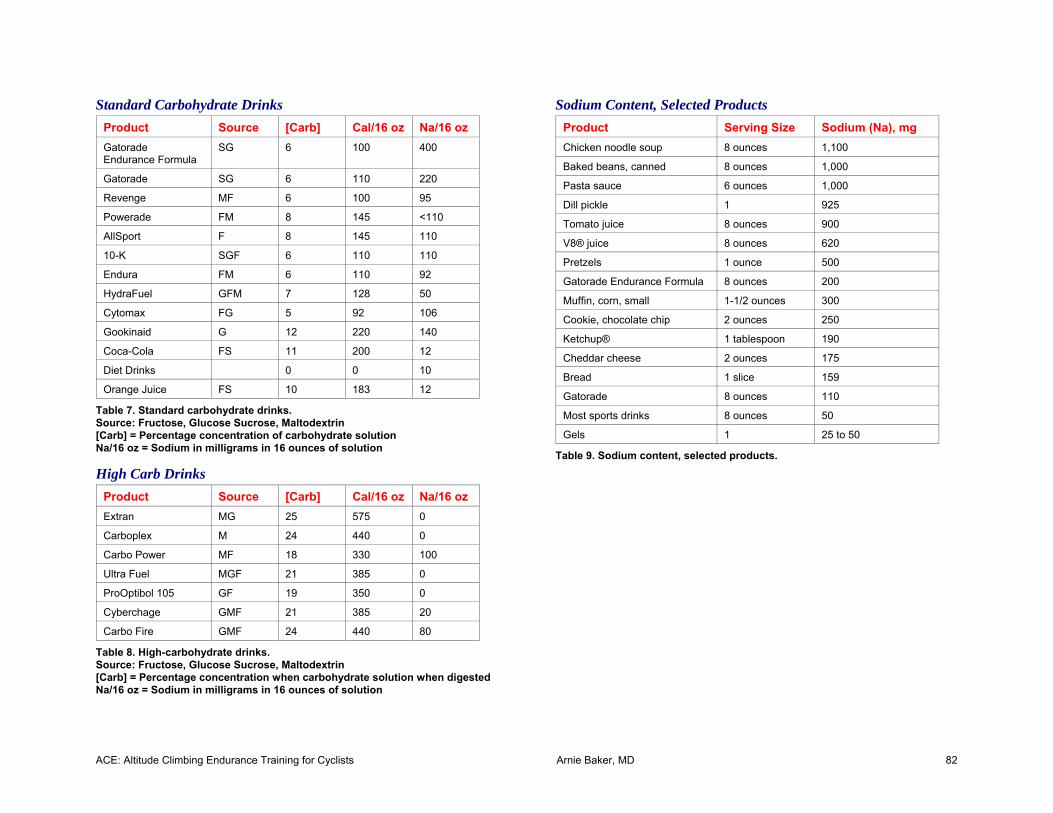
ACE: Altitude Climbing Endurance Training for Cyclists Arnie Baker, MD 82
Standard Carbohydrate Drinks
Product Source [Carb] Cal/16 oz Na/16 oz Gatorade Endurance Formula
SG 6 100 400
Gatorade SG 6 110 220
Revenge MF 6 100 95
Powerade FM 8 145 <110
AllSport F 8 145 110
10-K SGF 6 110 110
Endura FM 6 110 92
HydraFuel GFM 7 128 50
Cytomax FG 5 92 106
Gookinaid G 12 220 140
Coca-Cola FS 11 200 12
Diet Drinks 0 0 10
Orange Juice FS 10 183 12
Table 7. Standard carbohydrate drinks. Source: Fructose, Glucose Sucrose, Maltodextrin [Carb] = Percentage concentration of carbohydrate solution Na/16 oz = Sodium in milligrams in 16 ounces of solution
High Carb Drinks
Product Source [Carb] Cal/16 oz Na/16 oz Extran MG 25 575 0
Carboplex M 24 440 0
Carbo Power MF 18 330 100
Ultra Fuel MGF 21 385 0
ProOptibol 105 GF 19 350 0
Cyberchage GMF 21 385 20
Carbo Fire GMF 24 440 80
Table 8. High-carbohydrate drinks. Source: Fructose, Glucose Sucrose, Maltodextrin [Carb] = Percentage concentration when carbohydrate solution when digested Na/16 oz = Sodium in milligrams in 16 ounces of solution
Sodium Content, Selected Products
Product Serving Size Sodium (Na), mg Chicken noodle soup 8 ounces 1,100
Baked beans, canned 8 ounces 1,000
Pasta sauce 6 ounces 1,000
Dill pickle 1 925
Tomato juice 8 ounces 900
V8® juice 8 ounces 620
Pretzels 1 ounce 500
Gatorade Endurance Formula 8 ounces 200
Muffin, corn, small 1-1/2 ounces 300
Cookie, chocolate chip 2 ounces 250
Ketchup® 1 tablespoon 190
Cheddar cheese 2 ounces 175
Bread 1 slice 159
Gatorade 8 ounces 110
Most sports drinks 8 ounces 50
Gels 1 25 to 50
Table 9. Sodium content, selected products.
ACE: Altitude Climbing Endurance Training for Cyclists Arnie Baker, MD 83
Maltodextrin Nutrition This brief, specialized article is primarily about one source of
calories—maltodextrins.
Calorie/Energy Loss As stated above, it is typical for cyclists to use 2,500 to 3,000
calories during a century. Typical sport drinks and diluted fruit juice have 100–125 calories per 16-ounce bottle. This usually works out to about a 6% sugar solution.
Beverages do not usually have more calories than this because solutions of higher concentration are difficult to digest; more than 6% solutions are associated with cramps, diarrhea, and other gastrointestinal problems.
A few specialty sports drinks that contain glucose polymers or maltodextrins provide more than 400 calories per bottle and are generally easily tolerated. An example is the proprietary product Extran.
Better Maltodextrin?
Most commercially available high-carbohydrate sports drinks and gels contain maltodextrins mixed into proprietary formulas for taste and color. Other ingredients, for example vitamins or herbs, may be added—generally for marketing purposes.
These formulas sometimes have problems with dissolvability, palatability (taste), caking, or sludging.
You can make you own great solution inexpensively. You can purchase a wide variety of pure maltodextrin products
in 50-pound bags from commercial grain processors. The cost usually is less than $1.00 per pound or one-tenth that of proprietary products. The bag generally has a shelf life of two years.
Maltodextrin is relatively tasteless; it has minimal sweetness. You can add a little lemonade, fruit juice, Kool-Aid, soda, to your
own made-up solution for your personal favorite taste. Like many proprietary products, some commercial maltodextrins,
especially those sold through beer-brewing stores, will cake. Agglomerated products (processed to yield crystal clumps) are
dustless and free-flowing. They are easy to handle. Agglomerated maltodextrins have excellent dispersability and dissolution characteristics, quickly forming clear solutions when mixed with water.
The product that I use (MaltrinQD 5005) can dissolve 3 cups (24 fluid ounces) of powder into 2 cups (16 ounces) of fluid—not that I use that amount. This works out to about 1,000 calories per bottle.
If I am planning on taking in only one 16-ounce waterbottle per hour, and no snacks, I mix one cup of maltodextrin in a 16-ounce bottle. This yields about 300 calories. I do not do this often.
If I plan to eat snacks, I usually reduce the amount of maltodextrin to about half this amount. I do this commonly.
If it is hot, I will drink two or more waterbottles per hour. Again, I will mix one-half a cup of maltodextrin, or less, in a 16-ounce bottle. This works our perfectly—as it is hot I’ll tolerate a lower concentration than when it is cooler—but I’ll still be able to average 300 calories of carbohydrates per hour because I’ll be drinking more.
Summary: Buy Your Own Maltodextrin
It is cheaper, easier to handle, and with better taste. You can split a $100 order (100 pounds)—generally enough for four riders for a year.
5 Product reference: Maltrin product information: http://www.varied.com/food/maldescr.html Maltrin ordering, US West coast: E. T. Horn Company. Tel: 800-442-4676 web site: www.ethorn.com Maltrin ordering, US non West coast: J. M. Swank Company, Inc. Tel: 800-593-6375 web site: www.jmswank.com
ACE: Altitude Climbing Endurance Training for Cyclists Arnie Baker, MD 84
Event Nutrition Summary
Pre- and Post-Endurance Event Nutrition • Supper: Pre-event meal high in carbohydrates. If planning to
exercise for more than 4 hours, or 2 hours in high heat and humidity, add salt to foods.
• Breakfast: Aim for at least 1,000 calories. If planning to exercise for more than 4 hours, or 2 hours in high heat and humidity, add salt to foods.
• At the event: Have easily digestible fluids and calories available in case of a start delay.
• After the event: Consume 50 grams, or 200 calories, of carbohydrates within the first half-hour and another 200 calories of carbs within the first 2 hours after exercise—especially if riding the next day. Replace lost fluids and salt commensurate with losses.
Event Recommendations • Aim for at least 8 ounces of fluids, every 15 to 30 minutes,
depending upon the heat. • Have carbohydrate-in-water solutions (e.g. sports drinks), rather
than plain water. • Carry two waterbottles. Alternatively, use a hydration system
(e.g. CamelBak). • Try to consume at least 300 calories per hour of exercise. • For multi-hour events, consider preloading glycogen. • For multi-hour events in conditions of heat and humidity,
consider preloading with a salty diet, and during the event consume salty foods, and sodium-rich solutions and gels.
ACE: Altitude Climbing Endurance Training for Cyclists Arnie Baker, MD 85
Part 5: Equipment Here is a brief list of equipment issues for ACE™ rides:
Safety Proper fit, installation, reliability, and maintenance of equipment
are essential for rider safety and performance. Equipment must be clean, adjusted, and lubricated. Lightweight or aerodynamic equipment should not be used if safety is sacrificed. All riders should familiarize themselves with basic maintenance. No matter who works on your bike, you must check it and be confident of its safety.
The basic principles of bicycle equipment safety are that the wheels and other parts should be tightly fastened to the frame, the wheels should be sound, the tires should be properly inflated, the brakes and gears should work, and the drive train should move freely.
Aerobars help performance in flat solo events. They add unnecessary weight when climbing, and are a safety hazard in groups. Do not bring aerobars to the ACE™ rides.
Reliability Important
Do not save “race-day” equipment. Try out everything ahead of time and make sure it all works. Do not save a few grams with lightweight bolts prone to failure. If you get a “tune-up” do it two weeks ahead of time, in case adjustments are needed.
Use Standard Equipment
Use commonly available parts and accessories. Sure, some aero-wheels with internal nipples are a little faster,
but if a spoke breaks, tech support is not likely to be able to help.
Be Comfortable Bike and Bike Position
Although super high-pressure narrow tires, stiff rims, radial spokes, aero rims, and stiff frames improve performance in some circumstances, they are examples of bicycle components that contribute to rider fatigue.
Climbing is improved with a shorter, higher stem and more upright position than used by the typical road racer. Many bike stores position the handlebars so that the tips are horizontal. Adjust your handlebars so that the tips point slightly below horizontal—this will allow a more comfortable hand-on-the-hoods climbing position whether sitting or standing.
Other Sunscreen. Eyewear (sunglasses). Cycling gloves. Wind jacket.
Cycling computer.
Small Gears Make sure you have easy gears. Smaller gears save your
muscles. Although you may average a higher cadence over the course of a climb, you want to be able to spin a cadence of at least 50 rpm on the steeper pitches.
Although you may be able to push bigger gears for short periods on training rides, if you do not have easy-enough gears during your event you may not finish an event you otherwise can.
Of course, steeper climbs require easier gears. Although some ACE™ rides have grades no steeper than 4%, most have 6% to 8% climbs. The Tour of the California Alps—Markleeville Death Ride has many pitches of 10%. A few short sections are steeper.
Almost every strong rider needs at least a 39-27 on ACE™ rides. That means 39 teeth on the small chainring and 27 teeth on the largest cog on the rear wheel. This gearing may be enough for riders who can sustain climbing rates greater than 3,500 feet per
ACE: Altitude Climbing Endurance Training for Cyclists Arnie Baker, MD 86
hour up 10% grades. There are generally few such riders in recreational ACE™ events.
Smaller gears are recommended for most riders. Consider gearing your road bike with:
• A triple chainring. Commonly supplied with a 30-tooth inner chainring. 24, 26, and 28-tooth inner chainrings are also available. Shifting may be marginal with a 24-inner chainring, and fair with a 26-chainring.
• A compact crank that allows for a 34-tooth inner chainring, rather than the standard 39. Worried about missing your big gear 53 chainring? You needn’t. Instead of a 12-cog, you can use an 11-cog with the standard 50-tooth outer chainring; or, you can use an aftermarket 53-tooth outer chainring.
• Cogs up to 34 teeth and perhaps a mountain-bike rear derailleur. (IRD manufactures Shimano-10-speed compatible cassettes up to 34 teeth.)
• A combination of a smaller chainring and larger cogs.
Gearing Math Climb at about 2,000 feet per hour up 10% grades? Do the math: 2,000 feet climbing per hour up a 10% grade means you are
riding about 20,000 feet along the road per hour, or about 333 feet per minute.
A 28-inch wheel travels 28/12 feet x π x cadence x gear ratio per minute.
Therefore, for a 10%-grade-2,000-foot-per-hour climber, cadence x gear ratio = 45.
To keep a cadence above 50 rpm on a 10% grade you need a gear ratio of less than 0.9.
I suggest a 30-34. That is a 30-tooth front chainring (generally the smallest chainring of a standard road triple) and a 34-tooth rear cog. This is a gear ratio of 0.88.
To make this set-up, you need a triple chainring and a mountain bike cogset.
Perform the ACE™ Gearing Test Although you may occasionally allow your cadence to drop to as
low as 50 rpm on the steepest pitches, in general you would like to have the option to be able to keep cadence above 70 rpm and your heart rate under 75% on long grades.
Do the ACE™ gearing test: Ride up a long grade similar to ones you will face during your ACE™ event. Can you keep cadence over 70 rpm and heart rate under 75% of max? If not, you need easier gears.
The Tour of the California Alps—Gearing Recommendations
Finishing Time Gearing at Least Chainring-Cog
8 to 10 hours 39-29, 36-27, or 34-25
10 to 12 hours 39-34, 36-32, 34-29, or 30-27
12 hours or more 30-34, 28-32, 26-30, or 24-27
Table 10. Gearing based on finishing times. Chainring teeth of 34 or 36 imply a compact crank. Chainring teeth of 24 to 30 imply a triple. Cog teeth of 29 imply Campy. Cog teeth of 30 to 34 imply mountain bike cogsets.
Gearing Summary I often hear riders complain that they did not have easy enough
gears. No one has ever complained to me that they had too easy gears. Even if you end up having a “bail-out” gear you never need, so what? There are plenty of other gears you will probably never use. Like that 53-12.
You are not a wimp to have easy gears—you are smart.
For information about gears and gear-inches, see Appendix B: Gears and Gear Inches on page 118.
For information about derailleur capacities, see Appendix C: Rear Derailleur Capacities on page 119.
ACE: Altitude Climbing Endurance Training for Cyclists Arnie Baker, MD 87
Rims Although deep-dish aero-rims may have some advantages for
riding at speed on level-ground, they are often heavier than standard lightweight road wheels. They are also difficult to handle when descending with crosswinds.
Check Tires
Replace old, worn, or cut tires two weeks before the event. Inflate tires to recommended pressures at altitude within a day of the ride.
Check Cables, Brakes, and Derailleurs
Replace worn or frayed cables two weeks before the event. Check brake pads and derailleurs.
Lubrication
A little dab will do ya—make your drive train more efficient and allow you to ride more easily.
Lose Needless Weight
Do not laugh. I have known people to ride epics like this with kickstands. Every pound is twenty seconds for every hour of climbing. An extra 10 pounds can add half an hour to your time.
Be Prepared
Bring tool bag, spare tubes, tube repair kit, tire removal tools, and a pump. Carry some of your own energy food. Have emergency money and ID. A clear garbage bag weighs almost nothing and can save you if the weather turns cold or rainy.
ACE: Altitude Climbing Endurance Training for Cyclists Arnie Baker, MD 88
Day-Long Cycling
Part 6: Medical Problems6
Saddle Soreness Sores of the buttocks and groin area are a common occupational
hazard for the bicycle rider. Many causes can be avoided. Specific treatment is available if saddle sores do develop.
Crotchitis is dermatitis: irritation or inflammation of the crotch. Redness, itching, and pain are problems in this area.
Classic Saddle Sores
Classic saddle sores are inflamed and/or infected hair follicles (folliculitits, furuncles, and carbuncles) and glands (sweat and sebaceous).
Causes • Infection • Pressure and jarring • Friction and shearing forces
Saddle Sore Theory
There are two prevalent theories as to the origin of classic saddle sores.
The first has to do with infection and blocked glands. Bacteria get into glands and cause saddle sores. Therefore, treatment is directed at reducing the level of skin bacteria and preventing pore blockage.
6 Adapted from Bicycling Medicine, published by Simon & Schuster, 1998. The topics in this part are discussed for informational purposes. This information is not a substitute for professional care. Seek help if problems are more than mild, if you are uncertain about self-treatment, or if problems do not respond promptly.
The second theory has to do with (a) pressure and jarring and (b) friction and shearing forces. According to this theory, increased saddle pressure (which often arises through increased miles) prevents small blood vessels from bringing blood to the skin and the skin gets less nutrients. This causes a breakdown in the skin’s defenses, pore irritation, and blockage. Trapped bacteria may proliferate. A saddle sore develops.
Predictably, saddle sore incidence increases with increasing volume. Saddle sores are also more common after long easy rides: when riders do not push down hard on the pedals, they sit heavier on the saddle.
Riders who always get saddle sores on the same cheek may find that their leg on that side is shorter. The buttock of a shorter leg gets more bumping and bruising.
Other Types of Saddle Soreness Dermatitis/Crotchitis
Skin inflammation of the crotch, is a topic unto itself, discussed in detail below.
Ischial Tuberosity Pain This is pain in the area of the pelvic bones that bear your weight
on the bicycle seat. The ischial tuberosities are the “sitting bones.” Pain in this area occasionally progresses to bursitis, tuberositis,
or ulceration.
Chafing • Thigh. Chafing of the inside of the upper leg is common in
cyclists. It occurs because of friction caused by the repeated rubbing of the inside of the thigh during the up and down motion of the pedal stroke. Many cyclists note that the inside of their shorts pill and wear with friction. When this happens to your inner thighs, redness and discomfort are the results. Dampness of cycling shorts related to sweat production and the lack of breathability of the
ACE: Altitude Climbing Endurance Training for Cyclists Arnie Baker, MD 89
shorts’ material may make the problem worse. • Vaginal area. The mucous membranes are delicate and sensitive.
They do not have the protective hardness of skin. Many seats, positions, and riding styles expose these tissues to pressure, jarring, friction, and shearing. Chafing near the urethra can cause urinary tract symptoms and infection.
Skin Ulceration Skin that is missing its topmost surface layers and denuded is
ulcerated. This is sometimes an extreme result of chafing or pressure.
Hemorrhoids Dilated veins near the anus. Active hemorrhoids external to the
sphincter of the anus may contain blood clots and be painful. Folds of hemorrhoidal tissue may trap moisture and be itchy.
Although generally not thought to be caused by cycling, sitting on a saddle may increase discomfort or irritation.
Relatively Rare Problems • Subcutaneous nodules: These are a specific type of lump found
in high-volume male cyclists near the scrotum, sometimes called “extra testicles.”
• Tailbone abscess: A genetic predisposition to a blocked pilonidal sinus may be aggravated by cycling and become infected. Surgical treatment is often advised.
Dermatitis/Crotchitis Many cases of crotchitis are related to a combination of factors.
In addition to the causes of classic saddle sores outlined above, the following worsen crotchitis: • Warmth and moisture • Hygiene and irritants • Allergies
• Yeast overgrowth • Vaginal infections • Medical problems, including dermatitis
Warmth and Moisture Warmth and moisture aggravate most cases of crotchitis. Warmth also increases skin friction and predictably worsens
friction and shearing related saddle soreness. Avoid traveling to races or rides in your car already wearing
your bike shorts. Change into bike shorts when you arrive. Use bike shorts with a breathable, moisture-wicking crotch. Change out of moist or wet bicycling shorts as soon as possible after riding. Wear loose-fitting shorts or a skirt. Wear breathable fabrics and cotton underwear. Avoid tight-fitting non-breathing underwear, or wear no underwear. Pantyhose is an enemy of the crotch.
Allow ventilation to cool and dry the area. Avoid sitting on non-breathing surfaces such as plastic and leather. Use a car seat cover with air holes if your car has vinyl or leather seats.
Baby powder may help keep you dry. It also reduces friction and shearing forces.
Hygiene and Irritants Stool is a powerful irritant. Clean yourself properly. Overzealous hygiene can be just as much of a problem as lack of
hygiene. When you are irritated, wiping, and rubbing can cause chafing and further irritation. Since this area always has some bacteria, and since irritated skin is prone to worsen and become infected, overzealous wiping must be avoided.
Avoid wiping affected areas with rough toilet tissue. Wipe from front to back. Women: Do not carry bacteria toward
your vagina and urethra. Not only will this worsen crotchitis, but urinary tract infections and vaginal infections may result as well.
Avoid local irritants such as harsh soaps. If crotchitis extends to areas you need to wipe to keep clean,
consider using softer-quality bathroom tissue, facial tissue, or gentle

ACE: Altitude Climbing Endurance Training for Cyclists Arnie Baker, MD 90
medicated over-the-counter products such as Tucks. Moistened toilet paper or plain water are also alternatives. Clean,
and then pat—not wipe—dry.
Allergies Many products may cause skin allergies. Riders may be allergic to certain laundry products. Some riders use perfumed or chemically treated products such as
sprays, sanitary napkins, or lubricating oils to which they may be allergic.
To help with saddle sores near the crotch, riders may use tapes or pads to which they may have a tape allergy. This worsens saddle sores into saddle sores plus crotchitis.
If you suspect a laundry product allergy, try a fragrance-free laundry detergent, use a double-rinse cycle, and if you use a dryer fabric softener, make it fragrance-free.
Yeast Overgrowth Yeast overgrowth is commonly called jock itch or crotch rot.
Warmth, moisture, and friction, discussed above, are the principle causes.
Over-the-counter antifungal creams and powders may help reduce yeast overgrowth.
Occasionally irritated skin can also be helped by over-the-counter cortisone cream, although cortisone sometimes worsens yeast overgrowth. Long-term use of cortisone creams thins the skin and is a bad idea.
Vaginal Infections The extra moisture related to a vaginal infection may worsen
crotchitis. Treating the cause of the underlying vaginal discharge may help improve crotchitis.
Occasionally infections such as herpes cause crotch irritation. In turn, crotch irritation can also promote or exacerbate herpes outbreaks in people who harbor the virus.
Infected or otherwise blocked sweat or other glands may develop
into crotchitis if friction worsens these conditions.
Medical Problems Riders with skin conditions such as psoriasis or other eczemas
may have flare-ups in this area related to friction and other general factors listed above.
Occasionally other medical problems such as lactose intolerance or pinworms are the cause.
Prevention of Saddle Soreness
The best treatment is prevention. Some general measures will help almost all causes of saddle
soreness. Some treatments may improve some cases but may make other
cases worse. It may therefore be important to determine the cause of your saddle soreness.
Pressure and Jarring A more comfortable ride reduces the causes of most saddle
soreness. Even without specific saddle soreness problems, the hints below provide a more enjoyable ride.
Frame and fork. Construction methods and materials may allow for more or less comfort. Comfort is often sacrificed for responsiveness or cost. Butted tubes are more comfortable than straight-gage tubes. Relaxed, shallow touring seat-tube angles are more comfortable than those of steep-angled time trial bikes. Straight-bladed forks tend to transmit road forces more directly than raked forks. • Wheels. Tightly-tensioned spokes give a harsher ride.
Use wheels with a 3-cross spoking pattern. The trend of modern wheels to be radially laced may marginally reduce wind resistance. However, these stiffer wheels do not have give.
• Tires. Avoid narrow, high-pressure tires. Unless you are time trialing, a wider tire with about 100 psi is more comfortable. If you are 150 pounds, although you can certainly ride 19 mm
ACE: Altitude Climbing Endurance Training for Cyclists Arnie Baker, MD 91
200-psi tires, you will be much more comfortable on 23 or 25 mm tires inflated to 100 psi.
• Seatpost. Use a seatpost with an offset seat clamp. Binding the saddle directly above the seatpost is not as comfortable as the traditional offset clamp.
• Saddle. It may take a few tries to find a saddle shape that fits your anatomy. Use seats that provide enough padding or support and spread the support over as wide an area as is compatible with your anatomy. A cutout center section may reduce or eliminate pressure and irritation on the centerline of the crotch. Terry saddles work well for many riders, especially women. Severe cases may require drastic measures—cutting or paring your seat may be necessary to keep riding.
• Pad. Whether it be more padding on the saddle, a neoprene saddle cover, or gel shorts, padding helps reduce jarring. Do not confuse cushy with support. Those big wooly saddles do not usually work for longer rides. Padding elsewhere also helps. Handlebar tape and glove padding makes your upper body more comfortable, allows you to ride more relaxed. This translates to reduced tension and pressure on your rear end.
• Adapt. Do not suddenly and drastically increase your weekly mileage.
Friction and Shearing Forces • Emollients. Friction can be minimized by using an emollient skin
preparation, such as Vaseline, or an anti-yeast cream. Avoid pore-blocking emollients on the scrotum or vulva.
• Layers. A seat cover or pad fitted over your saddle, or two pairs of cycling shorts may reduce friction and shearing forces and function in the same way as a sock in a shoe. However, if crotchitis is related to warmth and moisture,
Vaseline or doubling up on your shorts may make things worse.
Bicycle Position • Frame geometry. Most bicycles are sized for men, making the
top tube stem length too long for most women even if the frame fits otherwise. This puts extra pressure on the crotch. Make sure your bicycle position is not too stretched out.
• Seat angle. A slight nose-down position may help, especially for time trial events or criteriums when you are in an aerodynamic position and putting a lot of pressure on the crotch. A minority of women prefer a nose-up position so that the saddle presses more on the pubic bone and less on the soft tissues around the vagina.
• Vary your position. Move around frequently; get off that saddle when you can. Stand up on your pedals to relieve crotch friction and pressure. When climbing, stand up periodically. When descending, put weight on your pedals and get off your crotch. This allows moving air to cool and dry your crotch while you relieve pressure. If you are riding tandem, be sure to take frequent crotch breaks by getting out of the saddle at stop signs and stoplights and by standing out of the saddle with your partner at least every 15 minutes.
Crotch Hygiene • Keep yourself dry. Modern synthetics wick away moisture and
are softer on the skin than traditional leather chamois. Do not continue to wear wet sweat-drenched shorts after riding. Change into loose shorts that allow air to circulate. After bathing, allow your crotch to dry completely before putting on tight-fitting shorts or cycling shorts. Powder in your shorts can prevent chafing that may lead to irritation and infected blocked glands (although powder may be linked to some cervical problems in
ACE: Altitude Climbing Endurance Training for Cyclists Arnie Baker, MD 92
women). • Keep yourself clean. • Have a hot bath after rides. Hot-water soaks increase blood
circulation to the crotch, allowing faster recuperation. • Always wear clean cycling shorts. Avoid wearing the same
shorts two days in a row without laundering. Soiled shorts not only have more bacteria, they do not breathe as well as freshly laundered ones.
• Avoid cycling shorts that are pilled or with seams in areas that either rub the inside thigh or upon which pressure is placed.
• Avoid shaving above the short line to the groin. This often results in “red spots,” caused by irritation and infection.
Self-Treatment • Apply all the preventative measures described above. • Modify your training. You do not have to stop cycling but you
may need to back off. It is not the time to increase mileage. A couple of years ago when I had some bad saddle sores, I modified my routine. Tuesday was hill sprints, Wednesday long hill climbing, and Thursday hill intervals—all done out of the saddle and off my sores.
• Soak in a comfortably hot bathtub three times a day for 15 minutes. Hot-water soaks increase blood circulation to the inflamed area, allowing more of the body’s healing factors access to the area.
• For classic saddle sores or ischial tuberosity pain, pad your skin with padded tape or moleskin. You may want to reduce the tackiness of moleskin by first applying it to something other than your skin. Leave some tack so that it will still stick, but not so much that it pulls your skin and hair off when you remove it later.
• Another possibility is to take a couple of Band-Aids or a layer of moleskin and cut out a small hole for the sore—effectively
padding around the sore and taking pressure off the sore itself. • The extra padding of a second pair of shorts worn over the first
may help reduce jarring or friction related saddle sores. However, two pairs of shorts may worsen dermatitis/crotchitis.
• A padded seat cover may help. • A different seat may help. • Suspension may help. Rear-end suspension or beamed seat tubes
reduce saddle pressure. • A modification of seat position—nose up or down, forward or
back, up or down—may help. • An emollient, such as Vaseline, may help friction-related
problems. Use emollients such as Vaseline or Bag Balm on the buttocks. Avoid pore-blocking emollients, such as Vaseline and Bag Balm in the gland-rich areas of the scrotum or vulva.
• Try Bag Balm, originally a veterinary product. The active ingredient, 8-hydroxyquinoline in petrolatum, increases the thickness of the skin.
• Topical cortisone, antifungal and antibacterial creams may occasionally help. Long-term use is not recommended.
• Shimming the shoe of the shorter leg may help if saddle sores are related to leg length discrepancy.
Medical and Surgical Treatment • Eczema may require prescription cortisone creams. • If hemorrhoids may it difficult to sit down, minor surgery may be
necessary. • If the area around the sore is infected, it may require surgical
drainage or antibiotics. • Uninfected sores that remain as painful, swollen, hard lumps can
occasionally be treated with a cortisone injection. • Occasionally surgery may be required to remove chronic cysts.
ACE: Altitude Climbing Endurance Training for Cyclists Arnie Baker, MD 93
Bicycle Seat Discomfort Both men and women may have problems finding a comfortable
saddle—although women have more trouble than men do. Most of us are aware that the shape of a woman’s pelvis is
different from that of a man’s. In fact, there are three or four common shapes to the pelvises of women, and some women do have an android shape similar to that of men. For this reason, the shape of a saddle that will provide the most comfort is an individual affair. Whereas most men will find the same kinds of saddles comfortable, this is not the case for women. You will probably need to try saddles of different shapes to determine the type that best matches your anatomy.
Seats: padding or no padding, gel-filled or not? The answers to these questions depend upon your riding style and the type of riding you do. Some saddles, such as the Terry, have a wide acceptance with many women. Some thin seat covers, such the one made by Pearl Izumi, allow an extra layer between you and the saddle to absorb rubbing, preventing your own anatomy from being chafed.
Sometimes problems of seat comfort are related to the general fit of a bicycle. Most bicycles are designed for men. Most bikes are sized with too long a top tube. This too-stretched-out position can make the seat uncomfortable near the pubic bone.
Seat position traditionally has been with the nose of the saddle pointed slightly up or level. Some women need the nose pointed just slightly down in order to be comfortable and avoid irritation of the urethra—the tube that carries urine from the bladder. The time-trialing position is the worst for most women. Improved flexibility may allow you to rotate your pelvis as you ride, reducing pressure on your pubic area while at the same time allowing you to bend over and achieve a more aerodynamic position.
Genital Numbness
What We’re Talking About Many men find that their penis feels numb or has a pins-and-
needles sensation during or after riding. The penis may feel “asleep,” swollen, or “not there.” Usually just the shaft of the penis is the problem, but sometimes the numbness may extend to the scrotum and the base of the genitals. Women similarly may experience numbness in the genital area. The problem is worse for longer rides, and worse after time trialing or riding for prolonged periods bent over in the drops or aero bars.
Causes
The cause is pressure on the pudendal nerve. The nerve becomes compressed between the bicycle seat and the symphysis pubis of the pelvic bone. Debate exists whether the nerve itself is being compressed, or the small blood vessels that feed the nerve. Regardless, the effect is a disturbance in the functioning of the nerve and the tissues it supplies.
Treatment
The best treatment is prevention. The usual cause is riding bent over for too long. Take rests from this position. Stretch, and get the pressure off your genitals every five minutes by standing on the bike or otherwise changing your position.
Use a seat position that points the nose of the saddle down a little bit more or lower the height of the seat. A padded or different saddle may be helpful—perhaps a differently shaped saddle with a different width. Padded bicycling shorts may help.
ACE: Altitude Climbing Endurance Training for Cyclists Arnie Baker, MD 94
Long-Term Complications Occasional nerve disturbance in this area usually resolves rapidly
when pressure is relieved. Most riders regain normal sensation within minutes. Sometimes as much as twenty-four hours is required for the nerve to return to apparently normal function. Rarely more than a day is required. The longer it takes the nerve to return to normal, the more damage is being done. Some small but real risk does exist for permanent damage unless you correct the problem.
Men: This problem has nothing to do with the ability of your body to produce testosterone, the male hormone. It has nothing to do with your ability to produce sperm. However, a numb penis is sometimes an “unfeeling” penis. Some men may have a problem with obtaining an erection, whereas others who achieve orgasm rapidly may find sexual relations improved because the reduced sensation helps them last longer.
Regardless, a numb penis should be avoided as much as possible because of the possibility of permanent nerve damage.
Neck Pain
What We’re Talking About Pain in the back of the neck that may or may not travel upward
and cause headache. See a doctor whenever neck pain is associated with loss of sensation, loss of power or pain in your arms. Pain in the front of the neck or in the jaw associated with exercise can originate from the heart. See a doctor if you experience this kind of pain.
Causes
Neck pain can be a result of strain or overuse. The pain may travel to the back of the head and become more generalized. If nerves are involved, it may travel to the arms. It is usually due to one of these causes:
Muscle strain and/or spasm. • Arthritis—usually wear-and-tear/degenerative arthritis, or
osteoarthritis. Strain on the vertebral joints from misalignment, often secondary to disc degeneration, also causes pain.
• A bulge or herniation of an intervertebral disc. This may cause pain that travels to the arms. If you have arm symptoms associated with neck pain, see a doctor. In younger cyclists, neck pain is usually due to muscle strain. In
older cyclists, a combination of muscle strain and degenerative changes is often responsible. Degenerative—wear-and-tear—changes are aging-related, not cycling-related.
Cycling-related neck strain is often associated with long rides. As primary muscles tire, form or technique worsens. Riding big gears tires primary muscles faster than smaller gears. Tendons, ligaments, accessory muscles, and joints bear loads normally born by primary muscles. This can cause strain or sprain with pain and/or swelling.
ACE: Altitude Climbing Endurance Training for Cyclists Arnie Baker, MD 95
Position on the bike can be a factor. Cyclists lacking flexibility may find the aerodynamic bent-over racing position uncomfortable. Anything that forces the rider to increase stretch in the neck may cause neck pain. For example, women tend to ride bikes with top tubes that are too long for them, since most bikes are designed for men. Women have relatively longer legs and relatively shorter reaches.
Jarring from rough mountain bike riding can be a factor. Road rides are worse for riders who forget to look around.
Neck pain may additionally be non–cycling-related, arising from: • Muscle tension due to stress, anxiety, depression, or fatigue • Poor posture
Treatment On the Bicycle
If your problem is due to long rides: • Allow for a gradual increase in endurance riding. Increase the
length of endurance rides no more than 10% per week. • Consciously relax your upper body—back, elbows, and neck—
every few minutes. Changing hand positions will change neck position and in turn reduce strain.
• Ride with a higher cadence—use smaller gears. • Stretch your neck on the bike. Look around—do not focus only
on the pavement directly in front of you. • A helmet is a must for safety—but make sure yours is
lightweight.
If your problem comes from craning of your neck on the bike: • Ride with a more upright posture. • Ride on the hoods or tops of the handlebars. Avoid the drops.
Use a more upright bar. • Reduce the distance you need to stretch. Raise or shorten the
stem. Use narrower handlebars. Get a bike with a shorter top tube.
If your problem is due to jarring: • Use wider tires. • Use lower tire pressure. • Get a gel saddle. • Use padded gloves and pad handlebars or grips. • Use a suspension system. • Ride a mountain bike on road rides. • Consider a recumbent bike.
Off the Bicycle R.I.C.E. Discussed in Bicycling Medicine. Strengthening. Strengthening the neck muscles may help. Do not
work on these muscle groups while you are still injured. Isometric neck exercises are helpful: use your hand to resist the motion of your head up-and-down and side-to-side. Shoulder shrugs are helpful.
Stretching. Helps some people. Voluntary range of motion exercises may help increase the flexibility of your neck. Avoid active range of motion exercises with machines, weights, or forcing your neck into positions—they may result in injury.
NSAIDs. Anti-inflammatory pain medicines are useful and are discussed in more detail in Bicycling Medicine.
Surgery. Usually the last-resort treatment. A surgical emergency may exist if the nerves being pinched in the neck interfere with muscle sensation or power elsewhere in the body.
Chiropractic Manipulation. Symptomatically helps some people with pain, although many traditional physicians dispute its effectiveness.
ACE: Altitude Climbing Endurance Training for Cyclists Arnie Baker, MD 96
Low Back Pain
What We’re Talking About Low backache that makes riding uncomfortable. Pain that forces
you to slow down or get off the bike. See a doctor whenever back pain is associated with loss of sensation or power in your legs.
Causes Back Strain
Acute low back pain can follow strain or overuse. The pain may travel to the buttock or thigh, but if nerves are not involved, it does not travel below the knee. It is usually due to: • Muscle strain and/or spasm. • Arthritis—usually wear-and-tear/degenerative arthritis, or
osteoarthritis. Strain on the vertebral joints from misalignment, often secondary to disc degeneration, also causes pain.
• A bulge or herniation of an intervertebral disc. This is discussed more under Nerve Compression below. In younger cyclists, back pain is usually due to muscle strain. In
older cyclists, a combination of muscle strain and degenerative changes is usually responsible.
Cycling-related back strain is often related to long rides, big gears, or hill work. Big-gear riding and hill climbing—especially on long grades—results in back pain because riders tighten their back muscles to get more power.
Riding big gears also tires primary muscles faster than smaller gears. As primary muscles tire, form or technique worsens. Tendons, ligaments, accessory muscles, and joints bear loads normally born by primary muscles. This can cause strain or sprain with attendant pain and/or swelling.
Position on the bike can be important. Cyclists lacking flexibility may find the aerodynamic bent-over racing position uncomfortable.
Anything that forces the rider to increase stretch may cause back pain.
Jarring from rough riding can be a factor. Chronic low back pain may additionally be due to non–cycling-
related factors, such as: • Leg-length difference • Swayback • Deconditioning and poor posture • Muscle tension—due to stress, anxiety, depression, or fatigue
Nerve Compression—“Pinched Nerve” The spinal cord travels down inside the spine, or vertebral
column. The vertebrae are cushioned, one from the other, by discs composed of fiber-like and jelly-like material. The spinal nerves exit between the bones of the spine, or vertebrae. Sometimes the nerves are pinched by a disc, which has been squeezed out of position between two vertebrae, or by the bones themselves.
The spinal nerves of the lower back form the sciatic nerve, which travels down the buttocks area and the back of the thigh. The various component spinal nerves then travel to various parts of the leg.
Nerves have pain sensors; other sensory fibers; and motor, or muscle-moving, fibers. The progression of severity of pinched nerves is usually pain, sensory change, and muscle weakness, in that order. Sensory changes include a pins-and-needles sensation, tingling, and areas of numbness.
When a nerve is being pinched, symptoms may occur along the area supplied by the nerve. Pain that radiates from the buttocks down the back of the thighs is commonly called sciatica. Pinched nerves in the back are the most frequent, but not the only, cause of sciatica. Occasionally the nerve is pinched in a buttock muscle, the piriformis, rather than in the spine.
ACE: Altitude Climbing Endurance Training for Cyclists Arnie Baker, MD 97
Obtain a consultation with a physician whenever you experience sensory change or muscle weakness.
Treatment On the Bicycle
If your problem is due to excessive exercise load: • Allow for a gradual increase in endurance riding. Increase the
length of endurance rides no more than 10% per week. • Ride with a higher cadence—use smaller gears. • If big gears are in your training program, allow yourself to adapt
to them slowly.
If your problem is due to hills: • Reduce hill mileage and then adapt to increased mileage slowly. • Shift your position every so often from seated to standing.
Consciously relax your back every few minutes when climbing. • Take a rest break at the side of the road on long climbs. Enjoy
the view!
If your problem is a too stretched-out position on the bike: • Reduce stretch by assuming a more upright posture. Ride on the
hoods or tops of the handlebars. • Reduce the distance you need to stretch. Raise or shorten the
stem. Use narrower handlebars. Get a bike with a shorter top tube.
If buttock pain or sciatica is related to nerve pressure in the piriformis muscle: • Get a gel-filled or a more compliant saddle.
If your problem is due to jarring:
• Use wider tires. • Use lower tire pressure. • Get a gel saddle. • Use a rear suspension system.
• Ride a mountain bike on road rides. • Consider a recumbent bike.
Off the Bicycle R.I.C.E. Discussed more fully in Bicycling Medicine. Studies
show that even the worst strains generally require, at most, a few days of bed rest. Mild strains may disappear as soon as you are off the bike. Ice or heat may help.
Strengthening. Strengthening the back and abdominal muscles may help. Do not work on these muscles while you are still injured. Climbing or gradually increasing mileage will often adapt the body sufficiently. Bent knee sit-ups, crunches, back extensions, pelvic tilt exercises, and rowing strengthen the back and abdominals.
Stretching. Helps some people. Back flexion exercises are most helpful. In individuals who have lost the normal curve, giving a flat back, extension exercises are more useful. Hamstring stretching relieves some of the need for the back to bend, and can help.
NSAIDs. Anti-inflammatory pain medicines are useful and are discussed in Bicycling Medicine.
Orthotics. A heel lift or cleat shim may help if a leg length difference exists.
Surgery. Usually the last-resort treatment. A surgical emergency exists if the nerves being pinched interfere with bowel or bladder function, or if rapidly progressive leg weakness occurs.
Weight Loss. Lessens back pain in many who are overweight. Chiropractic Manipulation. Symptomatically helps many with
back pain, although many traditional physicians dispute its effectiveness.
Posture Hints for Low Back Pain • Sit or stand using a footrest to bend the knee and hip of one leg. • Lie either curled up on your side, or on your back with pillows
under your knees. Do not lie on your belly. When rising from a lying position, roll to your side and push yourself up with your arm.
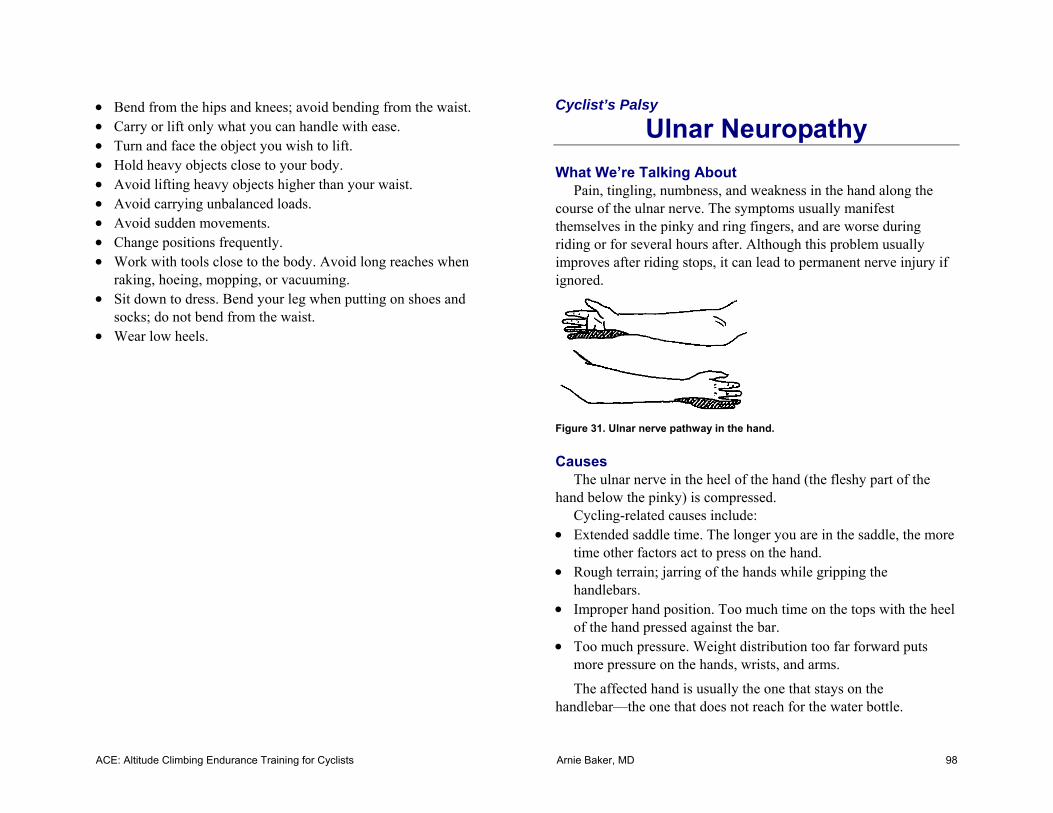
ACE: Altitude Climbing Endurance Training for Cyclists Arnie Baker, MD 98
• Bend from the hips and knees; avoid bending from the waist. • Carry or lift only what you can handle with ease. • Turn and face the object you wish to lift. • Hold heavy objects close to your body. • Avoid lifting heavy objects higher than your waist. • Avoid carrying unbalanced loads. • Avoid sudden movements. • Change positions frequently. • Work with tools close to the body. Avoid long reaches when
raking, hoeing, mopping, or vacuuming. • Sit down to dress. Bend your leg when putting on shoes and
socks; do not bend from the waist. • Wear low heels.
Cyclist’s Palsy
Ulnar Neuropathy
What We’re Talking About Pain, tingling, numbness, and weakness in the hand along the
course of the ulnar nerve. The symptoms usually manifest themselves in the pinky and ring fingers, and are worse during riding or for several hours after. Although this problem usually improves after riding stops, it can lead to permanent nerve injury if ignored.
Figure 31. Ulnar nerve pathway in the hand.
Causes
The ulnar nerve in the heel of the hand (the fleshy part of the hand below the pinky) is compressed.
Cycling-related causes include: • Extended saddle time. The longer you are in the saddle, the more
time other factors act to press on the hand. • Rough terrain; jarring of the hands while gripping the
handlebars. • Improper hand position. Too much time on the tops with the heel
of the hand pressed against the bar. • Too much pressure. Weight distribution too far forward puts
more pressure on the hands, wrists, and arms.
The affected hand is usually the one that stays on the handlebar—the one that does not reach for the water bottle.
ACE: Altitude Climbing Endurance Training for Cyclists Arnie Baker, MD 99
Treatment
On the Bicycle Keep pressure off the heel of the affected hand when riding:
• Reduce mileage: Readapt slowly.
• Prevent jarring: Use padded or gel gloves. Use padded, even double, handlebar tape; or padded grips. Use wider tires and/or lower tire pressure. Try suspension.
• Improve hand position: Reposition your hands frequently. Relax your hands, wrists, and upper body.
• Reduce pressure: Avoid placing pressure on the heel of your hand. Vary your position. Raise the stem height. Check that your seat is not too far forward. Use a shorter stem. Avoid tilting the saddle down. Use a shorter top tube.
Medical Treatment NSAIDs. May be helpful, but the best approach is to get pressure
off the heel of your hand when riding. Read more about anti-inflammatories in Bicycling Medicine.
Knees
What We’re Talking About Knee problems are common in cyclists. We are talking about overuse injuries—knee problems related to
the repeated and constant stresses of riding over time—which are one of the most frequent reasons cyclists seek medical advice.
Some knee problems are the result of sudden injuries related to trauma: a bicycle crash, or the sudden tearing of a cartilage or ligament. Sudden injuries, injuries with significant local swelling (water on the knee), knee clicking, knee instability, and knee collapse are not discussed here. Torn ligaments, torn menisci, and fractures generally require prompt professional medical attention.
Significant local redness or warmth may indicate an infection and requires prompt medical attention. Those with a history of gout or other forms of arthritis are advised to seek medical attention. The different kinds of knee arthritis are not discussed in this book.
With proper positioning, cycling helps many knee problems.
Bicycle Position Adjustment for Knee Pain The basic position considerations are seat position and foot
position. The seat may be:
• Too low or too high. • Too far forward or too far back.
The feet may be: • Too far apart or too close together. • Too toed in or toed out. • Too far forward or too far back in relationship to the pedal axle.
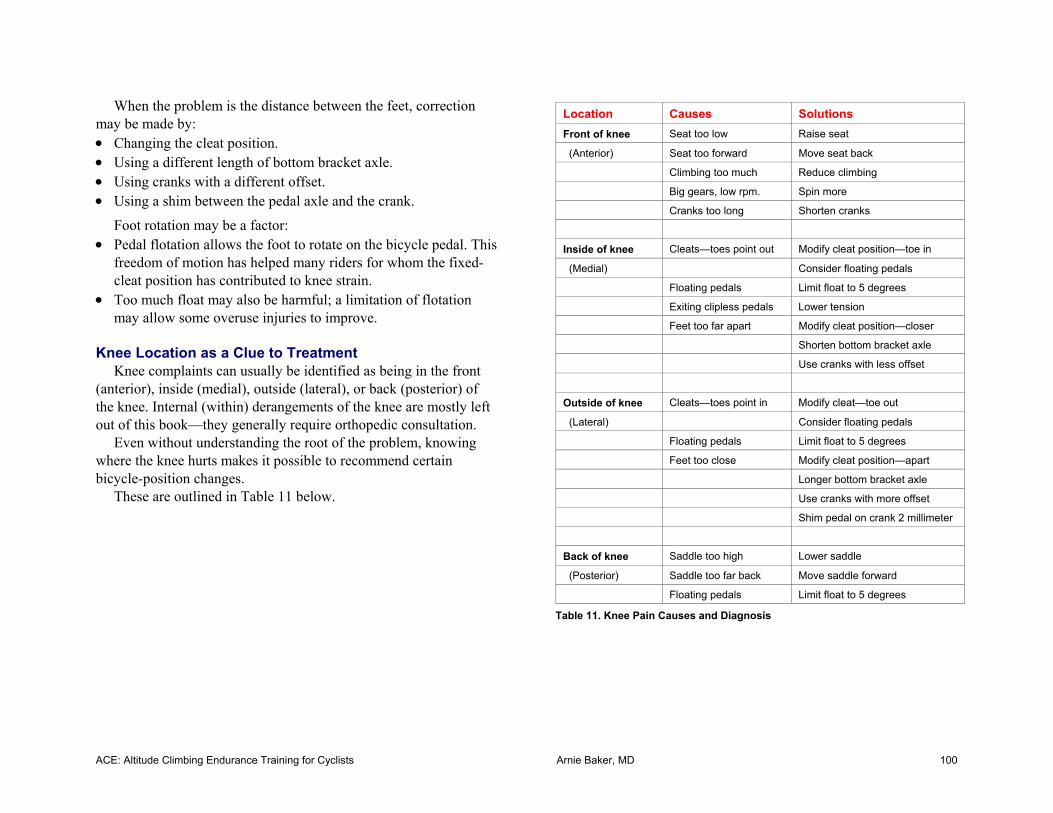
ACE: Altitude Climbing Endurance Training for Cyclists Arnie Baker, MD 100
When the problem is the distance between the feet, correction may be made by: • Changing the cleat position. • Using a different length of bottom bracket axle. • Using cranks with a different offset. • Using a shim between the pedal axle and the crank.
Foot rotation may be a factor: • Pedal flotation allows the foot to rotate on the bicycle pedal. This
freedom of motion has helped many riders for whom the fixed-cleat position has contributed to knee strain.
• Too much float may also be harmful; a limitation of flotation may allow some overuse injuries to improve.
Knee Location as a Clue to Treatment Knee complaints can usually be identified as being in the front
(anterior), inside (medial), outside (lateral), or back (posterior) of the knee. Internal (within) derangements of the knee are mostly left out of this book—they generally require orthopedic consultation.
Even without understanding the root of the problem, knowing where the knee hurts makes it possible to recommend certain bicycle-position changes.
These are outlined in Table 11 below.
Location Causes Solutions Front of knee Seat too low Raise seat
(Anterior) Seat too forward Move seat back
Climbing too much Reduce climbing
Big gears, low rpm. Spin more
Cranks too long Shorten cranks
Inside of knee Cleats—toes point out Modify cleat position—toe in
(Medial) Consider floating pedals
Floating pedals Limit float to 5 degrees
Exiting clipless pedals Lower tension
Feet too far apart Modify cleat position—closer
Shorten bottom bracket axle
Use cranks with less offset
Outside of knee Cleats—toes point in Modify cleat—toe out
(Lateral) Consider floating pedals
Floating pedals Limit float to 5 degrees
Feet too close Modify cleat position—apart
Longer bottom bracket axle
Use cranks with more offset
Shim pedal on crank 2 millimeter
Back of knee Saddle too high Lower saddle
(Posterior) Saddle too far back Move saddle forward
Floating pedals Limit float to 5 degrees
Table 11. Knee Pain Causes and Diagnosis
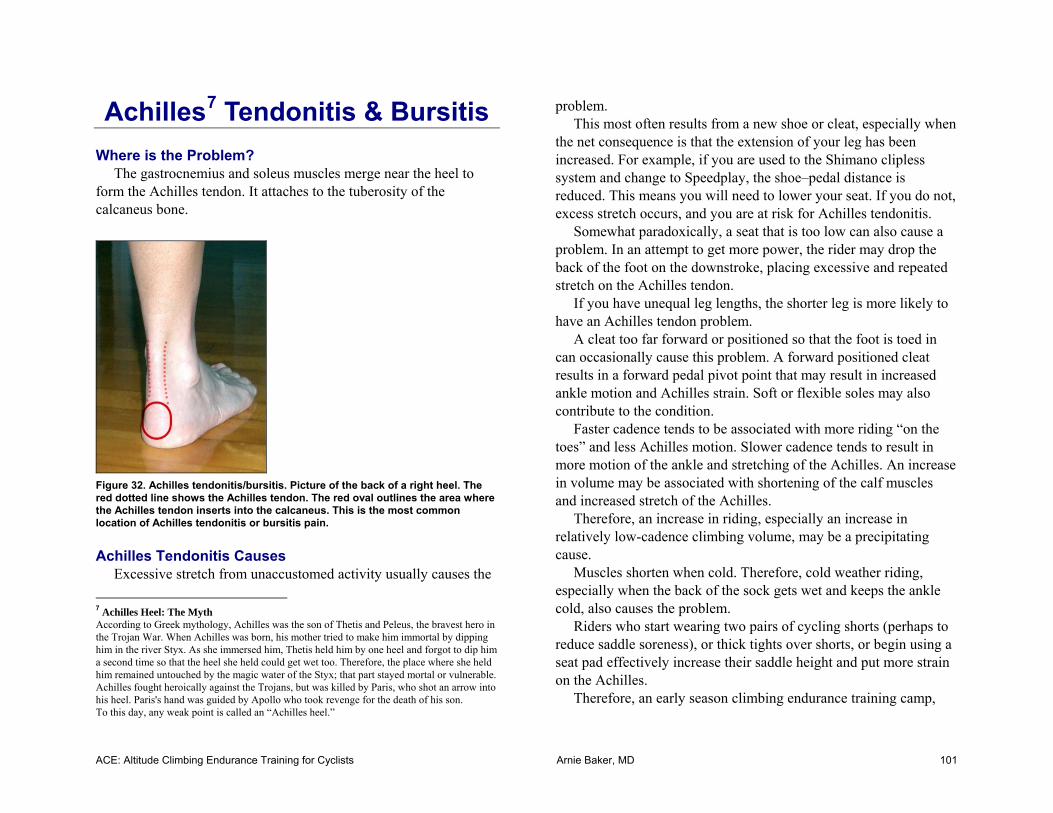
ACE: Altitude Climbing Endurance Training for Cyclists Arnie Baker, MD 101
Achilles7 Tendonitis & Bursitis
Where is the Problem? The gastrocnemius and soleus muscles merge near the heel to
form the Achilles tendon. It attaches to the tuberosity of the calcaneus bone.
Figure 32. Achilles tendonitis/bursitis. Picture of the back of a right heel. The red dotted line shows the Achilles tendon. The red oval outlines the area where the Achilles tendon inserts into the calcaneus. This is the most common location of Achilles tendonitis or bursitis pain.
Achilles Tendonitis Causes
Excessive stretch from unaccustomed activity usually causes the 7 Achilles Heel: The Myth According to Greek mythology, Achilles was the son of Thetis and Peleus, the bravest hero in the Trojan War. When Achilles was born, his mother tried to make him immortal by dipping him in the river Styx. As she immersed him, Thetis held him by one heel and forgot to dip him a second time so that the heel she held could get wet too. Therefore, the place where she held him remained untouched by the magic water of the Styx; that part stayed mortal or vulnerable. Achilles fought heroically against the Trojans, but was killed by Paris, who shot an arrow into his heel. Paris's hand was guided by Apollo who took revenge for the death of his son. To this day, any weak point is called an “Achilles heel.”
problem. This most often results from a new shoe or cleat, especially when
the net consequence is that the extension of your leg has been increased. For example, if you are used to the Shimano clipless system and change to Speedplay, the shoe–pedal distance is reduced. This means you will need to lower your seat. If you do not, excess stretch occurs, and you are at risk for Achilles tendonitis.
Somewhat paradoxically, a seat that is too low can also cause a problem. In an attempt to get more power, the rider may drop the back of the foot on the downstroke, placing excessive and repeated stretch on the Achilles tendon.
If you have unequal leg lengths, the shorter leg is more likely to have an Achilles tendon problem.
A cleat too far forward or positioned so that the foot is toed in can occasionally cause this problem. A forward positioned cleat results in a forward pedal pivot point that may result in increased ankle motion and Achilles strain. Soft or flexible soles may also contribute to the condition.
Faster cadence tends to be associated with more riding “on the toes” and less Achilles motion. Slower cadence tends to result in more motion of the ankle and stretching of the Achilles. An increase in volume may be associated with shortening of the calf muscles and increased stretch of the Achilles.
Therefore, an increase in riding, especially an increase in relatively low-cadence climbing volume, may be a precipitating cause.
Muscles shorten when cold. Therefore, cold weather riding, especially when the back of the sock gets wet and keeps the ankle cold, also causes the problem.
Riders who start wearing two pairs of cycling shorts (perhaps to reduce saddle soreness), or thick tights over shorts, or begin using a seat pad effectively increase their saddle height and put more strain on the Achilles.
Therefore, an early season climbing endurance training camp,
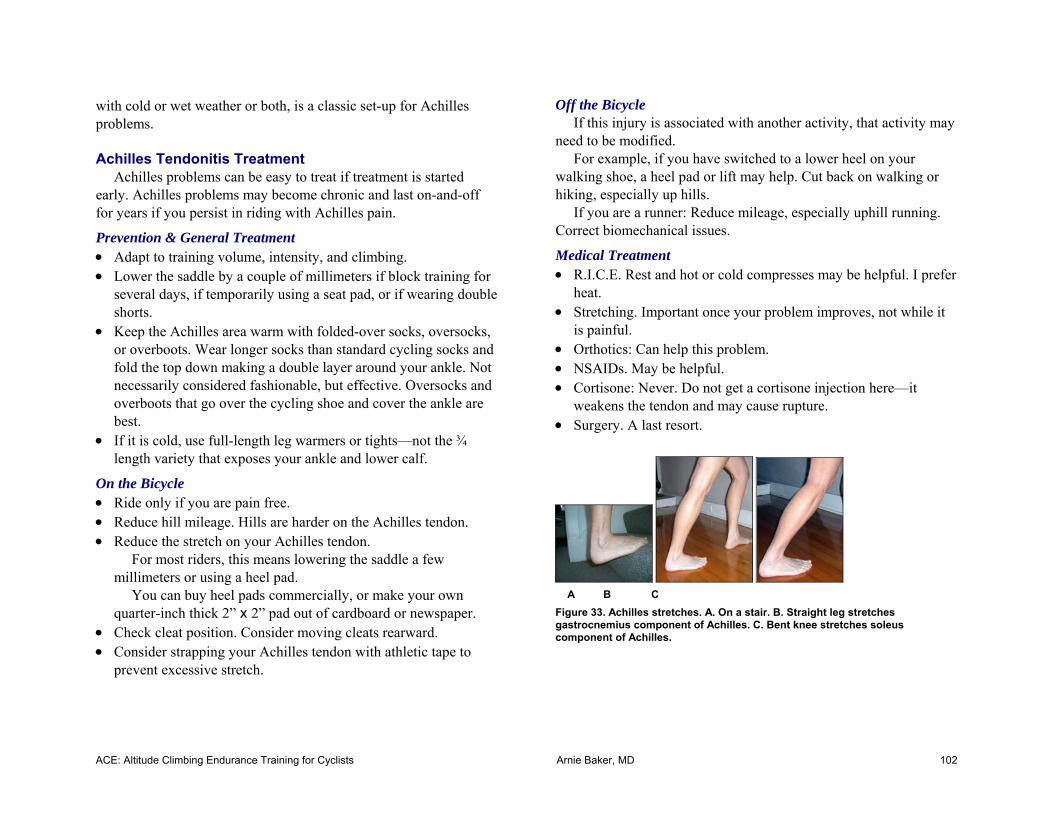
ACE: Altitude Climbing Endurance Training for Cyclists Arnie Baker, MD 102
with cold or wet weather or both, is a classic set-up for Achilles problems.
Achilles Tendonitis Treatment
Achilles problems can be easy to treat if treatment is started early. Achilles problems may become chronic and last on-and-off for years if you persist in riding with Achilles pain.
Prevention & General Treatment • Adapt to training volume, intensity, and climbing. • Lower the saddle by a couple of millimeters if block training for
several days, if temporarily using a seat pad, or if wearing double shorts.
• Keep the Achilles area warm with folded-over socks, oversocks, or overboots. Wear longer socks than standard cycling socks and fold the top down making a double layer around your ankle. Not necessarily considered fashionable, but effective. Oversocks and overboots that go over the cycling shoe and cover the ankle are best.
• If it is cold, use full-length leg warmers or tights—not the ¾ length variety that exposes your ankle and lower calf.
On the Bicycle • Ride only if you are pain free. • Reduce hill mileage. Hills are harder on the Achilles tendon. • Reduce the stretch on your Achilles tendon.
For most riders, this means lowering the saddle a few millimeters or using a heel pad. You can buy heel pads commercially, or make your own quarter-inch thick 2” x 2” pad out of cardboard or newspaper.
• Check cleat position. Consider moving cleats rearward. • Consider strapping your Achilles tendon with athletic tape to
prevent excessive stretch.
Off the Bicycle If this injury is associated with another activity, that activity may
need to be modified. For example, if you have switched to a lower heel on your
walking shoe, a heel pad or lift may help. Cut back on walking or hiking, especially up hills.
If you are a runner: Reduce mileage, especially uphill running. Correct biomechanical issues.
Medical Treatment • R.I.C.E. Rest and hot or cold compresses may be helpful. I prefer
heat. • Stretching. Important once your problem improves, not while it
is painful. • Orthotics: Can help this problem. • NSAIDs. May be helpful. • Cortisone: Never. Do not get a cortisone injection here—it
weakens the tendon and may cause rupture. • Surgery. A last resort.
A B C Figure 33. Achilles stretches. A. On a stair. B. Straight leg stretches gastrocnemius component of Achilles. C. Bent knee stretches soleus component of Achilles.
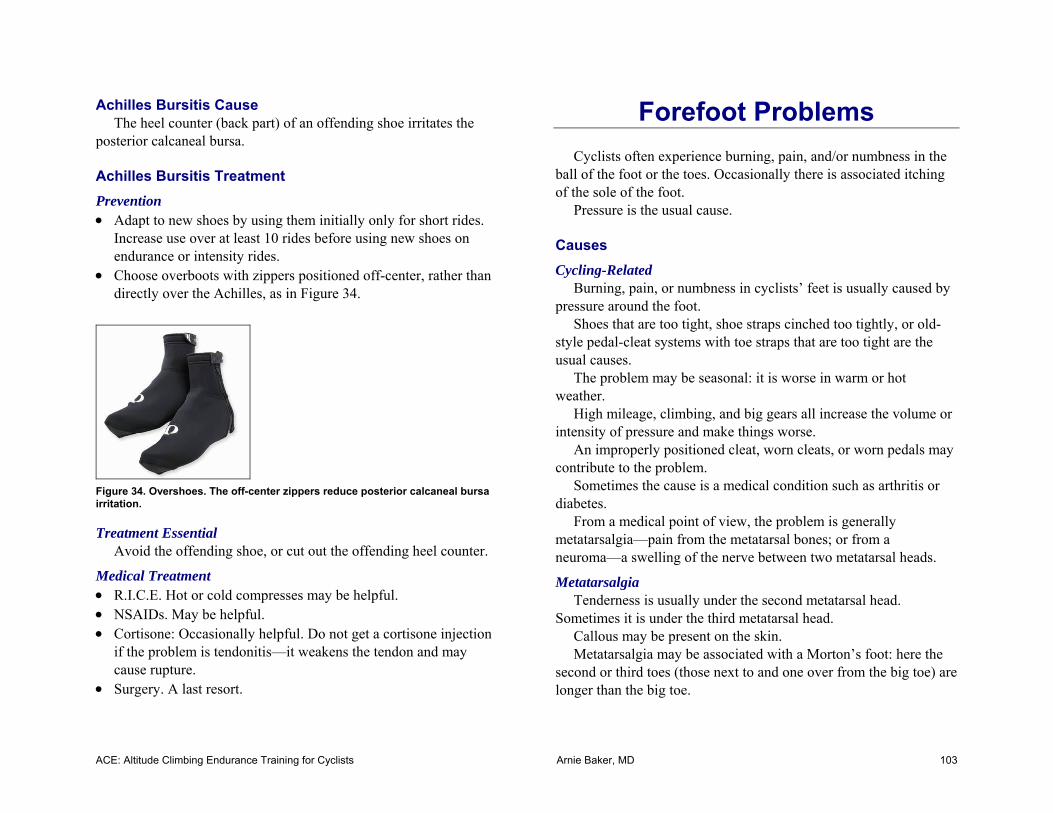
ACE: Altitude Climbing Endurance Training for Cyclists Arnie Baker, MD 103
Achilles Bursitis Cause The heel counter (back part) of an offending shoe irritates the
posterior calcaneal bursa.
Achilles Bursitis Treatment Prevention • Adapt to new shoes by using them initially only for short rides.
Increase use over at least 10 rides before using new shoes on endurance or intensity rides.
• Choose overboots with zippers positioned off-center, rather than directly over the Achilles, as in Figure 34.
Figure 34. Overshoes. The off-center zippers reduce posterior calcaneal bursa irritation.
Treatment Essential Avoid the offending shoe, or cut out the offending heel counter.
Medical Treatment • R.I.C.E. Hot or cold compresses may be helpful. • NSAIDs. May be helpful. • Cortisone: Occasionally helpful. Do not get a cortisone injection
if the problem is tendonitis—it weakens the tendon and may cause rupture.
• Surgery. A last resort.
Forefoot Problems Cyclists often experience burning, pain, and/or numbness in the
ball of the foot or the toes. Occasionally there is associated itching of the sole of the foot.
Pressure is the usual cause.
Causes Cycling-Related
Burning, pain, or numbness in cyclists’ feet is usually caused by pressure around the foot.
Shoes that are too tight, shoe straps cinched too tightly, or old-style pedal-cleat systems with toe straps that are too tight are the usual causes.
The problem may be seasonal: it is worse in warm or hot weather.
High mileage, climbing, and big gears all increase the volume or intensity of pressure and make things worse.
An improperly positioned cleat, worn cleats, or worn pedals may contribute to the problem.
Sometimes the cause is a medical condition such as arthritis or diabetes.
From a medical point of view, the problem is generally metatarsalgia—pain from the metatarsal bones; or from a neuroma—a swelling of the nerve between two metatarsal heads.
Metatarsalgia Tenderness is usually under the second metatarsal head.
Sometimes it is under the third metatarsal head. Callous may be present on the skin. Metatarsalgia may be associated with a Morton’s foot: here the
second or third toes (those next to and one over from the big toe) are longer than the big toe.
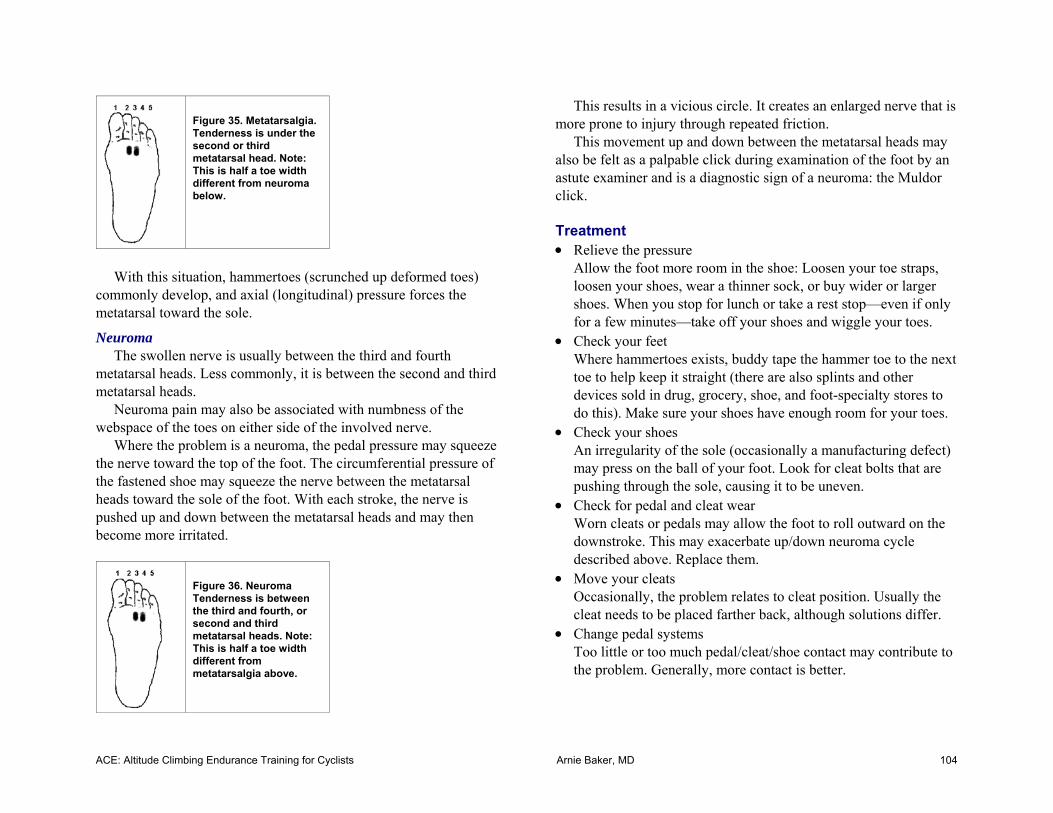
ACE: Altitude Climbing Endurance Training for Cyclists Arnie Baker, MD 104
Figure 35. Metatarsalgia. Tenderness is under the second or third metatarsal head. Note: This is half a toe width different from neuroma below.
With this situation, hammertoes (scrunched up deformed toes)
commonly develop, and axial (longitudinal) pressure forces the metatarsal toward the sole.
Neuroma The swollen nerve is usually between the third and fourth
metatarsal heads. Less commonly, it is between the second and third metatarsal heads.
Neuroma pain may also be associated with numbness of the webspace of the toes on either side of the involved nerve.
Where the problem is a neuroma, the pedal pressure may squeeze the nerve toward the top of the foot. The circumferential pressure of the fastened shoe may squeeze the nerve between the metatarsal heads toward the sole of the foot. With each stroke, the nerve is pushed up and down between the metatarsal heads and may then become more irritated.
Figure 36. Neuroma Tenderness is between the third and fourth, or second and third metatarsal heads. Note: This is half a toe width different from metatarsalgia above.
This results in a vicious circle. It creates an enlarged nerve that is more prone to injury through repeated friction.
This movement up and down between the metatarsal heads may also be felt as a palpable click during examination of the foot by an astute examiner and is a diagnostic sign of a neuroma: the Muldor click.
Treatment • Relieve the pressure
Allow the foot more room in the shoe: Loosen your toe straps, loosen your shoes, wear a thinner sock, or buy wider or larger shoes. When you stop for lunch or take a rest stop—even if only for a few minutes—take off your shoes and wiggle your toes.
• Check your feet Where hammertoes exists, buddy tape the hammer toe to the next toe to help keep it straight (there are also splints and other devices sold in drug, grocery, shoe, and foot-specialty stores to do this). Make sure your shoes have enough room for your toes.
• Check your shoes An irregularity of the sole (occasionally a manufacturing defect) may press on the ball of your foot. Look for cleat bolts that are pushing through the sole, causing it to be uneven.
• Check for pedal and cleat wear Worn cleats or pedals may allow the foot to roll outward on the downstroke. This may exacerbate up/down neuroma cycle described above. Replace them.
• Move your cleats Occasionally, the problem relates to cleat position. Usually the cleat needs to be placed farther back, although solutions differ.
• Change pedal systems Too little or too much pedal/cleat/shoe contact may contribute to the problem. Generally, more contact is better.
ACE: Altitude Climbing Endurance Training for Cyclists Arnie Baker, MD 105
• Try foot exercises Two include walking on the outsides of your feet—up to 10 minutes a day total time and picking up objects with your toes—up to 100 times a day.
• Pad your metatarsals Metatarsal padding is commercially available.
• Orthotics Shoe inserts can spread the pressure, may help. Cycling-specific orthotic are longer than running orthotics. Cyclists who also run may need to correct a pronation problem.
• Last resorts Cortisone injection and surgery are available for these problems.
Summary Almost all riders experience cycling-related forefoot problems.
Trigger factors—long rides, hilly rides, big gears, hot conditions, and shoes that are too tight—contribute to these problems. Simple treatments will improve or solve the problems for most riders.
Muscle Cramps
What We’re Talking About Cramps are involuntary muscle contractions or spasms, often
sustained and painful. Muscle cramps can and do affect almost all riders. What can be
done to help prevent this problem, and what can be done once cramps occur?
What Causes Cramps?
There are probably many causes of cramps. No one is certain why cramps occur in any individual. Although it is clear that cramps occur within muscles, it is likely that a neurologic reflex (involving anterior horn cells, firing at rate up to 300 per second, much higher than occurs with voluntary contraction of muscle) maintains most cramps.
Some of the more likely causes are: • Unaccustomed sudden hard exertion or inadequate conditioning.
Note that a bicycle position change can result in unaccustomed muscle use.
• Fluid and electrolyte imbalance. This is probably more of a problem in the local muscle cell area than a reflection of overall body electrolyte imbalance or dehydration. Some of the electrolytes implicated are sodium, magnesium, potassium, and calcium.
• Temperature changes. Not being used to cold or hot weather. • Low blood sugar. • Glycogen loading. Too much stored carbohydrate in muscle. Too
much rest or too many days off the bike. • Fatigue. • Accumulation of waste products, such as lactic acid. • Lack of flexibility.
ACE: Altitude Climbing Endurance Training for Cyclists Arnie Baker, MD 106
• Benign nighttime leg cramps, unknown cause, more common in older masters.
• Medical situations, problems or diseases (e.g. thyroid disease, amyotrophic lateral sclerosis, pregnancy, glycogen storage disease, patients on hemodialysis, tetanus, stiff-man syndrome, strychnine poisoning).
• Medications can cause cramps through fluid and electrolyte imbalance, and well as through other mechanisms (e.g. diuretics, or water pills, commonly used to treat high blood pressure; withdrawal from benzodiazepines such as valium)
• Over-the-counter supplements. These can cause cramps through fluid and electrolyte imbalance, and well as through other mechanisms (e.g. creatine has been associated with cramps in some studies).
Prevention • Train specifically. If you are targeting a long-distance event,
incorporate long rides into your training. If you are a racer and will have surges and jumps in your races, train that way.
• Allow time for acclimation if you are traveling. • Eat a diet rich in carbohydrates, calcium, potassium, and
magnesium. • If riding long or hard in the heat, add sodium to your diet. • Target-event glycogen loading (high-carbohydrate diet, little or
no exercise for a few days before the event) can improve performance. Cramps are less likely if you ride moderately an hour or two the day before your target event.
• Be adequately hydrated before and during rides and races. • Eat during long rides. • Review your medications with your physician.
Treatment of Cramps • Stretch the opposing muscle. If you have a cramp in your
quadriceps muscle, stretch your hamstrings. This may interrupt the neurological mechanism of the cramp.
• Stretch or massage the cramp. You may be able to do this while continuing to ride. For a calf cramp, stand on your extended affected leg, pedal at the bottom of the stroke, and drop our heel. For a quadriceps cramp, unclip the shoe of the affected leg, ride with one hand, and use the other hand to pull your shoe up toward your buttock.
• Concentrate on relaxing the affected muscle. • Apply hot or cold packs. Either may help.
ACE: Altitude Climbing Endurance Training for Cyclists Arnie Baker, MD 107
Eye Problems
What We’re Talking About • Scratchy, red, or otherwise irritated eyes. • Runny eyes. • Occasionally, a bug or other foreign matter in the eye.
All-day riding exposes the eyes to drying winds, sweat, pollens and other allergens, dust and other pollutants, and bugs. Altitude air is especially dry.
Wind causes the eyes to increase tear production and run. Tears may flow down the cheeks. Tears are also drained through tear ducts into the nose; as a result, the nose may become congested or run.
Treatment
Protect your eyes with eyewear—sunny or not. Wraparound clear glasses or sunglasses provide the best protection. If you already wear glasses, you may find oversized lenses more helpful at keeping out wind and irritants than regular or small lenses.
Cool compresses to the eyes can be very soothing. Over-the-counter eye decongestants such as Visine or Murine can get the red out, but they worsen eye dryness. Use artificial tears instead.
Contact lens wearers and those whose eyes are dry for other reasons may find a commercial tear or wetting solution helpful.
Eyewear Features to Look For • UV protection. Eye problems such as cataracts and pinguecula—
thickening of the inner white corner of the eye—have been linked to ultraviolet light. You are looking for at least 85% UV block, if not 100%.
• Shatterproof. “Unbreakable lenses.” Polycarbonate provides fantastic impact resistance with only slightly less optical quality than glass.
• Light reduction. Clear lenses are fine for dark, cloudy days; when it is bright, your eyes will be a lot more comfortable with sunglasses.
Bug in the Eye Usually natural tearing will wash the bug to the inside lower
corner of your eye. Wiping the corner gently usually rubs it away. Dabbing a corner of moist tissue paper may draw the bug out. Do not rub the cornea, the front, seeing part of your eye.
If tearing does not bring the bug to the lower inside corner of your eye, it may be trapped under the upper lid. Carefully dabbing it at this location will usually stick it to the tissue and remove it. Do not dab over the cornea.
The bug may feel as if it is still there if the cornea has become scratched.
If your eye is in spasm and shut, if you cannot see properly, if you get a persistent scratchy feeling every time you blink, if pain persists a couple of hours, or if you are not sure, see a doctor.
ACE: Altitude Climbing Endurance Training for Cyclists Arnie Baker, MD 108
Part 7: Training Schedules
Suggested Training: Overview
The following are training guidelines to help you to complete your target altitude-climbing-endurance event.
The minimum level will probably be sufficient if the weather is great—though you may finish with the last 20% of participants.
The moderate level training targets should allow you to finish in the middle of the pack.
The top 20% of riders will likely have large training volumes. The professional level is just that—the level of professional
bicycle racers. Although you may see some very talented amateurs, there probably will not be any true professionals in your field.
Climbing rates are based on a 100-mile event with 10,000 feet of climbing and a 10-hour time limit.
Keep in mind that depending upon your background, you may not have the base fitness to train the larger volumes. More is not necessarily better if you do not have the capacity to adapt to larger volumes.
The single-day climbing volume targets are the most important training priority.
Mileage Single Day • Minimum 60% target event on three training occasions • Moderate 70% target event on three training occasions • High 80+% target event on three training occasions • Pro 100% target event on three training occasions
Week • Minimum 133% target event on three training weeks • Moderate 175% target event on three training weeks • High 200% target event on three training weeks • Pro 250% target event on three training weeks
Climbing Volume Single Day • Minimum 60% target event on three training occasions • Moderate 70% target event on three training occasions • High 80+% target event on three training occasions • Pro 100% target event on three training occasions
Week • Minimum 125% target event on three training weeks • Moderate 150% target event on three training weeks • High 175% target event on three training weeks • Pro 200% target event on three training weeks
30-Minute Maximum Climbing Rate • Minimum 2,000 feet per hour (1,000 feet) • Moderate 3,000 feet per hour (1,500 feet) • High 4,000+ feet per hour (2,000+ feet) • Pro 5,000+ feet per hour (2,500+ feet)
All-Day Sustainable Climbing Rate • Minimum 1,600-1,800 feet per hour • Moderate 2,000-2,400 feet per hour • High 2,500+ feet per hour • Pro 4,000+ feet per hour
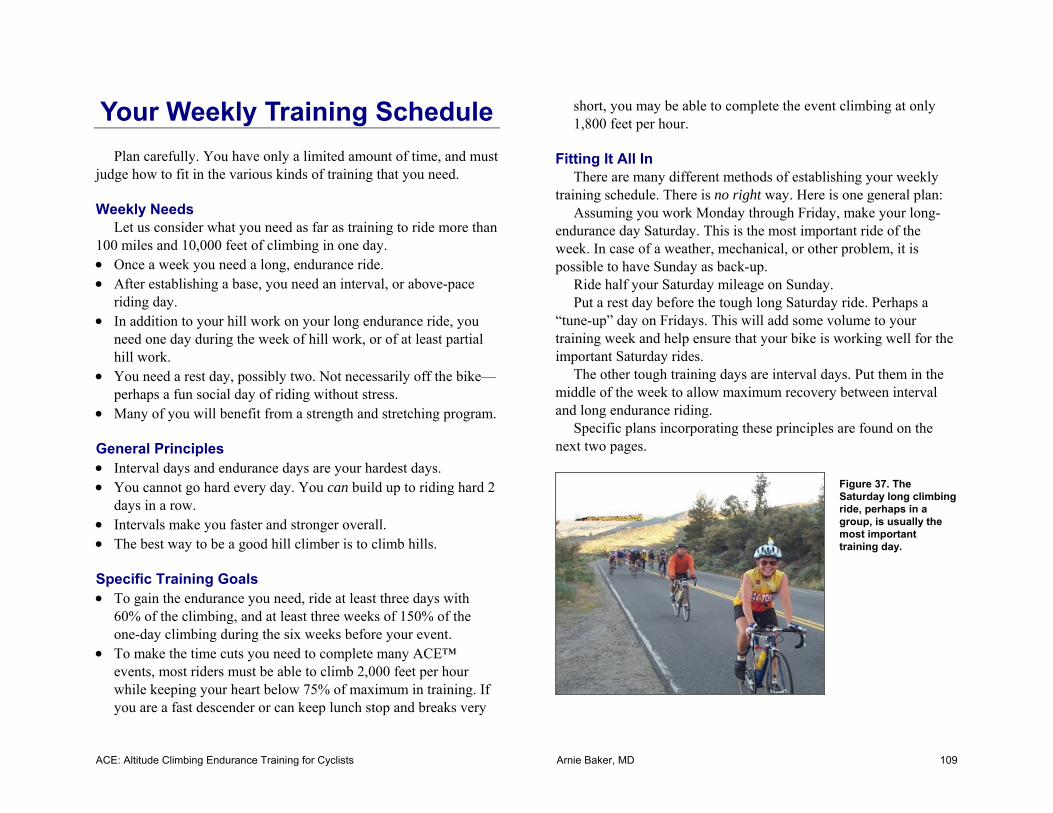
ACE: Altitude Climbing Endurance Training for Cyclists Arnie Baker, MD 109
Your Weekly Training Schedule Plan carefully. You have only a limited amount of time, and must
judge how to fit in the various kinds of training that you need.
Weekly Needs Let us consider what you need as far as training to ride more than
100 miles and 10,000 feet of climbing in one day. • Once a week you need a long, endurance ride. • After establishing a base, you need an interval, or above-pace
riding day. • In addition to your hill work on your long endurance ride, you
need one day during the week of hill work, or of at least partial hill work.
• You need a rest day, possibly two. Not necessarily off the bike—perhaps a fun social day of riding without stress.
• Many of you will benefit from a strength and stretching program.
General Principles • Interval days and endurance days are your hardest days. • You cannot go hard every day. You can build up to riding hard 2
days in a row. • Intervals make you faster and stronger overall. • The best way to be a good hill climber is to climb hills.
Specific Training Goals • To gain the endurance you need, ride at least three days with
60% of the climbing, and at least three weeks of 150% of the one-day climbing during the six weeks before your event.
• To make the time cuts you need to complete many ACE™ events, most riders must be able to climb 2,000 feet per hour while keeping your heart below 75% of maximum in training. If you are a fast descender or can keep lunch stop and breaks very
short, you may be able to complete the event climbing at only 1,800 feet per hour.
Fitting It All In There are many different methods of establishing your weekly
training schedule. There is no right way. Here is one general plan: Assuming you work Monday through Friday, make your long-
endurance day Saturday. This is the most important ride of the week. In case of a weather, mechanical, or other problem, it is possible to have Sunday as back-up.
Ride half your Saturday mileage on Sunday. Put a rest day before the tough long Saturday ride. Perhaps a
“tune-up” day on Fridays. This will add some volume to your training week and help ensure that your bike is working well for the important Saturday rides.
The other tough training days are interval days. Put them in the middle of the week to allow maximum recovery between interval and long endurance riding.
Specific plans incorporating these principles are found on the next two pages.
Figure 37. The Saturday long climbing ride, perhaps in a group, is usually the most important training day.

ACE: Altitude Climbing Endurance Training for Cyclists Arnie Baker, MD 110
Summary Saturday Long ride in hills Sunday Moderate ride Monday Off or short, easy day Tuesday Moderate or intervals Wednesday Moderate Thursday Moderate or intervals Friday Off or short, easy, tune-up
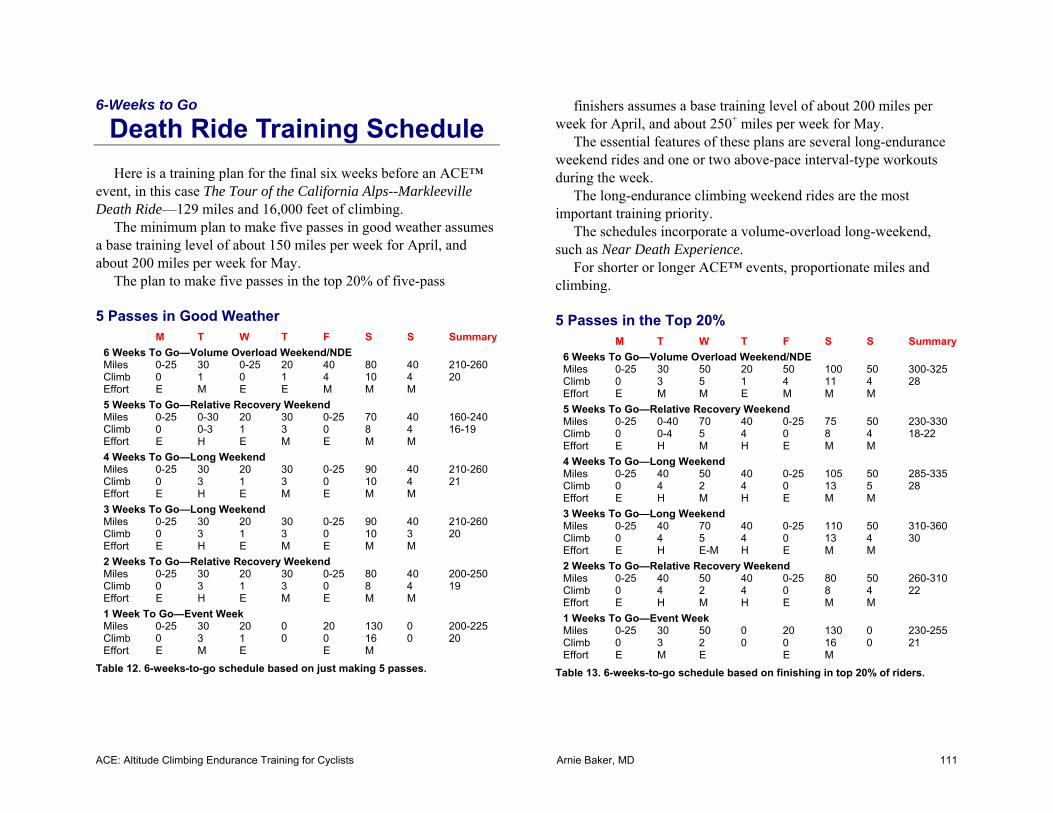
ACE: Altitude Climbing Endurance Training for Cyclists Arnie Baker, MD 111
6-Weeks to Go
Death Ride Training Schedule Here is a training plan for the final six weeks before an ACE™
event, in this case The Tour of the California Alps--Markleeville Death Ride—129 miles and 16,000 feet of climbing.
The minimum plan to make five passes in good weather assumes a base training level of about 150 miles per week for April, and about 200 miles per week for May.
The plan to make five passes in the top 20% of five-pass
5 Passes in Good Weather
M T W T F S S Summary
6 Weeks To Go—Volume Overload Weekend/NDE Miles 0-25 30 0-25 20 40 80 40 210-260 Climb 0 1 0 1 4 10 4 20 Effort E M E E M M M
5 Weeks To Go—Relative Recovery Weekend Miles 0-25 0-30 20 30 0-25 70 40 160-240 Climb 0 0-3 1 3 0 8 4 16-19 Effort E H E M E M M
4 Weeks To Go—Long Weekend Miles 0-25 30 20 30 0-25 90 40 210-260 Climb 0 3 1 3 0 10 4 21 Effort E H E M E M M
3 Weeks To Go—Long Weekend Miles 0-25 30 20 30 0-25 90 40 210-260 Climb 0 3 1 3 0 10 3 20 Effort E H E M E M M
2 Weeks To Go—Relative Recovery Weekend Miles 0-25 30 20 30 0-25 80 40 200-250 Climb 0 3 1 3 0 8 4 19 Effort E H E M E M M
1 Week To Go—Event Week Miles 0-25 30 20 0 20 130 0 200-225 Climb 0 3 1 0 0 16 0 20 Effort E M E E M
Table 12. 6-weeks-to-go schedule based on just making 5 passes.
finishers assumes a base training level of about 200 miles per week for April, and about 250+ miles per week for May.
The essential features of these plans are several long-endurance weekend rides and one or two above-pace interval-type workouts during the week.
The long-endurance climbing weekend rides are the most important training priority.
The schedules incorporate a volume-overload long-weekend, such as Near Death Experience.
For shorter or longer ACE™ events, proportionate miles and climbing.
5 Passes in the Top 20%
M T W T F S S Summary
6 Weeks To Go—Volume Overload Weekend/NDE Miles 0-25 30 50 20 50 100 50 300-325 Climb 0 3 5 1 4 11 4 28 Effort E M M E M M M
5 Weeks To Go—Relative Recovery Weekend Miles 0-25 0-40 70 40 0-25 75 50 230-330 Climb 0 0-4 5 4 0 8 4 18-22 Effort E H M H E M M
4 Weeks To Go—Long Weekend Miles 0-25 40 50 40 0-25 105 50 285-335 Climb 0 4 2 4 0 13 5 28 Effort E H M H E M M
3 Weeks To Go—Long Weekend Miles 0-25 40 70 40 0-25 110 50 310-360 Climb 0 4 5 4 0 13 4 30 Effort E H E-M H E M M
2 Weeks To Go—Relative Recovery Weekend Miles 0-25 40 50 40 0-25 80 50 260-310 Climb 0 4 2 4 0 8 4 22 Effort E H M H E M M
1 Weeks To Go—Event Week Miles 0-25 30 50 0 20 130 0 230-255 Climb 0 3 2 0 0 16 0 21 Effort E M E E M
Table 13. 6-weeks-to-go schedule based on finishing in top 20% of riders.

ACE: Altitude Climbing Endurance Training for Cyclists Arnie Baker, MD 112
18-Week ACE™ Program There are many ways to incorporate altitude-climbing-endurance
training within the framework of weekly, monthly, seasonal, or annual programs.
The following is a program for a targeted event of 120 miles with 10,000 feet of climbing.
It assumes a base level fitness sufficient to (1) finish a relatively flat century (less than 4,000 feet of climbing) in less than 8 hours and (2) climb 2,500 feet over 12 miles in less than 2 hours.
I have also incorporated a 13-week high-intensity climbing stationary trainer program in these workouts. You can create your own intensity workouts from the information on stationary training given earlier in this book, or you can perform the 13-week program detailed in my companion book High-Intensity Training for Cyclists, referenced on page 127.
I have incorporated an intensity program for a number of reasons:
(1) Many recreational riders have the requisite endurance to complete an altitude-climbing-endurance event such as The Tour of the California Alps—Markleeville Death Ride or the Colorado Triple Bypass; but many cannot finish the event within time cutoffs.
(2) Many riders do not have easy access to hills. By incorporating a program on a front-wheel-elevated stationary trainer, riders can effectively climb more than 2,500 feet during each 2-hour session.
(3) Many riders simply do not have the time during the week to efficiently get in climbing miles. Once again, by incorporating a program on a front-wheel-elevated stationary trainer, riders can effectively climb more than 2,500 feet each 2-hour session.
Week M Miles/ Climb
T Miles/ Climb
W Miles/Climb
T Miles/ Climb
F Miles/Climb
S Miles/ Climb
S Miles/Climb
Total Miles/ Climb
Effort Easy Hard if HIT
Easy Hard if HIT
Easy Long Easy
1 0-25 <2
30 0-3
20-50 0-2
30 0-3
0-25 <2
30 2-4
25 <2
120 6
2 0-25 <2
30 1-3
20-50 0-2
30 0-25 <2
40 3-4
25 <2
140 8
3 0-25 <2
30 2-4
20-50 0-2
30 2-4
0-25 <2
50 4
30 <2
140 8
4 0-25 <2
HIT 1A 2-4
20-60 0-5
HIT 1B 2-4
0-25 <2
50 5
30 <2
160 10
5 0-25 <2
HIT 2A 2-4
20-60 0-5
HIT 2B 0-25 <2
60 5
30 <2
160 10
6 0-25 <2
HIT 3A 2-4
20-60 0-5
HIT 3B 2-4
0-25 <2
60 6
35 <2
180 12
7 0-25 <2
HIT 4A 2-4
20-60 0-5
HIT 4B 2-4
0-25 <2
70 6
35 <2
180 12
8 0-25 <2
HIT 5A 2-4
20-60 0-5
HIT 5B 2-4
0-25 <2
70 6
35 <2
180 14
9 0-25 <2
HIT 6A 2-4
20-60 0-5
HIT 6B 2-4
0-25 <2
70 7
40 <2
200 14
10 0-25 <2
HIT 7A 2-4
20-60 0-5
HIT 7B 2-4
0-25 <2
80 7
40 <2
200 16
11 0-25 <2
HIT 8A 2-4
20-60 0-5
HIT 8B 2-4
0-25 <2
80 7
40 <2
200 16
12 0-25 <2
HIT 9A 2-4
20-60 0-5
HIT 9B 2-4
0-25 <2
80 7
45 <2
220 18
13 0-25 <2
HIT 10A 2-4
20-60 0-5
HIT 10B 2-4
0-25 <2
90 8
45 <2
220 18
14 0-25 <2
HIT 11A 2-4
20-60 0-5
HIT 11B 2-4
0-25 <2
90 8
45 <2
220 20
15 0-25 <2
HIT 12A 2-4
20-60 0-5
HIT 12B 2-4
0-25 <2
100 8
50 <2
240 20
16 0-25 <2
HIT 13A 2-4
20-60 0-5
HIT 13B 2-4
0-25 <2
100 8+
50 <2
240 20+
17 0-25 <2
30 2-4
20-60 0-5
30 2-4
0-25 <2
90 8+
40 <2
240 18+
18 0-25 <2
30 2-4
20-60 0-4
0-25 2-4
0-25 <2
EVENT120/10
180
Table 14. 18-week ACE™ program. Target event is 120 miles with 10,000 feet of climbing. Climbing is in 1,000s of feet. 13-week HIT program incorporated. HITx refers to the workouts in the companion book High-Intensity Training for Cyclists, available where you purchased this book.
ACE: Altitude Climbing Endurance Training for Cyclists Arnie Baker, MD 113
Tapering for Events Tapering is reducing volume and/or intensity of training prior to
competition. Most riders and coaches believe in the value of tapering for
events. Here is why, and here is how:
Why Taper? Optimal event-day performance is a balance between being (1)
recovered and rested, physically and mentally eager to race and (2) detrained—loosing fitness from too little training.
The idea is to arrive at the event with all systems primed. Tapering is reducing volume and/or intensity of training prior to
competition. Multiple studies have shown that this improves performance.
Most coaches recommend reducing overall volume and volume of intensity, but keeping interval intensity high. That is to say: ride less, perform fewer intervals, but keep interval quality for the intervals performed.
Volume reduction may be 20% to 60%.
Balancing Training and Detraining Consider these key points:
1. Glycogen energy stores take at least two days to be replaced after exhaustive aerobic exercise. More likely three. Exhaustive aerobic exercise occurs with a one-hour time trial at 90% of maximum heart rate or a two-hour ride at 85% of maximum heart rate.
2. No exercise in the 48 hours before events is associated with glycogen overload and muscle cramps in some athletes.
3. Muscle power is reduced by strength training for at least two weeks after maximum workouts. More likely three.
Strength training includes weight work, one-legged riding, big-gear work, and anaerobic efforts. Eccentric exercise is especially damaging to muscles. Eccentric exercise occurs when muscles lengthen under tension. This is characteristic of some weight work and unaccustomed high-cadence work. General cycling is not an eccentric exercise. General running is. For this reason, runners may need more of a taper than cyclists.
4. Endurance lasts for at least 10 days. More likely two weeks. 5. It takes at least a week to recover from an unaccustomed long
ride. 6. Maximum aerobic capacity lasts for a few days. Perhaps a
week.
How to Taper The key points provide the basis for the following
recommendations: 1. The last endurance ride should be 7 to 10 days before the event. 2. Avoid exhaustive aerobic exercise for at least three days prior to
the event. 3. Maximum weight work and maximum on-the-bike strength
work should be avoided for at least three weeks before the event. Avoid unaccustomed eccentric exercise. Accustomed on-the-bike strength work can be continued until one week before the event but at no more than 75% of previous maximum power.
4. Continue aerobic intervals until 3 to 7 days before the event. Reduce the number of intervals by one-third.
5. Rest or active rest (easy riding) two days before the event. 6. Warm-up the day before your event to near event intensities.

ACE: Altitude Climbing Endurance Training for Cyclists Arnie Baker, MD 114
Tapering Summary For many cyclists an effective taper turns out to be simply
missing one workout and shortening another. Following these suggestions should help you arrive at your event
well-rested, fit, and ready to do your best.
ACE: Altitude Climbing Endurance Training for Cyclists Arnie Baker, MD 115
Final Words: Clipped From: Rider Prep, deathride.com
The Death Ride is a Tough Ride for Serious Cyclists!
Riding 129 miles and 16,000 feet in one day is NOT easy! Keep in mind that the course in located on the eastern side of the Sierra Nevada mountains at elevations between 5,000' and 8,732'. It is remote, mountainous pine and sagebrush-covered country. Temperatures can be very HOT or very COLD, sometimes both in the same day. The weather can be DRY or WET, or both, as you climb from valley to pass. Blistering heat and bone chilling thunderstorms are not uncommon on the same day!
You Must Be Prepared and in Good Shape!
Ride many, many miles, and climb many hills on your bike seat before riding the Death Ride! We suggest you ride a few Centuries with hills, such as the Sierra or Comstock, prior to the Death Ride. Drink lots of water before and during the ride, as dehydration is the leading problem encountered on the Death Ride. Eat and drink a lot and do it before you need it!
Approved Helmets are Mandatory and Must Be Worn At All Times!
You must also wear your 3 Death Ride numbers and have your Death Ride water bottle to gain access to the ride. These will be checked by course marshals and law enforcement! No exceptions are made!
Your Bike Must Be in Top Working Order! Be sure you have good brakes and good tires. You must be able
to control your bike and your speed on serious downhills, with possible wet and/or rough pavement. Carry extra tubes, pump, tools, good rain or cold weather gear, identification, sunscreen, lip balm, and extra water bottles. Recommended Gearing for Climbing!
We suggest a 39 on front and a 28 on back or triple. We do not recommend aerobars or child carriers!
Ride Safe, Stay on Your Side of the Road, Ride Single File, Obey All Laws, and Be Attentive!
Even with part of the course is closed to vehicles, the California Motor Vehicle Code applies to the open portion of the ride. Riders who flagrantly violate the law will be cited and may be prohibited from riding in future Death Rides!
Note!
While we have tried to outline the necessary information for you to have a safe ride, please remember that the Death Ride can be dangerous! Be careful! Watch out for mud, rocks, cows, cattle guards, deer, other riders, and other hazards. Your safety is your responsibility. You ride at your own risk!
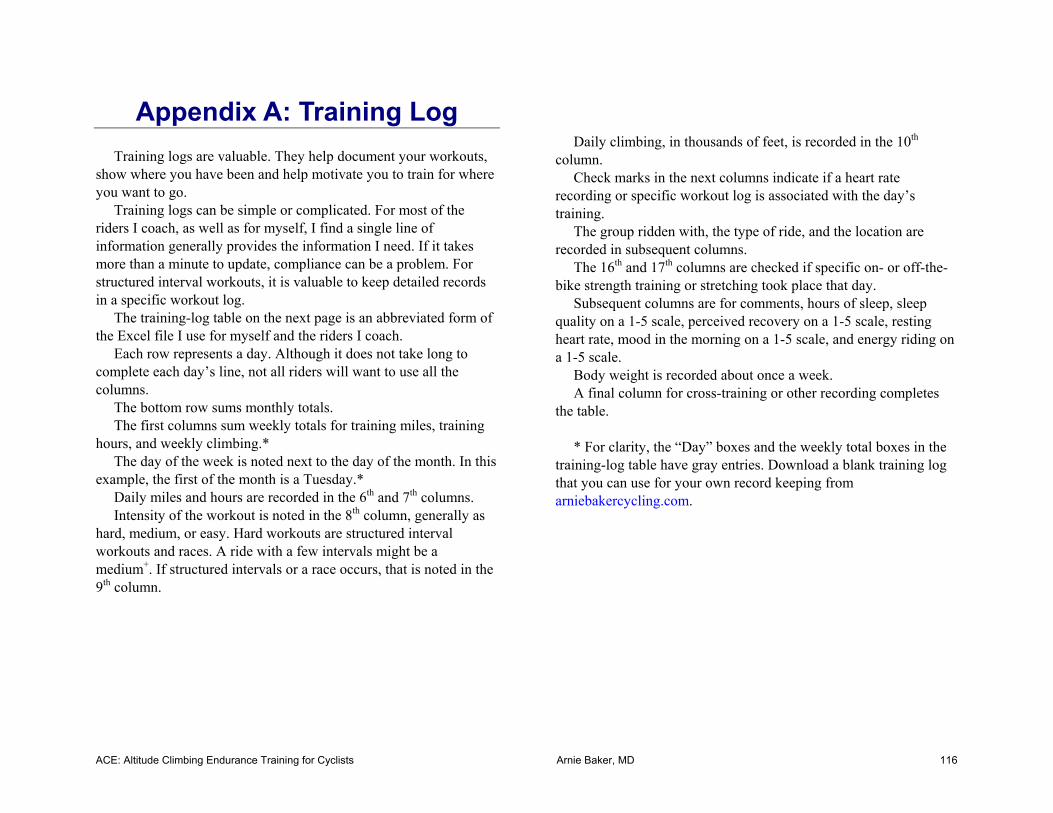
ACE: Altitude Climbing Endurance Training for Cyclists Arnie Baker, MD 116
Appendix A: Training Log Training logs are valuable. They help document your workouts,
show where you have been and help motivate you to train for where you want to go.
Training logs can be simple or complicated. For most of the riders I coach, as well as for myself, I find a single line of information generally provides the information I need. If it takes more than a minute to update, compliance can be a problem. For structured interval workouts, it is valuable to keep detailed records in a specific workout log.
The training-log table on the next page is an abbreviated form of the Excel file I use for myself and the riders I coach.
Each row represents a day. Although it does not take long to complete each day’s line, not all riders will want to use all the columns.
The bottom row sums monthly totals. The first columns sum weekly totals for training miles, training
hours, and weekly climbing.* The day of the week is noted next to the day of the month. In this
example, the first of the month is a Tuesday.* Daily miles and hours are recorded in the 6th and 7th columns. Intensity of the workout is noted in the 8th column, generally as
hard, medium, or easy. Hard workouts are structured interval workouts and races. A ride with a few intervals might be a medium+. If structured intervals or a race occurs, that is noted in the 9th column.
Daily climbing, in thousands of feet, is recorded in the 10th
column. Check marks in the next columns indicate if a heart rate
recording or specific workout log is associated with the day’s training.
The group ridden with, the type of ride, and the location are recorded in subsequent columns.
The 16th and 17th columns are checked if specific on- or off-the-bike strength training or stretching took place that day.
Subsequent columns are for comments, hours of sleep, sleep quality on a 1-5 scale, perceived recovery on a 1-5 scale, resting heart rate, mood in the morning on a 1-5 scale, and energy riding on a 1-5 scale.
Body weight is recorded about once a week. A final column for cross-training or other recording completes
the table. * For clarity, the “Day” boxes and the weekly total boxes in the
training-log table have gray entries. Download a blank training log that you can use for your own record keeping from arniebakercycling.com.
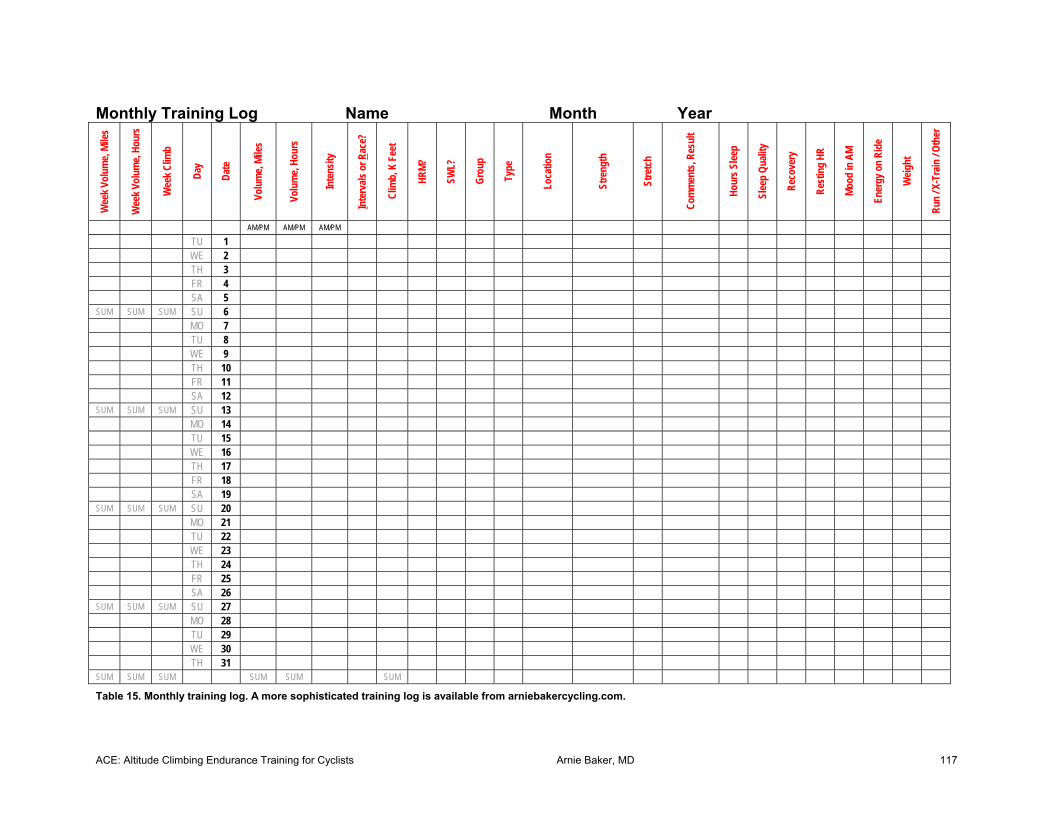
ACE: Altitude Climbing Endurance Training for Cyclists Arnie Baker, MD 117
Monthly Training Log Name Month Year W
eek V
olum
e, Mi
les
Wee
k Vol
ume,
Hour
s
Wee
k Clim
b
Day
Date
Volu
me,
Miles
Volu
me,
Hour
s
Inte
nsity
I nte
rvals
or R
ace?
Clim
b, K
Fee
t
HRM?
SWL?
Grou
p
Type
Loca
tion
Stre
ngth
Stre
tch
Com
men
ts, R
esul
t
Hour
s Slee
p
Slee
p Qu
ality
Reco
very
Rest
ing
HR
Mood
in A
M
Ener
gy o
n Ri
de
Weig
ht
Run
/ X-T
rain
/ Oth
er
AM/PM AM/PM AM/PM
TU 1 WE 2 TH 3 FR 4 SA 5
SUM SUM SUM SU 6 MO 7 TU 8 WE 9 TH 10 FR 11 SA 12
SUM SUM SUM SU 13 MO 14 TU 15 WE 16 TH 17 FR 18 SA 19
SUM SUM SUM SU 20 MO 21 TU 22 WE 23 TH 24 FR 25 SA 26
SUM SUM SUM SU 27 MO 28 TU 29 WE 30 TH 31
SUM SUM SUM SUM SUM SUM
Table 15. Monthly training log. A more sophisticated training log is available from arniebakercycling.com.
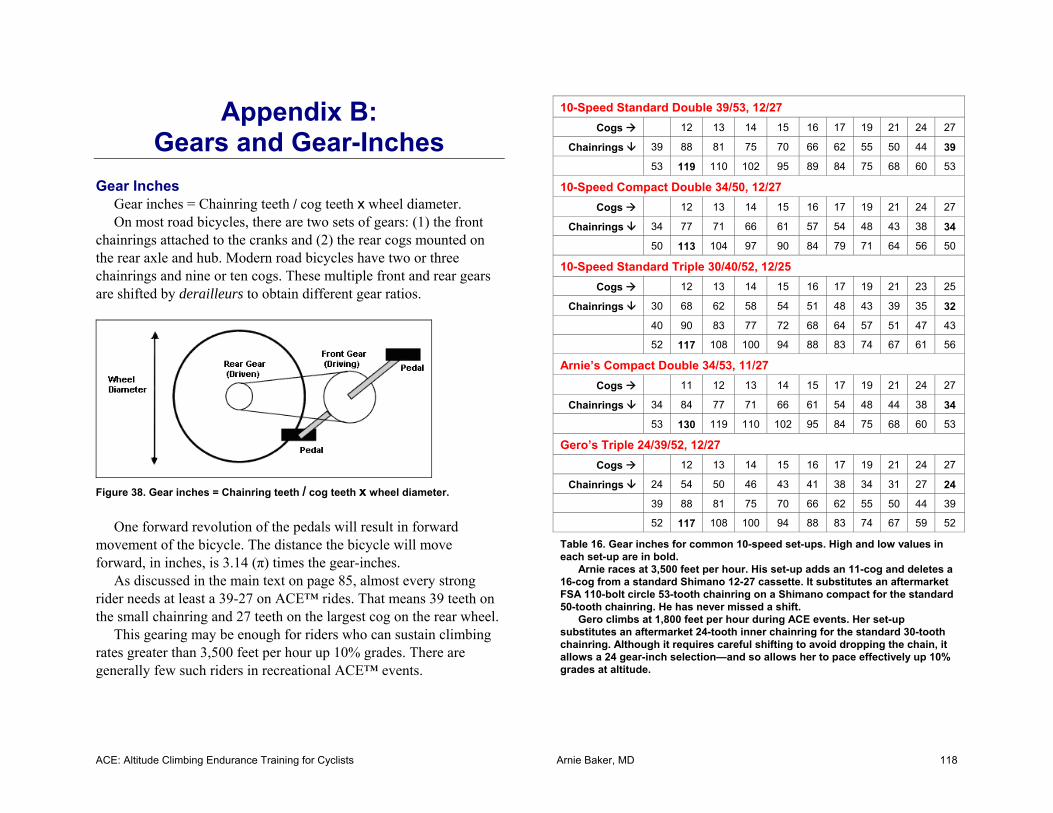
ACE: Altitude Climbing Endurance Training for Cyclists Arnie Baker, MD 118
Appendix B: Gears and Gear-Inches
Gear Inches
Gear inches = Chainring teeth / cog teeth x wheel diameter. On most road bicycles, there are two sets of gears: (1) the front
chainrings attached to the cranks and (2) the rear cogs mounted on the rear axle and hub. Modern road bicycles have two or three chainrings and nine or ten cogs. These multiple front and rear gears are shifted by derailleurs to obtain different gear ratios.
Figure 38. Gear inches = Chainring teeth / cog teeth x wheel diameter.
One forward revolution of the pedals will result in forward
movement of the bicycle. The distance the bicycle will move forward, in inches, is 3.14 (π) times the gear-inches.
As discussed in the main text on page 85, almost every strong rider needs at least a 39-27 on ACE™ rides. That means 39 teeth on the small chainring and 27 teeth on the largest cog on the rear wheel.
This gearing may be enough for riders who can sustain climbing rates greater than 3,500 feet per hour up 10% grades. There are generally few such riders in recreational ACE™ events.
10-Speed Standard Double 39/53, 12/27
Cogs 12 13 14 15 16 17 19 21 24 27
Chainrings 39 88 81 75 70 66 62 55 50 44 39
53 119 110 102 95 89 84 75 68 60 53
10-Speed Compact Double 34/50, 12/27
Cogs 12 13 14 15 16 17 19 21 24 27
Chainrings 34 77 71 66 61 57 54 48 43 38 34
50 113 104 97 90 84 79 71 64 56 50
10-Speed Standard Triple 30/40/52, 12/25
Cogs 12 13 14 15 16 17 19 21 23 25
Chainrings 30 68 62 58 54 51 48 43 39 35 32
40 90 83 77 72 68 64 57 51 47 43
52 117 108 100 94 88 83 74 67 61 56
Arnie’s Compact Double 34/53, 11/27
Cogs 11 12 13 14 15 17 19 21 24 27
Chainrings 34 84 77 71 66 61 54 48 44 38 34
53 130 119 110 102 95 84 75 68 60 53
Gero’s Triple 24/39/52, 12/27
Cogs 12 13 14 15 16 17 19 21 24 27
Chainrings 24 54 50 46 43 41 38 34 31 27 24
39 88 81 75 70 66 62 55 50 44 39
52 117 108 100 94 88 83 74 67 59 52
Table 16. Gear inches for common 10-speed set-ups. High and low values in each set-up are in bold. Arnie races at 3,500 feet per hour. His set-up adds an 11-cog and deletes a 16-cog from a standard Shimano 12-27 cassette. It substitutes an aftermarket FSA 110-bolt circle 53-tooth chainring on a Shimano compact for the standard 50-tooth chainring. He has never missed a shift. Gero climbs at 1,800 feet per hour during ACE events. Her set-up substitutes an aftermarket 24-tooth inner chainring for the standard 30-tooth chainring. Although it requires careful shifting to avoid dropping the chain, it allows a 24 gear-inch selection—and so allows her to pace effectively up 10% grades at altitude.
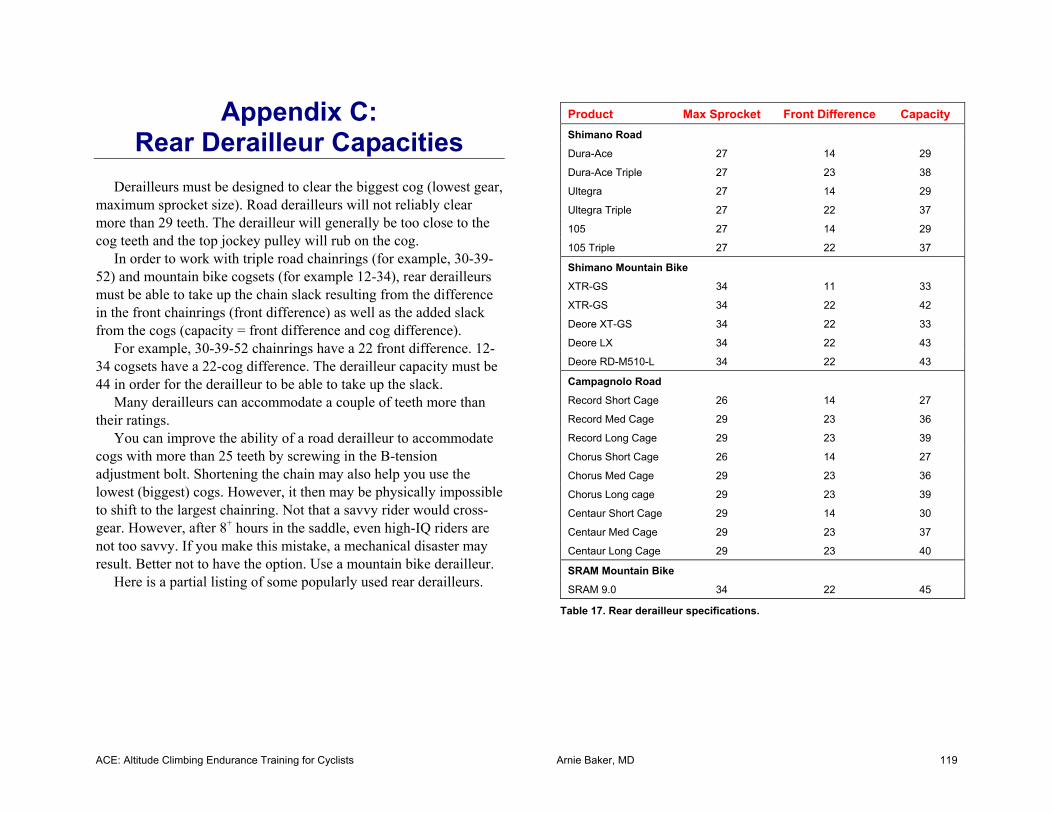
ACE: Altitude Climbing Endurance Training for Cyclists Arnie Baker, MD 119
Appendix C: Rear Derailleur Capacities
Derailleurs must be designed to clear the biggest cog (lowest gear,
maximum sprocket size). Road derailleurs will not reliably clear more than 29 teeth. The derailleur will generally be too close to the cog teeth and the top jockey pulley will rub on the cog.
In order to work with triple road chainrings (for example, 30-39-52) and mountain bike cogsets (for example 12-34), rear derailleurs must be able to take up the chain slack resulting from the difference in the front chainrings (front difference) as well as the added slack from the cogs (capacity = front difference and cog difference).
For example, 30-39-52 chainrings have a 22 front difference. 12-34 cogsets have a 22-cog difference. The derailleur capacity must be 44 in order for the derailleur to be able to take up the slack.
Many derailleurs can accommodate a couple of teeth more than their ratings.
You can improve the ability of a road derailleur to accommodate cogs with more than 25 teeth by screwing in the B-tension adjustment bolt. Shortening the chain may also help you use the lowest (biggest) cogs. However, it then may be physically impossible to shift to the largest chainring. Not that a savvy rider would cross-gear. However, after 8+ hours in the saddle, even high-IQ riders are not too savvy. If you make this mistake, a mechanical disaster may result. Better not to have the option. Use a mountain bike derailleur.
Here is a partial listing of some popularly used rear derailleurs.
Product Max Sprocket Front Difference Capacity Shimano Road
Dura-Ace 27 14 29
Dura-Ace Triple 27 23 38
Ultegra 27 14 29
Ultegra Triple 27 22 37
105 27 14 29
105 Triple 27 22 37
Shimano Mountain Bike
XTR-GS 34 11 33
XTR-GS 34 22 42
Deore XT-GS 34 22 33
Deore LX 34 22 43
Deore RD-M510-L 34 22 43
Campagnolo Road
Record Short Cage 26 14 27
Record Med Cage 29 23 36
Record Long Cage 29 23 39
Chorus Short Cage 26 14 27
Chorus Med Cage 29 23 36
Chorus Long cage 29 23 39
Centaur Short Cage 29 14 30
Centaur Med Cage 29 23 37
Centaur Long Cage 29 23 40
SRAM Mountain Bike
SRAM 9.0 34 22 45
Table 17. Rear derailleur specifications.
ACE: Altitude Climbing Endurance Training for Cyclists Arnie Baker, MD 120
Appendix D: Markleeville ACE™ Secrets
Jackie Johnson’s Tips
At recent Near Death Experience training camps for The Death Ride participants, Jackie Johnson, ride co-coordinator, has had these tips for riders.
1. Popular rides sell out. Know how to register early. 2. Come ready to ride—physically and mentally. Do not plan on
fixing things at your hotel or on the start line. 3. Pack everything. Clothes: Anticipate that the weather may be
cold and raining, or hot and humid. 4. Do not use new equipment. Brings spares if you have esoteric
equipment. 5. Get there at least the day before. 6. If you can pick up your race packet the day before, do so. 7. Know ahead of time where there is good parking. For The Death
Ride: Drive to Turtle Rock. Keep going. Park just past Turtle Rock.
8. If a flexible or staggered start, be ready to ride in the early waves. For Markleeville, plan on starting by 5:30 AM.
9. Avoid congested parking areas if you can. 10. Do not be afraid to ask for help. 11. If your vehicle is parked along the route, as is common for The
Death Ride, use your own vehicle as a stash for an ice chest, and other equipment. Change your socks and shorts, wash your face, and otherwise freshen up. Consider an endurance day favorite: chilled Frappuccino.
12. For most rides with cut-off times, such as The Death Ride, cut-off times are usually serious and enforced.
13. Safety: Watch your speed on descents, especially narrow or twisty passes such as Ebbetts at The Death Ride where slower riders are ascending while you are descending. Find out ahead of time about potholes, cattle grates, or other hazards.
14. Ride safely to the right at all times so that this becomes subconscious; at the end of ACE™ rides, you may not have much consciousness left.
15. Where there are controlled intersections, such as the intersection at Woodfords in The Death Ride, police are often present to enforce controls and will ticket riders who do not stop.
16. Bathroom lines can be a problem. Check with the promoter. There are often relatively little used commodes. For example, in The Death Ride there are extra bathrooms at Pickett’s, the campground at Ebbetts, behind the Chamber of Commerce in Markleeville, just past Hangman’s’ bridge, and at the intersection of Pickett’s and Monitor. Lines are longest at the tops and bottoms of climbs.
17. Stay a little out of synch with the masses for rest stops—lines will be shorter and your stops will be faster.
18. Many rides require rider registration and special identification. At The Death Ride, it is a waterbottle.
19. If you need all the time, you can to finish an event, keep in mind that some promoters will turn a blind eye to starting a little early. Check. It is okay to start 15-20 minutes early at The Death Ride.
20. If starting before dawn, use lights. 21. If you start early, keep in mind that rest stops may not be ready
and traffic controls not yet in place. 22. When you start in the dark, it may be difficult to remember to
preapply sunscreen.
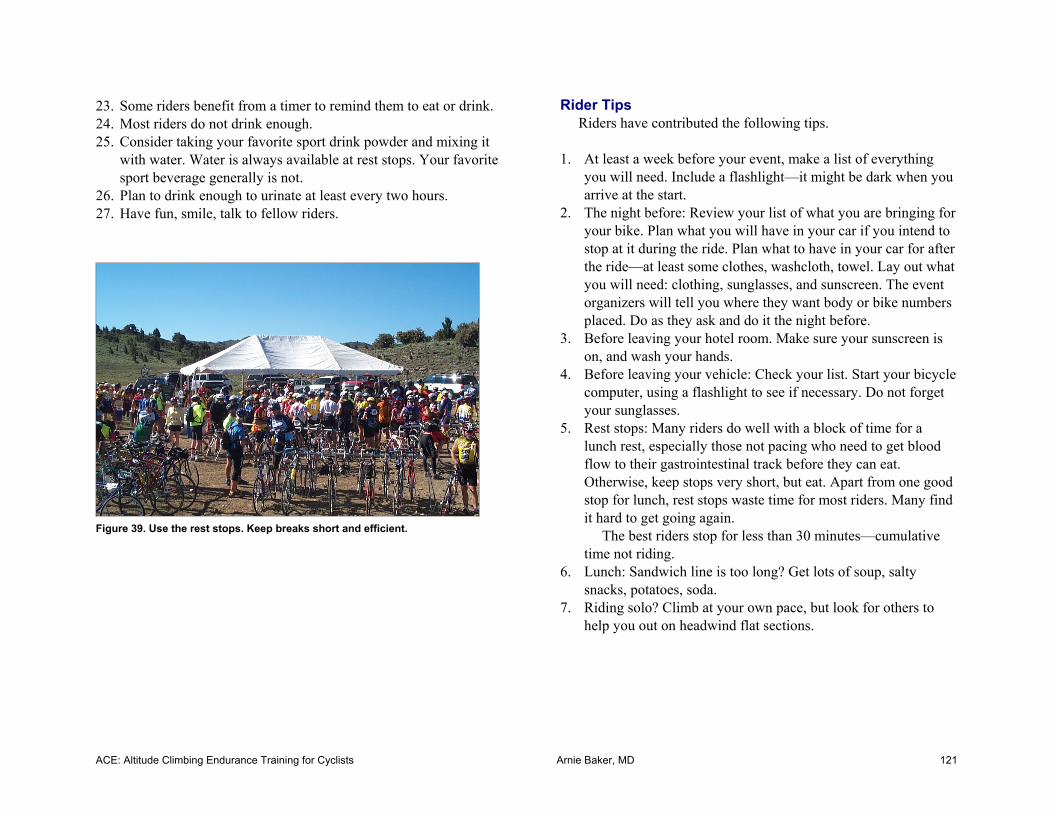
ACE: Altitude Climbing Endurance Training for Cyclists Arnie Baker, MD 121
23. Some riders benefit from a timer to remind them to eat or drink. 24. Most riders do not drink enough. 25. Consider taking your favorite sport drink powder and mixing it
with water. Water is always available at rest stops. Your favorite sport beverage generally is not.
26. Plan to drink enough to urinate at least every two hours. 27. Have fun, smile, talk to fellow riders.
Figure 39. Use the rest stops. Keep breaks short and efficient.
Rider Tips Riders have contributed the following tips.
1. At least a week before your event, make a list of everything you will need. Include a flashlight—it might be dark when you arrive at the start.
2. The night before: Review your list of what you are bringing for your bike. Plan what you will have in your car if you intend to stop at it during the ride. Plan what to have in your car for after the ride—at least some clothes, washcloth, towel. Lay out what you will need: clothing, sunglasses, and sunscreen. The event organizers will tell you where they want body or bike numbers placed. Do as they ask and do it the night before.
3. Before leaving your hotel room. Make sure your sunscreen is on, and wash your hands.
4. Before leaving your vehicle: Check your list. Start your bicycle computer, using a flashlight to see if necessary. Do not forget your sunglasses.
5. Rest stops: Many riders do well with a block of time for a lunch rest, especially those not pacing who need to get blood flow to their gastrointestinal track before they can eat. Otherwise, keep stops very short, but eat. Apart from one good stop for lunch, rest stops waste time for most riders. Many find it hard to get going again. The best riders stop for less than 30 minutes—cumulative time not riding.
6. Lunch: Sandwich line is too long? Get lots of soup, salty snacks, potatoes, soda.
7. Riding solo? Climb at your own pace, but look for others to help you out on headwind flat sections.
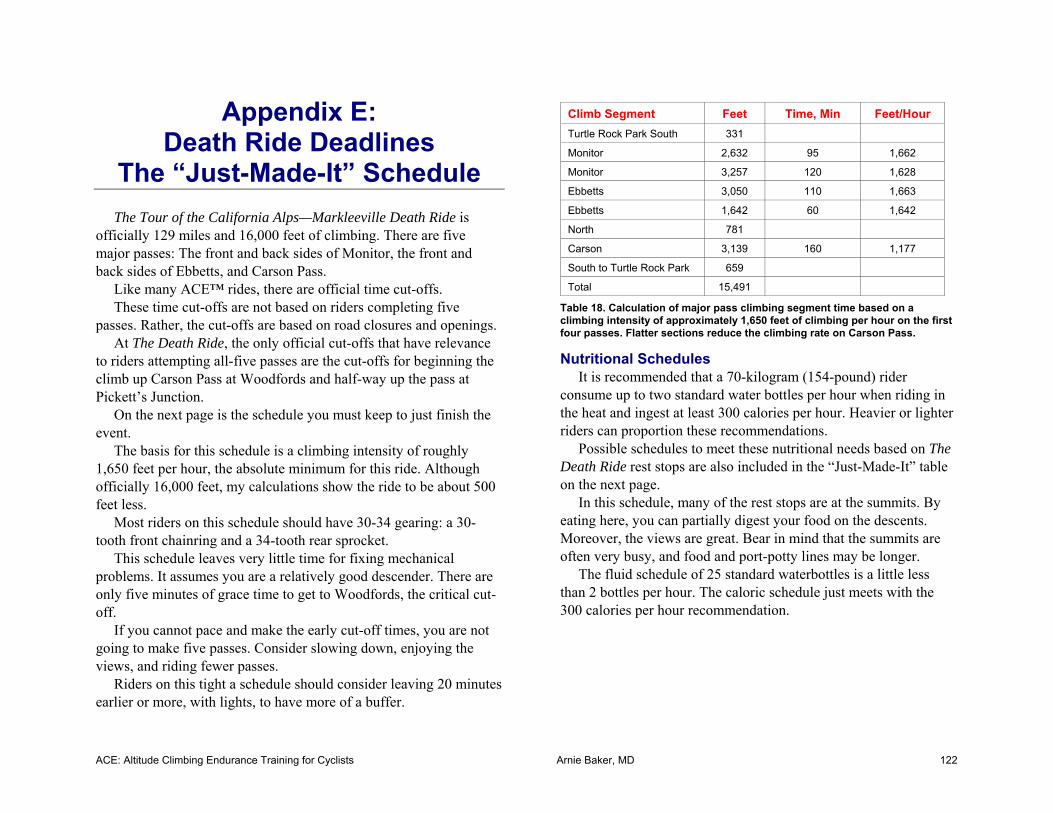
ACE: Altitude Climbing Endurance Training for Cyclists Arnie Baker, MD 122
Appendix E: Death Ride Deadlines
The “Just-Made-It” Schedule The Tour of the California Alps—Markleeville Death Ride is
officially 129 miles and 16,000 feet of climbing. There are five major passes: The front and back sides of Monitor, the front and back sides of Ebbetts, and Carson Pass.
Like many ACE™ rides, there are official time cut-offs. These time cut-offs are not based on riders completing five
passes. Rather, the cut-offs are based on road closures and openings. At The Death Ride, the only official cut-offs that have relevance
to riders attempting all-five passes are the cut-offs for beginning the climb up Carson Pass at Woodfords and half-way up the pass at Pickett’s Junction.
On the next page is the schedule you must keep to just finish the event.
The basis for this schedule is a climbing intensity of roughly 1,650 feet per hour, the absolute minimum for this ride. Although officially 16,000 feet, my calculations show the ride to be about 500 feet less.
Most riders on this schedule should have 30-34 gearing: a 30-tooth front chainring and a 34-tooth rear sprocket.
This schedule leaves very little time for fixing mechanical problems. It assumes you are a relatively good descender. There are only five minutes of grace time to get to Woodfords, the critical cut-off.
If you cannot pace and make the early cut-off times, you are not going to make five passes. Consider slowing down, enjoying the views, and riding fewer passes.
Riders on this tight a schedule should consider leaving 20 minutes earlier or more, with lights, to have more of a buffer.
Climb Segment Feet Time, Min Feet/Hour Turtle Rock Park South 331
Monitor 2,632 95 1,662
Monitor 3,257 120 1,628
Ebbetts 3,050 110 1,663
Ebbetts 1,642 60 1,642
North 781
Carson 3,139 160 1,177
South to Turtle Rock Park 659
Total 15,491
Table 18. Calculation of major pass climbing segment time based on a climbing intensity of approximately 1,650 feet of climbing per hour on the first four passes. Flatter sections reduce the climbing rate on Carson Pass.
Nutritional Schedules It is recommended that a 70-kilogram (154-pound) rider
consume up to two standard water bottles per hour when riding in the heat and ingest at least 300 calories per hour. Heavier or lighter riders can proportion these recommendations.
Possible schedules to meet these nutritional needs based on The Death Ride rest stops are also included in the “Just-Made-It” table on the next page.
In this schedule, many of the rest stops are at the summits. By eating here, you can partially digest your food on the descents. Moreover, the views are great. Bear in mind that the summits are often very busy, and food and port-potty lines may be longer.
The fluid schedule of 25 standard waterbottles is a little less than 2 bottles per hour. The caloric schedule just meets with the 300 calories per hour recommendation.
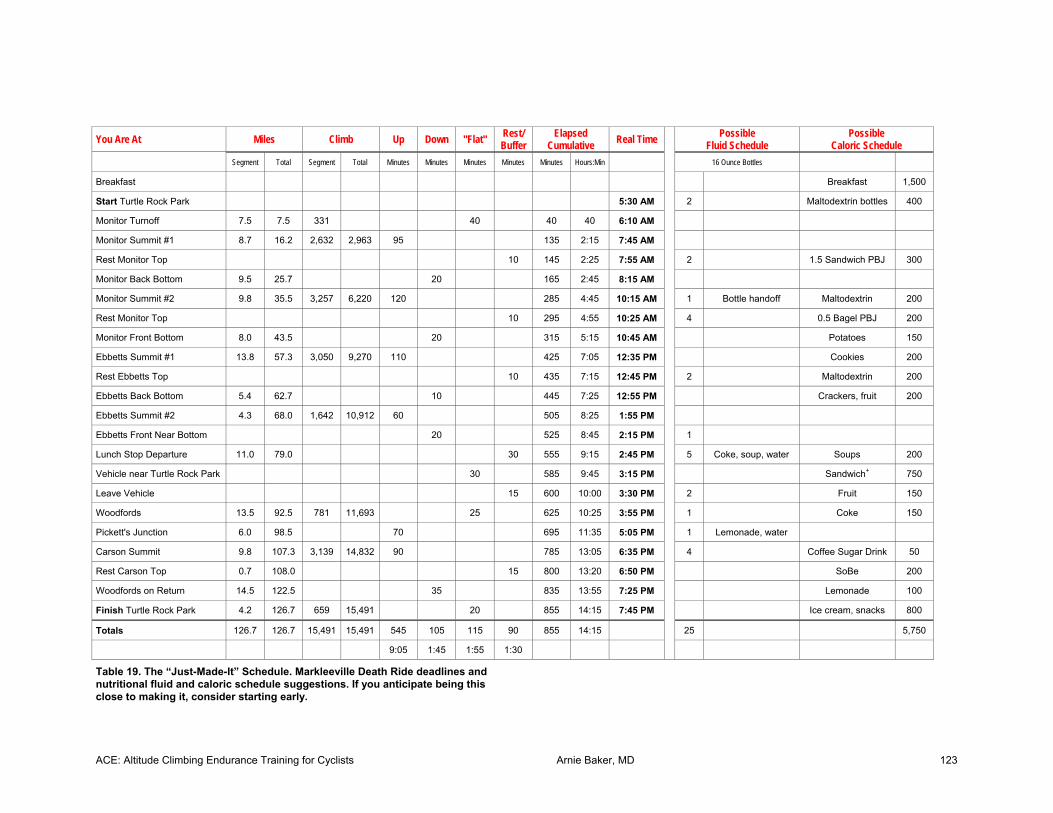
ACE: Altitude Climbing Endurance Training for Cyclists Arnie Baker, MD 123
You Are At Miles Climb Up Down "Flat" Rest/ Buffer
Elapsed Cumulative Real Time Possible
Fluid Schedule Possible
Caloric Schedule Segment Total Segment Total Minutes Minutes Minutes Minutes Minutes Hours:Min 16 Ounce Bottles
Breakfast Breakfast 1,500
Start Turtle Rock Park 5:30 AM 2 Maltodextrin bottles 400
Monitor Turnoff 7.5 7.5 331 40 40 40 6:10 AM
Monitor Summit #1 8.7 16.2 2,632 2,963 95 135 2:15 7:45 AM
Rest Monitor Top 10 145 2:25 7:55 AM 2 1.5 Sandwich PBJ 300
Monitor Back Bottom 9.5 25.7 20 165 2:45 8:15 AM
Monitor Summit #2 9.8 35.5 3,257 6,220 120 285 4:45 10:15 AM 1 Bottle handoff Maltodextrin 200
Rest Monitor Top 10 295 4:55 10:25 AM 4 0.5 Bagel PBJ 200
Monitor Front Bottom 8.0 43.5 20 315 5:15 10:45 AM Potatoes 150
Ebbetts Summit #1 13.8 57.3 3,050 9,270 110 425 7:05 12:35 PM Cookies 200
Rest Ebbetts Top 10 435 7:15 12:45 PM 2 Maltodextrin 200
Ebbetts Back Bottom 5.4 62.7 10 445 7:25 12:55 PM Crackers, fruit 200
Ebbetts Summit #2 4.3 68.0 1,642 10,912 60 505 8:25 1:55 PM
Ebbetts Front Near Bottom 20 525 8:45 2:15 PM 1
Lunch Stop Departure 11.0 79.0 30 555 9:15 2:45 PM 5 Coke, soup, water Soups 200
Vehicle near Turtle Rock Park 30 585 9:45 3:15 PM Sandwich+ 750
Leave Vehicle 15 600 10:00 3:30 PM 2 Fruit 150
Woodfords 13.5 92.5 781 11,693 25 625 10:25 3:55 PM 1 Coke 150
Pickett's Junction 6.0 98.5 70 695 11:35 5:05 PM 1 Lemonade, water
Carson Summit 9.8 107.3 3,139 14,832 90 785 13:05 6:35 PM 4 Coffee Sugar Drink 50
Rest Carson Top 0.7 108.0 15 800 13:20 6:50 PM SoBe 200
Woodfords on Return 14.5 122.5 35 835 13:55 7:25 PM Lemonade 100
Finish Turtle Rock Park 4.2 126.7 659 15,491 20 855 14:15 7:45 PM Ice cream, snacks 800
Totals 126.7 126.7 15,491 15,491 545 105 115 90 855 14:15 25 5,750
9:05 1:45 1:55 1:30
Table 19. The “Just-Made-It” Schedule. Markleeville Death Ride deadlines and nutritional fluid and caloric schedule suggestions. If you anticipate being this close to making it, consider starting early.

ACE: Altitude Climbing Endurance Training for Cyclists Arnie Baker, MD 124
Appendix F: Famous Climbs
Death Ride Climbs
Climb Gain Feet
Distance Miles
AverageGrade
Elevation Finish
Carson 3,139 9.8 6.2% 8,573
Ebbetts, Front Side 3,050 13.8 4.3% 8,731
Ebbetts, Back Side 1,642 4.3 7.3% 8,731
Monitor, Front Side 2,632 8.7 5.8% 8,314
Monitor , Back Side 3,257 9.8 6.4% 8,314
Other California Climbs
Climb Gain Feet
Distance Miles
AverageGrade
Elevation Finish
Crystal Lake 3,495 11.5 5.8% 5,045
Glendora Mt. 2,398 8.5 5.4% 3,467
Mt. Baldy 4,615 12.6 7.0% 6,260
Mt. Hamilton 4,300 19.0 4.4%
Mt. Palomar, South Grade 4,211 11.2 7.2% 5,255
Mt. Tam 1,976 12.5 3.0% 5,045
Montezuma 3,400 11.0 5.9% 4,000
Old La Honda 1,260 3.3 7.3% 1,683
Other US Climbs
Climb Gain Feet
Distance Miles
AverageGrade
Elevation Finish
Haleakala, HI 10,002 35.8 5.4% 10,004
Larch Mt. Oregon, WA 4,429 14.5 4.7% 4,337
Mt. Charleston, NV 4,750 17.2 5.3% 8,450
Mt. Evans, CO 7,100 29.2 4.7% 14,264
Mt. Graham, AZ 5,689 20.0 5.5% 9,000
Mt. Mitchell, NC 4,790 20.2 4.6% 6,591 Mt. Washington, NH 4,727 7.7 11.9% 6,287
Sandia Crest, NM 5,730 28.0 3.9% 10,639
Pro Tour Climbs
Climb Gain Feet
Distance Miles
AverageGrade
Elevation Finish
Alpe d’Huez, France 3,656 8.1 8.2% 5,839
Alto de l’Angliru 4,107 7.7 10.3% 5,150
Col de Fauniera, Italy 5,348 15.7 6.6% 7,926
Col de Galibier, North, France 6,611 21.8 5.8% 8,677
Col de Glandon, France 4,462 11.4 7.5% 6,312
Col de l’Iseran 6,708 29.1 4.4% 9,086
Col de Madelaine, France 5,033 12.1 8.0% 6,509
Col dell’Agnello, Italy 5,830 19.6 5.7% 9,015
Col du Aubisque, France 5,045 23.8 4.1% 5,606
Col du Tourmalet, France 4,605 11.3 7.8% 6,937
Hautacam, France 4,183 9.6 8.4% 5,036
Mont Ventoux, France 5,312 13.7 7.5% 6,263
Passo dello Stelvio, Italy 6,040 16.0 7.3% 9,045
Passo di Gavia, Italy 4,671 16.0 5.6% 8.587
Puerto de Navafria, Spain 2,083 7.2 5.6% 5,832
Sestrieres, Italy 3,001 13.5 4.3% 6,675
Simplon Pass, Italy 5,741 24.9 4.4% 6,578
Table 20. Death Ride, California, US, and professional tour climbs. Although gain, distance, and average grade all contribute to climbing difficulty, numbers can be deceiving. For example, the front side of Ebbetts Pass has several miles of shallow grade and many later sections over 10%. For more climbs, see: http://www.cycle2max.com/ and http://www.cyclingcols.com/.
ACE: Altitude Climbing Endurance Training for Cyclists Arnie Baker, MD 125
Appendix G: Training Glossary ACE Event—Hilly centuries+—one-day events over 100 miles
with more than 10,000 feet of climbing. Aerobic—With oxygen as a fuel source. Implied intensity is
below anaerobic level. Implied level of work is low enough that buildup of lactic acid is avoided and exercise can be continued for prolonged periods.
Anaerobic—Without the presence of oxygen. Implies a high level of work intensity that can only be maintained for relatively short periods of time. A very short energy production system—that of creatine phosphate—can supply energy need for about 10 seconds without the production of lactic acid. Other anaerobic efforts result in high levels of lactic acid.
Anaerobic-Endurance—The ability to maintain near-sprint speed for up to several minutes. Sometimes called speed-endurance. The ability to tolerate high lactic acid levels is implicit.
Bonk—The exhaustion point in endurance events related to depleted carbohydrates.
Cadence—Revolutions per minute of the legs. Cardiovascular—Referring to the heart and blood vessels. Creatine Phosphate—A chemical in cells that can briefly
replenish ATP and thereby produce energy for very short (up to 10 seconds) events.
Duration—Length of time spent performing an interval. If work is continuous, volume and duration are the same.
Endurance—Ability to last. Fartlek—“Speed play,” unstructured intervals. Fast-Twitch—Muscle fiber type characterized by a fast response
to nerve stimulation. This type of muscle fiber tends to be useful in strength or power activities such as sprinting. Also called Type II muscle fiber.
Glucose—A simple sugar. Used by the body for energy. Glycogen—A complex sugar. A form of storage energy in the
body. Hammer—Hard sustained effort. Intensity—Load or speed of work. Interval—Period of work. Interval Workout—Hard training efforts interspersed with
recovery or relief periods. The length of the interval normally is from just a few seconds to several minutes. The length of the interval, intensity of effort, gear (or workload) and cadence emphasize different aspects of fitness. Short efforts at high workloads tend to emphasize fast-twitch muscle strength. Efforts of a few minutes emphasize speed-endurance. Longer intervals emphasize lactic acid tolerance.
Isolated Leg Training, ILT—Training technique of riding with one leg.
Lactic Acid—A product of the body’s metabolism. Normally the blood contains less than one millimole of lactic acid per liter. Efforts up to time-trial threshold may result in levels of up to four to eight millimoles per liter. Levels higher than this cannot be sustained for prolonged periods of time.
Lactic Acid Clearance—The ability to clear, or metabolize, lactic acid.
Lactic Acid Tolerance—The ability to tolerate high lactic acid levels.
Leg Speed—How fast one can turn the cranks. Neuromuscular—Relating to the connection that occurs
between nerve and muscle. Often used in the context of coordination, leg speed, or skills
Noodling—Easy or recovery riding. Periodization—Training different aspects of fitness at different
periods of time. Power—Work performed per unit of time.
ACE: Altitude Climbing Endurance Training for Cyclists Arnie Baker, MD 126
Recovery—Period of training time when not working hard—rest or relative-rest period. Many athletes view training as work. Work is only part of the equation: TRAINING = WORK + RECOVERY.
Repetitions—The number of times a task or interval is repeated. Set—In training, a group of repetitions. Skill Workout—Workouts without intensity designed to acquire
neuromuscular co-ordination skills or techniques. Slow-Twitch—Muscle fiber type characterized by a slow
response to nerve stimulation. This type of muscle fiber tends to be useful in endurance activities. Also called Type I muscle fiber.
Snap—The ability to accelerate quickly. Specificity—Training principle that states you specifically
improve those characteristics of fitness that you train. Speed—Quickness, how fast one can go. Speed-Endurance—Anaerobic-endurance. The ability to
maintain near-sprint speed for up to several minutes. The ability to tolerate high lactic acid levels is implicit.
Sprint—Acceleration (and usually maintenance) of very-high speed.
Strength—Force that can be applied. Physiologists sometimes define strength as one-rep maximum—the maximum weight or force that a muscle can generate once. This is really a fast-twitch, or anaerobic-muscle measure. Maximum muscle force has a lot to do with pure sprinting.
Strength-Endurance—Slow-twitch muscle strength. Aerobic-muscle strength.
Surge—Moderate acceleration from one tempo to a faster tempo or threshold pace. Not as abrupt as a jump or attack.
Tempo—Pace. Normally implies moderately hard, steady riding or running below time-trial threshold or race pace.
Time-Trial Threshold—Maximum pace for efforts of 20 to 60 minutes in duration. Anaerobic threshold, lactic acid threshold, and ventilation thresholds, terms physiologists use, are all at lower levels.
Training Effect—The body’s response and adaptation to physical demands.
Volume of Training—Total time of intense training. If training is continuous, volume and duration are the same.
VO2 Max—The maximum uptake of oxygen a person can utilize to produce energy. A measure of the ability of muscles to use oxygen. An important determinant of fitness and success.
Wind-up—To accelerate up to speed. Less abrupt than a jump, or attack.
ACE: Altitude Climbing Endurance Training for Cyclists Arnie Baker, MD 127
Appendix H: ABC Publications The following subjects of this book are available as separate
handouts from http://arniebakercycling.com. Additional material is sometimes provided in the handouts.
Handouts • ACE™ Tips • Achilles Tendonitis & Bursitis • Climbing & Descending • Dealing With High Altitude • Endurance Sport Nutrition • Fitness Elements • Focus & Breathing • Forefoot Problems • Heart-Rate-Based Training • Isolated Leg Training • Maltodextrin Nutrition • Motivation • Muscle Cramps • Pacing • Six Climbing Positions—Road Cycling • Saddle Soreness
Enjoyed this Book? Readers of this book have also frequently ordered the following
available from http://arniebakercycling.com: Books • Bike Fit • High Intensity Training (HIT) for Cyclists • Nutrition for Sports • Psychling Psychology—Mind Training for Cyclists
Handouts • Aerobic Training • Century Training, Schedules, and Event Tips • Lumberjack Pacing • Maltodextrin Nutrition • Overtraining • Power-Based Training • Recovery • Stationary Training • Tips to Lose Weight • Training and Fitness Standards of Excellence • Training Logs • Warm Ups for Racing • Work of Breathing • Workout Series Handouts (Stationary Trainer Workouts)