Embed Size (px)
Citation preview
i
Copyright © 2018 by Charalampos (Haris) KapolosAll rights reserved. This book is distributed in different languages for free via thewebsite www.gobook.eu where the whole project is explained in more detail.When sharing this book, please do so by referring to the original website, so that everyone can contribute to the embellishment of the available translationsand the books provided.
Published in Greece, 2018by Charalampos KapolosSterea Ellada, Greecewww.gobook.euISBN 978-618-00-0799-3Last update : 07 September 2019
Typesetting and diagrams made by Haris KapolosFor the diagrams, the KGS free client was used.Cover Art : Pixlebun ( https://www.redbubble.com/people/pixlebun )
ii
Dedications
This book is dedicated to Nick Sibicky for showing me that you do not have to bea top professional player in order to be useful and spread the knowledge and joy ofplaying Go. Whatever knowledge we all have is precious and however small is the service andhelp that we can provide, it is always better than offering nothing back.
Acknowledgements
I would like to thank: - All the people that have played Go with me in the DGS and OGS clients. Withoutthem there would have been no content to write a book and I wouldn’t have becomea better player.- The KGS client for providing free Go client services and making the creation of allthose diagrams a smooth process. - My friends for the support and helping me proofread the first chapter of this bookwhen I wrote it back in 2017. They helped me notice some things that were notaesthetically correct before I blundered on to making the same mistakes for the restof the 180 pages. Thinking of the corrections I would have had to do makes meshudder (and the first chapter still has a couple of oddly sized diagrams, but the restof the book is quite fine).- Pixlebun for her amazing and creative cover art and Ailin Hsiao for permitting meto use that beautiful photo in page 5. - And last, but not the least, all the people that have helped with the project, sinceits public launch in December 2018. I really appreciate it.
iii
Table of contents
Chapter 1 - Introduction What is Go and why should we be interested in it? page 1Basic Rules (placing stones/ capturing / eyes / Ko / scoring ) page 6
s Go ranks and handicap games for all page 15
Chapter 2 - ShapesRelations between two stones page 18Relations between multiple stones page 23
s Influence and walls page 23 s Tiger’s mouth page 26s The ladder page 28s The Bamboo joint page 31s The Table shape page 32s The Dragon’s mouth page 34s Hane/Double Hane page 35s The Iron pillar page 36s The empty triangle page 36s Pincers page 37s Glossary (so far) page 38
Chapter 3 - Let’s PlayThe Opening page 39The Middle game page 45
s Light and Heavy page 50 The Endgame page 55
Chapter 4 - Joseki and FusekiWhat are Joseki and Fuseki page 634-4 star point joseki page 65
s 3-3 invasion joseki page 66 s Knight’s move approach joseki page 68
3-4 point joseki page 81The Kobayashi fuseki page 89The Chinese fuseki page 93The San-Ren-Sei page 97
iv
Chapter 5 - Attacking and DefendingOn fighting in general page 101Invasions page 103
s Contact plays page 109Reductions page 113Using influence to attack page 129
Chapter 6 - Life and DeathAbout Life and Death page 141Living and dead shapes
s Shapes of three points spaces page 142 s Shapes of four points spaces page 144s Shapes of five points spaces page 146 s Shapes of six points spaces page 147s Shapes of seven or more points spaces page 149
Tesuji (skillful moves) page 150Solving the problems (methodology) page 163
s The L group page 165 s The J group page 167
Chapter 7 - Some advanced topicsLearn to let go page 172More on the “Light and Heavy” subject page 175A few things about Sabaki (flexible “finesse” sequences) page 179Avoid creating too many groups page 183Do not reduce your own liberties for no reason page 187
Epilogue and what is coming next page 191

Page left intentionally blank
Introduction1
From a beginner for beginners8
I feel that I should explain that this book has two main reasons of existence.For its English version the first and foremost reason of existence is that I have neverfound a book written with a beginner's mindset.
Go has extremely simple rules to learn and memorize, but its complexity is simply mind-blowing. In the same way an art student feels overwhelmed in frontof an empty canvas, a beginner is overwhelmed in front of an empty board. We feel that we have no clear strategy and no clear reason for playing some moves.We also know that we do not have the skills or the deep thinking or the ability to playa "great move" or orchestrate a grand design across the board. Every new movewe encounter (and there are so many of them) makes us nervous. We feel lost andwe seek to improve ourselves, but the work is hard, the climb is not guaranteed with"just studying" and the people above us seem to understand so much more than us.
The vast knowledge of a pro or a high-dan seems beyond us and many people“despair” or "burn out" trying to brute force more knowledge of the game. But Go isnot that kind of a game, (un)fortunately, so maybe we should occasionally take astep back and review the fundamentals from a more simple/different perspective. Inthat regard, this book will try and cover as many things as possible and keep themas simple and clear as possible.So, why should you read this book? It is targeted at two different kinds of people:
a) those that want to initiate their friends who know nothing about the gameand present to them a beginner-friendly approach that, hopefully, will not dissuadethem from playing and experimenting with moves and playstyles;
b) double-digit kyu players who, I hope, will find within this book some basicideas on which they can improve, written with a way of thinking similar to their ownand, thus, more easily absorbed.
The second reason is that, to the best of my knowledge, there doesn’t seem tobe a free book that we can share legally if we want to spread knowledge of the gameto new players in every country. I wanted to provide something that could be sharedeasily and legally. A book that wouldn’t need negotiations and publishers tocoordinate in order to translate and distribute.
There are so many countries and so many languages, and not every citizenknows enough English to actually study a manuscript written in a foreign language.But resources and books in every native language are not readily available, so I feltthat something needed to be done.
This book is part of a project that aspires to fill that gap. It is my goal to makeit freely available to as many people and as many languages as possible.
2IntroductionI have to admit that this book is, as far as I know, the only one that is written by
a person who is not a professional Go player or a high dan-level amateur, but youdo not have to be a professional to write a beginner’s guidebook. Hopefully all theaforementioned target groups will find it useful and many other people will attemptto join me and help me with this idea/project.
The state of Go in my home country, Greece, was crucial in creating this project.While I am writing these lines, there is no formal Go “Association" in Greece, noteven a single established Go Club in the country. What does exist is 20-30 peoplethat are each year actually playing the game and are actively doing everything theycan to represent the game within and outside our country. We are all doing our best, but can we spread the word about this wonderful gamewithout Clubs, without an organization, without ways to teach? We cannot.We need a way to teach. A way to bring more people to appreciate this game andparticipate. I believe the best tool for this job is a book, so I made one, because Ithink that was the best I could provide to our collective effort. Outside this context,this book may look vain and might border on blasphemy in what it attempts,but it was never a matter of vanity. For Go in our country it is just a matter ofnecessity. And maybe other languages and countries need a book as well. I’venoticed the teams in the PandaNet EU championship. A lot of teams, in countrieslike ours, do not seem to have a lot of young players in them. Providing youngpeople with a book in their own language might help a lot.
One last thing before you move on to the actual content of the book. In my lineof work as a teacher of programming for school kids, I have noticed something: Kidsget bored easily when you tell them something new without explaining to them whythis new thing is important, useful and exciting. They find it burdensome or useless.They think it is just “more work” for them. The solution I came up for this problemwas to immediately show them the practical application of this new idea I justexplained them, in a real program. Of course, this means that for that moment theycannot fully grasp what exactly happened, but their curiosity is piqued. They realisethat what they were just taught is actually useful and not something vague andboring. So, I used this exact same idea in the book and when I am introducingsomething new, I try to immediately provide an example of a real game and thethoughts and decisions that went behind making those moves. I urge everyonereading the more complex examples to try and play out the moves presented in thediagrams in a real board, or a computer Go editor, and I hope that this will have thesame beneficial effect as it has to my students. If you do not get it all immediately,do not worry. By the end of this book, just like the end of the student’s term,everything will be much clearer.
Thank you for your time and faith in this book,Haris Kapolos, 3 Kyu DGS
Go (Japanese)/ Weiqi (Chinese) / Baduk (Korean) or also known as "thesurrounding game" is a two player abstract strategy game which was invented inChina approximately 2500 years ago and thus it is probably the most ancient boardgame still played today.
Legend has it that it was created either by the ancientChinese emperor Yao or his counsellor to educate theemperor's heir in the ways of the world and teach himdiscipline and balance. Others say that it was evolved fromancient warlords and their maps where they used stonesto carve out their strategy. Whichever the truth of its originsmight be, the fact of the matter is that Go was so importantthat in ancient China it was considered one of the fourcultivated arts of the high class, along with calligraphy,painting and playing the musical instrument guqin.
Go also reached high status in Japan where in the Edo period (1603–1868) theShogunate established the office of minister of Go ("Godokoro") and four hereditaryhouses to teach the game of Go. The modern version of the game is mostly basedon that period of time and this is why in this book we will mostly focus on theJapanese rules in order to keep things simple for new players. Today, of course, thegame does not have ministers, but it is still highly regarded as a game and, in manyplaces, as a form of art and the no longer hereditary Go title-holders are still widelyrespected.
In China, Japan and Korea there are many titles andcups around which the professional world of Gorevolves, as well as many international competitions forboth pros and amateurs. It was estimated in 2008 thatmore than 40 million people play the game, mostlyresiding in east Asia, but since then the game hasprogressed fast outside its traditional hub, especially inthe United States of America, where the American GoAssociation has begun certifying professional playerssince 2012, while in Europe the first professional playerwas certified in 2014 by the European Go Federation.
The game found itself in the spotlight when an Artificial Intelligence, namedAlphaGo, managed to defeat two of the best Go players of this decade, Lee Sedoland Ke Jie, causing a significant stir both in the Go and the computer sciencecommunity which spread the word about the game worldwide.
What is Go3
Past and present8
U.S.A. has held more than thirtyGo Congresses
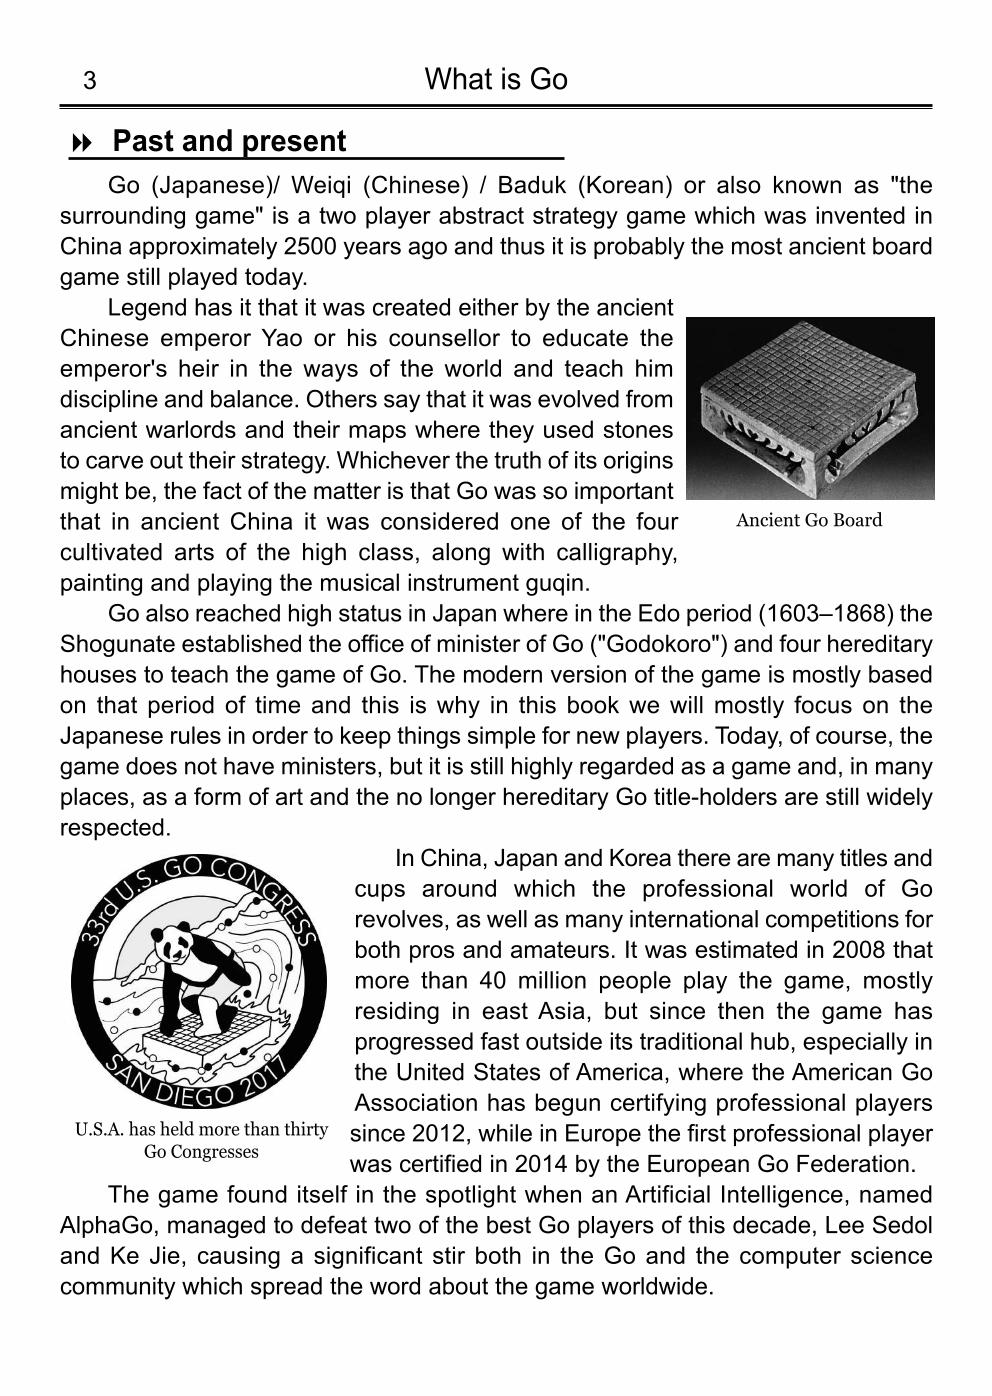
Ancient Go Board
Well, why should we care about any games at all?I think this is the question we need to answer first.
In many countries of the modern world, games have beenrelegated to a past-time reserved for young children andteens, while adults are viewed as immature or uncool whenthey spend their time learning or playing a game. Even inthe case of children, most parents regard games assomething the child is supposed to do to distract itself andgive the parents some quiet time or something which theyplay together with their kids in order to bond and have somefun. But are games really a distraction?
Before we go to the science of the matter, it is worth noting that games in natureare still one of the main ways with which one generation of any species can passknowledge to their younger offspring. So, even without any scientific backup,empirical observation alone should tell us that games are a more serious issue thanmost people imagine or give them credit for. Introducing science into the equation,there is a plethora of studies that indicate that games can actually improve children'sbehaviour, memory, concentration, intuition, self-control and their intelligence ingeneral. Of course not all games do all that, but Go comes very close in providingmost of those benefits at the same time. Training the mind follows the same basicprinciple as training our body. In the same way that we target our physical growth inflexing some particular muscles, games are flexing our "mental muscles." So, let ussee a small overview of what Go does:
It makes us re-evaluate our behaviour and our character, because it is a game•that actively punishes greed, envy, anger and recklessness;It trains our memory, because we will eventually have to remember the shapes•that lead us to win a fight and those that made us lose it;It improves our concentration and intuition, because the Go board and the •situations that arise in it are often complex and unique; It sparks our imagination, because we have to be able to think ahead. •It teaches planning, because it is not a game where we can win by accident, •so we have to devise short and long term strategy to achieve our goals;It challenges our intelligence, because setting the aforementioned goals is •not an easy feat;It improves our sense of evaluation, because in its vast board the possibilities•are many and they have to be constantly re-assessed.
4What is Go
But why should we be interested in it?8
Yasutoshi Yasuda 9p: A pioneer in promoting teaching Go at schools
What is Go5
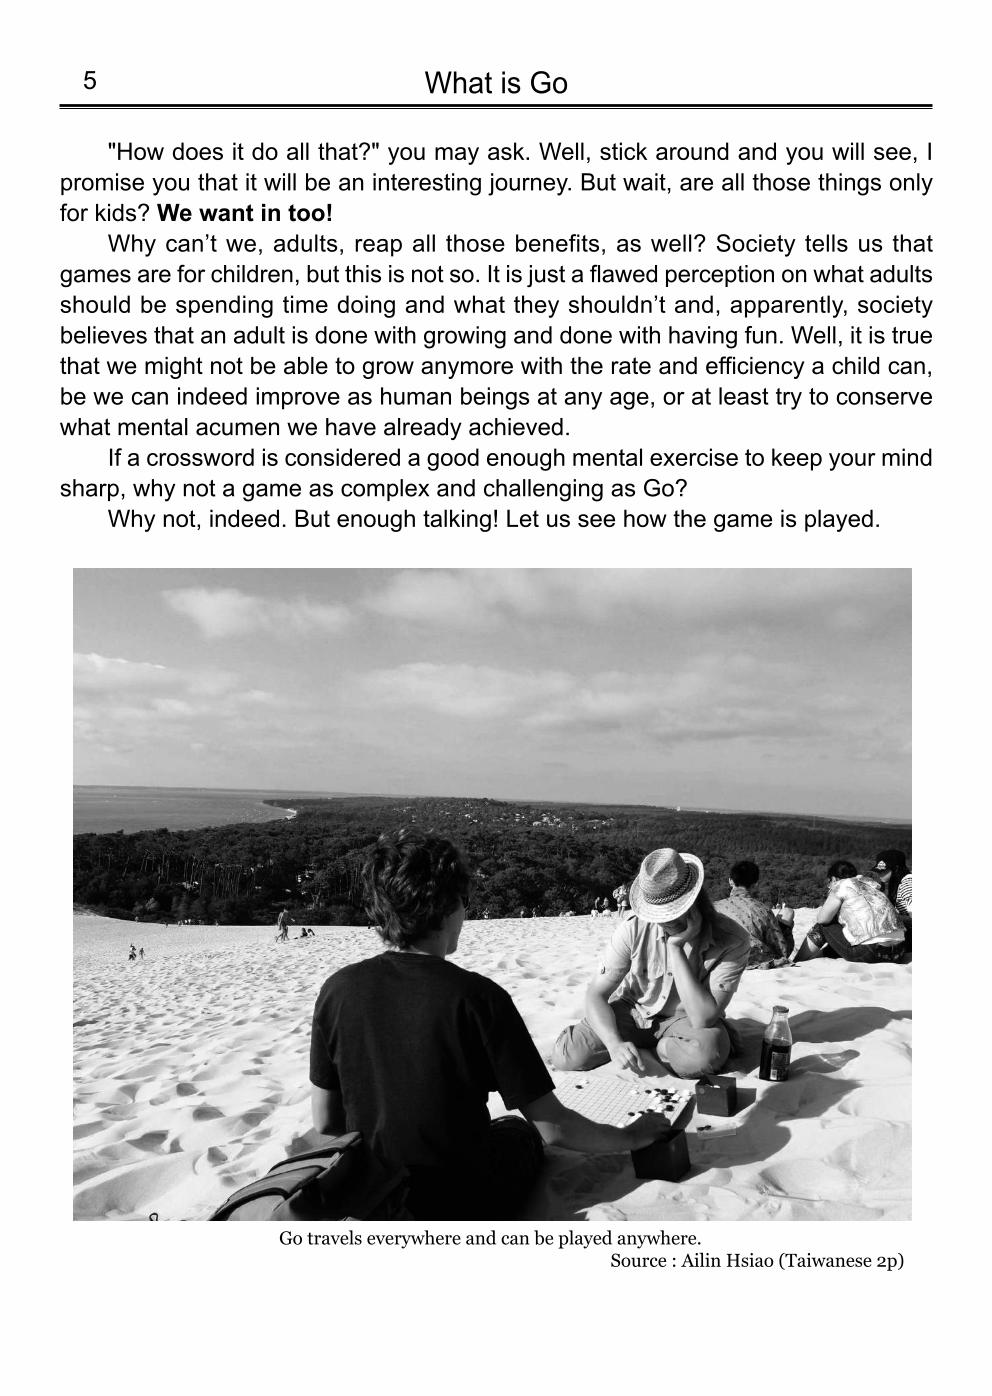
Go travels everywhere and can be played anywhere.Source : Ailin Hsiao (Taiwanese 2p)
"How does it do all that?" you may ask. Well, stick around and you will see, Ipromise you that it will be an interesting journey. But wait, are all those things onlyfor kids? We want in too!
Why can’t we, adults, reap all those benefits, as well? Society tells us thatgames are for children, but this is not so. It is just a flawed perception on what adultsshould be spending time doing and what they shouldn’t and, apparently, societybelieves that an adult is done with growing and done with having fun. Well, it is truethat we might not be able to grow anymore with the rate and efficiency a child can,be we can indeed improve as human beings at any age, or at least try to conservewhat mental acumen we have already achieved.
If a crossword is considered a good enough mental exercise to keep your mindsharp, why not a game as complex and challenging as Go?
Why not, indeed. But enough talking! Let us see how the game is played.
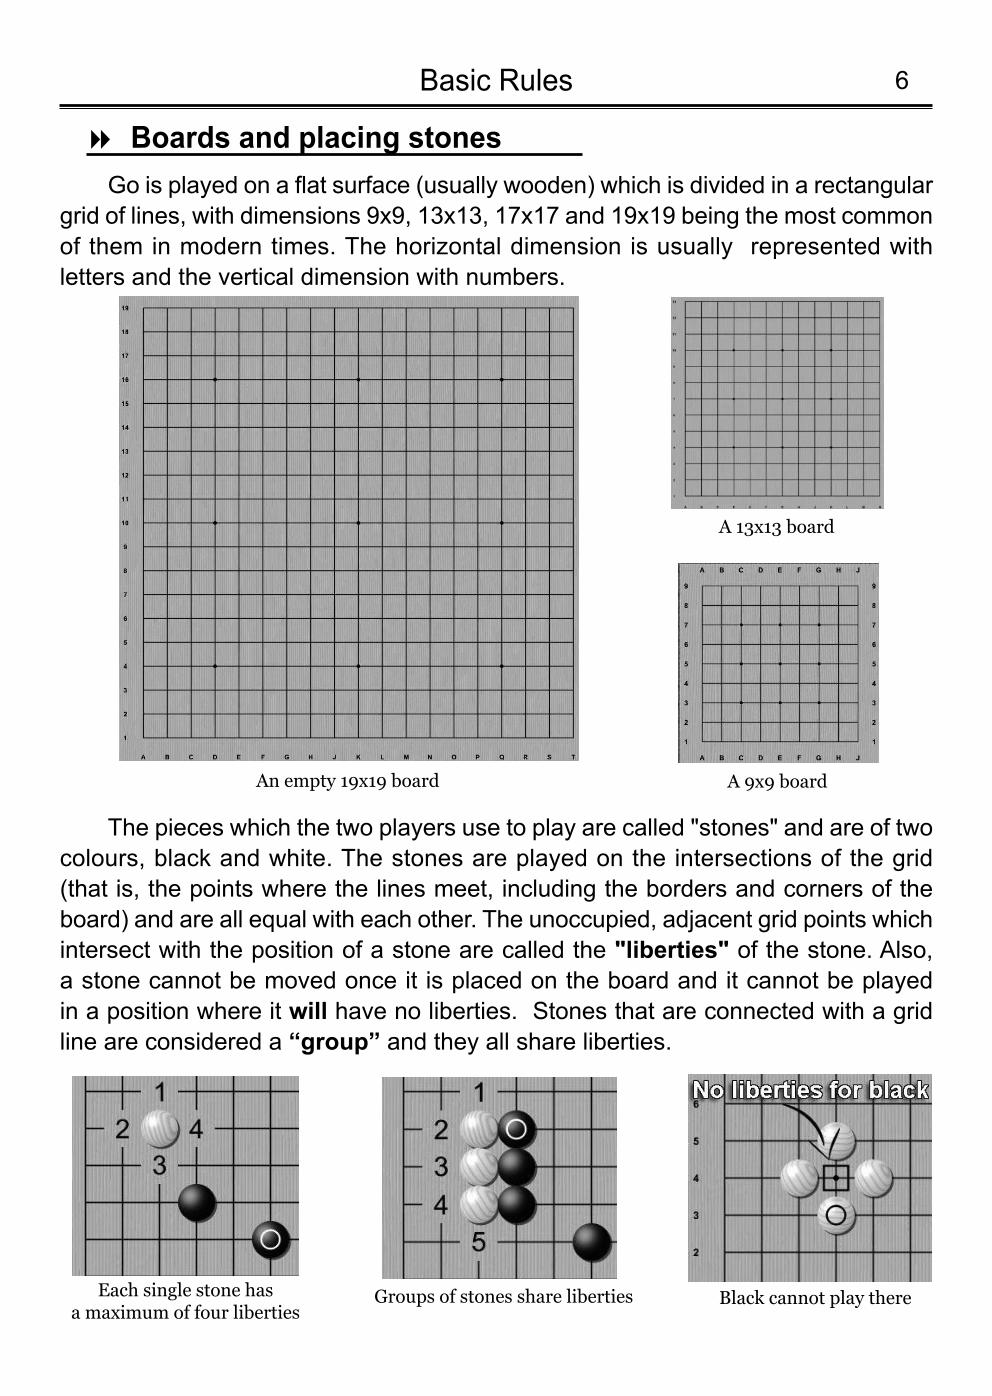
Go is played on a flat surface (usually wooden) which is divided in a rectangulargrid of lines, with dimensions 9x9, 13x13, 17x17 and 19x19 being the most commonof them in modern times. The horizontal dimension is usually represented withletters and the vertical dimension with numbers.
The pieces which the two players use to play are called "stones" and are of twocolours, black and white. The stones are played on the intersections of the grid (that is, the points where the lines meet, including the borders and corners of theboard) and are all equal with each other. The unoccupied, adjacent grid points whichintersect with the position of a stone are called the "liberties" of the stone. Also, a stone cannot be moved once it is placed on the board and it cannot be played in a position where it will have no liberties. Stones that are connected with a gridline are considered a “group” and they all share liberties.
6Basic Rules
Boards and placing stones8
An empty 19x19 board
A 13x13 board
Each single stone has a maximum of four liberties
Groups of stones share liberties
A 9x9 board
Black cannot play there
In Go there is no other kind of special game piece and this is what makes itsbasic rules simple to learn. But each stone can be placed almost anywhere on theboard and this is what creates the immense complexity to the game. Each playertakes one colour of stones and they play alternatively one stone each, trying tosurround as much territory (counted in open grid points, which are called “points”)of the board as they can.
The game normally starts with an empty board and the player with the blackstones plays first. In order for the game to remain balanced, since the first move isconsidered advantageous, the white player gets some points as compensation(called "komi"). The exact number of komi is decided by the players before thegame and it usually varies from 5.5 to 7.5 with the half point being added to avoid atie (called "jigo").
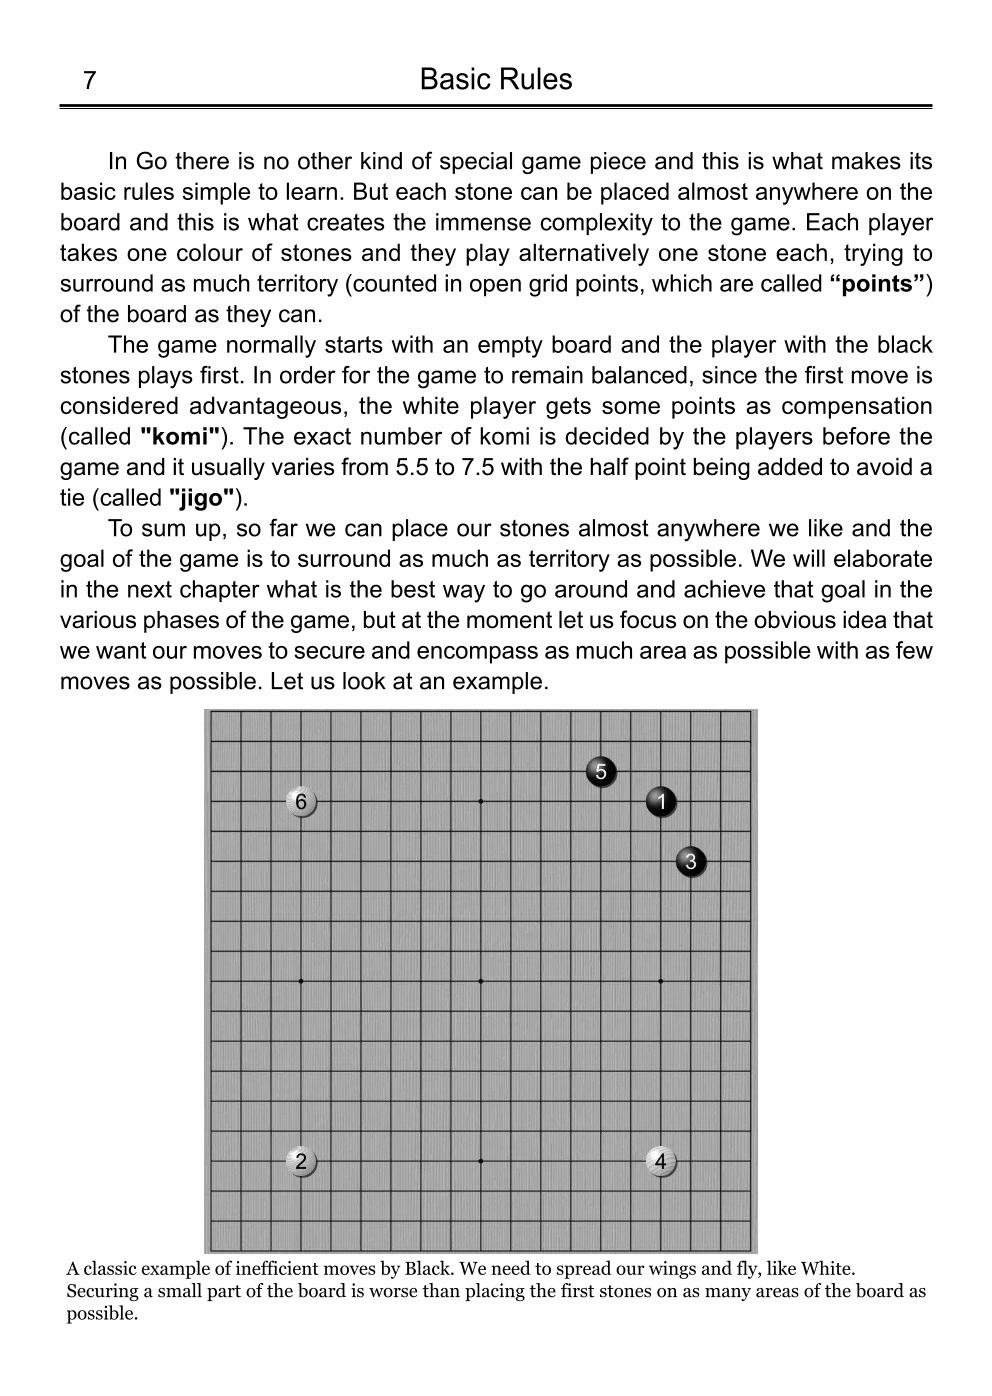
To sum up, so far we can place our stones almost anywhere we like and thegoal of the game is to surround as much as territory as possible. We will elaboratein the next chapter what is the best way to go around and achieve that goal in thevarious phases of the game, but at the moment let us focus on the obvious idea thatwe want our moves to secure and encompass as much area as possible with as fewmoves as possible. Let us look at an example.
Basic Rules7
A classic example of inefficient moves by Black. We need to spread our wings and fly, like White.Securing a small part of the board is worse than placing the first stones on as many areas of the board aspossible.
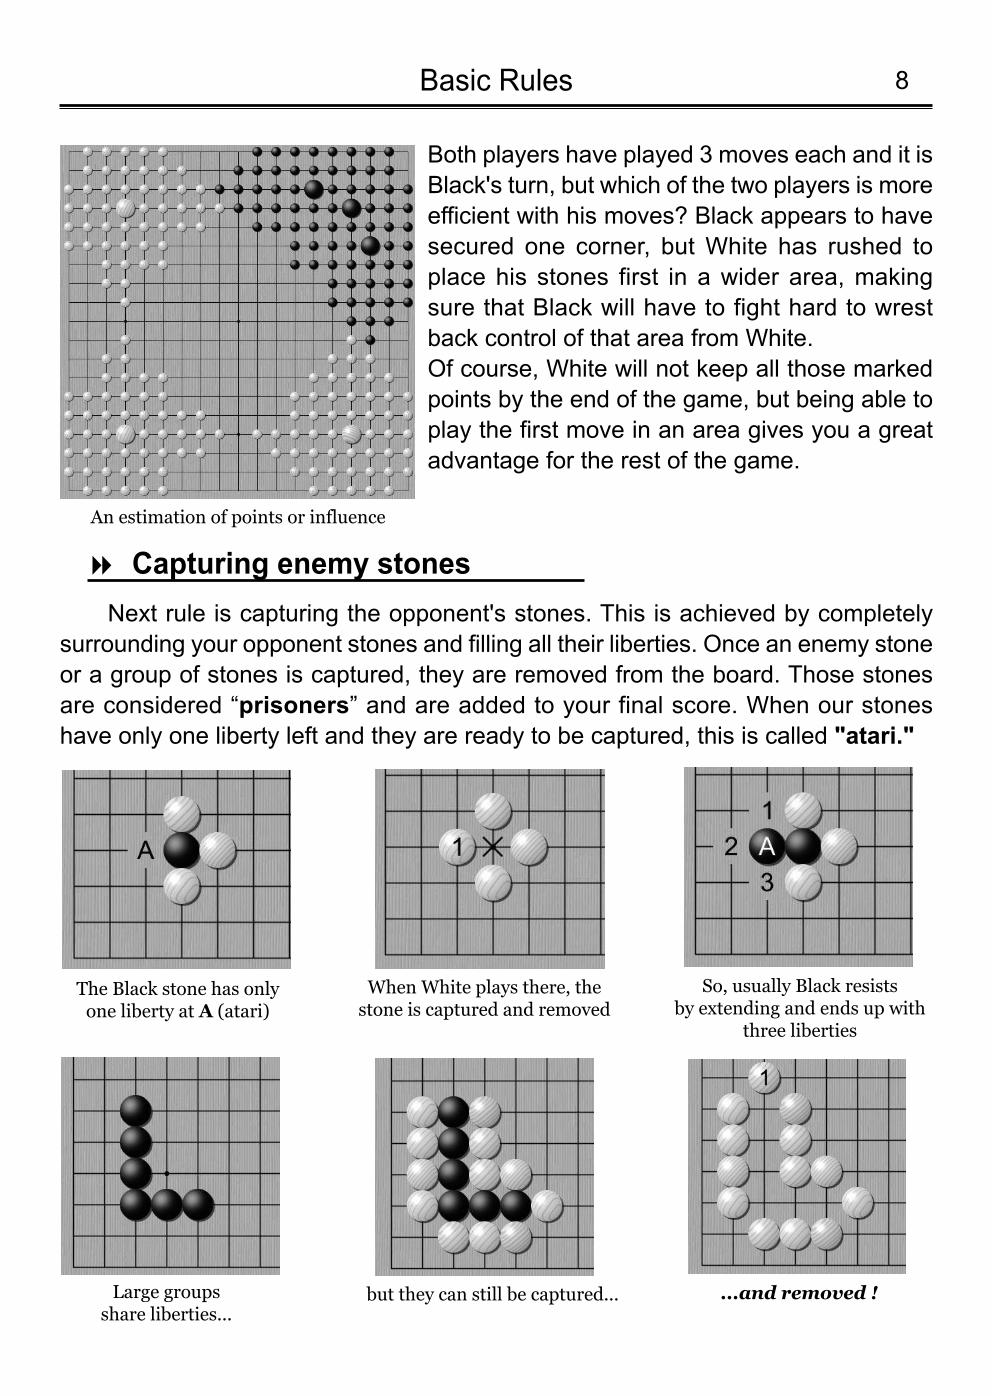
Both players have played 3 moves each and it isBlack's turn, but which of the two players is moreefficient with his moves? Black appears to havesecured one corner, but White has rushed toplace his stones first in a wider area, makingsure that Black will have to fight hard to wrestback control of that area from White. Of course, White will not keep all those markedpoints by the end of the game, but being able toplay the first move in an area gives you a greatadvantage for the rest of the game.
Next rule is capturing the opponent's stones. This is achieved by completelysurrounding your opponent stones and filling all their liberties. Once an enemy stoneor a group of stones is captured, they are removed from the board. Those stonesare considered “prisoners” and are added to your final score. When our stoneshave only one liberty left and they are ready to be captured, this is called "atari."
8Basic Rules
An estimation of points or influence
Capturing enemy stones8
The Black stone has onlyone liberty at A (atari)
When White plays there, thestone is captured and removed
So, usually Black resists by extending and ends up with
three liberties
Large groups share liberties...
but they can still be captured... ...and removed !
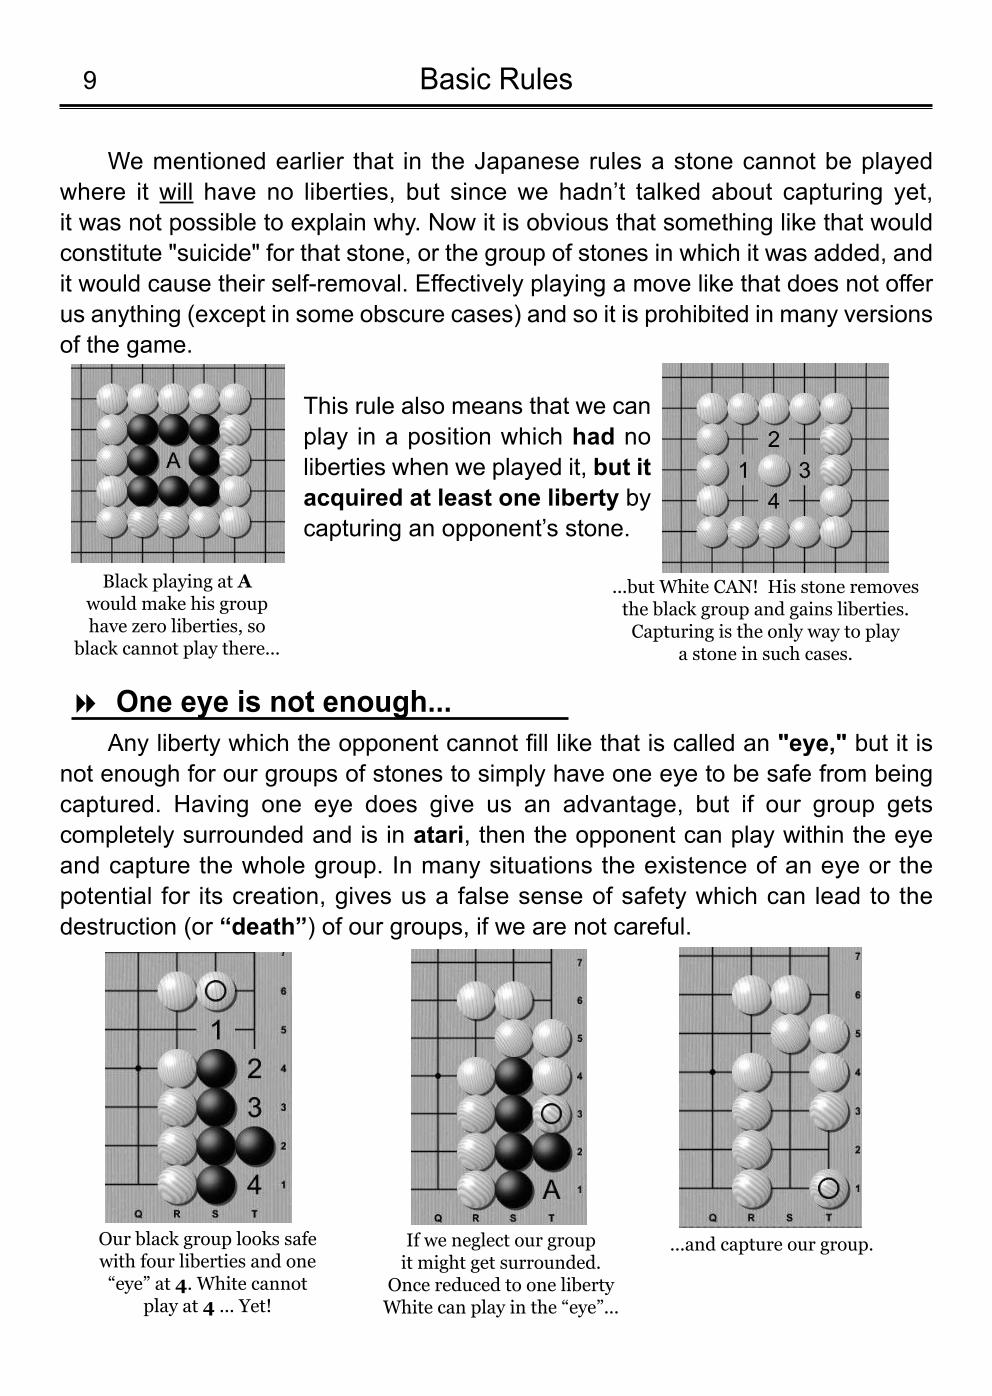
We mentioned earlier that in the Japanese rules a stone cannot be playedwhere it will have no liberties, but since we hadn’t talked about capturing yet, it was not possible to explain why. Now it is obvious that something like that wouldconstitute "suicide" for that stone, or the group of stones in which it was added, andit would cause their self-removal. Effectively playing a move like that does not offerus anything (except in some obscure cases) and so it is prohibited in many versionsof the game.
This rule also means that we canplay in a position which had noliberties when we played it, but itacquired at least one liberty bycapturing an opponent’s stone.
Basic Rules9
...but White CAN! His stone removesthe black group and gains liberties.Capturing is the only way to play
a stone in such cases.
Our black group looks safewith four liberties and one“eye” at 4. White cannot
play at 4 ... Yet!
If we neglect our group it might get surrounded.
Once reduced to one liberty White can play in the “eye”...
...and capture our group.
Black playing at Awould make his grouphave zero liberties, so
black cannot play there...
One eye is not enough...8
Any liberty which the opponent cannot fill like that is called an "eye," but it isnot enough for our groups of stones to simply have one eye to be safe from beingcaptured. Having one eye does give us an advantage, but if our group getscompletely surrounded and is in atari, then the opponent can play within the eyeand capture the whole group. In many situations the existence of an eye or thepotential for its creation, gives us a false sense of safety which can lead to thedestruction (or “death”) of our groups, if we are not careful.
10Basic Rules
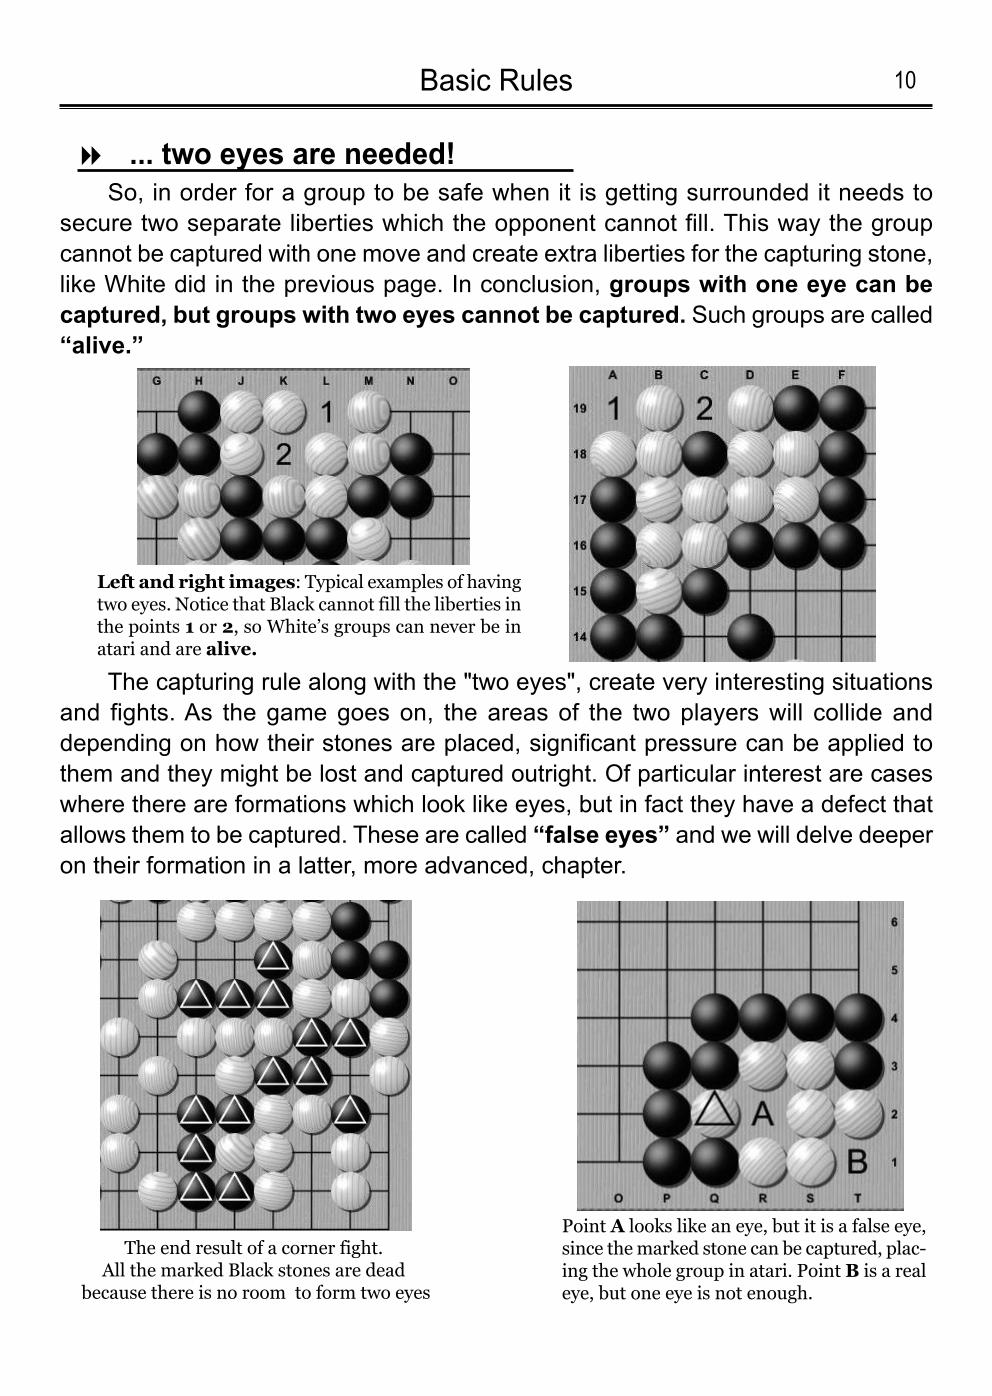
Left and right images: Typical examples of havingtwo eyes. Notice that Black cannot fill the liberties inthe points 1 or 2, so White’s groups can never be inatari and are alive.
... two eyes are needed!8
The end result of a corner fight.All the marked Black stones are dead
because there is no room to form two eyes
Point A looks like an eye, but it is a false eye,since the marked stone can be captured, plac-ing the whole group in atari. Point B is a realeye, but one eye is not enough.
The capturing rule along with the "two eyes", create very interesting situationsand fights. As the game goes on, the areas of the two players will collide anddepending on how their stones are placed, significant pressure can be applied tothem and they might be lost and captured outright. Of particular interest are caseswhere there are formations which look like eyes, but in fact they have a defect thatallows them to be captured. These are called “false eyes” and we will delve deeperon their formation in a latter, more advanced, chapter.
So, in order for a group to be safe when it is getting surrounded it needs tosecure two separate liberties which the opponent cannot fill. This way the groupcannot be captured with one move and create extra liberties for the capturing stone,like White did in the previous page. In conclusion, groups with one eye can becaptured, but groups with two eyes cannot be captured. Such groups are called“alive.”
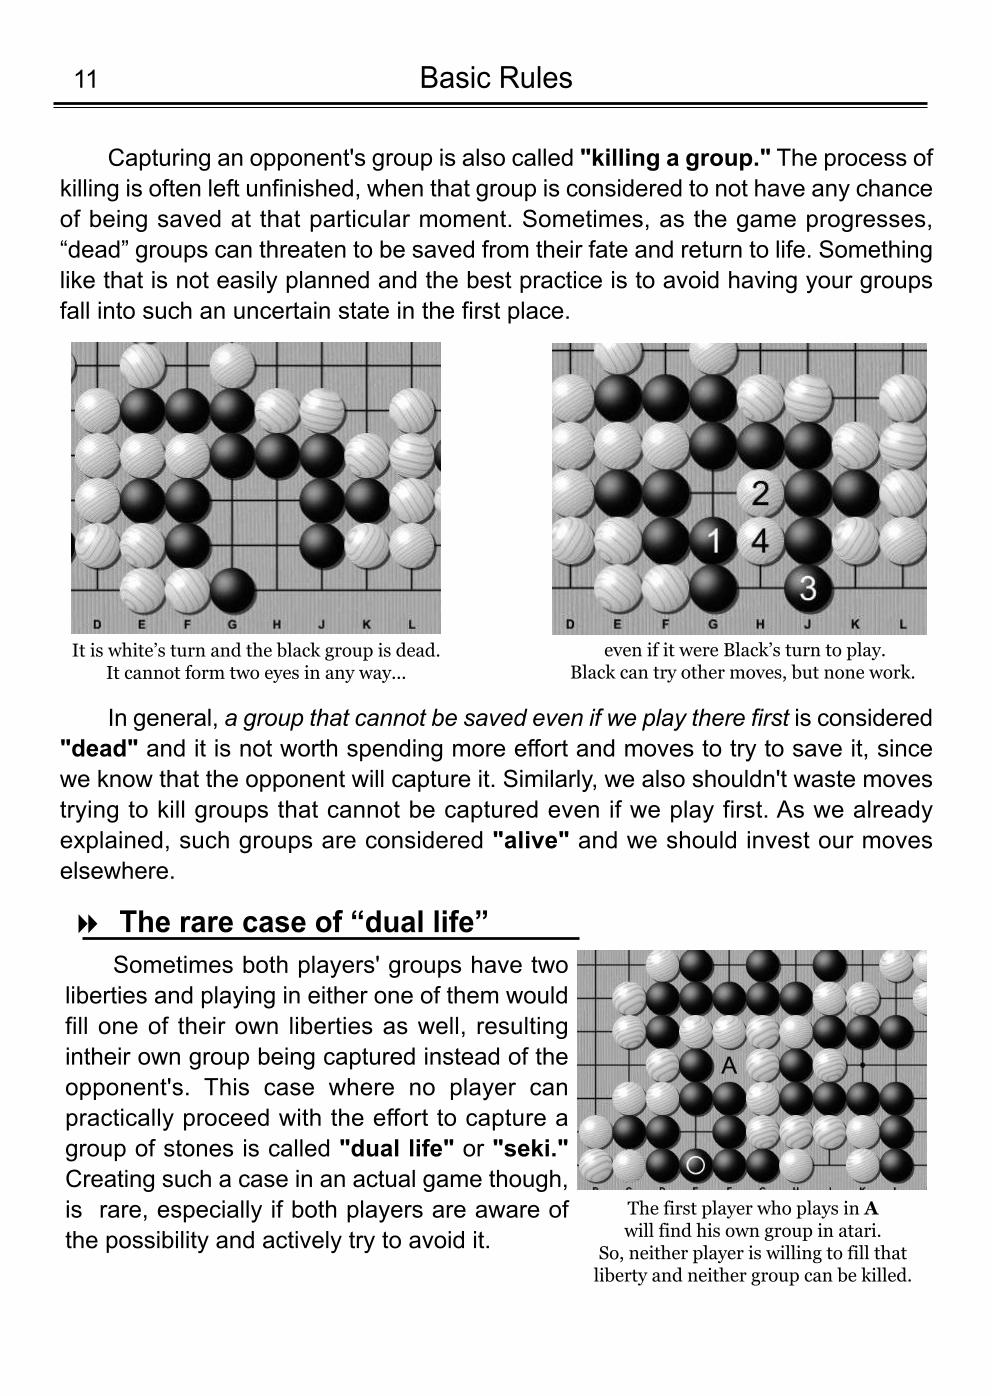
Capturing an opponent's group is also called "killing a group." The process ofkilling is often left unfinished, when that group is considered to not have any chanceof being saved at that particular moment. Sometimes, as the game progresses,“dead” groups can threaten to be saved from their fate and return to life. Somethinglike that is not easily planned and the best practice is to avoid having your groupsfall into such an uncertain state in the first place.
11
The rare case of “dual life”8
Basic Rules
It is white’s turn and the black group is dead.It cannot form two eyes in any way...
The first player who plays in A will find his own group in atari.
So, neither player is willing to fill that liberty and neither group can be killed.
even if it were Black’s turn to play. Black can try other moves, but none work.
In general, a group that cannot be saved even if we play there first is considered"dead" and it is not worth spending more effort and moves to try to save it, sincewe know that the opponent will capture it. Similarly, we also shouldn't waste movestrying to kill groups that cannot be captured even if we play first. As we alreadyexplained, such groups are considered "alive" and we should invest our moveselsewhere.
Sometimes both players' groups have twoliberties and playing in either one of them wouldfill one of their own liberties as well, resultingintheir own group being captured instead of theopponent's. This case where no player canpractically proceed with the effort to capture agroup of stones is called "dual life" or "seki."Creating such a case in an actual game though,is rare, especially if both players are aware ofthe possibility and actively try to avoid it.
12Basic Rules
Capturing is good, but ... 8
Avoiding loops 8
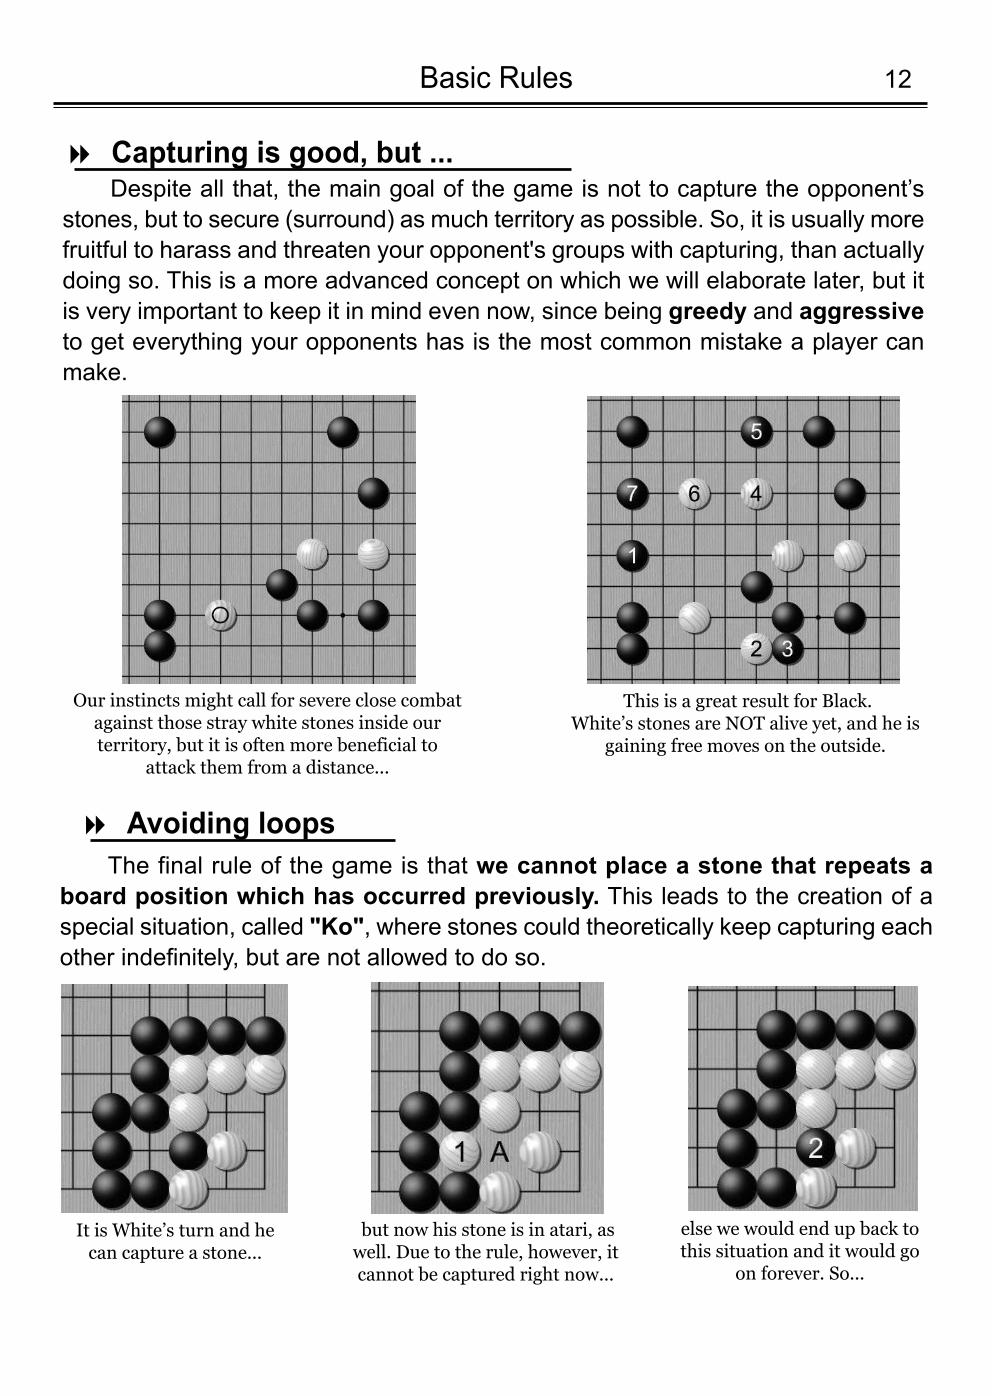
It is White’s turn and hecan capture a stone...
but now his stone is in atari, aswell. Due to the rule, however, itcannot be captured right now...
else we would end up back tothis situation and it would go
on forever. So...
Our instincts might call for severe close combatagainst those stray white stones inside our territory, but it is often more beneficial to
attack them from a distance...
This is a great result for Black. White’s stones are NOT alive yet, and he is
gaining free moves on the outside.
The final rule of the game is that we cannot place a stone that repeats aboard position which has occurred previously. This leads to the creation of aspecial situation, called "Ko", where stones could theoretically keep capturing eachother indefinitely, but are not allowed to do so.
Despite all that, the main goal of the game is not to capture the opponent’sstones, but to secure (surround) as much territory as possible. So, it is usually morefruitful to harass and threaten your opponent's groups with capturing, than actuallydoing so. This is a more advanced concept on which we will elaborate later, but itis very important to keep it in mind even now, since being greedy and aggressiveto get everything your opponents has is the most common mistake a player canmake.
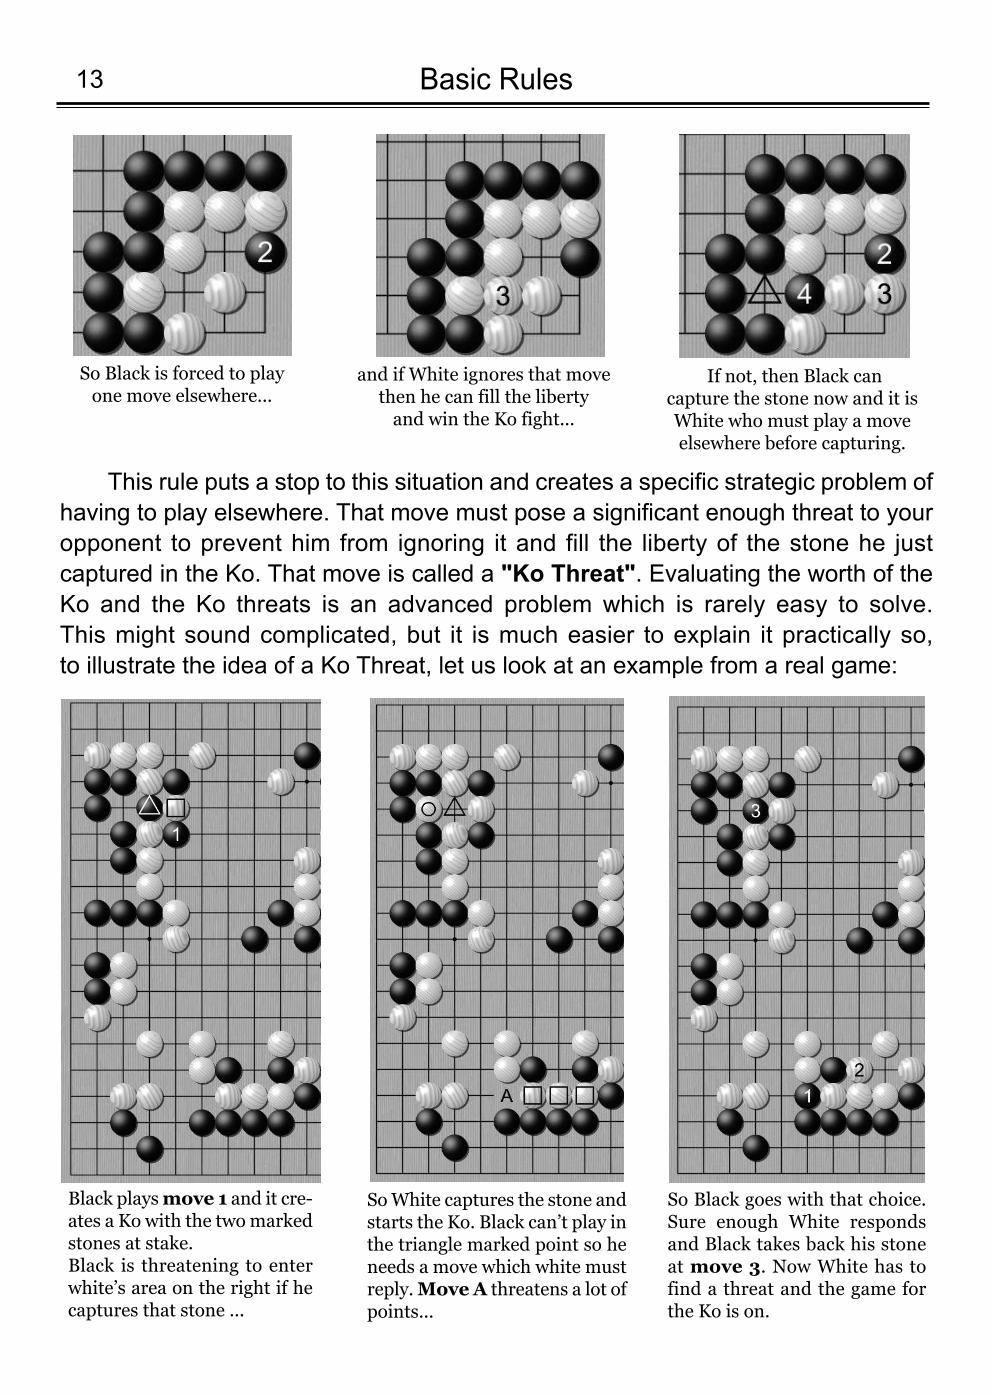
This rule puts a stop to this situation and creates a specific strategic problem ofhaving to play elsewhere. That move must pose a significant enough threat to youropponent to prevent him from ignoring it and fill the liberty of the stone he justcaptured in the Ko. That move is called a "Ko Threat". Evaluating the worth of theKo and the Ko threats is an advanced problem which is rarely easy to solve. This might sound complicated, but it is much easier to explain it practically so, to illustrate the idea of a Ko Threat, let us look at an example from a real game:
Basic Rules13
Black plays move 1 and it cre-ates a Ko with the two markedstones at stake. Black is threatening to enterwhite’s area on the right if hecaptures that stone ...
So Black goes with that choice.Sure enough White respondsand Black takes back his stoneat move 3. Now White has tofind a threat and the game forthe Ko is on.
So White captures the stone andstarts the Ko. Black can’t play inthe triangle marked point so heneeds a move which white mustreply. Move A threatens a lot ofpoints...
So Black is forced to playone move elsewhere...
and if White ignores that movethen he can fill the liberty and win the Ko fight...
If not, then Black can capture the stone now and it isWhite who must play a moveelsewhere before capturing.
14Basic Rules
Scoring and winning8
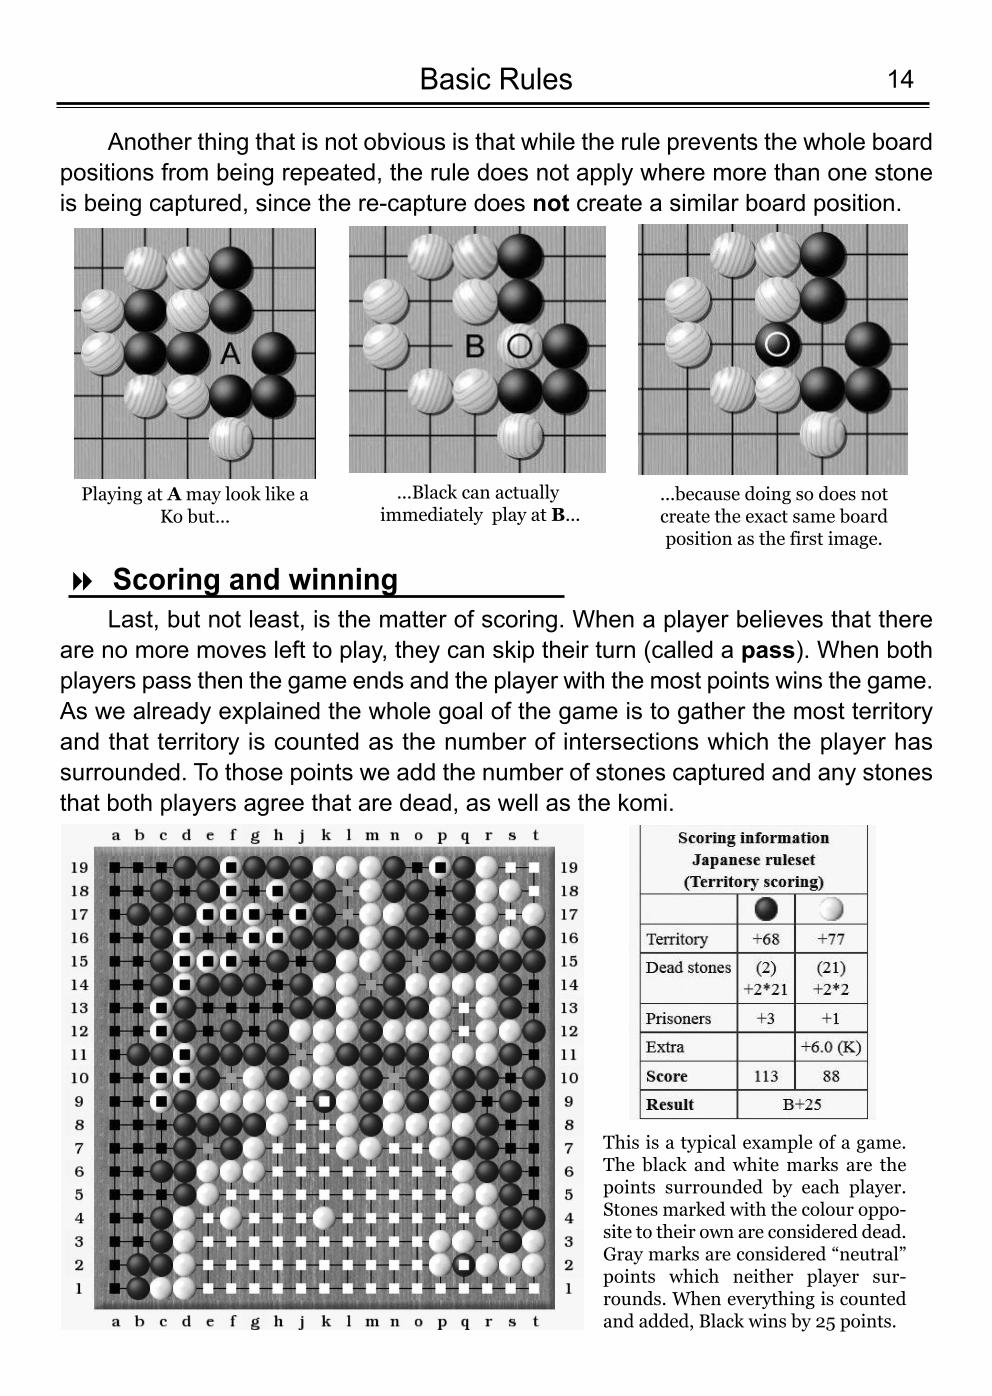
Playing at A may look like aKo but...
...Black can actuallyimmediately play at B...
...because doing so does notcreate the exact same boardposition as the first image.
This is a typical example of a game.The black and white marks are thepoints surrounded by each player. Stones marked with the colour oppo-site to their own are considered dead.Gray marks are considered “neutral”points which neither player sur-rounds. When everything is countedand added, Black wins by 25 points.
Another thing that is not obvious is that while the rule prevents the whole boardpositions from being repeated, the rule does not apply where more than one stoneis being captured, since the re-capture does not create a similar board position.
Last, but not least, is the matter of scoring. When a player believes that thereare no more moves left to play, they can skip their turn (called a pass). When bothplayers pass then the game ends and the player with the most points wins the game. As we already explained the whole goal of the game is to gather the most territoryand that territory is counted as the number of intersections which the player hassurrounded. To those points we add the number of stones captured and any stonesthat both players agree that are dead, as well as the komi.
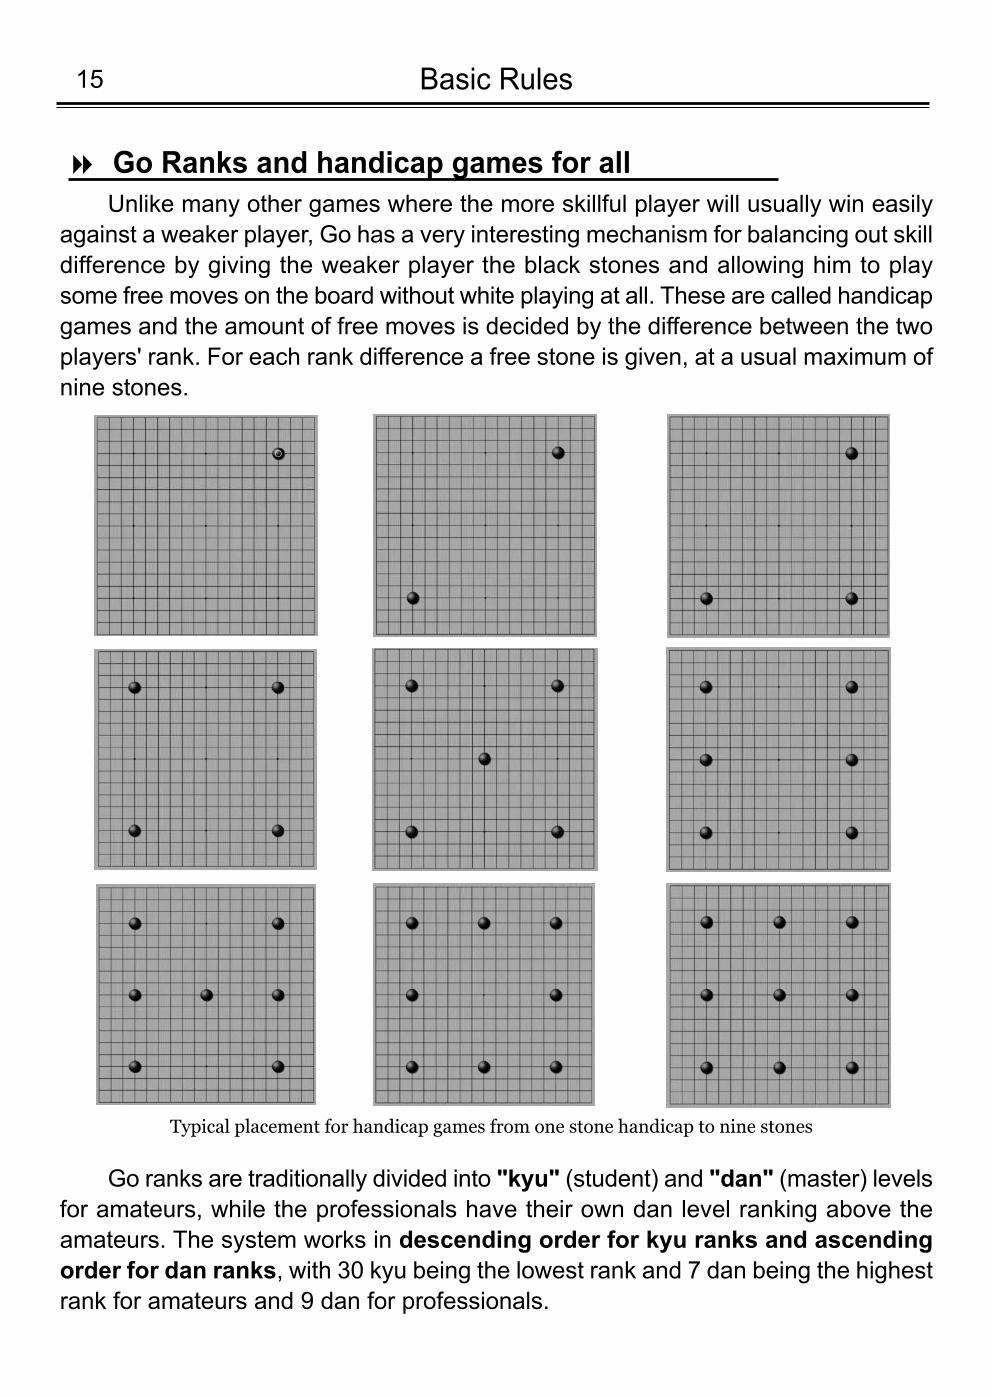
Unlike many other games where the more skillful player will usually win easilyagainst a weaker player, Go has a very interesting mechanism for balancing out skilldifference by giving the weaker player the black stones and allowing him to playsome free moves on the board without white playing at all. These are called handicapgames and the amount of free moves is decided by the difference between the twoplayers' rank. For each rank difference a free stone is given, at a usual maximum ofnine stones.
Basic Rules15
Go Ranks and handicap games for all8
Typical placement for handicap games from one stone handicap to nine stones
Go ranks are traditionally divided into "kyu" (student) and "dan" (master) levelsfor amateurs, while the professionals have their own dan level ranking above theamateurs. The system works in descending order for kyu ranks and ascendingorder for dan ranks, with 30 kyu being the lowest rank and 7 dan being the highestrank for amateurs and 9 dan for professionals.
16Basic Rules
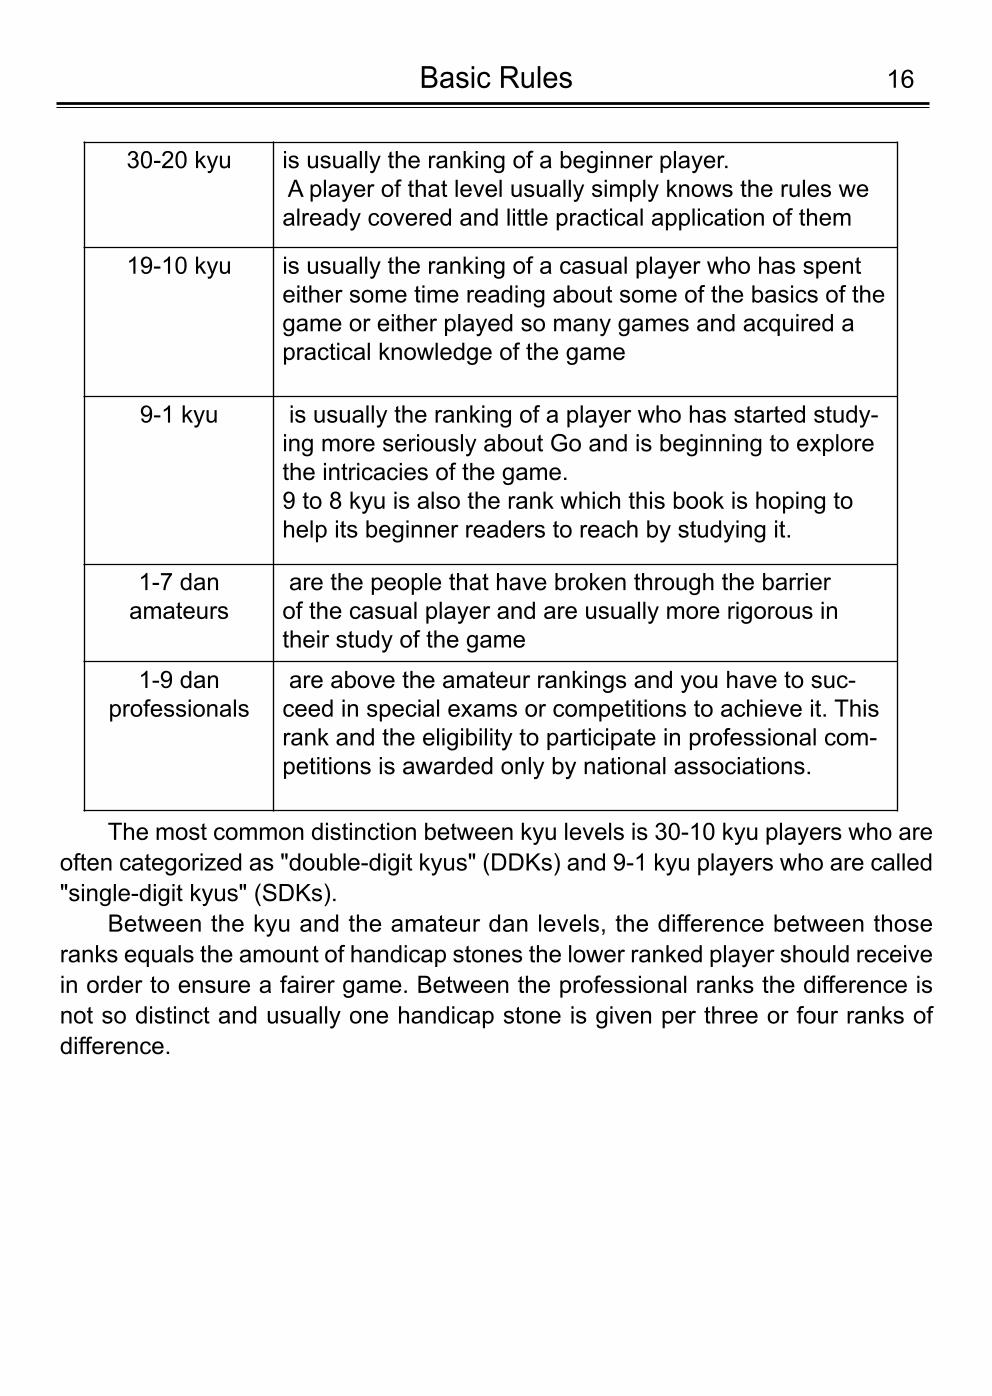
30-20 kyu is usually the ranking of a beginner player.A player of that level usually simply knows the rules wealready covered and little practical application of them
19-10 kyu is usually the ranking of a casual player who has spenteither some time reading about some of the basics of thegame or either played so many games and acquired apractical knowledge of the game
9-1 kyu is usually the ranking of a player who has started study-ing more seriously about Go and is beginning to explorethe intricacies of the game. 9 to 8 kyu is also the rank which this book is hoping tohelp its beginner readers to reach by studying it.
1-7 dan amateurs
are the people that have broken through the barrier of the casual player and are usually more rigorous intheir study of the game
1-9 dan professionals
are above the amateur rankings and you have to suc-ceed in special exams or competitions to achieve it. Thisrank and the eligibility to participate in professional com-petitions is awarded only by national associations.
The most common distinction between kyu levels is 30-10 kyu players who areoften categorized as "double-digit kyus" (DDKs) and 9-1 kyu players who are called"single-digit kyus" (SDKs).
Between the kyu and the amateur dan levels, the difference between thoseranks equals the amount of handicap stones the lower ranked player should receivein order to ensure a fairer game. Between the professional ranks the difference isnot so distinct and usually one handicap stone is given per three or four ranks ofdifference.
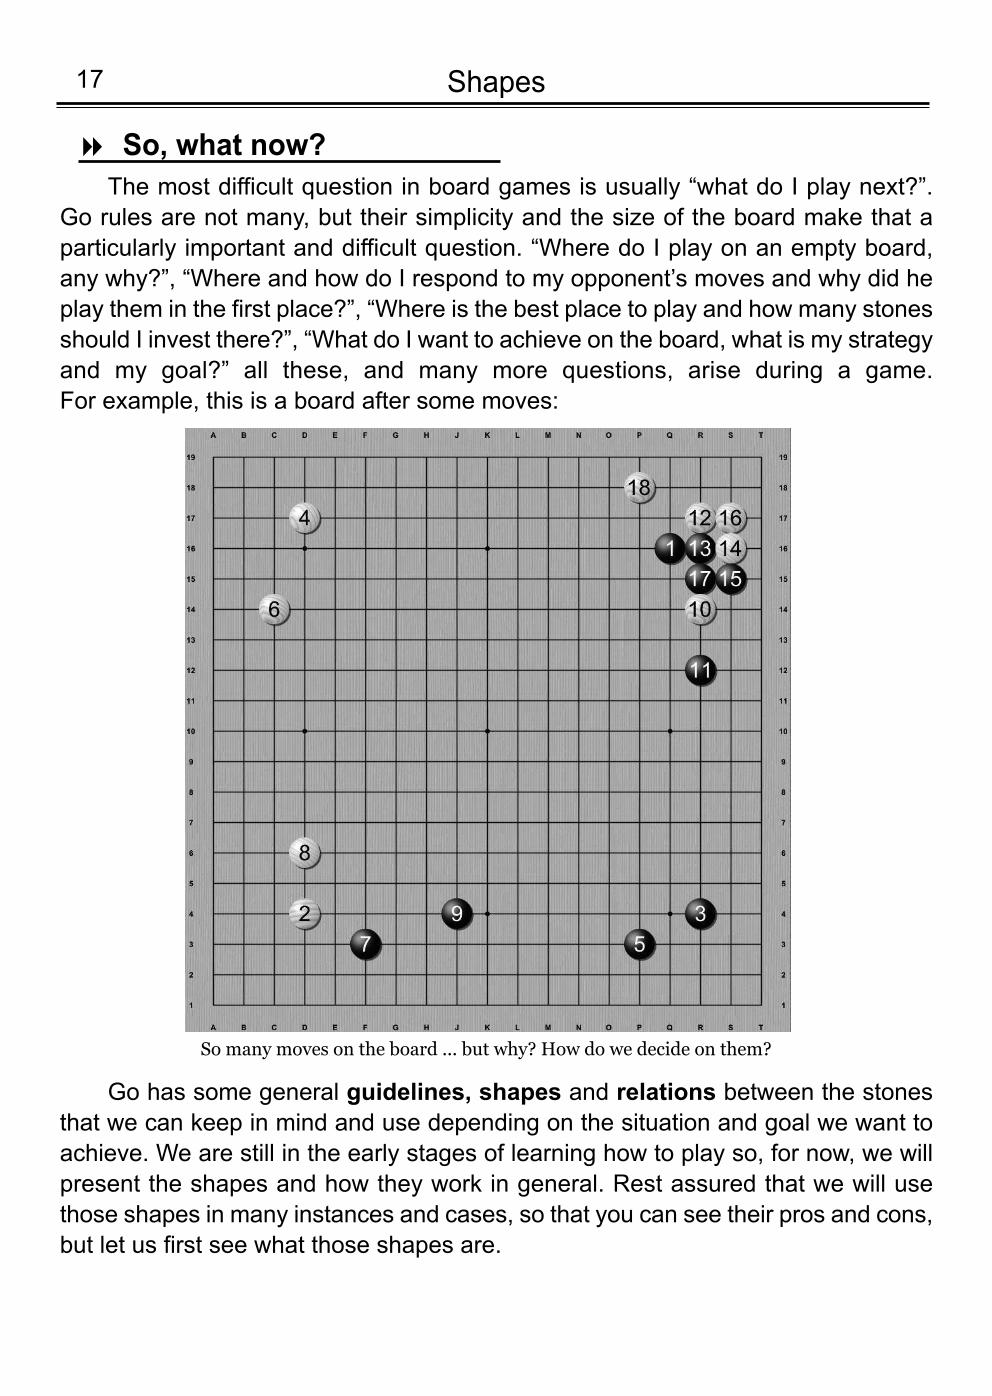
The most difficult question in board games is usually “what do I play next?”.Go rules are not many, but their simplicity and the size of the board make that aparticularly important and difficult question. “Where do I play on an empty board,any why?”, “Where and how do I respond to my opponent’s moves and why did heplay them in the first place?”, “Where is the best place to play and how many stonesshould I invest there?”, “What do I want to achieve on the board, what is my strategyand my goal?” all these, and many more questions, arise during a game. For example, this is a board after some moves:
Shapes17
So, what now?8
So many moves on the board ... but why? How do we decide on them?
Go has some general guidelines, shapes and relations between the stonesthat we can keep in mind and use depending on the situation and goal we want toachieve. We are still in the early stages of learning how to play so, for now, we willpresent the shapes and how they work in general. Rest assured that we will usethose shapes in many instances and cases, so that you can see their pros and cons,but let us first see what those shapes are.
18Shapes
Relations between two stones8
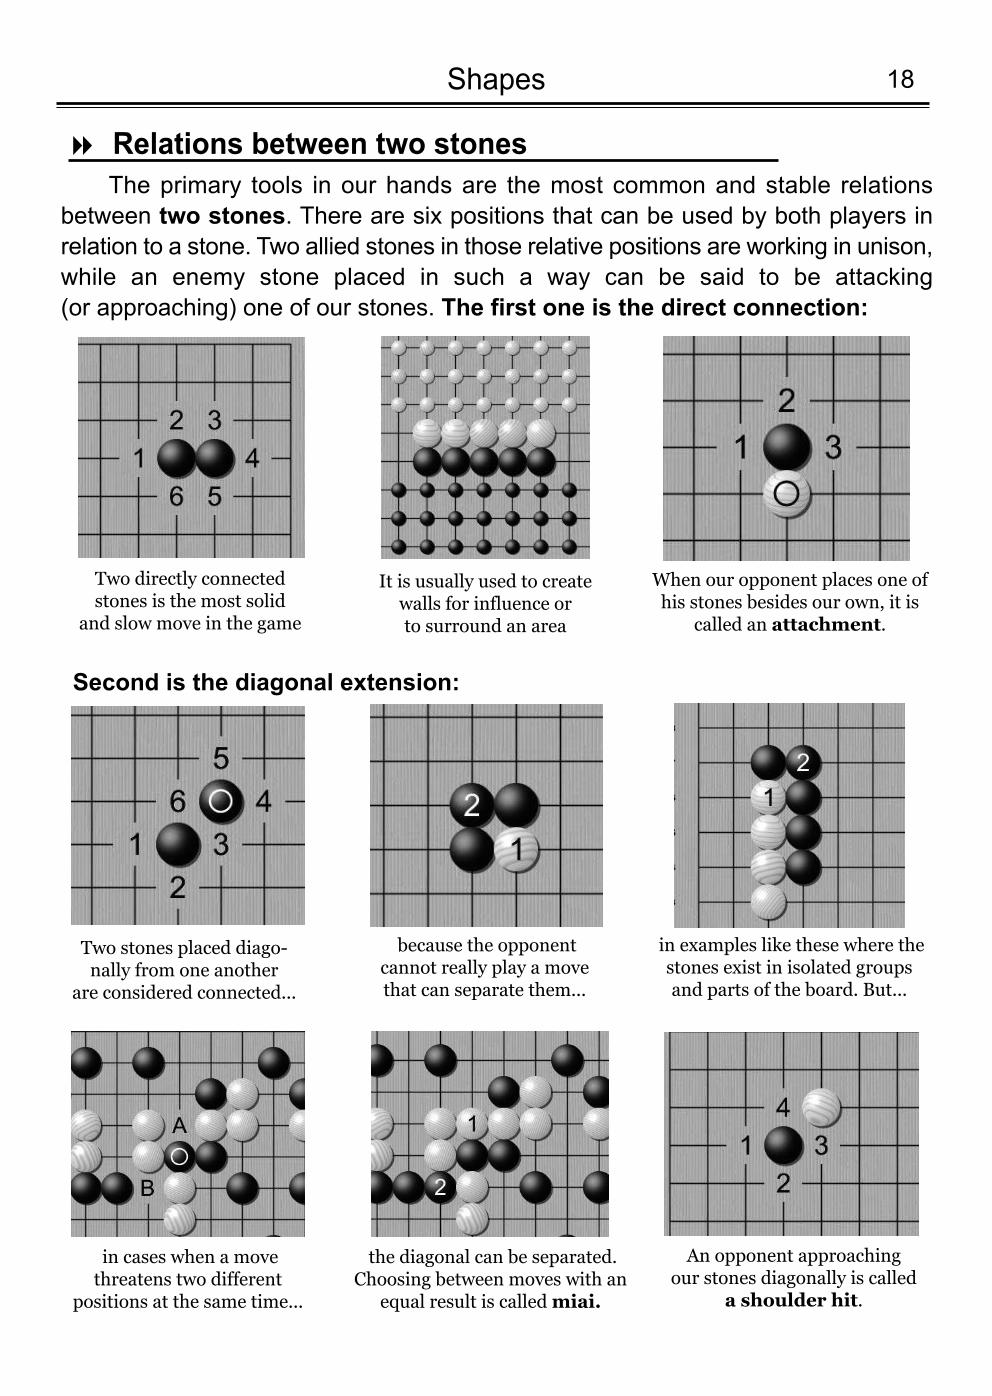
Two directly connectedstones is the most solid
and slow move in the game
When our opponent places one ofhis stones besides our own, it is
called an attachment.
It is usually used to create walls for influence or to surround an area
Two stones placed diago-nally from one another
are considered connected...
in examples like these where thestones exist in isolated groupsand parts of the board. But...
because the opponent cannot really play a move that can separate them...
in cases when a movethreatens two different
positions at the same time...
An opponent approaching our stones diagonally is called
a shoulder hit.
the diagonal can be separated.Choosing between moves with an
equal result is called miai.
The primary tools in our hands are the most common and stable relationsbetween two stones. There are six positions that can be used by both players inrelation to a stone. Two allied stones in those relative positions are working in unison,while an enemy stone placed in such a way can be said to be attacking (or approaching) one of our stones. The first one is the direct connection:
Second is the diagonal extension:
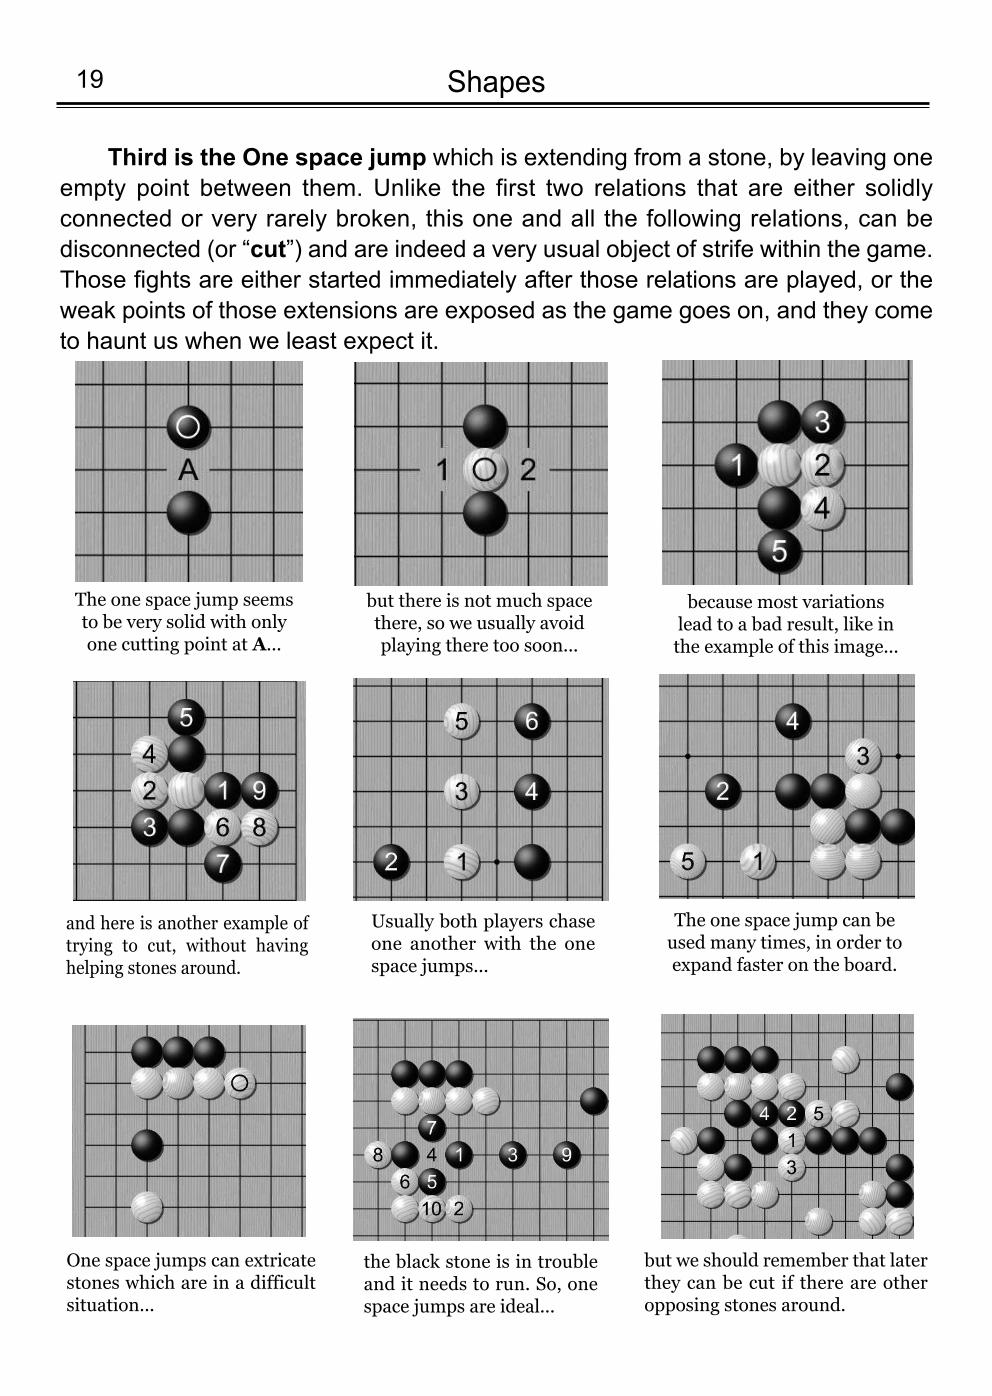
Third is the One space jump which is extending from a stone, by leaving oneempty point between them. Unlike the first two relations that are either solidlyconnected or very rarely broken, this one and all the following relations, can bedisconnected (or “cut”) and are indeed a very usual object of strife within the game.Those fights are either started immediately after those relations are played, or theweak points of those extensions are exposed as the game goes on, and they cometo haunt us when we least expect it.
Shapes19
The one space jump seems to be very solid with onlyone cutting point at A...
Usually both players chaseone another with the onespace jumps...
The one space jump can beused many times, in order to expand faster on the board.
One space jumps can extricatestones which are in a difficultsituation...
but we should remember that laterthey can be cut if there are otheropposing stones around.
the black stone is in troubleand it needs to run. So, onespace jumps are ideal...
but there is not much spacethere, so we usually avoidplaying there too soon...
and here is another example oftrying to cut, without havinghelping stones around.
because most variationslead to a bad result, like inthe example of this image...
20Shapes
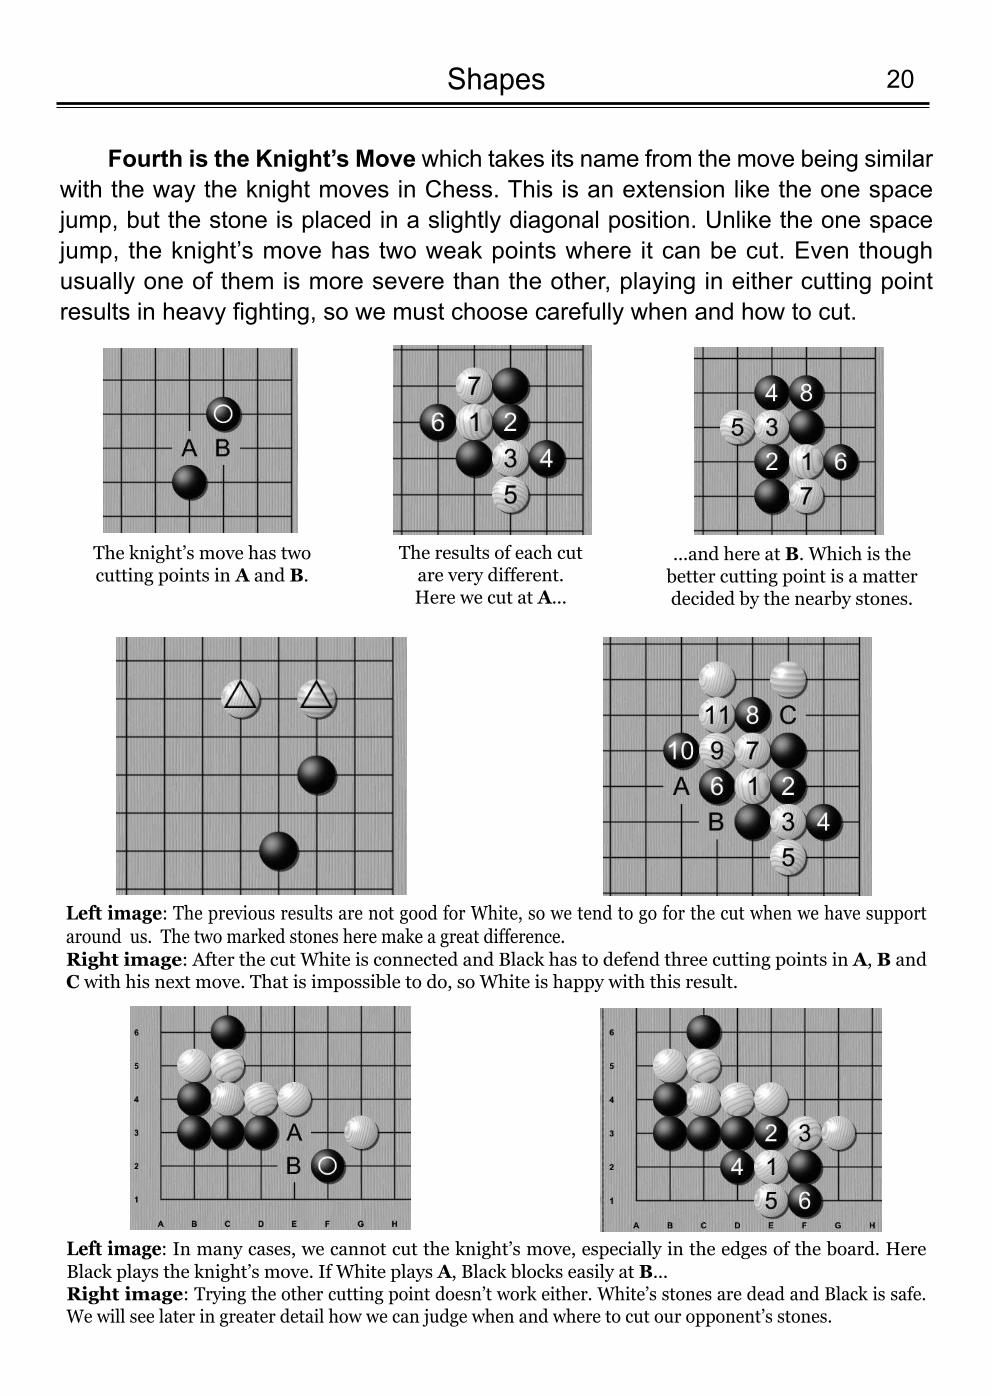
The knight’s move has twocutting points in A and B.
Left image: In many cases, we cannot cut the knight’s move, especially in the edges of the board. HereBlack plays the knight’s move. If White plays A, Black blocks easily at B...Right image: Trying the other cutting point doesn’t work either. White’s stones are dead and Black is safe. We will see later in greater detail how we can judge when and where to cut our opponent’s stones.
The results of each cut are very different. Here we cut at A...
Left image: The previous results are not good for White, so we tend to go for the cut when we have supportaround us. The two marked stones here make a great difference.Right image: After the cut White is connected and Black has to defend three cutting points in A, B andC with his next move. That is impossible to do, so White is happy with this result.
...and here at B. Which is the better cutting point is a matterdecided by the nearby stones.
Fourth is the Knight’s Move which takes its name from the move being similarwith the way the knight moves in Chess. This is an extension like the one spacejump, but the stone is placed in a slightly diagonal position. Unlike the one spacejump, the knight’s move has two weak points where it can be cut. Even thoughusually one of them is more severe than the other, playing in either cutting pointresults in heavy fighting, so we must choose carefully when and how to cut.
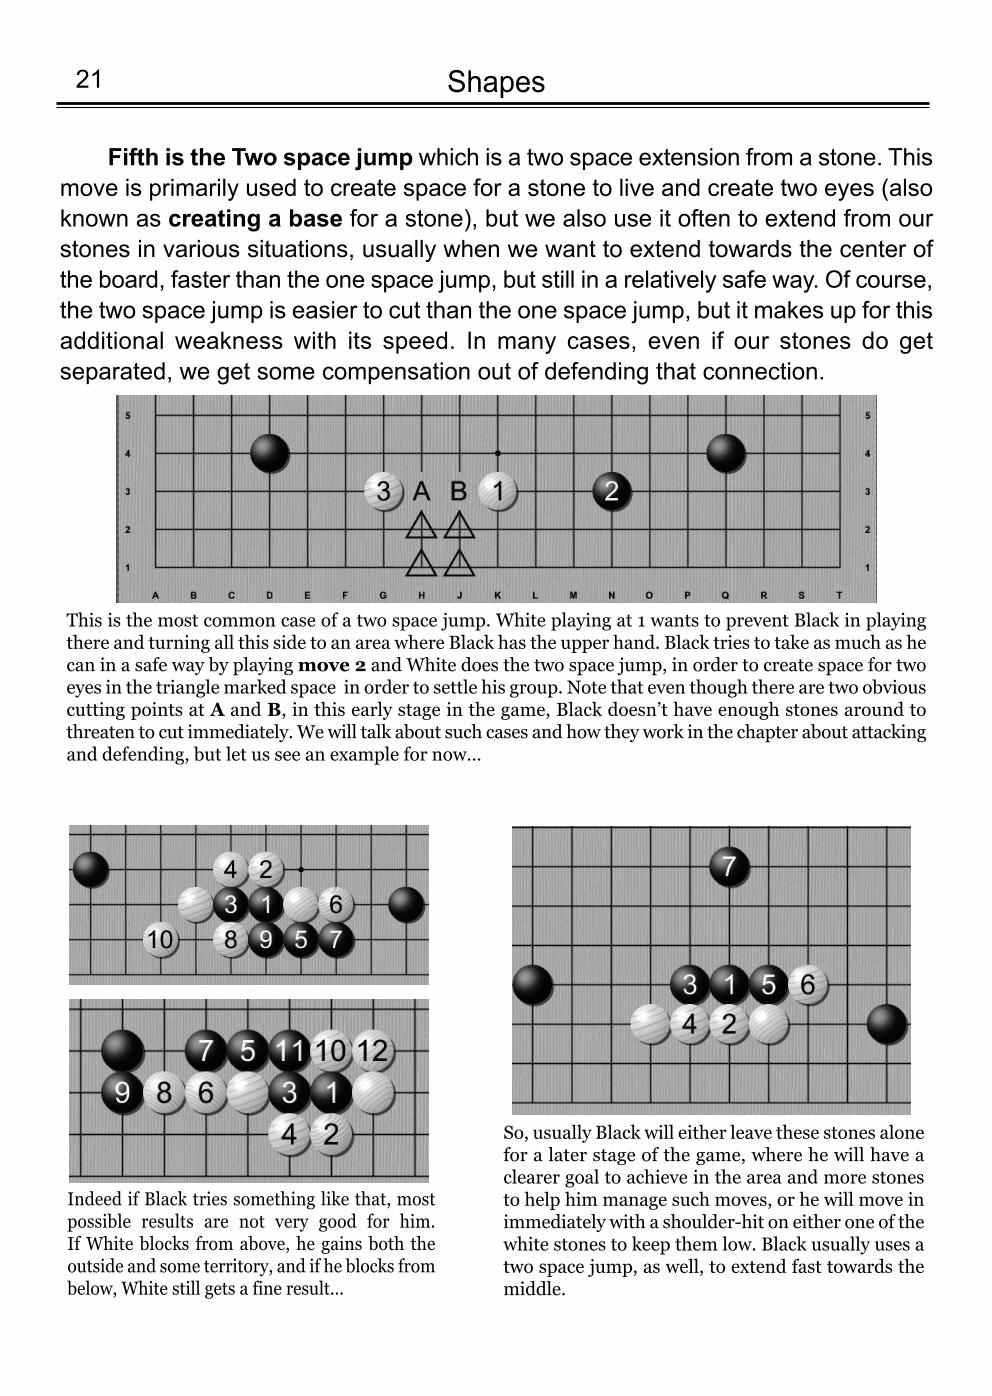
Fifth is the Two space jump which is a two space extension from a stone. Thismove is primarily used to create space for a stone to live and create two eyes (alsoknown as creating a base for a stone), but we also use it often to extend from ourstones in various situations, usually when we want to extend towards the center ofthe board, faster than the one space jump, but still in a relatively safe way. Of course,the two space jump is easier to cut than the one space jump, but it makes up for thisadditional weakness with its speed. In many cases, even if our stones do getseparated, we get some compensation out of defending that connection.
Shapes21
So, usually Black will either leave these stones alonefor a later stage of the game, where he will have aclearer goal to achieve in the area and more stonesto help him manage such moves, or he will move inimmediately with a shoulder-hit on either one of thewhite stones to keep them low. Black usually uses atwo space jump, as well, to extend fast towards themiddle.
Indeed if Black tries something like that, most possible results are not very good for him.If White blocks from above, he gains both theoutside and some territory, and if he blocks frombelow, White still gets a fine result...
This is the most common case of a two space jump. White playing at 1 wants to prevent Black in playingthere and turning all this side to an area where Black has the upper hand. Black tries to take as much as hecan in a safe way by playing move 2 and White does the two space jump, in order to create space for twoeyes in the triangle marked space in order to settle his group. Note that even though there are two obviouscutting points at A and B, in this early stage in the game, Black doesn’t have enough stones around tothreaten to cut immediately. We will talk about such cases and how they work in the chapter about attackingand defending, but let us see an example for now…
22Shapes
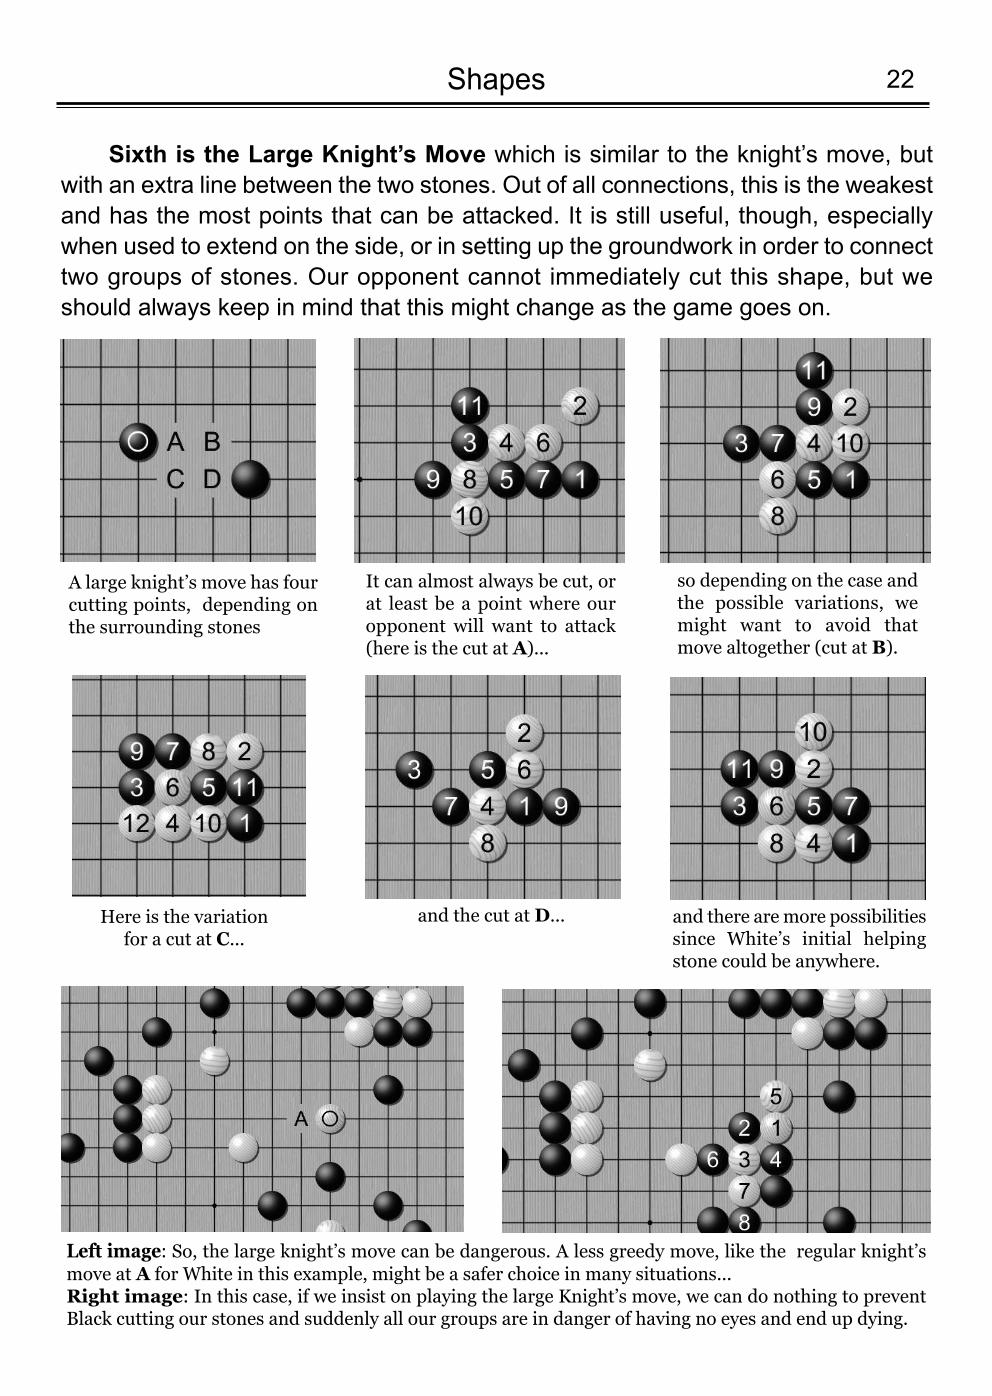
Here is the variation for a cut at C...
A large knight’s move has fourcutting points, depending onthe surrounding stones
It can almost always be cut, orat least be a point where ouropponent will want to attack(here is the cut at A)...
and the cut at D...
Left image: So, the large knight’s move can be dangerous. A less greedy move, like the regular knight’smove at A for White in this example, might be a safer choice in many situations...Right image: In this case, if we insist on playing the large Knight’s move, we can do nothing to preventBlack cutting our stones and suddenly all our groups are in danger of having no eyes and end up dying.
so depending on the case and the possible variations, wemight want to avoid that move altogether (cut at B).
and there are more possibilitiessince White’s initial helpingstone could be anywhere.
Sixth is the Large Knight’s Move which is similar to the knight’s move, butwith an extra line between the two stones. Out of all connections, this is the weakestand has the most points that can be attacked. It is still useful, though, especiallywhen used to extend on the side, or in setting up the groundwork in order to connecttwo groups of stones. Our opponent cannot immediately cut this shape, but weshould always keep in mind that this might change as the game goes on.
Having established the main relations and shapes between two stones, we cannow use them in order to create more intricate shapes involving multiple stones.Each of these shapes have their own strengths and weaknesses and choosingbetween them is not only an issue of the local situation, but of the whole board andthe goals we, and our opponent, want to achieve. Let us begin with the most obvious shape: The Wall.
The most immediate image that comes to our minds when hearing about a wall,is many stones connected one after another in a straight line. That is indeed theideal wall in terms of connectivity and strength, but many times creating somethinglike that can be abysmally slow, so, in real games, walls tend to have flaws or evengaps. The opponent usually will try to manoeuvre his stones into a position to exploitthose gaps, but if we are careful this can be avoided. Either way, the conundrumbetween “perfect wall, but slow” versus “imperfect wall, but fast” is one of the mostimportant things in the game, so we will talk extensively about it later in the book,since we always have to keep it in mind and try to find the right balance.
For that purpose, let us introduce the concept of influence. We have already seen that territory is the amount of almost certain points that
we have surrounded, that the opponent cannot usually reclaim. Usually territory iseasy to spot on the board, but influence is not like that. Influence is the generated“field” of strength which emanates from our stones and their shapes. The moresolid and wide those shapes, the better the influence. Usually we have to give upterritory to acquire influence and it is hard to decide whether it was worth it or not,because the ideal use of influence is not to simply turn it into territory, but to foil theexpansion and the moves of our opponents.
Shapes23
Relations between multiple stones8
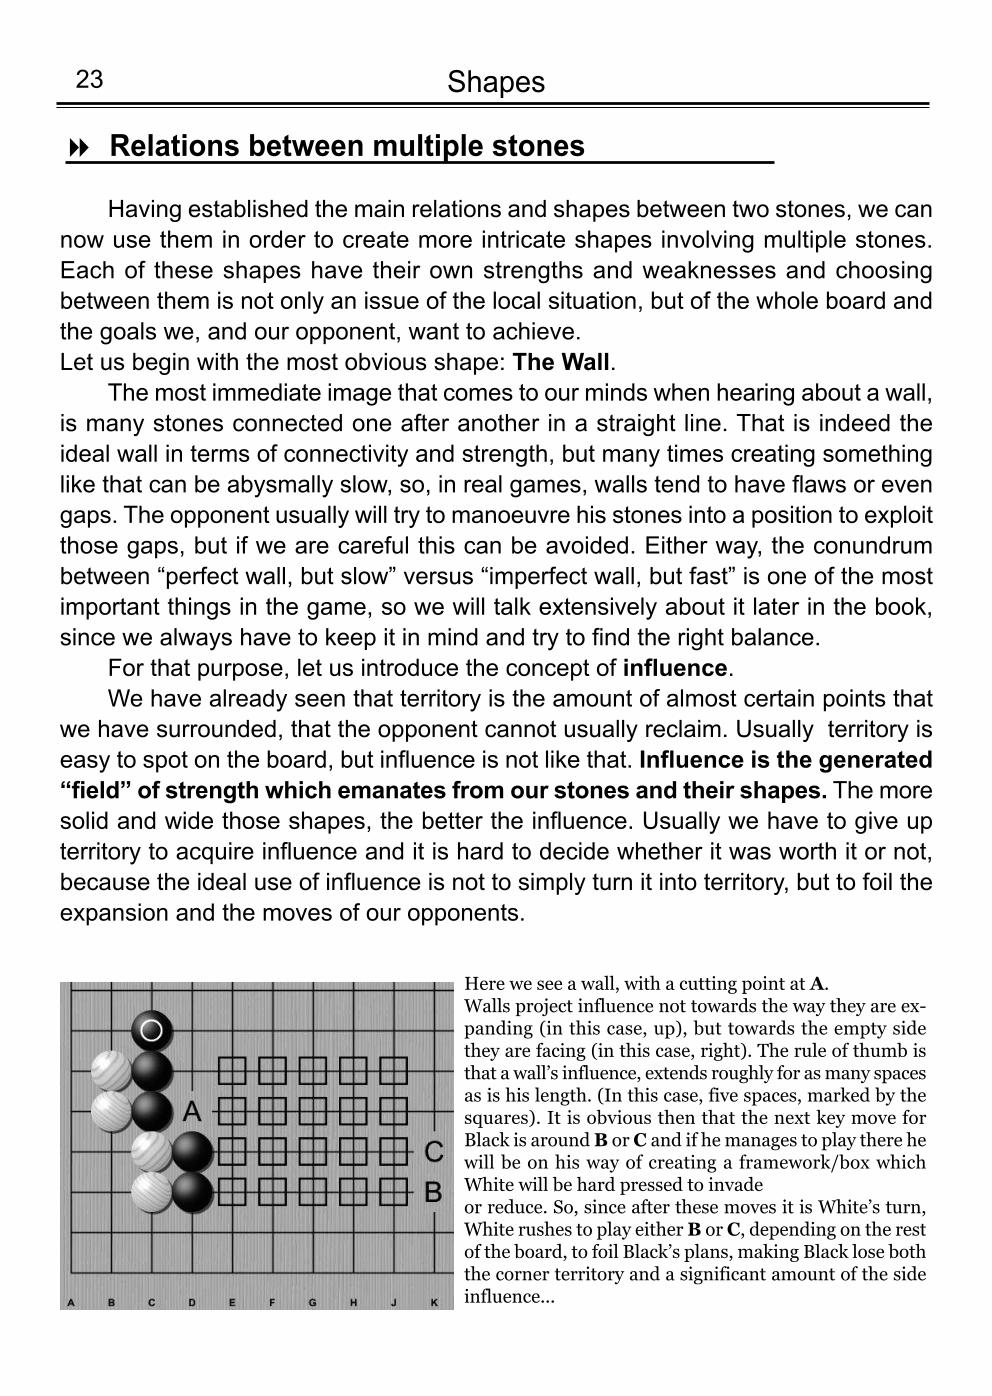
Here we see a wall, with a cutting point at A.Walls project influence not towards the way they are ex-panding (in this case, up), but towards the empty sidethey are facing (in this case, right). The rule of thumb isthat a wall’s influence, extends roughly for as many spacesas is his length. (In this case, five spaces, marked by thesquares). It is obvious then that the next key move forBlack is around B or C and if he manages to play there hewill be on his way of creating a framework/box whichWhite will be hard pressed to invade or reduce. So, since after these moves it is White’s turn,White rushes to play either B or C, depending on the restof the board, to foil Black’s plans, making Black lose boththe corner territory and a significant amount of the sideinfluence...
24Shapes
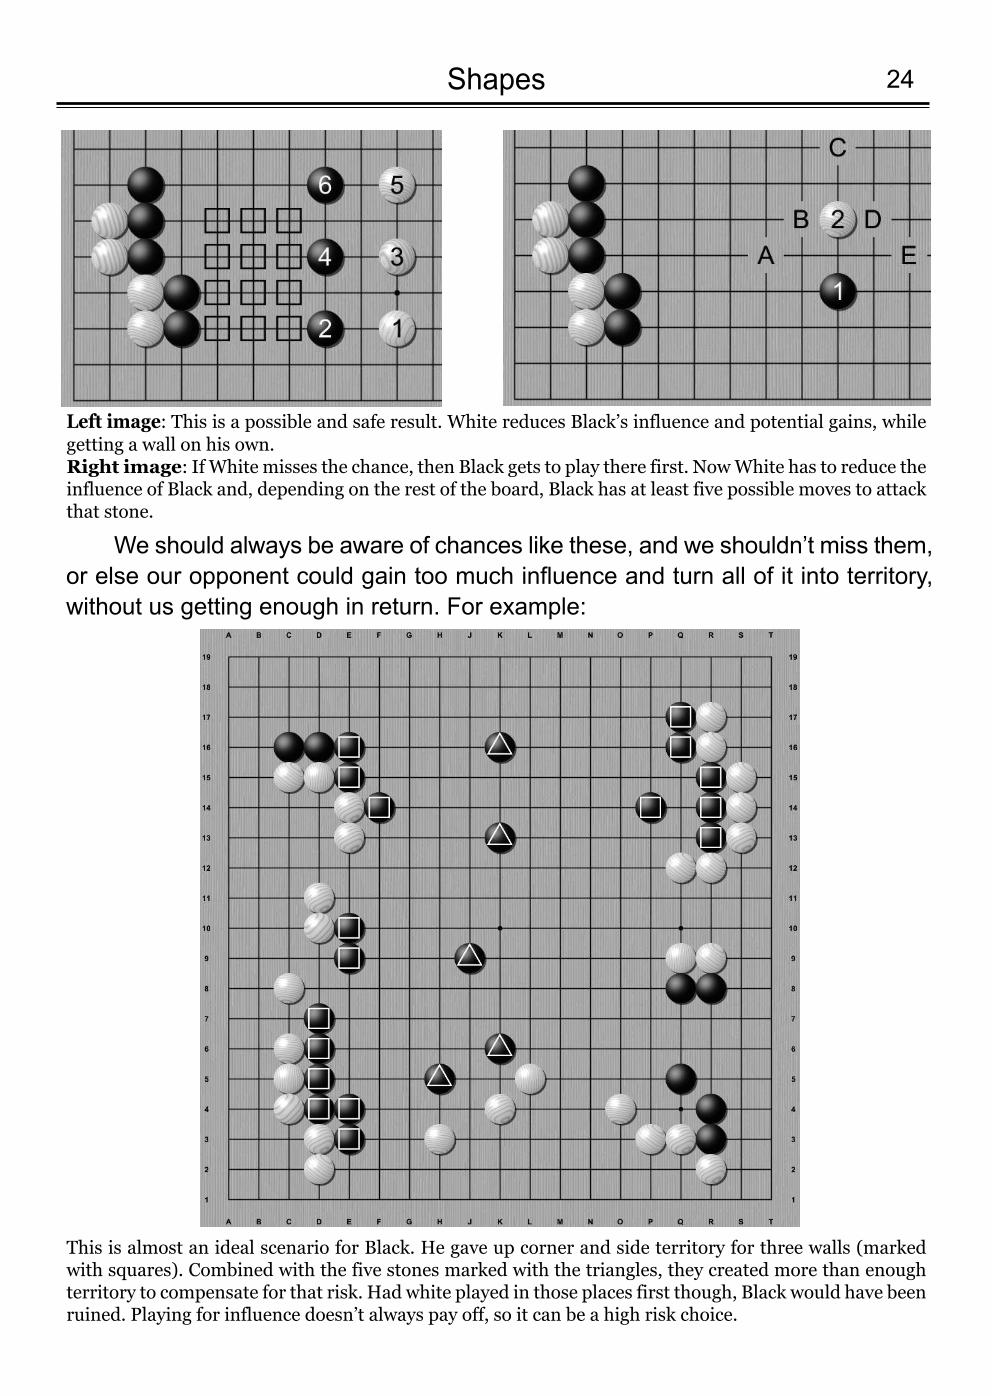
Left image: This is a possible and safe result. White reduces Black’s influence and potential gains, whilegetting a wall on his own.Right image: If White misses the chance, then Black gets to play there first. Now White has to reduce theinfluence of Black and, depending on the rest of the board, Black has at least five possible moves to attackthat stone.
This is almost an ideal scenario for Black. He gave up corner and side territory for three walls (markedwith squares). Combined with the five stones marked with the triangles, they created more than enoughterritory to compensate for that risk. Had white played in those places first though, Black would have beenruined. Playing for influence doesn’t always pay off, so it can be a high risk choice.
We should always be aware of chances like these, and we shouldn’t miss them,or else our opponent could gain too much influence and turn all of it into territory,without us getting enough in return. For example:
In our eyes, a large wall is just half of a box that can be turned into territory andwe usually feel that influence is something we need to defend and eventually turninto territory, so we end up playing too near our walls, or spend moves trying to makeour opponent get away from it, but this is the wrong approach to using influence.It is a hard mentality to get out of, and it is hard to use correctly, but influence andwalls are not there for us to defend them. They are there for us to use them to expandfrom or lure our opponent or attack other places. This is a more advanced subjectwhich we will talk about later, but, for now, an example:
Shapes25
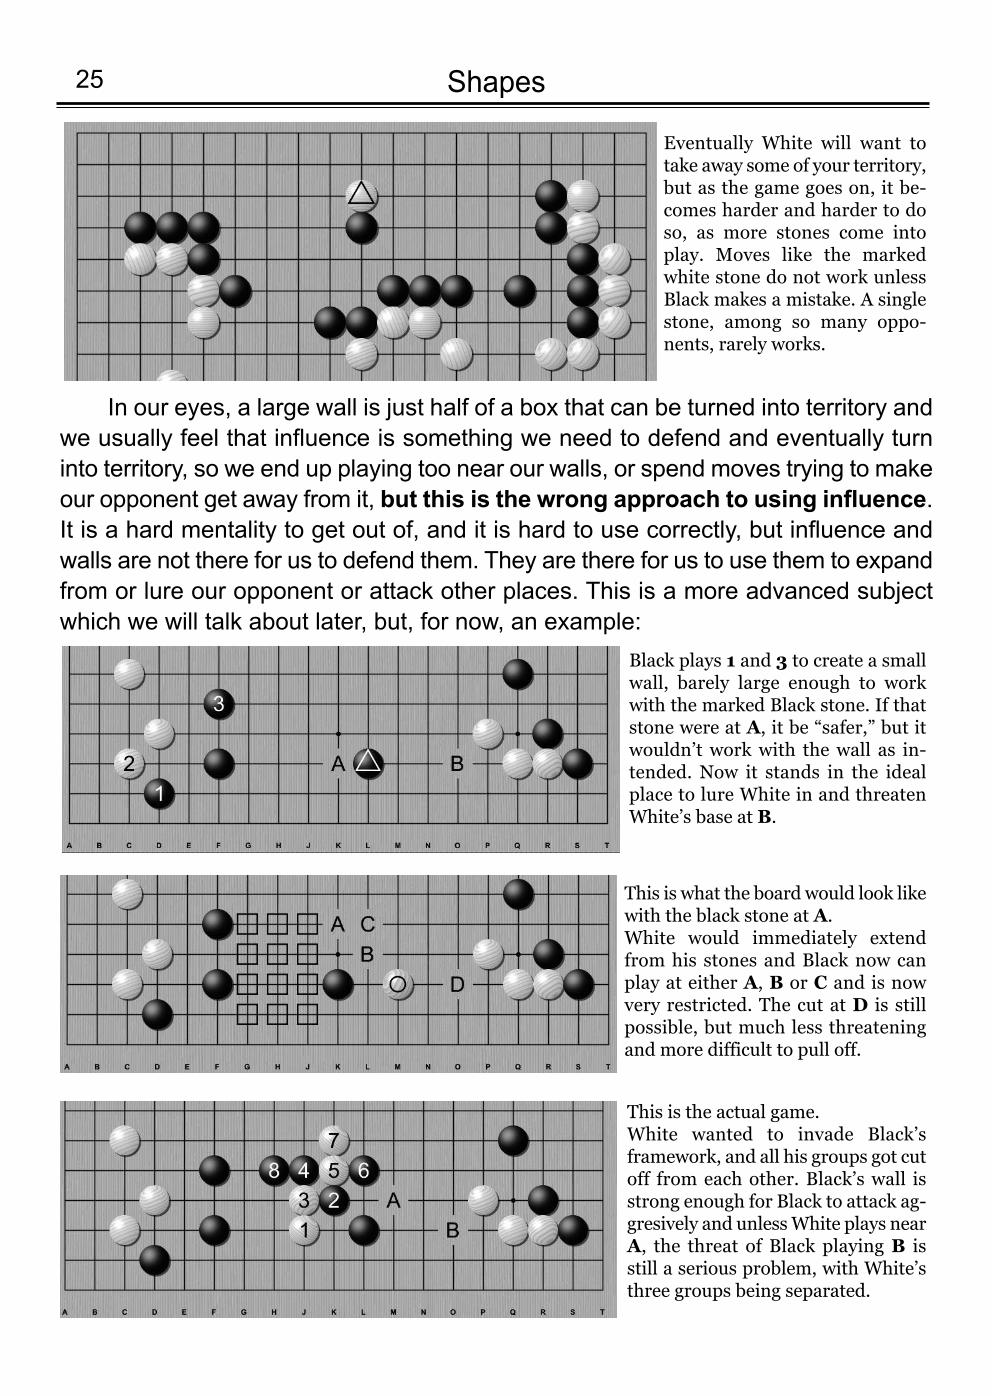
Eventually White will want totake away some of your territory,but as the game goes on, it be-comes harder and harder to doso, as more stones come intoplay. Moves like the markedwhite stone do not work unlessBlack makes a mistake. A singlestone, among so many oppo-nents, rarely works.
Black plays 1 and 3 to create a smallwall, barely large enough to workwith the marked Black stone. If thatstone were at A, it be “safer,” but itwouldn’t work with the wall as in-tended. Now it stands in the idealplace to lure White in and threatenWhite’s base at B.
This is what the board would look likewith the black stone at A.White would immediately extendfrom his stones and Black now canplay at either A, B or C and is nowvery restricted. The cut at D is stillpossible, but much less threateningand more difficult to pull off.
This is the actual game.White wanted to invade Black’sframework, and all his groups got cutoff from each other. Black’s wall isstrong enough for Black to attack ag-gresively and unless White plays nearA, the threat of Black playing B isstill a serious problem, with White’sthree groups being separated.

26Shapes
Left image: The Tiger’s mouth is theshape created by two diagonally con-nected stones with the addition of an-other diagonally connected stone in theA, B, C or D points. In the other four images we can see theresult and marked with 1 is the weakpoint of the tiger’s mouth. Playing there is called a peep.
Left image: When White plays on the weak point, Black must almost always reply by connecting his stones.Such forcing moves are always good for us to try to exploit if we are White, and they are always a possi-bility which we have to be careful of, when we are Black.Center image: If Black ignores the threat and plays 2 elsewhere, this is a possibility of what could happen,but usually Black ends up with his stones split in two groups. Considering that almost always such shapeshave surrounding stones, this means that one of Black’s groups could be dead.Right image: If Black decides to play on the weak spot himself, then a shape called ponuki is created.Once again, we do not go around the board creating this shape on our own, but it needs to emerge fromthe exchanges of moves on the board, for it to be really useful.
But why playing at A in the previous diagram is a good move? The answer comes from our second shape with many stones: The Tiger’s mouth.
There is a Go proverb that says “our opponents weak point, is our strong point”and this is true for the Tiger’s mouth as well. Of course we do not go around theboard and make this shape on its own. The shape needs to have some context andto arise naturally from the moves of both players and that is why the weak point isoften the main consideration on whether to use the shape or not.
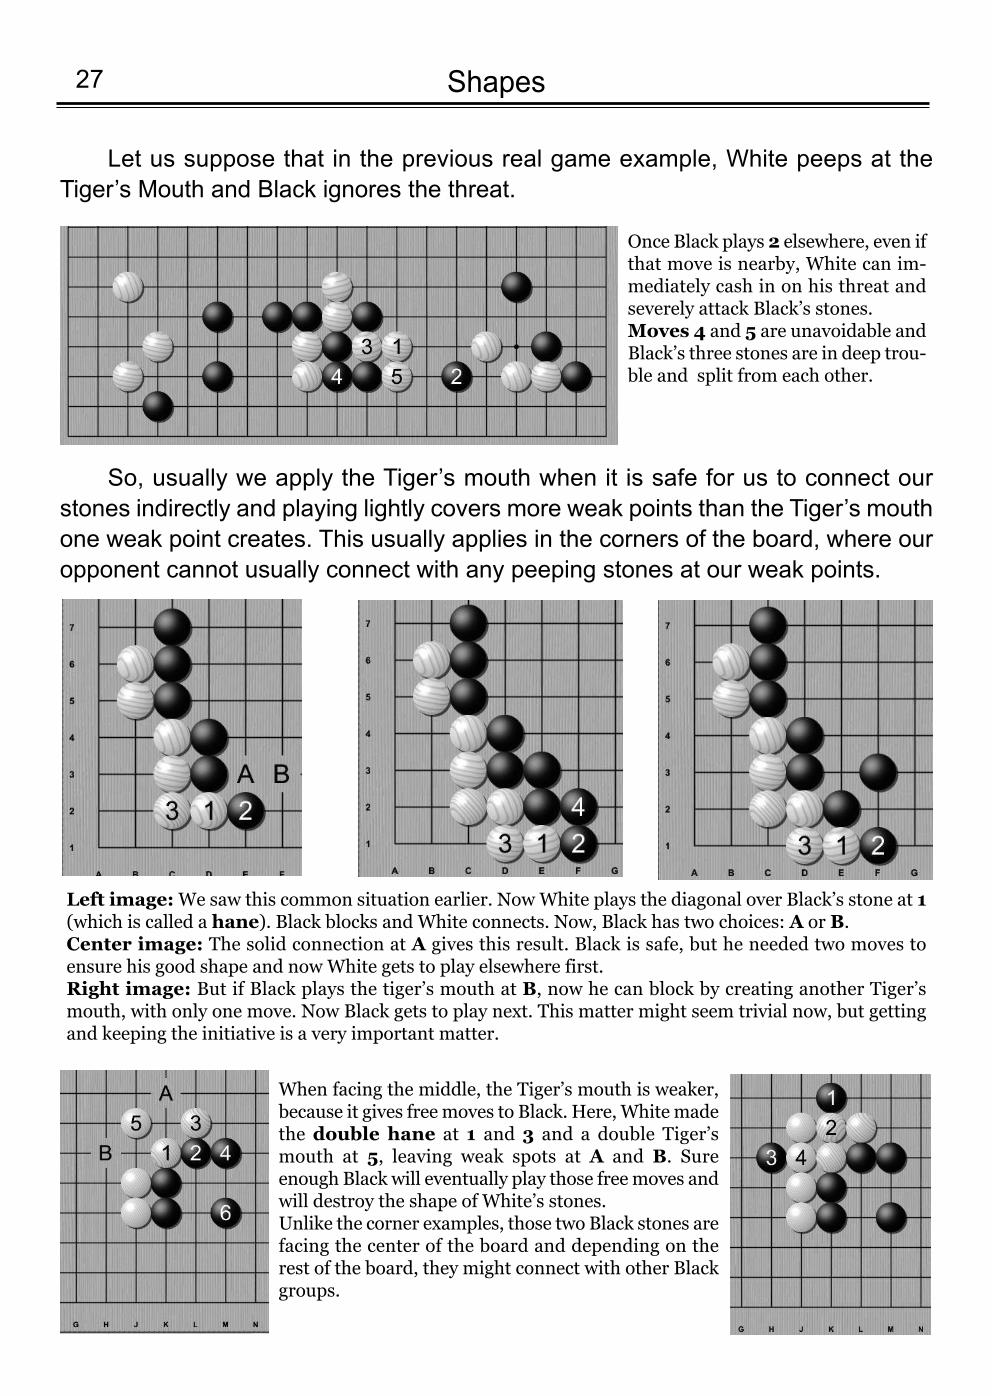
Let us suppose that in the previous real game example, White peeps at theTiger’s Mouth and Black ignores the threat.
Shapes27
Once Black plays 2 elsewhere, even ifthat move is nearby, White can im-mediately cash in on his threat andseverely attack Black’s stones. Moves 4 and 5 are unavoidable andBlack’s three stones are in deep trou-ble and split from each other.
When facing the middle, the Tiger’s mouth is weaker,because it gives free moves to Black. Here, White madethe double hane at 1 and 3 and a double Tiger’smouth at 5, leaving weak spots at A and B. Sureenough Black will eventually play those free moves andwill destroy the shape of White’s stones. Unlike the corner examples, those two Black stones arefacing the center of the board and depending on therest of the board, they might connect with other Blackgroups.
Left image: We saw this common situation earlier. Now White plays the diagonal over Black’s stone at 1(which is called a hane). Black blocks and White connects. Now, Black has two choices: A or B.Center image: The solid connection at A gives this result. Black is safe, but he needed two moves toensure his good shape and now White gets to play elsewhere first.Right image: But if Black plays the tiger’s mouth at B, now he can block by creating another Tiger’smouth, with only one move. Now Black gets to play next. This matter might seem trivial now, but gettingand keeping the initiative is a very important matter.
So, usually we apply the Tiger’s mouth when it is safe for us to connect ourstones indirectly and playing lightly covers more weak points than the Tiger’s mouthone weak point creates. This usually applies in the corners of the board, where ouropponent cannot usually connect with any peeping stones at our weak points.
28Shapes
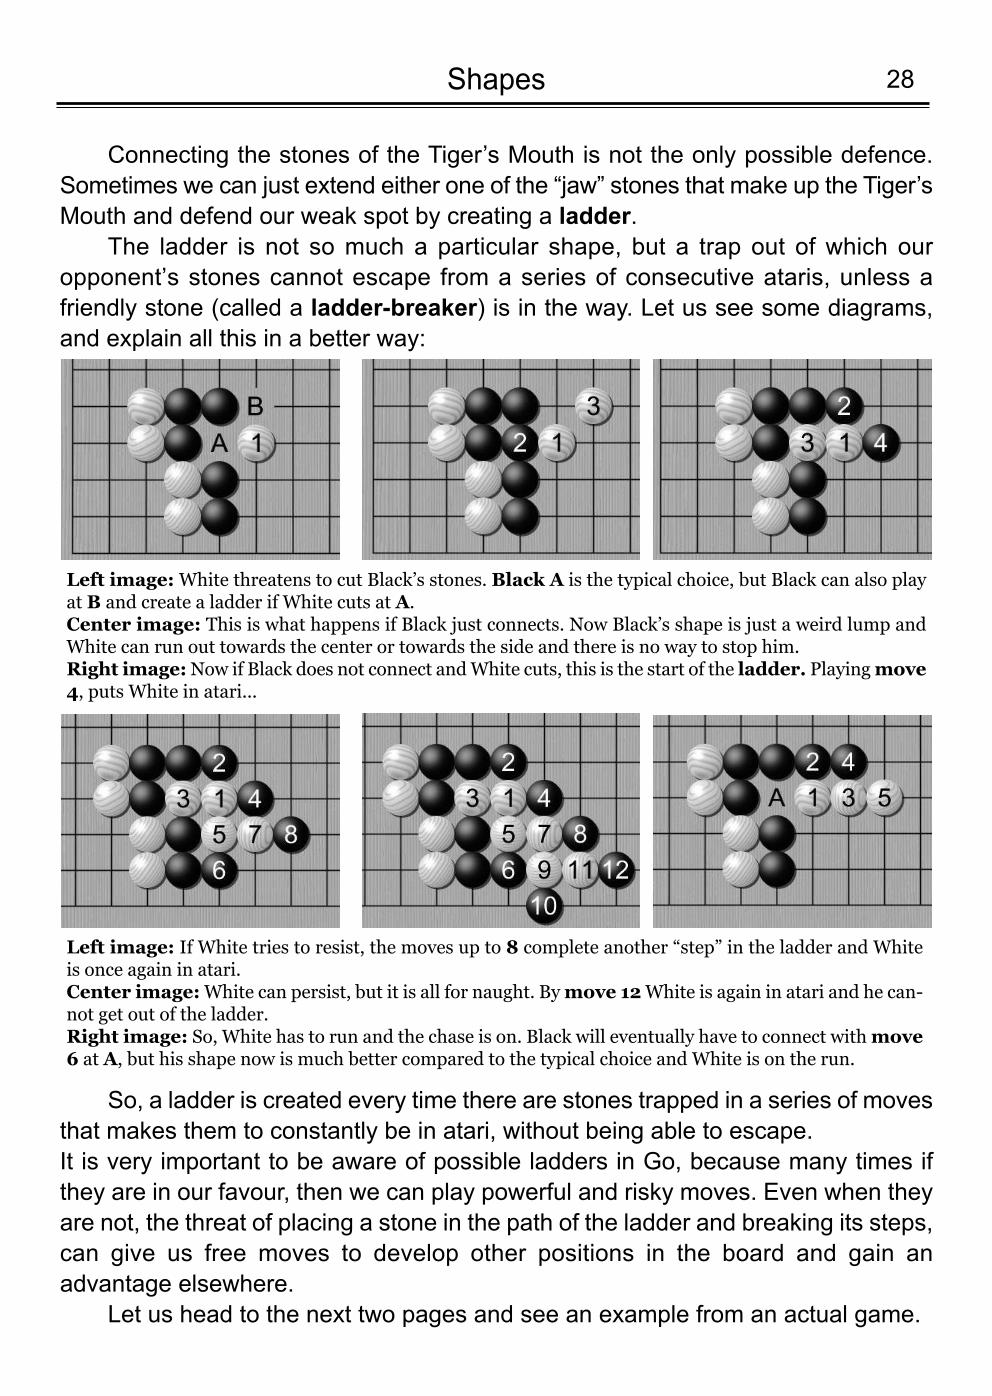
Left image: White threatens to cut Black’s stones. Black Α is the typical choice, but Black can also playat Β and create a ladder if White cuts at Α.Center image: This is what happens if Black just connects. Now Black’s shape is just a weird lump andWhite can run out towards the center or towards the side and there is no way to stop him.Right image: Now if Black does not connect and White cuts, this is the start of the ladder. Playing move4, puts White in atari...
Left image: If White tries to resist, the moves up to 8 complete another “step” in the ladder and Whiteis once again in atari.Center image: White can persist, but it is all for naught. By move 12 White is again in atari and he can-not get out of the ladder.Right image: So, White has to run and the chase is on. Black will eventually have to connect with move6 at A, but his shape now is much better compared to the typical choice and White is on the run.
Connecting the stones of the Tiger’s Mouth is not the only possible defence.Sometimes we can just extend either one of the “jaw” stones that make up the Tiger’sMouth and defend our weak spot by creating a ladder.
The ladder is not so much a particular shape, but a trap out of which ouropponent’s stones cannot escape from a series of consecutive ataris, unless afriendly stone (called a ladder-breaker) is in the way. Let us see some diagrams,and explain all this in a better way:
So, a ladder is created every time there are stones trapped in a series of movesthat makes them to constantly be in atari, without being able to escape.It is very important to be aware of possible ladders in Go, because many times ifthey are in our favour, then we can play powerful and risky moves. Even when theyare not, the threat of placing a stone in the path of the ladder and breaking its steps,can give us free moves to develop other positions in the board and gain anadvantage elsewhere.
Let us head to the next two pages and see an example from an actual game.
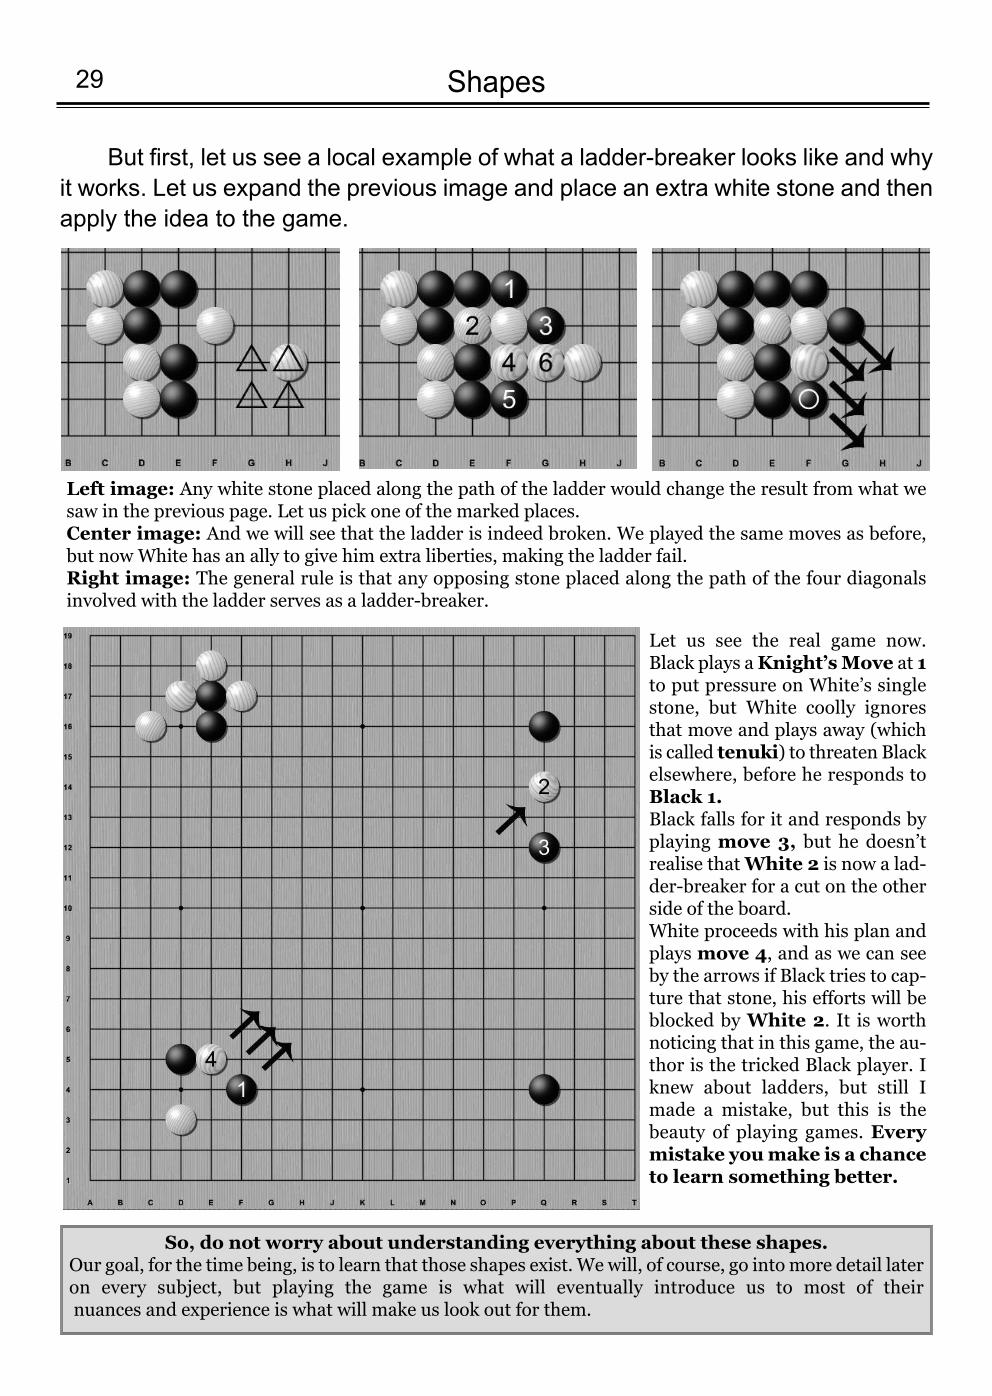
But first, let us see a local example of what a ladder-breaker looks like and whyit works. Let us expand the previous image and place an extra white stone and thenapply the idea to the game.
Shapes29
Let us see the real game now.Black plays a Knight’s Move at 1to put pressure on White’s singlestone, but White coolly ignoresthat move and plays away (whichis called tenuki) to threaten Blackelsewhere, before he responds toBlack 1.Black falls for it and responds byplaying move 3, but he doesn’trealise that White 2 is now a lad-der-breaker for a cut on the otherside of the board.White proceeds with his plan andplays move 4, and as we can seeby the arrows if Black tries to cap-ture that stone, his efforts will beblocked by White 2. It is worthnoticing that in this game, the au-thor is the tricked Black player. Iknew about ladders, but still Imade a mistake, but this is thebeauty of playing games. Everymistake you make is a chanceto learn something better.
Left image: Any white stone placed along the path of the ladder would change the result from what wesaw in the previous page. Let us pick one of the marked places.Center image: And we will see that the ladder is indeed broken. We played the same moves as before,but now White has an ally to give him extra liberties, making the ladder fail.Right image: The general rule is that any opposing stone placed along the path of the four diagonals involved with the ladder serves as a ladder-breaker.
So, do not worry about understanding everything about these shapes.Our goal, for the time being, is to learn that those shapes exist. We will, of course, go into more detail lateron every subject, but playing the game is what will eventually introduce us to most of theirnuances and experience is what will make us look out for them.
30Shapes
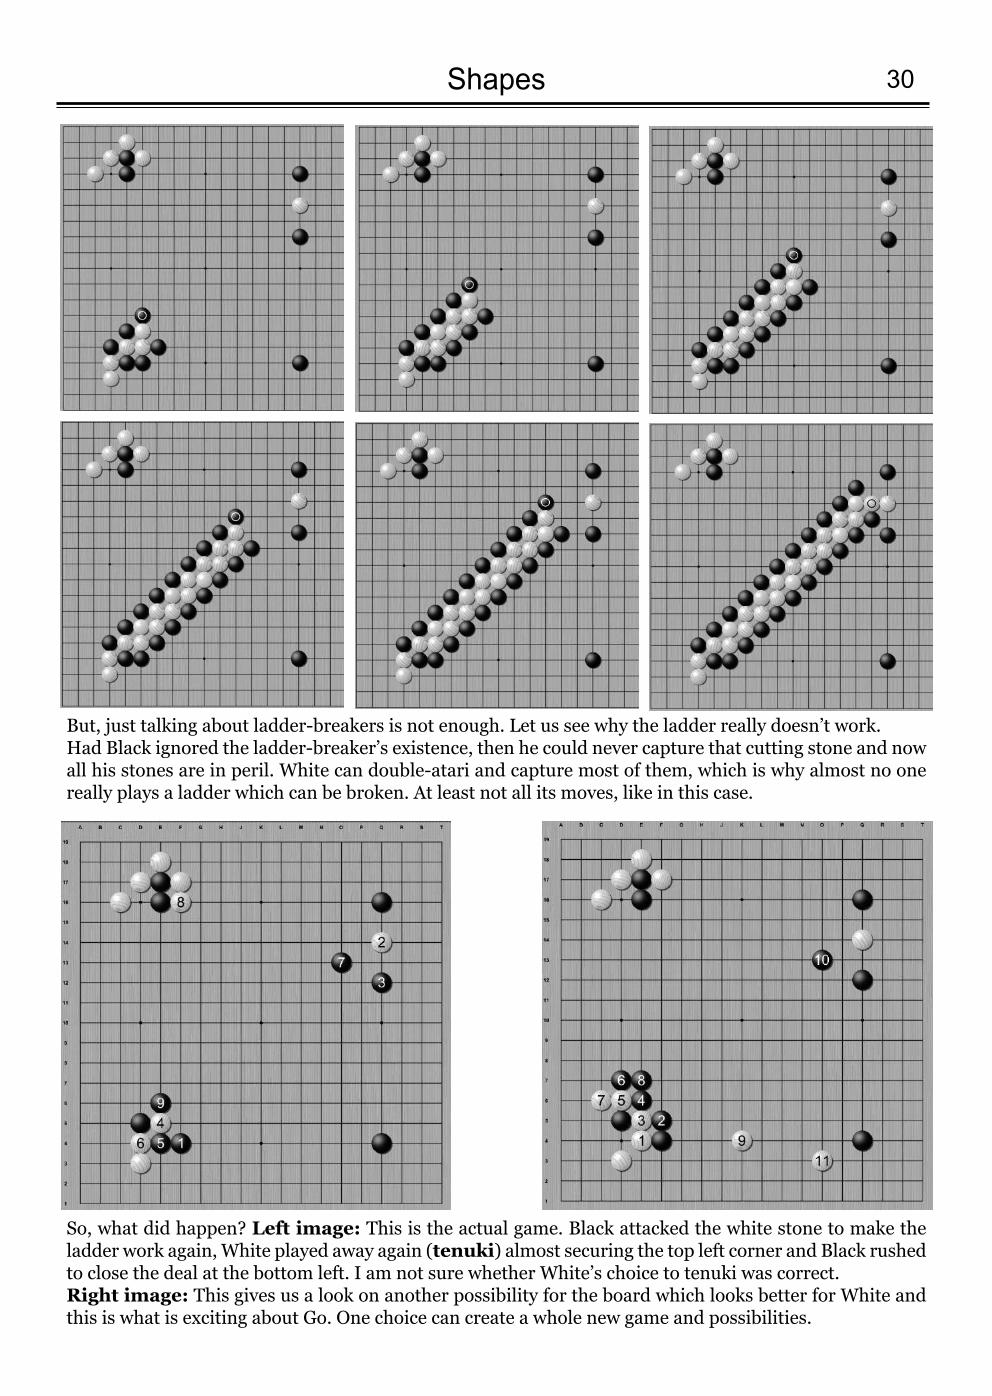
But, just talking about ladder-breakers is not enough. Let us see why the ladder really doesn’t work.Had Black ignored the ladder-breaker’s existence, then he could never capture that cutting stone and nowall his stones are in peril. White can double-atari and capture most of them, which is why almost no onereally plays a ladder which can be broken. At least not all its moves, like in this case.
So, what did happen? Left image: This is the actual game. Black attacked the white stone to make theladder work again, White played away again (tenuki) almost securing the top left corner and Black rushedto close the deal at the bottom left. I am not sure whether White’s choice to tenuki was correct. Right image: This gives us a look on another possibility for the board which looks better for White andthis is what is exciting about Go. One choice can create a whole new game and possibilities.
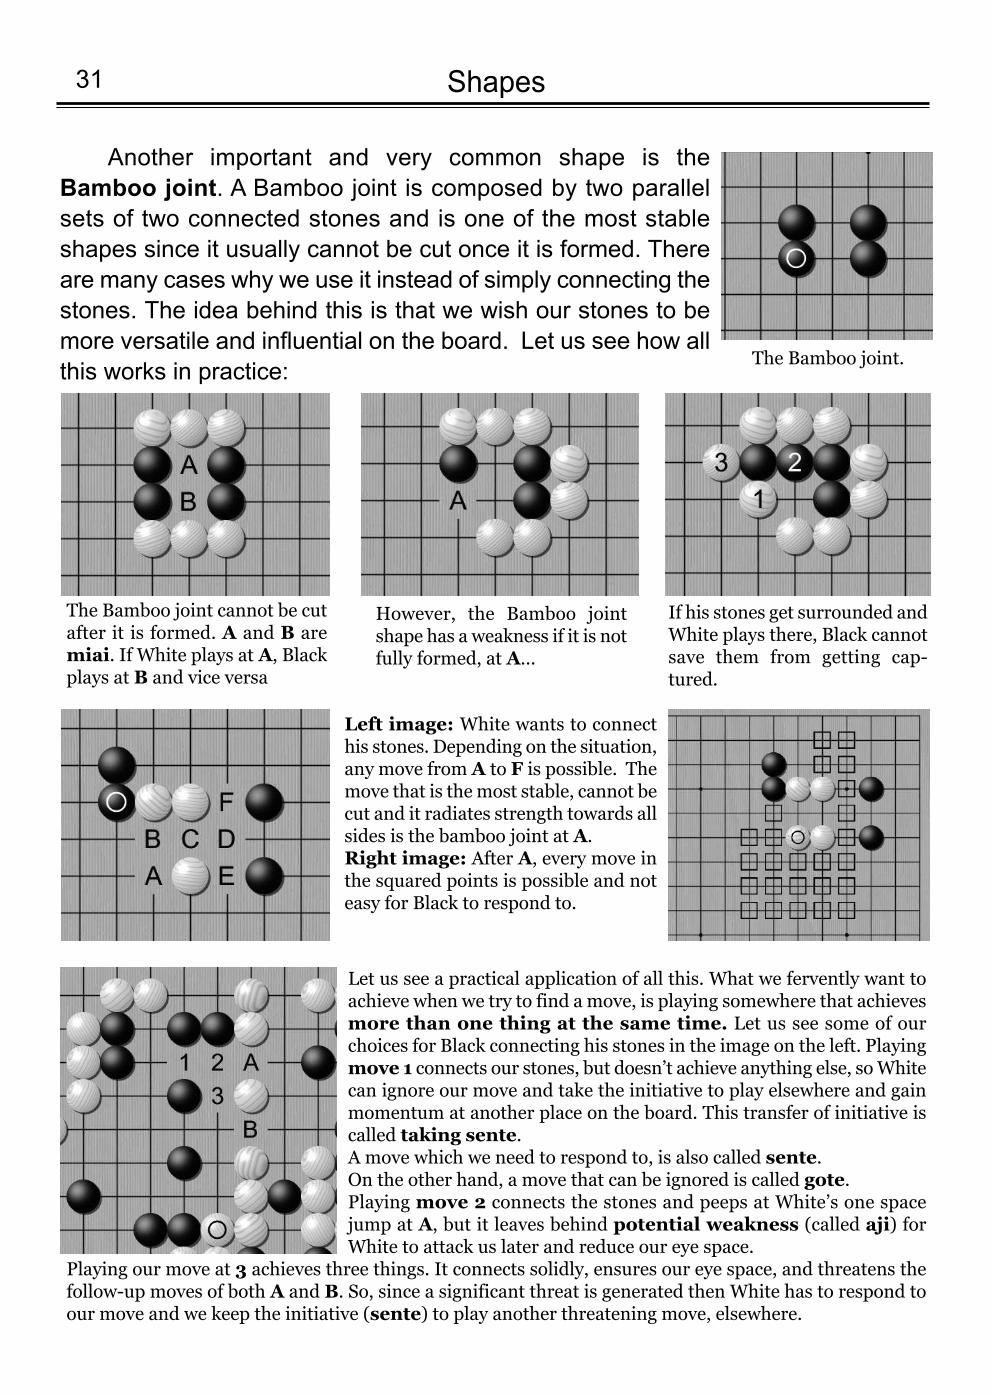
Another important and very common shape is theBamboo joint. A Bamboo joint is composed by two parallelsets of two connected stones and is one of the most stableshapes since it usually cannot be cut once it is formed. Thereare many cases why we use it instead of simply connecting thestones. Τhe idea behind this is that we wish our stones to bemore versatile and influential on the board. Let us see how allthis works in practice:
Shapes31
The Bamboo joint.
The Bamboo joint cannot be cutafter it is formed. A and B aremiai. If White plays at A, Blackplays at B and vice versa
However, the Bamboo jointshape has a weakness if it is notfully formed, at A...
If his stones get surrounded andWhite plays there, Black cannotsave them from getting cap-tured.
Left image: White wants to connecthis stones. Depending on the situation,any move from A to F is possible. Themove that is the most stable, cannot becut and it radiates strength towards allsides is the bamboo joint at A.Right image: After A, every move inthe squared points is possible and noteasy for Black to respond to.
Let us see a practical application of all this. What we fervently want toachieve when we try to find a move, is playing somewhere that achievesmore than one thing at the same time. Let us see some of ourchoices for Black connecting his stones in the image on the left. Playingmove 1 connects our stones, but doesn’t achieve anything else, so Whitecan ignore our move and take the initiative to play elsewhere and gainmomentum at another place on the board. This transfer of initiative iscalled taking sente. A move which we need to respond to, is also called sente. On the other hand, a move that can be ignored is called gote.Playing move 2 connects the stones and peeps at White’s one spacejump at A, but it leaves behind potential weakness (called aji) forWhite to attack us later and reduce our eye space.
Playing our move at 3 achieves three things. It connects solidly, ensures our eye space, and threatens thefollow-up moves of both A and B. So, since a significant threat is generated then White has to respond toour move and we keep the initiative (sente) to play another threatening move, elsewhere.
32Shapes
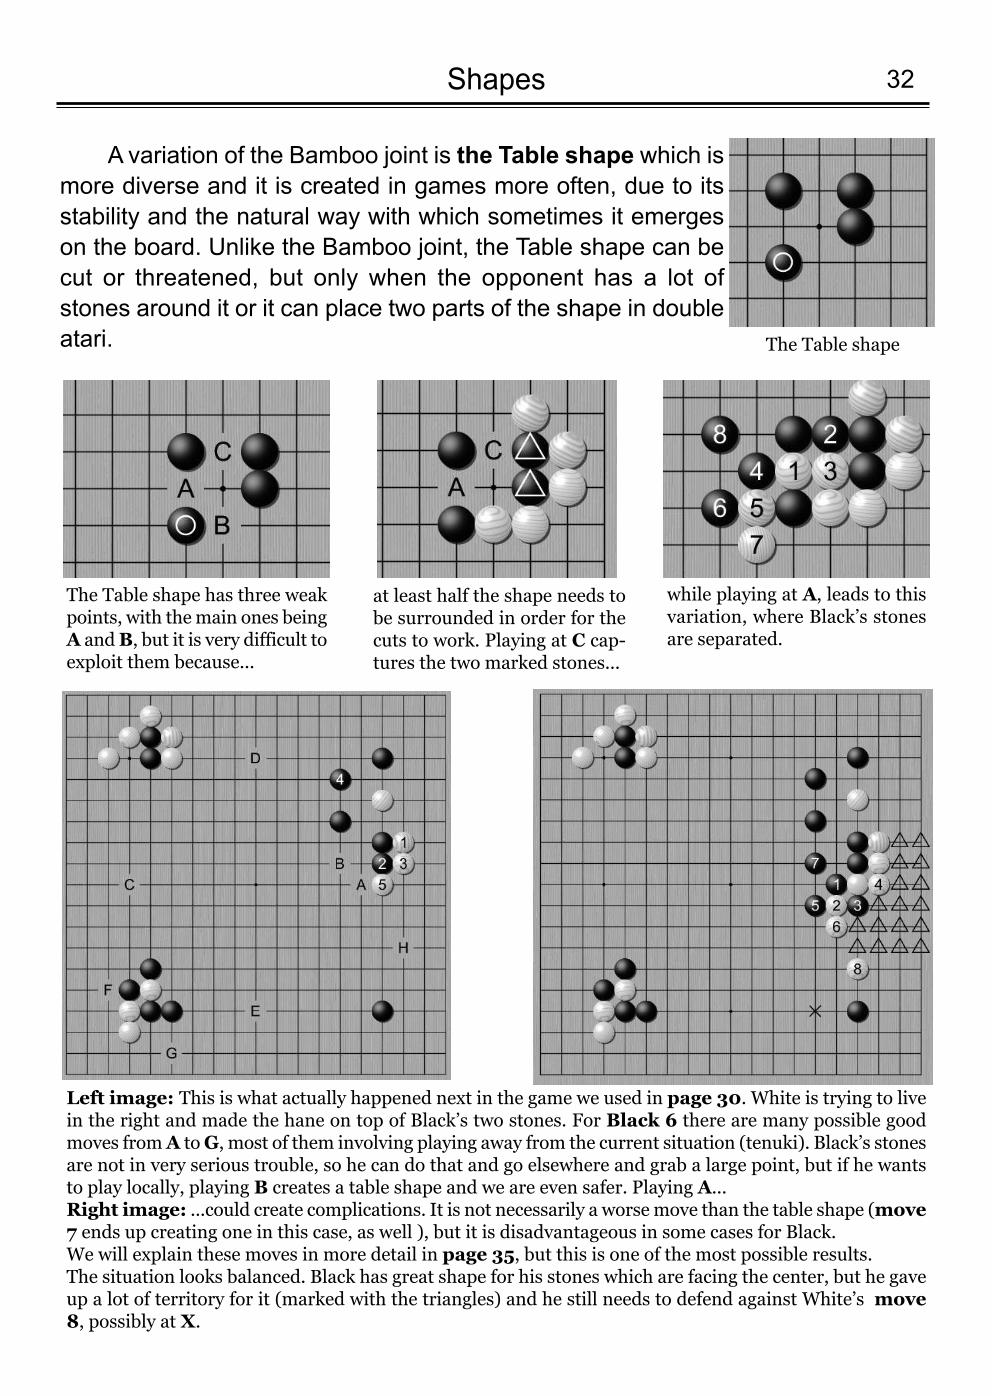
The Table shape
The Table shape has three weakpoints, with the main ones beingA and B, but it is very difficult toexploit them because...
at least half the shape needs tobe surrounded in order for thecuts to work. Playing at C cap-tures the two marked stones...
while playing at A, leads to thisvariation, where Black’s stonesare separated.
Left image: This is what actually happened next in the game we used in page 30. White is trying to livein the right and made the hane on top of Black’s two stones. For Black 6 there are many possible goodmoves from A to G, most of them involving playing away from the current situation (tenuki). Black’s stonesare not in very serious trouble, so he can do that and go elsewhere and grab a large point, but if he wantsto play locally, playing B creates a table shape and we are even safer. Playing A... Right image: ...could create complications. It is not necessarily a worse move than the table shape (move7 ends up creating one in this case, as well ), but it is disadvantageous in some cases for Black.We will explain these moves in more detail in page 35, but this is one of the most possible results. The situation looks balanced. Black has great shape for his stones which are facing the center, but he gaveup a lot of territory for it (marked with the triangles) and he still needs to defend against White’s move8, possibly at X.
A variation of the Bamboo joint is the Table shape which ismore diverse and it is created in games more often, due to itsstability and the natural way with which sometimes it emergeson the board. Unlike the Bamboo joint, the Table shape can becut or threatened, but only when the opponent has a lot ofstones around it or it can place two parts of the shape in doubleatari.
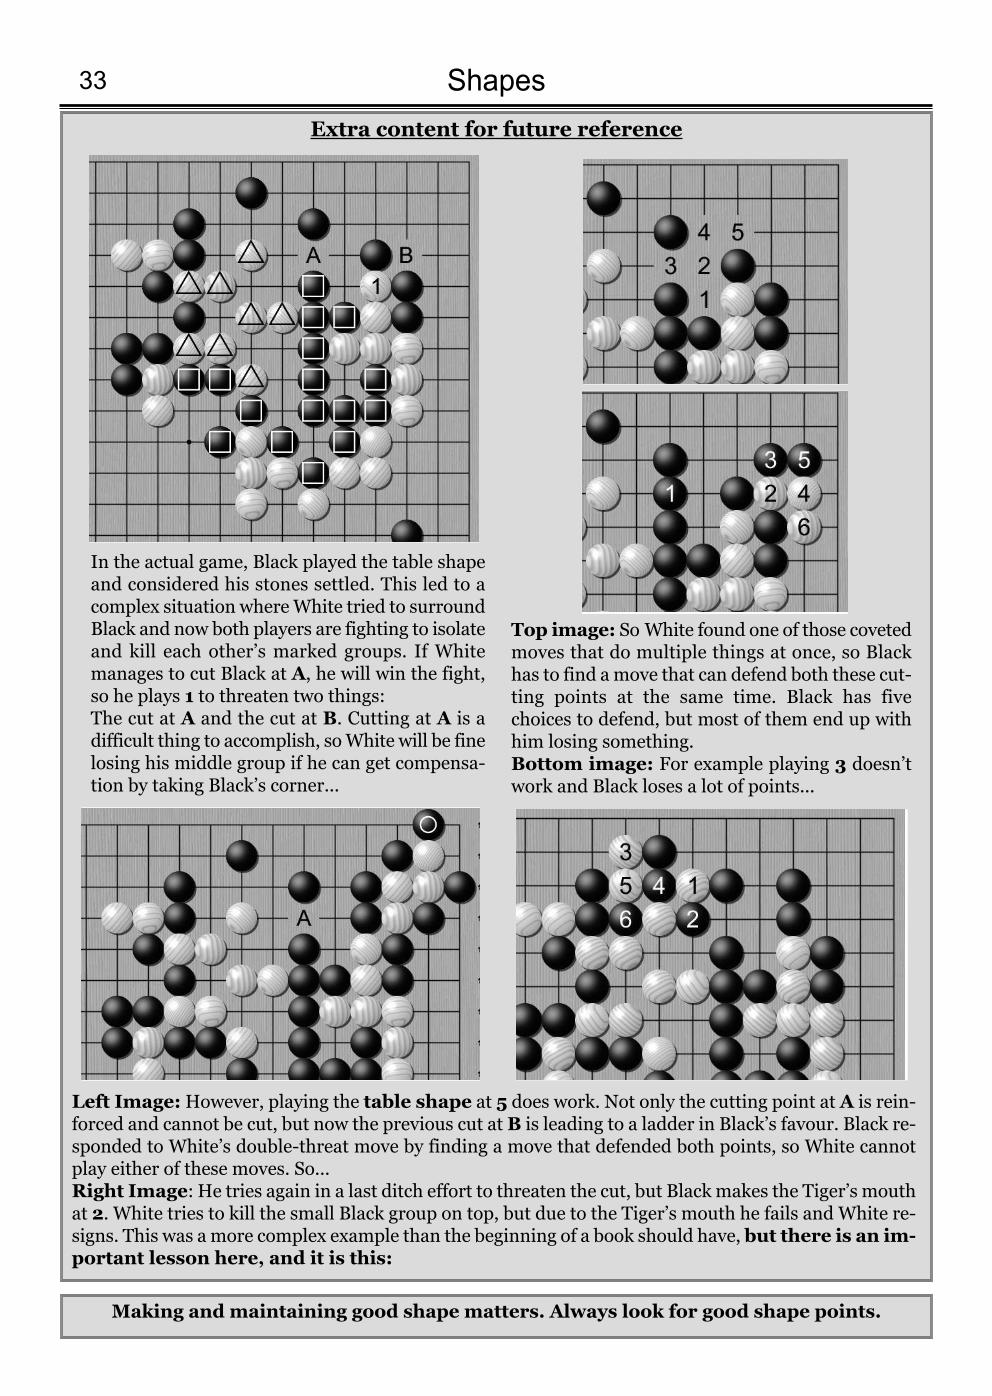
Extra content for future reference
Shapes33
In the actual game, Black played the table shapeand considered his stones settled. This led to acomplex situation where White tried to surroundBlack and now both players are fighting to isolateand kill each other’s marked groups. If Whitemanages to cut Black at A, he will win the fight,so he plays 1 to threaten two things: The cut at A and the cut at B. Cutting at A is adifficult thing to accomplish, so White will be finelosing his middle group if he can get compensa-tion by taking Black’s corner...
Top image: So White found one of those covetedmoves that do multiple things at once, so Blackhas to find a move that can defend both these cut-ting points at the same time. Black has fivechoices to defend, but most of them end up withhim losing something. Bottom image: For example playing 3 doesn’twork and Black loses a lot of points...
Left Image: However, playing the table shape at 5 does work. Not only the cutting point at A is rein-forced and cannot be cut, but now the previous cut at B is leading to a ladder in Black’s favour. Black re-sponded to White’s double-threat move by finding a move that defended both points, so White cannotplay either of these moves. So... Right Image: He tries again in a last ditch effort to threaten the cut, but Black makes the Tiger’s mouthat 2. White tries to kill the small Black group on top, but due to the Tiger’s mouth he fails and White re-signs. This was a more complex example than the beginning of a book should have, but there is an im-portant lesson here, and it is this:
Making and maintaining good shape matters. Always look for good shape points.
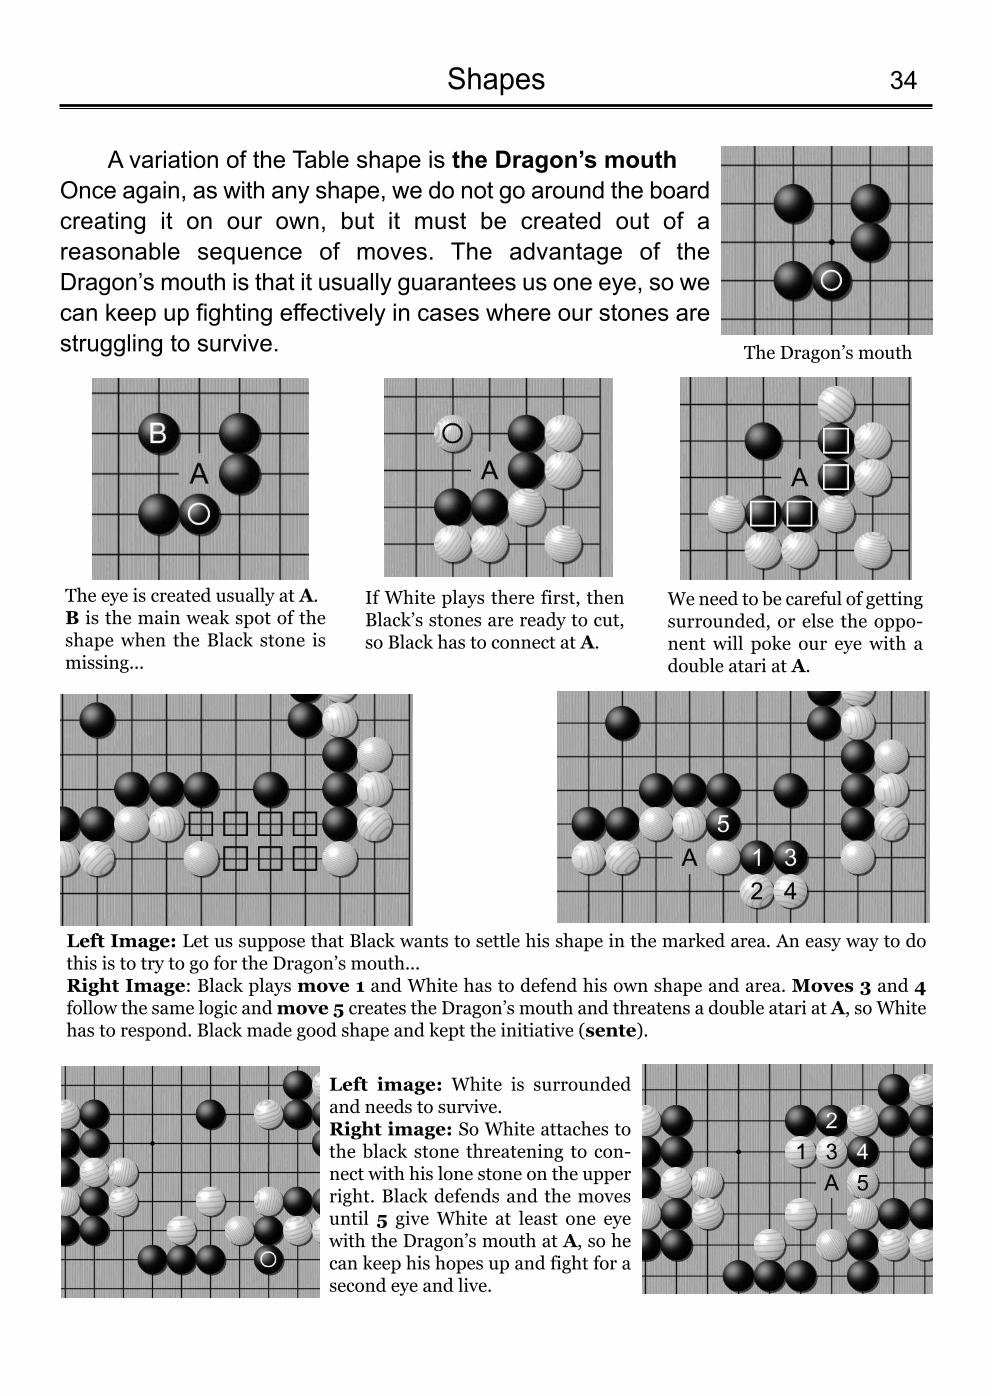
34Shapes
A variation of the Table shape is the Dragon’s mouthOnce again, as with any shape, we do not go around the boardcreating it on our own, but it must be created out of areasonable sequence of moves. The advantage of theDragon’s mouth is that it usually guarantees us one eye, so wecan keep up fighting effectively in cases where our stones arestruggling to survive. The Dragon’s mouth
The eye is created usually at A.B is the main weak spot of theshape when the Black stone ismissing...
If White plays there first, thenBlack’s stones are ready to cut,so Black has to connect at A.
Left Image: Let us suppose that Black wants to settle his shape in the marked area. An easy way to dothis is to try to go for the Dragon’s mouth...Right Image: Black plays move 1 and White has to defend his own shape and area. Moves 3 and 4follow the same logic and move 5 creates the Dragon’s mouth and threatens a double atari at A, so Whitehas to respond. Black made good shape and kept the initiative (sente).
Left image: White is surroundedand needs to survive.Right image: So White attaches tothe black stone threatening to con-nect with his lone stone on the upperright. Black defends and the movesuntil 5 give White at least one eyewith the Dragon’s mouth at A, so hecan keep his hopes up and fight for asecond eye and live.
We need to be careful of gettingsurrounded, or else the oppo-nent will poke our eye with adouble atari at A.
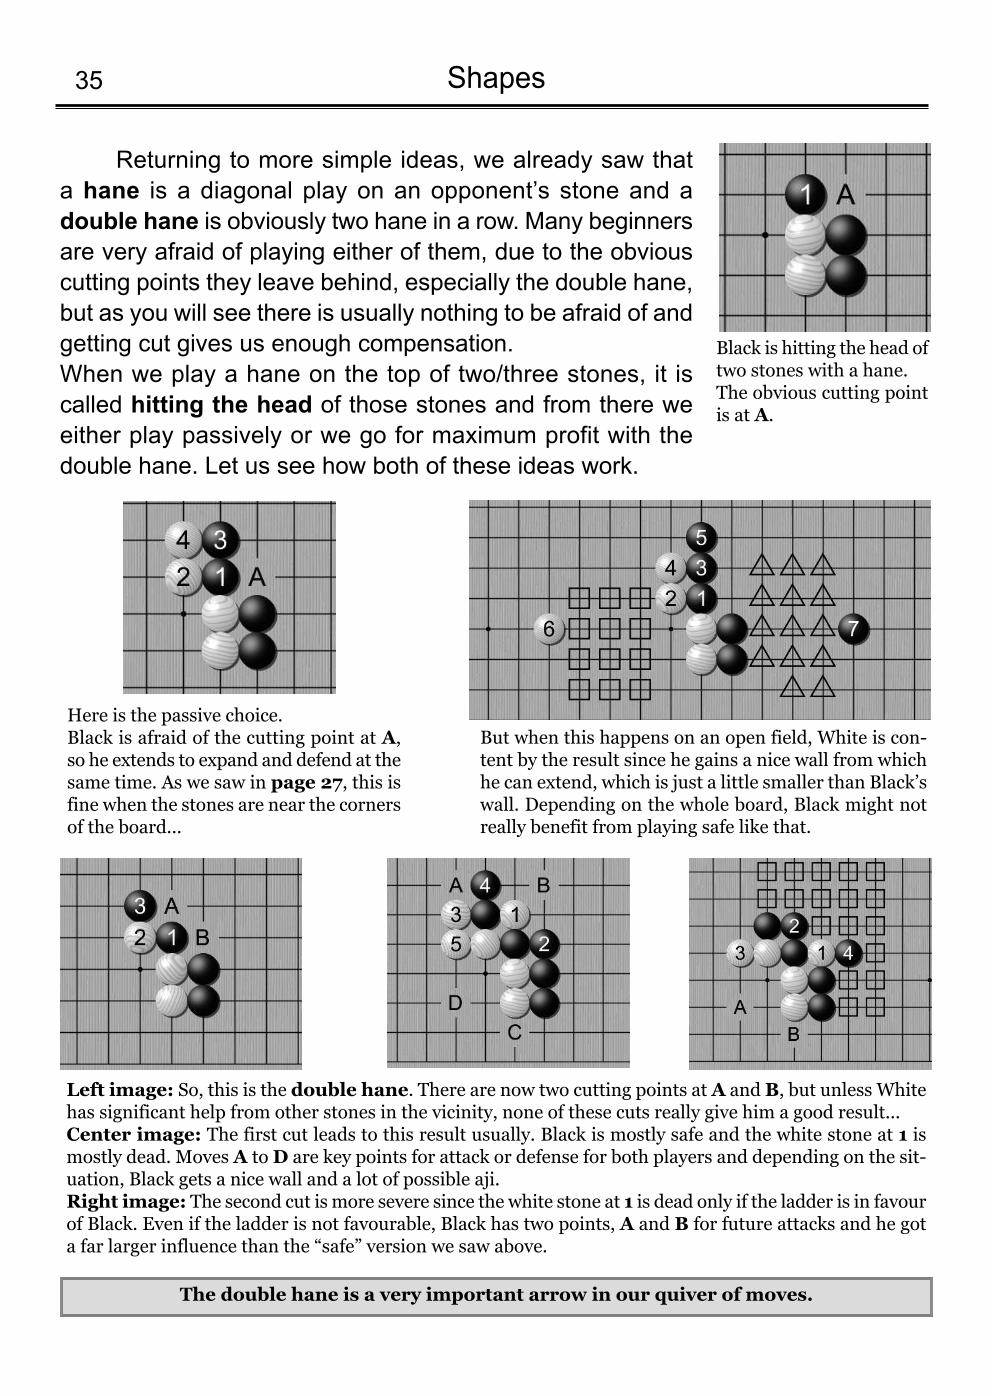
Returning to more simple ideas, we already saw thata hane is a diagonal play on an opponent’s stone and adouble hane is obviously two hane in a row. Many beginnersare very afraid of playing either of them, due to the obviouscutting points they leave behind, especially the double hane,but as you will see there is usually nothing to be afraid of andgetting cut gives us enough compensation.When we play a hane on the top of two/three stones, it iscalled hitting the head of those stones and from there weeither play passively or we go for maximum profit with thedouble hane. Let us see how both of these ideas work.
Shapes35
Here is the passive choice.Black is afraid of the cutting point at A,so he extends to expand and defend at thesame time. As we saw in page 27, this isfine when the stones are near the cornersof the board...
Βut when this happens on an open field, White is con-tent by the result since he gains a nice wall from whichhe can extend, which is just a little smaller than Black’swall. Depending on the whole board, Black might notreally benefit from playing safe like that.
The double hane is a very important arrow in our quiver of moves.
Black is hitting the head oftwo stones with a hane. The obvious cutting pointis at A.
Left image: So, this is the double hane. There are now two cutting points at A and B, but unless Whitehas significant help from other stones in the vicinity, none of these cuts really give him a good result...Center image: The first cut leads to this result usually. Black is mostly safe and the white stone at 1 ismostly dead. Moves A to D are key points for attack or defense for both players and depending on the sit-uation, Black gets a nice wall and a lot of possible aji.Right image: The second cut is more severe since the white stone at 1 is dead only if the ladder is in favourof Black. Even if the ladder is not favourable, Black has two points, A and B for future attacks and he gota far larger influence than the “safe” version we saw above.
Finishing this chapter we will see some shapes that regularly occur in the game,but we will not analyse them as much either because their pros and cons are moreobvious or because they will be explained more when we will showcase when andwhere they are used.
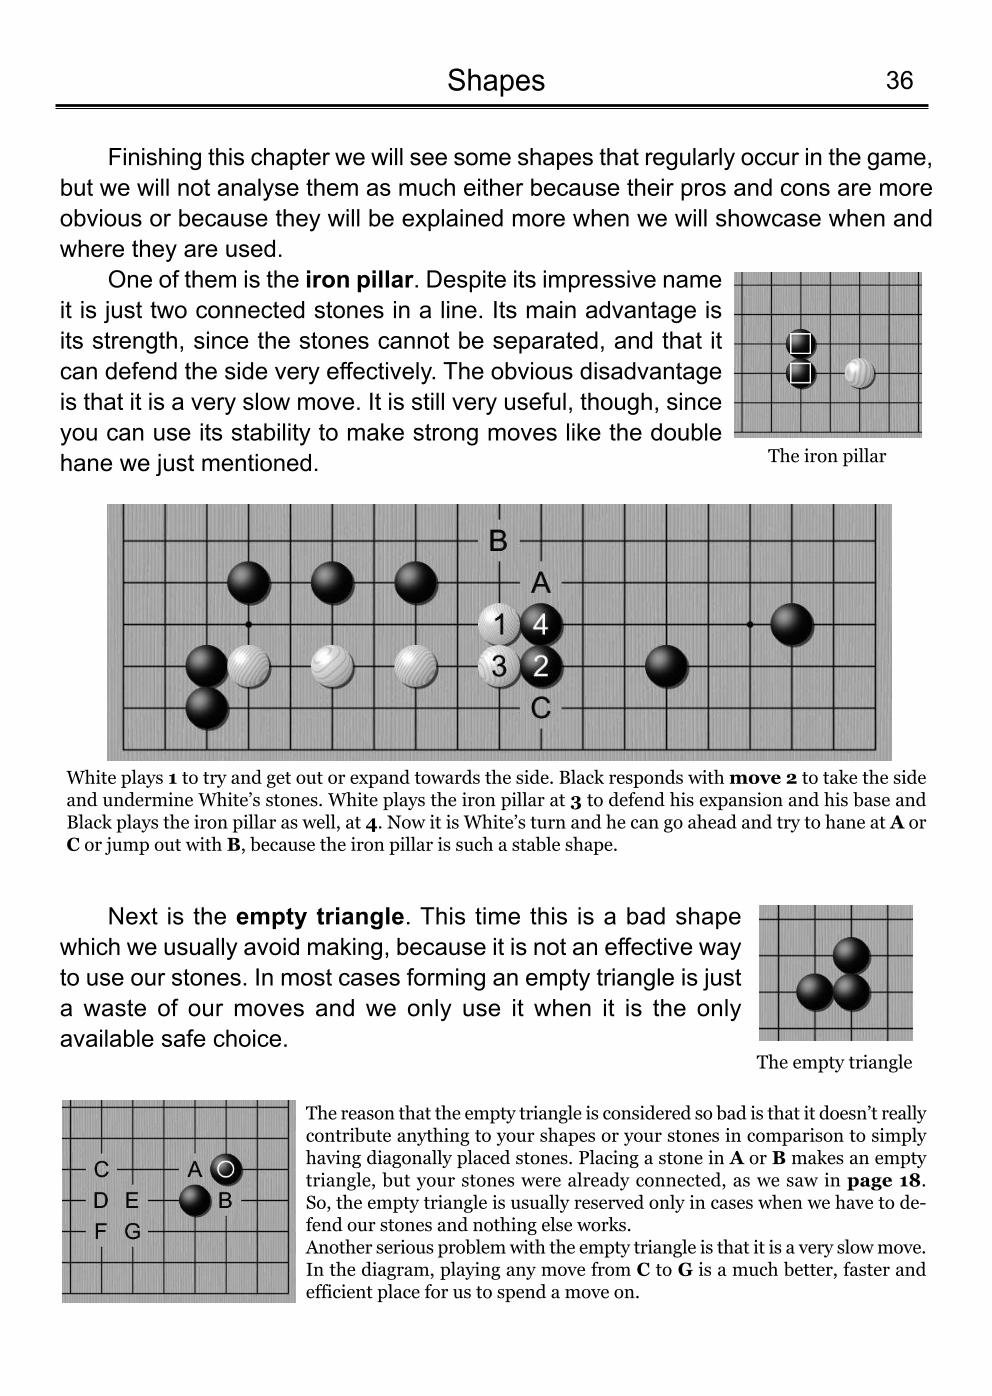
One of them is the iron pillar. Despite its impressive nameit is just two connected stones in a line. Its main advantage isits strength, since the stones cannot be separated, and that itcan defend the side very effectively. The obvious disadvantageis that it is a very slow move. It is still very useful, though, sinceyou can use its stability to make strong moves like the doublehane we just mentioned.
36Shapes
The iron pillar
White plays 1 to try and get out or expand towards the side. Black responds with move 2 to take the sideand undermine White’s stones. White plays the iron pillar at 3 to defend his expansion and his base andBlack plays the iron pillar as well, at 4. Now it is White’s turn and he can go ahead and try to hane at A orC or jump out with B, because the iron pillar is such a stable shape.
The empty triangle
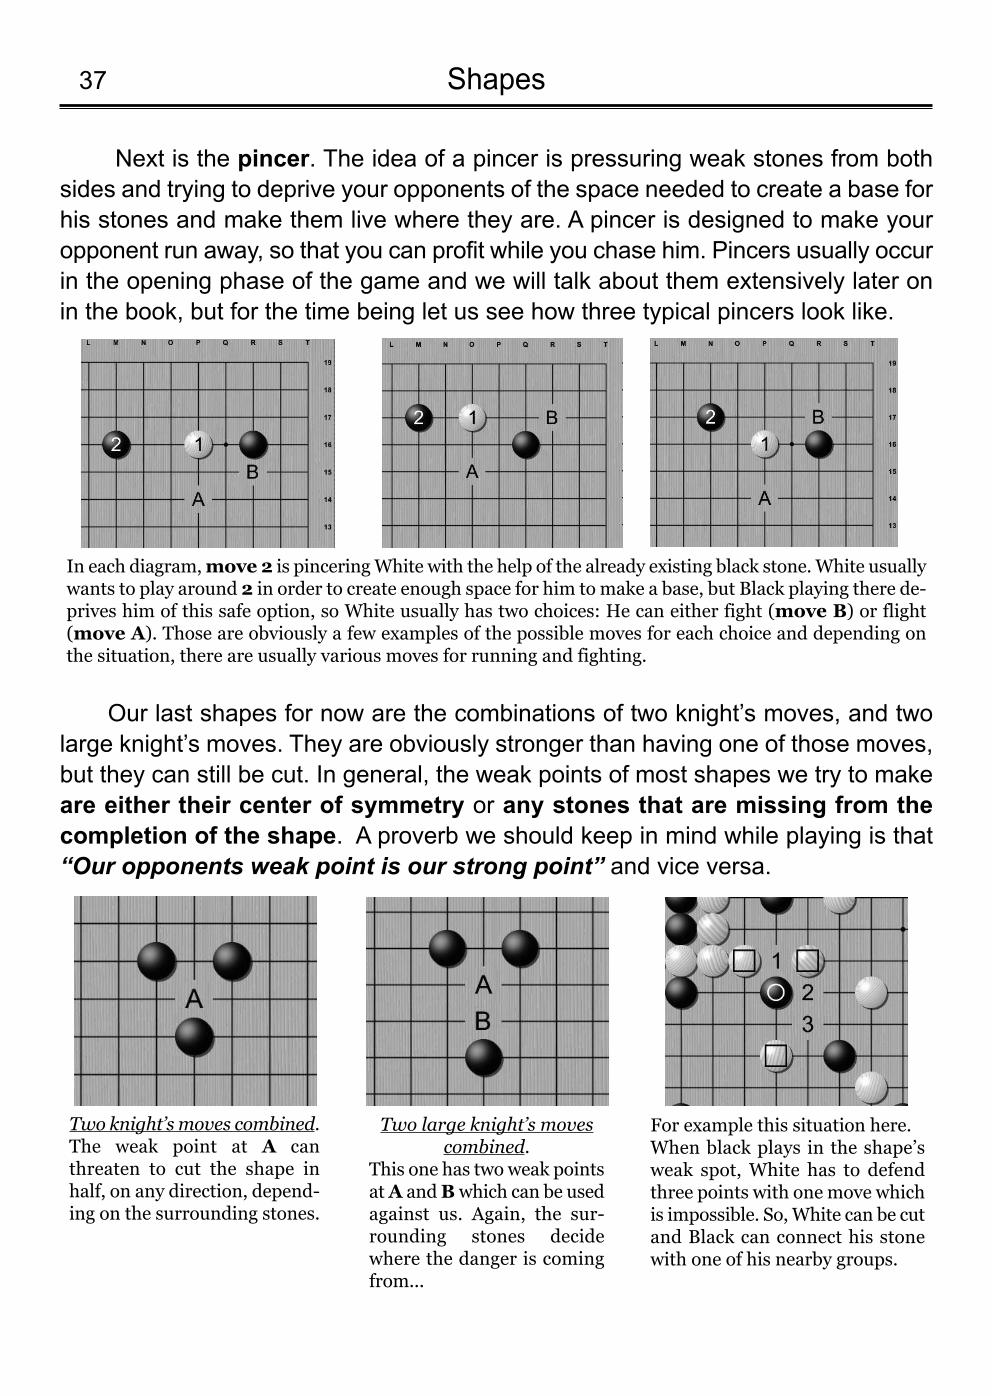
The reason that the empty triangle is considered so bad is that it doesn’t reallycontribute anything to your shapes or your stones in comparison to simplyhaving diagonally placed stones. Placing a stone in A or B makes an emptytriangle, but your stones were already connected, as we saw in page 18. So, the empty triangle is usually reserved only in cases when we have to de-fend our stones and nothing else works. Another serious problem with the empty triangle is that it is a very slow move.In the diagram, playing any move from C to G is a much better, faster andefficient place for us to spend a move on.
Next is the empty triangle. This time this is a bad shapewhich we usually avoid making, because it is not an effective wayto use our stones. In most cases forming an empty triangle is justa waste of our moves and we only use it when it is the onlyavailable safe choice.
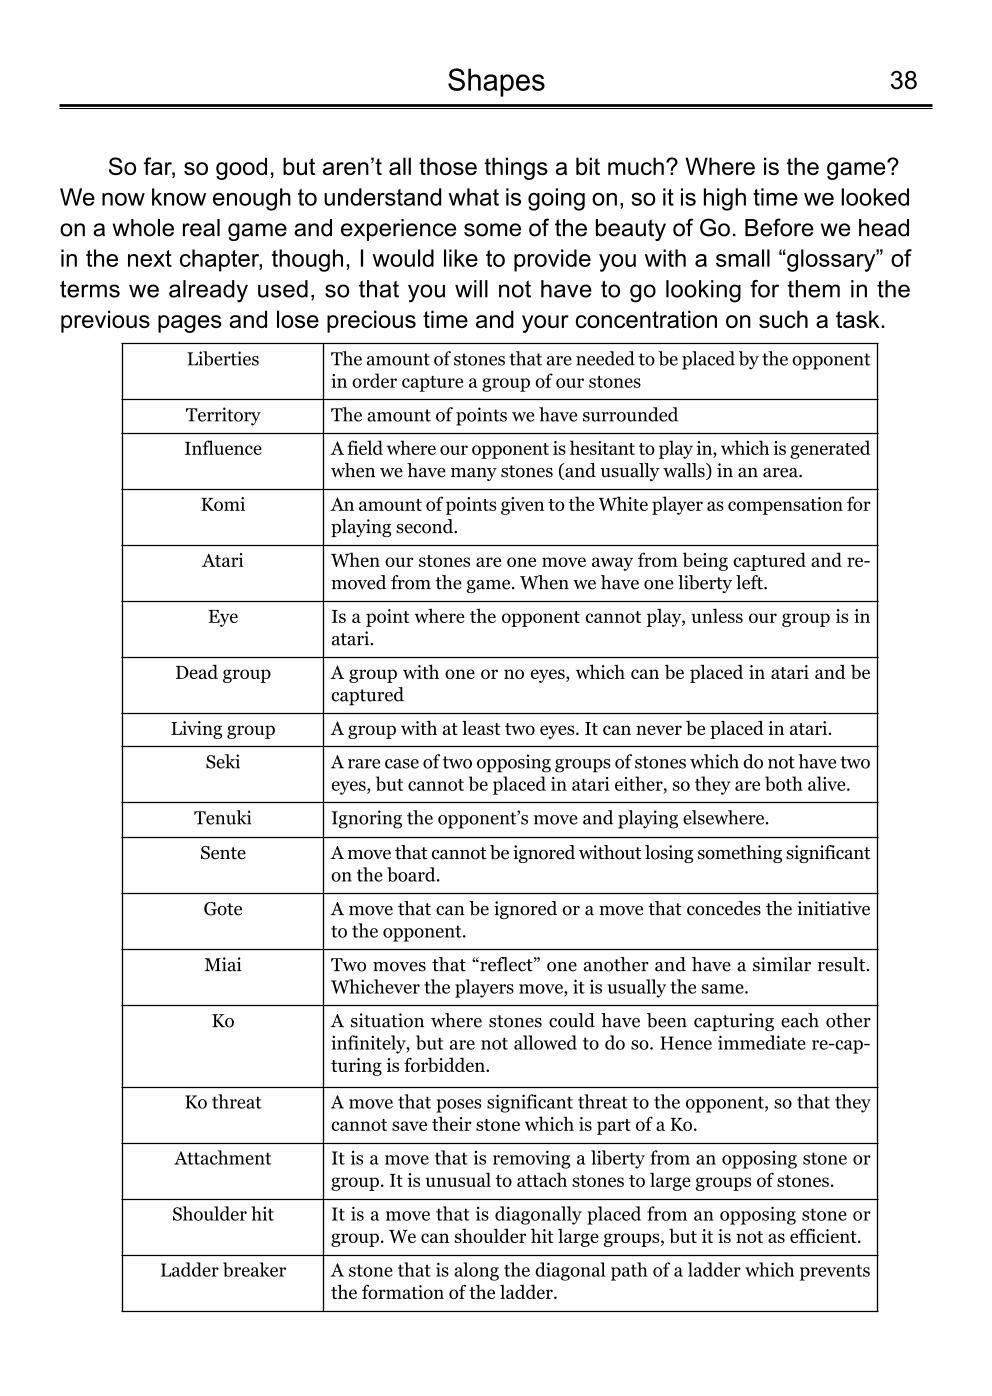
Next is the pincer. The idea of a pincer is pressuring weak stones from bothsides and trying to deprive your opponents of the space needed to create a base forhis stones and make them live where they are. A pincer is designed to make youropponent run away, so that you can profit while you chase him. Pincers usually occurin the opening phase of the game and we will talk about them extensively later onin the book, but for the time being let us see how three typical pincers look like.
Shapes37
Two knight’s moves combined.The weak point at A canthreaten to cut the shape inhalf, on any direction, depend-ing on the surrounding stones.
Two large knight’s movescombined.
This one has two weak pointsat A and B which can be usedagainst us. Again, the sur-rounding stones decidewhere the danger is comingfrom...
For example this situation here. When black plays in the shape’sweak spot, White has to defendthree points with one move whichis impossible. So, White can be cutand Black can connect his stonewith one of his nearby groups.
In each diagram, move 2 is pincering White with the help of the already existing black stone. White usuallywants to play around 2 in order to create enough space for him to make a base, but Black playing there de-prives him of this safe option, so White usually has two choices: He can either fight (move B) or flight(move A). Those are obviously a few examples of the possible moves for each choice and depending onthe situation, there are usually various moves for running and fighting.
Our last shapes for now are the combinations of two knight’s moves, and twolarge knight’s moves. They are obviously stronger than having one of those moves,but they can still be cut. In general, the weak points of most shapes we try to makeare either their center of symmetry or any stones that are missing from thecompletion of the shape. A proverb we should keep in mind while playing is that“Our opponents weak point is our strong point” and vice versa.
38Shapes
Liberties The amount of stones that are needed to be placed by the opponentin order capture a group of our stones
Territory The amount of points we have surrounded
Influence A field where our opponent is hesitant to play in, which is generatedwhen we have many stones (and usually walls) in an area.
Komi An amount of points given to the White player as compensation forplaying second.
Atari When our stones are one move away from being captured and re-moved from the game. When we have one liberty left.
Eye Is a point where the opponent cannot play, unless our group is inatari.
Dead group A group with one or no eyes, which can be placed in atari and becaptured
Living group A group with at least two eyes. It can never be placed in atari.
Seki A rare case of two opposing groups of stones which do not have twoeyes, but cannot be placed in atari either, so they are both alive.
Tenuki Ignoring the opponent’s move and playing elsewhere.
Sente A move that cannot be ignored without losing something significanton the board.
Gote A move that can be ignored or a move that concedes the initiativeto the opponent.
Miai Two moves that “reflect” one another and have a similar result.Whichever the players move, it is usually the same.
Ko A situation where stones could have been capturing each other infinitely, but are not allowed to do so. Hence immediate re-cap-turing is forbidden.
Ko threat A move that poses significant threat to the opponent, so that theycannot save their stone which is part of a Ko.
Attachment It is a move that is removing a liberty from an opposing stone orgroup. It is unusual to attach stones to large groups of stones.
Shoulder hit It is a move that is diagonally placed from an opposing stone orgroup. We can shoulder hit large groups, but it is not as efficient.
Ladder breaker A stone that is along the diagonal path of a ladder which preventsthe formation of the ladder.
So far, so good, but aren’t all those things a bit much? Where is the game? We now know enough to understand what is going on, so it is high time we lookedon a whole real game and experience some of the beauty of Go. Before we headin the next chapter, though, I would like to provide you with a small “glossary” ofterms we already used, so that you will not have to go looking for them in theprevious pages and lose precious time and your concentration on such a task.
Finally we are ready to look at a full real game. We will try to go over most of the moves made on the board and see the way of thinking behind them. For a better result I’d urge you to follow the moves on a real (or digital) Go boardand not to worry if you don’t fully grasp some of the content yet.
The goal is to present the phases of the game, along with as many thoughts aspossible, so that you can see what makes Go so interesting. If you are reading thischapter for the first time and things get too complicated for you, I recommend thatyou ignore all the parts labelled “choices on a move” and return to them after youhave finished the book.
The game has three phases: the opening, the middle game, and the endgame.I will discuss and explain each one of them while we go over the game. As mentionedearlier, the game has some guidelines to help us navigate through the immenseamount of possible moves. In the case of the opening we have these general ideasto work with:
1) We play moves from the third to the sixth line (counting from the edge of theboard). Playing on the third and fourth line initially is the most common strategy. We usually play on the fifth and sixth line only when we are extending from stoneswe set previously on lower lines.
2) The third line is the place we set a stone when we want to focus on gettingterritory. The fourth line is the place where we set our stones to focus on influence.Having only fourth-line or only third-line stones is not considered a good idea: a balance between the two is generally the best option.
3) Our first moves should be on the corners, around the black dots on the board(which are called star points). So, first we play one move in a free corner, trying tolay claim on it. There are many ways to play in the corner and there are setsequences of moves for some plays that produce a balanced result for both players.Those sequences are called joseki and we will analyse the most common of themafter the game. Always keep in mind that our focus is not on memorizingmoves, but understanding how they work and why.
4) Once the corners are accounted for, we either invest another move on a corner we have claimed, enclosing it, or we approach the corners of our opponent.
5) After the corners we extend to the sides. Deciding which side we want to focus will depend on the direction of play created by the moves we, and ouropponent, made previously. The direction of play is the idea that we want all our stones to have the best possibly synergy and, at the same time, expand andclaim the larger empty space currently on the board.
Keep these five things in mind and let us begin the game!
Let’s play: Opening39
Let’s play - The Opening8
40Let’s play: Opening
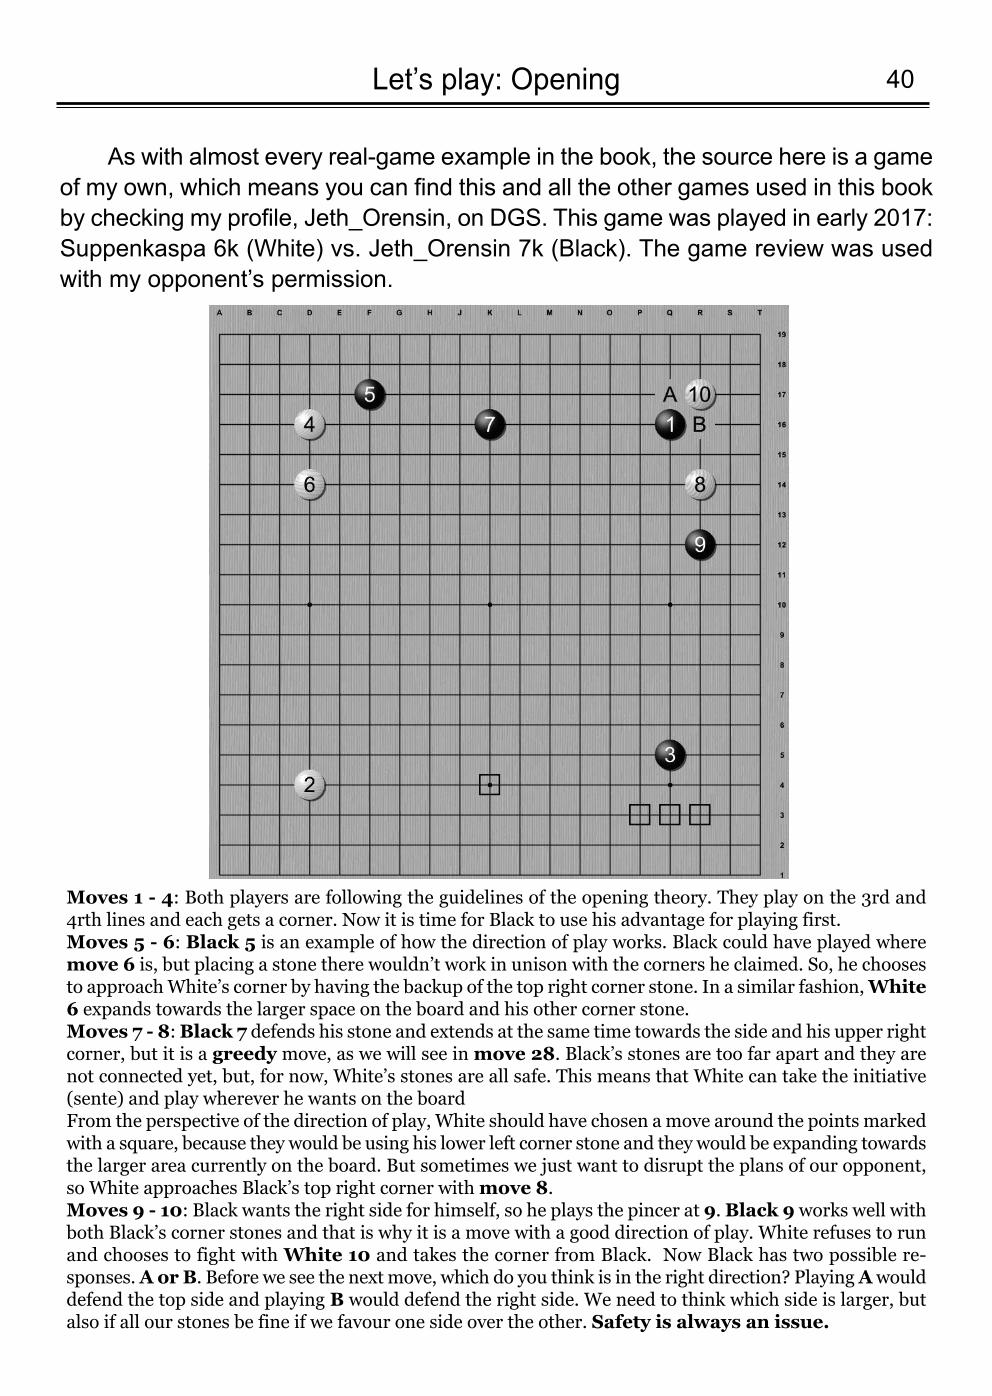
As with almost every real-game example in the book, the source here is a gameof my own, which means you can find this and all the other games used in this bookby checking my profile, Jeth_Orensin, on DGS. This game was played in early 2017:Suppenkaspa 6k (White) vs. Jeth_Orensin 7k (Black). The game review was usedwith my opponent’s permission.
Moves 1 - 4: Both players are following the guidelines of the opening theory. They play on the 3rd and4rth lines and each gets a corner. Now it is time for Black to use his advantage for playing first.Moves 5 - 6: Black 5 is an example of how the direction of play works. Black could have played wheremove 6 is, but placing a stone there wouldn’t work in unison with the corners he claimed. So, he choosesto approach White’s corner by having the backup of the top right corner stone. In a similar fashion, White6 expands towards the larger space on the board and his other corner stone.Moves 7 - 8: Black 7 defends his stone and extends at the same time towards the side and his upper rightcorner, but it is a greedy move, as we will see in move 28. Black’s stones are too far apart and they arenot connected yet, but, for now, White’s stones are all safe. This means that White can take the initiative(sente) and play wherever he wants on the boardFrom the perspective of the direction of play, White should have chosen a move around the points markedwith a square, because they would be using his lower left corner stone and they would be expanding towardsthe larger area currently on the board. But sometimes we just want to disrupt the plans of our opponent,so White approaches Black’s top right corner with move 8. Moves 9 - 10: Black wants the right side for himself, so he plays the pincer at 9. Black 9 works well withboth Black’s corner stones and that is why it is a move with a good direction of play. White refuses to runand chooses to fight with White 10 and takes the corner from Black. Now Black has two possible re-sponses. A or B. Before we see the next move, which do you think is in the right direction? Playing Awoulddefend the top side and playing B would defend the right side. We need to think which side is larger, butalso if all our stones be fine if we favour one side over the other. Safety is always an issue.
Let’s play: Opening41
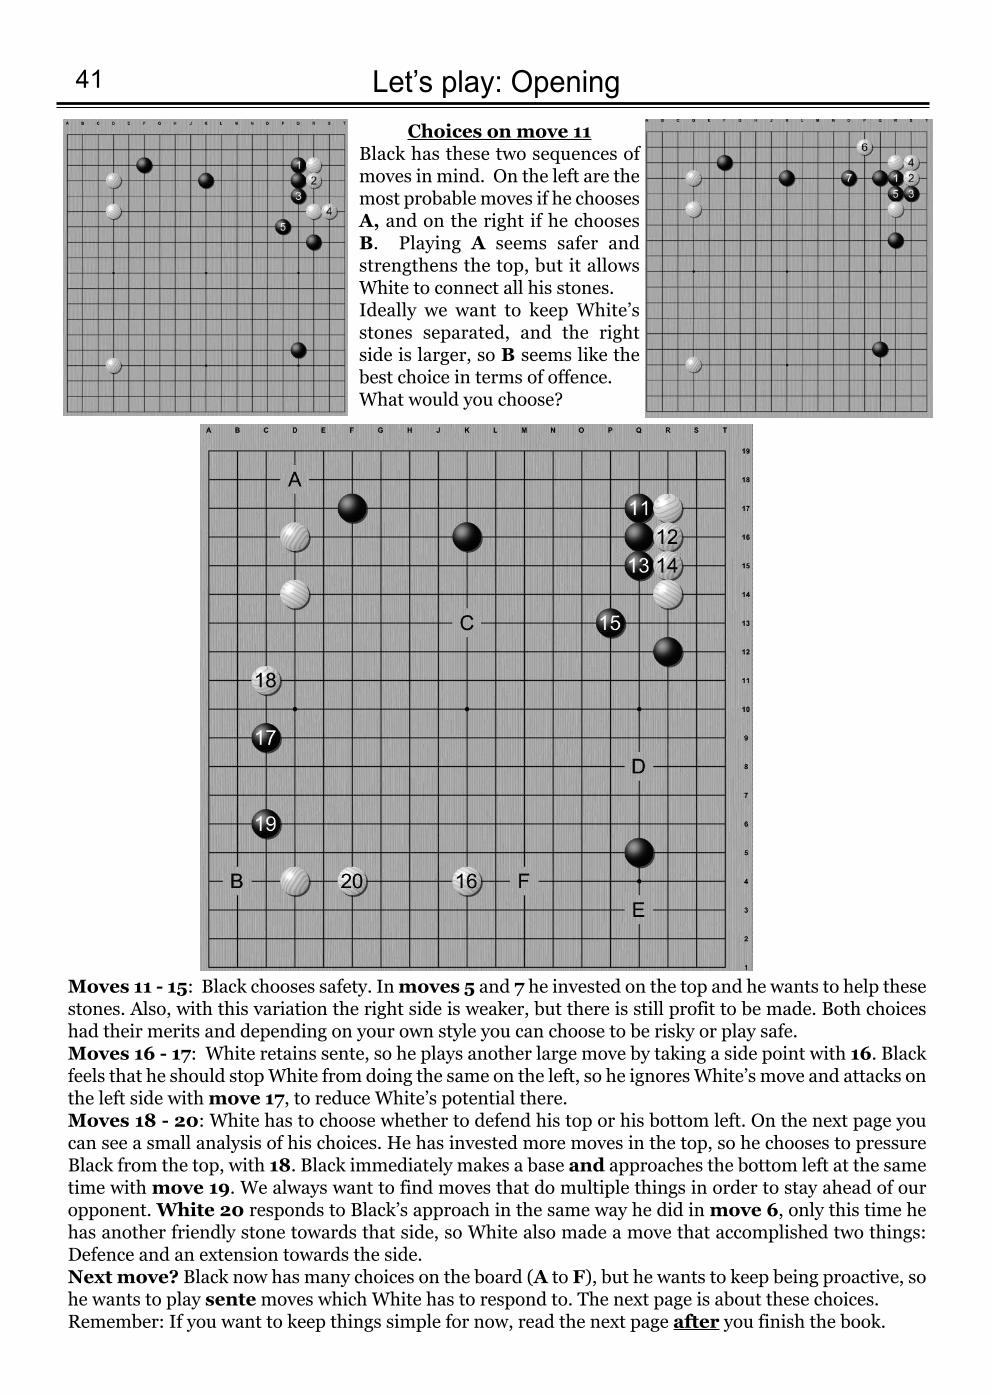
Moves 11 - 15: Black chooses safety. In moves 5 and 7 he invested on the top and he wants to help thesestones. Also, with this variation the right side is weaker, but there is still profit to be made. Both choiceshad their merits and depending on your own style you can choose to be risky or play safe. Moves 16 - 17: White retains sente, so he plays another large move by taking a side point with 16. Blackfeels that he should stop White from doing the same on the left, so he ignores White’s move and attacks onthe left side with move 17, to reduce White’s potential there. Moves 18 - 20: White has to choose whether to defend his top or his bottom left. On the next page youcan see a small analysis of his choices. He has invested more moves in the top, so he chooses to pressureBlack from the top, with 18. Black immediately makes a base and approaches the bottom left at the sametime with move 19. We always want to find moves that do multiple things in order to stay ahead of ouropponent. White 20 responds to Black’s approach in the same way he did in move 6, only this time hehas another friendly stone towards that side, so White also made a move that accomplished two things:Defence and an extension towards the side.Next move? Black now has many choices on the board (A to F), but he wants to keep being proactive, sohe wants to play sente moves which White has to respond to. The next page is about these choices.Remember: If you want to keep things simple for now, read the next page after you finish the book.
Choices on move 11Black has these two sequences ofmoves in mind. On the left are themost probable moves if he choosesA, and on the right if he choosesB. Playing A seems safer andstrengthens the top, but it allowsWhite to connect all his stones. Ideally we want to keep White’sstones separated, and the rightside is larger, so B seems like thebest choice in terms of offence.What would you choose?
42Let’s play: OpeningChoices on move 18
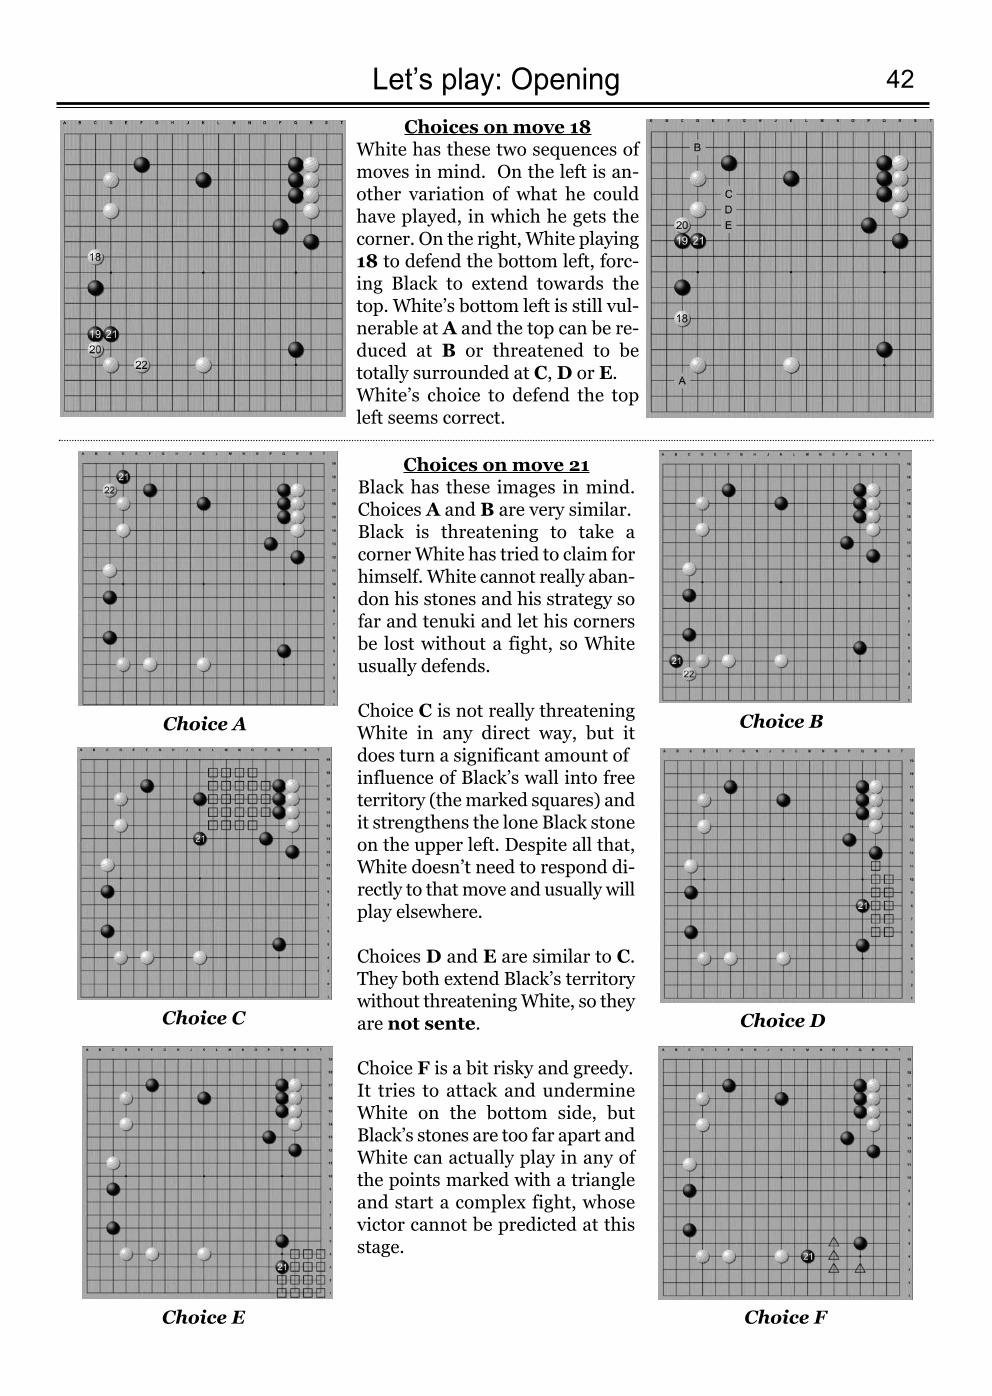
White has these two sequences ofmoves in mind. On the left is an-other variation of what he couldhave played, in which he gets thecorner. On the right, White playing18 to defend the bottom left, forc-ing Black to extend towards thetop. White’s bottom left is still vul-nerable at A and the top can be re-duced at B or threatened to betotally surrounded at C, D or E.White’s choice to defend the topleft seems correct.
Choices on move 21Black has these images in mind.Choices A and B are very similar.Black is threatening to take a corner White has tried to claim forhimself. White cannot really aban-don his stones and his strategy sofar and tenuki and let his cornersbe lost without a fight, so Whiteusually defends.
Choice C is not really threateningWhite in any direct way, but itdoes turn a significant amount of influence of Black’s wall into freeterritory (the marked squares) andit strengthens the lone Black stoneon the upper left. Despite all that,White doesn’t need to respond di-rectly to that move and usually willplay elsewhere.
Choices D and E are similar to C.They both extend Black’s territorywithout threatening White, so theyare not sente.
Choice F is a bit risky and greedy.It tries to attack and undermineWhite on the bottom side, butBlack’s stones are too far apart andWhite can actually play in any ofthe points marked with a triangleand start a complex fight, whosevictor cannot be predicted at thisstage.
Choice A
Choice C
Choice E
Choice D
Choice B
Choice F
Let’s play: Opening43
Moves 21 - 24: Black chooses to try and take as many sente moves as he can from all the choices we de-scribed and starts with the corners playing 21 at B4. White has to respond at 22 to defend his corner, soBlack gets to play again towards another corner resulting in Black and White making another similar ex-change with moves 23 and 24.Moves 25 - 26: Black got away with two moves and still has the choices we mentioned in page 41 avail-able. Instead, he goes for the peep at move 25, threatening to cut through the only weak point of a one-point jump, believing that this way he strengthens his own group and covers his weak point at H16. Whitedoes respond by connecting at 26, since it is rarely a good idea to let your opponent cut your stones, soBlack got the sente part right, but as you can see from the diagram, it didn’t prevent White’s attack.Move 27: Black 27 is such a misplaced move that it really deserves a page of its own, and indeed the nextpage will be dedicated to it. Any other choice presented, either 1, 2 or 3 would have been way better, butBlack made a huge mistake which will be causing him trouble for the rest of the game!Move 28: White is fed up with Black’s moves and now that Black gave up sente, he launches an invasion(which we will analyse in chapter 5). This is the first time we see something like this and usually the firstfight or invasion marks the end of the opening phase and gets us into the middle game. We mentioned that move 28 was a weak point for Black when he tried to strengthen it with move 25,but why was it a weak point? We analysed the different kinds of relations that two stones can have so youwill notice that the two marked black stones establish none of them. It looks like an extra-large knight’smove and we already explained that this type of relation is the weakest of them all with four weak points,especially if the opponent has friendly stones nearby. And Black extended even further, enlarging that gap,so now the weak point in the middle of the distance between those stones is so severe that it can be invaded,even when the enemy’s stones are further away (though the invader still needs some friendly stones aroundthat area to get the best result, as we will see in the next moves).
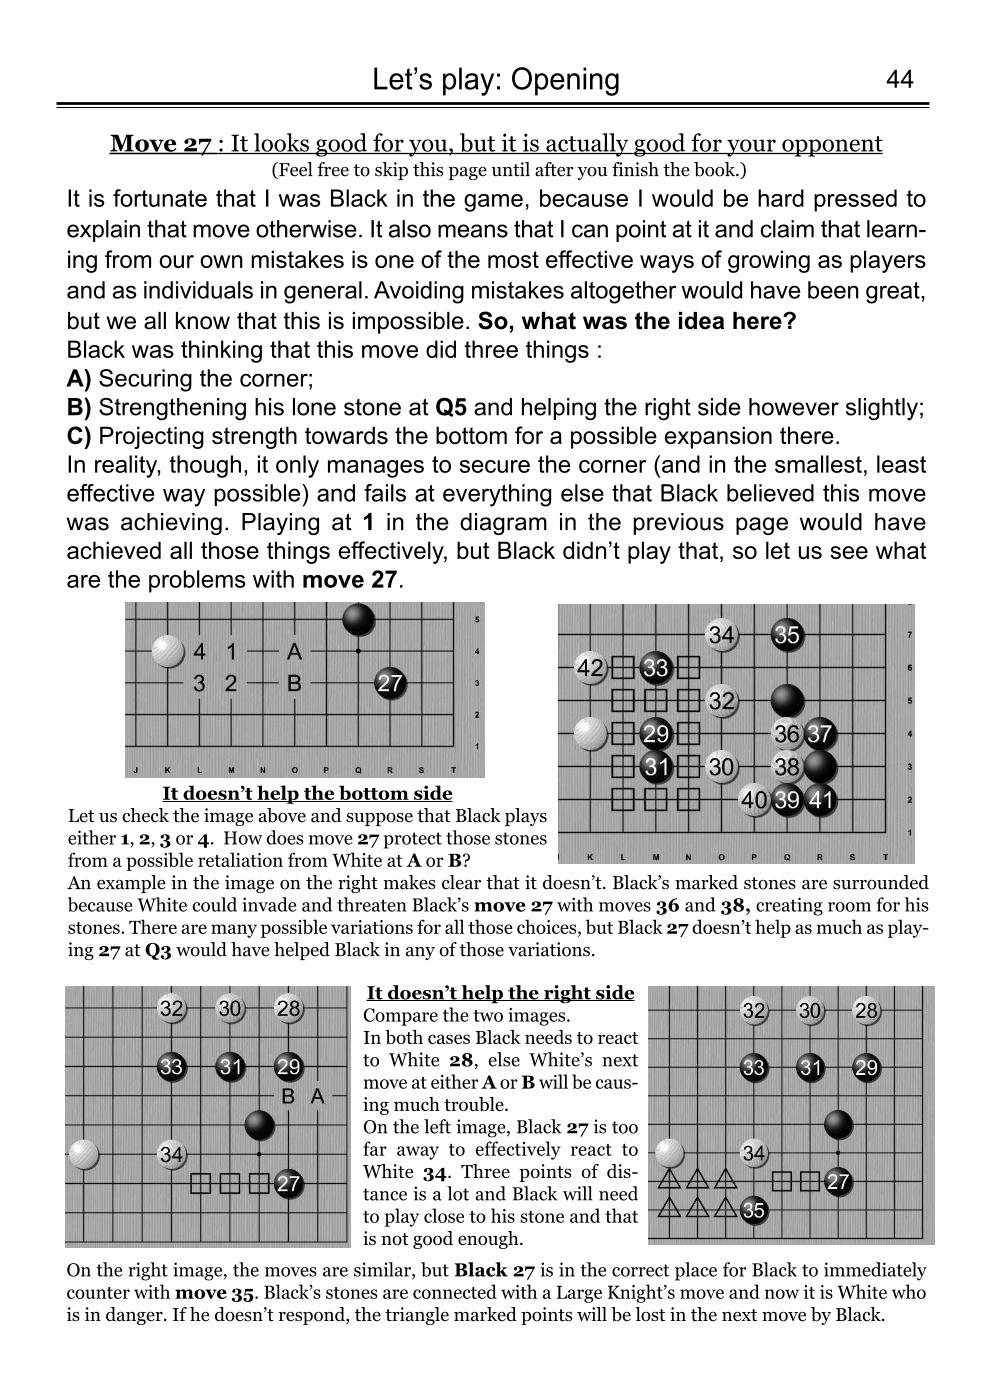
44Let’s play: Opening
Move 27 : It looks good for you, but it is actually good for your opponent(Feel free to skip this page until after you finish the book.)
It is fortunate that I was Black in the game, because I would be hard pressed toexplain that move otherwise. It also means that I can point at it and claim that learn-ing from our own mistakes is one of the most effective ways of growing as playersand as individuals in general. Avoiding mistakes altogether would have been great,but we all know that this is impossible. So, what was the idea here? Black was thinking that this move did three things : A) Securing the corner;B) Strengthening his lone stone at Q5 and helping the right side however slightly;C) Projecting strength towards the bottom for a possible expansion there.In reality, though, it only manages to secure the corner (and in the smallest, leasteffective way possible) and fails at everything else that Black believed this movewas achieving. Playing at 1 in the diagram in the previous page would haveachieved all those things effectively, but Black didn’t play that, so let us see whatare the problems with move 27.
It doesn’t help the bottom sideLet us check the image above and suppose that Black playseither 1, 2, 3 or 4. How does move 27 protect those stonesfrom a possible retaliation from White at A or B?An example in the image on the right makes clear that it doesn’t. Black’s marked stones are surroundedbecause White could invade and threaten Black’s move 27 with moves 36 and 38, creating room for hisstones. There are many possible variations for all those choices, but Black 27 doesn’t help as much as play-ing 27 at Q3 would have helped Black in any of those variations.
It doesn’t help the right sideCompare the two images. In both cases Black needs to reactto White 28, else White’s nextmove at either A or Bwill be caus-ing much trouble. On the left image, Black 27 is toofar away to effectively react toWhite 34. Three points of dis-tance is a lot and Black will needto play close to his stone and thatis not good enough.
On the right image, the moves are similar, but Black 27 is in the correct place for Black to immediatelycounter with move 35. Black’s stones are connected with a Large Knight’s move and now it is White whois in danger. If he doesn’t respond, the triangle marked points will be lost in the next move by Black.
Let’s play: Middle game45
Once the first fight breaks on the board and the opposing stones start to mingle,the opening is considered over and we pass to the middle game, where everythingstarts to get confusing. The guidelines of the opening are no longer as valid as before(though playing moves with good shape is always a valid idea) and all the board isready to be fought over.
Now, it is worth mentioning that our choices and our preferred strategy duringthe opening are going to set the tone for the kind of game we are going to play inthe middle game. If we played many fourth-line stones during the opening and aimedfor influence, we should stick to that theme and try to make it work. If we played thirdline stones for territory, it is a bit late to fight for influence and we should try to reducewhat influence our opponent got and win with the territory we have claimed. In thatregard, it is a nice idea to have a mix of all kinds of stones during the first movesand keep our options open, but every playstyle is valid.
Feel free to try, experiment and see what you like and what works, what youdislike and what fails. Don’t be afraid of being defeated. Explore and enjoy the gameand the knowledge will eventually come, as slowly a preferred strategy and stylegrows within you.
So many things happen in the middle game. We have invasions, reductions,fights over small and large territories, problems of life and death, capturing races,skilful plays (called tesuji), groups running towards safety or huddling towards thesides trying to survive.
Most of them exist in the game we are currently reviewing, so we will get tohave a first glimpse of what all those things are and how they work in practice, butdon’t worry: most of those components of the game have their own dedicated partslater in the book, where we will examine them in more detail.
So, since the relatively peaceful opening rules need expansion, what do we donow? We have another, more general, set of guidelines this time: 1) Always ask yourself: is my next move sente or was my opponent’s move sente?If your opponent played a move you have to respond to, then you should. Playingaway (tenuki) when our own groups and stones are not safe is not a good idea.When you are safe, rush to take the initiative for yourself.2) When is our group safe? A group is safe when it either has multiple ways ofmaking two eyes (it has a base) or it can easily link up with another group of ourstones. When all your groups are safe, it is your turn to go on the offensive.3) Do not create too many groups! Having too many groups makes it difficult to getpoints. Keep your groups close together or try to connect them. At the same time,try to keep your opponent separated.
Let’s play - The middle game8
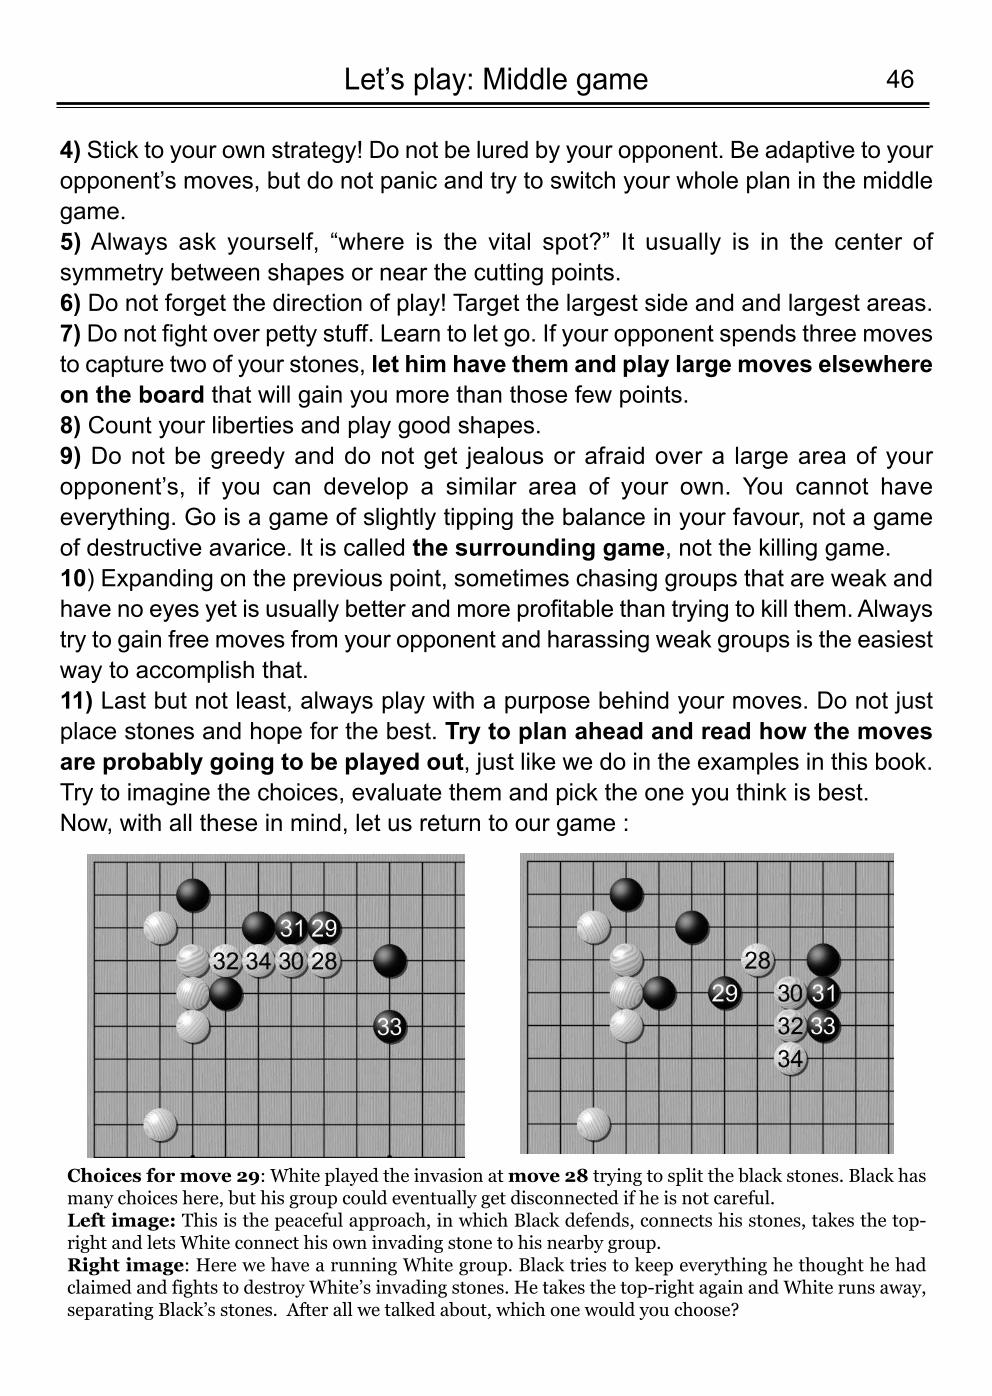
46Let’s play: Middle game
4) Stick to your own strategy! Do not be lured by your opponent. Be adaptive to youropponent’s moves, but do not panic and try to switch your whole plan in the middlegame.5) Always ask yourself, “where is the vital spot?” It usually is in the center ofsymmetry between shapes or near the cutting points. 6) Do not forget the direction of play! Target the largest side and and largest areas.7) Do not fight over petty stuff. Learn to let go. If your opponent spends three movesto capture two of your stones, let him have them and play large moves elsewhereon the board that will gain you more than those few points.8) Count your liberties and play good shapes.9) Do not be greedy and do not get jealous or afraid over a large area of youropponent’s, if you can develop a similar area of your own. You cannot haveeverything. Go is a game of slightly tipping the balance in your favour, not a gameof destructive avarice. It is called the surrounding game, not the killing game.10) Expanding on the previous point, sometimes chasing groups that are weak andhave no eyes yet is usually better and more profitable than trying to kill them. Alwaystry to gain free moves from your opponent and harassing weak groups is the easiestway to accomplish that.11) Last but not least, always play with a purpose behind your moves. Do not justplace stones and hope for the best. Try to plan ahead and read how the movesare probably going to be played out, just like we do in the examples in this book.Try to imagine the choices, evaluate them and pick the one you think is best.Now, with all these in mind, let us return to our game :
Choices for move 29: White played the invasion at move 28 trying to split the black stones. Black hasmany choices here, but his group could eventually get disconnected if he is not careful. Left image: This is the peaceful approach, in which Black defends, connects his stones, takes the top-right and lets White connect his own invading stone to his nearby group. Right image: Here we have a running White group. Black tries to keep everything he thought he hadclaimed and fights to destroy White’s invading stones. He takes the top-right again and White runs away,separating Black’s stones. After all we talked about, which one would you choose?
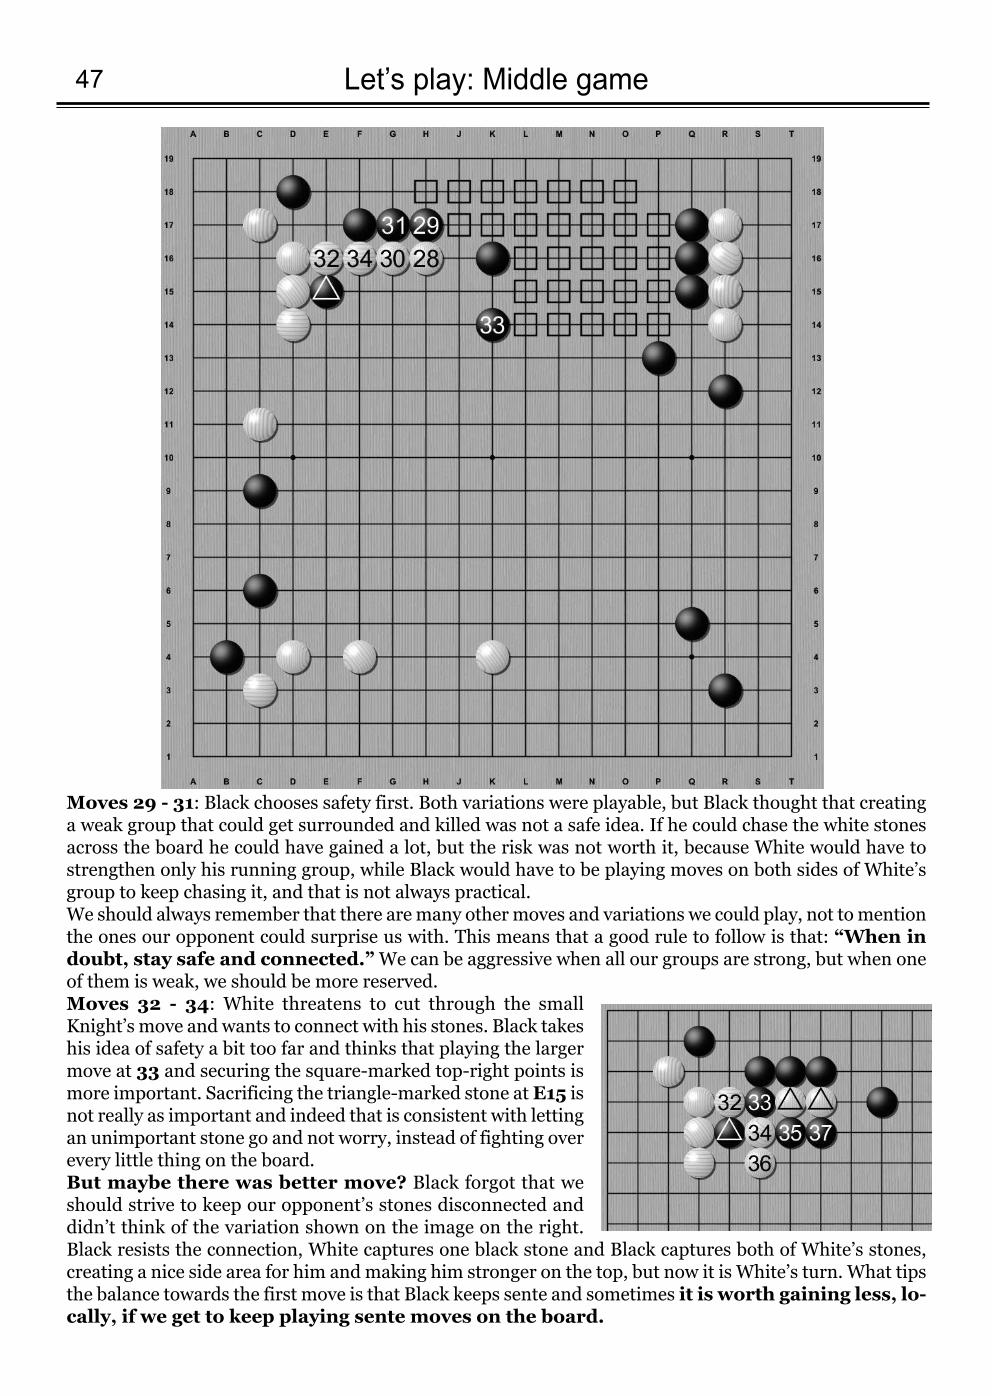
Let’s play: Middle game47
Moves 29 - 31: Black chooses safety first. Both variations were playable, but Black thought that creatinga weak group that could get surrounded and killed was not a safe idea. If he could chase the white stonesacross the board he could have gained a lot, but the risk was not worth it, because White would have tostrengthen only his running group, while Black would have to be playing moves on both sides of White’sgroup to keep chasing it, and that is not always practical. We should always remember that there are many other moves and variations we could play, not to mentionthe ones our opponent could surprise us with. This means that a good rule to follow is that: “When indoubt, stay safe and connected.” We can be aggressive when all our groups are strong, but when oneof them is weak, we should be more reserved.Moves 32 - 34: White threatens to cut through the smallKnight’s move and wants to connect with his stones. Black takeshis idea of safety a bit too far and thinks that playing the largermove at 33 and securing the square-marked top-right points ismore important. Sacrificing the triangle-marked stone at E15 isnot really as important and indeed that is consistent with lettingan unimportant stone go and not worry, instead of fighting overevery little thing on the board.But maybe there was better move? Black forgot that weshould strive to keep our opponent’s stones disconnected anddidn’t think of the variation shown on the image on the right.Black resists the connection, White captures one black stone and Black captures both of White’s stones,creating a nice side area for him and making him stronger on the top, but now it is White’s turn. What tipsthe balance towards the first move is that Black keeps sente and sometimes it is worth gaining less, lo-cally, if we get to keep playing sente moves on the board.
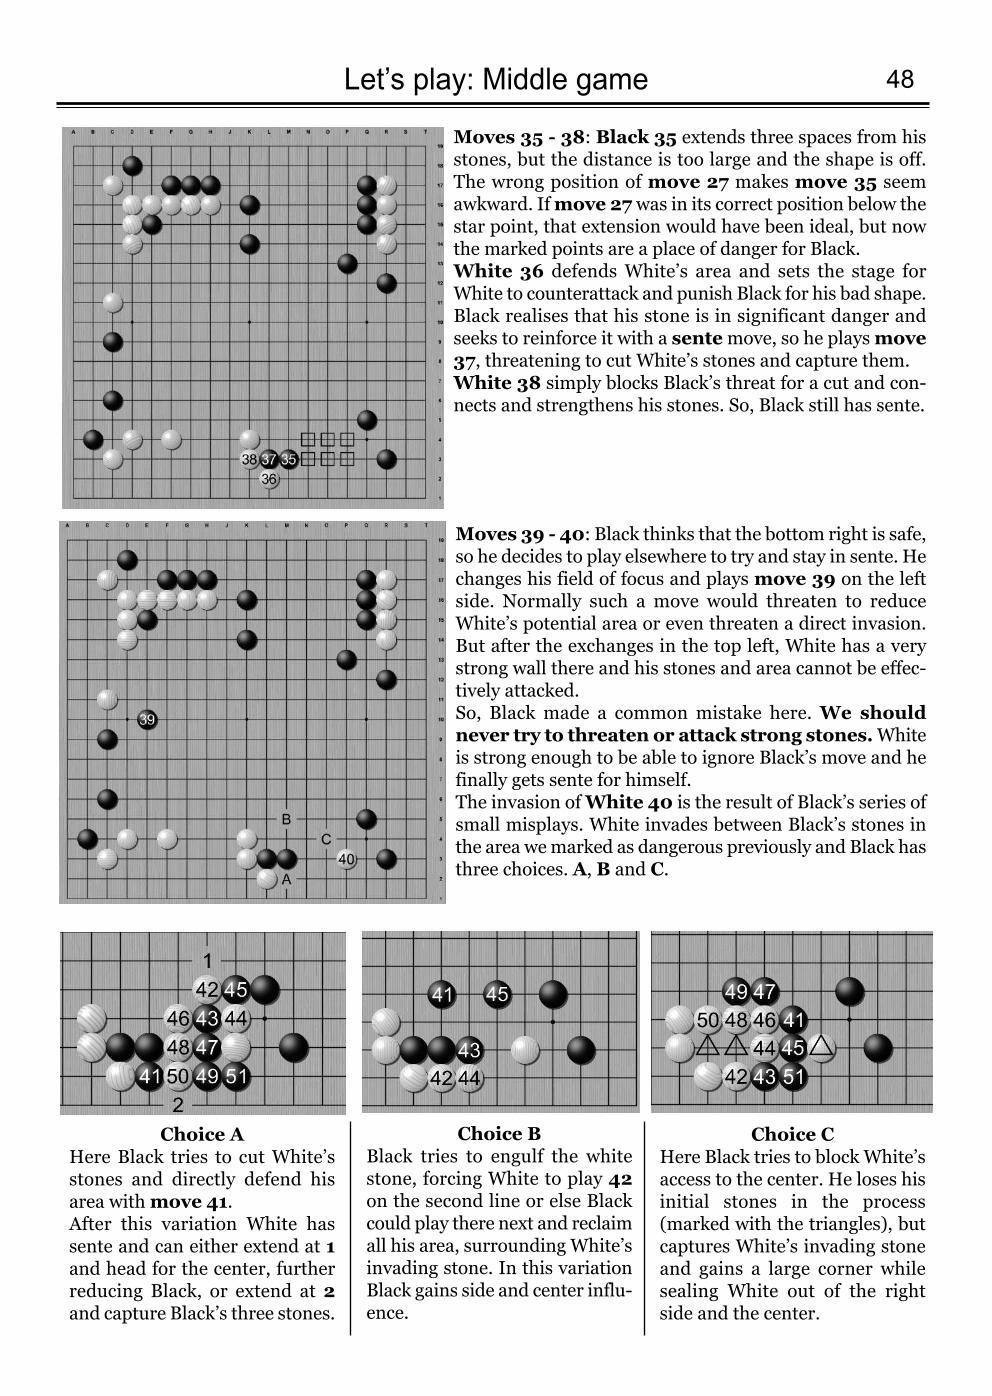
48Let’s play: Middle game
Moves 35 - 38: Black 35 extends three spaces from hisstones, but the distance is too large and the shape is off.The wrong position of move 27 makes move 35 seemawkward. If move 27 was in its correct position below thestar point, that extension would have been ideal, but nowthe marked points are a place of danger for Black.White 36 defends White’s area and sets the stage forWhite to counterattack and punish Black for his bad shape.Black realises that his stone is in significant danger andseeks to reinforce it with a sente move, so he plays move37, threatening to cut White’s stones and capture them.White 38 simply blocks Black’s threat for a cut and con-nects and strengthens his stones. So, Black still has sente.
Moves 39 - 40: Black thinks that the bottom right is safe,so he decides to play elsewhere to try and stay in sente. Hechanges his field of focus and plays move 39 on the leftside. Normally such a move would threaten to reduceWhite’s potential area or even threaten a direct invasion.But after the exchanges in the top left, White has a verystrong wall there and his stones and area cannot be effec-tively attacked. So, Black made a common mistake here. We shouldnever try to threaten or attack strong stones. Whiteis strong enough to be able to ignore Black’s move and hefinally gets sente for himself. The invasion of White 40 is the result of Black’s series ofsmall misplays. White invades between Black’s stones inthe area we marked as dangerous previously and Black hasthree choices. A, B and C.
Choice AHere Black tries to cut White’sstones and directly defend hisarea with move 41. After this variation White hassente and can either extend at 1and head for the center, furtherreducing Black, or extend at 2and capture Black’s three stones.
Choice BBlack tries to engulf the whitestone, forcing White to play 42on the second line or else Blackcould play there next and reclaimall his area, surrounding White’sinvading stone. In this variationBlack gains side and center influ-ence.
Choice CHere Black tries to block White’saccess to the center. He loses hisinitial stones in the process(marked with the triangles), butcaptures White’s invading stoneand gains a large corner whilesealing White out of the rightside and the center.
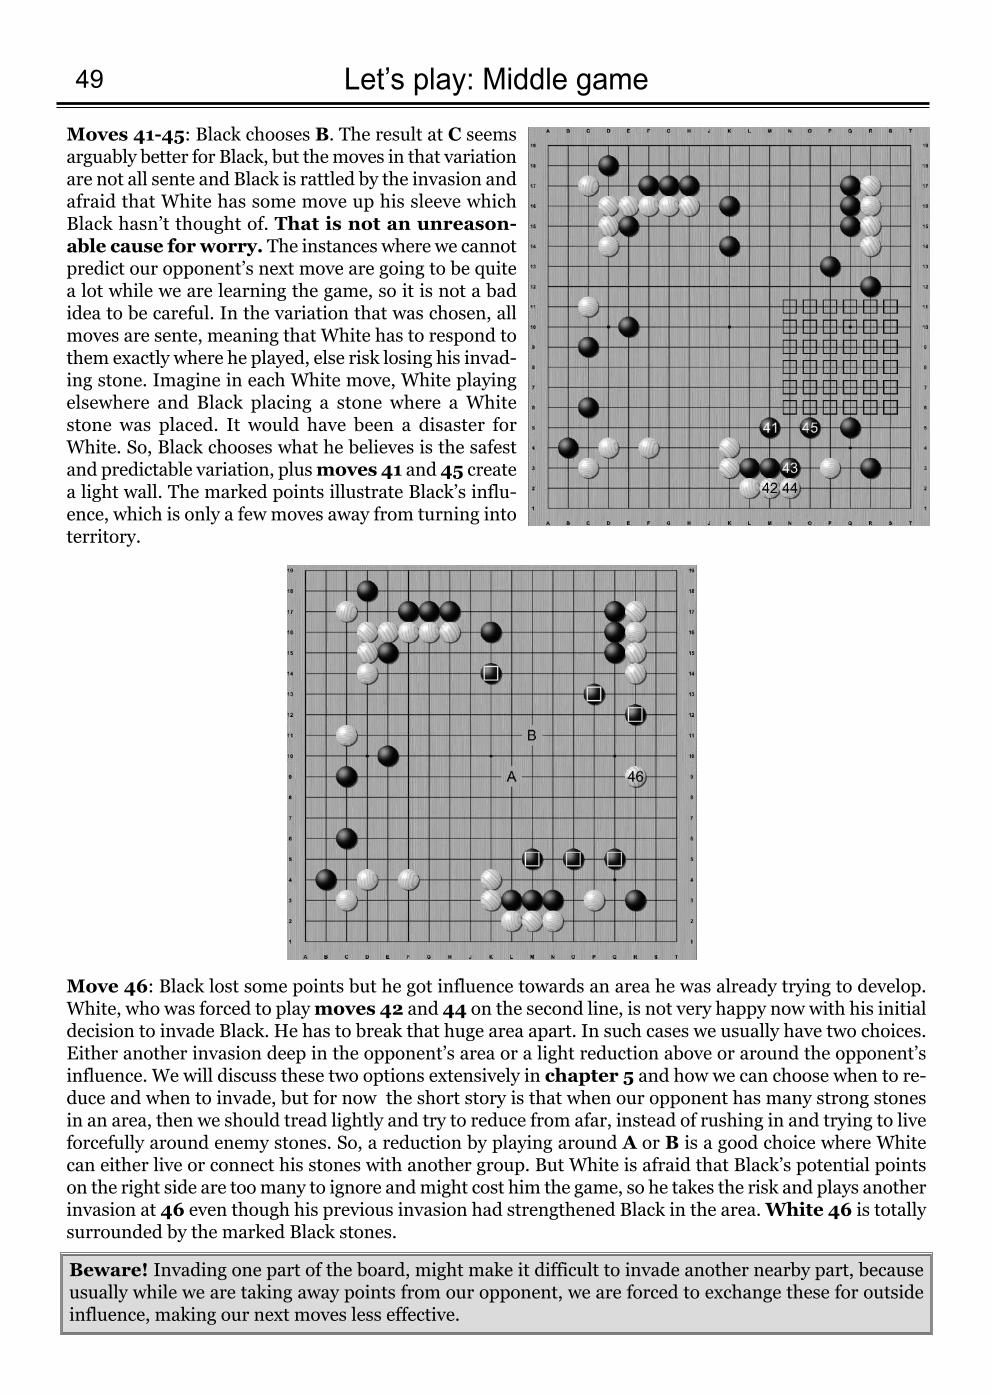
Let’s play: Middle game49
Moves 41-45: Black chooses B. The result at C seemsarguably better for Black, but the moves in that variationare not all sente and Black is rattled by the invasion andafraid that White has some move up his sleeve whichBlack hasn’t thought of. That is not an unreason-able cause for worry. The instances where we cannotpredict our opponent’s next move are going to be quitea lot while we are learning the game, so it is not a badidea to be careful. In the variation that was chosen, allmoves are sente, meaning that White has to respond tothem exactly where he played, else risk losing his invad-ing stone. Imagine in each White move, White playingelsewhere and Black placing a stone where a Whitestone was placed. It would have been a disaster forWhite. So, Black chooses what he believes is the safestand predictable variation, plus moves 41 and 45 createa light wall. The marked points illustrate Black’s influ-ence, which is only a few moves away from turning intoterritory.
Move 46: Black lost some points but he got influence towards an area he was already trying to develop.White, who was forced to play moves 42 and 44 on the second line, is not very happy now with his initialdecision to invade Black. He has to break that huge area apart. In such cases we usually have two choices.Either another invasion deep in the opponent’s area or a light reduction above or around the opponent’sinfluence. We will discuss these two options extensively in chapter 5 and how we can choose when to re-duce and when to invade, but for now the short story is that when our opponent has many strong stonesin an area, then we should tread lightly and try to reduce from afar, instead of rushing in and trying to liveforcefully around enemy stones. So, a reduction by playing around A or B is a good choice where Whitecan either live or connect his stones with another group. But White is afraid that Black’s potential pointson the right side are too many to ignore and might cost him the game, so he takes the risk and plays anotherinvasion at 46 even though his previous invasion had strengthened Black in the area. White 46 is totallysurrounded by the marked Black stones.
Beware! Invading one part of the board, might make it difficult to invade another nearby part, becauseusually while we are taking away points from our opponent, we are forced to exchange these for outsideinfluence, making our next moves less effective.
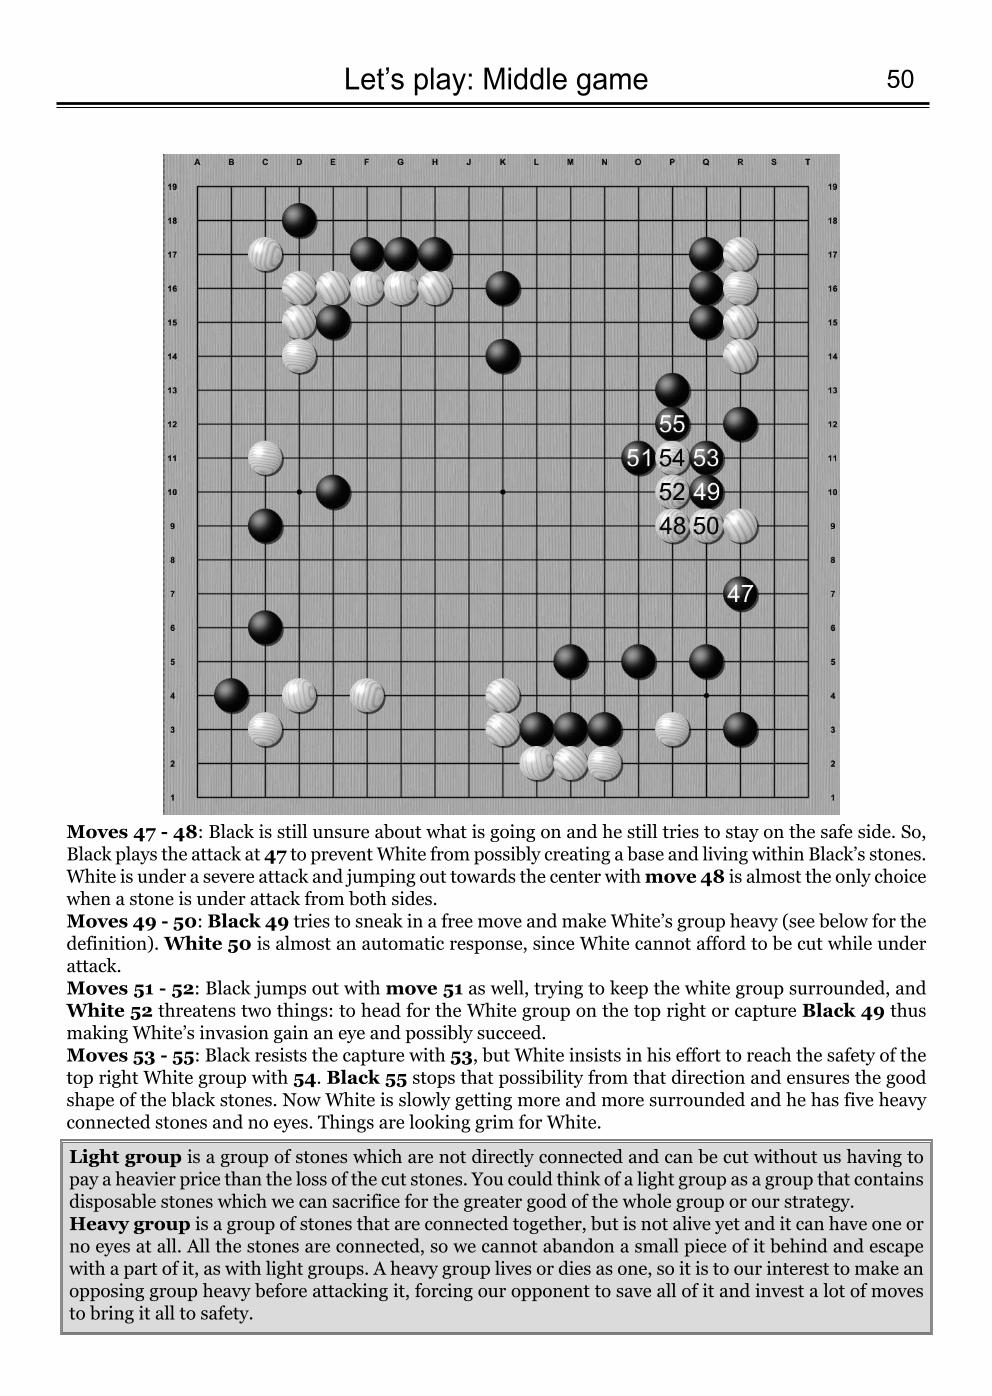
50Let’s play: Middle game
Moves 47 - 48: Black is still unsure about what is going on and he still tries to stay on the safe side. So,Black plays the attack at 47 to prevent White from possibly creating a base and living within Black’s stones.White is under a severe attack and jumping out towards the center with move 48 is almost the only choicewhen a stone is under attack from both sides.Moves 49 - 50: Black 49 tries to sneak in a free move and make White’s group heavy (see below for thedefinition). White 50 is almost an automatic response, since White cannot afford to be cut while underattack.Moves 51 - 52: Black jumps out with move 51 as well, trying to keep the white group surrounded, andWhite 52 threatens two things: to head for the White group on the top right or capture Black 49 thusmaking White’s invasion gain an eye and possibly succeed. Moves 53 - 55: Black resists the capture with 53, but White insists in his effort to reach the safety of thetop right White group with 54. Black 55 stops that possibility from that direction and ensures the goodshape of the black stones. Now White is slowly getting more and more surrounded and he has five heavyconnected stones and no eyes. Things are looking grim for White.
Light group is a group of stones which are not directly connected and can be cut without us having topay a heavier price than the loss of the cut stones. You could think of a light group as a group that containsdisposable stones which we can sacrifice for the greater good of the whole group or our strategy.Heavy group is a group of stones that are connected together, but is not alive yet and it can have one orno eyes at all. All the stones are connected, so we cannot abandon a small piece of it behind and escapewith a part of it, as with light groups. A heavy group lives or dies as one, so it is to our interest to make anopposing group heavy before attacking it, forcing our opponent to save all of it and invest a lot of movesto bring it all to safety.

Let’s play: Middle game51
Moves 56 - 57: White plays 56 threatening to try to connect with his top rightgroup or create the space for an eye and strengthen his position, if Black ig-nores his move and plays elsewhere. Black wants to keep White separated sohe plays 57 on s12 which ends the possibility of White connecting that wayand he threatens the group on the top right, as well. Right image: One variation can be seen here, where Black plays 57 to sur-round White and gives him the opportunity to play a lot of sente moves andcreate an eye in the squared marked point.
Moves 58 - 60: White cannot spend a move to strengthen his top right group since his invading groupis in critical danger, so he tries to break through the one point extension of Black, with move 58, but thatdoesn’t work. Black 59 places White’s stone in atari, so White has to extend with 60.Moves 61 - 63: Black needs to connect his stones, but how to decide betweenplaying in o6 and q6? In those cases we reinforce the stone that is in moredanger if attacked. If Black plays move 61 in q6 then the variation on theimage on the right is a possible result. White would surround and kill Black’ssix stones and win a huge fight. Black cannot allow this, so, back in the maindiagram, he plays o6 in move 61. White tries to cut anyway with 62, but Black’sstones are not in danger in this side, so Black 63 places White in atari andseems to settle the matter.
Always keep in mind: Preventing our opponent’s groups from connecting with each other is often animportant objective in the game. Even if we have to sacrifice some points, it is usually worth trying to keepthe opponent’s groups separated and weak, so that we can profit from attacking them later.
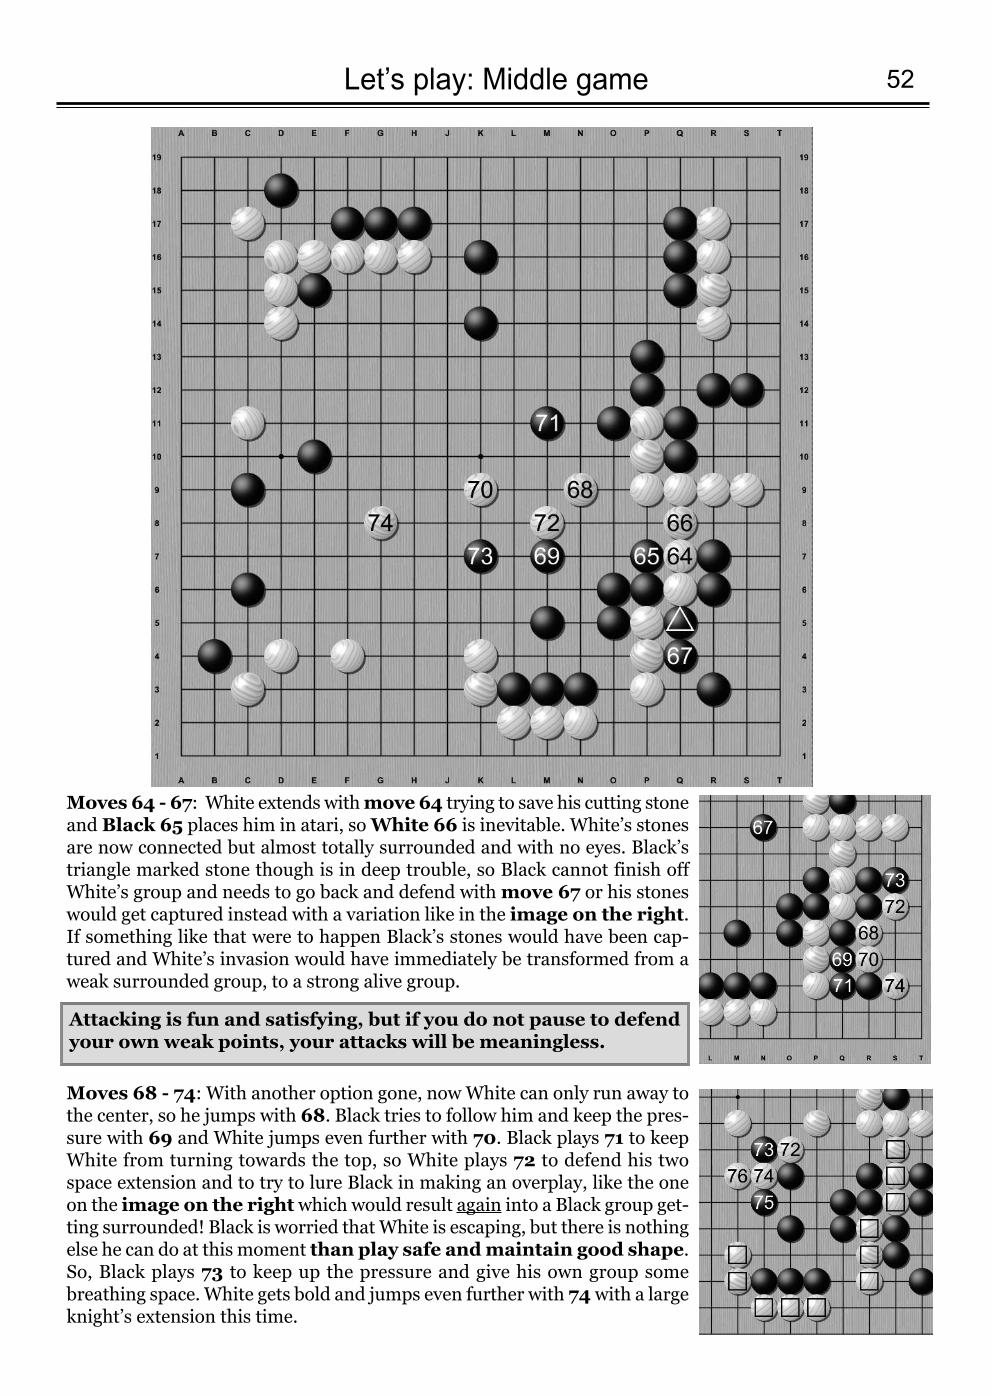
52Let’s play: Middle game
Moves 64 - 67: White extends with move 64 trying to save his cutting stoneand Black 65 places him in atari, so White 66 is inevitable. White’s stonesare now connected but almost totally surrounded and with no eyes. Black’striangle marked stone though is in deep trouble, so Black cannot finish offWhite’s group and needs to go back and defend with move 67 or his stoneswould get captured instead with a variation like in the image on the right.If something like that were to happen Black’s stones would have been cap-tured and White’s invasion would have immediately be transformed from aweak surrounded group, to a strong alive group.
Moves 68 - 74: With another option gone, now White can only run away tothe center, so he jumps with 68. Black tries to follow him and keep the pres-sure with 69 and White jumps even further with 70. Black plays 71 to keepWhite from turning towards the top, so White plays 72 to defend his twospace extension and to try to lure Black in making an overplay, like the oneon the image on the rightwhich would result again into a Black group get-ting surrounded! Black is worried that White is escaping, but there is nothingelse he can do at this moment than play safe and maintain good shape.So, Black plays 73 to keep up the pressure and give his own group somebreathing space. White gets bold and jumps even further with 74 with a largeknight’s extension this time.
Attacking is fun and satisfying, but if you do not pause to defendyour own weak points, your attacks will be meaningless.
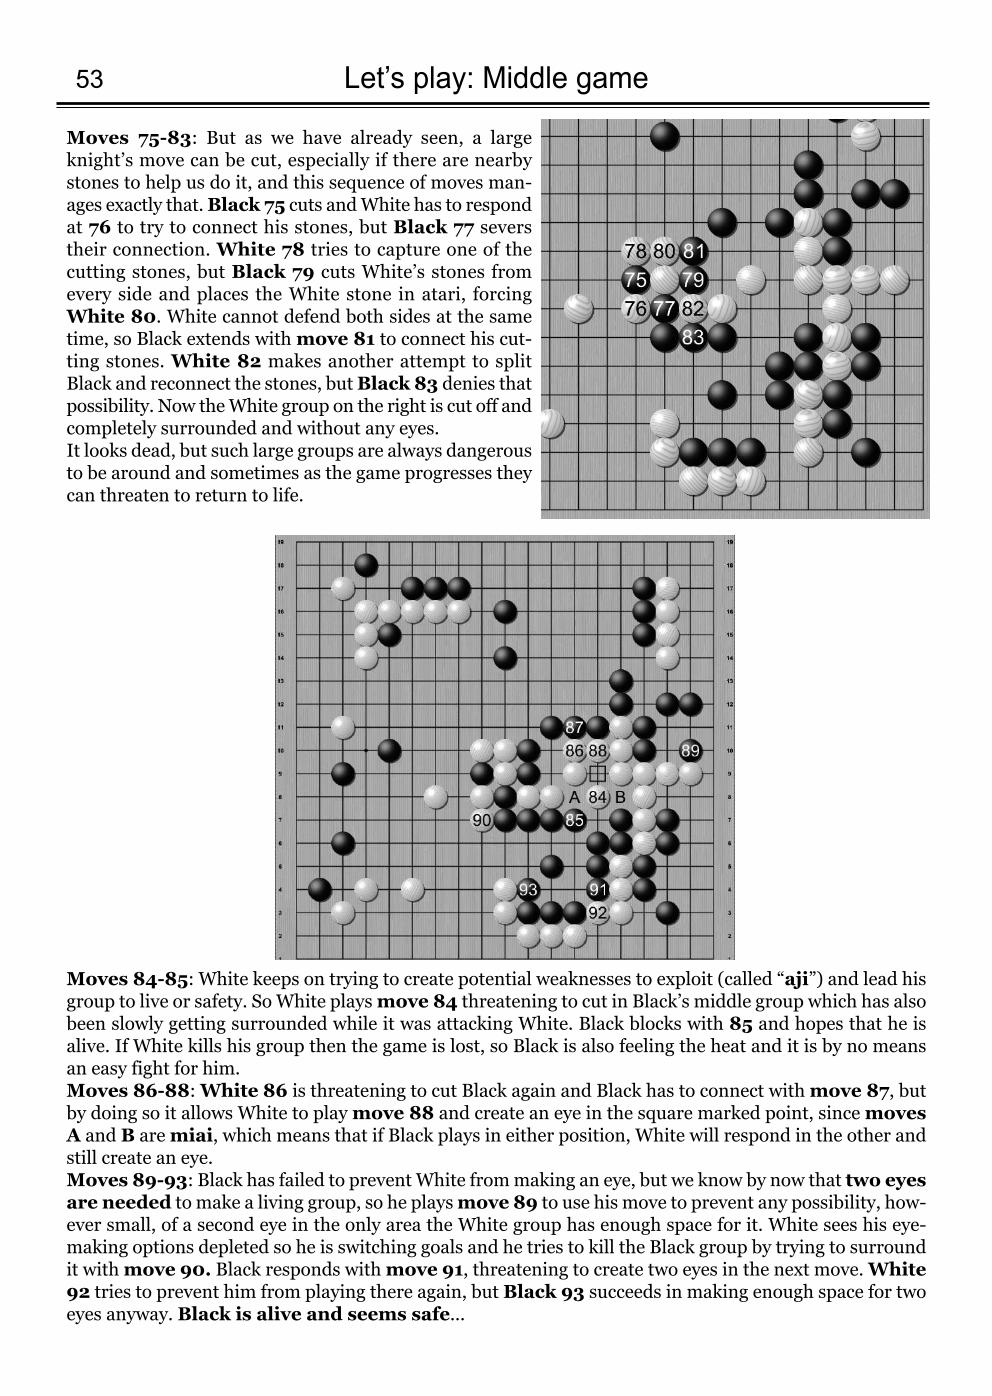
Let’s play: Middle game53
Moves 75-83: But as we have already seen, a largeknight’s move can be cut, especially if there are nearbystones to help us do it, and this sequence of moves man-ages exactly that. Black 75 cuts and White has to respondat 76 to try to connect his stones, but Black 77 severstheir connection. White 78 tries to capture one of thecutting stones, but Black 79 cuts White’s stones fromevery side and places the White stone in atari, forcingWhite 80. White cannot defend both sides at the sametime, so Black extends with move 81 to connect his cut-ting stones. White 82 makes another attempt to splitBlack and reconnect the stones, but Black 83 denies thatpossibility. Now the White group on the right is cut off andcompletely surrounded and without any eyes. It looks dead, but such large groups are always dangerousto be around and sometimes as the game progresses theycan threaten to return to life.
Moves 84-85: White keeps on trying to create potential weaknesses to exploit (called “aji”) and lead hisgroup to live or safety. So White plays move 84 threatening to cut in Black’s middle group which has alsobeen slowly getting surrounded while it was attacking White. Black blocks with 85 and hopes that he isalive. If White kills his group then the game is lost, so Black is also feeling the heat and it is by no meansan easy fight for him.Moves 86-88: White 86 is threatening to cut Black again and Black has to connect with move 87, butby doing so it allows White to play move 88 and create an eye in the square marked point, since movesA and B are miai, which means that if Black plays in either position, White will respond in the other andstill create an eye. Moves 89-93: Black has failed to prevent White from making an eye, but we know by now that two eyesare needed to make a living group, so he plays move 89 to use his move to prevent any possibility, how-ever small, of a second eye in the only area the White group has enough space for it. White sees his eye-making options depleted so he is switching goals and he tries to kill the Black group by trying to surroundit with move 90. Black responds with move 91, threatening to create two eyes in the next move. White92 tries to prevent him from playing there again, but Black 93 succeeds in making enough space for twoeyes anyway. Black is alive and seems safe...
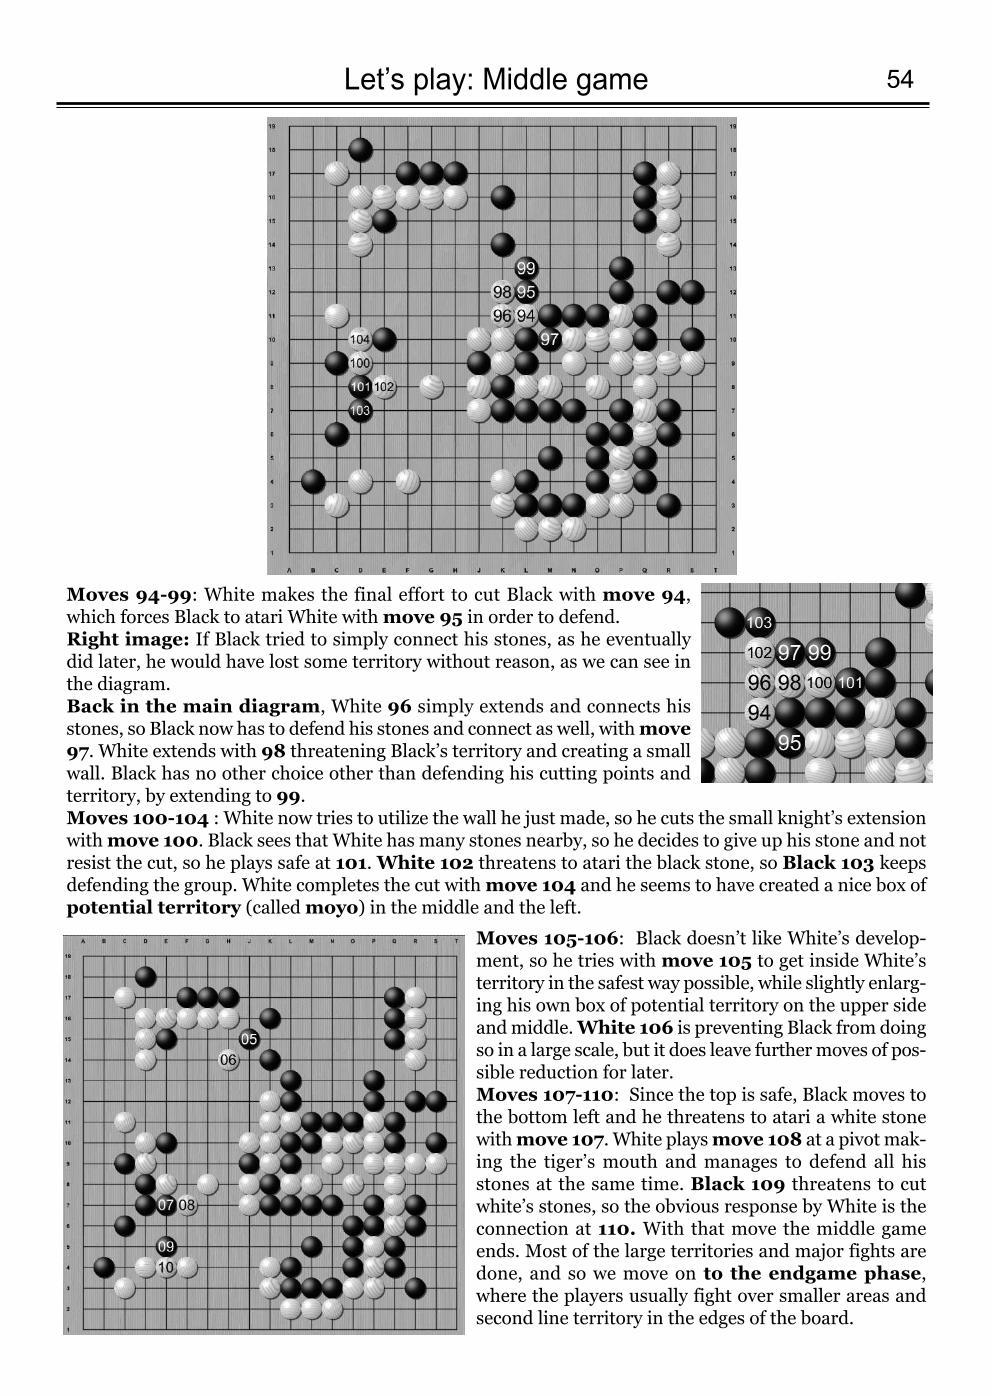
54Let’s play: Middle game
Moves 105-106: Black doesn’t like White’s develop-ment, so he tries with move 105 to get inside White’sterritory in the safest way possible, while slightly enlarg-ing his own box of potential territory on the upper sideand middle. White 106 is preventing Black from doingso in a large scale, but it does leave further moves of pos-sible reduction for later.Moves 107-110: Since the top is safe, Black moves tothe bottom left and he threatens to atari a white stonewith move 107. White plays move 108 at a pivot mak-ing the tiger’s mouth and manages to defend all hisstones at the same time. Black 109 threatens to cutwhite’s stones, so the obvious response by White is theconnection at 110. With that move the middle gameends. Most of the large territories and major fights aredone, and so we move on to the endgame phase,where the players usually fight over smaller areas andsecond line territory in the edges of the board.
Moves 94-99: White makes the final effort to cut Black with move 94,which forces Black to atari White with move 95 in order to defend. Right image: If Black tried to simply connect his stones, as he eventuallydid later, he would have lost some territory without reason, as we can see inthe diagram. Back in the main diagram, White 96 simply extends and connects hisstones, so Black now has to defend his stones and connect as well, withmove97. White extends with 98 threatening Black’s territory and creating a smallwall. Black has no other choice other than defending his cutting points andterritory, by extending to 99. Moves 100-104 : White now tries to utilize the wall he just made, so he cuts the small knight’s extensionwith move 100. Black sees that White has many stones nearby, so he decides to give up his stone and notresist the cut, so he plays safe at 101. White 102 threatens to atari the black stone, so Black 103 keepsdefending the group. White completes the cut with move 104 and he seems to have created a nice box ofpotential territory (called moyo) in the middle and the left.
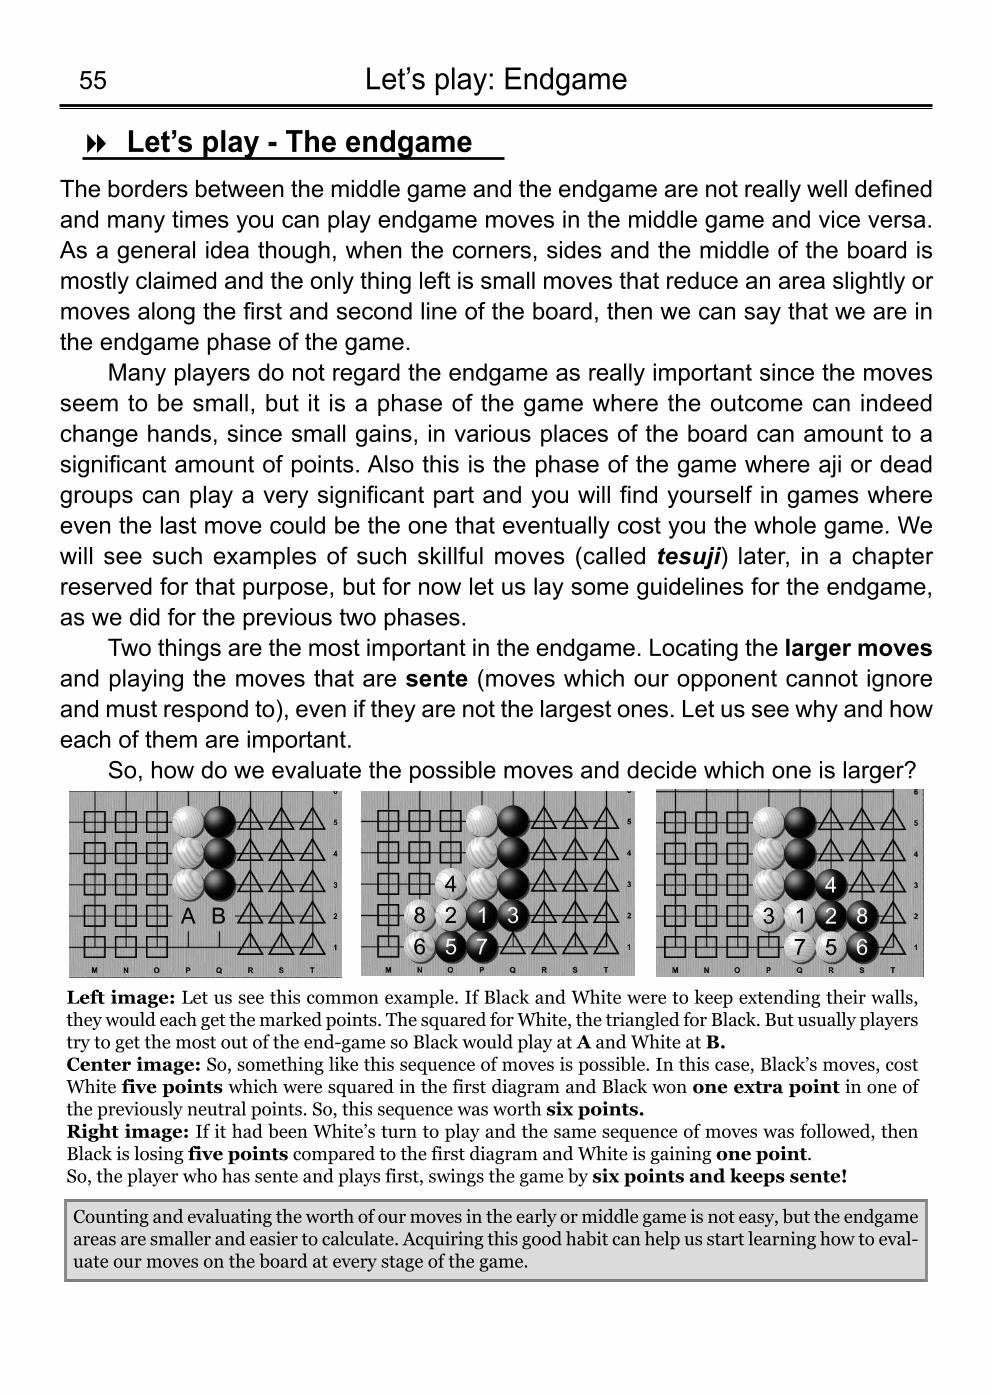
The borders between the middle game and the endgame are not really well definedand many times you can play endgame moves in the middle game and vice versa.As a general idea though, when the corners, sides and the middle of the board ismostly claimed and the only thing left is small moves that reduce an area slightly ormoves along the first and second line of the board, then we can say that we are inthe endgame phase of the game.
Many players do not regard the endgame as really important since the movesseem to be small, but it is a phase of the game where the outcome can indeedchange hands, since small gains, in various places of the board can amount to asignificant amount of points. Also this is the phase of the game where aji or deadgroups can play a very significant part and you will find yourself in games whereeven the last move could be the one that eventually cost you the whole game. Wewill see such examples of such skillful moves (called tesuji) later, in a chapterreserved for that purpose, but for now let us lay some guidelines for the endgame,as we did for the previous two phases.
Two things are the most important in the endgame. Locating the larger movesand playing the moves that are sente (moves which our opponent cannot ignoreand must respond to), even if they are not the largest ones. Let us see why and howeach of them are important.
So, how do we evaluate the possible moves and decide which one is larger?
Let’s play: Endgame55
Let’s play - The endgame8
Counting and evaluating the worth of our moves in the early or middle game is not easy, but the endgameareas are smaller and easier to calculate. Acquiring this good habit can help us start learning how to eval-uate our moves on the board at every stage of the game.
Left image: Let us see this common example. If Black and White were to keep extending their walls,they would each get the marked points. The squared for White, the triangled for Black. But usually playerstry to get the most out of the end-game so Black would play at A and White at B.Center image: So, something like this sequence of moves is possible. In this case, Black’s moves, costWhite five points which were squared in the first diagram and Black won one extra point in one ofthe previously neutral points. So, this sequence was worth six points.Right image: If it had been White’s turn to play and the same sequence of moves was followed, thenBlack is losing five points compared to the first diagram and White is gaining one point. So, the player who has sente and plays first, swings the game by six points and keeps sente!
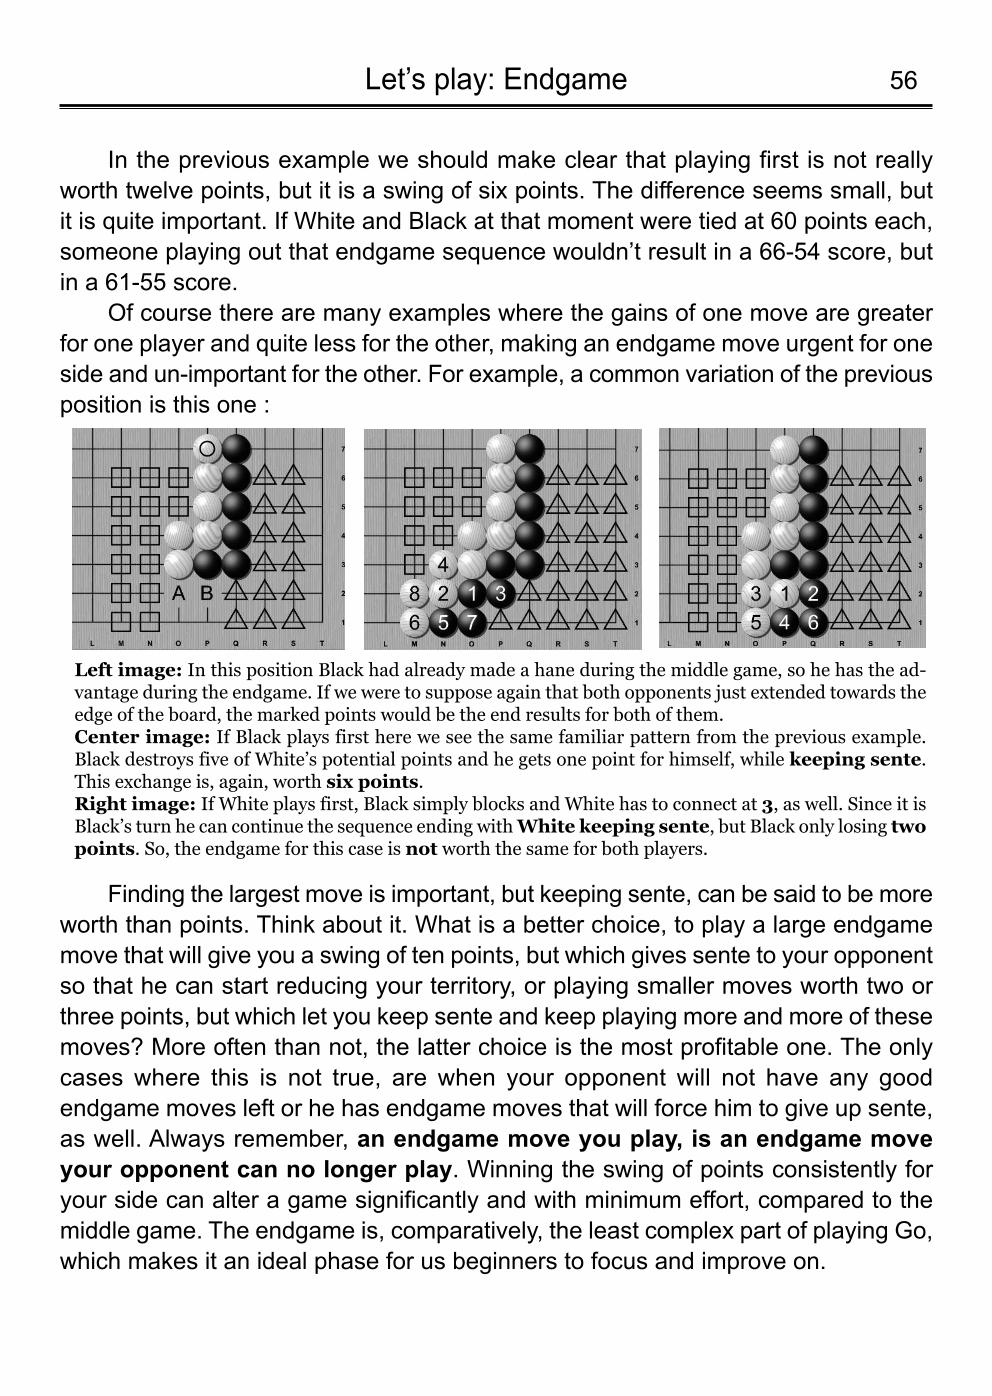
56Let’s play: Endgame
In the previous example we should make clear that playing first is not reallyworth twelve points, but it is a swing of six points. The difference seems small, butit is quite important. If White and Black at that moment were tied at 60 points each,someone playing out that endgame sequence wouldn’t result in a 66-54 score, butin a 61-55 score.
Of course there are many examples where the gains of one move are greaterfor one player and quite less for the other, making an endgame move urgent for oneside and un-important for the other. For example, a common variation of the previousposition is this one :
Finding the largest move is important, but keeping sente, can be said to be moreworth than points. Think about it. What is a better choice, to play a large endgamemove that will give you a swing of ten points, but which gives sente to your opponentso that he can start reducing your territory, or playing smaller moves worth two orthree points, but which let you keep sente and keep playing more and more of thesemoves? More often than not, the latter choice is the most profitable one. The onlycases where this is not true, are when your opponent will not have any goodendgame moves left or he has endgame moves that will force him to give up sente,as well. Always remember, an endgame move you play, is an endgame moveyour opponent can no longer play. Winning the swing of points consistently foryour side can alter a game significantly and with minimum effort, compared to themiddle game. The endgame is, comparatively, the least complex part of playing Go,which makes it an ideal phase for us beginners to focus and improve on.
Left image: In this position Black had already made a hane during the middle game, so he has the ad-vantage during the endgame. If we were to suppose again that both opponents just extended towards theedge of the board, the marked points would be the end results for both of them. Center image: If Black plays first here we see the same familiar pattern from the previous example.Black destroys five of White’s potential points and he gets one point for himself, while keeping sente.This exchange is, again, worth six points.Right image: If White plays first, Black simply blocks and White has to connect at 3, as well. Since it isBlack’s turn he can continue the sequence ending with White keeping sente, but Black only losing twopoints. So, the endgame for this case is not worth the same for both players.
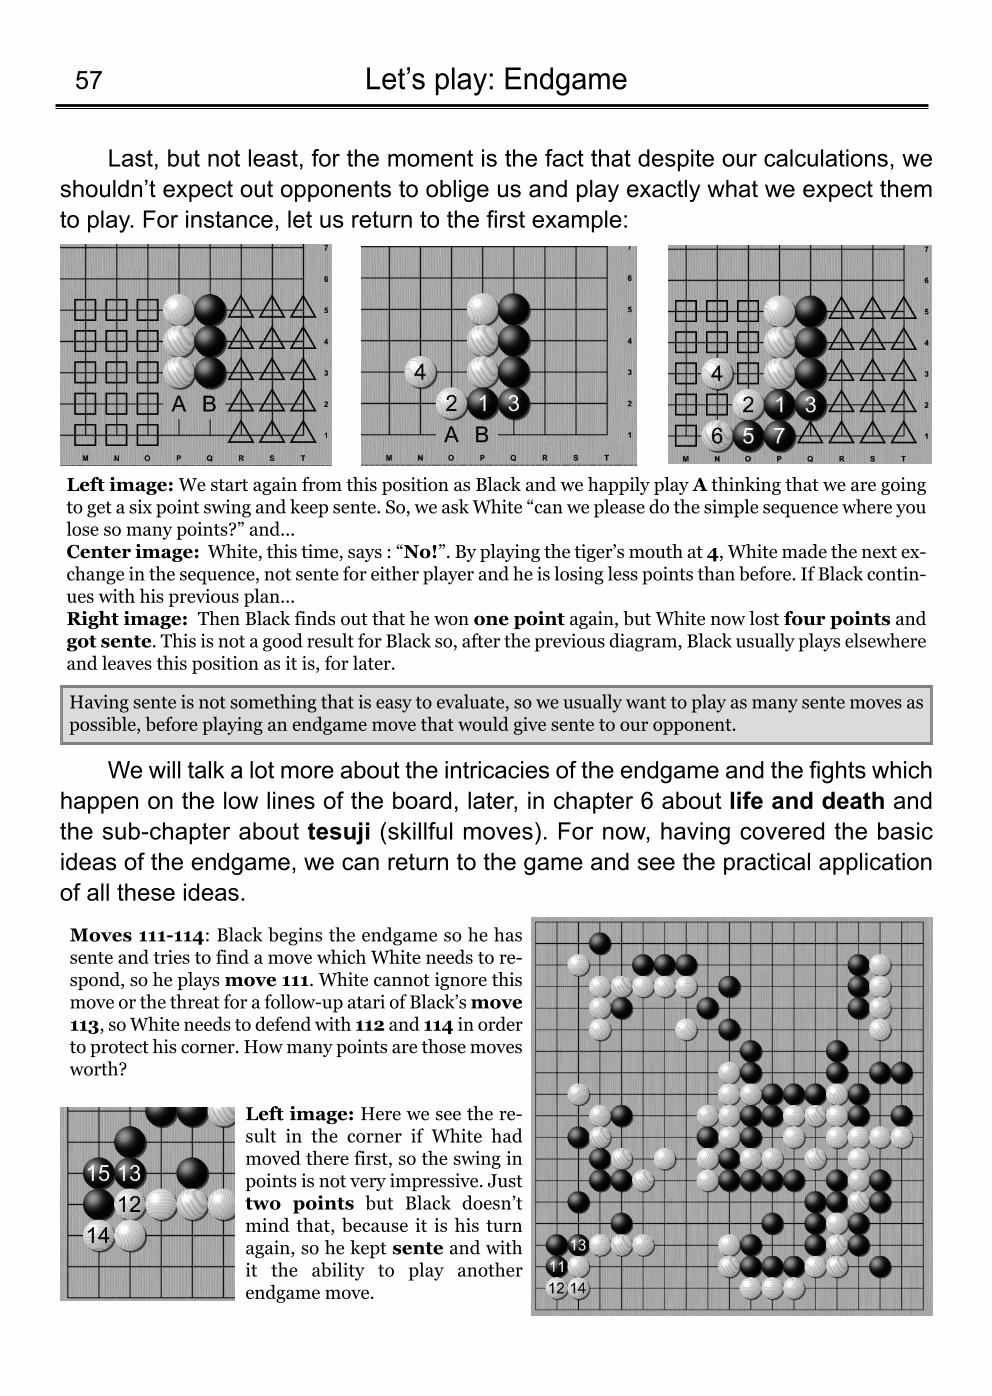
Last, but not least, for the moment is the fact that despite our calculations, weshouldn’t expect out opponents to oblige us and play exactly what we expect themto play. For instance, let us return to the first example:
We will talk a lot more about the intricacies of the endgame and the fights whichhappen on the low lines of the board, later, in chapter 6 about life and death andthe sub-chapter about tesuji (skillful moves). For now, having covered the basicideas of the endgame, we can return to the game and see the practical applicationof all these ideas.
Let’s play: Endgame57
Having sente is not something that is easy to evaluate, so we usually want to play as many sente moves aspossible, before playing an endgame move that would give sente to our opponent.
Moves 111-114: Black begins the endgame so he hassente and tries to find a move which White needs to re-spond, so he plays move 111. White cannot ignore thismove or the threat for a follow-up atari of Black’s move113, so White needs to defend with 112 and 114 in orderto protect his corner. How many points are those movesworth?
Left image: Here we see the re-sult in the corner if White hadmoved there first, so the swing inpoints is not very impressive. Justtwo points but Black doesn’tmind that, because it is his turnagain, so he kept sente and withit the ability to play anotherendgame move.
Left image: We start again from this position as Black and we happily play A thinking that we are goingto get a six point swing and keep sente. So, we ask White “can we please do the simple sequence where youlose so many points?” and... Center image: White, this time, says : “No!”. By playing the tiger’s mouth at 4, White made the next ex-change in the sequence, not sente for either player and he is losing less points than before. If Black contin-ues with his previous plan...Right image: Then Black finds out that he won one point again, but White now lost four points andgot sente. This is not a good result for Black so, after the previous diagram, Black usually plays elsewhereand leaves this position as it is, for later.

58Let’s play: Endgame
Moves 115 - 120: Black keeps up the pressureby playing the monkey jump at 115. Not onlysuch a move usually ends up with Black retainingsente, but White’s group is not totally alive yet, sothe monkey jump is threatening to kill it, if Whiteplays the wrong sequence of responses.White responds with the cut at 116. White knowsthat he will lose that stone, but he is doing it onpurpose to stop Black from playing any othermoves under White’s group. Black 117 places White’s stone under atari andWhite’s 118 places Black’s stone in atari in re-sponse, so Black is forced to capture a white stoneatmove 119 in order for his group to live. White120 concludes the defence against the monkeyjump and White’s group seems to be alive.
Moves 121 - 127: Black however sees that thereis still some possibility for killing White and playsthe hane at 121. White 122 is the only move thatcan defend and Black connects with 123 and isready to attack White. But White plays a verysmart move by extending at move 124. Now themoves A and B are miai. If Black plays at A,White plays at B and has two eyes in the markedsquares. If Black plays at B then White plays at Aand will have two eyes in the triangle and one ofthe squares. A magnificent move indeed! Black’s plan had crumbled, so he leaves that areaand decides that it is time for him to defend at 125which doesn’t threaten White at all, so it is notsente. That proves to be a bad idea, becauseWhite immediately plays a sente endgame moveat 126 which Black missed. Black is forced to de-fend at 127 and now it is White’s turn again.
The monkey jumpAn endgame skillful move (tesuji)
The monkey jump is an endgame large knight’s extension played on thefirst line, which can be executed only when you have a strong group ofstones which extends to the second line and your opponent does not havea stone in the second line to block you. In the example on the right, Whiteis missing a stone at the marked points on the second line, so Black canplay the monkey jump at A. White cannot cut this move in any way andunless there are other helping stones, Black will reduce White by aroundeight to ten points and retain sente after White defends.
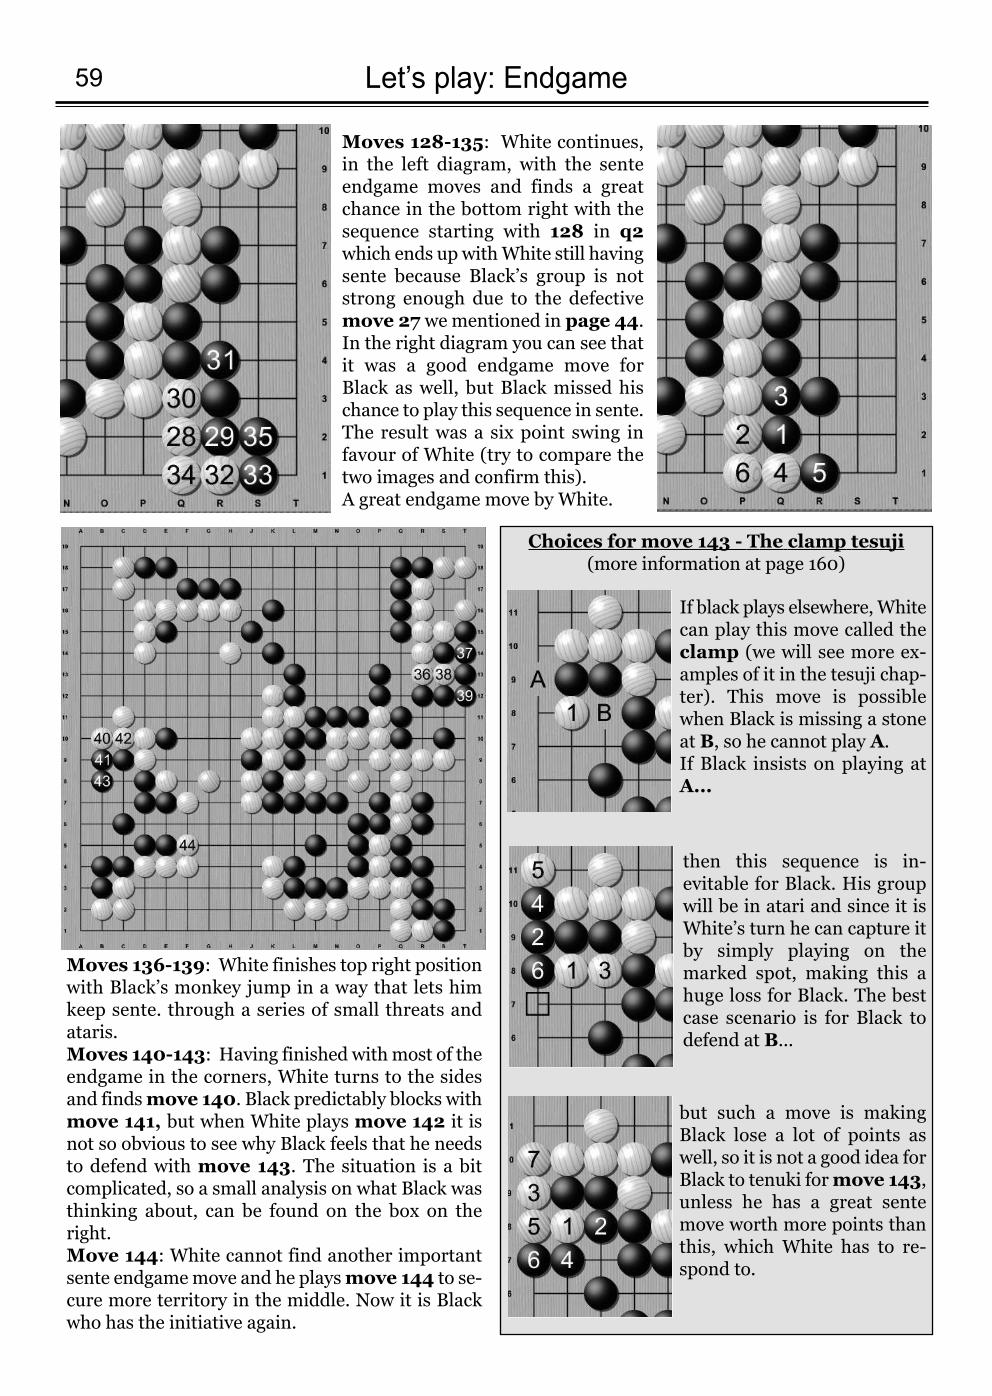
Choices for move 143 - Τhe clamp tesuji(more information at page 160)
Let’s play: Endgame59
Moves 136-139: White finishes top right positionwith Black’s monkey jump in a way that lets himkeep sente. through a series of small threats andataris.Moves 140-143: Having finished with most of theendgame in the corners, White turns to the sidesand finds move 140. Black predictably blocks withmove 141, but when White plays move 142 it isnot so obvious to see why Black feels that he needsto defend with move 143. The situation is a bitcomplicated, so a small analysis on what Black wasthinking about, can be found on the box on theright. Move 144: White cannot find another importantsente endgame move and he plays move 144 to se-cure more territory in the middle. Now it is Blackwho has the initiative again.
Moves 128-135: White continues,in the left diagram, with the senteendgame moves and finds a greatchance in the bottom right with thesequence starting with 128 in q2which ends up with White still havingsente because Black’s group is notstrong enough due to the defectivemove 27 we mentioned in page 44.In the right diagram you can see thatit was a good endgame move forBlack as well, but Black missed hischance to play this sequence in sente.The result was a six point swing infavour of White (try to compare thetwo images and confirm this). A great endgame move by White.
If black plays elsewhere, Whitecan play this move called theclamp (we will see more ex-amples of it in the tesuji chap-ter). This move is possiblewhen Black is missing a stoneat B, so he cannot play A. If Black insists on playing atA...
then this sequence is in-evitable for Black. His groupwill be in atari and since it isWhite’s turn he can capture itby simply playing on themarked spot, making this ahuge loss for Black. The bestcase scenario is for Black todefend at B...
but such a move is makingBlack lose a lot of points aswell, so it is not a good idea forBlack to tenuki for move 143,unless he has a great sentemove worth more points thanthis, which White has to re-spond to.
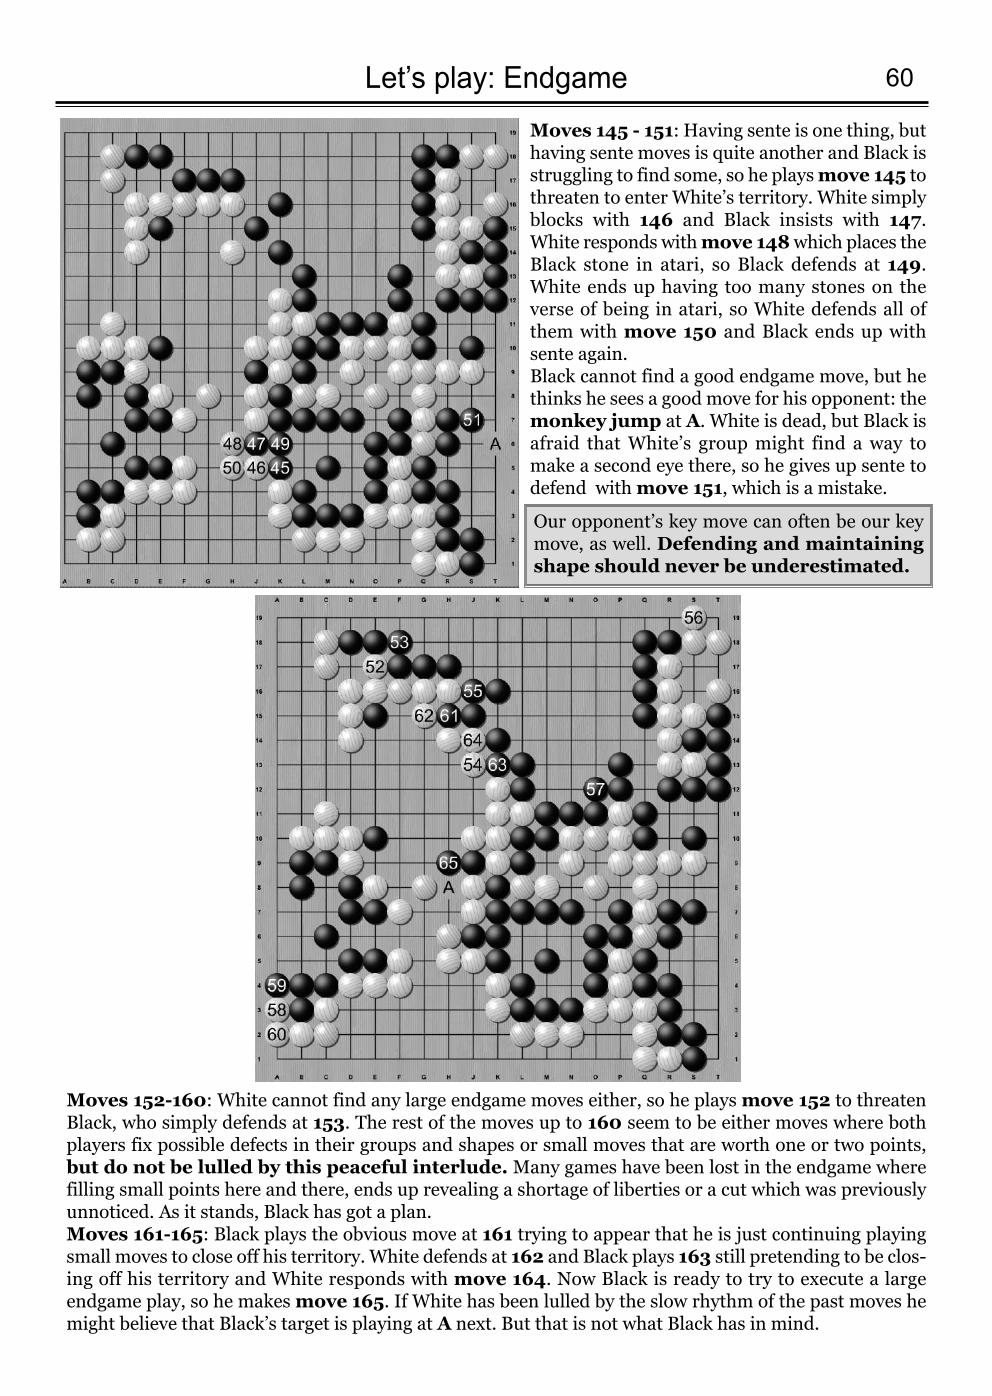
60Let’s play: EndgameMoves 145 - 151: Having sente is one thing, buthaving sente moves is quite another and Black isstruggling to find some, so he plays move 145 tothreaten to enter White’s territory. White simplyblocks with 146 and Black insists with 147.White responds with move 148which places theBlack stone in atari, so Black defends at 149.White ends up having too many stones on theverse of being in atari, so White defends all ofthem with move 150 and Black ends up withsente again. Black cannot find a good endgame move, but hethinks he sees a good move for his opponent: themonkey jump at A. White is dead, but Black isafraid that White’s group might find a way tomake a second eye there, so he gives up sente todefend with move 151, which is a mistake.
Our opponent’s key move can often be our keymove, as well. Defending and maintainingshape should never be underestimated.
Moves 152-160: White cannot find any large endgame moves either, so he plays move 152 to threatenBlack, who simply defends at 153. The rest of the moves up to 160 seem to be either moves where bothplayers fix possible defects in their groups and shapes or small moves that are worth one or two points,but do not be lulled by this peaceful interlude. Many games have been lost in the endgame wherefilling small points here and there, ends up revealing a shortage of liberties or a cut which was previouslyunnoticed. As it stands, Black has got a plan.Moves 161-165: Black plays the obvious move at 161 trying to appear that he is just continuing playingsmall moves to close off his territory. White defends at 162 and Black plays 163 still pretending to be clos-ing off his territory and White responds with move 164. Now Black is ready to try to execute a largeendgame play, so he makes move 165. If White has been lulled by the slow rhythm of the past moves hemight believe that Black’s target is playing at A next. But that is not what Black has in mind.
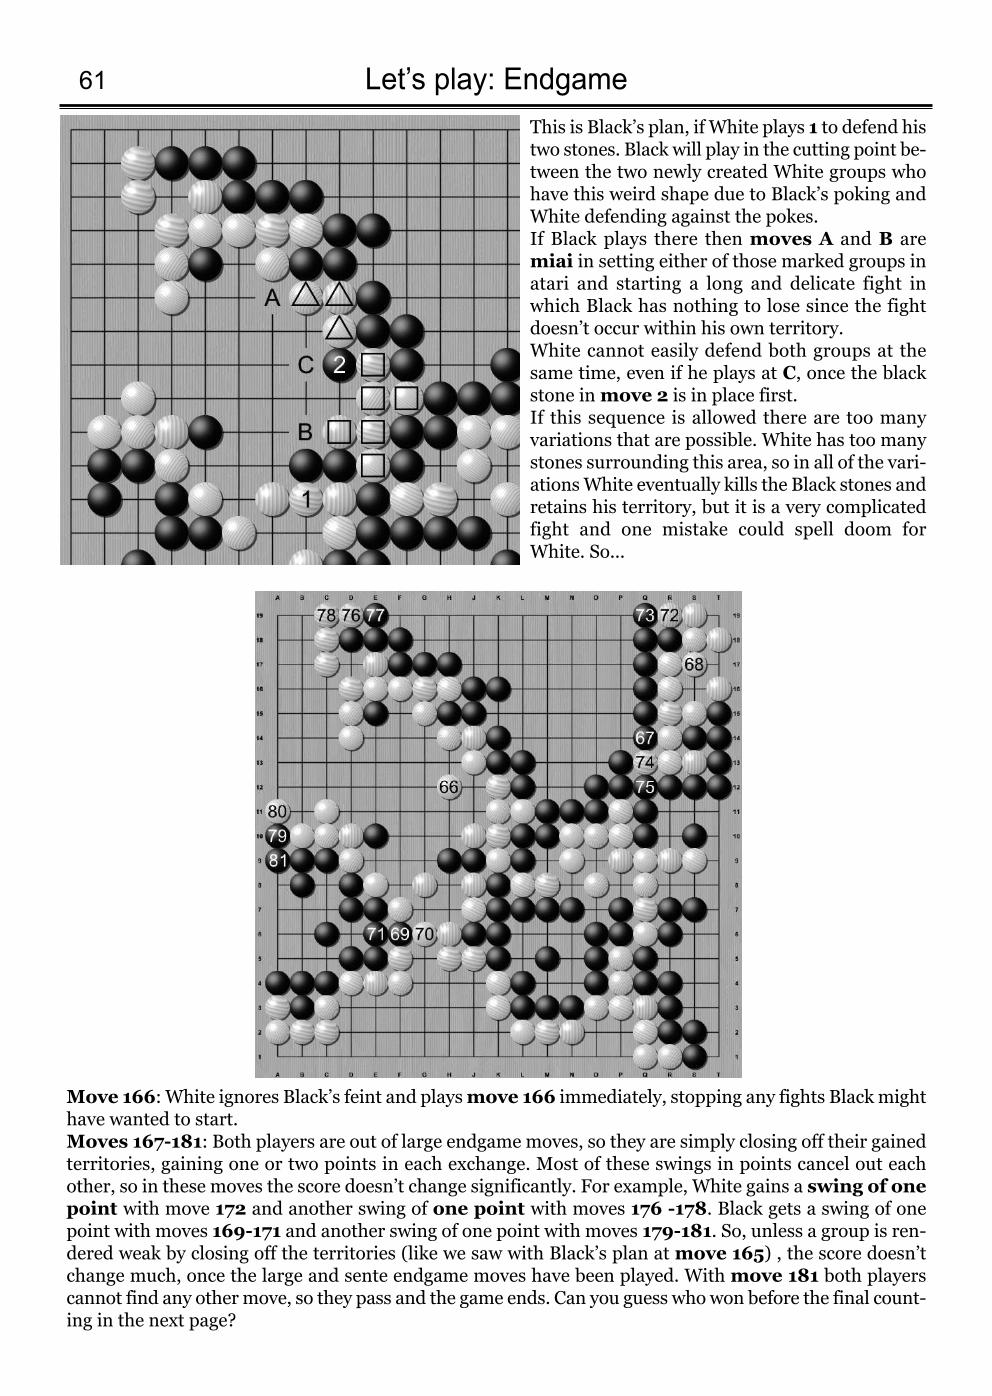
Let’s play: Endgame61
This is Black’s plan, if White plays 1 to defend histwo stones. Black will play in the cutting point be-tween the two newly created White groups whohave this weird shape due to Black’s poking andWhite defending against the pokes. If Black plays there then moves A and B aremiai in setting either of those marked groups inatari and starting a long and delicate fight inwhich Black has nothing to lose since the fightdoesn’t occur within his own territory.White cannot easily defend both groups at thesame time, even if he plays at C, once the blackstone in move 2 is in place first.If this sequence is allowed there are too manyvariations that are possible. White has too manystones surrounding this area, so in all of the vari-ations White eventually kills the Black stones andretains his territory, but it is a very complicatedfight and one mistake could spell doom forWhite. So...
Move 166: White ignores Black’s feint and plays move 166 immediately, stopping any fights Black mighthave wanted to start.Moves 167-181: Both players are out of large endgame moves, so they are simply closing off their gainedterritories, gaining one or two points in each exchange. Most of these swings in points cancel out eachother, so in these moves the score doesn’t change significantly. For example, White gains a swing of onepoint with move 172 and another swing of one point with moves 176 -178. Black gets a swing of onepoint with moves 169-171 and another swing of one point with moves 179-181. So, unless a group is ren-dered weak by closing off the territories (like we saw with Black’s plan at move 165) , the score doesn’tchange much, once the large and sente endgame moves have been played. With move 181 both playerscannot find any other move, so they pass and the game ends. Can you guess who won before the final count-ing in the next page?
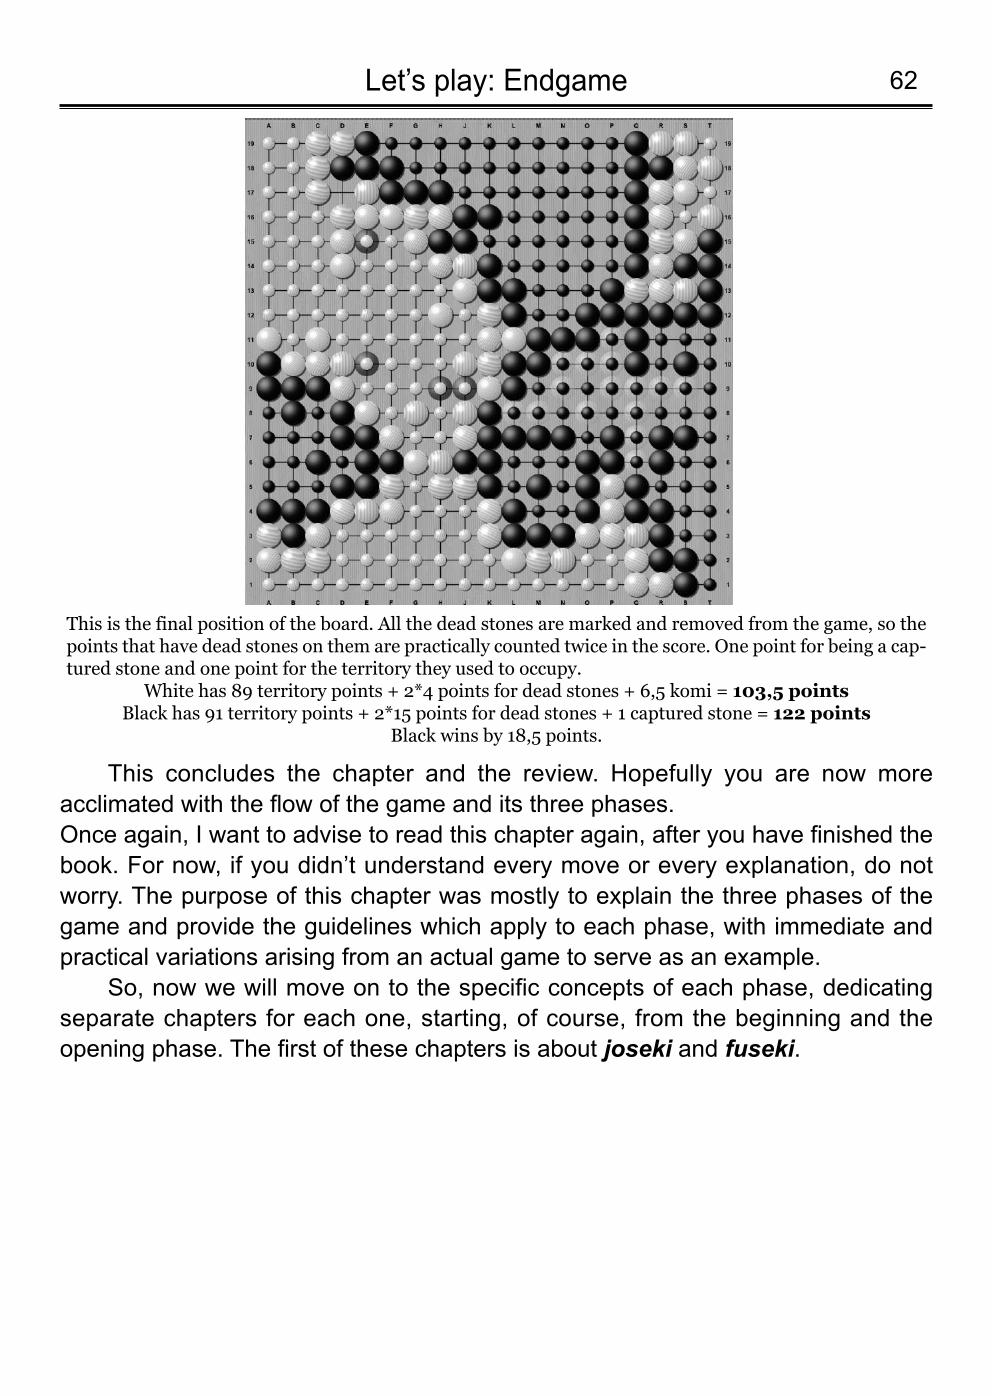
62Let’s play: Endgame
This is the final position of the board. All the dead stones are marked and removed from the game, so thepoints that have dead stones on them are practically counted twice in the score. One point for being a cap-tured stone and one point for the territory they used to occupy.
White has 89 territory points + 2*4 points for dead stones + 6,5 komi = 103,5 pointsBlack has 91 territory points + 2*15 points for dead stones + 1 captured stone = 122 points
Black wins by 18,5 points.
This concludes the chapter and the review. Hopefully you are now moreacclimated with the flow of the game and its three phases. Once again, I want to advise to read this chapter again, after you have finished thebook. For now, if you didn’t understand every move or every explanation, do notworry. The purpose of this chapter was mostly to explain the three phases of thegame and provide the guidelines which apply to each phase, with immediate andpractical variations arising from an actual game to serve as an example.
So, now we will move on to the specific concepts of each phase, dedicatingseparate chapters for each one, starting, of course, from the beginning and theopening phase. The first of these chapters is about joseki and fuseki.
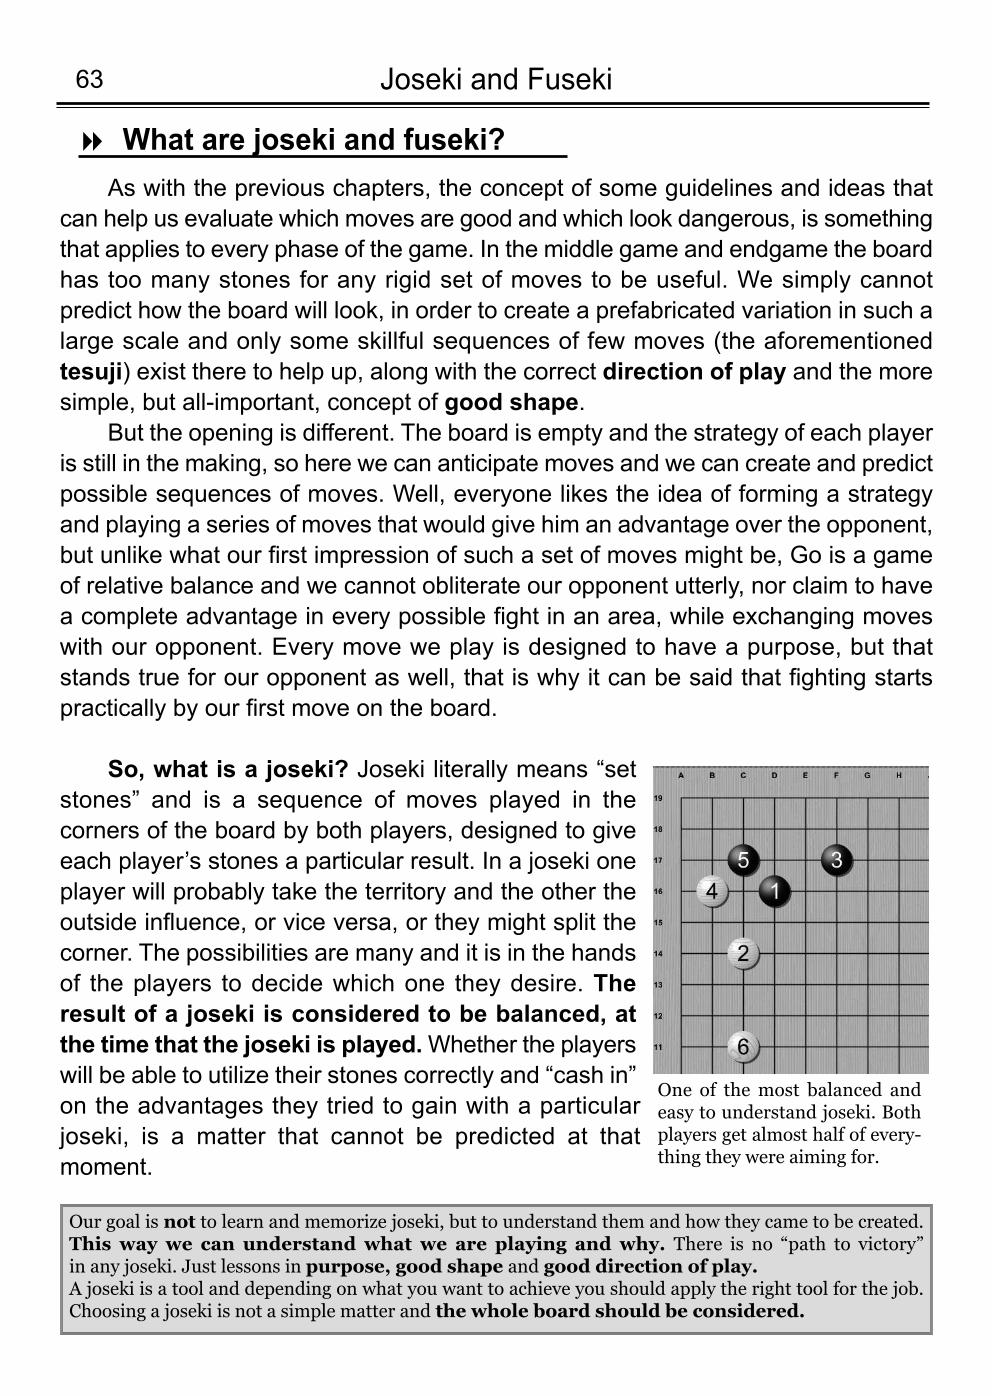
As with the previous chapters, the concept of some guidelines and ideas thatcan help us evaluate which moves are good and which look dangerous, is somethingthat applies to every phase of the game. In the middle game and endgame the boardhas too many stones for any rigid set of moves to be useful. We simply cannotpredict how the board will look, in order to create a prefabricated variation in such alarge scale and only some skillful sequences of few moves (the aforementionedtesuji) exist there to help up, along with the correct direction of play and the moresimple, but all-important, concept of good shape.
But the opening is different. The board is empty and the strategy of each playeris still in the making, so here we can anticipate moves and we can create and predictpossible sequences of moves. Well, everyone likes the idea of forming a strategyand playing a series of moves that would give him an advantage over the opponent,but unlike what our first impression of such a set of moves might be, Go is a gameof relative balance and we cannot obliterate our opponent utterly, nor claim to havea complete advantage in every possible fight in an area, while exchanging moveswith our opponent. Every move we play is designed to have a purpose, but thatstands true for our opponent as well, that is why it can be said that fighting startspractically by our first move on the board.
So, what is a joseki? Joseki literally means “setstones” and is a sequence of moves played in thecorners of the board by both players, designed to giveeach player’s stones a particular result. In a joseki oneplayer will probably take the territory and the other theoutside influence, or vice versa, or they might split thecorner. The possibilities are many and it is in the handsof the players to decide which one they desire. Theresult of a joseki is considered to be balanced, atthe time that the joseki is played. Whether the playerswill be able to utilize their stones correctly and “cash in”on the advantages they tried to gain with a particularjoseki, is a matter that cannot be predicted at thatmoment.
Joseki and Fuseki63
What are joseki and fuseki?8
One of the most balanced andeasy to understand joseki. Bothplayers get almost half of every-thing they were aiming for.
Our goal is not to learn and memorize joseki, but to understand them and how they came to be created.This way we can understand what we are playing and why. There is no “path to victory” in any joseki. Just lessons in purpose, good shape and good direction of play.A joseki is a tool and depending on what you want to achieve you should apply the right tool for the job.Choosing a joseki is not a simple matter and the whole board should be considered.
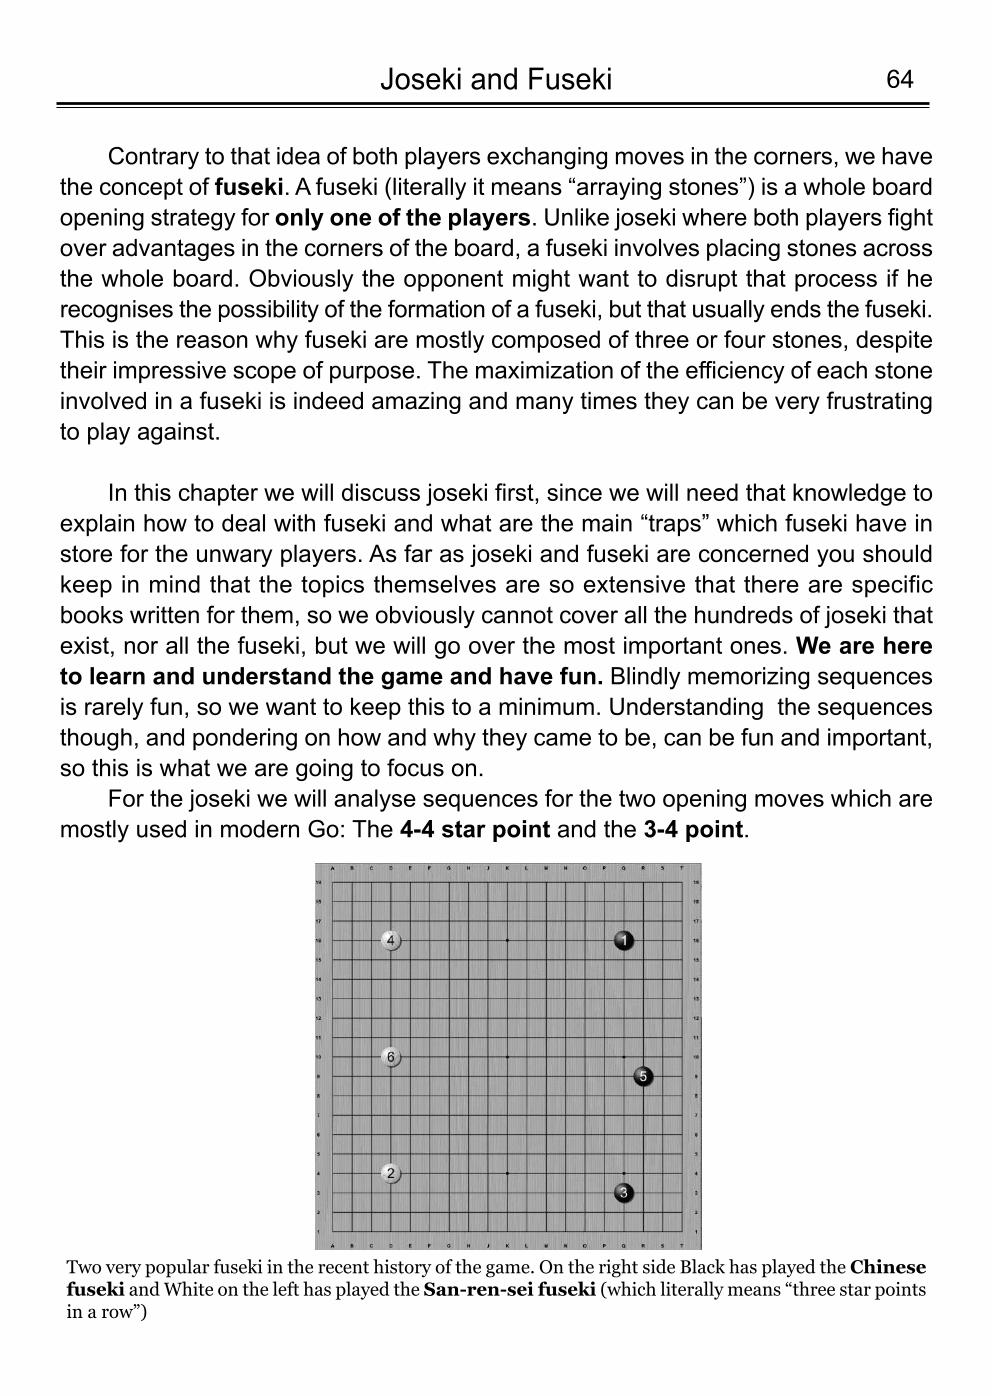
64Joseki and Fuseki
Two very popular fuseki in the recent history of the game. On the right side Black has played the Chinesefuseki and White on the left has played the San-ren-sei fuseki (which literally means “three star pointsin a row”)
Contrary to that idea of both players exchanging moves in the corners, we havethe concept of fuseki. A fuseki (literally it means “arraying stones”) is a whole boardopening strategy for only one of the players. Unlike joseki where both players fightover advantages in the corners of the board, a fuseki involves placing stones acrossthe whole board. Obviously the opponent might want to disrupt that process if herecognises the possibility of the formation of a fuseki, but that usually ends the fuseki.This is the reason why fuseki are mostly composed of three or four stones, despitetheir impressive scope of purpose. The maximization of the efficiency of each stoneinvolved in a fuseki is indeed amazing and many times they can be very frustratingto play against.
In this chapter we will discuss joseki first, since we will need that knowledge toexplain how to deal with fuseki and what are the main “traps” which fuseki have instore for the unwary players. As far as joseki and fuseki are concerned you shouldkeep in mind that the topics themselves are so extensive that there are specificbooks written for them, so we obviously cannot cover all the hundreds of joseki thatexist, nor all the fuseki, but we will go over the most important ones. We are hereto learn and understand the game and have fun. Blindly memorizing sequencesis rarely fun, so we want to keep this to a minimum. Understanding the sequencesthough, and pondering on how and why they came to be, can be fun and important,so this is what we are going to focus on.
For the joseki we will analyse sequences for the two opening moves which aremostly used in modern Go: The 4-4 star point and the 3-4 point.
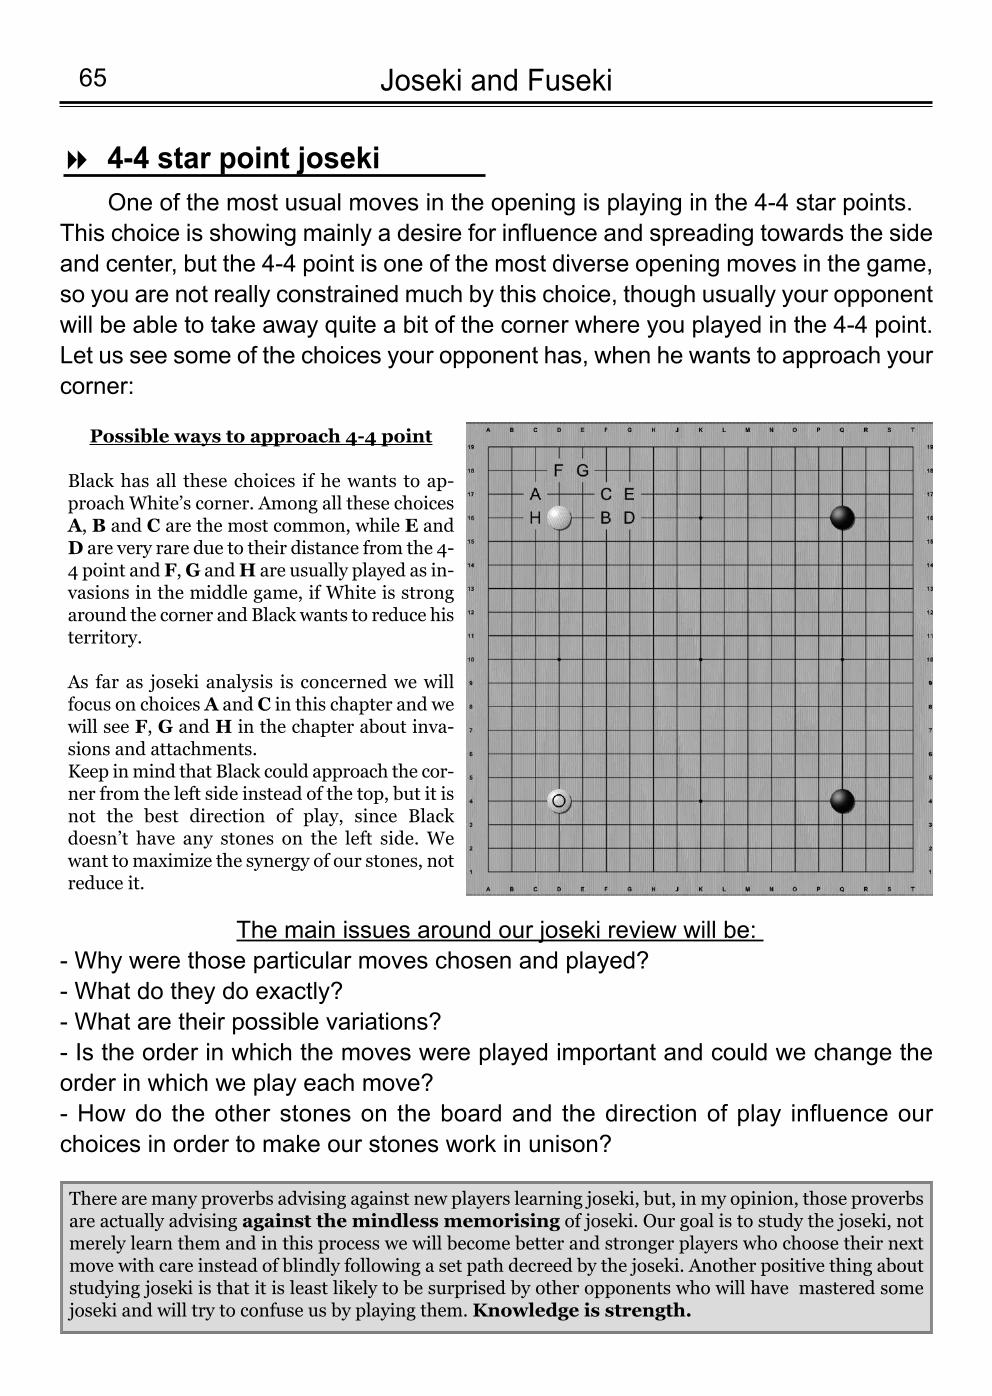
One of the most usual moves in the opening is playing in the 4-4 star points.This choice is showing mainly a desire for influence and spreading towards the sideand center, but the 4-4 point is one of the most diverse opening moves in the game,so you are not really constrained much by this choice, though usually your opponentwill be able to take away quite a bit of the corner where you played in the 4-4 point.Let us see some of the choices your opponent has, when he wants to approach yourcorner:
Joseki and Fuseki65
4-4 star point joseki8
Possible ways to approach 4-4 point
Black has all these choices if he wants to ap-proach White’s corner. Among all these choicesA, B and C are the most common, while E andD are very rare due to their distance from the 4-4 point and F, G and H are usually played as in-vasions in the middle game, if White is strongaround the corner and Black wants to reduce histerritory.
As far as joseki analysis is concerned we willfocus on choices A and C in this chapter and wewill see F, G and H in the chapter about inva-sions and attachments.Keep in mind that Black could approach the cor-ner from the left side instead of the top, but it isnot the best direction of play, since Blackdoesn’t have any stones on the left side. Wewant to maximize the synergy of our stones, notreduce it.
There are many proverbs advising against new players learning joseki, but, in my opinion, those proverbsare actually advising against the mindless memorising of joseki. Our goal is to study the joseki, notmerely learn them and in this process we will become better and stronger players who choose their nextmove with care instead of blindly following a set path decreed by the joseki. Another positive thing aboutstudying joseki is that it is least likely to be surprised by other opponents who will have mastered somejoseki and will try to confuse us by playing them. Knowledge is strength.
The main issues around our joseki review will be: - Why were those particular moves chosen and played?- What do they do exactly?- What are their possible variations? - Is the order in which the moves were played important and could we change theorder in which we play each move?- How do the other stones on the board and the direction of play influence ourchoices in order to make our stones work in unison?
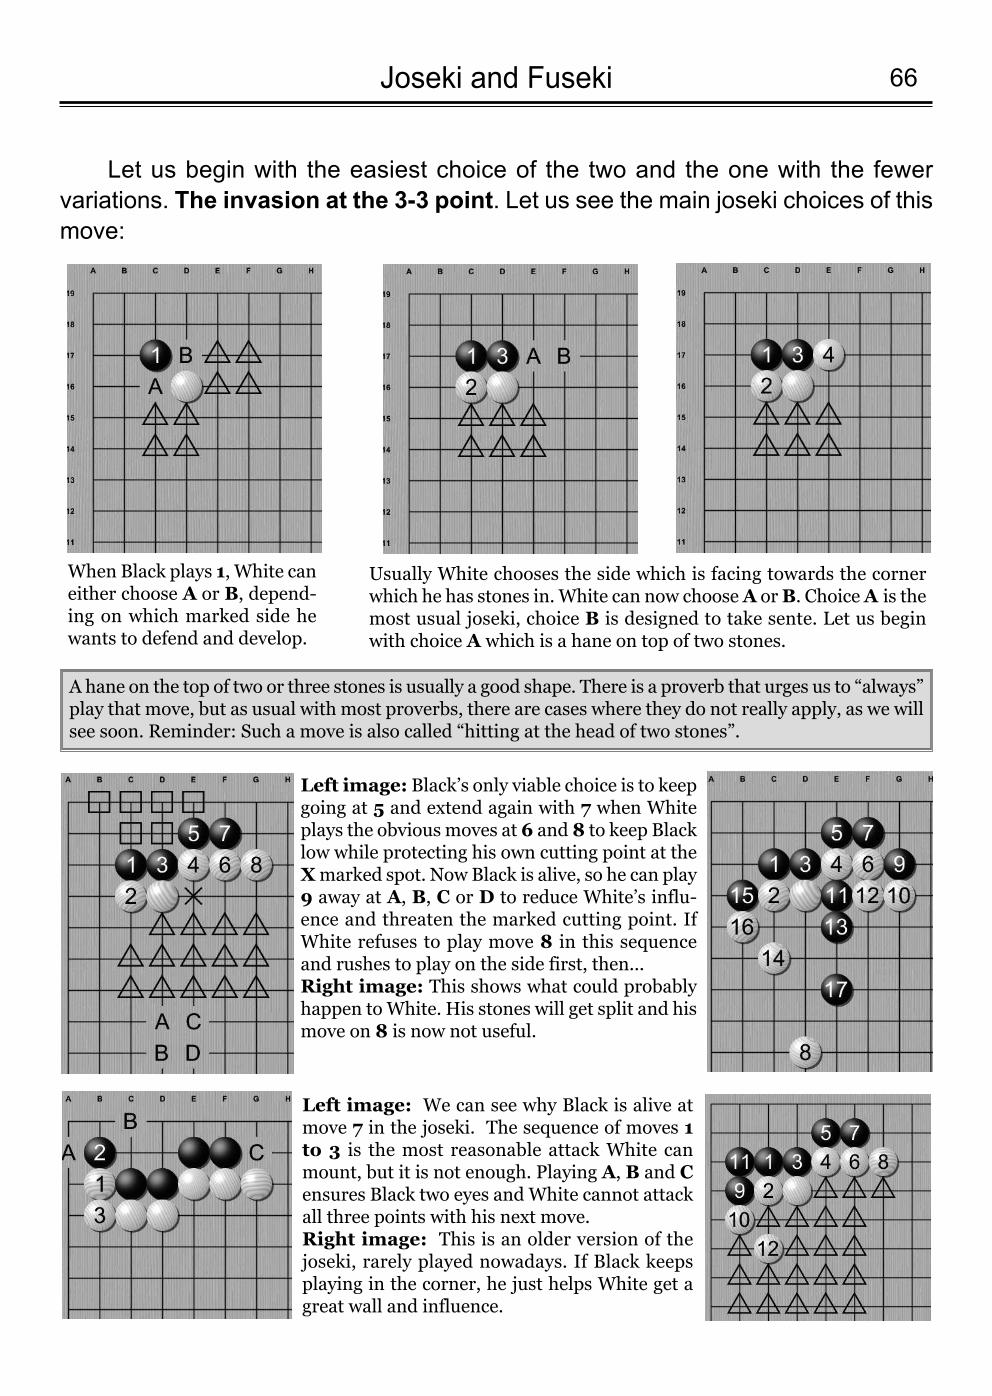
66Joseki and Fuseki
When Black plays 1, White caneither choose A or B, depend-ing on which marked side hewants to defend and develop.
Usually White chooses the side which is facing towards the cornerwhich he has stones in. White can now choose A or B. Choice A is themost usual joseki, choice B is designed to take sente. Let us beginwith choice A which is a hane on top of two stones.
Left image: Black’s only viable choice is to keepgoing at 5 and extend again with 7 when Whiteplays the obvious moves at 6 and 8 to keep Blacklow while protecting his own cutting point at theXmarked spot. Now Black is alive, so he can play9 away at A, B, C or D to reduce White’s influ-ence and threaten the marked cutting point. IfWhite refuses to play move 8 in this sequenceand rushes to play on the side first, then...Right image: This shows what could probablyhappen to White. His stones will get split and hismove on 8 is now not useful.
Left image: We can see why Black is alive atmove 7 in the joseki. The sequence of moves 1to 3 is the most reasonable attack White canmount, but it is not enough. Playing A, B and Censures Black two eyes and White cannot attackall three points with his next move.Right image: This is an older version of thejoseki, rarely played nowadays. If Black keepsplaying in the corner, he just helps White get agreat wall and influence.
A hane on the top of two or three stones is usually a good shape. There is a proverb that urges us to “always”play that move, but as usual with most proverbs, there are cases where they do not really apply, as we willsee soon. Reminder: Such a move is also called “hitting at the head of two stones”.
Let us begin with the easiest choice of the two and the one with the fewervariations. The invasion at the 3-3 point. Let us see the main joseki choices of thismove:

Before the “AI revolution” of AlphaGo playing the 3-3 point was not very popularin the early game, because humans hadn’t fully explored the idea of Black playingaway at move 9, but now it is a very popular move which can be played even aftera few stones on the board were just placed. It is a playstyle you should definitelyexplore when you feel more confident in your abilities to manipulate shape andinfluence. For now we will see how do we pick which side to defend, according tothe direction of play:
Joseki and Fuseki67
Another real game example. Black doesn’t likeWhite’s bottom right expansion and he wants to stopit from turning all to territory, so he invades the 3-3spot. Now White has two options to defend himself A or B.
How do we choose which one is the best?
Now that we know the joseki and the most possibleoutcome of each choice, all we have to do is envisionhow each choice would play out on the board andcompare the results. This is similar to what we havebeen doing when analysing the game in the previouschapter and it is called “reading a sequence”. Inthe case of joseki, though the reading has alreadybeen done for us, we shouldn’t be complacent, be-cause our opponent is not guaranteed to follow thejoseki moves and we should be able to read variationsto punish his moves.
Choice AIn this choice, White will create a wall which willbe facing his other wall in the middle creating anice moyo which Black cannot invade easily.
Choice BIn this choice, White’s wall will be facing towardsBlack’s marked stone. It is Black’s turn and he canplay A or B to make that wall pointless.
So, choice A is now obviously the move with the right direction of play in mind. When one move optionhelps you make a moyo and the other does not, then the right direction of play is easy to discern.
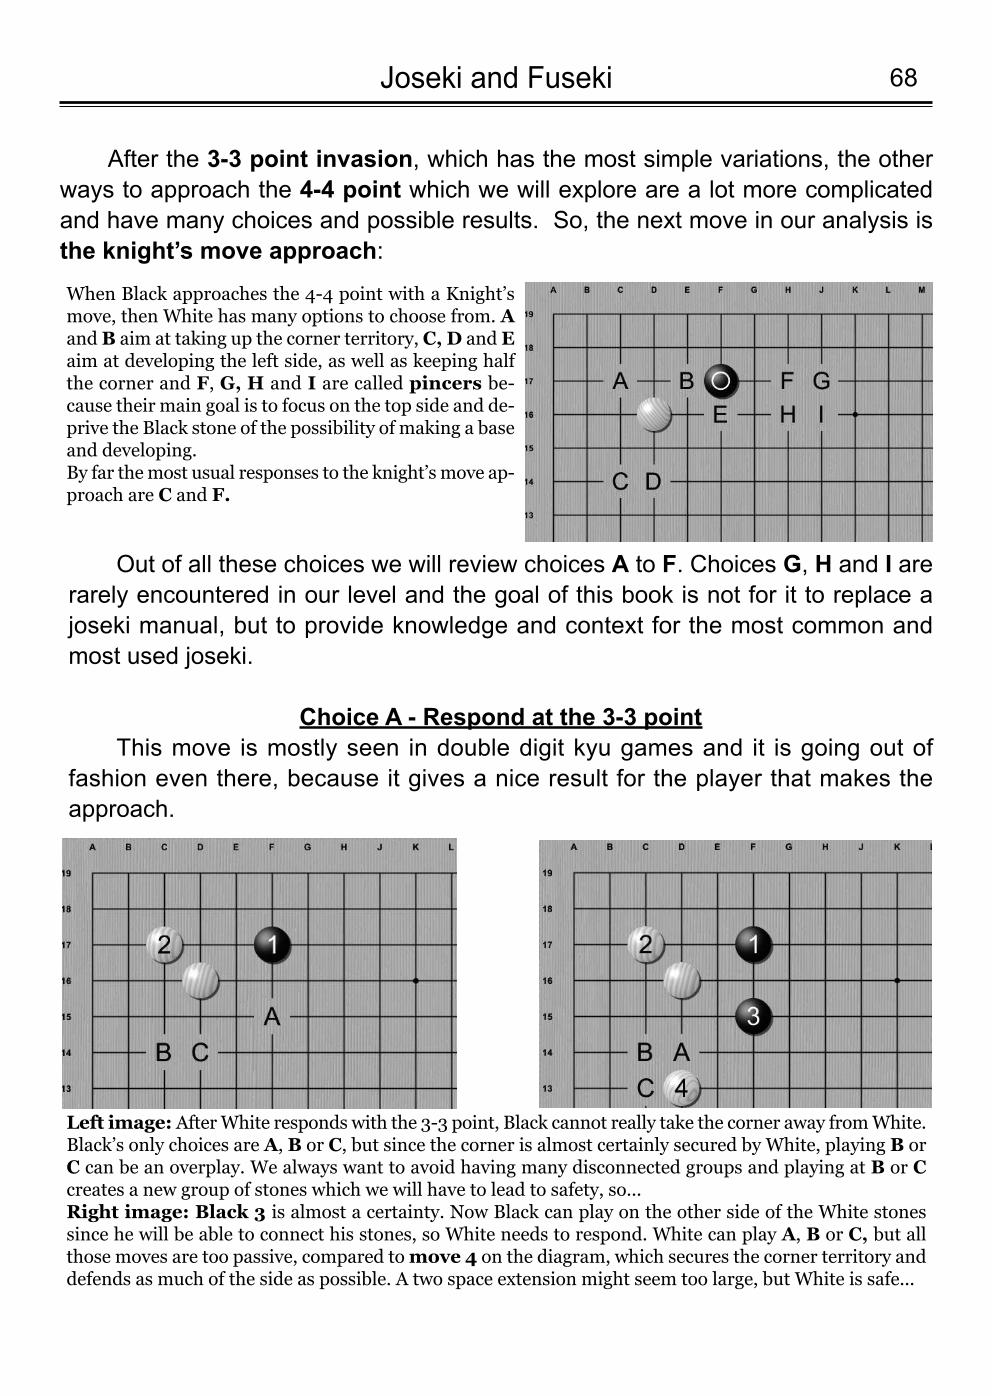
68Joseki and Fuseki
When Black approaches the 4-4 point with a Knight’smove, then White has many options to choose from. Aand B aim at taking up the corner territory, C, D and Eaim at developing the left side, as well as keeping halfthe corner and F, G, H and I are called pincers be-cause their main goal is to focus on the top side and de-prive the Black stone of the possibility of making a baseand developing.By far the most usual responses to the knight’s move ap-proach are C and F.
Left image: After White responds with the 3-3 point, Black cannot really take the corner away from White.Black’s only choices are A, B or C, but since the corner is almost certainly secured by White, playing B orC can be an overplay. We always want to avoid having many disconnected groups and playing at B or Ccreates a new group of stones which we will have to lead to safety, so... Right image: Black 3 is almost a certainty. Now Black can play on the other side of the White stonessince he will be able to connect his stones, so White needs to respond. White can play A, B or C, but allthose moves are too passive, compared to move 4 on the diagram, which secures the corner territory anddefends as much of the side as possible. A two space extension might seem too large, but White is safe...
Out of all these choices we will review choices A to F. Choices G, H and I arerarely encountered in our level and the goal of this book is not for it to replace ajoseki manual, but to provide knowledge and context for the most common andmost used joseki.
Choice A - Respond at the 3-3 pointThis move is mostly seen in double digit kyu games and it is going out of
fashion even there, because it gives a nice result for the player that makes theapproach.
After the 3-3 point invasion, which has the most simple variations, the otherways to approach the 4-4 point which we will explore are a lot more complicatedand have many choices and possible results. So, the next move in our analysis isthe knight’s move approach:
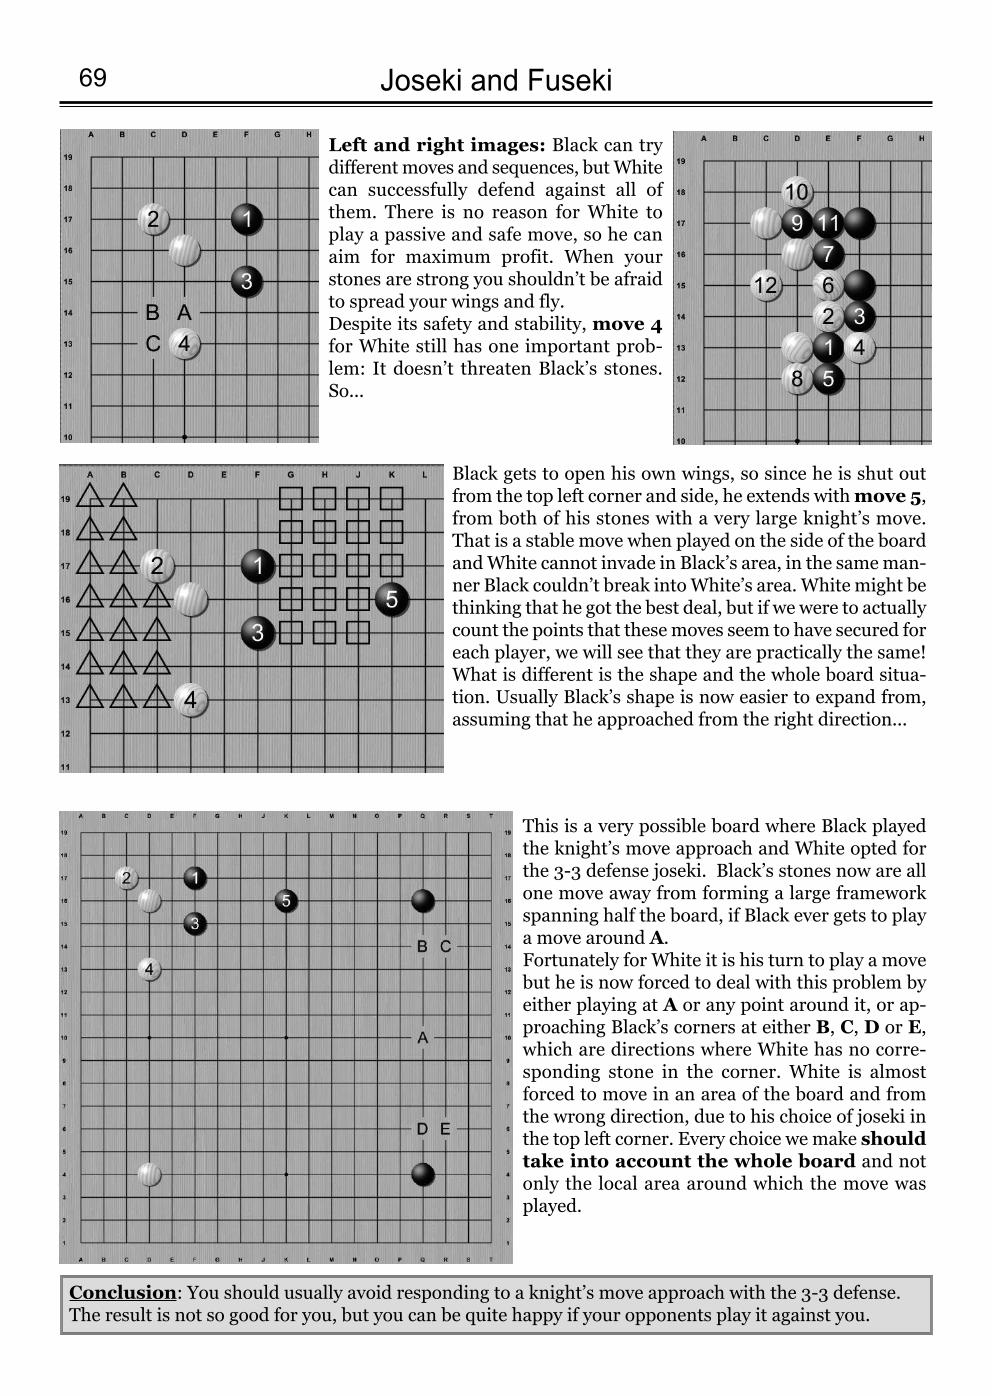
Joseki and Fuseki69
Left and right images: Black can trydifferent moves and sequences, but Whitecan successfully defend against all ofthem. There is no reason for White toplay a passive and safe move, so he canaim for maximum profit. When yourstones are strong you shouldn’t be afraidto spread your wings and fly. Despite its safety and stability, move 4for White still has one important prob-lem: It doesn’t threaten Black’s stones. So...
Conclusion: You should usually avoid responding to a knight’s move approach with the 3-3 defense. The result is not so good for you, but you can be quite happy if your opponents play it against you.
This is a very possible board where Black playedthe knight’s move approach and White opted forthe 3-3 defense joseki. Black’s stones now are allone move away from forming a large frameworkspanning half the board, if Black ever gets to playa move around A.Fortunately for White it is his turn to play a movebut he is now forced to deal with this problem byeither playing at A or any point around it, or ap-proaching Black’s corners at either B, C, D or E,which are directions where White has no corre-sponding stone in the corner. White is almostforced to move in an area of the board and fromthe wrong direction, due to his choice of joseki inthe top left corner. Every choice we make shouldtake into account the whole board and notonly the local area around which the move wasplayed.
Black gets to open his own wings, so since he is shut outfrom the top left corner and side, he extends with move 5,from both of his stones with a very large knight’s move.That is a stable move when played on the side of the boardand White cannot invade in Black’s area, in the same man-ner Black couldn’t break into White’s area. White might bethinking that he got the best deal, but if we were to actuallycount the points that these moves seem to have secured foreach player, we will see that they are practically the same!What is different is the shape and the whole board situa-tion. Usually Black’s shape is now easier to expand from,assuming that he approached from the right direction...
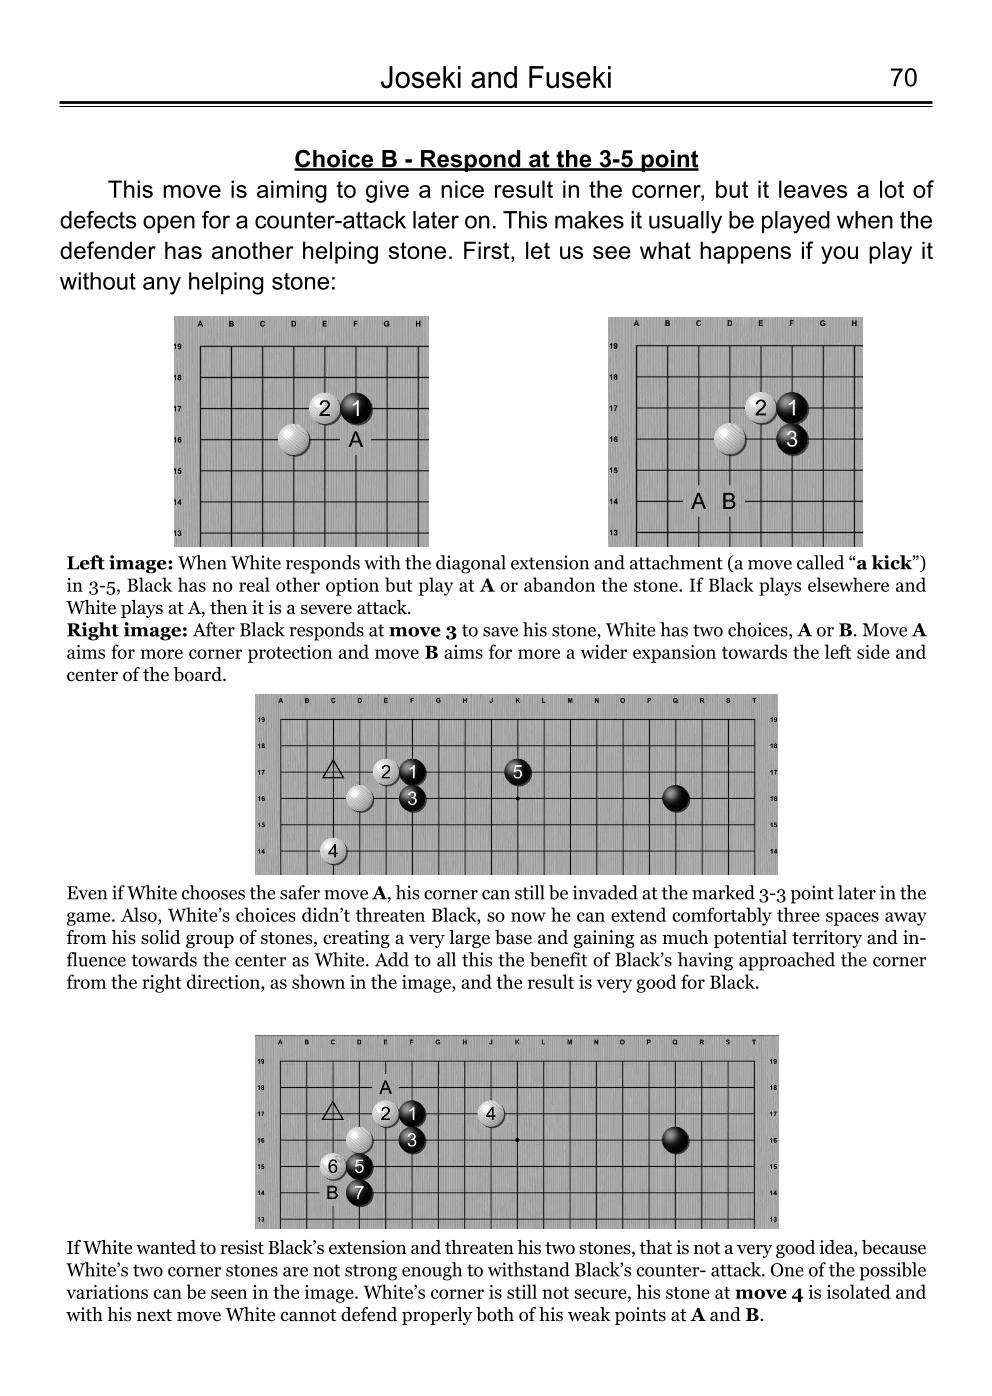
70Joseki and Fuseki
Choice B - Respond at the 3-5 pointThis move is aiming to give a nice result in the corner, but it leaves a lot of
defects open for a counter-attack later on. This makes it usually be played when thedefender has another helping stone. First, let us see what happens if you play itwithout any helping stone:
Left image: When White responds with the diagonal extension and attachment (a move called “a kick”)in 3-5, Black has no real other option but play at A or abandon the stone. If Black plays elsewhere andWhite plays at A, then it is a severe attack.Right image: After Black responds at move 3 to save his stone, White has two choices, A or B. Move Aaims for more corner protection and move B aims for more a wider expansion towards the left side andcenter of the board.
Even if White chooses the safer move A, his corner can still be invaded at the marked 3-3 point later in thegame. Also, White’s choices didn’t threaten Black, so now he can extend comfortably three spaces awayfrom his solid group of stones, creating a very large base and gaining as much potential territory and in-fluence towards the center as White. Add to all this the benefit of Black’s having approached the cornerfrom the right direction, as shown in the image, and the result is very good for Black.
If White wanted to resist Black’s extension and threaten his two stones, that is not a very good idea, becauseWhite’s two corner stones are not strong enough to withstand Black’s counter- attack. One of the possiblevariations can be seen in the image. White’s corner is still not secure, his stone at move 4 is isolated andwith his next move White cannot defend properly both of his weak points at A and B.
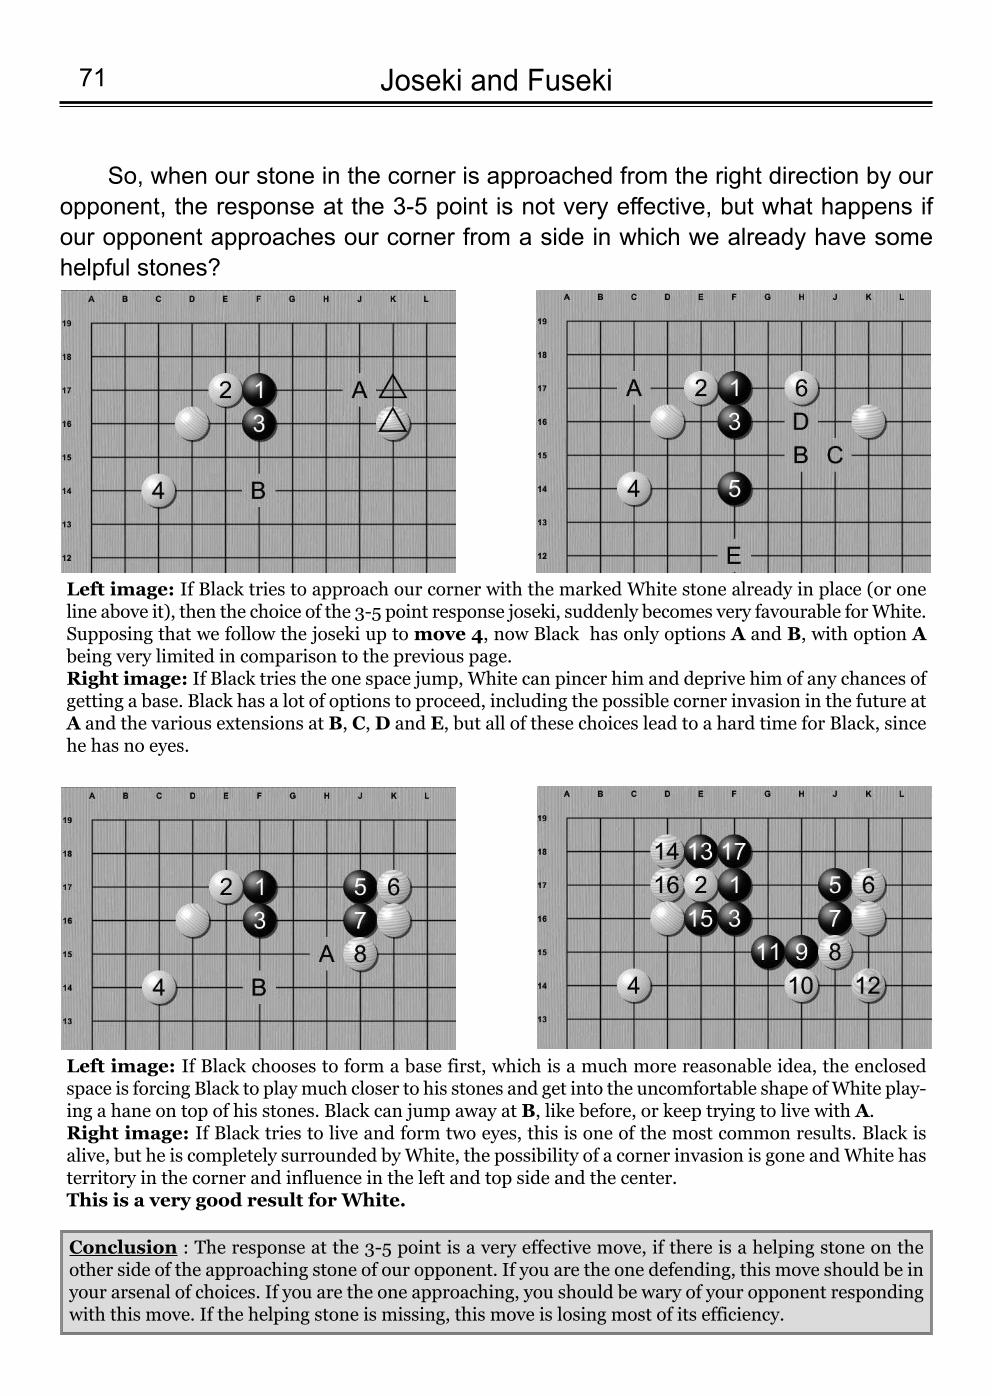
So, when our stone in the corner is approached from the right direction by ouropponent, the response at the 3-5 point is not very effective, but what happens ifour opponent approaches our corner from a side in which we already have somehelpful stones?
Joseki and Fuseki71
Left image: If Black tries to approach our corner with the marked White stone already in place (or oneline above it), then the choice of the 3-5 point response joseki, suddenly becomes very favourable for White.Supposing that we follow the joseki up to move 4, now Black has only options A and B, with option Abeing very limited in comparison to the previous page.Right image: If Black tries the one space jump, White can pincer him and deprive him of any chances ofgetting a base. Black has a lot of options to proceed, including the possible corner invasion in the future atA and the various extensions at B, C, D and E, but all of these choices lead to a hard time for Black, sincehe has no eyes.
Left image: If Black chooses to form a base first, which is a much more reasonable idea, the enclosedspace is forcing Black to play much closer to his stones and get into the uncomfortable shape of White play-ing a hane on top of his stones. Black can jump away at B, like before, or keep trying to live with A.Right image: If Black tries to live and form two eyes, this is one of the most common results. Black isalive, but he is completely surrounded by White, the possibility of a corner invasion is gone and White hasterritory in the corner and influence in the left and top side and the center. This is a very good result for White.
Conclusion : The response at the 3-5 point is a very effective move, if there is a helping stone on theother side of the approaching stone of our opponent. If you are the one defending, this move should be inyour arsenal of choices. If you are the one approaching, you should be wary of your opponent respondingwith this move. If the helping stone is missing, this move is losing most of its efficiency.
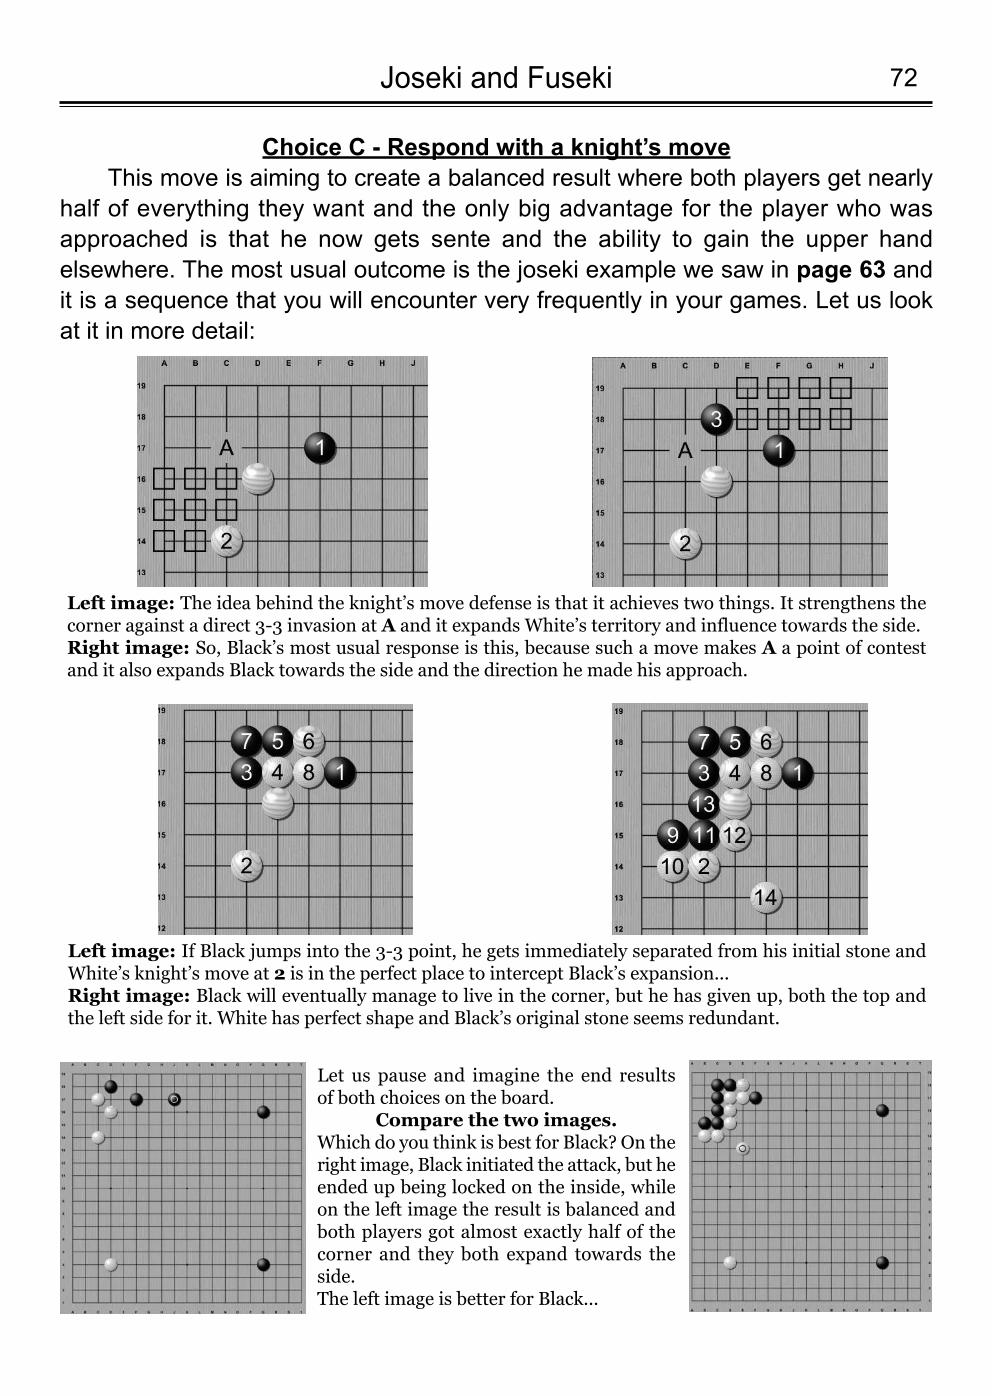
72Joseki and Fuseki
Choice C - Respond with a knight’s moveThis move is aiming to create a balanced result where both players get nearly
half of everything they want and the only big advantage for the player who wasapproached is that he now gets sente and the ability to gain the upper handelsewhere. The most usual outcome is the joseki example we saw in page 63 andit is a sequence that you will encounter very frequently in your games. Let us lookat it in more detail:
Let us pause and imagine the end results of both choices on the board.
Compare the two images.Which do you think is best for Black? On theright image, Black initiated the attack, but heended up being locked on the inside, whileon the left image the result is balanced andboth players got almost exactly half of thecorner and they both expand towards theside. The left image is better for Black...
Left image: The idea behind the knight’s move defense is that it achieves two things. It strengthens thecorner against a direct 3-3 invasion at A and it expands White’s territory and influence towards the side.Right image: So, Black’s most usual response is this, because such a move makes A a point of contestand it also expands Black towards the side and the direction he made his approach.
Left image: If Black jumps into the 3-3 point, he gets immediately separated from his initial stone andWhite’s knight’s move at 2 is in the perfect place to intercept Black’s expansion...Right image: Black will eventually manage to live in the corner, but he has given up, both the top andthe left side for it. White has perfect shape and Black’s original stone seems redundant.
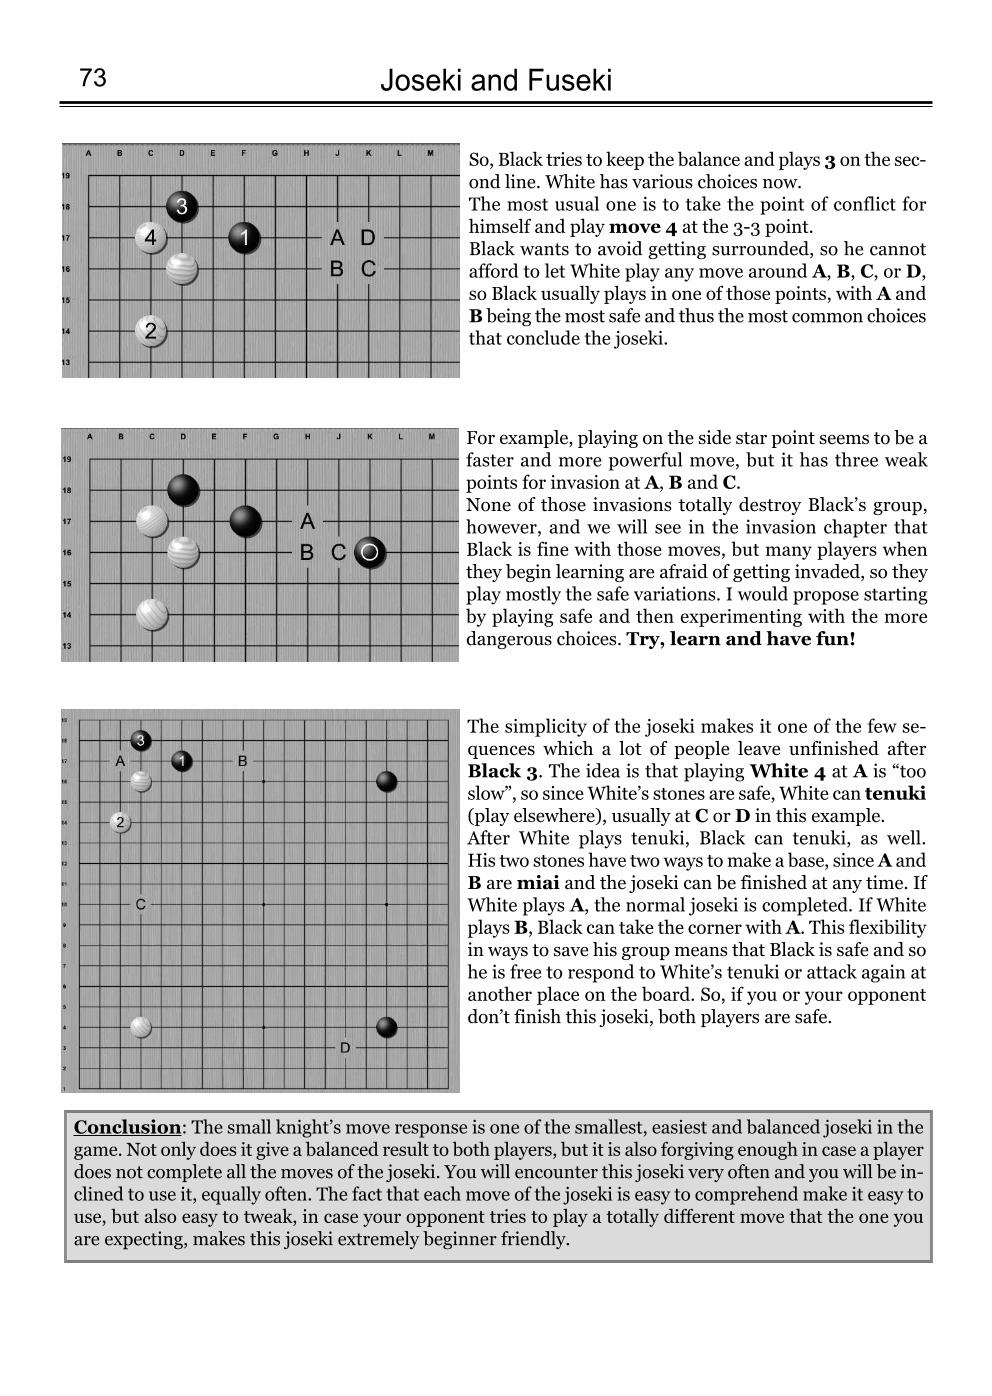
Joseki and Fuseki73
So, Black tries to keep the balance and plays 3 on the sec-ond line. White has various choices now.The most usual one is to take the point of conflict forhimself and play move 4 at the 3-3 point.Black wants to avoid getting surrounded, so he cannotafford to let White play any move around A, B, C, or D,so Black usually plays in one of those points, with A andB being the most safe and thus the most common choicesthat conclude the joseki.
For example, playing on the side star point seems to be afaster and more powerful move, but it has three weakpoints for invasion at A, B and C.None of those invasions totally destroy Black’s group,however, and we will see in the invasion chapter thatBlack is fine with those moves, but many players whenthey begin learning are afraid of getting invaded, so theyplay mostly the safe variations. I would propose startingby playing safe and then experimenting with the moredangerous choices. Try, learn and have fun!
The simplicity of the joseki makes it one of the few se-quences which a lot of people leave unfinished afterBlack 3. The idea is that playing White 4 at A is “tooslow”, so since White’s stones are safe, White can tenuki(play elsewhere), usually at C or D in this example.After White plays tenuki, Black can tenuki, as well. His two stones have two ways to make a base, since A andB are miai and the joseki can be finished at any time. IfWhite plays A, the normal joseki is completed. If Whiteplays B, Black can take the corner with A. This flexibilityin ways to save his group means that Black is safe and sohe is free to respond to White’s tenuki or attack again atanother place on the board. So, if you or your opponentdon’t finish this joseki, both players are safe.
Conclusion: The small knight’s move response is one of the smallest, easiest and balanced joseki in thegame. Not only does it give a balanced result to both players, but it is also forgiving enough in case a playerdoes not complete all the moves of the joseki. You will encounter this joseki very often and you will be in-clined to use it, equally often. The fact that each move of the joseki is easy to comprehend make it easy touse, but also easy to tweak, in case your opponent tries to play a totally different move that the one youare expecting, makes this joseki extremely beginner friendly.
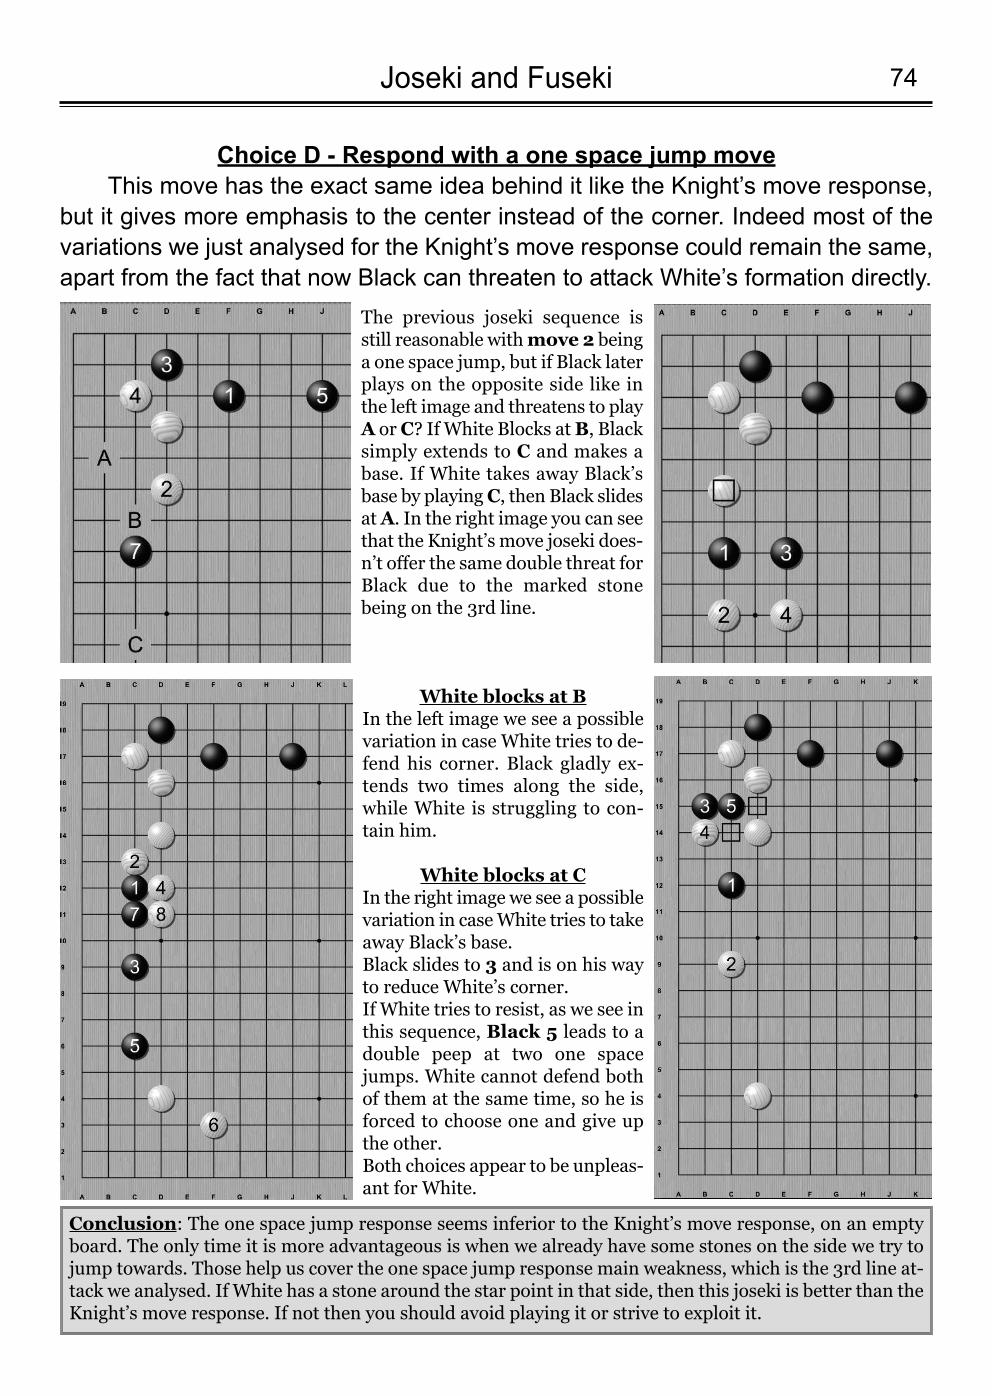
74Joseki and Fuseki
Choice D - Respond with a one space jump moveThis move has the exact same idea behind it like the Knight’s move response,
but it gives more emphasis to the center instead of the corner. Indeed most of thevariations we just analysed for the Knight’s move response could remain the same,apart from the fact that now Black can threaten to attack White’s formation directly.
The previous joseki sequence isstill reasonable with move 2 beinga one space jump, but if Black laterplays on the opposite side like inthe left image and threatens to playA or C? If White Blocks at B, Blacksimply extends to C and makes abase. If White takes away Black’sbase by playing C, then Black slidesat A. In the right image you can seethat the Knight’s move joseki does-n’t offer the same double threat forBlack due to the marked stonebeing on the 3rd line.
White blocks at BIn the left image we see a possiblevariation in case White tries to de-fend his corner. Black gladly ex-tends two times along the side,while White is struggling to con-tain him.
White blocks at CIn the right image we see a possiblevariation in case White tries to takeaway Black’s base.Black slides to 3 and is on his wayto reduce White’s corner. If White tries to resist, as we see inthis sequence, Black 5 leads to adouble peep at two one spacejumps. White cannot defend bothof them at the same time, so he isforced to choose one and give upthe other. Both choices appear to be unpleas-ant for White.
Conclusion: The one space jump response seems inferior to the Knight’s move response, on an emptyboard. The only time it is more advantageous is when we already have some stones on the side we try tojump towards. Those help us cover the one space jump response main weakness, which is the 3rd line at-tack we analysed. If White has a stone around the star point in that side, then this joseki is better than theKnight’s move response. If not then you should avoid playing it or strive to exploit it.
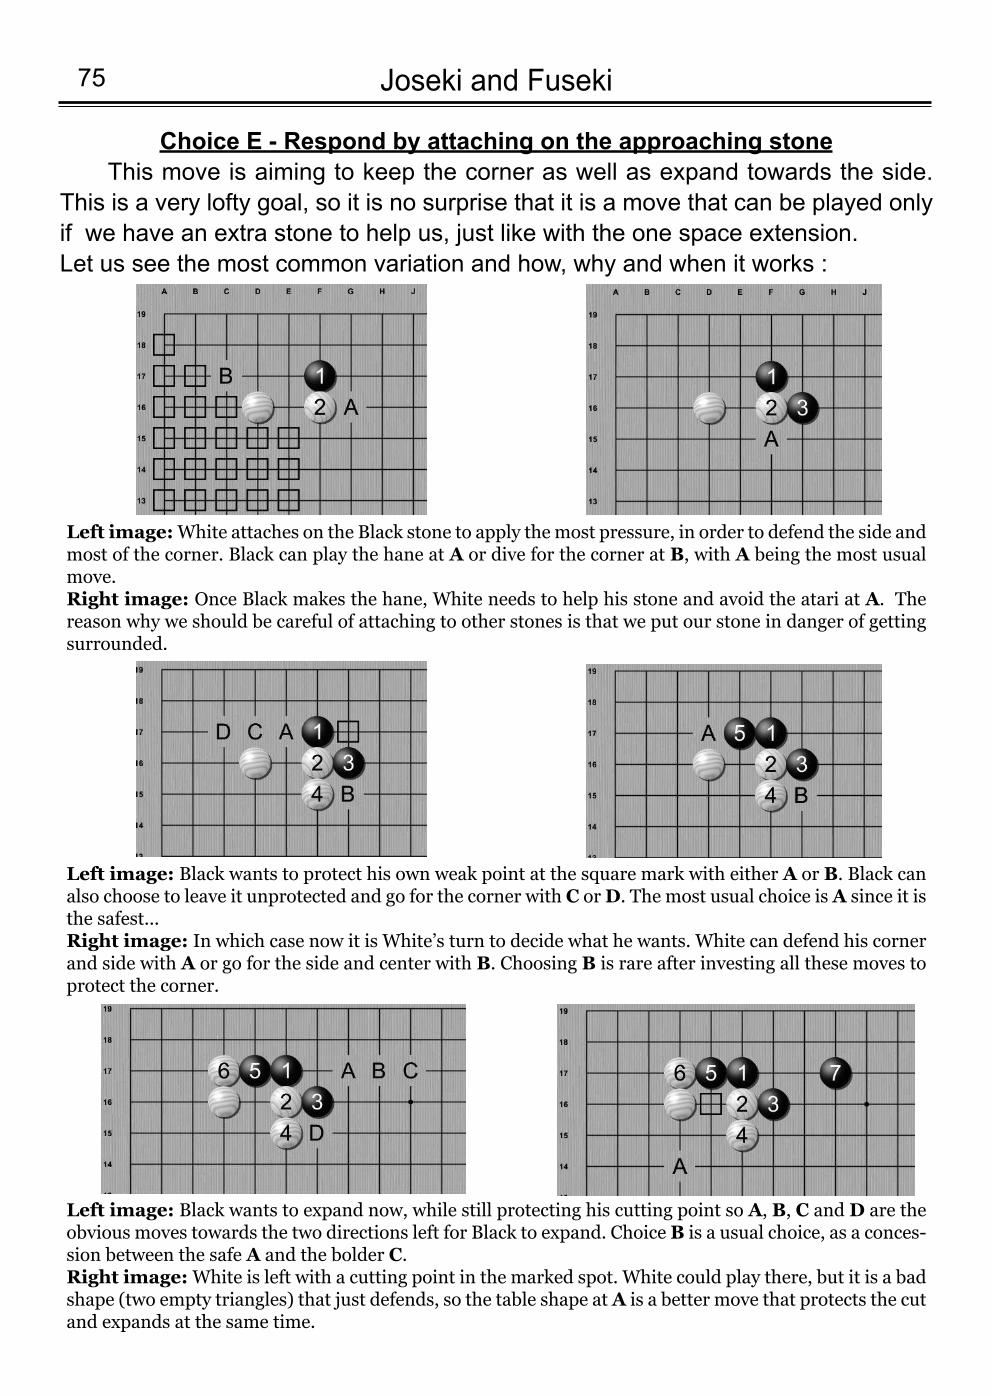
Choice E - Respond by attaching on the approaching stoneThis move is aiming to keep the corner as well as expand towards the side.
This is a very lofty goal, so it is no surprise that it is a move that can be played onlyif we have an extra stone to help us, just like with the one space extension.Let us see the most common variation and how, why and when it works :
Joseki and Fuseki75
Left image: White attaches on the Black stone to apply the most pressure, in order to defend the side andmost of the corner. Black can play the hane at A or dive for the corner at B, with A being the most usualmove.Right image: Once Black makes the hane, White needs to help his stone and avoid the atari at A. Thereason why we should be careful of attaching to other stones is that we put our stone in danger of gettingsurrounded.
Left image: Black wants to protect his own weak point at the square mark with either A or B. Black canalso choose to leave it unprotected and go for the corner with C or D. The most usual choice is A since it isthe safest...Right image: In which case now it is White’s turn to decide what he wants. White can defend his cornerand side with A or go for the side and center with B. Choosing B is rare after investing all these moves toprotect the corner.
Left image: Black wants to expand now, while still protecting his cutting point so A, B, C and D are theobvious moves towards the two directions left for Black to expand. Choice B is a usual choice, as a conces-sion between the safe A and the bolder C.Right image: White is left with a cutting point in the marked spot. White could play there, but it is a badshape (two empty triangles) that just defends, so the table shape at A is a better move that protects the cutand expands at the same time.
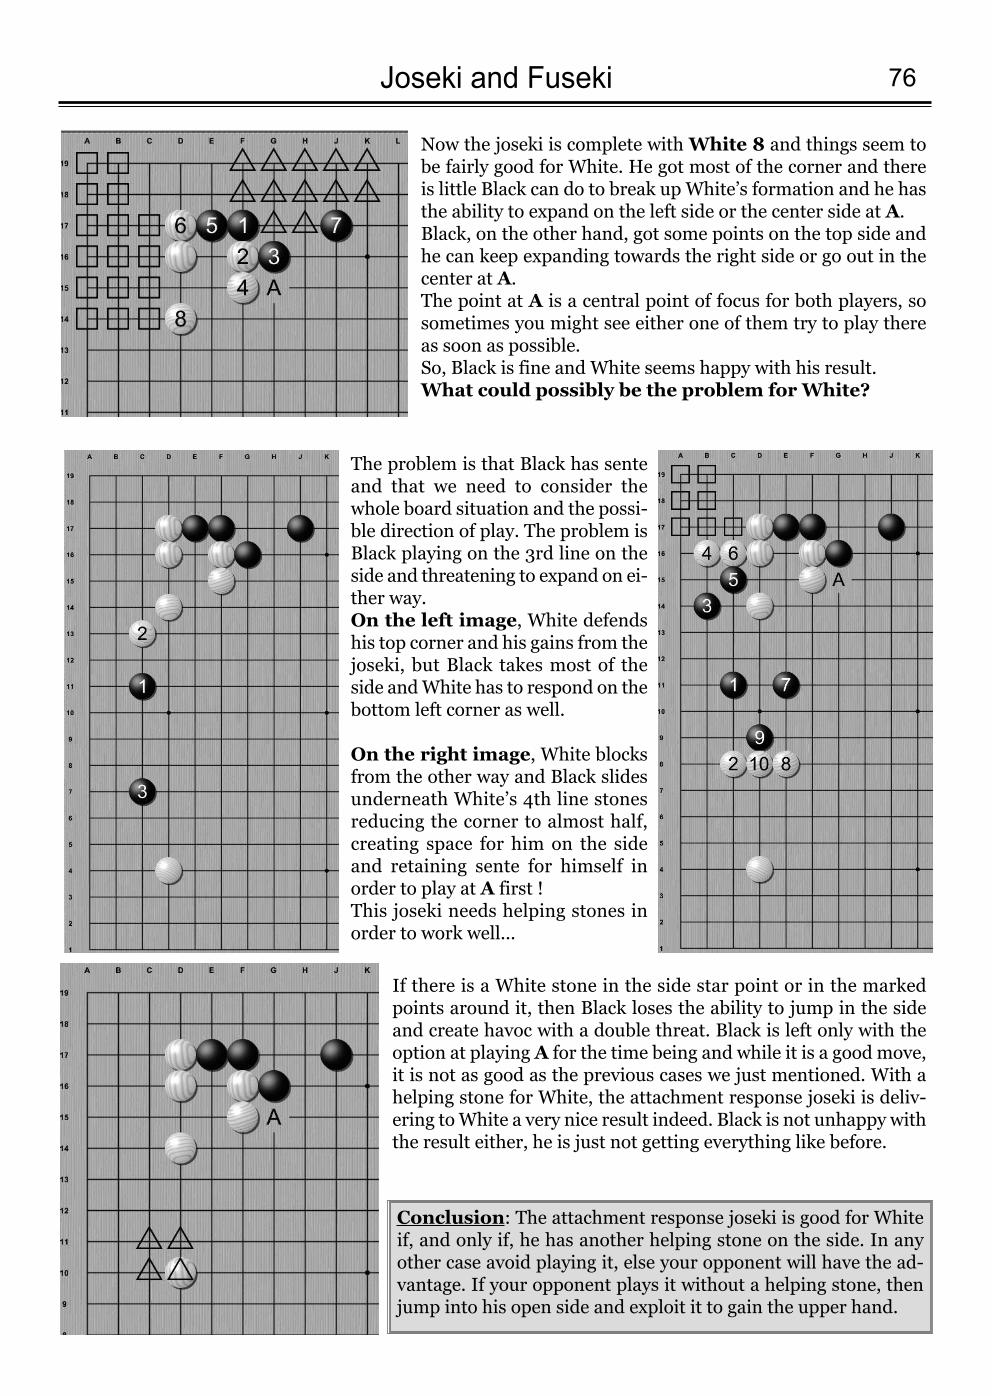
76Joseki and Fuseki
Now the joseki is complete with White 8 and things seem tobe fairly good for White. He got most of the corner and thereis little Black can do to break up White’s formation and he hasthe ability to expand on the left side or the center side at A. Black, on the other hand, got some points on the top side andhe can keep expanding towards the right side or go out in thecenter at A.The point at A is a central point of focus for both players, sosometimes you might see either one of them try to play thereas soon as possible.So, Black is fine and White seems happy with his result. What could possibly be the problem for White?
The problem is that Black has senteand that we need to consider thewhole board situation and the possi-ble direction of play. The problem isBlack playing on the 3rd line on theside and threatening to expand on ei-ther way. On the left image, White defendshis top corner and his gains from thejoseki, but Black takes most of theside and White has to respond on thebottom left corner as well.
On the right image, White blocksfrom the other way and Black slidesunderneath White’s 4th line stonesreducing the corner to almost half,creating space for him on the sideand retaining sente for himself inorder to play at A first ! This joseki needs helping stones inorder to work well...
If there is a White stone in the side star point or in the markedpoints around it, then Black loses the ability to jump in the sideand create havoc with a double threat. Black is left only with theoption at playing A for the time being and while it is a good move,it is not as good as the previous cases we just mentioned. With ahelping stone for White, the attachment response joseki is deliv-ering to White a very nice result indeed. Black is not unhappy withthe result either, he is just not getting everything like before.
Conclusion: The attachment response joseki is good for Whiteif, and only if, he has another helping stone on the side. In anyother case avoid playing it, else your opponent will have the ad-vantage. If your opponent plays it without a helping stone, thenjump into his open side and exploit it to gain the upper hand.
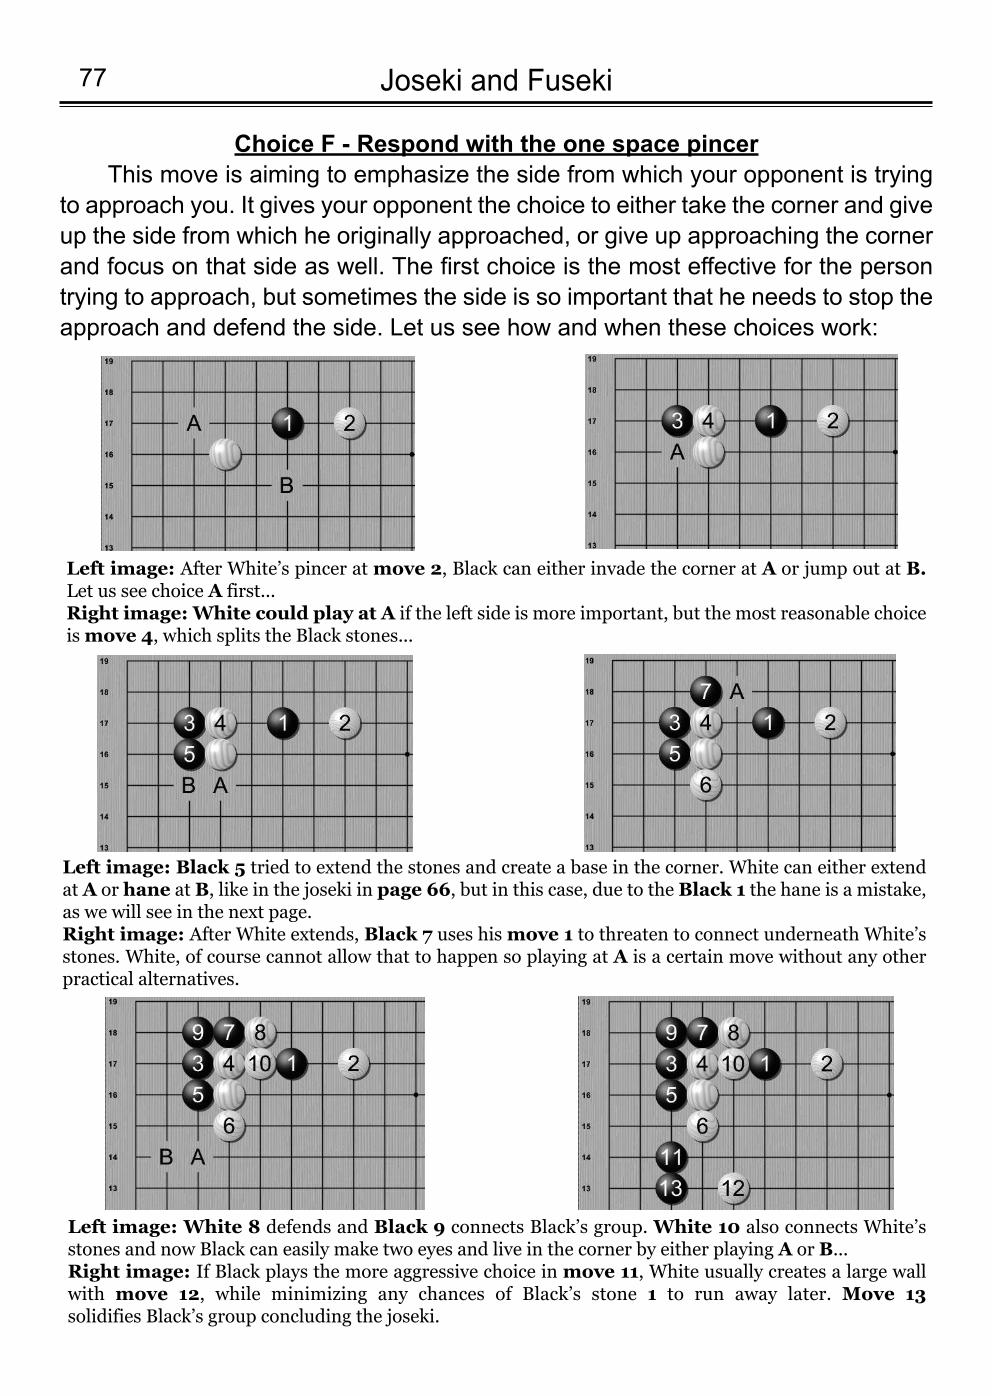
Choice F - Respond with the one space pincerThis move is aiming to emphasize the side from which your opponent is trying
to approach you. It gives your opponent the choice to either take the corner and giveup the side from which he originally approached, or give up approaching the cornerand focus on that side as well. The first choice is the most effective for the persontrying to approach, but sometimes the side is so important that he needs to stop theapproach and defend the side. Let us see how and when these choices work:
Joseki and Fuseki77
Left image: After White’s pincer at move 2, Black can either invade the corner at A or jump out at B.Let us see choice A first...Right image: White could play at A if the left side is more important, but the most reasonable choiceis move 4, which splits the Black stones...
Left image: Black 5 tried to extend the stones and create a base in the corner. White can either extendat A or hane at B, like in the joseki in page 66, but in this case, due to the Black 1 the hane is a mistake,as we will see in the next page.Right image: After White extends, Black 7 uses his move 1 to threaten to connect underneath White’sstones. White, of course cannot allow that to happen so playing at A is a certain move without any otherpractical alternatives.
Left image: White 8 defends and Black 9 connects Black’s group. White 10 also connects White’sstones and now Black can easily make two eyes and live in the corner by either playing A or B... Right image: If Black plays the more aggressive choice in move 11, White usually creates a large wallwith move 12, while minimizing any chances of Black’s stone 1 to run away later. Move 13solidifies Black’s group concluding the joseki.
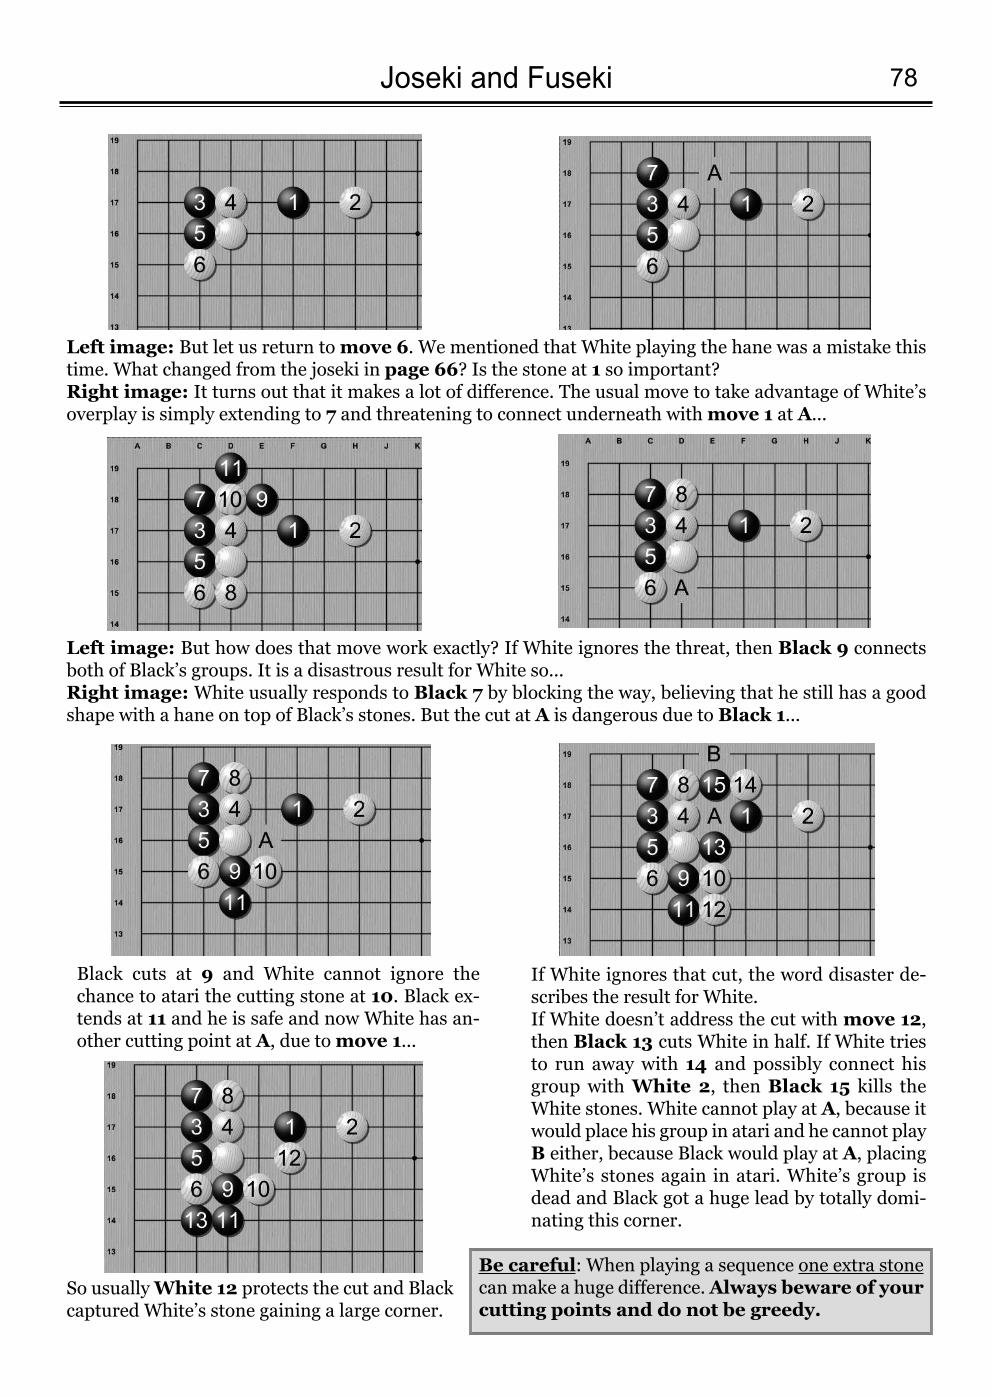
78Joseki and Fuseki
Left image: But let us return to move 6. We mentioned that White playing the hane was a mistake thistime. What changed from the joseki in page 66? Is the stone at 1 so important?Right image: It turns out that it makes a lot of difference. The usual move to take advantage of White’soverplay is simply extending to 7 and threatening to connect underneath with move 1 at A...
Left image: But how does that move work exactly? If White ignores the threat, then Black 9 connectsboth of Black’s groups. It is a disastrous result for White so...Right image: White usually responds to Black 7 by blocking the way, believing that he still has a goodshape with a hane on top of Black’s stones. But the cut at A is dangerous due to Black 1...
Black cuts at 9 and White cannot ignore thechance to atari the cutting stone at 10. Black ex-tends at 11 and he is safe and now White has an-other cutting point at A, due to move 1...
If White ignores that cut, the word disaster de-scribes the result for White. If White doesn’t address the cut with move 12,then Black 13 cuts White in half. If White triesto run away with 14 and possibly connect hisgroup with White 2, then Black 15 kills theWhite stones. White cannot play at A, because itwould place his group in atari and he cannot playB either, because Black would play at A, placingWhite’s stones again in atari. White’s group isdead and Black got a huge lead by totally domi-nating this corner.
So usually White 12 protects the cut and Blackcaptured White’s stone gaining a large corner.
Be careful: When playing a sequence one extra stonecan make a huge difference. Always beware of yourcutting points and do not be greedy.
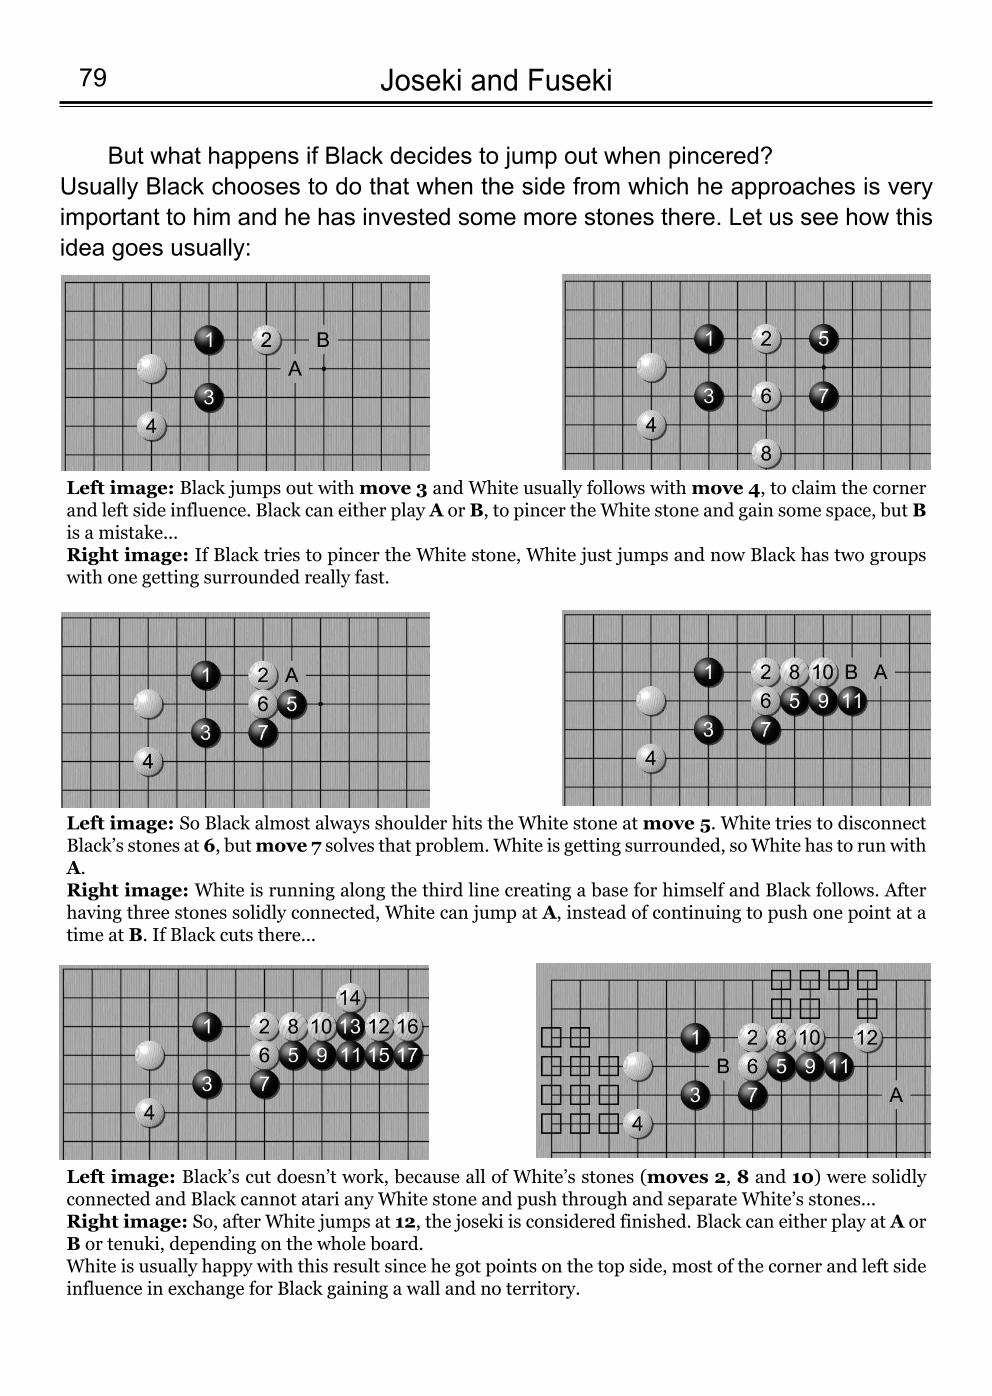
But what happens if Black decides to jump out when pincered?Usually Black chooses to do that when the side from which he approaches is veryimportant to him and he has invested some more stones there. Let us see how thisidea goes usually:
Joseki and Fuseki79
Left image: Black jumps out with move 3 and White usually follows with move 4, to claim the cornerand left side influence. Black can either play A or B, to pincer the White stone and gain some space, but Bis a mistake...Right image: If Black tries to pincer the White stone, White just jumps and now Black has two groupswith one getting surrounded really fast.
Left image: So Black almost always shoulder hits the White stone at move 5. White tries to disconnectBlack’s stones at 6, but move 7 solves that problem. White is getting surrounded, so White has to run withA.Right image: White is running along the third line creating a base for himself and Black follows. Afterhaving three stones solidly connected, White can jump at A, instead of continuing to push one point at atime at B. If Black cuts there...
Left image: Black’s cut doesn’t work, because all of White’s stones (moves 2, 8 and 10) were solidlyconnected and Black cannot atari any White stone and push through and separate White’s stones...Right image: So, after White jumps at 12, the joseki is considered finished. Black can either play at A orB or tenuki, depending on the whole board. White is usually happy with this result since he got points on the top side, most of the corner and left sideinfluence in exchange for Black gaining a wall and no territory.

80Joseki and Fuseki
But when do we pincer? When is it the right direction to use a pincer? Let us remember that the goal of the pincer is to emphasize the side from which
the opponent’s attack is coming, so we usually pincer when we have stones we wantto develop there. For example compare these two situations:
Conclusion: Pincers are very strong moves, but we should be very careful and consider the whole boardwhen we are using them. For this particular pincer, when you are approaching and you are pincered likethat, the most profitable response is to jump into the opponent’s corner. When you are being approached,you should always keep in mind that if you pincer, you will most probably lose your corner. The originalapproaching stone is very tricky to handle and it has a lot of aji, even in the late game.
In the left image White pincered with the marked Black stone being on the corner from the direction ofthe attack. In the right imageWhite pincered with a White stone being in that position. Even by looking at the two boards, the right image seems much better. On the left image the marked Blackstone is setting a barrier to White’s expansion, but on the right image all those marked lines are withinWhite’s influence and any move Black makes there will be instantly in a disadvantage.
Sometimes the defender will choose to block from theother side and allow the attacking stones to connect, inorder to gain side influence. The image on the left showsa typical example of a joseki that is used when the markedstone is on the side and we want to develop that area in-stead of the top.
It is all a matter of which direction we want to build,which direction we feel we are stronger, which direction is larger for us.The image on the left is a usual result of our subject afterthe joseki: Fuseki. Black’s stones on the right side willdominate the direction of play decisions maybe for thewhole game. We will revisit this exact sequence later, so,for the time being, just keep in mind the possible result.
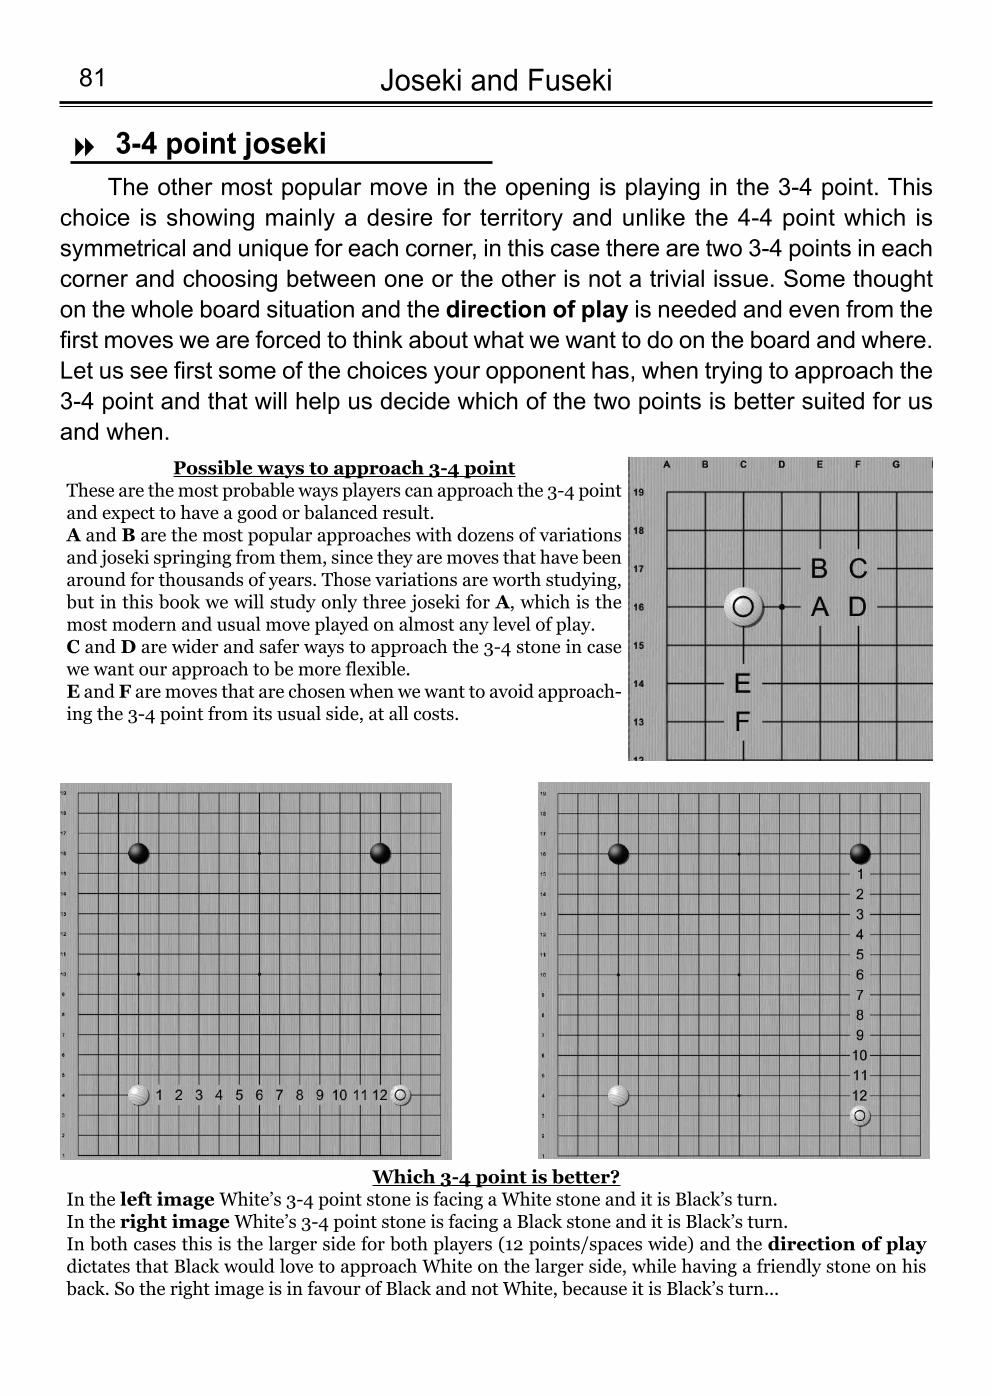
Joseki and Fuseki81
The other most popular move in the opening is playing in the 3-4 point. Thischoice is showing mainly a desire for territory and unlike the 4-4 point which issymmetrical and unique for each corner, in this case there are two 3-4 points in eachcorner and choosing between one or the other is not a trivial issue. Some thoughton the whole board situation and the direction of play is needed and even from thefirst moves we are forced to think about what we want to do on the board and where.Let us see first some of the choices your opponent has, when trying to approach the3-4 point and that will help us decide which of the two points is better suited for usand when.
Possible ways to approach 3-4 pointThese are the most probable ways players can approach the 3-4 pointand expect to have a good or balanced result.A and B are the most popular approaches with dozens of variationsand joseki springing from them, since they are moves that have beenaround for thousands of years. Those variations are worth studying,but in this book we will study only three joseki for A, which is themost modern and usual move played on almost any level of play.C and D are wider and safer ways to approach the 3-4 stone in casewe want our approach to be more flexible. E and F are moves that are chosen when we want to avoid approach-ing the 3-4 point from its usual side, at all costs.
8 3-4 point joseki
Which 3-4 point is better?In the left image White’s 3-4 point stone is facing a White stone and it is Black’s turn. In the right image White’s 3-4 point stone is facing a Black stone and it is Black’s turn. In both cases this is the larger side for both players (12 points/spaces wide) and the direction of playdictates that Black would love to approach White on the larger side, while having a friendly stone on hisback. So the right image is in favour of Black and not White, because it is Black’s turn...
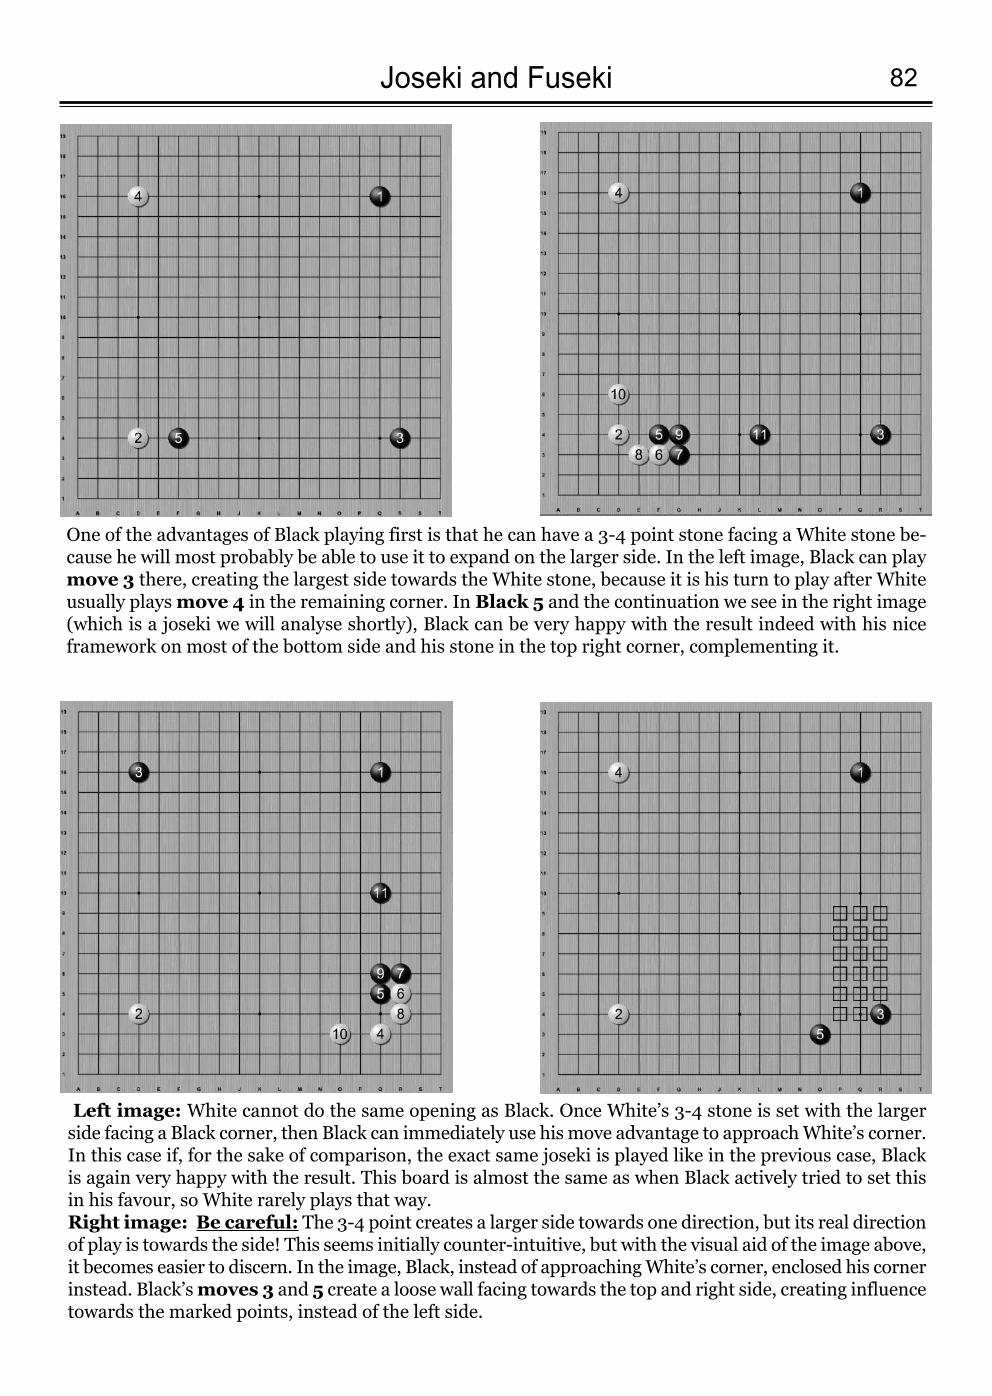
82Joseki and Fuseki
One of the advantages of Black playing first is that he can have a 3-4 point stone facing a White stone be-cause he will most probably be able to use it to expand on the larger side. In the left image, Black can playmove 3 there, creating the largest side towards the White stone, because it is his turn to play after Whiteusually plays move 4 in the remaining corner. In Black 5 and the continuation we see in the right image(which is a joseki we will analyse shortly), Black can be very happy with the result indeed with his niceframework on most of the bottom side and his stone in the top right corner, complementing it.
Left image: White cannot do the same opening as Black. Once White’s 3-4 stone is set with the largerside facing a Black corner, then Black can immediately use his move advantage to approach White’s corner.In this case if, for the sake of comparison, the exact same joseki is played like in the previous case, Blackis again very happy with the result. This board is almost the same as when Black actively tried to set thisin his favour, so White rarely plays that way. Right image: Be careful: The 3-4 point creates a larger side towards one direction, but its real directionof play is towards the side! This seems initially counter-intuitive, but with the visual aid of the image above,it becomes easier to discern. In the image, Black, instead of approaching White’s corner, enclosed his cornerinstead. Black’s moves 3 and 5 create a loose wall facing towards the top and right side, creating influencetowards the marked points, instead of the left side.

Joseki and Fuseki83
So let us see what happens when we play a 3-4 point and the opponentapproaches our corner from a one space jump relation. There are many ways torespond to that move and the possible results are too many to cover, but afteranalysing all these moves in the previous joseki it is now a lot easier to imagine whatthese moves aim to do, so let us at least see what these possibilities are:
Out of all these choices we will review choices A, B and C for various reasons.The main reason is that these moves cover the most common responses for thisjoseki and another important reason is that while it is impossible to cover allvariations, we could at least represent all the “categories” of the ideas behind thejoseki. So, choice A represents the option to fight for the corner, choice B is a verysevere pincer in most cases and choice C is the most usual peaceful option toexpand towards the side.
Choice A - Respond at the 3-6 pointThis move is a classic and it can be seen at any level of play and at almost any
historical era of the game. White aims to force Black to defend his stone and workhis way into securing the corner, while Black is occupied with making good shapefor his stones. The amount of moves that has been tried in this situation during allthese centuries is beyond the scope of a beginner’s book, but we have already seenthe most common variation in the previous page, so now we need to analyse theideas and thoughts behind each move and when it is to our advantage to choosethis variation which we will present.
In Go, when a choice of moves is so commonly accepted, it is usually becausethe moves are fair and balanced for both players, so we should point out once againthat even if you are the one approaching the corner or you are the one defending it,the ideas behind a joseki are useful to be in your arsenal of thoughts which will helpyou decide on your next move, not only in the corners, but in similar fights, later,elsewhere in the board.
When Black approaches the 3-4 pointwith a one spaceapproach, then White has many options to choose from: A, F and G aim at starting a fight and usually aim attaking the corner territory.C, D and E are peaceful options that aim at developingthe left side, as well as keeping part of the corner, with-out engaging the approaching stone. B, H and I are the most usual pincers and their maingoal, just like before, is to focus on the top side and de-prive the Black stone of a possibility of making a baseand developing.
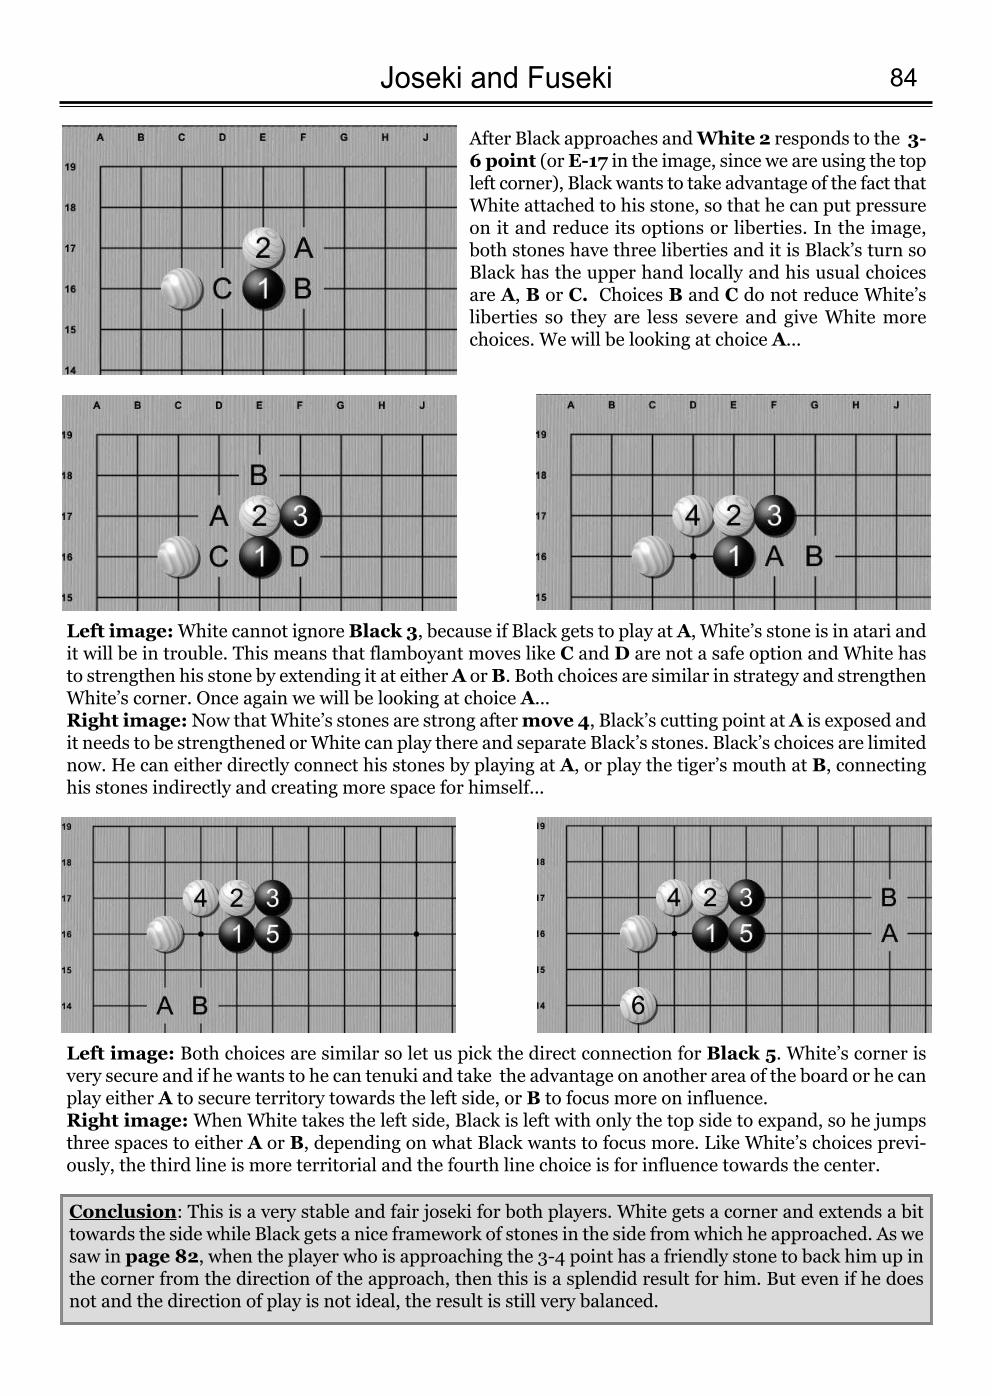
84Joseki and Fuseki
After Black approaches and White 2 responds to the 3-6 point (or E-17 in the image, since we are using the topleft corner), Black wants to take advantage of the fact thatWhite attached to his stone, so that he can put pressureon it and reduce its options or liberties. In the image,both stones have three liberties and it is Black’s turn soBlack has the upper hand locally and his usual choicesare A, B or C. Choices B and C do not reduce White’sliberties so they are less severe and give White morechoices. We will be looking at choice A...
Left image:White cannot ignore Black 3, because if Black gets to play at A, White’s stone is in atari andit will be in trouble. This means that flamboyant moves like C and D are not a safe option and White hasto strengthen his stone by extending it at either A or B. Both choices are similar in strategy and strengthenWhite’s corner. Once again we will be looking at choice A...Right image: Now that White’s stones are strong after move 4, Black’s cutting point at A is exposed andit needs to be strengthened or White can play there and separate Black’s stones. Black’s choices are limitednow. He can either directly connect his stones by playing at A, or play the tiger’s mouth at B, connectinghis stones indirectly and creating more space for himself...
Left image: Both choices are similar so let us pick the direct connection for Black 5. White’s corner isvery secure and if he wants to he can tenuki and take the advantage on another area of the board or he canplay either A to secure territory towards the left side, or B to focus more on influence. Right image: When White takes the left side, Black is left with only the top side to expand, so he jumpsthree spaces to either A or B, depending on what Black wants to focus more. Like White’s choices previ-ously, the third line is more territorial and the fourth line choice is for influence towards the center.
Conclusion: This is a very stable and fair joseki for both players. White gets a corner and extends a bittowards the side while Black gets a nice framework of stones in the side from which he approached. As wesaw in page 82, when the player who is approaching the 3-4 point has a friendly stone to back him up inthe corner from the direction of the approach, then this is a splendid result for him. But even if he doesnot and the direction of play is not ideal, the result is still very balanced.
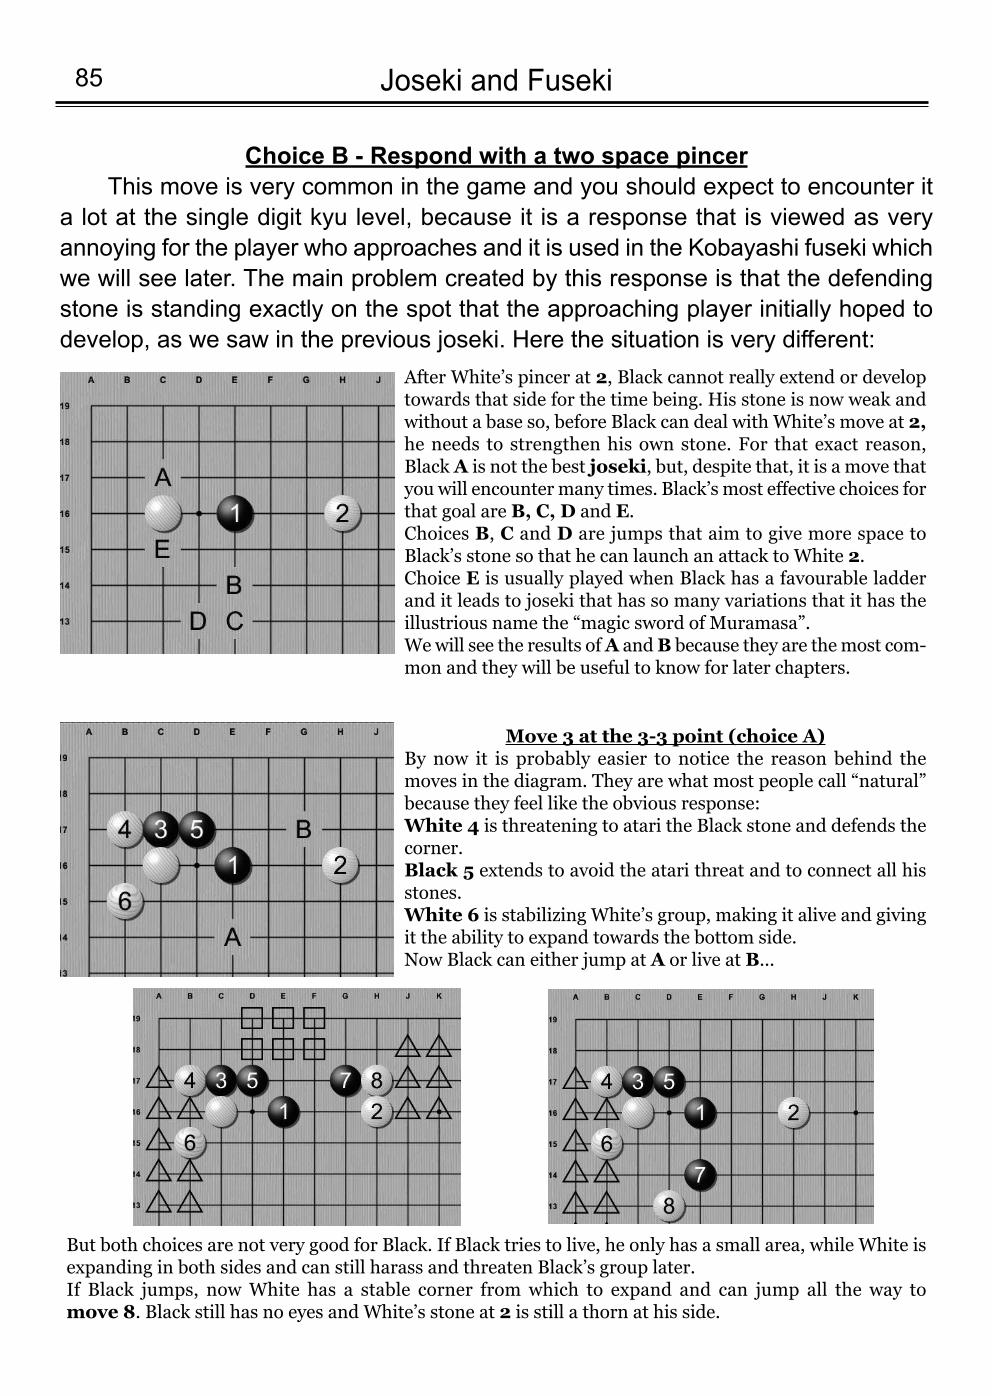
Choice B - Respond with a two space pincerThis move is very common in the game and you should expect to encounter it
a lot at the single digit kyu level, because it is a response that is viewed as veryannoying for the player who approaches and it is used in the Kobayashi fuseki whichwe will see later. The main problem created by this response is that the defendingstone is standing exactly on the spot that the approaching player initially hoped todevelop, as we saw in the previous joseki. Here the situation is very different:
Joseki and Fuseki85
After White’s pincer at 2, Black cannot really extend or developtowards that side for the time being. His stone is now weak andwithout a base so, before Black can deal with White’s move at 2,he needs to strengthen his own stone. For that exact reason,Black A is not the best joseki, but, despite that, it is a move thatyou will encounter many times. Black’s most effective choices forthat goal are B, C, D and E. Choices B, C and D are jumps that aim to give more space toBlack’s stone so that he can launch an attack to White 2.Choice E is usually played when Black has a favourable ladderand it leads to joseki that has so many variations that it has theillustrious name the “magic sword of Muramasa”.We will see the results of A and B because they are the most com-mon and they will be useful to know for later chapters.
But both choices are not very good for Black. If Black tries to live, he only has a small area, while White isexpanding in both sides and can still harass and threaten Black’s group later.If Black jumps, now White has a stable corner from which to expand and can jump all the way to move 8. Black still has no eyes and White’s stone at 2 is still a thorn at his side.
Move 3 at the 3-3 point (choice A)By now it is probably easier to notice the reason behind themoves in the diagram. They are what most people call “natural”because they feel like the obvious response: White 4 is threatening to atari the Black stone and defends thecorner.Black 5 extends to avoid the atari threat and to connect all hisstones.White 6 is stabilizing White’s group, making it alive and givingit the ability to expand towards the bottom side.Now Black can either jump at A or live at B...
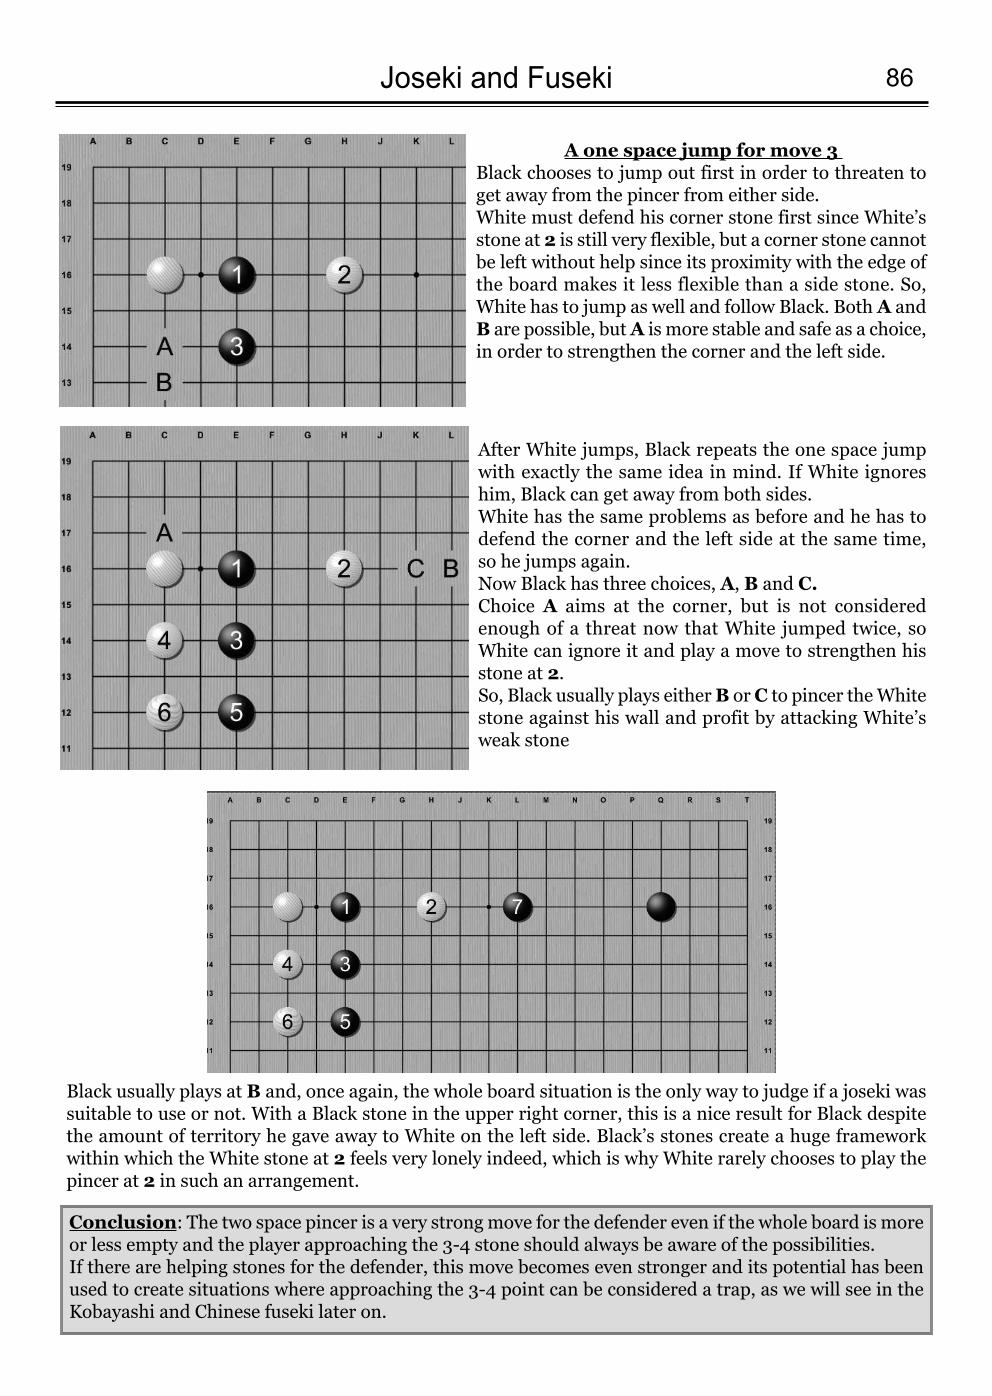
86Joseki and Fuseki
A one space jump for move 3 Black chooses to jump out first in order to threaten toget away from the pincer from either side. White must defend his corner stone first since White’sstone at 2 is still very flexible, but a corner stone cannotbe left without help since its proximity with the edge ofthe board makes it less flexible than a side stone. So,White has to jump as well and follow Black. Both A andB are possible, but A is more stable and safe as a choice,in order to strengthen the corner and the left side.
After White jumps, Black repeats the one space jumpwith exactly the same idea in mind. If White ignoreshim, Black can get away from both sides. White has the same problems as before and he has todefend the corner and the left side at the same time, so he jumps again. Now Black has three choices, A, B and C. Choice A aims at the corner, but is not consideredenough of a threat now that White jumped twice, soWhite can ignore it and play a move to strengthen hisstone at 2. So, Black usually plays either B or C to pincer the Whitestone against his wall and profit by attacking White’sweak stone
Black usually plays at B and, once again, the whole board situation is the only way to judge if a joseki wassuitable to use or not. With a Black stone in the upper right corner, this is a nice result for Black despitethe amount of territory he gave away to White on the left side. Black’s stones create a huge frameworkwithin which the White stone at 2 feels very lonely indeed, which is why White rarely chooses to play thepincer at 2 in such an arrangement.
Conclusion: The two space pincer is a very strong move for the defender even if the whole board is moreor less empty and the player approaching the 3-4 stone should always be aware of the possibilities. If there are helping stones for the defender, this move becomes even stronger and its potential has beenused to create situations where approaching the 3-4 point can be considered a trap, as we will see in theKobayashi and Chinese fuseki later on.
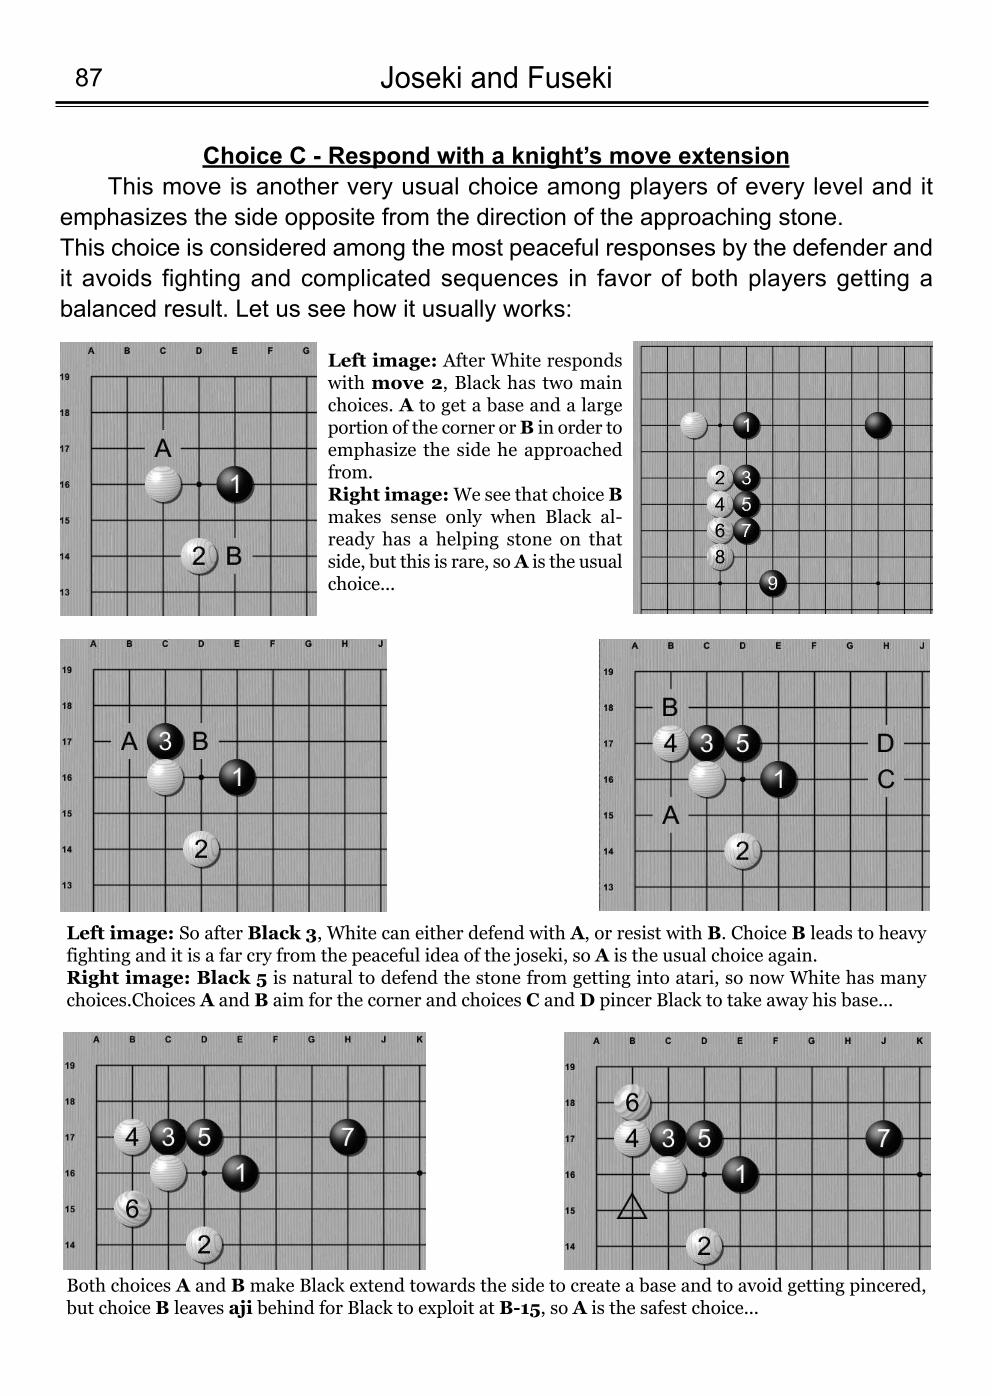
Choice C - Respond with a knight’s move extensionThis move is another very usual choice among players of every level and it
emphasizes the side opposite from the direction of the approaching stone. This choice is considered among the most peaceful responses by the defender andit avoids fighting and complicated sequences in favor of both players getting abalanced result. Let us see how it usually works:
Joseki and Fuseki87
Left image: After White respondswith move 2, Black has two mainchoices. A to get a base and a largeportion of the corner or B in order toemphasize the side he approachedfrom. Right image: We see that choice Bmakes sense only when Black al-ready has a helping stone on thatside, but this is rare, so A is the usualchoice...
Left image: So after Black 3, White can either defend with A, or resist with B. Choice B leads to heavyfighting and it is a far cry from the peaceful idea of the joseki, so A is the usual choice again.Right image: Black 5 is natural to defend the stone from getting into atari, so now White has manychoices.Choices A and B aim for the corner and choices C and D pincer Black to take away his base...
Both choices A and Bmake Black extend towards the side to create a base and to avoid getting pincered,but choice B leaves aji behind for Black to exploit at B-15, so A is the safest choice...
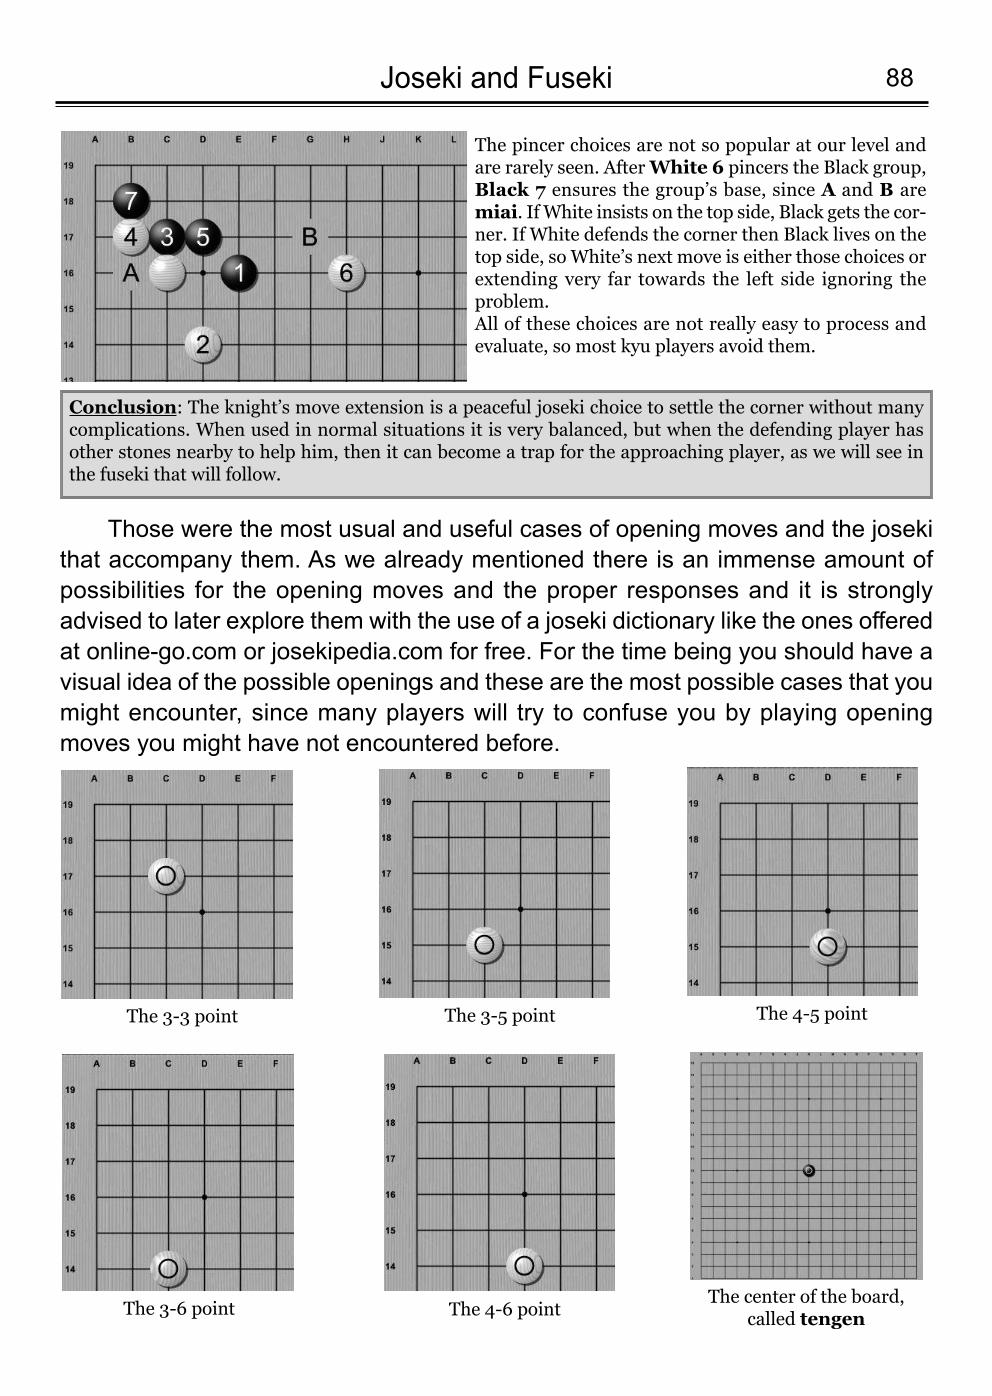
88Joseki and Fuseki
The pincer choices are not so popular at our level andare rarely seen. After White 6 pincers the Black group,Black 7 ensures the group’s base, since A and B aremiai. If White insists on the top side, Black gets the cor-ner. If White defends the corner then Black lives on thetop side, so White’s next move is either those choices orextending very far towards the left side ignoring theproblem. All of these choices are not really easy to process andevaluate, so most kyu players avoid them.
Conclusion: The knight’s move extension is a peaceful joseki choice to settle the corner without manycomplications. When used in normal situations it is very balanced, but when the defending player hasother stones nearby to help him, then it can become a trap for the approaching player, as we will see inthe fuseki that will follow.
Those were the most usual and useful cases of opening moves and the josekithat accompany them. As we already mentioned there is an immense amount ofpossibilities for the opening moves and the proper responses and it is stronglyadvised to later explore them with the use of a joseki dictionary like the ones offeredat online-go.com or josekipedia.com for free. For the time being you should have avisual idea of the possible openings and these are the most possible cases that youmight encounter, since many players will try to confuse you by playing openingmoves you might have not encountered before.
The 3-3 point The 3-5 point The 4-5 point
The 3-6 point The 4-6 pointThe center of the board,
called tengen
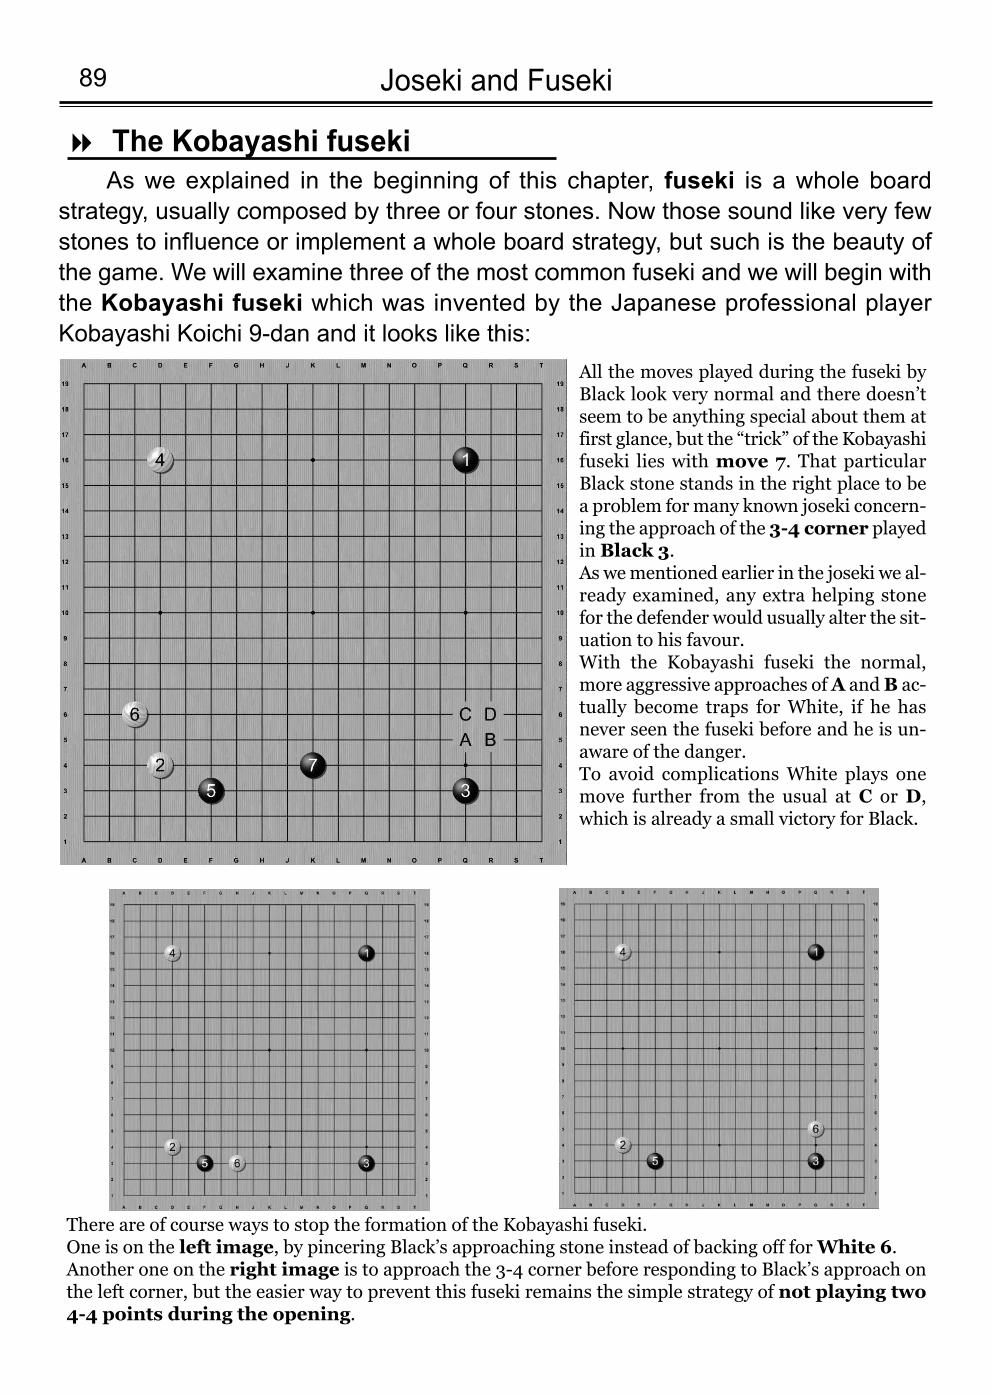
As we explained in the beginning of this chapter, fuseki is a whole boardstrategy, usually composed by three or four stones. Now those sound like very fewstones to influence or implement a whole board strategy, but such is the beauty ofthe game. We will examine three of the most common fuseki and we will begin withthe Kobayashi fuseki which was invented by the Japanese professional playerKobayashi Koichi 9-dan and it looks like this:
Joseki and Fuseki89
The Kobayashi fuseki8
All the moves played during the fuseki byBlack look very normal and there doesn’tseem to be anything special about them atfirst glance, but the “trick” of the Kobayashifuseki lies with move 7. That particularBlack stone stands in the right place to bea problem for many known joseki concern-ing the approach of the 3-4 corner playedin Black 3. As wementioned earlier in the joseki we al-ready examined, any extra helping stonefor the defender would usually alter the sit-uation to his favour. With the Kobayashi fuseki the normal,more aggressive approaches of A and B ac-tually become traps for White, if he hasnever seen the fuseki before and he is un-aware of the danger. To avoid complications White plays onemove further from the usual at C or D,which is already a small victory for Black.
There are of course ways to stop the formation of the Kobayashi fuseki. One is on the left image, by pincering Black’s approaching stone instead of backing off for White 6.Another one on the right image is to approach the 3-4 corner before responding to Black’s approach onthe left corner, but the easier way to prevent this fuseki remains the simple strategy of not playing two4-4 points during the opening.
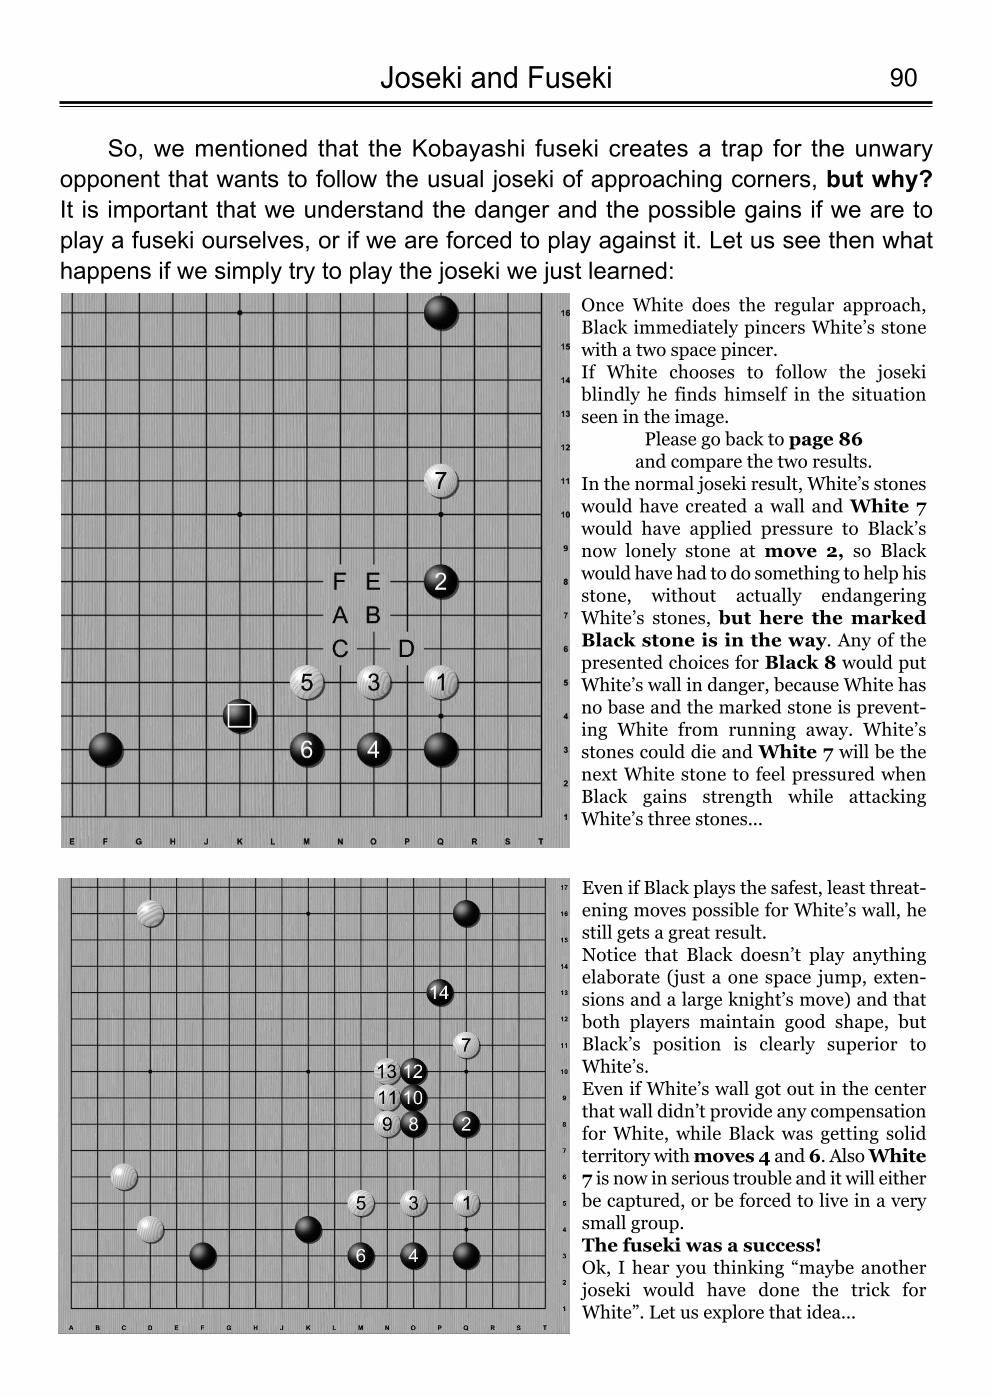
So, we mentioned that the Kobayashi fuseki creates a trap for the unwaryopponent that wants to follow the usual joseki of approaching corners, but why?It is important that we understand the danger and the possible gains if we are toplay a fuseki ourselves, or if we are forced to play against it. Let us see then whathappens if we simply try to play the joseki we just learned:
90Joseki and Fuseki
Even if Black plays the safest, least threat-ening moves possible for White’s wall, hestill gets a great result. Notice that Black doesn’t play anythingelaborate (just a one space jump, exten-sions and a large knight’s move) and thatboth players maintain good shape, butBlack’s position is clearly superior toWhite’s. Even if White’s wall got out in the centerthat wall didn’t provide any compensationfor White, while Black was getting solidterritory with moves 4 and 6. Also White7 is now in serious trouble and it will eitherbe captured, or be forced to live in a verysmall group.The fuseki was a success!Ok, I hear you thinking “maybe anotherjoseki would have done the trick forWhite”. Let us explore that idea...
Once White does the regular approach,Black immediately pincers White’s stonewith a two space pincer.If White chooses to follow the josekiblindly he finds himself in the situationseen in the image.
Please go back to page 86and compare the two results.
In the normal joseki result, White’s stoneswould have created a wall and White 7would have applied pressure to Black’snow lonely stone at move 2, so Blackwould have had to do something to help hisstone, without actually endangeringWhite’s stones, but here the markedBlack stone is in the way. Any of thepresented choices for Black 8 would putWhite’s wall in danger, because White hasno base and the marked stone is prevent-ing White from running away. White’sstones could die and White 7 will be thenext White stone to feel pressured whenBlack gains strength while attackingWhite’s three stones...
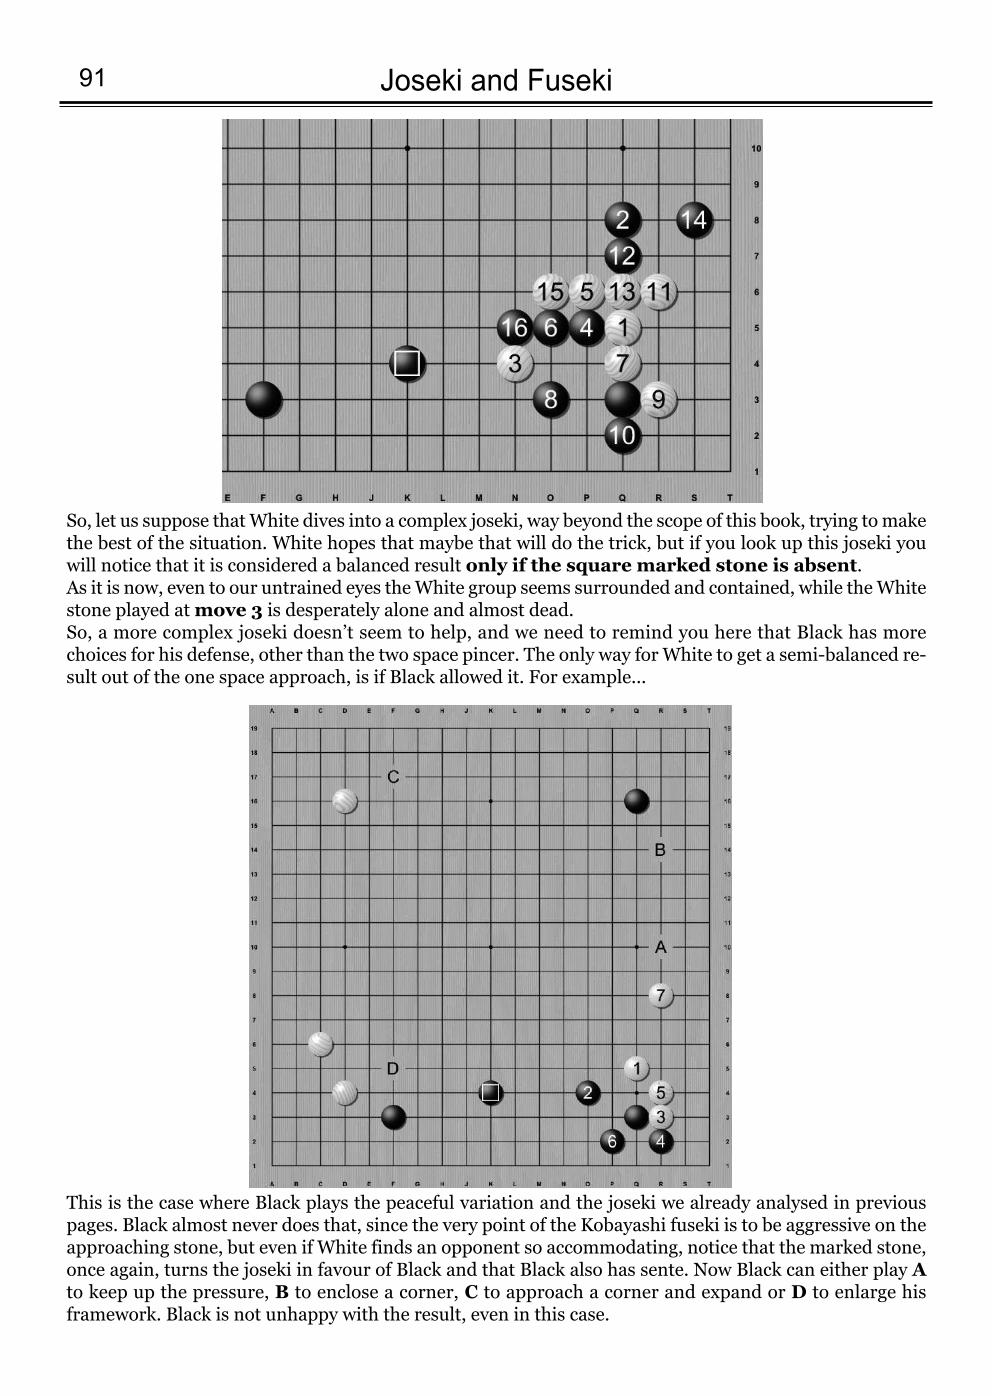
Joseki and Fuseki91
So, let us suppose that White dives into a complex joseki, way beyond the scope of this book, trying to makethe best of the situation. White hopes that maybe that will do the trick, but if you look up this joseki youwill notice that it is considered a balanced result only if the square marked stone is absent.As it is now, even to our untrained eyes the White group seems surrounded and contained, while the Whitestone played at move 3 is desperately alone and almost dead. So, a more complex joseki doesn’t seem to help, and we need to remind you here that Black has morechoices for his defense, other than the two space pincer. The only way for White to get a semi-balanced re-sult out of the one space approach, is if Black allowed it. For example...
This is the case where Black plays the peaceful variation and the joseki we already analysed in previouspages. Black almost never does that, since the very point of the Kobayashi fuseki is to be aggressive on theapproaching stone, but even if White finds an opponent so accommodating, notice that the marked stone,once again, turns the joseki in favour of Black and that Black also has sente. Now Black can either play Ato keep up the pressure, B to enclose a corner, C to approach a corner and expand or D to enlarge hisframework. Black is not unhappy with the result, even in this case.
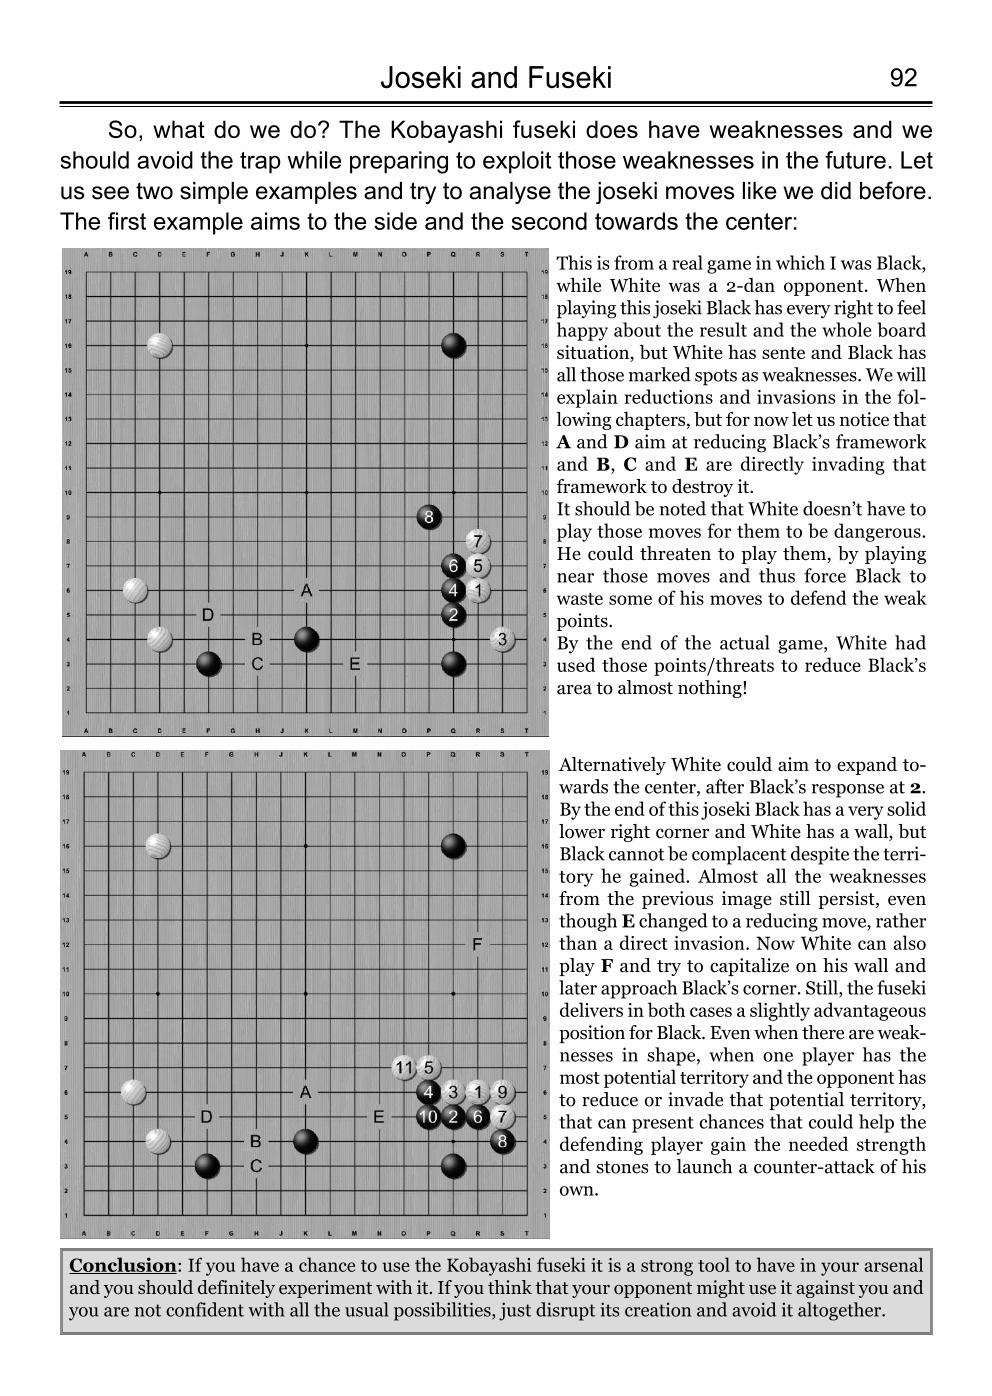
So, what do we do? The Kobayashi fuseki does have weaknesses and weshould avoid the trap while preparing to exploit those weaknesses in the future. Letus see two simple examples and try to analyse the joseki moves like we did before.The first example aims to the side and the second towards the center:
92Joseki and Fuseki
This is from a real game in which I was Black,while White was a 2-dan opponent. Whenplaying this joseki Black has every right to feelhappy about the result and the whole boardsituation, but White has sente and Black hasall those marked spots as weaknesses. We willexplain reductions and invasions in the fol-lowing chapters, but for now let us notice thatA and D aim at reducing Black’s frameworkand B, C and E are directly invading thatframework to destroy it. It should be noted that White doesn’t have toplay those moves for them to be dangerous.He could threaten to play them, by playingnear those moves and thus force Black towaste some of his moves to defend the weakpoints. By the end of the actual game, White hadused those points/threats to reduce Black’sarea to almost nothing!
Alternatively White could aim to expand to-wards the center, after Black’s response at 2.By the end of this joseki Black has a very solidlower right corner and White has a wall, butBlack cannot be complacent despite the terri-tory he gained. Almost all the weaknessesfrom the previous image still persist, eventhough E changed to a reducing move, ratherthan a direct invasion. Now White can alsoplay F and try to capitalize on his wall andlater approach Black’s corner. Still, the fusekidelivers in both cases a slightly advantageousposition for Black. Even when there are weak-nesses in shape, when one player has themost potential territory and the opponent hasto reduce or invade that potential territory,that can present chances that could help thedefending player gain the needed strengthand stones to launch a counter-attack of hisown.
Conclusion: If you have a chance to use the Kobayashi fuseki it is a strong tool to have in your arsenaland you should definitely experiment with it. If you think that your opponent might use it against you andyou are not confident with all the usual possibilities, just disrupt its creation and avoid it altogether.
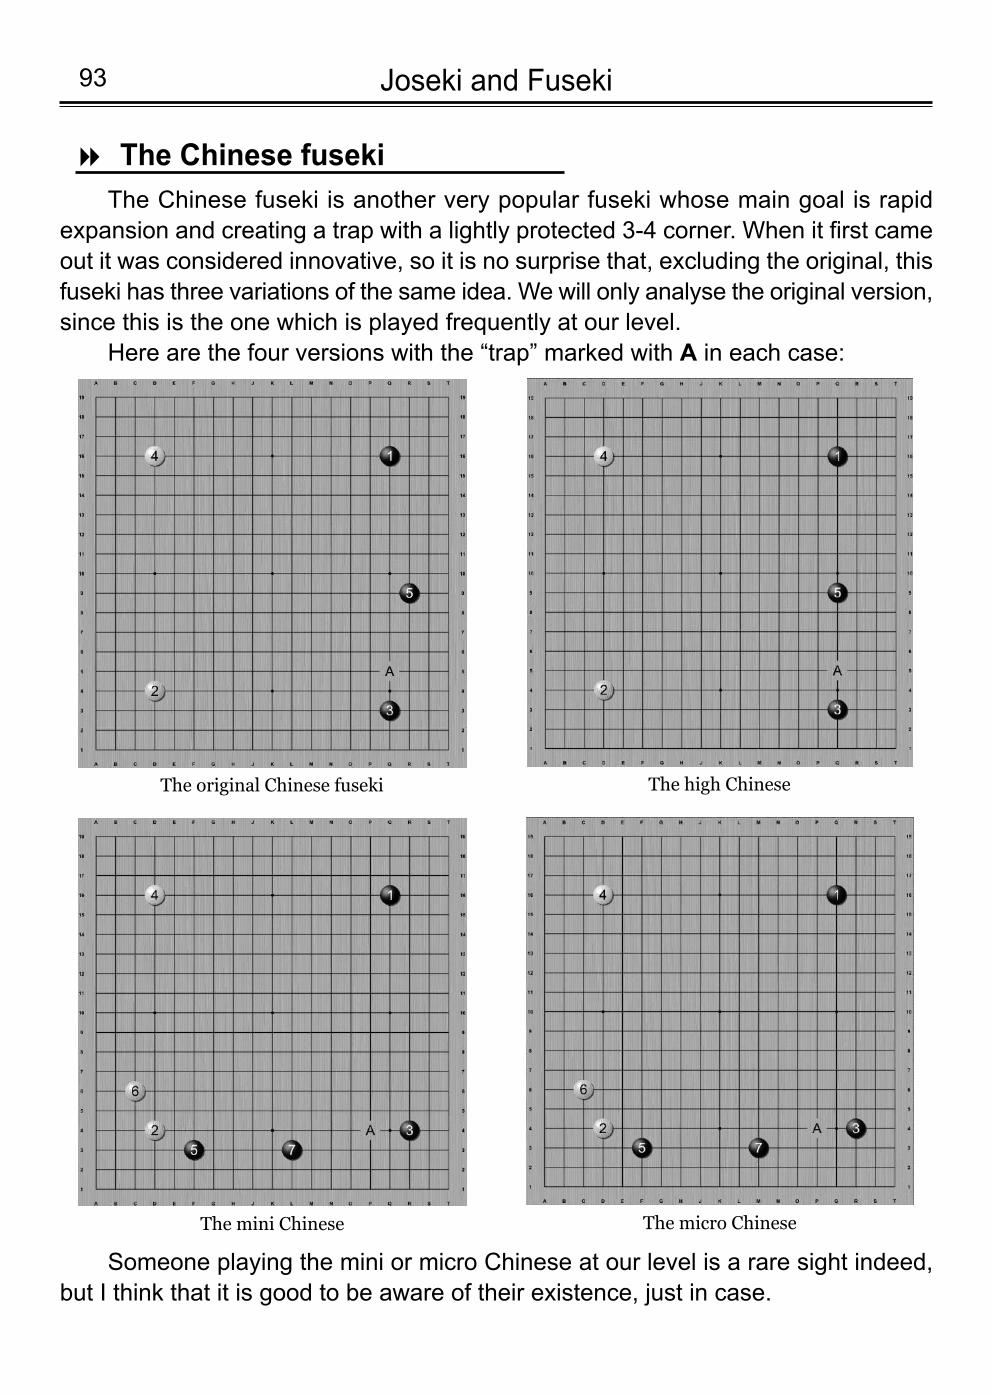
The Chinese fuseki is another very popular fuseki whose main goal is rapidexpansion and creating a trap with a lightly protected 3-4 corner. When it first cameout it was considered innovative, so it is no surprise that, excluding the original, thisfuseki has three variations of the same idea. We will only analyse the original version,since this is the one which is played frequently at our level.
Here are the four versions with the “trap” marked with A in each case:
Joseki and Fuseki93
The Chinese fuseki8
The original Chinese fuseki The high Chinese
The mini Chinese The micro Chinese
Someone playing the mini or micro Chinese at our level is a rare sight indeed,but I think that it is good to be aware of their existence, just in case.
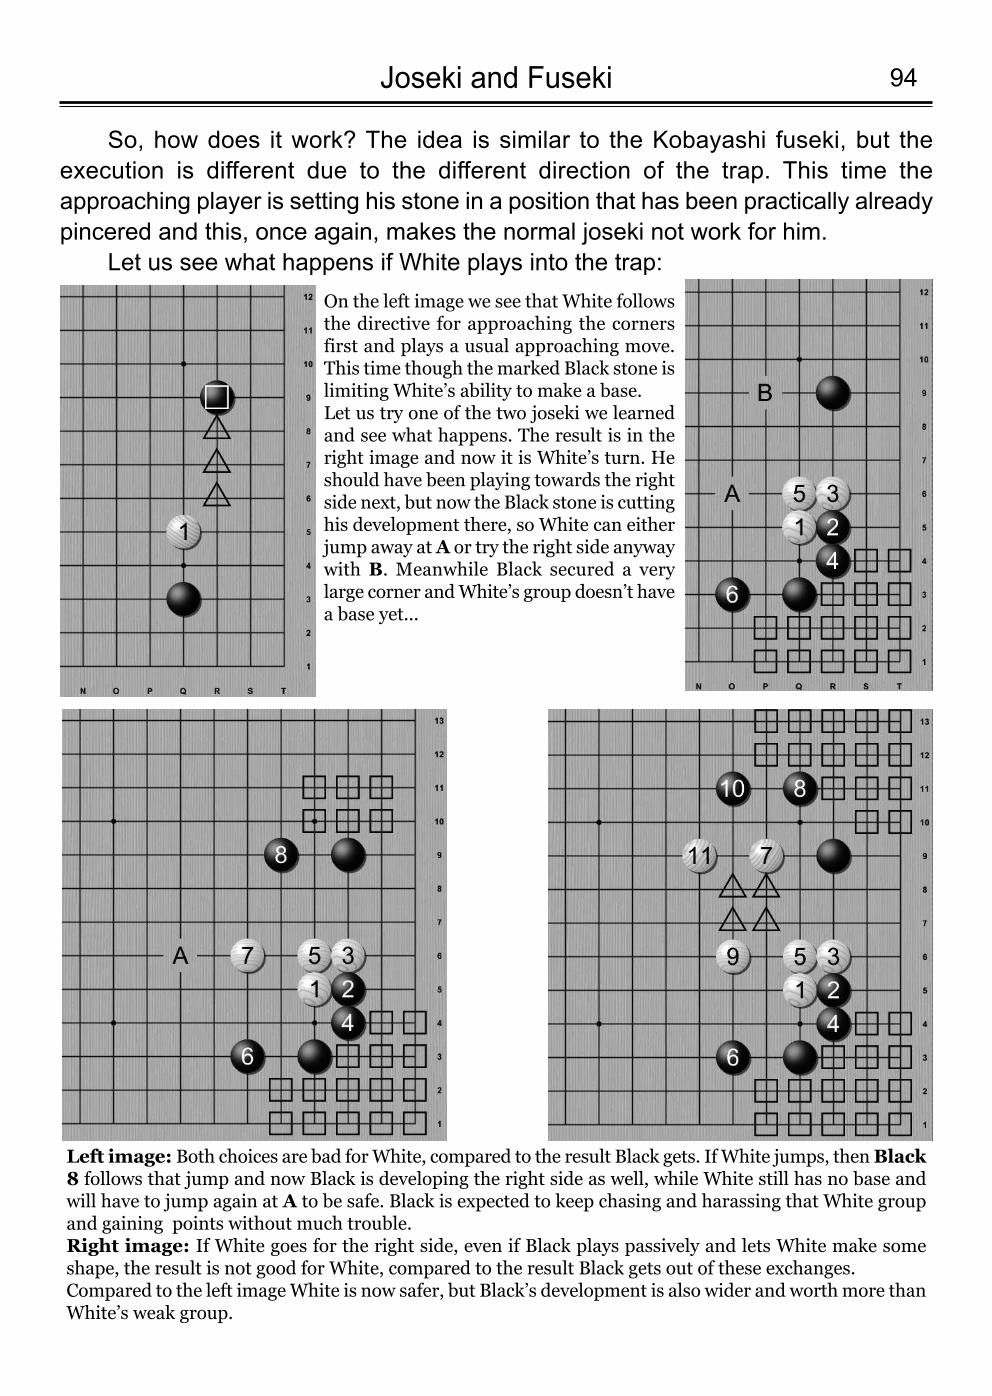
94Joseki and Fuseki
On the left image we see that White followsthe directive for approaching the cornersfirst and plays a usual approaching move.This time though the marked Black stone islimiting White’s ability to make a base.Let us try one of the two joseki we learnedand see what happens. The result is in theright image and now it is White’s turn. Heshould have been playing towards the rightside next, but now the Black stone is cuttinghis development there, so White can eitherjump away at A or try the right side anywaywith B. Meanwhile Black secured a verylarge corner and White’s group doesn’t havea base yet...
Left image: Both choices are bad for White, compared to the result Black gets. If White jumps, then Black8 follows that jump and now Black is developing the right side as well, while White still has no base andwill have to jump again at A to be safe. Black is expected to keep chasing and harassing that White groupand gaining points without much trouble.Right image: If White goes for the right side, even if Black plays passively and lets White make someshape, the result is not good for White, compared to the result Black gets out of these exchanges. Compared to the left image White is now safer, but Black’s development is also wider and worth more thanWhite’s weak group.
So, how does it work? The idea is similar to the Kobayashi fuseki, but theexecution is different due to the different direction of the trap. This time theapproaching player is setting his stone in a position that has been practically alreadypincered and this, once again, makes the normal joseki not work for him.
Let us see what happens if White plays into the trap:
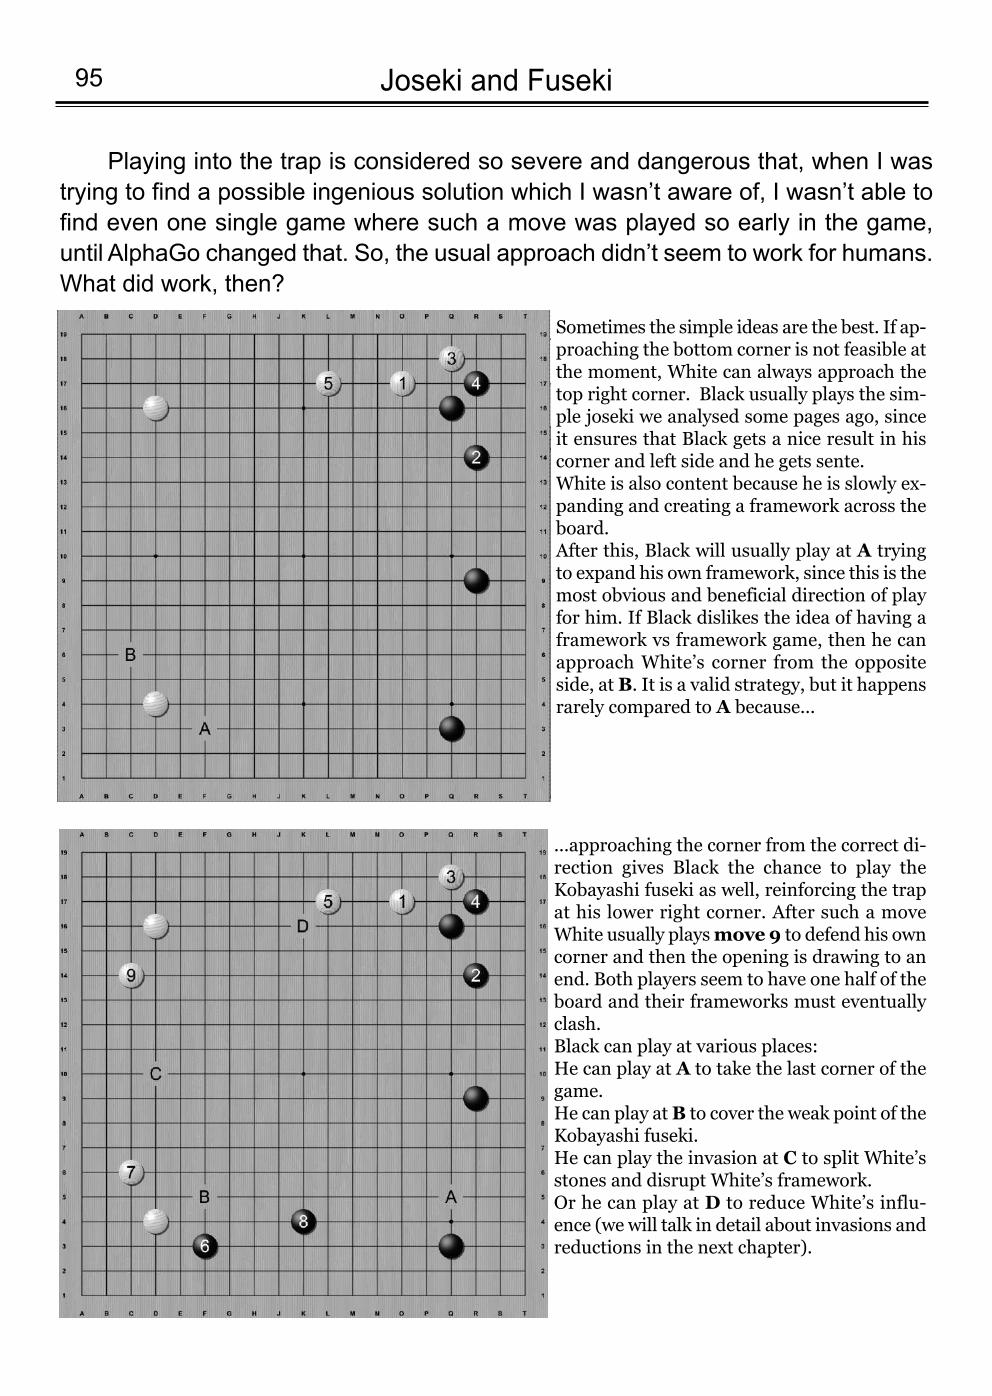
Joseki and Fuseki95
Playing into the trap is considered so severe and dangerous that, when I wastrying to find a possible ingenious solution which I wasn’t aware of, I wasn’t able tofind even one single game where such a move was played so early in the game,until AlphaGo changed that. So, the usual approach didn’t seem to work for humans.What did work, then?
Sometimes the simple ideas are the best. If ap-proaching the bottom corner is not feasible atthe moment, White can always approach thetop right corner. Black usually plays the sim-ple joseki we analysed some pages ago, sinceit ensures that Black gets a nice result in hiscorner and left side and he gets sente. White is also content because he is slowly ex-panding and creating a framework across theboard. After this, Black will usually play at A tryingto expand his own framework, since this is themost obvious and beneficial direction of playfor him. If Black dislikes the idea of having aframework vs framework game, then he canapproach White’s corner from the oppositeside, at B. It is a valid strategy, but it happensrarely compared to A because...
...approaching the corner from the correct di-rection gives Black the chance to play theKobayashi fuseki as well, reinforcing the trapat his lower right corner. After such a moveWhite usually plays move 9 to defend his owncorner and then the opening is drawing to anend. Both players seem to have one half of theboard and their frameworks must eventuallyclash. Black can play at various places:He can play at A to take the last corner of thegame.He can play at B to cover the weak point of theKobayashi fuseki.He can play the invasion at C to split White’sstones and disrupt White’s framework.Or he can play at D to reduce White’s influ-ence (we will talk in detail about invasions andreductions in the next chapter).
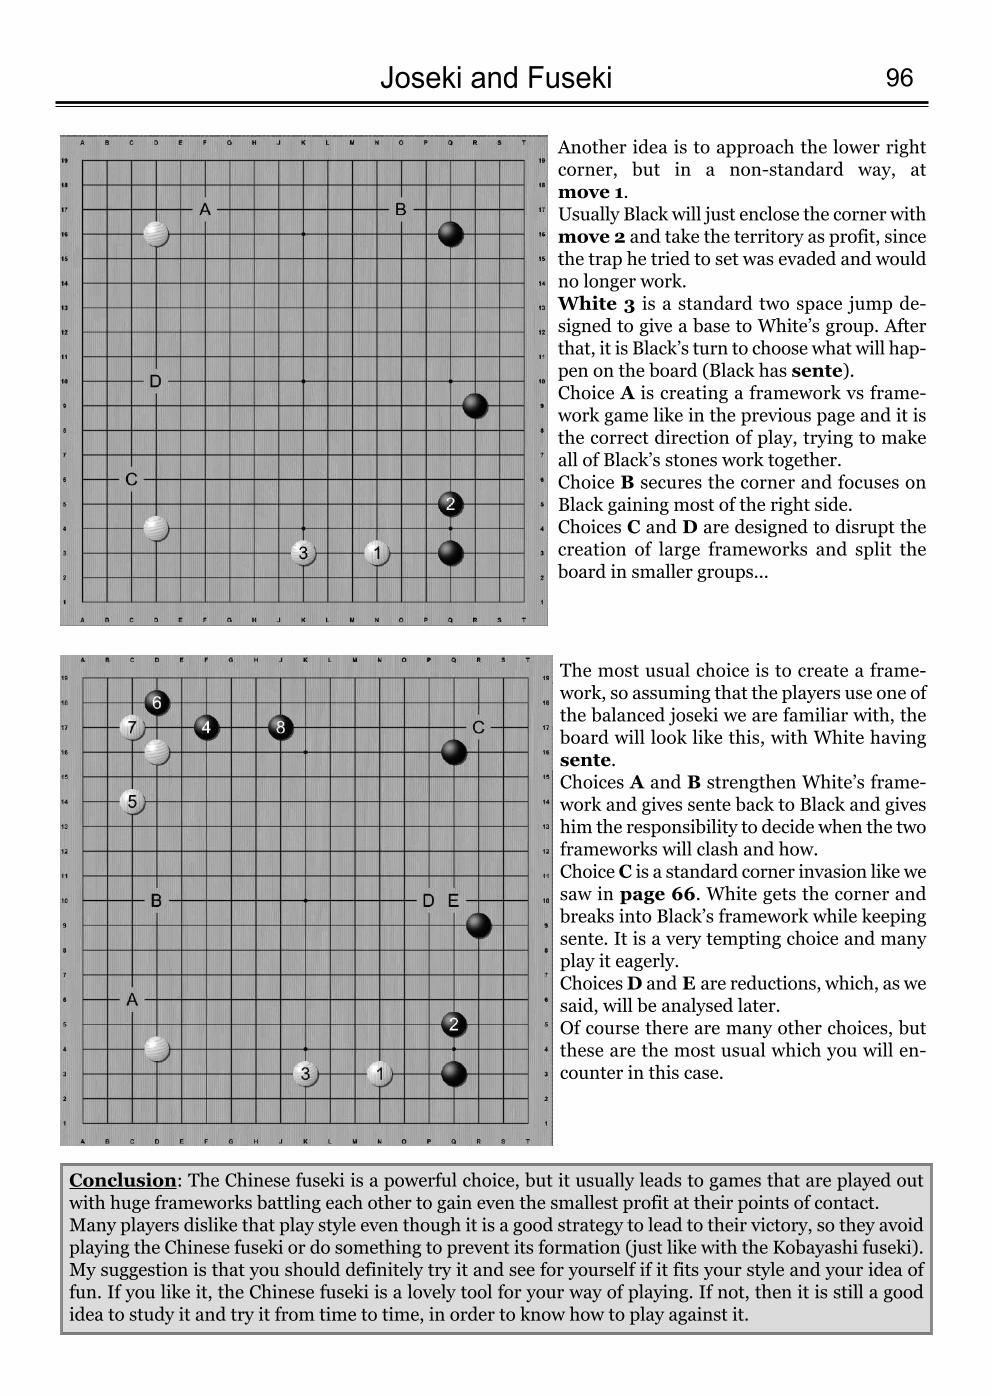
96Joseki and Fuseki
Another idea is to approach the lower rightcorner, but in a non-standard way, at move 1. Usually Black will just enclose the corner withmove 2 and take the territory as profit, sincethe trap he tried to set was evaded and wouldno longer work.White 3 is a standard two space jump de-signed to give a base to White’s group. Afterthat, it is Black’s turn to choose what will hap-pen on the board (Black has sente).Choice A is creating a framework vs frame-work game like in the previous page and it isthe correct direction of play, trying to makeall of Black’s stones work together.Choice B secures the corner and focuses onBlack gaining most of the right side.Choices C and D are designed to disrupt thecreation of large frameworks and split theboard in smaller groups...
The most usual choice is to create a frame-work, so assuming that the players use one ofthe balanced joseki we are familiar with, theboard will look like this, with White havingsente.Choices A and B strengthen White’s frame-work and gives sente back to Black and giveshim the responsibility to decide when the twoframeworks will clash and how.Choice C is a standard corner invasion like wesaw in page 66. White gets the corner andbreaks into Black’s framework while keepingsente. It is a very tempting choice and manyplay it eagerly.Choices D and E are reductions, which, as wesaid, will be analysed later. Of course there are many other choices, butthese are the most usual which you will en-counter in this case.
Conclusion: The Chinese fuseki is a powerful choice, but it usually leads to games that are played outwith huge frameworks battling each other to gain even the smallest profit at their points of contact.Many players dislike that play style even though it is a good strategy to lead to their victory, so they avoidplaying the Chinese fuseki or do something to prevent its formation (just like with the Kobayashi fuseki).My suggestion is that you should definitely try it and see for yourself if it fits your style and your idea offun. If you like it, the Chinese fuseki is a lovely tool for your way of playing. If not, then it is still a goodidea to study it and try it from time to time, in order to know how to play against it.
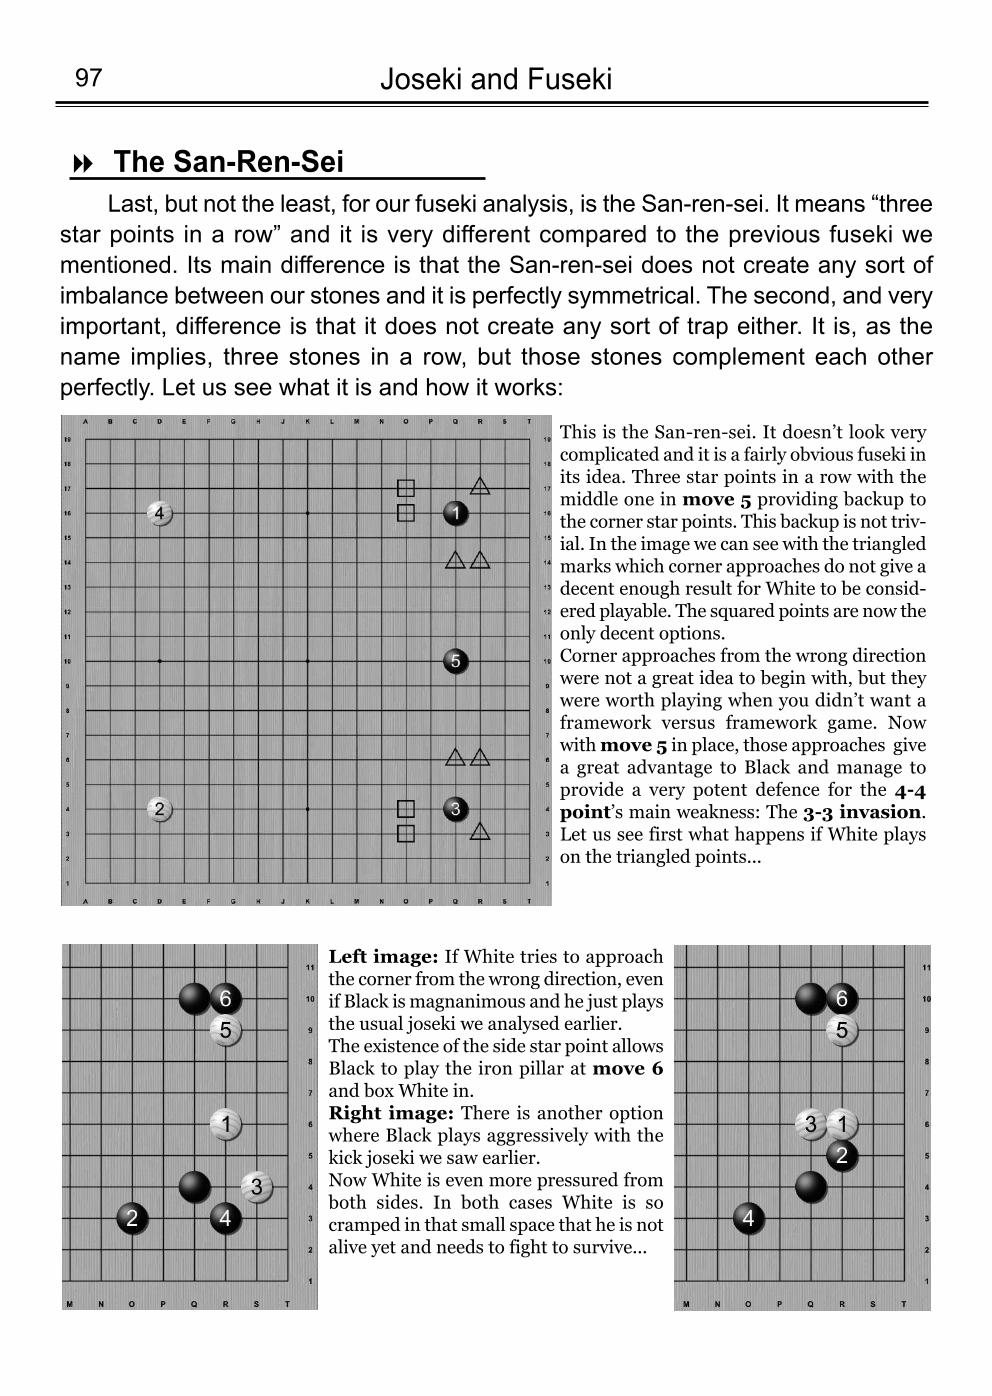
Last, but not the least, for our fuseki analysis, is the San-ren-sei. It means “threestar points in a row” and it is very different compared to the previous fuseki wementioned. Its main difference is that the San-ren-sei does not create any sort ofimbalance between our stones and it is perfectly symmetrical. The second, and veryimportant, difference is that it does not create any sort of trap either. It is, as thename implies, three stones in a row, but those stones complement each otherperfectly. Let us see what it is and how it works:
Joseki and Fuseki97
The San-Ren-Sei8
This is the San-ren-sei. It doesn’t look verycomplicated and it is a fairly obvious fuseki inits idea. Three star points in a row with themiddle one in move 5 providing backup tothe corner star points. This backup is not triv-ial. In the image we can see with the triangledmarks which corner approaches do not give adecent enough result for White to be consid-ered playable. The squared points are now theonly decent options. Corner approaches from the wrong directionwere not a great idea to begin with, but theywere worth playing when you didn’t want aframework versus framework game. Nowwith move 5 in place, those approaches givea great advantage to Black and manage toprovide a very potent defence for the 4-4point’s main weakness: The 3-3 invasion.Let us see first what happens if White playson the triangled points...
Left image: If White tries to approachthe corner from the wrong direction, evenif Black is magnanimous and he just playsthe usual joseki we analysed earlier. The existence of the side star point allowsBlack to play the iron pillar at move 6and box White in. Right image: There is another optionwhere Black plays aggressively with thekick joseki we saw earlier. Now White is even more pressured fromboth sides. In both cases White is socramped in that small space that he is notalive yet and needs to fight to survive...
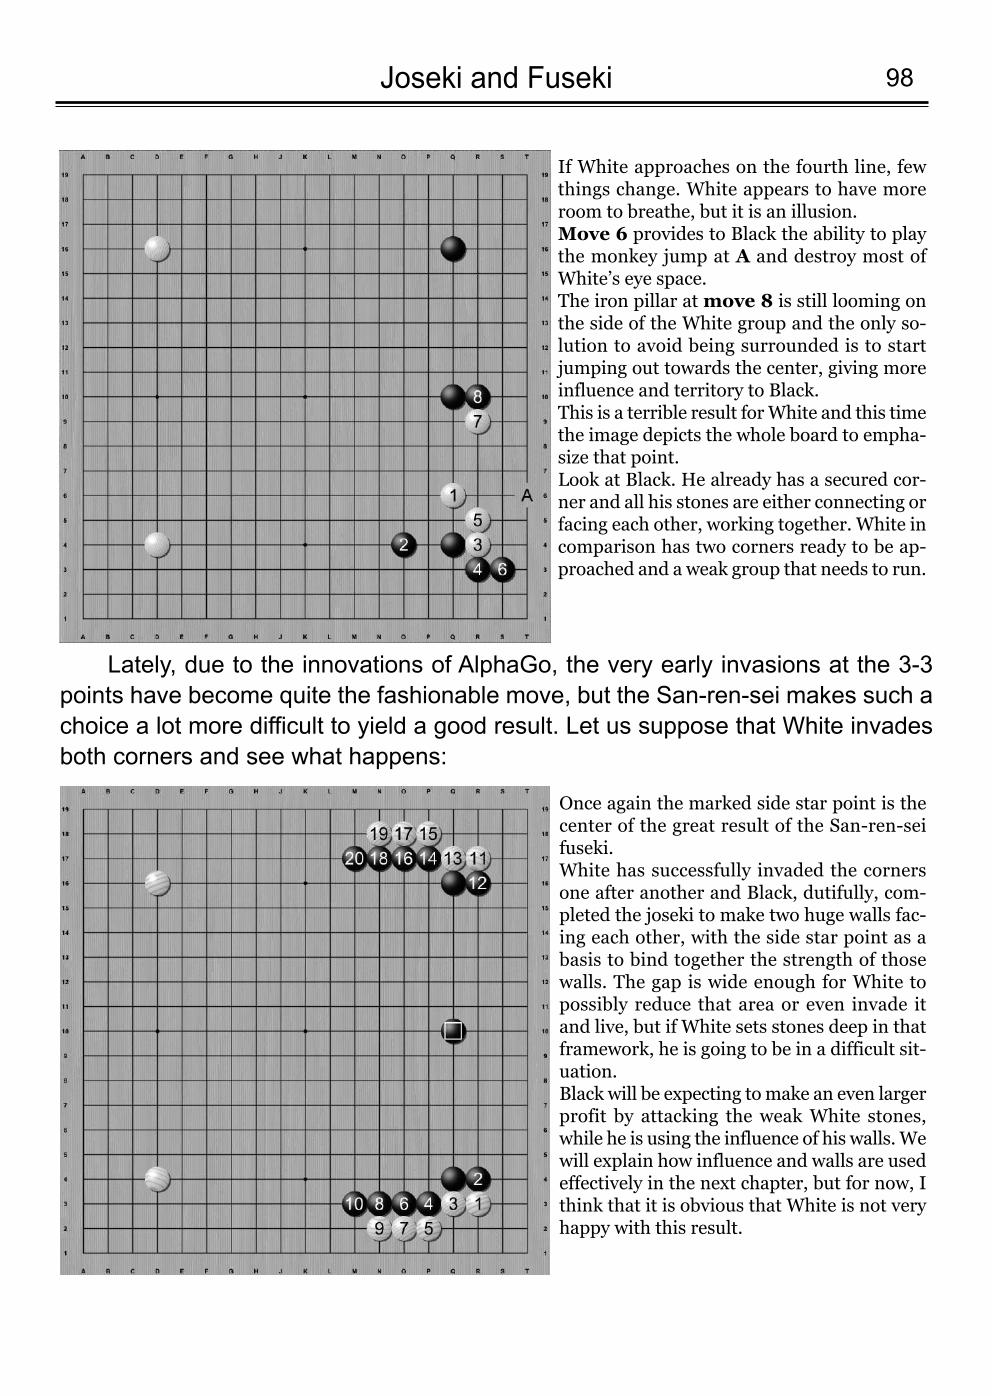
98Joseki and Fuseki
Once again the marked side star point is thecenter of the great result of the San-ren-seifuseki. White has successfully invaded the cornersone after another and Black, dutifully, com-pleted the joseki to make two huge walls fac-ing each other, with the side star point as abasis to bind together the strength of thosewalls. The gap is wide enough for White topossibly reduce that area or even invade itand live, but if White sets stones deep in thatframework, he is going to be in a difficult sit-uation. Black will be expecting to make an even largerprofit by attacking the weak White stones,while he is using the influence of his walls. Wewill explain how influence and walls are usedeffectively in the next chapter, but for now, Ithink that it is obvious that White is not veryhappy with this result.
If White approaches on the fourth line, fewthings change. White appears to have moreroom to breathe, but it is an illusion.Move 6 provides to Black the ability to playthe monkey jump at A and destroy most ofWhite’s eye space.The iron pillar at move 8 is still looming onthe side of the White group and the only so-lution to avoid being surrounded is to startjumping out towards the center, giving moreinfluence and territory to Black. This is a terrible result for White and this timethe image depicts the whole board to empha-size that point.Look at Black. He already has a secured cor-ner and all his stones are either connecting orfacing each other, working together. White incomparison has two corners ready to be ap-proached and a weak group that needs to run.
Lately, due to the innovations of AlphaGo, the very early invasions at the 3-3points have become quite the fashionable move, but the San-ren-sei makes such achoice a lot more difficult to yield a good result. Let us suppose that White invadesboth corners and see what happens:
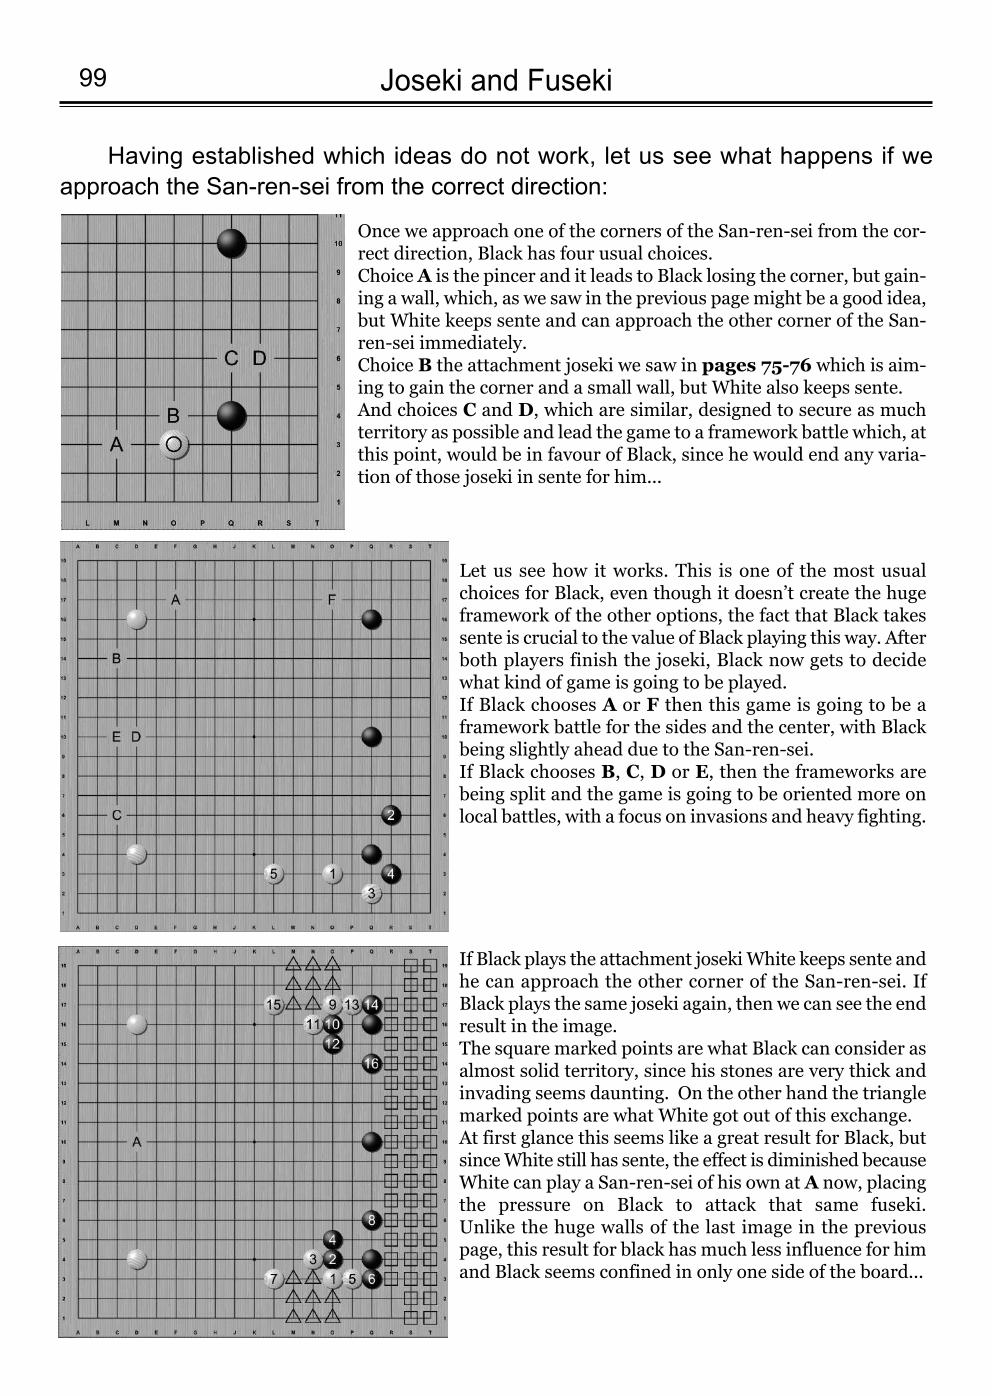
Having established which ideas do not work, let us see what happens if weapproach the San-ren-sei from the correct direction:
Joseki and Fuseki99
Once we approach one of the corners of the San-ren-sei from the cor-rect direction, Black has four usual choices.Choice A is the pincer and it leads to Black losing the corner, but gain-ing a wall, which, as we saw in the previous page might be a good idea,but White keeps sente and can approach the other corner of the San-ren-sei immediately.Choice B the attachment joseki we saw in pages 75-76 which is aim-ing to gain the corner and a small wall, but White also keeps sente.And choices C and D, which are similar, designed to secure as muchterritory as possible and lead the game to a framework battle which, atthis point, would be in favour of Black, since he would end any varia-tion of those joseki in sente for him...
Let us see how it works. This is one of the most usualchoices for Black, even though it doesn’t create the hugeframework of the other options, the fact that Black takessente is crucial to the value of Black playing this way. Afterboth players finish the joseki, Black now gets to decidewhat kind of game is going to be played.If Black chooses A or F then this game is going to be aframework battle for the sides and the center, with Blackbeing slightly ahead due to the San-ren-sei.If Black chooses B, C, D or E, then the frameworks arebeing split and the game is going to be oriented more onlocal battles, with a focus on invasions and heavy fighting.
If Black plays the attachment joseki White keeps sente andhe can approach the other corner of the San-ren-sei. IfBlack plays the same joseki again, then we can see the endresult in the image.The square marked points are what Black can consider asalmost solid territory, since his stones are very thick andinvading seems daunting. On the other hand the trianglemarked points are what White got out of this exchange.At first glance this seems like a great result for Black, butsince White still has sente, the effect is diminished becauseWhite can play a San-ren-sei of his own at A now, placingthe pressure on Black to attack that same fuseki. Unlike the huge walls of the last image in the previouspage, this result for black has much less influence for himand Black seems confined in only one side of the board...
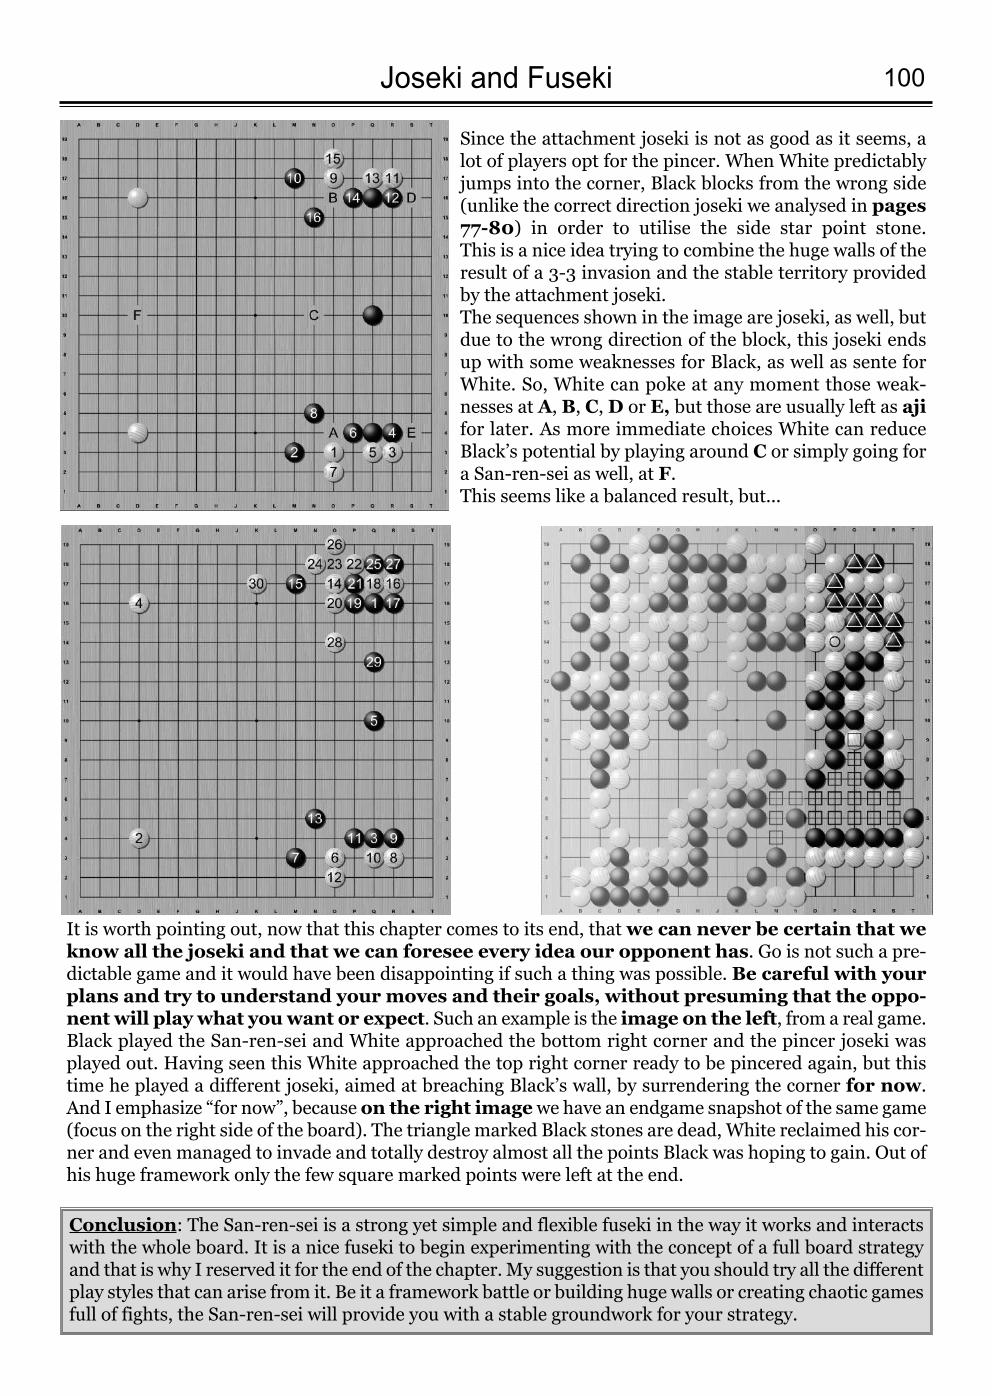
100Joseki and Fuseki
Since the attachment joseki is not as good as it seems, alot of players opt for the pincer. When White predictablyjumps into the corner, Black blocks from the wrong side(unlike the correct direction joseki we analysed in pages77-80) in order to utilise the side star point stone. This is a nice idea trying to combine the huge walls of theresult of a 3-3 invasion and the stable territory providedby the attachment joseki.The sequences shown in the image are joseki, as well, butdue to the wrong direction of the block, this joseki endsup with some weaknesses for Black, as well as sente forWhite. So, White can poke at any moment those weak-nesses at A, B, C, D or E, but those are usually left as ajifor later. As more immediate choices White can reduceBlack’s potential by playing around C or simply going fora San-ren-sei as well, at F. This seems like a balanced result, but...
It is worth pointing out, now that this chapter comes to its end, that we can never be certain that weknow all the joseki and that we can foresee every idea our opponent has. Go is not such a pre-dictable game and it would have been disappointing if such a thing was possible. Be careful with yourplans and try to understand your moves and their goals, without presuming that the oppo-nent will play what you want or expect. Such an example is the image on the left, from a real game.Black played the San-ren-sei and White approached the bottom right corner and the pincer joseki wasplayed out. Having seen this White approached the top right corner ready to be pincered again, but thistime he played a different joseki, aimed at breaching Black’s wall, by surrendering the corner for now.And I emphasize “for now”, because on the right imagewe have an endgame snapshot of the same game(focus on the right side of the board). The triangle marked Black stones are dead, White reclaimed his cor-ner and even managed to invade and totally destroy almost all the points Black was hoping to gain. Out ofhis huge framework only the few square marked points were left at the end.
Conclusion: The San-ren-sei is a strong yet simple and flexible fuseki in the way it works and interactswith the whole board. It is a nice fuseki to begin experimenting with the concept of a full board strategyand that is why I reserved it for the end of the chapter. My suggestion is that you should try all the differentplay styles that can arise from it. Be it a framework battle or building huge walls or creating chaotic gamesfull of fights, the San-ren-sei will provide you with a stable groundwork for your strategy.
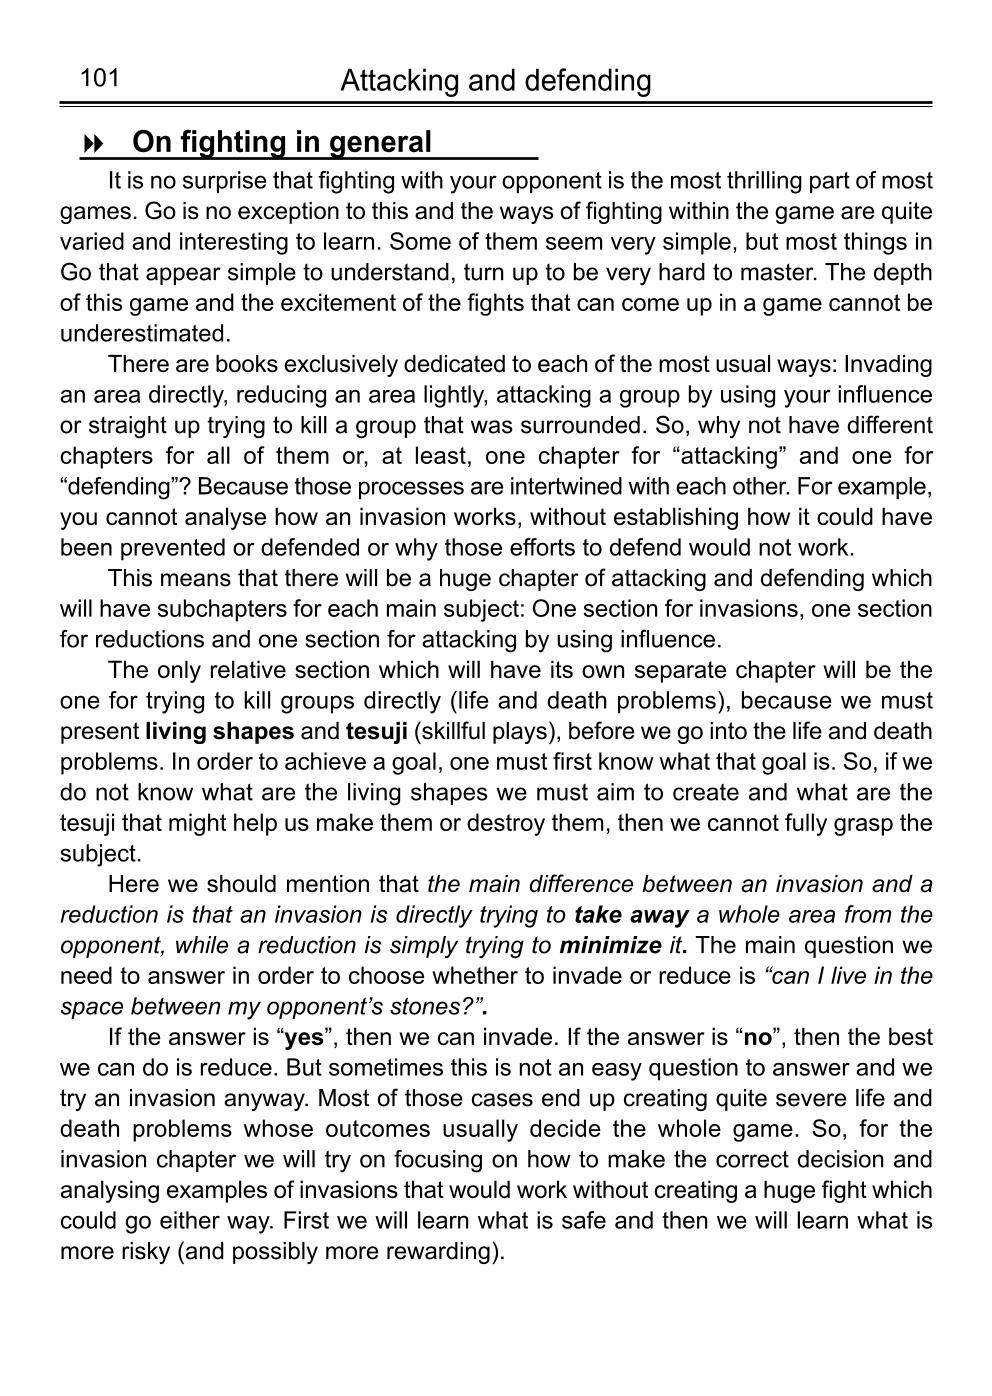
It is no surprise that fighting with your opponent is the most thrilling part of mostgames. Go is no exception to this and the ways of fighting within the game are quitevaried and interesting to learn. Some of them seem very simple, but most things inGo that appear simple to understand, turn up to be very hard to master. The depthof this game and the excitement of the fights that can come up in a game cannot beunderestimated.
There are books exclusively dedicated to each of the most usual ways: Invadingan area directly, reducing an area lightly, attacking a group by using your influenceor straight up trying to kill a group that was surrounded. So, why not have differentchapters for all of them or, at least, one chapter for “attacking” and one for“defending”? Because those processes are intertwined with each other. For example,you cannot analyse how an invasion works, without establishing how it could havebeen prevented or defended or why those efforts to defend would not work.
This means that there will be a huge chapter of attacking and defending whichwill have subchapters for each main subject: One section for invasions, one sectionfor reductions and one section for attacking by using influence.
The only relative section which will have its own separate chapter will be theone for trying to kill groups directly (life and death problems), because we mustpresent living shapes and tesuji (skillful plays), before we go into the life and deathproblems. In order to achieve a goal, one must first know what that goal is. So, if wedo not know what are the living shapes we must aim to create and what are thetesuji that might help us make them or destroy them, then we cannot fully grasp thesubject.
Here we should mention that the main difference between an invasion and areduction is that an invasion is directly trying to take away a whole area from theopponent, while a reduction is simply trying to minimize it. The main question weneed to answer in order to choose whether to invade or reduce is “can I live in thespace between my opponent’s stones?”.
If the answer is “yes”, then we can invade. If the answer is “no”, then the bestwe can do is reduce. But sometimes this is not an easy question to answer and wetry an invasion anyway. Most of those cases end up creating quite severe life anddeath problems whose outcomes usually decide the whole game. So, for theinvasion chapter we will try on focusing on how to make the correct decision andanalysing examples of invasions that would work without creating a huge fight whichcould go either way. First we will learn what is safe and then we will learn what ismore risky (and possibly more rewarding).
Attacking and defending101
On fighting in general8
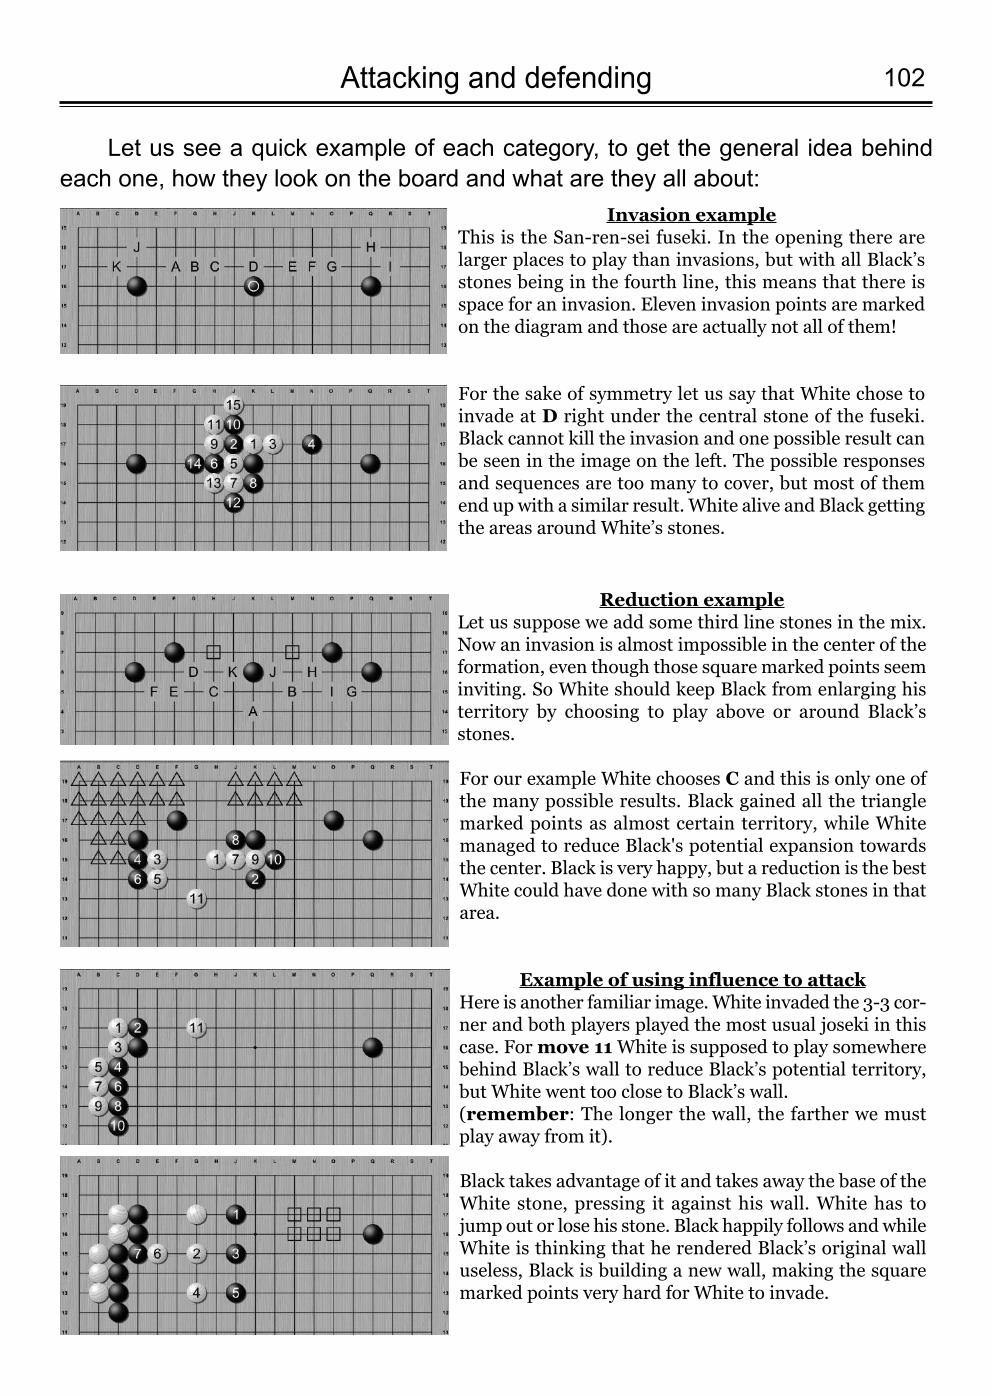
102Attacking and defending
Let us see a quick example of each category, to get the general idea behindeach one, how they look on the board and what are they all about:
Invasion exampleThis is the San-ren-sei fuseki. In the opening there arelarger places to play than invasions, but with all Black’sstones being in the fourth line, this means that there isspace for an invasion. Εleven invasion points are markedon the diagram and those are actually not all of them!
For the sake of symmetry let us say that White chose toinvade at D right under the central stone of the fuseki.Black cannot kill the invasion and one possible result canbe seen in the image on the left. The possible responsesand sequences are too many to cover, but most of themend up with a similar result. White alive and Black gettingthe areas around White’s stones.
Reduction exampleLet us suppose we add some third line stones in the mix.Now an invasion is almost impossible in the center of theformation, even though those square marked points seeminviting. So White should keep Black from enlarging histerritory by choosing to play above or around Black’sstones.
For our example White chooses C and this is only one ofthe many possible results. Black gained all the trianglemarked points as almost certain territory, while Whitemanaged to reduce Black's potential expansion towardsthe center. Black is very happy, but a reduction is the bestWhite could have done with so many Black stones in thatarea.
Example of using influence to attackHere is another familiar image. White invaded the 3-3 cor-ner and both players played the most usual joseki in thiscase. For move 11 White is supposed to play somewherebehind Black’s wall to reduce Black’s potential territory,but White went too close to Black’s wall. (remember: The longer the wall, the farther we mustplay away from it).
Black takes advantage of it and takes away the base of theWhite stone, pressing it against his wall. White has tojump out or lose his stone. Black happily follows and whileWhite is thinking that he rendered Black’s original walluseless, Black is building a new wall, making the squaremarked points very hard for White to invade.
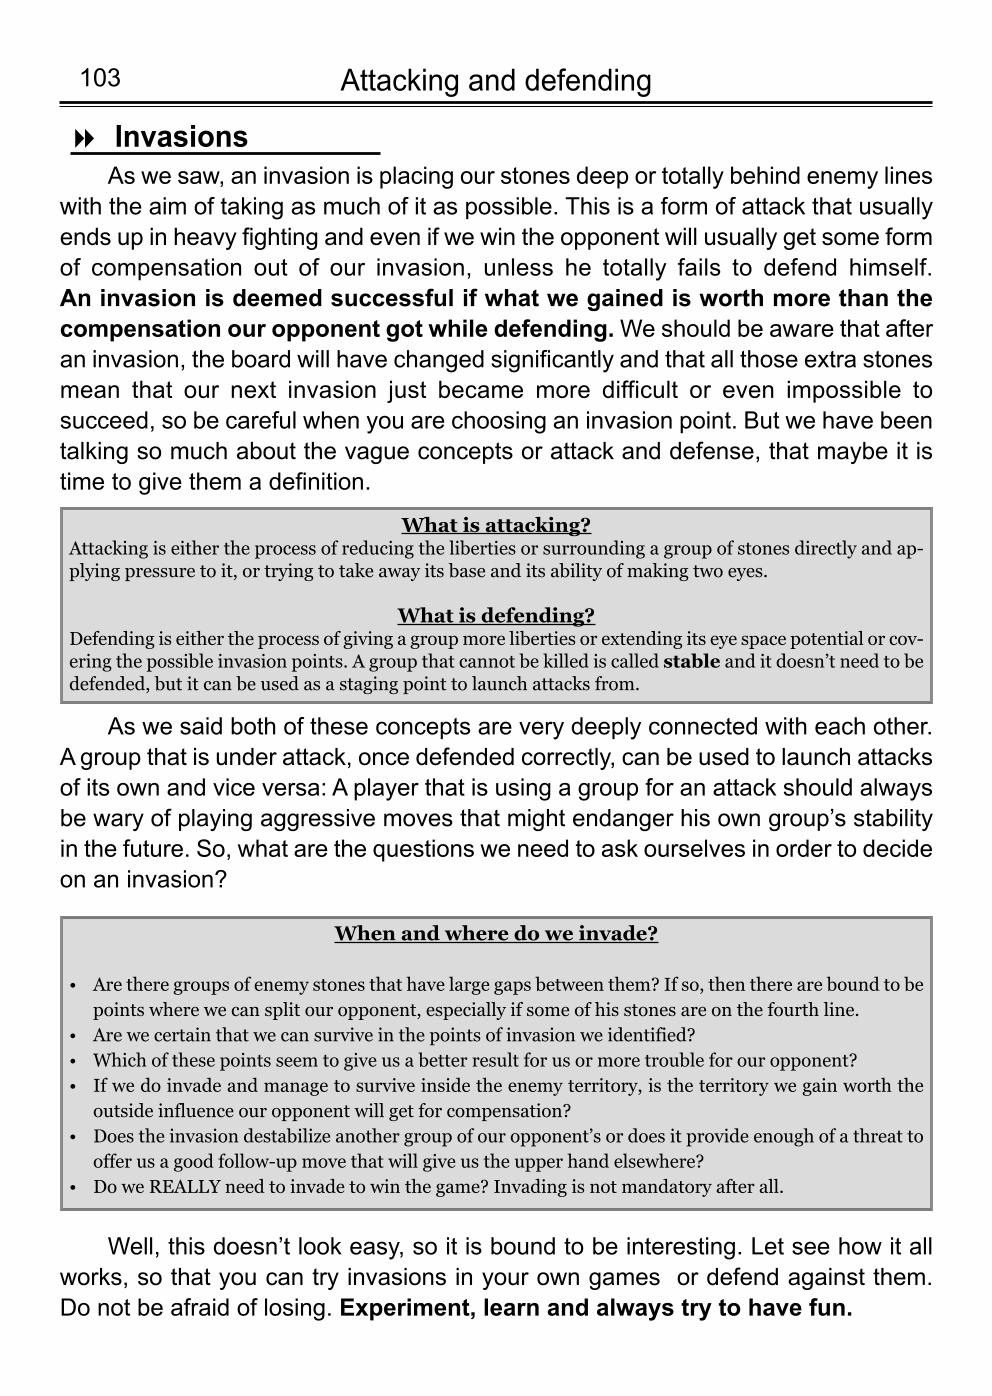
Attacking and defending103
As we saw, an invasion is placing our stones deep or totally behind enemy lineswith the aim of taking as much of it as possible. This is a form of attack that usuallyends up in heavy fighting and even if we win the opponent will usually get some formof compensation out of our invasion, unless he totally fails to defend himself. An invasion is deemed successful if what we gained is worth more than thecompensation our opponent got while defending.We should be aware that afteran invasion, the board will have changed significantly and that all those extra stonesmean that our next invasion just became more difficult or even impossible tosucceed, so be careful when you are choosing an invasion point. But we have beentalking so much about the vague concepts or attack and defense, that maybe it istime to give them a definition.
As we said both of these concepts are very deeply connected with each other.A group that is under attack, once defended correctly, can be used to launch attacksof its own and vice versa: A player that is using a group for an attack should alwaysbe wary of playing aggressive moves that might endanger his own group’s stabilityin the future. So, what are the questions we need to ask ourselves in order to decideon an invasion?
Well, this doesn’t look easy, so it is bound to be interesting. Let see how it allworks, so that you can try invasions in your own games or defend against them. Do not be afraid of losing. Experiment, learn and always try to have fun.
What is attacking?Attacking is either the process of reducing the liberties or surrounding a group of stones directly and ap-plying pressure to it, or trying to take away its base and its ability of making two eyes.
What is defending?Defending is either the process of giving a group more liberties or extending its eye space potential or cov-ering the possible invasion points. A group that cannot be killed is called stable and it doesn’t need to bedefended, but it can be used as a staging point to launch attacks from.
Invasions8
When and where do we invade?
Are there groups of enemy stones that have large gaps between them? If so, then there are bound to be•points where we can split our opponent, especially if some of his stones are on the fourth line.Are we certain that we can survive in the points of invasion we identified?•Which of these points seem to give us a better result for us or more trouble for our opponent?•If we do invade and manage to survive inside the enemy territory, is the territory we gain worth the•outside influence our opponent will get for compensation? Does the invasion destabilize another group of our opponent’s or does it provide enough of a threat to•offer us a good follow-up move that will give us the upper hand elsewhere?Do we REALLY need to invade to win the game? Invading is not mandatory after all.•
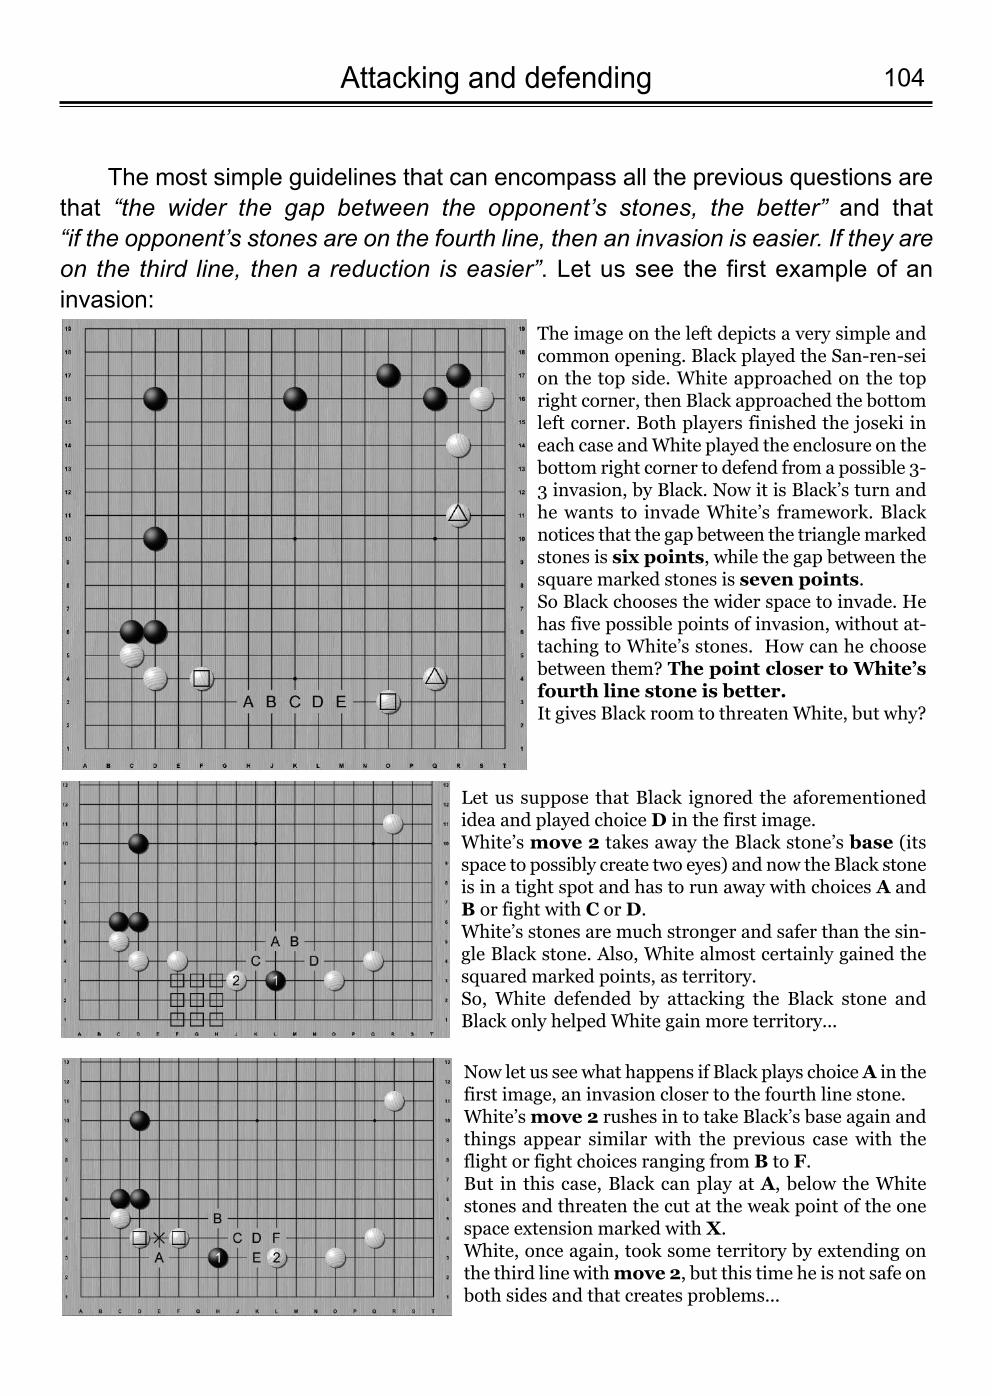
104Attacking and defending
The most simple guidelines that can encompass all the previous questions arethat “the wider the gap between the opponent’s stones, the better” and that “if the opponent’s stones are on the fourth line, then an invasion is easier. If they areon the third line, then a reduction is easier”. Let us see the first example of aninvasion:
The image on the left depicts a very simple andcommon opening. Black played the San-ren-seion the top side. White approached on the topright corner, then Black approached the bottomleft corner. Both players finished the joseki ineach case and White played the enclosure on thebottom right corner to defend from a possible 3-3 invasion, by Black. Now it is Black’s turn andhe wants to invade White’s framework. Blacknotices that the gap between the triangle markedstones is six points, while the gap between thesquare marked stones is seven points. So Black chooses the wider space to invade. Hehas five possible points of invasion, without at-taching to White’s stones. How can he choosebetween them? The point closer to White’sfourth line stone is better.It gives Black room to threaten White, but why?
Let us suppose that Black ignored the aforementionedidea and played choice D in the first image. White’s move 2 takes away the Black stone’s base (itsspace to possibly create two eyes) and now the Black stoneis in a tight spot and has to run away with choices A andB or fight with C or D. White’s stones are much stronger and safer than the sin-gle Black stone. Also, White almost certainly gained thesquared marked points, as territory. So, White defended by attacking the Black stone andBlack only helped White gain more territory...
Now let us see what happens if Black plays choice A in thefirst image, an invasion closer to the fourth line stone. White’s move 2 rushes in to take Black’s base again andthings appear similar with the previous case with theflight or fight choices ranging from B to F.But in this case, Black can play at A, below the Whitestones and threaten the cut at the weak point of the onespace extension marked with X. White, once again, took some territory by extending onthe third line with move 2, but this time he is not safe onboth sides and that creates problems...
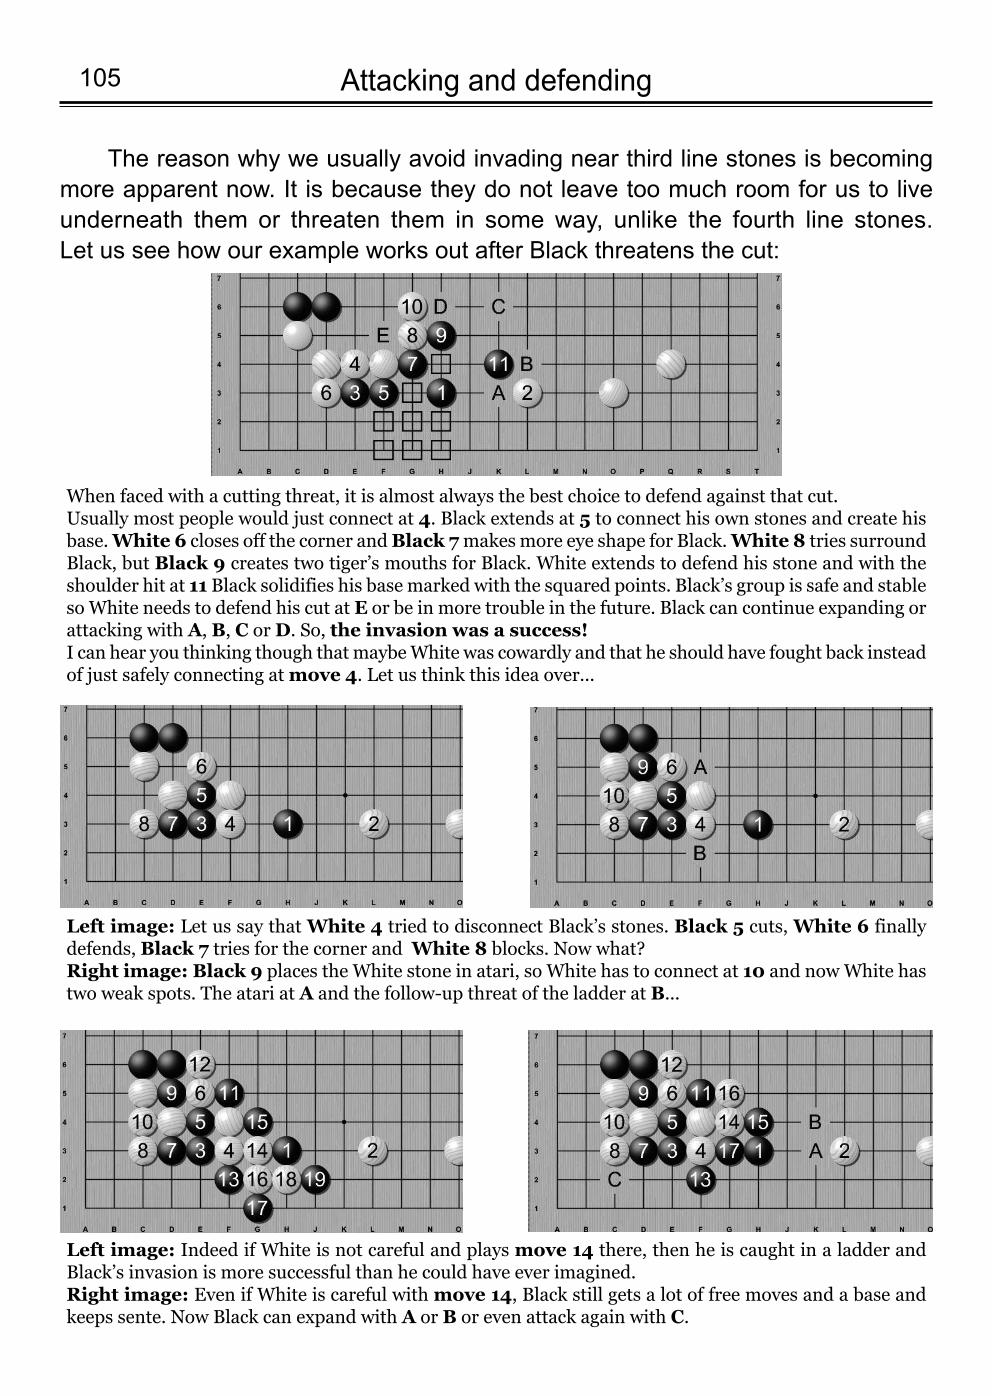
Attacking and defending105
The reason why we usually avoid invading near third line stones is becomingmore apparent now. It is because they do not leave too much room for us to liveunderneath them or threaten them in some way, unlike the fourth line stones. Let us see how our example works out after Black threatens the cut:
When faced with a cutting threat, it is almost always the best choice to defend against that cut. Usually most people would just connect at 4. Black extends at 5 to connect his own stones and create hisbase. White 6 closes off the corner and Black 7 makes more eye shape for Black. White 8 tries surroundBlack, but Black 9 creates two tiger’s mouths for Black. White extends to defend his stone and with theshoulder hit at 11 Black solidifies his base marked with the squared points. Black’s group is safe and stableso White needs to defend his cut at E or be in more trouble in the future. Black can continue expanding orattacking with A, B, C or D. So, the invasion was a success! I can hear you thinking though that maybe White was cowardly and that he should have fought back insteadof just safely connecting at move 4. Let us think this idea over...
Left image: Let us say that White 4 tried to disconnect Black’s stones. Black 5 cuts, White 6 finallydefends, Black 7 tries for the corner and White 8 blocks. Now what?Right image: Black 9 places the White stone in atari, so White has to connect at 10 and now White hastwo weak spots. The atari at A and the follow-up threat of the ladder at B...
Left image: Indeed if White is not careful and plays move 14 there, then he is caught in a ladder andBlack’s invasion is more successful than he could have ever imagined. Right image: Even if White is careful with move 14, Black still gets a lot of free moves and a base andkeeps sente. Now Black can expand with A or B or even attack again with C.
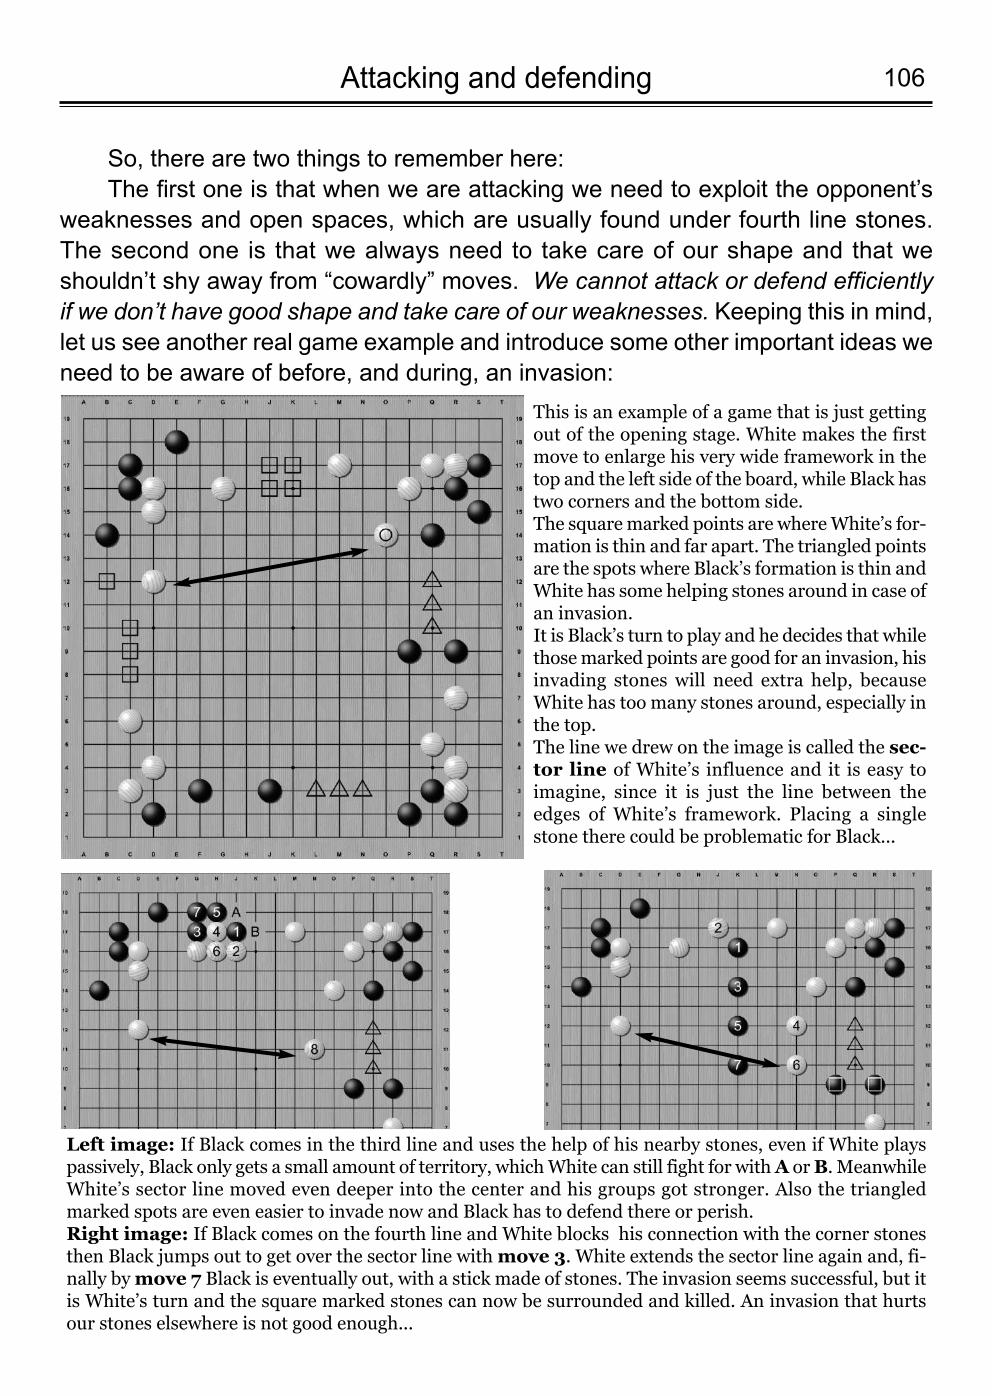
106Attacking and defending
So, there are two things to remember here: The first one is that when we are attacking we need to exploit the opponent’s
weaknesses and open spaces, which are usually found under fourth line stones.The second one is that we always need to take care of our shape and that weshouldn’t shy away from “cowardly” moves. We cannot attack or defend efficientlyif we don’t have good shape and take care of our weaknesses. Keeping this in mind,let us see another real game example and introduce some other important ideas weneed to be aware of before, and during, an invasion:
This is an example of a game that is just gettingout of the opening stage. White makes the firstmove to enlarge his very wide framework in thetop and the left side of the board, while Black hastwo corners and the bottom side. The square marked points are where White’s for-mation is thin and far apart. The triangled pointsare the spots where Black’s formation is thin andWhite has some helping stones around in case ofan invasion.It is Black’s turn to play and he decides that whilethose marked points are good for an invasion, hisinvading stones will need extra help, becauseWhite has too many stones around, especially inthe top. The line we drew on the image is called the sec-tor line of White’s influence and it is easy toimagine, since it is just the line between theedges of White’s framework. Placing a singlestone there could be problematic for Black...
Left image: If Black comes in the third line and uses the help of his nearby stones, even if White playspassively, Black only gets a small amount of territory, which White can still fight for with A or B. MeanwhileWhite’s sector line moved even deeper into the center and his groups got stronger. Also the triangledmarked spots are even easier to invade now and Black has to defend there or perish.Right image: If Black comes on the fourth line and White blocks his connection with the corner stonesthen Black jumps out to get over the sector line with move 3. White extends the sector line again and, fi-nally by move 7 Black is eventually out, with a stick made of stones. The invasion seems successful, but itis White’s turn and the square marked stones can now be surrounded and killed. An invasion that hurtsour stones elsewhere is not good enough...

Attacking and defending107
Black considers all the issues we presented in theprevious page and decides on a very good idea:He will place a stone that will help his fu-ture invasions. For this case he chooses the absolute center ofthe board (called tengen) which is a very inter-esting choice. Look at the whole board. Black’sstone not only seems to synergize with his stoneson the right and bottom side, but they create twohuge holes in White’s defense.If Black invades at the top squared points, thendepending on White’s response he can eitherjump out at A towards his stone on the tengen orconnect underneath at B. Moves A and B arepractically miai, so both issues presented in theprevious page were solved with one move and asan added bonus the exact same situation is mir-rored in the left side as well with points C and D.A magnificent move for Black. Defending fourdifferent points with one move seems quite im-possible...
Practical rule: When you are trying to invade, the more helping stones you have, the better chances youhave to get a good result out of the invasion. Moves that create multiple threats or miai situations are usu-ally crucial in a successful invasion.
Practical rule: When you are in doubt about what to do next in a situation, try to tenuki (play elsewhere)and change the situation on the board. Maybe later, with more stones around things will become easier tohandle and a solution might be presented to you.
White cannot decide what to do, so he delays anyresponse on that problem and tries to play some-where else and threaten Black in some other way,trying to change the board in his favor before hedeals with the whole situation. White plays move 2 to distract Black by threat-ening the cut at X and trying to see if he can getsome compensation in case Black goes in for aninvasion. Black ignores White and invades at move 3.White tries to expand his group on the left andcut off the Black stone with move 4, but despiteWhite blocking the one space jump, Black A andB are moves that would bring some gain forBlack. So, since Black has two options he getsgreedy and invades at move 5 as well. In this sideboth moves C and D are capable of leading theBlack stone to safety or at least deliver a signifi-cant gain to Black. White is in trouble, invaded intwo sides and his left group seems to be slowlygetting surrounded ...
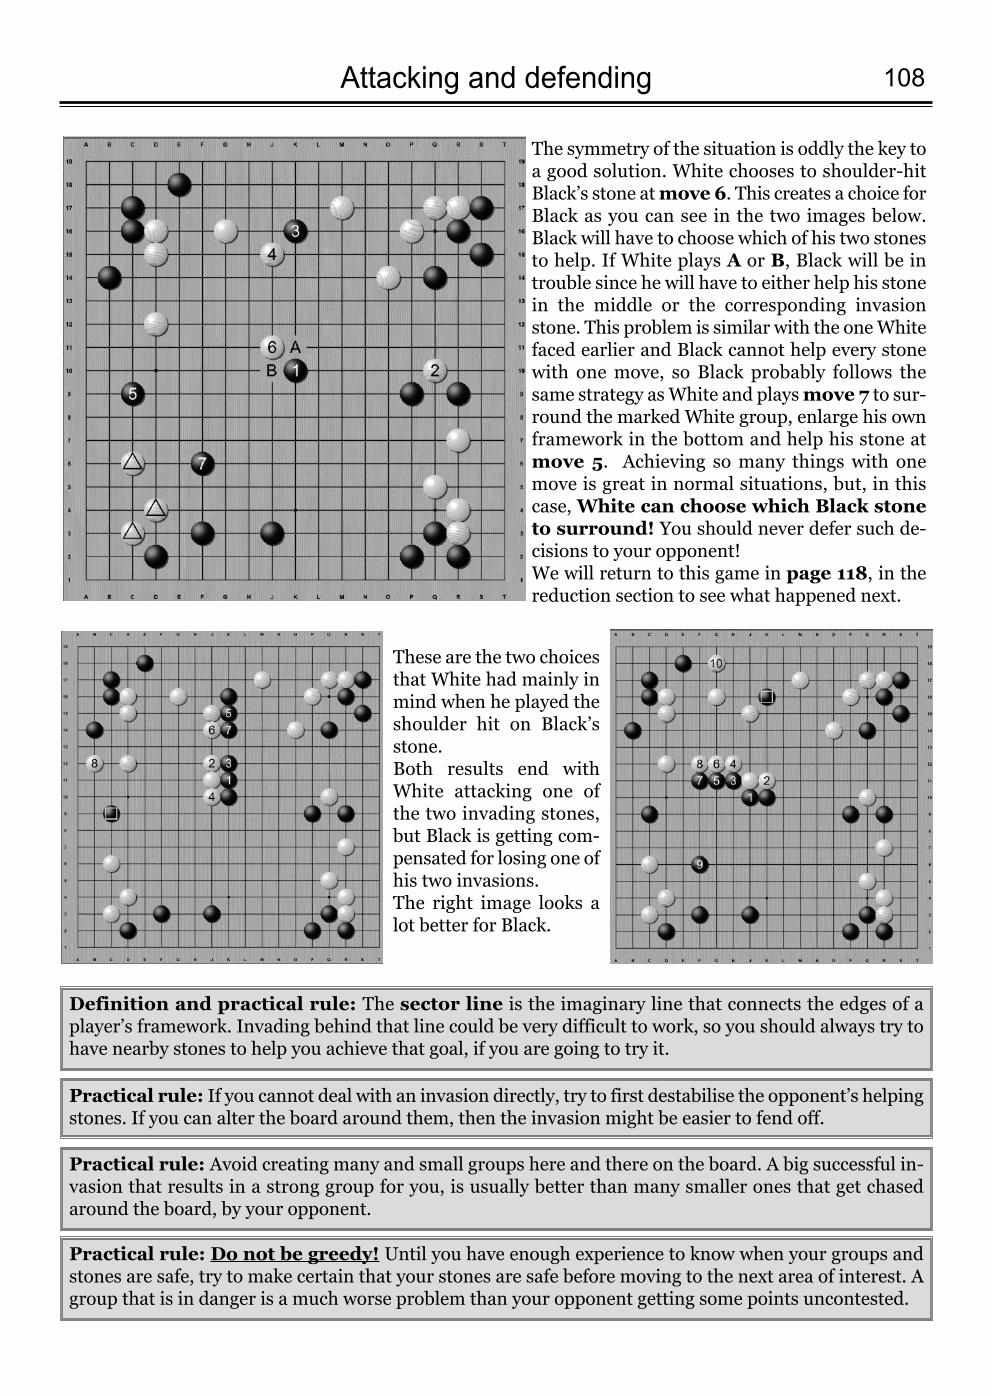
108Attacking and defending
The symmetry of the situation is oddly the key toa good solution. White chooses to shoulder-hitBlack’s stone at move 6. This creates a choice forBlack as you can see in the two images below.Black will have to choose which of his two stonesto help. If White plays A or B, Black will be introuble since he will have to either help his stonein the middle or the corresponding invasionstone. This problem is similar with the one Whitefaced earlier and Black cannot help every stonewith one move, so Black probably follows thesame strategy as White and plays move 7 to sur-round the marked White group, enlarge his ownframework in the bottom and help his stone atmove 5. Achieving so many things with onemove is great in normal situations, but, in thiscase, White can choose which Black stoneto surround! You should never defer such de-cisions to your opponent!We will return to this game in page 118, in thereduction section to see what happened next.
Practical rule: If you cannot deal with an invasion directly, try to first destabilise the opponent’s helpingstones. If you can alter the board around them, then the invasion might be easier to fend off.
Practical rule: Do not be greedy! Until you have enough experience to know when your groups andstones are safe, try to make certain that your stones are safe before moving to the next area of interest. Agroup that is in danger is a much worse problem than your opponent getting some points uncontested.
Definition and practical rule: The sector line is the imaginary line that connects the edges of aplayer’s framework. Invading behind that line could be very difficult to work, so you should always try tohave nearby stones to help you achieve that goal, if you are going to try it.
Practical rule: Avoid creating many and small groups here and there on the board. A big successful in-vasion that results in a strong group for you, is usually better than many smaller ones that get chasedaround the board, by your opponent.
These are the two choicesthat White had mainly inmind when he played theshoulder hit on Black’sstone. Both results end withWhite attacking one ofthe two invading stones,but Black is getting com-pensated for losing one ofhis two invasions. The right image looks alot better for Black.
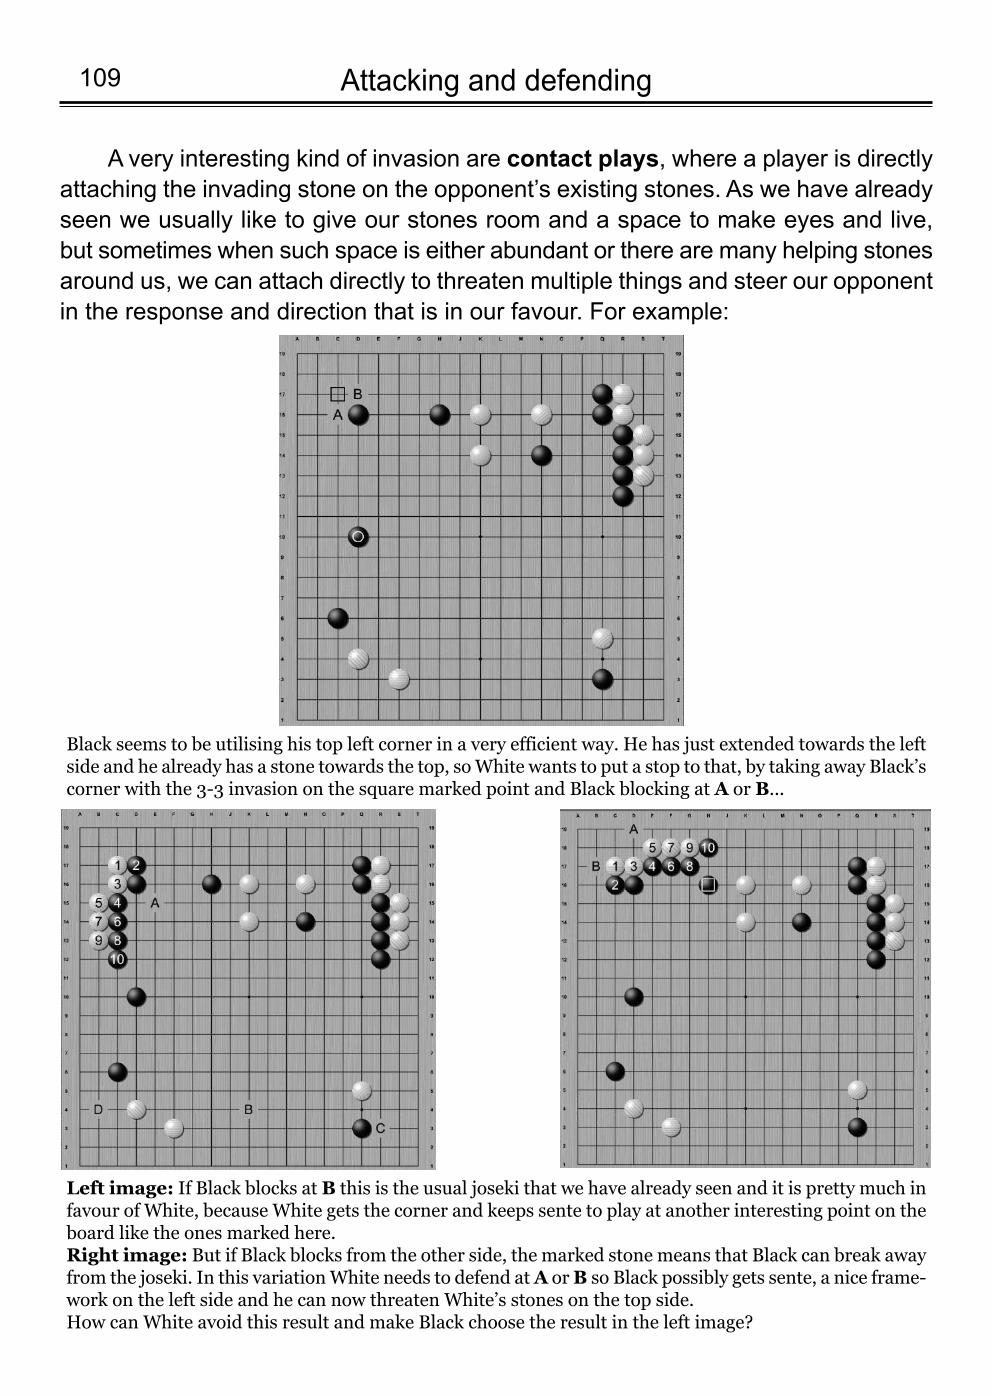
Attacking and defending109
A very interesting kind of invasion are contact plays, where a player is directlyattaching the invading stone on the opponent’s existing stones. As we have alreadyseen we usually like to give our stones room and a space to make eyes and live,but sometimes when such space is either abundant or there are many helping stonesaround us, we can attach directly to threaten multiple things and steer our opponentin the response and direction that is in our favour. For example:
Black seems to be utilising his top left corner in a very efficient way. He has just extended towards the leftside and he already has a stone towards the top, so White wants to put a stop to that, by taking away Black’scorner with the 3-3 invasion on the square marked point and Black blocking at A or B...
Left image: If Black blocks at B this is the usual joseki that we have already seen and it is pretty much infavour of White, because White gets the corner and keeps sente to play at another interesting point on theboard like the ones marked here.Right image: But if Black blocks from the other side, the marked stone means that Black can break awayfrom the joseki. In this variation White needs to defend at A or B so Black possibly gets sente, a nice frame-work on the left side and he can now threaten White’s stones on the top side. How can White avoid this result and make Black choose the result in the left image?
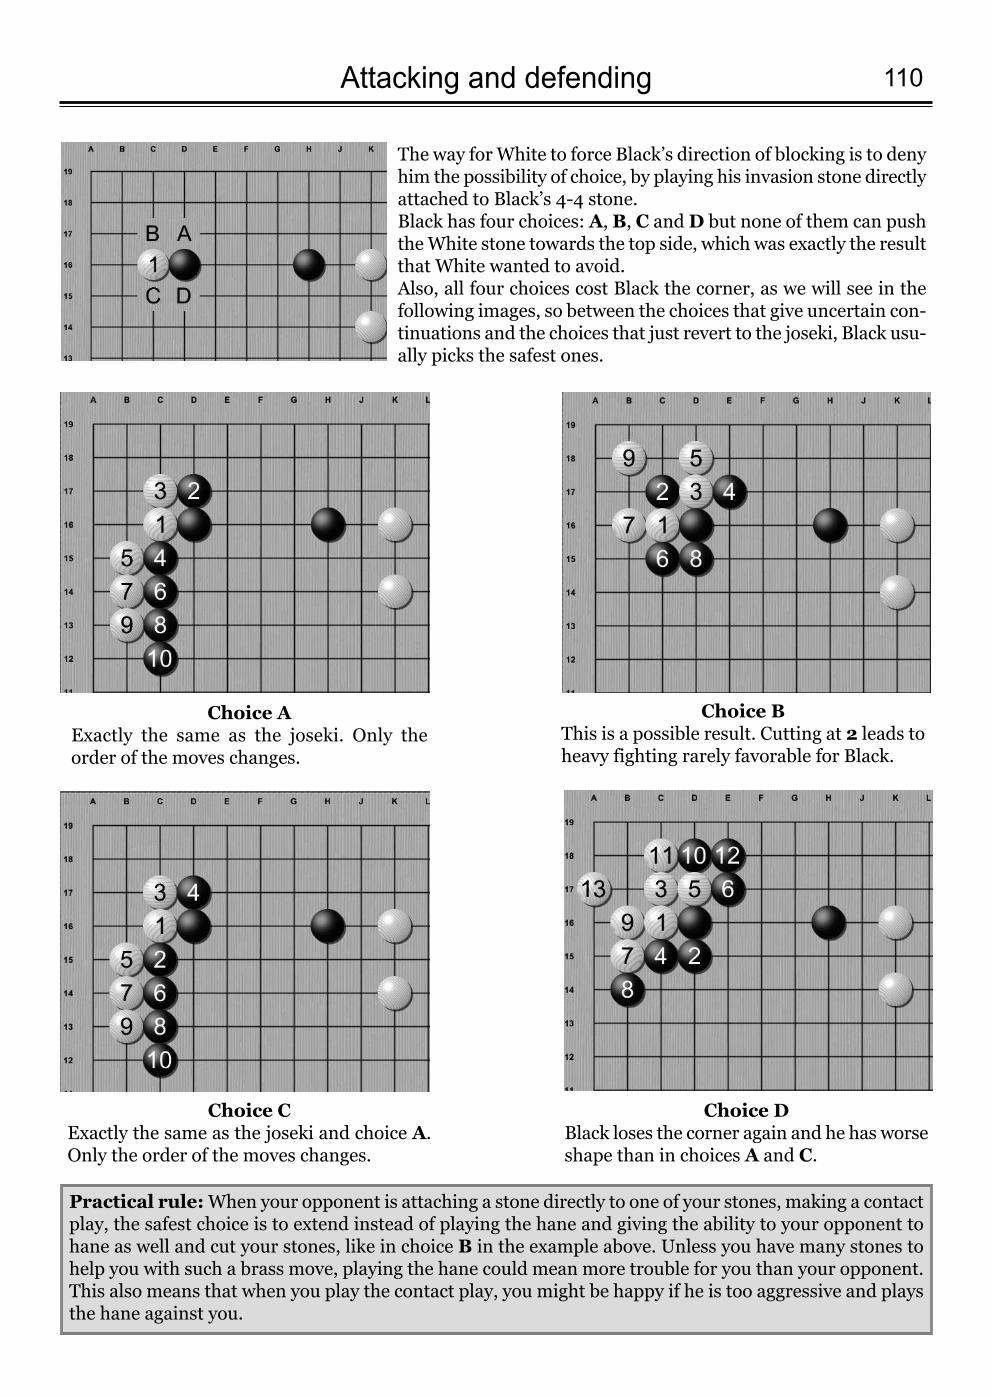
110Attacking and defending
The way for White to force Black’s direction of blocking is to denyhim the possibility of choice, by playing his invasion stone directlyattached to Black’s 4-4 stone. Black has four choices: A, B, C and D but none of them can pushthe White stone towards the top side, which was exactly the resultthat White wanted to avoid. Also, all four choices cost Black the corner, as we will see in thefollowing images, so between the choices that give uncertain con-tinuations and the choices that just revert to the joseki, Black usu-ally picks the safest ones.
Choice AExactly the same as the joseki. Only theorder of the moves changes.
Choice BThis is a possible result. Cutting at 2 leads toheavy fighting rarely favorable for Black.
Choice CExactly the same as the joseki and choice A.Only the order of the moves changes.
Choice DBlack loses the corner again and he has worseshape than in choices A and C.
Practical rule: When your opponent is attaching a stone directly to one of your stones, making a contactplay, the safest choice is to extend instead of playing the hane and giving the ability to your opponent tohane as well and cut your stones, like in choice B in the example above. Unless you have many stones tohelp you with such a brass move, playing the hane could mean more trouble for you than your opponent.This also means that when you play the contact play, you might be happy if he is too aggressive and playsthe hane against you.
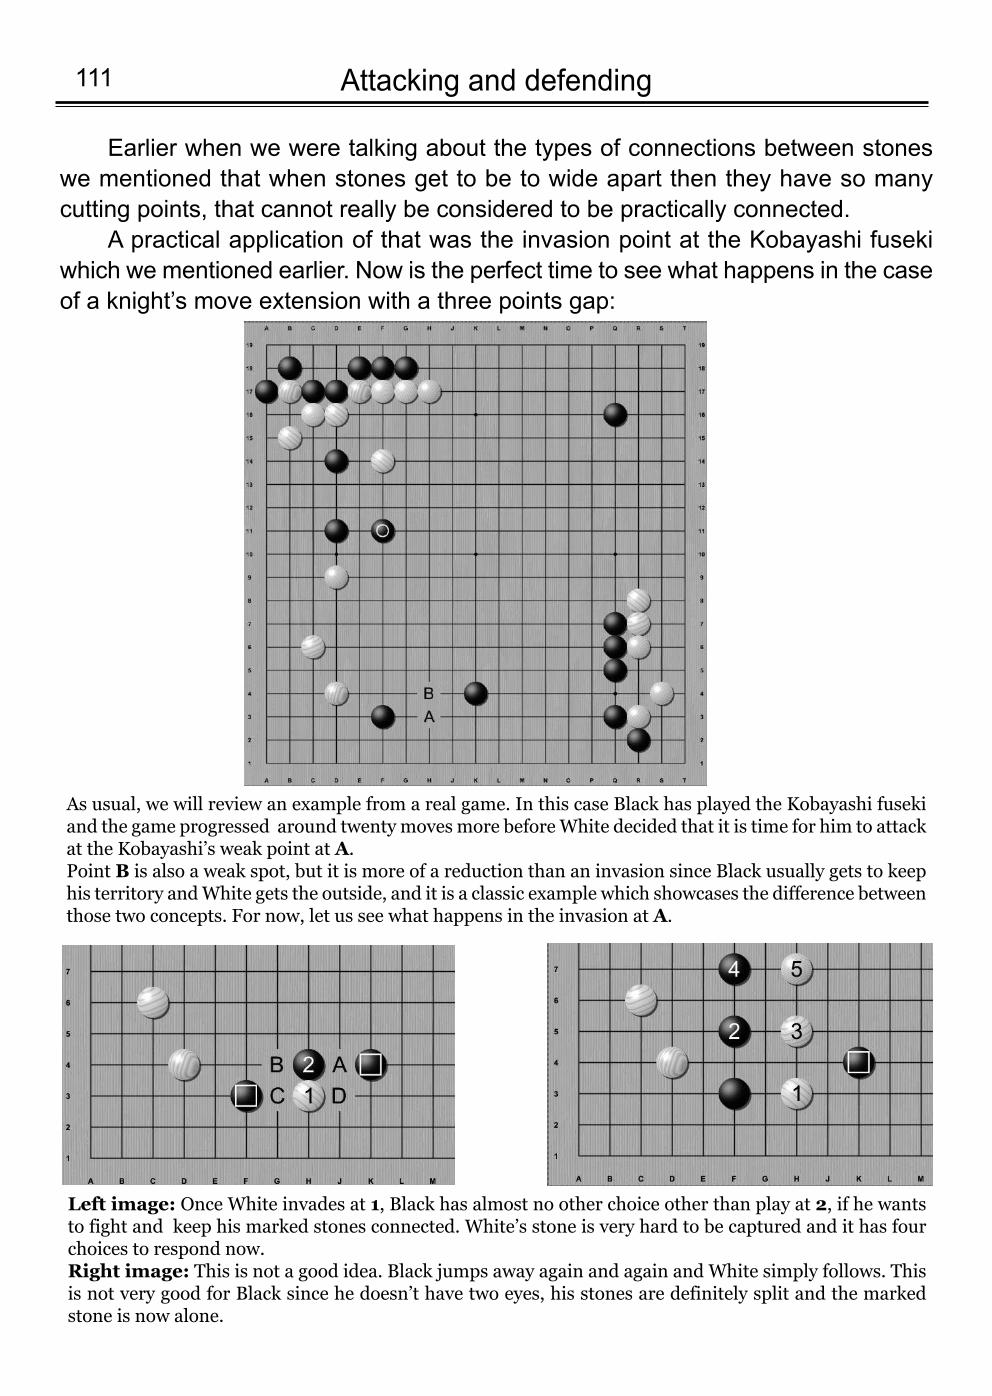
Attacking and defending111
Earlier when we were talking about the types of connections between stoneswe mentioned that when stones get to be to wide apart then they have so manycutting points, that cannot really be considered to be practically connected.
A practical application of that was the invasion point at the Kobayashi fusekiwhich we mentioned earlier. Now is the perfect time to see what happens in the caseof a knight’s move extension with a three points gap:
As usual, we will review an example from a real game. In this case Black has played the Kobayashi fusekiand the game progressed around twenty moves more before White decided that it is time for him to attackat the Kobayashi’s weak point at A. Point B is also a weak spot, but it is more of a reduction than an invasion since Black usually gets to keephis territory and White gets the outside, and it is a classic example which showcases the difference betweenthose two concepts. For now, let us see what happens in the invasion at A.
Left image: Once White invades at 1, Black has almost no other choice other than play at 2, if he wantsto fight and keep his marked stones connected. White’s stone is very hard to be captured and it has fourchoices to respond now. Right image: This is not a good idea. Black jumps away again and again and White simply follows. Thisis not very good for Black since he doesn’t have two eyes, his stones are definitely split and the markedstone is now alone.
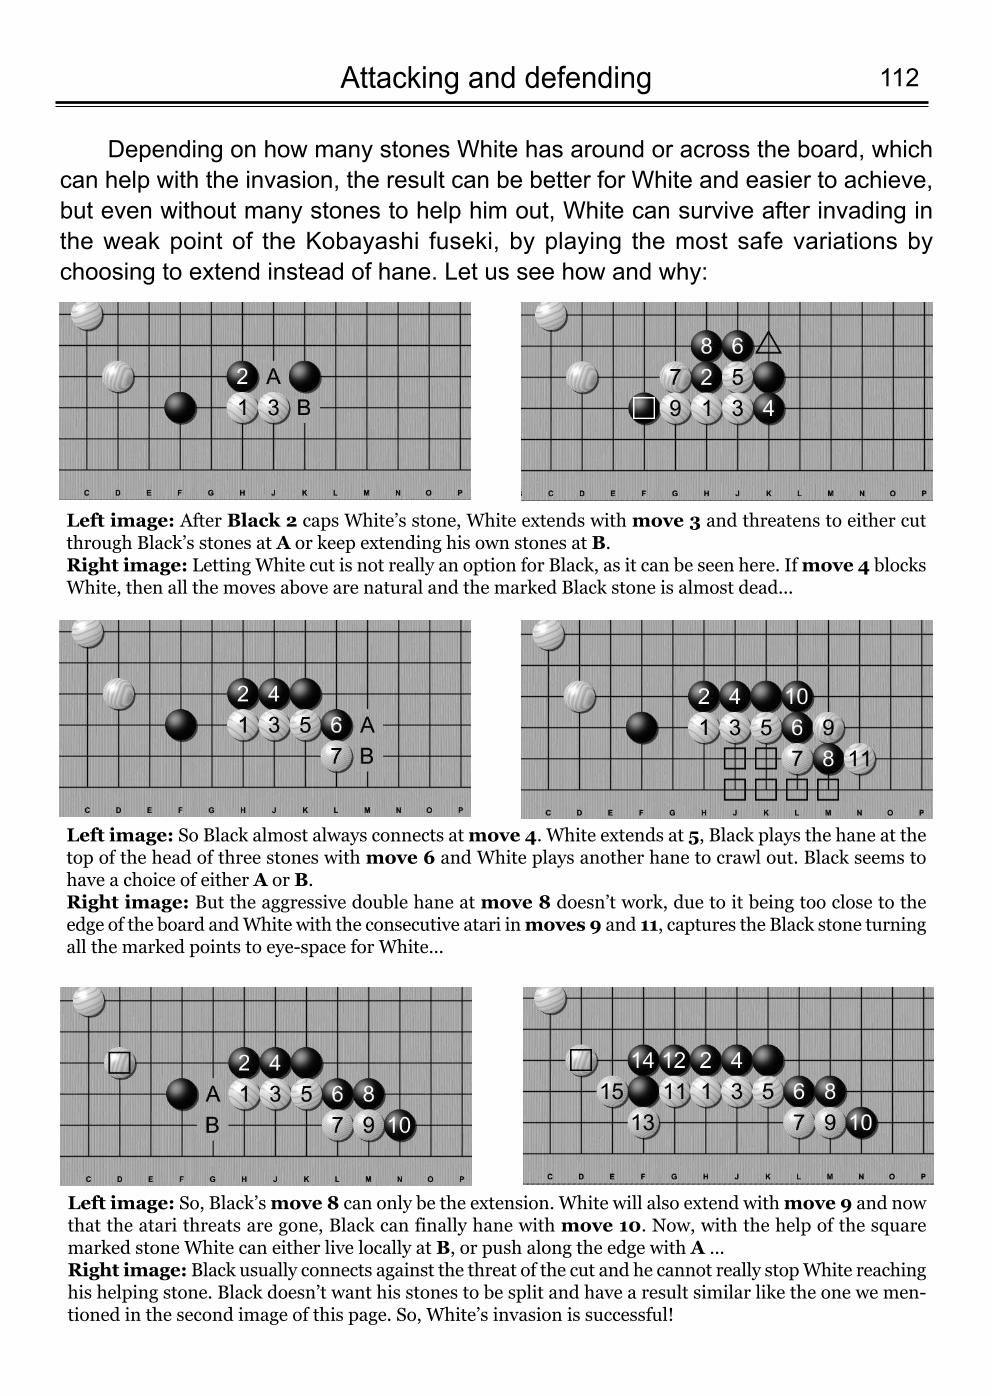
112Attacking and defending
Depending on how many stones White has around or across the board, whichcan help with the invasion, the result can be better for White and easier to achieve,but even without many stones to help him out, White can survive after invading inthe weak point of the Kobayashi fuseki, by playing the most safe variations bychoosing to extend instead of hane. Let us see how and why:
Left image: After Black 2 caps White’s stone, White extends with move 3 and threatens to either cutthrough Black’s stones at A or keep extending his own stones at B.Right image: Letting White cut is not really an option for Black, as it can be seen here. If move 4 blocksWhite, then all the moves above are natural and the marked Black stone is almost dead...
Left image: So Black almost always connects at move 4. White extends at 5, Black plays the hane at thetop of the head of three stones with move 6 and White plays another hane to crawl out. Black seems tohave a choice of either A or B.Right image: But the aggressive double hane at move 8 doesn’t work, due to it being too close to theedge of the board and White with the consecutive atari in moves 9 and 11, captures the Black stone turningall the marked points to eye-space for White...
Left image: So, Black’s move 8 can only be the extension. White will also extend with move 9 and nowthat the atari threats are gone, Black can finally hane with move 10. Now, with the help of the squaremarked stone White can either live locally at B, or push along the edge with A ...Right image: Black usually connects against the threat of the cut and he cannot really stop White reachinghis helping stone. Black doesn’t want his stones to be split and have a result similar like the one we men-tioned in the second image of this page. So, White’s invasion is successful!
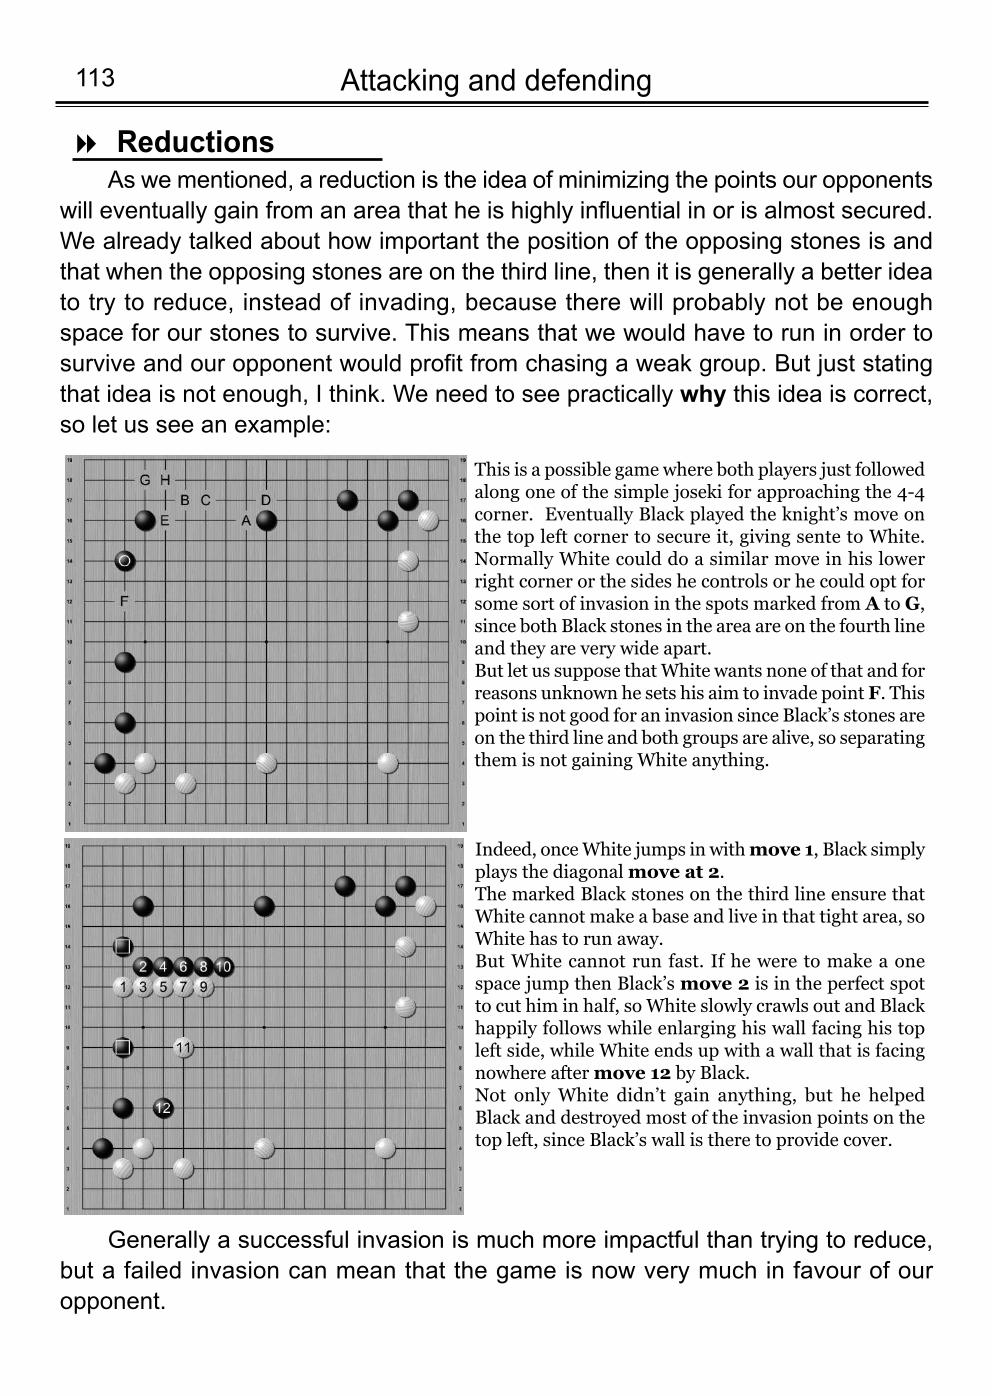
Attacking and defending113
As we mentioned, a reduction is the idea of minimizing the points our opponentswill eventually gain from an area that he is highly influential in or is almost secured.We already talked about how important the position of the opposing stones is andthat when the opposing stones are on the third line, then it is generally a better ideato try to reduce, instead of invading, because there will probably not be enoughspace for our stones to survive. This means that we would have to run in order tosurvive and our opponent would profit from chasing a weak group. But just statingthat idea is not enough, I think. We need to see practically why this idea is correct,so let us see an example:
Reductions8
This is a possible game where both players just followedalong one of the simple joseki for approaching the 4-4corner. Eventually Black played the knight’s move onthe top left corner to secure it, giving sente to White.Normally White could do a similar move in his lowerright corner or the sides he controls or he could opt forsome sort of invasion in the spots marked from A to G,since both Black stones in the area are on the fourth lineand they are very wide apart. But let us suppose that White wants none of that and forreasons unknown he sets his aim to invade point F. Thispoint is not good for an invasion since Black’s stones areon the third line and both groups are alive, so separatingthem is not gaining White anything.
Indeed, once White jumps in with move 1, Black simplyplays the diagonal move at 2.The marked Black stones on the third line ensure thatWhite cannot make a base and live in that tight area, soWhite has to run away.But White cannot run fast. If he were to make a onespace jump then Black’s move 2 is in the perfect spotto cut him in half, so White slowly crawls out and Blackhappily follows while enlarging his wall facing his topleft side, while White ends up with a wall that is facingnowhere after move 12 by Black.Not only White didn’t gain anything, but he helpedBlack and destroyed most of the invasion points on thetop left, since Black’s wall is there to provide cover.
Generally a successful invasion is much more impactful than trying to reduce,but a failed invasion can mean that the game is now very much in favour of ouropponent.
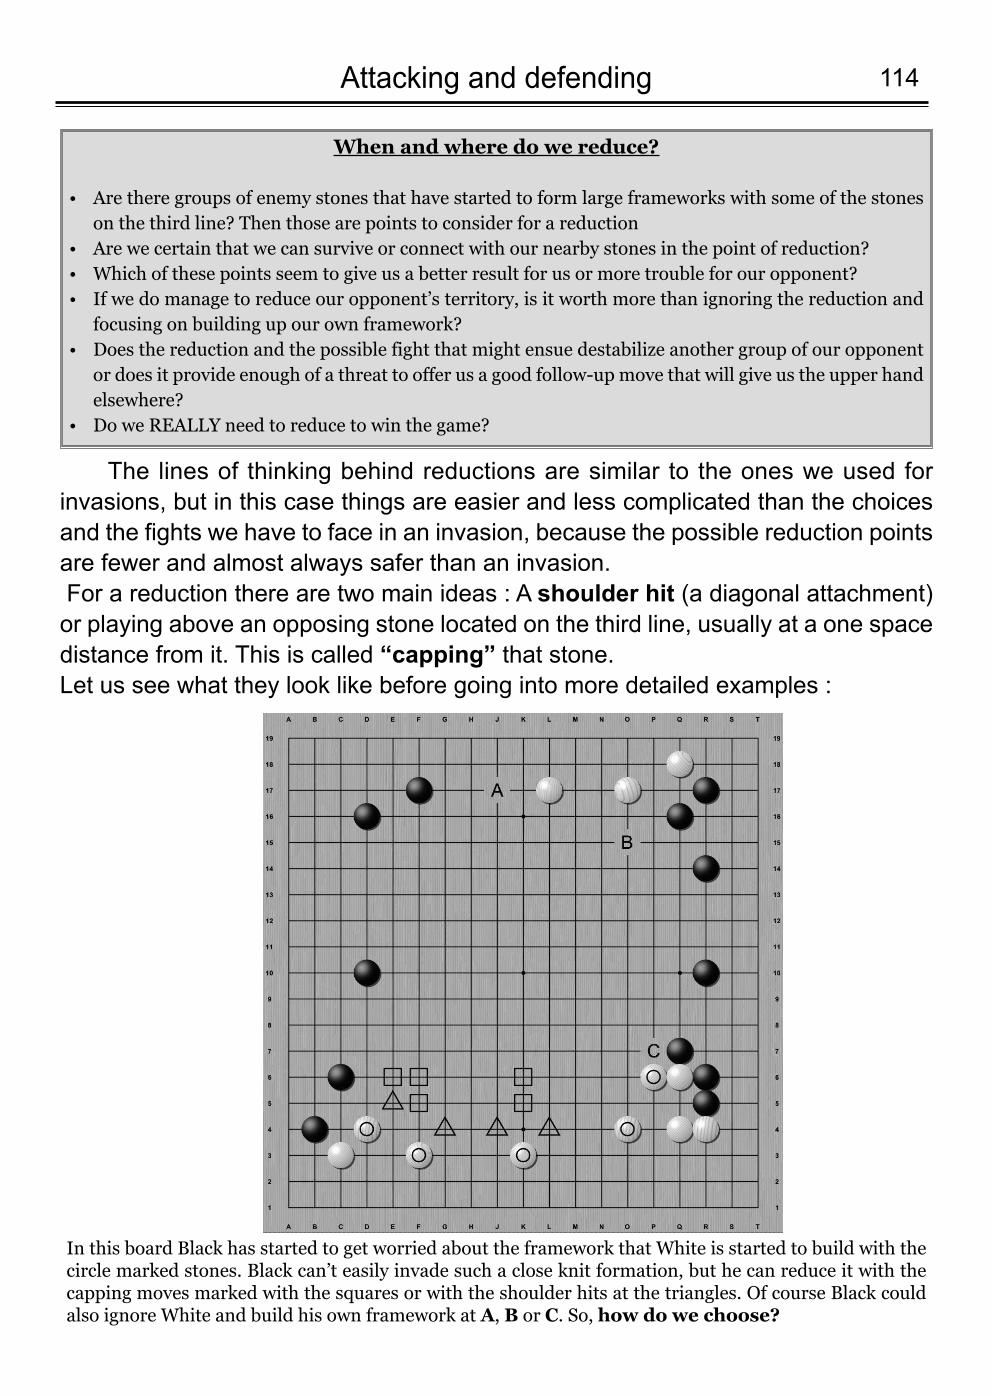
114Attacking and defending
The lines of thinking behind reductions are similar to the ones we used forinvasions, but in this case things are easier and less complicated than the choicesand the fights we have to face in an invasion, because the possible reduction pointsare fewer and almost always safer than an invasion. For a reduction there are two main ideas : A shoulder hit (a diagonal attachment)or playing above an opposing stone located on the third line, usually at a one spacedistance from it. This is called “capping” that stone. Let us see what they look like before going into more detailed examples :
When and where do we reduce?
Are there groups of enemy stones that have started to form large frameworks with some of the stones•on the third line? Then those are points to consider for a reductionAre we certain that we can survive or connect with our nearby stones in the point of reduction?•Which of these points seem to give us a better result for us or more trouble for our opponent?•If we do manage to reduce our opponent’s territory, is it worth more than ignoring the reduction and•focusing on building up our own framework? Does the reduction and the possible fight that might ensue destabilize another group of our opponent•or does it provide enough of a threat to offer us a good follow-up move that will give us the upper handelsewhere?Do we REALLY need to reduce to win the game? •
In this board Black has started to get worried about the framework that White is started to build with thecircle marked stones. Black can’t easily invade such a close knit formation, but he can reduce it with thecapping moves marked with the squares or with the shoulder hits at the triangles. Of course Black couldalso ignore White and build his own framework at A, B or C. So, how do we choose?
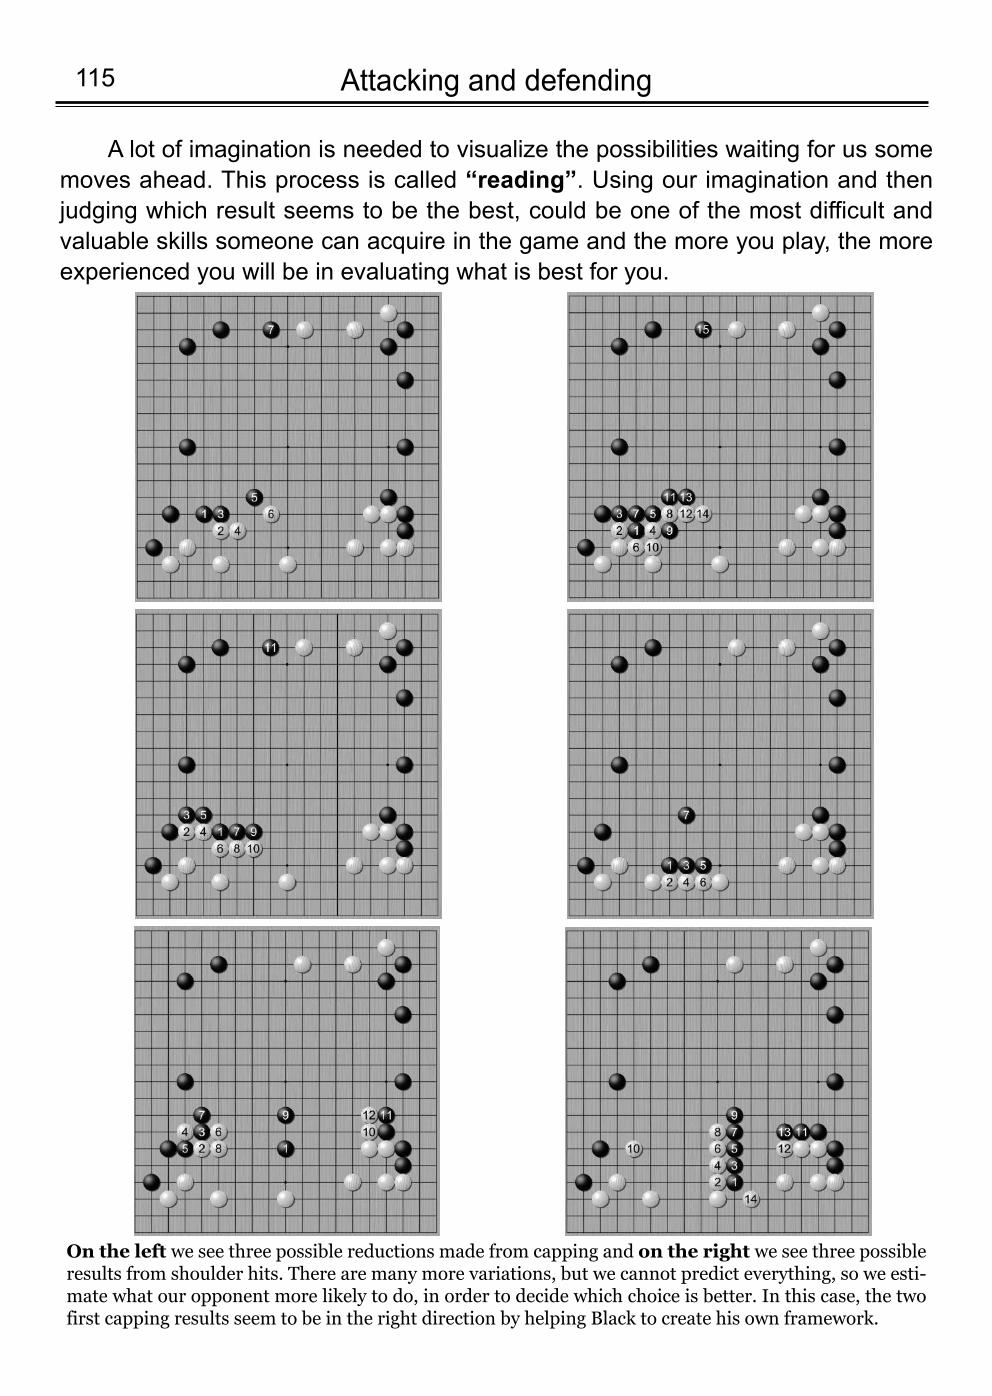
Attacking and defending115
A lot of imagination is needed to visualize the possibilities waiting for us somemoves ahead. This process is called “reading”. Using our imagination and thenjudging which result seems to be the best, could be one of the most difficult andvaluable skills someone can acquire in the game and the more you play, the moreexperienced you will be in evaluating what is best for you.
On the left we see three possible reductions made from capping and on the right we see three possibleresults from shoulder hits. There are many more variations, but we cannot predict everything, so we esti-mate what our opponent more likely to do, in order to decide which choice is better. In this case, the twofirst capping results seem to be in the right direction by helping Black to create his own framework.
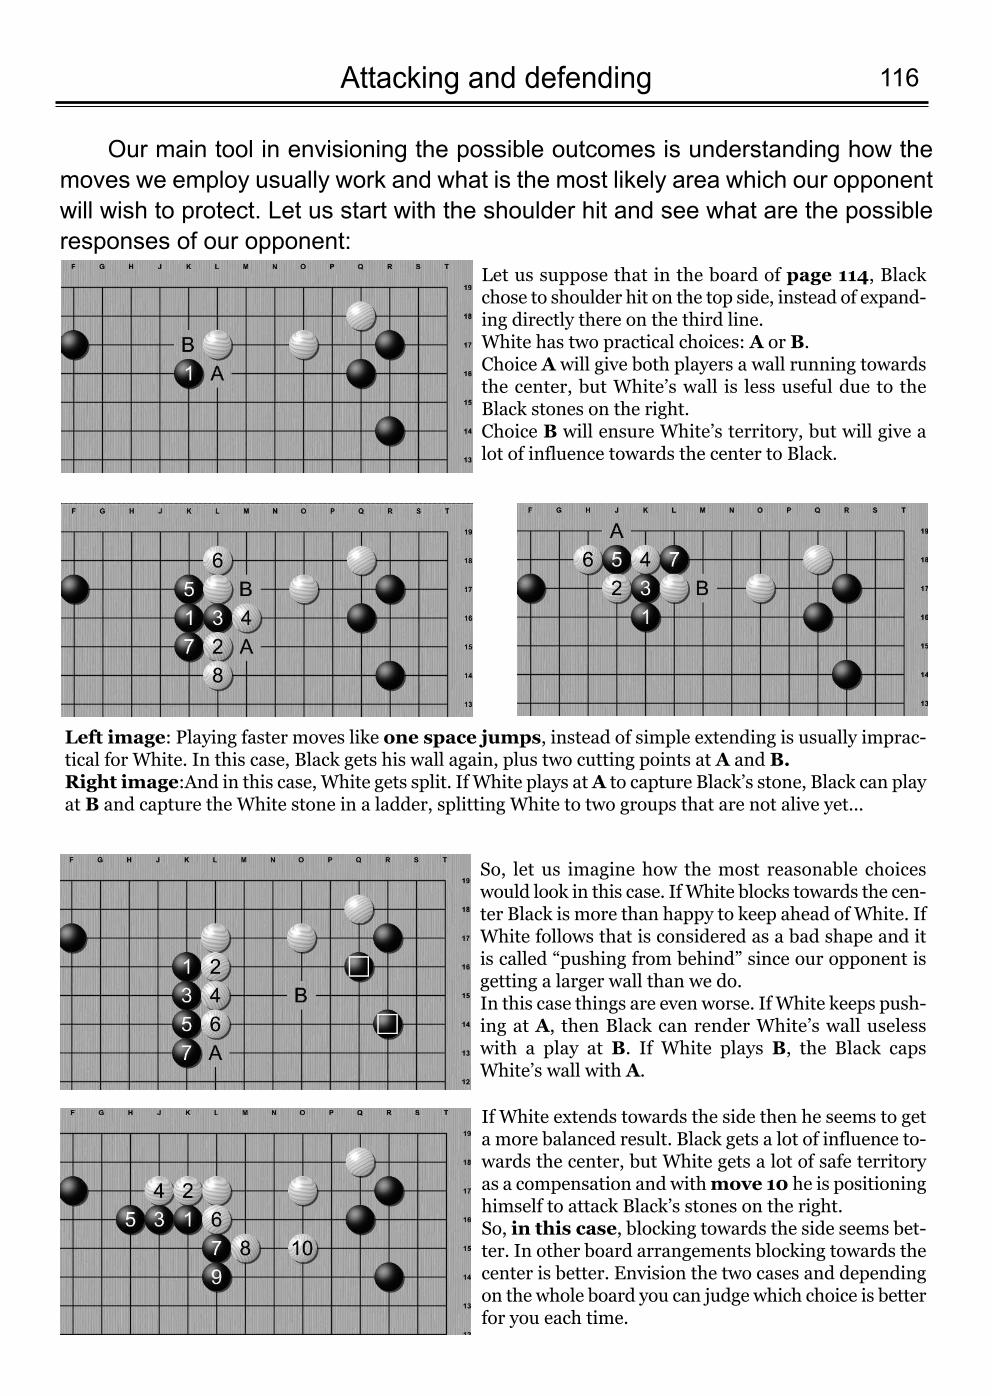
116Attacking and defending
Our main tool in envisioning the possible outcomes is understanding how themoves we employ usually work and what is the most likely area which our opponentwill wish to protect. Let us start with the shoulder hit and see what are the possibleresponses of our opponent:
Let us suppose that in the board of page 114, Blackchose to shoulder hit on the top side, instead of expand-ing directly there on the third line.White has two practical choices: A or B.Choice A will give both players a wall running towardsthe center, but White’s wall is less useful due to theBlack stones on the right.Choice B will ensure White’s territory, but will give alot of influence towards the center to Black.
Left image: Playing faster moves like one space jumps, instead of simple extending is usually imprac-tical for White. In this case, Black gets his wall again, plus two cutting points at A and B.Right image:And in this case, White gets split. If White plays at A to capture Black’s stone, Black can playat B and capture the White stone in a ladder, splitting White to twο groups that are not alive yet...
So, let us imagine how the most reasonable choiceswould look in this case. If White blocks towards the cen-ter Black is more than happy to keep ahead of White. IfWhite follows that is considered as a bad shape and itis called “pushing from behind” since our opponent isgetting a larger wall than we do. In this case things are even worse. If White keeps push-ing at A, then Black can render White’s wall uselesswith a play at B. If White plays B, the Black capsWhite’s wall with A.
If White extends towards the side then he seems to geta more balanced result. Black gets a lot of influence to-wards the center, but White gets a lot of safe territoryas a compensation and with move 10 he is positioninghimself to attack Black’s stones on the right. So, in this case, blocking towards the side seems bet-ter. In other board arrangements blocking towards thecenter is better. Envision the two cases and dependingon the whole board you can judge which choice is betterfor you each time.

Attacking and defending117
As far as capping is concerned things can be more complicated, especially if your opponent has too many stones in the area, but in the most common cases,capping has two usual responses, as well:
The most usual move used for capping reduction is theone space approach. When Black caps the White stoneon the third line, the most common moves for Whiteare A and B. Those moves usually are miai and whenWhite chooses one of them, Black goes for the otherpoint. Depending on the situation and the stones around thearea, White can read out the possible result and choosethe one that fits his plans best...
Left image: In this case, once White plays A, Black goes for B. White defends his territory at move 4and Black continues his threat with move 5. White blocks at 6 and Black is done with reducing, so hecan now jump towards the center with 7.Right image: If White plays B, Black goes for A. The moves in this case have the same reasoning as be-fore, with the only difference being that Black can play move 9 instead of jumping towards the center,since he has helping stones nearby.
Unlike a shoulder hit, capping sometimes seems like amove which we can ignore. This is not always the case,since we can get punished for ignoring the capping ofour stones. If White plays move 2 elsewhere, the usualpunishment is the attachment at move 3. The mostnatural move for White is to extend with move 4, butwith Black 5 that immediately creates the bad shapeof getting your two stones hit on the head. In this case,in the following moves White’s marked stones seem tobe in danger...
White might instead try to cut through Black’s stonesat move 4. This is not a very good idea in most cases.Black 5 threatens to cut White instead. White 6 goesfor the atari and Black 7 extends to save that stone andthreaten White. Now White needs to extend at move8 or lose his stone and all his territory. Black 9 is anatari that cuts both White stones and if White saves hiscutting stone like in the image, then he loses his stonehe played at move 6 and his marked stones are in evengreater danger now.
Remember: Mind your shape! Do not be too aggressive without a clear goal in mind.
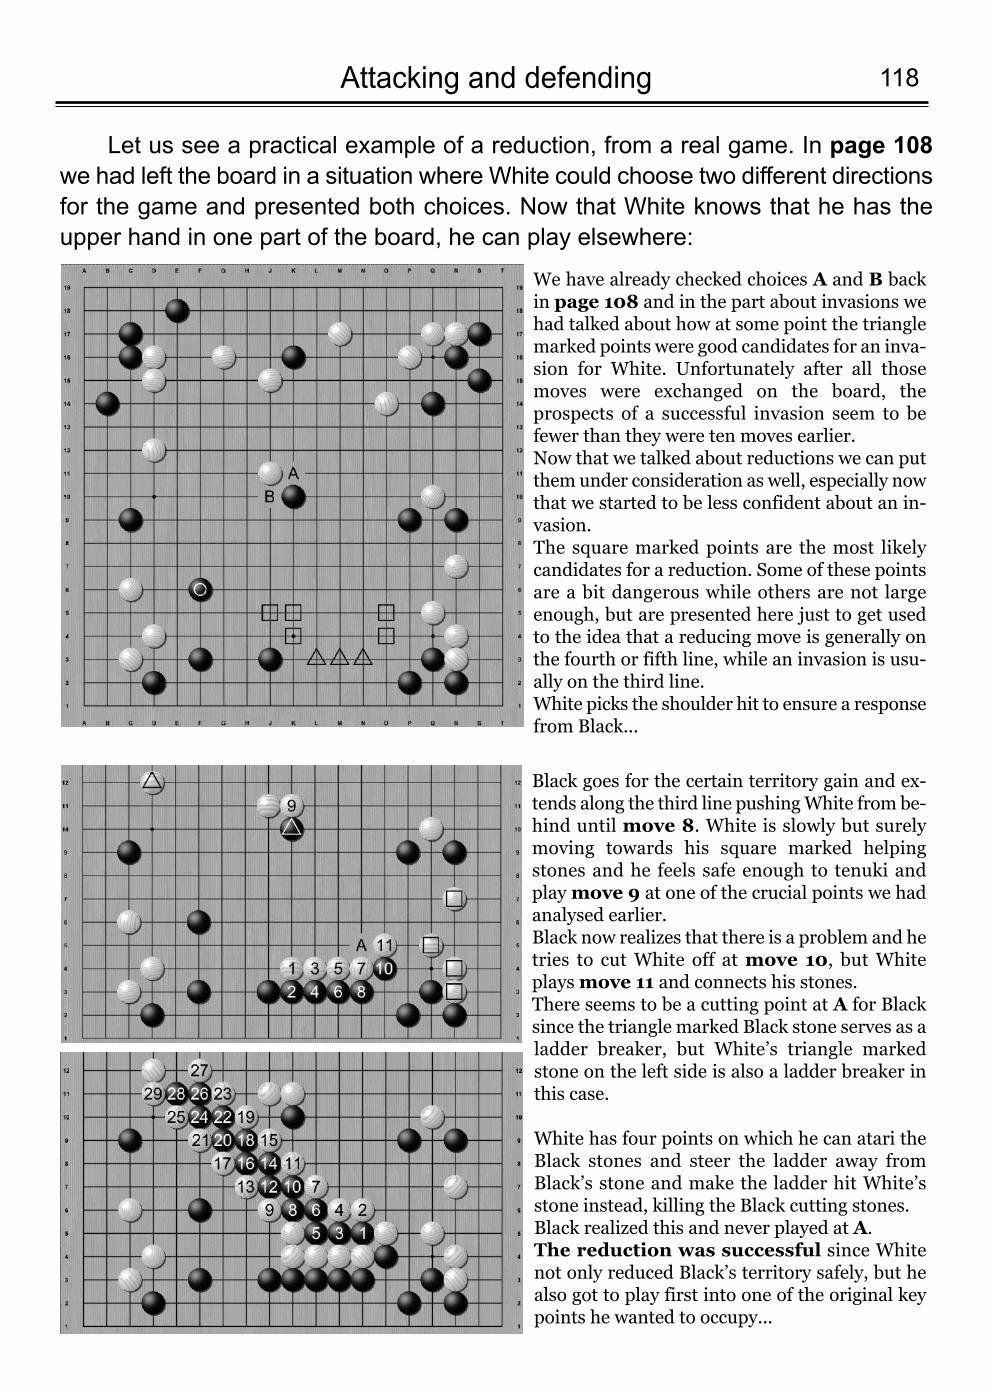
118Attacking and defending
Let us see a practical example of a reduction, from a real game. In page 108we had left the board in a situation where White could choose two different directionsfor the game and presented both choices. Now that White knows that he has theupper hand in one part of the board, he can play elsewhere:
We have already checked choices A and B backin page 108 and in the part about invasions wehad talked about how at some point the trianglemarked points were good candidates for an inva-sion for White. Unfortunately after all thosemoves were exchanged on the board, theprospects of a successful invasion seem to befewer than they were ten moves earlier.Now that we talked about reductions we can putthem under consideration as well, especially nowthat we started to be less confident about an in-vasion. The square marked points are the most likelycandidates for a reduction. Some of these pointsare a bit dangerous while others are not largeenough, but are presented here just to get usedto the idea that a reducing move is generally onthe fourth or fifth line, while an invasion is usu-ally on the third line. White picks the shoulder hit to ensure a responsefrom Black...
Black goes for the certain territory gain and ex-tends along the third line pushing White from be-hind until move 8. White is slowly but surelymoving towards his square marked helpingstones and he feels safe enough to tenuki andplay move 9 at one of the crucial points we hadanalysed earlier.Black now realizes that there is a problem and hetries to cut White off at move 10, but Whiteplays move 11 and connects his stones. There seems to be a cutting point at A for Blacksince the triangle marked Black stone serves as aladder breaker, but White’s triangle markedstone on the left side is also a ladder breaker inthis case.
White has four points on which he can atari theBlack stones and steer the ladder away fromBlack’s stone and make the ladder hit White’sstone instead, killing the Black cutting stones. Black realized this and never played at A. The reduction was successful since Whitenot only reduced Black’s territory safely, but healso got to play first into one of the original keypoints he wanted to occupy...
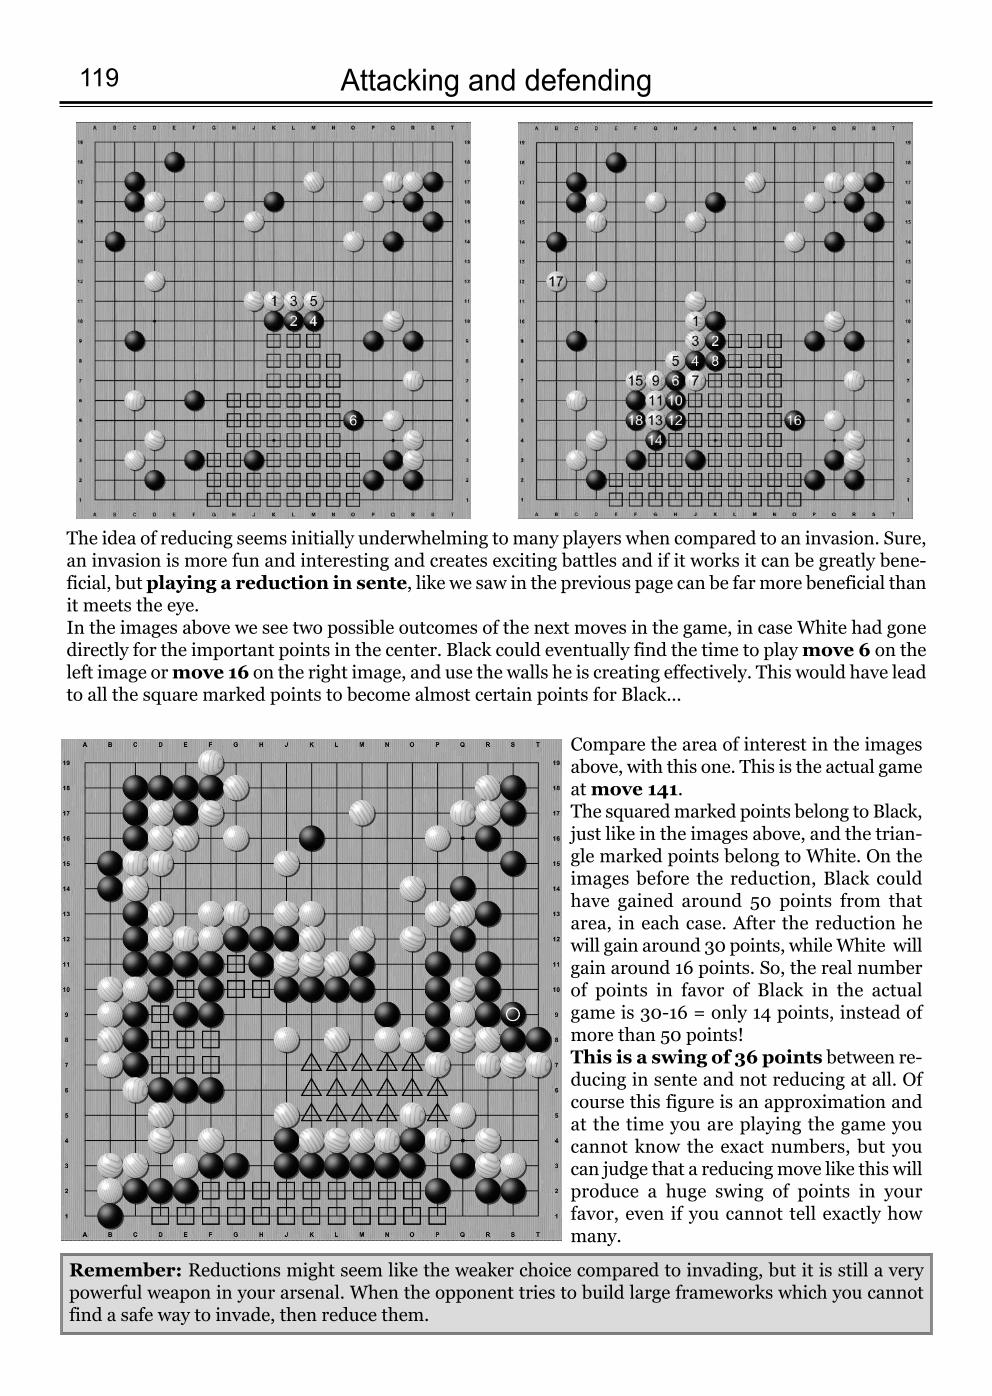
Attacking and defending119
The idea of reducing seems initially underwhelming to many players when compared to an invasion. Sure,an invasion is more fun and interesting and creates exciting battles and if it works it can be greatly bene-ficial, but playing a reduction in sente, like we saw in the previous page can be far more beneficial thanit meets the eye. In the images above we see two possible outcomes of the next moves in the game, in case White had gonedirectly for the important points in the center. Black could eventually find the time to play move 6 on theleft image or move 16 on the right image, and use the walls he is creating effectively. This would have leadto all the square marked points to become almost certain points for Black...
Compare the area of interest in the imagesabove, with this one. This is the actual gameat move 141. The squared marked points belong to Black,just like in the images above, and the trian-gle marked points belong to White. On theimages before the reduction, Black couldhave gained around 50 points from thatarea, in each case. After the reduction hewill gain around 30 points, while White willgain around 16 points. So, the real numberof points in favor of Black in the actualgame is 30-16 = only 14 points, instead ofmore than 50 points!This is a swing of 36 points between re-ducing in sente and not reducing at all. Ofcourse this figure is an approximation andat the time you are playing the game youcannot know the exact numbers, but youcan judge that a reducing move like this willproduce a huge swing of points in yourfavor, even if you cannot tell exactly howmany.
Remember: Reductions might seem like the weaker choice compared to invading, but it is still a verypowerful weapon in your arsenal. When the opponent tries to build large frameworks which you cannotfind a safe way to invade, then reduce them.
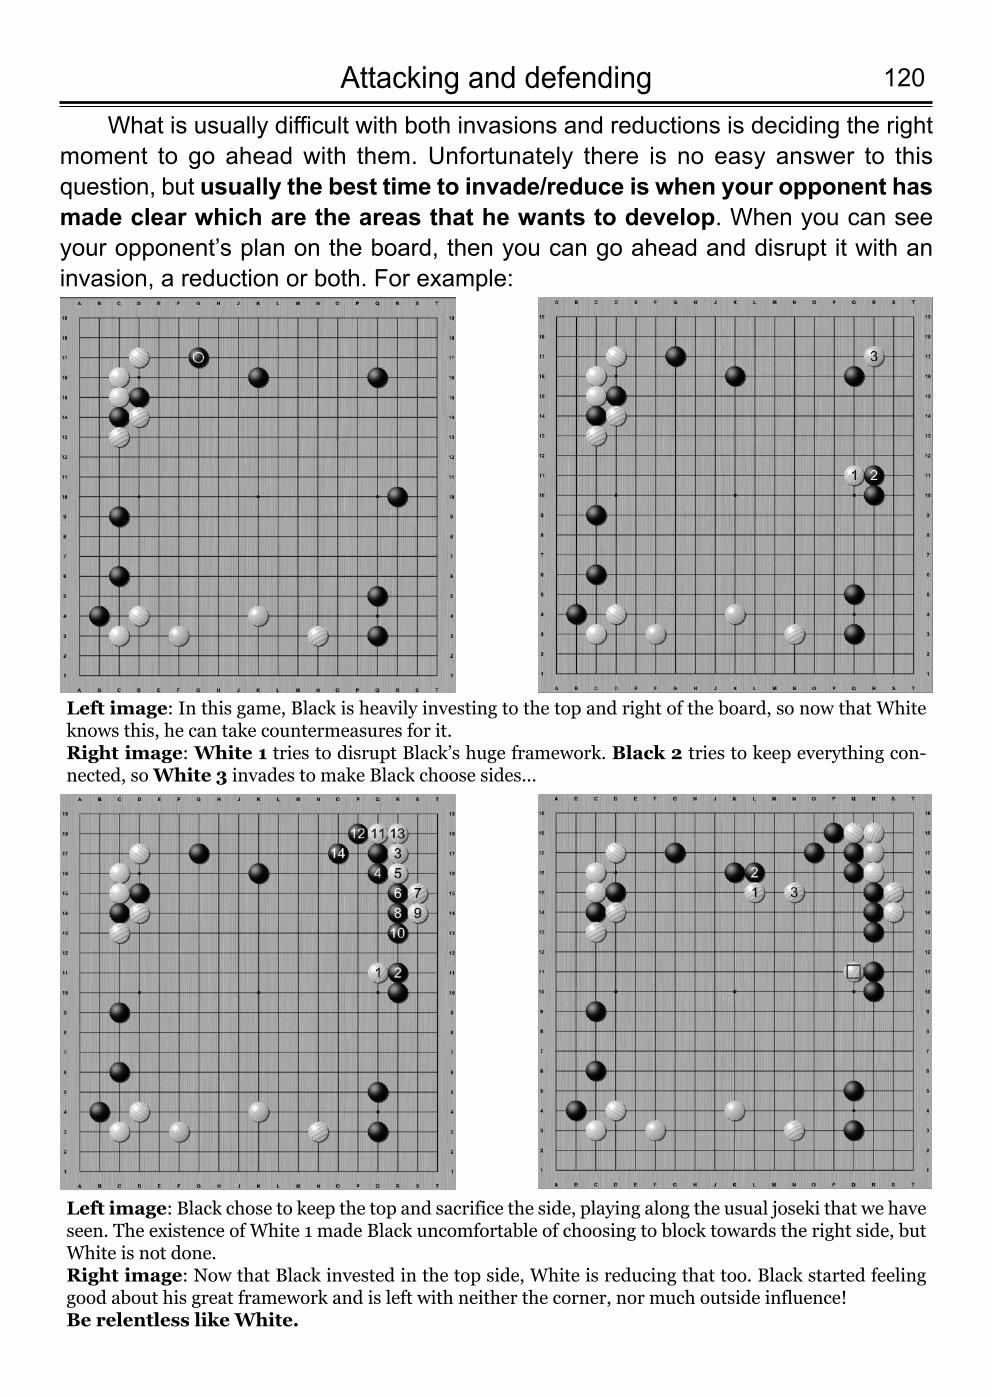
120Attacking and defendingWhat is usually difficult with both invasions and reductions is deciding the right
moment to go ahead with them. Unfortunately there is no easy answer to thisquestion, but usually the best time to invade/reduce is when your opponent hasmade clear which are the areas that he wants to develop. When you can seeyour opponent’s plan on the board, then you can go ahead and disrupt it with aninvasion, a reduction or both. For example:
Left image: In this game, Black is heavily investing to the top and right of the board, so now that Whiteknows this, he can take countermeasures for it.Right image: White 1 tries to disrupt Black’s huge framework. Black 2 tries to keep everything con-nected, so White 3 invades to make Black choose sides...
Left image: Black chose to keep the top and sacrifice the side, playing along the usual joseki that we haveseen. The existence of White 1 made Black uncomfortable of choosing to block towards the right side, butWhite is not done.Right image: Now that Black invested in the top side, White is reducing that too. Black started feelinggood about his great framework and is left with neither the corner, nor much outside influence! Be relentless like White.
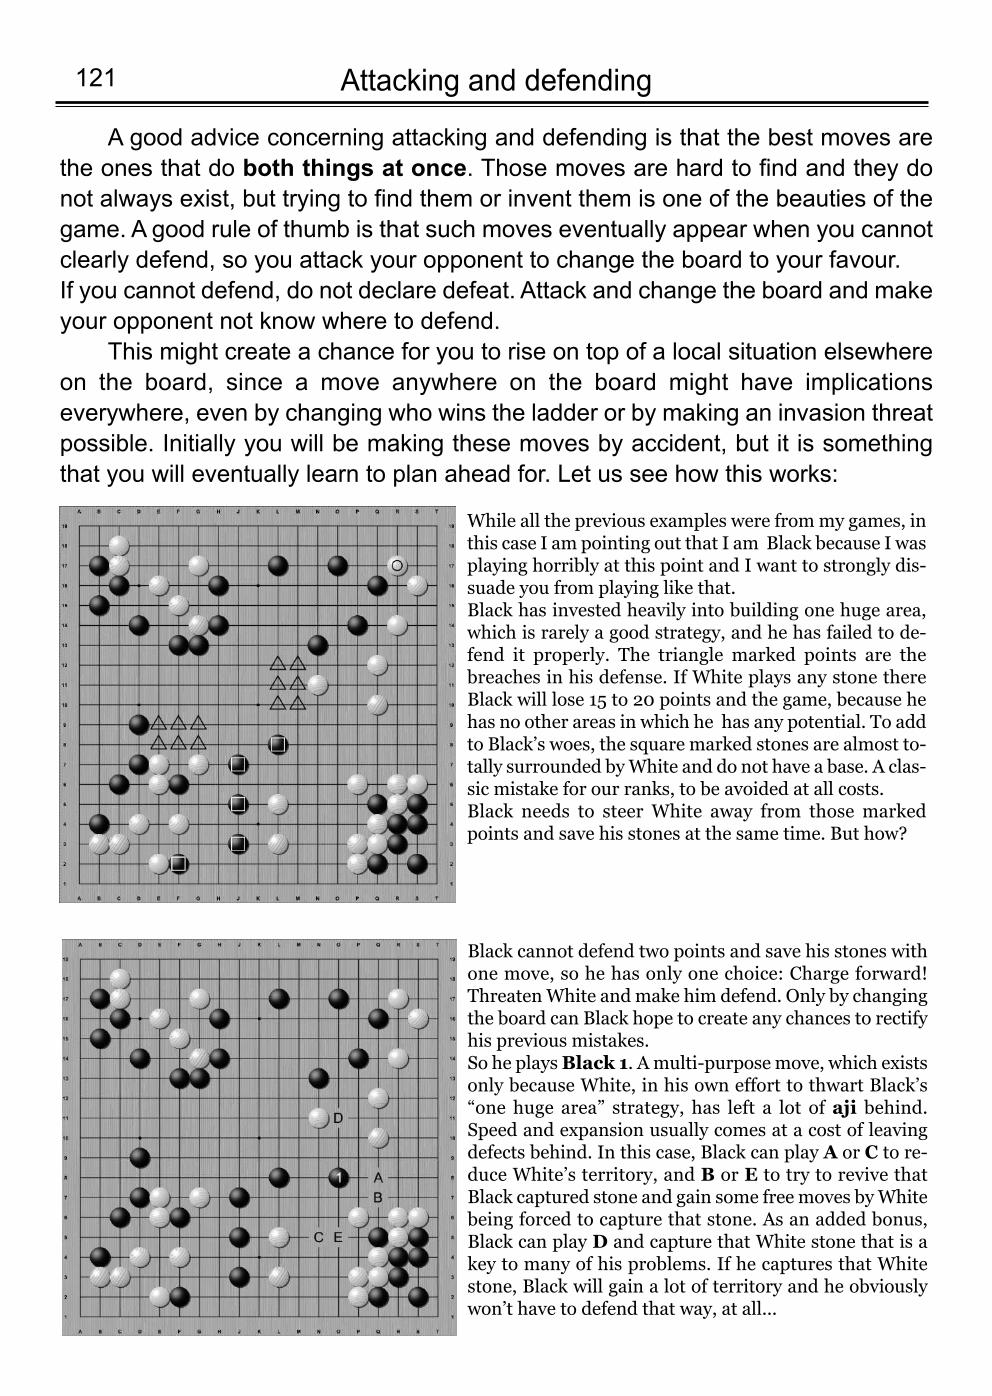
Attacking and defending121
A good advice concerning attacking and defending is that the best moves arethe ones that do both things at once. Those moves are hard to find and they donot always exist, but trying to find them or invent them is one of the beauties of thegame. A good rule of thumb is that such moves eventually appear when you cannotclearly defend, so you attack your opponent to change the board to your favour. If you cannot defend, do not declare defeat. Attack and change the board and makeyour opponent not know where to defend.
This might create a chance for you to rise on top of a local situation elsewhereon the board, since a move anywhere on the board might have implicationseverywhere, even by changing who wins the ladder or by making an invasion threatpossible. Initially you will be making these moves by accident, but it is somethingthat you will eventually learn to plan ahead for. Let us see how this works:
While all the previous examples were from my games, inthis case I am pointing out that I am Black because I wasplaying horribly at this point and I want to strongly dis-suade you from playing like that. Black has invested heavily into building one huge area,which is rarely a good strategy, and he has failed to de-fend it properly. The triangle marked points are thebreaches in his defense. If White plays any stone thereBlack will lose 15 to 20 points and the game, because hehas no other areas in which he has any potential. To addto Black’s woes, the square marked stones are almost to-tally surrounded by White and do not have a base. A clas-sic mistake for our ranks, to be avoided at all costs.Black needs to steer White away from those markedpoints and save his stones at the same time. But how?
Black cannot defend two points and save his stones withone move, so he has only one choice: Charge forward!Threaten White and make him defend. Only by changingthe board can Black hope to create any chances to rectifyhis previous mistakes.So he plays Black 1. A multi-purpose move, which existsonly because White, in his own effort to thwart Black’s“one huge area” strategy, has left a lot of aji behind.Speed and expansion usually comes at a cost of leavingdefects behind. In this case, Black can play A or C to re-duce White’s territory, and B or E to try to revive thatBlack captured stone and gain some free moves by Whitebeing forced to capture that stone. As an added bonus,Black can play D and capture that White stone that is akey to many of his problems. If he captures that Whitestone, Black will gain a lot of territory and he obviouslywon’t have to defend that way, at all...
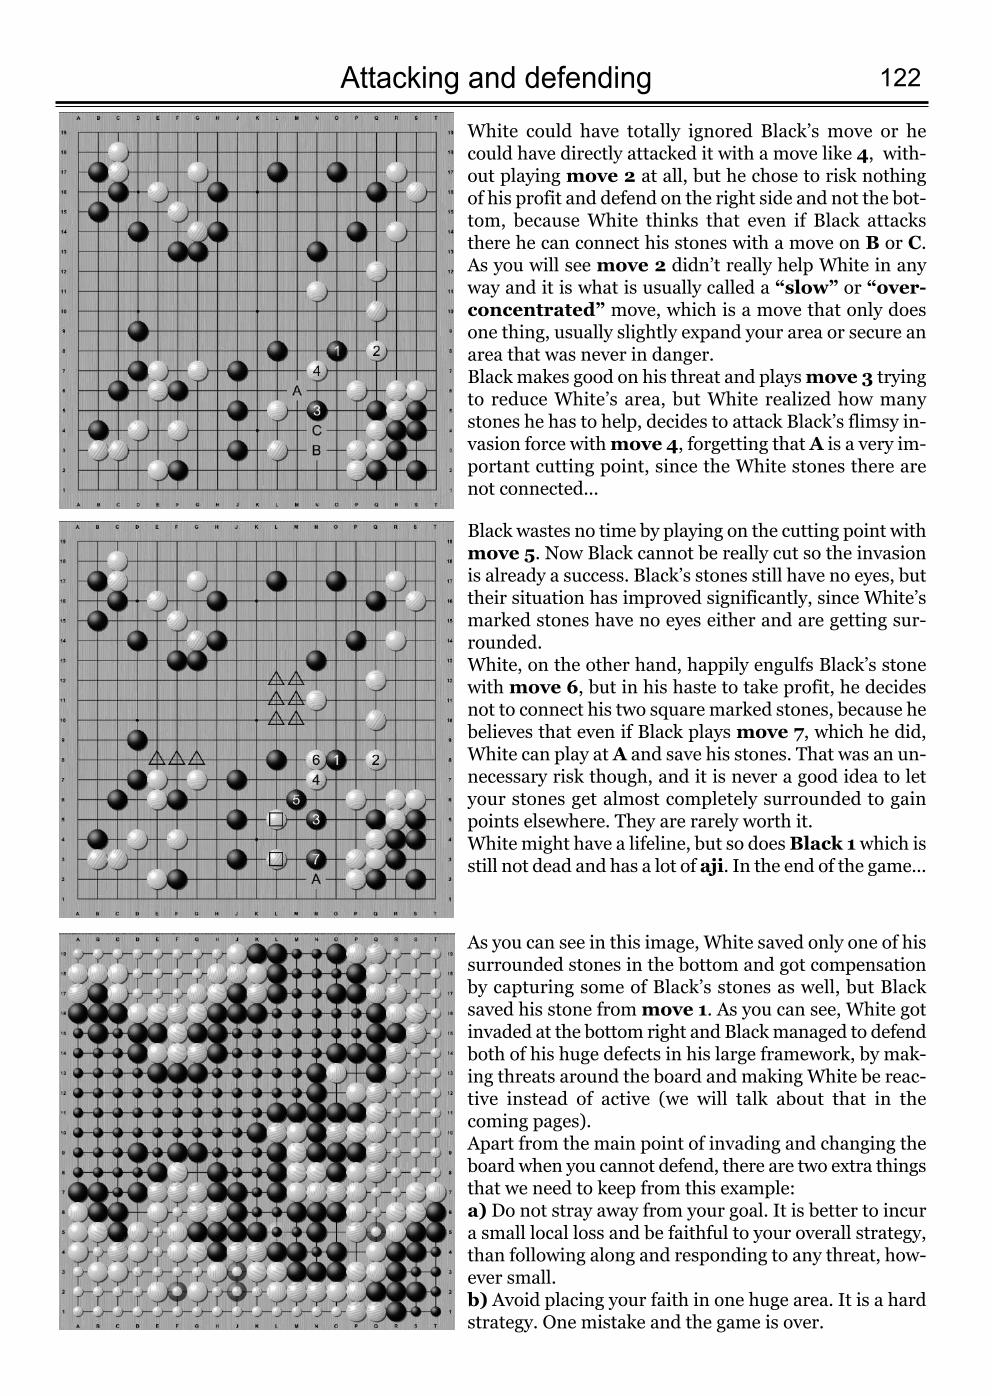
122Attacking and defendingWhite could have totally ignored Black’s move or hecould have directly attacked it with a move like 4, with-out playing move 2 at all, but he chose to risk nothingof his profit and defend on the right side and not the bot-tom, because White thinks that even if Black attacksthere he can connect his stones with a move on B or C.As you will see move 2 didn’t really help White in anyway and it is what is usually called a “slow” or “over-concentrated” move, which is a move that only doesone thing, usually slightly expand your area or secure anarea that was never in danger.Black makes good on his threat and plays move 3 tryingto reduce White’s area, but White realized how manystones he has to help, decides to attack Black’s flimsy in-vasion force with move 4, forgetting that A is a very im-portant cutting point, since the White stones there arenot connected...
Black wastes no time by playing on the cutting point withmove 5. Now Black cannot be really cut so the invasionis already a success. Black’s stones still have no eyes, buttheir situation has improved significantly, since White’smarked stones have no eyes either and are getting sur-rounded. White, on the other hand, happily engulfs Black’s stonewith move 6, but in his haste to take profit, he decidesnot to connect his two square marked stones, because hebelieves that even if Black plays move 7, which he did,White can play at A and save his stones. That was an un-necessary risk though, and it is never a good idea to letyour stones get almost completely surrounded to gainpoints elsewhere. They are rarely worth it. White might have a lifeline, but so does Black 1which isstill not dead and has a lot of aji. In the end of the game...
As you can see in this image, White saved only one of hissurrounded stones in the bottom and got compensationby capturing some of Black’s stones as well, but Blacksaved his stone from move 1. As you can see, White gotinvaded at the bottom right and Black managed to defendboth of his huge defects in his large framework, by mak-ing threats around the board and making White be reac-tive instead of active (we will talk about that in thecoming pages). Apart from the main point of invading and changing theboard when you cannot defend, there are two extra thingsthat we need to keep from this example: a) Do not stray away from your goal. It is better to incura small local loss and be faithful to your overall strategy,than following along and responding to any threat, how-ever small.b) Avoid placing your faith in one huge area. It is a hardstrategy. One mistake and the game is over.
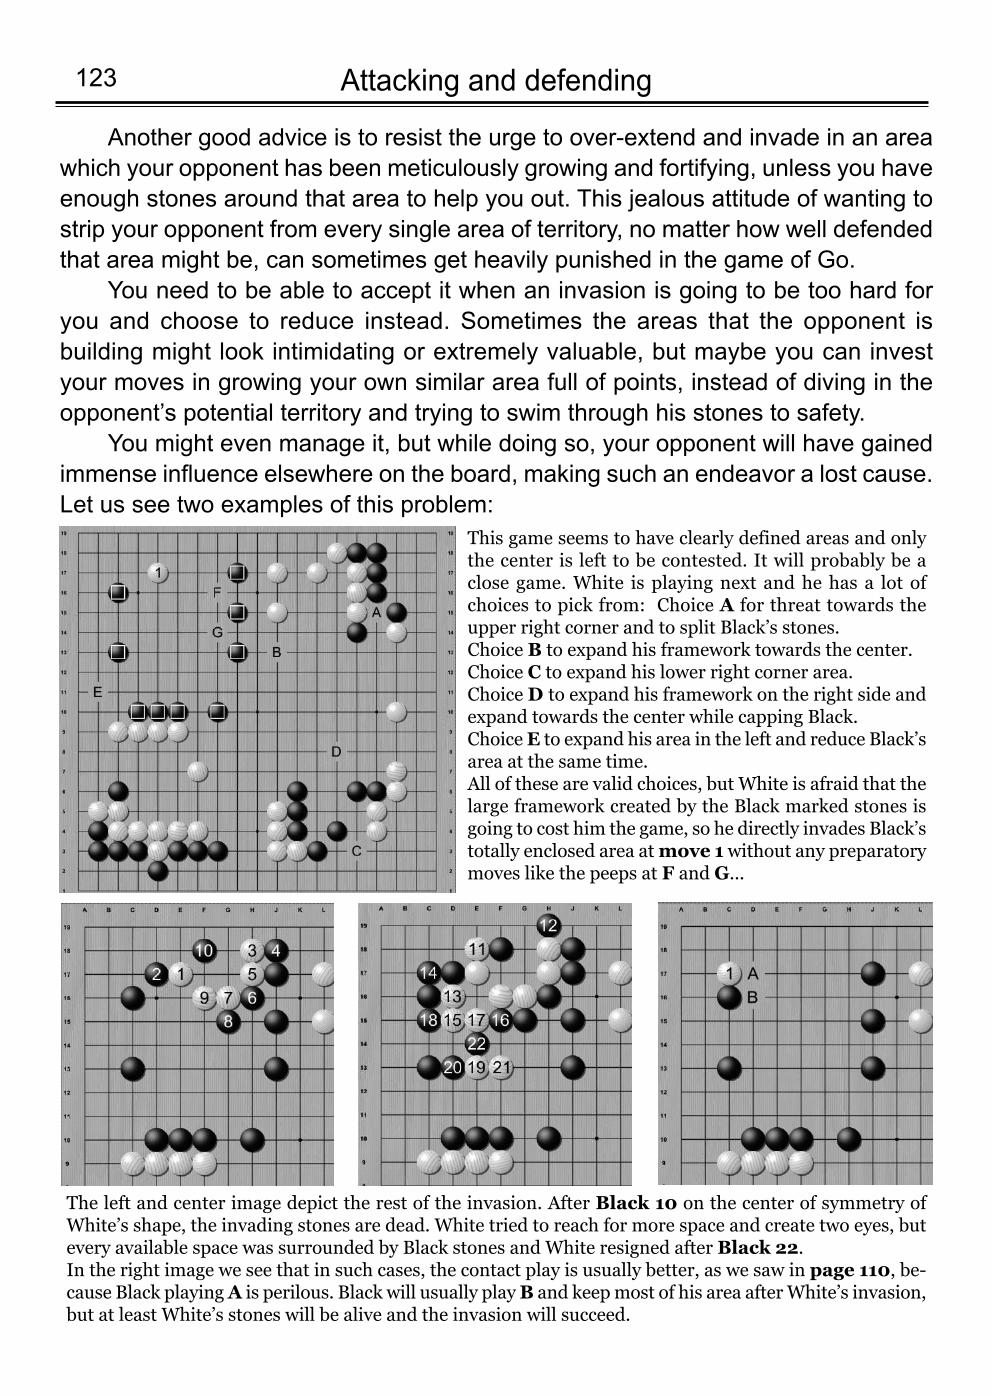
Attacking and defending123
Another good advice is to resist the urge to over-extend and invade in an areawhich your opponent has been meticulously growing and fortifying, unless you haveenough stones around that area to help you out. This jealous attitude of wanting tostrip your opponent from every single area of territory, no matter how well defendedthat area might be, can sometimes get heavily punished in the game of Go.
You need to be able to accept it when an invasion is going to be too hard foryou and choose to reduce instead. Sometimes the areas that the opponent isbuilding might look intimidating or extremely valuable, but maybe you can investyour moves in growing your own similar area full of points, instead of diving in theopponent’s potential territory and trying to swim through his stones to safety.
You might even manage it, but while doing so, your opponent will have gainedimmense influence elsewhere on the board, making such an endeavor a lost cause.Let us see two examples of this problem:
This game seems to have clearly defined areas and onlythe center is left to be contested. It will probably be aclose game. White is playing next and he has a lot ofchoices to pick from: Choice A for threat towards theupper right corner and to split Black’s stones.Choice B to expand his framework towards the center.Choice C to expand his lower right corner area.Choice D to expand his framework on the right side andexpand towards the center while capping Black. Choice E to expand his area in the left and reduce Black’sarea at the same time.All of these are valid choices, but White is afraid that thelarge framework created by the Black marked stones isgoing to cost him the game, so he directly invades Black’stotally enclosed area atmove 1without any preparatorymoves like the peeps at F and G...
The left and center image depict the rest of the invasion. After Black 10 on the center of symmetry ofWhite’s shape, the invading stones are dead. White tried to reach for more space and create two eyes, butevery available space was surrounded by Black stones and White resigned after Black 22.In the right image we see that in such cases, the contact play is usually better, as we saw in page 110, be-cause Black playing A is perilous. Black will usually play B and keep most of his area after White’s invasion,but at least White’s stones will be alive and the invasion will succeed.
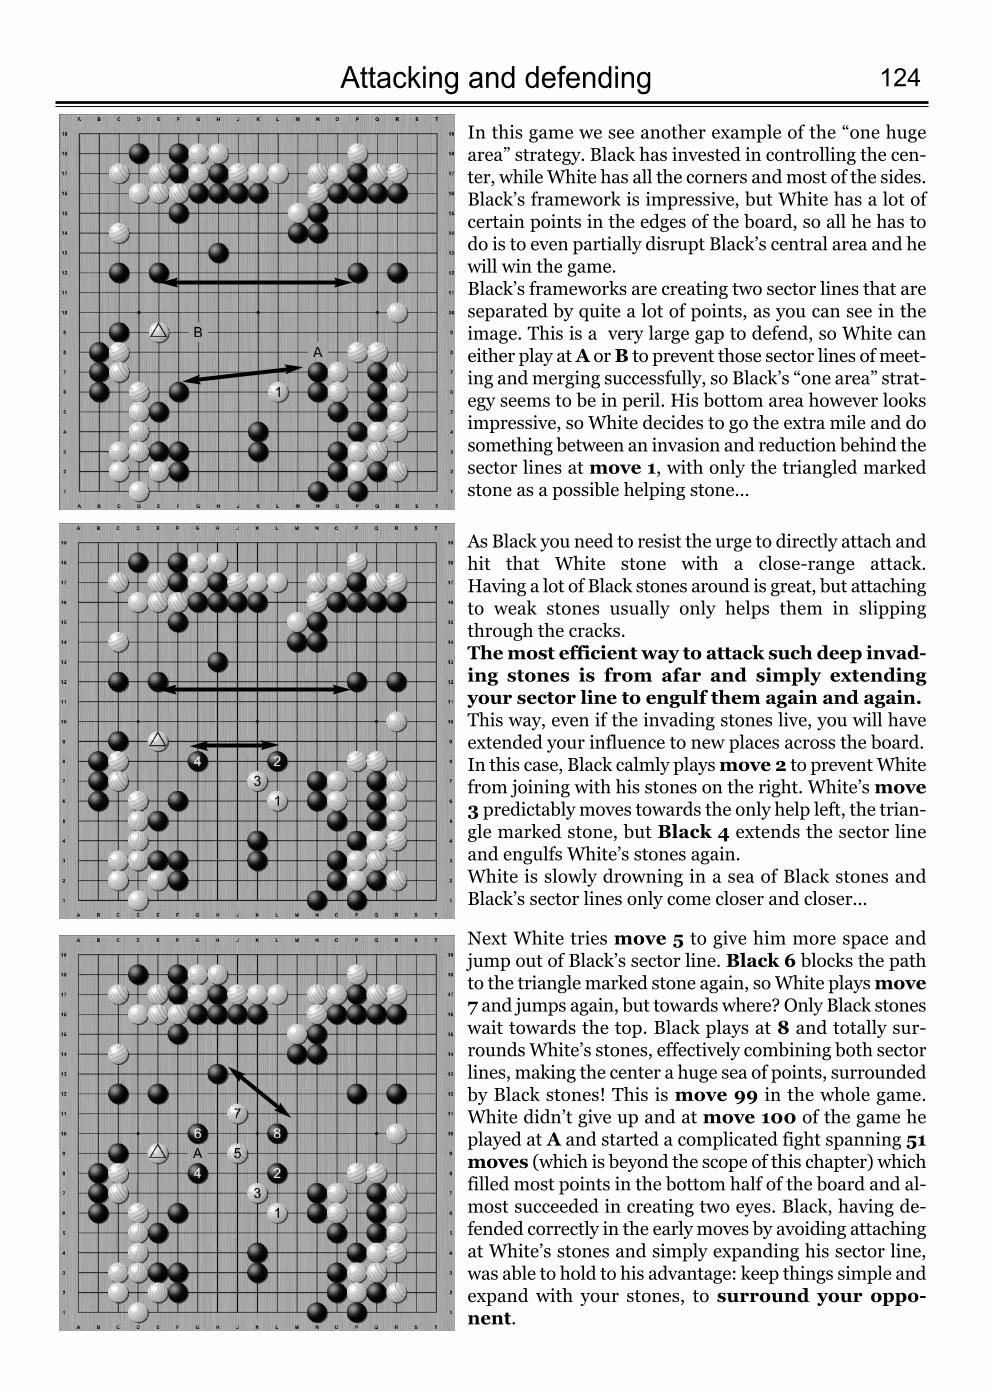
124Attacking and defending
In this game we see another example of the “one hugearea” strategy. Black has invested in controlling the cen-ter, while White has all the corners and most of the sides.Black’s framework is impressive, but White has a lot ofcertain points in the edges of the board, so all he has todo is to even partially disrupt Black’s central area and hewill win the game. Black’s frameworks are creating two sector lines that areseparated by quite a lot of points, as you can see in theimage. This is a very large gap to defend, so White caneither play at A or B to prevent those sector lines of meet-ing and merging successfully, so Black’s “one area” strat-egy seems to be in peril. His bottom area however looksimpressive, so White decides to go the extra mile and dosomething between an invasion and reduction behind thesector lines at move 1, with only the triangled markedstone as a possible helping stone...
As Black you need to resist the urge to directly attach andhit that White stone with a close-range attack. Having a lot of Black stones around is great, but attachingto weak stones usually only helps them in slippingthrough the cracks.The most efficient way to attack such deep invad-ing stones is from afar and simply extendingyour sector line to engulf them again and again.This way, even if the invading stones live, you will haveextended your influence to new places across the board.In this case, Black calmly plays move 2 to prevent Whitefrom joining with his stones on the right. White’s move3 predictably moves towards the only help left, the trian-gle marked stone, but Black 4 extends the sector lineand engulfs White’s stones again.White is slowly drowning in a sea of Black stones andBlack’s sector lines only come closer and closer...
Next White tries move 5 to give him more space andjump out of Black’s sector line. Black 6 blocks the pathto the triangle marked stone again, so White plays move7 and jumps again, but towards where? Only Black stoneswait towards the top. Black plays at 8 and totally sur-rounds White’s stones, effectively combining both sectorlines, making the center a huge sea of points, surroundedby Black stones! This is move 99 in the whole game.White didn’t give up and at move 100 of the game heplayed at A and started a complicated fight spanning 51moves (which is beyond the scope of this chapter) whichfilled most points in the bottom half of the board and al-most succeeded in creating two eyes. Black, having de-fended correctly in the early moves by avoiding attachingat White’s stones and simply expanding his sector line,was able to hold to his advantage: keep things simple andexpand with your stones, to surround your oppo-nent.
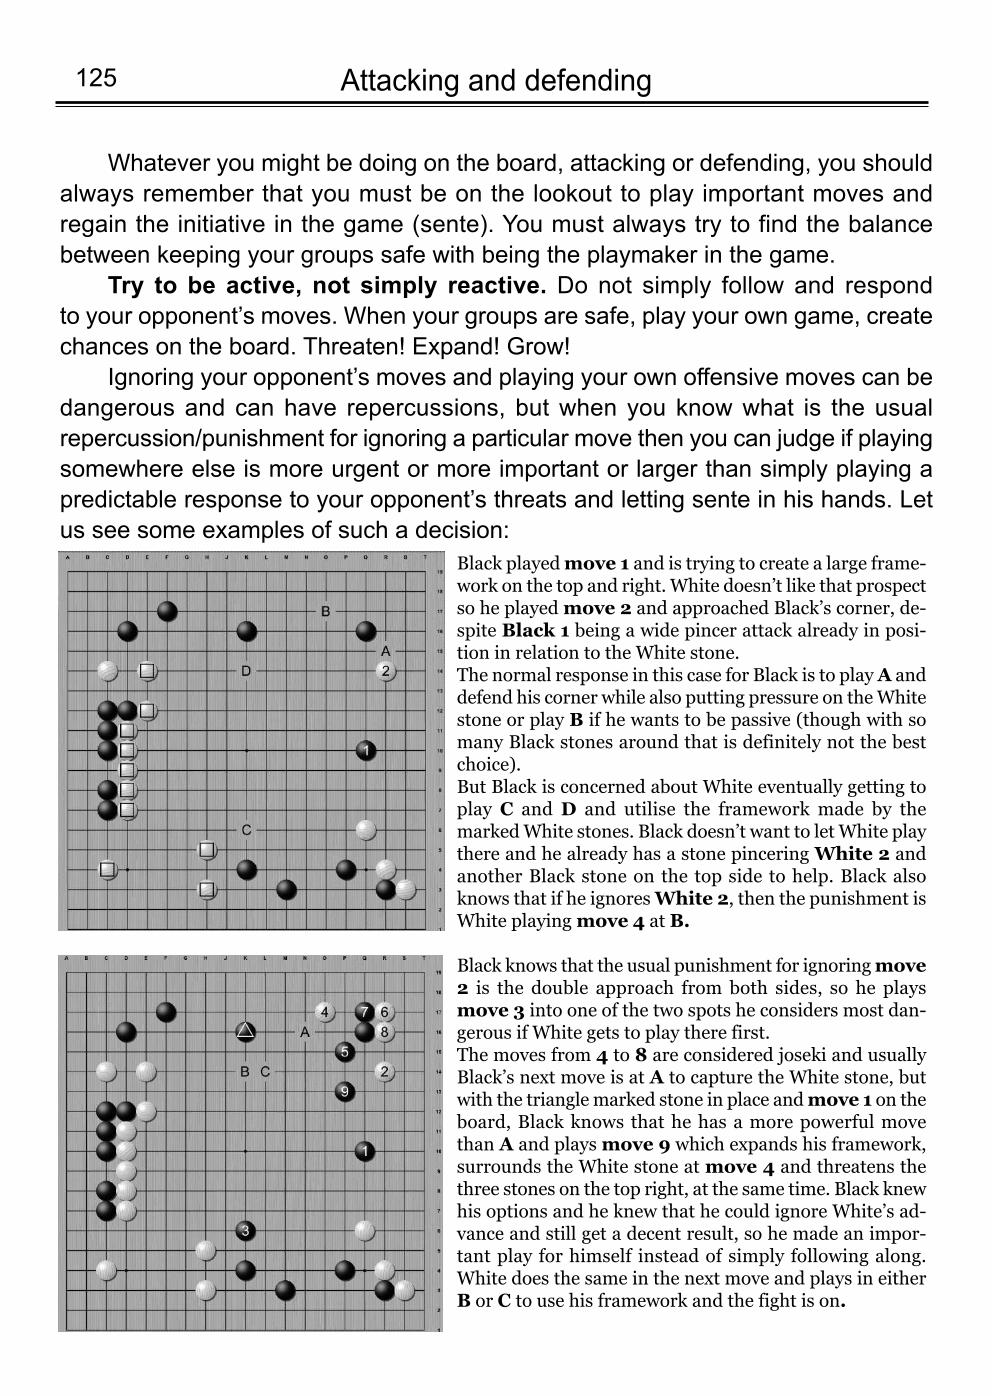
Attacking and defending125
Whatever you might be doing on the board, attacking or defending, you shouldalways remember that you must be on the lookout to play important moves andregain the initiative in the game (sente). You must always try to find the balancebetween keeping your groups safe with being the playmaker in the game.
Try to be active, not simply reactive. Do not simply follow and respond to your opponent’s moves. When your groups are safe, play your own game, createchances on the board. Threaten! Expand! Grow!
Ignoring your opponent’s moves and playing your own offensive moves can bedangerous and can have repercussions, but when you know what is the usualrepercussion/punishment for ignoring a particular move then you can judge if playingsomewhere else is more urgent or more important or larger than simply playing apredictable response to your opponent’s threats and letting sente in his hands. Letus see some examples of such a decision:
Black played move 1 and is trying to create a large frame-work on the top and right. White doesn’t like that prospectso he played move 2 and approached Black’s corner, de-spite Black 1 being a wide pincer attack already in posi-tion in relation to the White stone.The normal response in this case for Black is to play A anddefend his corner while also putting pressure on the Whitestone or play B if he wants to be passive (though with somany Black stones around that is definitely not the bestchoice).But Black is concerned about White eventually getting toplay C and D and utilise the framework made by themarked White stones. Black doesn’t want to let White playthere and he already has a stone pincering White 2 andanother Black stone on the top side to help. Black alsoknows that if he ignores White 2, then the punishment isWhite playing move 4 at B.
Black knows that the usual punishment for ignoring move2 is the double approach from both sides, so he playsmove 3 into one of the two spots he considers most dan-gerous if White gets to play there first. The moves from 4 to 8 are considered joseki and usuallyBlack’s next move is at A to capture the White stone, butwith the triangle marked stone in place and move 1 on theboard, Black knows that he has a more powerful movethan A and plays move 9 which expands his framework,surrounds the White stone at move 4 and threatens thethree stones on the top right, at the same time. Black knewhis options and he knew that he could ignore White’s ad-vance and still get a decent result, so he made an impor-tant play for himself instead of simply following along.White does the same in the next move and plays in eitherB or C to use his framework and the fight is on.
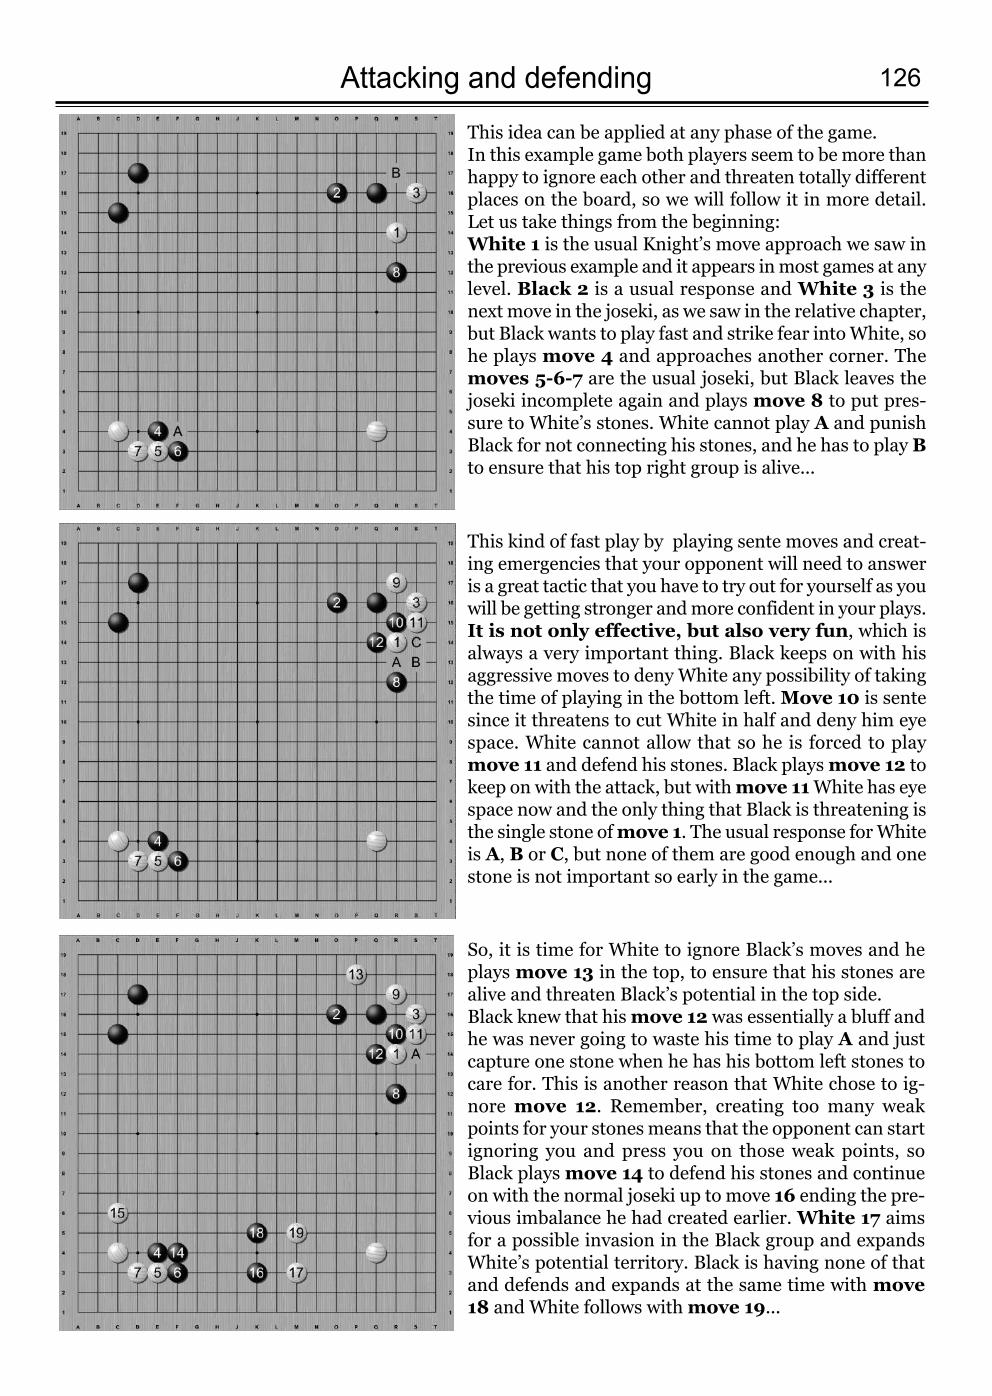
126Attacking and defending
This idea can be applied at any phase of the game. In this example game both players seem to be more thanhappy to ignore each other and threaten totally differentplaces on the board, so we will follow it in more detail.Let us take things from the beginning:White 1 is the usual Knight’s move approach we saw inthe previous example and it appears in most games at anylevel. Black 2 is a usual response and White 3 is thenext move in the joseki, as we saw in the relative chapter,but Black wants to play fast and strike fear into White, sohe plays move 4 and approaches another corner. Themoves 5-6-7 are the usual joseki, but Black leaves thejoseki incomplete again and plays move 8 to put pres-sure to White’s stones. White cannot play A and punishBlack for not connecting his stones, and he has to play Bto ensure that his top right group is alive...
This kind of fast play by playing sente moves and creat-ing emergencies that your opponent will need to answeris a great tactic that you have to try out for yourself as youwill be getting stronger and more confident in your plays.It is not only effective, but also very fun, which isalways a very important thing. Black keeps on with hisaggressive moves to deny White any possibility of takingthe time of playing in the bottom left. Move 10 is sentesince it threatens to cut White in half and deny him eyespace. White cannot allow that so he is forced to playmove 11 and defend his stones. Black playsmove 12 tokeep on with the attack, but with move 11White has eyespace now and the only thing that Black is threatening isthe single stone of move 1. The usual response for Whiteis A, B or C, but none of them are good enough and onestone is not important so early in the game...
So, it is time for White to ignore Black’s moves and heplays move 13 in the top, to ensure that his stones arealive and threaten Black’s potential in the top side.Black knew that his move 12 was essentially a bluff andhe was never going to waste his time to play A and justcapture one stone when he has his bottom left stones tocare for. This is another reason that White chose to ig-nore move 12. Remember, creating too many weakpoints for your stones means that the opponent can startignoring you and press you on those weak points, soBlack plays move 14 to defend his stones and continueon with the normal joseki up to move 16 ending the pre-vious imbalance he had created earlier. White 17 aimsfor a possible invasion in the Black group and expandsWhite’s potential territory. Black is having none of thatand defends and expands at the same time with move18 and White follows with move 19...
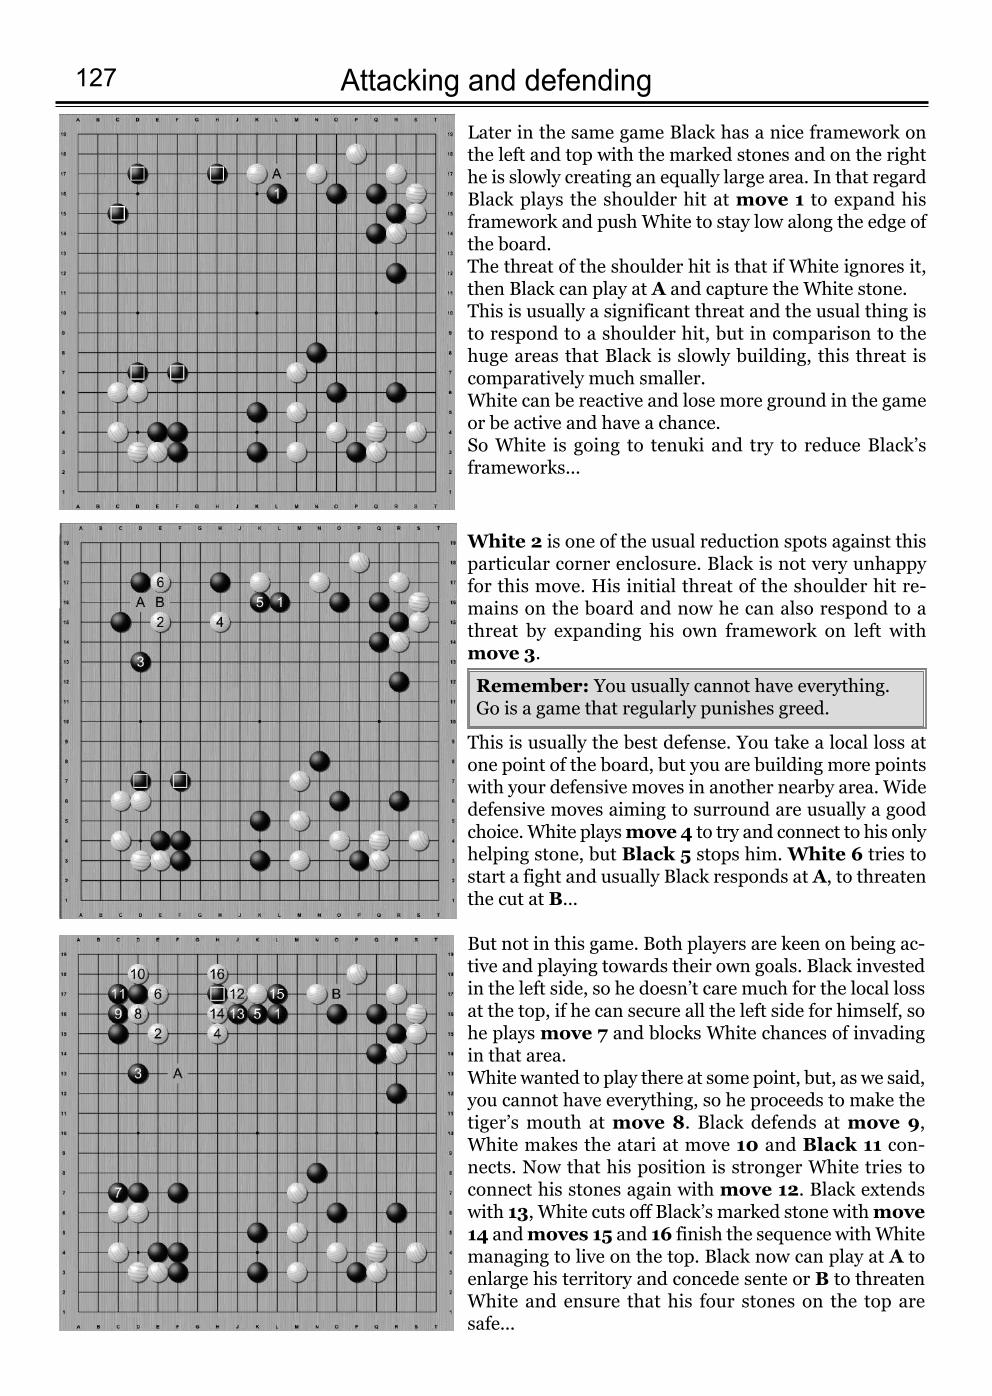
Attacking and defending127
Later in the same game Black has a nice framework onthe left and top with the marked stones and on the righthe is slowly creating an equally large area. In that regardBlack plays the shoulder hit at move 1 to expand hisframework and push White to stay low along the edge ofthe board.The threat of the shoulder hit is that if White ignores it,then Black can play at A and capture the White stone. This is usually a significant threat and the usual thing isto respond to a shoulder hit, but in comparison to thehuge areas that Black is slowly building, this threat iscomparatively much smaller. White can be reactive and lose more ground in the gameor be active and have a chance.So White is going to tenuki and try to reduce Black’sframeworks...
White 2 is one of the usual reduction spots against thisparticular corner enclosure. Black is not very unhappyfor this move. His initial threat of the shoulder hit re-mains on the board and now he can also respond to athreat by expanding his own framework on left withmove 3.
This is usually the best defense. You take a local loss atone point of the board, but you are building more pointswith your defensive moves in another nearby area. Widedefensive moves aiming to surround are usually a goodchoice. White plays move 4 to try and connect to his onlyhelping stone, but Black 5 stops him. White 6 tries tostart a fight and usually Black responds at A, to threatenthe cut at B...
But not in this game. Both players are keen on being ac-tive and playing towards their own goals. Black investedin the left side, so he doesn’t care much for the local lossat the top, if he can secure all the left side for himself, sohe plays move 7 and blocks White chances of invadingin that area.White wanted to play there at some point, but, as we said,you cannot have everything, so he proceeds to make thetiger’s mouth at move 8. Black defends at move 9,White makes the atari at move 10 and Black 11 con-nects. Now that his position is stronger White tries toconnect his stones again with move 12. Black extendswith 13, White cuts off Black’s marked stone with move14 and moves 15 and 16 finish the sequence with Whitemanaging to live on the top. Black now can play at A toenlarge his territory and concede sente or B to threatenWhite and ensure that his four stones on the top aresafe...
Remember: You usually cannot have everything. Go is a game that regularly punishes greed.
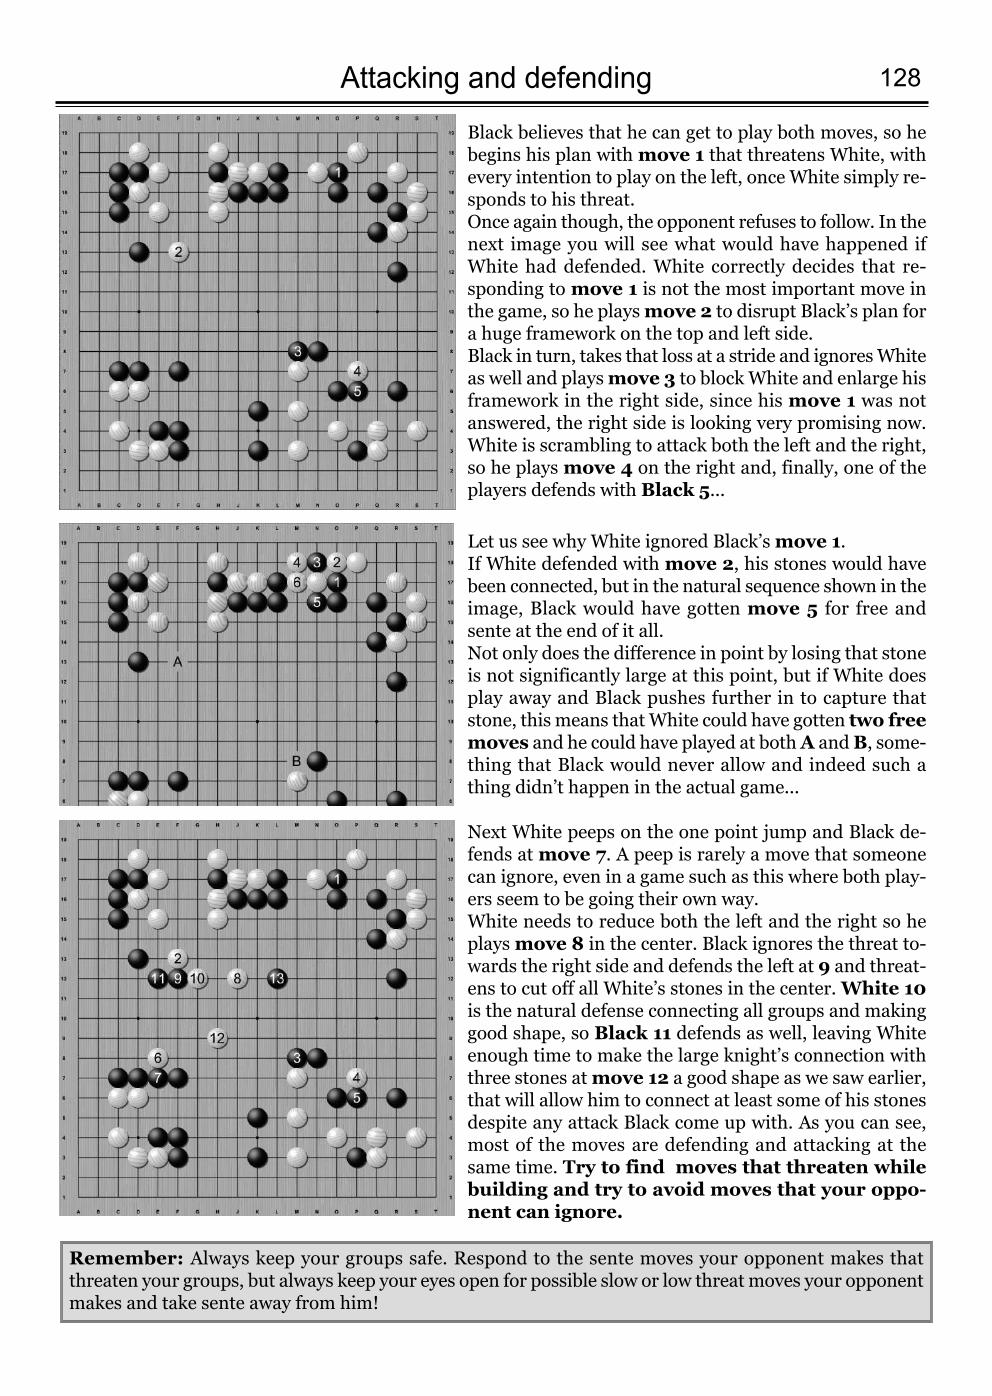
128Attacking and defending
Black believes that he can get to play both moves, so hebegins his plan with move 1 that threatens White, withevery intention to play on the left, once White simply re-sponds to his threat. Once again though, the opponent refuses to follow. In thenext image you will see what would have happened ifWhite had defended. White correctly decides that re-sponding to move 1 is not the most important move inthe game, so he plays move 2 to disrupt Black’s plan fora huge framework on the top and left side.Black in turn, takes that loss at a stride and ignores Whiteas well and plays move 3 to block White and enlarge hisframework in the right side, since his move 1 was notanswered, the right side is looking very promising now.White is scrambling to attack both the left and the right,so he plays move 4 on the right and, finally, one of theplayers defends with Black 5...
Let us see why White ignored Black’s move 1.If White defended with move 2, his stones would havebeen connected, but in the natural sequence shown in theimage, Black would have gotten move 5 for free andsente at the end of it all. Not only does the difference in point by losing that stoneis not significantly large at this point, but if White doesplay away and Black pushes further in to capture thatstone, this means that White could have gotten two freemoves and he could have played at both A and B, some-thing that Black would never allow and indeed such athing didn’t happen in the actual game...
Next White peeps on the one point jump and Black de-fends at move 7. A peep is rarely a move that someonecan ignore, even in a game such as this where both play-ers seem to be going their own way.White needs to reduce both the left and the right so heplays move 8 in the center. Black ignores the threat to-wards the right side and defends the left at 9 and threat-ens to cut off all White’s stones in the center. White 10is the natural defense connecting all groups and makinggood shape, so Black 11 defends as well, leaving Whiteenough time to make the large knight’s connection withthree stones at move 12 a good shape as we saw earlier,that will allow him to connect at least some of his stonesdespite any attack Black come up with. As you can see,most of the moves are defending and attacking at thesame time. Try to find moves that threaten whilebuilding and try to avoid moves that your oppo-nent can ignore.
Remember: Always keep your groups safe. Respond to the sente moves your opponent makes thatthreaten your groups, but always keep your eyes open for possible slow or low threat moves your opponentmakes and take sente away from him!
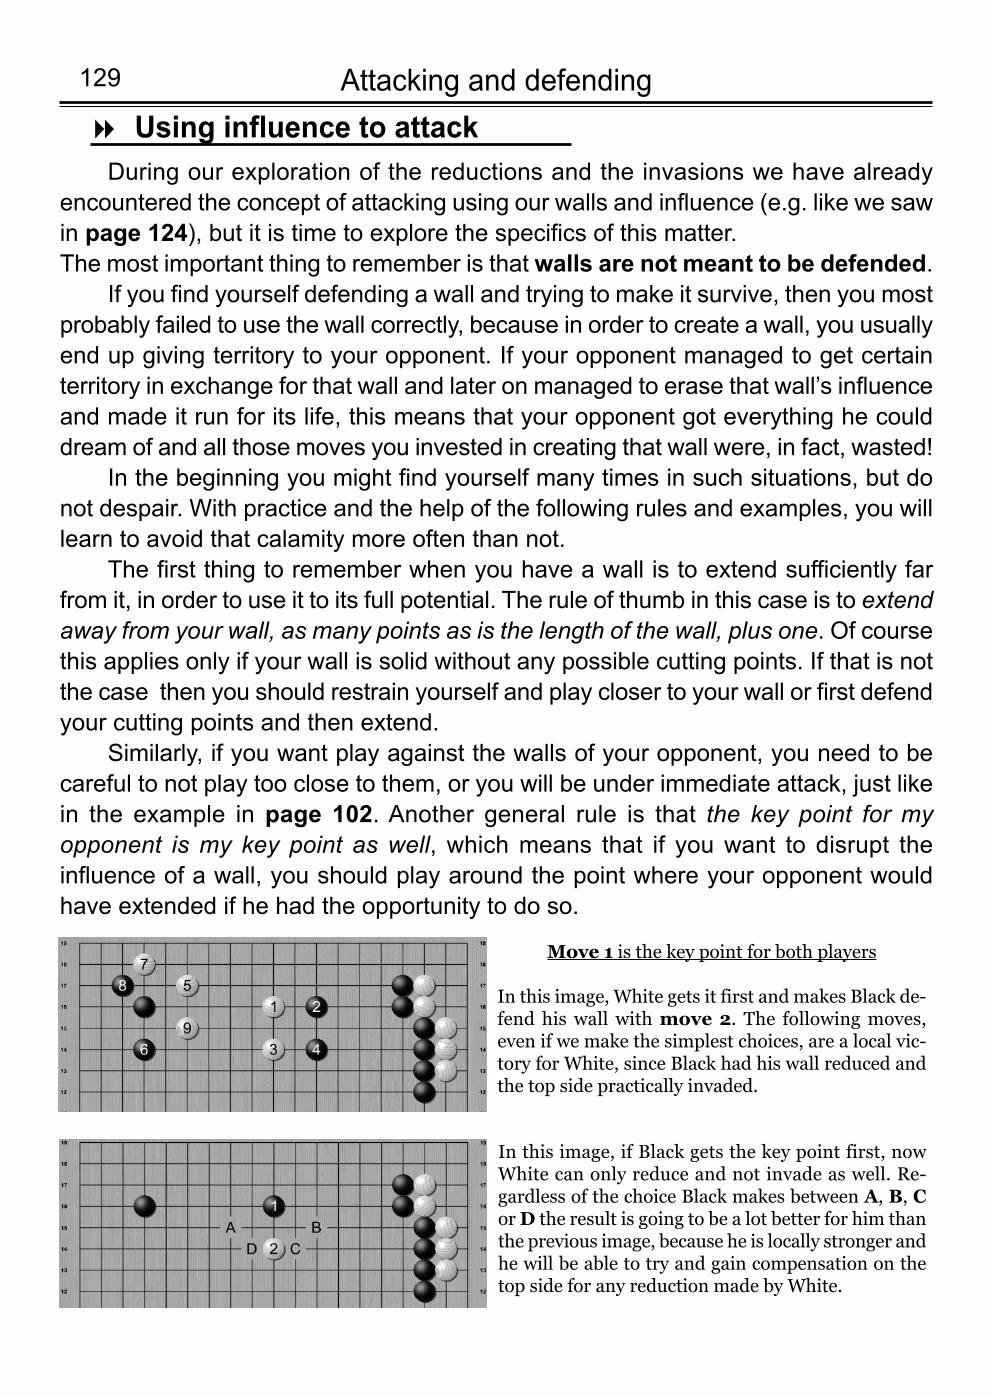
Attacking and defending129
During our exploration of the reductions and the invasions we have alreadyencountered the concept of attacking using our walls and influence (e.g. like we sawin page 124), but it is time to explore the specifics of this matter. The most important thing to remember is that walls are not meant to be defended.
If you find yourself defending a wall and trying to make it survive, then you mostprobably failed to use the wall correctly, because in order to create a wall, you usuallyend up giving territory to your opponent. If your opponent managed to get certainterritory in exchange for that wall and later on managed to erase that wall’s influenceand made it run for its life, this means that your opponent got everything he coulddream of and all those moves you invested in creating that wall were, in fact, wasted!
In the beginning you might find yourself many times in such situations, but donot despair. With practice and the help of the following rules and examples, you willlearn to avoid that calamity more often than not.
The first thing to remember when you have a wall is to extend sufficiently farfrom it, in order to use it to its full potential. The rule of thumb in this case is to extendaway from your wall, as many points as is the length of the wall, plus one. Of coursethis applies only if your wall is solid without any possible cutting points. If that is notthe case then you should restrain yourself and play closer to your wall or first defendyour cutting points and then extend.
Similarly, if you want play against the walls of your opponent, you need to becareful to not play too close to them, or you will be under immediate attack, just likein the example in page 102. Another general rule is that the key point for myopponent is my key point as well, which means that if you want to disrupt theinfluence of a wall, you should play around the point where your opponent wouldhave extended if he had the opportunity to do so.
Using influence to attack8
Move 1 is the key point for both players
In this image, White gets it first and makes Black de-fend his wall with move 2. The following moves,even if we make the simplest choices, are a local vic-tory for White, since Black had his wall reduced andthe top side practically invaded.
In this image, if Black gets the key point first, nowWhite can only reduce and not invade as well. Re-gardless of the choice Black makes between A, B, Cor D the result is going to be a lot better for him thanthe previous image, because he is locally stronger andhe will be able to try and gain compensation on thetop side for any reduction made by White.
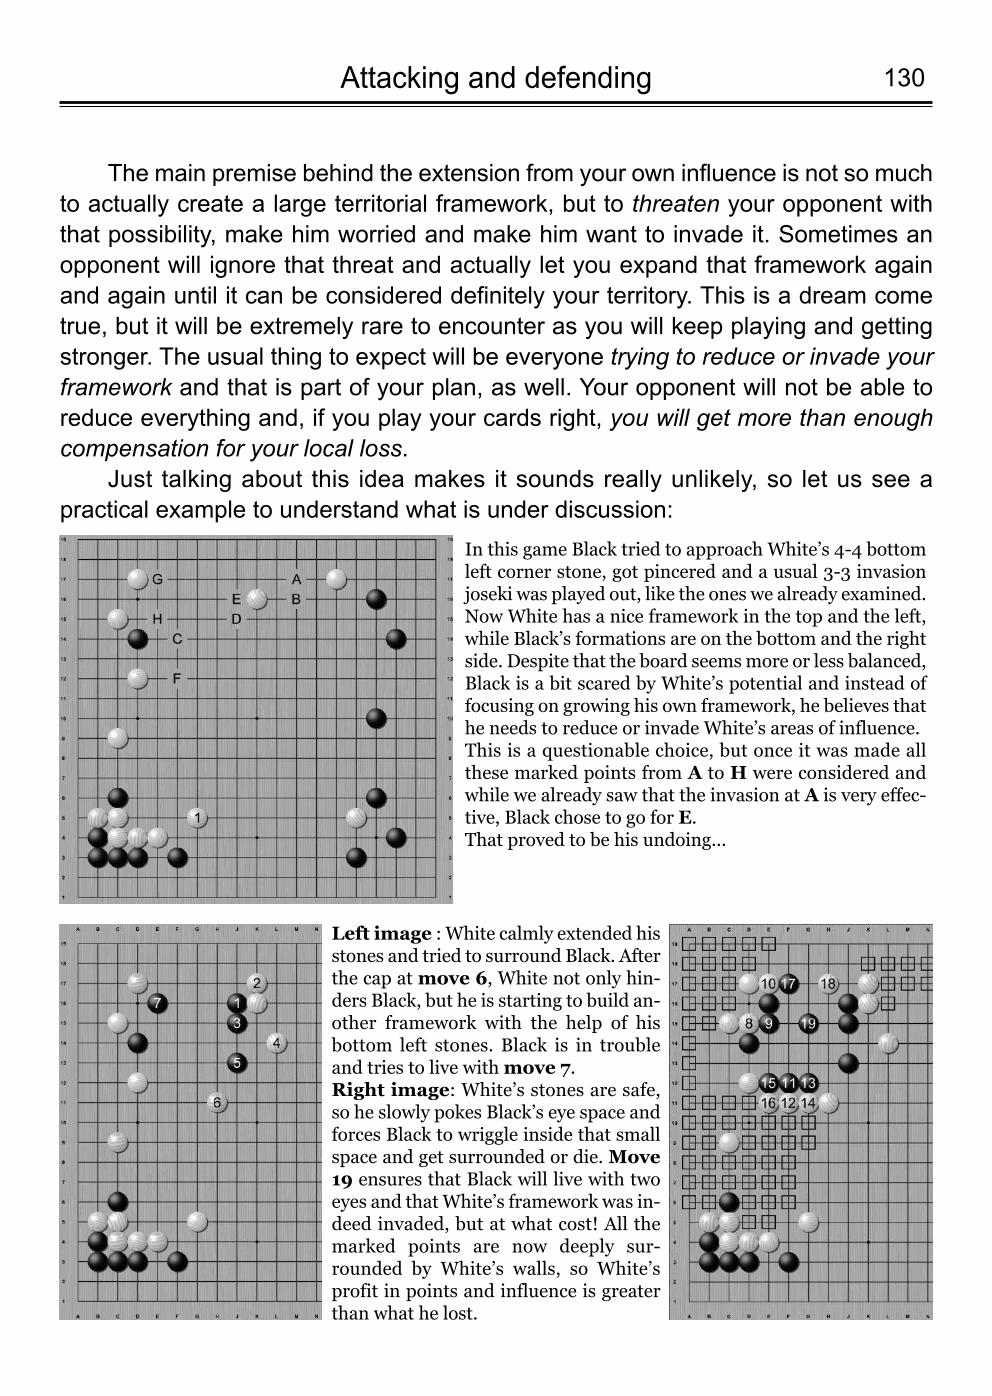
130Attacking and defending
The main premise behind the extension from your own influence is not so muchto actually create a large territorial framework, but to threaten your opponent withthat possibility, make him worried and make him want to invade it. Sometimes anopponent will ignore that threat and actually let you expand that framework againand again until it can be considered definitely your territory. This is a dream cometrue, but it will be extremely rare to encounter as you will keep playing and gettingstronger. The usual thing to expect will be everyone trying to reduce or invade yourframework and that is part of your plan, as well. Your opponent will not be able toreduce everything and, if you play your cards right, you will get more than enoughcompensation for your local loss.
Just talking about this idea makes it sounds really unlikely, so let us see apractical example to understand what is under discussion:
In this game Black tried to approach White’s 4-4 bottomleft corner stone, got pincered and a usual 3-3 invasionjoseki was played out, like the ones we already examined.Now White has a nice framework in the top and the left,while Black’s formations are on the bottom and the rightside. Despite that the board seems more or less balanced,Black is a bit scared by White’s potential and instead offocusing on growing his own framework, he believes thathe needs to reduce or invade White’s areas of influence. This is a questionable choice, but once it was made allthese marked points from A to H were considered andwhile we already saw that the invasion at A is very effec-tive, Black chose to go for E.That proved to be his undoing...
Left image : White calmly extended hisstones and tried to surround Black. Afterthe cap at move 6, White not only hin-ders Black, but he is starting to build an-other framework with the help of hisbottom left stones. Black is in troubleand tries to live with move 7.Right image: White’s stones are safe,so he slowly pokes Black’s eye space andforces Black to wriggle inside that smallspace and get surrounded or die. Move19 ensures that Black will live with twoeyes and that White’s framework was in-deed invaded, but at what cost! All themarked points are now deeply sur-rounded by White’s walls, so White’sprofit in points and influence is greaterthan what he lost.
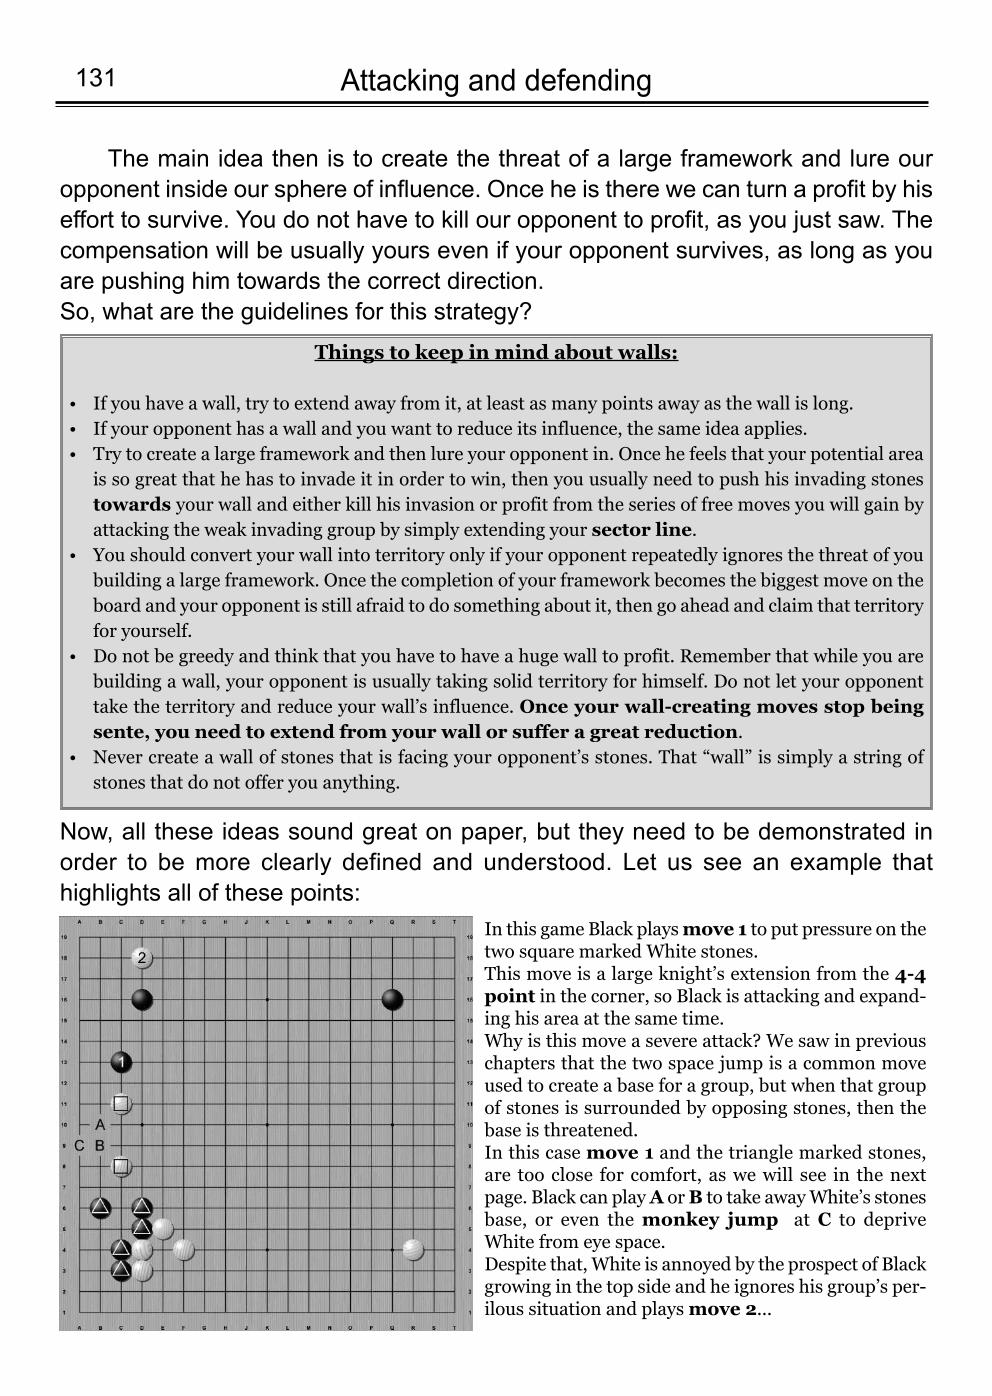
Attacking and defending131
The main idea then is to create the threat of a large framework and lure ouropponent inside our sphere of influence. Once he is there we can turn a profit by hiseffort to survive. You do not have to kill our opponent to profit, as you just saw. Thecompensation will be usually yours even if your opponent survives, as long as youare pushing him towards the correct direction.So, what are the guidelines for this strategy?
Now, all these ideas sound great on paper, but they need to be demonstrated inorder to be more clearly defined and understood. Let us see an example thathighlights all of these points:
Things to keep in mind about walls:
If you have a wall, try to extend away from it, at least as many points away as the wall is long.•If your opponent has a wall and you want to reduce its influence, the same idea applies.•Try to create a large framework and then lure your opponent in. Once he feels that your potential area•is so great that he has to invade it in order to win, then you usually need to push his invading stonestowards your wall and either kill his invasion or profit from the series of free moves you will gain byattacking the weak invading group by simply extending your sector line.You should convert your wall into territory only if your opponent repeatedly ignores the threat of you•building a large framework. Once the completion of your framework becomes the biggest move on theboard and your opponent is still afraid to do something about it, then go ahead and claim that territoryfor yourself.Do not be greedy and think that you have to have a huge wall to profit. Remember that while you are•building a wall, your opponent is usually taking solid territory for himself. Do not let your opponenttake the territory and reduce your wall’s influence. Once your wall-creating moves stop beingsente, you need to extend from your wall or suffer a great reduction.Never create a wall of stones that is facing your opponent’s stones. That “wall” is simply a string of•stones that do not offer you anything.
In this game Black plays move 1 to put pressure on thetwo square marked White stones. This move is a large knight’s extension from the 4-4point in the corner, so Black is attacking and expand-ing his area at the same time. Why is this move a severe attack? We saw in previouschapters that the two space jump is a common moveused to create a base for a group, but when that groupof stones is surrounded by opposing stones, then thebase is threatened. In this case move 1 and the triangle marked stones,are too close for comfort, as we will see in the nextpage. Black can play A or B to take away White’s stonesbase, or even the monkey jump at C to depriveWhite from eye space.Despite that, White is annoyed by the prospect of Blackgrowing in the top side and he ignores his group’s per-ilous situation and plays move 2...
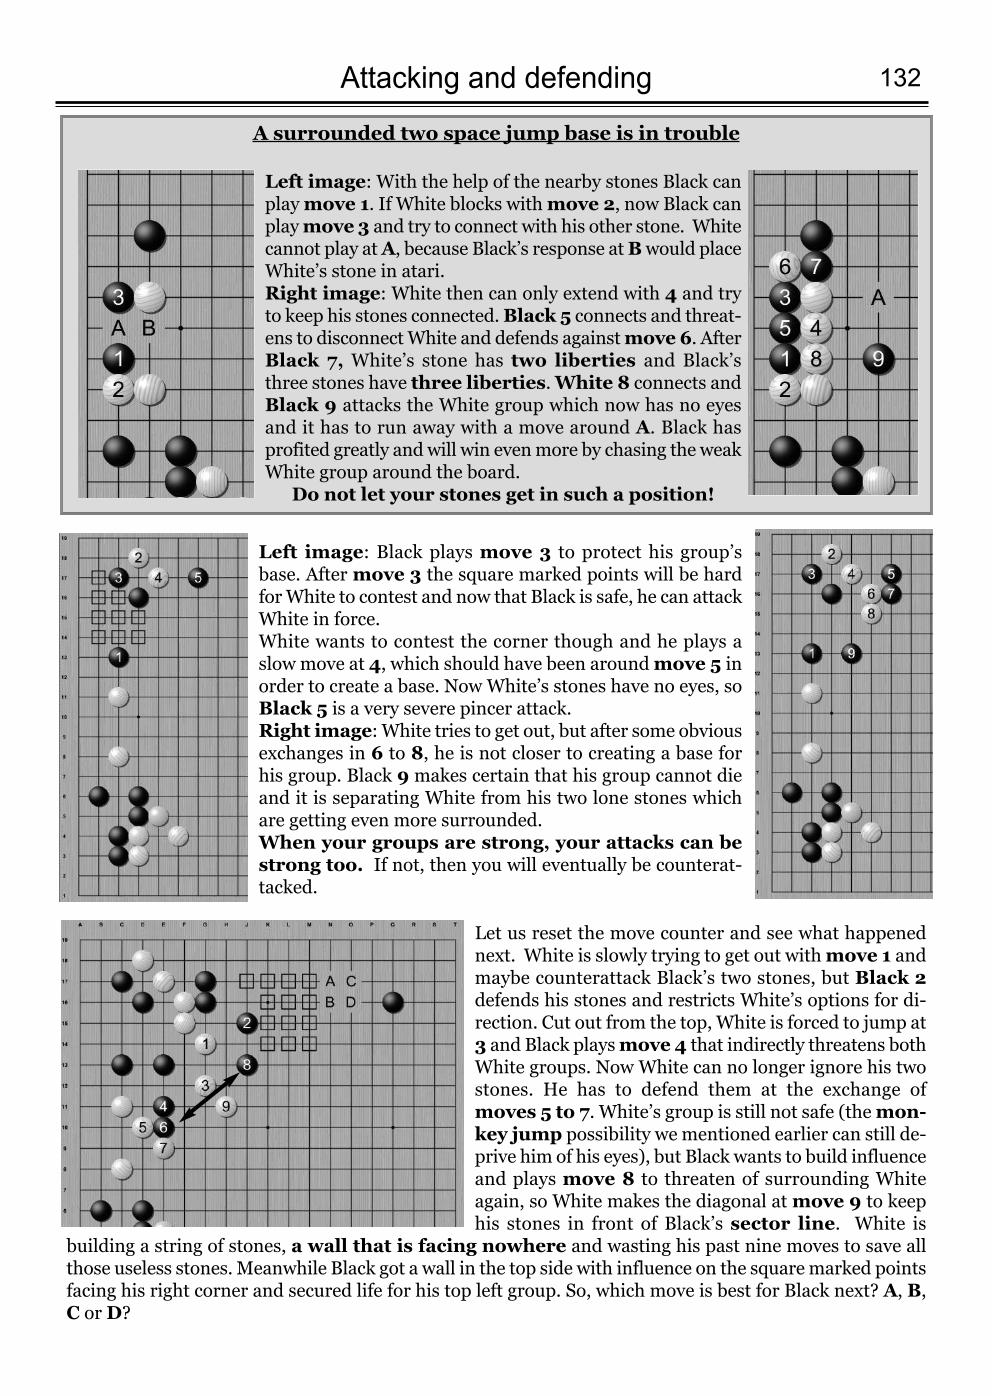
132Attacking and defending
A surrounded two space jump base is in trouble
Left image: With the help of the nearby stones Black canplay move 1. If White blocks with move 2, now Black canplay move 3 and try to connect with his other stone. Whitecannot play at A, because Black’s response at Bwould placeWhite’s stone in atari.Right image: White then can only extend with 4 and tryto keep his stones connected. Black 5 connects and threat-ens to disconnect White and defends against move 6. AfterBlack 7, White’s stone has two liberties and Black’sthree stones have three liberties. White 8 connects andBlack 9 attacks the White group which now has no eyesand it has to run away with a move around A. Black hasprofited greatly and will win even more by chasing the weakWhite group around the board.
Do not let your stones get in such a position!
Left image: Black plays move 3 to protect his group’sbase. After move 3 the square marked points will be hardfor White to contest and now that Black is safe, he can attackWhite in force. White wants to contest the corner though and he plays aslow move at 4, which should have been around move 5 inorder to create a base. Now White’s stones have no eyes, soBlack 5 is a very severe pincer attack.Right image: White tries to get out, but after some obviousexchanges in 6 to 8, he is not closer to creating a base forhis group. Black 9 makes certain that his group cannot dieand it is separating White from his two lone stones whichare getting even more surrounded. When your groups are strong, your attacks can bestrong too. If not, then you will eventually be counterat-tacked.
Let us reset the move counter and see what happenednext. White is slowly trying to get out with move 1 andmaybe counterattack Black’s two stones, but Black 2defends his stones and restricts White’s options for di-rection. Cut out from the top, White is forced to jump at3 and Black plays move 4 that indirectly threatens bothWhite groups. Now White can no longer ignore his twostones. He has to defend them at the exchange ofmoves 5 to 7. White’s group is still not safe (the mon-key jump possibility we mentioned earlier can still de-prive him of his eyes), but Black wants to build influenceand plays move 8 to threaten of surrounding Whiteagain, so White makes the diagonal at move 9 to keephis stones in front of Black’s sector line. White is
building a string of stones, a wall that is facing nowhere and wasting his past nine moves to save allthose useless stones. Meanwhile Black got a wall in the top side with influence on the square marked pointsfacing his right corner and secured life for his top left group. So, which move is best for Black next? A, B,C or D?
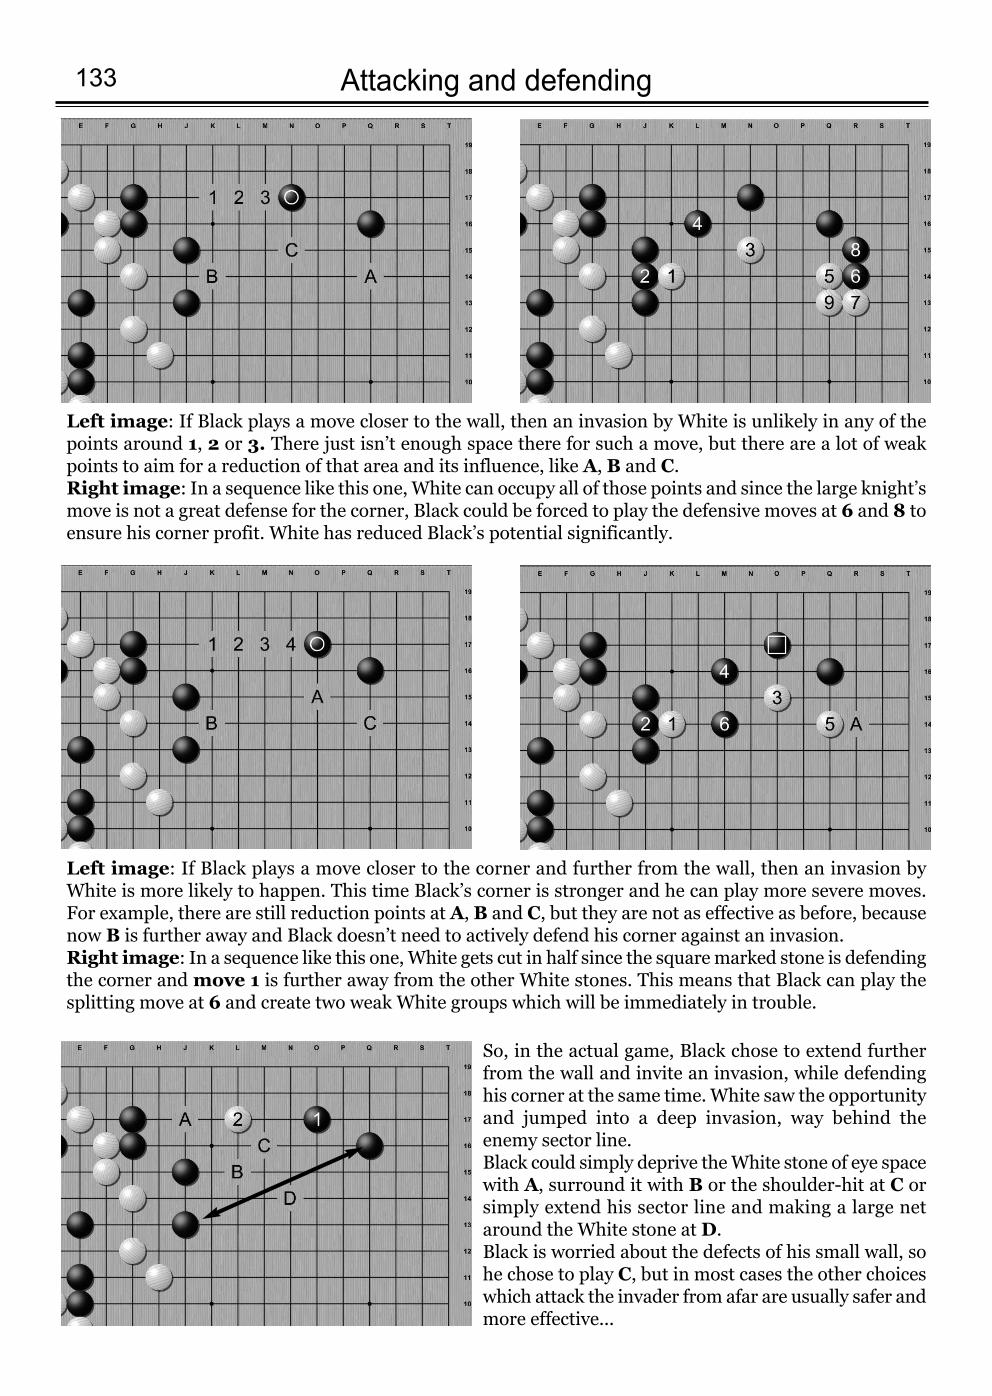
Attacking and defending133
Left image: If Black plays a move closer to the wall, then an invasion by White is unlikely in any of thepoints around 1, 2 or 3. There just isn’t enough space there for such a move, but there are a lot of weakpoints to aim for a reduction of that area and its influence, like A, B and C. Right image: In a sequence like this one, White can occupy all of those points and since the large knight’smove is not a great defense for the corner, Black could be forced to play the defensive moves at 6 and 8 toensure his corner profit. White has reduced Black’s potential significantly.
So, in the actual game, Black chose to extend furtherfrom the wall and invite an invasion, while defendinghis corner at the same time. White saw the opportunityand jumped into a deep invasion, way behind theenemy sector line.Black could simply deprive the White stone of eye spacewith A, surround it with B or the shoulder-hit at C orsimply extend his sector line and making a large netaround the White stone at D.Black is worried about the defects of his small wall, sohe chose to play C, but in most cases the other choiceswhich attack the invader from afar are usually safer andmore effective...
Left image: If Black plays a move closer to the corner and further from the wall, then an invasion byWhite is more likely to happen. This time Black’s corner is stronger and he can play more severe moves.For example, there are still reduction points at A, B and C, but they are not as effective as before, becausenow B is further away and Black doesn’t need to actively defend his corner against an invasion. Right image: In a sequence like this one, White gets cut in half since the square marked stone is defendingthe corner and move 1 is further away from the other White stones. This means that Black can play thesplitting move at 6 and create two weak White groups which will be immediately in trouble.
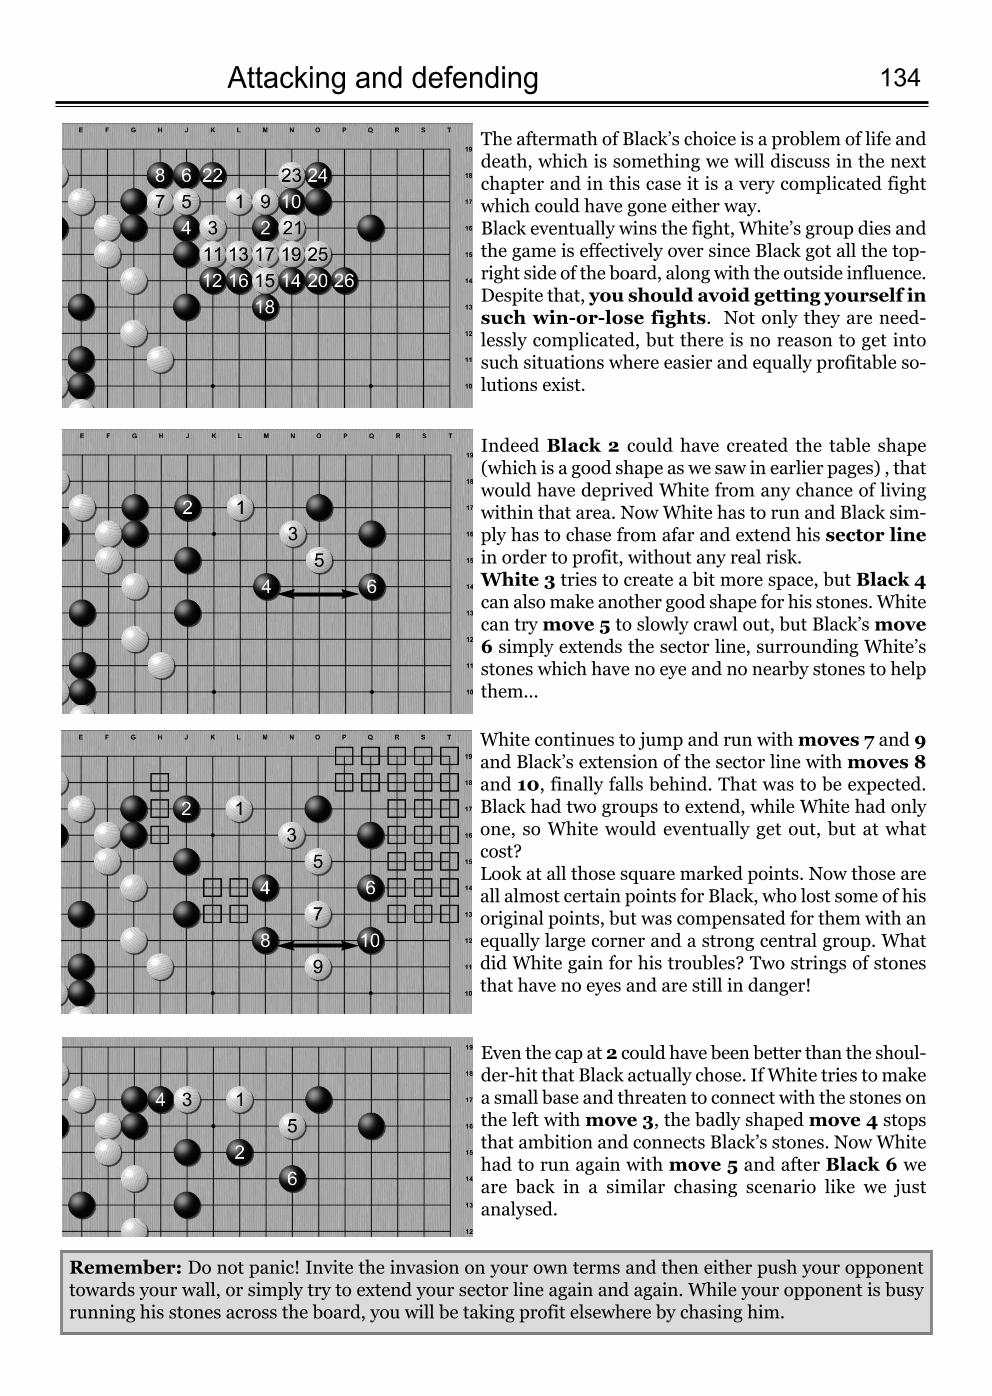
134Attacking and defending
The aftermath of Black’s choice is a problem of life anddeath, which is something we will discuss in the nextchapter and in this case it is a very complicated fightwhich could have gone either way. Black eventually wins the fight, White’s group dies andthe game is effectively over since Black got all the top-right side of the board, along with the outside influence.Despite that, you should avoid getting yourself insuch win-or-lose fights. Not only they are need-lessly complicated, but there is no reason to get intosuch situations where easier and equally profitable so-lutions exist.
Indeed Black 2 could have created the table shape(which is a good shape as we saw in earlier pages) , thatwould have deprived White from any chance of livingwithin that area. Now White has to run and Black sim-ply has to chase from afar and extend his sector linein order to profit, without any real risk. White 3 tries to create a bit more space, but Black 4can also make another good shape for his stones. Whitecan try move 5 to slowly crawl out, but Black’s move6 simply extends the sector line, surrounding White’sstones which have no eye and no nearby stones to helpthem...
White continues to jump and run with moves 7 and 9and Black’s extension of the sector line with moves 8and 10, finally falls behind. That was to be expected.Black had two groups to extend, while White had onlyone, so White would eventually get out, but at whatcost? Look at all those square marked points. Now those areall almost certain points for Black, who lost some of hisoriginal points, but was compensated for them with anequally large corner and a strong central group. Whatdid White gain for his troubles? Two strings of stonesthat have no eyes and are still in danger!
Even the cap at 2 could have been better than the shoul-der-hit that Black actually chose. If White tries to makea small base and threaten to connect with the stones onthe left with move 3, the badly shaped move 4 stopsthat ambition and connects Black’s stones. Now Whitehad to run again with move 5 and after Black 6 weare back in a similar chasing scenario like we justanalysed.
Remember: Do not panic! Invite the invasion on your own terms and then either push your opponenttowards your wall, or simply try to extend your sector line again and again. While your opponent is busyrunning his stones across the board, you will be taking profit elsewhere by chasing him.
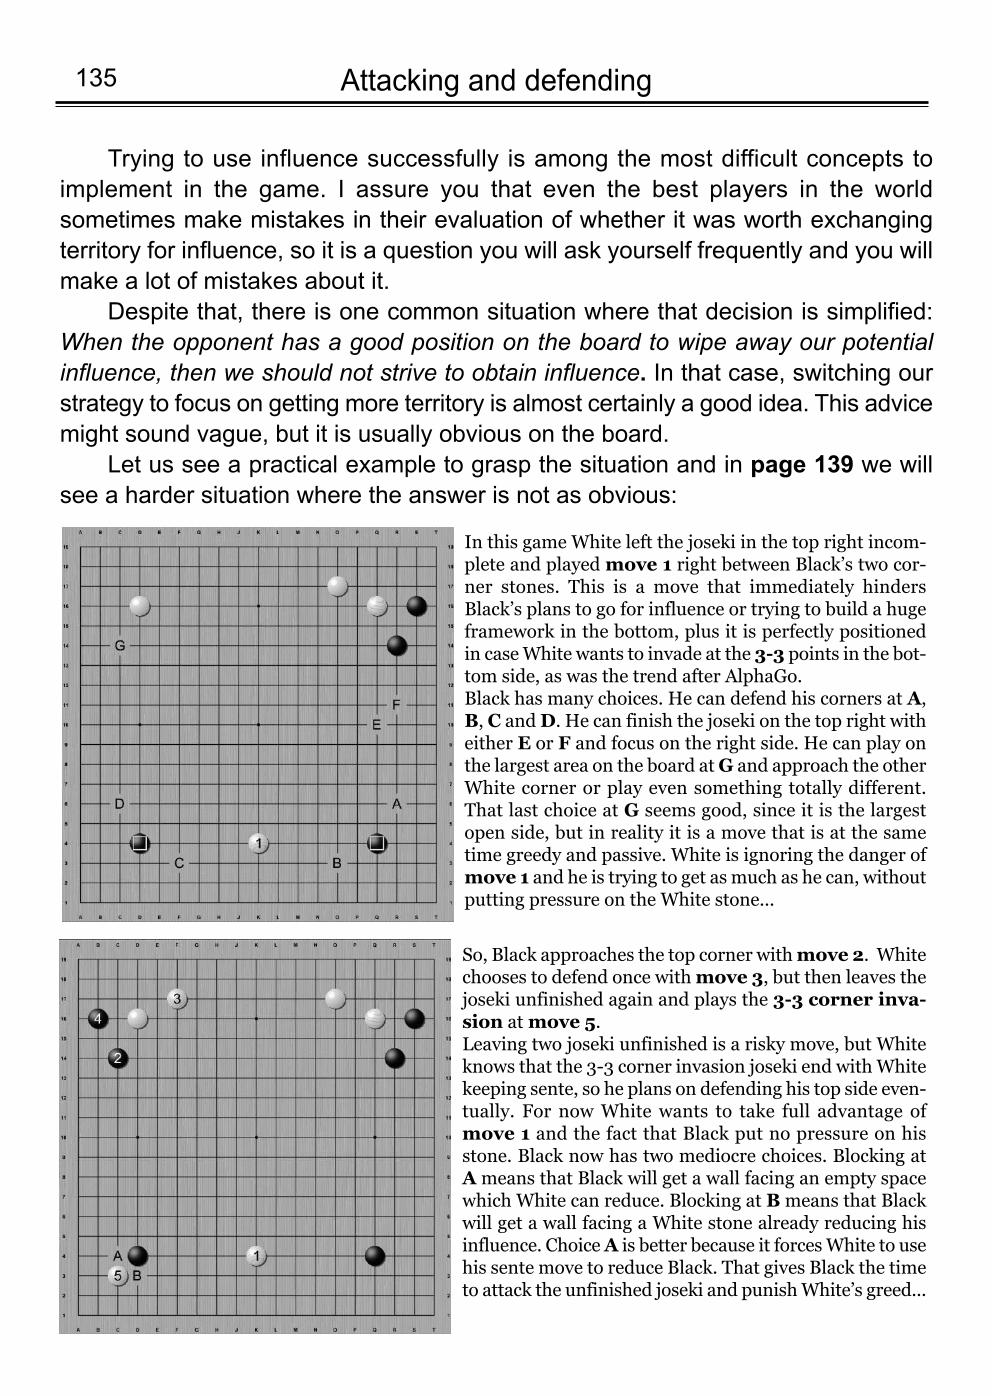
Attacking and defending135
Trying to use influence successfully is among the most difficult concepts toimplement in the game. I assure you that even the best players in the worldsometimes make mistakes in their evaluation of whether it was worth exchangingterritory for influence, so it is a question you will ask yourself frequently and you willmake a lot of mistakes about it.
Despite that, there is one common situation where that decision is simplified:When the opponent has a good position on the board to wipe away our potentialinfluence, then we should not strive to obtain influence. In that case, switching ourstrategy to focus on getting more territory is almost certainly a good idea. This advicemight sound vague, but it is usually obvious on the board.
Let us see a practical example to grasp the situation and in page 139 we willsee a harder situation where the answer is not as obvious:
In this game White left the joseki in the top right incom-plete and played move 1 right between Black’s two cor-ner stones. This is a move that immediately hindersBlack’s plans to go for influence or trying to build a hugeframework in the bottom, plus it is perfectly positionedin case White wants to invade at the 3-3 points in the bot-tom side, as was the trend after AlphaGo. Black has many choices. He can defend his corners at A,B, C and D. He can finish the joseki on the top right witheither E or F and focus on the right side. He can play onthe largest area on the board at G and approach the otherWhite corner or play even something totally different.That last choice at G seems good, since it is the largestopen side, but in reality it is a move that is at the sametime greedy and passive. White is ignoring the danger ofmove 1 and he is trying to get as much as he can, withoutputting pressure on the White stone...
So, Black approaches the top corner with move 2. Whitechooses to defend once with move 3, but then leaves thejoseki unfinished again and plays the 3-3 corner inva-sion at move 5.Leaving two joseki unfinished is a risky move, but Whiteknows that the 3-3 corner invasion joseki end with Whitekeeping sente, so he plans on defending his top side even-tually. For now White wants to take full advantage ofmove 1 and the fact that Black put no pressure on hisstone. Black now has two mediocre choices. Blocking atA means that Black will get a wall facing an empty spacewhich White can reduce. Blocking at B means that Blackwill get a wall facing a White stone already reducing hisinfluence. Choice A is better because it forces White to usehis sente move to reduce Black. That gives Black the timeto attack the unfinished joseki and punish White’s greed...

136Attacking and defending
But Black doesn’t block in the correct direction. After the joseki we already analysed earlier in the book isplayed out with the notable exception of move 1 being fur-ther away from the Black wall in order to connect every-thing together and at the same time finish the joseki onthe top left for Black, giving him a stronger group to stagehis attack against White. This is a dubious move thatleaves a lot of weak points for Black, but that is beyondthe scope of this chapter, so let us focus back on the matterat hand.White is happy that his triangle marked stone is rightwhere most of Black’s influence should have been and thathe didn’t have to use his sente move to reduce Black, sohe invades the other corner as well!Again, two mediocre choices, A and B. White expectsBlack to play the same sequence, but Black is unhappywith that result so he changes sides...
Now Black blocks from the other way and completes thejoseki correctly as well, but the result is still not good.White 12 immediately lands on the right spot to incon-venience Black’s wall and apply pressure at the two topmarked stones. White’s stones are alive in the corner andBlack has a wall that is facing nowhere.Black could play A and ensure that his stones are alive inthe top and give the chance to White to reduce him furtherin the bottom right. Or Black could play B which is closerto his wall than he would have liked, but it is, at least,using his wall to gain something.Both are suboptimal choices and in the end both sides ofblocking turned out to be bad for Black. So, what is a better choice? You should avoid being forcedby your opponent on playing move that are not in yourfavour. If your opponent has already reduced your poten-tial influence, go for territory...
Yes, but how? Even if you do not know a joseki to regain yourcorner, at least play something simple like the following exam-ple, instead of blindly following joseki that you do not like. Justremember your goal and stay consistent. In this case, if you cannot have your territory back, then youwant to avoid White ending the sequence with sente.Left image: Black doesn’t play the hane. Moves 4 and 6 sim-ply extend Black’s group and now A and B are miai. If White plays B to secure his territory, then Black plays A andensures his influence and helps the marked stones a bit.Right image: White decides to stick to his original plan andplay in the star point and reduce Black’s influence. Black 2 isonce again too close, but White doesn’t have enough space tomove. After the exchange of moves 3 and 4, now all threeWhite groups are in danger. Unlike the real game, White is notalive in the bottom corner and Black can still play A and makeWhite worry. But there is a better way!
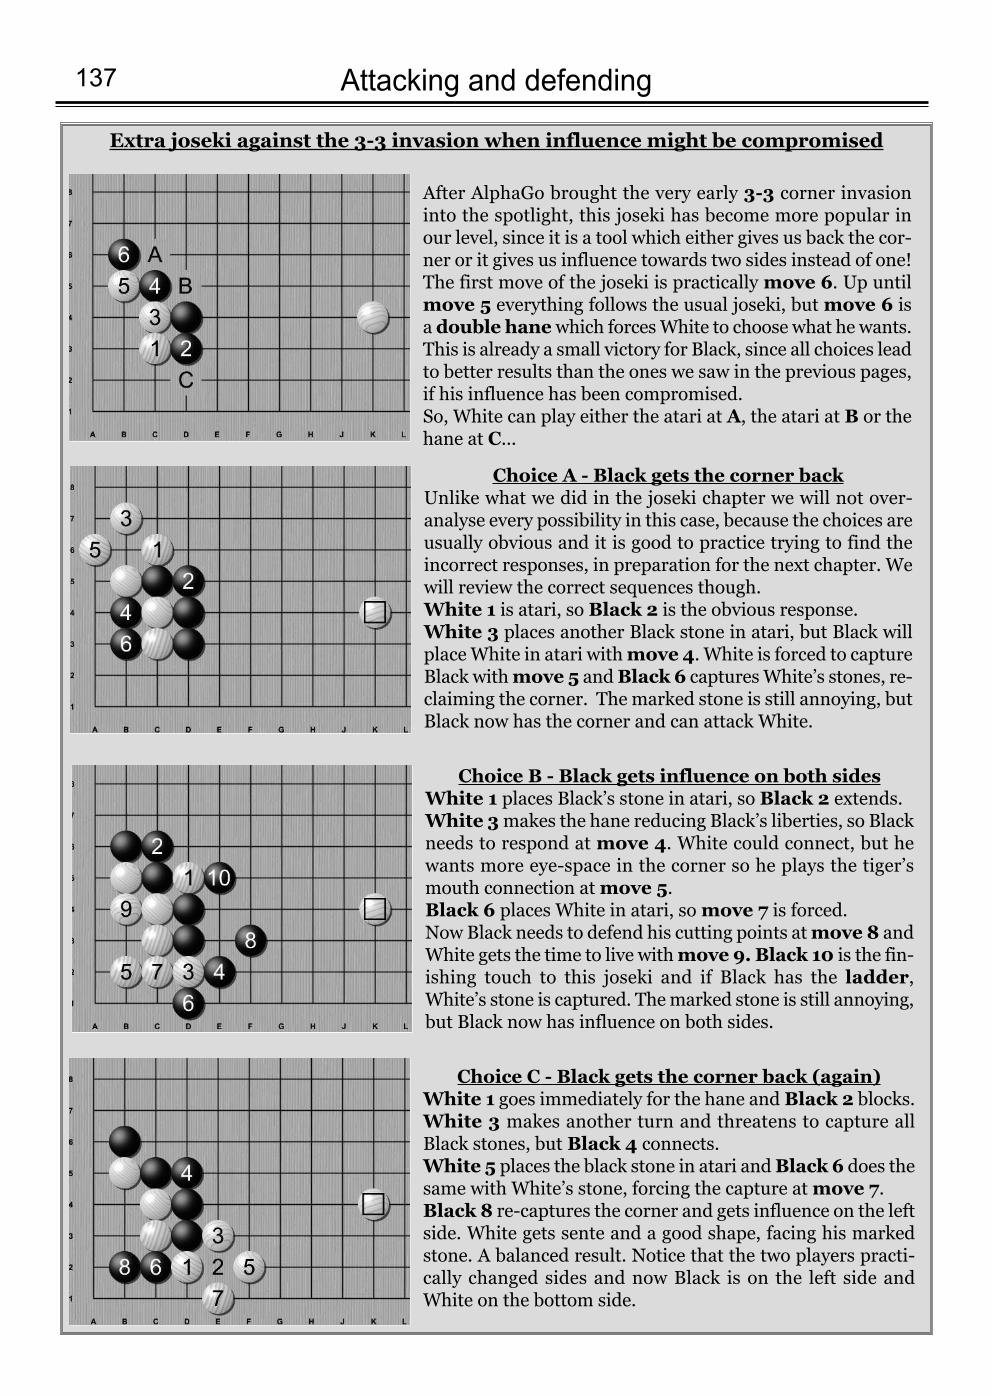
Attacking and defending137
Extra joseki against the 3-3 invasion when influence might be compromised
After AlphaGo brought the very early 3-3 corner invasioninto the spotlight, this joseki has become more popular inour level, since it is a tool which either gives us back the cor-ner or it gives us influence towards two sides instead of one!The first move of the joseki is practically move 6. Up untilmove 5 everything follows the usual joseki, but move 6 isa double hane which forces White to choose what he wants.This is already a small victory for Black, since all choices leadto better results than the ones we saw in the previous pages,if his influence has been compromised. So, White can play either the atari at A, the atari at B or thehane at C...
Choice A - Black gets the corner backUnlike what we did in the joseki chapter we will not over-analyse every possibility in this case, because the choices areusually obvious and it is good to practice trying to find theincorrect responses, in preparation for the next chapter. Wewill review the correct sequences though. White 1 is atari, so Black 2 is the obvious response. White 3 places another Black stone in atari, but Black willplace White in atari with move 4. White is forced to captureBlack with move 5 and Black 6 captures White’s stones, re-claiming the corner. The marked stone is still annoying, butBlack now has the corner and can attack White.
Choice B - Black gets influence on both sidesWhite 1 places Black’s stone in atari, so Black 2 extends.White 3 makes the hane reducing Black’s liberties, so Blackneeds to respond at move 4. White could connect, but hewants more eye-space in the corner so he plays the tiger’smouth connection at move 5. Black 6 places White in atari, so move 7 is forced. Now Black needs to defend his cutting points at move 8 andWhite gets the time to live with move 9. Black 10 is the fin-ishing touch to this joseki and if Black has the ladder,White’s stone is captured. The marked stone is still annoying,but Black now has influence on both sides.
Choice C - Black gets the corner back (again)White 1 goes immediately for the hane and Black 2 blocks.White 3 makes another turn and threatens to capture allBlack stones, but Black 4 connects.White 5 places the black stone in atari and Black 6 does thesame with White’s stone, forcing the capture at move 7.Black 8 re-captures the corner and gets influence on the leftside. White gets sente and a good shape, facing his markedstone. A balanced result. Notice that the two players practi-cally changed sides and now Black is on the left side andWhite on the bottom side.
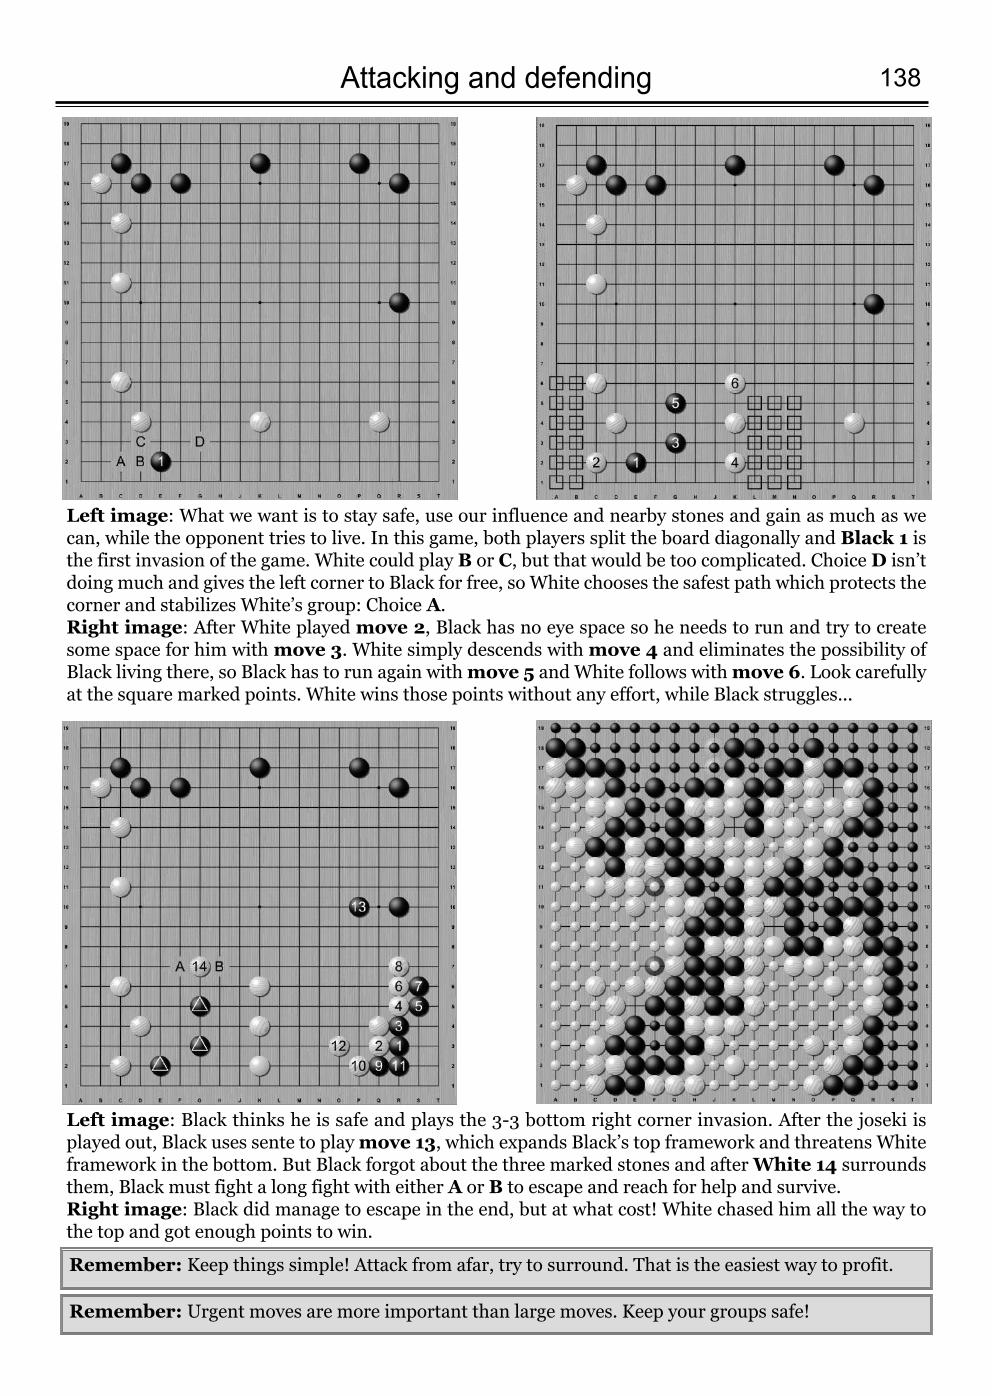
138Attacking and defending
Left image: What we want is to stay safe, use our influence and nearby stones and gain as much as wecan, while the opponent tries to live. In this game, both players split the board diagonally and Black 1 isthe first invasion of the game. White could play B or C, but that would be too complicated. Choice D isn’tdoing much and gives the left corner to Black for free, so White chooses the safest path which protects thecorner and stabilizes White’s group: Choice A. Right image: After White played move 2, Black has no eye space so he needs to run and try to createsome space for him with move 3. White simply descends with move 4 and eliminates the possibility ofBlack living there, so Black has to run again with move 5 and White follows with move 6. Look carefullyat the square marked points. White wins those points without any effort, while Black struggles...
Left image: Black thinks he is safe and plays the 3-3 bottom right corner invasion. After the joseki isplayed out, Black uses sente to play move 13, which expands Black’s top framework and threatens Whiteframework in the bottom. But Black forgot about the three marked stones and after White 14 surroundsthem, Black must fight a long fight with either A or B to escape and reach for help and survive. Right image: Black did manage to escape in the end, but at what cost! White chased him all the way tothe top and got enough points to win.
Remember: Keep things simple! Attack from afar, try to surround. That is the easiest way to profit.
Remember: Urgent moves are more important than large moves. Keep your groups safe!
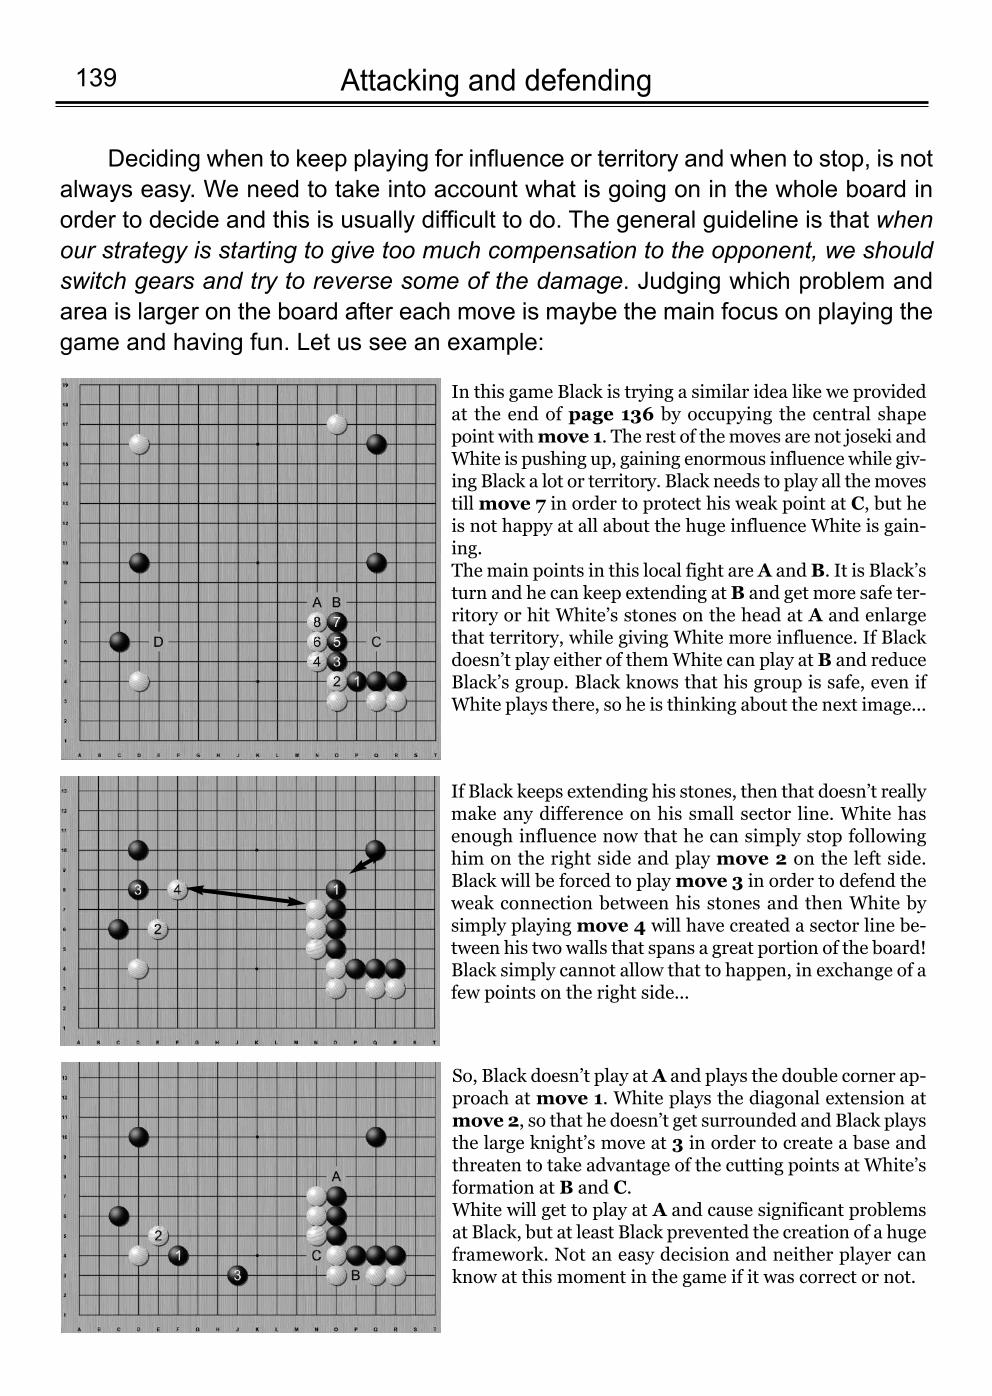
Attacking and defending139
Deciding when to keep playing for influence or territory and when to stop, is notalways easy. We need to take into account what is going on in the whole board inorder to decide and this is usually difficult to do. The general guideline is that whenour strategy is starting to give too much compensation to the opponent, we shouldswitch gears and try to reverse some of the damage. Judging which problem andarea is larger on the board after each move is maybe the main focus on playing thegame and having fun. Let us see an example:
In this game Black is trying a similar idea like we providedat the end of page 136 by occupying the central shapepoint with move 1. The rest of the moves are not joseki andWhite is pushing up, gaining enormous influence while giv-ing Black a lot or territory. Black needs to play all the movestill move 7 in order to protect his weak point at C, but heis not happy at all about the huge influence White is gain-ing. The main points in this local fight are A and B. It is Black’sturn and he can keep extending at B and get more safe ter-ritory or hit White’s stones on the head at A and enlargethat territory, while giving White more influence. If Blackdoesn’t play either of them White can play at B and reduceBlack’s group. Black knows that his group is safe, even ifWhite plays there, so he is thinking about the next image...
If Black keeps extending his stones, then that doesn’t reallymake any difference on his small sector line. White hasenough influence now that he can simply stop followinghim on the right side and play move 2 on the left side.Black will be forced to play move 3 in order to defend theweak connection between his stones and then White bysimply playing move 4 will have created a sector line be-tween his two walls that spans a great portion of the board!Black simply cannot allow that to happen, in exchange of afew points on the right side...
So, Black doesn’t play atA and plays the double corner ap-proach at move 1. White plays the diagonal extension atmove 2, so that he doesn’t get surrounded and Black playsthe large knight’s move at 3 in order to create a base andthreaten to take advantage of the cutting points at White’sformation at B and C.White will get to play at A and cause significant problemsat Black, but at least Black prevented the creation of a hugeframework. Not an easy decision and neither player canknow at this moment in the game if it was correct or not.
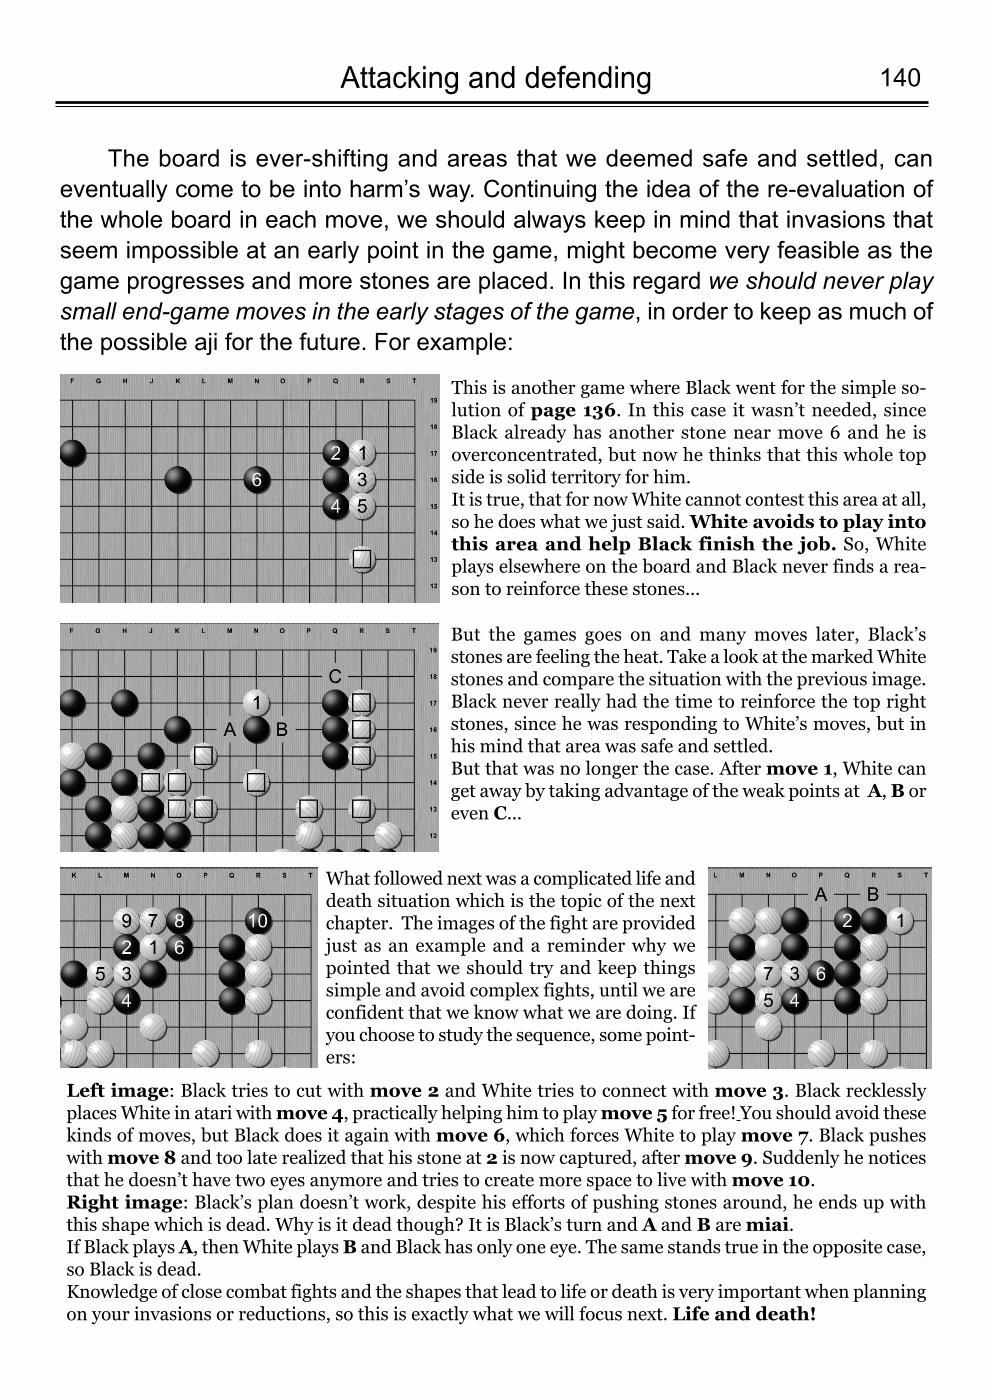
140Attacking and defending
The board is ever-shifting and areas that we deemed safe and settled, caneventually come to be into harm’s way. Continuing the idea of the re-evaluation ofthe whole board in each move, we should always keep in mind that invasions thatseem impossible at an early point in the game, might become very feasible as thegame progresses and more stones are placed. In this regard we should never playsmall end-game moves in the early stages of the game, in order to keep as much ofthe possible aji for the future. For example:
This is another game where Black went for the simple so-lution of page 136. In this case it wasn’t needed, sinceBlack already has another stone near move 6 and he isoverconcentrated, but now he thinks that this whole topside is solid territory for him.It is true, that for now White cannot contest this area at all,so he does what we just said. White avoids to play intothis area and help Black finish the job. So, Whiteplays elsewhere on the board and Black never finds a rea-son to reinforce these stones...
But the games goes on and many moves later, Black’sstones are feeling the heat. Take a look at the marked Whitestones and compare the situation with the previous image. Black never really had the time to reinforce the top rightstones, since he was responding to White’s moves, but inhis mind that area was safe and settled. But that was no longer the case. After move 1, White canget away by taking advantage of the weak points at A, B oreven C...
Left image: Black tries to cut with move 2 and White tries to connect with move 3. Black recklesslyplaces White in atari with move 4, practically helping him to play move 5 for free! You should avoid thesekinds of moves, but Black does it again with move 6, which forces White to play move 7. Black pusheswith move 8 and too late realized that his stone at 2 is now captured, after move 9. Suddenly he noticesthat he doesn’t have two eyes anymore and tries to create more space to live with move 10.Right image: Black’s plan doesn’t work, despite his efforts of pushing stones around, he ends up withthis shape which is dead. Why is it dead though? It is Black’s turn and A and B are miai. If Black plays A, then White plays B and Black has only one eye. The same stands true in the opposite case,so Black is dead.Knowledge of close combat fights and the shapes that lead to life or death is very important when planningon your invasions or reductions, so this is exactly what we will focus next. Life and death!
What followed next was a complicated life anddeath situation which is the topic of the nextchapter. The images of the fight are providedjust as an example and a reminder why wepointed that we should try and keep thingssimple and avoid complex fights, until we areconfident that we know what we are doing. Ifyou choose to study the sequence, some point-ers:
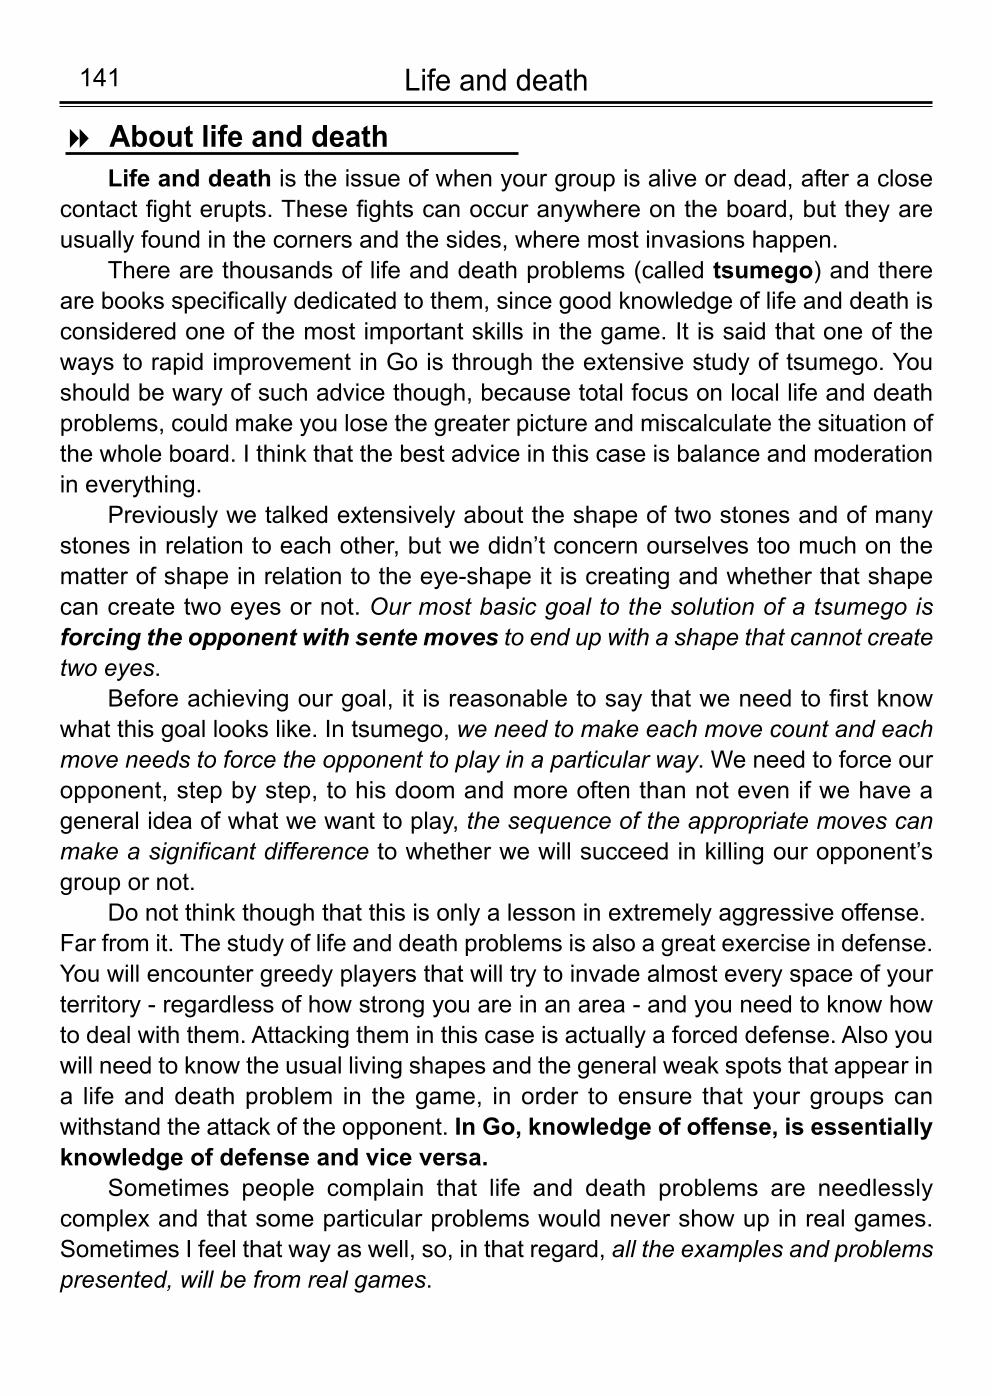
Life and death 141
Life and death is the issue of when your group is alive or dead, after a closecontact fight erupts. These fights can occur anywhere on the board, but they areusually found in the corners and the sides, where most invasions happen.
There are thousands of life and death problems (called tsumego) and thereare books specifically dedicated to them, since good knowledge of life and death isconsidered one of the most important skills in the game. It is said that one of theways to rapid improvement in Go is through the extensive study of tsumego. Youshould be wary of such advice though, because total focus on local life and deathproblems, could make you lose the greater picture and miscalculate the situation ofthe whole board. I think that the best advice in this case is balance and moderationin everything.
Previously we talked extensively about the shape of two stones and of manystones in relation to each other, but we didn’t concern ourselves too much on thematter of shape in relation to the eye-shape it is creating and whether that shapecan create two eyes or not. Our most basic goal to the solution of a tsumego isforcing the opponent with sente moves to end up with a shape that cannot createtwo eyes.
Before achieving our goal, it is reasonable to say that we need to first knowwhat this goal looks like. In tsumego, we need to make each move count and eachmove needs to force the opponent to play in a particular way. We need to force ouropponent, step by step, to his doom and more often than not even if we have ageneral idea of what we want to play, the sequence of the appropriate moves canmake a significant difference to whether we will succeed in killing our opponent’sgroup or not.
Do not think though that this is only a lesson in extremely aggressive offense.Far from it. The study of life and death problems is also a great exercise in defense.You will encounter greedy players that will try to invade almost every space of yourterritory - regardless of how strong you are in an area - and you need to know howto deal with them. Attacking them in this case is actually a forced defense. Also youwill need to know the usual living shapes and the general weak spots that appear ina life and death problem in the game, in order to ensure that your groups canwithstand the attack of the opponent. In Go, knowledge of offense, is essentiallyknowledge of defense and vice versa.
Sometimes people complain that life and death problems are needlesslycomplex and that some particular problems would never show up in real games.Sometimes I feel that way as well, so, in that regard, all the examples and problemspresented, will be from real games.
About life and death8
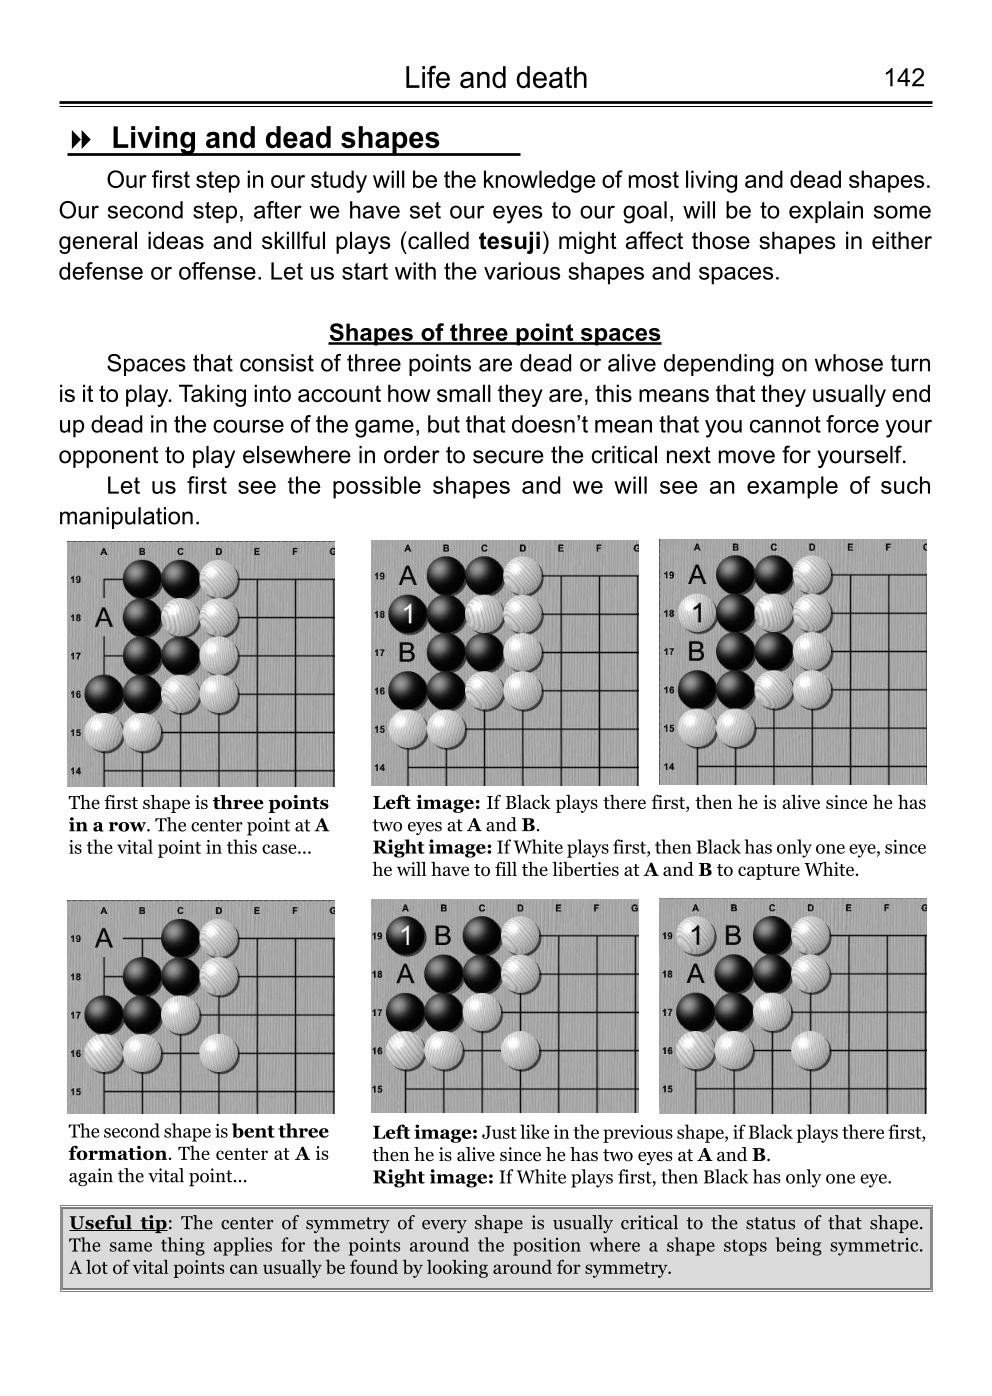
142Life and death
Our first step in our study will be the knowledge of most living and dead shapes.Our second step, after we have set our eyes to our goal, will be to explain somegeneral ideas and skillful plays (called tesuji) might affect those shapes in eitherdefense or offense. Let us start with the various shapes and spaces.
Shapes of three point spacesSpaces that consist of three points are dead or alive depending on whose turn
is it to play. Taking into account how small they are, this means that they usually endup dead in the course of the game, but that doesn’t mean that you cannot force youropponent to play elsewhere in order to secure the critical next move for yourself.
Let us first see the possible shapes and we will see an example of suchmanipulation.
Living and dead shapes8
The first shape is three pointsin a row. The center point at Ais the vital point in this case...
Left image: If Black plays there first, then he is alive since he hastwo eyes at A and B.Right image: If White plays first, then Black has only one eye, sincehe will have to fill the liberties at A and B to capture White.
Useful tip: The center of symmetry of every shape is usually critical to the status of that shape. The same thing applies for the points around the position where a shape stops being symmetric. A lot of vital points can usually be found by looking around for symmetry.
The second shape is bent threeformation. The center at A isagain the vital point...
Left image: Just like in the previous shape, if Black plays there first,then he is alive since he has two eyes at A and B.Right image: If White plays first, then Black has only one eye.
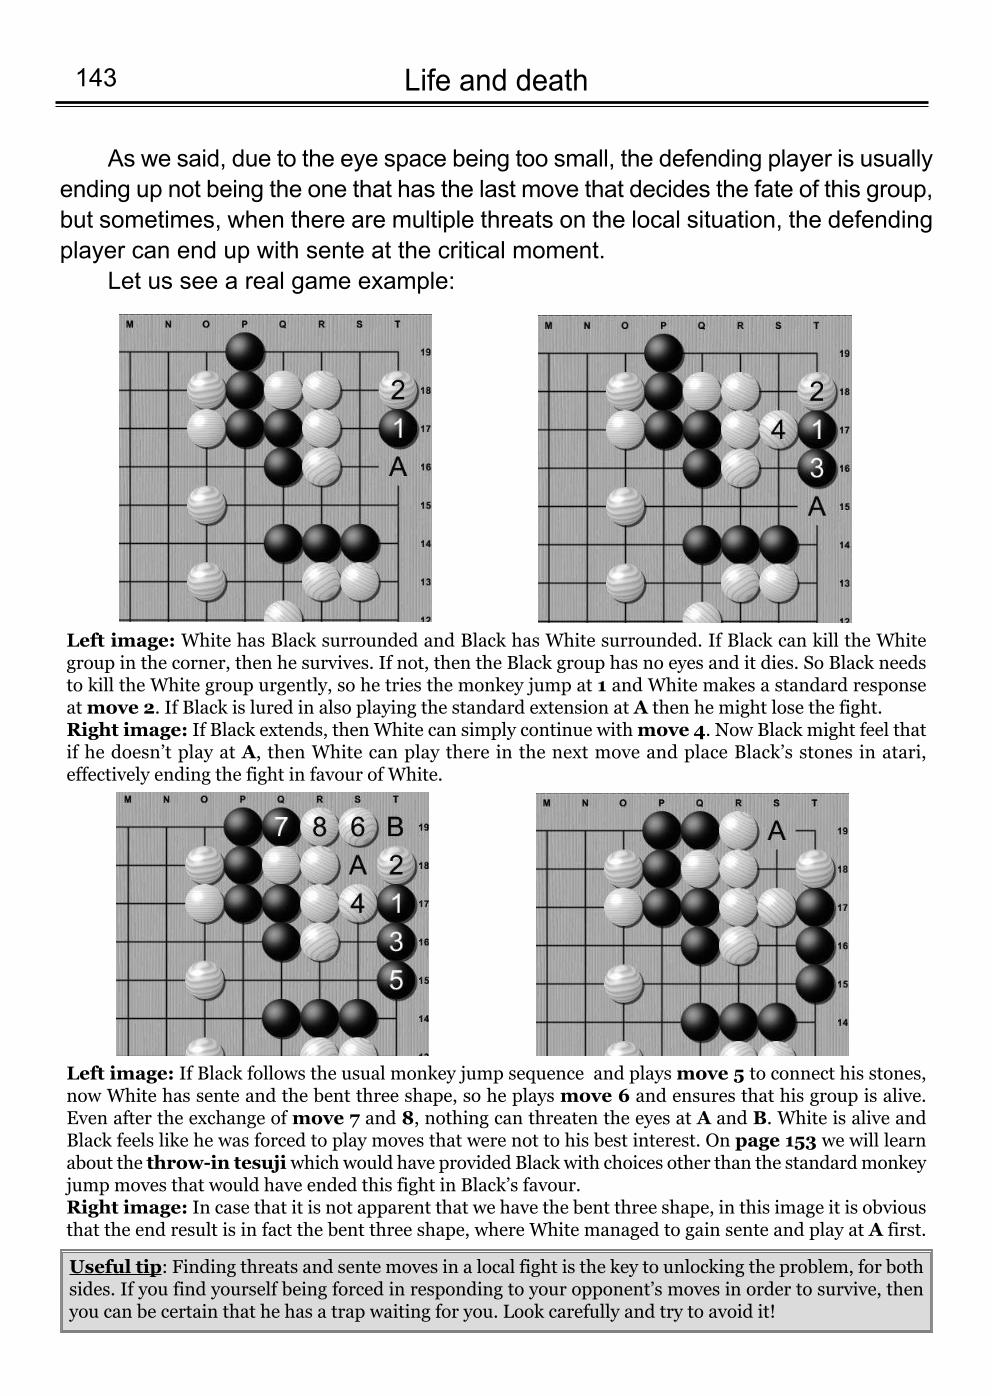
Life and death 143
As we said, due to the eye space being too small, the defending player is usuallyending up not being the one that has the last move that decides the fate of this group,but sometimes, when there are multiple threats on the local situation, the defendingplayer can end up with sente at the critical moment.
Let us see a real game example:
Left image: White has Black surrounded and Black has White surrounded. If Black can kill the Whitegroup in the corner, then he survives. If not, then the Black group has no eyes and it dies. So Black needsto kill the White group urgently, so he tries the monkey jump at 1 and White makes a standard responseat move 2. If Black is lured in also playing the standard extension at A then he might lose the fight.Right image: If Black extends, then White can simply continue with move 4. Now Black might feel thatif he doesn’t play at A, then White can play there in the next move and place Black’s stones in atari, effectively ending the fight in favour of White.
Left image: If Black follows the usual monkey jump sequence and plays move 5 to connect his stones,now White has sente and the bent three shape, so he plays move 6 and ensures that his group is alive.Even after the exchange of move 7 and 8, nothing can threaten the eyes at A and B. White is alive andBlack feels like he was forced to play moves that were not to his best interest. On page 153 we will learnabout the throw-in tesuji which would have provided Black with choices other than the standard monkeyjump moves that would have ended this fight in Black’s favour.Right image: In case that it is not apparent that we have the bent three shape, in this image it is obviousthat the end result is in fact the bent three shape, where White managed to gain sente and play at A first.
Useful tip: Finding threats and sente moves in a local fight is the key to unlocking the problem, for bothsides. If you find yourself being forced in responding to your opponent’s moves in order to survive, thenyou can be certain that he has a trap waiting for you. Look carefully and try to avoid it!
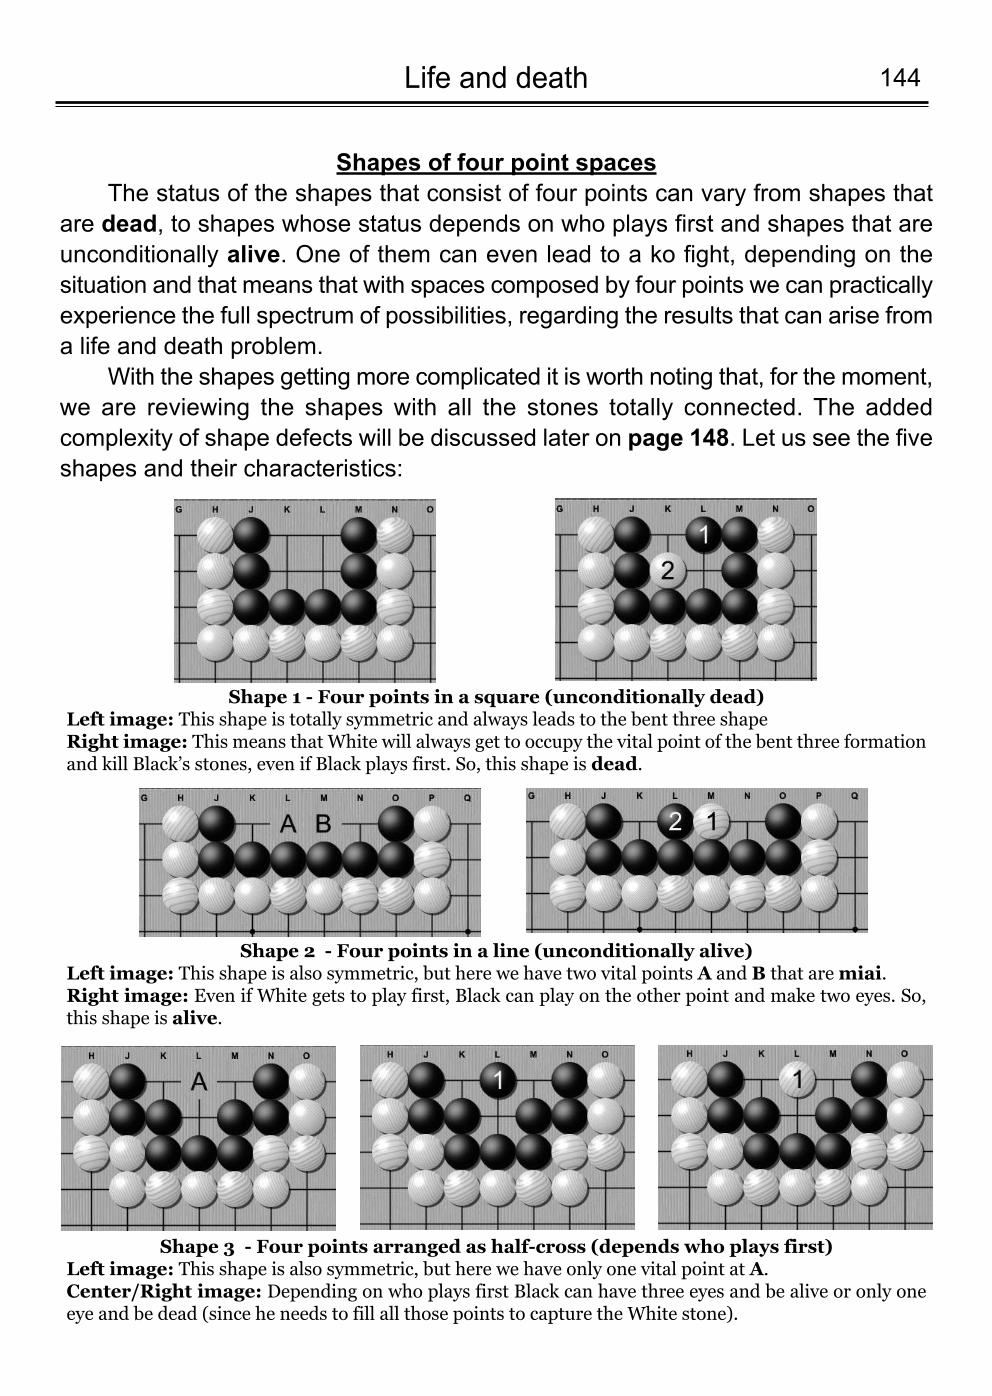
144Life and death
Shapes of four point spacesThe status of the shapes that consist of four points can vary from shapes that
are dead, to shapes whose status depends on who plays first and shapes that areunconditionally alive. One of them can even lead to a ko fight, depending on thesituation and that means that with spaces composed by four points we can practicallyexperience the full spectrum of possibilities, regarding the results that can arise froma life and death problem.
With the shapes getting more complicated it is worth noting that, for the moment,we are reviewing the shapes with all the stones totally connected. The addedcomplexity of shape defects will be discussed later on page 148. Let us see the fiveshapes and their characteristics:
Shape 1 - Four points in a square (unconditionally dead)Left image: This shape is totally symmetric and always leads to the bent three shapeRight image: This means that White will always get to occupy the vital point of the bent three formationand kill Black’s stones, even if Black plays first. So, this shape is dead.
Shape 2 - Four points in a line (unconditionally alive)Left image: This shape is also symmetric, but here we have two vital points A and B that are miai. Right image: Even if White gets to play first, Black can play on the other point and make two eyes. So,this shape is alive.
Shape 3 - Four points arranged as half-cross (depends who plays first)Left image: This shape is also symmetric, but here we have only one vital point at A. Center/Right image: Depending on who plays first Black can have three eyes and be alive or only oneeye and be dead (since he needs to fill all those points to capture the White stone).
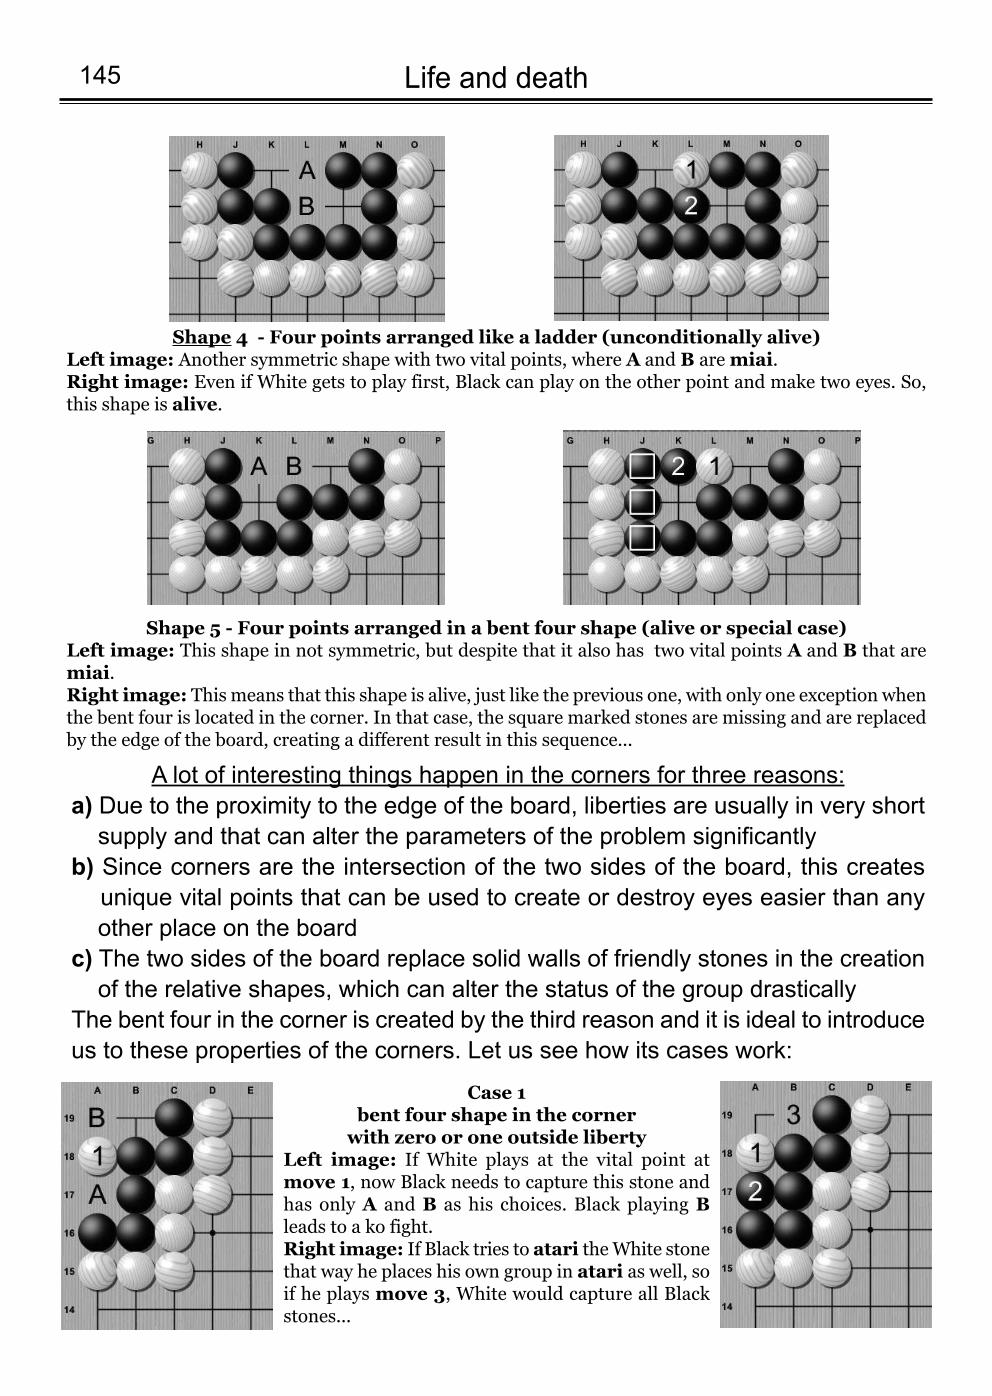
Life and death 145
A lot of interesting things happen in the corners for three reasons:a) Due to the proximity to the edge of the board, liberties are usually in very short supply and that can alter the parameters of the problem significantly
b) Since corners are the intersection of the two sides of the board, this creates unique vital points that can be used to create or destroy eyes easier than any other place on the board
c) The two sides of the board replace solid walls of friendly stones in the creation of the relative shapes, which can alter the status of the group drastically
The bent four in the corner is created by the third reason and it is ideal to introduceus to these properties of the corners. Let us see how its cases work:
Shape 5 - Four points arranged in a bent four shape (alive or special case)Left image: This shape in not symmetric, but despite that it also has two vital points A and B that aremiai. Right image: This means that this shape is alive, just like the previous one, with only one exception whenthe bent four is located in the corner. In that case, the square marked stones are missing and are replacedby the edge of the board, creating a different result in this sequence...
Case 1bent four shape in the corner with zero or one outside liberty
Left image: If White plays at the vital point atmove 1, now Black needs to capture this stone andhas only A and B as his choices. Black playing Bleads to a ko fight.Right image: If Black tries to atari the White stonethat way he places his own group in atari as well, soif he plays move 3, White would capture all Blackstones...
Shape 4 - Four points arranged like a ladder (unconditionally alive)Left image: Another symmetric shape with two vital points, where A and B are miai. Right image: Even if White gets to play first, Black can play on the other point and make two eyes. So,this shape is alive.
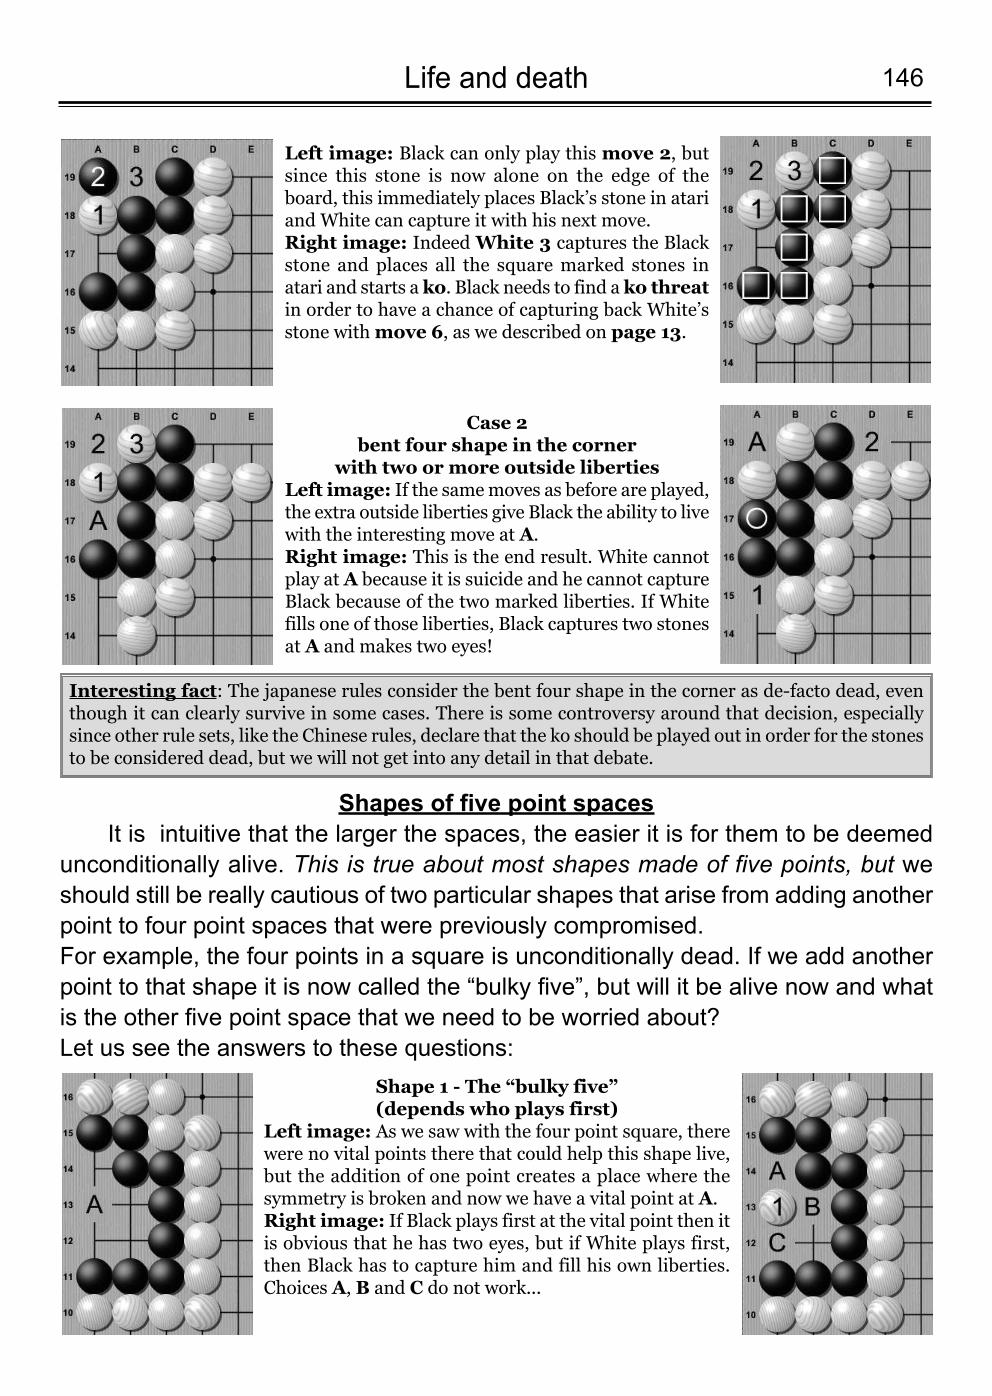
146Life and death
Interesting fact: The japanese rules consider the bent four shape in the corner as de-facto dead, eventhough it can clearly survive in some cases. There is some controversy around that decision, especiallysince other rule sets, like the Chinese rules, declare that the ko should be played out in order for the stonesto be considered dead, but we will not get into any detail in that debate.
Case 2bent four shape in the corner
with two or more outside libertiesLeft image: If the same moves as before are played,the extra outside liberties give Black the ability to livewith the interesting move at A.Right image: This is the end result. White cannotplay at A because it is suicide and he cannot captureBlack because of the two marked liberties. If Whitefills one of those liberties, Black captures two stonesat A and makes two eyes!
Left image: Black can only play this move 2, butsince this stone is now alone on the edge of theboard, this immediately places Black’s stone in atariand White can capture it with his next move.Right image: Indeed White 3 captures the Blackstone and places all the square marked stones inatari and starts a ko. Black needs to find a ko threatin order to have a chance of capturing back White’sstone with move 6, as we described on page 13.
Shapes of five point spacesIt is intuitive that the larger the spaces, the easier it is for them to be deemed
unconditionally alive. This is true about most shapes made of five points, but weshould still be really cautious of two particular shapes that arise from adding anotherpoint to four point spaces that were previously compromised. For example, the four points in a square is unconditionally dead. If we add anotherpoint to that shape it is now called the “bulky five”, but will it be alive now and whatis the other five point space that we need to be worried about? Let us see the answers to these questions:
Shape 1 - The “bulky five” (depends who plays first)
Left image: As we saw with the four point square, therewere no vital points there that could help this shape live,but the addition of one point creates a place where thesymmetry is broken and now we have a vital point at A. Right image: If Black plays first at the vital point then itis obvious that he has two eyes, but if White plays first,then Black has to capture him and fill his own liberties.Choices A, B and C do not work...
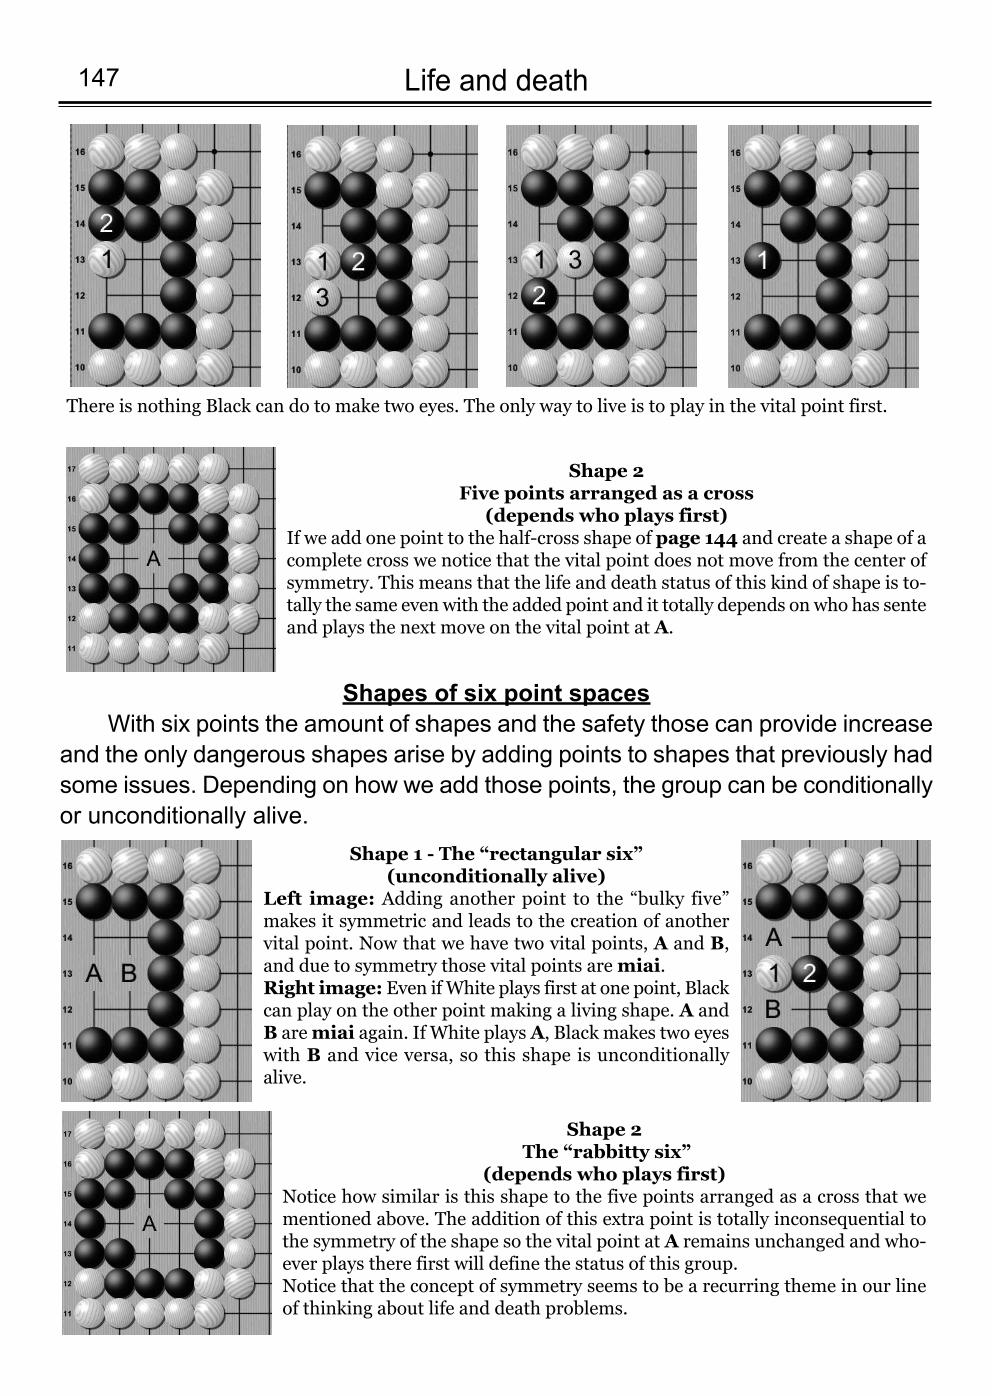
Life and death 147
There is nothing Black can do to make two eyes. The only way to live is to play in the vital point first.
Shape 2 Five points arranged as a cross
(depends who plays first)If we add one point to the half-cross shape of page 144 and create a shape of acomplete cross we notice that the vital point does not move from the center ofsymmetry. This means that the life and death status of this kind of shape is to-tally the same even with the added point and it totally depends on who has senteand plays the next move on the vital point at A.
Shapes of six point spacesWith six points the amount of shapes and the safety those can provide increase
and the only dangerous shapes arise by adding points to shapes that previously hadsome issues. Depending on how we add those points, the group can be conditionallyor unconditionally alive.
Shape 2 The “rabbitty six”
(depends who plays first)Notice how similar is this shape to the five points arranged as a cross that wementioned above. The addition of this extra point is totally inconsequential tothe symmetry of the shape so the vital point at A remains unchanged and who-ever plays there first will define the status of this group. Notice that the concept of symmetry seems to be a recurring theme in our lineof thinking about life and death problems.
Shape 1 - The “rectangular six” (unconditionally alive)
Left image: Adding another point to the “bulky five”makes it symmetric and leads to the creation of anothervital point. Now that we have two vital points, A and B,and due to symmetry those vital points are miai.Right image:Even if White plays first at one point, Blackcan play on the other point making a living shape. A andB are miai again. If White plays A, Black makes two eyeswith B and vice versa, so this shape is unconditionallyalive.
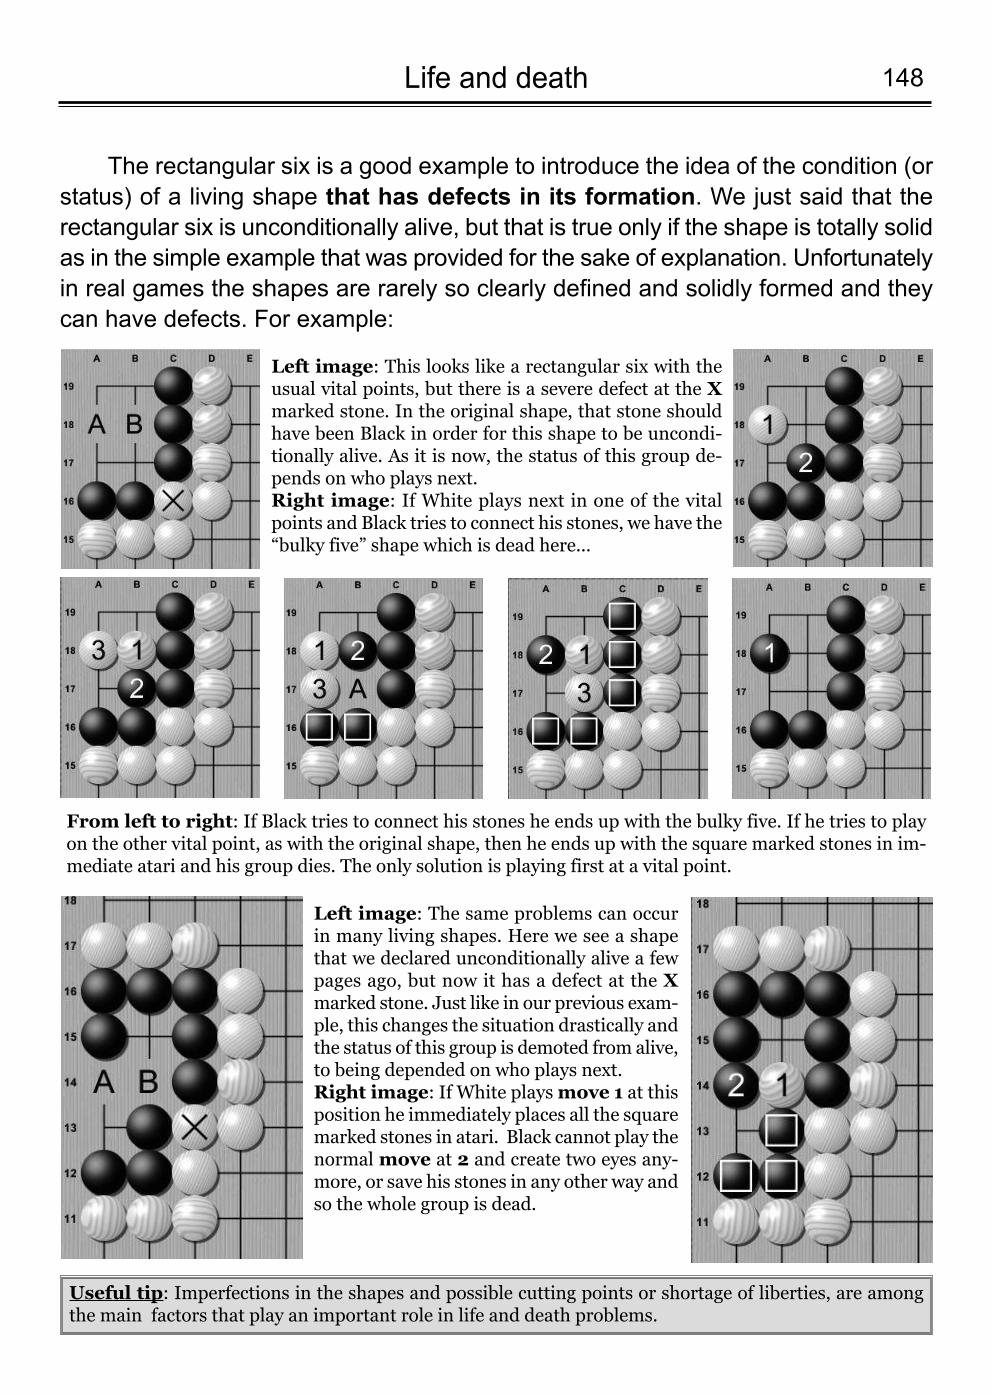
148Life and death
The rectangular six is a good example to introduce the idea of the condition (orstatus) of a living shape that has defects in its formation. We just said that therectangular six is unconditionally alive, but that is true only if the shape is totally solidas in the simple example that was provided for the sake of explanation. Unfortunatelyin real games the shapes are rarely so clearly defined and solidly formed and theycan have defects. For example:
Left image: This looks like a rectangular six with theusual vital points, but there is a severe defect at the Xmarked stone. In the original shape, that stone shouldhave been Black in order for this shape to be uncondi-tionally alive. As it is now, the status of this group de-pends on who plays next.Right image: If White plays next in one of the vitalpoints and Black tries to connect his stones, we have the“bulky five” shape which is dead here...
From left to right: If Black tries to connect his stones he ends up with the bulky five. If he tries to playon the other vital point, as with the original shape, then he ends up with the square marked stones in im-mediate atari and his group dies. The only solution is playing first at a vital point.
Left image: The same problems can occurin many living shapes. Here we see a shapethat we declared unconditionally alive a fewpages ago, but now it has a defect at the Xmarked stone. Just like in our previous exam-ple, this changes the situation drastically andthe status of this group is demoted from alive,to being depended on who plays next. Right image: If White plays move 1 at thisposition he immediately places all the squaremarked stones in atari. Black cannot play thenormal move at 2 and create two eyes any-more, or save his stones in any other way andso the whole group is dead.
Useful tip: Imperfections in the shapes and possible cutting points or shortage of liberties, are amongthe main factors that play an important role in life and death problems.
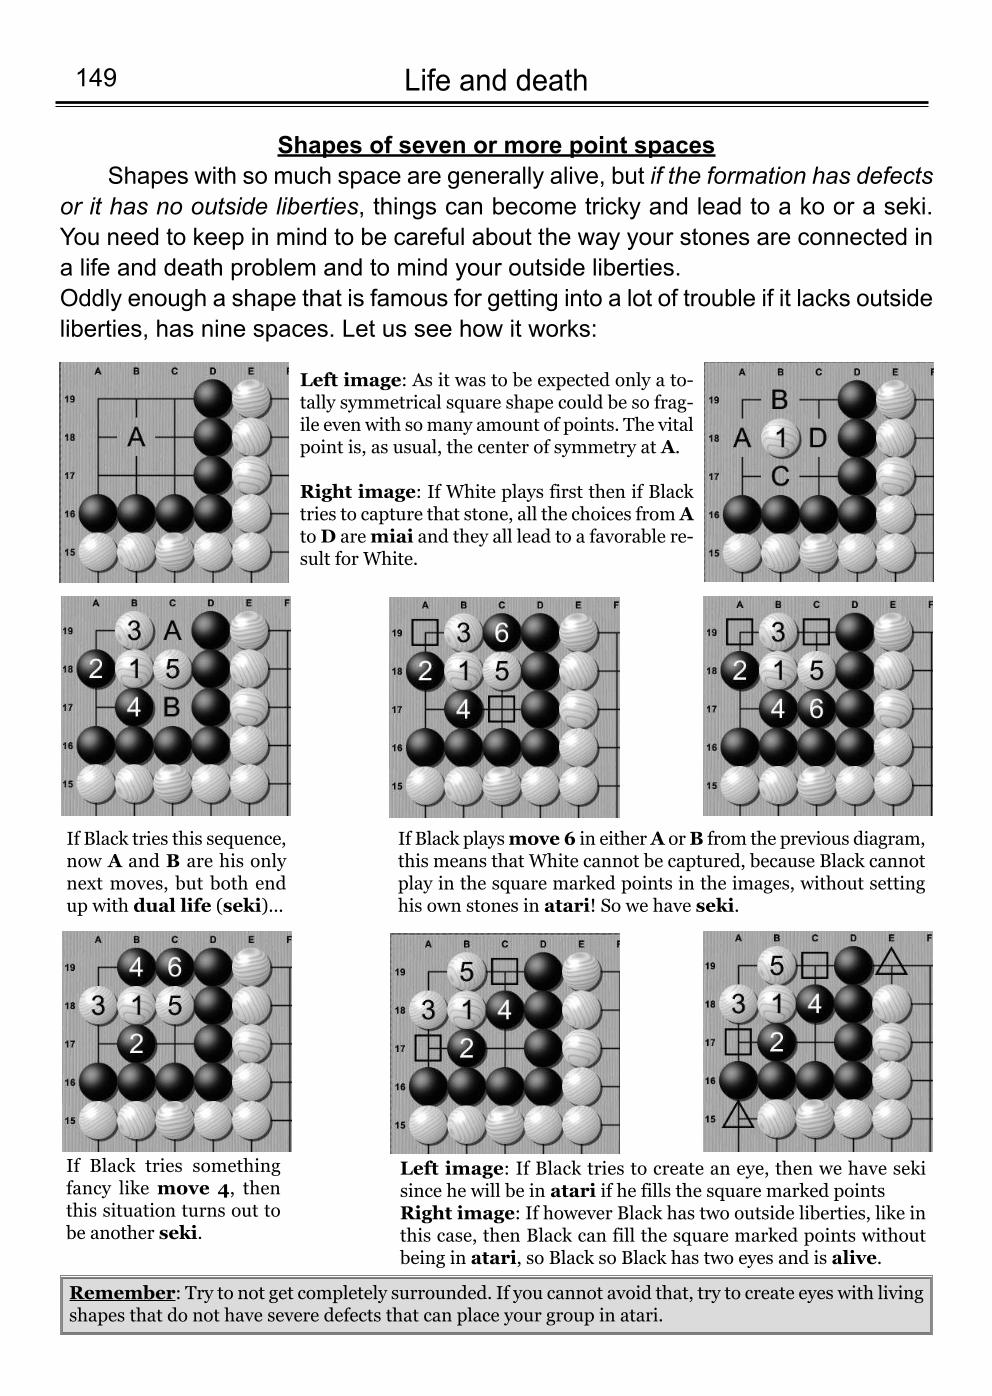
Life and death 149
Shapes of seven or more point spacesShapes with so much space are generally alive, but if the formation has defects
or it has no outside liberties, things can become tricky and lead to a ko or a seki.You need to keep in mind to be careful about the way your stones are connected ina life and death problem and to mind your outside liberties. Oddly enough a shape that is famous for getting into a lot of trouble if it lacks outsideliberties, has nine spaces. Let us see how it works:
Remember: Try to not get completely surrounded. If you cannot avoid that, try to create eyes with livingshapes that do not have severe defects that can place your group in atari.
Left image: As it was to be expected only a to-tally symmetrical square shape could be so frag-ile even with so many amount of points. The vitalpoint is, as usual, the center of symmetry at A.
Right image: If White plays first then if Blacktries to capture that stone, all the choices from Ato D are miai and they all lead to a favorable re-sult for White.
If Black tries this sequence,now A and B are his onlynext moves, but both endup with dual life (seki)...
If Black plays move 6 in either A or B from the previous diagram,this means that White cannot be captured, because Black cannotplay in the square marked points in the images, without settinghis own stones in atari! So we have seki.
If Black tries somethingfancy like move 4, thenthis situation turns out tobe another seki.
Left image: If Black tries to create an eye, then we have sekisince he will be in atari if he fills the square marked pointsRight image: If however Black has two outside liberties, like inthis case, then Black can fill the square marked points withoutbeing in atari, so Black so Black has two eyes and is alive.
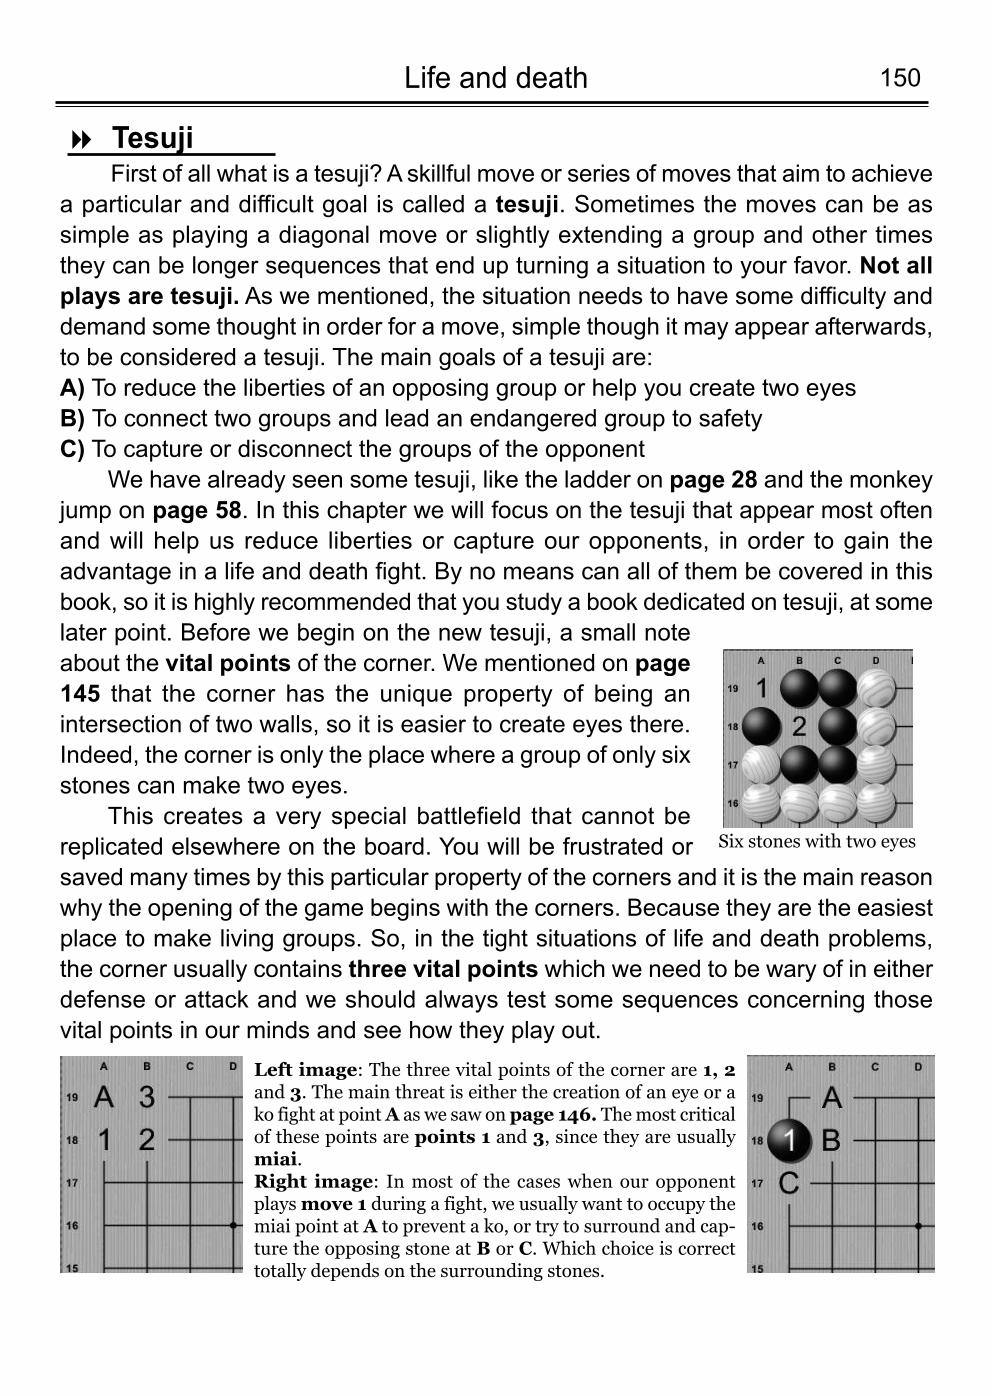
150Life and death
First of all what is a tesuji? A skillful move or series of moves that aim to achievea particular and difficult goal is called a tesuji. Sometimes the moves can be assimple as playing a diagonal move or slightly extending a group and other timesthey can be longer sequences that end up turning a situation to your favor. Not allplays are tesuji. As we mentioned, the situation needs to have some difficulty anddemand some thought in order for a move, simple though it may appear afterwards,to be considered a tesuji. The main goals of a tesuji are:A) To reduce the liberties of an opposing group or help you create two eyesB) To connect two groups and lead an endangered group to safetyC) To capture or disconnect the groups of the opponent
We have already seen some tesuji, like the ladder on page 28 and the monkeyjump on page 58. In this chapter we will focus on the tesuji that appear most oftenand will help us reduce liberties or capture our opponents, in order to gain theadvantage in a life and death fight. By no means can all of them be covered in thisbook, so it is highly recommended that you study a book dedicated on tesuji, at somelater point. Before we begin on the new tesuji, a small noteabout the vital points of the corner. We mentioned on page145 that the corner has the unique property of being anintersection of two walls, so it is easier to create eyes there.Indeed, the corner is only the place where a group of only sixstones can make two eyes.
This creates a very special battlefield that cannot bereplicated elsewhere on the board. You will be frustrated orsaved many times by this particular property of the corners and it is the main reasonwhy the opening of the game begins with the corners. Because they are the easiestplace to make living groups. So, in the tight situations of life and death problems,the corner usually contains three vital points which we need to be wary of in eitherdefense or attack and we should always test some sequences concerning thosevital points in our minds and see how they play out.
Tesuji8
Six stones with two eyes
Left image: The three vital points of the corner are 1, 2and 3. The main threat is either the creation of an eye or ako fight at point A as we saw on page 146. The most criticalof these points are points 1 and 3, since they are usuallymiai.Right image: In most of the cases when our opponentplays move 1 during a fight, we usually want to occupy themiai point at A to prevent a ko, or try to surround and cap-ture the opposing stone at B or C. Which choice is correcttotally depends on the surrounding stones.
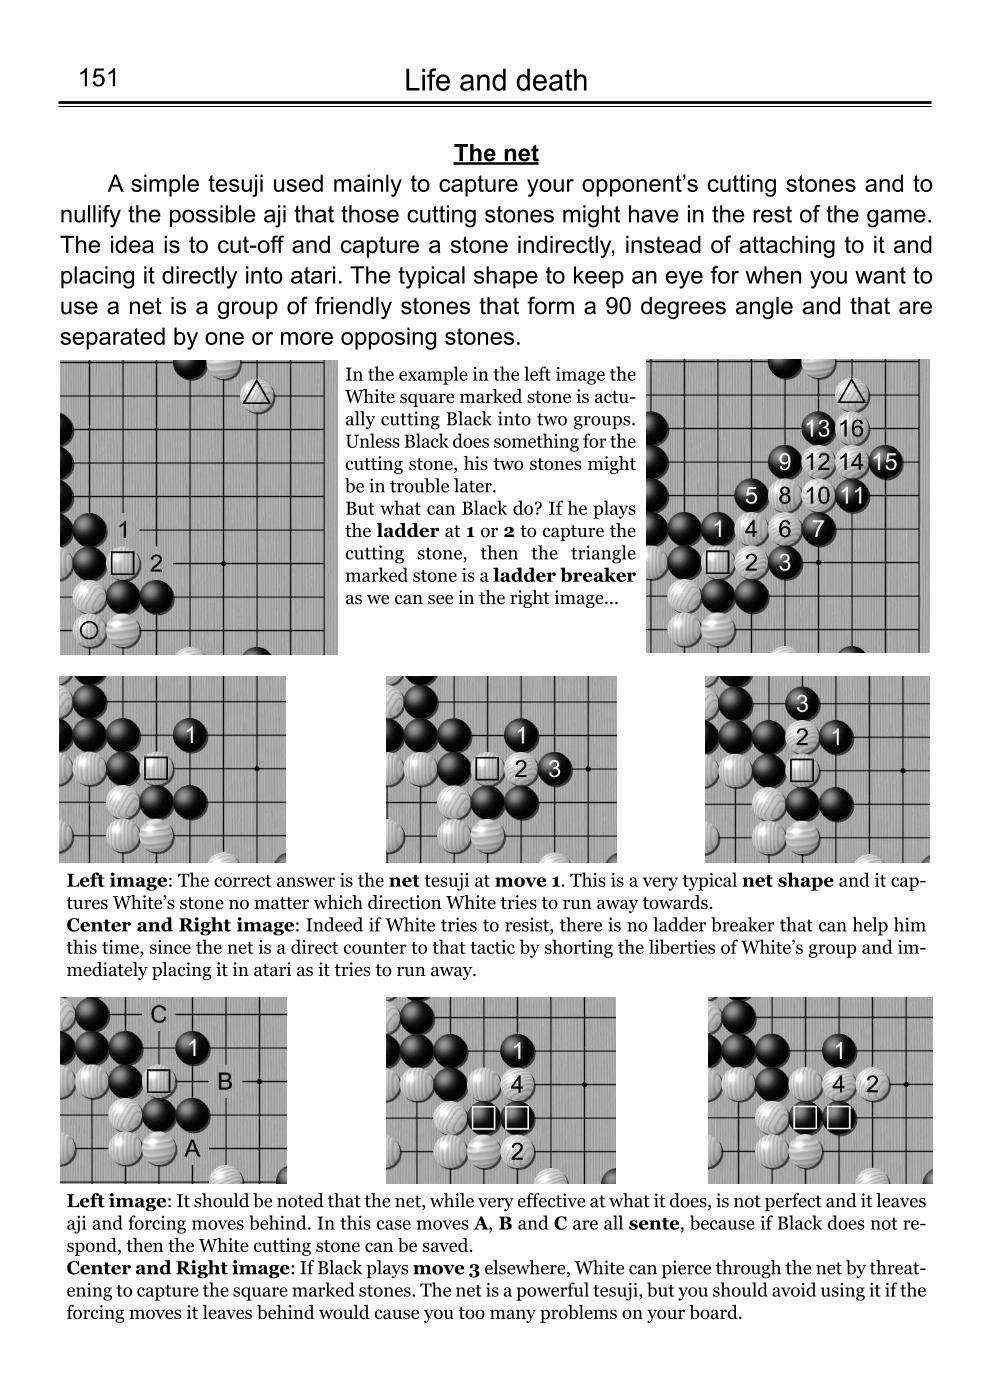
Life and death 151
The netA simple tesuji used mainly to capture your opponent’s cutting stones and to
nullify the possible aji that those cutting stones might have in the rest of the game.The idea is to cut-off and capture a stone indirectly, instead of attaching to it andplacing it directly into atari. The typical shape to keep an eye for when you want touse a net is a group of friendly stones that form a 90 degrees angle and that areseparated by one or more opposing stones.
In the example in the left image theWhite square marked stone is actu-ally cutting Black into two groups.Unless Black does something for thecutting stone, his two stones mightbe in trouble later. But what can Black do? If he playsthe ladder at 1 or 2 to capture thecutting stone, then the trianglemarked stone is a ladder breakeras we can see in the right image...
Left image: The correct answer is the net tesuji at move 1. This is a very typical net shape and it cap-tures White’s stone no matter which direction White tries to run away towards.Center and Right image: Indeed if White tries to resist, there is no ladder breaker that can help himthis time, since the net is a direct counter to that tactic by shorting the liberties of White’s group and im-mediately placing it in atari as it tries to run away.
Left image: It should be noted that the net, while very effective at what it does, is not perfect and it leavesaji and forcing moves behind. In this case moves A, B and C are all sente, because if Black does not re-spond, then the White cutting stone can be saved.Center and Right image: If Black plays move 3 elsewhere, White can pierce through the net by threat-ening to capture the square marked stones. The net is a powerful tesuji, but you should avoid using it if theforcing moves it leaves behind would cause you too many problems on your board.
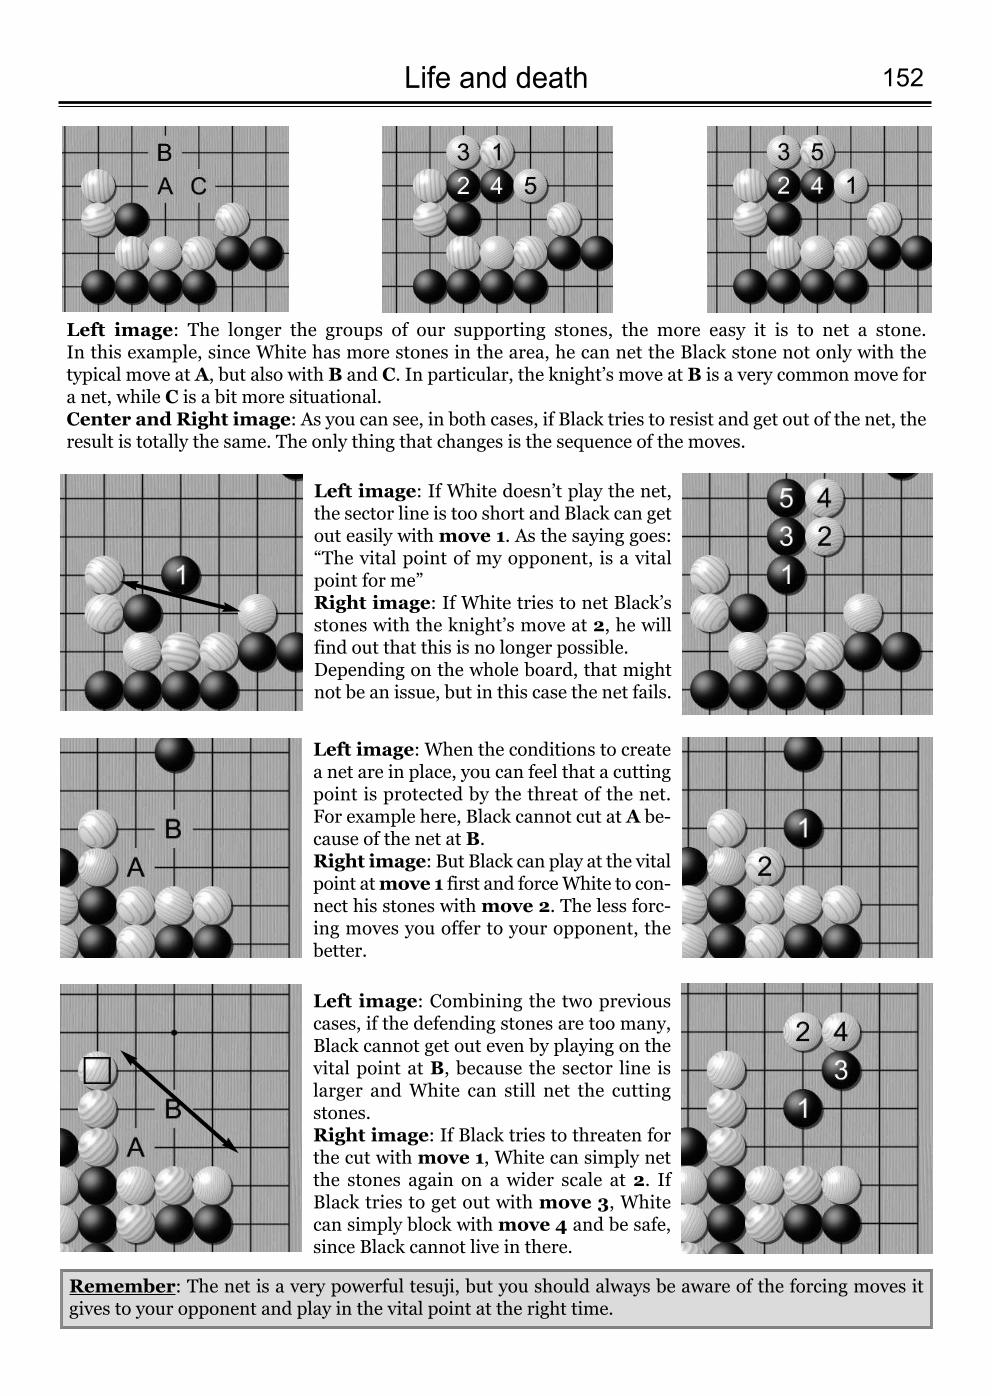
152Life and death
Left image: The longer the groups of our supporting stones, the more easy it is to net a stone. In this example, since White has more stones in the area, he can net the Black stone not only with thetypical move at A, but also with B and C. In particular, the knight’s move at B is a very common move fora net, while C is a bit more situational.Center and Right image: As you can see, in both cases, if Black tries to resist and get out of the net, theresult is totally the same. The only thing that changes is the sequence of the moves.
Left image: If White doesn’t play the net,the sector line is too short and Black can getout easily with move 1. As the saying goes:“The vital point of my opponent, is a vitalpoint for me”Right image: If White tries to net Black’sstones with the knight’s move at 2, he willfind out that this is no longer possible. Depending on the whole board, that mightnot be an issue, but in this case the net fails.
Left image: When the conditions to createa net are in place, you can feel that a cuttingpoint is protected by the threat of the net.For example here, Black cannot cut at A be-cause of the net at B.Right image: But Black can play at the vitalpoint at move 1 first and force White to con-nect his stones with move 2. The less forc-ing moves you offer to your opponent, thebetter.
Left image: Combining the two previouscases, if the defending stones are too many,Black cannot get out even by playing on thevital point at B, because the sector line islarger and White can still net the cuttingstones.Right image: If Black tries to threaten forthe cut with move 1, White can simply netthe stones again on a wider scale at 2. IfBlack tries to get out with move 3, Whitecan simply block with move 4 and be safe,since Black cannot live in there.
Remember: The net is a very powerful tesuji, but you should always be aware of the forcing moves itgives to your opponent and play in the vital point at the right time.
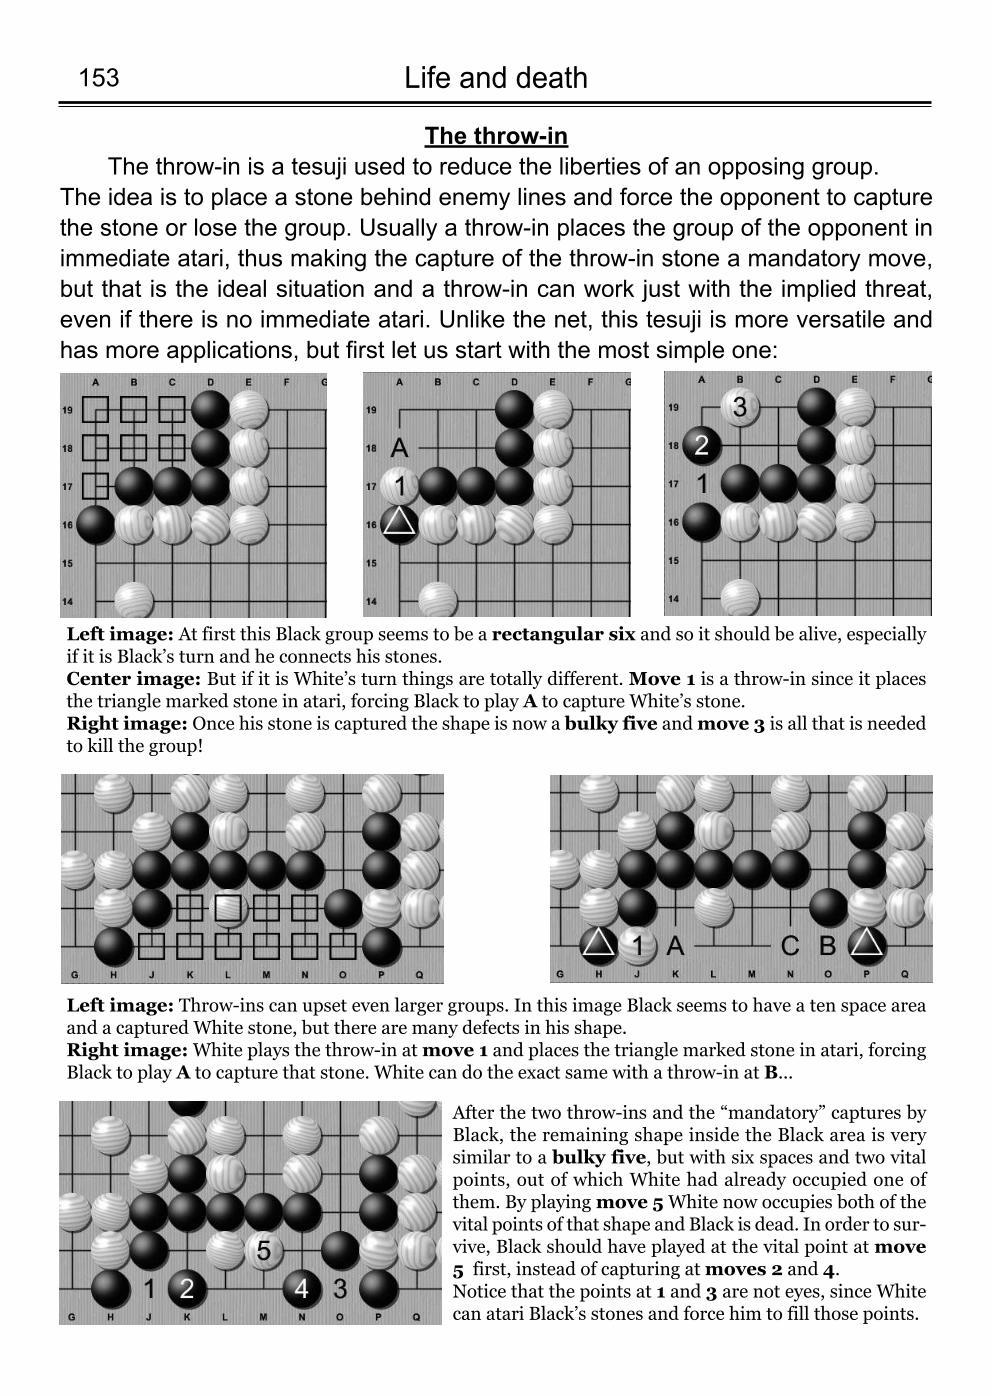
Life and death 153
The throw-inThe throw-in is a tesuji used to reduce the liberties of an opposing group.
The idea is to place a stone behind enemy lines and force the opponent to capturethe stone or lose the group. Usually a throw-in places the group of the opponent inimmediate atari, thus making the capture of the throw-in stone a mandatory move,but that is the ideal situation and a throw-in can work just with the implied threat,even if there is no immediate atari. Unlike the net, this tesuji is more versatile andhas more applications, but first let us start with the most simple one:
Left image: At first this Black group seems to be a rectangular six and so it should be alive, especiallyif it is Black’s turn and he connects his stones.Center image: But if it is White’s turn things are totally different. Move 1 is a throw-in since it placesthe triangle marked stone in atari, forcing Black to play A to capture White’s stone.Right image: Once his stone is captured the shape is now a bulky five and move 3 is all that is neededto kill the group!
Left image: Throw-ins can upset even larger groups. In this image Black seems to have a ten space areaand a captured White stone, but there are many defects in his shape.Right image:White plays the throw-in at move 1 and places the triangle marked stone in atari, forcingBlack to play A to capture that stone. White can do the exact same with a throw-in at B...
After the two throw-ins and the “mandatory” captures byBlack, the remaining shape inside the Black area is verysimilar to a bulky five, but with six spaces and two vitalpoints, out of which White had already occupied one ofthem. By playingmove 5White now occupies both of thevital points of that shape and Black is dead. In order to sur-vive, Black should have played at the vital point at move5 first, instead of capturing at moves 2 and 4.Notice that the points at 1 and 3 are not eyes, since Whitecan atari Black’s stones and force him to fill those points.
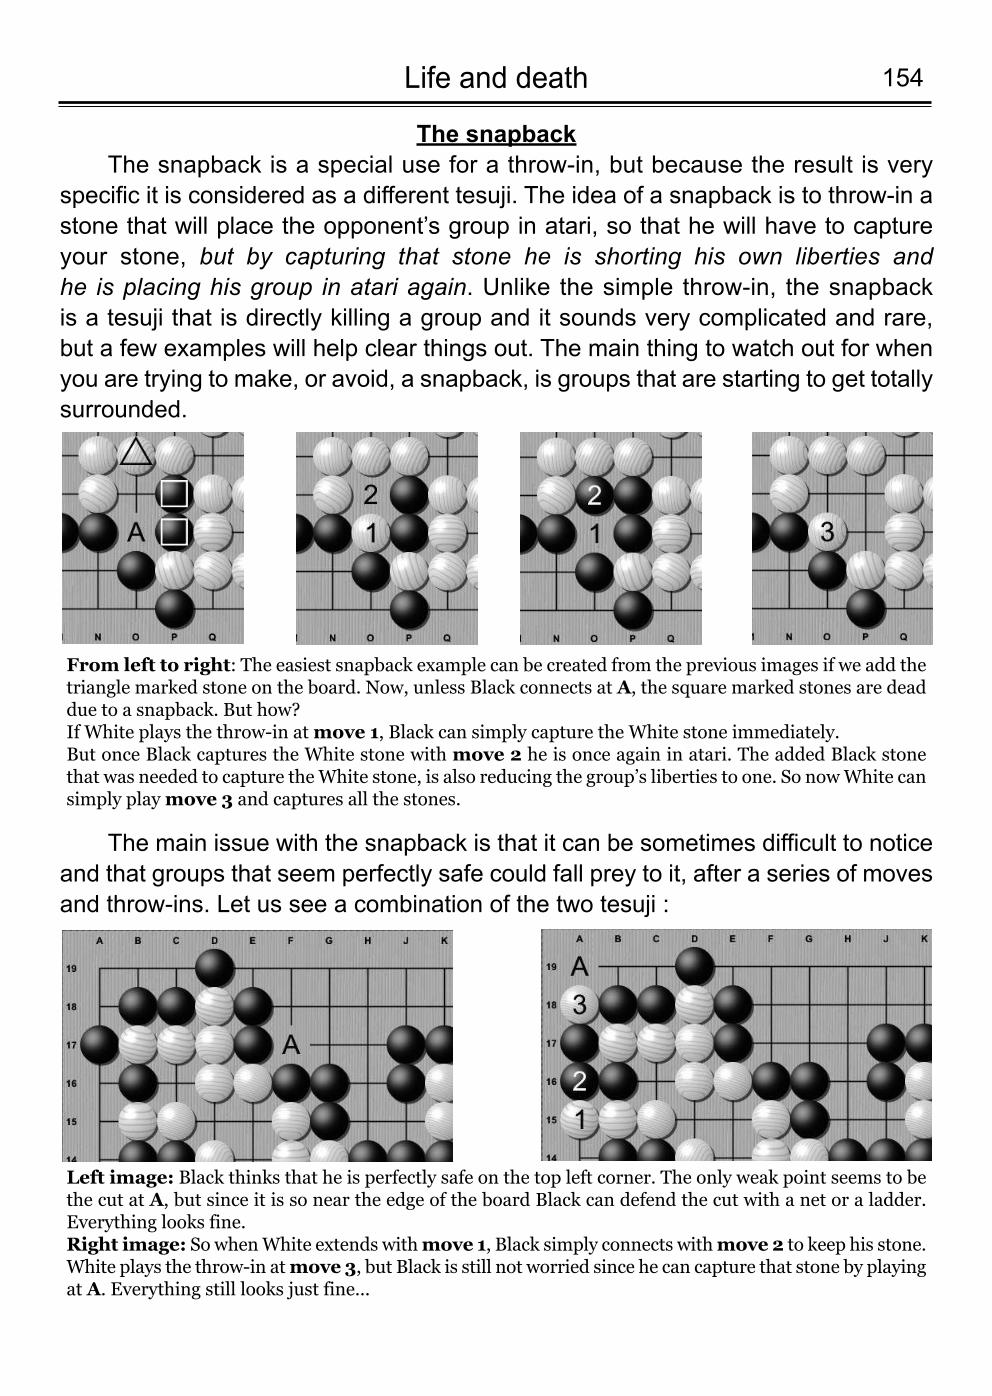
154Life and death
The snapbackThe snapback is a special use for a throw-in, but because the result is very
specific it is considered as a different tesuji. The idea of a snapback is to throw-in astone that will place the opponent’s group in atari, so that he will have to captureyour stone, but by capturing that stone he is shorting his own liberties and he is placing his group in atari again. Unlike the simple throw-in, the snapback is a tesuji that is directly killing a group and it sounds very complicated and rare, but a few examples will help clear things out. The main thing to watch out for whenyou are trying to make, or avoid, a snapback, is groups that are starting to get totallysurrounded.
From left to right: The easiest snapback example can be created from the previous images if we add thetriangle marked stone on the board. Now, unless Black connects at A, the square marked stones are deaddue to a snapback. But how? If White plays the throw-in at move 1, Black can simply capture the White stone immediately. But once Black captures the White stone with move 2 he is once again in atari. The added Black stonethat was needed to capture the White stone, is also reducing the group’s liberties to one. So now White cansimply play move 3 and captures all the stones.
Left image: Black thinks that he is perfectly safe on the top left corner. The only weak point seems to bethe cut at A, but since it is so near the edge of the board Black can defend the cut with a net or a ladder.Everything looks fine.Right image: So when White extends with move 1, Black simply connects with move 2 to keep his stone.White plays the throw-in atmove 3, but Black is still not worried since he can capture that stone by playingat A. Everything still looks just fine...
The main issue with the snapback is that it can be sometimes difficult to noticeand that groups that seem perfectly safe could fall prey to it, after a series of movesand throw-ins. Let us see a combination of the two tesuji :
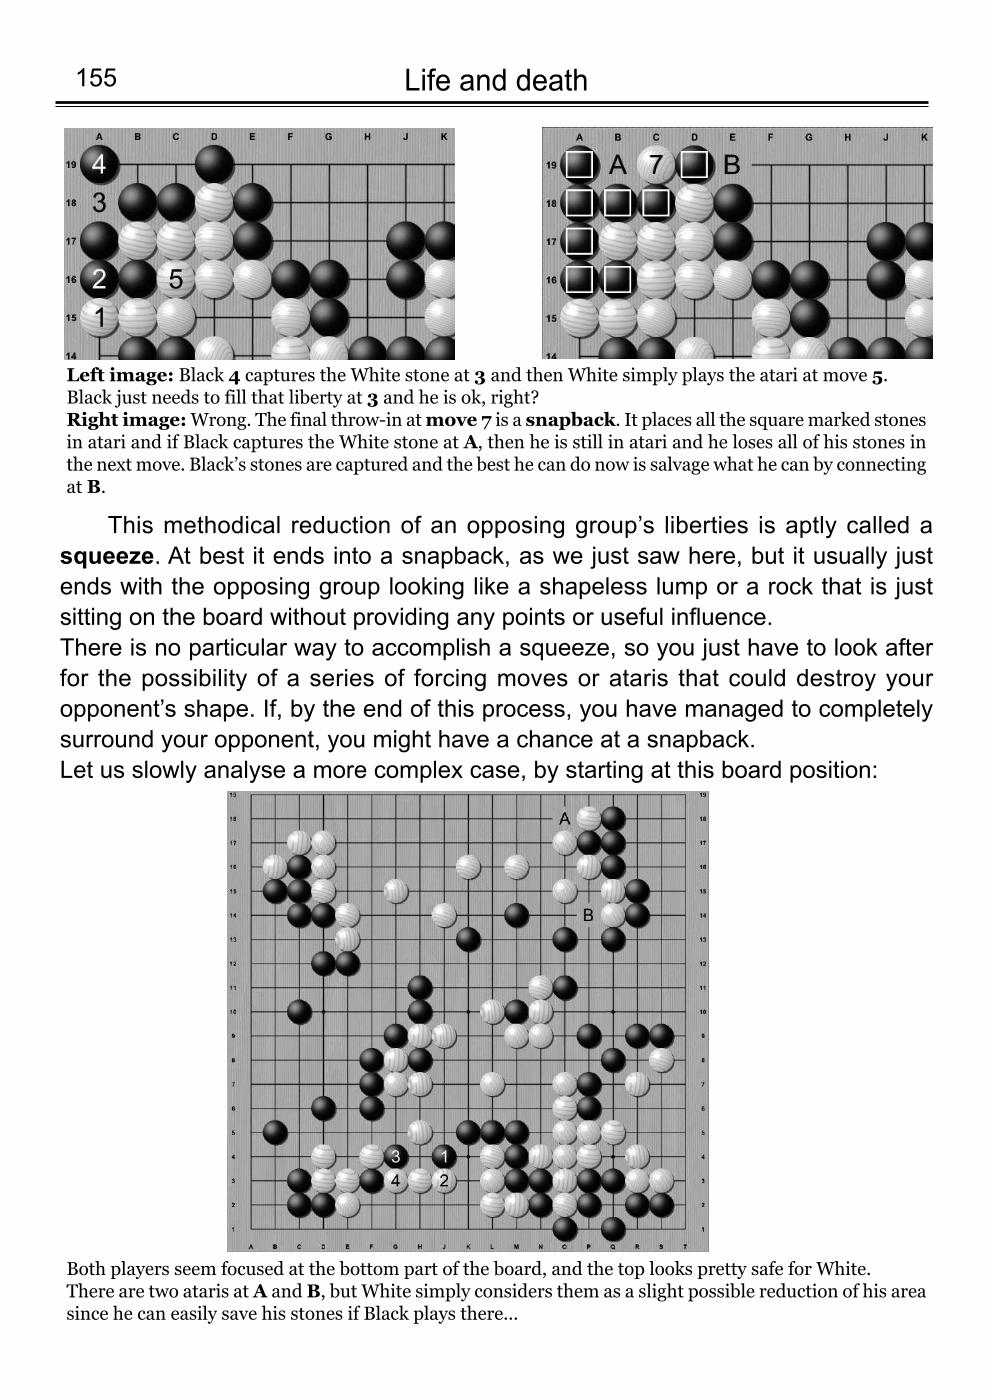
Life and death 155
Left image: Black 4 captures the White stone at 3 and then White simply plays the atari at move 5. Black just needs to fill that liberty at 3 and he is ok, right? Right image:Wrong. The final throw-in at move 7 is a snapback. It places all the square marked stonesin atari and if Black captures the White stone at A, then he is still in atari and he loses all of his stones inthe next move. Black’s stones are captured and the best he can do now is salvage what he can by connectingat B.
This methodical reduction of an opposing group’s liberties is aptly called asqueeze. At best it ends into a snapback, as we just saw here, but it usually justends with the opposing group looking like a shapeless lump or a rock that is justsitting on the board without providing any points or useful influence. There is no particular way to accomplish a squeeze, so you just have to look afterfor the possibility of a series of forcing moves or ataris that could destroy youropponent’s shape. If, by the end of this process, you have managed to completelysurround your opponent, you might have a chance at a snapback. Let us slowly analyse a more complex case, by starting at this board position:
Both players seem focused at the bottom part of the board, and the top looks pretty safe for White.There are two ataris at A and B, but White simply considers them as a slight possible reduction of his areasince he can easily save his stones if Black plays there...
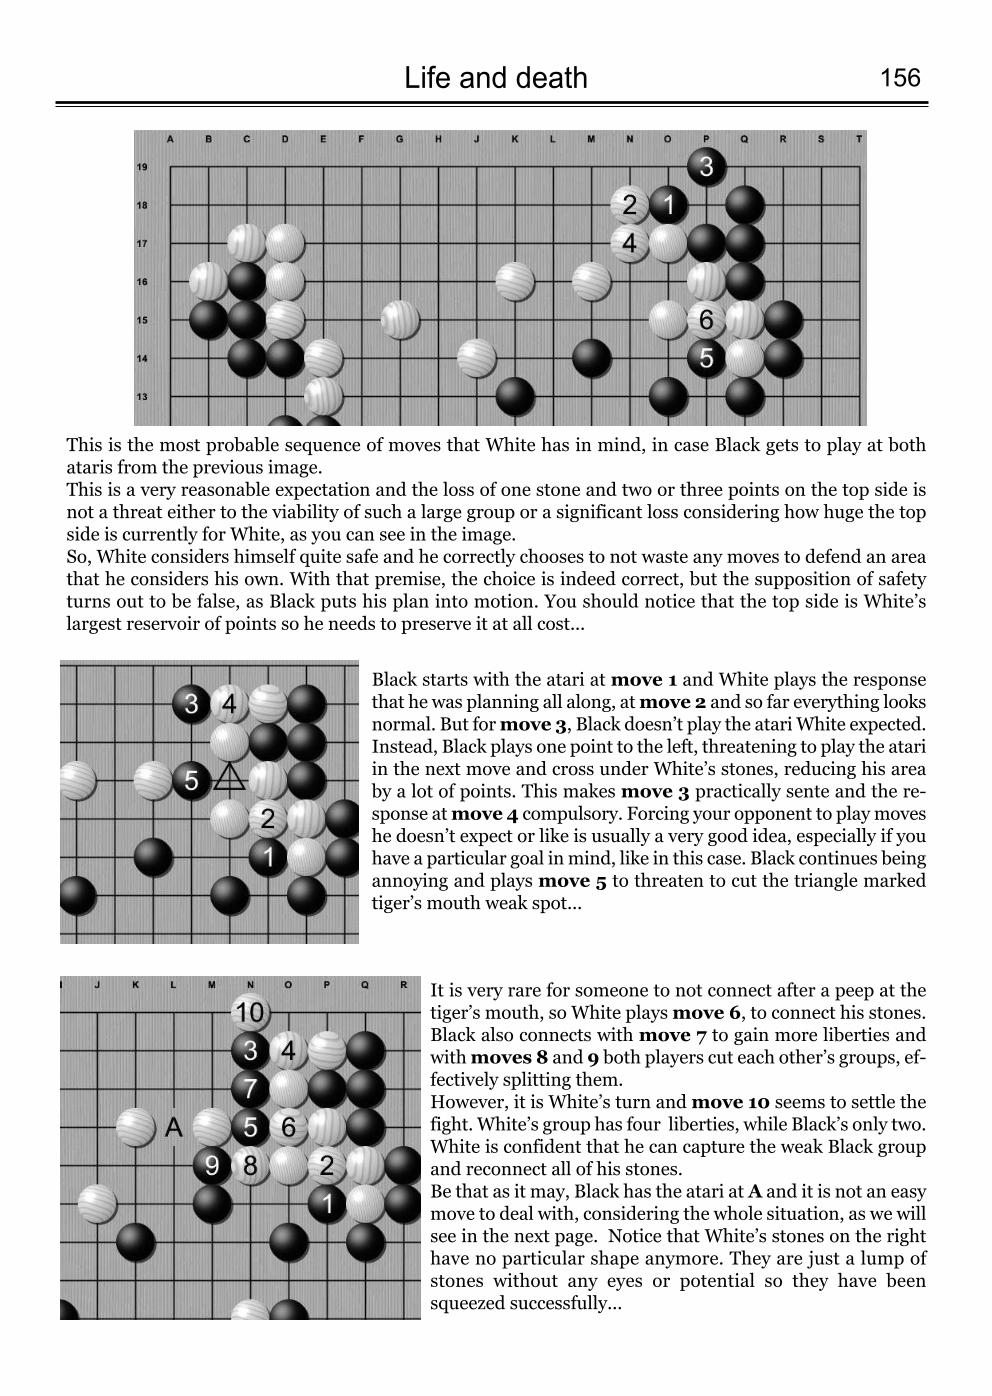
156Life and death
This is the most probable sequence of moves that White has in mind, in case Black gets to play at bothataris from the previous image. This is a very reasonable expectation and the loss of one stone and two or three points on the top side isnot a threat either to the viability of such a large group or a significant loss considering how huge the topside is currently for White, as you can see in the image. So, White considers himself quite safe and he correctly chooses to not waste any moves to defend an areathat he considers his own. With that premise, the choice is indeed correct, but the supposition of safetyturns out to be false, as Black puts his plan into motion. You should notice that the top side is White’slargest reservoir of points so he needs to preserve it at all cost...
Black starts with the atari at move 1 and White plays the responsethat he was planning all along, at move 2 and so far everything looksnormal. But for move 3, Black doesn’t play the atari White expected. Instead, Black plays one point to the left, threatening to play the atariin the next move and cross under White’s stones, reducing his areaby a lot of points. This makes move 3 practically sente and the re-sponse at move 4 compulsory. Forcing your opponent to play moveshe doesn’t expect or like is usually a very good idea, especially if youhave a particular goal in mind, like in this case. Black continues beingannoying and plays move 5 to threaten to cut the triangle markedtiger’s mouth weak spot...
It is very rare for someone to not connect after a peep at thetiger’s mouth, so White plays move 6, to connect his stones.Black also connects with move 7 to gain more liberties andwith moves 8 and 9 both players cut each other’s groups, ef-fectively splitting them. However, it is White’s turn and move 10 seems to settle thefight. White’s group has four liberties, while Black’s only two.White is confident that he can capture the weak Black groupand reconnect all of his stones. Be that as it may, Black has the atari at A and it is not an easymove to deal with, considering the whole situation, as we willsee in the next page. Notice that White’s stones on the righthave no particular shape anymore. They are just a lump ofstones without any eyes or potential so they have beensqueezed successfully...
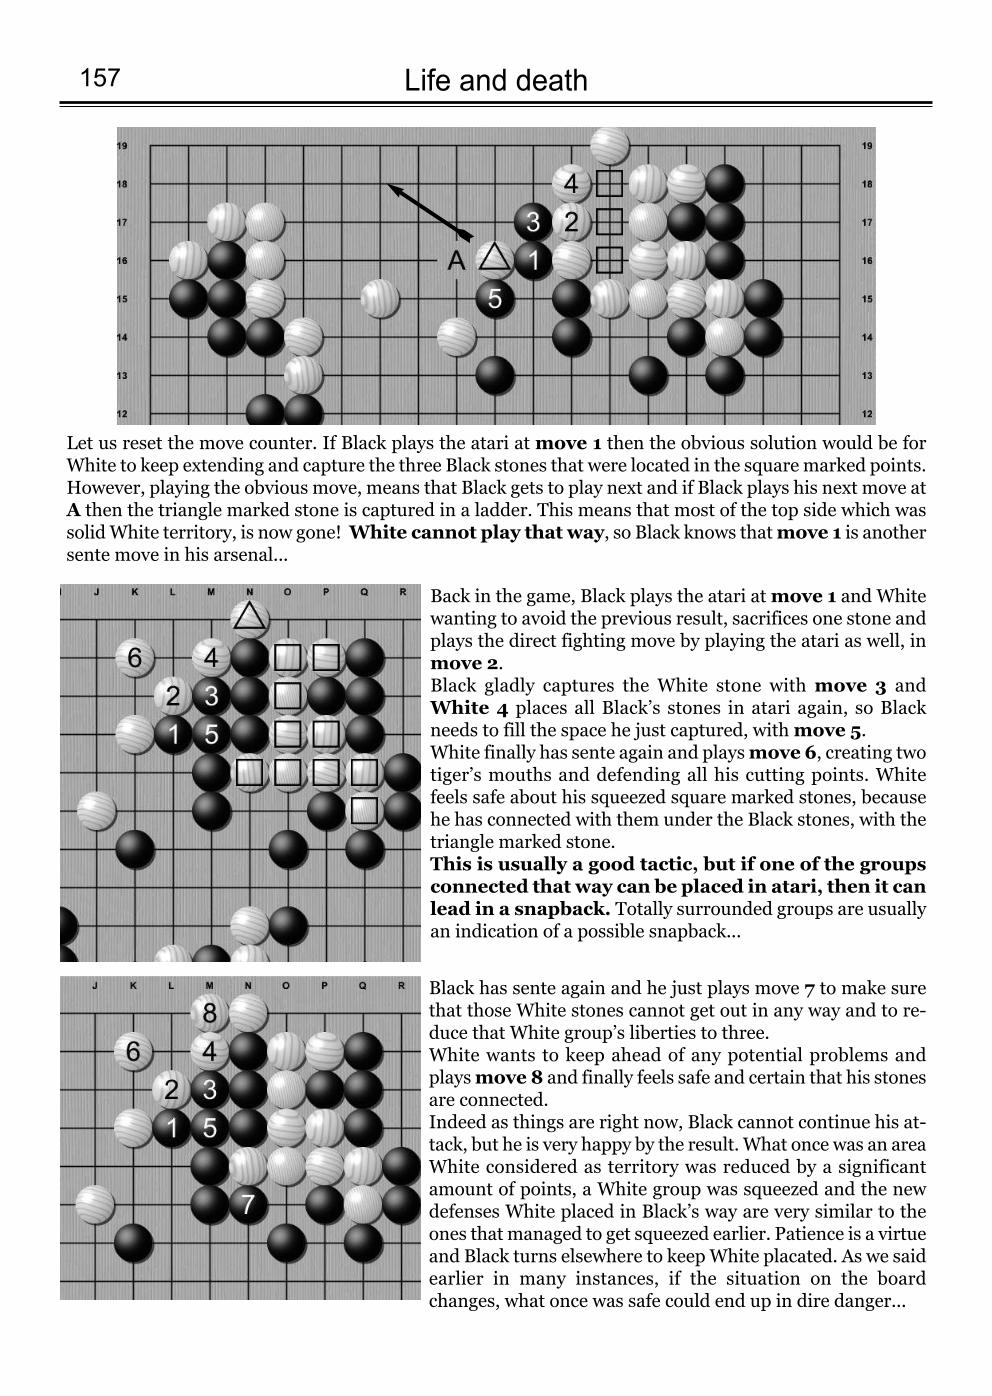
Life and death 157
Let us reset the move counter. If Black plays the atari at move 1 then the obvious solution would be forWhite to keep extending and capture the three Black stones that were located in the square marked points.However, playing the obvious move, means that Black gets to play next and if Black plays his next move atA then the triangle marked stone is captured in a ladder. This means that most of the top side which wassolid White territory, is now gone! White cannot play that way, so Black knows that move 1 is anothersente move in his arsenal...
Back in the game, Black plays the atari at move 1 and Whitewanting to avoid the previous result, sacrifices one stone andplays the direct fighting move by playing the atari as well, inmove 2. Black gladly captures the White stone with move 3 andWhite 4 places all Black’s stones in atari again, so Blackneeds to fill the space he just captured, with move 5.White finally has sente again and plays move 6, creating twotiger’s mouths and defending all his cutting points. Whitefeels safe about his squeezed square marked stones, becausehe has connected with them under the Black stones, with thetriangle marked stone. This is usually a good tactic, but if one of the groupsconnected that way can be placed in atari, then it canlead in a snapback. Totally surrounded groups are usuallyan indication of a possible snapback...
Black has sente again and he just plays move 7 to make surethat those White stones cannot get out in any way and to re-duce that White group’s liberties to three. White wants to keep ahead of any potential problems andplays move 8 and finally feels safe and certain that his stonesare connected.Indeed as things are right now, Black cannot continue his at-tack, but he is very happy by the result. What once was an areaWhite considered as territory was reduced by a significantamount of points, a White group was squeezed and the newdefenses White placed in Black’s way are very similar to theones that managed to get squeezed earlier. Patience is a virtueand Black turns elsewhere to keep White placated. As we saidearlier in many instances, if the situation on the boardchanges, what once was safe could end up in dire danger...
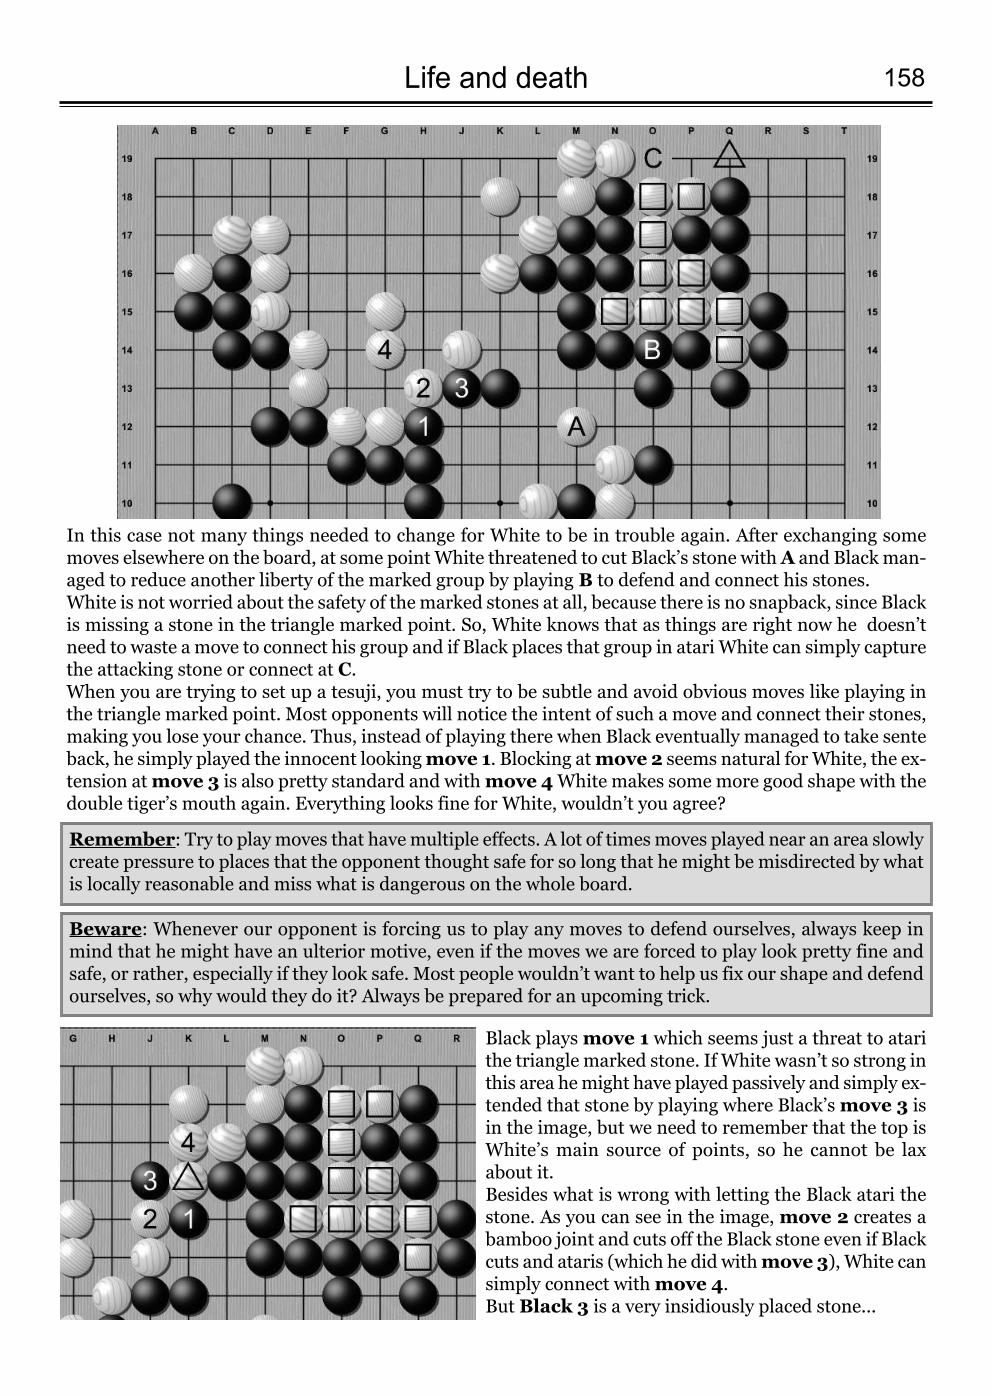
158Life and death
In this case not many things needed to change for White to be in trouble again. After exchanging somemoves elsewhere on the board, at some point White threatened to cut Black’s stone with A and Black man-aged to reduce another liberty of the marked group by playing B to defend and connect his stones.White is not worried about the safety of the marked stones at all, because there is no snapback, since Blackis missing a stone in the triangle marked point. So, White knows that as things are right now he doesn’tneed to waste a move to connect his group and if Black places that group in atari White can simply capturethe attacking stone or connect at C. When you are trying to set up a tesuji, you must try to be subtle and avoid obvious moves like playing inthe triangle marked point. Most opponents will notice the intent of such a move and connect their stones,making you lose your chance. Thus, instead of playing there when Black eventually managed to take senteback, he simply played the innocent looking move 1. Blocking atmove 2 seems natural for White, the ex-tension at move 3 is also pretty standard and withmove 4White makes some more good shape with thedouble tiger’s mouth again. Everything looks fine for White, wouldn’t you agree?
Remember: Try to play moves that have multiple effects. A lot of times moves played near an area slowlycreate pressure to places that the opponent thought safe for so long that he might be misdirected by whatis locally reasonable and miss what is dangerous on the whole board.
Beware: Whenever our opponent is forcing us to play any moves to defend ourselves, always keep inmind that he might have an ulterior motive, even if the moves we are forced to play look pretty fine andsafe, or rather, especially if they look safe. Most people wouldn’t want to help us fix our shape and defendourselves, so why would they do it? Always be prepared for an upcoming trick.
Black plays move 1 which seems just a threat to atarithe triangle marked stone. If White wasn’t so strong inthis area he might have played passively and simply ex-tended that stone by playing where Black’s move 3 isin the image, but we need to remember that the top isWhite’s main source of points, so he cannot be laxabout it. Besides what is wrong with letting the Black atari thestone. As you can see in the image, move 2 creates abamboo joint and cuts off the Black stone even if Blackcuts and ataris (which he did with move 3), White cansimply connect with move 4. But Black 3 is a very insidiously placed stone...
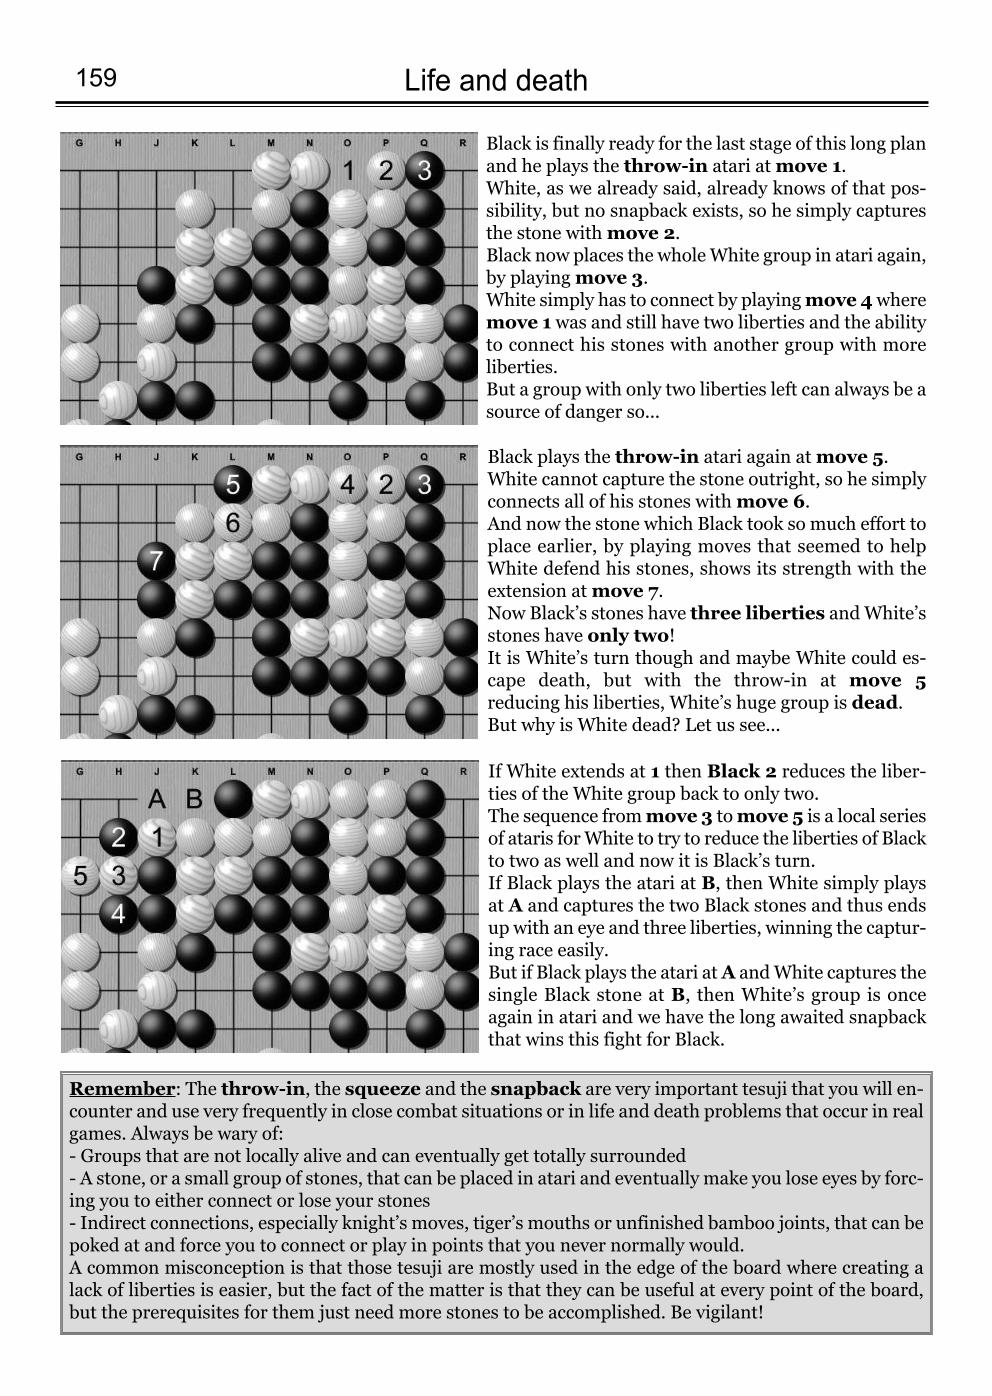
Life and death 159
Black is finally ready for the last stage of this long planand he plays the throw-in atari at move 1. White, as we already said, already knows of that pos-sibility, but no snapback exists, so he simply capturesthe stone with move 2.Black now places the whole White group in atari again,by playing move 3.White simply has to connect by playing move 4wheremove 1 was and still have two liberties and the abilityto connect his stones with another group with moreliberties.But a group with only two liberties left can always be asource of danger so...
Black plays the throw-in atari again at move 5. White cannot capture the stone outright, so he simplyconnects all of his stones with move 6.And now the stone which Black took so much effort toplace earlier, by playing moves that seemed to helpWhite defend his stones, shows its strength with theextension at move 7. Now Black’s stones have three liberties and White’sstones have only two!It is White’s turn though and maybe White could es-cape death, but with the throw-in at move 5reducing his liberties, White’s huge group is dead.But why is White dead? Let us see...
If White extends at 1 then Black 2 reduces the liber-ties of the White group back to only two. The sequence from move 3 to move 5 is a local seriesof ataris for White to try to reduce the liberties of Blackto two as well and now it is Black’s turn. If Black plays the atari at B, then White simply playsat A and captures the two Black stones and thus endsup with an eye and three liberties, winning the captur-ing race easily.But if Black plays the atari at A and White captures thesingle Black stone at B, then White’s group is onceagain in atari and we have the long awaited snapbackthat wins this fight for Black.
Remember: The throw-in, the squeeze and the snapback are very important tesuji that you will en-counter and use very frequently in close combat situations or in life and death problems that occur in realgames. Always be wary of: - Groups that are not locally alive and can eventually get totally surrounded- A stone, or a small group of stones, that can be placed in atari and eventually make you lose eyes by forc-ing you to either connect or lose your stones- Indirect connections, especially knight’s moves, tiger’s mouths or unfinished bamboo joints, that can bepoked at and force you to connect or play in points that you never normally would.A common misconception is that those tesuji are mostly used in the edge of the board where creating alack of liberties is easier, but the fact of the matter is that they can be useful at every point of the board,but the prerequisites for them just need more stones to be accomplished. Be vigilant!
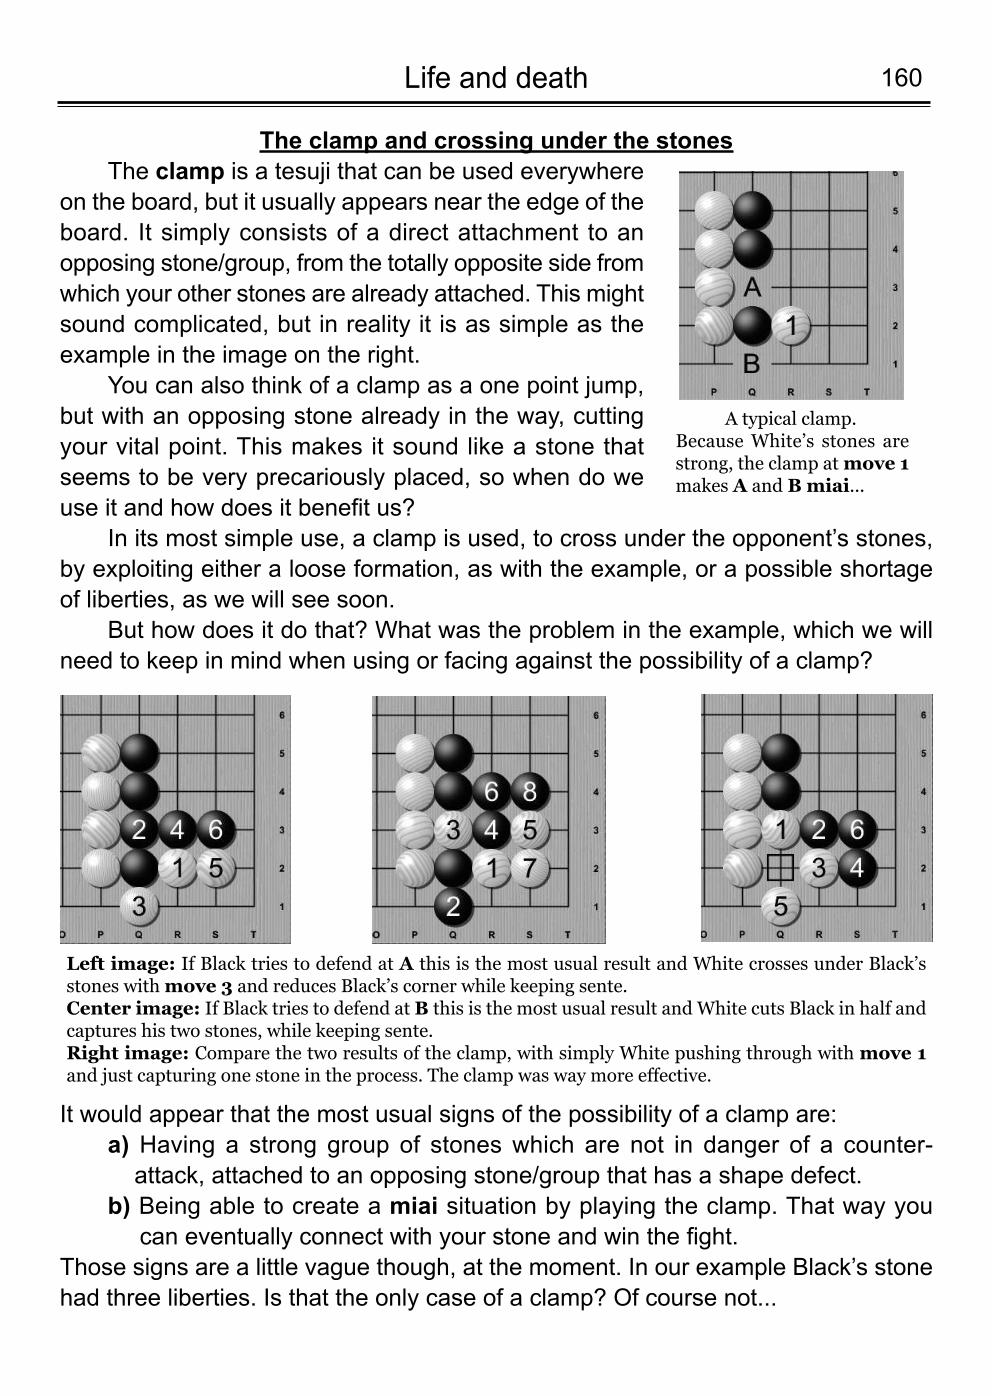
160Life and death
The clamp and crossing under the stonesThe clamp is a tesuji that can be used everywhere
on the board, but it usually appears near the edge of theboard. It simply consists of a direct attachment to anopposing stone/group, from the totally opposite side fromwhich your other stones are already attached. This mightsound complicated, but in reality it is as simple as theexample in the image on the right.
You can also think of a clamp as a one point jump,but with an opposing stone already in the way, cuttingyour vital point. This makes it sound like a stone thatseems to be very precariously placed, so when do weuse it and how does it benefit us?
In its most simple use, a clamp is used, to cross under the opponent’s stones,by exploiting either a loose formation, as with the example, or a possible shortageof liberties, as we will see soon.
But how does it do that? What was the problem in the example, which we willneed to keep in mind when using or facing against the possibility of a clamp?
Left image: If Black tries to defend at A this is the most usual result and White crosses under Black’sstones with move 3 and reduces Black’s corner while keeping sente. Center image: If Black tries to defend at B this is the most usual result and White cuts Black in half andcaptures his two stones, while keeping sente.Right image: Compare the two results of the clamp, with simply White pushing through with move 1and just capturing one stone in the process. The clamp was way more effective.
A typical clamp. Because White’s stones arestrong, the clamp atmove 1makes A and B miai...
It would appear that the most usual signs of the possibility of a clamp are: a) Having a strong group of stones which are not in danger of a counter-attack, attached to an opposing stone/group that has a shape defect.
b) Being able to create a miai situation by playing the clamp. That way you can eventually connect with your stone and win the fight.
Those signs are a little vague though, at the moment. In our example Black’s stonehad three liberties. Is that the only case of a clamp? Of course not...
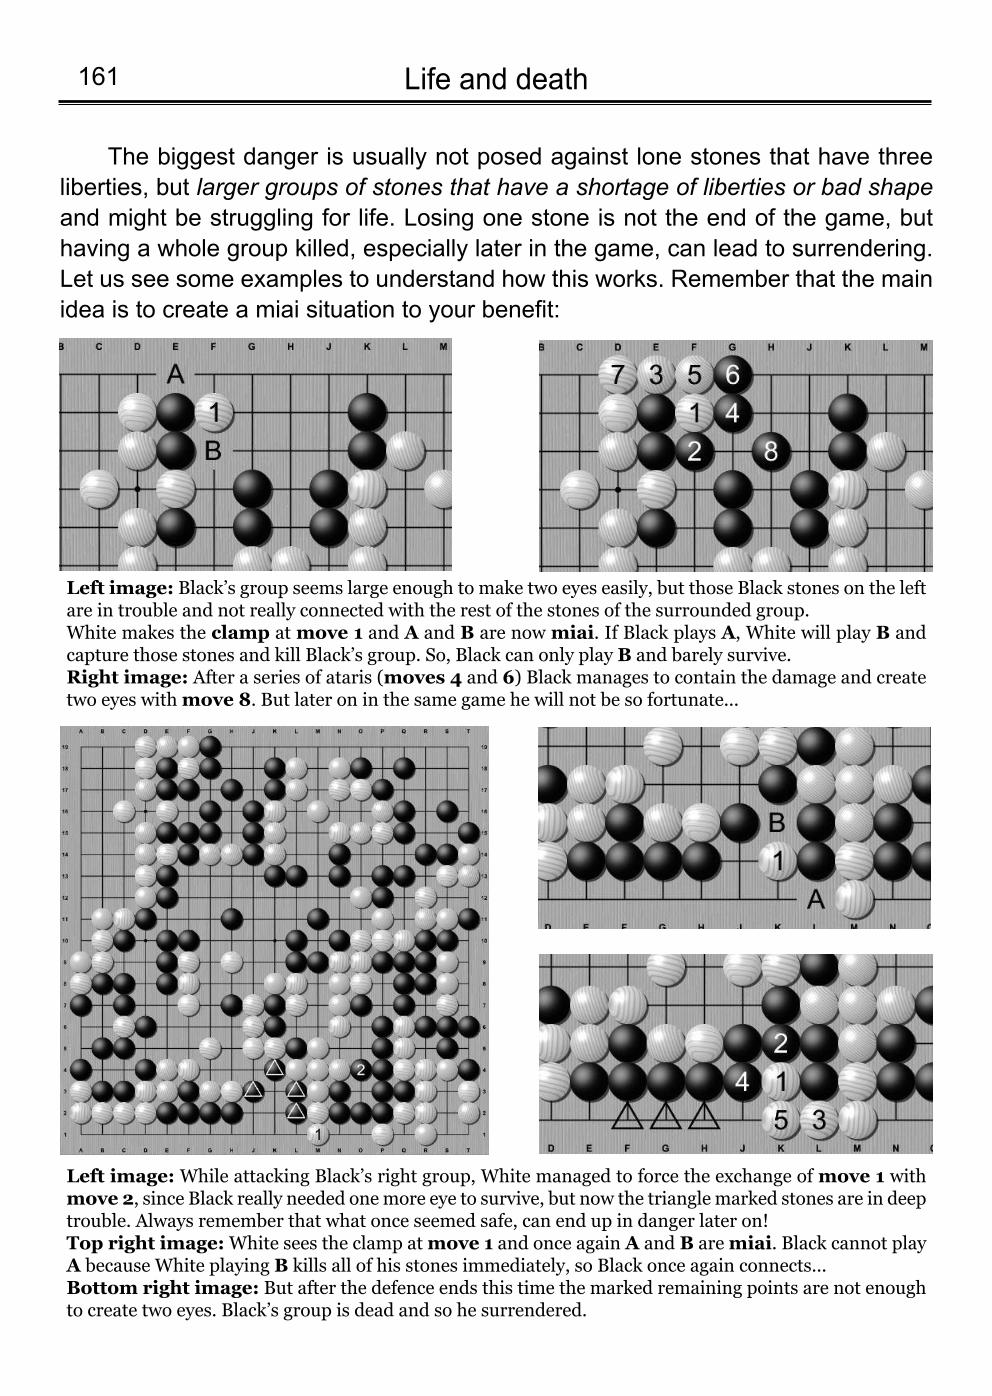
Life and death 161
The biggest danger is usually not posed against lone stones that have threeliberties, but larger groups of stones that have a shortage of liberties or bad shapeand might be struggling for life. Losing one stone is not the end of the game, buthaving a whole group killed, especially later in the game, can lead to surrendering.Let us see some examples to understand how this works. Remember that the mainidea is to create a miai situation to your benefit:
Left image: Black’s group seems large enough to make two eyes easily, but those Black stones on the leftare in trouble and not really connected with the rest of the stones of the surrounded group.White makes the clamp at move 1 and A and B are now miai. If Black plays A, White will play B andcapture those stones and kill Black’s group. So, Black can only play B and barely survive.Right image: After a series of ataris (moves 4 and 6) Black manages to contain the damage and createtwo eyes with move 8. But later on in the same game he will not be so fortunate...
Left image:While attacking Black’s right group, White managed to force the exchange ofmove 1 withmove 2, since Black really needed one more eye to survive, but now the triangle marked stones are in deeptrouble. Always remember that what once seemed safe, can end up in danger later on!Top right image:White sees the clamp at move 1 and once again A and B are miai. Black cannot playA because White playing B kills all of his stones immediately, so Black once again connects...Bottom right image: But after the defence ends this time the marked remaining points are not enoughto create two eyes. Black’s group is dead and so he surrendered.
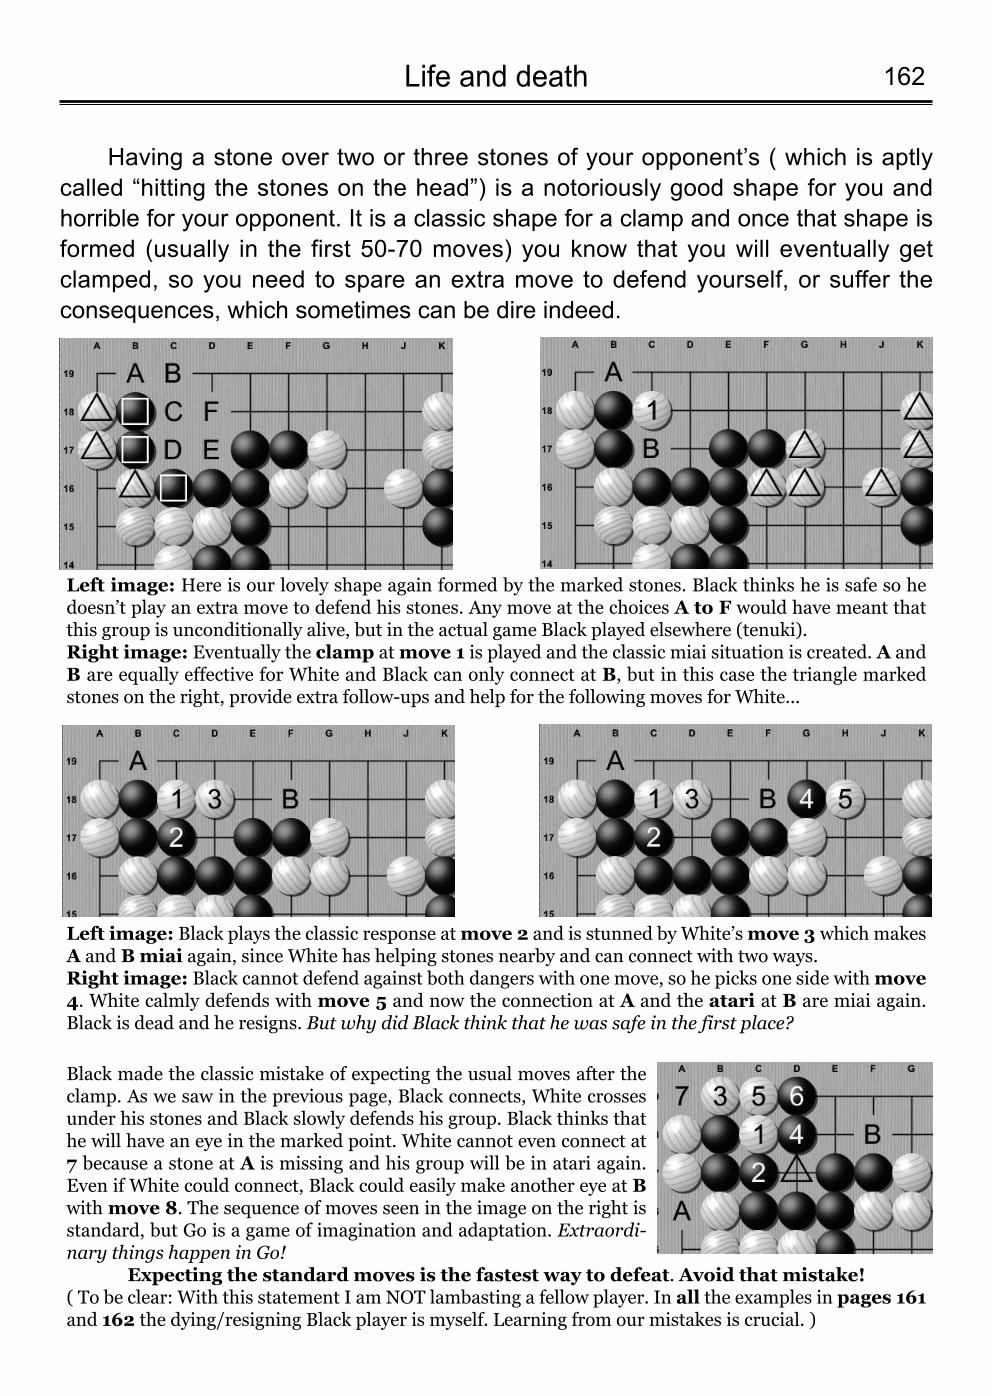
162Life and death
Having a stone over two or three stones of your opponent’s ( which is aptlycalled “hitting the stones on the head”) is a notoriously good shape for you andhorrible for your opponent. It is a classic shape for a clamp and once that shape isformed (usually in the first 50-70 moves) you know that you will eventually getclamped, so you need to spare an extra move to defend yourself, or suffer theconsequences, which sometimes can be dire indeed.
Left image: Here is our lovely shape again formed by the marked stones. Black thinks he is safe so hedoesn’t play an extra move to defend his stones. Any move at the choices A to F would have meant thatthis group is unconditionally alive, but in the actual game Black played elsewhere (tenuki).Right image: Eventually the clamp at move 1 is played and the classic miai situation is created. A andB are equally effective for White and Black can only connect at B, but in this case the triangle markedstones on the right, provide extra follow-ups and help for the following moves for White...
Left image: Black plays the classic response at move 2 and is stunned by White’s move 3 which makesA and Bmiai again, since White has helping stones nearby and can connect with two ways.Right image: Black cannot defend against both dangers with one move, so he picks one side with move4. White calmly defends with move 5 and now the connection at A and the atari at B are miai again.Black is dead and he resigns. But why did Black think that he was safe in the first place?
Black made the classic mistake of expecting the usual moves after theclamp. As we saw in the previous page, Black connects, White crossesunder his stones and Black slowly defends his group. Black thinks thathe will have an eye in the marked point. White cannot even connect at7 because a stone at A is missing and his group will be in atari again.Even if White could connect, Black could easily make another eye at Bwithmove 8. The sequence of moves seen in the image on the right isstandard, but Go is a game of imagination and adaptation. Extraordi-nary things happen in Go!
Expecting the standard moves is the fastest way to defeat. Avoid that mistake!( To be clear: With this statement I am NOT lambasting a fellow player. In all the examples in pages 161and 162 the dying/resigning Black player is myself. Learning from our mistakes is crucial. )
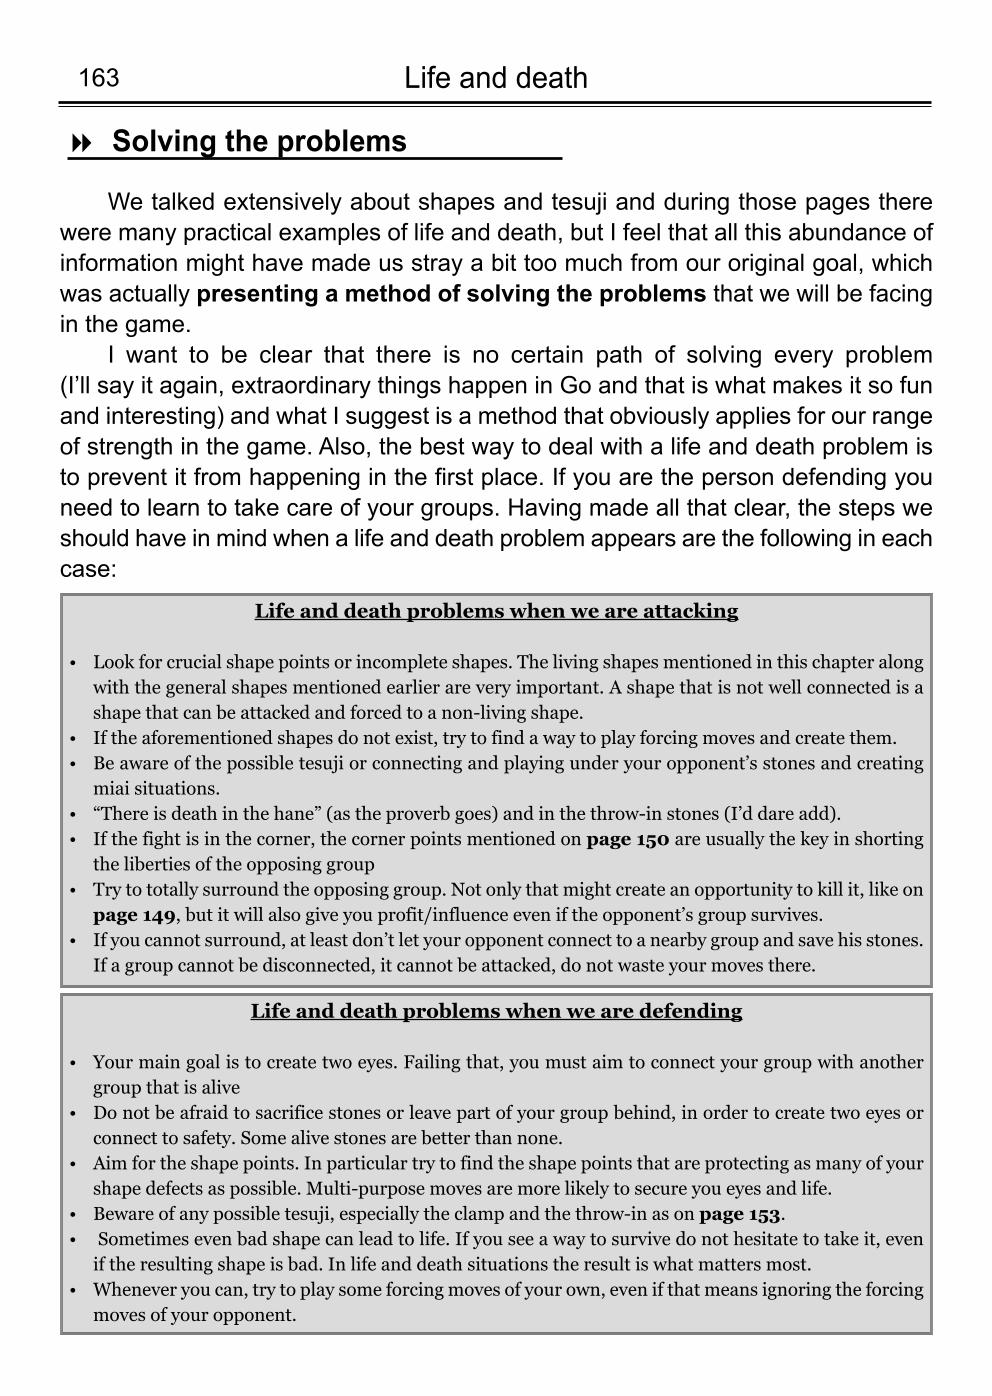
Life and death 163
Solving the problems 8
We talked extensively about shapes and tesuji and during those pages therewere many practical examples of life and death, but I feel that all this abundance ofinformation might have made us stray a bit too much from our original goal, whichwas actually presenting a method of solving the problems that we will be facingin the game.
I want to be clear that there is no certain path of solving every problem (I’ll say it again, extraordinary things happen in Go and that is what makes it so funand interesting) and what I suggest is a method that obviously applies for our rangeof strength in the game. Also, the best way to deal with a life and death problem isto prevent it from happening in the first place. If you are the person defending youneed to learn to take care of your groups. Having made all that clear, the steps weshould have in mind when a life and death problem appears are the following in eachcase:
Life and death problems when we are attacking
Look for crucial shape points or incomplete shapes. The living shapes mentioned in this chapter along•with the general shapes mentioned earlier are very important. A shape that is not well connected is ashape that can be attacked and forced to a non-living shape.If the aforementioned shapes do not exist, try to find a way to play forcing moves and create them.•Be aware of the possible tesuji or connecting and playing under your opponent’s stones and creating•miai situations. “There is death in the hane” (as the proverb goes) and in the throw-in stones (I’d dare add).•If the fight is in the corner, the corner points mentioned on page 150 are usually the key in shorting•the liberties of the opposing groupTry to totally surround the opposing group. Not only that might create an opportunity to kill it, like on•page 149, but it will also give you profit/influence even if the opponent’s group survives. If you cannot surround, at least don’t let your opponent connect to a nearby group and save his stones.•If a group cannot be disconnected, it cannot be attacked, do not waste your moves there.
Life and death problems when we are defending
Your main goal is to create two eyes. Failing that, you must aim to connect your group with another•group that is aliveDo not be afraid to sacrifice stones or leave part of your group behind, in order to create two eyes or•connect to safety. Some alive stones are better than none.Aim for the shape points. In particular try to find the shape points that are protecting as many of your•shape defects as possible. Multi-purpose moves are more likely to secure you eyes and life. Beware of any possible tesuji, especially the clamp and the throw-in as on page 153.•Sometimes even bad shape can lead to life. If you see a way to survive do not hesitate to take it, even•if the resulting shape is bad. In life and death situations the result is what matters most. Whenever you can, try to play some forcing moves of your own, even if that means ignoring the forcing•moves of your opponent.
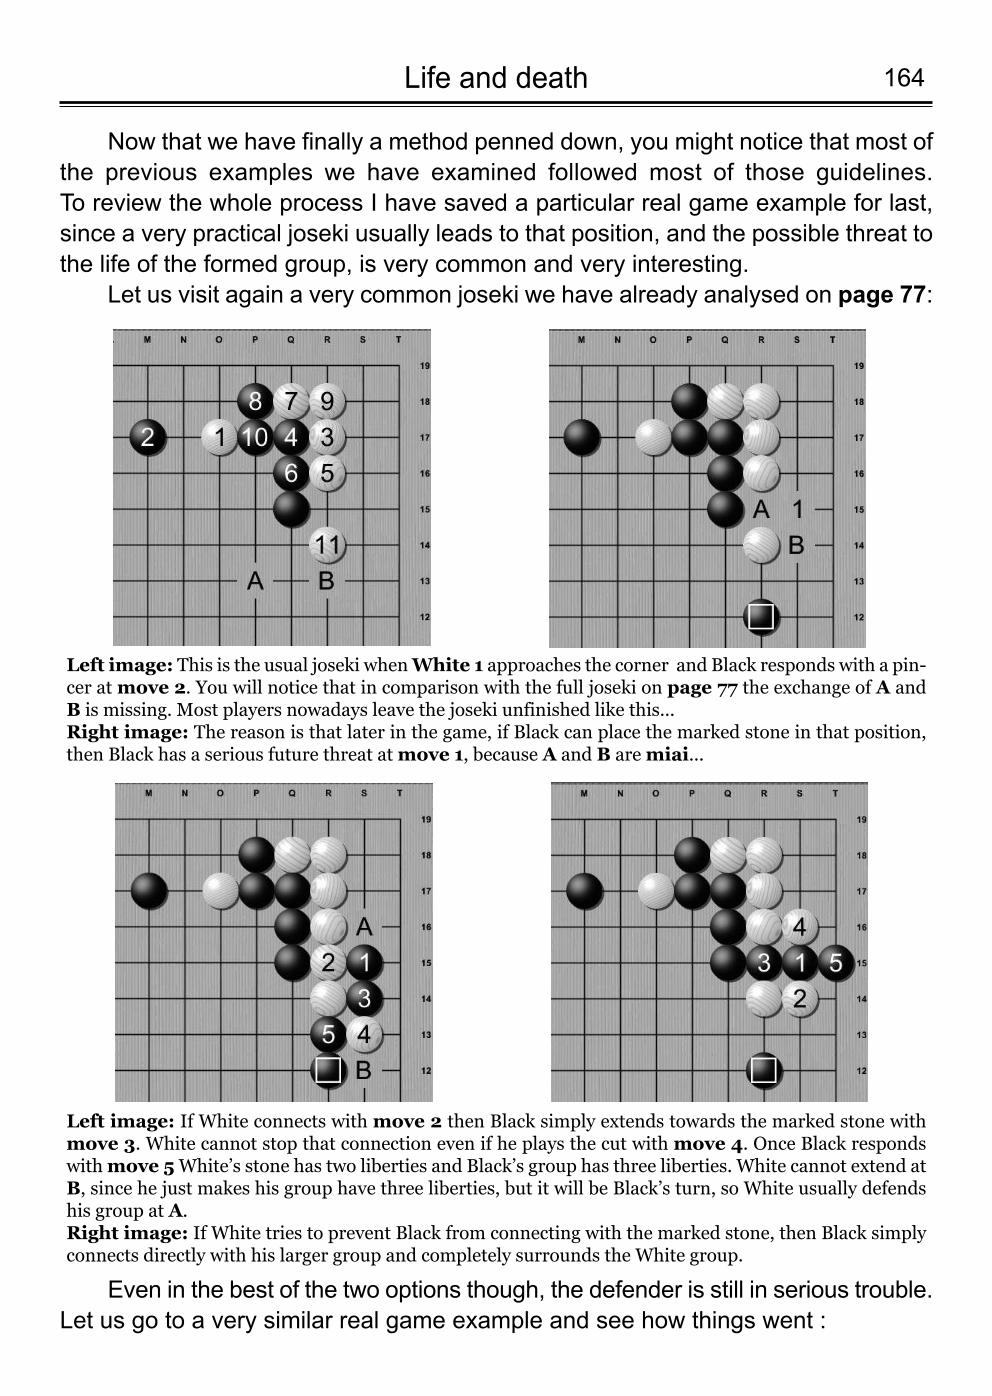
164Life and death
Now that we have finally a method penned down, you might notice that most ofthe previous examples we have examined followed most of those guidelines. To review the whole process I have saved a particular real game example for last,since a very practical joseki usually leads to that position, and the possible threat tothe life of the formed group, is very common and very interesting.
Let us visit again a very common joseki we have already analysed on page 77:
Left image: This is the usual joseki when White 1 approaches the corner and Black responds with a pin-cer at move 2. You will notice that in comparison with the full joseki on page 77 the exchange of A andB is missing. Most players nowadays leave the joseki unfinished like this...Right image: The reason is that later in the game, if Black can place the marked stone in that position,then Black has a serious future threat at move 1, because A and B are miai...
Even in the best of the two options though, the defender is still in serious trouble.Let us go to a very similar real game example and see how things went :
Left image: If White connects with move 2 then Black simply extends towards the marked stone withmove 3. White cannot stop that connection even if he plays the cut with move 4. Once Black respondswith move 5White’s stone has two liberties and Black’s group has three liberties. White cannot extend atB, since he just makes his group have three liberties, but it will be Black’s turn, so White usually defendshis group at A.Right image: If White tries to prevent Black from connecting with the marked stone, then Black simplyconnects directly with his larger group and completely surrounds the White group.
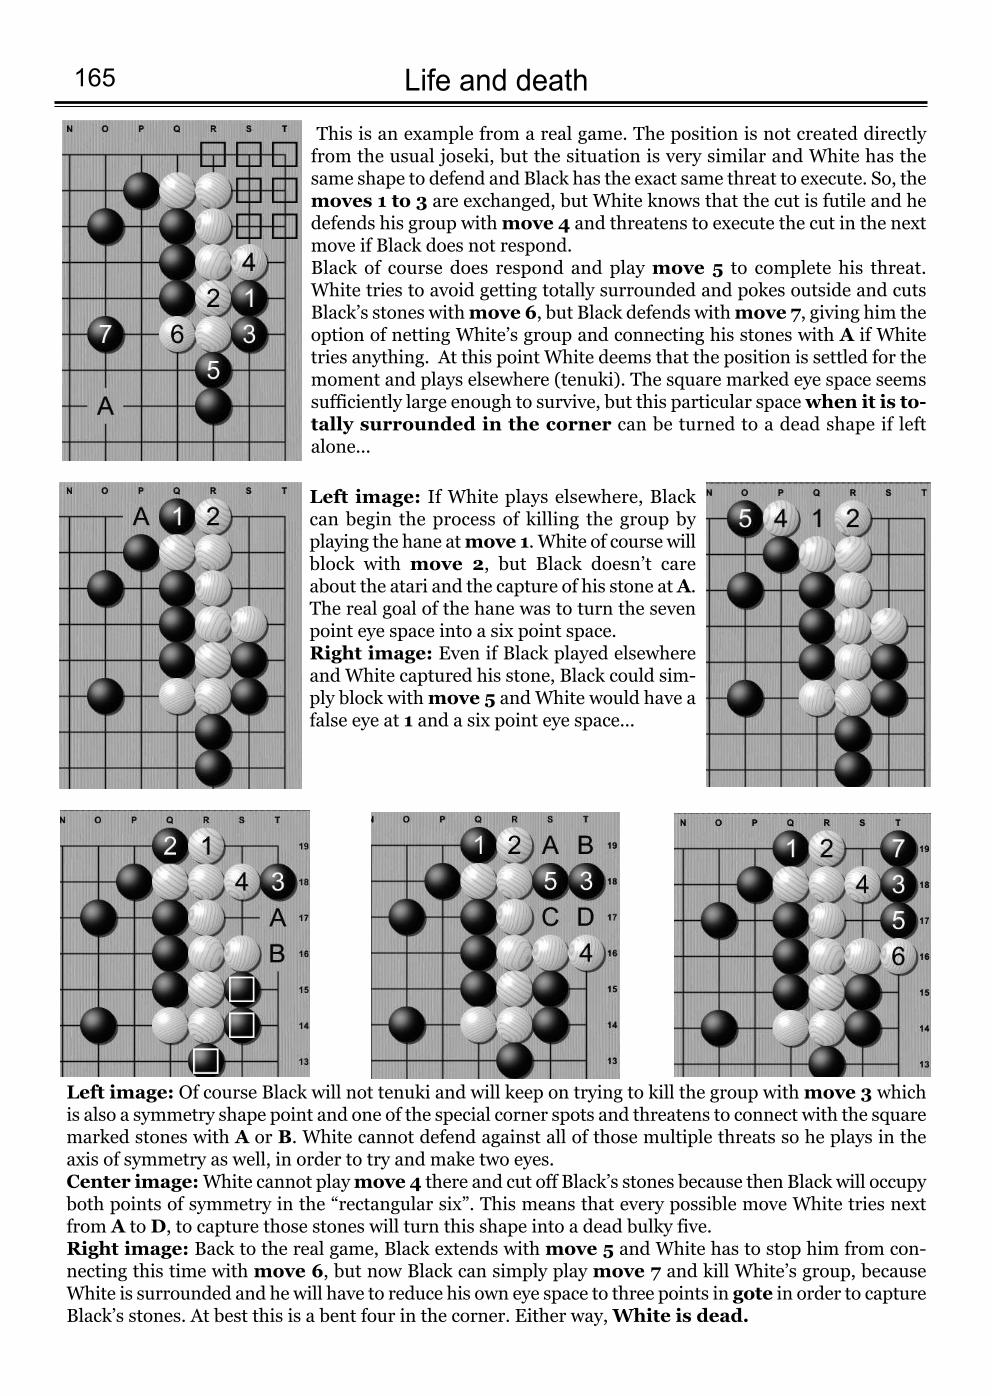
Life and death 165
This is an example from a real game. The position is not created directlyfrom the usual joseki, but the situation is very similar and White has thesame shape to defend and Black has the exact same threat to execute. So, themoves 1 to 3 are exchanged, but White knows that the cut is futile and hedefends his group with move 4 and threatens to execute the cut in the nextmove if Black does not respond. Black of course does respond and play move 5 to complete his threat. White tries to avoid getting totally surrounded and pokes outside and cutsBlack’s stones with move 6, but Black defends with move 7, giving him theoption of netting White’s group and connecting his stones with A if Whitetries anything. At this point White deems that the position is settled for themoment and plays elsewhere (tenuki). The square marked eye space seemssufficiently large enough to survive, but this particular space when it is to-tally surrounded in the corner can be turned to a dead shape if leftalone...
Left image: If White plays elsewhere, Blackcan begin the process of killing the group byplaying the hane at move 1. White of course willblock with move 2, but Black doesn’t careabout the atari and the capture of his stone at A.The real goal of the hane was to turn the sevenpoint eye space into a six point space.Right image: Even if Black played elsewhereand White captured his stone, Black could sim-ply block with move 5 and White would have afalse eye at 1 and a six point eye space...
Left image: Of course Black will not tenuki and will keep on trying to kill the group with move 3 whichis also a symmetry shape point and one of the special corner spots and threatens to connect with the squaremarked stones with A or B. White cannot defend against all of those multiple threats so he plays in theaxis of symmetry as well, in order to try and make two eyes.Center image: White cannot play move 4 there and cut off Black’s stones because then Black will occupyboth points of symmetry in the “rectangular six”. This means that every possible move White tries nextfrom A to D, to capture those stones will turn this shape into a dead bulky five.Right image: Back to the real game, Black extends with move 5 and White has to stop him from con-necting this time with move 6, but now Black can simply play move 7 and kill White’s group, becauseWhite is surrounded and he will have to reduce his own eye space to three points in gote in order to captureBlack’s stones. At best this is a bent four in the corner. Either way, White is dead.
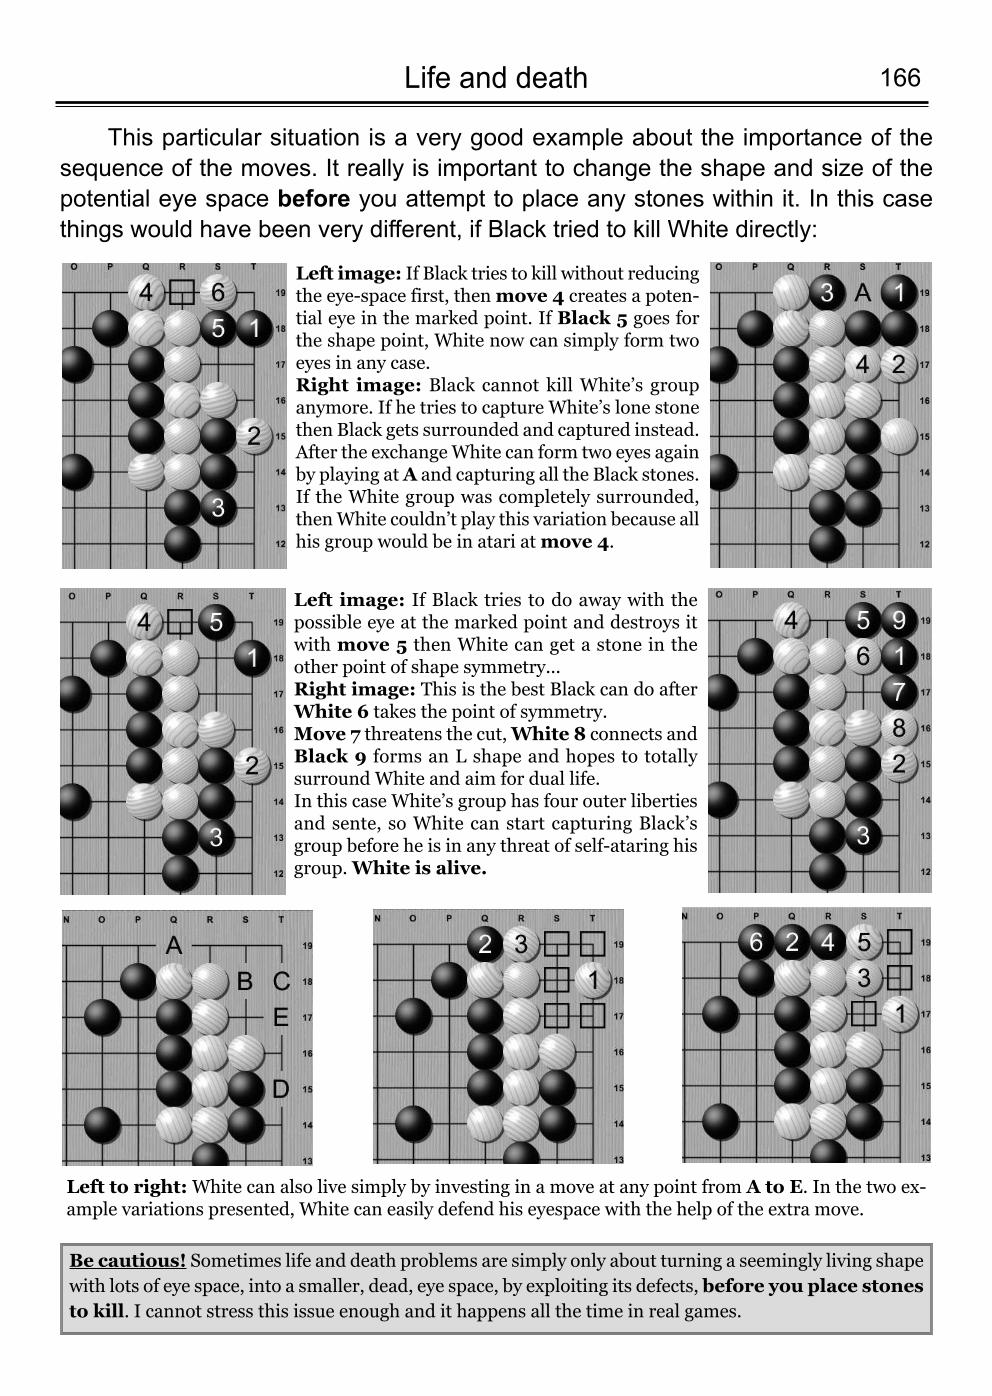
166Life and death
Be cautious! Sometimes life and death problems are simply only about turning a seemingly living shapewith lots of eye space, into a smaller, dead, eye space, by exploiting its defects, before you place stonesto kill. I cannot stress this issue enough and it happens all the time in real games.
Left image: If Black tries to kill without reducingthe eye-space first, then move 4 creates a poten-tial eye in the marked point. If Black 5 goes forthe shape point, White now can simply form twoeyes in any case.Right image: Black cannot kill White’s groupanymore. If he tries to capture White’s lone stonethen Black gets surrounded and captured instead.After the exchange White can form two eyes againby playing at A and capturing all the Black stones.If the White group was completely surrounded,then White couldn’t play this variation because allhis group would be in atari at move 4.
This particular situation is a very good example about the importance of thesequence of the moves. It really is important to change the shape and size of thepotential eye space before you attempt to place any stones within it. In this casethings would have been very different, if Black tried to kill White directly:
Left image: If Black tries to do away with thepossible eye at the marked point and destroys itwith move 5 then White can get a stone in theother point of shape symmetry... Right image: This is the best Black can do afterWhite 6 takes the point of symmetry. Move 7 threatens the cut, White 8 connects andBlack 9 forms an L shape and hopes to totallysurround White and aim for dual life.In this case White’s group has four outer libertiesand sente, so White can start capturing Black’sgroup before he is in any threat of self-ataring hisgroup. White is alive.
Left to right:White can also live simply by investing in a move at any point from A to E. In the two ex-ample variations presented, White can easily defend his eyespace with the help of the extra move.
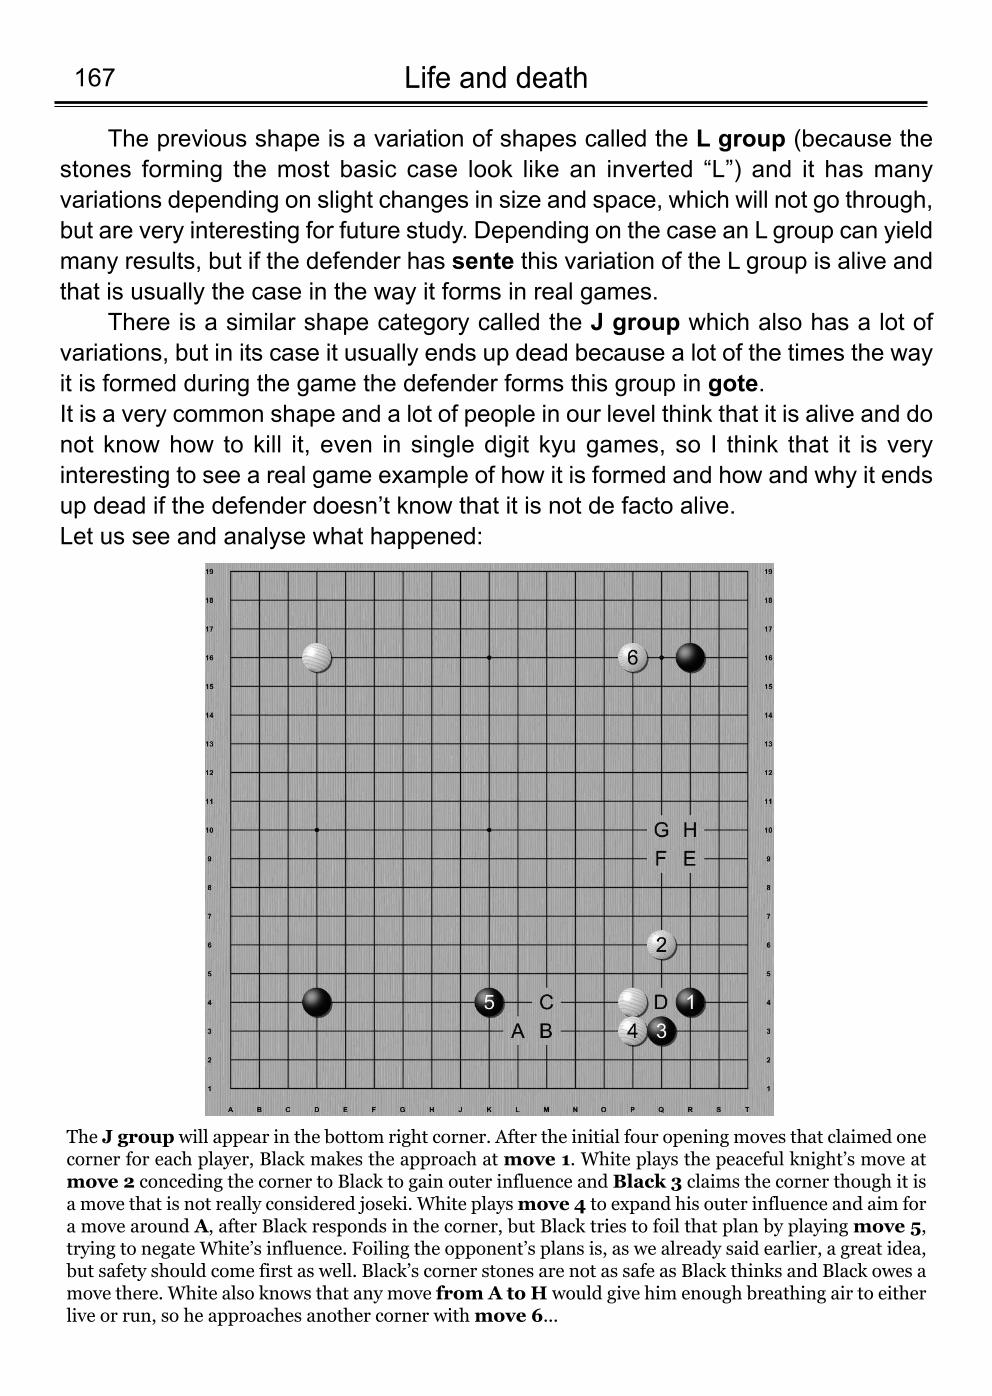
Life and death 167
The previous shape is a variation of shapes called the L group (because thestones forming the most basic case look like an inverted “L”) and it has manyvariations depending on slight changes in size and space, which will not go through,but are very interesting for future study. Depending on the case an L group can yieldmany results, but if the defender has sente this variation of the L group is alive andthat is usually the case in the way it forms in real games.
There is a similar shape category called the J group which also has a lot ofvariations, but in its case it usually ends up dead because a lot of the times the wayit is formed during the game the defender forms this group in gote. It is a very common shape and a lot of people in our level think that it is alive and donot know how to kill it, even in single digit kyu games, so I think that it is veryinteresting to see a real game example of how it is formed and how and why it endsup dead if the defender doesn’t know that it is not de facto alive. Let us see and analyse what happened:
The J group will appear in the bottom right corner. After the initial four opening moves that claimed onecorner for each player, Black makes the approach at move 1. White plays the peaceful knight’s move atmove 2 conceding the corner to Black to gain outer influence and Black 3 claims the corner though it isa move that is not really considered joseki. White plays move 4 to expand his outer influence and aim fora move around A, after Black responds in the corner, but Black tries to foil that plan by playing move 5,trying to negate White’s influence. Foiling the opponent’s plans is, as we already said earlier, a great idea,but safety should come first as well. Black’s corner stones are not as safe as Black thinks and Black owes amove there. White also knows that any move from A to H would give him enough breathing air to eitherlive or run, so he approaches another corner with move 6...
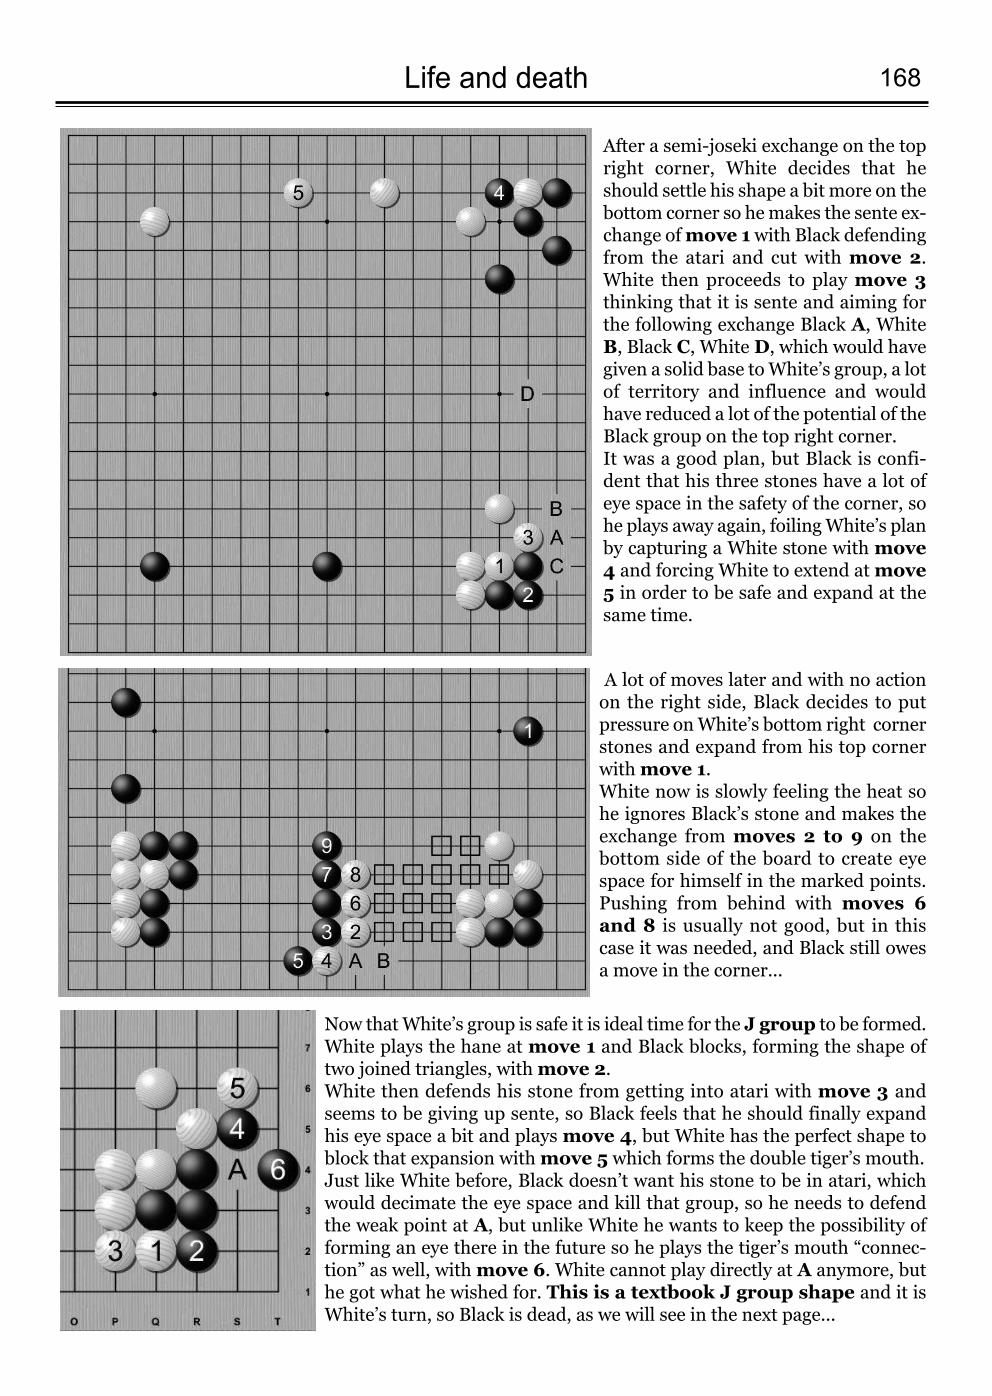
168Life and death
After a semi-joseki exchange on the topright corner, White decides that heshould settle his shape a bit more on thebottom corner so he makes the sente ex-change of move 1with Black defendingfrom the atari and cut with move 2.White then proceeds to play move 3thinking that it is sente and aiming forthe following exchange Black A, WhiteB, Black C, White D, which would havegiven a solid base to White’s group, a lotof territory and influence and wouldhave reduced a lot of the potential of theBlack group on the top right corner. It was a good plan, but Black is confi-dent that his three stones have a lot ofeye space in the safety of the corner, sohe plays away again, foiling White’s planby capturing a White stone with move4 and forcing White to extend at move5 in order to be safe and expand at thesame time.
A lot of moves later and with no actionon the right side, Black decides to putpressure on White’s bottom right cornerstones and expand from his top cornerwith move 1. White now is slowly feeling the heat sohe ignores Black’s stone and makes theexchange from moves 2 to 9 on thebottom side of the board to create eyespace for himself in the marked points.Pushing from behind with moves 6and 8 is usually not good, but in thiscase it was needed, and Black still owesa move in the corner...
Now that White’s group is safe it is ideal time for the J group to be formed.White plays the hane at move 1 and Black blocks, forming the shape oftwo joined triangles, with move 2. White then defends his stone from getting into atari with move 3 andseems to be giving up sente, so Black feels that he should finally expandhis eye space a bit and plays move 4, but White has the perfect shape toblock that expansion with move 5 which forms the double tiger’s mouth.Just like White before, Black doesn’t want his stone to be in atari, whichwould decimate the eye space and kill that group, so he needs to defendthe weak point at A, but unlike White he wants to keep the possibility offorming an eye there in the future so he plays the tiger’s mouth “connec-tion” as well, with move 6. White cannot play directly at A anymore, buthe got what he wished for. This is a textbook J group shape and it isWhite’s turn, so Black is dead, as we will see in the next page...
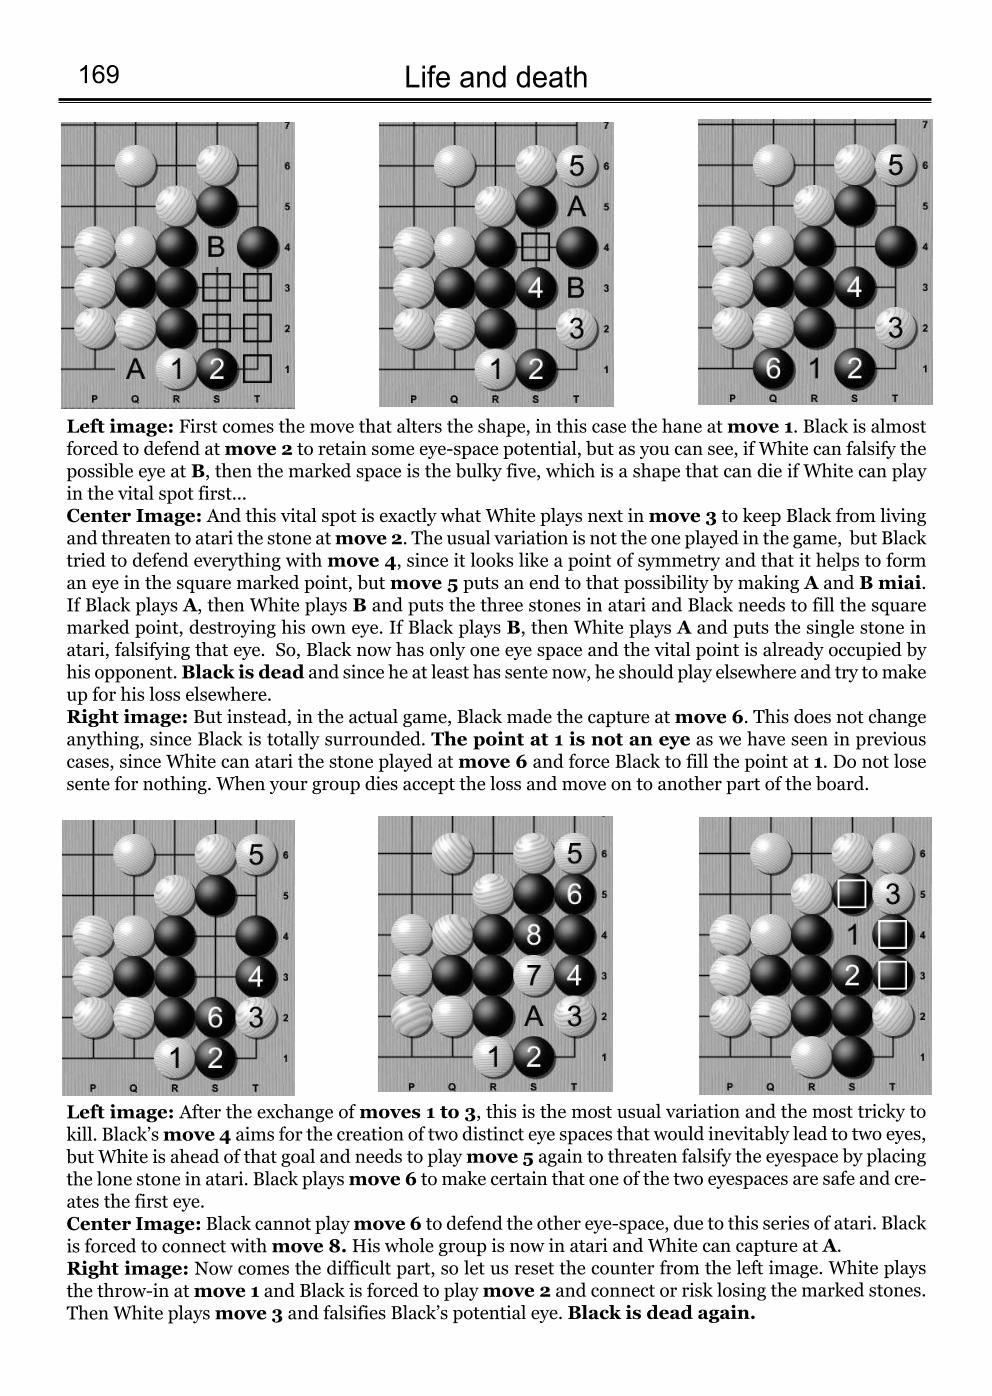
Life and death 169
Left image: First comes the move that alters the shape, in this case the hane at move 1. Black is almostforced to defend at move 2 to retain some eye-space potential, but as you can see, if White can falsify thepossible eye at B, then the marked space is the bulky five, which is a shape that can die if White can playin the vital spot first...Center Image: And this vital spot is exactly what White plays next in move 3 to keep Black from livingand threaten to atari the stone at move 2. The usual variation is not the one played in the game, but Blacktried to defend everything with move 4, since it looks like a point of symmetry and that it helps to forman eye in the square marked point, but move 5 puts an end to that possibility by making A and Bmiai.If Black plays A, then White plays B and puts the three stones in atari and Black needs to fill the squaremarked point, destroying his own eye. If Black plays B, then White plays A and puts the single stone inatari, falsifying that eye. So, Black now has only one eye space and the vital point is already occupied byhis opponent. Black is dead and since he at least has sente now, he should play elsewhere and try to makeup for his loss elsewhere.Right image: But instead, in the actual game, Black made the capture at move 6. This does not changeanything, since Black is totally surrounded. The point at 1 is not an eye as we have seen in previouscases, since White can atari the stone played at move 6 and force Black to fill the point at 1. Do not losesente for nothing. When your group dies accept the loss and move on to another part of the board.
Left image: After the exchange of moves 1 to 3, this is the most usual variation and the most tricky tokill. Black’s move 4 aims for the creation of two distinct eye spaces that would inevitably lead to two eyes,but White is ahead of that goal and needs to play move 5 again to threaten falsify the eyespace by placingthe lone stone in atari. Black plays move 6 to make certain that one of the two eyespaces are safe and cre-ates the first eye.Center Image: Black cannot play move 6 to defend the other eye-space, due to this series of atari. Blackis forced to connect with move 8. His whole group is now in atari and White can capture at A.Right image: Now comes the difficult part, so let us reset the counter from the left image. White playsthe throw-in at move 1 and Black is forced to play move 2 and connect or risk losing the marked stones.Then White plays move 3 and falsifies Black’s potential eye. Black is dead again.
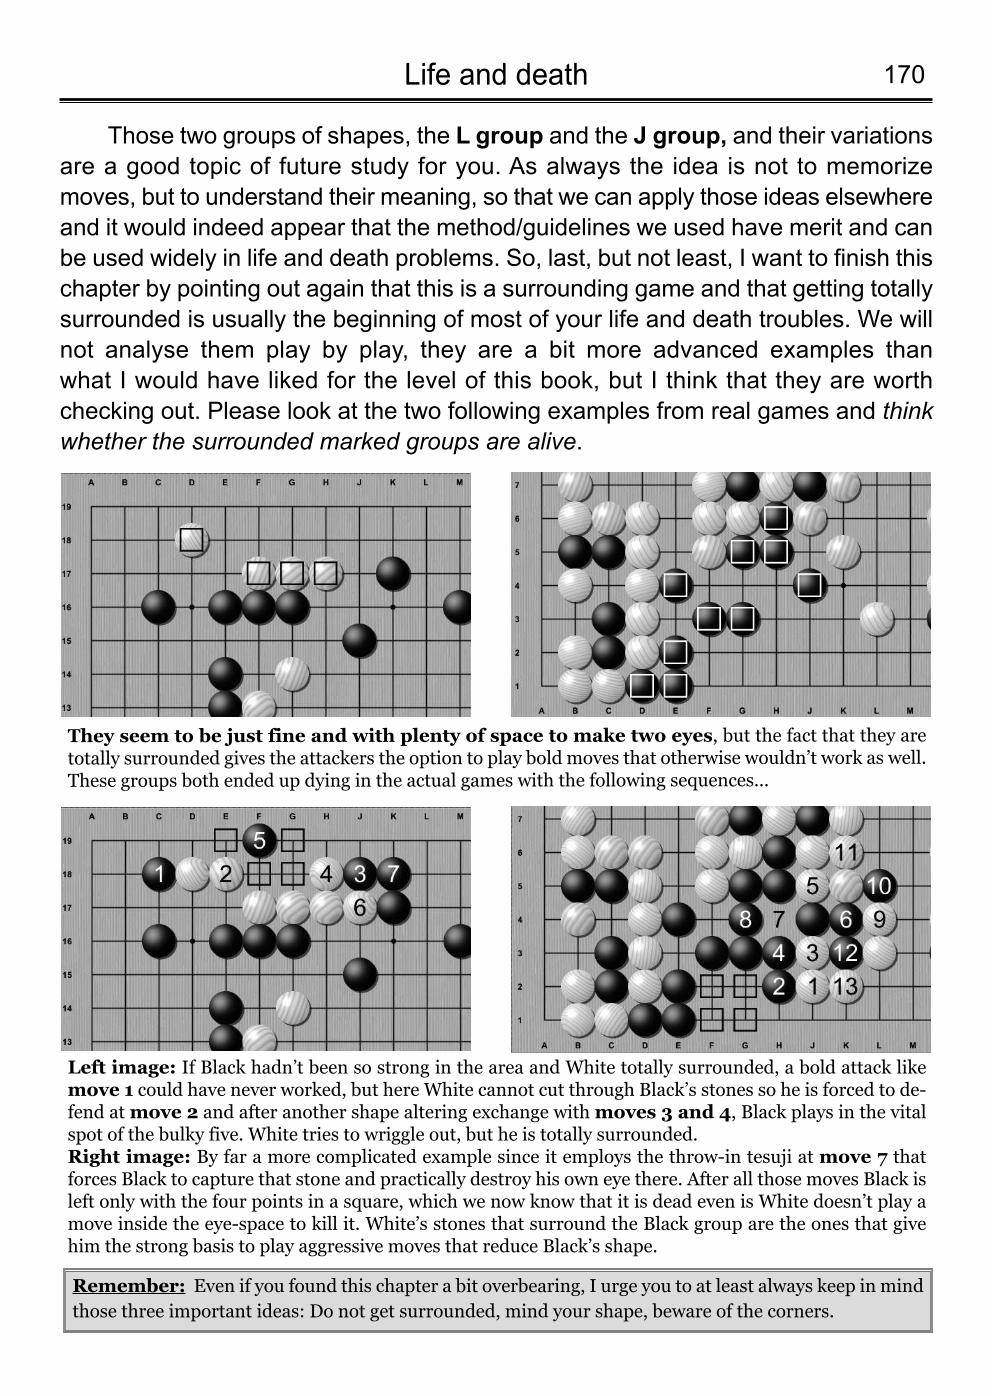
170Life and death
Those two groups of shapes, the L group and the J group, and their variationsare a good topic of future study for you. As always the idea is not to memorizemoves, but to understand their meaning, so that we can apply those ideas elsewhereand it would indeed appear that the method/guidelines we used have merit and canbe used widely in life and death problems. So, last, but not least, I want to finish thischapter by pointing out again that this is a surrounding game and that getting totallysurrounded is usually the beginning of most of your life and death troubles. We willnot analyse them play by play, they are a bit more advanced examples than what I would have liked for the level of this book, but I think that they are worthchecking out. Please look at the two following examples from real games and thinkwhether the surrounded marked groups are alive.
They seem to be just fine and with plenty of space to make two eyes, but the fact that they aretotally surrounded gives the attackers the option to play bold moves that otherwise wouldn’t work as well.These groups both ended up dying in the actual games with the following sequences...
Left image: If Black hadn’t been so strong in the area and White totally surrounded, a bold attack likemove 1 could have never worked, but here White cannot cut through Black’s stones so he is forced to de-fend at move 2 and after another shape altering exchange with moves 3 and 4, Black plays in the vitalspot of the bulky five. White tries to wriggle out, but he is totally surrounded.Right image: By far a more complicated example since it employs the throw-in tesuji at move 7 thatforces Black to capture that stone and practically destroy his own eye there. After all those moves Black isleft only with the four points in a square, which we now know that it is dead even is White doesn’t play amove inside the eye-space to kill it. White’s stones that surround the Black group are the ones that givehim the strong basis to play aggressive moves that reduce Black’s shape.
Remember: Even if you found this chapter a bit overbearing, I urge you to at least always keep in mindthose three important ideas: Do not get surrounded, mind your shape, beware of the corners.
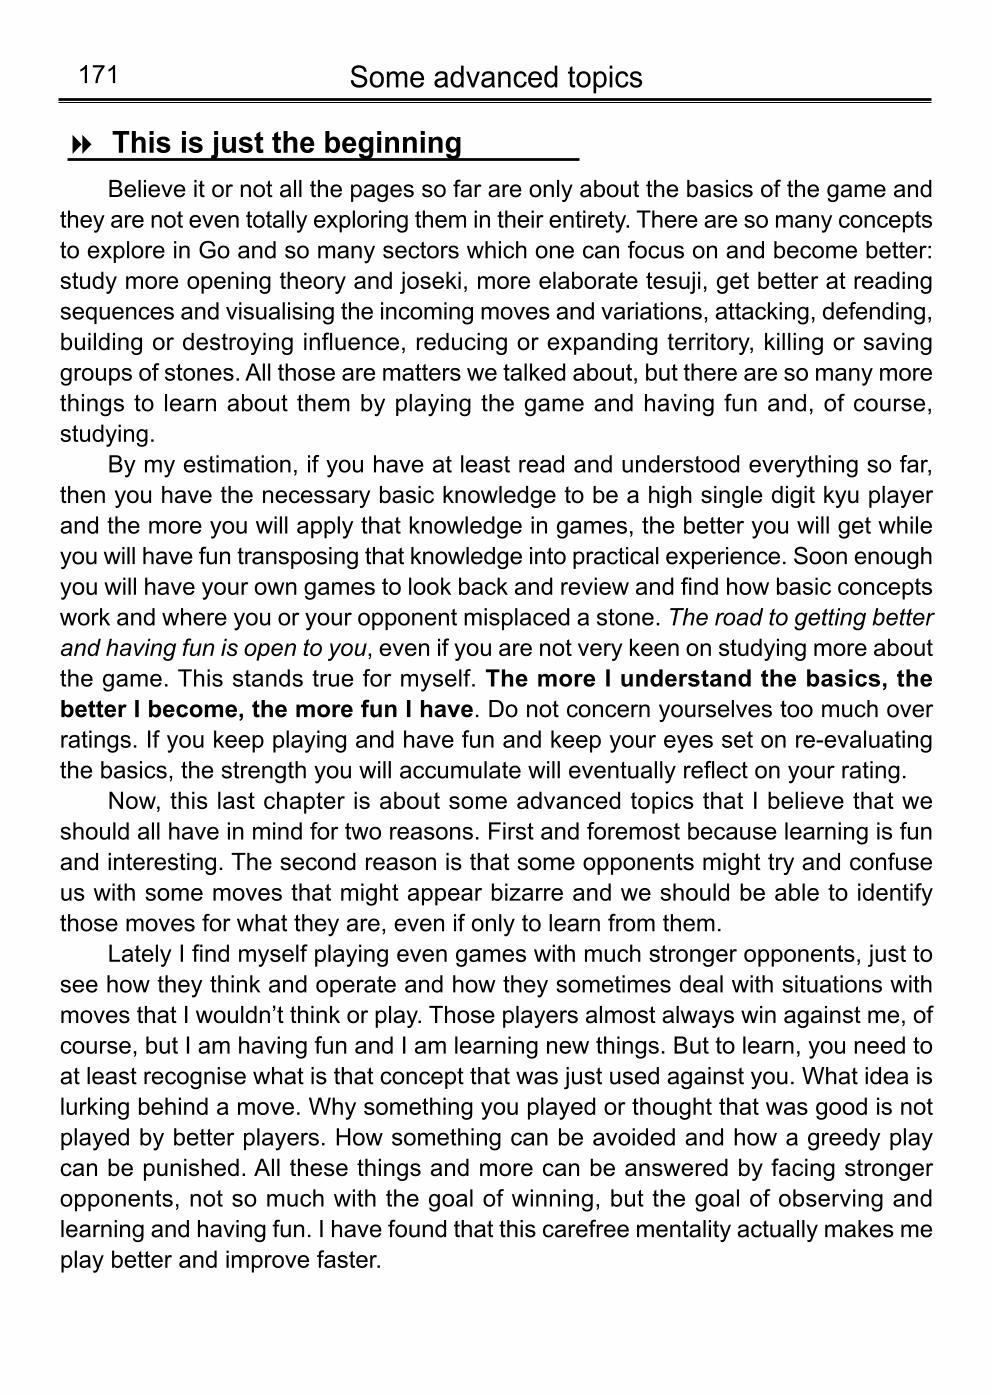
Some advanced topics171
Believe it or not all the pages so far are only about the basics of the game andthey are not even totally exploring them in their entirety. There are so many conceptsto explore in Go and so many sectors which one can focus on and become better:study more opening theory and joseki, more elaborate tesuji, get better at readingsequences and visualising the incoming moves and variations, attacking, defending,building or destroying influence, reducing or expanding territory, killing or savinggroups of stones. All those are matters we talked about, but there are so many morethings to learn about them by playing the game and having fun and, of course,studying.
By my estimation, if you have at least read and understood everything so far,then you have the necessary basic knowledge to be a high single digit kyu playerand the more you will apply that knowledge in games, the better you will get whileyou will have fun transposing that knowledge into practical experience. Soon enoughyou will have your own games to look back and review and find how basic conceptswork and where you or your opponent misplaced a stone. The road to getting betterand having fun is open to you, even if you are not very keen on studying more aboutthe game. This stands true for myself. The more I understand the basics, thebetter I become, the more fun I have. Do not concern yourselves too much overratings. If you keep playing and have fun and keep your eyes set on re-evaluatingthe basics, the strength you will accumulate will eventually reflect on your rating.
Now, this last chapter is about some advanced topics that I believe that weshould all have in mind for two reasons. First and foremost because learning is funand interesting. The second reason is that some opponents might try and confuseus with some moves that might appear bizarre and we should be able to identifythose moves for what they are, even if only to learn from them.
Lately I find myself playing even games with much stronger opponents, just tosee how they think and operate and how they sometimes deal with situations withmoves that I wouldn’t think or play. Those players almost always win against me, ofcourse, but I am having fun and I am learning new things. But to learn, you need toat least recognise what is that concept that was just used against you. What idea islurking behind a move. Why something you played or thought that was good is notplayed by better players. How something can be avoided and how a greedy playcan be punished. All these things and more can be answered by facing strongeropponents, not so much with the goal of winning, but the goal of observing andlearning and having fun. I have found that this carefree mentality actually makes meplay better and improve faster.
This is just the beginning8
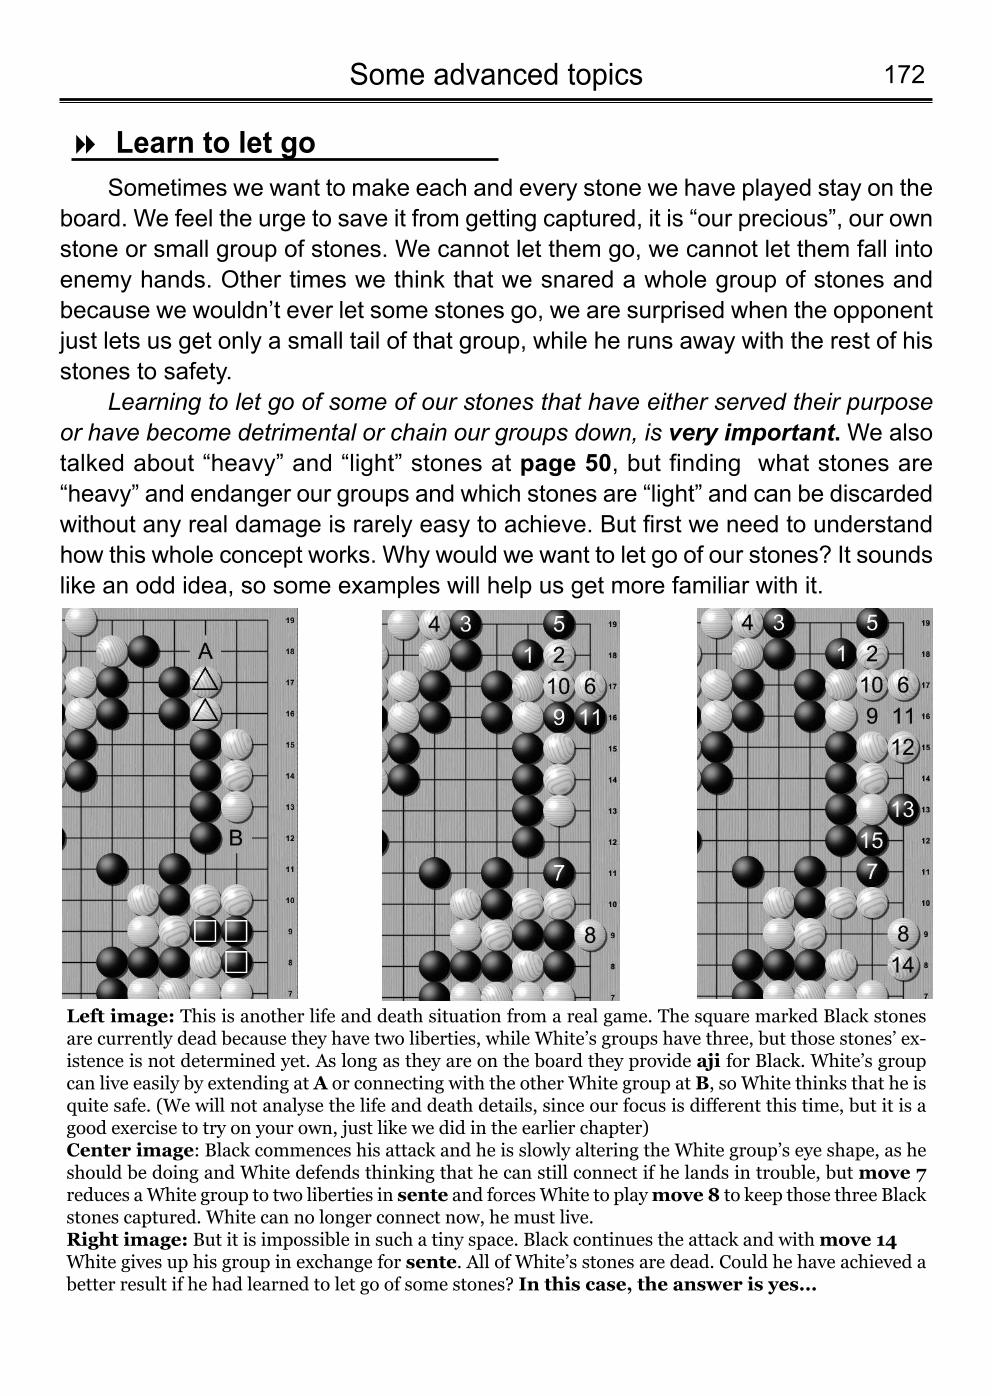
172Some advanced topics
Sometimes we want to make each and every stone we have played stay on theboard. We feel the urge to save it from getting captured, it is “our precious”, our ownstone or small group of stones. We cannot let them go, we cannot let them fall intoenemy hands. Other times we think that we snared a whole group of stones andbecause we wouldn’t ever let some stones go, we are surprised when the opponentjust lets us get only a small tail of that group, while he runs away with the rest of hisstones to safety.
Learning to let go of some of our stones that have either served their purposeor have become detrimental or chain our groups down, is very important. We alsotalked about “heavy” and “light” stones at page 50, but finding what stones are“heavy” and endanger our groups and which stones are “light” and can be discardedwithout any real damage is rarely easy to achieve. But first we need to understandhow this whole concept works. Why would we want to let go of our stones? It soundslike an odd idea, so some examples will help us get more familiar with it.
Learn to let go8
Left image: This is another life and death situation from a real game. The square marked Black stonesare currently dead because they have two liberties, while White’s groups have three, but those stones’ ex-istence is not determined yet. As long as they are on the board they provide aji for Black. White’s groupcan live easily by extending at A or connecting with the other White group at B, so White thinks that he isquite safe. (We will not analyse the life and death details, since our focus is different this time, but it is agood exercise to try on your own, just like we did in the earlier chapter)Center image: Black commences his attack and he is slowly altering the White group’s eye shape, as heshould be doing and White defends thinking that he can still connect if he lands in trouble, but move 7reduces a White group to two liberties in sente and forces White to play move 8 to keep those three Blackstones captured. White can no longer connect now, he must live.Right image: But it is impossible in such a tiny space. Black continues the attack and with move 14White gives up his group in exchange for sente. All of White’s stones are dead. Could he have achieved abetter result if he had learned to let go of some stones? In this case, the answer is yes...
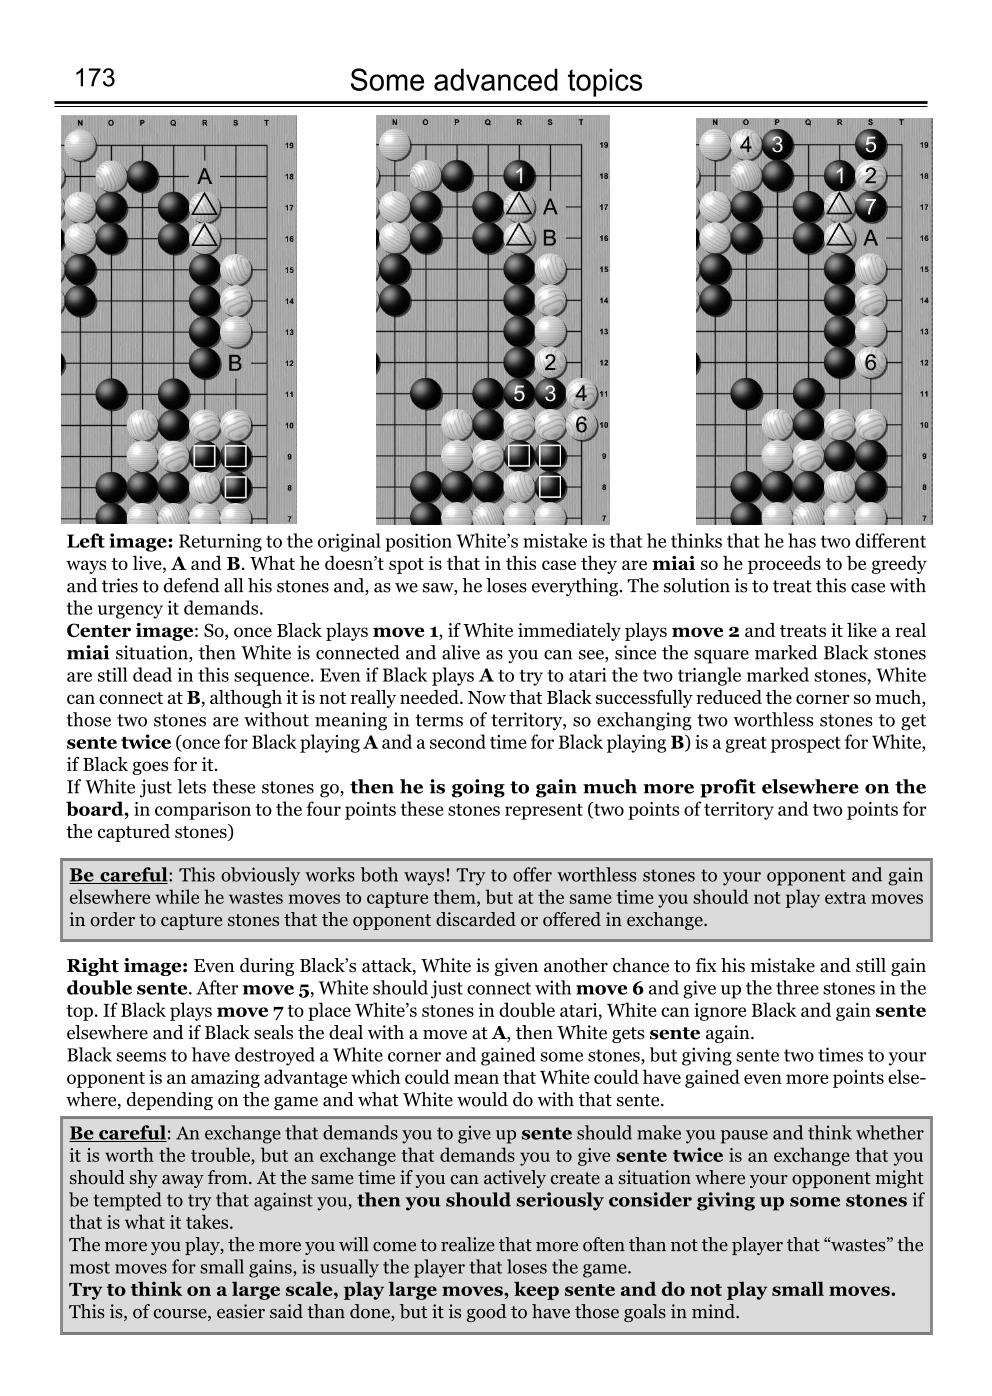
Some advanced topics173
Left image: Returning to the original position White’s mistake is that he thinks that he has two differentways to live, A and B. What he doesn’t spot is that in this case they are miai so he proceeds to be greedyand tries to defend all his stones and, as we saw, he loses everything. The solution is to treat this case withthe urgency it demands. Center image: So, once Black plays move 1, if White immediately plays move 2 and treats it like a realmiai situation, then White is connected and alive as you can see, since the square marked Black stonesare still dead in this sequence. Even if Black plays A to try to atari the two triangle marked stones, Whitecan connect at B, although it is not really needed. Now that Black successfully reduced the corner so much,those two stones are without meaning in terms of territory, so exchanging two worthless stones to getsente twice (once for Black playing A and a second time for Black playing B) is a great prospect for White,if Black goes for it. If White just lets these stones go, then he is going to gain much more profit elsewhere on theboard, in comparison to the four points these stones represent (two points of territory and two points forthe captured stones)
Right image: Even during Black’s attack, White is given another chance to fix his mistake and still gaindouble sente. After move 5, White should just connect with move 6 and give up the three stones in thetop. If Black plays move 7 to place White’s stones in double atari, White can ignore Black and gain senteelsewhere and if Black seals the deal with a move at A, then White gets sente again. Black seems to have destroyed a White corner and gained some stones, but giving sente two times to youropponent is an amazing advantage which could mean that White could have gained even more points else-where, depending on the game and what White would do with that sente.
Be careful: This obviously works both ways! Try to offer worthless stones to your opponent and gainelsewhere while he wastes moves to capture them, but at the same time you should not play extra movesin order to capture stones that the opponent discarded or offered in exchange.
Be careful: An exchange that demands you to give up sente should make you pause and think whetherit is worth the trouble, but an exchange that demands you to give sente twice is an exchange that youshould shy away from. At the same time if you can actively create a situation where your opponent mightbe tempted to try that against you, then you should seriously consider giving up some stones ifthat is what it takes. The more you play, the more you will come to realize that more often than not the player that “wastes” themost moves for small gains, is usually the player that loses the game. Try to think on a large scale, play large moves, keep sente and do not play small moves.This is, of course, easier said than done, but it is good to have those goals in mind.
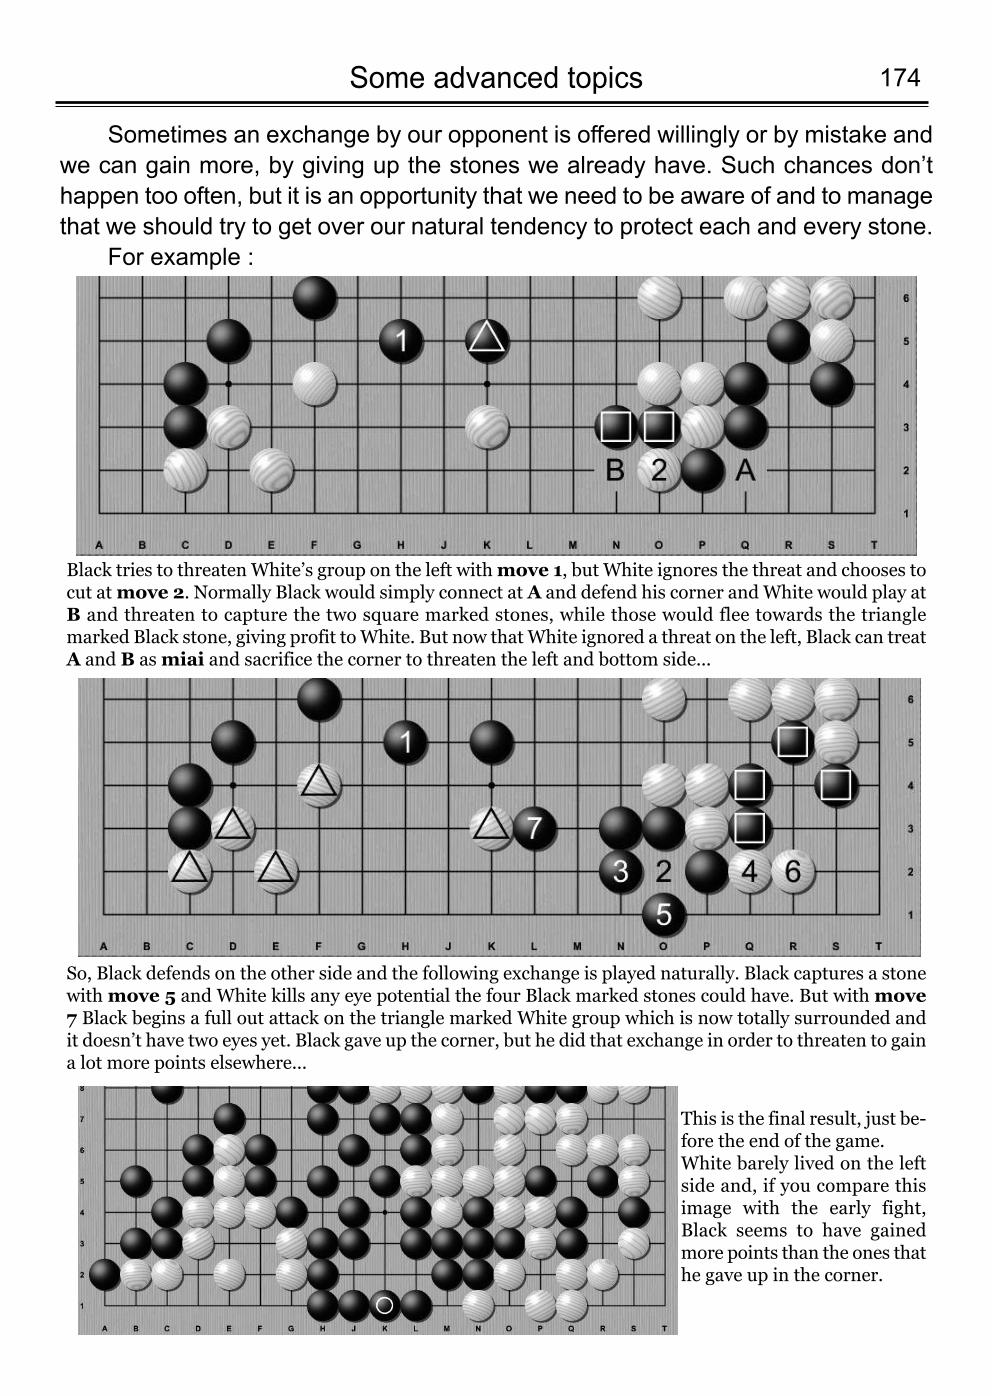
174Some advanced topics
Sometimes an exchange by our opponent is offered willingly or by mistake andwe can gain more, by giving up the stones we already have. Such chances don’thappen too often, but it is an opportunity that we need to be aware of and to managethat we should try to get over our natural tendency to protect each and every stone.
For example :
Black tries to threaten White’s group on the left with move 1, but White ignores the threat and chooses tocut atmove 2. Normally Black would simply connect at A and defend his corner and White would play atB and threaten to capture the two square marked stones, while those would flee towards the trianglemarked Black stone, giving profit to White. But now that White ignored a threat on the left, Black can treatA and B as miai and sacrifice the corner to threaten the left and bottom side...
So, Black defends on the other side and the following exchange is played naturally. Black captures a stonewith move 5 and White kills any eye potential the four Black marked stones could have. But with move7 Black begins a full out attack on the triangle marked White group which is now totally surrounded andit doesn’t have two eyes yet. Black gave up the corner, but he did that exchange in order to threaten to gaina lot more points elsewhere...
This is the final result, just be-fore the end of the game. White barely lived on the leftside and, if you compare thisimage with the early fight,Black seems to have gainedmore points than the ones thathe gave up in the corner.
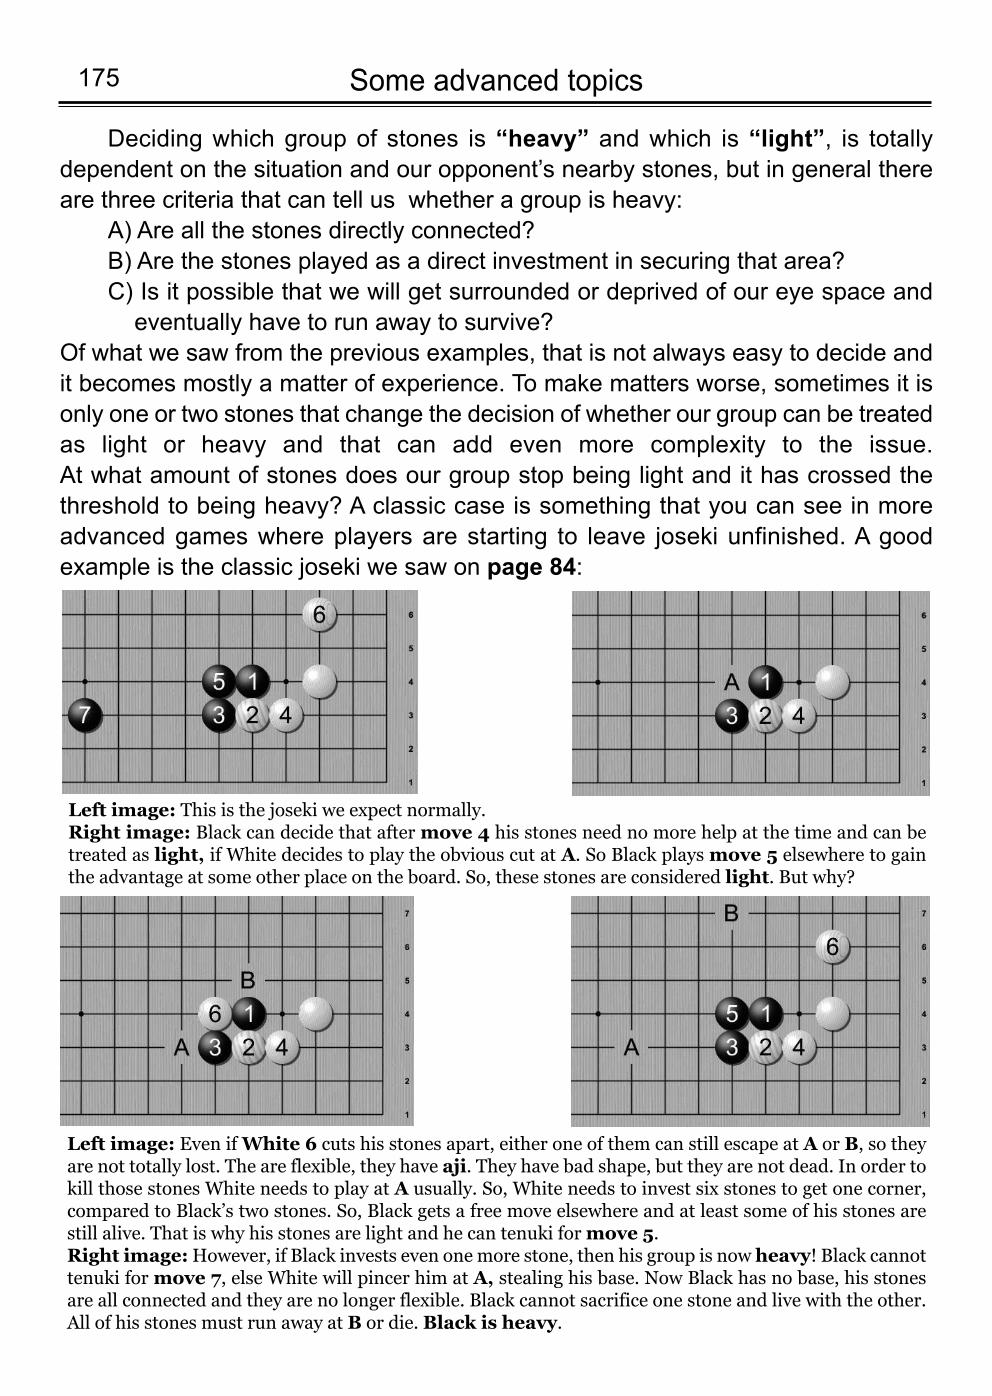
Some advanced topics175
Deciding which group of stones is “heavy” and which is “light”, is totallydependent on the situation and our opponent’s nearby stones, but in general thereare three criteria that can tell us whether a group is heavy:
A) Are all the stones directly connected?B) Are the stones played as a direct investment in securing that area?C) Is it possible that we will get surrounded or deprived of our eye space and
eventually have to run away to survive?Of what we saw from the previous examples, that is not always easy to decide andit becomes mostly a matter of experience. To make matters worse, sometimes it isonly one or two stones that change the decision of whether our group can be treatedas light or heavy and that can add even more complexity to the issue. At what amount of stones does our group stop being light and it has crossed thethreshold to being heavy? A classic case is something that you can see in moreadvanced games where players are starting to leave joseki unfinished. A goodexample is the classic joseki we saw on page 84:
Left image: This is the joseki we expect normally.Right image: Black can decide that after move 4 his stones need no more help at the time and can betreated as light, if White decides to play the obvious cut at A. So Black plays move 5 elsewhere to gainthe advantage at some other place on the board. So, these stones are considered light. But why?
Left image: Even if White 6 cuts his stones apart, either one of them can still escape at A or B, so theyare not totally lost. The are flexible, they have aji. They have bad shape, but they are not dead. In order tokill those stones White needs to play at A usually. So, White needs to invest six stones to get one corner,compared to Black’s two stones. So, Black gets a free move elsewhere and at least some of his stones arestill alive. That is why his stones are light and he can tenuki for move 5.Right image:However, if Black invests even one more stone, then his group is now heavy! Black cannottenuki for move 7, else White will pincer him at A, stealing his base. Now Black has no base, his stonesare all connected and they are no longer flexible. Black cannot sacrifice one stone and live with the other.All of his stones must run away at B or die. Black is heavy.
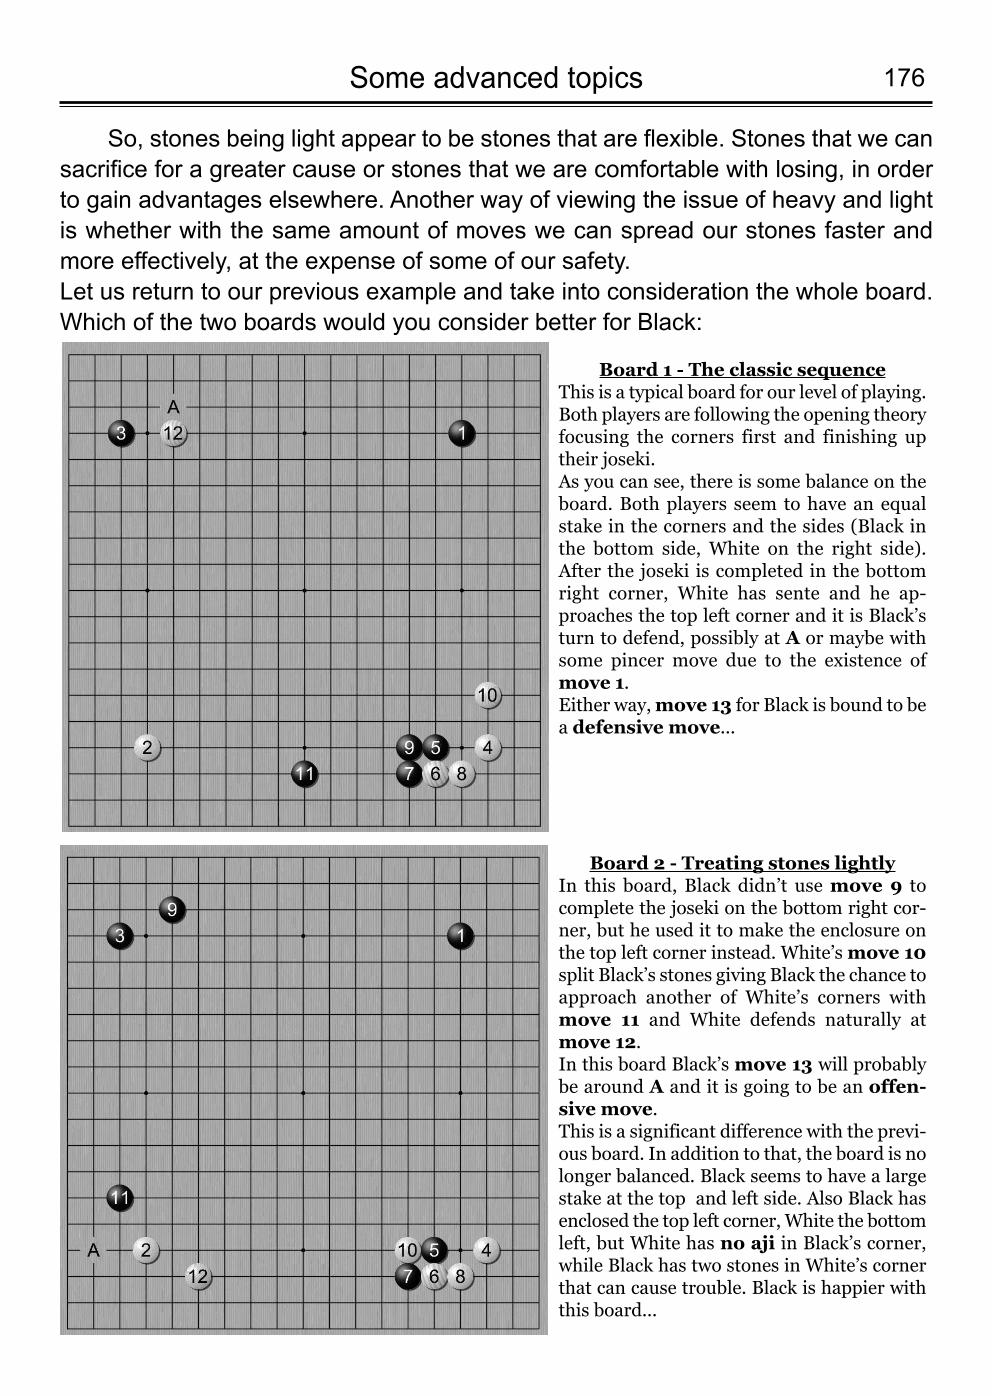
176Some advanced topics
So, stones being light appear to be stones that are flexible. Stones that we cansacrifice for a greater cause or stones that we are comfortable with losing, in orderto gain advantages elsewhere. Another way of viewing the issue of heavy and lightis whether with the same amount of moves we can spread our stones faster andmore effectively, at the expense of some of our safety. Let us return to our previous example and take into consideration the whole board.Which of the two boards would you consider better for Black:
Board 1 - The classic sequenceThis is a typical board for our level of playing.Both players are following the opening theoryfocusing the corners first and finishing uptheir joseki. As you can see, there is some balance on theboard. Both players seem to have an equalstake in the corners and the sides (Black inthe bottom side, White on the right side).After the joseki is completed in the bottomright corner, White has sente and he ap-proaches the top left corner and it is Black’sturn to defend, possibly at A or maybe withsome pincer move due to the existence ofmove 1.Either way, move 13 for Black is bound to bea defensive move...
Board 2 - Treating stones lightlyIn this board, Black didn’t use move 9 tocomplete the joseki on the bottom right cor-ner, but he used it to make the enclosure onthe top left corner instead. White’s move 10split Black’s stones giving Black the chance toapproach another of White’s corners withmove 11 and White defends naturally atmove 12. In this board Black’s move 13 will probablybe around A and it is going to be an offen-sive move. This is a significant difference with the previ-ous board. In addition to that, the board is nolonger balanced. Black seems to have a largestake at the top and left side. Also Black hasenclosed the top left corner, White the bottomleft, but White has no aji in Black’s corner,while Black has two stones in White’s cornerthat can cause trouble. Black is happier withthis board...
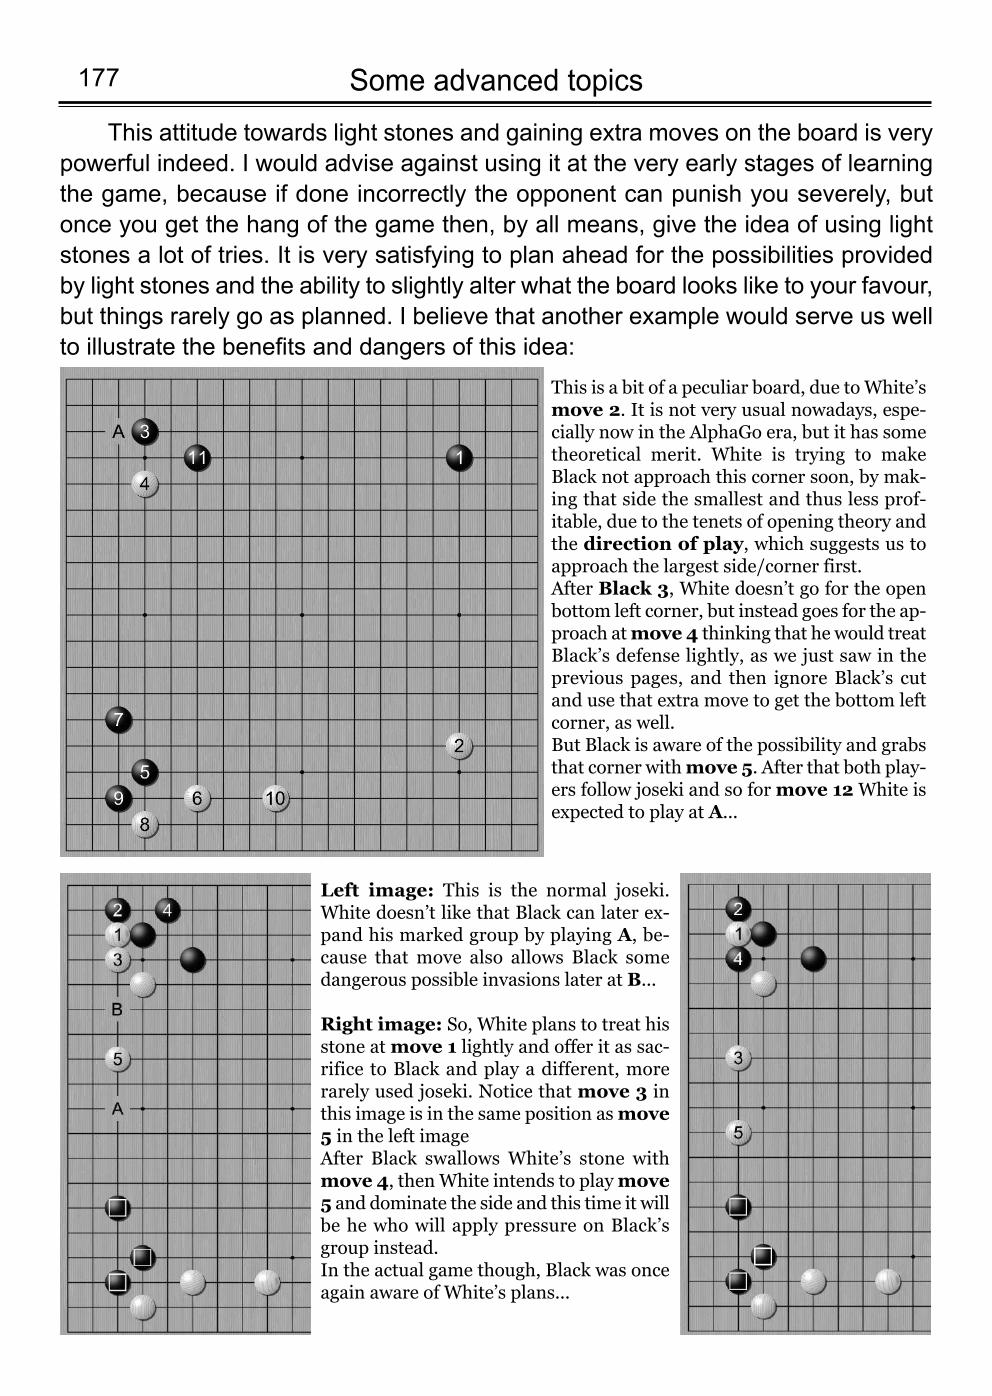
Some advanced topics177
This attitude towards light stones and gaining extra moves on the board is verypowerful indeed. I would advise against using it at the very early stages of learningthe game, because if done incorrectly the opponent can punish you severely, butonce you get the hang of the game then, by all means, give the idea of using lightstones a lot of tries. It is very satisfying to plan ahead for the possibilities providedby light stones and the ability to slightly alter what the board looks like to your favour,but things rarely go as planned. I believe that another example would serve us wellto illustrate the benefits and dangers of this idea:
This is a bit of a peculiar board, due to White’smove 2. It is not very usual nowadays, espe-cially now in the AlphaGo era, but it has sometheoretical merit. White is trying to makeBlack not approach this corner soon, by mak-ing that side the smallest and thus less prof-itable, due to the tenets of opening theory andthe direction of play, which suggests us toapproach the largest side/corner first. After Black 3, White doesn’t go for the openbottom left corner, but instead goes for the ap-proach at move 4 thinking that he would treatBlack’s defense lightly, as we just saw in theprevious pages, and then ignore Black’s cutand use that extra move to get the bottom leftcorner, as well.But Black is aware of the possibility and grabsthat corner with move 5. After that both play-ers follow joseki and so for move 12White isexpected to play at A...
Left image: This is the normal joseki.White doesn’t like that Black can later ex-pand his marked group by playing A, be-cause that move also allows Black somedangerous possible invasions later at B...
Right image: So, White plans to treat hisstone at move 1 lightly and offer it as sac-rifice to Black and play a different, morerarely used joseki. Notice that move 3 inthis image is in the same position as move5 in the left imageAfter Black swallows White’s stone withmove 4, then White intends to play move5 and dominate the side and this time it willbe he who will apply pressure on Black’sgroup instead.In the actual game though, Black was onceagain aware of White’s plans...
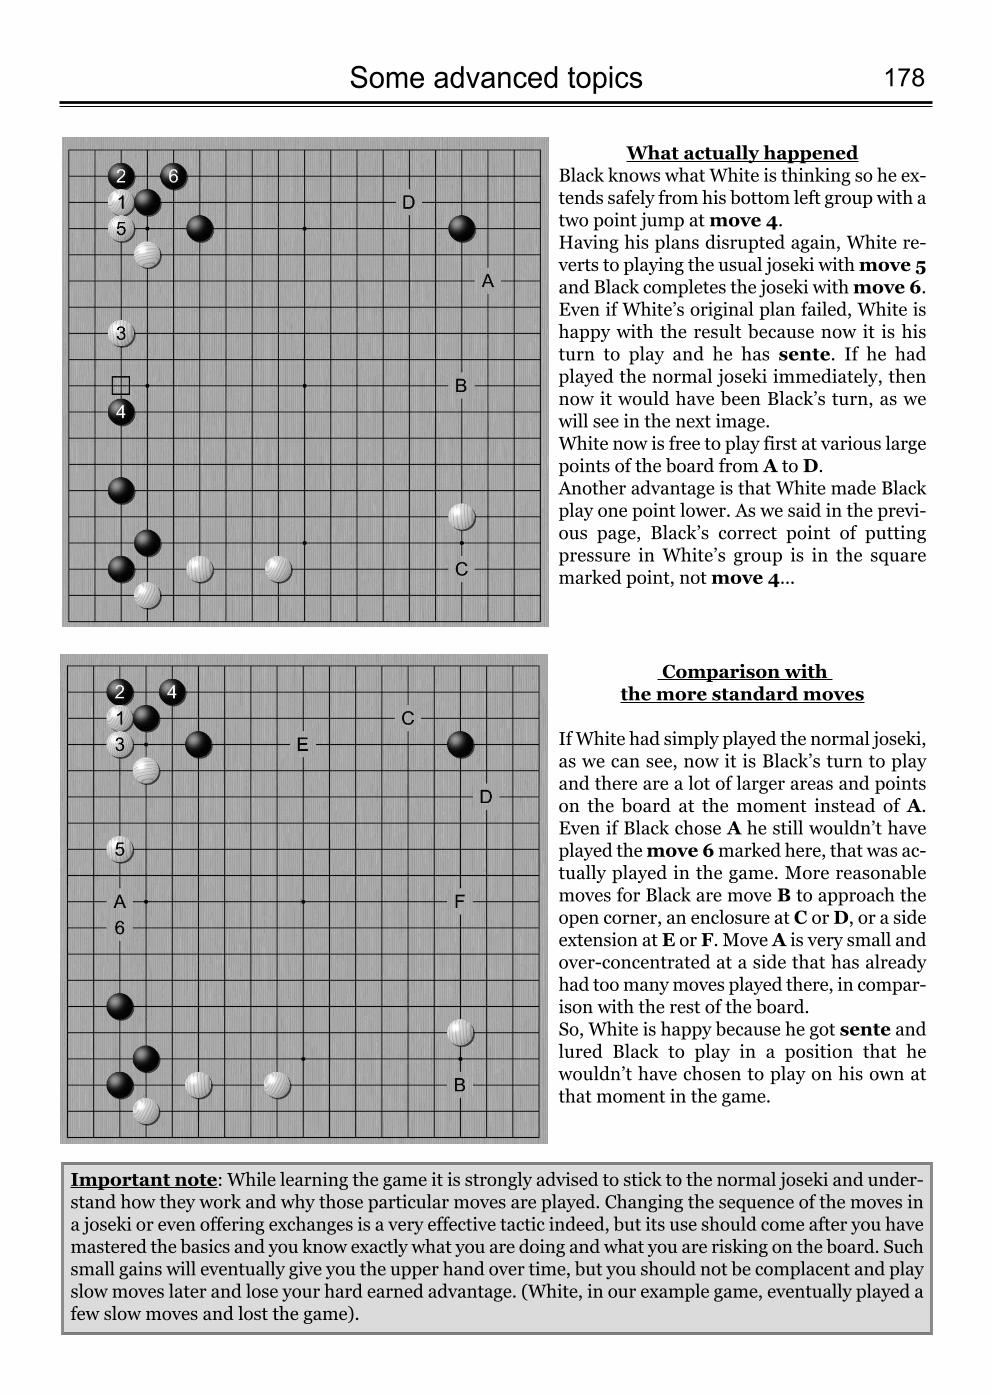
178Some advanced topics
What actually happenedBlack knows what White is thinking so he ex-tends safely from his bottom left group with atwo point jump at move 4.Having his plans disrupted again, White re-verts to playing the usual joseki with move 5and Black completes the joseki with move 6. Even if White’s original plan failed, White ishappy with the result because now it is histurn to play and he has sente. If he hadplayed the normal joseki immediately, thennow it would have been Black’s turn, as wewill see in the next image.White now is free to play first at various largepoints of the board from A to D. Another advantage is that White made Blackplay one point lower. As we said in the previ-ous page, Black’s correct point of puttingpressure in White’s group is in the squaremarked point, not move 4...
Comparison with the more standard moves
If White had simply played the normal joseki,as we can see, now it is Black’s turn to playand there are a lot of larger areas and pointson the board at the moment instead of A.Even if Black chose A he still wouldn’t haveplayed the move 6marked here, that was ac-tually played in the game. More reasonablemoves for Black are move B to approach theopen corner, an enclosure at C or D, or a sideextension at E or F. Move A is very small andover-concentrated at a side that has alreadyhad too many moves played there, in compar-ison with the rest of the board.So, White is happy because he got sente andlured Black to play in a position that hewouldn’t have chosen to play on his own atthat moment in the game.
Important note: While learning the game it is strongly advised to stick to the normal joseki and under-stand how they work and why those particular moves are played. Changing the sequence of the moves ina joseki or even offering exchanges is a very effective tactic indeed, but its use should come after you havemastered the basics and you know exactly what you are doing and what you are risking on the board. Suchsmall gains will eventually give you the upper hand over time, but you should not be complacent and playslow moves later and lose your hard earned advantage. (White, in our example game, eventually played afew slow moves and lost the game).
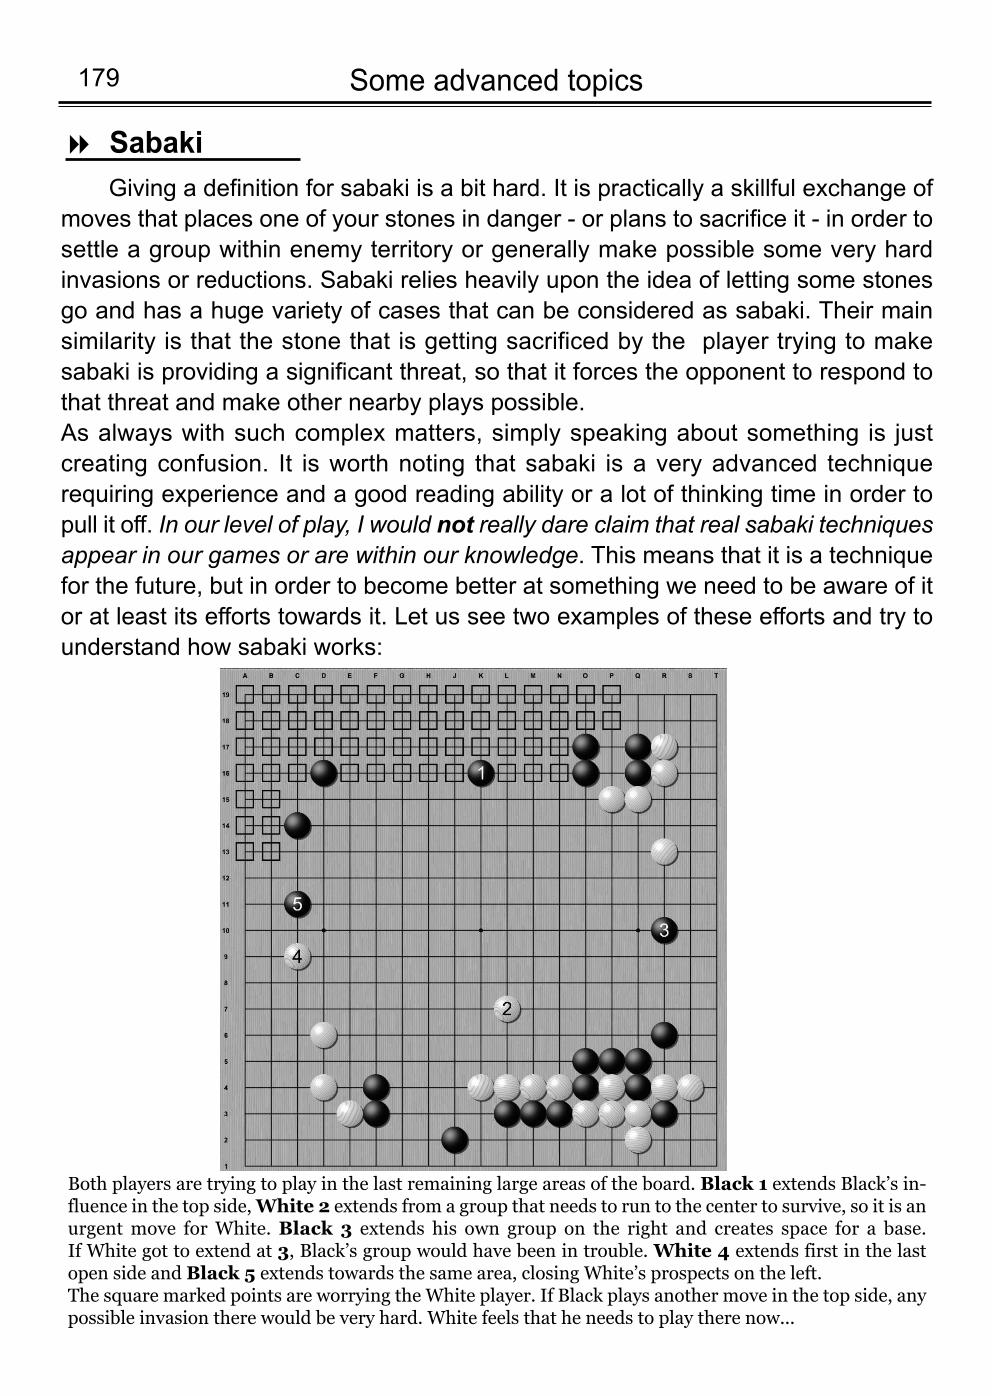
Some advanced topics179
Sabaki8
Giving a definition for sabaki is a bit hard. It is practically a skillful exchange ofmoves that places one of your stones in danger - or plans to sacrifice it - in order tosettle a group within enemy territory or generally make possible some very hardinvasions or reductions. Sabaki relies heavily upon the idea of letting some stonesgo and has a huge variety of cases that can be considered as sabaki. Their mainsimilarity is that the stone that is getting sacrificed by the player trying to makesabaki is providing a significant threat, so that it forces the opponent to respond tothat threat and make other nearby plays possible.As always with such complex matters, simply speaking about something is justcreating confusion. It is worth noting that sabaki is a very advanced techniquerequiring experience and a good reading ability or a lot of thinking time in order topull it off. In our level of play, I would not really dare claim that real sabaki techniquesappear in our games or are within our knowledge. This means that it is a techniquefor the future, but in order to become better at something we need to be aware of itor at least its efforts towards it. Let us see two examples of these efforts and try tounderstand how sabaki works:
Both players are trying to play in the last remaining large areas of the board. Black 1 extends Black’s in-fluence in the top side, White 2 extends from a group that needs to run to the center to survive, so it is anurgent move for White. Black 3 extends his own group on the right and creates space for a base. If White got to extend at 3, Black’s group would have been in trouble. White 4 extends first in the lastopen side and Black 5 extends towards the same area, closing White’s prospects on the left.The square marked points are worrying the White player. If Black plays another move in the top side, anypossible invasion there would be very hard. White feels that he needs to play there now...
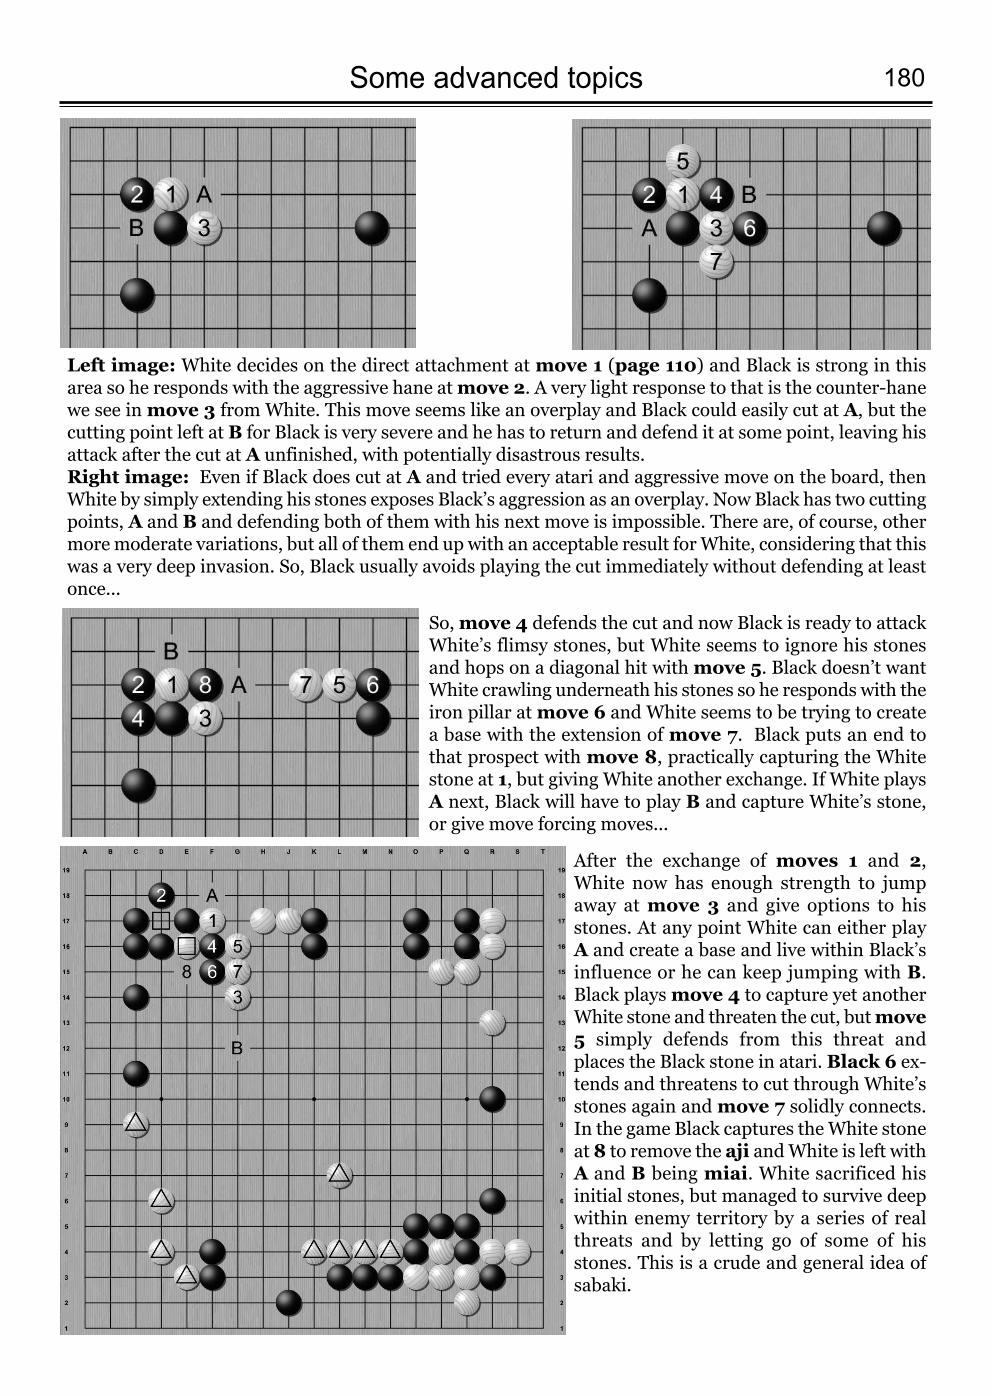
180Some advanced topics
After the exchange of moves 1 and 2,White now has enough strength to jumpaway at move 3 and give options to hisstones. At any point White can either playA and create a base and live within Black’sinfluence or he can keep jumping with B.Black plays move 4 to capture yet anotherWhite stone and threaten the cut, but move5 simply defends from this threat andplaces the Black stone in atari. Black 6 ex-tends and threatens to cut through White’sstones again and move 7 solidly connects.In the game Black captures the White stoneat 8 to remove the aji and White is left withA and B being miai. White sacrificed hisinitial stones, but managed to survive deepwithin enemy territory by a series of realthreats and by letting go of some of hisstones. This is a crude and general idea ofsabaki.
Left image: White decides on the direct attachment at move 1 (page 110) and Black is strong in thisarea so he responds with the aggressive hane at move 2. A very light response to that is the counter-hanewe see in move 3 from White. This move seems like an overplay and Black could easily cut at A, but thecutting point left at B for Black is very severe and he has to return and defend it at some point, leaving hisattack after the cut at A unfinished, with potentially disastrous results. Right image: Even if Black does cut at A and tried every atari and aggressive move on the board, thenWhite by simply extending his stones exposes Black’s aggression as an overplay. Now Black has two cuttingpoints, A and B and defending both of them with his next move is impossible. There are, of course, othermore moderate variations, but all of them end up with an acceptable result for White, considering that thiswas a very deep invasion. So, Black usually avoids playing the cut immediately without defending at leastonce...
So, move 4 defends the cut and now Black is ready to attackWhite’s flimsy stones, but White seems to ignore his stonesand hops on a diagonal hit with move 5. Black doesn’t wantWhite crawling underneath his stones so he responds with theiron pillar at move 6 and White seems to be trying to createa base with the extension of move 7. Black puts an end tothat prospect with move 8, practically capturing the Whitestone at 1, but giving White another exchange. If White playsA next, Black will have to play B and capture White’s stone,or give move forcing moves...
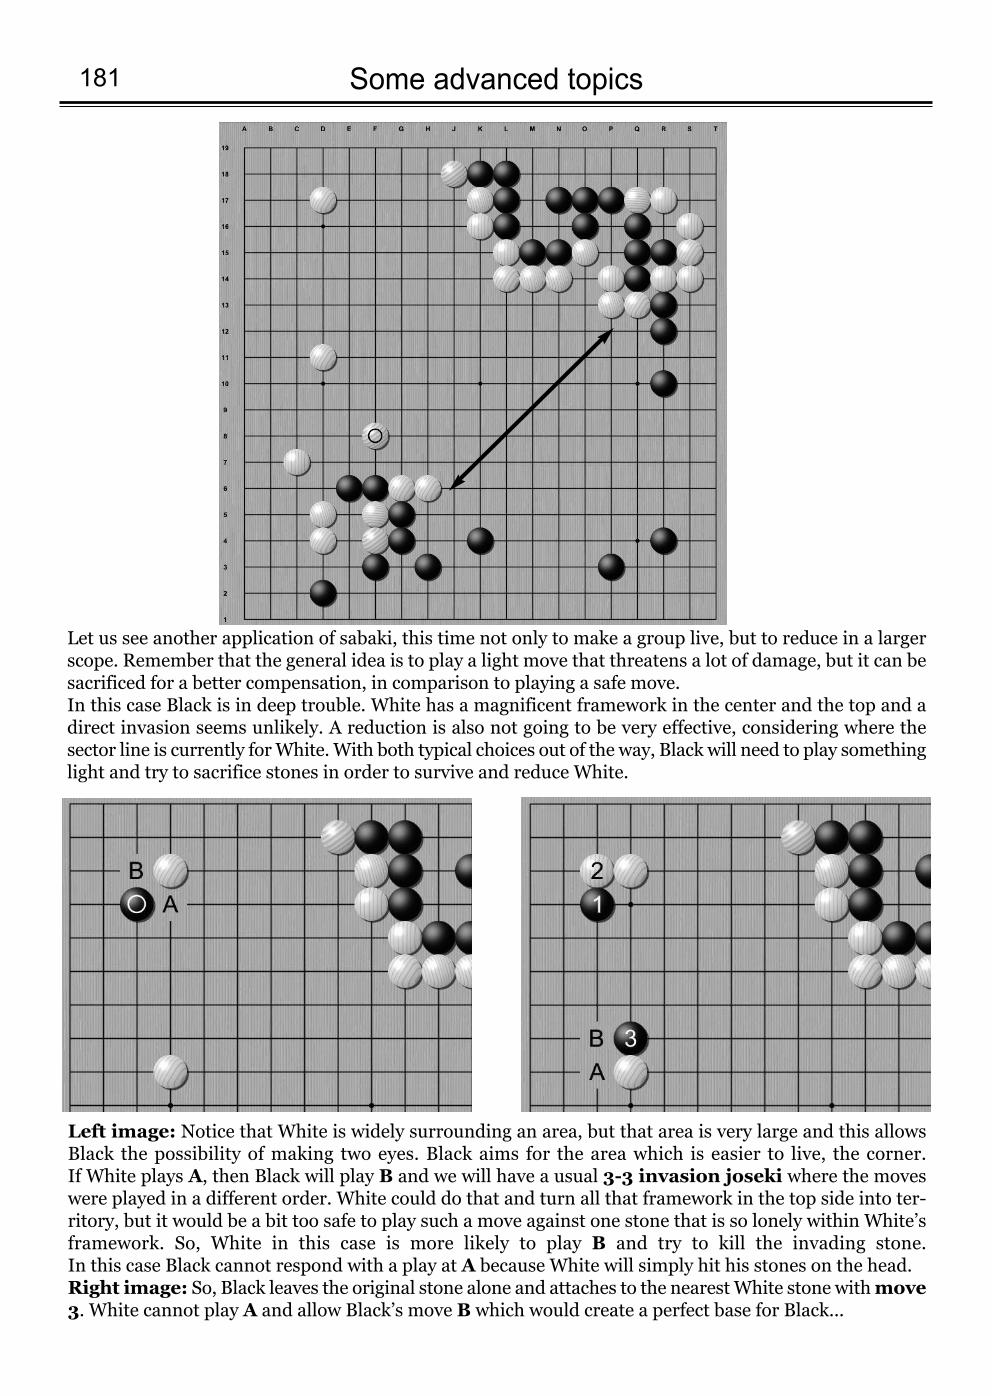
Some advanced topics181
Let us see another application of sabaki, this time not only to make a group live, but to reduce in a largerscope. Remember that the general idea is to play a light move that threatens a lot of damage, but it can besacrificed for a better compensation, in comparison to playing a safe move.In this case Black is in deep trouble. White has a magnificent framework in the center and the top and adirect invasion seems unlikely. A reduction is also not going to be very effective, considering where thesector line is currently for White. With both typical choices out of the way, Black will need to play somethinglight and try to sacrifice stones in order to survive and reduce White.
Left image: Notice that White is widely surrounding an area, but that area is very large and this allowsBlack the possibility of making two eyes. Black aims for the area which is easier to live, the corner. If White plays A, then Black will play B and we will have a usual 3-3 invasion joseki where the moveswere played in a different order. White could do that and turn all that framework in the top side into ter-ritory, but it would be a bit too safe to play such a move against one stone that is so lonely within White’sframework. So, White in this case is more likely to play B and try to kill the invading stone. In this case Black cannot respond with a play at A because White will simply hit his stones on the head.Right image: So, Black leaves the original stone alone and attaches to the nearest White stone with move3. White cannot play A and allow Black’s move B which would create a perfect base for Black...
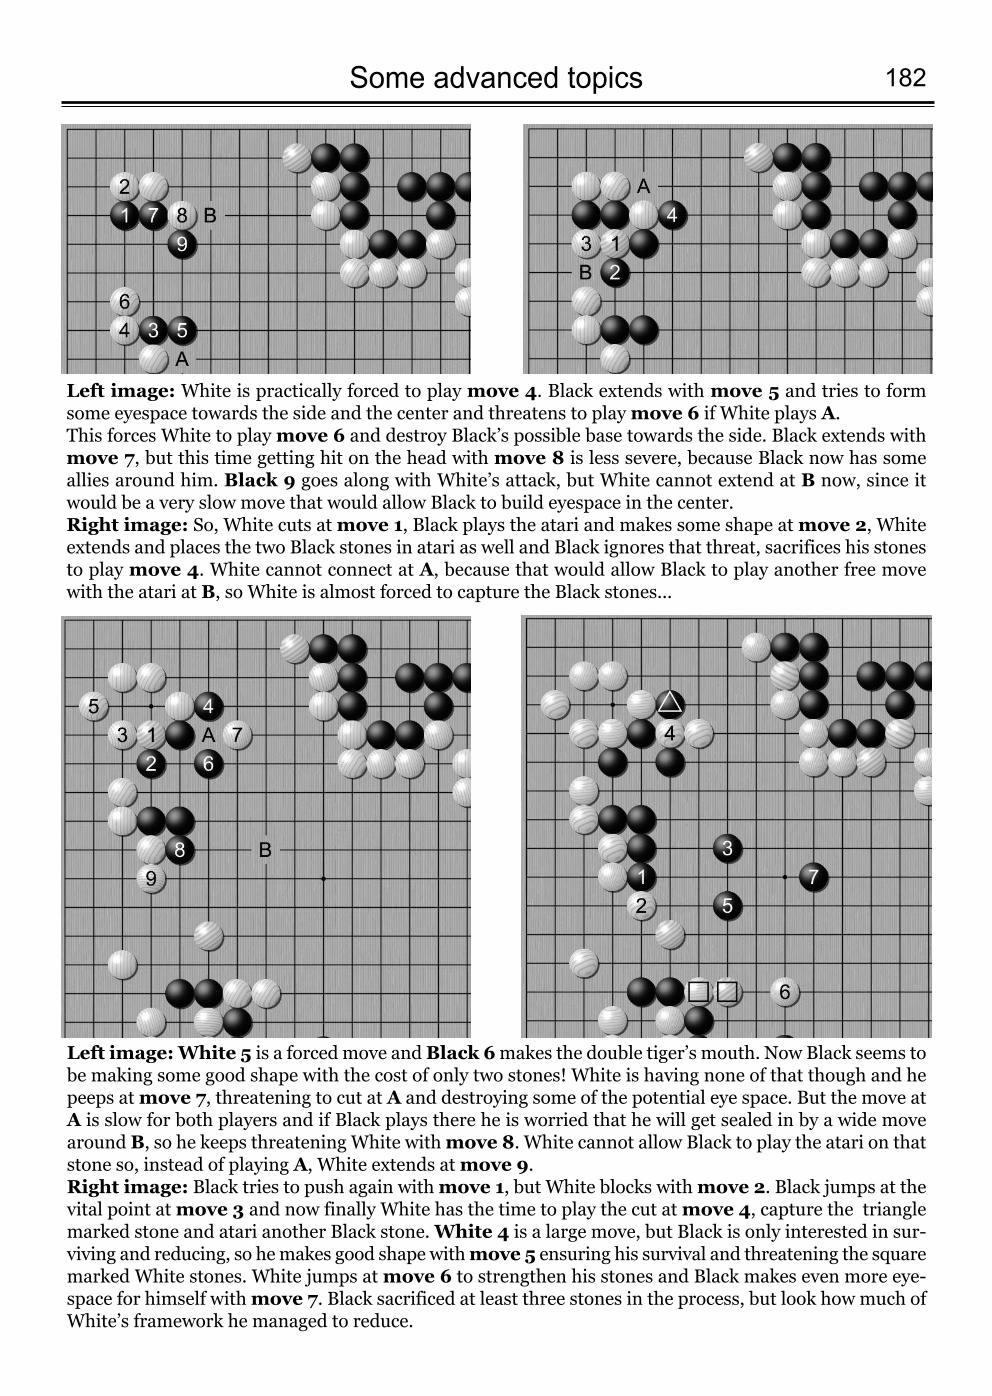
182Some advanced topics
Left image: White is practically forced to play move 4. Black extends with move 5 and tries to formsome eyespace towards the side and the center and threatens to play move 6 if White plays A. This forces White to play move 6 and destroy Black’s possible base towards the side. Black extends withmove 7, but this time getting hit on the head with move 8 is less severe, because Black now has someallies around him. Black 9 goes along with White’s attack, but White cannot extend at B now, since itwould be a very slow move that would allow Black to build eyespace in the center.Right image: So, White cuts at move 1, Black plays the atari and makes some shape at move 2, Whiteextends and places the two Black stones in atari as well and Black ignores that threat, sacrifices his stonesto play move 4. White cannot connect at A, because that would allow Black to play another free movewith the atari at B, so White is almost forced to capture the Black stones...
Left image:White 5 is a forced move and Black 6makes the double tiger’s mouth. Now Black seems tobe making some good shape with the cost of only two stones! White is having none of that though and hepeeps at move 7, threatening to cut at A and destroying some of the potential eye space. But the move atA is slow for both players and if Black plays there he is worried that he will get sealed in by a wide movearound B, so he keeps threatening White with move 8. White cannot allow Black to play the atari on thatstone so, instead of playing A, White extends at move 9.Right image: Black tries to push again with move 1, but White blocks with move 2. Black jumps at thevital point at move 3 and now finally White has the time to play the cut at move 4, capture the trianglemarked stone and atari another Black stone. White 4 is a large move, but Black is only interested in sur-viving and reducing, so he makes good shape with move 5 ensuring his survival and threatening the squaremarked White stones. White jumps at move 6 to strengthen his stones and Black makes even more eye-space for himself with move 7. Black sacrificed at least three stones in the process, but look how much ofWhite’s framework he managed to reduce.
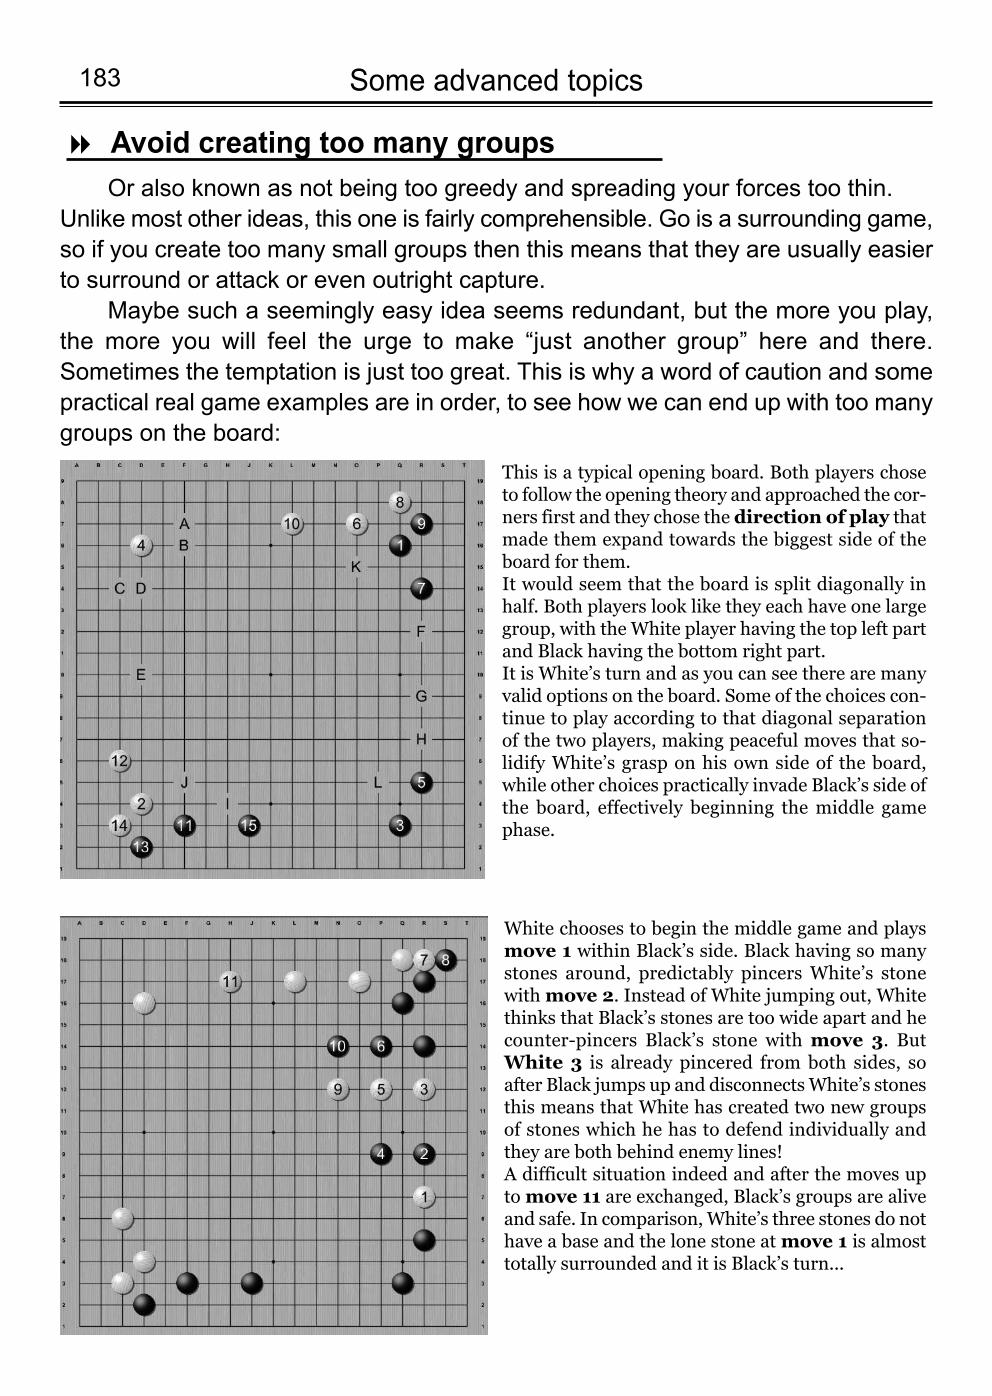
Some advanced topics183
Avoid creating too many groups8
Or also known as not being too greedy and spreading your forces too thin.Unlike most other ideas, this one is fairly comprehensible. Go is a surrounding game,so if you create too many small groups then this means that they are usually easierto surround or attack or even outright capture.
Maybe such a seemingly easy idea seems redundant, but the more you play,the more you will feel the urge to make “just another group” here and there.Sometimes the temptation is just too great. This is why a word of caution and somepractical real game examples are in order, to see how we can end up with too manygroups on the board:
White chooses to begin the middle game and playsmove 1 within Black’s side. Black having so manystones around, predictably pincers White’s stonewith move 2. Instead of White jumping out, Whitethinks that Black’s stones are too wide apart and hecounter-pincers Black’s stone with move 3. ButWhite 3 is already pincered from both sides, soafter Black jumps up and disconnects White’s stonesthis means that White has created two new groupsof stones which he has to defend individually andthey are both behind enemy lines!A difficult situation indeed and after the moves upto move 11 are exchanged, Black’s groups are aliveand safe. In comparison, White’s three stones do nothave a base and the lone stone at move 1 is almosttotally surrounded and it is Black’s turn...
This is a typical opening board. Both players choseto follow the opening theory and approached the cor-ners first and they chose the direction of play thatmade them expand towards the biggest side of theboard for them.It would seem that the board is split diagonally inhalf. Both players look like they each have one largegroup, with the White player having the top left partand Black having the bottom right part. It is White’s turn and as you can see there are manyvalid options on the board. Some of the choices con-tinue to play according to that diagonal separationof the two players, making peaceful moves that so-lidify White’s grasp on his own side of the board,while other choices practically invade Black’s side ofthe board, effectively beginning the middle gamephase.
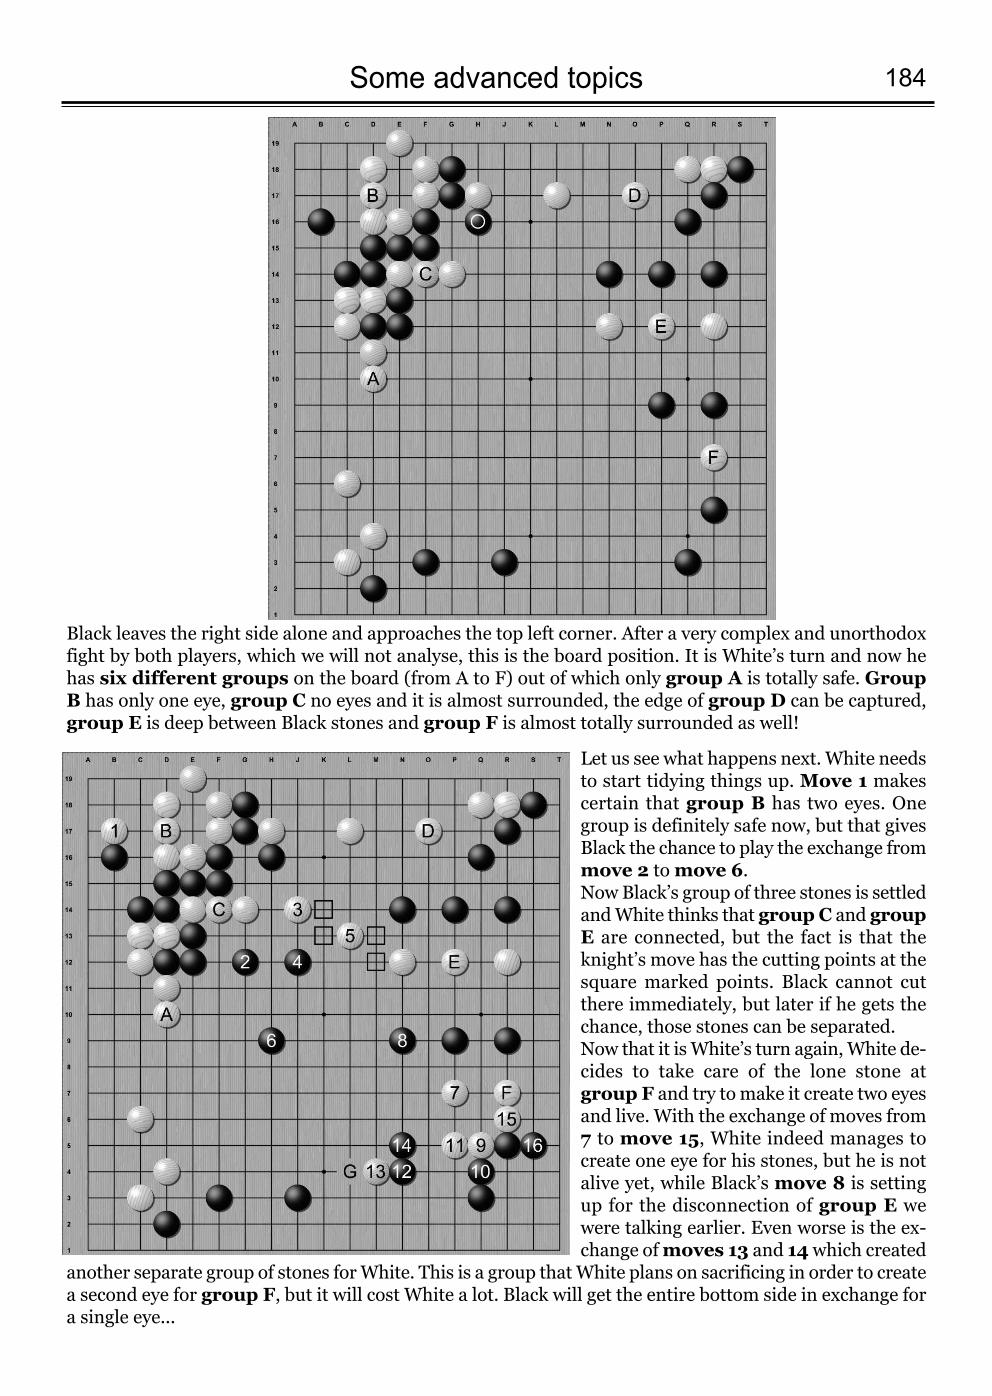
184Some advanced topics
Black leaves the right side alone and approaches the top left corner. After a very complex and unorthodoxfight by both players, which we will not analyse, this is the board position. It is White’s turn and now hehas six different groups on the board (from A to F) out of which only group A is totally safe. GroupB has only one eye, group C no eyes and it is almost surrounded, the edge of group D can be captured,group E is deep between Black stones and group F is almost totally surrounded as well!
Let us see what happens next. White needsto start tidying things up. Move 1 makescertain that group B has two eyes. Onegroup is definitely safe now, but that givesBlack the chance to play the exchange frommove 2 to move 6. Now Black’s group of three stones is settledand White thinks that group C and groupE are connected, but the fact is that theknight’s move has the cutting points at thesquare marked points. Black cannot cutthere immediately, but later if he gets thechance, those stones can be separated. Now that it is White’s turn again, White de-cides to take care of the lone stone atgroup F and try to make it create two eyesand live. With the exchange of moves from7 to move 15, White indeed manages tocreate one eye for his stones, but he is notalive yet, while Black’s move 8 is settingup for the disconnection of group E wewere talking earlier. Even worse is the ex-change of moves 13 and 14which created
another separate group of stones for White. This is a group that White plans on sacrificing in order to createa second eye for group F, but it will cost White a lot. Black will get the entire bottom side in exchange fora single eye...
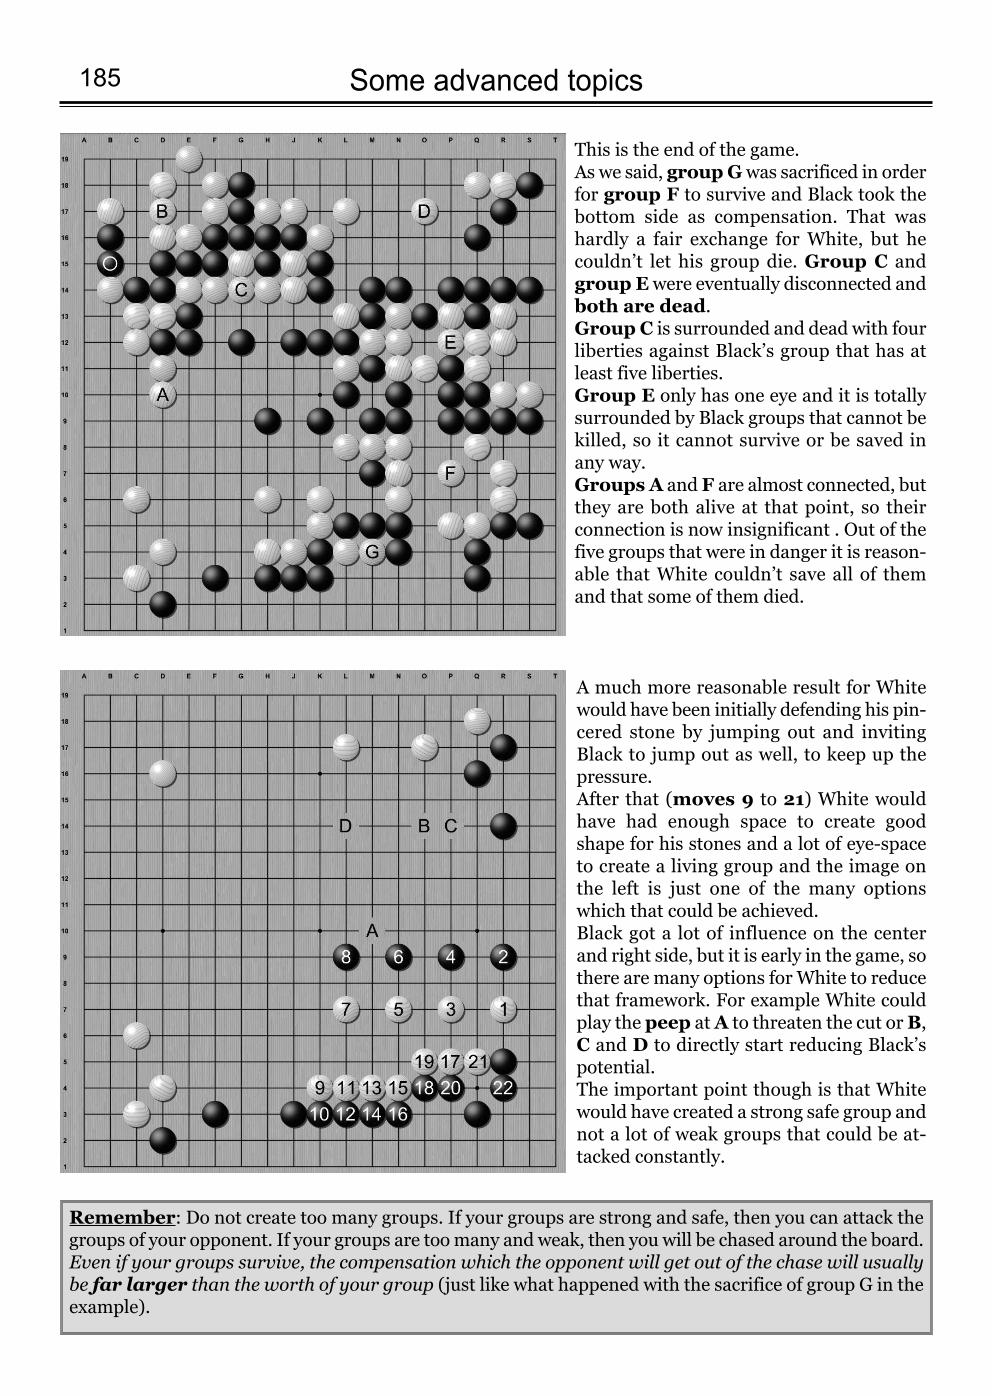
Some advanced topics185
This is the end of the game. As we said, group Gwas sacrificed in orderfor group F to survive and Black took thebottom side as compensation. That washardly a fair exchange for White, but hecouldn’t let his group die. Group C andgroup Ewere eventually disconnected andboth are dead.Group C is surrounded and dead with fourliberties against Black’s group that has atleast five liberties. Group E only has one eye and it is totallysurrounded by Black groups that cannot bekilled, so it cannot survive or be saved inany way. Groups A and F are almost connected, butthey are both alive at that point, so theirconnection is now insignificant . Out of thefive groups that were in danger it is reason-able that White couldn’t save all of themand that some of them died.
Remember: Do not create too many groups. If your groups are strong and safe, then you can attack thegroups of your opponent. If your groups are too many and weak, then you will be chased around the board.Even if your groups survive, the compensation which the opponent will get out of the chase will usuallybe far larger than the worth of your group (just like what happened with the sacrifice of group G in theexample).
A much more reasonable result for Whitewould have been initially defending his pin-cered stone by jumping out and invitingBlack to jump out as well, to keep up thepressure. After that (moves 9 to 21) White wouldhave had enough space to create goodshape for his stones and a lot of eye-spaceto create a living group and the image onthe left is just one of the many optionswhich that could be achieved. Black got a lot of influence on the centerand right side, but it is early in the game, sothere are many options for White to reducethat framework. For example White couldplay the peep at A to threaten the cut or B,C and D to directly start reducing Black’spotential. The important point though is that Whitewould have created a strong safe group andnot a lot of weak groups that could be at-tacked constantly.
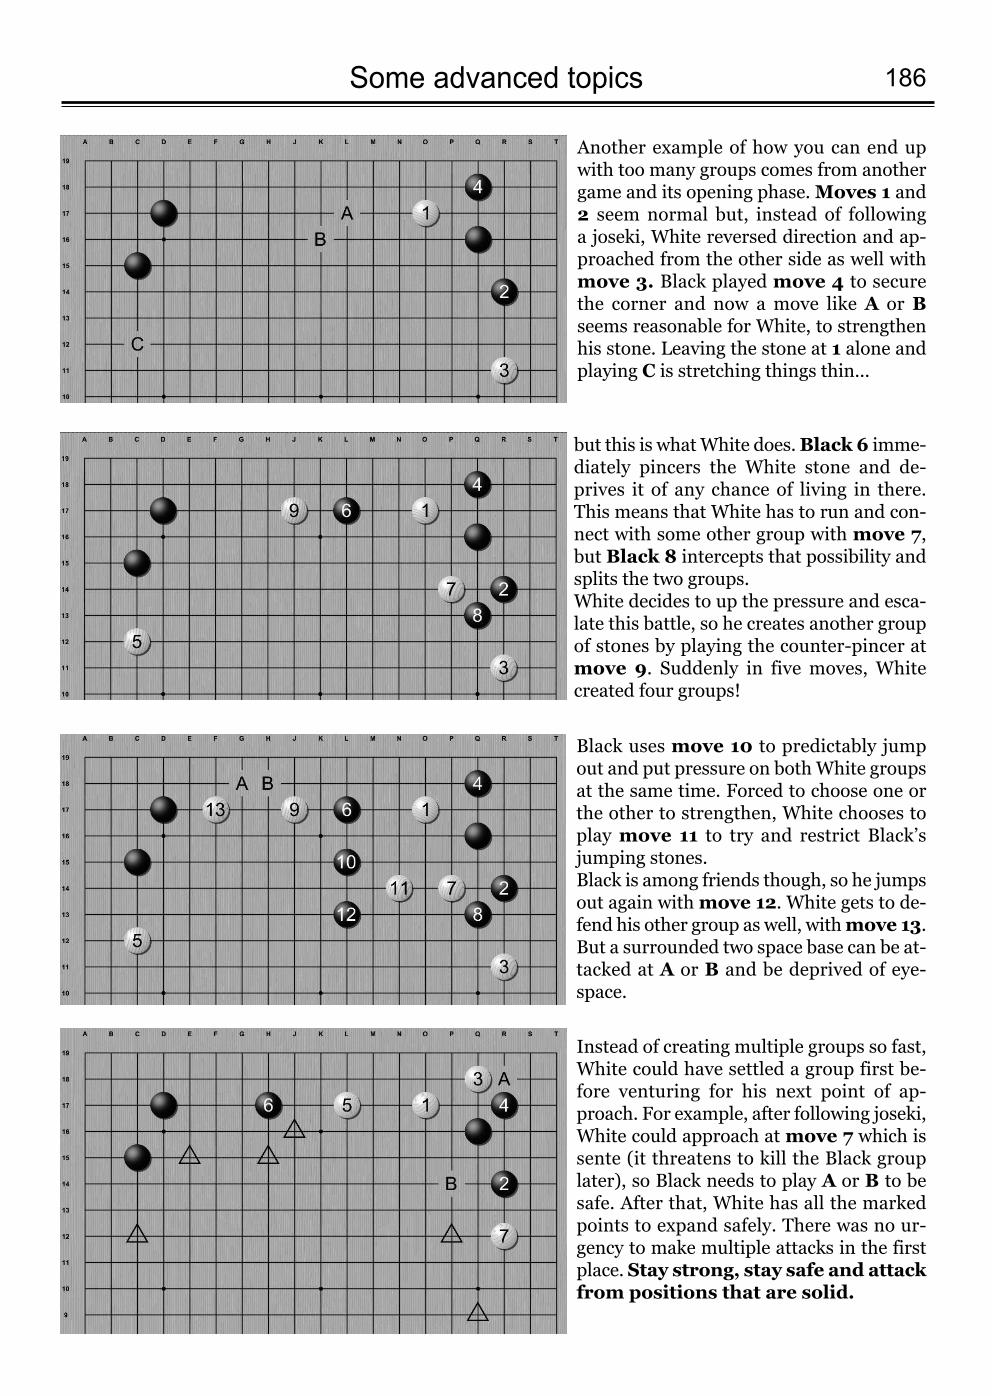
186Some advanced topics
Another example of how you can end upwith too many groups comes from anothergame and its opening phase. Moves 1 and2 seem normal but, instead of following a joseki, White reversed direction and ap-proached from the other side as well withmove 3. Black played move 4 to securethe corner and now a move like A or Bseems reasonable for White, to strengthenhis stone. Leaving the stone at 1 alone andplaying C is stretching things thin...
but this is what White does. Black 6 imme-diately pincers the White stone and de-prives it of any chance of living in there.This means that White has to run and con-nect with some other group with move 7,but Black 8 intercepts that possibility andsplits the two groups.White decides to up the pressure and esca-late this battle, so he creates another groupof stones by playing the counter-pincer atmove 9. Suddenly in five moves, Whitecreated four groups!
Black uses move 10 to predictably jumpout and put pressure on both White groupsat the same time. Forced to choose one orthe other to strengthen, White chooses toplay move 11 to try and restrict Black’sjumping stones. Black is among friends though, so he jumpsout again with move 12. White gets to de-fend his other group as well, with move 13.But a surrounded two space base can be at-tacked at A or B and be deprived of eye-space.
Instead of creating multiple groups so fast,White could have settled a group first be-fore venturing for his next point of ap-proach. For example, after following joseki,White could approach at move 7 which issente (it threatens to kill the Black grouplater), so Black needs to play A or B to besafe. After that, White has all the markedpoints to expand safely. There was no ur-gency to make multiple attacks in the firstplace. Stay strong, stay safe and attackfrom positions that are solid.

Some advanced topics187
Do not reduce your own liberties for no reason8
Last point of this book, but not the least, is the advice to avoid playing movesthat reduce our liberties, without having an actual plan and goal which we want toachieve. Especially in double digit kyu games, just because a gap exists betweentwo stones, a player feels the need to play there, even if there is no chance for a cutto work. This accomplishes nothing, except reducing our own liberties and forcingour opponent to defend and correct a problem in his defenses, practically for free. Itis far better to leave that small problem for later. As the board changes, what isinitially a small source of aji, can become a large threat which can let you mount adevastating attack. Or it might not blossom to be useful at all. Either way it is better to leave behind small problems in your opponent’s defensesto possibly exploit them later, than forcibly playing at every little small opening tryingto wedge your stones in places where they cannot possibly go.So, how does this idea look on the board? There are usually two cases, one inwhich you spend moves to help your opponent fix his shape and the second, whichis more serious, the case where you reduce your liberties and place your own groupsin danger. Let us start with the less severe case:
You may remember this game from the bottom right example on killing the J group in pages 167-169.This is the board a lot of moves later and it is White’s turn to play. As you can see there is a series of ataristhat can be played by White with stones A, B and C. Placing opposing stones in atari is always a tantalisingprospect, but in this case White doesn’t really gain anything by filling liberties to play those ataris. Whitecannot capture any stone that will give him any meaningful advantage and playing the ataris will help Blackfix his hanging connections and eradicate any aji in the area. Let us see why...
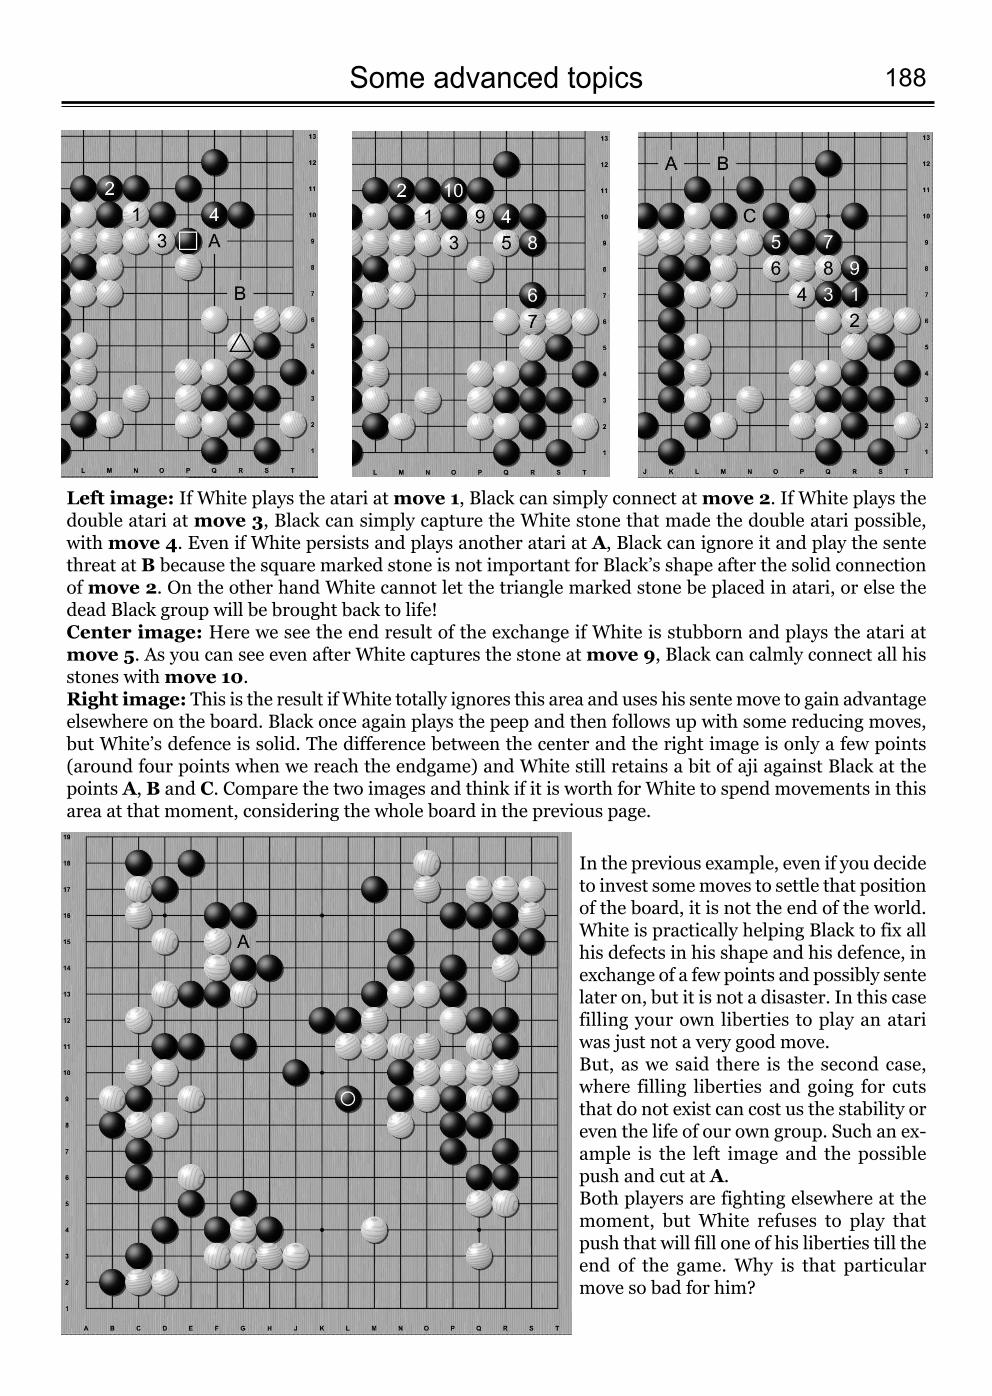
188Some advanced topics
Left image: If White plays the atari at move 1, Black can simply connect at move 2. If White plays thedouble atari at move 3, Black can simply capture the White stone that made the double atari possible,with move 4. Even if White persists and plays another atari at A, Black can ignore it and play the sentethreat at B because the square marked stone is not important for Black’s shape after the solid connectionof move 2. On the other hand White cannot let the triangle marked stone be placed in atari, or else thedead Black group will be brought back to life!Center image: Here we see the end result of the exchange if White is stubborn and plays the atari atmove 5. As you can see even after White captures the stone at move 9, Black can calmly connect all hisstones with move 10.Right image: This is the result if White totally ignores this area and uses his sente move to gain advantageelsewhere on the board. Black once again plays the peep and then follows up with some reducing moves,but White’s defence is solid. The difference between the center and the right image is only a few points(around four points when we reach the endgame) and White still retains a bit of aji against Black at thepoints A, B and C. Compare the two images and think if it is worth for White to spend movements in thisarea at that moment, considering the whole board in the previous page.
In the previous example, even if you decideto invest some moves to settle that positionof the board, it is not the end of the world.White is practically helping Black to fix allhis defects in his shape and his defence, inexchange of a few points and possibly sentelater on, but it is not a disaster. In this casefilling your own liberties to play an atariwas just not a very good move.But, as we said there is the second case,where filling liberties and going for cutsthat do not exist can cost us the stability oreven the life of our own group. Such an ex-ample is the left image and the possiblepush and cut at A.Both players are fighting elsewhere at themoment, but White refuses to play thatpush that will fill one of his liberties till theend of the game. Why is that particularmove so bad for him?
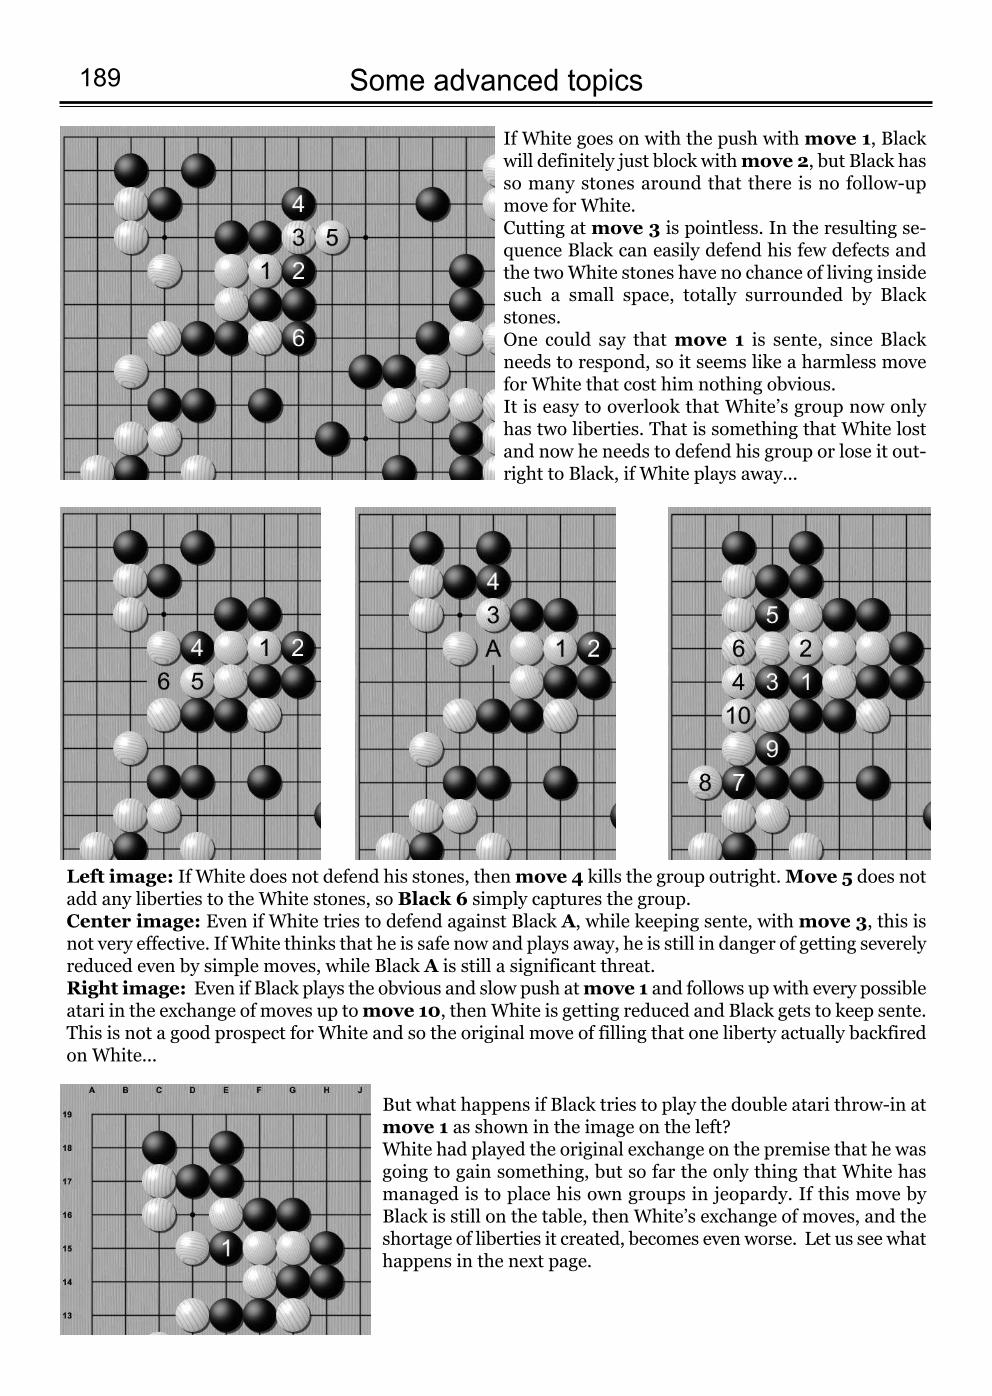
Some advanced topics189
Left image: If White does not defend his stones, then move 4 kills the group outright. Move 5 does notadd any liberties to the White stones, so Black 6 simply captures the group. Center image: Even if White tries to defend against Black A, while keeping sente, with move 3, this isnot very effective. If White thinks that he is safe now and plays away, he is still in danger of getting severelyreduced even by simple moves, while Black A is still a significant threat.Right image: Even if Black plays the obvious and slow push at move 1 and follows up with every possibleatari in the exchange of moves up to move 10, then White is getting reduced and Black gets to keep sente.This is not a good prospect for White and so the original move of filling that one liberty actually backfiredon White...
If White goes on with the push with move 1, Blackwill definitely just block with move 2, but Black hasso many stones around that there is no follow-upmove for White. Cutting at move 3 is pointless. In the resulting se-quence Black can easily defend his few defects andthe two White stones have no chance of living insidesuch a small space, totally surrounded by Blackstones. One could say that move 1 is sente, since Blackneeds to respond, so it seems like a harmless movefor White that cost him nothing obvious. It is easy to overlook that White’s group now onlyhas two liberties. That is something that White lostand now he needs to defend his group or lose it out-right to Black, if White plays away...
But what happens if Black tries to play the double atari throw-in atmove 1 as shown in the image on the left? White had played the original exchange on the premise that he wasgoing to gain something, but so far the only thing that White hasmanaged is to place his own groups in jeopardy. If this move byBlack is still on the table, then White’s exchange of moves, and theshortage of liberties it created, becomes even worse. Let us see whathappens in the next page.
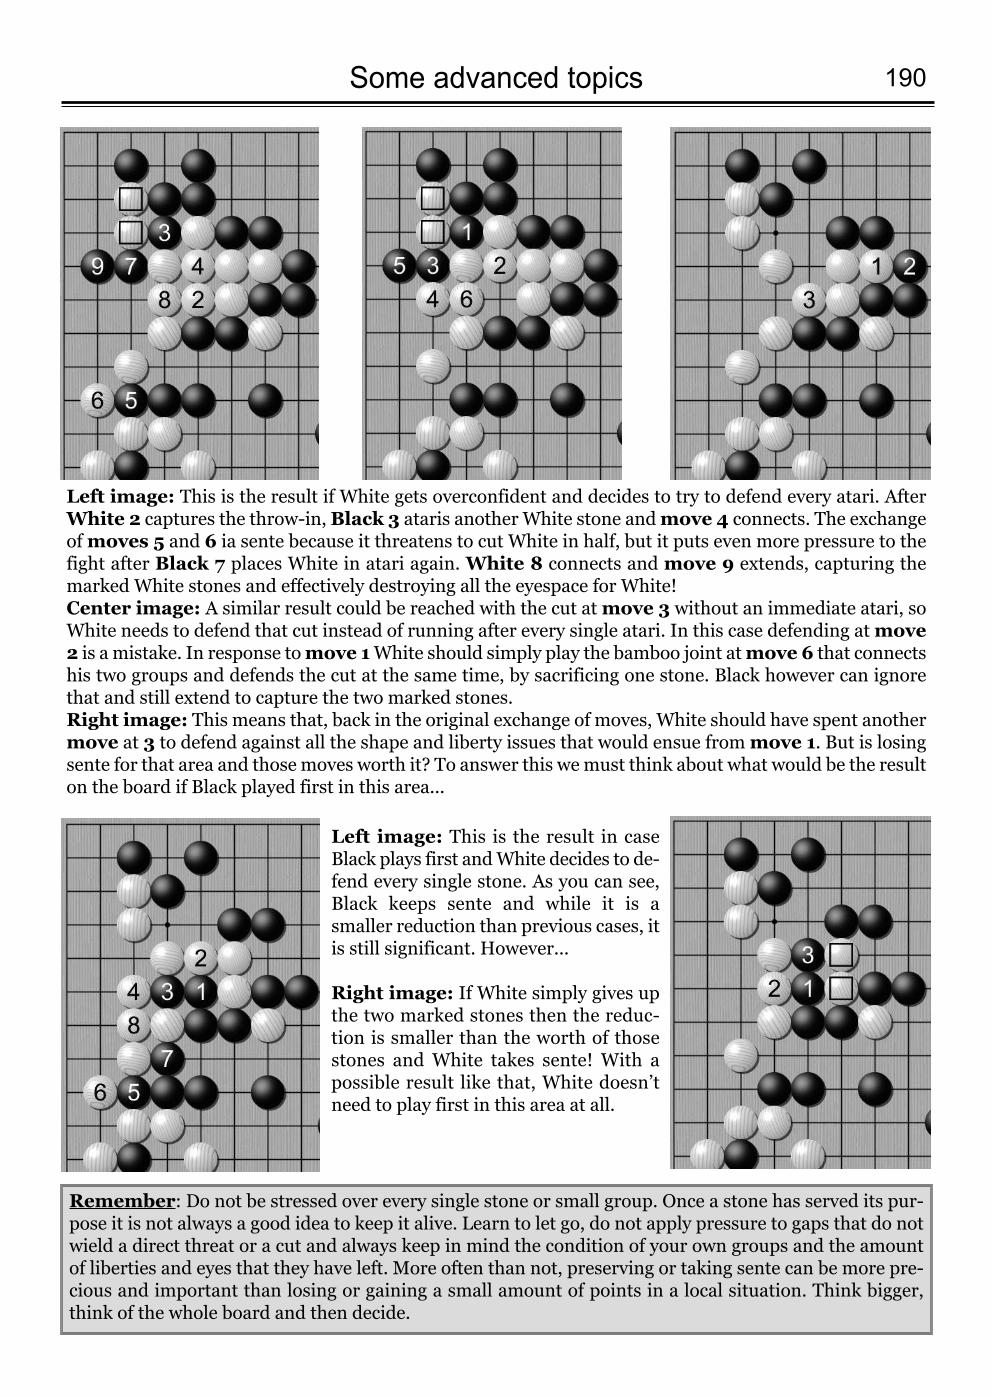
190Some advanced topics
Left image: This is the result if White gets overconfident and decides to try to defend every atari. AfterWhite 2 captures the throw-in, Black 3 ataris another White stone and move 4 connects. The exchangeof moves 5 and 6 ia sente because it threatens to cut White in half, but it puts even more pressure to thefight after Black 7 places White in atari again. White 8 connects and move 9 extends, capturing themarked White stones and effectively destroying all the eyespace for White!Center image: A similar result could be reached with the cut at move 3 without an immediate atari, soWhite needs to defend that cut instead of running after every single atari. In this case defending at move2 is a mistake. In response to move 1White should simply play the bamboo joint at move 6 that connectshis two groups and defends the cut at the same time, by sacrificing one stone. Black however can ignorethat and still extend to capture the two marked stones.Right image: This means that, back in the original exchange of moves, White should have spent anothermove at 3 to defend against all the shape and liberty issues that would ensue from move 1. But is losingsente for that area and those moves worth it? To answer this we must think about what would be the resulton the board if Black played first in this area...
Left image: This is the result in caseBlack plays first and White decides to de-fend every single stone. As you can see,Black keeps sente and while it is asmaller reduction than previous cases, itis still significant. However...
Right image: If White simply gives upthe two marked stones then the reduc-tion is smaller than the worth of thosestones and White takes sente! With apossible result like that, White doesn’tneed to play first in this area at all.
Remember: Do not be stressed over every single stone or small group. Once a stone has served its pur-pose it is not always a good idea to keep it alive. Learn to let go, do not apply pressure to gaps that do notwield a direct threat or a cut and always keep in mind the condition of your own groups and the amountof liberties and eyes that they have left. More often than not, preserving or taking sente can be more pre-cious and important than losing or gaining a small amount of points in a local situation. Think bigger,think of the whole board and then decide.
191
Epilogue and what is coming next8
This is the end of this book, which contains most of my Go knowledge as asingle digit kyu. Of course learning, for both you and me, will never stop, but it doesn’tneed to be an arduous procedure. The main goal for us amateur players is to getbetter and have fun while playing our games.
For some people that might mean more and more studying. Others might takeit easy and try to learn as they play. Whichever you might choose, remember thatthe basics described within this book are by no means exhausted as topics.
There are so many things to learn, even in basic and simple concepts. Duringthe many months that it took me to write this book I reduced my own studying to thebare minimum in order to focus on rearranging what I already knew and explain themas well as I could. Revisiting those basic concepts actually made me a betterplayer. When I began writing I was 4-5 kyu and had struck a small wall. Duringwriting I finally broke a small hole in the barrier and rose to 3 kyu.
Now I am focused on challenging dan level players in DGS and playing againstthem constantly. I am still losing all those games, but I am having fun and I feel likeI am getting better slowly, but surely, just by the re-evaluation of my knowledge thatthose better players are forcing me to do, in order to present an actual challenge forthem.
In that regard, now that you finished the book, I would advise you to go backand read again the chapter with the review of an actual game. I guarantee you thatyou will see a lot more into it than when you started reading this book. Of course,despite having learnt and understood something, that doesn’t mean that you canapply it easily yourself. Play Go, have fun and try to experiment with what youlearned and what you understand of the game. Sometimes, immediately after playinga move, you will regret it and see your mistake. Do not worry about that, it is part ofthe fun. I found myself in a very embarrassing situation where I was writing anexample on life and death, finished the corresponding pages and right the next day I made a mistake in a very similar position and died. It happens.
I hope that you found this book helpful. I am confident that I will get better aswell, both in Go and in writing, and it is my intent to make more books in the future.Books that are helpful, books that are free, books that can be read in your ownnative language. That is my vision. I know that it can be done, especially with yourhelp.
If I can get to one dan and I can write a book to help you all achieve it as well? That is my dream. I hope that it will happen.
Thank you for your time and patience
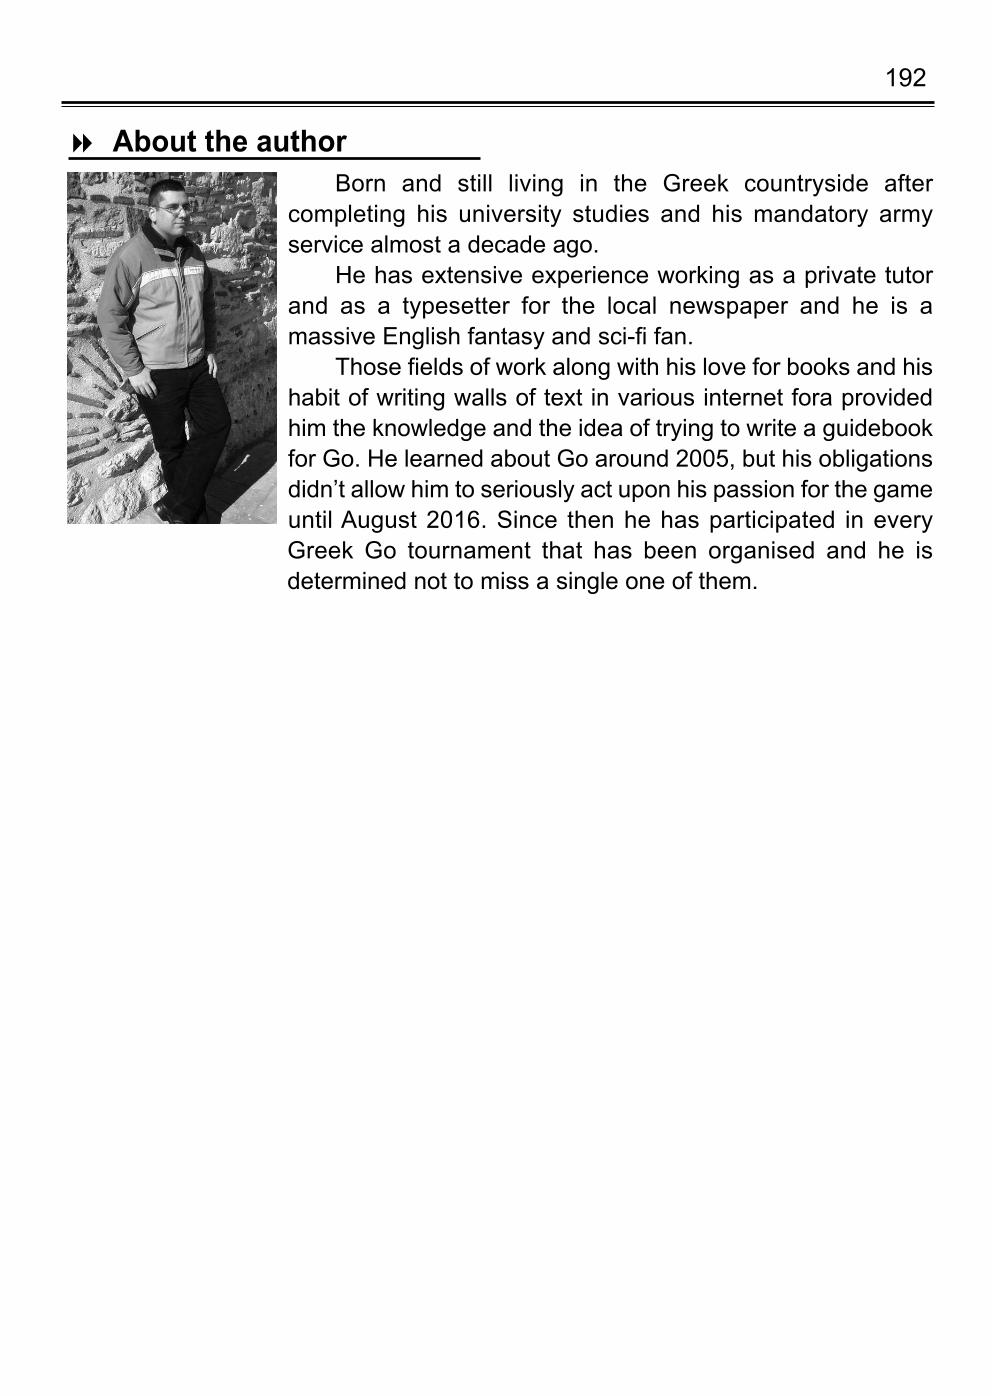
192
Born and still living in the Greek countryside aftercompleting his university studies and his mandatory armyservice almost a decade ago.
He has extensive experience working as a private tutorand as a typesetter for the local newspaper and he is amassive English fantasy and sci-fi fan.
Those fields of work along with his love for books and hishabit of writing walls of text in various internet fora providedhim the knowledge and the idea of trying to write a guidebookfor Go. He learned about Go around 2005, but his obligationsdidn’t allow him to seriously act upon his passion for the gameuntil August 2016. Since then he has participated in everyGreek Go tournament that has been organised and he isdetermined not to miss a single one of them.
About the author8
ISBN 978-618-00-0799-3
![arXiv:1911.06755v1 [cond-mat.mes-hall] 15 Nov 2019](https://img.dokumen.tips/doc/110x75/633d1d80b3b8cf377905763a/arxiv191106755v1-cond-matmes-hall-15-nov-2019.jpg)

![arXiv:2202.05409v1 [cond-mat.mtrl-sci] 11 Feb 2022](https://img.dokumen.tips/doc/110x75/633da2524b474c0bdb0d990a/arxiv220205409v1-cond-matmtrl-sci-11-feb-2022.jpg)
![arXiv:1204.4126v1 [cond-mat.str-el] 18 Apr 2012](https://img.dokumen.tips/doc/110x75/633f4b72c03de4a9aa074efa/arxiv12044126v1-cond-matstr-el-18-apr-2012.jpg)

![arXiv:2101.00268v2 [cond-mat.str-el] 17 Apr 2021](https://img.dokumen.tips/doc/110x75/633d3a2bb8f945bd7407a6bc/arxiv210100268v2-cond-matstr-el-17-apr-2021.jpg)


![arXiv:1704.01138v1 [cond-mat.mtrl-sci] 4 Apr 2017](https://img.dokumen.tips/doc/110x75/6334498d3108fad7760f72bb/arxiv170401138v1-cond-matmtrl-sci-4-apr-2017.jpg)

![arXiv:2112.07604v1 [cond-mat.str-el] 14 Dec 2021](https://img.dokumen.tips/doc/110x75/633e736ecb34155943069a08/arxiv211207604v1-cond-matstr-el-14-dec-2021.jpg)
![arXiv:2109.10374v1 [cond-mat.soft] 21 Sep 2021](https://img.dokumen.tips/doc/110x75/6351d48b6d21fafbd9023299/arxiv210910374v1-cond-matsoft-21-sep-2021.jpg)
![arXiv:2011.02811v2 [cond-mat.soft] 24 Nov 2020](https://img.dokumen.tips/doc/110x75/632597cee491bcb36c0a6095/arxiv201102811v2-cond-matsoft-24-nov-2020.jpg)
![arXiv:2106.10845v1 [cond-mat.mes-hall] 21 Jun 2021](https://img.dokumen.tips/doc/110x75/633f224746cc250efb0d6da0/arxiv210610845v1-cond-matmes-hall-21-jun-2021.jpg)
![arXiv:1901.05659v2 [cond-mat.soft] 9 Jul 2019](https://img.dokumen.tips/doc/110x75/63196900c51d6b41aa046676/arxiv190105659v2-cond-matsoft-9-jul-2019.jpg)


![arXiv:1901.07359v1 [cond-mat.soft] 10 Jan 2019](https://img.dokumen.tips/doc/110x75/633ce532a16a13fe71056c99/arxiv190107359v1-cond-matsoft-10-jan-2019.jpg)
![arXiv:1904.01403v1 [cond-mat.soft] 2 Apr 2019](https://img.dokumen.tips/doc/110x75/631918184cd7b3442408e37a/arxiv190401403v1-cond-matsoft-2-apr-2019.jpg)
![arXiv:2201.07578v2 [cond-mat.mes-hall] 12 Apr 2022](https://img.dokumen.tips/doc/110x75/633d7eb70ed447799e006f41/arxiv220107578v2-cond-matmes-hall-12-apr-2022.jpg)

![arXiv:2103.11005v2 [cond-mat.soft] 5 Oct 2021](https://img.dokumen.tips/doc/110x75/6320248e1d045ece4b011027/arxiv210311005v2-cond-matsoft-5-oct-2021.jpg)

![arXiv:1902.06219v2 [cond-mat.soft] 6 May 2019](https://img.dokumen.tips/doc/110x75/632531df5c2c3bbfa80312b5/arxiv190206219v2-cond-matsoft-6-may-2019.jpg)
