Embed Size (px)
Citation preview

CloudOYE CDNUSER MANUAL
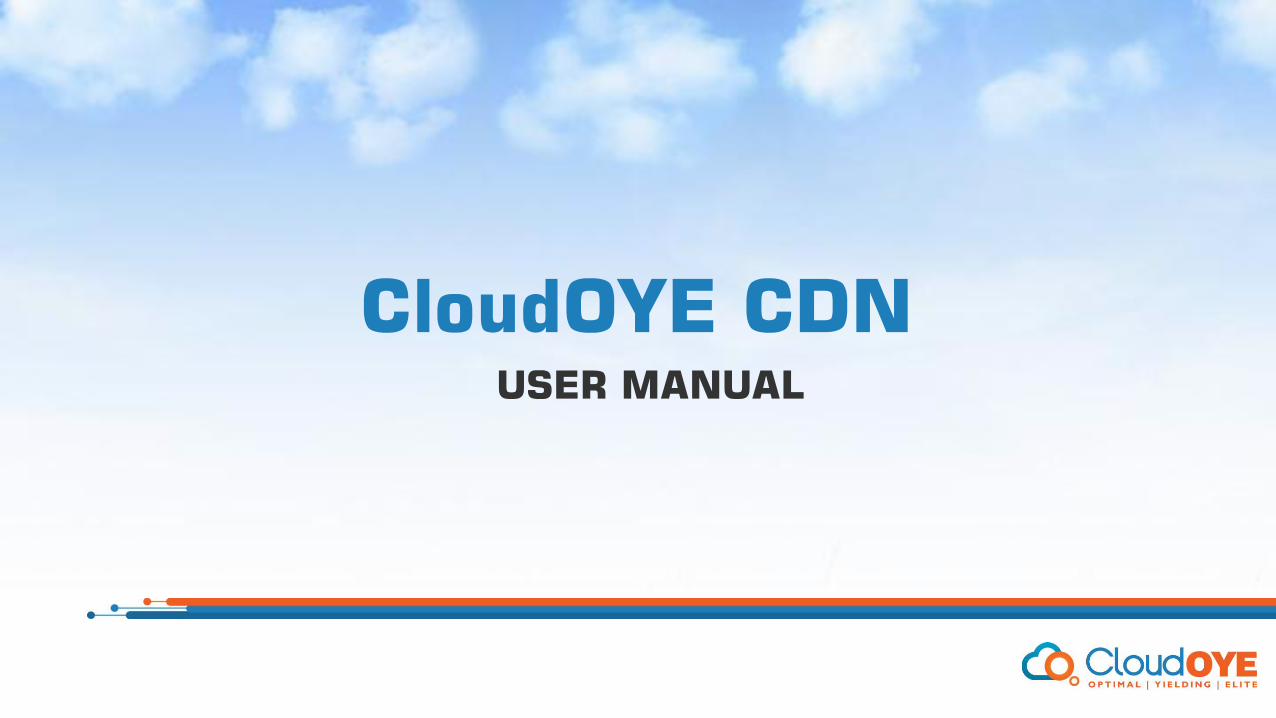
Password - Based AccessLogon to http://mycloud.cloudoye.com.Enter your Username & Password
In case, you have forgotten your password,click „Forgot your password „ to request a new one.

INSTRUCTIONS TO CREATE
CloudOYE CDN Resource

Once you have entered your credentials successfully,you’ll get to see your dashboard.
1. Click „Resources‟ given in the left hand side panel of your dashboard

You‟ll be redirected to a screen „CDN Resources‟

Click CDN Resource Wizard on the right hand side of the panel of your dashboard.
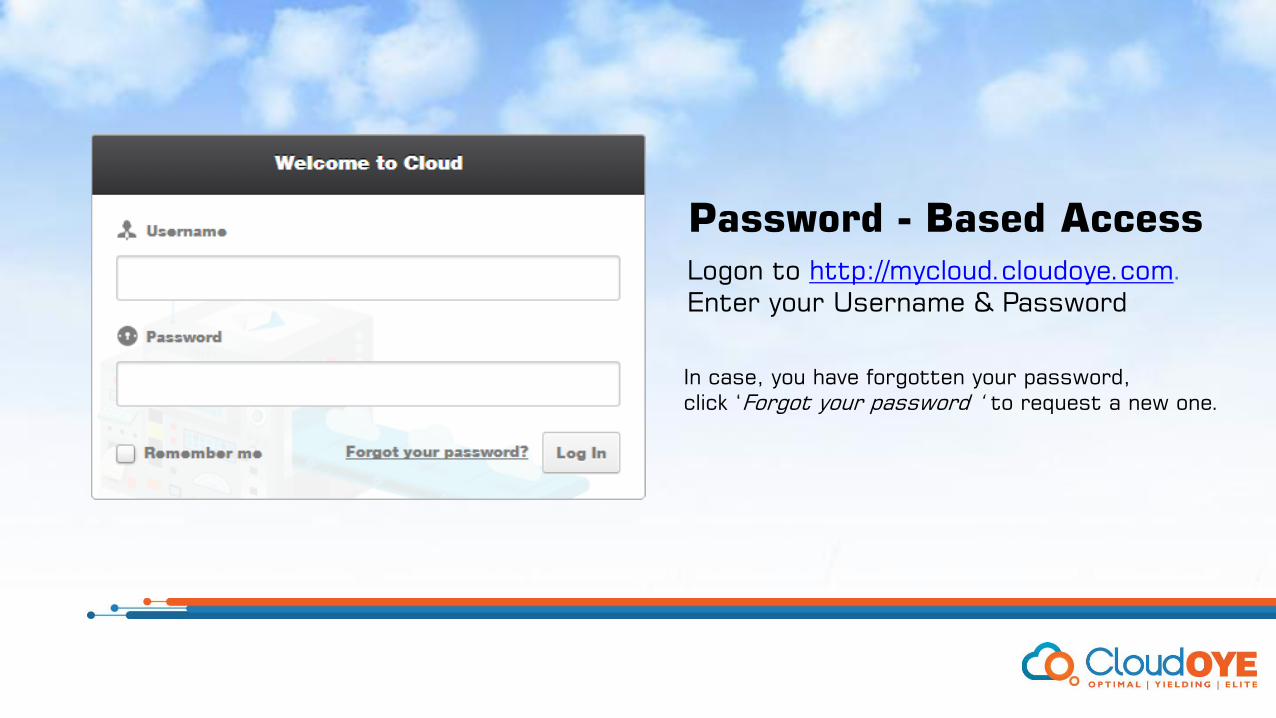
TYPE SELECT
Now, create your
CloudOYE CDN Resource in 4 easy steps
1PROPERTIES
2EDGE
LOCATIONS
3ADVANCED SETTINGS
4
STEP1
TYPE SELECT
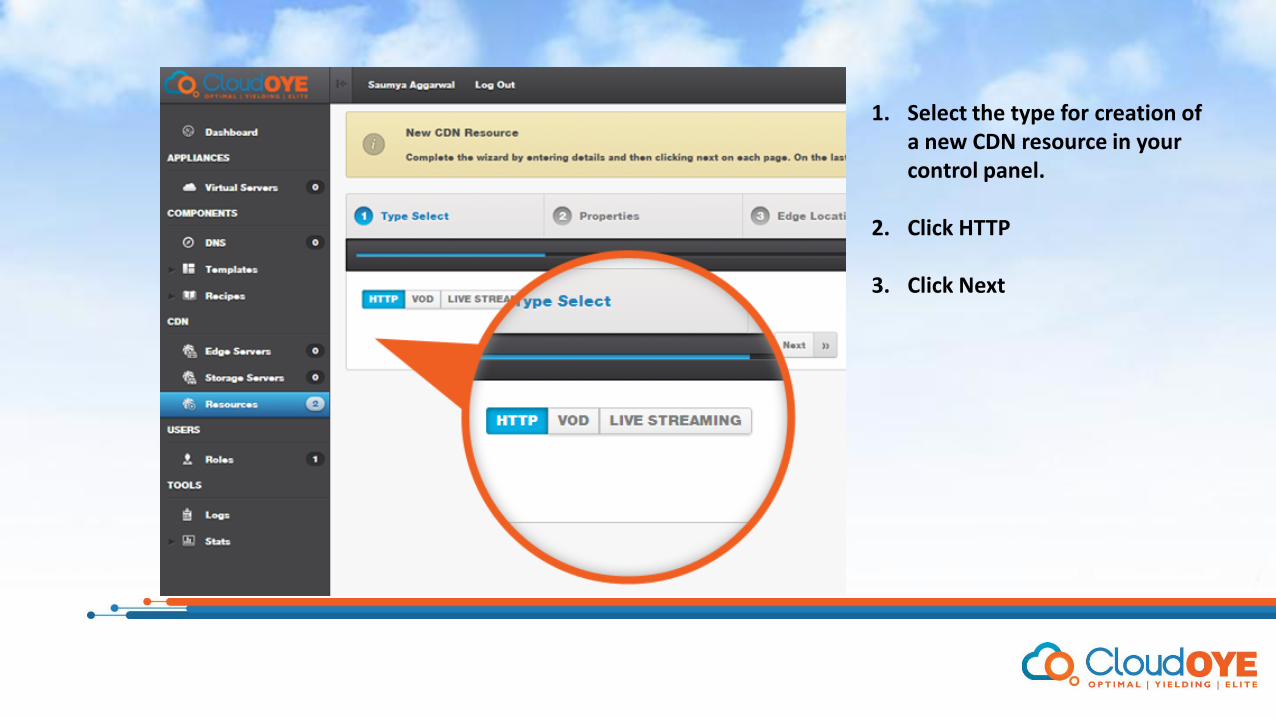
1. Select the type for creation of a new CDN resource in your control panel.
2. Click HTTP
3. Click Next
STEP2
CREATE PROPERTIES

Now, fill in:
1. CDN Hostname: Enter your domain name, i.e. the URL of your website. For e.g. www. cloudoye.net
2. Enable SSL: SSL is optional. Drag the bar to enable it, else leave it as it is.
3. Content Origin: It is by default set on PULL, as you‟re required to pull the data from multiple locations during CDN resource creation
4. Origins: Type in your website‟s IP address, if you‟re using more than one origin. (You site should remain the same as your domain name entered above)
5. Click Next
Note: Please type the full hostname and ensure that it does not end with „r.worldssl.net‟, otherwise SSL will be enabled automatically.

STEP3
Edge Locations
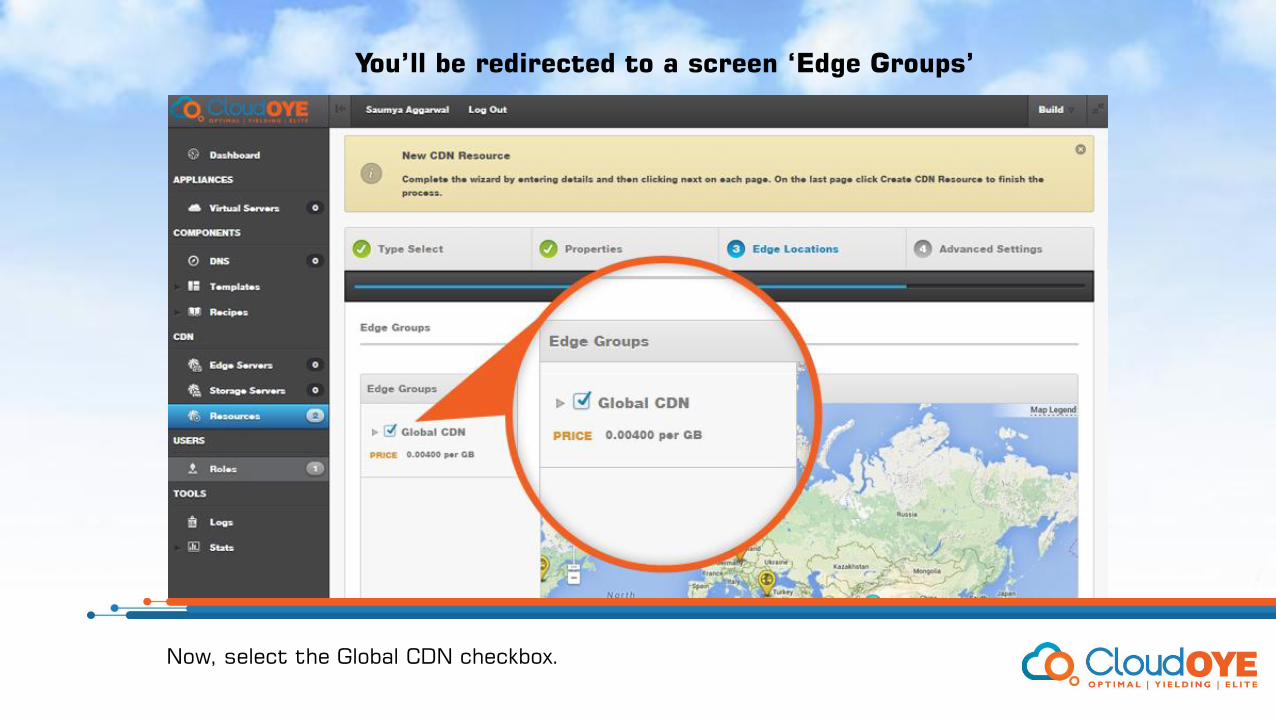
You’ll be redirected to a screen ‘Edge Groups’
Now, select the Global CDN checkbox.
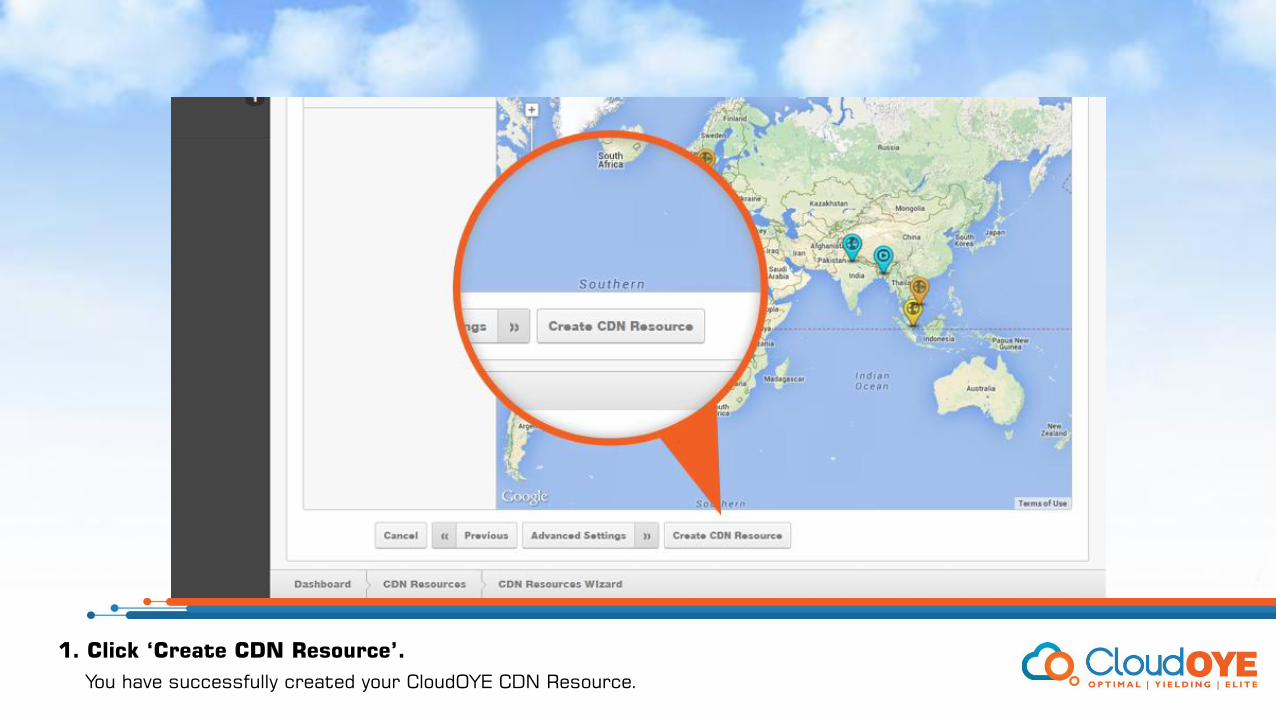
1. Click ‘Create CDN Resource’.
You have successfully created your CloudOYE CDN Resource.
How to edit the settings of your
CDN Resource
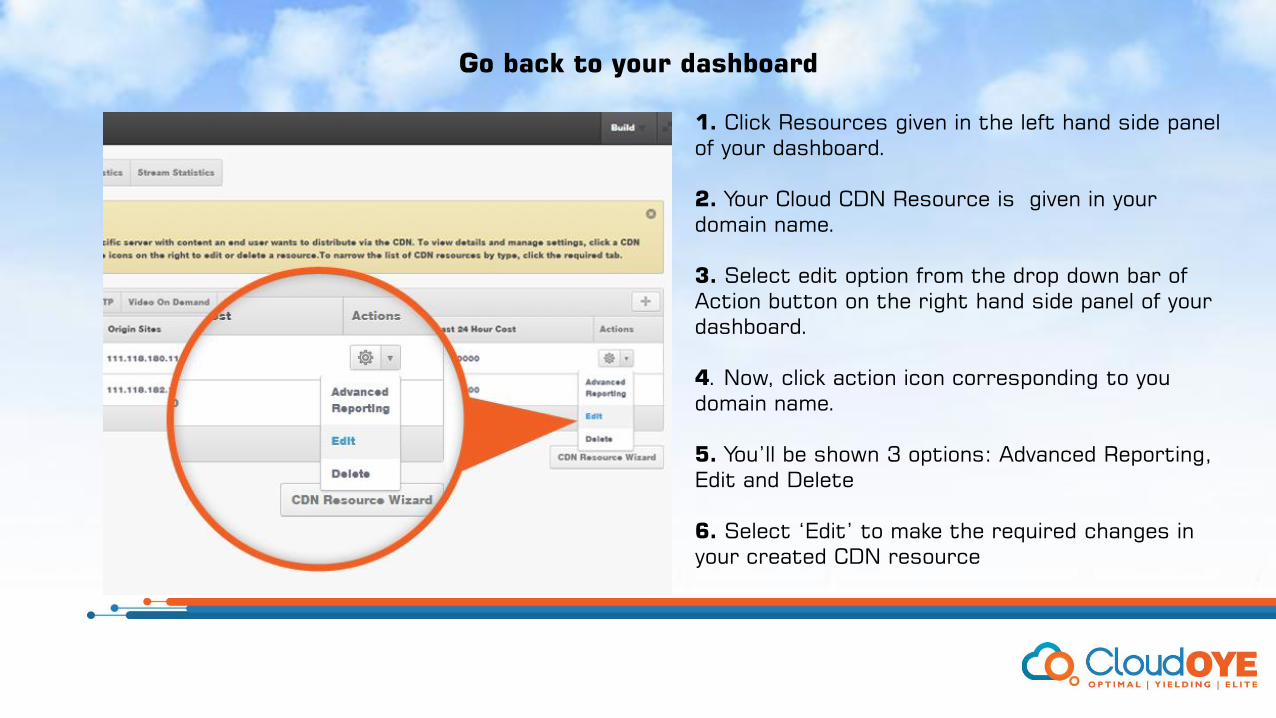
1. Click Resources given in the left hand side panel of your dashboard.
2. Your Cloud CDN Resource is given in your domain name.
3. Select edit option from the drop down bar of Action button on the right hand side panel of your dashboard.
4. Now, click action icon corresponding to you domain name.
5. You‟ll be shown 3 options: Advanced Reporting, Edit and Delete
6. Select „Edit‟ to make the required changes in your created CDN resource
Go back to your dashboard
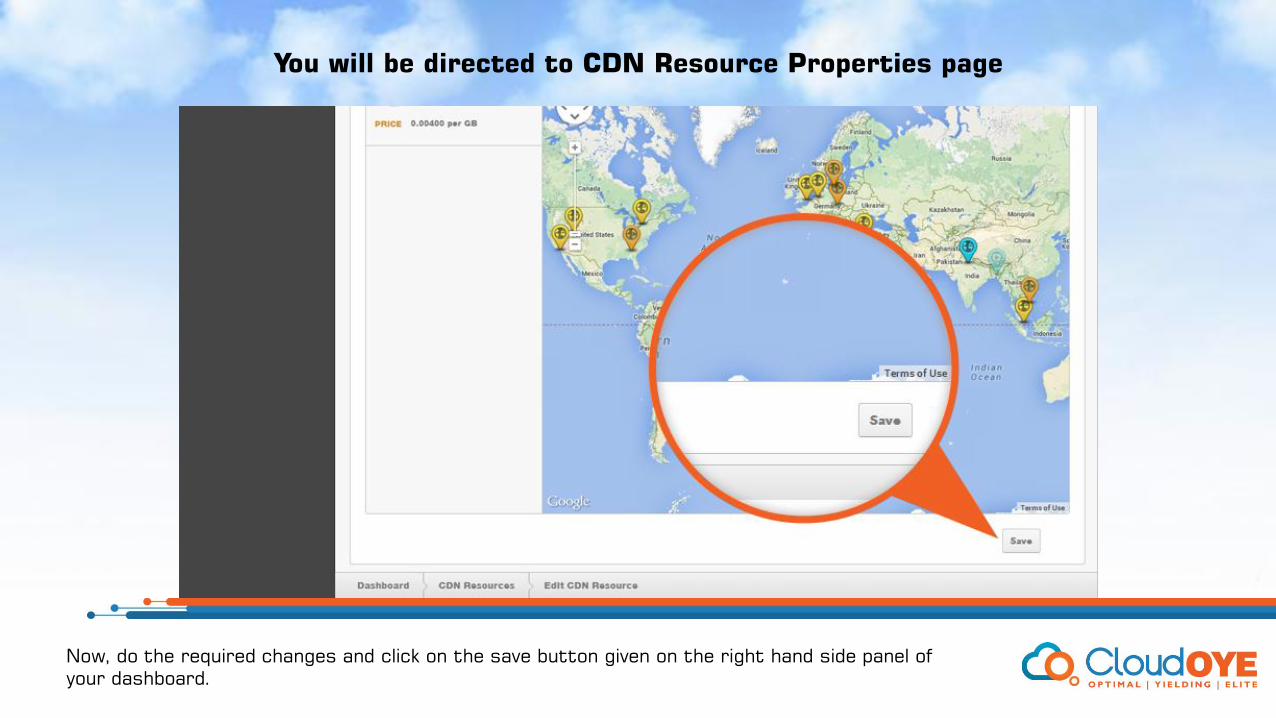
You will be directed to CDN Resource Properties page
Now, do the required changes and click on the save button given on the right hand side panel of your dashboard.
How to check the advanced reporting of your
CDN Resource

1. Click Resources given in the left hand side panel of your dashboard.
2. Your Cloud CDN Resource is given in your domain name.
3. Select edit option from the drop down bar of Action button on the right hand side panel of your dashboard.
4. Now, click action icon corresponding to you domain name.
5. You‟ll be shown 3 options: Advanced Reporting, Edit and Delete
6. Select „Advanced Reporting‟ to check advanced reporting of your CDN Resources.
Go back to your dashboard

You will be directed to Advanced Reporting page
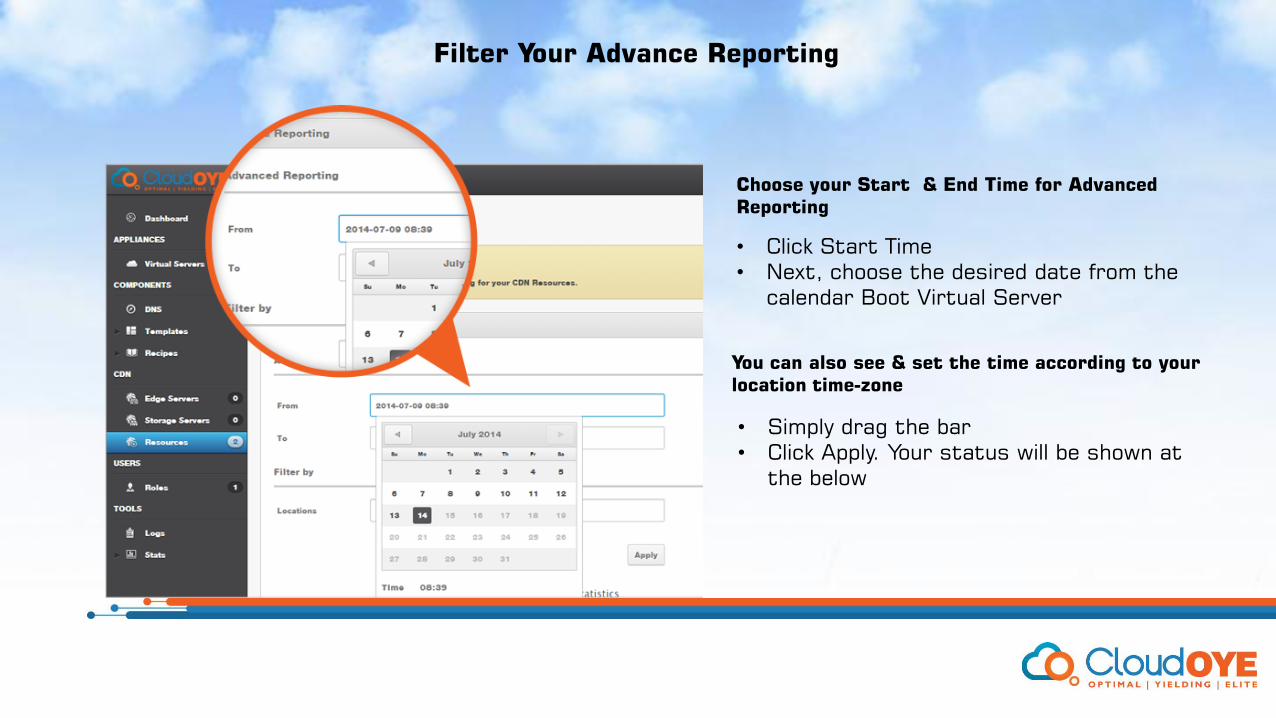
Choose your Start & End Time for AdvancedReporting
Filter Your Advance Reporting
• Click Start Time• Next, choose the desired date from the
calendar Boot Virtual Server
You can also see & set the time according to yourlocation time-zone
• Simply drag the bar• Click Apply. Your status will be shown at
the below
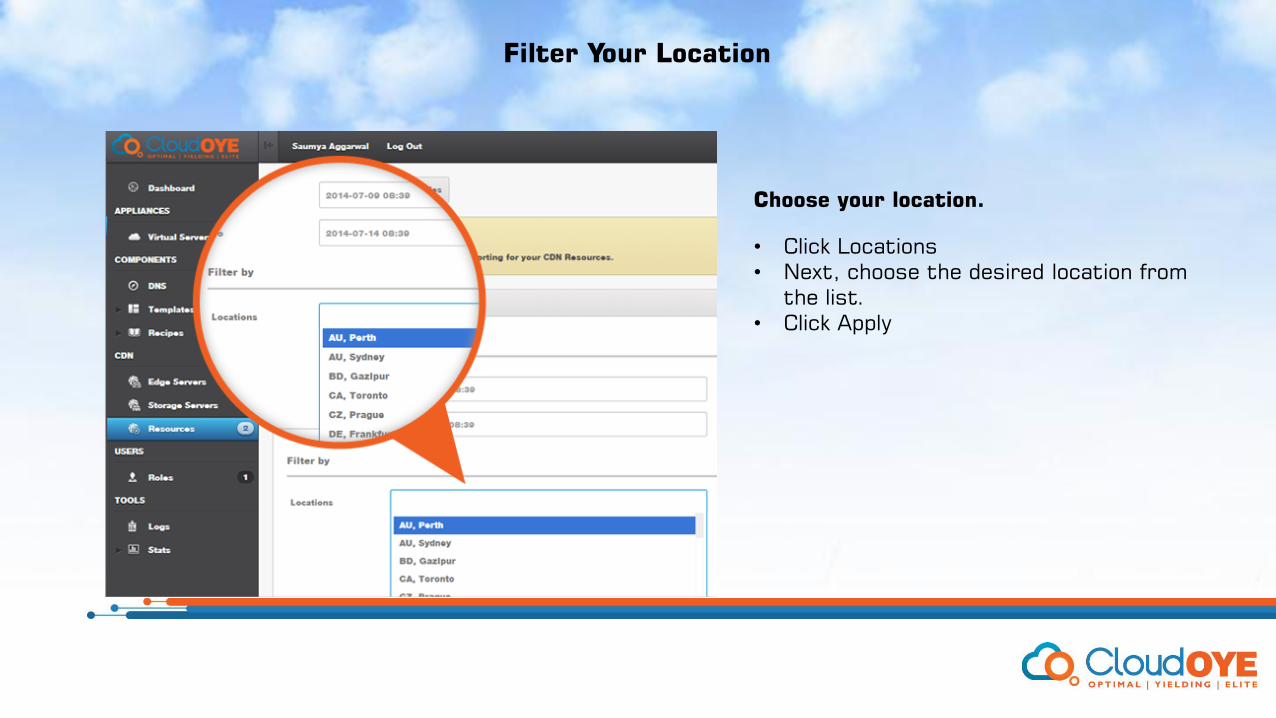
Choose your location.
Filter Your Location
• Click Locations • Next, choose the desired location from
the list.• Click Apply

You will get information related to bandwidth and cache utilizationof selected time frame
How to perform website
CDN integration?
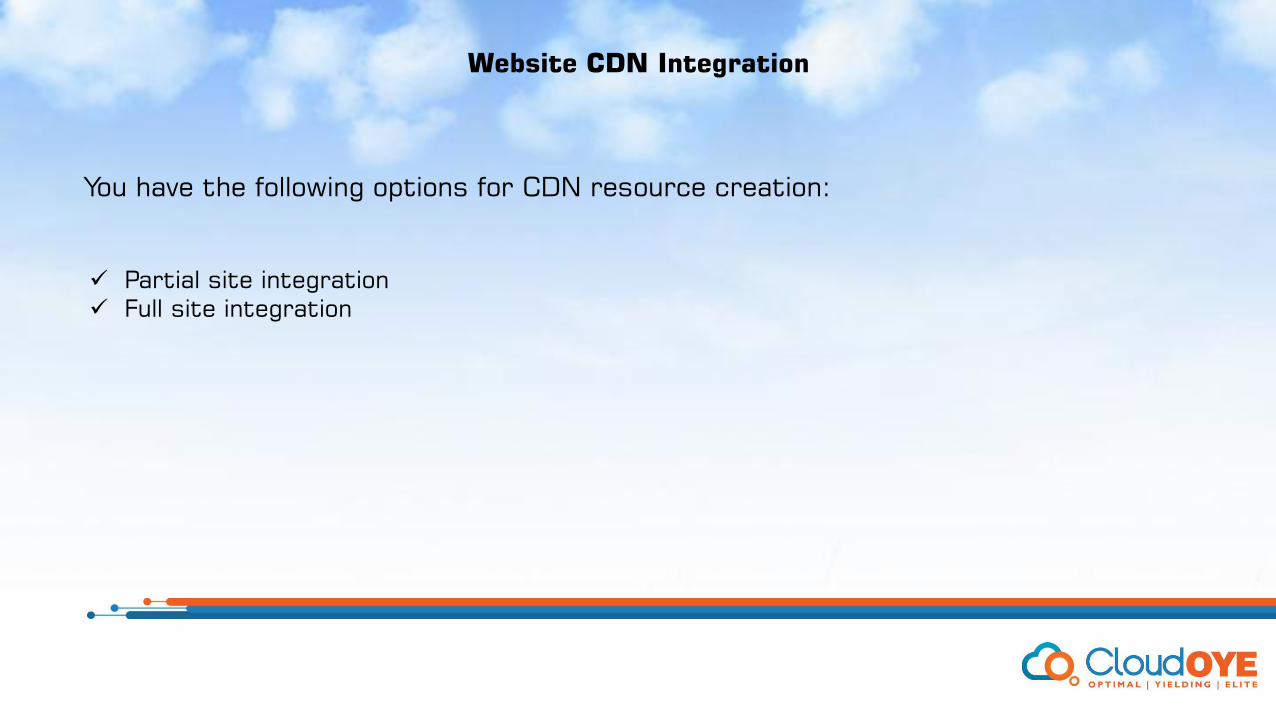
Website CDN Integration
You have the following options for CDN resource creation:
Partial site integration Full site integration
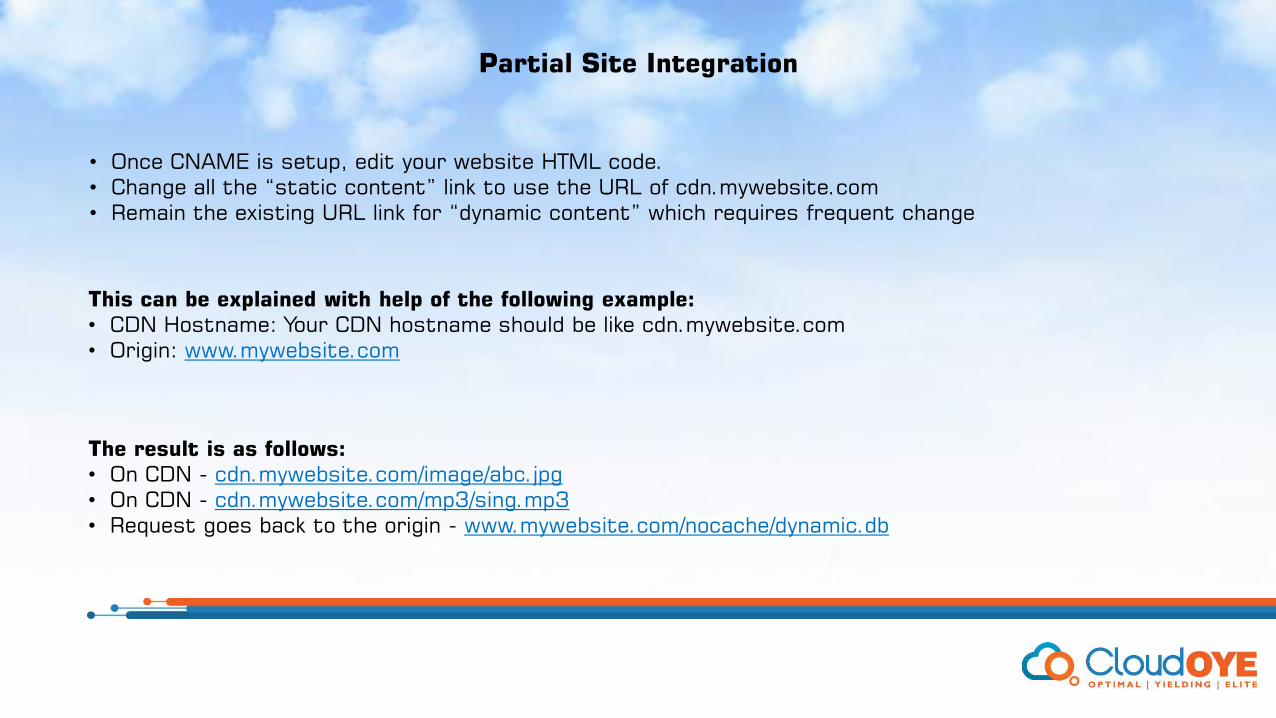
Partial Site Integration
• Once CNAME is setup, edit your website HTML code.• Change all the “static content” link to use the URL of cdn.mywebsite.com• Remain the existing URL link for “dynamic content” which requires frequent change
This can be explained with help of the following example:• CDN Hostname: Your CDN hostname should be like cdn.mywebsite.com• Origin: www.mywebsite.com
The result is as follows:• On CDN - cdn.mywebsite.com/image/abc.jpg• On CDN - cdn.mywebsite.com/mp3/sing.mp3• Request goes back to the origin - www.mywebsite.com/nocache/dynamic.db
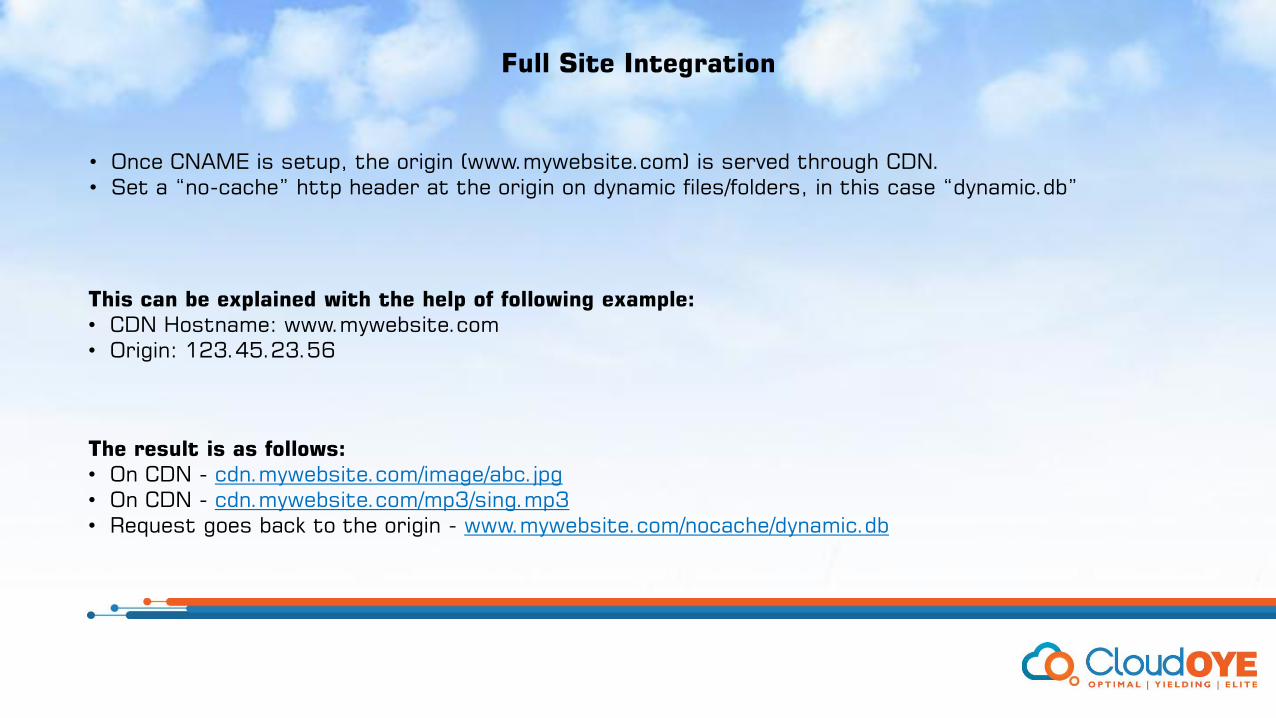
Full Site Integration
• Once CNAME is setup, the origin (www.mywebsite.com) is served through CDN.• Set a “no-cache” http header at the origin on dynamic files/folders, in this case “dynamic.db”
This can be explained with the help of following example:• CDN Hostname: www.mywebsite.com• Origin: 123.45.23.56
The result is as follows:• On CDN - cdn.mywebsite.com/image/abc.jpg• On CDN - cdn.mywebsite.com/mp3/sing.mp3• Request goes back to the origin - www.mywebsite.com/nocache/dynamic.db

How to verify if the website is on
CDN
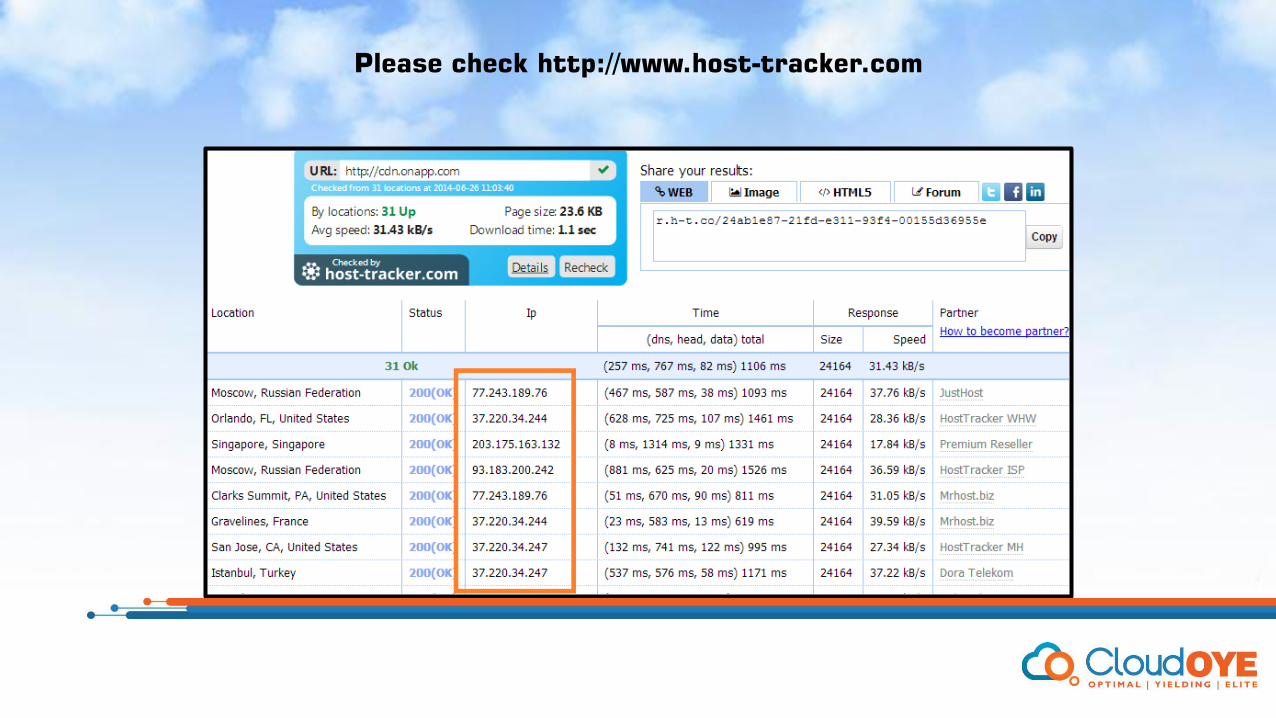
Please check http://www.host-tracker.com

What is onApp
CDN DNS redirection?
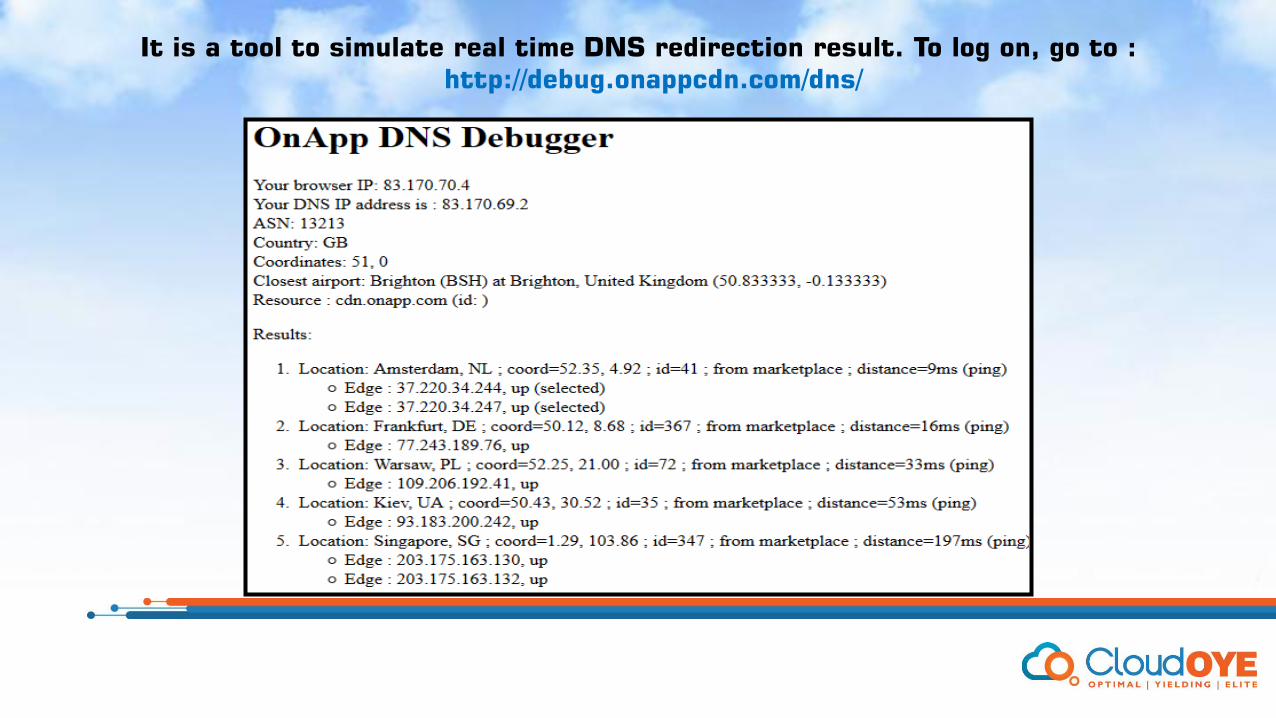
It is a tool to simulate real time DNS redirection result. To log on, go to : http://debug.onappcdn.com/dns/
How to compare
CDN content with Debugger?
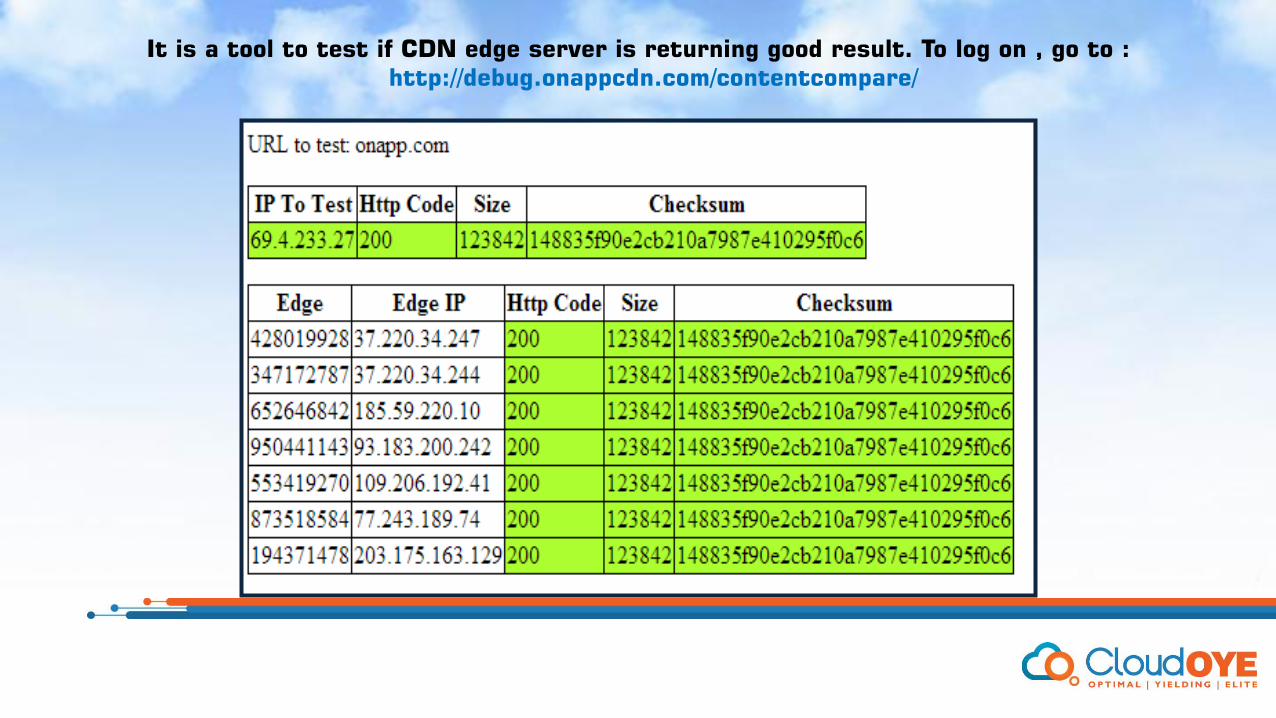
It is a tool to test if CDN edge server is returning good result. To log on , go to : http://debug.onappcdn.com/contentcompare/

CDN
Reporting

Detailed Reporting
CDN helps to perform detailed reporting based on the bandwidth statistics. Select the following filters:• Date and Time range• CDN resources• Locations
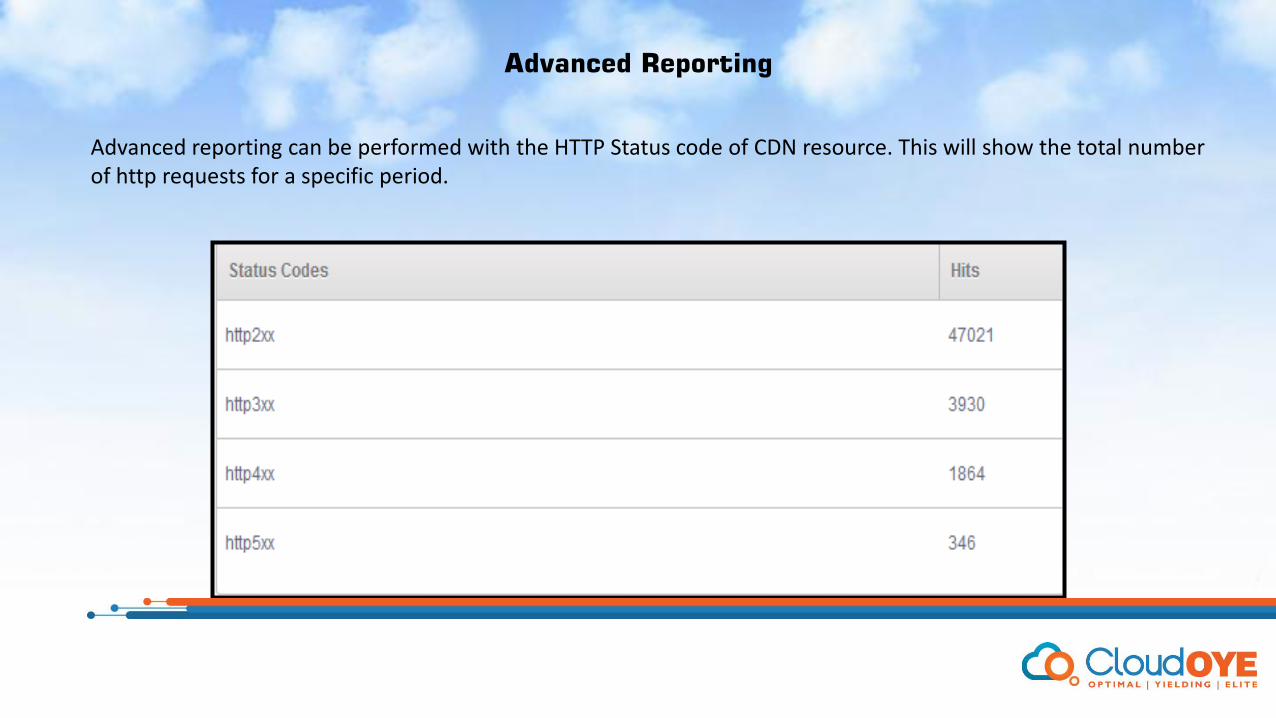
Advanced Reporting
Advanced reporting can be performed with the HTTP Status code of CDN resource. This will show the total number of http requests for a specific period.

Caching Mechanism
Generally, there are 3 levels of content expiry settings in an OnApp CDN solution:
Origin Server – Here end users may modify the cache control header at the origin server (where the content is hosted), eg Apache config or htaccess rule.
CDN Resource Level - Customers may configure the CDN site's content expiry setting at CP by navigating to [ CDN Resource] -> Create/Edit CDN Resource -> Enable Advanced Settings.
Cloud Owner Level - Cloud owner may configure the global content expiry time in the dashboard. The default time is 60 minutes.
The maximum cache size for a file is 2GB (HTTP PULL). Anything larger than 2GB can still be served by the CDN edge server, however it would not be cached.
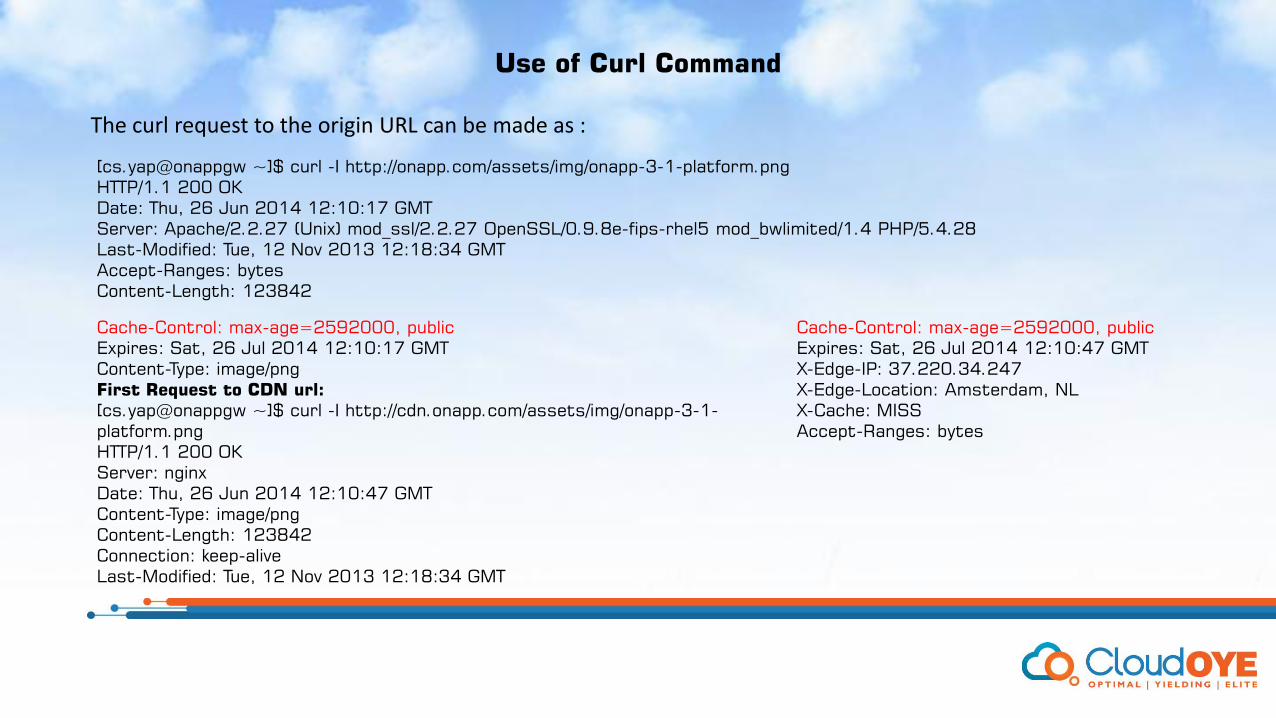
Use of Curl Command
The curl request to the origin URL can be made as :
Cache-Control: max-age=2592000, publicExpires: Sat, 26 Jul 2014 12:10:17 GMTContent-Type: image/pngFirst Request to CDN url:[cs.yap@onappgw ~]$ curl -I http://cdn.onapp.com/assets/img/onapp-3-1-platform.pngHTTP/1.1 200 OKServer: nginxDate: Thu, 26 Jun 2014 12:10:47 GMTContent-Type: image/pngContent-Length: 123842Connection: keep-aliveLast-Modified: Tue, 12 Nov 2013 12:18:34 GMT
Cache-Control: max-age=2592000, publicExpires: Sat, 26 Jul 2014 12:10:47 GMTX-Edge-IP: 37.220.34.247X-Edge-Location: Amsterdam, NLX-Cache: MISSAccept-Ranges: bytes
[cs.yap@onappgw ~]$ curl -I http://onapp.com/assets/img/onapp-3-1-platform.pngHTTP/1.1 200 OKDate: Thu, 26 Jun 2014 12:10:17 GMTServer: Apache/2.2.27 (Unix) mod_ssl/2.2.27 OpenSSL/0.9.8e-fips-rhel5 mod_bwlimited/1.4 PHP/5.4.28Last-Modified: Tue, 12 Nov 2013 12:18:34 GMTAccept-Ranges: bytesContent-Length: 123842
Purge and Prefetch
PurgePurge function can be used to clear the cache in the CDN edge server. Once the cache is cleared, when a visitor request comes in again, the CDN edge server will PULL from the origin, and get the latest up-to-date content. You can purge on file path: cdn.mywebsite.com/image/abc.jpgYou can issue a Full Site Purge, where all cache files under CDN resource “cdn.mywebsite.com” will be cleared
PrefetchWith prefetch command, you can pre-populate the files from the origin to the CDN edge server to ensure that the files are ready to be cached in the CDN edge server before the visitors request for it.The prefetch is in url path format, for example: cdn.mywebsite.com/image/abc.jpg

For Sales Information
Contact No:India - 18002122022US – 18882883570
Email: [email protected]
For Customer Support
Contact No:91-120-666-7718/19
Email: [email protected]

Thank You!www.cloudoye.com