Embed Size (px)
Citation preview

XenClient
Claudio Mascaro
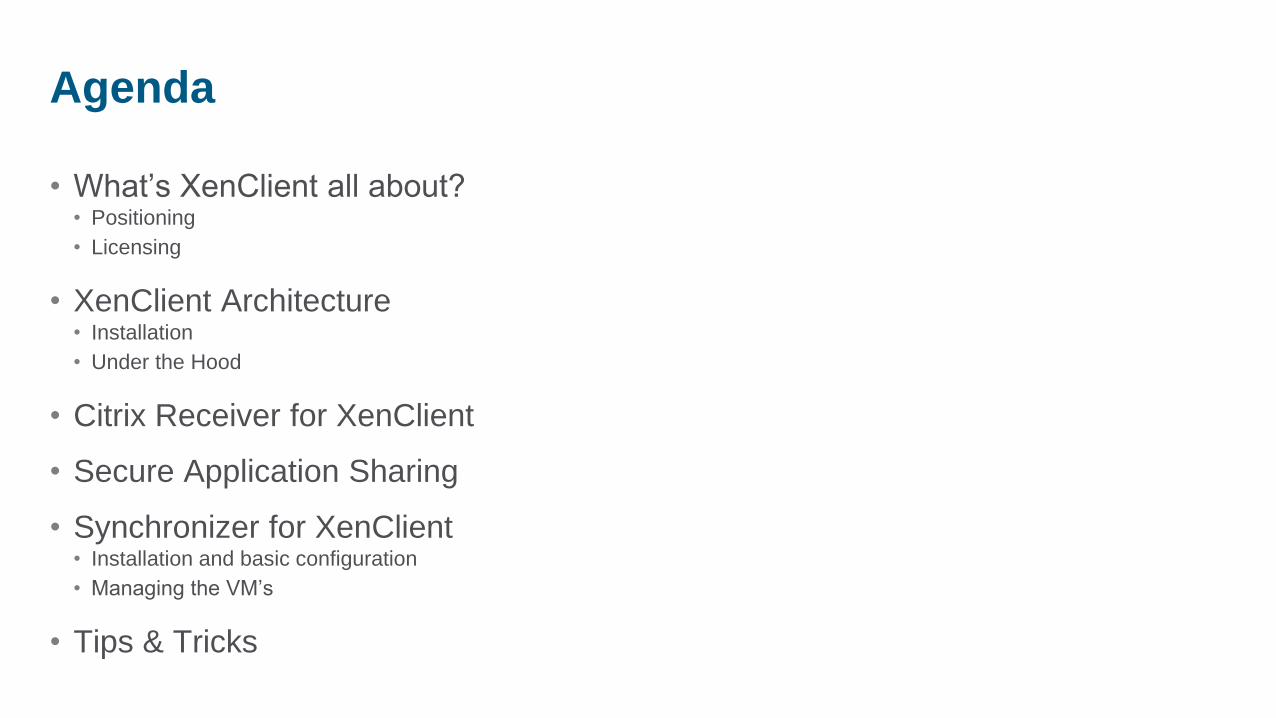
• What’s XenClient all about? • Positioning
• Licensing
• XenClient Architecture • Installation
• Under the Hood
• Citrix Receiver for XenClient
• Secure Application Sharing
• Synchronizer for XenClient • Installation and basic configuration
• Managing the VM’s
• Tips & Tricks
Agenda

• Type 1 hypervisor: High performance because it runs on bare metal
• Built on 64-bit open source Xen technology
• Runs multiple virtual desktops simultaneously
• Completely secure isolation for each VM
• Hardware independent VMs
• Service VM Architecture for extensibility
XenClient technology
Compatible laptop &
desktop hardware
What is XenClient technology?

• First Service VM for XenClient
• Simple wizard to create VMs locally
• Easy switching between VMs with Switcher Bar
• Connector for centralized synchronization of desktops
• Self-service provisioning and recovery
• Enforcement of local policy and kill pill
XenClient
technology
Citrix Receiver for XenClient
Citrix R
eceiv
er
for
XenC
lient
Local VM
Desktops

Automatic
Δsync
Synchronizer for
XenClient XenClient
technology
Synchronizer for XenClient
Citrix R
eceiv
er
for
XenC
lient
Copy of
Local VMs Local VM
Desktops
• Centralized delivery of virtual desktops
• Full-time backup & rapid recovery
• Remote kill & local policy controls

Type 1 Hypervisor (XenClient)
Types of client hypervisor architectures
Hardware
Type-1 Hypervisor
Corporate Image Personal Image
Hardware
Personal Image
Type-2 Hypervisor
Corporate Image
Type 2 Hypervisor (Traditional VMM)
• Better Security and Isolation
• Bare Metal Performance
• Less Isolation and Security
• Easier to Retrofit
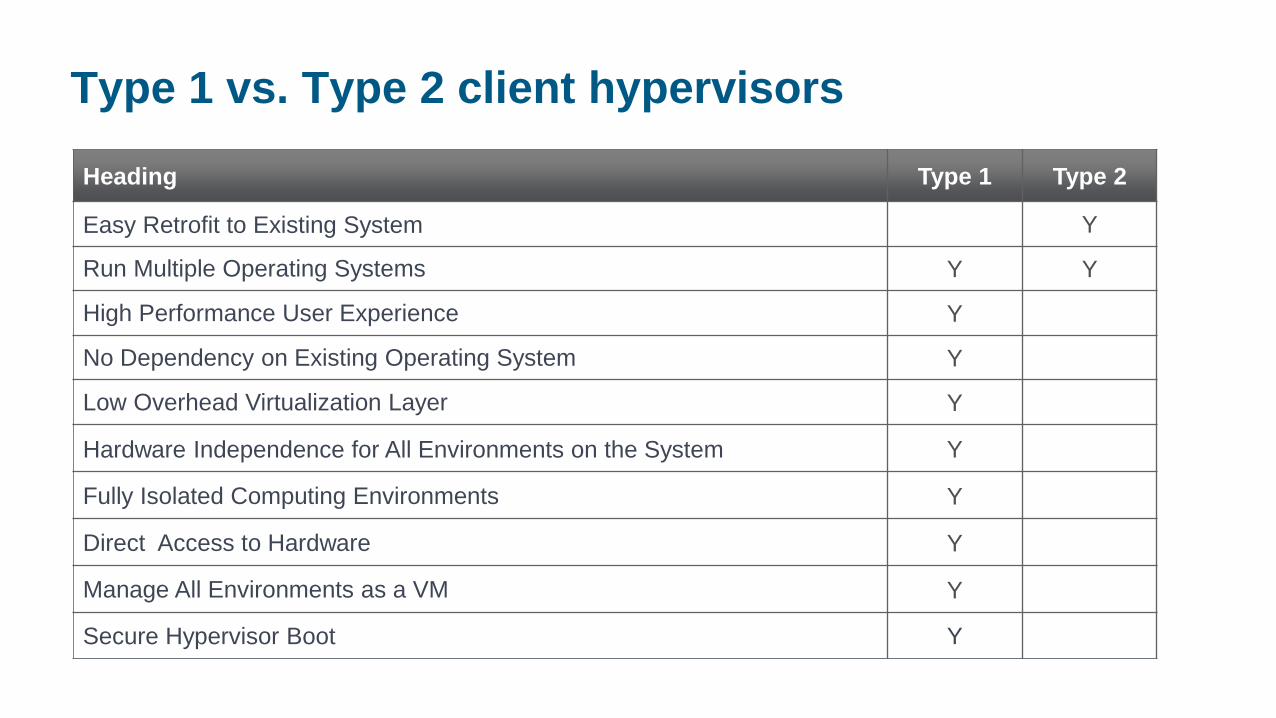
Type 1 vs. Type 2 client hypervisors
Heading Type 1 Type 2
Easy Retrofit to Existing System Y
Run Multiple Operating Systems Y Y
High Performance User Experience Y
No Dependency on Existing Operating System Y
Low Overhead Virtualization Layer Y
Hardware Independence for All Environments on the System Y
Fully Isolated Computing Environments Y
Direct Access to Hardware Y
Manage All Environments as a VM Y
Secure Hypervisor Boot Y

XenClient Architecture

Xen Hypervisor
Hardware Audio GPU USB
Disk ACPI NIC
XenClient architecture
Personal VM Business VM Control
Domain
Service
VM

Hardware isolation operation
Xen Hypervisor
Hardware Audio GPU USB
Disk ACPI NIC
Personal VM Personal VM Control
Domain
Service
VM

Hardware
Hardware pass through operation
Xen Hypervisor
Audio
Disk ACPI
Personal VM Control
Domain
Service
VM
GPU USB
NIC
Personal VM
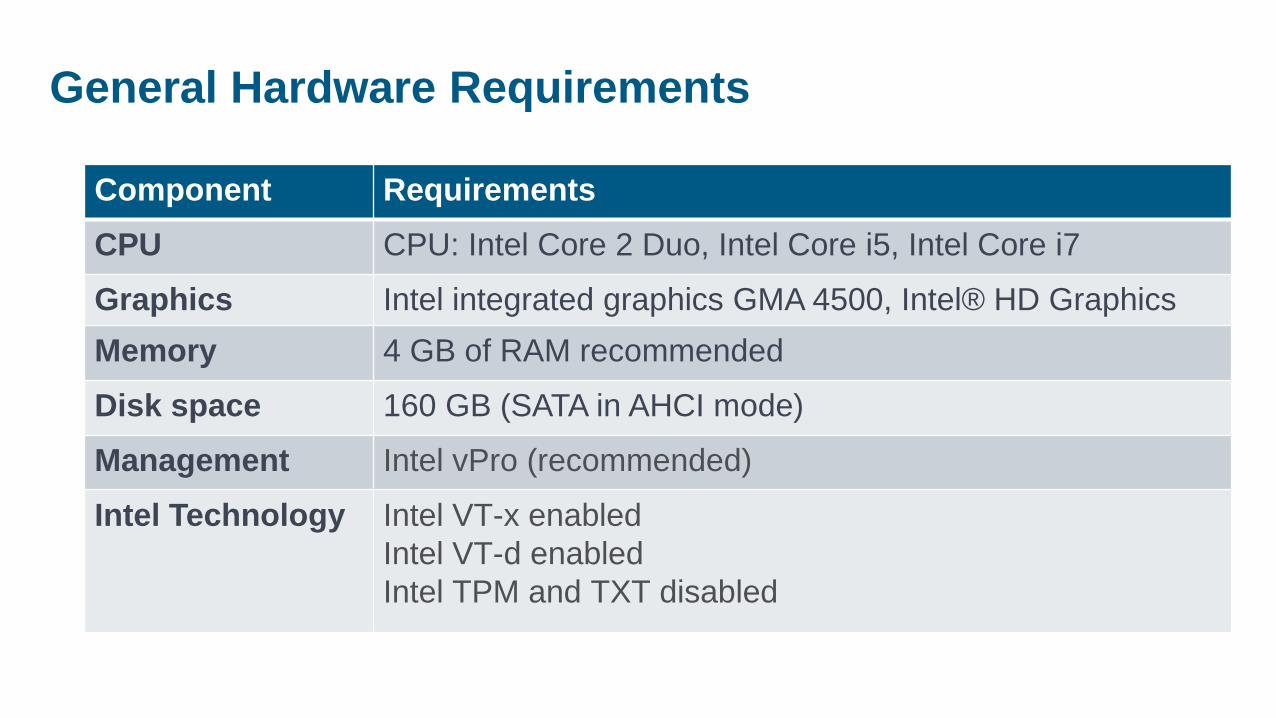
Component Requirements
CPU CPU: Intel Core 2 Duo, Intel Core i5, Intel Core i7
Graphics Intel integrated graphics GMA 4500, Intel® HD Graphics
Memory 4 GB of RAM recommended
Disk space 160 GB (SATA in AHCI mode)
Management Intel vPro (recommended)
Intel Technology Intel VT-x enabled
Intel VT-d enabled
Intel TPM and TXT disabled
General Hardware Requirements

• CPU: Core i5, Core i7, Intel Core 2 Duo
• Graphics: Intel® HD Graphics Intel Integrated Graphics 4500MHD
• Wireless: Intel® WiFi Link 5100
Intel® WiFi Link 5300
Intel® Centrino® 6200
Intel® Centrino® 6300
Dell Wireless™ 1501 adapters
Dell Wireless™ 1520 adapters
Intel 5150 Wireless adapters (WiFi Only)
Intel 6250 Wireless adapters (WiFi Only)
Broadcom 4312G Wireless adapters
Broadcom 4322AGN Wireless adapters
Supported Platforms (RC2)
• Dell Latitude E6410 E6510
E4200
E4300 E4310
E6400 E6500
• HP EliteBook
8440p
6930p
2530p 2540p
• HP Compaq Elite
HP Compaq 8000 Elite
• Lenovo ThinkPad T500
T400
X200
• Dell OptiPlex 780
• Required Intel Technology Intel VT-x
Intel VT-d
• Future Use Intel TXT
Intel AMT
• Highly Recommend: vPro Enabled Systems
Memory: 4 GB of RAM
Disk: 160 GB of disk space recommended

XenClient Installation
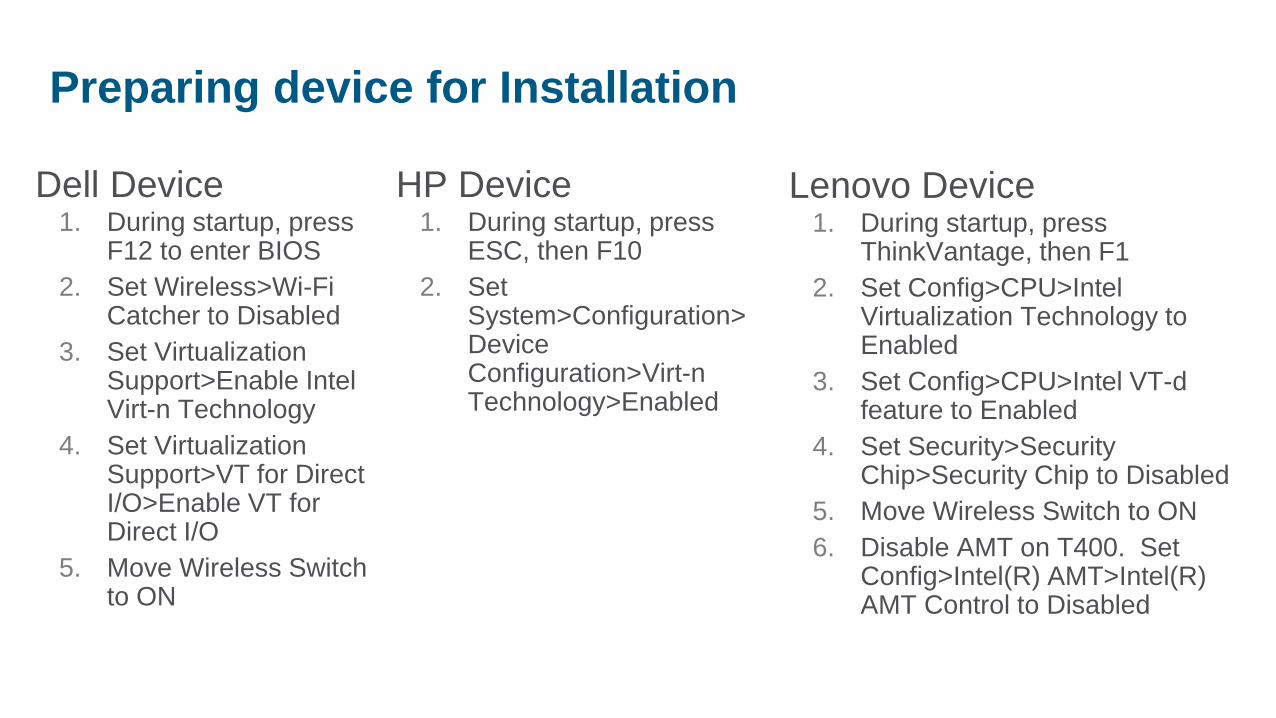
Lenovo Device 1. During startup, press
ThinkVantage, then F1
2. Set Config>CPU>Intel Virtualization Technology to Enabled
3. Set Config>CPU>Intel VT-d feature to Enabled
4. Set Security>Security Chip>Security Chip to Disabled
5. Move Wireless Switch to ON
6. Disable AMT on T400. Set Config>Intel(R) AMT>Intel(R) AMT Control to Disabled
Preparing device for Installation
HP Device 1. During startup, press
ESC, then F10
2. Set System>Configuration> Device Configuration>Virt-n Technology>Enabled
Dell Device 1. During startup, press
F12 to enter BIOS
2. Set Wireless>Wi-Fi Catcher to Disabled
3. Set Virtualization Support>Enable Intel Virt-n Technology
4. Set Virtualization Support>VT for Direct I/O>Enable VT for Direct I/O
5. Move Wireless Switch to ON

• Windows XP SP3 32bit
• Windows Vista SP2 32bit
• Windows 7 32bit
• Windows 7 64bit
Supported Operating Systems
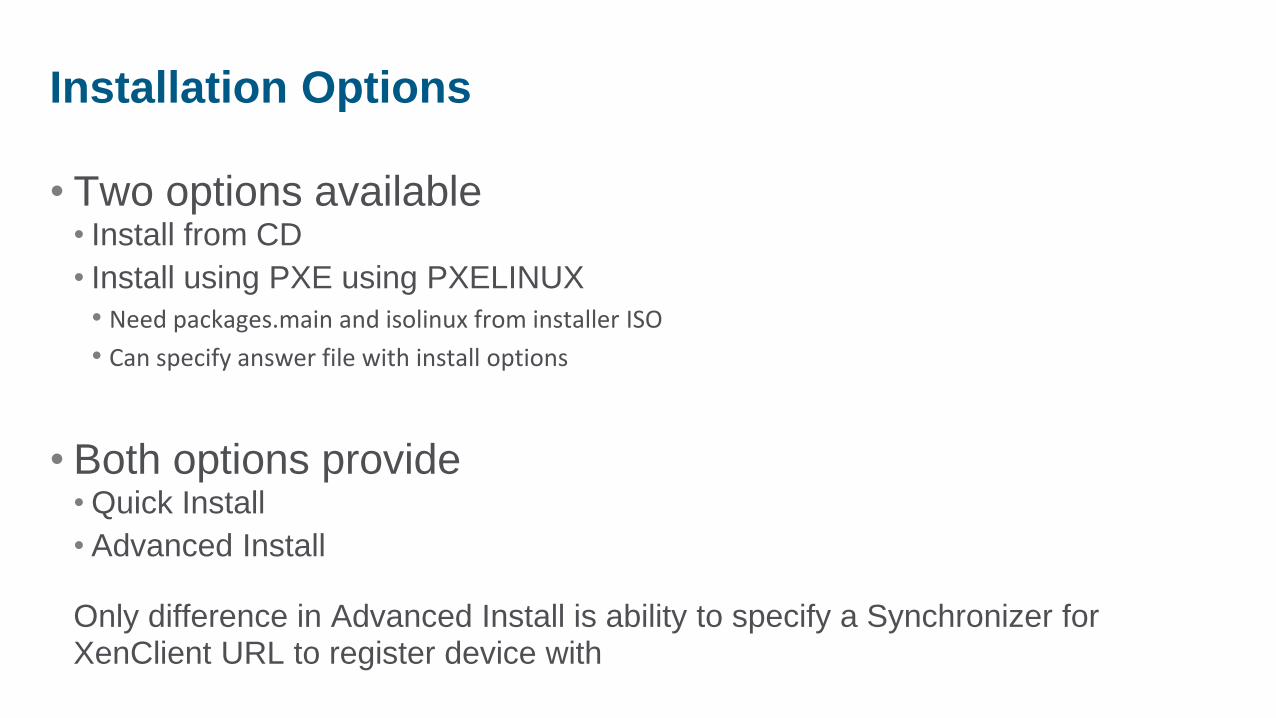
• Two options available • Install from CD
• Install using PXE using PXELINUX
• Need packages.main and isolinux from installer ISO
• Can specify answer file with install options
• Both options provide • Quick Install
• Advanced Install
Only difference in Advanced Install is ability to specify a Synchronizer for XenClient URL to register device with
Installation Options

PXE Answer file Options
Tag Name Description
INTERACTIVE Determines whether the installer will interact with the user or not
QUICK-OPTION Used as a parent for other answerfile tags
SOURCE The installation package source
MODE Indicates whether to perform a destructive fresh installation, or upgrade
PRIMARY-DISK Required for automated installation if more than one disk is detected
NETWORK-INTERFACE Specifies the network device for use by the install
PASSWORD Used to set the system password
ENABLE-SSH Used to enable or disable the dom0 (control domain) ssh server
BACKEND Used to supply the URL specifying the location of the Synchronizer for XenClient.
SKIPREADY If this tag is present, the Are you ready to install? screen is not displayed.
PREINSTALL Used to supply a script to be executed prior to installation.
POSTINSTALL A post install script, executed at the end of a successful installation.

Installation Steps
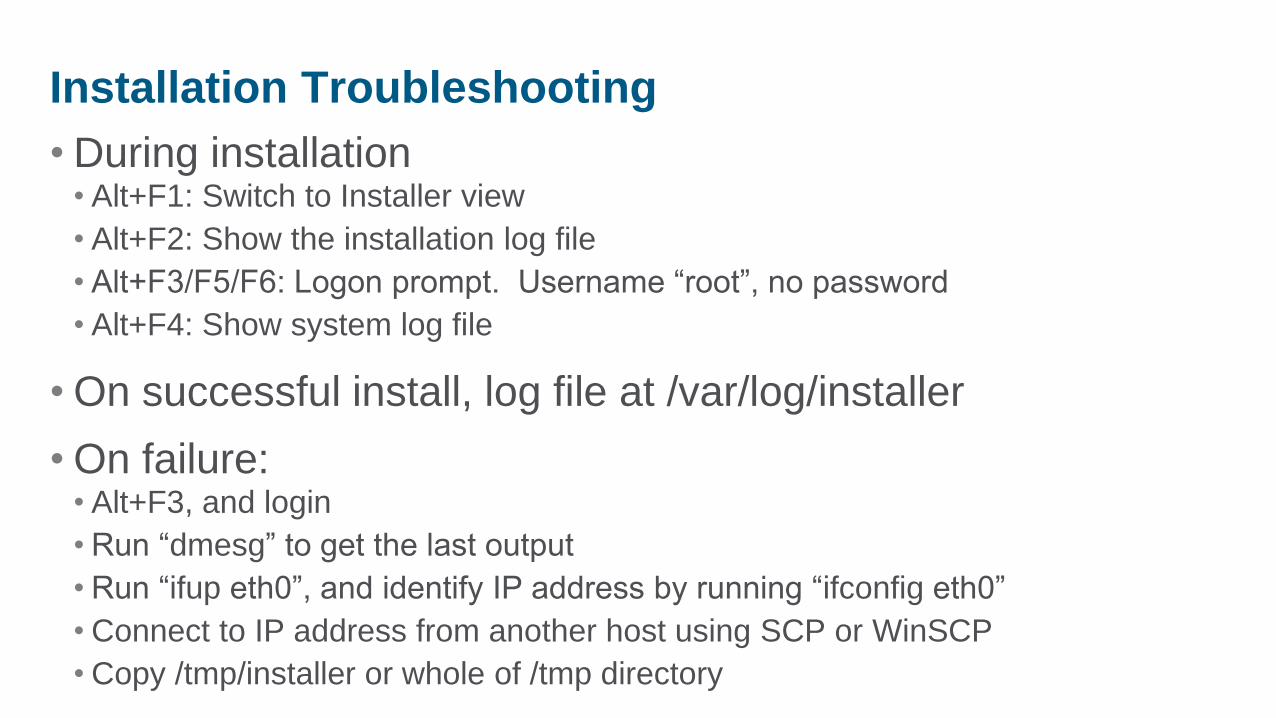
• During installation • Alt+F1: Switch to Installer view
• Alt+F2: Show the installation log file
• Alt+F3/F5/F6: Logon prompt. Username “root”, no password
• Alt+F4: Show system log file
• On successful install, log file at /var/log/installer
• On failure: • Alt+F3, and login
• Run “dmesg” to get the last output
• Run “ifup eth0”, and identify IP address by running “ifconfig eth0”
• Connect to IP address from another host using SCP or WinSCP
• Copy /tmp/installer or whole of /tmp directory
Installation Troubleshooting
• CPU’s • XenClient virtualizes the CPU core(s) of the device and presents them as Virtual CPUs
(vCPUs). You can allocate the vCPUs to VMs. XenClient automatically shares the computing load over the vCPU cores according to your allocation.
• RAM • RAM is allocated to VMs according to your settings. A certain amount of RAM is required for
XenClient operation, so not all installed device RAM is available to be allocated to VMs
• GPU • The GPU can be allocated to a single VM. This is part of the 3D Graphics Support graphics
experience, providing excellent graphics performance to your favoured VM
Device / Resource Sharing
• Network and internet connection sharing • XenClient networking is handled on two levels: host-wide connectivity, and the connectivity of
each individual VM. A wired or wireless connection is configured using Network Manager in Citrix Receiver for XenClient for the host
• USB • USB devices are handled differently according to their type. Human Computer Interaction (HCI)
devices (for example mouse and keyboard) are connected to whichever VM the user is currently using.
• USB optical media device
• USB storage: hard drive
• USB printers
• USB keyboard
• USB mouse
Device / Resource Sharing

Under the Hood: The Engine

• Based on OpenEmbedded
• Disk layout (uses LVM) • /config (12MB) : configuration, preserve en upgrade
• / (100MB): root file system
• /boot (12MB): boot volume, used by grub2
• /storage (remaining space): Placeholder for vm disk images (vhds)
• Citrix receiver UI • Linux PV guest
• Midori (GTK2 web browser) full screen
XenClient Linux Distribution

HDX VM Control Domain VM
XenClient Device Handling
OS
Disk
Network
Audio
Xen
qemu
Input Video
USB
Backend
Hardware
Disk
Backend
Audio USB
Disk NIC
Usb
Network
Backend
Wlan
GPU
OS
Disk
Network
Audio Input
Usb
qemu
Video
VT-d
Linux drivers DVD
DVD

Contro
l Dom
ain
XenClient Architecture
WinXP
Corporate
Switcher Bar
XenMgr
Qemu-dm
(Win7)
Ctxusb (Win7)
Uid
Input
Network
Manager
Receiver
XenVm (Win7)
Qemu-dm
(WinXP)
XenVm
(WinXP)
Ctxusb
(WinXP)
Win7
Personal
Switcher Bar
Dbus
Bed
dbd

• Everything is exposed on D-Bus
• Vms config file (json) are stored under /config/vm
• dbd (data base daemon) expose the config on dbus (db-read, db-write, db-ls, …)
• xec-vm • Formated interface
• List vms, create new vms
• xec • Raw program to do a dbus rpc (server, interface, object, method).
• By default talk to xenmgr (xec start <uuid>. xec reboot <uid>, …)
XenClient CLI

Receiver for XenClient

• Change Power Options
• Change Touchpad Options
• Setup Networking
• Register with Synchronizer for XenClient
• Create VM(s) • From optical media (CD / DVD)
• Download from Synchronizer for XenClient
• VM Management
Receiver for XenClient functions

• Shutdown • Graceful shutdown that shuts down running VM(s)
• Restart • Graceful restart that will shut down running VM(s), and reboots them
• Sleep • Suspends VM(s) and puts device into S3 state
• Hibernate • Hibernates VM(s) and puts device into S4 state
Host-wide Power Management

• vNIC MAC Address exposed to network
• Each VM can get IP Address from DHCP server, or have static IP
Networking - Bridged
Hardware
Xen Hypervisor
NIC
Service
VM
vNIC vNIC Control
Domain

• vNIC MAC Address not exposed to network
• Each VM gets an internal NAT’ed IP Address
• Wireless networks are always shared
Networking - Shared
Hardware
Xen Hypervisor
Service
VM
vNIC vNIC Control
Domain
NIC

• vNIC MAC Address not exposed to network
• Each VM gets an internal IP Address or manual configuration
• Only VM’s can communicate between them no external connection possible
Networking - Internal
Hardware
Xen Hypervisor
Service
VM
vNIC vNIC Control
Domain
NIC

Synchronizer for XenClient

IT Pro and IT Admin
Existing Virtual
Desktop
Synchronize
Virtual
Desktop
Download
Synchronizer
Appliance
Self-Service Download via
Citrix Receiver for
XenClient
Publish to
Users
Available at citrix.com
& partner websites Created with
Citrix Receiver

Synchronizer for
XenClient
Synchronizer Architecture
Citrix XenServer
HTTPS
• Appliance on XenServer
• Single port client initiated HTTPS
• Web based admin interface
• Local or AD linked authentication
• Block level differencing with compression
Active Directory
Storage

XenClient users are then able to choose from the set of Desktops that have
been assigned to them, and synchronize these down onto their notebooks
From the Synchronizer for XenClient interface, the Desktop is
assigned to the specific users that should be allowed access to it
This desktop is then published to Synchronizer for XenClient, resulting
in a single central Desktop VM that can be assigned to many users.
Synchronizer for XenClient
Publishing
Assignment
Synchronization
Using a XenClient-based notebook, an OS instance and associated
applications are installed from media, resulting in a template Desktop Authoring

Synchronizer Installation – 1st Import XVA

Synchronizer Installation – 2nd Configure

Synchronizer Installation – 3rd Login

• Assign desktop to user/group
• Set policies and configuration • Desktop version
• Authorship
• Modify VM properties
• Audio: Disabled, Enabled no Recording, Enabled with Recording
• Optical Drive Access: Disabled, Read-Only, Read-Write
• Networking: Wired and/or Wireless enabled/disabled
• CPU and Memory
• Lease Time, Backup Frequency, Phone Home Frequency
VM Appliance Management

Secure Application Sharing

Xen Hypervisor
Secure Application Sharing
Personal
(Subscribing VM)
Business 1
(App Publishing VM)
Business 2
(App Publishing VM)
Control
Domain
Service
VM

• Publishing: • Install “Publish Application” tools
• Reboot
• Subscribing: • Install “Subscribe Application” tools
• Service for VM to VM communication
• Receiver, Online Plugin, Dazzle
• Reboot
• Enable “Subscribe to Applications” for the VM on the “Experimental” tab
• Default application list picked up from “Start Menu” for All Users, and if logged in, for particular user
Secure Application Sharing

Secure Application Sharing - Installation

XenClient RC2 Enhancements - General
• Enhanced USB device support and USB device management
• Experimental support for shared VM images (Dynamic VM Image mode)
• Expanded hardware compatibility list
• Support for 64bit Windows 7
• Improved device power management
• Intel AMT KVM over IP support
• Intel Extended Page Table support
• Usability enhancements to the VM upload and download process
• Usability enhancements to authentication
• In VM alerting system
• Synchronizer upgrade
• XenClient upgrade

XenClient RC2 USB - Enhancements
RC2 improves USB support incl. new tab in Receiver for XenClient UI
Added support for the following devices:
• Apple iPod, iPhone, iPad
• Microsoft Windows Phones
• Android Phones
• Headsets
• Fingerprint Readers
• Webcams
• Smart Card Readers
• 3G data modems
XenClient RC2 Bluetooth - Enhancements
Bluetooth
With our new improved USB support comes support for a variety of Bluetooth
devices. On most systems in our HCL the Bluetooth system is actually a USB
device that can be assigned to a virtual machine. This allows that virtual machine to
talk to your Bluetooth devices.

XenClient RC2 Usability - Enhancements
Simplified VM upload and download process
We removed combined steps and even removed a number of steps to make the
process of uploading a VM image to a Synchronizer super simple. We also removed
the duplicate publish VMs that were cluttering the UI.
Improved display of upload/download progress
Along with enhancements to the actual upload and download process we enhanced
the display of upload and download progress information and now include this
information on the main Receiver for XenClient UI.
Enhanced client authentication experience
Here again we combined steps and cleanup up the UI to make the authentication
experience on XenClient simpler to use and understand.

XenClient RC2 Usability - Enhancements
In VM alerting system
We have a brand new in VM alerting system that will make sure users are aware of
critical issues affecting the system such as low disk space, policy actions, or
impending lease time expiries. Previously this type of information was only available
in the Receiver for XenClient UI.
Mouse pointer trails support
We have starting extended XenClient to be more accessible to all users and the first
area of focus was on the mouse and trackpad. In this release we added pointer
trails support
Automatic slipstream of Intel Graphics drivers
In RC2 we automatically slipstream the Intel graphics drivers into most versions of
Windows. So you can flip on the 3D graphics feature and be ready to go without
having to download any drivers.

XenClient RC2 Management – Enhancements ( short )
• Intel AMT KVM Remote Control
• Intel Extended Page Tables support
• In place upgrade for XenClient
• Local authentication enhancements
• Secure Application Sharing

XenClient RC2 Synchronizer – Enhancements
Synchronizer for XenClient RC2 Enhancements
• Dynamic Image Mode (Experimental)
• Simplified disk space expansion for image and backup storage
• Simplified and Expanded Synchronizer Setup
• In place upgrade for Synchronizer
• Scalability enhancements
• Usability Enhancements

Tips and Tricks
Citrix Confidential - Do Not Distribute

• SSH into Control Domain • Username is “root”, and password can be set from UI or at Install time
• Run the “status-report” command from the prompt
• “scp” or “WinSCP” the report from /tmp/status-report folder
• Alternatively you can run «status-server» and point your browser to your dom0 ip (http://your.ip.address)
XenClient Status Report

• Turn on ATAPI logging to help debug CD/DVD issues • SSH into control domain
• Run the command “touch /etc/debugcdrom” from the prompt
• Logs will be written to /var/log/cdrom-<VM slot number>
• “scp” or “WinSCP” the logs from the above folder
• Refresh Receiver for XenClient UI • If the Receiver for XenClient UI hangs, it can be refreshed by pressing Ctrl+Q
Other troubleshooting tips

• The filesystem for XenClient is based on a linux partition formatted with extended fs and managed by LVM2
• Check the pyhsical disk / disk ID’s
• Enter the command pvscan and fdisk
Disks Partitions and Filesystems
root@xenclient-dom0:/boot# pvscan
PV /dev/sda1 VG xenclient lvm2 [119.24 GB / 11.84 GB free]
Total: 1 [119.24 GB] / in use: 1 [119.24 GB] / in no VG: 0 [0 ]
root@xenclient-dom0:/boot# fdisk -l /dev/sda
Disk /dev/sda: 128.0 GB, 128035676160 bytes
255 heads, 63 sectors/track, 15566 cylinders
Units = cylinders of 16065 * 512 = 8225280 bytes
Device Boot Start End Blocks Id System
/dev/sda1 * 1 15566 125033863+ 83 Linux

The main commands for the Logical Volume Management • lvscan
• Summary of all volumes
Disks Partitions and Filesystems
root@xenclient-dom0:/boot# lvscan
ACTIVE '/dev/xenclient/boot' [12.00 MB] inherit
ACTIVE '/dev/xenclient/config' [12.00 MB] inherit
ACTIVE '/dev/xenclient/root' [252.00 MB] inherit
ACTIVE '/dev/xenclient/swap' [256.00 MB] inherit
ACTIVE '/dev/xenclient/log' [64.00 MB] inherit
ACTIVE '/dev/xenclient/root.old' [252.00 MB] inherit
ACTIVE '/dev/xenclient/storage' [106.57 GB] inherit

• Which directories are used by XenClient /config
/config/vms
/storage/disks
/storage/isos
/usr/lib/xenmgr
/etc/xen
Disks Partitions and Filesystems

• xec-vm --- Formated interface, List vms, create new vms
• xec --- Raw program to do a dbus rpc (server, interface, object, method).
• xentop --- CPU / Process / Memory information like the top command but for Xen e.g. which domain
• xenops --- Various xen commands to debug and set options e.g. xenops dmesg
• xenstore* --- various commands to manage the xenstore e.g. xenstore-ls summary of the xenstore content
• xenpm --- Xen powermanagemetn control tool e.g. xenpm get-cpufreq-para
• xenvm --- start a VM from the command line usage: xenvm [--config <config>] [--uuid <uuid>] [<config>-deprecated]
• status-report --- This will create a archive wchich holds all major log files and screenshots for troubleshooting
• bed-deregister --- Script to unregister a XenClient from a Synchronizer
• screenshot --- Allows to create screenshots form any windows IOVM / Guest VM
XenClient CLI’s
• Therer are multiple ways to save / restore your VM’s • Obviousely for normal usage the Synchronizer is the preferred option
• Alternately you can use
• Attach a USB Harddrive / Memory Stick (Best way for off-line operations) • Important: XenClient has only read-only NTFS support
• SSH / Secure Copy • Use any scp application
e.g. Cyberduck for OS/X, WinSCP for windows
• FTP (Lowest common dominator) • Very fast if a fast FTP server is available (no enryption)
• Not secure…. Server needs to support «passive mode» for Firwall traversal
How to copy / restore your VHD’s

• Open Terminal (Ctrl-Shift-T)
• Attach your USB Device
• Enter dmesg
• You should get a similar output
Mounting an External Drive (USB)
[ 4134.025069] usb-storage: device found at 2
[ 4134.025070] usb-storage: waiting for device to settle before scanning
[ 4135.022083] scsi 6:0:0:0: Direct-Access Ext Hard Disk PQ: 0 ANSI:
[ 4135.048780] sd 6:0:0:0: [sdb] 488397168 512-byte hardware sectors: (951 MB/907 MiB)
[ 4135.049144] sd 6:0:0:0: [sdb] Write Protect is off
[ 4135.049149] sd 6:0:0:0: [sdb] Mode Sense: 10 00 00 00
[ 4135.049152] sd 6:0:0:0: [sdb] Assuming drive cache: write through
[ 4135.049868] sd 6:0:0:0: [sdb] 488397168 512-byte hardware sectors: (951 MB/907 MiB)
[ 4135.050266] sd 6:0:0:0: [sdb] Write Protect is off
[ 4135.050270] sd 6:0:0:0: [sdb] Mode Sense: 10 00 00 00
[ 4135.050271] sd 6:0:0:0: [sdb] Assuming drive cache: write through
[ 4135.050274] sdb: sdb1
[ 4135.103685] sd 6:0:0:0: [sdb] Attached SCSI disk
[ 4135.104275] usb-storage: device scan complete
/dev/sdb1 is your volume

• After you recoginzed the device ID • Mount the volume by entering:
mount /dev/sdb1 /mnt
• Verify the mount by entering:
mount
rootfs on / type rootfs (rw)
/dev/mapper/xenclient-root on / type ext3 (rw,barrier=1,data=ordered)
/dev/mapper/xenclient-boot on /boot/system type ext3 (rw,errors=continue,barrier=1,data=ordered)
…
/dev/mapper/xenclient-storage on /storage type ext3 (rw,errors=remount-ro,barrier=1,data=ordered)
/dev/sdb1 on /mnt type ext3 (rw,errors=continue,barrier=1,data=ordered)
Mounting an External Drive (USB)

• The configuration files are stored in • /config/db -> General Configs such as Power Management
• /config/vms/uuid.db
• Example • Show content of an VM config file
• more /config/vms/a3d63881-e6df-4237-abed-024146b7c4ba.db
• The VHD’s are store in • /storage/disks
How/where to find your virtual HD’s
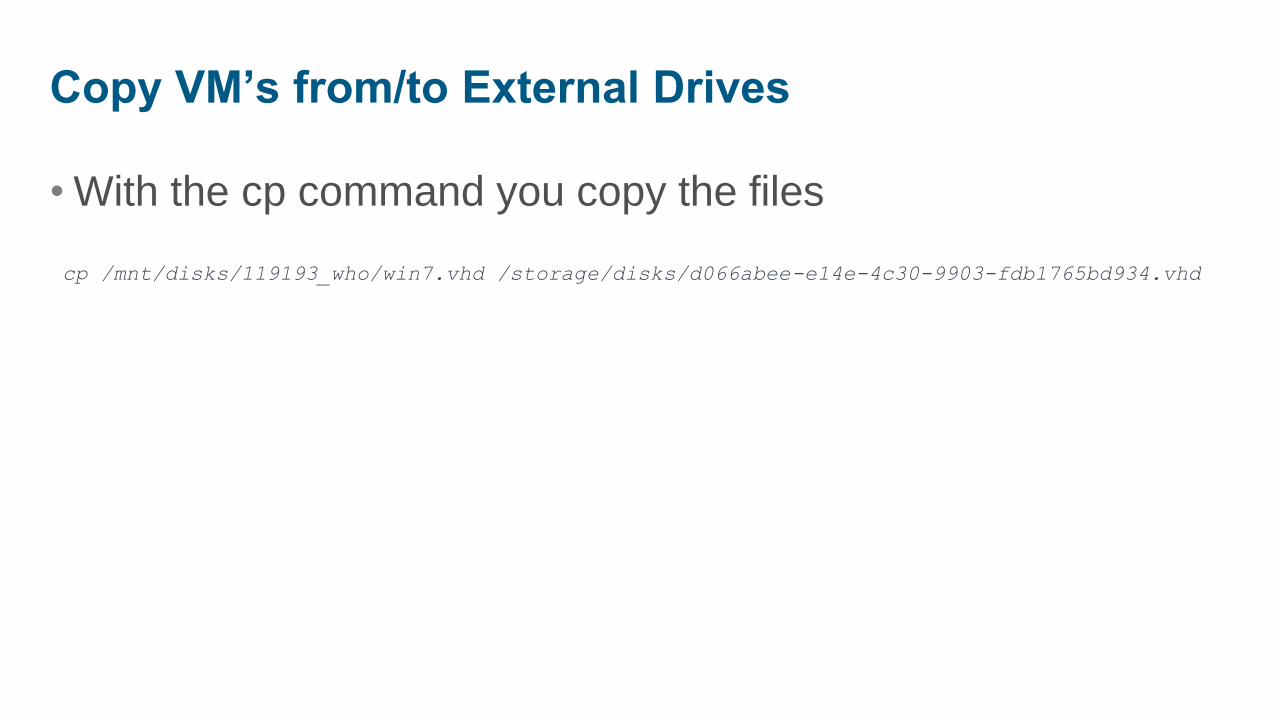
• With the cp command you copy the files
Copy VM’s from/to External Drives
cp /mnt/disks/119193_who/win7.vhd /storage/disks/d066abee-e14e-4c30-9903-fdb1765bd934.vhd

Using SCP to copy the VM’s

• There’s no FTP but a ftpget and ftpput command
Using FTP to copy the VM’s
Usage: ftpget [options] remote-host local-file remote-file
Retrieve a remote file via FTP
Options:
-c,--continue Continue previous transfer
-v,--verbose Verbose
-u,--username Username
-p,--password Password
-P,--port Port number
#ftpput -v -u synergy -p synergy 192.168.1.150 win-test.vhd 4f74119b-d869-4928-87d9-b4e43d7269ea.vhd
Connecting to 192.168.1.150 (192.168.1.150:21)
ftpput: cmd (null) (null)
ftpput: cmd USER synergy
ftpput: cmd PASS synergy
ftpput: cmd TYPE I (null)
ftpput: cmd PASV (null)
ftpput: cmd STOR win-test.vhd
ftpput: cmd (null) (null)
ftpput: cmd QUIT (null)