Embed Size (px)
Citation preview

By Maria GagneLIS 416 – Tech. in School Library
Transfer Photos:Digital Camera to Computer

Items Needed for Transfer1. Your Digital Camera
2. USB Cable Connection (cord that came with camera)
3. Removable SD Card
4. Computer
5. Optional: USB, External hard drive, or online storage like Google Drive for extra storage
6. USB port or SD Card Reader (if your computer does not have one you can purchase an external one)
1 2
3 4
5

Step 1:• Plug camera into your computer with the USB cord that came with the camera.
• Make sure to put the smaller end of the USB Cord into the appropriate port on the camera, and plug the large end of the USB cord into the USB port on your computer.
OR
• If you don’t have a USB cord for the camera, or can’t get it to work then you may use your preferred SD card instead. This can be done by opening the SD card slot on your camera to extract the SD card and placing it into the appropriate card slot on your computer.
• If you do not have an SD card slot built-in to your computer. Then no worries if desire you may purchase an external SD Card slot from select stores and online stores like Amazon for a fair price.


Step 2• Once your camera is connected to your computer. A window should pop-up on
the desktop that prompts you to open camera contents with camera software.
• This software varies with different names depending on your camera’s brand and model. However, it is always accompanied with either an icon of a camera or an icon of an SD card.
• If this window does not automatically pop-up you may have to look for the camera device under the section on your computer that displays devices and hard disk drives in use . For example: on Windows computers this might be found in Computer within the Start Menu.


Step 3• You should be able to access, your cameras memory card or memory via the USB
cord, through various files that will be found after clicking on camera pop-up or icon.
• Once it has been clicked you should be able to see the camera’s memory including your photos in a various dated folders. Once the photos are found on your camera you should be able CTRL+Shift to select all the photos you would like to transfer, or simply click on the one photo you want to transfer.
Or
• Now there are cameras that will have its own personalized software that allows users to select the photos they want transferred to their computer by boxes that can be checked or by selecting click methods. However, if your software for the camera is unavailable or does not work. The clicking on camera icon to locate the cameras memory file folders should work just fine.


Step 4• After you have clicked CTRL+Shift to select the pictures, or simply select a
picture by clicking on it. You should either Right+Click the selected photos and copy, or use the shortcut CTRL+C to copy the photos you would like to transfer to your computer.
• After selecting your photos, you will go to My Pictures and click New Folder at the top to create a new folder with a name of your choice.
• Once this is done you will now have a folder to place the transferring photos into your computer.
• PS: It helps when going back to the folder to include some sort of date of when the photos were taking. So that way when you go to look at the photos later on you will know how old or recent they are.

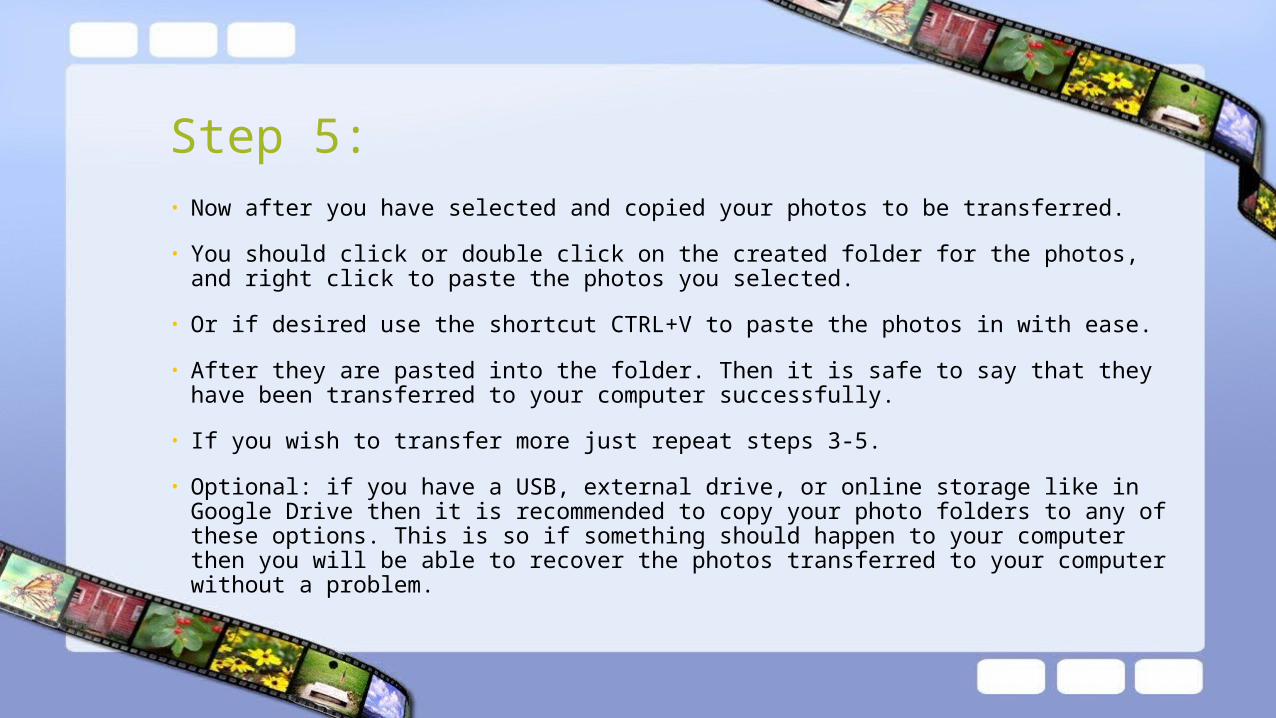
Step 5:• Now after you have selected and copied your photos to be transferred.
• You should click or double click on the created folder for the photos, and right click to paste the photos you selected.
• Or if desired use the shortcut CTRL+V to paste the photos in with ease.
• After they are pasted into the folder. Then it is safe to say that they have been transferred to your computer successfully.
• If you wish to transfer more just repeat steps 3-5.
• Optional: if you have a USB, external drive, or online storage like in Google Drive then it is recommended to copy your photo folders to any of these options. This is so if something should happen to your computer then you will be able to recover the photos transferred to your computer without a problem.


Congratulations!!You have now successfully transferred your photos from your digital camera to your computer.

Works Cited• Computer, H. (2014). How to Transfer Photos from Your Digital Camera to
Computer - Video - For Dummies. Dummies.com. Retrieved 19 November 2014, from http://www.dummies.com/how-to/content/how-to-transfer-photos-from-your-digital-camera-to-computer.html
• Transferring Photos from Your Camera to Your Computer. (2014) (1st ed., pp. 1-4). Washington D.C. Retrieved from http
://www.digitalpreservation.gov/personalarchiving/documents/photo_transfer.pdf