Embed Size (px)
Citation preview

C o m m u n i t y E x p e r i e n c e D i s t i l l e d
Leverage the power of high availability clusters on CentOS Linux, the enterprise-class, open source operating system
CentOS High Availability Mitja R
esman
CentOS High Availability
The high performance and stability of CentOS Linux are the key factors that make CentOS Linux the right Linux distribution to build high availability solutions on. This book introduces you to high availability before briefl y walking you through the cluster stack and its layers. The book is then divided into two parts, part A and part B, based on CentOS versions 6 and 7 respectively. Each part begins with the installation and confi guration of the Corosync cluster messaging software with CMAN or with the Pacemaker cluster resource management software.
You will also be introduced to cluster service confi guration and cluster service management before you confi gure fencing or STONITH on CentOS 6 and CentOS 7. By the end of this book, you will have the skills required to independently design, implement, and maintain a CentOS high availability multinode cluster environment.
Who this book is written for
This book is targeted at system engineers and system administrators who want to upgrade their knowledge and skills in high availability and want to learn practically how to achieve high availability with CentOS Linux. You are expected to have good CentOS Linux knowledge and basic networking experience.
$ 29.99 US£ 19.99 UK
Prices do not include local sales tax or VAT where applicable
Mitja Resman
What you will learn from this book
Prepare the CentOS 6 and CentOS 7 operating systems for cluster software installation
Install, confi gure, and test cluster stacks on CentOS 6 (Corosync, CMAN, and RGManager) and CentOS 7 (Corosync and Pacemaker)
Confi gure failover domains, cluster resources, cluster services, and cluster resource groups
Start, stop, add, and remove cluster nodes from a cluster on CentOS 6 and CentOS 7
Place a cluster on standby mode to perform maintenance work on the cluster node
Confi gure fencing on CentOS 6 and STONITH on CentOS 7
Successfully test cluster failovers
CentO
S High Availability
P U B L I S H I N GP U B L I S H I N G
community experience dist i l led
Visit www.PacktPub.com for books, eBooks, code, downloads, and PacktLib.
Free Sample
In this package, you will find: The author biography
A preview chapter from the book, Chapter 5 'Playing with Cluster Nodes
on CentOS 6'
A synopsis of the book’s content
More information on CentOS High Availability
About the Author Mitja Resman hails from a small, beautiful country called Slovenia in south-central
Europe. He is a fan of Linux and also an open source enthusiast. He is a Red Hat
Certified Engineer and Linux Professional Institute professional. Working as a system
administrator, Mitja gained years of professional experience with open source software
and Linux system administration on local and international projects. The Swiss Army
Knife syndrome makes him an expert in the field of VMware virtualization, Microsoft
system administration, and more recently, Android system administration.
Mitja has a strong desire to learn, develop, and share knowledge with others. This is the
reason he started a blog called . It provides CentOS Linux guides and
how-to articles covering all sorts of topics appropriate for both beginners and advanced
users. Mitja is also a devoted father and husband. His daughter and wife are the ones
who take his mind off the geek stuff and make him appreciate life and look forward
to the things to come.

CentOS High Availability The book will guide you through the process of installing, configuring, and administering
a multinode computer cluster on CentOS version 6 and 7 using two different cluster
suites with respect to the CentOS version.
What This Book Covers Chapter 1, Getting Started with High Availability, provides facts about high availability.
Chapter 2, Meet the Cluster Stack on CentOS, shows you how cluster stack software
works as a whole to provide high availability.
Chapter 3, Cluster Stack Software on CentOS 6, covers installation and configuration of
cluster stack software on CentOS 6.
Chapter 4, Resource Manager on CentOS 6, teaches you how to manage your cluster
resources and services with the RGManager resource manager on CentOS 6.
Chapter 5, Playing with Cluster Nodes on CentOS 6, explains how to manage and
administer cluster nodes on CentOS 6.
Chapter 6, Fencing on CentOS 6, provides the details and recommendations on the
quorum disk on CentOS 6.
Chapter 7, Testing Failover on CentOS 6, discovers cluster node fencing on CentOS 6.
Chapter 8, Two-node Cluster Considerations on CentOS 6, covers some final cluster
failover tests on CentOS 6.
Chapter 9, Cluster Stack Software on CentOS 7, shows you how to install and configure
cluster stack software on CentOS 7.
Chapter 10, Resource Manager on CentOS 7, teaches you how to manage your cluster
resources and services with the Pacemaker resource manager on CentOS 7.
Chapter 11, Playing with Cluster Nodes on CentOS 7, explains how to manage and
administer cluster nodes on CentOS 7.
Chapter 12, STONITH on CentOS 7, introduces the details and recommendations on
quorum disk on CentOS 7.
Chapter 13, Testing Failover on CentOS 7, covers cluster node fencing, the so-called
STONITH, on CentOS 7.
Chapter 14, Two-node Cluster Considerations on CentOS 7, provides some final cluster
failover tests on CentOS 7.

[ 57 ]
Playing with Cluster Nodes on CentOS 6
In the previous chapter, you learned how to add, manage, and remove failover domains, cluster resources, and cluster services with RGManager on CentOS 6. Since a computer cluster is a live system and is constantly developing and growing with additional resources and services, it is also very important for you, as a cluster administrator, to know how to add or remove a cluster node from the cluster if the situation requires you to.
This chapter focuses on familiarizing you with cluster node management on CentOS 6. You will learn how to add and remove cluster nodes from an existing and running computer cluster.
Adding a new cluster nodeAdding a new cluster node to an existing cluster confi guration does not require any cluster service downtime. By this point, you should be familiar with the process of installing and confi guring cluster stack software on a new CentOS 6 cluster node, so the steps for adding a new cluster node are not covered in detail.
To add a new cluster node to the existing cluster confi guration, follow these steps:
1. Operating system preparation:
Configure network interfaces and networking Configure NTP time synchronization Configure DNS resolving Check the network connectivity between the cluster nodes
Playing with Cluster Nodes on CentOS 6
[ 58 ]
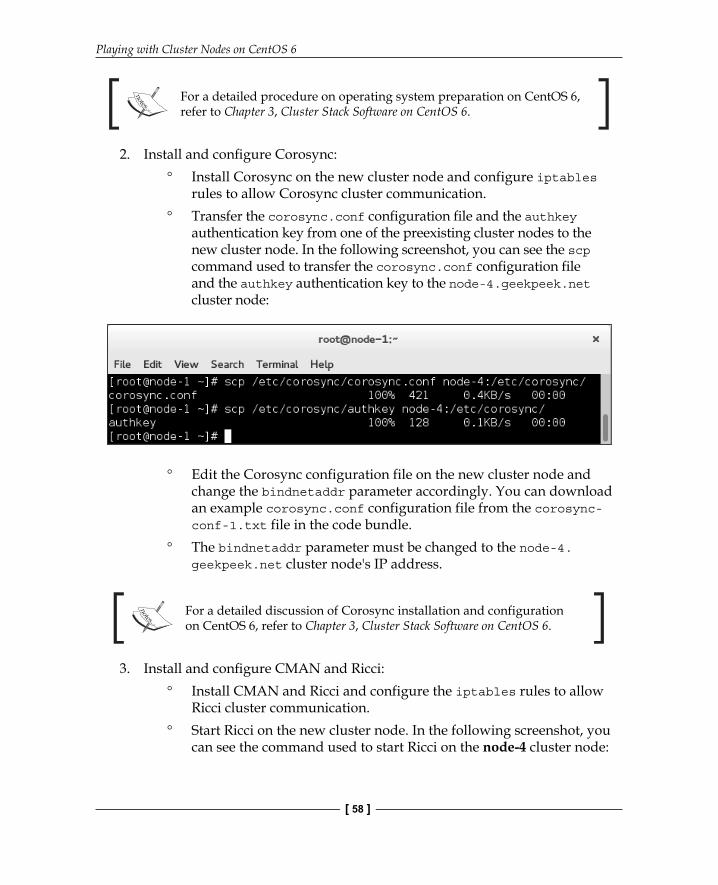
For a detailed procedure on operating system preparation on CentOS 6, refer to Chapter 3, Cluster Stack Software on CentOS 6.
2. Install and confi gure Corosync: Install Corosync on the new cluster node and configure iptables
rules to allow Corosync cluster communication. Transfer the corosync.conf configuration file and the authkey
authentication key from one of the preexisting cluster nodes to the new cluster node. In the following screenshot, you can see the scp command used to transfer the corosync.conf configuration file and the authkey authentication key to the node-4.geekpeek.net cluster node:
Edit the Corosync configuration file on the new cluster node and change the bindnetaddr parameter accordingly. You can download an example corosync.conf configuration file from the corosync-conf-1.txt file in the code bundle.
The bindnetaddr parameter must be changed to the node-4.geekpeek.net cluster node's IP address.
For a detailed discussion of Corosync installation and configuration on CentOS 6, refer to Chapter 3, Cluster Stack Software on CentOS 6.
3. Install and confi gure CMAN and Ricci: Install CMAN and Ricci and configure the iptables rules to allow
Ricci cluster communication. Start Ricci on the new cluster node. In the following screenshot, you
can see the command used to start Ricci on the node-4 cluster node:

Chapter 5
[ 59 ]
Edit the CMAN configuration file on one of the pre-existing cluster nodes, and add a new cluster node to the <clusternodes> section and the <failoverdomains> section, if required. Do not forget to increase the config_version parameter number. You can download an example CMAN cluster.conf configuration file from the cman-conf-2.txt file in the code bundle.
A new cluster node called node-4 is now added to the cluster configuration within the <clusternodes> and <failoverdomains> sections.
Verify the cluster configuration and distribute the new cluster configuration to all other cluster nodes as follows. In the following screenshot, you can see the command used to verify the cluster configuration and propagate it to other cluster nodes:
The CMAN cluster.conf configuration file is now successfully distributed at the new node-4 cluster node due to the running Ricci service.
Start the CMAN service on the new cluster node and check the cluster node's status with the cman_tool nodes command. In the following screenshot, you can see the output of the cman_tool nodes command:
Playing with Cluster Nodes on CentOS 6
[ 60 ]
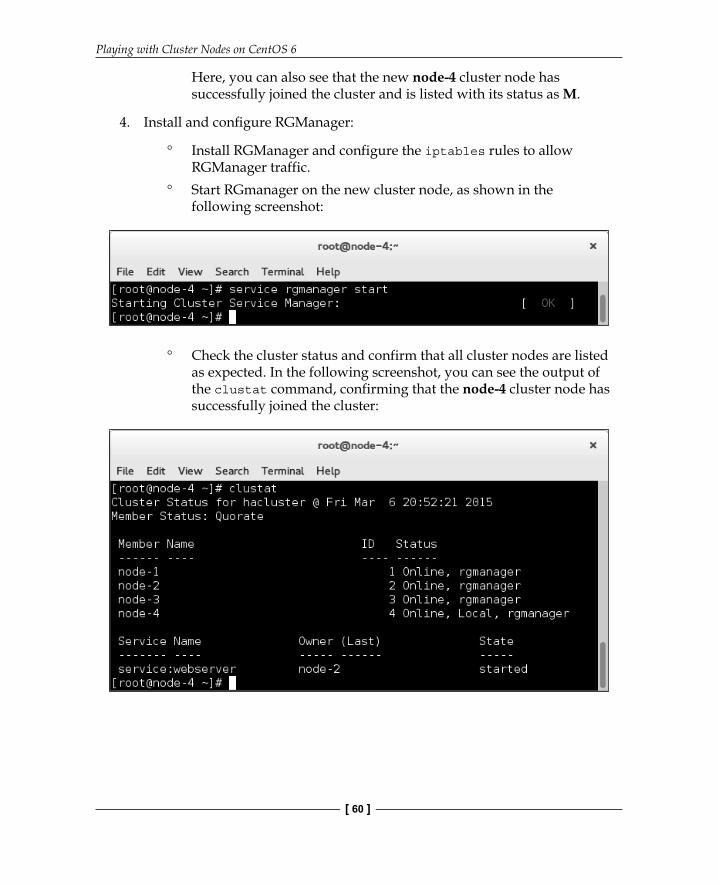
Here, you can also see that the new node-4 cluster node has successfully joined the cluster and is listed with its status as M.
4. Install and confi gure RGManager:
Install RGManager and configure the iptables rules to allow RGManager traffic.
Start RGmanager on the new cluster node, as shown in the following screenshot:
Check the cluster status and confirm that all cluster nodes are listed as expected. In the following screenshot, you can see the output of the clustat command, confirming that the node-4 cluster node has successfully joined the cluster:
Chapter 5
[ 61 ]
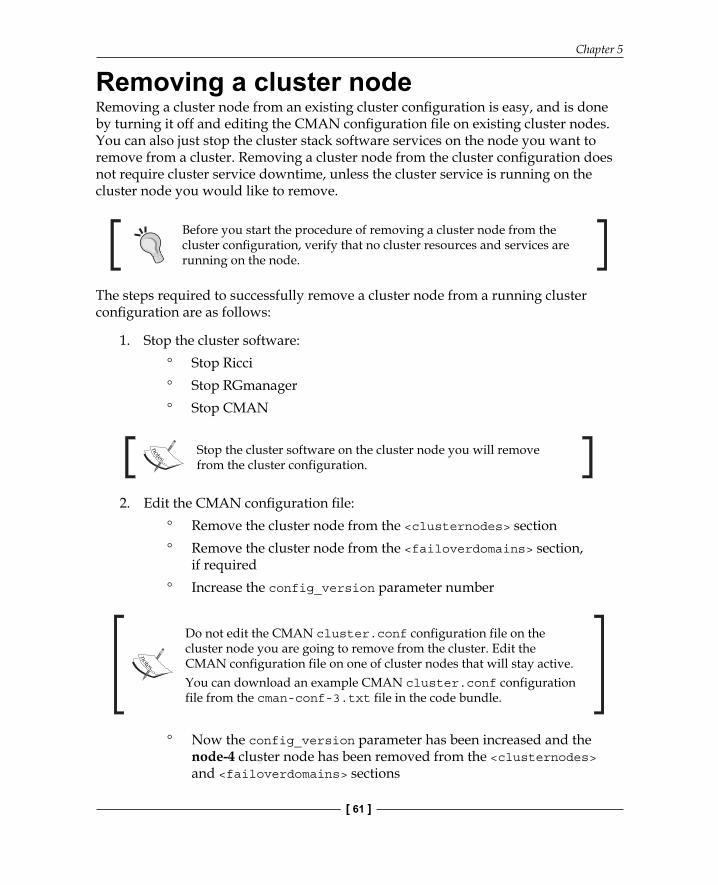
Removing a cluster nodeRemoving a cluster node from an existing cluster confi guration is easy, and is done by turning it off and editing the CMAN confi guration fi le on existing cluster nodes. You can also just stop the cluster stack software services on the node you want to remove from a cluster. Removing a cluster node from the cluster confi guration does not require cluster service downtime, unless the cluster service is running on the cluster node you would like to remove.
Before you start the procedure of removing a cluster node from the cluster confi guration, verify that no cluster resources and services are running on the node.
The steps required to successfully remove a cluster node from a running cluster confi guration are as follows:
1. Stop the cluster software: Stop Ricci Stop RGmanager Stop CMAN
Stop the cluster software on the cluster node you will remove from the cluster configuration.
2. Edit the CMAN confi guration fi le: Remove the cluster node from the <clusternodes> section Remove the cluster node from the <failoverdomains> section,
if required Increase the config_version parameter number
Do not edit the CMAN cluster.conf configuration file on the cluster node you are going to remove from the cluster. Edit the CMAN configuration file on one of cluster nodes that will stay active.You can download an example CMAN cluster.conf configuration file from the cman-conf-3.txt file in the code bundle.
Now the config_version parameter has been increased and the node-4 cluster node has been removed from the <clusternodes> and <failoverdomains> sections

Playing with Cluster Nodes on CentOS 6
[ 62 ]
3. Distribute the CMAN confi guration fi le: Validate the cluster configuration and distribute the CMAN
configuration file to other, still active cluster nodes. In the following screenshot, you can see the command used to verify the cluster configuration and distribute the cluster.conf configuration file to other cluster nodes:
4. Check the Cluster Status parameter to confi rm that the cluster node was removed from the cluster confi guration. In the following screenshot, you can see that the node-4 cluster node has been successfully removed from the cluster:
The node-4 cluster node is no longer listed and has been successfully removed from the cluster configuration

Chapter 5
[ 63 ]
SummaryIn this chapter, you learned how to add a cluster node to a running cluster confi guration, and how to remove a cluster node from it without any cluster service disruption or downtime. In the following chapter, you will explore the cluster node fencing mechanism and how to confi gure cluster node fencing.

Where to buy this book You can buy CentOS High Availability from the Packt Publishing website.
Alternatively, you can buy the book from Amazon, BN.com, Computer Manuals and most internet
book retailers.
Click here for ordering and shipping details.
www.PacktPub.com
Stay Connected:
Get more information CentOS High Availability