Embed Size (px)
Citation preview

Road to Energy
Independence
Owner: Joanne Olson – Viroqua, WI
Pre-retrofit Post-retrofit
1
Revised 03-23-11

Energy Independence at
709 Independence Lane
Deep Energy Reduction
- A Staged Approach
Stage 1: Exterior Retrofit
Stage 2: Basement Retrofit with
Appliance Upgrades
Stage 3: Renewable Energy
2

3-Staged Approach (Due to Cost Considerations)
Stage 1: Exterior Retrofit ~$70,000 (actual)
Stage 2: Basement Retrofit ~$13,000 (wall & floor estimate)
Stage 3: Renewable Energy ~$30,000 (hopeful, to get to net zero 6 KW system)
• Replace appliances such as refrigerator, stove, & misc. throughout
• Incentives & tax credits will help ~$20,000
• Total estimated cost to achieve near net zero: $93,000
• Energy savings won’t quite pay for upgrades, but added comfort & health are worth $450/month to finance project.
• We hope that PACE financing will be available in the next few years.
3

House & Household Summary
• Household size: 1 grandma
• 1948 ranch with basement
• 2,052 ft2 finished floor area (1,100 up, 952 conditioned
basement below grade)
• 2x4 frame construction
• Poorly insulated & drafty, single-pane windows
• 30-year-old natural gas water heater & furnace (furnace is
a first-generation condensing unit ~88% efficiency; we are
waiting to replace it. It’s not a priority. We replaced the
motor with a high efficiency motor).
• Grandma is there full-time, with the exception of a few
weeks of vacation per year. She does have visitors
throughout the year; they add to the energy load.
4

What’s the Energy Cost?
Cost of Natural Gas (NG): $1.10/therm
– @90% efficiency = $1.22 /therm (100,000 btus)
– @90% efficiency = 82,000 btus/dollar
Total bill ÷ Total usage (i.e., therms) = Cost/unit
Cost of Electricity: $.13/kWh
– @100% efficiency = $3.81/therm
– @100% efficiency = 26,250 btus/dollar
For heat/dryer/stove NG is 3.12 times more
cost effective (electricity@ 90% efficiency)
5

Project Highlights
Eave extension, foamed with closed cell SPF eliminating soffit ventilation
Exterior retrofit, eave extension, foamed bathroom wall, cellulose cavity insulation. R-30+ walls
3” polyiso on great room/cathedral roof added above existing insulation
3” polyiso above grade walls, 3” of XPS below grade
6
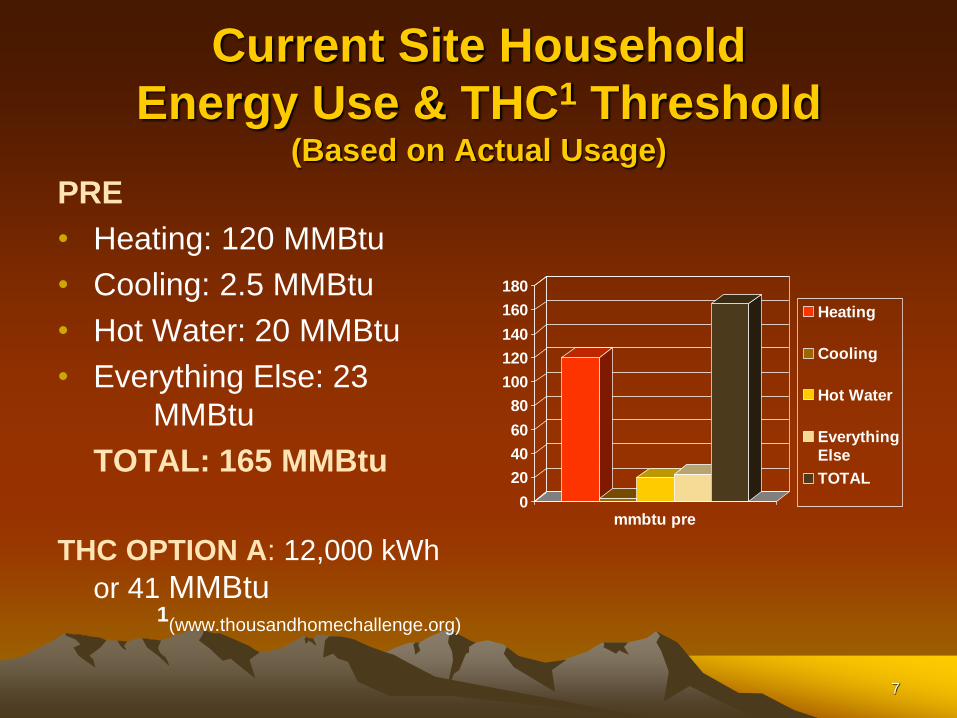
Current Site Household
Energy Use & THC1 Threshold (Based on Actual Usage)
PRE
• Heating: 120 MMBtu
• Cooling: 2.5 MMBtu
• Hot Water: 20 MMBtu
• Everything Else: 23
MMBtu
TOTAL: 165 MMBtu
THC OPTION A: 12,000 kWh
or 41 MMBtu 1
(www.thousandhomechallenge.org)
0
20
40
60
80
100
120
140
160
180
mmbtu pre
Heating
Cooling
Hot Water
EverythingElse
TOTAL
7

Pre- & Post-Direct
Indicators of Performance
Stage 1 of 3
• Btu/kWh per Household
Pre = 165 MMBtu; Post = ~112 MMBtu
• Household Annual Cost ($) – Pre $1,550 (NG) $600 (elec) Total = $2,150
– Post $600 (NG) $600 (elec) Total = $1,200
• Projected Post kWh/FFA (Finished Floor Area)
16 kWh per FFA (total energy use)
• Water & Sewage About the same ~200 cubic feet/month (7.4 gallons = 1 cubic foot)
– Important note: Natural gas is about ½ the cost of propane, so if propane were used it would be ~ double the energy cost & savings
8

Site Energy Household
Reductions (Stage 1) Joanne is pretty conservation minded already. She did share a freezer, but she
recently bought one of her own. No renewables have been installed yet, so results
are mostly efficiency savings. There is still room for some improvement.
Behavioral Choices
Efficiency
Renewables
CommunitySolutions
9
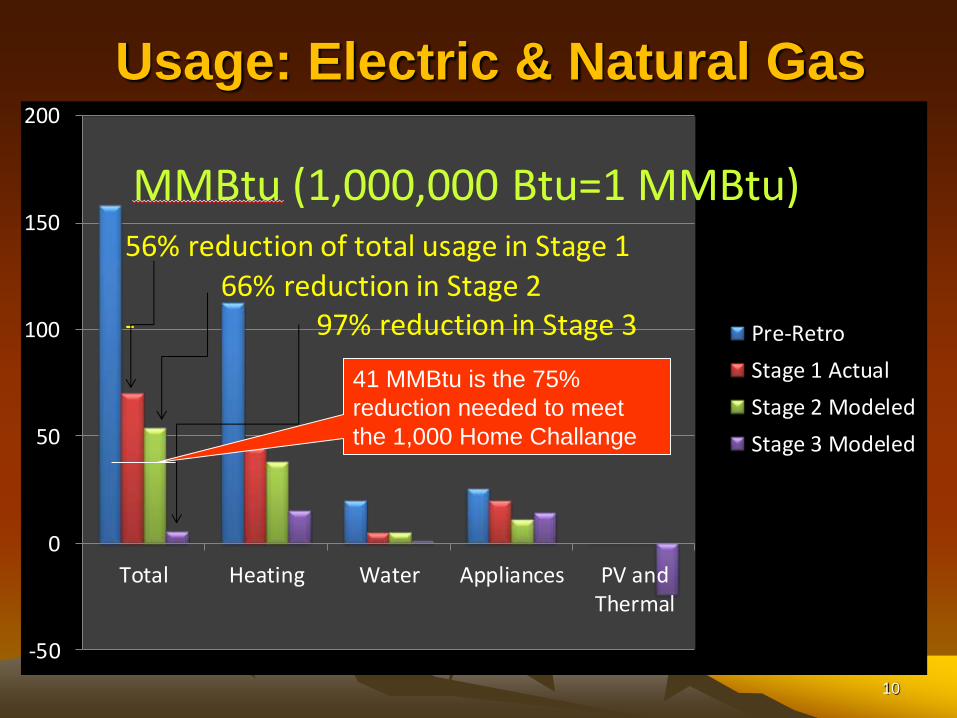
Usage: Electric & Natural Gas
-50
0
50
100
150
200
Total Heating Water Appliances PV andThermal
Pre-Retro
Stage 1 Actual
Stage 2 Modeled
Stage 3 Modeled
MMBtu (1,000,000 Btu=1 MMBtu)56% reduction of total usage in Stage 1
66% reduction in Stage 2- 97% reduction in Stage 3
41 MMBtu is the 75%
reduction needed to meet
the 1,000 Home Challange
10

THC Thresholds
-50
0
50
100
150
200
Pre Retro Stage 1 Stage 2 Stage 3
MMBtu
Solar
Appliances
Hot Water
Heating
41 MMBtu is the THC Threshold.
We could probably reach it if she
didn’t use the small space
heater/fireplace (70% efficient
heater vs. 90% furnace).
11

THC REDUCTION MATRIX Stage 1: Joanne Olson ANNUAL HOUSEHOLD kWh- MODELED Usage-not actual
Loads Current
Use Proposed Usage Reductions - kWh/yr Target Use
THC
Threshold
(breakout
may be
estimated)
Efficiency Behavioral
Choices Renewables
Community
Solutions
(kWh/yr) Building
Upgrades
Equipment
Upgrades
On-site
Offsets (kWh/yr) (kWh/yr)
Heating 33,030 13,624 19406 11,017
Cooling
Hot Water 8,251 4,413 3,838
All Else 4,233 894 3,339 1,058
Total 45,514 13,624 5,307 26,583 12,075
REDUCTION
18,931
KWh/yr
12

Basis for Predicting
Reductions
4 scenarios run using RemRate software
1) Baseline
2) Above grade exterior retrofit
3) Basement retrofit
4) Solar/renewables
Software was fairly accurate in the 2nd scenario.
The rest is yet to come!
13

Modeled Usage - All Stages
We used RemRate to perform several energy
model ratings (HERS Rating)
• Existing: 125
• Stage 1: 67
• Stage 2: 48
• Stage 3: 16
14
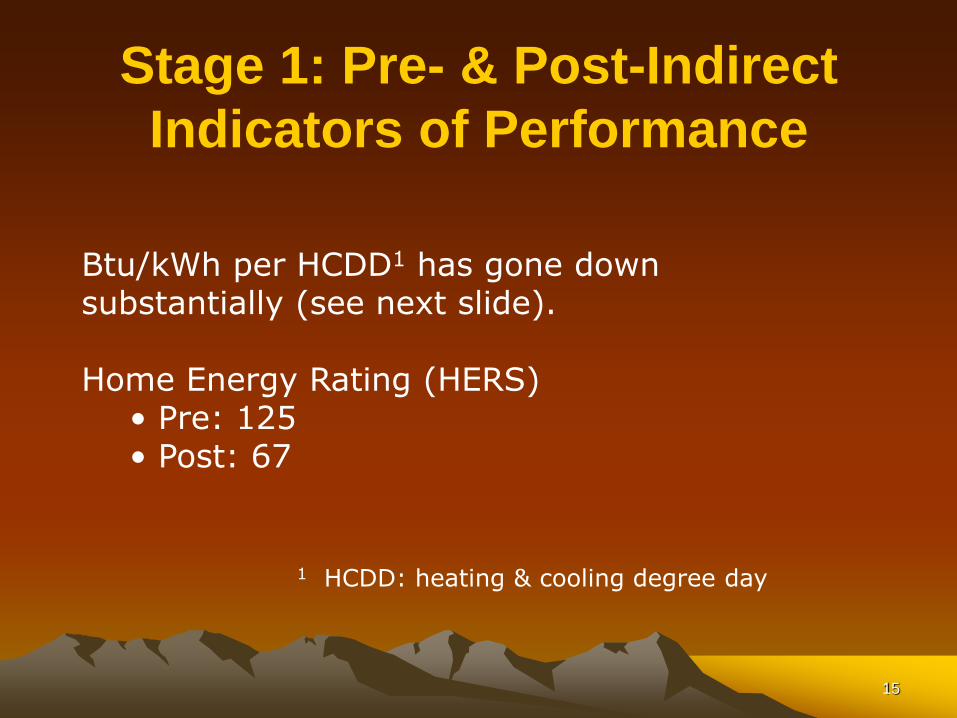
Stage 1: Pre- & Post-Indirect
Indicators of Performance
Btu/kWh per HCDD1 has gone down substantially (see next slide). Home Energy Rating (HERS)
• Pre: 125 • Post: 67
1 HCDD: heating & cooling degree day
15

Heating Degree Days
Look at Before and After
Project Completed Oct 2009 16

Gas Usage 2009-2010
Heating & Hot Water Only
(Dryer & cooking are electric)
Stage 1 retrofit mostly completed by 10/09
• 4 family members for 2 weeks in Dec 2010
- Lots of cooking & showers
• Changed from electric to gas range Dec 2010
• ERV was set at 70% and now is @20%-30%
Therms/Month
17

Electricity Usage •Electricity increased because of greater dehumidifier use •High water table caused damp basement •With increased envelope tightness, dampness is amplified •To be addressed in Stage 2!
• Installed ERV Nov 2010
• New sump pump Dec 2010
• New fan motor for furnace 2010
• Dehumidification & A/C 2009 & 2010
• New freezer July 2010
18

Project’s Biggest
Challenges/Opportunities
Where to draw the line on “project creep?”
• We could have spent much more time & money;
each day brought more decisions.
Cost of materials
• We found & bought misordered insulation from a
large construction company for about ½ price
and ERV was 1/5 of the price. Spray foam was
purchased from the manufacturer at a discount
because of dated product.
19

What Was Challenging?
• To air seal we foamed & foamed & foamed.
• We nearly created a thermal bridge-free house. We didn’t get the openings (windows & doors) because of the time & cost vs. the benefit.
• The budget… we live in an area in which it will be difficult to recover costs at point of sale. The value proposition was increased comfort as well as lowered bills.
20

What Worked Well?
My crew! Once they understood all of the key concepts, such as the drainage plane, they didn’t need a lot of guidance. A mock-up wall section communicated effectively.
• Grandma’s flexibility: She allowed me to make judgment calls on the spot as needed. She didn’t hover over the project. I don’t know if I could have inspired this type of confidence in all of my clients. This helped things move along.
• Exterior retrofit: Minimal disturbance, all new siding & drainage plane.
21

Building Enclosure Summary
• Walls: 2x4 dense pack cellulose with 3” (R-20) of rigid polyiso. Fur out for drainage plane & cement board siding. Serious fiberglass windows with 7 series glass
• Cathedral Roof: R-20 polyiso skin with existing fiberglass cavity & 2 inches of EPS for a total of R-40. Unvented
• Attic: Sealed soffit venting with closed cell foam & R-60 cellulose throughout
• Basement: Stage 2
22

Cool Stuff!
New Overhangs - New Unvented Soffit
Before After
Before After 23

Air Leakage
Blower Door Test Results
PRE (June 21, 2009)
2,100 CFM 50
8 ACH 50 (includes basement)
.45 CFM 50/Ft2 surface area (6 sides)
POST (January 15, 2010)
700 CFM 50
2.6 ACH 50 (includes basement)
.15 CFM 50/Ft2 surface area (6 sides)
24
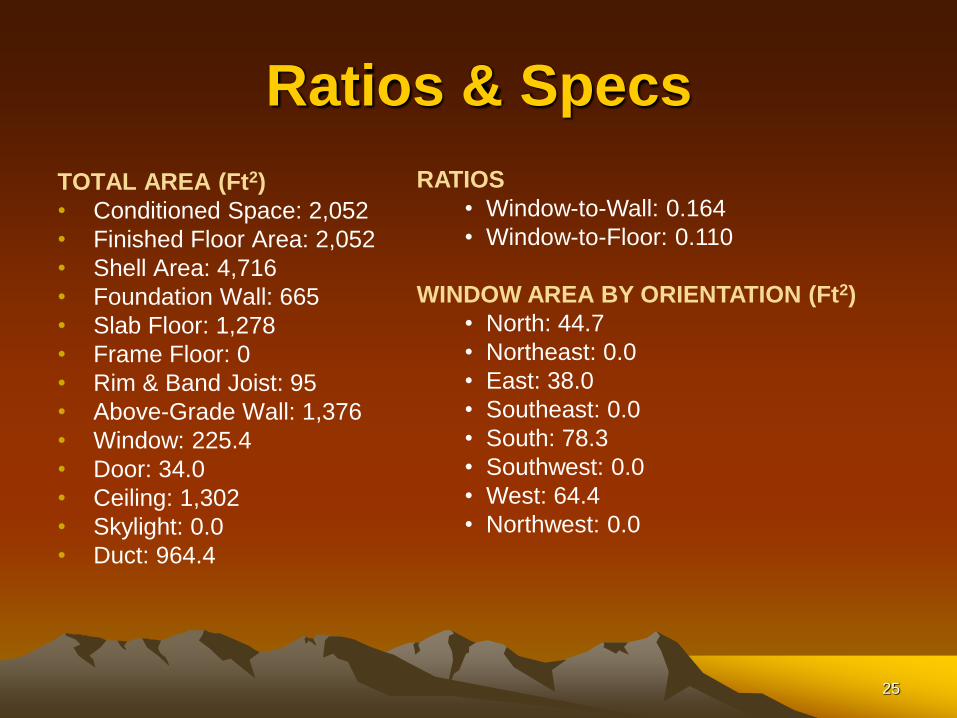
Ratios & Specs
TOTAL AREA (Ft2)
• Conditioned Space: 2,052
• Finished Floor Area: 2,052
• Shell Area: 4,716
• Foundation Wall: 665
• Slab Floor: 1,278
• Frame Floor: 0
• Rim & Band Joist: 95
• Above-Grade Wall: 1,376
• Window: 225.4
• Door: 34.0
• Ceiling: 1,302
• Skylight: 0.0
• Duct: 964.4
RATIOS
• Window-to-Wall: 0.164
• Window-to-Floor: 0.110
WINDOW AREA BY ORIENTATION (Ft2)
• North: 44.7
• Northeast: 0.0
• East: 38.0
• Southeast: 0.0
• South: 78.3
• Southwest: 0.0
• West: 64.4
• Northwest: 0.0
25

Winter Comfort
Heating System
Current:
– Stand alone natural gas fireplace for radiant space heat in “great room” the main room ~70% efficient
– Old condensing forced air, tested at 90%!
Thermostat settings: ~64º F
Planned:
Higher efficiency units. Possibly the Vertex hot water with water-to-air heat exchange
26

Summer Comfort
• Reducing Solar Gains: Lattice with seasonal
plants shading south deck windows
• Reducing Internal Gains: Vent cook stove
• Creative Comfort: Ceiling fans & new overhangs
• Mechanical Solutions: We left older central AC &
will buy new as/if needed
• We installed a Renewaire ERV to circulate air
27

Water Heating Installed direct vent tankless Takagi water heater. It was what the
plumber sold. I didn’t do my research first.
• Eliminated all standby losses; efficiency is great.
• Delivery of hot water is far from instantaneous!
• Water use increased! Grandma couldn’t use the “trickle’” dishwashing & the initial hot water to the shower was wasted. Changed dishwashing technique from a “trickle” rinse to a tub wash.
• Tankless selected to reduce standby losses but, in reality, the savings aren’t that great & the lag time involved in the system is annoying. If you shut off & then turn water back on you get a pocket of cold water.
• Renewables: Stage 3 solar DHW.
• Next job: combination space & water heating system.
28

Good Air Quality
• Key Pre-existing Problems: Radon 10 pl – Still exists… but ERV helps
• Source Control Strategies: Stage 2
• Unanswered or Unresolved Issues: Can we afford a basement retrofit to address the radon? – We’re planning at least the perimeter wall retrofit &
probably not the “basement lowering”
• We made a much tighter house & changed the drying potential of the interior so we now use a dehumidifier in addition to our ERV.
29

Mechanical Ventilation
• Renewaire E130
• Simple design with dedicated ducts
• Operated at low speed fairly consistently
• Energy Use/Day: ~1,500 watts/day
• Performance: We’re still working on the data
such as the actual energy or anecdotal
regarding RH or comfort. Both the comfort &
relative humidity levels are higher.
• Simple design worked well
30

Mechanical Ventilation
Do Differently?
• Run ducts in attic under insulation. We
built duct chases in the house which were
more difficult & costly than running them in
the attic.
• We considered using the existing forced
air duct work but opted to have a
dedicated system to ensure reliable
airflow.
31

Major Appliances
Space Conditioning: Nothing new yet. Old furnace is in good shape but upgraded the motor
Combustion Venting: New direct vent tankless Takagi water heater
Mechanical Ventilation: ERV & bathroom vent
Operational Changes: Primarily use space heater… Less efficient but only heat specific spaces
Change of Use: Water heater - Can’t use “trickle” dish washing & went to “tub” dish washing (no dishwasher)
32

Electrical Use – Plug Loads
• She bought a freezer & replaced the electric stove with gas.
• Actions & Impact: Grandma was fairly good about
conservation so we primarily focused on energy efficiency.
• Observations: Higher humidity in home resulted in increased
dehumidifier & energy use. We will address this in Stage 2.
We are keeping an eye on radon levels.
• Lessons Learned: Know budget & possible padding because
of overruns. Also, prioritize. We didn’t buy a new refrigerator &
we put those $$ toward a new building shell.
33

Timeline & Major Steps
• Stage 1: 2009 Exterior retrofit & new slab
insulation in part of home (not basement)
• Stage 1½: 2010 New appliances, i.e.,
refrigerator & stove
• Stage 2: 2011 Basement retrofit
• Stage 3: 2012 Solar PV & hot water
34

Rapid Feedback & Monitoring
• Utility bills say a lot
• Monitoring temp & RH in the house. Use
Kill A Watt meters to submeter plug loads
• A live link by summer 2011!
• Tracking utility bills (now)
35

Non-Energy Benefits
• Thermal comfort is incredible
• Constant fresh air with ERV
• Exterior should be virtually maintenance
free for 20 years
• Secured expenses… Fewer worries about
energy costs
36

Furring Strips Over Drainage
Plane/House Wrap We waited & waited for the windows so we ended up furring out over
the house wrap. This did not allow us to flash as planned. Timing is everything. We had to move the gas line (after the meter) to accommodate the new 4” of wall - he spun the pipe (it cost $60).
37

Cathedral Retrofit The existing 6” Fiberglass insulation wasn’t perfect, but we decided that it
would be financially prohibitive to remove it, so we left it. We then cut back
the ridge sheathing & air sealed (foamed) it solid. The rafter tails were
completely foamed. We performed a blower door test as we went, & it
appears to be working well. One beam in the middle that we couldn’t foam
showed some leakage, but we’re not sure how. We put in 3” beveled sub
fascia build-up to take the 3” Foam insulation. Sheathing went on top of
this, then tar paper, & then shingles.
38
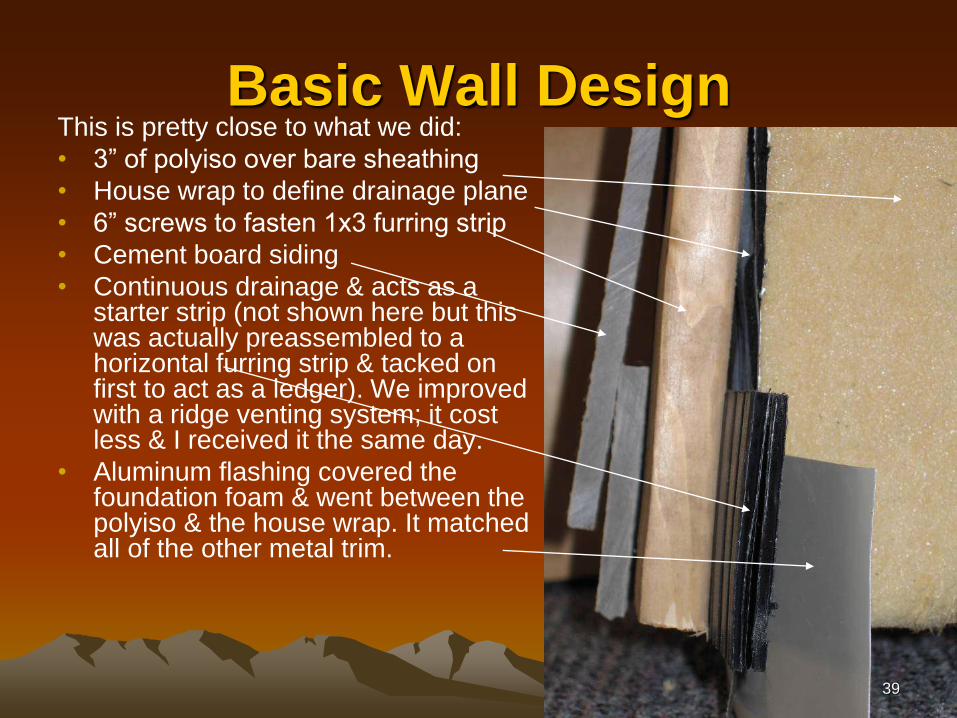
Basic Wall Design This is pretty close to what we did:
• 3” of polyiso over bare sheathing
• House wrap to define drainage plane
• 6” screws to fasten 1x3 furring strip
• Cement board siding
• Continuous drainage & acts as a starter strip (not shown here but this was actually preassembled to a horizontal furring strip & tacked on first to act as a ledger). We improved with a ridge venting system; it cost less & I received it the same day.
• Aluminum flashing covered the foundation foam & went between the polyiso & the house wrap. It matched all of the other metal trim.
39

More Wall Details:
Cellulose, Insulation Caps
40

Pick the Right Fasteners • We went from a heavier gauge 6” #3 Phillips head to a lighter gauge
6 & 5” torque screw (better self tapping, as well). It saved a ton of
time & cussing! We didn’t have to worry about the shear strength
because the siding fur-outs were on well supported ledgers.
41

Learn from Deconstruction • As you deconstruct, you will find clues to how your home is performing. These
photos reveal air leakage: dusty fiberglass & moisture stains on the underside of roof
sheathing. This sheathing is a perfect example of an attic vs. (non-purposefully
vented) cathedral. The cathedral side shows where warm, moist air condensed on
the sheathing (rusty nails, too) & over time it would fail. The attic side of the
sheathing is fine even though the venting wasn’t great.
• Air sealing cathedral ceilings is critical.
Peak of Cathedral Ceiling/Roof
42

3” Window Build-out to Accommodate Polyiso 5” star head torque screws with construction adhesive
House wrap over that & then the furring strips
43
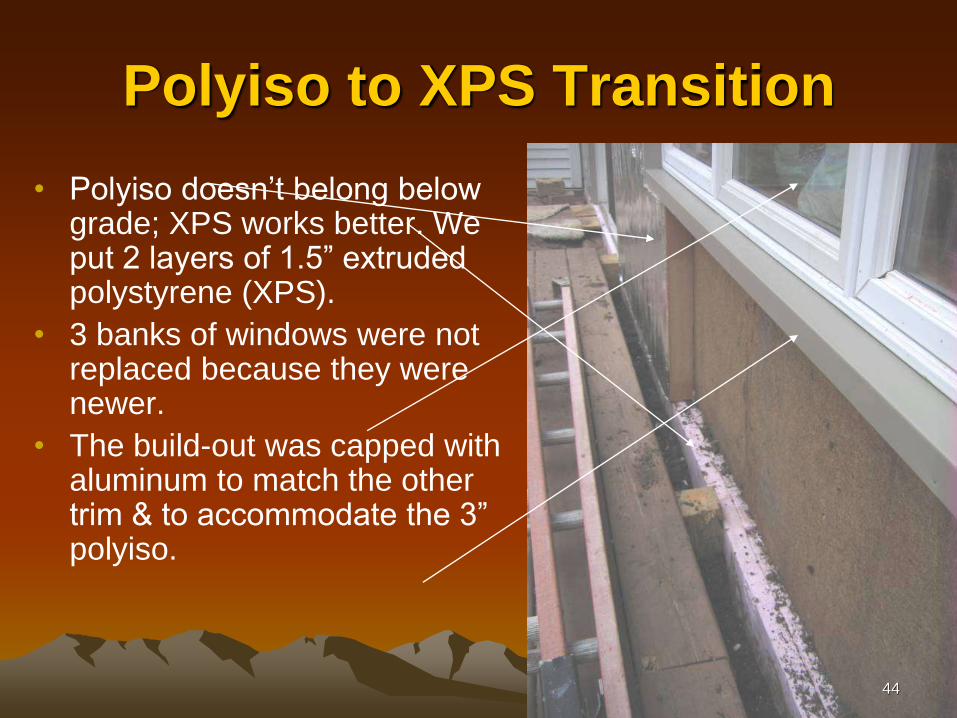
Polyiso to XPS Transition
• Polyiso doesn’t belong below grade; XPS works better. We put 2 layers of 1.5” extruded polystyrene (XPS).
• 3 banks of windows were not replaced because they were newer.
• The build-out was capped with aluminum to match the other trim & to accommodate the 3” polyiso.
44

Pictures Save a 1,000 Cusses • After I foamed all of the difficult cavities & before we resheathed
the exterior, I took photos & made a little booklet for the crew &
for the insulator. From those photos, I’m sure that we saved
hours & hours, e.g., below: the insulator now knows exactly
which cavities need to be filled.
45
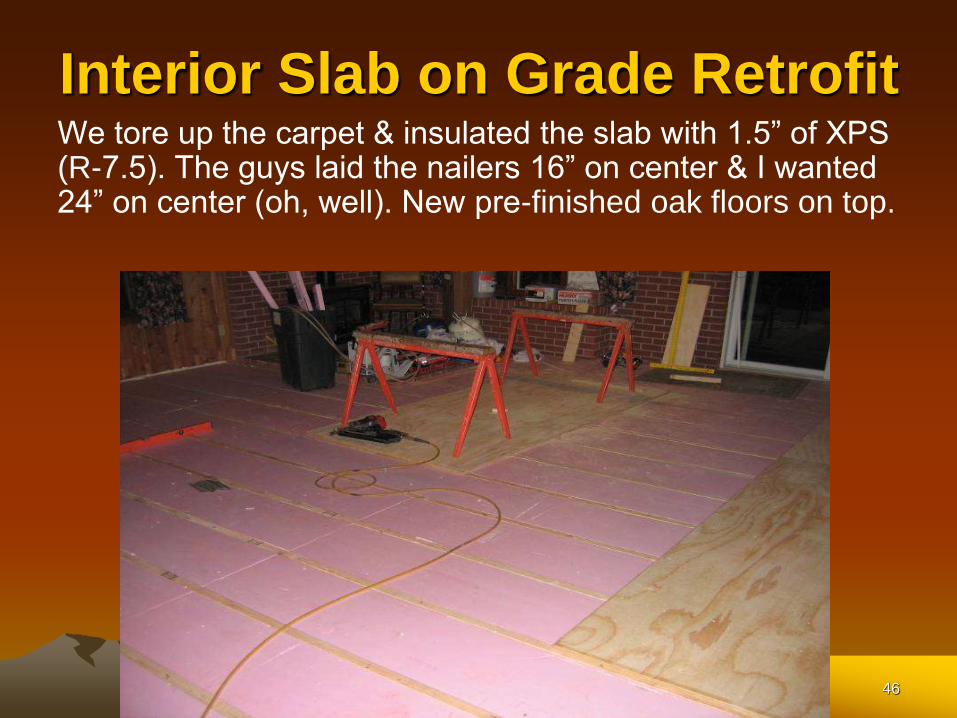
Interior Slab on Grade Retrofit We tore up the carpet & insulated the slab with 1.5” of XPS (R-7.5). The guys laid the nailers 16” on center & I wanted 24” on center (oh, well). New pre-finished oak floors on top.
46

What Worked & What Didn’t
YES
• Exterior approach vs. interior
• So far, sealing the soffit vents to maximize truss heel insulation with closed cell spf ~R-6/inch (solid R-20+)
• Maintained gable & roof vents
• Drainage plane with cement board
NO
• Exterior drainage tile. The water in the basement is from a high water table or spring
47

Lessons Learned
• Find the right fastener for securing exterior foam. We went from a heavier gauge 6” Phillips head to a lighter gauge 5½” star head & saved a lot of time.
• Order early if you are buying high performance windows; nail down the ETA.
• Exterior retrofits allow for a deep energy upgrade while not very intrusive for the owner.
• Plan for surprises & budget accordingly. We found some rotten rim joists, also some concrete that needed to be removed which added ~$600. We couldn’t get the chimney out easily, so we stopped trying & built around it.
• We realized that the cathedral ceiling had existing insulation & we made a judgment call to leave it to save on budget.
• We left 3 banks of windows that are low-E Andersens, this saved us ~$2,000. In all, things that were left weren’t as good as something new, but the budget had boundaries & there were other priorities.
• Shop early & wait for sales on products & materials. Look for discounted products from big builders, lumberyards, & manufacturers. We bought a new ERV for $150 from a big builder.
• We modified plastic ridge venting to use for our siding starter strip & drainage plane relief.
48

Most Helpful
Information Resources
• www.Buildingscience.com
• www.greenbuildingadvisor.com
Well thought out plan & risk/reward
evaluation. Should we leave some
insulation? Yes, if we can be assured of
great air sealing.
49

For Additional Information
www.E3Coalition.org
Data link to HOBO monitoring system
coming soon.
50

Homeowner/Project Team
Joanne Olson: patient
grandma, mother
Jim Olson: son, builder,
consultant
– E3coalition.org will have
data monitoring link
51