
User Manual
HK2200

FCC Notice
This equipment has been tested and found to comply with the limits for a Class B dig-ital device, pursuant to part 15 of the FCC Rules. These limits are designed to provide reasonable protection against harmful interference in residential installation. This equipment generates, uses and can radiate radio frequency energy and if not installed and used in accordance with the instructions, may cause harmful interference to radio communications. However, there is no guarantee that interference will not occur in a particular installation. If this equipment does cause harmful interference to radio or television reception, detectable by turning the equipment in question off and on, the user is encouraged to try to correct the interference by one or more of the following measures:
• Reorient or relocate the receiving antenna
• Increase the distance between the equipment and the receiver
• Connect the equipment to an outlet on a different circuit than that which the receiveris connected to
• Or consult the dealer or an experienced radio/TV technician for help.
This device complies with Part 15 of the FCC Rules. Operation is subject to following two conditions:
1. This device may not cause harmful interference, and2. This device must accept any interference that may cause undesired operation.
2

3
Safety instructions
Read all of these instructions before you operate your projector and save for future reference.
1. Read instructionsAll the safety and operating instructions should be read before the appliance isoperated.
2. Notes and warningsAll notes and warnings in the operating instructions should be adhered to.
3. CleaningUnplug the projector from the wall socket before cleaning. Use a damp cloth forcleaning the projector housing. Do not use liquid or aerosol cleaners.
4. AccessoriesDo not place this product on an unstable cart, stand, or table. The product may fall,causing serious damage to the product.Keep the plastic packing materials (from the projector, accessories and optionalparts) out of the reach of children as these bags may result in death by suffocation.Be particularly careful around the small children.
5. VentilationThe projector is equipped with ventilation holes (intake) and ventilation holes(exhaust).Do not block or place anything near these slots, or internal heat build-up mayoccur, causing picture degradation or damage to the projector.
6. Power sourcesCheck that the operating voltage of your unit is identical with the voltage of yourlocal power supply.
7. ServicingDo not attempt to service this projector yourself. Refer all servicing to qualifiedservice personnel.
8. Replacement partsWhen replacement parts are required, be sure that the replacement parts arespecified by the manufacture. Unauthorized substitutions may result in fire, electricshock or other hazards.
9. Moisture CondensationNever operate this projector immediately after moving it from a cold location to awarm one. When the projector is exposed to such a change in temperature,moisture may condense on the lens and the crucial internal parts. To prevent theunit from possible damage, do not use the projector for at least 2 hours when thereis an extreme or sudden change in temperature.

Notes on the AC Power Cord
AC Power Cord must meet the requirement of countries where you use this projector. Please confirm your AC plug type with the graphics below and ensure that the proper AC Power Cord is used. If the supplied AC Power Cord does not match your AC out-let, please contact your sales dealer. This projector is equipped with a grounding type AC line plug. Please ensure that your outlet fits the plug. Do not defeat the safety pur-pose of this grounding type plug. We highly recommend using a video source device also equipped with a grounding type AC line plug to prevent signal interference due to voltage fluctuations.
For Australia and Mainland China
For the U.S.A. and Canada
For the U.K.
Ground
For Continental Europe
Ground
Ground
Ground
4

Table of Contents
5
Introduction ........................................................................................... 6Shipping contents .................................................................................................................................. 6Projector Overview ................................................................................................................................. 7
Controls and functions ......................................................................... 8Projector & Remote control .................................................................................................................... 8Installing the Batteries .......................................................................................................................... 10Remote Control Operation ................................................................................................................... 11
Positioning your projector ................................................................. 12Choosing a location ............................................................................................................................. 12Obtaining a preferred projected image size ......................................................................................... 13Shifting the projection lens ................................................................................................................... 14Adjusting the Projector Height ............................................................................................................. 15Adjusting the Projector Focus and Zoom ............................................................................................. 15
Operation ............................................................................................. 16Installing the USB wireless dongle ....................................................................................................... 16Powering On the Projector ................................................................................................................... 16Powering Off the Projector ................................................................................................................... 16
Home Screen ....................................................................................... 17
Connection .......................................................................................... 18Connecting to a Wi-Fi Network ............................................................................................................ 19Screencasting with a Smartphone, Tablet, or PC ................................................................................ 20Screencasting by Mirror Cast ............................................................................................................... 25Presenting from a Media Player ........................................................................................................... 26
Using the menus ................................................................................. 27Securing the projector .......................................................................................................................... 28Upgrading firmware .............................................................................................................................. 30Menu operation .................................................................................................................................... 31
Maintenance ........................................................................................ 41Cleaning the Lens ................................................................................................................................ 41Cleaning the Projector Housing ........................................................................................................... 41Replacing the Lamp ............................................................................................................................. 42
Specifications ...................................................................................... 44Dimensions .......................................................................................................................................... 45
Appendix .............................................................................................. 46LED Indicator Messages ...................................................................................................................... 46Troubleshooting ................................................................................................................................... 49RS-232 Protocol ................................................................................................................................... 50

Introduction
Shipping contentsCarefully unpack and verify that you have all of the items shown below. If any of these items are missing, please contact your place of purchase.
Standard accessories
Projector Remote control AAA batteries*2
HDMI cable Power cord Quick start guide
Warranty card Safety guide USB Wireless dongle
6

Projector Overview
1. Lamp cover 2. Control panel3. Lens shift 4. Focus ring5. Zoom ring 6. Front IR remote control sensor7. Projection lens 8. Quick-release lever9. Adjuster feet 10. Ventilation holes (air exhaust) 11. Security bar 12. Ventilation holes (air inlet) 13. Speaker 14. Hidden USB wireless dongle port15. Ceiling mount holes 16. 12V DC output terminal
Triggers external devices such as an electric screen or light control, etc
17. RS-232 control port 18. USB Mini-B port (for firmware upgrades)
19. HDMI input ports 20. SPDIF output port21. Audio output jack 22. Kensington anti-theft lock slot 23. USB Type-A port (USB 2.0) 24. USB Type-A port (USB 3.0)25. AC power socket
1
6
1
22
33
14
7
891099 11678 9
1012
13
9
99
1115
25
1718
24
19
22
2021
23
16
45
7

Controls and functions
Projector & Remote control1. Power
Turns the projector on and ooff. ON / OFF
Turns the projector on and off.2. Arrow keys ( / / / )
When the On-Screen Display (OSD) menu is activated, these keys are used as directional arrows to select the desired menu items and to make adjustments.
3. OKUsed to confirm the selection on the menu.
4. SourceDisplays the source selection bar.
5. BackUsed to return to the previous layer. Goes back to previous OSD menu, exits and saves menu settings.
6. / MenuTurns on the On-Screen Display (OSD) menu.
7. Power indicator light(See "LED Indicator Messages" on page 46.)
8. Temperature warning light(See "LED Indicator Messages" on page 46.)
9. Lamp indicator light(See "LED Indicator Messages" on page 46.)
10. HDMI 1/HDMI 2Selects HDMI 1 or HDMI 2 input source.
11. Number keys12. Keystone
Displays the Keystone correction menu.13. Brightness
Displays the setting bars for adjustments of the appropriate brightness values.
1
2
3
456
7 8 9
1
10
5
1
121314
16
19
212223
32
17
24
6 18
2011
15
8

14. BlankUsed to hide the screen picture.
15. FreezeUsed to freeze/unfreeze the on-screen picture.
16. HDMI 3No function
17. / /USB: Switch to Media Player
source. Wi-Fi: Switch to wireless linking. Bluetooth: No function
18. Media PlayerAccesses projector Home Screenpage.
19. IDNo function
20. ECODisplays the lamp mode selection bar(Normal / ECO / Dynamic ECO).
21. VolumeDisplays the volume adjustment bar.
22. MuteToggles projector audio between on andoff.
23. ContrastDisplays the setting bars for adjustmentsof the appropriate contrast values.
24. AutoNo function
9

Installing the Batteries1. Press and open the battery cover, as
illustrated.
2. Remove the old batteries (if applicable) and install two AAA batteries. Make sure that the positive and negative ends are positioned correctly, as illustrated.
3. Replace the battery cover until it clicks into place.
Caution
• Risk of explosion if battery is replaced by an incorrect type.
• Dispose of used batteries according to the instructions.
• Make sure the plus and minus terminals are correctly aligned when loading a battery.
Note
• Keep the batteries out of the reach of children. There is a danger of death by accidentally swallowing the batteries.
• Remove batteries from remote control when not using for extended periods.
• Do not dispose of the used batteries along with household waste. Dispose of used batteries according to local regulations.
• Danger of explosion may happen if batteries are incorrectly replaced. Replce all the batteries with new ones.
• Batteries should not be in or near to fire or water, keep batteries in a dark, cool and dry place.
• If suspect battery leakage, wipe out the leakage and then replace new batteries.
• If the leakage adheres to your body or clothes, rinse well with water immediately.
10

Remote Control OperationPoint the remote control at the infrared remote sensor and press a button.• Operating the projector from the front
Note
• Do not point the laser directly to the people's eyes (especially small children). There is a danger of injury to the eyes.
• The remote control may not operate when there is sunlight or other strong light such as a fluorescent lamp shining on the remote sensor.
• Operate the remote control from a position where the remote sensor is visible.
• Do not drop the remote control or jolt it.
• Keep the remote control out of locations with excessively high temperature or humidity.
• Do not get water on the remote control or place wet objects on it.
• Do not disassemble the remote control.
7m
5m15 15
8m
11

Positioning your projector
Choosing a locationBefore choosing an installation location for your projector, take the following factors into consideration:• Size and position of your screen• Electrical outlet location• Location and distance between the projector and the rest of your equipmentYou can install your projector in the following ways.
After turning on the projector, go to SETTINGS Menu > Projection and press / to select a setting.
1. Front
Select this location with the projector placed on the table in front of the screen. This is the most common way to position the projector for quick setup and portability.
2. Rear
Select this location with the projector placed on the table behind the screen. Note that a special rear projection screen is required.
3. Front+Ceiling
Select this location with the projector suspended upside-down in front of the screen. Purchase the Projector Ceiling/Wall Mount Kit from your dealer to mount your projector.
4. Rear+Ceiling
Select this location with the projector suspended upside-down from behind the screen. Note that a special rear projection screen and the Projector Ceiling/Wall Mount Kit are required for this installation location.
12

Obtaining a preferred projected image sizeThe distance from the projector lens to the screen, the zoom setting (if available), and the video format each factors in the projected image size.
Projection dimensions
• The screen aspect ratio is 16:9 and the projected picture is in a 16:9 aspect ratioScreen size Distance from screen (mm)
DiagonalH (mm) W (mm)
Min lengthAverage
Max length
Inch mm (max. zoom)
(min. zoom)
30 762 374 664 750 863 97640 1016 498 886 1001 1151 130250 1270 623 1107 1251 1439 162760 1524 747 1328 1501 1727 195370 1778 872 1550 1751 2015 227880 2032 996 1771 2001 2302 260390 2286 1121 1992 2251 2590 2929100 2540 1245 2214 2502 2878 3254110 2794 1370 2435 2752 3166 3580120 3048 1494 2657 3002 3454 3905130 3302 1619 2878 3252 3741 4231140 3556 1743 3099 3502 4029 4556150 3810 1868 3321 3752 4317 4881160 4064 1992 3542 4003 4605 5207170 4318 2117 3763 4253 4893 5532180 4572 2241 3985 4503 5180 5858190 4826 2366 4206 4753 5468 6183200 5080 2491 4428 5003 5756 6509210 5334 2615 4649 5253 6044 6834220 5588 2740 4870 5504 6331 7159230 5842 2864 5092 5754 6619 7485240 6096 2989 5313 6004 6907 7810250 6350 3113 5535 6254 7195 8136260 6604 3238 5756 6504 7483 8461270 6858 3362 5977 6754 7770 8787280 7112 3487 6199 7004 8058 9112290 7366 3611 6420 7255 8346 9437
H
WProjection distance
Center of lens
Screen16:9 Screen diagonal
Vertical Offset
13

For example, if you are using a 120-inch screen, the recommended projection distance is 3454 mm.If your measured projection distance is 5000 mm, the closest match in the "Distance from screen (mm)" column is 4893 mm. Looking across this row shows that a 170'' (about 4.3 m) screen is required.
Note• All measurements are approximate and may vary from the actual sizes.
We recommend that if you intend to permanently install the projector, you should physically test the projection size and distance using the actual projector in situ before you permanently install it, so as to make allowance for this projector's optical characteristics. This will help you determine the exact mounting position so that it best suits your installation location.
• To optimize your projection quality, we suggest doing the projection by following the values in the non-gray cells.
• The values in the gray cells are for reference only.
Shifting the projection lens
Note• Please stop turning the afjustment knob when you hear a clicking sound indicating the
the knob has reached its limit. Over-turning the knob may cause damage.
300 7620 3736 6641 7505 8634 9763
1V
min. 0 V max. 0.1 V
Desk-front projection
14

Adjusting the Projector Height
The projector is equipped with 1 front adjuster foot and 2 rear adjuster feet.These adjusters change the image height and projection angle.1. Pull the quick-release lever and lift the front of the projector. Once the image is
positioned where you want it, release the quick-release lever to lock the foot inposition. You may also screw the front adjuster foot to change the image height.
2. Use the rear adjuster foot to fine tune the horizontal angle.To retract the foot, screw the adjuster foot in a reverse direction.
Note
• To avoid damaging the projector, make sure that the adjuster feet are fully retractedbefore placing the projector in its carrying case.
Adjusting the Projector Focus and Zoom
1. Focus the image by rotating the focus ring. A still image is recommended for focusing.
2. Adjust the image size by sliding the zoom ring.
Front adjuster foot
Rear adjuster foot Rear adjuster foot
Focus ring
Zoom ring
15

Operation
Installing the USB wireless dongleFollow the illustrations below to install the USB wireless dongle. Make sure that the cover is installed back after the USB wireless dongle is plugged. Do not turn the power on with the cover open.
Powering On the Projector1. Complete the AC power cord and peripheral signal cable(s) connections.
2. Press on the projector or ON on the remote control to turn on the projector.The projector takes a minute or so to warm up.
3. Turn on your source (computer, notebook, DVD, etc.). The projector automatically detects your source when Auto source setting is ON.• If the projector doesn't detect a valid signal,
the message 'No Signal' will continue to be displayed.
Warning
• Never look into the lens when the lamp is on. This can damage your eyes.
• This focal point concentrates high temperature. Do not place any object near it to avoid possible fire hazard.
Powering Off the Projector1. Press on the projector or OFF on the remote control to turn off the projector
lamp. You will see a message "Power off Please press power again" appear onthe screen.
2. Press on the projector or OFF on the remote control again to confirm.• If you want to turn the projector back on, you must wait until the projector has
completed the cooling cycle and has entered stand-by mode. Once in stand-by mode, simply press on the projector or ON on the remote control to restart the projector.
3. Disconnect the AC power cord from the electrical outlet and the projector.4. Do not turn on the projector right after power off.
12
3
16

Home ScreenHome Screen is the projector's operating system that allows you to choose HDMI input source, media player, AirReceiver, wireless linking, as well as language settings.
When the projector is not projecting an image from a connected source it will display Home Screen by default. If the projector is projecting from a source, you can return to Home Screen page by pressing or .
The Home Screen page offers the following features:• Source List - Selects input source for Media Player, HDMI1 or HDMI2.• AirReceiver - Allows you to wirelessly cast content from smartphones, tablets, or
PCs.• Network - Connects the projector to a wireless network.• Mirror Cast - Allow you to cast content directly from smartphones , tables or PCs
which are compatible with Miracast function.
17

ConnectionWhen connecting a signal source to the projector, be sure to:1. Turn all equipment off before making any connections.
2. Use the correct signal cables for each source.3. Ensure the cables are firmly inserted.
Important
• In the connections shown above, some cables may not be included with the projector.They are commercially available from electronics stores.
• The connection illustrations above are for reference only. The rear connecting jacksavailable on the projector vary with each projector model.
• Please check your computer’s baud rate at 9600 so that you can connect the projectorby using a suitable RS-232 cable.
1. 12V Trigger for screen control 2. HDMI cable3. USB cable (Mini-B to A type) 4. Audio cable5. SPDIF cable 6. USB Storage Device for Media
Player, Firmware Upgrade7. RS232 cable
2 2
4
2
1
67
3
5
6
18

Connecting to a Wi-Fi NetworkBefore you can project wirelessly via the projector you must first connect the projector to a wireless network.1. Install the USB wireless dongle before using (See 16 page).
2. Power on the projector. See "Powering On the Projector" on page 16.3. On the Home Screen page interface, select Network and press OK to access the
wireless settings.
4. Turn on the Wi-Fi to see available networks.5. Select the SSID for the wireless AP you want to connect to and press OK.
19

Screencasting with a Smartphone, Tablet, or PCScreencasting allows you to wirelessly cast content from smartphones, tablets, or PCs (using either the iOS, MacOS, Android, or Windows operating systems) that are connected to the same network as the projector by AirReceiver.
Note
• Why don't some apps or videos wirelessly cast (or stream) content from my mobile device to the projector?
While many protocols and apps have been tested to wirelessly cast (or stream) content smoothly to the projector, sometimes there are regional restrictions or compatibility issues for video streaming from a mobile device to the projector. It is recommended to contact your mobile device manufacturer, telecom provider or application developer for compatibility and limitations.
• Some live-streaming applications such as Netflix, Amazon Video, etc. do not support screencasting via the the projector.
• DRM protected movies from iTunes do not support screencasting via the the projector.
• AirReceiver and Mirror Cast have been set on by default.
20

Screencasting with an iOS Device
1. Power on the projector. See "Powering On the Projector" on page 16.
2. Connect the projector to a Wi-Fi network. See "Connecting to a Wi-Fi Network" on page 19.
3. Connect your device to the same Wi-Fi network as the projector.4. Swipe up from the bottom of the device's screen to access the iOS control
console.
5. Tap the Screen Mirroring button on the iOS control console.
6. In the Screen Mirroring menu select the device name "Vivitek".
7. Your iOS device's screen will be displayed on the projector.
21

Screencasting with a MacOS Device
1. Power on the projector. See "Powering On the Projector" on page 16.
2. Connect the projector to a Wi-Fi network. See "Connecting to a Wi-Fi Network" onpage 19.
3. Connect your device to the same Wi-Fi network as the projector.4. Open the status menu at the top of the screen and then click the Screen Mirroring
button.
5. In the Screen Mirroring menu select the device name "Vivitek".
6. Your MacOS device's screen will be displayed on the projector.
22

Screencasting with an Android Device
1. Power on the projector. See "Powering On the Projector" on page 16.
2. Connect the projector to a Wi-Fi network. See "Connecting to a Wi-Fi Network" onpage 19.
3. Connect your device to the same Wi-Fi network as the projector.4. Launch the wireless casting function on your device.
Note
• Every Android smartphone/tablet brand uses a different name for their wireless castingfeature. Check your device's user manual or call the device's support line to find out thename of your device's casting feature.
5. In the wireless casting menu select the device name "Vivitek".6. Your Android device's screen will be displayed on the projector.
Screencasting with a Windows PC
1. Power on the projector. See "Powering On the Projector" on page 16.
2. Connect the projector to a Wi-Fi network. See "Connecting to a Wi-Fi Network" onpage 19.
3. Connect your PC to the same Wi-Fi network as the projector.4. Launch the Chrome web browser on your PC.5. Click on the menu button at the top right corner of the browser window.
23

6. Select Cast... in the Chrome menu.
7. In the Cast tab menu select the device name "Vivitek".
8. Select either Cast tab cast the browser tab you are viewing, or Cast desktop to cast your PCs entire desktop.
9. Your Windows PC's screen will be displayed on the projector.
24

Screencasting by Mirror Cast1. Launch Miracast function on your device.
2. In the casting menu select the device ID name "AirReceiver_xxxx" for example.3. Your device's screen will be displayed on the projector directly without Wi-Fi
Network.
Screencasting Problems
Problem: Unable to find Vivitek in my device's casting list.
1. Ensure that both devices are in the same network and successfully connected
2. Restart AirReceiver on the projector several times (Check AirReceiver > Restart/Close > RESTART).
3. Change the device's discovery setting and check again (Check AirReceiver > Advanced Setting > Device Discovery Tweeks > Turn Off / On)
Problem: Casting is successful but the display screen is black.
4. Go to AirReceiver > Advanced Settings > Use Hardware (HW) Codec, turn off this feature and check again.
Problem: Unable to find the casting function in your Android smartphone/tablet.
5. The casting function might be located in the device's Setting > Wireless and network section.
6. If you are still unable to find your device's casting function, visit Google Play to download and install a casting application (Example: Google Home). After successfully installing and launching Google Home, select Account from the Menu bar > and choose Mirror device to start casting.
25

Presenting from a Media PlayerThe USB port on the projector allows you to browse the image and document files stored on a USB flash drive connected to the projector. It can elimate the need for a computer source.
Supported files formats
Viewing files
1. Plug a USB flash drive into the USB port in the rear of the projector.
2. Press on the projector and select Media Player or press on the remotecontrol. The projector displays the built in media reader main page.
3. Press / / / to select and press OK to enter the sub-folder or display a file.4. After a file is displayed, press OK to call out the function bar. You can press / to
select the function and press OK to enact the selected item.
Video format Audio format Photo format• MPEG1• MPEG4• H.263• Motion JPEG
• MPEG1/2 Layer1• MPEG1/2 Layer2• FLAC
• JPEG Base-line• JPEG Progressive• PNG non-interlace• PNG interlace• BMP
26

Using the menusThe projector has multilingual on-screen display (OSD) menus that allow you to makeimage adjustments and change a variety of settings.
1. Press on the projector or on the remote control to open the OSD menu.
2. When OSD is displayed, use / to select any feature in the main menu.3. After selecting the desired main menu item, press to enter sub-menu for feature
setting.4. Use / to select the desired item and adjust the settings with / .5. To enter the next level of OSD menu, press OK.6. Press Menu twice* to leave and save the settings.*The first press leads you back to the main menu and the second press closes theOSD menu.
27

Securing the projector
Utilizing the password function
Setting a password
1. Go to MANAGEMENT Menu > Password. Press OK. The password setting page appears.
2. Select Change Password and press OK.3. The four arrow keys ( , , , )
respectively represent 4 digits (1, 2, 3, 4). According to the password you desire to set, press the arrow keys to enter six digits for the password.
4. Confirm the new password by re-entering the new password. Once the password is set, the OSD menu returns to the Password page.
5. To activate the Power On Lock function, press / to highlight Power On Lock and press / to select On. Input the password again.
Note
• The digits being input will display as asterisks on-screen. Make a note of your selected password and keep it in a safe place in advance or right after the password is entered so that it is available to you should you ever forget it.
• Once a password has been set and the power on lock is activated, the projector cannot be used unless the correct password is entered every time the projector is started.
If you forget the password
If you enter the wrong password, the password error message will appear, and the Input Current Password message follows. If you absolutely do not remember the password, you can use the password recall procedure.If you enter an incorrect password 5 times in succession, the projector will automatically shut down in a short time.
28

Entering the password recall procedure
1. Press and hold OK for 3 seconds. Theprojector will display a coded number onthe screen.
2. Write down the number and turn off yourprojector.
3. Seek help from the local service center todecode the number. You may be required toprovide proof of purchase documentation toverify that you are an authorized user of theprojector.
Changing the password
1. Go to MANAGEMENT Menu > Password > Change Password.
2. Press OK. The message “Input Current Password” appears.3. Enter the old password.
• If the password is correct, another message “Input New Password” appears.• If the password is incorrect, the password error message will appear, and the
message “Input Current Password” appears for your retry. You can pressBACK to cancel the change or try another password.
4. Enter a new password.5. Confirm the new password by re-entering the new password.
Disabling the password function
To disable password protection, go to MANAGEMENT Menu > Password > Power On Lock and press / to select Off. The message “Input Current Password” appears. Enter the current password.
• If the password is correct, the OSD menu returns to the password setting page.You will not have to enter the password next time turning on the projector.
• If the password is incorrect, the password error message will appear, and themessage “Input Current Password” appears for your retry. You can pressBACK to cancel the change or try another password.
Note• Though the password function is disabled, you need to keep the old password in hand
should you ever need to re-activate the password function by entering the oldpassword.
29

Upgrading firmware1. Go to Vivitek website to download the latest firmware
file.
2. Unzip the download file, find and save the file named "update_signed.zip" to the USB flash drive.(Suggest to use the USB flash drive with FAT32 format)
3. Insert USB flash drive into USB port in the rear of the projector.4. Go to MANAGEMENT Menu > Firmware Upgrade menu and press OK.
5. Select Yes to upgrade the firmware version. In the process of upgrading, please keep power on until updating finished.
6. When you see this message “Upgrade Sucessfully”, firmware upgrade is done.
30

Menu operationNote• Please note that the on-screen display (OSD) menus vary according to the signal type
selected and the projector model you are using.
• The menu items are available when the projector detects at least one valid signal. Ifthere is no equipment connected to the projector or no signal detected, limited menuitems are accessible.
PICTURE menu
Display Mode
The projector is preset with several predefined picture modes so that you can choose one to suit your operating environment and input signal picture type.• Bright: Maximizes the brightness of the projected image. This
mode is suitable for environments where extra-high brightness isrequired, such as using the projector in well lit rooms.
• Vivid TV: With well-saturated color, fine-tuned sharpness and ahigher brightness level, Vivid TV mode is perfect for watchingmovies in a living room where there is a small amount of ambientlight.
• Cinema: Complement with accurate color and deepest contrast atlower brightness level, Cinema mode is suitable for playing moviesin an environment with a bit of ambient light, like in living room.
• User: Recalls the settings customized based on the currentavailable display modes. See "User Mode" on page 31.
• ISF Night: Only available when ISF is enabled.• ISF Day: Only available when ISF is enabled.• Smooth Picture: Hidden as default. Shows only when Smooth
Picture is switched on in the ALIGNMENT menu.• 3D: Is appropriate for playing 3D images and 3D video clips. This
mode is only available when 3D function is enabled.• HLG: Delivers Hybrid Long Gamma effects by adding a logarithmic
curve with extra brightness over the top of the signal. This mode isonly available when:
ALIGNMENT > HDR is set at Auto, and HLG content is detected.
User ModeWhen Display Mode is set to User, you can adjust Bright, Vivid TV, Cinema induvudually.
BrightnessThe higher the value, the brighter the image. Adjust this control so the black areas of the image appear just as black and that detail in the dark areas is visible.
ContrastThe higher the value, the greater the contrast. Use this to set the peak white level after you have previously adjusted the Brightness setting to suit your selected input and viewing environment.
ColorLower setting produces less saturated colors. If the setting is too high, colors on the image will be overpowering, which makes the image unrealistic.
31

Tint The higher the value, the more greenish the picture becomes. The lower the value, the more reddish the picture becomes.
Sharpness The higher the value, the sharper the picture becomes.
Advanced
Gamma Selection
Gamma refers to the relationship between input source and picture brightness. Choose a preferred gamma mode from among 1.8/2.0/2.1/2.2/2.3/2.4/2.5/2.6/User.HDR Brightness
The projector can automatically adjust the brightness levels of your image according to the input source. You can also manually select a brightness level to display better picture quality. When the value is higher, the image becomes brighter; when the value is lower, the image becomes darker.Color Temperature
There are several preset color temperature settings available. The available settings may vary according to the signal type selected.
• Preset: Selects a color temperature from among Normal, Cool, Lamp Native, or Warm.
You can also set a preferred color temperature by adjusting the following options.
• Red Gain/Green Gain/Blue Gain: Adjusts the contrast levels of Red, Green, and Blue.
• Red Offset/Green Offset/Blue Offset: Adjusts the brightness levels of Red, Green, and Blue.
32

Advanced(Continued)
Color Management
This function provides six sets (RGBCMY) of colors to be adjusted. When you select each color, you can independently adjust its range and saturation according to your preference.
• Primary Color: Selects a color from among R (Red), G (Green), B (Blue), C (Cyan), M (Magenta), or Y (Yellow).
• Hue: Increase in the range will include colors consisted of more proportions of its two adjacent colors. Please refer to the illustration for how the colors relate to each other.For example, if you select Red and set its range at 0, only pure red in the projected picture will be selected. Increasing its range will include red close to yellow and red close to magenta.
• Saturation: Adjusts the values to your preference. Every adjustment made will reflect to the image immediately. For example, if you select Red and set its value at 0, only the saturation of pure red will be affected.
Note
• Saturation is the amount of that color in a video picture. Lower settings produce less saturated colors; a setting of “0” removes that color from the image entirely. If the saturation is too high, that color will be overpowering and unrealistic.
• Gain: Adjusts the values to your preference. The contrast level of the primary color you select will be affected. Every adjustment made will reflect to the image immediately.
Note
• When "White" is selected, "Hue/Saturation/Gain" is changed into "Red Gain/Green Gain/Blue Gain.
RED
BLUE
GREENYellow
CyanMagenta
33

Advanced(Continued)
ViviSettings
• Color Enhancer: Allows you to fine-tune the saturation ofcolors with larger flexibility. It modulates complex coloralgorithms to flawlessly render saturated colors, fine gradients,intermediate hues and subtle pigments.
• Flesh Tone: Provides a smart adjustment of hue only forcalibrating people's skin color, not other colors in the image. Itprevents discoloration of skin tones from the light of theprojection beam, portraying every skin tone in its most beautifulshade.
• ViviPeaking: It is a super-resolution technology which radicallyenhances Full HD content in terms of colors, contrast, andtextures. It's also a Detail Enhancement Technology refinessurface details for true-to-life images that pop off the screen.Users can adjust levels of sharpness and detail enhancementfor optimal viewing.
• ViviMotion: You can use this feature to smooth fast-movingvideos by comparing consecutive image frames ans insertingan intermediate image frame between them.
Noise Reduction
Reduces electrical image noise caused by different media players.ViviBlack
Changes the black level of the projected pictures to enhance the effect of contrast ratio.Brilliant Color
This feature utilizes a new color-processing algorithm and system level enhancements to enable higher brightness while providing truer, more vibrant colors in picture. It enables a greater than 50% brightness increase in mid-tone images, which are common in video and natural scenes, so the projector reproduces images in realistic and true colors.
Reset Current Display Mode
Returns all of the adjustments you’ve made for the selected Display Mode to the factory preset values.
34

ALIGNMENT menu
Digital Zoom
Conceals the poor picture quality in the four edges.The greater the value, the more portion of the picture is concealed while the screen remains filled and geometrically accurate. Setting 0 means the picture is 100% displayed.
3D
This projector features a 3D function which enables you to enjoy the 3D movies, videos, and sporting events in a more realistic way by presenting the depth of the images. You need to wear a pair of 3D glasses to view the 3D images.• 3D Mode: The default setting is Auto and the projector
automatically chooses an appropriate 3D format when detecting 3D contents. If the projector cannot recognize the 3D format, manually choose a 3D mode according to your preference.
• 3D Sync Invert: When your 3D image is distorted, enable this function to switch between the image for the left eye and the right eye for more comfortable 3D viewing experience.
HDR
The projector supports HDR imaging sources. It can automatically detect the dynamic range of the source for SDR or HDR10 or HLG, and optimize settings to reproduce contents under wider dynamic range. Meanwhile, the Display Mode cannot be adjusted after switching to HDR.
Smooth Picture
Minimizes the acoustic noise. It is suitable for the need of watching movies that requires an ultra-quiet environment so that you won't be disturbed by the noise of the projector. When this mode is used, the following menu functions will be automatically changed to the designated settings and grayed out.• On: To turn on XPR (The display resolution will be 3840 x 2160.)• Off: To turn off XPR (The display resolution will be 1920 x 1080.)
35

Aspect Ratio
There are several options to set the image's aspect ratio depending on your input signal source.• Auto: Scales an image proportionally
to fit the projector's native resolution in its horizontal or vertical width.
• Fill: Projects an image as its original resolution and resizes it to fit within the display area.
• 4:3: Scales an image so that it is displayed in the center of the screen with a 4:3 aspect ratio.
• 16:9: Scales an image so that it is displayed in the center of the screen with a 16:9 aspect ratio.
Keystone Corrects vertical keystoning of the image manually.
16:9 picture
4:3 picture
16:9 picture
4:3 picture
16:9 picture
36

SETTINGS menu
ProjectionThe projector can be installed on a ceiling or behind a screen, or with one or more mirrors.See "Choosing a location" on page 12.
Language Sets the language for the On-Screen Display (OSD) menus.Splash Screen
Allows you to select which logo screen will be displayed during projector start-up.
Auto Off Timer
Allows the projector to turn off automatically if no input signal is detected after a set period of time to prevent unnecessary waste of lamp life.
Direct Power On
Allows the projector to turn on automatically once the power is fed through the power cord.
Menu Settings
• Menu Position: Sets the On-Screen Display (OSD) menu position.
• Menu Display Time: Sets the length of time the OSD will remain active after your last key press.
• Message: Sets the reminder messages on or off.Auto Source Allows the projector to automatically search for a signal.
Audio Settings
• Effect: • Mode: This function utilizes MaxxAudio sound enhancement
technology, which incorporates Waves’s algorithms to deliver great effects of the bass and treble, and provide you with immersive cinematic audio experience. The following preset sound modes are provided: Normal, Cinema, Music, Dynamic, and User.The User mode allows you to personalize the sound settings. When selecting the User mode, you may make manual adjustments with the User Settings function.If the Mute function is activated, adjusting Effect will turn off the Mute function.
• User Settings: Select desired frequency bands (100 Hz, 300 Hz,1k Hz, 3k Hz, and 10k Hz) to adjust the levels according to your preference. The settings made here define the User mode.
• Mute: Temporarily turns off the sound.• Volume: Adjusts the sound level.• S/PDIF: Enable or disable S/PDIF.• Reset Audio Settings: All of the adjustments you’ve done for the
Effect menu return to the factory preset values.
37

MANAGEMENT menu
Light Settings
• Light Mode: Selects a suitable lamp power from among the provided modes. • Normal: Provides full lamp brightness.• ECO: Lowers brightness to extend the lamp life and decreases
the fan noise.• Dynamic ECO: Adjusts the lamp power automatically
depending on the content brightness level while optimizing display quality.
• Reset Light Timer: See "Replacing the Lamp" on page 42.• Light Timer: Displays Light Timer information.
HDMI Settings
• HDMI Range
Selects a suitable color format to optimize display quality.• Auto: Automatically selects a suitable color space and gray
level for the incoming HDMI signal.• Full: Utilizes the Full range RGB 0-255.• Limited: Utilizes the Limited range RGB 16-235.
Password See "Utilizing the password function" on page 28.
Key Lock
With the control keys on the projector and remote control locked, you can prevent your projector settings from being changed accidentally (by children, for example). When the Key Lock is on, no control keys on the projector will operate except POWER.To release panel key lock, press and hold (the right key) on the projector or remote control for 3 seconds.
Note
• If you turn off the projector without disabling panel key lock, the projector will still be in locked status the next time it is turned on.
LED Indicator
You can turn off the LED warning lights. This is to avoid any light disturbance when viewing images in a dark room.
ISF
The ISF calibration menu is password protected and only accessible by authorized ISF calibrators. The ISF (Imaging Science Foundation) has developed carefully crafted, industry-recognized standards for optimal video performance and has implemented a training program for technicians and installers to use these standards to obtain optimal picture quality from video display devices. Accordingly, we recommend that setup and calibration be performed by an ISF certified installation technician.
Note
• For more information, go to www.imagingscience.com or contact the dealer or retailer from whom you purchased the projector.
38

Test Pattern
Adjusts the image size and focus and check that the projected image is free from distortion.
HDMI EDID
• HDMI EDID
Switch HDMI EDID between HDMI 1.4 or HDMI 2.0 in order to solvecompatibility issue with uncertain old players.
• 2.0: Enhanced mode can switch to HDMI 2.0 EDID• 1.4: Standard mode can switch to HDMI 1.4 EDID.
12V Trigger
• On: If this is selected, the projector will send electronic signal outwhen it is turned on.
• Off: If this is selected, the projector will not send electronic signalout when it is turned on.
High Altitude
We recommend you use the High Altitude when your environment is between 1500 m –3000 m above sea level, and ambient temperature is between 0°C–30°C.Operation under "High Altitude" may cause a higher decibel operating noise level because of increased fan speed necessary to improve overall system cooling and performance.If you use this projector under other extreme conditions excluding the above, it may display auto shut-down symptoms, which is designed to protect your projector from over-heating. In cases like this, you should switch to High Altitude mode to solve these symptoms. However, this is not to state that this projector can operate under any and all harsh or extreme conditions.
Note
• Do not use the High Altitude if your altitude is between 0 m and 1500m and ambient temperature is between 0°C and 35°C. The projectorwill be over cooled, if you turn the mode on under such a condition.
Firmware Upgrade
See "Upgrading firmware" on page 30.
Reset All Settings
Returns all settings to the factory preset values.
39

INFORMATION menu
• Model Name: Shows the current model name of your projector.• Source: Shows the current signal source.• Resolution: Shows the native resolution of the input signal.• Light Usage Time: Shows the number of hours the lamp has been used.• 3D Format: Shows the current 3D mode.• Firmware Version: Shows the system & DLP versions of your projector.• Serial No.: Shows the serial number of your projector.
40

MaintenanceThe projector needs proper maintenance. You should keep the lens clean as dust, dirt or spots will project on the screen and diminish image quality. If any other parts need replacing, contact your dealer or qualified service personnel. When cleaning any part of the projector, always switch off and unplug the projector first.
Warning
• Never open any of the covers on the projector. Dangerous electrical voltages inside theprojector can cause severe injury. Do not attempt to service this product yourself. Referall servicing to qualified service personnel.
Cleaning the LensGently wipe the lens with lens cleaning paper. Do not touch the lens with your hands.Cleaning the Projector HousingGently wipe with a soft cloth. If dirt and stains are not easily removed, use a soft cloth damped with water, or water and neutral detergent, and wipe dry with a soft, dry cloth.
Note
• Turn off the projector and remove the AC power cord from the power outlet beforebeginning maintenance work.
• Make sure the lens is cool before cleaning.
• Do not use detergents or chemicals other than those noted above. Do not use benzeneor thinners.
• Do not use chemical sprays.
• Use a soft cloth or lens paper only.
41

Replacing the LampAs the projector operates over time, the brightness of the projector lamp gradually decreases and the lamp becomes more susceptible to breakage. We recommend replacing the lamp if a warning message is displayed. Do not attempt to replace the lamp yourself. Contact the qualified service personnel for replacement.
Note
• The lamp is extremely hot right after turning off the projector. If you touch the lamp, you may scald your finger. When you replace the lamp, wait for at least 45 minutes for the lamp to cool down.
• Do not touch the lamp glass at any time. The lamp may explode due to improper handling, including the touching of the lamp glass.
• Lamp lifetime may differ from lamp to lamp and according to the environment of use. There is no guarantee of the same lifetime for each lamp. Some lamps may fail or terminate their lifetime in a shorter period of time than other similar lamps.
• A lamp may explode as a result of vibration, shock or degradation as a result of hours of use as its lifetime draws to an end. Risk of explosion may differ according to the environment or conditions in which the projector and lamp are being used.
• Wear protective gloves and eyeglasses when fixing or detaching the lamp.
• Faster on-off-cycles will damage the lamp and reduce lamp life. Wait at least for 5 minutes to turn off the projector after powering on.
• Do not operate the lamp in proximity to paper, cloth, or other combustible material nor cover it with such materials.
• Do not operate the lamp in an atmosphere containing an inflammable substance, such as thinner.
• Thoroughly ventilate the area or the room when operating the lamp in an oxygen atmosphere (in the air). If ozone is inhaled, it could cause headaches, nausea, dizziness, and other symptoms.
• The inorganic mercury is involved in the lamp. If the lamp bursts, the mercury inside the lamp will be exposed. Leave the area immediately if the lamp shatters while being operated and ventilate the area for at least 30 minutes in order to avoid the inhalation of mercury fumes. Otherwise it could be harmful to user’s health.
42

1. Turn off the projector.
2. If the projector is installed in a ceiling mount, remove it3. Unplug the power cord.4. Use a screwdriver to remove the screw from the cover. (Illustration #1)
Push up and remove the cover. (Illustration #2)5. Remove the screw from the lamp module. (Illustration #3)
Raise the handle, and lift out the module. (Illustration #4)
6. Insert the new lamp module into the projector and tighten the screws.7. Replace the lamp cover and tighten the screw.8. Turn on the projector. If the lamp does not turn on after the warm-up period, try
reinstalling the lamp.9. Reset the lamp hour. Refer to the “MANAGEMENT > Light Settings > Reset
Light Timer” menu.
Note
• Dispose the used lamp according to local regulations.
• Ensure that screws are tightened properly. Screws not tightened fully may result ininjury or accidents.
• Since the lamp is made of glass, do not drop the unit and do not scratch the glass.
• Do not reuse the old lamp. This could cause the lamp to explode.
• Be sure to turn off the projector and unplug the AC power cord before replacing thelamp.
• Do not use the projector with the lamp cover removed.
2
1
3
4
43

Specifications• All specifications are subject to change without notice.
Model HK2200
Optical
Resolution 3840 x 2160 with XPR, 1920 x 1080 without XPR
Display system 1-CHIP DMD
Lens F = 1.9 ~ 2.47, f = 12 ~ 15.6 mm
Clear focus range 1.2m ~ 5.1m @ Wide, 1.3m ~ 4.9m @ Tele
Lamp 245 W lamp
Zoom ratio 1.3X
Electrical
Power supply AC100–240V, 3.60 A, 50–60 Hz (Automatic)
Power consumption 350 W (Max); 0.5 W (Standby)
Mechanical
Weight 3.7 Kg + 200 g (8.2 lbs + 0.44 lbs)
Output terminals
Speaker 5 watt x 1
Audio signal output PC audio jack x 1SPDIF to optical x 1
Control
USB
Type-A (USB 3.0) x 1Type-A (USB 2.0) x 1Mini-B x 1Type-A (USB 2.0 for wireless dongle) x 1
Trigger for screen control 12V DC x 1
RS-232 serial control 9 pin x 1
IR receiver x 1
Input terminals
Video signal input HDMI (2.0b, HDCP 2.2) x 2
Environmental Requirements
Operating temperature 0°C–40°C at sea level
Operating relative humidity 10%–90% (without condensation)
Operating altitude0–1499 m at 0°C–35°C1500–3000 m at 0°C–30°C (with High Altitude Mode on)
Storage temperature -20°C–60°C at sea level
Storage humidity 10%–90% RH (without condensation)
Storage altitude 30°C@ 0~12,200m above sea level
Transporting Original packing or equivalent is recommended
44

Dimensions367.3 mm (W) x 254.0 mm (D) x 129.7 mm (H)
Ceiling mount installationCeiling mount screws:M4 x 8 (Max. L = 8mm)
Unit: mm
45

Appendix
LED Indicator MessagesLight
Status & Description
System events
System is in stand-by mode
System is powering up
System is under normal operation
System is cooling down
Downloading
Colorwheel start fail
Scaler reset fail
Lamp life exhausted
Lamp door is not closed
Burn-In events
Burn-in on
Burn-in off
Lamp events
Lamp error in normal operation
Lamp is not lit up
Thermal events
Fan 1 error (the actual fan speed is outside the desired speed)Fan 2 error (the actual fan speed is outside the desired speed)
Fan 3 error (the actual fan speed is outside the desired speed)Fan 4 error (the actual fan speed is outside the desired speed)
Temperature 1 error (over limited temperature)
: Off: Orange On : Green On : Red On
: Orange Flashing : Green Flashing : Red Flashing
46
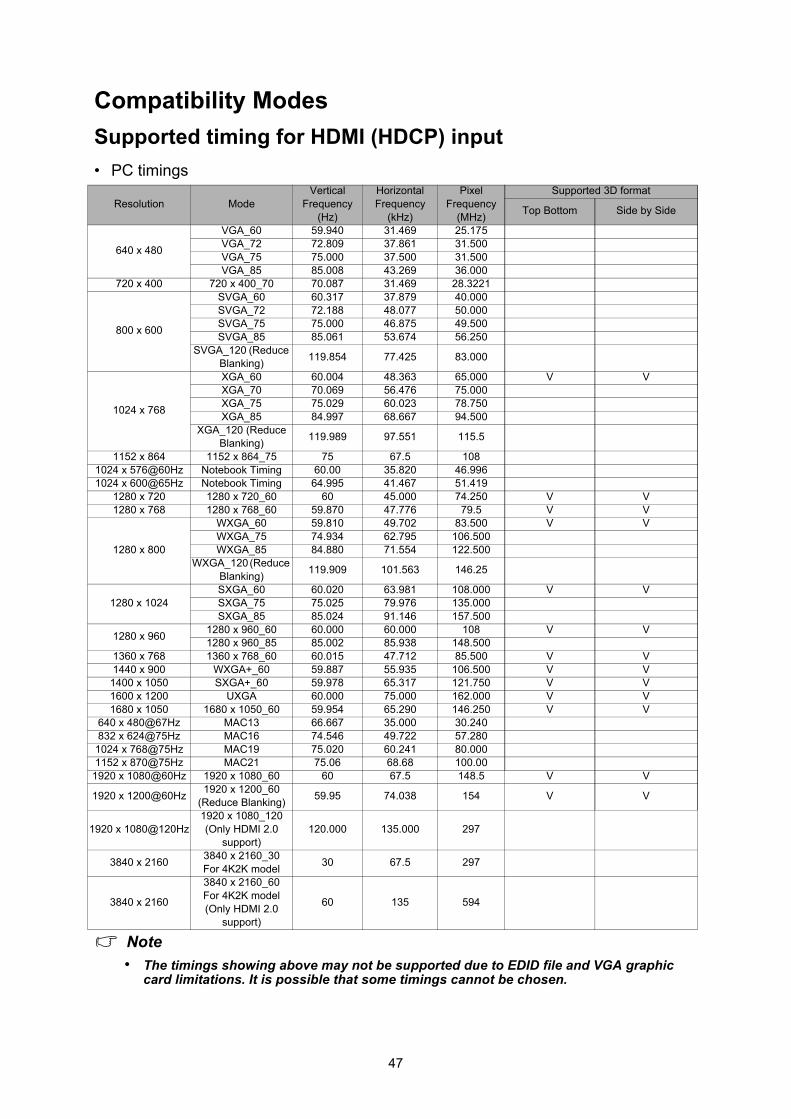
Compatibility Modes
Supported timing for HDMI (HDCP) input
• PC timings
Note• The timings showing above may not be supported due to EDID file and VGA graphic
card limitations. It is possible that some timings cannot be chosen.
Resolution ModeVertical
Frequency (Hz)
Horizontal Frequency
(kHz)
Pixel Frequency
(MHz)
Supported 3D format
Top Bottom Side by Side
640 x 480
VGA_60 59.940 31.469 25.175 VGA_72 72.809 37.861 31.500 VGA_75 75.000 37.500 31.500 VGA_85 85.008 43.269 36.000
720 x 400 720 x 400_70 70.087 31.469 28.3221
800 x 600
SVGA_60 60.317 37.879 40.000 SVGA_72 72.188 48.077 50.000 SVGA_75 75.000 46.875 49.500 SVGA_85 85.061 53.674 56.250
SVGA_120 (Reduce Blanking) 119.854 77.425 83.000
1024 x 768
XGA_60 60.004 48.363 65.000 V VXGA_70 70.069 56.476 75.000 XGA_75 75.029 60.023 78.750 XGA_85 84.997 68.667 94.500
XGA_120 (Reduce Blanking) 119.989 97.551 115.5
1152 x 864 1152 x 864_75 75 67.5 1081024 x 576@60Hz Notebook Timing 60.00 35.820 46.9961024 x 600@65Hz Notebook Timing 64.995 41.467 51.419
1280 x 720 1280 x 720_60 60 45.000 74.250 V V1280 x 768 1280 x 768_60 59.870 47.776 79.5 V V
1280 x 800
WXGA_60 59.810 49.702 83.500 V VWXGA_75 74.934 62.795 106.500WXGA_85 84.880 71.554 122.500
WXGA_120 (Reduce Blanking) 119.909 101.563 146.25
1280 x 1024SXGA_60 60.020 63.981 108.000 V VSXGA_75 75.025 79.976 135.000SXGA_85 85.024 91.146 157.500
1280 x 960 1280 x 960_60 60.000 60.000 108 V V1280 x 960_85 85.002 85.938 148.500
1360 x 768 1360 x 768_60 60.015 47.712 85.500 V V1440 x 900 WXGA+_60 59.887 55.935 106.500 V V
1400 x 1050 SXGA+_60 59.978 65.317 121.750 V V1600 x 1200 UXGA 60.000 75.000 162.000 V V1680 x 1050 1680 x 1050_60 59.954 65.290 146.250 V V
640 x 480@67Hz MAC13 66.667 35.000 30.240832 x 624@75Hz MAC16 74.546 49.722 57.2801024 x 768@75Hz MAC19 75.020 60.241 80.0001152 x 870@75Hz MAC21 75.06 68.68 100.00
1920 x 1080@60Hz 1920 x 1080_60 60 67.5 148.5 V V
1920 x 1200@60Hz 1920 x 1200_60 (Reduce Blanking) 59.95 74.038 154 V V
1920 x 1080@120Hz1920 x 1080_120(Only HDMI 2.0
support)120.000 135.000 297
3840 x 2160 3840 x 2160_30For 4K2K model 30 67.5 297
3840 x 2160
3840 x 2160_60For 4K2K model(Only HDMI 2.0
support)
60 135 594
47

• Video timings
• Color Depth Table
Timing ResolutionHorizontal Frequency
(kHz)
Vertical Frequency
(Hz)
Dot Clock Frequency
(MHz)
Supported 3D formatFrame
Packing Top Bottom Side by Side
480i 720 (1440) x 480 15.73 59.94 27480p 720 x 480 31.47 59.94 27576i 720 (1440) x 576 15.63 50 27576p 720 x 576 31.25 50 27
720/50p 1280 x 720 37.5 50 74.25 V V V720/60p 1280 x 720 45.00 60 74.25 V V V
1080/24P 1920 x 1080 27 24 74.25 V V V1080/25P 1920 x 1080 28.13 25 74.251080/30P 1920 x 1080 33.75 30 74.251080/50i 1920 x 1080 28.13 50 74.25 V1080/60i 1920 x 1080 33.75 60 74.25 V1080/50P 1920 x 1080 56.25 50 148.5 V V1080/60P 1920 x 1080 67.5 60 148.5 V V
2160/24P 3840 x 2160 (Only HDMI 2.0 support) 54 24 297
2160/25P 3840 x 2160 (Only HDMI 2.0 support) 56.25 25 297
2160/30P 3840 x 2160 (Only HDMI 2.0 support) 67.5 30 297
2160/50P 3840 x 2160 (Only HDMI 2.0 support) 112.5 50 594
2160/60P 3840 x 2160 (Only HDMI 2.0 support) 135 60 594
Display format (refresh rate) Chroma subsampling 8 Bit 10 Bit 12 Bit
4K/60p (60 Hz)04:04:04 Yes No No04:02:02 Yes Yes Yes04:02:00 Yes Yes Yes
4K/24p (24 Hz)04:04:04 Yes Yes Yes04:02:02 Yes Yes Yes04:02:00 Yes Yes Yes
48

TroubleshootingRefer to the symptoms and measures listed below before sending the projector for repairs. If the problem persists, contact your local reseller or service center. Please refer to "LED Indicator Messages" as well.Start-up problems
If no lights turn on:• Be sure that the power cord is securely connected to the projector and the other end is
plugged into an outlet with power.• Press the power button again.• Unplug the power cord and wait for a short while, then plug it in and press the power
button again.Image problems
If the searching source is displayed:• Press Source on the remote control to select an active input source.• Be sure the external source is turned on and connected.• For a computer connection, ensure your notebook computer’s external video port is
turned on. Refer to the computer manual.If the image is out of focus:• While displaying the on-screen menu, adjust the focus ring. (The image size should
not change; if it does, you are adjusting the zoom, not the focus.)• Check the projection lens to see if it needs cleaning.
Remote control problems
If the remote control does not operate:• Be sure nothing is blocking the remote control receiver on the front of the projector.
Use the remote control within the effective range.• Aim the remote control at the screen or at the front or back of the projector.• Move the remote control so it is more directly in front of or behind the projector and
not as far to the side.
49

RS-232 ProtocolRS-232 Setting
Examples:
Baud rate: 9600Parity check: NoneData bit: 8Stop bit: 1Flow control: None
Control items Input command row Projector return messageExecute command reset.all[CR] RESET.ALLQuery current brightness op bright ?[CR] OP BRIGHT =50Set up brightness op bright =100[CR] OP BRIGHT =100Brightness value + 1 op bright +[CR] OP BRIGHT ="new value"Brightness value - 1 op bright -[CR] OP BRIGHT ="new value"Out of range or not support op bright =200[CR] OP BRIGHT =NAIllegal command op abright =100[CR] *Illegal format#
50

Function Type Operation Support ASCIIWrite Power On Y op power.on<CR>Write Power off Y op power.off<CR>Read Power Status Y op standby.power ?<CR>Write HDMI 1 Y op input.sel =0<CR>Write HDMI 2 Y op input.sel =1<CR>Write Media Y op input.sel =2<CR>Read Current source Y op input.sel ?<CR>Write Bright Y op pic.mode =0<CR>Write Vivid TV Y op pic.mode =1<CR>Write Cinema Y op pic.mode =2<CR>Write User Y op pic.mode =3<CR>Read Display Mode Y op pic.mode ?<CR>Write Reset Current Display Mode Y op pic.reset<CR>Write Refer Bright Y op ref.pic =0<CR>Write Refer Vivid TV Y op ref.pic =1<CR>Write Refer Cinema Y op ref.pic =2<CR>Write Brightness level for customer Y op bright =100<CR>Read Brightness value Y op bright ?<CR>Write Contrast level for customer Y op contrast =100<CR>Read Contrast value Y op contrast ?<CR>Write Color level for customer Y op color =100<CR>Read Color value Y op color ?<CR>Write Tint level for customer Y op tint =100<CR>Read Tint value Y op tint ?<CR>Write Sharpness level for customer Y op sharp =0<CR>Read Sharpness value Y op sharp ?<CR>Write Gamma 1.8 Y op gamma =0<CR>Write Gamma 2.0 Y op gamma =1<CR>Write Gamma 2.1 Y op gamma =2<CR>Write Gamma 2.2 Y op gamma =3<CR>Write Gamma 2.3 Y op gamma =4<CR>Write Gamma 2.4 Y op gamma =5<CR>Write Gamma 2.5 Y op gamma =6<CR>Write Gamma 2.6 Y op gamma =7<CR>Write Gamma User (TBD) Y op gamma =8<CR>Write Color Temperature - Normal Y op color.temp =0<CR>Write Color Temperature - Warm Y op color.temp =1<CR>Write Color Temperature - Cool Y op color.temp =2<CR>Write Color Temperature - Lamp Native Y op color.temp =3<CR>Read Color Temperature Status Y op color.temp ?<CR>Write Color Temperature - Red Gain Y op red.gain =100<CR>Read Color Temperaturet - Red Gain value Y op red.gain ?<CR>Write Color Temperaturet - Green Gain Y op green.gain =100<CR>Read Color Temperature - Green Gain value Y op green.gain ?<CR>Write Color Temperature- Blue Gain Y op blue.gain =100<CR>Read Color Temperature - Blue Gain value Y op blue.gain ?<CR>Write Color Temperature - Red Offset Y op red.offset =100<CR>Read Color Temperature - Red Offset value Y op red.offset ?<CR>Write Color Temperature - Green Offset Y op green.offset =100<CR>Read Color Temperature - Green Offsetvalue Y op green.offset ?<CR>Write Color Temperature - Blue Offset Y op blue.offset =100<CR>Read Color Temperature - Blue Offset value Y op blue.offset ?<CR>Write Color Management - Red Gain Y op hsg.r.gain =100<CR>Write Color Management - Red/Hue Y op hsg.r.hue =100<CR>Write Color Management - Red/Saturation Y op hsg.r.sat =100<CR>Write Color Management - Green Gain Y op hsg.g.gain =100<CR>Write Color Management - Green/Hue Y op hsg.g.hue =100<CR>Write Color Management - Green/Saturation Y op hsg.g.sat =100<CR>Write Color Management - Blue Gain Y op hsg.b.gain =100<CR>Write Color Management - Blue/Hue Y op hsg.b.hue =100<CR>Write Color Management - Blue/Saturation Y op hsg.b.sat =100<CR>Write Color Management - Cyan Gain Y op hsg.c.gain =100<CR>Write Color Management - Cyan/Hue Y op hsg.c.hue =100<CR>Write Color Management - Cyan/Saturation Y op hsg.c.sat =100<CR>
Color Setting
Power
User Mode
Source Selection
Display Mode
51

Write Color Management - Magenta Gain Y op hsg.m.gain =100<CR>Write Color Management - Magenta/Hue Y op hsg.m.hue =100<CR>Write Color Management - Magenta/Saturation Y op hsg.m.sat =100<CR>Write Color Management - Yellow Gain Y op hsg.y.gain =100<CR>Write Color Management - Yellow/Hue Y op hsg.y.hue =100<CR>Write Color Management - Yellow/Saturation Y op hsg.y.sat =100<CR>Write ViviSettings - Color Enhencer Y op color.en =8<CR>Write ViviSettings - Flesh Tone Y op flesh.t =0<CR>Write ViviSettings - ViviPeaking Y op vivi.peaking =0<CR>Write ViviSettings - ViviMotion Y op vivi.motion =0<CR>Write Noise Reduction Y op noise.r =0<CR>Write ViviBlack Y op vivi.black =0<CR>Write Brilliant color Y op bri.color =1<CR>Read Brilliant color status Y op bri.color ?<CR>Write Digital Zoom Y op zoom =0<CR>Write 3D Auto Y op threed.format =0<CR>Write 3D Sync Top Bottom Y op threed.format =1<CR>Write 3D Sync Side by side Y op threed.format =2<CR>Write 3D Off Y op threed.format =3<CR>Read 3D Status Y op threed.format ?<CR>Write 3D inverter Y op threed.syncinvert =1<CR>Write HDR Y op hdr.control =1<CR>Write Quietest Y op quietest =1<CR>Write Aspect Auto Y op aspect =0<CR>Write Aspect real Y op aspect =1<CR>Write Aspect 4:3 Y op aspect =2<CR>Write Aspect 16:9 Y op aspect =3<CR>Read Aspect Status Y op aspect ?<CR>Write Keystone vertical Y op v.keystone =30<CR>Write Projector Position-Front Y op projection =0<CR>Write Projector Position-Front+Ceiling Y op projection =1<CR>Write Projector Position-Rear Y op projection =2<CR>Write Projector Position-Rear+Ceiling Y op projection =3<CR>Read Projector Position Status Y op projection ?<CR>Write Language Y op lang =0<CR>Write splash screen Y op splash.screen =0<CR>Write Auto Off Timer Y op sleep.timer =0<CR>Write Direct Power On Y op direct.poweron =1<CR>Read Direct Power On-Status Y op direct.poweron ?<CR>Write Menu Position Y op menu.position =0<CR>Write Menu Display Time Y op menu.timer =0<CR>Write Message Y op message =0<CR>Write Auto Source Y op auto.src =0<CR>Write Mute On Y op mute =1<CR>Write Mute Off Y op mute =0<CR>Read Mute Status Y op mute ?<CR>Write Volume level for customer Y op volume =0<CR>Read Volume Status Y op volume ?<CR>Write S/PDIF ON Y op spdif =1<CR>Read S/PDIF Status Y op spdif ?<CR>Write Sound Mode : Nromal Y op sound.mode =0<CR>Write Sound Mode : Cinema Y op sound.mode =1<CR>Write Sound Mode : Music Y op sound.mode =2<CR>Write Sound Mode : Dynamic Y op sound.mode =3<CR>Write Sound Mode : User Y op sound.mode =5<CR>Write User EQ - 100Hz Y op UserEQ.100hz =10<CR>Read User EQ - 100Hz Y op UserEQ.100hz ?<CR>Write User EQ - 300Hz Y op UserEQ.300hz =10<CR>Read User EQ - 300Hz Y op UserEQ.300hz ?<CR>Write User EQ - 1kHZ Y op UserEQ.1khz =10<CR>Read User EQ - 1kHZ Y op UserEQ.1khz ?<CR>Write User EQ - 3kHz Y op UserEQ.3khz =10<CR>Read User EQ - 3kHz Y op UserEQ.3khz ?<CR>Write User EQ - 10kHz Y op UserEQ.10khz =10<CR>Read User EQ - 10kHz Y op UserEQ.10khz ?<CR>
Color Setting
Settings
Picture
Audio Settings
52

Write Reset Audio Settings Y op audio.reset<CR>Write Normal mode Y op light.mode =0<CR>Write ECO mode Y op light.mode =1<CR>Write Dynamic ECO mode Y op light.mode =2<CR>Read Light Mode Status Y op light.mode ?<CR>Write Light Timer Reset Y op light1.reset<CR>Read Light Timer Y op light1.hours ?<CR>Write HDMI Settings Y op hdmi.range =0<CR>Write Change New password & Power on lock = Y op security.lock =<CR>Write Remove psaaword & Power on lock = off Y op security.unlock =<CR>Write Key lock Y op keypad.lock =0<CR> Write LED Indicator Y op led =0<CR> Write Test Pattern Y op test.pattern =0<CR> Write 12V Trigger Y op trigger =0<CR> Write High Altitude mode off Y op fanspeed =0<CR>Write Firmware Upgrade Y op fwupgrade<CR>Write Reset all settings Y op reset.all<CR>Read Model Name Y op model ?<CR>Read Eco Blank Status Y op ecoblank ?<CR>Write Eco Blank Y op ecoblank =1<CR>Write Freeze Y op Freeze =1<CR>Read Freeze Status Y op Freeze ?<CR>Write Menu On/Off Y op menu<CR>Write Back Y op back<CR>
Light Settings
Miscellaneous
Management
53
Recommended


