Embed Size (px)
Citation preview

SLIDE NAME IN TEMPLATE:
\
1
02 TITLE - BLUE NAME
BOSKALIS COLORS:
RGB values:
R 255, G 255, B 255
R 0, G 0, B 0
R 255, G 247, B 25
R 0, G 38, B 99
R 0, G 81, B 158
R 127, G 127, B 127
R 191, G 191, B 191
R 49, G 128, B 255
SET UP GRIDS AND GUIDES:
Grids and guides make it easier to align shapes and objects
(index, chart, table etc.). Grids and guides can be shown or
hidden.
Right-click on an empty area of the slide and then click Grid
and Guides.
Check under Guide settings → the button Display drawing
guides on screen.
If you want the current settings in the Grid and Guide dialog box
to be the default settings for all presentations, rather than just
this one, click Set as Default.
Drawing guides are not visible during a slide show and do not
show on prints or handouts.
SLIDE EXAMPLE:
INSERT A PICTURE:
1. Click icon to add a picture:
2. Locate the picture you wish to insert and double-
click on it
3. Right-click on the picture and Send to Back to place
it in the background behind your text
BERWICH SLUER
CROW INFRADAGEN
19 JUNI 2014
RISICO’S AFWIJKINGEN ASFALTPROCES TE
KWANTIFICEREN?

SLIDE NAME IN TEMPLATE:
\
2
08 TEXT & PICTURE 80/20
SLIDE EXAMPLE:
BULLET LEVELS
(INCREASE OR DECREASE)
By using List Levels, you can organize bullets and numbering
into categories. Complete the following steps to adjust the
List Level:
To promote the text line UP one list level, go to the Home
command tab and click in the Paragraph box on:
INCREASE LIST LEVEL
To bring the text line DOWN one list level, go to the Home
command tab and click in the Paragraph box on :
DECREASE LIST LEVEL
INSERT A PICTURE:
1. Click icon to add a picture:
2. Locate the picture you wish to insert and
double-click on it
3. The picture is centered automatically. If the
main focus of the picture is not visible, please
use another picture
4. Right-click on the picture and Send to Back to
place it in the background behind your text
Proces- en risicobeheersing cruciaal bij geintegreerde contracten:
• Risicobeheersing => faalkostenreductie, scherpere aanbiedingen
• Procesbeheersing => verificatie en validatie (aantonen geleverde prestatie)
Behoefte aan informatie:
• Informatie over functionele prestaties verhardingen
• Informatie over schadeontwikkeling en schadeoorzaken
Lange termijn monitoring zeer wenselijk, maar zeker geen Nederlandse ‘hobby’
Behoefte aan objectieve informatie

SLIDE NAME IN TEMPLATE:
\
3
08 TEXT & PICTURE 80/20
SLIDE EXAMPLE:
BULLET LEVELS
(INCREASE OR DECREASE)
By using List Levels, you can organize bullets and numbering
into categories. Complete the following steps to adjust the
List Level:
To promote the text line UP one list level, go to the Home
command tab and click in the Paragraph box on:
INCREASE LIST LEVEL
To bring the text line DOWN one list level, go to the Home
command tab and click in the Paragraph box on :
DECREASE LIST LEVEL
INSERT A PICTURE:
1. Click icon to add a picture:
2. Locate the picture you wish to insert and
double-click on it
3. The picture is centered automatically. If the
main focus of the picture is not visible, please
use another picture
4. Right-click on the picture and Send to Back to
place it in the background behind your text
Nieuwe generatie bedrijfsinformatiesystemen
Bouwstoffen
Ontwerp
Typetesting
Specificatie
Asfaltproductie
FPC
Planning
Transport Verwerking
B&O
Garantiebeheer
Gestructureerde en betrouwbare informatie gehele levenscyclus asfaltverharding
Voorbeelden: AIS, PRIMA
Ondersteunende systemen: GIS, HR-video, APEX, RELATICS, VIACON, LIMS etc.

SLIDE NAME IN TEMPLATE:
\
4
08 TEXT & PICTURE 80/20
SLIDE EXAMPLE:
BULLET LEVELS
(INCREASE OR DECREASE)
By using List Levels, you can organize bullets and numbering
into categories. Complete the following steps to adjust the
List Level:
To promote the text line UP one list level, go to the Home
command tab and click in the Paragraph box on:
INCREASE LIST LEVEL
To bring the text line DOWN one list level, go to the Home
command tab and click in the Paragraph box on :
DECREASE LIST LEVEL
INSERT A PICTURE:
1. Click icon to add a picture:
2. Locate the picture you wish to insert and
double-click on it
3. The picture is centered automatically. If the
main focus of the picture is not visible, please
use another picture
4. Right-click on the picture and Send to Back to
place it in the background behind your text
ASPARI contourplots

SLIDE NAME IN TEMPLATE:
\
5
08 TEXT & PICTURE 80/20
SLIDE EXAMPLE:
BULLET LEVELS
(INCREASE OR DECREASE)
By using List Levels, you can organize bullets and numbering
into categories. Complete the following steps to adjust the
List Level:
To promote the text line UP one list level, go to the Home
command tab and click in the Paragraph box on:
INCREASE LIST LEVEL
To bring the text line DOWN one list level, go to the Home
command tab and click in the Paragraph box on :
DECREASE LIST LEVEL
INSERT A PICTURE:
1. Click icon to add a picture:
2. Locate the picture you wish to insert and
double-click on it
3. The picture is centered automatically. If the
main focus of the picture is not visible, please
use another picture
4. Right-click on the picture and Send to Back to
place it in the background behind your text
ASPARI contourplots

SLIDE NAME IN TEMPLATE:
\
6
08 TEXT & PICTURE 80/20
SLIDE EXAMPLE:
BULLET LEVELS
(INCREASE OR DECREASE)
By using List Levels, you can organize bullets and numbering
into categories. Complete the following steps to adjust the
List Level:
To promote the text line UP one list level, go to the Home
command tab and click in the Paragraph box on:
INCREASE LIST LEVEL
To bring the text line DOWN one list level, go to the Home
command tab and click in the Paragraph box on :
DECREASE LIST LEVEL
INSERT A PICTURE:
1. Click icon to add a picture:
2. Locate the picture you wish to insert and
double-click on it
3. The picture is centered automatically. If the
main focus of the picture is not visible, please
use another picture
4. Right-click on the picture and Send to Back to
place it in the background behind your text
ASPARI contourplots

SLIDE NAME IN TEMPLATE:
\
7
08 TEXT & PICTURE 80/20
SLIDE EXAMPLE:
BULLET LEVELS
(INCREASE OR DECREASE)
By using List Levels, you can organize bullets and numbering
into categories. Complete the following steps to adjust the
List Level:
To promote the text line UP one list level, go to the Home
command tab and click in the Paragraph box on:
INCREASE LIST LEVEL
To bring the text line DOWN one list level, go to the Home
command tab and click in the Paragraph box on :
DECREASE LIST LEVEL
INSERT A PICTURE:
1. Click icon to add a picture:
2. Locate the picture you wish to insert and
double-click on it
3. The picture is centered automatically. If the
main focus of the picture is not visible, please
use another picture
4. Right-click on the picture and Send to Back to
place it in the background behind your text
HR-videobeelden en visuele inspectie
SLIDE NAME IN TEMPLATE:
\
8
08 TEXT & PICTURE 80/20
SLIDE EXAMPLE:
BULLET LEVELS
(INCREASE OR DECREASE)
By using List Levels, you can organize bullets and numbering
into categories. Complete the following steps to adjust the
List Level:
To promote the text line UP one list level, go to the Home
command tab and click in the Paragraph box on:
INCREASE LIST LEVEL
To bring the text line DOWN one list level, go to the Home
command tab and click in the Paragraph box on :
DECREASE LIST LEVEL
INSERT A PICTURE:
1. Click icon to add a picture:
2. Locate the picture you wish to insert and
double-click on it
3. The picture is centered automatically. If the
main focus of the picture is not visible, please
use another picture
4. Right-click on the picture and Send to Back to
place it in the background behind your text
HR-videobeelden en visuele inspectie

SLIDE NAME IN TEMPLATE:
\
9
08 TEXT & PICTURE 80/20
SLIDE EXAMPLE:
BULLET LEVELS
(INCREASE OR DECREASE)
By using List Levels, you can organize bullets and numbering
into categories. Complete the following steps to adjust the
List Level:
To promote the text line UP one list level, go to the Home
command tab and click in the Paragraph box on:
INCREASE LIST LEVEL
To bring the text line DOWN one list level, go to the Home
command tab and click in the Paragraph box on :
DECREASE LIST LEVEL
INSERT A PICTURE:
1. Click icon to add a picture:
2. Locate the picture you wish to insert and
double-click on it
3. The picture is centered automatically. If the
main focus of the picture is not visible, please
use another picture
4. Right-click on the picture and Send to Back to
place it in the background behind your text
HR-videobeelden en visuele inspectie
UP-NO 34003
Σ Lengte [m] ST ROOK Schadebee ld Ernstklasse
1R-L 2R-L
Rafe ling Craque le Rafe ling
KM_VAN KM_T OT Lichte Matige Lichte Matige Lichte Matige
21,500 21,400 5,650433991 8,627306088
21,600 21,500 0,828707837 4,074026552
21,700 21,600 1,386953646 1,814827133
21,800 21,700 36,16239345
21,900 21,800 13,77113847 12,44264973 7,335503863
22,000 21,900 0,145153303 2,718169447 41,19884141
22,100 22,000 1,988554543 10,720636 37,48375223
22,200 22,100 7,827521441 1,312195002 2,965894838 35,38311452
22,300 22,200 4,773345301 23,6799975
22,400 22,300 1,12277261 0,846158779 21,9233611 46,54891361
22,500 22,400 2,832897922 14,41527314
Kleur Omvang
Groen A Geringe Omvang
Geel B Beperkte Omvang
Rood C Grote Omvang

SLIDE NAME IN TEMPLATE:
\
10
08 TEXT & PICTURE 80/20
SLIDE EXAMPLE:
BULLET LEVELS
(INCREASE OR DECREASE)
By using List Levels, you can organize bullets and numbering
into categories. Complete the following steps to adjust the
List Level:
To promote the text line UP one list level, go to the Home
command tab and click in the Paragraph box on:
INCREASE LIST LEVEL
To bring the text line DOWN one list level, go to the Home
command tab and click in the Paragraph box on :
DECREASE LIST LEVEL
INSERT A PICTURE:
1. Click icon to add a picture:
2. Locate the picture you wish to insert and
double-click on it
3. The picture is centered automatically. If the
main focus of the picture is not visible, please
use another picture
4. Right-click on the picture and Send to Back to
place it in the background behind your text
HR-videobeelden en visuele inspectie

SLIDE NAME IN TEMPLATE:
\
11
08 TEXT & PICTURE 80/20
SLIDE EXAMPLE:
BULLET LEVELS
(INCREASE OR DECREASE)
By using List Levels, you can organize bullets and numbering
into categories. Complete the following steps to adjust the
List Level:
To promote the text line UP one list level, go to the Home
command tab and click in the Paragraph box on:
INCREASE LIST LEVEL
To bring the text line DOWN one list level, go to the Home
command tab and click in the Paragraph box on :
DECREASE LIST LEVEL
INSERT A PICTURE:
1. Click icon to add a picture:
2. Locate the picture you wish to insert and
double-click on it
3. The picture is centered automatically. If the
main focus of the picture is not visible, please
use another picture
4. Right-click on the picture and Send to Back to
place it in the background behind your text
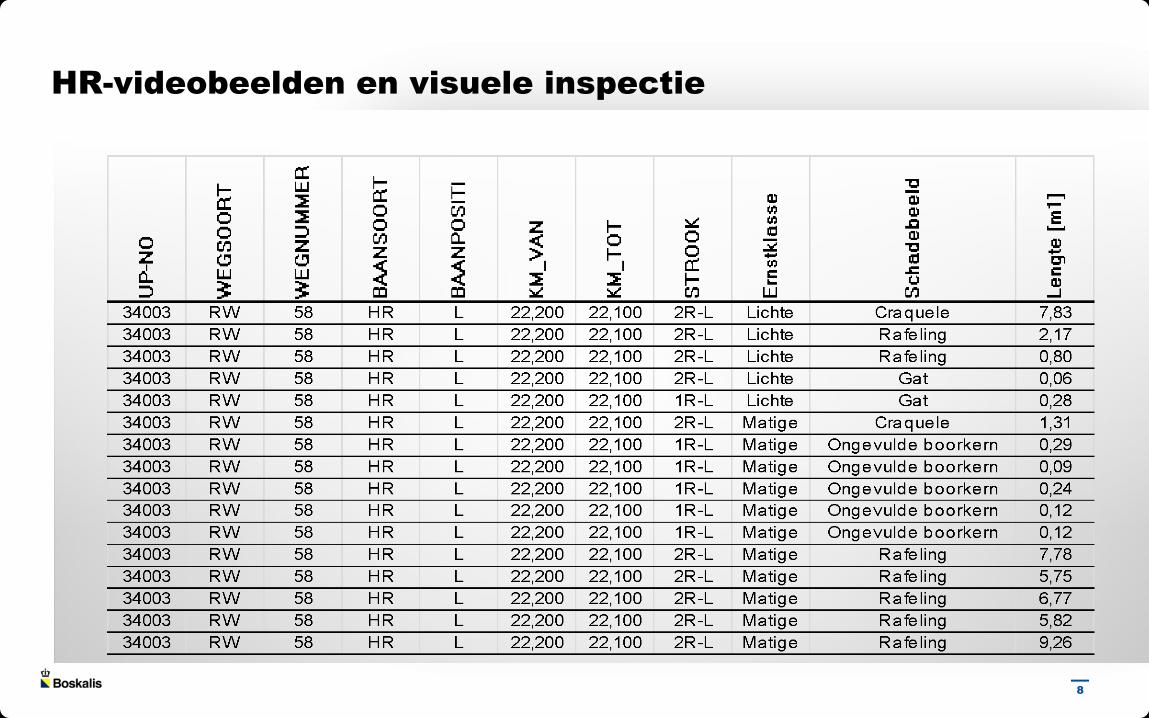
HR-beelden met procesinformatie

SLIDE NAME IN TEMPLATE:
\
12
08 TEXT & PICTURE 80/20
SLIDE EXAMPLE:
BULLET LEVELS
(INCREASE OR DECREASE)
By using List Levels, you can organize bullets and numbering
into categories. Complete the following steps to adjust the
List Level:
To promote the text line UP one list level, go to the Home
command tab and click in the Paragraph box on:
INCREASE LIST LEVEL
To bring the text line DOWN one list level, go to the Home
command tab and click in the Paragraph box on :
DECREASE LIST LEVEL
INSERT A PICTURE:
1. Click icon to add a picture:
2. Locate the picture you wish to insert and
double-click on it
3. The picture is centered automatically. If the
main focus of the picture is not visible, please
use another picture
4. Right-click on the picture and Send to Back to
place it in the background behind your text
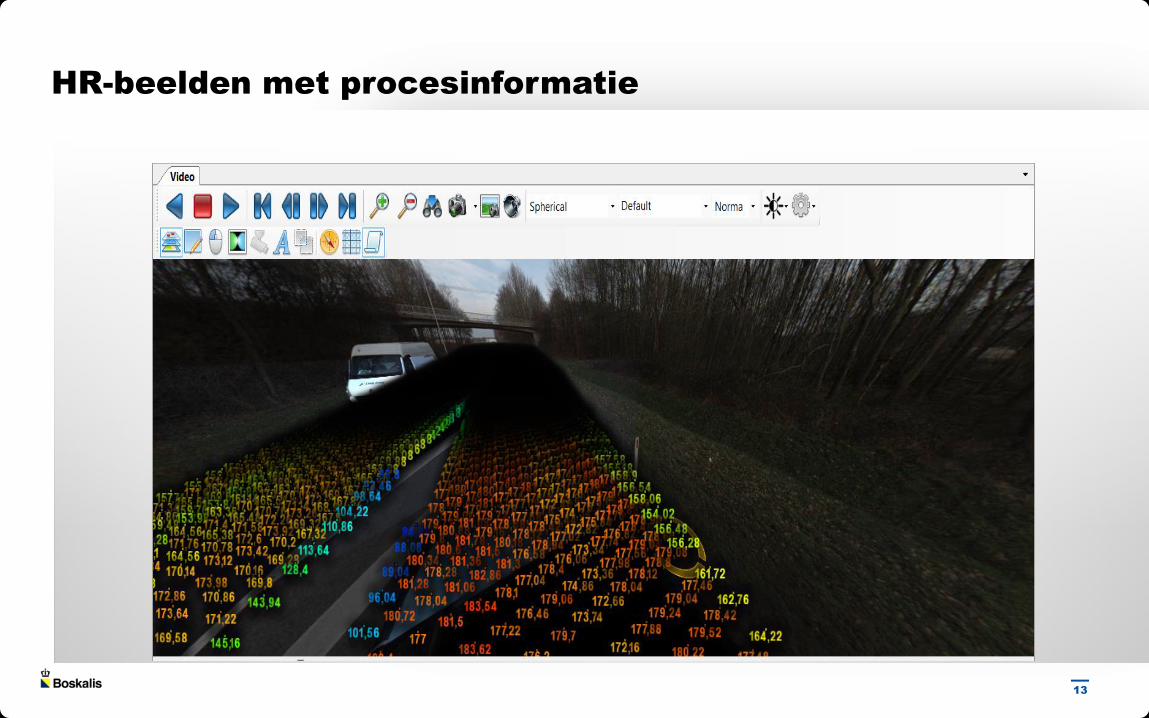
HR-beelden met procesinformatie
SLIDE NAME IN TEMPLATE:
\
13
08 TEXT & PICTURE 80/20
SLIDE EXAMPLE:
BULLET LEVELS
(INCREASE OR DECREASE)
By using List Levels, you can organize bullets and numbering
into categories. Complete the following steps to adjust the
List Level:
To promote the text line UP one list level, go to the Home
command tab and click in the Paragraph box on:
INCREASE LIST LEVEL
To bring the text line DOWN one list level, go to the Home
command tab and click in the Paragraph box on :
DECREASE LIST LEVEL
INSERT A PICTURE:
1. Click icon to add a picture:
2. Locate the picture you wish to insert and
double-click on it
3. The picture is centered automatically. If the
main focus of the picture is not visible, please
use another picture
4. Right-click on the picture and Send to Back to
place it in the background behind your text
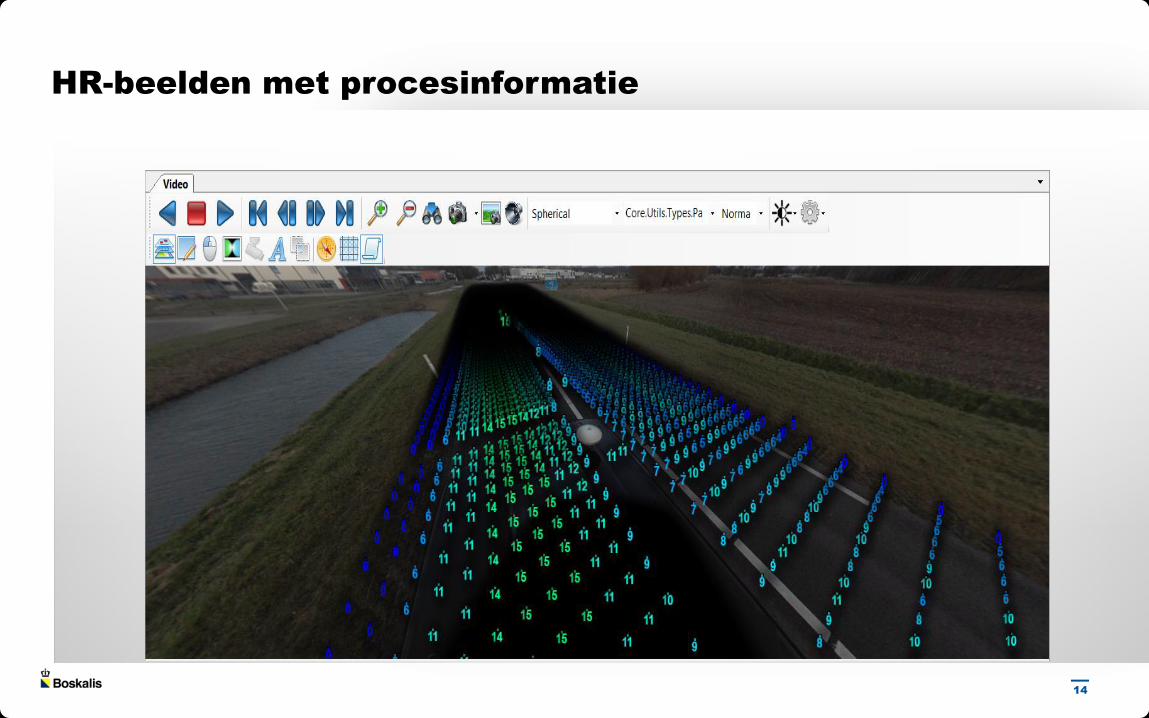
HR-beelden met procesinformatie
SLIDE NAME IN TEMPLATE:
\
14
08 TEXT & PICTURE 80/20
SLIDE EXAMPLE:
BULLET LEVELS
(INCREASE OR DECREASE)
By using List Levels, you can organize bullets and numbering
into categories. Complete the following steps to adjust the
List Level:
To promote the text line UP one list level, go to the Home
command tab and click in the Paragraph box on:
INCREASE LIST LEVEL
To bring the text line DOWN one list level, go to the Home
command tab and click in the Paragraph box on :
DECREASE LIST LEVEL
INSERT A PICTURE:
1. Click icon to add a picture:
2. Locate the picture you wish to insert and
double-click on it
3. The picture is centered automatically. If the
main focus of the picture is not visible, please
use another picture
4. Right-click on the picture and Send to Back to
place it in the background behind your text
HR-beelden met procesinformatie

SLIDE NAME IN TEMPLATE:
\
15
08 TEXT & PICTURE 80/20
SLIDE EXAMPLE:
BULLET LEVELS
(INCREASE OR DECREASE)
By using List Levels, you can organize bullets and numbering
into categories. Complete the following steps to adjust the
List Level:
To promote the text line UP one list level, go to the Home
command tab and click in the Paragraph box on:
INCREASE LIST LEVEL
To bring the text line DOWN one list level, go to the Home
command tab and click in the Paragraph box on :
DECREASE LIST LEVEL
INSERT A PICTURE:
1. Click icon to add a picture:
2. Locate the picture you wish to insert and
double-click on it
3. The picture is centered automatically. If the
main focus of the picture is not visible, please
use another picture
4. Right-click on the picture and Send to Back to
place it in the background behind your text
HR-beelden met procesinformatie

SLIDE NAME IN TEMPLATE:
\
16
08 TEXT & PICTURE 80/20
SLIDE EXAMPLE:
BULLET LEVELS
(INCREASE OR DECREASE)
By using List Levels, you can organize bullets and numbering
into categories. Complete the following steps to adjust the
List Level:
To promote the text line UP one list level, go to the Home
command tab and click in the Paragraph box on:
INCREASE LIST LEVEL
To bring the text line DOWN one list level, go to the Home
command tab and click in the Paragraph box on :
DECREASE LIST LEVEL
INSERT A PICTURE:
1. Click icon to add a picture:
2. Locate the picture you wish to insert and
double-click on it
3. The picture is centered automatically. If the
main focus of the picture is not visible, please
use another picture
4. Right-click on the picture and Send to Back to
place it in the background behind your text
HR-beelden met procesinformatie

SLIDE NAME IN TEMPLATE:
\
17
08 TEXT & PICTURE 80/20
SLIDE EXAMPLE:
BULLET LEVELS
(INCREASE OR DECREASE)
By using List Levels, you can organize bullets and numbering
into categories. Complete the following steps to adjust the
List Level:
To promote the text line UP one list level, go to the Home
command tab and click in the Paragraph box on:
INCREASE LIST LEVEL
To bring the text line DOWN one list level, go to the Home
command tab and click in the Paragraph box on :
DECREASE LIST LEVEL
INSERT A PICTURE:
1. Click icon to add a picture:
2. Locate the picture you wish to insert and
double-click on it
3. The picture is centered automatically. If the
main focus of the picture is not visible, please
use another picture
4. Right-click on the picture and Send to Back to
place it in the background behind your text
• Geografische indeling wegen (wegvakken)
• Boorkernen
• Temperatuur asfaltspecie (ASPARI)
• Aantal walsovergangen (ASPARI)
• Verwerkte vrachten asfalt, inclusief koppeling naar alle achterliggende data
• Visuele kwaliteit (HR-beelden)
• Conditiemetingen
- draagvermogen (valgewicht)
- natte stroefheid
- droge stroefheid
- vlakheid
- dwarshelling
• En alles wat je zelf nog kan bedenken…..
Voorbeelden beschikbare gegeorefereerde data

SLIDE NAME IN TEMPLATE:
\
18
08 TEXT & PICTURE 80/20
SLIDE EXAMPLE:
BULLET LEVELS
(INCREASE OR DECREASE)
By using List Levels, you can organize bullets and numbering
into categories. Complete the following steps to adjust the
List Level:
To promote the text line UP one list level, go to the Home
command tab and click in the Paragraph box on:
INCREASE LIST LEVEL
To bring the text line DOWN one list level, go to the Home
command tab and click in the Paragraph box on :
DECREASE LIST LEVEL
INSERT A PICTURE:
1. Click icon to add a picture:
2. Locate the picture you wish to insert and
double-click on it
3. The picture is centered automatically. If the
main focus of the picture is not visible, please
use another picture
4. Right-click on the picture and Send to Back to
place it in the background behind your text
Structurele lange termijn monitoring van verhardingen is geen Nederlandse hobby, maar
huidige stormachtige technische ontwikkelingen stellen ons in staat om bijna gratis en
voor niets op gestructureerde wijze objectieve informatie over de prestaties van
verhardingen te verzamelen.
Conclusie

SLIDE NAME IN TEMPLATE:
\
19
07 PICTURE FULL SCREEN
SLIDE EXAMPLE:
INSERT A PICTURE:
1. Click icon to add a picture:
2. Locate the picture you wish to insert and double-
click on it
3. Right-click on the picture and Send to Back to place
it in the background behind your text