Embed Size (px)
Citation preview

P a g e | 1
Camera Settings for Rotoscope Footage Using classroom Canon T1i 1. Turn the camera on.
2. Turn the settings dial on top to the Video Setting.
3. Select Menu button.
Video Setting
Menu Button

P a g e | 2
4. Under the red tab with the movie camera icon check to see that the resolution is set to 1280 x 720. If it’s already set to this size, press the Menu Button to exit.
How to Change the Movie Rec. Size
1. Use the arrow keys to move down the list to Movie rec. size.
2. Press the Set Button. (This opens up the options for resolution.)
3. Use the arrow keys to move down to 1280 x 720.
4. Press Set.
5. Press Menu button again to exit.

P a g e | 3
How to Shoot Video 1. To record - Press the Record Button to begin recording.
2. To stop recording – Press the Record Button again.
3. To view your recording a. Press the Preview Button b. Locate the clip you want to view c. Press the Set Button twice
4. To get back to recording mode – Press the Preview Button
Record Button
Preview Button

P a g e | 4
Editing Your Footage 1. Open Adobe Premiere Pro CC and choose New Project.
2. Name your file: periodnumberlastname_rotoscopeclip
3. Click Browse and choose N Drive>Student Folders>Your Period>Your
Name>Rotoscope Folder. Click OK.

P a g e | 5
4. Click the Project Tab to make it active.
5. Click on the New Item Icon.
6. Choose Sequence…
7. Click the HDV folder to expand. Click on HDV 720p30 preset.
New Item Icon

P a g e | 6
8. Double-Click anywhere in the Project Panel.
9. Locate your rotoscope footage in your N Drive>Student Folder>Period>Your
Name>Rotoscope Folder and click Import. NOTE: You may have more than one clip because you may have planned on cutting the final time down to 15 seconds.
10. Drag and drop your footage to the Source Panel. (Upper Left)
11. Press the Play Button to view your clip.
Play Button

P a g e | 7
12. When you get to the beginning of the footage you want use, press the
Mark In button.
13. Play the clip to the point at which you want to end and press Mark Out button.
14. Put your cursor anywhere on the video in the Source Panel. Click and hold the mouse button down while and dragging to the timeline.
15. Hover over the V1 (Video 1) layer and release the mouse. The video snaps to the timeline.
Mark In Button Mark Out Button

P a g e | 8
16. You may get a Clip Mismatch Warning. If so, choose Keep existing settings.
17. You are ready to Export when you have 15 Seconds of footage.
The next few pages have videos to help you use the tools in Premiere Pro to get your clip looking just the way you want it.

P a g e | 9
Useful Premiere Pro Tools Zoom In/Zoom Out on Footage
Plus Key = Zoom In Minus Key = Zoom Out Or use slider at the bottom of the sequence panel
Cutting Footage with the Razor Tool Lifting and Extracting, Deleting and Ripple Deleting Footage
Next you will export from Premiere. Continue to the next page.

P a g e | 10
Exporting Out of Premiere Next you will export your footage out of Premiere as an FLV.
1. Click somewhere in the Sequence Panel to make that Panel active.
2. Click File>Export>Media…
3. Make sure your settings match the screenshot
4. Click Queue. This will launch Adobe Media Encoder.
Click on the text here to bring up a dialog Box so you can choose where to save the file and what to name it. Save: In your N Drive Student Folder>Rotoscope Folder Name: rotoscopefootage

P a g e | 11
5. Double-check all settings and make any necessary changes.
6. Click on the Green Play Button to render your footage.
It will be saved to the folder you chose in Step 3.
7. Once your render is finished, you can close Encoder. The next step is to import your video into Flash. Continue to the next page.
P a g e | 12
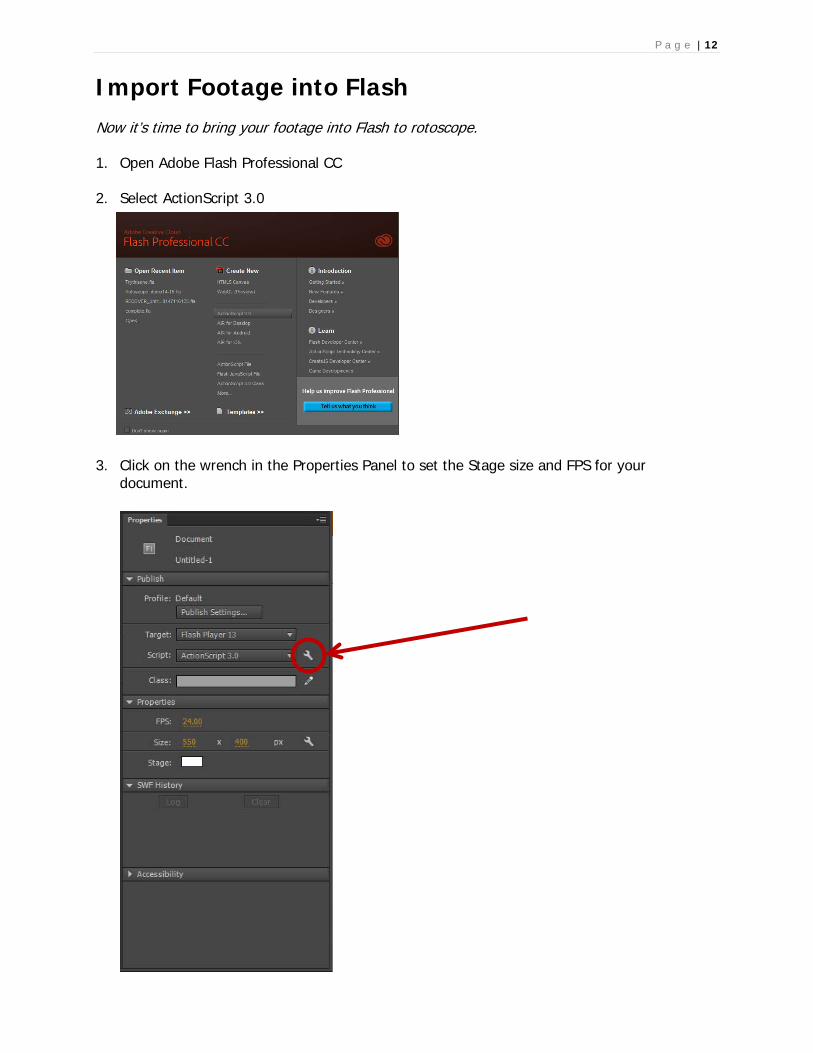
Import Footage into Flash
Now it’s time to bring your footage into Flash to rotoscope.
1. Open Adobe Flash Professional CC
2. Select ActionScript 3.0
3. Click on the wrench in the Properties Panel to set the Stage size and FPS for your
document.

P a g e | 13
4. Change the Stage size to 1280 x 720 and the Frame rate to 15.
5. Click OK.
6. Import your video by Choosing File>Import>Import Video… 7. Choose Embed FLV in SWF and play in timeline 8. Click Browse… button and choose your edited rotoscope footage.
9. Click Next.

P a g e | 14
10. Do nothing on this screen. 11. Click Next> again.
12. Do nothing on this screen. 13. Click Finish.

P a g e | 15
14. Double-Click on Layer 1 and rename it Footage.
15. Lock the Layer by clicking on the dot on the Footage Layer below the padlock icon.
16. Click on the New Layer icon to make a new layer. Name it Draw.
17. Click on the Draw Layer name. (Clicking on the layer name selects all the frames in that layer)
18. Right-Click anywhere on the selected frames and choose Convert to Blank Keyframes
New Layer icon

P a g e | 16
19. The result.
20. Add a Ball Layer and a Background Layer.
21. Lock them all except the Draw Layer.
From this point forward, the directions are much more general. Let the creativity flow!
• To draw use the Paintbrush or Pencil. Keep in mind the paintbrush uses a fill and the pencil uses a stroke.
• For either the Paintbrush or the Pencil, there are options for each tool at the bottom of the Tool Panel. Check them out!
• To smooth your lines even more, change the smoothing setting to your likeness. 50 is the default.
• When you want to play the animation, simply hide the video layer by clicking on the eye on the Footage Layer.
Options for each tool.

P a g e | 17
• To fill areas with color, make sure the shapes are closed or close to it.
• The Fill Tool has some options at the bottom of the Tool Panel that will help with filling objects. You can choose Close Large Gaps and the Fill Tool will fill your object…sometimes.
• If your gap is too large, here is a little trick. Draw a line across the opening with a different color. Use the Fill Tool, then remove the line you drew.
• IMPORTANT! Before you export DELETE THE VIDEO LAYER!
P a g e | 18
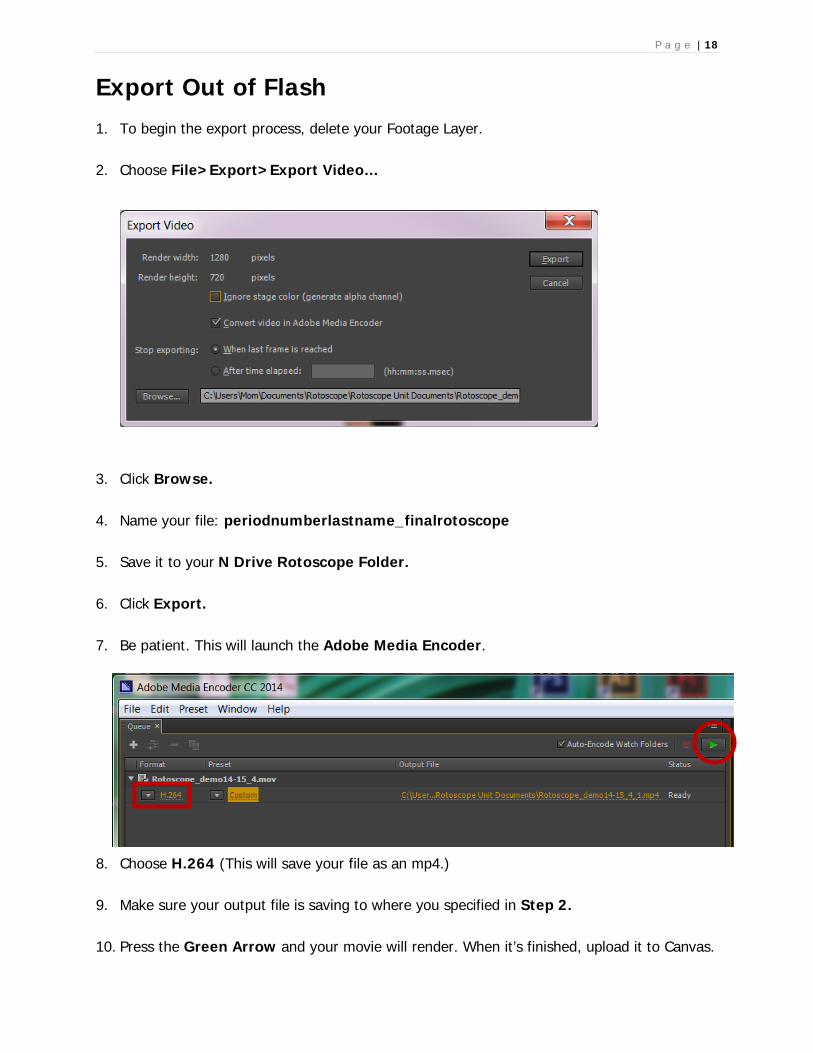
Export Out of Flash 1. To begin the export process, delete your Footage Layer.
2. Choose File>Export>Export Video…
3. Click Browse.
4. Name your file: periodnumberlastname_finalrotoscope
5. Save it to your N Drive Rotoscope Folder.
6. Click Export.
7. Be patient. This will launch the Adobe Media Encoder.
8. Choose H.264 (This will save your file as an mp4.)
9. Make sure your output file is saving to where you specified in Step 2.
10. Press the Green Arrow and your movie will render. When it’s finished, upload it to Canvas.