Embed Size (px)
Citation preview

Non-Event-Driven Particle Systems
Create panel (Geometry) Particle Systems Create menu Particles Non-event-driven particle systems provide relatively simple, straightforward methods for generating particle sub-objects over time for the purpose of simulating snow, rain, dust, and so on. You use particle systems primarily in animations. 3ds Max provides six built-in, non-event-driven particle systems: Spray, Snow, Super Spray, Blizzard, PArray, and PCloud. The built-in particle systems share these controls: Emitter
Specifies where in the scene the particles are generated. The emitter is the particle system's main sub-object. It doesn't render. Particles appear on the surface of the emitter and fall (or drift, drop, flurry, spray) from the emitter in a particular direction.
TimingThe timing parameters control the dynamics of particles in the system. They specify how quickly particles appear, how quickly they disappear, whether the emission rate is constant, and so on.
Particle-specific parametersThese parameters are specific to the kind of particle system. Examples are particle size and speed.
Rendering propertiesThese parameters are also specific to the kind of particle system. There are options for displaying particles in viewports and rendering them in scenes and animations. Particles do not necessarily appear the same in renderings as they do in viewports. You can modify and animate particle system parameters. You can also affect particle system behavior with space warps. In addition, you can deform particle systems with the Mesher compound object.
Spray Particle SystemSpray simulates water drops such as rain, a fountain, the spray from a garden hose, and so on.Procedures To create spray:
1. On the Create panel, make sure (Geometry) is active and Particle Systems is chosen in the object category list, then click Spray.
2. Drag in a viewport to create the Spray emitter; see Creating a Particle Emitter. The emitter's direction vector points in the negative Z direction of the active construction plane. For example, if you create the emitter in the Top viewport, the particles will move downward in the Front and Left viewports.
Interface
1

Particles group Viewport Count
Maximum number of particles displayed in viewports at any given frame. TipSetting the viewport count less than the render count can improve viewport performance.
Render CountMaximum number of particles that can appear in a single frame when you render it. Works in combination with the particle system's timing parameters.
When the number of particles reaches the Render Count value, particle creation is suspended until some particles die.
When enough particles die, particle creation resumes until Render Count is reached again.
Drop SizeSize of a particle in the active units.
SpeedInitial velocity of each particle as it leaves the emitter. Particles travel at this speed unless they are affected by a particle system space warp.
VariationVaries the initial speed and direction of particles. The greater the Variation, the stronger and broader the spray.
Drops, Dots, or TicksChoose how particles are displayed in viewports. The display setting does not affect how particles are rendered. Drops are streaks that appear like raindrops, dots are points, ticks are small plus signs.
2

Render group Tetrahedron(The default.) Particles are rendered as long tetrahedrons, with the length you
specify in the Drop Size parameter. Tetrahedron is the default setting for rendering. It provides a basic simulation of water drops.
FacingParticles are rendered as square faces whose width and height equals the Drop Size. Facing particles always face the camera (or the user's perspective). They are provided especially for use with material maps. Use with an appropriate opacity map for bubbles or snowflakes. NoteFacing works correctly only in a perspective or camera view.
Timing group Timing parameters control the "birth and death" rates of emitted particles. At the bottom of the Timing group is a line that displays the maximum sustainable rate. This value is based on the Render Count and the lifetime of each particle. To be precise: maximum sustainable rate=Render Count/Life Because the number of particles in a frame never exceeds Render Count, if the Birth Rate exceeds the maximum rate, the system will run out of particles, pause until some die off, and then start again, generating particles in bursts or spurts. Start
Number of the first frame where particles appear. Life
The lifetime of each particle, in number of frames. Birth Rate
The number of new particles born per frame. If this is less than or equal to the maximum sustainable rate, the particle system generates an even flow of particles. If it is greater than the maximum rate, the particle system generates particles in bursts. You can animate the Birth Rate parameter.
ConstantWhen on, Birth Rate is unavailable and the birth rate used equals the maximum sustainable rate. When off, Birth Rate is available. Default=on. Turning Constant off does not mean that the birth rate varies automatically; the birth rate remains constant unless you animate the Birth Rate parameter.
Emitter group The emitter specifies the area where particles appear in the scene. It has a geometry you can display in viewports, but it isn't renderable. The emitter is displayed as a rectangle with a vector pointing out of one side. The vector shows the direction in which the system emits particles. Width and Length
You implicitly set the initial value of these parameters when you drag in a viewport to create the emitter. You can adjust the values in the rollout. The space occupied by the particle system at any given time is the result of a combination of its initial parameters (such as size of the emitter, and speed and variation of emission) and any space warps that have been applied.
HideTurn on to hide the emitter in viewports. When Hide is off, the emitter is displayed in viewports. The emitter is never rendered. Default=off.
Snow Particle System
Create panel (Geometry) Choose Particle Systems from the drop-down list. Object Type rollout Snow
3

Create menu Particles Snow Snow simulates falling snow or confetti. The snow system is similar to Spray, but it has additional parameters to generate tumbling snowflakes, and its rendering options are different.
Kinds of SnowNote Blizzard is a more powerful and advanced version of Snow. It provides all the functionality of Snow, plus additional features. TipTo animate particles following a path through space, use the Path Follow space warp. Procedures To create snow:
1. On the Create panel, make sure (Geometry) is active and Particle Systems is selected from the object category drop-down list, then click Snow.
2. Drag in a viewport to create the Snow emitter; see Creating a Particle Emitter. The emitter's direction vector points in the negative Z direction of the active construction plane.
Interface
4

Particles group Viewport Count
Maximum number of particles displayed in viewports at any given frame. TipSetting the viewport count less than the render count can improve viewport performance.
Render CountMaximum number of particles that can appear in a single frame when you render it. Works in combination with the particle system's timing parameters.
When the number of particles reaches the Render Count value, particle creation is suspended until some particles die.
When enough particles die, particle creation resumes until Render Count is reached again.
Flake SizeSize of a particle in the active units.
SpeedInitial velocity of each particle as it leaves the emitter. Particles travel at this speed unless they are affected by a particle system space warp.
VariationVaries the initial speed and direction of particles. The greater the Variation, the broader the area of snowfall.
Tumble5
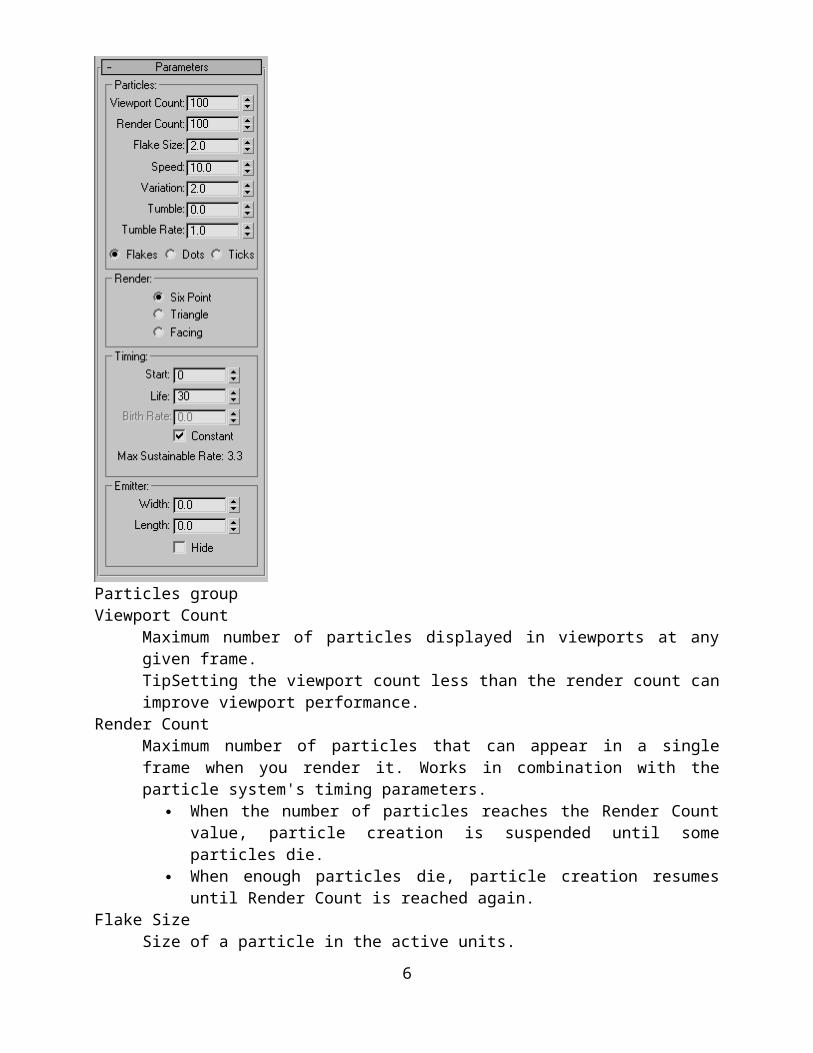
Amount of random rotation for snowflake particles. This parameter can range from 0 to 1. At 0, flakes do not rotate; at 1, they rotate the most. The axis of rotation is generated randomly for each particle.
Tumble RateSpeed at which snowflakes rotate. The greater the Tumble Rate, the faster the rotation.
Flakes, Dots, or TicksSelect how particles are displayed in viewports. The display setting does not affect how particles are rendered. Flakes are star-shaped snowflakes, dots are points, ticks are small plus signs.
Render group Six Point(The default.) Each particle is rendered as a six-pointed star. Each side of the star
is a face to which you can assign a material. This is the default setting for rendering. TriangleEach particle is rendered as a triangle. Only one side of the triangle is a face to
which you can assign a material. FacingParticles are rendered as square faces whose width and height equals the Drop
Size. Facing particles always face the camera (or the user's perspective). They are provided especially for use with material maps. Use with an appropriate opacity map for bubbles or snowflakes. NoteFacing works correctly only in a perspective or camera view.
Timing group Timing parameters control the "birth and death" rates of emitted particles. At the bottom of the Timing group is a line that displays the maximum sustainable rate. This value is based on the Render Count and the lifetime of each particle. To be precise: maximum sustainable rate=Render Count/Life Because the number of particles in a frame never exceeds Render Count, if the Birth Rate exceeds the maximum rate, the system will run out of particles, pause until some die off, and then start again, generating bursts or spurts of particles. Start
Number of the first frame where particles appear. Life
The lifetime of a particle, in number of frames. Birth Rate
The number of new particles born per frame. If this is less than or equal to the maximum sustainable rate, the particle system generates an even flow of particles. If it is greater than the maximum rate, the particle system generates particles in bursts. You can animate the Birth Rate parameter.
ConstantWhen on, Birth Rate is unavailable and the birth rate used equals the maximum sustainable rate. When off, Birth Rate is available. Default=on. Turning Constant off does not mean that the birth rate varies automatically; the birth rate remains constant unless you animate the Birth Rate parameter.
Emitter group The emitter specifies the area where particles appear in the scene. It has a geometry you can display in viewports, but it isn't renderable. The emitter is displayed as a rectangle with a vector pointing out of one side. The vector shows the direction in which the system emits particles. You set emitter parameters in the Emitter group of the particle system's Parameters rollout. Width and Length
6

You implicitly set the initial value of these parameters when you drag in a viewport to create the emitter. You can adjust the values in the rollout. The space occupied by the particle system at any given time is the result of a combination of its initial parameters (size of the emitter, and speed and variation of emission) and any space warps that have been applied.
HideTurn on to hide the emitter in viewports. When off, the emitter is displayed in viewports. The emitter is never rendered. Default=off.
PCloud Particle System
Create panel (Geometry) Choose Particle Systems from the drop-down list. Object Type rollout PCloud Create menu Particles PCloud Use the PCloud (or Particle Cloud) particle system when you want a "cloud" of particles that fill a specific volume. PCloud can provide a flock of birds, a starfield, or a troupe of soldiers marching over terrain. You can confine the particles using basic supplied volumes of a box, sphere, or cylinder, or you can use any renderable object in the scene as a volume as long as that object has depth. Two-dimensional objects do not work with PCloud. TipThere is no automatic way to hide the object chosen as the object-based emitter. Hide it by using Hide Selected on the Display panel, or by applying a Hide key in Track View.
PCloud viewport icon (default emitter)
PCloud viewport icon (object-based emitter)
7

PCloud used to form a school of fish (each fish is a particle)Procedures To create a particle cloud:
1. On the Create panel, make sure (Geometry) is active and Particle Systems is chosen in the object category list, then click PCloud.
2. Drag in a viewport to create the PCloud emitter; Adding a PCloud emitter works the same way as creating a box primitive: First drag out the length and width, then release the mouse button and move the mouse vertically to set the height, and then click to finish. The emitter appears with a letter "C" representing the particle cloud.
3. Adjust the various parameters on the command panel. Interface This section describes the Object-Based Emitter, Particle Formation, and Display Icon groups in the Basic Parameters rollout, and the Particle Motion group in the Particle Generation rollout. These are the only controls unique to PCloud. The other PCloud rollouts and their contents are identical with those in Particle Array, except that Object Fragments and associated settings are not available on the Particle Type rollout. Basic Parameters rollout
8

Object-Based Emitter group Lets you select a renderable mesh object to use as a particle emitter. This object is used only when the Object-Based Emitter option is chosen in the Particle Formation group. Pick Object
Click this, and then select a renderable mesh object to be used as a custom emitter. Object
Displays the name of the picked object. Particle Formation group These options let you specify the shape of the emitter.
Box EmitterChooses a box-shaped emitter. Sphere EmitterChooses a sphere-shaped emitter. Cylinder EmitterChooses a cylindrical emitter. Object-Based EmitterChooses the object selected in the Object-Based Emitter group.
NoteWith regard to animation of the object-based emitter, the particles will properly fill a deformed object at frame 0, but they can't stay with the emitter while it's moving. If the emitter moves in a straight line, this can give the appearance of the cloud moving with the emitter.
Display Icon group These options let you adjust the dimensions of the emitter icon when a custom object is not used as an emitter. When a custom object is used you can still resize the "Fill" icon using these options. Rad/Len
Adjusts the radius of a spherical or cylindrical icon, and the length of a box icon. Width
Sets the width of a box emitter. 9

HeightSets the height of a box or cylindrical emitter.
Emitter HiddenHides the emitter.
Particle Generation rollout
Particle Motion group Speed
The speed of the particle at birth along the normal, in units per frame. NoteFor the correct volume effect, Speed should be set to 0.
VariationApplies a percentage of variation to the speed of emission for each particle.
Random DirectionOne of three options that affect the direction of the particles. This option emits particles in random directions.
Direction Vector Specifies the direction of the particles by a vector defined by the three X, Y, and Z spinners. X/Y/ZDisplays the particle direction vector.
Reference Object Emits particles in the direction of the local Z axis of a specified object. ObjectDisplays the name of the picked object. Pick ObjectClick this, and then select an object in the scene to use as a reference object. This button is available only when you choose Reference Object. VariationApplies a percentage of variation to the direction when you choose either the Direction Vector or Reference Object option. This spinner is unavailable and has no effect when you choose Random Direction.
PCloud Particle System
Create panel (Geometry) Choose Particle Systems from the drop-down list. Object Type rollout PCloud Create menu Particles PCloud Use the PCloud (or Particle Cloud) particle system when you want a "cloud" of particles that fill a specific volume. PCloud can provide a flock of birds, a starfield, or a troupe of soldiers marching over terrain.
10

You can confine the particles using basic supplied volumes of a box, sphere, or cylinder, or you can use any renderable object in the scene as a volume as long as that object has depth. Two-dimensional objects do not work with PCloud. TipThere is no automatic way to hide the object chosen as the object-based emitter. Hide it by using Hide Selected on the Display panel, or by applying a Hide key in Track View.
PCloud viewport icon (default emitter)
PCloud viewport icon (object-based emitter)
PCloud used to form a school of fish (each fish is a particle)Procedures To create a particle cloud:
1. On the Create panel, make sure (Geometry) is active and Particle Systems is chosen in the object category list, then click PCloud.
2. Drag in a viewport to create the PCloud emitter; see Creating a Particle Emitter. Adding a PCloud emitter works the same way as creating a box primitive: First drag out the length and width, then release the mouse button and move the mouse vertically to set the height, and then click to finish. The emitter appears with a letter "C" representing the particle cloud.
11

3. Adjust the various parameters on the command panel. Interface This section describes the Object-Based Emitter, Particle Formation, and Display Icon groups in the Basic Parameters rollout, and the Particle Motion group in the Particle Generation rollout. These are the only controls unique to PCloud. The other PCloud rollouts and their contents are identical with those in Particle Array, except that Object Fragments and associated settings are not available on the Particle Type rollout. Basic Parameters rollout
Object-Based Emitter group Lets you select a renderable mesh object to use as a particle emitter. This object is used only when the Object-Based Emitter option is chosen in the Particle Formation group. Pick Object
Click this, and then select a renderable mesh object to be used as a custom emitter. Object
Displays the name of the picked object. Particle Formation group These options let you specify the shape of the emitter.
Box EmitterChooses a box-shaped emitter. Sphere EmitterChooses a sphere-shaped emitter. Cylinder EmitterChooses a cylindrical emitter. Object-Based EmitterChooses the object selected in the Object-Based Emitter group.
NoteWith regard to animation of the object-based emitter, the particles will properly fill a deformed object at frame 0, but they can't stay with the emitter while it's moving. If the emitter moves in a straight line, this can give the appearance of the cloud moving with the emitter.
12

Display Icon group These options let you adjust the dimensions of the emitter icon when a custom object is not used as an emitter. When a custom object is used you can still resize the "Fill" icon using these options. Rad/Len
Adjusts the radius of a spherical or cylindrical icon, and the length of a box icon. Width
Sets the width of a box emitter. Height
Sets the height of a box or cylindrical emitter. Emitter Hidden
Hides the emitter. Particle Generation rollout
Particle Motion group Speed
The speed of the particle at birth along the normal, in units per frame. NoteFor the correct volume effect, Speed should be set to 0.
VariationApplies a percentage of variation to the speed of emission for each particle.
Random DirectionOne of three options that affect the direction of the particles. This option emits particles in random directions.
Direction Vector Specifies the direction of the particles by a vector defined by the three X, Y, and Z spinners. X/Y/ZDisplays the particle direction vector.
Reference Object Emits particles in the direction of the local Z axis of a specified object. ObjectDisplays the name of the picked object. Pick ObjectClick this, and then select an object in the scene to use as a reference object. This button is available only when you choose Reference Object. VariationApplies a percentage of variation to the direction when you choose either the Direction Vector or Reference Object option. This spinner is unavailable and has no effect when you choose Random Direction.
Super Spray Particle System
13

Create panel (Geometry) Choose Particle Systems from the drop-down list. Object Type rollout Super Spray Create menu Particles Super Spray Super Spray emits a controlled spray of particles. This particle system is like the simple Spray particle system with the added power provided by all the newer particle systems. TipTo animate particles following a path through space, use the Path Follow space warp.
Super Spray viewport icon (emitter)
Particles emerging from a super spray systemProcedures To create a super spray particle system:
1. On the Create panel, make sure (Geometry) is active and Particle Systems is chosen in the object category list, then click Super Spray.
2. Drag in any viewport to create the Super Spray emitter icon; see Creating a Particle Emitter. The icon appears as an intersecting plane and circle with an arrow. The initial direction of the spray (based on the orientation of the emitter icon and indicated by the icon arrow) depends on the viewport in which you create the icon. Generally, the particles spray toward you when created in an orthographic viewport, or spray upward when created in a Perspective viewport.
3. Adjust the various parameters to alter the spray effect. Interface NoteThis section describes the Particle Formation group in the Basic Parameters rollout, and the Particle Motion group in the Particle Generation rollout. These are the only controls unique to Super Spray. The other Super Spray rollouts and their contents are identical with those in Particle Array, except that Object Fragments and associated settings are not available on the Particle Type rollout. Basic Parameters rollout
14

These items control the direction and spread of particles. Particle Formation group Off Axis
Affects the angle of the particle stream off the Z axis (along the plane of the X axis). Spread
Affects the spread of the particles away from the emission vector (along the plane of the X axis).
Off PlaneAffects the angle of emission about the Z axis. This has no effect if Off Axis is set to 0.
SpreadAffects the spread of the particles about the Off Plane axis. This has no effect if Off Axis is set to 0.
Particle Generation rollout Particle Motion group Speed
The speed of the particle at birth, in units per frame. Variation
Applies a percentage of variation to the speed of emission for each particle.
PArray Particle System
Create panel (Geometry) Choose Particle Systems from the drop-down list. Object Type rollout PArray Create menu Particles PArray The PArray (Particle Array) particle system can distribute particles on a geometric object. You can also use it to create sophisticated object explosions. TipA good way to create explosions with PArray is to set the particle type to Object Fragments and then apply a PBomb space warp.
15

When you use PArray to emit particles using a selected geometric object as the emitter template (or pattern) for the emission, the object is referred to as the distribution object.
Basket used as a distribution object for random particles over its surface
How particles can be distributed on an object:Left: Edges Center: Vertices Right: Faces Procedures To set up a particle array:
1. Create an object that will become the distribution object, providing the emitter pattern (or exploded object) for the particle array.
2. On the Create panel, make sure (Geometry) is active and Particle Systems is chosen in the object category list, then click PArray.
3. Drag anywhere in a viewport to create the particle-system object; see Creating a Particle Emitter.
4. On the Basic Parameters rollout, click Pick Object, and then click the object to use as the distribution object.
5. Adjust the various options in the Particle Array rollouts to achieve the effect you want.
16

The distribution object can be any object containing renderable faces. The particle-system object does not appear in the rendered scene. Its placement, orientation or size in the scene has no influence on the particle effect. To access the Particle Array parameters after creation, open the Modify panel and select the particle-system object (or click any visible particles in the viewport). To transform or otherwise modify the distribution object, select the distribution object itself. Also, you can share a single distribution object among more than one particle-system object. The distribution object merely provides the template for the particles, which are actually generated by the particle system.
Example: To assign three different mapped materials to fragments: 1. Apply mapping coordinates to the distribution object, either by turning on Generate
Mapping Coords, if necessary, or by applying a UVW Map modifier. 2. Assign a Multi/Sub-Object material to the distribution object. 3. Set up the first three sub-materials to be mapped materials.
4. Select the PArray icon. 5. On the Particle Type rollout in the Mat'l Mapping And Source group, choose Picked
Emitter. 6. In the Particle Type rollout Particle Types group, turn on Object Fragments. 7. Make sure the three spinners in the Fragment Materials group are set to 1, 2, and 3,
respectively (or match the numbers with the sub-materials you've assigned in your multi/sub-object material).
Particle Generation Rollout (PArray)
Create panel (Geometry) Choose Particle Systems from the drop-down list. Object Type rollout SuperSpray/Blizzard/Parray/PCloud Particle Generation rollout
Select a SuperSpray/Blizzard/Parray/PCloud emitter. Modify panel Particle Generation rollout Items on this rollout control when and how quickly particles form, how particles move, and the size of the particles over time. Interface
17

Particle Quantity group In this group, you can choose one of two methods by which the number of particles is determined over time. These settings are unavailable if you set Particle Type (in the Particle Type rollout) to Object Fragments.
Use Rate(The default.) Specifies a fixed number of particles emitted per frame. Use the spinner to set the number of particles formed per frame.
Use TotalSpecifies a total number of particles formed over the life of the system. Use the spinner to set the number of particles formed per frame. The life of the system, in frames, is specified by the Life spinner in the Particle Timing group, described later in this topic. TipGenerally, Use Rate is best for a continuous flow of particles, like a trail of pixie dust, while Use Total is better for bursts of particles over a short period of time.
Particle Motion group These spinners control the initial particle velocity, which is directed along the surface, edge, or vertex normals (interpolated for each emitter point). Speed
The velocity of the particle at birth, along the normal, in units traveled per frame. Variation
Applies a percentage of variation to the speed of emission for each particle. Divergence
18

Applies an angular degree of variation by which each particle's velocity can vary from the emitter normal. NoteThe initial direction for a fragment cluster is the normal of the cluster's seed face. Clusters are created by choosing a single face (the seed face), and then creating a cluster outward from that face, depending on the method chosen in the Object Fragment Controls group on the Particle Type rollout.
Particle Timing group These options specify when particle emission starts and stops, and the lifespan of the individual particles. Emit Start
Sets the frame at which particles begin to exist in the scene. Emit Stop
Sets the last frame at which particles are emitted. This setting has no effect if you choose the Object Fragments particle type.
Display UntilSpecifies the frame at which all particles will disappear, regardless of other settings.
LifeSets the lifespan in number of frames of each particle from the frame of creation.
VariationSpecifies the number of frames by which the life of each particle can vary from the norm.
Subframe SamplingTurning on any of the three checkboxes below helps avoid particle "puffing" by sampling particles at a much higher subframe resolution, instead of the relatively coarse frame resolution. Depending on your needs, you can do this over time, over motion, or over rotation. "Puffing" is the effect of emitting separate "puffs" or clusters of particles, rather than a continuous stream. This effect is especially noticeable when the emitter is animated.
Creation TimeEnables the addition of a time offset to the equations of motion that prevents puffing in time. This setting has no effect with the Object Fragments particle type. Default=on.
Emitter TranslationIf the object-based emitter is moving in space, particles are created at integral times at positions along the geometry's path between renderable positions. This prevents puffing in space. This setting has no effect if Object Fragment particle type is on. Default=on.
Emitter RotationIf the emitter is rotating, turn this on to avoid puffing and produce smooth spiral effects. Default=off. ImportantEach additional subframe sampling checkbox that you turn on progressively increases the necessary computation. In addition, the methods are listed in order of least amount of computation to most. Thus, Emitter Rotation is more costly than Emitter Translation, which is more costly than Creation Time.
Particle Size group These spinners specify the size of the particles. Size
This animatable parameter specifies the target size for all particles in the system, depending on the type of particle:
Standard ParticlesThe major dimension of the particle. ConstantThe dimension, in rendered pixels, of a Constant type of particle. Object FragmentsNo effect.
Variation
19

The percentage by which the size of each particle may vary from the norm. This is applied to the Size value. Use this parameter to get a realistic mix of large and small particles.
Grow ForThe number of frames over which the particle grows from being very small to the Size value. The result is subject to the Size/Variation value, since Grow For is applied after Variation. Use this parameter to simulate natural effects such as bubbles growing as they reach the surface.
Fade ForThe number of frames over which the particle will shrink to 1/10th its Size setting prior to its death. This is also applied after Variation. Use this parameter to simulate natural effects such as sparks fading to ash.
Uniqueness group By changing the Seed value in this spinner, you achieve different results using otherwise identical particle settings. New
Randomly generates a new seed value. Seed
Sets a specific seed value. Particle Type Rollout (PArray)
Create panel (Geometry) Choose Particle Systems from the drop-down list. Object Type rollout SuperSpray/Blizzard/Parray/PCloud Particle Type rollout
Select a SuperSpray/Blizzard/Parray/PCloud emitter. Modify panel Particle Type rollout The controls on this rollout let you specify the type of particle used and the type of mapping performed on the particles.
Left: A stream from a fountainRight: The same stream with various types of particles Interface
20

Particle Types group These options specify one of four categories of particle type. Depending on which option you choose, different controls become available in the lower portion of the Particle Type rollout.
Standard ParticlesUses one of several standard particle types, such as triangle, cube, tetra, and so on.
MetaParticlesUses Metaball particles. These are particle systems in which the individual particles blend together in blobs or streams.
Object FragmentsCreates particles out of fragments of an object.
21

Object Fragments is available only with Particle Array. Choose it when you want to fracture the particle emitter object and use the pieces as particles. This option is useful for animating explosions and shattering collisions. The fragments are created at the Emit Start frame. The Use Rate, Use Total, Emit Stop, and Particle Size parameters are unavailable.
Instanced GeometryGenerates particles that are instances of either an object, a linked hierarchy of objects, or a group. The object is selected in the Instancing Parameters group on the Particle Type rollout. Choose Instanced Geometry when you want particles to be identical instances of another object in your scene. Instanced geometry particles are extremely effective for creating crowds, flocks, or flows of very detailed objects. Here are a few examples:
o Instance a red blood cell and use Super Spray to animate blood flowing in an artery.
o Instance a bird and use Particle Cloud to animate a flock of birds flying. o Instance a rock and use Particle Cloud to animate an asteroid field.
NoteOnly one type of particle can be used for the particle system. However, you can have more than one particle array bound to a single object, and each particle array can emit a different type of particle. TipImage motion blur, described in Object Properties Motion Blur group, is known not to work properly with instanced particles. Use object motion blur with instanced particles, or use image motion blur with standard particles.
Standard Particles group When you choose Standard Particles in the Particle Types group, the options in this group become available. Choose one of the following options to specify the particle type:
TriangleRenders each particle as a triangle. Use Triangle particles with noise opacity for steam or smoke.
CubeRenders each particle as a cube. Special
Each particle consists of three intersecting 2D squares. These are effective when you use a face-map material, described in Shader Basic Parameters Rollout, optionally along with an opacity map, to create the effect of a three-dimensional particle.
Facing Renders each particle as a square that always faces the view. Use with an appropriate opacity map for bubbles or snowflakes.
ConstantProvides a particle that remains the same size, in pixels, specified in the Size spinner in the Particle Generation rollout Particle Size group. This size never changes, regardless of the particle's distance from the camera. ImportantYou must render either a camera or a perspective view for Constant particles to render correctly.
TetraRenders each particle as a mapped tetrahedron. Use Tetra particles for raindrops or sparks. The default alignment of the tetra particles depends on the particle system type and emitter setup. To specify an alignment, use controls in the Rotation and Collision rollout.
SixPointRenders each particle as a six-pointed, two-dimensional star. SphereRenders each particle as a sphere.
MetaParticle Parameters group When you choose the MetaParticles option in the Particle Types group, the options in this group become available, and metaballs are used as particles. Metaparticles take extra time to render but are very effective for spraying and flowing liquid effects.
22

TensionDetermines the tightness of the particles, with regard to their tendency to blend with other particles. The higher the Tension, the harder the blobs, and the harder it is for them to merge.
VariationSpecifies the percent of variation of the Tension effect.
Evaluation CoarsenessSpecifies how accurately the metaparticle solution is calculated. The higher the coarseness values, the less calculation. However, if the coarseness is too high, there may be little or no metaparticle effect at all. Conversely, if the coarseness is set too low, the time for calculation can become extremely long.
RenderSets the coarseness for metaparticles in the rendered scene. This option is unavailable when Automatic Coarseness is on.
ViewportSets the coarseness for the viewport display. This option is unavailable when Automatic Coarseness is on.
Automatic CoarsenessA general rule is to set the Coarseness value between 1/4 and 1/2 the size of the particles. When this item is on, the rendering coarseness is automatically set, based on the size of the particles, and the viewport coarseness is set to about twice that of the rendering coarseness.
One Connected BlobWhen off (the default), all particles are calculated; when on, a shortcut algorithm is used that calculates and displays only those particles that are adjoining or contiguous to each other. NoteOne Connected Blob mode speeds particle calculations, but you should use it only when your metaparticles form one connected blob, as the label indicates. That is, all particles' blobs must be touching. For example, if you were to use One Connected Blob on a stream of particles containing a mass of 10 contiguous particles followed by a space, then 12 contiguous particles followed by another space, and finally 20 contiguous particles, one of the particles will be chosen, and only the mass connected to that particle will be displayed and rendered. TipWhen in doubt, leave this option off. If you think all your particles are contiguous and want to save time, turn on One Connected Blob, and then display various frames to see if everything appears.
Object Fragment Controls group With a particle array, when you choose the Object Fragments particle type, the items in this group become available, and the object-based emitter is exploded into fragments, rather than being used to distribute particles. NoteTo see the fragments in the viewports, choose Mesh in the Viewport Display group near the bottom of the Basic Parameters rollout. The items in this group include a Thickness spinner, along with three option buttons that determine how the fragments are formed. TipThere is no automatic way to hide the distribution object that explodes into fragments. To create the illusion that an object is exploding, you must either set the original object to be invisible at the start of the explosion, as described in Add Visibility Track , or move or scale the original object so it doesn't remain in view. Thickness
23

Sets the thickness of the fragments. At 0, the fragments are single-sided with no thickness. When greater than 0, the fragments are extruded, at fragmentation time, by the amount specified. The outer and inner surfaces of the fragment use identical smoothing, which is picked up from the object-based emitter. The edges of the fragments are not smoothed. The three options that follow specify how the object fragments.
All FacesEach face of the object becomes a particle. This results in triangular particles.
Number of ChunksThe object breaks into irregular fragments. The Minimum spinner, below, specifies the minimum number of fragments that will appear. The method of calculating the chunks may result in more fragments than specified.
MinimumDetermines a number of "seed" faces in the geometry. Each seed face collects connecting faces surrounding it until all available faces are exhausted. Any leftover faces become unique particles, thus increasing the minimum number of fragments.
Smoothing AngleThe fragments are broken based on the angles between face normals, as specified in the Angle spinner. Generally, the higher the Angle value, the fewer the number of fragments.
AngleSets the amount of smoothing angle.
Instancing Parameters group
24

These options are used when you specify Instanced Geometry in the Particle Types group. They let you generate each particle as an instance of either an object, a linked hierarchy of objects, or a group. NoteInstanced objects can be animated, providing the animation incorporates one or more of the following types:
Animation of object geometry parameters, such as a sphere's Radius setting. Animation of object-space modifiers, such as the Angle setting of a Bend modifier. Transform animation of a hierarchical object's children. Transform animation of the top-
level parent and non-hierarchical objects is not supported. For example, if you use the toolbar Select and Rotate function to animate a box rotating, and then use the box as instanced geometry with a particle system, the system will not use instanced box's keyframed animation.
ObjectDisplays the name of the picked object.
Pick ObjectClick this, and then select an object in the viewport to be used as a particle. If you select an object that's part of a hierarchy and Use Subtree Also is on, then the picked object and its children become a particle. If you pick a group, all objects in the group are used as a particle.
Use Subtree AlsoTurn this on when you want to include the linked children of the picked object in the particle. If the picked object is a group, all children of the group are included. Note that you can turn this on or off at any time to alter the particles.
Animation Offset KeyingBecause the instanced objects can be animated, the options here let you specify the timing of the animations for the particles.
NoneEach particle duplicates the timing of the original object. As a result, the animation of all particles will be identically timed.
BirthThe firstborn particle is an instance of the current animation of the source object at the moment of that particle's birth. Each subsequent particle then uses the same start time for the animation. For example, if the animation of the source object is a bend from 0 to 180 degrees, and the first particle is born at frame 30, when the object is at 45 degrees, then that particle, and all subsequent particles will be born starting at a bend of 45 degrees.
RandomThis option is the same as None when Frame Offset is set to 0. Otherwise, each particle is born using the same animation as the source object at the time of birth, but with a random offset of frames, based on the value in the Frame Offset spinner.
Frame OffsetSpecifies an offset value from the current timing of the source object. Mat'l Mapping and Source group Specifies how a mapped material affects the particles, and lets you specify the source of the material assigned to the particles. A detailed description of how materials affect particles is in the topic Using Mapped Materials with Particle Systems. Time
Specifies the number of frames from the birth of the particle that it takes to complete one mapping of the particle.
DistanceSpecifies the distance, in units, from the birth of the particle that it takes to complete one mapping of the particle.
25

NoteTetra particles are an exception. They always have their own local mapping from head to tail, as described in the following section.
Get Material FromUpdates the material carried by the particle system, using the source specified by the option buttons below this button. ImportantRemember to click Get Material From whenever you choose a different source option button, or whenever you assign a new material to the specified source. Only a single material (or multi/sub-object material) is carried by the particle-system object at any time. Thus, when you change sources, you actually overwrite the currently assigned material with an instance of the source material.
IconThe particles use the material currently assigned to the particle system icon. NoteThe Time and Distance options are available only when you choose this option.
Picked EmitterThe particles use the material assigned to the distribution object. Instanced GeometryThe particles use the material assigned to the instanced
geometry. This option is available only when you choose Instanced Geometry in the Particle Types group. ImportantWhen you turn on either Picked Emitter or Instanced Geometry, an instance of the material from the chosen source is copied to the emitter icon, overwriting the material originally assigned to the icon. Thus, if you've assigned a material to the particle emitter, and then switch to Picked Emitter, the material originally assigned to the icon is replaced by an instance of the material carried by the picked object. If you then return to the Icon option, the particle system does not revert to the material that was assigned the icon, but retains the material taken from the picked object.
Fragment Materials group These spinners let you assign different material ID numbers to outside surfaces, the edges and the back sides of fragment particles. You can then assign different materials to the front, edge and back of the fragments by using a multi/sub-object material. Outside ID
Specifies which face ID number is assigned to the outside faces of the fragments. This spinner defaults to 0, which is not a valid ID number, forcing the outside of the particle fragments to use whatever material is currently assigned to the associated faces. Thus, if your distribution object already has several submaterials assigned to its outer faces, these materials are retained by using ID 0. If you want a single, specific submaterial, you can assign it by changing the Outside ID number.
Edge IDSpecifies which submaterial ID number is assigned to the edges of the fragments.
Backside IDSpecifies which submaterial ID number is assigned to the back sides of the fragments.
Rotation and Collision Rollout (PArray)
Create panel (Geometry) Choose Particle Systems from the drop-down list. Object Type rollout SuperSpray/Blizzard/Parray/PCloud Rotation and Collision rollout
Select a SuperSpray/Blizzard/Parray/PCloud emitter. Modify panel Rotation and Collision rollout Particles often move at high rates of speed. In such cases, you might want to add motion blur to the particles to enhance their motion. Also, real-world particles typically rotate as they move, and collide with each other.
26

The options on this rollout affect the rotation of the particles, provide motion blur effects, and control inter-particle collisions. Interface
Spin Speed Controls group Spin Time
The number of frames for one rotation of a particle. If set to 0, no rotation takes place. Variation
The percent of variation of the Spin Time. Phase
Sets the initial particle rotation, in degrees. This has no meaning for fragments, which always begin with zero rotation.
VariationThe percent of variation of the Phase.
Spin Axis Controls group These options determine the spin axis for the particles, and provide a partial method of applying motion blur to the particles.
RandomThe spin axis for each of the particles is random. Direction of Travel/Mblur
(Not available with the Blizzard particle system.) Rotates the particles about a vector formed by the direction in which they're moving. This option also lets you apply a form of motion blur to the particles by using the Stretch spinner. For further information, see Achieving Particle Motion Blur.
27

StretchWhen greater than 0, the particles stretch along the travel axis, depending on their speed. Specifically, the Stretch value specifies the percent of their length per each unit of the Speed setting (in the Particle Motion group). Thus, if you set Stretch to 2 while Speed is set at 10, the particles are stretched 20 percent longer than their original size along the axis of their travel. This spinner is available only when you choose Direction of Travel/Mblur. NoteFor best results when using Stretch, you should also assign the Particle MBlur map as an opacity map of the material assigned to the particle system.
User Defined Uses a vector defined in the three X, Y, and Z axis spinners. X/Y/Z AxisSpecifies the spin vector of the X, Y, or Z axis, respectively. These spinners are available only when User Defined is chosen. VariationThe amount, in degrees, by which the spin axis of each particle may vary from the specified X Axis, Y Axis, and Z Axis settings. This spinner is available only when you choose User Defined.
Interparticle Collisions group These options enable collisions between particles, and control how the collisions occur. Note that this involves intensive calculation, particularly when large numbers of particles are involved. Enable
Enables inter-particle collisions in the calculation of the particle movements. Calc Intervals Per Frame
The number of intervals per rendering interval, during which an inter-particle collision test is conducted. The higher the value, the more accurate the simulation, but the slower the simulation will run.
BounceThe degree to which speed is recovered after a collision.
VariationThe percentage of random variation of the Bounce value, applied to the particles.
Object Motion Inheritance Rollout (PArray)
Create panel (Geometry) Choose Particle Systems from the drop-down list. Object Type rollout SuperSpray/Blizzard/Parray/PCloud Object Motion Inheritance rollout
Select a SuperSpray/Blizzard/Parray/PCloud emitter. Modify panel Object Motion Inheritance rollout Each particle's position and direction of movement are determined by the position and orientation of the emitter at the time the particle is created. If the emitter is moving through the scene, particles are scattered along the emitter's path. Use these options to affect the motion of the particles by the motion of the emitter. Procedures Example: To observe object motion inheritance:
1. Create a Super Spray particle system.
2. Animate the emitter moving sideways (perpendicular to the direction of the particle stream) between frames 1 and 15.
3. Play the animation while observing it from the Top viewport. The emitter stops at frame 15, while the particles it has emitted up to that point continue moving along the diagonal between the emitter's path and that of the particles. The remaining particles move straight out from the emitter.
4. On the Object Motion Inheritance rollout, set Influence to 50.
28

5. Play the animation again. This time, only some of the particles inherit the emitter's motion, while the rest move straight out from the emitter. Note that the latter form a diagonal stream because each particle emerges at a subsequent point on the emitter path.
Interface
InfluenceThe percent of particles that inherit the motion of the object-based emitter at the moment of particle formation. For example, when this is set at 100 (the default), all particles travel along with a moving object; when it's set at 0, none of the particles are affected by the translation of the object and fall behind its movement.
MultiplierModifies the amount by which the emitter motion affects the particle motion. This can be a positive or negative number.
VariationProvides a percentage of variation of the Multiplier value.
Bubble Motion Rollout (PArray)
Create panel (Geometry) Choose Particle Systems from the drop-down list. Object Type rollout SuperSpray/Parray/PCloud Bubble Motion rollout
Select a SuperSpray/Parray/PCloud emitter. Modify panel Bubble Motion rollout Bubble motion provides the wobbling effect you see in bubbles rising underwater. Typically, it's used when the particles are set to rise in thin streams. Bubble motion is similar to a waveform, and the Bubble Motion parameters let you adjust the amplitude, period, and phase of the bubble "wave." NoteThe bubble motion is not affected by space warps, so you can use a space warp to control the direction of the particle flow without altering the local, wobbling bubble effect. TipInterParticle Collisions, Deflector Binding, and Bubble Noise do not get along well together. Particles may leak through the deflector when these three are used together. Instead of bubble motion, use animated mapping. Use facing particles with an animated map of a bubble, where the bubble is smaller than the map size. The bubble is animated moving around the map. This simulates bubble motion at the map level. Interface
AmplitudeThe distance the particle moves off its usual velocity vector as it travels.
Variation
29

The percent of Amplitude variation applied to each particle. Period
The cycle time for one complete oscillation of a particle through the bubble "wave." A recommended value might be 20 to 30 intervals. NoteBubble motion is measured in time, not in rate, so a very large Period value means the motion takes a long time to complete. Thus, there is no motion, effectively. Period is therefore set to a very large default value so that the default motion of this type is none.
VariationThe percent of Period variation for each particle.
PhaseThe initial displacement of the bubble pattern along the vector.
VariationThe percent of Phase variation for each particle.
Particle Spawn Rollout (PArray)
Create panel (Geometry) Choose Particle Systems from the drop-down list. Object Type rollout SuperSpray/Blizzard/Parray/PCloud Particle Spawn rollout
Select a SuperSpray/Blizzard/Parray/PCloud emitter. Modify panel Particle Spawn rollout The options on the Particle Spawn rollout let you specify what happens to particles when they die, or when they collide with a particle deflector. Using the options on this rollout, you can have particles generate additional generations of particles upon collision or death. Interface
30

Particle Spawning Effects group Choose one of these options to determine what happens to the particles at either collision or death.
NoneUses none of the spawning controls, and the particles act as they normally would. That is, upon collision, they either bounce or stick, depending on Particle Bounce settings in the deflector, and on death they disappear.
Die After CollisionParticles disappear when they strike a deflector to which they're bound, such as the SDeflector. PersistThe life, in frames, that the particle will persist after the collision. Setting this to 0 (the default) causes particles to vanish immediately after the collision. VariationVaries the Persist value of each particle, when Persist is greater than 0. This lets you "feather" the dying off of particle density.
Spawn on CollisionSpawn effects take place upon collision with a bound deflector. Spawn on DeathSpawn effects take place at the end of each particle's life. Spawn TrailsParticles are spawned from existing particles at each frame of that particle's
life. The Multiplier spinner specifies the number of particles that are spawned from each particle. The base direction of the spawned particles is opposite that of the parent's velocity. The Scale, Direction, and Speed Chaos factors are applied to that base direction.
31

NoteIf the Multiplier is greater than 1, at least one of the three Chaos factors must be greater than 0 in order to see the additional spawned particles. Otherwise, the multiples will occupy the same space. WarningThis option can produce many particles. For best results, begin by setting Particle Quantity on the Particle Generation rollout to Use Rate and to 1.
SpawnsThe number of spawns beyond the original particle generation. For example, if this is set to 1, and you're spawning at death, one spawning will occur beyond the original lifespan of each particle.
AffectsSpecifies the percentage of particles that will spawn. Reducing this reduces the number of particles that produce spawned particles.
MultiplierMultiplies the number of particles spawned at each spawning event.
VariationSpecifies a percentage range by which the Multiplier value will vary, frame by frame.
Direction Chaos group Chaos
Specifies the amount by which the direction of the spawned particle can vary from the direction of the parent particle. A setting of 0 means no variance. A setting of 100 causes the spawned particle to travel in any random direction. A setting of 50 causes the spawned particle to deviate from its parent's path by up to 90 degrees.
Speed Chaos group These options let you vary the spawned particles' speed randomly in relation to their parents' speed. Factor
This is the range of a percentage of change in the speed of the spawned particle relative to its parent. A value of 0 means no change.
SlowApplies the speed factor randomly to slow the speed of the spawned particles. FastRandomly speeds up particles based on the speed factor. BothSome particles speed up, while others slow down, based on the speed factor.
Inherit Parent VelocitySpawned particles inherit the speed of their parents, in addition to the effect of the speed factor.
Use Fixed ValueUses the Factor value as a set value, rather than as a range applied randomly to each particle.
Scale Chaos group
32

These options apply random scaling to the particles. Factor
Determines a random percentage range of scaling of the spawned particles relative to their parents, and dependent on the options below.
DownRandomly scales down spawned particles to be smaller than their parents, based on the Factor value.
UpRandomly scales up spawned particles to be larger than their parents. BothScales spawned particles both larger and smaller than their parents.
Use Fixed ValueUses the Factor value as a fixed value, rather than a range of values.
Lifespan Value Queue group These options let you specify a list of alternative lifespan values for each spawned generation of particles. The spawned particles use these lifespans rather than the lifespan specified for the original particles in the Life spinner on the Particle Generation rollout. List window
Displays a list of lifespan values. The first value on the list is used for the first generation of spawned particles, the next value is used for the next generation, and so on. If there are fewer values on the list than there are spawnings, then the last value is used repeatedly for all remaining spawnings.
AddAdds the value in the Lifespan spinner to the list window.
DeleteDeletes the currently highlighted value in the list window.
ReplaceLets you replace a value in the queue with a value in the Lifespan spinner. To use, first place a new value in the Lifespan spinner, then select the value in the queue you want to replace, and click the Replace button.
LifespanUse this to set a value, and then click the Add button to add the value to the list window.
33

Object Mutation Queue group The options in this group let you switch between instanced-object particles with each spawning (as set with the Spawns spinner). These options are available only if Instanced Geometry is the current particle type. List window
Displays a list of objects to be instanced as particles. The first object on the list is used for the first spawning, the second for the second spawning, and so on. If there are fewer objects on the list than there are spawnings, then the last object on the list is used for all remaining spawnings.
PickClick this, and then select an object in the viewport to add to the list. Note that the type of object you use is based on the settings in the Instancing Parameters group of the Particle Type rollout. For example, if you've turned on Subtree in that group, you can pick object hierarchies. Likewise, if you've picked a group, you can use groups as your spawned particles.
DeleteDeletes the currently highlighted object in the list window.
ReplaceReplaces an object in the queue with a different object. Select an object in the queue to enable the Replace button. Click Replace, and then pick an object in the scene to replace the highlighted item in the queue.
Load/Save Presets Rollout (PArray)
Create panel )Geometry) Choose Particle Systems from the drop-down list. Object Type rollout SuperSpray/Blizzard/Parray/PCloud Load/Save Presets rollout
Select a SuperSpray/Blizzard/Parray/PCloud emitter. Modify panel Load/Save Presets rollout These options let you store preset values that can be used in other, related particle systems. For example, after setting parameters for a PArray and saving it under a specific name, you can then select another PArray system, and load the preset values into the new system. Interface
Preset NameAn editable field in which you can define a name for your settings. Click the Save button to save the preset name.
Saved Presets34

Contains all the saved preset names. A number of presets are included with 3ds Max; to see what they do, create a particle system, load a preset, and play back the animation. Some of the presets, such as Particle Array's Shimmer Trail, are most effective with moving particle systems.
LoadLoads the preset currently highlighted in the Saved Presets list. Alternatively, double-click the preset name in the list to load it.
SaveSaves the current name in the Preset Name field and places it in the Saved Presets window.
DeleteDeletes the selected items in the Save Presets window. NoteAnimated parameter values subsequent to frame 0 are not stored.
35