Embed Size (px)
Citation preview
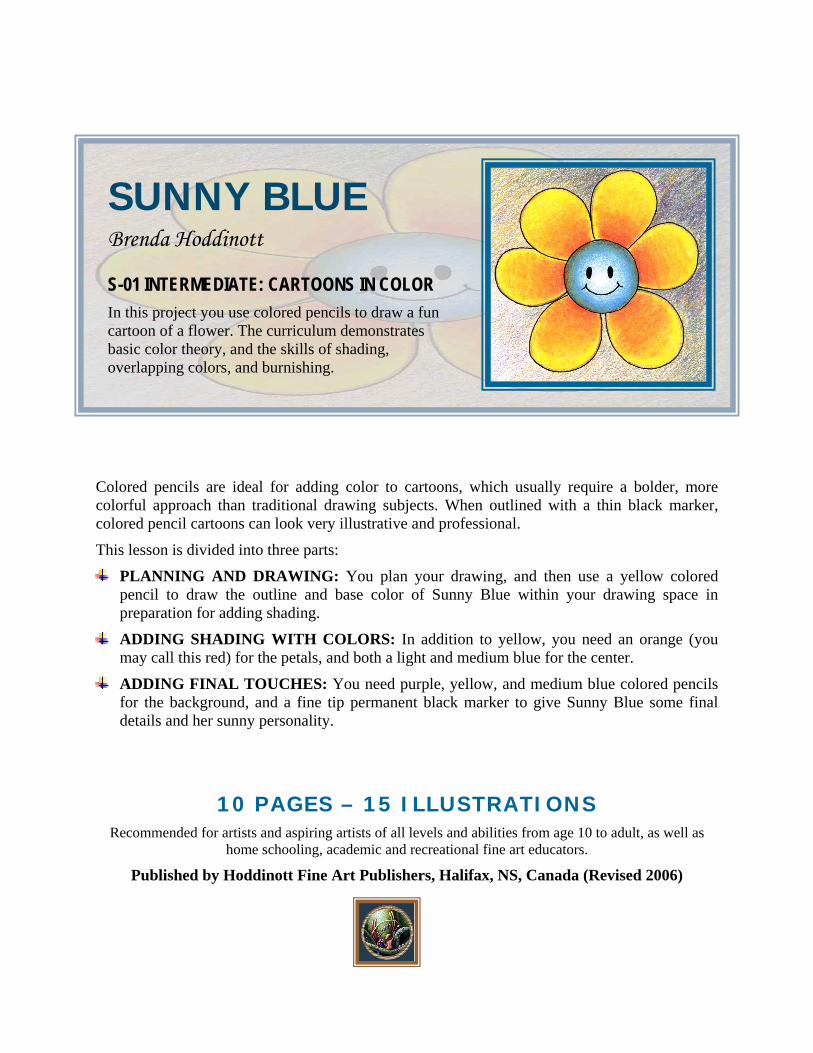
SUNNY BLUE Brenda Hoddinott
S-01 INTERMEDIATE: CARTOONS IN COLOR In this project you use colored pencils to draw a fun cartoon of a flower. The curriculum demonstrates basic color theory, and the skills of shading, overlapping colors, and burnishing.
Colored pencils are ideal for adding color to cartoons, which usually require a bolder, more colorful approach than traditional drawing subjects. When outlined with a thin black marker, colored pencil cartoons can look very illustrative and professional.
This lesson is divided into three parts:
PLANNING AND DRAWING: You plan your drawing, and then use a yellow colored pencil to draw the outline and base color of Sunny Blue within your drawing space in preparation for adding shading.
ADDING SHADING WITH COLORS: In addition to yellow, you need an orange (you may call this red) for the petals, and both a light and medium blue for the center.
ADDING FINAL TOUCHES: You need purple, yellow, and medium blue colored pencils for the background, and a fine tip permanent black marker to give Sunny Blue some final details and her sunny personality.
10 PAGES – 15 ILLUSTRATIONS Recommended for artists and aspiring artists of all levels and abilities from age 10 to adult, as well as
home schooling, academic and recreational fine art educators.
Published by Hoddinott Fine Art Publishers, Halifax, NS, Canada (Revised 2006)
Copyright to all articles, images, text, projects, lessons and exercises within this drawing class belong to Brenda Hoddinott and may not be reproduced or used for any commercial purposes whatsoever without the written permission of Brenda Hoddinott. E-mail [email protected] Web sites http://www.finearteducation.com and http://www.drawspace.com
- 2 -
PLANNING AND DRAWING Throughout this section you plan your drawing, and draw an outline of Sunny Blue within your drawing space in preparation for adding shading. Drawing space (sometimes called a drawing format) refers to the area of a drawing surface within a specific perimeter.
Choose white drawing paper with some texture, as opposed to being smooth, so the colored pencils will easily adhere to your drawing surface. Texture refers to the surface detail of the paper, and is also referred to as the tooth. The word tooth refers to its surface texture, which can range from silky smooth to very coarse. The more tooth a paper has, the rougher it feels.
Stay away from paper with a glossy surface! If a paper’s surface is too smooth, the pigment in the colored pencils simply won’t stick, because there’s no tooth for it to grab hold of. Hence, it’s darn near impossible to render medium and dark colors.
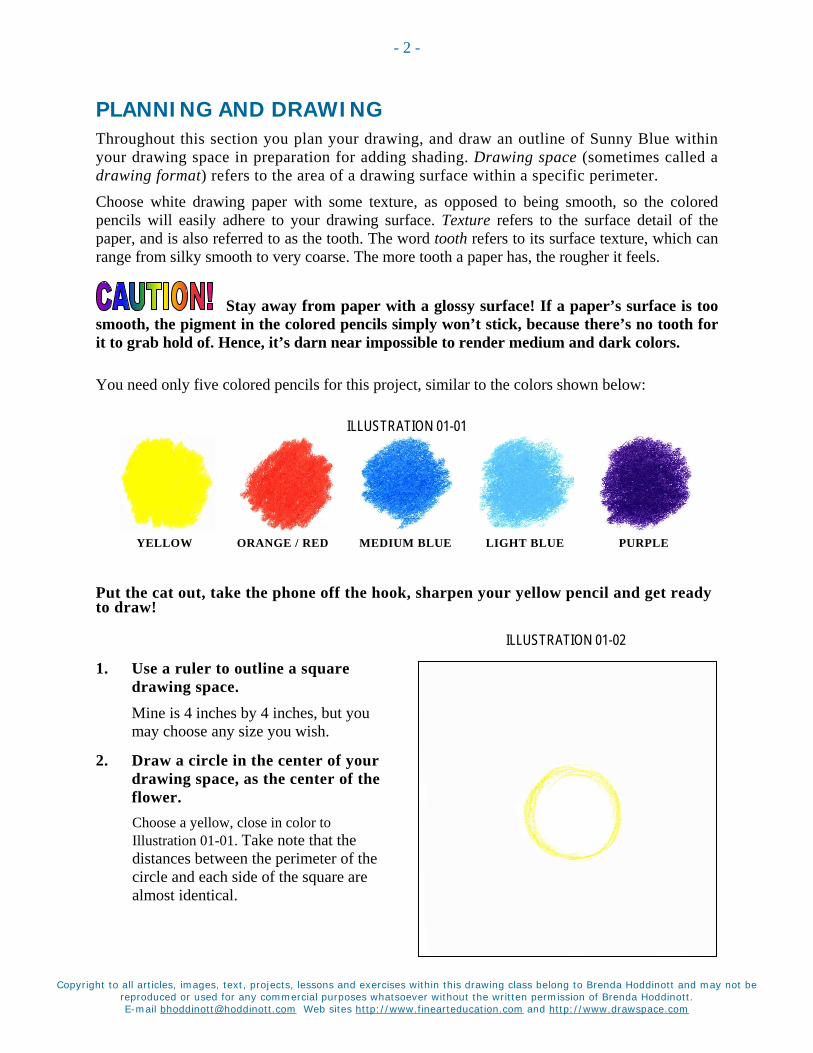
You need only five colored pencils for this project, similar to the colors shown below:
ILLUSTRATION 01-01
YELLOW ORANGE / RED MEDIUM BLUE LIGHT BLUE PURPLE
Put the cat out, take the phone off the hook, sharpen your yellow pencil and get ready to draw!
ILLUSTRATION 01-02
1. Use a ruler to outline a square drawing space. Mine is 4 inches by 4 inches, but you may choose any size you wish.
2. Draw a circle in the center of your drawing space, as the center of the flower. Choose a yellow, close in color to Illustration 01-01. Take note that the distances between the perimeter of the circle and each side of the square are almost identical.
Copyright to all articles, images, text, projects, lessons and exercises within this drawing class belong to Brenda Hoddinott and may not be reproduced or used for any commercial purposes whatsoever without the written permission of Brenda Hoddinott. E-mail [email protected] Web sites http://www.finearteducation.com and http://www.drawspace.com
- 3 -
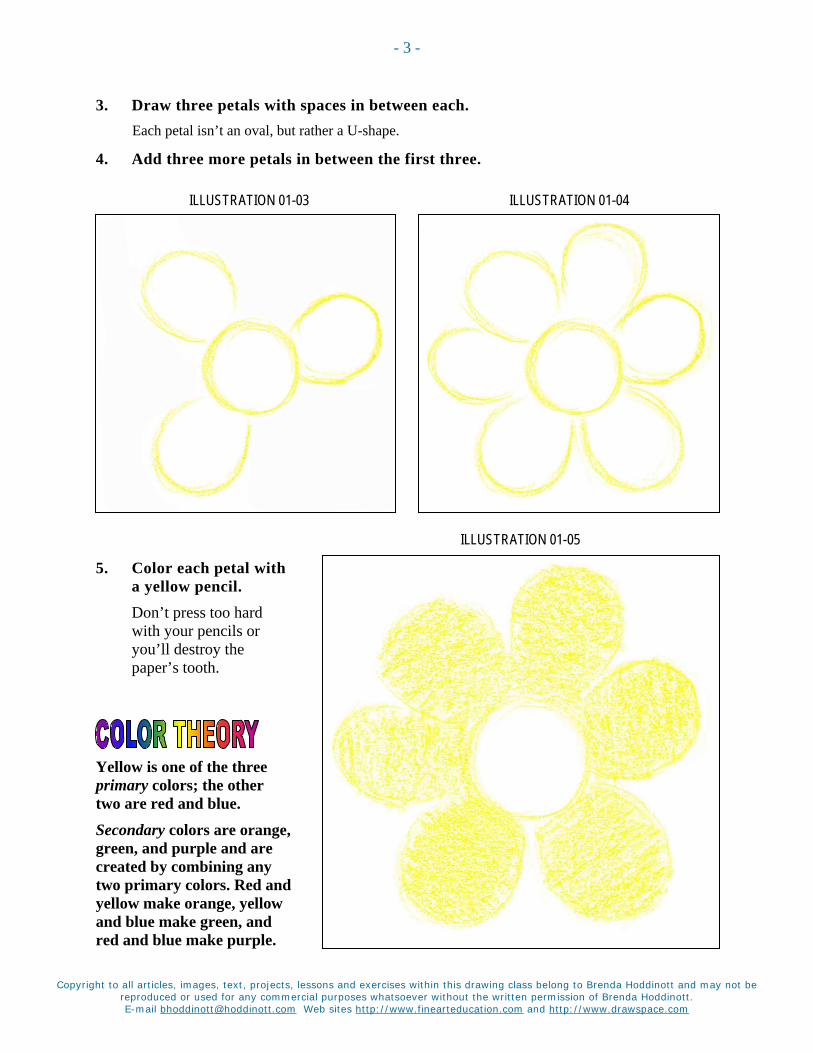
3. Draw three petals with spaces in between each. Each petal isn’t an oval, but rather a U-shape.
4. Add three more petals in between the first three.
ILLUSTRATION 01-03 ILLUSTRATION 01-04
ILLUSTRATION 01-05
5. Color each petal with a yellow pencil. Don’t press too hard with your pencils or you’ll destroy the paper’s tooth.
Yellow is one of the three primary colors; the other two are red and blue. Secondary colors are orange, green, and purple and are created by combining any two primary colors. Red and yellow make orange, yellow and blue make green, and red and blue make purple.
Copyright to all articles, images, text, projects, lessons and exercises within this drawing class belong to Brenda Hoddinott and may not be reproduced or used for any commercial purposes whatsoever without the written permission of Brenda Hoddinott. E-mail [email protected] Web sites http://www.finearteducation.com and http://www.drawspace.com
- 4 -
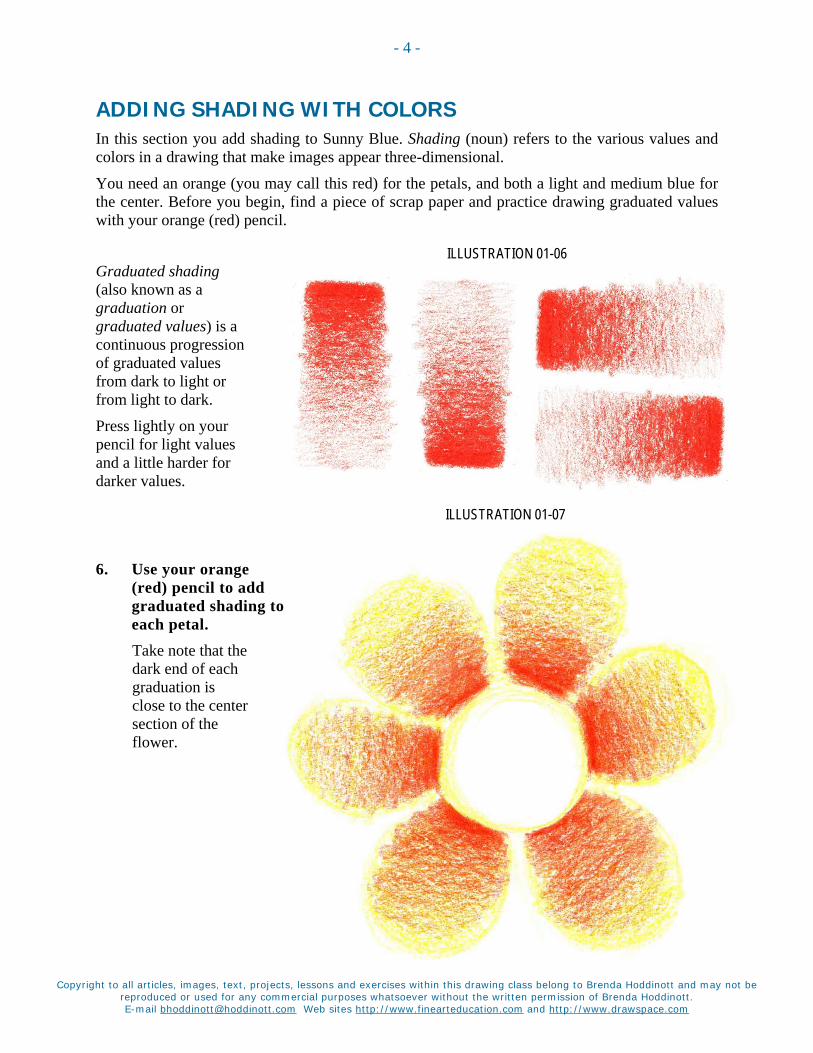
ADDING SHADING WITH COLORS In this section you add shading to Sunny Blue. Shading (noun) refers to the various values and colors in a drawing that make images appear three-dimensional.
You need an orange (you may call this red) for the petals, and both a light and medium blue for the center. Before you begin, find a piece of scrap paper and practice drawing graduated values with your orange (red) pencil.
ILLUSTRATION 01-06 Graduated shading (also known as a graduation or graduated values) is a continuous progression of graduated values from dark to light or from light to dark.
Press lightly on your pencil for light values and a little harder for darker values.
ILLUSTRATION 01-07
6. Use your orange (red) pencil to add graduated shading to each petal. Take note that the dark end of each graduation is close to the center section of the flower.
Copyright to all articles, images, text, projects, lessons and exercises within this drawing class belong to Brenda Hoddinott and may not be reproduced or used for any commercial purposes whatsoever without the written permission of Brenda Hoddinott. E-mail [email protected] Web sites http://www.finearteducation.com and http://www.drawspace.com
- 5 -
ILLUSTRATION 01-08
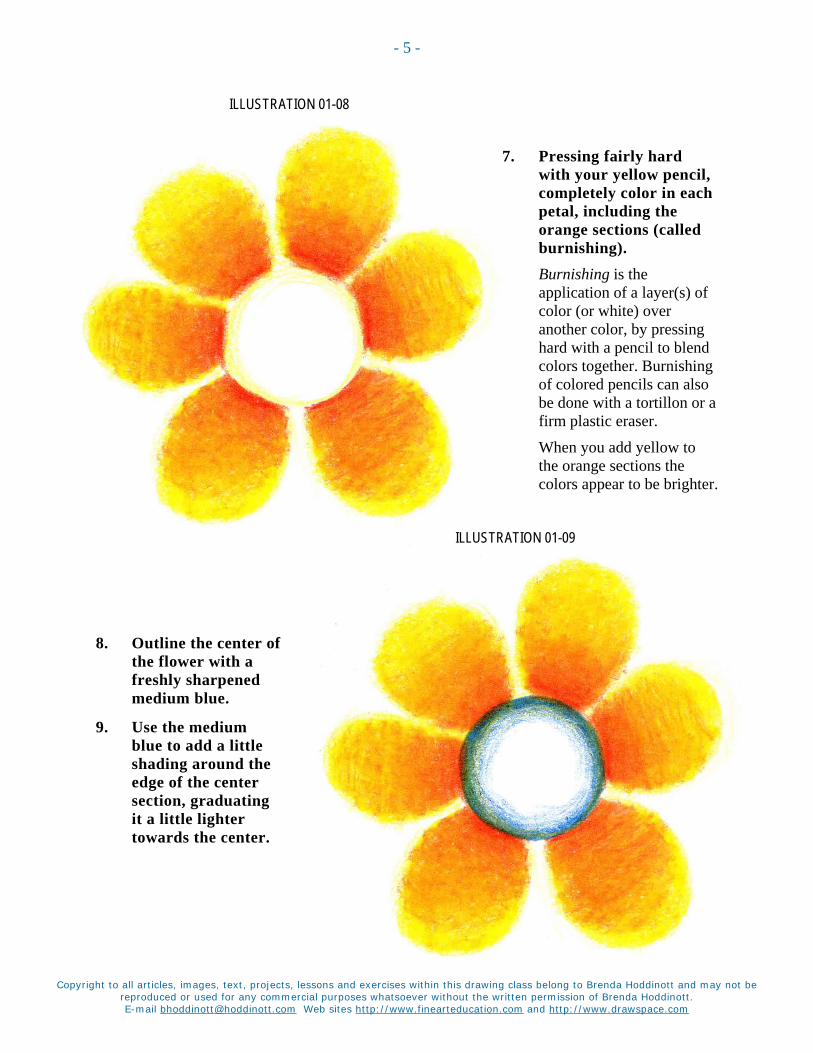
7. Pressing fairly hard with your yellow pencil, completely color in each petal, including the orange sections (called burnishing). Burnishing is the application of a layer(s) of color (or white) over another color, by pressing hard with a pencil to blend colors together. Burnishing of colored pencils can also be done with a tortillon or a firm plastic eraser.
When you add yellow to the orange sections the colors appear to be brighter.
ILLUSTRATION 01-09
8. Outline the center of the flower with a freshly sharpened medium blue.
9. Use the medium blue to add a little shading around the edge of the center section, graduating it a little lighter towards the center.
Copyright to all articles, images, text, projects, lessons and exercises within this drawing class belong to Brenda Hoddinott and may not be reproduced or used for any commercial purposes whatsoever without the written permission of Brenda Hoddinott. E-mail [email protected] Web sites http://www.finearteducation.com and http://www.drawspace.com
- 6 -
ILLUSTRATION 01-10
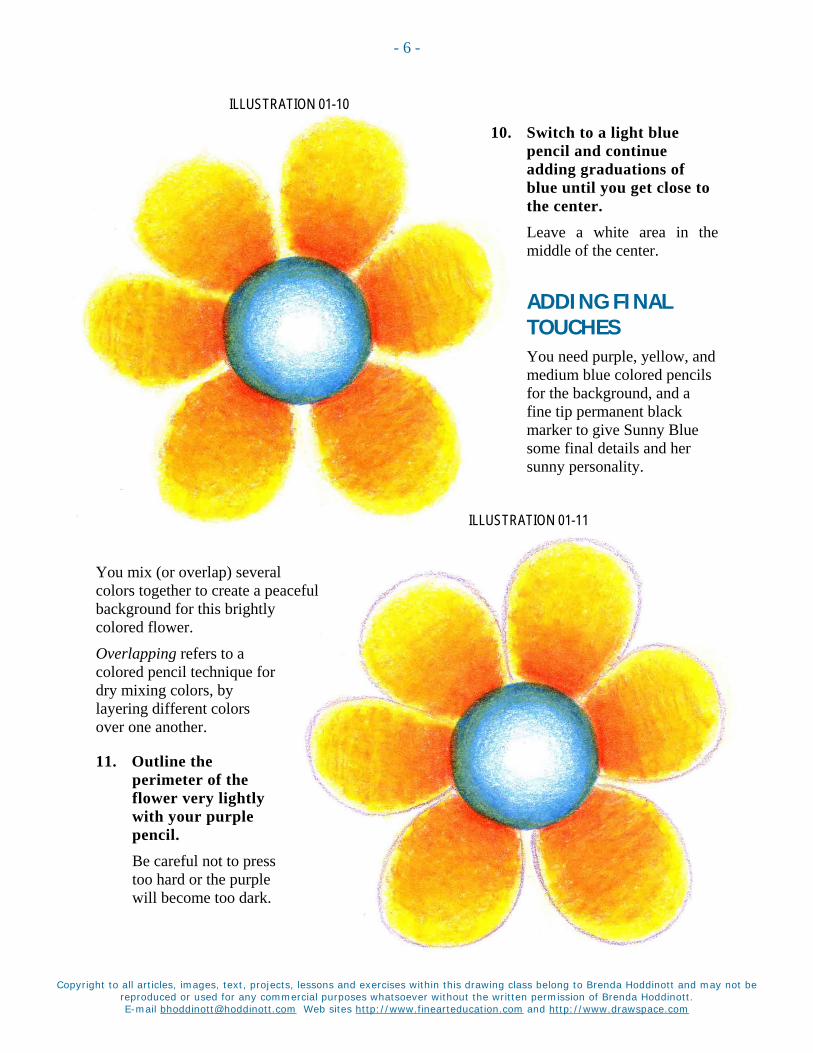
10. Switch to a light blue pencil and continue adding graduations of blue until you get close to the center. Leave a white area in the middle of the center.
ADDING FINAL TOUCHES You need purple, yellow, and medium blue colored pencils for the background, and a fine tip permanent black marker to give Sunny Blue some final details and her sunny personality.
ILLUSTRATION 01-11
You mix (or overlap) several colors together to create a peaceful background for this brightly colored flower.
Overlapping refers to a colored pencil technique for dry mixing colors, by layering different colors over one another.
11. Outline the perimeter of the flower very lightly with your purple pencil. Be careful not to press too hard or the purple will become too dark.

Copyright to all articles, images, text, projects, lessons and exercises within this drawing class belong to Brenda Hoddinott and may not be reproduced or used for any commercial purposes whatsoever without the written permission of Brenda Hoddinott. E-mail [email protected] Web sites http://www.finearteducation.com and http://www.drawspace.com
- 7 -
ILLUSTRATION 01-12
12. Lightly shade the entire background with purple. Take note that I have used very light diagonal hatching lines.
ILLUSTRATION 01-13
13. Add yellow shading on top of the purple in the background. Keep your shading light by pressing lightly with your pencil.
Copyright to all articles, images, text, projects, lessons and exercises within this drawing class belong to Brenda Hoddinott and may not be reproduced or used for any commercial purposes whatsoever without the written permission of Brenda Hoddinott. E-mail [email protected] Web sites http://www.finearteducation.com and http://www.drawspace.com
- 8 -
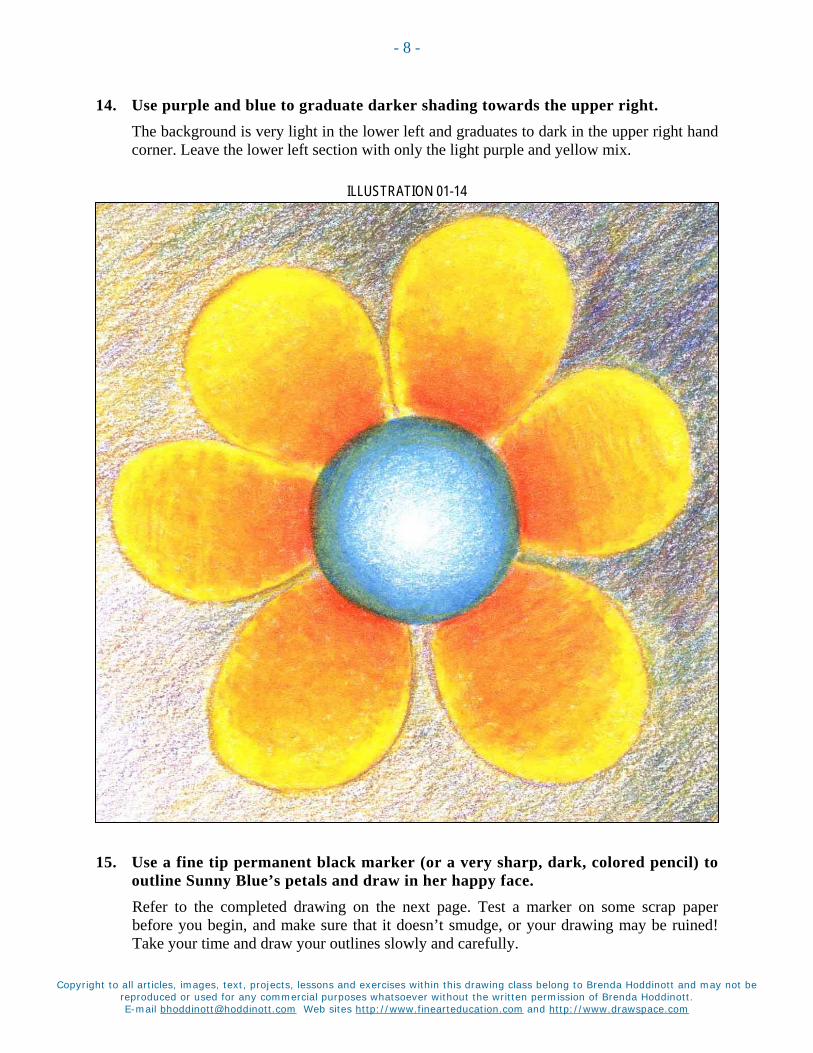
14. Use purple and blue to graduate darker shading towards the upper right. The background is very light in the lower left and graduates to dark in the upper right hand corner. Leave the lower left section with only the light purple and yellow mix.
ILLUSTRATION 01-14
15. Use a fine tip permanent black marker (or a very sharp, dark, colored pencil) to outline Sunny Blue’s petals and draw in her happy face. Refer to the completed drawing on the next page. Test a marker on some scrap paper before you begin, and make sure that it doesn’t smudge, or your drawing may be ruined! Take your time and draw your outlines slowly and carefully.

Copyright to all articles, images, text, projects, lessons and exercises within this drawing class belong to Brenda Hoddinott and may not be reproduced or used for any commercial purposes whatsoever without the written permission of Brenda Hoddinott. E-mail [email protected] Web sites http://www.finearteducation.com and http://www.drawspace.com
- 9 -
Check over your drawing and touch up any areas that you are not completely happy with. Sign your name and put today’s date on the back of your drawing!
ILLUSTRATION 01-15
The three best ways to improve your drawing skills are practice, practice and more practice! So grab another piece of paper,
choose another lesson and draw some more!
Copyright to all articles, images, text, projects, lessons and exercises within this drawing class belong to Brenda Hoddinott and may not be reproduced or used for any commercial purposes whatsoever without the written permission of Brenda Hoddinott. E-mail [email protected] Web sites http://www.finearteducation.com and http://www.drawspace.com
- 10 -
BRENDA HODDINOTT - BIOGRAPHY As a self-educated teacher, visual artist, portraitist, forensic artist, and illustrator, Brenda Hoddinott utilizes diverse art media including graphite, technical pen, colored pencil, chalk pastel, charcoal, conté crayon, and oil paints.
My philosophy on teaching art is to focus primarily on the enjoyment aspects while gently introducing the technical and academic. Hence, in creating a passion for the subject matter,
the quest for knowledge also becomes enjoyable. >Brenda Hoddinott<
Born in St. John’s, Newfoundland, Brenda grew up in the small town of Corner Brook. She developed strong technical competencies with a personal commitment to self directed learning, and the aid of assorted “Learn to Draw” books. During Brenda’s twenty-five year career as a self-educated civilian forensic artist, numerous criminal investigation departments have employed Brenda’s skills, including Royal Canadian Mounted Police and municipal police departments. In 1992, Brenda was honored with a commendation from the Royal Canadian Mounted Police, and in 1994, she was awarded a Certificate of Membership from “Forensic Artists International”.
Her home-based art career included graphic design, and teaching recreational drawing and painting classes. As supervisor of her community’s recreational art department, Brenda hired and trained teachers, and designed curriculum for several children’s art programs. In 1998, Brenda chose to end her eighteen-year career as an art educator in order to devote more time to writing, drawing, painting, and developing her websites.
Drawspace http://www.drawspace.com incorporates her unique style and innovative approach to curriculum development. This site offers downloadable and printable drawing classes for students of all abilities from the age of eight through adult. Students of all ages, levels and abilities have praised the simple step-by-step instructional approach. This site is respected as a resource for fine art educators, home schooling programs, and educational facilities throughout the world.
LEARN-TO-DRAW BOOKS BY BRENDA HODDINOTT Drawing for Dummies: Wiley Publishing, Inc., New, York, NY, this 336 page book is
available on various websites and in major bookstores internationally.
The Complete Idiot’s Guide to Drawing People: Winner of the Alpha-Penguin Book of the Year Award 2004, Alpha - Pearson Education – Macmillan, Indianapolis, IN, this 360 page book is available on various websites and in major bookstores internationally.
Brenda Hoddinott
S-02 INTERMEDIATE: CARTOONS IN COLOR
With only five colored pencils, you draw this silly cartoon face centered inside long wild blue fur. The three dimensional nose
and realistic eyes are rendered with a technique called burnishing, and the fur is
created with hatching.
This lesson is divided into the following five parts:
INTRODUCTION: Colors of pencils and type of paper needed is discussed.
OUTLINING WOOLY BOO BLUE: You outline a cartoon face in preparation for adding shading.
SHADING FUNNY CARTOON EYES: Eyes are shaded with three colored pencils, and a bold, colorful approach.
SHADING THE FORM OF A SPHERICAL NOSE: Two colored pencils are used for shading Wooly’s nose.
USING HATCHING TO SHADE LONG BLUE FUR: You need two colored pencils to shade Wooly Boo Blue’s fuzzy fluffy fur.
Suggested drawing supplies include Good quality white drawing paper and the five colors of pencils illustrated in the Introduction.
Recommended for artists, aged ten to ninety-nine, who have limited drawing skills, as well as home schooling, academic and recreational fine art educators
8 PAGES – 16 ILLUSTRATIONS Published by Hoddinott Fine Art Publishers, Halifax, NS, Canada, 2004 (Revised 2006)
Copyright to all articles, images, text, projects, lessons and exercises within this drawing class belong to Brenda Hoddinott and may not be reproduced or used for any commercial purposes whatsoever without the written permission of Brenda Hoddinott.
E-mail [email protected] Web sites http://www.finearteducation.com and http://www.drawspace.com
- 2 -
Don’t press too hard with your colored pencils – keep your lines VERY light. Colored pencils are really difficult to erase, and you may not be able to cover your mistakes if you press too hard.
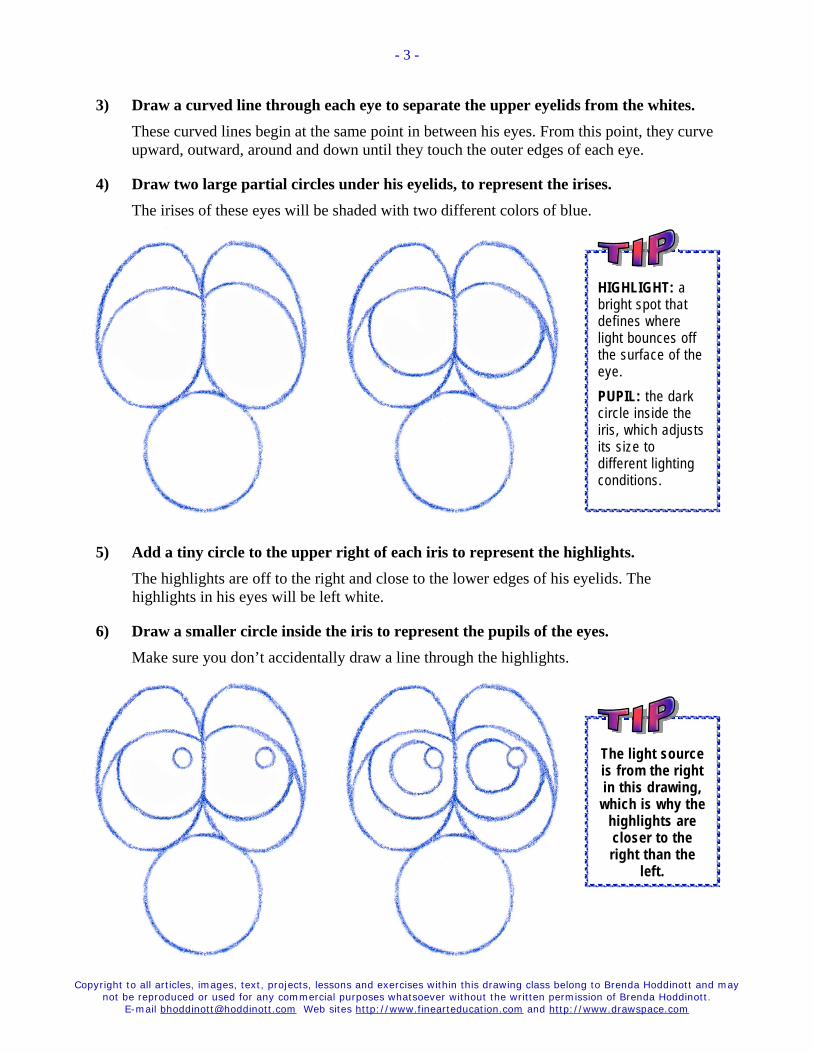
UPPER EYELID: is a fold of skin that covers the upper section of an eye. WHITE OF THE EYE: (also called an eyeball) is the large sphere mostly hidden inside the orbital sockets of the skull. IRIS: is the colored circular shape surrounding the pupil of the eye.
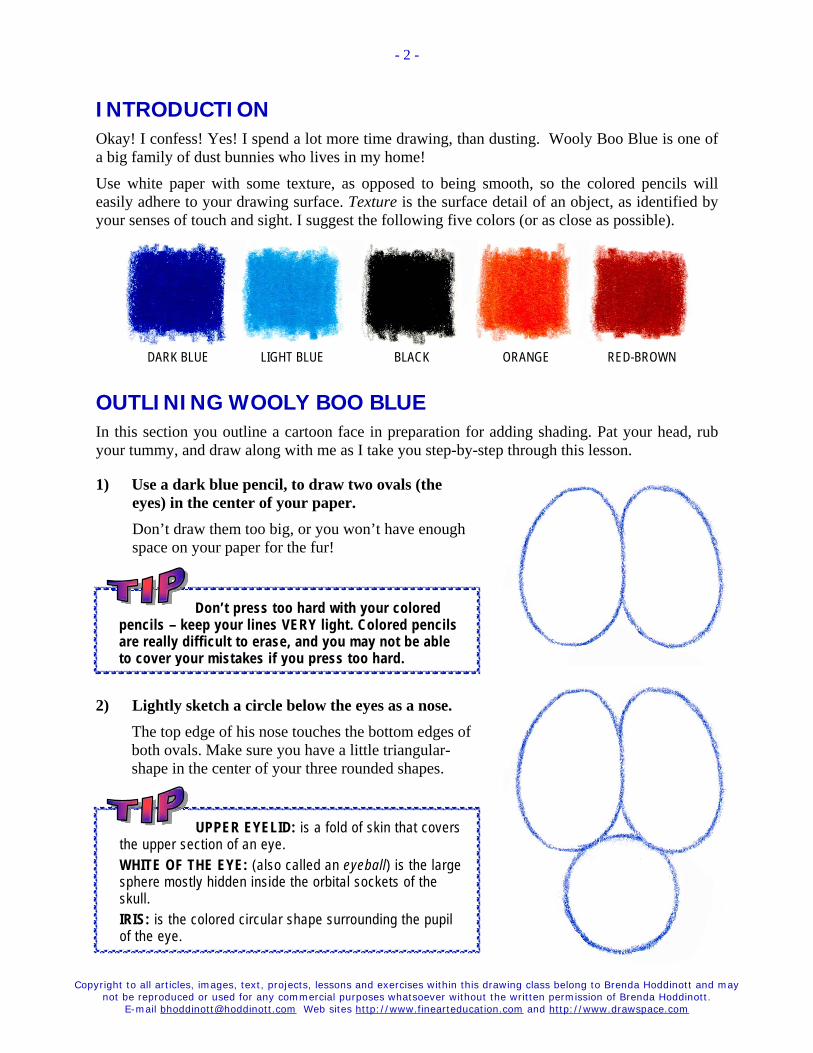
INTRODUCTION Okay! I confess! Yes! I spend a lot more time drawing, than dusting. Wooly Boo Blue is one of a big family of dust bunnies who lives in my home!
Use white paper with some texture, as opposed to being smooth, so the colored pencils will easily adhere to your drawing surface. Texture is the surface detail of an object, as identified by your senses of touch and sight. I suggest the following five colors (or as close as possible).
DARK BLUE LIGHT BLUE BLACK ORANGE RED-BROWN
OUTLINING WOOLY BOO BLUE In this section you outline a cartoon face in preparation for adding shading. Pat your head, rub your tummy, and draw along with me as I take you step-by-step through this lesson.
1) Use a dark blue pencil, to draw two ovals (the eyes) in the center of your paper. Don’t draw them too big, or you won’t have enough space on your paper for the fur!
2) Lightly sketch a circle below the eyes as a nose. The top edge of his nose touches the bottom edges of both ovals. Make sure you have a little triangular-shape in the center of your three rounded shapes.
Copyright to all articles, images, text, projects, lessons and exercises within this drawing class belong to Brenda Hoddinott and may not be reproduced or used for any commercial purposes whatsoever without the written permission of Brenda Hoddinott.
E-mail [email protected] Web sites http://www.finearteducation.com and http://www.drawspace.com
- 3 -
HIGHLIGHT: a bright spot that defines where light bounces off the surface of the eye. PUPIL: the dark circle inside the iris, which adjusts its size to different lighting conditions.
The light source is from the right in this drawing,
which is why the highlights are closer to the right than the
left.
3) Draw a curved line through each eye to separate the upper eyelids from the whites. These curved lines begin at the same point in between his eyes. From this point, they curve upward, outward, around and down until they touch the outer edges of each eye.
4) Draw two large partial circles under his eyelids, to represent the irises. The irises of these eyes will be shaded with two different colors of blue.
5) Add a tiny circle to the upper right of each iris to represent the highlights. The highlights are off to the right and close to the lower edges of his eyelids. The highlights in his eyes will be left white.
6) Draw a smaller circle inside the iris to represent the pupils of the eyes. Make sure you don’t accidentally draw a line through the highlights.
Copyright to all articles, images, text, projects, lessons and exercises within this drawing class belong to Brenda Hoddinott and may not be reproduced or used for any commercial purposes whatsoever without the written permission of Brenda Hoddinott.
E-mail [email protected] Web sites http://www.finearteducation.com and http://www.drawspace.com
- 4 -
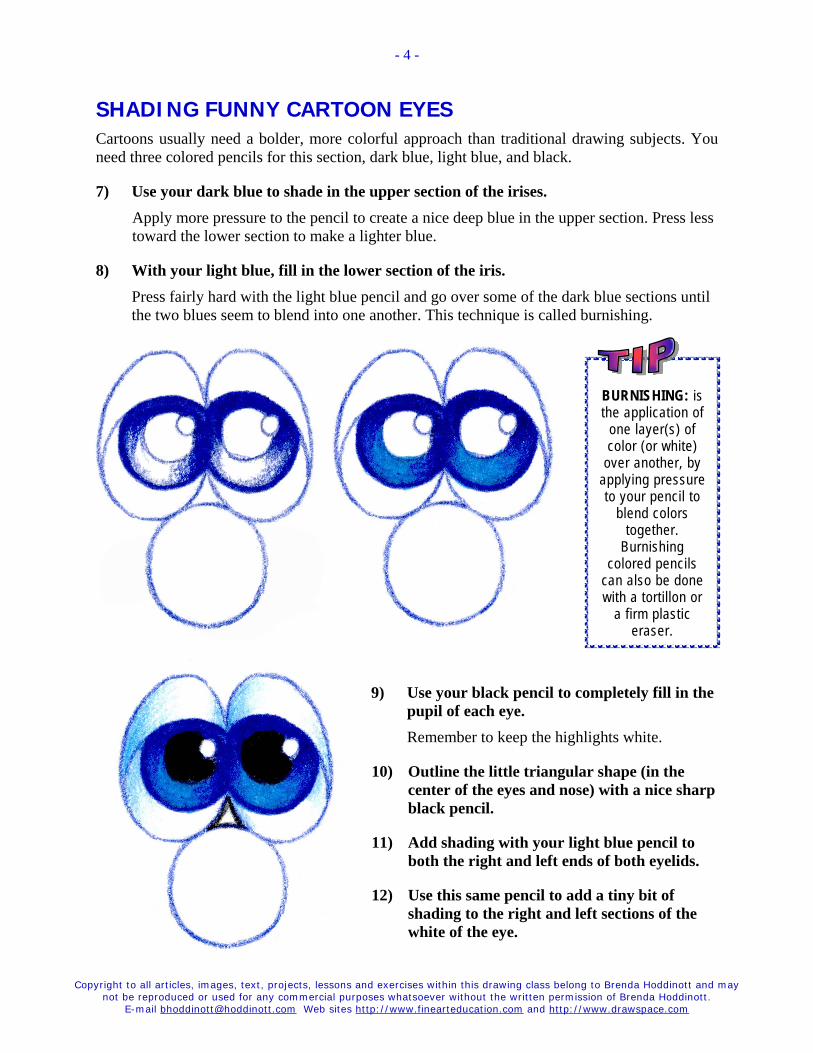
BURNISHING: is the application of
one layer(s) of color (or white)
over another, by applying pressure to your pencil to
blend colors together.
Burnishing colored pencils
can also be done with a tortillon or
a firm plastic eraser.
SHADING FUNNY CARTOON EYES Cartoons usually need a bolder, more colorful approach than traditional drawing subjects. You need three colored pencils for this section, dark blue, light blue, and black.
7) Use your dark blue to shade in the upper section of the irises. Apply more pressure to the pencil to create a nice deep blue in the upper section. Press less toward the lower section to make a lighter blue.
8) With your light blue, fill in the lower section of the iris. Press fairly hard with the light blue pencil and go over some of the dark blue sections until the two blues seem to blend into one another. This technique is called burnishing.
9) Use your black pencil to completely fill in the pupil of each eye. Remember to keep the highlights white.
10) Outline the little triangular shape (in the center of the eyes and nose) with a nice sharp black pencil.
11) Add shading with your light blue pencil to both the right and left ends of both eyelids.
12) Use this same pencil to add a tiny bit of shading to the right and left sections of the white of the eye.
Copyright to all articles, images, text, projects, lessons and exercises within this drawing class belong to Brenda Hoddinott and may not be reproduced or used for any commercial purposes whatsoever without the written permission of Brenda Hoddinott.
E-mail [email protected] Web sites http://www.finearteducation.com and http://www.drawspace.com
- 5 -
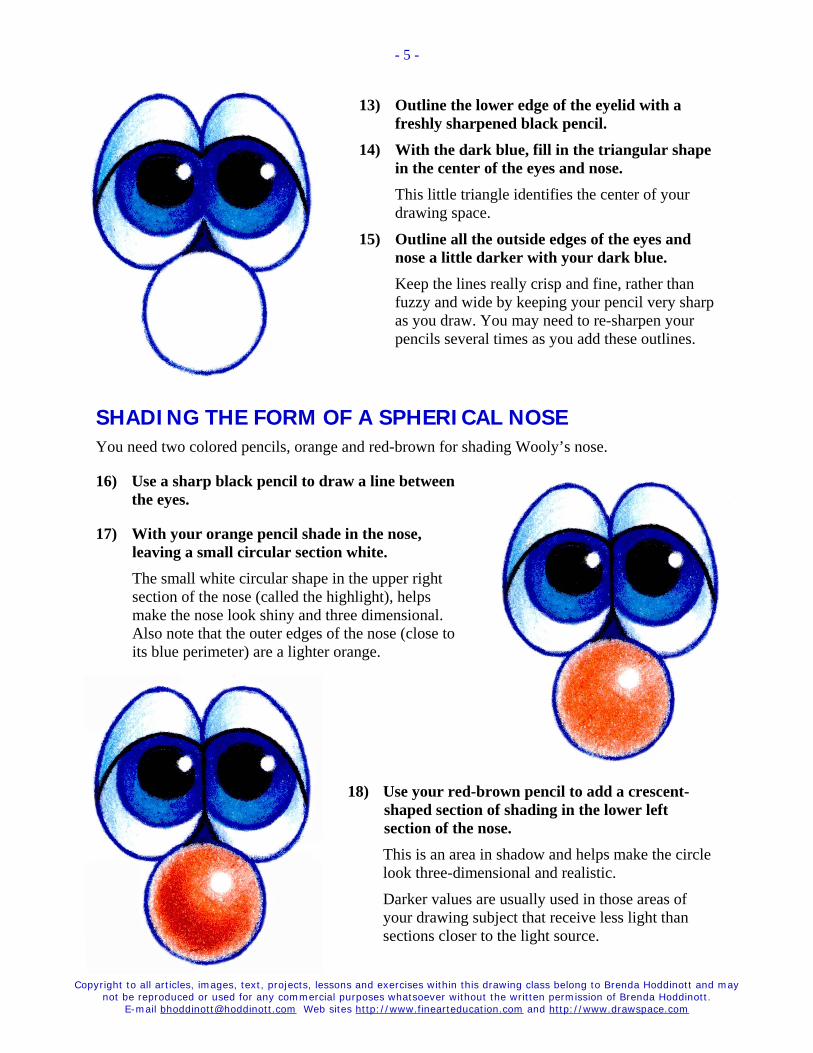
13) Outline the lower edge of the eyelid with a freshly sharpened black pencil.
14) With the dark blue, fill in the triangular shape in the center of the eyes and nose. This little triangle identifies the center of your drawing space.
15) Outline all the outside edges of the eyes and nose a little darker with your dark blue. Keep the lines really crisp and fine, rather than fuzzy and wide by keeping your pencil very sharp as you draw. You may need to re-sharpen your pencils several times as you add these outlines.
SHADING THE FORM OF A SPHERICAL NOSE You need two colored pencils, orange and red-brown for shading Wooly’s nose.
16) Use a sharp black pencil to draw a line between the eyes.
17) With your orange pencil shade in the nose, leaving a small circular section white. The small white circular shape in the upper right section of the nose (called the highlight), helps make the nose look shiny and three dimensional. Also note that the outer edges of the nose (close to its blue perimeter) are a lighter orange.
18) Use your red-brown pencil to add a crescent-shaped section of shading in the lower left section of the nose. This is an area in shadow and helps make the circle look three-dimensional and realistic.
Darker values are usually used in those areas of your drawing subject that receive less light than sections closer to the light source.
Copyright to all articles, images, text, projects, lessons and exercises within this drawing class belong to Brenda Hoddinott and may not be reproduced or used for any commercial purposes whatsoever without the written permission of Brenda Hoddinott.
E-mail [email protected] Web sites http://www.finearteducation.com and http://www.drawspace.com
- 6 -
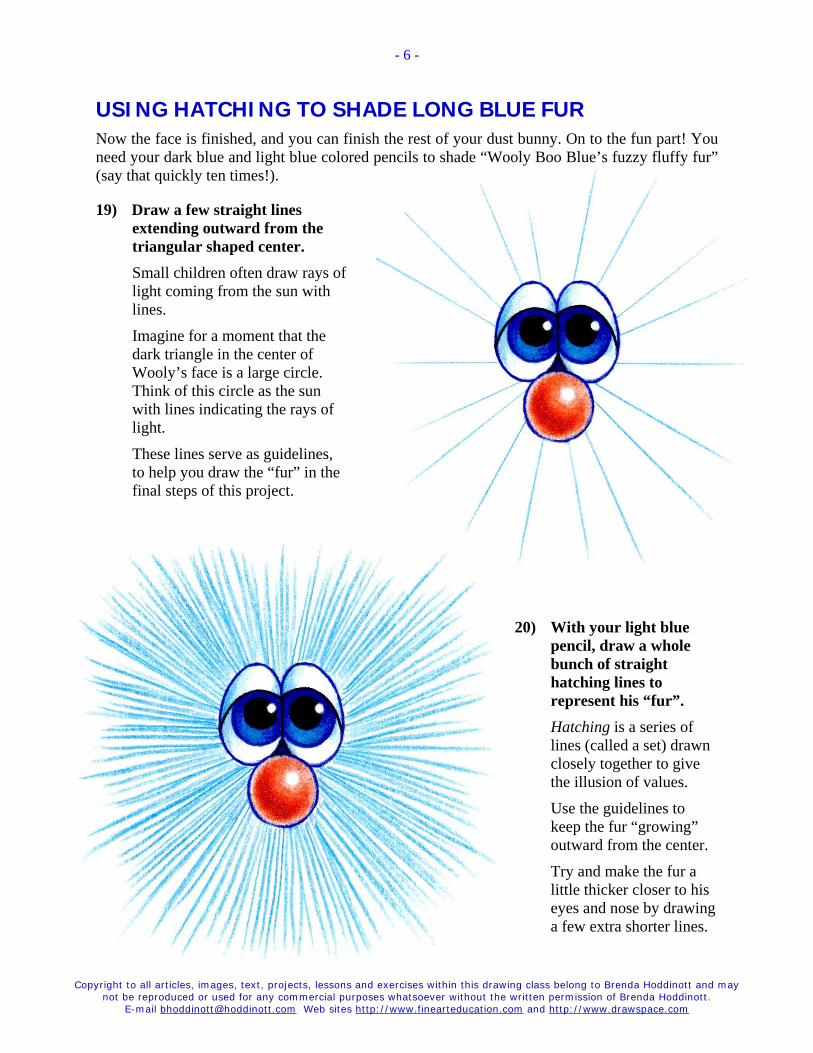
USING HATCHING TO SHADE LONG BLUE FUR Now the face is finished, and you can finish the rest of your dust bunny. On to the fun part! You need your dark blue and light blue colored pencils to shade “Wooly Boo Blue’s fuzzy fluffy fur” (say that quickly ten times!).
19) Draw a few straight lines extending outward from the triangular shaped center. Small children often draw rays of light coming from the sun with lines.
Imagine for a moment that the dark triangle in the center of Wooly’s face is a large circle. Think of this circle as the sun with lines indicating the rays of light.
These lines serve as guidelines, to help you draw the “fur” in the final steps of this project.
20) With your light blue pencil, draw a whole bunch of straight hatching lines to represent his “fur”. Hatching is a series of lines (called a set) drawn closely together to give the illusion of values.
Use the guidelines to keep the fur “growing” outward from the center.
Try and make the fur a little thicker closer to his eyes and nose by drawing a few extra shorter lines.
Copyright to all articles, images, text, projects, lessons and exercises within this drawing class belong to Brenda Hoddinott and may not be reproduced or used for any commercial purposes whatsoever without the written permission of Brenda Hoddinott.
E-mail [email protected] Web sites http://www.finearteducation.com and http://www.drawspace.com
- 7 -
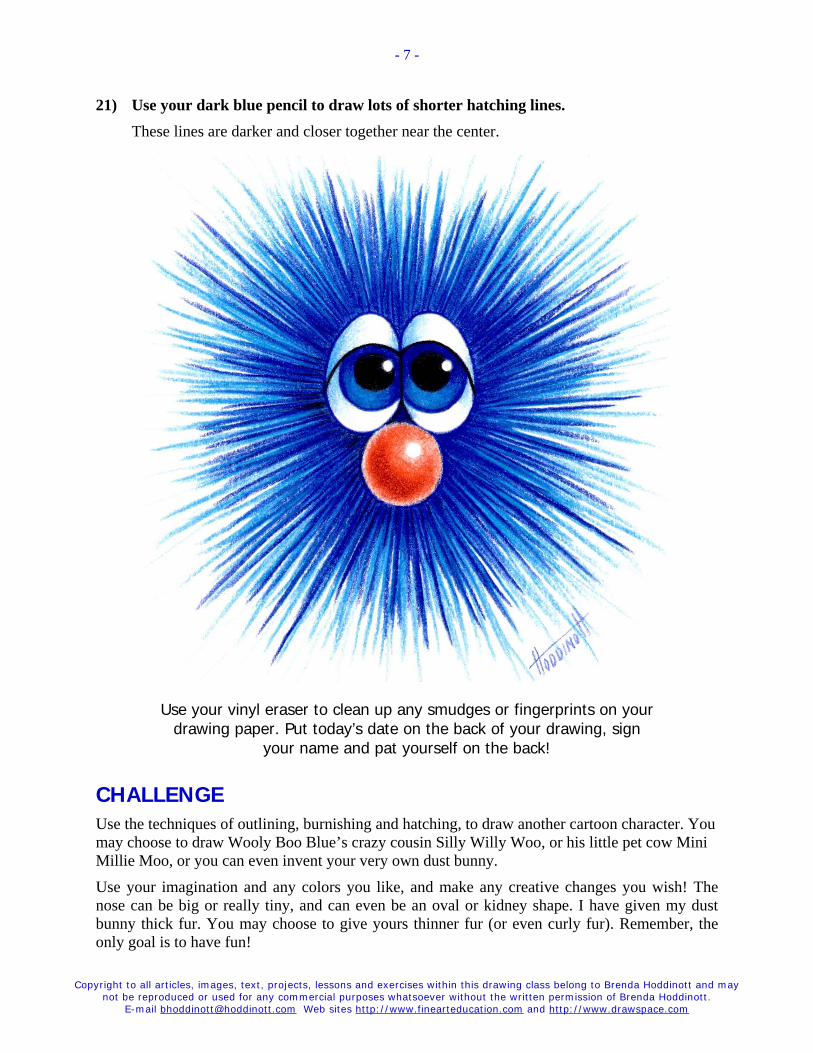
21) Use your dark blue pencil to draw lots of shorter hatching lines. These lines are darker and closer together near the center.
Use your vinyl eraser to clean up any smudges or fingerprints on your drawing paper. Put today’s date on the back of your drawing, sign
your name and pat yourself on the back!
CHALLENGE Use the techniques of outlining, burnishing and hatching, to draw another cartoon character. You may choose to draw Wooly Boo Blue’s crazy cousin Silly Willy Woo, or his little pet cow Mini Millie Moo, or you can even invent your very own dust bunny.
Use your imagination and any colors you like, and make any creative changes you wish! The nose can be big or really tiny, and can even be an oval or kidney shape. I have given my dust bunny thick fur. You may choose to give yours thinner fur (or even curly fur). Remember, the only goal is to have fun!
Copyright to all articles, images, text, projects, lessons and exercises within this drawing class belong to Brenda Hoddinott and may not be reproduced or used for any commercial purposes whatsoever without the written permission of Brenda Hoddinott.
E-mail [email protected] Web sites http://www.finearteducation.com and http://www.drawspace.com
- 8 -
BRENDA HODDINOTT - BIOGRAPHY As a self-educated teacher, visual artist, portraitist, forensic artist, and illustrator, Brenda utilizes diverse art media including graphite, technical pen, colored pencil, chalk pastel, charcoal, conté crayon, and oil paints.
My philosophy on teaching art is to focus primarily on the enjoyment aspects while gently introducing the
technical and academic. Hence, in creating a passion for the subject matter, the quest for knowledge also
becomes enjoyable. >Brenda Hoddinott<
Born in St. John’s, Newfoundland, Brenda grew up in the small town of Corner Brook. She developed strong technical competencies with a personal commitment to self directed learning, and the aid of assorted “Learn to Draw” books. During Brenda’s twenty-five year career as a self-educated civilian forensic artist, numerous criminal investigation departments have employed Brenda’s skills, including Royal Canadian Mounted Police and municipal police departments. In 1992, Brenda was honored with a commendation from the Royal Canadian Mounted Police, and in 1994, she was awarded a Certificate of Membership from “Forensic Artists International”.
Her home-based art career included graphic design, and teaching recreational drawing and painting classes. As supervisor of her community’s recreational art department, Brenda hired and trained teachers, and designed curriculum for several children’s art programs. In 1998, Brenda chose to end her eighteen-year career as an art educator in order to devote more time to writing, drawing, painting, and developing her websites.
Drawspace http://www.drawspace.com incorporates her unique style and innovative approach to curriculum development. This site offers downloadable and printable drawing classes for students of all abilities from the age of eight through adult. Students of all ages, levels and abilities have praised the simple step-by-step instructional approach. This site is respected as a resource for fine art educators, home schooling programs, and educational facilities throughout the world.
LEARN-TO-DRAW BOOKS BY BRENDA HODDINOTT Drawing for Dummies: Wiley Publishing, Inc., New, York, NY, this 336 page book is
available on various websites and in major bookstores internationally.
The Complete Idiot’s Guide to Drawing People: Winner of the Alpha-Penguin Book of the Year Award 2004, Alpha - Pearson Education – Macmillan, Indianapolis, IN, this 360 page book is available on various websites and in major bookstores internationally.
Brenda Hoddinott
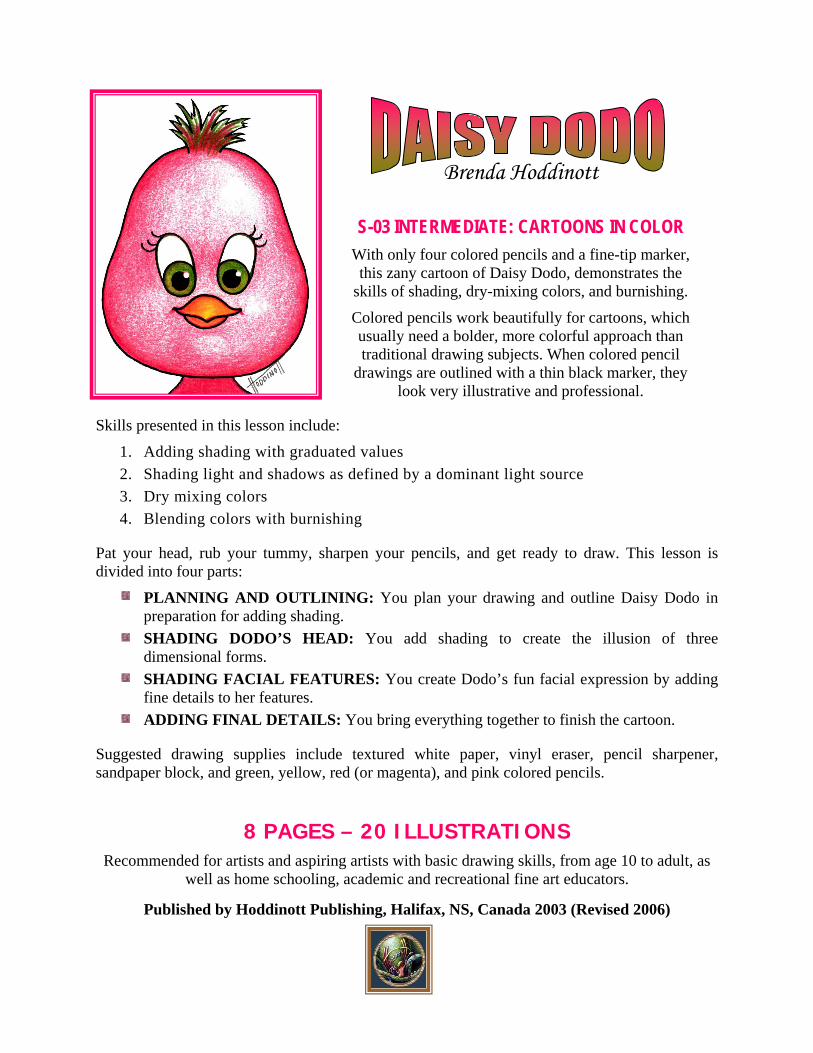
S-03 INTERMEDIATE: CARTOONS IN COLOR With only four colored pencils and a fine-tip marker, this zany cartoon of Daisy Dodo, demonstrates the
skills of shading, dry-mixing colors, and burnishing.
Colored pencils work beautifully for cartoons, which usually need a bolder, more colorful approach than traditional drawing subjects. When colored pencil
drawings are outlined with a thin black marker, they look very illustrative and professional.
Skills presented in this lesson include:
1. Adding shading with graduated values 2. Shading light and shadows as defined by a dominant light source 3. Dry mixing colors 4. Blending colors with burnishing
Pat your head, rub your tummy, sharpen your pencils, and get ready to draw. This lesson is divided into four parts:
PLANNING AND OUTLINING: You plan your drawing and outline Daisy Dodo in preparation for adding shading.
SHADING DODO’S HEAD: You add shading to create the illusion of three dimensional forms.
SHADING FACIAL FEATURES: You create Dodo’s fun facial expression by adding fine details to her features.
ADDING FINAL DETAILS: You bring everything together to finish the cartoon.
Suggested drawing supplies include textured white paper, vinyl eraser, pencil sharpener, sandpaper block, and green, yellow, red (or magenta), and pink colored pencils.
8 PAGES – 20 ILLUSTRATIONS Recommended for artists and aspiring artists with basic drawing skills, from age 10 to adult, as
well as home schooling, academic and recreational fine art educators.
Published by Hoddinott Publishing, Halifax, NS, Canada 2003 (Revised 2006)
Copyright to all articles, images, text, projects, lessons and exercises within this drawing class belong to Brenda Hoddinott and may not be reproduced or used for any commercial purposes whatsoever without the written permission of Brenda Hoddinott.
E-mail [email protected] Web sites http://www.finearteducation.com and http://www.drawspace.com
- 2 -
PLANNING AND OUTLINING In this section you plan your drawing and outline Daisy Dodo in preparation for adding shading. Shading refers to the various values that make drawings look three-dimensional.
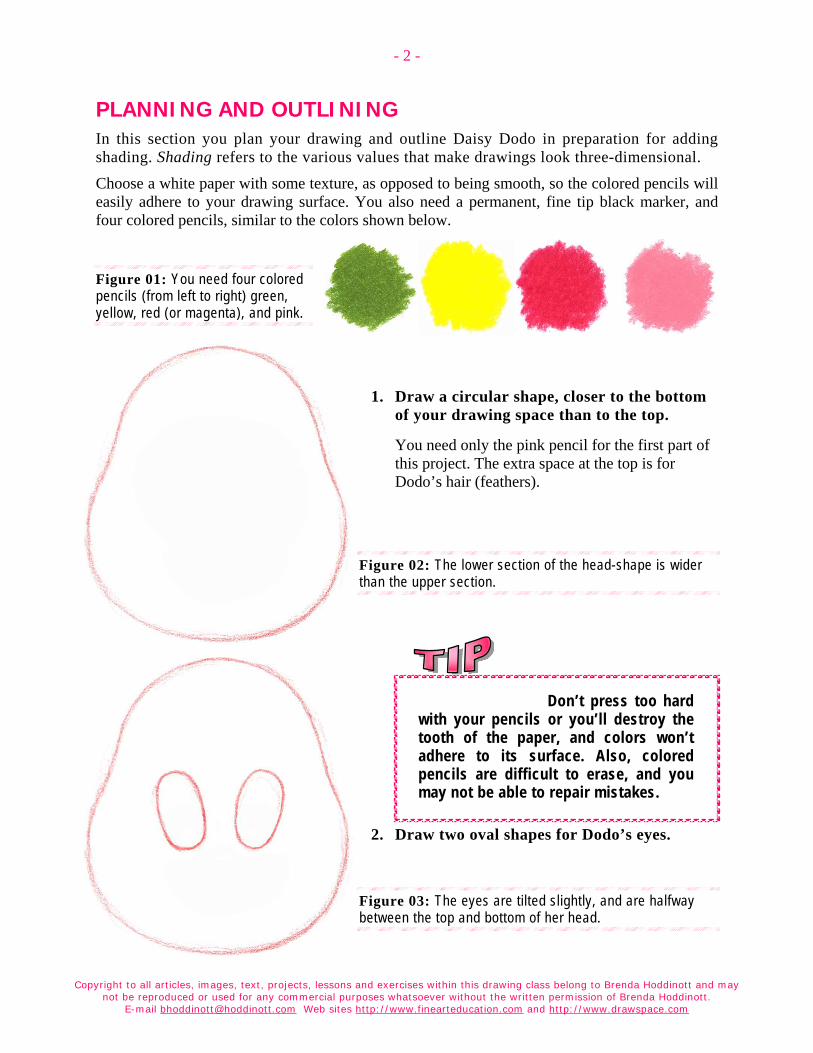
Choose a white paper with some texture, as opposed to being smooth, so the colored pencils will easily adhere to your drawing surface. You also need a permanent, fine tip black marker, and four colored pencils, similar to the colors shown below.
Figure 01: You need four colored pencils (from left to right) green, yellow, red (or magenta), and pink.
1. Draw a circular shape, closer to the bottom
of your drawing space than to the top.
You need only the pink pencil for the first part of this project. The extra space at the top is for Dodo’s hair (feathers).
Figure 02: The lower section of the head-shape is wider than the upper section.
2. Draw two oval shapes for Dodo’s eyes.
Figure 03: The eyes are tilted slightly, and are halfway between the top and bottom of her head.
Don’t press too hard with your pencils or you’ll destroy the tooth of the paper, and colors won’t adhere to its surface. Also, colored pencils are difficult to erase, and you may not be able to repair mistakes.
Copyright to all articles, images, text, projects, lessons and exercises within this drawing class belong to Brenda Hoddinott and may not be reproduced or used for any commercial purposes whatsoever without the written permission of Brenda Hoddinott.
E-mail [email protected] Web sites http://www.finearteducation.com and http://www.drawspace.com
- 3 -
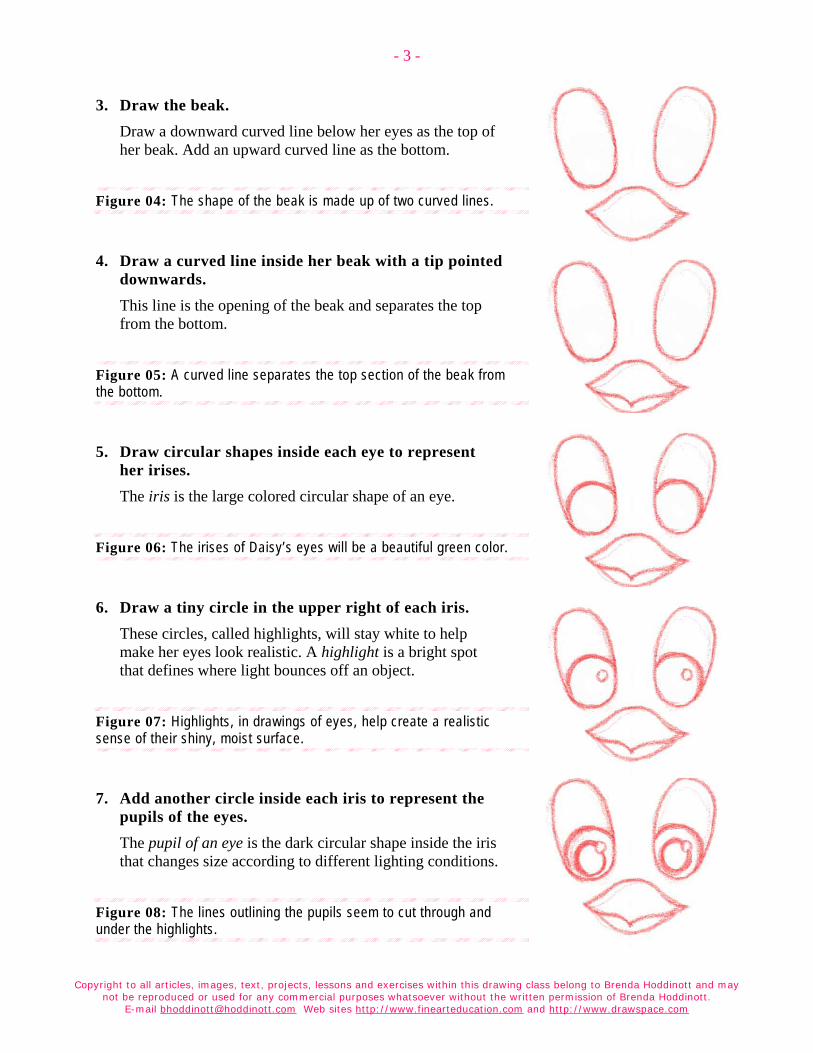
3. Draw the beak. Draw a downward curved line below her eyes as the top of her beak. Add an upward curved line as the bottom.
Figure 04: The shape of the beak is made up of two curved lines.
4. Draw a curved line inside her beak with a tip pointed downwards. This line is the opening of the beak and separates the top from the bottom.
Figure 05: A curved line separates the top section of the beak from the bottom.
5. Draw circular shapes inside each eye to represent her irises. The iris is the large colored circular shape of an eye.
Figure 06: The irises of Daisy’s eyes will be a beautiful green color.
6. Draw a tiny circle in the upper right of each iris. These circles, called highlights, will stay white to help make her eyes look realistic. A highlight is a bright spot that defines where light bounces off an object.
Figure 07: Highlights, in drawings of eyes, help create a realistic sense of their shiny, moist surface.
7. Add another circle inside each iris to represent the pupils of the eyes. The pupil of an eye is the dark circular shape inside the iris that changes size according to different lighting conditions.
Figure 08: The lines outlining the pupils seem to cut through and under the highlights.
Copyright to all articles, images, text, projects, lessons and exercises within this drawing class belong to Brenda Hoddinott and may not be reproduced or used for any commercial purposes whatsoever without the written permission of Brenda Hoddinott.
E-mail [email protected] Web sites http://www.finearteducation.com and http://www.drawspace.com
- 4 -
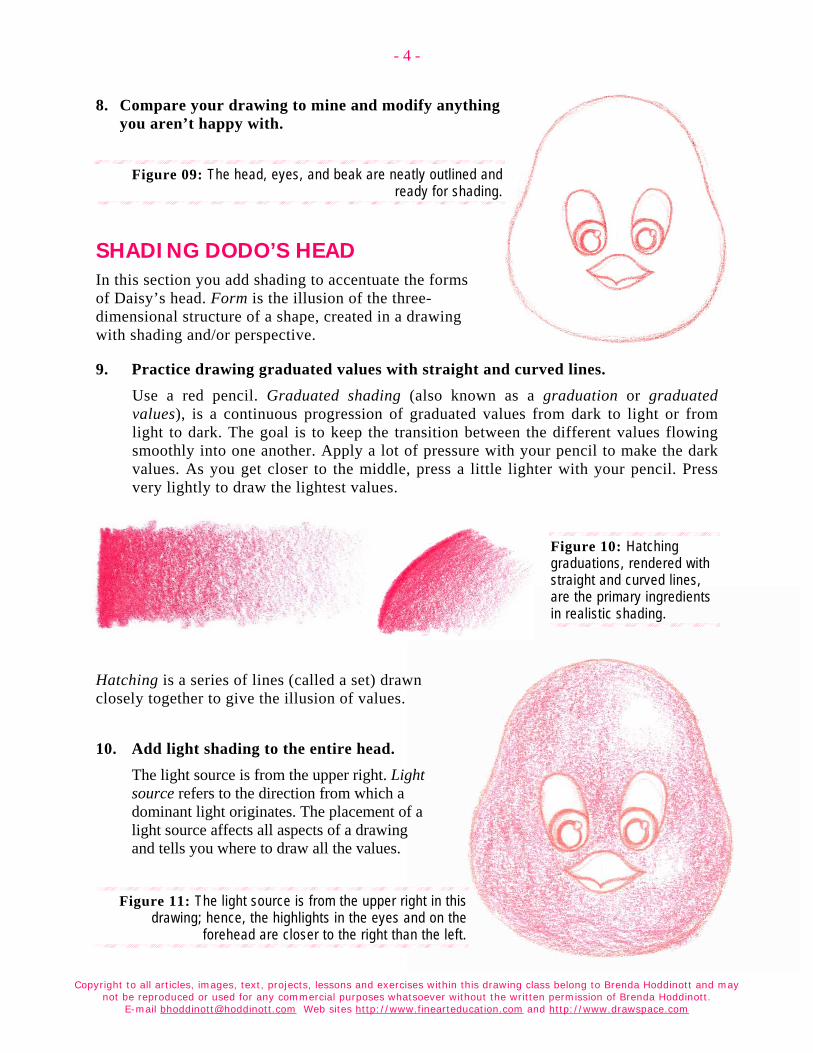
8. Compare your drawing to mine and modify anything you aren’t happy with.
Figure 09: The head, eyes, and beak are neatly outlined and ready for shading.
SHADING DODO’S HEAD In this section you add shading to accentuate the forms of Daisy’s head. Form is the illusion of the three-dimensional structure of a shape, created in a drawing with shading and/or perspective.
9. Practice drawing graduated values with straight and curved lines. Use a red pencil. Graduated shading (also known as a graduation or graduated values), is a continuous progression of graduated values from dark to light or from light to dark. The goal is to keep the transition between the different values flowing smoothly into one another. Apply a lot of pressure with your pencil to make the dark values. As you get closer to the middle, press a little lighter with your pencil. Press very lightly to draw the lightest values.
Figure 10: Hatching graduations, rendered with straight and curved lines, are the primary ingredients in realistic shading.
Hatching is a series of lines (called a set) drawn closely together to give the illusion of values.
10. Add light shading to the entire head. The light source is from the upper right. Light source refers to the direction from which a dominant light originates. The placement of a light source affects all aspects of a drawing and tells you where to draw all the values.
Figure 11: The light source is from the upper right in this drawing; hence, the highlights in the eyes and on the
forehead are closer to the right than the left.
Copyright to all articles, images, text, projects, lessons and exercises within this drawing class belong to Brenda Hoddinott and may not be reproduced or used for any commercial purposes whatsoever without the written permission of Brenda Hoddinott.
E-mail [email protected] Web sites http://www.finearteducation.com and http://www.drawspace.com
- 5 -
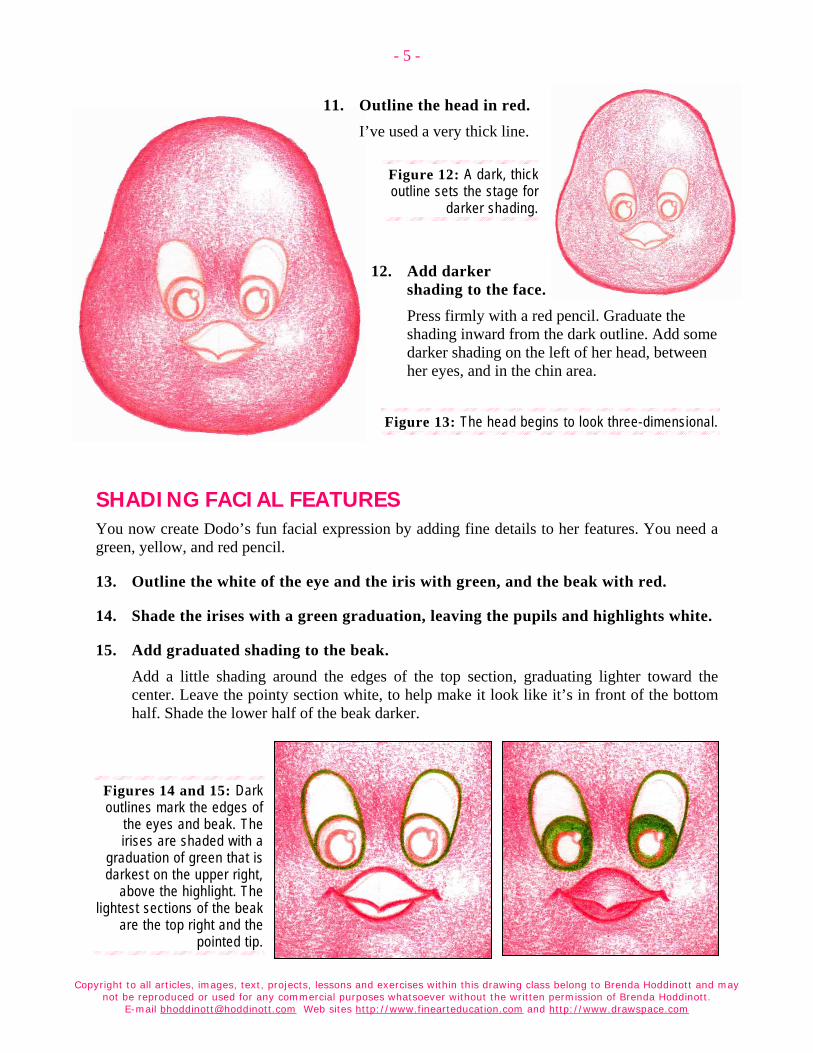
11. Outline the head in red. I’ve used a very thick line.
Figure 12: A dark, thick outline sets the stage for
darker shading.
12. Add darker
shading to the face. Press firmly with a red pencil. Graduate the shading inward from the dark outline. Add some darker shading on the left of her head, between her eyes, and in the chin area.
Figure 13: The head begins to look three-dimensional.
SHADING FACIAL FEATURES You now create Dodo’s fun facial expression by adding fine details to her features. You need a green, yellow, and red pencil.
13. Outline the white of the eye and the iris with green, and the beak with red.
14. Shade the irises with a green graduation, leaving the pupils and highlights white.
15. Add graduated shading to the beak. Add a little shading around the edges of the top section, graduating lighter toward the center. Leave the pointy section white, to help make it look like it’s in front of the bottom half. Shade the lower half of the beak darker.
Figures 14 and 15: Dark outlines mark the edges of
the eyes and beak. The irises are shaded with a
graduation of green that is darkest on the upper right,
above the highlight. The lightest sections of the beak
are the top right and the pointed tip.
Copyright to all articles, images, text, projects, lessons and exercises within this drawing class belong to Brenda Hoddinott and may not be reproduced or used for any commercial purposes whatsoever without the written permission of Brenda Hoddinott.
E-mail [email protected] Web sites http://www.finearteducation.com and http://www.drawspace.com
- 6 -
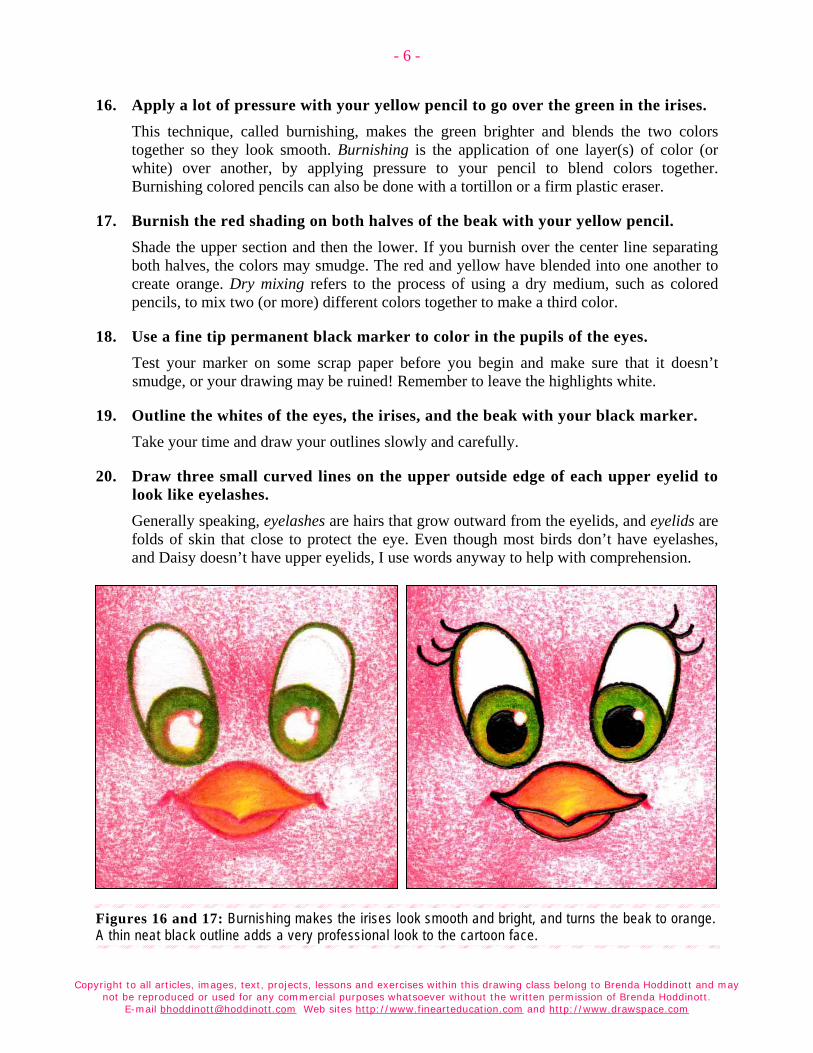
16. Apply a lot of pressure with your yellow pencil to go over the green in the irises. This technique, called burnishing, makes the green brighter and blends the two colors together so they look smooth. Burnishing is the application of one layer(s) of color (or white) over another, by applying pressure to your pencil to blend colors together. Burnishing colored pencils can also be done with a tortillon or a firm plastic eraser.
17. Burnish the red shading on both halves of the beak with your yellow pencil. Shade the upper section and then the lower. If you burnish over the center line separating both halves, the colors may smudge. The red and yellow have blended into one another to create orange. Dry mixing refers to the process of using a dry medium, such as colored pencils, to mix two (or more) different colors together to make a third color.
18. Use a fine tip permanent black marker to color in the pupils of the eyes. Test your marker on some scrap paper before you begin and make sure that it doesn’t smudge, or your drawing may be ruined! Remember to leave the highlights white.
19. Outline the whites of the eyes, the irises, and the beak with your black marker. Take your time and draw your outlines slowly and carefully.
20. Draw three small curved lines on the upper outside edge of each upper eyelid to look like eyelashes. Generally speaking, eyelashes are hairs that grow outward from the eyelids, and eyelids are folds of skin that close to protect the eye. Even though most birds don’t have eyelashes, and Daisy doesn’t have upper eyelids, I use words anyway to help with comprehension.
Figures 16 and 17: Burnishing makes the irises look smooth and bright, and turns the beak to orange. A thin neat black outline adds a very professional look to the cartoon face.
Copyright to all articles, images, text, projects, lessons and exercises within this drawing class belong to Brenda Hoddinott and may not be reproduced or used for any commercial purposes whatsoever without the written permission of Brenda Hoddinott.
E-mail [email protected] Web sites http://www.finearteducation.com and http://www.drawspace.com
- 7 -
ADDING FINAL DETAILS In this section, you bring everything together to finish your cartoon.
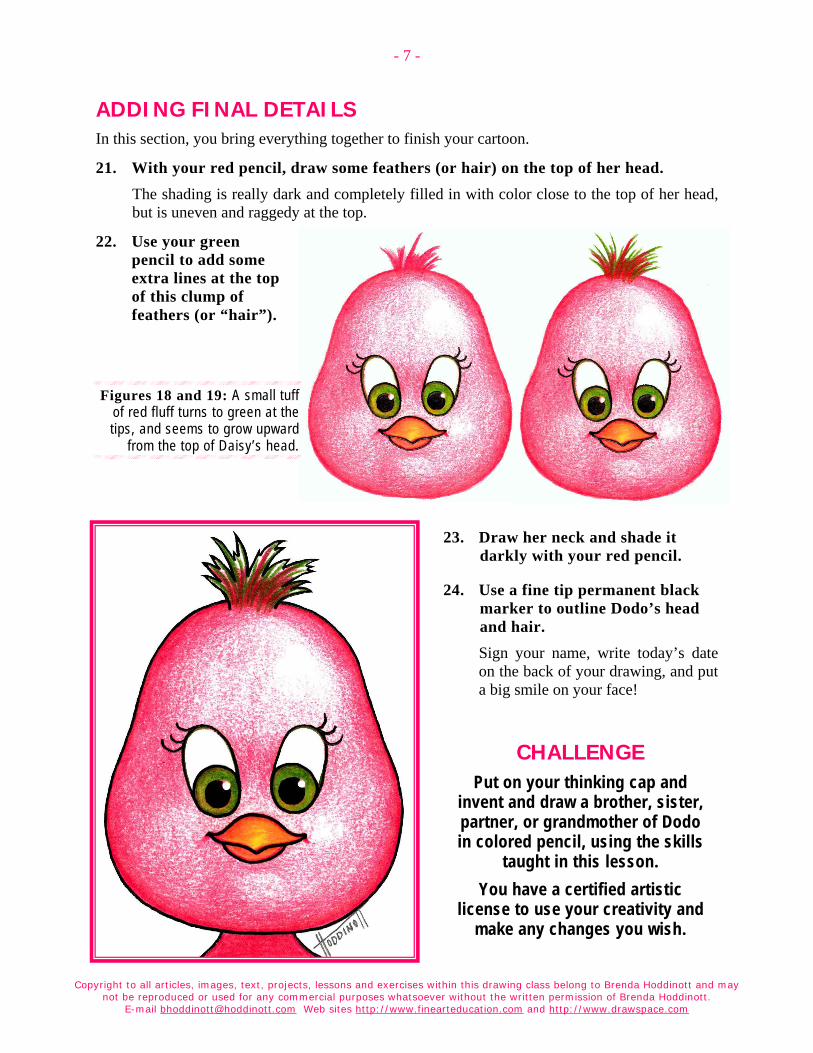
21. With your red pencil, draw some feathers (or hair) on the top of her head. The shading is really dark and completely filled in with color close to the top of her head, but is uneven and raggedy at the top.
22. Use your green pencil to add some extra lines at the top of this clump of feathers (or “hair”).
Figures 18 and 19: A small tuff of red fluff turns to green at the tips, and seems to grow upward
from the top of Daisy’s head.
23. Draw her neck and shade it darkly with your red pencil.
24. Use a fine tip permanent black marker to outline Dodo’s head and hair. Sign your name, write today’s date on the back of your drawing, and put a big smile on your face!
CHALLENGE Put on your thinking cap and
invent and draw a brother, sister, partner, or grandmother of Dodo in colored pencil, using the skills
taught in this lesson. You have a certified artistic
license to use your creativity and make any changes you wish.
Copyright to all articles, images, text, projects, lessons and exercises within this drawing class belong to Brenda Hoddinott and may not be reproduced or used for any commercial purposes whatsoever without the written permission of Brenda Hoddinott.
E-mail [email protected] Web sites http://www.finearteducation.com and http://www.drawspace.com
- 8 -
BRENDA HODDINOTT - BIOGRAPHY As a self-educated teacher, visual artist, portraitist, forensic artist, and illustrator, Brenda utilizes diverse art media including graphite, technical pen, colored pencil, chalk pastel, charcoal, conté crayon, and oil paints.
My philosophy on teaching art is to focus primarily on the enjoyment aspects while gently introducing the
technical and academic. Hence, in creating a passion for the subject matter, the quest for knowledge also
becomes enjoyable. >Brenda Hoddinott<
Born in St. John’s, Newfoundland, Brenda grew up in the small town of Corner Brook. She developed strong technical competencies with a personal commitment to self directed learning, and the aid of assorted “Learn to Draw” books. During Brenda’s twenty-five year career as a self-educated civilian forensic artist, numerous criminal investigation departments have employed Brenda’s skills, including Royal Canadian Mounted Police and municipal police departments. In 1992, Brenda was honored with a commendation from the Royal Canadian Mounted Police, and in 1994, she was awarded a Certificate of Membership from “Forensic Artists International”.
Her home-based art career included graphic design, and teaching recreational drawing and painting classes. As supervisor of her community’s recreational art department, Brenda hired and trained teachers, and designed curriculum for several children’s art programs. In 1998, Brenda chose to end her eighteen-year career as an art educator in order to devote more time to writing, drawing, painting, and developing her websites.
Drawspace http://www.drawspace.com incorporates her unique style and innovative approach to curriculum development. This site offers downloadable and printable drawing classes for students of all abilities from the age of eight through adult. Students of all ages, levels and abilities have praised the simple step-by-step instructional approach. This site is respected as a resource for fine art educators, home schooling programs, and educational facilities throughout the world.
LEARN-TO-DRAW BOOKS BY BRENDA HODDINOTT Drawing for Dummies: Wiley Publishing, Inc., New, York, NY, this 336 page book is
available on various websites and in major bookstores internationally.
The Complete Idiot’s Guide to Drawing People: Winner of the Alpha-Penguin Book of the Year Award 2004, Alpha - Pearson Education – Macmillan, Indianapolis, IN, this 360 page book is available on various websites and in major bookstores internationally.
Brenda Hoddinott
S07 INTERMEDIATE: CARTOONS IN COLOR Colored pencils are a great medium for drawing everything and anything. They beautifully portray soft delicate drawings such as portraits and flowers, and also work very well for subjects needing a bolder, more colorful approach such as cartoons.
The adorable cartoon character in this project challenges you to create the illusion of form by graduating values with colors.
This project is divided into the following four sections:
PUTTING CHUCK INSIDE YOUR DRAWING SPACE: You establish the basic proportions of a chick, based on your personal preferences, and outline the overall shapes with curved lines.
OUTLINING A FUN FACE: You outline the shapes of Chuck’s face and features. Feel free to exercise your creative license and make changes to Chuck’s face so as to invent your very own cartoon character.
SHADING CHUCK’S HEAD AND FACE: You add shading to Chuck’s head and facial features with brightly colored graduations.
SHADING CHUCK’S BODY AND ADDING FINAL DETAILS: You add shading to Chuck’s head, body, legs, and feet. Finally, you have the option of outlining your cartoon with a freshly sharpened pencil or a fine-tip black marker.
You need white drawing paper, kneaded and vinyl erasers, a ruler, and seven colored pencils as close as possible to the illustrations in the first section of this lesson.
11 PAGES - 22 ILLUSTRATIONS This lesson is recommended for artists with good drawing skills. The curriculum is easily implemented
into instructional programs for home schooling, academic and recreational learning environments.
Published by Hoddinott Publishers, Halifax, NS, Canada – 2004 (Revised 2007)
Copyright to al l art icles, images, text, projects, lessons and exercises within this drawing class belong to Brenda Hoddinott and may not be reproduced or used for any commercial purposes whatsoever without the wri t ten permission of Brenda Hoddinott .
E-mail bhoddinott@hoddinott .com Web si tes http:/ /www.f inearteducat ion.com and ht tp:/ /www.drawspace.com
- 2 -
Proportion: is the relationship in size of one component of a drawing to another or others. Shape: refers to the outward outline of a form. Basic shapes include circles, squares and triangles. Form: as applied to drawing, is the illusion of the three-dimensional structure of a shape. Drawing space: refers to the area of a drawing surface within a specific perimeter, outlined by a shape of any size, such as a square, rectangle or circle.
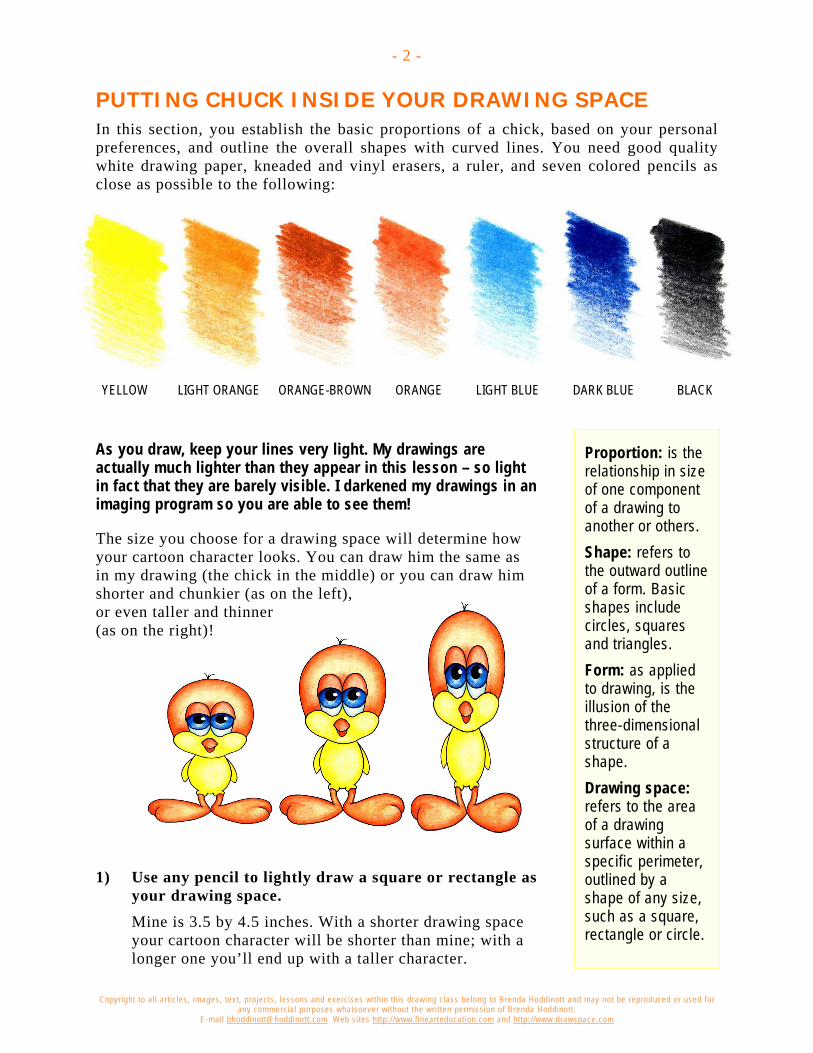
PUTTING CHUCK INSIDE YOUR DRAWING SPACE In this section, you establish the basic proportions of a chick, based on your personal preferences, and outline the overall shapes with curved lines. You need good quality white drawing paper, kneaded and vinyl erasers, a ruler, and seven colored pencils as close as possible to the following:
YELLOW LIGHT ORANGE ORANGE-BROWN ORANGE LIGHT BLUE DARK BLUE BLACK
As you draw, keep your lines very light. My drawings are actually much lighter than they appear in this lesson – so light in fact that they are barely visible. I darkened my drawings in an imaging program so you are able to see them!
The size you choose for a drawing space will determine how your cartoon character looks. You can draw him the same as in my drawing (the chick in the middle) or you can draw him shorter and chunkier (as on the left), or even taller and thinner (as on the right)!
1) Use any pencil to lightly draw a square or rectangle as your drawing space. Mine is 3.5 by 4.5 inches. With a shorter drawing space your cartoon character will be shorter than mine; with a longer one you’ll end up with a taller character.
Copyright to al l art icles, images, text, projects, lessons and exercises within this drawing class belong to Brenda Hoddinott and may not be reproduced or used for any commercial purposes whatsoever without the wri t ten permission of Brenda Hoddinott .
E-mail bhoddinott@hoddinott .com Web si tes http:/ /www.f inearteducat ion.com and ht tp:/ /www.drawspace.com
- 3 -
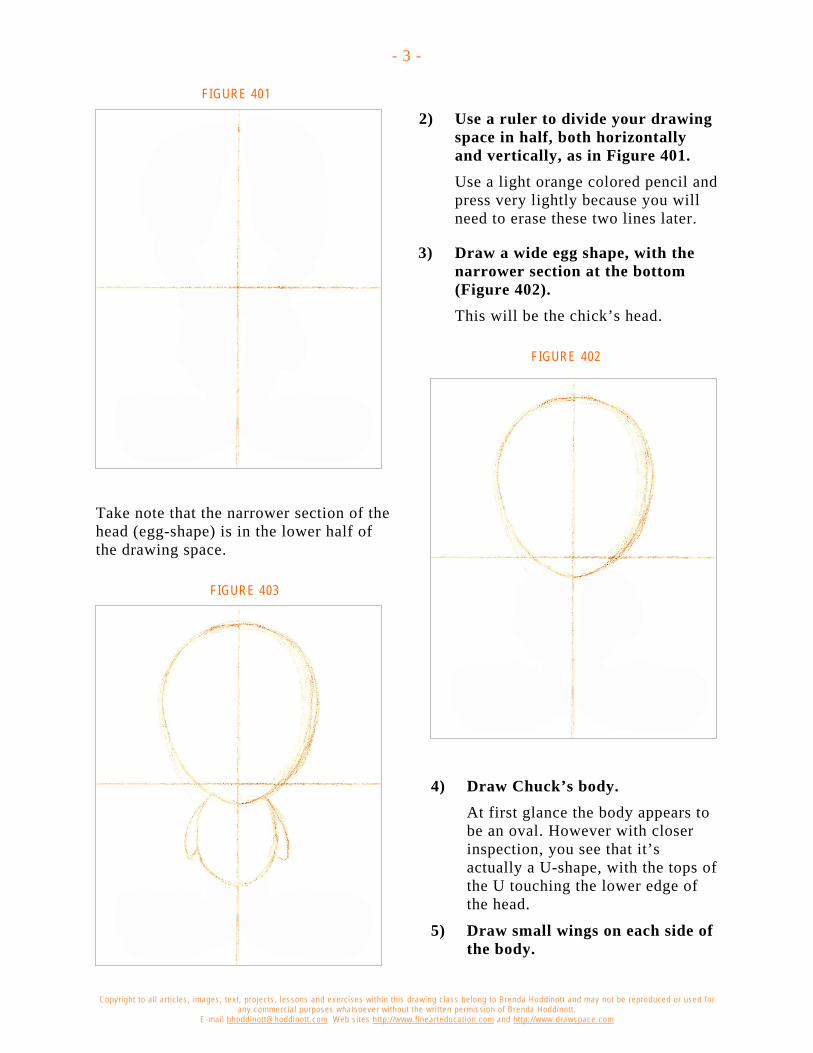
FIGURE 401 2) Use a ruler to divide your drawing
space in half, both horizontally and vertically, as in Figure 401. Use a light orange colored pencil and press very lightly because you will need to erase these two lines later.
3) Draw a wide egg shape, with the narrower section at the bottom (Figure 402). This will be the chick’s head.
FIGURE 402
Take note that the narrower section of the head (egg-shape) is in the lower half of the drawing space.
FIGURE 403
4) Draw Chuck’s body. At first glance the body appears to be an oval. However with closer inspection, you see that it’s actually a U-shape, with the tops of the U touching the lower edge of the head.
5) Draw small wings on each side of the body.
Copyright to al l art icles, images, text, projects, lessons and exercises within this drawing class belong to Brenda Hoddinott and may not be reproduced or used for any commercial purposes whatsoever without the wri t ten permission of Brenda Hoddinott .
E-mail bhoddinott@hoddinott .com Web si tes http:/ /www.f inearteducat ion.com and ht tp:/ /www.drawspace.com
- 4 -
FIGURE 405
FIGURE 404
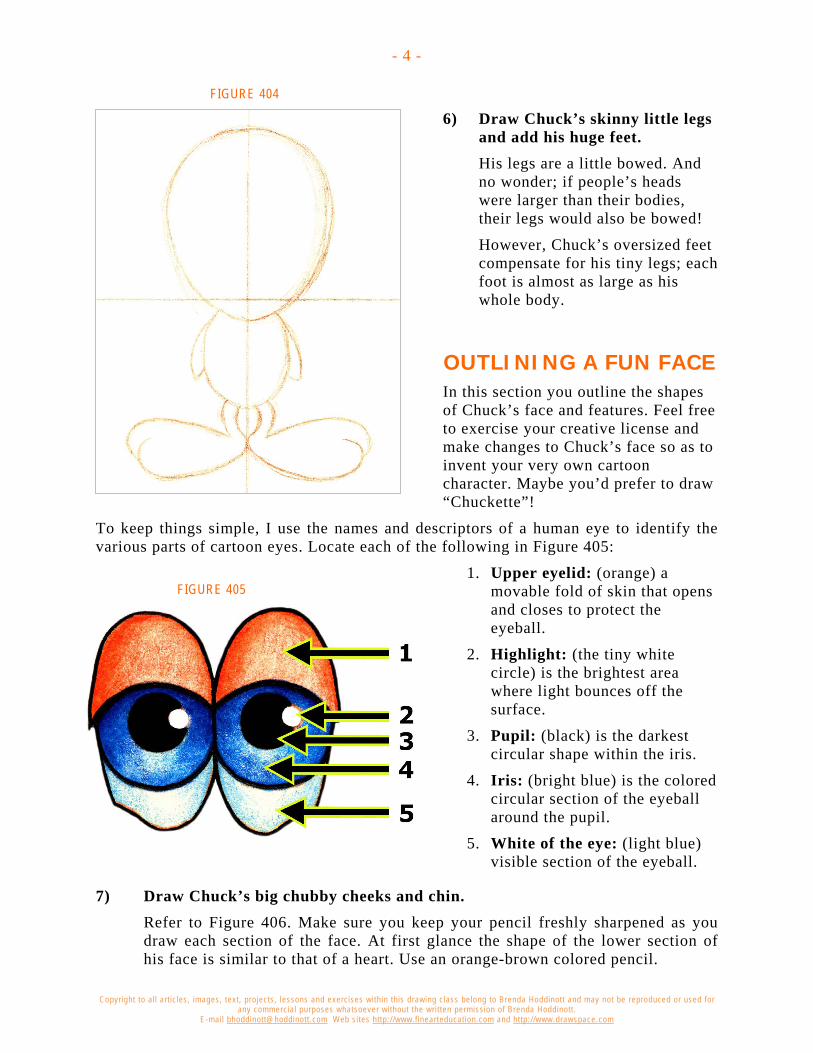
6) Draw Chuck’s skinny little legs and add his huge feet. His legs are a little bowed. And no wonder; if people’s heads were larger than their bodies, their legs would also be bowed!
However, Chuck’s oversized feet compensate for his tiny legs; each foot is almost as large as his whole body.
OUTLINING A FUN FACE In this section you outline the shapes of Chuck’s face and features. Feel free to exercise your creative license and make changes to Chuck’s face so as to invent your very own cartoon character. Maybe you’d prefer to draw “Chuckette”!
To keep things simple, I use the names and descriptors of a human eye to identify the various parts of cartoon eyes. Locate each of the following in Figure 405:
1. Upper eyelid: (orange) a movable fold of skin that opens and closes to protect the eyeball.
2. Highlight: (the tiny white circle) is the brightest area where light bounces off the surface.
3. Pupil: (black) is the darkest circular shape within the iris.
4. Iris: (bright blue) is the colored circular section of the eyeball around the pupil.
5. White of the eye: (light blue) visible section of the eyeball.
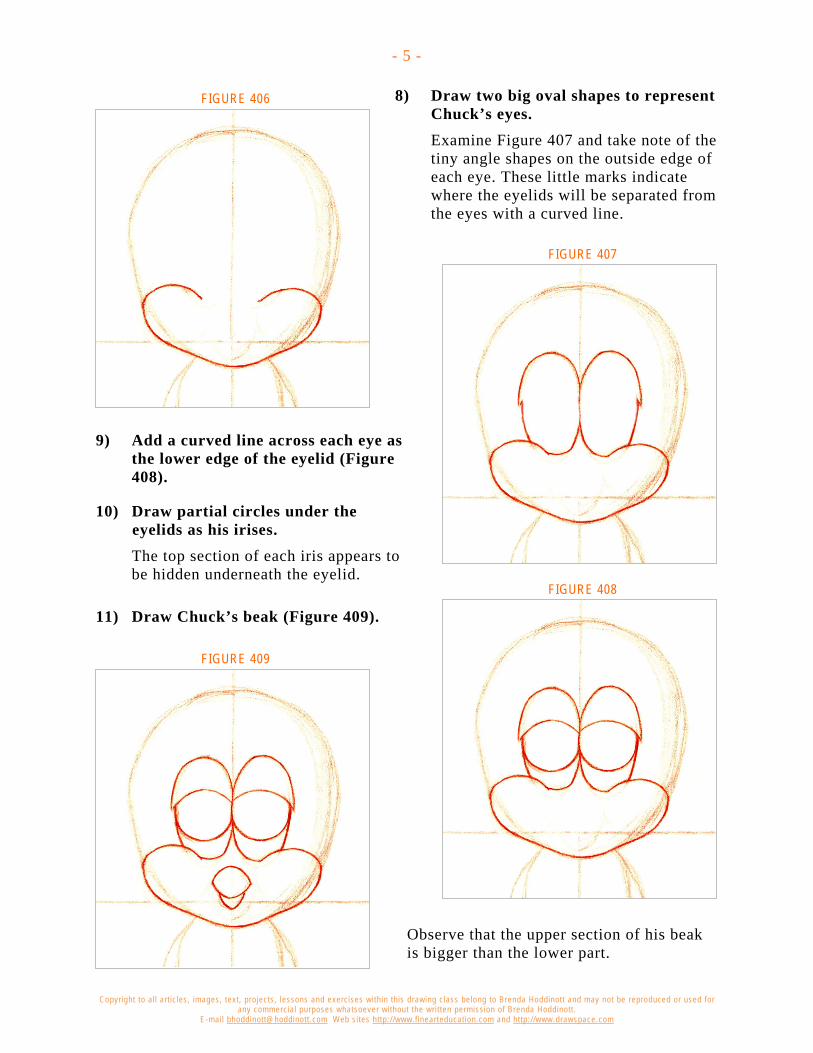
7) Draw Chuck’s big chubby cheeks and chin. Refer to Figure 406. Make sure you keep your pencil freshly sharpened as you draw each section of the face. At first glance the shape of the lower section of his face is similar to that of a heart. Use an orange-brown colored pencil.
Copyright to al l art icles, images, text, projects, lessons and exercises within this drawing class belong to Brenda Hoddinott and may not be reproduced or used for any commercial purposes whatsoever without the wri t ten permission of Brenda Hoddinott .
E-mail bhoddinott@hoddinott .com Web si tes http:/ /www.f inearteducat ion.com and ht tp:/ /www.drawspace.com
- 5 -
FIGURE 409
FIGURE 408
FIGURE 406
FIGURE 407
8) Draw two big oval shapes to represent Chuck’s eyes. Examine Figure 407 and take note of the tiny angle shapes on the outside edge of each eye. These little marks indicate where the eyelids will be separated from the eyes with a curved line.
9) Add a curved line across each eye as the lower edge of the eyelid (Figure 408).
10) Draw partial circles under the eyelids as his irises. The top section of each iris appears to be hidden underneath the eyelid.
11) Draw Chuck’s beak (Figure 409).
Observe that the upper section of his beak is bigger than the lower part.
Copyright to al l art icles, images, text, projects, lessons and exercises within this drawing class belong to Brenda Hoddinott and may not be reproduced or used for any commercial purposes whatsoever without the wri t ten permission of Brenda Hoddinott .
E-mail bhoddinott@hoddinott .com Web si tes http:/ /www.f inearteducat ion.com and ht tp:/ /www.drawspace.com
- 6 -
FIGURE 410
FIGURE 412
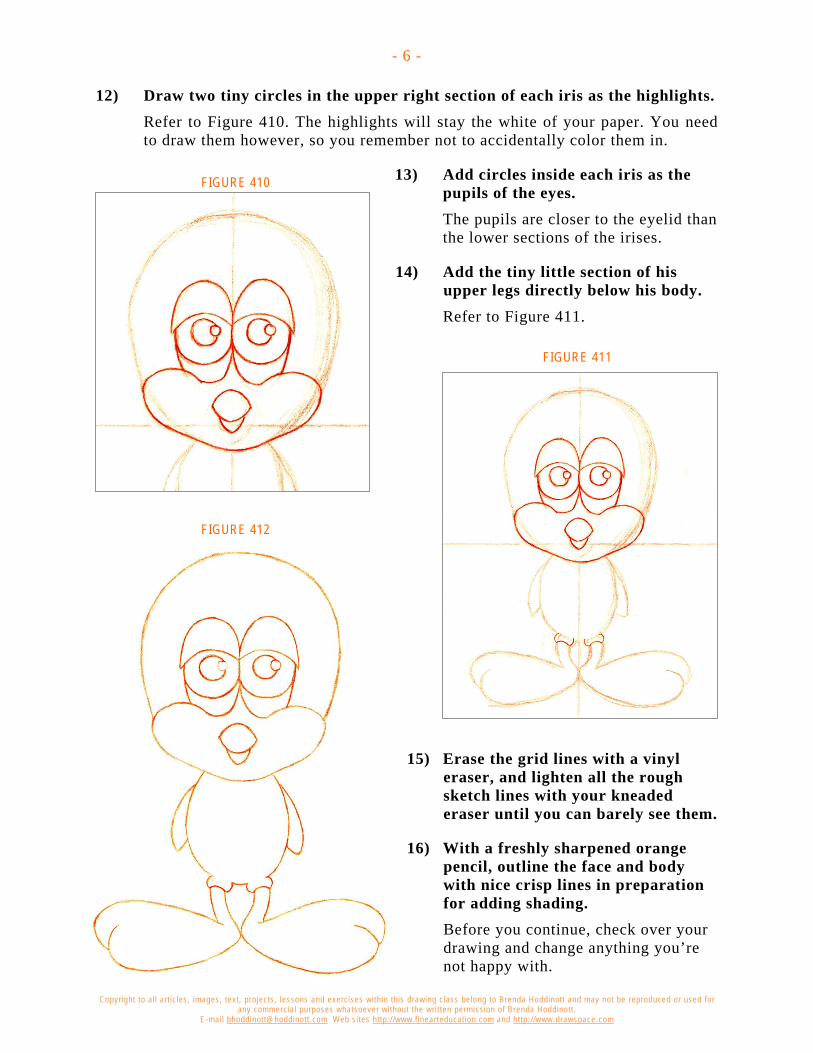
12) Draw two tiny circles in the upper right section of each iris as the highlights. Refer to Figure 410. The highlights will stay the white of your paper. You need to draw them however, so you remember not to accidentally color them in.
13) Add circles inside each iris as the pupils of the eyes. The pupils are closer to the eyelid than the lower sections of the irises.
14) Add the tiny little section of his upper legs directly below his body. Refer to Figure 411.
FIGURE 411
15) Erase the grid lines with a vinyl eraser, and lighten all the rough sketch lines with your kneaded eraser until you can barely see them.
16) With a freshly sharpened orange pencil, outline the face and body with nice crisp lines in preparation for adding shading. Before you continue, check over your drawing and change anything you’re not happy with.
Copyright to al l art icles, images, text, projects, lessons and exercises within this drawing class belong to Brenda Hoddinott and may not be reproduced or used for any commercial purposes whatsoever without the wri t ten permission of Brenda Hoddinott .
E-mail bhoddinott@hoddinott .com Web si tes http:/ /www.f inearteducat ion.com and ht tp:/ /www.drawspace.com
- 7 -
FIGURE 414
FIGURE 413
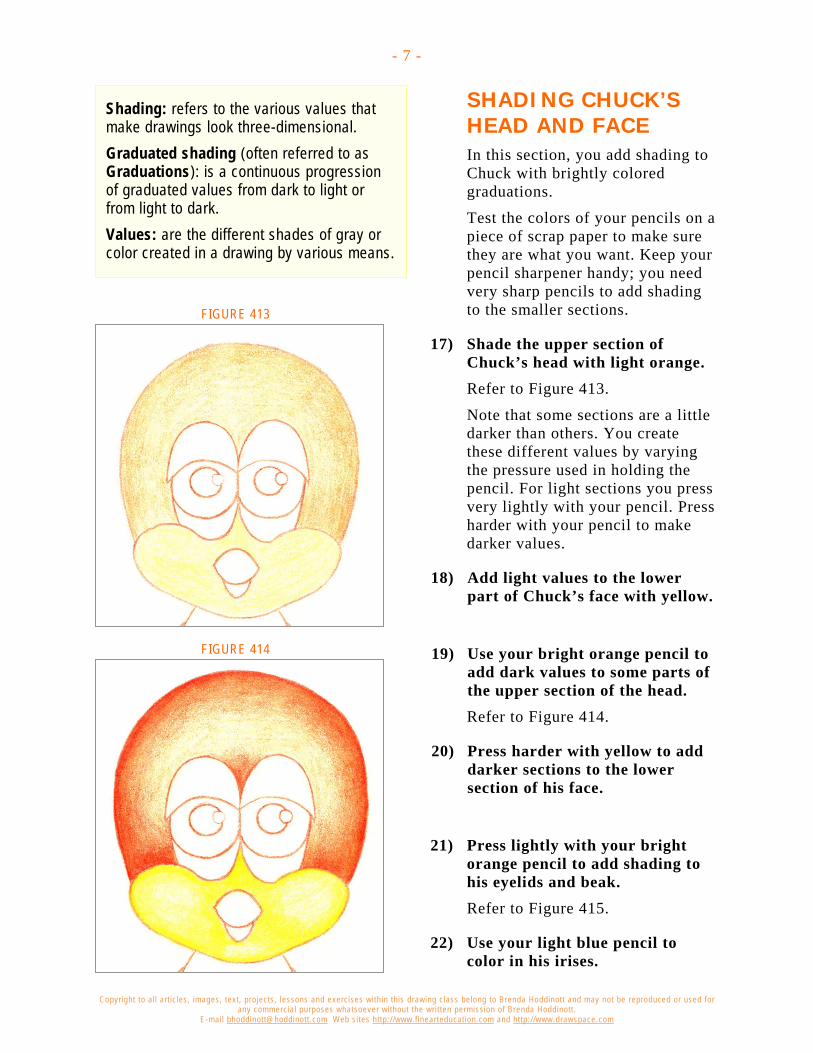
Shading: refers to the various values that make drawings look three-dimensional. Graduated shading (often referred to as Graduations): is a continuous progression of graduated values from dark to light or from light to dark. Values: are the different shades of gray or color created in a drawing by various means.
SHADING CHUCK’S HEAD AND FACE In this section, you add shading to Chuck with brightly colored graduations.
Test the colors of your pencils on a piece of scrap paper to make sure they are what you want. Keep your pencil sharpener handy; you need very sharp pencils to add shading to the smaller sections.
17) Shade the upper section of Chuck’s head with light orange. Refer to Figure 413.
Note that some sections are a little darker than others. You create these different values by varying the pressure used in holding the pencil. For light sections you press very lightly with your pencil. Press harder with your pencil to make darker values.
18) Add light values to the lower part of Chuck’s face with yellow.
19) Use your bright orange pencil to add dark values to some parts of the upper section of the head. Refer to Figure 414.
20) Press harder with yellow to add darker sections to the lower section of his face.
21) Press lightly with your bright orange pencil to add shading to his eyelids and beak. Refer to Figure 415.
22) Use your light blue pencil to color in his irises.
Copyright to al l art icles, images, text, projects, lessons and exercises within this drawing class belong to Brenda Hoddinott and may not be reproduced or used for any commercial purposes whatsoever without the wri t ten permission of Brenda Hoddinott .
E-mail bhoddinott@hoddinott .com Web si tes http:/ /www.f inearteducat ion.com and ht tp:/ /www.drawspace.com
- 8 -
FIGURE 415
FIGURE 417
FIGURE 416
FIGURE 418
FIGURE 419
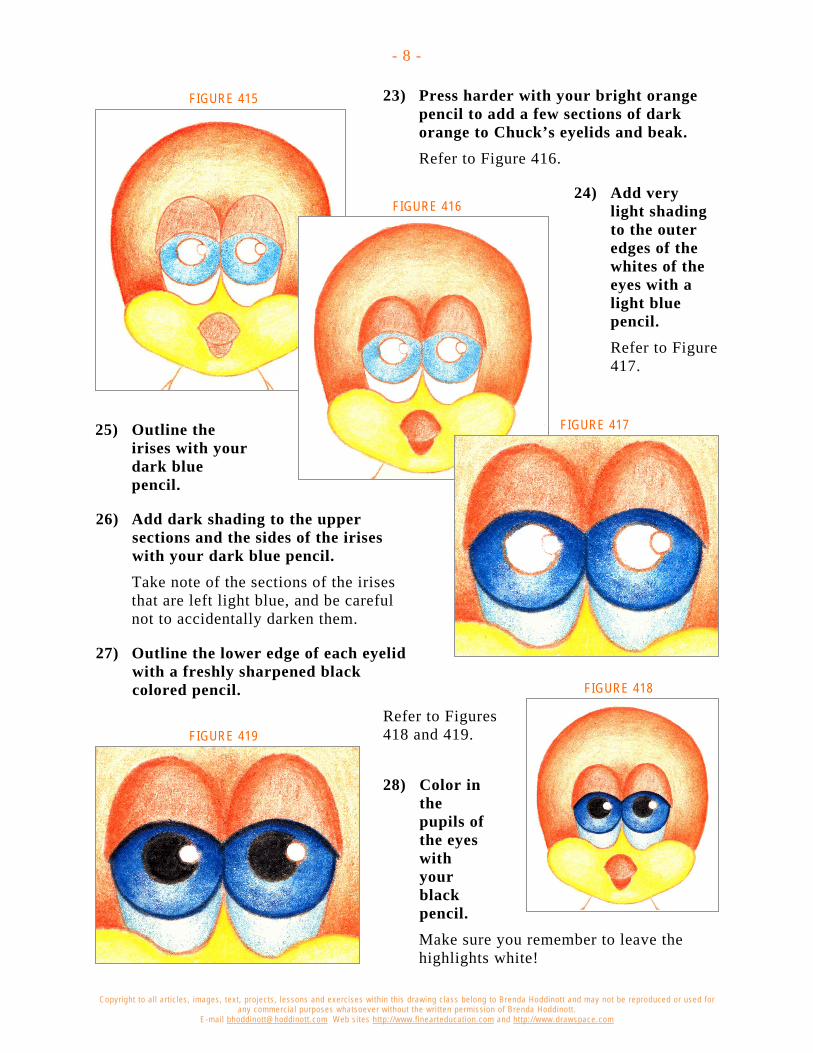
23) Press harder with your bright orange pencil to add a few sections of dark orange to Chuck’s eyelids and beak. Refer to Figure 416.
24) Add very light shading to the outer edges of the whites of the eyes with a light blue pencil. Refer to Figure 417.
25) Outline the irises with your dark blue pencil.
26) Add dark shading to the upper sections and the sides of the irises with your dark blue pencil. Take note of the sections of the irises that are left light blue, and be careful not to accidentally darken them.
27) Outline the lower edge of each eyelid with a freshly sharpened black colored pencil.
Refer to Figures 418 and 419.
28) Color in the pupils of the eyes with your black pencil. Make sure you remember to leave the highlights white!
Copyright to al l art icles, images, text, projects, lessons and exercises within this drawing class belong to Brenda Hoddinott and may not be reproduced or used for any commercial purposes whatsoever without the wri t ten permission of Brenda Hoddinott .
E-mail bhoddinott@hoddinott .com Web si tes http:/ /www.f inearteducat ion.com and ht tp:/ /www.drawspace.com
- 9 -
FIGURE 420
FIGURE 421
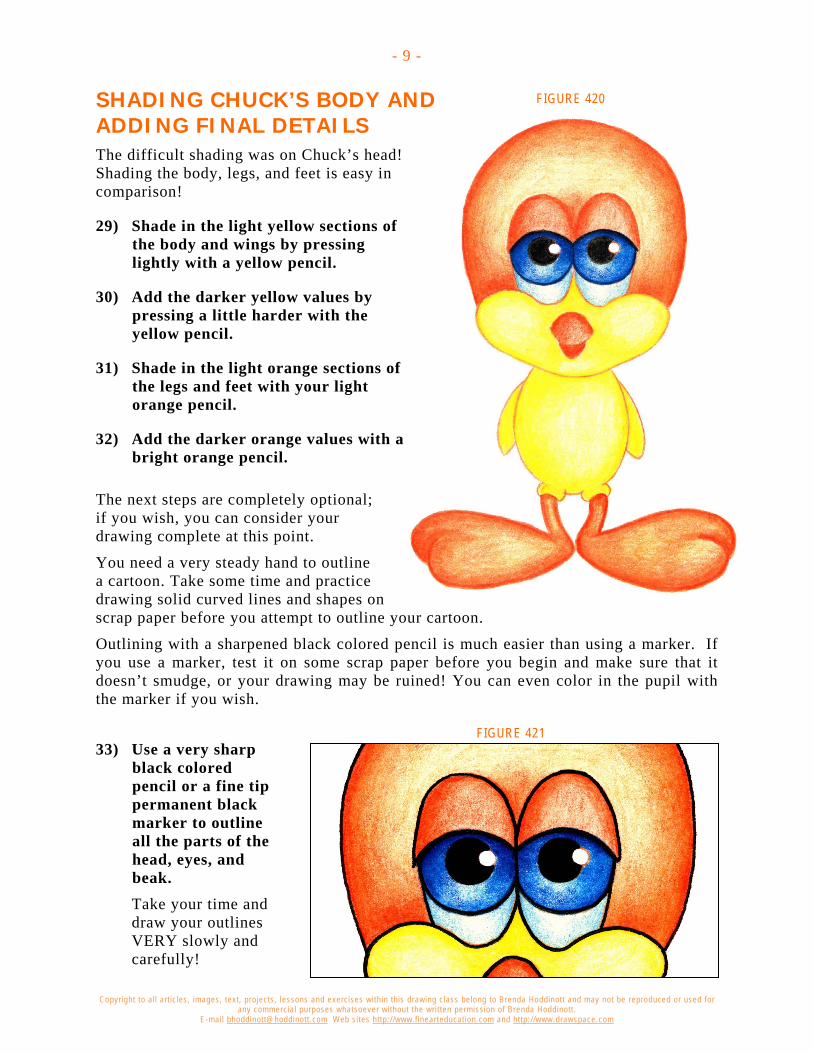
SHADING CHUCK’S BODY AND ADDING FINAL DETAILS The difficult shading was on Chuck’s head! Shading the body, legs, and feet is easy in comparison!
29) Shade in the light yellow sections of the body and wings by pressing lightly with a yellow pencil.
30) Add the darker yellow values by pressing a little harder with the yellow pencil.
31) Shade in the light orange sections of the legs and feet with your light orange pencil.
32) Add the darker orange values with a bright orange pencil.
The next steps are completely optional; if you wish, you can consider your drawing complete at this point.
You need a very steady hand to outline a cartoon. Take some time and practice drawing solid curved lines and shapes on scrap paper before you attempt to outline your cartoon.
Outlining with a sharpened black colored pencil is much easier than using a marker. If you use a marker, test it on some scrap paper before you begin and make sure that it doesn’t smudge, or your drawing may be ruined! You can even color in the pupil with the marker if you wish.
33) Use a very sharp black colored pencil or a fine tip permanent black marker to outline all the parts of the head, eyes, and beak. Take your time and draw your outlines VERY slowly and carefully!
Copyright to al l art icles, images, text, projects, lessons and exercises within this drawing class belong to Brenda Hoddinott and may not be reproduced or used for any commercial purposes whatsoever without the wri t ten permission of Brenda Hoddinott .
E-mail bhoddinott@hoddinott .com Web si tes http:/ /www.f inearteducat ion.com and ht tp:/ /www.drawspace.com
- 10 -
FIGURE 422
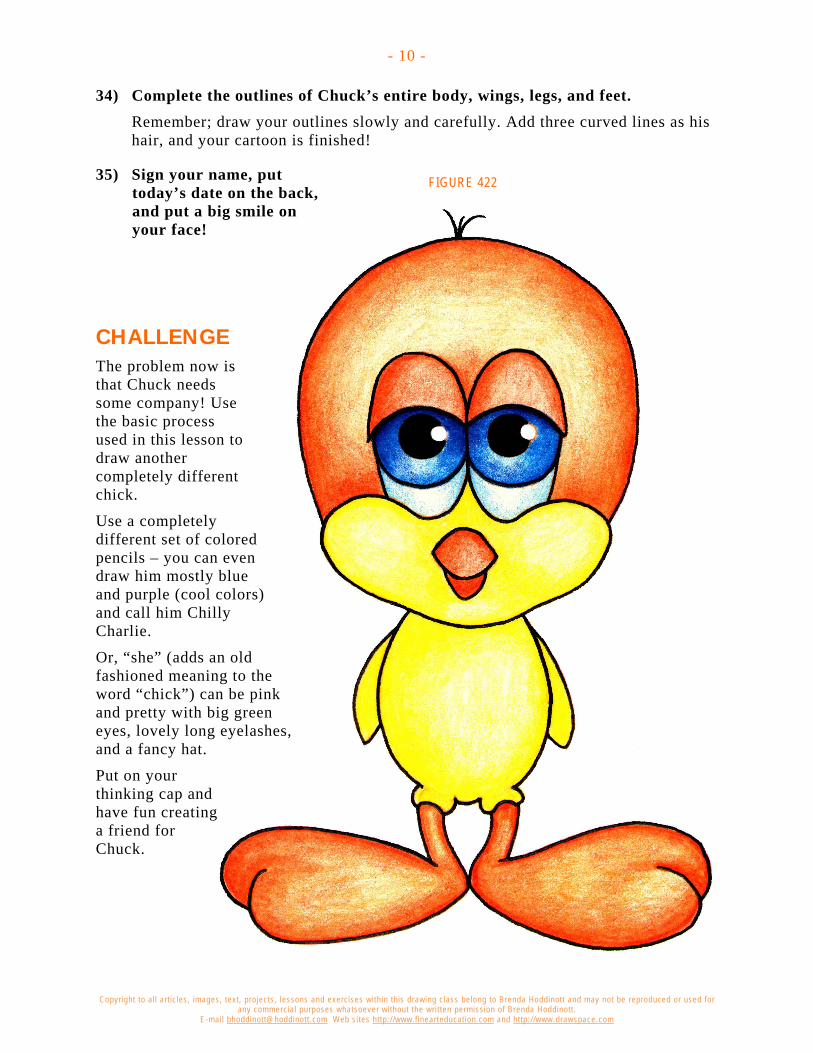
34) Complete the outlines of Chuck’s entire body, wings, legs, and feet. Remember; draw your outlines slowly and carefully. Add three curved lines as his hair, and your cartoon is finished!
35) Sign your name, put today’s date on the back, and put a big smile on your face!
CHALLENGE The problem now is that Chuck needs some company! Use the basic process used in this lesson to draw another completely different chick.
Use a completely different set of colored pencils – you can even draw him mostly blue and purple (cool colors) and call him Chilly Charlie.
Or, “she” (adds an old fashioned meaning to the word “chick”) can be pink and pretty with big green eyes, lovely long eyelashes, and a fancy hat.
Put on your thinking cap and have fun creating a friend for Chuck.
Copyright to al l art icles, images, text, projects, lessons and exercises within this drawing class belong to Brenda Hoddinott and may not be reproduced or used for any commercial purposes whatsoever without the wri t ten permission of Brenda Hoddinott .
E-mail bhoddinott@hoddinott .com Web si tes http:/ /www.f inearteducat ion.com and ht tp:/ /www.drawspace.com
- 11 -
BRENDA HODDINOTT As a self-educated teacher, visual artist, portraitist, forensic artist, and illustrator, Brenda utilizes diverse art media including graphite, technical pen, colored pencil, chalk pastel, charcoal, conté crayon, and oil paints.
My philosophy on teaching art is to focus primarily on the enjoyment aspects while gently introducing the technical and academic. Hence, in creating a passion for the subject matter, the quest for knowledge also becomes enjoyable.
Brenda Hoddinott
Biography
Born in St. John’s, Newfoundland, Brenda grew up in the small town of Corner Brook. She developed strong technical competencies with a personal commitment to self directed learning, and the aid of assorted “Learn to Draw” books. During Brenda’s twenty-five year career as a self-educated civilian forensic artist, numerous criminal investigation departments have employed Brenda’s skills, including Royal Canadian Mounted Police and municipal police departments. In 1992, Brenda was honored with a commendation from the Royal Canadian Mounted Police, and in 1994, she was awarded a Certificate of Membership from “Forensic Artists International”.
Her home-based art career included graphic design, and teaching recreational drawing and painting classes. As supervisor of her community’s recreational art department, Brenda hired and trained teachers, and designed curriculum for several children’s art programs. In 1998, Brenda chose to end her eighteen-year career as an art educator in order to devote more time to writing, drawing, painting, and developing her websites.
Drawspace http://www.drawspace.com incorporates her unique style and innovative approach to curriculum development. This site offers downloadable and printable drawing classes for students of all abilities from the age of eight through adult. Students of all ages, levels and abilities have praised the simple step-by-step instructional approach. This site is respected as a resource for fine art educators, home schooling programs, and educational facilities throughout the world.
Learn-to-draw books
Drawing for Dummies: Wiley Publishing, Inc., New, York, NY, this 336 page book is available on various websites and in major bookstores internationally.
The Complete Idiot’s Guide to Drawing People: Winner of the Alpha-Penguin Book of the Year Award 2004, Alpha - Pearson Education – Macmillan, Indianapolis, IN, this 360 page book is available on various websites and in major bookstores internationally.
Brenda Hoddinott
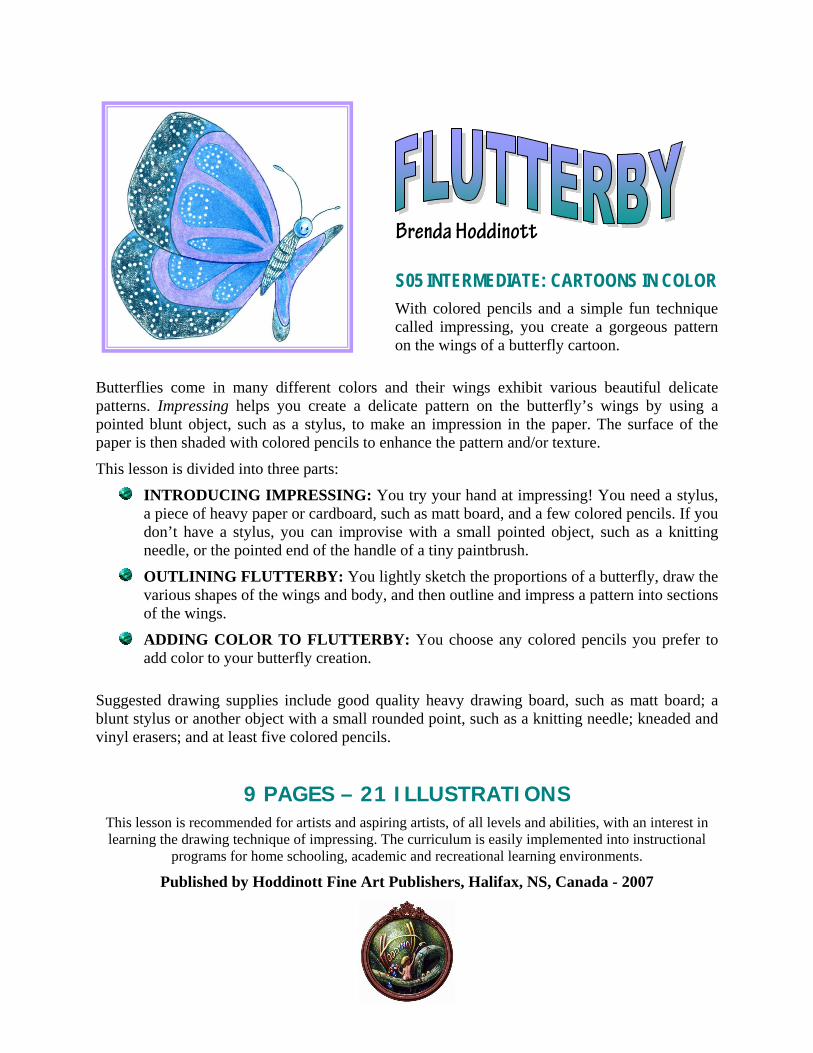
S05 INTERMEDIATE: CARTOONS IN COLOR With colored pencils and a simple fun technique called impressing, you create a gorgeous pattern on the wings of a butterfly cartoon.
Butterflies come in many different colors and their wings exhibit various beautiful delicate patterns. Impressing helps you create a delicate pattern on the butterfly’s wings by using a pointed blunt object, such as a stylus, to make an impression in the paper. The surface of the paper is then shaded with colored pencils to enhance the pattern and/or texture.
This lesson is divided into three parts:
INTRODUCING IMPRESSING: You try your hand at impressing! You need a stylus, a piece of heavy paper or cardboard, such as matt board, and a few colored pencils. If you don’t have a stylus, you can improvise with a small pointed object, such as a knitting needle, or the pointed end of the handle of a tiny paintbrush.
OUTLINING FLUTTERBY: You lightly sketch the proportions of a butterfly, draw the various shapes of the wings and body, and then outline and impress a pattern into sections of the wings.
ADDING COLOR TO FLUTTERBY: You choose any colored pencils you prefer to add color to your butterfly creation.
Suggested drawing supplies include good quality heavy drawing board, such as matt board; a blunt stylus or another object with a small rounded point, such as a knitting needle; kneaded and vinyl erasers; and at least five colored pencils.
9 PAGES – 21 ILLUSTRATIONS This lesson is recommended for artists and aspiring artists, of all levels and abilities, with an interest in learning the drawing technique of impressing. The curriculum is easily implemented into instructional
programs for home schooling, academic and recreational learning environments.
Published by Hoddinott Fine Art Publishers, Halifax, NS, Canada - 2007
Copyright to al l art icles, images, text, projects, lessons and exercises within this drawing class belong to Brenda Hoddinott and may not be reproduced or used for any commercial purposes whatsoever without the wri t ten permission of Brenda Hoddinott .
E-mail bhoddinott@hoddinott .com Web si tes http:/ /www.f inearteducat ion.com and ht tp:/ /www.drawspace.com
2
FIGURE 01
FIGURE 02
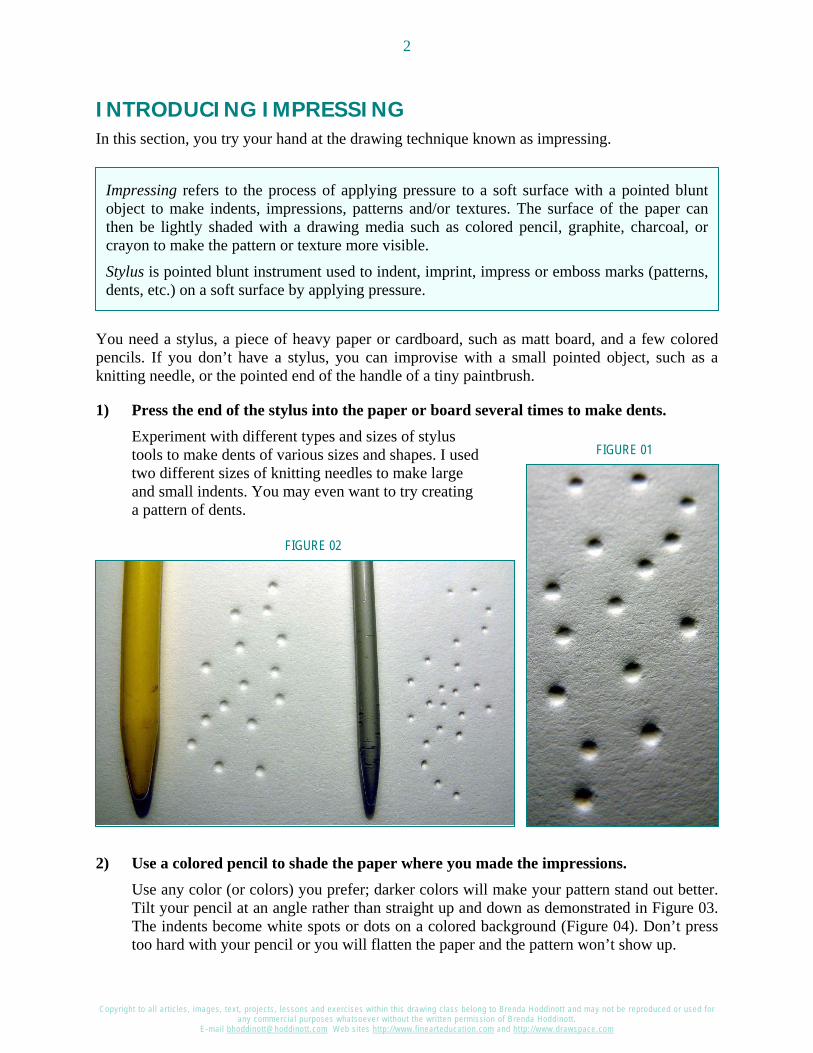
INTRODUCING IMPRESSING In this section, you try your hand at the drawing technique known as impressing.
You need a stylus, a piece of heavy paper or cardboard, such as matt board, and a few colored pencils. If you don’t have a stylus, you can improvise with a small pointed object, such as a knitting needle, or the pointed end of the handle of a tiny paintbrush.
1) Press the end of the stylus into the paper or board several times to make dents. Experiment with different types and sizes of stylus tools to make dents of various sizes and shapes. I used two different sizes of knitting needles to make large and small indents. You may even want to try creating a pattern of dents.
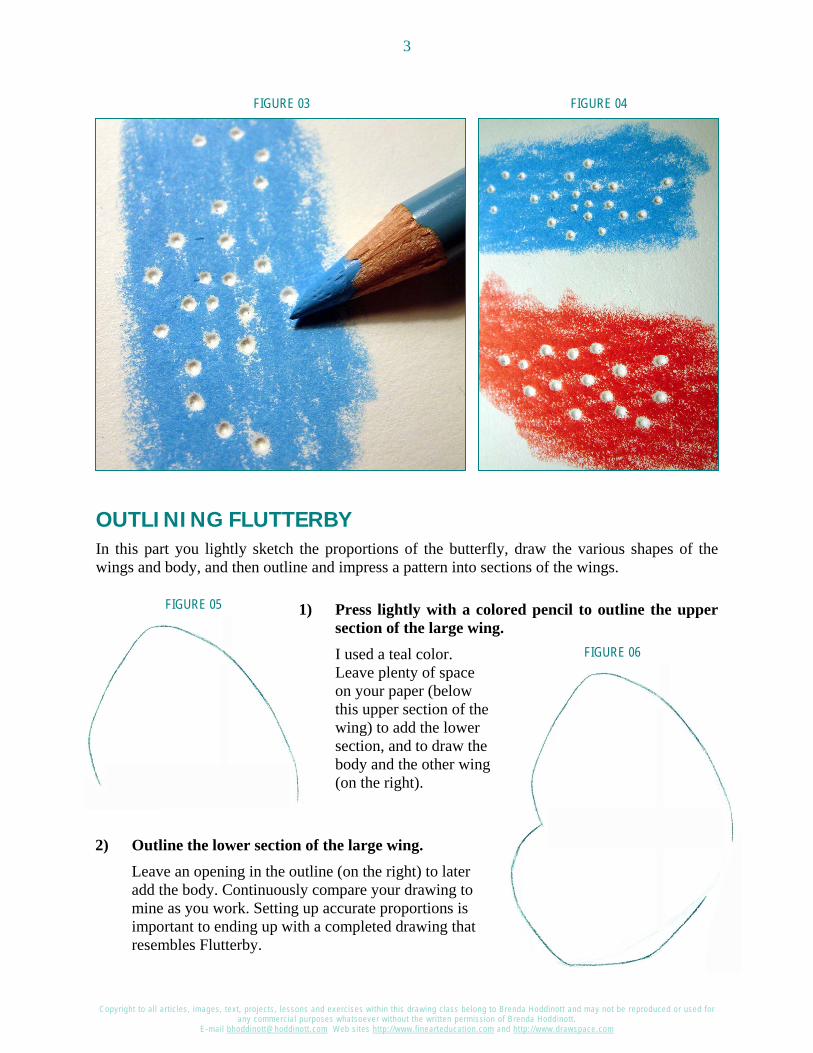
2) Use a colored pencil to shade the paper where you made the impressions. Use any color (or colors) you prefer; darker colors will make your pattern stand out better. Tilt your pencil at an angle rather than straight up and down as demonstrated in Figure 03. The indents become white spots or dots on a colored background (Figure 04). Don’t press too hard with your pencil or you will flatten the paper and the pattern won’t show up.
Impressing refers to the process of applying pressure to a soft surface with a pointed blunt object to make indents, impressions, patterns and/or textures. The surface of the paper can then be lightly shaded with a drawing media such as colored pencil, graphite, charcoal, or crayon to make the pattern or texture more visible.
Stylus is pointed blunt instrument used to indent, imprint, impress or emboss marks (patterns, dents, etc.) on a soft surface by applying pressure.
Copyright to al l art icles, images, text, projects, lessons and exercises within this drawing class belong to Brenda Hoddinott and may not be reproduced or used for any commercial purposes whatsoever without the wri t ten permission of Brenda Hoddinott .
E-mail bhoddinott@hoddinott .com Web si tes http:/ /www.f inearteducat ion.com and ht tp:/ /www.drawspace.com
3
FIGURE 05
FIGURE 06
FIGURE 03 FIGURE 04
OUTLINING FLUTTERBY In this part you lightly sketch the proportions of the butterfly, draw the various shapes of the wings and body, and then outline and impress a pattern into sections of the wings.
1) Press lightly with a colored pencil to outline the upper section of the large wing. I used a teal color. Leave plenty of space on your paper (below this upper section of the wing) to add the lower section, and to draw the body and the other wing (on the right).
2) Outline the lower section of the large wing. Leave an opening in the outline (on the right) to later add the body. Continuously compare your drawing to mine as you work. Setting up accurate proportions is important to ending up with a completed drawing that resembles Flutterby.
Copyright to al l art icles, images, text, projects, lessons and exercises within this drawing class belong to Brenda Hoddinott and may not be reproduced or used for any commercial purposes whatsoever without the wri t ten permission of Brenda Hoddinott .
E-mail bhoddinott@hoddinott .com Web si tes http:/ /www.f inearteducat ion.com and ht tp:/ /www.drawspace.com
4
FIGURE 07 FIGURE 08
FIGURE 09
In S-03 Intermediate: Daisy Dodo, a zany cartoon bird demonstrates a bold, colorful approach to drawing cartoons.
You learn the colored pencil skills of shading, dry-mixing colors, and burnishing.
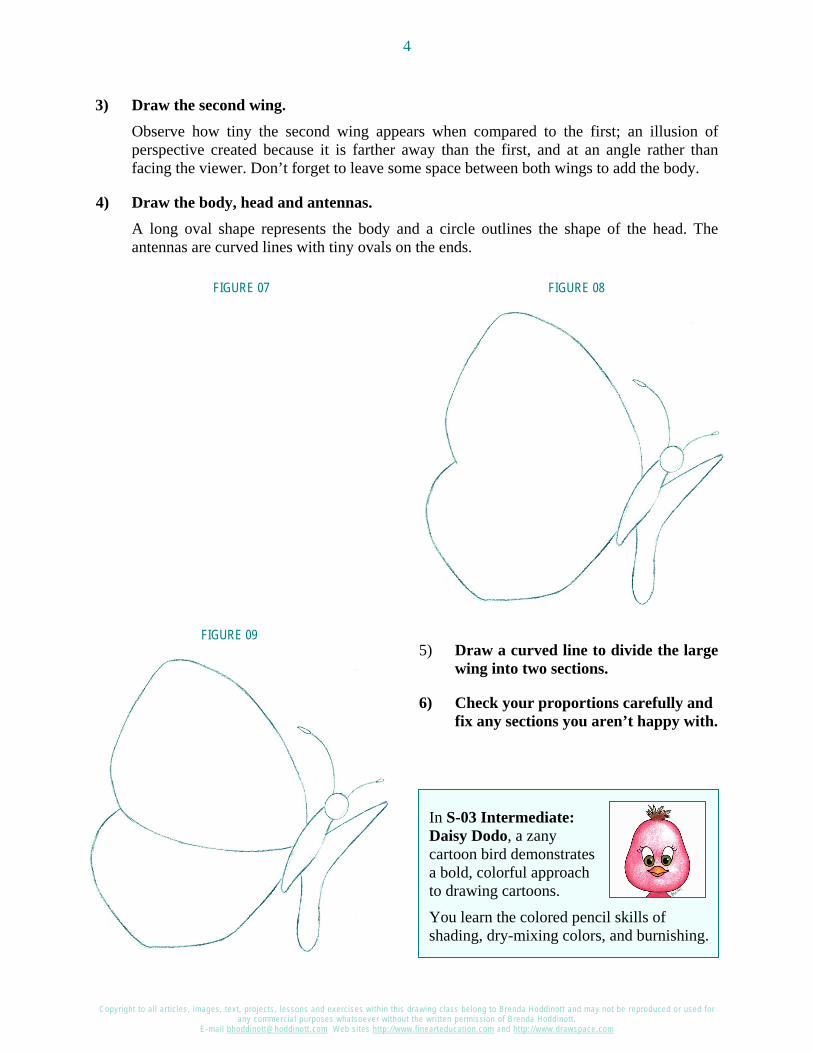
3) Draw the second wing. Observe how tiny the second wing appears when compared to the first; an illusion of perspective created because it is farther away than the first, and at an angle rather than facing the viewer. Don’t forget to leave some space between both wings to add the body.
4) Draw the body, head and antennas. A long oval shape represents the body and a circle outlines the shape of the head. The antennas are curved lines with tiny ovals on the ends.
5) Draw a curved line to divide the large wing into two sections.
6) Check your proportions carefully and fix any sections you aren’t happy with.
Copyright to al l art icles, images, text, projects, lessons and exercises within this drawing class belong to Brenda Hoddinott and may not be reproduced or used for any commercial purposes whatsoever without the wri t ten permission of Brenda Hoddinott .
E-mail bhoddinott@hoddinott .com Web si tes http:/ /www.f inearteducat ion.com and ht tp:/ /www.drawspace.com
5
FIGURE 10
FIGURE 11
FIGURE 12
FIGURE 13
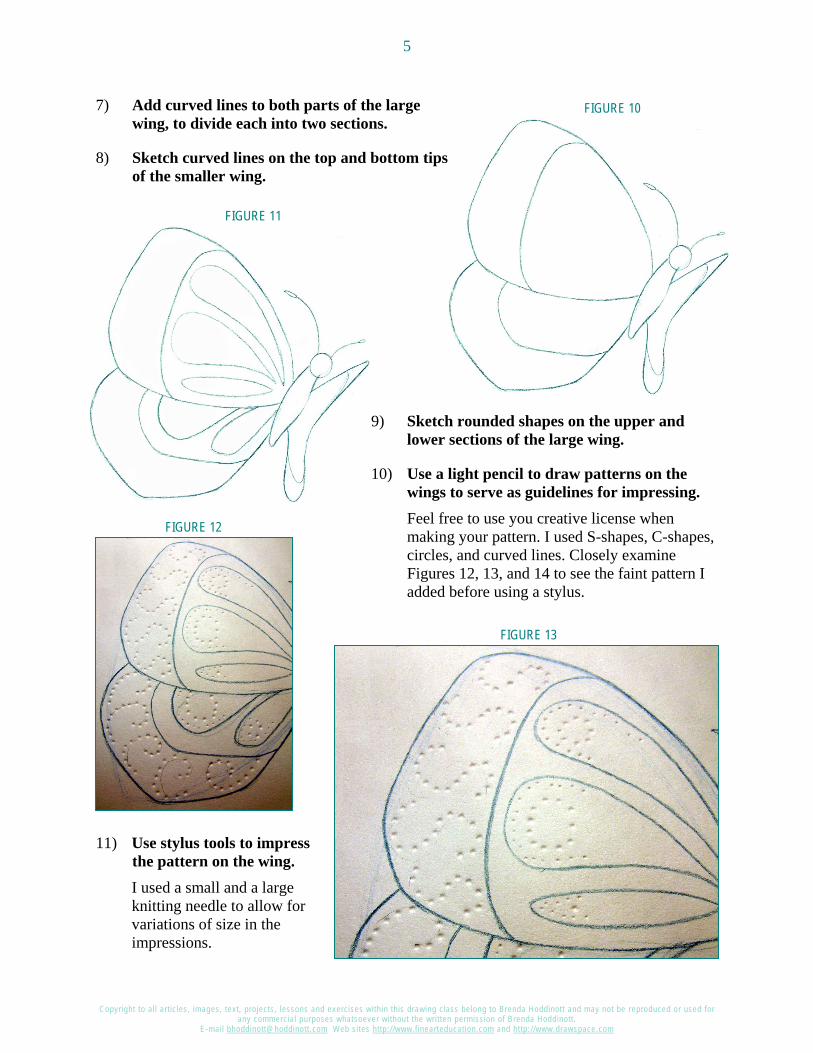
7) Add curved lines to both parts of the large wing, to divide each into two sections.
8) Sketch curved lines on the top and bottom tips of the smaller wing.
9) Sketch rounded shapes on the upper and lower sections of the large wing.
10) Use a light pencil to draw patterns on the wings to serve as guidelines for impressing. Feel free to use you creative license when making your pattern. I used S-shapes, C-shapes, circles, and curved lines. Closely examine Figures 12, 13, and 14 to see the faint pattern I added before using a stylus.
11) Use stylus tools to impress the pattern on the wing. I used a small and a large knitting needle to allow for variations of size in the impressions.
Copyright to al l art icles, images, text, projects, lessons and exercises within this drawing class belong to Brenda Hoddinott and may not be reproduced or used for any commercial purposes whatsoever without the wri t ten permission of Brenda Hoddinott .
E-mail bhoddinott@hoddinott .com Web si tes http:/ /www.f inearteducat ion.com and ht tp:/ /www.drawspace.com
6
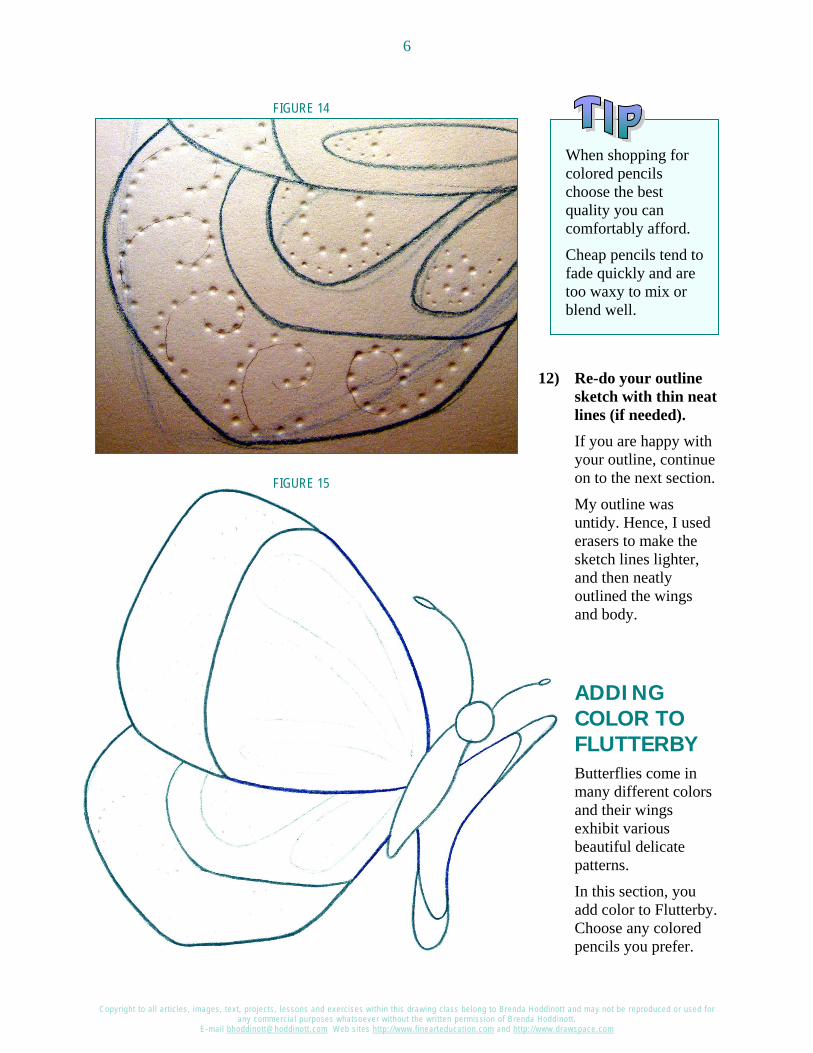
FIGURE 14
When shopping for colored pencils choose the best quality you can comfortably afford.
Cheap pencils tend to fade quickly and are too waxy to mix or blend well.
FIGURE 15
12) Re-do your outline sketch with thin neat lines (if needed). If you are happy with your outline, continue on to the next section.
My outline was untidy. Hence, I used erasers to make the sketch lines lighter, and then neatly outlined the wings and body.
ADDING COLOR TO FLUTTERBY Butterflies come in many different colors and their wings exhibit various beautiful delicate patterns.
In this section, you add color to Flutterby. Choose any colored pencils you prefer.
Copyright to al l art icles, images, text, projects, lessons and exercises within this drawing class belong to Brenda Hoddinott and may not be reproduced or used for any commercial purposes whatsoever without the wri t ten permission of Brenda Hoddinott .
E-mail bhoddinott@hoddinott .com Web si tes http:/ /www.f inearteducat ion.com and ht tp:/ /www.drawspace.com
7
FIGURE 16
FIGURE 02
FIGURE 17
FIGURE 18
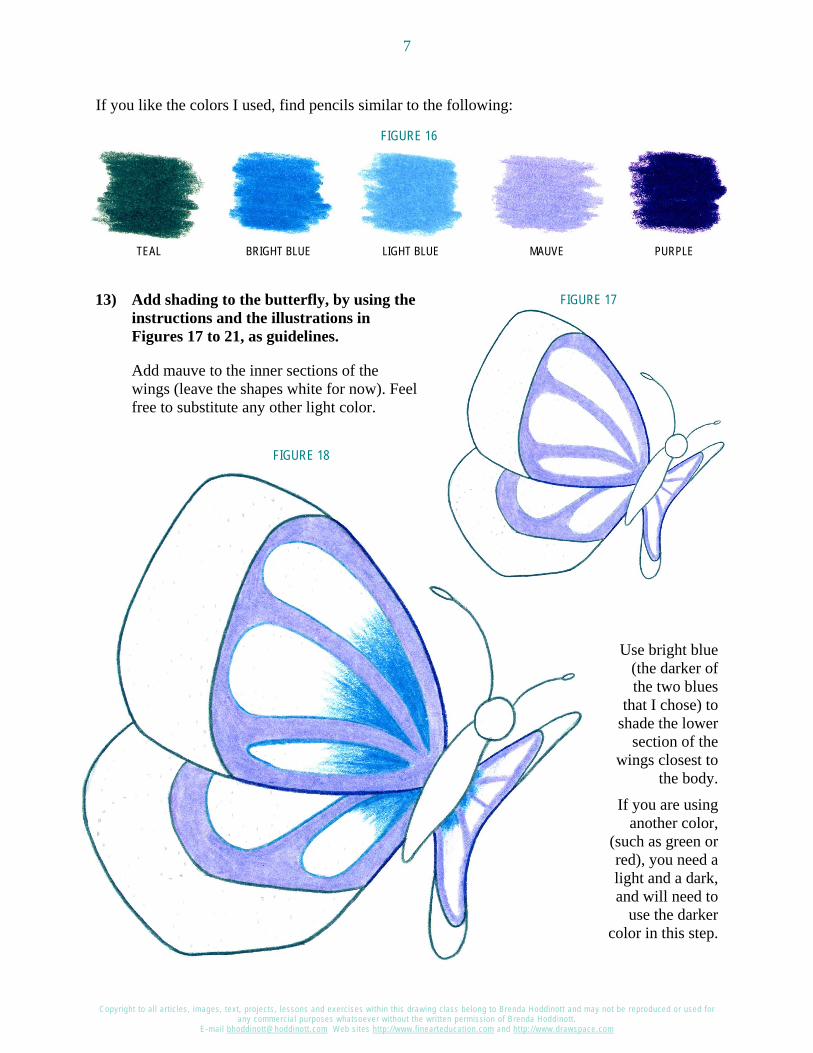
If you like the colors I used, find pencils similar to the following:
TEAL BRIGHT BLUE LIGHT BLUE MAUVE PURPLE
13) Add shading to the butterfly, by using the instructions and the illustrations in Figures 17 to 21, as guidelines.
Add mauve to the inner sections of the wings (leave the shapes white for now). Feel free to substitute any other light color.
Use bright blue (the darker of the two blues
that I chose) to shade the lower
section of the wings closest to
the body.
If you are using another color,
(such as green or red), you need a light and a dark, and will need to
use the darker color in this step.
Copyright to al l art icles, images, text, projects, lessons and exercises within this drawing class belong to Brenda Hoddinott and may not be reproduced or used for any commercial purposes whatsoever without the wri t ten permission of Brenda Hoddinott .
E-mail bhoddinott@hoddinott .com Web si tes http:/ /www.f inearteducat ion.com and ht tp:/ /www.drawspace.com
8
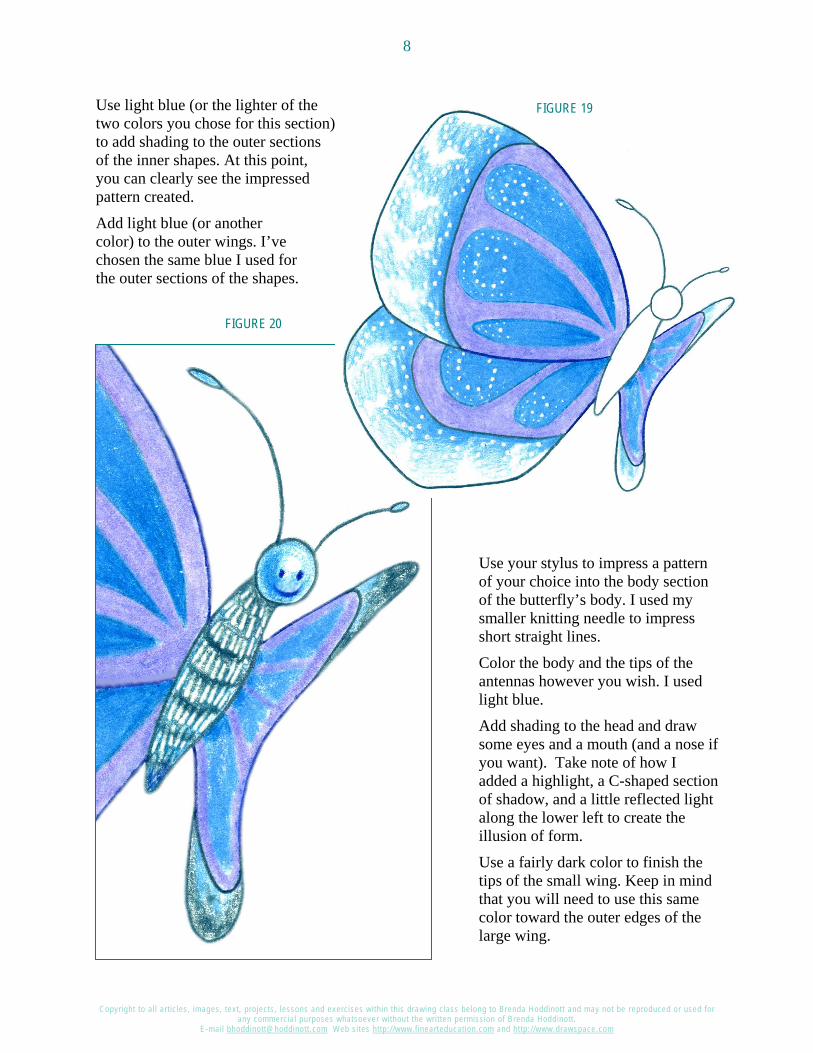
FIGURE 20
FIGURE 19 Use light blue (or the lighter of the two colors you chose for this section) to add shading to the outer sections of the inner shapes. At this point, you can clearly see the impressed pattern created.
Add light blue (or another color) to the outer wings. I’ve chosen the same blue I used for the outer sections of the shapes.
Use your stylus to impress a pattern of your choice into the body section of the butterfly’s body. I used my smaller knitting needle to impress short straight lines.
Color the body and the tips of the antennas however you wish. I used light blue.
Add shading to the head and draw some eyes and a mouth (and a nose if you want). Take note of how I added a highlight, a C-shaped section of shadow, and a little reflected light along the lower left to create the illusion of form.
Use a fairly dark color to finish the tips of the small wing. Keep in mind that you will need to use this same color toward the outer edges of the large wing.
Copyright to al l art icles, images, text, projects, lessons and exercises within this drawing class belong to Brenda Hoddinott and may not be reproduced or used for any commercial purposes whatsoever without the wri t ten permission of Brenda Hoddinott .
E-mail bhoddinott@hoddinott .com Web si tes http:/ /www.f inearteducat ion.com and ht tp:/ /www.drawspace.com
9
Colored pencils are a wonderful medium for drawing everything and anything. They can beautifully portray soft delicate drawings such as portraits and flowers, and also work very well for subjects needing a bolder, more colorful approach.
Colored pencils are relatively inexpensive, not messy, and are portable enough to take along wherever you go.
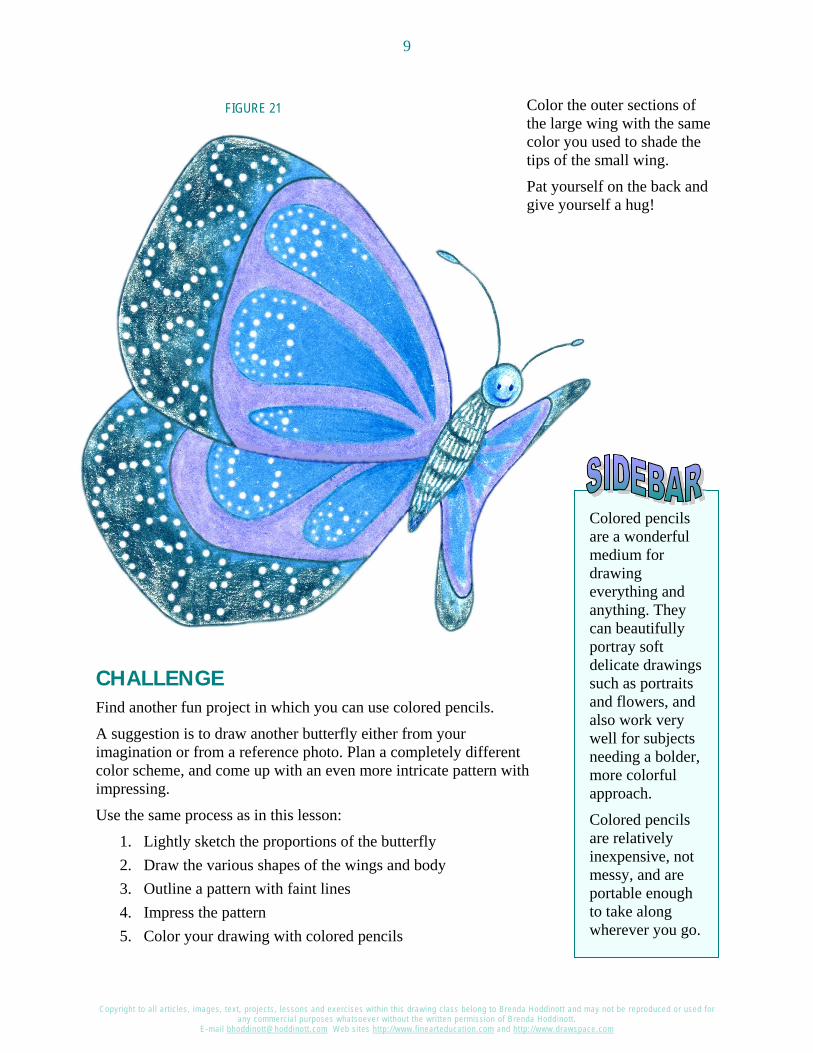
FIGURE 21 Color the outer sections of the large wing with the same color you used to shade the tips of the small wing.
Pat yourself on the back and give yourself a hug!
CHALLENGE Find another fun project in which you can use colored pencils.
A suggestion is to draw another butterfly either from your imagination or from a reference photo. Plan a completely different color scheme, and come up with an even more intricate pattern with impressing.
Use the same process as in this lesson:
1. Lightly sketch the proportions of the butterfly 2. Draw the various shapes of the wings and body 3. Outline a pattern with faint lines 4. Impress the pattern 5. Color your drawing with colored pencils
Copyright to al l art icles, images, text, projects, lessons and exercises within this drawing class belong to Brenda Hoddinott and may not be reproduced or used for any commercial purposes whatsoever without the wri t ten permission of Brenda Hoddinott .
E-mail bhoddinott@hoddinott .com Web si tes http:/ /www.f inearteducat ion.com and ht tp:/ /www.drawspace.com
10
Brenda Hoddinott As a self-educated teacher, visual artist, portraitist, forensic artist, and illustrator, Brenda utilizes diverse art media including graphite, technical pen, colored pencil, chalk pastel, charcoal, conté crayon, and oil paints.
My philosophy on teaching art is to focus primarily on the enjoyment aspects while gently introducing the technical and academic.
Hence, in creating a passion for the subject matter, the quest for knowledge also becomes enjoyable.
Brenda Hoddinott
Biography Born in St. John’s, Newfoundland, Brenda grew up in the small town of Corner Brook. She developed strong technical competencies with a personal commitment to self directed learning, and the aid of assorted “Learn to Draw” books. During Brenda’s twenty-five year career as a self-educated civilian forensic artist, numerous criminal investigation departments have employed Brenda’s skills, including Royal Canadian Mounted Police and municipal police departments. In 1992, Brenda was honored with a commendation from the Royal Canadian Mounted Police, and in 1994, she was awarded a Certificate of Membership from “Forensic Artists International”.
Her home-based art career included graphic design, and teaching recreational drawing and painting classes. As supervisor of her community’s recreational art department, Brenda hired and trained teachers, and designed curriculum for several children’s art programs. In 1998, Brenda chose to end her eighteen-year career as an art educator in order to devote more time to writing, drawing, painting, and developing her websites.
Drawspace http://www.drawspace.com incorporates her unique style and innovative approach to curriculum development. This site offers downloadable and printable drawing classes for students of all abilities from the age of eight through adult. Students of all ages, levels and abilities have praised the simple step-by-step instructional approach. This site is respected as a resource for fine art educators, home schooling programs, and educational facilities throughout the world.
Learn-to-draw books Drawing for Dummies: Wiley Publishing, Inc., New, York, NY, this 336 page book is available on various websites and in major bookstores internationally.
The Complete Idiot’s Guide to Drawing People: Winner of the Alpha-Penguin Book of the Year Award 2004, Alpha - Pearson Education – Macmillan, Indianapolis, IN, this 360 page book is available on various websites and in major bookstores internationally.