Floating picture with curled corner (Basic) To reproduce the effects on this slide, do the following: On the Home tab, in the Slides group, click Layout, and then click Blank. On the Insert tab, in the Images group, click Picture. In the Insert Picture dialog box, select a picture, and then click Insert. Select the picture on the slide. Under Picture Tools, on the Format tab, in the bottom right corner of the Size group, click the Size and Position dialog box launcher. In the Format Picture dialog box, resize or crop the image so that the height is set to 5.64” and the width is set to 3.77”. To crop the picture, click Crop in the left pane, and in the Crop pane, under Crop position, enter values into the Height, Width, Left, and Top boxes. To resize the picture, click Size in the left pane, and in the right pane, under Size and rotate, enter values into the Height and Width boxes. Under Picture Tools, on the Format tab, in the Size group, click the down arrow under Crop, and then click Crop to Shape. Under Rectangles, click Snip Single Corner Rectangle (third option from the left). On the Home tab, in the Drawing group, click Shapes, and then under Basic Shapes click Right Triangle (first row, fourth option from the left). On the slide, drag to draw a right triangle. Select the triangle. Under Drawing Tools, on the Format tab, in the Size group, do the following: In the Shape Height box, enter 0.55”. In the Shape Width box, enter 0.55”. On the Home tab, in the bottom right corner of the Drawing group, click the Format Shape dialog box launcher. In the Format Shape dialog box, click Fill in the left pane, select Gradient fill in the Fill pane, and then do the following: In the Type list, select Linear. Click the button next to Direction, and then click Linear Diagonal (first row, third option from the left). In the Angle box, enter 135°. Under Gradient stops, click Add gradient stops or Remove gradient stops until two stops appear in the slider. Also under Gradient stops, customize the gradient stops as follows: Select the first stop in the slider, and then do the following: In the Position box, enter 47%. Click the button next to Color, and then under Theme Colors click White, Background 1 (first row, first option from the left). Select the second stop in the slider, and then do the following: In the Position box, enter 100%. Click the button next to Color, and then under Theme Colors click Black, Text 1, Lighter 35% (third row, second option from the left). Also in the Format Shape dialog box, click Shadow in the left pane. In the Shadow pane, click the button next to Presets, and then under Outer, click Offset Diagonal Bottom Left (first row, third option from the left). Press and hold SHIFT and select both the picture and the triangle on the slide. On the Home tab, in the Drawing group, click Arrange, point to Align, and then do the following: Click Align to Slide. Click Align Top. Click Align Right. Select the picture. Drag the yellow diamond adjustment handle left or right to align the snipped corner with the top edge of the triangle. Press and hold SHIFT and select both the picture and the triangle on the slide. On the Home tab, in the Drawing group, click Arrange, and then click Group. Select the group. On the Home tab, in the bottom right corner of the Drawing group, click the Format Picture dialog box launcher. Click 3-D Rotation in the left pane, and then do the following in the 3-D Rotation pane: Click the button next to Presets, and then under Perspective, click Perspective Relaxed Moderately (second row, second option from the left). In the X box, enter 2.3°. In the Y box, enter 338.5°. In the Z box, enter 347.1°. In the Perspective box, enter 60°. Also in the Format Picture dialog box, click Shadow in the left pane. In the Shadow pane, do the following: Click the button next to Presets, and then under Outer, click Offset Diagonal Bottom Left (first row, third option from the left). In the Transparency box, enter 70°. In the Size box, enter 104%. In the Blur box, enter 27 pt. In the Angle box, enter 120°. In the Distance box, enter 20 pt. To reproduce the background effects on this slide, do the following: Right-click the slide background area, and then click Format Background. In the Format Background dialog box, click Fill in the left pane, select Gradient fill in the Fill pane, and then do the following: In the Type list, select Radial. Click the button next to Direction, and then click From Center (third option from the left). Under Gradient stops, click Add gradient stops or Remove gradient stops until two stops appear in the slider. Also under Gradient stops, customize the gradient stops as follows: Select the first stop in the slider, and then do the following: In the Position box, enter 10%. Click the button next to Color, and then under Theme Colors click White, Background 1, Darker 5% (second row, first option from the left). Select the second stop in the slider, and then do the following: In the Position box, enter 99%. Click the button next to Color, and then under Theme Colors click White, Background 1, Darker 35% (fifth row, first option from the left).
65
หนังสอืพิมพฉบับ 3 เดอืนยอนหลัง
ใหบริการในรูปแบบไมโครฟลม
การสืบคนชื่อหนังสือพิมพ
พมิพชื่อหนังสอืพมิพ เลอืกเขตขอมูล
การแสดงผลการสืบคน
66 รายการบรรณานุกรมที่สมบูรณ
ผูแตง. (ปพมิพ, วัน เดือน). ชื่อบทความ. ชื่อหนังสือพมิพ, น. หรือ p.
หมายเลขไมโครฟลม
ดูหมายเลขไมโครฟลมทั้งหมด
เครื่องอานไมโครฟลม
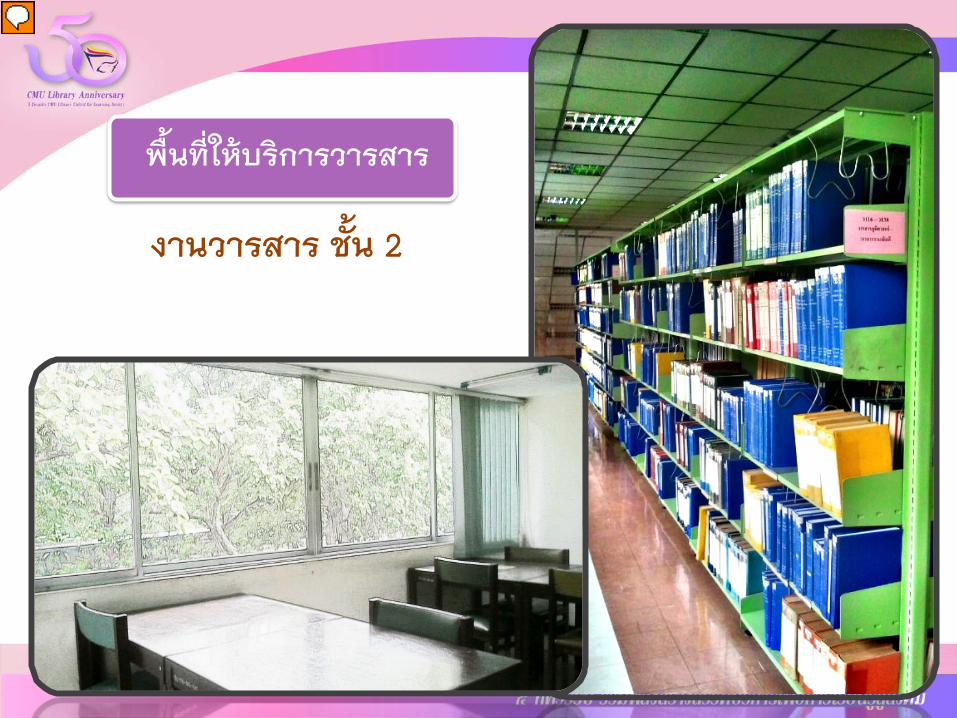
ใหบรกิารที่ หองโสตทัศนวัสดุ ชั้น 3
ผูใชบรกิารสามารถอานไมโครฟลมจากเครื่องอานไมโครฟลม
และทําสําเนาเอกสารหนาที่ตองการได
Presenter
Presentation Notes
Floating picture with curled corner (Basic) To reproduce the effects on this slide, do the following: On the Home tab, in the Slides group, click Layout, and then click Blank. On the Insert tab, in the Images group, click Picture. In the Insert Picture dialog box, select a picture, and then click Insert. Select the picture on the slide. Under Picture Tools, on the Format tab, in the bottom right corner of the Size group, click the Size and Position dialog box launcher. In the Format Picture dialog box, resize or crop the image so that the height is set to 5.64” and the width is set to 3.77”. To crop the picture, click Crop in the left pane, and in the Crop pane, under Crop position, enter values into the Height, Width, Left, and Top boxes. To resize the picture, click Size in the left pane, and in the right pane, under Size and rotate, enter values into the Height and Width boxes. Under Picture Tools, on the Format tab, in the Size group, click the down arrow under Crop, and then click Crop to Shape. Under Rectangles, click Snip Single Corner Rectangle (third option from the left). On the Home tab, in the Drawing group, click Shapes, and then under Basic Shapes click Right Triangle (first row, fourth option from the left). On the slide, drag to draw a right triangle. Select the triangle. Under Drawing Tools, on the Format tab, in the Size group, do the following: In the Shape Height box, enter 0.55”. In the Shape Width box, enter 0.55”. On the Home tab, in the bottom right corner of the Drawing group, click the Format Shape dialog box launcher. In the Format Shape dialog box, click Fill in the left pane, select Gradient fill in the Fill pane, and then do the following: In the Type list, select Linear. Click the button next to Direction, and then click Linear Diagonal (first row, third option from the left). In the Angle box, enter 135°. Under Gradient stops, click Add gradient stops or Remove gradient stops until two stops appear in the slider. Also under Gradient stops, customize the gradient stops as follows: Select the first stop in the slider, and then do the following: In the Position box, enter 47%. Click the button next to Color, and then under Theme Colors click White, Background 1 (first row, first option from the left). Select the second stop in the slider, and then do the following: In the Position box, enter 100%. Click the button next to Color, and then under Theme Colors click Black, Text 1, Lighter 35% (third row, second option from the left). Also in the Format Shape dialog box, click Shadow in the left pane. In the Shadow pane, click the button next to Presets, and then under Outer, click Offset Diagonal Bottom Left (first row, third option from the left). Press and hold SHIFT and select both the picture and the triangle on the slide. On the Home tab, in the Drawing group, click Arrange, point to Align, and then do the following: Click Align to Slide. Click Align Top. Click Align Right. Select the picture. Drag the yellow diamond adjustment handle left or right to align the snipped corner with the top edge of the triangle. Press and hold SHIFT and select both the picture and the triangle on the slide. On the Home tab, in the Drawing group, click Arrange, and then click Group. Select the group. On the Home tab, in the bottom right corner of the Drawing group, click the Format Picture dialog box launcher. Click 3-D Rotation in the left pane, and then do the following in the 3-D Rotation pane: Click the button next to Presets, and then under Perspective, click Perspective Relaxed Moderately (second row, second option from the left). In the X box, enter 2.3°. In the Y box, enter 338.5°. In the Z box, enter 347.1°. In the Perspective box, enter 60°. Also in the Format Picture dialog box, click Shadow in the left pane. In the Shadow pane, do the following: Click the button next to Presets, and then under Outer, click Offset Diagonal Bottom Left (first row, third option from the left). In the Transparency box, enter 70°. In the Size box, enter 104%. In the Blur box, enter 27 pt. In the Angle box, enter 120°. In the Distance box, enter 20 pt. To reproduce the background effects on this slide, do the following: Right-click the slide background area, and then click Format Background. In the Format Background dialog box, click Fill in the left pane, select Gradient fill in the Fill pane, and then do the following: In the Type list, select Radial. Click the button next to Direction, and then click From Center (third option from the left). Under Gradient stops, click Add gradient stops or Remove gradient stops until two stops appear in the slider. Also under Gradient stops, customize the gradient stops as follows: Select the first stop in the slider, and then do the following: In the Position box, enter 10%. Click the button next to Color, and then under Theme Colors click White, Background 1, Darker 5% (second row, first option from the left). Select the second stop in the slider, and then do the following: In the Position box, enter 99%. Click the button next to Color, and then under Theme Colors click White, Background 1, Darker 35% (fifth row, first option from the left).