Embed Size (px)
Citation preview
Abstract
Anti-Virus manufacturers nowadays implements more and
more complex functions and algorithms in order to detect
the latest and newest viruses along with their variants.
There is however simple methods that can be used to by-
pass most of these, especially those that doesn’t use
heuristics and similar techniques at all.
Bypassing Anti-Virus Scanners
Page 1
Contents
Chapter 1 – Introduction ..............................................................................................................2
Chapter 2 – PE File Structure ......................................................................................................3
2.1 - AV Signatures and the PE file format ..................................................................................4
2.2 – Modifying AV Signatures in PE Files .................................................................................5
2.3 – Polymorphic Techniques and Hijacks .................................................................................7
Chapter 3 – Encoding Binary Files ..............................................................................................8
3.1 – Preparing the PE file for Encoding .....................................................................................9
3.2 – Implementing the Custom Encoder ...................................................................................13
Chapter 4 – Decoding Binary Files.............................................................................................16
4.1 – Altering the Encoder to a Decoder ....................................................................................16
4.2 – Testing the Custom Decoder .............................................................................................18
Chapter 5 – Conclusion ...............................................................................................................21

Page 2
Chapter 1
Introduction
Anti-Virus manufacturers has evolved a lot during the last decade, starting with simple signature-
based scanners and thereafter slowly implementing more and more advanced heuristics. Most of
these are able to scan files stored on the harddisk, but also opcodes in the memory.
Opcodes are in short, Assembly commands which are the lowest level of instructions given to the
CPU by any application running. A program is usually developed in a higher level language such
as C or C++, where opcodes are usually not directly involved. The compiler on the other hand,
translates the high-level code into these opcodes based on the Architecture used and so forth.
When a traditional Anti-Virus application scans a file, it does so by reading the offsets and its
assigned values. Where the offset is a memory address and the value is an opcode which the
scanner can read with a simple binary hex-viewer. Therefore, it is able to look for a signature.
If an application passes the file-scan check on the harddisk without any heuristic “sandboxes”
applied, then the file is either safe to run or the Anti-Virus application just got bypassed!
This paper will show some of the methods and techniques, one can use in order to do this.
This is for educational purposes only.
Page 3
Chapter 2
PE File Structure
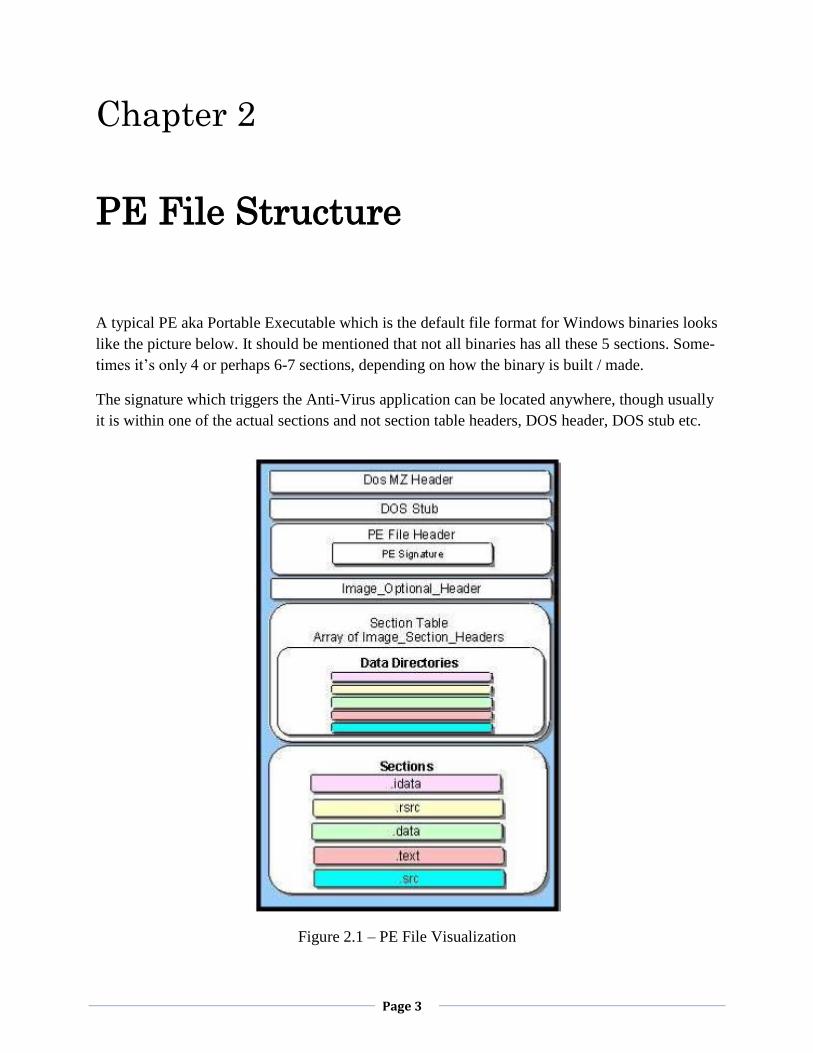
A typical PE aka Portable Executable which is the default file format for Windows binaries looks
like the picture below. It should be mentioned that not all binaries has all these 5 sections. Some-
times it’s only 4 or perhaps 6-7 sections, depending on how the binary is built / made.
The signature which triggers the Anti-Virus application can be located anywhere, though usually
it is within one of the actual sections and not section table headers, DOS header, DOS stub etc.
Figure 2.1 – PE File Visualization

Page 4
2.1 – AV Signatures and the PE file format
Finding the signature that the Anti-Virus application looks for, isn’t that hard if an old technique
is used which is performed by splitting the file into several files and then scanning each file to
see which one of them contains the signature.
Sometimes the signature is pretty easy to find, e.g. in case ncx99.exe is used. This is a simple
netcat listener, which binds cmd.exe to port 99 on the global network interface. In the picture
below from offset E77E to offset E78F is the main signature located.
Figure 2.1.1 – Hexadecimal View of a Binary File
Furthermore, the signature is located in the idata section in this case. This means that if we
would try to encode the entire idata section, then our executable file might not work at all!
Therefore we could try to edit a part of this, or encode only the signature to avoid AV detection.
Page 5
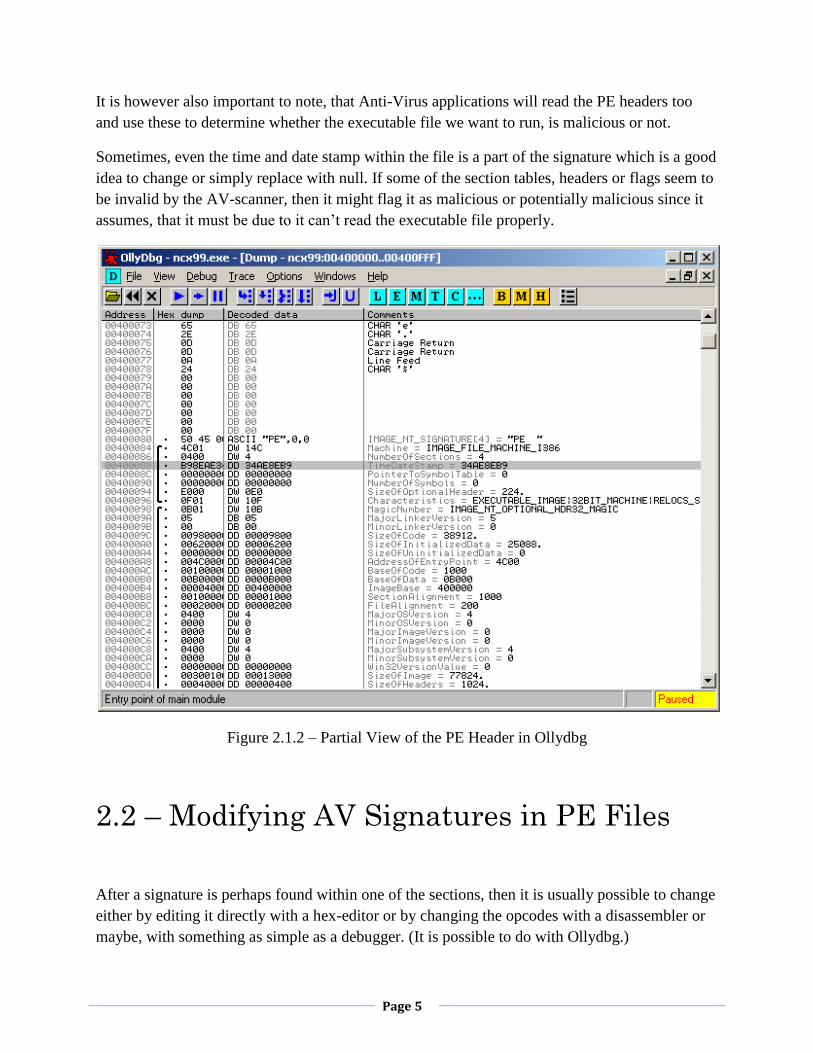
It is however also important to note, that Anti-Virus applications will read the PE headers too
and use these to determine whether the executable file we want to run, is malicious or not.
Sometimes, even the time and date stamp within the file is a part of the signature which is a good
idea to change or simply replace with null. If some of the section tables, headers or flags seem to
be invalid by the AV-scanner, then it might flag it as malicious or potentially malicious since it
assumes, that it must be due to it can’t read the executable file properly.
Figure 2.1.2 – Partial View of the PE Header in Ollydbg
2.2 – Modifying AV Signatures in PE Files
After a signature is perhaps found within one of the sections, then it is usually possible to change
either by editing it directly with a hex-editor or by changing the opcodes with a disassembler or
maybe, with something as simple as a debugger. (It is possible to do with Ollydbg.)

Page 6
In case ncx99.exe is used as previously mentioned, then it is possible to change both the listening
port and the program it will execute. Of course if we change it to e.g. calc.exe then it won’t do
much good for any hacker at all, but changing the listening port from 99 to e.g. 81 do make a
difference. It isn’t many AV’s that gets fooled by this, but it is a few.
Figure 2.2.1 – ncx99.exe – Original (Binds cmd.exe to port 99)
Figure 2.2.2 – ncx99.exe – Modified (Binds cmd.exe to port 81)
As you can see, Avast and Ikarus were bypassed. If we were to attack a computer which used
one of these, then we would’ve succeeded now just by changing the listening port.
Page 7
2.3 – Polymorphic Techniques and Hijacks
Polymorphic Techniques
Some polymorphic viruses, has the same functionality but different opcodes. This is yet another
technique used by more skilled hackers. An example of this could be that instead of PUSH -1,
the hacker could use DEC ESI, PUSH ESI, INC ESI if the ESI register is 0 to start with. If it isn’t
then we might have to save the value of ESI, by pushing it onto the stack, XOR’ing it so it
becomes null (XOR ESI, ESI) and then use it to push the value -1 to the stack.
Afterwards we would of course have to restore the original value of ESI, by POP’ing the stack.
That is however just an example, since most AV scanners shouldn’t detect PUSH -1 alone as
anything malicious. But in case we encounter a signature, which is executable code and we can’t
change it to NOP’s, then we would have to use encoding methods or “polymorphic methods”.
Hijacks
In case we want to encode it, we have to hijack the entry point of the binary file either by editing
the PE headers or perhaps by overwriting the first instruction to a jump, which then points to a
“code cave” which is an unused section of data, where a hacker can enter his own code without
altering the size of the target file.
It should be noted though, that some AV’s actually checks the file-size too.
The hacker can of course, overwrite instructions further inside the binary too if he or she desires
to do so. As long as the original program still contains the same functionality, in order to execute
without crashing or causing similar errors, then it doesn’t matter where any edits are made.
Page 8
Chapter 3
Encoding Binary Files
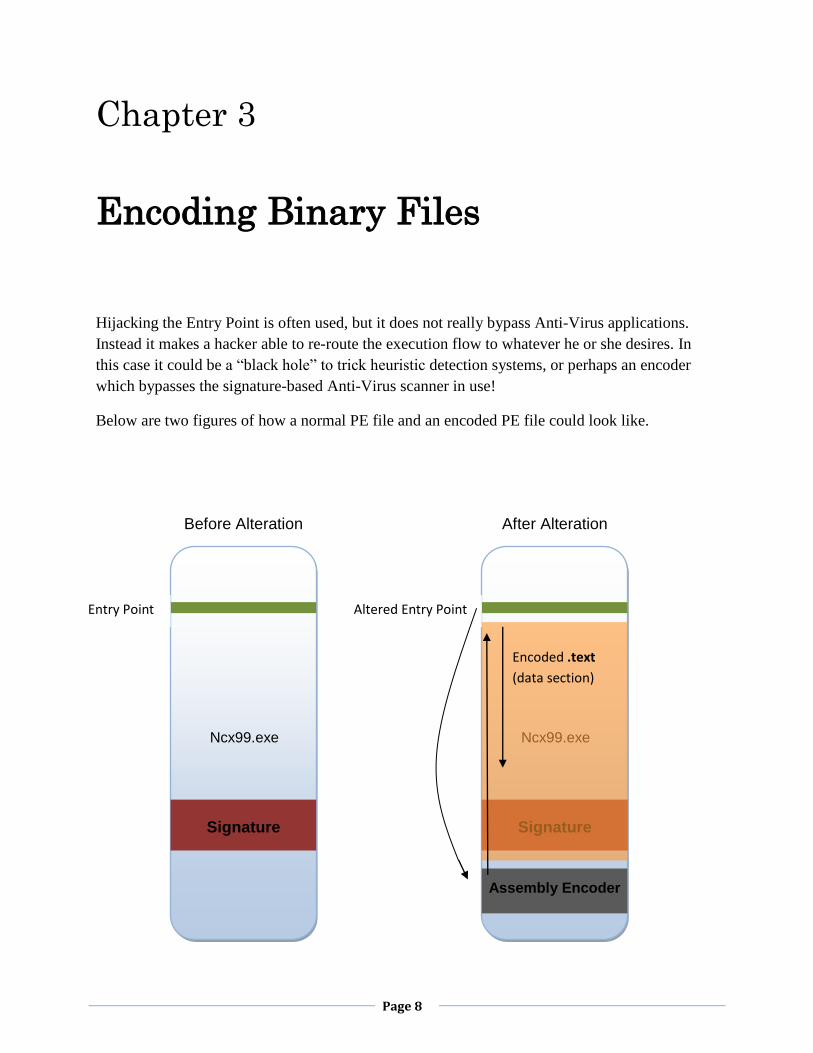
Hijacking the Entry Point is often used, but it does not really bypass Anti-Virus applications.
Instead it makes a hacker able to re-route the execution flow to whatever he or she desires. In
this case it could be a “black hole” to trick heuristic detection systems, or perhaps an encoder
which bypasses the signature-based Anti-Virus scanner in use!
Below are two figures of how a normal PE file and an encoded PE file could look like.
Before Alteration
Ncx99.exe
Entry Point
Signature
After Alteration
Ncx99.exe
Altered Entry Point
Signature
Encoded .text
(data section)
Assembly Encoder
Page 9
3.1 – Preparing the PE file for Encoding
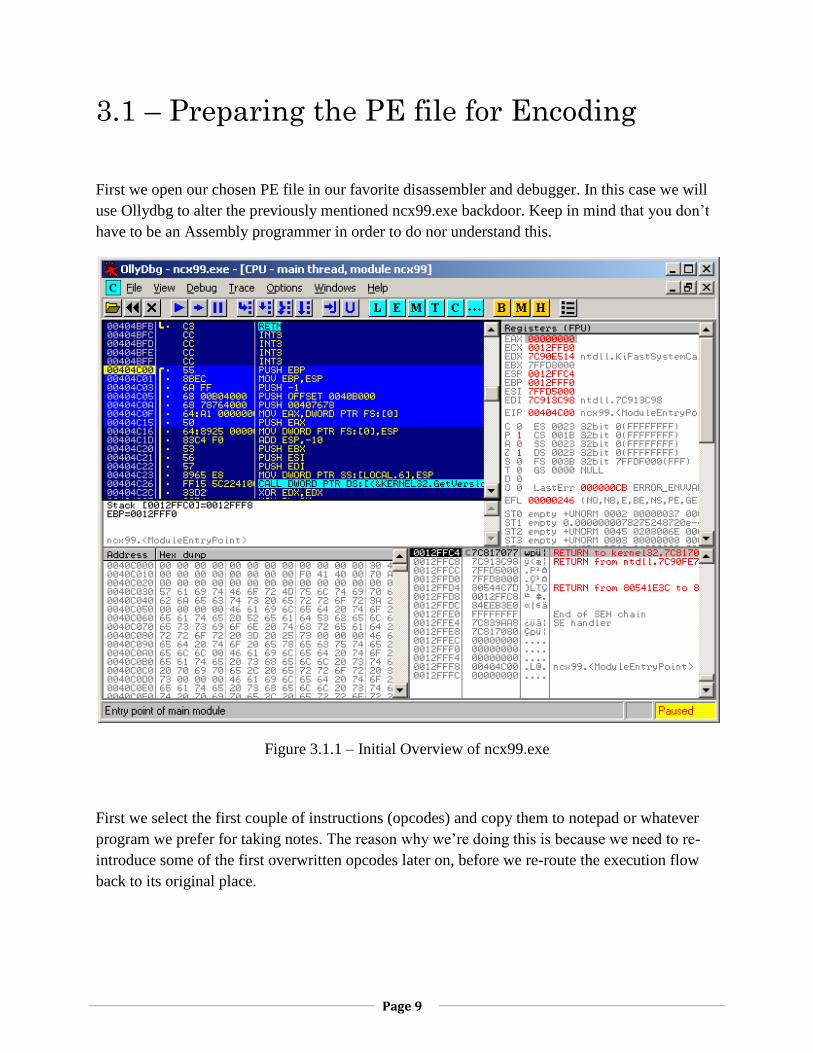
First we open our chosen PE file in our favorite disassembler and debugger. In this case we will
use Ollydbg to alter the previously mentioned ncx99.exe backdoor. Keep in mind that you don’t
have to be an Assembly programmer in order to do nor understand this.
Figure 3.1.1 – Initial Overview of ncx99.exe
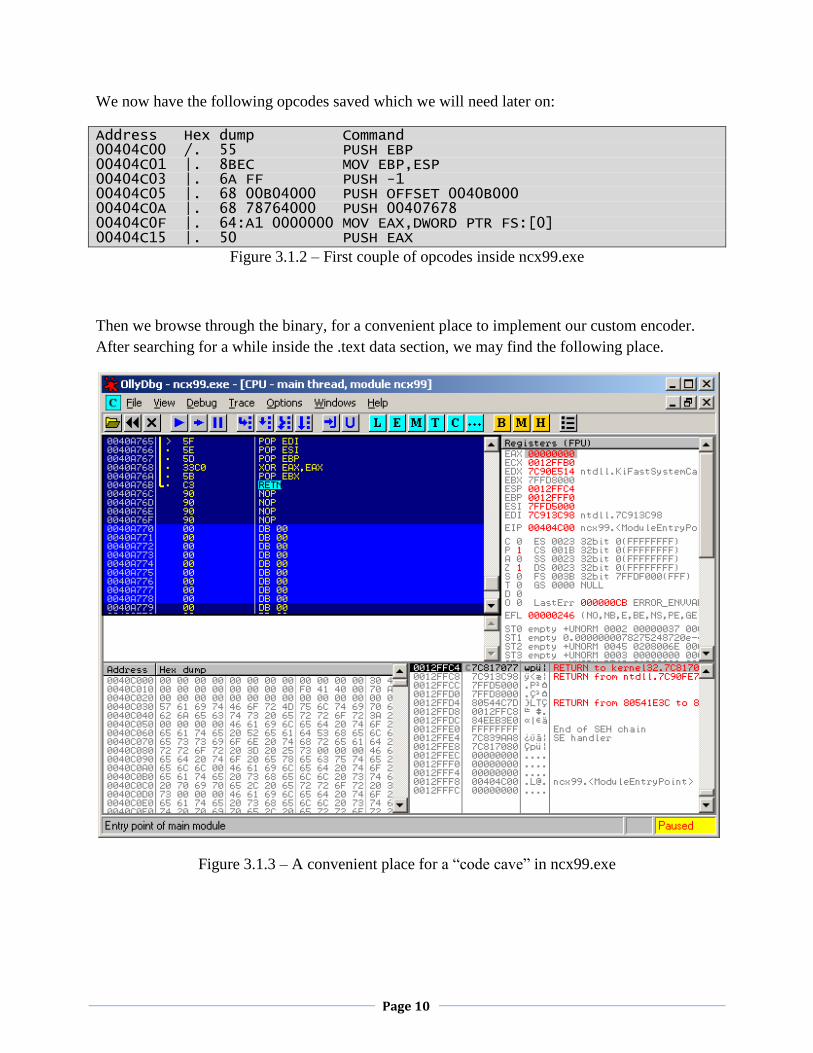
First we select the first couple of instructions (opcodes) and copy them to notepad or whatever
program we prefer for taking notes. The reason why we’re doing this is because we need to re-
introduce some of the first overwritten opcodes later on, before we re-route the execution flow
back to its original place.
Page 10
We now have the following opcodes saved which we will need later on:
Address Hex dump Command 00404C00 /. 55 PUSH EBP 00404C01 |. 8BEC MOV EBP,ESP 00404C03 |. 6A FF PUSH -1 00404C05 |. 68 00B04000 PUSH OFFSET 0040B000 00404C0A |. 68 78764000 PUSH 00407678 00404C0F |. 64:A1 0000000 MOV EAX,DWORD PTR FS:[0] 00404C15 |. 50 PUSH EAX
Figure 3.1.2 – First couple of opcodes inside ncx99.exe
Then we browse through the binary, for a convenient place to implement our custom encoder.
After searching for a while inside the .text data section, we may find the following place.
Figure 3.1.3 – A convenient place for a “code cave” in ncx99.exe
Page 11
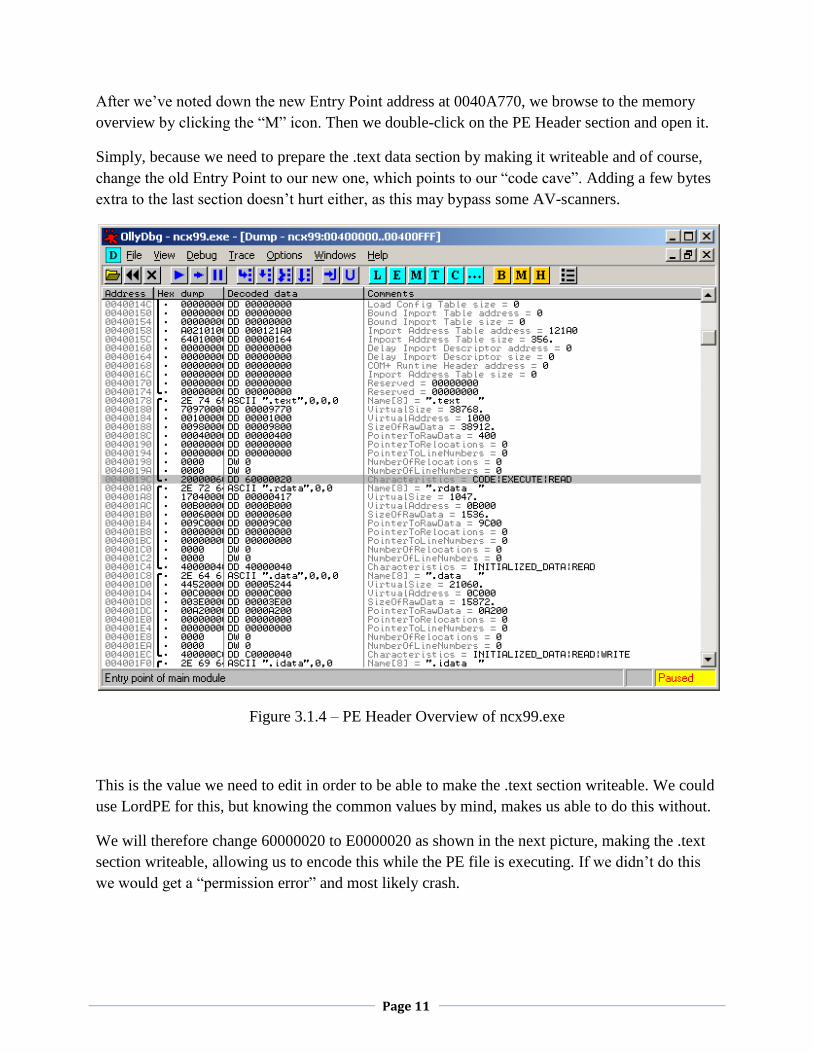
After we’ve noted down the new Entry Point address at 0040A770, we browse to the memory
overview by clicking the “M” icon. Then we double-click on the PE Header section and open it.
Simply, because we need to prepare the .text data section by making it writeable and of course,
change the old Entry Point to our new one, which points to our “code cave”. Adding a few bytes
extra to the last section doesn’t hurt either, as this may bypass some AV-scanners.
Figure 3.1.4 – PE Header Overview of ncx99.exe
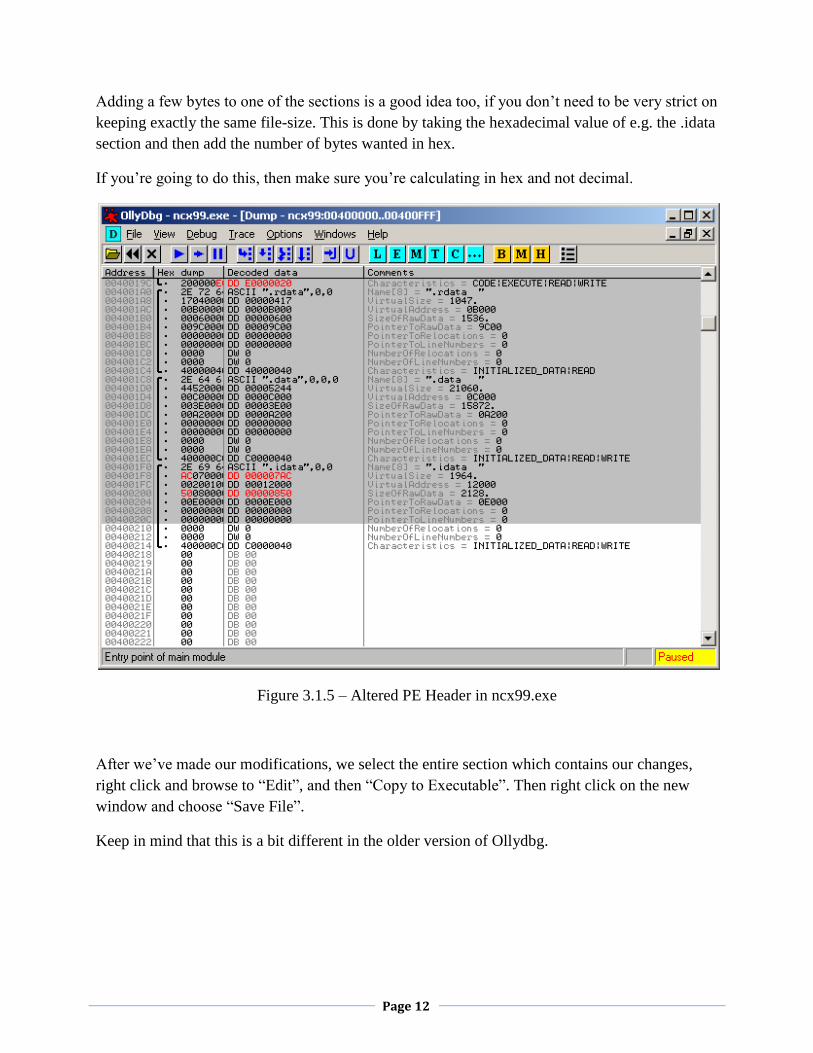
This is the value we need to edit in order to be able to make the .text section writeable. We could
use LordPE for this, but knowing the common values by mind, makes us able to do this without.
We will therefore change 60000020 to E0000020 as shown in the next picture, making the .text
section writeable, allowing us to encode this while the PE file is executing. If we didn’t do this
we would get a “permission error” and most likely crash.
Page 12
Adding a few bytes to one of the sections is a good idea too, if you don’t need to be very strict on
keeping exactly the same file-size. This is done by taking the hexadecimal value of e.g. the .idata
section and then add the number of bytes wanted in hex.
If you’re going to do this, then make sure you’re calculating in hex and not decimal.
Figure 3.1.5 – Altered PE Header in ncx99.exe
After we’ve made our modifications, we select the entire section which contains our changes,
right click and browse to “Edit”, and then “Copy to Executable”. Then right click on the new
window and choose “Save File”.
Keep in mind that this is a bit different in the older version of Ollydbg.

Page 13
Because we’ve added a few bytes to the .idata section, the program won’t execute. Therefore we
need to add the amount of bytes we “added”, by using a hex-editor to add the actual amount of
bytes that was added to the .idata section.
Figure 3.1.6 – Altered ncx99.exe unable to execute
In this case XVI32 (a hex-editor) is sufficient to use. Simply browse to the end of the PE file,
open the “Edit” menu and choose “Insert string”. Then make sure you either add 00, 90 or CC.
Preferably just add 00 as this will do nothing at all. Under “Insert <n> times” you choose hexa-
decimal and choose the amount of bytes you added to the .idata section. When you’re done click
the “save” icon and your executable PE file, should be working again.
3.2 – Implementing the Custom Encoder
With all the preparations made, we’re ready to implement the encoder. First we open our
modified PE file in Ollydbg and see that we’ve landed at 0040A770. After taking a closer look
on where the base (beginning) address is and where our code cave begins, we note down that
from offset 00401000 to 0040A76F, is what we’ll encode.
There are many ways to implement an encoder, but the easiest way is the one Mati Aharoni from
Offensive Security did in his public video presentation about AV’s. The encoder we’re going to
implement is slightly different in order to hopefully confuse a few more Anti-Virus scanners.
We’ll basically encode almost the entire .text section, with an encoder which loops through each
byte of the selected code that we want to encode. The encoding mechanism itself will just change
the byte to whatever we tell it to become.

Page 14
Address Hex dump Command 0040A770 . B8 00104000 MOV EAX,00401000 0040A775 8000 13 ADD BYTE PTR DS:[EAX],13 0040A778 . 8030 0F XOR BYTE PTR DS:[EAX],0F 0040A77B 8000 37 ADD BYTE PTR DS:[EAX],37 0040A77E . 40 INC EAX 0040A77F . 3D 6FA74000 CMP EAX,0040A76F 0040A784 .^ 7E EF JLE SHORT 0040A775
Figure 3.2.1 – Custom Assembly Encoder
Explanation of the Custom Encoder
1) First the base (beginning) address is moved into the EAX register.
2) Then it adds 13 to the byte which EAX is pointing to.
3) XOR (Exclusive OR) the byte with 0F which EAX is pointing to.
4) Add 37 to the byte which EAX is pointing to.
5) Increase EAX to point to the next byte.
6) Compare EAX with our ending address.
7) If our ending address hasn’t been reached, jump to (2).
Figure 3.2.2 – Custom Encoder inside Ollydbg

Page 15
With our custom encoder implemented we’re almost done. It should be noted, that we could also
use other opcodes too, to encode our .text section. Such opcodes could be: sub, or, and, etc.
But for now we’re going to re-introduce some of the first few opcodes that was originally run by
the executable in the start. Now we could be simple and just place a jump to 00404C00, but we’ll
add the first couple of instructions ourselves as shown in the picture below.
Figure 3.2.3 – Re-Introduced Opcodes in ncx99.exe
With that done you may wonder what the JMP 00404C05 opcode is. That is a jump to the offset
aka memory address where the next instruction after the original PUSH -1 is located.
It should be noted that if we were to execute the file now, it would simply fail because the PE
file as it is right now, will encode the .text section and try to execute it. Since it becomes
encoded, then it will most likely fail and crash. But save the changes anyway and re-open it.
This is because we first need to use our encoder, to encode the file and afterwards change it to a
decoder, so the execution flow will seem completely normal even without a debugger.

Page 16
Chapter 4
Decoding Binary Files
After we’ve successfully implemented our encoder we need to save the encoded contents and
then change our encoder to a decoder as previously mentioned. This is relatively simple as you
will experience yourself.
When we hit the first instruction which moves 00401000 into the EAX register, we can right-
click this and select “Follow in Dump”. By pressing “F7” on your keyboard we can single-step
through the custom encoder, and watch our .text section become encoded.
To speed up this process, select the instruction right after the JLE SHORT 0040A775 opcode,
place a breakpoint by pressing “F2” on your keyboard and then press “F9” to execute until the
breakpoint stops the execution flow.
Some of the code and even your encoder may seem completely different now. This is because
the encoder altered all the opcodes in the .text data section, except your encoder even though it
may seem so. Copy the changes to an “executable” and save it as a new file.
4.1 – Altering the Encoder to a Decoder
Now open the newly created file and look at the custom encoder we implemented earlier.
As you can see almost all of the opcodes are “gibberish” and therefore we might have to press
CTRL+A to do a quick analysis in order to get our custom encoder visible. When it appears to
look like it should, we change two of the opcodes in order to make it a decoder.
Our initial encoder added 13 to the byte which EAX pointed to, then it XOR’d it with 0F and
added 37 to end with. Now we need to reverse this, by deducting -37 to start with and then -13.

Page 17
Figure 4.1.1 – Changing the Encoder to a Decoder
We will still use the add opcode and of course xor, but we’ll only need to change the values as
mentioned previously, which you can also see in the picture above in figure 4.1.1.
When we’ve done that we copy our changes to an executable, and save it as a new file.
In theory the PE file should work now just as it did to start with, but it is also encoded too
making it able to bypass some AV-scanners, which makes it more interesting.

Page 18
4.2 – Testing the Custom Decoder
Now it’s time to test if our encoded file will decode properly and execute gracefully.
Figure 4.2.1 – Encoded Overview of ncx99.exe
In the picture above, only the first hex character has been decoded back to its original “state”.
(Please note that a character in this case, is a byte which is the same as 8 bits made of binary.)
By placing a breakpoint right after JLE SHORT 0040A775, and then running the PE file until it
stops executing, we’ll see that the entire .text section has changed back to its original state.
If we execute the first couple of re-introduced opcodes including the long jump back to where
the real start of the program is, we’ll see that it may still look obfuscated or encoded.

Page 19
Figure 4.2.2 – The Beginning of the Decoded PE File
This does not really matter, as we can hit CTRL+A and do a quick analysis of the code. When
we’ve done that we may see that our executable PE file is back to its original state again and if
we press “F9” we may see that our program is executing without any errors.
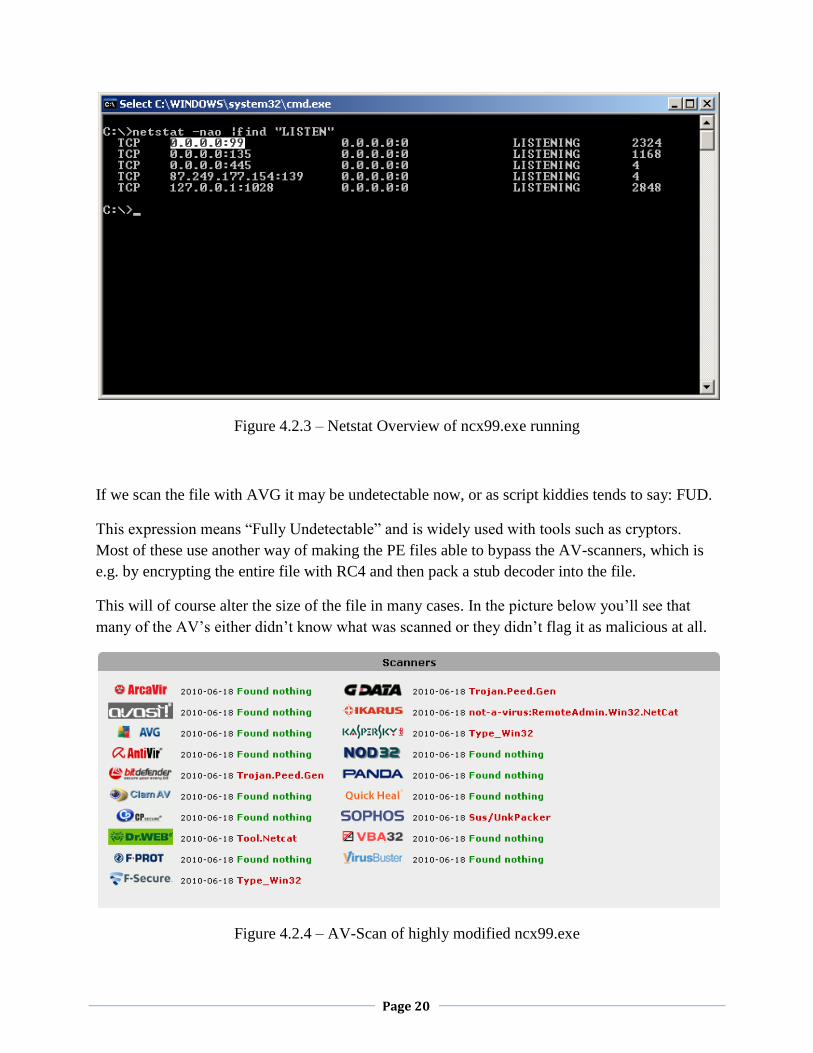
If that is the case then we’ve encoded the binary file and even decoded it successfully.
Even scanning the file now with a lot of different AV-scanners will reveal different results, if the
file is just scanned and not executed since we haven’t implemented any bypassing techniques for
heuristic (malicious) opcode detection.
Page 20
Figure 4.2.3 – Netstat Overview of ncx99.exe running
If we scan the file with AVG it may be undetectable now, or as script kiddies tends to say: FUD.
This expression means “Fully Undetectable” and is widely used with tools such as cryptors.
Most of these use another way of making the PE files able to bypass the AV-scanners, which is
e.g. by encrypting the entire file with RC4 and then pack a stub decoder into the file.
This will of course alter the size of the file in many cases. In the picture below you’ll see that
many of the AV’s either didn’t know what was scanned or they didn’t flag it as malicious at all.
Figure 4.2.4 – AV-Scan of highly modified ncx99.exe

Page 21
Chapter 5
Conclusion
The purpose of this paper was to demonstrate how easy it is to bypass signature-based Anti-
Virus scanners which do not use heuristics at all or perhaps only in an insufficient way which
makes a hacker able to outsmart the AV-system in use.
Figure 5.1 – ncx99.exe before any modifications
As you can see almost all of the AV-scanners detects the original ncx99.exe by default.
Page 22
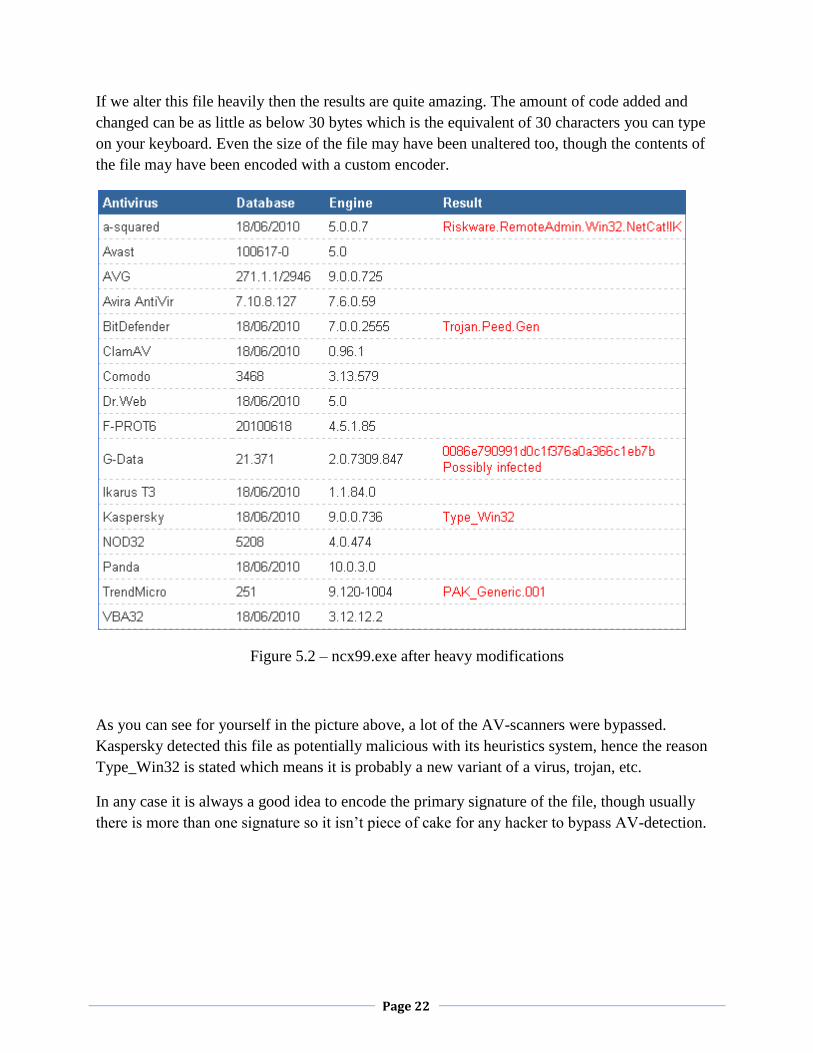
If we alter this file heavily then the results are quite amazing. The amount of code added and
changed can be as little as below 30 bytes which is the equivalent of 30 characters you can type
on your keyboard. Even the size of the file may have been unaltered too, though the contents of
the file may have been encoded with a custom encoder.
Figure 5.2 – ncx99.exe after heavy modifications
As you can see for yourself in the picture above, a lot of the AV-scanners were bypassed.
Kaspersky detected this file as potentially malicious with its heuristics system, hence the reason
Type_Win32 is stated which means it is probably a new variant of a virus, trojan, etc.
In any case it is always a good idea to encode the primary signature of the file, though usually
there is more than one signature so it isn’t piece of cake for any hacker to bypass AV-detection.

Page 23
References
[1] http://www.intern0t.net [2] http://www.ollydbg.de/ [3] http://www.chmaas.handshake.de/delphi/freeware/xvi32/xvi32.htm [4] http://debugger.immunityinc.com/ [5] https://forum.immunityinc.com/board/show/0/ [6] http://free.avg.com/ww-en/homepage [7] http://www.uninformed.org/?v=5&a=3&t=pdf [8] http://www.offensive-security.com