Embed Size (px)
Citation preview

SAP AG 1999
TABC10/11 Technical Consultant Training (Week 3)
Technical Consultant TrainingR/3 AdministrationTechnical Consultant TrainingR/3 Administration
TABC10/11 R/3 Release 4.6B 50039590
TABC10/11 R/3 Release 4.6B 50039590
Week 3Week 3
Oct-9-2000

© SAP AG TABC10 ii
SAP AG 1999
Copyright 2000 SAP AG. All rights reserved.
Neither this training manual nor any part thereof maybe copied or reproduced in any form or by any means,or translated into another language, without the priorconsent of SAP AG. The information contained in thisdocument is subject to change and supplement without priornotice.
All rights reserved.
Copyright
n Trademarks:
n Microsoft ®, Windows ®, NT ®, PowerPoint ®, WinWord ®, Excel ®, Project ®, SQL-Server ®, Multimedia Viewer ®, Video for Windows ®, Internet Explorer ®, NetShow ®, and HTML Help ® are registered trademarks of Microsoft Corporation.
n Lotus ScreenCam ® is a registered trademark of Lotus Development Corporation. n Vivo ® and VivoActive ® are registered trademarks of RealNetworks, Inc.
n ARIS Toolset ® is a registered Trademark of IDS Prof. Scheer GmbH, Saarbrücken
n Adobe ® and Acrobat ® are registered trademarks of Adobe Systems Inc. n TouchSend Index ® is a registered trademark of TouchSend Corporation.
n Visio ® is a registered trademark of Visio Corporation.
n IBM ®, OS/2 ®, DB2/6000 ® and AIX ® are a registered trademark of IBM Corporation. n Indeo ® is a registered trademark of Intel Corporation.
n Netscape Navigator ®, and Netscape Communicator ® are registered trademarks of Netscape Communications, Inc.
n OSF/Motif ® is a registered trademark of Open Software Foundation. n ORACLE ® is a registered trademark of ORACLE Corporation, California, USA.
n INFORMIX ®-OnLine for SAP is a registered trademark of Informix Software Incorporated.
n UNIX ® and X/Open ® are registered trademarks of SCO Santa Cruz Operation. n ADABAS ® is a registered trademark of Software AG
n The following are trademarks or registered trademarks of SAP AG; ABAP/4, InterSAP, RIVA, R/2, R/3, R/3 Retail, SAP (Word), SAPaccess, SAPfile, SAPfind, SAPmail, SAPoffice, SAPscript, SAPtime, SAPtronic, SAP-EDI, SAP EarlyWatch, SAP ArchiveLink, SAP Business Workflow, and ALE/WEB. The SAP logo and all other SAP products, services, logos, or brand names included herein are also trademarks or registered trademarks of SAP AG.
n Other products, services, logos, or brand names included herein are trademarks or registered trademarks of their respective owners.

© SAP AG TABC10 iii
Contents
Section: Advanced R/3 System Administration..................................................................................................................1 Graphical User Interfaces for R/3.....................................................................................................................................2
Graphical User Interfaces for R/3................................................................................................................................3 Frontend Administration................................................................................................................................................4 GUI Strategy: Overview ................................................................................................................................................5 SAP GUI: Overview.......................................................................................................................................................6 SAP GUI: Installation Options.....................................................................................................................................7 SAP GUI: Installation Procedures................................................................................................................................8 SAP GUI: Dialog-Free Installation and Maintenance..............................................................................................9 SAP GUI: Accessing the SAP Library ......................................................................................................................10 SAP Library: Overriding the Standard Settings.......................................................................................................11 SAPLOGON: Logon and Trace..................................................................................................................................12 SAPLOGON: Configuration.......................................................................................................................................13 SAPLOGON Configuration Files ..............................................................................................................................14 SAP GUI Connection String .......................................................................................................................................15 Logon Groups................................................................................................................................................................16 Logon Load Balancing: Mechanism..........................................................................................................................17 Logon Load Balancing: Advanced Features ............................................................................................................18 SAP GUI for HTML.....................................................................................................................................................19 SAP GUI for Java..........................................................................................................................................................20 Frontend in a WAN Environment ..............................................................................................................................21 Unit Summary ................................................................................................................................................................22 Further Documentation ................................................................................................................................................23
Computer Aided Test Tool ..............................................................................................................................................24 Computer Aided Test Tool..........................................................................................................................................25 CATT: Introduction......................................................................................................................................................26 CATT: Uses ...................................................................................................................................................................27 CATT: Other Uses ........................................................................................................................................................28 Processes Less Suited for CATT ................................................................................................................................29 CATT: Initial Screen ....................................................................................................................................................30 CATT: Recording Transactions..................................................................................................................................31 CATT: Creating a Test Case.......................................................................................................................................32 CATT: Maintaining the Test Case Functions...........................................................................................................33 CATT: Maintaining the Function Details .................................................................................................................34 CATT: Maintaining the Input Values........................................................................................................................35 Test Case Processing Modes .......................................................................................................................................36 Test Case Logs...............................................................................................................................................................37 Variants...........................................................................................................................................................................38 Defining Variants ..........................................................................................................................................................39 External Variants..........................................................................................................................................................40 External Variants: File Format ..................................................................................................................................41 CATT: TIPS ...................................................................................................................................................................42 Authorization .................................................................................................................................................................43 User Master Records ....................................................................................................................................................44 System Requirements ...................................................................................................................................................45 Unit Summary ................................................................................................................................................................46 Unit Actions...................................................................................................................................................................47 Computer Aided Test Tool: Exercises.......................................................................................................................48 Computer Aided Test Tool: Solutions.......................................................................................................................49
R/3 Security........................................................................................................................................................................51 R/3 Security....................................................................................................................................................................52 Security in Client/Server Architecture ......................................................................................................................53 Basis Security Audit .....................................................................................................................................................54 Security Audit: Profile Parameters.............................................................................................................................55 Audit Configuration: Selection Criteria ....................................................................................................................56 Reading the Security Audit Log .................................................................................................................................57 SAProuter: Overview...................................................................................................................................................58 SAProuter: Implementation.........................................................................................................................................59 SAProuter: Route Strings.............................................................................................................................................60 SAProuter: Route Permission Table (saprouttab)....................................................................................................61 SAProuter: Testing Basic Functions with NIPING.................................................................................................62

© SAP AG TABC10 iv
SAProuter: Trace File and Other Options.................................................................................................................63 SAProuter: Communication Partners and.................................................................................................................64 Additional Security Measures: SAP GUI Reconnect..............................................................................................65 Additional Security Measures: Authorization Groups............................................................................................66 Additional Security Measures: Trusted Relationships Between R/3 Systems ....................................................67 Unit Summary ................................................................................................................................................................68 Further Documentation ................................................................................................................................................69 Unit Actions............................................................................................................. Error! Bookmark not defined. R/3 Security: Exercises .......................................................................................... Error! Bookmark not defined. R/3 Security: Solutions .......................................................................................... Error! Bookmark not defined.
Section: Technical Core Competence - Workplace .........................................................................................................70 Introduction........................................................................................................................................................................71
Introduction....................................................................................................................................................................72 mySAP.com Components............................................................................................................................................73 mySAP.com Workplace Overview............................................................................................................................74 mySAP.com Workplace Features...............................................................................................................................75 mySAP.com Workplace Benefits...............................................................................................................................76 Unit Summary ................................................................................................................................................................77 Further Documentation ................................................................................................................................................78
Workplace Architecture ...................................................................................................................................................79 Workplace Architecture ...............................................................................................................................................80 Workplace Screen Layout............................................................................................................................................81 Workplace Architecture Overview.............................................................................................................................82 Workplace Server Functionality.................................................................................................................................83 Central User Administration .......................................................................................................................................84 Collective Roles Maintenance ....................................................................................................................................85 Initial Sign-On ...............................................................................................................................................................86 LaunchPad Access ........................................................................................................................................................87 Middleware Functionality............................................................................................................................................88 Middleware: Web Server and AGate.........................................................................................................................89 Drag&Relate: Overview..............................................................................................................................................90 Drag&Relate: Technical View....................................................................................................................................91 Drag&Relate: Example ................................................................................................................................................92 Frontend Environment..................................................................................................................................................93 SAP GUI Overview ......................................................................................................................................................94 Windows Terminal Server...........................................................................................................................................95 Workplace Architecture Summary .............................................................................................................................96 Further Documentation ................................................................................................................................................97 Unit Summary ................................................................................................................................................................98 Unit Actions...................................................................................................................................................................99 Workplace Architecture: Exercises......................................................................................................................... 100 Workplace Architecture: Solutions......................................................................................................................... 102
Configuration and Administration............................................................................................................................... 105 Configuration and Administration .......................................................................................................................... 106 Typical Load Distribution......................................................................................................................................... 107 Workplace Server Requirements............................................................................................................................. 108 Workplace Software Components........................................................................................................................... 109 Work Process Requirements .................................................................................................................................... 110 Required SAP Instances............................................................................................................................................ 111 Installation Scenarios................................................................................................................................................. 112 RRR Workplace Installation .................................................................................................................................... 113 RRR Standalone Configuration: Disk Layout....................................................................................................... 114 RRR Separate Workplace Server: Disk Layout.................................................................................................... 115 RRR Installation Wizard ........................................................................................................................................... 116 ITS Requirements....................................................................................................................................................... 117 Typical Recommended Setup .................................................................................................................................. 118 Configuration Procedure ........................................................................................................................................... 119 Workplace Server Configuration............................................................................................................................. 120 Registering Logical Systems .................................................................................................................................... 121 Creating RFC Destinations....................................................................................................................................... 122 Component Systems Configuration ........................................................................................................................ 123 Middleware Configuration ....................................................................................................................................... 124 Registering an ITS ..................................................................................................................................................... 125

© SAP AG TABC10 v
Customizing Tables Overview................................................................................................................................. 126 Creating Collective Roles ......................................................................................................................................... 127 Create Single Roles.................................................................................................................................................... 128 Entering the Target System...................................................................................................................................... 129 Migrating Authorization Profiles to Roles............................................................................................................. 130 MiniApps..................................................................................................................................................................... 131 Integrating MiniApps into the Workplace ............................................................................................................. 132 Drag&Relate ............................................................................................................................................................... 133 How to Set Up Drag&Relate.................................................................................................................................... 134 SAP Library ................................................................................................................................................................ 135 SAP Library Browser ................................................................................................................................................ 136 SAP Library Settings................................................................................................................................................. 137 SAP Library Web Server Directories ..................................................................................................................... 138 Distributing Single Roles.......................................................................................................................................... 139 Additional Users......................................................................................................................................................... 140 Predefined Administrative Roles............................................................................................................................. 141 Authorizations for User WPEXCHANGE............................................................................................................. 142 Synchronization Jobs................................................................................................................................................. 143 Standard Housekeeping Jobs.................................................................................................................................... 144 Starting and Stopping................................................................................................................................................ 145 Daily Tasks.................................................................................................................................................................. 146 Weekly Tasks.............................................................................................................................................................. 147 Monthly Tasks ............................................................................................................................................................ 148 Occasional Tasks........................................................................................................................................................ 149 Middleware Administration ..................................................................................................................................... 150 Workplace Service Phases ........................................................................................................................................ 151 GoingLive Check for Workplace ............................................................................................................................ 152 SAP Service Marketplace ......................................................................................................................................... 153 Further Documentation ............................................................................................................................................. 154 Unit Summary ............................................................................................................................................................. 155 Unit Actions................................................................................................................................................................ 156 Configuration and Administration: Exercises ....................................................................................................... 157 Configuration and Administration: Solutions ....................................................................................................... 160
Internet Transaction Server........................................................................................................................................... 169 Internet Transaction Server...................................................................................................................................... 170 ITS Service Details .................................................................................................................................................... 171 Browser and SAP GUI Logon ................................................................................................................................. 172 Service Files ................................................................................................................................................................ 173 Service Parameters: Selection of SAP System...................................................................................................... 174 Service Parameters: Implicit Logon........................................................................................................................ 175 Service Parameters: Explicit Logon........................................................................................................................ 176 Service Parameters: ITS Internal............................................................................................................................. 177 Maintaining ITS Services Files................................................................................................................................ 178 Starting an ITS Service ............................................................................................................................................. 179 Lookup for Logon Service Parameters ................................................................................................................... 180 ITS Instances and Administration........................................................................................................................... 181 ITS Administration: Sign-On ................................................................................................................................... 182 ITS Administration: Topics ...................................................................................................................................... 183 ITS User Management .............................................................................................................................................. 184 Creating Administration Users ................................................................................................................................ 185 ITS User Maintenance............................................................................................................................................... 186 Instance Monitoring: Overview............................................................................................................................... 187 Drill Down Instance Monitoring ............................................................................................................................. 188 Starting and Stopping Virtual Instances ................................................................................................................. 189 Thread Overview........................................................................................................................................................ 190 ITS Administration Configuration .......................................................................................................................... 191 File Security ................................................................................................................................................................ 192 File Security Using the ITS Admin Instance......................................................................................................... 193 Network Security........................................................................................................................................................ 194 Different Log File Types .......................................................................................................................................... 195 Location of Log Files ................................................................................................................................................ 196 Access Log Files ........................................................................................................................................................ 197 Reading the Access Log Files .................................................................................................................................. 198

© SAP AG TABC10 vi
Loadstat Log Files...................................................................................................................................................... 199 Reading the Loadstat Log Files ............................................................................................................................... 200 Diagnostics and Performance Log Files................................................................................................................. 201 States of a Log File .................................................................................................................................................... 202 Burying Log Files ...................................................................................................................................................... 203 Maintaining Internet Users ....................................................................................................................................... 204 National Language Support...................................................................................................................................... 205 System Templates ...................................................................................................................................................... 206 Customizing System Templates (1)........................................................................................................................ 207 Customizing System Templates (2) ........................................................................................................................ 208 System Templates and Runtime Mode................................................................................................................... 209 Template Directory Lookup and Runtime Modes................................................................................................ 210 Where to Place Customized System Templates.................................................................................................... 211 Template Cache.......................................................................................................................................................... 212 Patching an ITS Installation ..................................................................................................................................... 213 Debugging an Internet Application Component (1)............................................................................................. 214 Debugging an Internet Application Component (2)............................................................................................. 215 Further Documentation ............................................................................................................................................. 216 Unit Summary ............................................................................................................................................................. 217 Unit Actions................................................................................................................................................................ 218 Internet Transaction Server: Exercises................................................................................................................... 219 Internet Transaction Server: Solutions................................................................................................................... 222
Users: Single Sign On .................................................................................................................................................... 232 Users: Single Sign-On and Administration ........................................................................................................... 233 mySAP.com Workplace Single Sign-On ............................................................................................................... 234 MYSAPSSO Cookie .................................................................................................................................................. 235 MYSAPSSO Cookie: ITS AGate Settings ............................................................................................................ 236 SAP Logon Ticket...................................................................................................................................................... 237 SAP Logon Ticket: Verification.............................................................................................................................. 238 Cookies in Multiple Domains .................................................................................................................................. 239 X.509 Certificates ...................................................................................................................................................... 240 Digital Certificates for Users.................................................................................................................................... 241 Certification Authority.............................................................................................................................................. 242 X.509 Digital Certificate Details ............................................................................................................................. 243 Public Key Infrastructure and Trust Center........................................................................................................... 244 Single Sign-On Using Digital Certificates............................................................................................................. 245 Installing the Certificates .......................................................................................................................................... 246 Digital Certificates: ITS Settings............................................................................................................................. 247 Digital Certificates: SAP System Settings............................................................................................................. 248 Frontend Administration........................................................................................................................................... 249 Cookies in the Browser (1) ....................................................................................................................................... 250 Cookies in the Browser (2) ....................................................................................................................................... 251 Cookies and SAP GUI for Windows ...................................................................................................................... 252 Digital Certificates: Web Browser Settings........................................................................................................... 253 Central User Administration (1).............................................................................................................................. 254 ALE: Definition of Logical Systems ...................................................................................................................... 255 ALE: RFC Parameters and Groups......................................................................................................................... 256 User Administration Before SAP Release 4.5 ...................................................................................................... 257 Central User Administration (2).............................................................................................................................. 258 Central User Administration (3).............................................................................................................................. 259 What Data Can Be Distributed? .............................................................................................................................. 260 Profiles and Activity Groups.................................................................................................................................... 261 Locking Users ............................................................................................................................................................. 262 CUA Setup (1) ............................................................................................................................................................ 263 CUA Setup (2) ............................................................................................................................................................ 264 CUA Setup (3) ............................................................................................................................................................ 265 Global User Manager ................................................................................................................................................ 266 Transfer Existing Users into CUA .......................................................................................................................... 267 Using CUA: Transport Configuration .................................................................................................................... 268 Log Display (1)........................................................................................................................................................... 269 Log Display (2)........................................................................................................................................................... 270 Analyzing Distribution Errors (1) ........................................................................................................................... 271 Analyzing Distribution Errors (2) ........................................................................................................................... 272

© SAP AG TABC10 vii
Unit Summary ............................................................................................................................................................. 273 Unit Actions................................................................................................................................................................ 274 Single Sign On: Exercises ........................................................................................................................................ 275 Single Sign On: Solutions......................................................................................................................................... 278
Including MiniApps....................................................................................................................................................... 284 Including MiniApps................................................................................................................................................... 285 Including MiniApps: Unit Objectives .................................................................................................................... 286 Course Overview Diagram (5)................................................................................................................................. 287 LaunchPad and MiniApps........................................................................................................................................ 288 Types of MiniApps .................................................................................................................................................... 289 MiniApp Characteristics ........................................................................................................................................... 290 MiniApps, MidiApps, and MaxiApps.................................................................................................................... 291 An Example: The Workflow/Webflow Inbox MiniApp ..................................................................................... 292 Creating MiniApps..................................................................................................................................................... 293 A Programming Model: ITS Flow Logic ............................................................................................................... 294 Adding MiniApps to Roles....................................................................................................................................... 295 Personalization of MiniApps and the LaunchPad ................................................................................................ 296 Favorites Personalization.......................................................................................................................................... 297 Including MiniApps: Unit Summary ...................................................................................................................... 298 Appendix: Where Can I Find MiniApps?.............................................................................................................. 299
Software Logistics.......................................................................................................................................................... 300 Software Logistics...................................................................................................................................................... 301 Software Logistics: Systems and Data ................................................................................................................... 302 Workplace Server Transport Connection............................................................................................................... 303 mySAP.com Workplace Transports........................................................................................................................ 304 System Landscape...................................................................................................................................................... 305 System Landscape: RFC Destinations.................................................................................................................... 306 Upgrade: System Landscape.................................................................................................................................... 307 Upgrade: Workplace Server..................................................................................................................................... 308 Component Systems and PlugIns (1)...................................................................................................................... 309 Component Systems and PlugIns (2)...................................................................................................................... 310 Upgrade: ITS............................................................................................................................................................... 311 Customer Development............................................................................................................................................. 312 Development Terminology....................................................................................................................................... 313 System Environment for Customer Development................................................................................................ 314 SAP@Web Studio...................................................................................................................................................... 315 Projects......................................................................................................................................................................... 316 Source Control............................................................................................................................................................ 317 Transport Connection Using SAP@Web Studio.................................................................................................. 318 Add to Source Control of the Development System............................................................................................ 319 Assign Transport Request in Development System............................................................................................. 320 Site Definition Wizard .............................................................................................................................................. 321 Publish Internet Objects ............................................................................................................................................ 322 Development Organization....................................................................................................................................... 323 Access Rights to ITS Files (NT Security).............................................................................................................. 324 Making ITS Files Available ..................................................................................................................................... 325 ITS Backup Strategy.................................................................................................................................................. 326 Unit Summary ............................................................................................................................................................. 327 Unit Actions................................................................................................................................................................ 328 Software Logistics: Exercises .................................................................................................................................. 329 Software Logistics: Solutions .................................................................................................................................. 331
Monitoring and Troubleshooting................................................................................................................................. 337 Monitoring and Troubleshooting............................................................................................................................. 338 Building up the mySAP.com Workplace Portal ................................................................................................... 339 Accessing an SAP System from the LaunchPad................................................................................................... 340 Performance Issues .................................................................................................................................................... 341 External Web Monitoring Tools .............................................................................................................................. 342 Continuous Monitoring (1)....................................................................................................................................... 343 Continuous Monitoring (2)....................................................................................................................................... 344 Browser and Network Configuration...................................................................................................................... 345 Troubleshooting: Getting the Right URL .............................................................................................................. 346 PERFMON Tool ........................................................................................................................................................ 347 Desktop: Bottleneck Analysis .................................................................................................................................. 348
© SAP AG TABC10 viii
Web Server Administration and Monitoring......................................................................................................... 349 Local Access to Web Server Administration ........................................................................................................ 350 Remote Access to Web Server Administration..................................................................................................... 351 Monitoring Current Performance ............................................................................................................................ 352 Recording Performance Over Time ........................................................................................................................ 353 Web Server: Troubleshooting.................................................................................................................................. 354 Troubleshooting: Page Not Displayed.................................................................................................................... 355 Web Server: Tuning Parameters .............................................................................................................................. 356 Connections and Timeout......................................................................................................................................... 357 Internet Connection Types........................................................................................................................................ 358 Choosing the Best Connection................................................................................................................................. 359 Hardware Resources: Web Load Balancing.......................................................................................................... 360 ITS Monitoring........................................................................................................................................................... 361 Three Ways of Monitoring the ITS......................................................................................................................... 362 Logs and Troubleshooting........................................................................................................................................ 363 ITS Logs: Error Analysis .......................................................................................................................................... 364 ITS Trace Example .................................................................................................................................................... 365 Troubleshooting: Wgate <=> AGate ...................................................................................................................... 366 Troubleshooting: AGate <=> SAP System............................................................................................................ 367 Drag&Relate Server Logs......................................................................................................................................... 368 Bottleneck Analysis ................................................................................................................................................... 369 Available Tools .......................................................................................................................................................... 370 AGate Sessions........................................................................................................................................................... 371 AGate Threads............................................................................................................................................................ 372 Internal Scalability ..................................................................................................................................................... 373 ITS Administration Instance (1) .............................................................................................................................. 374 ITS Administration Instance (2) .............................................................................................................................. 375 Drag&Relate Servlet.................................................................................................................................................. 376 Workplace Server Monitoring: CCMS................................................................................................................... 377 Monitoring the SAP System Landscape................................................................................................................. 378 CCMS Alert Monitor................................................................................................................................................. 379 Working with the Alert Monitor.............................................................................................................................. 380 Defining Monitors...................................................................................................................................................... 381 Rule -Based MTE Selection ...................................................................................................................................... 382 CCMS Monitor for Workplace Systems ................................................................................................................ 383 Including SAP Systems with Release 3.x.............................................................................................................. 384 Configuring a Standalone Gateway on AGate ...................................................................................................... 385 Including a Standalone Gateway in Central CCMS............................................................................................. 386 ALE Monitoring and Central CCMS...................................................................................................................... 387 ALE: IDoc Administrator......................................................................................................................................... 388 Workplace Server Error Analysis ............................................................................................................................ 389 Roles and URL Generation ...................................................................................................................................... 390 Using Authorization Groups.................................................................................................................................... 391 Transaction Analysis ................................................................................................................................................. 392 Workplace Server Response Time .......................................................................................................................... 393 SAP Component System Transaction Analysis .................................................................................................... 394 Unit Summary ............................................................................................................................................................. 395 Unit Actions................................................................................................................................................................ 396 Monitoring and Troubleshooting: Exercises ......................................................................................................... 397 Monitoring and Troubleshooting: Solutions.......................................................................................................... 399
Drag&Relate.................................................................................................................................................................... 404 Drag&Relate ............................................................................................................................................................... 405 Drag&Relate: Unit Objectives ................................................................................................................................. 406 Course Overview Diagram (8)................................................................................................................................. 407 Supported Scenarios.................................................................................................................................................. 408 Drag&Relate Architecture ........................................................................................................................................ 409 Prerequisites ................................................................................................................................................................ 410 Maintenance for BOR Objects................................................................................................................................. 411 Drag&Relate: Unit Summary ................................................................................................................................... 412
Section: Ready-to-Run ....................................................................................................................................................... 413 Ready-to-Run R/3........................................................................................................................................................... 414
Ready-to-Run R/3 ...................................................................................................................................................... 415 What is Ready-to-Run R/3? ..................................................................................................................................... 416

© SAP AG TABC10 ix
Ready-to-Run R/3 ...................................................................................................................................................... 417 Overview of Ready-to-Run R/3 Installation.......................................................................................................... 418 Ready-To-Run R/3 Configuration Assistant (1) ................................................................................................... 419 Ready-To-Run R/3 Configuration Assistant (2) ................................................................................................... 420 Ready-to-Run R/3 Configuration Assistant (3) .................................................................................................... 421 Ready-to-Run R/3 Configuration Assistant (4) .................................................................................................... 422 Ready-to-Run R/3 Configuration Assistant (5) .................................................................................................... 423 Ready-to-Run R/3 ...................................................................................................................................................... 424 Ready-to-Run R/3: Network under NT .................................................................................................................. 425 The Ready-to-Run R/3 Domain Concept for NT.................................................................................................. 426 Preconfigured Basis (1)............................................................................................................................................. 427 Preconfigured Basis (2)............................................................................................................................................. 428 Ready-to-Run R/3 ...................................................................................................................................................... 429 Administration and Service Concept...................................................................................................................... 430 System Administration Assistant (1) ...................................................................................................................... 431 System Administration Assistant (2) ...................................................................................................................... 432 Understanding the Task List .................................................................................................................................... 433 Administration Concept............................................................................................................................................ 434 Trouble Shooting Roadmap...................................................................................................................................... 435 Using the RRR Configuration Reference............................................................................................................... 436 Ready-to-Run R/3 ...................................................................................................................................................... 437 Installation Overview................................................................................................................................................ 438 Installation of RRR together with Windows NT? ................................................................................................ 439 Ready-to-Run R/3 Software Layers ........................................................................................................................ 440 Ready-to-Run R/3: Delivery Process (1) ............................................................................................................... 441 Ready-to-Run R/3: Delivery Process (2) ............................................................................................................... 442 Planning RRR Installation Sequence...................................................................................................................... 443 Preparing RRR Installation....................................................................................................................................... 444 RRR Installation Program - Introduction Screen.................................................................................................. 445 Build RRR Installation Image.................................................................................................................................. 446 Possible RRR Installation Sources.......................................................................................................................... 447 Start the Installation Process: Program RRRStart ................................................................................................ 448 Ready-to-Run R/3 ...................................................................................................................................................... 449 Handover Workshop Schedule ................................................................................................................................ 450 Ready-to-Run R/3 ...................................................................................................................................................... 451 Ready-to-Run R/3: Information............................................................................................................................... 452

© SAP AG TABC10 1
SAP AG 1999
Section: Advanced R/3 System Administration
Graphical User Interfacesfor R/3
Computer Aided Test Tool
R/3 Security

© SAP AG TABC10 2
SAP AG 1999
Graphical User Interfacesfor R/3
Computer Aided Test Tool
R/3 Security
Graphical User Interfaces for R/3

© SAP AG TABC10 3
SAP AG 1999
Graphical User Interfaces for R/3
Contentsl Frontend types, requirements, and computer layoutl SAP GUI frontend maintenance and distribution strategiesl SAPLOGON configuration
ObjectivesAt the end of this unit, you will be able to:l Select the right frontend type for each user groupl Define a frontend maintenance and distribution strategy to meet
your requirementsl Set up the SAPLOGON configuration files for end user groups

© SAP AG TABC10 4
SAP AG 1999
Requirement analysis:Compare actual and the required
infrastructure
SAP R/3 frontend requirements→ SAP Note 26417
End user requirements
Frontend infrastructure (PC and network infrastructure)
Administrator requirements:- Ease of installation- Ease of distribution
StandardizationStandardization
Frontend Administration
GUI technology: Windows, Java, and HTML
GUI components: Such as standard, networkgraphics, EXCEL List Viewer, and download
n When considering your frontend requirements, you must consider the PCs from the administration and from the user perspective.
n For the end user, it is important to have all the components on the desktop that are needed for day-to-day work with R/3.
n For the system administrator, frontend computer administration must be organized so that it remains as simple as possible, especially when the system includes a large number of frontends. As the system administrator, you must also consider:
� Frontend PCs are not all technically the same throughout the company. Also, users do not all need the same GUI components installed.
� For an existing desktop infrastructure, which includes PCs, workstations, networks, and printers, you should assess your overall end user requirements and your R/3 frontend software requirements.
� Using the results of this requirements assessment, construct a matrix summarizing and grouping together the different user requirements relating to GUI technology and the GUI components.
� By standardizing the GUI technology or GUI components for the different groups, the system administrator can then design suitable scenarios for distributing and maintaining the frontend software.

© SAP AG TABC10 5
SAP AG 1999
GUI Strategy: Overview
R/3 3.1 R/3 4.0 / 4.5
Windows32 bit
Javaapplication
R/3 4.6R/3 3.0
Native Mac
Native OS/2
Native Motif
NativeWindows32 bitWTSNative Windows 16 Bit
Browserbased
Java Applet-based
Windows16 bit
Unix / Motif
Mac
OS/2
Browser
SAP GUI forWindows
SAP GUI forJava
SAP GUI forHTML
SAP-MAPIAPO-AddOn
BW-AddOn
n There are three categories of R/3 frontends:
� SAP GUI for Windows , which offers various frontend components and interfaces. SAP GUI can be installed as a frontend server or in a local installation. Since R/3 Release 4.5B, SAP GUI is also available for Windows Terminal Server (WTS). For more information, see SAP Note 138869.
� SAP GUI for Java, which is available –as of R/3 Release 4.6B – as a local installation for all Java-supported platforms.
� SAP GUI for HTML, which is a browser-based frontend of SAP´s Internet Transaction Server (ITS). Apart from the browser, no local installation on the frontend computer is required.

© SAP AG TABC10 6
SAP AG 1999
SAP GUI: Overview
l Installation options
l Access to SAP Library
l SAPLOGON and SAPLGPAD
l Logon load balancing
n In the following section, we will focus on the SAP GUI and its components:
� Installation options for the SAP GUI and distribution of the applicable frontend files
� Access to the SAP Library from Frontend PCs
� Configuration of SAPLOGON and SAPLGPAD
SAPLOGON and SAPLGPAD use the same configuration files. The only difference is that SAPLGPAD does not provide push buttons to change its configuration files.
� Logon load balancing
n Note: This unit discusses SAPLOGON only.

© SAP AG TABC10 7
SAP AG 1999
SAP GUI: Installation Options
Presentation CD Installation server
Option 1Local installation from CD
Option 2Installation frominstallation server
• Automatic installation and update on PC• Distribution of SAPLOGON configuration files depending on local or server installation • Distribution of services file
• Manual installation and update on PC• Distribution of services file• Distribution of SAPLOGON configuration files
n Option 1: Local installation from CD This option is used when only a few PC frontends have to be installed. Apart from OS configuration files, such as hosts and services, the system administrator must adapt and distribute at least the following configuration files:
� saplogon.ini (access list needed only for the SAPLOGON program)
� sapmsg.ini (list of message servers needed only for the SAPLOGON program)
� saproute.ini (list of routers needed only for the SAPLOGON program)
� sapdoccd.ini (access list to online documentation needed only to override standard settings)
n Option 2: Installation from the installation server (a) Server installation This option is mostly used for PCs in a LAN. SAP configuration files can reside on a central server and updated as required by the system administrator. The installation process and the update of the SAP GUI frontend software can be performed automatically, by means of logon scripts.
(b) Local installation This option can be used for all frontend computers in a LAN or for notebooks that are sometimes connected to a LAN. The advantage of this installation option is that the network traffic between the installation server and the frontend is minimized, therefore more free local hard disk space is required. The services file and SAPLOGON configuration files must be distributed as shown in Option 1.

© SAP AG TABC10 8
SAP AG 1999
SAP GUI: Installation Procedures
SAPADMIN.EXE
SETUP.EXE
Installation server
Local installationNETSETUP.EXE
Preparing installationpackages
Server installation
Presentation CD
n To install the SAP GUI, you can proceed as follows:
� Test a local SAP GUI installation from the installation CD to a sample PC. Create templates for the SAP GUI configuration files and the services file.
� Install an installation server using program SETUP.EXE.
� Define installation packages for different user groups using program SAPADMIN.EXE.
� If you use Windows NT as one of your frontend platforms, configure the NetInstall Service and the Service Installation Service (SIS). This ensures that the Windows NT frontend users do not require local administration authorization to perform an automated or manual installation.
� Log on to a PC where the frontend components are to be installed. Use a user account –without local administrator rights– and start the installation using program NETSETUP.EXE from the installation server.
� If installation is successful, distribute the packages needed, using logon scripts of the user PCs. Include the distribution of SAPLOGON configuration files, and adapt the services file if necessary.
n The SAP GUI installation procedure is described in detail in the guide Installing SAP Frontend Software for PCs (Material number 51006773).

© SAP AG TABC10 9
SAP AG 1999
Dialog-free installation enables:Dialog-free installation enables:• Automatic software distribution• Frontend maintenance using logon scripts
SAP GUI: Dialog-Free Installation and Maintenance
<path to installation server>\netsetup.exe /p:“<package name>” /install /IntelliMode
Include in logon scripts:
Installation server
Preparing installationpackages
Server installation
NETSETUP.EXE
SAPSETUP.EXE
n The installation program NETSETUP calls program SAPSETUP and enables a dialog-free installation.
n Installation packages can be distributed with the MS Systems Management Server (SMS) or using logon scripts.
n Before starting NETSETUP on the end users PC, you must ensure:
� Sufficient free disk space is available
� The correct network authorizations have been granted
� SIS is installed if the frontend PC is using Windows NT
n When installing the frontend components using logon scripts there are several options you can use. If no user interaction is desired during installation process, use the IntelliMode option of the NETSETUP program. This option checks if there is already an up-to-date SAP GUI installation prior to the actual installation. If there is an up-to-date SAP GUI already installed, the NETSETUP program terminates without any action.
n A detailed description of all NETSETUP parameters can be found in the guide Installing SAP Frontend Software for PCs (Material number 51006773).
n If there are any errors during the installation, check the log file sapsetup.log.
© SAP AG TABC10 10
SAP AG 1999
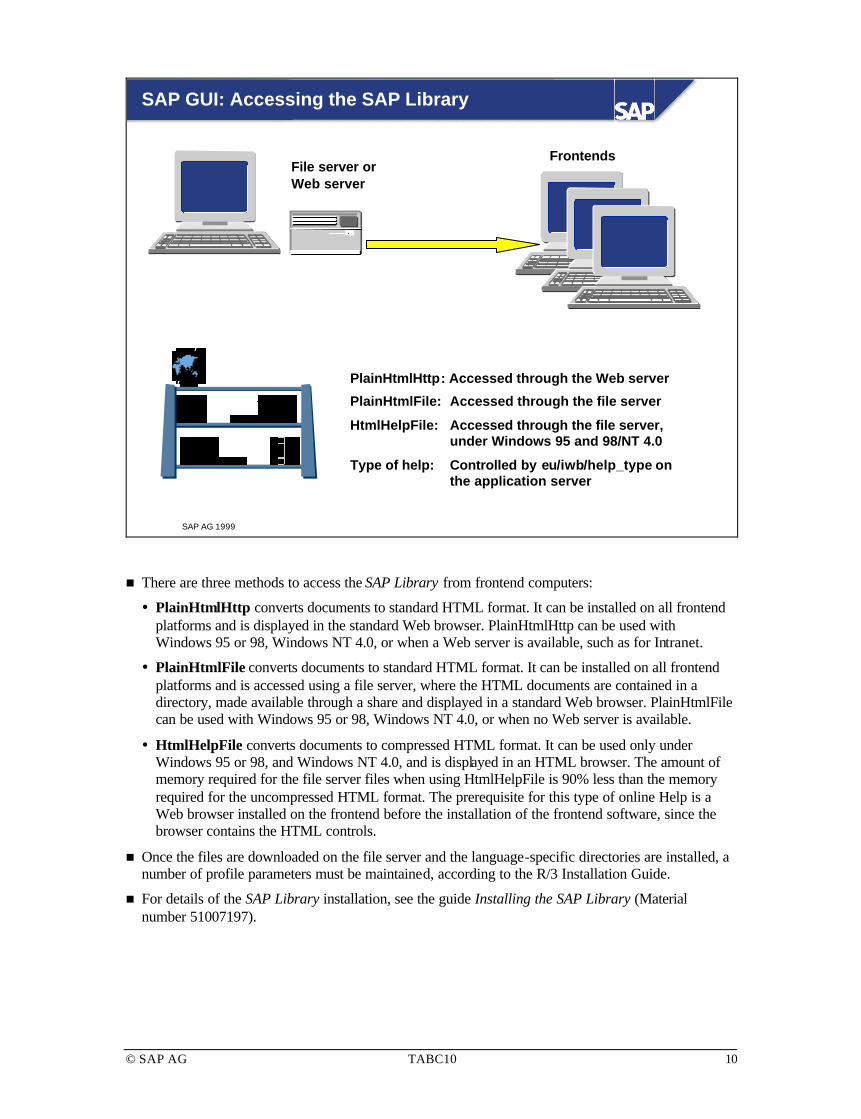
File server orWeb server
PlainHtmlHttp: Accessed through the Web server
PlainHtmlFile: Accessed through the file server
HtmlHelpFile: Accessed through the file server,under Windows 95 and 98/NT 4.0
Type of help: Controlled by eu/iwb/help_type onthe application server
Frontends
SAP GUI: Accessing the SAP Library
n There are three methods to access the SAP Library from frontend computers:
� PlainHtmlHttp converts documents to standard HTML format. It can be installed on all frontend platforms and is displayed in the standard Web browser. PlainHtmlHttp can be used with Windows 95 or 98, Windows NT 4.0, or when a Web server is available, such as for Intranet.
� PlainHtmlFile converts documents to standard HTML format. It can be installed on all frontend platforms and is accessed using a file server, where the HTML documents are contained in a directory, made available through a share and displayed in a standard Web browser. PlainHtmlFile can be used with Windows 95 or 98, Windows NT 4.0, or when no Web server is available.
� HtmlHelpFile converts documents to compressed HTML format. It can be used only under Windows 95 or 98, and Windows NT 4.0, and is displayed in an HTML browser. The amount of memory required for the file server files when using HtmlHelpFile is 90% less than the memory required for the uncompressed HTML format. The prerequisite for this type of online Help is a Web browser installed on the frontend before the installation of the frontend software, since the browser contains the HTML controls.
n Once the files are downloaded on the file server and the language-specific directories are installed, a number of profile parameters must be maintained, according to the R/3 Installation Guide.
n For details of the SAP Library installation, see the guide Installing the SAP Library (Material number 51007197).

© SAP AG TABC10 11
SAP AG 1999
SAP Library: Overriding the Standard Settings
Request forSAP Library sapdoccd.ini in
Windows directory of frontend PC?
sapdoccd.ini inSAP GUI directory (local
or central)?
sapdoccd.ini inparent directory of
SAP GUI?
No
No
Yes
Yes
Yessapdoccd.ini
[HtmlHelp]...[SystemId-B20]...
Take standard settingsbased on R/3 profile
No
n To override standard settings for the Help type and the location of the Help files, change the SAP GUI configuration file sapdoccd.ini on the frontend PC.
n To do this, use the sections [HTMLHELP] and [SystemId-<SID>], for example:
[HtmlHelp]
HelpType=PlainHtmlHttp
PlainHtmlHttpServer=p99999.sap-ag.de:1080
PlainHtmlHttpPath-DE=PlainHtml/46A/DE
PlainHtmlHttpPath=PlainHtml/46A/EN
[SystemId-B20]
HelpType=HtmlHelpFile
HtmlHelpFilePath-DE=\\p16381\htmlhelp\46a\DE
HtmlHelpFilePath=\\p16381\htmlhelp\46a\EN
n Error handling:
� For every access to the SAP Library, a log is written into the Windows directory in file sapdoccd.log. This file contains relevant information about sapdoccd.ini and any problems with the browser version.

© SAP AG TABC10 12
SAP AG 1999
SAPGUI.EXE
Displayentries
saplogon.ini
Read
Create SAP GUIconnection stringStart of
SAPLOGON
DEV_xxxx.TDWDEV_xxxx.LOG
Write trace filesif activated
SAPLOGON.EXE
SAPLOGON: Logon and Trace
FRONT.EXE
n The program SAPLOGON.EXE is located in directory [drive letter]:\<target directory>\Sapgui, as defined during the SAP GUI frontend software installation. To connect to R/3, SAPLOGON starts the program SAPGUI.EXE, which starts program FRONT.EXE. To locate this file, click the upper left corner of SAPLOGON and choose About SAP GUI >> System Information.
n When program SAPLOGON.EXE is started, the SAP GUI configuration files saplogon.ini, sapmsg.ini, and saproute.ini are read. To locate these files, click the upper left corner of SAPLOGON and choose Options. The file saplogon.ini is initially empty and contains a list of R/3 Systems and logon parameters selected by the user. This information is used for creating the SAP GUI connection string at logon.
n To prevent the saplogon.ini entries from being changed, set this file to Read only for all frontend computers. To switch off the edit function of SAPLOGON, click in the upper left corner of SAPLOGON and choose Options >> Disable editing functionality.
n To trace the SAP GUI logon activities, click the upper left corner of SAPLOGON and choose Options >> Activate SAP GUI trace level. The trace files are located in the work directory and their names are:
DEV_xxxx.TDW (ASCII) and DEV_xxxx.LOG (binary)
n To configure the edit and trace functions in the file saplogon.ini, set the following parameters:
NoEditFunctionality = 1
SapguiTraceActivated = 0
SapguiTraceLevel = 3

© SAP AG TABC10 13
SAP AG 1999
File services on frontend PC must be maintained manually
sapmsg.ini saproute.ini
Add entry to SAPLOGON
saplogon.ini
Read
Write
Read
Read Sort entriesand write
User selects messageserver or adds new message server in
SAPLOGON dialog box
User selects saprouter entry or adds new one
in SAPLOGON dialog box
SAPLOGON: Configuration
n The file saplogon.ini is maintained and sorted every time a new entry for an R/3 System is created or changed using the Edit button. If you have to change saplogon.ini manually (for example, if you want to merge two different versions), see SAP Notes 99435 and 145385.
n There are two more ini files that are maintained implicitly when editing in SAPLOGON:
� sapmsg.ini contains a list of message servers for R/3 Systems and logical service names. It is read whenever a logon group is selected from within SAPLOGON.
� saproute.ini contains a list of saprouters that can be selected in SAPLOGON.
n The frontend file services (in Windows NT under c:\windowsNT\system32\drivers\etc) cannot be edited by SAPLOGON but entries are needed to connect to the R/3 Systems. Entries must be added manually using an ASCII text editor. R/3-relevant entries for message servers are:
� sapms<System ID> <service number>/tcp

© SAP AG TABC10 14
SAP AG 1999
SAPLOGON Configuration Files
StartSAPLOGON
SAPLOGON configurationfile in SAP GUI directory?
No
no
Yes
Yes
Start SAPLOGON withempty configuration
SAPLOGON configurationfile in Windows directory?
Start SAPLOGON withthe configuration files found
sapmsg.ini, saproute.ini, andsaplogon.ini can be
independently storedin either the Windows directory
or in the SAP GUI directory
No
n The SAPLOGON configuration files can be located in different locations independently from each other.
n For server installations, at least the files sapmsg.ini and saproute.ini should be placed in the central sapgui directory. These files should only be maintained by the system administrator.
n The saplogon.ini file can also be located centrally. However, you should ensure the file is Read only for the end users.

© SAP AG TABC10 15
SAP AG 1999
Group logonsapgui.exe /M/tcc1/S/sapmsDEV/G/Public(sapmsDEV as defined in SERVICES)sapgui.exe /M/tcc1/S/3600/G/Public
Server logonsapgui.exe /H/tcc3/S/sapdp01(sapdp01 as defined in SERVICES) sapgui.exe /H/oss001/S/3201
Group logonMessage server on host tcc1System number 01Service name sapmsDEV=3600Logon group PublicServer logonHost tcc3Instance number 01Service name sapdp01=3201
SAP GUI Connection String
DEV_DVEBMGS00_tcc1
DEV_D00_tcc2
DEV_D01_tcc3
n For users working only with one R/3 System, there only needs to be one SAP GUI icon on the user’s PC desktop. Therefore, the system administrator must ensure that the correct SAP GUI connection string is used.
n When logging on to an R/3 System, the connection string must contain the access path and the program SAPGUI.EXE. The connection string must be constructed in the same sequence in which the connection progresses through all instances (saprouter instances, message server instance, or R/3 instance). The connection string must specify the following:
� For a connection to a logon group using the message server (Group Logon) /M/<machine where message server is running>/S/<service number used by the message server>/G/<case sensitive name of logon group to connect to>
When using logical names for the machine where a message server is running, define the names in the sapmsg.ini file of the frontend server. R/3 documentation often refers to system numbers instead of service numbers. A system number 00 is the same as an entry in the services file sapms<R/3 System ID>=3600/tcp.
� For a connection to a specific R/3 instance using its dispatcher (Server Logon) /H/<application server where R/3 instance is running>/S/<service number used by the dispatcher>
R/3 documentation often refers to instance numbers instead of service numbers. An instance number 01 is the same as an entry in the services file sapdp01=3201/tcp.
© SAP AG TABC10 16
SAP AG 1999
Logon Groups
l Frontend PCs should be configured so that users canonly log on to the group they require
l A user should not be allowed to change the predefineddesktop configuration
l R/3 users are NOT assigned to logon groupsSTOP
n The logon group a user logs on to is determined at the frontend, it is not specified in an R/3 table. Therefore, the system administrator must deliver the correct SAP GUI frontend configuration to every R/3 user’s desktop environment.
n When you create the SAP GUI frontend configuration, you can use:
� The SAPLOGON configuration files, or
� A shortcut, which consists of the SAP GUI program and the applicable connection string
n Logon groups improve system performance because users are equally distributed across the available application servers assigned to their group, based on the server with the best response time and fewest users.
n Note: R/3 users are NOT assigned to logon groups (it is the frontend PCs that are assigned to a logon group). However, you can exclude R/3 users from specific R/3 instances through the user exit SUSR0001, right after logon. However, this is an enhancement, which is not part of the SAP standard. See also SAP Note 106388.

© SAP AG TABC10 17
SAP AG 1999
Logon Load Balancing: Mechanism
Instance weight algorithm:Instance_weight =Answer_weight x 5 + user_weight
Ex. A = 15 + 2 = 17 B = 10 + 3 = 13 C = 5 + 1 = 6
Favorite server = A
answer_weight(highest number = best)
user_weight(highest number = best)
Favorite server = Server with highest instance_weight
Answerweight
3
2
1
Server
A
B
C
Userweight
3
2
1
Server
B
A
C
n At system startup, program SAPMSSY6 executes RSRZLLG0, which is a cyclical background program for determining logon priority list. Program RSRZLLG0 then runs every 5 minutes and after every fourth logon. Note: RFC users are checked after 5 minutes only, not after the fourth logon.
n Program RSRZLLG0 reads performance data (average dialog response time, number of users) for all instances and calculates weights (answer_weight and user_weight) based on this data.
n Based on the calculation, the higher the answer_weight, the better the response time (the same applies for the user_weight).
n An overall instance weight (instance_weight = (answer_weight * 5) + user_weight) is then calculated for all instances.
n The favorite server for a particular logon group is the server with the highest instance_weight for that group.
n To display information for favorite logon servers, call Transaction SMLG and choose Goto >> System diagnosis >> Msg. server status area.
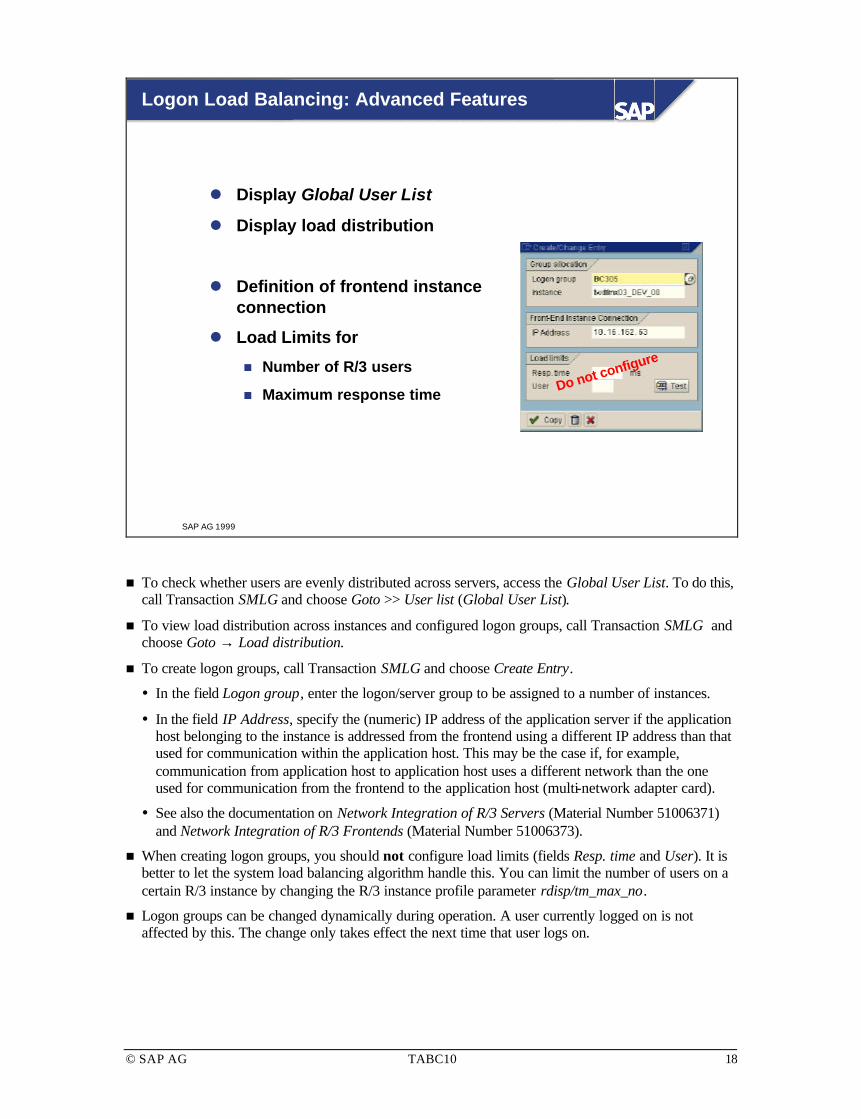
© SAP AG TABC10 18
SAP AG 1999
Logon Load Balancing: Advanced Features
l Display Global User List
l Display load distribution
l Definition of frontend instanceconnection
l Load Limits for
n Number of R/3 users
n Maximum response time Do not configure
n To check whether users are evenly distributed across servers, access the Global User List. To do this, call Transaction SMLG and choose Goto >> User list (Global User List).
n To view load distribution across instances and configured logon groups, call Transaction SMLG and choose Goto → Load distribution.
n To create logon groups, call Transaction SMLG and choose Create Entry.
� In the field Logon group, enter the logon/server group to be assigned to a number of instances.
� In the field IP Address, specify the (numeric) IP address of the application server if the application host belonging to the instance is addressed from the frontend using a different IP address than that used for communication within the application host. This may be the case if, for example, communication from application host to application host uses a different network than the one used for communication from the frontend to the application host (multi-network adapter card).
� See also the documentation on Network Integration of R/3 Servers (Material Number 51006371) and Network Integration of R/3 Frontends (Material Number 51006373).
n When creating logon groups, you should not configure load limits (fields Resp. time and User). It is better to let the system load balancing algorithm handle this. You can limit the number of users on a certain R/3 instance by changing the R/3 instance profile parameter rdisp/tm_max_no.
n Logon groups can be changed dynamically during operation. A user currently logged on is not affected by this. The change only takes effect the next time that user logs on.

© SAP AG TABC10 19
SAP AG 1999
Web serverWeb serverInternet Internet
Transaction Transaction Server Server
Web browserWeb browser
PresentationPresentation
ApplicationApplication
DatabaseDatabase
......
SAP GUISAP GUI
SAP GUI for HTML
l Internet enabling for standardtransactions
l Installation free on the frontend
n Web applications can be accessedusing a Web browser
n No GUI installation or maintenance onfrontend required
l Low infrastructure requirements
n Web browsers work on a small-scaleuser machine
n Relatively low network bandwidth(28k or 56k modem will suffice)
n The SAP GUI for HTML is mostly used for standard application transactions. A complete list of standard transactions is available in SAPNet under http://www.sap.com/internet >> Internet Application Components (IAC).
n The SAP GUI for HTML is based on Internet Transaction Server (ITS) technology. If you use Unix application servers, at least one extra Windows NT server is required to run the ITS. In a Windows NT environment, this extra server is recommended. The ITS extends the three-tier client/server structure of the R/3 System to the Internet.
n The R/3 System through SAP GUI can be used simultaneously with the ITS without any problems.
n For more information about the ITS, see SAP Training BC440 and the SAP@Web Installation Guide (Material number 51007160).

© SAP AG TABC10 20
SAP AG 1999
R/3 3.1 R/3 4.0 / 4.5 R/3 4.6R/3 3.0
Native Mac
Native OS/2
Native Motif
Javaapplication
Unix / Motif
Mac
OS/2
SAP GUIfor Java
l SAP GUI for Java will be available for R/3 Release 4.6B
l SAP GUI for Java is a Java application running in a VM
l For details, see SAP Note 146505
SAP GUI for Java
n The SAP GUI for Java will be available as of R/3 Release 4.6B.
n The SAP GUI for Java is a Java application that runs in a virtual machine (VM).
n For detailed information about the hardware requirements and availability of the SAP GUI for Java, see SAP Note 146505.

© SAP AG TABC10 21
SAP AG 1999
Frontend in a WAN Environment
l Using SAP GUI Release 4.6 in WAN (see SAP Note 161053)
l Local SAP GUI installation
l Local access to help CD
l Using SAProuter to increase performance(see SAP Note 30289)
l Special Web themes (templates) for slow intranet orInternet connections
l See Network Integration of R/3 Servers and NetworkIntegration of R/3 Frontends
n When using SAP GUI Release 4.6 in a WAN environment, there are different methods to decrease the network load. From SAPLogon, choose Properties →Connection Speed →Low Speed Connection. For further details, see SAP Note 161053.
n Local SAP GUI installations do not require loading program files over the network.
n If you use the SAP Library, it must be accessed from a local CD drive or hard disk.
n You should use the SAProuter for frontend access as it handles connection attempts to and broken connections from the application server.
n When developing Internet Application Components (IAC) for the Internet or intranet, developers must consider the number of users accessing their HTML pages using slow WAN connections. ITS enables you to have a number of different themes for these users, for example, with fewer graphical elements and without sound effects. End users can also change settings on their browsers to keep a longer history, and restrict the use of sounds and videos.
n See also the documentation on Network Integration of R/3 Servers (Material Number 51006371) and Network Integration of R/3 Frontends (Material Number 51006373).

© SAP AG TABC10 22
SAP AG 1999
Now you are able to:
l Select the right frontend type for each user group
l Define a frontend maintenance and distribution strategy tomeet your requirements
l Set up the SAPLOGON configuration files for end user groups
Unit Summary
© SAP AG TABC10 23
SAP AG 1999
Further Documentation
l Installation Documentation:In SAPNet choose Services → Online Services →Installation/Upgrade → Installation/Upgrade guides
l When you search for documentation in SAPNet, specifythe material number and use the QuickSearch
l When you order documentation using a SAPNetmessage, specify the material number

© SAP AG TABC10 24
SAP AG 1999
Graphical User Interfacesfor R/3
Computer Aided Test Tool
R/3 Security
Computer Aided Test Tool

© SAP AG TABC10 25
SAP AG 1999
Computer Aided Test Tool
Contentsl Introduction to the CATTl Different uses of CATTl Creating test casesl Creating an external file with variants to run a test case
ObjectivesAt the end of this unit, you will be able to:l Explain the different uses of CATTl Record a test casel Create an external file to run a test case

© SAP AG TABC10 26
SAP AG 1999
l Why should a system administrator use CATT?
CATT: Introduction
Stress test Test upgrade
Train users Load data
n The Computer Aided Test Tool (CATT) is part of the ABAP Workbench, and can be used for administrative purposes.
n You can use the CATT to run a stress test on your system. To improve the accuracy of the test, you can build think time into the CATT.
n After an R/3 upgrade, use the CATT to test application functions before your end users test the system.
n The CATT enables you to load data that cannot be loaded using Batch Input.
n For training purposes, the CATT can be used by:
� End users to see how transactions are entered, and to reinforce their learning by reviewing transactions in foreground
� System administrators to load master data for training, such as customer master records and material masters
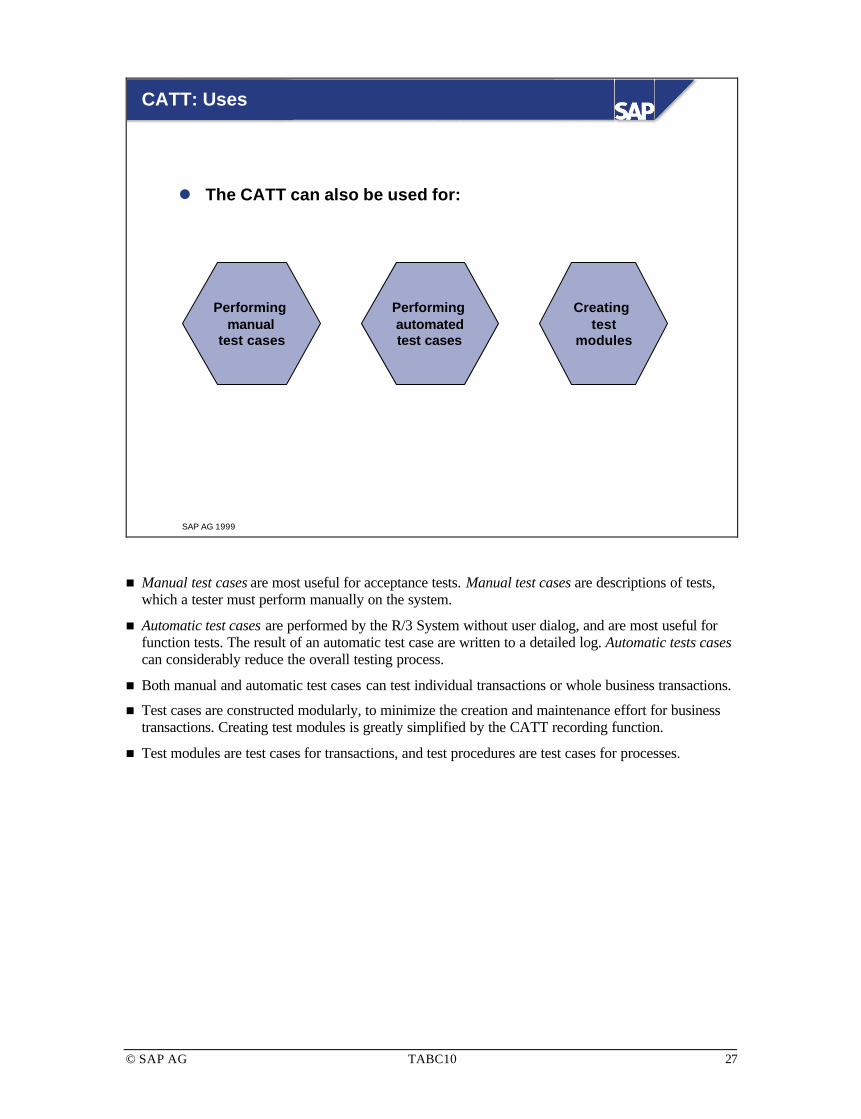
© SAP AG TABC10 27
SAP AG 1999
l The CATT can also be used for:
CATT: Uses
Performing manual
test cases
Performing automatedtest cases
Creating test
modules
n Manual test cases are most useful for acceptance tests. Manual test cases are descriptions of tests, which a tester must perform manually on the system.
n Automatic test cases are performed by the R/3 System without user dialog, and are most useful for function tests. The result of an automatic test case are written to a detailed log. Automatic tests cases can considerably reduce the overall testing process.
n Both manual and automatic test cases can test individual transactions or whole business transactions.
n Test cases are constructed modularly, to minimize the creation and maintenance effort for business transactions. Creating test modules is greatly simplified by the CATT recording function.
n Test modules are test cases for transactions, and test procedures are test cases for processes.

© SAP AG TABC10 28
SAP AG 1999
CATT: Other Uses
l You can also use CATT to:
n Test transactions
n Check system messages
n Check authorizations (user profiles)
n Test results and database updates
n Setup customizing tables
n Test the effect of customizing setting changes
n The success of automated testing depends on the quality of the test cases. Therefore, it is important to plan the test steps and gather the information needed before creating the test cases.
n When you plan your test, consider the following:
� What is to be tested?
� Which process chains are to be modeled with CATT?
� Which application areas are involved?
� Which test cases are needed?
� How do the test cases have to be structured so that they can be reused?
� Do the database changes have to be checked?
� Do the error messages have to be checked?
n When you plan your test, you must also consider the following restrictions :
� Are the tests restricted by language-dependencies?
� Is the object country-specific?
� Does the test have to be performed in a specific sequence, or certain time of day?
� Do you have to consider the system environment, such as tablespaces or backups?

© SAP AG TABC10 29
SAP AG 1999
Processes Less Suited for CATT
l Do not run a test procedure for:
Lists and Display
Menu Paths
Online Help
Editor Functions
n With CATT, you should not run a test procedure for the following:
� Lists and Displays - it is easier to run the list or display than to create a test case
� Online Help - is also easier to choose the help as opposed to using test case
� With Editor Functions - these transaction contain the statement LEAVE TO TRANSACTION. You cannot use the test case for transactions that contain the statement LEAVE TO TRANSACTION.
� Menu paths - it is easier for a user to enter a menu path or execute a transaction than it is to put in a test case.

© SAP AG TABC10 30
SAP AG 1999
l To display the initialCATT screen, callTransaction SCAT
CATT: Initial Screen
n To display the initial CATT screen, choose Tools →ABAP Workbench →Test →Test Workbench →CATT (or call Transaction SCAT).
n All customer created test cases begin with the letter Y or Z. When you create a test procedure or module, give it a unique name of up to 30 characters.

© SAP AG TABC10 31
SAP AG 1999
CATT: Recording Transactions
Execute
l Enter the transactionyou would like torecord
n To create a test case, from the initial screen of CATT, choose Test case →Record transaction (or press Ctrl + F1). In the dialog box displayed, enter the transaction code and choose Record.
n Once you start recording, every keystroke is recorded in the CATT. Therefore, if you make a mistake you should re-record your transaction.
n After you save the transaction, choose End Recording in the dialog box displayed.

© SAP AG TABC10 32
SAP AG 1999
CATT: Creating a Test Case
n When the recording is finished, you are prompted to save your test case:
� Enter the description in the field Title.
� Enter the name of person responsible for the test in the field Name.
� Enter the Development class and Component.

© SAP AG TABC10 33
SAP AG 1999
CATT: Maintaining the Test Case Functions
l One test case canhave multiplefunctions
n To maintain a test case, choose Change from the initial CATT screen.
n When you record your test case, the system records all the values that you specify.
n The function on the above screen is TCD (test transaction).
n Other possible functions you can specify are:
� REF: Refer to test case FUN: Use function module
� TXT: Enter comment CHEERR: Check system message
� CHETAB: Check table contents CHEVAR: Check variable contents
� SETTAB: Set customizing table RESTAB: Reset table
� DO n... (EXIT)... ENDDO: Loops
� EXIT: Conditional termination IF... ENDIF conditions: Use of conditions
� SETVAR: Assign values to variables and parameters
n To learn more about the advanced features of CATT, enroll in course CA610.

© SAP AG TABC10 34
SAP AG 1999
CATT: Maintaining the Function Details
The recording captured the:
ProgramScreen number
Code
Field values
n The Function details screen displays the following entries, which you made during the recording of your test case:
� Program
� Screen number
� Code (BDC_OKCODE)
� Field values
n If you made a mistake while recording, you must know the function details (program, screen number, code, and field values) and update the mistake. Therefore, it is easier to re-record the transaction.
n To see the fields you entered during the recording, double -click the first program name or choose Field List
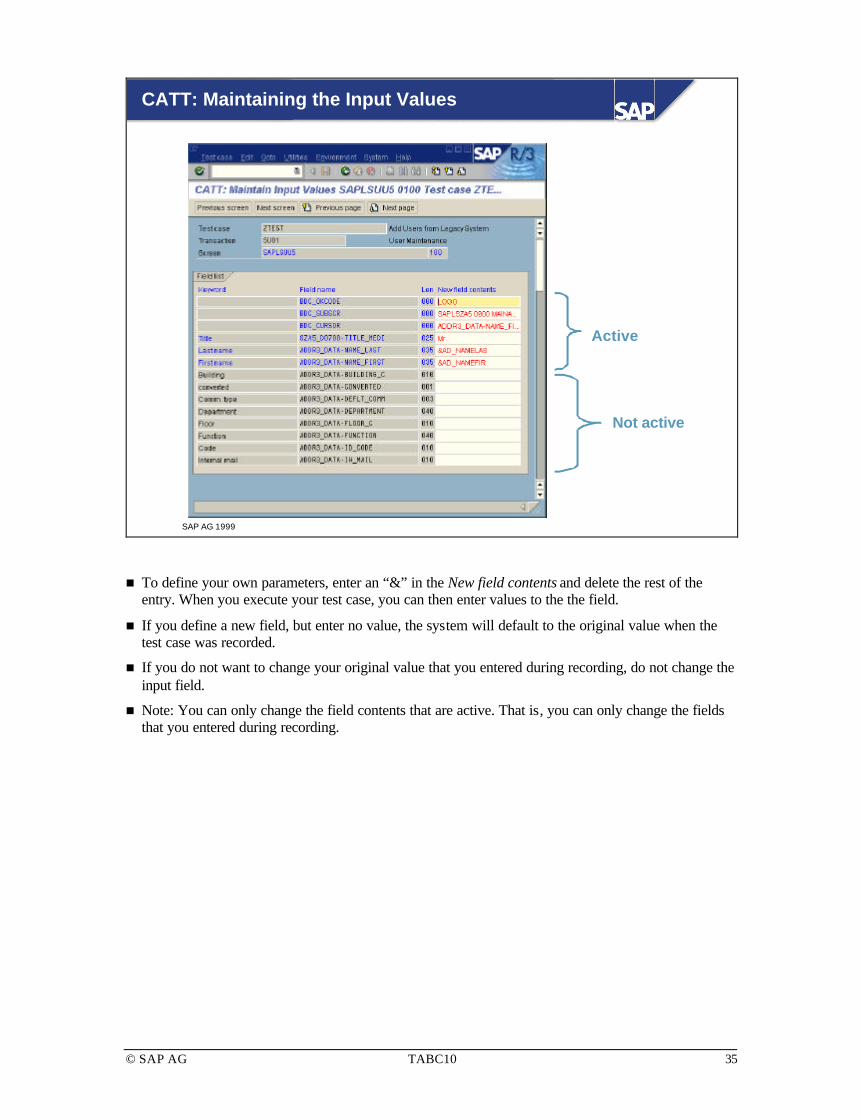
© SAP AG TABC10 35
SAP AG 1999
CATT: Maintaining the Input Values
Active
Not active
n To define your own parameters, enter an “&” in the New field contents and delete the rest of the entry. When you execute your test case, you can then enter values to the the field.
n If you define a new field, but enter no value, the system will default to the original value when the test case was recorded.
n If you do not want to change your original value that you entered during recording, do not change the input field.
n Note: You can only change the field contents that are active. That is, you can only change the fields that you entered during recording.

© SAP AG TABC10 36
SAP AG 1999
Test Case Processing Modes
l There are three different methods when processing yourtest case
ForegroundForeground
BackgroundBackground
ForegroundForeground
Errors
n The processing mode only affects the execution of transactions in the test case where the function is TCD or dialog function modules.
n Foreground
� The test case runs in dialog. You can correct field entries or influence the test by entering BDC_OK codes. Display the next screen by choosing Enter .
n Background
� The test case runs in the background. If your data is not valid, the processing is not interrupted: An error message is written to the log file, and the processing continues with the next record. For example, if you are processing 100 records and the 50th record has invalid data, an error message is written to the log file, and the processing continues with the 51st record.
n Errors
� The test case runs in the background until the first error or termination. It then switches to dialog processing. Once it is in dialog, you can change any incorrect entries. When you confirm your entries, the test case continues in the background until the next error.

© SAP AG TABC10 37
SAP AG 1999
Test Case Logs
Short log
Long log
n You can specify the log type for a test case when it is executed. There are two types of logs:
� Long Contains all the test case function data. If an error occurs, a long log is automatically created, beginning from the module where the error occurred, even if you chose the option w/o in the initial screen.
� Short Contains only the information about the functions called by the test case and the parameter contents.
n The log files also contain the run times.
n Note: If the job RSCATDEL is scheduled, logs are deleted after 14 days. To keep a log longer in the system, change the expiry date manually. To do this, choose Goto >> Procedure attributes in the log. Enter an expiry date in the dialog box is displayed.

© SAP AG TABC10 38
SAP AG 1999
Variants
l Before you can create test case variants, you must havecreated test case import parameters (values)
l You can maintain variants in R/3 or locally on yourhard-drive
l You can specify multiple variants for a test case
l Use variants to broaden the range of tests
n Before you can create test case variants, you must have already created the test case import parameters.
n You can maintain variants in R/3 or locally on your hard-drive (explained later in this unit).
n To enter variants in R/3, from the main CATT screen (Transaction SCAT), enter the test case that you want to add variants for. Then choose Goto >> Variants >> Edit.
n You can decide which variant to use when you call a test case.
n Use variants to broaden the range of tests.

© SAP AG TABC10 39
SAP AG 1999
Defining Variants
l You can use the following values to define variants:
<normal entry> The parameter takes the entered value
<blank> The parameter default value is used
< " > The parameter is initialized
< ' > The parameter is not used. If the field for thisparameter is filled by SET/GET parameters,these parameter values are used.
< ! > The field in which the parameter is used isinitialized (for example, to delete SET/GETparameters)
n You can enter the test case values (variants) at runtime in import parameters that can, for example, be put in transaction input fields. Thus making the use of test cases more flexible.
n You can store sets of values, which you want to give to the import parameters at runtime, in variants. You then only need to specify the variant name at the test case runtime.
n When a test case runs, the system checks each import parameter to see if a value has been defined for it in a variant.
n If it has been defined, this value is given to the parameter at runtime.
n If it has not been defined, the parameter default value is used. If there the default value was not specified at the time of recording, the initial value is used.

© SAP AG TABC10 40
SAP AG 1999
External Variants
l Create external variants in a table calculation program,such as Microsoft EXCEL
l Save the data in a text file
ZADDUSER.TXT
n With the CATT, you can create variants for the test case import parameters in an external table calculation program, such as Microsoft EXCEL. The variants that you create in the external file can be uploaded during the execution of the test case.
n The external data is stored in a text file, with the elements separated by tabs.
n If you did not create any variants for the test case, you can create a text file containing all test case parameters and their short texts and default values. To do this, choose Goto >> Variants >> Export defaults. The dialog box Copy to local file is displayed.
n The system default value for the external file name is <test case name>.txt. You can change the path and file name but not the extension.
n Once you have edited the file (for example, in EXCEL), save the file as a text file with tab column separators. Close the file in the external program. Note: The file must be closed to be imported into the R/3 System.
n To import the edited file, you can either:
� Choose Goto >> Variants >> Import, from the test case Maintenance change mode, or
� During execution, from the section Variants, select External from file, choose Choose, and enter the path and file name.

© SAP AG TABC10 41
SAP AG 1999
External Variants: File Format
[Variant ID] [Variant Text] XUBNAME
--> Parameter texts User
--> Proposed values JODI
*** Changes to the default valuesdisplayed above not effective
--> Entered values WILMA
Row 1
Row 2
Row 3
Row 4
Row 5
n When you export a text file, it appears as follows:
� Column [Variant ID] Contains the variant ID
� Column [Variant text] Contains a short text about the variant
� Column &<parameter> Contains the test case import parameter.
n The first row contains the column headers.
n The second row contains the field name displayed in R/3.
n The third row contains the default value.
n The fourth row contains a comment that states changes to the default value are not considered.
n You can define the new data in the fifth row and on.

© SAP AG TABC10 42
SAP AG 1999
CATT: TIPS
l Only create test cases for transactions that you know well
l Choose the parameters and screen sequence so the test canbe reused
l Avoid creating new test cases when existing ones can bemodified
l When you modify test cases, ensure they remain compatible
l Document all test cases
l Use variants to broaden the range of tests

© SAP AG TABC10 43
SAP AG 1999
Authorization
Object Fields Value Meaning
ABAP Workbench(S_DEVELOP)
Development Class Create, Delete, Change ObjectDEVCLASS
Not used for CATTP_GROUP
OBJTYPE
OBJNAME
ACTVT
SCAT Object Type
Test Case Name
01 Create or generate
02 Change
03 Display
06 Delete
07 Activate, generate
16 Execute
70 Administer
n Authorization object S_DEVELOP has five fields, for which the following settings are checked:
� Development class (DEVCLASS). This authorization object is for the Change and Transport Management System, and is checked when you create the test case, not at runtime.
� Authorization group ABAP program (P_GROUP). This authorization object is not checked.
� Development object type (OBJTYPE). This authorization object is checked for value “SCAT” when this transaction is executed.
� Object name (OBJNAME). The test case name is checked.
� Activity (ACTVT). You can assign authorizations to individual test cases or groups of test cases. The following values are checked:
01 Create or generate
02 Change
03 Display
06 Delete
07 Activate, generate
16 Execute
70 Administer
© SAP AG TABC10 44
SAP AG 1999
User Master Records
l To activate the test status flag on the user master record,you need:
n Authorization for the object ABAP Development Workbench(S_DEVELOP)
n Development class ID SCAT, with activity 70
l The termination flag must be set on the test case attributes
n To activate the test status flag, you need the following authorizations:
� ABAP Development Workbench object (S_DEVELOP)
� Development class ID SCAT
� Activity 70 (Administer)
n If the test status flag is activated for a user, the test status is set when the CATT processes start.
n The test status is language-dependent and is stored depending on the process variant started.
n A history of test status allocation is also kept.
n The test status should only be set for final test cases.
n Transports of the CATT processes are generally compiled in other systems because of the test status.
n If the termination flag is set, the test case terminates upon the occurrence of the first error. Otherwise it continues despite errors. If the termination flag is not set, the current TCD or REF is aborted.

© SAP AG TABC10 45
SAP AG 1999
System Requirements
l To allow test casesto run in a client,the client tableT000 must bemaintained
l From the Clientdetails view, setthe appropriateflag in theRestrictionssection
n You can create client-independent test cases in any client, but you can only run them in one client. This must not be a productive client, as Customizing settings are changed and test master data is created, such as documents, which can lead to errors in the production system.
n To allow test cases to run in a client, the client table T000 must be maintained in system administration. To do this, choose Tools →Administration →Client administration →Client maintenance.
n In the Client details view, set the flag Allows CATT processes to be started from the Restrictions section.
n If the Automatic recording of changes flag is set in table T000, correction windows may appear during the customizing transactions. Do not set this flag when creating test cases, otherwise the test case procedure screen sequence for this customizing transaction may no longer be correct.

© SAP AG TABC10 46
SAP AG 1999
Now you are able to:
l Record a test case
l Create an external file to run a test case
Unit Summary
© SAP AG TABC10 47
SAP AG 1999
l Exercises?
l Solutions
Unit Actions

© SAP AG TABC10 48
Computer Aided Test Tool: Exercises
No. Exercise
1 Record a test case
1.1 Record a test case with the following specifications: Test case name: ZBC305 Transaction to be recorded: SU01. Function: Create user. For the user ID, specify the following: User: CATT Title: Mr. or Ms. Last name: CATT Initial password: init Test case description: Test Add User Component: BC-CCM-USR Development class: $TMP
2 Enter parameters for a test case
2.1 Define the following parameters in test case ZBC305: User name (initial screen of Transaction SU01) Last name (second screen of Transaction SU01) Hints: Use "&" as the parameter names.
3 Execute the test case with a different parameter value
3.1 Execute test case ZBC305 with the following parameter values: User name: CATTCOPY Last name: CATTCOPY Specify Errors as the processing mode.
3.2 Check if the user CATTCOPY has been created. 4 Create and use an external variant for the test case
4.1 Export the default parameters into a frontend file in order to create an external variant for your test case. Use the default values for the path and file name. Remember path and file name for the next step of the exercise.
4.2 Open the file using Notepad. Note: You can start Notepad from within R/3 using the report ZEDIT.
4.3 Enter the following external variant: AUTOCATT as the user ID AUTOCATT as the last name Note: Make your entries in the fifth (5th) line.
4.4 Execute the test case using the external variant from file.
4.5 Now import the file to R/3 to create a non-external variant.
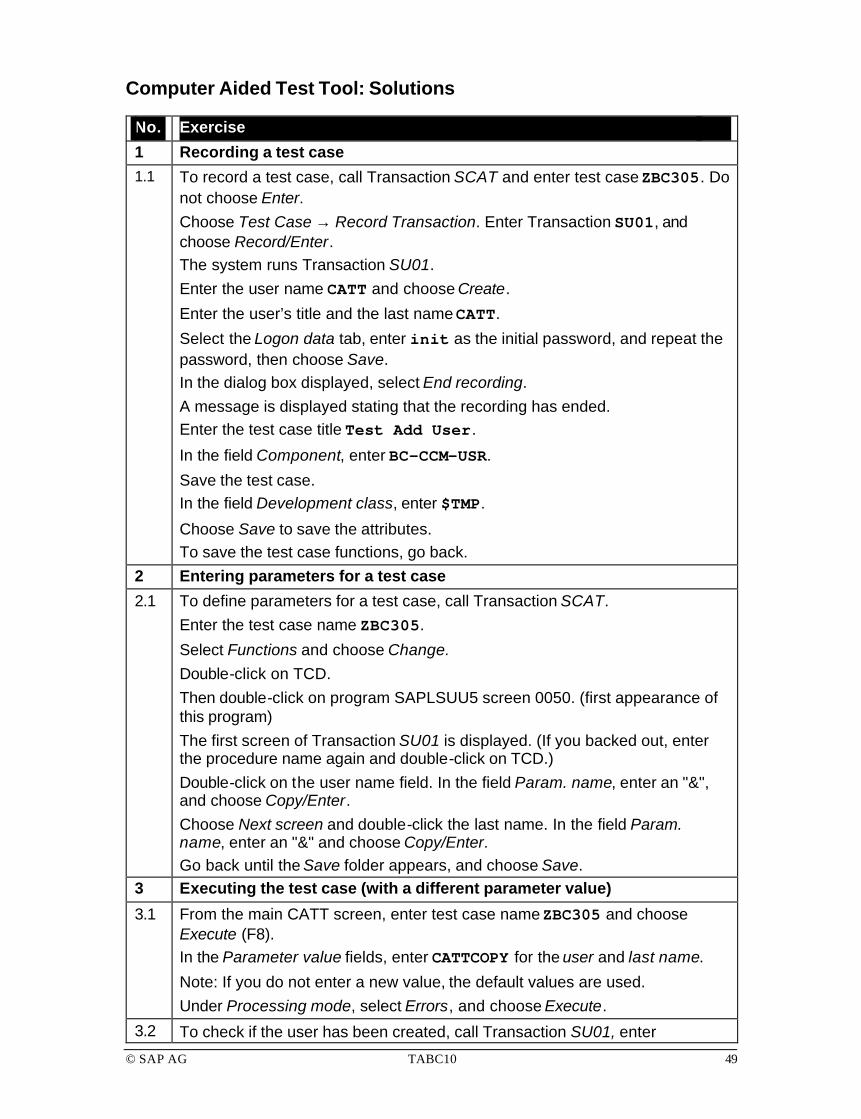
© SAP AG TABC10 49
Computer Aided Test Tool: Solutions
No. Exercise
1 Recording a test case 1.1 To record a test case, call Transaction SCAT and enter test case ZBC305. Do
not choose Enter. Choose Test Case → Record Transaction. Enter Transaction SU01, and choose Record/Enter. The system runs Transaction SU01. Enter the user name CATT and choose Create.
Enter the user’s title and the last name CATT.
Select the Logon data tab, enter init as the initial password, and repeat the password, then choose Save. In the dialog box displayed, select End recording. A message is displayed stating that the recording has ended. Enter the test case title Test Add User.
In the field Component, enter BC-CCM-USR.
Save the test case. In the field Development class, enter $TMP.
Choose Save to save the attributes. To save the test case functions, go back.
2 Entering parameters for a test case
2.1 To define parameters for a test case, call Transaction SCAT. Enter the test case name ZBC305.
Select Functions and choose Change. Double-click on TCD. Then double-click on program SAPLSUU5 screen 0050. (first appearance of this program) The first screen of Transaction SU01 is displayed. (If you backed out, enter the procedure name again and double-click on TCD.) Double-click on the user name field. In the field Param. name, enter an "&", and choose Copy/Enter. Choose Next screen and double-click the last name. In the field Param. name, enter an "&" and choose Copy/Enter. Go back until the Save folder appears, and choose Save.
3 Executing the test case (with a different parameter value)
3.1 From the main CATT screen, enter test case name ZBC305 and choose Execute (F8). In the Parameter value fields, enter CATTCOPY for the user and last name.
Note: If you do not enter a new value, the default values are used. Under Processing mode, select Errors, and choose Execute.
3.2 To check if the user has been created, call Transaction SU01, enter CATTCOPY in the field user, and choose Display.

© SAP AG TABC10 50
CATTCOPY in the field user, and choose Display.
4 Creating and using an external variant for the test case
4.1 To export the default parameters into a frontend file, in the test case, select Goto → Variants → Export Default.
Note: The default file name is <the name of your test case>.txt. Do not change the default values. Remember path and file name for the next step of the exercise.
Choose Transfer/Enter. A file containing the parameter structure with short texts and default values is created.
4.2 To open the file, call Transaction SA38. In the field Program enter ZEDIT and choose Execute.
Choose File → Open and select the file created in exercise 4.1.
4.3 On the fifth (5th) line, enter your external variants: First, tab twice and enter AUTOCATT (for user ID)
Tab again, and enter AUTOCATT (for last name)
Save and close the file.
4.4 To execute the test case using the external variant from file, from the initial CATT screen, enter the test case name and choose Execute. In the field Variants, select External from file and choose Choose. Select the file created in exercise 4.3. and choose Open. Under Processing mode, select Errors, and choose Execute. Note: When you use this method, the file must be imported each time the test case is executed (file remains only on PC).
4.5 To import the file to R/3, call Transaction SCAT. Enter the test case name and in the field Subobjects, select Functions. Choose Change. Then choose Goto → Variants → Edit.
Choose Import as text file.
In the dialog box displayed, select the file created in exercise 4.3. and choose Transfer. Select Add newly-imported, nonexistent variants. Choose Copy/Enter. Save your settings. Go back.
To display the new variant, choose Goto → Variants → Edit. Enter a description. Save again. Note: When you execute the test case using a non-external variant, you must call Transaction SCAT, enter the test case name and choose Execute. In the field Variants, select Special, generic and choose the already imported variant.

© SAP AG TABC10 51
SAP AG 1999
Graphical User Interfacesfor R/3
Computer Aided Test Tool
R/3 Security
R/3 Security

© SAP AG TABC10 52
SAP AG 1999
R/3 Security
Contentsl Security in client-server architecturel Transporting activity groupsl Security audit logl SAProuter
ObjectivesAt the end of this unit, you will be able to:l Describe security in client-server architecturel Transport activity groupsl Configure the security audit logl Configure and administer SAProuter

© SAP AG TABC10 53
SAP AG 1999
Presentation layer
Application layer
Database layer
Operating systems
R
CommunicationLAN and WAN
R• Access control to
R/3 data• Administration
• R/3 authorization concept • Object locking
• Access control / password• Integrity
Access control:• SNC • SAProuter
• File access control• OS commands• OS user accounts
Security in Client/Server Architecture
n Securing all the layers of the R/3 client-server architecture means ensuring confidentiality, integrity, and access control at all times.
n Confidentiality means that only authorized users have access to read or process R/3 data. Access for non-authorized users is prohibited.
n To ensure security, SAP has implemented the R/3 authorization concept, which is the security mechanism inside R/3.
n There are other areas you must consider, outside of the R/3 System, to ensure the security of all components of your R/3 installation:
� Operating system Do not allow users to sign on to the operating system. If they need to access a file, allow them access to Transaction AL11 (this is the display access of the SAP directories).
� Database system Change the default password for the database user and limit who can use this user ID.

© SAP AG TABC10 54
SAP AG 1999
End user
Basis audit log
Basis securityadministrator
R/3
RFC/CPIC user
Filter
Failedlogons
Basis Security Audit
n The Security Audit Log keeps a record of security-related activit ies in the R/3 System. This information is recorded daily in an audit file on each application server.
n You can specify the information you want to audit in the Security Audit Log. To specify or change the selection criteria, you can choose to:
� Save the selection criteria permanently in the database.
� Change the selection criteria dynamically on one or more application servers.
n If you save the selection criteria permanently in the database, then all of the application servers use the identical selection criteria for saving audit events in the audit log. You only have to define the criteria once for all application servers.

© SAP AG TABC10 55
SAP AG 1999
Security Audit: Profile Parameters
Parameter Description Value
rsau/enable Enable security audit 0 (not activated)1 (audit activated)
rsau/local/file Name of security audit file audit_++++++++
rsau/max_diskspace/local Maximum space for security <customer-defined>audit file
rsau/selection_slots Number of selection slots for 1-5 (default value 2)security audit
These profile parameters are needed to use the Security Audit Log
n The Security Audit Log is only active if you used Transaction SM19 to maintain and activate the profiles. Set the profile parameters as stated above.
n In the profile parameter rsau/local/file, the eight + symbols represent the date, which is automatically substituted with the current date by the system.
n If parameter rsau/max_diskspace/per_file is used, parameter rsau/local/file is no longer valid and will no longer be analyzed. Parameters DIR_AUDIT and FN_AUDIT are used instead.
n Parameter rsau/max_diskspace/local specifies the maximum size of a security audit file If this size is reached, then system logging of audit events is completed.
n Parameter rsau/selection_slots specifies the number of selection units that are set using Transaction SM19 and checked by the system during processing.
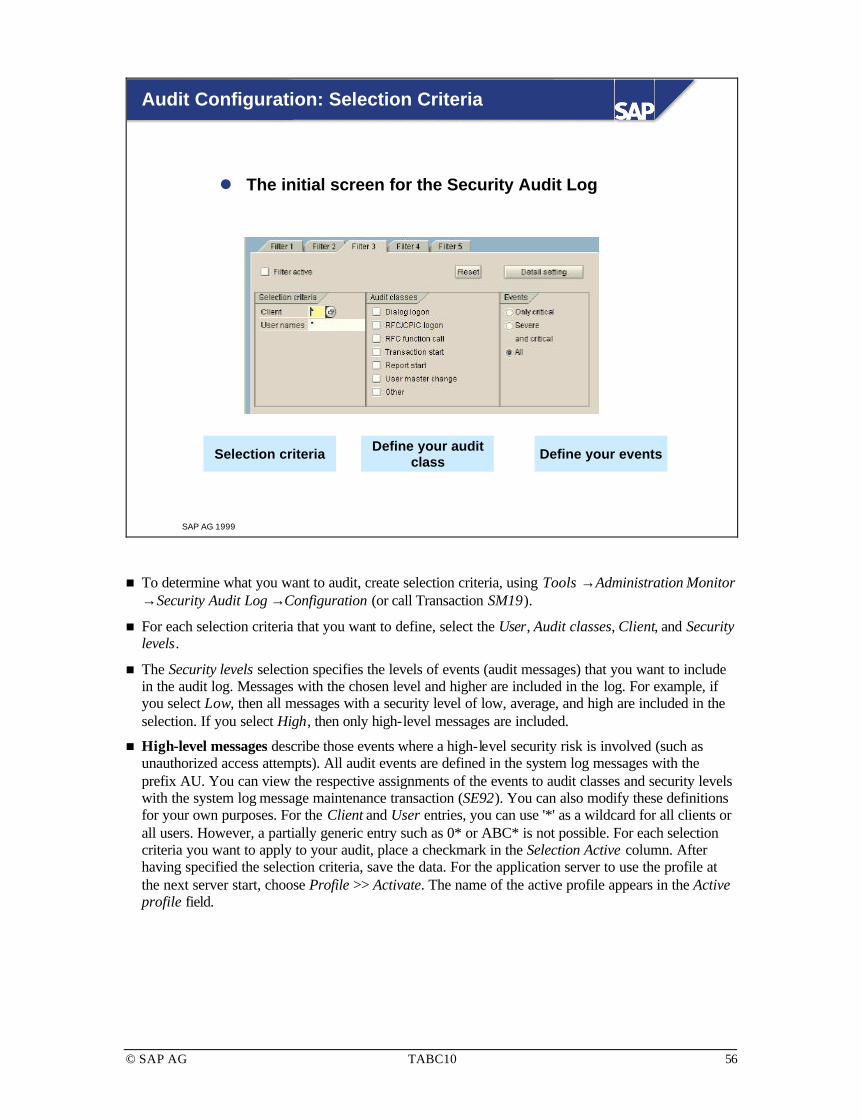
© SAP AG TABC10 56
SAP AG 1999
Audit Configuration: Selection Criteria
l The initial screen for the Security Audit Log
Define your auditclassSelection criteria Define your events
n To determine what you want to audit, create selection criteria, using Tools →Administration Monitor →Security Audit Log →Configuration (or call Transaction SM19).
n For each selection criteria that you want to define, select the User, Audit classes, Client, and Security levels.
n The Security levels selection specifies the levels of events (audit messages) that you want to include in the audit log. Messages with the chosen level and higher are included in the log. For example, if you select Low, then all messages with a security level of low, average, and high are included in the selection. If you select High, then only high-level messages are included.
n High-level messages describe those events where a high-level security risk is involved (such as unauthorized access attempts). All audit events are defined in the system log messages with the prefix AU. You can view the respective assignments of the events to audit classes and security levels with the system log message maintenance transaction (SE92). You can also modify these definitions for your own purposes. For the Client and User entries, you can use '*' as a wildcard for all clients or all users. However, a partially generic entry such as 0* or ABC* is not possible. For each selection criteria you want to apply to your audit, place a checkmark in the Selection Active column. After having specified the selection criteria, save the data. For the application server to use the profile at the next server start, choose Profile >> Activate. The name of the active profile appears in the Active profile field.

© SAP AG TABC10 57
SAP AG 1999
Reading the Security Audit Log
l The SecurityAudit Logdisplays
From/To Date
Time, Client, User ID,Transaction Code,
Terminal ID, and Textthat describes the
Event
n The Security Audit Log produces a report on the activities that have been recorded in the audit file. You can analyze a local server, a remote server, or all of the servers in your R/3 System.
n To display the initial screen, call Transaction SM20. It is designed similar to the System Log (Transaction SM21).
n The following information is provided:
� Time
� Client
� User
� Tcode (transaction code)
� Text (describing event)

© SAP AG TABC10 58
SAP AG 1999
Firewall
LAN
(R/3 Systems)
SAProuter
WAN
Internet
SAProuter: Overview
n SAProuter is a program that serves as an intermediate station between R/3 Systems or programs. SAProuter acts as an application level gateway (proxy) and can be implemented independently of an R/3 System directly on a firewall. SAProuter enables you to completely control access to your R/3 System(s).
n The network interface (NI) is a separate, platform-independent, intermediate layer developed by SAP. The NI layer forms the upper part of the transport layer in the OSI 7 layer model. SAProuter as well as all R/3 CPI-C and RFC programs use this layer.
n SAProuter uses a configurable a route permission table to allow or deny connections from other systems.
n You can use SAProuter to:
� Control and log the connections to your R/3 System
� Allow access from only the SAProuters you have selected
� Protect your connection and data from unauthorized access
� Only allow encrypted connection from a known partner (using the SNC layer)

© SAP AG TABC10 59
SAP AG 1999
SAProuter: Implementation
SAProuterl Create subdirectory for saprouter in
/usr/sap (UNIX), \usr\sap (NT)
l Download the most recent version ofSAProuter from sapserv#
l To start SAProuter automatically, editstartsap script (UNIX) or configuresaprouter as service (Windows NT).
l Maintain route permission table forexample in:/usr/sap/saprouter/saprouttab (UNIX)\usr\sap\saprouter\saprouttab (NT)
l For documentation see collective SAPNote 30289 or SAP Library.
n During installation, SAProuter is normally located in directory /usr/sap/<SID>/SYS/exe/run (UNIX). SAP recommends that you create the subdirectory saprouter in the directory /usr/sap, because the /exe/run dir. will be overwritten by the new kernel functions during an R/3 Release upgrade, thus destroying your SAProuter configuration.
n Under Unix, you can start SAProuter from the script startsap. Under Windows NT, it is recommended to define the service.
n SAP also recommends downloading the most recent version from any sapserv system.
n SAP recommends that the route permission table be maintained in /usr/sap/saprouter/saprouttab (UNIX). If you wish to place this table in another directory or under a name other than saprottab, specify the location using the option saprouter -r.

© SAP AG TABC10 60
SAP AG 1999
SAProuter: Route Strings
WAN
(Internet)
SAP firewall
SAPSAProuter
CustomerSAProuter
Frontend PC
computer1
Customer LAN
SAP LAN
/H/customer_saprouter/W/apppswd/H/sap_saprouter/H/appserver
Customer firewall
Application Server
APPSERVER
Connect
Password
n A route string describes the stations of a connection required between two hosts. Each route string has a sub-string for each SAProuter in between, and for the target server.
n The syntax for the sub-strings are:
� /H/ = indicates the host name.
� /S/ = an optional entry used for specifying the service port. The default value is 3299.
� /W/ = indicates the password for the connection. The default is “”, no password.
n In the example shown here, the connection from the customer’s frontend PC computer1 to SAP’s application server APPSERVER is set up in three steps:
� 1. computer1 sets up the connection to customer_saprouter according to the first sub-string.
� 2. customer_saprouter uses the route permission table to check whether the connection is allowed. This sets up the connection between both SAProuters.
� 3. sap_saprouter checks whether the route from customer_saprouter to the application server is allowed. The password is also checked. sap_saprouter then sets up the connection to the application server APPSERVER.

© SAP AG TABC10 61
SAP AG 1999
WAN
(Internet)Computer 2Computer 2
Computer 1
CustomerSAProuter SAP
SAProuter
Field Permit/Deny
ServiceTargetcomputer
Sourcecomputer
Password
Value P computer1 SAPSaprouter
3299 xyz123
P 123.45.67.* 123.45.* *
SAProuter: Route Permission Table (saprouttab)
Customerfirewall
Customer LAN SAP LAN
SAP firewall
n A route permission table (saprouttab) must be defined for each SAProuter. The route permission table contains the host names, port numbers, and passwords of a source and destination host. Each time an access is requested, R/3 looks for table saprouttab in the working directory of the SAProuter. If no route permission table is found, SAProuter terminates with an error message.
n To create a route permission table, use a standard text editor.
n The route permission table contains a maximum of five fields for each possible access:
� Permit/Deny/Secure, Source computer, Target computer, Service, and Password
n When making entries in these fields, you can use “wildcards” (*). However, these should be used with caution.
n In the example shown here, all computers with IP addresses beginning with 123.45.67 do not need a password to communicate with all of the services on target computers with host addresses (IP address) beginning with 123.45. If the first field displays a D instead of a P, access to the specified computer and its services has been denied. If you leave the service and password blank, the defaults are used. For service the default is 3299; if the field Password is blank, no password is required.
n When checking accesses, SAProuter looks for the first appearance of a Permit or a Deny for one specific computer. Once this is found, the rest of the route permission table is not checked for this computer.
n When you configure the route permission table, specify all deny entries before permits.

© SAP AG TABC10 62
SAP AG 1999
niping -s saprouter -r niping -c -H host2
niping -c -H /H/host1/H/host2WithSAProuter
WithoutSAProuter
Window 2(Host 2)
Window 3(Host 3)
Window 1(Host 1)
Server ClientRouter
SAProuter: Testing Basic Functions with NIPING
n Step 1: In Window 1 ( host 1) start SAProuter by entering command saprouter -r. This command starts SAProuter without parameters. For a complete list of SAProuter commands, search for saprouter in the Online help.
n Step 2: In Window 2 (host 2), start the test program niping to emulate a server by entering command niping -s.
n Step 3: In Window 3 (host 3), start the test program niping to emulate a client, by entering command niping -c -H host2. This command tests the connection without SAProuter, that is, it tests the connection directly between host 2 and host 3.
n Step 4: In Window 3, restart the test program niping by entering the command niping -c -H /H/host1/H/host2. This command tests the connection with SAProuter. A host name is interpreted as a route through one or more SAProuters to the server if the host name is preceded with /H/.
n In steps 3 and 4, several data packets are sent to the server and then returned by the server.
n To stop all active niping servers and clients, enter command niping -t.

© SAP AG TABC10 63
SAP AG 1999
l Display a complete list of SAProuter options: saprouter
l Start SAProuter: saprouter -r
l Stop SAProuter: saprouter -s
l Set trace level: saprouter -r -V3
l Toggle trace level: -t option
l Specify trace file: saprouter -T <trace file>
l Specify a log file: saprouter -r -G <log file>
SAProuter: Trace File and Other Options
n The main SAProuter commands are:
� saprouter displays a complete list of the SAProuter parameters (this includes all options and examples of a route permission table).
� saprouter -r starts program SAProuter.
� saprouter -s stops program SAProuter.
n The trace level can be set to 1 to 3 (1 being lowest detail and 3 being the highest). The default destination for the trace file is dev_rout in the work dir. You can specify the trace to another file by setting the -T option.
n For logging connections, you can specify a log file when starting your SAProuter. To do this, use the option -G, for example, saprouter -r -G <log file>. All important actions such as connection start, run-time operations, are logged to the file:
� Connection from (client name / address)
� Connection to (partner name / address)
� Partner service
� Start time/end time
� Connection requests rejected by the route permission table

© SAP AG TABC10 64
SAP AG 1999
RFC, CPIC, or otherR/3 System
Applicationserver
Databaseserver
Zone protectedby firewall
SAP GUI
SAPlpd
SAProuter
SAProuter: Communication Partners and
n The communication between the following system components can be protected using SAProuter.
� R/3 application servers
� SAP GUI
� SAPlpd
� External RFC programs
� External CPIC programs
n When communication on the NI layer should include a SAProuter the host name fields in R/3 can be used to store the complete SAProuter string.
n Examples:
� RFC connection between two R/3 Systems: In the calling R/3 system the RFC connection is maintained using transaction SM59. In the field target host enter the SAProuter string: e.g. /H/twdfmx16/S/3299/H/twdfmx17 instead of twdfmx17 (without SAProuter)
� R/3 Server - SAPlpd: In transaction SPAD choose output devices select the HostSpoolAccMethod S and in the field Destination Host enter the SAProuter connection string instead of the host name. If the field is too small for this string, you can use Transaction SM55 to define a short host name known in R/3 and assign a whole SAProuter string to it. For example: /H/twdfmx16/S/3299/H/twdfmx17/S/515 instead of twdfmx17 (without SAProuter).

© SAP AG TABC10 65
SAP AG 1999
Additional Security Measures: SAP GUI Reconnect
Applicationserver
n If the connection between the application server and SAP GUI fails, a dia log box is displayed, allowing you to reconnect to the SAP GUI. To log on again, choose Yes and enter your user ID and password. Then choose User >> Copy session.
n This triggers a reconnection, and (if no problems exist) all the sessions you had prior to the connection failure will be reattached and you can carry on working with the sessions you had before.
n The SAP GUI reconnection is always performed on the same application server where the sessions were running. If you log on using the connection broken pop up, you will not have any problems re-logging on. If you do not use the pop up, the reconnection mechanism only works if you directly re-log on to the correct application server.
n User sessions are only available for the period specified in parameter rdisp/keep_alive, which has a default value of 1200 seconds.
n If no entry is made in the R/3 System, the frontend is automatically logged off after the number of seconds specified in parameter rdisp/gui_auto_logout. If the value is 0, the frontend does not automatically log off..
n Note: If you the value of rdisp/keep_alive is greater than 0 and you do not use the reconnection, there may be locking issues.
n If the value of rdisp/keep_alive is lower than the value of rdisp/gui_auto_logout, you will lose your work because the buffer will no longer have your work. In this example, rdisp/keep_alive is only useful for a reconnection if you lose the connection to the R/3 System. That is, if there is a network failure and you reconnect within the rdisp/keep_alive time, you will have your work.

© SAP AG TABC10 66
SAP AG 1999
Additional Security Measures: AuthorizationGroups
l Program RSCSAUTH
n Allows customers to maintain authorization groups on all ABAPprograms (SAP- and customer-defined)Note: Updates to SAP programs are not considered modifications
l You can enter specific programs ("Program name" selection)or choose a specific application
l Customer- defined programs with no authorization check in thecode are now secure
Program: ZABAPTEST
No authorization check
Program attributes show noauthorization group. Withprogram RSCSAUTH, youcan add authorizationgroups without affecting theoriginal program attributes
n SAP programs are supplied either with an authorization group that does not fit in with the customer's authorization system, or without an authorization group altogether.
n Program RSCSAUTH allows you to maintain the authorization groups for such programs without the need to change the program attributes. It also allows you to restore customer-specific authorization groups following an upgrade.
n Program RSCSAUTH generates a list of type 1 reports (column Program), the authorization groups as maintained by SAP (column SAP), and those maintained by the customer (column Customer).
n Column Customer is an input field where you can enter your own authorization groups.
n When you choose Save, the customer-specific authorization groups for all selected reports are copied to table TRDIR. This has the same effect as changing the authorization group in the program attributes, since existing SAP authorization groups are overwritten. The authorization groups for each program are also entered in table SREPOATH. This is to allow you to restore customer-specific authorization groups following an upgrade by running program RSCSAUTH again.

© SAP AG TABC10 67
SAP AG 1999
Additional Security Measures: TrustedRelationships Between R/3 Systems
R/3 database servers
R/3 application servers
R/3 presentation servers
Trusted System(contains RFC client)
Trusting System(contains RFC server)
Trust relationship
Single log on to R/3
DEV QAS
n R/3 Systems can establish trusted relationships between each other.
n If a calling (sending) R/3 System is known to the called (receiving) system as a trusted system, no password must be supplied.
n The calling (sending) R/3 System must be registered with the called (receiving) R/3 System as a trusted system. The called (sending) system is called the trusting system.
n Trusted relationships between R/3 Systems have the following advantages:
� Single sign on is possible beyond system boundaries
� No passwords are transmitted in the network
� Timeout mechanism protects against replay attacks
� User-specific logon data are checked in the trusting system
n The trust relationship is not mutual, which means it applies to one direction only. To establish a mutual trust relationship between two partner systems, you must define each of the two trusted systems in its respective partner systems.
n Therefore, access to Transaction SM59 should be restricted and the contents of table RFCDES should be checked regularly.

© SAP AG TABC10 68
SAP AG 1999
Unit Summary
Now you are able to:
l Implement the following R/3 security tools:
n Central User Administration
n Security Audit Log
n SAProuter
l Help develop constructive strategies for meetingsecurity requirements in the R/3 System interfaces inyour IT environment
© SAP AG TABC10 69
SAP AG 1999
Further Documentation
l The R/3 Security Guide in SAPNet
n http://sapnet.sap.com/securityguide
n The R/3 Security Guide contains detailed information about:
� All topics in this unit are covered
� References
� Checklists
� Further recommendations by SAP regarding security

© SAP AG TABC10 70
SAP AG 1999
Section: Technical Core Competence - Workplace
Introduction Including MiniApps
Workplace Architecture Software Logistics
Configuration andAdministration
Monitoring andTroubleshooting
InternetTransaction Server Drag&Relate
Users:Single Sign On

© SAP AG TABC10 71
SAP AG 1999
Introduction Including MiniApps
Workplace Architecture Software Logistics
Configuration andAdministration
Monitoring andTroubleshooting
InternetTransaction Server Drag&Relate
Users:Single Sign On
Introduction
© SAP AG TABC10 72
SAP AG 2000
Introduction
Contentsl mySAP.com Components
l mySAP.com Overview
l mySAP.com Features
l mySAP.com Benefits
ObjectivesAt the end of this unit, you will be able to:
l Describe the key components and associated benefits ofmySAP.com Workplace

© SAP AG TABC10 73
SAP AG 2000
mySAP.com Components
mySAP.comMarketplace
mySAP.comWorkplace
mySAP.comBusinessScenarios
mySAP.comApplication
Hosting
l mySAP.com consists of 4 main components:
n mySAP.com combines new and existing SAP products and services in the Internet and for intranets. The main components are:
n mySAP.com Workplace: The Workplace provides each employee with an easy-to-use, standard user interface. Within a Web browser, users have a set of tasks assigned to them by their user role. In addition, each user can personalize his own her own individual Workplace. E-mail, search engines, and other Web services can also be integrated.
n mySAP.com Marketplace: The Marketplace at www.mysap.com enables companies to market information, content, and products. Offers for specific groups can be found in the corresponding Business Community (for example, for a particular industry). Business partners can connect their business processes, such as buying and selling, in the Marketplace. This is known as one-step business.
n Business scenarios: SAP provides a variety of electronic business solutions for the Internet and for intranets.
n Application hosting: SAP or SAP partners set up or run the business systems for the customer. The customer decides whether to employ hosting only for the evaluation phase, or for the implementation phase, or also during production.
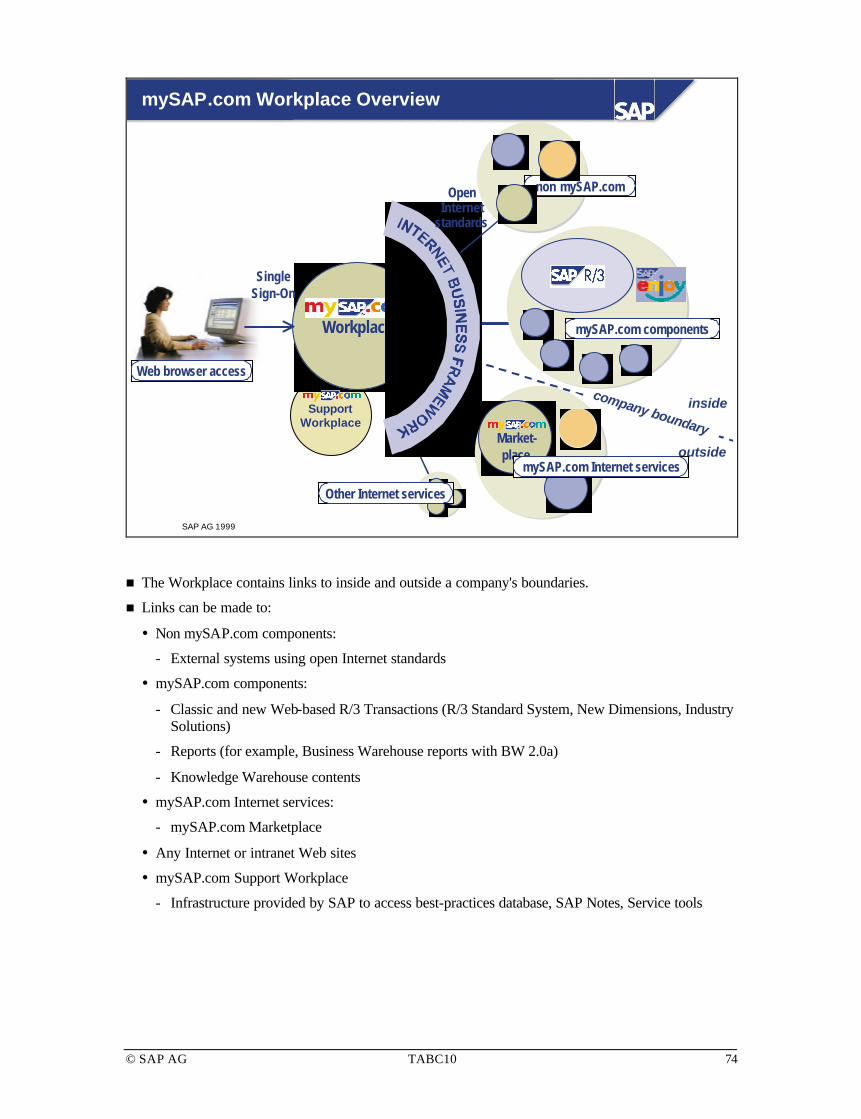
© SAP AG TABC10 74
SAP AG 1999
SupportWorkplace
company boundary
mySAP.com Workplace Overview
Web browser access
WorkplaceWorkplace
Market-place
Market-place
SingleSign-On
mySAP.com components
OpenInternet
standards
non mySAP.com
inside
outsidemySAP.com Internet services
Other Internet services
n The Workplace contains links to inside and outside a company's boundaries.
n Links can be made to:
� Non mySAP.com components:
External systems using open Internet standards
� mySAP.com components:
Classic and new Web-based R/3 Transactions (R/3 Standard System, New Dimensions, Industry Solutions)
Reports (for example, Business Warehouse reports with BW 2.0a)
Knowledge Warehouse contents
� mySAP.com Internet services:
mySAP.com Marketplace
� Any Internet or intranet Web sites
� mySAP.com Support Workplace
Infrastructure provided by SAP to access best-practices database, SAP Notes, Service tools
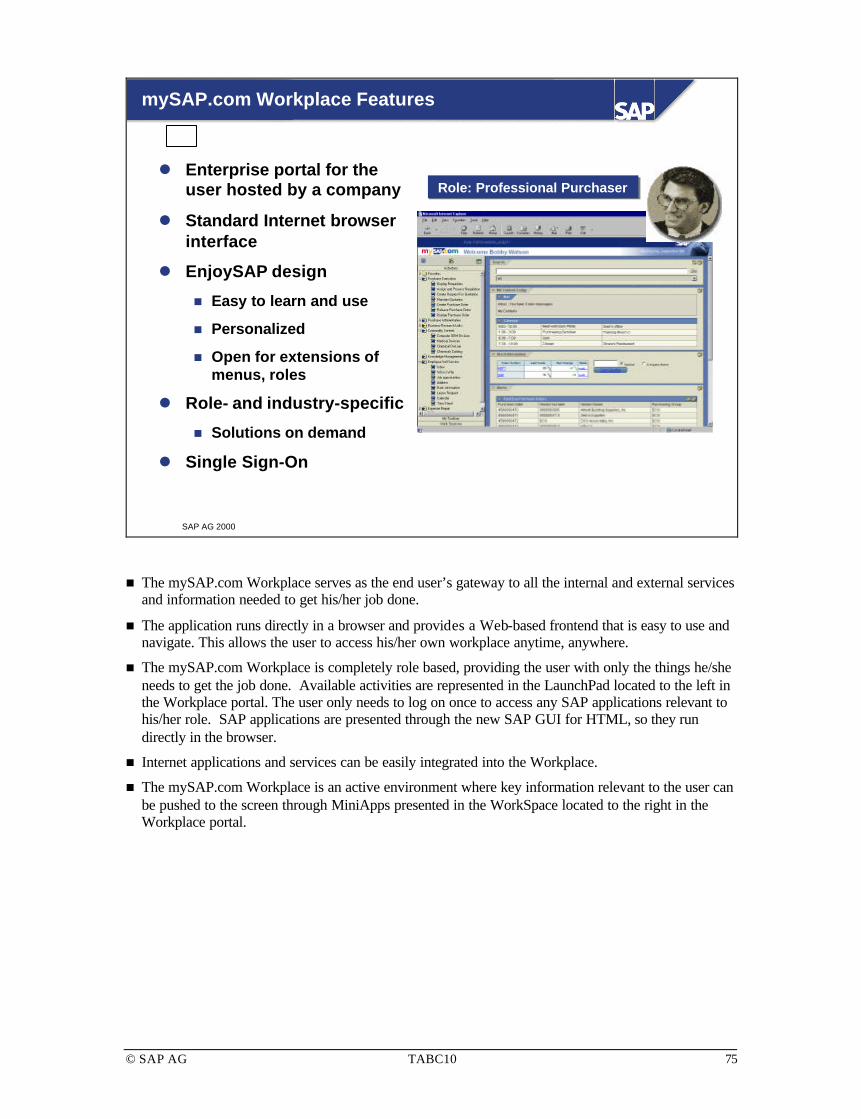
© SAP AG TABC10 75
SAP AG 2000
mySAP.com Workplace Features
l Enterprise portal for theuser hosted by a company
l Standard Internet browserinterface
l EnjoySAP design
n Easy to learn and use
n Personalized
n Open for extensions ofmenus, roles
l Role- and industry-specific
n Solutions on demand
l Single Sign-On
Role: Professional PurchaserRole: Professional Purchaser
n The mySAP.com Workplace serves as the end user’s gateway to all the internal and external services and information needed to get his/her job done.
n The application runs directly in a browser and provides a Web-based frontend that is easy to use and navigate. This allows the user to access his/her own workplace anytime, anywhere.
n The mySAP.com Workplace is completely role based, providing the user with only the things he/she needs to get the job done. Available activities are represented in the LaunchPad located to the left in the Workplace portal. The user only needs to log on once to access any SAP applications relevant to his/her role. SAP applications are presented through the new SAP GUI for HTML, so they run directly in the browser.
n Internet applications and services can be easily integrated into the Workplace.
n The mySAP.com Workplace is an active environment where key information relevant to the user can be pushed to the screen through MiniApps presented in the WorkSpace located to the right in the Workplace portal.

© SAP AG TABC10 76
SAP AG 2000
mySAP.com Workplace Benefits
l Access to all necessaryinternal and externalservices through onescreen
l Seamless integration in themySAP.com environment
l Portal tailored to the user’srole in the company
l Single Sign-On access toall services
l User-friendly Web browserinterface
l Access through theInternet anytime, anywhere
Role: Professional PurchaserRole: Professional Purchaser

© SAP AG TABC10 77
SAP AG 2000
You are now able to:
Unit Summary
n Describe the key components and associatedbenefits of mySAP.com Workplace

© SAP AG TABC10 78
SAP AG 2000
Further Documentation
l service.sap.com
n .../estarter
n .../ides
l mySAP.com Workplace Demo CD(Material Number 50038177)
For further information aboutmySAP.com Workplace, see:

© SAP AG TABC10 79
SAP AG 1999
Introduction Including MiniApps
Workplace Architecture Software Logistics
Configuration andAdministration
Monitoring andTroubleshooting
InternetTransaction Server Drag&Relate
Users:Single Sign On
Workplace Architecture
© SAP AG TABC10 80
SAP AG 2000
Workplace Architecture
Contentsl mySAP.com Workplace architecture overview
l mySAP.com Workplace components
l Interaction of components
ObjectivesAt the end of this unit, you will be able to:
l List the components of the mySAP.com Workplacearchitecture
l List the mySAP.com Workplace requirements
l Describe the architecture and functionality of eachcomponent

© SAP AG TABC10 81
SAP AG 2000
Workplace Screen Layout
LaunchPadwith roles andURLs
LaunchPadwith roles andURLs
WorkSpacewith MiniAppsand SAP GUI
WorkSpacewith MiniAppsand SAP GUI
Drag&Relate
n The graphic illustrates a mySAP.com Workplace designed specifically for a purchasing agent. To sign on to his Workplace, Bobby Watson calls a special URL through his Internet browser. Once he has signed on, the mySAP.com Workplace portal is built within his browser. The initial screen of the portal has two main sections:
� The LaunchPad containing activities
� The WorkSpace containing MiniApps
n The LaunchPad is built based on the role(s) of the user. With the LaunchPad, all of the information and activities the users needs are just one click away. Within a LaunchPad for a purchasing agent, the user may access an SAP System to create a purchase order, access a Business Information Warehouse system to run key reports, and then access the Web to carry out research on a particular vendor. All of these activit ies can be carried out easily through the LaunchPad.
n The WorkSpace is an active environment where key information is pushed to the screen via MiniApps. MiniApps are relevant and easy-to-understand pieces of information. The user role determines a selection of MiniApps for display. These are displayed immediately when the user signs on.

© SAP AG TABC10 82
SAP AG 2000
WebserverWeb
server
Workplace Architecture Overview
WPS(≥4.6B)
R/3(≥3.1H)
APO
WorkplaceMiddleware
l Internet Transaction Server
l SAP GUI for HTML
l MiniApps
l Drag&Relate Servlet
Frontend
environment
Web browser
Workplace
Middleware
...
Component systems
l Component systems do not need to be upgraded to Release 4.6
BW
l Supported Browsers
l Internet Explorer
l Others: see SAPNet
Workplace Server
n The mySAP.com Workplace is a a key building block of mySAP.com. It provides role -based Web access to everything users need during their workday
n The scalable mySAP.com Workplace Middleware provides:
� The Internet Transaction Server (ITS) which also represents the SAP GUI for HTML together with a Web browser
� Execution of MiniApps
� A Drag&Relate server for handling drag-and-relate requests
n The Workplace Server consists of:
� The Workplace Server is a standard R/3 system with special AddOns.
� The Workplace Server uses Release 4.6 Basis technology (For details, see SAP Note 183914)
� As of Release 4.6D, the Workplace Server is included in the Basis software component of any standard R/3 System. No separate Workplace Server and no AddOn installation is then required.
n For up-to-date release information about all Workplace components, see http://service.sap.com/dbosplatforms.

© SAP AG TABC10 83
SAP AG 2000
Workplace Server Functionality
The Workplace Server is an SAP System for:
l Central User Administration
l Collective Roles Maintenance
n Including single roles
n Including MiniApps
l Initial Sign-On to a mySAP.comenvironment
l LaunchPad Access
l Launching the right GUI
n By GUI classification fortransactions
n For user preferences
n By generation from URL
Workplace ServerWorkplace Server
Central UserAdministration
(CUA)
Transactionclassification
ITS addresses
User data
Roles
Personalization
URL generation
n The Workplace Server (WPS) is connected to the SAP component systems via RFC connections. The Workplace provides the following functions:
� Central User Administration (CUA): Using Single Sign-On, users log on to the Workplace server where they and their roles are identified.
� Collective roles management: The WPS manages all role definitions (activity groups) and access methods (in the form of URLs) for the functions and services that can be accessed in the Workplace.
� LaunchPad access (personalization): This includes personalizing roles, defining favorites (for example, favorite URLs in the LaunchPad), and selecting the GUI.
� URL generation
� Classification of transactions: The transactions that cannot run with the SAP GUI for HTML are classified in Customizing.
� RFC management: The Workplace Server maintains an RFC connection to all mySAP.com components or applications that can be accessed in relation to the user’s role.
� ITS address management: The Workplace Server links the logical systems (component systems) with the address of the corresponding Internet Transaction Server (ITS).

© SAP AG TABC10 84
SAP AG 2000
Central User Administration
Defined users:User A
User B
User C
Defined users:User X
User Y
Defined users:User A
User D
User X
Defined users(required):
User A
User B
User C
User D
User X
User Y
l CUA makes administration easier
l Each user of the component system must be defined on the Workplace Server
WPS
BW
APO
R/3
...
WorkplaceServer
Component Systems
n CUA is a powerful SAP tool for synchronizing user master records.
n Each user signs on to the Workplace from a Web browser. The Workplace then controls the connections to the various component systems. Any user account for any component system must also exist on the Workplace Server.
n The component system may be a standard R/3 System, a BW system, a B2B system, and so on.
n Example:
� Users A, B, C are defined on component system 1.
� Users X, Y are defined on component system 2.
� Users A, D, X are defined on component system 3.
� All users are defined on the Workplace Server.
n Users A and X exist on two different component systems. For example, the user master record for user A may be different on component systems 1 and 3, but you must decide how the user master record of user A is defined on the Workplace Server. In this case, you must synchronize the user master records of user A in component systems 1 and 3, and then define the synchronized user master record of user A on the Workplace Server.

© SAP AG TABC10 85
SAP AG 2000
Collective Roles Maintenance
Createsingle role
Copy singleroles to WPS
Assign single roles to collective roles
and assign collectiveroles to users
Use CUA to distributeuser assignments to component systems
KeepadditionalURL info
WorkplaceServer
Componentsystem CS1
Componentsystem CS2
Componentsystem CS3
l Single roles are maintained on the component systems
l Collective roles are maintained exclusively on the Workplace Server
12
3
5
4Create
single role
Createsingle role
1
1
...
n Single roles are similar to activity groups. They are generated exclusively on the component systems. Collective roles are generated on the Workplace Server. As of Release 4.6C, single roles can also be created on the Workplace Server and then distributed to the component systems. Example:
1. The single roles on the various systems can differ from each other. For example, the component system may run with different SAP releases. Each entry in a single role represents an SAP transaction code. For each transaction code, URL information is generated.
A developer role on CS1 (for instance: development system, SAP Release 4.0B)
A quality tester role on CS2 (for instance: quality assurance system, SAP Release 3.1I)
A system administrator role on CS3 (for instance: sandbox system, SAP Release 4.6B)
2. The single roles (and the URL information) are copied to the Workplace Server. This can be done either by using SAP transport or by downloading and uploading the single roles to files using the WPST transaction.
3. On the Workplace Server, single roles are assigned to collective roles using transaction PFCG. The collective roles are stored.
4. CUA is used to distribute user assignments to the component systems.
5. Additional URL information (transaction classification in table TSTCCLASS) is stored on each component system.

© SAP AG TABC10 86
SAP AG 2000
Initial Sign-On
Desktop
WorkplaceMiddleware
Browser
Sign on to WPS1
Work-placeServer
Read collective rolefrom user master
record
Generate URLs fromrole and send
URLs to Middleware
4
R/3BW
3
WebserverWeb
serverWorkplaceMiddlewareOpen RFC
connection
2 Send URL toLaunchPad and
close RFC connection
5
DisplayLaunchPad
6
At initial sign-on,the componentsystems are notaccessed at all
...
n Example
1. A user signs on to the Workplace Server by opening a specific URL on the Web Server.
2. The request is passed to the ITS for processing. To handle the logon, the ITS opens an RFC connection to the Workplace Server.
3. The Workplace Server reads the collective role from the user’s masters record.
4. The URL is generated from the URL information for the role and send back to the Middleware.
5. The ITS sends the URL back through the open RFC connection to the LaunchPad. The RFC connection is then closed.
6. The browser displays the LaunchPad.
n After the mySAP.com Workplace home page is initialized, no further requests to the Workplace Server are needed.

© SAP AG TABC10 87
SAP AG 2000
LaunchPad Access
Work-placeServer
BW R/3
Desktop
WorkplaceMiddleware
Call transaction
Execute transactionand read additional
URL info
Send HTMLpage to browser
or launch theright GUI
Click a menuentry on theLaunchPad
1
3
4
6
Browser
Send screen withadditional URL
info to Middleware
5
Read URLinfo from
cache
2WebserverWeb
serverWorkplaceMiddleware
...
n The complete LaunchPad menu is fetched at once. Folders in the LaunchPad are opened and closed locally in the browser and do not involve requests to the Workplace Server.
n URLs are generated by the Workplace Server and passed on to the browser. They contain the information needed to contact the addressed services, for example, Single Sign-On (SSO) information, system, client, transaction, and GUI to be used.
n In the case of the SAP GUI for the HTML environment, the handling is done by the ITS.
1. The user clicks a URL (for example, a LaunchPad menu item). The ITS is called and information is passed.
2. The ITS retrieves the URL info of the users role from the ITS cache. The cache contains for each node of the user menu: RFC destination, node type (transaction, URL, KW object), node information (transaction code, URL name, KW object name).
3. The ITS logs on to the target component and calls the transaction. This connection is either a DIAG or RFC connection.
4. The component system executes the transaction and reads further URL info from the user role.
5. The screen contents and URL info are passed to the ITS.
6. ITS generates the HTML page (either directly converting from DIAG to HTML or using templates from SAP@Web Studio). The DIAG or RFC connection is kept open for further calls.
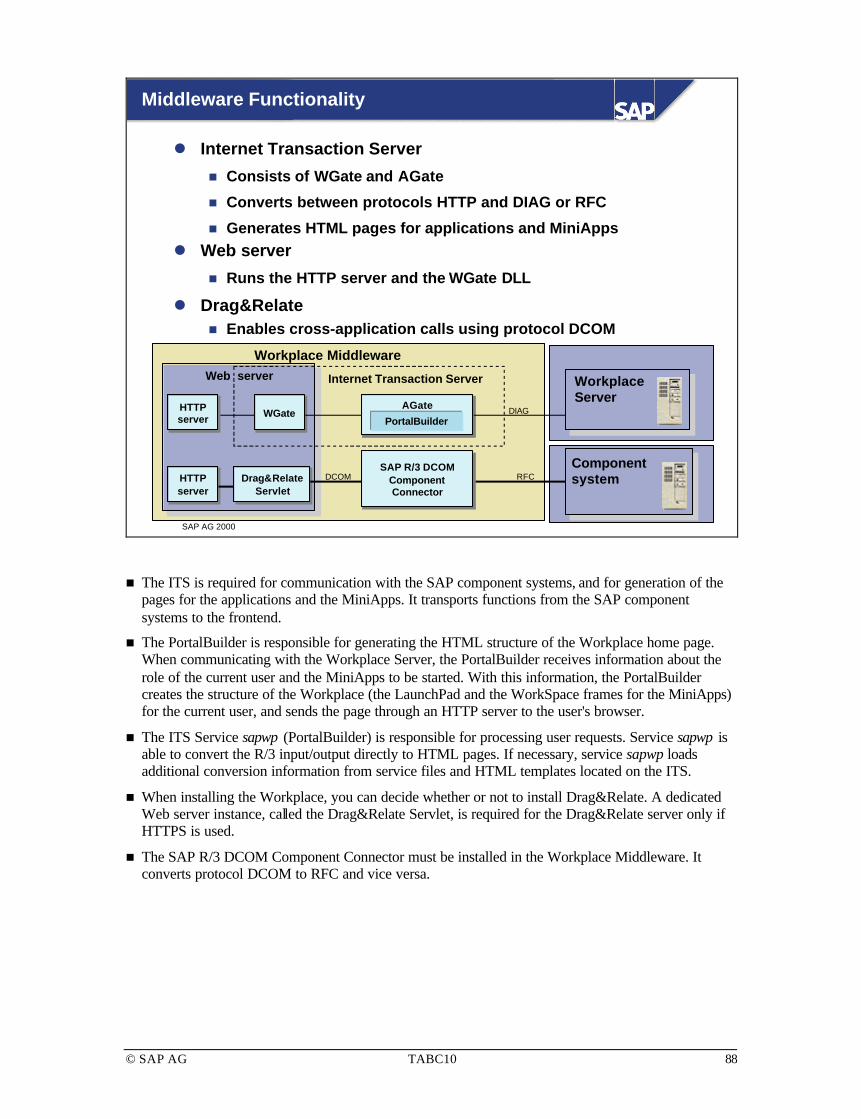
© SAP AG TABC10 88
SAP AG 2000
Middleware Functionality
WorkplaceServer
Workplace Middleware
Web server Web server
AGateAGate
PortalBuilderWGateWGate DIAG
l Internet Transaction Server
n Consists of WGate and AGate
n Converts between protocols HTTP and DIAG or RFC
n Generates HTML pages for applications and MiniAppsl Web server
n Runs the HTTP server and the WGate DLL
l Drag&Relaten Enables cross-application calls using protocol DCOM
HTTPserverHTTPserver
Internet Transaction Server
ComponentsystemRFCHTTP
serverHTTPserver
SAP R/3 DCOMComponentConnector
SAP R/3 DCOMComponentConnector
DCOMDrag&RelateServlet
Drag&RelateServlet
n The ITS is required for communication with the SAP component systems, and for generation of the pages for the applications and the MiniApps. It transports functions from the SAP component systems to the frontend.
n The PortalBuilder is responsible for generating the HTML structure of the Workplace home page. When communicating with the Workplace Server, the PortalBuilder receives information about the role of the current user and the MiniApps to be started. With this information, the PortalBuilder creates the structure of the Workplace (the LaunchPad and the WorkSpace frames for the MiniApps) for the current user, and sends the page through an HTTP server to the user's browser.
n The ITS Service sapwp (PortalBuilder) is responsible for processing user requests. Service sapwp is able to convert the R/3 input/output directly to HTML pages. If necessary, service sapwp loads additional conversion information from service files and HTML templates located on the ITS.
n When installing the Workplace, you can decide whether or not to install Drag&Relate. A dedicated Web server instance, called the Drag&Relate Servlet, is required for the Drag&Relate server only if HTTPS is used.
n The SAP R/3 DCOM Component Connector must be installed in the Workplace Middleware. It converts protocol DCOM to RFC and vice versa.

© SAP AG TABC10 89
SAP AG 2000
Middleware: Web Server and AGate
LoadHTML template
LoadHTML template
Loadservice file
Loadservice file
Workplace Server
Component system
ComponentsWorkplace MiddlewareFrontend
AGateAGate
Web serverWeb server
Send preparedrequest
Send preparedrequest
HTML pageHTML page
BrowserHTTPserverHTTPserver WGateWGate
User requestUser request
HTML pageHTML page
Internet Transaction Server
R/3 inputR/3 input
R/3 outputR/3 output
Call WGateCall WGate
n The HTTP server has the following functions:
� To accept HTTP requests from client browsers
� To forward specific requests to the WGate through one of the supported interfaces and transmit the dynamically generated HTML pages back to the client
� To deliver static information, such as pictures embedded in HTML pages, directly from the file system of the HTTP server machine
n The WGate connects the ITS to the HTTP server. The WGate is always located on the same computer as the HTTP server. The following standard Web server interfaces are possible:
� Microsoft Information Server API (ISAPI) and Netscape Server API (NSAPI). Both the ISAPI and NSAPI load the WGate into the HTTP server process as a DLL.
� Common Gateway Interface (CGI). As of Release 4.6C, the CGI starts the WGate as an external executable program.
n The AGate manages communication to and from the SAP System, including:
� Establishing the connection by using SAP GUI or RFC protocols
� Generating the HTML documents for the SAP applications
� Managing the session context and time-outs
� Code page conversions and national language support

© SAP AG TABC10 90
SAP AG 2000
Drag&Relate: Overview
l Drag&Relate is an easy-to-use navigation tool
n Select an object (such as a customer number)
n Drag it to a related object (such as Display Customer)
n An activity is performed (such as displaying the master dataassociated with the customer number)
l Possible scenarios:
n MiniApp → SAP
n SAP → SAP
n MiniApp → Web
n SAP → Web
Workplace Middleware
Web server Web server Componentsystem
RFCHTTPserverHTTPserver
SAP R/3 DCOMComponentConnector
SAP R/3 DCOMComponentConnector
DCOMDrag&RelateServlet
Drag&RelateServlet
n Drag&Relate is a navigation tool offered in the mySAP.com Workplace to make it easy for the user to obtain additional information. For example, the user may see a customer number and wish for additional information about the customer. By selecting the customer number with the cursor and dragging and relating it to another activity such as Display Customer, the user can view the customer’s master information.
n The user can also Drag&Relate information from the Web. For example, a user can get the latest exchange rate information for a currency by dragging and relating the currency out to a financial services Web site.
n The Drag&Relate feature regarding one object type (such as a sales order) within mySAP.com component systems is handled by the ITS. In this case, enabling Drag&Relate involves simply an ITS parameter setting.
n If Drag&Rela te is executed using different types of objects (such as relating a sales order with the customer), additional software is necessary.

© SAP AG TABC10 91
SAP AG 2000
Drag&Relate: Technical View
Drag&Relate
APO
BW
R/3
SAP R/3DCOM
ComponentConnector
SAP R/3DCOM
ComponentConnector
IIS (only for SSL)IIS (only for SSL)
... others... others
Port9990
Port9993
Frontend Components
Browser
Port443
IISinstance
IISinstance
ForwardDLL
ForwardDLL
RFC
RFC
RFC
DCOM
DCOM
DCOMPort9991
The WorkplaceServer does not
need aDrag&Relate
Servlet instance
Drag&RelateServlet
Drag&RelateServlet
Drag&RelateServlet
Drag&RelateServlet
Drag&RelateServlet
Drag&RelateServlet
n To use Drag&Relate functionality, you need to install one Drag&Relate Servlet for each logical component system.
n The Drag&Relate server can be installed either on a separate computer or on the same computer that hosts the other Workplace Middleware components.
n There is a one-to-one correspondence between the Servlet instances and SAP component systems, so every component system has its own Servlet instance.
n The graphic shows three Drag&Relate Servlets for three different logical component systems. The Servlets are configured with different TCP ports on which they offer a network service. Normally, the Workplace Server does not need a Drag&Relate Servlet instance.
n Communication with the SAP systems occurs through the SAP CDOM Component Connector (DCOM CC). Technically, the DCOM CC is a DLL loaded by the Drag&Relate Servlet. It offers a COM interface to the client process (the Drag&Relate Servlet) and translates COM calls to RFC calls directed toward the SAP System.
n The Drag&Relate Servlet does not handle encryption. If you prefer to use Secure Sockets Layer (SSL) for the communication involved in the Drag&Relate functions, you can optionally connect your Drag&Relate server instances to the Web server (Internet Information Server 4.0). This is done with an Internet Information Server extension DLL called forward.dll, which is installed by the setup program. It forwards incoming requests to the Drag&Relate Servlet. Only one IIS instance is needed for all Drag&Relate server instances. The secure port number of the Default Web Site must be 443.
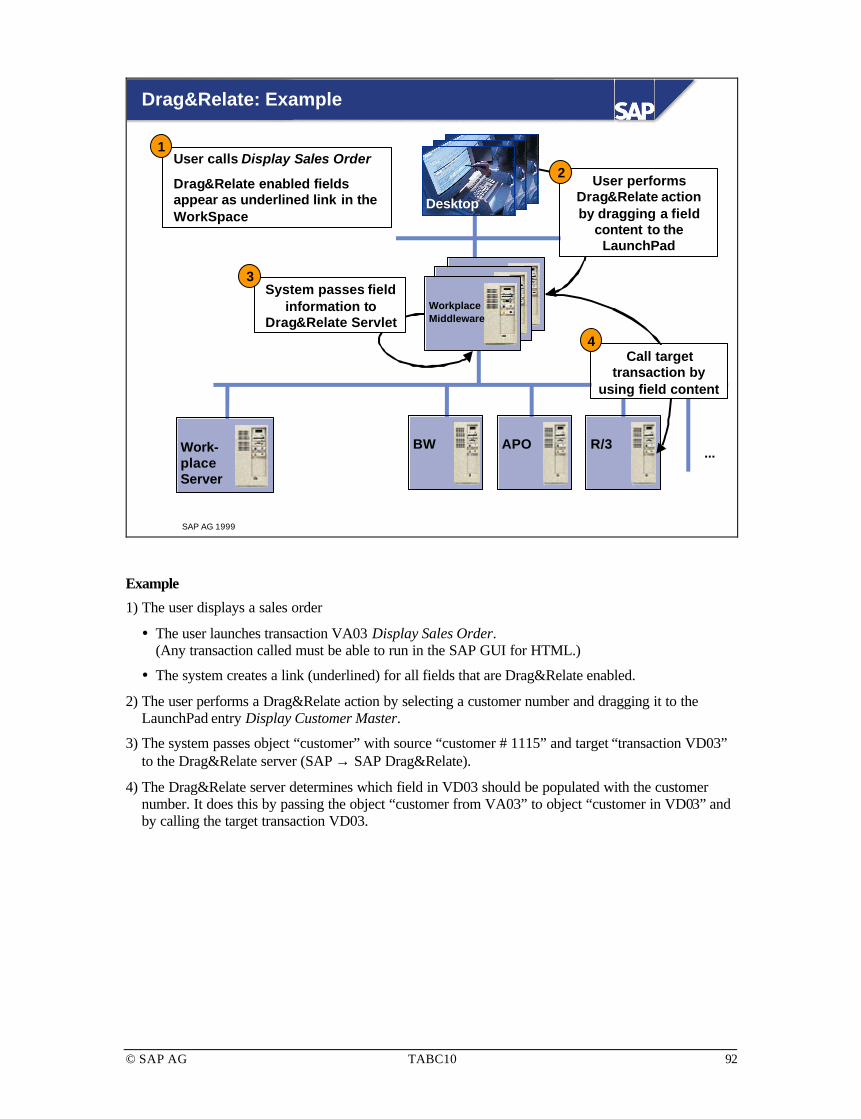
© SAP AG TABC10 92
SAP AG 1999
WebserverWeb
server
Drag&Relate: Example
Work-placeServer
BW R/3APO
WorkplaceMiddleware
Desktop
...
User calls Display Sales Order
Drag&Relate enabled fieldsappear as underlined link in theWorkSpace
1
User performsDrag&Relate actionby dragging a field
content to theLaunchPad
2
System passes fieldinformation to
Drag&Relate Servlet
3
Call targettransaction by
using field content
4
Example
1) The user displays a sales order
� The user launches transaction VA03 Display Sales Order. (Any transaction called must be able to run in the SAP GUI for HTML.)
� The system creates a link (underlined) for all fields that are Drag&Relate enabled.
2) The user performs a Drag&Relate action by selecting a customer number and dragging it to the LaunchPad entry Display Customer Master.
3) The system passes object “customer” with source “customer # 1115” and target “transaction VD03” to the Drag&Relate server (SAP → SAP Drag&Relate).
4) The Drag&Relate server determines which field in VD03 should be populated with the customer number. It does this by passing the object “customer from VA03” to object “customer in VD03” and by calling the target transaction VD03.

© SAP AG TABC10 93
SAP AG 2000
Frontend Environment
Anycomponent
systems
Workplace MiddlewareFrontend environment
Browser(SAPGUI for HTML)
SAP GUIfor Windows
WindowsTerminal
Client
SAP GUIfor Java
Work-placeuser
WindowsTerminalServer
SAP GUIfor Windows
Frontend server
DIAG orRFC
ProprietaryProtocol
DIAG orRFC
HTTPserver
Internet TransactionServer
SAP GUIfor HTML
HTTP(S)HTML
DIAG
Components
Browser launches
correct GUI
DIAG
n Generally, at the frontend, only the Web browser that runs with the SAP GUI for HTML has to be installed. The Web browser is used to display the Workplace window. The SAP GUI for HTML runs in the WorkSpace in the Workplace window.

© SAP AG TABC10 94
SAP AG 2000
SAP GUI Overview
R/3 3.1 R/3 4.0 / 4.5
Windows32 bit
Javaapplication
R/3 4.6R/3 3.0
Native Mac
Native OS/2
Native Motif
NativeWindows32 bitWTSNative Windows 16 bit
Browserbased
Java Applet based
Windows16 bit
UNIX/Motif
Mac
OS/2
Browser
SAP-MAPIAPO AddOn
BW AddOn
l SAP GUI for Windows
n Needs to be installed locally
n Runs in a separate window(after launch from the Workplace)
n Additionally usable througha Windows Terminal Server (Citrix)
– This also runs in the right partof the Workplace window
l SAP GUI for Java
n Replaces old SAP GUI on platformsother than Windows
n Small plug-in needs to be installed
n Runs in the right part of theWorkplace window
l SAP GUI for HTML
n Only need to install a Web browser
n Runs in the right part of theWorkplace window
n The SAP GUI for the Windows environment is a good choice for professional users who always work in the same environment.
� As of SAP Release 4.5B, a SAP GUI is also available for Windows Terminal Server (WTS). For more information, see SAP Note 138869. The SAP GUI for WTS gives the end user exactly the functionality of a SAP GUI for the Windows environment but reduces administrative overhead, since the GUI infrastructure is installed on a Windows server instead of on the frontend PC.
n The SAP GUI for the Java environment is available as of SAP Release 4.6B as a local installation for all Java-supported platforms. This GUI runs in the WorkSpace as a browser PlugIn.
n The SAP GUI for HTML is a browser-based frontend for the ITS. Apart from the browser, no local installation on the frontend computer is required.
� Whenever you launch a transaction from the LaunchPad, the MiniApps in the WorkSpace disappear and are replaced by the HTML page for the transaction.
� As of SAP Release 4.6B, not all transactions run in this GUI. A transaction classification defines which GUI should be used for which transaction. In the long run, more and more transactions will be supported by the SAP GUI for the HTML environment. Some specialized functions (for example, the ABAP Workbench) may not run in the SAP GUI for HTML.

© SAP AG TABC10 95
SAP AG 2000
Windows Terminal Server
Browser
Citrix WebClient
Citrix MetaFrame
Windows NTTerminal Server
Windows NTTerminal Server
Windowsapplication
SAP GUI
Component system
ICA
ICA*
* Independent Computing Architecture® protocol
l Citrix Web Client runs in the browser
l Additional server required to runCitrix MetaFrame and Windows NT Terminal Server
l Allows central administration ofSAP GUI and Windows applications
n For applications that are not Web-enabled, the Workplace offers optional integration of a terminal server client. This requires an additional server running on Microsoft Windows NT Terminal Server Edition and Citrix MetaFrame.
n Citrix MetaFrame allows user interface software to run on a Windows NT server while the user interaction occurs at another client machine. A Citrix Web Client can bring any Windows screen into a browser running on the client.
n If you intend to run only Web-enabled applications and transactions in the Workplace, you can use Windows NT Terminal Server and Citrix Web Client. Nearly all applications that run on Windows NT, including applications based on Win32, Win16, and ActiveX, can also be run in the Workplace.
n Terminal emulations for mainframe and other legacy systems can be integrated into the Workplace.
n Features:
� Small ActiveX Web Client is installed on first use.
� Thin ICA protocol supports WAN usage (requires dedicated TCP/IP port).
� Workplace supports up to 256 colors.
� Web clients adapt to the dimensions of the browser frame at startup.
� Usage of SAP GUI for Windows via Terminal Server is configurable for each user.

© SAP AG TABC10 96
SAP AG 2000
Workplace Architecture Summary
User frontend(s) Web server
Browser
HTMLfiles Templates
Frontend environment Workplace Middleware
DIAG orRFC
Frontend server
ProprietaryProtocol
DIAG orRFC
SAP GUIfor Windows
SAP GUIfor Java
WindowsTerminal
Client (Citrix)
Java /Citrix
plug-ins
DIAG
DIAG or
RFC
DCOM/RFC
Work-placeuser
Component systems
BW
APO
WorkplaceServer
BBP
KW
CRM
SEM
Standard R/3
HTTPserver
HTTPserver
WindowsGUI
WindowsTerminal
Server
AGate
WGate SAP GUIfor HTML
Internet Transaction Server
Browser launches
correct GUI
HTTP(S)HTML
HTTP(S)HTML
Components
D&R DCOM
AGate
WGate Portal Builder
Internet Transaction Server
n Frontend environment
� The frontend contains the browser and the GUI. Three SAP GUIs are available, one for each of the following environments: HTML, Java, and Windows.
n Workplace Middleware
� The key component is the ITS.
� The Drag&Relate server is responsible for rendering the Workplace and delivering Drag&Relate functionality at the frontend.
n Components
� This includes all the component systems, such as R/3 and Business Warehouse. The components deliver specialized functionality. The component systems define roles or activity groups, authorizations, classification of transactions, and Customizing settings.
� The Workplace Server can be regarded as a special component. Up to SAP Release 4.6C, the Workplace Server is an SAP Basis component with a special AddOn. As far as maintenance is concerned, this AddOn behaves like other AddOns (for example, Industry Solutions). The first Workplace Servers released for production use were shipped with SAP Release 4.6B.
� As of SAP Release 4.6D, the Workplace Server 2.10 is included in the SAP standard system. All other releases cited here are minimum releases. R/3 3.1H, BW 2.0A, APO 2.0A, BBP 1.0B, KW 4.0, CRM 1.2, SEM 1.0
© SAP AG TABC10 97
SAP AG 2000
Further Documentation
l SAP Notes:
n 183998 (Overview Note), 183914, 138869
l SAP Note categories:
n WP-DR: Drag&Relate
n WP-FRM: Frontend/Middleware
n WP-PLI: PlugIns
n WP-SRV: Workplace Server
l Useful SAP links
n www.sap.com/workplace (creation of demo user)
n service.sap.com/dbosplatforms
Additional information about mySAP.com Workplace:
n To obtain your own IDES Workplace user, choose www.sap.com/workplace → Test-drive. Just fill in the registration form online and get a user ID and password through an email from SAP.
n To demo the Citrix PlugIn, choose www.sap.com/workplace → Test-drive.

© SAP AG TABC10 98
SAP AG 2000
You are now able to:
Unit Summary
l List the components of the mySAP.comWorkplace architecture
l List the mySAP.com Workplace requirements
l Describe the architecture and functionality ofeach component

© SAP AG TABC10 99
SAP AG 2000
Unit Actions
l Exercises?
l Solutions

© SAP AG TABC10 100
Workplace Architecture: Exercises
No. Exercise
1 Introduction to the training system environment: In this class you will work in many different systems. In order to have an overview of your systems, clients, and users use this exercise to record your system information.
Training System LandscapeInstructor + max. 28 students in class
DEV QAS DEV QAS DEV QAS DEV QAS
ITS WPS
QAS00DEV00 QAS01DEV01 QAS07QAS06 DEV07DEV06
WPS
ITS ADM
one standalone Gateway GAT
8 Basis Training servers, 2 SIDs per NT server, 2 students per SID
…
…
400 401 402 403 403 403 403 403
1081 1080
3210 3220 3211 3221 3216 3226 3217 3227Web Port
client
00 01 10 11 00 01 10 11 00 01 10 11 00 01 10 11
1.1 Group ID:
The group ID is used throughout the whole training to specify your exercises.
Possible group IDs: DEV01, DEV02, DEV03, DEV04, DEV05, DEV06, DEV07 QAS01, QAS02, QAS03, QAS04, QAS05, QAS06, QAS07 What is your group ID?
1.2 Your neighbors group ID:
For some exercises it will be required to work together with your neighboring group. Example: If your group ID is DEV01 your neighbors group ID is QAS01. What is the group ID of your neighboring group?
1.3 mySAP.com Workplace Server:
Use the solutions page to fill in your system information provided by your instructor.
1.4 mySAP.com Middleware Server:
Use the solutions page to fill in your system information provided by your instructor.
1.5 mySAP.com component system:
Use the solutions page to fill in your system information provided by your

© SAP AG TABC10 101
instructor.
2 Create SAPLOGON entries for Logon with SAPGUI for Windows
2.1 Create the SAPLOGON entry WPS for logon to the central instance of your Workplace Server WPS. Use application server logon.
2.2 a) Create the SAPLOGON entry <your group ID> Central for logon to the central instance of your component system. Use application server logon.
b) Create the SAPLOGON entry <your group ID> Dialog for logon to the dialog instance of your component system. Use application server logon.

© SAP AG TABC10 102
Workplace Architecture: Solutions
No. Solution
1 Introduction to the training system environment: In this class you will work in many different systems. In order to have an overview of your systems, clients, and users use this exercise to record your system information. Use this sheet as a reference throughout the training!
1.1 My group ID:
1.2 My neighbors group ID:
mySAP.com Workplace Server:
Server name
Server SID WPS
System number (Central Instance) 00
Message Server Port (see services file under sapmsWPS)
Client 4__
User BC350
Initial Password
Changed Password
CPIC User WPEXCHANGE
1.3
CPIC User Password
mySAP.com Middleware Server:
Web Server Name
Domain
NT User Name developer
NT User Password
Name of the class’ virtual ITS Instance assigned to the Workplace Server
WPS
Web server port for WPS 1080
Name of your virtual ITS being assigned to your component system
<your group ID>
Web server port for your <groupID>
Name of your virtual ITS for Administration purpose
ADM
Web server port 1081
1.4
Your ITS Administration Instance User
<your group ID>

© SAP AG TABC10 103
Initial password
Changed password
SID of standalone Gateway GAT
Gateway Service 3300
mySAP.com component system:
Server name
Server SID
System Number (Central Instance) 00 for DEV and 10 for QAS
System Number (Dialog Instance) 01 for DEV and 11 for QAS
Message Server Port (see services file under sapmsDEV or sapmsQAS)
Client 200
User BC350
Initial password
Changed password
CPIC User WPEXCHANGE
1.5
CPIC User Password
2 Create SAPLOGON entries for Logon with SAPGUI for Windows
2.1 To create the SAPLOGON entry WPS for logon to the central instance of your Workplace Server WPS start SAPLOGON.
Select New.
In the field Description enter WPS.
In the field Application Server enter the server name of the Workplace Server
In the field System Number enter 00 for the central instance.
Select OK .

© SAP AG TABC10 104
2.2 a) To create the SAPLOGON entry <your group ID> Central for logon to the central instance of your component system start SAPLOGON.
Select New.
In the field Description enter <your group ID> Central.
In the field Application Server enter the server name of the component system
In the field System Number enter <System Number (Central Instance)>.
Select OK .
b) To create the SAPLOGON entry <your group ID> Dialog for logon to the dialog instance of your component system start SAPLOGON.
Select New.
In the field Description enter <your group ID> Dialog.
In the field Application Server enter the server name of the component system
In the field System Number enter <System Number (Dialog Instance)>.
Select OK .

© SAP AG TABC10 105
SAP AG 1999
Introduction Including MiniApps
Workplace Architecture Software Logistics
Configuration andAdministration
Monitoring andTroubleshooting
InternetTransaction Server Drag&Relate
Users:Single Sign On
Configuration and Administration

© SAP AG TABC10 106
SAP AG 2000
Configuration and Administration
Contentsl Workplace Server setup
l Workplace Middleware setup
l Workplace configuration
l Workplace Server administration
l SAP Service Marketplace
ObjectivesAt the end of this unit, you will be able to:
l Explain the setup of a Workplace Server based on:
n The typical Workplace load distribution
n The Workplace requirements
n The number of Workplace users

© SAP AG TABC10 107
SAP AG 2000
Typical Load Distribution
User dialog: graphical information processing
Processing application logic: System managementTransaction monitoring
Handling Internet access
Processing R/3 Internet transactions
Presentation
Application
Database
CreateProduction
Orders
ReleaseProduction
Orders
ScheduleProduction
Accept Customer
Order
ConfirmDelivery
B u i l dProducts
ExplodeB i l l- of-Material
ReserveMaterial
CustomerService
Rep
PlantPersonnelProduction
Order
C u s t o m e rOrder Part Material Task
Internet
Database services
Application services
Webbrowser
Webserver
Internet Transaction Server
Presentation services
Information storageDatabase backup
Layer Client/serverarchitecture
3-tier Multi-tier
10-20%
60-70%
5-10%
10-20%
CPU Load
n The graphic above shows the CPU time distribution of a typical request.
n The main load in a mySAP.com Workplace landscape is on the component systems (60-70%).
n The Workplace Middleware usually is not a bottleneck in the mySAP.com Workplace, since it takes only about 5-10% of the overall load.
n The load on the presentation layer (frontend environment) is 10-20%. This is slightly higher than in standard SAP releases prior to Release 4.6.
n For each mySAP.com Workplace user, SAP recommends a minimum network or modem bandwith of at least 56 kbit/s. Multiple users can share line capacity only if they do all not sign on at the same time.
n For every concurrently active user, if you assume an average think time of 30 seconds per dialog step, you should allow for a line capacity of
� 20 kbit/sec for SAP GUI for HTML
� 2 kbit/sec for SAP GUI for Windows
n These recommendations provide only a very rough estimate of your bandwidth requirements. Depending on specific SAP transactions used, application data, customizing, and user behavior, actual requirements may differ greatly. For more information on network load, see http://service.sap.com/network .

© SAP AG TABC10 108
SAP AG 1999
Workplace Server Requirements
l Sizing the mySAP.com Workplace
n Quicksizer (service.sap.com/quicksizing)
l Workplace Server:
n Minimum requirement:
w 512 MB RAM, 12 GB disk space
n Typical dialog load of a Workplace user:
w 4 Workplace users = 1 low BC user
w 1 low BC user =10 dialog steps per hour
l Example:
n 2000 Workplace users =500 low BC users
n All 2000 users sign on within 1 hour
n Requires:
w 1 GB RAM on DB + 1 GB RAM on App. Server
n For details of the most current version of the Workplace Server, see the installation documentation supplied with mySAP.com Workplace Edition.
n The hardware sizing for the mySAP.com Workplace is performed with the SAPNet Quicksizer, the mySAP.com Services Workpace (transaction DSA), and/or vendor-specific tools. Enter sizing results in the Configuration Assistant.
n A standard Ready-to-Run (RRR) configuration consists of:
� Workplace Server
� Middleware server
� Web server
n The server roles can be distributed in various ways. Server roles can all be located on one machine or they can be located on separate servers. The sizing contains a high level of flexibility and allows SAP hardware partners to offer specific package versions to customers.

© SAP AG TABC10 109
SAP AG 1999
Workplace Software Components
l Required on Workplace Server
n WP 2.00 (Basis =4.6B): Workplace AddOn
n WP 2.10 (Basis 4.6D): included in thestandard SAP System Basis
l Required on Component System
n Workplace PlugIn (WP-PI)
n Release 3.1H/3.1I: SAP Note 195812
n Release 4.0B-4.6C: SAP Note 195810
SAINTWP-PI
R/3 Basis <4.6D
WP-PI 2.10
R/3 Basis 4.6D
Workplace is part of SAP Standard
Workplace 2.10
n A Workplace Server can be installed with either of the following options:
� SAP ships a special Workplace Server Installation Kit. This kit is very similar to a standard SAP R/3 installation kit. The R/3 System shipped with the Workplace Server Installation Kit contains an R/3 Basis System together with the Workplace AddOn but does not contain any application components.
� A Workplace AddOn can be installed in a standard R/3 System.
� As of SAP Release 4.6D, the Workplace AddOn is included in every standard R/3 System.
n For the component systems, the following applies:
� The Workplace Server PlugIn is installed the same way as an SAP AddOn Solution. To install the PlugIn, use transaction SAINT.
� The PlugIn consists of some new ABAP programs and some changed ABAP programs in the R/3 Basis Area (Profile Generator, User Maintenance).
� Application programs in the R/3 Components (FI, MM, SD, and so on) are not changed by the PlugIn installation.
n For further information on the Workplace Server Strategy, see SAP Note 183914.

© SAP AG TABC10 110
SAP AG 2000
Work Process Requirements
D U E B S
Dispatcher
M G
WorkplaceServer
=1≥2 ≥1 ≥2 ≥2
=1 =1
n The central instance on the Workplace Server has the same work process requirements as a central instance in a standard R/3 System.
n The minimum requirements are:
� 2 or more Dialog (D) work processes
� 1 or more Update (U) work process(es) (1 U and optionally 1 U2)
� 1 Enqueue (E) work process
� 2 or more Background (B) work processes
� 2 or more Spool (S) work processes
� 1 Message Server (M) work process
� 1 Gateway (G) work process

© SAP AG TABC10 111
SAP AG 2000
Required SAP Instances
l Number of SAP instances depends on number of Workplace users(4 Workplace users = 1 low BC user)
l Dialog WP on Workplace Server is only occupied during sign-on
l Example:
n 2000 Workplace users sign on within 1 peak hour:
w Average 33 Workplace users per minute
w Maximum 33 dialog WP simultaneously occupied
l Additional dialog instance may be necessary for over 2000Workplace users
D U E B S
DVEBMGS00
D … D
D00
Central instance Additional dialog instance
n During Workplace configuration, you need to calculate the number of SAP instances.
n Four Workplace users generate about the same load as one low Basis Component (BC) user. A low user is a non-intensive user (less than 10 dialog steps per hour).
n Example: 2000 workplace users sign on within one hour (peak load). This implies an average of 2000/60 = 33.3 logons per minute. If all logons take place in parallel, a maximum of 33 dialog work processes will be occupied. The central instance on a Workplace Server typically contains the following work processes:
� 33 Dialog (in this example)
� 2 Update
� 2 Background
� 1 Enqueue
� 2 Spool
n An SAP instance may contain a maximum of 40 work processes (see SAP Note 9942). The example shows that if there are more than 2000 users on the Workplace Server, an additional dialog instance may be required.

© SAP AG TABC10 112
SAP AG 2000
Installation Scenarios
WorkplaceServer
Middleware
Web server
1 2
3
WorkplaceServer
Middleware
Web server
Web server
WorkplaceServer
Middleware
Web server
4
Middleware
Firewall
WorkplaceServer
Standalone configuration Separate Workplace Server
Multiple separate Web servers Multiple separate Web servers andmultiple separate Middleware servers
Firewall
n To handle Internet requests to a Web server, it is necessary to implement a high security mechanism.
n Scenarios 1 and 2 represents installations in an intranet environment without high security requirements. These are suitable only for small installations or test installations.
n For high security implementations, the installation of a separate Web server is recommended. Additionally, a firewall must be installed. Workplace scenarios 3 and 4 represent such environments.
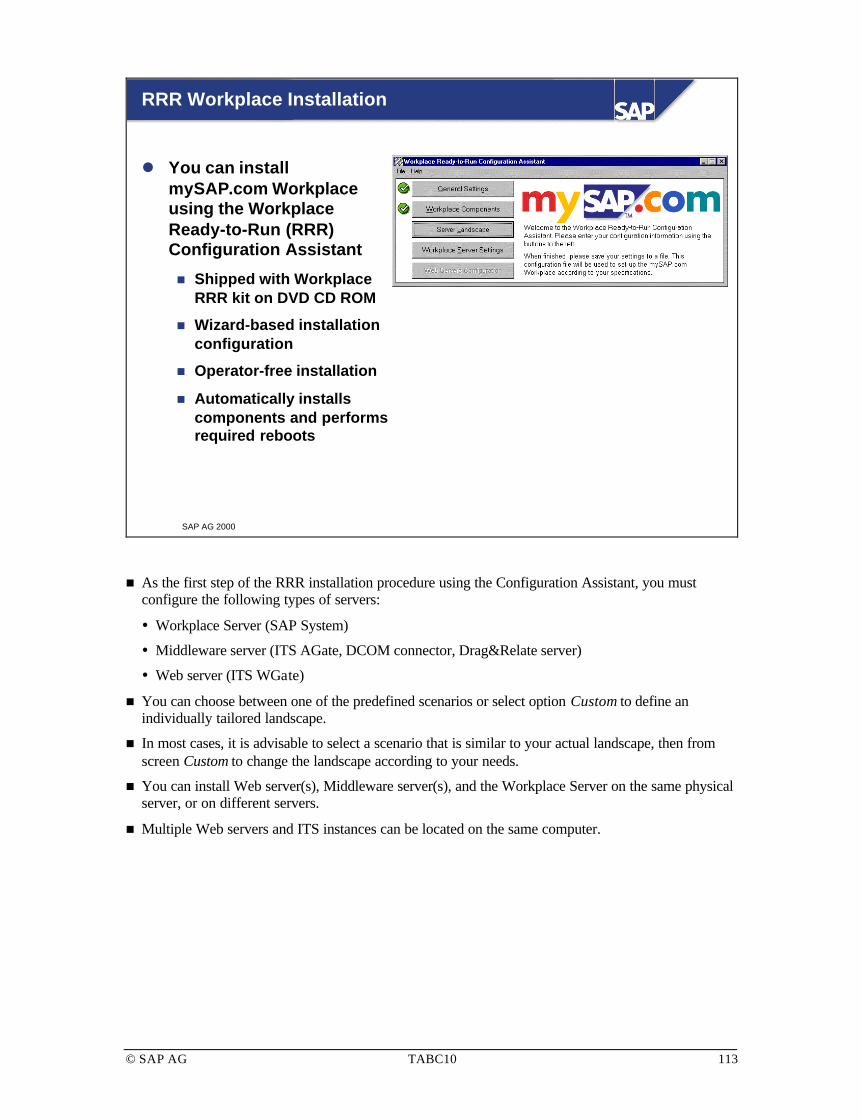
© SAP AG TABC10 113
SAP AG 2000
RRR Workplace Installation
l You can installmySAP.com Workplaceusing the WorkplaceReady-to-Run (RRR)Configuration Assistant
n Shipped with WorkplaceRRR kit on DVD CD ROM
n Wizard-based installationconfiguration
n Operator-free installation
n Automatically installscomponents and performsrequired reboots
n As the first step of the RRR installation procedure using the Configuration Assistant, you must configure the following types of servers:
� Workplace Server (SAP System)
� Middleware server (ITS AGate, DCOM connector, Drag&Relate server)
� Web server (ITS WGate)
n You can choose between one of the predefined scenarios or select option Custom to define an individually tailored landscape.
n In most cases, it is advisable to select a scenario that is similar to your actual landscape, then from screen Custom to change the landscape according to your needs.
n You can install Web server(s), Middleware server(s), and the Workplace Server on the same physical server, or on different servers.
n Multiple Web servers and ITS instances can be located on the same computer.

© SAP AG TABC10 114
SAP AG 2000
RRR Standalone Configuration: Disk Layout
Standaloneconfiguration
l WorkplaceServer andMiddlewareon one server
l All services onone server:
n WorkplaceServer
n ITS (WGate,AGate)
n Web server
Transport/Upgrade dir.SAP executablesDB executablesDB offline logsRAID 1, ≥4 GB
Disk 4Disk 4
Disk 3Disk 3
Disk 2Disk 2
Disk NDisk N
Disk 5Disk 5
sapdata1 ... <n>RAID 5, ≥9 GB
Disk ..Disk ..
Paging part 24 x RAM, max. 9 GB
DB online logsRAID 1, ≥4 GB
Disk 1Disk 1
Paging part 1Second NT
ITS, Web serverRAID 1, ≥4 GB
Work-placeuser
1
n The graphic shows the disk layout of the RRR standalone server installation. A standalone installation is typically used for test and development environments and small production sites.
n All services, including the middleware (Web server and SAP Internet Transaction Server) and the Workplace server, are installed and running on one server.
n In the RRR installation, it is recommended to
� Install a copy of the NT operating system (second NT) to prevent long downtimes in case of system disk failure.
� To improve performance, set up two physically separated disk areas for OS paging.
� Since the Workplace Server has significantly lower I/O rates than a standard SAP System, the database data can be placed on a RAID 5 disk set.
� For data security reasons, the DB online and offline redo logs must reside on different physical disks.

© SAP AG TABC10 115
SAP AG 2000
RRR Separate Workplace Server: Disk Layout
Transport/Upgrade dir.SAP executablesDB executablesDB offline logsRAID 1, ≥4 GB
Disk 4Disk 4
Disk 3Disk 3
Disk 2Disk 2
Disk NDisk N
Disk 1Disk 1
Disk 5Disk 5
sapdata1 ... <n>RAID 5, ≥9 GB
Disk ..Disk ..
Paging part 1Second NT
RAID 1, ≥4 GB
Paging part 23 x RAM, max. 9 GB
DB online logsRAID 1, ≥4 GBDisk 2Disk 2
Disk 1Disk 1
Paging part 1Second NT
ITS, Web serverRAID 1, ≥4 GB
Paging part 22 x RAM
max. 9 GB
Work-placeuser
SeparateWorkplaceServer
l First server:
n WorkplaceServer
l Second server:
n ITS (AGate,WGate)
n Web server
2
n The right side of the graphic shows the disk layout of the RRR Workplace Server installed on a separate server. The Workplace Server in this installation scenario is running alone on this machine. The Workplace Server is based on an R/3 Basis System. This is a pure Basis System without an R/3 application environment.
n The middle of the graphic shows the disk layout of the RRR Middleware Server installed on a separate server. The middleware (Webserver and SAP Internet Transaction Server) in this installation scenario is installed on a separate server.
n For Drag&Relate functionality, a Drag&Relate Servlet must be installed on every Middleware server.

© SAP AG TABC10 116
SAP AG 2000
RRR Installation Wizard
4
Multiple separate Web servers andmultiple separate Middleware servers
3
Multiple separate Web servers
n To maintain security with Internet access, you can install separate Web servers (scenario 3). This enables you to locate the Web servers in a separate network segment and insert a firewall to control access to the Middleware servers. If you have very many users, and especially when you use SSL encrypted HTTP access, this scenario reduces the load on the Middleware.
n To handle high load, you can install the Middleware components for various component systems on separate computers (scenario 4).
n To enable browsers to use HTTP to access the Web servers directly, you should install a Drag&Relate Servlet on each Web server.
n For detailed information about installing the Workplace Middleware, see the SAP Implementation Guide.
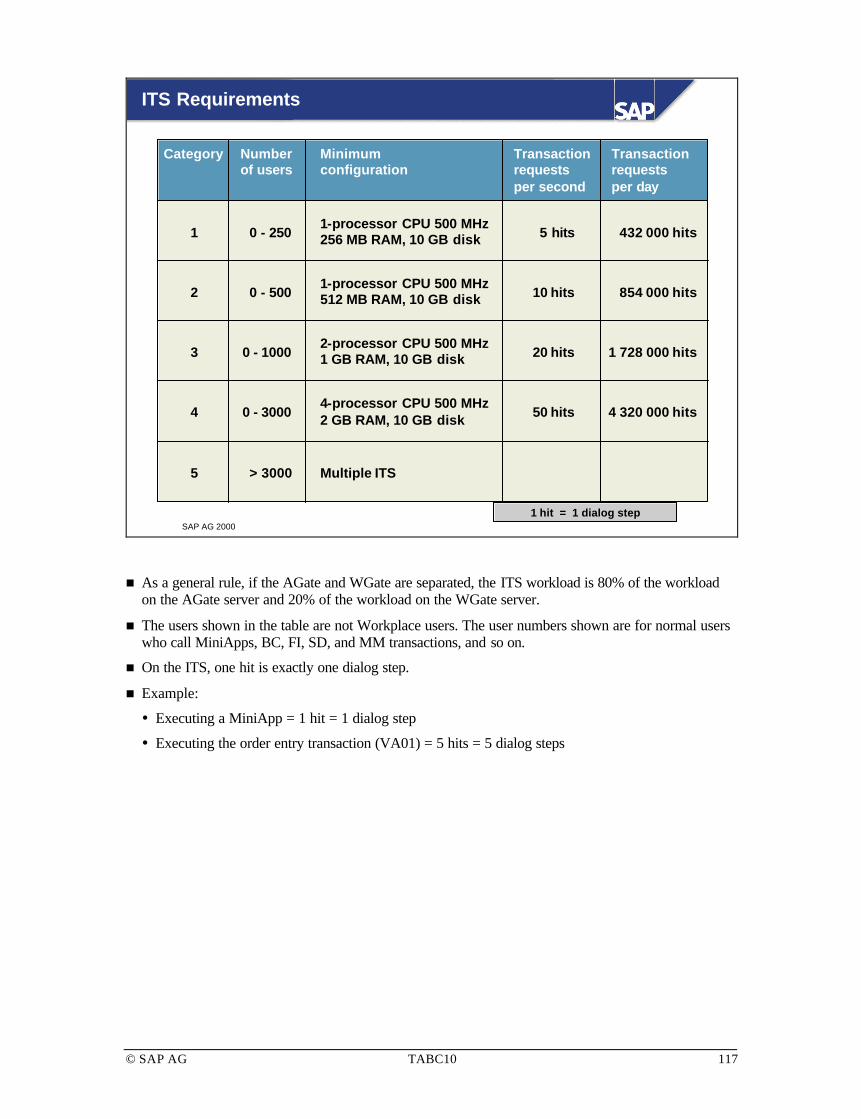
© SAP AG TABC10 117
SAP AG 2000
1 hit = 1 dialog step
ITS Requirements
Category Numberof users
Minimumconfiguration
Transactionrequestsper second
Transactionrequests per day
1 0 - 2501-processor CPU 500 MHz256 MB RAM, 10 GB disk 5 hits 432 000 hits
2 0 - 500 10 hits 854 000 hits
3 0 - 1000 20 hits 1 728 000 hits
4 0 - 3000 50 hits 4 320 000 hits
5 > 3000 Multiple ITS
1-processor CPU 500 MHz512 MB RAM, 10 GB disk
2-processor CPU 500 MHz1 GB RAM, 10 GB disk
4-processor CPU 500 MHz2 GB RAM, 10 GB disk
n As a general rule, if the AGate and WGate are separated, the ITS workload is 80% of the workload on the AGate server and 20% of the workload on the WGate server.
n The users shown in the table are not Workplace users. The user numbers shown are for normal users who call MiniApps, BC, FI, SD, and MM transactions, and so on.
n On the ITS, one hit is exactly one dialog step.
n Example:
� Executing a MiniApp = 1 hit = 1 dialog step
� Executing the order entry transaction (VA01) = 5 hits = 5 dialog steps

© SAP AG TABC10 118
SAP AG 2000
Typical Recommended Setup
Workplace Middleware
Virtual ITS instancesVirtual ITS instancesWeb server instancesWeb server instances
... others... others
AGateAGate
AGateAGate
... others
Work-placeuser
Frontend Components
DefaultPort = 80
WorkplaceServer
BW
R/3
ClientA
ClientB
ClientX
ClientY
AGateAGate
AGateAGate
Port80
Port81
Port82
Port83
WGateWGate
WGateWGate
WGateWGate
WGateWGate
HTTPserver
HTTPserver
HTTPserver
HTTPserver
n There should be a one-to-one correspondence between ITS instances and SAP component systems, so that every backend SAP System has its own Web server and ITS instance. The advantage of this configuration is a clear setup and simple administration.
n Each logical component system and the Workplace Server itself (which usually has only one production client) usually have a separate ITS instance. A logical system corresponds to a client in one SAP System. For example, if you have a system with two production clients 200 and 400, you need two ITS instances.
n Different clients may run different applications with different customizing, so a separate ITS instance is needed for each client.
n A separate middleware infrastructure is recommended for each client, as the clients can run completely different applications with different customizing and so on.
n Prior to Release 4.6D, to distinguish between the different ITS instances, each ITS instance must be served by a separate Web server instance. As of Release 4.6D, this is no longer necessary. Multiple Web servers and ITS instances can be located on the same computer.

© SAP AG TABC10 119
SAP AG 2000
Configuration Procedure
l Call System Administration Assistant and follow the instructions in:
n Workplace Server: ConfigurationExamples:
w RegisteringLogical Systems
w Creating RFCDestinations
n Component System:Configuration
n Middleware Server:Configuration andAdministration
n The Workplace configuration procedure requires the following main steps:
� Workplace Server configuration
� Component systems configuration
� Middleware server configuration
n The following graphics give further details of these steps.

© SAP AG TABC10 120
SAP AG 2000
Workplace Server Configuration
l SystemAdministrationAssistant (SAA)contains aWorkplace Serverconfiguration guide
l Task list forRelease 4.6B canbe downloadedfrom sapservXand imported
n If you use the RRR installation procedure, the whole R/3 Basis environment is preconfigured automatically.
n Based on customer requirements, these preconfigurations can be changed individually if necessary:
� Setup of the TMS configuration
� Country-specific language, code page, and currency settings
� Profile management
� Operation modes
� Software logistics and the system landscape infrastructure (clients)
� Remote service connection (SAP Service Marketplace)
� Standard housekeeping jobs (periodic background jobs)
� Logon groups
� Backup plan (CCMS Planning Calendar)
� Initial R/3 System and database performance tuning
� Preparation of the Central User Administration (CUA) Customizing
n If you do not use the RRR installation procedure, you can download the System Administration Assistant from sapservX. See SAP Note 212133.

© SAP AG TABC10 121
SAP AG 2000
Registering Logical Systems
l All actions in the Workplace Server can be called fromtransaction SSAA
n Define all logical systems in every participating SAP System
n Maintain the logicalsystems: enter aname and shortdescription for eachcomponent in theworkplace systemlandscape
n Assign a client toeach logical system
n For URL generation, the Workplace requires information about the system infrastructure. Each component in the system infrastructure must therefore be registered as a logical system on the Workplace Server.
n All actions in the Workplace Server can be called from transaction SSAA:
� In SSAA, select Entire View.
� Define all logical systems in every participating SAP System: in the SAP Reference IMG choose Basis → Distribution (ALE) → Sending and Receiving Systems → Logical Systems → Name Logical Systems.
� Maintain the logical systems: enter a name and short description for each component in the workplace system landscape. The logical system names are used in many places during configuration (role definition, ITS registration, and so on).
� Assign a client to each logical system: in the SAP Reference IMG choose Basis → Distribution (ALE) → Sending and Receiving Systems → Logical Systems → Assign Client to Logical System.

© SAP AG TABC10 122
SAP AG 2000
Creating RFC Destinations
l Define a RFC connectionon the Workplace Serverfor each componentsystem (the RFCconnections must havethe same names as in thecorresponding logicalsystems)
l Start transaction SM59 orfrom the Easy Accessmenu choose RFCdestinations
n The Workplace Server loads information from the component systems to database tables using RFC destinations. The destinations are required, for example, for URL generation. For each component system, an RFC destination must be created and maintained on the Workplace Server. RFC destination names are case sensitive. They must be the same as the names of the corresponding logical systems.
n Procedure for creating RFC destinations:
� Choose Tools → Administration and Administration → Network → RFC destinations or call transaction SM59
� Check whether an RFC destination to the component system with the same name as the logical system exists. If so, you can stop here.
� Create a new RFC destination. In field RFC destination, enter a text identical to the logical system name of the component. In field Connection type, enter 3, for R/3 → R/3 connection. In field Description, enter a short description of the connection. To confirm your entries, choose Enter. In field Destination server, enter a server name for the component.
� Enter the system number. You can display the system number by choosing the system and choosing Properties… in SAP Logon. The dialog box shows the number.
� If you want, you can also specify the client and the logon language.
� Save your changes. To test the connection, choose Remote logon → Test connection.

© SAP AG TABC10 123
SAP AG 2000
Component Systems Configuration
l Logical systemsetup
l Transport ofroles
l Drag&Relateconfiguration
n The major configuration steps for the component systems are:
� Logical system setup: The logical system definition is required for communication with the Workplace Server, so do not delete or change existing logical systems and assignments.
� Transport of roles: Single roles are transported to the Workplace Server where they are assigned to collective roles. If CUA is used on the Workplace Server, single roles can be distributed to any other component. system.
� Drag&Relate configuration: BOR objects and fields must be assigned to Drag&Relate.

© SAP AG TABC10 124
SAP AG 2000
Middleware Configuration
l No direct accessfrom SAA toMiddleware
l SAA containsdocumentationonly for theMiddlewareconfiguration
n The SAA does not offer direct administrative access to the Middleware server.
n For details, see unit ITS.

© SAP AG TABC10 125
SAP AG 2000
Registering an ITS
l SAA entry Register an ITS Server calls transaction SM30
l Enter table name TWPURLSVR
l Create a new entry with the following information:
n Web server
w <hostname>.<domain>:<port>
w Example: twdfmx14.wdf.sap-ag.de:1080
n Web protocol
w HTTP/HTTPS
n GUI start protocol
w HTTP/HTTPS
n GUI start server
w <hostname>.<domain>:<port>
w Example: P37222.wdf.sap-ag.de:1080
n If you call the SAA entry Registering an ITS , transaction SM30 is called. In SM30, no table name is provided and you must enter the table name TWPURLSVR manually.
n To avoid hostname/IP adress resolution problems, always enter the full domain name for a Web server or GUI start server.

© SAP AG TABC10 126
SAP AG 2000
Customizing Tables Overview
l Central Workplace system
n TWPURLSVRWeb server definition forcomponent systems
n USRURLSVRLogical Web server for logicalsystems for a special user
n USRURLPRSUser-specific GUI settings
n VWPCUSTOMCGeneral Workplace settings
l Component systems
n TSTCCLASSGUI classification fortransactions and declarationof service file names for IACs
n THRPCLASSGUI classification for workflowcustomer tasks
n THRSCLASSGUI classification for workflowstandard tasks
n Tables TWPURLSVR, USRURLSVR, TSTCCLASS, THRPCLASS, THRSCLASS, USRURLPRS are customizing and personalization tables required to generate URLs.
n Tables TWPURLSVR, USRURLSVR, USRURLPRS are maintained in the central system, which is the system where the Workplace Server software runs.
n Tables TSTCCLASS, THRPCLASS, THRSCLASS describe transactions, IACs, and workflow tasks of the component system. They should be maintained in the component systems.

© SAP AG TABC10 127
SAP AG 2000
Creating Collective Roles
l You can create, maintain, and change collective roles onlyon the Workplace Server
l On the Workplace Server, single roles are groupedtogether as collective roles and arranged to represent theWorkplace LaunchPad
l To create new collective roles, use transaction PFCG
l To distribute roles, use CUA
l If you do not use CUA, assign users to collective roles asdescribed for single roles
Use PFCG for collectiveroles maintenance
WorkplaceServer
Use CUA for roledistribution
n From a logical point of view, a role is a description of a job in a company.
n From a technical point of view, a role is simply a container for transactions, Web links (URLs), reports, executable files, MiniApps, Knowledge Warehouse links, and links to non-SAP systems. A role also contains the authorizations (not shown in the graphic) needed to perform the transactions defined in the role.
n A user role determines the transactions, information, and services that a user may access using the mySAP.com Workplace. It also determines the visual appearance of a user’s Workplace by determining the contents of the LaunchPad and the WorkSpace.
n The use of collective roles simplifies user administration.
n Collective roles are collections of single roles. They do not contain any further authorization data.
n A collective role can contain single roles that access different systems in the Workplace system landscape. The collective role is required for the creation of the LaunchPad.
n You must assign a collective role to each user.
� If you do not use CUA, carry out the user assignment for both the single role in the component system and the collective role on the Workplace server.
� If you use CUA, carry out the user assignment for single and collective roles on the Workplace server. CUA automatically assigns the single profile to the user in the component system.

© SAP AG TABC10 128
SAP AG 2000
Create Single Roles
l In the component systems, use transaction PFCGto create new single roles:
� Insert a single role
name
� Choose
Basic maintenance
� Choose type
Individual
� Choose Create
n Create single roles in the component systems of the Workplace. Do not create any collective roles in a component system. You can create collective roles only on the Workplace Server.
n The user profile that is assigned to a user is generated within the single role. The profile generator functionality is located in the component systems where the functions contained in the role are performed.
n There are no internal naming conventions for distinguishing single and collective roles in an SAP System. When creating and naming your roles, use names that enable you to distinguish between single and collective roles.
n Administrators have the following options for assigning predefined user roles to the users:
� Assign the user roles supplied by SAP unchanged to your users.
� Copy the user roles supplied by SAP, modify them, and assign them to your users.
� If the user roles supplied by SAP do not reflect your business processes, you can define your own roles.

© SAP AG TABC10 129
SAP AG 2000
Entering the Target System
In single role maintenance, choose tab Menu
Enter the logical system or theRFC destination
n Perform this procedure on the Workplace Server only. First, check that:
� The single roles have been transported from the component systems to the Workplace Server.
� The RFC destinations have been defined.
� The logical systems have been registered.
n Change the single role by entering the system name of the component system to which users need access from the Workplace LaunchPad.
n The logical system name must be identical with the RFC destination name (always uppercase).

© SAP AG TABC10 130
SAP AG 2000
Migrating Authorization Profiles to Roles
l Call transaction SU25 andExecute Step 6:Copy data from old profiles
l Two options are offered:
n Optimized
w Recognizes organization levels
w Takes over all authorizationfor S_TCODE
w Takes over open authorizations
n Identical to profile
w Does not recognizeorganization levels
l Once generated, roles can be editedwith the Profile Generator (PFCG)
n When you call transaction SU25, the system displays a list of all active authorization profiles. Choose the profiles for which you want to generate roles. Then choose a way of converting the profiles. A role is generated for each profile you select. The name of the role consists of the name of the original profile and a generated ID. You can edit the generated roles in transaction PFCG.
n There are two ways of converting profiles into roles:
� Choose Optimized. The system collects all authorization data for the profile and starts editing. It attempts to fill the organizational levels that correspond to individual fields in the authorization objects with values. It also checks the transaction codes contained in the profile. All transactions that are explicitly specified in the authorization object S_TCODE are stored in the menu selection of the role. All authorization data belonging to these transactions is added to the existing authorization data. So there may be open authorizations in the authorization data for the roles. This gives you all the authorizations matching the SAP default values for this release for the selected transactions. After the operation is finished, you should check all the authorizations for the roles and maintain any open authorizations.
� Choose Identical to profile. This creates a role containing exactly the same authorization data as the profile. However, the system does not recognize any organizational levels and does not add any transactions to the menu selection of the role. So there is no menu selection, the current SAP default values are not added to the transactions, and the organizational levels are not filled.

© SAP AG TABC10 131
SAP AG 1999
MiniApps
l MiniApps are in theWorkSpace area of themySAP.com Workplace
l MiniApps proactivelyprovide users withalerts and keyperformance indicatorsapplicable to their role
l MiniApp examplesinclude:
n Email, calendaraccess
n Search engine
n Company / Webrelated news
n Workflow inbox
n MiniApps are intuitive, easy-to-use Web applications. They are designed to be simple and obvious. When you start the mySAP.com Workplace as a user, they quickly give you an overview of and access to your most important data. They present the most important information and enable you to get additional information when necessary.
n MiniApps are shown in the WorkSpace in the mySAP.com Workplace.
n The role of the user determines which MiniApps are pushed to the screen, but users can modify the MiniApps to suit their own wishes.
n The Workplace architecture supports various MiniApp technologies and communication with any server. MiniApps are assigned using a URL definition, so they can integrate information from company intranets, Internet sites, third-party software products, and so on.
n For more information on MiniApps, see http://www.sap.com/miniapps .

© SAP AG TABC10 132
SAP AG 2000
Integrating MiniApps into the Workplace
l You can include a URL in a role (in transaction PFCG,Role Maintenance) in one of the following ways:
n As node type URL without variable components(fixed URL)
n As node type URL with variable components
l For MiniApps created with the BW or flow logic,you must use the ITS
l If you use predefined roleSAP_WORKPLACE_USER,you can also change yourMiniApp settings withinthe browser
n You can integrate existing MiniApps into your Workplace as follows:
� Use transaction PFCG to enter role maintenance. Select an appropriate single role that is to contain the MiniApp (do not include MiniApps in composite roles). Choose Goto → MiniApps.
� The system usually displays a table of MiniApps that have already been integrated. If you have only integrated one MiniApp so far, the system displays the detailed data for this entry.
� To add MiniApps to the role, choose New entries.
In field Role, specify the role that you just maintained.
In field Sequence number, determine the sequence in which the MiniApps are displayed.
In field Header, enter a title for the MiniApp.
In field Height: pixels, determine the display area of the MiniApp.
In field URL, enter the MiniApp address. You can use both fixed URL addresses and URLs with variable components that are replaced at runtime. For more information, see section Including URL Addresses with Variable Components in the documentation Configuration Guide for the mySAP.com Workplace. If you use variable components, use variables <web_server> and <language> to specify the Web server and the logon language, and specify the logical system of the component for which the MiniApp has been defined.

© SAP AG TABC10 133
SAP AG 2000
Drag&Relate
l In RRR installations, Drag&Relate is pre-installed on theWorkplace Server
l To use Drag&Relate, you must first perform certain tasks
l The System Administration Assistant provides moreinformation about Drag&Relate:
n Call transaction SSAA
n Choose System Administration Assistant → Display tasks
n Choose Running your System → Middleware Server →TopTier Drag&Relate
n Choose
Documentation
n A Drag&Relate Servlet is implemented as an NT Service called TopTierServer SAP_n.

© SAP AG TABC10 134
SAP AG 2000
How to Set Up Drag&Relate
l Add the entry “~navigationenabled 1” to the service file for theSAP GUI for HTML (webgui.srvc)
l If necessary, use transaction SPO0 in the component systems to:
n Define new relationships between data elements and BOR objects(each data element to one BOR object only)
n Define the transactions that can be started
Assignedtransactions
BORobject
n The SAP Business Object Repository (BOR) is used to enable Drag&Relate within SAP applications. Within the component systems, relations between data elements and BOR objects must be defined. The Drag&Relate Servlet extracts the meta data from the BOR through a function module that is shipped with the Workplace PlugIn.
n To define relationships between BOR objects and data elements:
� Call transaction SPO0
� Enter an object type, for instance BUS1022, and choose Change.
� From the menu, choose Goto → Transactions.
� Select a target transaction, for instance AB02.
� From the menu, choose Goto → Field assignment.
� Define which fields of the business object should be automatically set to the screen input fields of the target transaction.
n BOR objects can also be linked to target transactions of other BOR objects.
� The appropriate object attributes must be implemented in the BOR for the object relationship.
� Only relationships between Drag&Relate enabled BOR objects are supported.

© SAP AG TABC10 135
SAP AG 1999
File server orWeb server
Recommended for use with Workplace:
PlainHtmlHttp: Accessed through the Web server
PlainHtmlFile: Accessed through the file server
HtmlHelpFile: Accessed through the file server,under Windows 95 and 98/NT 4.0
Type of help: Controlled by eu/iwb/help_type onthe application server
Frontends
SAP Library
n There are three methods to access the SAP Library from frontend computers:
� PlainHtmlHttp converts documents to standard HTML format. It can be installed on all frontend platforms and is displayed in the standard Web browser. PlainHtmlHttp can be used with Windows 95 or 98, Windows NT 4.0, or whenever a Web server is available.
� PlainHtmlFile converts documents to standard HTML format. It can be installed on all frontend platforms and is accessed using a file server, where the HTML documents are contained in a directory, made available through a share and displayed in a standard Web browser. PlainHtmlFile can be used with Windows 95 or 98, Windows NT 4.0, or when no Web server is available.
� HtmlHelpFile converts documents to compressed HTML format. It can be used only under Windows 95 or 98, or Windows NT 4.0, and is displayed in an HTML browser. The amount of memory required for the file server files when using HtmlHelpFile is 90% less than the memory required for uncompressed HTML. For this type of access, before you install the other frontend software, you must install a Web browser on the frontend.
n Once the files are downloaded on the file server and the language-specific directories are installed, a number of profile parameters must be maintained. For details, see the R/3 Installation Guide.
n For details of SAP Library installation, see the guide Installing the SAP Library.

© SAP AG TABC10 136
SAP AG 2000
SAP Library Browser
PowerfulSearch engine
Hit quality
SAP Library
Application help
n When accessing the SAP Library through a Web server you can:
� Start the application help directly from within the SAP GUI for HTML. This takes you directly to the topic that is related to your current screen.
� Perform full-text search in the whole SAP Library. A powerful search engine provides you with information about the hit quality of the object found in SAP Library.
� Access the glossary.

© SAP AG TABC10 137
SAP AG 2000
When using SAP GUI for Windows, you can override these settings locally on your PC
SAP Library Settings
eu/iwb/help_type 2 (PlainHtmlHttp)
eu/iwb/installed_languages Language letter codes(example: EF for English and French)
eu/iwb/server_< frontend platform> Name of Web server and port(platform example: win32) (example: p99999.sap-ag.de:1080)
eu/iwb/path_<frontend platform> saphelp/helpdata(platform example: win32) (see standard directory structure)
SAP Instance Profile Parameter Parameter Value
n The parameters mentioned above must be maintained in every SAP System. You can use them to distinguish between the SAP Libraries of different system types, such as R/3, BW, and APO.
n The profile parameters can be different in the different instances of an SAP System:
� Users accessing a subset of instances (for example, using logon groups) may use a different help type than other users. Configure the profile parameters for this subset of instances according to the needs of the users.
� When implementing the Workplace, group Workplace users who use the SAP GUI for HTML in one logon group and make sure that the instances belonging to this logon group are configured to use help type PlainHtmlHttp (help type 2).
n When using SAP GUI for Windows, you can use the PC local file sapdoccd.ini to override these standard settings. For details, see the installation documentation.

© SAP AG TABC10 138
SAP AG 2000
SAP Library Web Server Directories
<Platform>
wwwroot
<InstallDir>
helpdata
EN
helpindx
en
verity_common
shortcut
{alias: /saphelp}
(help files, English version)
verity
bin {alias: /verity_cgi}
(utilities for search engine)
(index data, English version)
(search engine)
(example: win32)
(offline access to SAP Library)
n During installation, the directory structure shown above is created automatically. All installation directories must be located below a home directory of a Web instance.
n Two alias names must be created manually:
� Saphelp
� Verity_cgi
n For offline access to the SAP Library (that is, when not connected to the Workplace or any component system), use the command files stored in the directory shortcut. These command files allow you to create start menu entries that point to your central SAP Library Web server. These command files may also be integrated into network logon scripts.

© SAP AG TABC10 139
SAP AG 1999
Distributing Single Roles
l Single roles are created on the component system
l The following functions are available for distributing rolesto the Workplace Server:
n Extract the single roles from the component system and useRFC to transport them to the Workplace Server
n Download the roles to a local file and then upload this file
n Use a transport request to transport the roles
l You can find the functions in transaction PFCG
l The function you use depends on:
n Your SAP System release
n Whether you have installed the Workplace PlugIn
n Scenario 1: You use SAP System Release 3.1H through 4.0B. Reports are available for downloading and uploading the roles (see SAP Note 181368).
n Scenario 2: You use SAP System Release 4.5A through 4.5B. In addition to downloading and uploading with reports, you can also transport the roles.
n Scenario 3: You use SAP System Release 4.6B or higher. A menu function for downloading and uploading is available in the role maintenance transaction.
n Scenario 4: You use SAP System Release 3.1H through 4.6B and have installed the Workplace PlugIn:
� From the Workplace Server, you can import roles from the component systems to the Workplace Server by installing the Workplace PlugIn.
� The PlugIn contains transaction WPST that allows you to write the roles in a system to a file. In addition, you can also write the enterprise menu to a file in the form of a role. You can then upload these files to the Workplace Server. To do this, in the Workplace maintenance transaction role, choose Role → Upload.
� Another option, once you have installed the PlugIn, is to import the roles from the legacy system to the Workplace using RFC. To do this, from another system in the Workplace, choose Role → Read by RFC.

© SAP AG TABC10 140
SAP AG 2000
Additional Users
l Middleware server users (optional)n ITSadm (in RRR installations)n GATadm (in RRR installations)
n SAPServiceGAT (NT only, in RRR installations)
l Component Systemn WPEXCHANGE (recommended user for synchronizing roles)
Changesingle role
Copy singleroles to WPS
Update collective roleswhich contain the
changed single role
WorkplaceServer
Componentsystem CS1
12
4...CPIC user
WPEXCHANGEreceives changed role
3
n Middleware server users, functions, and default passwords (typically created in RRR installations):
� ITSadm, NT administrator for ITS, itsadmins, itssusers, administrators
� GATadm, administrator for standalone GW, SAP_GAT_Localadmin, administrators
� SAPServiceGAT, service user for standalone GW, SAP_GAT_Localadmin, administrators
n SAP System users:
� SAP*, DDIC, EARLYWATCH, SAPCPIC, TMSADM with same function and default passwords as a standard R/3 system.
� WPEXCHANGE, recommended user for synchronizing roles (CPIC user, see SAP Note 215927)
n Example:
1) A single role is changed on a component system.
2) A background synchronization job copies the changed role to the Workplace Server.
3) The changed role is sent via RFC connection to user WPEXCHANGE.
4) User WPEXCHANGE updates all collective roles that contain the changed single role.

© SAP AG TABC10 141
SAP AG 2000
Predefined Administrative Roles
l SAP_BC_SYSTEM_ADMIN(system administrator role)
l SAP_WORKPLACE, consists of:
n SAP_WORKPLACE_USER
n SAP_WORKPLACE_ADMIN
l SAP_BC_WORKPLACE_SUPPORT
l SAP_BC_ENDUSER_AG(end user role)
l SAP_WP_EXCHANGE(Workplace service user role, WP 2.10 onwards)
n Predefined roles:
� SAP_BC_SYSTEM_ADMIN (system administrator role)
� SAP_WORKPLACE containing:
SAP_WORKPLACE_USER, with URLs for changing MiniApps and personalizing the GUI.
SAP_BC_WORKPLACE_ADMIN, administrator for the mySAP.com Workplace. This role contains links to the main administrative transactions. For example, you can start transactions for CCMS system monitoring and CTS transactions directly from the LaunchPad. There are also links to office transactions and to the SAA. From the SAA, you can execute numerous administration and monitoring transactions and can also access administration documentation for the Workplace Server and the Middleware server.
� SAP_BC_WORKPLACE_SUPPORT, user for mySAP.com Workplace support. This role contains links to SAPNet - Web Frontend and SAPNet - R/3 Frontend.
� SAP_BC_ENDUSER_AG is to be assigned to every Workplace user. This role contains the minimum authorizations necessary to log on to the Workplace. Check that its authorization profiles are generated.
� SAP_WP_EXCHANGE (Workplace service user role for user WPEXCHANGE, WP 2.10 onwards)

© SAP AG TABC10 142
SAP AG 2000
Authorizations for User WPEXCHANGE
Object Fields Value Meaning
Basis, Rel 4.6C(S_RFC)
FUGRRFC_TYPE
STCD Transaction classification,URL generation
SDWZ Drag&RelateSPRT Drag&RelatePLRN Role extractorsSWK1 Workflow inbox
RFC_NAME
ACTVT 16 Execute
Basis, Rel 4.5(S_USER_AGR)
*ACT_GROUP
ACTVT 03 Display
n User WPEXCHANGE is recommended on the component system for use in the RFC destination for synchronizing roles (CPIC user, see SAP Note 215927).
n The graphic shows the authorizations needed for this user. As of Workplace 2.10, the predefined role SAP_WP_EXCHANGE contains these authorizations For details, see SAP Note 215927.
n Additionally, authorizations are used for CUA.
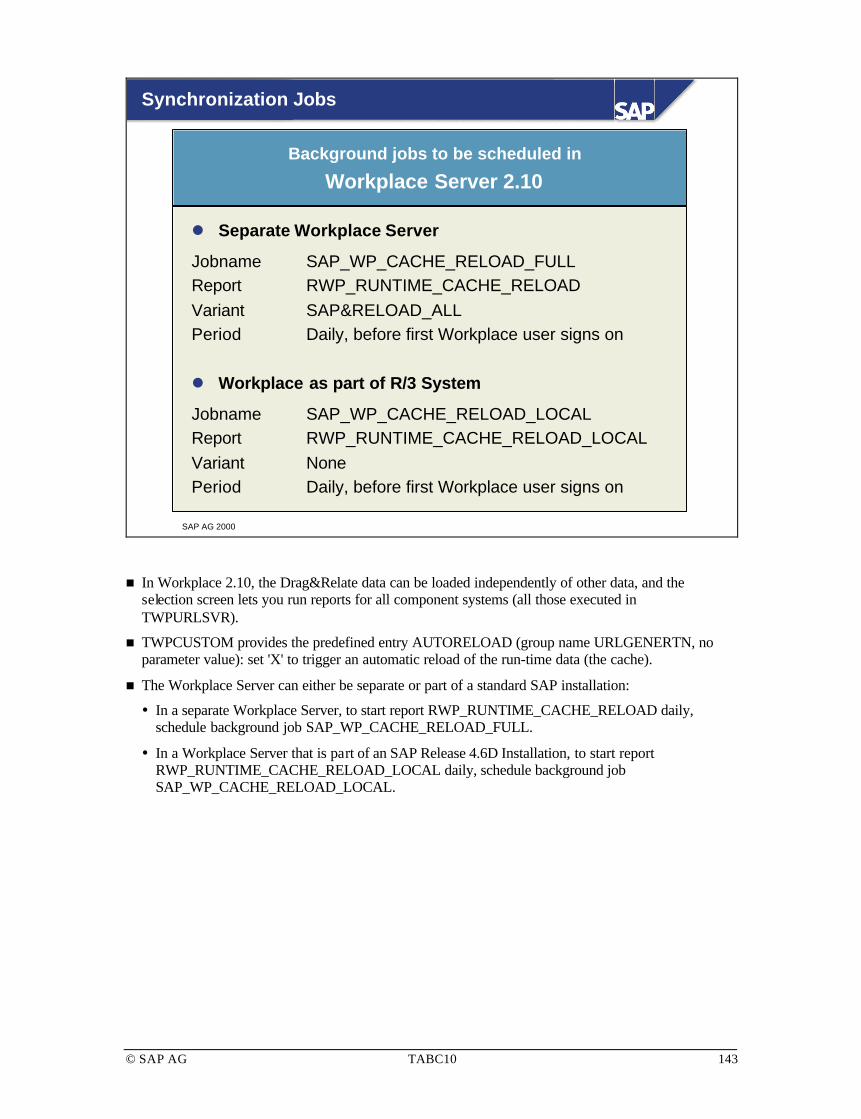
© SAP AG TABC10 143
SAP AG 2000
l Separate Workplace Server
Jobname SAP_WP_CACHE_RELOAD_FULLReport RWP_RUNTIME_CACHE_RELOADVariant SAP&RELOAD_ALLPeriod Daily, before first Workplace user signs on
l Workplace as part of R/3 System
Jobname SAP_WP_CACHE_RELOAD_LOCALReport RWP_RUNTIME_CACHE_RELOAD_LOCALVariant NonePeriod Daily, before first Workplace user signs on
Synchronization Jobs
Background jobs to be scheduled in
Workplace Server 2.10
n In Workplace 2.10, the Drag&Relate data can be loaded independently of other data, and the selection screen lets you run reports for all component systems (all those executed in TWPURLSVR).
n TWPCUSTOM provides the predefined entry AUTORELOAD (group name URLGENERTN, no parameter value): set 'X' to trigger an automatic reload of the run-time data (the cache).
n The Workplace Server can either be separate or part of a standard SAP installation:
� In a separate Workplace Server, to start report RWP_RUNTIME_CACHE_RELOAD daily, schedule background job SAP_WP_CACHE_RELOAD_FULL.
� In a Workplace Server that is part of an SAP Release 4.6D Installation, to start report RWP_RUNTIME_CACHE_RELOAD_LOCAL daily, schedule background job SAP_WP_CACHE_RELOAD_LOCAL.

© SAP AG TABC10 144
SAP AG 2000
RSBTCDEL Delete background logs YES
RSPO1041 Delete old spool requests YES
RSPO1043 Check consistency of spool DB YES
RSBDCREO Reorganize BI folders and logs NO
RSSNAPDL Delete ABAP short dumps YES
RSSTAT60 Reorganize table MONI YES
RSORA811 Delete old brbackup/brarchive YES
RSORASNP Reorganize the SNAP & STAT$ logs YES
RSCOLL00 Performance monitor collector run YES
Standard Housekeeping Jobs
Report Description Required onWorkplace
n We recommend that you schedule these reports to run periodically.
n For a list of the required programs, their parameters, and the recommended repeat intervals, see SAP Note 16083. Names are suggested for the required jobs. Follow the recommendations, as the naming conventions enable SAP Support to check quickly and easily whether these jobs have been activated in your system.

© SAP AG TABC10 145
SAP AG 2000
Starting and Stopping
Microsoft Management Consolevia SAP R/3 Systems Snap-in
l Workplace Server
n NT: sapmmc.exe
l Workplace Middleware
n ITS
w AGate
w WGate
n Drag&Relate Servlet
w Start/Stop ServiceTopTierServer SAP_n
n The Workplace Server is started/stopped in the same way as a standard R/3 System. The Microsoft Management Console (mmc.exe) is installed with the SAP R/3 Systems snap-in.
n The Workplace Middleware is started/stopped from the ITS. Each ITS installation contains an ITS administration instance. From here, all AGates and WGates can be started and stopped.
n The Drag&Relate Servlet is implemented as an NT Service called TopTierServer SAP_n. To start/stop a Drag&Relate Servlet, use the NT Services control panel.

© SAP AG TABC10 146
SAP AG 1999
Daily Tasks
l Workplace Serveradministration isintegrated in SAA
l Special SAA TaskSchedule
n StandardR/3 System:daily
n WorkplaceServer:weekly
n System activity on the Workplace Server is significantly lower than in a standard SAP System.
n The SAA schedules longer maintenance intervals for a Workplace Server than for a standard SAP System.

© SAP AG TABC10 147
SAP AG 1999
Weekly Tasks
l Backup cycle
n Archives oncea week
n Full backuponce a week
l Backup tools
n sapdba
n brbackup
n brarchive
n Schedule usingCCMS (DB13)
n On a separate Workplace Server, it is sufficient to save archives to tape once per week and to perform a full backup once per week.
n You can perform the backup as in a standard SAP System by using the CCMS (transaction DB13).

© SAP AG TABC10 148
SAP AG 1999
Monthly Tasks
l Security
n Change adminpasswords
l Database
n Monitor DBgrowth
n Verify DB
l Spool
n Check TemSe
l ALE
n Archive IDoc
n The following data are stored in the database of a separate Workplace Server:
� Collective roles
� User master records
� Spool requests and spool data
� IDocs, in case CUA is used to communicate with external systems
n No application transaction data is stored on a separate Workplace Server. Therefore, it is sufficient to monitor database growth once per month.
n For security reasons, administrator passwords (such as SAP*, DDIC) should be changed once per month.

© SAP AG TABC10 149
SAP AG 1999
Occasional Tasks
l Security
n Change adminpasswords
n Delete old usermaster records
l Transport system
n Check TMS
n For security reasons, old user master records should be deleted and admin passwords should be changed on a regular basis. The same rules apply as for a standard R/3 System. For details, see the SAP Security Guide.
n The transport system should be checked:
� When the system landscape is changed (for example, by adding new systems to the TMS)
� After an upgrade

© SAP AG TABC10 150
SAP AG 1999
l Daily
n Check ITSavailability
n Check ITS logs
l Weekly
n Back up all files onthe Middlewareservers
l Unscheduled
n Complete backup
n Restart ITS,Web server,standalonegateway
Middleware Administration
n As of Release 4.6D, some of the daily checks can be performed directly from the CCMS Alert Monitor (RZ20). In earlier releases, use the ITS administration instance to check the ITS status and logs.
n Use standard operating system tools to backup the files on the Middleware servers once per week.
n If possible, restart all Middleware components when the system has planned downtime. This avoids, for example, memory leaks.

© SAP AG TABC10 151
SAP AG 2000
Workplace Service Phases
Self-services
Remoteservices
Planning of Implementation Go live Production Upgradeimplementation operation
WorkplaceImplementation Guide
Upgrade Guide
SAPEarlyWatchAlert Service
SAP GoingLiveService
SAPEarlyWatchAlert Service
SAPEarlyWatchService
Ready-to-RunInstallation
Phases of Workplace implementation
n Implementation
� Implementation Guide
� IT Operation Manual
n System operation and optimization
� Life-cycle dependent system checks: EarlyWatch Service, GoingLive Checks, EarlyWatch Alert
� Upgrade Guide: Workplace upgrade, R/3 upgrade
n SAP Support
� TeamSAP Support (EarlyWatch, GoingLive)
� Consulting packages

© SAP AG TABC10 152
SAP AG 2000
GoingLive Check for Workplace
2 months 1 month +1 month
Analysis§ Sizing plausibility
Check (hardwareand network)§ Configuration§ Load distribution§ Security aspects
Optimization§ Performance
of MiniApps§ Network load
of MiniApps
Verification§ Configuration§ Sizing verification§ System usage and
bottleneck analysis
EarlyWatchService
Start of Production
Three GoingLive Sessions for the Workplace
n The GoingLive Check ensures a smooth transition to production operation.
n This service is
� Free of charge
� Available now
n You can order it through SAP Local Support.

© SAP AG TABC10 153
SAP AG 2000
l SAP Service Marketplace: http://service.sap.com
n Customer, role, and situation tailoring through mySAP.com
n Customer, partner, and SAP use the same service workflow
n Fully integrates mySAP.com Support Workplace
l For all SAP support services: mySAP.com Support Workplace
n Self-services
n Service-dependent SAP back office support
n Consulting packages
n Life-cycle support (GoingLive Check, EarlyWatch Service,EarlyWatch Alert, ...)
n Access to Best Practices database
n Message posting and SAP Notes search and subscription
n Support Packages and Legal Change Packages (HR)
n Training scheduling/ordering and Virtual Classroom
n SAP support through back office–front office connection
SAP Service Marketplace
NEW
NEW
NEW
NEW
NEW
n The mySAP.com Support Workplace provides access to numerous services, including:
� Self-services
� Service-dependent SAP back office support
� Consulting packages
� Access to the SAP Best Practices database
� Message posting
� SAP Notes search and subscription
n As of SAP Release 4.6C, run transaction DSA to perform SAP self-services.

© SAP AG TABC10 154
SAP AG 2000
Further Documentation
l SAP Notes 9942, 16083, 183914, 195812, 195810,212133, 215927
l SAP Note categories:
n WP-DR: Drag&Relate
n WP-FRM: Frontend/Middleware
n WP-PLI: PlugIns
n WP-SRV: Workplace Server
l Installing the SAP Library (Material Number 51007197)
l SAP Service Marketplace: http://service.sap.com
l MiniApps: http://www.sap.com/miniapps
Further information about mySAP.com Workplace:

© SAP AG TABC10 155
SAP AG 2000
You are now able to:
Unit Summary
l Plan, set up, and configure a mySAP.comlandscape and its components:
n Connect the Workplace
n Assign administrator roles
n Customize the Workplace
l Administer the Workplace Server
n Distinguish between a standard SAP Systemand the Workplace Server

© SAP AG TABC10 156
SAP AG 2000
Unit Actions
l Exercises?
l Solutions

© SAP AG TABC10 157
Configuration and Administration: Exercises
No. Exercise
1 Check if the Workplace Server and the component system have the right Add On and Plug In.
1.1 On the Workplace Server
Log on with user BC350 (your client) and change initial password given by your instructor. Use this user for al interactive logons to the Workplace Server.
Check the system status of the Workplace Server (software components, Addon) using the system status, transaction SAINT and SPAM
1.2 On your component system
Log on with user BC350 (client 200), change initial password given by your instructor to the same password as in 1.1 for the user on the Workplace Server. Use this user for al interactive logons to your component system.
Check the system status of the Workplace Server (software components, Addon) using the system status, transaction SAINT and SPAM
2 Create Logical Systems and RFC Destination on Workplace Server
2.1 On the Workplace Server
Create Logical System WPSCLNT<your client number> using the System Administration Assistant (Transaction SSAA)
Create Logical System <your group ID> using the System Administration Assistant (Transaction SSAA)
2.2 On the Workplace Server
Assign Logical system WPSCLNT<your client> to client <your client>
2.3 On the Workplace Server
Create the RFC Destination, <your group ID> pointing to the central instance of your component system (technical data see your reference sheet from the chapter Workplace Architecture):
Use
Connection Type: 3
Language: EN
Client: 200
User: WPEXCHANGE
Password: <as specified by your instructor>
2.4 On the Workplace Server
Register your ITS server for URL generation using the System Administration Assistant (Transaction SSAA):
Include entries for your logical systems:
WPSCLNT<your client> and

© SAP AG TABC10 158
<your group ID>
3 Create Logical Systems on your component system
3.1 On your component system
Define Logical System WPSCLNT<your client number>.
Define Logical System <your group ID>
Is the entry WPSCLNT<your client> necessary for the workplace or is it only recommended for ALE consistency?
3.2 On your component system
Assign Logical System <your group ID> to your client 200.
4 Periodic Administration tasks on the Workplace Server
4.1 On the Workplace Server
Explore the periodic administration tasks using transaction SSAA.
5 Creating a role
5.1 On your component system
Create the individual role Z<your group ID> as a copy of Activity Group SAP_BC_BASIS_ADMIN_AG.
Use transaction PFCG.
Assign to the user BC350 to your newly created role and perform a user compare to update user master records.
5.2 On the Workplace Server
Create the composite role ZCOMP<your group ID>.
Add roles SAP_BC_ENDUSER_AG and SAP_WORKPLACE_USER to your composite role.
Include Activity Group Z<your group ID> from component system into your composite role using RFC copy
5.3 On the Workplace Server
Include individual role Z<your group ID> from your component system (from Exercise 5.1)
Why don’t you have to perform a user compare?
5.4 On the Workplace Server
Include the Easy Web Transaction PZ24 (Who is Who) pointing to your component system as Mini-application into your composite role ZCOMP<your group ID>.
Use the following:
Sequence 01
Heading Who is who?
Height (pixels) 300
URL: http://<webserver and domain>:<web server port for your group ID> →/scripts/wgate/pz24/!?~client=200&~language=EN

© SAP AG TABC10 159
5.5 On the Workplace Server
Test for correct URL generation starting Transaction SURL_LAUNCHPAD_TEST
6 Configure your mySAP.com Workplace component system to use the HTML Online help for its dialog instance.
6.1 Test if you can access to the online help using your internet browser:
What is the right URL?
6.2 On your component system
Adapt your SAP Instance profile parameters eu/iwb* for the dialog instance to access the SAP Library using the help type PlainHtmlHttp.
Use the following information:
The web server for your online help is the web server used for the workplace (port 1080).
6.3 On your component system
Make sure you are logged on to the central instance. Restart your dialog instance using transaction RZ03.
6.4 How can you test your settings were successful? Is a test with SAPGUI for Windows sufficient?
7 Perform a sizing check for your Workplace project. Use your component system.
7.1 On your component system
Use transaction DSA to perform a GoingLive self-service Sizing Check.
7.2 On your component system
Generate an HTML Report
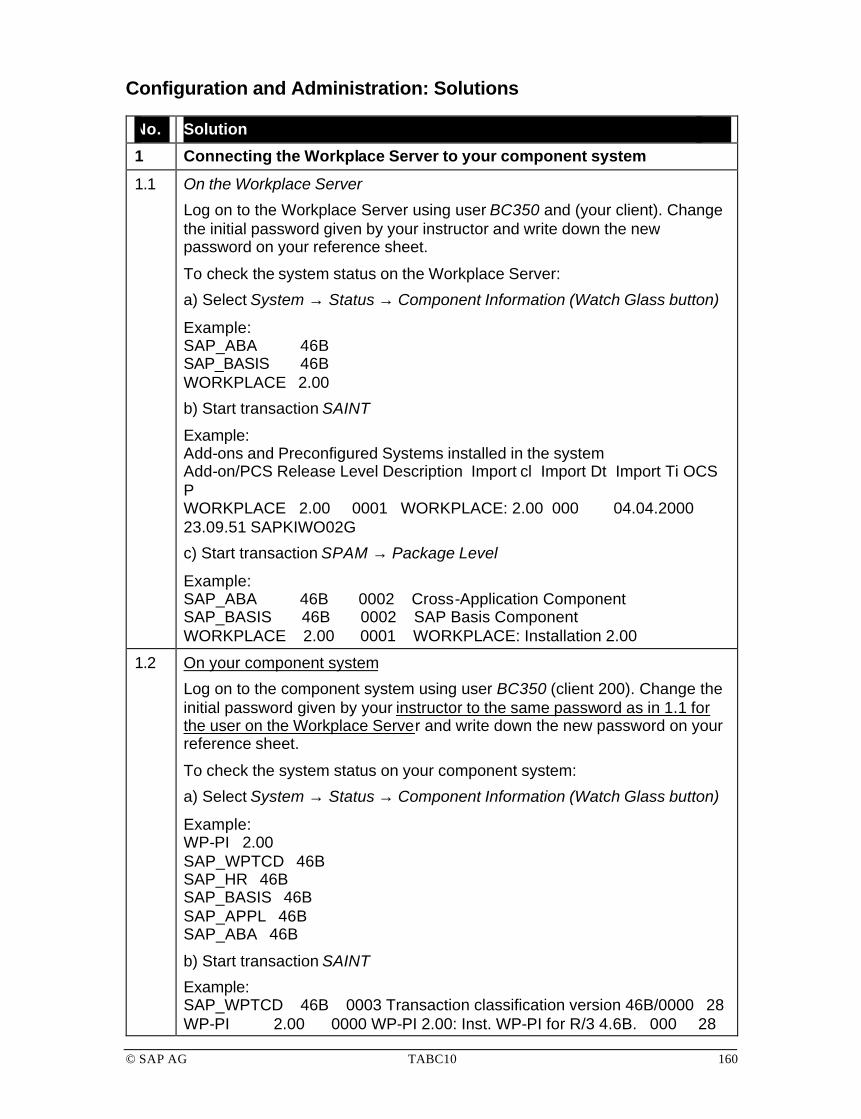
© SAP AG TABC10 160
Configuration and Administration: Solutions
No. Solution
1 Connecting the Workplace Server to your component system
1.1 On the Workplace Server
Log on to the Workplace Server using user BC350 and (your client). Change the initial password given by your instructor and write down the new password on your reference sheet.
To check the system status on the Workplace Server:
a) Select System → Status → Component Information (Watch Glass button)
Example: SAP_ABA 46B SAP_BASIS 46B WORKPLACE 2.00
b) Start transaction SAINT
Example: Add-ons and Preconfigured Systems installed in the system Add-on/PCS Release Level Description Import cl Import Dt Import Ti OCS P WORKPLACE 2.00 0001 WORKPLACE: 2.00 000 04.04.2000 23.09.51 SAPKIWO02G
c) Start transaction SPAM → Package Level
Example: SAP_ABA 46B 0002 Cross-Application Component SAP_BASIS 46B 0002 SAP Basis Component WORKPLACE 2.00 0001 WORKPLACE: Installation 2.00
1.2 On your component system
Log on to the component system using user BC350 (client 200). Change the initial password given by your instructor to the same password as in 1.1 for the user on the Workplace Server and write down the new password on your reference sheet.
To check the system status on your component system:
a) Select System → Status → Component Information (Watch Glass button)
Example: WP-PI 2.00 SAP_WPTCD 46B SAP_HR 46B SAP_BASIS 46B SAP_APPL 46B SAP_ABA 46B
b) Start transaction SAINT
Example: SAP_WPTCD 46B 0003 Transaction classification version 46B/0000 28 WP-PI 2.00 0000 WP-PI 2.00: Inst. WP-PI for R/3 4.6B. 000 28

© SAP AG TABC10 161
c) Start transaction SPAM → Package Level
Example: SAP_ABA 46B 0000 Cross-Application Component SAP_BASIS 46B 0000 SAP Basis Component SAP_HR 46B 0000 Human Resources SAP_APPL 46B 0000 Logistics and Accounting WP-PI 2.00 0000 WP-PI 2.00: Inst. WP-PI for R/3 4.6B. SAP_WPTCD 46B 0003 Transaction classification version 46B/0
2 Create Logical Systems and RFC Destination on Workplace Server
2.1 On the Workplace Server
To define Logical Systems from the initial screen start transaction SSAA and select tab Entire view.
Choose Display Tasks.
If there is a pop-up System Administration Assistant – System Landscape asking for confirmation of the new configuration select Save.
Under mySAP.com Workplace → Running Your System → Workplace Server: Configuration and Administration → Workplace Server: Configuration → WP: Registering Logical Systems choose Execute.
Choose SAP Reference IMG
Under Basis → Distribution (ALE) → Sending and Receiving systems → Logical systems → Define Logical system choose Execute
Choose OK → New Entries.
In the first line enter: in the field Logical system enter WPSCLNT<Your client number> in the field description enter Workplace server < your group ID>
In the second line enter: in the field Logical system enter <your group ID> in the field description enter Component System < your group ID>
Save your settings and create and assign a Change Request if needed.
2.2 On the Workplace Server
To assign a client to a Logical System from the initial screen start transaction SSAA and select tab Entire view.
Choose Display Tasks.
Under mySAP.com Workplace → Running Your System → Workplace Server: Configuration and Administration → Workplace Server: Configuration → WP: Assigning Client to Logical System choose Execute.
Choose Enter
Choose Display -> Change
Choose Continue/Enter
Double-click <your client number>
In the field Logical System select your Logical System WPSCLNT<your client>

© SAP AG TABC10 162
Save your settings.
Choose Enter.
2.3 On the Workplace Server
To create RFC Destination <your group ID> (upper case) start transaction SSAA and select tab Entire view.
Choose Display Tasks
Under mySAP.com Workplace → Running Your System → Workplace Server: Configuration and Administration → Workplace Server: Configuration → WP: Creating RFC connections choose Execute. Choose Create
In the field RFC Destination enter <your group ID> (upper case) In the field Connection Type select 3 In the field Description enter Workplace to Component <your group ID> In the field Language enter EN In the field Client enter 200 In the field User enter WPEXCHANGE In the field Password enter the password as specified by your instructor Save your settings.
In the field Target Host enter the server name of your component system. In the field System Number enter the system number of the central instance of your component system (00 for DEV, 10 for QAS).
Save your settings.
Select Test connection. Make sure there are no errors
Note: RFC destination names are case sensitive.
2.4 On the Workplace Server
To register an ITS server for URL generation start transaction SSAA and select tab Entire view.
Choose Display Execute
Under mySAP.com Workplace → Running Your System → Workplace Server: Configuration and Administration → Workplace Server: Configuration → WP: Registering an ITS server choose Execute.
In the field Table/View enter TWPURLSVR
Choose Maintain
Choose Continue/Enter
Choose New entries.
In the field Logical System enter WPSCLNT<your client> In the field Web server enter <name of web server and domain>:1080 In the field SAPGUIforHTML prot enter HTTP In the field GUI Start Server enter the name of your web server In the field GUI Start protocol enter HTTP Leave the other fields blank.
Save your settings and provide a new change request if needed.
Select Next Entry.

© SAP AG TABC10 163
In the field Logical System enter <your group ID> In the field Web server enter <name of web server and domain>:< web server port for your group ID>. In the field SAPGUIforHTML prot enter HTTP In the field GUI Start Server enter the name of your web server In the field GUI Start protocol enter HTTP Leave the other fields blank.
Save your settings.
Example:
1.
Logical system WPSCLNT401
Web server TWDF25.WDF.SAP-AG.DE:1080
SAPGUIforHTML prot HTTP
GUI start server TWDF25.WDF.SAP-AG.DE:1080
GUI start protocol HTTP
2.
Logical system DEV03
Web server TWDF25.WDF.SAP-AG.DE:3213
SAPGUIforHTML prot HTTP
GUI start server TWDF25.WDF.SAP-AG.DE:3213
GUI start protocol HTTP
3 Create Logical Systems on your component system
3.1
On your component system
To define the Logical Systems start transaction SPRO, choose SAP Reference IMG Under Basis Components → Distribution (ALE) → Sending and Receiving Systems → Logical Systems → Define Logical System choose Execute. Choose Enter Choose New Entries.
In the first line enter: In the field Logical system enter WPSCLNT<Your client number> In the field description enter Workplace server < your group ID>
In the second line enter: In the field Logical system enter <your group ID> In the field description enter Component System < your group ID>
Save your settings and provide a new change request if needed.
The entry WPSCLNT<your client> on the component system is recommended for ALE consistency.
3.2 On your component system
To assign a client to a Logical System start transaction SPRO
Choose SAP Reference IMG

© SAP AG TABC10 164
Under Basis Components → Distribution (ALE) → Sending and Receiving Systems → Logical Systems → Assign Client to Logical System choose Execute
Choose Enter.
Double-click 200.
In the field Logical System select <your group ID>
Save your settings.
Choose Enter.
4 Periodic Administration tasks on the Workplace Server
4.1 On the Workplace Server
To explore the periodic administration tasks start transaction SSAA
Choose Display Tasks
Under mySAP.com Workplace → Running your system → Workplace Server: Additional Administration Tasks.
Explore: SAP System Administration Performance Monitoring Database Administration Windows NT Administration
5 Creating a role
5.1 On your component system
To create the individual role Z<your group ID> start Transaction PFCG. In the field Activity group enter SAP_BC_BASIS_ADMIN_AG.
Choose Copy Activity Group. In the field activity Group enter Z<your group ID> Choose Copy All Choose Change.
Select tab Authorizations Choose Change Authorization Data Choose Generate . Choose Execute/Enter Choose Back
Select tab User In the field User ID enter BC350
Save your settings.
Choose User compare. Choose Complete compare.
5.2 On the Workplace Server
To create a composite role start Transaction PFCG. In the field Role enter ZCOMP<your group ID>.
Choose Create Composite Role. In the field Description enter Composite role for <your group ID>

© SAP AG TABC10 165
Save your settings
Select tab Roles Choose Insert Line Mark SAP_BC_ENDUSER_AG Choose Copy/Enter. Choose Insert Line Mark SAP_WORKPLACE_USER Choose Copy/Enter.
Save your settings.
Select tab Menu. Choose Read Menu. Select tab User. In field User ID enter BC350.
Save your settings.
Choose User compare.
5.3 On the Workplace Server
To include an individual role from your component system start transaction PFCG. In the field Role enter ZCOMP<your group ID> Select Role → Read by RFC from another system. Mark Selection of RFC destination. Choose Continue/Enter. Select the RFC Destination <your group ID>. Mark Z<your group ID> Choose Copy/Enter Choose Transfer/Enter Choose Change
Select tab Roles. Choose Insert Line Mark Z<your group ID>. Choose Copy/Enter.
Save your settings.
Select tab Menu. Choose Read Menu. Choose Yes.
Save your settings.
You don’t have to perform a user compare because the user master record of user workplace did not change. The user compare enters generated authorization profiles into the user master record in the current system. In 5.4 no new authorization profile was generated on WPS.
5.4 On the Workplace Server
To include Easy Web Transaction PZ24 (Who is Who?) pointing to your component system as a Mini-application into your composite role start Transaction PFCG.
In the field Role enter ZCOMP<your group ID> Choose Change

© SAP AG TABC10 166
Select Goto → Mini-applications Choose New Entries. In the field Sequence enter 01 In the field Heading enter Who is who? In the field Height (pixels) enter 300 In the field URL enter http://<webserver and domain>:<web server port for <your group ID→/scripts/wgate/pz24/!?~client=200&~language=EN
Save your settings.
Example URL http://twdf25.wdf.sap-ag.de:3213/scripts/wgate /pz24/!?~client=200 &~language=EN
5.5 On the Workplace Server
To test for correct URL generation start transaction: SURL_LAUNCHPAD_TEST
In the field User enter BC350
Choose Enter
Study your role menu entries and Mini-application.
6 Component system – Prepare the use of the SAP Library
6.1 To test if you can access the SAP Library start your internet browser and enter the following URL: URL: http://<web server>:1080/saphelp/helpdata/en/home.htm
Example: URL: http://twdf25.wdf.sap-ag.de:1080/saphelp/helpdata/en/home.htm
6.2 On your component system
To adapt your SAP Instance profile parameters eu/iwb* for the Dialog Instance log on to the central instance. Start transaction RZ10.
In the field Profile select the Instance profile of the dialog instance (<component system ID>_D01_<server of component system> or <component system ID>_D11_<server of component system>)
In the field edit profile mark Extended Maintenance
Choose Change.
Double-click eu/iwb/help_type In the field Parameter val. enter 2. Choose Copy. Choose Back.
Double-click eu/iwb/path_win32 In the field Parameter val. enter saphelp/helpdata. Choose Copy. Choose Back.
Double-click eu/iwb/installed_languages In the field Parameter val. enter E. Choose Copy. Choose Back.
Choose Create. In the field Parameter name enter eu/iwb/server_win32. In the field Parameter val. enter <name of web server and domain>:1080 Choose Copy.

© SAP AG TABC10 167
Choose Copy. Choose Yes.
Choose Back.
Choose Back.
Choose Yes.
Choose Save.
Choose No.
Choose Yes.
Choose Continue.
Choose Continue.
Double-click No.
6.3 On your component system
To restart your dialog instance start transaction RZ03.
Mark the dialog instance (services DBS)
Select Control → Stop SAP instance.
Confirm the following pop-ups with Yes.
Select Refresh until the Dialog Instance shows status Not active.
Select Control → Start SAP instance
6.4 On your component system
To test if your settings were successful logon to the Dialog Instance of your component system using SAPGUI for Windows. Test with Help → SAP Help Library.
Check the SAPGUI logfile under c:\<Windows Directory>\Sapdoccd.log on your frontend computer for correct URL generation.
Possibly a different help type than PlainHtmlHttp is displayed because of overlaying sapdoccd.ini. The right help type will be displayed later when accessing from the webgui.
Example of Log File:
Program path = C:\Program Files\SAPpc\SAPGUI\HTMLHELP\SHH.EXE SHH version = 4.5.2.3 Command line = TYPE=2&SERVER=twdf14.wdf.sap-ag.de:1080&PATH=saphelp/helpdata/EN&SYSTEM=QAS&_CLASS=IWB_STRUCT&_LOIO=&_SLOIO=e18e51341a06084de10000009b38f83b&LANGUAGE=EN&RELEASE=46B&IWB_COUNTRY=&IWB_INDUSTRY=
Info: --- Default settings from command line --- Info: HelpType=PlainHtmlHttp Info: PlainHtmlHttpServer=twdf14.wdf.sap-ag.de:1080 Info: PlainHtmlHttpPath=saphelp/helpdata/EN Info: --- Contents of profile "C:\WINNT\sapdoccd.ini" --- Info: HelpType="HtmlHelpFile" Info: HtmlHelpFilePath-EN=\\USSFO000\docu\46b\htmlhelp\ helpdata\EN
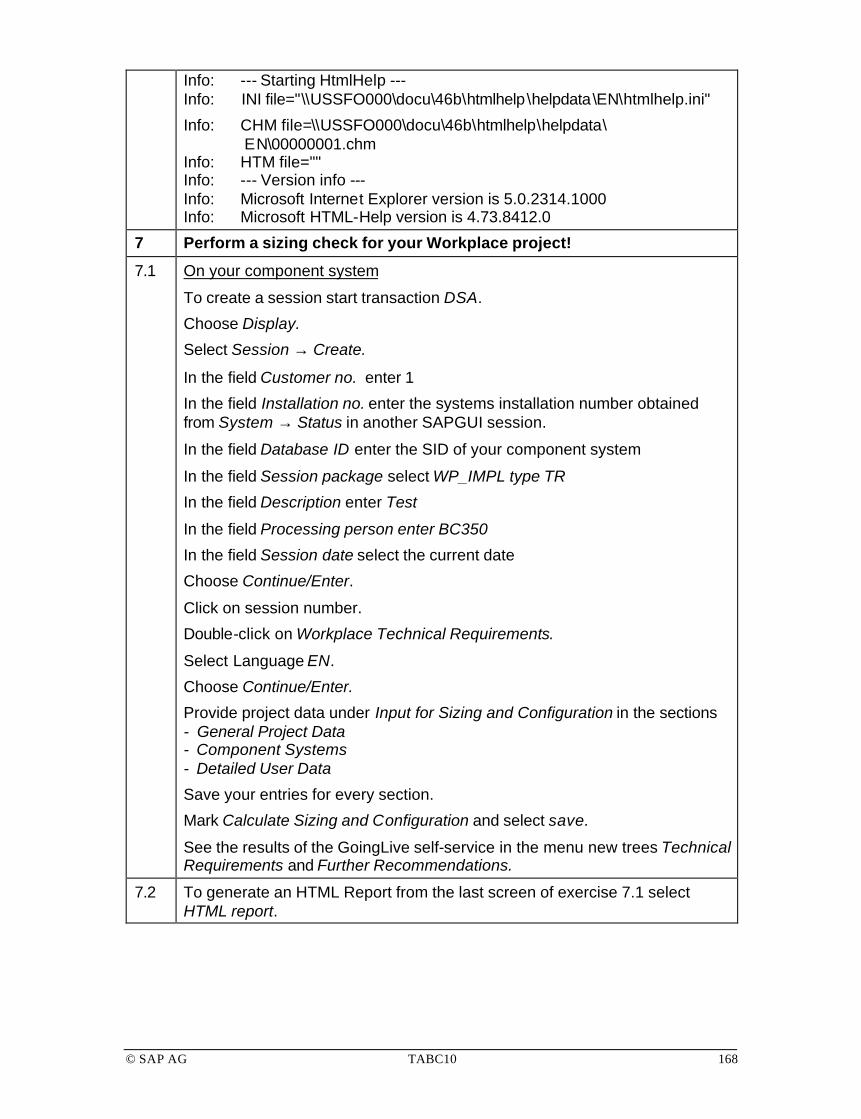
© SAP AG TABC10 168
Info: --- Starting HtmlHelp --- Info: INI file="\\USSFO000\docu\46b\htmlhelp\helpdata\EN\htmlhelp.ini"
Info: CHM file=\\USSFO000\docu\46b\htmlhelp\helpdata\ EN\00000001.chm Info: HTM file="" Info: --- Version info --- Info: Microsoft Internet Explorer version is 5.0.2314.1000 Info: Microsoft HTML-Help version is 4.73.8412.0
7 Perform a sizing check for your Workplace project!
7.1 On your component system
To create a session start transaction DSA.
Choose Display.
Select Session → Create.
In the field Customer no. enter 1
In the field Installation no. enter the systems installation number obtained from System → Status in another SAPGUI session.
In the field Database ID enter the SID of your component system
In the field Session package select WP_IMPL type TR
In the field Description enter Test
In the field Processing person enter BC350
In the field Session date select the current date
Choose Continue/Enter.
Click on session number.
Double-click on Workplace Technical Requirements.
Select Language EN.
Choose Continue/Enter.
Provide project data under Input for Sizing and Configuration in the sections - General Project Data - Component Systems - Detailed User Data
Save your entries for every section.
Mark Calculate Sizing and Configuration and select save.
See the results of the GoingLive self-service in the menu new trees Technical Requirements and Further Recommendations.
7.2 To generate an HTML Report from the last screen of exercise 7.1 select HTML report.

© SAP AG TABC10 169
SAP AG 1999
Introduction Including MiniApps
Workplace Architecture Software Logistics
Configuration andAdministration
Monitoring andTroubleshooting
InternetTransaction Server Drag&Relate
Users:Single Sign On
Internet Transaction Server
© SAP AG TABC10 170
SAP AG 1999
Internet Transaction Server
Contentsl ITS Services
l ITS Administration
l Monitoring, control, security
l Diagnostics and maintenance
ObjectivesAt the end of this unit, you will be able to:
l Describe ITS Services
l Explain ITS Administration
l Control, monitor, and maintain your ITS environment
l Work with the administration menu

© SAP AG TABC10 171
SAP AG 1999
ITS Service Details
HTML businesstemplates
HTML businesstemplates
Service filesService files WorkplaceServer
Componentsystem
Components
Browser
Workplace MiddlewareFrontend
HTTPserver
HTTPserver WGateWGate AGateAGate
MIME objectsMIME objects
CGI TCP/IP
RFC
DIAG
HTTP
ITS
n The SAP Internet Transaction Server (ITS) provides the following services for Internet users:
� Administering logon information to the SAP System (name of system, user details)
� Running a transaction in the SAP System or calling a function module or report
� Converting SAP data (screens or lists) to HTML pages
n When a service is started, a SAP GUI or RFC session is started internally:
� The ITS assigns the HTTP requests for the service to the correct session.
� A user context corresponds to the session in the SAP System.
� The session ends when the service ends (by logoff or time-out in ITS).
n The main ITS directory contains subdirectories Services and Templates:
� Subdirectory Services contains transaction-specific and global service descriptions.
� Subdirectory Templates contains HTML templates and language resource files.
n The Web server directory structure contains static files such as graphics and images, which are integrated into HTML pages by the Web server:
� Subdirectory \SAP\ITS\GRAPHICS contains static graphics files.
� Subdirectory \SAP\ITS\MIMES contains static image files.

© SAP AG TABC10 172
SAP AG 1999
Browser and SAP GUI Logon
WorkplaceServer
Componentsystem
Components
URLlogon
Workplace MiddlewareFrontend
AGateAGate
ITS
HTTPserver
HTTPserver WGateWGate
SAP GUIlogon
Client, name, password, language
Access permissions
Client, name,password,language
Logon behavior
Logon screenLogon screen
Global.srvcGlobal.srvc
<service>.srvc<service>.srvc
n Users who access the SAP System using SAP GUI for Windows may need to provide logon information such as client, user name, password, and language. Their user authorizations for the SAP System determine what they are authorized to do.
n Users who access any SAP System using the browser may need to enter similar logon information. Again, their user authorizations for the SAP System determine what they are authorized to do.
n Logon behavior using an ITS service is controlled by various parameter values that can:
� Either be predefined in either or both of the ITS service files
� Or be specified in the URL

© SAP AG TABC10 173
SAP AG 1999
Service Files
global.srvc~messageserver s01~logingroup Public~systemname DEV~client 400~login meier~password *****~language DE
Service parametersfor all services
When service is started, thisfile is read first by AGate
webgui.srvc~login~language
wngui.srvc~login smith~language EN
Z234.srvc~transaction Z234~login~language
jvgui.srvc~login~language
Service parametersfor individual services
. . .These files are read next
n Service files are text files that are stored in the AGate file system. They contain the settings that the ITS requires to connect to the SAP System to start a transaction or a WebRFC-enabled function module.
n The structure of services files is as follows. Each line contains a parameter name with a value separated by at least one space or a tab stop. These files can be edited:
� Either with any text editor with the ITS Administration Instance
� Or with a tool provided by SAP (for details, see unit Software Logistics)
n The file global.srvc contains all the global settings common to all individual services. When a service is started, two files are imported, first global.srvc and then <service>.srvc. The values from <service>.srvc are either added to or override the values from global.srvc.

© SAP AG TABC10 174
SAP AG 1999
ITS
ITS
l Direct selection ofapplication server
~messageserver s01~systemname DEV~logingroup Public
~appserver s03~systemnumber 00
l Example of usingSAProuter
~routestring /H/gateway/S/3299/H/s03/S/3200
Service Parameters: Selection of SAP System
l Load balancing acrossthe message server
AGateAGate
AGateAGate
DEV
DEV
s01s02
s03
s03
n A user logs on through the AGate as a "normal" GUI user, so all the various SAP GUI logon options can be used.
n The SAProuter can also be used between the AGate and the SAP System.
n If not all of the parameters contain values, the ITS automatically generates an error message.

© SAP AG TABC10 175
SAP AG 1999
l All the data for logging onto anSAP System is in the service file
SAP
Service Parameters: Implicit Logon
~client 400~login meier~password *****~language DE
System HelpSAP R/3
3 3éé 33é
êê ê
Client 400
User MEIER
Password *****
Language DE
SAP System
n The ITS uses the following service parameters to sign on to the SAP System:
� ~client - client
� ~login - SAP user
� ~password - password
� ~language - logon language
n If all the parameters have values, the ITS logs on to the SAP System when the service is started without asking the user for logon details.
n This type of start is called implicit logon and is mainly employed for users who do not have their own SAP user. For example, it can be employed to implement Internet sales scenarios, where initially unknown Web users order goods and services in an SAP System.
n Because all Internet users are logged on as the same SAP user and they all have the same authorizations, you cannot distinguish between them in the SAP System.

© SAP AG TABC10 176
SAP AG 1999
l The data for logging onto theSAP System is only partly in theservice file
Login Smith
Password ********
Please logon to the R/3 System
Service Parameters: Explicit Logon
~client 400~login~password~language EN
SAP System
System HelpSAP R/3
3 3éé 33é
êê ê
Client 400
User SMITH
Password ********
Language EN
n If one or more of the parameters do not contain values, the ITS automatically creates an HTML form to ask the user for the missing logon details.
n This type of start is called explicit logon and is only used if all the users have their own SAP user.
n In this case, you can identify the different Internet users in the SAP System and they may have different authorizations.

© SAP AG TABC10 177
SAP AG 1999
~timeout 5~cookies 1~usertimeout 60
l Administration of logon data
l Parameters for creating URL
~hostunsecure s34~portunsecure 1080~hostsecure s34~portsecure 443~exiturl http://www.sap.com
Service Parameters: ITS Internal
Name of HTTP serverPort for HTTPName of HTTPS serverPort for HTTPSHome URL
Max. time between two dialog stepsData buffering of explicit logonMax. duration of buffering
n Administration of logon data
� ~timeout: The time in minutes from the last request during a user session until the session is automatically terminated.
� ~cookies: Activates the creation of cookies by ITS.
� ~usertimeout: The time in minutes that a user context (client, user, and password) is retained after the session timeout period defined by the parameter ~timeout has expired: If the user logs on again before the time defined by ~usertimeout has expired, no logon information is required. If the time defined by ~usertimeout has expired, the user must enter logon information again.
n Parameters for creating URL
� ~hostunsecure: name of the Web server for http access
� ~portunsecure: number of Web server port for http access
� ~hostsecure: name of the Web server for https access
� ~portsecure: number of the Web server port for https access
� ~exiturl: The URL to which a request is redirected if a session is terminated by the OK code /NEX .

© SAP AG TABC10 178
SAP AG 1999
Maintaining ITS Services Files
n The service description file for each service contains a series of service parameters that define how the service should run. If no values are set for some parameters, the values are taken from the global service file. Some parameters from the global service file are established when the system is installed and should not be changed. Others can (or even must) be changed during development or before going live.
n For each ITS service, the Service files contain any connection or configuration information details that deviate from the global definitions file.
n Except for the cases mentioned above, services can either be added to or removed from the file Global Services.

© SAP AG TABC10 179
SAP AG 1999
Starting an ITS Service
Start with transferring parameters:.../wgate/<service>/!?~client=400&~language=EN&~transaction=SP01&...
Start without transferring parameters:http://<webserver><domain>:<port>/<path>/wgate/<service>/!
WebBrowser
HTTPserver
HTTPserver WGateWGateCGIHTTP
ITS
n Depending on the Web server used, <path> may vary. For IIS, choose scripts.
n The service name is a symbolic name with a maximum of 14 characters. If customers create their own services, the names of those services should begin with Z.
n The file system and the configuration of the HTTP server determine the syntax needed to start a service.
n You can also specify transferring parameters that partly overwrite settings in the services files.
� Example: … wgate/<service>/!?~client=400&~language=EN&transaction=SP01&...
n As an alternative to the URL in the graphic, the following syntax can also be used:
� http://<server>/<path>/wgate?~service=<service>

© SAP AG TABC10 180
SAP AG 1999
yes
yes
Lookup for Logon Service Parameters
Specificservice
Example: Client determination
Parameter not maintained 200
Actualvalue
Parameter blank 300
300 300
global.srvc webgui.srvc
400
Inputrequired
300
URL
400
…/webgui/!?~client=400&~language=EN
Parameter blank400
no no
no
no no
Globalservice
200
200
200
200
n The following sources are available for logon information:
� Global services file: global.srvc
� Specific services file. Example: webgui.srvc
� Transfer of logon parameters from the URL. Example: ...wgate/<service>/!?~client=400&~language=EN...
n The Workplace LaunchPad transfers logon parameters from the URL to connect to component systems.
n The graphic shows the substitution mechanisms for logon parameters.

© SAP AG TABC10 181
SAP AG 1999
l Each ITS installation consists of:
n One ITS Administrationinstance
n One or more virtualinstances
l Use the dedicated ITSadministration instance to:
n Manage ITS instances
n Monitor ITS performance
n Maintain ITS configurationparameters
n Configure file and networksecurity
n View log and trace files
ITS Instances and Administration
ITS instances
... others
Components
WPL
BW2
ClientA
ClientB
Virtual instanceVirtual instance
Virtual instanceVirtual instance
... others
Admin instanceADM
Admin instanceADM

© SAP AG TABC10 182
SAP AG 1999
ITS Administration: Sign-On
To connect to the admin instance:
l Start the admin service
http://<hostname>.<domain>:<port>/scripts/wgate/admin/!
l Sign on with user itsadmin
n To connect to the ITS administration instance, use a browser such as Microsoft Internet Explorer 5 (MS IE5).
n The ITS Administration instance is first installed with one user, itsadmin, and default password init.

© SAP AG TABC10 183
SAP AG 1999
ITS Administration: Topics
Virtual ITS instance Currently selected instance Instance topic
Under Main, choose WPL Under WPL, choose Performance

© SAP AG TABC10 184
SAP AG 1999
ITS User Management
l In ITS user management, you can:
l Add new users
l Change existing users
l Reset passwords
l Delete users
l All users are stored in the NT Registry
n The users of the ITS administration instance are stored in the NT registry under HKEY_LOCAL_MACHINE\SOFTWARE\SAP\its\2.0\<virtual ITS Instance for Administration>\Admin\Users
n The name of the virtual ITS instance used for ITS administration is usually ADM.

© SAP AG TABC10 185
SAP AG 1999
Creating Administration Users
l To add new users, specify a user name and a passwordthat can be modified by the user
dev00
l Users can be given access toany ITS instance with eitheradministrator or view-onlyauthorization
n To create new users in the ITS Administration instance, in the main menu choose Administration → User management → Add.
n Users who are given administrator access to an ITS instance have full administrator authorizations for the instances specified, but no access to user management. Only the main admin account itsadmin can manage other users.
n Users who are given view-only access to an ITS instance can display information about the instances specified, but have no administrator authorizations and no access to user management.
n Users can have administrator access to some instances, but view-only access to others.
n When users log on, they see only those ITS instances to which they have access.
n All ITS Administration user information is maintained in the registry, which can also only be viewed by the account itsadmin.

© SAP AG TABC10 186
SAP AG 1999
ITS User Maintenance
l Reset passwords, grant administration authorization,or delete accounts
Jumpin Jack Flash
dev00
dev00
n To modify or delete users in the ITS administration instance, in the main menu choose Administration → User management and then select the user you want to change or delete.

© SAP AG TABC10 187
SAP AG 1999
Instance Monitoring: Overview
l Cumulative information about all ITS instancesrunning on the server is readily available
n To display the Performance Overview in the ITS Administration instance, in the main menu choose Overview.
n The summary information includes:
� Available resources on the machine
� Relative resource usage by individual ITS instances
n To branch directly to performance details for a particular ITS instance, click on an instance in the ITS column.
n For details on interpreting these statistics, see unit Monitoring and Troubleshooting.

© SAP AG TABC10 188
SAP AG 1999
Drill Down Instance Monitoring
l Activity drilldowns are immediately availablefor each instance
n This list shows that there are five virtual ITS instances on the same server.
n The ADM instance is the the administrative instance for this server.
n The other virtual ITS instances belong to mySAP.com Workplace component systems.

© SAP AG TABC10 189
SAP AG 1999
Starting and Stopping Virtual Instances
l The runtime status and control of all instances are easilyaccessible
AGateWGate
l Command line mode: itsvcontrol
n To control virtual ITS instances in the ITS Administration instance, in the main menu choose Control.
n This screen shows where to start and stop associated AGate or WGate components.
� WGate: In the graphic, W3SRV/5 is the name of the Web server instance as specified in the NT registry. If this service is stopped, the Web server instance is no longer accessible by HTTP, even for other non-ITS applications.
� AGate: If this service is stopped, any current user sessions will be lost. Before stopping the ITS instance, check in the Performance Overview to see if there are any open AGate sessions.
n The AGate and WGate can also be started using the command line mode:
� Itsvcontrol.exe /v * /c start - this starts all virtual ITS instances.
� For more information, see the ITS Installation Guide.
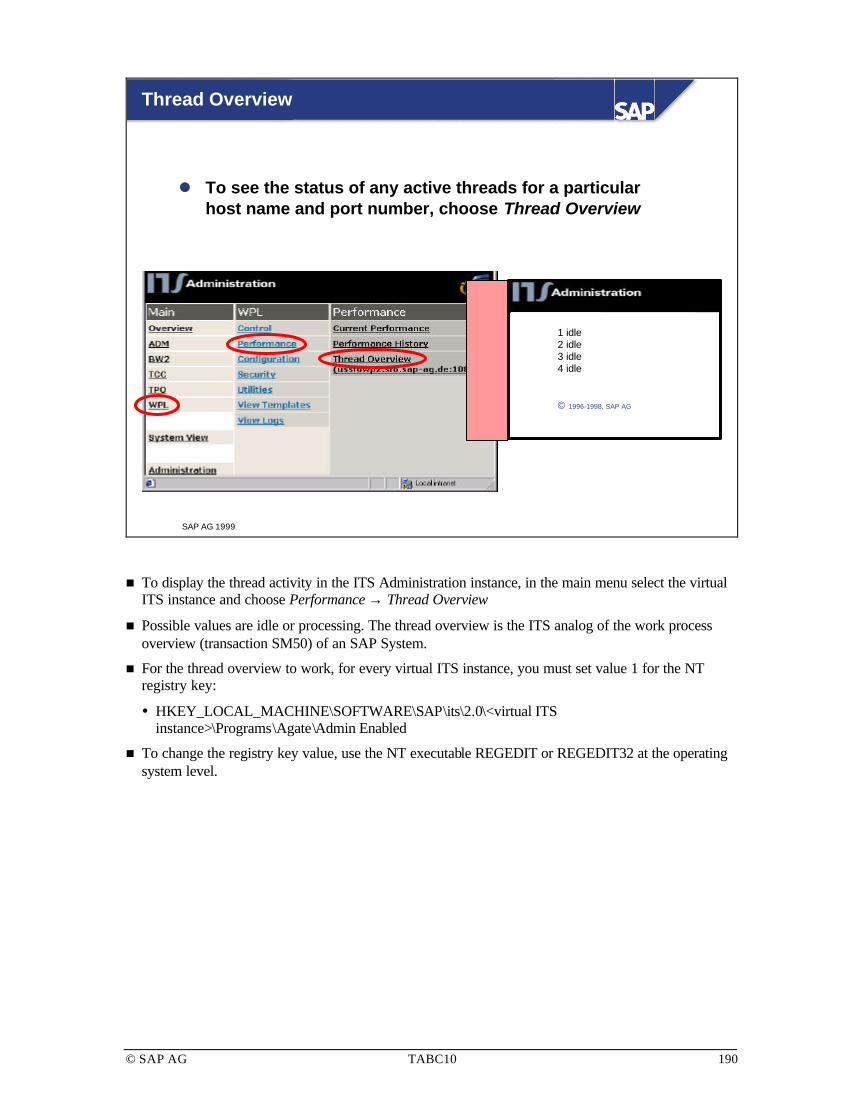
© SAP AG TABC10 190
SAP AG 1999
Thread Overview
l To see the status of any active threads for a particularhost name and port number, choose Thread Overview
1 idle2 idle3 idle4 idle
© 1996-1998, SAP AG
n To display the thread activity in the ITS Administration instance, in the main menu select the virtual ITS instance and choose Performance → Thread Overview
n Possible values are idle or processing. The thread overview is the ITS analog of the work process overview (transaction SM50) of an SAP System.
n For the thread overview to work, for every virtual ITS instance, you must set value 1 for the NT registry key:
� HKEY_LOCAL_MACHINE\SOFTWARE\SAP\its\2.0\<virtual ITS instance>\Programs\Agate\Admin Enabled
n To change the registry key value, use the NT executable REGEDIT or REGEDIT32 at the operating system level.

© SAP AG TABC10 191
SAP AG 1999
ITS Administration Configuration
l The ITS Administration configuration options allow you toview and modify ITS parameters in the followingcategories:
n Performance
n Global services
n Services
n National language support
n Logs
n Traces
n Debug
n Registry
n Security

© SAP AG TABC10 192
SAP AG 1999
File Security
Who is allowed access to ITS files?
l ITS supports three levels of NT file security:
n ITS Administrator Group only
n ITS Administrators in ITS Administrator Groupand Internet Developers in an ITS User Group
n Everyone has permission
l ITS file security is implemented during ITS setup, but youcan modify this for each ITS instance using either the ITSadministration tool or OS-level commands
n Itsvprotect.exe

© SAP AG TABC10 193
SAP AG 1999
File Security Using the ITS Admin Instance
n To change ITS file permissions using the ITS Administration instance, from the main menu select the virtual instance and choose Security → File Security. You will temporarily lose the connection to your Admin instance.
n ITSADMIN restricts access to administrators in ITS Administrator Group only. Users have read access to files, but only users in the ITS Administrator Group can modify them.
� If you choose this option, enter values for Admin Account, Admin Password, Admin Group, and Web Server Account. In the field Web Server Account, enter the NT user created during Web server installation and used for anonymous access.
n ITSADMIN+ITSUSER restricts access to administrators in ITS Administrator Group and users in ITS User Group. Administrators in ITS Administrator Group have read/write access to all files. Users in ITS User Group have read/write access to a predefined subset of ITS files, and read access to other files. Other users have read access to all files, but cannot modify them.
� If you choose this option, enter values for Admin Account, Admin Password, Admin Group, Web Server Account, and User Group.
n EVERYONE grants all users read/write access to all ITS files.

© SAP AG TABC10 194
SAP AG 1999
Network Security
l Network security determines how the WGate and AGatecomponents of the ITS communicate with each other
l Three types of security:
n Socket (unused)
n Network Interface (NI)
n NI Secure Network Communication (NISNC)
l ITS network security is implemented during ITS setup, but inITS administration you can modify this for each ITS instance
n Menu Network Security lists three different types of communication between WGate and AGate. These involve different security protocols:
� Socket: Communication interface on the basis of the TCP/IP protocol (unused)
� Network Interface (NI): To provide independence from the various platforms, SAP has developed the intermediate layer NI for all network connections. It is used by SAProuter and all R/3 programs, as well as by the development kits for CPI-C and Remote Function Call (RFC).
� NI Secure Network Communication (NISNC): SNC is an interface in the SAP architecture that enables the use of external encryption products to secure SAP communication. For configuration details, see SAP Note 304312.
n SAP does not implement any encryption methods in its own software. SAP lets the customer choose an encryption procedure and infrastructure, such as key distribution. SAP software is not subject to country-specific restrictions on encryption software.
n The security product can also use other security functions not offered directly by SAP, such as smart cards or biometrics. A variety of products have already been certified for use with SAP Systems. The product you use determines whether NISNC supports all three levels of security.

© SAP AG TABC10 195
SAP AG 1999
Different Log File Types
n There are four main types of ITS log files:
� Access logs
� Load statistics logs
� Diagnostics logs
� Performance logs
n To display logs using the ITS Administration instance, in the main menu select the virtual instance then choose Security → Logs.
n These logs and their internal handling are distinct from traces, which are written to keep track of errors that occur at runtime.

© SAP AG TABC10 196
SAP AG 1999
Location of Log Files
l ITS log files are located in the default directory:
n <ITS Installation Directory> → <ITS virtual Instance> → logs
w access.log
w diagnostics.log
w loadstat_01bfa4d3888c6420.log
w performance.log
w performance_01bfa67345002330.log
w loadstat.log
l Log files are cached:Flushing log files synchronizes cache and file
n To view the ITS log files, you can do one of the following:
� Assign a default viewer such as Windows NT Notepad
� Use the ITS Administration instance
� Use report RSHTTP20 on your Workplace Server
n For performance reasons, log file information is written to a cache, not directly to the log files. When the cache exceeds a specified size, the cache is flushed to the log file. Therefore, the log files may not always contain the latest information. To enable you to view the latest information, ITS Administration allows you to flush the contents of the cache to the log file any time. To flush the contents of the cache to the log file in the Main frame, select an ITS instance and choose Utilities → Flush Logs. ITS Administration refreshes the contents of the log file from the cache.

© SAP AG TABC10 197
SAP AG 1999
Access Log Files
l Access logs contain statistical information about ITSservice usage
l This information allows you to check how many requestshave been made to a certain ITS service, or whether anyillegal accesses have been attempted
Log file access.log
2000/03/10 11:18:20.187: 0 #62: IP 169.145.142.21, +webgui, tpoadm
2000/03/10 11:55:12.515: 0 #65: IP 169.145.141.78, sapwp, tpoadm
2000/03/10 14:56:31.796: 0 #180: IP 169.145.142.53, +webgui, tpoadm
n Access logs contain statistical information about ITS service usage that allows you to check how many requests have been made to a certain ITS service or whether any illegal accesses have been attempted.
n The access log helps you identify possible attacks or illegal requests made from the Internet to the site by unauthorized users.
n Access logs contain one entry for each request processed by the AGate component of the ITS.

© SAP AG TABC10 198
SAP AG 1999
Reading the Access Log Files
2000/03/10 11:55:12.515: 0 #65: IP 169.145.141.78, sapwp, tpoadm
Date and time
(local machine time)when the entry wascreated
Number of the AGate
instance that created the entry
The numbering starts at 0
Sequence number
of the request sincethe last restart of the ITS
The number is prefixedby #
IP address
of the remote host that issued the request
If the IP address cannot be determined, the value is set to???.???.???.???
Service name
Starting: *<name>
Stopping: +<name>
Running session:<name> (no * or +)
Timeout: –<name>
Logon account name
n Each log entry contains the following information:
� Date and time
� Number of the AGate
� Sequence number
� IP address
� If (and only if) a problem is detected, a single character specifying the type of problem:
W (warning): normally indicates that an access with an invalid session ID was denied due to an invalid random part.
A (alert): normally indicates that an access was attempted with an invalid session ID.
� Service name, with the following prefixes:
Starting a session: *<service name>
Stopping a session: +<service name>
Access to running session: <service name> (no * or + )
Timeout of a session: –<service name>
� Logon account name

© SAP AG TABC10 199
SAP AG 1999
Loadstat Log Files
l Load statistics logs contain information about the currentAGate load
l This information allows you to tune the ITS installation tohandle high loads at your site
n Statistics log appended every 60 seconds
l For each AGate instance running, the ITS writes a line intothe Loadstat.log file with the following syntax:<date> <time>:<agateid>:w=<weight>s=<s_avail>/<s_max>w=<w_avail>/<w_max>h/s=<hps> tat=<tat>
n Load statistics logs contain information about the current AGate load. This information allows you to tune the ITS installation to handle high loads at your site.
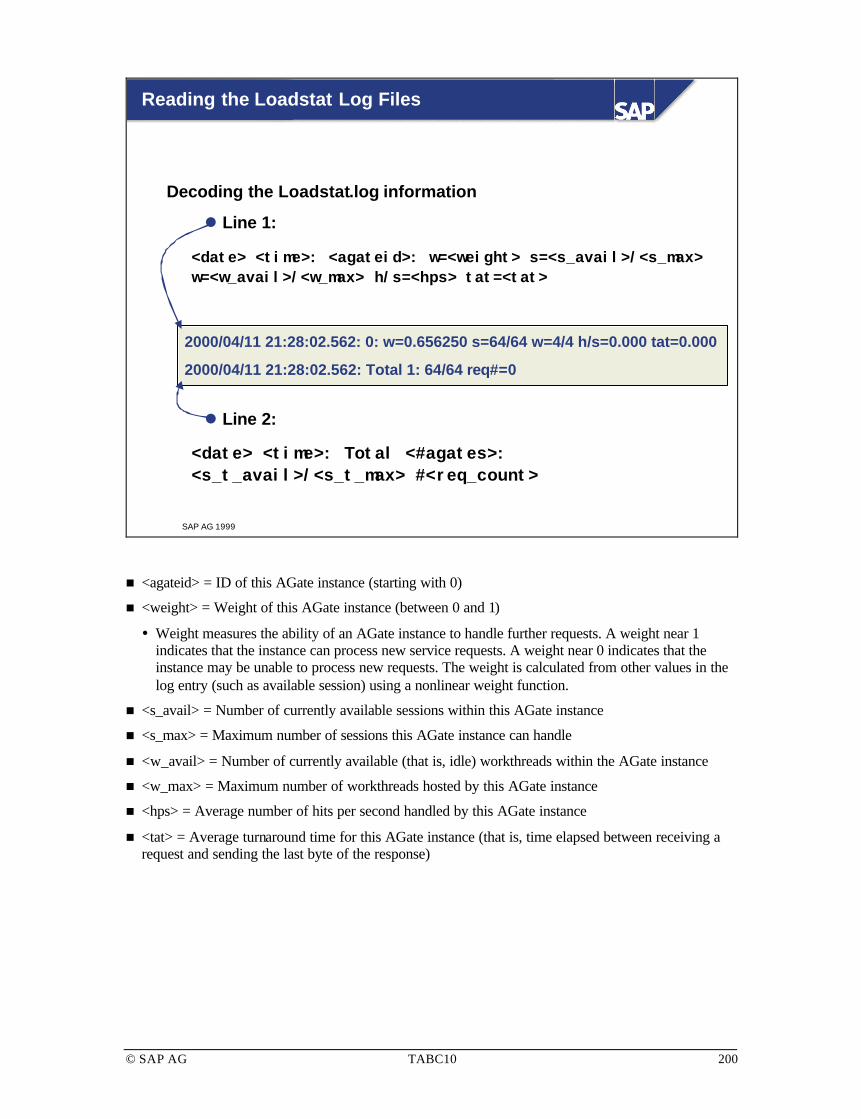
© SAP AG TABC10 200
SAP AG 1999
Decoding the Loadstat.log information
l Line 1:
<date> <time>: <agateid>: w=<weight> s=<s_avail>/<s_max>w=<w_avail>/<w_max> h/s=<hps> tat=<tat>
Reading the Loadstat Log Files
2000/04/11 21:28:02.562: 0: w=0.656250 s=64/64 w=4/4 h/s=0.000 tat=0.000
2000/04/11 21:28:02.562: Total 1: 64/64 req#=0
l Line 2:
<date> <time>: Total <#agates>:<s_t_avail>/<s_t_max> #<req_count>
n <agateid> = ID of this AGate instance (starting with 0)
n <weight> = Weight of this AGate instance (between 0 and 1)
� Weight measures the ability of an AGate instance to handle further requests. A weight near 1 indicates that the instance can process new service requests. A weight near 0 indicates that the instance may be unable to process new requests. The weight is calculated from other values in the log entry (such as available session) using a nonlinear weight function.
n <s_avail> = Number of currently available sessions within this AGate instance
n <s_max> = Maximum number of sessions this AGate instance can handle
n <w_avail> = Number of currently available (that is, idle) workthreads within the AGate instance
n <w_max> = Maximum number of workthreads hosted by this AGate instance
n <hps> = Average number of hits per second handled by this AGate instance
n <tat> = Average turnaround time for this AGate instance (that is, time elapsed between receiving a request and sending the last byte of the response)

© SAP AG TABC10 201
SAP AG 1999
2000/03/09 16:20:59.640: --- log opened -----------------------------
2000/03/28 16:24:47.750: --- log closed ------------------------------
2000/03/28 16:43:43.750: --- log opened -----------------------------
Diagnostics and Performance Log Files
l The diagnostics.log file contains all diagnostic informationpassed to a client when requested in the URL command~command=diagnostics
l Performance logs contain information about ITS andsystem performance
n Diagnostics logs contain all diagnostics information passed to a client when requested in the URL command ~command=diagnostics .
n Performance logs contain information about ITS and system performance, including session and work thread usage, request load and turnaround time, CPU usage, and other statistics.
n For further details, see unit Monitoring and Troubleshooting.

© SAP AG TABC10 202
SAP AG 1999
State 3The log is buried.Default: deletedafter backup
State 2The log is archived under a uniquename. Example:loadstat_01bc67292f8c86b0.log
State 1Log is current logExample: loadstat.log
FileSize
TimeToLive
States of a Log File
l A log file has three states during its lifetime:
n Transition from state 1 to state 2 occurs once the maximum file size of the log file is reached.
� Current log is closed
� Current log name is expanded to create a unique name (for example, access_01bc67292f8c86b0.log )
� A new empty log file is opened (for example, access.log ) as the current log
n Transition from state 2 to state 3 occurs once the timeout of the log file expires.
n To change these settings using the ITS Administration instance, in the main menu select the virtual instance then choose Configuration → Logs and select the log you want to change settings for.
n Defaults:
� FileSize = 1048576 bytes (1 MB)
� TimeToLive = 31 days
� BurialCmd = delete

© SAP AG TABC10 203
SAP AG 1999
Burying Log Files
l Archived log files exist on thesystem until the time specifiedby parameter TimeToLive isexceeded
l The file is then buried:
n By default, burying meansdeleting
n Burying behavior can beconfigured using parameterBurialCmd
Log
l A burial command can begiven for each type of log filespecifying how the archivedlog file should be handled
n If parameter BurialCmd is leftblank or has an incorrect value,ITS automatically deletes theexpired file
n If parameter BurialCmd has adefined value, ITS attempts torun it in a command shell
n One option is to compress andarchive the file
n BurialCmd specifies how archived log files are handled after their time-to-live has expired. If you do not enter a value, an expired file is deleted. To specify some other handling, enter a burial command.
n You can use any valid shell command. The macro commands listed below also enable you to obtain information about the archived file dynamically at runtime.
n Before you call your command, you may need certain information about the log file in question. If you use the following parameters, they are expanded at runtime by the ITS:
� %p - Replaced by the full path of the current log file. Example: C:\ProgramFiles\SAP\ITS\2.0\Logs\access_01bc67292f8c86b0.log
� %d - Replaced by the directory of the current log file. Example: C:\Program Files\SAP\ITS\2.0\Logs
� %a - Replaced by the name of the archive without extension and index. Example: Access
� %f - Replaced by the current log file name with extension and index. Example: access_01bc67292f8c86b0.log
� %I - Replaced by the current log file index. Example: 01bc67292f8c86b0

© SAP AG TABC10 204
SAP AG 1999
Maintaining Internet Users
l Some Internet Application Components (IACs) require a logonname and password to enter the SAP System
l Other IACs do not, but use a generic or IAC-specific logon
n For these IACs, there is an SAP transaction for maintaining thoseInternet users
l To maintain Internet users in SAP, sign on to the SAP System inthe appropriate client:
n Choose Tools → Administration → User maintenance → Internet users
n From here, you can:
u Create an Internet user
u Change an Internet user
u Lock or unlock an Internet user
n For IACs using generic or IAC-specific logon, there is an SAP transaction for maintaining Internet user data (such as passwords). The Internet users are identified by:
� User name
� User type (based on the IACs that the user wants to run)
n This information is client-specific and stored in the table BAPIUSW01. The information is used as an extension of the user's existing master record. When Internet users log on, the details are checked against the information in BAPIUSW01, and unauthorized users are rejected.

© SAP AG TABC10 205
SAP AG 1999
National Language Support
l When a Web user logs on, login.html retrieves all possiblelogon languages from the registry
n A restricted list of languages is returned (see ~language) infile Global.srvc or <service.srvc>
n If languages are not specified, all the languages from theregistry are available for selection
w login.html does not use a hardcoded list of languages
n As national language support (NLS) requires an overall evaluation of the whole NLS system landscape, you are advised to contact local support or your local consultant for country-specific solutions.
n For additional information, see the ITS Administration Guide or contact an SAP NLS Consultant.
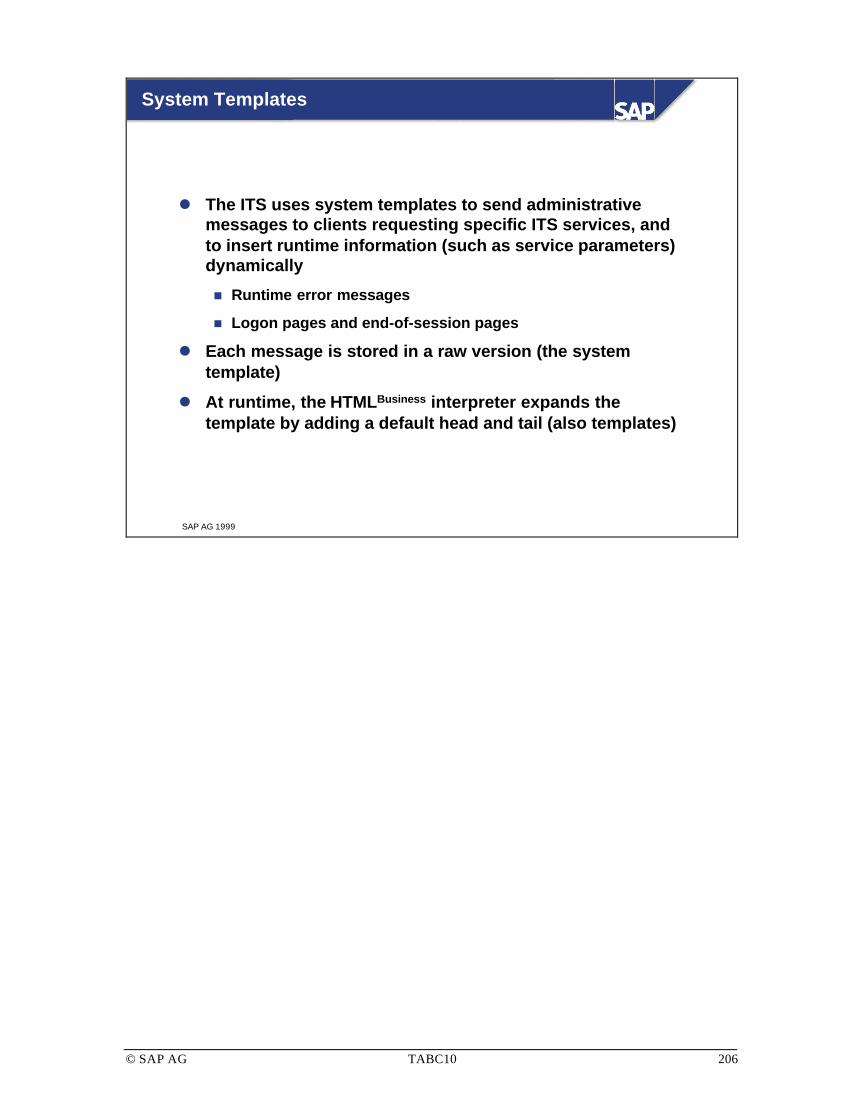
© SAP AG TABC10 206
SAP AG 1999
System Templates
l The ITS uses system templates to send administrativemessages to clients requesting specific ITS services, andto insert runtime information (such as service parameters)dynamically
n Runtime error messages
n Logon pages and end-of-session pages
l Each message is stored in a raw version (the systemtemplate)
l At runtime, the HTMLBusiness interpreter expands thetemplate by adding a default head and tail (also templates)

© SAP AG TABC10 207
SAP AG 1999
Customizing System Templates (1)
Standard
Customized
n ITS system messages can be customized to show application-specific or customer-specific messages.

© SAP AG TABC10 208
SAP AG 1999
Customizing System Templates (2)
head.html
tail.html
cantconnect.html
<ITS Installation Directory>
<virtual ITS>
templates
system
n An error message is built up using three HTML templates:
� head.html - used for all messages in common
� Any html template specifying the exact error message (for example, cantconnect.html)
� Tail.html - used for all messages in common
n To find the standard system templates, choose <ITS Installation Directory> → <virtual ITS> → Templates → System.

© SAP AG TABC10 209
SAP AG 1999
System Templates and Runtime Mode
l The ITS supports two runtime modes,which handle ITS system templatesdifferently
l Service parameter ~runtimeMode
n ~runtimeMode = DM (Development mode)
w Templates generate detailed messagesfor developers
n ~runtimeMode = PM (Production mode)
w Regular system messages aregenerated
n Development mode (DM)
� The contents of templa tes in development mode are intended for developers who need detailed information about problems that occur in order to find solutions. These system messages are useful for developers, but inappropriate for customers.
� Customers must not modify development mode system templates, because they are essential for the proper operation of the ITS.
n Production mode (PM)
� Clients accessing a site at a live ITS installation usually need more generic messages when an error occurs. To generate these messages, templates defined in development mode can be overloaded in production mode. For example, if your SAP System is currently inaccessible due to database maintenance, you may prefer not to return a message "Can't connect to SAP System” citing full technical details. Instead, you may prefer the message "Service currently unavailable, please try again later."
� Production mode system templates are intended for customer modification and are therefore not delivered as standard by SAP.
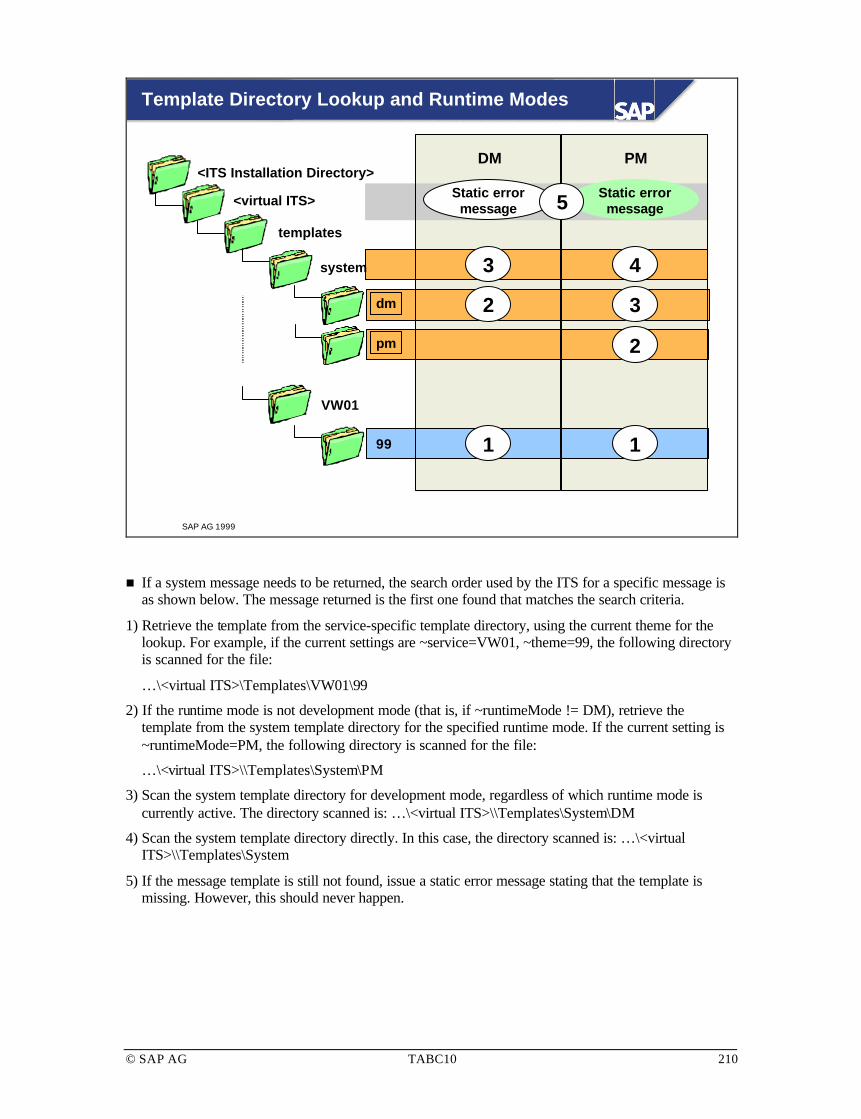
© SAP AG TABC10 210
SAP AG 1999
Template Directory Lookup and Runtime Modes
<ITS Installation Directory>
<virtual ITS>
templates
system
VW01
dm
pm
99
DM PM
Static errormessage
3
Static errormessage
2
2
3
4
11
5
n If a system message needs to be returned, the search order used by the ITS for a specific message is as shown below. The message returned is the first one found that matches the search criteria.
1) Retrieve the template from the service-specific template directory, using the current theme for the lookup. For example, if the current settings are ~service=VW01, ~theme=99, the following directory is scanned for the file:
…\<virtual ITS>\Templates\VW01\99
2) If the runtime mode is not development mode (that is, if ~runtimeMode != DM), retrieve the template from the system template directory for the specified runtime mode. If the current setting is ~runtimeMode=PM, the following directory is scanned for the file:
…\<virtual ITS>\\Templates\System\PM
3) Scan the system template directory for development mode, regardless of which runtime mode is currently active. The directory scanned is: …\<virtual ITS>\\Templates\System\DM
4) Scan the system template directory directly. In this case, the directory scanned is: …\<virtual ITS>\\Templates\System
5) If the message template is still not found, issue a static error message stating that the template is missing. However, this should never happen.

© SAP AG TABC10 211
SAP AG 1999
Where to Place Customized System Templates
<ITS Installation Directory>
<virtual ITS>
templates
system
ZVA01
dm
pm
99
Copy SAP standard template
n If you change system templates, you should first copy them to the service template directory and then change the copy. Changes to future updates are then guaranteed by SAP.
n The copied templates are treated as “normal” templates. Changed templates should be included in the source control (see unit Software Logistics).

© SAP AG TABC10 212
SAP AG 1999
Template Cache
set parameter
Static templates = 1
Going Live
Before
To clear template cache
n The HTML Business interpreter manages a cache of HTML Business templates. When a reference is made to one of these templates, the interpreter checks whether the template has been modified since it was last written to the cache. If changes have been made, the template is reloaded into the cache.
n This behavior is appropriate in a development environment where templates may be modified frequently, but can prove expensive in a production environment where templates are rarely modified. For this reason, before going live, you should switch off this action in the registry by setting parameter Static templates to 1.
n In the rare event that templates are modified in a production environment, and the static templates parameter is set (that is, the template update checking mechanism is switched off), ITS Administration provides a utility that allows you to reload all the cached templates.
n To clear the template cache in the Main frame, select an ITS instance and choose Utilities → Clear Template Cache. ITS Administration clears the cache and reloads the cached templates.

© SAP AG TABC10 213
SAP AG 1999
Patching an ITS Installation
l Tools used:
n PKPATCH (exchanging of HTML Templates)
n CAR (unpacking files)
l Impact:
n Performance increase
n Error fixing without changing ITS release
n For further details, see SAP Note 191571.

© SAP AG TABC10 214
SAP AG 1999
Debugging an Internet Application Component (1)
n During your own Internet development work, you may wish to debug an Internet Application Component (IAC).
n Before debugging an IAC, you must do the following:
� In the ITS Administration instance, in the main menu select the virtual instance and choose Configuration → Debug.
Specify an available port for the connection with the SAP GUI (for example, sapdp03).
Activate Debug (remember to disable this option after your tests and never use the debugger in a production environment).
� In SAPlogon, create a new connection to your ITS with the following settings:
Application server: Name of ITS
System Number: Port number as specified (for example, 3203)

© SAP AG TABC10 215
SAP AG 1999
Debugging an Internet Application Component (2)
n To debug an IAC, proceed as follows:
� Log on to the IAC using your browser and proceed to the screen you want to debug.
� Log on to the AGate using SAPlogon. Here you can switch on the ABAP debugger by entering /H in the OK code field followed by Enter
� You are not asked to provide user name and password. ITS compares the IP address with that of the browser session and sends the SAP GUI screens to the browser session address. Thus you must open the browser and the SAP GUI on the same server.

© SAP AG TABC10 216
SAP AG 1999
Further Documentation
l Classes ITS70, BC940
l www.sap.com/internet
n List of available BAPIs and IACs by R/3 Release
n SAP Internet Strategy Releases
l www.saplabs.com/its
n Software and resource downloads
l www.mysap.com
For additional information see:

© SAP AG TABC10 217
SAP AG 1999
You are now able to:
Unit Summary
l Use ITS Services
l Set up and configure the ITS
l Administer the ITS using theITS Administration instance
l Access and interpret log files

© SAP AG TABC10 218
SAP AG 1999
Unit Actions
l Exercises?
l Solutions

© SAP AG TABC10 219
Internet Transaction Server: Exercises
No. Exercise
1 Prepare your ITS Instance
1.1 Logon on to the ITS Administration Instance with <your group ID> and change the password given by the instructor.
1.2 Configure global.srvc to use the right URLs for browser access to services of the component systems (normally done during ITS Installation)
~portsecure (443) ~hostsecure (your web server) ~portunsecure (your web port) ~hostunsecure (your web server) ~exiturl (any web address e.g. http://www.sap.com)
Where are these parameters used?
1.3 Configure application server logon to the dialog instance of your component system in the global.srvc of your ITS instance <your group ID> (normally done during ITS installation).
1.4 Configure global.srvc - Group Logon – demo by Trainer:
Trainer utilizes group ID DEV00, ITS administration account DEV00 and an NT account.
1.5 When do changes to services files become active?
1.6 Log on to your component system using the ITS service webgui. Use user BC350.
1.7 Test if you can access the online help from within your webgui?
2 ITS logon information lookup
2.1 In the file webgui.srvc of your component system delete the parameter ~client.
Log on to your component system using the ITS service webgui. Use user BC350. Which client are you logged on?
2.2 In the file global.srvc of your component system enter client 555.
In the file webgui.srvc of your component system insert the parameter ~client but leave the value for the client empty (default).
Log on to your component system using the ITS service webgui. Use user BC350. Which client are you logged on?
2.3 In the file webgui.srvc of your component system enter client 200.
Log on to your component system using the ITS service webgui. Use user BC350. Which client are you logged on?
2.4 In the file webgui.srvc of your component system delete the parameter value for ~client again.
Log on to your component system using the ITS service webgui and specifying client 200, language EN and transaction SP01 in the URL. Use user BC350. Which client are you logged on?

© SAP AG TABC10 220
2.5 In the file global.srvc of your component system enter client 200 (used for upcoming exercises)
3 Start and Stop
3.1 When is it o.k. to restart your AGate?
What are the corresponding R/3 Objects to Agate threads and sessions.
3.2 First log on to your component system using the ITS service VX98. Use user BC350.
Now explicitly log off from SAP System from within the browser and monitor that the corresponding Agate session is deleted. Monitor using the ITS Administration instance in a separate browser window.
Double-check if the user is logged off the component system by running transaction SM04 on the component system using SAPGUI for Windows.
4 Log Files
4.1 Access Log: Monitor unauthorized access.
First log on to your component system using the ITS service VX98 specifying an invalid user. See the entry in the access log.
Next log on to your component system using the ITS service VX98 specifying user BC350 and the right password. See the entry in the access log.
In your internet browser select Exit to delete the Agate session.
See the entry in the access log.
4.2 Loadstat Log: See the entry in the loadstat.log
5 Archiving and Burying log files
5.1 Set the archiving parameter for the performance log of your ITS Instance:
FileSize = 10
Log on to your component system using the ITS service webgui a few times. Use user BC350. Check if the performance log is archived after the file size is reached.
5.2 Set the burial timeout parameter for the performance log of your ITS Instance:
TimeToLive = 0
Log on to your component system using the ITS service webgui a few times. Use user BC350. check if the performance log is buried.
5.3 Change the burial command.
Set the burial command to ren “%p” oldperformanceold_%i.log (Rename the files instead of deleting)
Log on to your component system using the ITS service webgui a few times. Use user BC350. Check if the performance log is renamed instead of being deleted.
5.4 Reset your changes from 5.1, 5.2 , 5.3 for the upcoming exercises.
Set FileSize = 1048576 (undo 5.1) Set TimeToLive = 7 (undo 5.2)

© SAP AG TABC10 221
Set BurialCmd = del “%p” (undo 5.3)
6 Trace Levels
6.1 Increase the trace level for the AGate process to 2
6.2 Configure the Agate trace file to always append to the log file.
6.3 Log on to your component system using the ITS service webgui. Use user BC350.
6.4 Display the AGate trace file.
6.5 Reset your changes from 6.1
Set Trace Level for A Gate process to 1
7 Change important parameters when GoingLive
7.1 Activate Template Buffering by setting the parameter statictemplates to 1.
7.2 Instructor demo: Activate SAPmpr BAPI buffering.
8 Debugging an Easy Web Transaction
8.1 Enable debugging for your ITS Instance use port sapdp## where ## is the last two digits of your web server port and add 20.
Example: ITS Instance DEV01 = Port 3211 → 11+20=31 → sapdp31 ITS Instance QAS01 = Port 3221 → 21+20=41 → sapdp41
8.2 Configure your SAPLOGON to connect to the AGATE and the port specified in 8.1
8.3 First log on to your component system using the ITS service PZ24. Use user BC350. Next logon to the Agate configured in 8.2 using SAPGUI for Windows.
8.4 Try to log on to the debugger port of your partner group using SAPGUI for Windows. Why is this impossible?
9 Logging on to the Workplace Portal
9.1 Log on to the workplace server (your client) using the ITS service sapwp (Workplace Portal). Use user BC350.

© SAP AG TABC10 222
Internet Transaction Server: Solutions
Some parts of the exercise require logon as ITSADMIN. Since the user ITSADMIN is accessible by only the Instructor, such parts will be demonstrated by the Instructor.
No. Solution
1 Prepare your ITS Instance
1.1 To logon to the ITS administration Instance with <your group ID> enter the following URL in your Internet Browser:
http://<webserver + domain>:1081/scripts/wgate/admin/!
Enter your name: <group ID>, Password: as given by instructor.
Choose Logon
Select Administration → Change Password.
Provide old and new password.
Save your settings.
Write down your new password in the reference sheet.
1.2 To configure global.srvc to use the right URLs for browser access to services of the component systems (normally done during ITS Installation) in the ITS Administration Instance select your ITS Instance → Configuration → Global Services → All Settings.
In the field ~portsecure enter 443 (dummy entry)
In the field ~hostsecure enter the name of your webserver (with domain)
In the field ~portunsecure enter the port of your Web server instance <your group ID> (see reference sheet)
In the field ~hostunsecure enter the name of your webserver (with domain)
In the field ~exiturl enter any URL that should be displayed when an ITS service is ended manually.
Example: http://www.sap.com
Save your settings.
The parameters ~portsecure, ~hostsecure , ~hostunsecure, ~portunsecure, are used for internal communication e.g. for the Thread Overview.
The parameter ~exiturl specifies the URL that should be displayed when an ITS service is ended manually.
1.3 To configure application server logon in the global.srvc in the ITS Admin Instance select your ITS Instance → Configuration → Global Services → Default R/3 system.
Mark Single Application Server:
In the field Application Server enter the server name of your component System
In the field System Number enter the system number of the dialog instance (01 for DEV, 11 for QAS) of your component system.

© SAP AG TABC10 223
Leave the field SAP Router String blank.
Save your settings.
To configure default R/3 User settings in the global.srvc in the ITS Admin Instance select your ITS Instance → Configuration → Global Services → Default R/3 User.
In the field Client enter 200.
Leave the other fields blank.
Save your settings.
Example: Twdf10.wdf.sap-ag.de Application Server (for dev) 11 (for qas) System Number (of your dialog instance) 200 Client (when maintained)
1.4 Configure global.srvc - Group Logon – by Trainer:
Trainer utilizes group ID DEV00, ITS administration account DEV00 and an NT account.
Before changing ITS Parameters the following files need to be configured (created) on the ITS Server:
In file c:\<Windows Directory>\system32\drivers\etc\services add a record for sapms<system ID of component system> specifying the tcp port number. The port number has to be obtained from the corresponding services file and the entry for sapms<system ID of component system> on the component system.
Create an entry for Group Logon to your component system using SAPLOGON on any frontend server. Then the file sapmsg.ini is automatically created on the server where SAPLOGON runs. Create file c:\<Windows Directory>\sapmsg.ini using a local SAPGUI Installation and entering the Message Server Information for Group Logon. This file needs to be transferred as is to the ITS Server to the corresponding directory. The ITS Server does not necessarily require a SAPGUI installation.
To configure application server logon in the global.srvc in the ITS Admin Instance select your ITS Instance → Configuration → Global Services → Default R/3 system.
Mark Load Balancing:
In the field System Name enter the system ID of your component system (as in the file c:\<Windows directory>\sapmsg.ini)
In the field Message Server enter the name of the message server of your component system (as in the file c:\<Windows directory>\sapmsg.ini).
In the field Login Group enter Public (name as specified in your component system transaction SMLG and case sensitive)
Leave the field SAP Router String blank.
Save your settings.
To configure default R/3 User settings in the global.srvc in the ITS Admin Instance select your ITS Instance → Configuration → Global Services →

© SAP AG TABC10 224
Default R/3 User.
In the field Client enter 200.
Leave the other fields blank.
Save your settings.
Examples: WPS System Name Twdf10.wdf.sap-ag.de Message Server Public Login Group 200 Client (when maintained)
1.5 Changes to global.svrc and to any other srvc file are effective immediately.
1.6 To log on to your component system using the ITS service webgui enter the following URL in your internet browser: http://<your web server>:<web server port for <your group ID→/scripts/ wgate/webgui/!
Use user BC350.
Example URL in the browser: http://twdf10.wdf.sap-ag.de:3221/scripts/wgate/webgui/!
1.7 To test if you can access the online help from within your webgui log on to your component system using the ITS service webgui choosing the following URL: http://<your web server>:<web server port for <your group ID→/scripts/ wgate/webgui/!
Use user BC350.
Select Help → SAP Library
2 ITS logon information lookup
2.1 To delete the parameter ~client from the file webgui.srvc of your component system log on to the ITS Administration Instance select your Instance → Configuration → Services → Webgui.srvc
In the field ~client mark the delete flag and save your settings.
To log on to your component system using the ITS service webgui choose the following URL: http://<your web server>:<web server port for <your group ID→ /scripts/wgate/webgui/!
Use user BC350.
Since the specific service does not contain the parameter for the client the ITS takes the value from the global.srvc. You are logged on to client 200.
To verify the client you are logged on in the webgui select System → Status.
After logging on close your internet browser and start it again.
2.2 To enter client 555 in the global.srvc file of your component system log on to the ITS Administration Instance select your Instance → Configuration → Global Services → Default R/3 User.
In the parameter value field for Client enter 555.

© SAP AG TABC10 225
Save your settings.
To insert the parameter ~client into your webgui.srvc file on to the ITS Administration Instance select your Instance → Configuration → Services → Webgui.srvc
In the last empty line in the Parameter field enter ~client. Leave the field for the parameter value empty and save your settings.
To log on to your component system using the ITS service webgui choose the following URL: http://<your web server>:<web server port for <your group ID→/scripts/ wgate/webgui/!
Use user BC350.
Since the specific service webgui.srvc contains an empty string for the client the ITS prompts for a new client and does not take the value of the global.srvc file.
The field Client displays the default client as defined in the connected SAP System. Overwrite this setting with 200. You are logged on to client 200.
To verify the client you are logged on in the webgui select System → Status.
After logging on close your internet browser and start it again.
2.3 To maintain the client field in the file webgui.srvc log on to the ITS Administration Instance select your Instance → Configuration → Services → Webgui.srvc
In the field ~client enter 200 and save your settings.
To log on to your component system using the ITS service webgui choose the following URL: http://<your web server>:<web server port for <your group ID→/scripts/ wgate/webgui/!
Use user BC350.
Since the specific service webgui.srvc overrides the global.srvc file you are logged on to client 200.
To verify the client you are logged on in the webgui select System → Status.
After logging on close your Internet Browser and start it again.
2.4 To delete the parameter value for the client in the file webgui.srvc log on to the ITS Administration Instance select your Instance → Configuration → Services → Webgui.srvc
In the field ~client delete the parameter value and save your settings.
To log on to your component system using the ITS service webgui specifying client as 200, logon language EN and transaction SP01 choose the following URL: http://<your web server>:<web server port for <your group ID→/scripts/ wgate/webgui/!?~client=200&~language=EN&~transaction=SP01
Use user BC350.
Since the specific service parameter of service webgui.srvc for the client is empty you are prompted for a client. This field is now already filled with the

© SAP AG TABC10 226
value from the URL. You are logged on to client 200.
To verify the client you are logged on in the webgui select System → Status.
After logging on close your Internet Browser and start it again.
Note: This type of exercise is used to enable troubleshooting of configuration problems. The Workplace Server automatically generates the URLs as described in this exercise.
2.5 To enter client 200 in the global.srvc file of your component system log on to the ITS Administration Instance select your Instance → Configuration → Global Services → Default R/3 User.
In the parameter value field for Client enter 200.
Save your settings.
3 Start and Stop
3.1 For stopping the Agate almost the same rules apply as for stopping R/3 Systems.
Check for used Agate sessions using the ITS Administration Tool → Overview (Sessions (u/m) ). Find out the users holding the sessions using the access log (for details see later exercise). Agate sessions correspond to sessions in R/3 that can be monitored using transaction SM04/AL08.
Check for running processing threads using the ITS Administration Tool → Overview (WThreads (u/m) ) or select your ITS Instance → Performance → Thread Overview. Processing Agate threads correspond to running work processes in R/3 that can be monitored using transaction SM50/SM66
3.2 To log on to your component system using the ITS service VX98 start your Internet Browser and enter the following URL: http://<your web server>:<web server port for <your group ID→/scripts/ wgate/vx98/!
Use user BC350.
To monitor the A Gate sessions use the ITS Administration instance → Overview in a separate Browser Window.
Check the field sessions used for the ITS Instance <your group ID>. The number of used sessions should be at least one.
To monitor if the user is logged on to the SAP component system, log on to the dialog instance of the component system using SAPGUI for Windows.
Start transaction SM04.
Check for the session where the terminal is the name of the ITS server.
To explicitly log off from SAP System in your Internet Browser showing the Easy Web Transaction VX98 select Exit. You are redirected to the URL specified in parameter ~exitur l defined in exercise 1.2.
Next in the browser window displaying ITS Administration instance → Overview note that the number of used sessions for your ITS Instance is reduced by 1.

© SAP AG TABC10 227
In the session of SAPGUI for Windows (transaction SM04 select refresh and note that the session where the terminal is the name of the ITS server disappeared.
4 Log Files
4.1 Access Log: Monitor unauthorized access.
To log on to your component system using the ITS service VX98 start your Internet Browser and enter the following URL:
http://<your web server>:<web server port for <your group ID→ /scripts/wgate/vx98/!
Enter an invalid user.
To see the entry in the access log in the ITS Administration Instance select your Instance → View Logs → Logs → access.log
Example Log: 2000/05/25 19:55:25.890: --- log opened ------------------------------------------
w 2000/05/25 19:55:45.906: 0 : IP 169.145.142.44, access with invalid random key: 78176f25 2000/05/25 19:55:59.796: 0 #1: IP 169.145.142.44, vx98, usertest
To log on to your component system using the ITS service VX98 start your Internet Browser and enter the following URL:
http://<your web server>:<web server port for <your group ID→ /scripts/wgate/vx98/!
Use User BC350 and the right password.
Select Exit to delete the Agate session.
To see the entry in the access log in the ITS Administration Instance select your Instance → View Logs → Logs → access.log
Example Log: 2000/05/25 20:21:39.234: 0 #15: IP 169.145.142.44, vx98, master
2000/05/25 20:26:08.312: 0 #16: IP 169.145.142.44, +vx98,
4.2 Loadstat Log: See the entry in the loadstat.log:
Example: 2000/05/25 20:45:02.028: 0: w=0.657715 s=63/64 w=4/4 h/s=0.000 tat=0.003
2000/05/25 20:45:02.028: Total 1: 63/64 req#=0

© SAP AG TABC10 228
2000/05/25 20:46:02.028: 0: w=0.657715 s=63/64 w=4/4 h/s=0.000 tat=0.002 2000/05/25 20:46:02.028: Total 1: 63/64 req#=1
5 Archiving and burying log files
5.1 To set the archiving parameter for the Performance Log of your ITS Instance in the ITS Administration instance select your Instance → Configuration → Logs → Performance → FileSize
In the field New Value enter 10 and save your settings.
Restart your Agate to activate the values.
To test if the performance log is archived after the maximum file size is reached, log on to your component system using the ITS service webgui in a second browser window enter the following URL in your internet browser: http://<your web server>:<web server port for <your group ID→ /scripts/wgate/webgui/!
Use user BC350.
In the ITS Administration Instance select your Instance → View Logs → Logs to see whether new logs have been written.
5.2 To set the burying timeout parameter for the Performance Log of your ITS Instance in the ITS Administration instance select your Instance → Configuration → Logs → Performance → TimeToLive
In the field New Value enter 0 and save your settings.
Restart your Agate to activate the values.
To test if the archived performance log is buried (deleted) after the TimeToLive expired (in this case immediately), log on to your component system using the ITS service webgui in a second browser window enter the following URL in your internet browser: http://<your web server>:<web server port for <your group ID→ /scripts/wgate/webgui/!
Use user BC350.
In the ITS Administration Instance select your Instance → View Logs → Logs to see whether archived files are deleted (buried).
5.3 To change the burial command for the Performance Log of your ITS Instance in the ITS Administration instance select your Instance → Configuration → Logs → Performance → BurialCmd
In the field New Value enter
ren "%p" oldperformance_%i.log
Save your settings.
Restart your Agate to activate the values.
To test if the archived performance log is buried (renamed) after the TimeToLive expired (in this case immediately), log on to your component
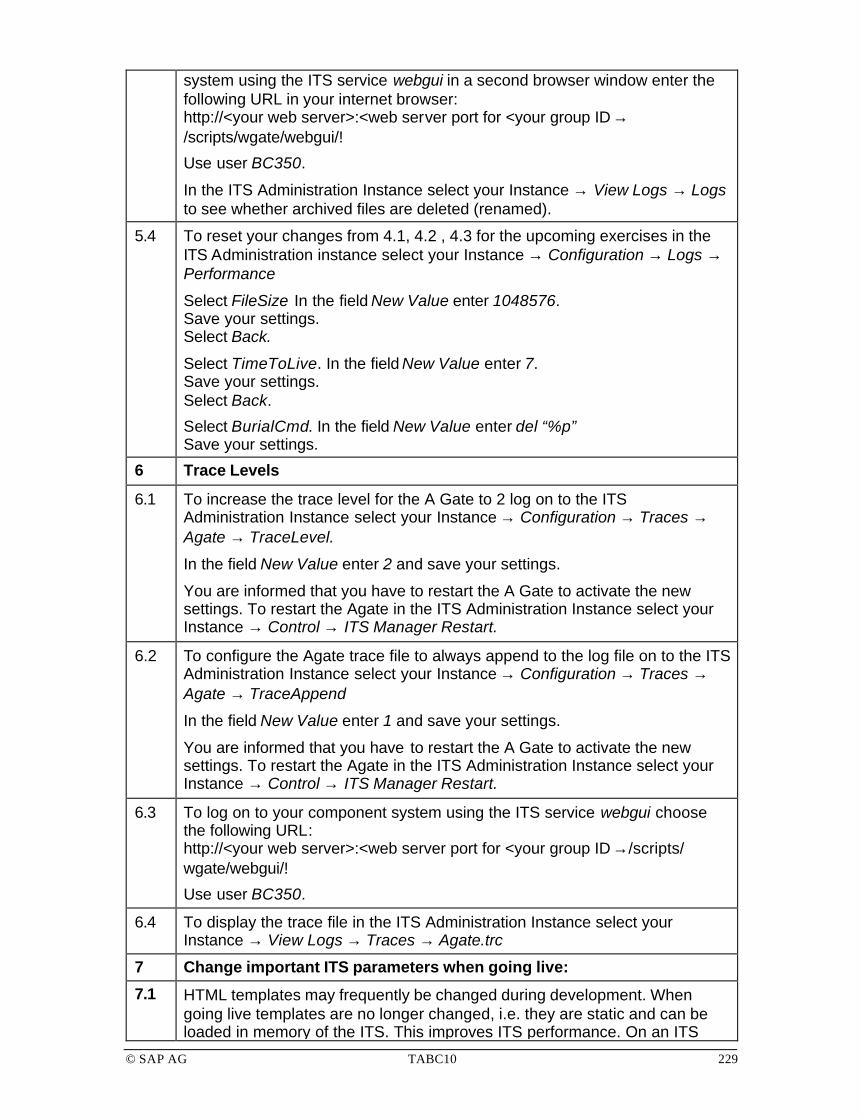
© SAP AG TABC10 229
system using the ITS service webgui in a second browser window enter the following URL in your internet browser: http://<your web server>:<web server port for <your group ID→ /scripts/wgate/webgui/!
Use user BC350.
In the ITS Administration Instance select your Instance → View Logs → Logs to see whether archived files are deleted (renamed).
5.4 To reset your changes from 4.1, 4.2 , 4.3 for the upcoming exercises in the ITS Administration instance select your Instance → Configuration → Logs → Performance
Select FileSize In the field New Value enter 1048576. Save your settings. Select Back.
Select TimeToLive. In the field New Value enter 7. Save your settings. Select Back.
Select BurialCmd. In the field New Value enter del “%p” Save your settings.
6 Trace Levels
6.1 To increase the trace level for the A Gate to 2 log on to the ITS Administration Instance select your Instance → Configuration → Traces → Agate → TraceLevel.
In the field New Value enter 2 and save your settings.
You are informed that you have to restart the A Gate to activate the new settings. To restart the Agate in the ITS Administration Instance select your Instance → Control → ITS Manager Restart.
6.2 To configure the Agate trace file to always append to the log file on to the ITS Administration Instance select your Instance → Configuration → Traces → Agate → TraceAppend
In the field New Value enter 1 and save your settings.
You are informed that you have to restart the A Gate to activate the new settings. To restart the Agate in the ITS Administration Instance select your Instance → Control → ITS Manager Restart.
6.3 To log on to your component system using the ITS service webgui choose the following URL: http://<your web server>:<web server port for <your group ID→/scripts/ wgate/webgui/!
Use user BC350.
6.4 To display the trace file in the ITS Administration Instance select your Instance → View Logs → Traces → Agate.trc
7 Change important ITS parameters when going live:
7.1 HTML templates may frequently be changed during development. When going live templates are no longer changed, i.e. they are static and can be loaded in memory of the ITS. This improves ITS performance. On an ITS

© SAP AG TABC10 230
installation by default the value is 0, i.e. the caching is switched off. Set the value to 1 to switch on caching of the templates.
To activate Template Buffering by setting the parameter statictemplates to 1 in the ITS Administration Instance select your ITS instance → Configuration → Performance →Static Templates. In the field New Value enter 1 Save your settings.
You are informed that you have to restart the AGate to activate the new settings. To restart the Agate in the ITS Administration Instance select your Instance → Control → ITS Manager Restart.
7.2 Instructor Demo:
SAPMPR – BAPI Buffering In the registry the parameter SAPMPR is very important. On an ITS installation the default value is 0 but should be changed to 1 when you go live. This allows all BAPI’s to be loaded in memory once and not on every logon. Improves logon performance.
To activate SAPmpr BAPI buffering in the ITS Administration Instance log on with the itsadmin user (these registry changes can only be performed by the itsadmin account) and select your ITS instance → Configuration → Registry → Programs → SAPmpr → Production Mode In the field New Value enter 1 Save your settings
You are informed that you have to restart the AGate to activate the new settings. To restart the Agate in the ITS Administration Instance select your Instance → Control → ITS Manager Restart.
8 Debugging an Easy Web Transaction
8.1 To enable debugging for your ITS Instance in the ITS Administration Instance select your Instance → Configuration → Debug → Debug.
Mark ON
Save your settings.
To configure the debugger port for your ITS Instance in the ITS Administration Instance select your Instance → Configuration → Debug → SapguiDebuggerPort.
In the field New Value enter sapdp## where ## is the last two digits of your Web server port + 20.
Save your settings.
Restart your ITS Agate to activate the settings.
Example for port numbers: ITS Instance DEV01 = Port 3211 → 11+20=31 → sapdp31 ITS Instance QAS01 = Port 3221 → 21+20=41 → sapdp41
8.2 To configure your SAPLOGON to connect to the AGate and the port specified in 8.1. start SAPLOGON
Select New

© SAP AG TABC10 231
In the field Description enter AGate (Debugging)
In the field Application Server enter the name of your web server
In the field System Number enter the debugger port number from 8.1
Example: If you selected sapdp31 enter 31, if your selected sapdp41 enter 41.
8.3 To log on to your component system using the ITS service PZ24 choose the following URL: http://<your web server>:<web server port for <your group ID→ /scripts/wgate/pz24/!
Use user BC350.
Example URL: http://twdf10.wdf.sap-ag.de/scripts/wgate/PZ24/! To logon to the Agate configured in 8.2 using SAPGUI for Windows use your SAPLOGON entry. Note: you are not asked for user name and password.
8.4 To try to log on to the debugger port number of your partner group using SAPGUI for Windows you have to change the port number in the SAPLOGON entry to your neighbor groups port number.
Logon is impossible because the ITS compares frontend IP addresses when logging on to the debugger.
9 Logging on to the Workplace Portal
9.1 To log on to your workplace server using the ITS service sapwp (Workplace Portal) choose the following URL: http://<your web server>:1080/scripts/wgate/sapwp/!
Use user BC350.

© SAP AG TABC10 232
SAP AG 1999
Introduction Including MiniApps
Workplace Architecture Software Logistics
Configuration andAdministration
Monitoring andTroubleshooting
InternetTransaction Server Drag&Relate
Users:Single Sign On
Users: Single Sign On

© SAP AG TABC10 233
SAP AG 2000
Users: Single Sign-On and Administration
Contentsl Cookies and browser settings
l Certificates and SNC
l Central User Administration
ObjectivesAt the end of this unit, you will be able to:
l Use cookies or certificates for Single Sign-On
l Configure the Web browser for end users
l Configure and perform Central User Administration
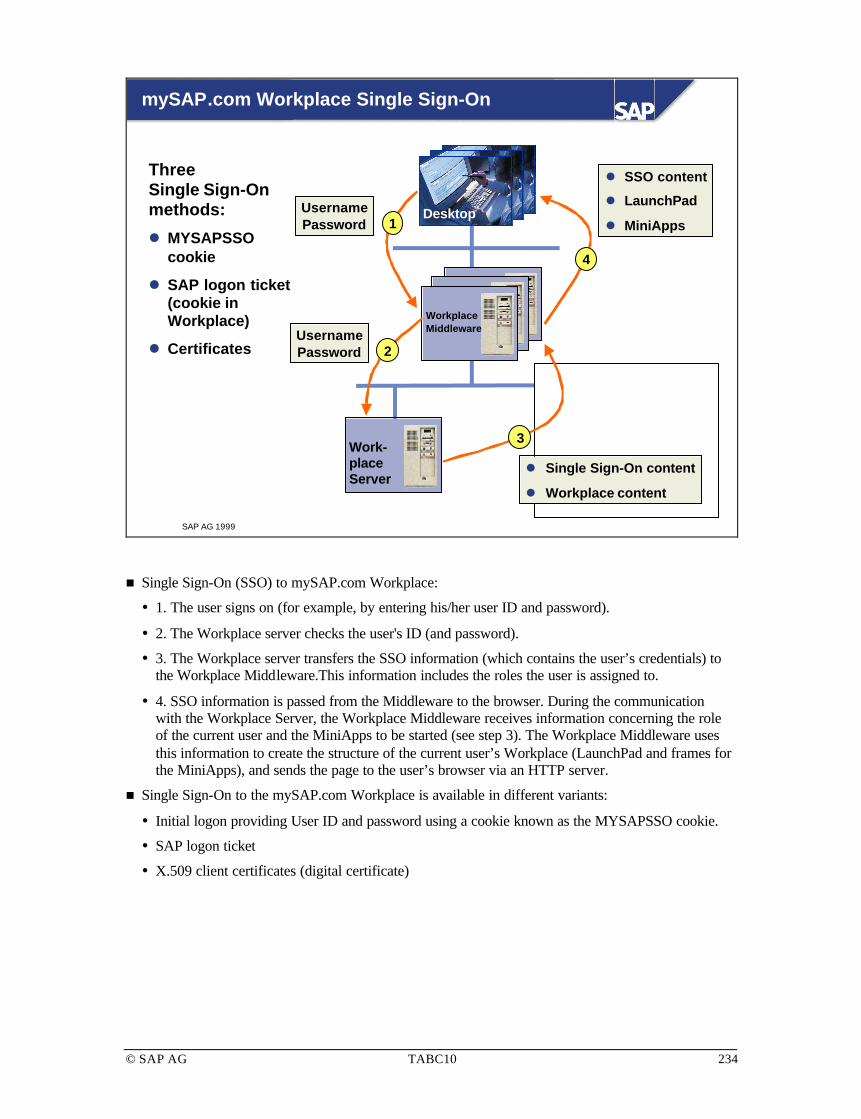
© SAP AG TABC10 234
SAP AG 1999
WebserverWeb
server
mySAP.com Workplace Single Sign-On
Work-placeServer
BW R/3
WorkplaceMiddleware
Desktop
UsernamePassword
UsernamePassword
l Single Sign-On content
l Workplace content
l SSO content
l LaunchPad
l MiniApps1
2
3
4
ThreeSingle Sign-Onmethods:
l MYSAPSSOcookie
l SAP logon ticket(cookie inWorkplace)
l Certificates
n Single Sign-On (SSO) to mySAP.com Workplace:
� 1. The user signs on (for example, by entering his/her user ID and password).
� 2. The Workplace server checks the user's ID (and password).
� 3. The Workplace server transfers the SSO information (which contains the user’s credentials) to the Workplace Middleware.This information includes the roles the user is assigned to.
� 4. SSO information is passed from the Middleware to the browser. During the communication with the Workplace Server, the Workplace Middleware receives information concerning the role of the current user and the MiniApps to be started (see step 3). The Workplace Middleware uses this information to create the structure of the current user’s Workplace (LaunchPad and frames for the MiniApps), and sends the page to the user’s browser via an HTTP server.
n Single Sign-On to the mySAP.com Workplace is available in different variants:
� Initial logon providing User ID and password using a cookie known as the MYSAPSSO cookie.
� SAP logon ticket
� X.509 client certificates (digital certificate)
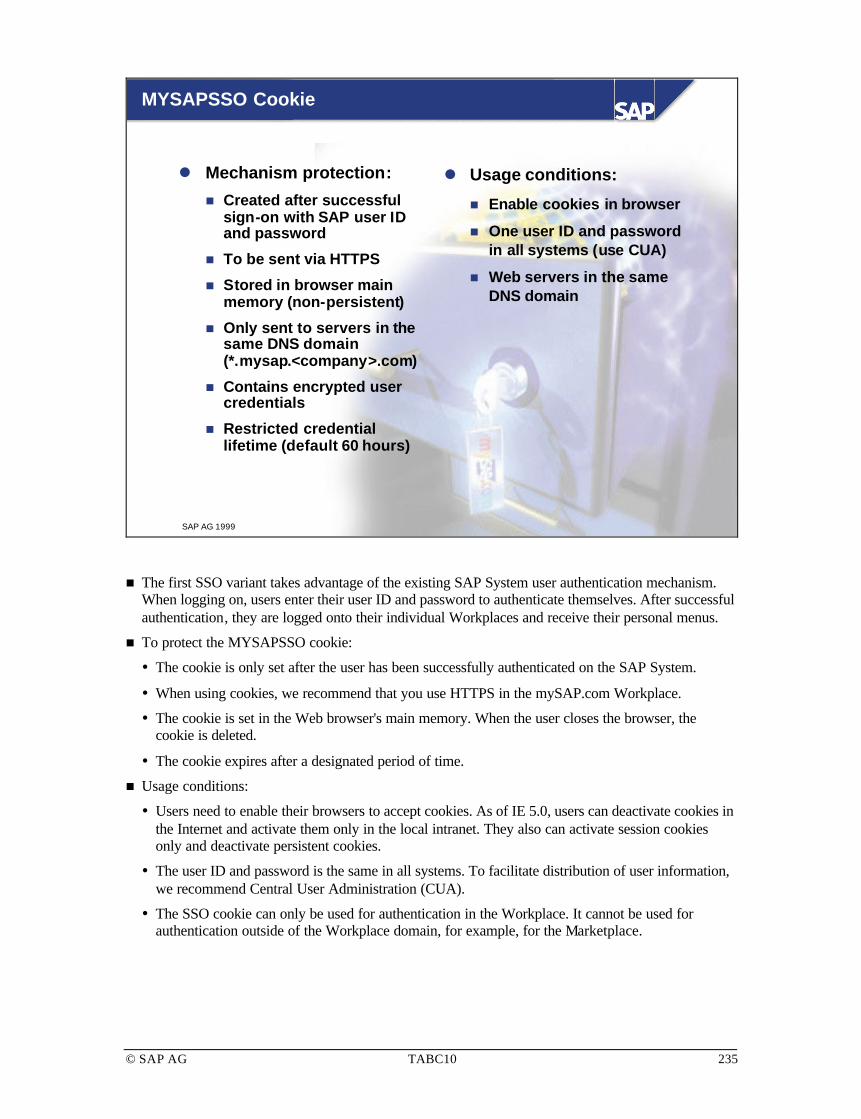
© SAP AG TABC10 235
SAP AG 1999
MYSAPSSO Cookie
l Mechanism protection:
n Created after successfulsign-on with SAP user IDand password
n To be sent via HTTPS
n Stored in browser mainmemory (non-persistent)
n Only sent to servers in thesame DNS domain(*.mysap.<company>.com)
n Contains encrypted usercredentials
n Restricted credentiallifetime (default 60 hours)
l Usage conditions:
n Enable cookies in browser
n One user ID and passwordin all systems (use CUA)
n Web servers in the sameDNS domain
n The first SSO variant takes advantage of the existing SAP System user authentication mechanism. When logging on, users enter their user ID and password to authenticate themselves. After successful authentication, they are logged onto their individual Workplaces and receive their personal menus.
n To protect the MYSAPSSO cookie:
� The cookie is only set after the user has been successfully authenticated on the SAP System.
� When using cookies, we recommend that you use HTTPS in the mySAP.com Workplace.
� The cookie is set in the Web browser's main memory. When the user closes the browser, the cookie is deleted.
� The cookie expires after a designated period of time.
n Usage conditions:
� Users need to enable their browsers to accept cookies. As of IE 5.0, users can deactivate cookies in the Internet and activate them only in the local intranet. They also can activate session cookies only and deactivate persistent cookies.
� The user ID and password is the same in all systems. To facilitate distribution of user information, we recommend Central User Administration (CUA).
� The SSO cookie can only be used for authentication in the Workplace. It cannot be used for authentication outside of the Workplace domain, for example, for the Marketplace.

© SAP AG TABC10 236
SAP AG 2000
MYSAPSSO Cookie: ITS AGate Settings
Service global.srvc
~cookies = 1 (create session cookies)~usertimeout = 8 (validity time of SSO cookie, hours)~timeout = 60 (lifetime of inactive sessionson server in minutes)

© SAP AG TABC10 237
SAP AG 2000
SAP Logon Ticket
l Mechanism protection:
n Created after successfullogon with SAP user IDand password
n To be sent via HTTPS
n Stored in browser mainmemory (non-persistent)
n Only sent to servers in thesame DNS domain(*.mysap.<company>.com)
è Contains digitally signeddata (user ID but nopassword)
n Restricted credentiallifetime (default 60 hours)
l Usage conditions:
n Enable cookies in browser
n One user ID in all systems(use CUA)
è No passwordsynchronization needed
n Web servers in the sameDNS domain
è Certain kernel patch leveland the Workplace PlugInis required in every system
è Trust relationship to theWorkplace Server to verifyand accept the digitallysigned ticket
n Compared to previous versions of Workplace, SSO using a cookie is improved in Workplace 2.10. This solution is also known as the SAP logon ticket.
n The SSO ticket or SSO cookie expires after a designated period of time (default 60 hours). If it expires during a session, the user must be re-authenticated on the Workplace Server.
n Hypertext Transfer Protocol over Secure Sockets Layer (HTTPS) is set as the default transfer protocol for SSO tickets and SSO cookies. For security reasons, to prevent cookies being caught during transmission and used by unauthorized users, we recommend configuring your Workplace Web servers to use HTTPS. If all of your Workplace Web servers use HTTPS, administration is facilitated.

© SAP AG TABC10 238
SAP AG 2000
SAP Logon Ticket: Verification
Step 1
l Verify the digital signature of the SAP Logon Ticket using theattached
n Certificate of the Workplace Server
n Certificate of the Certification Authority
The certificates are stored in a file on the application servercontaining a Public Key List
Step 2
l Check
n The Access Control List of trusted Workplace Servers
n The expiration time
Step 3
l Log on using the user name stored in the SAP Logon Ticket(no password necessary)
n Users must have the same user ID in all of the Workplace systems they access using SSO. Passwords need not be same in all systems.
n Because SSO tickets and SSO cookies are only sent to Web servers that exist in the Workplace Server’s domain (determined by the location of the Workplace Server's Web server), the SSO environment is only available to services where the corresponding Web servers are placed in the same domain as the Workplace Server’s Web server. They cannot be used for authentication in systems outside of the Workplace domain, for example, the mySAP.com Marketplace.
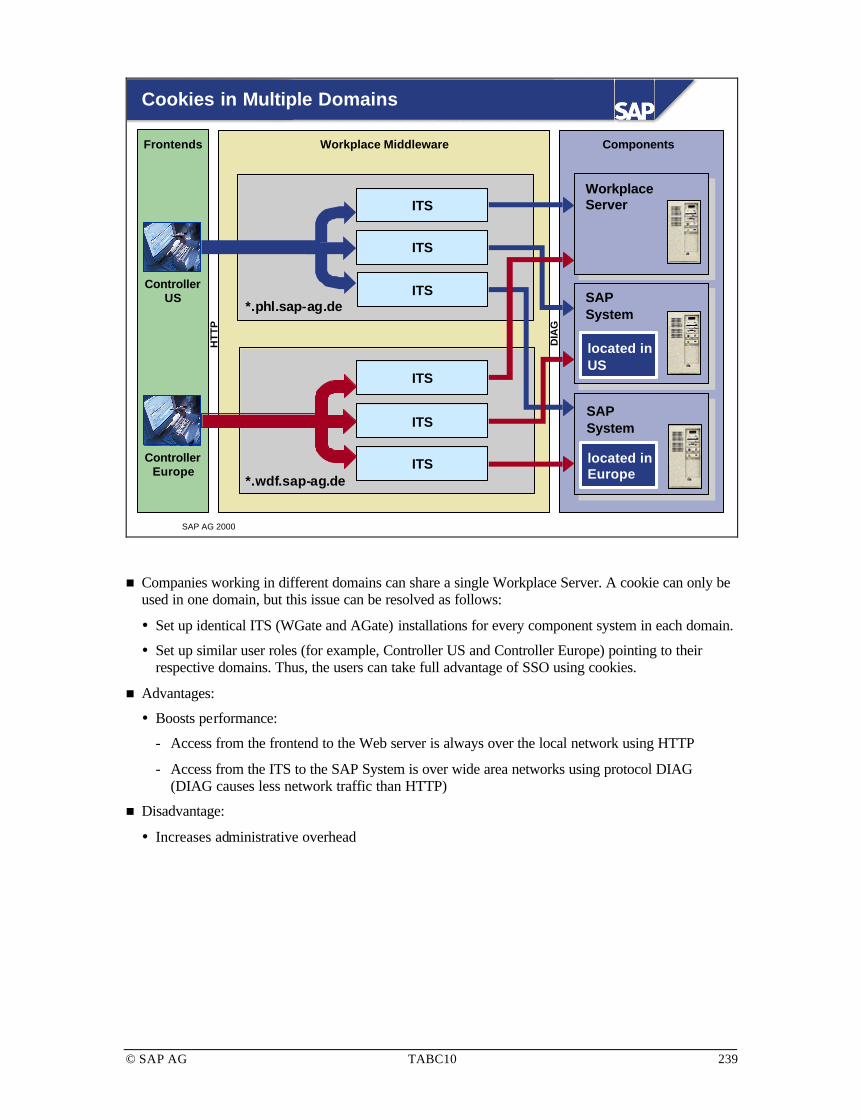
© SAP AG TABC10 239
SAP AG 2000
Cookies in Multiple Domains
ComponentsWorkplace MiddlewareFrontends
SAPSystem
ITS
WorkplaceServer
SAPSystem
ITS
ITS
ITS
ITS
ITS
*.phl.sap-ag.de
*.wdf.sap-ag.de
ControllerUS
ControllerEurope
DIA
G
HT
TP
located inUS
located inEurope
n Companies working in different domains can share a single Workplace Server. A cookie can only be used in one domain, but this issue can be resolved as follows:
� Set up identical ITS (WGate and AGate) installations for every component system in each domain.
� Set up similar user roles (for example, Controller US and Controller Europe) pointing to their respective domains. Thus, the users can take full advantage of SSO using cookies.
n Advantages:
� Boosts performance:
Access from the frontend to the Web server is always over the local network using HTTP
Access from the ITS to the SAP System is over wide area networks using protocol DIAG (DIAG causes less network traffic than HTTP)
n Disadvantage:
� Increases administrative overhead

© SAP AG TABC10 240
SAP AG 2000
X.509 Certificates
l Mechanism protection:
n Uses public keytechnology
n Secure key generation anddistribution (registration)
n Secure storage for privatekey
n Uses the SSL protocol
l Usage conditions:
n Enable HTTPS for all Webservers
n Provide certificates for allusers
n Import certificate intobrowser (or connect viasmartcard)
n Provide mapping to SAPuser ID (use CUA)
n The third SSO variant uses the Secure Sockets Layer (SSL) protocol and X.509 client certificates to authenticate the user.
n To protect critical information when using client certificates:
� Public key technology is used.
� Make sure you use a secure process for generating and distributing keys.
� Make sure your users have a secure storage location for the private keys. For example, you may want to use smartcards.
� The SSL protocol is used to encrypt data as it is transferred (to include user data).
n Usage conditions:
� Use HTTPS in the Workplace (configured for using mutual authentication).
� Provide client certificates to users.
� Enable users to import certificates in their browser or make them available in another way (for example, using smartcards).
� Ensure that a mapping exists in the Workplace system between the user’s identification contained in the certificate and the user ID in the Workplace.

© SAP AG TABC10 241
SAP AG 2000
Digital Certificates for Users
WorkplaceServer
WGateWGate AGateAGateWebserver
Webserver
The Web server performs the authentication using the user certificate
A secure channel is then needed to forward the result of the authenticationand the user certificate name to the SAP System
è SNC is required
Webbrowser
HTTPSHTTPS SAP protocolSAP protocol SAP protocolSAP protocol
DIAG/RFCDIAG/RFC
SSLSSL SNCSNC SNCSNC
n SSL authentication using X.509 certificates uses public key technology.
n In public key technology, for each user (or system component), a pair of keys are generated for each user (or system component) and issued to the user (or component). One key is a public key and the other is private.
n The keys are issued by a third party, called a Certification Authority (CA). The CA binds the key pair to its owner and creates a digital certificate, which it also signs using its own digital signature.
n To be able to digitally sign SSO tickets, the mySAP.com Workplace Server must possess a public key pair and a public key certificate.
n In the mySAP.com Workplace, you can use two types of certificates:
� Certificates signed by the Workplace Server itself
� Certificates signed by a designated CA

© SAP AG TABC10 242
SAP AG 2000
Certification Authority
l Challenge:Authentic exchange of public keys
l Solution:Certification Authority (CA) as Trust Center (TC)
n Authentic channel needed for exchange of TC’s public keys
n TC’s digital signature ensures authenticity of user public keys
n CA issues public key certificates
n Certificate links certificate subject (user) and public key
n Link is protected by CA’s digital signature
n The Workplace Server’s public key pair and self-signed public key certificate are provided to the Workplace Server during the installation process.
n When using a certificate signed by the SAP CA, the Workplace component systems can verify the Workplace Server’s signature contained in SSO tickets without needing any additional information.
n To obtain a certificate signed by the SAP CA, you create a certificate request on the Workplace Server. The Workplace Server generates its own public key pair and SSO Personal Security Environment (SSO PSE) and sends the public key certificate to the SAP CA to be signed. The SAP CA signs the certificate and sends the signed certificate back to you to place in the Workplace Server’s SSO PSE.

© SAP AG TABC10 243
SAP AG 2000
l Defines binding between identity andunique public key
l Belongs to individual or system
l Digitally signed by CA
l Unique with respect to CA and serialnumber
l Managed within global Public KeyInfrastructure (PKI)
l Contains public part of cryptographickey pair
l Private key is not included and mustbe stored in a secure place
X.509 Digital Certificate Details
ð Your digital identity card on the Web (mySAP.com passport)
SubjectPublic Key InfoIssuer (CA)ValidityVersionSerial numberExtended attributes such as email, address, job position
CA Digital Signature:
n The X.509 certificate (digital certificate) is a digital document that acts as the user's digital identification card on the Internet. The X.509 format is the Internet standard developed by the International Telecommunication Union (ITU). It is the most common standard used for digital certificates.
n For SSL authentication using X.509 certificates, the customer must establish a public key infrastructure (PKI) to manage client certificates.
n The digital certificate contains the public part of the key pair information. The certificate is unique to each person, because it is based on the public and private key combination.
n When using SSL with mutual authentication to communicate (using HTTPS connections), the certificate is attached to all messages.
n The private key stays with the owner. The owner must take extreme to protect this key.

© SAP AG TABC10 244
SAP AG 2000
2 Certification of public key
CA
1 Generation of key pair
Private key
Public key
3 Distribution
Public Key Infrastructure and Trust Center
4
Digital envelope
Usage
Digital signature
5 Certificate revocation
CA CA2 5 . . .
n To apply public key technology, you need to perform the following steps:
1. Generate key pairs
2. Certify the public keys
3. Distribute the private keys
4. Use the keys and the certificates to create digital certificates and digital envelopes
5. Revoke certificates
n When distributing private keys, extreme care must be taken. Distribution by email is not secure. We advise personal transfer of private keys, as with company ID cards.
n Key administrators should maintain a revocation list to keep track of users who are no longer employees or whose certificates have been misused or lost.
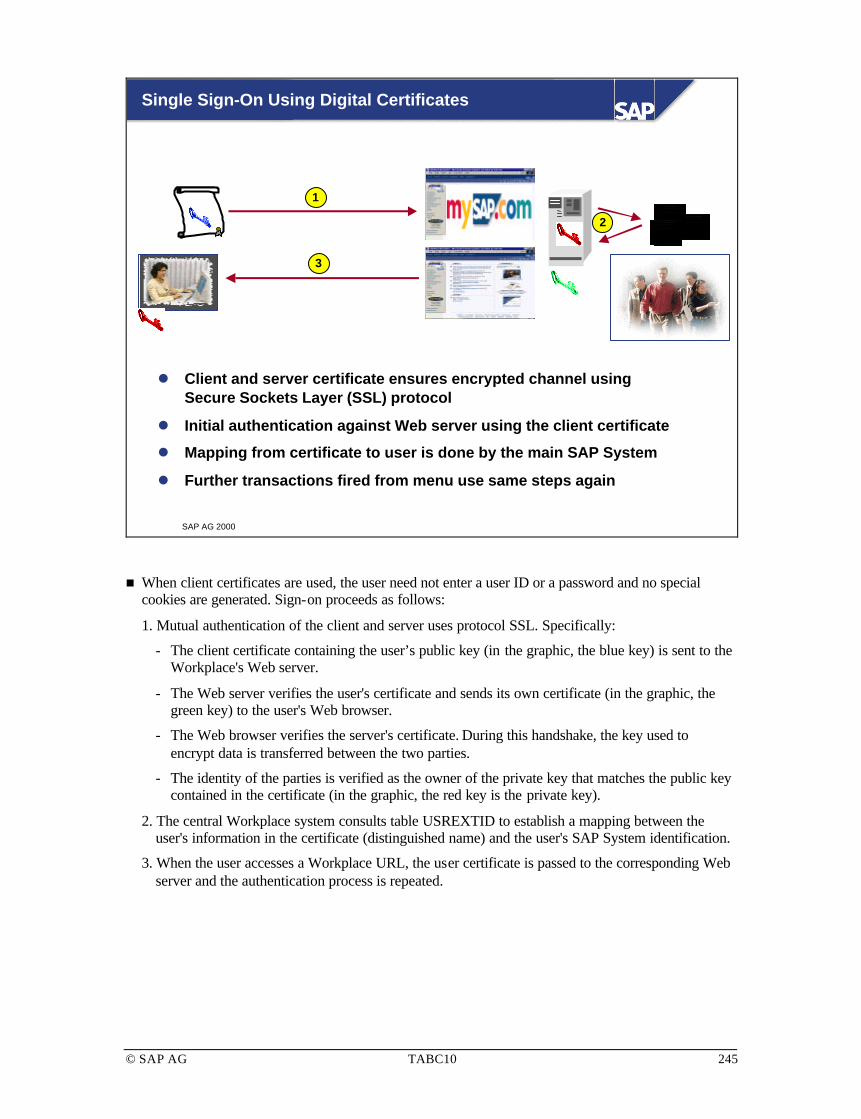
© SAP AG TABC10 245
SAP AG 2000
Single Sign-On Using Digital Certificates
l Client and server certificate ensures encrypted channel usingSecure Sockets Layer (SSL) protocol
l Initial authentication against Web server using the client certificate
l Mapping from certificate to user is done by the main SAP System
l Further transactions fired from menu use same steps again
1
2
3
n When client certificates are used, the user need not enter a user ID or a password and no special cookies are generated. Sign-on proceeds as follows:
1. Mutual authentication of the client and server uses protocol SSL. Specifically:
The client certificate containing the user’s public key (in the graphic, the blue key) is sent to the Workplace's Web server.
The Web server verifies the user's certificate and sends its own certificate (in the graphic, the green key) to the user's Web browser.
The Web browser verifies the server's certificate. During this handshake, the key used to encrypt data is transferred between the two parties.
The identity of the parties is verified as the owner of the private key that matches the public key contained in the certificate (in the graphic, the red key is the private key).
2. The central Workplace system consults table USREXTID to establish a mapping between the user's information in the certificate (distinguished name) and the user's SAP System identification.
3. When the user accesses a Workplace URL, the user certificate is passed to the corresponding Web server and the authentication process is repeated.

© SAP AG TABC10 246
SAP AG 2000
Installing the Certificates
l Administration tasks
n Configure the Web server
n Configure the SAP Systemapplication server
n Maintain the user'sexternal identification inthe SAP System
n Configure the ITScomponents
Webmaster: MasterPhone: 911Server: Microsoft Key ManagerCommon-name: twdf14.wdf.sap-ag.deOrganization Unit: TCC[…]Country: DE
-----BEGIN NEW CERTIFICATE REQUEST-----MIIBIjCBzQIBADBoMQswCQYDVQQGEA1JvdDEPMA0GA1UEChMGU0FQLUFHZGZteDA0LndkZi5zYXAtYWcuZGUwXDxxEh8O6zPUBAkAa5dciLELadM0YlDGnAARNbQrVd8r2mVyC4wIDAQABoAAwDS3d7cif4eGvJ8GaY3J3BVR3B0fOLyxBZ/kF/a2Tnv-----END NEW CERTIFICATE REQUEST-----
Typical Certificate Request
n Installing the digital certificates involves the following administration tasks.
n Configure the Web server.
� Enable HTTPS on the Web server and configure it to accept certificates that you trust. When Internet users sign on to the SAP System over the ITS using client certificates, the certificates are not further authenticated in the SAP System. The SAP System makes sure that the user has an account, but it does not verify the issuer of the certificate. If a user possesses more than one certificate issued from different CAs, but they contain the same identification, the SAP System does not distinguish between the certificates. You can establish your own CA and configure your Web server to accept its certificates only.
� Configure your Web server to pass the certificate on to the WGate. This step depends on the Web server and the operating system that you use.
� Install certificates.
n Configure the SAP System application server. See the SNC Installation Guide.
n Maintain the user's external identification in the SAP System. See SAP Library.
n Configure the ITS components. See the ITS Installation Guide.

© SAP AG TABC10 247
SAP AG 1999
Digital Certificates: ITS Settings
l Activation of SNC WGate çè AGateRegistry Entries...\SncNameAGate...\SncNameWGate
l NT Environment variable SNC_LIB
l Activation of SNC AGate çè SAP SystemService global.srvc~clientcert = 1~sncNameR3 = ...
n To prepare the ITS installation for the use with digital certificates the following changes are required:
n Activation of SNC between Wgate and Agate
� Specify the following two ITS registry parameter values.
SncNameAGate: distinguished SNC name of AGate instance
SncNameWGate: distinguished SNC name of WGate instance
� To change registry settings in the Main frame of the ITS Administration Instance, select the ITS instance you want to configure and choose Configuration → Registry → Connects. For information on ITS in Release 4.6, see SAP Note 304312.
n Set NT Environment variable SNC_LIB to point to your SNC library DLL.
n Activation of SNC between AGate and SAP System:
� Maintain the following parameters in global.srvc:
~clientcert=1
~sncNameR3=<snc name of target SAP System>

© SAP AG TABC10 248
SAP AG 2000
Digital Certificates: SAP System Settings
l Maintain Access Control List
l Maintain SAP instance profile parameters
n snc/extid_login_rfc = 1
n snc/extid_login_diag = 1
l Maintain table USRACLEXT
n To allow for generaluser switch fromAGate to individualuser
n To enable mappingbetween certificateowner and user ID
n Maintain the access control list using transaction SNC0. The AGate is regarded as a system that is connected using SNC.
n Maintain the following SAP Instance profile parameters:
� snc/extid_login_diag - deals with logons using protocol DIAG
� snc/extid_login_rfc - deals with logons through RFC
� For each parameter, setting 1 allows a logon through an external server using an external ID, for example using a X.509 certificate. In both cases, the default setting does not allow this.
n Maintain table USREXTID using transaction EXTID_DN. You can either revoke user certificates or deactivate the corresponding entry.
n Additional prerequisites for accepting external identification are:
� Use of SNC secure communication with the server
� Release of the server for this logon variant

© SAP AG TABC10 249
SAP AG 2000
Frontend Administration
l Prepare your browser to accept the right type of cookies
l Check that certificate is imported into your browser
l Protect the launch of the SAP GUI for HTML from withinyour browser by implementing a suitable security policy
n The frontend computers of your users must be prepared for Single Sign-On:
� If cookies are used, by configuring cookie usage.
� If digital certificates are used, by importing the user certificate into the frontend browsers. Depending on the partner security software used, the procedure may not require any administrator action.

© SAP AG TABC10 250
SAP AG 2000
Cookies in the Browser (1)
Hard disk on PC
Memory (session)
n In the Workplace environment, you can administer cookies as follows:
� In IE4, you can only choose to disable or enable cookies or get cookie prompts.
� In IE5, you can also allow session cookies (not stored).
n Workplace users must enable their browsers to accept cookies. Users can distinguish between session cookies and stored (persistent) cookies. As of IE5, they can deactivate Internet cookies and activate only local intranet cookies. They can deactivate persistent cookies and activate only session cookies.
n For security reasons, system administrators should avoid giving permission to store cookies on PCs. Such cookies are not used by SAP.

© SAP AG TABC10 251
SAP AG 1999
Cookies in the Browser (2)
n To display usage of MYSAPSSO cookies:
� Configure your Internet browser to prompt whenever a cookie is received. In IE5, allowing session cookies (not stored) triggers the alert shown in the graphic.
� Sign on to your mySAP.com Workplace and in the dialog box select More Info.

© SAP AG TABC10 252
SAP AG 1999
Cookies and SAP GUI for Windows
Wngui script File created: ![X].sap Wngui expiration time is the same as for the MYSAPSSO cookie (default 60 hours)
Download or execute?
Launch SAP GUI for Windows (sapsh.exe)
http://…../scripts/wgate/wngui/...
n The ITS service wngui does not store cookie information. When a user runs a SAP Windows transaction through the browser, the wngui service executes sapsh.exe. Whenever necessary, the user is prompted to select either Open the file or Save on disk. The user should select Open the file. A temporary file ![1].sap is created in C:\WINNT\Temporary Internet Files directory. This file gets its logon information from the user cookie in memory.
n The file has information from the cookie that has a default life of 60 hours.

© SAP AG TABC10 253
SAP AG 1999
Digital Certificates: Web Browser Settings
n In Microsoft Internet Explorer 5.0, to check your certificates:
� Choose Tools → Internet Options → Content → Certificates
� Tab Personal shows your own certificate
� Tab Trusted Root Certification Authorities shows the certificates of trusted CAs

© SAP AG TABC10 254
SAP AG 2000
Central User Administration (CUA)
l Uses Application Link Enabling (ALE)
l Allows administration of an entire system landscapefrom one single central system
l Is configured in two steps:
n Basic ALE customizing
n Configuration of the fields of the user master recordsto be distributed
Central User Administration (1)
n Central User Administration is based on ALE technology and is used to distribute user master records between systems. To configure Central User Administration, you do not need specialist knowledge of ALE.
n With Central User Administration:
� An entire system landscape can be administered from one single central system.
� You can display an overview of all user data in the entire system landscape.
� All user data is stored in the standard SAP tables (USR*) that contain the user master record data.
n You should use Central User Administration if:
� You have a complex system landscape with several clients in different systems.
� You want to allow the same user to work in more than one system.
� You want the same user ID to represent the same individual in all systems.
� You want to synchronize the user data in all your systems easily.
n To set up Central User Administration, perform the basic ALE customizing and configure the fields of the user master records to be distributed.

© SAP AG TABC10 255
SAP AG 2000
ALE: Definition of Logical Systems
l In a distributed environment, all systems must have a unique ID(for the logical system)
l The name of a logical system is set up at the end of the systeminstallation
l Assign a logical system name to the system you are currentlylogged onto
l You must specify the logical system IDs of all the systems youare communicating with
n As of SAP Release 4.6B, to define a logical system, start transaction SALE and choose Sending and Receiving Systems → Logical Systems → Define Logical Systems.
n The logical system is used as the partner ID for communication. The partner type is LS and the name may be up to 10 characters long. Example: DU1CLNT801
n Each system in the distributed environment must have a unique logical system name (including non-SAP systems).
n The name of a logical system is defined at the end of the system installation.

© SAP AG TABC10 256
SAP AG 2000
ALE: RFC Parameters and Groups
l Create and/or use RFC server groups
l Adapt the SAP profile parameters to the recommendedvalues
n For information about these SAP profile parameters,see SAP Notes 74141 and 99284
l These settings apply to tRFC calls at the sender end andto aRFC calls used for inbound processing at the receiverend (only if RFC server groups are used)
n Important RFC parameters:
� rdisp/rfc_max_own_used_wp - maximum allowed quota of dialog WPs used by this user
� rdisp/rfc_min_wait_dia_wp - minimum number of dialog WPs to be kept free
� rdisp/rfc_max_comm_entries - maximum % allowed communication entries used
� rdisp/rfc_max_own_login - maximum % allowed logon quota usage for own logins
� rdisp/rfc_max_login - maximum % allowed logon quota usage
� rdisp/rfc_max_queue - maximum % allowed dispatcher queue usage
� rdisp/rfc_use_quotas - resource determination on/off
n RFC server groups are used to control asynchronous RFC (aRFC) overloads at the receiver end (aRFCs are used for parallel inbound processing). If RFC server groups are not used, work processes are used on the given (single) destination instance, so all work processes on that instance can be blocked by concurrent aRFC processing.
� To create RFC server groups, use transaction RZ12.
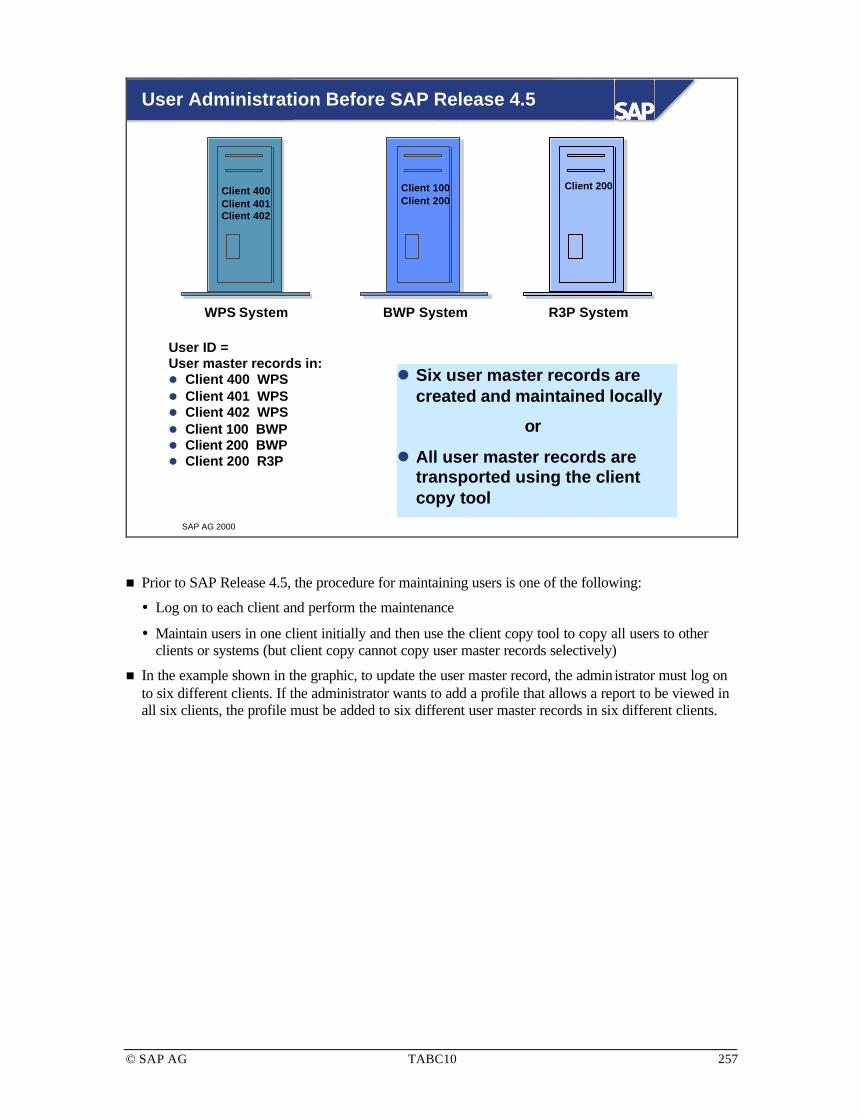
© SAP AG TABC10 257
SAP AG 2000
Client 200
R3P System
Client 100 Client 200
BWP System
Client 400 Client 401 Client 402
WPS System
User ID =User master records in:l Client 400 WPSl Client 401 WPSl Client 402 WPSl Client 100 BWPl Client 200 BWPl Client 200 R3P
l Six user master records arecreated and maintained locally
or
l All user master records aretransported using the clientcopy tool
User Administration Before SAP Release 4.5
n Prior to SAP Release 4.5, the procedure for maintaining users is one of the following:
� Log on to each client and perform the maintenance
� Maintain users in one client initially and then use the client copy tool to copy all users to other clients or systems (but client copy cannot copy user master records selectively)
n In the example shown in the graphic, to update the user master record, the admin istrator must log on to six different clients. If the administrator wants to add a profile that allows a report to be viewed in all six clients, the profile must be added to six different user master records in six different clients.

© SAP AG TABC10 258
SAP AG 2000
No local maintenanceof user master data
required
Client 200
R3P System
Client 100 Client 200
BWP System Client 400 Client 401 Client 402
WPS System
The creation andmaintenance of alluser master data is
performed in one client
RFC RFC Logical SystemsWPSCLNT400WPSCLNT401WPSCLNT402BWPCLNT100BWPCLNT200R3PCLNT200
Central User Administration (2)
n Here, the central system is an SAP System that keeps and controls user master data for an entire system landscape. Outside of this context, a central system is usually a server running both a central R/3 instance and a database.
n Here, a local system is a system receiving data from the central system.
n In the graphic, Central User Administration is performed in system WPS, client 402. The user master records are distributed to the local systems using RFC connections. No local maintenance of user master data is required.
n ALE uses logical systems to identify clients in a multi-system landscapes. Logical systems are defined in ALE customizing and then assigned to a single client.
n In an ALE environment, all logical systems must be defined in all participating SAP Systems. This can be achieved by local maintenance or using customizing transport requests.

© SAP AG TABC10 259
SAP AG 2000
Parts of the usermaster record can be
maintained locally andcan be redistributed
Client 200
R3P System
Client 100 Client 200
BWP System Client 400 Client 401 Client 402
WPS System
RFC
RFC
RFC
Central User Administration (3)
n With CUA, parts of user master records can be maintained locally. These changes can then be redistributed back to the central system, which in turn redistributes the changed records to the other local systems.
n If you maintain parts of the user master records locally and want the changes redistributed to the central system, RFC connections must exist from the local system to the central system.
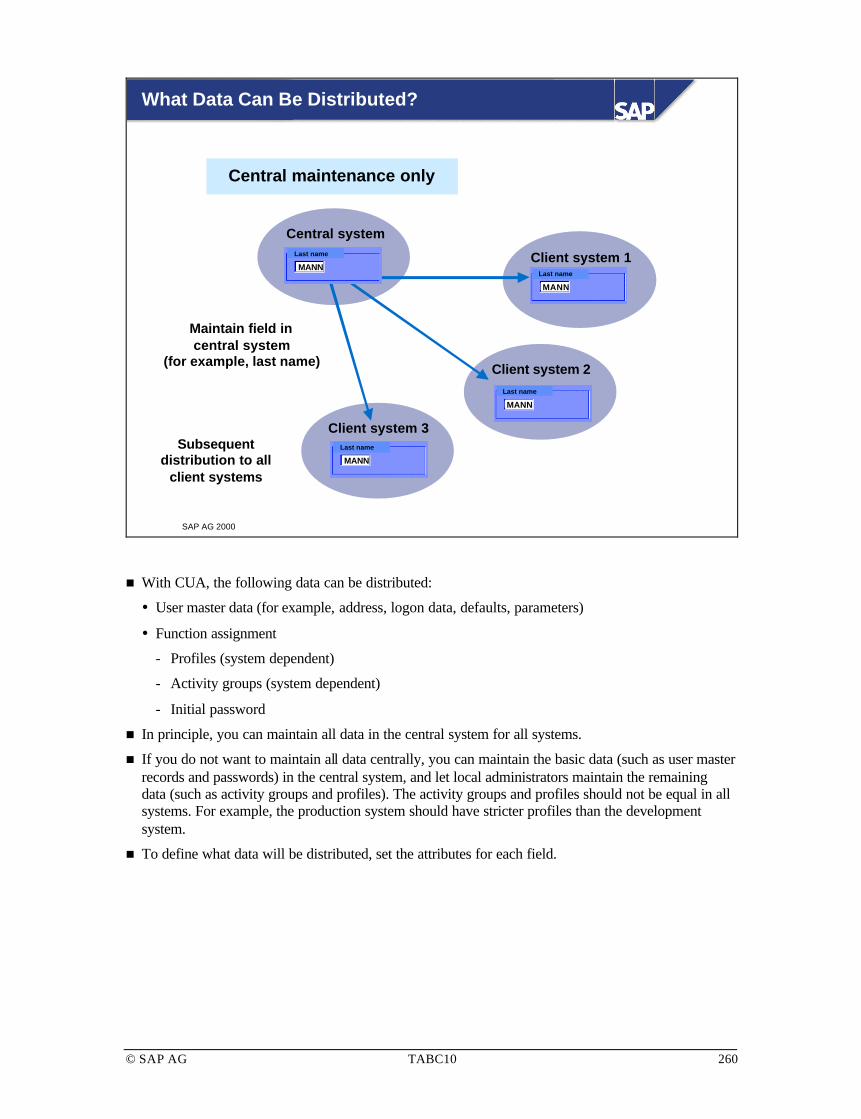
© SAP AG TABC10 260
SAP AG 2000
Client system 2
Client system 1
Central system
Client system 3
Central maintenance only
Maintain field incentral system
(for example, last name)
Subsequentdistribution to all
client systemsMANN
Last name
MANN
Last name
MANN
Last nameMANN
Last name
What Data Can Be Distributed?
n With CUA, the following data can be distributed:
� User master data (for example, address, logon data, defaults, parameters)
� Function assignment
Profiles (system dependent)
Activity groups (system dependent)
Initial password
n In principle, you can maintain all data in the central system for all systems.
n If you do not want to maintain all data centrally, you can maintain the basic data (such as user master records and passwords) in the central system, and let local administrators maintain the remaining data (such as activity groups and profiles). The activity groups and profiles should not be equal in all systems. For example, the production system should have stricter profiles than the development system.
n To define what data will be distributed, set the attributes for each field.

© SAP AG TABC10 261
SAP AG 2000
Local system
Central system
l System-dependent assignments
n User activity group
n User profile
l Maintenance of profiles and activity groups
n Because customizing settings are different
n Because releases are different
Profiles and Activity Groups
n The assignment and maintenance of profiles and activity groups is very important.
n Because their assignment is system dependent, SAP recommends maintaining the assignments centrally. With CUA, you can assign the profiles as well as the system.
n The advantage of using CUA for assigning profiles and activity groups is that to define the system-dependent assignments, you do not have to log on on to each system. You can do it all from one system.
n Maintenance of profiles and activity groups is always performed on a local system. A user may have different activity groups in different systems.

© SAP AG TABC10 262
SAP AG 2000
Lock indicator Unlock Unlocklocally globally
Lock caused by incorrect logon x optional
Local administrator lock x optional
Global administrator lock optional x
Locking Users
n With CUA, you can:
� Handle locks globally
� Specify whether users may be locally or globally locked and unlocked
� Select option Everywhere for local or global unlocking
� Specify where a user can be unlocked following an incorrect logon
n To handle user locks, use transaction SU01.

© SAP AG TABC10 263
SAP AG 2000
Define all logical systems in every SAP System
Assign every logical system to a client
Define RFC connections in both directions for every connection
ALE
Client 400
Logical systems
WPSCLNT400R3PCLNT200 Client 200
WP
S
R3P
CUA Setup (1)
n To asign logical systems to clients, in the Implementation Guide (transaction SPRO) choose Basis Components → Distribution (ALE) → Sending and Receiving Systems → Logical Systems → Name Logical System. Choose Edit → New Entries. Always ensure that each client is assigned to only one logical system.
n To assign the logical system name to a client, choose Tools → Administration → Administration → Client Administration → SCC4 Client Maintenance. In Logical System, enter the name of the logical system you want to assign to the client.
n To define RFC destinations, choose Tools → Administration → Administration → Network → RFC Destinations (or call transaction SM59).
� The user you specify for logging on to the other system must have the authorization SAP_ALL. The name for this user should be clearly recognizable. In the central system, this name appears under Last Changed by.
� RFC destination should be defined in both directions between the central system and the local systems.
� The name of the RFC destination should be identical to the name of the target logical system, for example, PRDCLNT100. The RFC destination name is case sensitive.
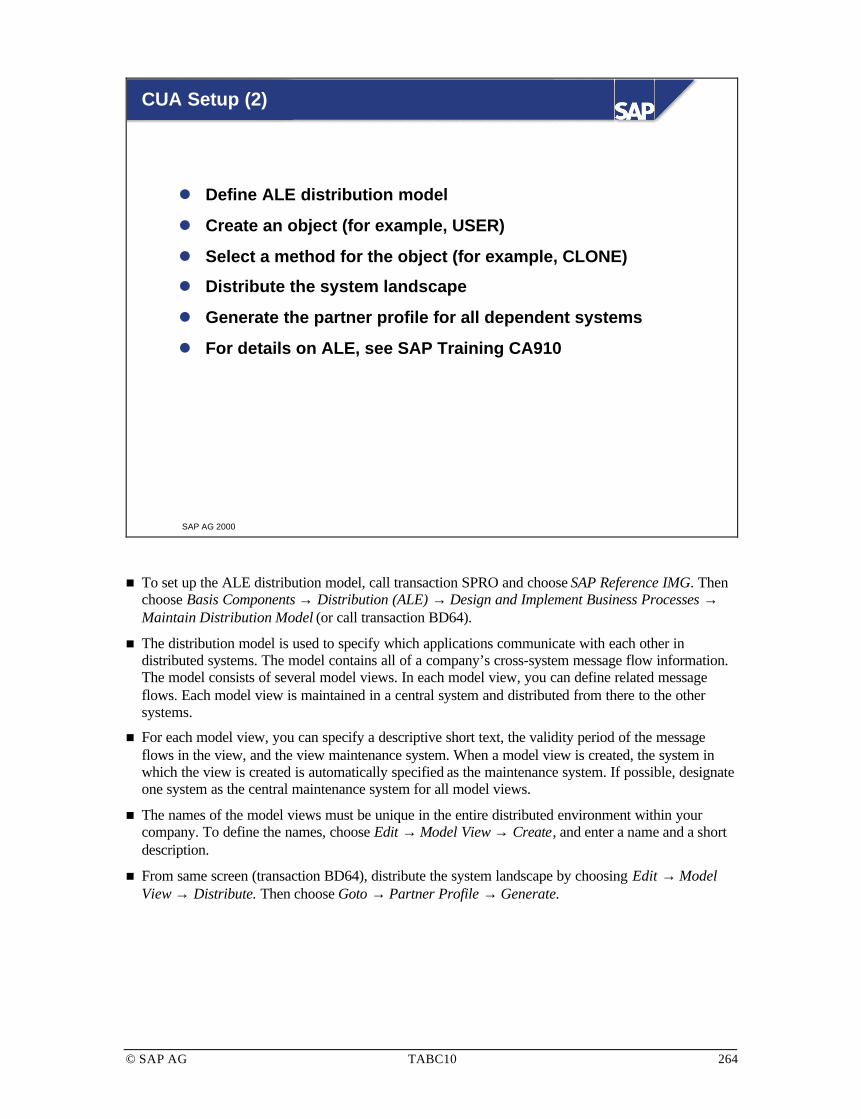
© SAP AG TABC10 264
SAP AG 2000
l Define ALE distribution model
l Create an object (for example, USER)
l Select a method for the object (for example, CLONE)
l Distribute the system landscape
l Generate the partner profile for all dependent systems
l For details on ALE, see SAP Training CA910
CUA Setup (2)
n To set up the ALE distribution model, call transaction SPRO and choose SAP Reference IMG. Then choose Basis Components → Distribution (ALE) → Design and Implement Business Processes → Maintain Distribution Model (or call transaction BD64).
n The distribution model is used to specify which applications communicate with each other in distributed systems. The model contains all of a company’s cross-system message flow information. The model consists of several model views. In each model view, you can define related message flows. Each model view is maintained in a central system and distributed from there to the other systems.
n For each model view, you can specify a descriptive short text, the validity period of the message flows in the view, and the view maintenance system. When a model view is created, the system in which the view is created is automatically specified as the maintenance system. If possible, designate one system as the central maintenance system for all model views.
n The names of the model views must be unique in the entire distributed environment within your company. To define the names, choose Edit → Model View → Create, and enter a name and a short description.
n From same screen (transaction BD64), distribute the system landscape by choosing Edit → Model View → Distribute. Then choose Goto → Partner Profile → Generate.

© SAP AG TABC10 265
SAP AG 2000
l Defining fields to be transferred
l Field attributes are maintained once during Customizing
l Easy-to-use transaction for quick setting of attributes
n Field lists arranged in tabstrips corresponding to those in theuser maintenance transaction SU01
l Automatic distribution of field attributes within the givensystem infrastructure
l Transfer users from new systems to the central system(transaction SCUG)
CUA Setup (3)
n To set up the field selection, choose Basis Components → Distribution (ALE) → Modeling and Implementing Business Processes → Predefined ALE → Business Processes → Cross-Application Business Processes → Central User Administration → Set Distribution Parameters for Field (or call transaction SCUM).
n When selecting User Distribution Field Selection, you can choose from the following options:
� Global - data can only be maintained in the central system and is completely distributed.
� Proposal - a default value is maintained in the central system. This value is distributed when a user is created and is then maintained locally.
� Redistribution - data is maintained both centrally and locally. When data is changed locally, the change is redistributed to the central system, and then distributed to the other local systems.
� Local Data - can only be maintained in the local system. Data changes are not distributed to other systems.
� Everywhere - data is maintained both centrally and locally. However, data changes are not redistributed to other systems.
n To transfer users from a new system to the central system, run transaction SCUG. Select New Systems and choose Transfer Users.
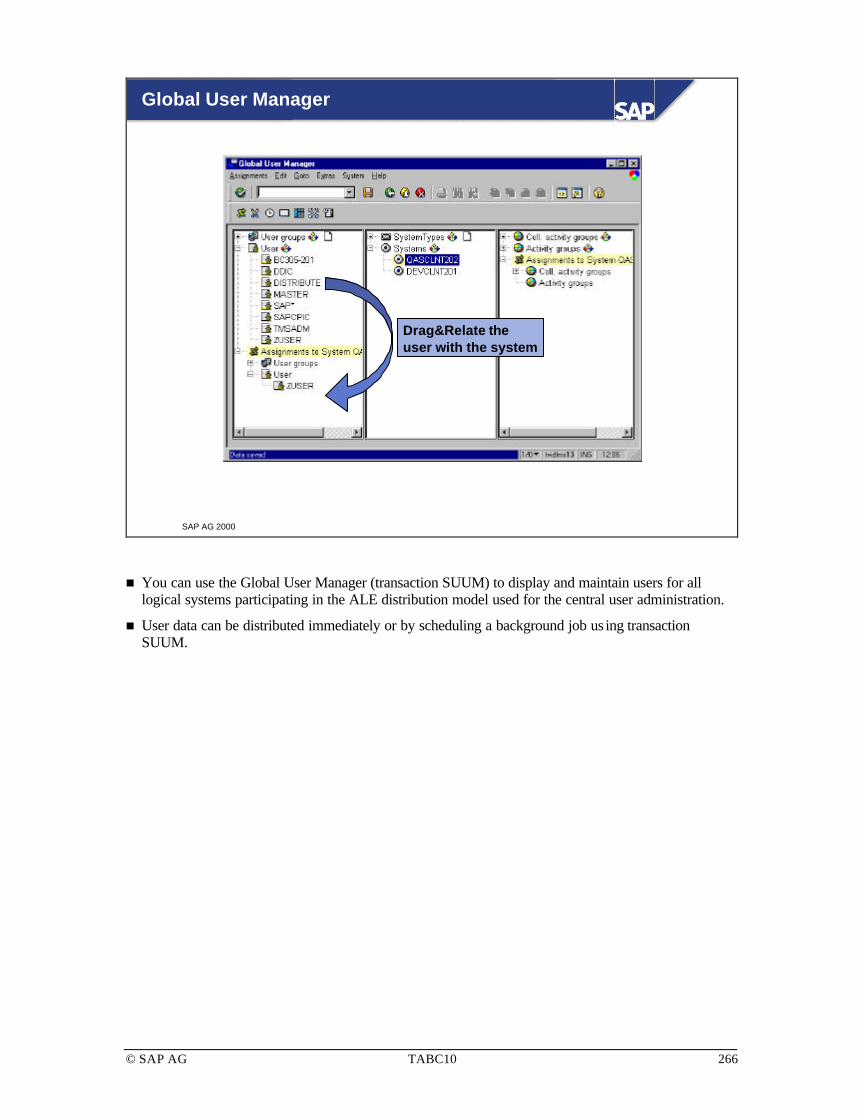
© SAP AG TABC10 266
SAP AG 2000
Drag&Relate theuser with the system
Global User Manager
n You can use the Global User Manager (transaction SUUM) to display and maintain users for all logical systems participating in the ALE distribution model used for the central user administration.
n User data can be distributed immediately or by scheduling a background job us ing transaction SUUM.
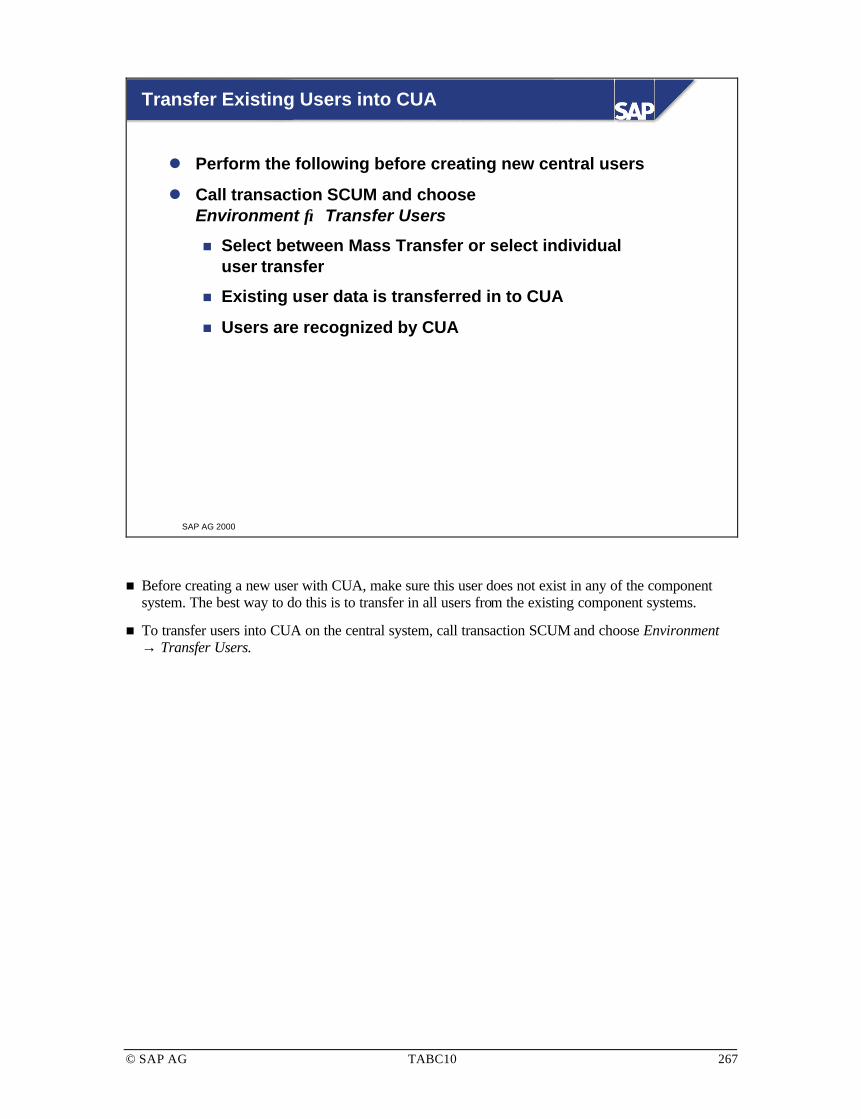
© SAP AG TABC10 267
SAP AG 2000
Transfer Existing Users into CUA
l Perform the following before creating new central users
l Call transaction SCUM and chooseEnvironment → Transfer Users
n Select between Mass Transfer or select individualuser transfer
n Existing user data is transferred in to CUA
n Users are recognized by CUA
n Before creating a new user with CUA, make sure this user does not exist in any of the component system. The best way to do this is to transfer in all users from the existing component systems.
n To transfer users into CUA on the central system, call transaction SCUM and choose Environment → Transfer Users.

© SAP AG TABC10 268
SAP AG 2000
R3P (client x)
Individual Role
WPS (client y)
User masters
Authorization profiles
User masters
Individual Role
Central User Admin.
User assignment
Transport *
Transport
Do not import user assignment:maintain table PRGN_CUST
Using CUA: Transport Configuration
Do not export Auth. profiles:maintain table PRGN_CUST
* Depending onyour SAP Releaseyou can also copyroles using RFC
n To transport individual roles from the component system to the Workplace Server, use transaction PFCG and choose Transport Activity Group. To perform a mass transport of activity groups, use transaction PFCG and choose Environment → Mass transport.
n Authorization profiles are normally transported along with the individual roles. However, this is not recommended.
� To avoid exports of authorization profiles, insert the line PROFILE_TRANSPORT with value NO in customizing table PRGN_CUST.
n When exporting individual roles, you can also transport user assignments. However, this should not be done using CUA.
� To protect the target system from receiving these user assignments during a transport, insert the line USER_REL_IMPORT with value NO in customizing table PRGN_CUST.

© SAP AG TABC10 269
SAP AG 2000
Log Display (1)
Transaction SCUL
n The results of creating or changing users can be displayed using transaction SCUL.
n To display the distribution logs, call transaction SU01 and choose Environment → Distribution log (transaction SCUL). A column of pushbuttons appears that you can use to display the logs. The pushbutton texts form the evaluation criteria for the logs displayed.
n For example, if you choose Systems, the system displays the status of the users, sorted by subsystem. To display the users in a subsystem, expand the tree. The color of a node corresponds to the worst error within a node.
n To display the color legend, choose Environment → Color legend.

© SAP AG TABC10 270
SAP AG 1999
Log Display (2)
Successfullydistributed user
User unconfirmed
User with error
Sorted by usersor system
Manual selectionpossible
n You can sort the log display list in the following ways:
� By users, to show the systems a user should be distributed to
� By systems, to show the users assigned to each system
n To select users or target systems manually, call transaction SCUL and choose Man. Selection.

© SAP AG TABC10 271
SAP AG 1999
Analyzing Distribution Errors (1)
l Data is transferred betweenthe systems by ALE
l ALE uses IDocs todistribute the data
l For every user, 3 IDocsare distributed:
n User data
n Role assignments
n Profile assignments
l To analyze distributionproblems, you can usetransaction WE05 incentral and clientsystems
n If you have ALE knowledge, you can use ALE error analysis to analyze CUA distribution errors.
n The IDocs created for CUA are for:
� User data
� Role assignments
� Profile assignments
n The main transaction for analyzing ALE distribution errors is WE05.

© SAP AG TABC10 272
SAP AG 1999
l On the WE05 initial screenyou can search IDoc listsby various criteria, such ascreation date and time
l The result gives you anoverview of the number ofIDocs matching yoursearch criteria
l View Details gives you alist of every single IDoc
l Use the list to analyzedistribution problems
Analyzing Distribution Errors (2)
n In transaction WE05:
� To get an overview of failed IDocs, search IDoc lists by criteria such as creation time and date.
� To display a list of every single IDoc, choose View Details. Use this list to analyze distribution problems.

© SAP AG TABC10 273
SAP AG 2000
You are now able to:
Unit Summary
l Configure the browser for users
l Use cookies for SSO
l Explain the use of certificates for SSO
l Configure and use CUA
© SAP AG TABC10 274
SAP AG 2000
Unit Actions
l Exercises?
l Solutions

© SAP AG TABC10 275
Single Sign On: Exercises
In these exercises the course participants will setup the central user administration in Workplace Server WPS in their respective clients. That is, the user master data will be maintained in WPS and be distributed from there. The username is BC350 for each student. The receiving client for user master data will be client 200 in your component system. The user in this client is BC350
No. Exercises
1 Setting up Central User Administration for your system: Defining Logical systems
1.1 Note: This exercise has already been done by you in Workplace Configuration exercise, chapter Workplace Configuration.
Set up two logical systems in WPS and in <your component system> (enter the logical system name in uppercase)
2 Setting up Central User Administration for your system: Assign Logical Systems to client
2.1 Note: This exercise has already been done by you in Workplace Configuration exercise, chapter Workplace Configuration.
Assign the two logical systems to clients:
WPSCLNT<your client>
<your group ID>
3 Setting up Central User Administration for your system: Creating RFC Destinations
3.1 On the Workplace Server
The RFC Destination <your component system> in your Workplace Server has already been created by you in an exercise in Chapter Workplace Configuration.
On your component system
Now you have to make sure that the user entered in this RFC destination has really the authorization profile SAP_ALL assigned.
3.2 On your component system
Create the RFC Destination WPSCLNT<your client> in your component system pointing to your Workplace Server:
Use the following specifications:
Connection Type: 3
Language: EN
Client: <your client in WPS>
User: COMMCPIC
Password: as provided by the instructor
Next, test whether your RFC connection has a user with the authorization to log in to the target host.

© SAP AG TABC10 276
4 Setting up Central User Administration for your system: Set up the ALE Distribution Model on the Workplace Server
4.1 On the Workplace Server
Create the ALE distribution model view WPS<your group ID>
4.2 On the Workplace Server
Define that in the created model view the users (object USER) and the users company address (object UserCompany) should be always kept up to date (method Clone) from the central system to the dependant system.
Hint: Use the Add BAPI button in Transaction BD64
5 Setting up Central User Administration for your system: Generate Partner Profiles
5.1 On the Workplace Server
Generate the partner profile for the connection to your component system.
Use model WPS<your group ID> and partner system <your group ID>
Hint: Use Transaction BD64 → Environment → Generate Partner Profile
6 Setting up Central User Administration for your system: Distribute the distribution model and generate the partner profile on your component system.
6.1 On the Workplace Server
Distribute the distribution model from the Workplace Server to your component system.
6.2 On your component system
Generate the partner profile for the connection to the Workplace Server.
Use model view WPS<group ID> and partner system WPSCLNT<your client number>.
Hint: Use Transaction BD64 → Environment → Generate Partner Profile
7 Modification for the use of CUA in the Workplace environment
7.1 On the Workplace Server
Change IDOC Basic Type to userclone01:
Start Transaction WE20.
Display the sub nodes for Partner type LS in the tree structure.
Select system <your group ID> in the tree structure.
Execute the entry USERCLONE in the table Outbound Parameters by double-clicking it.
In the group Idoc type, change the entry Basic type from USERCLONE02 to USERCLONE01.
Save your changes.
8 Setting up Central User Administration for your system: Define field distribution (field selection)

© SAP AG TABC10 277
8.1 On the Workplace Server
Define that the field first name can be maintained locally and will be redistributed (RetVal).
Define that all remaining fields should be maintained globally (Global).
9 Include users into CUA using the migration tool
9.1 On the Workplace Server
Practice utilizing transaction SCUM – User Distribution Field Selection for user migration into CUA.
Migrate user BC305 from your component system into CUA.
10 Using Central User Administration: Create a user on the Workplace Server and distribute it.
10.1 On the Workplace Server
Create the user DISTRIBUTE with password initial. For Logical System WPSCLNT<your client> assign the role ZCOMP<your group ID>
For Logical System <your group ID> assign the role Z<your group ID>.
11 Using Central User Administration: Maintain a local field and redistribute it
11.1 On your component system
Change the first name of user DISTRIBUTE to HUGO.
11.2 On the Workplace Server
Check to see if the first name HUGO of user DISTRIBUTE has been redistributed.
12 Browser and Cookies
12.1 Disable allowing cookies to be stored on your computer. Allow per session cookies (not stored) to appear with a prompt only. Log on to the Workplace Server using the ITS service sapwp. Use user BC350.
Check for the MYSAPSSO cookie when logging on.
12.2 Configure your Internet Browser to recommended settings:
Disable cookies that are stored on your computer
Enable per-session cookies (not stored)
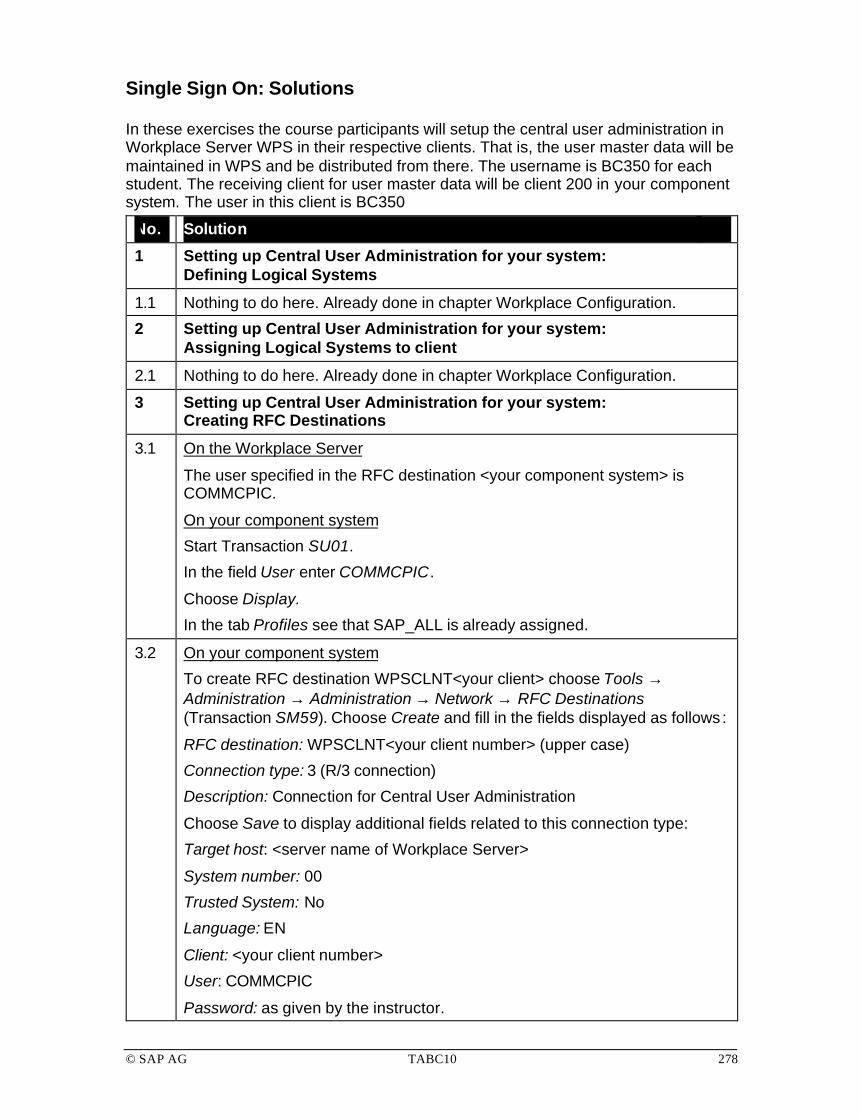
© SAP AG TABC10 278
Single Sign On: Solutions
In these exercises the course participants will setup the central user administration in Workplace Server WPS in their respective clients. That is, the user master data will be maintained in WPS and be distributed from there. The username is BC350 for each student. The receiving client for user master data will be client 200 in your component system. The user in this client is BC350
No. Solution
1 Setting up Central User Administration for your system: Defining Logical Systems
1.1 Nothing to do here. Already done in chapter Workplace Configuration.
2 Setting up Central User Administration for your system: Assigning Logical Systems to client
2.1 Nothing to do here. Already done in chapter Workplace Configuration.
3 Setting up Central User Administration for your system: Creating RFC Destinations
3.1 On the Workplace Server
The user specified in the RFC destination <your component system> is COMMCPIC.
On your component system
Start Transaction SU01.
In the field User enter COMMCPIC.
Choose Display.
In the tab Profiles see that SAP_ALL is already assigned.
3.2 On your component system
To create RFC destination WPSCLNT<your client> choose Tools → Administration → Administration → Network → RFC Destinations (Transaction SM59). Choose Create and fill in the fields displayed as follows :
RFC destination: WPSCLNT<your client number> (upper case)
Connection type: 3 (R/3 connection)
Description: Connection for Central User Administration
Choose Save to display additional fields related to this connection type:
Target host: <server name of Workplace Server>
System number: 00
Trusted System: No
Language: EN
Client: <your client number>
User: COMMCPIC
Password: as given by the instructor.

© SAP AG TABC10 279
Save the entry and select Test Connection.
To test whether your RFC connection has a user with the RFC authorization to log in to the target host select Test → Authorization.
4 Setting up Central User Administration for your system: Setting up the ALE Distribution Model on the Workplace Server
4.1 On the Workplace Server
To set up an ALE distribution model, call Transaction SPRO and choose SAP Reference IMG. Under Basis Components → Distribution (ALE) → Modeling and Implement Business Processes → Maintain Distribution Model and Distribute Views choose Execute (or start Transaction BD64)
Choose Distribution Model → Switch Processing Mode.
Choose Create Model View.
In the field Short text enter Central User Administration
In the field Technical name enter WPS<your group ID>
Choose Continue/Enter
Save your settings.
4.2 On the Workplace Server
To set up objects and methods in the created model view call Transaction BD64 and choose Add BAPI.
1. To define object USER, specify the following:
In the field Model View enter WPS<your group ID>
In the field Sender/client enter WPSCLNT<your client number>
In the field Receiver/serve enter <your group ID>
In the field Obj. name/Interface enter USER
In the field Method enter clone
Choose Continue/Enter
Save your settings.
2. To define object UserCompany, specify the following:
In the field Model View enter WPS<your group ID>
In the field Sender/client enter WPSCLNT<your client number>
In the field Receiver/server enter <your group ID>
In the field Obj. name/Interface enter UserCompany
In the field Method enter clone
Save your settings.
5 Setting up Central User Administration for your system: Generating Partner Profiles
5.1 On the Workplace Server
To generate the partner profile on the Workplace Server, call Transaction

© SAP AG TABC10 280
BD64 and choose Environment → Generate Partner Profiles.
In the field Model view select WPS<your group ID>
In the field Partner system select <your group ID>
Use the default values for all other fields.
Choose Execute.
6 Setting up Central User Administration for your system: Distributing the system landscape and generate the partner profile on your local system.
6.1 On the Workplace Server
To distribute the system landscape from the Workplace Server to the component system, on the Workplace Server start Transaction BD64 and choose Edit → Model View → Distribute.
Select model view WPS<your group ID>
Choose Continue/Enter.
Note: If the names of the RFC connections are the same as the logical name of the local system the right system is already marked.
Choose Continue/Enter.
6.2 On your component system
To generate the partner profile for model view WPS<your group ID> on the component system, on the Workplace Server start Transaction BD64. You should now see the model view created on the Workplace Server.
From the same screen (Transaction BD64), choose Environment → Generate Partner Profiles.
In the field Model select WPS<group ID>
In the field Partner system select WPSCLNT<your client number>.
Use the default values for all other fields.
Choose Execute.
7 Modification for the use of CUA in the Workplace environment
7.1 On the Workplace Server
Change IDOC Basic Type from userclone02 to userclone01:
Start Transaction WE20.
Display the sub nodes for Partner type LS in the tree structure.
Select system <your group ID> in the tree structure.
Double-click the entry USERCLONE in the table Outbound Parameters by double-clicking it.
In the group Idoc type, change the entry Basic type from USERCLONE02 to USERCLONE01.
Save your changes.
8 Setting up Central User Administration for your system: Defining field distribution (field selection)

© SAP AG TABC10 281
8.1 On the Workplace Server
To set up the field selection, start Transaction SPRO and choose SAP Reference IMG. Under Basis → Distribution (ALE) → Modeling and Implementing Business Processes → Predefined ALE Business Processes → Cross-Application Business Processes → Central User Administration → Set Distribution Parameters for Field choose Execute. (or start Transaction SCUM).
In the field model view select WPS<your group ID>
Choose Save.
Choose Environment → Field Selection.
To define that the field First name can be maintained locally and will be redistributed, in the tab Address select RetVal for this field .
By default, all other settings are defined as Global.
Save your settings.
Note: Even after saving the entries you will be warned that Data will be lost. Ignore this pop up, and leave the transaction.
9 Include users into CUA using the migration tool
9.1 On the Workplace Server
Start Transaction SCUM (User Distribution Field Selection) for user migration from the component system to CUA.
To start the migration tool select Environment → Transfer Users. Mark <your component system>.
Note that this system is marked as New.
Select Transfer Users.
A list of new users which have not been transferred after CUA was activated will appear. Select the user BC305 to be included in the CUA. Select Transfer Users.
Now the user BC305 is visible on the system WPS using transaction SU01 or SUUM. In the migration tool the migrated user disappears in the tab New Users and appears in the tab Already central users
10 Using Central User Administration: Creating a user in the central system and distributing it
10.1 On the Workplace Server
To create the user DISTRIBUTE, in the central system start Transaction SU01.
In the field User, enter DISTRIBUTE.
Choose Create.
In the tab Address, specify the following : Last name: DISTRIBUTE. First name: (Leave this field blank)
In the tab Logon data : Enter and repeat as initial password INIT.

© SAP AG TABC10 282
In the tab Activity groups: In the first line of column SYSTEM, select WPSCLNT<your client number>. In the first line of column Activity Group, enter ZCOMP<your group ID> In the second line of column SYSTEM, select <your group ID> In the second line of column Activity Group, enter Z<your group ID>
Save your settings.
Choose Continue.
Choose Continue.
Now the user is automatically distributed to the local system.
11 Using Central User Administration: Maintaining a local field and redistributing it
11.1 On your component system:
To change the first name in the component system, log on to the component system with user BC350.
Start Transaction SU01.
Note that the menu for creating users is greyed out and the button is missing.
In the field User, enter DISTRIBUTE.
Choose Change.
Note: The field First name is the only input enabled field.
In the tab Address, in the field First name enter HUGO.
Save your entries.
11.2 On the Workplace Server
To check if the first name HUGO has been redistributed, start transaction SU01.
In the field User enter DISTRIBUTE.
Choose Display.
The field First Name now contains the name HUGO.
12 Internet Browser and Cookies
12.1 Open your Internet browser.
Select Tools → Internet Options.
Select menu Security.
Select Local Intranet → Custom Level.
Under Cookies → Allow cookies that are stored on your computer mark Disable
Under Cookies → Allow per-session cookies (not stored) mark Prompt
Choose OK
Choose OK
To log on to your workplace server using the ITS service sapwp (Workplace Portal) choose the following URL:

© SAP AG TABC10 283
http://<your web server>:1080/scripts/wgate/sapwp/!
On first security alert choose YES.
On second security alert choose YES.
Logon to Workplace with user BC350.
On next security alert choose More Info . You will notice the MYSAPSSO cookie and the expiration.
Choose Yes to accept the cookie.
12.2 Configure your Internet Browser to recommended settings:
Open your Internet browser.
Select Tools → Internet Options.
Select menu Security.
Select Local Intranet → Custom Level.
Under Cookies → Allow cookies that are stored on your computer mark Disable
Under Cookies → Allow per-session cookies (not stored) mark Enable
Choose OK
Choose OK

© SAP AG TABC10 284
SAP AG 1999
Introduction Including MiniApps
Workplace Architecture Software Logistics
Configuration andAdministration
Monitoring andTroubleshooting
InternetTransaction Server Drag&Relate
Users:Single Sign On
Including MiniApps

© SAP AG TABC10 285
SAP AG 1999
l What is a MiniApp?
l Development approaches
l Including MiniApps in the Workplace
l Personalization
Contents:
Including MiniApps

© SAP AG TABC10 286
SAP AG 1999
l Describe the characteristics and types ofMiniApps
l Include MiniApps in the Workplace
At the conclusion of this unit, you will be able to:
Including MiniApps: Unit Objectives

© SAP AG TABC10 287
SAP AG 1999
Course Overview Diagram (5)
Preface
Unit 1 Introduction
Unit 2 Architecture and Security
Unit 3 Central User Administration
Unit 4 Role Definition
Unit 5 Including MiniApps
Unit 6 Customizing Settings
Unit 7 System Integration
Unit 8 Drag&Relate
Appendix

© SAP AG TABC10 288
SAP AG 1999
LaunchPad and MiniApps
LaunchPad
WorkSpace• Transactions• MiniApps
Drag&Relate
n MiniApps are intuitive, easy to use Web applications . When you start the mySAP.com Workplace, they quickly give you an overview of and access to your most important data.
n MiniApps are self-contained Web documents supplied by the Workplace Server using a URL. It does not matter where they reside. The Workplace architecture supports various MiniApp technologies and communication with any server, so it is open for third-party software.
n MiniApps form the push portion of the mySAP.com Workplace where key information and services can be presented immediately when users log on. Release 2.00 of the Workplace delivers SAP’s first predefined MiniApp. In addition, companies are free to define their own MiniApps and attach them to their role definitions. These MiniApps are assigned to a role using just a URL. As a result, it is very straightforward to include items such as Web services and company information. MiniApps can also be used to access data directly from an SAP or a non-SAP component. As of Release 2.0 of the SAP Business Information Warehouse, users can also define MiniApps using Web reporting.
n The MiniApps that are seen in the mySAP.com Workplace depend on the user’s role.

© SAP AG TABC10 289
SAP AG 1999
Types of MiniApps
Stock tickerStock ticker
AlertAlert
E-mail addressE-mail address Telephone directoryTelephone directory
ReportsReports
ToDo listToDo listCalendarCalendarNewsNews
MiniApp
s
Web search toolWeb search tool
n MiniApps can be used to represent a wide range of information. Apart from the topics listed above, MiniApps can represent:
� Small previews of full transactions (for example, system monitoring tools, lists of documents that are currently on hold, or lists of customers with overdue accounts)
� Commonly used functions that require a small amount of input where the user does not need to launch an entire application.
� Shared folders
� Ad hoc queries
� Wizards and navigation accelerators
� Interfaces for third-party applications
n For more complex tasks, you should use Easy Web Transactions instead of MiniApps. Easy Web Transactions are designed for casual users and are easy and intuitive to use. They offer a way to use simple applications in the Web. Logically, they are a step on from the former Internet Application Components (IACs).

© SAP AG TABC10 290
SAP AG 1999
MiniApp Characteristics
MiniApps should be:
l Simplel Directl Activel Access providingl Personalizablel Leanl Self-containedl Stateless
MiniApps should be:
l Simplel Directl Activel Access providingl Personalizablel Leanl Self-containedl Stateless
n MiniApps should fulfill a set of characteristic requirements. They should be:
� Simple : Everything should be presented on one screen. If you have a more complex application in mind, consider whether it might be better to implement it as an Easy Web Transaction.
� Direct: Access within a MiniApp to data and functions does not require navigation.
� Active : MiniApps automatically fetch the data for the users.
� Access providing : They should offer access to complex operations.
� Personalizable : Users should be able to configure MiniApps as they wish.
� Lean: They should contain only essential functions.
� Self-contained: MiniApps should be independently executable objects
� Stateless: They should not require permanent connection to the SAP System (once a URL has been executed, the connection to the SAP System is freed).
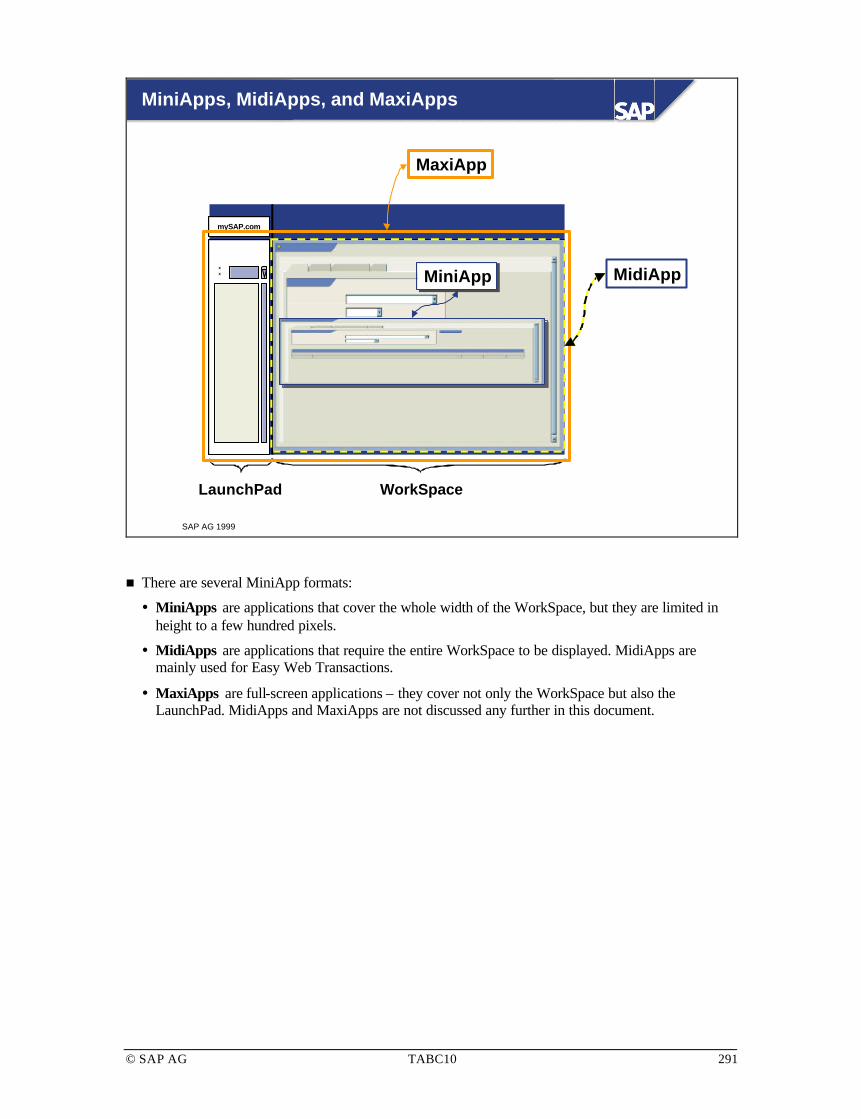
© SAP AG TABC10 291
SAP AG 1999
MiniApps, MidiApps, and MaxiApps
LaunchPad WorkSpace
xx
mySAP.com
MiniAppMiniApp MidiApp
MaxiApp
n There are several MiniApp formats:
� MiniApps are applications that cover the whole width of the WorkSpace, but they are limited in height to a few hundred pixels.
� MidiApps are applications that require the entire WorkSpace to be displayed. MidiApps are mainly used for Easy Web Transactions.
� MaxiApps are full-screen applications – they cover not only the WorkSpace but also the LaunchPad. MidiApps and MaxiApps are not discussed any further in this document.

© SAP AG TABC10 292
SAP AG 1999
An Example: The Workflow/Webflow Inbox MiniApp
Workflow Inbox MiniApp
Show my work items Update!
Work item list
Inbox Outbox Resubmission Info
With task All entries
In Status All entries
0 Entries total Last updated at 17:14:39
Detail Text
Workflow/WebflowInbox MiniApp
Collect Workflow tasksin component systems...
...and display them in the Workplace!
n The Workflow/Webflow Inbox MiniApp is an example of a typical MiniApp. It selects data in all logical systems that are:
� Activated globally (active in table SWLIGL; use transaction SM30 to edit table entries)
� Addressed by a role that is associated both with attribute Read Workflow/Webflow Inbox and with the user (active in table SWLIAG; use transaction SM30 to edit table entries)
n Make sure that the URL entered in the role points to service BCBMTWFM0001 on the Workplace Server (see also Adding MiniApps to Roles in this unit).
n The Workflow/Webflow Inbox MiniApp selects all the work items for the current user from these systems. Users can then choose to enter the Inbox, the Outbox, or the Resubmission folder.
n The Inbox shows work items that are ready to be processed by the current user. Users can execute a work item by clicking its text. Choose the Display icon to display the work item.
n For the Outbox, users can choose between various selection periods. They can also switch between categories of items to be presented from all addressed systems:
� Workflows started
� Work items executed
� Work items forwarded
n In the Resubmission folder, users find all the work items for resubmission in the addressed systems.
n Users can update any view at any time by choosing Refresh.
© SAP AG TABC10 293
SAP AG 1999
Creating MiniApps
n The simplest MiniApp is just a URL to a Web document. In this case, no additional development is required. If you wish to create more complex MiniApps, there are two steps to be taken:
n Developing a MiniApp
� You can develop MiniApps in a popular development environment (for example, MS Visual Studio, IBM Visual Age). Make sure the customer name space is correct.
� If you use the SAP Business Information Warehouse 2.0 (BW), you can use Web Reporting to create MiniApps. You have to use the Internet Transaction Server (ITS) for MiniApps created with the BW and Flow Logic. For more information, see the SAP Library at Basis -> Frontend Services -> ITS/SAP@Web Studio.
� Another possibility is to make use of Flow Logic and Business HTML Templates on the ITS (see the slide later in this unit).
n Integrating MiniApps in the Workplace:
� MiniApps are included in roles via URLs (see Adding MiniApps to Roles in this unit). The URLs may contain variable tags (see the Customizing Settings unit).

© SAP AG TABC10 294
SAP AG 1999
A Programming Model: ITS Flow Logic
Component system
BAPI
BAPIBAPI
BAPIBAPI
BAPI
BAPI
BAPI
BAPI
BAPI
ITS Flow LogicWorkplace(Web browser)
Presentationat runtime
Templatefiles
Flowfiles
(Frontend) (ITS)
n The following programming model focuses on the connection between MiniApps and SAP component systems, such as the R/3 System or SAP BW.
n MiniApps logically consist of three layers: the presentation at runtime, template files, and flow files.
n The presentation at runtime is just what a visitor to the Web site (for example, the Workplace user) sees in his or her Web browser.
n The template files define the look of the various components of a Web page. The code used for the template describes the physical structure of the page, that is, which component appears in which location on the page. It also allows the visualization of image files in the Web browser. The template layer is represented by the business HTML templates stored on the ITS.
n The flow files describe which data populates the page. They also set up the process flow, that is, which template is called next (Flow Logic ). The flow files describe various states defined by the application developer to perform certain functions, such as making a BAPI call to the SAP System.
n Flow Logic specifies:
� The information flow of the application (you can compare this to the “Flow Logic” of SAP screens)
� What to do with the user interface events
� How to transfer data to BAPIs and vice versa
� How to populate the template layer with data
n Flow Logic is represented by flow files based on XML language. These files are also stored on the ITS.

© SAP AG TABC10 295
SAP AG 1999
1 200 www.sap.com
2 350 News
3 200 Business Directory
4 200 Stock ticker
Adding MiniApps to Roles
Heading Workflow Inbox MiniApp
Height (pixels) 350
URL http://igwpz.wdf.sap-ag.de:1080/scripts/wgate/bcbmtwfm0001/!
Role Single role on component system
Sequence 5
Mini-Apps for role
Sequence Height: Pixels MiniApp title
New Entries
Role Single role on component system
n You can integrate existing MiniApps in your Workplace. Proceed as follows:
n Use transaction PFCG to enter role maintenance. Select an appropriate single role that is to contain the MiniApp (note: you should not include MiniApps in composite roles). Choose Goto -> MiniApps.
n The system usually displays a table of MiniApps that have already been integrated. If you have only integrated one MiniApp so far, the system immediately displays the detailed data for this entry.
n Choose New entries to add MiniApps to the role.
� Specify the role that you just maintained in the Role field.
� The Sequence number field determines the sequence in which the MiniApps are displayed.
� Enter a title for the MiniApp in the header field.
� The Height: pixels field determines the display area of the MiniApp.
� Enter the MiniApp address in the URL field. You can use both fixed URL addresses and URLs with variable components that are replaced at runtime. For more information, refer to the section Including URL Addresses with Variable Components in the documentation Configuration Guide for the mySAP.com Workplace. If you use variable components, make sure you always use the variables <web_server> and <language> to specify the Web server and the logon language. You also have to specify the logical system of the component for which the MiniApp has been defined.

© SAP AG TABC10 296
SAP AG 1999
Personalization of MiniApps and the LaunchPad
(drag&drop favorites)
Favorites
My Links Marketplace
Composite role on Workplace
Tools
Accounting: Master records
Logistics: Sales and Distribution
Create Sales Order
Change Sales Order
Display Sales Order Human Resources
Personalize Workplace
Workplace: Personalize MiniApps
Generic services
www.sap.com http://www.sap.comNews http://www.mysap.com/general-news?gimme=Business&cols=3&headliStock ticker http://www.mysap.com/general-stocks?symbols=SAP IBM&view=quick Workflow Inbox MiniApp http://igwpz:1080/scripts/wgate/bcbmtwfm0001/!
Home Application Edit Logoff
www.sap.comNewsStock tickerWorkflow Inbox MiniApp
Choose MiniApps Generated URL
Configure MiniApps
Adjust Positionof MiniApp
Hide/show MiniApp
Click here...
...or choose "Edit" in the WorkSpace
Refresh Edit
www.sap.com
Welcome Willi Workplace
n You can personalize the display of the MiniApps in the WorkSpace to optimize the MiniApps according to your requirements, provided your user has been assigned to the role SAP_WORKPLACE_USER. Proceed as follows:
� In the WorkSpace, choose Edit (or, if available, click the according entry in the LaunchPad)
� In the next dialog box (Update MiniApps), you can do the following:
On the upper screen area, select the MiniApps that you want to display from the ones provided for your roles.
On the lower screen area, you can specify whether a MiniApp should be displayed only in a minimized form. Using the up and down arrows, you can move a MiniApp up or down in the list.
� Finally save the changes. You must choose Refresh in the WorkSpace to see the effect of your changes.

© SAP AG TABC10 297
SAP AG 1999
Favorites Personalization
FavoritesFavorites
My Links My Links
Marketplace Marketplace
Composite role on WorkplaceComposite role on Workplace
Tools Tools
Accounting: Master records Accounting: Master records
Logistics: Sales and Distribution Logistics: Sales and Distribution
Create Sales Order Create Sales Order
Change Sales Order Change Sales Order
Display Sales Order Display Sales Order
Human Resources Human Resources
Personalize Workplace Personalize Workplace
Workplace: Personalize MiniApps Workplace: Personalize MiniApps
Generic servicesGeneric services
www.sap.comwww.sap.com http://www.sap.com http://www.sap.comNewsNews http://www.mysap.com/general-news?gimme=Business&cols=3&headli http://www.mysap.com/general-news?gimme=Business&cols=3&headliStock tickerStock ticker http://www.mysap.com/general-stocks?symbols=SAP IBM&view=quick http://www.mysap.com/general-stocks?symbols=SAP IBM&view=quick Workflow Inbox MiniApp http://igwpz:1080/scripts/wgate/bcbmtwfm0001/!Workflow Inbox MiniApp http://igwpz:1080/scripts/wgate/bcbmtwfm0001/!
Home ApplicationHome Application Edit LogoffLogoff
Choose MiniApps Generated URL
www.sap.comNewsStock tickerWorkflow Inbox MiniApp
Configure MiniApps Edit Favorites - Microsoft Internet Explorer
New Folder
New URL
Add
Add
Delete Favorite
Favorites
My Links
Marketplace Folder name
URL
Description
n Every user has a Favorites folder in the LaunchPad.
n The Favorites folder is provided for the user to group together the activities they use most often, as well as their own personally defined links to Web sites and services.
n When the user choose Edit in the LaunchPad, a dialog box appears in which new folders can be defined to logically group entries together. The user is also free to define his or her own favorite Web URLs.
n Favorites are stored for the user on the Workplace Server.

© SAP AG TABC10 298
SAP AG 1999
You are now able to:
Including MiniApps: Unit Summary
l Describe the characteristics and types ofMiniApps
l Include MiniApps in the Workplace

© SAP AG TABC10 299
SAP AG 1999
Appendix: Where Can I Find MiniApps?
MiniApp
s
n MiniApps are supplied by both SAP and their consulting partners. You can also create your own MiniApps.
n MiniApps supplied by SAP or SAP’s partners either require an SAP System or are completely independent of an SAP System.
n You can find SAP system-independent MiniApps in the mySAP.com Marketplace, listed on the URL http://www.mysap.com/links.htm. These include the News and Stock ticker MiniApps. In the future, SAP will make available other system-independent MiniApps, for example, calendar functions or display of the number of unread e-mails.
n From the technical perspective, you have the following options when creating your own MiniApps:
n You can create the services on which the MiniApps are based in the ABAP Workbench using the Web Application Builder or using another development environment (for example, MS Visual Studio or IBM Visual Age).
n If you use the SAP Business Information Warehouse 2.0 (BW), you can create MiniApps using Web Reporting.
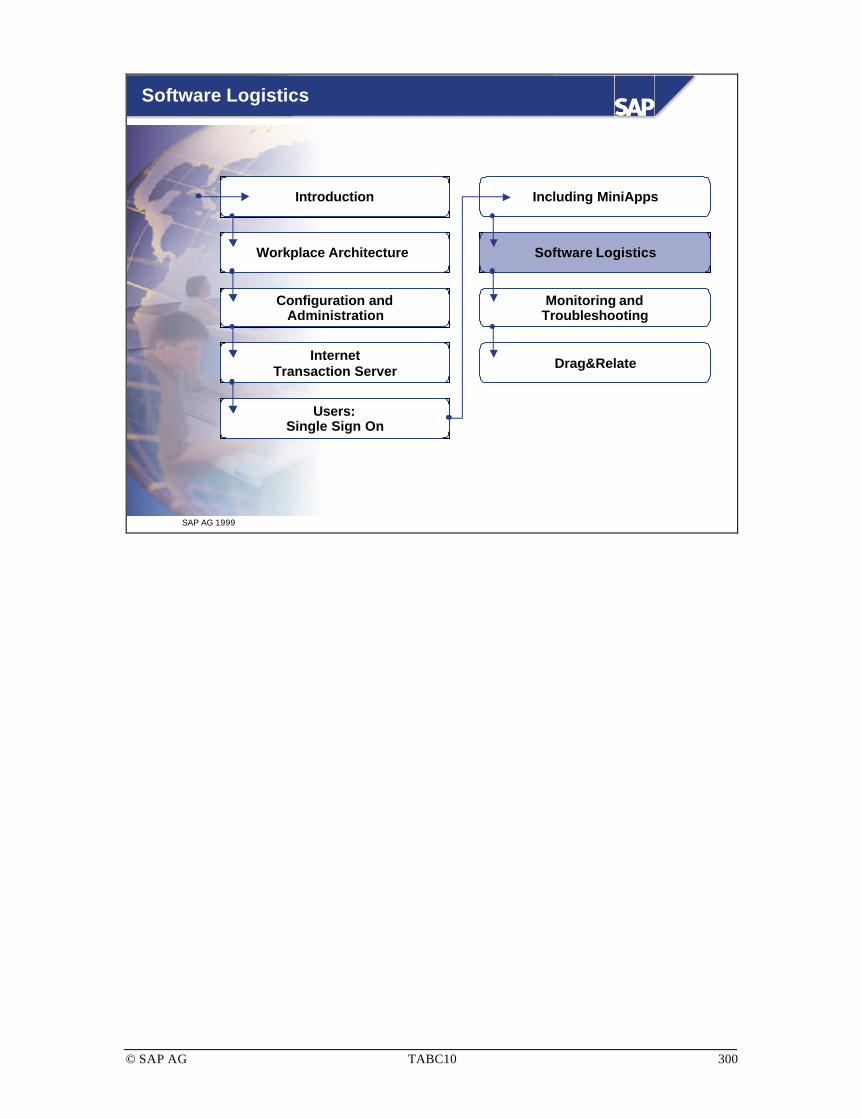
© SAP AG TABC10 300
SAP AG 1999
Introduction Including MiniApps
Workplace Architecture Software Logistics
Configuration andAdministration
Monitoring andTroubleshooting
InternetTransaction Server Drag&Relate
Users:Single Sign On
Software Logistics
© SAP AG TABC10 301
SAP AG 2000
Software Logistics
Contentsl System landscape
l Development strategy
l ITS development organization
ObjectivesAt the end of this unit, you will be able to:
l Set up a production system landscape formySAP.com Workplace
l Realize a given development strategy
l Set up an ITS development organization

© SAP AG TABC10 302
SAP AG 2000
Software Logistics: Systems and Data
Development
Quality Assurance
Production
R/3 Core
PRD
QAS
DEV Client 100
Client 400
Virtual ITS: HTML, MIME, …
Virtual ITS: HTML, MIME, …
Virtual ITS: HTML, MIME, …Client 400
Client 400 Virtual ITS: HTML, MIME, …
Virtual ITS without customer-specific
development objectsClient 400
WPS
AGate and WGate withcustomer-specific Internet development objects
Sin
gle
ro
les
n The graphic shows the systems involved in a Workplace environment and the related data.
n Every logical system (client in a system) must have a separate virtual ITS installation.
n The objects that are most important for software logistics are:
� Single roles: These roles are usually created in a development system (DEV) and transported through a quality assurance system (QAS) to a production system (PRD) using the SAP Transport System. Roles are client-dependent objects.
� Customer-specific Internet development objects of a virtual ITS residing on either AGate or WGate, such as:
MIME files (sounds, graphics, …)
HTML template files
Language files (*.trc)
To transport customer-specific Internet development objects, use the SAP tool SAP@Web Studio and the SAP Transport System.

© SAP AG TABC10 303
SAP AG 2000
Workplace Server Transport Connection
l You can include the Workplace Server in theexisting transport landscape
l You only need to transport single roles from thecomponent system to the Workplace system
l You can also copy roles using upload/downloador using an RFC connection
l Do not transport Workplace customizing
l Take care when transporting between differentSAP Releases:
Workplace ServerBasis Release 4.6D
Workplace ServerBasis Release 4.6D
SAP SystemRelease 3.1I
SAP SystemRelease 3.1I
!SAP SystemRelease 4.0B
SAP SystemRelease 4.0B
SAP...
SAP...
SAP...
SAP...
. . .
n The Workplace Server (WPS) may be integrated into one of the existing transport domains. Make sure the WPS does not receive any development (customizing) from other component systems.
n To include the WPS into the transport domain of other systems from a non-configured Transport Management System (TMS), on the WPS call transaction STMS and choose Other configuration. Log on to the component system, call transaction STMS, choose System Overview, mark the WPS, choose SAP System → Approve, and distribute the TMS configuration.
n You need to exchange only a few objects between component systems and the WPS:
� The definition of roles
� The Central User Administration (CUA) ALE distribution model
� The CUA logical system names
n In most cases, WPS Customizing is not transported, as it contains URLs and server names. Transport of composite roles is possible.
n Depending on the release level of the interacting SAP Systems, transports may be impossible for either of the following reasons:
� The systems are logically different. For example, you cannot transport Customizing for a function that does not exist in the target system.
� Some field or table definitions are different in the two systems.

© SAP AG TABC10 304
SAP AG 1999
Delivery
TransportDomain
Controller
Consolidation DeliveryIntegration
BWQuality
Assurance
APOAssurance
WorkplaceProduction
R/3Development
BWDevelopment
APODevelopment
R/3Production
BWProduction
APOProduction
R/3Quality
Assurance
mySAP.com Workplace Transports
Transport DomainDOMAIN_WPS
TransportGroupWPS_R3
TransportGroupWPS_BW
TransportGroupWPS_APO
n The WPS is used for logon to all other systems, so it should be the most available server in your mySAP.com system landscape. You can use the WPS as the central transport domain controller. Within a transport domain, SAP Systems that share a common transport directory form a transport group. You need not use just one transport directory. You can form a separate transport group for each set of development, quality assurance, and production systems.
n The TMS supports transports between transport groups. After a change request has been released, the request is marked in the common transport directory for import into the target system. If the source and target systems are in different transport groups, you must adjust the import queue of the target system in the target system group: from the screen Import Queue, choose Extras → Other requests → In other groups. TMS searches (at OS level) in the import buffers of all transport groups in the transport domain for change requests for the target system, and transfers the data files and cofiles for all the requests.
n Before a data file is transferred, the change request is marked in the import queue with a spark icon, which disappears after the target system import queue is adjusted.
n The SAP System you are using displays only the transports (in the change and transport organizers) and the transport logs for its own transport group.

© SAP AG TABC10 305
SAP AG 2000
System Landscape
WPS
PRD
QAS
DEV
BWP
BWQ
BWD
APP
APQ
APD
ITS
ITS
ITS
ITS
ITS
ITS
ITS
ITS
ITS
ITS
Development
Quality Assurance
Production
R/3 Core BusinessWarehouse
Advanced Planningand Optimization
Example
n The graphic shows a sample system landscape.
n The Internet Transaction Server (ITS) can be several ITS installations, either on the same server or on different servers. An ITS installation includes both an AGate and a WGate.
n One virtual ITS Instance is recommended for each logical system of a component system.

© SAP AG TABC10 306
SAP AG 2000
System Landscape: RFC Destinations
WPS
PRD BWP APP
ITS
ITS
ITS
ITS
Naming convention: Name of RFC destination = Name of target logical system
RFC Destinations inboundto WPS used for CUA
RFC destinations outbound from WPS usedfor Workplace communication and for CUA
n For mySAP.com Workplace, there are RFC destinations:
� Outbound from the WPS to the component systems
� Inbound to the WPS from the component systems
n When creating the RFC destinations, check that:
� The name of the RFC destination is the same as the name of the target logical system (required for the installation). The destination name is case sensitive.
� The user entered in the RFC destination has the correct type (CPIC, Dialog) and the correct authorizations in the component system.
n Only system administrators are authorized to maintain and display RFC destinations.
n SAP recommends creating a second set of RFC destinations for the use of the centralized CCMS monitor. The names of these RFC destinations do not have to be the same as the names of the logical systems.

© SAP AG TABC10 307
SAP AG 2000
Upgrade: System Landscape
WPS
PRD
QAS
DEV
BWP
BWQ
BWD
APP
APQ
APD
ITS
ITS
ITS
ITS
ITS
ITS
ITS
ITS
ITS
ITS
Development
Quality Assurance
Production
R/3 Core BusinessWarehouse
Advanced Planningand Optimization
ITS
WPS You can upgrade these components separately
n When you upgrade a mySAP.com Workplace environment, you can upgrade the following components separately:
� ITS
� Workplace Server
� Component systems and PlugIns

© SAP AG TABC10 308
SAP AG 1999
Upgrade: Workplace Server
Workplace 2.00
R/3 Basis 4.6B R/3 Basis 4.6D
R3up
Workplace
Workplaceis now part ofSAP Standard
Workplace 2.10
n As of Workplace 2.10, the Workplace is part of the SAP standard installation, thus a separate AddOn installation is not needed. For details, see the upgrade guide.

© SAP AG TABC10 309
SAP AG 1999
Component Systems and PlugIns (1)
WP-PI 2.00
R/3 4.0B R/3 4.6B
SAP_WPTCD 40B
WP-PI 2.00
SAP_WPTCD 46B
R3up
WP-PI
Password
Keep existingAddOn
Reinstall
n The mySAP.com component system must be prepared for the use with the Workplace. For this purpose, the following components must be installed:
� WP-PI: the Workplace PlugIn that allows communication between the mySAP.com component system and the WPS. For details, search in SAPNet for SAP Notes with keyword WP-PI.
� SAP_WPTCD: the GUI classification list. Install this software component in the component system only after you have installed the WP-PI. For details, see SAP Note 203781 and search in SAPNet for SAP Notes with keyword TSTCCLASS (the table filled by SAP_WPTCD).
n To check which of the above components are installed on your system, choose System → Status → Component Information or run transaction SAINT.
n When upgrading an SAP System that contains an AddOn, you can:
� Keep the present version of the AddOn (an R3up password is required)
� Upgrade the AddOn along with your SAP System (a separate upgrade CD is required)
� Delete the AddOn (not recommended)
n The WP-PI is checked in upgrade phase IS_READ and KEY_CHK. For details, see SAP Notes 199229 and 201044. With WP 2.00, keep the existing version of the WP-PI during the upgrade and reinstall it after the upgrade. Also, reinstall the software component SAP_WPTCD. Before the upgrade, back up customer changes (Z* entries) to table TSTCCLASS.

© SAP AG TABC10 310
SAP AG 1999
Component Systems and PlugIns (2)
R/3 4.0B R/3 4.0B
SAINT
WP-PI
WP-PI 2.00
SAP_WPTCD 40B
WP-PI 2.10
SAP_WPTCD 40B
n If you upgrade only the version of the Workplace Server, the following software components are affected in the mySAP.com component systems:
� WP-PI: There is a special delta PlugIn installation version on your Workplace Installation CD. For details, search in SAPNet for SAP Notes with keyword WP-PI.
� SAP_WPTC: This software component always corresponds to the release of the SAP component system. Thus no changes are necessary when you upgrade the WPS.

© SAP AG TABC10 311
SAP AG 2000
Upgrade: ITS
ITS Executables ITS Packages (IACs)
Rule:
Release of ITS ≥ highest releaseof any component systems
Can be upgraded at any time whennew release is available
Upgrade of ITS = Deinstall and reinstall + Publish customer Internet development
Rule:
Release of ITS Package correspondsrelease of component system
46b_all
Workplace
webgui
Bw20a_complete
n To upgrade the ITS, delete the old ITS installation and reinstall the new version.
n Upgrading the ITS requires looking at the following components:
� ITS Executables: These behave like a frontend component. The release of the ITS executables must be at least as high as the highest release of any component system. The ITS executables can be reinstalled at any time whenever a new version is available.
� ITS Packages: Depending on the type of the component system (R/3, BW, …), you may have different ITS packages containing different IACs or IACs. Since IACs include templates for program screens, the IAC release must always match the release of the component system. If the component system is not yet on the latest release, you can install a new version of the ITS software together with an older package.
� Customer Internet developments: Since the whole ITS installation is deleted and reinstalled for the upgrade, you must publish your whole Internet development from the SAP database to the ITS servers. You should have a backup available to restore service files.

© SAP AG TABC10 312
SAP AG 2000
l Standard terminology for developingcustomer-specific Internet applications
l How developers use SAP Internetdevelopment tools
l Using SAP Internet development tools foradministrative purposes
l Setting up the system environment for acustomer development organization
Customer Development
n If you want to bring customer-specific ABAP programs or transactions to the Internet, you can either choose the SAP GUI for HTML or create an Internet Application Component.
n To create an IAC for your existing programs, the administrator typically prepares the environment (ITS, PCs for developer, connections, ...). The administrator should know about:
� Terminology used
� Main features of development tools
� Use of development tools for publishing
� Organizing SAP Internet development

© SAP AG TABC10 313
SAP AG 2000
Development Terminology
l Internet development and mySAP.com
n Internet Application Component (IAC)
n MiniApp
l Implementation models for Internet transactions
n SAP GUI for HTML
n Web transactions
n WebRFC
n Web reporting
n Internet Application Components (IACs) are easy-to-use applications for mySAP.com Workplace.
n MiniApps are self-contained Web documents that you can access using a Uniform Resource Locator (URL) managed by the WPS. The resource itself can be anywhere on the Web.
n Implementation models for Internet transactions:
� The SAP GUI for HTML dynamically emulates the screens of SAP dialog transactions in a Web browser by automatically mapping screen elements on the SAP System side to HTML. This mapping is implemented by HTML Business functions (one for each screen element), which either reside in the ITS kernel or are called from those functions.
� Web transactions are Internet-enabled SAP dialog transactions that can be called from a Web browser. To support Web transactions, the ITS communicates with the SAP System through the SAP GUI interface using protocol DIAG. At runtime, the ITS merges the data on each SAP transaction screen into an HTML template, and passes the result to the user’s browser for display.
� WebRFC-based IACs are SAP function modules that can be called from a Web browser. At runtime, the called function module evaluates the parameters, retrieves and processes the data, and returns the result as an HTML page (or binary data) to the user’s Web browser.
� Web Reporting enables standard SAP reports to be called directly from a Web browser. Web Reporting is based on WebRFC technology.

© SAP AG TABC10 314
SAP AG 2000
Development
QualityAssurance
Production
System Environment for Customer Development
PRD
QAS
DEVAGate
SAP@WebStudio
AGate
Publish
Publish
Check in/out
WGate
WGate
PC of Developer
SAP@WebStudio
PC of ITS Admin
AGate
PublishWGateSAP@Web
Studio
PC of ITS Admin
Sourcecontrol
Sourcecontrol
Add tosourcecontrol
R
R
11
22
3344
55
6677
88
99 1010
n Customers can use the SAP PC-based tool SAP@Web Studio to develop objects for the Internet.
n Developers can use SAP@Web Studio not only to develop Internet objects such as HTML templates but also to connects their PC with the SAP database and with the ITS AGate and WGate Web site.
n The steps involved in the development process are:
(1) Create an object in the SAP System and request a change authorization (done by developer)
(2) Publish the object to the development ITS for testing (done by developer)
(3) Check in object after development is complete (done by developer)
(4) Assign object to change request (done by developer)
(5) Transport change request to quality assurance system QAS (done by project administrator)
(6) Copy transported objects to SAP@Web Studio (done by project administrator)
(7) Publish object to QAS ITS (done by project administrator)
(8) Transport change request to production system PRD (done by project administrator)
(9) Copy transported objects to SAP@Web Studio (done by project administrator)
(10) Publish object to PRD ITS (done by project administrator)
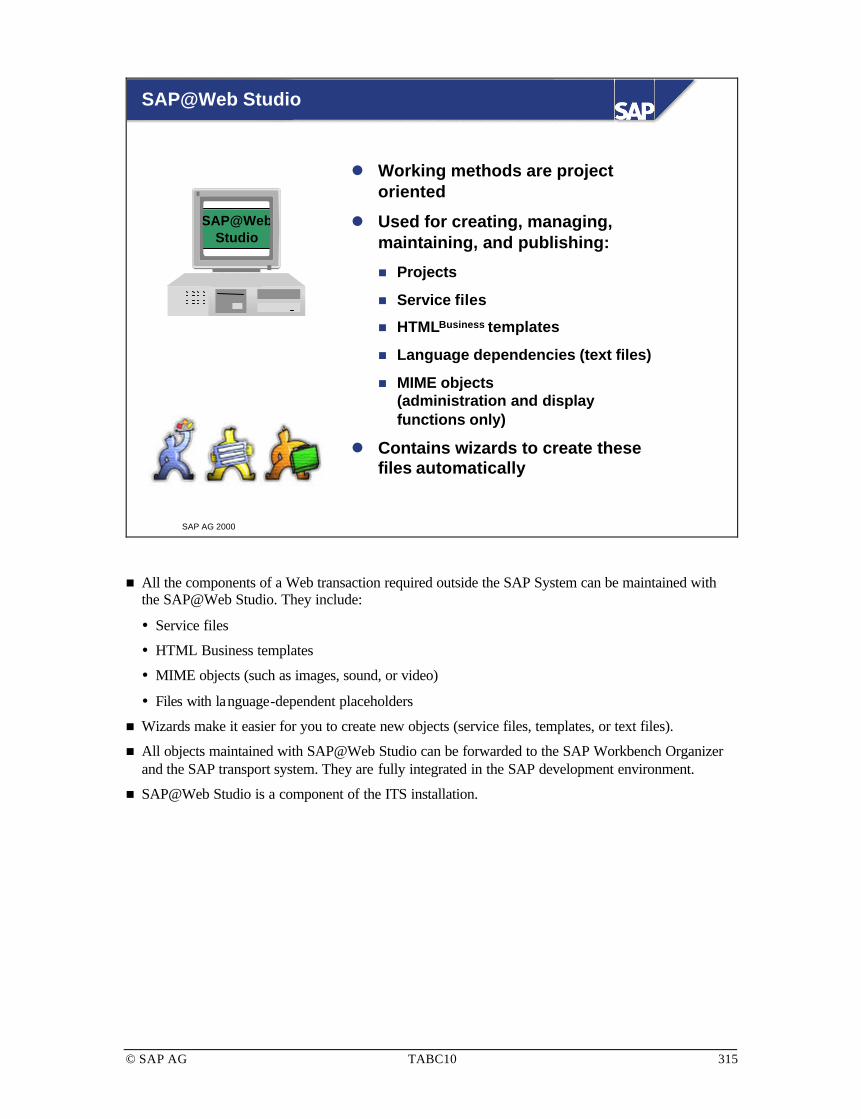
© SAP AG TABC10 315
SAP AG 2000
SAP@WebStudio
SAP@Web Studio
l Working methods are projectoriented
l Used for creating, managing,maintaining, and publishing:
n Projects
n Service files
n HTMLBusiness templates
n Language dependencies (text files)
n MIME objects(administration and displayfunctions only)
l Contains wizards to create thesefiles automatically
n All the components of a Web transaction required outside the SAP System can be maintained with the SAP@Web Studio. They include:
� Service files
� HTML Business templates
� MIME objects (such as images, sound, or video)
� Files with language-dependent placeholders
n Wizards make it easier for you to create new objects (service files, templates, or text files).
n All objects maintained with SAP@Web Studio can be forwarded to the SAP Workbench Organizer and the SAP transport system. They are fully integrated in the SAP development environment.
n SAP@Web Studio is a component of the ITS installation.

© SAP AG TABC10 316
SAP AG 2000
MIME
Project BC350_Demo
Services Templates Texts
Projects
<b>`i`</b>`itab[i]`
abcd.srvctest.srvc
seatsseats
SAP@WebStudio
SAPHTTP
WG
ate
ITS
AG
ate
Webbrowser
Publish / import from site
n In SAP@Web Studio, a project is created by the developer keeping a PC local copy of his or her development work. This local copy must be synchronized with the contents of the connected SAP System database and with the current contents of the ITS files.

© SAP AG TABC10 317
SAP AG 2000
Source Control
SAP@WebStudio
Check out
Get
Add to source control
Check in
l Backup of customer Internet development
l Locking development objects
SAP
11
33
66
99
n Source control is the interface between an SAP System and SAP@Web Studio.
n Internet applications are developed for an SAP System that has a Web repository. All objects developed for IACs must be imported into the SAP System. Thus:
� They are automatically included in the SAP System backup.
� The SAP System takes care of locking development objects.
n Operations possible with source control:
� Add to source control (if objects have not yet been imported into the SAP System)
� Get files in order to display files in SAP@Web Studio (no change authorization)
� Check out files in order to modify them using SAP@Web Studio (requests change authorization)
� Check in files in order to import them to SAP database (returns the change authorization)

© SAP AG TABC10 318
SAP AG 1999
HTTP
WG
ate
ITS
AG
ate
SAP
MIME
Project BC350_Demo
Services Templates Texts
Add to sourcecontrol
Add to sourcecontrol
Transport Connection Using SAP@Web Studio
R
<b>`i`</b>`itab[i]`
abcd.srvctest.srvc
seatsseats
SAP@WebStudio
Webbrowser
Publish
11
22
n SAP@Web Studio enables all the objects from a project to be transferred to the Workbench Organizer or to the SAP transport system. These are transported together with the relevant ABAP programs.
n Following the transport into the consolidation or production system, the objects can be loaded from the SAP System into a project and copied to WGate and AGate using Publish.

© SAP AG TABC10 319
SAP AG 2000
Project – file viewProject – file view
2 GLOBAL (srvc)2 BC350demo (srvc)050
2 SAPBC350_100.html
2 SAPBC350_200.html
2 BC350demo_DE.htrc
SAP LogonSAP Logon
for RFC fromSAP@Web Studiointo SAP
Add to Source Control of the Development System
SAP@WebStudio
11
n In SAP@Web Studio, select the required objects in Project - File View. The objects must be assigned to a development class and to a development request in the SAP System.
n Use Add to write these objects by RFC to the SAP database. Language-dependent objects are transferred only in the language used to sign on to the SAP System.
� With the SAP translation tools, text files for a service can be translated in R/3. Use the translation tools for logical objects. Choose the logical object IARC. To select the text name, use F4 input help.
� Alternatively, you can select the R/3 attribute Multi-language. In this case, you can also use Add to transfer objects into R/3 in other languages. However, you must use language-dependent MIME objects, which cannot be translated in R/3.
n The tables containing the objects belong to development class SBF_WEB.
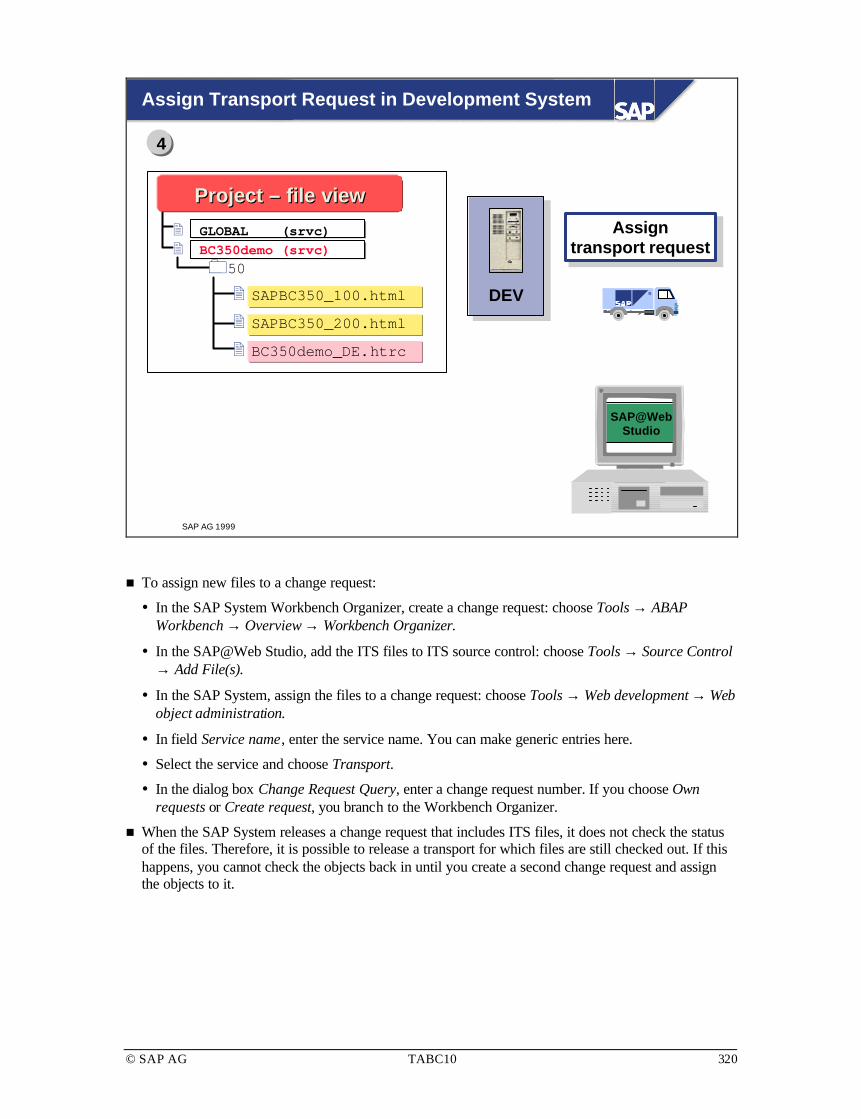
© SAP AG TABC10 320
SAP AG 1999
44
R
Project – file viewProject – file view
2 GLOBAL (srvc)2 BC350demo (srvc)050
2 SAPBC350_100.html
2 SAPBC350_200.html
2 BC350demo_DE.htrc
Assigntransport request
Assigntransport request
Assign Transport Request in Development System
SAP@WebStudio
DEV
n To assign new files to a change request:
� In the SAP System Workbench Organizer, create a change request: choose Tools → ABAP Workbench → Overview → Workbench Organizer.
� In the SAP@Web Studio, add the ITS files to ITS source control: choose Tools → Source Control → Add File(s).
� In the SAP System, assign the files to a change request: choose Tools → Web development → Web object administration.
� In field Service name, enter the service name. You can make generic entries here.
� Select the service and choose Transport.
� In the dialog box Change Request Query, enter a change request number. If you choose Own requests or Create request, you branch to the Workbench Organizer.
n When the SAP System releases a change request that includes ITS files, it does not check the status of the files. Therefore, it is possible to release a transport for which files are still checked out. If this happens, you cannot check the objects back in until you create a second change request and assign the objects to it.

© SAP AG TABC10 321
SAP AG 2000
Site definition wizard
Symbolic name for the site
Name of server on which WGate is running
Name of server on which AGate is running
Name of virtual ITS
URL for HTTP server with port (to start service)
A
Site Definition Wizard
SAP@WebStudio
ABCDE
HTTP
WG
ate
ITS
AG
ate
B C
E D
n To define an Internet Transaction Server (ITS) site, you need to specify the ITS server and Web server locations of all ITS files belonging to a particular service as follows:
� In the SAP@Web Studio site wizard, choose Project → Site Definition. Dialog box Site Definition appears.
� Choose New. The Site Wizard appears.
� Enter a site name (A) and choose Next.
� Enter the Web server host name (B) and choose Next.
� Enter the ITS server host name (C) and choose Next.
� Define the shared directories on the Web server and the virtual ITS server (D).

© SAP AG TABC10 322
SAP AG 2000
2 GLOBAL (srvc)2 BC350demo (srvc)099
2 SAPBC350_100.html
2 SAPBC350_200.html
2 BC350demo_DE.htrc
SAP LogonSAP Logonfor RFC fromSAP@Web Studiointo SAP
PublishPublish
Publish Internet Objects
SAP@WebStudio
HTTP
WG
ate
ITS
AG
ate
PRD
Project – file viewProject – file view
22 77 1010
n To read objects by RFC from the SAP database into a project, use Get.
n To copy these objects from the project to the AGate and the HTTP server, use Publish.
n Objects cannot be changed in SAP@Web Studio. The recommended procedure is to always change the originals in the development system and transport the changes. If you urgently need to unlock objects for correction or repair in SAP@Web Studio, use function Check out. To lock them again, use function Check in.

© SAP AG TABC10 323
SAP AG 2000
Development Organization
User groups
ITS Users = Developers
ITS Admin = Administrators
ITS Admin
ITS Admin
AGateSAP@Web
Studio
AGate
Publish
Publish
WGate
WGate
Developer PC
SAP@WebStudio
ITS Admin PC
AGate
PublishWGateSAP@Web
Studio
ITS Admin PC
Development
QualityAssurance
Production
n Development of Internet applications follows the same software logistics rules as for ABAP development: developers have authorization to change their development objects only in the development environment.
n You should group the NT Users of Internet developers in the NT User Group ITS Users and the NT Users of ITS administrators in the NT User Group ITS Admin. If developers need access to more than one ITS instance, you should create several NT Groups of ITS Users and grant access selectively to ITS development instances.
n Developers create new development objects on the development system and can check their work by publishing their new Internet services directly on the ITS assigned to the development system.
n You should ensure that only development project leaders and ITS administrators can publish Internet services to quality assurance or production ITS instances.

© SAP AG TABC10 324
SAP AG 2000
Access Rights to ITS Files (NT Security)
NT user groups ITS setting
Admin Only
Admin + User
No security
A
A U
Security
Recommended for ITS assigned to Development Systems
Recommended for ITS assigned to Quality Assurance and Production Systems
n Configure the development ITS for ITS Admin and for ITS Users but configure the quality assurance and production ITS for ITS Admin only. This ensures that ITS administrators can publish to all ITS servers whereas developers can publish their Internet services only to the development ITS.
n The NT file authorizations can be configured as follows:
� During initial ITS installation in the installation routine
� After initial installation using the ITS Administration instance
� After initial installation using the executable itsvprotect that can be found under <drive>:\Program Files\SAP\its\2.0\admin
n For details on how to use the tool itsvprotect and on how the different ITS subdirectories are affected by changing the above NT Group settings, see the SAP@Web Installation Guide.

© SAP AG TABC10 325
SAP AG 2000
Making ITS Files Available
AG
ate
<virtual ITS>_WWW
WG
ate Root Directory for virtual ITS>
SAP
ITSmimes
<WWW
HTTP
Share for MIME objectsor FTP access
ITS
<virtual ITS>
Installation Directory><ITS
<virtual ITS>_ITS
Installation Directory><ITS
Share for ITS services andtemplates or FTP access
Root Directory for virtual ITS><WWW
Example: c:\Program Files\SAP\ITS\2.0
Example: f:\InetPub\wwwroot
n When ITS is installed, the NT shares shown in the graphic are created automatically.
n The two following shares allow access to the files used when developing an Internet service:
� <virtual ITS>_ITS. This file stores objects used by the AGate (HTML templates, services files, language files, ...).
� <virtual ITS>_WWW. This file stores all MIME objects (graphics, embedded sounds, …).
n To allow Web development, these shares on a development ITS should be made accessible for Internet developers.
n If you either cannot or prefer not to use NT shares to exchange data with these directories, you can also use ftp.

© SAP AG TABC10 326
SAP AG 2000
ITS Backup Strategy
l For fast recovery, a backup of the Middleware server contains aversion of your objects
l Objects are included in the database of the assigned SAP Systemand can be published to the ITS during any scheduled ITS downtime
time
Completebackup
1 week 1 week
Up-to-datebackup
Publishnew
objects
n If you have a large number of new Internet objects, create an NT backup directly after publishing the new objects. This backup makes recovery much easier, since it already includes all Internet objects.
n If you have your own Internet development, it may not be sufficient to restore a full NT backup and an up-to-date NT backup:
� If objects were published to ITS since the last up-to-date NT backup, repeat the publishing.
� Make sure that your own Internet objects on the ITS server are always up-to-date relative to the objects stored in the database of the production system.
� Publish directly after every successful import of new Internet objects.
© SAP AG TABC10 327
SAP AG 2000
You are now able to:
Unit Summary
l Set up a production system landscape formySAP.com Workplace
l Realize a given development strategy
l Set up an ITS development organization
l Ensure system landscape consistency

© SAP AG TABC10 328
SAP AG 2000
Unit Actions
l Exercises?
l Solutions

© SAP AG TABC10 329
Software Logistics: Exercises
The purpose of these exercises is to give a Workplace Administrator an understanding how to support own Internet development projects. The purpose is not to enable the administrator to develop own applications.
No. Exercise
1 Configure SAP@Web Studio
1.0 Preparation: Map a network drive from your frontend PC to the share >\<your group ID>_ITS of your webserver. Use the NT User as specified in your reference sheet and the password as provided by your instructor.
1.1 Start the SAP@Web Studio on your frontend computer and create the project ZBC350_<your group ID>
1.2 In SAP@Web Studio
Define a site definition for your ITS Server <your group ID> for your project.
Name the site <your group ID>
1.3 In SAP@Web Studio
Add the existing ITS service it00 to your project using the import from site method and rename the ITS service to zit00_<your group ID>.
1.4 In SAP@Web Studio
Publish your new ITS service zit00_<your group ID> to your ITS.
1.5 In Internet Browser
Log on to your component system using the new ITS service zit00_<your group ID>. Use user BC350.
1.6 In SAP@Web Studio
Configure Source Control for your component system.
1.7 In SAP@Web Studio
Add your newly created ITS service to the source control.
1.8 On the component system using SAPGUI for Windows
Include your ITS Service in a Change Request on your component system
Logon with user BC350. Use development class ZBC305
1.9 On the component system using SAPGUI for Windows
Release the Change Request
1.10 Only groups QAS*
On the component system using SAPGUI for Windows
Import the Change Request from your neighbor group to your component system QAS.
1.11 Only groups QAS*
In SAP@Web Studio
Publish the newly imported service from your neighbor group to your ITS.

© SAP AG TABC10 330
1.12 In Internet Browser
Log on to your component system using the ITS service zit00_<your neighbor’s group ID>. Use user BC350.
Who is able to log on?
Why can the QAS group log on whilst the DEV group can’t?
2 Customize System Templates using SAP@Web Studio to display customized ITS error messages
2.1 On the ITS Administration Instance
Change the parameter value of the services parameter ~appserver in the services file of your ITS Service zit00_<your group ID> to a dummy system.
2.2 In Internet Browser
Log on to your component system using the ITS service webgui. Use user BC350. Verify that an ITS error message (cantlogon.html) is displayed when logging on to your ITS service zit00_<your group ID>.
2.3 In SAP@Web Studio
Include the system template cantconnect.html into your ITS service zit00_<your group ID>. Add the template to the source control and check it out for modification.
2.4 In SAP@Web Studio
Insert a new paragraph into the template. Check in the template.
2.5 In SAP@Web Studio
Publish the template.
2.6 In Internet Browser
Verify that your customized error message is displayed when logging on to your component system using ITS service zit00_<your group ID>.
2.7 In SAP@Web Studio
Check in the system template.

© SAP AG TABC10 331
Software Logistics: Solutions
The purpose of these exercises is to give a Workplace Administrator an understanding how to support own Internet development projects. The purpose is not to enable the administrator to develop own applications.
No. Solution
1 Configure SAP@Web Studio
1.0 To map a network drive from your frontend PC to the webserver start the windows explorer and select Tools → Map Network Drive
In the field Path enter \\<name of web server>\<your group ID>_ITS
In the field Connect as enter your NT User developer.
Choose OK
Enter the password as provided by your instructor and choose OK .
1.1 To start SAP@Web Studio on your frontend computer Click the Windows Start button → Programs → SAP@Web Studio → Studio 46B.
In SAP@Web Studio select File → New and enter the project name ZBC350_<your group ID>
Choose OK.
1.2 In SAP@Web Studio
To create a site definition mark your project then select Project → Site definition → New.
Enter the site name <your group ID> and choose Next.
Enter your Web Server and choose Next.
Enter your ITS Server and choose Next.
In the field Define Connection select ITS Virtual Shares
Mark ITS 2.0 and higher, in the field ITS Instance enter <your group ID> and choose Next.
Enter the web server name including domain and port number and choose Next.
Choose Finish.
Now mark the newly created site definition and choose OK.
1.3 In SAP@Web Studio
To add the existing ITS service it00 to your project using the import from site method select Project → Add to Project → Import and choose Next.
Mark Import Service from Site and choose Next.
Mark your Site Definition <your group ID> and choose Next.
In the input field type in the service name it00 and choose Next.
Choose Next.
Choose Finish.

© SAP AG TABC10 332
To rename the service it00 to zit00_<your group ID> in the Project Workspace mark the service it00 then right-click and select Rename
Enter the new name zit00_<your group ID>.
1.4 In SAP@Web Studio
To publish your new service zit00_<your group ID> to your ITS, in the Project Workspace mark the service name then right-click and select Publish.
Select your Site definition and choose OK.
1.5 In Internet Browser
To log on to your component system using the newly created ITS service zit00_<your group ID> choose the following URL:
http://<your web server>:<web server port for <your group ID→ /scripts/wgate/ zit00_<your group ID> /!
Use user BC350.
1.6 In SAP@Web Studio
To configure Source Control for your component system select Tools → Source Control → Connect to R/3 .
Select the Dialog Instance of your component system.
Choose OK.
In the field Client enter 200
In the field User enter BC350
In the field Password enter your password
In the field Language enter EN
Choose OK.
1.7 In SAP@Web Studio
To add your newly created ITS service to the source control select tab File View of the Project Workspace, right click on your service zit00_<your group ID> and choose Add to Source Control.
Choose OK.
Select you’re the Dialog Instance of your component system and choose OK.
1.8 On the component system using SAPGUI for Windows
To include your ITS Service in a Change Request log on to your component system.
Note: In the logon pop-up choose Continue with this logon without ending any other logon. The other user is logged on through ITS.
Start Transaction SIAC1 on your component system.
In the field Service Selection enter your service zit00_<your group ID>.
Choose Execute.
Mark the service and select Transport (Not Transfer!)
Enter the development class ZBC305.
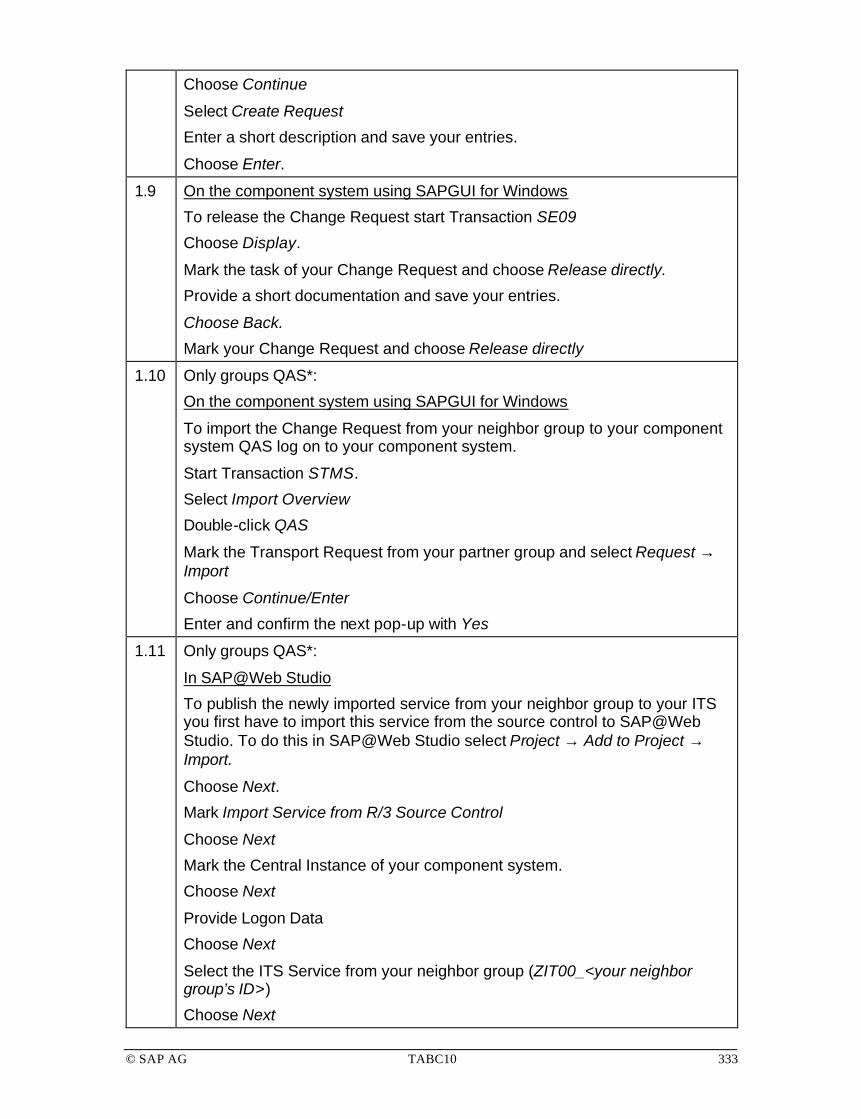
© SAP AG TABC10 333
Choose Continue
Select Create Request
Enter a short description and save your entries.
Choose Enter.
1.9 On the component system using SAPGUI for Windows
To release the Change Request start Transaction SE09
Choose Display.
Mark the task of your Change Request and choose Release directly.
Provide a short documentation and save your entries.
Choose Back.
Mark your Change Request and choose Release directly
1.10 Only groups QAS*:
On the component system using SAPGUI for Windows
To import the Change Request from your neighbor group to your component system QAS log on to your component system.
Start Transaction STMS.
Select Import Overview
Double-click QAS
Mark the Transport Request from your partner group and select Request → Import
Choose Continue/Enter
Enter and confirm the next pop-up with Yes
1.11 Only groups QAS*:
In SAP@Web Studio
To publish the newly imported service from your neighbor group to your ITS you first have to import this service from the source control to SAP@Web Studio. To do this in SAP@Web Studio select Project → Add to Project → Import.
Choose Next.
Mark Import Service from R/3 Source Control
Choose Next
Mark the Central Instance of your component system.
Choose Next
Provide Logon Data
Choose Next
Select the ITS Service from your neighbor group (ZIT00_<your neighbor group’s ID>)
Choose Next

© SAP AG TABC10 334
Choose Next
Choose Finish
To publish your new service zit00_<your neighbor group’s ID> to your ITS in the Project Workspace select tab File view and mark the service name then right-click and select Publish.
In the field Publish to Site select <your group ID>
Choose OK.
1.12 In Internet Browser
To log on to the component system using the ITS service zit00_< group ID DEV*> choose the following URL: http://<your web server>:<web server port for <group ID DEV*→ /scripts/wgate/ zit00_< group ID DEV*> /!
Use user BC350.
Whether you can log on or not depends on the question if the services file for the service has been maintained in the development system and if it has been transported.
If you transport services files remember to maintain the correct server names afterwards.
2 Customize System Templates using SAP@Web Studio to display customized ITS error messages
2.1 On the ITS Administration Instance
Change the parameter value of the services parameter ~appserver in the services file of your ITS Service zit00_<your group ID> to a dummy system. logon to the ITS administration instance.
Select your ITS Instance <your group ID> → Configuration → Services → zit00_<your group ID>.
To insert the parameter ~appserver into your file zit00_<your group ID> .srvc file on to the ITS Administration Instance select your Instance → Configuration → Services → zit00_<your group ID>.srvc
In the last empty line in the Parameter field enter ~appserver and save your settings.
In the list of parameters ~appserver should appear.
In the field for the parameter value enter DUMMY.
Save your settings.
2.2 In Internet Browser
To log on to your component system using the ITS service zit00_<your group ID> choose the following URL: http://<your web server>:<web server port for <your group ID→ /scripts/wgate/zit00_<your group ID>/!
Use user BC350.
The ITS error message Cannot Connect to R/3 System will be displayed.
2.3 In SAP@Web Studio

© SAP AG TABC10 335
To include the system template cannotlogon.html into your ITS service zit00_<your group ID> in SAP@Web Studio select tab File view of your Project workspace and mark the folder 99 of your ITS Service ZIT00_<your group ID>.
Select Project → Add to project → Files.
Now choose the drive you mapped in exercise 1.0 and select the file templates\system\dm\cantconnect.html
Choose Open.
To add the file to the source control mark the file in your the file view of your Project workspace and right-click → Add to Source control
Choose OK
Select your component system
Choose OK.
To check out the template for modification you first need to include it in a change request:
To do this log on to your component system and start transaction SIAC1.
In the field Service Selection enter the name of your ITS Service ZIT00_<your group ID>.
Execute
Open the tree and mark the file CANTCONNECT under ZIT00_<your group ID> → 99 → Templates → Language-ind.
Select Transport (not Transfer!)
Enter the development class ZBC305
Choose Continue/Enter
Choose Create Request
Enter a short description and save your entries.
Choose Continue/Enter
To check out the template for modification in SAP@Web Studio go to the file view of your Project workspace and right-click the file cantconnect.html.
Select Check Out.
Choose OK.
2.4 In SAP@Web Studio
To insert a new paragraph into the template double -click the file cantconnect.html.
In the right side of your SAP@Web Window simply copy the lines
<P> The Internet Transaction Server could not connect to `ConnectString` </P>
and append it after the last line. You can change the text inside the <P> (Paragraph) </P> tags.

© SAP AG TABC10 336
Example:
<h3>Cannot Connect to R/3 System </h3> <P> The Internet Transaction Server could not connect to `ConnectString` </P> <P> Call Helpdesk under 5555.
</P>
Save your changes.
2.5 In SAP@Web Studio
To publish the template, in the file view of your project workspace right-click the file cantconnect.html
Select Publish
Select your Site.
Choose OK.
2.6 In Internet Browser
To verify that your customized error message is displayed, log on to your component system using the ITS service ZIT00_<your group ID> and choose the fo llowing URL: http://<your web server>:<web server port for <your group ID→ /scripts/wgate/ ZIT00_<your group ID>/!
Use user BC350.
2.7 In SAP@Web Studio
To check in the system template in the file view of your project workspace right-click the file cantconnect.html
Select Check in
Choose OK.
Now the file cannot be modified without being checked out again.

© SAP AG TABC10 337
SAP AG 1999
Introduction Including MiniApps
Workplace Architecture Software Logistics
Configuration andAdministration
Monitoring andTroubleshooting
InternetTransaction Server Drag&Relate
Users:Single Sign On
Monitoring and Troubleshooting

© SAP AG TABC10 338
SAP AG 2000
Monitoring and Troubleshooting
Contentsl Frontend and network
l Web server
l Internet Transaction Server
l Workplace Server
ObjectivesAt the end of this unit, you will be able to:
l Monitor and troubleshooting the:
n Network between frontend and SAP System
n Web server
n Internet Transaction Server
n Workplace Server

© SAP AG TABC10 339
SAP AG 2000
Web server of theSAP System
ITS of the SAPSystem
SAP ComponentSystem
Workplace ServerITS of theWorkplace Server
Generate HTML page(frame, LaunchPad)
Generate HTML page(frame, LaunchPad)
Building up the mySAP.com Workplace Portal
Desktop Webserver
AGate SAPSystem
Net
wor
kN
etw
ork
Net
wor
kN
etw
ork
Net
wor
kN
etw
ork
DBDB
Example: http://server.com/scripts/wgate/sapwp/!
User request(portal page)
User request(portal page)
CallWGate
CallWGate
Send prepared request
Send prepared request
Display HTMLpage (Frame,Launchpad)
Display HTMLpage (Frame,Launchpad)
User authorization, LaunchPad, URLs
for MiniApps
User authorization, LaunchPad, URLs
for MiniApps
Request forMiniApp
Request forMiniApp
Example: Building the portalpage of a SAP Workplace
CallWGate
CallWGate Send prepared
request
Send prepared request Select and
calculate Output Data for MiniApp
Select and calculate
Output Data for MiniAppGenerate HTML Page (MiniApp)Generate HTML Page (MiniApp)Display HTML
page (includingMiniApps)
Display HTMLpage (including
MiniApps)
RFC
RFC

© SAP AG TABC10 340
SAP AG 2000
Generate HTML pageGenerate HTML page
Accessing an SAP System from the LaunchPad
Desktop Webserver
AGate SAPSystem
Net
wor
kN
etw
ork
Net
wor
kN
etw
ork
Net
wor
kN
etw
ork
DBDB
Example:http://pgwshop.sap.com/scripts/wgate/WW20/!?~client=…
User requestUser requestCall WGateCall WGate
Send prepared request
Send prepared request Load service
file for WW20
Load servicefile for WW20 Call SAP
transaction WW20
Call SAP transaction WW20
SAP outputSAP outputLoad HTMLtemplate or
style
Load HTMLtemplate or
style
Send HTML pageSend HTML page
Example: Accessing theInternet ApplicationComponent WW20
DIAG
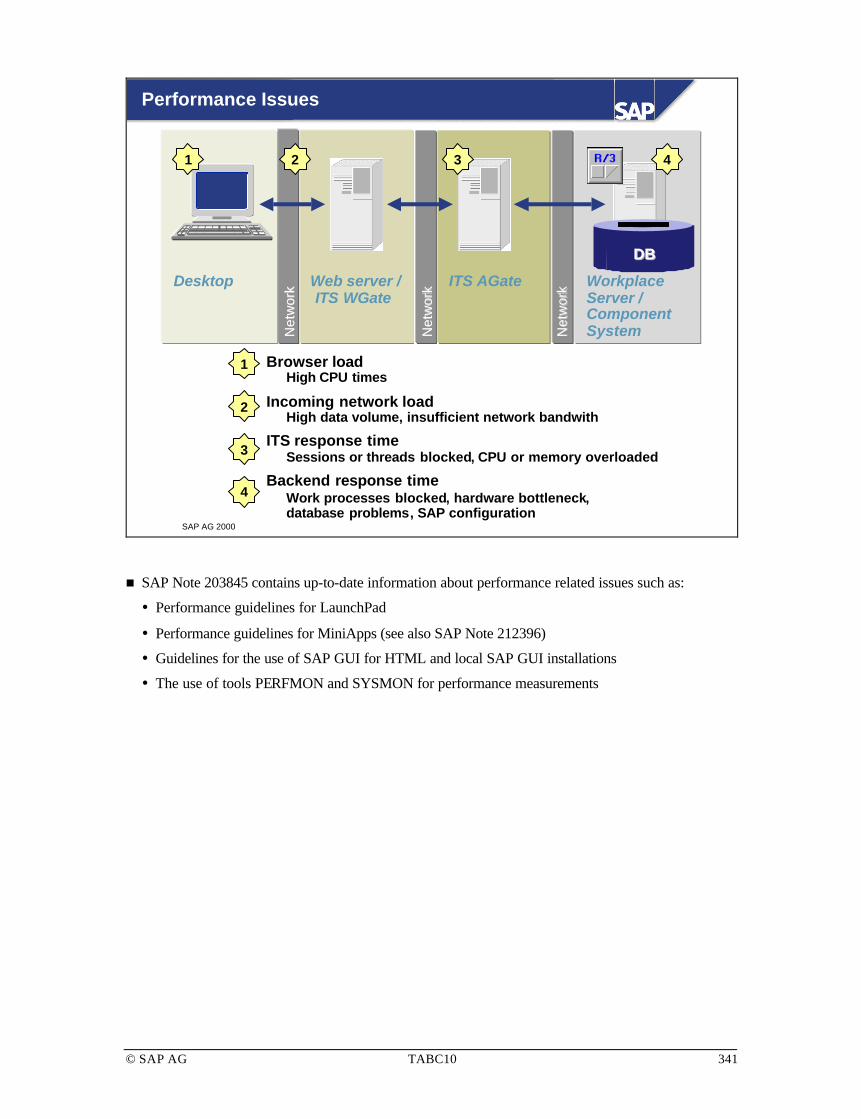
© SAP AG TABC10 341
SAP AG 2000
Performance Issues
Desktop Web server / ITS WGate
ITS AGate WorkplaceServer / ComponentSystemN
etw
ork
Net
wor
k
Net
wor
kN
etw
ork
Net
wor
kN
etw
ork
DBDB
Browser loadHigh CPU times
Incoming network loadHigh data volume, insufficient network bandwith
ITS response timeSessions or threads blocked, CPU or memory overloaded
Backend response timeWork processes blocked, hardware bottleneck,database problems, SAP configuration
1 2 3 4
1
2
3
4
n SAP Note 203845 contains up-to-date information about performance related issues such as:
� Performance guidelines for LaunchPad
� Performance guidelines for MiniApps (see also SAP Note 212396)
� Guidelines for the use of SAP GUI for HTML and local SAP GUI installations
� The use of tools PERFMON and SYSMON for performance measurements

© SAP AG TABC10 342
SAP AG 2000
External Web Monitoring Tools
PERFMONtool
Bottleneckanalysis
Browserand networkconfiguration
Erroranalysis
External Webmonitoring
tools
Continuousmonitoring
SAP Systemmonitoring
MiddlewareserverWeb server
Desktop
and
network

© SAP AG TABC10 343
SAP AG 2000
Continuous Monitoring (1)
l External Web monitoring tools:
n Various possible monitors
w Ping to Web server
w HTTP access to various instances (ports)
w Complete transactions (sign-on to the Workplace,follow certain links, ...)
n Alert functions in case of errors or if threshold valuesreached (email, pager, ...)
n Reporting functions (avg., max., min. response timesover different time frames, error summaries, ...)

© SAP AG TABC10 344
SAP AG 1999
Continuous Monitoring (2)
Example: External Web monitoring tool
Desktop
Webserver /WGate
ITS
WorkplaceServer / ComponentSystem
n The location of bottlenecks can be detected from the desktop by setting up various checks:
� Network response time: desktop – Web server
� Web server response time: desktop – Web server
� ITS response time: desktop – ITS
� R/3 response time: desktop – R/3
n Unusual high delta times between the single steps point to possible bottlenecks.
n The best candidate for improving performance can be located.
n Network errors can be detected (data loss during pings, ...).

© SAP AG TABC10 345
SAP AG 2000
Browser and Network Configuration
PERFMONtool
Bottleneckanalysis
Browserand networkconfiguration
Erroranalysis
External Webmonitoring
tools
Continuousmonitoring
SAP Systemmonitoring
MiddlewareserverWeb server
Desktop
and
network

© SAP AG TABC10 346
SAP AG 2000
Troubleshooting: Getting the Right URL
n If a LaunchPad entry does not seem to work, you can get the URL directly from your browser. To do this:
� Select the menu entry and right-click.
� Choose Open in new window. The URL is displayed in a new browser window.

© SAP AG TABC10 347
SAP AG 2000
PERFMON Tool
PERFMONtool
Bottleneckanalysis
Browserand networkconfiguration
Erroranalysis
External Webmonitoring
tools
Continuousmonitoring
SAP Systemmonitoring
MiddlewareserverWeb server
Desktop
and
network

© SAP AG TABC10 348
SAP AG 2000
Desktop: Bottleneck Analysis
DesktopWeb server /
WGate ITS
Workplace / ComponentSystem
Incoming network load
Browser load
Find bottlenecks due to
l High network load
l High browser load
Example
Perfmon(Windows NT)
n There are two approaches to bottleneck analysis:
� For a detailed analysis, use the Windows NT Performance Monitor (Perfmon).
� Alternatively, use an external Web monitoring tool.
n Using the Performance Monitor:
� Verify that the Performance Monitor is installed
� Set up the counters and the log file (adjust the log file and chart settings)
� Ensure that no other services or programs are running that may impact the measurement (such as programs causing network or CPU load).
� Perform the measurement
� Extract the relevant counters (export them to a file)
� Calculate the relevant quantities
� Interpret the results
� The performance monitor can also be used to monitor performance remotely.
n For further details, see the White Paper Measuring performance-relevant data using PERFMON on Windows NT on www.microssoft.com → Support → Knowledgebase .

© SAP AG TABC10 349
SAP AG 2000
Web Server Administration and Monitoring
Tuningparameters
Bottleneckanalysis
Trouble-shooting
Erroranalysis
Web serveradmin andmonitoring
Continuousmonitoring
SAP Systemmonitoring
MiddlewareserverWeb server
Desktop
and
network

© SAP AG TABC10 350
SAP AG 2000
HTML interface forIIS administration
MS Management Console for IIS administration
Local Access to Web Server Administration
http://localhost:1082/iisadmin
n Local access to the Microsoft Internet Information Server (IIS) administration is possible in two ways:
� By default, the HTML interface for IIS administration can be accessed only locally on the Web server. Therefore, the URL points to the localhost using the port number of the administration Web site. You can obtain the port number from the properties of the administration Web site.
� Or you can use the Microsoft Management Console on the Web server.
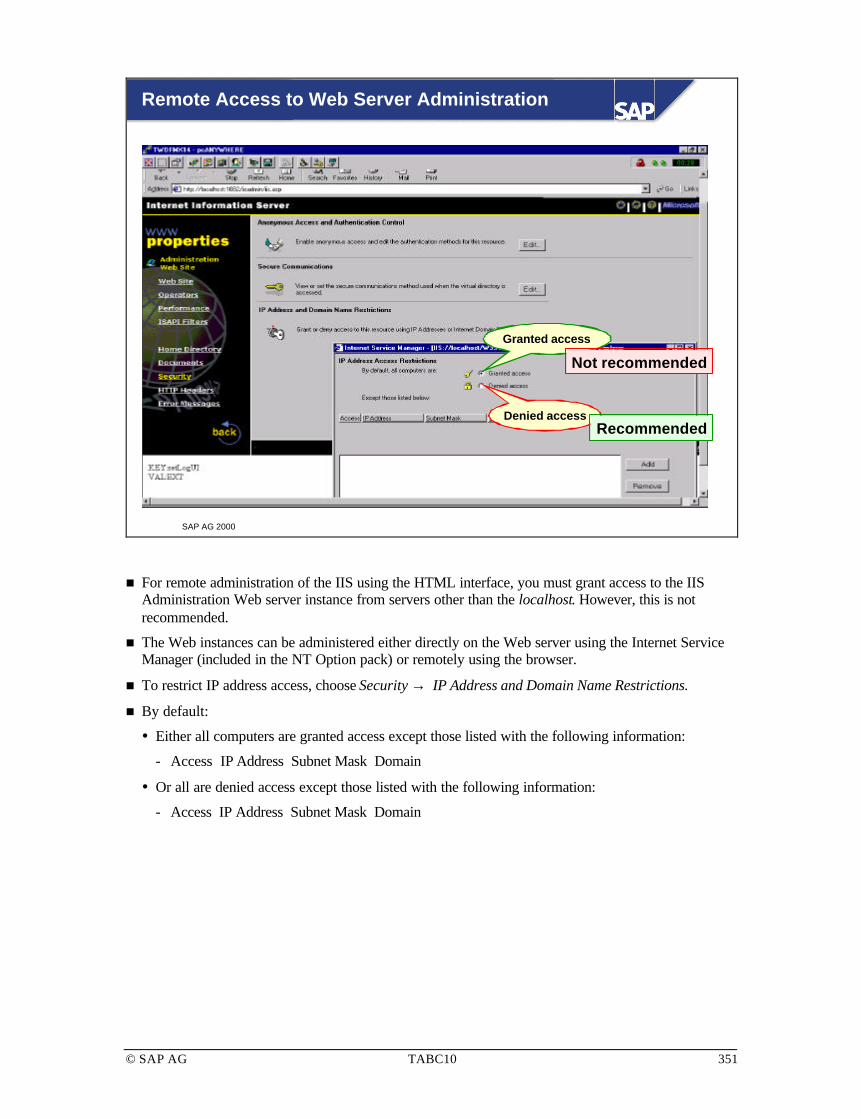
© SAP AG TABC10 351
SAP AG 2000
Remote Access to Web Server Administration
Denied access
Not recommended
Recommended
Granted access
n For remote administration of the IIS using the HTML interface, you must grant access to the IIS Administration Web server instance from servers other than the localhost. However, this is not recommended.
n The Web instances can be administered either directly on the Web server using the Internet Service Manager (included in the NT Option pack) or remotely using the browser.
n To restrict IP address access, choose Security → IP Address and Domain Name Restrictions.
n By default:
� Either all computers are granted access except those listed with the following information:
Access IP Address Subnet Mask Domain
� Or all are denied access except those listed with the following information:
Access IP Address Subnet Mask Domain

© SAP AG TABC10 352
SAP AG 2000
You can monitor Web sites, FTP sites, and ActiveServerPages applications using the NT tools:
l Performance Monitor
helps investigate ongoing Web site problems ordetermine how changes to Web site contents affectload and performance
l Event Viewer
helps view error messages generated from Web orFTP site activity
Monitoring Current Performance
n To display current performance with the Performance Monitor on Windows NT:
1. Choose Start → Programs → Administrator Tools → Performance Monitor.
2. In menu View, make sure Chart is selected.
3. In menu Edit, choose Add to Chart. A dialog box appears.
4. In the object list, select FTP Service, Web Service, Active Server Pages, or IIS Global.
5. In the counter list, select one or more counters. For information about counters, choose Explain .
6. In the instance list, if applicable, select the Web or FTP site for which you want to monitor performance. If you want to monitor all Web sites, select Total. Choose Add.
7. Repeat steps 4-6 until you have selected all the counters you are interested in.
8. Choose Done.
n To view current performance with the Windows NT Event Viewer:
� Choose Start → Programs → Administrator Tools → Performance Monitor.
� In menu Log, select the log you want to view: System, Security, or Application.

© SAP AG TABC10 353
SAP AG 2000
You can use NT Performance Monitor to:
l Record server performance over extendedperiods of time
l Record activity informationto create reports and chartsfor analysis
l Help identify performancebottlenecks and plan serverupgrades
Recording Performance Over Time
n To record performance over time on your NT desktop:
1. Choose Start → Programs → Administrator Tools → Performance Monitor.
2. In menu View, choose Log.
3. In menu Edit, choose Add to Log. A dialog box appears.
4. In the computer list, select your workstation or the server for the computer you want to check.
5. In the object list, select FTP Service, Web Service, Active Server Pages, or IIS Global. Choose Add.
6. Repeat steps 4 and 5 until you have added all objects you are interested in.
7. Choose Done.
8. In menu Options, select Log. A dialog box appears. Enter a name for your log file.
9. Under Update Time, select Periodic Update and select or type a time interval (in seconds). To begin logging, click Start Log.
n To stop the log, in menu Options, choose Log → Stop Log.
n To view the log, in menu Options, choose Data from → Log File. Enter the file name and choose OK. To analyze the data, you can switch to chart view or report view.

© SAP AG TABC10 354
SAP AG 2000
Web Server: Troubleshooting
Tuningparameters
Bottleneckanalysis
Trouble-shooting
Erroranalysis
Web serveradmin andmonitoring
Continuousmonitoring
SAP Systemmonitoring
MiddlewareserverWeb server
Desktop
and
network

© SAP AG TABC10 355
SAP AG 2000
Troubleshooting: Page Not Displayed
Webbrowser
http(s)://server.[domain]:[port]/directory/[document.html]
As specified in DNS server
Standard ports in Web server (80, 443)
Standard documents definablefor Web instance, such as
Index.htmlHome.html
Check Web server configuration:
l Separate memory segment (IIS 4.0)l Access rightsl Error messages
There are virtual directories
Protocol
n If a page is not displayed correctly in your browser, check the following:
� Protocol: http or https
� Server name and domain: ask your network administrator if this server is entered in the DNS server.
� Port number: no port number specified means default ports 80 (http) or 443 (https) are used.
� Virtual directory: see Web instance definition.
� Standard documents: if no document is entered, the Web server may automatically display a standard document.

© SAP AG TABC10 356
SAP AG 2000
Web Server: Tuning Parameters
Tuningparameters
Bottleneckanalysis
Trouble-shooting
Erroranalysis
Web serveradmin andmonitoring
Continuousmonitoring
SAP Systemmonitoring
MiddlewareserverWeb server
Desktop
and
network

© SAP AG TABC10 357
SAP AG 2000
Connections and Timeout
l Limiting the number of connections
is an effective way to conserve bandwidthfor other uses
l Setting a timeout value limit
also reduces waste of processingresources due to broken connections
#
À
n Limiting the number of connections is a simple and effective way to conserve bandwidth for other uses. All connection attempts above the connection limit are rejected. Setting a timeout limit also reduces the waste of processing resources caused by broken connections.
n Example
n To limit the number of connections in the IIS:
� In the Internet Service Manager, select the Web site, right-click, and choose Properties.
� Under Web Site Properties, flag Limited to .
� In field Maximum Connections, enter the maximum number of simultaneous connections you want to allow.

© SAP AG TABC10 358
SAP AG 2000
Connection type
Dedicated PPP/SLIP
56K (frame relay)
ISDN (using PPP)
T1
Fractional T1
T3
ATM
Internet Connection Types
Pages transmitted
0.3 to 0.6
0.9
1.7
24
710
ATM
Users supported
2-3
10-20
10-50
100-500
5000+
Maximum bandwidth
Modem speed
56 000 bps
56 000-64 000 bps
1 540 000 bps
Varies as needed
45 000 000 bps
155 000 000 bps
n The table shown in the graphic provides guidelines for various connection types. Your choice of connection type depends on the file transmission speed you need.
n The amount of bandwidth you have is a function of the type of connection you select. How fast your files are sent is a function of connection speed and file size.

© SAP AG TABC10 359
SAP AG 2000
Choosing the Best Connection
For the IIS, tochoose the bestconnection, youcan use acalculator utility
n The IIS has a calculator utility. You can enter connection type, page size in kilobytes, and allowable page load time in seconds. The calculator provides connection speed in kilobytes per second, pages per second, and maximum number of simultaneous users and hits per day.
n For further details, see the IIS help file.
n To access the calculator utility in the Internet Service Manager, choose Help and in the browser use the search function. Search for Calculating Connection Performance.

© SAP AG TABC10 360
SAP AG 2000
Hardware Resources: Web Load Balancing
Load BalancingLoad Balancing
WGate1WGate1 WGate2WGate2 WGate3WGate3
User A User B
http://www.sap.com
http://wwwext1sap.com http://wwwext2sap.com http://wwwext3sap.com
AGate1AGate1 AGate2AGate2 AGate3AGate3
n Web server load balancing software or hardware (these are third party products) must meet the requirement that:
� Users are tracked and always (for example, within each day) routed to the same WGate so that they do not lose their AGate session context. For example, in the graphic, user A is always routed to WGate 1 and User B to WGate 2.
n The load balancing mechanism considers only the performance of WGate servers. The AGates are are not considered. If an AGate is down, be sure to stop the corresponding WGate. Then the WGate server dispatches new requests to the other available servers.

© SAP AG TABC10 361
SAP AG 2000
ITS Monitoring
AGate andDrag&Relate
Bottleneckanalysis
Logs andtrouble-shooting
Erroranalysis
ITS monitoringContinuousmonitoring
SAP Systemmonitoring
MiddlewareserverWeb server
Desktop
and
network
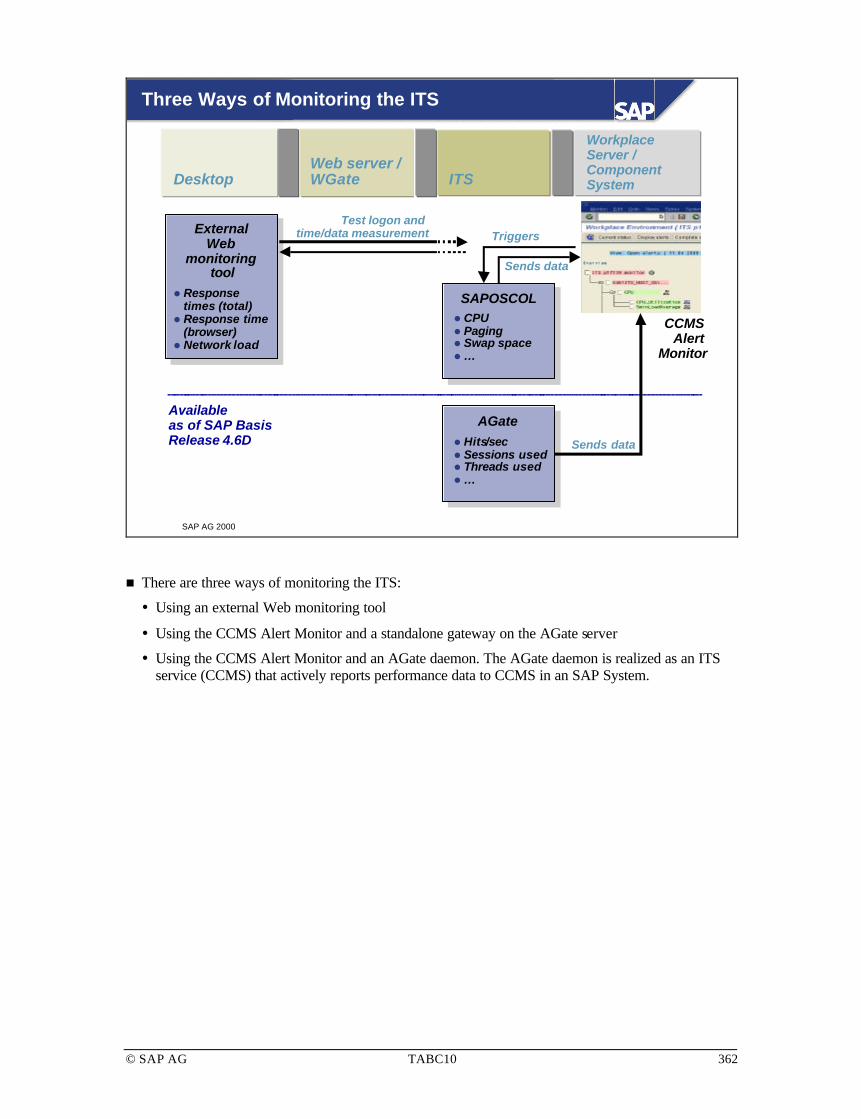
© SAP AG TABC10 362
SAP AG 2000
Three Ways of Monitoring the ITS
DesktopWeb server /WGate ITS
WorkplaceServer / ComponentSystem
SAPOSCOL
AGateAvailableas of SAP BasisRelease 4.6D
External Web
monitoring tool
l Hits/secl Sessions usedl Threads usedl…
l CPUl Pagingl Swap spacel…
l Responsetimes (total)
l Response time(browser)
l Network load
CCMS Alert
Monitor
Triggers
Sends data
Sends data
Test logon and time/data measurement
n There are three ways of monitoring the ITS:
� Using an external Web monitoring tool
� Using the CCMS Alert Monitor and a standalone gateway on the AGate server
� Using the CCMS Alert Monitor and an AGate daemon. The AGate daemon is realized as an ITS service (CCMS) that actively reports performance data to CCMS in an SAP System.

© SAP AG TABC10 363
SAP AG 2000
Logs and Troubleshooting
AGate andDrag&Relate
Bottleneckanalysis
Logs andtrouble-shooting
Erroranalysis
ITS monitoringContinuousmonitoring
SAP Systemmonitoring
MiddlewareserverWeb server
Desktop
and
network

© SAP AG TABC10 364
SAP AG 2000
ITS Logs: Error Analysis
AGate.trc
Mmanager.trc
Log files
Web serverLogfile
ST22ABAPDumps
SM21Syslog
SMGWGateway
Trace
RSHTTP20
ITS AdminInstance
ITS AdminInstance
DesktopWeb server /WGate ITS
WorkplaceServer / ComponentSystem
n ITS log and trace files (AGate.trc, MManager.trc, …):
� You can access these through the ITS Admin instance (<instance> → View Logs → Traces).
� You can adjust the degree of detail through the trace level (<instance> → Configuration → Traces → <tracefile>).
� If the trace file directory is accessible through a Web server instance, you can use report RSHTTP20 to read the trace and log files (you can also do this for the Web server log files – see SAP Note 214251).
n CCMS (Remote OS Collector): watch for alerts in transaction RZ20, such as freespace problems.
n To determine bottlenecks related to RFC communication, use SAP Basis Monitors:
� Gateway trace (SMGW)
� Wait situations for dialog workprocesses (SM51)
� Timeout parameter
n See also SAP Notes 183845 and 207040.

© SAP AG TABC10 365
SAP AG 2000
ITS Trace Example
l Example: AGate.trc, Trace Level = 3
n Symptom: ITS instance is starting, but going down againafter a few seconds
n AGate.trc-file extract:
WorkCreateWorkThread: WorkThread #m created.
WorkDoWork: WorkDoGetRequest() ...
*E* WorkCreateWorkThread: _beginthreadex(m+1) failed.
*E* Error in WorkInitialize, rc=2
n Solution: Memory exhausted on ITS. Increase memory orreduce the number of workthreads
n For further details, see SAP Note 209307.

© SAP AG TABC10 366
SAP AG 2000
Troubleshooting: Wgate <=> AGate
C:\winnt\system32\drivers\etc\services
sapavwmm_WPS 3901/tcp
sapavw00_WPS 3900/tcp
saprouter
AGateWGate
MManagerniping client
niping server
NIco
nnec
tion
test
n For a detailed description of the SAProuter functionality and administration, see the online documentation, BC SAProuter. Configure the SAProuter to relay only one specific WGate–AGate connection and deny all other connection attempts.
n Configure the WGate to connect to the AGate through a SAProuter. Enter the route string in the NT registry on the WGate host in the location HKEY_LOCAL_MACHINE\Software\SAP\ITS\2.0\<INST>\Connects\Host (where <INST> is the name of the virtual ITS installation).
n The key may contain a route string of the type: /H/<SAProuterhost>/S/<routerservice>/H/<host>
n Do not specify the AGate port in the route string.
n The SAProuter host must be able to map the port that is entered in the following key to a port number:
� HKEY_LOCAL_MACHINE\Software\SAP\ITS\2.0\<INST>\Connects\PortAGate
n The default entry is sapavw00_<INST>. If this port is not mapped in the SAProuter file etc\services, enter the port number directly in this key.
n To test the connection between the AGate and WGate server through the SAProuter, use the SAP GUI network interface (NI) connection test tool niping. For further details of niping, see SAP Library.

© SAP AG TABC10 367
SAP AG 2000
Troubleshooting: AGate <=> SAP System
Parameter lookup:
1. Global.srvc 2. <Specific service>.srvc + parameters specified in 1.3. Command line + logon screen or cookie
NT services file may not be correctly maintained on ITS Server toinclude message server entries for The component systems
C:\winnt\system32\drivers\etc\services
sapmsWPS 3600/tcp
Group logon using message server
AGate
n To check that the connection parameters for your SAP System are correct, check the URL of the link generated in the LaunchPad.
n The parameters used for the connection can be substituted in the following order:
1. Global.srvc
2. <Specific service>.srvc + parameters specified in 1.
3. Command line + logon screen or cookie + parameters specified in 2.
n Make sure that the NT services file on the AGate server is maintained correctly and contains entries for the message servers for all mySAP.com Workplace SAP Systems.

© SAP AG TABC10 368
SAP AG 1999
Drag&Relate Server Logs
Wed May 03 12:24:53 : InitializingWed May 03 12:24:53 : Opening server superman:2773Wed May 03 12:24:53 : Pinging server superman:2773Wed May 03 12:25:24 : Reply from superman:2773, 18 attemptsWed May 03 12:25:24 : ReadyWed May 03 12:25:26 : Initialized the logging system
TTLC8.tmp
[System]
ServerName=SAP_TCC{3911e20e-2128-11d4-b6c4-
[TopTierServer]
…
Multiplexer.dat
LogSize = 4194304
n To run the Server Monitor, from the Drag&Relate Server program group on the Windows menu Start, choose Drag&Relate Server Monitor. To display the server log in the Server Monitor, choose View Logs.
n The server log lists all events associated with the Drag&Relate Server.
n Each query to the Drag&Relate Server generates a log entry that contains the following information:
� The user name
� The request URL and parameters
� The elapsed time between the receipt of the request and the completion of the task by the server
� The syntax of the SQL query that was launched
� A description of any errors that occurred
n To enable the Drag&Relate Server log, in the dialog box Server Monitor, select Options and flag Enable Log.
n The default maximum size of the log file is 20 MB, but the size is configurable. To configure the size of the log file in the Drag&Relate Server installation directory, browse to the directory DataFile. Open the file multiplexer.dat. Under the TopTier Server section, add the following line:
� LogSize = <number of bytes>

© SAP AG TABC10 369
SAP AG 2000
Bottleneck Analysis
AGate andDrag&Relate
Bottleneckanalysis
Logs andtrouble-shooting
Erroranalysis
ITS monitoringContinuousmonitoring
SAP Systemmonitoring
MiddlewareserverWeb server
Desktop
and
network

© SAP AG TABC10 370
SAP AG 2000
Available Tools
PERFOR-MANCE.LOG
LOADSTAT.LOG
ACCESS.LOG
SM50SAP WorkProcesses
ST03WorkloadMonitor
RSHTTP20
CCMS AlertMonitor
SAPOSCOL
External Web
monitoring tool
l Responsetimes (total)
l Response time(browser)
l Network load
Test logon and time/data measurement
As of 4.6Dl CPU loadl Memory
consumptionl Network load
l Responsetime (ITS)
l Sessionsused
l Threadsused
l Response time (SAP)lWork processes used
ITS AdminInstance
ITS AdminInstance
DesktopWeb server /WGate ITS
WorkplaceServer / ComponentSystem
n SAP CCMS monitors SM50 (Work process overview) and ST03 (Workload overview) help you to identify bottlenecks in the SAP System (Workplace Server or component system).
n Performance problems in the ITS are reported in the ITS log files. Hardware bottlenecks on the computer where the ITS runs are reported by the tool SAPOSCOL.
n ITS log files can be accessed:
� From the ITS Admin instance
� From the SAP System through report RSHTTP20
� As of SAP Release 4.6D, from the CCMS Alert Monitor

© SAP AG TABC10 371
SAP AG 2000
Session poolPool of
workthreads
Dispatcherthread
R/3In port
AGate
AGate Sessions
Occupied
SAPSystemSAP
System
n The ITS works with internal parallelism so that several workthreads can run at the same time. A special dispatcher thread assigns a request to a worker thread.
n Session memory contains the internal status of an IAC. The ITS can assign the required amount of session memory to a request by evaluating an HTTP cookie. Either the ITS has sent this cookie with the first response to the Web browser for a new session or the ITS uses the session ID that is hidden in the most recent page it has generated.
n In each session, the following data is stored:
� Connection data (TCP/IP address of client, R/3 connection data and current R/3 screen)
� Settings in the service files (such as language and topic)
� Time at which the timeout mechanism was last set
� Synchronization information (such as screen and subscreen numbers)

© SAP AG TABC10 372
SAP AG 2000
Pool of workthreads Session pool
Dispatcherthread
AGate
AGate Threads
Occupied
SAPSystemSAP
SystemIn port
n Data flow in a request-response cycle:
� A request from the WGate reaches the dispatcher thread.
� The dispatcher thread assigns an available workthread to the request.
� The workthread reads the relevant session memory.
� A request is sent to R/3 (DIAG or RFC).
� A response is sent from R/3 (on screen or in internal table).
� The workthread converts the R/3 response into HTML.
� The workthread writes the data to the relevant session memory.
� The workthread sends the response to the WGate.
� The workthread becomes available for use again.

© SAP AG TABC10 373
SAP AG 2000
Internal Scalability
é Worker threads
☺ Higher throughput
L More memory used andmore demands made onthe processor
é Number of session memories
☺ More sessions can beopened at the same time
L More memory used
n The number of workthreads determines the maximum number of requests that can be processed at the same time. The number of session memories determines the maximum number of sessions that can be open at the same time.
n Each workthread requires 1 megabyte of main memory. Each open session requires 250 kilobytes of memory.
n The number of workthreads and the number of session memories are held in the Windows NT registry of the AGate computer. When an AGate is installed, setup offers two configuration options:
� Default configuration - 64 worker threads, 2000 session memory
� Minimize memory usage - 4 worker threads, 64 session memory
n Registry keys (AGate computer): HKEY_LOCAL_MACHINE, SOFTWARE, SAP, ITS, 2.0, <virtual ITS>, Programs, AGate, MaxWorkThreads, Number of worker threads, MaxSessions, Number of sessions open simultaneously

© SAP AG TABC10 374
SAP AG 2000
ITS Administration Instance (1)
Currentperformance
Highwatermark
n The ITS Admin instance (Performance view) gives you an overview of the current situation of the ITS. You can locate such problems as:
� High reponse times
� CPU bottlenecks
� Workthread bottlenecks
� User session bottlenecks

© SAP AG TABC10 375
SAP AG 2000
ITS Administration Instance (2)
ITS performance history: file performance.log
l Evaluate historic bottlenecks and critical situations, like:
l High load situations (hits/sec, available work threads and user sessions,high turnaround times, ...)
l Hardware bottlenecks (CPU load, memory load, disk space problems, ...)
<ITS installation directory>\2.0\<virtual ITS>\logs\
ITS log file directory:
n For each AGate instance, the following details are displayed:
� Visible from left to right in the graphic: time stamp, the AGate, available sessions, maximum number of sessions, available work threads, maximum number of work threads, hits/sec, turnaround time, hits, uptime, ITS user CPU %, ITS kernel CPU %, total physical memory, available physical memory, total virtual memory, available virtual memory
� Not visible in the graphic: memory load %, total disk space, free disk space

© SAP AG TABC10 376
SAP AG 2000
Drag&Relate Servlet
n The capacity of the Drag&Relate Server determines how it copes with the various factors that contribute to the load on the application. One of the main tasks of the system administrator is to maintain optimal system performance by monitoring network traffic and adjusting server capacity accordingly.
n The Server Monitor displays a list of active server instances. A server instance is a unit of capacity, operating like another server.
n The Server Monitor also displays information about the number and frequency of hits, and of heavy hits. A heavy hit is a request that takes longer to execute than the time limit defined in the dialog box Options. Use the information about heavy hits to analyze the performance of your application and to adjust server capacity accordingly.
n The number of users, the number of requests, the speed of the database, the complexity of queries, and various other factors all affect the performance of a system. To optimize performance, you can gauge the load on your application and then add or remove server instances. The Drag&Relate Server functions as a load distributor that channels requests among the server instances.
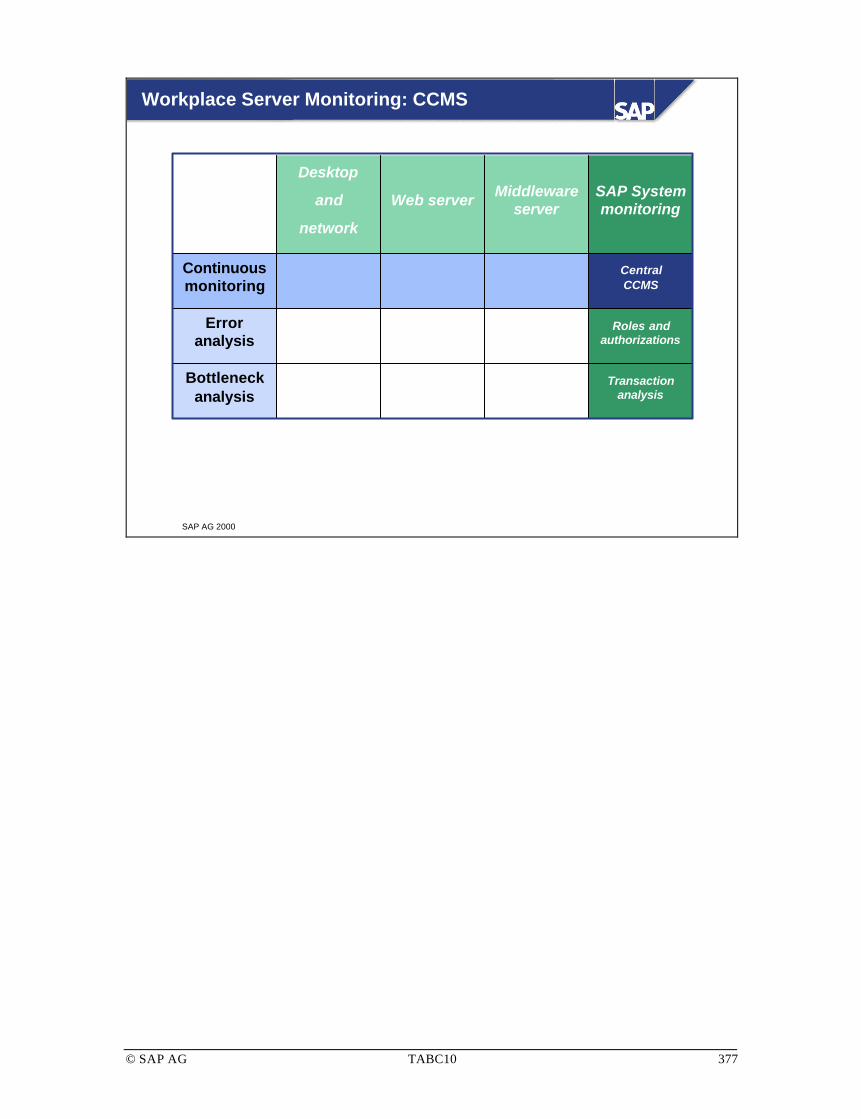
© SAP AG TABC10 377
SAP AG 2000
Workplace Server Monitoring: CCMS
Transactionanalysis
Bottleneckanalysis
Roles andauthorizations
Erroranalysis
CentralCCMS
Continuousmonitoring
SAP Systemmonitoring
MiddlewareserverWeb server
Desktop
and
network

© SAP AG TABC10 378
SAP AG 2000
Monitoring the SAP System Landscape
WPSWPS
PRDPRD BWPBWP APPAPPIT
S
ITS
ITS
ITS
R/3 Core BusinessWarehouse
Advanced Planningand Optimization
RZ20
OS collector data from standalone gateway
ITS admin information from AGate daemon (>=46D)
ITS traces and log files
All
CC
MS
Mo
nit
ori
ng
Dat
a
Use Ready-to-Run Workplace Monitor SetConsider Use of client 066
n You can monitor all SAP Systems and all ITS servers from the central Computing Center Management System (CCMS) on the Workplace server.
n To access the SAP Systems:
� Use the existing RFC connections to the production clients. The user in this RFC destination is of type CPIC, so this user cannot be used for dialog transactions.
� Alternatively, connect to client 066 and use the default user EARLYWATCH.
n To access the Middleware server:
� Create a new RFC connection to the standalone gateway and include this in the central CCMS monitor to display OS performance.
� Altermatively, connect your AGate server to the central CCMS using the AGate daemon (BAPI calls) to display the most important ITS admin instance settings.

© SAP AG TABC10 379
SAP AG 2000
CCMS Alert Monitor
Monitoring tree elementsAll tree nodes
l Represent one physical or logical object
l Summarize alerts andpropagate to higher nodes
l Receive data and may create alerts
l Use data for analysisalerts
Monitoring objects
Monitoring attributes
n The CCMS has an object-based monitoring architecture that simplifies the task of monitoring a set of SAP Systems. This monitoring architecture integrates information from the entire SAP environment and uses this data stream to present an easy-to-manage overview of the condition of the SAP Systems and their environment. The information is displayed in a tree-based structure called the Alert Monitor (transaction RZ20).
n The Alert Monitor has two views:
� Current status shows the present situation of the system.
� Open alert shows the past situation of the system. This view is useful for analyzing problems that occurred since the last system monitoring run.
n For each monitoring attribute, alerts are displayed if configurable threshold conditions are met. To view alerts, select the monitoring attributes required and choose Display alerts. If the monitor is switched to view Open alert, the open alert status for the entire tree is displayed.
n To analyze a problem situation, you can start an analysis tool for a specific attribute. To do this, select a tree element and choose Start analysis method.
n SAP Release 4.6 is delivered with all the tool assignments required to monitor your SAP System. However, you can maintain additional tool assignments and threshold conditions.

© SAP AG TABC10 380
SAP AG 2000
Working with the Alert Monitor
Situation: Only specific monitoring objects are of interest
Solution:
l SAP monitoring templates
Define your own monitors:
l Static monitors
l Rule-based monitors
Database
Security
DataArchiving
BufferHit Ratio
n The Alert Monitor for SAP Release 4.6 is delivered with stable monitoring templates that can be used directly. These provide predefined and fully Customized views of the SAP System. Be sure to check that the default threshold values are applicable for your system requirements.
n There are monitors for the entire SAP System and for specific areas of the system architecture, such as for data archiving, security, communication and for the database. The monitor tree elements (MTEs) displayed in these SAP monitor templates cannot be changed, but they can be copied and the copy can be modified.
n You may choose to monitor only a subsystem of SAP. When you work with the SAP Alert Monitor:
� You can use the predefined SAP monitor templates. Check if there is a specific template for the part of the SAP System you plan to monitor, otherwise all the MTEs are shown in the SAP template System / All Monitoring Segments / All monitoring Contexts.
� You can copy an SAP monitor template and modify it using transaction RZ20. To do this, you must first activate the maintenance function (under Extras → Activate maintenance function). You can define your own monitor set and put the copy of the SAP monitor template into the new set. The attributes of a monitor set determine whether other users can see it or modify it.

© SAP AG TABC10 381
SAP AG 2000
Defining Monitors
Monitor name
Virtual node
Rule node withrule parameters
Known nodes ofknown systems
Add new node
n If no appropriate SAP template is available, you can define a new monitor. A new monitor is a new view of the existing MTEs for a system. The thresholds of an MTE can be set only once and are valid in all monitors.
n To create a new monitor, call transaction RZ20 and activate the maintenance function. Then mark your monitor set and choose Create. All the existing MTEs for the system are displayed: select the MTEs you want for the new monitor. To change an existing monitor, in transaction RZ20 mark the monitor and choose Change.
n When you save the new monitor, you can specify its name. To organize the structure of your monitor, you can insert virtual nodes to serve as descriptors. These nodes are marked with a special icon (a circle with a cross in the center).
n Any MTEs can be aligned under virtua l nodes. There are two ways to select MTEs:
� Under Selectable MTE, all MTEs of all SAP Systems that are known and running are shown. Click the node to expand the tree, and mark the MTEs that should be included in the new monitor. If an MTE on a higher tree level is marked, all the MTEs under this subtree are automatically included. The result is a static monitor, which shows the selected MTEs.
� You can choose Rule nodes to determine (using predefined rules) which MTEs should be inserted. The result is a rule-based monitor, which shows all MTEs that fit the rules at the moment of monitoring.

© SAP AG TABC10 382
SAP AG 2000
Rule-Based MTE Selection
l CCMS_DEFINE_R3_SYSTEMS
n Delivers R/3 System names
l CCMS_GET_MTE_BY_CLASS
n Delivers MTEs and all lower MTEs of a special MTE class
l CCMS_GET_MTE_BY_CLASS_AS_VIRTUAL andCCMS_GET_MTE_BY_CLASS_UNDER_CLASS
n Structured view of CCMS_GET_MTE_BY_CLASS
n In a rule-based monitor, MTEs are selected using rules. The MTEs are not marked explicitly but are described dynamically. The monitor runtime environment processes the rules to ensure that a rule -based monitor is updated periodically. Three rules can be used for monitor design:
� CCMS_DEFINE_R3_SYSTEMS: This rule creates virtual MTEs for R/3 Systems that have been included in the Alert Monitor. The selection options include ALL (all available R/3 Systems); CURRENT (R/3 System where the Alert Monitor is running), and specific systems by name. Use this rule to set up rule -based monitoring across one or more R/3 Systems. Rule MTEs that you add below this MTE are interpreted for each system that you have selected.
� CCMS_GET_MTE_BY_CLASS: This rule inserts monitoring functions by MTE class. The <MTEclass> parameter lets you add monitoring functions by MTE type (such as CPU, response time, and buffer hit ratio). The members of the MTE class are displayed as real nodes in the monitor tree.
� CCMS_GET_MTE_BY_CLASS_AS_VIRTUAL and CCMS_GET_MTE_BY_CLASS_UNDER_CLASS: Use these two rules in conjunction. When you select the former rule, use parameter <MTEclass> to include the MTE class as a virtual node in the tree. You then select the latter rule. In parameter <ChildMTEclass>, specify the MTE classes that you want to monitor as real nodes in your monitor.

© SAP AG TABC10 383
SAP AG 2000
CCMS Monitor for Workplace Systems
R/3Variant X
BWVariant Y
Central Monitoring SystemVariant Z
Settings for remote systems aredefined in the remote systemsRemote SAP Systems
Alert
n The new monitoring architecture in the CCMS enables you to monitor other SAP Systems. Alerts and data from multiple systems can be displayed in a single monitor and can be captured by a single monitor definition (this is done automatically in rule -based monitors). Systems across platforms and across releases can be monitored, including SAP 3.x Systems. The basis for multi-system monitoring is the monitoring architecture in each of the systems to be monitored.
n Multi-system monitoring is realized through a loose coupling of individual monitoring architectures by means of RFC links. The monitoring architectures in the monitored systems remain independent. Threshold settings and method assignment and execution is done in the monitored system. The central system collects information as required from the remote systems that are known to it.
n To include a remote SAP System in a central monitoring system, use transaction RZ21 and choose Technical infrastructure → Create remote monitoring entry. Enter the remote SAP System SID and the name of an RFC connection that is properly defined in transaction SM59 and that points to the remote SAP System. You can choose if a specific instance or all instances of the remote system should be included in the Alert Monitor. Choose Save.
n If there is a valid user and password entry made in the RFC connection, no logon prompt appears while opening the Alert Monitor. Otherwise, you must get authorization in the remote system to collect the data.
n Remote systems do not automatically appear in the SAP monitoring templates. After copying the templates, change parameter <CURRENT> to <ALL> in rule CCMS_DEFINE_R3_SYSTEMS.

© SAP AG TABC10 384
SAP AG 2000
Including SAP Systems with Release 3.x
SAP Release ≥3.0DVariant X
Central Monitoring SystemVariant Z
Settings for remote systems aredefined in the remote systemsRemote SAP Systems
Alert
ftp://sapservX/general/misc/ccms-ma/3xmonitoring
n For detailed information on how to install 3.X CCMS agents, see the readme file at:
� ftp://sapservX/general/misc/ccms-ma/3xmonitoring
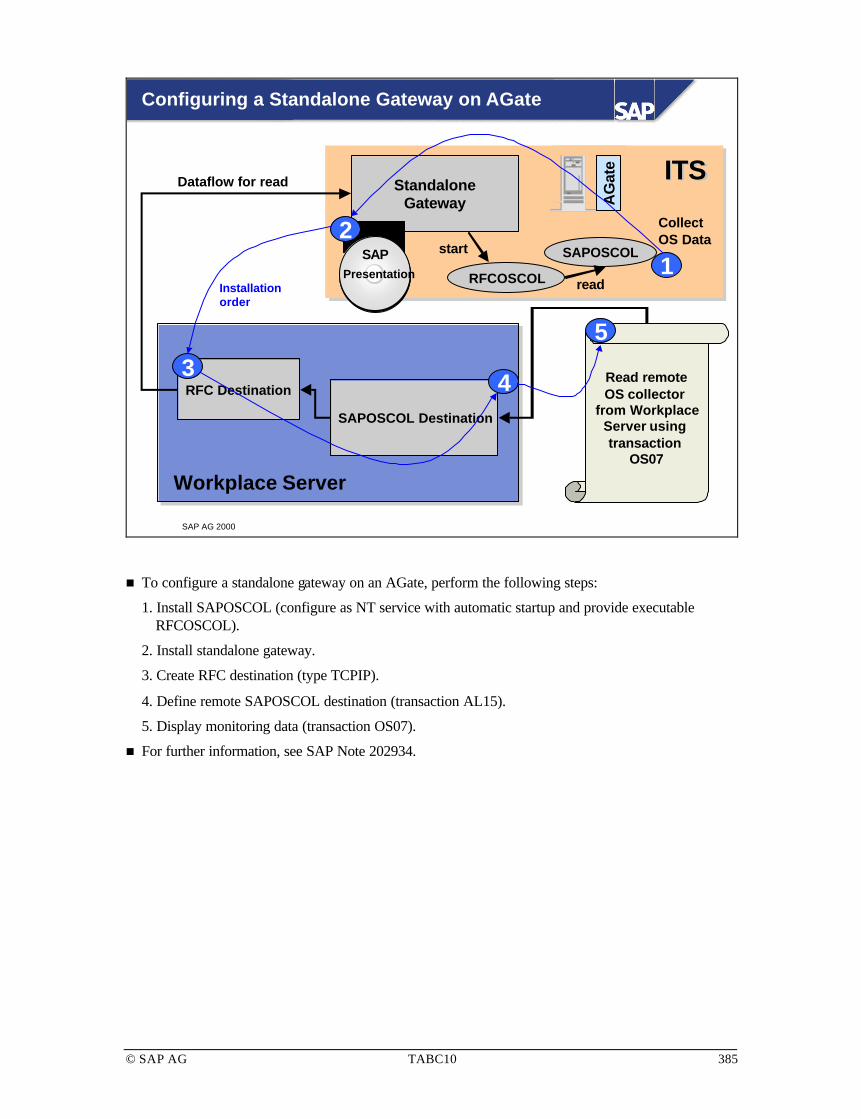
© SAP AG TABC10 385
SAP AG 2000
Configuring a Standalone Gateway on AGate
AG
ate
StandaloneGateway
SAPPresentation
21
Workplace Server
ITSITS
SAPOSCOL
RFCOSCOL
Collect OS Data
read
start
RFC Destination3
SAPOSCOL Destination
4 Read remoteOS collector
from WorkplaceServer using transaction
OS07
5
Dataflow for read
Installationorder
n To configure a standalone gateway on an AGate, perform the following steps:
1. Install SAPOSCOL (configure as NT service with automatic startup and provide executable RFCOSCOL).
2. Install standalone gateway.
3. Create RFC destination (type TCPIP).
4. Define remote SAPOSCOL destination (transaction AL15).
5. Display monitoring data (transaction OS07).
n For further information, see SAP Note 202934.

© SAP AG TABC10 386
SAP AG 2000
Workplace Server
Including a Standalone Gateway in Central CCMS
3
2
1
RZ20
Create data collector method
Integrate collector into central CCMS
Reset monitoring segment
n To include a standalone gateway in central CCMS, perform the following steps:
1. Create data collector method.
2. Integrate collector into central CCMS using transaction RZ20.
3. Reset monitoring segment using transaction RZ21.
n For further information, see SAP Note 210890.

© SAP AG TABC10 387
SAP AG 2000
ALE Monitoring and Central CCMS
Transaction SALE
CCMS
n Transaction SALE is the central transaction for ALE configuration, ALE administration, and ALE error handling.
n To monitor SAP Systems using the Alert Monitor in the CCMS, you must define, activate, and maintain ALE monitoring objects: start transaction SALE and choose System Monitoring → Central Monitoring of all Systems → Define, Activate and Test ALE Monitoring Objects.
� To create a new monitoring object, choose Create/Activate monitoring objects and enter the new monitoring object.
� To activate a monitoring object, choose Create/Activate monitoring objects and mark field Active.
� To maintain a monitoring object, choose Change monitoring object. You can enter selection options for outbound processing, inbound processing, and partner system, You can also select a time period (in days) for evaluation.
n You can start the CCMS ALE monitor from the ALE Administration screen: start transaction SALE and choose System Monitoring → Central Monitoring of all Systems → Define, Activate and Test ALE Monitoring Objects and ALE monitoring in CCMS. The IDocs that meet the selection criteria are evaluated. If the number of selected IDocs exceeds the number specified, an alert (red or green) situation is reported.
n The frequency of the run of the collector method can be defined by creating new values for ALE MTE classes for a customer properties variant.

© SAP AG TABC10 388
SAP AG 2000
ALE: IDoc Administrator
Generation of partner profile (transaction BD64)
Definition of IDoc Administrator (transaction WE46)
IDoc Administrator
IDoc Administrator
Must both be deactivated in a Workplace Server
n The SAP Workplace Server is an SAP System with an SAP Basis. It does not contain any application modules. Therefore, the IDoc system environment must be set correctly in transaction WE46:
� Message control is available must be deactivated.
� Application is available in system must be deactivated.
n Define an IDoc administrator in the system using transaction WE46 and customize the workflow (transaction SWU3). If an IDoc error occurs, a message is placed in the IDoc administrator’s Workflow Inbox.
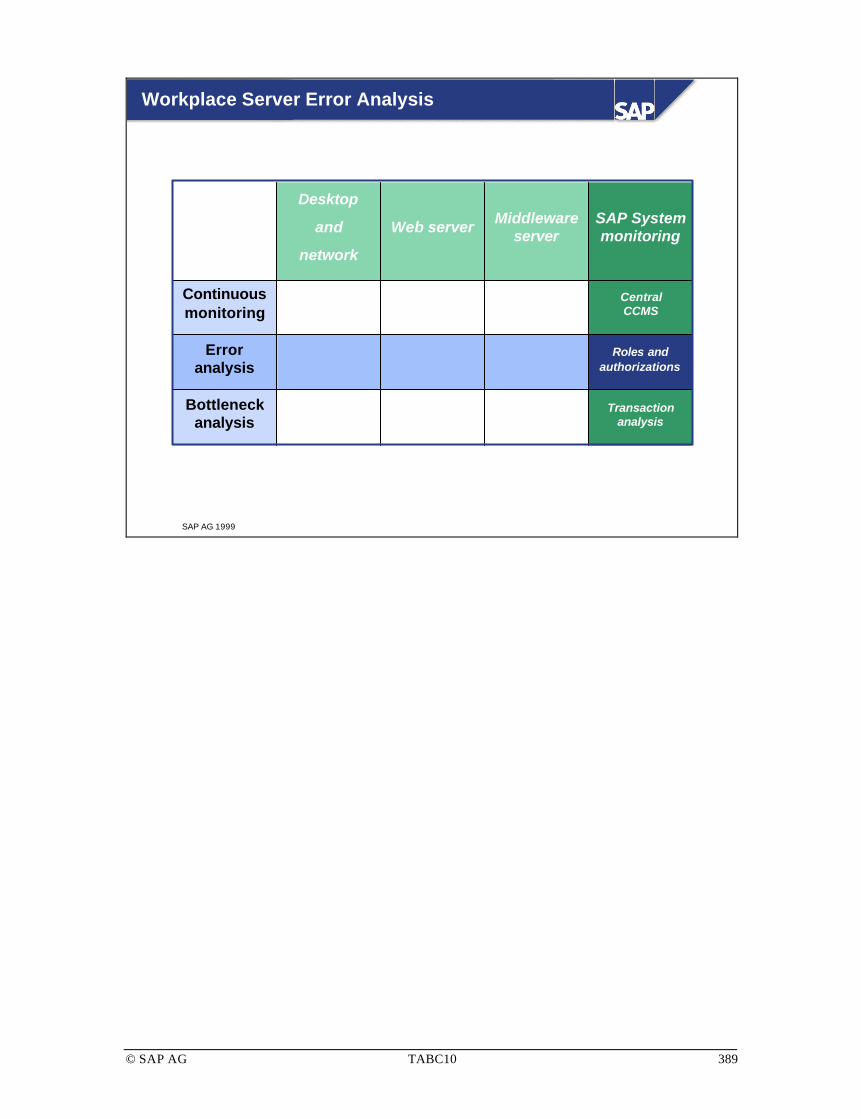
© SAP AG TABC10 389
SAP AG 1999
Roles andauthorizations
Workplace Server Error Analysis
Transactionanalysis
Bottleneckanalysis
Erroranalysis
CentralCCMS
Continuousmonitoring
SAP Systemmonitoring
MiddlewareserverWeb server
Desktop
and
network

© SAP AG TABC10 390
SAP AG 2000
Roles and URL Generation
l Test transactions
n SURL_LAUNCHPAD_TEST Test LaunchPad creation
n SURL_PERS_ADMIN Personalization of URL general admin.
n SURL_PERS_USER Personalization of URL general user
n SURL_SINGLE_GEN_TEST Test LaunchPad and URL generation
l Test function module
n WP_ALL_GET (Determination of transactions for one WP user)
l Authorization trace (ST01 and SU53)
l Release of transaction for the use in the Internet
n To verify that URLs are generated correctly, you can use any of several test transactions, such as SURL_LAUNCHPAD_TEST.
n The number of transaction included in a Workplace role affects the response time during sign-on. To find the total number of transactions in the LaunchPad for a specific user, perform a test with function module WP_ALL_GET and enter the user name. Perform this test on the Workplace Server and leave the field for the RFC destination empty. The number of transactions is displayed in field MENU_NODE_TAB. A typical value is 200 transactions per user.
n If a transaction cannot be performed due to a lack of authorization(s), obtain the (first) missing authorization in the SAP System using transaction SU53 or perform an authorization trace using transaction ST01.
n SAP transactions, reports, and function modules must be released for use in the Internet. To do so, use transaction SMW0. Before Internet release is possible, you may need to supply an authorization group in a report.

© SAP AG TABC10 391
SAP AG 1999
Using Authorization Groups
Program attributes show noauthorization group
To add authorization groups,use program RSCSAUTH
Example:Program ZABAPTESThas no authorization check
l Program RSCSAUTH
n Allows customers to maintain authorization groups on allABAP programs (defined by SAP or customer)Updates to SAP programs are not considered modifications
l You can enter specific programs (selection Program name)or choose a specific application
l Customer-defined programs with no authorization check inthe code are now secure
n SAP programs may be supplied either with an authorization group that does not fit in with the customer’s authorization system or without an authorization group at all.
n Program RSCSAUTH allows you to maintain the authorization groups for such programs without the need to change the program attributes. It also allows you to restore customer-specific authorization groups following an upgrade.
n Program RSCSAUTH generates a list of type 1 reports (column Program), the authorization groups maintained by SAP (column SAP), and those maintained by the customer (column Customer).
n Column Customer is an input field where you can enter your own authorization groups.
n When you choose Save, the customer-specific authorization groups for all selected reports are copied to table TRDIR. This has the same effect as changing the authorization group in the program attributes, since existing SAP authorization groups are overwritten. The authorization groups for each program are also entered in table SREPOATH. This is to allow you to restore customer-specific authorization groups following an upgrade by running program RSCSAUTH again.

© SAP AG TABC10 392
SAP AG 1999
Transactionanalysis
Roles andauthorizations
Transaction Analysis
Bottleneckanalysis
Erroranalysis
CentralCCMS
Continuousmonitoring
SAP Systemmonitoring
MiddlewareserverWeb server
Desktop
and
network

© SAP AG TABC10 393
SAP AG 1999
Workplace Server Response Time
l As the login accesscomes through RFC,monitor RFC task
l RFC profile → Servers
n Under Functionmodules, findperformance data forspecific modules
n Under Remotedestination, find forexample the incomingrequests from the ITS
l User profile
n Number of users in agiven time frame
l Time profile
n Performancebottlenecks in a givetime frame
l Dialog task contains onlyadministrator’stransactions
n To analyze Workplace Server response time, call transaction ST03 and choose Performance Database → RFC Profile :
� As all user requests come in through RFC, you should monitor the RFC task closely.
� Under Function modules, find performance data for specific modules. Important for the Workplace login are:
SUSR_LOGIN_CHECK_RFC
BAPI_USER_GET_DETAIL
WP_ALL_GET
� Under Remote destination, find for example the incoming requests from the ITS.
n The dialog task contains administrative transactions only, such as:
User and role management
System monitoring

© SAP AG TABC10 394
SAP AG 2000
SAP Component System Transaction Analysis
Internet sales
Monitoring EWTs is similar to monitoringother transactions in the SAP System
Text On/Off
Online Store
ESS:Time management,Travel management
n To analyze component system transactions, call transaction ST03 and choose Performance Database → Transaction Profile.

© SAP AG TABC10 395
SAP AG 2000
You are now able to:
Unit Summary
l Monitor the network between the frontendand the SAP System
l Monitor the Web server
l Monitor the Internet Transaction Server
l Monitor the Workplace Server

© SAP AG TABC10 396
SAP AG 2000
Unit Actions
l Exercises?
l Solutions

© SAP AG TABC10 397
Monitoring and Troubleshooting: Exercises
No. Exercise
1 Desktop Trace using PERFMON
1.1 Start the Windows NT tool Performance Monitor (PERFMON)
Make sure the NT Service Network Monitor Agent is started.
1.2 Configure the PERFMON tool
- to monitor the CPU load on your frontend computer and
- to monitor the Network load between webserver and frontend
1.3 Log on to the workplace using your internet browser and have your performance monitor recording the performance data.
Identify first peak of network load.
Identify first peak of CPU load.
Estimate the network time
Estimate the rendering time in the browser.
How can the amount of data being transferred during initial logon be determined?
1.4 Check the statistical records written on the workplace server during initial logon.
Hint: Use Transaction STAD.
2 Create central CCMS on your component system
2.1 Create your own monitor set ZBC350.
2.2 Copy the following into the monitor set ZBC350:
Entire System from the SAP CCMS Monitor Template to Z_Entire System_<your group ID>
2.3 Change the copied rule based monitor to monitor all connected SAP Systems not only the current one.
2.4 Create a central monitoring system
Include the workplace server into your monitoring architecture. Use the RFC destination WPSCLNT<your client number> created in an earlier exercise.
2.5 Start your Central CCMS Monitor
3 Include Standalone Gateway into central CCMS
3.1 Create RFC Connection to your Standalone Gateway on the middleware Server.
3.2 Create remote SAPOSCOL entry.
3.3 Display the operating system performance
3.4 Include remote SAPOSCOL into your monitor set
3.5 Create a new Monitor ZITS_<name of webserver> in your monitor set ZBC350 displaying the performance values from the standalone Gateway:

© SAP AG TABC10 398
Create the monitor based on the rule CCMS_GET_MTE_BY_CLASS and use your class ZITS_<name of web server>_OperatingSystem created in exercise 3.4.
3.6 Display Monitoring Data of your new Monitor
4 Display ITS Logs from within SAP System
4.1 Trainer Demo:
Create the new Web server Instance LOG on TCP port 3219
Create the new virtual directory ITSLogs_WPS for the Web Server Instance LOG
4.2 Display the ITS Logs from within your component system using report RSHTTP20

© SAP AG TABC10 399
Monitoring and Troubleshooting: Solutions
No. Solution 1 Desktop Trace using PERFMON
1.1 To check if the Network Monitor Agent is running select Start → Settings → Control Panel → Services Mark Network Monitor Agent Choose Start Choose Close. To start the Windows NT tool Performance Monitor (PERFMON) on a default NT Server choose Start → Programs → Administrative Tools (Common) → Performance Monitor or open a command prompt and simply enter perfmon.exe
Close all other applications such as Internet Browser, SAPGUI, SAP@Web Studio.
1.2 To configure the Perfmon tool Select Edit → Add to chart
In the field Object select Processor In the field Counter select % Processor Time Choose Add In the field Object select Network Segment In the field Counter select Total Bytes Received/sec In the field Counter select % Network Utilization Choose Add. Choose Done
1.3 Start your Internet Browser. Log on to your workplace using the following URL: http://<web server>:1080/scripts/wgate/sapwp/! Record the performance chart right after getting the logon screen. You can save the chart after logon using File → Export Chart
Identify first peak of network load. Identify first peak of CPU load. Estimate the network time:
The network time is roughly the time between the first network peak and the first CPU peak (start of HTML rendering). Estimate the rendering time in the browser:
The rendering time is roughly the time of high CPU load (if no other application is running). The amount of data being transferred during initial logon is determined only by analyzing the exported chart. You would have to summarize the column Total Bytes Received.

© SAP AG TABC10 400
1.4 To check the statistical records written on the workplace server during initial logon start transaction STAD. Specify your user name and the system time of logging on. Choose OK.
Evaluating the statistical records you can get the response time of the Workplace Server.
2 Create central CCMS on your component system
2.1 To create your own monitor set, run Transaction RZ20. To activate the maintenance function, choose Extras → Activate maintenance function.
Note: The maintenance function must be activated for all CCMS exercises using Transaction RZ20. Choose Create. Select New monitor set. Choose Continue. Specify the name of the monitor set: ZBC350 Choose Copy/Enter.
2.2 To copy a template into the monitor set ZBC350, you must first expand the folder SAP CCMS Monitor Templates and display the Entire System template. Perform the following: Place your cursor on the template Entire System and choose Copy.
In the dialog box displayed, in the field To monitor set select monitor set ZBC350. In the field for your new monitor enter Z_ Entire System_<your group ID> Choose Continue.
2.3 Start transaction RZ20. Unfold your Monitor Set ZBC350. Mark your monitor Z_ Entire System_<your group ID> Select Change Mark the upper most node CCMS_DEFINE_R3_SYSTEMS Select Change Choose Continue In the field R3System select <ALL> Continue
All nodes lower in the tree structure are affected by the changes automatically. Save your settings.
2.4 In order to monitor the workplace server from the component system in the component system start transaction RZ21 → Technical Infrastructure → Create remote monitoring entry In the field Target System ID enter WPS
In the field Target System RFC Destination select WPSCLNT<your client number>

© SAP AG TABC10 401
Save your settings.
2.5 To start your Central CCMS Monitor start transaction RZ20 Unfold the Monitor Set ZBC350 Double-Click your Monitor Z_ Entire System_<your group ID>
3 Include Standalone Gateway into central CCMS
3.1 To create the RFC Connection to your Standalone Gateway on the middleware server start transaction SM59 Select Create In the field RFC Destination enter GAT In the field connection type enter T In the field Description enter : Standalone Gateway Save your settings Select Explicit Host In the field Program enter rfcoscol.exe In the field Target Host enter the name of your web server Select Destination → Gateway Options
In the field Gateway Host enter the name of your web server In the field Gateway Service enter 3300 Choose OK Save your settings To test the RFC Destination choose Test Connection
3.2 To create a remote SAPOSCOL entry start transaction AL15. In the field SAPOSCOL destination enter GAT_<name of your web server> Select Add SAPOSCOL dest. Choose Yes Double-click the RFC Destination GAT. Provide a descriptive text. Save your settings.
3.3 To display the operating system performance start transaction OS07 Double Click the SAPOSCOL destination GAT
3.4 Include Remote SAPOSCOL into your monitor set your first have to set up a new collector method: To do this a) Start Transaction RZ21 b) In the field Methods mark Method definitions and choose Display overview c) Mark the standard method CCMS_Remote_OS_Collect and select copy
In the field to enter ZITS_<name of web server>_Remote_OS_Collect' Choose Continue. d) Select Display <-> Change and select the tab Parameters.
In the line MCNAME in the field Parameter Value enter ZITS_<name of web server>_OS (this is the name of the monitor element that should appear in transaction RZ20).

© SAP AG TABC10 402
In the line MTECLASS in the field Parameter Value enter ZITS_<name of web server>_OperatingSystem ( this is the name of the MTE class to which the monitoring element should be assigned) In the line DESTINATION in the field Parameter Value enter GAT (the name of the RFC destination used for the RFCOSCOL (created in exercise 3.1) e) Select the tab Release and in the field execution method as mark data collection method
f) Select the tab Control and in the field Execute method mark Automat. in dialog process (short running program). Save your settings Now reset the status of the monitoring segment of the new monitoring node. To do this: a) Start transaction RZ21. b) Select Technical infrastructure → Overview of segments. Mark the segment of the server where the RFCOSCOL is defined and select Edit Data. c) Select Edit → Segment → Reset to 'WARMUP' status.
Choose Continue Select Yes
3.5 To create a new Monitor ZITS_<name of webserver> in your monitor set ZBC350 displaying the performance values from the standalone Gateway Choose Extras → Activate maintenance function
Start transaction RZ20. Mark your monitor set ZBC350 and choose Create. Select Monitor Definition → Change Name In the field Monitor enter ZITS_<name of webserver> Choose Continue. Mark the top node and select Create Nodes. Mark Rule Node. Choose Continue. In the field Rule select CCMS_GET_MTE_BY_CLASS Choose Continue. In the field R3System select <CURRENT> In the field MTEClass select ZITS_<name of web server>_OperatingSystem Choose Continue→
Save your settings. 3.6 To display the monitoring data of your new monitor start transaction RZ20.
Unfold your monitor set ZBC350 and double-click your new monitor ZITS_<name of webserver>.
4 Display ITS Logs from within SAP System
4.1 Trainer Demo:
Preparation: Create a new Windows NT directory on your Web Server under

© SAP AG TABC10 403
f:\Inetpub\wwwroot\log To create a new Web server Instance LOG on TCP port 3250 on NT level select Start → Programs → Windows NT 4.0 Option Pack → Microsoft Internet Information Server → Internet Service Manager Select Action → New → Site
In the field Web Site Description enter LOG Choose Next In the field TC Port this Web Site should use enter 3219 Choose Next
In the field Enter the path for your Home Directory enter f:\Inetpub\wwwroot\log Choose Next Enable only Read access Choose Finish.
To create the new virtual directory ITSLogs_WPS for the Web Server Instance LOG right-click the Web Server Instance LOG and select New → Virtual Instance. In the field Alias to be used to access virtual directory enter ITSLogs_WPS Choose Next In the field Physical Path enter G:\Program Files\SAP\ITS\2.0\WPS\logs Choose Next Mark Allow Read Access Mark Allow Directory Browsing Choose Finish Start the Web Instance
4.2 To display the ITS Logs from within your component system using report RSHTTP20 start transaction SA38. In the field Program enter RSHTTP20. Choose Execute. In the field Url enter http://<your web server>:3219/ITSLogs_WPS/loadstat.log In the field Blankstocrlf enter a X Choose Enter

© SAP AG TABC10 404
SAP AG 1999
Introduction Including MiniApps
Workplace Architecture Software Logistics
Configuration andAdministration
Monitoring andTroubleshooting
InternetTransaction Server Drag&Relate
Users:Single Sign On
Drag&Relate
© SAP AG TABC10 405
SAP AG 1999
l Supported scenarios
l Drag&Relate architecture
l Relationship of BOR objects and data elements
Contents:
Drag&Relate

© SAP AG TABC10 406
SAP AG 1999
l Describe the requirements for Drag&Relate
l Maintain relationships for BOR objects
At the conclusion of this unit, you will be able to:
Drag&Relate: Unit Objectives

© SAP AG TABC10 407
SAP AG 1999
Course Overview Diagram (8)
Preface
Unit 1 Introduction
Unit 2 Architecture and Security
Unit 3 Central User Administration
Unit 4 Role Definition
Unit 5 Including MiniApps
Unit 6 Customizing Settings
Unit 7 System Integration
Unit 8 Drag&Relate
Appendix

© SAP AG TABC10 408
SAP AG 1999
Supported Scenarios
LaunchPad
WorkSpace• Transactions• MiniApps
• SAP -> SAP• SAP -> Web
n The Drag&Relate function allows you to link data from one application with another application. You can navigate between the various objects in the transactions and the LaunchPad using Drag&Relate. By simply selecting an object (for example, a purchase order) and dragging it onto another object in the LaunchPad (for example, a Web page) an activity is carried out (for example, the delivery status of the purchase order is displayed).
n The Drag&Relate function is available for the following scenarios:
� SAP -> SAP
� SAP -> Web

© SAP AG TABC10 409
SAP AG 1999
Drag&Relate Architecture
Backendsystems
Workplace Middleware
SAP DCOM Componentsystem 1
Web serverInstance n+1
Repository
Drag&RelateServlet
SAP DCOM Componentsystem n
Repository
Drag&RelateServlet
n When installing the Workplace, you can decide whether you want to install the Drag&Relate function.
n If you use the Drag&Rela te function with one object type (such as a sales order) within mySAP.com component systems, it is handled by the ITS. In this case, enabling Drag&Relate simply involves an ITS parameter setting.
n If you execute the Drag&Relate function using different types of objects (object relations such as relating a sales order to the customer), additional software is necessary:
� For each client in the component system, a Drag&Relate Servlet is required. Each Servlet has its own Drag&Relate repository, which contains meta data about the object relationships.
� The component systems are connected by the SAP DCOM CC (component connector).
n In the component systems, you must define relationships between data elements and BOR objects.
n A dedicated Web server instance for Drag&Relate Servlets is required only if HTTPS is used.
n The HyperRelational technology that enables Drag&Relate was invented and patented by TopTier Software Inc. (www.toptier.com).

© SAP AG TABC10 410
SAP AG 1999
Prerequisites
Desktop Backendsystems
Workplace Middleware
Web server ITS
Web browser WorkplaceServerInstance 0 PortalBuilder
Instance n Instance n
Drag&RelateServlets
Componentsystem n
IE 5.0or higher
• Plug-In installed• Object relationships• SPO1 permissions~navigationenabled=1
SAP DCOM
• Object relationships• TWPURLSVR
Repositorycreated
n To enable the Drag&Relate function, the following prerequisites must be fulfilled:
n At present, Drag&Relate is only supported by the SAP GUI for HTML. The Web browser must be a Microsoft Internet Explorer Release 5.0 or higher.
n On the ITS, for parameter ~navigationenabled the value “1” must be entered for the service file for the SAP GUI for HTML (webgui.srvc).
n For each client of the component system, a Drag&Relate Servlet is installed. Initially, the Drag&Relate repository is filled with the object relationships defined in the corresponding component system.
n The relevant Drag&Relate Server must be specified in Customizing table TWPURLSVR on the Workplace Server.
n For the component systems , Drag&Relate is implemented as a plug-in. You must import the plug-in into each component system that the Drag&Relate function is to be available in. You can use the plug-in with releases higher than R/3 Release 4.0B. You require the appropriate support packages for R/3 Release 4.0B, R/3 Release 4.5B, and R/3 Release 4.6A to activate HTML link generation (SAPKB46A03 for 4.6A, SAPKH45B13 for 4.5B, SAPKH40B36 for 4.0B). As of Release 4.6B, the objects are included in the standard system. You must assign users the authorization for transaction SPO1 in all component systems so that they can use Drag&Relate.

© SAP AG TABC10 411
SAP AG 1999
Maintenance for BOR Objects
Object Type BUS1022: Edit Definitions
Transactions Object relation Key
Object type BUS1022 Fixed assetObject name FixedAssetObject class
Key definitionKey type Primary key Key is active
Identifies Element Data element Parameter IDCOMPANYCODE BURKS BUKASSET ANLN1 AN1SUBNUMBER ANLN2 AN2
Transaction assignment
Transaction Skip initial screen Program ScreenAB02 SAPLAB01 10AB03 SAPLAB01 10AB08 SAPLAB01 10ABAA SAPMA01B 100ABAV SAPMA01B 100ABAVN SAPLAMDP 100ABAW SAPMA01B 100ABGF SAPMA01B 100ABGL SAPMA01B 100ABIF SAPMA01B 100ABMA SAPMA01B 100
n Transaction SPO0 is available for defining Drag&Relate relationships . You must maintain the Drag&Relate relationship in the component system that the transaction is to be executed in.
n You should only classify your own BOR (Business Object Repository) objects . If you change the classification of SAP objects, these could be overwritten during the next upgrade of the Workplace.
n The definition contains the steps:
� Define a relationship between the relevant data element and a BOR object. This relationship is known as a key part. This definition releases the content of the output fields that use this data element for Drag&Relate.
� Define the transactions that can be started. You use this defin ition to specify the transactions that an object can be dragged to. The user can see that he or she can drag the object to this particular transaction because the mouse pointer changes.
� Release data elements for Drag&Relate. The data element that a drag enabled screen field is based on must be uniquely assigned to a key field of the business object type. If there are several key fields, the underlying data elements must have a parameter ID so that they can be set automatically (with a SET/GET PARAMETER).
n At the moment, the table for the relationships is empty when the system is delivered. In future editions (Web delivery), this table will be filled.

© SAP AG TABC10 412
SAP AG 1999
You are now able to:
Drag&Relate: Unit Summary
l Describe the requirements for Drag&Relate
l Maintain relationships for BOR objects

© SAP AG TABC10 413
SAP AG 1999
Section: Ready-to-Run
Ready-to-Run R/3
© SAP AG TABC10 414
SAP AG 2000
ReadyReady-to-Run R/3-to-Run R/3
Release 4.6B
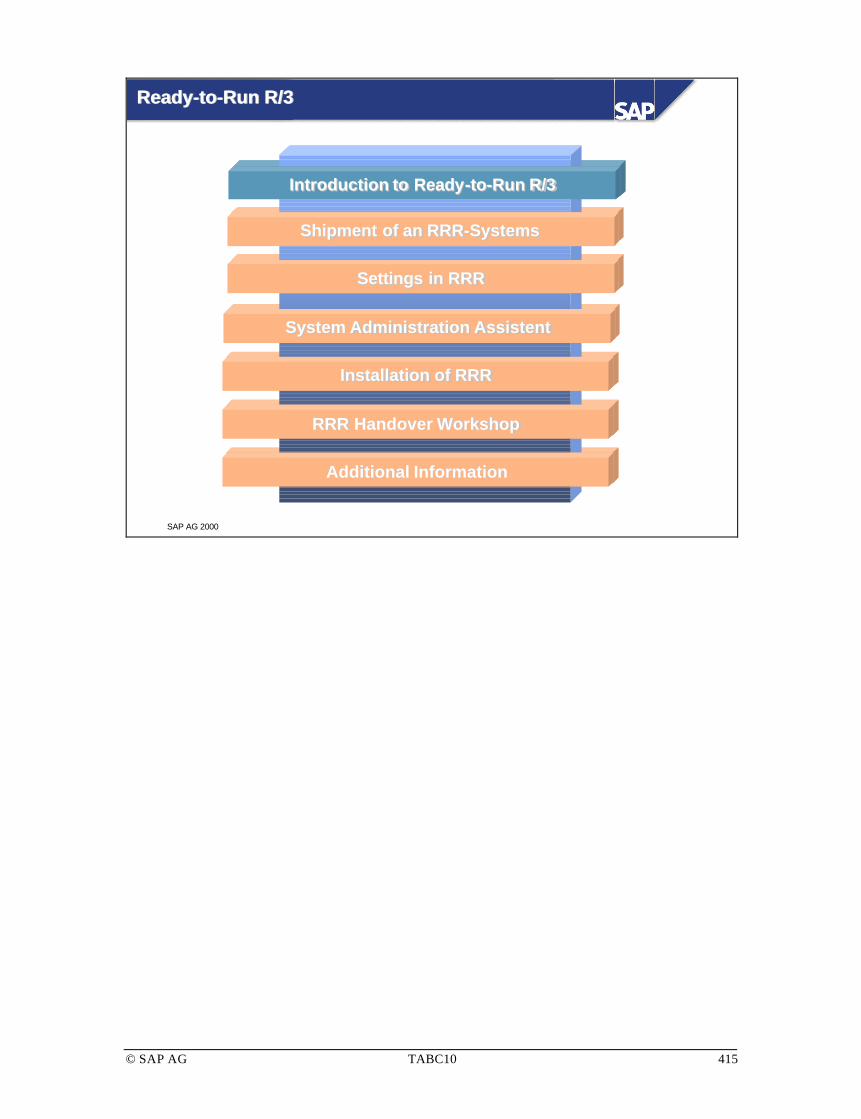
© SAP AG TABC10 415
SAP AG 2000
Ready-to-Run R/3Ready-to-Run R/3
IntroductionIntroduction to to ReadyReady-to-Run R/3-to-Run R/3
ShipmentShipment of an RRR-Systems of an RRR-Systems
SettingsSettings in RRR in RRR
System Administration AssistentSystem Administration Assistent
Installation of RRRInstallation of RRR
RRR RRR HandoverHandover Workshop Workshop
Additional InformationAdditional Information

© SAP AG TABC10 416
SAP AG 2000
What is Ready-to-Run R/3?What is Ready-to-Run R/3?
System AdministrationAssistant
CompleteOperationsConcept
SAP Remote Support
Router
Switch/Hub
All components ...
Standard Network
HardwareOperating System
SAP SystemProductionSystem
TestSystem
Database
... Installed and Configured
Efficient Transferof Knowledge
RRR HandoverWorkshop
l Ready-to-Run R/3 (RRR) is an SAP System solution that delivers a preinstalled and preconfigured SAP System with a complete hardware and software infrastructure.
l The RRR solution includes the installation of the operating system, the database (MS SQL Server, Oracle, Informix, DB2, DB2/400), the SAP System, and optionally, the SAP frontend, as well as the complete configuration of the operating system and network, and Basis Customizing
l As well as tools at the SAP System and operating system level (the most important being the System Administration Assistant), the RRR package also includes a detailed administration concept for the SAP System and the database.

© SAP AG TABC10 417
SAP AG 2000
Ready-to-Run R/3Ready-to-Run R/3
IntroductionIntroduction to to ReadyReady-to-Run R/3-to-Run R/3
ShipmentShipment of an RRR-Systems of an RRR-Systems
SettingsSettings in RRR in RRR
System Administration AssistentSystem Administration Assistent
Installation of RRRInstallation of RRR
RRR RRR HandoverHandover Workshop Workshop
Additional InformationAdditional Information

© SAP AG TABC10 418
SAP AG 2000
Specification of customerrequirements
SAP R/3Best practicesBasis configuration
Unattendedinstallation
Installation
Customer
ConfigurationAssistant
Configure to order
Configuration fileautomatically created
Delivery of systemsif not installed onsite
Overview of Ready-to-Run R/3 InstallationOverview of Ready-to-Run R/3 Installation

© SAP AG TABC10 419
SAP AG 2000
l Available Platforms andsupported Databasesconfigurable through externalfiles
Ready-To-Run R/3 Configuration Assistant (1)Ready-To-Run R/3 Configuration Assistant (1)

© SAP AG TABC10 420
SAP AG 2000
l Supports predefinedpackages or customconfiguration
l Multiple applicationservers for productionsystem
l Available packagesconfigurable throughexternal files
Ready-To-Run R/3 Configuration Assistant (2)Ready-To-Run R/3 Configuration Assistant (2)

© SAP AG TABC10 421
SAP AG 2000
l Definition of central R/3parameters
l Language settings (oneadditional language canbe installedautomatically)
Ready-to-Run R/3 Configuration Assistant (3)Ready-to-Run R/3 Configuration Assistant (3)

© SAP AG TABC10 422
SAP AG 2000
l R/3 users per modulerequired for Systemtuning (calculation ofProfile parameters)
l No sizing/no check here
Ready-to-Run R/3 Configuration Assistant (4)Ready-to-Run R/3 Configuration Assistant (4)
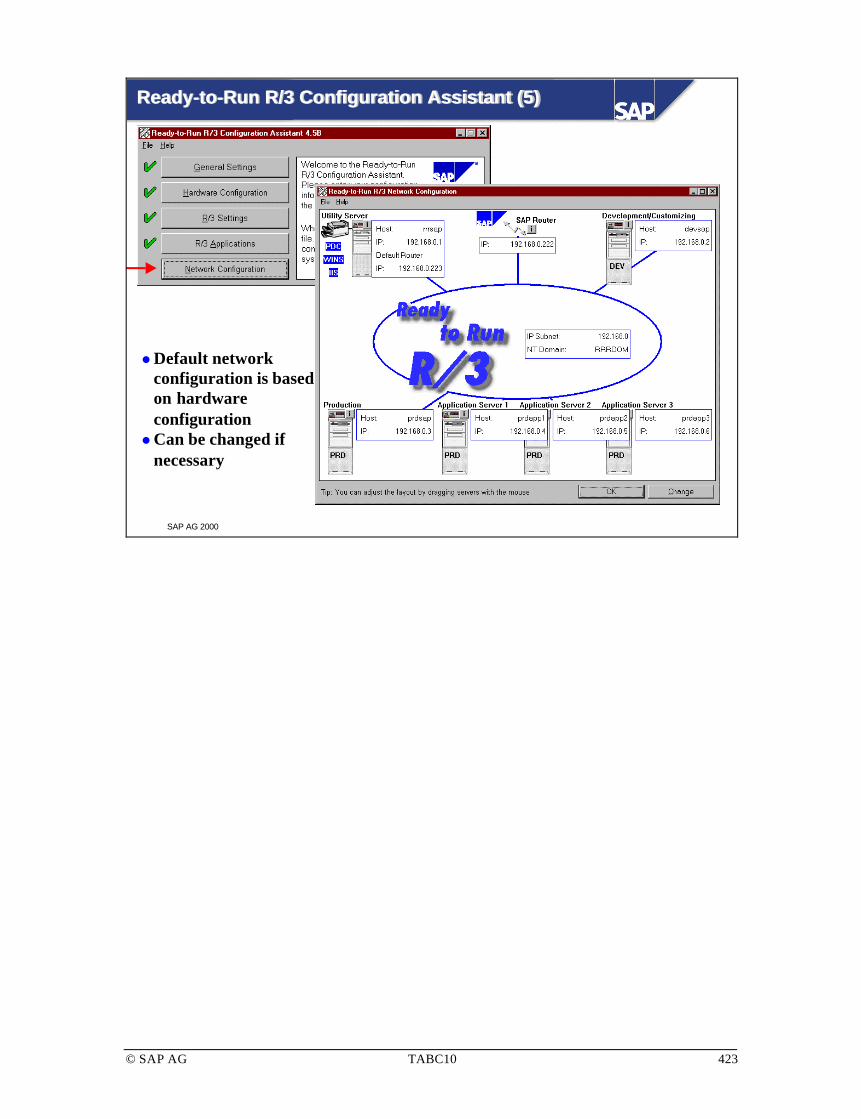
© SAP AG TABC10 423
SAP AG 2000
lDefault networkconfiguration is basedon hardwareconfiguration
lCan be changed ifnecessary
Ready-to-Run R/3 Configuration Assistant (5)Ready-to-Run R/3 Configuration Assistant (5)

© SAP AG TABC10 424
SAP AG 2000
Ready-to-Run R/3Ready-to-Run R/3
IntroductionIntroduction to to Ready Ready-to-Run R/3-to-Run R/3
ShipmentShipment of an RRR-Systems of an RRR-Systems
SettingsSettings in RRR in RRR
System Administration AssistentSystem Administration Assistent
Installation of RRRInstallation of RRR
RRRRRR Handover Handover Workshop Workshop
Additional InformationAdditional Information

© SAP AG TABC10 425
SAP AG 2000
Ready-to-Run R/3: Network under NTReady-to-Run R/3: Network under NT
SAPNET(Remote-Support)
End user PC
WINS Server
DHCP ServerRouterRouter
Private IP Addresses
registeredIP addresses
WINS Client WINS Client
DHCP Client DHCP Client
R/3 Productive-Server<prdsap> /<prdappX> (X=1,2,…) R/3 Development-Server
<devsap>
WINS Client
Other InternetSites
Utility Server<rrrsap>
WINS Client
End user PC
Online-DocumentationRRR-Tools
Printer...
SAPRouter
l The RRR delivery includes a small, private network that connects the servers and optionally several preconfigured client PCs. As well as the physical network infrastructure, the package also contains a complete concept for assigning and managing IP addresses.
l The quality of the network is of great importance for the availability, security and performance of a distributed client-server system such as the SAP System. The network components delivered with RRR offer a high-quality, extendable backbone, that meets all SAP requirements.
l To make sure of these qualities, we recommend that you operate the network as an SAP-internal network. The SAP-internal network must be connected to the existing company network to enable communication with the frontends outside the SAP-internal network and the SAP System.
l This slide shows the installation of an SAP network. Non-official IP addresses are used according to RFC (Request for Comments) 1918. A router connects the network to the Internet. The router must be assigned an official IP address (available from Internet providers in your country) and a private IP address for connecting to the network of your company.
l The network-related services are distributed across multiple servers: The Utility Server (default host name rrrsap) hosts the WINS service (assigns host names to IP address for the NetBIOS environment) and the DHCP service (assigns IP addresses to hosts dynamically).

© SAP AG TABC10 426
SAP AG 2000
The Ready-to-Run R/3 Domain Concept for NTThe Ready-to-Run R/3 Domain Concept for NT
Domain RRRDOM (default)
RRR DB undProductive Server
defaultHostname:PRDSAP
RRRDevelopment
Server
defaultHostname:DEVSAP
defaultHostname:PRDAPP1
Application Serverof the Production System
(Usage depends on the RRR Configuration)
defaultHostname:PRDAPPn
RRRUtilityServerPDC
defaultHostname:RRRSAP
WINS
DHCP
• • • •
l The RRR NT domain concept consists of a domain with default name RRRDOM. This domain contains all servers of the SAP Systems and the Utility Server.
l This ‘one domain’ model lets all users use their domain logins to access all services for which they have rights. The administrators can manage user accounts and resources centrally for the whole domain.
l The decision to set up the RRR domain as a ‘one domain’ model was made for administration and security reasons. This model guarantees that no users or user groups from other domains can access the resources of the SAP domain at the file level.
l As well as the default NT administrators, the RRRDOM domain also includes several preconfigured, global user accounts for administration purposes, the SAP administrators and the NT Service Accounts of the SAP production and test systems. This means that it is no extra work to add more SAP application servers.
l The RRR Utility Server contains the primary domain controller (PDC) of the RRRDOM domain. This detaches the SAP infrastructure from the security administration of other, non-SAP, components.

© SAP AG TABC10 427
SAP AG 2000
PreconfiguredPreconfigured Basis (1) Basis (1)
l R/3 Profile Administration
l Operation Modes (Day / Night Operation)
l Transport Management System (TMS)
l Software Logistics and System Landscape Infrastructure (Clients)
l Printer Infrastructure
l Remote Service Connection with SAPNET Frontend (formerly OSS)
l System Housekeeping Background Jobs
l Monitoring Infrastructure
l Logon Groups
l Pre-implemented Backup and Statistic Update Concept of the Databases
l Automatical Language Import during Installation possible
l Country specific Language, Code Page and Currency Settings
l Initial SAP and Database Tuning
l Import of tuned SAP-Profiles in Database
l . . .

© SAP AG TABC10 428
SAP AG 2000
PreconfiguredPreconfigured Basis (2) Basis (2)
Customerspecfic Currency DEM
Devicedriver of Sample Printer POST2
Language for maintaining system DescriptionGermanEnglishJapanese
SAP Service Center for your Regionsapserv3 Walldorfsapserv4 Foster Citysapserv5 Tokyosapserv6 Sydneysapserv7 Singapur
Program Edit Goto System HelpINST_CUSTOMER_ACTIONS
l As well as the standard RRR configuration, some customer-specific settings are made in the Final System Setup when the RRR System is handed over. These are made by executing the report program INST_CUSTOMER_ACTIONS.
l The following settings are made:
� Country-specific currency
� Print driver setup
� The administration concept guide is generated in the chosen language.
� A country-specific SAPNet Service host is assigned.

© SAP AG TABC10 429
SAP AG 2000
Ready-to-Run R/3Ready-to-Run R/3
IntroductionIntroduction to to Ready Ready-to-Run R/3-to-Run R/3
ShipmentShipment of an RRR-Systems of an RRR-Systems
SettingsSettings in RRR in RRR
System Administration AssistentSystem Administration Assistent
Installation of RRRInstallation of RRR
RRRRRR Handover Handover Workshop Workshop
Additional InformationAdditional Information

© SAP AG TABC10 430
SAP AG 2000
Administration and Service ConceptAdministration and Service Concept
l System Administration Assistant
n Easy-to-use administration tool for all SAP Systems
l Trouble Shooting Roadmapn Provides information to solve SAP and database administration problems
without the need for external help (for example from SAP Hotline)
l System Handling Concept
n Services is depending on system provider
l System Specifications
n RRR contains template documents with pre-filled, detailed information aboutRRR settings
n An administration manual can be maintained using the SystemAdministration Assistant

© SAP AG TABC10 431
SAP AG 2000
Current selection
Administrator FunctionDevelopment and Customizing ProcessTechnical InformationSystem SpecificationCustomizing FunctionApplication Function
Display only customer modifications for SAA
Save settings
Entire view Selective view Alert view
System Administration Assistant Edit Goto System Help
Hide selection screen in future
Worklist
Selection screen
Administration concept
System Administration Assistant (1)System Administration Assistant (1)
System Administration Assistant Customizing and Development in a 1 System Landscape Running Your System Overview: SAP System Administration SNI: Checklist for Operating the Production System SNI: Daily Tasks SNI: Weekly Tasks SNI: Monthly Tasks SNI: Yearly Tasks SNI: Unscheduled/Occasional Tasks
Additional Administration Tasks Troubleshooting, Service and Support Technical Information Configuration Reference
Assistant Edit Goto View System Help Ready-to-Run R/3: System Administration
Tools → Administration → Monitor → System Administration Assistant Transaction SSAA
Click
List of current alerts List of open alerts
l Design of the System Administration Assistant:
� Easy-to-use hypertext structure for administrating the SAP System
� Platform-specific Online Help for the RRR System
� Explains the whole structure of the system and its administration to the system administrator
� Contains tools that support less experienced system administrators
� Standard SAP System transactions are integrated directly into the SAA
� Online Help is available even when the SAP System is not running
l To access the System Administration Assistant, choose Tools → Administration → Monitor → System Administration Assistant. The first thing you see is the task overview (Transaction SSAA). On the initial screen you can choose to view the System Administration Assistant in different ways.
l To help the system administrator recognize the status of the system, each task is flagged with a symbol that indicates whether it has been executed on time, has not been executed, or needs to be executed. A legend gives you more information on the symbols used in the System Administration Assistant (choose Goto → Legend).

© SAP AG TABC10 432
SAP AG 2000
System Administration Assistant (2)System Administration Assistant (2)
Customizing and Development in a 1 System Landscape Running Your System Overview: SAP System Administration SNI: Checklist for Operating the Production System SNI: Daily Tasks SAP: CCMS System Monitoring (General Monitoring Funct SAP: Using the CCMS Alert Monitor SAP: Using the System Monitor SAP: Checking the System Log SAP: Checking Consistency of the Spool System
SAP: Checking for Spool Output Requests with Errors SAP: Checking Work Process Status
SAP: Analyzing ABAP Short Dumps SAP: Checking for Update Errors SAP: Checking Lock Entries SAP: Checking Batch Input Sessions SAP: Scheduling Jobs SAP: Checking Background Jobs
Assistant Edit Goto View System Help Ready-to-Run R/3: System Administration
Click
System Log: Local Analysis of sni01p
Time TA Clt User Tcod MNo C Text Date: 01.10.98
15:58:24 MS E00 S New system log file started with number 0 15:58:24 MS E10 S Buffer SCSA generated with 4096 length 4096 15:58:24 MS Q01 S Start message server, 1 times since System startup, PID 366 15:58:24 DP Q00 S Start SAP-R/3 System, SAPSYSTEM 01, dispatcher PID 357
See system log doc. Next section
System log Edit Goto Environment System Help System Log: Local Analysis of sni01p
l The location of the Online Help HTML files is specified with the SAP profile at the SAP server level. The entries in this profile point to the RRR Utility Server. The setting is made automatically when the RRR System is installed.
l Demonstration of the System Administration Assistant functions:
� Calling a transaction in the SAP System from the System Administration Assistant
� Accessing RRR-specific documentation from the System Administration Assistant
� Jumping to RRR-specific documentation in the standard documentation

© SAP AG TABC10 433
SAP AG 2000
Understanding the Task ListUnderstanding the Task List
System Administration Assistant- xAssistant Edit Goto Tools View System Help
System Administration Assistant |- Running Your System | |- PRD: Checklist for Operating the Production System | | |- PRD: Daily Tasks | | |- SAP: Checking the System Log | | |- DB: Monitoring Database Growth | |- DEV: Checklist for the Development/Test System | |- DEV: Daily Tasks | |- SAP: Checking the System Log |- Additional tasks |- R/3: System Administration |- Users: Copying a User
The status is shown for:• Tasks that have already been executed• Tasks that still have to be executed today
Occasional tasks do not have a status
Task must still beexecuted
Task was executedon time
l The task list shows the status for all periodic tasks:
� Green: This task was executed on time
� Red: This task still has to be executed
l Position the cursor over the light to display the time when the task was executed and the user.
l Occasional tasks do not have a status.
l The status of a task is always set after it has been executed. The status of tasks in remote systems can also be shown, as long as remote access to this system is allowed.

© SAP AG TABC10 434
SAP AG 2000
Administration ConceptAdministration Concept
Click
Current selection
Administrator FunctionDevelopment and Customizing ProcessTechnical InformationSystem SpecificationCustomizing FunctionApplication Function
Display only customer modifications
Save settings
Entire view Selective view Alert view
System Administration Assistant Edit Goto System Help
Hide selection screen in future
Worklist
Selection screen
Administration concept
The System Administration Assistant as an Administration Concept for theSystem Administrator
System administration can be split into:
O Periodic system monitoring tasks that have to be repeated to ensure the smooth operation of the systemO Tasks that are performed only in exceptional cases, or for special reasonsAn example of a periodic task is a data backup; a once-only task may be a
The System Administration Assistant collects these administration tasks togetherand orders them logically and according to their periodicity.
The System Administration Assistant does not contain all administration tasks.Its aim is to present the most important and most frequent tasks in a singleLocation. The System Administration Assistant can be thought of as an
Link
Document Edit Goto System Help
Hypertext
l The initial screen of the System Administration Assistant (Transaction SSAA) contains documentation on how you can use this tool in your own Administration Concept. See the slide for how to display this documentation.

© SAP AG TABC10 435
SAP AG 2000
Trouble Shooting RoadmapTrouble Shooting Roadmap
l The Trouble Shooting Roadmap was developed to support SAP system administrators in finding appropriate corrections to a variety of standard problems. It is especially helpful in the early stages of an SAP System implementation.
l The Trouble Shooting Roadmap is integrated into the System Administration Assistant (Running Your System → Troubleshooting, Service and Support → Troubleshooting).
l The Roadmap is intended as an aid to orientation for system administrators dealing with the complex interaction of the different system components. It is fully structured as a series of steps, starting from the general problem area.
l The Roadmap speeds up the identification of problems and makes sure that system administrators do not forget any important aspects by giving them a standard procedure to follow. It takes the administrator through a hierarchy that leads from the problem to its technical cause.

© SAP AG TABC10 436
SAP AG 2000
Using the RRR Configuration ReferenceUsing the RRR Configuration Reference
Click
Additional Administration Tasks Troubleshooting, Service and Support Technical Information Network Concepts for Ready-to-Run R/3 Frontend PCs Configuration Reference SAP Configuration Reference Maintaining Company Configuration Reference
Assistant Edit Goto View System Help Ready-to-Run R/3: System Administration
l The configuration reference contains all data for administrating Basis components in the SAP system landscape. This includes:
� Configuration of hardware and software
� System environment in the particular area
� Important administration rules for system administrators in a particular area
� CCMS tasks
l The delivered configuration reference includes the Customizing settings (or preconfiguration) of RRR. It is a template for the individual specifications of the customer. Customers specify their own individual system landscapes and IT infrastructures in the texts and tables of the configuration reference.
l SAP recommends that you adapt the system specifications while you are implementing the SAP System. Also change and extend them accordingly when you change the system while you are using it productively. Only a complete and up-to-date configuration reference can support you in running your systems.
l There are two types of configuration reference:
� SAP standard configuration reference (read-only, gives information about the delivered RRR System)
� Company-specific configuration reference (to be adapted by the customer); use the System Administration Assistant in the SAP System to maintain this configuration reference.

© SAP AG TABC10 437
SAP AG 2000
Ready-to-Run R/3Ready-to-Run R/3
IntroductionIntroduction to to Ready Ready-to-Run R/3-to-Run R/3
ShipmentShipment of an RRR-Systems of an RRR-Systems
SettingsSettings in RRR in RRR
System Administration AssistentSystem Administration Assistent
Installation of RRRInstallation of RRR
RRRRRR Handover Handover Workshop Workshop
Additional InformationAdditional Information

© SAP AG TABC10 438
SAP AG 2000
Installation OverviewInstallation Overview
RRR Unattended InstallationWindows NT CDSeparate for copyright reasons
Installation ImageRRR
• Hardware Assembly• Disk Configuration• Installation Initial NT• Copy OEM Drivers• Start RRRStart program
OEM Hardware Drivers
Solution Provider
RRR Configuration File
l A completely unattended installation was choosen for the RRR-System cause such an installation is simple, so that low skilled IT personal can perform it and the resulting R/3 Systems are correctly customized.
l Starting with release 4.5B the NT-Installation is optional.
l For the RRR installation the following parts are needed:
� Hardware
� MS Windows NT CD
� NT Service Pack 4
� OEM drivers
� RRR configuration files
� RRR installation image

© SAP AG TABC10 439
SAP AG 2000
Installation of RRR together with Windows NT?Installation of RRR together with Windows NT?
• Install RRR with an existing Windows NT
• Install 2nd NT during RRR installation
• Machine should have two Windows NT• 1st NT is needed for backup/emergency• 2nd NT for productive operation
Two choices for Installation
l When you start an RRR installation you have to choose, if you want to install the RRR system together with a new NT installation OR to install the RRR system on an existing and according to RRR prerequisites customized NT system.
l It is recommended to have a second NT system installed. This is due to complete backups of the productive system, including all files (R/3, database and productive NT) and emergency maintenances from within the second NT system.

© SAP AG TABC10 440
SAP AG 2000
Ready-to-Run R/3 Software LayersReady-to-Run R/3 Software Layers
Initial NT Productive NT (optional)
Database
RRR settings
RRR extensions
Initial NT is used for NT maintenance / full backupand to start the RRR unattended installation.
Provided by Assembly Partner
R/3
RRRStart
l The RRR installation is based on an initial MS Windows NT installation.
l This initial NT will later be used for NT maintenance and full backup.

© SAP AG TABC10 441
SAP AG 2000
Ready-to-Run R/3: Delivery Process (1)Ready-to-Run R/3: Delivery Process (1)
Development
Utility Server
Production system
Delivery of the whole configuration at once
Configuration Assistant
l This is the standard RRR installation procedure.
l It consist of:
� setup of hardware,
� preparation according to the RRR specifications,
� installation procedure and
� (if not performed on the customer site) delivery.
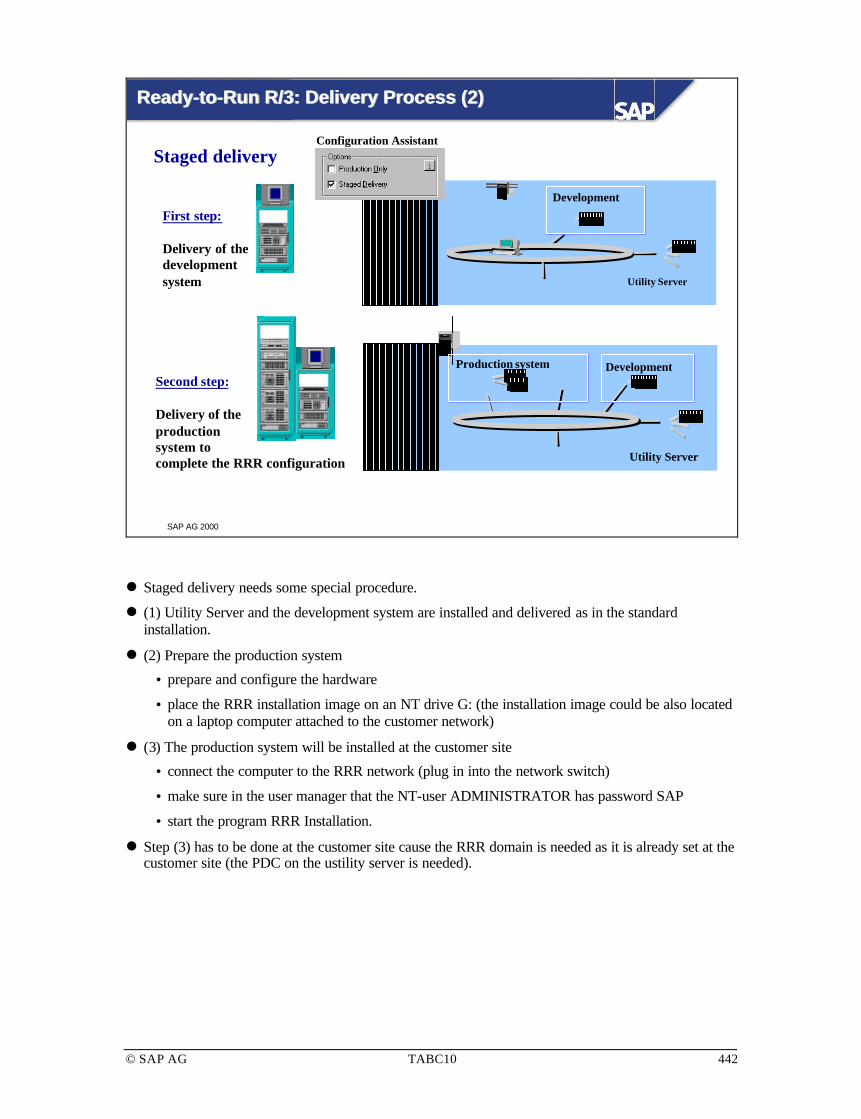
© SAP AG TABC10 442
SAP AG 2000
Ready-to-Run R/3: Delivery Process (2)Ready-to-Run R/3: Delivery Process (2)
First step:
Delivery of thedevelopmentsystem
Development
Utility Server
Staged delivery
Second step:
Delivery of the production system to complete the RRR configuration
Development
Utility Server
Production system
Configuration Assistant
l Staged delivery needs some special procedure.
l (1) Utility Server and the development system are installed and delivered as in the standard installation.
l (2) Prepare the production system
� prepare and configure the hardware
� place the RRR installation image on an NT drive G: (the installation image could be also located on a laptop computer attached to the customer network)
l (3) The production system will be installed at the customer site
� connect the computer to the RRR network (plug in into the network switch)
� make sure in the user manager that the NT-user ADMINISTRATOR has password SAP
� start the program RRR Installation.
l Step (3) has to be done at the customer site cause the RRR domain is needed as it is already set at the customer site (the PDC on the ustility server is needed).

© SAP AG TABC10 443
SAP AG 2000
l RRR system consists of multiple machines
n Utility Server, Development Server, Production Server,Application Server(s)
l Installation order matters!
n Domain Controller, WINS
n NT shares
l Save installation sequence
n Install machines one after another: US → TS → PS → A1, A2,...
l Accelerated installation sequence:
n Install Development and Production Server simultaneously
n Not recommended!
Planning RRR Installation SequencePlanning RRR Installation Sequence

© SAP AG TABC10 444
SAP AG 2000
l Hardware assembly
n Assemble RRR hardware
n Configure RAID system and disks according to RRR documentation
l Install Initial Windows NT 4.0 operating system
n Directory: c:\winnt.ini
n Install OEM hardware drivers if needed
l Set up additional files and directories
n Directory c:\i386 (NT installation with OEM drivers in place if needed!)
n Directory c:\sp5 (NT Service Pack 5)
n c:\cfg\unattend.txt (unattended NT installation)
n c:\cfg\fileserv.cmd (connection to installation image)
n c:\cfg\rrrconf.cfg (RRR Configuration Assistant file)
Preparing RRR InstallationPreparing RRR Installation
l Before the RRR installation can start the RRR machines have to be prepared. Some additional steps have to be scheduled.
l Check next slides for more information.

© SAP AG TABC10 445
SAP AG 2000
RRR Installation Program - Introduction ScreenRRR Installation Program - Introduction Screen
l RRR CD auto-run
n Starts automatically whenuser inserts RRR CD-ROM
l Start programs
n RRRBuild - builds RRRinstallation image
n RRRConf - RRRConfiguration Assistant
l View documentation
n Installation GuideRRRIntro program(On RRR CD: \RRR\Common\RRRIntro.exe)
l When the RRR CD is inserted, the above shown screen should appear. The program RRRINTRO.EXE is a wrapper program for the RRRBUILD.EXE and the RRRCONF.EXE program. It can also be used to call the RRR windows help file s.
l If the auto-run feature is disabled the program can be started manually.

© SAP AG TABC10 446
SAP AG 2000
Build RRR Installation ImageBuild RRR Installation Image
l Choose Source and Target Drive
n Installation Target can be a localdisk or any network drive (e.g. afile server)
l Select Database System
n You can also choose “All” toinstall all database systems
l Insert listed CDs
n Arbitrary order
n Program will automaticallyrecognize the inserted CD
l Click Copy for each CD
n Mounted CD will be copied tothe appropriate directory oninstallation image
RRRBuild program(On RRR CD: \RRR\Common\RRRBuild.exe)
1
2
3
4
11
2
3
4

© SAP AG TABC10 447
SAP AG 2000
Possible RRR Installation SourcesPossible RRR Installation Sources
RRR LANRRR LAN
Utility server
R/3 target system
File serverG:
The source drive for the installation image can be adedicated file server, some additional disks in theutility server or the local hard disk G: on the targetmachine.
l The source drive for the installa tion image can be a dedicated file server, additional disks in the utility server or the local hard disk G: on the target machine.

© SAP AG TABC10 448
SAP AG 2000
Start the Installation Process: ProgramStart the Installation Process: Program RRRStart RRRStart
l Connect RRR installation imageserver via c:\cfg\fileserv.cmd
l Select to install NT or use existingNT installation
l Check NT user and organization
n Needed for NT license installation
l Fill in NT license key
l Select machine to install
n Available machines determined bythe configuration file
l Select RRR installation image drive
n default data from where you startRRRStart
l Press Start button
2
3
4
6
5
1
2
3
4
5
RRRStart program(On RRR CD: \RRR\Common\RRRStart.exe)
1
6
0
l The command file fileserv.cmd could be empty but must be existing. You can find a sample file on the RRR installation CD.
l If the machines are set up correctly and the RRR configuration file is provided, the program RRRstart can be started from its location \RRR\Common on the installation image.
l Extensive RRR installation documentation is available on the RRR installation CD in the INSTDOCU directory. In this directory you can also find the Microsoft documentation for Windows NT.

© SAP AG TABC10 449
SAP AG 2000
Ready-to-Run R/3Ready-to-Run R/3
IntroductionIntroduction to to Ready Ready-to-Run R/3-to-Run R/3
ShipmentShipment of an RRR-Systems of an RRR-Systems
SettingsSettings in RRR in RRR
System Administration AssistentSystem Administration Assistent
Installation of RRRInstallation of RRR
RRRRRR Handover Handover Workshop Workshop
Additional InformationAdditional Information
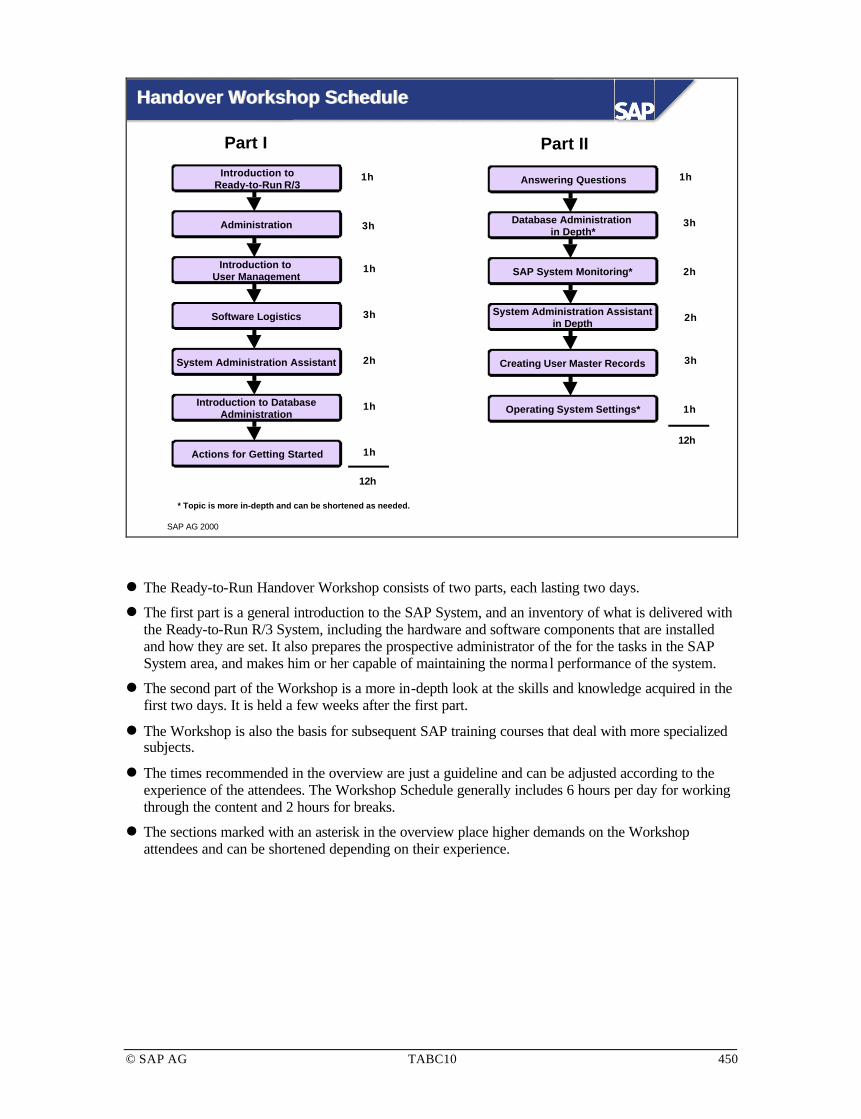
© SAP AG TABC10 450
SAP AG 2000
Handover Workshop ScheduleHandover Workshop Schedule
Introduction toReady-to-Run R/3
Part I
Administration
Introduction to User Management
Software Logistics
System Administration Assistant
Introduction to DatabaseAdministration
Actions for Getting Started
Answering Questions
Part II
Database Administration in Depth*
SAP System Monitoring*
System Administration Assistantin Depth
Creating User Master Records
Operating System Settings*
1h
3h
1h
3h
2h
1h
1h
1h
3h
2h
2h
3h
1h
12h
12h
* Topic is more in-depth and can be shortened as needed.
l The Ready-to-Run Handover Workshop consists of two parts, each lasting two days.
l The first part is a general introduction to the SAP System, and an inventory of what is delivered with the Ready-to-Run R/3 System, including the hardware and software components that are installed and how they are set. It also prepares the prospective administrator of the for the tasks in the SAP System area, and makes him or her capable of maintaining the normal performance of the system.
l The second part of the Workshop is a more in-depth look at the skills and knowledge acquired in the first two days. It is held a few weeks after the first part.
l The Workshop is also the basis for subsequent SAP training courses that deal with more specialized subjects.
l The times recommended in the overview are just a guideline and can be adjusted according to the experience of the attendees. The Workshop Schedule generally includes 6 hours per day for working through the content and 2 hours for breaks.
l The sections marked with an asterisk in the overview place higher demands on the Workshop attendees and can be shortened depending on their experience.

© SAP AG TABC10 451
SAP AG 2000
Ready-to-Run R/3Ready-to-Run R/3
IntroductionIntroduction to to Ready Ready-to-Run R/3-to-Run R/3
ShipmentShipment of an RRR-Systems of an RRR-Systems
SettingsSettings in RRR in RRR
System Administration AssistentSystem Administration Assistent
Installation of RRRInstallation of RRR
RRRRRR Handover Handover Workshop Workshop
Additional InformationAdditional Information

© SAP AG TABC10 452
SAP AG 2000
• www.sap.com/rrr or intranet.sap.com/rrr
• Contact us: [email protected]
Ready-to-Run R/3: InformationReady-to-Run R/3: Information