Xpand!
Version 1.0
™

Copyright
© 2006 Digidesign, a division of Avid Technology, Inc. All rights reserved. This guide may not be duplicated in whole or in part without the express written consent of Digidesign.
Digidesign, Avid, Pro Tools, Pro Tools|HD, Pro Tools LE, Pro Tools M-Powered, Digidesign Digi 002, Digidesign Command|8, Digidesign Control|24, Digidesign D-Command, Digidesign D-Control, Digidesign ProControl, and RTAS are either trademarks or registered trademarks of Avid Technology, Inc. in the US and other countries. All other trademarks contained herein are the property of their respective owners.
Product features, specifications, system requirements, and availability are subject to change without notice.
PN 9329-19038-00 REV A 1/06

Contents
iii
contents
Chapter 1. Introduction
. . . . . . . . . . . . . . . . . . . . . . . . . . . . . . . . . . . . . . . . . . . . . . . . . . . . . . 1
Features. . . . . . . . . . . . . . . . . . . . . . . . . . . . . . . . . . . . . . . . . . . . . . . . . . . . . . . . . . . . . . . 1
System Requirements . . . . . . . . . . . . . . . . . . . . . . . . . . . . . . . . . . . . . . . . . . . . . . . . . . . . . 2
Working With Plug-ins . . . . . . . . . . . . . . . . . . . . . . . . . . . . . . . . . . . . . . . . . . . . . . . . . . . . . 2
Conventions Used in This Guide. . . . . . . . . . . . . . . . . . . . . . . . . . . . . . . . . . . . . . . . . . . . . . 2
Chapter 2. Installation
. . . . . . . . . . . . . . . . . . . . . . . . . . . . . . . . . . . . . . . . . . . . . . . . . . . . . . . 3
Installing Xpand! . . . . . . . . . . . . . . . . . . . . . . . . . . . . . . . . . . . . . . . . . . . . . . . . . . . . . . . . . 3
Removing Xpand! . . . . . . . . . . . . . . . . . . . . . . . . . . . . . . . . . . . . . . . . . . . . . . . . . . . . . . . . 3
Chapter 3. Operate Xpand!
. . . . . . . . . . . . . . . . . . . . . . . . . . . . . . . . . . . . . . . . . . . . . . . . . . . 5
Editing Parameters . . . . . . . . . . . . . . . . . . . . . . . . . . . . . . . . . . . . . . . . . . . . . . . . . . . . . . . 5
Assigning Parameters to MIDI Controllers . . . . . . . . . . . . . . . . . . . . . . . . . . . . . . . . . . . . . . . 6
Smart Knobs . . . . . . . . . . . . . . . . . . . . . . . . . . . . . . . . . . . . . . . . . . . . . . . . . . . . . . . . . . . 6
Edit Pages . . . . . . . . . . . . . . . . . . . . . . . . . . . . . . . . . . . . . . . . . . . . . . . . . . . . . . . . . . . . . 7
Mix (Mixer) Page . . . . . . . . . . . . . . . . . . . . . . . . . . . . . . . . . . . . . . . . . . . . . . . . . . . . . . . . . 8
Mod (Modulation) Page . . . . . . . . . . . . . . . . . . . . . . . . . . . . . . . . . . . . . . . . . . . . . . . . . . . 10
Arp (Arpeggiator) Page. . . . . . . . . . . . . . . . . . . . . . . . . . . . . . . . . . . . . . . . . . . . . . . . . . . . 12
FX (Effects) Page. . . . . . . . . . . . . . . . . . . . . . . . . . . . . . . . . . . . . . . . . . . . . . . . . . . . . . . . 13
Appendix A. MIDI Controller Assignment
. . . . . . . . . . . . . . . . . . . . . . . . . . . . . . . . . . . . . . 15
Appendix B. Available Parts
. . . . . . . . . . . . . . . . . . . . . . . . . . . . . . . . . . . . . . . . . . . . . . . . . 17
Appendix C. Arpeggiator Modes
. . . . . . . . . . . . . . . . . . . . . . . . . . . . . . . . . . . . . . . . . . . . . . 29
Appendix D. Effects And Parameters
. . . . . . . . . . . . . . . . . . . . . . . . . . . . . . . . . . . . . . . . . 31
Contents

Xpand! Plug-In Guide
iv

Chapter 1: Introduction
1
chapter 1
Introduction
Welcome to the Xpand!™ virtual workstation plug-in.
Xpand! is a plug-in instrument that is developed with the musician, arranger, composer and mu-sic producer in mind—a sonic powerhouse, which features a thousand high-quality factory sounds, suitable for any music genre. Its intui-tive interface allows users, no matter their level of sound-designing skill, to quickly create or ad-just sounds to their needs in virtually no time.
The Xpand! engine consists of a sample play-back, FM, wavetable, and virtual analogue synth architecture, capable of creating complex sounds very efficiently, allowing for multiple si-multaneous patches with integrated effects on any Pro Tools system.
Features
Supported Formats
Xpand! is only available in RTAS® format for Windows XP and Mac OS X.
Supported Systems
Xpand! is supported on the following systems:
• Pro Tools|HD®
• Pro Tools LE™
• Pro Tools M-Powered™
Xpand! requires Pro Tools 7.0 or higher.
Sample Rate and Channel Format Support
Xpand! supports 44.1 kHz, 48 kHz, 88.2 kHz, 96 kHz, 176.4 kHz, and 192 kHz sample rates.
Xpand! works with mono and stereo formats only.
Control Surface Support
Xpand! can be operated from the following con-trol surfaces:
• Digidesign® Digi 002®
• Digidesign Command|8®
• Digidesign Control|24™
• Digidesign D-Command ™
• Digidesign D-Control™
• Digidesign ProControl®
• Mackie HUI-compatible controllers

Xpand! Plug-In Guide
2
System Requirements
To use Xpand!, you need the following:
• A Digidesign-qualified Pro Tools|HD sys-tem, Pro Tools LE system, or Pro Tools M-Powered system
Compatibility Information
Digidesign can only assure compatibility and provide support for hardware and software it has tested and approved.
For a list of Digidesign-qualified computers, op-erating systems, hard drives, and third-party de-vices, refer to the latest compatibility informa-tion on the Digidesign Web site (www.digidesign.com).
Working With Plug-ins
Refer to the
DigiRack Plug-Ins Guide
for informa-tion on working with plug-ins, including:
• Using Plug-Ins as Inserts
• The Plug-In Window
• Adjusting Plug-In Parameters
• Automating Plug-Ins
• Using the Plug-In Settings Librarian
Conventions Used in This Guide
All Digidesign guides use the following conven-tions to indicate menu choices and key com-mands:
:
The following symbols are used to highlight im-portant information:
Convention Action
File > Save Session Choose Save Session from the File menu
Control+N Hold down the Control key and press the N key
Control-click Hold down the Control key and click the mouse button
Right-click Click with the right mouse button
User Tips are helpful hints for getting the most from your Pro Tools system.
Important Notices include information that could affect your Pro Tools session data or the performance of your Pro Tools system.
Shortcuts show you useful keyboard or mouse shortcuts.
Cross References point to related sections in this guide or other Pro Tools Guides.

Chapter 2: Installation
3
chapter 2
Installation
Installing Xpand!
To install Xpand!:
1
Double-click the Xpand! installer application.
2
Follow the on-screen instructions to complete the installation.
The Xpand! installer puts the Xpand! plug-in files in the following location:
On Windows
Program Files\Common Files\ Digidesign\DAE\Plug-Ins
On Mac OS X
/Library/Application Support/ Digidesign/Plug-Ins
By default, the Xpand! installer puts the plug-in’s content file (Xpand!.dat) in the following location (content folder):
On Windows
Program Files\Digidesign\Xpand!
On Mac OS X
/Library/Application Support/ Digidesign/ Xpand!
Removing Xpand!
If you need to remove the Xpand! plug-in from your system, follow the instructions below for your computer platform.
Windows XP
To remove the Xpand! plug-in:
1
From the Start menu, choose Settings > Con-trol Panel > Software.
2
Select the Xpand! plug-in from the list of in-stalled applications and click the Change/Re-move button.
3
Follow the on-screen instructions to remove the plug-in.
Mac OS X
To remove the Xpand! plug-in:
■
Drag all files with “Xpand!” in their names from the Plug-Ins and the content folder to the Trash, or to the Plug-Ins (Unused) folder.
The Xpand! plug-in is not copy-protected and does not need to be authorized.

Xpand! Plug-In Guide
4

Chapter 3: Operate Xpand!
5
chapter 3
Operate Xpand!
Xpand! is a virtual music workstation featuring a broad range of sound generation possibilities including multi-sampled instruments as well as FM, wavetable, and virtual analogue synthesis.
Getting started with Xpand! is very easy and self-explanatory, especially if you are already fa-miliar with virtual instruments or hardware workstations.
Note that Xpand! is not multi-timbral—one in-stance is assigned to one MIDI channel and pro-vides four synthesizer slots, each with individ-ual Mix, MIDI, Arpeggiator, Modulation and Effects settings. A slot can hold one of 500 syn-thesizer presets, called
Parts
.
The settings of all four slots and their respective Parts can be saved as a single
Patch
. Xpand! comes with a set of over 1000 Patches, created by renowned sound designers. It’s worth brows-ing through these Patches to get an impression of the versatility of Xpand!.
Editing Parameters
Using a Mouse
You can adjust Xpand! plug-in controls by click-ing and dragging the control’s slider or knob, or by moving over it and scrolling up or down with the scroll wheel.
Adjust rotary controls by clicking and dragging horizontally or vertically. Parameter values in-crease as you drag upward or to the right, and decrease as you drag downward or to the left.
Keyboard Shortcuts
◆
For finer adjustments, hold down Control (Windows) or Command (Macintosh) while moving the control.
◆
To return a control to its default value, Alt-click (Windows) or Option-click (Macintosh) the control.
Patch is another name for the plug-in set-tings. Refer to the DigiRack Plug-Ins Guide for information on working with RTAS plug-ins.
Dragging a control

Xpand! Plug-In Guide
6
Using a Control Surface
Xpand! can be controlled from any control sur-face supported by Pro Tools. Refer to the appro-priate controller product guide for more infor-mation.
Assigning Parameters to MIDI Controllers
In addition to pre-assigned MIDI controllers such as Sustain Pedal and Volume, you can as-sign MIDI controllers to Xpand! parameters for automation or real-time control from a MIDI keyboard or control surface. MIDI assignments are saved per Patch.
To assign Xpand! parameters of to a MIDI controller:
■
Right-click (Windows) or Control-click (Mac-intosh) the control, select “Assign” and choose a controller number from the pop-up MIDI CC list.
-or-
■
Right-click (Windows)/Control-click (Macin-tosh) the control, select “Learn” from the menu and move the desired knob or controller on your MIDI keyboard or sequencer. Xpand! will set this MIDI controller to the parameter you have chosen.
To remove a MIDI controller assignment:
■
Right-click (Windows) or Control-click (Mac-intosh) an assigned control and choose “Forget” to remove its MIDI controller assignment
.
Smart Knobs
The upper section of Xpand! provides 6 useful pre-assigned controls called Smart knobs. These are intended for quickly adapting a preset Part or Patch to your session in terms of feel, timbre, enveloping and other settings. For each Part, the Smart knobs are intelligently pre-assigned to im-portant parameters by professional sound de-signers to make working with Xpand! as easy as possible. The assigned parameter is displayed in the black field below each knob.
Smart Knob Assignment List
Select from the list on the left to set whether Xpand! displays the Smart knobs for the whole Patch (Global) or for a specific Part (A, B, C, D).
See Appendix A for a list of MIDI controllers and their standard assignment to parame-ters.
Xpand! has pre-defined parameter assign-ments for Digidesign and supported third party hardware control surfaces.

Chapter 3: Operate Xpand!
7
Level (Master Volume)
On the right-hand of the Smart knob section there is a master Volume control as well as a Clip indicator.
Smart Display
The Smart display is a context-sensitive text dis-play. When you select a Patch or Part, it displays some descriptive text. When editing knobs or controls, it displays the parameter name and value. It does not display parameter values of in-coming automation. Click parameters (without moving the mouse) to show their current value without changing it.
Select “Global” from the Smart Knob Assign-ment list to show a short description of the cur-rently selected Patch.
Edit Pages
Below the Smart knob section are four tabs for accessing different control pages where you can edit the Parts in more detail. Click one of the four tabs on either side of the Smart display to display the respective page.
Tab Controls
MIX Mixer, Panning, FX Sends, MIDI
MOD Modulation Matrix Settings
ARP Arpeggiator Settings
FX Load & Edit Effects

Xpand! Plug-In Guide
8
Mix (Mixer) Page
This page is where you set up each Part’s vol-ume, position in the stereo field and its send amount to the built-in effects. There are also set-tings for MIDI input transposition and key range to set up split layers.
Select and Load Parts
Activate or deactivate the slot by clicking its blue button.When the slot is activated the but-ton is lit.
Click the area surrounding the On/Off button to select the Part, so its Smart knobs are displayed.
To load a Part into the slot, click into the black Name field and choose a Part from the pop-up list. You can also browse through the Parts by moving the mouse cursor above the Name field and moving the scroll wheel up or down.
Level
Move the slider to set the Part’s volume level, in-creasing volume to the right and decreasing to the left. The blue meter shows the slot’s audio output. The Level control appears on all four pages—on Mix and Arp pages as a slider, on the Mod and FX pages as a knob.
Pan (Panning)
Move to the right or left to set the Part’s position in the stereo field. The Panning control appears also on the Arpeggiator and the FX page.
FX1
This knob is the Part’s send amount to FX1. Ad-just the Part’s feed into the effect by moving the knob.
FX2
This knob is the Part’s send amount to FX2. Ad-just the Part’s feed into the effect by moving the knob.
See Appendix B for a list of all available Parts.
On/Off button
Part selector Name field

Chapter 3: Operate Xpand!
9
Tr/Fine
The Tr/Fine (Transpose/Fine) section includes two different controls for transposing incoming MIDI notes. The Semitone control (the upper control) transposes incoming notes up or down in semitones. For finer control, use the Cents control (the lower control), which transposes notes up or down in cents.
Click the control and drag up or down to in-crease or descrease its value.
Hi/Lo Key
Use the Hi/Lo Key controls to assign Parts to dif-ferent keyboard ranges. This can be useful for splitting your keyboard across different Parts. For example, Part A holding a bass sound could be assigned C-1 to B2 and Part 2 your synth lead assigned C3 to G8.
To assign a Part to a certain key range do the following:
■
Click the Upper/Lower key range limit control and drag up or down to increase or decrease its value.
-or-
■
Do the following:
• Right-click the control and choose Learn.
• Then press the appropriate key on your MIDI keyboard.
Cent
Semitone
Upper key range limit
Lower key range limit

Xpand! Plug-In Guide
10
Mod (Modulation) Page
The Mod page lets you easily create sophisti-cated modulation settings for shaping a Part. Your MIDI keyboard’s modulation wheel and pressure (also called aftertouch) can be used as modulation sources.
Normally, the modulation wheel provides a pe-riodically repeating modulation such as vibrato, and aftertouch provides a static offset to the se-lected destination such as volume or filter swells.
Many Xpand! Patches and Parts have pre-as-signed settings for modulation wheel and pres-sure. With the following controls you can adapt them or create your own.
Modulation Wheel Controls
Shape & Destination
Select the waveform shape for the modulation from the upper pop-up list—an LFO waveform used to modulate the selected destination. For most waveforms there is a choice of a freely ad-justable and a tempo-synchronized setting (Sync), except for “Off” and “Random.” If the pop-up is set to Off the movements of the mod-ulation wheel will directly modulate the desti-nation without a time varying waveform.
Select a destination for the modulation by your MIDI keyboard’s modulation wheel from the lower pop-up list:
Rate
Move this knob to set the speed or rate of the modulation wheel’s modulation. When using a synchronized shape (such as Saw Sync), the Rate control sets the speed in fixed, tempo synchro-nized steps. When using other shapes (such as Sine, Tri, and Saw), the LFO speed is freely ad-justable.
Depth
This knob sets the strength or amount of how much the signal is affected by the modulation. Depth is a bipolar control, which means that it can be set to positive or negative values.
Destination Description
Pitch Affects the Part’s pitch.
Wave Changes the sound based on its Part. For example, shaping wave-forms, FM modulation depth, sample start point offset, detun-ing.
Filter Affects the Part’s filter cutoff fre-quency.
Volume Affects the Part’s volume level.
Pan Affects the Part’s position in the stereo field.
For example, with the modulation wheel’s shape set to Off and destination to Pan, moving the mod wheel up makes the signal go to the left (negative Depth value) or to the right (positive Depth value).

Chapter 3: Operate Xpand!
11
Pressure Controls
Many MIDI keyboards provide pressure (also called aftertouch) to generate a MIDI control signal which depends on how hard you press down held keys after the initial “note on.”
With Xpand! you can use this control signal to modulate a number of useful controls.
Destination
Select a destination for the modulation by your MIDI keyboard’s pressure from the pop-up list:
Depth
This knob sets how much the signal is affected by the pressure control signal. Depth is a bipolar control, which means that it can be set to posi-tive and negative values.
Destination Description
Pitch Affects the Part’s pitch.
Wave Changes the sound based on its Part. For example, shaping wave-forms, FM modulation depth, sample start point offset, detun-ing.
Filter Affects the Part’s filter cutoff fre-quency.
Volume Affects the Part’s volume level.
For example, with destination set to Filter, applying aftertouch increases (positive Depth value) or decreases (negative Depth value) the filter cutoff frequency.
Xpand! Plug-In Guide
12
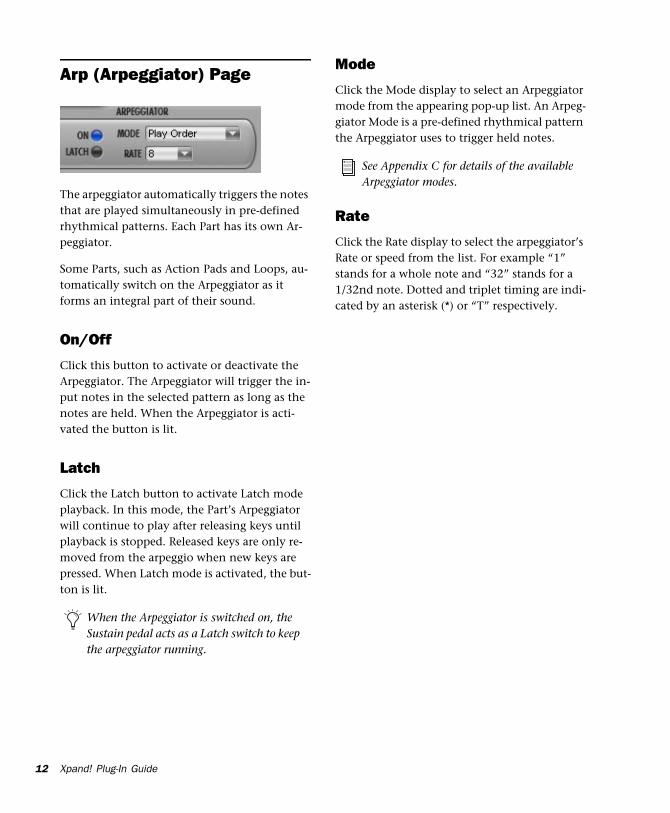
Arp (Arpeggiator) Page
The arpeggiator automatically triggers the notes that are played simultaneously in pre-defined rhythmical patterns. Each Part has its own Ar-peggiator.
Some Parts, such as Action Pads and Loops, au-tomatically switch on the Arpeggiator as it forms an integral part of their sound.
On/Off
Click this button to activate or deactivate the Arpeggiator. The Arpeggiator will trigger the in-put notes in the selected pattern as long as the notes are held. When the Arpeggiator is acti-vated the button is lit.
Latch
Click the Latch button to activate Latch mode playback. In this mode, the Part’s Arpeggiator will continue to play after releasing keys until playback is stopped. Released keys are only re-moved from the arpeggio when new keys are pressed. When Latch mode is activated, the but-ton is lit.
Mode
Click the Mode display to select an Arpeggiator mode from the appearing pop-up list. An Arpeg-giator Mode is a pre-defined rhythmical pattern the Arpeggiator uses to trigger held notes.
Rate
Click the Rate display to select the arpeggiator’s Rate or speed from the list. For example “1” stands for a whole note and “32” stands for a 1/32nd note. Dotted and triplet timing are indi-cated by an asterisk (*) or “T” respectively.
When the Arpeggiator is switched on, the Sustain pedal acts as a Latch switch to keep the arpeggiator running.
See Appendix C for details of the available Arpeggiator modes.

Chapter 3: Operate Xpand! 13
FX (Effects) Page
Xpand! provides two FX (effects) per instance. Send controls for each Part are located on the Mix and FX pages.
On/Off
Click the button to activate or deactivate the ef-fect. The button is lit when the effect is acti-vated.
Type
Click the FX type display to select an effect from the pop-up list.
Parameters 1 & 2
Edit the selected effect by two parameters. The parameters are varying and depend on the type of effect.
To FX1 (FX2 Send to FX1)
This control sends the output signal of FX2 into FX1 instead of directly to the output. When set to 100%, FX2 and FX1 are connected in parallel, rather than in series at 0%.
See Appendix D for a list of all Effects and their available parameters.

Xpand! Plug-In Guide14

Appendix A: MIDI Controller Assignment 15
appendix a
MIDI Controller Assignment
Default controller assignments to parameters:Some controllers have a standard function if the controller is not assigned to a parameter:
Some controllers have a standard function and cannot be assigned to a parameter:
Supported RPNs:
MIDI CC Standard Function
7 Master Output Level
10 Part A Pan
16 Part A Smart Knob 1
17 Part A Smart Knob 2
18 Part A Smart Knob 3
19 Part A Smart Knob 4
72 Global Release
73 Global Attack
74 Global Cutoff
75 Global Decay
79 Global Filter Env Depth
80 Part A Smart Knob 5
81 Part A Smart Knob 6
91 Part A FX1 Send
93 Part A FX2 Send
Universal real-time octave tuning SysEx messages are supported!
MIDI CC Standard Function
1 Modulation Wheel
5 Glide Time
11 Expression
64 Sustain Pedal
65 Glide On/Off
MIDI CC Standard Function
6 RPN Data Entry
100 RPN Select (LSB)
101 RPN Select (MSB)
120 All Sound Off
121 Reset Controllers
123 All Notes Off
0 Example: Pitch Bend RangeCC100 = 0, CC101 = 0, CC6 = bend range in semitones
1 Example: Fine TuneCC100 = 0, CC101 = 1, CC6 = fine tune amount

Xpand! Plug-In Guide16

Appendix B: Available Parts 17
appendix b
Available Parts
Folders
Soft Pads
Bright Pads
Action Pads
Pad Layers
Percussive
Polysynths
Synth Brass
Soft Leads
Hard Leads
Ambience + FX
Acoustic Piano
Electric Pianos
Organs
Clavinets
Strings
Vocals
Brass + Woodwind
Mallets
Bells
Guitars
Ethnic
Hits
Synth Basses
Basses
Drums
Percussion
Loops
Basics
Folders (Cont.)

Xpand! Plug-In Guide18
Softpads
Sweepscape
Massive Pad
Sea Spray
Shimmer
Singing Pad
Sweeping Overtones
Epic Pad
Phaser Pad
Gentle Bells Sweep
Triangle Bend
Gentle Man
Bell Pad
Gentle Pulser
Rich Chaos
Kapow Pad
Simple Sine
Mother Of All Pads
Swoosh Pad
80s Synth Stack
Basic Soft Pad
Distance
Fat Octave Pad
Fehler Tron Choir
Fehler Tron Strings
Grand Octave
Mellow Band Pass Pad
Cuddly Pad
Noise Band 1
Triangle Pad
Simple Saw
Soft Noiseband
Soft + Squarish
Soft Machinegun
Square Sample&Hold
Squarish
Warm + Fluffy
Warmth
Smooth Wavetable
Slow Swimmer
Sine Bend
Synthetic Woods
Bright Pads
Majestic
Bright Bend Up Pad
Oceanica
Slap Bells
Bright HPF Sweep
Classic 5th Sweeper
Super Smooth
Mysterious Bells
Sweeper
Artificially Enhanced
Electric Pad
Sawtooth Bend
PWM Bend
Softpads (Cont.)
Fuzzy Saws 1
Band Pass Square
Bright Octaves
Heavy Octaves
Phaser Jet
Resolution
Steamy Square
Tune Up
Big Belly Pad
Bright PWM
Bright Sync Sweep
Bright Sync Waves
Bright Wave Bells
Floater
Fuzzy Saws 2
Fuzzy Saws 3
High Pass Sweeper
Nice Sweeper
Saw + Strings
Soft Square Pad
Square Bend
Big Sweeper
Sparkle
Digital Cascade
Soft Fizzle
Bright Pads (Cont.)
Appendix B: Available Parts 19
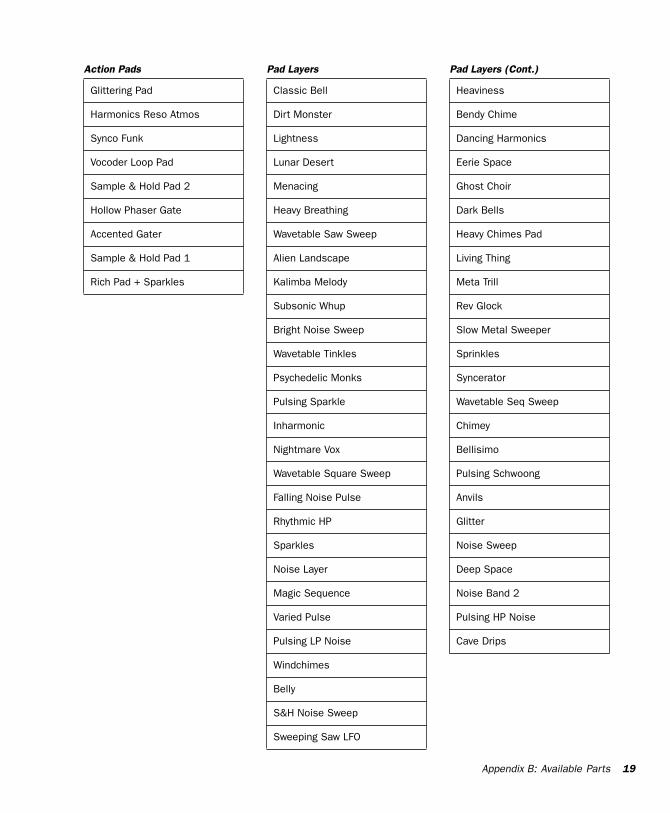
Action Pads
Glittering Pad
Harmonics Reso Atmos
Synco Funk
Vocoder Loop Pad
Sample & Hold Pad 2
Hollow Phaser Gate
Accented Gater
Sample & Hold Pad 1
Rich Pad + Sparkles
Pad Layers
Classic Bell
Dirt Monster
Lightness
Lunar Desert
Menacing
Heavy Breathing
Wavetable Saw Sweep
Alien Landscape
Kalimba Melody
Subsonic Whup
Bright Noise Sweep
Wavetable Tinkles
Psychedelic Monks
Pulsing Sparkle
Inharmonic
Nightmare Vox
Wavetable Square Sweep
Falling Noise Pulse
Rhythmic HP
Sparkles
Noise Layer
Magic Sequence
Varied Pulse
Pulsing LP Noise
Windchimes
Belly
S&H Noise Sweep
Sweeping Saw LFO
Heaviness
Bendy Chime
Dancing Harmonics
Eerie Space
Ghost Choir
Dark Bells
Heavy Chimes Pad
Living Thing
Meta Trill
Rev Glock
Slow Metal Sweeper
Sprinkles
Syncerator
Wavetable Seq Sweep
Chimey
Bellisimo
Pulsing Schwoong
Anvils
Glitter
Noise Sweep
Deep Space
Noise Band 2
Pulsing HP Noise
Cave Drips
Pad Layers (Cont.)

Xpand! Plug-In Guide20
Percussive
Hollow Arp
Metal Noize Arp
Strung Up
Random Chime
Popper
Galloping Woodblocks
Arpogee
Saw Arp
Arpy 1
Soft FM Arpeggio
Syncophant
Tiney Arp
FM Tinemaker
Tinemaker
Sequencer Perc 1
Sequencer Perc 2
Hammered Metal Slap
Steam Pipes
Timbale 1
Noise Crash
Piano Attack Partial
Organ Key Clicks
Belly Attack Partial
E Piano Attack Partial
Clav Attack Partial
FM Mallet
FM Metallic Breath
FM Metallic
FM Percussive
Vibes Attack Partial
Tapped Bottle
Analog Pulse
Analog Saw
Ac Guitar Attack Partial
Muted El Guitar Attack
Synth Guitar
Bass Guitar Pick
Hat
80s Cowbell
Agogo 1
Agogo 2
Analog Metal
Bent Metal
Castanet Attack Partial
Chine Type
Woody
Crash
Electro Blip
Electro Hat
Electro Ride
Electro Tom
Electro Wood
Endless Kick
Flexible Noise
Galloping Pipes
Jingle Bell
Percussive (Cont.)
Kick Drum
Metal Girl
Metal Guy
Pitched Cabasa
Reso Zap
Steamy Pipes
Tambourine
Timbale 2
Triangle
Windchimes
Woodblock
Percussive (Cont.)

Appendix B: Available Parts 21
Polysynths
Attackertronic
D Something 1
Techno Stadium
Porta Bend
Smooth Metal
Simple Strings
Sparkling
Bright Zapper
Standard Bend Poly
Bruce The Saw
Bug Terminator
Classic Saw Poly
Sync Attack
Diffused Saws
Digital Fantasy
Percy Saw
Puncher
Big Strings
Slapback
Stratosphere
Attack Sweep
Basic Pulse Width
Big Octave Strings
Bright n Smooth
Chorus Strings
Classic Digi Metal
D Something 2
Digital Metal
Lush Digi Stack
Percussive Choral
Perky Chords
Propogate
Sync Funk
Techno Chords
Tines Pad
Vocalised
Wavey
Synth Brass
Attack Brass
Classic Synth Horns
Spitty Synth Brass
Warm Horns
Bright n Bendy
Brighter Horns
Bright Synth Brass
Tune Up Brass
Brite n Tite
Attack Reso Brass
Polysynths (Cont.) Soft Leads
Nice Saw
Lost In Space
Metal With Mandolins
Not Too Phased
Unison Square Lead
Soft Sync
Chime Lead
Clicky Phaser Lead
Nice Wave
Resonating Lead
Smooth Square
Vocalish
Theremin
Calliope
Bend Saw
Light Square Lead
Tri Self Oscillating
Soft Saw
Whiner
Fuzzy Pulse

Xpand! Plug-In Guide22
Hard Leads
Saw Stack
Dangerous
Velosync
A Little Phased
Excited
Deep Fried
Dynamic Dirt
Square Stack
Insyncerator
Digi Lead
Dirty Square
Square Uni Sync
Fifth Saw
Nasty 5th
Pauls State
Saw 5th
Saw Octave Stack
Saw Octave
Saw Stack 2
Simple Saw
Syncer
The Razor
Wire Lead
Bright Unison
1 Osc Pulse Lead
Ambience + FX
Underwater Cave
Snoring Vogon
Reverse Melody
S&H Reso Atmos
Vogon Alarm Clock
It's Damp In Here
Lonely Space Traveller
Flying Zapper
Pulsating Sub
Mans Best Friend
Didjeridont
Ambient Droplets
Subsonic
Heavy Wind
Pressure Leak
Slave Ship
Ambient Resonance
Ausserirdische
Chatter
Cosmic Hail Storm
Drunken Organist
Gentle Grains
Harp On
Musical Cosmology
Rhythmatron
Rhythmetic
Acoustic Piano
Natural Grand Piano
Grand Piano Eco
Reduced Piano
Resonant Ambience
Resonant Ambience Eco
Honky Tonk Piano
Upright Piano
Piano Soft Layer
Piano Med Soft Layer
Piano Med Hard Layer
Piano Hard Layer
Piano Hardest Layer

Appendix B: Available Parts 23
Electric Pianos
Suitcase
Suitcase Selector
Mark 1
Mark 1 Selector
Wurli
Wurli Selector
Pretty FM
Warmth FM
Synth EP
FM EP Body
FM Piano Bodies 1
Analog Piano Body
FM Tinemaker
Tinemaker
Organs
The Classic B
Clean + Warm
Full Bars
Dirty 70s
Full n Rich
Jazz
Kick Me
Paler Shade Of White
Reggae Organ
The Kid
Cruisey Chap
Cartoon OClock
Nice n Smooth
Full Rock
Clean + Funky
Huge Cathedral
Welcome
Cathedral Organ
Simple Cathedral Organ
Tonewheels Bleed
Transistor Bleed
Clavinets
Clavinet
Clavinet + Tone Control
Voice Mod Clav
Wah Clav
Bi-Phaser Clav
Phaser Clav
Tremolo Clav
Amped Clav
Strings
Big Legato Strings
Big Legato Pad
Formant Shift Strings
Soft Legato Strings
Soft Legato Pad
Bright Legato Strings
Bright Legato Pad
Pizzicato Strings
Legato-Pizzicato
Hybrid Strings Stack
Hybrid Pad
Formant Shift Hybrid

Xpand! Plug-In Guide24
Vocals
Aah Choir
Aah Choir Pad
Aah Choir High Pass
Ooh Choir
Ooh Choir Pad
Ooh Choir High Pass
Ooh To Aah Choir
Aah To Ooh Choir
Breathy Hybrid
Breathy Pad
Breathy High Pass
Smooth Hybrid
Smooth Pad
Smooth High Pass
Digi Choir
Digi Pad
Digi High Pass
Old Faithful
Faithful Pad
Faithful High Pass
Classic Fair
Fair Pad
Fair High Pass
Brass + Woodwind
Natural Brass Section
Brass Soft Layer
Brass Hard Layer
Bigger Section
Hybrid Brass
Hybrid Octaves
French Horns
Hybrid Horns
Solo Trumpet
Soft Trumpet
Hard Trumpet
Trumpets Section
Tenor Sax
Soft Tenor Sax
Hard Tenor Sax
Tenor Saxes Section
Clarinet
Soft Clarinet
Hard Clarinet
Mallets
Vibraphone
Marimba
Xylophone
Music Box
Bent Marimba
Vibratone
Bells
Glockenspiel 1
Tubular Bells
Pretty Chimes
Light Bells
Analog Chimes
Big FM Bells
Complex Bells
Digi Buzz Bells
Digital Spectral
FM Bells Stack
Glassy Glockenspiel
Huge Bending Bells Pad
Nasal Bells
Reso Noise Bells
Woodpecker Bells
Pitched Triangle
Church Bells Loop
Reversed Glock Melody
Glock Gliss Down
Glock Gliss Up

Appendix B: Available Parts 25
Guitars
Steel String Acoustic
Steel String Ac + Harmonics
Steel String Ac Harmonics
Soft Steel String
Med Steel String
Hard Steel String
Nylon String Acoustic
Nylon String Ac + Harmonics
Nylon String Ac Harmonics
Soft Nylon String
Med Soft Nylon String
Med Hard Nylon String
Hard Nylon String
Very Hard Nylon String
Clean Electric Guitar
Mod Wah Clean
Dynamic Wah Clean
Dirty Guitar
Mod Wah Dirty
Dynamic Wah Dirty
Clean Electric 1+5 Strum
Clean Major Bar Chord
Clean Minor Bar Chord
Powerchords + Feedback
Ethnic
Sitar
Gentle Sitar
Kalimba
Melodic Kalimba
Panpipes
Soft Panpipes
Hard Panpipes
Panpipes Pad
Percy Bottle
Soft Bottle
Synth Bottle Perc
Hits
Orchestra Hit 1
Orchestra Hit 2
Orchestra Hit 3
Orchestra Hit 4
Orchestra Hit 5
Orchestra Hit 6
Orchestra Hit 7

Xpand! Plug-In Guide26
Synth Basses
Pulse Thumper
Wide Unison Saw Bass
Two Osc 303 Imposter
Percy FM Bass
Ultra Fuzz Attack
Tek Bass
Phaser Face Bass
Simple Analog Thumper
Rave Saw + Sync Bass
Subsonic 2
Super Fuzz
Octa Saw Bass
Sync Bass
Car Chase Bass
Pulsating Vocal Fuzz
Aliased Wavetable Bass
Dirty Fooger Bass
FM Velo Start Bass
Gritty Saw Bass
Hybrid Thump Bass
Jupiter Unison Bass
Metallic Fuzz Bass
MKS Uni Bass 2
MKS Uni Saw
Reso Wow Bass
Rubberly Bass
Simple Saw Bass
Simple Wow Bass
Subsonic 1
The Lonely Guy
Tight Ow Bass
303 Imposter
Unison Square Bass
Wide Unison Bass
1 Osc Saw Bass
1 Osc Saw Sync Bass
1 Osc Square-Pulse Bass
1 Osc Square-Pulse Sync Bass
2 Osc Pulse Sync Attack Bass
2 Osc Saw Sync Attack Bass
Basses
Full Pick Bass
Soft Pick Bass
Hard Pick Bass
Full Finger Bass
Soft Finger Bass
Hard Finger Bass
Very Hard Finger Bass
Double Bass
Soft Double Bass
Medium Double Bass
Hard Double Bass
Synth Basses (Cont.) Drums
Kicks Selector
Snares Selector
Hats+Toms+Cyms Selector
Clap+Cow+Tam Selector
Kicks Menu
Snares Menu
Sidesticks Menu
Claps Menu
Hi-Hats Menu
Toms Menu
Crashes Menu
Splashes Menu
Rides Menu
China Type Menu
Cowbells + Tambs Menu

Appendix B: Available Parts 27
Percussion
Natural Percussion
Electronic Percussion
Conga Menu 1
Conga Menu 2
Bongo Menu 1
Bongo Menu 2
Tambourine Menu
Maracas Menu
Bongos+Congas+Timbales
Metallic + Wooden Perc
Shaken Percussion
Windchimes
Timpani
Timpani Low Velo
Timpani Med Velo
Timpani Hard Velo
Taiko
Loops
Human Beatbox 080
Acoustic Drums 100
Acoustic Drums 120
Acoustic Rock 120
Acoustic Vintage 100
Reggae 120
Big Beat 100 01
Big Beat 100 02
Big Beat 100 03
Big Beat 100 04
Big Beat 100 05
Electronic 110 01
Electronic 110 02
Electronic 110 03
Electronic 110 04
Electronic 110 05
Electronic 120 01
Electronic 120 02
Electronic Perc 120
Drum n Bass 160 01
Drum n Bass 160 02
Drum n Bass 160 03
Drum n Bass 160 04
Perc Loops 90
Tek Chords 120
Melodic Loops 100
Basics
Poly Saw
Poly Square
Poly Pulse
Poly PWM
Poly Triangle
Poly Sine
Poly Digital Wave
Poly Electro Drum
Mono Saw
Mono Square
Mono Pulse
Mono PWM
Mono Triangle
Mono Sine
Mono Digital Wave

Xpand! Plug-In Guide28
Appendix C: Arpeggiator Modes 29
appendix c
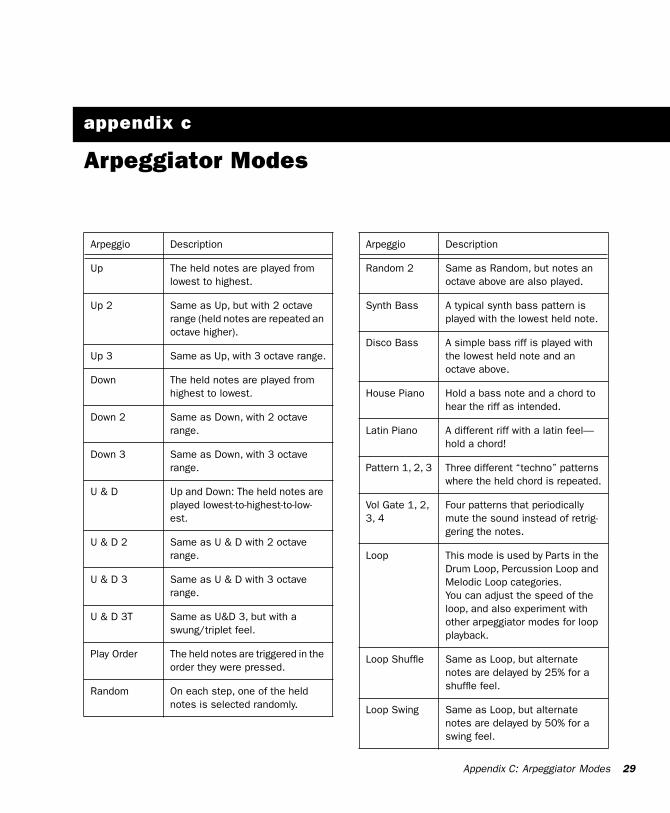
Arpeggiator Modes
Arpeggio Description
Up The held notes are played from lowest to highest.
Up 2 Same as Up, but with 2 octave range (held notes are repeated an octave higher).
Up 3 Same as Up, with 3 octave range.
Down The held notes are played from highest to lowest.
Down 2 Same as Down, with 2 octave range.
Down 3 Same as Down, with 3 octave range.
U & D Up and Down: The held notes are played lowest-to-highest-to-low-est.
U & D 2 Same as U & D with 2 octave range.
U & D 3 Same as U & D with 3 octave range.
U & D 3T Same as U&D 3, but with a swung/triplet feel.
Play Order The held notes are triggered in the order they were pressed.
Random On each step, one of the held notes is selected randomly.
Arpeggio Description
Random 2 Same as Random, but notes an octave above are also played.
Synth Bass A typical synth bass pattern is played with the lowest held note.
Disco Bass A simple bass riff is played with the lowest held note and an octave above.
House Piano Hold a bass note and a chord to hear the riff as intended.
Latin Piano A different riff with a latin feel—hold a chord!
Pattern 1, 2, 3 Three different “techno” patterns where the held chord is repeated.
Vol Gate 1, 2, 3, 4
Four patterns that periodically mute the sound instead of retrig-gering the notes.
Loop This mode is used by Parts in the Drum Loop, Percussion Loop and Melodic Loop categories.You can adjust the speed of the loop, and also experiment with other arpeggiator modes for loop playback.
Loop Shuffle Same as Loop, but alternate notes are delayed by 25% for a shuffle feel.
Loop Swing Same as Loop, but alternate notes are delayed by 50% for a swing feel.

Xpand! Plug-In Guide30

Appendix D: Effects And Parameters 31
appendix d
Effects And Parameters
Category Name Knob 1 Knob 2
Hall Hall Size Shape
Soft Hall Size Shape
Bright Hall Size Shape
Predelay Hall Size Pre-Del
Dense Hall Size Shape
Room Room Size Shape
Soft Room Size Shape
Bright Room Size Shape
Predelay Room Size Pre-Del
Dense Room Size Shape
Plate Plate Size EQ
Soft Plate Size EQ
Bright Plate Size EQ
Predelay Plate Size Pre-Del
Dense Plate Size EQ

Xpand! Plug-In Guide32
Special Reverb Cho+Rev Chor Depth Rev Size
Cho+Rev Soft Chor Depth Rev Size
Cho+Rev Bright Chor Depth Rev Size
Non-Linear Size EQ
Reverse Size Diff
Early Reflections Size EQ
Drum Room Size EQ
Club Size Shape
Overheads Size Height
Stadium Size EQ
Flapper Size Diff
Close Size EQ
Resonators Pitch Decay
Category Name Knob 1 Knob 2

Appendix D: Effects And Parameters 33
Delay Delay Delay Feedback
Lofi Delay Delay Feedback
Stereo Delay Delay Feedback
Lofi Stereo Delay Delay Feedback
Ping Pong Delay Feedback
Lofi Ping Pong Delay Feedback
Gallop Echo Delay Feedback
Tape Echo Delay Feedback
Ducking Delay Delay Feedback
Cloud Delay Delay Feedback
Chaos Delay Grain Feedback
Modulation Chorus Rate Depth
Rich Chorus Rate Depth
Ensemble Rate Depth
Space Chorus Rate Depth
Quad Chorus Rate Depth
Voice Mod Rate Vowel
Phaser Rate Depth
Bi-Phaser Rate Depth
Deep Phaser Rate Depth
Flanger Rate Depth
Detune Detune Delay
Pitch Shift Left Right
Category Name Knob 1 Knob 2

Recommended