VCP – IaaS Study Notes Resources: The notes herein are compiled from my own testing as well as below references:
- VMware Documentation/Whitepapers/Communities DOCs here - Other References used are noted in the Section/Objective they’re used in - Since this is IaaS, I assume you are already familiar with most vSphere tasks; as such, I don’t go into great
detail about some vSphere tasks needed as pre-requisites to some vCD tasks - Last but not least - *LAB*!!! Pretty much all of below I did in my lab. I highly recommend having one
SECTION 1 INSTALL & CONFIGURE VCLOUD DIRECTOR 1.1 – Install vCloud Components Identify Required vCloud Components & Pre-Req’s for Installation
vCloud Components (see diagram below from pg. 8 vCD1.5 Install & Configure Guide):
1. vCloud Director (vCD) Server (“Cells”) – could be 1 or many
a. “Cell” – vCD Server running a collection of services
2. vCD Database – only 1 DB needed despite number of vCD Cells
3. vCenter Server
4. vCenter Server DB
5. vShield Manager (VSM) – 1 per vCenter Server; provides Network services to vCenter & vCD
6. ESXi Hosts
7. vCenter Chargeback Manager (VCM)
8. vCenter Chargeback DB
9. vCloud Connector (vCC)
vCloud Install Prerequisites (pg. 10 & 25, vCD1.5 Install & Configure Guide) 1. vCenter Server 4.0 U2/U3, 4.1(U1), 5.0 2. ESX/i Hosts 4.0 U2/U3, 4.1(U1), 5.0 (same as vCenter Server versions) 3. vShield Manager (VSM) 1 (U1), 5.0

4. vCenter Networks intended for vCD External Networks/Pools must be available to all Hosts in Cluster used in vCD
5. vDS (Distr Virt Switch) must be used for cross-host fencing & Network Pool allocation 6. vCenter Clusters must have DRS set to Fully Automated which requires shared storage 7. vCenter Clusters must not have Storage DRS (SDRS) enabled 8. vCenter must trust Hosts (SSL Certificates) 9. Licensing: vSphere Ent+ so vCD can leverage vDS for Isolated Networks 10. vCD Server
a. RHEL5 U4/5/6 x64 OS b. 950MB HDD space c. 1GB RAM (2GB recommended) d. 2 NICs (http, consoleproxy) e. Oracle/SQL DB – 16GB RAM, 100GB HDD, 4 vCPUs
11. LDAP a. AD – W2K3, W2K8(R2), Win7 b. OpenLDAP – Linux
12. vCD Web GUI Browser Support (NOTE: ONLY 32bit BROWSERS SUPPORTED, EVEN ON 64bit OSs) a. IE 7/8/9 b. Firefox 3.6/4.x/5.x
13. Flash 10.2 or later & Java JRE 1.6 U10 or later; both must be 32bit as x64 is not supported 14. VSM (Appliance)
a. 8 GB RAM for all VSM components (Mgr, App, Edge, Endpoint) b. 8-20GB HDD space c. Two 1GB NICs d. vCenter/vSphere 4.0U2 or later
15. vCB a. 2GHz CPU b. 4GB RAM a. 2GB HDD space b. W2K3 SP2 or R2, W2K8 or R2 (x64) c. DB = SQL 2K5 SP2 / 2K8 SP2; Oracle 10g R2 / 11g R2 d. Browsers = IE 7 & 8; FF 4 & 5; Flash 10.1+ e. Run with vCenter 2.5U3, 4.0, 4.1, 5.0
16. vCC c. 2GHz CPU d. 4GB RAM e. 2GB HDD space
Describe Installation Order of vCloud Components
vSphere: 1. vCenter Server DB Configured 2. vCenter Server Install & Components (i.e. SSO, Web Client, VUM, etc.) 3. ESXi 4. Create a DRS-enabled Cluster (automated), vDS, & Port Groups for External Networking
vCloud 1. vCD DB Configured 2. VSM (1 per vCenter Server) 3. vCD Host (RHEL VM) 4. SSL Certificates on vCD Host (before vCD install) 5. vCD 6. Verify DNS, NTP, connectivity (ifping on RHEL vCD Server) 7. vCB 8. vCC
Explain the Purpose & Use Case of Each vCloud Component
vCenter Server – provides automation/networking features used by vCD
ESX/i Hosts – provides resources (compute, memory, storage, network) used by vCD
vCD – centralized Cloud management interface
VSM – provides networking & security policies to vCD
vCB – provides resource usage measurement for billing
vCC – enables workloads (VMs, vApps, etc.) to be migrated to other Cloud sources, Private or Public
Create a Sysprep Package (pg. 32-33, vCD1.5 Install & Configure Guide)
Copy sysprep binaries for each OS to a desired location on the vCD Host (i.e. extract the deploy.cab file for each OS) 1. Each OS requires its own folder – /win2000, /win2k3, /win2k3_64, /winxp, winxp_64
a. Example: /support/sysprep/win2000, etc.; place extracted deploy.cab files in respective OS folder
Run: /opt/vmware/cloud-director/deploymentpackageCreator/createSysprepPackage.sh /support/sysprep
Restart the vCD services: service vmware-vcd restart
Copy the vcloud_sysprep_properties & windows_deployment_package_sysprep.cab files to all vCD servers (cells) if have multiple vCD cells 1. Two files located in: /opt/vmware/vcloud-director/guestcustomization 2. Use WinSCP or SCP command 3. Restart vCD services on each cell the files copied to ( service vmware-vcd restart )
Install vCloud Director (pg. 26-30, vCD1.5 Install & Configure Guide)
Download appropriate version of vCD bin file from VMware
Verify bin file checksum or digital signature (reference #3, pg. 26)
Log onto vCD server (RHEL VM) as root
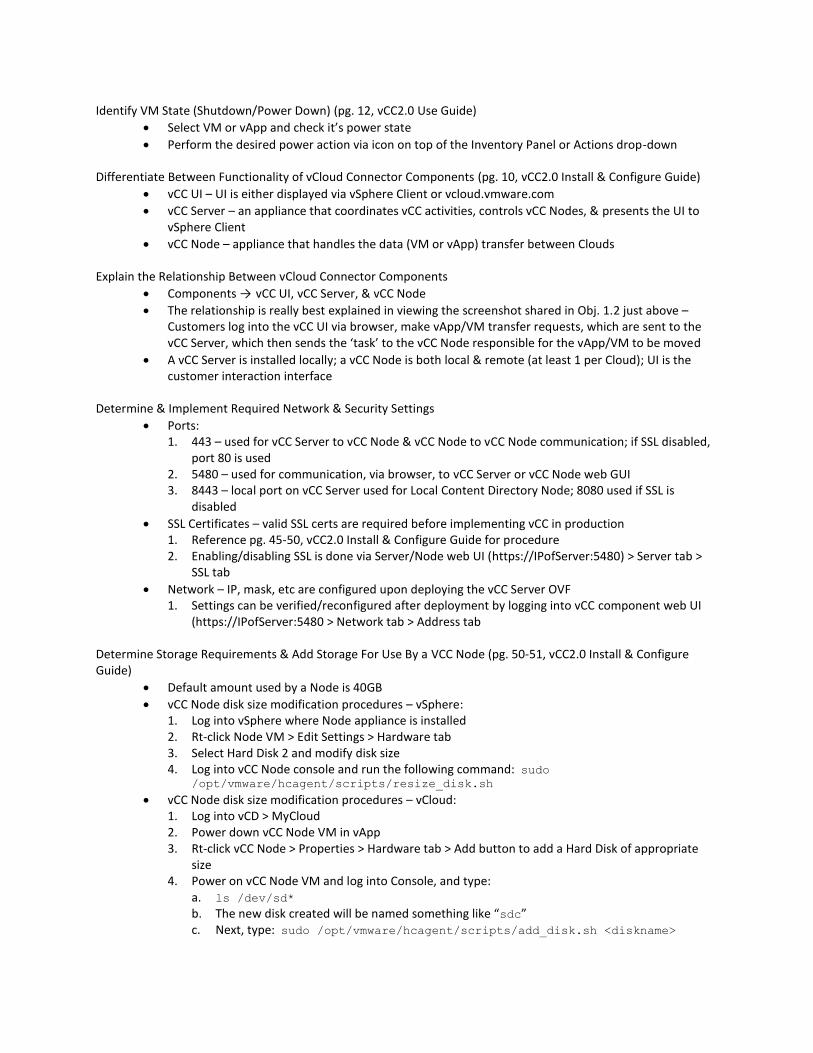
Check bin file executable permissions by running: ls -la
1. Notice the “vmware…” and “lib…” files are not executable (1
st column of –rw-r--r--)
a. The “lib…” installer is needed to install necessary files as noted on pg. 10 2. Make them executable by running: chmod 555 NameOfFile or chmod u+x NameOfFile
Install the “lib…” file first: rpm –i libXdmcp-xxxx.rpm (xxxx = lib file build number)
Install vCD by typing: ./vmware-vcloud-director-1.5.x-nnnnnn.bin (nnnnnn = vCD build number)
After vCD installer runs, a built-in script finalizes the install by requesting user input for the http & remote console proxy IPs, as well as the vCD DB created prior to this install (for example of input needed, reference pg. 28-30; DB creation steps are listed below)
Once complete, the vCD services will be restarted; open a browser to http://vCDserverName to begin vCD configurations

Install vShield Manager (pg. 21-22, vCD1.5 Install & Configure Guide; pg. 18-19, VSM 5.0.1 Quickstart Guide)
Download appropriate OVA file from VMware
Log into vCenter & click on File > Deploy OVF Template
Go through the install wizard and select configurations as appropriate 1. VM location 2. Storage location & disk format 3. NIC assignment
After installation, open web browser to https://IPofVSM
Log in with user: admin , password: default 1. At manager> prompt type enable , then default (as password) 2. At manager# type setup to setup VSM IP, Subnet, Gateway, DNS
After configuration is saved, type exit and leave VM running
Install vCenter Chargeback (pg. 20-24, vCB2.0 Install & Upgrade Guide)
Host Prerequisites 1. Make sure ports are free → 8080, 8009, 443 2. Set static IP for VM/physical server vCB will be installed on 3. OS → 2K3 SP2 or R2; 2K8 or R2
DB Prerequisites 1. Create a DB user/pwd (don’t use SYS, SA, etc. accounts) 2. Assign proper DB permissions to the user and/or run a script, depending on your DB type (Oracle or
SQL)
Full prerequisite checklist is on pg. 16, vCB2.0 Install & Upgrade Guide
vCB Architecture:

Download vCB .exe file from VMware
Run the installer (details on pg. 20-23, vCB2.0 Install & Upgrade Guide) 1. You have a choice to install Load Balancer, vCB Manager, and DB Collector on the same or different
servers 2. If separating the Load Balancer & vCB Manager, you have to install the Load Balancer first 3. If the installer fails, any components that were installed up to the point of failure, get removed (i.e.
the uninstaller is invoked) 4. Enter vCB DB info: DB type (SQL/Oracle), DB FQDN or IP, port (if not default), DB name, SQL mode, DB
username & password 5. It’s recommended to separate the vCB Manager install from the vCB DB because if you need to move
the vCB Manager server for any reason, it’s a fairly simple install then point the Manager to the vCB DB server
6. Enter Load Balancer (LB) info: server FQDN or IP, admin email, https port (if not default) 7. Enter vCB Manager info: FQDN or IP, http port (if not default), LB port, unique vCB Manager instance
name a. NOTE: If only installing LB, UNCHECK to install vCB Manager
8. Enter vCB Manager username & password (8-24 char’s, upper/lower-case) a. This screen not displayed if only installing LB
9. Choose Data Collectors (DC) to install (if installing vCD Collector, enter vCD DB info); enter vCB Manager admin account info if prompted (if chose to install vCD or vShield (VS) Data Collectors)
10. Choose Install; after install, note the URL displayed to connect to vCB Manager UI 11. Generate SSL Certificates (review info on pg. 23, vCB2.0 Install & Upgrade Guide for details) 12. To continue installation in creating a Cluster, review info on pg. 24-28, vCB2.0 Install & Upgrade
Guide 13. For vCB service dependencies/order, see pg. 33, vCB2.0 Install & Upgrade Guide (DB, Mgr, Data Col) 14. Other install items to note:
a. If installing ‘ancillary’ Data Collectors (i.e. vCD & VS DC), VS DC cannot be installed unless vCD DC is installed first
b. When/if uninstalling vCB, do so through the application (Start > Programs > Vmware > VMware vCenter Chargeback > Uninstall VMware vCenter Chargeback); uninstalling through Add/Remove Programs (or Programs & Features) is not a ‘clean’ uninstall & may require manual uninstallation of some items
Install vCloud Connector
vCC Components:
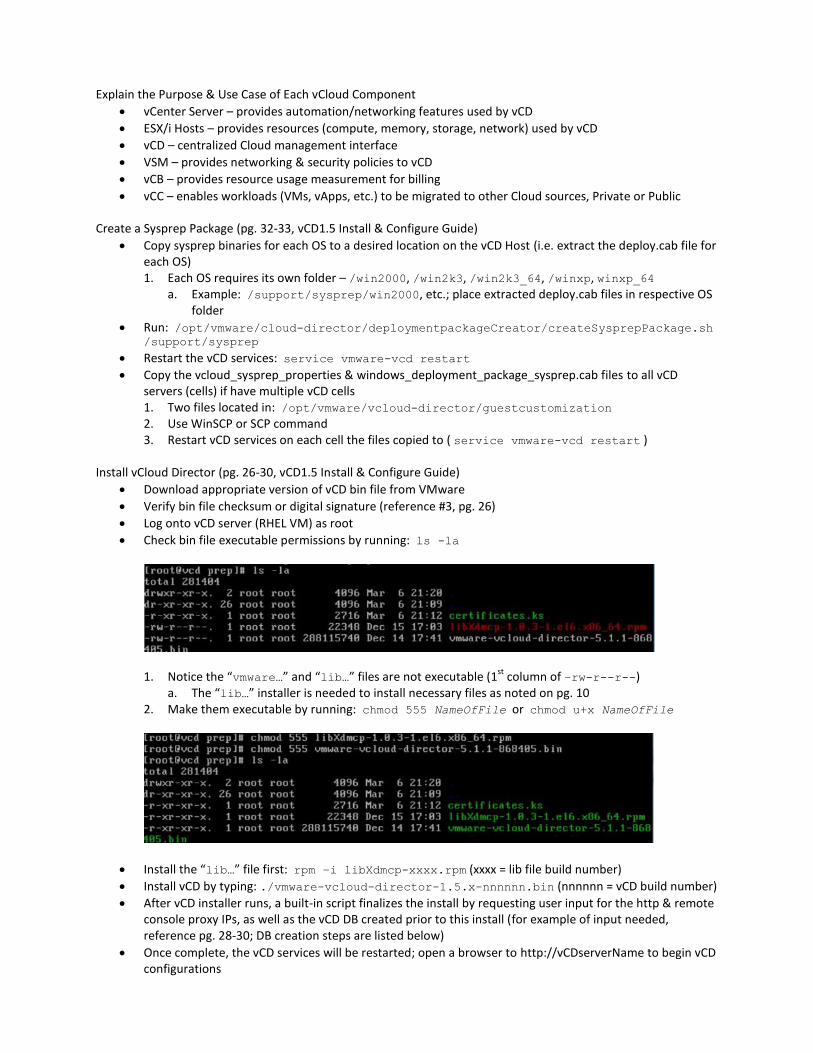
vCC is deployed as a virtual appliance
Only 1 vCC server is needed, and the UI is accessed via the vSphere Client (UI deployed by the vCC server)
1 vCC Node is needed per vCloud (i.e. private, public, or both) 1. One vCC Node can support a max of 20 Organizations
Supported web browsers on pg. 18, vCC2.0 Install & Configure Guide 1. Recommend not to use FF browser as some tabs display as blank
vCC is a multi-install process (see pg. 15-44, vCC2.0 Install & Config Guide [ignore the vCD5.1 sections]): 1. Choose install considerations (pub>priv; priv>priv; vSphere use; vCD use) 2. Requirements:
a. vSphere 4.0/4.1/5.0/5.1 b. vCD 1.5/5.1 c. VSM 5.1.2 d. IE 8/9, FF 15/16, Chrome 22/23;
3. Download vCC Server OVA & either install in vSphere or vCD, depending on implementation decisions 4. Download vCC Node OVA & either install in vSphere or vCD, depending on implementation decisions 5. Install vCC Server 6. Configure vCC Server
a. https://IPofvCCserver:5480 b. System tab, Network tab, Server tab, vSphere tab, Node tab
7. Install vCC Node 8. Register vCC Node with a Cloud
a. https://IPofvCCnode:5480 b. Node tab, then Cloud tab, then enter appropriate information
9. Configure vCC Node a. https://IPofvCCnode:5480 b. System tab, Network tab, Server tab, vSphere tab, Node tab
10. Register vCC Node with vCC Server a. https://IPofvCCserver:5480 b. Nodes tab > Register tab; complete Node information then click Register
11. Register vCC Server UI in vSphere via vSphere Client tab in the vCC Server UI
Configure vCloud Director Network Connections (pg. 27-30, vCD1.5 Install & Configure Guide)
I believe what this is referring to is tasks prompted to do via the post-install script
Reference pg. 27-30, vCD1.5 Install & Configure Guide for specific prompts & input required

NOTE: If using multiple vCD cells, it is required to configure a shared NFS repository PRIOR to running the vCD network/DB configuration script; so, when doing vCD install, choose no when prompted to run the configuration script if the NFS share isn’t mounted yet
Configure vCloud Director Database Settings (pg. 15-17, vCD1.5 Install & Configure Guide)
Install supported MS SQL in Mixed Mode; NOTE: Windows Authentication not supported
Using SMSS, open New Query window & run 4 scripts located on pg. 17 to create the DB, logs, user, & user permissions (dbo); can copy all 4 in a single Query window and click ‘Execute’ 1. NOTE: Document the DB username & password as they are used for vCD install
Oracle DB begins on pg. 15 (won’t cover here)
To attach DB to vCD, reference pg. 27-30, vCD1.5 Install & Configure Guide
Troubleshoot Basic Installation Issues
Most install issues (IMO) will be from “fat-fingering” commands (mis-typing), or maybe forgetting a password or IP causing pieces of the installation to fail
Other issues may arise from forgetting an installation step (i.e. libXdmcp.xxxx.rpm file needing installed before vCD installation)
1.2 – Configure & Administer vCloud Connector Identify Components of vCloud Connector
vCC Server
vCC UI
vCC Node
Reference the Screenshot in Obj 1.1, Install vCC
Describe Cross-Cloud vApp Flow (pg. 59-60, vCC 2.0 Install & Configure Guide)
(1) User makes request via vCC UI
(2) vCC Server tells vCC Node to transfer the vApp
(3) vCC Node tells vCenter Server to export via VIM API
(4) vApp content is moved from Datastore to source vCC Node cache
(5) vApp content is transferred from source Node to destination Node via checkpoint-restart
(6) Destination vCC Node calls the vCD API to import
(7) vApp content transfers from destination vCC Node cache to vCD transfer server storage
(8) vCD sends the command for the appropriate vCenter import
(9) vApp content transfers from vCD transfer server storage to destination datastore network & made available through the vCD Catalog
Identify VM State (Shutdown/Power Down) (pg. 12, vCC2.0 Use Guide)
Select VM or vApp and check it’s power state
Perform the desired power action via icon on top of the Inventory Panel or Actions drop-down
Differentiate Between Functionality of vCloud Connector Components (pg. 10, vCC2.0 Install & Configure Guide)
vCC UI – UI is either displayed via vSphere Client or vcloud.vmware.com
vCC Server – an appliance that coordinates vCC activities, controls vCC Nodes, & presents the UI to vSphere Client
vCC Node – appliance that handles the data (VM or vApp) transfer between Clouds
Explain the Relationship Between vCloud Connector Components
Components → vCC UI, vCC Server, & vCC Node
The relationship is really best explained in viewing the screenshot shared in Obj. 1.2 just above – Customers log into the vCC UI via browser, make vApp/VM transfer requests, which are sent to the vCC Server, which then sends the ‘task’ to the vCC Node responsible for the vApp/VM to be moved
A vCC Server is installed locally; a vCC Node is both local & remote (at least 1 per Cloud); UI is the customer interaction interface
Determine & Implement Required Network & Security Settings
Ports: 1. 443 – used for vCC Server to vCC Node & vCC Node to vCC Node communication; if SSL disabled,
port 80 is used 2. 5480 – used for communication, via browser, to vCC Server or vCC Node web GUI 3. 8443 – local port on vCC Server used for Local Content Directory Node; 8080 used if SSL is
disabled
SSL Certificates – valid SSL certs are required before implementing vCC in production 1. Reference pg. 45-50, vCC2.0 Install & Configure Guide for procedure 2. Enabling/disabling SSL is done via Server/Node web UI (https://IPofServer:5480) > Server tab >
SSL tab
Network – IP, mask, etc are configured upon deploying the vCC Server OVF 1. Settings can be verified/reconfigured after deployment by logging into vCC component web UI
(https://IPofServer:5480 > Network tab > Address tab
Determine Storage Requirements & Add Storage For Use By a VCC Node (pg. 50-51, vCC2.0 Install & Configure Guide)
Default amount used by a Node is 40GB
vCC Node disk size modification procedures – vSphere: 1. Log into vSphere where Node appliance is installed 2. Rt-click Node VM > Edit Settings > Hardware tab 3. Select Hard Disk 2 and modify disk size 4. Log into vCC Node console and run the following command: sudo
/opt/vmware/hcagent/scripts/resize_disk.sh
vCC Node disk size modification procedures – vCloud: 1. Log into vCD > MyCloud 2. Power down vCC Node VM in vApp 3. Rt-click vCC Node > Properties > Hardware tab > Add button to add a Hard Disk of appropriate
size 4. Power on vCC Node VM and log into Console, and type:
a. ls /dev/sd* b. The new disk created will be named something like “sdc” c. Next, type: sudo /opt/vmware/hcagent/scripts/add_disk.sh <diskname>

Register vCloud Connector With vCenter Server
Log into vCC Server web UI (https://IPofServer:5480) > Server tab > vSphere Client tab
Troubleshoot Common vCloud Connector Installation & Operation Issues
Reference pg. 65-69, vCC2.0 Install & Configure Guide for troubleshooting steps/suggestions; or pg. 53, vCC2.0 Use Guide
Storage issues – may need to reboot vCC Node to clean up temp files
Connectivity issues – log onto appropriate vCC component & run curl -k -v commands
Log file access – download via vCC component web UI > Server tab > General tab 1. For public multi-tenant, log onto own vCC Server > Node tab > gears icon > Download logs 2. Log size modification – done via vCC Server or Node configuration file
1.3 – Configure vCloud Director & vShield Manager System Settings Identify vCloud Director Pre-Requisites (pg. 25, vCD1.5 Install & Configure Guide)
This was covered in Obj 1.1
Cite Steps to Deploy vShield Manager Appliance (pg. 21-22, vCD1.5 Install & Configure Guide; pg. 18-19, VSM5.0.1 Quickstart Guide)
This was covered in Obj 1.1
Identify Relationship Between vCenter Server & vShield Manager
VSM is the centralized network mgmt component of vShield & is installed as an OVA VM into vSphere
vCenter Server is added within the VSM web GUI & leverages VMware Infrastructure SDK to display vSphere Client inventory panel
There must be one VSM appliance per vCenter Server to manage Cloud networks
Generate Self-Signed Certificates (pg. 17-21, vCD1.5 Install & Configure Guide)
vCD: 1. Before installing vCD, log into the (RHEL) vCD server 2. Recommended – create a “support” or “prep” directory: mkdir support 3. Run appropriate keystore commands based on your org security policy (signed vs self-signed) to
create http and remote console proxy certificates a. For self-signed, type: keytool –keystore certificates.ks –storetype JCEKS –
storepass passwd –keyalg RSA –alias http (once run, rerun cmd changing http to consoleproxy)
b. Reference Step #3, pg. 17, vCD1.5 Install & Config Guide for assistance in user input required
VSM 1. Log into VSM web UI 2. Settings & Reports > Configuration > SSL Certificates > Generate CSR & supply required info 3. Once .csr comes back from a CA as a .cer, go to same SSL Certs area & Import the .cer then Apply
Import Self-Signed or CA Issued Certificates (pg. 19, vCD1.5 Install & Configure Guide)
Once the .cer file is received from a trusted CA, use SCP tool to place file on vCD VM (i.e. in support directory)
Import each .cer into the keystore file 1. CA root cert: keytool -storetype JCEKS –storepass passwd –keystore
certificates.ks –import –alias root –file root.cer 2. http cert: keytool -storetype JCEKS –storepass passwd –keystore
certificates.ks –import –alias http –file http.cer 3. console proxy cert: keytool -storetype JCEKS –storepass passwd –keystore
certificates.ks –import –alias consoleproxy –file consoleproxy.cer
Add Additional vCenter Servers to a vCloud Director Implementation (pg. 16, vCD1.5 Admin Guide)
Log into vCD via browser
Select Manage & Monitor tab > vCenters (in left pane)
Select Attach New vCenter to launch the wizard & supply requested vCenter & VSM information
Configure Licensing for vCloud Director & vShield Manager
vCD 1. After installing vCD, log into vCD web UI for 1
st time; one of the config items is to enter a license
VSM 1. In vCenter > Home > Licensing 2. Report View > Asset 3. Rt-click vShield Asset > Change License Key
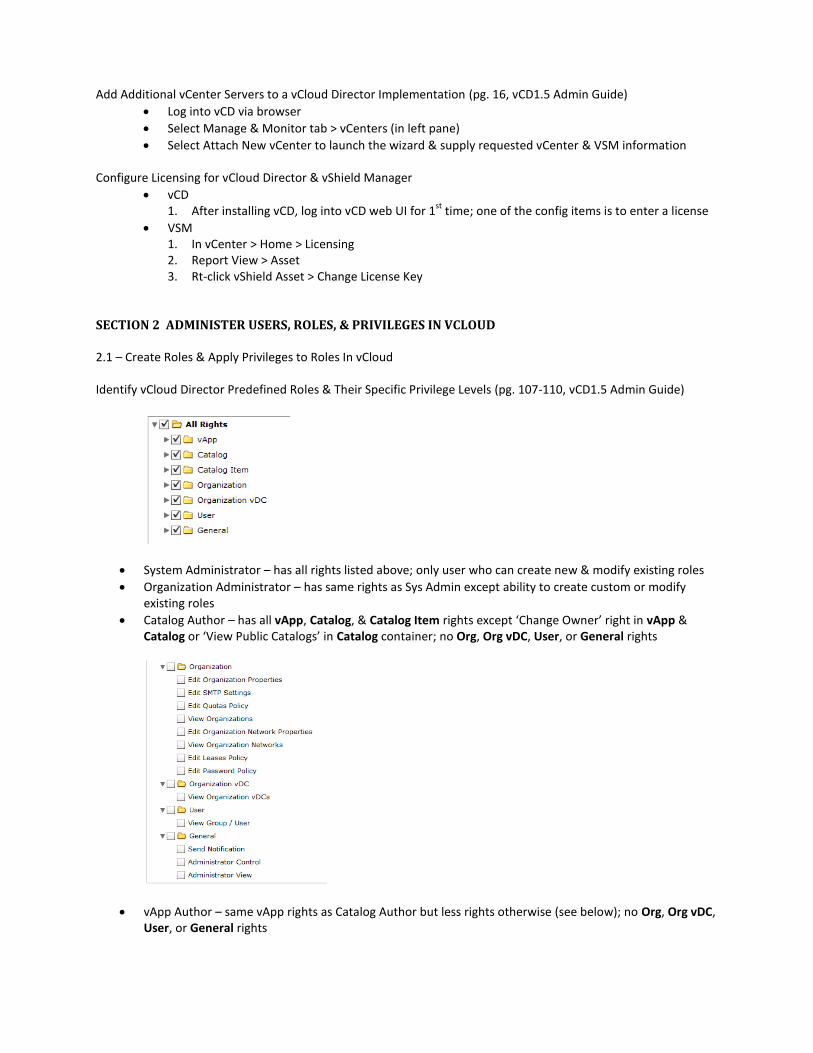
SECTION 2 ADMINISTER USERS, ROLES, & PRIVILEGES IN VCLOUD 2.1 – Create Roles & Apply Privileges to Roles In vCloud Identify vCloud Director Predefined Roles & Their Specific Privilege Levels (pg. 107-110, vCD1.5 Admin Guide)
System Administrator – has all rights listed above; only user who can create new & modify existing roles
Organization Administrator – has same rights as Sys Admin except ability to create custom or modify existing roles
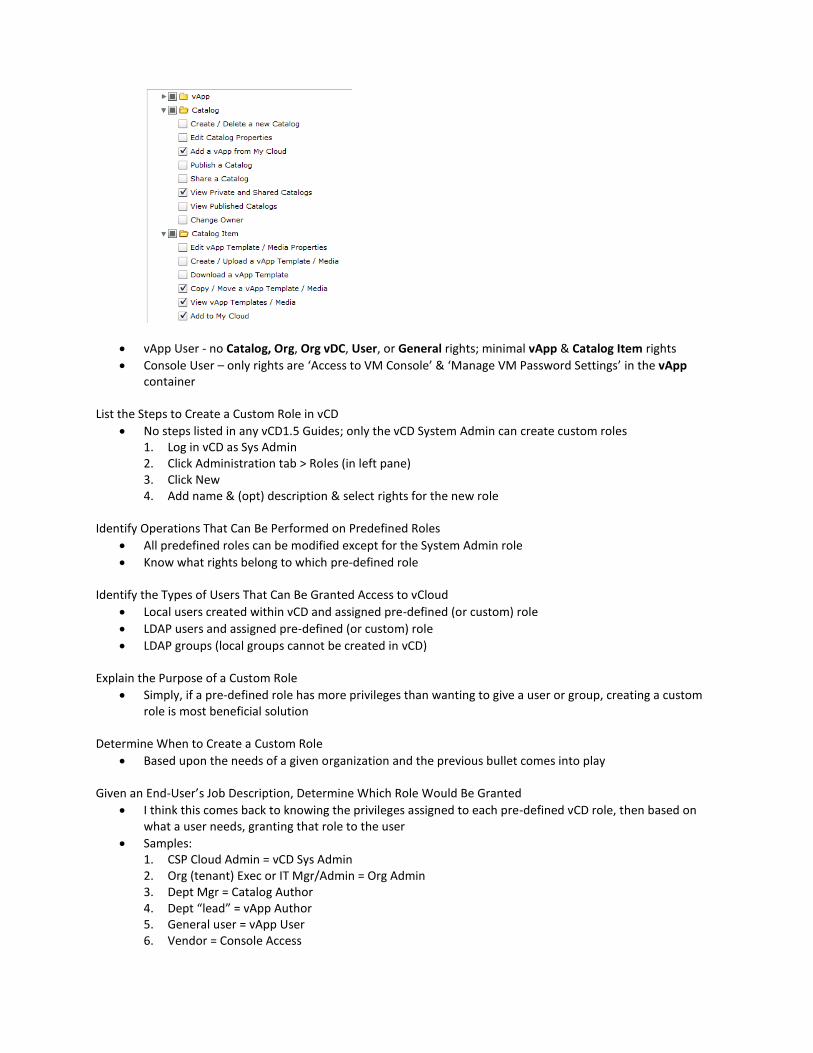
Catalog Author – has all vApp, Catalog, & Catalog Item rights except ‘Change Owner’ right in vApp & Catalog or ‘View Public Catalogs’ in Catalog container; no Org, Org vDC, User, or General rights
vApp Author – same vApp rights as Catalog Author but less rights otherwise (see below); no Org, Org vDC, User, or General rights
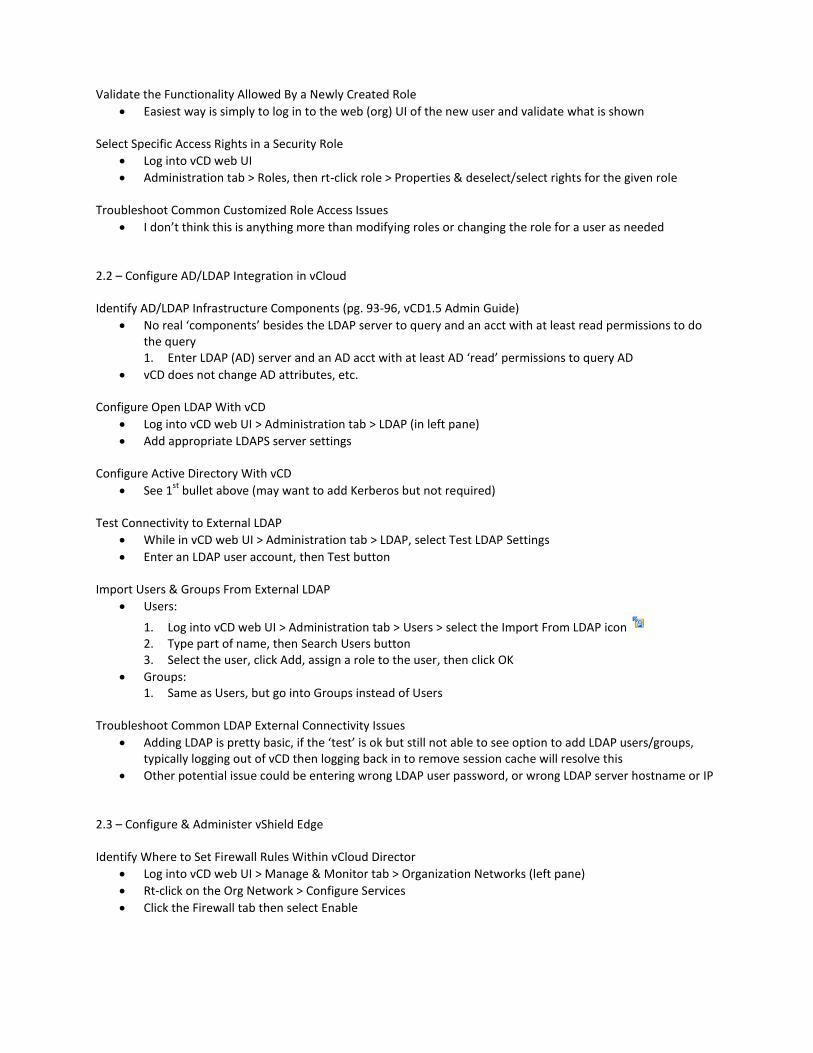
vApp User - no Catalog, Org, Org vDC, User, or General rights; minimal vApp & Catalog Item rights
Console User – only rights are ‘Access to VM Console’ & ‘Manage VM Password Settings’ in the vApp container
List the Steps to Create a Custom Role in vCD
No steps listed in any vCD1.5 Guides; only the vCD System Admin can create custom roles 1. Log in vCD as Sys Admin 2. Click Administration tab > Roles (in left pane) 3. Click New 4. Add name & (opt) description & select rights for the new role
Identify Operations That Can Be Performed on Predefined Roles
All predefined roles can be modified except for the System Admin role
Know what rights belong to which pre-defined role
Identify the Types of Users That Can Be Granted Access to vCloud
Local users created within vCD and assigned pre-defined (or custom) role
LDAP users and assigned pre-defined (or custom) role
LDAP groups (local groups cannot be created in vCD)
Explain the Purpose of a Custom Role
Simply, if a pre-defined role has more privileges than wanting to give a user or group, creating a custom role is most beneficial solution
Determine When to Create a Custom Role
Based upon the needs of a given organization and the previous bullet comes into play
Given an End-User’s Job Description, Determine Which Role Would Be Granted
I think this comes back to knowing the privileges assigned to each pre-defined vCD role, then based on what a user needs, granting that role to the user
Samples: 1. CSP Cloud Admin = vCD Sys Admin 2. Org (tenant) Exec or IT Mgr/Admin = Org Admin 3. Dept Mgr = Catalog Author 4. Dept “lead” = vApp Author 5. General user = vApp User 6. Vendor = Console Access
Validate the Functionality Allowed By a Newly Created Role
Easiest way is simply to log in to the web (org) UI of the new user and validate what is shown
Select Specific Access Rights in a Security Role
Log into vCD web UI
Administration tab > Roles, then rt-click role > Properties & deselect/select rights for the given role
Troubleshoot Common Customized Role Access Issues
I don’t think this is anything more than modifying roles or changing the role for a user as needed
2.2 – Configure AD/LDAP Integration in vCloud Identify AD/LDAP Infrastructure Components (pg. 93-96, vCD1.5 Admin Guide)
No real ‘components’ besides the LDAP server to query and an acct with at least read permissions to do the query 1. Enter LDAP (AD) server and an AD acct with at least AD ‘read’ permissions to query AD
vCD does not change AD attributes, etc.
Configure Open LDAP With vCD
Log into vCD web UI > Administration tab > LDAP (in left pane)
Add appropriate LDAPS server settings
Configure Active Directory With vCD
See 1st
bullet above (may want to add Kerberos but not required)
Test Connectivity to External LDAP
While in vCD web UI > Administration tab > LDAP, select Test LDAP Settings
Enter an LDAP user account, then Test button
Import Users & Groups From External LDAP
Users:
1. Log into vCD web UI > Administration tab > Users > select the Import From LDAP icon 2. Type part of name, then Search Users button 3. Select the user, click Add, assign a role to the user, then click OK
Groups: 1. Same as Users, but go into Groups instead of Users
Troubleshoot Common LDAP External Connectivity Issues
Adding LDAP is pretty basic, if the ‘test’ is ok but still not able to see option to add LDAP users/groups, typically logging out of vCD then logging back in to remove session cache will resolve this
Other potential issue could be entering wrong LDAP user password, or wrong LDAP server hostname or IP
2.3 – Configure & Administer vShield Edge Identify Where to Set Firewall Rules Within vCloud Director
Log into vCD web UI > Manage & Monitor tab > Organization Networks (left pane)
Rt-click on the Org Network > Configure Services
Click the Firewall tab then select Enable
Explain vShield Firewall Concepts As They Relate to a vCloud Environment
Provides isolation & security by controlling what traffic can enter or even exit the source network (Org or vApp Network)
The default Firewall policy allows all outgoing traffic & no inbound traffic except for replies to outbound
Provides Load Balancing & VPN capability (requires license)
vShield Edge has 2 vNICs for routing (internal & external interfaces)
Determine Which Firewall Rules Need Applied or Modified
This will be case-by-case
Port(s) needed?
IP(s) allowed
Identify Ordering For Firewall Rules
Rules are applied as they appear in the list, from top to bottom
To modify the list, simply click & drag a rule up or down in the list
Enable/Disable Firewall
See the first item in this Objective
The procedure to Disable an Edge Firewall is to simply deselect Enable in the Firewall tab
Add/Modify/Delete Firewall Rules
Add: 1. In the Firewall tab > click the Add button 2. Enter a Name 3. Choose a traffic direction (inbound/outbound) 4. Enter the Source IP and/or Port, and Destination IP and/or Port 5. Select the Protocol and Action (Allow/Deny), then select Enabled & (opt) Logging box; click OK when
done
Modify 1. In the Firewall tab, select the rule then click the Edit button 2. Modify properties described in the steps listed just above
Delete 1. In the Firewall tab, select the rule then click the Delete button
Determine Which vShield Devices Impact a Given Service
Edge – NAT, VPN, DHCP, Firewall
App – a hypervisor module and internal vNIC-level Firewall Virtual Appliance
Endpoint – offloads antivirus & antimalware to a dedicated 3rd
party Virtual Appliance
Data Security – provides visibility into sensitive data
Verify Firewall Rule Operation
This is nothing more than testing communication from within a VM the Edge Firewall is securing
Troubleshoot Common Firewall Service Issues
Check Firewall rule order
Verify Firewall rule direction is accurate
Firewall rule enabled
SECTION 3 CONFIGURE & ADMINISTER VCENTER CHARGEBACK 3.1 – Configure & Administer vCenter Chargeback Roles & Privileges

Identify vCenter Chargeback Permissions (pg. 36, vCB2.0 User’s Guide)
Create
Read
Update
Delete
Entity Cost Modify
Identify Resource Types (pg. 36, vCB2.0 User’s Guide)
vCenter Server
vCenter Server Entity
Data Collector
LDAP Server
SMTP Server
(Chargeback) Hierarchy
Chargeback Hierarchical Entity
Attribute
Tier
Cost Model
Cost Template
Fixed Cost
Report
Schedule
Role
Billing Policy
Automatic Report Scheduler
Screenshot below identifies Permissions (columns on right) & Resource Types (far left column):
I thought it important to also be aware of a few Resource Type dependencies vCB has:
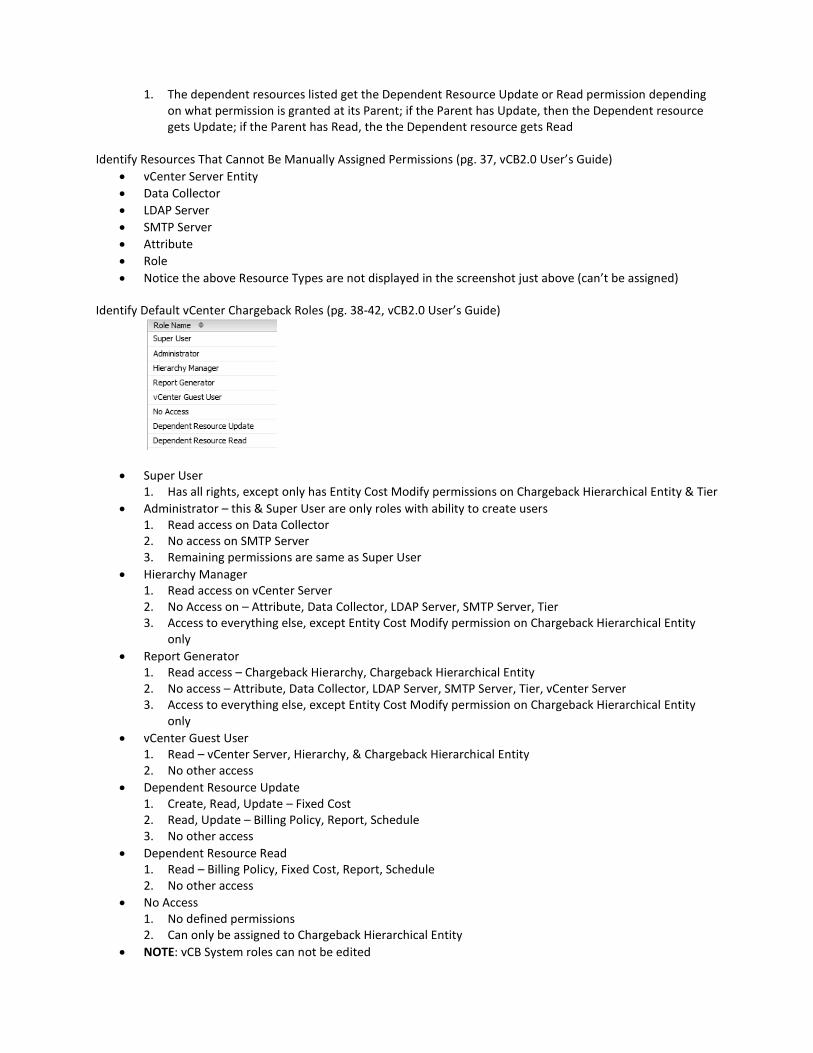
1. The dependent resources listed get the Dependent Resource Update or Read permission depending on what permission is granted at its Parent; if the Parent has Update, then the Dependent resource gets Update; if the Parent has Read, the the Dependent resource gets Read
Identify Resources That Cannot Be Manually Assigned Permissions (pg. 37, vCB2.0 User’s Guide)
vCenter Server Entity
Data Collector
LDAP Server
SMTP Server
Attribute
Role
Notice the above Resource Types are not displayed in the screenshot just above (can’t be assigned)
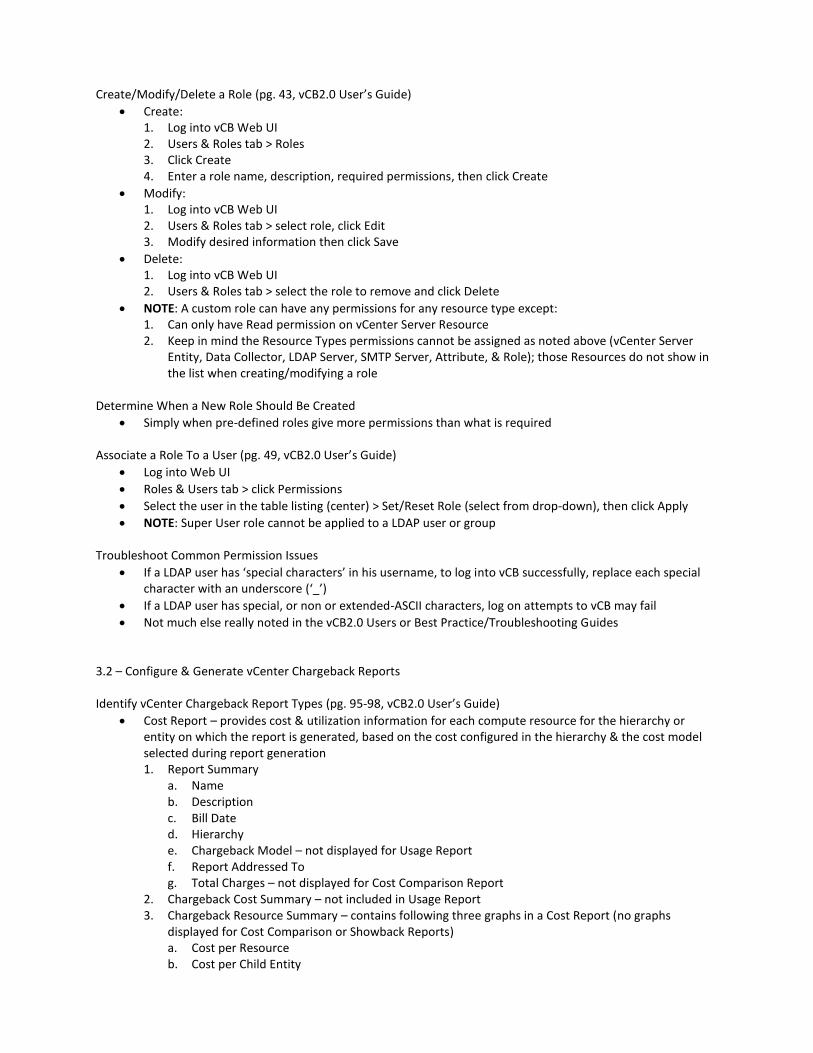
Identify Default vCenter Chargeback Roles (pg. 38-42, vCB2.0 User’s Guide)
Super User 1. Has all rights, except only has Entity Cost Modify permissions on Chargeback Hierarchical Entity & Tier
Administrator – this & Super User are only roles with ability to create users 1. Read access on Data Collector 2. No access on SMTP Server 3. Remaining permissions are same as Super User
Hierarchy Manager 1. Read access on vCenter Server 2. No Access on – Attribute, Data Collector, LDAP Server, SMTP Server, Tier 3. Access to everything else, except Entity Cost Modify permission on Chargeback Hierarchical Entity
only
Report Generator 1. Read access – Chargeback Hierarchy, Chargeback Hierarchical Entity 2. No access – Attribute, Data Collector, LDAP Server, SMTP Server, Tier, vCenter Server 3. Access to everything else, except Entity Cost Modify permission on Chargeback Hierarchical Entity
only
vCenter Guest User 1. Read – vCenter Server, Hierarchy, & Chargeback Hierarchical Entity 2. No other access
Dependent Resource Update 1. Create, Read, Update – Fixed Cost 2. Read, Update – Billing Policy, Report, Schedule 3. No other access
Dependent Resource Read 1. Read – Billing Policy, Fixed Cost, Report, Schedule 2. No other access
No Access 1. No defined permissions 2. Can only be assigned to Chargeback Hierarchical Entity
NOTE: vCB System roles can not be edited
Create/Modify/Delete a Role (pg. 43, vCB2.0 User’s Guide)
Create: 1. Log into vCB Web UI 2. Users & Roles tab > Roles 3. Click Create 4. Enter a role name, description, required permissions, then click Create
Modify: 1. Log into vCB Web UI 2. Users & Roles tab > select role, click Edit 3. Modify desired information then click Save
Delete: 1. Log into vCB Web UI 2. Users & Roles tab > select the role to remove and click Delete
NOTE: A custom role can have any permissions for any resource type except: 1. Can only have Read permission on vCenter Server Resource 2. Keep in mind the Resource Types permissions cannot be assigned as noted above (vCenter Server
Entity, Data Collector, LDAP Server, SMTP Server, Attribute, & Role); those Resources do not show in the list when creating/modifying a role
Determine When a New Role Should Be Created
Simply when pre-defined roles give more permissions than what is required
Associate a Role To a User (pg. 49, vCB2.0 User’s Guide)
Log into Web UI
Roles & Users tab > click Permissions
Select the user in the table listing (center) > Set/Reset Role (select from drop-down), then click Apply
NOTE: Super User role cannot be applied to a LDAP user or group
Troubleshoot Common Permission Issues
If a LDAP user has ‘special characters’ in his username, to log into vCB successfully, replace each special character with an underscore (‘_’)
If a LDAP user has special, or non or extended-ASCII characters, log on attempts to vCB may fail
Not much else really noted in the vCB2.0 Users or Best Practice/Troubleshooting Guides
3.2 – Configure & Generate vCenter Chargeback Reports Identify vCenter Chargeback Report Types (pg. 95-98, vCB2.0 User’s Guide)
Cost Report – provides cost & utilization information for each compute resource for the hierarchy or entity on which the report is generated, based on the cost configured in the hierarchy & the cost model selected during report generation 1. Report Summary
a. Name b. Description c. Bill Date d. Hierarchy e. Chargeback Model – not displayed for Usage Report f. Report Addressed To g. Total Charges – not displayed for Cost Comparison Report
2. Chargeback Cost Summary – not included in Usage Report 3. Chargeback Resource Summary – contains following three graphs in a Cost Report (no graphs
displayed for Cost Comparison or Showback Reports) a. Cost per Resource b. Cost per Child Entity
c. Usage per Child Entity 4. Chargeback Cost Details
Usage Report – similar to Cost Report except provides only compute resource utilization data 1. Report summary same as Cost Report with some exceptions (see section 1, Report Summary above) 2. Chargeback Resource Summary – only Usage per Child Entity shown
Cost Comparison Report – compares costs for each resource & entity based on two different cost models 1. Report summary same as Cost Report with some exceptions (see section 1, Report Summary above)
Showback Report – helps analyze how costs are distributed among entities based on specified distribution policy 1. Report structure same as Cost Report with some exceptions
Identify Components of the Reporting Dashboard (pg. 120-122, vCB2.0 User’s Guide)
Graph display for resource cost & usage for a hierarchy or entity for last 30 days excluding current day
Dashboard displays 3 charts 1. Cost per Resource 2. Cost per Child Entity 3. Cost per Day
Option to view Top N reports: 1. Top N most expensive VMs 2. Top N least expensive VMs 3. Top N CPU consuming VMs 4. Top N Memory consuming VMs 5. NOTE: N = 10, 20, or 50
Given a Reporting Requirement, Determine What Report Type Should Be Run
I think this is nothing more than knowing the Report Types listed above; review what each report generates
Schedule Reports (pg. 106-108, vCB2.0 User’s Guide)
Log into Web UI > Reports tab > Create Reports (if not already done so)
Set Report parameters (Cost Model, Compute Resources), click Schedule parameter desired > then Next 1. Report Creation Time 2. Recurrence Pattern – Daily, Weekly, Monthly, Quarterly, ½ Yearly, Yearly, Custom 3. Range of Recurrence (then Next)
Finish the remaining report parameters (Report Summary & Details items), then Submit
Manage Archived Reports (pg. 113 to Create, pg. 115 to Manage in vCB2.0 User’s Guide)
Log into Web UI > Reports tab > Archived Reports, then click the desired report name to open it
Export
1. Select the report output type (.rtf, .pdf, .csv – ) 2. Click Download, then Save or Open the document
Email 1. Select the Email This Report icon 2. Fill in email details, then click the Send button
Delete 1. Reports tab > Archived Reports 2. Click next to the Report name (not on Report name), then ‘red cross’ (delete) icon 3. Confirm the action by clicking OK
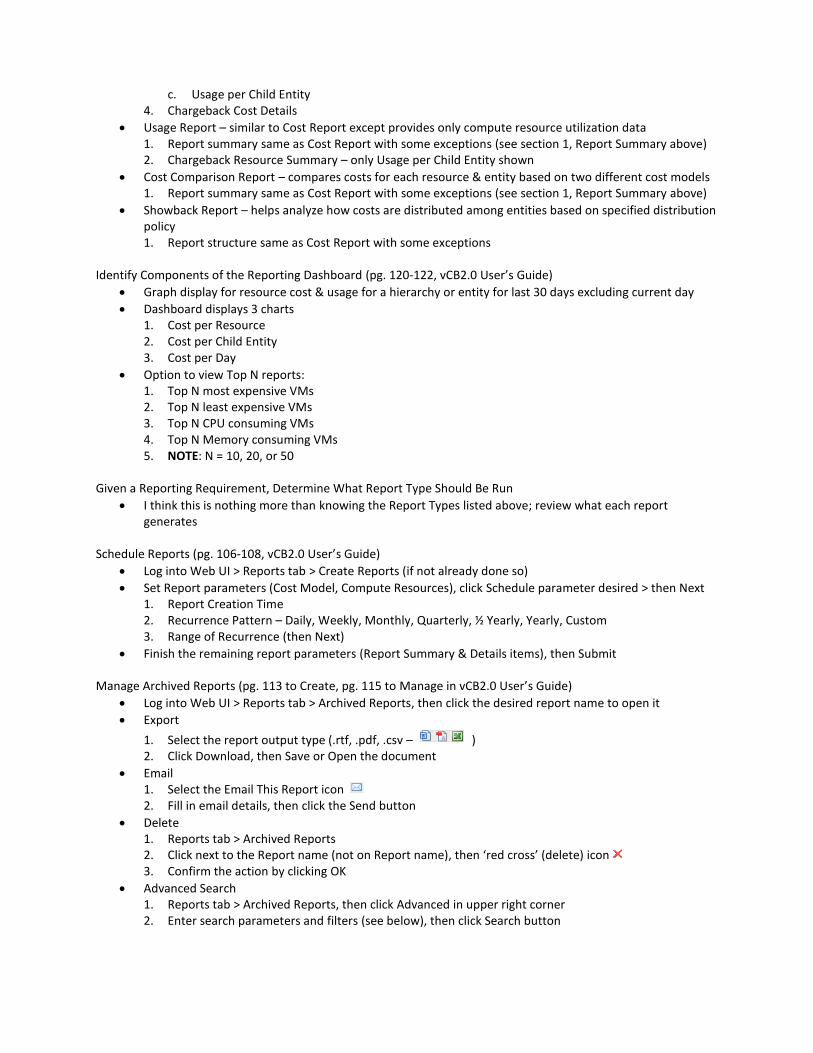
Advanced Search 1. Reports tab > Archived Reports, then click Advanced in upper right corner 2. Enter search parameters and filters (see below), then click Search button
Generate Custom Reports
I think this resembles report creation process; nothing in the Guides on specifics of this
3.3 – Configure & Manage vCenter Chargeback Cost Elements Identify vCenter Chargeback Cost Elements (pg. 67, vCB2.0 User’s Guide)
Chargeable Computing Resource
Base Rate
Rate Factor
Fixed Cost
Billing Policy
Cost Model
Cost Template
List Cost Elements Attributes (pg. 68-69, vCB2.0 User’s Guide)
Chargeable Computing Resource – any computing resource that must be accounted for when calculating IT operational costs 1. CPU measured in GHz 2. Memory measured in GB 3. Network bandwidth measured in GB/hour 4. Storage measured in GB 5. Disk Read & Write measured in GB/hour 6. vCPU number in VM NOTE: If vCD/VSM Data Collectors are installed, then following resources also accounted for: 7. Count of Networks belonging to an organization or vApp 8. NAT Service enabled or not 9. Firewall Service enabled or not 10. IPSec VPN Tunnel Count enabled (number of) 11. External Network Transmit & Receive measured in MB 12. External Network Transmit & Receive Rate measured in MB/hour
Base Rate – global rate wanting to charge for a unit of chargeable compute resource used, reserved, or allocated for a specific duration; sample base rate values:

1. The Duration is configurable (hourly, weekly, monthly, quarterly, 1/2yr, year) 2. Base rate precision value = 4 digits
Rate Factor – multiplication factor used with the base rate to calculate the charge for a unit of chargeable compute resource used or allocated for a specific duration 1. Useful when wanting to charge hierarchy entities differently 2. Value can be between 0 & 999.99 (precision up to 2 decimal places); sample rate factors/base rates:
Fixed Cost – a definite cost that can be charged for an entity, recurring or one-time costs 1. Recurring – periodic for specific resources; e.g. maintenance costs 2. Specific to an entity – i.e. real estate cost for storage 3. One-time – cost charged for a provided service; e.g. VM provisioning fee or VM Guest OS fee
Billing Policy – determines cost types & amount of chargeable compute resources units considered for calculating chargeback cost (see next Heading below for default policies) 1. ONLY accounts for amount of resource consumed, reserved, or allocated during the report duration
Cost Model – defines base rates for chargeable computing resources, currency, billing policy used for calculating the total cost, & other costs
Cost Template – entity-specific cost configuration details; rate factors for chargeable compute resource & the fixed costs
Describe Default Billing Policies & Cost Models (pg. 70-72, vCB2.0 User’s Guide)
Default Billing Policies:
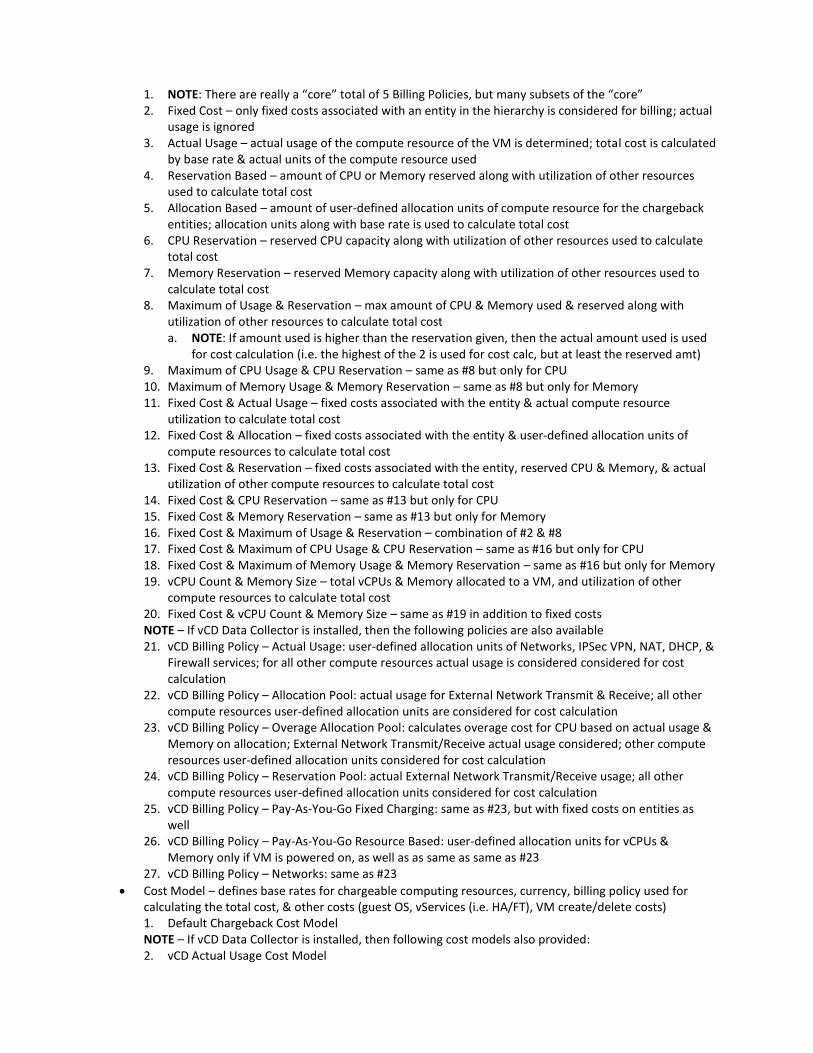
1. NOTE: There are really a “core” total of 5 Billing Policies, but many subsets of the “core” 2. Fixed Cost – only fixed costs associated with an entity in the hierarchy is considered for billing; actual
usage is ignored 3. Actual Usage – actual usage of the compute resource of the VM is determined; total cost is calculated
by base rate & actual units of the compute resource used 4. Reservation Based – amount of CPU or Memory reserved along with utilization of other resources
used to calculate total cost 5. Allocation Based – amount of user-defined allocation units of compute resource for the chargeback
entities; allocation units along with base rate is used to calculate total cost 6. CPU Reservation – reserved CPU capacity along with utilization of other resources used to calculate
total cost 7. Memory Reservation – reserved Memory capacity along with utilization of other resources used to
calculate total cost 8. Maximum of Usage & Reservation – max amount of CPU & Memory used & reserved along with
utilization of other resources to calculate total cost a. NOTE: If amount used is higher than the reservation given, then the actual amount used is used
for cost calculation (i.e. the highest of the 2 is used for cost calc, but at least the reserved amt) 9. Maximum of CPU Usage & CPU Reservation – same as #8 but only for CPU 10. Maximum of Memory Usage & Memory Reservation – same as #8 but only for Memory 11. Fixed Cost & Actual Usage – fixed costs associated with the entity & actual compute resource
utilization to calculate total cost 12. Fixed Cost & Allocation – fixed costs associated with the entity & user-defined allocation units of
compute resources to calculate total cost 13. Fixed Cost & Reservation – fixed costs associated with the entity, reserved CPU & Memory, & actual
utilization of other compute resources to calculate total cost 14. Fixed Cost & CPU Reservation – same as #13 but only for CPU 15. Fixed Cost & Memory Reservation – same as #13 but only for Memory 16. Fixed Cost & Maximum of Usage & Reservation – combination of #2 & #8 17. Fixed Cost & Maximum of CPU Usage & CPU Reservation – same as #16 but only for CPU 18. Fixed Cost & Maximum of Memory Usage & Memory Reservation – same as #16 but only for Memory 19. vCPU Count & Memory Size – total vCPUs & Memory allocated to a VM, and utilization of other
compute resources to calculate total cost 20. Fixed Cost & vCPU Count & Memory Size – same as #19 in addition to fixed costs NOTE – If vCD Data Collector is installed, then the following policies are also available 21. vCD Billing Policy – Actual Usage: user-defined allocation units of Networks, IPSec VPN, NAT, DHCP, &
Firewall services; for all other compute resources actual usage is considered considered for cost calculation
22. vCD Billing Policy – Allocation Pool: actual usage for External Network Transmit & Receive; all other compute resources user-defined allocation units are considered for cost calculation
23. vCD Billing Policy – Overage Allocation Pool: calculates overage cost for CPU based on actual usage & Memory on allocation; External Network Transmit/Receive actual usage considered; other compute resources user-defined allocation units considered for cost calculation
24. vCD Billing Policy – Reservation Pool: actual External Network Transmit/Receive usage; all other compute resources user-defined allocation units considered for cost calculation
25. vCD Billing Policy – Pay-As-You-Go Fixed Charging: same as #23, but with fixed costs on entities as well
26. vCD Billing Policy – Pay-As-You-Go Resource Based: user-defined allocation units for vCPUs & Memory only if VM is powered on, as well as as same as same as #23
27. vCD Billing Policy – Networks: same as #23
Cost Model – defines base rates for chargeable computing resources, currency, billing policy used for calculating the total cost, & other costs (guest OS, vServices (i.e. HA/FT), VM create/delete costs) 1. Default Chargeback Cost Model NOTE – If vCD Data Collector is installed, then following cost models also provided: 2. vCD Actual Usage Cost Model

3. vCD Allocation Pool Cost Model 4. vCD Overage Allocation Pool Cost Model 5. vCD Reservation Pool 6. vCD Pay-As-You-Go – Fixed Charging Cost Model 7. vCD Pay-As-You-Go – Resource Based Charging Cost Model 8. vCD Networks Cost Model
Create/Edit Billing Policies (pg. 83-84, vCB2.0 User’s Guide)
Create: 1. Log into the vCB Web UI > Manage Cost tab > Billing Policy > Create button 2. Provide a Name and (opt) Description 3. Click the Expression tab & select a resource & a defined attribute for it 4. Repeat for each remaining resource OR if there is identical configuration for ‘remaining resources’,
select All Other Resources from the Resource drop-down & then the defined Expression desired NOTE – Billing policies must account for ALL resources; so if you don’t explicitly define all resources individually, then the All Other Resources option must be selected and defined with an Expression
Edit: 1. Log into the vCB Web UI > Manage Cost tab > Billing Policy > Edit button 2. Modify areas as needed 3. When complete, click Save 4. NOTE: Can not edit System Billing Policies
Manage Cost Models (pg. 73-77, vCB2.0 User’s Guide)
Cost Model – defines base rates for chargeable computing resources, currency, billing policy used for calculating the total cost, & other costs (guest OS, vServices (i.e. HA/FT), VM create/delete costs) 1. Default Chargeback Cost Model NOTE – If vCD Data Collector is installed, then following cost models also provided: 2. vCD Actual Usage Cost Model 3. vCD Allocation Pool Cost Model 4. vCD Overage Allocation Pool Cost Model 5. vCD Reservation Pool 6. vCD Pay-As-You-Go – Fixed Charging Cost Model 7 vCD Pay-As-You-Go – Resource Based Charging Cost Model 8 vCD Networks Cost Model
Creating different Cost Models allows for cost comparison or to charge differently for a set of entities or hierarchies
Create: 1. Log into vCB Web UI > Manage Cost tab > Cost Models > Create button 2. Provide a Name & (opt) Description, as well as Currency type 3. Select the Billing Policy tab
a. Choose dates the billing period is effective (Update From Now Onwards is default) b. Set the Billing Policy type
4. Select Base Rates tab a. Choose dates the rates are effective (Update From Now Onwards is default) b. Set the base rate & duration for each compute resource NOTE – If no rate is entered, a default rate value of 0 is used
5. Select the Other Costs tab a. Enter remaining settings as needed, then click Create
From the Tools menu in upper right of the vCB Web UI, select Base Rate Calculator to help calculate base rates for CPU, Memory, and Storage (procedure on pg. 75, vCB2.0 User’s Guide)
Edit Cost Configuration of an Entity (pg. 86-87, vCB2.0 User’s Guide)
Configure Cost tab > Edit Entity Cost, select the Hierarchy from the drop-down, then click on an Entity

On the right side, select the Cost Model from the drop-down and the duration (default = Update From Now Onwards)
Enter rates in the Rate Factor tab 1. If a Cost Template was selected, Rate Factors from the Template are used, but the values can be
modified 2. Click Update Rate Factors button when complete
Click the Fixed Costs tab 1. Select desired cost from the drop-down then click the Add To The List link 2. Check the box to Propagate if needed, then choose options (All Descendents, Immediate Children;
then All, VMs, Hosts, or vApps) 3. Click Update Fixed Costs button when complete
Click the 3rd
tab to Enable/Disable Billing (is Enabled by default), then click Update Billing button when complete
Manage Physical Infrastructure Costing (pg. 88-91, vCB2.0 User’s Guide)
Rate Factors can be defined at the Host & Cluster or Datastore levels
When generating a report on a hierarchical entity or hierarchy, vCB checks if any entity-specific cost config is set for the selected Cost Model & uses that; if no cost config details are set, then vCB checks whether Rate Factors are set at the Host & Cluster or Datastore level for the VMs on which the report is being generated
To set Rate Factors on Physical Entities: 1. Configure Cost tab > Edit Infrastructure Cost 2. Select entity(ies) from the drop-down menu (Host & Cluster or Datastores), then select an Entity 3. Choose the Cost Model, Duration, then enter Rate Factor info 4. Click Update Rate Factors button when complete
For Datastore Tiers/Rating – rates can be placed on individual Datastores or Tiers (groups of Datastores)
Rates can also be defined for VM Storage Profiles which is then assigned to all Datastores in the Profile
Cost Calculation: 1. vCB 1
st checks for a cost config on the Datastore
2. If #1 is not defined, vCB then checks for cost config on a Tier 3. If a Datastore is in more than 1 profile, then the highest Rate Factor of all the profiles the Datastore is
in is used 4. If a Datastore is in more than 1 profile and no rate is created for each, then a default value of 1 is
used 5. If a Datastore is in more than 1 profile and only one profile has a user-defined rate, then that rate is
used even if that rate is < 1
Create Datastore Tiers 1. Configure Cost tab > Edit Infrastructure Cost, then select Datastores from the drop-down 2. Click the Create Tier button at the bottom (left pane), then enter a label for the Tier 3. Click anywhere outside the Tier label box to ‘save’ the info (pressing Enter doesn’t save it) 4. To place a Datastore in a Tier, rt-click on a Datastore in the Ungrouped Tier and select Move This
Datastore to Another Tier (nothing will seem like it happened…no Window displays, etc.) 5. Rt-click on the Tier you want to move the Datastore to and select Put the Datastore/Storage Profile in
This Tier 6. Repeat for remaining Datastores you want to move
To set Rate Factors on individual Datastores or Tiers, click on the entity and follow the steps listed in the 3
rd bullet just above
Manage Pricing Matrix For Virtual Machines (pg. 91-94, vCB2.0 User’s Guide)
Create Price Matrix for VMs 1. Configure Cost tab > Edit VM Instance Cost 2. Click the Create button at the bottom 3. Select to Apply to All Hierarchies or specific one
a. Define the Hierarchy Name & Entity Selection Criteria is specific is chosen

b. Add & Delete Rows as necessary 4. In the VM Instance Matrix section, first click Add to create a new row then enter the required vCPU
count, Memory value (click in the Memory column), Cost, & Duration 5. Click the Create button when complete
If/when multiple matrices are added, you can change the list priority by selecting a matrix then clicking the Move Up or Move Down link
To Delete a matrix, select it then click the Delete button
3.4 – Troubleshoot Common vCenter Chargeback Issues Collect Logs
Two ways: 1. Start menu > Programs > VMware > VMware vCenter Chargeback > vCenter Chargeback Manager
Tools and click Collect vCenter Chargeback Manager Logs a. A CMD Prompt window opens b. Enter log destination folder c. Select whether to collect Application & System Event logs should be collected & if additional Data
Collectors were installed aside from those installed during initial vCB installation d. Press any key to exit the utility
2. Open a CMD Prompt and cd to C:\Program Files (x86)\VMware\VMware vCenter
Chargeback\vCenter-CD-Tools\troubleshooting\bin and run the vCenterCB-support.bat file
3. A .zip file is placed in the folder you designated in the CMD window when the job is complete
Run Troubleshooting Utility
See previous item
Explain Impact of vSphere Statistic Levels on Report Generation
If vCB Reports do not display Disk Read/Write Info, Memory Usage and Cost, or Network Transmitted/Received Info, typically the reason is because the vCenter Server statistics collection level must be set to 3 or higher
For vCenter 2.5U3 and U4, & vSphere 4.0 and later
Explain Impact on Local Firewall Settings on vCenter Chargeback Services
If unable to access the vCB Web UI, verify port exceptions are added in Windows Firewall, if it is enabled
Otherwise, simply make sure vCB services are running
Given a Service Failure, Determine Root Cause
Basically here, just know the vCB dependencies; some services depend on either the vCenter or vCB DB to be able to run (vCB service start order: vCB Mgr DB Service, vCB Mgr Service, vCB Data Collector Service)
I suggest referencing the Best Practices & Troubleshooting Guide for an overview of potential causes for issues
SECTION 4 CONFIGURE & ADMINISTER VCLOUD NETWORKING 4.1 – Create & Administer vCloud External & Organizational Networks NOTE: A couple of amazing resources I recommend reading before tackling this section is a blog post by Massimo Re Ferrè – http://vexpert.me/dN and a 3-part vCD Networking Series posts by Duncan Epping – http://vexpert.me/dS, http://vexpert.me/dT, http://vexpert.me/dU Identify & Differentiate Types of vCloud Organizational Networks
External Organization Network – Direct Connection 1. Accessible by multiple organizations; VMs from different organizations can connect to & see traffic on
this network 2. Provides direct Layer 2 connectivity outside of the organization and directly into the organization 3. Requires a configured External Network within vCD
External Organization Network – NAT-Routed Percentage of Cluster 1. Accessible only by the organization 2. Provides controlled access to an External Network; System & Org Administrators can control NAT &
Firewall to make VMs accessible from the External Network 3. Requires a configured External Network & Network Pool
Internal Organization Network 1. Accessible only by the organization 2. Provides isolated private network to the organization that multiple internal vApps can connect to; no
connectivity can be made outside of or into this network 3. Requires a Network Pool
Create/Modify/Delete an External Network
Create (pg. 18, vCD1.5 Admin Guide): 1. Make sure you have a vDS PG created in vSphere beforehand (vSS or Cisco not supported); if VLAN
use is desired, it cannot be a trunk 2. Log into the vCD Web UI > Manage & Monitor tab 3. Select External Networks in the left pane and click the Add Network (green “+”) button 4. Click the vCenter Server and the vDS PG used for the External Network, then Next 5. Enter Mask, Gateway, & IP Range info, then Next 6. Name the External Network & (opt) Description, then Next, then Finish
Modify: 1. Manage & Monitor tab > select the External Network > rt-click, then click Properties 2. Modify Name & Description or Network Specification as needed 3. NOTE: If Mask & Gateway need to be changed, a new External Network needs to be created
Delete: 1. Before you can delete an External Network, you must delete all organizations networks that rely on it 2. Manage & Monitor tab > select the External Network > rt-click, then click Delete

Create/Modify/Delete an External Direct Organization Network (pg. 51, vCD1.5 Admin Guide)
Create: 1. Make sure you have an External Network created first 2. Log into the vCD Web UI > Manage & Monitor tab 3. Select Organization Networks in the left pane and click the Add Network (green “+”) button 4. Select an Organization, then Next 5. Select the network type (Typical – select External, then Direct from drop-down; or Advanced –
External Direct-Connect), then Next 6. Select an External Network (deselect Only User Networks Accessible by This Org if needed), then Next 7. Type a Name and (opt) Description, then Next, then Finish
Modify: 1. Simply rt-click the External Org Network > click Properties
Delete: 1. Simply rt-click the External Org Network > click Delete 2. NOTE: Make sure no vApps (VMs) are connected to this network
Create/Modify/Delete an External NAT-Routed Organization Network (pg. 51-52, vCD1.5 Admin Guide)
I will not go over this as it’s identical to Create a Direct-Connect just above; the only difference is to select either Typical – External, then Routed from drop-down or Advanced – External Routed
Modify: 1. Simply rt-click the External Org Network > click Properties
Delete: 1. Simply rt-click the External Org Network > click Delete 2. NOTE: Make sure no vApps (VMs) are connected to this network
Create/Modify/Delete an Internal Organization Network (pg. 52-53, vCD1.5 Admin Guide)
I will not go over this as it’s identical to Create a Direct-Connect just above; the only difference is to select either Typical – Internal (deselect External option), or Advanced – Internal 1. NOTE: There is a pre-requisite for this network – a Network Pool must first be created
Modify: 1. Simply rt-click the External Org Network > click Properties
Delete: 1. Simply rt-click the External Org Network > click Delete 2. NOTE: Make sure no vApps (VMs) are connected to this network
Explain the Relationship Between External Networks & vSphere Port Groups
An External Network is a logical differentiated network in vCD that is based on a vSphere Port Group. Many Orgs can connect to the same External Network (i.e. vDS PG) for communication outside the Org which may or may not have Internet connectivity
Explain the Purpose & Use Cases for External Networks
See previous item; basically, External Networks allow Orgs (specifically, the vApps/VMs within Orgs) to connect externally to it, either to other Orgs or Internet or both
Explain the Relationship Between Organization Networks & vShield Edge
Two types of Org Networks use Edge – External NAT-Routed and potentially Internal Networks (if DHCP is needed)
Edge provides isolation & security by use of Firewall, NAT, DHCP, & VPN network services
So, when an Org needs external access yet traffic needs to be secure/isolated from other tenants (i.e. Orgs), an Edge device needs to be placed between the Org & External Network to provide that requirement. In addition, for an Internal Network, if DHCP is needed to disperse IPs to vApps/VMs, an Edge device is needed
Explain Best Practices Related to Organization Networks (pg. 27-28/30, Architecting vCloud Whitepaper)
Use a vDS where/when possible (not vSS)
Public Cloud considerations 1. Create two different Org Networks – external and internal (private) 2. External Network should be Routed using Edge for NAT’ing, Firewall, & DHCP 3. Both the Internal & External Network should leverage the same VCDNI Pool 4. Use two separate IP Pool Ranges for Internal & External Networks
a. 8 Public IPs for External b. Full Class C range of IPs for Internal
Private Cloud considerations – same as Public with the following exceptions: 1. One External Network to enable an Org to access resources outside of vCD (i.e. to access LAN) 2. Follow the wizard, filling in the Mask & Gateway of the LAN, and giving a range of IPs from the LAN as
its “Public IP Pool” (range of 30 IPs is a suggested starting point)
Given Organization Requirements, Determine Appropriate Organization Network Type
This is self-explanatory – given a scenario, determine the appropriate network to configure for an Org. This is really about knowing each network (Direct, Routed, Internal) & Network Pool type (benefits/limits)
I recommend reviewing Duncan Epping’s 1st
& 2nd
post in the 3-part vCD Networking series (links provided at beginning of this Obj.)
4.2 – Configure & Administer vCloud Network Pools
Describe the Concept of a Network Pool (pg. 19, vCD1.5 Admin Guide)
A group of undifferentiated networks available for use within an Org vDC to create vApp Networks & External NAT-Routed or Internal Organization Networks
Network Pools are backed by vSphere resources – VLAN IDs or PGs; also created with vCD Isolated Networks
Traffic in a Network Pool is isolated at Layer 2 from other networks
Org vDCs can have one Network Pool, but multiple Org vDCs can share the same Network Pool
Three Network Pool Types: 1. VLAN-Backed
a. A “pool” of VLANs are used b. PGs are automatically created by vCD as an Org uses this Pool, and a VLAN is assigned to the PG c. Trunking is not supported d. Requires vDS e. Limitations – VLAN use; no vSS or Cisco vDS allowed
2. vCD Network Isolated (VCDNI) a. PGs are automatically created b. Isolation occurs via Mac-in-Mac encapsulation c. Requires vDS d. Limitations – no vSS or Cisco vDS allowed; no VLANs required (one recommended); MTU config’d
3. Port-Group Backed a. Same as VLAN-Backed, but PGs need to be manually created and VLANs assigned b. Trunking is not supported c. Can use vSS, vDS, or Cisco Nexus 1000v d. Limitations – inflexible due to manual PG creation; VLAN use
Create/Delete a Network Pool (pg. 66-67, vCD1.5 Admin Guide)
Create 1. From Manage & Monitor tab > Network Pools in the left pane, click the Add (green “+”) button 2. Select which pool type to create:
a. VLAN-Backed – at next screen type a range of VLAN IDs; select vCenter then a vDS… Finish 1) Provides best security, scalability, and performance for Org Networks

2) VLANs used must be isolated at Layer 2 b. VCDNI – at next screen type # of networks for the pool; type a VLAN ID (opt); select a vDS… Finish
1) Best for use with vApp Networks 2) PGs not need to be pre-created 3) Configure MTU size on physical infrastructure, vDS, and the VCDNI Network Pool
c. PG-Backed – at next screen select a vCenter & 1 or more PGs… Finish 1) vDS is not required for this Network Pool type 2) PGs must either be physically isolated or isolated via VLANs 3) PGs must be available on each Host in the vSphere Cluster 4) Trunking is not supported
Delete (pg. 67, vCD1.5 Admin Guide): 1. Prerequisites:
a. No Org vDC associated with Network Pool b. No vApps use the Network Pool c. No External NAT-Routed or Internal Org Networks use the Network Pool
2. From Manage & Monitor tab > Network Pools in the left pane 3. Rt-click the Network Pool and click Delete
Expand a Network Pool (pg. 66-67, vCD1.5 Admin Guide)
Add PortGroups 1. Manage & Monitor tab > Network Pools in left pane, rt-click PG Network Pool and select Properties 2. Select Network Pool Settings tab, select a newly created PG, Add, then click OK when done
Add Isolated Networks 1. Manage & Monitor tab > Network Pools in left pane, rt-click VCDNI Network Pool & select Properties 2. Select Network Pool Settings tab, enter number of vCD Isolated Networks, then click OK when done
Add VLAN IDs 1. In VLAN-Backed Network Pool Properties > Network Pool Settings tab, enter VLAN ID range, Add,
then click OK when done
Determine Appropriate Backing for a Given Network Pool
Not sure what VMware is wanting here; I think this may be referring to knowing when to use a specific Network Pool type; review Duncan’s 2
nd vCD Networking post
Configure Network Pool Properties
Refer to the above Expand Network Pool item (Network Pool Settings tab) or rename (General tab)
4.3 – Configure & Administer vApp Networks
Identify vApp Network Types (pg. 68, vCD1.5 User’s Guide)
vApp Networks resemble Org Networks as described below: 1. Isolated
a. Select None in the Connection drop-down when creating a vApp Network b. Contained solely within the vApp
2. Routed a. Route to an Org Network when VMs in a vApp needs to communicate with VMs in other vApps b. Network services such as Firewall and Static Routes can be configured
3. Direct-Connect a. Fencing can be configured here if VMs in separate vApps have identical network (IP) settings to
prevent conflict when starting the separate vApps at the same time 4. (Fenced) – this isn’t really a vApp Network type as much as it is a selected option when adding an Org
Network from within the vApp Network
a. What this does is allow VMs with same IP settings that are in different vApps within an org to be powered on at the same time without IP conflict; this is possible by use of an Edge device getting deployed that sits between the vApp VMs and the Org Network
Explain the Purpose & Use Cases for vApp Networks
I discussed some of the answer to this in the previous item, but a vApp Network allows VMs within a vApp to communicate either with each other or each other and with VMs outside of the vApp (other vApps within the Org) or with vApps outside of the Org
Explain the Relationship Between vApp Networks & vShield Edge Devices
The relationship is identical to how Edge relates to Org Networks – Edge devices are used for Firewall, Routing, NAT, Fencing, and DHCP services
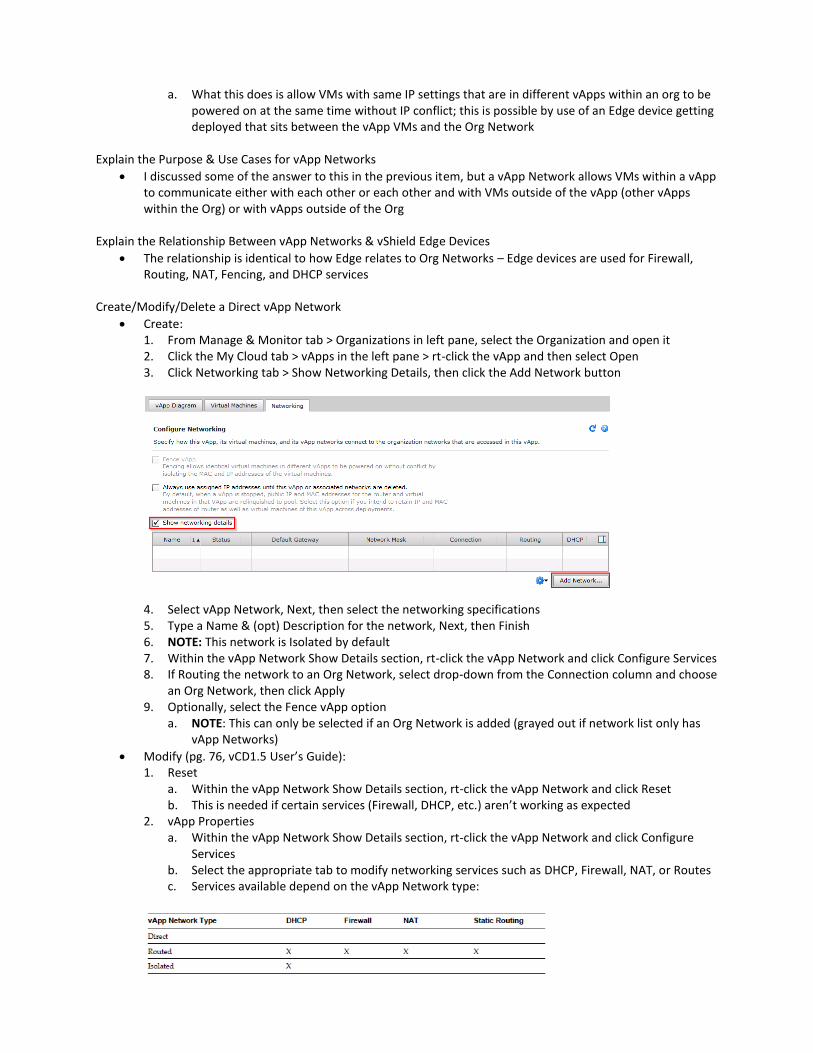
Create/Modify/Delete a Direct vApp Network
Create: 1. From Manage & Monitor tab > Organizations in left pane, select the Organization and open it 2. Click the My Cloud tab > vApps in the left pane > rt-click the vApp and then select Open 3. Click Networking tab > Show Networking Details, then click the Add Network button
4. Select vApp Network, Next, then select the networking specifications 5. Type a Name & (opt) Description for the network, Next, then Finish 6. NOTE: This network is Isolated by default 7. Within the vApp Network Show Details section, rt-click the vApp Network and click Configure Services 8. If Routing the network to an Org Network, select drop-down from the Connection column and choose
an Org Network, then click Apply 9. Optionally, select the Fence vApp option
a. NOTE: This can only be selected if an Org Network is added (grayed out if network list only has vApp Networks)
Modify (pg. 76, vCD1.5 User’s Guide): 1. Reset
a. Within the vApp Network Show Details section, rt-click the vApp Network and click Reset b. This is needed if certain services (Firewall, DHCP, etc.) aren’t working as expected
2. vApp Properties a. Within the vApp Network Show Details section, rt-click the vApp Network and click Configure
Services b. Select the appropriate tab to modify networking services such as DHCP, Firewall, NAT, or Routes c. Services available depend on the vApp Network type:

Delete (pg. 76, vCD1.5 User’s Guide): 1. Make sure the vApp using the vApp Network is stopped & no VMs in the vApp are connected to the
network 2. Within the vApp Network Show Details section, rt-click the vApp Network and click Delete, then Apply
Create/Modify/Delete a NAT-Routed vApp Network
See previous steps for Direct-Connect item
Create/Modify/Delete an Internal vApp Network
See previous steps for Direct-Connect item
Troubleshoot vApp Networks Using the Visual Mapping Tool
Within the vApp Network Show Details section
To display a diagram of the network(s) used by the vApp: 1. Rt-click the vApp > Open > vApp Diagram tab
4.4 – Administer vCloud Network Services
Identify Available vShield Edge Network Services (pg. 53, vCD1.5 Admin Guide)
DHCP
Firewall
NAT
VPN
Configure DHCP/NAT/VPN Services (pg. 53, vCD1.5 Admin Guide – Org Network; pg. 69-75, vCD1.5 User’s Guide – vApp Network)
DHCP: 1. When enabled for an Org Network, connect a VM vNIC in the Org to that network and select DHCP 2. Can be configured in vCD by System & Org Administrators 3. Configure:
a. Prerequisite – must have an External NAT-Routed or Internal Org Network b. Manage & Monitor tab > Organization Networks in left pan c. Rt-click Org Network > Configure Services d. Select DHCP tab > check Enable DHCP box e. Enter an IP range that vCD will use to satisfy VM DHCP IP requests f. Set default & max lease times (or use default values), click OK

g. NOTE: After the settings are configured, they will eventually show in the vShield Edge tab for the
PG object the Org Network is associated with in vCenter
NAT (pg. 56-57, vCD1.5 Admin Guide): 1. NAT – External IP mapping must be done before NAT mapping 2. Can only be configured by a Sys Administrator 3. Select NAT-External IPs tab, type in an external IP(s), click Add, then OK 4. Select NAT Mapping tab > Add button, choose Port Forwarding or IP Translation 5. Choose an external IP from the drop-down that was added in Step 3 and the internal IP it will be
forwarded to (select the Port & Protocol if Port Fwd option was selected); click OK when done 6. NAT Mapping rules are enforced by their order in the list; if needing to re-order the items, simply click
& drag a rule up or down in the list (this can be done by Sys & Org Administrators) 7. NOTE: After the settings are configured, they will eventually show in the vShield Edge tab for the PG
object the Org Network is associated with in vCenter
VPN (pg. 56-57, vCD1.5 Admin Guide): 1. Site-to-Site VPN is allowed between Org Networks in the same or different Organizations, including
different instances of vCD, as well as remote networks 2. Can be configured by Sys & Org Administrators 3. Prerequisites – An External NAT-Routed Org Network and at least vShield Mgr 5.0 with appropriate
licensing 4. Configure:
a. Manage & Monitor tab > Org Networks in left pane b. Select an Org Network > rt-click > Configure Services c. Select Site-to-Site VPN tab, then click to Enable Site-to-Site VPN d. Enter a public IP, then click OK e. Tunnel Config (below encompasses all VPN settings – Within an Org, Between Orgs, & Remote)
1) NOTE: If firewall is between the tunnel endpoints, verify ports 50, 51, 500, & 4500 are open 2) In the Site-to-Site VPN tab, click Add 3) Enter a Name & (opt) Description 4) Select a Network in This Org from the drop-down and choose a peer network, or…. 5) Select a Network in Another Org from the drop-down and click Connect to Another Org 6) Enter the login info for the peer org and click Continue
7) Or, select a Remote Network 8) Select a peer network/settings, then click OK or Connect
Add a SNAT/DNAT Rule (pg. 40-41, vShield5.0.1 Admin Guide)
SNAT – a NAT’ing rule that translates an internal private IP into a public IP for outbound traffic
DNAT – maps a public IP to an internal private IP for inbound traffic
See NAT section in previous item; when creating an IP Translation in the NAT Mapping tab, you are essentially creating a DNAT Rule; when checking the IP Masquerade box in the NAT Mapping tab, you are configuring SNAT
When you create these rules in the NAT tabs in vCD, they will (eventually) show in the vShield Edge tab in vCenter

Add a DHCP IP Pool (pg. 41, vShield5.0.1 Admin Guide)
The range of IPs used in the pool cannot overlap the static IP pool for the Org Network
When configuring the Org Network in vCD, the configuration will happen and show in the vShield Edge tab in vSphere Client
Manage & Monitor tab > Org Networks in left pane
Rt-click Org Network > Configure Services, select DHCP tab and enter a range of IPs; click OK when done
Add DHCP Static Binding (pg. 42, vShield5.0.1 Admin Guide)
Binding binds (attaches) an IP and MAC addresses to a VM 1. IP & MAC addresses are ‘released’ from a VM once it is powered down
Connect vSphere Client to vCenter > Inventory > Networking
Select the Org Network PG in the left pane, then vShield Edge tab on the right
Click DHCP link > Add Binding under DHCP Bindings section and add desired info (see below screenshot)
Another option – open a vApp > Network tab, and check the box for the Always Use Assigned IP Addresses Until This vApp or Associated Networks are Deleted option
Configure the VPN Service (pg. 43, vShield5.0.1 Admin Guide)
Connect vSphere Client to vCenter > Inventory > Networking
Select the Org Network PG in the left pane, then vShield Edge tab on the right
Click the VPN link, then Enable VPN
In the Add VPN box, type the IP address of the Edge in the Local Service IP address
Enter the pre-shared key in PSK for Sites with any Peer IP if anonymous sites connect to the VPN service
Type a Name for the VPN connection in the VPN Gateway ID (opt – select Log to log VPN activity)
Click OK
Configure Syslog (pg. 36, vShield5.0.1 Admin Guide or pg. 65-66, vCD1.5 Admin Guide)
Manage & Monitor tab > Org Networks > rt-click on network & select Synchronize Syslog Server Settings
vSphere Client > vCenter > Org Network PG > vShield Edge tab > Status link; expand Remote Syslog Servers panel > Edit link and type the IP of the remote Syslog server, then click OK
Use Logs to Troubleshoot Common Network Service Issues
Know where to find logs in vCD (Org/vApp) and use them to diagnose potential network issues
Reference the vCD Best Practice & Troubleshooting Guide
SECTION 5 CONFIGURE & ADMINISTER VCLOUD ORGANIZATIONS 5.1 – Create vCloud Organizations

Identify the URL Name of a Newly Created Organization
Two ways to display the same info: 1. Manage & Monitor > Organizations (open) > Administration tab > General 2. Manage & Monitor > Organizations (open) > Home, then select Org Settings link on far right
URL format: https://vCDURL/Cloud/org/OrgName
Create/Modify/Delete vCloud Organizations
Create (pg. 24-27, vCD1.5 Admin Guide): 1. Manage & Monitor tab > Organizations, then click Add (green “+”) button 2. Instead of writing a long list of ‘how to’, I will provide a screenshot of a list of items needing
configured for a new Org, then add some pertinent info below (not necessarily discuss each item in the list as some are self-explanatory; reference pg. 24-27, vCD1.5 Admin Guide for details):
3. For Name This Org, there are two boxes requiring info:
a. Org Name – this name needs to be a “URL friendly” name as this name will be used in web browsers by users in the Org to connect to their Cloud
b. Org Full Name – this is more of an “alias” name, but keep this professional; this is the name of the Org that will display in the header after the Org users log into their Cloud
4. LDAP: a. None – if no LDAP is used, then a Local vCD user should be created (optional if using LDAP) b. System – the new Org will use LDAP that is configured in the vCD system c. Custom – LDAP of the Org is used; LDAP settings will need to be provided by the Org
5. Catalog Publishing – typically, Orgs do not publish their catalogs to other Orgs & this is the default
Modify: 1. To change any Org settings made during creation, simply rt-click on the Org & choose Properties 2. Select the tab containing the setting you’re wanting to change 3. NOTE: If there is to be an Org name change, keep a couple things in mind:
a. The Org must first be disabled…Org Name field isn’t editable otherwise b. The URL to the Org’s Cloud will change c. Don’t forget to re-enable the Org after the name change
4. All other changes shouldn’t require the Org to be disabled
Delete: 1. Rt-click the Org and select Disable 2. Once the Org is Disabled, rt-click again and select Delete
Configure VM Lease Times
Manage & Monitor tab > Organizations > rt-click desired Org > Properties, then Policies tab
See below screenshots of all items in the Policies tab (and what’s listed below are defaults upon Org creation)
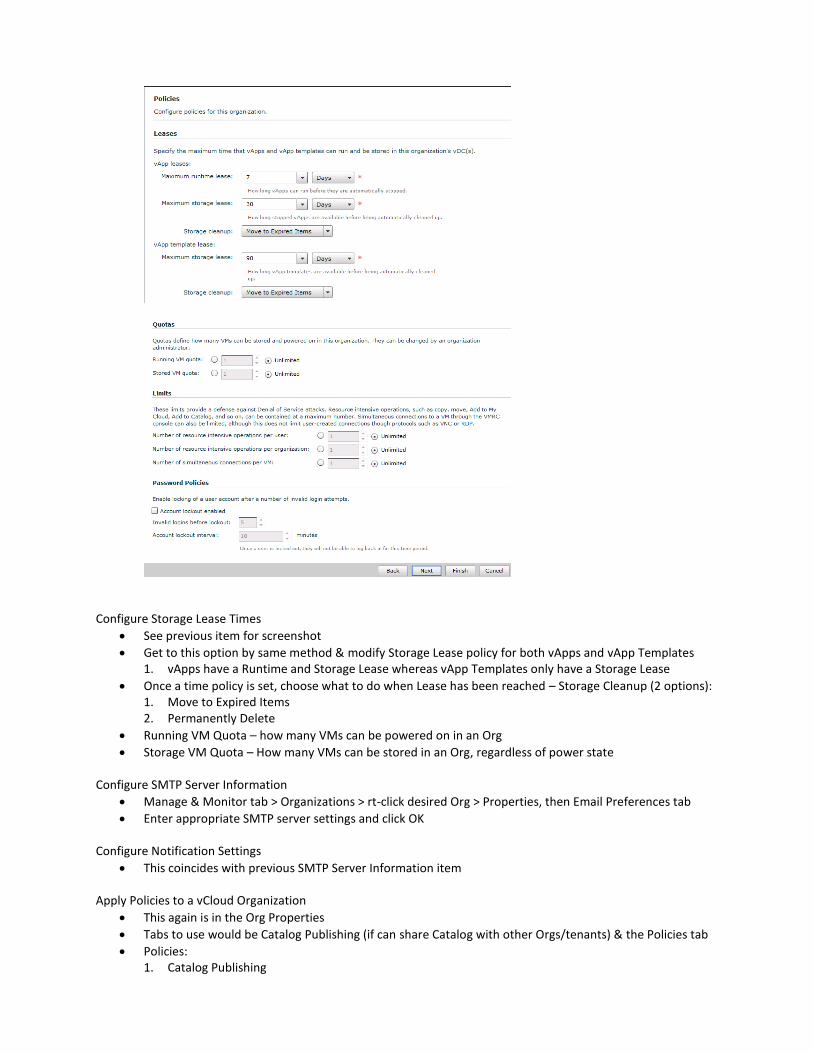
Configure Storage Lease Times
See previous item for screenshot
Get to this option by same method & modify Storage Lease policy for both vApps and vApp Templates 1. vApps have a Runtime and Storage Lease whereas vApp Templates only have a Storage Lease
Once a time policy is set, choose what to do when Lease has been reached – Storage Cleanup (2 options): 1. Move to Expired Items 2. Permanently Delete
Running VM Quota – how many VMs can be powered on in an Org
Storage VM Quota – How many VMs can be stored in an Org, regardless of power state
Configure SMTP Server Information
Manage & Monitor tab > Organizations > rt-click desired Org > Properties, then Email Preferences tab
Enter appropriate SMTP server settings and click OK
Configure Notification Settings
This coincides with previous SMTP Server Information item
Apply Policies to a vCloud Organization
This again is in the Org Properties
Tabs to use would be Catalog Publishing (if can share Catalog with other Orgs/tenants) & the Policies tab
Policies: 1. Catalog Publishing

2. Leases 3. Quotas 4. Limits 5. Password
5.2 – Administer vCloud Organizations List Operations That Can Be Performed on an Organization
I think this is referring to the same settings that you can configure on an Org; as such, refer to Obj. 5.1
List the vCloud Constructs That Make Up an Organization
Again, I have no idea what this is asking for, but if I had to guess, it seems VMware wants us to know what components of vCD make up an Org… 1. Org vDCs
a. Provides resources to an org b. Resources within an Org vDC are derived from a Provider vDC c. Many Org vDCs can be created from a single Provider vDC
2. Users/Groups a. Users can be local or LDAP b. Groups can only come from LDAP
3. Policies (see previous item for screenshot of Org Properties tab) a. Catalogs – catalogs can be published internally (only seen within the Org) or externally (other
Orgs) b. Password – password lockout after x attempts and timeout interval between login re-attempt
after lockout c. VM & Storage Leases – basically, resource cleanup for unused resources consumed by an Org
4. Server Settings – LDAP & SMTP
Given a Tier of Server Determine Appropriate Organization vDC
I think what VMware wants here is associating different server/compute/storage levels into tiered performance/feature levels; i.e. SLA levels
For example: 1. A server with several CPU sockets, multiple cores, and several GHz speed; great magnitude of RAM;
SSDs for storage; and “high-end” vSphere features such as HA & FT (vSphere Ent+ licensed features), would be in a tier labeled Tier1, or maybe Platinum or Gold tier.
2. A couple CPU sockets, moderate GHz speed; moderate amount of RAM; & SAS storage; and minimal vSphere features (vSphere Ent licensed features) would be Tier2 or Silver tier….and so on..
Based off the above server resource examples, you would create Provider vDCs into differing tiers, associating tier 1 type vSphere Cluster resources to a Provider vDC and labeling it “Tier1” or “Platinum, and so on
Then, Org vDCs would be created based off those tiers and allocated to Orgs who require certain tier or SLA characteristics
Edit Leases/Quotas/Limits Applied to an Organization
This was covered in Obj. 5.1; see the screenshots in Obj. 5.1 of the Policies tab of an Org’s Properties
To get to the Policies tab → Manage & Monitor tab > Organizations > rt-click the Org wanting to modify > Properties, then select the Policies tab to modify Lease, Quota, & Limit settings
Leases – provide a level of control over an Org’s storage & compute resources specifying the max amt of time vApps can run & max time vApps/vApp Templates can be stored
Quotas – determine how many VMs can be stored & powered on in an Org
Limits – prevent resource-intensive operations from affecting all users in vCD; helps prevent DoS attacks
Revise Catalogs Attached to an Organization
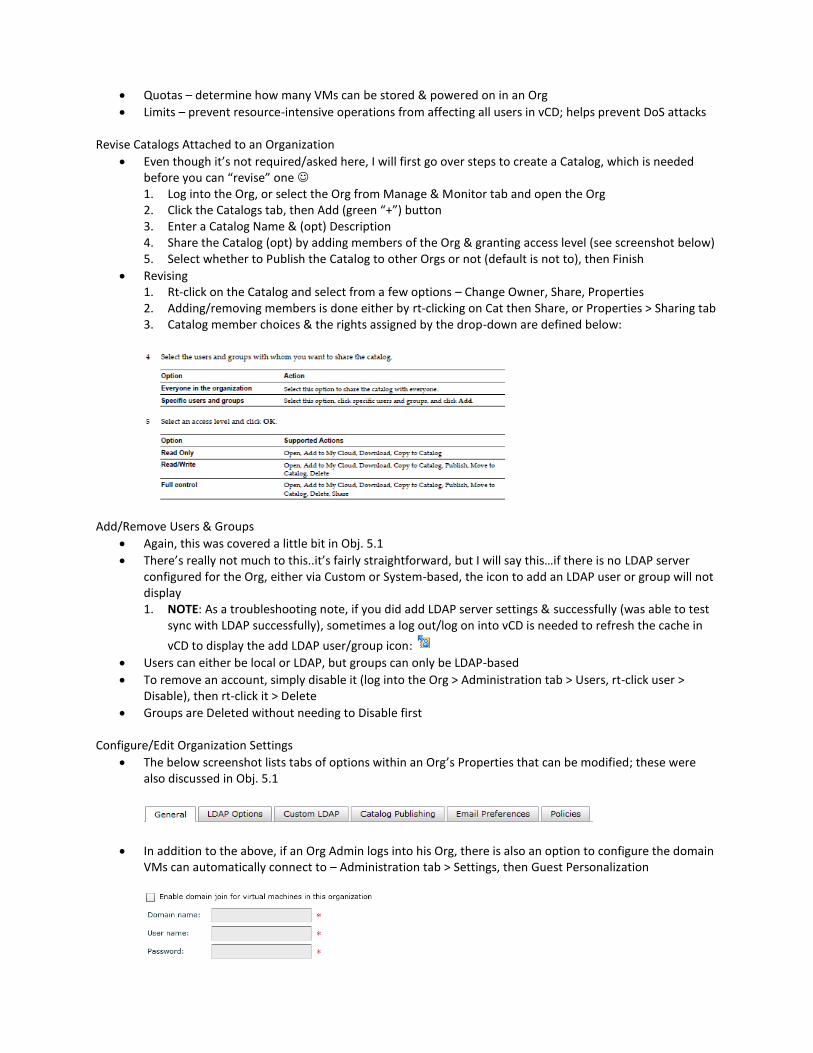
Even though it’s not required/asked here, I will first go over steps to create a Catalog, which is needed before you can “revise” one 1. Log into the Org, or select the Org from Manage & Monitor tab and open the Org 2. Click the Catalogs tab, then Add (green “+”) button 3. Enter a Catalog Name & (opt) Description 4. Share the Catalog (opt) by adding members of the Org & granting access level (see screenshot below) 5. Select whether to Publish the Catalog to other Orgs or not (default is not to), then Finish
Revising 1. Rt-click on the Catalog and select from a few options – Change Owner, Share, Properties 2. Adding/removing members is done either by rt-clicking on Cat then Share, or Properties > Sharing tab 3. Catalog member choices & the rights assigned by the drop-down are defined below:
Add/Remove Users & Groups
Again, this was covered a little bit in Obj. 5.1
There’s really not much to this..it’s fairly straightforward, but I will say this…if there is no LDAP server configured for the Org, either via Custom or System-based, the icon to add an LDAP user or group will not display 1. NOTE: As a troubleshooting note, if you did add LDAP server settings & successfully (was able to test
sync with LDAP successfully), sometimes a log out/log on into vCD is needed to refresh the cache in
vCD to display the add LDAP user/group icon:
Users can either be local or LDAP, but groups can only be LDAP-based
To remove an account, simply disable it (log into the Org > Administration tab > Users, rt-click user > Disable), then rt-click it > Delete
Groups are Deleted without needing to Disable first
Configure/Edit Organization Settings
The below screenshot lists tabs of options within an Org’s Properties that can be modified; these were also discussed in Obj. 5.1
In addition to the above, if an Org Admin logs into his Org, there is also an option to configure the domain VMs can automatically connect to – Administration tab > Settings, then Guest Personalization

Allocate Resources to an Organization
This is done by simply creating an Organization Virtual Datacenter (Org vDC), which as I indicated earlier is “partitioned” from a Provider vDC
A single Org can have multiple Org vDCs associated with it
Create (pg 28-31, vCD1.5 Admin Guide): 1. Manage & Monitor tab > Organization vDCs > Add (green “+”) button 2. Select an Org to attach the Org vDC to 3. Select a Provider vDC to attain resources from 4. Choose an Allocation Model of how resources will be given to the Org (see below):
a. NOTE: Duncan Epping also has a fantastic post explaining Allocation Models & when best to use a particular one that I *highly* recommend reading: http://vexpert.me/e3
5. Configure resources based on the Allocation Model selected (not all below options will display)
6. Allocate Storage amount to the Org vDC for vApps & vApp Templates
a. Thin provisioning – recommended, but need to monitor for over provisioning b. Fast provisioning – recommended if needing to clone vApps as this configures linked clones
instead of full clones 1) NOTE: Fast provisioning requires minimum of vSphere 5 (vCenter/ESXi) and Datastores to be
connected to LESS THAN 8 ESXi Hosts 7. Choose a Network Pool (if None, then one can be added later) 8. Name & (opt) give Description of the Org vDC, then Finish
Explain the Purpose & Use Case for Storage Options
Thin Provisioning – allows the use of storage for only what is actually written to disk, not what is allocated; the conserves storage, but need to monitor for potential over allocation
Fast Provisioning – allows for use of linked clones instead of full clones when cloning vApps (VMs); the linked-clone VM uses the same base disk as the parent, but has delta disks created where data is written to (changes) 1. Caveats – must be using a minimum of vSphere 5 (vCenter/ESXi) and the original VM and cloned VM
must be in the same vSphere Datacenter
Shadow VMs
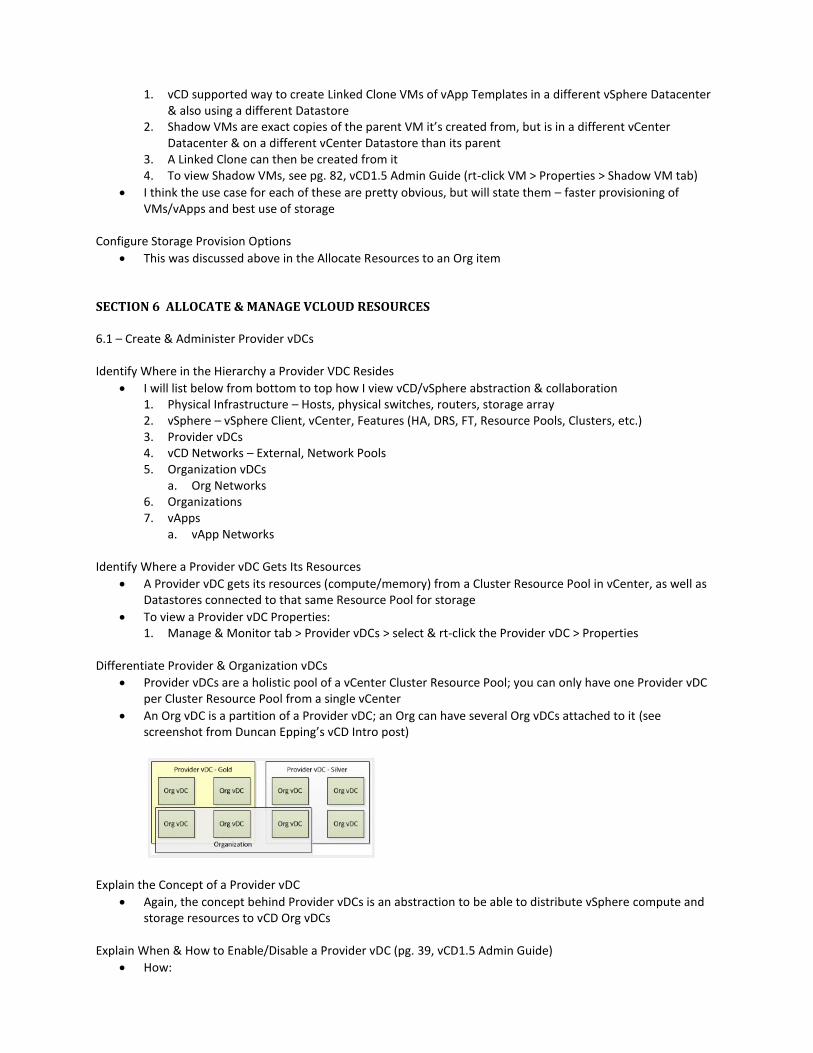
1. vCD supported way to create Linked Clone VMs of vApp Templates in a different vSphere Datacenter & also using a different Datastore
2. Shadow VMs are exact copies of the parent VM it’s created from, but is in a different vCenter Datacenter & on a different vCenter Datastore than its parent
3. A Linked Clone can then be created from it 4. To view Shadow VMs, see pg. 82, vCD1.5 Admin Guide (rt-click VM > Properties > Shadow VM tab)
I think the use case for each of these are pretty obvious, but will state them – faster provisioning of VMs/vApps and best use of storage
Configure Storage Provision Options
This was discussed above in the Allocate Resources to an Org item
SECTION 6 ALLOCATE & MANAGE VCLOUD RESOURCES 6.1 – Create & Administer Provider vDCs Identify Where in the Hierarchy a Provider VDC Resides
I will list below from bottom to top how I view vCD/vSphere abstraction & collaboration 1. Physical Infrastructure – Hosts, physical switches, routers, storage array 2. vSphere – vSphere Client, vCenter, Features (HA, DRS, FT, Resource Pools, Clusters, etc.) 3. Provider vDCs 4. vCD Networks – External, Network Pools 5. Organization vDCs
a. Org Networks 6. Organizations 7. vApps
a. vApp Networks
Identify Where a Provider vDC Gets Its Resources
A Provider vDC gets its resources (compute/memory) from a Cluster Resource Pool in vCenter, as well as Datastores connected to that same Resource Pool for storage
To view a Provider vDC Properties: 1. Manage & Monitor tab > Provider vDCs > select & rt-click the Provider vDC > Properties
Differentiate Provider & Organization vDCs
Provider vDCs are a holistic pool of a vCenter Cluster Resource Pool; you can only have one Provider vDC per Cluster Resource Pool from a single vCenter
An Org vDC is a partition of a Provider vDC; an Org can have several Org vDCs attached to it (see screenshot from Duncan Epping’s vCD Intro post)
Explain the Concept of a Provider vDC
Again, the concept behind Provider vDCs is an abstraction to be able to distribute vSphere compute and storage resources to vCD Org vDCs
Explain When & How to Enable/Disable a Provider vDC (pg. 39, vCD1.5 Admin Guide)
How:

1. Manage & Monitor tab > Provider vDCs > select & rt-click the Provider vDC and choose Disable 2. When a Provider vDC is disabled, Org vDCs are also disabled; no more vApps/VMs can be turned on
or created, but current running vApps/VMs continue to run
When: 1. None of the vCD Guides share when disabling is best, but I assume for such instances as maybe for
maintenance on the vSphere resources associated with the Provider vDC or if resources are approaching their limits
Create/Delete a Provider VDC
Create (pg. 17-18, vCD1.5 Admin Guide): 1. Manage & Monitor tab > Provider vDCs > New Provider vDC 2. Enter Name & (opt) Description
a. Name/Description can be used to identify the Tier level and/or “function” of the Provider vDC 3. Select Supported Hardware Version 4. Select a vCenter Server and Resource Pool 5. Select one or more Datastores (CTRL+CLICK), then Add, then Next
a. Read-only Datastores (NFS) are not supported 6. Enter root user & password, then Next, then Finish
a. NOTE: Upon completion, ESXi Hosts get “prepared” for use in vCD by getting a vCD agent installed on them, which requires them to temporarily be placed in Maint Mode; if you don’t have enough Hosts in the Cluster Resource Pool to handle VM migrations, this agent install will fail; but don’t worry…this can be manually done after Provider vDC creation
Delete (pg. 39-40, vCD1.5 Admin Guide): 1. Manage & Monitor tab > Provider vDCs > select & rt-click the Provider vDC > Disable 2. Make sure all Org vDCs & Org Networks that use the Provider vDC are disabled/deleted 3. Rt-click on the Provider vDC > Delete, then Yes to confirm
Select Resource Pools & Datastores For a Provider VDC (pg. 41-42, vCD1.5 Admin Guide)
Datastores: 1. Manage & Monitor tab > Provider vDCs > select & rt-click Provider vDC, then Open 2. Click the Datastores tab, then Add/Remove 3. Select Datastores as needed to add (or remove), then OK when complete
Resource Pools: 1. Manage & Monitor tab > Provider vDCs > select & rt-click Provider vDC, then Open 2. Click the Resource Pools tab, then Add Resource Pool 3. Select a resource pool to add, then Finish 4. NOTE: Adding additional Resource Pools to a Provider vDC makes Pay-As-You-Go Org vDCs
expandable/elastic
Properties of a Provider vDC:

Explain When & How to Enable/Disable a Provider vDC Host (pg. 40, vCD1.5 Admin Guide)
When: 1. This is done when maintenance is needed to be done to the vSphere ESXi Host and to simply prevent
additional vApps from starting on the Host a. vApps/VMs on the Host need to be powered down, or migrated
2. If a Host was added to the Cluster RP vCD uses, it needs to be “prepared” (vCD agent installed); the first step in installing the vCD agent is to Disable the Host
How: 1. Manage & Monitor tab > Provider vDCs > select & rt-click Provider vDC, then Open 2. Click Hosts tab, rt-click on the Host and select Disable (or enable) 3. If VMs reside on the Host from the same area in vCD, rt-click on Host and select Redeploy VMs 4. See next item for a new Host in the Cluster RP (Prepare)
Prepare/Unprepare a Provider vDC Host (pg. 40-41, vCD1.5 Admin Guide)
Preparing is done, as I mention above, to install the vCD agent on a Host so it can be used by vCD 1. Manage & Monitor tab > Provider vDCs > select & rt-click Provider vDC, then Open 2. Click Hosts tab, rt-click on the Host and select Prepare (or Unprepare)
Upgrade/Repair a Provider VDC Host Agent (pg. 41, vCD1.5 Admin Guide)
Process is similar to Prepare, except choose Upgrade Host or Repair Host instead of Prepare (or Unprepare) Host
Repairs can be done if vCD cannot connect to/contact a Host
Explain When & How to Enable/Disable a Provider Datastore
Manage & Monitor tab > Datastores > select & rt-click a Datastore then Disable (or Enable)
You Disable a Datastore before it can be deleted
vApps cannot be powered on or started on the Datastore to be Disabled
Configure Low Disk Space Warnings
Similar to a vSphere Alarm for low disk storage remaining on a Datastore
Manage & Monitor tab > Provider vDCs > select & rt-click Provider vDC, then Open
Click Datastores, select and rt-click a Datastore > Properties
Select disk space thresholds for the Datastore, then click OK when complete
6.2 – Create & Administer Organization vDCs List All Allocation Models
See the Allocate Resources to an Organization item in Obj. 5.2
NOTE: Many of the items in this Objective is repeat information; instead of repeating (retyping) the info, I will direct you to where the info was previously discussed
I again recommend reading Duncan Epping’s post on Allocation Models – http://vexpert.me/e3
Explain the Concept of an Organization vDC
An Org vDC is a partition of a Provider vDC and provides resources to an Organization
An Org vDC can only be associated with one Org, but an Org can have many Org vDCs
Create/Modify/Delete an Organization vDC (pg. 44-49, vCD1.5 Admin Guide)
Create: 1. See the Allocate Resources to an Organization item in Obj. 5.2
Modify: 1. To change items from the ‘Allocate Resources…’ section covered above, just rt-click on an Org vDC >
Properties
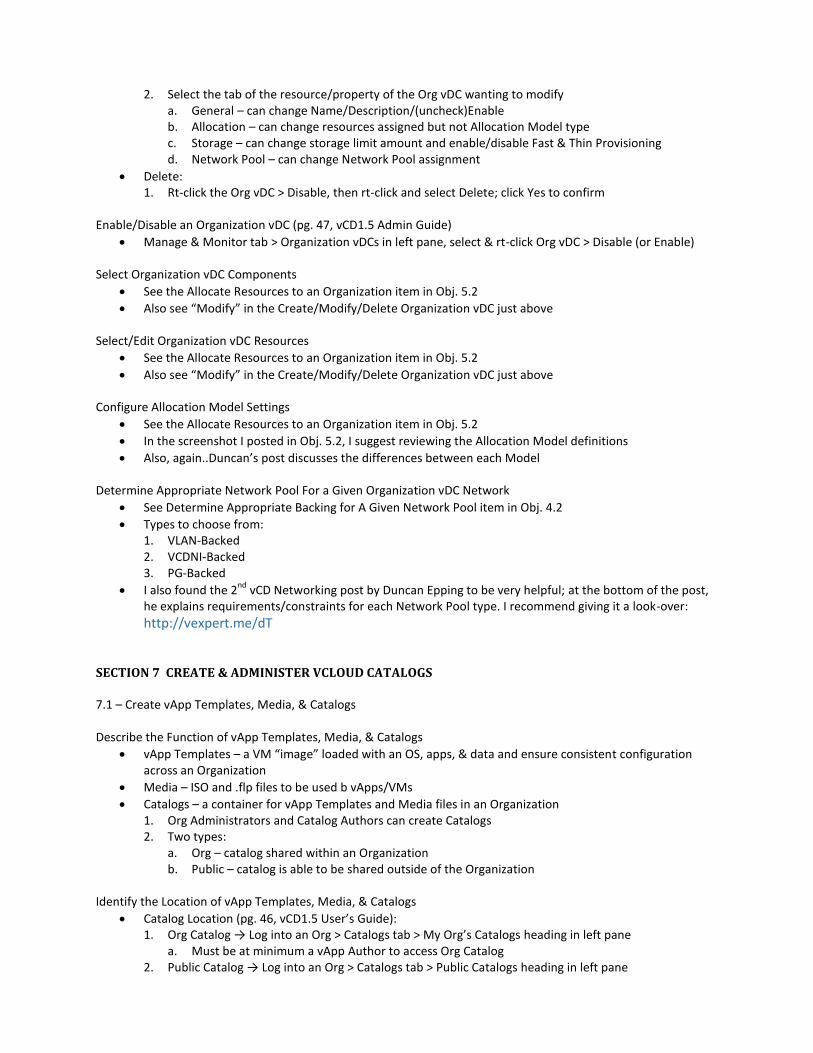
2. Select the tab of the resource/property of the Org vDC wanting to modify a. General – can change Name/Description/(uncheck)Enable b. Allocation – can change resources assigned but not Allocation Model type c. Storage – can change storage limit amount and enable/disable Fast & Thin Provisioning d. Network Pool – can change Network Pool assignment
Delete: 1. Rt-click the Org vDC > Disable, then rt-click and select Delete; click Yes to confirm
Enable/Disable an Organization vDC (pg. 47, vCD1.5 Admin Guide)
Manage & Monitor tab > Organization vDCs in left pane, select & rt-click Org vDC > Disable (or Enable)
Select Organization vDC Components
See the Allocate Resources to an Organization item in Obj. 5.2
Also see “Modify” in the Create/Modify/Delete Organization vDC just above
Select/Edit Organization vDC Resources
See the Allocate Resources to an Organization item in Obj. 5.2
Also see “Modify” in the Create/Modify/Delete Organization vDC just above
Configure Allocation Model Settings
See the Allocate Resources to an Organization item in Obj. 5.2
In the screenshot I posted in Obj. 5.2, I suggest reviewing the Allocation Model definitions
Also, again..Duncan’s post discusses the differences between each Model
Determine Appropriate Network Pool For a Given Organization vDC Network
See Determine Appropriate Backing for A Given Network Pool item in Obj. 4.2
Types to choose from: 1. VLAN-Backed 2. VCDNI-Backed 3. PG-Backed
I also found the 2nd
vCD Networking post by Duncan Epping to be very helpful; at the bottom of the post, he explains requirements/constraints for each Network Pool type. I recommend giving it a look-over:
http://vexpert.me/dT
SECTION 7 CREATE & ADMINISTER VCLOUD CATALOGS 7.1 – Create vApp Templates, Media, & Catalogs Describe the Function of vApp Templates, Media, & Catalogs
vApp Templates – a VM “image” loaded with an OS, apps, & data and ensure consistent configuration across an Organization
Media – ISO and .flp files to be used b vApps/VMs
Catalogs – a container for vApp Templates and Media files in an Organization 1. Org Administrators and Catalog Authors can create Catalogs 2. Two types:
a. Org – catalog shared within an Organization b. Public – catalog is able to be shared outside of the Organization
Identify the Location of vApp Templates, Media, & Catalogs
Catalog Location (pg. 46, vCD1.5 User’s Guide): 1. Org Catalog → Log into an Org > Catalogs tab > My Org’s Catalogs heading in left pane
a. Must be at minimum a vApp Author to access Org Catalog 2. Public Catalog → Log into an Org > Catalogs tab > Public Catalogs heading in left pane

a. Must be an Org Administrator to access Public Catalogs
Media Location – in a Catalog (when in a Catalog, click the Media tab)
vApp Templates – in a Catalog (when in a Catalog, click the vApp Template tab)
Identify the Format in Which vApp Templates, Media, & Catalogs Can Be Stored
vApp Templates: 1. OVF version 1.0 and 1.1 2. OVF with deployment options are preserved in the Template
Media: 1. ISO 2. .FLP
Differentiate Between vApp Templates, Media, & Catalogs
A Catalog is the container of vApp Templates and Media files; see first item from this Objective
Create/Update a vApp Template
Must be at least a Catalog Author user
Create: 1. Manage & Monitor tab > Organizations in left pane, rt-click the Org and Open 2. Catalogs tab > My Org’s Catalogs, vApp Templates tab 3. Click the Upload icon (1
st icon) to upload an OVF, or click the Import from vSphere icon (2
nd one)
4. Provide the relevant info for the Import, or Browse to the OVF, then click Upload or OK
Update: 1. Manage & Monitor tab > Organizations in left pane, rt-click the Org and Open 2. Catalogs tab > My Org’s Catalogs, vApp Templates tab 3. Rt-click the vApp Template > Properties
Create/Delete a Catalog
Must be at least a Catalog Author user 1. Manage & Monitor tab > Organizations in left pane, rt-click the Org and Open 2. Catalogs tab > My Org’s Catalogs, then Add (green “+”) Catalog button 3. Provide a Name (Next), add Org members to share the Catalog with (Next), then Finish 4. NOTE: If the Sys Administrator did not grant Publish Catalog permission on the Org, the option to
Publish the Catalog to other Orgs is not displayed
Publish a Catalog to Different Organizations
Must be at least a Catalog Author user
The Sys Administrator must have granted the Org Catalog Publishing to be able to do this procedure 1. Click Catalogs tab > rt-click the Catalog > Publish and select Publish to All Orgs, then click OK
7.2 – Administer vCloud Catalogs Identify Frequently Used Catalog Properties
Change Owner
Publish (if Org-enabled by the Sys Admin)
Share
All the above can be accessed via rt-click menu on the Catalog or rt-click Catalog > Properties
Explain How Guest Customization Works in vCloud Implementations (pg. 105, vCD1.5 User’s Guide)
If you use MS Windows OS, sysprep (given a legacy OS) is handled by any given vCD cell (remember adding MS Sysprep pkgs earlier in our studies?)
VMware Tools must be installed in the VM for the Guest Customization feature to work
Installing VMware Tools requires for the Guest Customization feature to first be disabled

Deploy a vApp From a Catalog (pg. 62, vCD1.5 User’s Guide)
Org Catalog – must be at least a vApp User
Public Catalog – must be at least a vApp Author
My Cloud tab > vApps > Add (green “+”) vApp from Catalog button…or…
Catalogs tab > My Org’s Catalogs > vApp Templates, rt-click vApp and select Add to My Cloud
Configure a Catalog to be Shared By Users in an Organization
Rt-click the Catalog > Share…
Add Entire Org or select members of the Org to add, granting appropriate Catalog rights to each user 1. Read Only 2. Read/Write 3. Full Control
Copy vApp Templates & Media To/From a Catalog
From the vApp Templates tab in My Org’s Catalogs, rt-click the vApp Template & select Copy To…
Provide the information – Name, Catalog from drop-down, Org vDC from drop-down, then click OK
Configure Catalog Properties
Items that can be change (rt-click Catalog > Properties): 1. Name/Description 2. Sharing (with members within an Org) 3. Publish (to other/outside Orgs)
Given Requirements, Apply the Appropriate Properties to a Catalog
Self-explanatory – see previous item above on Properties that can be modified
SECTION 8 MONITOR A VCLOUD IMPLEMENTATION 8.1 – Troubleshoot & Audit Resources & Events in vCloud
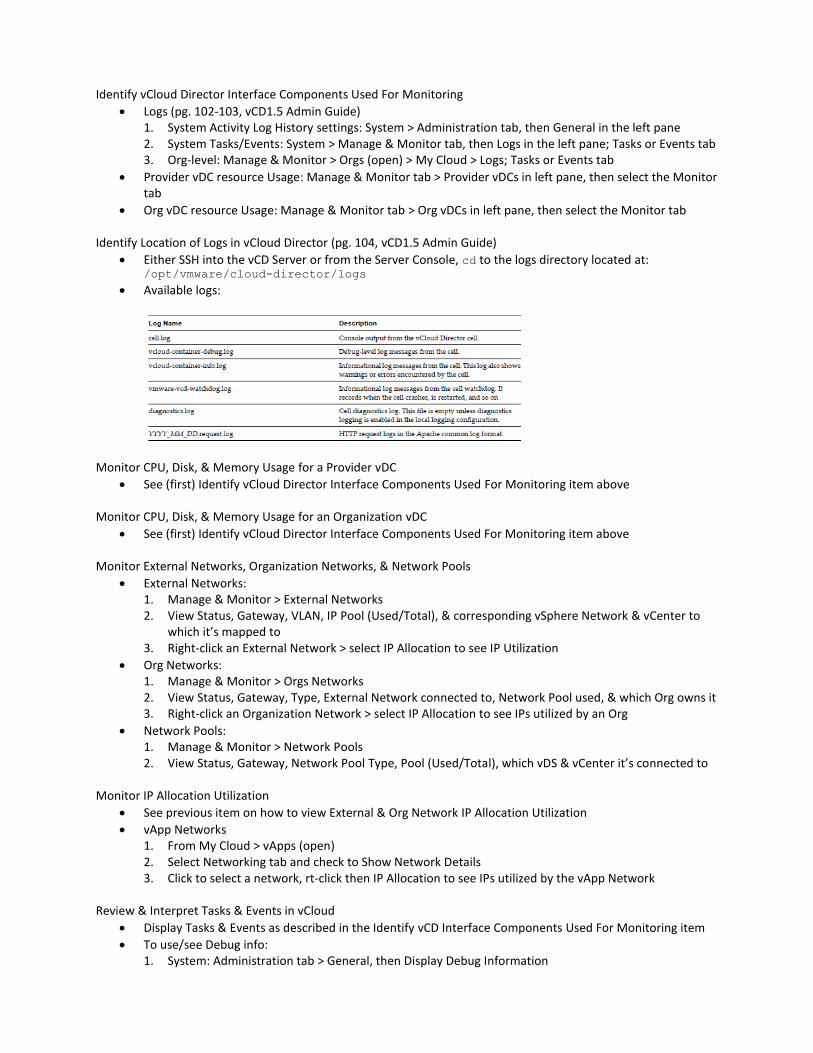
Identify vCloud Director Interface Components Used For Monitoring
Logs (pg. 102-103, vCD1.5 Admin Guide) 1. System Activity Log History settings: System > Administration tab, then General in the left pane 2. System Tasks/Events: System > Manage & Monitor tab, then Logs in the left pane; Tasks or Events tab 3. Org-level: Manage & Monitor > Orgs (open) > My Cloud > Logs; Tasks or Events tab
Provider vDC resource Usage: Manage & Monitor tab > Provider vDCs in left pane, then select the Monitor tab
Org vDC resource Usage: Manage & Monitor tab > Org vDCs in left pane, then select the Monitor tab
Identify Location of Logs in vCloud Director (pg. 104, vCD1.5 Admin Guide)
Either SSH into the vCD Server or from the Server Console, cd to the logs directory located at: /opt/vmware/cloud-director/logs
Available logs:
Monitor CPU, Disk, & Memory Usage for a Provider vDC
See (first) Identify vCloud Director Interface Components Used For Monitoring item above
Monitor CPU, Disk, & Memory Usage for an Organization vDC
See (first) Identify vCloud Director Interface Components Used For Monitoring item above
Monitor External Networks, Organization Networks, & Network Pools
External Networks: 1. Manage & Monitor > External Networks 2. View Status, Gateway, VLAN, IP Pool (Used/Total), & corresponding vSphere Network & vCenter to
which it’s mapped to 3. Right-click an External Network > select IP Allocation to see IP Utilization
Org Networks: 1. Manage & Monitor > Orgs Networks 2. View Status, Gateway, Type, External Network connected to, Network Pool used, & which Org owns it 3. Right-click an Organization Network > select IP Allocation to see IPs utilized by an Org
Network Pools: 1. Manage & Monitor > Network Pools 2. View Status, Gateway, Network Pool Type, Pool (Used/Total), which vDS & vCenter it’s connected to
Monitor IP Allocation Utilization
See previous item on how to view External & Org Network IP Allocation Utilization
vApp Networks 1. From My Cloud > vApps (open) 2. Select Networking tab and check to Show Network Details 3. Click to select a network, rt-click then IP Allocation to see IPs utilized by the vApp Network
Review & Interpret Tasks & Events in vCloud
Display Tasks & Events as described in the Identify vCD Interface Components Used For Monitoring item
To use/see Debug info: 1. System: Administration tab > General, then Display Debug Information
Troubleshoot Common Resource/Event Issues in vCloud
I think this just comes from experience; outside of VMware support, Google is your friend (oh yeah, and the Twitterz )
8.2 – Map vCloud Resources to vSphere Resources Differentiate Components of vCloud Director & vSphere Client Interfaces
Cloud Components 1. Provider vDCs – provide vSphere resources to Organization vDCs 2. Organization vDCs – resources are partitioned from a Provider vDC and dispersed to an Organization 3. vCD Networking
a. External Networks – use vSS or vDS PortGroups or a Cisco Nexus 1000v; recommend changing vSphere ports to Ephemeral
b. Organization Networks 1) External Direct-Connect – Org is routed directly to External Network with no network
services (i.e. DHCP, Firewall, NAT, etc.) 2) External NAT-Routed – same as Direct, but routed with vShield Edge, providing network
services mentioned above 3) Internal –vApp to vApp communication within Org; doesn’t communicate outside of an Org
c. vApp Networks 1) Direct (to Org Network) – same as Org Direct-Connect but from a vApp to Org Network 2) Routed (to Org Network) – same as Org NAT-Routed but from a vApp to Org Network 3) Internal – intra-vApp communication only (i.e. between VMs within a vApp)
d. Network Pools – used to create Internal & NAT-Routed Org Networks and all vApp Networks; a key attribute of Network Pools to understand is, at the very least, they are used for cross-ESXi Host communication (i.e. VMs reside on different Hosts) 1) PortGroup-Backed – can be a vSS, Cisco Nexus 1000v, or vDS PortGroup; manual PG
creation; inflexible 2) VLAN-Backed – must be on a vDS; automatic PortGroup created when needed; VLAN limited 3) vCD Network Isolated (VCDNI) – must be on a vDS; automatic PortGroup created when
needed; no need for VLAN use (recommended to use 1) 4. Organizations – (tenants) consumers of vCD resources 5. Users & Groups – System and Organizational 6. Catalogs – containers of vApps and Media 7. vApps – application (VM) containers
vSphere Components 1. ESXi Hosts 2. vCenter
a. DRS b. vDS c. Resource Pools
3. Storage a. SAN b. Storage Array
4. Networking a. VLANs b. PortGroups
Describe the Relationship Between vCloud Storage Resources & VMFS/NFS Datastores
vCD Organizations use storage resources (VMFS or NFS Datastores) from a given Org vDC, that are in turn connected to the Resource Pool used for a Provider vDC; exception – a read-only Datastore (not supported by vCD)

Describe the Relationship Between vCloud Network Resources & vSphere Virtual Switches
I will explain this in the next few bullets, but let me re-recommend to read through the blog posts on vCD Networking by Massimo Re Ferrè (link at start of Obj. 4.1) and the 3-part series by Duncan Epping (link at end of Obj. 6.2)
vSphere network resources are consumed by vApp & Org Networks by way of Network Pools
Network Pools provide inter-Host communication between VMs residing on different Hosts within a Cluster
I have explained each networking component above, but generally speaking, an External Network (i.e. PortGroup) should be created for each Org in your vCD environment to provide network isolation between tenants/consumers of the Cloud
Direct-Connect & NAT-Routed Org Networks connect to an External Network for Org vApp communication that needs to transpire outside of the Org
Direct & Routed vApp Networks connect to an Org Network, which may or may not connect externally from the Org
Both Org & vApp Networks have an Internal type to provide intra-Org & intra-vApp isolated communication respectively
Describe the Relationship Between vCloud Compute Resources & DRS/HA Clusters/Resource Pools
There really isn’t much to describe here I think; just know that a vSphere Cluster Resource Pool resources are provided to vCD via a Provider vDC; that Provider vDC resources can then be carved up in multiple Org vDCs to be used by multiple Orgs (1 Org vDC per Org, but an Org can have more than 1 Org vDC)
Determine Total/Current Resources Available to a Provider/Organization VDC Relative to Assigned vSphere Resources
From the Manage & Monitor tab > Organization or Provider vDCs, then Monitor tab
Determine Explicit vSphere Resources Consumed by a Provider/Organization VDC
From the Manage & Monitor tab > Organization vDCs or Provider vDCs, then Monitor tab
Determine Which vSwitch Resource is Being Used by a Given vCloud Network
External Network provides a column for vDS PG it’s connected to
Org Networks in turn only show which Ext Ntwk or Ntwk Pool it’s using
Network Pools provides a column which vDS & vCenter it’s associated with
vApp Networks do not provide a way to see which vSphere resource it’s connected to; but you can figure it out by uncovering the vCD Networking layers, if the vApp Ntwk uses Ext Org networks
Determine on Which Datastore a vCloud Hosted VM Resides
My Cloud > VMs, and reference the Datastore column
Determine on Which ESXi Host a vCloud Hosted VM Resides
My Cloud > VMs, and reference the Host column
Authored by: Shane Williford For Public Use, but give credit to author & bloggers where used in various areas of this document
Recommended